Embed Size (px)
Citation preview

(Revision A/e, April 2015, © MDG Fog Generators Ltd)
User Guide
Atmospheric Generator
Model 1.30 & 1.31

theONE TM Atmospheric Generator
theONETM User Guide, Rev: A/e 2 / 44
Intentionally left blank

theONE TM Atmospheric Generator
theONETM User Guide, Rev: A/e 3 / 44
TABLE OF CONTENT Section Page User Guide 4
How to read this User Guide 5
Copyright Notice 5
theONE 6
Qualified Personnel 6
Need a little Help? 6
Pre-Install 7
Electrical Requirements 7
Environmental Requirements 7
Cable Requirements 7
Tubing Requirements 7
Unpacking 8
Setting Up 8
Gas and Fluid Requirements 9
Gas 9
Fluid 9
Installing the MDG theONE 10
MDG theONE with its Rack 10
MDG theONE standalone 11
Working with the MDG theONE 12
Start the MDG theONE 12
The MDG theONE Menu 13
LCD Saver 13
Menu Tree 14
Operating instructions 17
DMX Control 21
RDM Control 22
Network Control 24
USB Control and Diagnostic 29
Bootloader 29
Touring Rack 30
How to install the fluid reservoir 31
How to mount a gas bottle 31
How to replace a gas bottle 32
External fan 32
Tool drawer 34
Rigging the Touring Rack 34
Stacking the Touring Rack 35
Troubleshooting 36
MDG theONE Specifications 39
Maintenance 41
Limited Warranty 42
Declaration of Conformity 43
Notes 44

theONE TM Atmospheric Generator
theONETM User Guide, Rev: A/e 4 / 44
USER GUIDE
Congratulations on your purchase of the MDG theONE™. These original instructions describe the use of this Atmospheric generator.
MDG manufactures fog generators since 1980. Our fog systems have been used in numerous applications including firefighters’ training, the motion picture industry, theatres, theme parks, flight simulators, and also educational, worship and touring venues throughout the world. With
proper care, we are confident your MDG theONE™ will provide you with years of quality service.
CAUTION
This appliance is not intended for use by persons (including children) with reduced physical, sensory or mental capabilities, or lack of experience and knowledge, unless they have been given supervision or instruction concerning use of the appliance by a person responsible for their safety. Children should be supervised to ensure that they do not play with the appliance.
CAUTION
If the supply cord is damaged, it must be replaced by the manufacturer, its service agent or similarly qualified persons in order to avoid a hazard.
CAUTION This equipment must always be disconnected from its power source during service or when replacing parts.

theONE TM Atmospheric Generator
theONETM User Guide, Rev: A/e 5 / 44
HOW TO READ THIS USER GUIDE
WARNING and CAUTION are used throughout this manual to forewarn of possible danger to the users if precautions are not observed. As is customary in military and some commercial manuals, the precautions will always precede the steps to which it refers so that the users will be aware of any potential danger before performing the task.
WARNING and CAUTION labels are key equipment parts. Do not remove, change
or cover these labels. If the labels are not readable, contact MDG Fog Generators
Ltd. BOLD TEXT: Contains important information, cautionary steps and warnings that should be read and understood prior to installing the unit.
BOLD and ITALIC TEXT: pertains to product names and trademarks, proprietary names
and products made by MDG Fog Generators Ltd.
Please read the following instructions carefully and completely before installing, pressurizing and turning on the Fog Generator.
COPYRIGHT NOTICE This User Guide (Original Instructions) is copyrighted and all rights are reserved by MDG Fog Generators Ltd.
No part of this publication may be reproduced, transmitted, transcribed, stored in a retrieval system, or translated into any language or computer language, in any form or by any means, electronic, mechanical, magnetic, optical, chemical, manual or otherwise, without the prior written permission of MDG Fog Generators Ltd.

theONE TM Atmospheric Generator
theONETM User Guide, Rev: A/e 6 / 44
theONE The MDG theONE is a revolutionary, digital, dual mode atmospheric generator. Its simple and efficient multi-level User Interface, accessible from the backlit LCD panel, allows for a gradual switch between either mode seamlessly using various networking protocols, DMX-512-A USITT and RDM ANSI E1.20. Each parameter is set into specific presets, but can be accessed and redefined by advanced users.
The networking capability of the MDG theONE allows the user to install the generator as part of an existing network. The generator pumps its fluid from its 20 l (5.28 US gal) container into a pressurized reservoir. The two interconnected 9 kg (20 lb) CO
2 (or N
2) bottles sit in separate cradles in the universal
standard rolling rack, for easier storage and freight. The 100~250V, 50/60Hz universal power supply, dual rigging points, and supplied half-couplers
make the MDG theONE especially fit for ready-to-go touring conditions (indoor use or outdoor with shelter).
QUALIFIED PERSONNEL MDG theONE systems will perform as designed but are to be installed, operated, and serviced by trained personnel. Installation, operation and servicing of this equipment require trained personnel with technical skills in electrical theory and fluid dynamics. This manual is not a substitute for qualified technicians or local authorities on electricity, gas, fluid, or engineering, and therefore does not supersede, amend or void local safety installation practices. Please refer to local authorities for further information.
NEED A LITTLE HELP? At MDG, we try our best to provide you with complete information for our products. Despite it all, sometimes, a little more is required due to the specifics of your project and installation. We’re looking forward to go that extra mile for you. Contact us: By Phone: +1-800-663-3020 +1-514-272-6040 By Fax: +1-514-722-3229 By e-mail: [email protected] On the Web: www.mdgfog.com By Mail: MDG Fog Generators Ltd. 10301, Avenue Pelletier Montréal, QC, H1H 3R2 Canada Please note that our business hours are from 08h30 to 12h00 and from 12h30 to 17h00 (8:30AM to 12:00PM and 12:30PM 5:00PM), Eastern (GMT -5).

theONE TM Atmospheric Generator
theONETM User Guide, Rev: A/e 7 / 44
PRE-INSTALL
ELECTRICAL REQUIREMENTS - Operating voltage: 100-250 VAC, single phase. 50/60 Hz, 1480 W.
- Ground / Earth connection REQUIRED.
ENVIRONMENTAL REQUIREMENTS Indoor use or outdoor with shelter
Dry room conditions, 90 % relative humidity @ 50 ˚C (122 ˚F), and non-condensing -30º C (-22º F) to 50º C (122º F) operating temperature
1 m (3.3 ft) clearance on all sides and in front of the equipment required.
Dust-free space
Storage conditions: -40 ˚C to 60 ˚C (-40 ˚F to 140 ˚F), 80 % relative humidity @ 60º C (140 º F).
CABLE REQUIREMENTS Power input: 1.5 mm (14 AWG), 3-wire, 90 ˚C copper,
CE UL/CSA compliant cable
DMX/RDM data: Dual twisted pair 0.75 mm (22 AWG) + shield, XLR-5 type connector, CE UL/CSA compliant cable
Network data: Network cable category 5 (four “twisted” wire pairs), with standard
RJ-45 plugs. CE UL/CSA compliant cable
USB data: Standard USB 2.0 cable, A to B Male/Male type, CE UL/CSA compliant cable
Note: Install Power and Data in separate conduits, or as per local electrical code requirements.
TUBING REQUIREMENTS theONE touring Included.
theONE standalone 1/4" SS flexible braided Hose, end connection female JIC 37° flare
3/8" OD plastic hose for the liquid input
CAUTION: If the installation requires tubing, before linking the tubing to this system or any of its components, it is mandatory that all the tubing be rinsed, for at least 30 min, with pressurized hot water (minimum 60 psi @ 170 ºF / 414 kPa @ 77 ºC) to remove all contaminants, dust and metal particles.
theONE TM Atmospheric Generator
theONETM User Guide, Rev: A/e 8 / 44
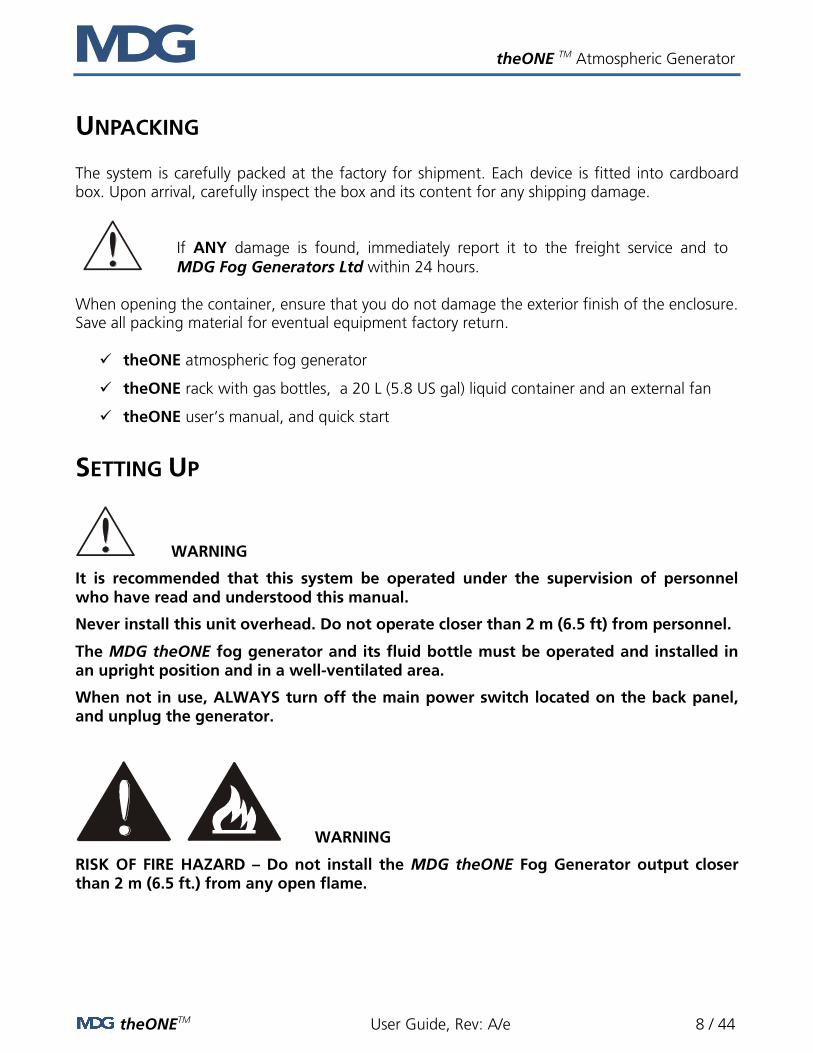
UNPACKING The system is carefully packed at the factory for shipment. Each device is fitted into cardboard box. Upon arrival, carefully inspect the box and its content for any shipping damage.
If ANY damage is found, immediately report it to the freight service and to
MDG Fog Generators Ltd within 24 hours. When opening the container, ensure that you do not damage the exterior finish of the enclosure. Save all packing material for eventual equipment factory return. theONE atmospheric fog generator
theONE rack with gas bottles, a 20 L (5.8 US gal) liquid container and an external fan
theONE user’s manual, and quick start
SETTING UP
WARNING
It is recommended that this system be operated under the supervision of personnel who have read and understood this manual.
Never install this unit overhead. Do not operate closer than 2 m (6.5 ft) from personnel.
The MDG theONE fog generator and its fluid bottle must be operated and installed in an upright position and in a well-ventilated area.
When not in use, ALWAYS turn off the main power switch located on the back panel, and unplug the generator.
WARNING
RISK OF FIRE HAZARD – Do not install the MDG theONE Fog Generator output closer than 2 m (6.5 ft.) from any open flame.
theONE TM Atmospheric Generator
theONETM User Guide, Rev: A/e 9 / 44
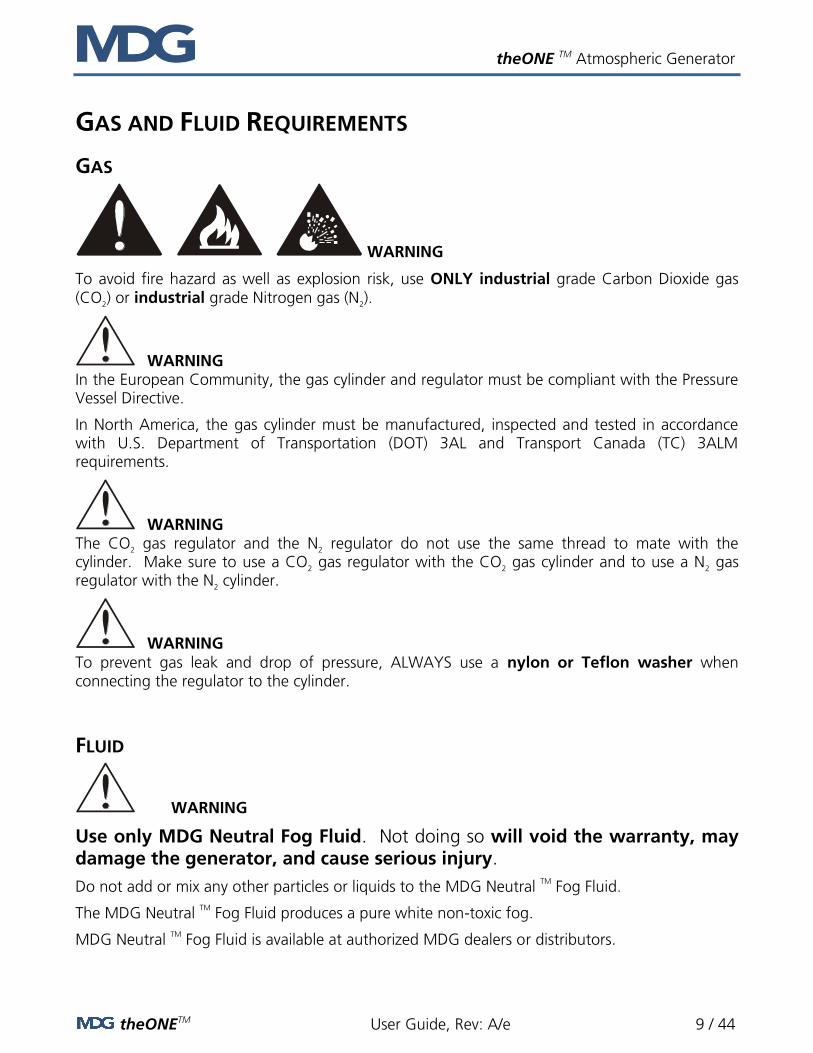
GAS AND FLUID REQUIREMENTS
GAS
WARNING
To avoid fire hazard as well as explosion risk, use ONLY industrial grade Carbon Dioxide gas (CO
2) or industrial grade Nitrogen gas (N
2).
WARNING In the European Community, the gas cylinder and regulator must be compliant with the Pressure Vessel Directive.
In North America, the gas cylinder must be manufactured, inspected and tested in accordance with U.S. Department of Transportation (DOT) 3AL and Transport Canada (TC) 3ALM requirements.
WARNING The CO
2 gas regulator and the N
2 regulator do not use the same thread to mate with the
cylinder. Make sure to use a CO2 gas regulator with the CO
2 gas cylinder and to use a N
2 gas
regulator with the N2 cylinder.
WARNING To prevent gas leak and drop of pressure, ALWAYS use a nylon or Teflon washer when connecting the regulator to the cylinder.
FLUID
WARNING
Use only MDG Neutral Fog Fluid. Not doing so will void the warranty, may damage the generator, and cause serious injury.
Do not add or mix any other particles or liquids to the MDG Neutral TM
Fog Fluid.
The MDG Neutral TM
Fog Fluid produces a pure white non-toxic fog.
MDG Neutral TM
Fog Fluid is available at authorized MDG dealers or distributors.

theONE TM Atmospheric Generator
theONETM User Guide, Rev: A/e 10 / 44
INSTALLING THE MDG theONE Exercise caution when selecting the location to install or use this equipment:
Install the MDG theONE away from rain, wind, heavy dust or any harsh environment situations (indoor or outdoor with shelter).
Ensure available space for all conduits and tubing runs, if you are using the MDG theONE without its rack.
Install the MDG theONE as close to fluid supply as possible, when using the MDG theONE without its rack.
The MDG theONE requires 1 m (3.28 ft) of clearance on each side and 2 m (6.56 ft) to the front.
MDG THEONE WITH ITS RACK The MDG theONE touring (with its rack) comes almost ready to use.
Install the gas bottles, if they are not already in the rack. Tighten the buckle straps.
Connect both bottles to the gas inlet flexible braided Hoses.
Open the gas bottles, and check the gauge, on top of the generator, to verify there is enough pressure (Pressure > 100 psi / 690 kPa).
Replace the seal liquid reservoir cap with the cap equipped with the liquid line and the vent. Keep seal cap for future use.
Insert the liquid line in the liquid input fitting.
Connect the data wiring (DMX/RDM or Network), if you want to use remote control.
Plug the power cord,
100–250 VAC, 50/60 Hz, 1480 W.
The MDG theONE is ready to be powered.
See Touring Rack chapter for more details.
Buckle strap
European gas bottle
theOne
Liquid reservoir
External fan
US gas bottle Tool drawer

theONE TM Atmospheric Generator
theONETM User Guide, Rev: A/e 11 / 44
MDG theONE STANDALONE
Connect the gas inlet to a gas bottle via a flexible braided Hose.
The gas inlet is a 1/4" male JIC 37° flare fitting.
Connect the liquid reservoir to the liquid inlet via a 3/8" plastic tube.
Do not forget to open the vent on the reservoir.
Leave the reservoir as close as possible to the
MDG theONE.
Connect the data wiring (Male XLR-5 connector for DMX/RDM, RJ45 for network).
Connect the power cord.
100–250 VAC, 50/60 Hz, 1480 W.
Open the gas bottle, and check the gauge, on top of the generator, to verify there is enough pressure (pressure > 100 psi / 690 kPa - MAX 2500 psi / 17.2 MPa).
The MDG theONE is ready to be powered.
Network
DMX In/Out
Keyboard
Liquid Inlet Power VAC
Gas Inlet
On/Off
LCD Screen Pressure gauge
USB

theONE TM Atmospheric Generator
theONETM User Guide, Rev: A/e 12 / 44
WORKING WITH THE MDG theONE The user Interface of the MDG theONE includes a LCD 4x20 characters white LED backlight screen, with five (5) tactile buttons, located on top of the generator.
START THE MDG theONE Switch On the power.
The MDG theONE will display during four (4) seconds, the following message:
theONE, by MDG Version x.xx
Testing BootLoad….
These four seconds allow you to connect the generator to your PC, via a USB cable, to update the firmware of the control board (see BootLoader for further details).
Then, the MDG theONE will display during two (2) seconds, the following message:
theONE by
MDG Fog Generators Ltd (V: x.xx – F: y.yyy)
where ‘x.xx’ is the version of your generator, and ‘y.yyy’ is the firmware of the program. The program will load the configuration parameters, saved in the EEPROM memory.
Finally, the screen will display the menu.

theONE TM Atmospheric Generator
theONETM User Guide, Rev: A/e 13 / 44
THE MDG THEONE MENU The user can scroll in the menu by using the buttons of the keyboard:
‘’ moves the selection to the next menu (same level), or decrease a data value.
When at the end of a list, the program moves back to the first item of this list.
If the selected menu is a data input menu, keeping this key pressed will increase the value more rapidly.
In a data input menu, when the value reaches its maximum value, the program continues with the minimum value.
‘’ moves the selection to the previous menu (same level), or increase a data value.
If the item is the first of a menu, the program moves the selection to the last item of that menu.
If the selected menu is a data input menu, keeping this key pressed will decrease the value more rapidly.
In a data input menu, when the value reaches its minimum value, the program continues with the minimum value.
‘’ moves the last selection to the upper level
This key has no effect in the first level.
In a data input menu, pressing this key permits to exit the menu without changing any value (escape).
‘’ moves the selection to the sub-menu
This key has the same effect that the key ‘’, when scrolling through the menus.
‘’ confirms a selection or data value.
This key has the same effect that the key ‘’, when scrolling through the menus.
In a toggle menu, this key confirms the selection and moves the cursor back to the upper level menu.
In a data input menu, this key confirms the value of the data and moves the cursor back to the upper level menu.
LCD SAVER The program can automatically switch off the LCD screen (menu display and backlight) if there is no keyboard activity. The user can choose between a 30 second and a 2 minute delay in the Settings Menu (« SETTINGSLCD SAVER »).
When the LCD Saver is activated, just press any key of the keyboard to re-activate the LCD screen functions.
The user can also deactivate the LCD saver by selecting the OFF option.

theONE TM Atmospheric Generator
theONETM User Guide, Rev: A/e 14 / 44
MENU TREE The menu is divided in four (4) main menus:
- Status Menu summarizes all the state of the fog generator. None of its sub menus can be modified.
- Control Menu allows the user to control locally the MDG theONE. All its sub menus can be set, as long as the generator is not in DMX/RDM or Ethernet mode.
- Interface Menu allows the user to define or verify the communication via DMX/RDM or Network.
- Setting Menu summarizes general configuration of the generator.
The menu is refreshed every second.
- Items display with a « - » character are state messages or parameters, updated by the program.
- The user cannot modify them.
- Items display with a « » character are control parameters.
- The user, within specific ranges or choices, can MODIFY them. In user input mode, the value or the choice is preceded with a « ? »
This menu can be modified by user
This menu cannot be modified by user
The value is presently modified by user
theONE TM Atmospheric Generator
theONETM User Guide, Rev: A/e 15 / 44
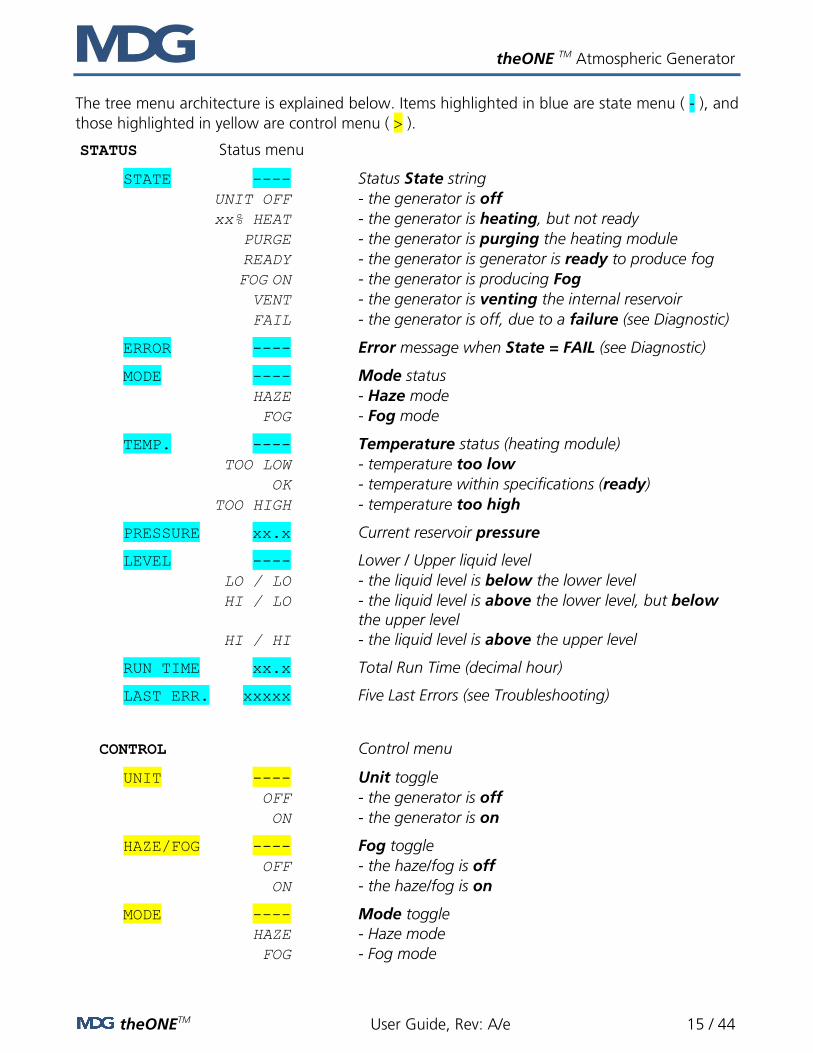
The tree menu architecture is explained below. Items highlighted in blue are state menu ( - ), and
those highlighted in yellow are control menu ( ).
STATUS Status menu
STATE ---- Status State string
UNIT OFF - the generator is off
xx% HEAT - the generator is heating, but not ready
PURGE - the generator is purging the heating module
READY - the generator is generator is ready to produce fog
FOG ON - the generator is producing Fog
VENT - the generator is venting the internal reservoir
FAIL - the generator is off, due to a failure (see Diagnostic)
ERROR ---- Error message when State = FAIL (see Diagnostic)
MODE ---- Mode status
HAZE - Haze mode
FOG - Fog mode
TEMP. ---- Temperature status (heating module)
TOO LOW - temperature too low
OK - temperature within specifications (ready)
TOO HIGH - temperature too high
PRESSURE xx.x Current reservoir pressure
LEVEL ---- Lower / Upper liquid level
LO / LO - the liquid level is below the lower level
HI / LO - the liquid level is above the lower level, but below
the upper level
HI / HI - the liquid level is above the upper level
RUN TIME xx.x Total Run Time (decimal hour)
LAST ERR. xxxxx Five Last Errors (see Troubleshooting)
CONTROL Control menu
UNIT ---- Unit toggle
OFF - the generator is off
ON - the generator is on
HAZE/FOG ---- Fog toggle
OFF - the haze/fog is off
ON - the haze/fog is on
MODE ---- Mode toggle
HAZE - Haze mode
FOG - Fog mode
theONE TM Atmospheric Generator
theONETM User Guide, Rev: A/e 16 / 44
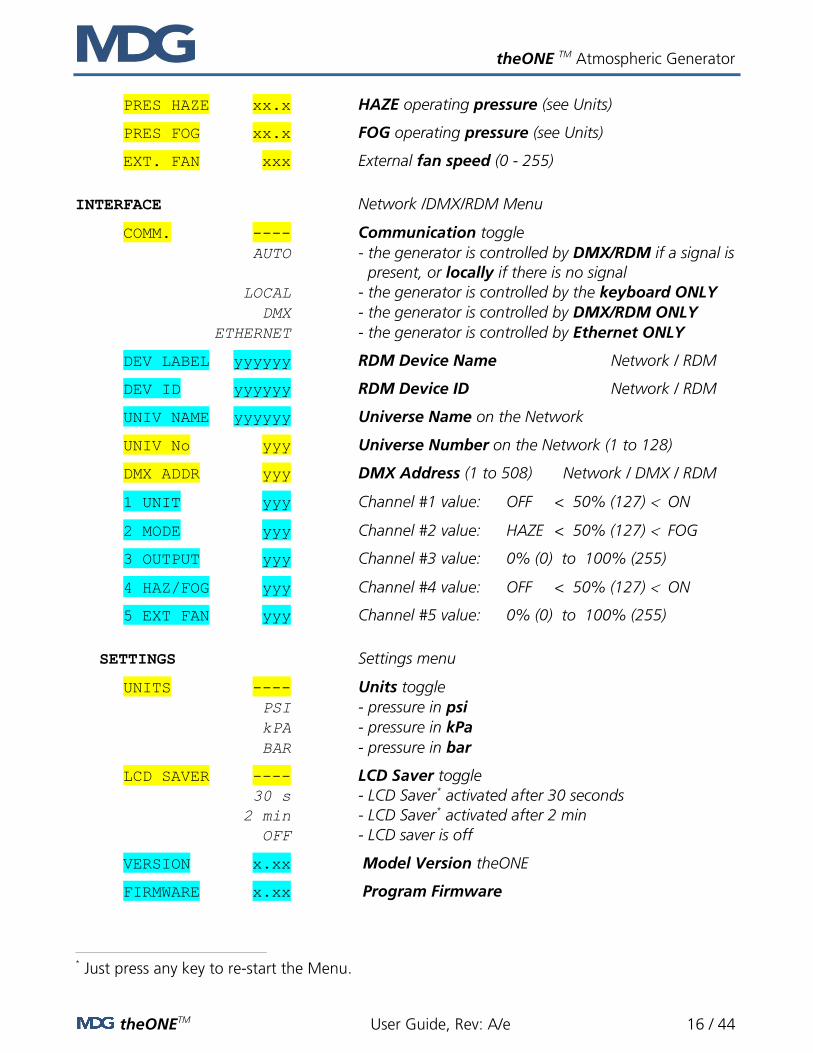
PRES HAZE xx.x HAZE operating pressure (see Units)
PRES FOG xx.x FOG operating pressure (see Units)
EXT. FAN xxx External fan speed (0 - 255)
INTERFACE Network /DMX/RDM Menu
COMM. ---- Communication toggle
AUTO - the generator is controlled by DMX/RDM if a signal is
present, or locally if there is no signal
LOCAL - the generator is controlled by the keyboard ONLY
DMX - the generator is controlled by DMX/RDM ONLY
ETHERNET - the generator is controlled by Ethernet ONLY
DEV LABEL yyyyyy RDM Device Name Network / RDM
DEV ID yyyyyy RDM Device ID Network / RDM
UNIV NAME yyyyyy Universe Name on the Network
UNIV No yyy Universe Number on the Network (1 to 128)
DMX ADDR yyy DMX Address (1 to 508) Network / DMX / RDM
1 UNIT yyy Channel #1 value: OFF < 50% (127) ON
2 MODE yyy Channel #2 value: HAZE < 50% (127) FOG
3 OUTPUT yyy Channel #3 value: 0% (0) to 100% (255)
4 HAZ/FOG yyy Channel #4 value: OFF < 50% (127) ON
5 EXT FAN yyy Channel #5 value: 0% (0) to 100% (255)
SETTINGS Settings menu
UNITS ---- Units toggle
PSI - pressure in psi
kPA - pressure in kPa
BAR - pressure in bar
LCD SAVER ---- LCD Saver toggle
30 s - LCD Saver* activated after 30 seconds
2 min - LCD Saver* activated after 2 min
OFF - LCD saver is off
VERSION x.xx Model Version theONE
FIRMWARE x.xx Program Firmware
* Just press any key to re-start the Menu.

theONE TM Atmospheric Generator
theONETM User Guide, Rev: A/e 17 / 44
OPERATING INSTRUCTIONS The MDG theONE Generator is quite easy to operate and require no preventive maintenance. The generator can be controlled either locally, with the keyboard, via DMX (see DMX control and RDM Control) or network protocol (see Network control). This paragraph focuses on local control.
Starting Procedures
Powered up the generator, the control program first checks the level of fluid inside the internal reservoir. If the reservoir is partially empty, the program will start the pumps to fill the reservoir to capacity, except if the reservoir has not been properly vented (see shutdown procedures). This procedure may take up to two minutes.
WARNING If the program is unable to refill the reservoir, a FAIL state will disable the
generator (see Fail State paragraph).
At this point, the MDG theONE switches to stand-by mode, and most of the electronic controls are off (pressure, and temperature of the heating module).
When the generator is manually switched to «UNIT ON» mode («CONTROLUNITON»), the
program starts the heating cycle («STATUSSTATE = UNIT ON»), which will last approximately 7 minutes. When the temperature reaches operating level (READY level), the Automatic Purging System
TM (APS™) will be automatically initiated («STATUSSTATE =
PURGE»).
After the first purging cycle is completed (30 to 60 sec.), the reservoir is vented, and the generator is ready to produce fog («STATUSSTATE = READY»).
Operating Mode
The menu «CONTROLMODE» controls the Fog / Haze mode.
Choosing the HAZE mode will switch the MDG theONE in a Haze mode.
Choosing the FOG mode will switch the MDG theONE in a Fog mode.
Adjusting the working pressure of the internal reservoir controls the amount of the fog / haze emission.
«CONTROLPRES. HAZ» sets the working pressure of the Haze Mode
«CONTROLPRES. FOG» sets the working pressure of the Fog Mode
theONE TM Atmospheric Generator
theONETM User Guide, Rev: A/e 18 / 44
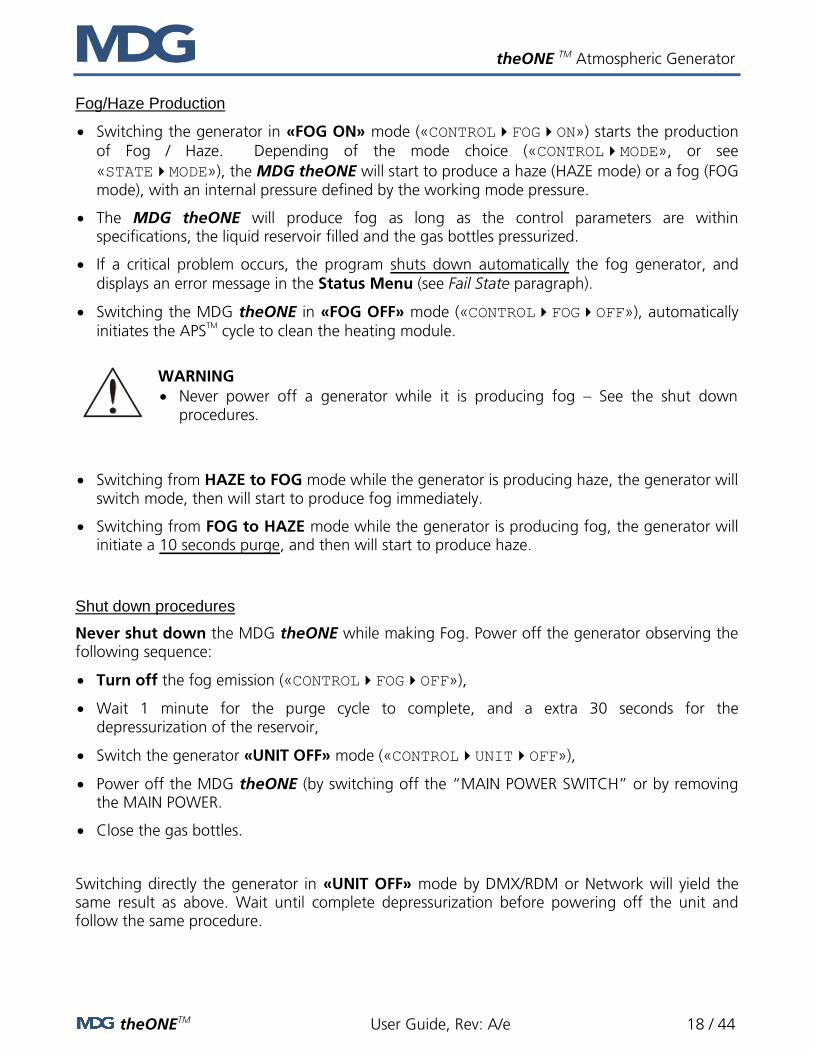
Fog/Haze Production
Switching the generator in «FOG ON» mode («CONTROLFOGON») starts the production
of Fog / Haze. Depending of the mode choice («CONTROLMODE», or see
«STATEMODE»), the MDG theONE will start to produce a haze (HAZE mode) or a fog (FOG mode), with an internal pressure defined by the working mode pressure.
The MDG theONE will produce fog as long as the control parameters are within specifications, the liquid reservoir filled and the gas bottles pressurized.
If a critical problem occurs, the program shuts down automatically the fog generator, and
displays an error message in the Status Menu (see Fail State paragraph).
Switching the MDG theONE in «FOG OFF» mode («CONTROLFOGOFF»), automatically initiates the APS
TM cycle to clean the heating module.
WARNING
Never power off a generator while it is producing fog – See the shut down procedures.
Switching from HAZE to FOG mode while the generator is producing haze, the generator will switch mode, then will start to produce fog immediately.
Switching from FOG to HAZE mode while the generator is producing fog, the generator will initiate a 10 seconds purge, and then will start to produce haze.
Shut down procedures
Never shut down the MDG theONE while making Fog. Power off the generator observing the following sequence:
Turn off the fog emission («CONTROLFOGOFF»),
Wait 1 minute for the purge cycle to complete, and a extra 30 seconds for the depressurization of the reservoir,
Switch the generator «UNIT OFF» mode («CONTROLUNITOFF»),
Power off the MDG theONE (by switching off the “MAIN POWER SWITCH” or by removing the MAIN POWER.
Close the gas bottles.
Switching directly the generator in «UNIT OFF» mode by DMX/RDM or Network will yield the same result as above. Wait until complete depressurization before powering off the unit and follow the same procedure.

theONE TM Atmospheric Generator
theONETM User Guide, Rev: A/e 19 / 44
Auto/Local
In «Local» Mode («INTERFACECOMM.LOCAL»), only the keyboard controls the MDG theONE.
In «Auto» Mode («INTERFACECOMM.AUTO»), the MDG theONE is controlled via DMX / RMD if there is a DMX signal on the line, or via the keyboard if there is no signal.
WARNING
In «AUTO Mode», DMX commands always take precedence over Local
commands
If the DMX Signal is valid, the menus will be partially disable
Unplug the DMX data wire to control the generator locally.
EEPROM Parameters
The following parameters are saved at each time they are modified
Communication Mode AUTO/LOCAL/DMX/ETHERNET
DMX Start Address
Device Label
Universe Name
Units (Pressure)
LCD Saver
Powering off the MDG theONE, the program saves the last set of parameters as follows:
Mode HAZE / FOG, if User is in Local Mode
HAZE Pressure If User is in Local Mode
FOG Pressure If User is in Local Mode
Universe Address
Total Run Time
At the next start–up, parameters readings automatically configure the menu for the user.
Default parameters will be loaded if the generator is unable to read the parameters (electrical shutdown during EEPROM writing).

theONE TM Atmospheric Generator
theONETM User Guide, Rev: A/e 20 / 44
FAIL State
FAIL state mode is initiated if any critical error occurs. In this state, the MDG theONE is off, awaiting an action from the user, and the LCD is flashing. When error happens, the menu jumps directly to the Error String in the Status Menu. The last five (5) critical errors are displayed in the LAST ERR String («STATUSLAST ERR»):
ERROR = REFILL LAST ERR CODE = C
This error will occur if the generator is unable to fill the reservoir within a fixed time interval.
This may be due to a leak from the fluid line between the external reservoir and the generator, or simply that the external reservoir is empty.
Error = P. LOW LAST ERR CODE = 7
This error will occur if the generator is unable to reach the operating pressure within a fixed time interval.
This may be due to a leaking gas line (between the gas bottle and the generator), a closed or empty gas bottles, a ball valve closed on the gas line or a problem with the pressure transducer.
Error = P. HIGH LAST ERR CODE = 8
This error will occur if the pressure is too high for a specific regime, while the gas flow inlet is fully closed.
This may be due to a solenoid valve malfunction (electronic or physical blockage), a problem with the pressure transducer, or the heating module partially clogged.
Error = HEATER LAST ERR CODE = 6
This error will occur if the temperature of the heating module is not increasing with the proper thermal ramp.
This is generally due to a heater cartridge problem. Shut down the generator and restart it. Check the heating process with the value of the Status («STATUSSTATExx% HEAT»). If the percent is not increasing, the heater cartridges have failed.
Using the generator in 100-130 VAC will solve the problem temporary if only one cartridge has failed
Please contact an Authorized Service Center if this problem persists.
Error = T. HIGH LAST ERR CODE = 4
This error will occur if the temperature of the heating module is too high.
This is generally due to an electronic problem. Shut down the generator and restart it.
Please contact an Authorized Service Center if this problem persists.

theONE TM Atmospheric Generator
theONETM User Guide, Rev: A/e 21 / 44
Error = T. SAF LAST ERR CODE = 5
This error will occur if abnormal temperature difference between the two sensors of the heating module is detected.
This is generally due to an electronic or a sensor problem. Shut down the generator and restart it.
Please contact an Authorized Service Center if this problem persists.
Error = PCB HIGH LAST ERR CODE = D
This error will occur when the internal temperature of the generator is too high.
This may happen if the external temperature is very high or if the vents of the MDG theONE are partially blocked. Clear out the vents and put the generator in the shade. Shut down and restart the generator.
Please contact an Authorized Service Center if this problem persists.
Error = WD RESET LAST ERR CODE = E
This error will occur if the watchdog (software safety) resets the generator.
This is generally due to software or chip problem. Shut down the generator and restart it.
Please contact an Authorized Service Center if this problem persists.
DMX CONTROL The MDG theONE can be controlled via a DMX512-A USITT standard protocol.
WARNING
Activating the «DMX» mode («INTERFACEMODEDMX»), controls the MDG
theONE only by DMX signal. If the DMX wire is unplugged or DMX signal is lost,
the generator initiates an automatic shutdown procedure.
Activating the «AUTO» mode («INTERFACEMODEAUTO»), controls MDG
theONE by DMX, only if there is a signal. If the DMX wire is unplugged or DMX
signal is lost, the generator keeps the last DMX values.
WARNING
In «AUTO Mode», DMX commands always take precedence over Local
commands.

theONE TM Atmospheric Generator
theONETM User Guide, Rev: A/e 22 / 44
The MDG theONE provides a simple way to check if there is DMX signal:
The user can change the DMX Start Address in the Interface Menu («INTERFACECOMM.DMX ADDR»), and choose any value between 1 and 508 (508+5 = 512, last DMX channel).
The Interface uses five (5) DMX channels:
Channel 1 0 (0%) UNIT OFF 128 (50%) UNIT ON 255 (100%)
Channel 2 0 (0%) MODE HAZE 128 (50 %) MODE FOG 255 (100%)
Channel 3 0 (0) – 255 (100%), FOG OUTPUT (from minimum to maximum pressure)
Channel 4 0 (0%) FOG OFF 128 (50%) FOG ON 255 (100%)
Channel 5 0 (0) – 255 (100%), EXTERNAL FAN (from minimum to maximum speed)
These channels have the same behaviour that the menus of the local interface (see Operating
instructions paragraph).
RDM CONTROL The MDG theONE can be controlled via a RDM ANSI E1.20 protocol, an intelligent bi-directional communication utilizing the DMX512 data link.
RDM permits a console or other controlling device to discover and then configure, monitor, and manage intermediate and end-devices connected through a DMX512 network. RDM provides for intelligent control of devices on a DMX512 network, which has not been previously available outside of proprietary networks
RDM Control has the same functionalities than the DMX Control (see DMX Control) with bi-directional functions allowing the user to read or write specific functions.
No DMX Signal
DMX Signal
theONE TM Atmospheric Generator
theONETM User Guide, Rev: A/e 23 / 44
The RMD supported parameters implemented in the MDG theONE are summarized in the following table.
RDM Parameter ID’s Value GET
Allowed SET
Allowed Comments
DISC_UNIQUE_BRANCH 0x0001
DISC_MUTE 0x0002
DISC_UN_MUTE 0x0003
QUEUED_MESSAGE 0x0020
STATUS_MESSAGES 0x0030
SUPPORTED_PARAMETERS 0x0050
PARAMETER_DESCRIPTION 0x0051
DEVICE_INFO 0x0060
PRODUCT_DETAIL_ID_LIST 0x0070
DEVICE_MODEL_DESCRIPTION 0x0080 Atmospheric Generator
MANUFACTURER_LABEL 0x0081 MDG Fog Generators Ltd
DEVICE_LABEL 0x0082
SOFTWARE_VERSION_LABEL 0x00C0
DMX_PERSONALITY 0x00E0 1
DMX_PERSONALITY_DESCRIPTION 0x00E1
DMX_START_ADDRESS 0x00F0 1 to 508
SLOT_INFO 0x0120
SLOT_DESCRIPTION 0x0121
DEFAULT_SLOT_VALUE 0x0122
IDENTIFY_DEVICE 0x1000 LCD flashes
MDG_NETWORK_UNIVERSE_NUMBER 0x8000 1 < unsigned Word < 128
MDG_NETWORK_UNIVERSE_NAME 0x8001 ASCII text
Up to 32 characters
MDG_GENERATOR_STATE 0x8002 ASCII text
Up to 20 characters
MDG_LCD_SAVER 0x8004 Unsigned Byte
0=30 s,1=2 min, 2=Off
MDG_COMM 0x8005
Unsigned Byte
0 = AUTO, 1 = LOCAL,
2 = DMX, 3 = LAN
Table 1: RDM Supported Parameters.

theONE TM Atmospheric Generator
theONETM User Guide, Rev: A/e 24 / 44
NETWORK CONTROL The network interface, developed by Pathway Connectivity Solutions, supports all major Ethernet protocols:
ArtNet
Pathport Protocol
Strand Shownet
ETC Net2 eDMX, and ETC Net3
Streaming ACN (E1.31 sACN)
If you do not have a control program, install Pathport Manager (5.2 or above) by downloading the latest build from www.pathwayconnect.com.
Before launching Pathport Manager 5.2, the computer’s network interface card (NIC) must be set to the same IP domain and subnet mask as the Pathport nodes, or the nodes will be shown as ‘questionable (can’t fetch props, can’t fetch patch)’. The default settings for Pathport nodes are in the 10.x.x.x IP range with subnet mask of 255.0.0.0.
If the computer uses a wireless card, you may be obliged to disable it and turn the transmitter off.
If you are using a firewall, disable it too or allow a security exception to allow the program (Pathport Manager and Java) to communicate through the firewall.
Connect to the MDG theONE via an Ethernet switch, using a normal Ethernet cable.
Switch the control mode to Ethernet («INTERFACECOMM.ETHERNET»).
Start Pathport Manager 5 by clicking on the PathportManager5 icon.
Follow the prompts to set up an Administrator account. You must be logged in as Administrator to make configuration changes.
The node will be discovered in the background while you log in, and sorted by current name.
Read carefully the full manual of PathPort Manager to learn how to use this program. In
this manual, we will focus ONLY on the MDG theONE functions.

theONE TM Atmospheric Generator
theONETM User Guide, Rev: A/e 25 / 44
Node Properties
Click on the MDG theONE device in the upper Device List pane and the base node properties appear in the lower Device Properties pane.
The Embedded RDM ID is the RDM device ID of the MDG theONE. This number is unique and is identical to Device ID in «INTERFACEDEV
ID».
If this ID is different to the ID of the MDG theONE, the Generator Status field will display «OFFLINE». Modify this field to match both devices ID. The Generator Status is a summary of the status of the fog generator, including the fail status. The message is constantly updated via the Network connection, as long as the MDG theONE is physically connected to the network, and the Communication Mode is switched to Ethernet.
This field is a summation of the «STATUSSTATE» and «STATUSERROR» fields. The user cannot modify this field.
If the MDG theONE is not in Ethernet Mode («INTERFACECOMMETHERNET»), the
Generator Status field will display «OFFLINE».
The Node NAME is a field that can be customized by the user. It is recommended to use the serial number of the Atmospheric Generator.
If the Ethernet connection is active, you can identify the generator.
Select the node, press left mouse button, and « Identify » menu (or « Nodes Identify » menu).
The LCD screen will start to flash until you press « Stop Indentifying »
You can also use the Identify Node property in lower Device Properties pane.
When the Ethernet is active, the MDG theONE will act as a DMX or RDM node (see also
RDM Control) for all devices connected on its DMX lines (DMX OUT).
Generator Status
Device ID
theONE device
Node Name

theONE TM Atmospheric Generator
theONETM User Guide, Rev: A/e 26 / 44
Port Properties
It is important to set the Port Direction as Output.
The Universe Name can be assigned in the field Patch Name. The value will be automatically updated in the «INTERFACECOMM.UNIV
NAME».
The Universe Number cannot be changed in that pane. It must be changed only in DMX Patch Tab (see next paragraph). However, the Universe Number and Universe Summary fields are updated as soon as the Universe is modified.
The DMX Start Address defines the first DMX channel. Choose any value between 1 and 508 (508+5 = 512, last DMX channel). The DMX
Start Address can also be modified in «INTERFACECOMM.DMX ADDR».
Press Send Config to Nodes button when you want to update the node.
DMX Patch
Select DMX Patch tab.
To change Universe, select the new Universe.
Pressing Send Patch to Ports button updates the node.
You can also modify the Universe Number in the «INTERFACECOMM.UNIV No».
Universe Name is updated in all the panes, as well as on the fog generator («INTERFACECOMM.UNIV NAME».).
Port Direction
Universe Name
DMX Start Address
Universe Name

theONE TM Atmospheric Generator
theONETM User Guide, Rev: A/e 27 / 44
DMX Control
In the DMX Virtual Console, define the xDMX Universe X as well as the DMX Start Channel Y.
The first five (5) channels are now configured to control the MDG fog Generator:
X.(Y) 0 (0%) Unit Off 128 (50%) Unit On 255 (100%)
X.(Y+1) 0 (0%) Haze 128 (50%) Fog 255 (100%)
X.(Y+2) 0 (0%) – 255 (100 %), Fog output
X.(Y+3) 0 (0%) Fog off 128 (50%) Fog on 255 (100%)
X.(Y+4) 0 (0%) – 255 (100%), External fan
Universe Number
DMX Start Channel
Unit Off/ Unit On
Mode Haze / Fog
Fog output
Fog Off/ Fog On
External Fan

theONE TM Atmospheric Generator
theONETM User Guide, Rev: A/e 28 / 44
RDM Control
The last version of the PathPort Manager (version 5.1.1 and above) provides the user with a front-end interface allowing the discovery, configuration and monitoring of RDM devices connected to Pathport Nodes, as the one mounted in the MDG theONE.
The RDM Manager tab shows all RDM-enabled output ports in the upper pane, and all discovered RDM devices in the lower.
Discovery is very simple. Select one port or as many as you wish. Click the “Discover RDM Devices” button. The Latest Action bar will turn green as discovery is completed on each port. The number of responders found on each port is listed under the “# RDM Devices” column. Details of all RDM responders will be reported in the lower pane.
To review PIDs, select a specific RDM responder, and then choose Device Details either from the RDM Manager Menu tab or from the right-click menu.
FOR FURTHER DETAILS, READ THE PATHPORT MANAGER MANUAL.
RDM Devices
theONE (PathPort Node)
Device details

theONE TM Atmospheric Generator
theONETM User Guide, Rev: A/e 29 / 44
USB CONTROL AND DIAGNOSTIC The MDG theONE can now be connected to a Windows PC via an USB cable and interact with a Windows dialog Terminal.
Contact the MDG Service to have the last package for the MDG Terminal.
BOOTLOADER The MDG theONE uses a BootLoader, also called boot manager. This small program is a firmware (software embedded in a hardware device) located into the non-volatile memory of the microcontroller unit (MCU) that allows in-circuit reprogramming of the device using its USB communication ports.
To upgrade the firmware, you will need:
a computer running under windows, with a USB 2.0 connector
special driver for the USB, included in the package,
a standard USB 2.0 cable, A to B Male/Male type
Contact the MDG Service to have the last package firmware upgrade for the MDG theONE.

theONE TM Atmospheric Generator
theONETM User Guide, Rev: A/e 30 / 44
TOURING RACK The MDG rack of the Touring version is made of 6061-T6 aluminum tubing (1.5” nominal) and plates.
The rack is equipped with the following:
a 20 L (5.28 US gal.) bottle
an external fan
Four (4) swivel caster wheels with a load capacity of 133 kg (330 lbs) per wheel. Two wheels have a full brake.
A tool drawer.
The rack can be equipped with any kind of gas bottles, from 150 to 200 mm (6" to 8") in diameter, with a maximal height of 915 mm (36").
A series of high pressure pigtails allows the user to connect the most common standard CO2
bottles to the MDG theONE.
The MDG Touring rack is engineered to hook under a truss with all the following components:
- theONE fog generator
- Two (2) gas bottles, fully loaded
- One (1) fluid reservoir 20 L (5.28 US gal), fully loaded
- External MDG fan.
The total weight is around 120 kg (265 lb). See Rigging the Touring Rack paragraph for details.
The MDG Touring rack is also engineered to be stacked on another MDG Touring rack. See Stacking the Touring Rack paragraph for details.
WARNING Users should inspect the rack for any bends, bumps, cracks, holes, etc, that might have been caused to the frame by abuse or inadequate storage and handling.
Do not use damaged structures until a thorough inspection and /or repair procedures is carried out.
WARNING Severe load conditions such as shocks due to the unit being dropped, impacted by handling equipment, uneven loads, and wind loads have not been analyzed since there was no specific requests by the end customer.
These loads could cause permanent damage and this could lead to premature failure under more normal operating conditions.
theONE TM Atmospheric Generator
theONETM User Guide, Rev: A/e 31 / 44
Pigtail
JIC fitting
Buckle strap
Buckle Strap
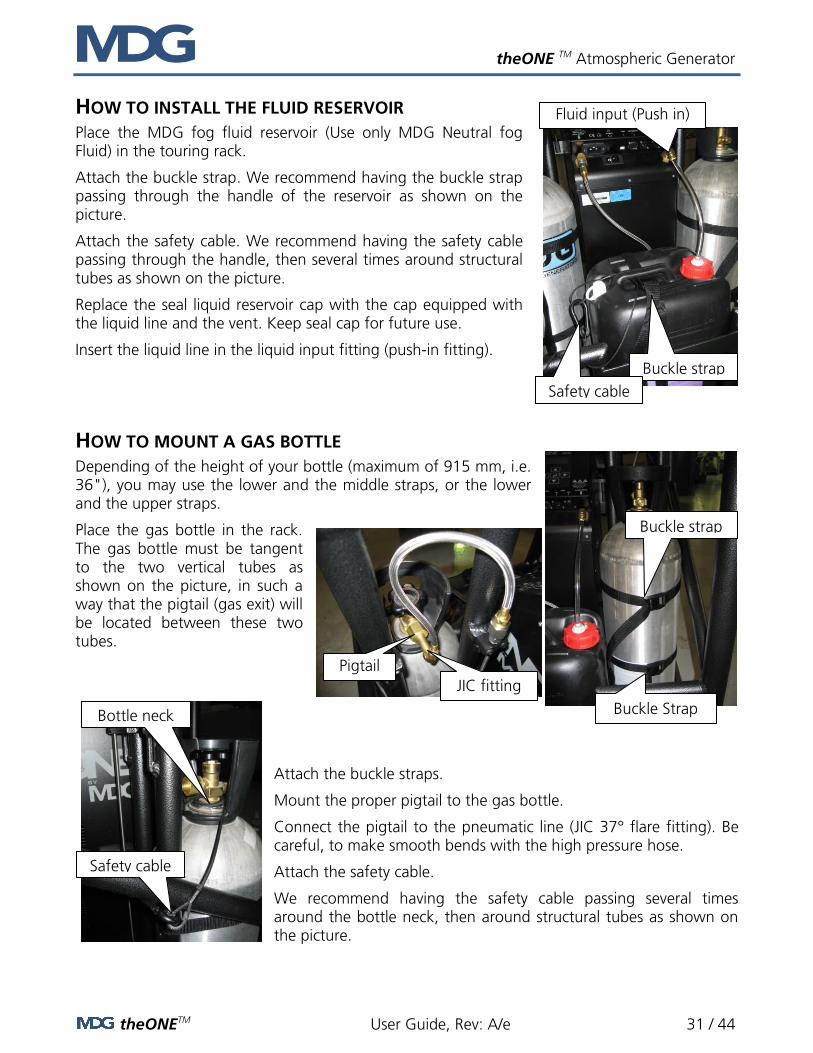
HOW TO INSTALL THE FLUID RESERVOIR Place the MDG fog fluid reservoir (Use only MDG Neutral fog Fluid) in the touring rack.
Attach the buckle strap. We recommend having the buckle strap passing through the handle of the reservoir as shown on the picture.
Attach the safety cable. We recommend having the safety cable passing through the handle, then several times around structural tubes as shown on the picture.
Replace the seal liquid reservoir cap with the cap equipped with the liquid line and the vent. Keep seal cap for future use.
Insert the liquid line in the liquid input fitting (push-in fitting).
HOW TO MOUNT A GAS BOTTLE Depending of the height of your bottle (maximum of 915 mm, i.e. 36"), you may use the lower and the middle straps, or the lower and the upper straps.
Place the gas bottle in the rack. The gas bottle must be tangent to the two vertical tubes as shown on the picture, in such a way that the pigtail (gas exit) will be located between these two tubes.
Attach the buckle straps.
Mount the proper pigtail to the gas bottle.
Connect the pigtail to the pneumatic line (JIC 37° flare fitting). Be careful, to make smooth bends with the high pressure hose.
Attach the safety cable.
We recommend having the safety cable passing several times around the bottle neck, then around structural tubes as shown on the picture.
Safety cable
Bottle neck
Fluid input (Push in)
Buckle strap
Safety cable

theONE TM Atmospheric Generator
theONETM User Guide, Rev: A/e 32 / 44
Safety cable
Handlewheel
This icon on top
Quick release pin
HOW TO REPLACE A GAS BOTTLE The Touring rack is equipped with a ball valve on each gas lines. Therefore, it is possible to replace the gas bottle while the fog generator is working.
To proceed:
1. Close the gas bottle
1. Close the ball valve
2. Replace the gas bottle (see How to mount a gas bottle for more details)
3. Open the gas bottle
4. Open the ball valve
EXTERNAL FAN The touring rack comes with an external fan for the MDG theONE.
The 10” external fan (900 CFM, 24 VDC) will improve tremendously the dispersion of the haze (or the fog) in large areas.
There is two different ways to install the fan on the rack, depending if the user wants to disperse the fog upward (floor installation), or downward (rigging installation). The fog or haze jets should never go through the fan.
Upward dispersion
Mount the fan below the fog nozzle for upward fog dispersion.
Just pin the fan at the position below the nozzle. Verify the fan support is horizontal, and insert the quick release pins on both sides.
Attach the safety cable. We recommend having the safety cable passing inside the fan support, then several times around structural tube as shown on the picture.
Valve opened
Valve closed

theONE TM Atmospheric Generator
theONETM User Guide, Rev: A/e 33 / 44
DMX
Quick release pin
Rotate the fan to have the configuration icon on top of the fan, and slightly incline the fan to have a downstream dispersion. Be careful to tighten the two handlewheels on both sides. Connect the three (3) contacts DMX cable to the MDG theONE’s front receptacle.
Downward dispersion
Mount the fan above the fog nozzle for downward fog dispersion.
Just pin the fan at the position below the nozzle. Verify the fan support is horizontal, and insert the quick release pins on both sides.
Attach the safety cable. We recommend having the safety cable passing inside the fan support, then several times around structural tube.
Rotate the fan to have the configuration icon on top of the fan, and slightly incline the fan to have a downstream dispersion. Be careful to tighten the two handlewheels on both sides.
Connect the three (3) contacts DMX cable to the MDG theONE’s front receptacle.
Transportation
When the external fan is not used, it can be stored under
the MDG theONE generator.
DO NOT FORGET TO DISCONNECT THE DMX cable, and to remove the quick release pins.
Insure that the fan is horizontal, and place the DMX cable inside the fan support.
Slide the fan below the fog generator, with the metal hinge on top until you see two holes on the support plate. If you feel some resistance, pull upward the back of the fan.
Insert the quick release pins in the two holes of the support plate.
Attach the safety cable as shown on the picture.
Quick release pin
Safety cable
Support plate
Hinge on top
This icon on top
theONE TM Atmospheric Generator
theONETM User Guide, Rev: A/e 34 / 44
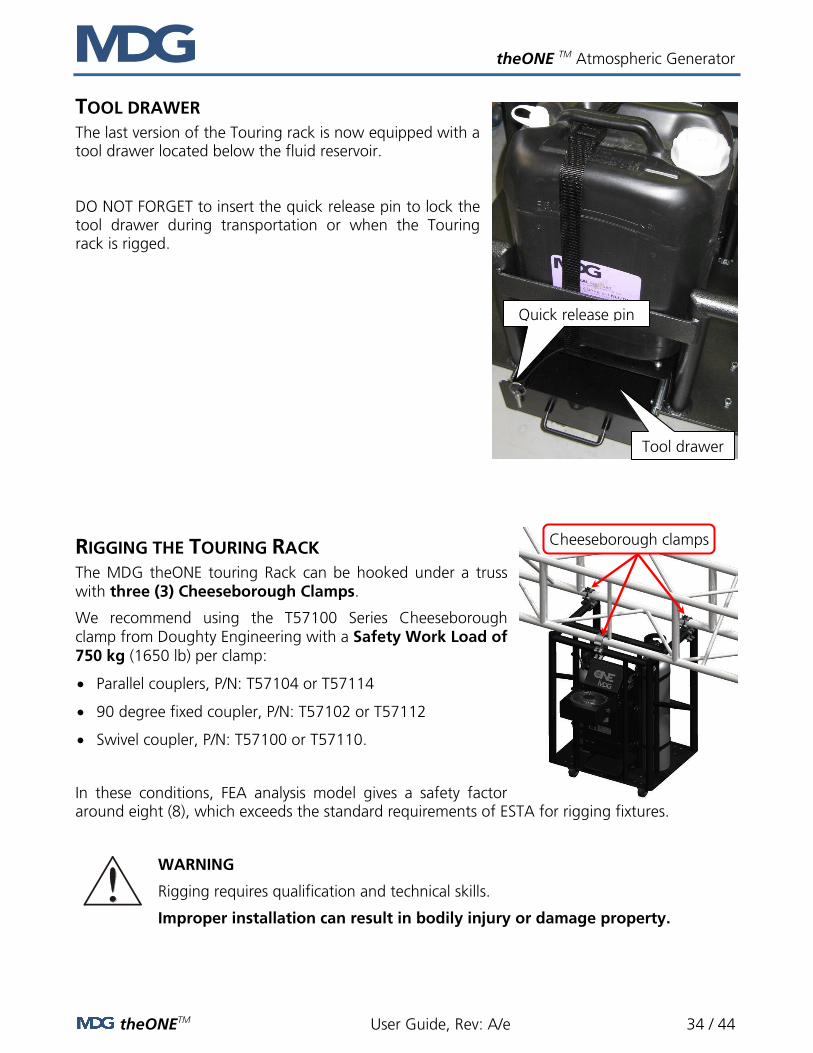
TOOL DRAWER The last version of the Touring rack is now equipped with a tool drawer located below the fluid reservoir. DO NOT FORGET to insert the quick release pin to lock the tool drawer during transportation or when the Touring rack is rigged.
RIGGING THE TOURING RACK The MDG theONE touring Rack can be hooked under a truss with three (3) Cheeseborough Clamps.
We recommend using the T57100 Series Cheeseborough clamp from Doughty Engineering with a Safety Work Load of 750 kg (1650 lb) per clamp:
Parallel couplers, P/N: T57104 or T57114
90 degree fixed coupler, P/N: T57102 or T57112
Swivel coupler, P/N: T57100 or T57110.
In these conditions, FEA analysis model gives a safety factor around eight (8), which exceeds the standard requirements of ESTA for rigging fixtures.
WARNING
Rigging requires qualification and technical skills.
Improper installation can result in bodily injury or damage property.
Cheeseborough clamps
Quick release pin
Tool drawer

theONE TM Atmospheric Generator
theONETM User Guide, Rev: A/e 35 / 44
WARNING
NEVER HANG THE MDG TOURING RACK ABOVE AUDIENCE.
WARNING
NEVER HANG THE MDG TOURING RACK ABOVE ELECTRICAL OR FLAMMABLE DEVICES.
STACKING THE TOURING RACK We recommend using the three (3) T57000 Series Half Cheeseborough from Doughty Engineering with a Safety Work Load of 750 kg (1650 lbs, P/N: T57000 or T57010).
Do not stack more than two (2) racks high.
Half Cheeseborough clamps

theONE TM Atmospheric Generator
theONETM User Guide, Rev: A/e 36 / 44
TROUBLESHOOTING Contact MDG, if symptoms are not listed, or if the provided solutions fail to resolve the issue.
Table 2: Symptoms and Solutions
Symptoms Probable Causes and Suggested Actions
The generator does not switch On Verify that AC power cord is properly connected on both ends.
Check the fuse or the breakers of your VAC entry. The wattage of the generator is 1480 W.
Verify the AC voltage on the power cord. 100~250 VAC.
The generator does not produce fog Verify that the Unit is ON («CONTROLUNITON»)
Verify that the UNIT is READY («STATUSSTATE =
READY»)
The generator needs approximately eight (8) minutes to be ready.
Verify that the Unit is not in a FAIL state («STATUSSTATE = FAIL»)
If Yes, check the symptoms below
Verify the communication mode («INTERFACECOMM.»)
You cannot control the generator locally if you are in DMX mode, and vice-versa.
If you are in DMX mode:
- Verify the cable
- verify the DMX Start address and the channels
If you are in Network mode:
- Verify the cable
- Verify the Node status
- Verify the RDM ID number
- Verify the Universe parameters and the DMX Start Address
… ∕…
theONE TM Atmospheric Generator
theONETM User Guide, Rev: A/e 37 / 44
Symptoms Probable Causes and Suggested Actions
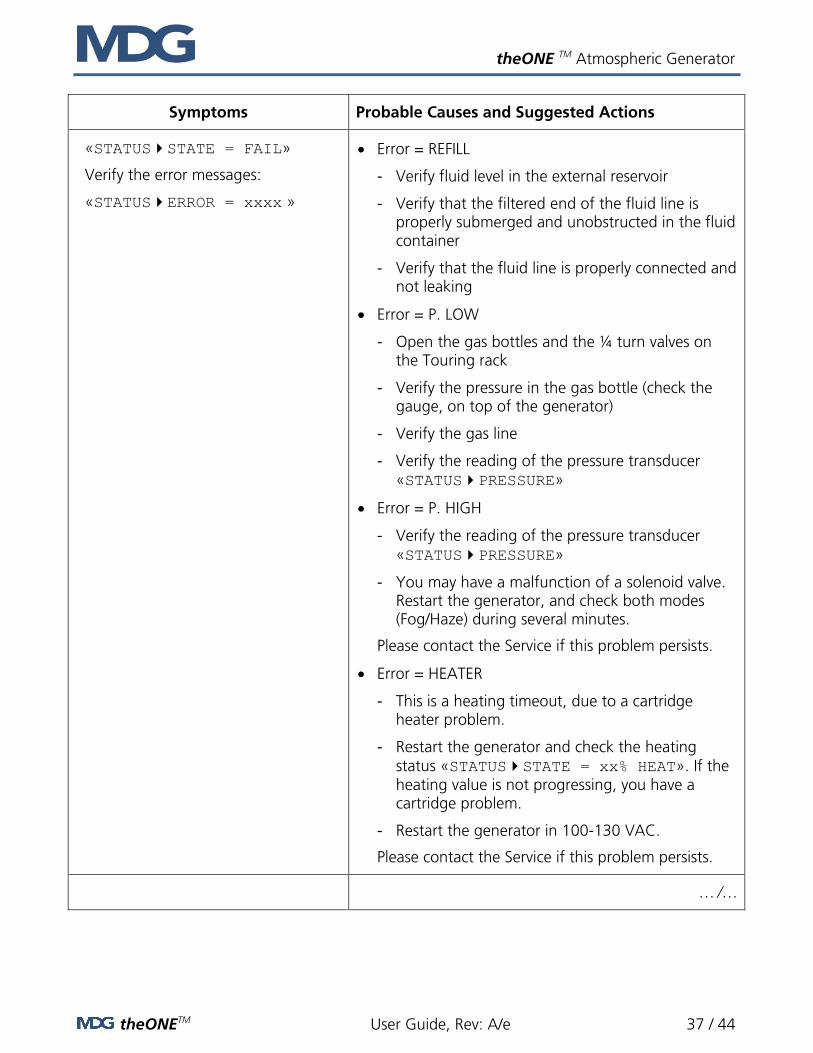
«STATUSSTATE = FAIL»
Verify the error messages:
«STATUSERROR = xxxx »
Error = REFILL
- Verify fluid level in the external reservoir
- Verify that the filtered end of the fluid line is properly submerged and unobstructed in the fluid container
- Verify that the fluid line is properly connected and not leaking
Error = P. LOW
- Open the gas bottles and the ¼ turn valves on the Touring rack
- Verify the pressure in the gas bottle (check the gauge, on top of the generator)
- Verify the gas line
- Verify the reading of the pressure transducer «STATUSPRESSURE»
Error = P. HIGH
- Verify the reading of the pressure transducer «STATUSPRESSURE»
- You may have a malfunction of a solenoid valve. Restart the generator, and check both modes (Fog/Haze) during several minutes.
Please contact the Service if this problem persists.
Error = HEATER
- This is a heating timeout, due to a cartridge heater problem.
- Restart the generator and check the heating status «STATUSSTATE = xx% HEAT». If the heating value is not progressing, you have a cartridge problem.
- Restart the generator in 100-130 VAC.
Please contact the Service if this problem persists.
… ∕…

theONE TM Atmospheric Generator
theONETM User Guide, Rev: A/e 38 / 44
Error = T. HIGH
- Restart the generator. This is generally due to an electronic problem.
Please contact the Service if this problem persists.
Error = T. SAF
- Restart the generator. This is generally due to an electronic or sensor problem.
Please contact the Service if this problem persists.
Error = PCB HIGH
- Verify that the vents area are not blocked
- Stop the MDG theONE, if it is possible
- Try to change the position of the MDG theONE to a cooler place
Please contact the Service if this problem persists.
Error = WD RESET
- Restart the generator.
Please contact the Service if this problem persists.
LCD displays strange letters or does not seem to work normally
In some conditions (Radio transmission or static discharges), the LCD may lose its settings. The generator is still working, but the LCD displays strange or no characters:
- Wait 30 seconds without touching any key, until the LCD saver starts
- Press any key
If the menu does not reappear, restart the generator.
Please contact the Service if this problem persists.

theONE TM Atmospheric Generator
theONETM User Guide, Rev: A/e 39 / 44
MDG theONE SPECIFICATIONS
Series theONE Atmospheric Generator
Fog output: 85 m3 (3000 ft
3) per minute in Fog mode, at full pressure
Total Running Time (Touring†): Fog mode 15 hours at 275 kPa / 40 psi
41 hours at 69 kPa / 10 psi Haze mode 50 hours at 207 kPa / 30 psi 120 hours at 69 kPa / 10 psi
Fog colour: Pure white
Particle size: 0.5 to 0.7 microns
Fluid consumption: Fog mode 1 L (0.26 US gal) per hour at 275 kPa / 40 psi 0.5 L (0.12 US gal) per hour at 69 kPa / 10 psi Haze mode 55 mL (1.63 oz) per hour at 207 kPa / 30 psi 12 mL (0.35 oz) per hour at 69 kPa / 10 psi
Fluid type: MDG Neutral TM
Fog Fluid ONLY – M.S.D.S. available on request
External fluid reservoir: 20 L (5.28 US gal) bottle
Gas type: Industrial Grade CO2 or N
2
Gas pressure input: 17.2 MPa / 2500 psi
Gas consumption: Fog Mode 1.16 kg (2.56 lb) per hour at 275 kPa / 40 psi 0.44 kg (0.97 lb) per hour at 69 kPa / 10 psi Haze Mode 0.35 kg (0.77 lb) per hour at 207 kPa / 30 psi 0.15 kg (0.33 lb) per hour at 69 kPa / 10 psi
APS: Automatic Purging System
Warm-up time: Under 10 minutes
Operating voltage: 100-250 VAC, 50/60Hz, 1 phase
Power consumption: 1100 W @ 100 VAC, 1480 W @ 250 VAC
Control signal: Manual
USB (diagnostic & Bootload) DMX / RDM Protocol ArtNet Pathport Protocol Strand Shownet ETC Net2 eDMX Streaming ACN (E1.31 sACN)/ETC Net3
† 2 x 9 kg (20 lb) CO
2 or N
2 gas bottle, 20 L (5.3 US gal.) Fog Fluid container
theONE TM Atmospheric Generator
theONETM User Guide, Rev: A/e 40 / 44
Noise emission (at 1 m/3.3 ft) 45 - 60 dB theONE Standalone
45 - 70 dB theONE Touring
Operating temperature: -30 °C (-22 °F) to 50 °C (122 ˚F)
Operating humidity: 90 % relative humidity @ 50 °˚C (122 ˚F), non-condensing
Storage temperature: -40 º C (-40 º F) to 60º C (140 º F)
Storage humidity: 80% relative humidity @ 60º C (140 º F)
theONE Standalone: - Dimensions 61 cm (24”) H x 25 cm (10”) W x 30 cm (12”) D - Weight: 23 kg (50 lb)
theONE Touring (including rack): - Dimensions 106 cm (42”) H x 76 cm (30”) W x 61 cm (24”) D - Weight: 120 kg (265 lb)
theONE TM Atmospheric Generator
theONETM User Guide, Rev: A/e 41 / 44
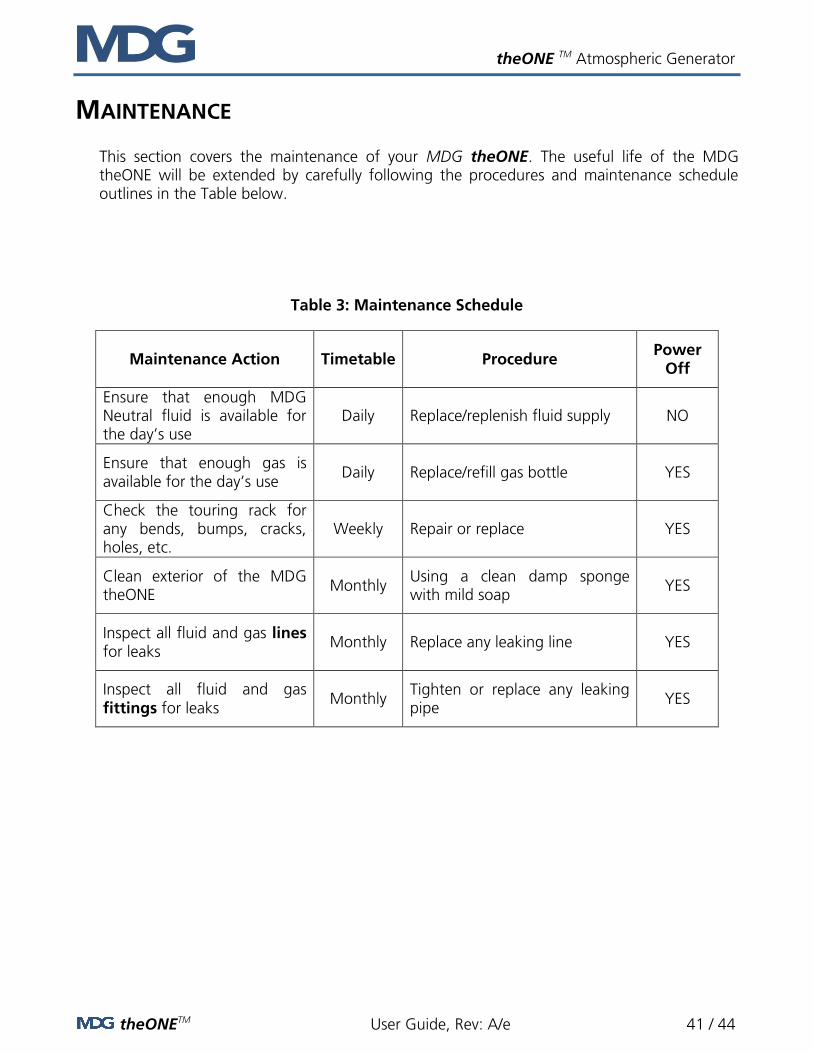
MAINTENANCE
This section covers the maintenance of your MDG theONE. The useful life of the MDG theONE will be extended by carefully following the procedures and maintenance schedule outlines in the Table below.
Table 3: Maintenance Schedule
Maintenance Action Timetable Procedure Power
Off
Ensure that enough MDG Neutral fluid is available for the day’s use
Daily Replace/replenish fluid supply NO
Ensure that enough gas is available for the day’s use
Daily Replace/refill gas bottle YES
Check the touring rack for any bends, bumps, cracks, holes, etc.
Weekly Repair or replace YES
Clean exterior of the MDG theONE
Monthly Using a clean damp sponge with mild soap
YES
Inspect all fluid and gas lines for leaks
Monthly Replace any leaking line YES
Inspect all fluid and gas fittings for leaks
Monthly Tighten or replace any leaking pipe
YES
theONE TM Atmospheric Generator
theONETM User Guide, Rev: A/e 42 / 44
LIMITED WARRANTY
Limited 2 years Warranty
When installed and operated as recommended, MDG Fog Generators Ltd guarantees that this product will remain free of defects in parts and labor for a period of two (2) years from the moment it is delivered. This warranty does not apply if the product has been modified without our written authorization, or repaired without a written authorization from MDG or at one of its authorized service centre, or if it is used under conditions for which it has not been designed for, or if a non MDG FOG FLUID™ as been used. MDG Fog Generators Ltd is not responsible for any damages resulting from a faulty installation or from abusive use of the product. If any device is found unsatisfactory under the terms of this warranty, MDG Fog Generators Ltd will repair or replace it free of all charges except transportation costs. This warranty applies only to the product itself and MDG Fog Generators Ltd declines responsibility for any losses, costs, or damages resulting from its use. MDG Fog Generators Ltd shall not be liable for consequential damage in case of any failure to meet the conditions of any warranty or shipping schedule, nor will claims for labor, loss of profits, repairs, or other expenses incidental to replacement be allowed. The repair or replacement of the product, by MDG Fog Generators Ltd shall constitute fulfillment of all obligations to the purchaser.
No other guarantees or warranties, expressed or implied, are made by MDG Fog Generators Ltd in connection with its products. This warranty is non-transferable and applies to the original purchaser only. To obtain satisfaction under the terms of this warranty, contact your local sales
office, and we will be pleased to help you.
MDG Fog Generators ltd

theONE TM Atmospheric Generator
theONETM User Guide, Rev: A/e 43 / 44
DECLARATION OF CONFORMITY

theONE TM Atmospheric Generator
theONETM User Guide, Rev: A/e 44 / 44
NOTES