Embed Size (px)
Citation preview

MainBoss Basic 2.9
User’s Guide
Copyright © 2009, Thinkage Ltd.
Permission granted to reproduce all or part of this document provided that Thinkage’s copyright notice is
included in the reproduction. No money may be charged for such reproductions except to recover all or part
of the cost of reproduction.

- i -
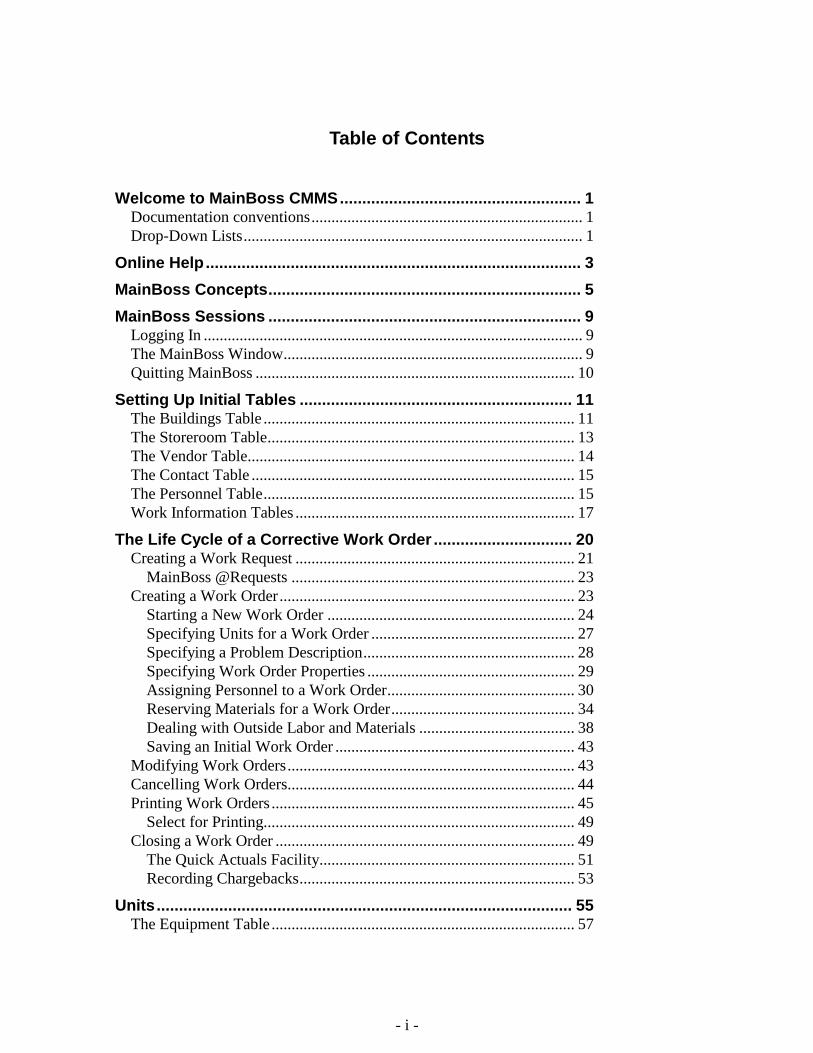
Table of Contents
Welcome to MainBoss CMMS ...................................................... 1
Documentation conventions .................................................................... 1
Drop-Down Lists ..................................................................................... 1
Online Help .................................................................................... 3
MainBoss Concepts ...................................................................... 5
MainBoss Sessions ...................................................................... 9
Logging In ............................................................................................... 9
The MainBoss Window ........................................................................... 9
Quitting MainBoss ................................................................................ 10
Setting Up Initial Tables ............................................................. 11
The Buildings Table .............................................................................. 11
The Storeroom Table ............................................................................. 13
The Vendor Table.................................................................................. 14
The Contact Table ................................................................................. 15
The Personnel Table .............................................................................. 15
Work Information Tables ...................................................................... 17
The Life Cycle of a Corrective Work Order ............................... 20
Creating a Work Request ...................................................................... 21
MainBoss @Requests ....................................................................... 23
Creating a Work Order .......................................................................... 23
Starting a New Work Order .............................................................. 24
Specifying Units for a Work Order ................................................... 27
Specifying a Problem Description ..................................................... 28
Specifying Work Order Properties .................................................... 29
Assigning Personnel to a Work Order ............................................... 30
Reserving Materials for a Work Order .............................................. 34
Dealing with Outside Labor and Materials ....................................... 38
Saving an Initial Work Order ............................................................ 43
Modifying Work Orders ........................................................................ 43
Cancelling Work Orders........................................................................ 44
Printing Work Orders ............................................................................ 45
Select for Printing.............................................................................. 49
Closing a Work Order ........................................................................... 49
The Quick Actuals Facility ................................................................ 51
Recording Chargebacks ..................................................................... 53
Units ............................................................................................. 55
The Equipment Table ............................................................................ 57
- ii -
Equipment Identification ................................................................... 59
Equipment Service ............................................................................ 60
Equipment Spare Parts ...................................................................... 61
Equipment Specifications .................................................................. 62
Equipment Value ............................................................................... 63
Equipment Meters ............................................................................. 65
Examining and Editing Equipment Records ......................................... 68
The Spaces Table .................................................................................. 68
More About Meters ............................................................................... 68
Basic Principles about Meters ........................................................... 68
Recording Meter Readings ................................................................ 69
Meter Offsets ..................................................................................... 70
Template Specifications ........................................................................ 72
Creating a Template Specification .................................................... 74
Using a Template Specification in an Equipment Record ................ 75
Obsolete Equipment .............................................................................. 77
Service Contracts .................................................................................. 78
Preventive Maintenance ............................................................. 81
Steps for Handling Preventive Maintenance: ........................................ 82
Creating Tasks ....................................................................................... 84
Scheduling Units for Preventive Maintenance ...................................... 86
Specifying Task Schedules .................................................................... 88
Scheduling Examples ........................................................................ 92
Generating Preventive Maintenance Work Orders ............................... 94
Adjusting Preventive Maintenance Work Orders ................................. 95
Work Order Schedules .......................................................................... 95
Printing Preventive Maintenance Work Orders .................................... 97
Closing Preventive Maintenance Work Orders ..................................... 98
General Inventory Control .......................................................... 99
Creating a New Inventory Item ........................................................... 100
Describing Inventory Items ................................................................. 101
Inventory Item Properties ................................................................ 102
Inventory Item Status ...................................................................... 103
Inventory Item Usage ...................................................................... 106
Inventory Item Maintenance ............................................................ 107
Inventory Operations ........................................................................... 107
Finding Which Storeroom Contains a Particular Item .................... 108
Taking Physical Inventory ............................................................... 109
Other Inventory Operations ............................................................. 112
Inventory Details ................................................................................. 112
Purchasing and Receiving ....................................................... 117
The Purchasing/Receiving Process ..................................................... 118
The Re-Order Report ........................................................................... 120
- iii -
Creating a New Purchase Order .......................................................... 121
General Purchase Order Information............................................... 122
Purchase Order Items ...................................................................... 123
Picking Items ................................................................................... 125
Purchase Order Extras ..................................................................... 127
Modifying a Purchase Order ............................................................... 129
Printing a Purchase Order ................................................................... 130
Issuing a New Purchase Order ............................................................ 131
Recording Receipts ............................................................................. 132
The Quick Receive Facility ............................................................. 135
Adding Individual Items to a Shipment Receipt ............................. 136
Closing a Purchase Order .................................................................... 138
Prototype Purchase Orders .................................................................. 139
Browsers and Editors ............................................................... 141
Using Browsers ................................................................................... 141
Searching for a Particular Record ................................................... 144
Using Editors ....................................................................................... 145
Cloning Records .............................................................................. 149
Reports ...................................................................................... 151
Entering Report Specifications............................................................ 151
Previewing Reports ............................................................................. 153
A List of MainBoss Reports ................................................................ 153
Exporting Data .................................................................................... 155
Attachments .............................................................................. 157
Creating an Attachment ....................................................................... 158
Quick Annotations .......................................................................... 159
Using an Attachment ........................................................................... 160
MainBoss Administration ......................................................... 162
Accessing Administration Functions .................................................. 162
Saving Settings .................................................................................... 163
Preferences .......................................................................................... 164
Company Information ..................................................................... 164
Date and Time Format and Other Preferences ................................ 164
Custom Text Settings .......................................................................... 168
Database Operations ............................................................................ 168
Reindexing ...................................................................................... 168
Backing Up Your MainBoss Database ............................................ 169
Restoring Your Database From Backup .......................................... 170
Auditing ........................................................................................... 172
Security ................................................................................................ 174
Changing Your Administration Password ....................................... 174
Authorizing New Users ................................................................... 175
Logins and Security ......................................................................... 177
- iv -
Archiving ............................................................................................. 178
How Archiving Works .................................................................... 179
Archiving Your Data ....................................................................... 179
Restoring and Using an Archive Set ............................................... 180
Cleaning Up Dearchived Data ......................................................... 183
Work Request Notification ................................................................. 184
The MainBoss Command Line ................................................. 185
The Backup Subcommand .................................................................. 186
The Restore Subcommand .................................................................. 186
Setting a Language .............................................................................. 187
Service Desk Mode ............................................................................. 187
License Key Entry Only ...................................................................... 188
Appendix A: New Features In MainBoss 2.9........................... 189
New in MainBoss 2.9 Update 5 .......................................................... 189
New in MainBoss 2.9 Update 4 .......................................................... 190
New in MainBoss 2.9 Update 3 .......................................................... 191
New in MainBoss 2.9 .......................................................................... 191
Appendix B: Installing MainBoss 2.9 ...................................... 195
The MainBoss Setup Program............................................................. 195
Installing on a Local Network ............................................................. 196
Registering MainBoss ......................................................................... 197
MainBoss Service Desk ...................................................................... 199
Using the Sample Databases ............................................................... 200
Appendix C: Frequently Asked Questions.............................. 201
Requestor Lists .................................................................................... 201
Unselecting in a Drop-Down List ....................................................... 201
Printing Reports .................................................................................. 201
MainBoss Version ............................................................................... 201
Deleting Inventory Items ..................................................................... 202
Scheduling Preventive Maintenance ................................................... 203
Forgotten Passwords ........................................................................... 203
Recommended Tables ......................................................................... 203
Emailing MainBoss Reports ............................................................... 205
Packaging MainBoss Files .................................................................. 206
AutoCAD ............................................................................................ 207
Obsolete Equipment and Preventive Maintenance .............................. 207
Upgrades to Hardware or Windows .................................................... 208
Editing MainBoss files using another program ................................... 209
Headings for Scheduled PM Tasks ..................................................... 210
Appendix D: Troubleshooting .................................................. 211
Slow Performance and Network Errors .............................................. 214
Obtaining MainBoss Support .............................................................. 216

- v -
- 1 -
Introduction
Welcome to MainBoss CMMS
Thank you for licensing MainBoss CMMS version 2.9. We think you’ll find it provides all
the features you need for managing your organization’s maintenance work.
Documentation conventions
This guide uses the following documentation conventions:
Menus and menu items are shown in bold face:
Select Buildings from the Tables menu.
References to menu entries typically use arrows. For example, Tables Buildings
refers to the Buildings entry in the Tables menu.
Data-entry fields are shown in bold face, enclosed in double quotes:
See the “Equip Type” field...
Buttons are shown in bold face and underlined:
Click the Done button.
Keyboard keys are shown in bold face enclosed in <angle brackets>:
Press the <Tab> key.
Using the Mouse: Whenever this guide tells you to click on a button, a menu item, or
some other object on the screen, click with the left button of the mouse.
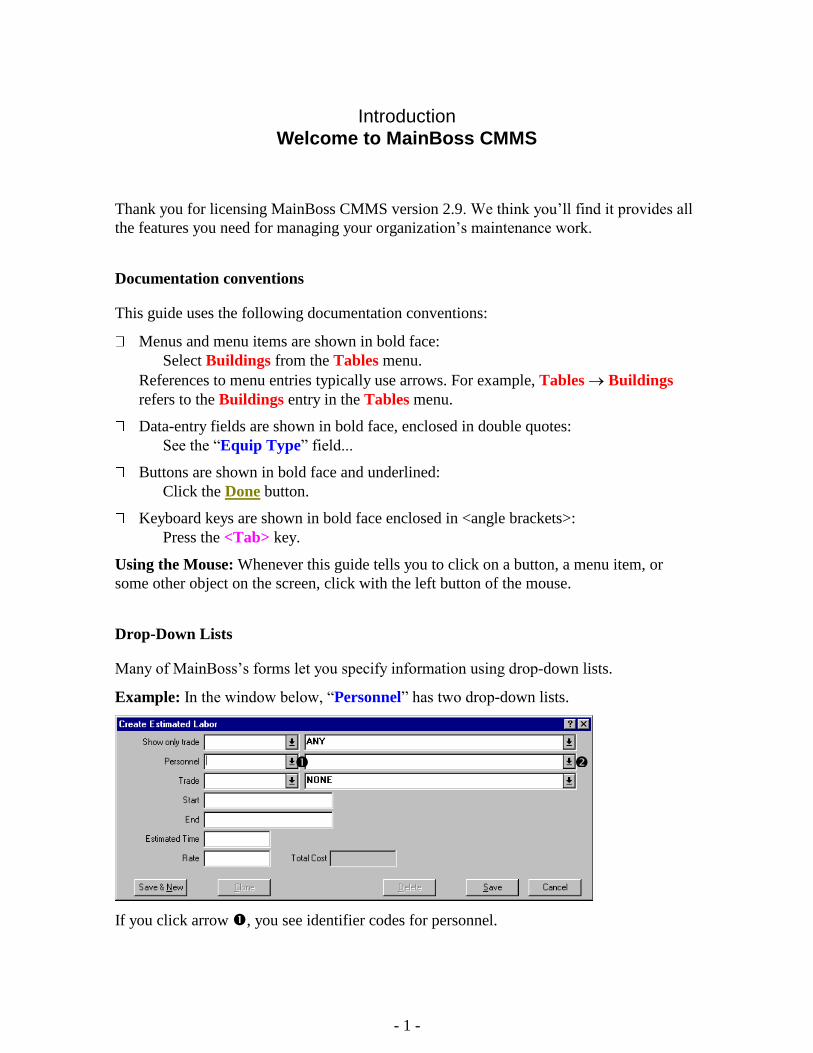
Drop-Down Lists
Many of MainBoss’s forms let you specify information using drop-down lists.
Example: In the window below, “Personnel” has two drop-down lists.
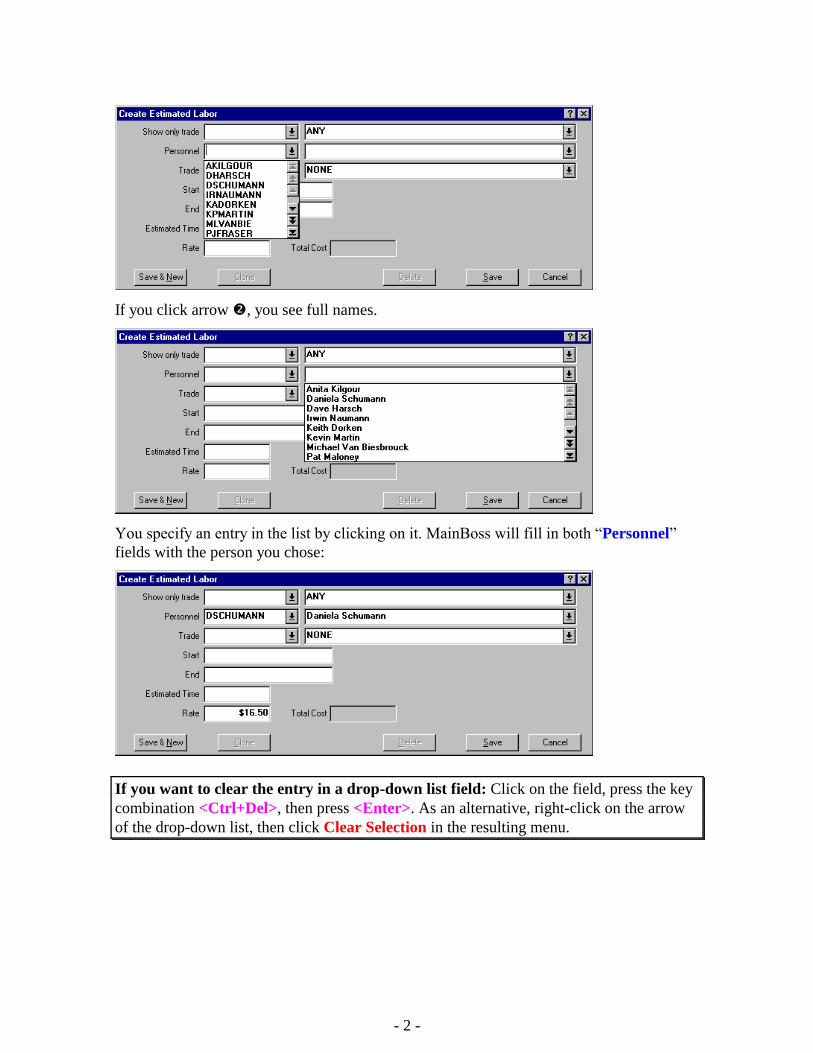
If you click arrow , you see identifier codes for personnel.
- 2 -
If you click arrow , you see full names.
You specify an entry in the list by clicking on it. MainBoss will fill in both “Personnel”
fields with the person you chose:
If you want to clear the entry in a drop-down list field: Click on the field, press the key
combination <Ctrl+Del>, then press <Enter>. As an alternative, right-click on the arrow
of the drop-down list, then click Clear Selection in the resulting menu.
- 3 -
Online Help
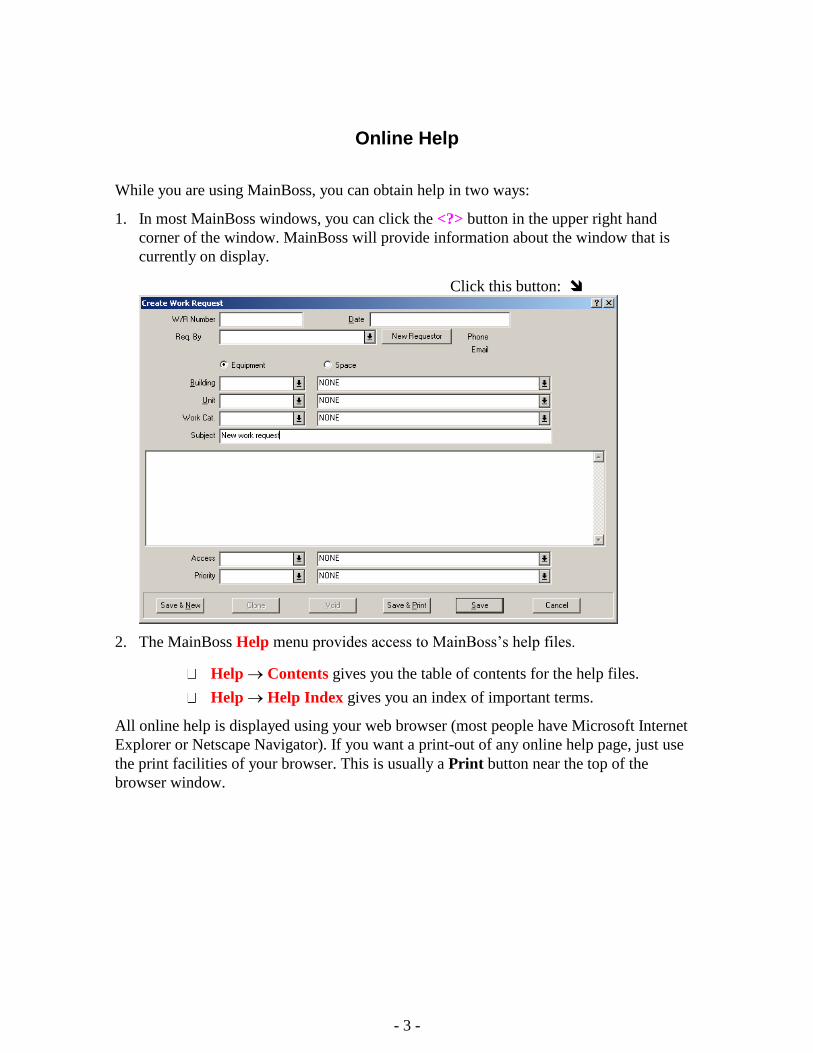
While you are using MainBoss, you can obtain help in two ways:
1. In most MainBoss windows, you can click the <?> button in the upper right hand
corner of the window. MainBoss will provide information about the window that is
currently on display.
Click this button:
2. The MainBoss Help menu provides access to MainBoss’s help files.
Help Contents gives you the table of contents for the help files.
Help Help Index gives you an index of important terms.
All online help is displayed using your web browser (most people have Microsoft Internet
Explorer or Netscape Navigator). If you want a print-out of any online help page, just use
the print facilities of your browser. This is usually a Print button near the top of the
browser window.
- 4 -
Important: To access online help, you must have a web browser configured to open
HTML files. Most users will already have their computers configured appropriately
(probably using Microsoft Internet Explorer or Netscape Navigator). If you do not have an
appropriate browser configured, open Windows Explorer and double-click on any HTML
file (for example, any of the .htm files in the manual subdirectory of the directory where
MainBoss is installed). Windows will ask you to specify a program with which to open the
file; specify the browser on your system. If your system does not have a browser, you can
obtain one free from Microsoft, Netscape, or several other software companies. Ask your
computer dealer for more information.
- 5 -
MainBoss Concepts
This section explains a number of concepts that underlie MainBoss. It does not describe the
fine details of using the software, but looks at how MainBoss is organized and how you can
adapt that organization to the work you do.
___________________________________________________________
Table: A table is a list of entries, each of which contains information about
something.
For example, the Buildings Table is a list of the buildings where your
organization does maintenance work. Each entry in the Buildings Table
contains information about a particular building (for example, its name
and/or address).
Each entry in a table must be given an identifier code. No two entries in the
same table should have the same code.
___________________________________________________________
Equipment: Equipment is a general term for any device that might require
maintenance.
It’s up to you to decide what constitutes a separate piece of equipment. For
example, you might consider a complete assembly line as a single piece of
equipment, or you might choose to regard the line as a system made up of
many separate pieces.
___________________________________________________________
Space: A space is an area in a building.
This might be a single room, a set of adjoining rooms, or an entire floor in
an office block.
If you have to deal with large rooms, you might divide them into multiple
spaces; a large factory floor might be divided into the spaces “Factory Floor
Northeast”, “Factory Floor Northwest”, etc. so you can specify locations
with more precision and make it easier for personnel to find the site of a
problem.
___________________________________________________________
- 6 -
___________________________________________________________
Unit: A maintenance unit (or simply a unit) is either a space or a piece of
equipment.
In general, MainBoss lets you perform similar operations on both. For
example, you can schedule preventive maintenance for either a space or
equipment. You can prepare work orders requesting work on either type of
unit, and keep work histories of both types of unit.
Because spaces and equipment are so similar in MainBoss, you often have
the freedom to choose which one you will use in a certain situation. For
example, the heating/air conditioning facilities for a particular area could be
regarded as equipment or they could be considered part of the space itself. It
all depends on which approach fits better with the way your organization
works.
General Principle: The main difference between equipment and spaces is that equipment
can have capital costs and meters, while spaces can’t.
___________________________________________________________
Work request: A work request reports a problem.
Work requests are often based on complaints from people outside the
maintenance department. They state preliminary information about the
problem: the location, the name of the person reporting the problem, the
date/time the report was received, and a brief description of the problem
itself.
___________________________________________________________
Work order: A work order is a detailed description of work to be done.
Work orders are usually printed and handed to the personnel who have been
assigned to do the work.
Work orders are more detailed than work requests. For example, a work
order may specify the amount of time the job is expected to take, the
materials to be used, and so on. Such details are not present in a work
request.
General Principle: Work requests are designed to be simple so they can be filled out by
non-maintenance personnel. Work orders are more detailed, and usually filled out by
maintenance management.
___________________________________________________________
- 7 -
___________________________________________________________
Report: A report lists information extracted from MainBoss’s files.
MainBoss can print many different types of reports, including work
histories, cost summaries, equipment lists, and so on.
___________________________________________________________
Items: Items are materials used in the course of your maintenance work.
Items include spare parts, tools, chemicals, and so on. There are two types
of item:
Inventoried items are materials you want MainBoss to keep track of. For
example, you will probably want MainBoss to keep track of consumable
items used regularly for maintenance (filters, oil, etc.) and important spare
parts for all your equipment. In this way, MainBoss can tell you when you
are running low and need to order more parts to keep in your inventory.
Non-inventoried items are materials that you don’t want MainBoss to keep
track of. These might include materials that you don’t normally keep in
inventory (parts that you only order when they’re needed) or materials that
you simply don’t bother tracking (for example, basics like glue and tape that
are used so often it would be too much work to keep detailed records about
how much each job uses).
___________________________________________________________
Unit of Measurement: A unit used in measuring materials in your inventory.
Examples include quarts, meters, pounds or kilograms. These are useful
when specifying how much of a particular material is used in a job (e.g.
three quarts of oil in an oil change).
Many materials (like light bulbs or fan belts) come in indivisible units. The
MainBoss sample databases use the measurement EA (Each) for such
materials.
___________________________________________________________
- 8 -
___________________________________________________________
Purchase Order: A purchase order requests or records the purchase of goods and/or
services from an outside source.
MainBoss makes it easy to create a purchase order that can be sent directly
to a supplier, telling what items you want to purchase. The same sort of
purchase order can be sent to an outside contractor describing work that
you’d like that contractor to do.
Even if your organization already has a system for creating purchase orders,
MainBoss’s facilities are still useful for internal record-keeping. In other
words, it’s useful to create a MainBoss purchase order saying, “We bought
A, B, and C from Supplier X” even if the paperwork you send to your
suppliers doesn’t come from MainBoss itself. In this situation, you might
think of MainBoss’s purchase orders as requisitions for the “real” purchase
orders used by your organization.
___________________________________________________________
Database: A collection of files containing the information used by MainBoss.
Roughly speaking, there is a separate file for each type of data that
MainBoss uses. For example, there is one file for work orders, another file
for work requests, another file for equipment information, and so on.
___________________________________________________________
- 9 -
MainBoss Sessions
A MainBoss session begins when you start the MainBoss program and ends when you quit
the program. MainBoss sessions are controlled through the Session menu.
Logging In
When the MainBoss program starts, you may be asked to identify yourself. (Some
organizations may prefer to turn off this requirement, in which case you can start using
MainBoss immediately, without specifying your name and password.)
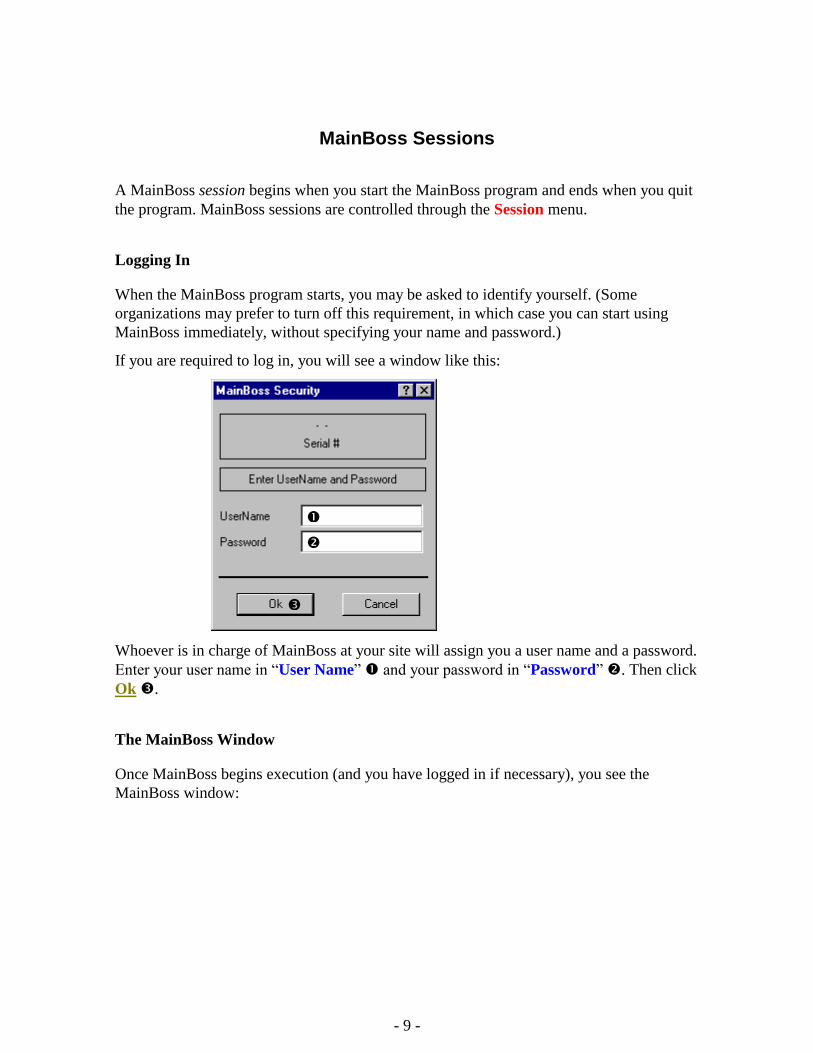
If you are required to log in, you will see a window like this:
Whoever is in charge of MainBoss at your site will assign you a user name and a password.
Enter your user name in “User Name” and your password in “Password” . Then click
Ok .
The MainBoss Window
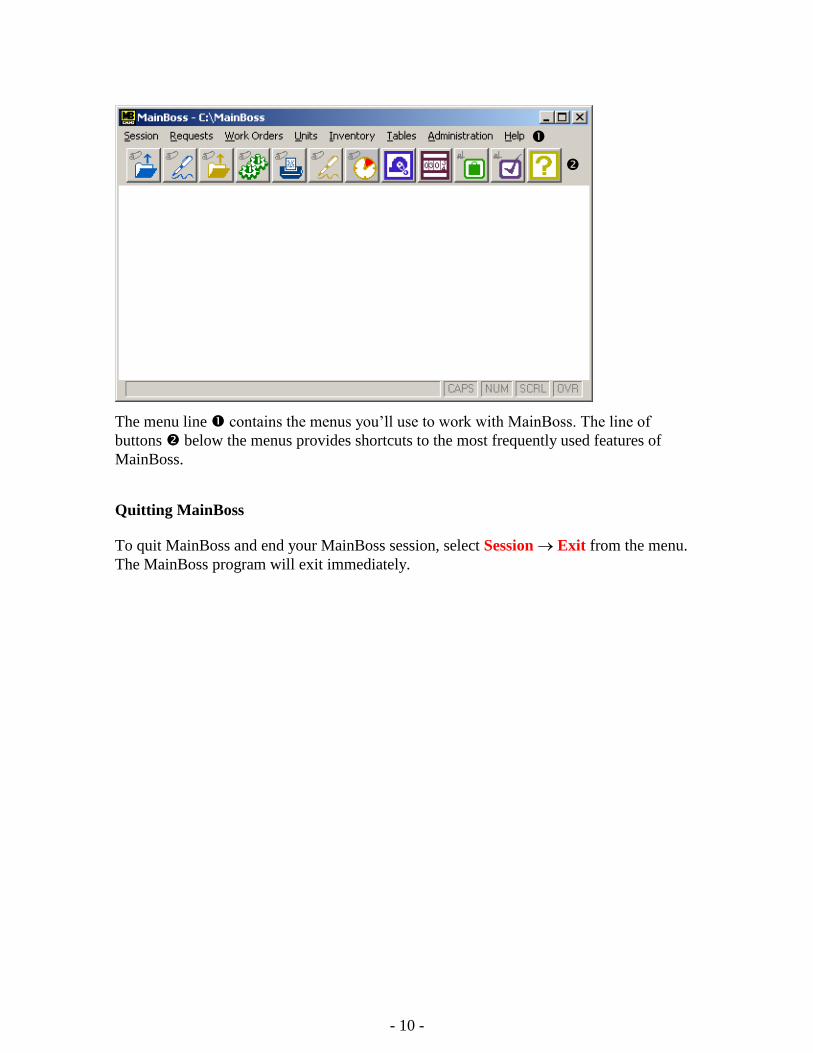
Once MainBoss begins execution (and you have logged in if necessary), you see the
MainBoss window:
- 10 -
The menu line contains the menus you’ll use to work with MainBoss. The line of
buttons below the menus provides shortcuts to the most frequently used features of
MainBoss.
Quitting MainBoss
To quit MainBoss and end your MainBoss session, select Session Exit from the menu.
The MainBoss program will exit immediately.
- 11 -
Setting Up Initial Tables
To get started using MainBoss, you usually have to set up some tables. For example, if you
are going to use MainBoss to keep track of which workers are assigned to which jobs, you
have to set up the Personnel. This table records the names of your personnel, plus any
extra information that might be useful (for example, job class, contact information, hourly
charge rates, and so on).
You only have to fill in the information that’s relevant to your operations. For example, if
your organization doesn’t keep track of labor costs for each job, you wouldn’t fill in the
hourly charge rates for your workers.
Although different organizations will have different needs, the rest of this chapter describes
the tables that most MainBoss users will want to set up. The sections are given in an order
that make sense for most organizations.
Note: You examine the contents of a table using a browser. You add new entries to a table
(or modify existing entries) using an editor. For information on how to use browsers and
editors, see Browsers and Editors on page 141.
The Buildings Table
___________________________________________________________
Building: Any place you perform maintenance, store items, or receive purchased
goods.
___________________________________________________________
A building might be an industrial plant, a commercial or institutional building; it could
even be a fleet of vehicles. Maintenance contractors might consider each customer a
separate “building”.
The Buildings table records information about all your buildings. Even if your
organization only has one building, you must set up the Buildings table (with a single
record for that one building).
Note: If you intend to use MainBoss to print purchase orders, be sure to record full address
information for any building where shipments may be received. MainBoss puts this address
information on purchase orders, to let vendors know where shipments should be delivered.
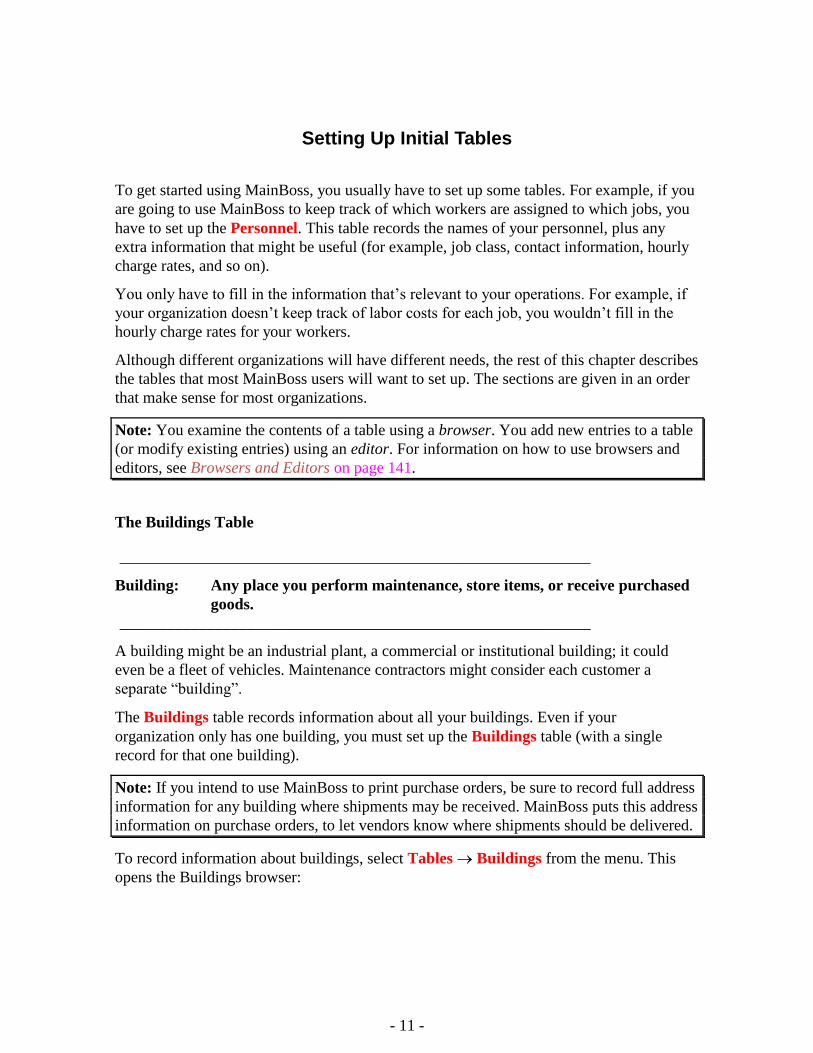
To record information about buildings, select Tables Buildings from the menu. This
opens the Buildings browser:
- 12 -
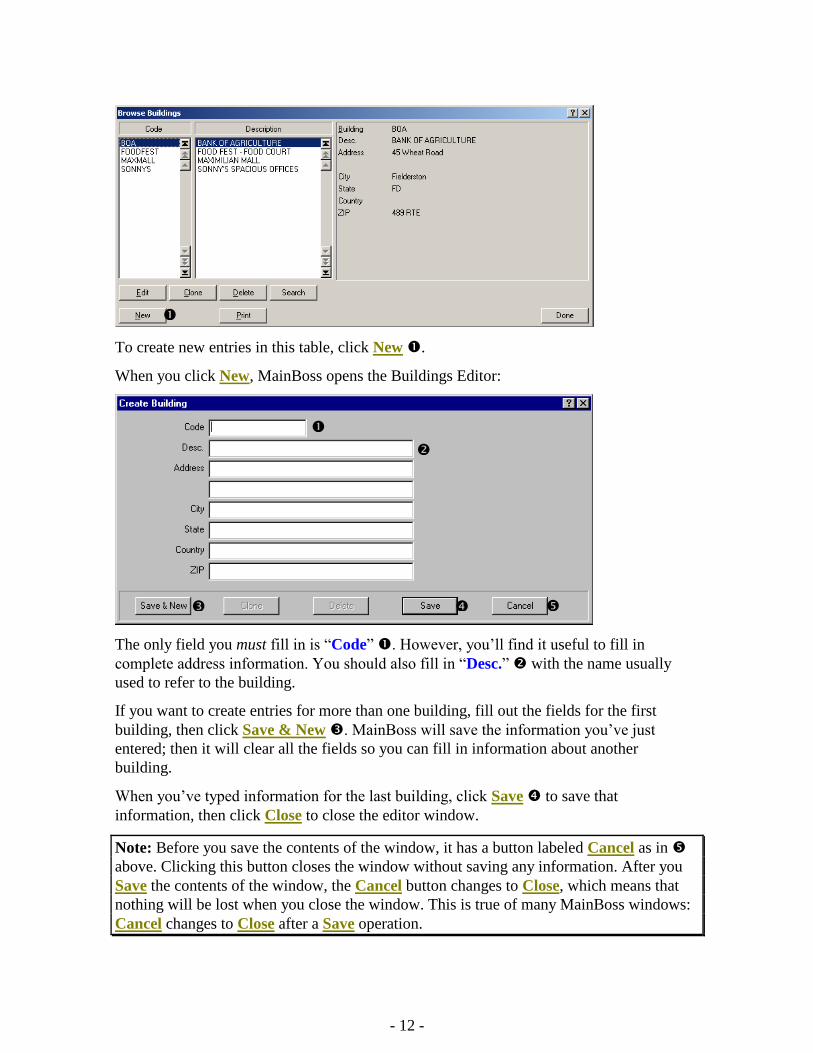
To create new entries in this table, click New .
When you click New, MainBoss opens the Buildings Editor:
The only field you must fill in is “Code” . However, you’ll find it useful to fill in
complete address information. You should also fill in “Desc.” with the name usually
used to refer to the building.
If you want to create entries for more than one building, fill out the fields for the first
building, then click Save & New . MainBoss will save the information you’ve just
entered; then it will clear all the fields so you can fill in information about another
building.
When you’ve typed information for the last building, click Save to save that
information, then click Close to close the editor window.
Note: Before you save the contents of the window, it has a button labeled Cancel as in
above. Clicking this button closes the window without saving any information. After you
Save the contents of the window, the Cancel button changes to Close, which means that
nothing will be lost when you close the window. This is true of many MainBoss windows:
Cancel changes to Close after a Save operation.
- 13 -
The Storeroom Table
___________________________________________________________
Storeroom: Anywhere you keep inventory materials.
If you have more than one storeroom, it is obviously important to know
which storeroom contains which items so that workers can quickly find the
materials they need.
___________________________________________________________
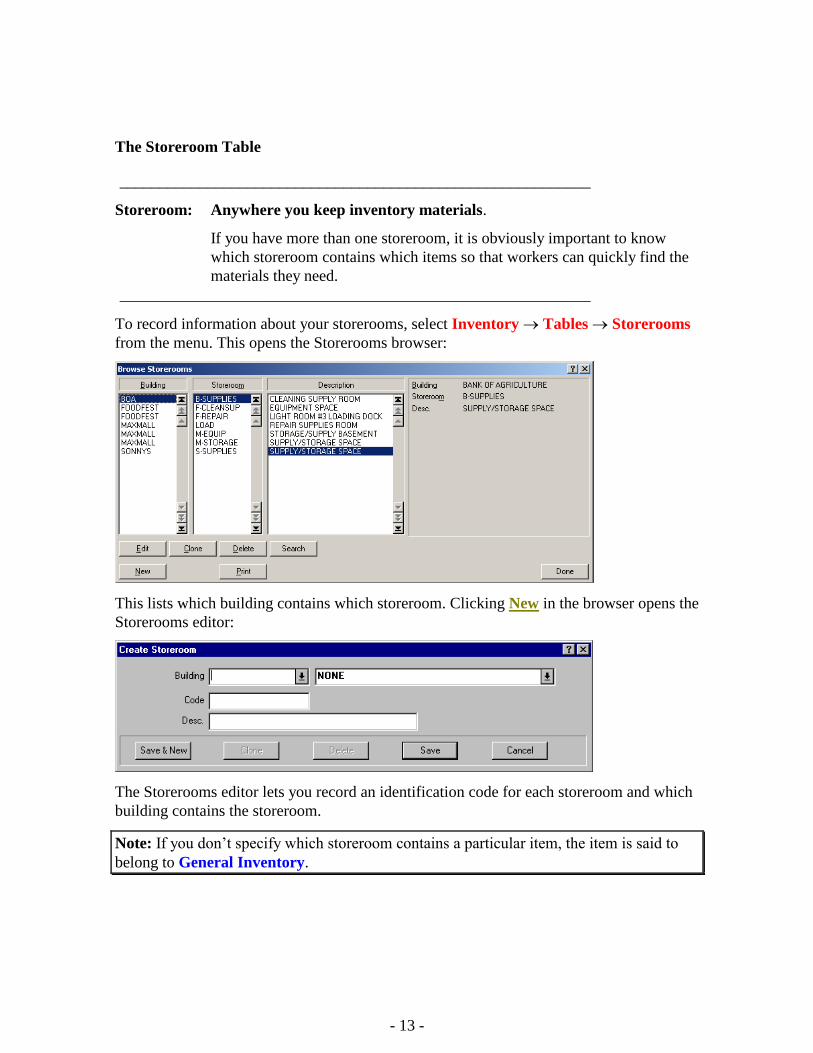
To record information about your storerooms, select Inventory Tables Storerooms
from the menu. This opens the Storerooms browser:
This lists which building contains which storeroom. Clicking New in the browser opens the
Storerooms editor:
The Storerooms editor lets you record an identification code for each storeroom and which
building contains the storeroom.
Note: If you don’t specify which storeroom contains a particular item, the item is said to
belong to General Inventory.
- 14 -
The Vendor Table
___________________________________________________________
Vendor: Anyone outside your organization who provides you with goods or
services.
Vendors include your suppliers and any outside contractors who are hired to
do specialized work.
___________________________________________________________
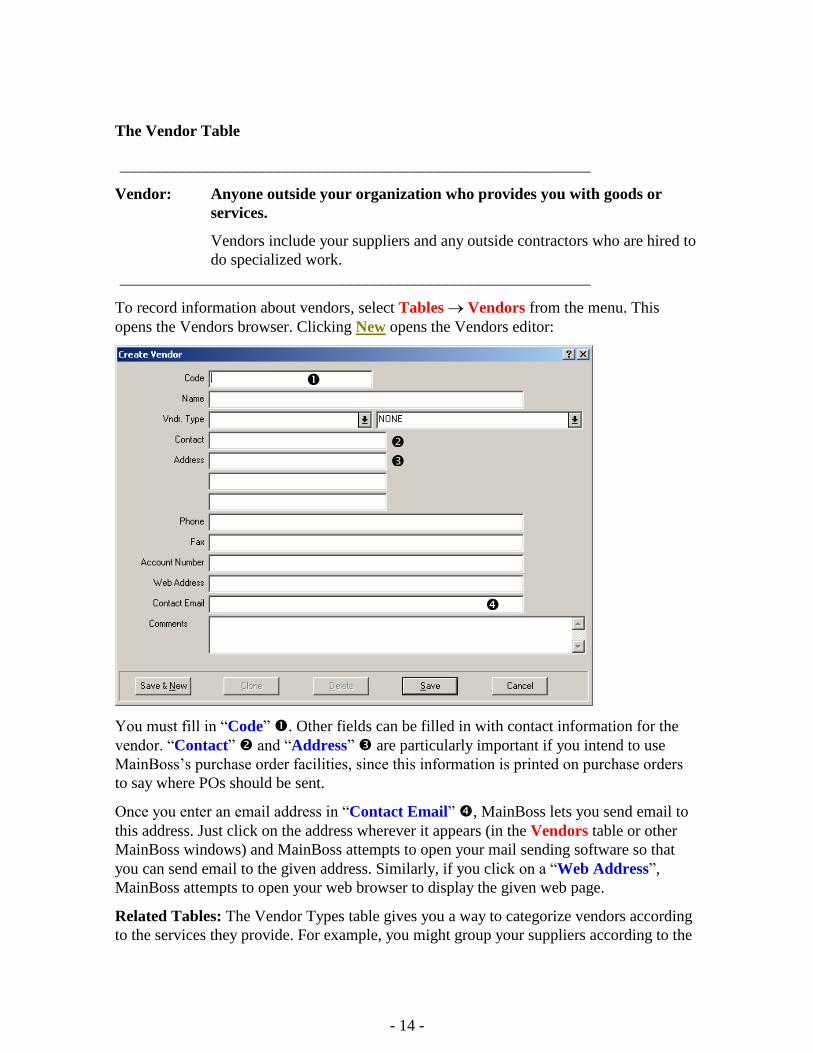
To record information about vendors, select Tables Vendors from the menu. This
opens the Vendors browser. Clicking New opens the Vendors editor:
You must fill in “Code” . Other fields can be filled in with contact information for the
vendor. “Contact” and “Address” are particularly important if you intend to use
MainBoss’s purchase order facilities, since this information is printed on purchase orders
to say where POs should be sent.
Once you enter an email address in “Contact Email” , MainBoss lets you send email to
this address. Just click on the address wherever it appears (in the Vendors table or other
MainBoss windows) and MainBoss attempts to open your mail sending software so that
you can send email to the given address. Similarly, if you click on a “Web Address”,
MainBoss attempts to open your web browser to display the given web page.
Related Tables: The Vendor Types table gives you a way to categorize vendors according
to the services they provide. For example, you might group your suppliers according to the
- 15 -
type of materials they supply and group your outside contractors according to the services
they provide.
Categorizing vendors in this way can speed the process of creating work orders and
purchase orders. For example, suppose you’re preparing a purchase order to restock your
supply of electrical materials. If you’ve created an “Electrical Supplier” category, you can
ask MainBoss to display only the vendors in that category when you want to choose a
vendor to fill the order. Instead of having to choose from your full list of vendors,
MainBoss will only show vendors in the correct category.
In this way, creating vendor types can simplify some of the things you do with MainBoss.
However, you can use all the features of MainBoss even if you do not define any vendor
types.
To see the Vendor Types table, select Tables Vendor Types from the menu.
The Contact Table
___________________________________________________________
Contact: Anyone you may need to contact in connection with your maintenance
work.
In particular, anyone who submits a work request is considered a contact.
___________________________________________________________
The Contacts table lets you record information about your contacts. To see or change the
table, select Tables Contacts from the menu. This opens the Contacts browser.
Clicking New opens the Contacts editor so you can enter information about new contacts.
The Personnel Table
___________________________________________________________
Personnel: Your organization’s maintenance staff.
This does not include any outside contractors who may be hired for certain
jobs. Outside contractors are considered vendors.
___________________________________________________________
The Personnel table lists information about each person in your maintenance staff,
including contact information and the rates charged per hour for each person’s work.
To record information about your personnel, select Work Orders Tables Personnel
from the menu. This opens the Personnel browser:
- 16 -
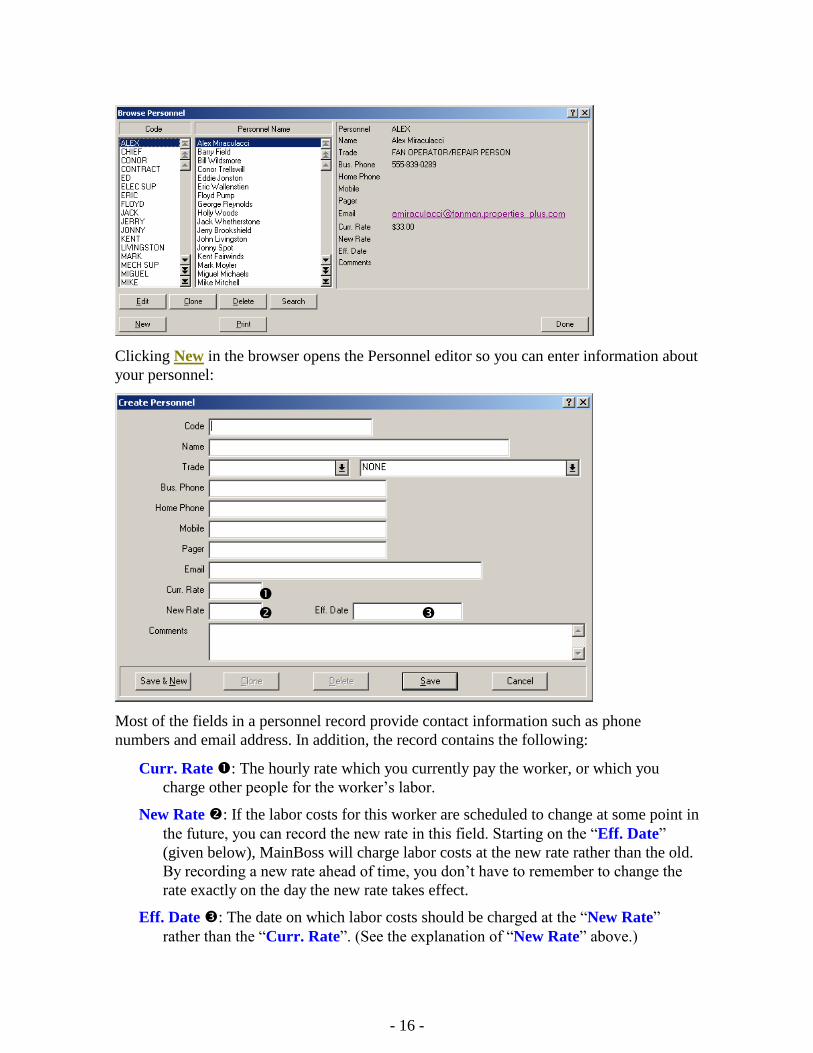
Clicking New in the browser opens the Personnel editor so you can enter information about
your personnel:
Most of the fields in a personnel record provide contact information such as phone
numbers and email address. In addition, the record contains the following:
Curr. Rate : The hourly rate which you currently pay the worker, or which you
charge other people for the worker’s labor.
New Rate : If the labor costs for this worker are scheduled to change at some point in
the future, you can record the new rate in this field. Starting on the “Eff. Date”
(given below), MainBoss will charge labor costs at the new rate rather than the old.
By recording a new rate ahead of time, you don’t have to remember to change the
rate exactly on the day the new rate takes effect.
Eff. Date : The date on which labor costs should be charged at the “New Rate”
rather than the “Curr. Rate”. (See the explanation of “New Rate” above.)
- 17 -
Related Tables: The Trades table gives you a way to categorize workers according to job
classifications. For example, you might group your personnel into mechanics, electricians,
engineers, and so on.
Categorizing workers in this way can speed the process of creating work orders. For
example, suppose you’re creating a work order to fix a mechanical problem, and you’re
assigning personnel to deal with the problem. You can tell MainBoss to change the list of
available personnel so that it only displays people in the Mechanics category. This makes
it faster to pick the worker you want from the list.
In this way, creating trade categories can simplify some of the things you do with
MainBoss. However, you can use all the features of MainBoss even if you do not define
any trade categories.
To see the Trades table, select Work Orders Tables Trades from the menu.
Work Information Tables
MainBoss has a number of tables which contain information related to the work that you
do.
___________________________________________________________
Priority: A code indicating the urgency of a job.
For example, you might create a set of priorities from “Urgent” to “Do
whenever time allows.” You can attach these priority codes to work orders
so that your personnel can tell which jobs need to be done first.
To define priority codes, select Work Orders Tables Priorities from
the menu.
___________________________________________________________
Access Code: A code indicating any restrictions on doing a job.
For example, you might have restrictions like “Only make repairs on this
equipment after 5:00 pm” or “Always get permission from supervisor before
shutting down machinery.” Codes like this can be attached to work orders
so that your personnel are informed about any special access conditions that
might apply to jobs.
To define access codes, select Work Orders Tables Access Codes
from the menu.
___________________________________________________________
- 18 -
___________________________________________________________
Project: A group of work orders related to a single goal.
For example, suppose you are renovating an area in one of your buildings.
You could define a Renovation project and mark all related work orders as
belonging to that project. This makes it easy to distinguish which jobs are
part of the renovation and which jobs are not.
By grouping jobs according to projects, you can get the “big picture” on
what your maintenance department is doing. Otherwise, you may end up
with a lot of individual work orders that make it hard to get an overview of
what’s going on.
To set up projects, select Work Orders Tables Projects from the
menu.
___________________________________________________________
Repair Closing Code:
A code used to summarize the nature of a repair.
Closing codes are a quick way to summarize the nature of the jobs you do.
For example, you might set up closing codes to indicate problems that were
due to electrical faults, equipment wear, accidental damage, vandalism, and
so on.
By adding closing codes to work orders, you can use MainBoss to give you
a picture on the overall nature of the jobs you do. For example, you can get
a report on all jobs that arose because of electrical faults. This may help you
notice patterns that indicate trends or underlying problems that need to be
addressed.
To define Repair Closing Codes, select Work Orders Tables Repair
Closing Codes from the menu.
___________________________________________________________
- 19 -
___________________________________________________________
Work Categories:
Codes used to classify the type of work done in a particular job.
For example, you might define categories like “electrical”, “plumbing”,
“heating/air-conditioning”, “vandalism repair”, and so on. You might define
additional categories for preventive maintenance jobs, such as “inspection”,
“routine maintenance”, and “major overhaul”.
Using work categories is another way to add extra information to your work
orders. This information can later be analyzed through MainBoss reports;
for example, by obtaining information about a “plumbing” category, you
can determine the exact labor and material costs associated with plumbing
problems in a particular building. This may help you make decisions about
budget allocations—for example, you can prove to upper management the
exact cost of plumbing problems, perhaps justifying major renovations
where the troubles are worst.
To define Work Categories, select Work Orders Tables Work
Categories from the menu.
___________________________________________________________
- 20 -
The Life Cycle of a Corrective Work Order
This chapter outlines the usual sequence of events in dealing with a problem report
received from outside the maintenance department.
Note: The sections in this chapter describe typical ways in which organizations use
MainBoss. However, almost everything here is optional; you can choose which MainBoss
features fit best with your methods of operation. For example, a MainBoss work order lets
you record advance estimates of the labor and materials for a job, plus the actual costs of
labor and materials once the job is finished. However, you don’t have to use these
facilities; if your organization doesn’t keep track of labor and/or materials on a per-job
basis, you can simply omit this information from your work orders.
Here are the steps you typically follow to handle a problem that is reported to your
maintenance department:
1. Create a work request (see Creating a Work Request on page 21). This is done by a
person who wants to report a problem or by the maintenance department staffer who
receives the problem report.
2. Create a work order based on the work request (see Creating a Work Order on page
23). This is usually done by someone in maintenance management.
3. Print off the work order and give it to the workers assigned to the task (see Printing
Work Orders on page 45).
4. Close off the work order when the work is actually completed (see Closing a Work
Order on page 49). This may be done by maintenance management or by the workers
who actually did the job.
- 21 -
At any point in the process, you can edit the results of previous stages. For example, when
you originally create a work order, you may not have enough information to estimate the
expected labor and material costs. When you do get this information, you can go back and
add it to the work order. You can even modify a work order after it’s closed, if you get
additional information or discover that you made a mistake.
Creating a Work Request
The first step in responding to a problem is to create a work request. The work request
summarizes basic information about the problem: what the problem is, which piece of
equipment or space is involved, who reported the problem, and so on.
MainBoss @Requests: MainBoss @Requests is an add-on package that lets people in
your organization submit requests by e-mail. These e-mail messages are automatically
converted into work requests, thereby saving you the time and trouble of creating requests
by hand. For more information, e-mail [email protected].
To create a new work request, select Requests Open Request from the menu. This
opens a window where you can enter information about the problem:
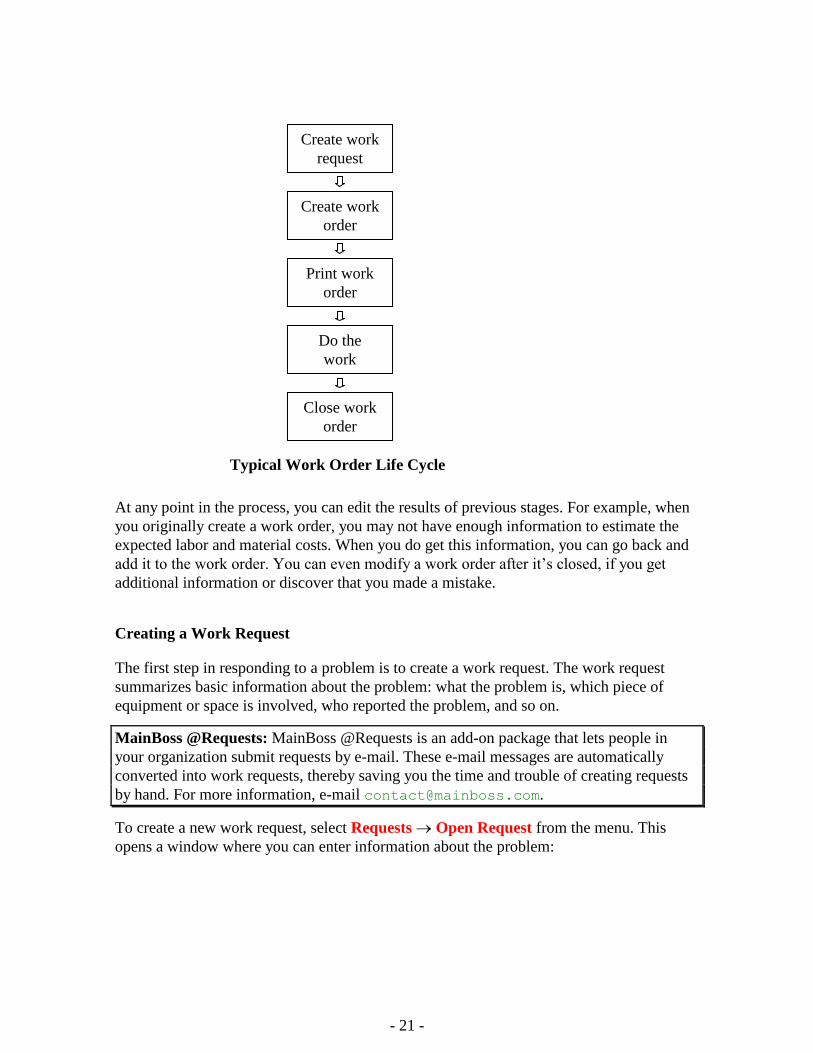
Create work
request
Create work
order
Print work
order
Do the
work
Close work
order
Typical Work Order Life Cycle
- 22 -
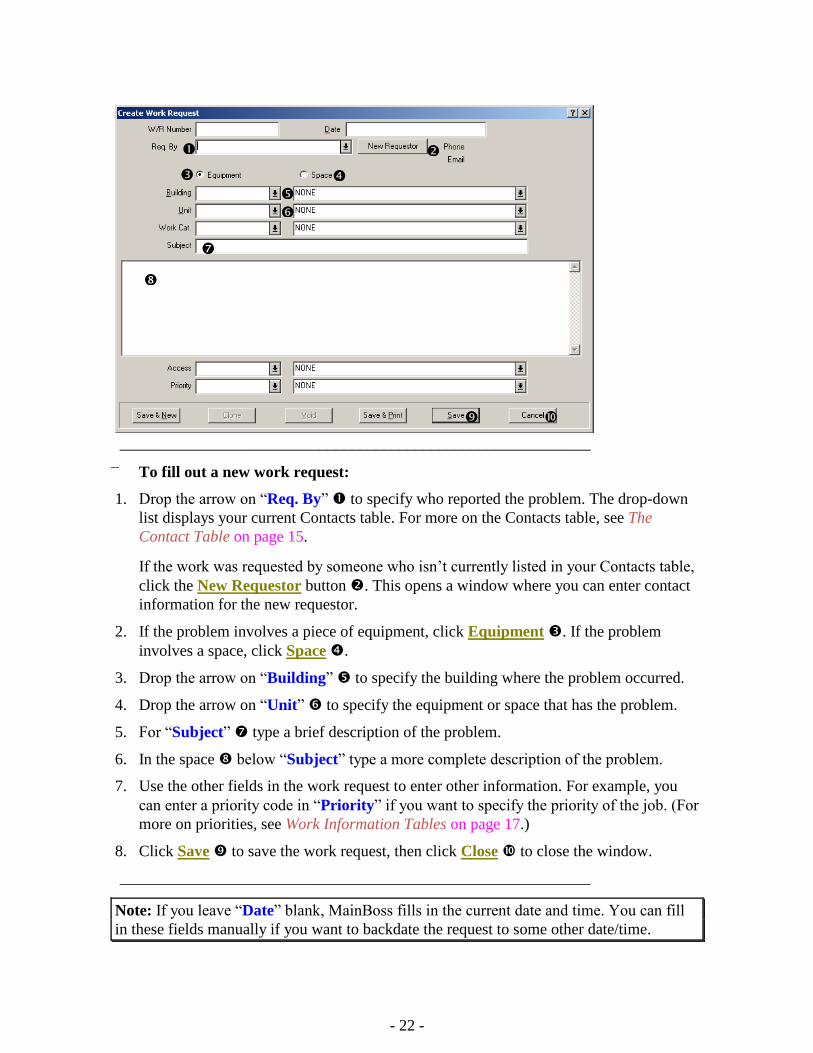
___________________________________________________________
To fill out a new work request:
1. Drop the arrow on “Req. By” to specify who reported the problem. The drop-down
list displays your current Contacts table. For more on the Contacts table, see The
Contact Table on page 15.
If the work was requested by someone who isn’t currently listed in your Contacts table,
click the New Requestor button . This opens a window where you can enter contact
information for the new requestor.
2. If the problem involves a piece of equipment, click Equipment . If the problem
involves a space, click Space .
3. Drop the arrow on “Building” to specify the building where the problem occurred.
4. Drop the arrow on “Unit” to specify the equipment or space that has the problem.
5. For “Subject” type a brief description of the problem.
6. In the space below “Subject” type a more complete description of the problem.
7. Use the other fields in the work request to enter other information. For example, you
can enter a priority code in “Priority” if you want to specify the priority of the job. (For
more on priorities, see Work Information Tables on page 17.)
8. Click Save to save the work request, then click Close to close the window.
___________________________________________________________
Note: If you leave “Date” blank, MainBoss fills in the current date and time. You can fill
in these fields manually if you want to backdate the request to some other date/time.
- 23 -
Once you have created a work request, you can print it using the Save & Print button. For
more information, see the online help.
MainBoss @Requests
If your organization has licensed MainBoss @Requests as an add-on to the normal
MainBoss package, users can submit requests by email.
The process is simple. People who are authorized to submit requests send email to a
designated address inside your organization. The MainBoss @Requests software watches
for any messages that arrive at that email address. When a message arrives, the @Requests
software automatically creates a work request using information from the message. The
work request is placed into your normal MainBoss database where it can then be processed
into a work order.
Creating a Work Order
The next step in the life cycle of a work order is to create a preliminary work order.
Usually, work orders are created by starting from from an existing work request. However,
you can also create a work order “from scratch” without having a work request to start
with.
A preliminary work order may contain any or all of the following information:
priority of the job
date/time the job should be done
personnel assigned to do the job (possibly including labor costs based on the
workers’ wages)
length of time the job is expected to take
materials expected to be needed for the job
a detailed description of the work to be performed
Associated Purchase Orders: A work order may involve labor done by an outside
contractor. For example, you might have a job where some of the work can be done by
your own personnel and some of the work must be done by a licensed electrician from
outside your organization.
In this case, MainBoss makes it easy for you to create a purchase order covering the cost of
the hired contractor. The purchase order can also include the cost of any materials supplied
by the contractor. Associating a purchase order with a work order makes it easier to keep
track of costs and to identify what the outside contractor actually did for you.
In addition to materials and labor costs, a purchase order may contain extra charges
(usually just called extras). For example, a contractor might charge you a standard hourly
- 24 -
rate, plus a surcharge for working at night or on weekends. Contractors may also charge
handling fees, service taxes, etc. Such extras may also be included in the purchase order.
Starting a New Work Order
There are two ways to begin creating a new work order: starting from an existing work
request, or making the work order from scratch.
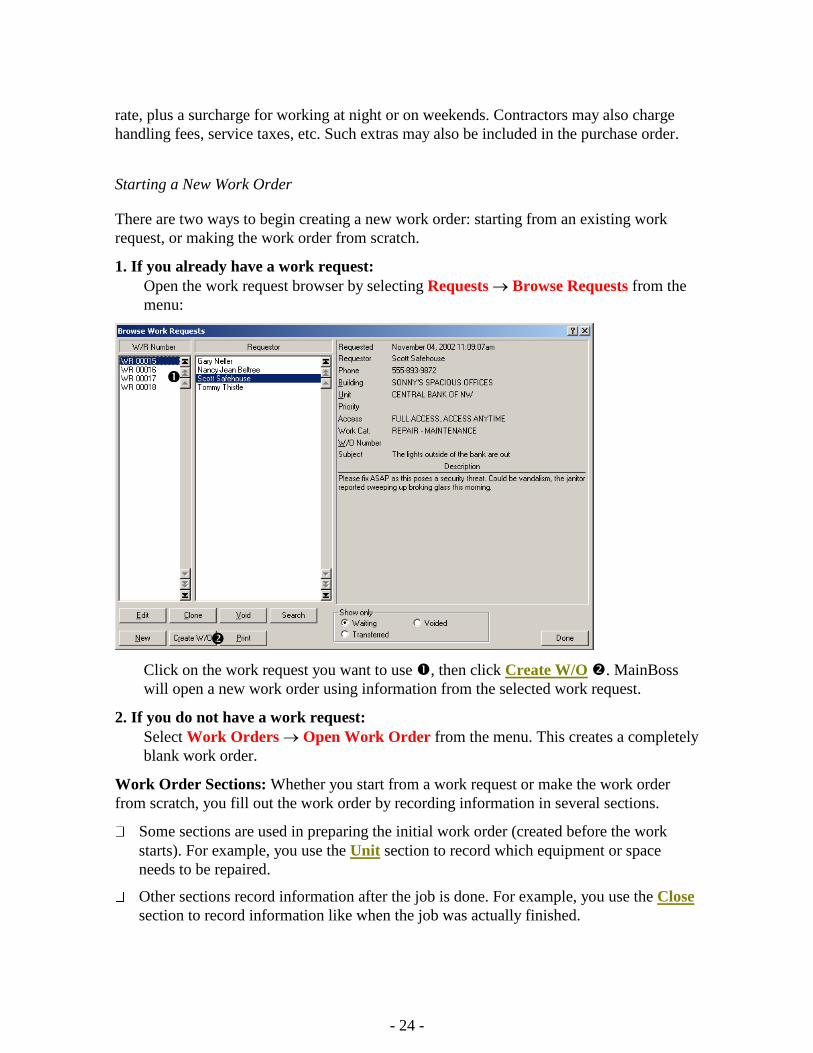
1. If you already have a work request:
Open the work request browser by selecting Requests Browse Requests from the
menu:
Click on the work request you want to use , then click Create W/O . MainBoss
will open a new work order using information from the selected work request.
2. If you do not have a work request:
Select Work Orders Open Work Order from the menu. This creates a completely
blank work order.
Work Order Sections: Whether you start from a work request or make the work order
from scratch, you fill out the work order by recording information in several sections.
Some sections are used in preparing the initial work order (created before the work
starts). For example, you use the Unit section to record which equipment or space
needs to be repaired.
Other sections record information after the job is done. For example, you use the Close
section to record information like when the job was actually finished.
- 25 -
Some sections are used both before and after the job. For example, you use the Labor
section before the job to estimate how much time personnel will spend on the work.
You use the same section after the job to record how much time the workers actually
spent.
When creating a work order, you can fill out the sections in any order. However, you may
find it helpful to use the following sequence:
___________________________________________________________
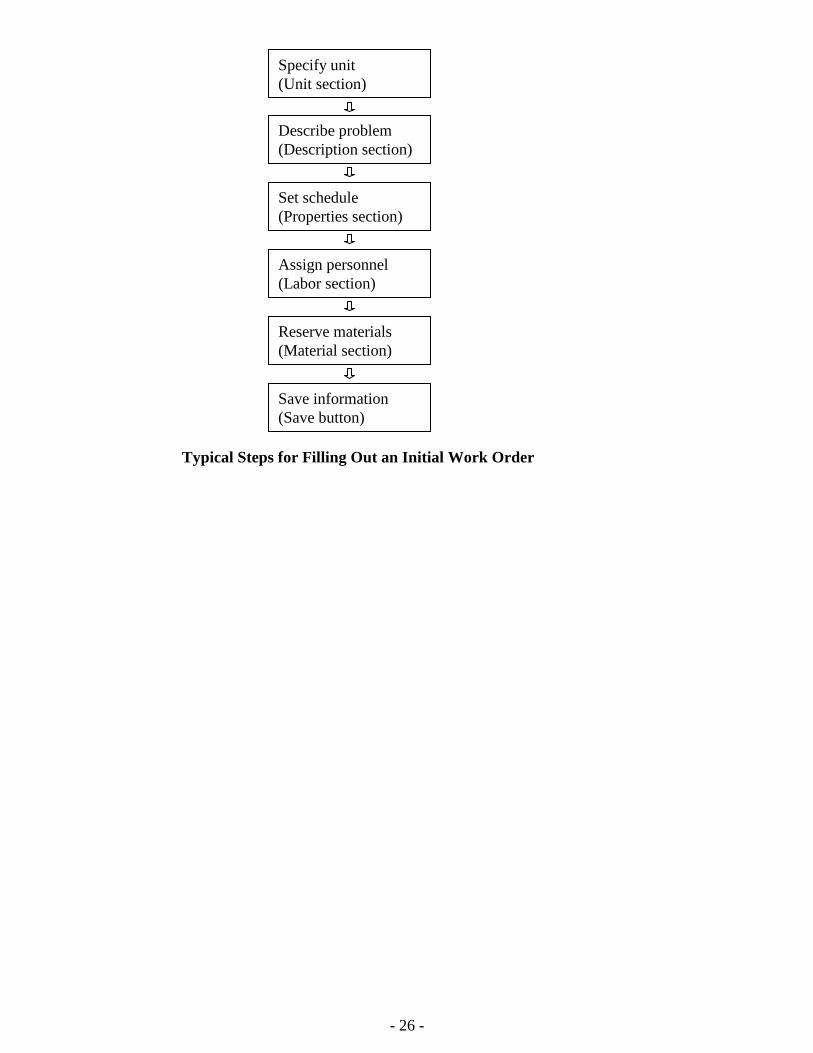
To fill out an initial work order (before the job):
1. Fill out the Unit section to specify which equipment or space needs to be repaired. (See
Specifying Units for a Work Order on page 27).
2. Fill out the Description section to describe what should be done. (See Specifying a
Problem Description on page 28.)
3. Fill out the Properties section to specify when the job should start and when you
expect it to end, plus other relevant details. (See Specifying Work Order Properties on
page 29.)
4. Fill out the Labor section to assign personnel to the job and to estimate how long each
person will spend on the work. (See Assigning Personnel to a Work Order on page 30.)
5. Fill out the Material section to reserve any spare parts or other materials that you
expect the job will need. (See Reserving Materials for a Work Order on page 34.)
6. Save all the information you have recorded. (See Saving an Initial Work Order on page
43.)
___________________________________________________________
- 26 -
Specify unit
(Unit section)
Typical Steps for Filling Out an Initial Work Order
Describe problem
(Description section)
Set schedule
(Properties section)
Assign personnel
(Labor section)
Reserve materials
(Material section)
Save information
(Save button)
- 27 -
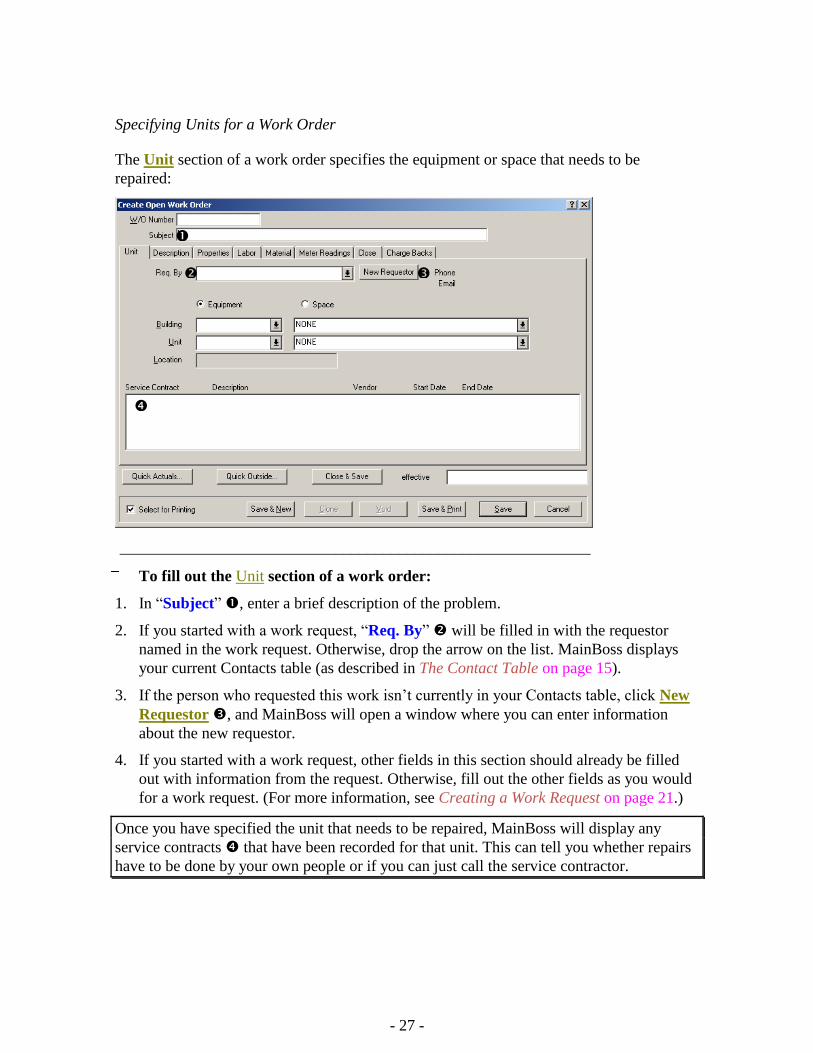
Specifying Units for a Work Order
The Unit section of a work order specifies the equipment or space that needs to be
repaired:
___________________________________________________________
To fill out the Unit section of a work order:
1. In “Subject” , enter a brief description of the problem.
2. If you started with a work request, “Req. By” will be filled in with the requestor
named in the work request. Otherwise, drop the arrow on the list. MainBoss displays
your current Contacts table (as described in The Contact Table on page 15).
3. If the person who requested this work isn’t currently in your Contacts table, click New
Requestor , and MainBoss will open a window where you can enter information
about the new requestor.
4. If you started with a work request, other fields in this section should already be filled
out with information from the request. Otherwise, fill out the other fields as you would
for a work request. (For more information, see Creating a Work Request on page 21.)
Once you have specified the unit that needs to be repaired, MainBoss will display any
service contracts that have been recorded for that unit. This can tell you whether repairs
have to be done by your own people or if you can just call the service contractor.
- 28 -
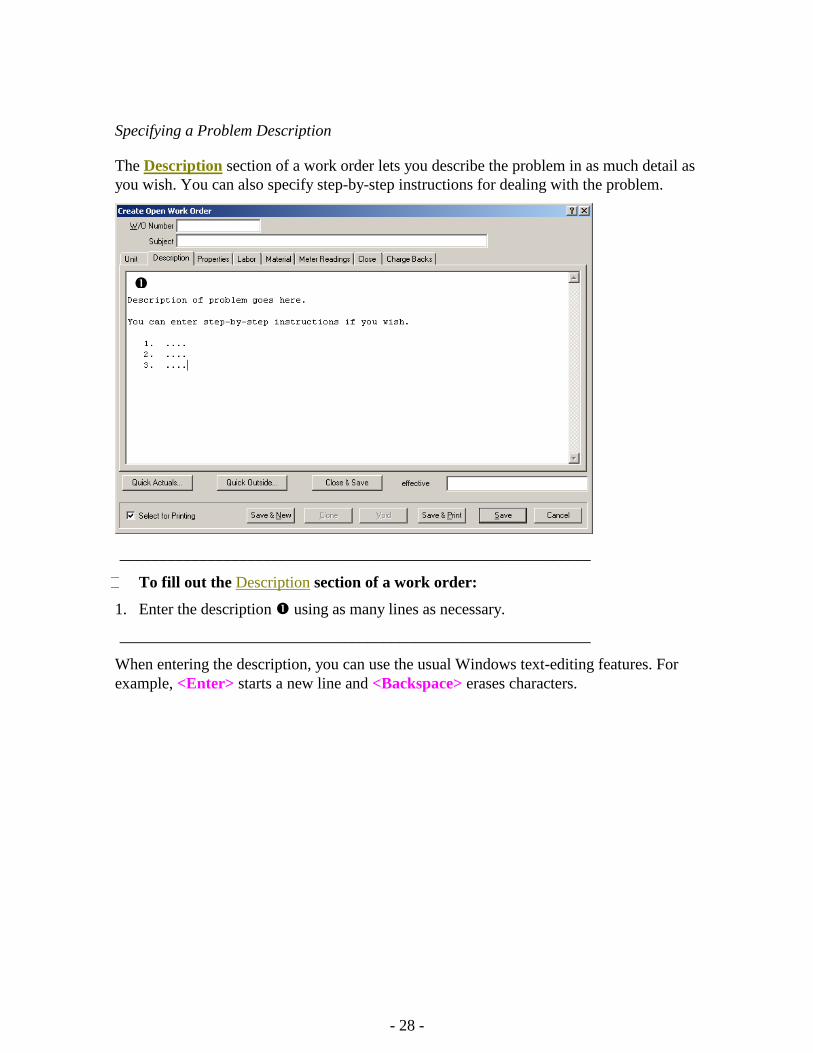
Specifying a Problem Description
The Description section of a work order lets you describe the problem in as much detail as
you wish. You can also specify step-by-step instructions for dealing with the problem.
___________________________________________________________
To fill out the Description section of a work order:
1. Enter the description using as many lines as necessary.
___________________________________________________________
When entering the description, you can use the usual Windows text-editing features. For
example, <Enter> starts a new line and <Backspace> erases characters.
- 29 -
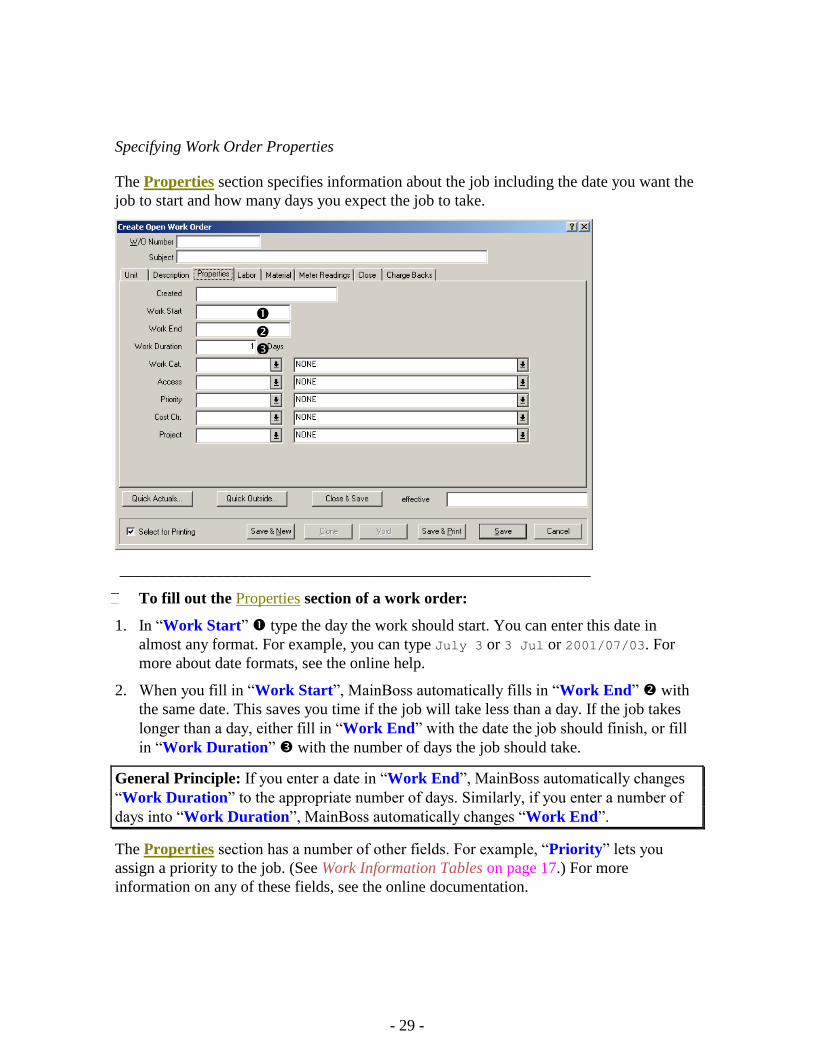
Specifying Work Order Properties
The Properties section specifies information about the job including the date you want the
job to start and how many days you expect the job to take.
___________________________________________________________
To fill out the Properties section of a work order:
1. In “Work Start” type the day the work should start. You can enter this date in
almost any format. For example, you can type July 3 or 3 Jul or 2001/07/03. For
more about date formats, see the online help.
2. When you fill in “Work Start”, MainBoss automatically fills in “Work End” with
the same date. This saves you time if the job will take less than a day. If the job takes
longer than a day, either fill in “Work End” with the date the job should finish, or fill
in “Work Duration” with the number of days the job should take.
General Principle: If you enter a date in “Work End”, MainBoss automatically changes
“Work Duration” to the appropriate number of days. Similarly, if you enter a number of
days into “Work Duration”, MainBoss automatically changes “Work End”.
The Properties section has a number of other fields. For example, “Priority” lets you
assign a priority to the job. (See Work Information Tables on page 17.) For more
information on any of these fields, see the online documentation.
- 30 -
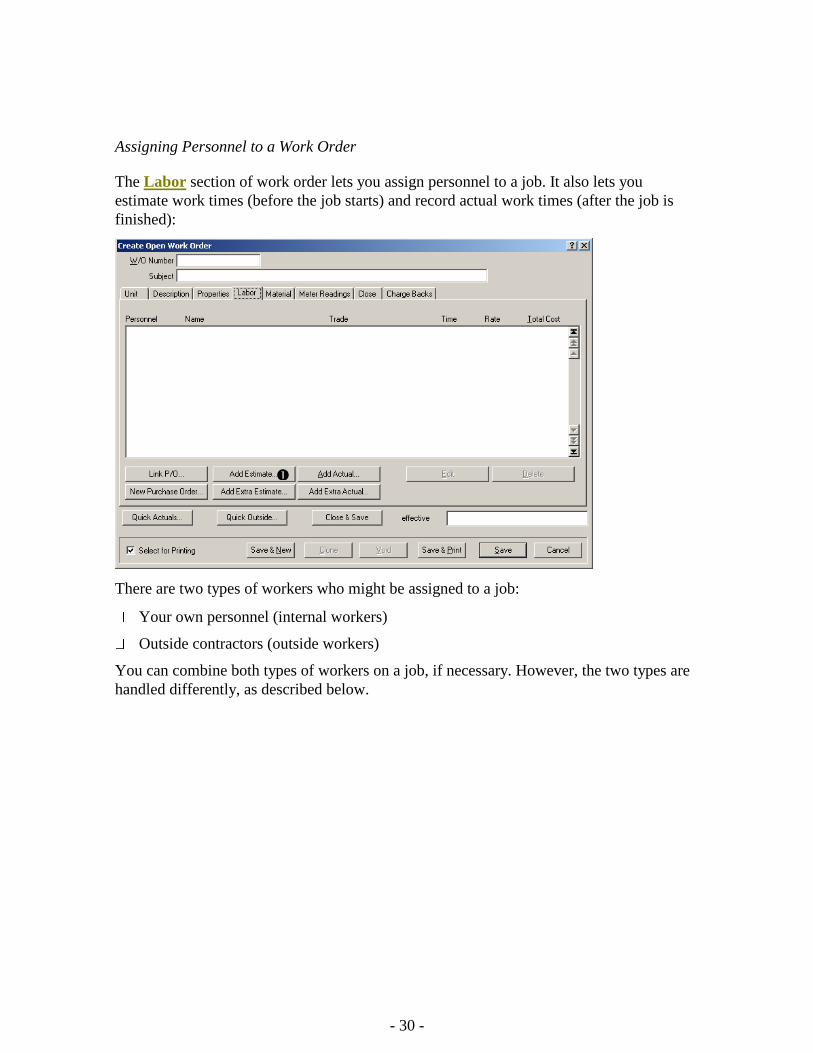
Assigning Personnel to a Work Order
The Labor section of work order lets you assign personnel to a job. It also lets you
estimate work times (before the job starts) and record actual work times (after the job is
finished):
There are two types of workers who might be assigned to a job:
Your own personnel (internal workers)
Outside contractors (outside workers)
You can combine both types of workers on a job, if necessary. However, the two types are
handled differently, as described below.
- 31 -
___________________________________________________________
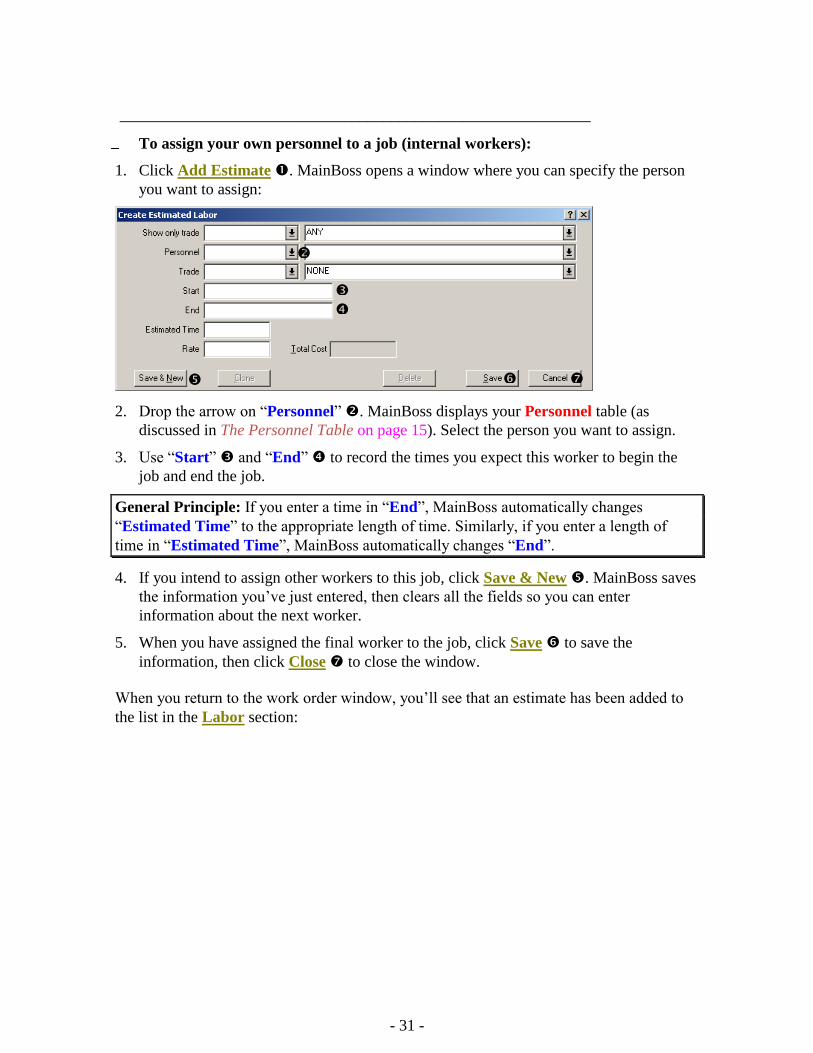
To assign your own personnel to a job (internal workers):
1. Click Add Estimate . MainBoss opens a window where you can specify the person
you want to assign:
2. Drop the arrow on “Personnel” . MainBoss displays your Personnel table (as
discussed in The Personnel Table on page 15). Select the person you want to assign.
3. Use “Start” and “End” to record the times you expect this worker to begin the
job and end the job.
General Principle: If you enter a time in “End”, MainBoss automatically changes
“Estimated Time” to the appropriate length of time. Similarly, if you enter a length of
time in “Estimated Time”, MainBoss automatically changes “End”.
4. If you intend to assign other workers to this job, click Save & New . MainBoss saves
the information you’ve just entered, then clears all the fields so you can enter
information about the next worker.
5. When you have assigned the final worker to the job, click Save to save the
information, then click Close to close the window.
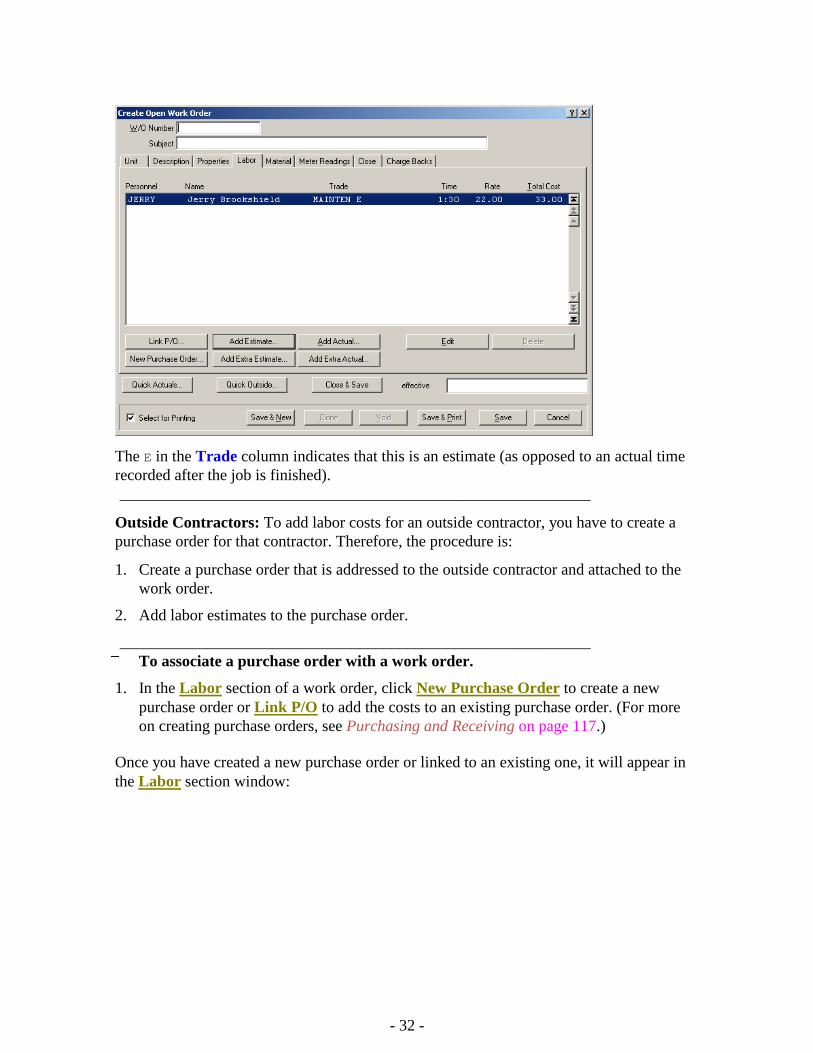
When you return to the work order window, you’ll see that an estimate has been added to
the list in the Labor section:
- 32 -
The E in the Trade column indicates that this is an estimate (as opposed to an actual time
recorded after the job is finished).
___________________________________________________________
Outside Contractors: To add labor costs for an outside contractor, you have to create a
purchase order for that contractor. Therefore, the procedure is:
1. Create a purchase order that is addressed to the outside contractor and attached to the
work order.
2. Add labor estimates to the purchase order.
___________________________________________________________
To associate a purchase order with a work order.
1. In the Labor section of a work order, click New Purchase Order to create a new
purchase order or Link P/O to add the costs to an existing purchase order. (For more
on creating purchase orders, see Purchasing and Receiving on page 117.)
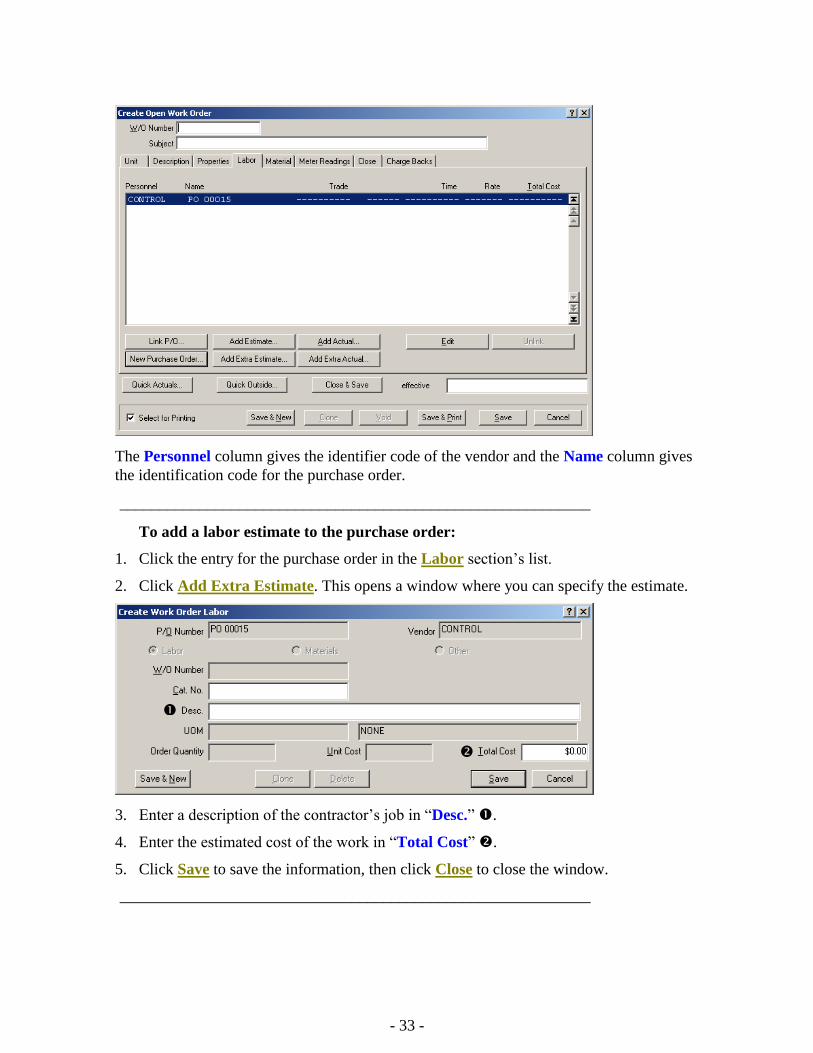
Once you have created a new purchase order or linked to an existing one, it will appear in
the Labor section window:
- 33 -
The Personnel column gives the identifier code of the vendor and the Name column gives
the identification code for the purchase order.
___________________________________________________________
To add a labor estimate to the purchase order:
1. Click the entry for the purchase order in the Labor section’s list.
2. Click Add Extra Estimate. This opens a window where you can specify the estimate.
3. Enter a description of the contractor’s job in “Desc.” .
4. Enter the estimated cost of the work in “Total Cost” .
5. Click Save to save the information, then click Close to close the window.
___________________________________________________________
- 34 -
When you return to the work order window, you’ll see there’s a new line below the
purchase order, showing the cost estimate you’ve entered.
Note: The labor cost will be added to the purchase order as an extra.
Reserving Materials for a Work Order
When you assign materials to a work order before the work is done, you estimate what
materials you believe the work is likely to require. The materials you specify are then put
on reserve. For example, if a job on a forklift truck will replace certain engine belts, you
can put an appropriate number of belts on reserve when you make up the work order.
Note: In order to reserve materials for a work order, you must set up MainBoss’s inventory
table. This table records the materials you use in your work. For more information, see
Describing Inventory Items on page 101.
For the purposes of reordering inventory, stock levels do not include any materials that
have been put on reserve. For example, if you currently have six fan belts in a storeroom
but two of those belts have been put on reserve, your stock level is reported to be four fan
belts with two more on reserve. If the reorder point for this type of item is five belts,
MainBoss will recommend that you should order more of the belts, even though you
actually have six belts on the shelf—the belts put on reserve are not included in the stock
level because they are already spoken for.
After a job is done, you should go back to the work order and enter the actual materials
used. MainBoss adjusts inventory levels accordingly—items that were initially put on
reserve are marked as used, or taken off reserve if it turns out the materials weren’t needed
after all. For more on recording the actual use of materials, see Closing a Work Order on
page 49.
You record materials estimates in the Material section of a work order:
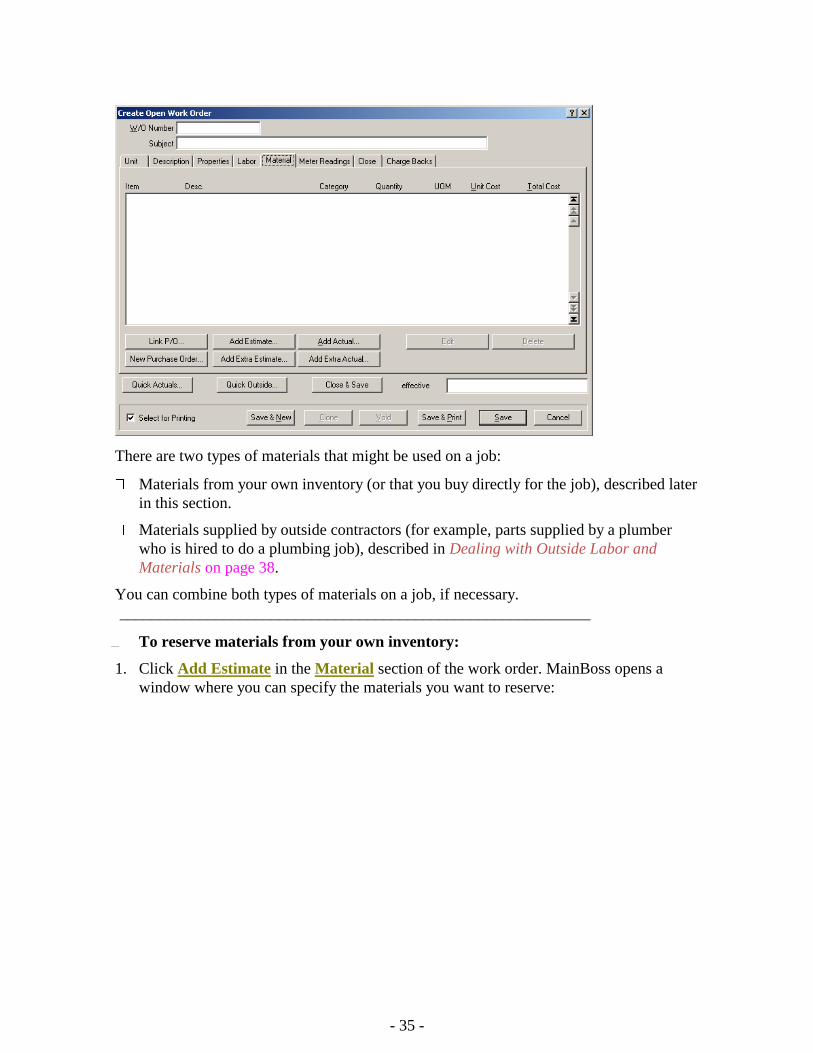
- 35 -
There are two types of materials that might be used on a job:
Materials from your own inventory (or that you buy directly for the job), described later
in this section.
Materials supplied by outside contractors (for example, parts supplied by a plumber
who is hired to do a plumbing job), described in Dealing with Outside Labor and
Materials on page 38.
You can combine both types of materials on a job, if necessary.
___________________________________________________________
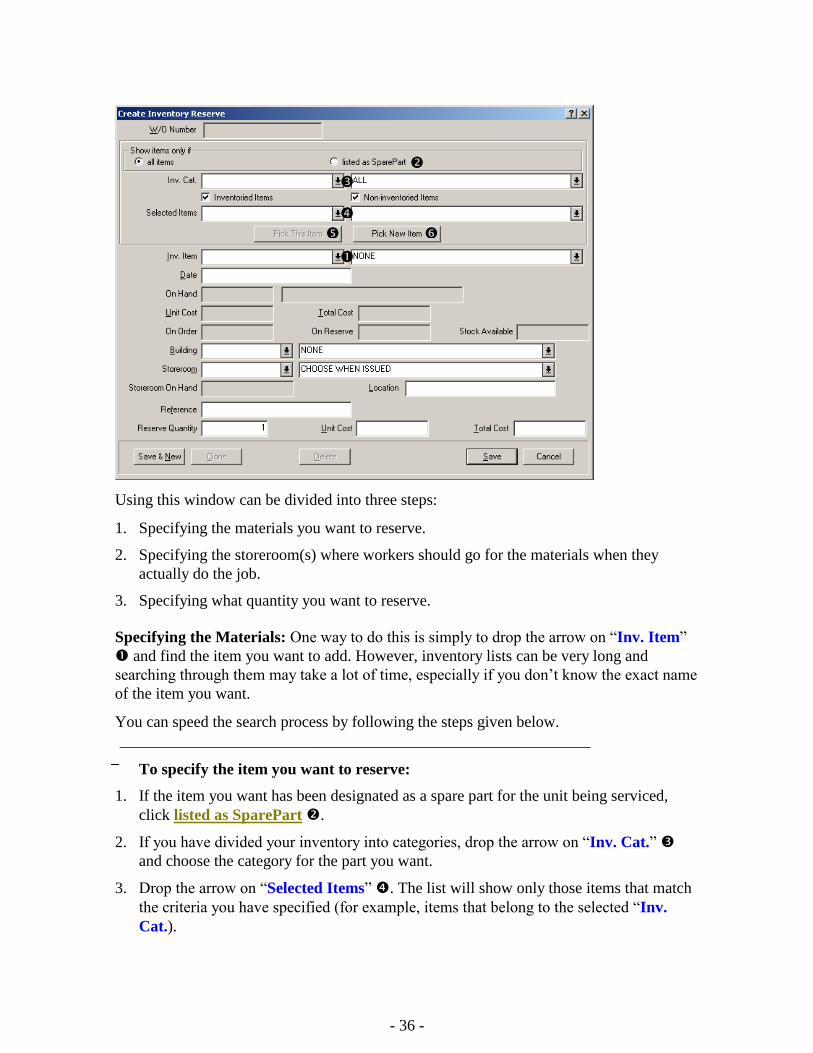
To reserve materials from your own inventory:
1. Click Add Estimate in the Material section of the work order. MainBoss opens a
window where you can specify the materials you want to reserve:
- 36 -
Using this window can be divided into three steps:
1. Specifying the materials you want to reserve.
2. Specifying the storeroom(s) where workers should go for the materials when they
actually do the job.
3. Specifying what quantity you want to reserve.
Specifying the Materials: One way to do this is simply to drop the arrow on “Inv. Item”
and find the item you want to add. However, inventory lists can be very long and
searching through them may take a lot of time, especially if you don’t know the exact name
of the item you want.
You can speed the search process by following the steps given below.
___________________________________________________________
To specify the item you want to reserve:
1. If the item you want has been designated as a spare part for the unit being serviced,
click listed as SparePart .
2. If you have divided your inventory into categories, drop the arrow on “Inv. Cat.”
and choose the category for the part you want.
3. Drop the arrow on “Selected Items” . The list will show only those items that match
the criteria you have specified (for example, items that belong to the selected “Inv.
Cat.).
- 37 -
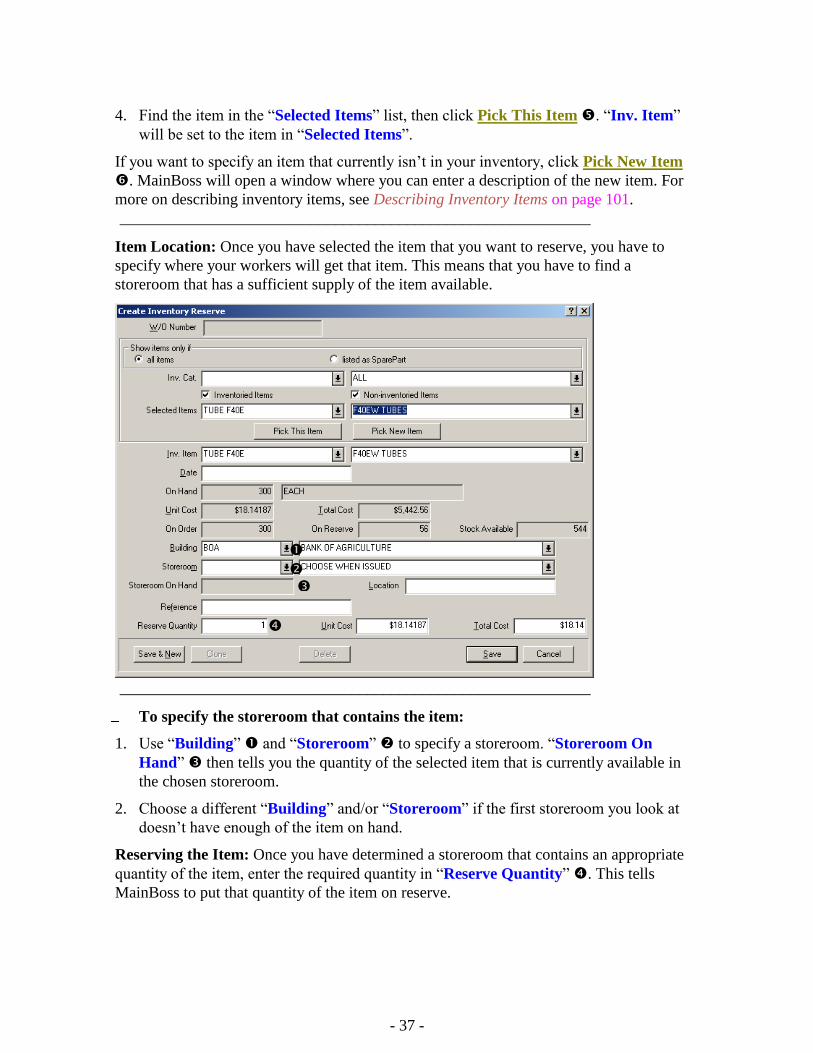
4. Find the item in the “Selected Items” list, then click Pick This Item . “Inv. Item”
will be set to the item in “Selected Items”.
If you want to specify an item that currently isn’t in your inventory, click Pick New Item
. MainBoss will open a window where you can enter a description of the new item. For
more on describing inventory items, see Describing Inventory Items on page 101.
___________________________________________________________
Item Location: Once you have selected the item that you want to reserve, you have to
specify where your workers will get that item. This means that you have to find a
storeroom that has a sufficient supply of the item available.
___________________________________________________________
To specify the storeroom that contains the item:
1. Use “Building” and “Storeroom” to specify a storeroom. “Storeroom On
Hand” then tells you the quantity of the selected item that is currently available in
the chosen storeroom.
2. Choose a different “Building” and/or “Storeroom” if the first storeroom you look at
doesn’t have enough of the item on hand.
Reserving the Item: Once you have determined a storeroom that contains an appropriate
quantity of the item, enter the required quantity in “Reserve Quantity” . This tells
MainBoss to put that quantity of the item on reserve.
- 38 -
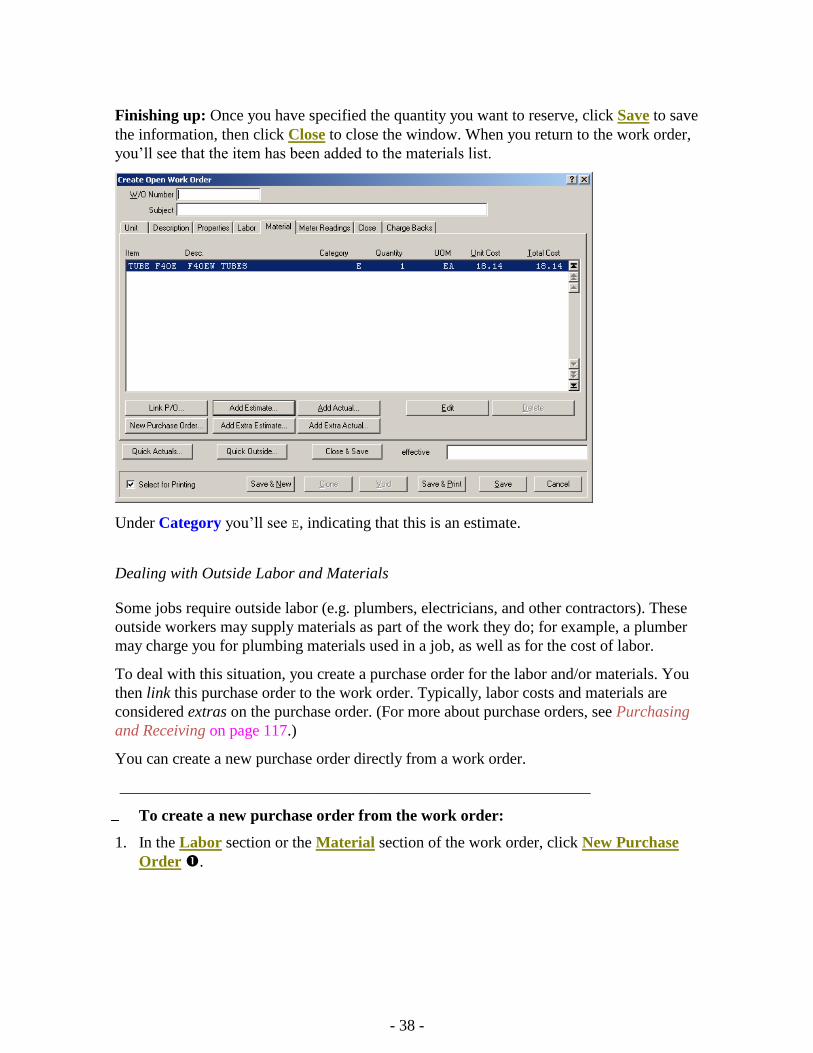
Finishing up: Once you have specified the quantity you want to reserve, click Save to save
the information, then click Close to close the window. When you return to the work order,
you’ll see that the item has been added to the materials list.
Under Category you’ll see E, indicating that this is an estimate.
Dealing with Outside Labor and Materials
Some jobs require outside labor (e.g. plumbers, electricians, and other contractors). These
outside workers may supply materials as part of the work they do; for example, a plumber
may charge you for plumbing materials used in a job, as well as for the cost of labor.
To deal with this situation, you create a purchase order for the labor and/or materials. You
then link this purchase order to the work order. Typically, labor costs and materials are
considered extras on the purchase order. (For more about purchase orders, see Purchasing
and Receiving on page 117.)
You can create a new purchase order directly from a work order.
___________________________________________________________
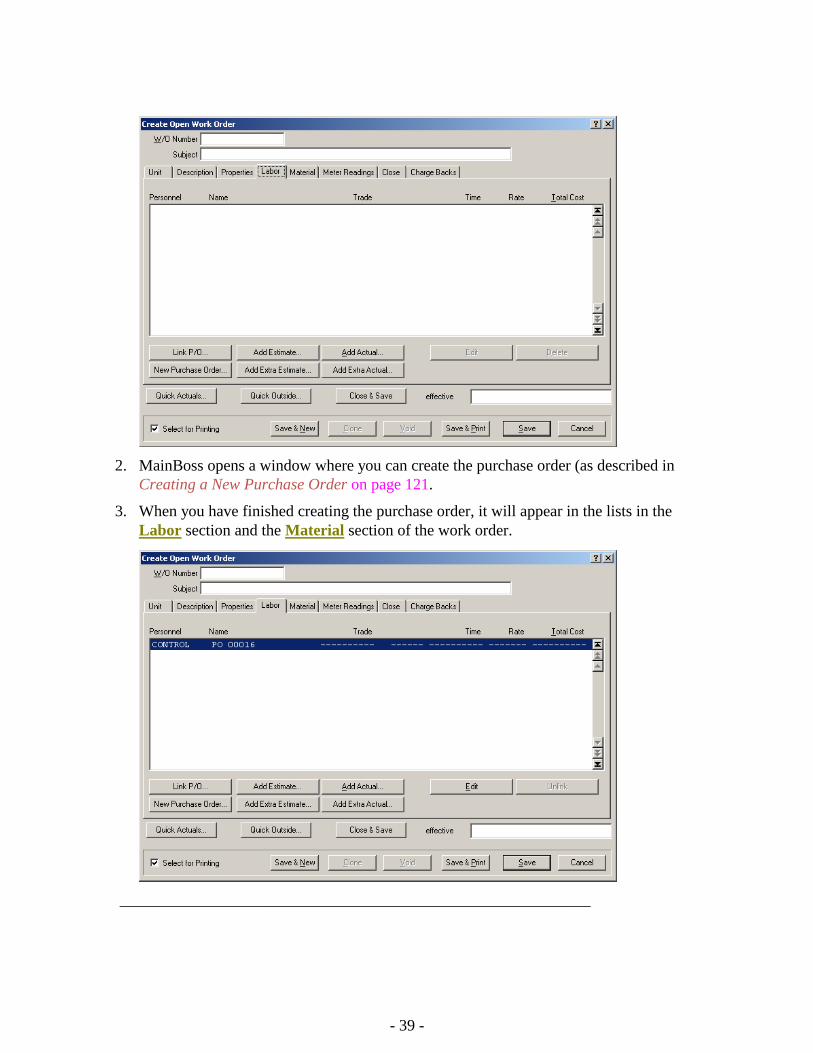
To create a new purchase order from the work order:
1. In the Labor section or the Material section of the work order, click New Purchase
Order .
- 39 -
2. MainBoss opens a window where you can create the purchase order (as described in
Creating a New Purchase Order on page 121.
3. When you have finished creating the purchase order, it will appear in the lists in the
Labor section and the Material section of the work order.
___________________________________________________________
- 40 -
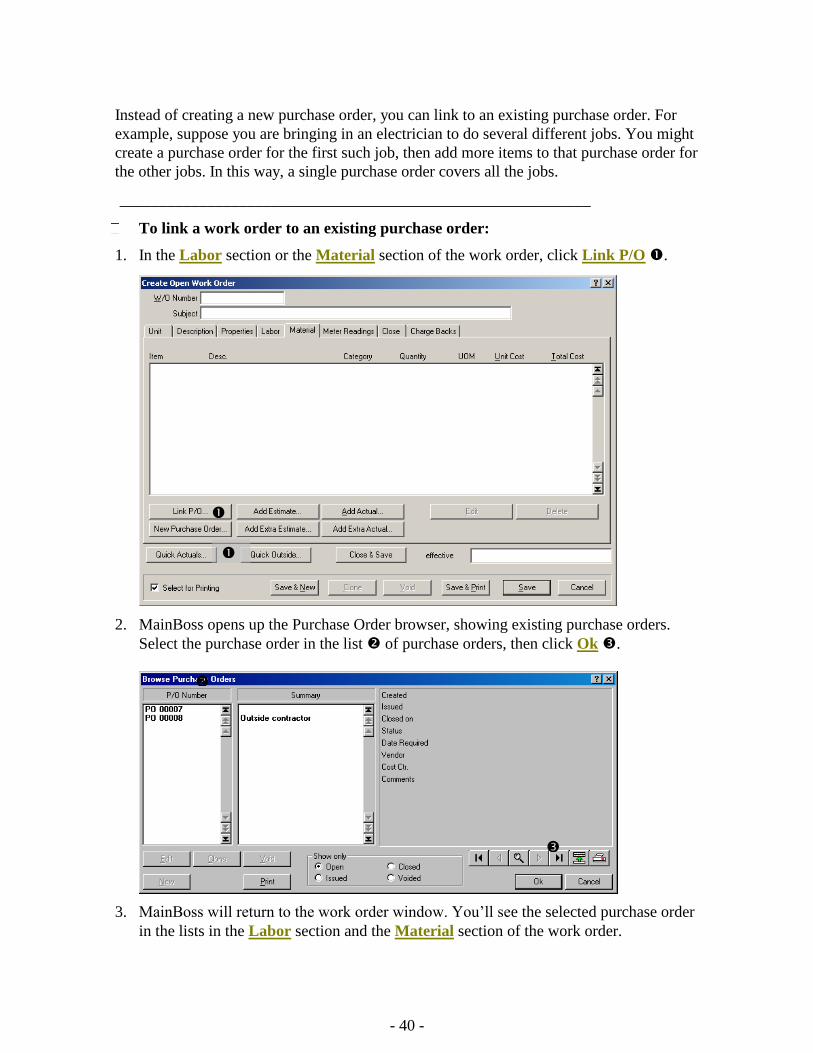
Instead of creating a new purchase order, you can link to an existing purchase order. For
example, suppose you are bringing in an electrician to do several different jobs. You might
create a purchase order for the first such job, then add more items to that purchase order for
the other jobs. In this way, a single purchase order covers all the jobs.
___________________________________________________________
To link a work order to an existing purchase order:
1. In the Labor section or the Material section of the work order, click Link P/O .
2. MainBoss opens up the Purchase Order browser, showing existing purchase orders.
Select the purchase order in the list of purchase orders, then click Ok .
3. MainBoss will return to the work order window. You’ll see the selected purchase order
in the lists in the Labor section and the Material section of the work order.
- 41 -
___________________________________________________________
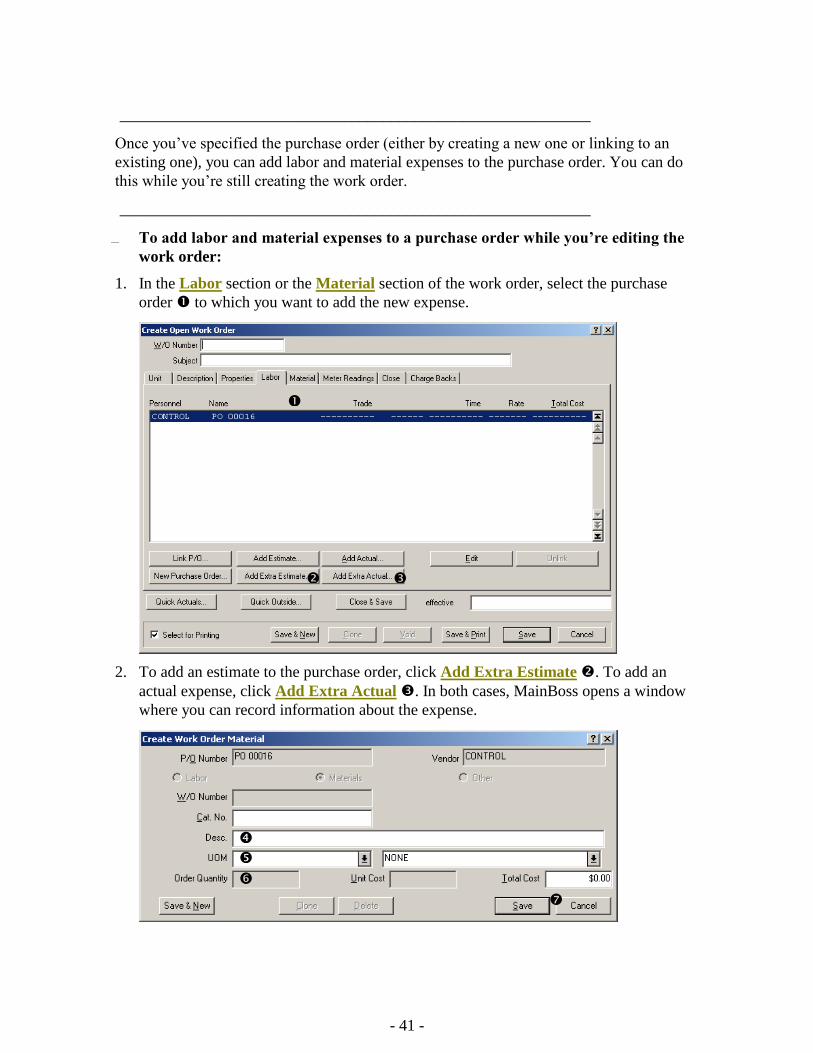
Once you’ve specified the purchase order (either by creating a new one or linking to an
existing one), you can add labor and material expenses to the purchase order. You can do
this while you’re still creating the work order.
___________________________________________________________
To add labor and material expenses to a purchase order while you’re editing the
work order:
1. In the Labor section or the Material section of the work order, select the purchase
order to which you want to add the new expense.
2. To add an estimate to the purchase order, click Add Extra Estimate . To add an
actual expense, click Add Extra Actual . In both cases, MainBoss opens a window
where you can record information about the expense.

- 42 -
3. In “Cat. No.” , enter any reference number assigned by the outside contractor (e.g.
the contractor’s identification number for a particular type of material).
4. In “Desc.” , enter a description of the labor or materials.
5. In “UOM” , enter a unit of measure. (This is only relevant for materials expenses,
not labor.)
6. In “Total Cost” , enter the total cost of the labor or materials.
7. Click Save to save the information you’ve just entered, then click Close to close the
window.
8. When you return to the work order, you’ll see that the expense has been recorded in the
expense list.
___________________________________________________________
Expenses entered in this way are recorded as “extras” in the purchase order. For an
explanation of “extras”, see the discussion of purchase orders in Purchase Order Extras on
page 127.
You can also add items to the purchase order by editing the purchase order directly. To do
this, double-click on the purchase order in the lists in the Labor section or the Material
section of the work order. MainBoss will open a window that lets you edit the purchase
order, using the facilities described in Creating a New Purchase Order on page 121.
- 43 -
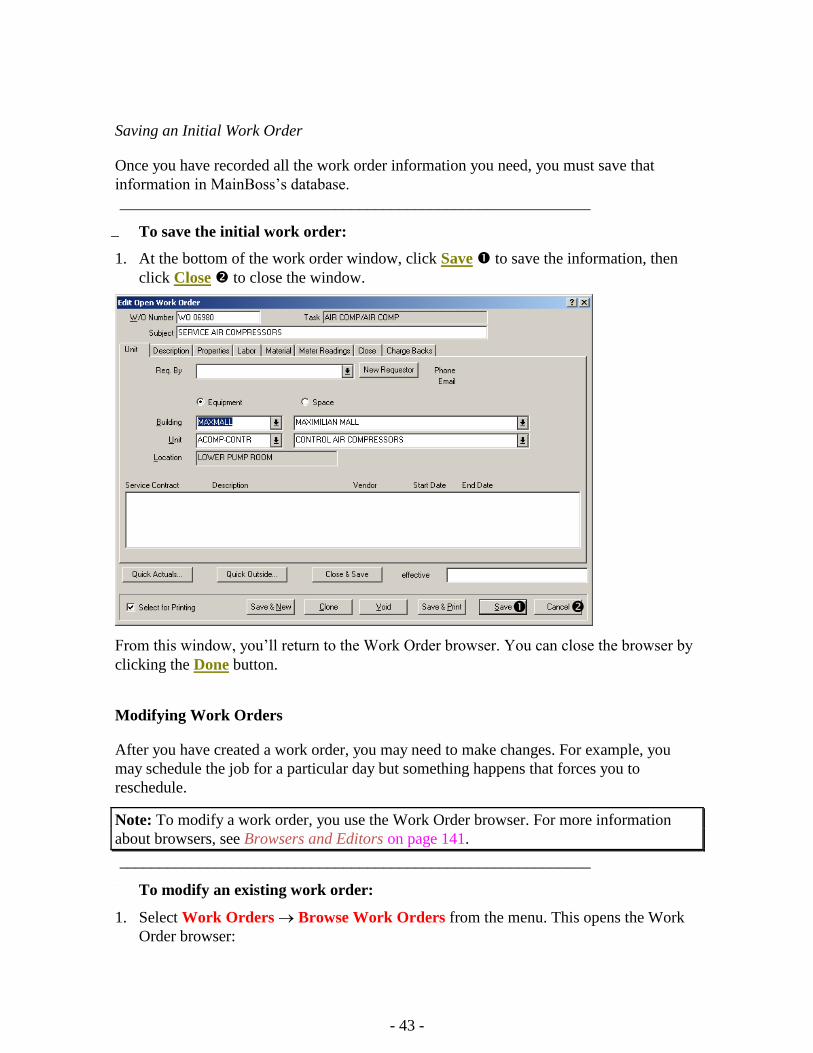
Saving an Initial Work Order
Once you have recorded all the work order information you need, you must save that
information in MainBoss’s database.
___________________________________________________________
To save the initial work order:
1. At the bottom of the work order window, click Save to save the information, then
click Close to close the window.
From this window, you’ll return to the Work Order browser. You can close the browser by
clicking the Done button.
Modifying Work Orders
After you have created a work order, you may need to make changes. For example, you
may schedule the job for a particular day but something happens that forces you to
reschedule.
Note: To modify a work order, you use the Work Order browser. For more information
about browsers, see Browsers and Editors on page 141.
___________________________________________________________
To modify an existing work order:
1. Select Work Orders Browse Work Orders from the menu. This opens the Work
Order browser:

- 44 -
2. By default, the browser shows open work orders. If you want to modify a work order
that you’ve already closed, click Closed . If you want to modify a work order that
you’ve voided (canceled), click Voided . The browser will change to list either
closed or voided work orders.
3. In the list of work orders , find the work order you want to change. Click that work
order to select it.
4. Either double-click the work order where it appears in the list, or click Edit .
5. MainBoss will open a window showing all the information you have previously
recorded about the work order. Make any changes you want, then click Save. This
saves the new information, replacing the old information. After you have saved, click
Close to close the work order window.
___________________________________________________________
Cancelling Work Orders
You can cancel a work order at any time. To do so, select Work Orders Browse Work
Orders from the menu. This opens the work order browser.
- 45 -
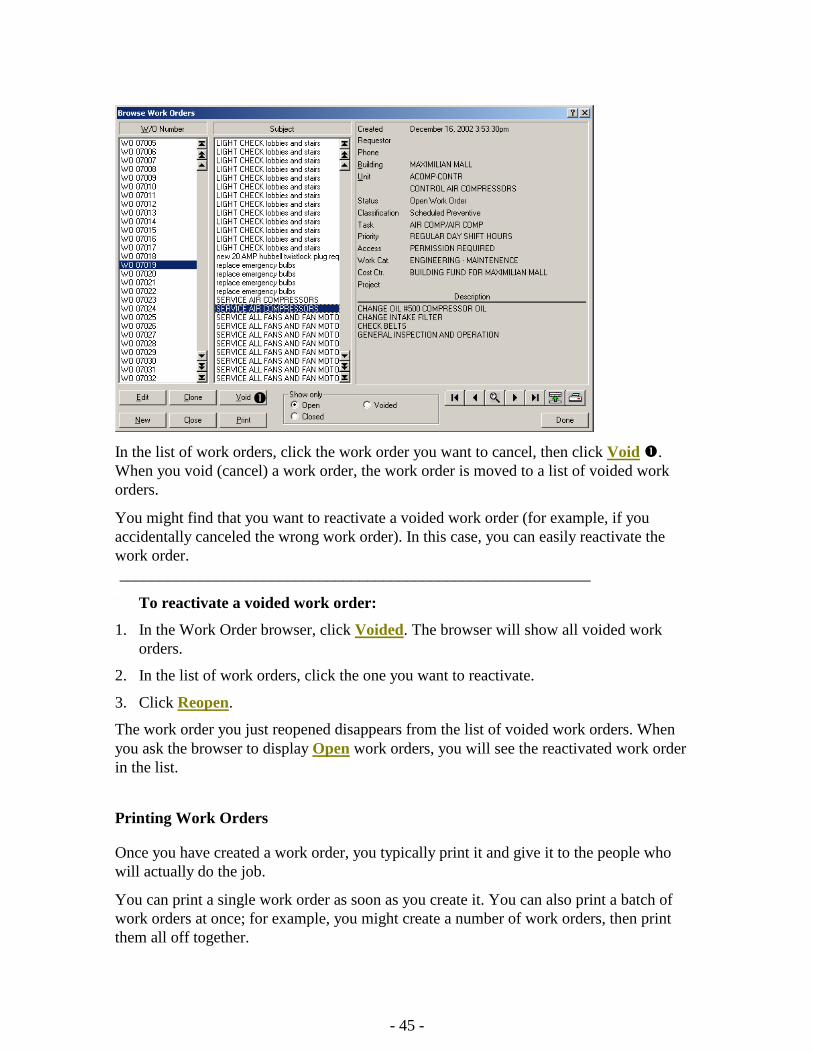
In the list of work orders, click the work order you want to cancel, then click Void .
When you void (cancel) a work order, the work order is moved to a list of voided work
orders.
You might find that you want to reactivate a voided work order (for example, if you
accidentally canceled the wrong work order). In this case, you can easily reactivate the
work order.
___________________________________________________________
To reactivate a voided work order:
1. In the Work Order browser, click Voided. The browser will show all voided work
orders.
2. In the list of work orders, click the one you want to reactivate.
3. Click Reopen.
The work order you just reopened disappears from the list of voided work orders. When
you ask the browser to display Open work orders, you will see the reactivated work order
in the list.
Printing Work Orders
Once you have created a work order, you typically print it and give it to the people who
will actually do the job.
You can print a single work order as soon as you create it. You can also print a batch of
work orders at once; for example, you might create a number of work orders, then print
them all off together.
- 46 -
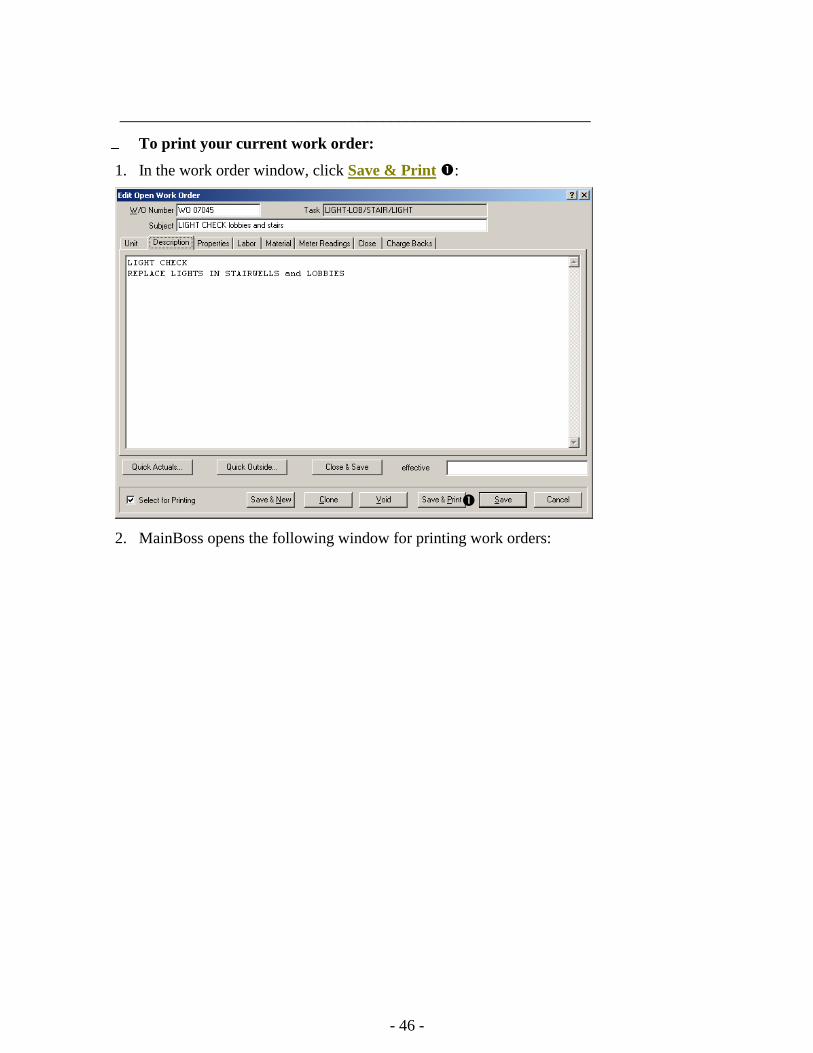
___________________________________________________________
To print your current work order:
1. In the work order window, click Save & Print :
2. MainBoss opens the following window for printing work orders:
- 47 -
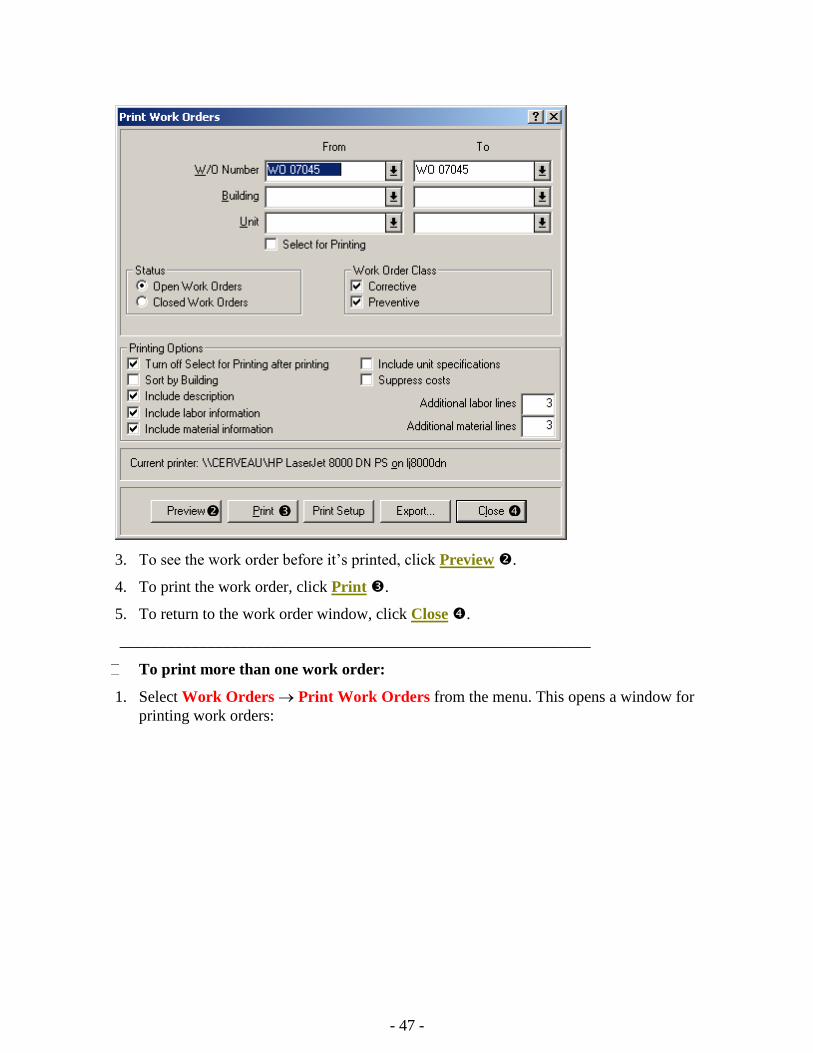
3. To see the work order before it’s printed, click Preview .
4. To print the work order, click Print .
5. To return to the work order window, click Close .
___________________________________________________________
To print more than one work order:
1. Select Work Orders Print Work Orders from the menu. This opens a window for
printing work orders:
- 48 -
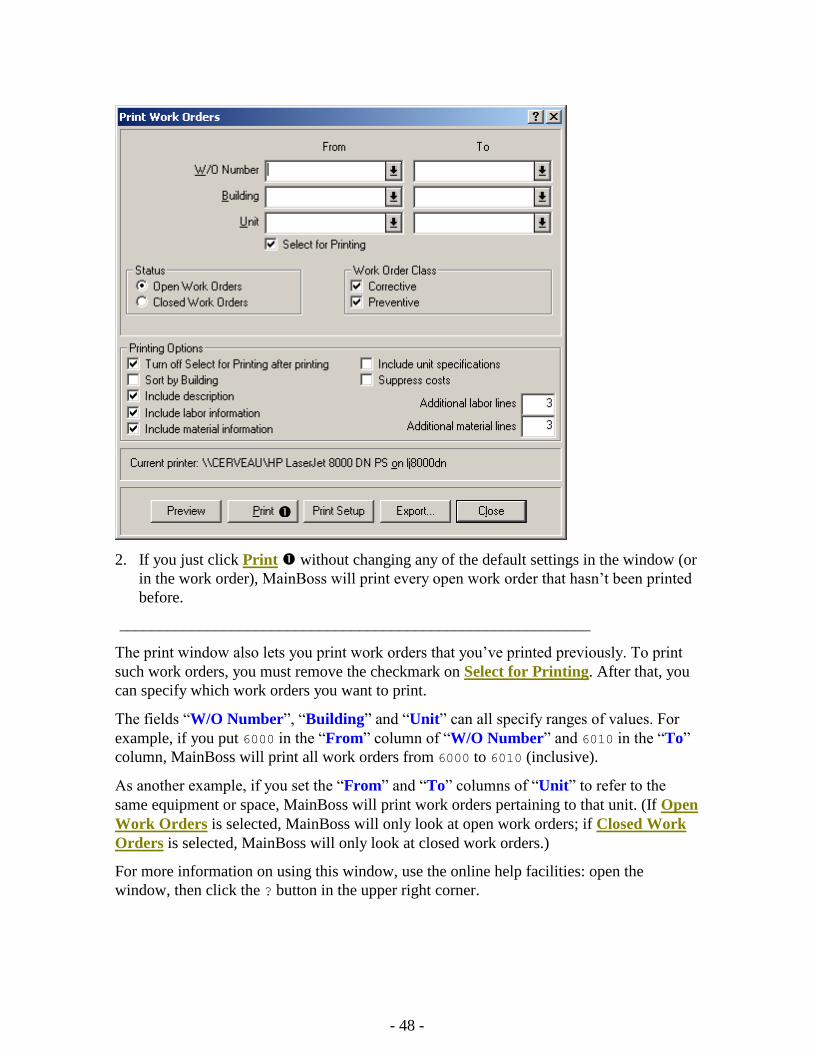
2. If you just click Print without changing any of the default settings in the window (or
in the work order), MainBoss will print every open work order that hasn’t been printed
before.
___________________________________________________________
The print window also lets you print work orders that you’ve printed previously. To print
such work orders, you must remove the checkmark on Select for Printing. After that, you
can specify which work orders you want to print.
The fields “W/O Number”, “Building” and “Unit” can all specify ranges of values. For
example, if you put 6000 in the “From” column of “W/O Number” and 6010 in the “To”
column, MainBoss will print all work orders from 6000 to 6010 (inclusive).
As another example, if you set the “From” and “To” columns of “Unit” to refer to the
same equipment or space, MainBoss will print work orders pertaining to that unit. (If Open
Work Orders is selected, MainBoss will only look at open work orders; if Closed Work
Orders is selected, MainBoss will only look at closed work orders.)
For more information on using this window, use the online help facilities: open the
window, then click the ? button in the upper right corner.
- 49 -
Select for Printing
The bottom left hand corner of the work order window has a checkbox labeled Select for
Printing. Checkmarking this box indicates that you intend to print this work order the next
time you print a batch of work orders.
The window for printing work orders also has a checkbox labeled Select for Printing.
Checkmarking this box indicates that you only want to print work orders that had Select
for Printing checkmarked.
The window for printing work orders has another checkbox labeled Turn off Select for
Printing after printing. If this is checkmarked, a work order’s Select for Printing
checkbox is turned off once the work order has been printed.
These three checkboxes work together in a simple way:
1. Whenever you create a new work order, its Select for Printing box is turned on by
default.
2. When you print work orders with Work Orders Print Work Orders, this
window’s Select for Printing and Turn off Select for Printing after printing are
checkmarked by default. Therefore, if you just click Print, MainBoss will print all
appropriate work orders that were marked for printing. After each work order is
printed, MainBoss turns off their Select for Printing option.
Therefore if you use the defaults, MainBoss prints any work order that hasn’t previously
been printed.
Closing a Work Order
After a job is finished, you should close the associated work order. This means that you
record final information about the job; for example, you record the actual labor and
material costs (as opposed to any estimates you made when creating the original work
order).
___________________________________________________________
To close a work order:
1. Using the Work Order browser, begin editing the work order. (This is described in
Modifying Work Orders on page 43.)
2. In the Properties section of the work order, review the details to make sure the job
started and ended on the dates originally scheduled.
- 50 -
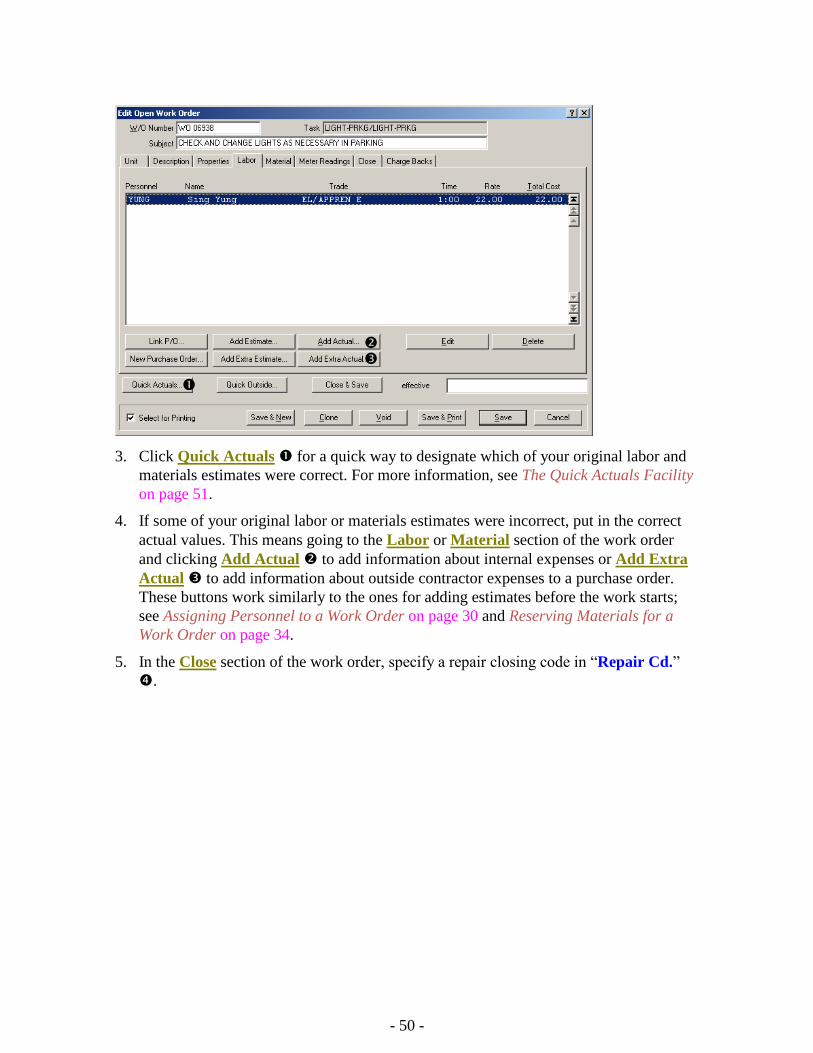
3. Click Quick Actuals for a quick way to designate which of your original labor and
materials estimates were correct. For more information, see The Quick Actuals Facility
on page 51.
4. If some of your original labor or materials estimates were incorrect, put in the correct
actual values. This means going to the Labor or Material section of the work order
and clicking Add Actual to add information about internal expenses or Add Extra
Actual to add information about outside contractor expenses to a purchase order.
These buttons work similarly to the ones for adding estimates before the work starts;
see Assigning Personnel to a Work Order on page 30 and Reserving Materials for a
Work Order on page 34.
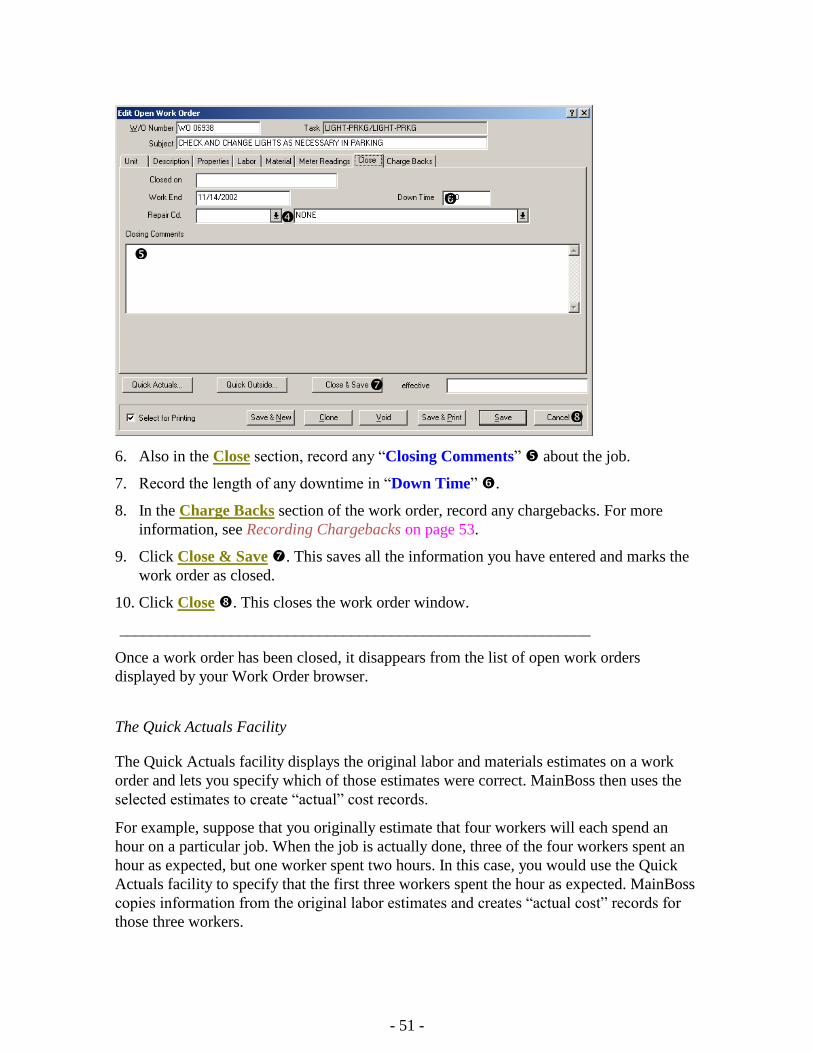
5. In the Close section of the work order, specify a repair closing code in “Repair Cd.”
.
- 51 -
6. Also in the Close section, record any “Closing Comments” about the job.
7. Record the length of any downtime in “Down Time” .
8. In the Charge Backs section of the work order, record any chargebacks. For more
information, see Recording Chargebacks on page 53.
9. Click Close & Save . This saves all the information you have entered and marks the
work order as closed.
10. Click Close . This closes the work order window.
___________________________________________________________
Once a work order has been closed, it disappears from the list of open work orders
displayed by your Work Order browser.
The Quick Actuals Facility
The Quick Actuals facility displays the original labor and materials estimates on a work
order and lets you specify which of those estimates were correct. MainBoss then uses the
selected estimates to create “actual” cost records.
For example, suppose that you originally estimate that four workers will each spend an
hour on a particular job. When the job is actually done, three of the four workers spent an
hour as expected, but one worker spent two hours. In this case, you would use the Quick
Actuals facility to specify that the first three workers spent the hour as expected. MainBoss
copies information from the original labor estimates and creates “actual cost” records for
those three workers.
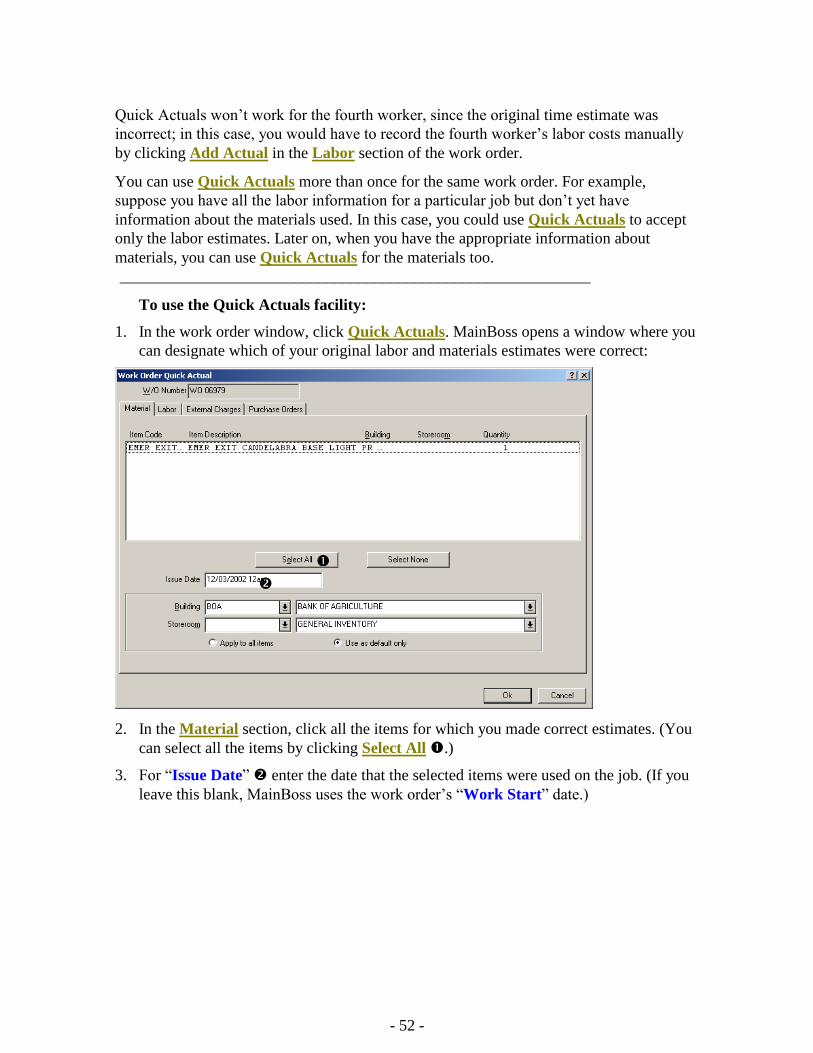
- 52 -
Quick Actuals won’t work for the fourth worker, since the original time estimate was
incorrect; in this case, you would have to record the fourth worker’s labor costs manually
by clicking Add Actual in the Labor section of the work order.
You can use Quick Actuals more than once for the same work order. For example,
suppose you have all the labor information for a particular job but don’t yet have
information about the materials used. In this case, you could use Quick Actuals to accept
only the labor estimates. Later on, when you have the appropriate information about
materials, you can use Quick Actuals for the materials too.
___________________________________________________________
To use the Quick Actuals facility:
1. In the work order window, click Quick Actuals. MainBoss opens a window where you
can designate which of your original labor and materials estimates were correct:
2. In the Material section, click all the items for which you made correct estimates. (You
can select all the items by clicking Select All .)
3. For “Issue Date” enter the date that the selected items were used on the job. (If you
leave this blank, MainBoss uses the work order’s “Work Start” date.)
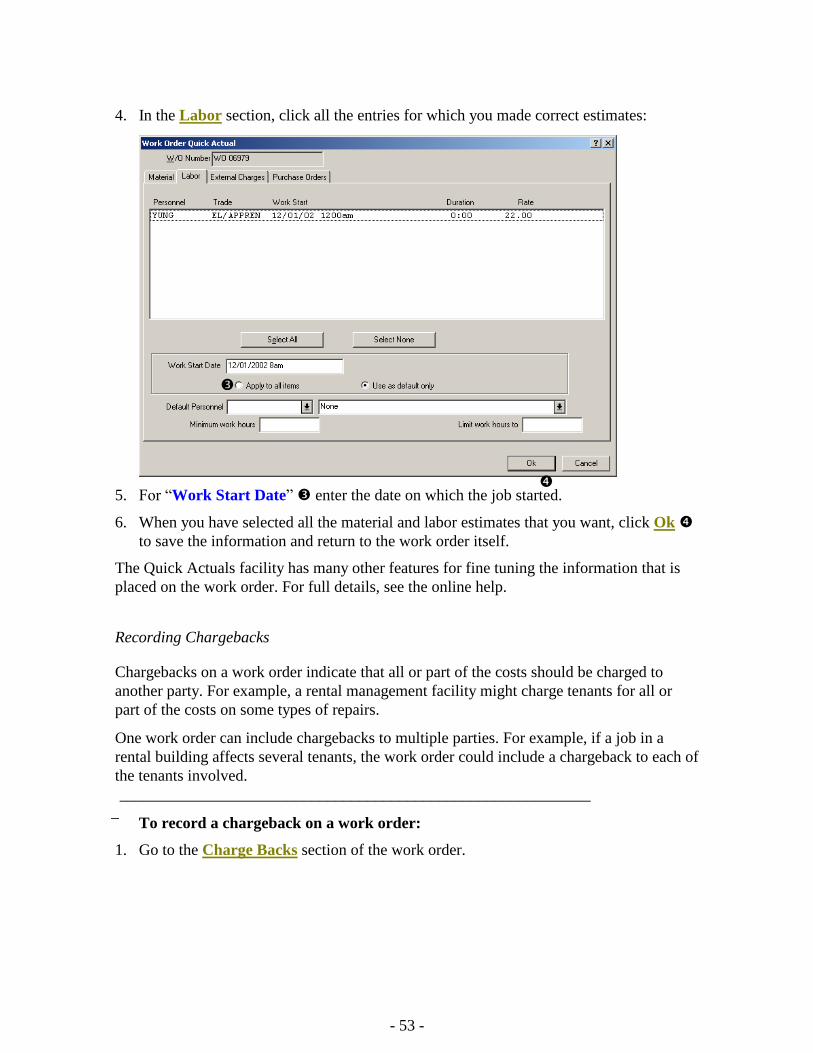
- 53 -
4. In the Labor section, click all the entries for which you made correct estimates:
5. For “Work Start Date” enter the date on which the job started.
6. When you have selected all the material and labor estimates that you want, click Ok
to save the information and return to the work order itself.
The Quick Actuals facility has many other features for fine tuning the information that is
placed on the work order. For full details, see the online help.
Recording Chargebacks
Chargebacks on a work order indicate that all or part of the costs should be charged to
another party. For example, a rental management facility might charge tenants for all or
part of the costs on some types of repairs.
One work order can include chargebacks to multiple parties. For example, if a job in a
rental building affects several tenants, the work order could include a chargeback to each of
the tenants involved.
___________________________________________________________
To record a chargeback on a work order:
1. Go to the Charge Backs section of the work order.
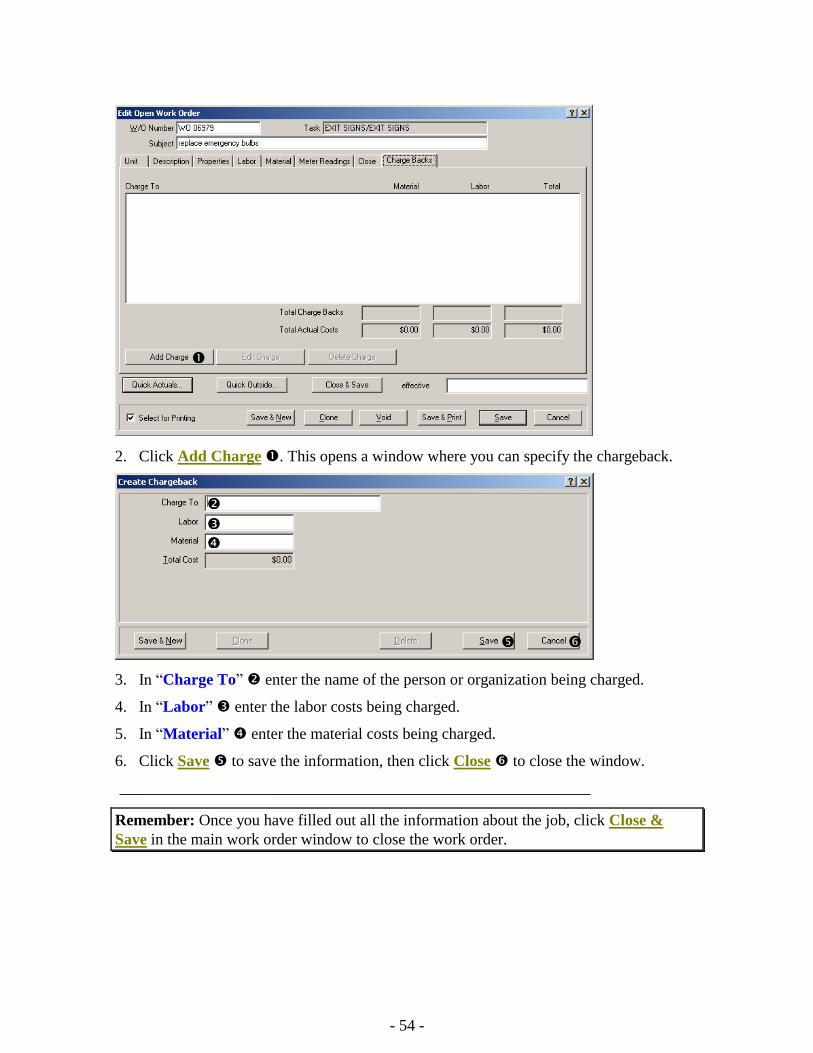
- 54 -
2. Click Add Charge . This opens a window where you can specify the chargeback.
3. In “Charge To” enter the name of the person or organization being charged.
4. In “Labor” enter the labor costs being charged.
5. In “Material” enter the material costs being charged.
6. Click Save to save the information, then click Close to close the window.
___________________________________________________________
Remember: Once you have filled out all the information about the job, click Close &
Save in the main work order window to close the work order.
- 55 -
Units
In order to use MainBoss productively, you should record information about your
equipment and spaces. For example, it is useful to record the location of each piece of
equipment, plus identification information (make, model, serial number), and any
warranties or service contracts that apply. Many organizations will also find it helpful to
record the purchase price of equipment and to project replacement costs expected in future
years.
All such work can be done through the MainBoss Units menu. This chapter looks at
procedures for recording information about units. To begin with, here is some basic
terminology.
___________________________________________________________
Meter: A device that is associated with a piece of equipment and that measures
information relevant to maintenance work.
Examples include mileage meters on vehicles or clocks indicating hours of
use for pieces of equipment.
It is often helpful to take regular meter readings and record them in
MainBoss. For example, this lets you schedule preventive maintenance
according to meter readers (e.g. inspecting a piece of equipment every 500
hours of use).
The readings given by a meter are assumed to increase over time. This is not
true in some cases (for example with meters that “roll over” at 999999). To
handle this situation, MainBoss uses meter offsets as described in Meter
Offsets on page 70.
___________________________________________________________
Specification: Information that may be helpful in performing maintenance on a unit.
With a vehicle, for example, it may be useful to record engine type, gas tank
size, tools required for servicing, and so on.
___________________________________________________________
- 56 -
___________________________________________________________
Attachment: An online document that contains useful information about a unit.
For example, you might have schematic diagrams available on your
computer, or documents recording information that isn’t in your MainBoss
database.
Any kind of file can be specified as an attachment. For example, a rental
management company might have online legal documents describing lease
agreements with tenants. These documents could be attached to MainBoss
records if they would be useful to personnel who want to know what kind of
maintenance has been contractually guaranteed.
___________________________________________________________
System: A collection of interrelated equipment and/or spaces.
For example, the equipment making up a factory assembly line might be
labeled a system, since problems with one piece of equipment can affect the
performance of the whole line.
Grouping your units into systems can make it easier for you to identify
large-scale trends or to create more fine-tuned reports. For example, if you
specify which units belong to an assembly line, it becomes easy to provide
management with a report listing all problems on the assembly line over a
given period.
___________________________________________________________
Obsolete Code: An indication of how and/or why a piece of equipment was taken out
of service.
For example, you might have different codes indicating whether the
equipment was broken, too expensive to maintain, superseded by a newer
model, etc.
By keeping track of how equipment becomes obsolete, you may get a better
picture of trends in your operations. It also helps make your records more
complete, so you can tell exactly why a piece of equipment was
discontinued.
Note: Even if you have recorded that a particular piece of equipment is obsolete, MainBoss
makes it easy to bring that equipment back into service.
___________________________________________________________
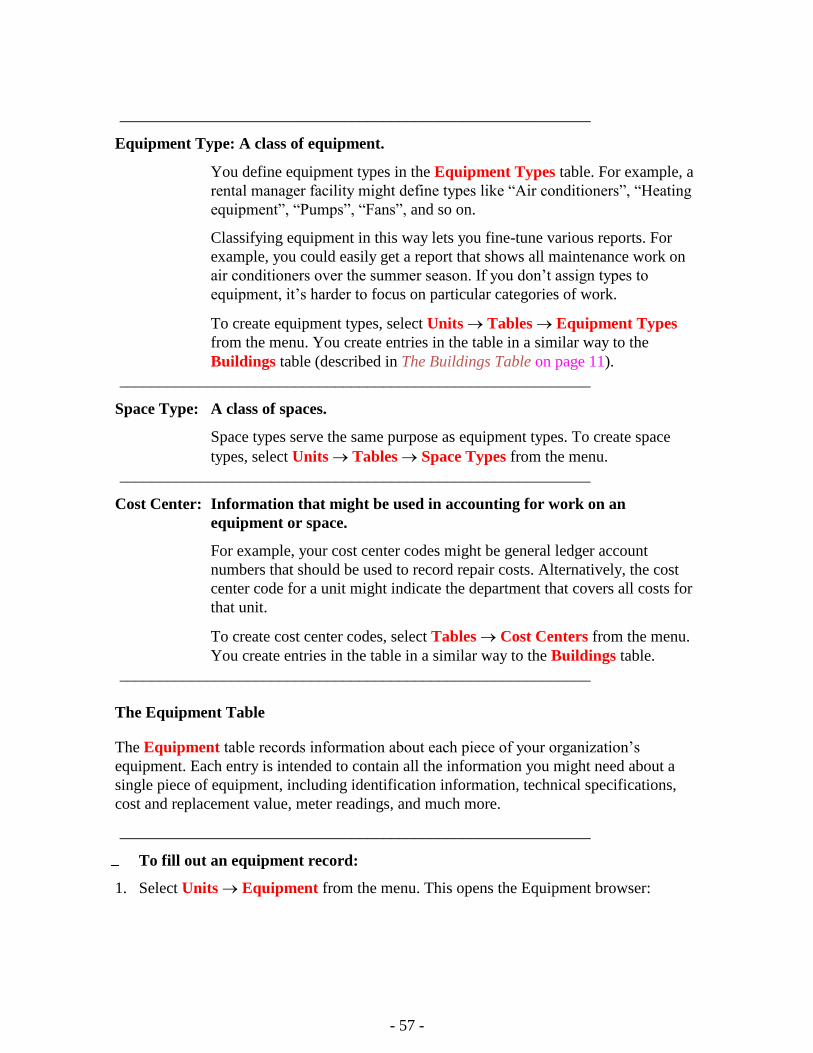
- 57 -
___________________________________________________________
Equipment Type: A class of equipment.
You define equipment types in the Equipment Types table. For example, a
rental manager facility might define types like “Air conditioners”, “Heating
equipment”, “Pumps”, “Fans”, and so on.
Classifying equipment in this way lets you fine-tune various reports. For
example, you could easily get a report that shows all maintenance work on
air conditioners over the summer season. If you don’t assign types to
equipment, it’s harder to focus on particular categories of work.
To create equipment types, select Units Tables Equipment Types
from the menu. You create entries in the table in a similar way to the
Buildings table (described in The Buildings Table on page 11).
___________________________________________________________
Space Type: A class of spaces.
Space types serve the same purpose as equipment types. To create space
types, select Units Tables Space Types from the menu.
___________________________________________________________
Cost Center: Information that might be used in accounting for work on an
equipment or space.
For example, your cost center codes might be general ledger account
numbers that should be used to record repair costs. Alternatively, the cost
center code for a unit might indicate the department that covers all costs for
that unit.
To create cost center codes, select Tables Cost Centers from the menu.
You create entries in the table in a similar way to the Buildings table.
___________________________________________________________
The Equipment Table
The Equipment table records information about each piece of your organization’s
equipment. Each entry is intended to contain all the information you might need about a
single piece of equipment, including identification information, technical specifications,
cost and replacement value, meter readings, and much more.
___________________________________________________________
To fill out an equipment record:
1. Select Units Equipment from the menu. This opens the Equipment browser:
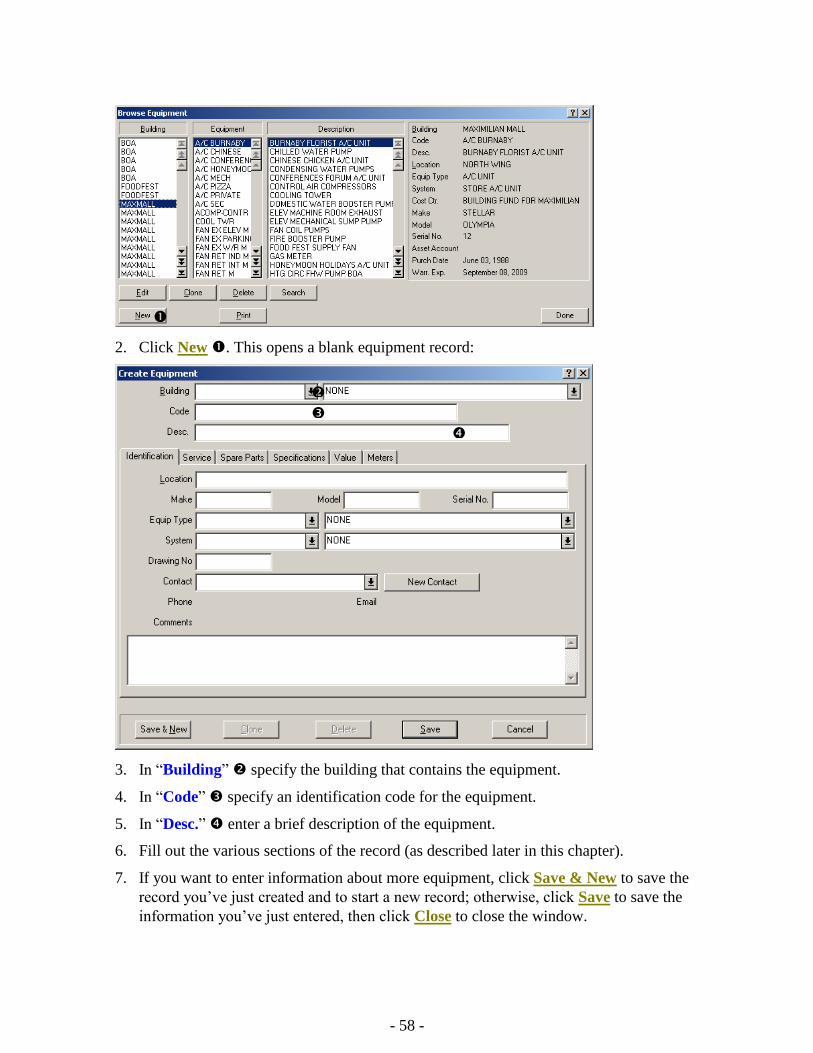
- 58 -
2. Click New . This opens a blank equipment record:
3. In “Building” specify the building that contains the equipment.
4. In “Code” specify an identification code for the equipment.
5. In “Desc.” enter a brief description of the equipment.
6. Fill out the various sections of the record (as described later in this chapter).
7. If you want to enter information about more equipment, click Save & New to save the
record you’ve just created and to start a new record; otherwise, click Save to save the
information you’ve just entered, then click Close to close the window.
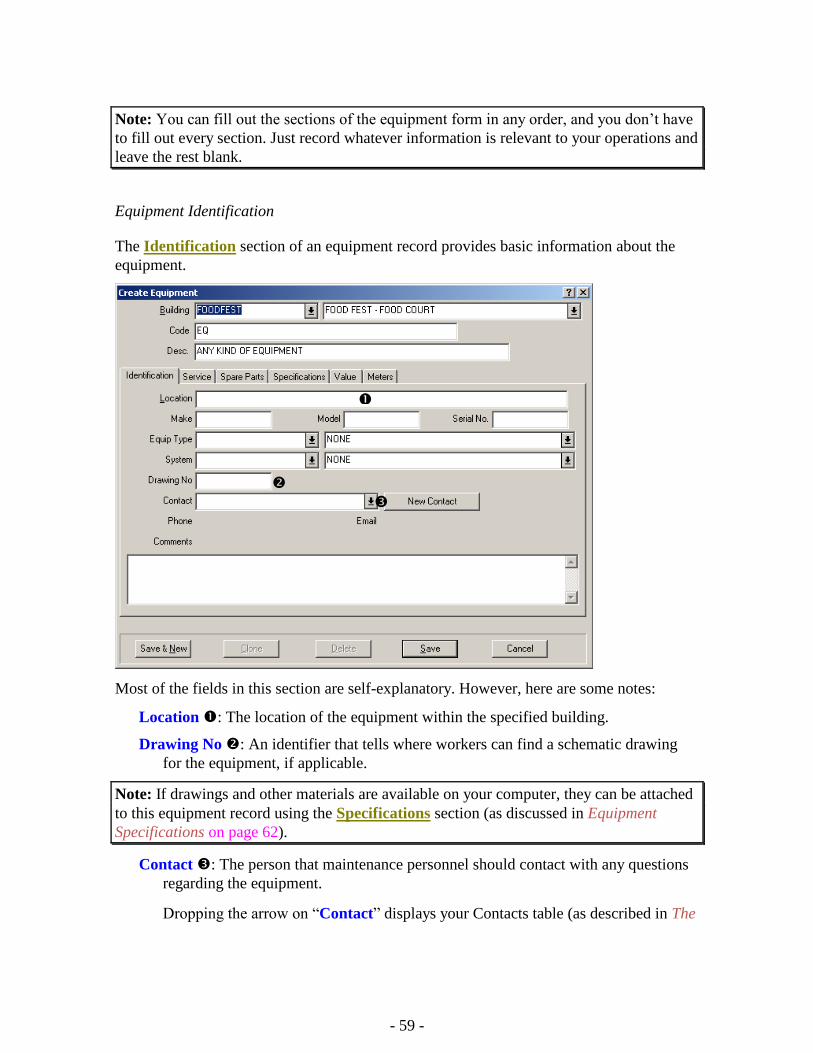
- 59 -
Note: You can fill out the sections of the equipment form in any order, and you don’t have
to fill out every section. Just record whatever information is relevant to your operations and
leave the rest blank.
Equipment Identification
The Identification section of an equipment record provides basic information about the
equipment.
Most of the fields in this section are self-explanatory. However, here are some notes:
Location : The location of the equipment within the specified building.
Drawing No : An identifier that tells where workers can find a schematic drawing
for the equipment, if applicable.
Note: If drawings and other materials are available on your computer, they can be attached
to this equipment record using the Specifications section (as discussed in Equipment
Specifications on page 62).
Contact : The person that maintenance personnel should contact with any questions
regarding the equipment.
Dropping the arrow on “Contact” displays your Contacts table (as described in The
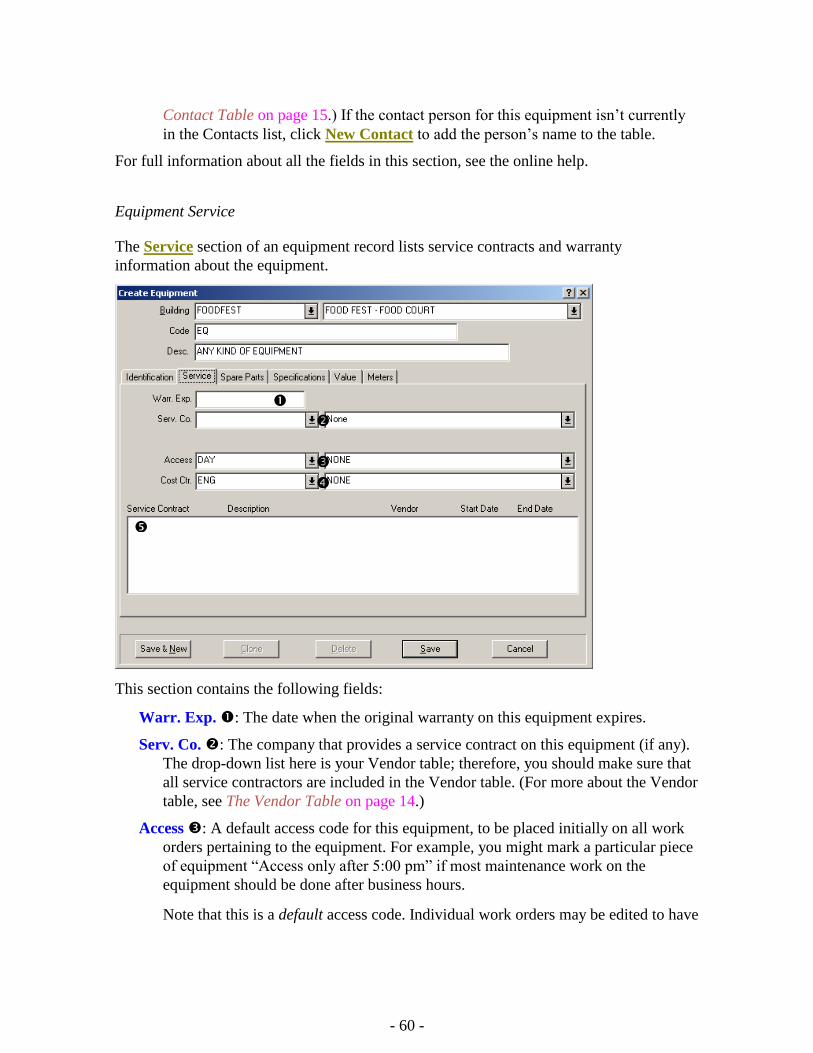
- 60 -
Contact Table on page 15.) If the contact person for this equipment isn’t currently
in the Contacts list, click New Contact to add the person’s name to the table.
For full information about all the fields in this section, see the online help.
Equipment Service
The Service section of an equipment record lists service contracts and warranty
information about the equipment.
This section contains the following fields:
Warr. Exp. : The date when the original warranty on this equipment expires.
Serv. Co. : The company that provides a service contract on this equipment (if any).
The drop-down list here is your Vendor table; therefore, you should make sure that
all service contractors are included in the Vendor table. (For more about the Vendor
table, see The Vendor Table on page 14.)
Access : A default access code for this equipment, to be placed initially on all work
orders pertaining to the equipment. For example, you might mark a particular piece
of equipment “Access only after 5:00 pm” if most maintenance work on the
equipment should be done after business hours.
Note that this is a default access code. Individual work orders may be edited to have
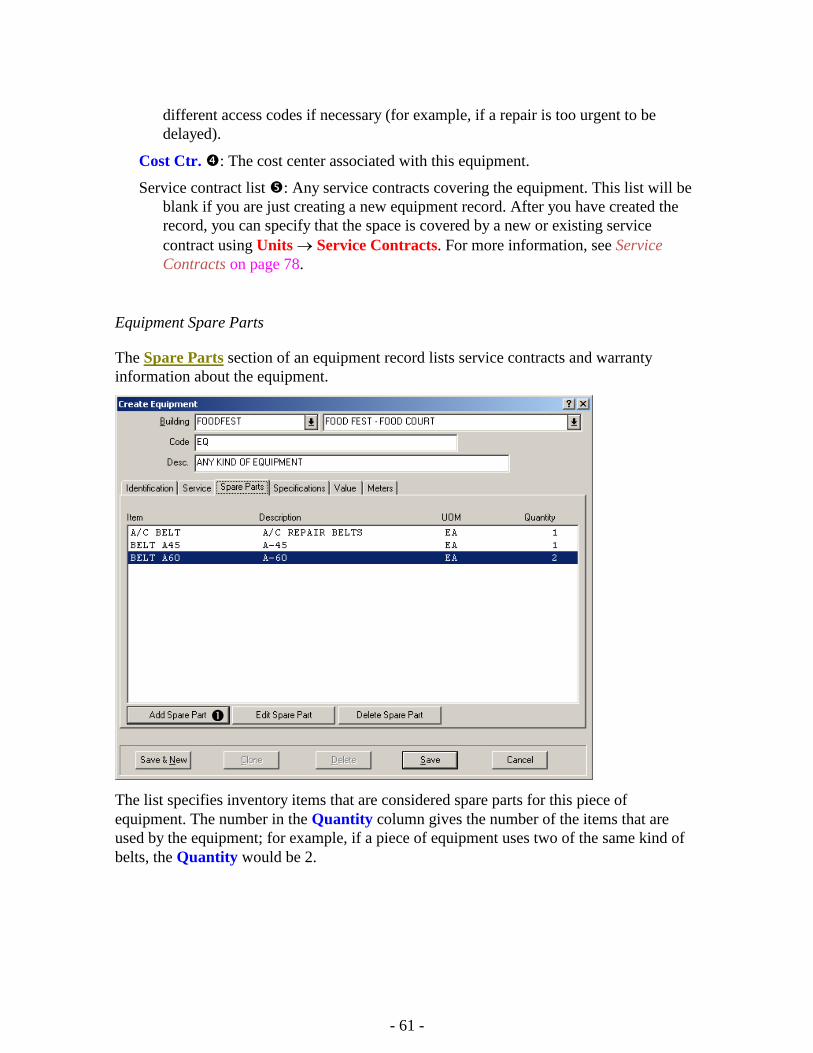
- 61 -
different access codes if necessary (for example, if a repair is too urgent to be
delayed).
Cost Ctr. : The cost center associated with this equipment.
Service contract list : Any service contracts covering the equipment. This list will be
blank if you are just creating a new equipment record. After you have created the
record, you can specify that the space is covered by a new or existing service
contract using Units Service Contracts. For more information, see Service
Contracts on page 78.
Equipment Spare Parts
The Spare Parts section of an equipment record lists service contracts and warranty
information about the equipment.
The list specifies inventory items that are considered spare parts for this piece of
equipment. The number in the Quantity column gives the number of the items that are
used by the equipment; for example, if a piece of equipment uses two of the same kind of
belts, the Quantity would be 2.
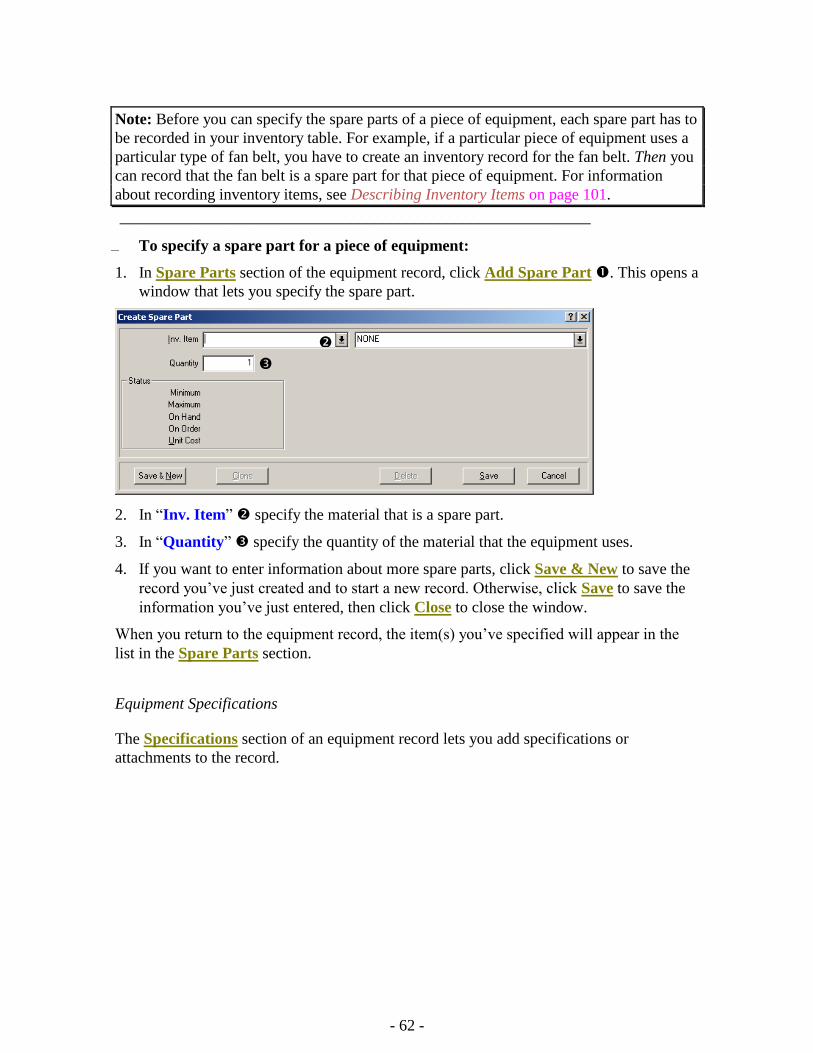
- 62 -
Note: Before you can specify the spare parts of a piece of equipment, each spare part has to
be recorded in your inventory table. For example, if a particular piece of equipment uses a
particular type of fan belt, you have to create an inventory record for the fan belt. Then you
can record that the fan belt is a spare part for that piece of equipment. For information
about recording inventory items, see Describing Inventory Items on page 101.
___________________________________________________________
To specify a spare part for a piece of equipment:
1. In Spare Parts section of the equipment record, click Add Spare Part . This opens a
window that lets you specify the spare part.
2. In “Inv. Item” specify the material that is a spare part.
3. In “Quantity” specify the quantity of the material that the equipment uses.
4. If you want to enter information about more spare parts, click Save & New to save the
record you’ve just created and to start a new record. Otherwise, click Save to save the
information you’ve just entered, then click Close to close the window.
When you return to the equipment record, the item(s) you’ve specified will appear in the
list in the Spare Parts section.
Equipment Specifications
The Specifications section of an equipment record lets you add specifications or
attachments to the record.
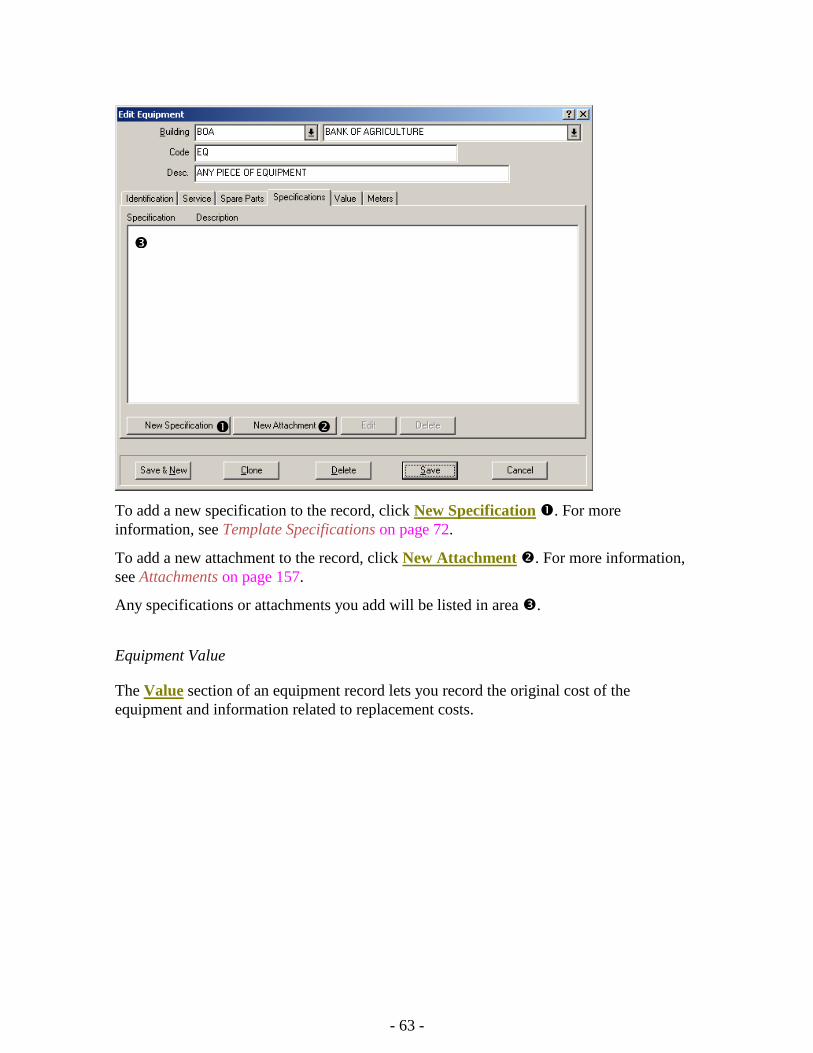
- 63 -
To add a new specification to the record, click New Specification . For more
information, see Template Specifications on page 72.
To add a new attachment to the record, click New Attachment . For more information,
see Attachments on page 157.
Any specifications or attachments you add will be listed in area .
Equipment Value
The Value section of an equipment record lets you record the original cost of the
equipment and information related to replacement costs.
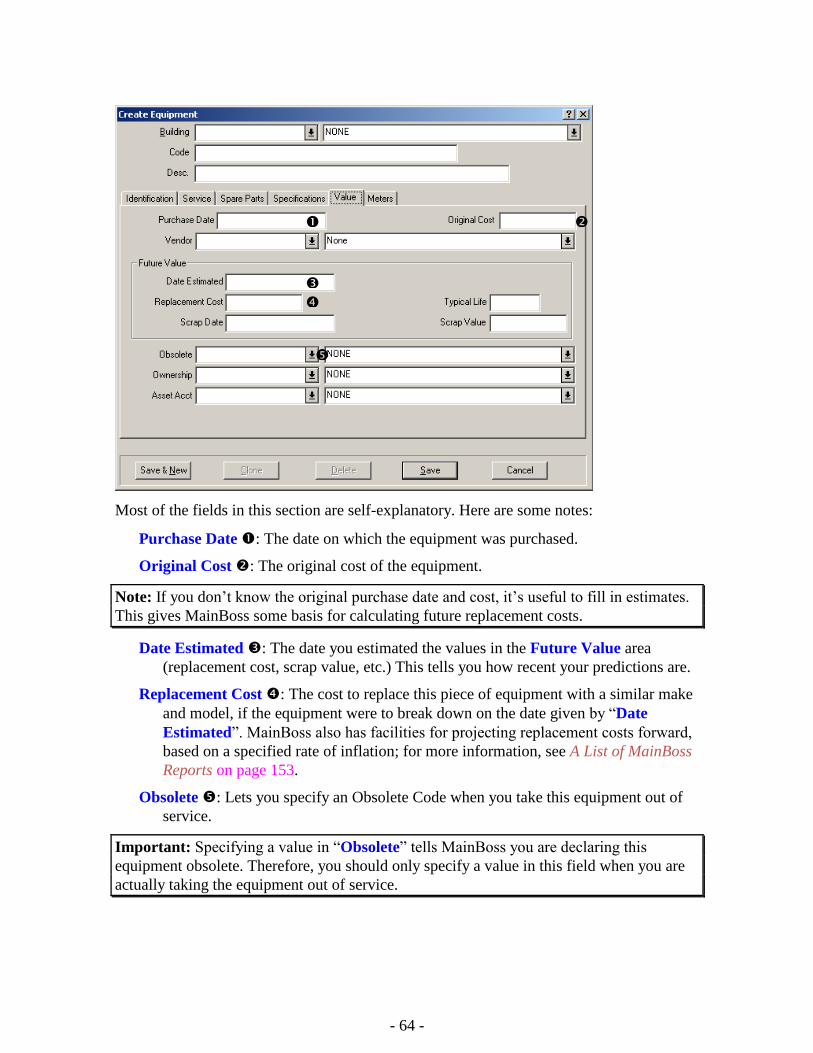
- 64 -
Most of the fields in this section are self-explanatory. Here are some notes:
Purchase Date : The date on which the equipment was purchased.
Original Cost : The original cost of the equipment.
Note: If you don’t know the original purchase date and cost, it’s useful to fill in estimates.
This gives MainBoss some basis for calculating future replacement costs.
Date Estimated : The date you estimated the values in the Future Value area
(replacement cost, scrap value, etc.) This tells you how recent your predictions are.
Replacement Cost : The cost to replace this piece of equipment with a similar make
and model, if the equipment were to break down on the date given by “Date
Estimated”. MainBoss also has facilities for projecting replacement costs forward,
based on a specified rate of inflation; for more information, see A List of MainBoss
Reports on page 153.
Obsolete : Lets you specify an Obsolete Code when you take this equipment out of
service.
Important: Specifying a value in “Obsolete” tells MainBoss you are declaring this
equipment obsolete. Therefore, you should only specify a value in this field when you are
actually taking the equipment out of service.
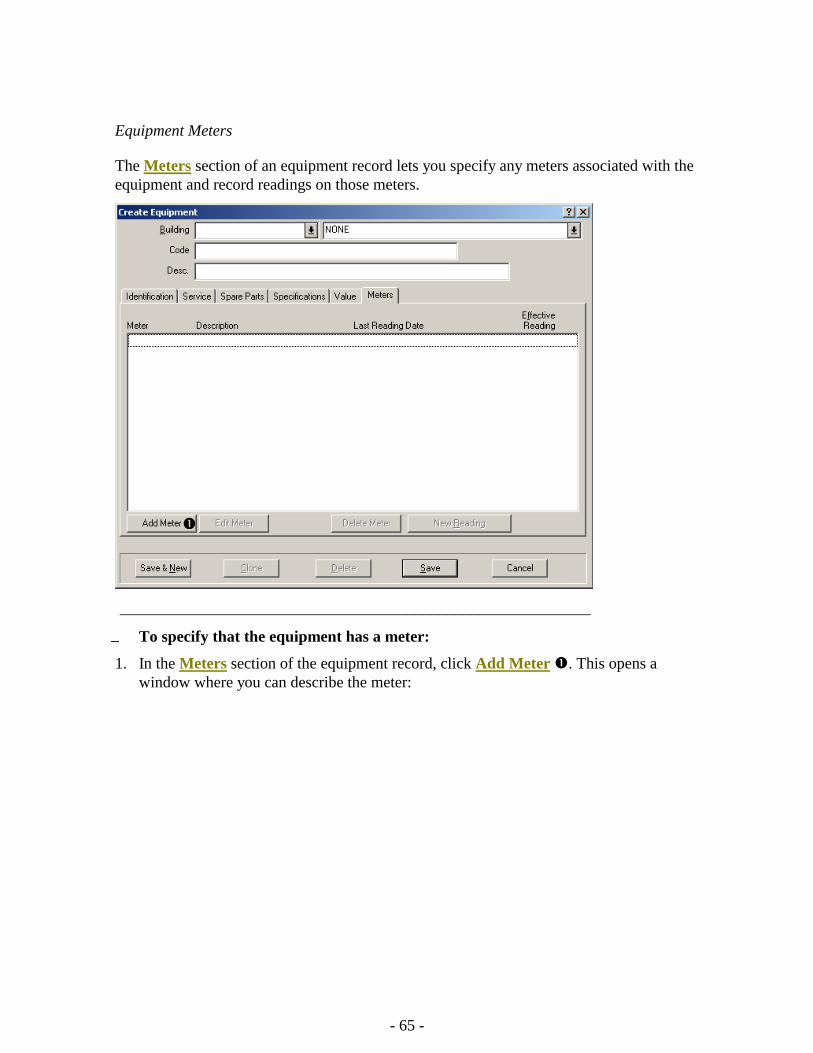
- 65 -
Equipment Meters
The Meters section of an equipment record lets you specify any meters associated with the
equipment and record readings on those meters.
___________________________________________________________
To specify that the equipment has a meter:
1. In the Meters section of the equipment record, click Add Meter . This opens a
window where you can describe the meter:
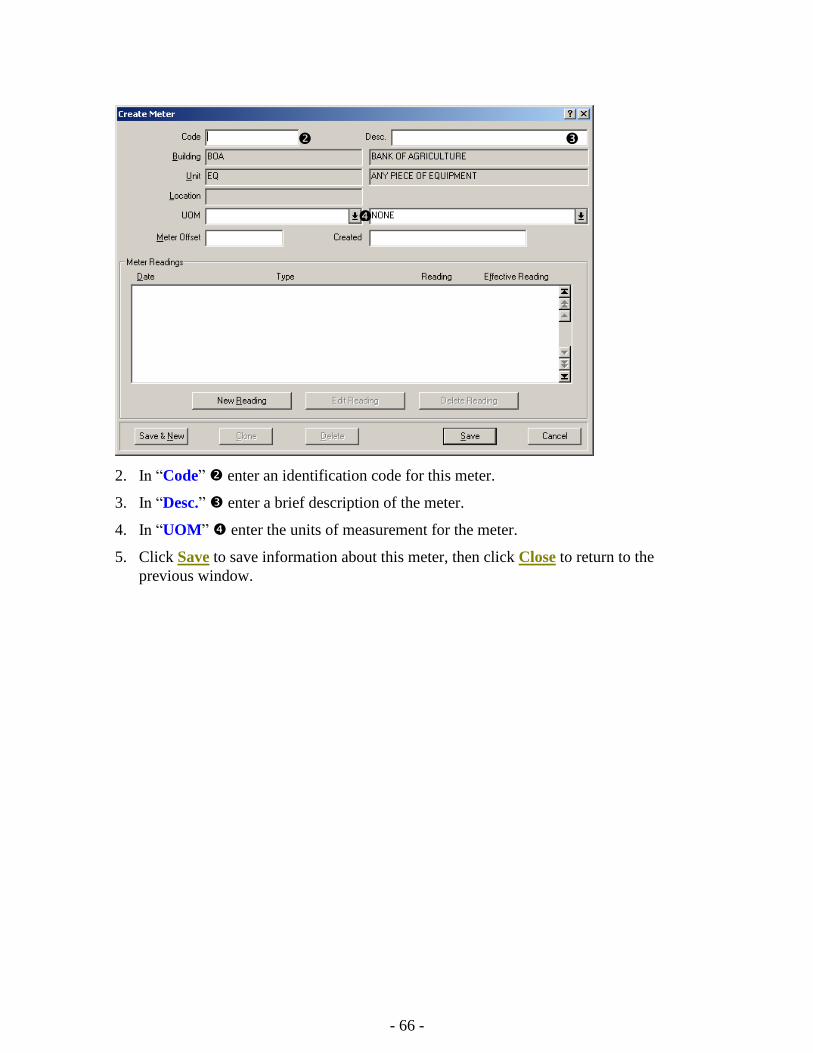
- 66 -
2. In “Code” enter an identification code for this meter.
3. In “Desc.” enter a brief description of the meter.
4. In “UOM” enter the units of measurement for the meter.
5. Click Save to save information about this meter, then click Close to return to the
previous window.
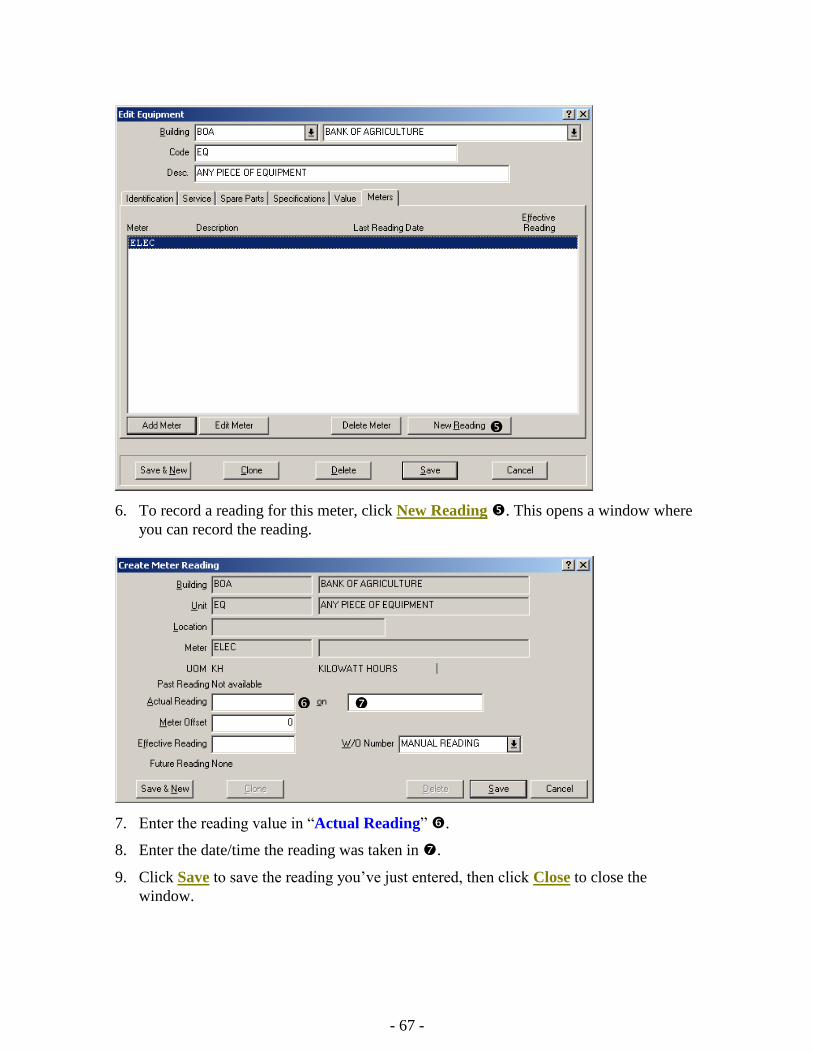
- 67 -
6. To record a reading for this meter, click New Reading . This opens a window where
you can record the reading.
7. Enter the reading value in “Actual Reading” .
8. Enter the date/time the reading was taken in .
9. Click Save to save the reading you’ve just entered, then click Close to close the
window.
- 68 -
Note: Meters are shown in the equipment record, but meter readings are not. For
information on viewing meter readings, see More About Meters on page 68.
Examining and Editing Equipment Records
From time to time, information about a piece of equipment may change. For example, the
equipment might be moved to a different building or you might reassess its replacement
cost. In this case, you should modify the equipment record to reflect the change.
Maintenance personnel might also wish to consult equipment records for information about
the equipment. For example, you might want to see when the warranty runs out on a
particular piece of equipment.
In both cases, you use the Equipment browser to look at the existing record. Open the
browser with Units Equipment, select the piece of equipment in the browser’s list, then
click Edit. MainBoss will open the equipment record so you can examine it. You can also
make changes as appropriate.
When you have finished with the record, click Save to save any changes you’ve made, then
click Close to close the record window.
The Spaces Table
The Space table lists the spaces where maintenance might be required. These could include
offices in a commercial or industrial building, apartments in a residential building,
classrooms in a school, patient rooms in a hospital, common areas, grounds, etc.
MainBoss handles spaces very much like equipment. For example, the record describing a
space is like an equipment form without the Value or Meters sections.
To open the Space browser, select Units Spaces from the menu. From this point
onward, creating, examining or editing a space record is exactly like doing the same with
an equipment record. See The Equipment Table on page 57 for more information.
More About Meters
Equipment Meters on page 65 showed how to specify that a piece of equipment had one or
more associated meters. This section discusses additional information about meters.
Basic Principles about Meters
Meters can be used to schedule preventive maintenance. For example, you might specify
that a car needs an oil change every 3000 miles as measured by the car’s odometer.
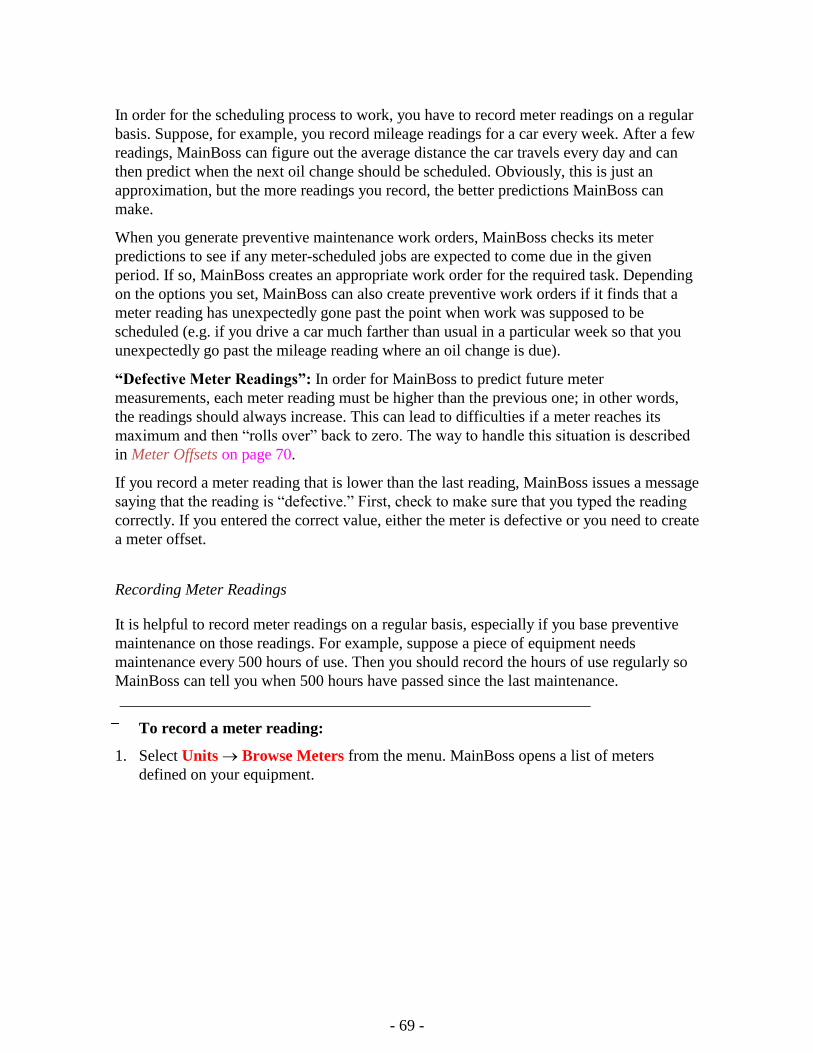
- 69 -
In order for the scheduling process to work, you have to record meter readings on a regular
basis. Suppose, for example, you record mileage readings for a car every week. After a few
readings, MainBoss can figure out the average distance the car travels every day and can
then predict when the next oil change should be scheduled. Obviously, this is just an
approximation, but the more readings you record, the better predictions MainBoss can
make.
When you generate preventive maintenance work orders, MainBoss checks its meter
predictions to see if any meter-scheduled jobs are expected to come due in the given
period. If so, MainBoss creates an appropriate work order for the required task. Depending
on the options you set, MainBoss can also create preventive work orders if it finds that a
meter reading has unexpectedly gone past the point when work was supposed to be
scheduled (e.g. if you drive a car much farther than usual in a particular week so that you
unexpectedly go past the mileage reading where an oil change is due).
“Defective Meter Readings”: In order for MainBoss to predict future meter
measurements, each meter reading must be higher than the previous one; in other words,
the readings should always increase. This can lead to difficulties if a meter reaches its
maximum and then “rolls over” back to zero. The way to handle this situation is described
in Meter Offsets on page 70.
If you record a meter reading that is lower than the last reading, MainBoss issues a message
saying that the reading is “defective.” First, check to make sure that you typed the reading
correctly. If you entered the correct value, either the meter is defective or you need to create
a meter offset.
Recording Meter Readings
It is helpful to record meter readings on a regular basis, especially if you base preventive
maintenance on those readings. For example, suppose a piece of equipment needs
maintenance every 500 hours of use. Then you should record the hours of use regularly so
MainBoss can tell you when 500 hours have passed since the last maintenance.
___________________________________________________________
To record a meter reading:
1. Select Units Browse Meters from the menu. MainBoss opens a list of meters
defined on your equipment.
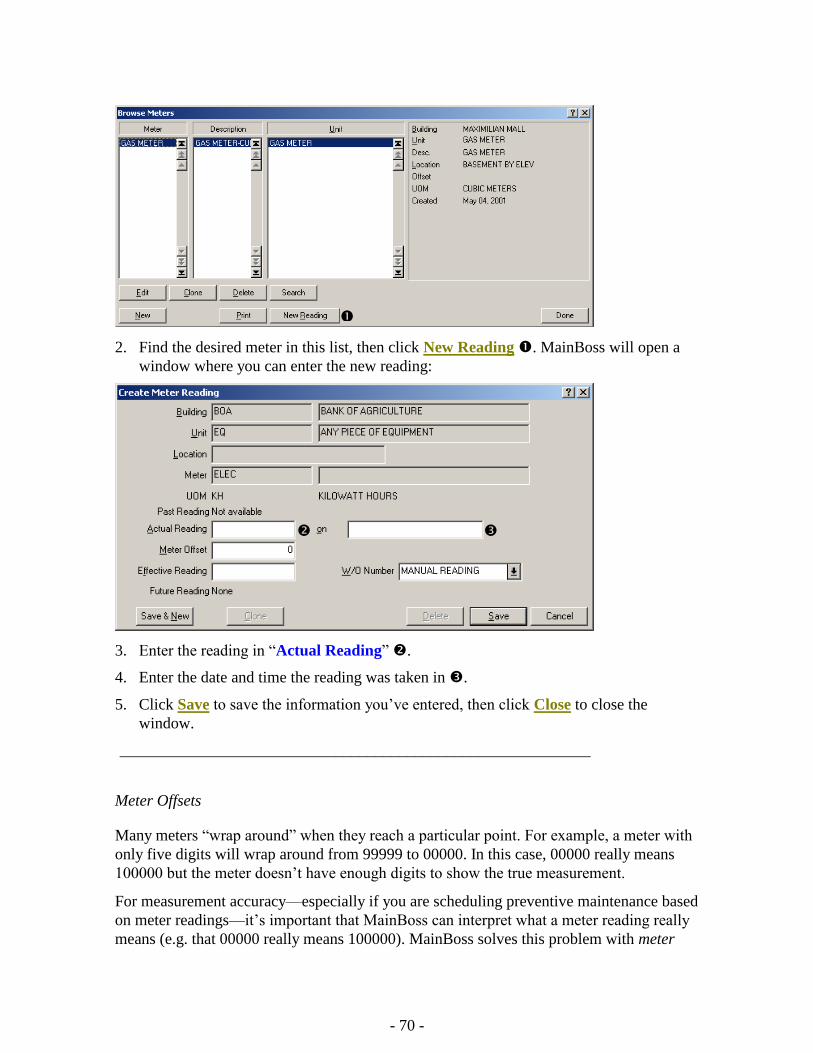
- 70 -
2. Find the desired meter in this list, then click New Reading . MainBoss will open a
window where you can enter the new reading:
3. Enter the reading in “Actual Reading” .
4. Enter the date and time the reading was taken in .
5. Click Save to save the information you’ve entered, then click Close to close the
window.
___________________________________________________________
Meter Offsets
Many meters “wrap around” when they reach a particular point. For example, a meter with
only five digits will wrap around from 99999 to 00000. In this case, 00000 really means
100000 but the meter doesn’t have enough digits to show the true measurement.
For measurement accuracy—especially if you are scheduling preventive maintenance based
on meter readings—it’s important that MainBoss can interpret what a meter reading really
means (e.g. that 00000 really means 100000). MainBoss solves this problem with meter

- 71 -
offsets. A meter offset is a number that MainBoss adds to the reading you see on the meter
in order to come up with the “true” value for the meter.
In our example of the five-digit meter, the meter offset is zero until the first time the meter
wraps around. Then you should set the meter offset to 100000; this means that when the
meter reads (for example) 00123, the real value is actually 100123. If and when the meter
wraps around again, you should set the meter offset to 200000, and so on. In this way,
workers can simply record the readings they see on the meter, but MainBoss can still
calculate the true value associated with the meter.
Meter offsets may also be used when an old meter breaks and a new meter must be
installed. For example, if the old meter breaks at 12345 and you install a new meter that
starts at zero, you should specify a meter offset of 12345. This tells MainBoss to add 12345
to all readings from the new meter in order to determine the true value of what is being
measured.
Important: You must change the meter offset every time a meter wraps around, every time
you reset a meter to zero, and every time you replace an old meter with a new one.
Otherwise, MainBoss will not be able to convert meter readings into true values and you
will not be able to schedule preventive maintenance by meter readings.
___________________________________________________________
To specify the meter offset for a meter:
1. Select Units Browse Meters from the menu. MainBoss opens a list of meters
defined on your equipment.
2. Find the desired meter in this list, then click New Reading . MainBoss will open a
window where you can enter the new reading:
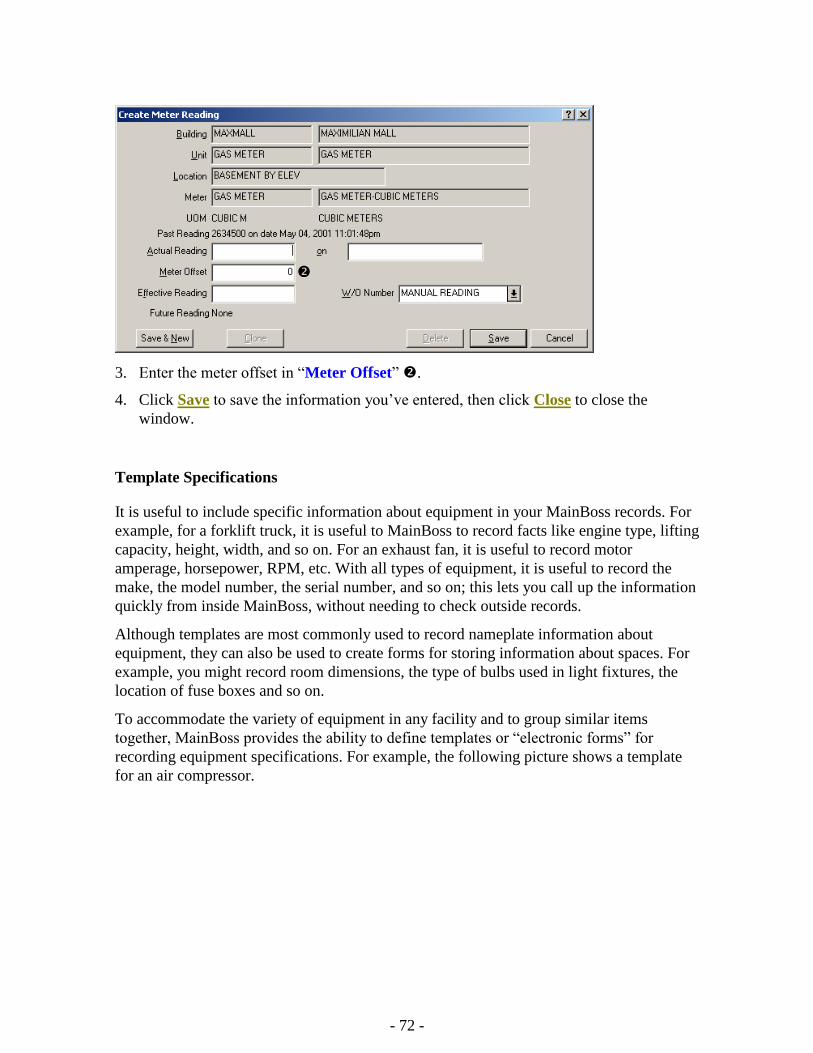
- 72 -
3. Enter the meter offset in “Meter Offset” .
4. Click Save to save the information you’ve entered, then click Close to close the
window.
Template Specifications
It is useful to include specific information about equipment in your MainBoss records. For
example, for a forklift truck, it is useful to MainBoss to record facts like engine type, lifting
capacity, height, width, and so on. For an exhaust fan, it is useful to record motor
amperage, horsepower, RPM, etc. With all types of equipment, it is useful to record the
make, the model number, the serial number, and so on; this lets you call up the information
quickly from inside MainBoss, without needing to check outside records.
Although templates are most commonly used to record nameplate information about
equipment, they can also be used to create forms for storing information about spaces. For
example, you might record room dimensions, the type of bulbs used in light fixtures, the
location of fuse boxes and so on.
To accommodate the variety of equipment in any facility and to group similar items
together, MainBoss provides the ability to define templates or “electronic forms” for
recording equipment specifications. For example, the following picture shows a template
for an air compressor.
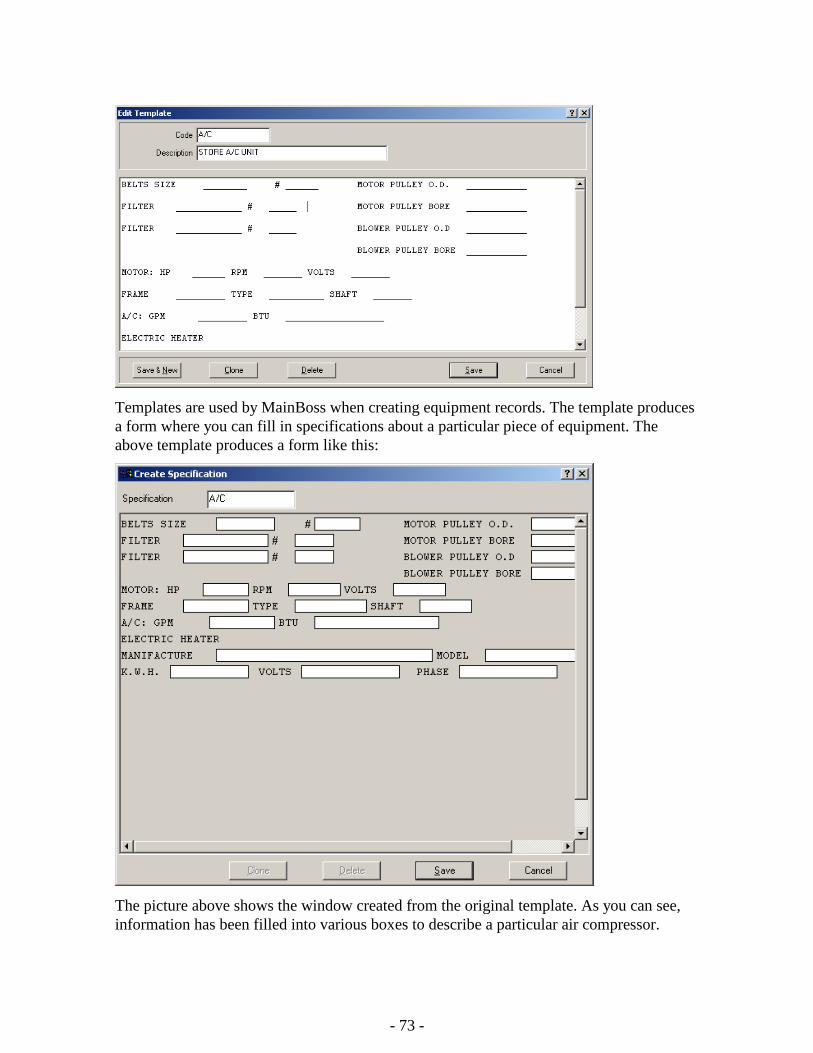
- 73 -
Templates are used by MainBoss when creating equipment records. The template produces
a form where you can fill in specifications about a particular piece of equipment. The
above template produces a form like this:
The picture above shows the window created from the original template. As you can see,
information has been filled into various boxes to describe a particular air compressor.
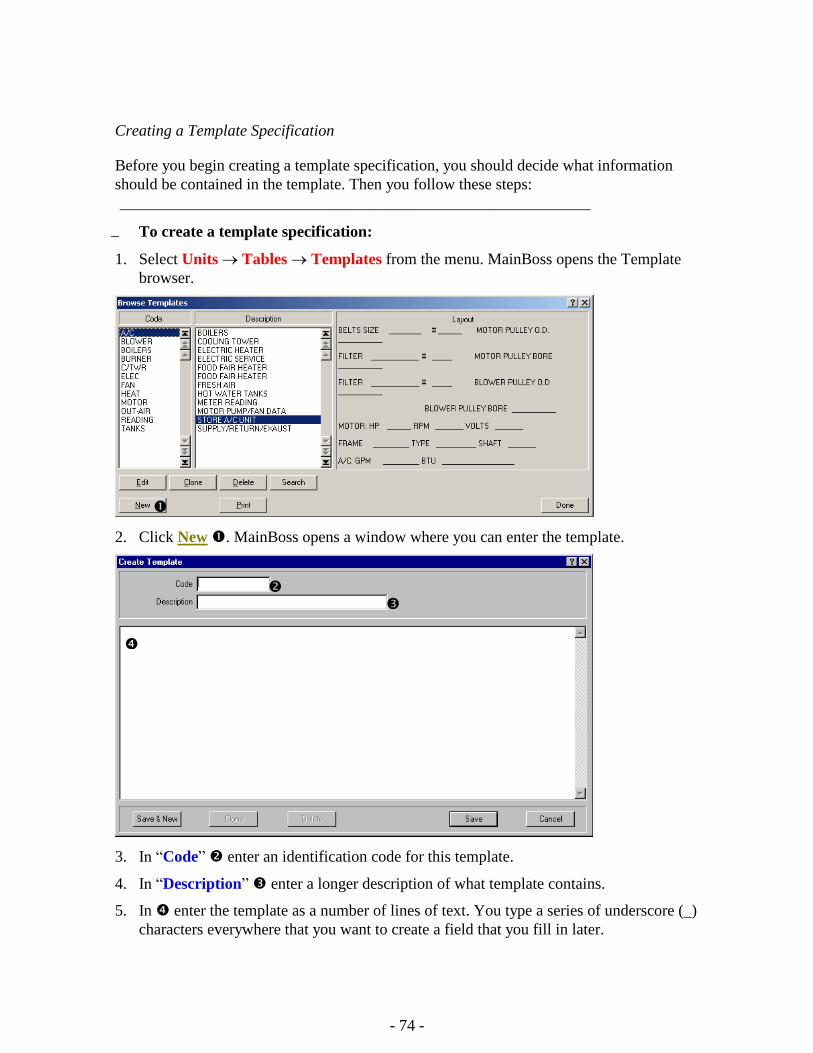
- 74 -
Creating a Template Specification
Before you begin creating a template specification, you should decide what information
should be contained in the template. Then you follow these steps:
___________________________________________________________
To create a template specification:
1. Select Units Tables Templates from the menu. MainBoss opens the Template
browser.
2. Click New . MainBoss opens a window where you can enter the template.
3. In “Code” enter an identification code for this template.
4. In “Description” enter a longer description of what template contains.
5. In enter the template as a number of lines of text. You type a series of underscore (_)
characters everywhere that you want to create a field that you fill in later.
- 75 -
For example,
Serial #: __________________
tells MainBoss that the template should contain a label “Serial #” followed by a field
that can be filled in with a serial number. The size of the field (the number of characters
that can be typed into it) is the same as the number of underscore characters that you
type.
The maximum length of any line in the template is 80 characters. There is no limit on
the number of lines. A line can contain multiple fields, as in
Field1: _____ Field2: _____ Field3: _____
Note: It’s a good idea to put one or more blank characters at the beginning and end of each
string of underscore characters. This will make the template easier to use and read later on.
6. When you’ve typed the template, click Save to save what you’ve entered, then click
Close to close the window.
___________________________________________________________
Using a Template Specification in an Equipment Record
Once you have created a template specification, you can use it in equipment records. For
example, if you create a template that can hold information about forklift trucks, you can
then use that template in the equipment records for all your forklift trucks.
An equipment record can use more than one template specification. For example, you
might make one template for all automotive vehicles and then separate templates for
vehicles with special characteristics (like forklifts, delivery trucks, etc.). With this set-up, a
forklift truck might have two templates: the generic automobile template, plus a template
that recorded information that was unique to forklifts.
To associate a template with a particular piece of equipment, open that equipment’s record
in the Equipment table (as described in Examining and Editing Equipment Records on
page 68). Then follow these steps:
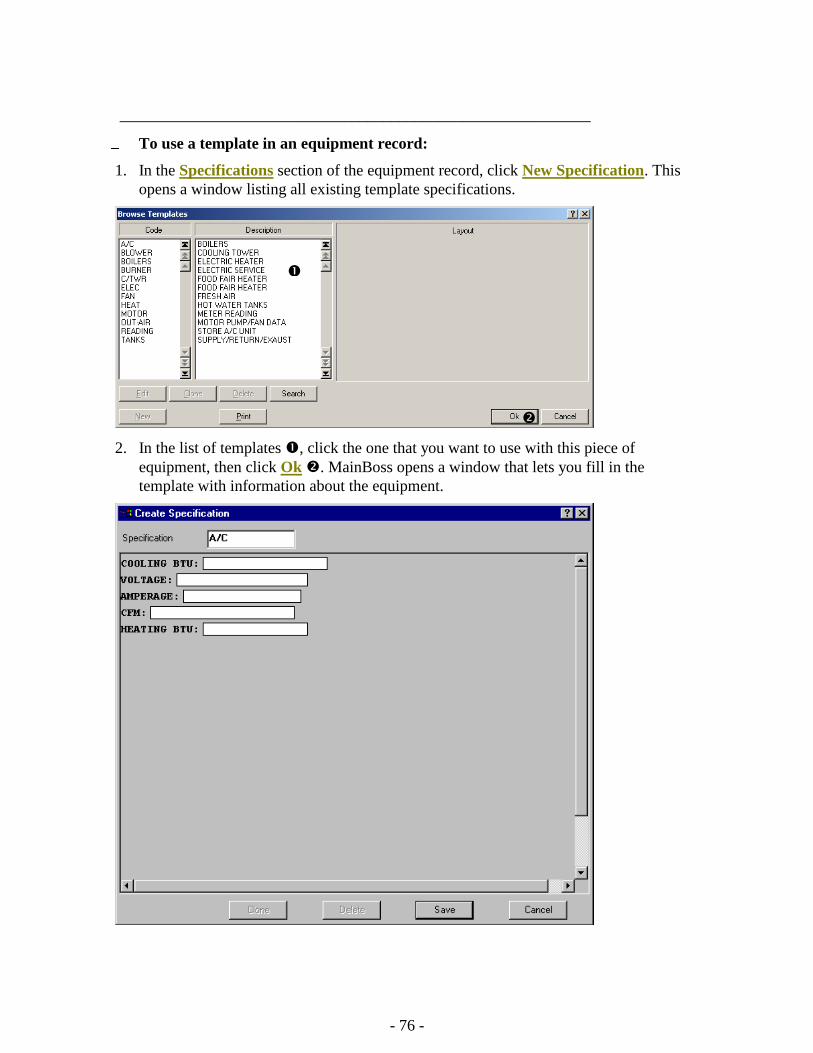
- 76 -
___________________________________________________________
To use a template in an equipment record:
1. In the Specifications section of the equipment record, click New Specification. This
opens a window listing all existing template specifications.
2. In the list of templates , click the one that you want to use with this piece of
equipment, then click Ok . MainBoss opens a window that lets you fill in the
template with information about the equipment.
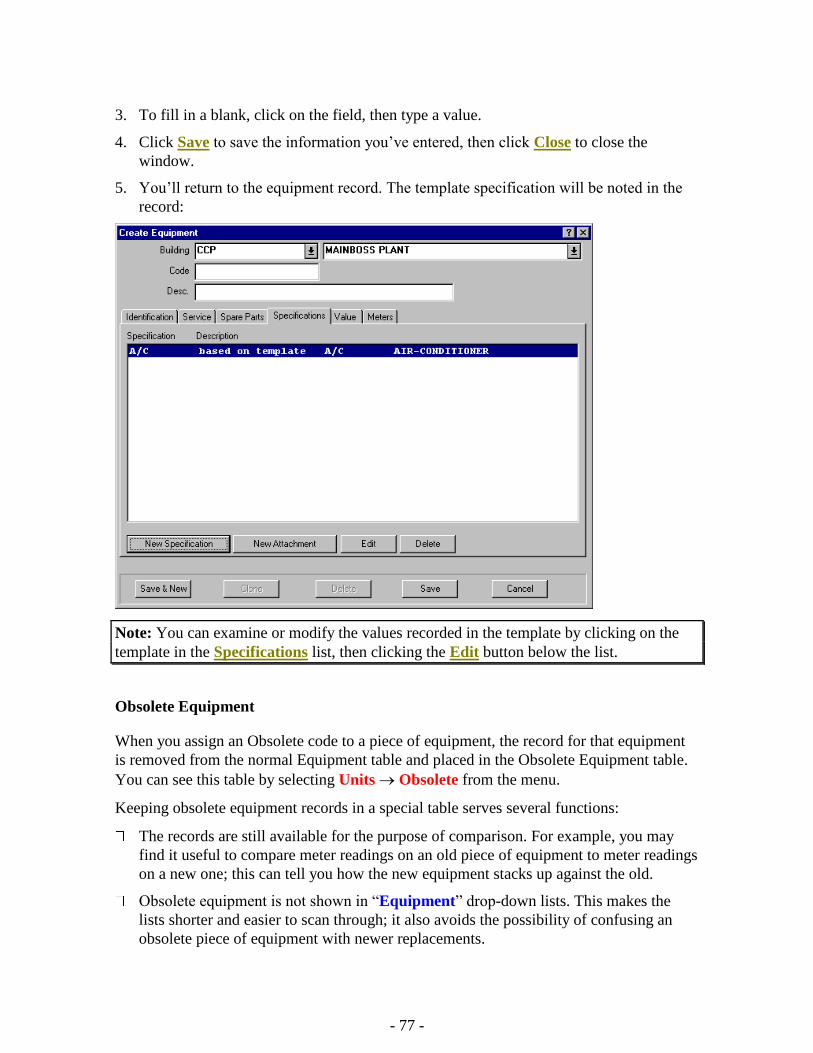
- 77 -
3. To fill in a blank, click on the field, then type a value.
4. Click Save to save the information you’ve entered, then click Close to close the
window.
5. You’ll return to the equipment record. The template specification will be noted in the
record:
Note: You can examine or modify the values recorded in the template by clicking on the
template in the Specifications list, then clicking the Edit button below the list.
Obsolete Equipment
When you assign an Obsolete code to a piece of equipment, the record for that equipment
is removed from the normal Equipment table and placed in the Obsolete Equipment table.
You can see this table by selecting Units Obsolete from the menu.
Keeping obsolete equipment records in a special table serves several functions:
The records are still available for the purpose of comparison. For example, you may
find it useful to compare meter readings on an old piece of equipment to meter readings
on a new one; this can tell you how the new equipment stacks up against the old.
Obsolete equipment is not shown in “Equipment” drop-down lists. This makes the
lists shorter and easier to scan through; it also avoids the possibility of confusing an
obsolete piece of equipment with newer replacements.

- 78 -
If it happens that you want to bring an old piece of equipment back into service,
MainBoss makes it easy to move the record from the Obsolete Equipment table back to
the normal Equipment table.
Note: When you make a piece of equipment obsolete, MainBoss does not automatically
delete information about spare parts associated with that equipment. For example, the
Spare Parts report will show the comment MADE OBSOLETE when a spare part is associated
with obsolete equipment. If you want to remove such lines from the Spare Parts report, you
must open the equipment record for the obsolete equipment and remove all the spare parts
records associated with that equipment.
___________________________________________________________
To return obsolete equipment to service:
1. Open the Obsolete Equipment browser with Units Obsolete:
2. In the list of equipment , click on the equipment you want to bring back into service.
3. Click Activate . This clears the obsolete code that you previously attached to the
equipment record and makes the record available in the normal Equipment table.
Service Contracts
MainBoss can record information about any service contracts on your equipment and
spaces.
Note: You should create appropriate records for the equipment and spaces before you
record information about the service contracts that cover those units.
When you prepare a work order on a particular piece of equipment or space, the Unit
section of the work order will list any existing service contracts on the unit.
___________________________________________________________
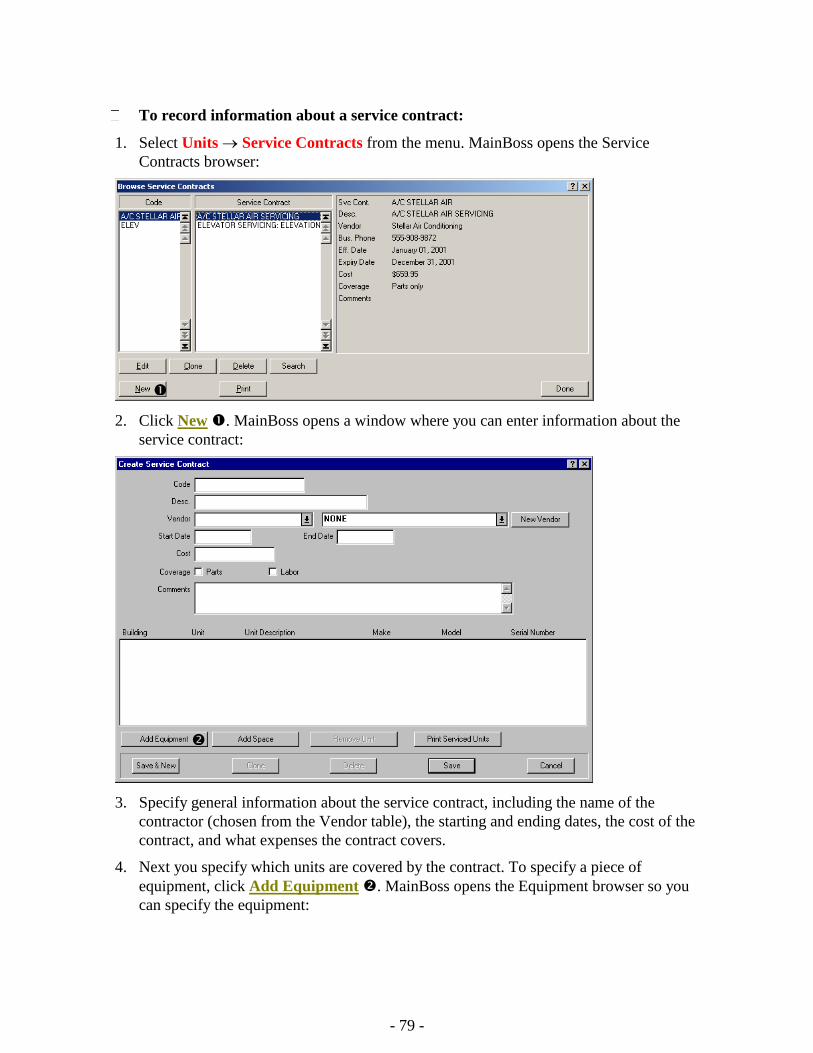
- 79 -
To record information about a service contract:
1. Select Units Service Contracts from the menu. MainBoss opens the Service
Contracts browser:
2. Click New . MainBoss opens a window where you can enter information about the
service contract:
3. Specify general information about the service contract, including the name of the
contractor (chosen from the Vendor table), the starting and ending dates, the cost of the
contract, and what expenses the contract covers.
4. Next you specify which units are covered by the contract. To specify a piece of
equipment, click Add Equipment . MainBoss opens the Equipment browser so you
can specify the equipment:
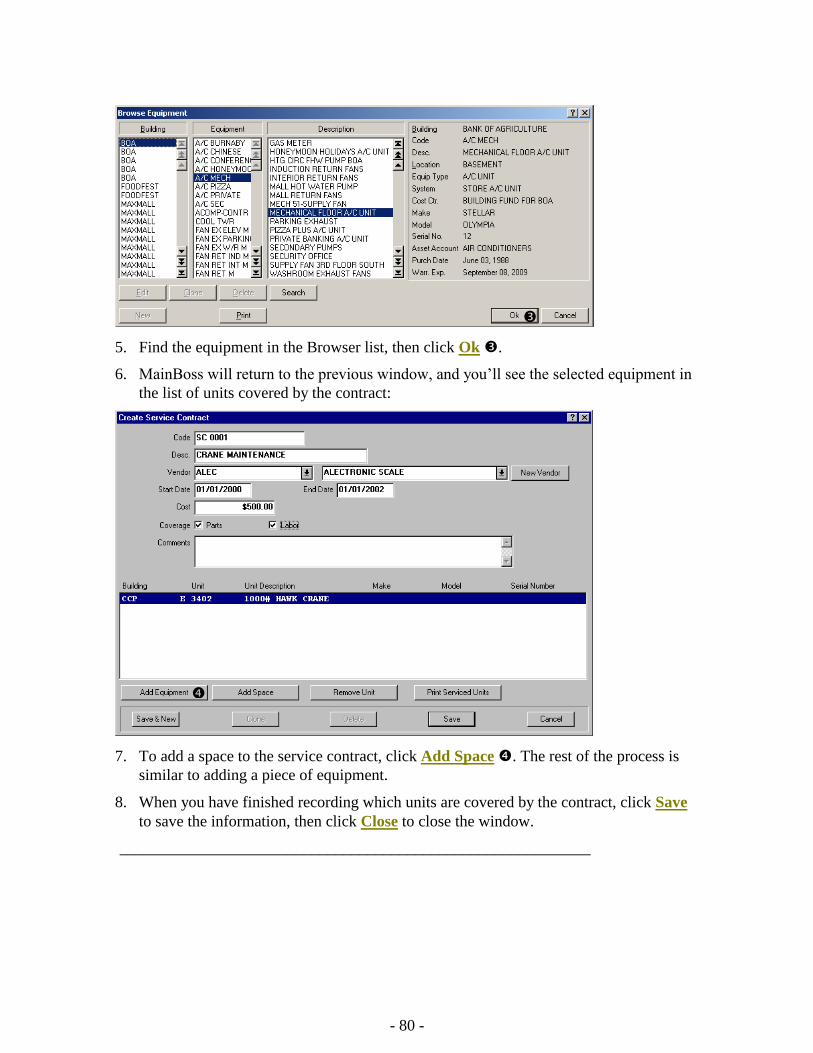
- 80 -
5. Find the equipment in the Browser list, then click Ok .
6. MainBoss will return to the previous window, and you’ll see the selected equipment in
the list of units covered by the contract:
7. To add a space to the service contract, click Add Space . The rest of the process is
similar to adding a piece of equipment.
8. When you have finished recording which units are covered by the contract, click Save
to save the information, then click Close to close the window.
___________________________________________________________
- 81 -
Preventive Maintenance
This chapter introduces the basics of scheduling preventive maintenance (PM). Each PM
job is represented by a work order, just as a repair job would be. However, PM work orders
are created and scheduled by MainBoss itself; you do not make them up individually the
way that you do with corrective jobs.
Here are some terms that MainBoss uses in connection with preventive maintenance:
___________________________________________________________
Task: A description of a particular preventive maintenance operation.
For example, you might write up a task describing everything that should be
done during an oil change on a forklift truck. This could include inspecting
engine belts, checking the filters, etc. in addition to the oil change itself.
Task descriptions are typically written up as checklists or step-by-step
instructions for workers to follow.
___________________________________________________________
Assigned unit: A unit (equipment or space) to which a task has been assigned.
Once you have written up a task description, you must tell MainBoss which
units require that type of maintenance. For example, if the task is an oil
change on a forklift truck, you would assign that task to all your forklift
trucks.
___________________________________________________________
Schedule: A specification of how often a particular PM task needs to be
performed on a unit.
For example, once you have assigned the “oil change” task to one or more
forklift trucks, you must specify a schedule for how often each truck gets
serviced.
Work can be scheduled by date (e.g. every three months) or by meter
reading (e.g. every 3000 miles). MainBoss’s scheduling facilities offer a
good deal of flexibility; for example, you can set up schedules like “The
first Tuesday of every month” or “Every 30 days during winter but not
during the rest of the year.”
___________________________________________________________
- 82 -
___________________________________________________________
Preventive work order: A work order created by MainBoss and based on a task.
For example, suppose a forklift truck is scheduled for an oil change every
three months. Then every three months, MainBoss can create a work order
based on information from the task description. The work order specifies
exactly what workers should do during the oil change.
Since task descriptions are used to create work orders, a task description
may contain similar information to a work order. For example, the
description might say that every time you do an oil change, you need a given
quantity of oil, a new filter, and so on. When MainBoss creates the work
order, it takes this information from the task description and uses it to
reserve materials for the job.
___________________________________________________________
Steps for Handling Preventive Maintenance:
The following list outlines the usual process for dealing with preventive maintenance work
on a particular unit (equipment or space):
Setup Phase:
1. Specify the preventive maintenance task (see Creating Tasks on page 84).
2. Assign the task to the unit (see Scheduling Units for Preventive Maintenance on page
86).
3. Specify a schedule for the task on that unit (see Specifying Task Schedules on page 88).
Use Phase:
4. Tell MainBoss to create work orders for all tasks that should be scheduled in the near
future (see Generating Preventive Maintenance Work Orders on page 94).
5. Adjust the generated work orders as necessary (see Adjusting Preventive Maintenance
Work Orders on page 95).
6. Print preventive maintenance work orders (see Printing Preventive Maintenance Work
Orders on page 97).
7. When a job is done, close the work order. This is done exactly like closing corrective
work orders—for details, see Closing a Work Order on page 49.
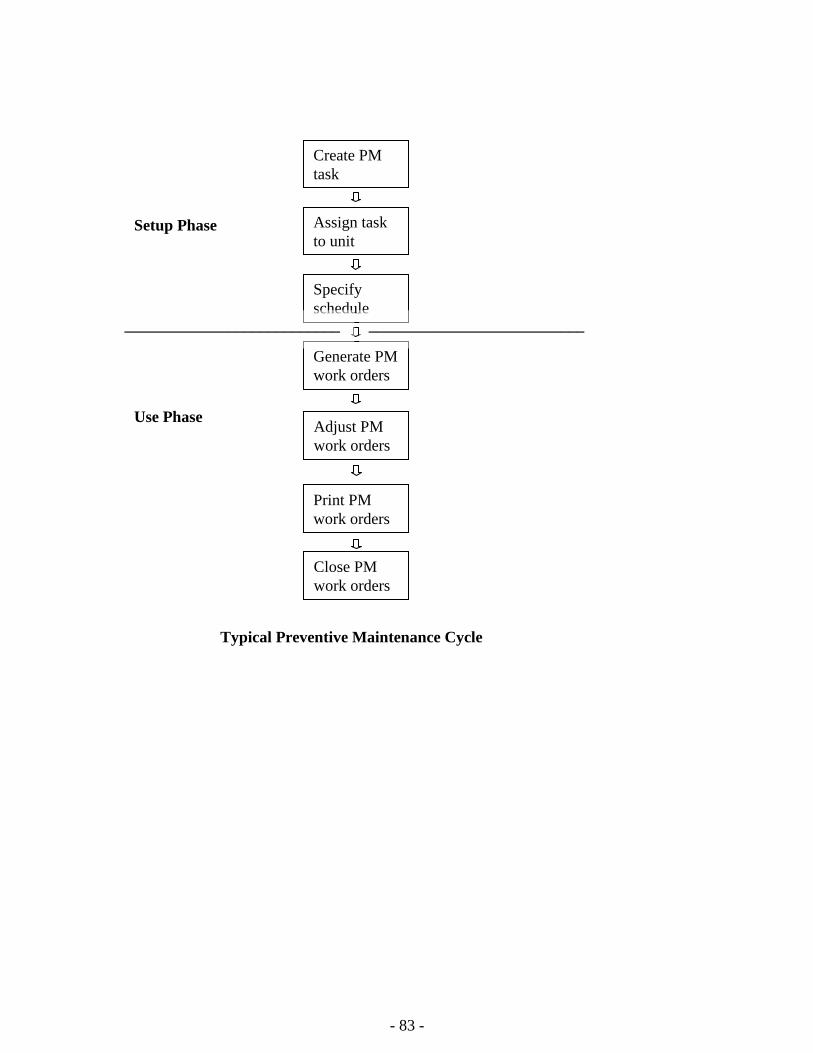
- 83 -
Create PM
task
Assign task
to unit
Specify
schedule
Generate PM
work orders
Print PM
work orders
Typical Preventive Maintenance Cycle
Close PM
work orders
Adjust PM
work orders
Setup Phase
Use Phase
___________________________ ___________________________
- 84 -
Creating Tasks
Tasks have many features in common with work orders. For example, you can assign
personnel and reserve materials for tasks. When MainBoss creates a preventive work order
from a task, it uses information from the task description to fill out the various sections of
the work order.
The task description can contain a lot of information or only a little. For example, if the
same workers will always be assigned to a particular PM job, you can record the workers’
names and time estimates in the task description. MainBoss will use this information to fill
out the Labor section of any work order generated from the task.
On the other hand, if you intend to assign a job to whoever has free time on the day in
question, you might leave the task’s Labor section blank. In this case, you would fill in the
work order’s Labor section during the “Adjust Work Order” step (as described in
Adjusting Preventive Maintenance Work Orders on page 95).
Note: If you divide your workers into Trade classes, you might simply assign a Trade to a
job rather than a specific person. For example, if you have a MECHANIC trade category with
five people in it, you might specify that the person who does the job will belong to that
trade, without specifying which person will actually be assigned.
During the “Adjust Work Order” step, you can also allow for differences between a
particular work order and the original task. For example, suppose the task description says
that Chris is assigned to a particular job, but Chris is sick or on vacation when the job has
to be done. In this case, you can have MainBoss generate the work order from the task as
usual, then change the work order to assign someone else to the job. This is another
example of adjusting work orders after they’ve been generated.
General Principle: Any information you record in the task description is used to fill out
work orders generated from that task. After a work order is generated, you may adjust that
work order to reflect any special considerations.
___________________________________________________________
To create a preventive maintenance task:
1. Select Work Orders Browse Tasks from the menu. This opens the Task browser:
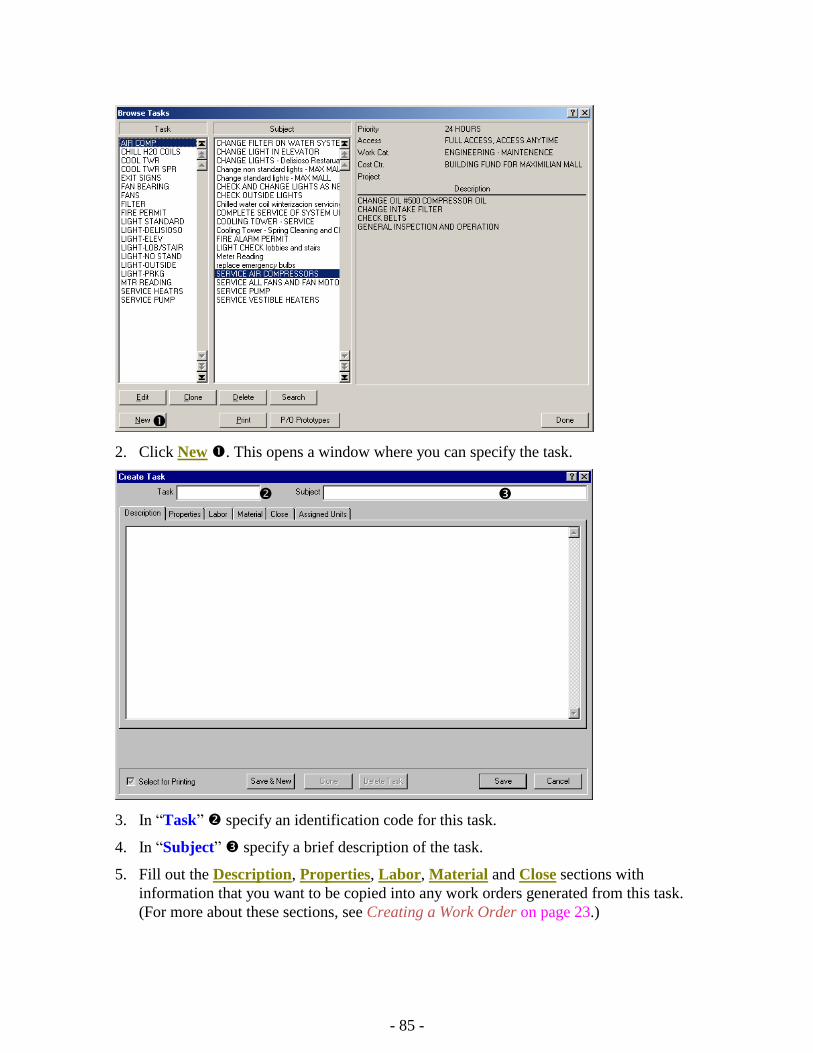
- 85 -
2. Click New . This opens a window where you can specify the task.
3. In “Task” specify an identification code for this task.
4. In “Subject” specify a brief description of the task.
5. Fill out the Description, Properties, Labor, Material and Close sections with
information that you want to be copied into any work orders generated from this task.
(For more about these sections, see Creating a Work Order on page 23.)
- 86 -
6. Fill out the Assigned Units section as described in Scheduling Units for Preventive
Maintenance on page 86.
___________________________________________________________
Prototype Purchase Orders: When a work order uses labor or materials from an outside
contractor, you create a purchase order to handle the costs. When a task uses labor or
materials from an outside contractor, you can create a prototype purchase order to handle
the costs. In the same way that a task can be used to create work orders, a prototype
purchase order can be used to create real purchase orders.
For more on prototype purchase orders, see Prototype Purchase Orders on page 139.
Note: You can print task descriptions using Work Orders Reports Print Tasks.
Scheduling Units for Preventive Maintenance
When you have filled out the other sections of a task description, you use the Assigned
Units section to specify the units to which the task will apply. For example, if the task
describes an inspection procedure for air-conditioning units, you would specify all the air-
conditioners that need that kind of inspection.
When you assign a unit to a task, MainBoss gives you the chance to add extra information
to any work orders created for that unit. For example, suppose that the inspection for a
particular air-conditioner model requires a few more steps than the standard inspection
process. Then the main task description can describe a “generic” inspection, while the unit
assignment information can describe any extra steps needed by this specific air-conditioner
unit.
As another example, suppose that changing the oil on a particular make of forklift truck
requires a special tool that isn’t required with other trucks. In this case, the unit assignment
information for that truck can record that the special tool is required.
When MainBoss creates a preventive work order based on a task, it adds the assigned unit
information to the information given in the task. Therefore, the resulting work order
consists of information from the task, plus information from the assigned unit record.
(Some fields can only contain one piece of information. For example, the “Access” field
can only contain a single access restriction code. In this case, the work order will have the
setting from the assigned unit record instead of the one from the original task.)
___________________________________________________________
To schedule a unit for preventive maintenance:
1. Go to the Assigned Units section of the task description.
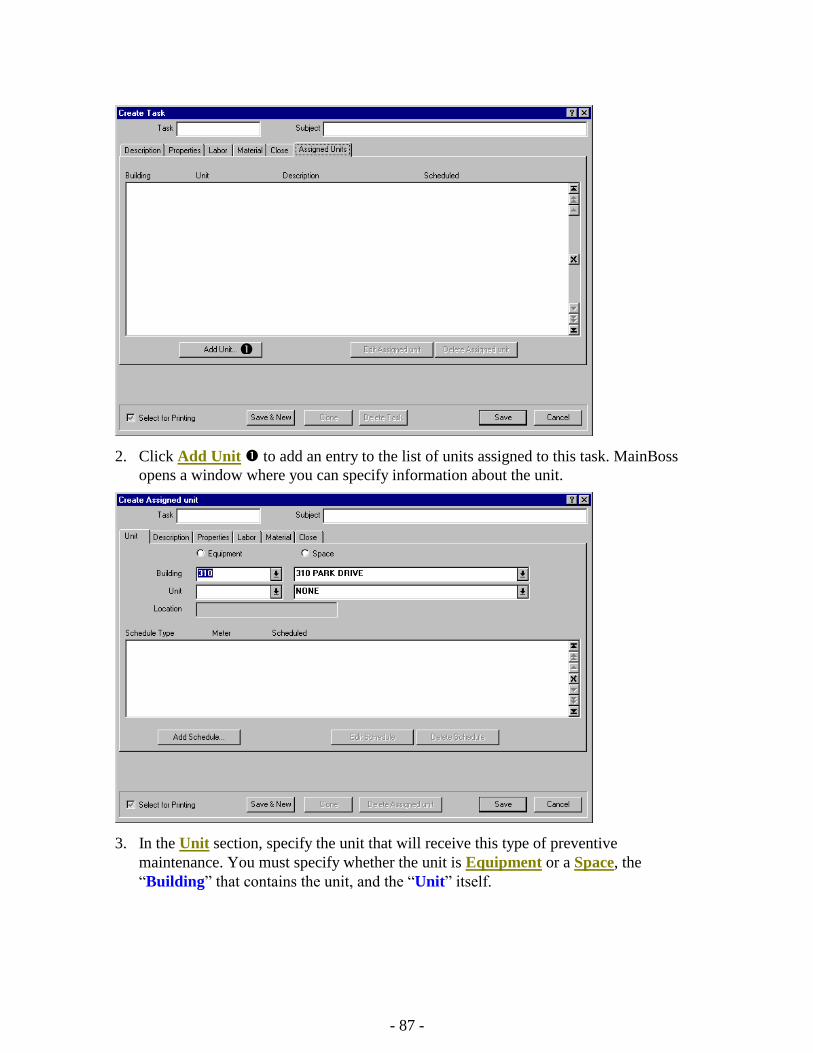
- 87 -
2. Click Add Unit to add an entry to the list of units assigned to this task. MainBoss
opens a window where you can specify information about the unit.
3. In the Unit section, specify the unit that will receive this type of preventive
maintenance. You must specify whether the unit is Equipment or a Space, the
“Building” that contains the unit, and the “Unit” itself.
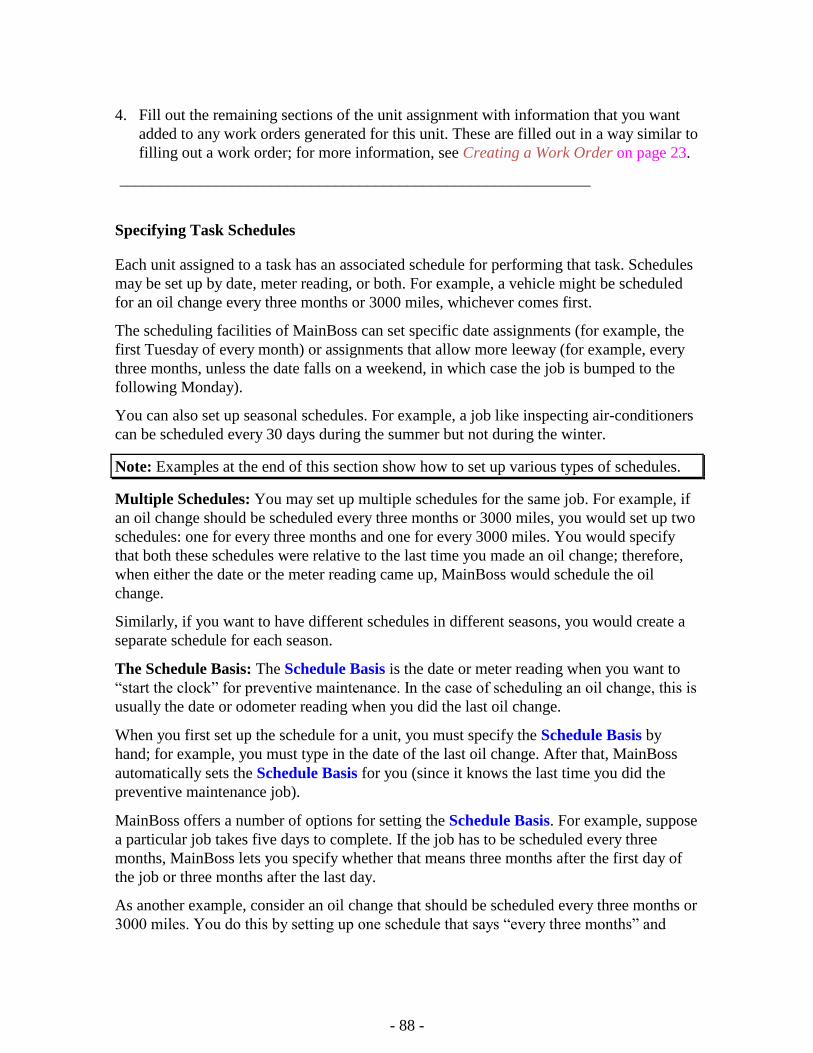
- 88 -
4. Fill out the remaining sections of the unit assignment with information that you want
added to any work orders generated for this unit. These are filled out in a way similar to
filling out a work order; for more information, see Creating a Work Order on page 23.
___________________________________________________________
Specifying Task Schedules
Each unit assigned to a task has an associated schedule for performing that task. Schedules
may be set up by date, meter reading, or both. For example, a vehicle might be scheduled
for an oil change every three months or 3000 miles, whichever comes first.
The scheduling facilities of MainBoss can set specific date assignments (for example, the
first Tuesday of every month) or assignments that allow more leeway (for example, every
three months, unless the date falls on a weekend, in which case the job is bumped to the
following Monday).
You can also set up seasonal schedules. For example, a job like inspecting air-conditioners
can be scheduled every 30 days during the summer but not during the winter.
Note: Examples at the end of this section show how to set up various types of schedules.
Multiple Schedules: You may set up multiple schedules for the same job. For example, if
an oil change should be scheduled every three months or 3000 miles, you would set up two
schedules: one for every three months and one for every 3000 miles. You would specify
that both these schedules were relative to the last time you made an oil change; therefore,
when either the date or the meter reading came up, MainBoss would schedule the oil
change.
Similarly, if you want to have different schedules in different seasons, you would create a
separate schedule for each season.
The Schedule Basis: The Schedule Basis is the date or meter reading when you want to
“start the clock” for preventive maintenance. In the case of scheduling an oil change, this is
usually the date or odometer reading when you did the last oil change.
When you first set up the schedule for a unit, you must specify the Schedule Basis by
hand; for example, you must type in the date of the last oil change. After that, MainBoss
automatically sets the Schedule Basis for you (since it knows the last time you did the
preventive maintenance job).
MainBoss offers a number of options for setting the Schedule Basis. For example, suppose
a particular job takes five days to complete. If the job has to be scheduled every three
months, MainBoss lets you specify whether that means three months after the first day of
the job or three months after the last day.
As another example, consider an oil change that should be scheduled every three months or
3000 miles. You do this by setting up one schedule that says “every three months” and
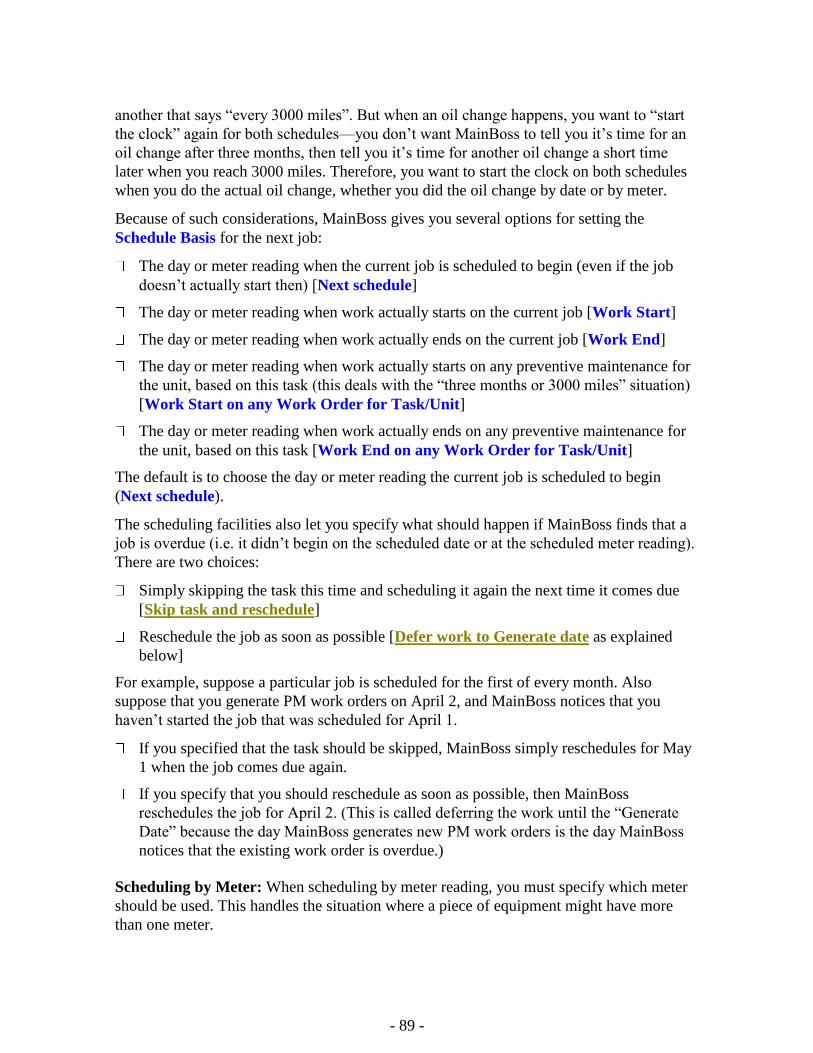
- 89 -
another that says “every 3000 miles”. But when an oil change happens, you want to “start
the clock” again for both schedules—you don’t want MainBoss to tell you it’s time for an
oil change after three months, then tell you it’s time for another oil change a short time
later when you reach 3000 miles. Therefore, you want to start the clock on both schedules
when you do the actual oil change, whether you did the oil change by date or by meter.
Because of such considerations, MainBoss gives you several options for setting the
Schedule Basis for the next job:
The day or meter reading when the current job is scheduled to begin (even if the job
doesn’t actually start then) [Next schedule]
The day or meter reading when work actually starts on the current job [Work Start]
The day or meter reading when work actually ends on the current job [Work End]
The day or meter reading when work actually starts on any preventive maintenance for
the unit, based on this task (this deals with the “three months or 3000 miles” situation)
[Work Start on any Work Order for Task/Unit]
The day or meter reading when work actually ends on any preventive maintenance for
the unit, based on this task [Work End on any Work Order for Task/Unit]
The default is to choose the day or meter reading the current job is scheduled to begin
(Next schedule).
The scheduling facilities also let you specify what should happen if MainBoss finds that a
job is overdue (i.e. it didn’t begin on the scheduled date or at the scheduled meter reading).
There are two choices:
Simply skipping the task this time and scheduling it again the next time it comes due
[Skip task and reschedule]
Reschedule the job as soon as possible [Defer work to Generate date as explained
below]
For example, suppose a particular job is scheduled for the first of every month. Also
suppose that you generate PM work orders on April 2, and MainBoss notices that you
haven’t started the job that was scheduled for April 1.
If you specified that the task should be skipped, MainBoss simply reschedules for May
1 when the job comes due again.
If you specify that you should reschedule as soon as possible, then MainBoss
reschedules the job for April 2. (This is called deferring the work until the “Generate
Date” because the day MainBoss generates new PM work orders is the day MainBoss
notices that the existing work order is overdue.)
Scheduling by Meter: When scheduling by meter reading, you must specify which meter
should be used. This handles the situation where a piece of equipment might have more
than one meter.
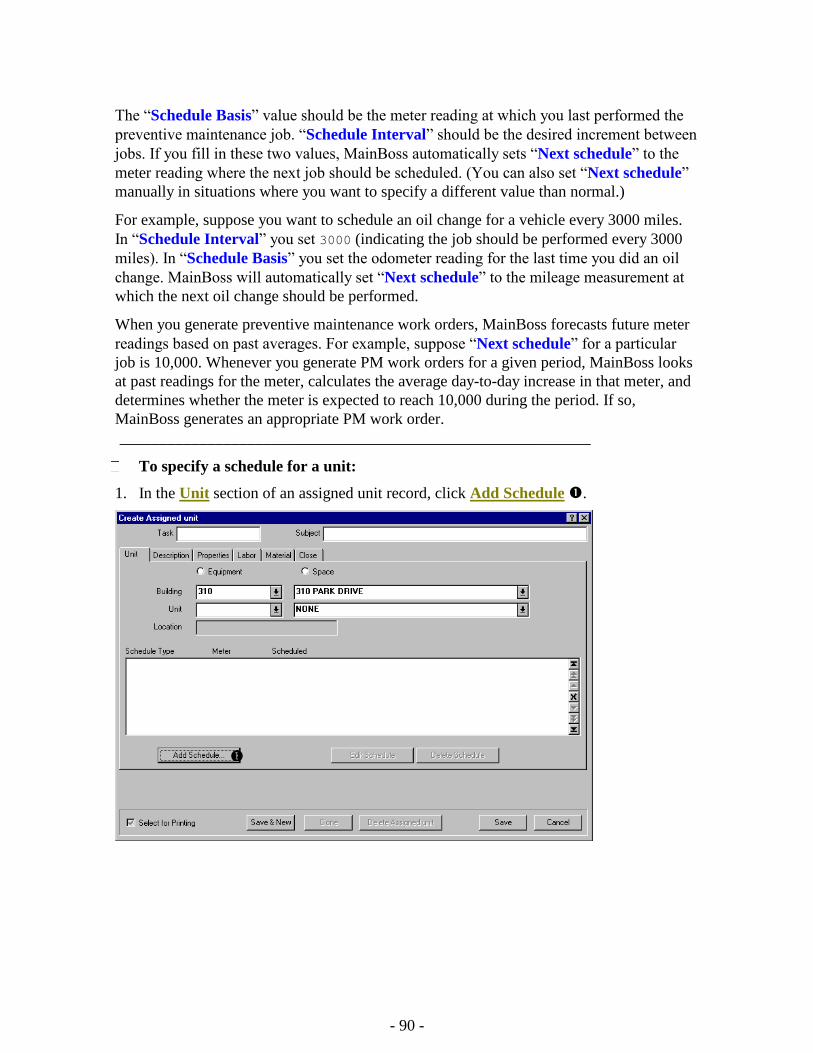
- 90 -
The “Schedule Basis” value should be the meter reading at which you last performed the
preventive maintenance job. “Schedule Interval” should be the desired increment between
jobs. If you fill in these two values, MainBoss automatically sets “Next schedule” to the
meter reading where the next job should be scheduled. (You can also set “Next schedule”
manually in situations where you want to specify a different value than normal.)
For example, suppose you want to schedule an oil change for a vehicle every 3000 miles.
In “Schedule Interval” you set 3000 (indicating the job should be performed every 3000
miles). In “Schedule Basis” you set the odometer reading for the last time you did an oil
change. MainBoss will automatically set “Next schedule” to the mileage measurement at
which the next oil change should be performed.
When you generate preventive maintenance work orders, MainBoss forecasts future meter
readings based on past averages. For example, suppose “Next schedule” for a particular
job is 10,000. Whenever you generate PM work orders for a given period, MainBoss looks
at past readings for the meter, calculates the average day-to-day increase in that meter, and
determines whether the meter is expected to reach 10,000 during the period. If so,
MainBoss generates an appropriate PM work order.
___________________________________________________________
To specify a schedule for a unit:
1. In the Unit section of an assigned unit record, click Add Schedule .

- 91 -
2. MainBoss opens a window where you can specify the schedule for this unit:
3. Specify whether the work will be scheduled By Date or By Meter .
4. Set “Schedule Basis” (typically to the date or meter reading when this PM task was
last performed on the unit). If you are scheduling by meter reading, you must also
specify the meter involved.
5. Set “Schedule Interval” to the length of time or meter readings between one job
and the next. (Time can be set in days, weeks, months, quarters, or years.)
6. For “Set Schedule Basis to” choose an option for controlling what will be the basis
for scheduling the next time this task is done.
7. For “If task is overdue” choose an option for what happens if MainBoss is
generating work orders and finds that a previously generated work order hasn’t been
started yet.
8. Go to the Exceptions section:
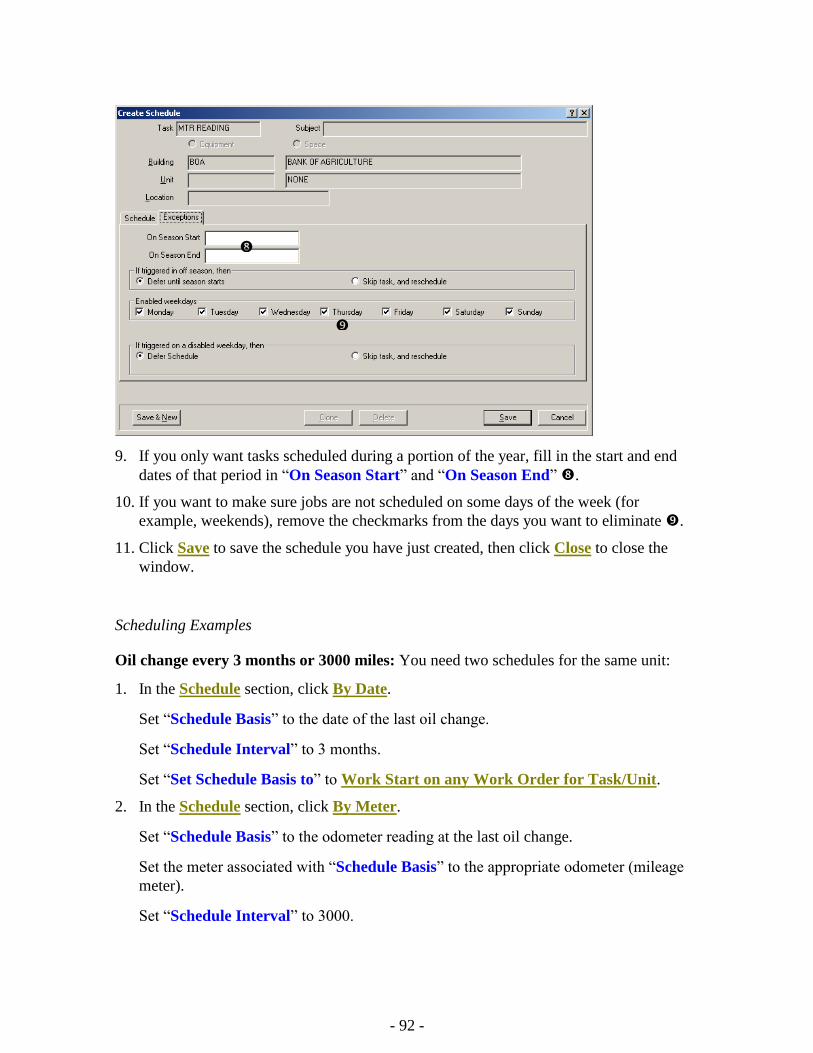
- 92 -
9. If you only want tasks scheduled during a portion of the year, fill in the start and end
dates of that period in “On Season Start” and “On Season End” .
10. If you want to make sure jobs are not scheduled on some days of the week (for
example, weekends), remove the checkmarks from the days you want to eliminate .
11. Click Save to save the schedule you have just created, then click Close to close the
window.
Scheduling Examples
Oil change every 3 months or 3000 miles: You need two schedules for the same unit:
1. In the Schedule section, click By Date.
Set “Schedule Basis” to the date of the last oil change.
Set “Schedule Interval” to 3 months.
Set “Set Schedule Basis to” to Work Start on any Work Order for Task/Unit.
2. In the Schedule section, click By Meter.
Set “Schedule Basis” to the odometer reading at the last oil change.
Set the meter associated with “Schedule Basis” to the appropriate odometer (mileage
meter).
Set “Schedule Interval” to 3000.
- 93 -
Set “Set Schedule Basis to” to Work Start on any Work Order for Task/Unit.
___________________________________________________________
Scheduling a job for the first Tuesday of every month:
In the Schedule section:
Click By Date.
Set “Schedule Basis” to the most recent first Tuesday of the month.
Set “Schedule Interval” to 1 month.
In the Exceptions section:
Remove the checkmarks on every weekday but Tuesday.
A similar techinque can be used for dates like “the second Wednesday of the month”, “the
third Thursday” and so on.
___________________________________________________________
Scheduling a job every month May - October, every three months otherwise: You
need two schedules for the same unit.
1. In the Schedule section, click By Date.
Set “Schedule Basis” to the last date the job was done.
Set “Schedule Interval” to 1 month.
Set “Set Schedule Basis to” to Work Start on any Work Order for Task/Unit.
In the Exceptions section, set “On Season Start” to May 1.
Set “On Season End” to October 31.
Set “If triggered in off season, then” to Defer until season starts.
2. In the Schedule section, click By Date.
Set “Schedule Basis” to the last date the job was done.
Set “Schedule Interval” to 3 months.
Set “Set Schedule Basis to” to Work Start on any Work Order for Task/Unit.
In the Exceptions section, set “On Season Start” to November 1.
Set “On Season End” to April 30.
Set “If triggered in off season, then” to Defer until season starts.
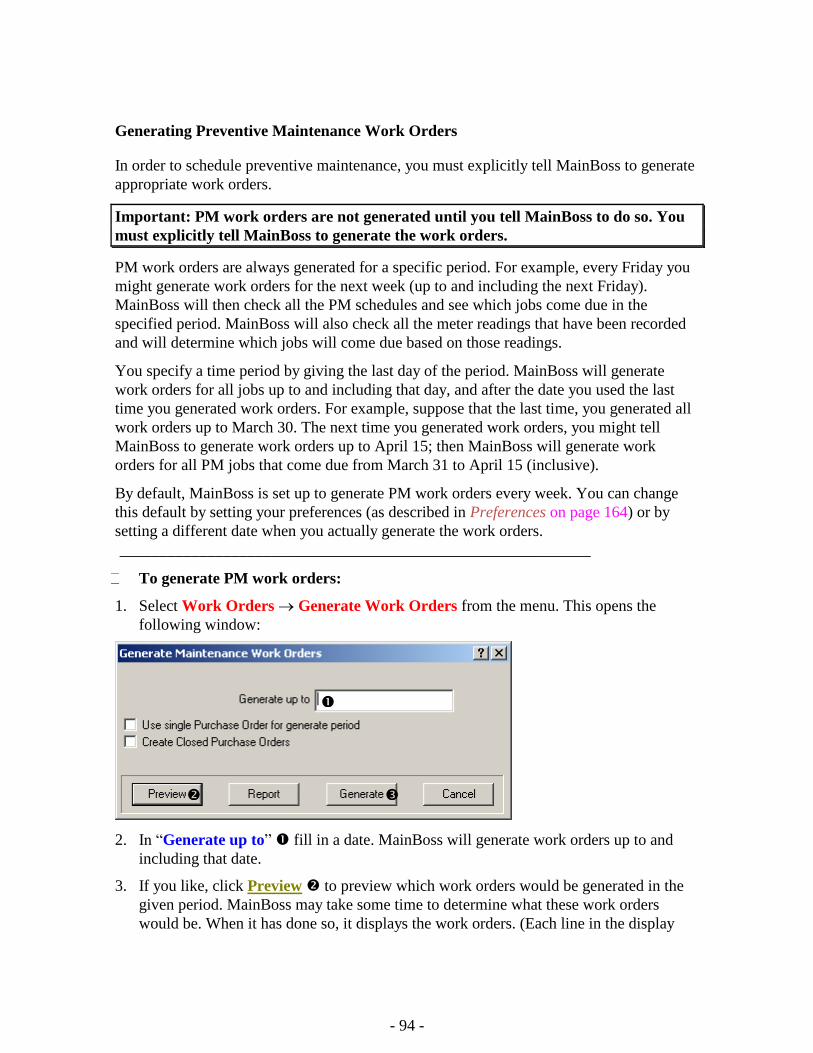
- 94 -
Generating Preventive Maintenance Work Orders
In order to schedule preventive maintenance, you must explicitly tell MainBoss to generate
appropriate work orders.
Important: PM work orders are not generated until you tell MainBoss to do so. You
must explicitly tell MainBoss to generate the work orders.
PM work orders are always generated for a specific period. For example, every Friday you
might generate work orders for the next week (up to and including the next Friday).
MainBoss will then check all the PM schedules and see which jobs come due in the
specified period. MainBoss will also check all the meter readings that have been recorded
and will determine which jobs will come due based on those readings.
You specify a time period by giving the last day of the period. MainBoss will generate
work orders for all jobs up to and including that day, and after the date you used the last
time you generated work orders. For example, suppose that the last time, you generated all
work orders up to March 30. The next time you generated work orders, you might tell
MainBoss to generate work orders up to April 15; then MainBoss will generate work
orders for all PM jobs that come due from March 31 to April 15 (inclusive).
By default, MainBoss is set up to generate PM work orders every week. You can change
this default by setting your preferences (as described in Preferences on page 164) or by
setting a different date when you actually generate the work orders.
___________________________________________________________
To generate PM work orders:
1. Select Work Orders Generate Work Orders from the menu. This opens the
following window:
2. In “Generate up to” fill in a date. MainBoss will generate work orders up to and
including that date.
3. If you like, click Preview to preview which work orders would be generated in the
given period. MainBoss may take some time to determine what these work orders
would be. When it has done so, it displays the work orders. (Each line in the display
- 95 -
has a “disposition” providing information about the generation process. For an
explanation of these dispositions, see the online help.)
4. Click Generate to generate the actual work orders. (MainBoss may take some time
to generate the work orders. When it’s finished, MainBoss displays how many work
orders were actually generated.)
5. Click Close to close the window.
___________________________________________________________
Preview shows what work orders are due to be generated but does not actually create the
work orders. To create the PM work orders, you must click Generate.
Adjusting Preventive Maintenance Work Orders
After MainBoss has generated a set of PM work orders, you may adjust any of those work
orders to reflect special circumstances. For example, suppose that a PM task description
assigns a job to a particular worker, but that worker is sick or on vacation. In this case, you
should adjust the generated work order to assign the job to someone else.
As another example, suppose a vehicle is scheduled for a routine oil change but you’ve
also received a complaint about a slow leak in one of the vehicle’s tires. You may choose
to modify the oil change work order to tell workers to deal with the slow leak too.
You can adjust a work order at any time, but many organizations find it convenient to
review PM work orders immediately after the work orders have been generated. At this
point, they’ll be easy to find in the list of outstanding work orders—they’ll be at the end
because they’ve just been generated.
To adjust a PM work order, follow the instructions for modifying work orders given in
Modifying Work Orders on page 43.
Work Order Schedules
After you have generated PM work orders, it’s often a good idea to check upcoming
schedules for your personnel. For example, if a particular worker has been scheduled to do
several jobs on the same day, work orders might need to be adjusted to give part of the
work to someone else.
MainBoss can display and/or print off a report on the work scheduled for any period. For
example, if you have just generated PM work orders for the upcoming week, you’ll
probably find it useful to get a report on exactly who has been scheduled to do what during
that week.
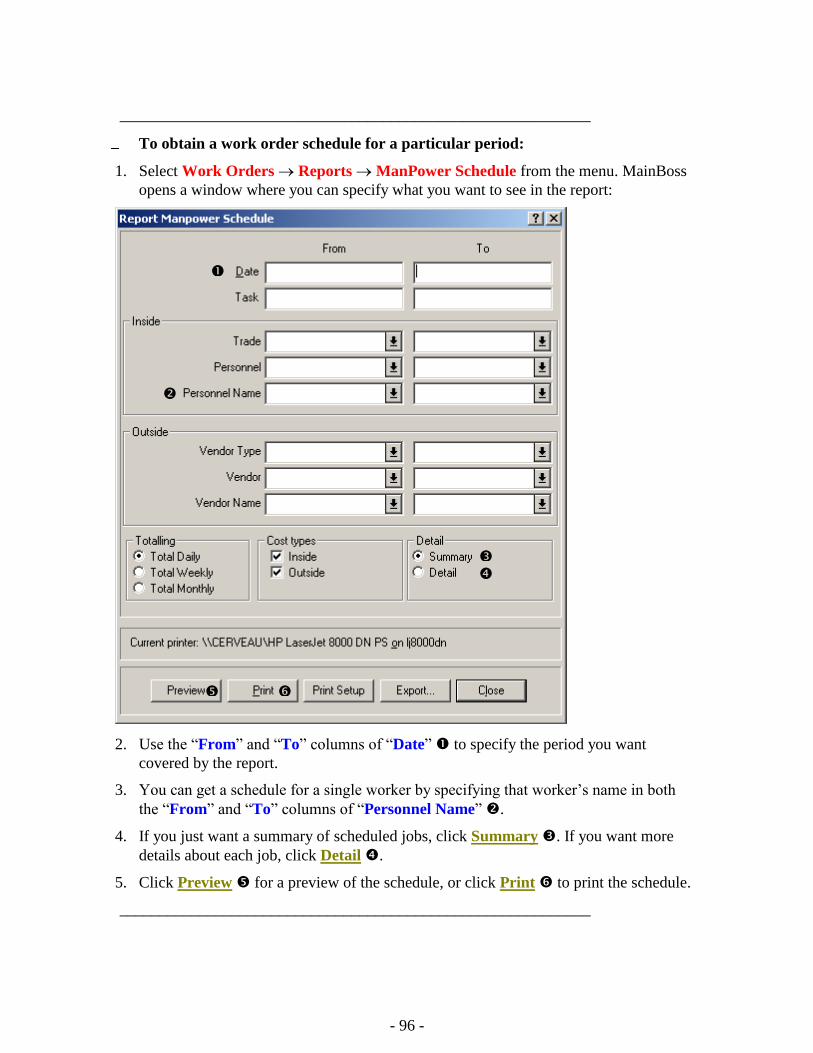
- 96 -
___________________________________________________________
To obtain a work order schedule for a particular period:
1. Select Work Orders Reports ManPower Schedule from the menu. MainBoss
opens a window where you can specify what you want to see in the report:
2. Use the “From” and “To” columns of “Date” to specify the period you want
covered by the report.
3. You can get a schedule for a single worker by specifying that worker’s name in both
the “From” and “To” columns of “Personnel Name” .
4. If you just want a summary of scheduled jobs, click Summary . If you want more
details about each job, click Detail .
5. Click Preview for a preview of the schedule, or click Print to print the schedule.
___________________________________________________________
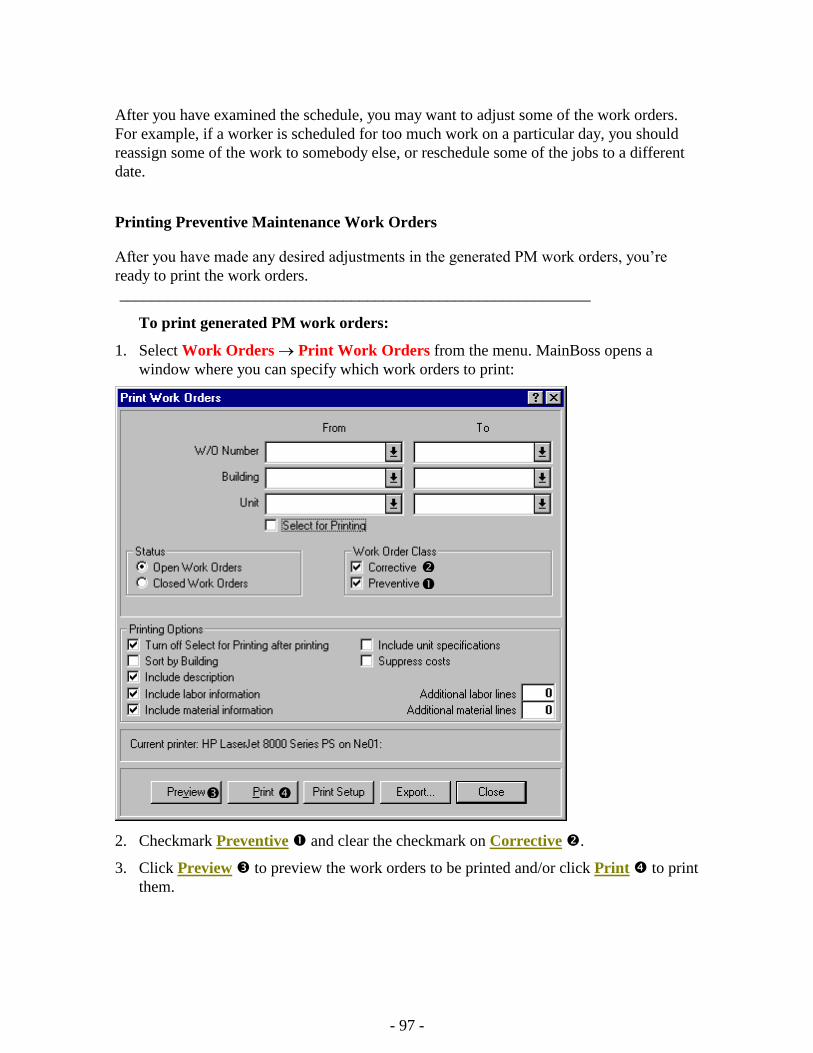
- 97 -
After you have examined the schedule, you may want to adjust some of the work orders.
For example, if a worker is scheduled for too much work on a particular day, you should
reassign some of the work to somebody else, or reschedule some of the jobs to a different
date.
Printing Preventive Maintenance Work Orders
After you have made any desired adjustments in the generated PM work orders, you’re
ready to print the work orders.
___________________________________________________________
To print generated PM work orders:
1. Select Work Orders Print Work Orders from the menu. MainBoss opens a
window where you can specify which work orders to print:
2. Checkmark Preventive and clear the checkmark on Corrective .
3. Click Preview to preview the work orders to be printed and/or click Print to print
them.

- 98 -
Closing Preventive Maintenance Work Orders
You close a preventive maintenance work order the same way you close other work orders.
However, it’s important to make sure that you set the “Work End” date to the date when
the job was actually finished.
- 99 -
General Inventory Control
This chapter outlines how MainBoss helps you keep track of your materials inventory. In
particular, the chapter examines how to record information about what items you have in
inventory and where those items are stored.
Note: This chapter does not look at purchasing and receiving. That topic is covered in
Purchasing and Receiving on page 117.
As inventory materials are used, MainBoss automatically adjusts its database according to
the information recorded when you close a work order. For example, if a particular work
order states that you put a new tire on a forklift truck, MainBoss automatically reduces the
count of tires in your inventory (as of the date of issue as stated on the work order).
You may also make manual adjustments to inventory totals. This lets you account for
breakage, transfers from one storeroom to another, and other factors that influence your
inventory. (See Other Inventory Operations on page 112.)
MainBoss can print off a checklist stating what items a particular storeroom is expected to
contain. Comparing this checklist to the actual storeroom contents lets you reconcile
MainBoss’s records with actual counts. For more information, see Taking Physical
Inventory on page 109.
Inventoried vs. Non-Inventoried Items: Recall that MainBoss distinguishes between two
types of materials:
Inventoried items are materials whose use you monitor on a per-job basis.
Non-inventoried items are materials whose use you do not monitor so precisely, either
because they are used rarely and seldom kept on hand, or because they are too much
trouble to monitor exactly (e.g. masking tape, glue, pencils, and other widely used
items).
The most important difference between the two is that MainBoss doesn’t try to tell you
when to reorder non-inventoried items (because it doesn’t keep track of how much you’re
using). However, you can still include non-inventoried items on purchase orders. For
example, you probably don’t want MainBoss to keep track of every dab of glue that gets
used on a job, but you can still write up a purchase order to buy more glue.
___________________________________________________________
Inventory Category: An inventory category is a name used to group inventory items.
For example, you might create an inventory category named LIGHT BULBS
under which you group all the various kinds of light bulbs used in your
operations.
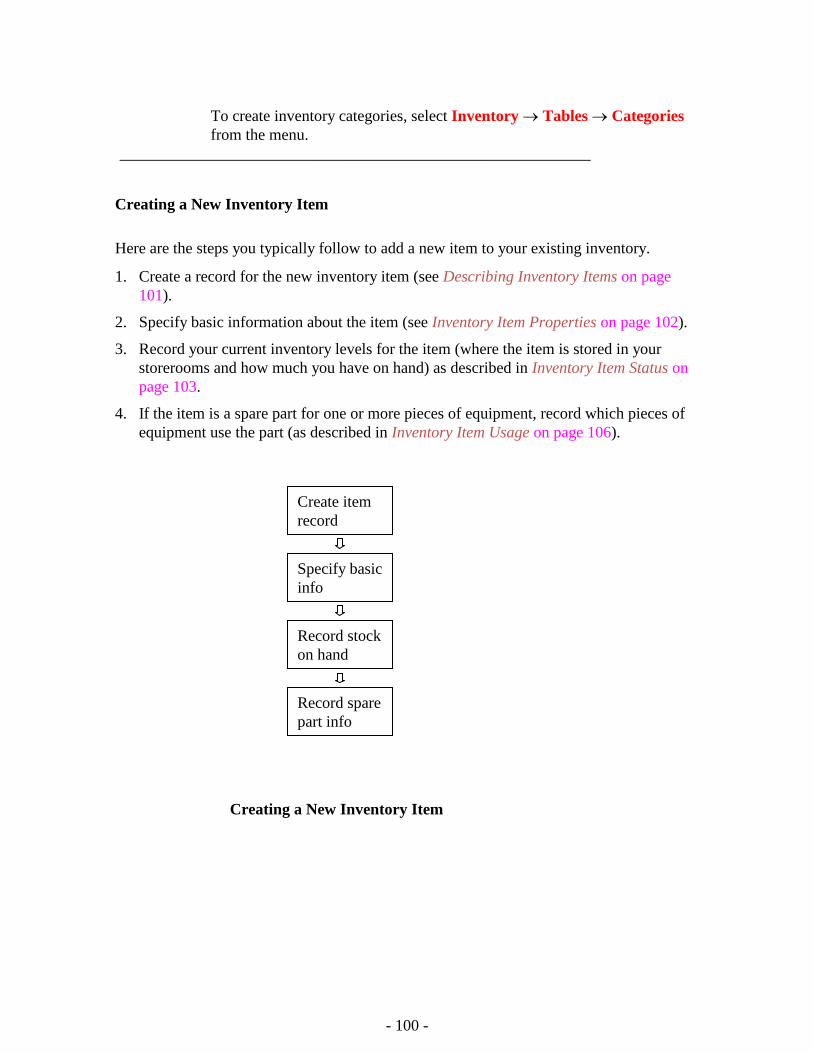
- 100 -
To create inventory categories, select Inventory Tables Categories
from the menu.
___________________________________________________________
Creating a New Inventory Item
Here are the steps you typically follow to add a new item to your existing inventory.
1. Create a record for the new inventory item (see Describing Inventory Items on page
101).
2. Specify basic information about the item (see Inventory Item Properties on page 102).
3. Record your current inventory levels for the item (where the item is stored in your
storerooms and how much you have on hand) as described in Inventory Item Status on
page 103.
4. If the item is a spare part for one or more pieces of equipment, record which pieces of
equipment use the part (as described in Inventory Item Usage on page 106).
Create item
record
Specify basic
info
Record stock
on hand
Record spare
part info
Creating a New Inventory Item
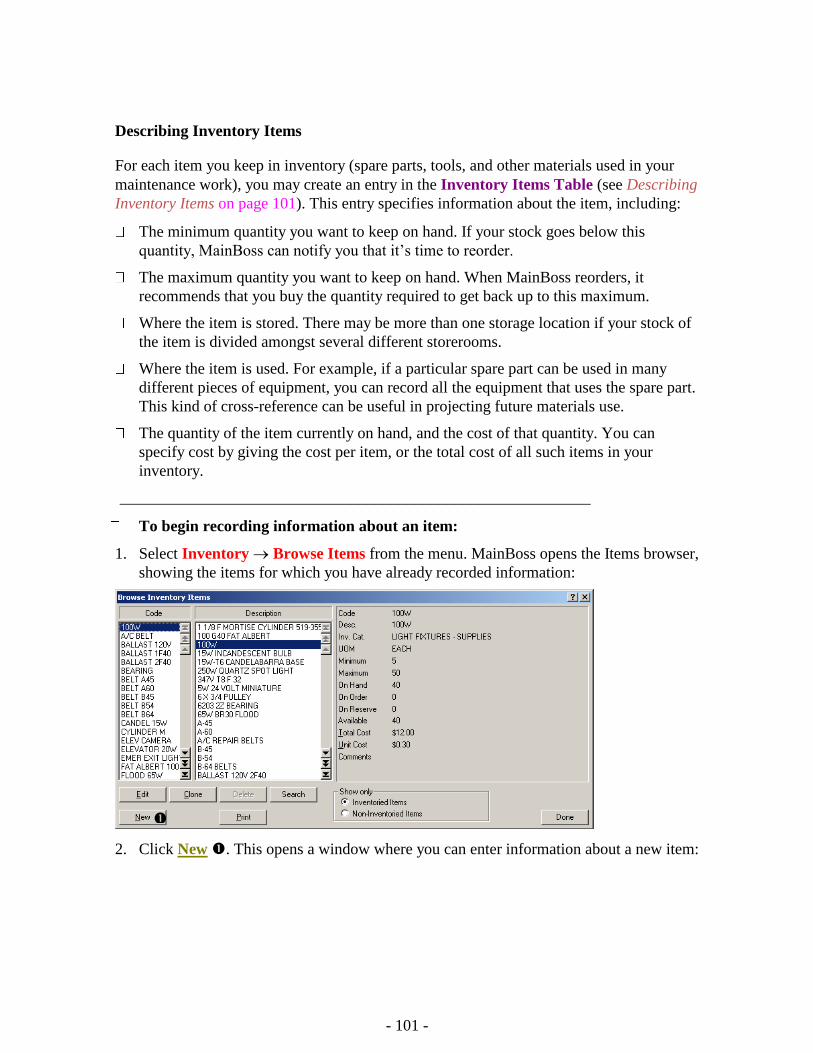
- 101 -
Describing Inventory Items
For each item you keep in inventory (spare parts, tools, and other materials used in your
maintenance work), you may create an entry in the Inventory Items Table (see Describing
Inventory Items on page 101). This entry specifies information about the item, including:
The minimum quantity you want to keep on hand. If your stock goes below this
quantity, MainBoss can notify you that it’s time to reorder.
The maximum quantity you want to keep on hand. When MainBoss reorders, it
recommends that you buy the quantity required to get back up to this maximum.
Where the item is stored. There may be more than one storage location if your stock of
the item is divided amongst several different storerooms.
Where the item is used. For example, if a particular spare part can be used in many
different pieces of equipment, you can record all the equipment that uses the spare part.
This kind of cross-reference can be useful in projecting future materials use.
The quantity of the item currently on hand, and the cost of that quantity. You can
specify cost by giving the cost per item, or the total cost of all such items in your
inventory.
___________________________________________________________
To begin recording information about an item:
1. Select Inventory Browse Items from the menu. MainBoss opens the Items browser,
showing the items for which you have already recorded information:
2. Click New . This opens a window where you can enter information about a new item:
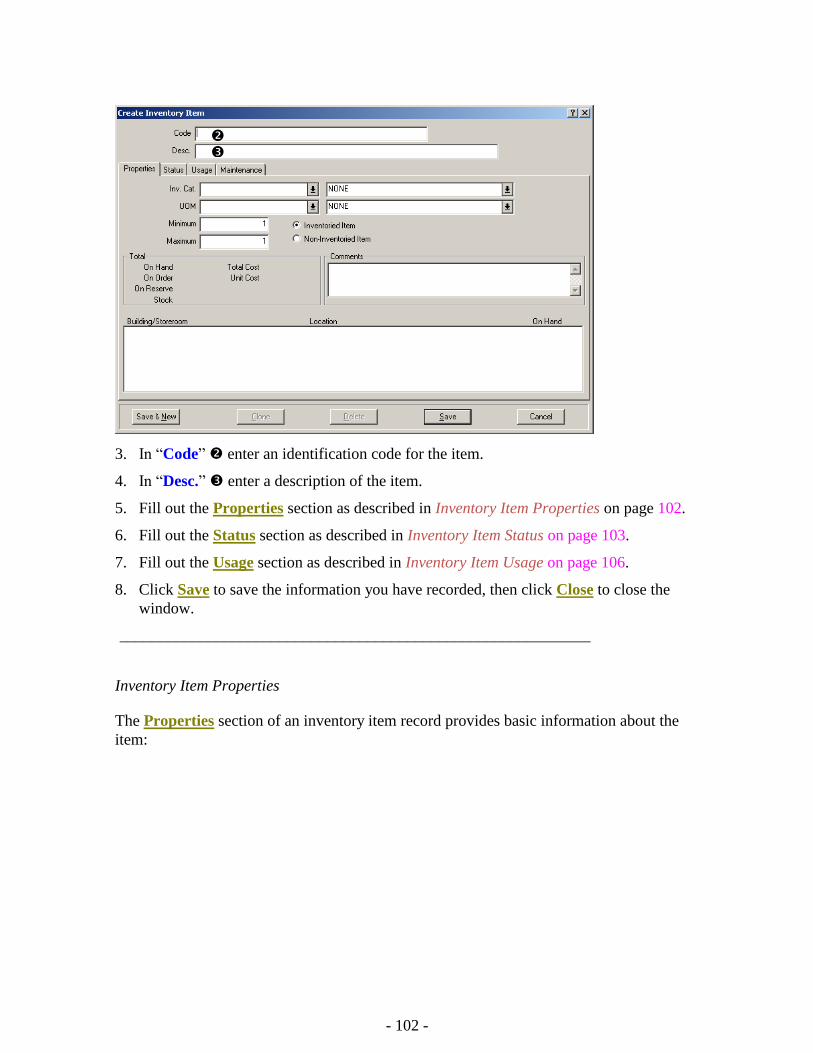
- 102 -
3. In “Code” enter an identification code for the item.
4. In “Desc.” enter a description of the item.
5. Fill out the Properties section as described in Inventory Item Properties on page 102.
6. Fill out the Status section as described in Inventory Item Status on page 103.
7. Fill out the Usage section as described in Inventory Item Usage on page 106.
8. Click Save to save the information you have recorded, then click Close to close the
window.
___________________________________________________________
Inventory Item Properties
The Properties section of an inventory item record provides basic information about the
item:
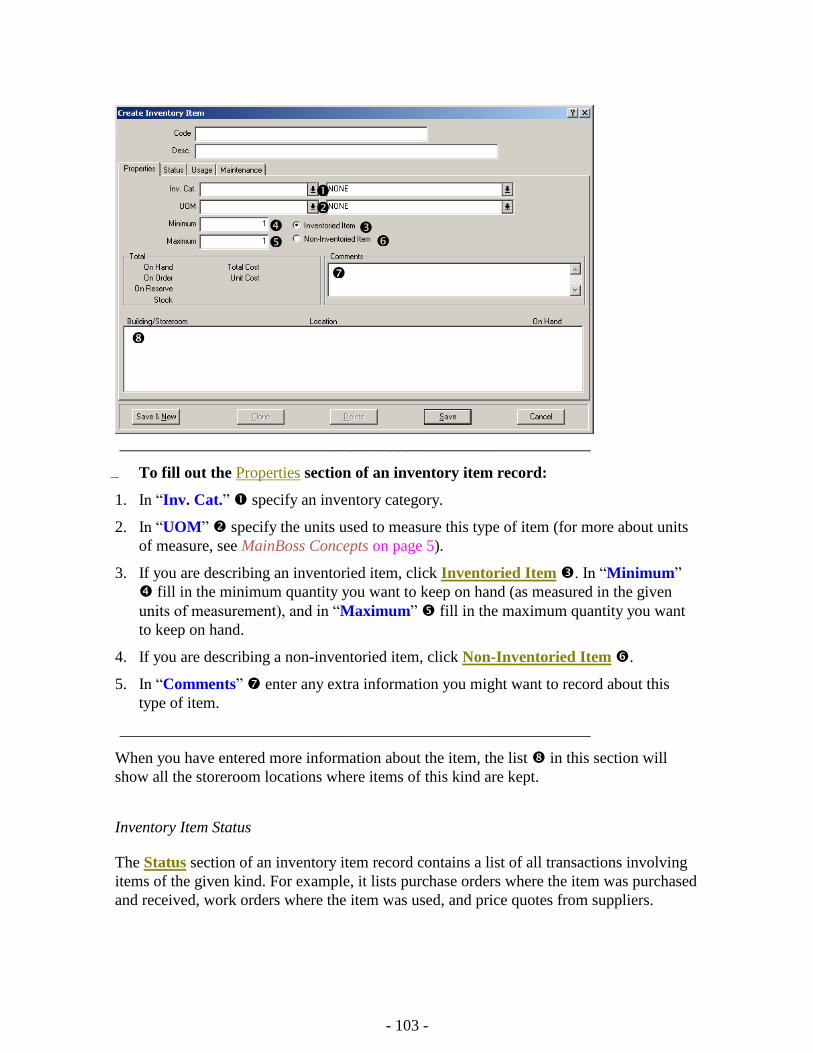
- 103 -
___________________________________________________________
To fill out the Properties section of an inventory item record:
1. In “Inv. Cat.” specify an inventory category.
2. In “UOM” specify the units used to measure this type of item (for more about units
of measure, see MainBoss Concepts on page 5).
3. If you are describing an inventoried item, click Inventoried Item . In “Minimum”
fill in the minimum quantity you want to keep on hand (as measured in the given
units of measurement), and in “Maximum” fill in the maximum quantity you want
to keep on hand.
4. If you are describing a non-inventoried item, click Non-Inventoried Item .
5. In “Comments” enter any extra information you might want to record about this
type of item.
___________________________________________________________
When you have entered more information about the item, the list in this section will
show all the storeroom locations where items of this kind are kept.
Inventory Item Status
The Status section of an inventory item record contains a list of all transactions involving
items of the given kind. For example, it lists purchase orders where the item was purchased
and received, work orders where the item was used, and price quotes from suppliers.
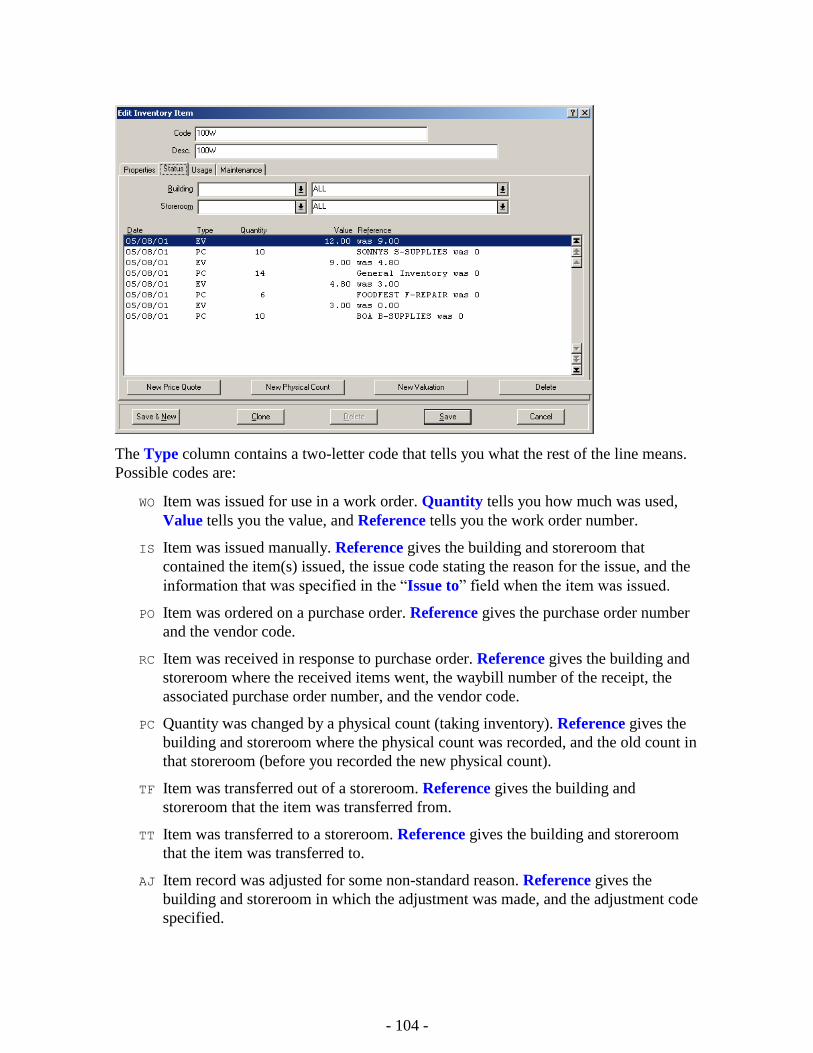
- 104 -
The Type column contains a two-letter code that tells you what the rest of the line means.
Possible codes are:
WO Item was issued for use in a work order. Quantity tells you how much was used,
Value tells you the value, and Reference tells you the work order number.
IS Item was issued manually. Reference gives the building and storeroom that
contained the item(s) issued, the issue code stating the reason for the issue, and the
information that was specified in the “Issue to” field when the item was issued.
PO Item was ordered on a purchase order. Reference gives the purchase order number
and the vendor code.
RC Item was received in response to purchase order. Reference gives the building and
storeroom where the received items went, the waybill number of the receipt, the
associated purchase order number, and the vendor code.
PC Quantity was changed by a physical count (taking inventory). Reference gives the
building and storeroom where the physical count was recorded, and the old count in
that storeroom (before you recorded the new physical count).
TF Item was transferred out of a storeroom. Reference gives the building and
storeroom that the item was transferred from.
TT Item was transferred to a storeroom. Reference gives the building and storeroom
that the item was transferred to.
AJ Item record was adjusted for some non-standard reason. Reference gives the
building and storeroom in which the adjustment was made, and the adjustment code
specified.
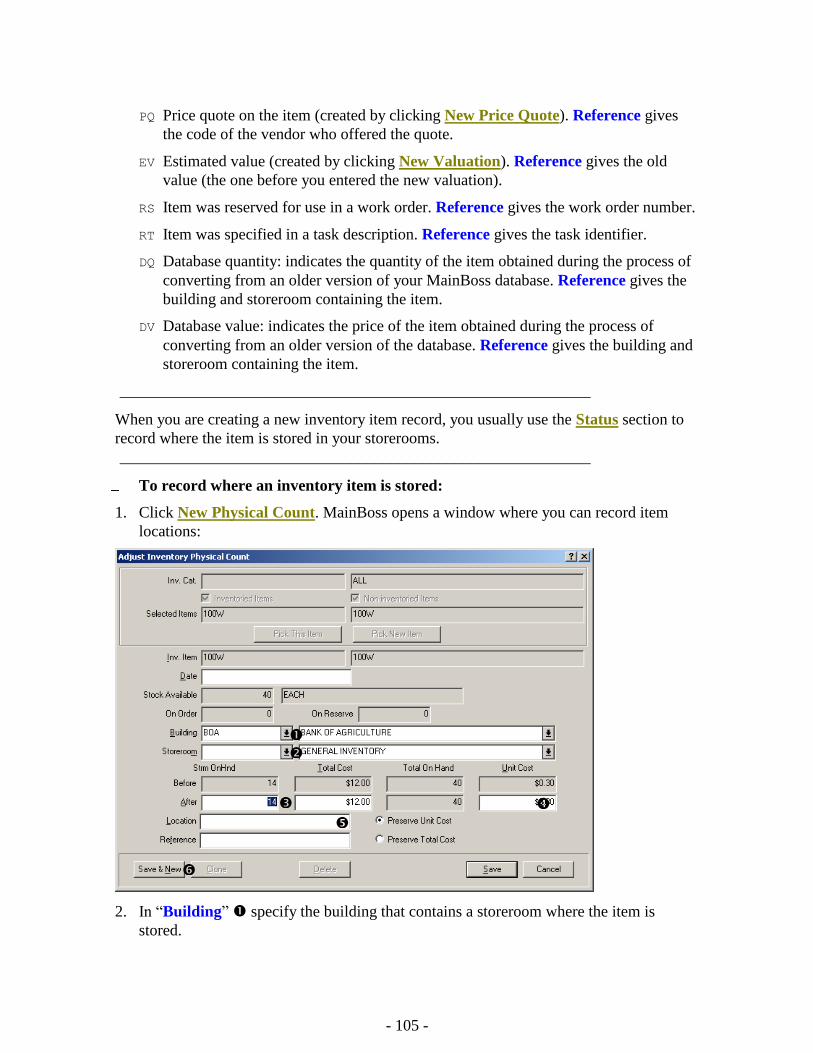
- 105 -
PQ Price quote on the item (created by clicking New Price Quote). Reference gives
the code of the vendor who offered the quote.
EV Estimated value (created by clicking New Valuation). Reference gives the old
value (the one before you entered the new valuation).
RS Item was reserved for use in a work order. Reference gives the work order number.
RT Item was specified in a task description. Reference gives the task identifier.
DQ Database quantity: indicates the quantity of the item obtained during the process of
converting from an older version of your MainBoss database. Reference gives the
building and storeroom containing the item.
DV Database value: indicates the price of the item obtained during the process of
converting from an older version of the database. Reference gives the building and
storeroom containing the item.
___________________________________________________________
When you are creating a new inventory item record, you usually use the Status section to
record where the item is stored in your storerooms.
___________________________________________________________
To record where an inventory item is stored:
1. Click New Physical Count. MainBoss opens a window where you can record item
locations:
2. In “Building” specify the building that contains a storeroom where the item is
stored.
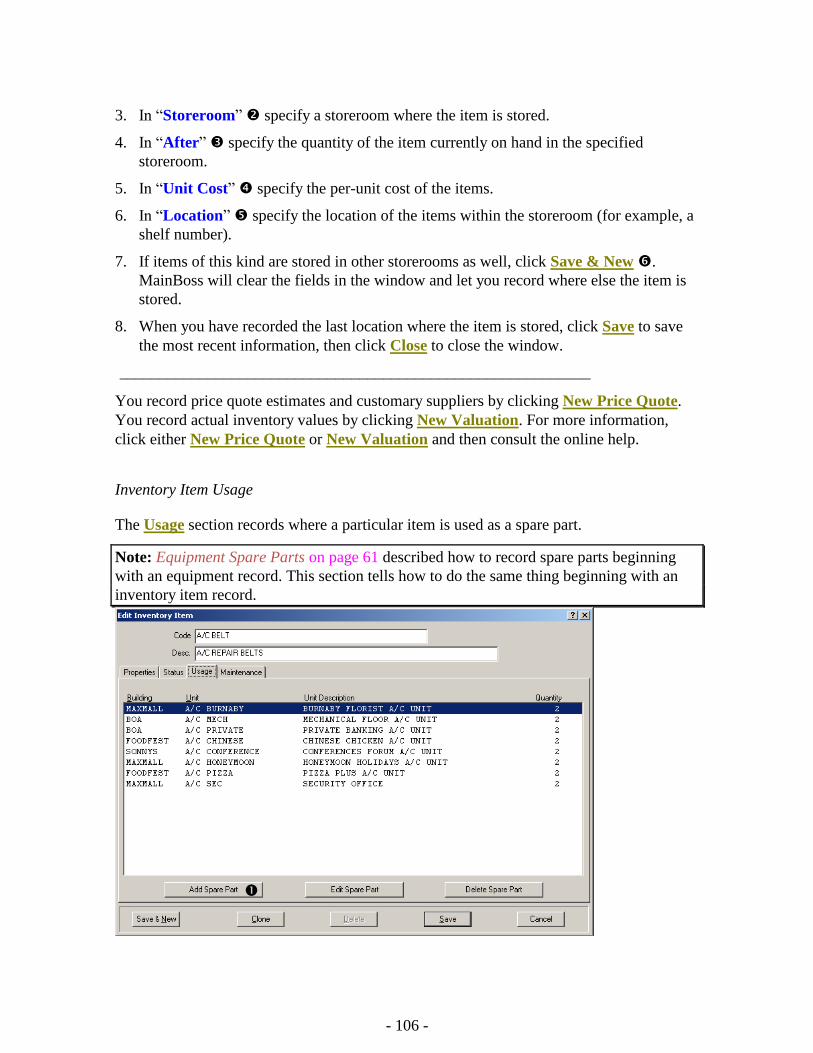
- 106 -
3. In “Storeroom” specify a storeroom where the item is stored.
4. In “After” specify the quantity of the item currently on hand in the specified
storeroom.
5. In “Unit Cost” specify the per-unit cost of the items.
6. In “Location” specify the location of the items within the storeroom (for example, a
shelf number).
7. If items of this kind are stored in other storerooms as well, click Save & New .
MainBoss will clear the fields in the window and let you record where else the item is
stored.
8. When you have recorded the last location where the item is stored, click Save to save
the most recent information, then click Close to close the window.
___________________________________________________________
You record price quote estimates and customary suppliers by clicking New Price Quote.
You record actual inventory values by clicking New Valuation. For more information,
click either New Price Quote or New Valuation and then consult the online help.
Inventory Item Usage
The Usage section records where a particular item is used as a spare part.
Note: Equipment Spare Parts on page 61 described how to record spare parts beginning
with an equipment record. This section tells how to do the same thing beginning with an
inventory item record.
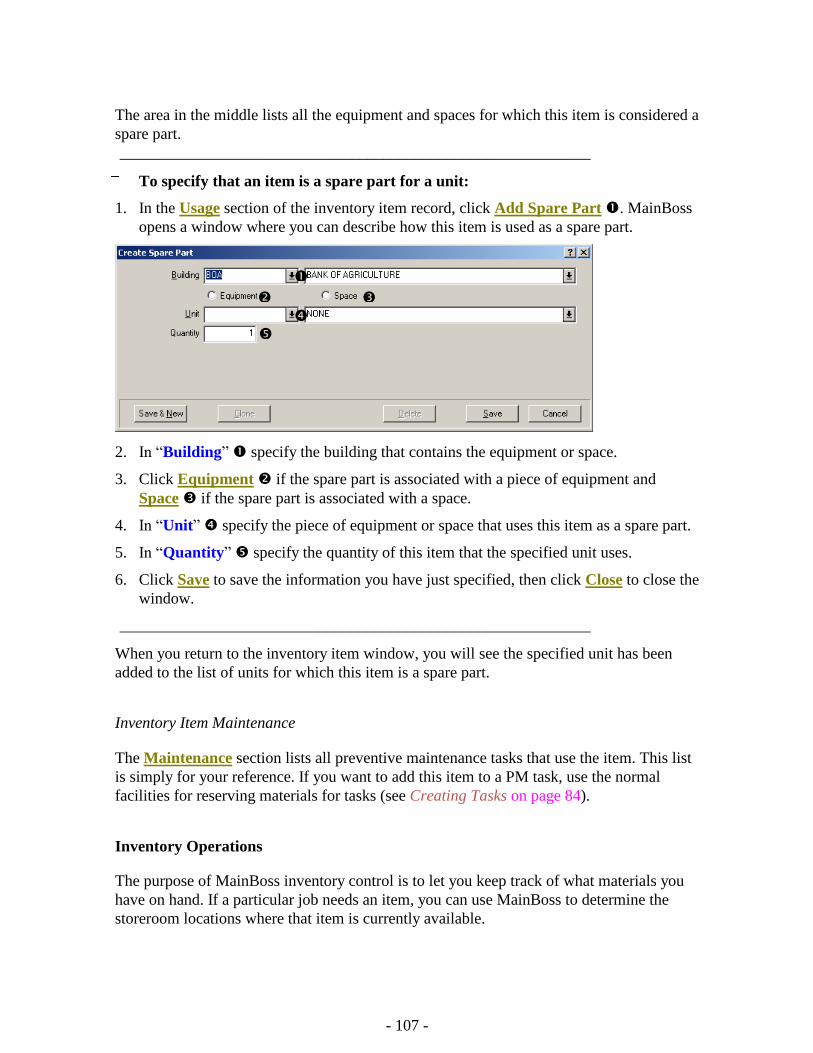
- 107 -
The area in the middle lists all the equipment and spaces for which this item is considered a
spare part.
___________________________________________________________
To specify that an item is a spare part for a unit:
1. In the Usage section of the inventory item record, click Add Spare Part . MainBoss
opens a window where you can describe how this item is used as a spare part.
2. In “Building” specify the building that contains the equipment or space.
3. Click Equipment if the spare part is associated with a piece of equipment and
Space if the spare part is associated with a space.
4. In “Unit” specify the piece of equipment or space that uses this item as a spare part.
5. In “Quantity” specify the quantity of this item that the specified unit uses.
6. Click Save to save the information you have just specified, then click Close to close the
window.
___________________________________________________________
When you return to the inventory item window, you will see the specified unit has been
added to the list of units for which this item is a spare part.
Inventory Item Maintenance
The Maintenance section lists all preventive maintenance tasks that use the item. This list
is simply for your reference. If you want to add this item to a PM task, use the normal
facilities for reserving materials for tasks (see Creating Tasks on page 84).
Inventory Operations
The purpose of MainBoss inventory control is to let you keep track of what materials you
have on hand. If a particular job needs an item, you can use MainBoss to determine the
storeroom locations where that item is currently available.
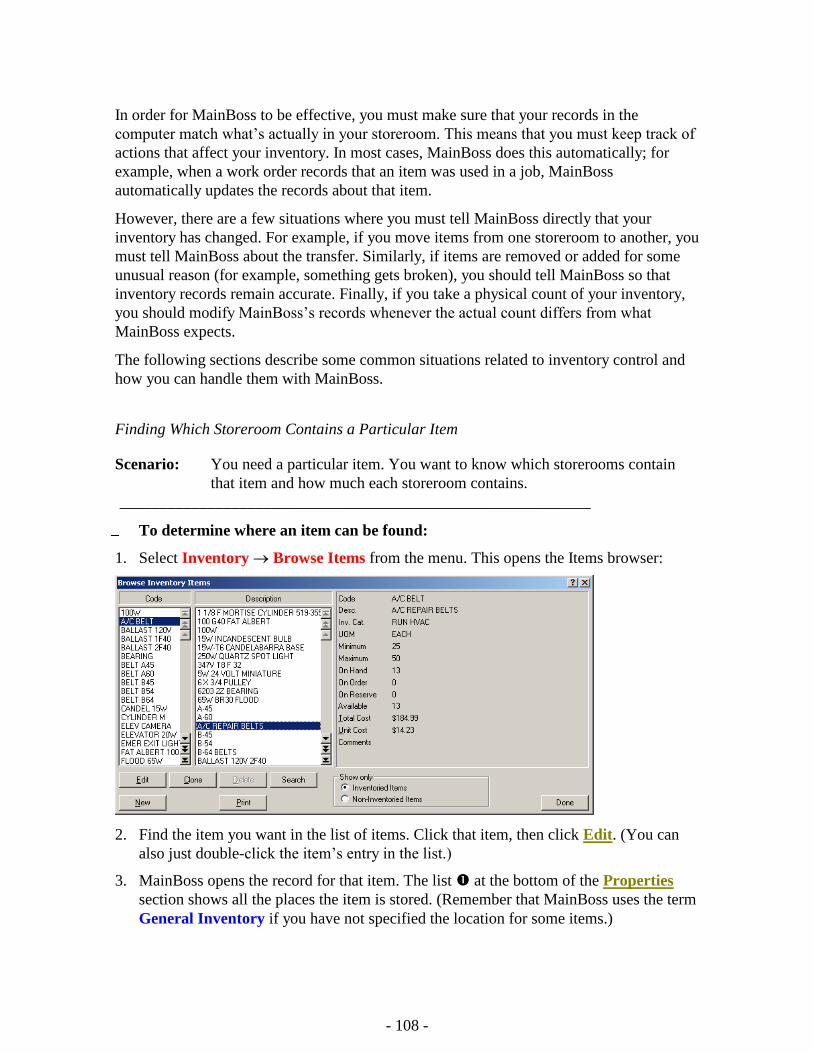
- 108 -
In order for MainBoss to be effective, you must make sure that your records in the
computer match what’s actually in your storeroom. This means that you must keep track of
actions that affect your inventory. In most cases, MainBoss does this automatically; for
example, when a work order records that an item was used in a job, MainBoss
automatically updates the records about that item.
However, there are a few situations where you must tell MainBoss directly that your
inventory has changed. For example, if you move items from one storeroom to another, you
must tell MainBoss about the transfer. Similarly, if items are removed or added for some
unusual reason (for example, something gets broken), you should tell MainBoss so that
inventory records remain accurate. Finally, if you take a physical count of your inventory,
you should modify MainBoss’s records whenever the actual count differs from what
MainBoss expects.
The following sections describe some common situations related to inventory control and
how you can handle them with MainBoss.
Finding Which Storeroom Contains a Particular Item
Scenario: You need a particular item. You want to know which storerooms contain
that item and how much each storeroom contains.
___________________________________________________________
To determine where an item can be found:
1. Select Inventory Browse Items from the menu. This opens the Items browser:
2. Find the item you want in the list of items. Click that item, then click Edit. (You can
also just double-click the item’s entry in the list.)
3. MainBoss opens the record for that item. The list at the bottom of the Properties
section shows all the places the item is stored. (Remember that MainBoss uses the term
General Inventory if you have not specified the location for some items.)

- 109 -
___________________________________________________________
Taking Physical Inventory
Keeping an accurate inventory, even with a perpetual inventory such as the one in
MainBoss, is notoriously difficult. For this reason, most organizations periodically take a
physical count of their stock.
There are several common approaches to taking a physical count of your stock:
Periodic inventory: Closing down all your maintenance operations for a time and doing
a complete count in all your storerooms
Perpetual inventory: Every time you issue or receive a particular item, you take a count
of the quantity of that item in the same location
Cycle audit: Periodically selecting a type of inventory item and counting your complete
stock of that item
Cyclical inventory: Progressively counting parts of your stock until you have counted
everything; for example, you might take inventory in one storeroom a month until you
have covered all your storerooms. Once you have finished, you start the cycle again at
the beginning.
After taking inventory by any of the above methods, you should compare the numbers from
the physical count to the numbers in MainBoss’s records. If there is a disagreement, you
should update MainBoss’s records to reflect the actual numbers.
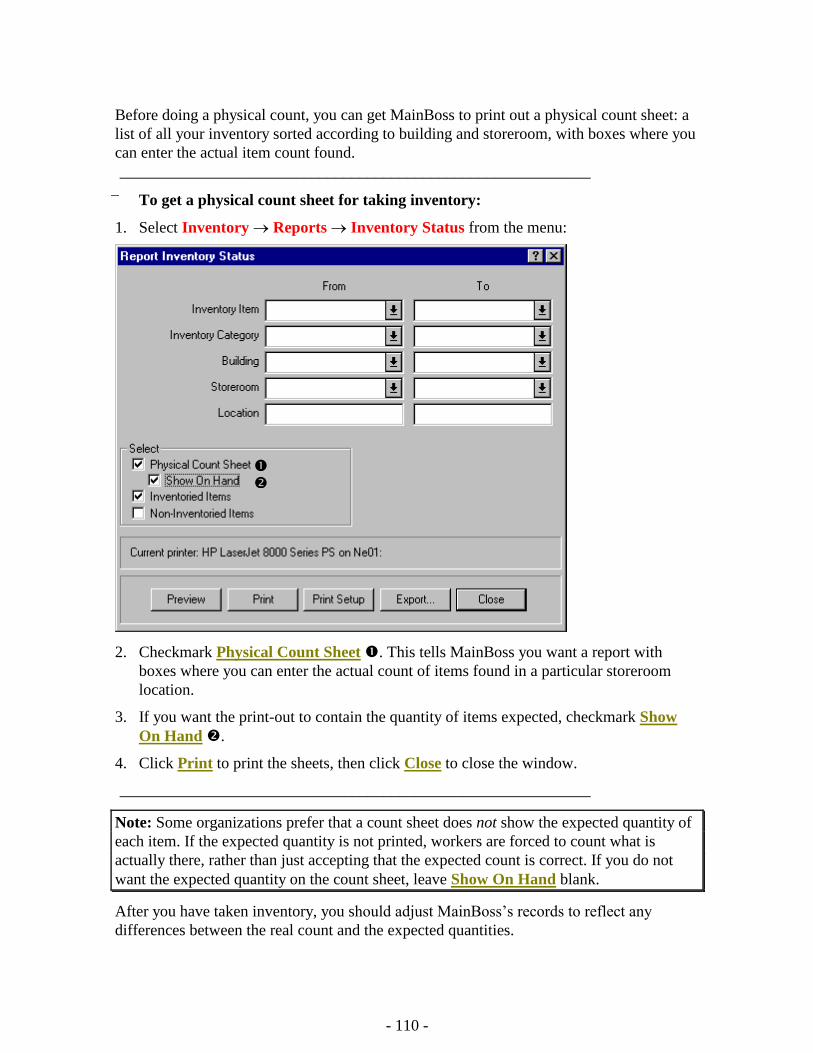
- 110 -
Before doing a physical count, you can get MainBoss to print out a physical count sheet: a
list of all your inventory sorted according to building and storeroom, with boxes where you
can enter the actual item count found.
___________________________________________________________
To get a physical count sheet for taking inventory:
1. Select Inventory Reports Inventory Status from the menu:
2. Checkmark Physical Count Sheet . This tells MainBoss you want a report with
boxes where you can enter the actual count of items found in a particular storeroom
location.
3. If you want the print-out to contain the quantity of items expected, checkmark Show
On Hand .
4. Click Print to print the sheets, then click Close to close the window.
___________________________________________________________
Note: Some organizations prefer that a count sheet does not show the expected quantity of
each item. If the expected quantity is not printed, workers are forced to count what is
actually there, rather than just accepting that the expected count is correct. If you do not
want the expected quantity on the count sheet, leave Show On Hand blank.
After you have taken inventory, you should adjust MainBoss’s records to reflect any
differences between the real count and the expected quantities.
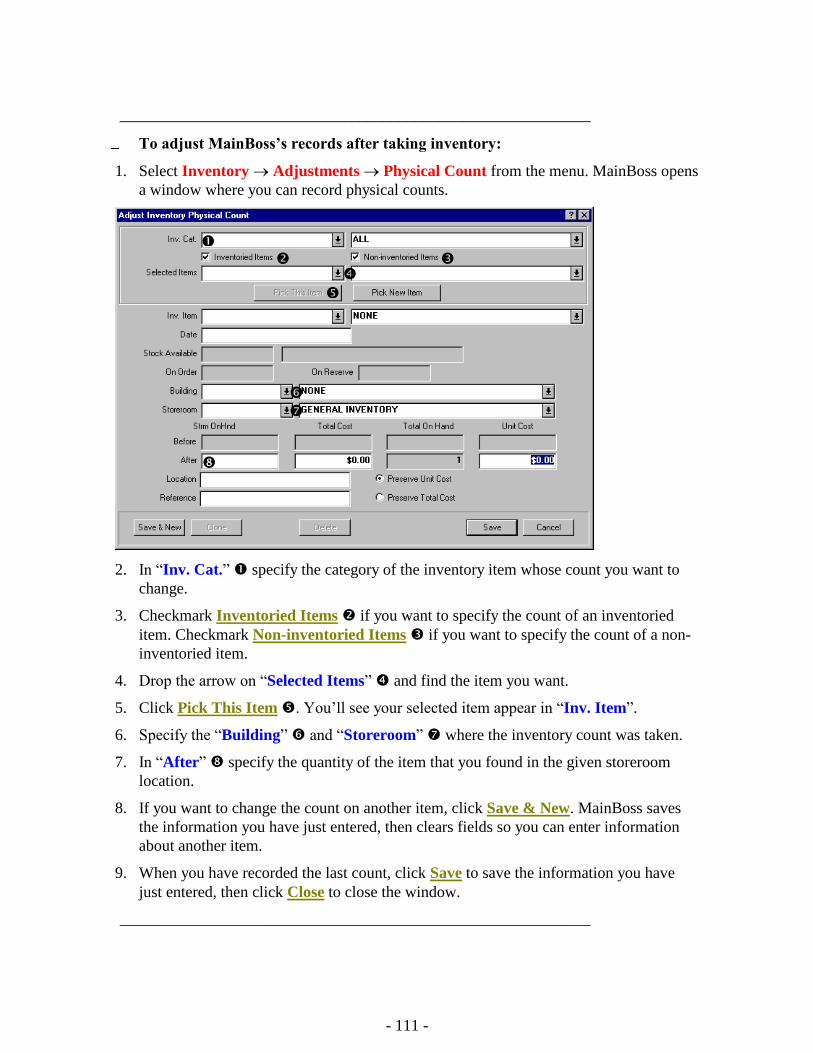
- 111 -
___________________________________________________________
To adjust MainBoss’s records after taking inventory:
1. Select Inventory Adjustments Physical Count from the menu. MainBoss opens
a window where you can record physical counts.
2. In “Inv. Cat.” specify the category of the inventory item whose count you want to
change.
3. Checkmark Inventoried Items if you want to specify the count of an inventoried
item. Checkmark Non-inventoried Items if you want to specify the count of a non-
inventoried item.
4. Drop the arrow on “Selected Items” and find the item you want.
5. Click Pick This Item . You’ll see your selected item appear in “Inv. Item”.
6. Specify the “Building” and “Storeroom” where the inventory count was taken.
7. In “After” specify the quantity of the item that you found in the given storeroom
location.
8. If you want to change the count on another item, click Save & New. MainBoss saves
the information you have just entered, then clears fields so you can enter information
about another item.
9. When you have recorded the last count, click Save to save the information you have
just entered, then click Close to close the window.
___________________________________________________________
- 112 -
The process described above changes the count of items in your inventory, but keeps the
same value per unit for the items.
Other Inventory Operations
A number of other inventory control operations are available through Inventory
Adjustments:
Note: For details about any of the operations listed below, see the online help.
___________________________________________________________
Issue:
Deals with situations in which materials are issued from inventory, other than in
connection with a work order. For example, a rental management company might issue
a supply of light bulbs to tenants so that tenants can change their own bulbs rather than
calling in maintenance personnel.
You use issue codes to specify reasons for issuing materials. You define your own
issue codes using Inventory Tables Issues.
___________________________________________________________
Transfer:
Lets you record when you move materials from one storeroom to another.
___________________________________________________________
Value:
Lets you specify the value of items in your inventory.
___________________________________________________________
Price Quote:
Lets you record any price quotes you have received from suppliers.
___________________________________________________________
Other:
Is a catch-all operation that deals with any inventory adjustments not covered by other
operations. For example, if you have to record losses due to breakage or theft, you
would use this operation.
You use adjustment codes to specify reasons for making adjustments. You define your
own codes using Inventory Tables Adjustments.
___________________________________________________________
Inventory Details
This section discusses precise details of certain aspects of inventory control.
- 113 -
On Hand: When MainBoss tells you the quantity of an item that is currently on hand, that
is the quantity that is expected to be present in all your storerooms. The related quantity,
Storeroom On Hand, is the amount expected to be in a specific storeroom. The total on
hand amount is the sum of all Storeroom On Hand values.
On Order: When you create purchase order, the quantity of items on the purchase order
are said to be on order. More precisely, the items are put on order at the point that you
Save the purchase order. Note that those items are on order, even if you haven’t actually
issued the purchase order yet.
When you record the receipt of a shipment, quantities on order are reduced appropriately.
For example, suppose that you currently have 30 light bulbs on order and you receive a
shipment containing 10 light bulbs. When you record the receipt, the quantity on order goes
down to 20.
If you receive more of an item than you ordered, the on order quantity can go negative. For
example, if you currently have 30 light bulbs on order, but you receive a shipment with 40
light bulbs, the on order quantity will become -10. This indicates that you now have more
items than you ordered.
When you close a purchase order, MainBoss adjusts on order quantities to account for
items ordered but not received. For example, suppose a purchase order called for 30 light
bulbs but you only receive 10. This leaves 20 light bulbs still on order. If you close the
purchase order at this point, MainBoss assumes that you have cancelled the outstanding
quantity on order. Therefore, MainBoss adjusts its records to show that you no longer have
the 20 light bulbs still on order.
The total quantity of an item on order is the sum of all on order quantities from open
purchase orders. For example, if one purchase order calls for 10 light bulbs and another
calls for 20, you have a total of 30 light bulbs on order.
On Reserve: When you create a work order, you can reserve inventory materials for use in
the work order. These materials are said to be on reserve. You put materials on reserve
when you use Add Estimate to add them to the Material section of an open work order.
More precisely, the materials are put on reserve when you Save the work order where the
estimates appear. If you have not yet saved the work order, the materials are not yet on
reserve.
Materials can be removed from reserve in several ways:
You can Void the work order. In this case, all materials that were on reserve become
available for use again.
You can use Delete in the Material section of the work order to delete material
estimates from the materials list. Deleting an estimate makes reserved materials
available once more. More precisely, the materials become available when you Save
the changes you’ve made in the work order.
- 114 -
You can use Quick Actuals or Add Actual to state that reserved materials have
actually been used (issued). For example, suppose you use Add Estimate to reserve 10
quarts of oil for a job, then use Add Actual to say that the job actually used 8 quarts.
MainBoss will update its records to say that you now have only 2 quarts on reserve,
since you used 8 of the original 10 quarts. (MainBoss will also update its records to say
that you have 8 quarts less on hand.)
Note that if you originally reserved 10 quarts of oil, but actually used 12, you have the
unusual case of having -2 quarts of oil on reserve. This indicates that you used more
than you reserved.
When you close a work order, MainBoss removes all outstanding reservations for
materials on that work order. For example, suppose you reserved 10 quarts of oil but
only used 8 quarts. This leaves 2 quarts still on reserve. However, when you close the
work order, MainBoss removes those 2 quarts from the reserve. Since the work order
has been closed, the job is finished and the extra 2 quarts obviously weren’t needed.
Similarly, if you originally used 10 quarts of oil but actually used 12, you would end up
with -2 quarts on reserve. When you close the work order, MainBoss adjusts this to say
that you no longer have any oil on reserve.
The total quantity of an item on reserve is the sum of all on reserve quantities from open
work orders. For example, if one work order calls for 10 quarts of oil and another calls for
20, you have a total of 30 quarts on reserve.
Stock Available: When MainBoss tells you the total quantity of an item available, the
quantity is calculated as
Stock Available = OnHand + OnOrder - OnReserve
Notice that items on order are considered available, even though they haven’t been
received yet. This means that receiving items in response to a purchase order doesn’t
change the amount available. For example, if you receive 10 light bulbs that you previously
ordered, the amount on hand goes up by 10 but the amount on order goes down by 10.
Therefore there’s no net change in the stock available.
Similarly, the stock available doesn’t change if you use materials in connection with a
work order. For example, if you use 8 quarts of oil in a work order, the amount on hand
goes down by 8 quarts, but the amount on reserve also goes down by 8 quarts, since you’ve
used some of the oil you reserved. Therefore there’s no net change in the stock available.
When MainBoss needs to determine whether stock should be reordered, it looks at the
available quantity, not at the quantity on hand. This applies to the Reorder report and to the
item selection facilities for a purchase order.
Closed and Voided Work Orders/Purchase Orders: After a work order has been closed
or voided, the use of Add Estimate does not put materials on reserve. Since the job is
already finished or cancelled, there is no point in putting materials on reserve. (The only
reason you would use Add Estimate would be to correct your records after the fact.)
- 115 -
Similarly, after a purchase order has been closed or voided, adding items to the purchase
order does not put those items on order.
Excluding the Current Record: Whenever MainBoss displays inventory numbers (on
order, on hand, on reserve, or available), the quantities always exclude information in the
current window.
For example, suppose you are using Add Estimate in the Material section of a work order
to reserve materials for the work order. This window displays how much of the item is on
hand, on order, on reserve, and available, excluding any materials reserved in the current
window. If you change the amount in the “Reserve Quantity” field, the numbers shown in
“On Reserve”, “Stock Available”, etc. will not change.
Furthermore, if you reserve some materials, save the record, close the window, then open
the record again (using Edit in the Material section), the “On Reserve” quantity shown
will not take into account the materials that you previously reserved in this record.
General Principle: When MainBoss shows you inventory quantities in a window, the
numbers are always given as if the record you are looking at does not exist.
To illustrate this, here is a concrete example. The example uses dates in order to make
some things clearer.
1. June 1: The inventory count for light bulbs is zero on hand, zero on order, zero on
reserve, zero available.
2. June 2: You take a physical count of one storeroom and find you actually have 10 light
bulbs on hand. Using Inventory Adjustments Physical Count, you set the on
hand number to 10.
3. June 3: You take a physical count of another storeroom and find another 15 light bulbs
there. Once again, you use Inventory Adjustments Physical Count. When you
first open the window, you will see 10 lights bulbs on hand (from the record you made
the day before). You record another 15 light bulbs, bringing the total to 25.
4. June 4: You reserve one light bulb for use in a work order, using Add Estimate in the
Material section of the work order. This opens a window where you can record how
many light bulbs you want to reserve. Even though you reserve one bulb, the “On
Reserve” count in the window does not change—the count ignores any materials
issued via the current window (even after you save the record). The same goes for other
inventory numbers shown in the window.
5. June 5: You decide to change the preceding work order to reserve two light bulbs
instead of one. You use the Edit button in the Material section of the work order to
open the record again. You’ll see that the “On Reserve” count is still zero, since
MainBoss ignores the current record. However, if you set the time on the current record
record to June 5 without saving the record, MainBoss will change the “On Reserve”
count from zero to 1. This is because the reserve count is 1 as of today, ignoring any
changes you might make to the current record...because of the materials you reserved

- 116 -
yesterday. If you now Save the current record, the reserve count goes back to zero
because MainBoss once again ignores the influence of the current record.
Remember that MainBoss ignores the effect of the current record while it’s on the screen.
However, if you go to the inventory item browser, you will see that MainBoss has reserved
the quantity of the item that you specified.
- 117 -
Purchasing and Receiving
MainBoss has detailed facilities for reporting which inventory items need to be restocked,
for creating purchase orders, and for tracking shipments received. This chapter outlines the
usual sequence of events for purchasing and receiving. For more detailed information, see
the online help.
___________________________________________________________
Shipping Mode: A shipping mode specifies how a purchase should be shipped.
For example, you might create modes that indicate “Ship by overnight
courier”, “Ship by cheapest rate”, “Deliver during work hours”, and so on.
To define shipping modes, select Inventory Tables Shipping Modes
from the menu.
___________________________________________________________
Payment Terms: A payment terms code specifies how you wish to pay for a purchase.
For example, you might create codes that indicate “Payment on receipt”,
“C.O.D.”, “Net 30”, and so on.
To define payment terms codes, select Inventory Tables Payment
Terms from the menu.
___________________________________________________________
Waybill: A waybill number identifies a shipment received in response to a
purchase order.
Each shipment has a unique waybill number, chosen by you or generated
automatically by MainBoss.
___________________________________________________________
Completed Purchase Order: A completed purchase order is a preliminary draft of a
purchase order.
For example, if you need authorization before sending a purchase order to a
supplier, you would usually create a completed purchase order and print it
out, then submit that PO for management approval.
You can edit a completed purchase order whenever necessary. For example,
if management does not approve some of the requested items, you can
delete those items before issuing the purchase order to the vendor.
___________________________________________________________
- 118 -
___________________________________________________________
Issued Purchase Order: You issue a purchase order when the PO is ready to be
submitted to the supplier. From that point on, the PO is an issued
purchase order.
A completed purchase order becomes an issued purchase order when you
have obtained all the required authorizations and have marked the PO as
ready to submit. After you issue a PO, you print it off and send it to the
supplier.
___________________________________________________________
Closed Purchase Order: You close a purchase order when you have received all the
goods and services covered by the PO, or have canceled any goods and
services that have not already been received.
In other words, you close a purchase order when it’s been filled or when
you’ve canceled any unreceived portion of the order.
___________________________________________________________
The Purchasing/Receiving Process
The following shows the usual steps of the purchasing/receiving cycle.
1. Print a report of what materials need to be reordered (see The Re-Order Report on page
120).
2. Decide which materials will be purchased from which suppliers.
3. Create a purchase order for each supplier, listing the materials you want to purchase
(see Creating a New Purchase Order on page 121).
4. Obtain any authorizations needed for the purchase.
5. Issue the purchase order and send it to the vendor (see Issuing a New Purchase Order
on page 131).
6. Each time a shipment is received in response to the purchase order, assign the shipment
a waybill number and record which items were received (see Recording Receipts on
page 132).
7. When all the ordered items have been received, close the PO (see Closing a Purchase
Order on page 138).
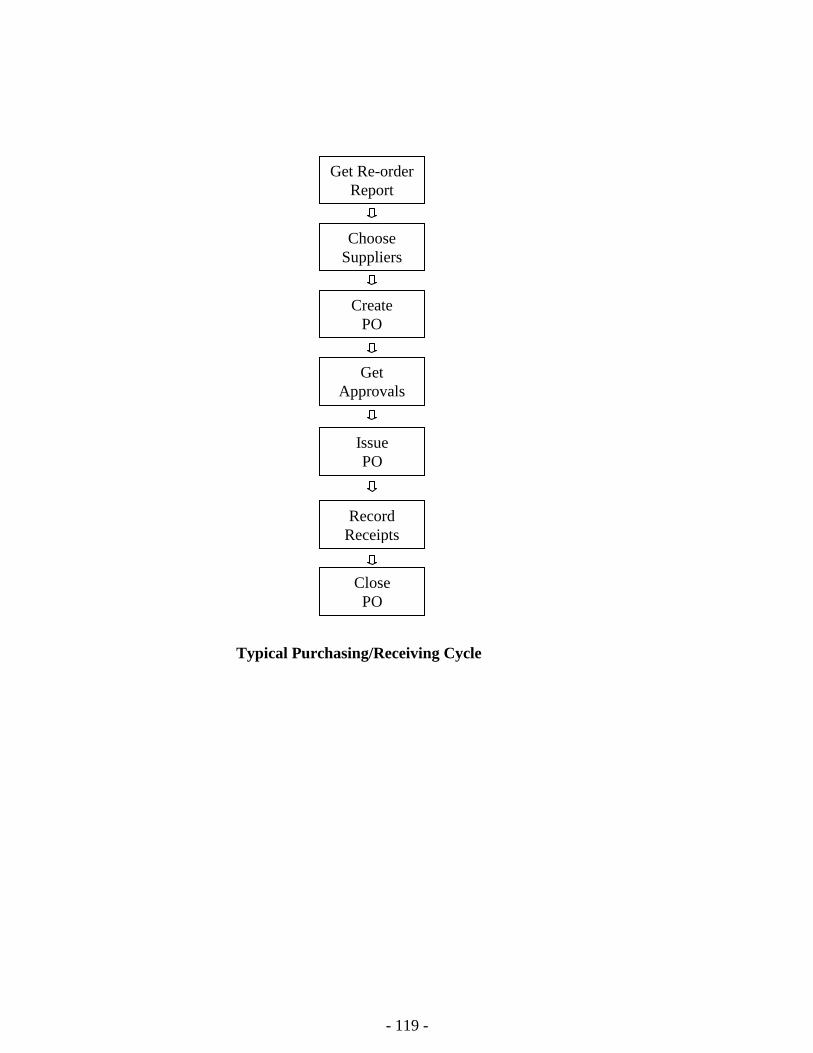
- 119 -
Get Re-order
Report
Choose
Suppliers
Create
PO
Get
Approvals
Record
Receipts
Typical Purchasing/Receiving Cycle
Close
PO
Issue
PO
- 120 -
Note that the steps given above are only one approach to purchasing/ receiving. A common
alternative is to depend on a small number of suppliers and to prepare regular purchase
orders for each. For example, you might ask, “What do we need to buy from Supplier X
this week?” In this case, you might prepare your purchase orders for your regular suppliers
first, then print a re-order report to see if there was anything else you needed to order.
Note: Purchase orders may be issued for services as well as for goods. For example, if you
hire an outside contractor to do three weeks of work, you could issue a purchase order to
cover the costs of that work. Labor costs would be regarded as “extras” on the purchase
order.
The Re-Order Report
The Re-order Report lists all inventoried items that need to be re-ordered. To determine
whether an item needs to be reordered, MainBoss looks at your current on-hand stock of
that item, minus the quantity that has been put on reserve for work orders, plus the quantity
that has already been put on order in open or issued purchase orders. In other words,
MainBoss looks at the quantity
OnHand + OnOrder - OnReserve
If this is less than the minimum stock level for an item, MainBoss indicates that the item
should be reordered. MainBoss suggests that you re-order a quantity that will put the above
calculation up to the maximum stock level for the item.
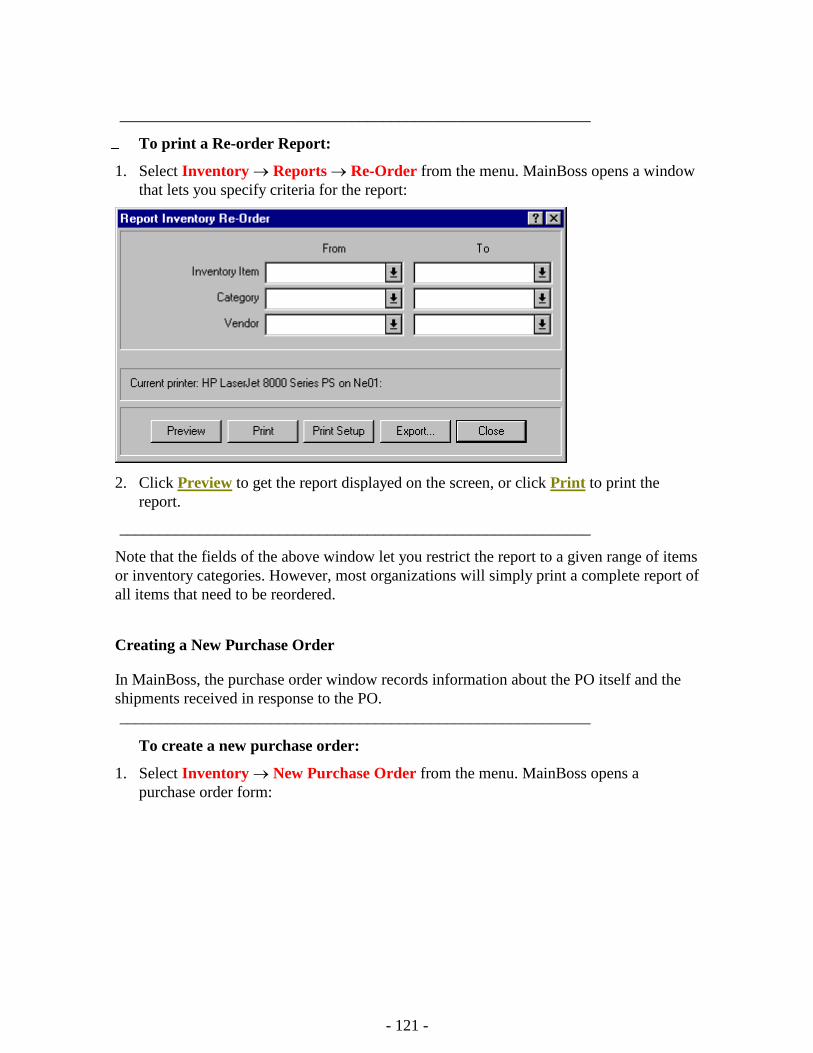
- 121 -
___________________________________________________________
To print a Re-order Report:
1. Select Inventory Reports Re-Order from the menu. MainBoss opens a window
that lets you specify criteria for the report:
2. Click Preview to get the report displayed on the screen, or click Print to print the
report.
___________________________________________________________
Note that the fields of the above window let you restrict the report to a given range of items
or inventory categories. However, most organizations will simply print a complete report of
all items that need to be reordered.
Creating a New Purchase Order
In MainBoss, the purchase order window records information about the PO itself and the
shipments received in response to the PO.
___________________________________________________________
To create a new purchase order:
1. Select Inventory New Purchase Order from the menu. MainBoss opens a
purchase order form:
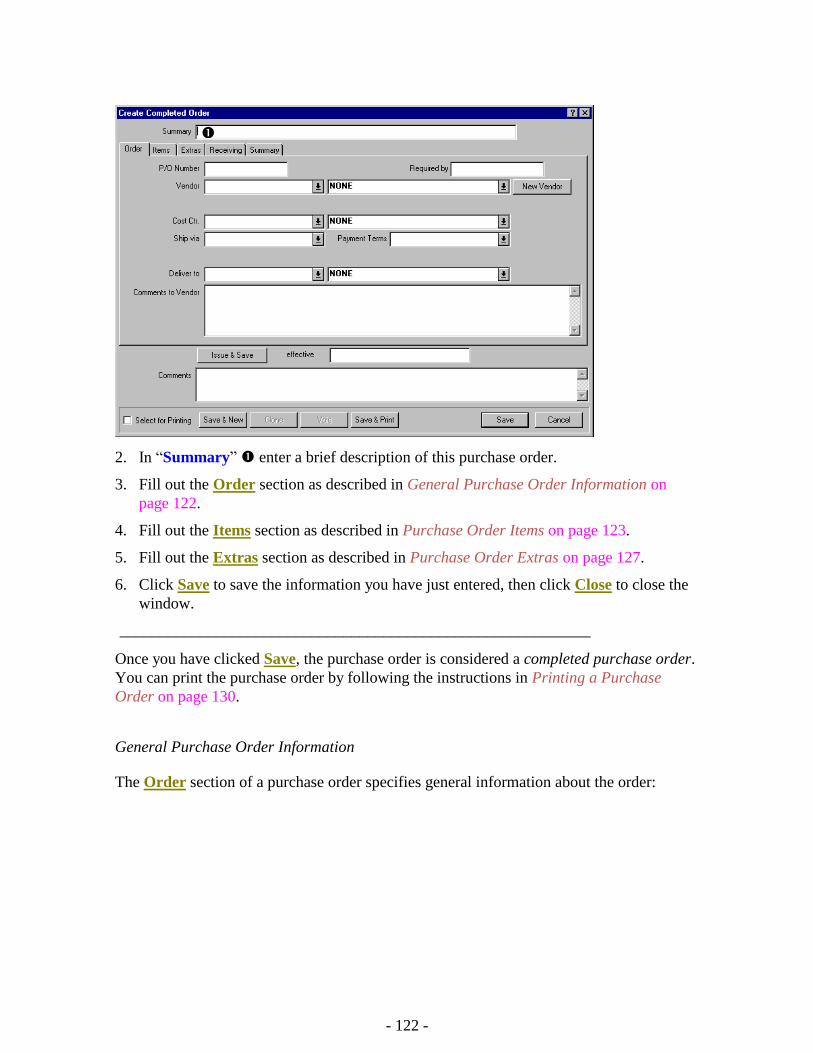
- 122 -
2. In “Summary” enter a brief description of this purchase order.
3. Fill out the Order section as described in General Purchase Order Information on
page 122.
4. Fill out the Items section as described in Purchase Order Items on page 123.
5. Fill out the Extras section as described in Purchase Order Extras on page 127.
6. Click Save to save the information you have just entered, then click Close to close the
window.
___________________________________________________________
Once you have clicked Save, the purchase order is considered a completed purchase order.
You can print the purchase order by following the instructions in Printing a Purchase
Order on page 130.
General Purchase Order Information
The Order section of a purchase order specifies general information about the order:
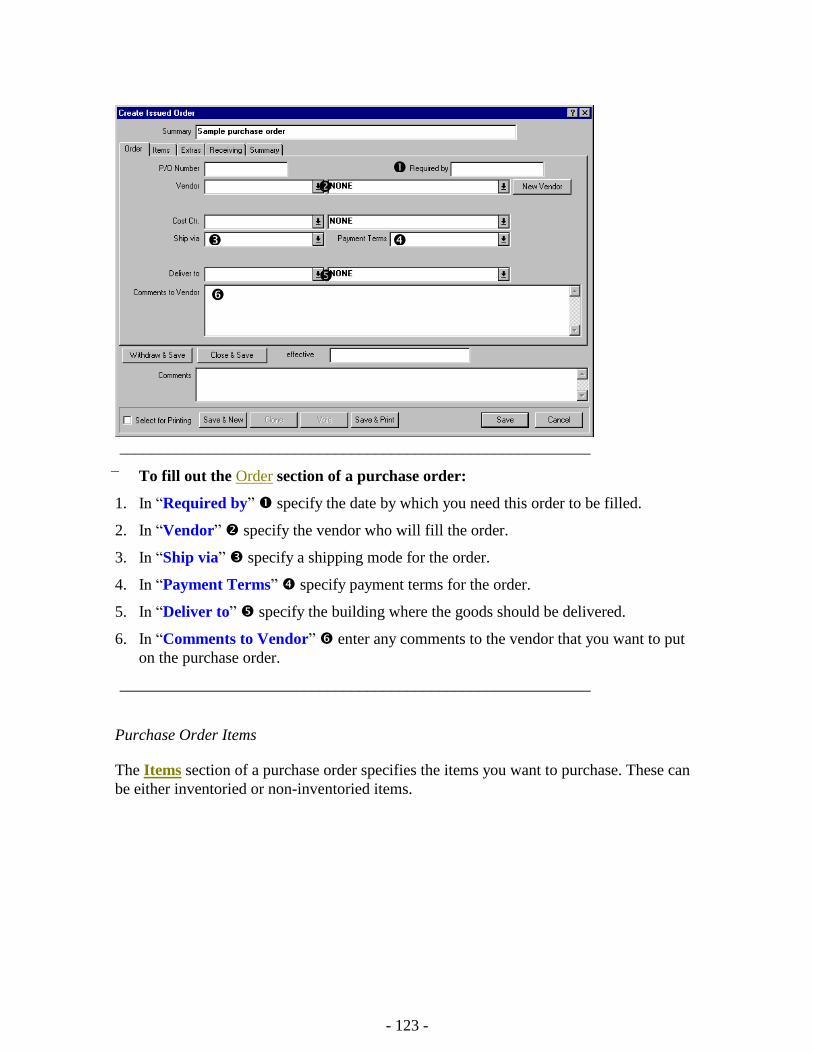
- 123 -
___________________________________________________________
To fill out the Order section of a purchase order:
1. In “Required by” specify the date by which you need this order to be filled.
2. In “Vendor” specify the vendor who will fill the order.
3. In “Ship via” specify a shipping mode for the order.
4. In “Payment Terms” specify payment terms for the order.
5. In “Deliver to” specify the building where the goods should be delivered.
6. In “Comments to Vendor” enter any comments to the vendor that you want to put
on the purchase order.
___________________________________________________________
Purchase Order Items
The Items section of a purchase order specifies the items you want to purchase. These can
be either inventoried or non-inventoried items.
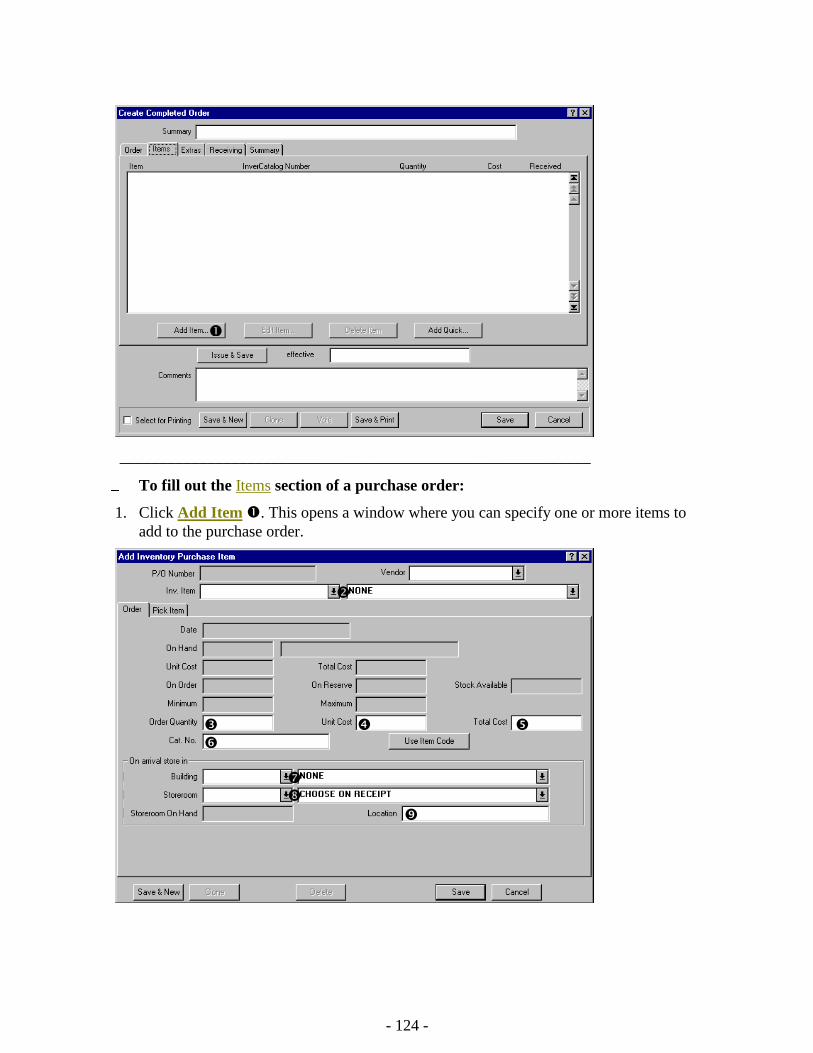
- 124 -
___________________________________________________________
To fill out the Items section of a purchase order:
1. Click Add Item . This opens a window where you can specify one or more items to
add to the purchase order.
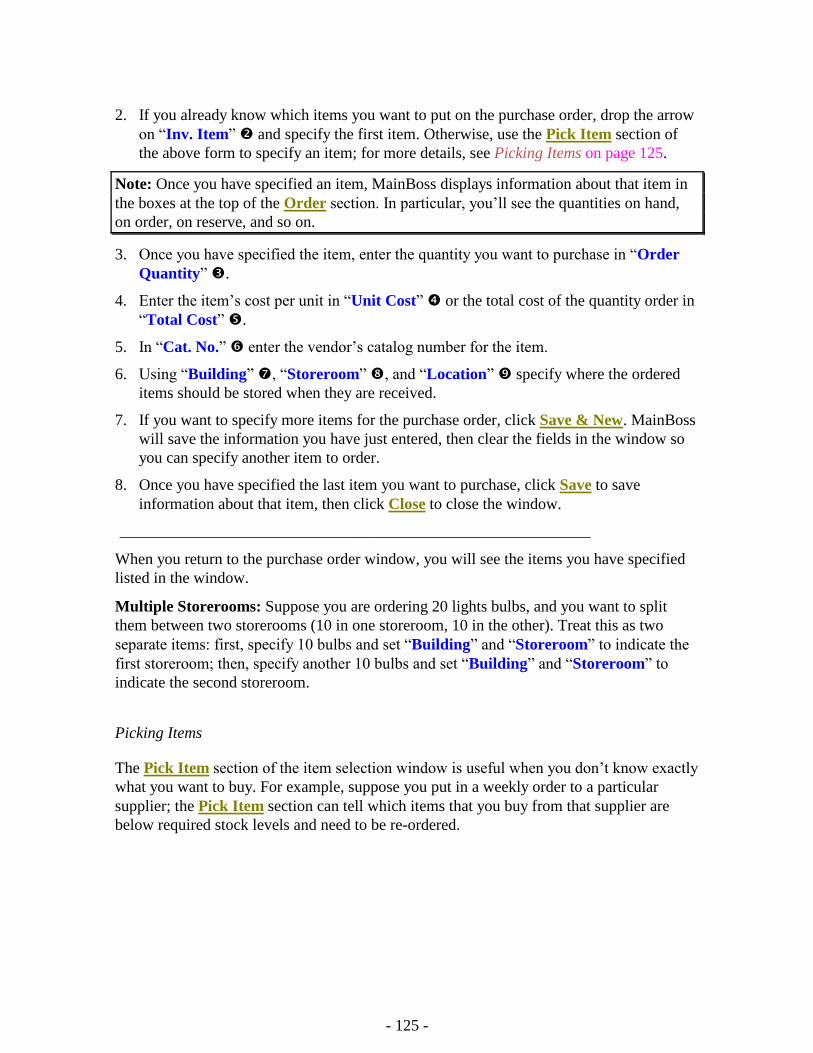
- 125 -
2. If you already know which items you want to put on the purchase order, drop the arrow
on “Inv. Item” and specify the first item. Otherwise, use the Pick Item section of
the above form to specify an item; for more details, see Picking Items on page 125.
Note: Once you have specified an item, MainBoss displays information about that item in
the boxes at the top of the Order section. In particular, you’ll see the quantities on hand,
on order, on reserve, and so on.
3. Once you have specified the item, enter the quantity you want to purchase in “Order
Quantity” .
4. Enter the item’s cost per unit in “Unit Cost” or the total cost of the quantity order in
“Total Cost” .
5. In “Cat. No.” enter the vendor’s catalog number for the item.
6. Using “Building” , “Storeroom” , and “Location” specify where the ordered
items should be stored when they are received.
7. If you want to specify more items for the purchase order, click Save & New. MainBoss
will save the information you have just entered, then clear the fields in the window so
you can specify another item to order.
8. Once you have specified the last item you want to purchase, click Save to save
information about that item, then click Close to close the window.
___________________________________________________________
When you return to the purchase order window, you will see the items you have specified
listed in the window.
Multiple Storerooms: Suppose you are ordering 20 lights bulbs, and you want to split
them between two storerooms (10 in one storeroom, 10 in the other). Treat this as two
separate items: first, specify 10 bulbs and set “Building” and “Storeroom” to indicate the
first storeroom; then, specify another 10 bulbs and set “Building” and “Storeroom” to
indicate the second storeroom.
Picking Items
The Pick Item section of the item selection window is useful when you don’t know exactly
what you want to buy. For example, suppose you put in a weekly order to a particular
supplier; the Pick Item section can tell which items that you buy from that supplier are
below required stock levels and need to be re-ordered.
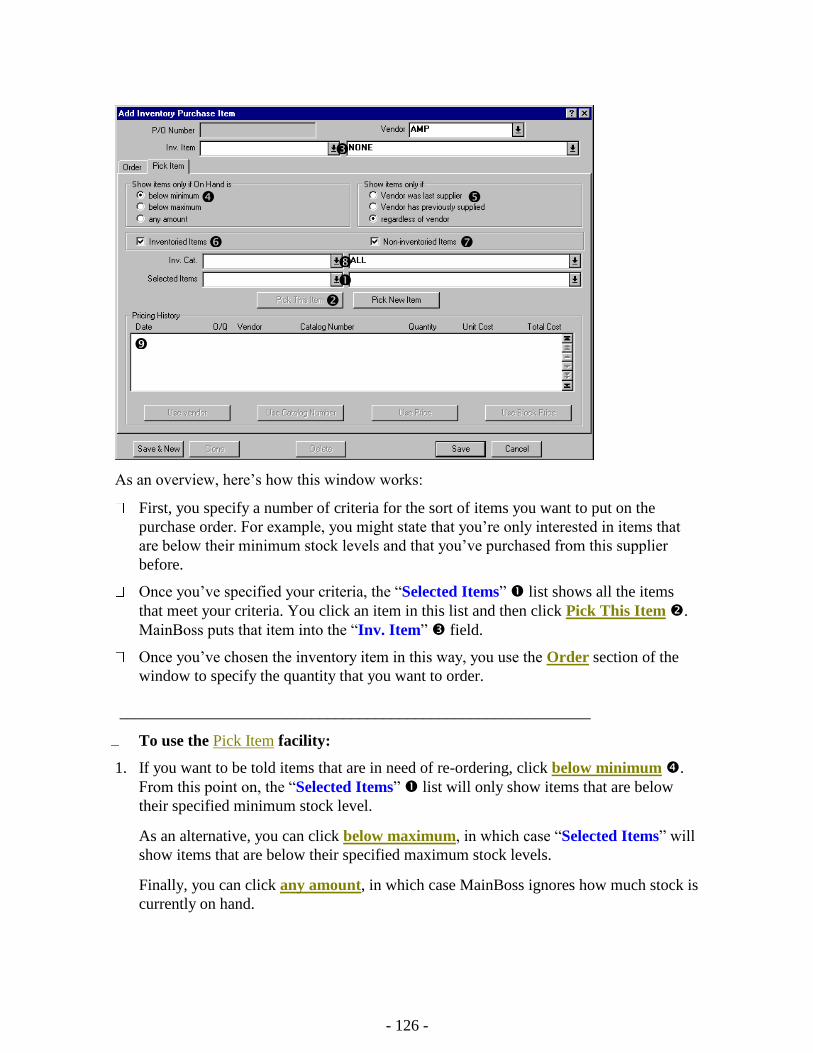
- 126 -
As an overview, here’s how this window works:
First, you specify a number of criteria for the sort of items you want to put on the
purchase order. For example, you might state that you’re only interested in items that
are below their minimum stock levels and that you’ve purchased from this supplier
before.
Once you’ve specified your criteria, the “Selected Items” list shows all the items
that meet your criteria. You click an item in this list and then click Pick This Item .
MainBoss puts that item into the “Inv. Item” field.
Once you’ve chosen the inventory item in this way, you use the Order section of the
window to specify the quantity that you want to order.
___________________________________________________________
To use the Pick Item facility:
1. If you want to be told items that are in need of re-ordering, click below minimum .
From this point on, the “Selected Items” list will only show items that are below
their specified minimum stock level.
As an alternative, you can click below maximum, in which case “Selected Items” will
show items that are below their specified maximum stock levels.
Finally, you can click any amount, in which case MainBoss ignores how much stock is
currently on hand.

- 127 -
2. If you want to see items that were bought most recently from this supplier, click
Vendor was last supplier . In this case, “Selected Items” will only show items
whose most recent purchase was from the supplier specified in “Vendor”.
As an alternative, you can click Vendor has previously supplied. In this case,
“Selected Items” shows any items that have ever been purchased from this vendor
(even if the most recent purchase was from some other supplier).
Finally, you can click regardless of vendor. In this case, MainBoss ignores vendors
when creating the “Selected Items” list.
3. Checkmark Inventoried Items if you want “Selected Items” to include inventoried
items. Checkmark Non-inventoried Items if you want “Selected Items” to include
non-inventoried items.
4. If you only want to look at items in a particular category, specify that category in “Inv.
Cat.” .
5. “Selected Items” now shows all items that fit your criteria. Click the item you want to
add to the purchase order, then click Pick This Item . MainBoss displays your
chosen item in “Inv. Item” .
___________________________________________________________
Once you have chosen the item, MainBoss displays a price history of the item in the
Pricing History section .
Purchase Order Extras
The Extras section of a purchase order lets you specify any extra expenses that may be
included in the final PO price. For example, you might record shipping charges, taxes, or
surcharges for expedited delivery. You can also use this section to record costs for services
(e.g. labor).
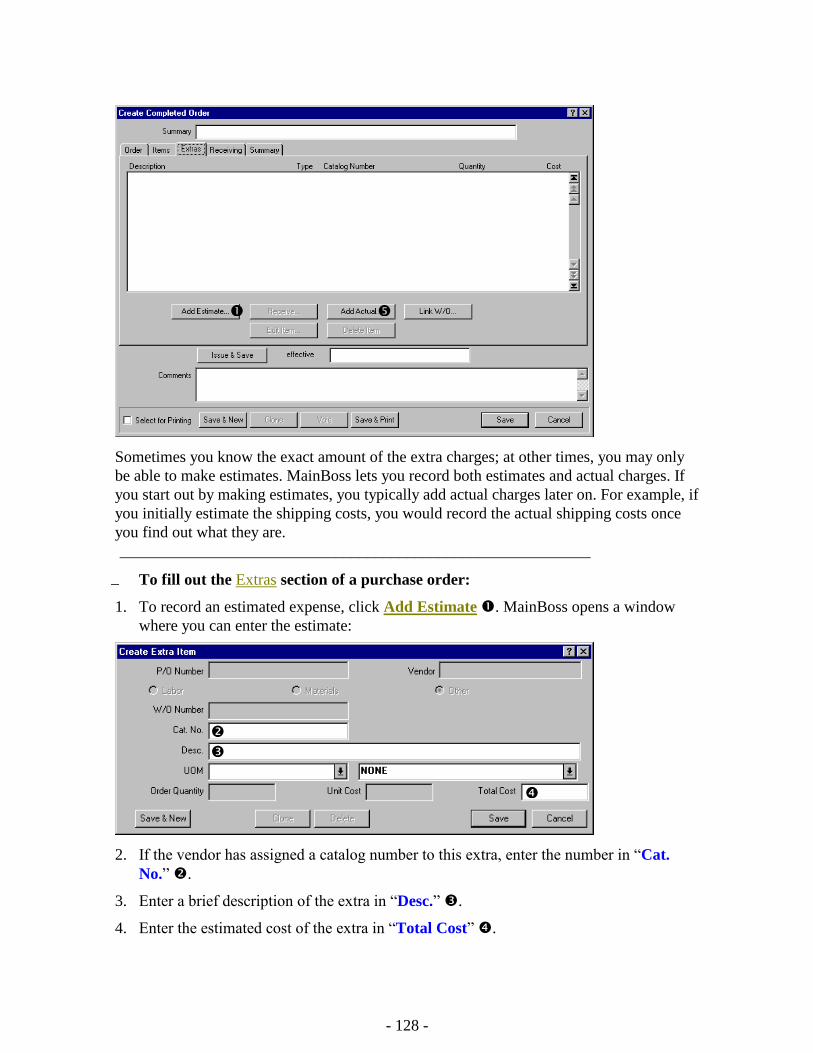
- 128 -
Sometimes you know the exact amount of the extra charges; at other times, you may only
be able to make estimates. MainBoss lets you record both estimates and actual charges. If
you start out by making estimates, you typically add actual charges later on. For example, if
you initially estimate the shipping costs, you would record the actual shipping costs once
you find out what they are.
___________________________________________________________
To fill out the Extras section of a purchase order:
1. To record an estimated expense, click Add Estimate . MainBoss opens a window
where you can enter the estimate:
2. If the vendor has assigned a catalog number to this extra, enter the number in “Cat.
No.” .
3. Enter a brief description of the extra in “Desc.” .
4. Enter the estimated cost of the extra in “Total Cost” .

- 129 -
5. Click Save to save the information you have just entered, then click Close to close the
window.
6. Recording an actual expense is similar, except that you click Add Actual in the
purchase order window.
___________________________________________________________
Modifying a Purchase Order
You can modify a purchase order at any time. For example, you might fill out part of a
purchase order, then find that you need more information before you can complete it. In
that case, you Save the purchase order in the usual way, then come back to it later on.
___________________________________________________________
To edit an existing purchase order:
1. Select Inventory Browse Purchasing from the menu. MainBoss opens the
purchase order browser:
2. In the list of purchase orders , find the purchase order you want to modify and click
on that entry.
3. Click Edit to edit the purchase order. MainBoss will open a window where you can
edit the purchase order.
___________________________________________________________
Editing an existing purchase order is similar to creating a new purchase order. For more
information, see Creating a New Purchase Order on page 121.
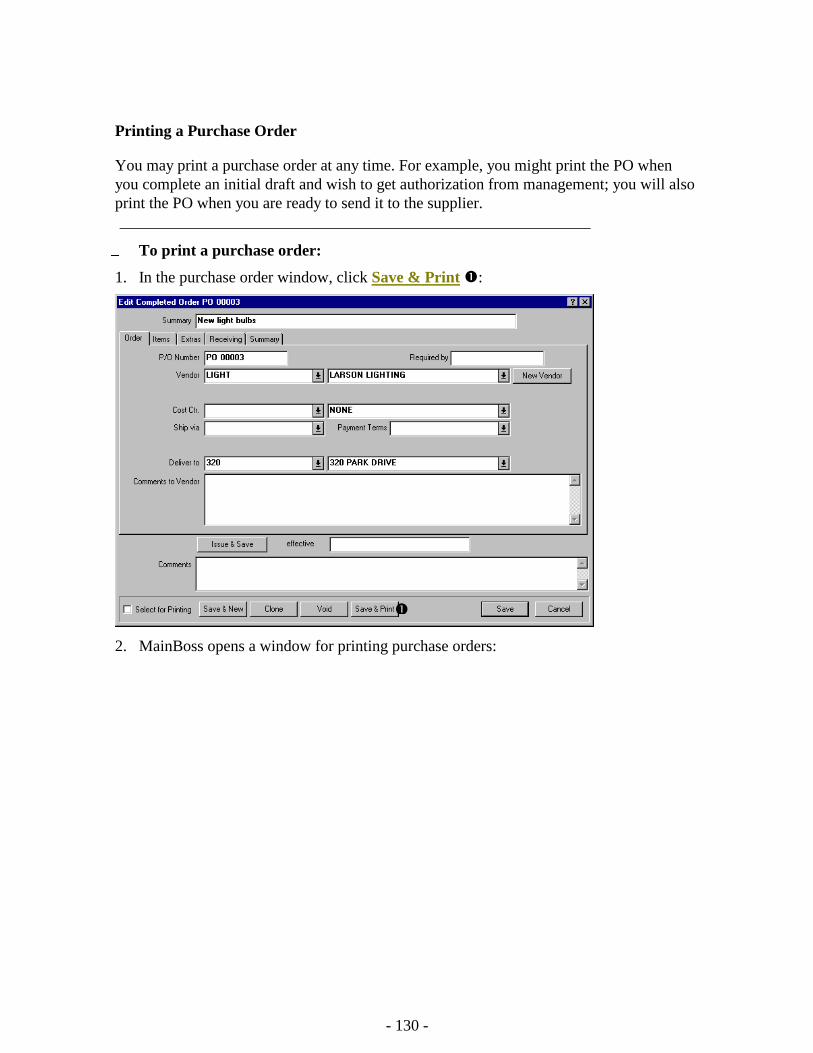
- 130 -
Printing a Purchase Order
You may print a purchase order at any time. For example, you might print the PO when
you complete an initial draft and wish to get authorization from management; you will also
print the PO when you are ready to send it to the supplier.
___________________________________________________________
To print a purchase order:
1. In the purchase order window, click Save & Print :
2. MainBoss opens a window for printing purchase orders:
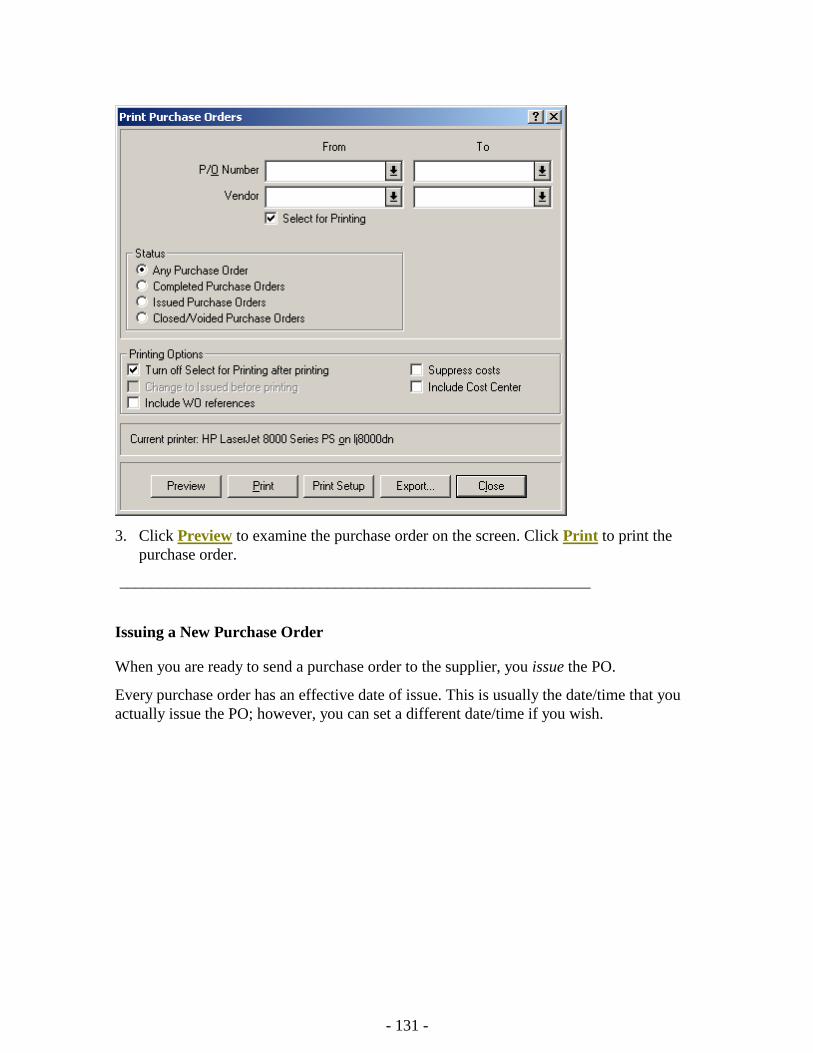
- 131 -
3. Click Preview to examine the purchase order on the screen. Click Print to print the
purchase order.
___________________________________________________________
Issuing a New Purchase Order
When you are ready to send a purchase order to the supplier, you issue the PO.
Every purchase order has an effective date of issue. This is usually the date/time that you
actually issue the PO; however, you can set a different date/time if you wish.
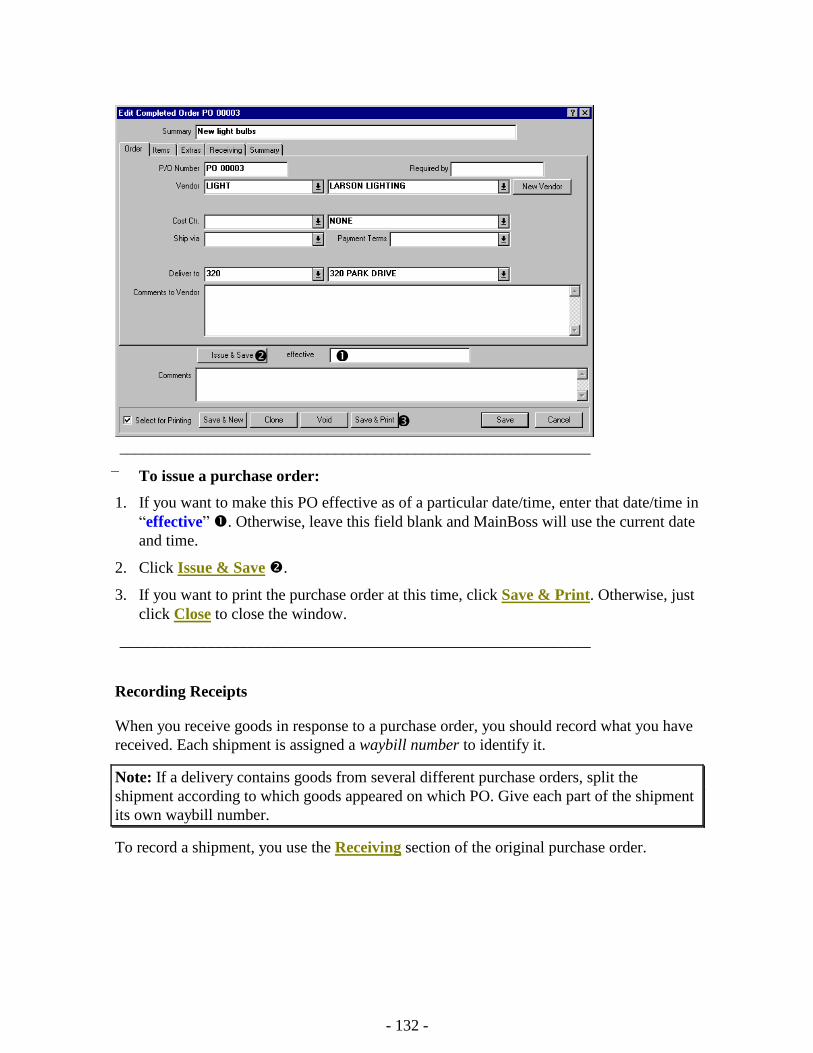
- 132 -
___________________________________________________________
To issue a purchase order:
1. If you want to make this PO effective as of a particular date/time, enter that date/time in
“effective” . Otherwise, leave this field blank and MainBoss will use the current date
and time.
2. Click Issue & Save .
3. If you want to print the purchase order at this time, click Save & Print. Otherwise, just
click Close to close the window.
___________________________________________________________
Recording Receipts
When you receive goods in response to a purchase order, you should record what you have
received. Each shipment is assigned a waybill number to identify it.
Note: If a delivery contains goods from several different purchase orders, split the
shipment according to which goods appeared on which PO. Give each part of the shipment
its own waybill number.
To record a shipment, you use the Receiving section of the original purchase order.
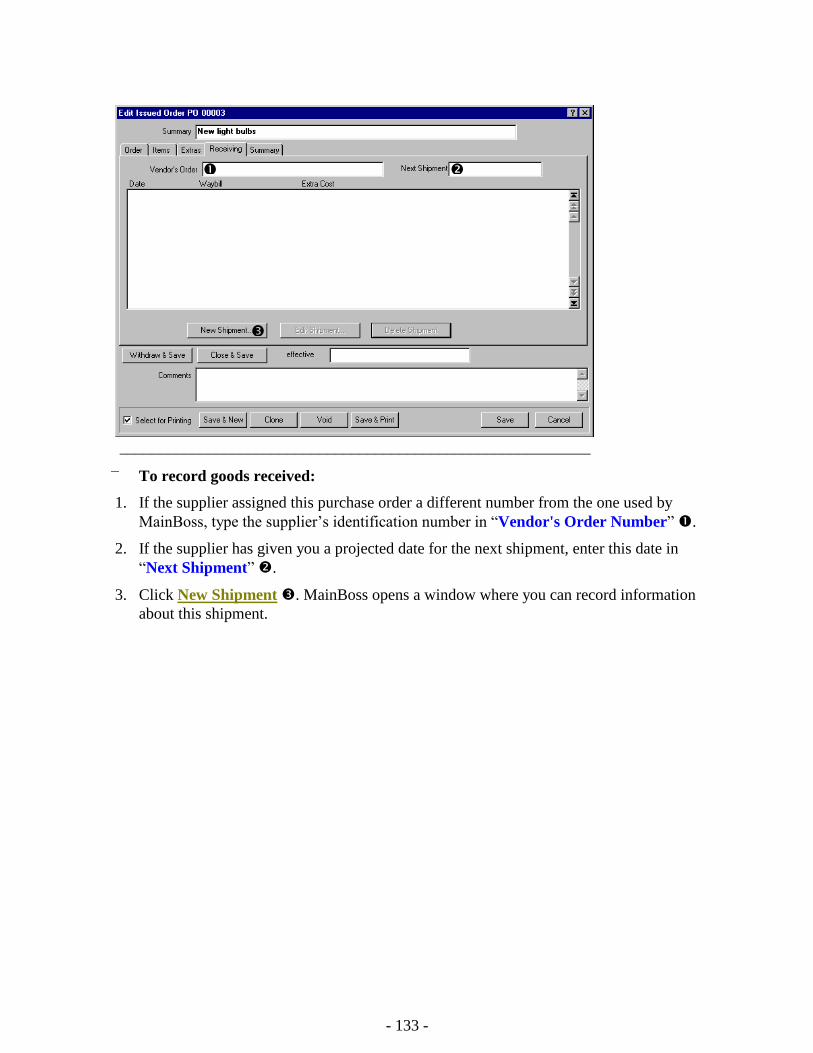
- 133 -
___________________________________________________________
To record goods received:
1. If the supplier assigned this purchase order a different number from the one used by
MainBoss, type the supplier’s identification number in “Vendor's Order Number” .
2. If the supplier has given you a projected date for the next shipment, enter this date in
“Next Shipment” .
3. Click New Shipment . MainBoss opens a window where you can record information
about this shipment.
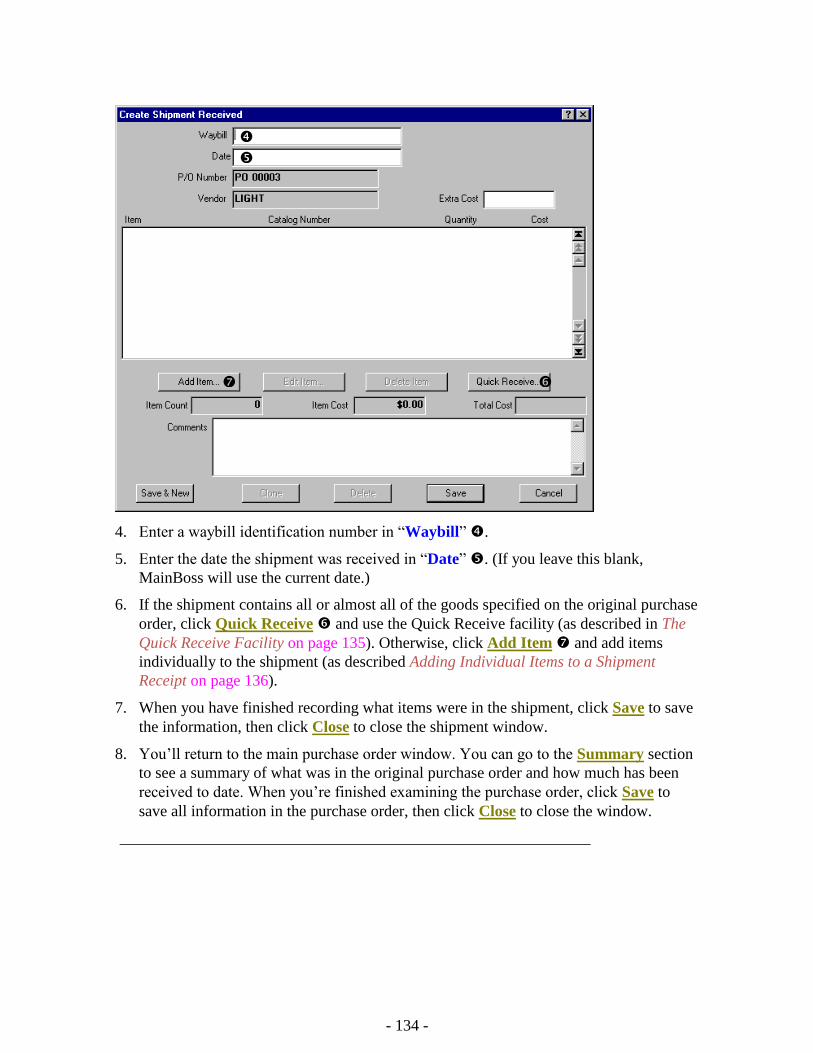
- 134 -
4. Enter a waybill identification number in “Waybill” .
5. Enter the date the shipment was received in “Date” . (If you leave this blank,
MainBoss will use the current date.)
6. If the shipment contains all or almost all of the goods specified on the original purchase
order, click Quick Receive and use the Quick Receive facility (as described in The
Quick Receive Facility on page 135). Otherwise, click Add Item and add items
individually to the shipment (as described Adding Individual Items to a Shipment
Receipt on page 136).
7. When you have finished recording what items were in the shipment, click Save to save
the information, then click Close to close the shipment window.
8. You’ll return to the main purchase order window. You can go to the Summary section
to see a summary of what was in the original purchase order and how much has been
received to date. When you’re finished examining the purchase order, click Save to
save all information in the purchase order, then click Close to close the window.
___________________________________________________________
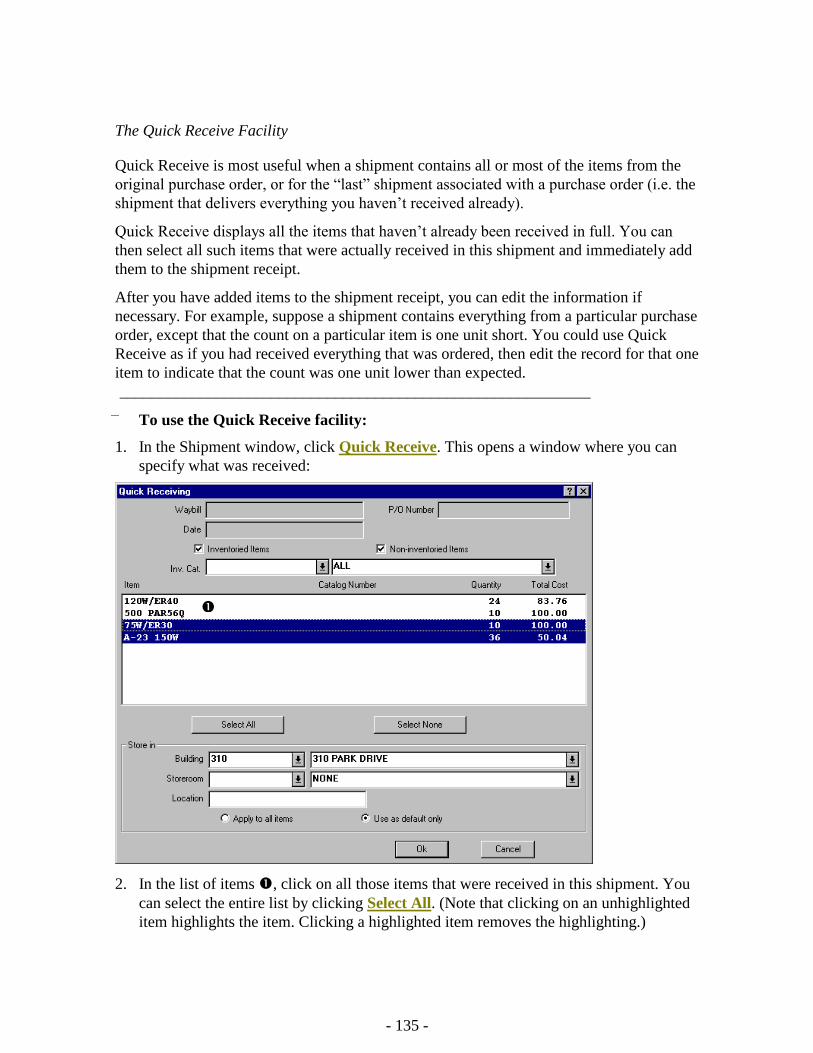
- 135 -
The Quick Receive Facility
Quick Receive is most useful when a shipment contains all or most of the items from the
original purchase order, or for the “last” shipment associated with a purchase order (i.e. the
shipment that delivers everything you haven’t received already).
Quick Receive displays all the items that haven’t already been received in full. You can
then select all such items that were actually received in this shipment and immediately add
them to the shipment receipt.
After you have added items to the shipment receipt, you can edit the information if
necessary. For example, suppose a shipment contains everything from a particular purchase
order, except that the count on a particular item is one unit short. You could use Quick
Receive as if you had received everything that was ordered, then edit the record for that one
item to indicate that the count was one unit lower than expected.
___________________________________________________________
To use the Quick Receive facility:
1. In the Shipment window, click Quick Receive. This opens a window where you can
specify what was received:
2. In the list of items , click on all those items that were received in this shipment. You
can select the entire list by clicking Select All. (Note that clicking on an unhighlighted
item highlights the item. Clicking a highlighted item removes the highlighting.)
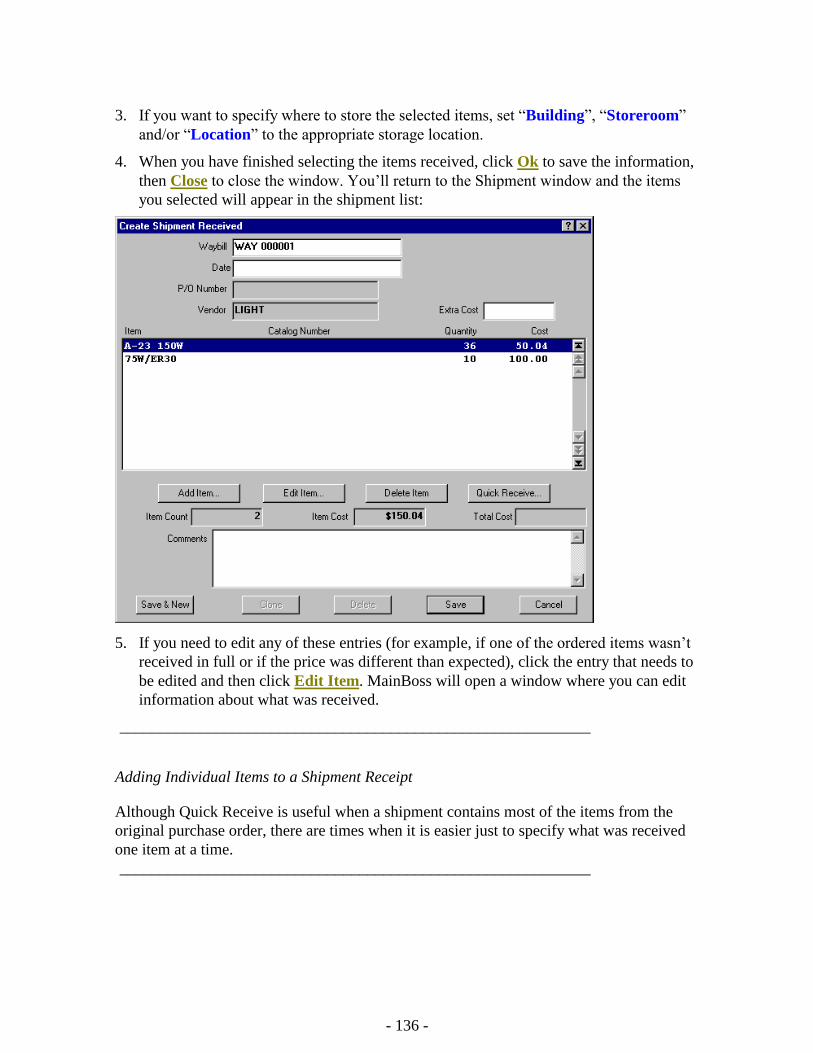
- 136 -
3. If you want to specify where to store the selected items, set “Building”, “Storeroom”
and/or “Location” to the appropriate storage location.
4. When you have finished selecting the items received, click Ok to save the information,
then Close to close the window. You’ll return to the Shipment window and the items
you selected will appear in the shipment list:
5. If you need to edit any of these entries (for example, if one of the ordered items wasn’t
received in full or if the price was different than expected), click the entry that needs to
be edited and then click Edit Item. MainBoss will open a window where you can edit
information about what was received.
___________________________________________________________
Adding Individual Items to a Shipment Receipt
Although Quick Receive is useful when a shipment contains most of the items from the
original purchase order, there are times when it is easier just to specify what was received
one item at a time.
___________________________________________________________
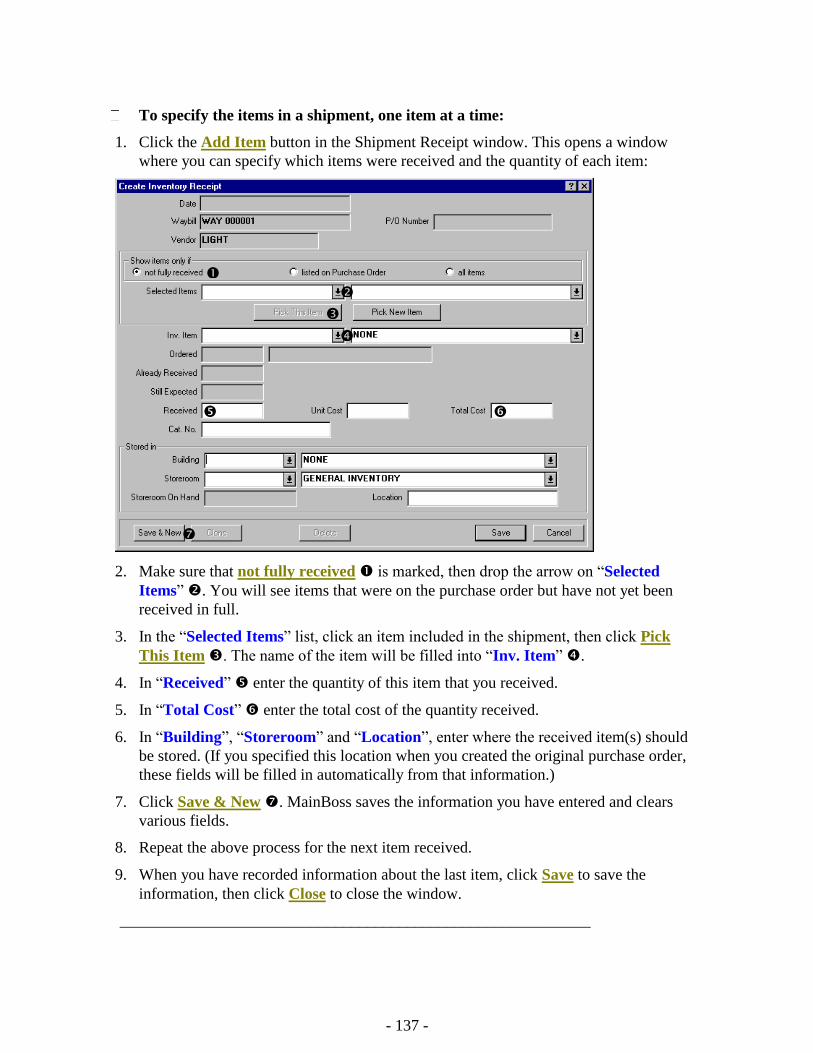
- 137 -
To specify the items in a shipment, one item at a time:
1. Click the Add Item button in the Shipment Receipt window. This opens a window
where you can specify which items were received and the quantity of each item:
2. Make sure that not fully received is marked, then drop the arrow on “Selected
Items” . You will see items that were on the purchase order but have not yet been
received in full.
3. In the “Selected Items” list, click an item included in the shipment, then click Pick
This Item . The name of the item will be filled into “Inv. Item” .
4. In “Received” enter the quantity of this item that you received.
5. In “Total Cost” enter the total cost of the quantity received.
6. In “Building”, “Storeroom” and “Location”, enter where the received item(s) should
be stored. (If you specified this location when you created the original purchase order,
these fields will be filled in automatically from that information.)
7. Click Save & New . MainBoss saves the information you have entered and clears
various fields.
8. Repeat the above process for the next item received.
9. When you have recorded information about the last item, click Save to save the
information, then click Close to close the window.
___________________________________________________________
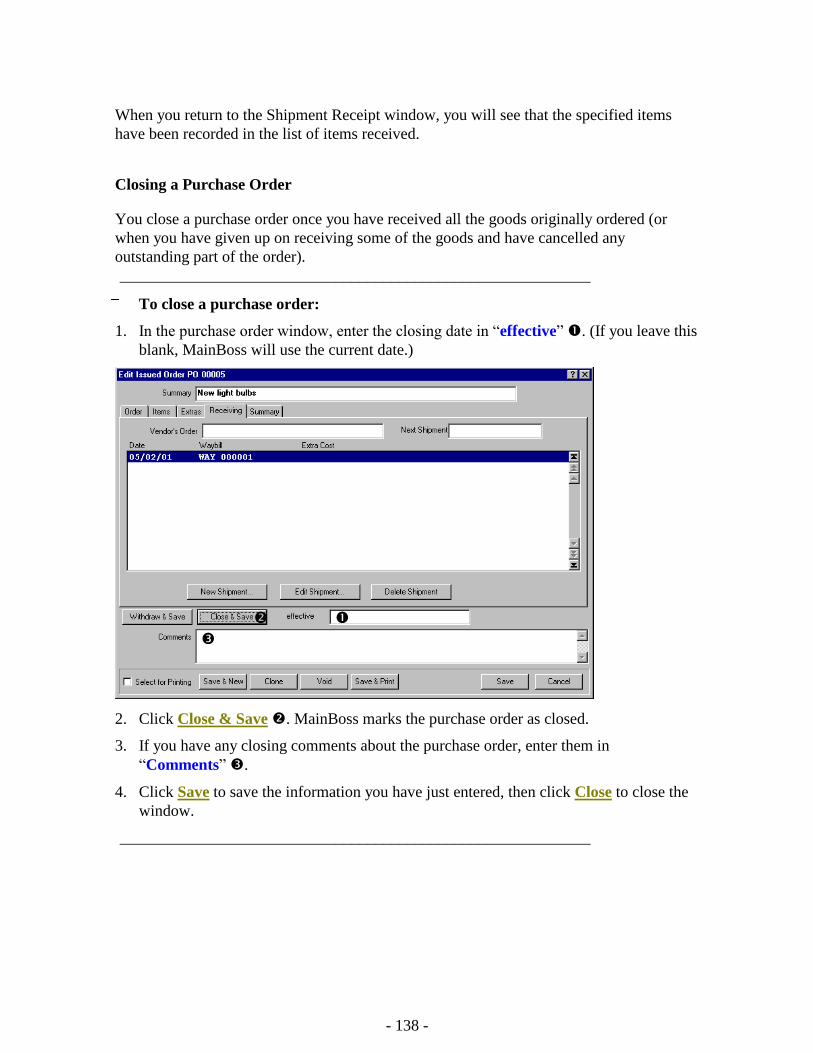
- 138 -
When you return to the Shipment Receipt window, you will see that the specified items
have been recorded in the list of items received.
Closing a Purchase Order
You close a purchase order once you have received all the goods originally ordered (or
when you have given up on receiving some of the goods and have cancelled any
outstanding part of the order).
___________________________________________________________
To close a purchase order:
1. In the purchase order window, enter the closing date in “effective” . (If you leave this
blank, MainBoss will use the current date.)
2. Click Close & Save . MainBoss marks the purchase order as closed.
3. If you have any closing comments about the purchase order, enter them in
“Comments” .
4. Click Save to save the information you have just entered, then click Close to close the
window.
___________________________________________________________
- 139 -
Prototype Purchase Orders
Some preventive maintenance tasks may have associated costs for outside labor or for
materials purchases. For example, you may hire a certified electrician to make an annual
inspection of your electrical systems, or you may get a contractor to recharge your fire
extinguishers on a regular basis. As another example, you may take company vehicles to an
outside service center for regular maintenance like oil changes.
In such cases, you can add a prototype purchase order to the PM task description. This is
not a real purchase order; however, it provides information that MainBoss can use to create
real purchase orders when a work order is generated from the PM task.
For example, suppose your fire extinguishers need to be recharged every year. You can
create a PM task description for recharging the fire extinguishers, and that task description
can include a prototype purchase order for the company that does the recharging. When
MainBoss generates a work order from the task description, it also generates a real
purchase order from the prototype purchase order. You can then send this purchase order to
the recharging company as a request for service.
All prototype purchase orders have an identification code. This is different from the
identifier that will appear on any real purchase orders generated from the prototype.
___________________________________________________________
To create a prototype purchase order:
1. In the Labor or Material of a task description, click New Purchase Order. MainBoss
opens a window where you can create the prototype purchase order:
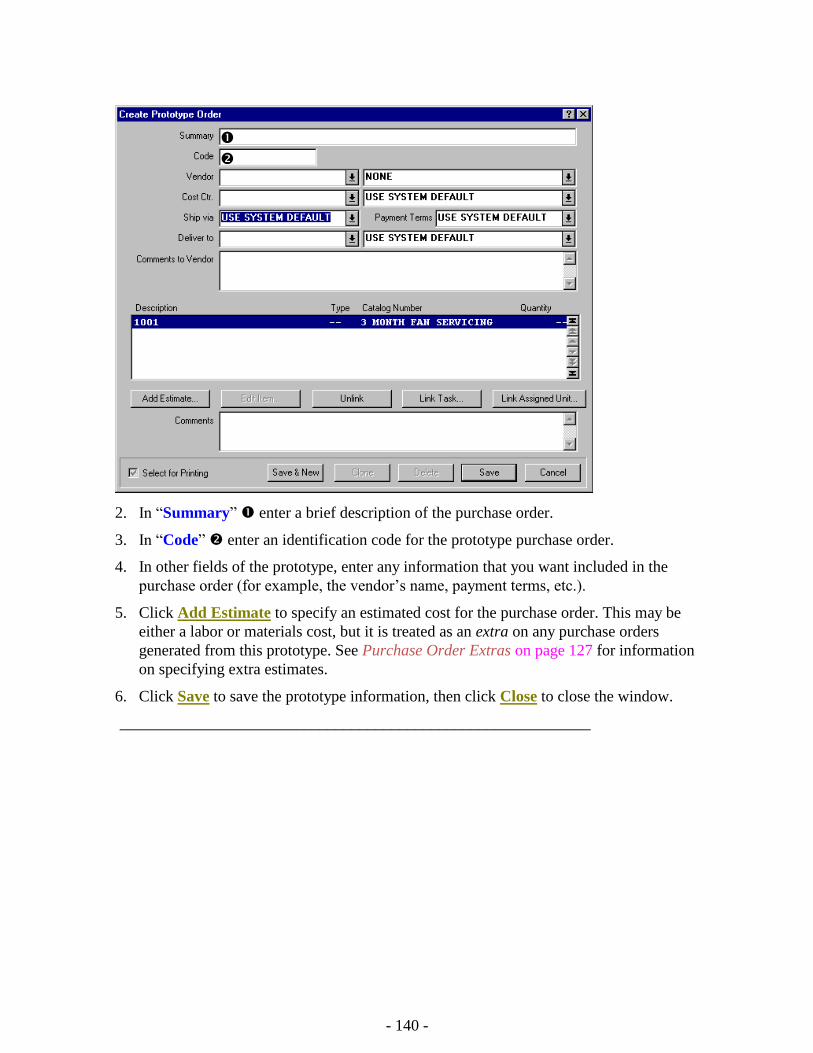
- 140 -
2. In “Summary” enter a brief description of the purchase order.
3. In “Code” enter an identification code for the prototype purchase order.
4. In other fields of the prototype, enter any information that you want included in the
purchase order (for example, the vendor’s name, payment terms, etc.).
5. Click Add Estimate to specify an estimated cost for the purchase order. This may be
either a labor or materials cost, but it is treated as an extra on any purchase orders
generated from this prototype. See Purchase Order Extras on page 127 for information
on specifying extra estimates.
6. Click Save to save the prototype information, then click Close to close the window.
___________________________________________________________
- 141 -
Browsers and Editors
Much of your work with MainBoss is done using browsers and editors. Previous chapters
have shown you how to use browsers and editors in simple ways. This chapter goes into
more detail, so that you get the most out of MainBoss’s facilities.
Browsers: A browser is a window that shows you a list of things. For example, the
Purchase Order browser shows you a list of current purchase orders.
A browser window lets you add new entries to the list, and modify or delete existing
entries. For example, the Purchase Order browser lets you create new purchase orders or
edit existing ones. It also lets you void (cancel) purchase orders that you have previously
created.
Browsers also let you search for items. For example, suppose you want to record some
information about a piece of equipment. You would open the Equipment browser and use it
to search through your equipment list until you found the appropriate piece of equipment;
you could then use the browser to tell MainBoss that you wanted to edit the information on
that piece of equipment.
Finally, browsers let you print information about items in the list. For example, if you want
to print out one or more purchase orders, you open the Purchase Order browser, then click
the Print button.
Editors: An editor is a window that shows you information about a single thing. For
example, the Purchase Order editor shows information about a particular purchase order.
MainBoss will open an editor window when you want to create a new record or edit an old
one. For example, when you want to create a new purchase order, MainBoss opens the
Purchase Order editor window; all the information fields in this window will be blank until
you enter some information. Later on, if you want to change some of the information in the
same purchase order, MainBoss will open the Purchase Order editor again; this time, the
editor will show you all the information that you entered when you originally created the
purchase order.
Basic Principle: A browser shows a list of records and an editor shows a single record.
Using Browsers
The picture below shows a typical MainBoss browser (the Equipment browser):
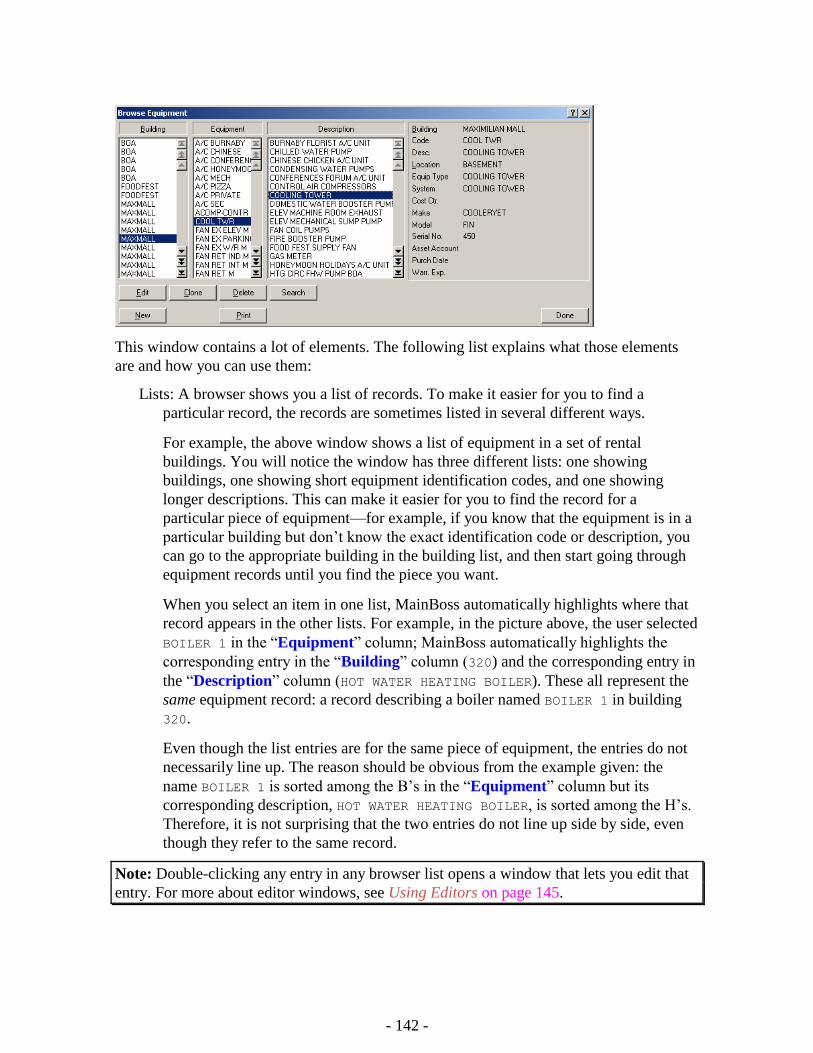
- 142 -
This window contains a lot of elements. The following list explains what those elements
are and how you can use them:
Lists: A browser shows you a list of records. To make it easier for you to find a
particular record, the records are sometimes listed in several different ways.
For example, the above window shows a list of equipment in a set of rental
buildings. You will notice the window has three different lists: one showing
buildings, one showing short equipment identification codes, and one showing
longer descriptions. This can make it easier for you to find the record for a
particular piece of equipment—for example, if you know that the equipment is in a
particular building but don’t know the exact identification code or description, you
can go to the appropriate building in the building list, and then start going through
equipment records until you find the piece you want.
When you select an item in one list, MainBoss automatically highlights where that
record appears in the other lists. For example, in the picture above, the user selected
BOILER 1 in the “Equipment” column; MainBoss automatically highlights the
corresponding entry in the “Building” column (320) and the corresponding entry in
the “Description” column (HOT WATER HEATING BOILER). These all represent the
same equipment record: a record describing a boiler named BOILER 1 in building
320.
Even though the list entries are for the same piece of equipment, the entries do not
necessarily line up. The reason should be obvious from the example given: the
name BOILER 1 is sorted among the B’s in the “Equipment” column but its
corresponding description, HOT WATER HEATING BOILER, is sorted among the H’s.
Therefore, it is not surprising that the two entries do not line up side by side, even
though they refer to the same record.
Note: Double-clicking any entry in any browser list opens a window that lets you edit that
entry. For more about editor windows, see Using Editors on page 145.
- 143 -
List controls: Each list has a scroll bar on the right, and each scroll bar contains a
number of arrow buttons. These buttons let you move through the entries in the list.
The arrows are:
Go to the first entry in the list
Scroll back one “page” (16 lines)
Go up one line
Go down one line
Scroll forward one “page”
Go to the last entry in the list
Using these buttons, you can move through any list to find entries you want.
MainBoss also has a facility that lets you search through the list for a specific entry;
this facility is described later in this section.
Note that the buttons may be disabled, depending on your current position in the
list. For example, if you are already at the beginning of a particular list, the three
buttons for moving backwards in the list are all disabled.
Buttons: Below the three lists are buttons labeled Edit, New, Clone, Delete, and Print.
There may be different buttons in different browsers, but these five are the most
common.
Edit: Lets you change the information in an existing record. Click the record you
want to change (in any of the lists), then click the Edit button. MainBoss opens
an editor window to let you change the information.
New: Lets you create a new record. Click the New button, and MainBoss will open
an editor window to let you enter information for the new entry.
Clone: Creates a new record starting with information taken from an old one. For
example, suppose your organization already has several forklift trucks and then
obtains a new one. To create a record for the new truck, you can clone the
information from one of the existing trucks; this saves you the effort of typing
in a lot of identical information for the new truck.
To clone an existing record, click the entry you want to clone and then click
Clone. MainBoss opens an editor window with most of the information fields
filled in with information from the old record. You can then edit this
information and fill in any blank fields to describe the new piece of equipment.
In some cases, MainBoss asks you to specify what information you want to
clone. For example, when you clone an existing work order, MainBoss asks you
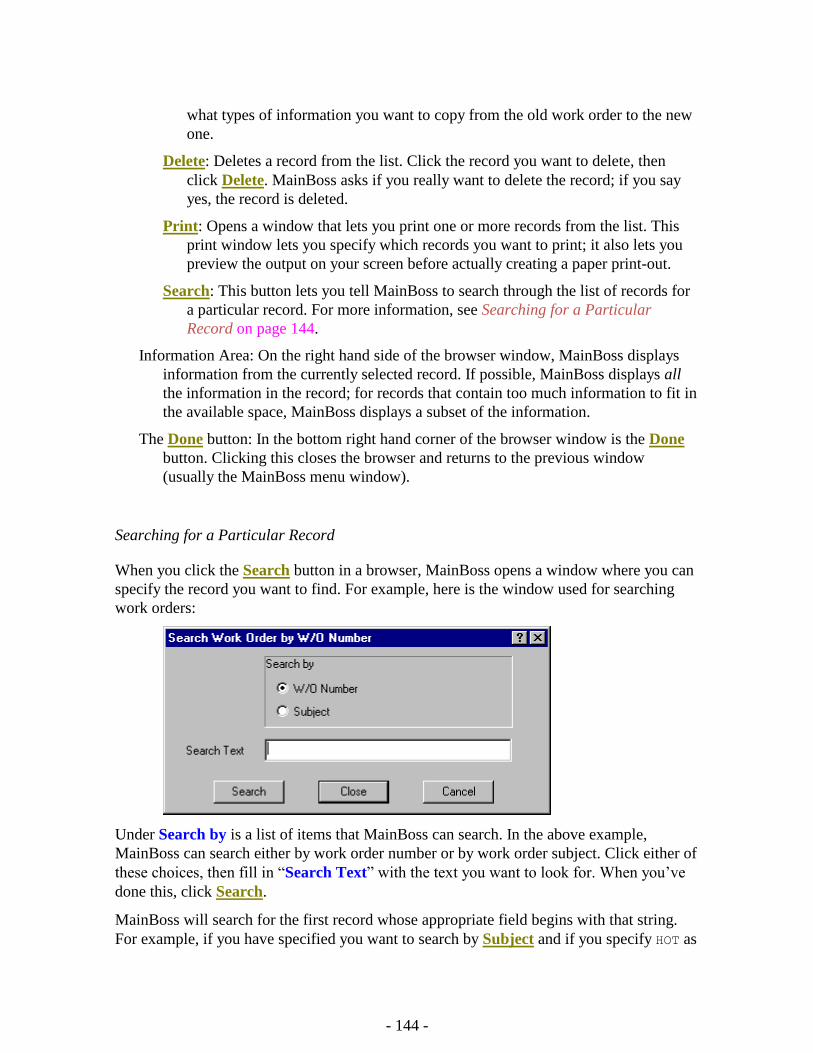
- 144 -
what types of information you want to copy from the old work order to the new
one.
Delete: Deletes a record from the list. Click the record you want to delete, then
click Delete. MainBoss asks if you really want to delete the record; if you say
yes, the record is deleted.
Print: Opens a window that lets you print one or more records from the list. This
print window lets you specify which records you want to print; it also lets you
preview the output on your screen before actually creating a paper print-out.
Search: This button lets you tell MainBoss to search through the list of records for
a particular record. For more information, see Searching for a Particular
Record on page 144.
Information Area: On the right hand side of the browser window, MainBoss displays
information from the currently selected record. If possible, MainBoss displays all
the information in the record; for records that contain too much information to fit in
the available space, MainBoss displays a subset of the information.
The Done button: In the bottom right hand corner of the browser window is the Done
button. Clicking this closes the browser and returns to the previous window
(usually the MainBoss menu window).
Searching for a Particular Record
When you click the Search button in a browser, MainBoss opens a window where you can
specify the record you want to find. For example, here is the window used for searching
work orders:
Under Search by is a list of items that MainBoss can search. In the above example,
MainBoss can search either by work order number or by work order subject. Click either of
these choices, then fill in “Search Text” with the text you want to look for. When you’ve
done this, click Search.
MainBoss will search for the first record whose appropriate field begins with that string.
For example, if you have specified you want to search by Subject and if you specify HOT as
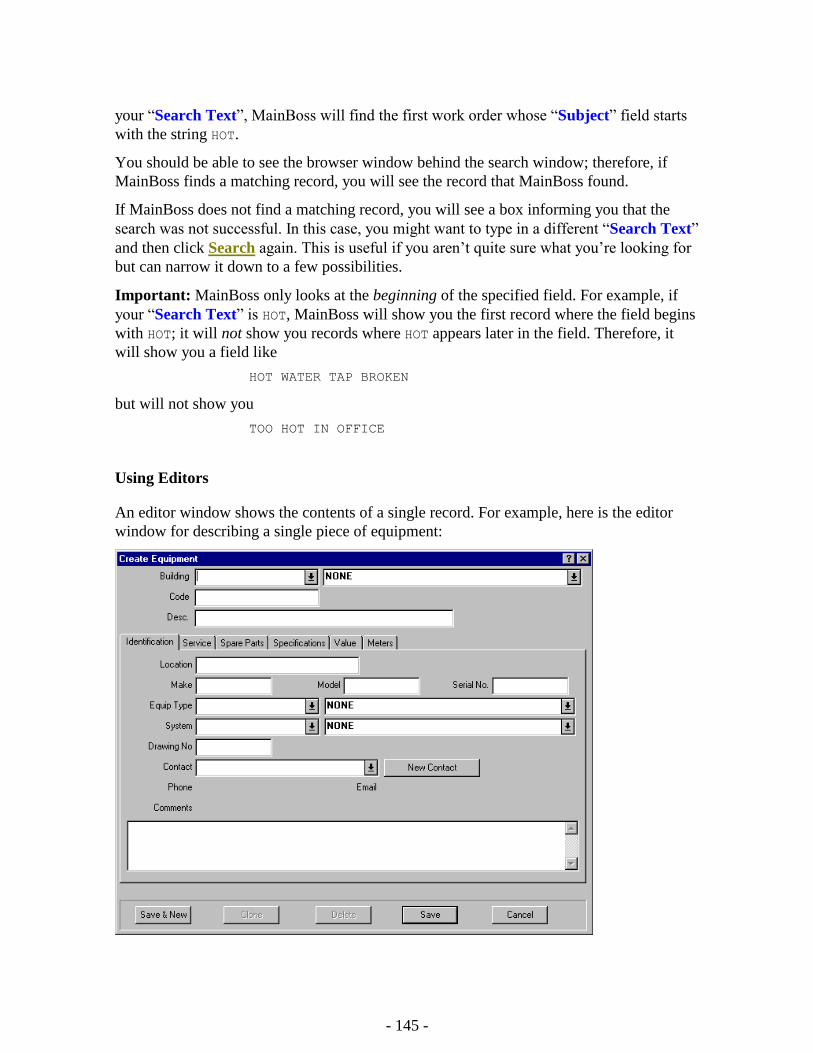
- 145 -
your “Search Text”, MainBoss will find the first work order whose “Subject” field starts
with the string HOT.
You should be able to see the browser window behind the search window; therefore, if
MainBoss finds a matching record, you will see the record that MainBoss found.
If MainBoss does not find a matching record, you will see a box informing you that the
search was not successful. In this case, you might want to type in a different “Search Text”
and then click Search again. This is useful if you aren’t quite sure what you’re looking for
but can narrow it down to a few possibilities.
Important: MainBoss only looks at the beginning of the specified field. For example, if
your “Search Text” is HOT, MainBoss will show you the first record where the field begins
with HOT; it will not show you records where HOT appears later in the field. Therefore, it
will show you a field like
HOT WATER TAP BROKEN
but will not show you
TOO HOT IN OFFICE
Using Editors
An editor window shows the contents of a single record. For example, here is the editor
window for describing a single piece of equipment:
- 146 -
The window consists of a number of information fields. For example, the “Building” field
at the top of the window lets you specify the building that contains the equipment.
In the editor window, you can move the cursor from one field to the next by pressing the
<Tab> key. For example, if you have just filled in the “Make” field, pressing <Tab>
moves the cursor to “Model”. In this way, you can <Tab> from one field to the next
without having to use the mouse. Of course, you can still use the mouse if you wish. (Note
that <Shift+Tab> goes backwards to the previous field; this is useful if you type
something, <Tab> out, then notice a typing mistake in the previous field.)
There are several types of information fields. The following explains the most common
types of fields, using the Equipment editor window as an example.
Text fields: The simplest type of field is a text field. In the window above, “Make”,
“Model” and “Serial No.” are all text fields. To fill these in, just click on the field,
then type appropriate values (in this case, the make, model, and serial number of a
piece of equipment).
Text fields let you use the usual Windows editing features. For example, you can
make corrections using <Backspace> or the <Delete> key. You can copy the
current selection with <Ctrl+C>, cut the current selection with <Ctrl+X>, and
paste in the contents of the clipboard using <Ctrl+V>. You can also use other
standard editing features; for more information, see the documentation on your
Windows system.
Date/time fields: A date/time field lets you record a calendar date and/or time of day.
For example, when you writing up a work order, you can record information like
the date you want the job to start, the date you expect it to end, the date you created
the work order, and so on.
MainBoss gives you a great deal of freedom in how you enter dates and times. For
example, here are a number of ways to enter the same date:
December 25, 2001 Dec 25, 2001 2001/12/25 12/25/2001 12/25/01
Times may also be included in the field, either at the beginning or the end, as in
Dec 25, 2001 3:00 pm 3:00 pm Dec 25, 2001 12/25/2001 15:00 15:00 12/25/2001
The examples above show that you can use either a 12-hour or 24-hour clock.
Different parts of the world use different conventions for expressing numeric dates.
For example, some use the MMDDYY convention (so that 01/02/03 would be
interpreted as January 2, 2003). Other places use the YYMMDD convention (so

- 147 -
01/02/03 would be interpreted as February 3, 2001). Still others use the
DDMMYY convention (so 01/02/03 would be interpreted as February 1, 2003).
The convention used by your organization can be set by your system administrator
using preferences (as described in Date and Time Format and Other Preferences on
page 164). When in doubt, you can always type in dates using a less ambiguous
format. For example, if you type Feb 1, 2003 your meaning will always be clear.
Date fields also recognize entries like last year, next year, today, and similar
phrases.
Drop-down lists: The “Building” field in the Equipment editor is a drop-down list.
When you click the accompanying drop-down button:
MainBoss displays a set of possible values for the information field. In the case of
“Building”, this is the set of buildings defined in your MainBoss Buildings table.
If a drop-down list contains a large number of entries, MainBoss displays a scroll
bar on the edge of the list, as in:
The arrow buttons in this scroll bar have the same meanings as the arrow buttons in
a browser scroll bar. For an explanation of these buttons, see Using Browsers on
page 141.
To find the desired entry in a long drop-down list, you can click the arrow buttons
to move through the list. As an alternative, you can simply start typing the value
you want inside the drop-down field. For example, if you type MNO in a drop-down
field, MainBoss will drop the list and show you the first list entry that begins with
MNO; if there is no such entry, MainBoss will show the first list entry that comes
after the string you’ve typed. Typing a few letters is a quick way to jump down
through a long list of possibilities.
Important: If a drop-down list currently contains a selected value and you want to clear
(erase) that value, click on the area where the value is displayed, then type <Ctrl+Delete>
(hold down the <Ctrl> key and press <Delete>). MainBoss will drop down the list. Click
the mouse anywhere on the window except the drop-down list, and MainBoss will clear the
field. You can also clear a drop-down list by right-clicking the list’s arrow and clicking
Clear Selection in the resulting menu.
Option buttons: There are two types of option buttons, both illustrated in the following
window:
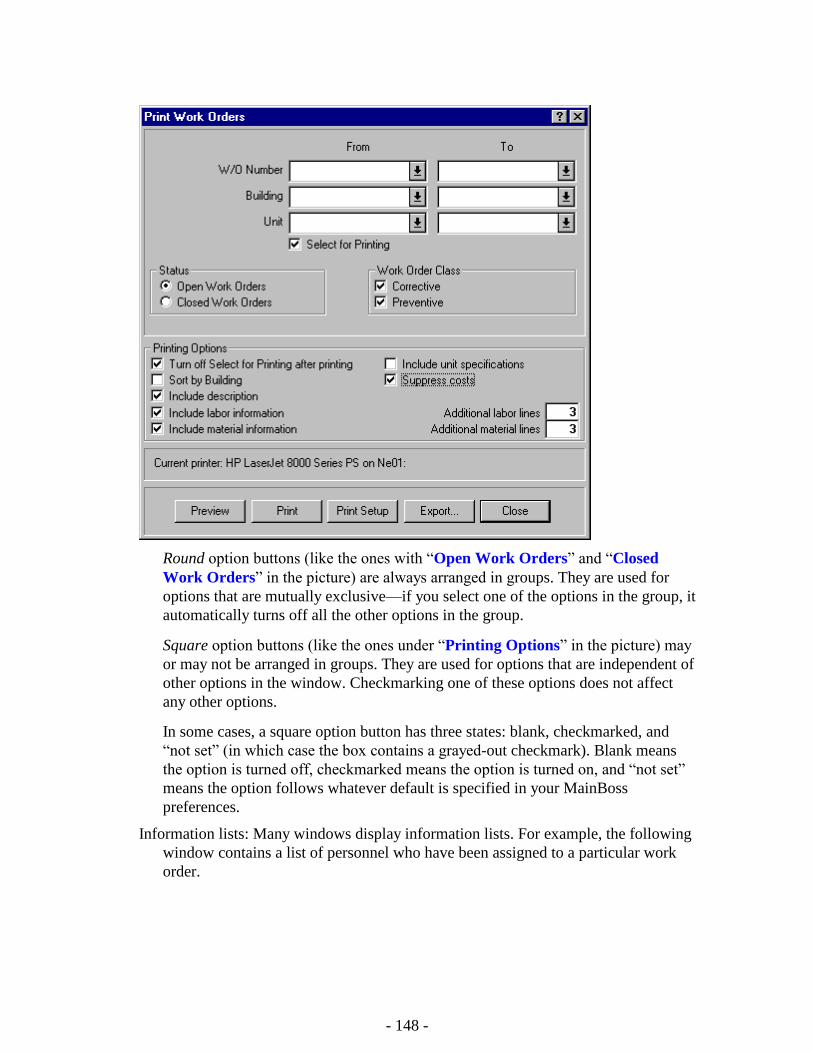
- 148 -
Round option buttons (like the ones with “Open Work Orders” and “Closed
Work Orders” in the picture) are always arranged in groups. They are used for
options that are mutually exclusive—if you select one of the options in the group, it
automatically turns off all the other options in the group.
Square option buttons (like the ones under “Printing Options” in the picture) may
or may not be arranged in groups. They are used for options that are independent of
other options in the window. Checkmarking one of these options does not affect
any other options.
In some cases, a square option button has three states: blank, checkmarked, and
“not set” (in which case the box contains a grayed-out checkmark). Blank means
the option is turned off, checkmarked means the option is turned on, and “not set”
means the option follows whatever default is specified in your MainBoss
preferences.
Information lists: Many windows display information lists. For example, the following
window contains a list of personnel who have been assigned to a particular work
order.
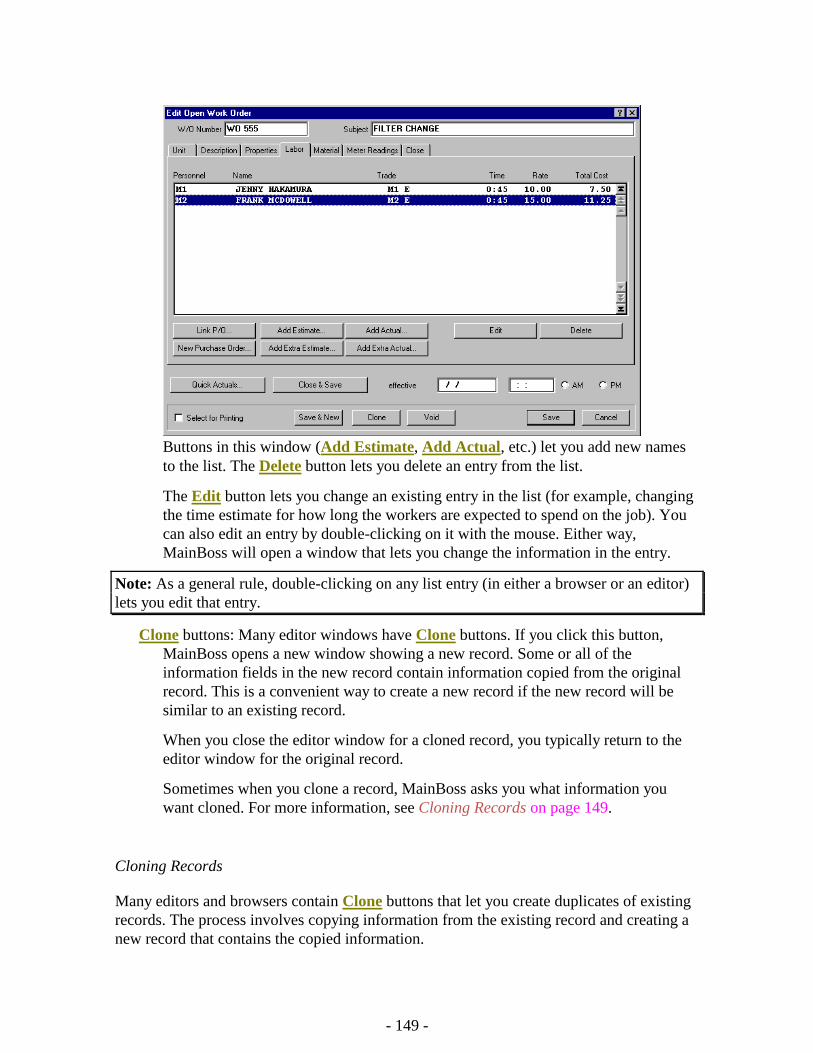
- 149 -
Buttons in this window (Add Estimate, Add Actual, etc.) let you add new names
to the list. The Delete button lets you delete an entry from the list.
The Edit button lets you change an existing entry in the list (for example, changing
the time estimate for how long the workers are expected to spend on the job). You
can also edit an entry by double-clicking on it with the mouse. Either way,
MainBoss will open a window that lets you change the information in the entry.
Note: As a general rule, double-clicking on any list entry (in either a browser or an editor)
lets you edit that entry.
Clone buttons: Many editor windows have Clone buttons. If you click this button,
MainBoss opens a new window showing a new record. Some or all of the
information fields in the new record contain information copied from the original
record. This is a convenient way to create a new record if the new record will be
similar to an existing record.
When you close the editor window for a cloned record, you typically return to the
editor window for the original record.
Sometimes when you clone a record, MainBoss asks you what information you
want cloned. For more information, see Cloning Records on page 149.
Cloning Records
Many editors and browsers contain Clone buttons that let you create duplicates of existing
records. The process involves copying information from the existing record and creating a
new record that contains the copied information.

- 150 -
In some cases, MainBoss will ask you what information you want to copy into the new
record. For example, when you clone a work order, MainBoss opens a window that lets you
specify which information should be copied from the original work order (including labor
information, materials, chargeback information, and so on). Select the types of information
that you want to copy from the old to the new, then click Ok.
- 151 -
Reports
MainBoss can produce a wide variety of reports on major Maintenance, Equipment and
Inventory concerns. All reports can be printed or displayed on your screen. They can also
be exported for use in external programs such as database, spreadsheet and word
processing applications…or even faxed if you have a built-in fax/modem and faxing
software that provides you with a faxing “printer.” Some reports can be summarized to
give management an overview of important trends.
Note: All reports generated by MainBoss are designed to be printed on 8.5 by 11 paper or
A4 paper, in portrait format.
Entering Report Specifications
In many reports, you can select ranges of values for the report to cover. For example, the
Labor History report provides information on work done by your maintenance personnel;
this may include hours worked, labor costs, the dates and times of specific jobs, and so on.
When you want to produce a Labor History report, you can tell MainBoss that you want the
report to cover a specific time period (for example, work done during the month of
February), a specific set of workers (one worker in particular or several workers at once),
work done in a particular building, and so on. MainBoss combines all these criteria to
produce a report that only covers the material you want to see.
As an example of how this works, here’s a screen from the window that lets you print the
Labor History report:
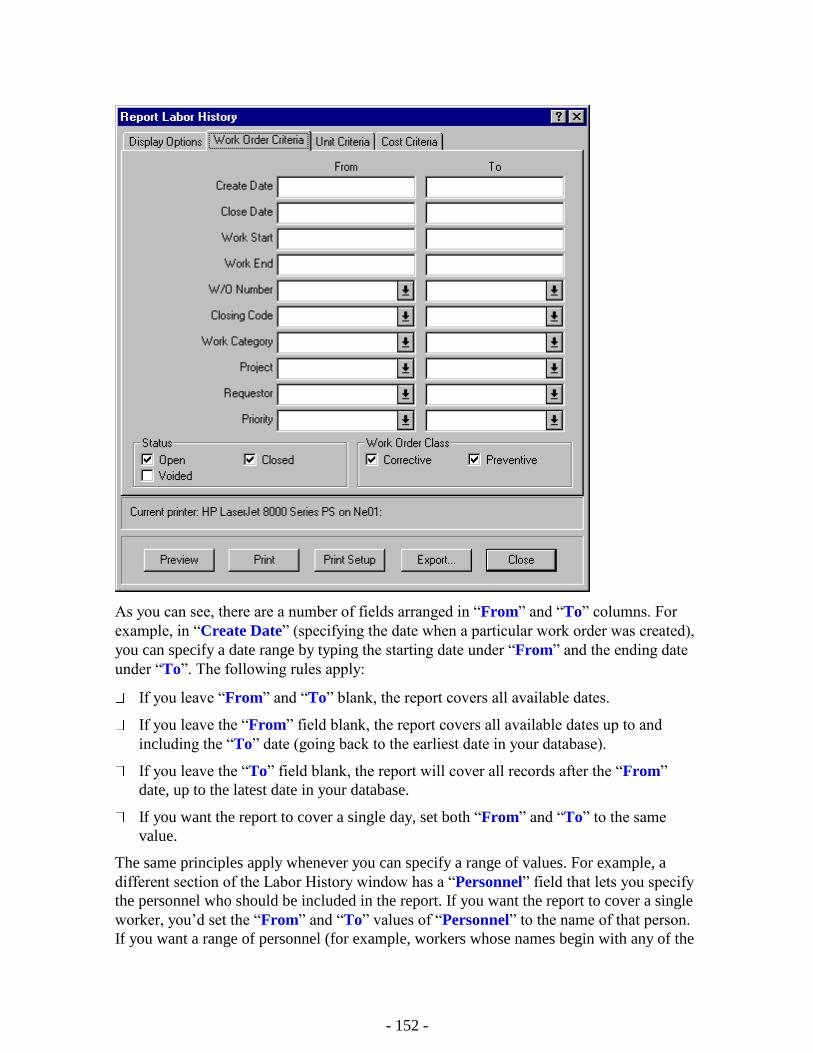
- 152 -
As you can see, there are a number of fields arranged in “From” and “To” columns. For
example, in “Create Date” (specifying the date when a particular work order was created),
you can specify a date range by typing the starting date under “From” and the ending date
under “To”. The following rules apply:
If you leave “From” and “To” blank, the report covers all available dates.
If you leave the “From” field blank, the report covers all available dates up to and
including the “To” date (going back to the earliest date in your database).
If you leave the “To” field blank, the report will cover all records after the “From”
date, up to the latest date in your database.
If you want the report to cover a single day, set both “From” and “To” to the same
value.
The same principles apply whenever you can specify a range of values. For example, a
different section of the Labor History window has a “Personnel” field that lets you specify
the personnel who should be included in the report. If you want the report to cover a single
worker, you’d set the “From” and “To” values of “Personnel” to the name of that person.
If you want a range of personnel (for example, workers whose names begin with any of the
- 153 -
letters in the range A through M), you could set the “From” value to the first name in the
A’s and the “To” value to the last name in the M’s.
Previewing Reports
MainBoss lets you preview reports by displaying them on your computer screen. In this
way, you can see everything that will be printed if and when you send the report to your
printer.
To preview a report, click the Preview button in the window for printing the report.
MainBoss displays a window that contains the following:
Preview area: The main part of the window shows the preview itself.
Page: The page number of the page you’re currently previewing.
Goto Page: Lets you go to a different page of the preview. Type the desired page
number into “Page”, then click Goto Page. MainBoss will go to the specified page.
First Page: Goes to the first page of the report
Previous Page: Goes to the previous page of the report.
Next Page: Goes to the next page of the report.
Last Page: Goes to the last page of the report.
Full Size: Adjusts the displayed information so that it fills the preview area. This is the
default. If the preview area is too small to show an entire page, the area will have
scroll bars so that you can look at parts that don’t fit on the screen.
Full Page: Adjusts the displayed information so that the preview area shows an entire
page of the report.
Typically, Full Page shows more data than Full Size, but the printing is smaller
and may be harder to read.
Print: Immediately prints the report you are previewing. In this way, you can print the
report without having to close the preview window.
Close: Closes the preview window.
Note: While previewing a report, you can also use the <Page Up> and <Page Down> keys
to move backward and forward through the report.
A List of MainBoss Reports
This section provides a brief description of each report that MainBoss can produce. For
information on any of these reports, see the online documentation.
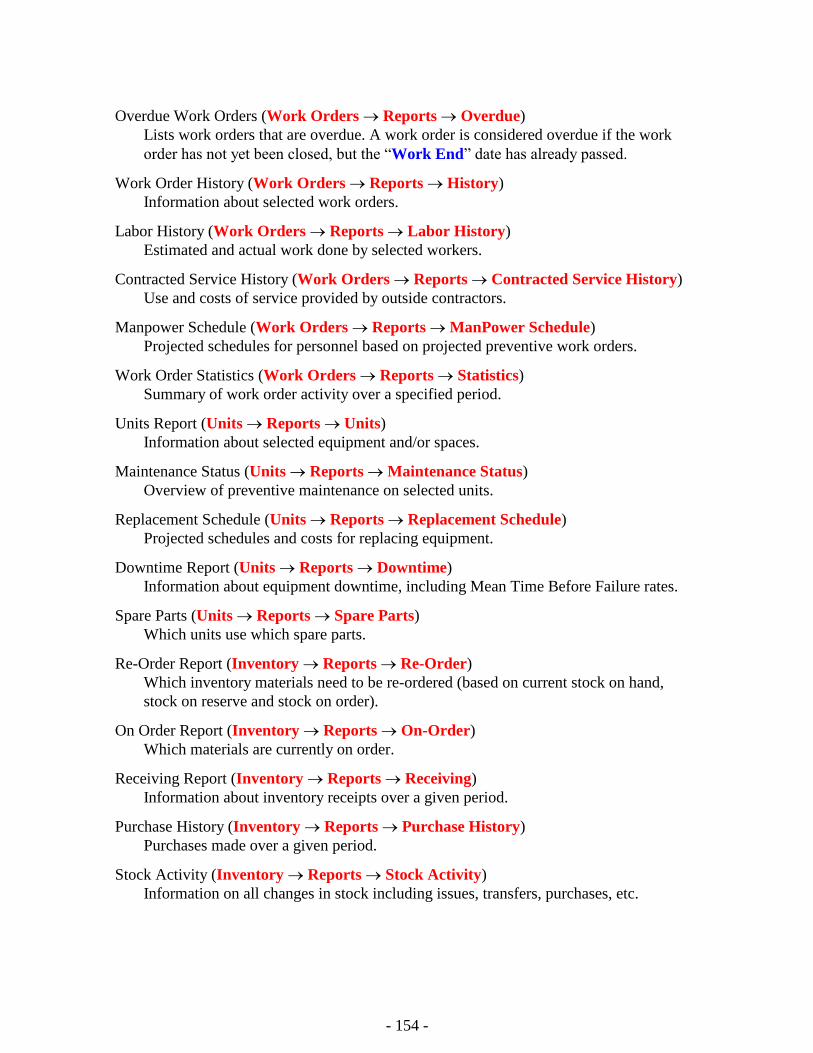
- 154 -
Overdue Work Orders (Work Orders Reports Overdue)
Lists work orders that are overdue. A work order is considered overdue if the work
order has not yet been closed, but the “Work End” date has already passed.
Work Order History (Work Orders Reports History)
Information about selected work orders.
Labor History (Work Orders Reports Labor History)
Estimated and actual work done by selected workers.
Contracted Service History (Work Orders Reports Contracted Service History)
Use and costs of service provided by outside contractors.
Manpower Schedule (Work Orders Reports ManPower Schedule)
Projected schedules for personnel based on projected preventive work orders.
Work Order Statistics (Work Orders Reports Statistics)
Summary of work order activity over a specified period.
Units Report (Units Reports Units)
Information about selected equipment and/or spaces.
Maintenance Status (Units Reports Maintenance Status)
Overview of preventive maintenance on selected units.
Replacement Schedule (Units Reports Replacement Schedule)
Projected schedules and costs for replacing equipment.
Downtime Report (Units Reports Downtime)
Information about equipment downtime, including Mean Time Before Failure rates.
Spare Parts (Units Reports Spare Parts)
Which units use which spare parts.
Re-Order Report (Inventory Reports Re-Order)
Which inventory materials need to be re-ordered (based on current stock on hand,
stock on reserve and stock on order).
On Order Report (Inventory Reports On-Order)
Which materials are currently on order.
Receiving Report (Inventory Reports Receiving)
Information about inventory receipts over a given period.
Purchase History (Inventory Reports Purchase History)
Purchases made over a given period.
Stock Activity (Inventory Reports Stock Activity)
Information on all changes in stock including issues, transfers, purchases, etc.
- 155 -
Issues Report (Inventory Reports Issues)
Information on all materials issued from inventory.
Inventory Status (Inventory Reports Inventory Status)
All items in stock within one or more storerooms. The report can be written in
“physical count” form to facilitate taking inventory.
Inventory Value (Inventory Reports Inventory Value)
The value of materials currently on hand.
Inventory Where Used (Inventory Reports Inventory Where Used)
Which preventive maintenance tasks use which inventory items.
Note: To see the online help about any of these reports, use the menu selections listed
above, then click the <?> button in the upper right hand corner of the resulting window.
Exporting Data
MainBoss can export data from a report in a format that lets you use the data with another
computer program. For example, you could export data for use with Microsoft Excel or
Microsoft Access; you could then use Excel or Access to create a customized report based
on that data.
MainBoss can export data in two formats:
The dBase-format creates a .DBF file suitable for use with programs that accept FoxPro
dBase data. (This includes Microsoft Excel and Access.)
The text format creates a .CSV (text) file consisting of ASCII character data. Each line
consists of a series of fields, separated by commas. You can choose whether the text
file begins with a line giving the name of each field or just starts immediately with the
data.
To export data in either format, you click the Export button in the window for printing a
report. MainBoss opens a standard Windows “Save as” dialog where you can specify the
name of the file that should hold the exported data. The Save as type field gives the
following choices:
Database Files (*.DBF): MainBoss will save the data in dBase format.
ASCII Comma Delimited (*.CSV): MainBoss will save the data in text format, with
fields separated by commas.
ASCII Comma Delimited with Field Names (*.CSV): MainBoss will save the data
in text format, with fields separated by commas. The first line in the file will give
names for each field.
As a simple example, here are a few lines of information from the Units report, exported
using the last format listed above. (The lines have been truncated to fit on the page.)
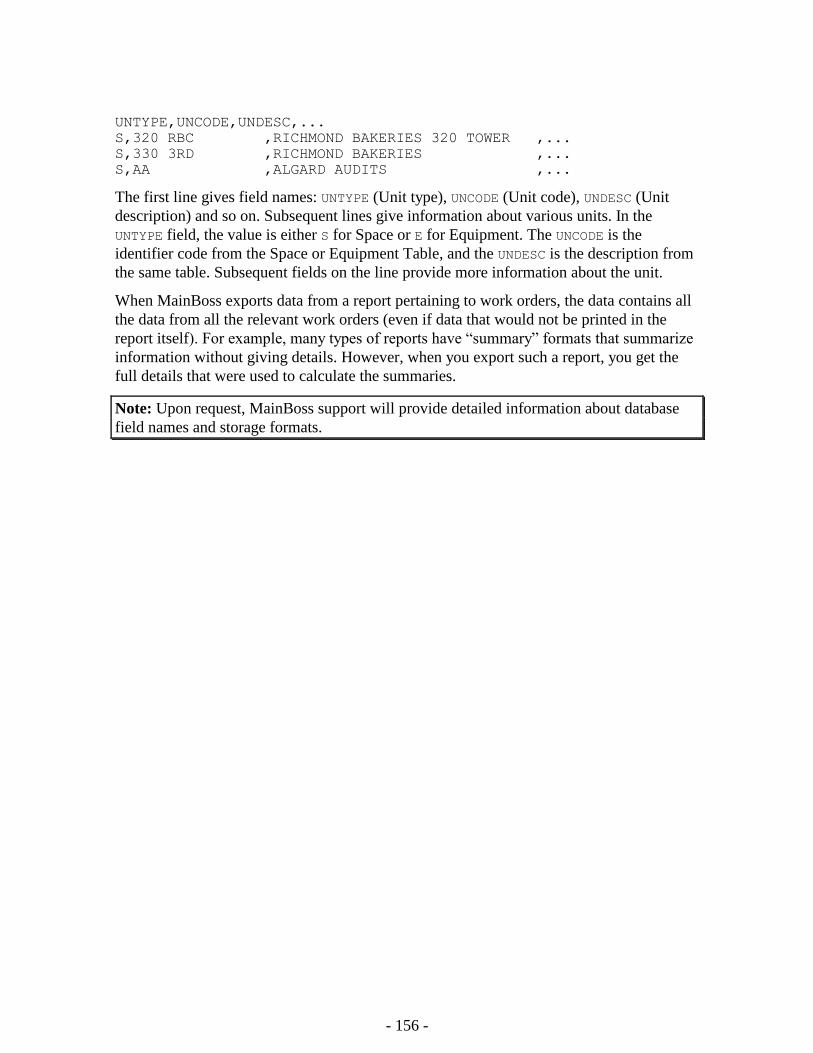
- 156 -
UNTYPE,UNCODE,UNDESC,...
S,320 RBC ,RICHMOND BAKERIES 320 TOWER ,...
S,330 3RD ,RICHMOND BAKERIES ,...
S,AA ,ALGARD AUDITS ,...
The first line gives field names: UNTYPE (Unit type), UNCODE (Unit code), UNDESC (Unit
description) and so on. Subsequent lines give information about various units. In the
UNTYPE field, the value is either S for Space or E for Equipment. The UNCODE is the
identifier code from the Space or Equipment Table, and the UNDESC is the description from
the same table. Subsequent fields on the line provide more information about the unit.
When MainBoss exports data from a report pertaining to work orders, the data contains all
the data from all the relevant work orders (even if data that would not be printed in the
report itself). For example, many types of reports have “summary” formats that summarize
information without giving details. However, when you export such a report, you get the
full details that were used to calculate the summaries.
Note: Upon request, MainBoss support will provide detailed information about database
field names and storage formats.
- 157 -
Attachments
Many organizations have online information associated with equipment and/or spaces. For
example, a manufacturing plant might have schematic diagrams showing how to make a
certain kind of repair, while a rental management company might have an online document
that states contractual agreements with a particular tenant.
In such cases, it is useful to attach drawings, documents, and other types of files to the
records in MainBoss. This makes it easier for your management and workers to locate
information that might be relevant to a particular task.
An Example: As an example of how this works, consider the case of a rental management
company that provides maintenance services to a number of tenants in an office building.
Whenever a tenant signs a lease, the company prepares a Microsoft Word document
specifying any special contractual agreements between the tenant and the management
company.
Obviously, there are times when it might be useful for the maintenance department to
check the contractual agreements that have been made with a particular tenant. Therefore,
in the MainBoss Space table entry for each tenant’s office, the company specifies the name
of the file that contains the relevant document. It is also necessary to tell MainBoss that this
file should be opened with Microsoft Word.
Once this information has been set up, anyone looking at the Space table entry can open the
document file directly from MainBoss. This means that MainBoss starts Microsoft Word to
display the file; you can also use Word’s usual facilities for printing the file, editing it, and
so on.
The same principle applies for other types of files. For example, if you have a CAD-CAM
file providing a schematic diagram for some piece of equipment, you can record the name
of that file in the appropriate Equipment table entry.
Viewing programs: In order to display or print an attachment, MainBoss has to know
what software to use. Often this is handled by the Windows operating system; for example,
Windows may be set up so that files whose names end in .doc are opened in Microsoft
Word. On the other hand, your Windows system may not have software automatically
associated with other types of files.
If Windows does not automatically associate software with a particular type of file, you
must tell MainBoss what software to use for displaying and/or printing that file. This
means that you have to tell MainBoss about the viewing program needed for that file.
For example, suppose you are attaching a CAD-CAM file and Windows doesn’t have an
existing file association for that type of file. Then you need to tell MainBoss what program
to use in order to look at the file.
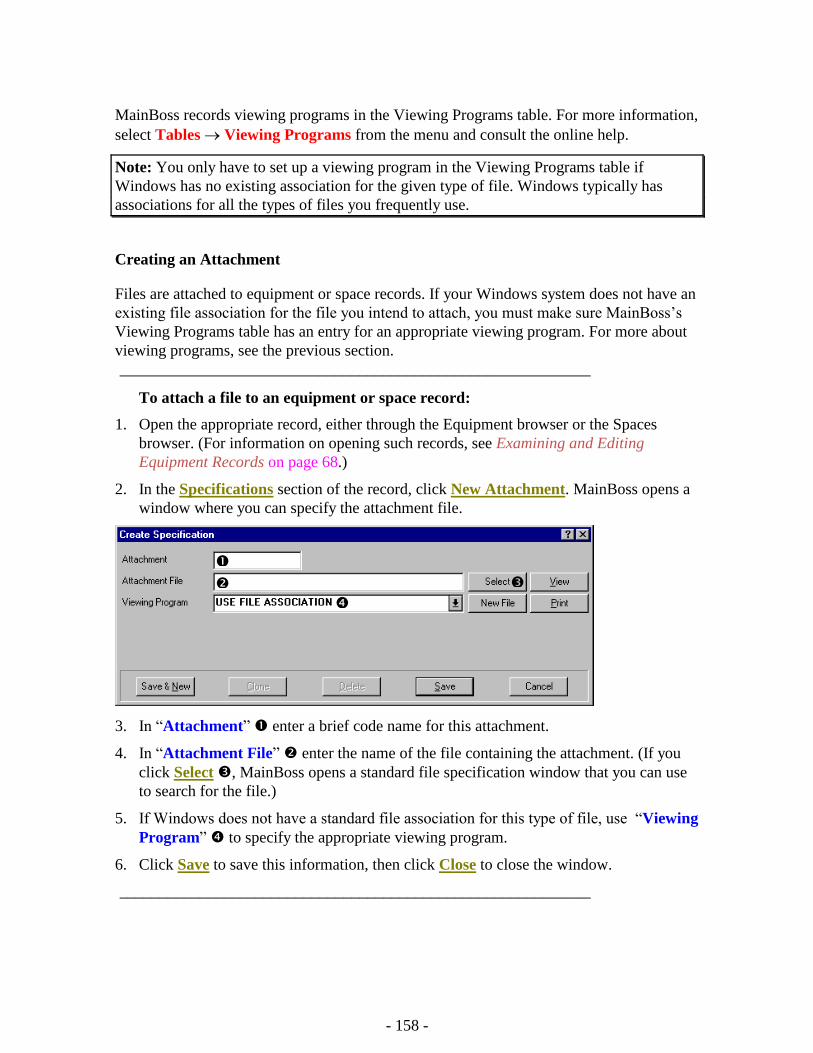
- 158 -
MainBoss records viewing programs in the Viewing Programs table. For more information,
select Tables Viewing Programs from the menu and consult the online help.
Note: You only have to set up a viewing program in the Viewing Programs table if
Windows has no existing association for the given type of file. Windows typically has
associations for all the types of files you frequently use.
Creating an Attachment
Files are attached to equipment or space records. If your Windows system does not have an
existing file association for the file you intend to attach, you must make sure MainBoss’s
Viewing Programs table has an entry for an appropriate viewing program. For more about
viewing programs, see the previous section.
___________________________________________________________
To attach a file to an equipment or space record:
1. Open the appropriate record, either through the Equipment browser or the Spaces
browser. (For information on opening such records, see Examining and Editing
Equipment Records on page 68.)
2. In the Specifications section of the record, click New Attachment. MainBoss opens a
window where you can specify the attachment file.
3. In “Attachment” enter a brief code name for this attachment.
4. In “Attachment File” enter the name of the file containing the attachment. (If you
click Select , MainBoss opens a standard file specification window that you can use
to search for the file.)
5. If Windows does not have a standard file association for this type of file, use “Viewing
Program” to specify the appropriate viewing program.
6. Click Save to save this information, then click Close to close the window.
___________________________________________________________
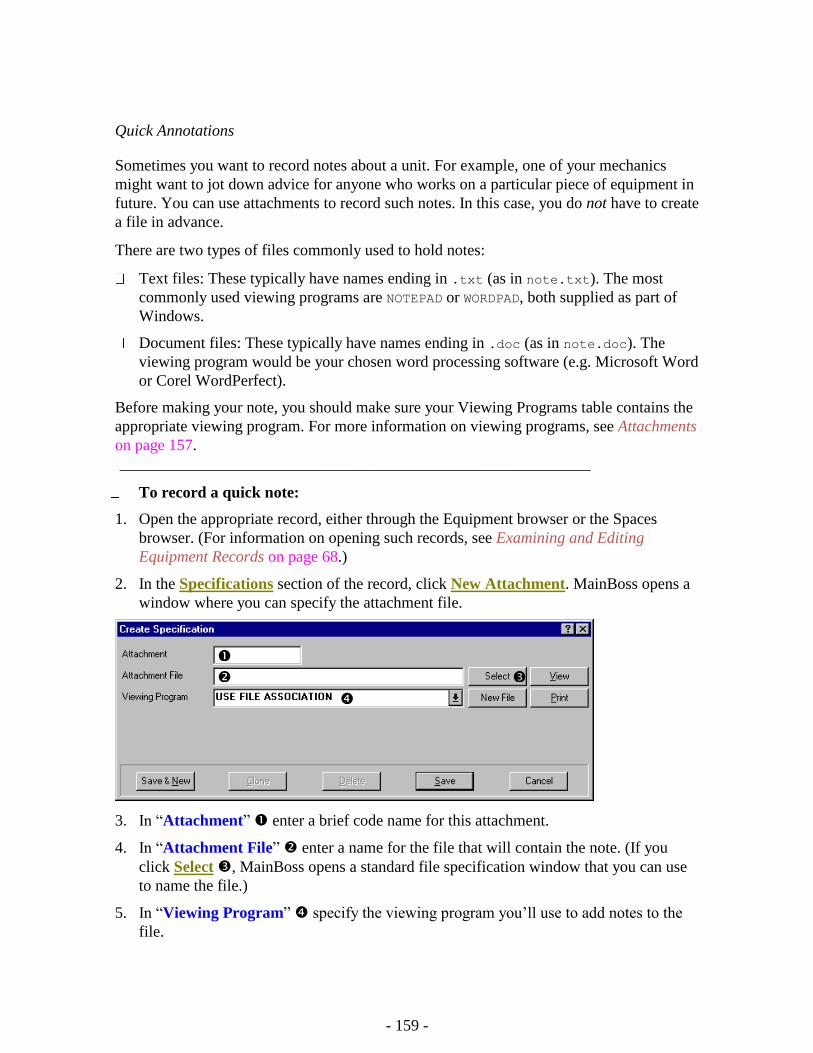
- 159 -
Quick Annotations
Sometimes you want to record notes about a unit. For example, one of your mechanics
might want to jot down advice for anyone who works on a particular piece of equipment in
future. You can use attachments to record such notes. In this case, you do not have to create
a file in advance.
There are two types of files commonly used to hold notes:
Text files: These typically have names ending in .txt (as in note.txt). The most
commonly used viewing programs are NOTEPAD or WORDPAD, both supplied as part of
Windows.
Document files: These typically have names ending in .doc (as in note.doc). The
viewing program would be your chosen word processing software (e.g. Microsoft Word
or Corel WordPerfect).
Before making your note, you should make sure your Viewing Programs table contains the
appropriate viewing program. For more information on viewing programs, see Attachments
on page 157.
___________________________________________________________
To record a quick note:
1. Open the appropriate record, either through the Equipment browser or the Spaces
browser. (For information on opening such records, see Examining and Editing
Equipment Records on page 68.)
2. In the Specifications section of the record, click New Attachment. MainBoss opens a
window where you can specify the attachment file.
3. In “Attachment” enter a brief code name for this attachment.
4. In “Attachment File” enter a name for the file that will contain the note. (If you
click Select , MainBoss opens a standard file specification window that you can use
to name the file.)
5. In “Viewing Program” specify the viewing program you’ll use to add notes to the
file.

- 160 -
6. Click New File. MainBoss creates the file and opens it with the specified viewing
program. You can then write up any notes you want to record. When you’re finished,
save the file and exit the viewing program.
7. Back in MainBoss, click Save to save MainBoss’s record of the attachment, then click
Close to close the window.
___________________________________________________________
Using an Attachment
Once you have attached a file to an equipment or space record, MainBoss makes it easy to
view or print the attachment.
___________________________________________________________
To read or edit an attachment:
1. Open the appropriate record, either through the Equipment browser or the Spaces
browser. (For information on opening such records, see Examining and Editing
Equipment Records on page 68.)
2. In the attachment list , double-click the attachment you want to read or edit.
MainBoss will open a window showing information about the attachment.
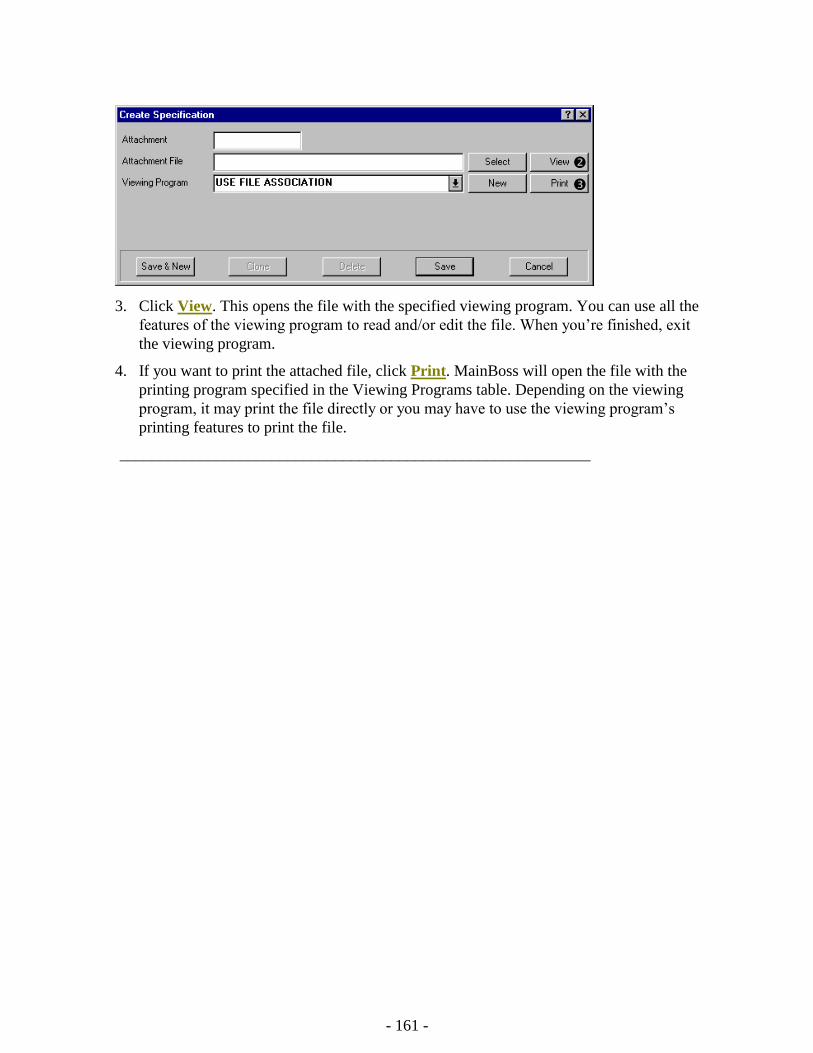
- 161 -
3. Click View. This opens the file with the specified viewing program. You can use all the
features of the viewing program to read and/or edit the file. When you’re finished, exit
the viewing program.
4. If you want to print the attached file, click Print. MainBoss will open the file with the
printing program specified in the Viewing Programs table. Depending on the viewing
program, it may print the file directly or you may have to use the viewing program’s
printing features to print the file.
___________________________________________________________
- 162 -
MainBoss Administration
The Administration menu lets an administrator control the behavior of MainBoss. The
menu offers access to the following features:
Preferences: Customizing various aspects of MainBoss to meet the needs of your
organization.
Database Utilities: Keeping your MainBoss database files in efficient working order,
plus backing up and restoring the entire database.
Security: Restricting the ways in which other users can use MainBoss. For example,
you might want to prevent unauthorized users from creating new purchase orders; the
security features of MainBoss make this possible.
Archiving: The archiving process removes old records from your database files. For
example, you can use this to remove work orders, work requests, and purchase orders
that are more than a year old. Removing these records makes the files smaller; not only
does this increase the speed of many MainBoss operations, it also makes it simpler for
you to find more recent records since the tables aren’t cluttered up with old entries.
(Note that MainBoss’s archiving facilities also let you examine old records that have
been removed from your database files; therefore you can still obtain older information
if necessary.)
License Keys: Lets you enter and modify license keys for MainBoss software products.
Accessing Administration Functions
Administration operations are normally disabled. This means that when you try to select an
operation from one of the Administration submenus, the items are all grayed out; clicking
on them does nothing.
In order to enable administration operations, you must login as the MainBoss
administrator. If you aren’t already logged in as the administrator, you can do so by
selecting Session Login from the menu. MainBoss will display the usual login window.
For “User Name” type ADMINISTRATOR, and for “Password” type the administration
password.
Note: For more information about logging in, see Logging In on page 9.
When you first license MainBoss, you will be given the password to use as administrator.
Later on, you may change to a different password, as described in Changing Your
Administration Password on page 174.
- 163 -
Important: Anyone who knows your Administration password can control all the
administrative functions of MainBoss, including security features. Therefore, you should
only give the password to people who have the authority to control all other MainBoss
users at your site.
A person who is logged in as ADMINISTRATOR may grant other users the ability to use the
Administration menu. Therefore in some organizations, a person logs in as
ADMINISTRATOR when MainBoss is first installed and grants administration privileges to
various other users; from this point on, there is no need to log in as ADMINISTRATOR, since
you can perform administrative operations under other user names. For more about
granting permissions to other users, see Authorizing New Users on page 175.
If you have logged in as ADMINISTRATOR to do some administrative work, then want to go
back to being a “normal” non-administrator user, select Session Login from the menu,
then log in with both “User Name” and “Password” blank (no characters). This puts you
back to being an “anonymous” user.
Note: MainBoss will only let you log in as an anonymous user if you have security turned
off. If you have security turned on, you must always log in as a “named” user. For more
about turning security off and on, see Logins and Security on page 177.
Saving Settings
A number of windows let you save some of their settings. For example, the window for
printing a work order can “remember” the number of Additional labor lines and
Additional material lines from one MainBoss session to the next. This means that you
don’t have to fill in these fields each time you print work orders; MainBoss will
automatically remember the settings you have saved.
Note: Settings may only be saved by the administrator. Therefore, to save settings you
must log in as the administrator.
___________________________________________________________
To save settings for a window:
1. Move the mouse pointer to the title bar of the window (the bar at the top of the window
where the window’s title is displayed).
2. Right-click on the title (press the mouse’s right-hand button). A small menu will
appear.
3. If you can save settings for this particular window, the menu will have a Save Settings
entry. Click this menu item.
___________________________________________________________
Many windows do not let you save their settings. The ability to save settings is most
commonly associated with windows for printing reports.
- 164 -
When you ask to save the settings for a window, MainBoss does not save all the settings; it
only saves the settings that you are most likely to keep the same in future.
Preferences
The Preferences section of the Administration lets you specify default behaviors for
MainBoss. For example, if most of your work orders are related to equipment, you can
specify that new work orders should start with the “Equipment” box checked off. On the
other hand, if most of your work orders are related to spaces, you can specify that new
work orders should start with the “Space” box checked off. In this way, blank work orders
are initially set up to match your most common situation. Of course, if a particular work
order is different, you can always change that work order when you create it; however,
setting up your preferences to reflect your most common situation can save you from
having to type in the same information over and over again.
You can set preferences for work requests, work orders, unit records (equipment and
spaces), and purchase orders. For more information, see the online help. You can also set
preferences for the way that dates and times are displayed, as discussed in the next section.
Company Information
MainBoss lets you record various types of general information about your organization, for
use in reports, purchase orders, and various other functions. For example, you can specify a
bitmap containing your company logo, for use in printed purchase orders sent to vendors.
(The bitmap will be scaled to a size of 2.4 x .9 inches on the final printout. If you have a
600 dpi printer, this corresponds to a bitmap of 1440 x 540 pixels.)
Date and Time Format and Other Preferences
MainBoss lets you specify preferences for a number of other types of information used by
the program. In particular, you can specify the format you prefer for dates and times.
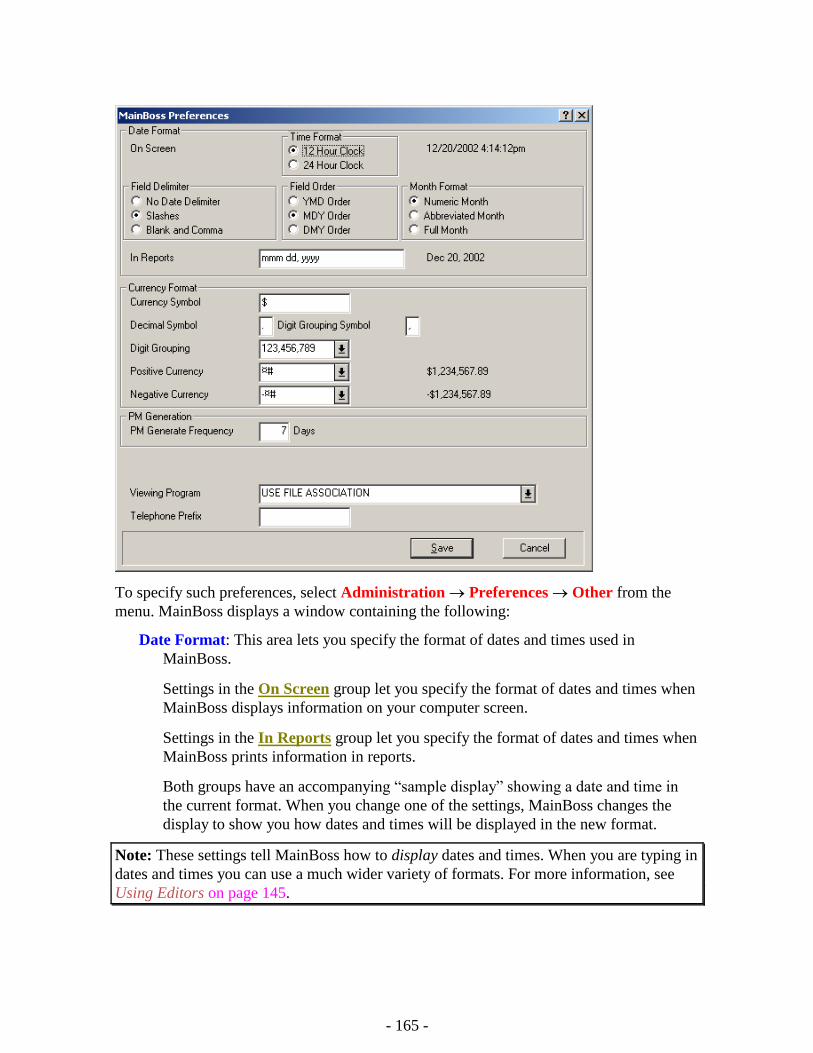
- 165 -
To specify such preferences, select Administration Preferences Other from the
menu. MainBoss displays a window containing the following:
Date Format: This area lets you specify the format of dates and times used in
MainBoss.
Settings in the On Screen group let you specify the format of dates and times when
MainBoss displays information on your computer screen.
Settings in the In Reports group let you specify the format of dates and times when
MainBoss prints information in reports.
Both groups have an accompanying “sample display” showing a date and time in
the current format. When you change one of the settings, MainBoss changes the
display to show you how dates and times will be displayed in the new format.
Note: These settings tell MainBoss how to display dates and times. When you are typing in
dates and times you can use a much wider variety of formats. For more information, see
Using Editors on page 145.

- 166 -
Time Format: Settings in this area specify how MainBoss displays times on your
computer screen.
12 Hour Clock: Times are measured on a 12-hour clock, often with an added
AM or PM designation, as in 01:30 PM.
24 Hour Clock: Times are measured on a 24-hour clock, as in 13:30.
Field Delimiter: Settings in this area specify how MainBoss will break up dates
into separate parts.
No Date Delimiter: Dates are not broken up into separate parts. For example, if
you are using all numeric dates in MDY format, December 25, 2001 would
be displayed as 122501.
Slashes: Dates are broken into parts separated by slash characters. For example,
if you are using all numeric dates in MDY format, December 25, 2001
would be displayed as 12/25/01.
Blank and Comma: Dates are broken into parts separated by spaces; a comma
may also be used to separate parts of the date. For example, if you are using
all numeric dates in MDY format, December 25, 2001 would be displayed
as 12 25, 2001.
Field Order: Settings in this area specify the order of the parts of the date.
YMD Order: Dates consist of the year followed by the month followed by the
day.
MDY Order: Dates consist of the month followed by the day followed by the
year.
DMY Order: Dates consist of the day followed by the month followed by the
year.
Month Format: Settings in this area specify how months are represented.
Numeric Month: Months are written as numbers from 01 to 12.
Abbreviated Month: Months are written with three-letter abbreviations (for
example, Nov for November).
Full Month: Months are written out with their full names (for example,
January).
In Reports: Specifies a format for displaying dates in reports. The field can contain
any of the following:
mm The month as two digits.
mmm The month as a three-digit abbreviation (e.g. Nov)
mmmm The full name of the month (e.g. January)
dd The day as two digits (e.g. 03 or 25)
d The day written as one or two digits (e.g. 3 or 25)
- 167 -
yyyy The day written as four digits (e.g. 2001)
yy The day written as two digits (e.g. 01)
In addition, you can add other characters, such as spaces or punctuation
characters between different parts of the date. For example, if you specify the
format mmm/dd/yyyy, MainBoss would display dates as in Dec/25/2001.
Currency Format: The options in this area specify defaults for representing currencies
throughout MainBoss (including in reports). Also in this area, MainBoss displays
sample positive and negative currency values to show what such values look like. If
you change one of the options, the display will also change to show the result.
Currency Symbol: One or more characters to be used to represent currency units.
Examples are $ for the dollar or ¥ for the yen.
Decimal Symbol: A single character to be used to separate the fractional part of a
currency value from the rest of the value. For example, the dot "." is typically
used as a decimal point in dollar values, as in $23.99.
Digit Grouping Symbol: A single character to be used to group digits in the non-
fractional part of a currency value. For example, the comma "," is typically
used as a grouping symbol in dollar values, as in $1,000,000.00.
Digit Grouping: Lists possible ways in which digits may be grouped. You should
pick your preferred grouping format from this list.
Positive Currency: Lists possible ways in which positive currency values may be
displayed. For example, the currency symbol may appear at the beginning of the
value (as in $23.99) or at the end (as in 23.99$).
Negative Currency: Lists possible ways in which negative currency values may be
displayed. For example, some organizations prefer to use a minus sign in front,
as in -$23.99, while other organizations prefer to put such values in
parentheses, as in ($23.99).
PM Generation: The options in this section specify defaults for generating preventive
maintenance work orders. For further information on generating such work orders,
see Generating Preventive Maintenance Work Orders on page 94.
PM Generate Frequency: Specifies the default number of days between
generating new preventive maintenance work orders. For example, if you intend
to generate new work orders every two weeks, you would set this field to 14.
For more information about generating preventive maintenance work orders,
see Generating Preventive Maintenance Work Orders on page 94.
Viewing Program: Specifies the default viewing program used with attachment files.
For more information, see Attachments on page 157.
Telephone Prefix: Specifies a default string of digits that you want to put at the
beginning of all new telephone numbers. For example, if most of your telephone
- 168 -
calls are made to your local area code, you would set “Telephone Prefix” to that
area code. This saves you the time of typing the area code whenever you type in a
new phone number. (For phone numbers not in that area code, you can simply
delete the default prefix and start typing the number from the beginning.)
Custom Text Settings
The Custom Text feature of MainBoss has two basic uses:
You can customize MainBoss’s terminology to match the terminology used by your
organization. For example, instead of “Cost Center” your organization may prefer to
use the term “Department.” This feature lets you tell MainBoss to use “Department”
wherever it usually uses “Cost Center”.
You can change MainBoss to use some other language instead of English.
Note: MainBoss supplies custom settings for a limited set of non-English languages. If you
want to work in some other language, you must create your own file of custom translations.
For more on custom text settings, see the online help.
Database Operations
The Administration Database menu lets you clean up the MainBoss database and
perform backup/restore operations.
Reindexing
Reindexing means cleaning up your MainBoss database and rebuilding its indexes. Usually,
the only time you have to do this is when you install a new version of MainBoss. However,
it may also be necessary if part of your database has been damaged (for example, by
hardware problems or a power failure).
Important: MainBoss will not let you reindex the database if anyone else is currently
using MainBoss. Therefore, you should make sure that all other users at your site quit
MainBoss before you attempt to reindex.
___________________________________________________________
To reindex your database:
1. Select Administration Database Re-Index from the menu. MainBoss displays
the following:
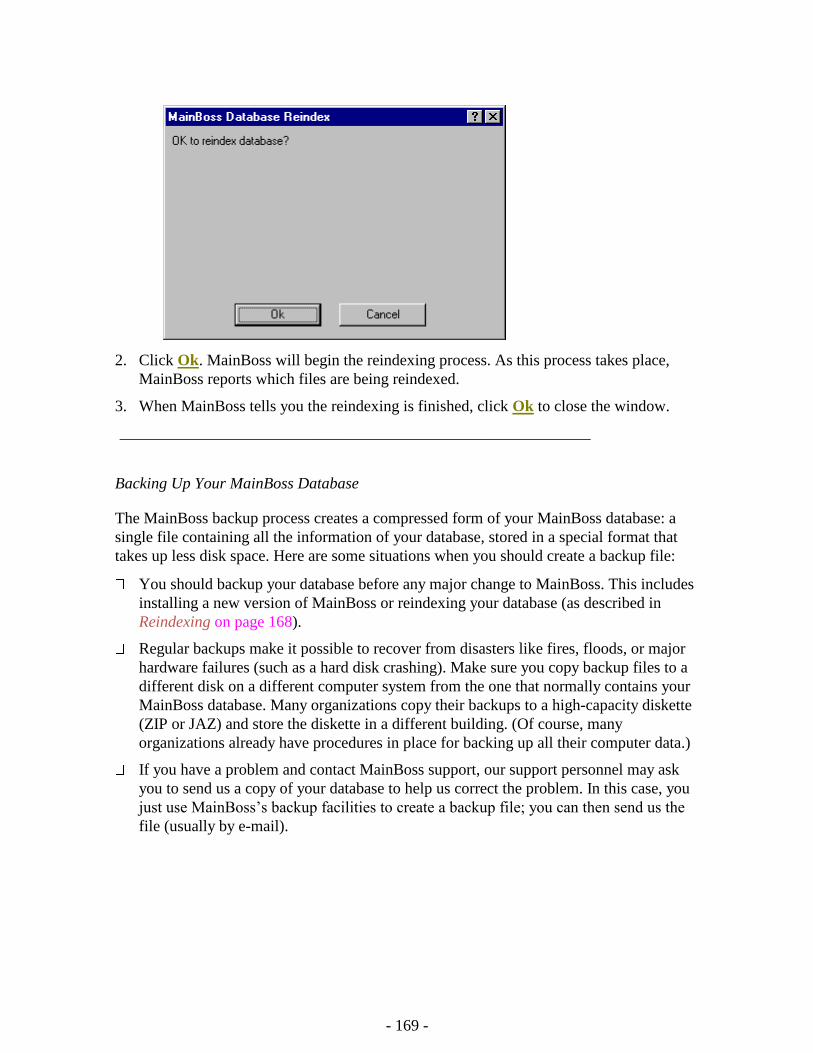
- 169 -
2. Click Ok. MainBoss will begin the reindexing process. As this process takes place,
MainBoss reports which files are being reindexed.
3. When MainBoss tells you the reindexing is finished, click Ok to close the window.
___________________________________________________________
Backing Up Your MainBoss Database
The MainBoss backup process creates a compressed form of your MainBoss database: a
single file containing all the information of your database, stored in a special format that
takes up less disk space. Here are some situations when you should create a backup file:
You should backup your database before any major change to MainBoss. This includes
installing a new version of MainBoss or reindexing your database (as described in
Reindexing on page 168).
Regular backups make it possible to recover from disasters like fires, floods, or major
hardware failures (such as a hard disk crashing). Make sure you copy backup files to a
different disk on a different computer system from the one that normally contains your
MainBoss database. Many organizations copy their backups to a high-capacity diskette
(ZIP or JAZ) and store the diskette in a different building. (Of course, many
organizations already have procedures in place for backing up all their computer data.)
If you have a problem and contact MainBoss support, our support personnel may ask
you to send us a copy of your database to help us correct the problem. In this case, you
just use MainBoss’s backup facilities to create a backup file; you can then send us the
file (usually by e-mail).
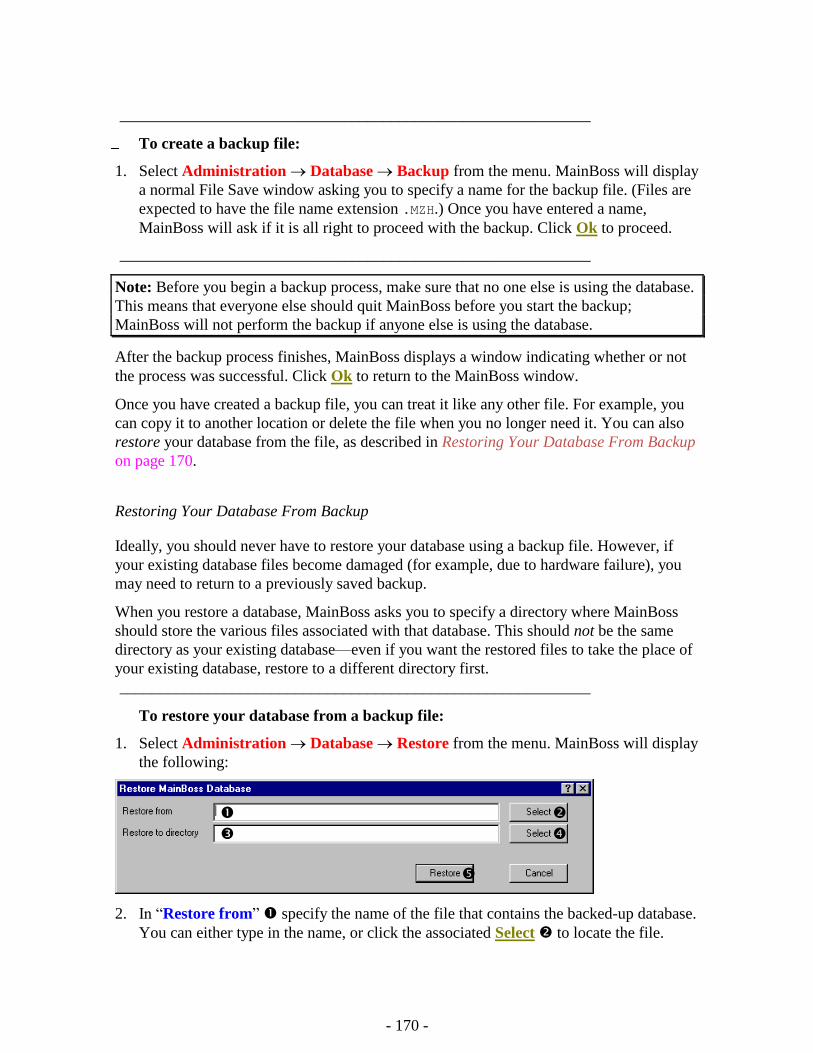
- 170 -
___________________________________________________________
To create a backup file:
1. Select Administration Database Backup from the menu. MainBoss will display
a normal File Save window asking you to specify a name for the backup file. (Files are
expected to have the file name extension .MZH.) Once you have entered a name,
MainBoss will ask if it is all right to proceed with the backup. Click Ok to proceed.
___________________________________________________________
Note: Before you begin a backup process, make sure that no one else is using the database.
This means that everyone else should quit MainBoss before you start the backup;
MainBoss will not perform the backup if anyone else is using the database.
After the backup process finishes, MainBoss displays a window indicating whether or not
the process was successful. Click Ok to return to the MainBoss window.
Once you have created a backup file, you can treat it like any other file. For example, you
can copy it to another location or delete the file when you no longer need it. You can also
restore your database from the file, as described in Restoring Your Database From Backup
on page 170.
Restoring Your Database From Backup
Ideally, you should never have to restore your database using a backup file. However, if
your existing database files become damaged (for example, due to hardware failure), you
may need to return to a previously saved backup.
When you restore a database, MainBoss asks you to specify a directory where MainBoss
should store the various files associated with that database. This should not be the same
directory as your existing database—even if you want the restored files to take the place of
your existing database, restore to a different directory first.
___________________________________________________________
To restore your database from a backup file:
1. Select Administration Database Restore from the menu. MainBoss will display
the following:
2. In “Restore from” specify the name of the file that contains the backed-up database.
You can either type in the name, or click the associated Select to locate the file.
- 171 -
3. In “Restore to directory” specify the directory where MainBoss should store the
backed-up database. You can either type in the name or click the associated Select to
locate the directory.
4. Click Restore to restore the database.
___________________________________________________________
Using a Restored Database: Once you have restored the database, there are two ways to
use it:
The safest way is to create a Windows shortcut that refers to the new database. To do
this, use the right-hand mouse button to click the Windows desktop, then click New,
then Shortcut. Windows will start a wizard to help you specify the new shortcut. For
Command Line, click the Browse button and find the MainBoss program file (named
mboss.exe under the directory where you installed the software). Assign any name you
like to the shortcut.
Once you have created the shortcut, use the right-hand mouse button to click on the
shortcut and then click Properties. Windows opens up a “property sheet” for the
shortcut. In the Shortcut section, change the name in the “Start in” field to be the
name of the directory where you restored the database files. Finally, click Ok to close
the property sheet.
Double-clicking on this shortcut will start MainBoss; however, instead of using your
standard database, this version of MainBoss will use the database restored from
backup. You can perform any operations with this database that you can perform with
your previous database.
Note that any operations you perform on the restored database will not affect your
“standard” database.
After you have spent some time examining the restored database to make sure it is
working properly, you may decide to replace your “standard” database with the restored
one. If so, copy all the files and subdirectories from the directory where you restored
the database to the directory containing your “standard” database. This overwrites your
standard database with the restored one.
From this point onward, you should get rid of the shortcut you created to the restored
database and resume using your “standard” database.
Note: Make sure you keep track of which database you are using. If you are in doubt, look
at the title line in the main MainBoss window—it tells you the directory containing your
database files. Changes that you make in one database do not affect the other, so don’t get
confused about which database you are actually using. If you intend to replace your
standard database with the restored one, restore the database, check the restored database to
make sure the data looks all right, and then copy the restored data over the standard data.
- 172 -
Auditing
MainBoss’s auditing facilities examine your database for errors and other unusual
conditions. These conditions may arise from a variety of causes:
Power failures or other system crashes while MainBoss was in the middle of an
operation.
Left-over problems from older versions of MainBoss.
Deleting table entries that other tables depend on. For example, suppose you delete an
entry from the Priority Code table, but one or more work orders still have that priority.
The audit report will show you which work orders use the now non-existent priority.
Typing errors and other kinds of mistakes. For example, the auditing facilities look at
the labor records associated with a closed work order, then compares the dates of the
labor records to the dates on the work order. If the labor records specify work done
outside the period of the work order itself, this usually indicates a mistake in entering
dates for the work order or the labor records.
Some of the conditions listed in the audit report may not be actual errors. For example,
MainBoss reports any date earlier than 1980 in the database. Most of the time, such an old
date is evidence of a mistake when typing information; however, some organizations may
have old equipment with a purchase date before 1980. In this kind of situation, you can
simply ignore what the audit report shows.
The auditing window lets you correct some kinds of errors. With many types of errors,
however, you may need to correct the situation using other parts of MainBoss. For
example, suppose you delete a Priority code from the Priority table and MainBoss
discovers a number of work orders that use the now non-existent code. The auditing
window lets you blank out the priority code on such work orders, so that they no longer use
the old code.
However, you may prefer to assign different priority codes to some of the work orders; in
this case, you must use the normal facilities to open each work order and assign a new
code. Alternatively, you may decide to restore the code you deleted (which means creating
a new priority code with the same identifier as the deleted one).
The above example shows that it may take work to resolve the problems listed in the audit
report—you may have to edit existing records, create table entries, and so on. We
recommend that audit report problems be handled by someone who is thoroughly
knowledgeable with your organization’s operations.
Note: Before beginning an audit, we recommend that you reindex your database first (as
described in Reindexing on page 168). For both reindexing and running the audit, make
sure that nobody else is using the database at the same time.
___________________________________________________________
- 173 -
To audit your database:
1. Select Administration Database Audit from the menu. MainBoss begins by
opening a window that indicates an audit is taking place; this window shows the audit’s
progress by displaying the names of the files that MainBoss is reading. You can cancel
the audit by clicking Close in this window.
2. After the files in your database have been examined, MainBoss displays a new window
stating the results of the audit. For information about using this window, see the online
help by clicking the <?> button in the upper right hand corner of the window.
___________________________________________________________
Here are some of the problems that might be reported by an audit:
Orphan record,AUDIT found a record who noone refers to: An orphan
record is one that should be referred to by some other record but is not. For
example, when you type in the labor costs for a work order, MainBoss creates labor
records; the record for the work order should contain links to all the associated
labor costs. However, suppose you are entering a work order and the system crashes
after you have typed in some labor records but before you save the actual work
order. In this case, your database won’t have a work order record that links to the
labor records. Therefore, the labor records are orphans—they’re just wasted space,
because no work order is using them. Other types of orphan records can occur in
similar ways.
The usual way to deal with orphan records is to delete them. Click on the line in the
Problem list, then click the Delete Record button.
Lost link,AUDIT found a reference to a record in another table
that does not exist: A lost link occurs when you delete a record in one table
and other records in other tables refer to the deleted record. For example, if you
delete a Priority code from the Priority table, any existing work orders that use that
priority will now have a lost link.
The audit report lets you solve the problem of lost links by setting the field blank:
click the line in the Problem list, then click Set Blank. This sets the corresponding
field blank; in our previous example, it would clear out the priority code in the
work order. In some cases, however, you might prefer to take a different action. For
example, you might prefer to assign a new priority code rather than blanking out the
old, or to reinstate the missing code.
Bad character in text field: A text field contains a character that MainBoss
does not allow (usually a backslash \). The audit window lets you set this character
to a blank instead.
Bad Date: A field contains a value that is not a valid date.
Date is in the future: A field contains a date that is in the future, even though
such a date doesn’t make sense. Note that MainBoss does not report this problem if
- 174 -
it makes sense for a date to be in the future; for example, the “Scrap Date” for a
piece of equipment is typically in the future, so MainBoss does not consider this a
problem. However, if the “Purchase Date” is in the future, MainBoss considers
this an indication that the date might have been typed incorrectly.
Date is before 1980: This is considered suspicious for any date, even though
there are situations where it might be correct.
Work start date is past close date: The closing date on a work order
comes before the stated date that the work was started. This suggests that either the
start date or close date is incorrect.
Work end date is past close date: The work order was closed before the job
was actually finished. This suggests that either the work end date or the close date
is incorrect.
Labor time outside workorder interval: A labor record specifies that work
was done on a job before the work order’s start date or after the work order’s close
date.
Effective reading < previous reading: A meter reading is lower than the
previous reading on the same meter. This suggests that one of the readings was
typed incorrectly. If this code appears, it may explain why meter-scheduled tasks
fail to generate work orders.
Reading date/time <= previous reading: A meter reading was specified at a
date/time that preceded a reading that was already recorded. This suggests that the
readings were entered out of order, or that a date/time was typed incorrectly.
Security
MainBoss’s security facilities help you control who can use MainBoss and what each
person can do with the software.
Changing Your Administration Password
When you license MainBoss, you are given an administration password. There are several
reasons why you might wish to change this password:
You might want to change the password to something that is easier for you to
remember.
You should change the password if there is a chance that some unauthorized person has
learned the old password. Some organizations like to change the password on a regular
basis (for example, every month) just in case an unauthorized person has learned the
old password.
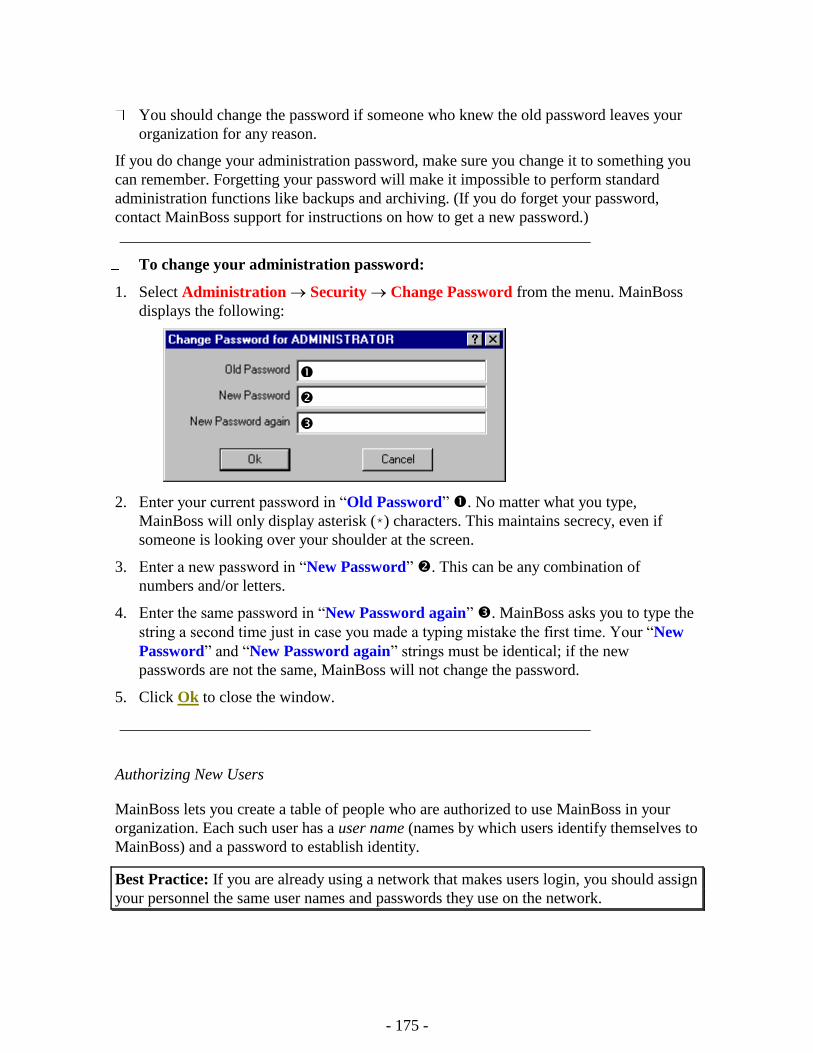
- 175 -
You should change the password if someone who knew the old password leaves your
organization for any reason.
If you do change your administration password, make sure you change it to something you
can remember. Forgetting your password will make it impossible to perform standard
administration functions like backups and archiving. (If you do forget your password,
contact MainBoss support for instructions on how to get a new password.)
___________________________________________________________
To change your administration password:
1. Select Administration Security Change Password from the menu. MainBoss
displays the following:
2. Enter your current password in “Old Password” . No matter what you type,
MainBoss will only display asterisk (*) characters. This maintains secrecy, even if
someone is looking over your shoulder at the screen.
3. Enter a new password in “New Password” . This can be any combination of
numbers and/or letters.
4. Enter the same password in “New Password again” . MainBoss asks you to type the
string a second time just in case you made a typing mistake the first time. Your “New
Password” and “New Password again” strings must be identical; if the new
passwords are not the same, MainBoss will not change the password.
5. Click Ok to close the window.
___________________________________________________________
Authorizing New Users
MainBoss lets you create a table of people who are authorized to use MainBoss in your
organization. Each such user has a user name (names by which users identify themselves to
MainBoss) and a password to establish identity.
Best Practice: If you are already using a network that makes users login, you should assign
your personnel the same user names and passwords they use on the network.
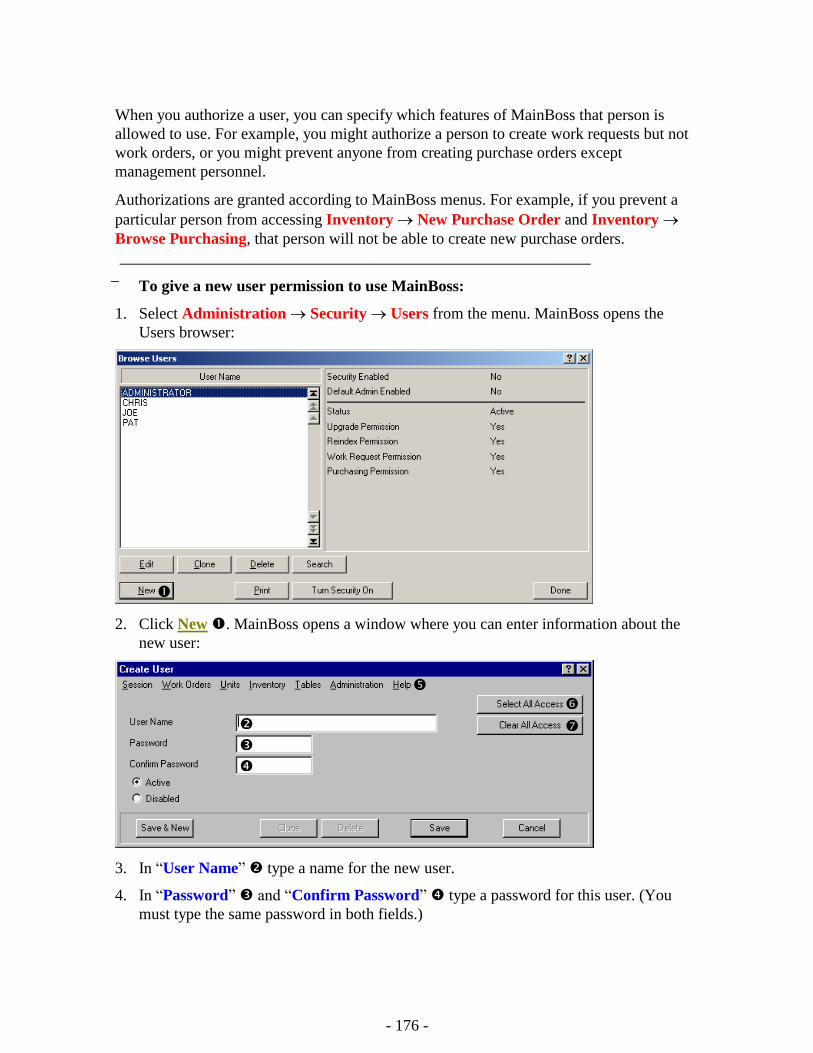
- 176 -
When you authorize a user, you can specify which features of MainBoss that person is
allowed to use. For example, you might authorize a person to create work requests but not
work orders, or you might prevent anyone from creating purchase orders except
management personnel.
Authorizations are granted according to MainBoss menus. For example, if you prevent a
particular person from accessing Inventory New Purchase Order and Inventory
Browse Purchasing, that person will not be able to create new purchase orders.
___________________________________________________________
To give a new user permission to use MainBoss:
1. Select Administration Security Users from the menu. MainBoss opens the
Users browser:
2. Click New . MainBoss opens a window where you can enter information about the
new user:
3. In “User Name” type a name for the new user.
4. In “Password” and “Confirm Password” type a password for this user. (You
must type the same password in both fields.)
- 177 -
5. Use the window’s menu bar to specify which MainBoss features this user will be
permitted to use. If you checkmark a menu item, this user will be able to use the
feature; if you remove the checkmark on an item, the user will not be able to use the
feature. You can checkmark every menu item by clicking Select All Access , and you
can turn off all the checkmarks by clicking Clear All Access .
6. Click Save when you have finished specifying these permissions, then click Close to
close the window.
___________________________________________________________
When creating a new user, you may find it useful to Clone an existing user from the Users
browser. This creates a new user with the same access settings as the user that you cloned.
For example, if you hire a new worker who’ll have the same access permissions as one of
your current workers, making a clone of the current worker’s record will set up the same
access settings. That way you don’t have to set up the same permissions again for the new
worker.
You may also find it useful to make up a few “request-only” users in advance. For
example, you might create users named REQUEST1, REQUEST2, etc. with appropriate
passwords and permissions set only to allow the creation of work requests. You can then
hand out these user names and passwords to people who can be authorized to submit
requests.
Logins and Security
MainBoss can run with its security features turned on or off.
If security is turned on: Whenever someone starts the MainBoss program, MainBoss
asks that person to enter a name and a password. After the user has logged in, the only
features available are those that have been authorized for that user (as described in
Authorizing New Users on page 175).
If security is turned off: People are not asked to identify themselves when MainBoss
begins. They can use any of MainBoss’s normal features. However, they still have to
log in as ADMINISTRATOR before they can use features from the Administration menu.
___________________________________________________________
To turn security on or off:
1. First, log in as ADMINISTRATOR (as described in Logging In on page 9).
2. Select Administration Security Users from the menu. MainBoss opens the
Users browser:
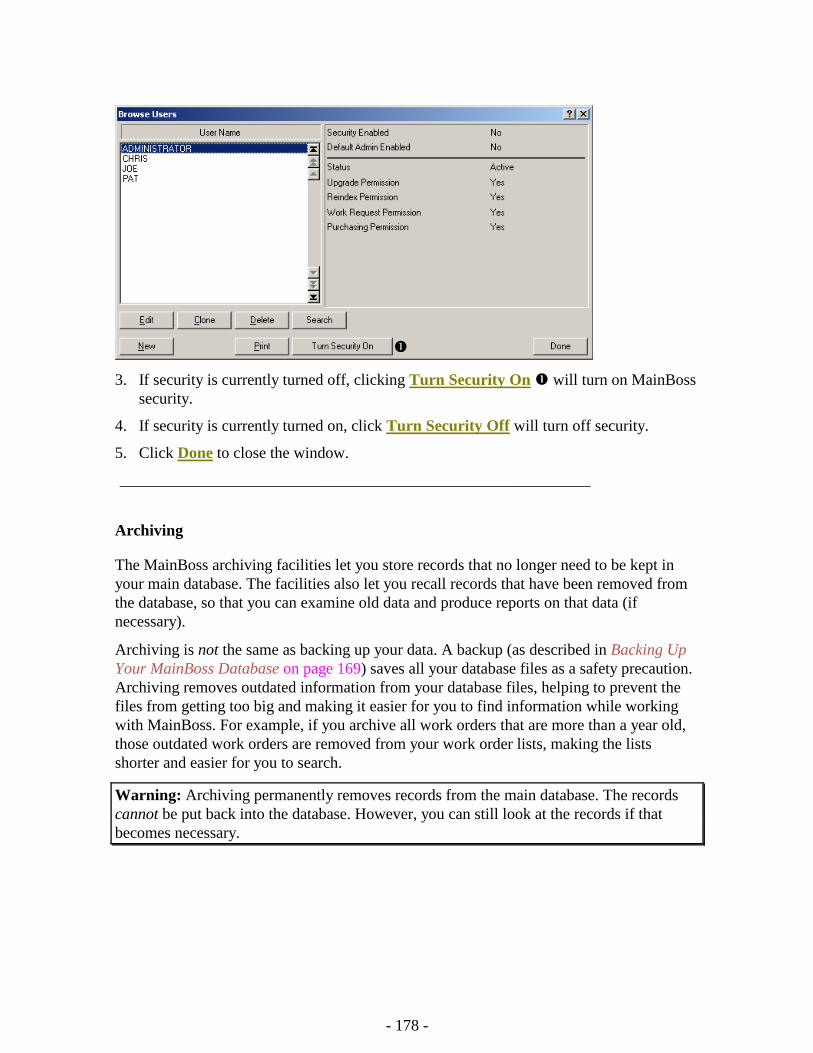
- 178 -
3. If security is currently turned off, clicking Turn Security On will turn on MainBoss
security.
4. If security is currently turned on, click Turn Security Off will turn off security.
5. Click Done to close the window.
___________________________________________________________
Archiving
The MainBoss archiving facilities let you store records that no longer need to be kept in
your main database. The facilities also let you recall records that have been removed from
the database, so that you can examine old data and produce reports on that data (if
necessary).
Archiving is not the same as backing up your data. A backup (as described in Backing Up
Your MainBoss Database on page 169) saves all your database files as a safety precaution.
Archiving removes outdated information from your database files, helping to prevent the
files from getting too big and making it easier for you to find information while working
with MainBoss. For example, if you archive all work orders that are more than a year old,
those outdated work orders are removed from your work order lists, making the lists
shorter and easier for you to search.
Warning: Archiving permanently removes records from the main database. The records
cannot be put back into the database. However, you can still look at the records if that
becomes necessary.
- 179 -
How Archiving Works
Archived information is stored on your hard drive in compressed format. This reduces the
disk space required to store the records. Another benefit of archiving will be improved
performance. Archiving removes work orders, purchase orders, and inventory history
records from your everyday database, saving them in separate files. This means that your
everyday database becomes smaller, which may speed up MainBoss operations
significantly.
Each time you archive, a new set of compressed data is stored in a separate archiving
directory. This is called an archive set. MainBoss lets you name each set of archived data
so that any time you need to retrieve a specific set of historical work orders for reports and
analysis they can be quickly restored from the compressed format. If you archived quarterly
and you wanted to reconstruct an entire year of work history you would restore each
quarter, one after the other. (Note that you can only create reports for each individual
quarter, not for the entire year.)
You must deal with each archive set individually—you cannot merge them together. For
example, suppose that each quarter you archive any records that are more than a year old.
You cannot combine the archives of four quarters into information for a whole year. If you
wanted reports on your archived information, you could produce quarterly reports, but
could not combine the data to get a single yearly report. You also cannot change the
contents of archive sets; once information has been archived, it cannot be edited.
When you restore an archive set, MainBoss creates a number of working files containing
uncompressed data from the archive set. These working files are only necessary as long as
you want to work with the old archived data. Since the working files take up extra disk
space, you should clear them once you are finished looking at the old data; clearing the
files frees up the disk space.
Clearing these working files does not affect the compressed archive sets. Therefore, if you
ever want to look at old data again, you can just restore the same archive set. This creates
new working files that can be examined as necessary.
Note: Before you begin any archiving operation, saving or restoring, we recommend that
you back up your MainBoss database. This ensures that your data remains safe if MainBoss
fails because of a power outage or some other system failure. For more about backing up
your database, see Backing Up Your MainBoss Database on page 169.
Archiving Your Data
Most organizations choose to archive data on a regular basis (for example, every quarter or
every six months). The archiving process removes old work order, purchase order, and
inventory history records from your MainBoss database; these old records are stored in a
specially compressed format that takes up less disk space.
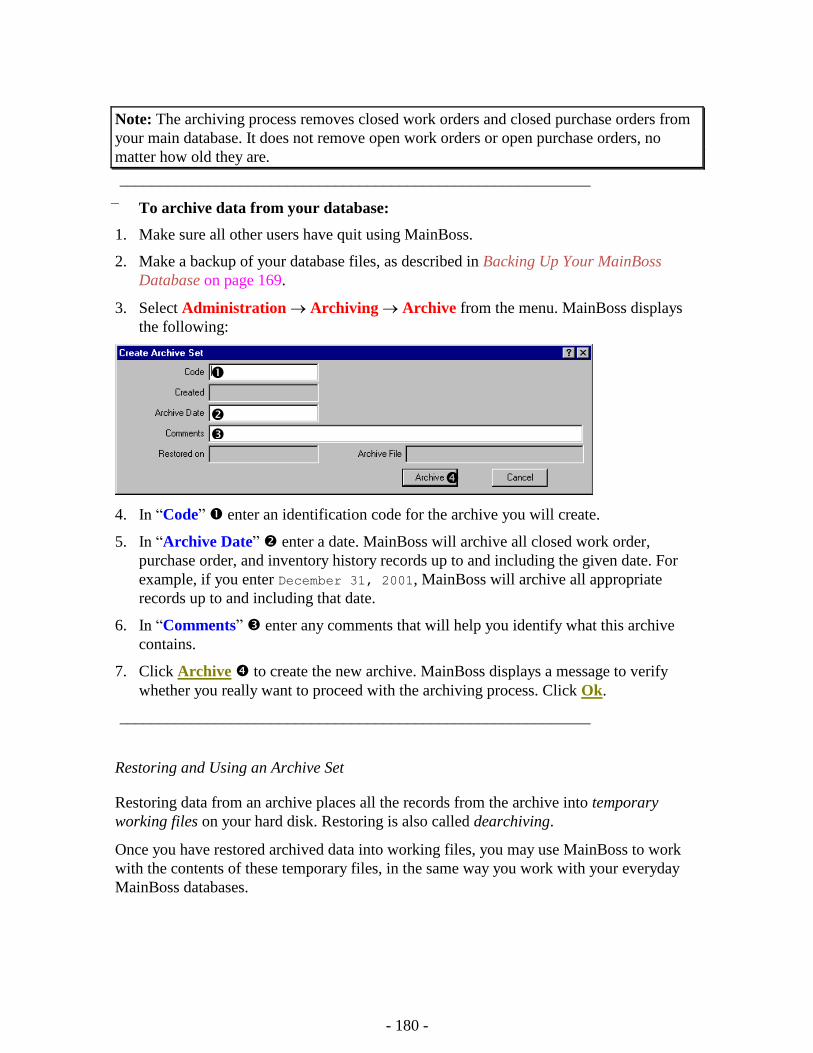
- 180 -
Note: The archiving process removes closed work orders and closed purchase orders from
your main database. It does not remove open work orders or open purchase orders, no
matter how old they are.
___________________________________________________________
To archive data from your database:
1. Make sure all other users have quit using MainBoss.
2. Make a backup of your database files, as described in Backing Up Your MainBoss
Database on page 169.
3. Select Administration Archiving Archive from the menu. MainBoss displays
the following:
4. In “Code” enter an identification code for the archive you will create.
5. In “Archive Date” enter a date. MainBoss will archive all closed work order,
purchase order, and inventory history records up to and including the given date. For
example, if you enter December 31, 2001, MainBoss will archive all appropriate
records up to and including that date.
6. In “Comments” enter any comments that will help you identify what this archive
contains.
7. Click Archive to create the new archive. MainBoss displays a message to verify
whether you really want to proceed with the archiving process. Click Ok.
___________________________________________________________
Restoring and Using an Archive Set
Restoring data from an archive places all the records from the archive into temporary
working files on your hard disk. Restoring is also called dearchiving.
Once you have restored archived data into working files, you may use MainBoss to work
with the contents of these temporary files, in the same way you work with your everyday
MainBoss databases.
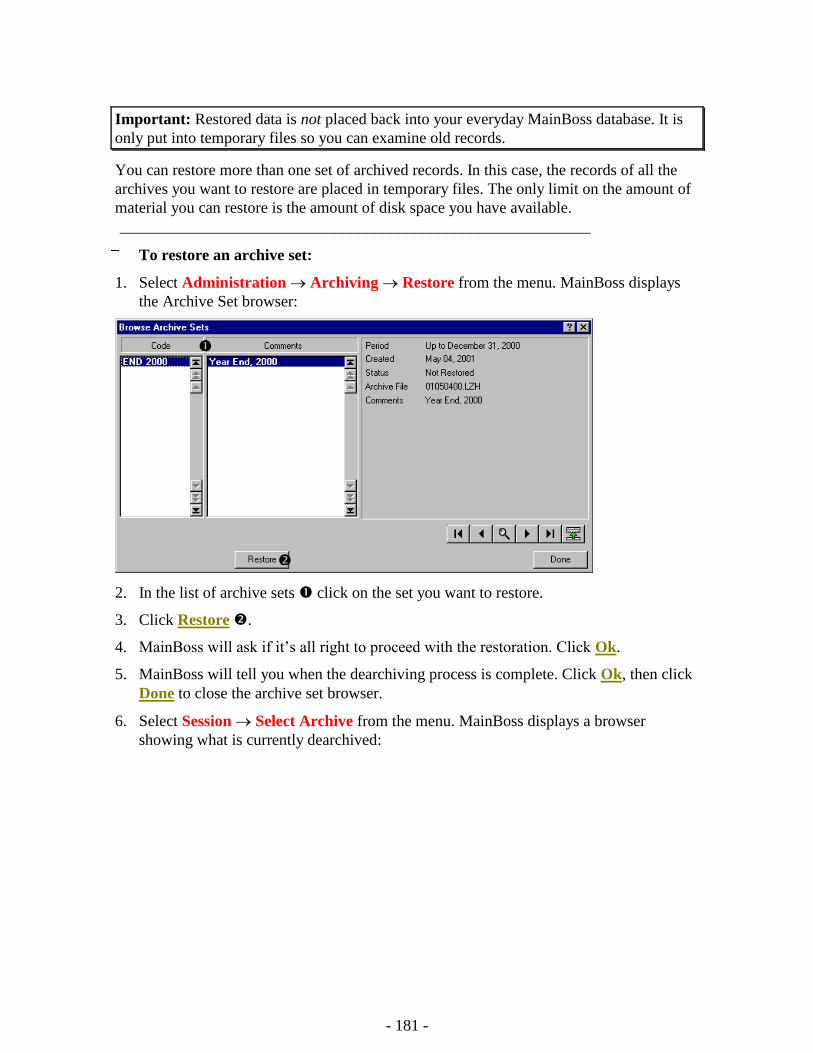
- 181 -
Important: Restored data is not placed back into your everyday MainBoss database. It is
only put into temporary files so you can examine old records.
You can restore more than one set of archived records. In this case, the records of all the
archives you want to restore are placed in temporary files. The only limit on the amount of
material you can restore is the amount of disk space you have available.
___________________________________________________________
To restore an archive set:
1. Select Administration Archiving Restore from the menu. MainBoss displays
the Archive Set browser:
2. In the list of archive sets click on the set you want to restore.
3. Click Restore .
4. MainBoss will ask if it’s all right to proceed with the restoration. Click Ok.
5. MainBoss will tell you when the dearchiving process is complete. Click Ok, then click
Done to close the archive set browser.
6. Select Session Select Archive from the menu. MainBoss displays a browser
showing what is currently dearchived:
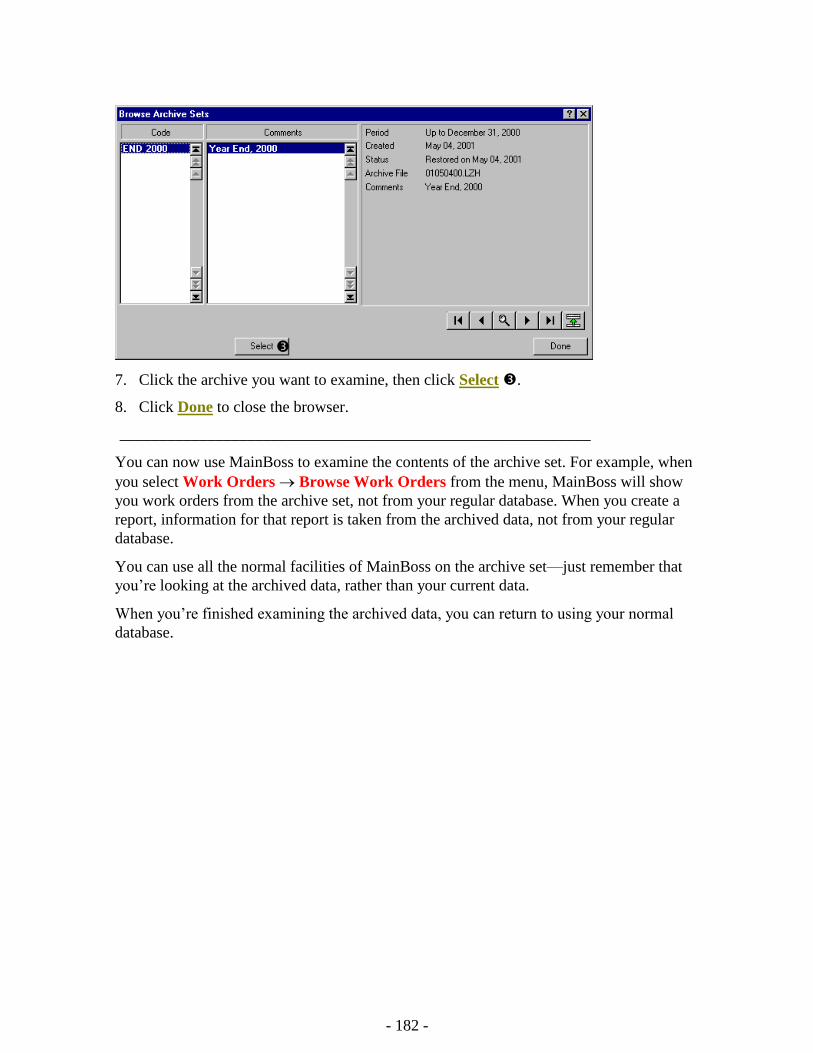
- 182 -
7. Click the archive you want to examine, then click Select .
8. Click Done to close the browser.
___________________________________________________________
You can now use MainBoss to examine the contents of the archive set. For example, when
you select Work Orders Browse Work Orders from the menu, MainBoss will show
you work orders from the archive set, not from your regular database. When you create a
report, information for that report is taken from the archived data, not from your regular
database.
You can use all the normal facilities of MainBoss on the archive set—just remember that
you’re looking at the archived data, rather than your current data.
When you’re finished examining the archived data, you can return to using your normal
database.
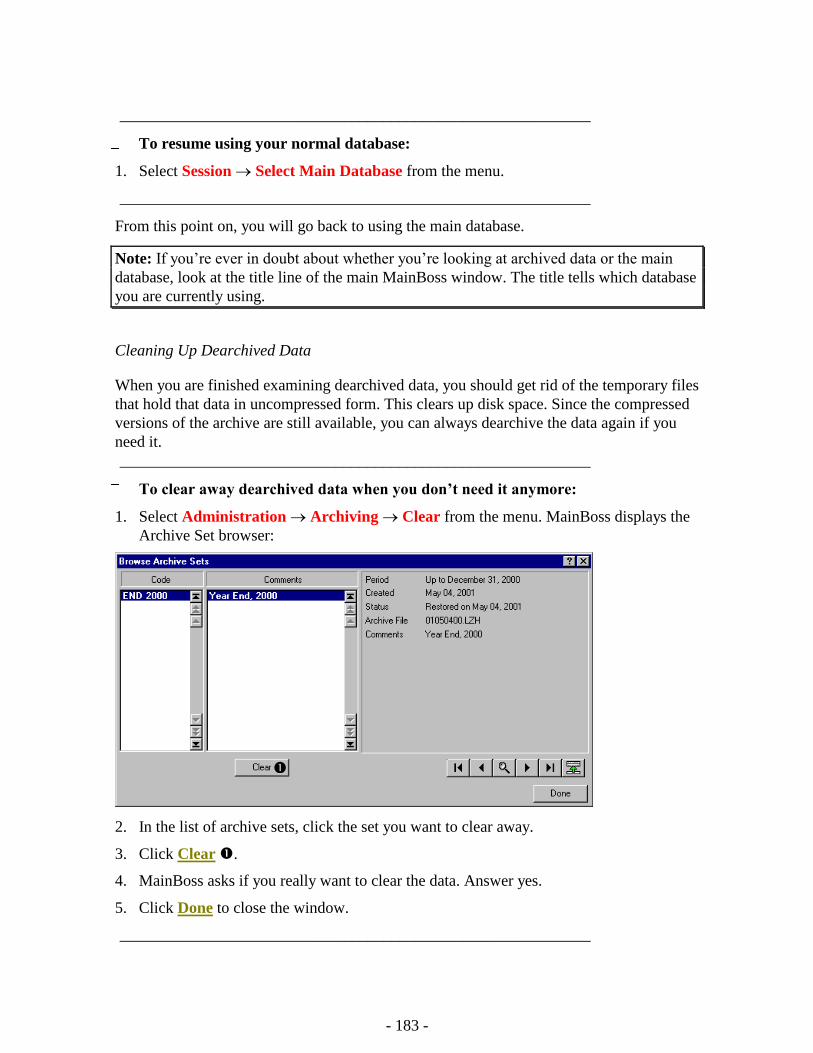
- 183 -
___________________________________________________________
To resume using your normal database:
1. Select Session Select Main Database from the menu.
___________________________________________________________
From this point on, you will go back to using the main database.
Note: If you’re ever in doubt about whether you’re looking at archived data or the main
database, look at the title line of the main MainBoss window. The title tells which database
you are currently using.
Cleaning Up Dearchived Data
When you are finished examining dearchived data, you should get rid of the temporary files
that hold that data in uncompressed form. This clears up disk space. Since the compressed
versions of the archive are still available, you can always dearchive the data again if you
need it.
___________________________________________________________
To clear away dearchived data when you don’t need it anymore:
1. Select Administration Archiving Clear from the menu. MainBoss displays the
Archive Set browser:
2. In the list of archive sets, click the set you want to clear away.
3. Click Clear .
4. MainBoss asks if you really want to clear the data. Answer yes.
5. Click Done to close the window.
___________________________________________________________
- 184 -
Work Request Notification
As an add-on to the MainBoss package, you can download software that will notify you
whenever someone creates a new work request. For example, suppose department
secretaries at a company are all authorized to submit work requests to report maintenance
problems. The WRNotifier software can notify you when one of them creates a request.
This is similar to the way that many E-mail packages notify you that you have received a
new E-mail message.
For more information about this notification facility, see the MainBoss web site
(http://www.mainboss.com).
- 185 -
The MainBoss Command Line
MainBoss can be invoked using a command line with various arguments. This makes it
possible to invoke MainBoss from a command file (.BAT or .CMD) or from other software
applications that invoke programs through command lines.
In particular, MainBoss command line options make it easy to backup your MainBoss
database automatically, using software like the Windows 2000 Task Scheduler. In this way,
you can schedule regular backups that take place automatically, without anyone having to
start MainBoss by hand.
In a command prompt window, you would usually invoke MainBoss with a CD command to
go to the directory that contains the program file, and then a command to invoke MainBoss
itself. The lines below show a typical example:
cd "C:\program files\mainboss\2.9"
mboss Backup /mbd:C:\mainboss /mzh:D:\mbsaves
Note that the program is named mboss, not MainBoss.
The general format of the command line is
mboss subcommand option option option...
As a special case,
mboss /?
prints information about using MainBoss in command-line format, including a list of all
subcommands and options.
As another special case,
mboss /MainBossDatabase:folder
starts a normal MainBoss session on the MainBoss database contained in the given folder.
If you omit the /MainBossDatabase argument, the command just starts a normal
MainBoss session using the current directory as the MainBoss database directory.
Abbreviations: Most keywords on the MainBoss command line may be abbreviated. In
MainBoss documentation, the letters that must be included are shown in upper case; any or
all other letters may be omitted. For example, the following are all valid abbreviations for
the option /MainBossDatabase:
/mainbossdb
/mbdata
/mbdb
/mbd
- 186 -
Although the documentation shows some letters in upper case and some in lower, you can
type letters in any case you want. For example, /MBD is exactly the same as /mbd or /Mbd
on the MainBoss command line.
The Backup Subcommand
The Backup subcommand backs up your MainBoss database in the same way described in
Backing Up Your MainBoss Database on page 169. The format of the command is
mboss Backup /MainBossDatabase:folder /MZH:filename
where
/MainBossDatabase:folder
specifies the folder that contains your MainBoss database. If you omit this option,
MainBoss assumes that the current directory contains your database.
/MZH:filename
specifies the name of the MZH file that MainBoss should create to hold the backup data.
Instead of a filename, you can specify a folder name. In this case, MainBoss creates a
backup file in the given folder. The name of the file is CCYYMMDD.MZH (where
CCYYMMDD is the current date).
The Backup subcommand also recognizes the /Verbose option. If this option is specified,
MainBoss displays progress messages as it backs up the database; otherwise, MainBoss
simply backs up the database without displaying any messages (provided no errors occur).
As a model for performing regular backups, suppose that your MainBoss database is stored
in the folder C:\MainBoss and you want to write backups to another computer on your
local network. Suppose that you address the backup computer as drive H: and you want to
store backup files in the folder H:\mbsaves. In this case, you could use the Windows 2000
task scheduler to run
mboss Backup /MBD:C:\MainBoss /MZH:H:\mbsaves
Since the /MZH option specifies a folder rather than a file name, MainBoss creates a new
file in the folder every time the database is backed up. (Note that all these backup files will
use up disk space.)
The Restore Subcommand
The Restore subcommand restores your database from a backup file, in the same way
described in Restoring Your Database From Backup on page 170. The format of the
command is
mboss Restore /MainBossDatabase:folder /MZH:filename
where

- 187 -
/MainBossDatabase:folder
specifies the folder where you want to write the restored database. If the specified
folder already contains MainBoss database files, you will be asked if you really want
to overwrite those files.
/MZH:filename
specifies the name of the MZH file that contains the backup database you want to
restore.
The Restore subcommand always displays at least one message, indicating whether or not
the restoration was successful.
Setting a Language
Normally, MainBoss looks at the Regional Settings of your Windows system to determine
which language to use (English, French, etc.). When you invoke MainBoss by command
line, however, you can explicitly specify a language. In this case, MainBoss will ignore
your Regional Settings and use whatever language you specify (provided that the language
is supported on your system).
All languages on Windows system are represented by a code consisting of four
hexadecimal digits. Popular languages include:
0007 German
0009 English
000a Spanish
000c French
0016 Portuguese
To specify a language when you invoke MainBoss, you use the following command line
option:
/LANGID:xxxx
Sets the language to the one represented by code xxxx. For example, /LANGID:0007
sets the language to basic German.
For more on language settings, see Custom Text Settings on page 168.
Service Desk Mode
Usually, the mboss command operates as if you invoked the standard MainBoss CMMS
program. However, you can also use it to start MainBoss Service Desk:
mboss /ServiceDesk+
starts a Service Desk session. Note that you can specify other options (e.g. LANGID) with
this form of the command.
For more about MainBoss Service Desk, see MainBoss Service Desk on page 199.
- 188 -
License Key Entry Only
It’s possible to invoke MainBoss in such a way that it only lets you enter license keys:
mboss /LicenseKeys+ /MainBossDatabase:folder
This starts MainBoss in a manner that reduces entries in the menu bar to those needed for
entering license keys. The buttons in the quick action bar are also reduced.
As soon as you start MainBoss with this option, you will be asked to enter the
ADMINISTRATOR password. Once you have entered this password, you will go to the main
screen with its reduced menu bar. From there, you can enter license keys as described in
Registering MainBoss on page 197.
- 189 -
Appendix A: New Features In MainBoss 2.9
New in MainBoss 2.9 Update 5
The following list gives differences between MainBoss 2.9 Update 5 and earlier releases of
MainBoss 2.9.
Administration Database Export XML lets you export the entire contents of
your database in XML format. This is primarily intended for facilitating users who wish
to upgrade from MainBoss Basic to MainBoss Advanced. For more information, see
Error! Reference source not found. on page Error! Bookmark not defined..
Auditing facilities have been improved in several ways. For example, when the auditor
discovers a link to a missing record, you now have the option of creating an appropriate
record to replace the missing one.
The archiver now preserves “Location” information when inventory transactions are
archived.
The Work Order History report now lets you restrict the report to labor costs incurred
within a given range of dates (specifically, for workers whose contribution to a job
started in the specified range of dates).
In many windows, the Cancel button now changes to Close once you have saved the
data shown in the window. In other words, Close tells you that it’s safe to close the
window because the data has been saved. Cancel closes the window without saving any
changes.
When you are looking at transferred work requests with the work request browser, the
browser now shows the work order numbers assigned to the transferred requests.
The Unit report now has a Suppress costs option. If this is checkmarked, the report
will not contain the costs of the equipment. This is useful if you intend to give the
report to personnel who need equipment lists but who don’t need (or shouldn’t be told)
cost information.
In previous releases, the Downtime Report considered that the date of the downtime
was the date that the associated work order was closed. Now, the date is the work
order’s “Work Start” date.
All browsers now have a Search button instead of the old navigation bar. Clicking
Search will let you search for a record whose description or code begins with a
specified string.
The default button for printing reports and generating preventive work orders has been
changed to Preview. This means that if you just press <Enter>, you’ll get a preview of
the report or generated work orders. Previously, the default was Close for report
windows and Generate up to for preventive work orders.
- 190 -
The behavior has changed for “From” and “To” fields, plus all other fields where you
specify a pair of values to indicate a range. If you type a value into the field that
indicates the start of the range, MainBoss automatically puts the same value into the
field that indicates the end of the range. This is useful if you want the range to be
restricted to a single value. (To do this previously, you had to type the same value
twice: once for the start of the range, and once for the end.)
If you type a value into the “end of range” field first, MainBoss does not type that value
into the “beginning of range.”
The window for editing work requests now has a Save & Print button.
The Work Order Statistics report now lets you select work orders based on status
(open, closed, or voided).
When grouped by building, the Work Order History report will now sort by unit
location within buildings when you ask for a detailed report. (Previously, it sorted by
work order number.) Also, when grouped by asset account, system, ownership, project,
or cost center, information will be sorted by unit code within each group.
The Work Order History report can now sort results by access code.
The Work Request History report now starts a new page for each new grouping. For
example, if you’re grouping by building, the work requests for each new building will
start on a separate page.
New in MainBoss 2.9 Update 4
The following list gives differences between MainBoss 2.9 Update 4 and earlier releases of
MainBoss 2.9.
A new Include Cost Center option is available when printing purchase orders. This
option is useful if you use MainBoss’s purchase order facilities to create purchase
requests that you then send to your purchasing department. The Cost Center can then
provide information to your purchasing department.
The Work Order Labor History report now includes the Task ID for preventive
maintenance jobs.
The window for producing Manpower Schedule reports now has a number of default
options set when the window is first opened. These options will produce a report
showing what work orders are scheduled for your staff each day for the next week. This
makes it quick and easy to produce the type of schedule that most customers use most
often.
Specifically, the default options are Total Daily (breaking down the report day-by-
day), Inside (inside workers as opposed to outside contractors), and Detail (giving
complete details of each job). The "From" and "To" columns for "Date" are set for the
forthcoming week (starting with today).
- 191 -
New in MainBoss 2.9 Update 3
The following list gives differences between MainBoss 2.9 Update 3 and earlier releases of
MainBoss 2.9.
If a user does not have permission to browse work orders, the user will not be given
permission to close a work order from the work order record (i.e. the Close & Save
button will be disabled).
The Receiving Report (Inventory Reports Receiving) now includes the Unit
Cost beside the quantity received. This is where the Waybill used to be. The
Waybill number is now on a new detail line after the first line.
The Overdue Work Order report listed work orders whose “Work End” date has
already passed (i.e. due yesterday or before). In earlier releases of MainBoss 2.9, the
report include work orders that were due on the current date (i.e. jobs that were
scheduled to end “today”).
MainBoss places restrictions on the ability to delete records shown in browsers—you
can only delete such items if you are logged in to ADMINISTRATOR or to a user who has
permission to Reindex the database. However, Update 3 allows all users to delete
records which have been created as part of creating other records. For example, if
someone creates a Shipment Receipt record from the Receiving section of a Purchase
Order window, the same person can delete that Shipment Receipt record using the same
purchase order. However, the same person will not be able to delete Shipment Receipt
using the Receipt browser unless the person has Reindex permission on the database.
This should make it easier for people to correct mistakes, while still maintaining the
security of preventing unauthorized users from deleting information created by
someone else.
The Purchase History report now makes note of Items received but not
ordered. For example, if you are recording the contents of a shipment and the
shipment contains items that weren’t included in any purchase order, the Purchase
History report contains a bold-faced warning before any line-item that reports excess
items received.
New in MainBoss 2.9
The following list gives differences between MainBoss 2.8 and 2.9.
A new Requests menu has been introduced, containing operations related to work
requests. This includes the menu items Open Request, Browse Requests, and Print
Requests. All of these operations were previously obtained through the Work Orders
menu. Note that the information produced by Print Requests was previously known as
the Work Request History report.
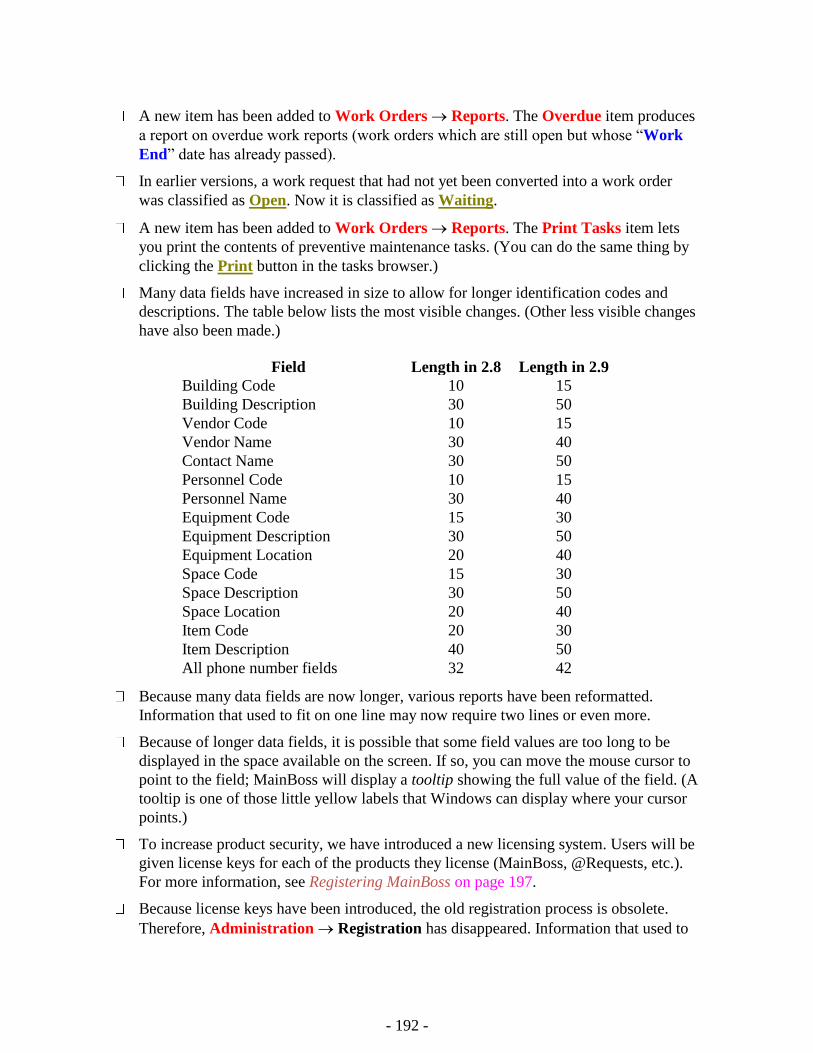
- 192 -
A new item has been added to Work Orders Reports. The Overdue item produces
a report on overdue work reports (work orders which are still open but whose “Work
End” date has already passed).
In earlier versions, a work request that had not yet been converted into a work order
was classified as Open. Now it is classified as Waiting.
A new item has been added to Work Orders Reports. The Print Tasks item lets
you print the contents of preventive maintenance tasks. (You can do the same thing by
clicking the Print button in the tasks browser.)
Many data fields have increased in size to allow for longer identification codes and
descriptions. The table below lists the most visible changes. (Other less visible changes
have also been made.)
Field Length in 2.8 Length in 2.9
Building Code 10 15
Building Description 30 50
Vendor Code 10 15
Vendor Name 30 40
Contact Name 30 50
Personnel Code 10 15
Personnel Name 30 40
Equipment Code 15 30
Equipment Description 30 50
Equipment Location 20 40
Space Code 15 30
Space Description 30 50
Space Location 20 40
Item Code 20 30
Item Description 40 50
All phone number fields 32 42
Because many data fields are now longer, various reports have been reformatted.
Information that used to fit on one line may now require two lines or even more.
Because of longer data fields, it is possible that some field values are too long to be
displayed in the space available on the screen. If so, you can move the mouse cursor to
point to the field; MainBoss will display a tooltip showing the full value of the field. (A
tooltip is one of those little yellow labels that Windows can display where your cursor
points.)
To increase product security, we have introduced a new licensing system. Users will be
given license keys for each of the products they license (MainBoss, @Requests, etc.).
For more information, see Registering MainBoss on page 197.
Because license keys have been introduced, the old registration process is obsolete.
Therefore, Administration Registration has disappeared. Information that used to
- 193 -
be specified in the Registration window is now specified with Administration
Preferences Company Information.
The Work-Requests-Only (WRO) version of MainBoss is now a separate software
package. Previously, customers used the MainBoss software itself but were expected to
set permissions for WRO users so that they could only create work requests. This was
always a point of confusion; therefore, we’ve created a separate WRO software
package. The name of the new package is MainBoss Service Desk, described in
MainBoss Service Desk on page 199.
The Manpower Schedule report now includes open corrective maintenance work orders
if they fall within the specified time period. Previously, the report only listed preventive
work orders.
Inventory item records now have a “Comments” field where users can record any
information not covered by other fields.
MainBoss 2.9 makes it possible to restrict a user’s ability to delete information from
the database. For example, users may not be able to delete personnel records, vendor
information, equipment descriptions, and so on (even though they might be allowed to
create such records).
In order to delete such items, you must explicitly login to ADMINISTRATOR or to another
user name that has permission to Reindex the database. No other users will be allowed
to delete information. (However, it will be possible for other users to void work orders,
work requests, etc. if they have permission to access the relevant browsers. Voiding
does not actually delete the entry; it marks the entry as voided, but the information
remains in the database where it can be recovered if necessary. This is different from
deleting, which actually removes information from the database.)
The “Next schedule” field appears in the window that you use for setting the schedule
for preventive maintenance on a unit. In previous versions of MainBoss, the value of
this field could not be changed—it was set automatically from other information
specified in the window. For example, if you had specified that a maintenance task
should be scheduled every 90 days, “Next schedule” was automatically set 90 days
after the last time you did the job.
In MainBoss 2.9, you can set “Next schedule” manually. This means that you can enter
a specific date or meter reading when the task should be scheduled, even if it’s different
from the usual schedule. For example, you can enter a specific date that a job should be
done. MainBoss will then use the given date, no matter what other information is
specified in the scheduling window.
The use of “PM Generate Frequency” has changed. In the past, the new “Generate
up to” value (used in generating preventice maintenance work orders) was calculated
by adding “PM Generate Frequency” to the previous value of “Generate up to”. For
example, if “PM Generate Frequency” was 7 days, the new “Generate up to” was set
to the old “Generate up to” plus 7 days, every time you generated work orders.
- 194 -
Now, the new “Generate up to” value is set to the current date plus “PM Generate
Frequency”. For example, if “PM Generate Frequency” is 7 days, “Generate up to”
is set to the current date plus 7 days. The previous “Generate up to” date has no effect
on this process.
Note that you can always set “Generate up to” manually to specify any date you want.
The new behavior only affects the default “Generate up to” value.
More keyboard shortcuts have been added to allow mouse-free operation.
New command line options have been added. /ServiceDesk+ starts MainBoss Service
Desk, and /LicenseKeys+ starts MainBoss in a mode that only allows the entry of
license keys.
- 195 -
Appendix B: Installing MainBoss 2.9
This appendix describes how to install MainBoss 2.9 on your system.
If you receive the package on CD-ROM:
Follow the instructions printed on the CD mailer to launch the installation
program.
Choose from the set of available languages, then install.
If you receive the package by downloading it from our web site:
Follow the instructions given on the web site for downloading and installing
the software.
The MainBoss Setup Program
The MainBoss Setup program installs MainBoss on your system. During the process, you
will be asked a number of questions including the following:
Is this the first time you have installed MainBoss at your site, or do you already have an
existing MainBoss database? If you have already installed MainBoss on at least one
computer at your site, choose Existing MainBoss Data Files. Otherwise, choose
New MainBoss Data Files (which tells the Setup program to create a new empty
database).
If you are installing a new database, where do you want to store the files? MainBoss
typically needs 30-40 megabytes of storage (depending on how much data you store in
the various tables and databases the software uses).
What type of installation do you want? The choices are Typical, Compact, and
Custom. If you choose Custom, Setup lets you choose what will and won’t get installed;
if you choose Compact, Setup gives you the minimum amount required to run
MainBoss (which means, for example, that Setup will not install any sample
databases); if you choose Typical, Setup gives you all available sample databases and
the default online help.
If you answered Custom to the previous question, the installation program asks you to
specify what you want to install. The possibilities are:
The program files: these contain the actual MainBoss software and must be
installed.
The sample files: these are sample databases showing how MainBoss can be
used in a variety of contexts. The samples are:

- 196 -
Facility: A rental management facility, where the maintenance staff
primarily deals with the needs of tenants.
Plant: A manufacturing plant, where the maintenance staff primarily deals
with the plant’s equipment.
Laundry: A large hospital laundry.
By default, the installation program installs all of the databases. However,
you can select or unselect any of the samples by clicking on the entry.
The help files: these contain online help information. There will always be a
set of files called Default, providing help in English. You may also have
the option of obtaining online help in other languages.
If you have already installed MainBoss 2.9 on your computer and then run the Setup
program again, the program asks whether you are modifying your installation, repairing
your set-up, or uninstalling.
Modify: You would pick this answer if, for example, you wanted to install a sample
database that you didn’t install when you first installed MainBoss.
Repair: You would pick this answer if you have previously installed MainBoss 2.9 on
this machine but have to re-install (for example, if you are installing a new update or
you accidentally deleted some of the files). In this case, Setup will re-install using
exactly the same configuration you requested when you first installed MainBoss 2.9.
Remove: You would pick this answer if you want to remove MainBoss from the
machine. The process will delete the program files and sample databases, but will not
delete your actual MainBoss database files. If you want to delete those files too, use
normal Windows commands to delete the directory that contains the files.
Note: You must have Administrative permissions on your Windows system in order to run
the MainBoss Setup program. If you do not have such permissions, you must use standard
Windows procedures to log in to an account that does have the permissions.
Installing on a Local Network
When MainBoss is used on a local computer network, the database files are all stored on
one computer in that network. The program files can then be installed on every computer in
the network where people will be using MainBoss; however, those programs will all
reference the database files on the original computer.
If you are installing MainBoss for the first time at your site:
1. Decide which computer will hold the database files. You must install MainBoss
on this computer before you install on any other computers.
- 197 -
2. Run the MainBoss installation program on the computer that will hold the
database files.
3. During the installation process, you will be given an ADMINISTRATOR password.
Write down this password; you will need it to login as the MainBoss
administrator. (Once you login as the administrator, you can change the
password to something you’ll find easier to remember—for details on changing
passwords, see Changing Your Administration Password on page 174.)
4. Once you have installed MainBoss on this first computer, you can run the
installation program on any other computers you have licensed for running
MainBoss. When the installation program asks you to specify the location of the
data files, type in the name of the directory where you installed the data files on
the first computer.
If you have previously installed any version of MainBoss at your site:
1. IMPORTANT: Reindex your database before you install the new software. For
a description of how to do this, see Reindexing on page 168.
2. IMPORTANT: For the sake of safety, back up your existing MainBoss data
files. This protects your existing data in the event of a power failure or some
other interruption during the installation process. For a description of how to
copy your data files, see Backing Up Your MainBoss Database on page 169.
3. For every computer licensed to run MainBoss, run the installation program.
When the installation program asks you to specify the location of the data files,
type in or select the name of the directory that holds your existing data files.
Permissions: After installing MainBoss on a workstation, make sure that all users who
have access to MainBoss on that workstation have the following rights to the
files/directories:
Rights to Create, Delete and Modify files in ALL MainBoss directory
structures
Rights to Read, Write (to), Modify and Delete any file in the ARC and ARCLH
subdirectories
Note: Once you have installed a new version of MainBoss and are sure it is working
properly, you can uninstall the older version. However, we recommend that you run the
new version for at least two weeks before removing the old one.
Registering MainBoss
When you license any MainBoss software package, you are given a license key that should
be used to register your software. Essentially, you enter the license key to validate your
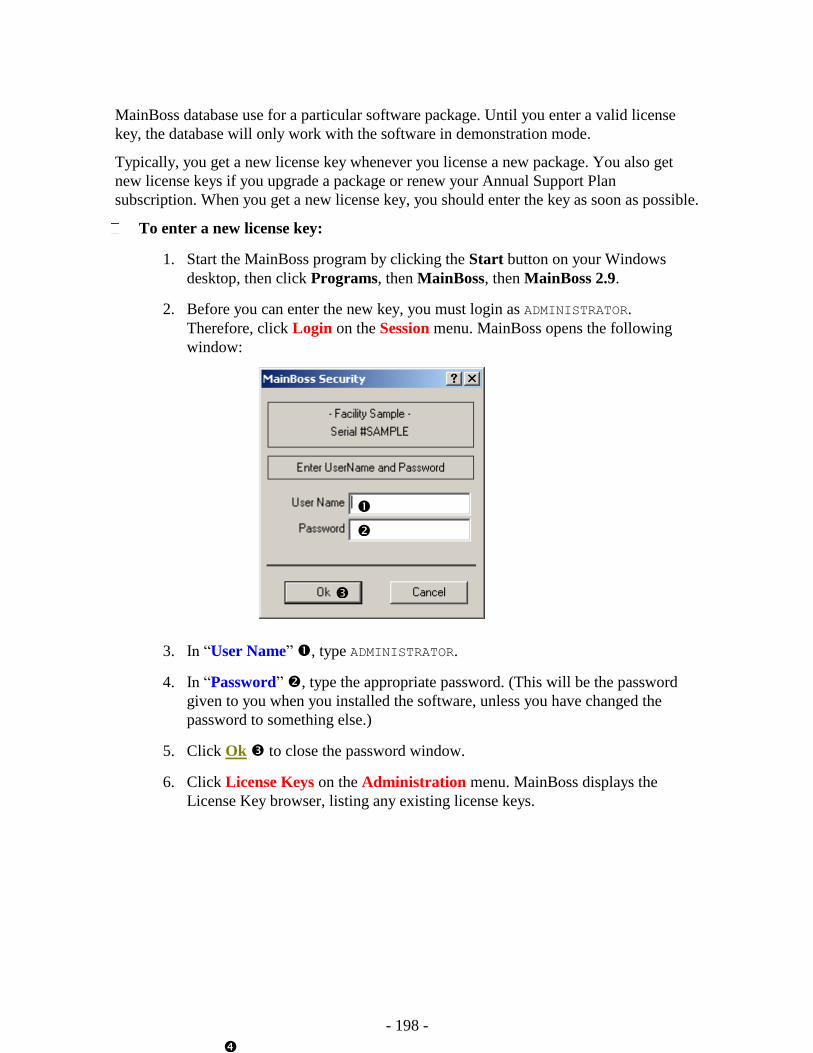
- 198 -
MainBoss database use for a particular software package. Until you enter a valid license
key, the database will only work with the software in demonstration mode.
Typically, you get a new license key whenever you license a new package. You also get
new license keys if you upgrade a package or renew your Annual Support Plan
subscription. When you get a new license key, you should enter the key as soon as possible.
To enter a new license key:
1. Start the MainBoss program by clicking the Start button on your Windows
desktop, then click Programs, then MainBoss, then MainBoss 2.9.
2. Before you can enter the new key, you must login as ADMINISTRATOR.
Therefore, click Login on the Session menu. MainBoss opens the following
window:
3. In “User Name” , type ADMINISTRATOR.
4. In “Password” , type the appropriate password. (This will be the password
given to you when you installed the software, unless you have changed the
password to something else.)
5. Click Ok to close the password window.
6. Click License Keys on the Administration menu. MainBoss displays the
License Key browser, listing any existing license keys.
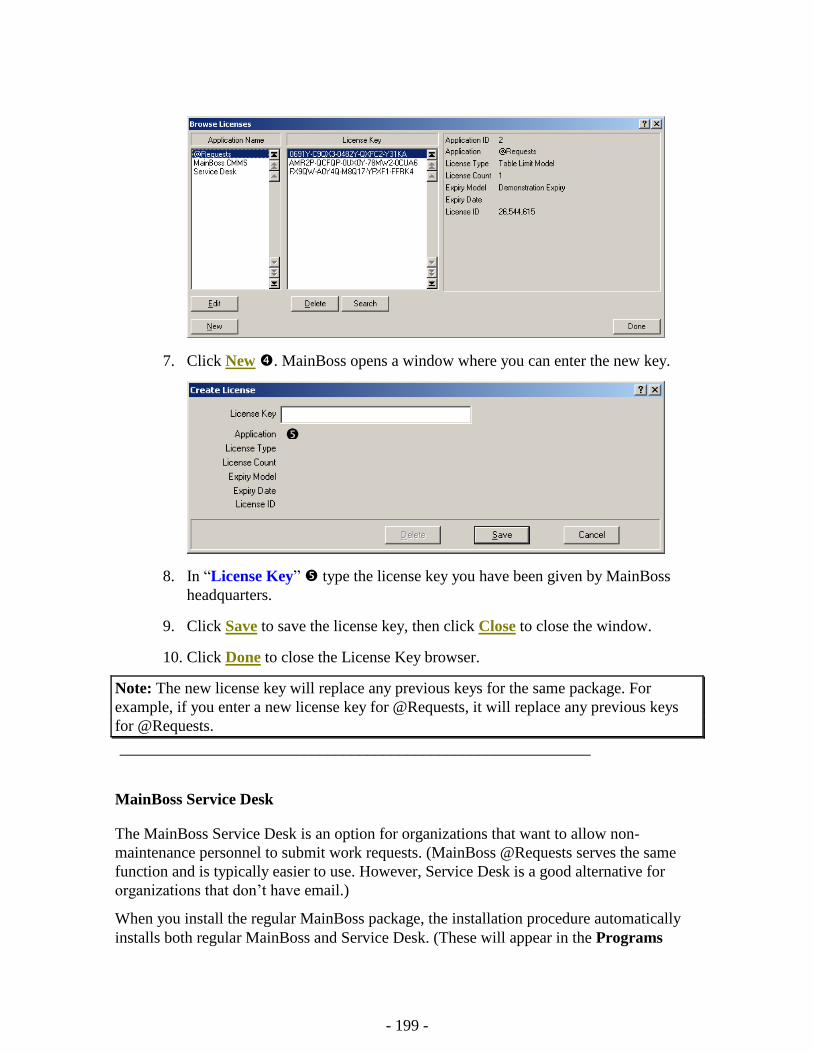
- 199 -
7. Click New . MainBoss opens a window where you can enter the new key.
8. In “License Key” type the license key you have been given by MainBoss
headquarters.
9. Click Save to save the license key, then click Close to close the window.
10. Click Done to close the License Key browser.
Note: The new license key will replace any previous keys for the same package. For
example, if you enter a new license key for @Requests, it will replace any previous keys
for @Requests.
___________________________________________________________
MainBoss Service Desk
The MainBoss Service Desk is an option for organizations that want to allow non-
maintenance personnel to submit work requests. (MainBoss @Requests serves the same
function and is typically easier to use. However, Service Desk is a good alternative for
organizations that don’t have email.)
When you install the regular MainBoss package, the installation procedure automatically
installs both regular MainBoss and Service Desk. (These will appear in the Programs
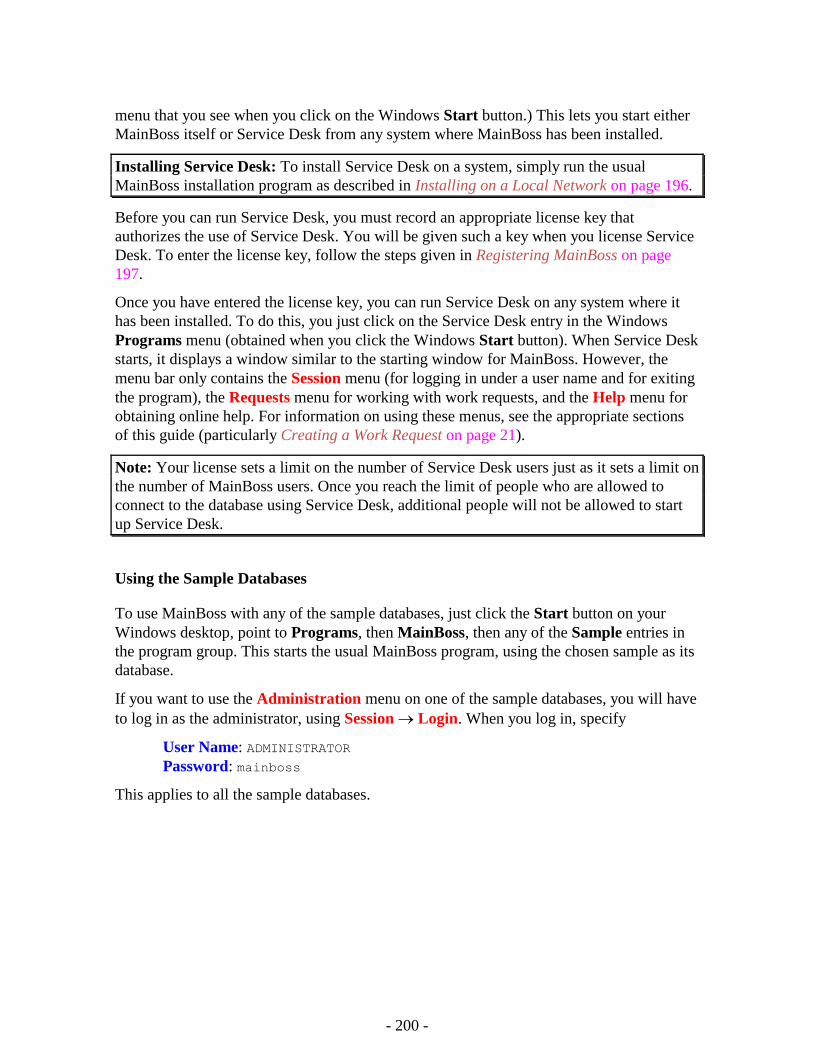
- 200 -
menu that you see when you click on the Windows Start button.) This lets you start either
MainBoss itself or Service Desk from any system where MainBoss has been installed.
Installing Service Desk: To install Service Desk on a system, simply run the usual
MainBoss installation program as described in Installing on a Local Network on page 196.
Before you can run Service Desk, you must record an appropriate license key that
authorizes the use of Service Desk. You will be given such a key when you license Service
Desk. To enter the license key, follow the steps given in Registering MainBoss on page
197.
Once you have entered the license key, you can run Service Desk on any system where it
has been installed. To do this, you just click on the Service Desk entry in the Windows
Programs menu (obtained when you click the Windows Start button). When Service Desk
starts, it displays a window similar to the starting window for MainBoss. However, the
menu bar only contains the Session menu (for logging in under a user name and for exiting
the program), the Requests menu for working with work requests, and the Help menu for
obtaining online help. For information on using these menus, see the appropriate sections
of this guide (particularly Creating a Work Request on page 21).
Note: Your license sets a limit on the number of Service Desk users just as it sets a limit on
the number of MainBoss users. Once you reach the limit of people who are allowed to
connect to the database using Service Desk, additional people will not be allowed to start
up Service Desk.
Using the Sample Databases
To use MainBoss with any of the sample databases, just click the Start button on your
Windows desktop, point to Programs, then MainBoss, then any of the Sample entries in
the program group. This starts the usual MainBoss program, using the chosen sample as its
database.
If you want to use the Administration menu on one of the sample databases, you will have
to log in as the administrator, using Session Login. When you log in, specify
User Name: ADMINISTRATOR
Password: mainboss
This applies to all the sample databases.
- 201 -
Appendix C: Frequently Asked Questions
This section addresses some of the most common questions that MainBoss users ask our
support staff.
Requestor Lists
Q: How do I change entries in the Requestor pull-down menu?
A: Changes can be made with Tables Contacts. This lists all your past Requestors.
Duplicates can be deleted (for example, if Tom and Tommy refer to the same person), but
please be aware that if you delete a requestor from the Contacts Table, any existing work
requests that refer to that requestor will now have a blank “Req. By” field. You will have
to go back and pick the correct Requestor from the pull-down menu if this information is
important to you.
Unselecting in a Drop-Down List
Q: I previously selected an entry from a drop-down list. Now I want to clear the field
so that nothing is selected. How do I do that?
A: Use the cursor to click on the field, then press <Ctrl+Del>. This clears the field.
Printing Reports
Q: When I try to print reports, nothing comes out. Why?
A: If you are using an unregistered version of MainBoss, the program will not print reports
(although you can still Preview any report on your computer screen). To register
MainBoss, you must have a valid registration number. Once you have received a
registration number, you can register by following the instructions in Registering MainBoss
on page 197.
Note that the sample databases are registered; therefore, you can print output using the
sample databases.
MainBoss Version
Q: How do I know what version of MainBoss I am running?
A: Select Help About in the MainBoss menu bar. MainBoss displays a screen which
provides information about the software.
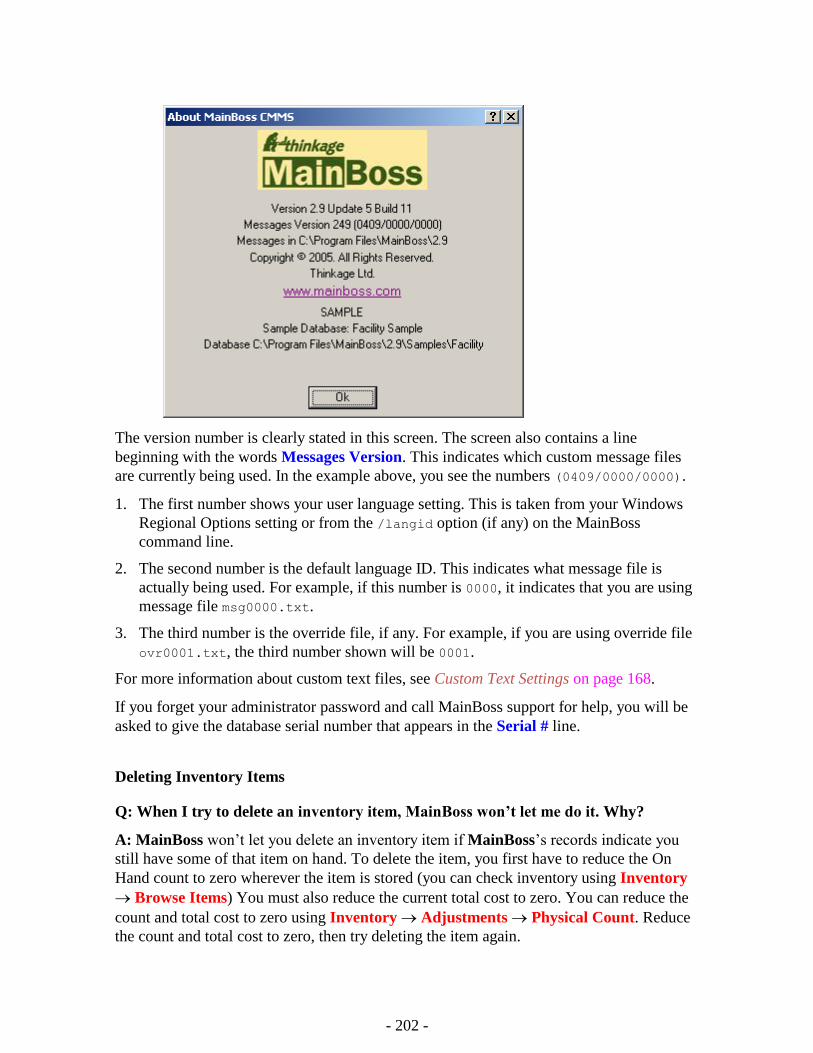
- 202 -
The version number is clearly stated in this screen. The screen also contains a line
beginning with the words Messages Version. This indicates which custom message files
are currently being used. In the example above, you see the numbers (0409/0000/0000).
1. The first number shows your user language setting. This is taken from your Windows
Regional Options setting or from the /langid option (if any) on the MainBoss
command line.
2. The second number is the default language ID. This indicates what message file is
actually being used. For example, if this number is 0000, it indicates that you are using
message file msg0000.txt.
3. The third number is the override file, if any. For example, if you are using override file
ovr0001.txt, the third number shown will be 0001.
For more information about custom text files, see Custom Text Settings on page 168.
If you forget your administrator password and call MainBoss support for help, you will be
asked to give the database serial number that appears in the Serial # line.
Deleting Inventory Items
Q: When I try to delete an inventory item, MainBoss won’t let me do it. Why?
A: MainBoss won’t let you delete an inventory item if MainBoss’s records indicate you
still have some of that item on hand. To delete the item, you first have to reduce the On
Hand count to zero wherever the item is stored (you can check inventory using Inventory
Browse Items) You must also reduce the current total cost to zero. You can reduce the
count and total cost to zero using Inventory Adjustments Physical Count. Reduce
the count and total cost to zero, then try deleting the item again.

- 203 -
Scheduling Preventive Maintenance
Q: I’ve set up a preventive maintenance schedule for my equipment, but work orders
don’t appear on the days when a preventive maintenance task should be performed.
What’s going wrong?
A: MainBoss does not automatically generate work orders—you have to tell MainBoss to
create the work orders. You do this with Work Orders Generate Work Orders.
MainBoss opens a window where you specify a range of dates for which you want work
orders; for example, if you want to create work orders to the end of the month, specify the
last day of the month in “Generate up to”. When you click Ok, MainBoss will generate
work orders for all preventive maintenance tasks that should be carried out in the time
range specified.
By default, MainBoss sets up the Generate Work Orders dates so that you can generate
work orders every week. To change this frequency (for example, generating the work
orders once a month), use Administration Preferences Other; then set the “PM
Generate Frequency” field to a number of days. For example, if you set “PM Generate
Frequency” to 30, MainBoss assumes you intend to generate work orders once a month
rather than every week.
Forgotten Passwords
Q: I’ve forgotten my administrator password, so I can’t use MainBoss
Administration. What do I do?
A: Phone or e-mail MainBoss Support for instructions. Please be ready to supply your
MainBoss database serial number so that MainBoss Support can confirm you are a
registered customer. (You can obtain your database serial number from Help About.)
Recommended Tables
Q: Which tables do I have to set up before using MainBoss features?
A: You do not have to complete any tables before using MainBoss. However, to get
meaningful results, we recommend that you at least complete the following tables before
beginning to use MainBoss for your work:
Buildings
Access
Priorities
Work Categories
Repair Closing Codes

- 204 -
One or both of the following pairs of tables are recommended for all MainBoss sites:
Personnel
Trades
Complete the Personnel table if you will be creating work orders using your own staff.
Because Personnel records refer to the Trades table, there must be an entry in the Trades
table before adding Personnel.
Vendors
Vendor Types
Complete the Vendor table if you will be creating work orders using outside contractors.
Because Vendor records refer to the Vendor Types table, there must be an entry in the
Vendor Types table before adding Vendors.
The following tables are recommended if you plan to issue work orders for Equipment:
Equipment Type
Equipment (accessed from the Units menu)
The following tables are recommended if you plan to issue work orders for building areas
(called Spaces in MainBoss):
Space Type
Spaces
The following tables are recommended if you plan to keep track of your inventory of
supplies and parts:
Storerooms
Categories
Units of Measure
Items
To use purchasing and receiving features, the following tables are recommended:
Vendors
Vendor types
All Inventory tables
Shipping Modes
Payment Terms
You should also specify address information for buildings in the Buildings table where
shipments may be received.
Other MainBoss tables can be used to provide useful supplementary information in various
contexts; however, they are typically not as important as the tables listed above.
- 205 -
Emailing MainBoss Reports
Q: How do I e-mail MainBoss reports to other people?
A: The key is to create a printer definition that is associated with a file rather than an actual
printer port. You do this in the usual way that you add a printer to your system (for
example, through the Printers entry in Windows control panel).
Set up a printer definition for the type of printer that the E-mail recipient will be using. For
example, if you want to send the report to someone who will run off the report on an HP
LaserJet 4SI MX, set up a printer definition for such a machine but when you are asked to
specify a printer port, choose FILE:.
Note: If you do not know what kind of printer will be used, or if you want to create a type
of report suitable for many different types of printer, set up a generic text printer (ASCII)
associated with FILE:
Once you have set up an appropriate printer definition, you are ready to prepare MainBoss
reports for e-mail. When you want to prepare such a report, start MainBoss and choose the
report from the MainBoss Reports menu as always. Then, in the dialog box for printing the
report, click the Setup button. This opens a dialog where you can choose a printer. Choose
the FILE: printer definition that you created, then go through the usual steps to print the
report.
When you ask MainBoss to print the report, Windows will prompt you for the name of a
file where the report should be printed. Specify an appropriate file; this will be the file you
send out by e-mail. Continue on as normal, and Windows will write the report to the
specified file rather than printing it.
You can send out the resulting file directly by e-mail. However, you may prefer to shrink
the report first by using a utility like WinZip. In this case, the recipient will have to unZIP
the report before printing it.
To print a report that is stored in a file, you use the DOS COPY command with the /b
option. For example, if you are printing to a printer on port LPT1, you might use
copy /b report.prn LPT1:
If you are printing to a network printer, you have to make sure that you are copying to a
shared printer. A typical command line might look like
copy /b report.prn \\JOE\printer
where JOE is the name of a system on the network which has created a shared printer
attachment for the printer you want to use.
- 206 -
Note: If you decide that it’s too complicated to set up shared printers, you may just decide
to create the original report in generic text format (ASCII). This lets you read the print file
into Windows NOTEPAD, Microsoft Word, or some other program for reading text files.
You can then print the file using the program’s normal facilities for printing text.
When you want to print reports on your own system, remember to use the Setup button to
change back from the FILE: printer to one of the real printers available to your computer.
Packaging MainBoss Files
Q: How do I package up MainBoss files to send to MainBoss support?
A: Normally, you would use Administration Database Backup to create a backup
file, then send us the file.
However, if your MainBoss database is very damaged (for example, because of a power
failure at a critical moment), you may not be able to start the MainBoss program normally.
If you try to start MainBoss in this situation, MainBoss will issue one or more messages
indicating that the database files contain errors. MainBoss will then quit.
In such a situation, you can create a backup file by using MainBoss in its command line
form.
___________________________________________________________
To create a backup file from the MainBoss command line:
1. Start a Windows Command Prompt application.
2. In the command window, CD to the directory that contains your MainBoss software, as
in:
cd "C:\Program Files\MainBoss\2.9"
3. Type the following command
mboss backup /mbd:"DBDIR" /mzh:"FILENAME"
where DBDIR is the name of the directory containing your MainBoss database and
FILENAME is the name you want to give to the packaged files. For example, you might
type
mboss backup /mbd:"C:\MainBoss" /mzh:"package.mzh"
___________________________________________________________
You can send the resulting file (e.g. package.mzh) to MainBoss support by E-mail or you
can put it on a disk and mail it to us.
If the above process doesn’t work, you can use WINZIP to create a ZIP file containing all
the files in your database directory.
- 207 -
AutoCAD
Q: Do I have to have AutoCAD installed to view my attached drawings from
MainBoss?
A: Having AutoCAD installed on your system lets you view and print drawings in the
same manner that you can view and print documents which require MS Word or
WordPerfect. However not every system accessing MainBoss is likely to be licensed for
the full version of AutoCAD.
An inexpensive alternative for viewing and printing both documents and drawings is to
install a viewer such as Autodesk’s Volo View (U.S.$49). This will let you view, mark up,
measure, compare, and print your CAD drawings, without risking changes to the original
AutoCAD file. It also lets you view many different document types, including raster image
and business formats. Volo View may also be used in conjunction with a browser like MS
Internet Explorer for Internet & Intranet document and drawing viewing.
Complete information about Volo View is available at the Autodesk web site,
www.autodesk.com.
Obsolete Equipment and Preventive Maintenance
Q: When I declare equipment obsolete, what do I do about preventive maintenance
tasks related to that equipment?
A: Declaring equipment obsolete does not cancel any preventive maintenance tasks
scheduled for the equipment. You have to cancel those by hand. We recommend the
following approach:
1. Before you declare the equipment obsolete, find out what PM tasks are associated with
that equipment. You can do this with Work Orders Reports Print Tasks. In
the “Unit” field, specify the equipment you intend to declare obsolete.
2. For each task listed, open the task description using Work Orders Browse Tasks.
In the Assigned Units section of the task record, double-click the unit you want to
declare obsolete. This opens the task assignment for this unit.
3. In the Unit section of the assigned unit record, double-click the first schedule entry.
This opens the schedule record.
4. In the Schedule section of the schedule record, checkmark Do not use this schedule.
This prevents the use of this schedule in future. Click Save to preserve your change,
then click Close to close the schedule.
5. Repeat Steps 3 and 4 for every other schedule in the assigned unit record. When you’re
finished, click Save to save the changes you’ve made, then click Close to close the
record.
- 208 -
6. You’ll end up back in the task record. Click Save to save the changes you’ve made,
then click Close to close the record.
7. Once you’ve canceled all future task schedules, you must cancel all outstanding work
orders on the equipment. To do this, use Work Orders Browse Work Orders, and
click Print. This opens a window for printing work orders.
8. In the print window, clear the checkmark on Select for Printing and Turn off Select
for Printing after printing. In both fields of “Unit”, specify the unit you intend to
declare obsolete. Checkmark Open Work Orders. Click Print to print the report.
9. Using the report, void all the open work orders for the unit.
10. Finally, you can declare the unit obsolete. Use Units Equipment and double-click
on the entry for the equipment. This opens the equipment record.
11. In the Value section of the equipment record, specify an obsolete code in the
“Obsolete” field. Fill in any other relevant information (e.g. “Scrap Date” and “Scrap
Value”). When you’re done, click Save to save the changes, then click Close.
Note that you do not delete the schedule or the task description, even if the task description
isn’t used for other equipment. It is useful to preserve this information for historical
purposes.
Upgrades to Hardware or Windows
Q: How do I handle upgrading my hardware or my version of Windows?
A: If you get new computing hardware or upgrade your version of Windows on the
computer that holds your MainBoss database, you will want to migrate your MainBoss
installation to the new system as painlessly as possible. We recommend the following
steps.
1. Before you abandon the old system, make a backup of your MainBoss database using
Administration Database Backup.
2. Copy the backup file to a safe location (e.g. burn it onto a CD or copy it to another
computer in the network).
3. On the new system, install the MainBoss software. Specify that you want to create a
new database under C:\MainBoss.
4. Start MainBoss on the new system and use Administration Database Restore to
restore the database from the backup file. Restore it to the location C:\NMainBoss.
(The letter "N" stands for “new”.)
5. Exit MainBoss. Use Windows Explorer locate the folder called C:\MainBoss.
6. Rename the folder C:\MainBoss to OMainBoss. (The letter "O" stands for “old”.)
7. Rename the folder C:\NMainBoss to C:\MainBoss.
- 209 -
8. Restart MainBoss. Now you'll be working with the restored database. Reindex the
database with Administration Database Re-Index. You can then use MainBoss
as normal.
9. Delete the C:\OMainBoss folder. This folder holds the empty “new” database created
when you installed MainBoss in step 3 above. You don’t need the empty database
because you're now using your original data.
Editing MainBoss files using another program
Q: Can I edit MainBoss data files with other software?
A: The data files that contain MainBoss information can be opened with Microsoft Excel,
Microsoft Access, Visual FoxPro and other such programs. Users who are familiar with
these software packages sometimes ask if they can be used for editing the MainBoss data
files. The answer is NO.
Let’s look at a specific example. Suppose you’re about to generate preventive maintenance
work orders and you make a typing mistake: you accidentally generate all work orders up
to October 1, 2005 rather than October 1, 2004. Oops. You suddenly have a lot of new
work orders you want to get rid of...and Voiding each one individually will take a lot of
time. Why can’t you just use Excel to open the file that contains work orders, then delete
all the extra work orders with a single Excel delete command?
The answer is that MainBoss tables are interlinked—they refer to each other in many
different ways. For example, suppose some generated work order reserves spare parts for
use in the job. In the file that contains inventory information, there’s a record that says,
“These spare parts are reserved for this work order”...and there’s a link that points to the
relevant work order. If you delete something from the work order file, that link in the
inventory file is no longer good; it points to something that’s disappeared. The bad link in
the inventory file can lead to serious trouble later on.
On the other hand, if you use MainBoss itself to void work orders, MainBoss knows how
all the data files are interlinked and makes sure no problems occur. When you delete a
record in one file, MainBoss adjusts all other files appropriately so that nothing is left
hanging.
The moral is simple: Never make changes in any MainBoss file using a program other
than MainBoss itself.
Advanced users also ask us if they can open a MainBoss file in another program (Excel,
Access, etc.) and just look at the data. Sometimes it’s easier to view data in a spreadsheet
format rather than printing a MainBoss report or browsing individual records. In principle,
this is okay because it doesn’t actually change MainBoss’s data...but you still have to be
careful. FoxPro, for example, can change your data even if you don’t ask it to. A simple
action like moving between records (i.e. changing the input focus to another record) can
write out any changes you might have made to the previous record.
- 210 -
Viewing a table with Microsoft Access automatically creates a file with the same base
name but with the suffix .INF. This file is created in the MainBoss database folder. .INF
files can clutter up the folder and may cause confusion about which files are actually used
by MainBoss.
Viewing a file in Excel marks the file as “busy” and prevents other users from changing it.
If someone is using MainBoss at the same time that you’re looking at the file in Excel, the
MainBoss user can end up getting “file busy” error messages that cause MainBoss to exit.
In order to view a MainBoss table in any other program, in-depth knowledge of both
MainBoss’ underlying data structure and of the viewing program is required. Therefore, we
don’t recommend doing this. If you need to view a MainBoss file using another program,
start by copying the MainBoss file from the MainBoss database folder to another directory.
You can then read the copy and use it however you want...but don’t copy it back when
you’re finished with it! Just delete the copy when you’re done.
The bottom line is that it’s best to use MainBoss the way it was intended: make any
changes, additions or deletions right within the program. Other programs may seem like
shortcuts, but they’ll cause problems later.
Headings for Scheduled PM Tasks
Q: The Assigned Units section of the Edit Task window has various entries under the
Scheduled heading. What do they mean?
A: The following entries may appear in the Scheduled column:
not scheduled: Used if the unit has no assigned schedule.
every reading XXX: Used if the unit only has a meter-based schedule. The value XXX
indicates the value between scheduled maintenance tasks (e.g. 3000 if the unit is
scheduled for maintenance every 3000 miles).
every XXX Days or every XXX months: Used if the unit only has a date-based schedule.
The value XXX tells the number of days or months between scheduled maintenance
tasks.
by both: Used if the unit has exactly one meter-based schedule and one date-based
schedule.
advanced schedule: Used if the unit has more than one meter-based schedule or more
than one date-based schedule.
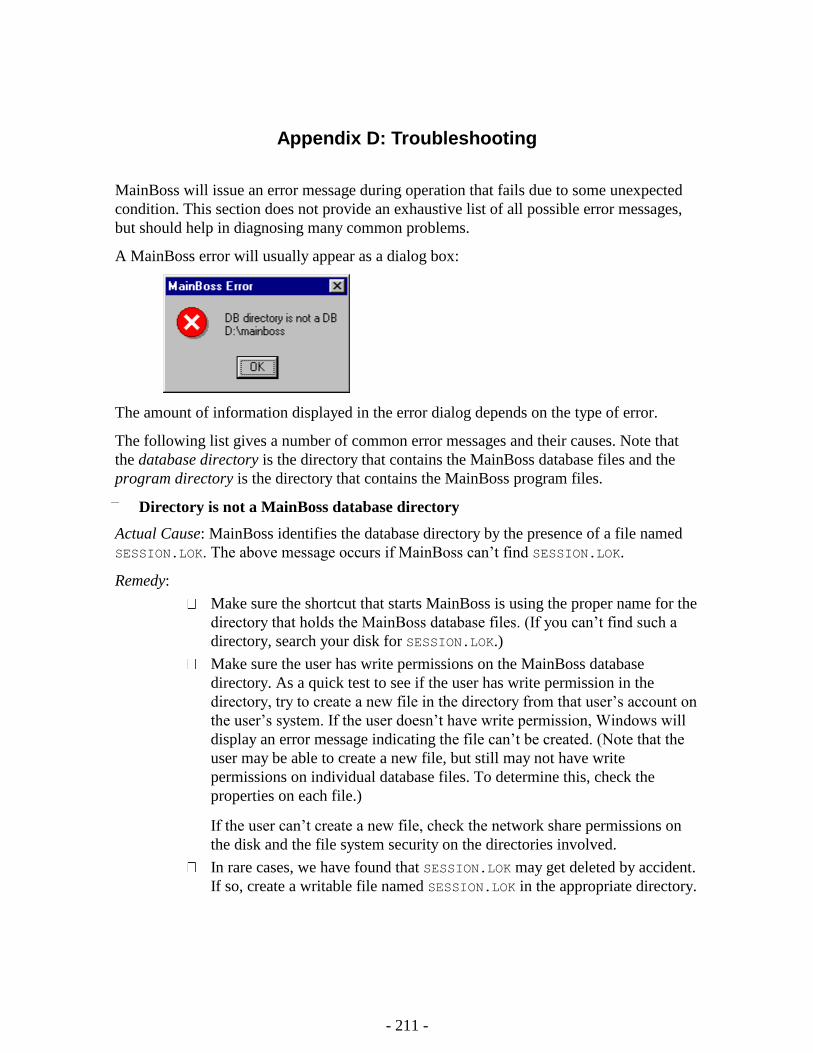
- 211 -
Appendix D: Troubleshooting
MainBoss will issue an error message during operation that fails due to some unexpected
condition. This section does not provide an exhaustive list of all possible error messages,
but should help in diagnosing many common problems.
A MainBoss error will usually appear as a dialog box:
The amount of information displayed in the error dialog depends on the type of error.
The following list gives a number of common error messages and their causes. Note that
the database directory is the directory that contains the MainBoss database files and the
program directory is the directory that contains the MainBoss program files.
Directory is not a MainBoss database directory
Actual Cause: MainBoss identifies the database directory by the presence of a file named
SESSION.LOK. The above message occurs if MainBoss can’t find SESSION.LOK.
Remedy:
Make sure the shortcut that starts MainBoss is using the proper name for the
directory that holds the MainBoss database files. (If you can’t find such a
directory, search your disk for SESSION.LOK.)
Make sure the user has write permissions on the MainBoss database
directory. As a quick test to see if the user has write permission in the
directory, try to create a new file in the directory from that user’s account on
the user’s system. If the user doesn’t have write permission, Windows will
display an error message indicating the file can’t be created. (Note that the
user may be able to create a new file, but still may not have write
permissions on individual database files. To determine this, check the
properties on each file.)
If the user can’t create a new file, check the network share permissions on
the disk and the file system security on the directories involved.
In rare cases, we have found that SESSION.LOK may get deleted by accident.
If so, create a writable file named SESSION.LOK in the appropriate directory.
- 212 -
No MainBoss Database found
Actual Cause: MainBoss can’t find the database files.
Remedy:
Make sure the shortcut that starts MainBoss is using the proper name for the
directory that holds the MainBoss database files.
Make sure the user has write permissions on the MainBoss database
directory. (See above for more information.)
Make sure both a SESSION.LOK and an EXCLUDE.LOK file exist in the
database directory. If they do not, create new writable files with those
names.
Unlicensed Database
Actual Cause: MainBoss tells you that your database is unlicensed, even though you have
already entered a license key.
Remedy:
This might happen if there was an interruption (e.g. power outage) while a
new version of MainBoss is updating the database. To fix the problem, start
MainBoss program in “License Key Only” mode and enter your current
license keys. For information on “License Key Only” mode, see License Key
Entry Only on page 188.
The problem might also occur if you try to start a MainBoss package
without having installed an appropriate license key. For example, you will
get this message if you try to start MainBoss Service Desk but have not
recorded a license key for the software. If you have been given a license key
for a particular package but have not yet recorded the key in the MainBoss
database, see Registering MainBoss on page 197 for an explanation of how
to record keys.
The system cannot find the file specified
Actual Cause: The file does not exist in the specified location.
Remedy:
Make sure the file exists, and does not have the READONLY attribute set.
session.lok: Access is denied
Actual Cause: The SESSION.LOK file exists, but cannot be opened for write permissions.
Remedy:
Check that the SESSION.LOK file does not have the READONLY attribute
on it.
Make sure the user has write permissions on the MainBoss database
directory. (See above for more information.)
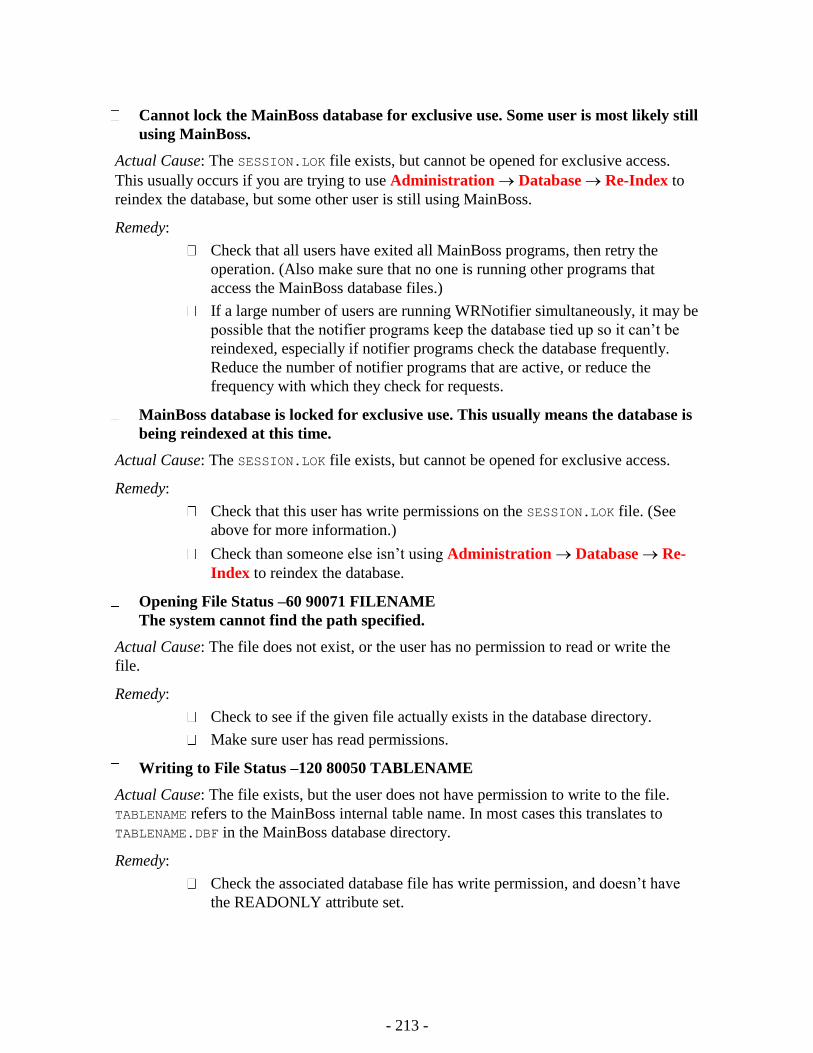
- 213 -
Cannot lock the MainBoss database for exclusive use. Some user is most likely still
using MainBoss.
Actual Cause: The SESSION.LOK file exists, but cannot be opened for exclusive access.
This usually occurs if you are trying to use Administration Database Re-Index to
reindex the database, but some other user is still using MainBoss.
Remedy:
Check that all users have exited all MainBoss programs, then retry the
operation. (Also make sure that no one is running other programs that
access the MainBoss database files.)
If a large number of users are running WRNotifier simultaneously, it may be
possible that the notifier programs keep the database tied up so it can’t be
reindexed, especially if notifier programs check the database frequently.
Reduce the number of notifier programs that are active, or reduce the
frequency with which they check for requests.
MainBoss database is locked for exclusive use. This usually means the database is
being reindexed at this time.
Actual Cause: The SESSION.LOK file exists, but cannot be opened for exclusive access.
Remedy:
Check that this user has write permissions on the SESSION.LOK file. (See
above for more information.)
Check than someone else isn’t using Administration Database Re-
Index to reindex the database.
Opening File Status –60 90071 FILENAME
The system cannot find the path specified.
Actual Cause: The file does not exist, or the user has no permission to read or write the
file.
Remedy:
Check to see if the given file actually exists in the database directory.
Make sure user has read permissions.
Writing to File Status –120 80050 TABLENAME
Actual Cause: The file exists, but the user does not have permission to write to the file.
TABLENAME refers to the MainBoss internal table name. In most cases this translates to
TABLENAME.DBF in the MainBoss database directory.
Remedy:
Check the associated database file has write permission, and doesn’t have
the READONLY attribute set.

- 214 -
Slow Performance and Network Errors
Slow performance may be due to difficulties with your internal computer network (your
LAN). MainBoss is often the first program where network problems are noticed, since it
can use your network more intensively than other software.
Network problems are often subtle. For example, if you have a faulty wire, it doesn’t
usually stop transmissions completely. Instead, you get “noise” on the line that interferes
with sending or receiving data. The network may have to make several attempts before
transmitting a “packet” of data cleanly. Obviously, this slows down performance because
the network has to send the same data several times; but because the data eventually gets
through, MainBoss (and other software) still operate correctly. The only symptom you’ll
see is an increased length of time before MainBoss gets the data it needs.
Network difficulties typically arise from faulty hardware. There are three general
possibilities:
Faulty or inadequate cables between a single computer and the network
server. For example, we’ve seen many cases where all the computers at a
company have been upgraded for faster network communications, but the
wires connecting those computers (hidden in walls or ceilings) are many
years old and unable to handle fast data transmission.
Cable problems may affect a single computer (if that computer’s connection
has a fault) or the entire network (if all the cables in your network are old
and slow).
The network card in a single computer is faulty. In this case, the computer
in question will have significant performance problems. Other computers
may also slow down slightly too, since the one “bad” computer keeps
creating network errors that the central server has to handle. Making more
work for the central server slows down everybody.
The network card in the server computer is faulty. In this case, all computers
on the network may experience poor performance.
If you encounter poor performance, you can check your network by running diagnostic
problems. Windows XP has built-in network diagnostic tools that can help; see
http://www.microsoft.com/technet/prodtechnol/winxppro/maintain/netdiag.ms
px
for information.
Companies that manufacture network cards also provide diagnostic programs to check for
problems. For example, if your network server uses an Intel network card, Intel supplies a
diagnostic program that lets you check to see whether you’re experiencing a lot of network
errors. If you didn’t get appropriate diagnostic software when you bought the network card,

- 215 -
you can download the software from Intel’s web site. The same applies with other
manufacturers.
You should run diagnostic programs both on the network server and on computers that talk
to the server. In many cases, if a computer’s network card is malfunctioning, the card can’t
detect its own problems—it doesn’t notice that it’s making mistakes. However, other
computers that try to communicate with that card will be able to see that the card is “sick”
because it generates a lot of errors.
A computer’s event log may also reveal network errors. The event log only shows errors
where the hardware gives up after making several attempts at data transmission. The log
won’t reveal how often transmissions failed on the first few attempts but eventually got
through. Therefore, if network errors do show up on the event log, the odds are you have a
significant problem.
Network problems may result in “information” or “warning” messages in the event log
rather than actual “errors.” Also, diagnostics arising from network problems often don’t
come out and say you have network problems. They give cryptic messages like the
following:
The browser service has failed to retrieve the backup list too many
times on transport
No Domain Controller is available for domain XXXXXX due to the
following...
The browser has forced an election on network \Device\XXXXX because a
master browser was stopped.
It may be difficult to figure out that such problems were actually caused by network errors.
If your network errors are severe enough, the problem may eventually reach the point
where it causes MainBoss error messages. For example, suppose MainBoss tries to write
information over your network to the central MainBoss database. MainBoss waits for a
considerable period of time, but if the write operation doesn’t work because of repeated
network errors, MainBoss will eventually give up and report an I/O error. Typically
however, network problems first show up as slow performance; only later do you see
MainBoss errors.
It should be noted that no network is perfect. An error rate of under 1% is normal and
acceptable. Significantly higher rates are signs of trouble.
Correcting network difficulties may require buying new hardware, especially if the
problems lie in a malfunctioning network card. Buying the cheapest available card may not
be wise—in our experience, some network cards are better than others and you have to pay
for good quality.
If your network problems result because you’re trying to run transmissions faster than your
wiring allows, you may be able to increase overall performance by slowing down
transmission speed. If running a little slower lets you avoid transmission errors, you may
- 216 -
end up with better overall flowthrough because data gets through cleanly on the first try
rather than requiring several attempts.
(Note that you might not have directly set the transmission speed of your network. Often,
you just set network cards to run in “auto” mode. This means that when computers first
connect with each other, they run tests to determine the fastest possible speed at which they
can communicate. After that, they always try to run at that speed, even if problems arise
that make such speed no longer feasible. In this case, you must explicitly set
communication speed to something the network can actually support.)
MainBoss on a Non-Server Computer: With Windows XP and Windows 2000, you
should make sure your MainBoss database is stored on the server computer as opposed to
some other computer in the network. The reason is that Microsoft has deliberately designed
Windows XP and Windows 2000 to slow down performance when more than two users
attempt to access files on a non-server computer simultaneously. (This is Microsoft’s way
of encouraging you to buy more server licenses.) You can avoid this slowdown by putting
your MainBoss database on your server.
Obtaining MainBoss Support
When you purchase MainBoss, you receive 30 days of free support, including toll-free
phone calls and on-line support via the Internet. We also offer an Annual Support Plan that
provides ongoing phone and on-line support. Support Plan Subscribers also receive free
updates and one free upgrade per year containing enhancements and new features.
You can contact MainBoss Maintenance Software at:
Telephone:
1-800-563-0894 (English)
1-519-895-1860 (outside Canada and the U.S.)
Fax:
1-519-895-1864
Address:
MainBoss Maintenance Software
85 McIntyre Drive
Kitchener, ON N2R 1H6, Canada
E-mail: [email protected]
World Wide Web: http://www.mainboss.com
Support through the web site is available on the Services page. This page offers software
updates and the most up-to-date list of answers to frequently asked questions, plus a form
where you can request online support.

- 217 -
If you have suggestions for improvements to MainBoss, please e-mail us at: [email protected]
INDEX
@Requests, 21, 23
12 hour clock, 166
24 hour clock, 166
abbreviations, 185
Access, 209
access code, 17
adjusting work orders, 95
adjustment codes, 104
adjustments, 99, 112
physical count, 109
administration, 162
administration menu, 162, 200
archiving
archive, 180
clear, 183
restore, 181
database, 168
audit, 173
backup, 170, 206, 208
export XML, 189
reindex, 168, 209, 213
restore, 170, 208
preferences, 164
other, 165, 203
security
change password, 175
users, 176, 177
administrator, 162, 188, 197
advanced schedule, 210
annual support plan, 198
archive sets, 179
creating, 179
restoring, 180
archiver, 178
archiving, 162, 178, 179
clear, 183
ASP, 198
assigned units, 81
attachments, 56, 62, 157, 167
creating, 158
audit, 172
autocad, 207
available, 114
backing up, 169, 185, 186
bad character, 173
bad date, 173
browsers, 11, 141
searching, 144
users, 176
using, 141
buildings, 11
buttons, 1
by both, 210
categories
work, 19
chargebacks, 53
clear selection, 2
clearing fields, 147, 201
clone, 143, 149
closed purchase orders, 118
closing codes, 18
command line, 185
company information, 164
completed purchase orders, 117
contacts, 15, 22, 27, 201
contacts table, 15
contracted service history, 154
conventions, 1
cost centers, 57
ctrl+del, 201
current rate, 16
custom text, 168
customized reports, 155
cycle audit, 109

cyclical inventory, 109
database, 8
backing up, 169, 185, 186
restoring from backup, 170, 186
utilities, 162
database files, 8
date estimated, 64
date format, 164, 165
date/times, 146
dates, 146
dBase, 155
DBF, 155
dearchiving, 180
defective meter readings, 69
delete, 149
demonstration mode, 198
disposition, 95
double-clicking, 142, 149
downtime report, 154
drawing numbers, 59
drop-down lists, 1, 147
clearing, 201
unselecting, 201
editing MainBoss files, 209
editors, 11, 141
using, 145
effective date, 16
equipment, 5, 57
editing, 68
identification, 59
meters, 65
obsolete, 77
service contracts, 60
spare parts, 61
specifications, 62, 75
templates, 75
values, 63
equipment types, 57
Excel, 209
exiting MainBoss, 10
export, 155
exporting data, 155
extras, 23, 34
FAQ, 201
fax, 151
fields, 1
clearing, 201
first page, 153
FoxPro, 209
frequently asked questions, 201
full page, 153
full size, 153
general inventory, 13
generate frequency, 167
generating PM work orders, 94
help, 3
help menu, 3
about, 201, 203
index, 3
table of contents, 3
history, 154
identifier codes, 5
installation, 195
inventoried items, 7, 99
inventory
adjustments, 99, 112
cycle audit, 109
cyclical inventory, 109
deleting, 202
issues, 112
operations, 107
periodic, 109
perpetual, 109
price quotes, 112
purchasing and receiving, 117
status, 155
storerooms, 13, 101
taking inventory, 109
transfers, 112
valuations, 112
value, 155
where used, 155
inventory category, 99
inventory control, 99
inventory items
creating, 100, 101
editing, 101
inventoried, 7, 99
maintenance, 107
non-inventoried, 7, 99
properties, 102
status, 103
usage, 106
inventory menu
adjustments, 112
physical count, 111, 115, 202
browse items, 101, 108, 202
browse purchasing, 129
new purchase order, 121
reports
inventory status, 110
receiving, 191
re-order, 121
tables
adjustments, 112
categories, 100
issues, 112
payment terms, 117
shipping modes, 117
inventory status report, 155
inventory value report, 155
inventory where used report, 155
issue codes, 104, 112
issued purchase orders, 118
issues, 112
issues report, 155
items, 7
creating, 100
inventoried, 7, 99
non-inventoried, 7, 99
keyboard keys, 1
keyboard shortcuts, 146, 147
labor history, 154
languages, 187
last page, 153
license keys, 162, 188
link
lost, 173
login, 9, 162, 177
lost link, 173
MainBoss @Requests, 21, 23
maintenance status, 154
maintenance units, 6
manpower schedule, 154
manpower scheduling, 82
materials, 7
menus, 1
administration, 162
help, 3
session, 9
units, 55
meter offsets, 70
meter readings, 69
meters, 55, 65, 68
defective readings, 69
meter offsets, 70
readings, 69
scheduling PMs, 89
mouse, 1
MZH, 170
nameplate information, recording, 72
network installation, 196
new password again, 175
new rate, 16
next page, 153
non-inventoried items, 7, 99
not scheduled, 210
obsolete, 64
obsolete codes, 56
obsolete equipment, 77, 207
reactivating, 78
obsolete equipment table, 77
offsets
meters, 70
on hand, 113

on order, 113
on order report, 154
on reserve, 34, 113
on-line support, 216
open request, 21
option buttons, 147
original cost, 64
orphan record, 173
overdue work orders, 154, 191
password, 162, 175, 203
administrator, 197
changing, 174
payment terms, 117
performance
slow, 214
periodic inventory, 109
perpetual inventory, 109
personnel, 15
personnel table, 15
physical counts, 104, 109, 155
preferences, 162, 164
custom text, 168
date/time, 164
preventive maintenance, 81, 167, 207
adjusting work orders, 95
closing work orders, 98
creating tasks, 84
generating work orders, 94
printing work orders, 97
prototype purchase orders, 139
scheduling, 82, 203
scheduling units, 86
steps, 82
task schedules, 88
tasks, 82
preventive work order, 82
preview, 153
generated work orders, 94
previous page, 153
price quotes, 112
printing, 144
printing tasks, 86, 207
priorities, 17
projects, 18
prototype purchase orders, 86, 139
purchase date, 64
purchase history, 154
purchase orders, 8, 23, 32, 38
closed, 118
closing, 138
completed, 117
creating, 121
extras, 127
history, 191
issued, 118
issuing, 131
items, 123
modifying, 129
order, 122
printing, 130
prototype, 86
prototypes, 139
quick receive, 135
receipts, 132
purchasing, 117
quick actuals, 51
quick receive, 135
quitting MainBoss, 10
receipts, 132
adding items, 136
quick receive, 135
receiving, 117
quick receive, 135
receiving report, 154
regional settings, 187
registration, 197
reindex, 168
re-order report, 120, 154
repair closing codes, 18
replacement cost, 64
replacement schedule, 154
reports, 7, 151
contracted service history, 154
customized, 155
downtime, 154
emailing, 205
inventory status, 155
inventory value, 155
inventory where used, 155
issues, 155
labor history, 154
maintenance status, 154
manpower schedule, 154
on order, 154
overdue work orders, 154, 191
previewing, 153
printing, 201
purchase history, 154
receiving, 154
re-order, 120, 154
replacement schedule, 154
spare parts, 154
stock activity, 154
units, 154
work order history, 154
work order statistics, 154
request history, 191
requestors, 201
requests menu
browse requests, 24
open request, 21
Requests menu, 191
reserve materials, 34
restoring from archives, 180
restoring from backup, 170, 186
sample databases, 200
saving settings, 163
schedule basis, 88
schedule classes, 210
schedules, 81
scheduling preventive maintenance, 82
searching for records, 144
security, 162, 174
activation, 177
change password, 174
deactivation, 177
users, 175
select for printing, 49
service company, 60
service contracts, 78
service desk, 187, 193, 199
session menu
exit, 10
login, 162, 163, 200
select archive, 181
select main database, 183
sessions, 9
setup, 195
shipping mode, 117
slow performance, 214
space types, 57
spaces, 5
spaces table, 68
spare parts, 78
report, 154
specifications, 55, 62, 72
creating, 74
using, 75
statistics, 154
stock activity, 154
stock available, 114
storerooms, 13, 101
support, 216
systems, 5, 56
table
trades, 17
tables, 5, 11
contacts, 15, 22
equipment, 57
obsolete equipment, 77
personnel, 15
required, 203
spaces, 68
templates, 72
vendor types, 14
tables menu
buildings, 11
contacts, 15, 201
storerooms, 13
vendor types, 15
vendors, 14

viewing programs, 158
task headings, 210
tasks, 81, 82
creating, 84
printing, 86, 192, 207
schedules, 88
telephone prefix, 167
templates, 72
creating, 74
using, 75
templates table, 72
text fields, 146
time format, 164
times, 146
tooltip, 192
trades, 17
transfers, 112
troubleshooting, 211
units, 6, 27, 55
scheduling, 86
units menu, 55
browse meters, 69, 71
equipment, 57, 68, 208
obsolete, 77, 78
reports
downtime, 154
inventory status, 155
inventory value, 155
inventory where used, 155
issues, 155
maintenance status, 154
on order, 154
purchase history, 154
receiving, 154
re-order, 154
replacement schedule, 154
spare parts, 154
stock activity, 154
units, 154
service contracts, 61, 79
spaces, 68
tables
cost centers, 57
equipment types, 57
space types, 57
templates, 74
units of measurement, 7
units report, 154
unlicensed database, 212
upgrading hardware, 208
user name, 175
users, 175
utilities, 168
reindex, 168
valuations, 112
vendor types, 14
vendors, 14
version, 201
viewing programs, 157, 167
Volo View, 207
waiting work request, 192
warranty expiry, 60
waybills, 117, 132
web address, 14
web page, 14
where used, 155
work categories, 19
work order history, 154
work order statistics, 154
work orders, 6, 20, 78
adjusting, 95
browse work orders, 182
cancelling, 44
chargebacks, 53
closing, 20, 49, 98
description, 28
labor, 30
materials, 34
modifying, 43
overdue, 154, 191
personnel, 30
preventive, 82
printing, 45, 97
properties, 29
quick actuals, 51
saving, 43
schedules, 95
units, 27
work orders menu
browse tasks, 84, 207
browse work orders, 43, 44
generate work orders, 94, 203
open work order, 24
print, 47, 49, 97
reports
contracted service history, 154
history, 154
labor history, 154
manpower schedule, 96, 154
overdue, 154
statistics, 154
tables
access codes, 17
personnel, 15
priorities, 17
projects, 18
repair closing codes, 18
trades, 17
work category, 19
work request history, 191
work requests, 6, 20
notification, 184
waiting, 192
work start, 29
WRNotifier, 184
![Motor controller CMMS-AS/CMMS-ST/CMMD-AS · 2020. 3. 11. · Description Fuctionsand commissioning Firmware-Version from1.4.0.x.6 8040107 1404NH [8034520] Motor controller CMMS-AS/CMMS-ST/CMMD-AS](https://img.pdfslide.us/doc/110x75/6104fac614512e5e1a70cd3d/motor-controller-cmms-ascmms-stcmmd-as-2020-3-11-description-fuctionsand.jpg)