Embed Size (px)
Citation preview
WISCONSIN DEPARTMENT OF
HEALTH SERVICES
DIVISION OF LONG TERM CARE
Licensed Bed Assessment e-Payment (LBAP)
User Guide
Last updated on 4/11/2013
[1]
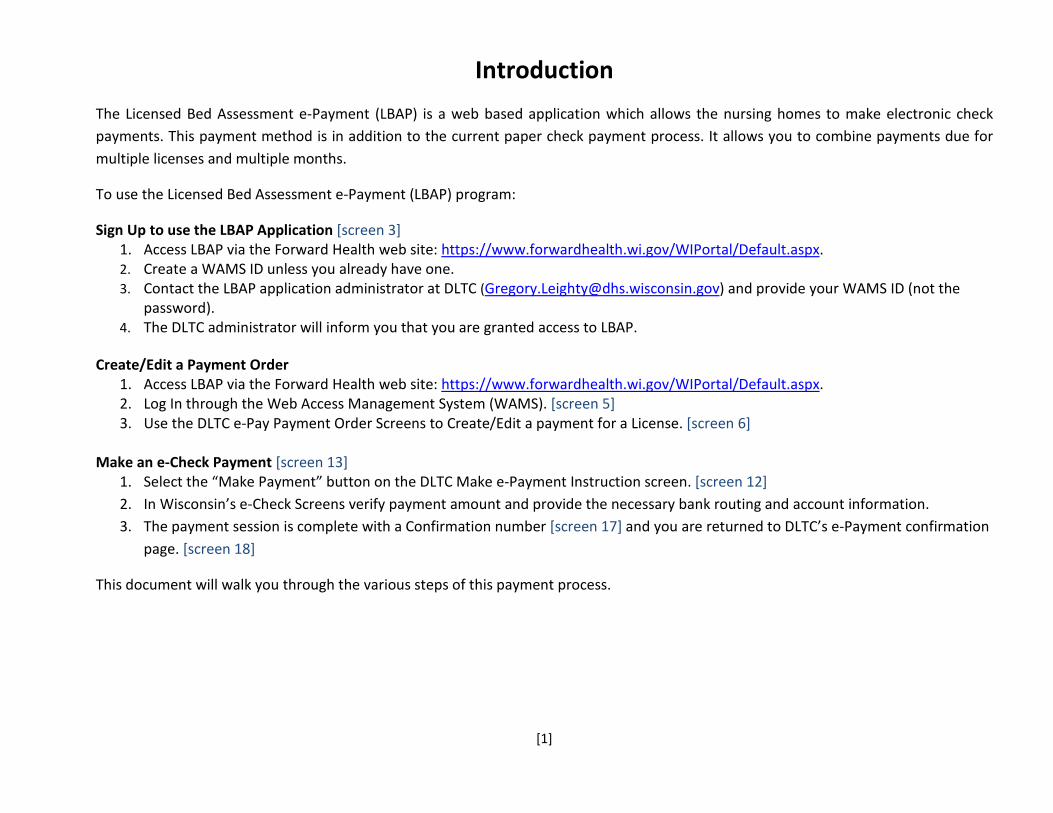
Introduction The Licensed Bed Assessment e-Payment (LBAP) is a web based application which allows the nursing homes to make electronic check payments. This payment method is in addition to the current paper check payment process. It allows you to combine payments due for multiple licenses and multiple months.
To use the Licensed Bed Assessment e-Payment (LBAP) program:
Sign Up to use the LBAP Application [screen 3] 1. Access LBAP via the Forward Health web site: https://www.forwardhealth.wi.gov/WIPortal/Default.aspx. 2. Create a WAMS ID unless you already have one. 3. Contact the LBAP application administrator at DLTC ([email protected]) and provide your WAMS ID (not the
password). 4. The DLTC administrator will inform you that you are granted access to LBAP.
Create/Edit a Payment Order
1. Access LBAP via the Forward Health web site: https://www.forwardhealth.wi.gov/WIPortal/Default.aspx. 2. Log In through the Web Access Management System (WAMS). [screen 5] 3. Use the DLTC e-Pay Payment Order Screens to Create/Edit a payment for a License. [screen 6]
Make an e-Check Payment [screen 13]
1. Select the “Make Payment” button on the DLTC Make e-Payment Instruction screen. [screen 12] 2. In Wisconsin’s e-Check Screens verify payment amount and provide the necessary bank routing and account information. 3. The payment session is complete with a Confirmation number [screen 17] and you are returned to DLTC’s e-Payment confirmation
page. [screen 18]
This document will walk you through the various steps of this payment process.
[2]
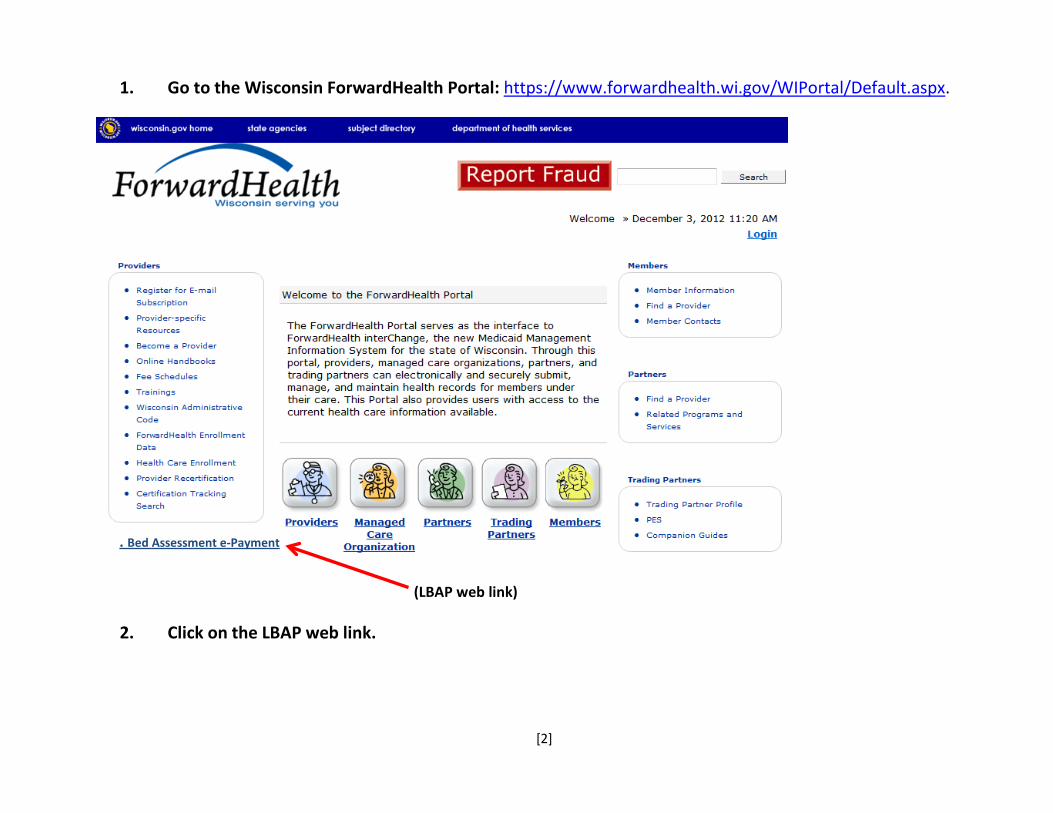
1. Go to the Wisconsin ForwardHealth Portal: https://www.forwardhealth.wi.gov/WIPortal/Default.aspx.
2. Click on the LBAP web link.
. Bed Assessment e-Payment
(LBAP web link)
[3]
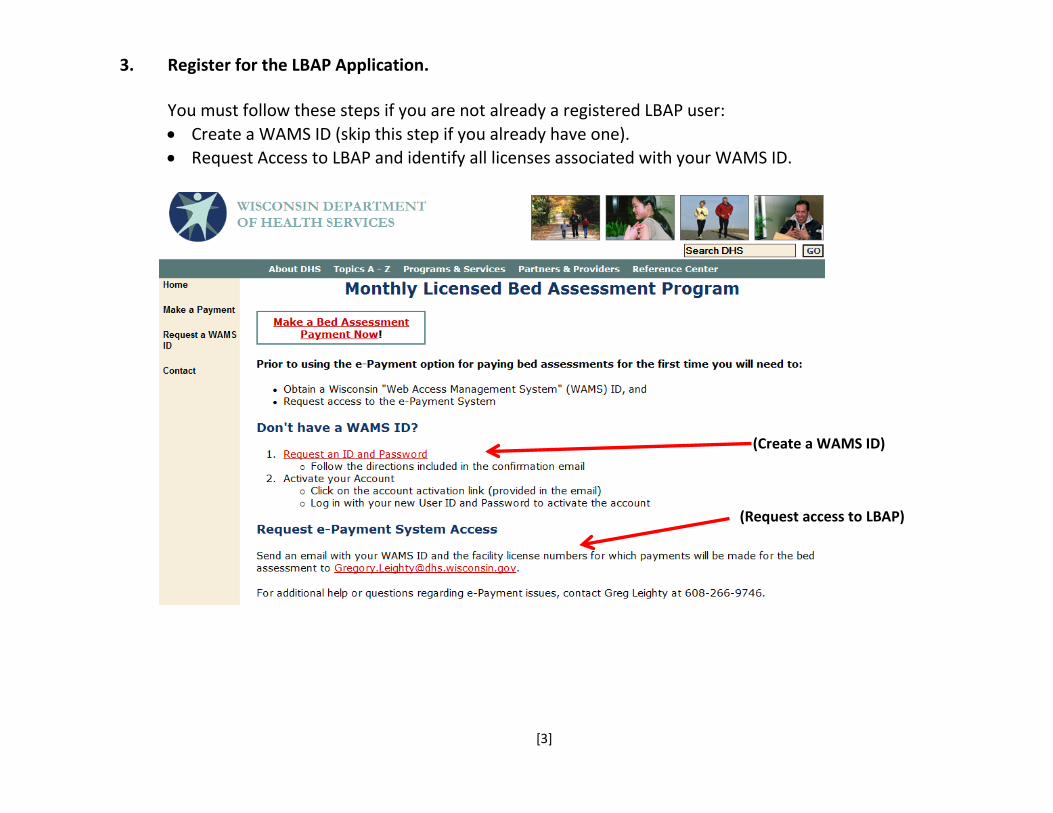
3. Register for the LBAP Application.
You must follow these steps if you are not already a registered LBAP user: • Create a WAMS ID (skip this step if you already have one). • Request Access to LBAP and identify all licenses associated with your WAMS ID.
(Request access to LBAP)
(Create a WAMS ID)
[4]
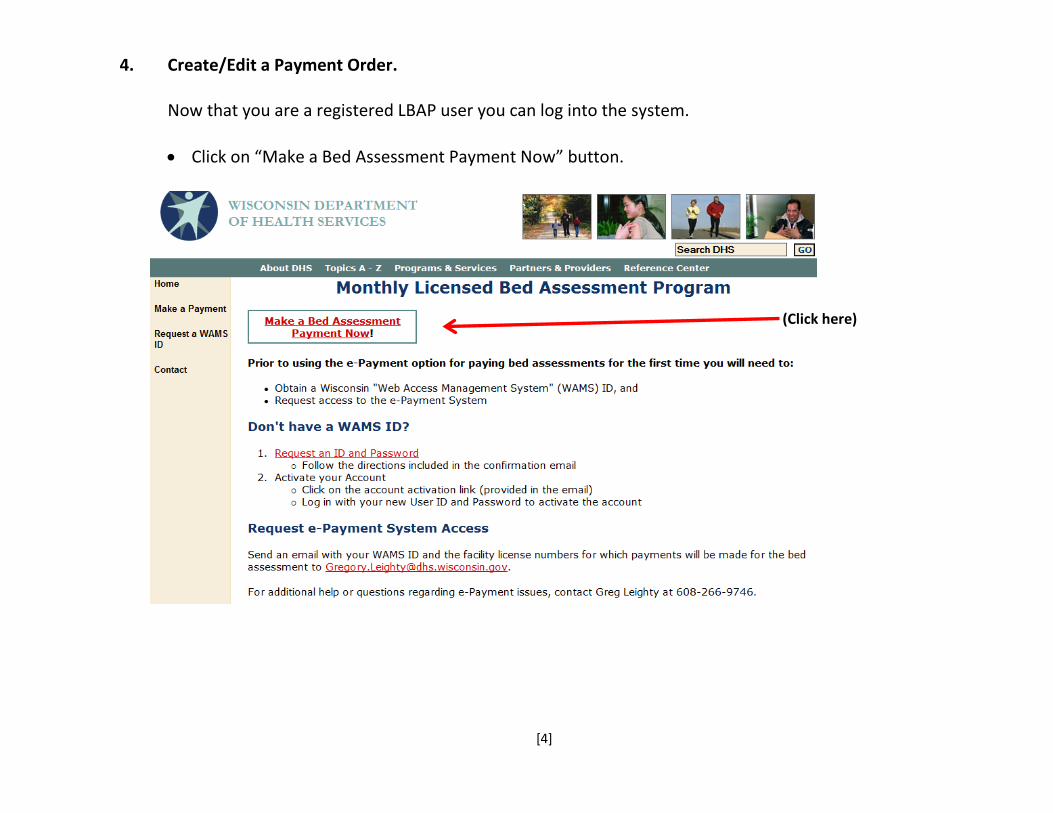
4. Create/Edit a Payment Order.
Now that you are a registered LBAP user you can log into the system.
• Click on “Make a Bed Assessment Payment Now” button.
(Click here)
[5]
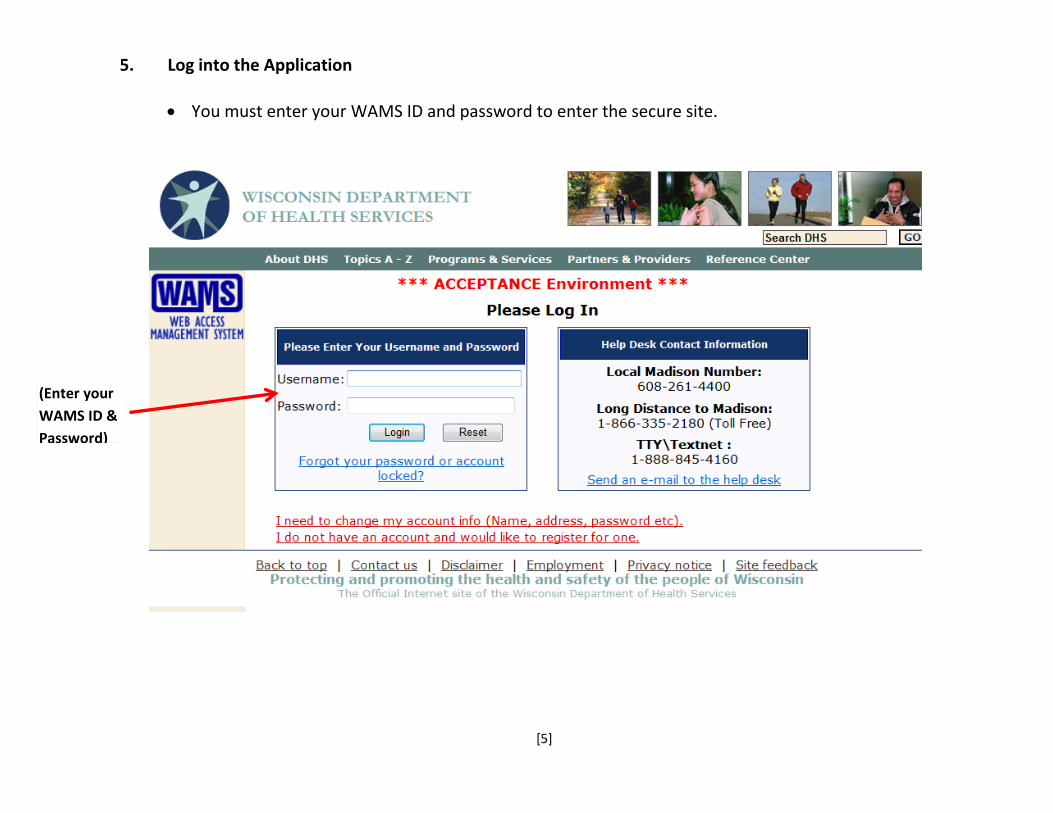
5. Log into the Application • You must enter your WAMS ID and password to enter the secure site.
(Enter your WAMS ID & Password)

[6]
6. Begin an e-Payment Order session.
You are now into the 1st LBAP application page.
• Click on “Pay for Facility License” to add or edit a payment for each registered licenses under your WAMS ID.
(Click here)

[7]
7. Create a single payment order for any number of licenses and invoice periods.
• For each license, click on “Add/Edit payments” to edit the payments associated with the license.
(Click here)
[8]
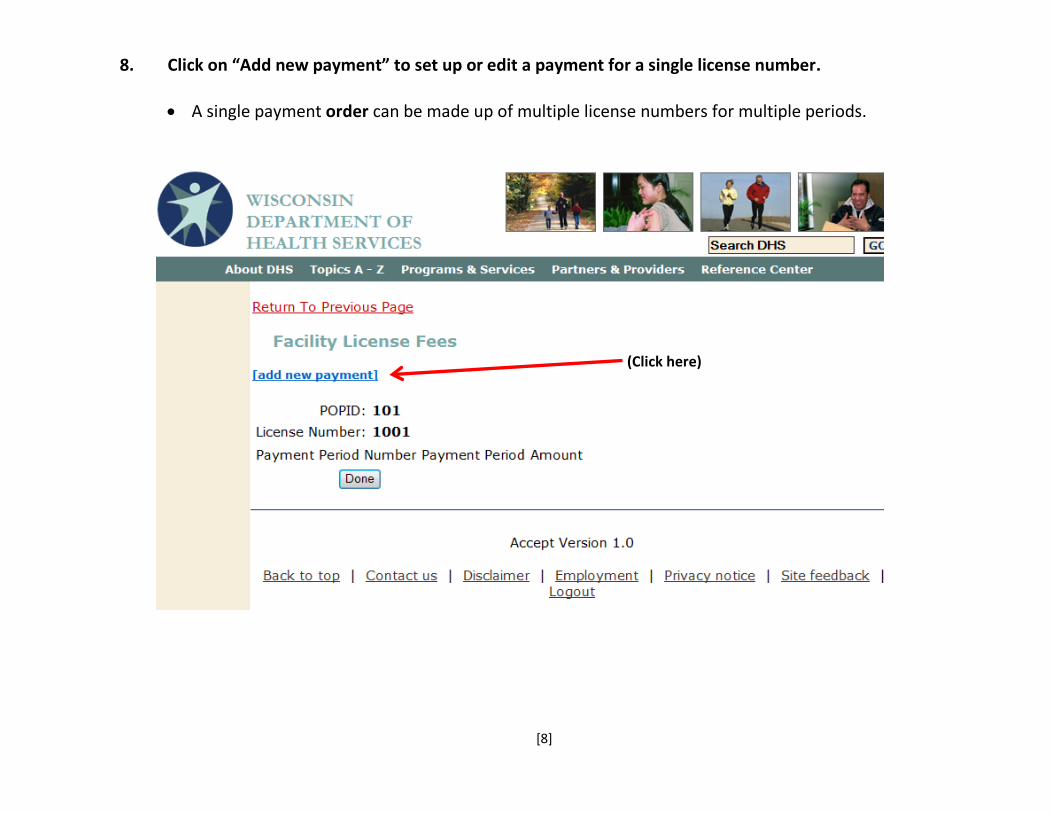
8. Click on “Add new payment” to set up or edit a payment for a single license number.
• A single payment order can be made up of multiple license numbers for multiple periods.
(Click here)
[9]
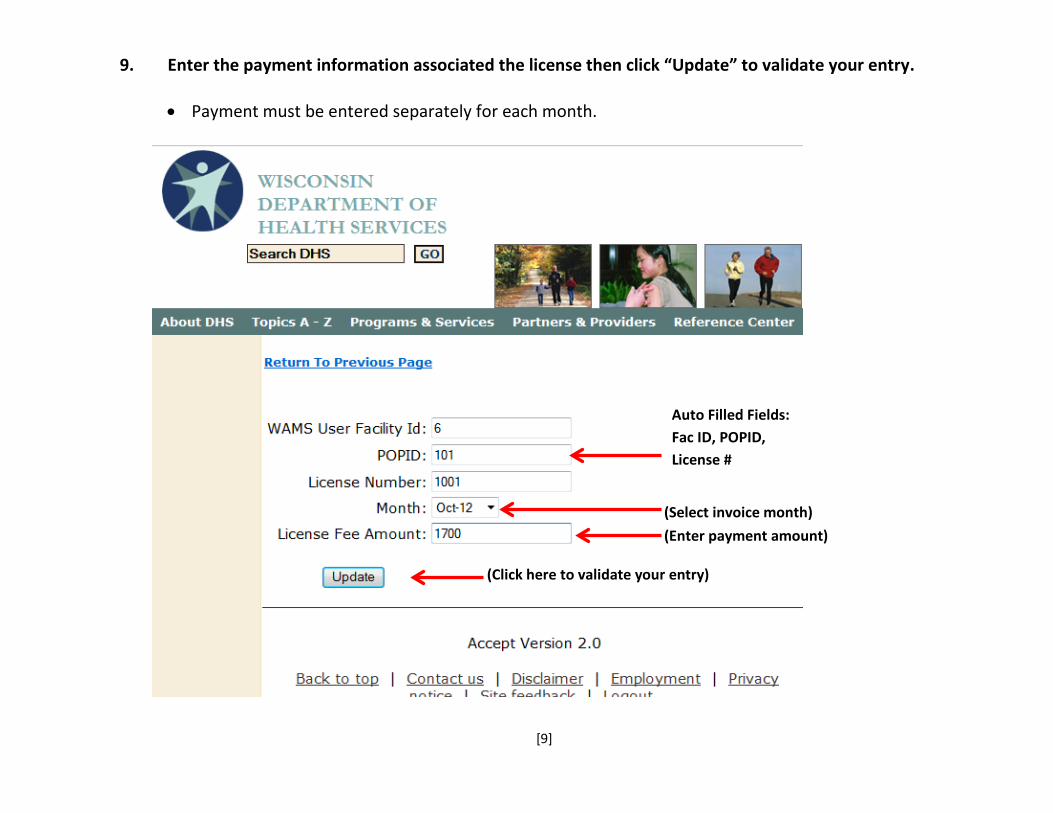
9. Enter the payment information associated the license then click “Update” to validate your entry.
• Payment must be entered separately for each month.
(Click here to validate your entry)
Auto Filled Fields: Fac ID, POPID, License #
(Select invoice month) (Enter payment amount)
[10]
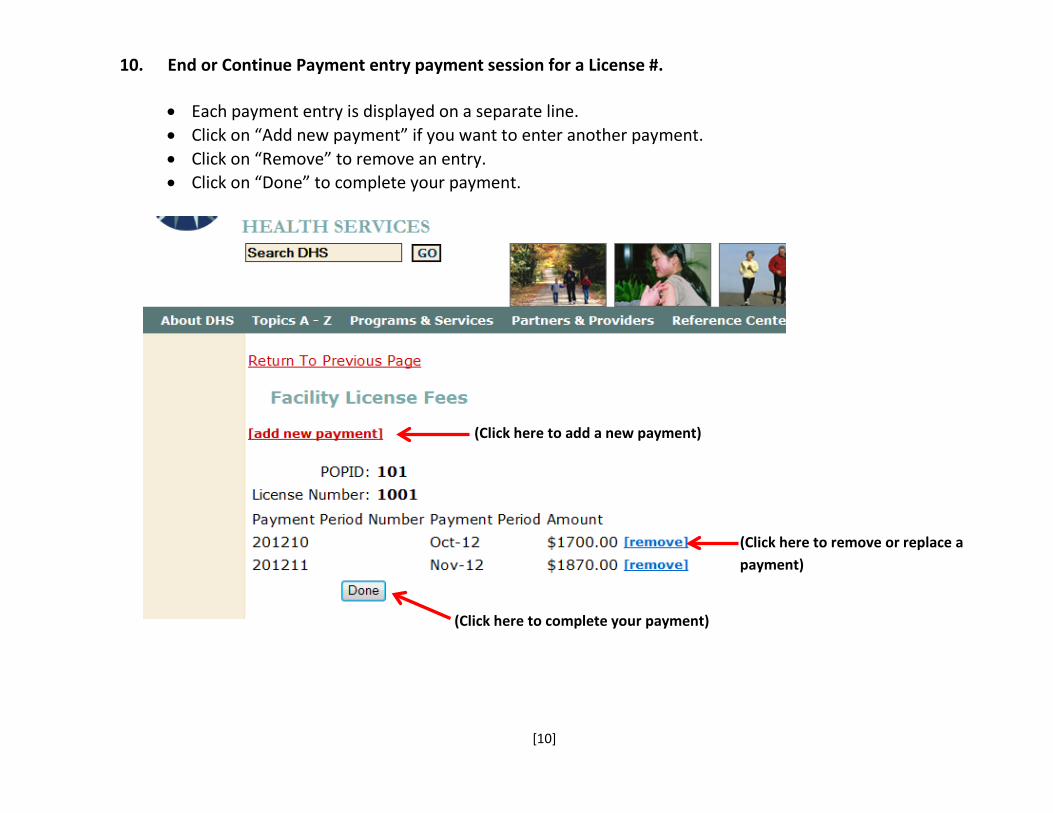
10. End or Continue Payment entry payment session for a License #.
• Each payment entry is displayed on a separate line. • Click on “Add new payment” if you want to enter another payment. • Click on “Remove” to remove an entry. • Click on “Done” to complete your payment.
(Click here to complete your payment)
(Click here to remove or replace a payment)
(Click here to add a new payment)
[11]
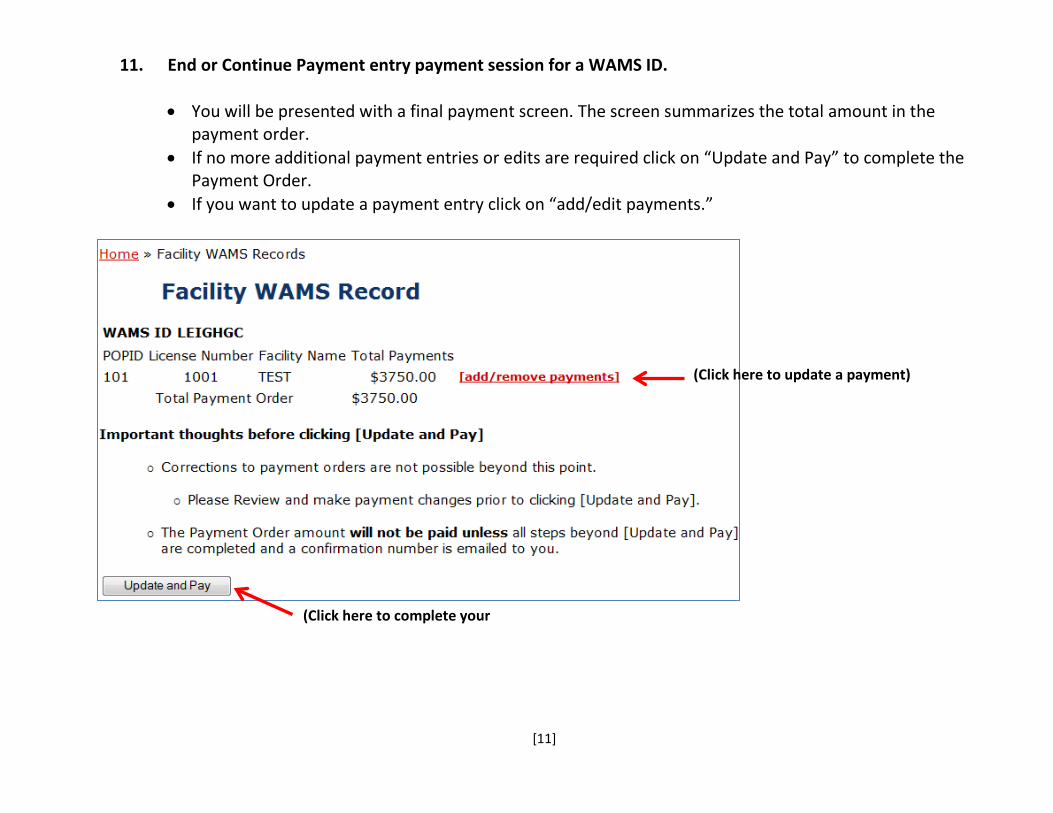
11. End or Continue Payment entry payment session for a WAMS ID.
• You will be presented with a final payment screen. The screen summarizes the total amount in the payment order.
• If no more additional payment entries or edits are required click on “Update and Pay” to complete the Payment Order.
• If you want to update a payment entry click on “add/edit payments.”
(Click here to complete your
(Click here to update a payment)
[12]
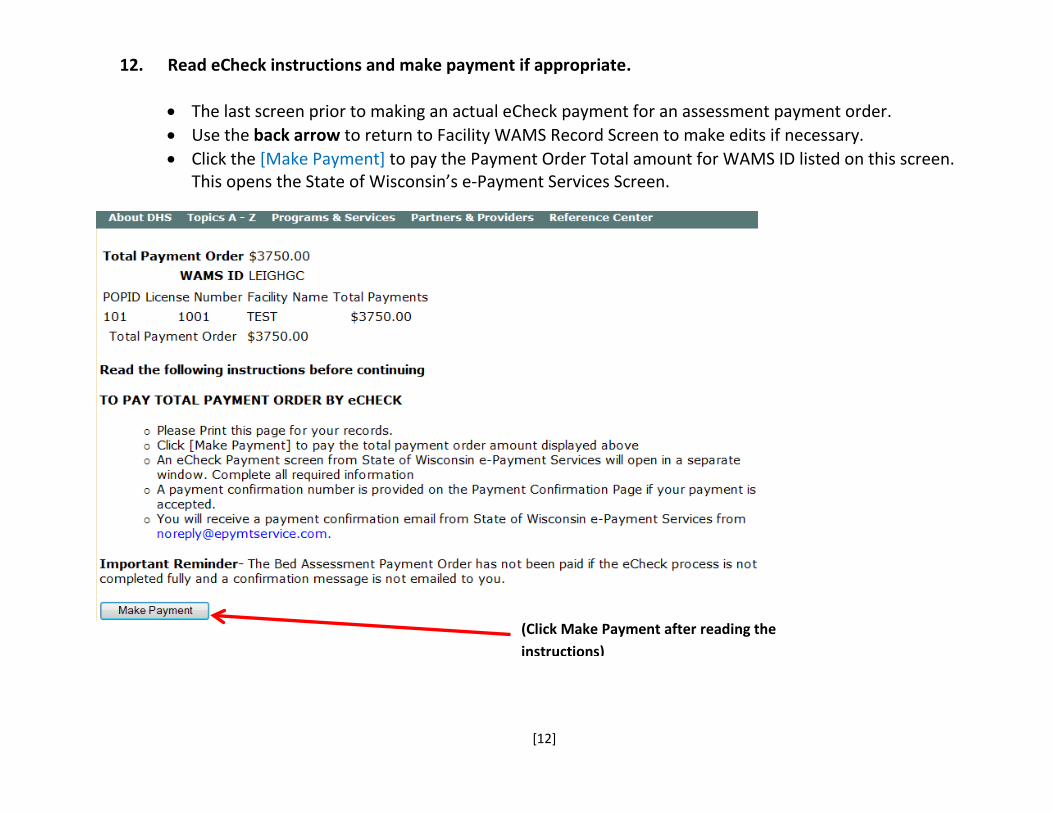
12. Read eCheck instructions and make payment if appropriate.
• The last screen prior to making an actual eCheck payment for an assessment payment order. • Use the back arrow to return to Facility WAMS Record Screen to make edits if necessary. • Click the [Make Payment] to pay the Payment Order Total amount for WAMS ID listed on this screen.
This opens the State of Wisconsin’s e-Payment Services Screen.
(Click Make Payment after reading the instructions)
[13]
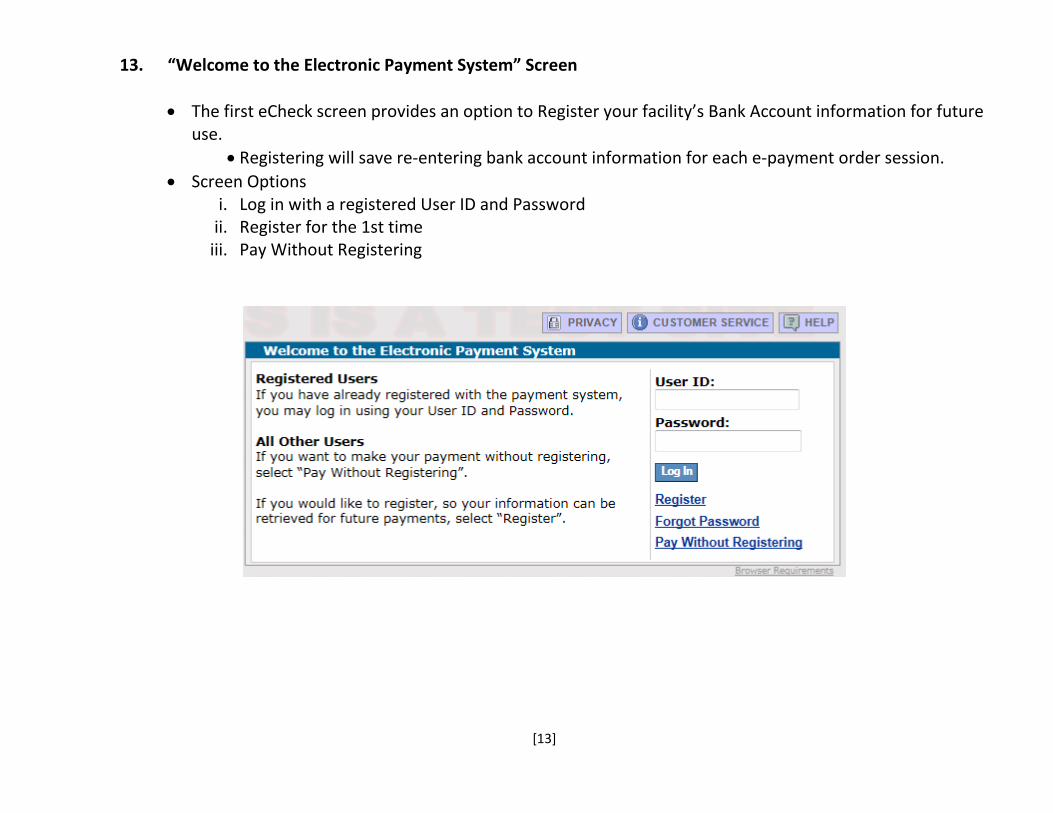
13. “Welcome to the Electronic Payment System” Screen
• The first eCheck screen provides an option to Register your facility’s Bank Account information for future use.
• Registering will save re-entering bank account information for each e-payment order session. • Screen Options
i. Log in with a registered User ID and Password ii. Register for the 1st time
iii. Pay Without Registering
[14]
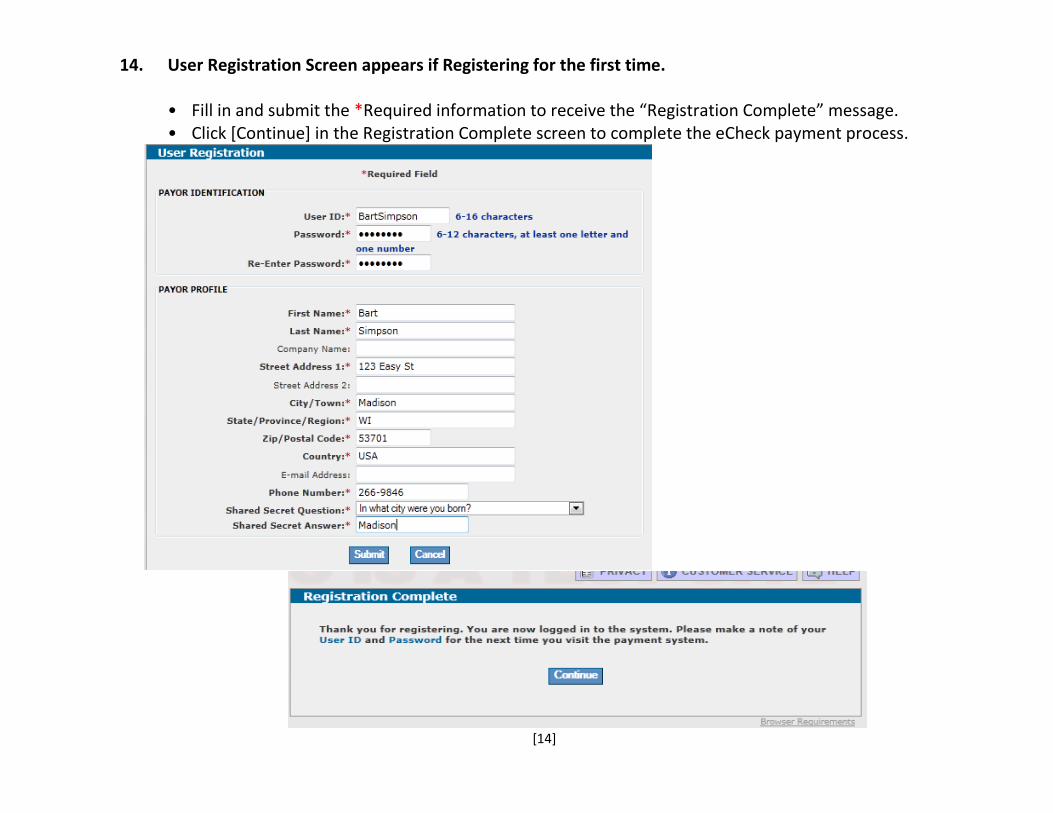
14. User Registration Screen appears if Registering for the first time.
• Fill in and submit the *Required information to receive the “Registration Complete” message. • Click [Continue] in the Registration Complete screen to complete the eCheck payment process.
[15]
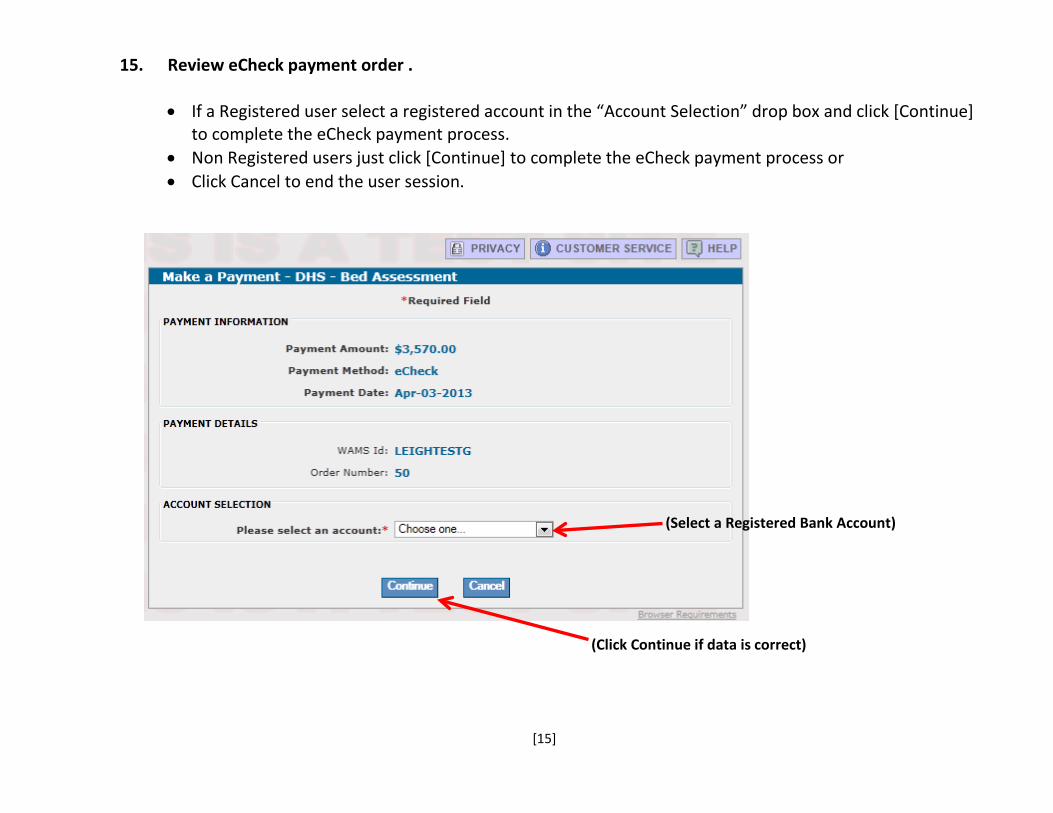
15. Review eCheck payment order .
• If a Registered user select a registered account in the “Account Selection” drop box and click [Continue] to complete the eCheck payment process.
• Non Registered users just click [Continue] to complete the eCheck payment process or • Click Cancel to end the user session.
(Click Continue if data is correct)
(Select a Registered Bank Account)
[16]
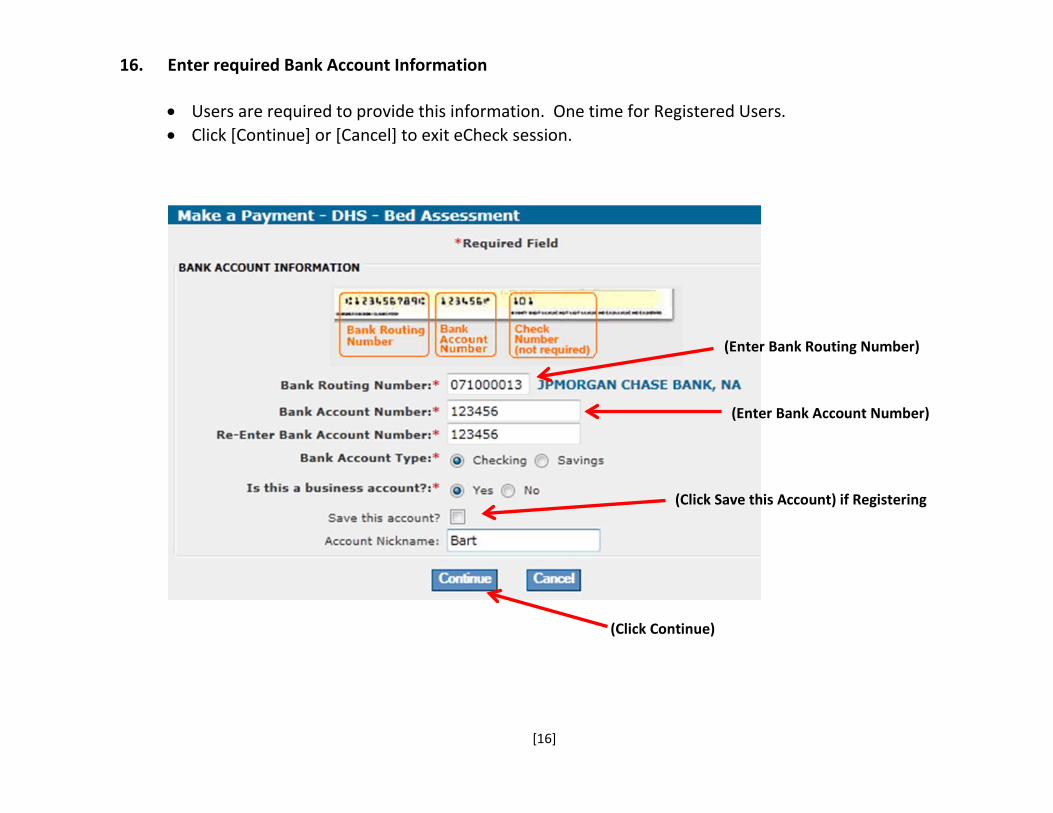
16. Enter required Bank Account Information
• Users are required to provide this information. One time for Registered Users. • Click [Continue] or [Cancel] to exit eCheck session.
(Enter Bank Routing Number)
(Enter Bank Account Number)
(Click Continue)
(Click Save this Account) if Registering
[17]
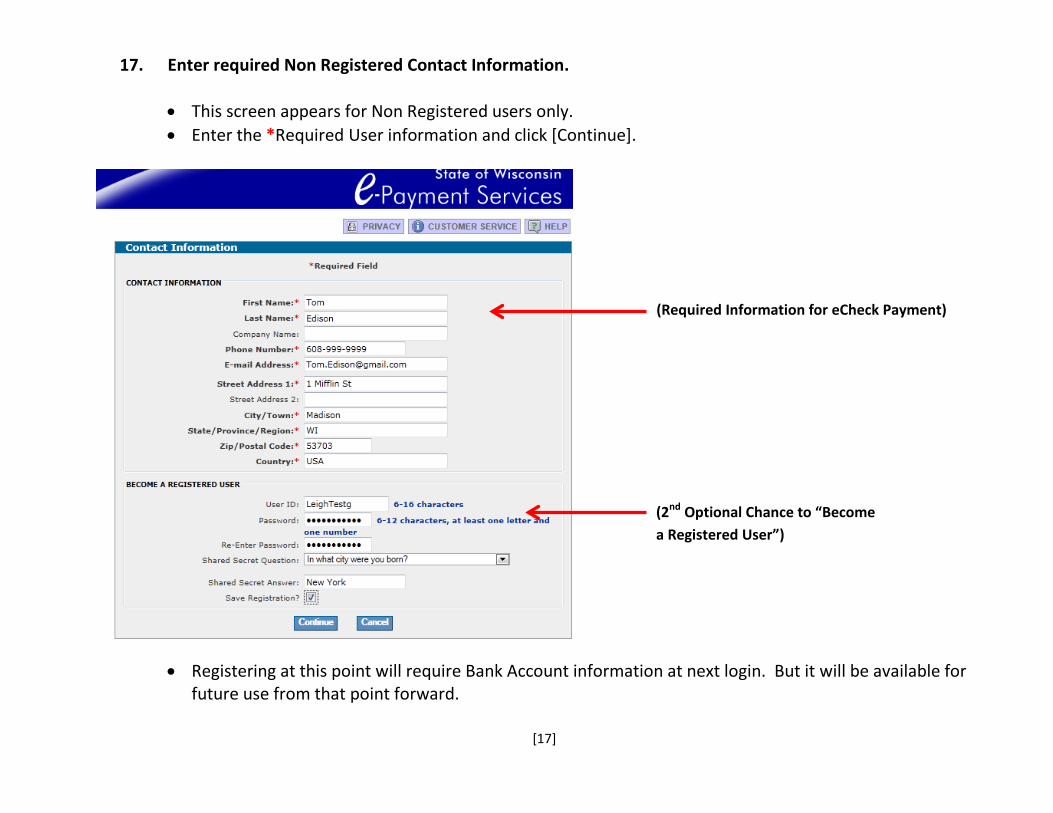
17. Enter required Non Registered Contact Information.
• This screen appears for Non Registered users only. • Enter the *Required User information and click [Continue].
• Registering at this point will require Bank Account information at next login. But it will be available for future use from that point forward.
(2nd Optional Chance to “Become a Registered User”)
(Required Information for eCheck Payment)
[18]
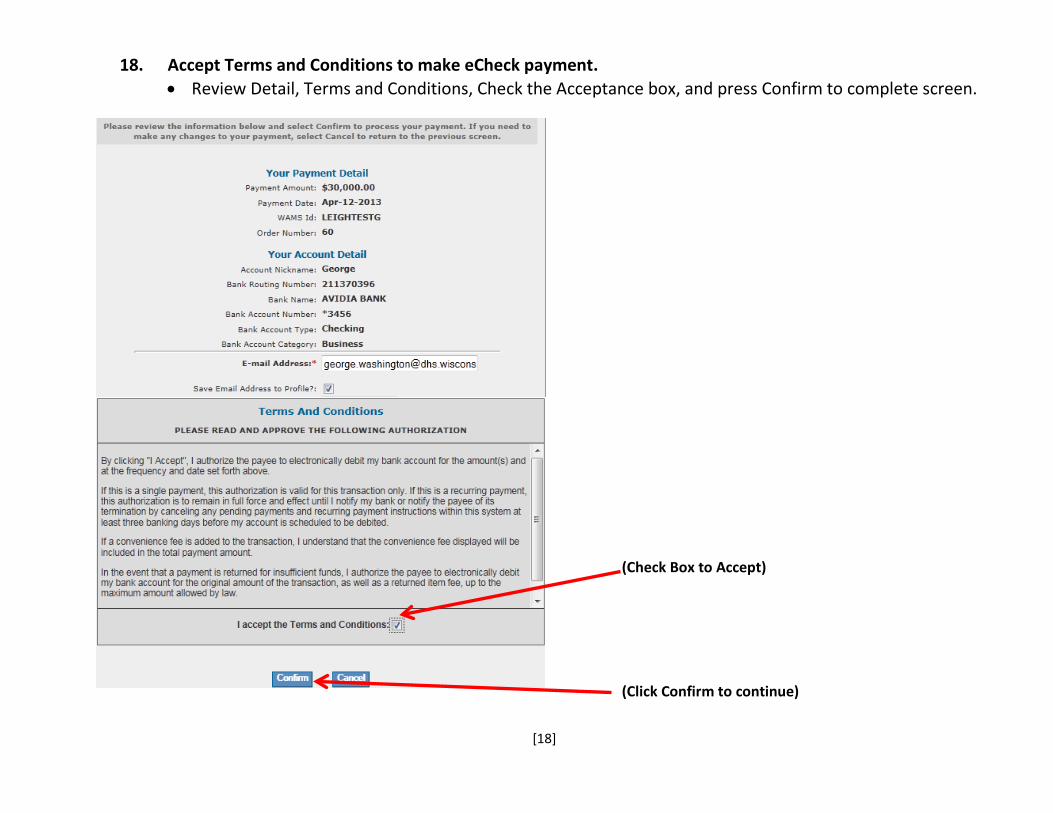
18. Accept Terms and Conditions to make eCheck payment. • Review Detail, Terms and Conditions, Check the Acceptance box, and press Confirm to complete screen.
(Check Box to Accept)
(Click Confirm to continue)
[19]
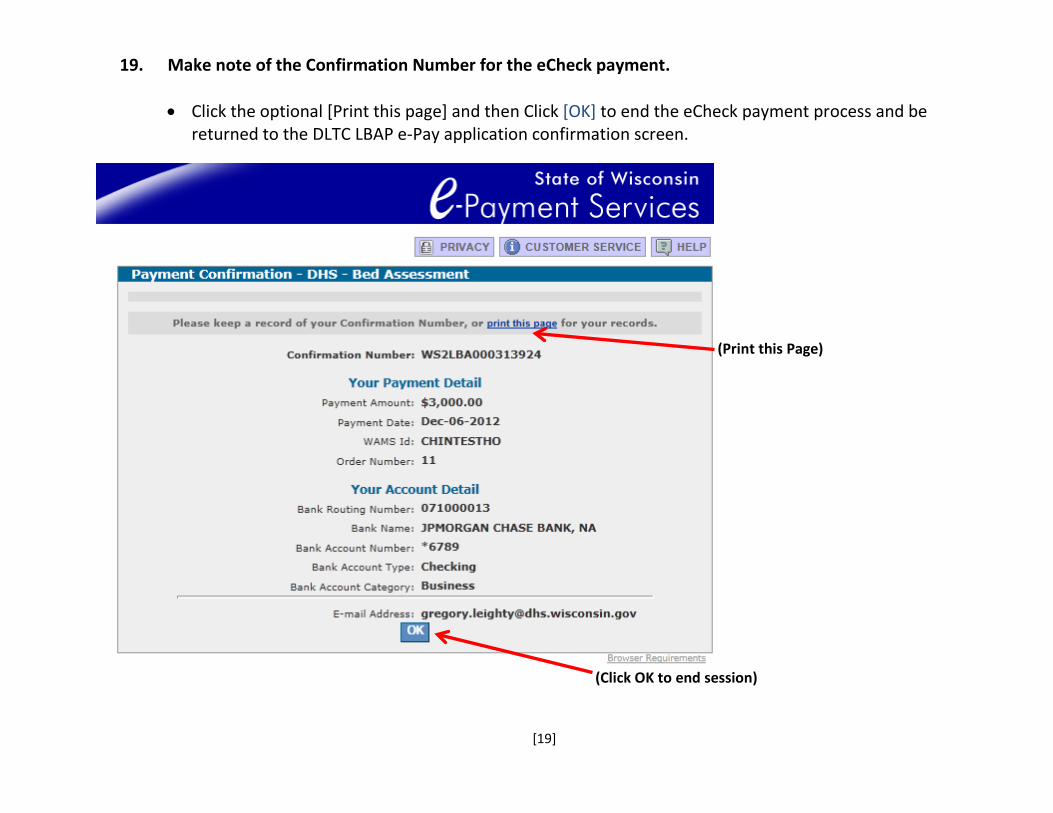
19. Make note of the Confirmation Number for the eCheck payment.
• Click the optional [Print this page] and then Click [OK] to end the eCheck payment process and be returned to the DLTC LBAP e-Pay application confirmation screen.
(Click OK to end session)
(Print this Page)
[20]
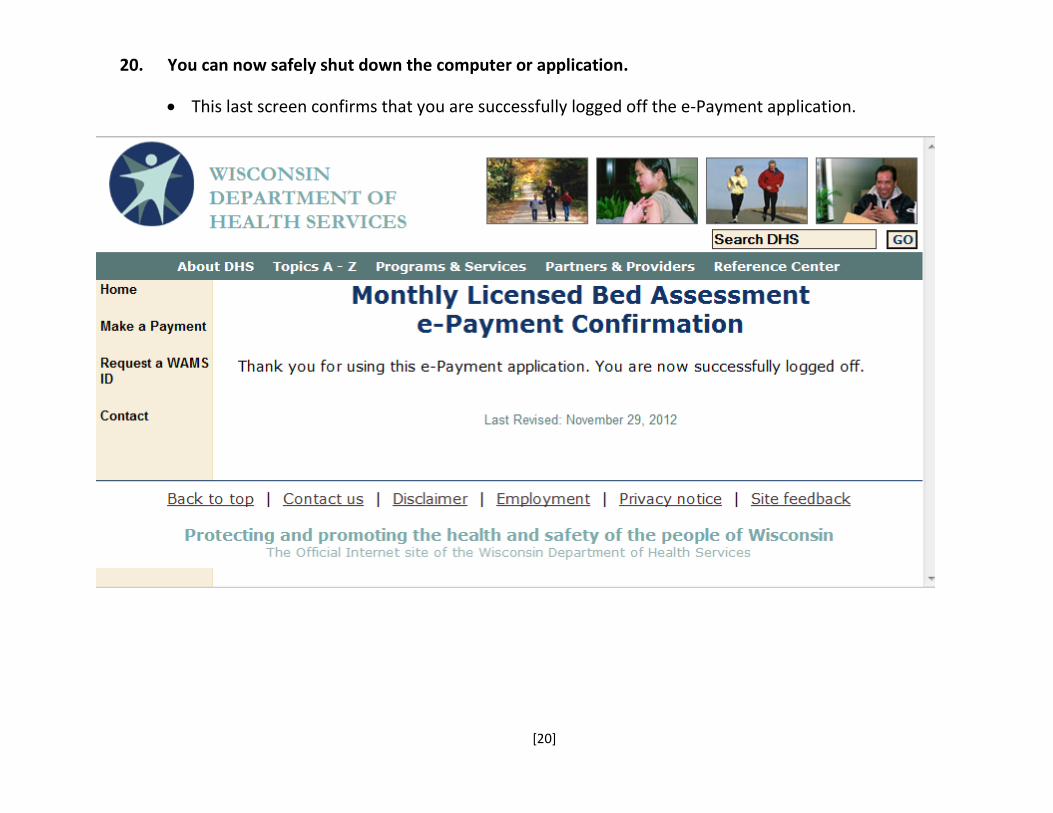
20. You can now safely shut down the computer or application.
• This last screen confirms that you are successfully logged off the e-Payment application.