Embed Size (px)
Citation preview

General Navigation
An overview of how to navigate through ecomdash

This is the left navigation screen. It is your gateway to all the modules that you will be using while running your business in ecomdash. This guide is always available on the left-hand side of ecomdash. You will always be able to easily jump between the modules using this navigation.
The down-facing arrow means that there are additional sections within each module. Every module (besides the Dashboard) has multiple screens to navigate through.
Left Navigation

The Action dropdown menu is always present while using ecomdash.
This dropdown provides quick links to regular tasks you will perform inside of ecomdash.
The right-hand side of the top navigation will state your name and a link to logout of the application.
Click the Contact Us button in the middle of the screen to send us an email about production issues, enhancement requests, questions, and anything else that we could assist you with.
Top Navigation Bar

The Dashboard
The Dashboard icon is the only tab in the left navigation screen that doesn’t have a dropdown arrow associated with it.
The dashboard is where you go to get the latest sales and inventory information that ecomdash has pulled from your marketplaces. It’s also where you can view account information and graphs that map out the health of your business over the past 12 months.
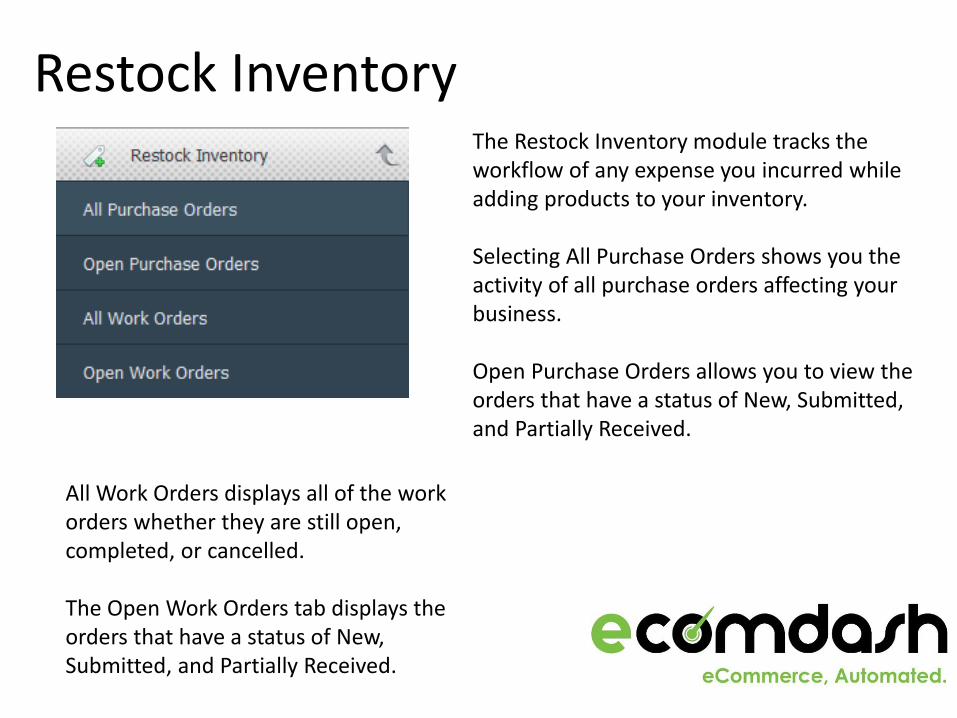
The Restock Inventory module tracks the workflow of any expense you incurred while adding products to your inventory.
Selecting All Purchase Orders shows you the activity of all purchase orders affecting your business.
Open Purchase Orders allows you to view the orders that have a status of New, Submitted, and Partially Received.
Restock Inventory
All Work Orders displays all of the work orders whether they are still open, completed, or cancelled.
The Open Work Orders tab displays the orders that have a status of New, Submitted, and Partially Received.

The Inventory module allows you to manage your inventory and view items that are in low inventory.
Inventory Management displays all of your products, kits, and built products.
The Low Inventory section lets you see any product that is currently low in inventory based on what is set as the reorder level. These are the products you may want to reorder by creating a purchase order directly from the Low Inventory section.
Inventory

The List for Sale module allows access to the listing tool ecomlister.
The Active Listings section is where you manage the live listings you currently have in the system.
The Unlisted Products section allows you to view the products that are not listed on your sales channels.
The Queued Listings section shows the products that have not been listed, but are ready to list or require edits before the listing can be sent to the sales channel.
List for Sale

Once ecomdash imports your sales orders from your online storefronts or you manually create a new sales order, you will be able to work the order using the Sales Order module.
The All Sales Orders section is the combined list of all of your sales orders regardless of its status.
The Awaiting Payment Orders section is only for the orders that have yet to be paid.
The Paid-Ready to Ship section is for orders that have been paid, but have not yet had a shipping order attached to them.
Sales Orders

The Shipping Orders module is for when you have completed your sales order. You can generate a shipping order to track the delivery of the product from your store to the customer’s hands.
All Shipping Orders is where you can see the status of all of your shipping orders regardless of where they are in the shipping process.
Unshipped Orders is where you can view and handle all sales orders that have yet to be shipped.
Dropship Management is designed to handle sales orders when your suppliers take care of the fulfillment process. You will be able to upload a file with tracking information back into ecomdash from this view.
Shipping Orders

The Support module allows you to look across your company’s history through many of the other modules in ecomdash.
Ecomdash permanently archives everything you do in the system. Because of this you are able to get the entire history of the selected topics in the Support module.
The search function allows you to search for a specific ecomdash order #,marketplace order #, or by customer name to find a specific order in ecomdash.
The reports section will show you numbers and trends for a variety of topics and over a time period of your choosing.
Support

The Administration module is where you go to set up your company on ecomdash.
Add your company details such as name, logo, contact information, and location.
Adjust settings for Inventory, Sales Orders, Shipping, and Email in the Settings section.
E-mail Templates is where you go to create the templates for the optional automated e-mails ecomdash offers.
Employees lets you add employee names, e-mail addresses, and define access to the modules in ecomdash.
Suppliers allows you add or edit the suppliers of the products you sell.
Storefronts lets you add a new online or physical storefront to sell your products on.
Shippers allows you to add or edit your shippers in ecomdash.
Warehouses allows you to manage the locations where your products are stored.
Inventory Import/Export Formulas lets you define formats you will use to import/export inventory .csv files.
Administration
List Screens
What options can I find on a typical screen within ecomdash?

Above is an example of a typical list-screen page that you’ll find in ecomdash. Within these screens there are a variety of actions you can complete that are universal from page to page. These are:
Sortable Columns: Each column has a little up and a little down arrow. You sort each column by clicking on these arrows.
Quick Search: In the upper right-hand corner is a search function. Ecomdash permanently archives all of your transactions, so you can search for something from the moment you signed up until today.
Quick Actions: A lot of the pages will have quick actions that you can take without having to go to a separate page. This page, for instance, has a little box for you to directly create a shipping order, and a red X for you to cancel the project. There is also a pencil in the order # column for when you want to manually change an order number. These same icons may appear on other pages as well.
See More Items Per List: The Show tab in the upper left-hand corner gives you the option of showing a specified number of orders on screen at a given time. The default is 10 items, but you can show up to 100.
Multiple Pages: Sometimes you will need multiple pages to show all of your inventory. This page list will always be on the lower right-hand side.

Detail Screens
What additional information can I enter for each of my entries?

Each item on a list screen has the ability to be clicked on to obtain more detailed information. Each of these detail screens look a little different, but have the same basic functions:
Title Bar: The title bar at the top of the screen will show you the order number and some helpful information about that order’s status within the system.
Tabs: Detail screens will have a default “details” page that they will go to, but oftentimes there will be additional tabs that provide even more specified details. These will appear in the upper right-hand side of the title bar.
Required Fields: Not every field that is shown needs to be filled out, but there are some that are required. Required fields will have a red dot to the right of them. The rest are optional.
Constant Actions: Regardless of what screen you’re in there is always a “Back” and “Save” button that appear on the bottom of the screen.
E-mail Actions: Some of the detail screens will have an e-mail “quick action” icon. This will allow you to send one of you pre-made e-mail templates to a customer or supplier.