Embed Size (px)
Citation preview
User guide for Crop Area Statistics
Order for entering Master Pages
1: Gram Panchayat Master
2: Village Pancahyat Mapping Master
3: Major Dept Master
4: Department Master
5: Division Master
6: Designation Master
7: Post Master
8: Office Master
9: HQ Detail Master
10: Officer Master
1: Gram Panchayat Master
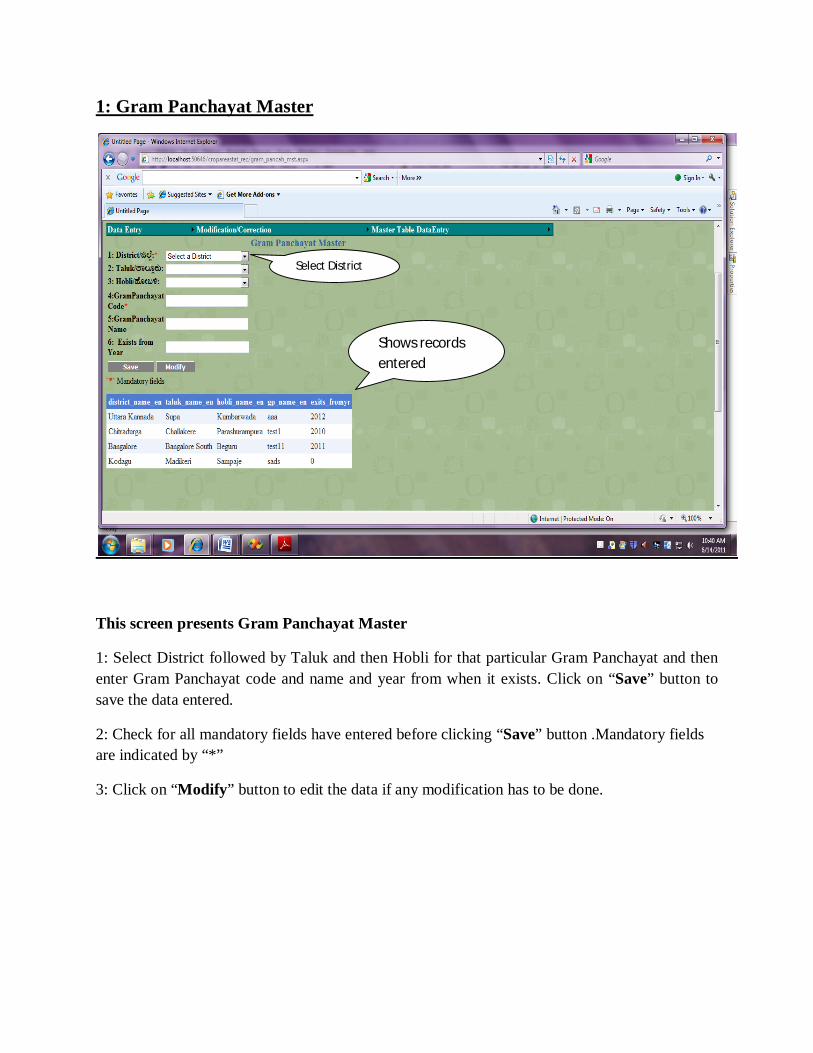
This screen presents Gram Panchayat Master
1: Select District followed by Taluk and then Hobli for that particular Gram Panchayat and then enter Gram Panchayat code and name and year from when it exists. Click on “Save” button to save the data entered.
2: Check for all mandatory fields have entered before clicking “Save” button .Mandatory fields are indicated by “*”
3: Click on “Modify” button to edit the data if any modification has to be done.
Select District
Shows records entered
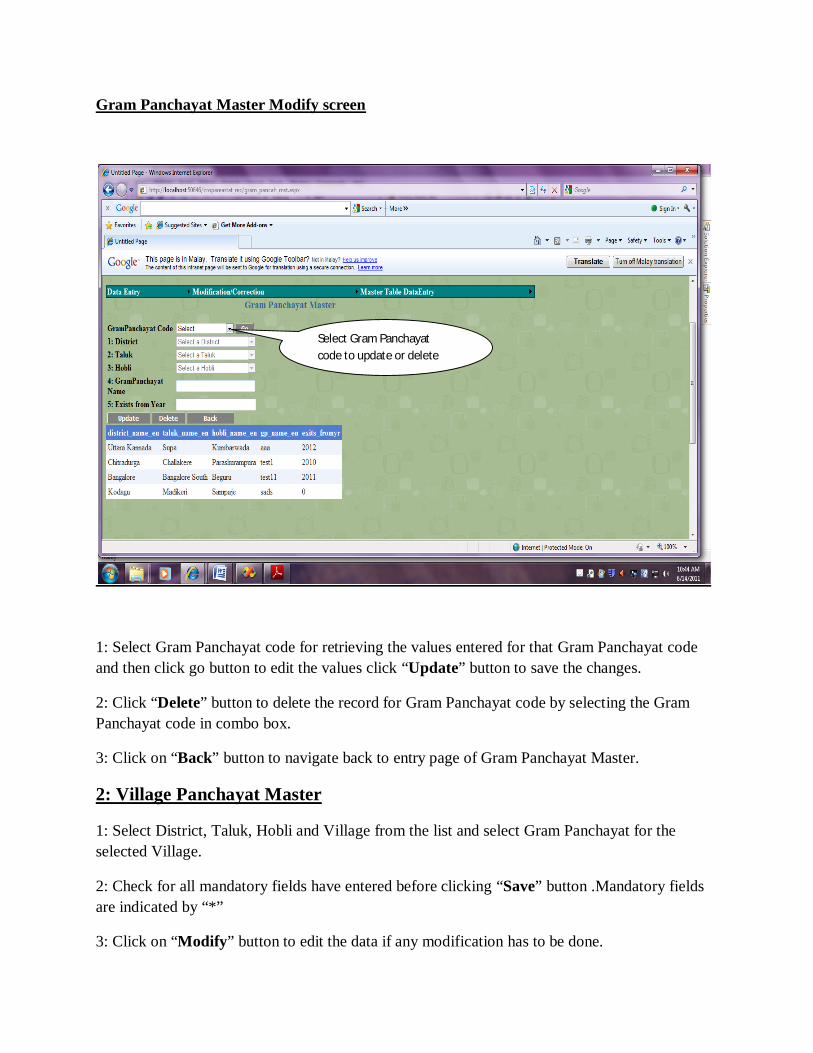
Gram Panchayat Master Modify screen
1: Select Gram Panchayat code for retrieving the values entered for that Gram Panchayat code and then click go button to edit the values click “Update” button to save the changes.
2: Click “Delete” button to delete the record for Gram Panchayat code by selecting the Gram Panchayat code in combo box.
3: Click on “Back” button to navigate back to entry page of Gram Panchayat Master.
2: Village Panchayat Master
1: Select District, Taluk, Hobli and Village from the list and select Gram Panchayat for the selected Village.
2: Check for all mandatory fields have entered before clicking “Save” button .Mandatory fields are indicated by “*”
3: Click on “Modify” button to edit the data if any modification has to be done.
Select Gram Panchayat code to update or delete
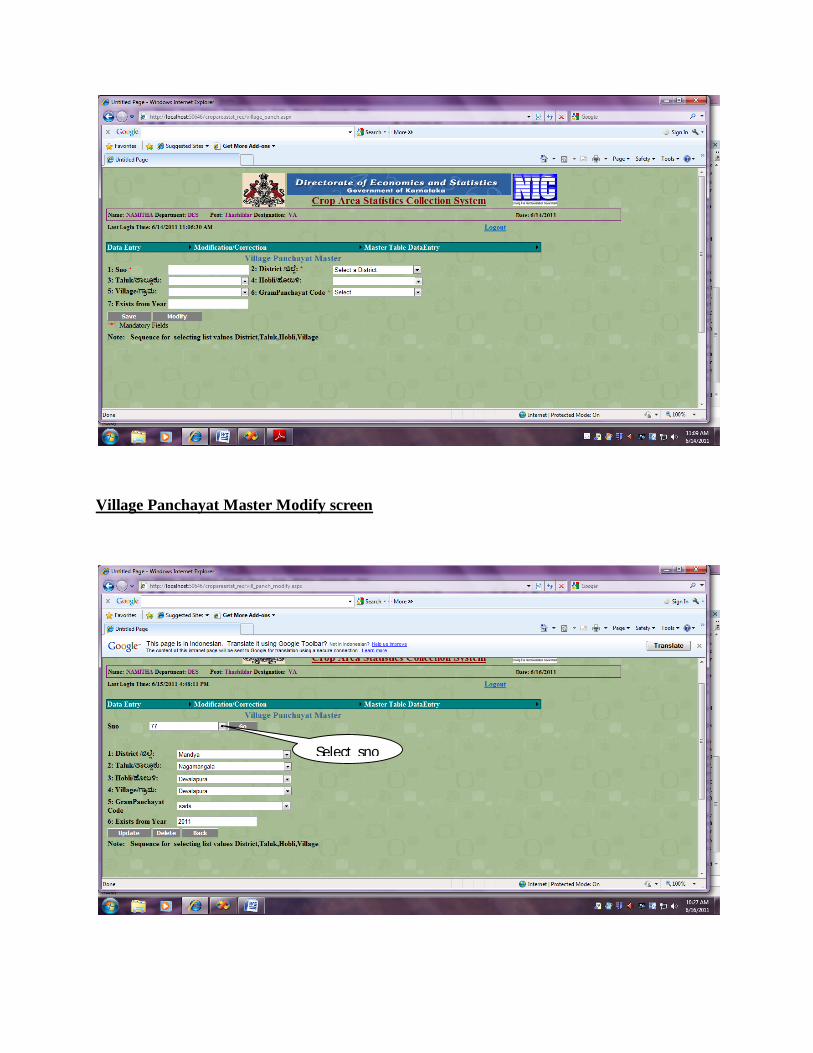
Village Panchayat Master Modify screen
Select sno

1: Select Sno for retrieving the values entered for that Village Panchayat and then click ”Go” button to edit the values click “Update” button to save the changes.
2: Click “Delete” button to delete the record from Village Panchayat by selecting the Sno in combo box.
3: Click on “Back” button to navigate back to entry page of Village Panchayat Master.
3: Major Department Master
1: Enter Major Department Code and name and then click on “Save” button to save the data
2: Check for all mandatory fields have entered before clicking “Save” button .Mandatory fields are indicated by “*”.
3: Saved data automatically shown in table.
4: In order to edit the data click on “Edit” this is shown on screen
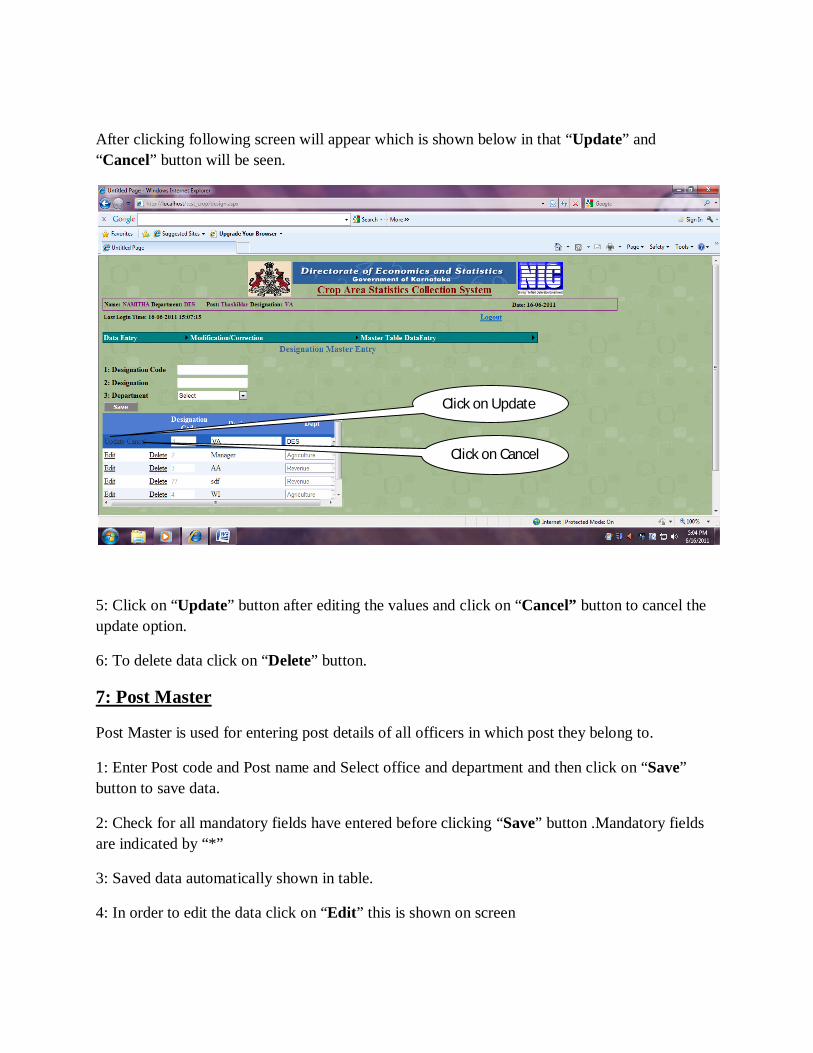
After clicking following screen will appear which is shown below in that “Update” and “Cancel” button will be seen.
Shows records entered
Click on Edit
Click on Delete
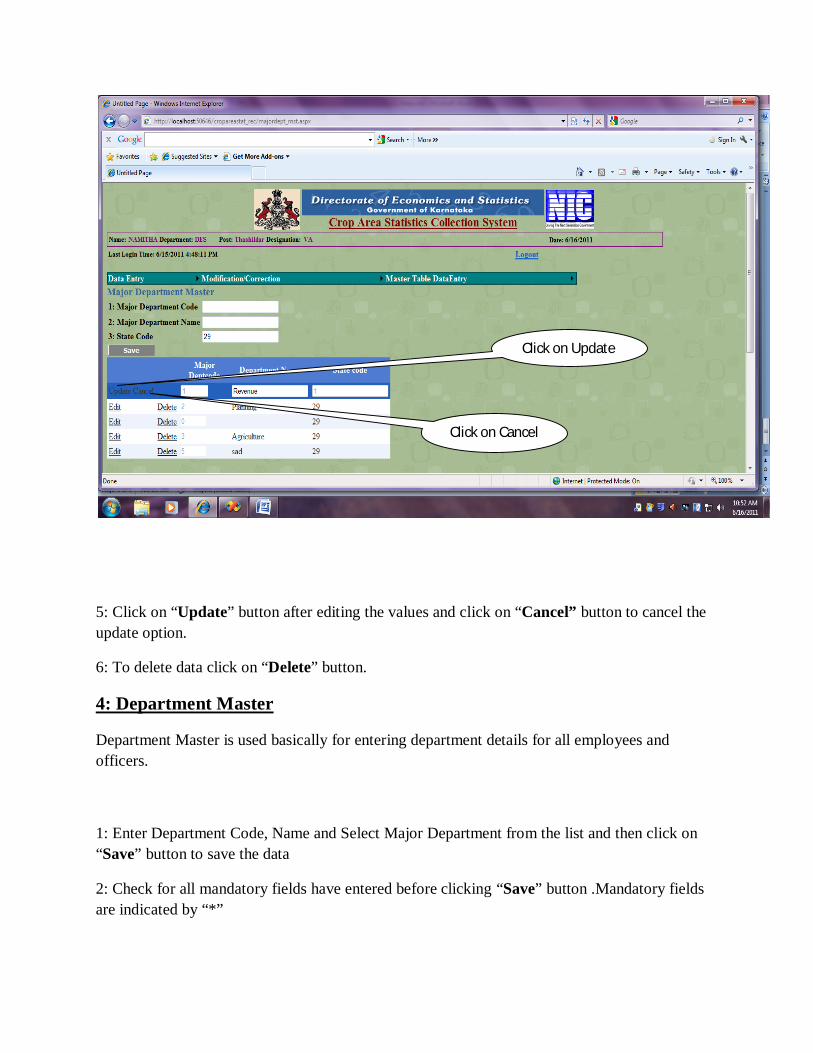
5: Click on “Update” button after editing the values and click on “Cancel” button to cancel the update option.
6: To delete data click on “Delete” button.
4: Department Master
Department Master is used basically for entering department details for all employees and officers.
1: Enter Department Code, Name and Select Major Department from the list and then click on “Save” button to save the data
2: Check for all mandatory fields have entered before clicking “Save” button .Mandatory fields are indicated by “*”
Click on Update
Click on Cancel
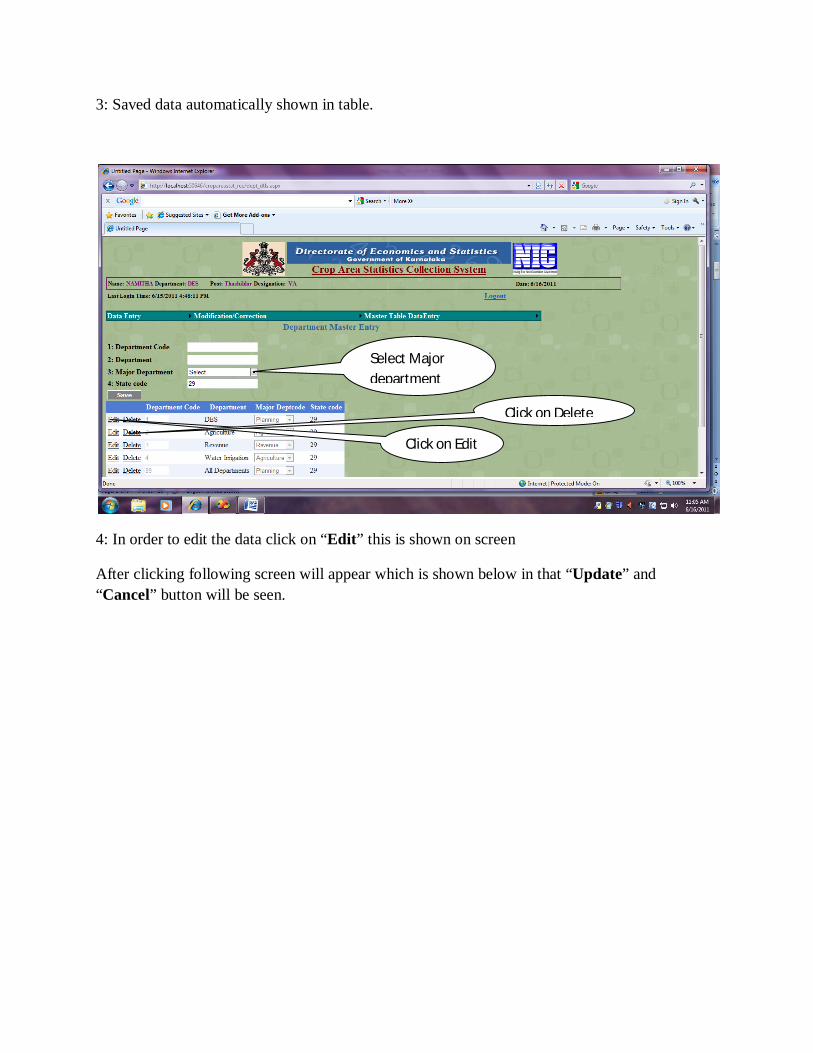
3: Saved data automatically shown in table.
4: In order to edit the data click on “Edit” this is shown on screen
After clicking following screen will appear which is shown below in that “Update” and “Cancel” button will be seen.
Click on Edit
Click on Delete
Select Major department
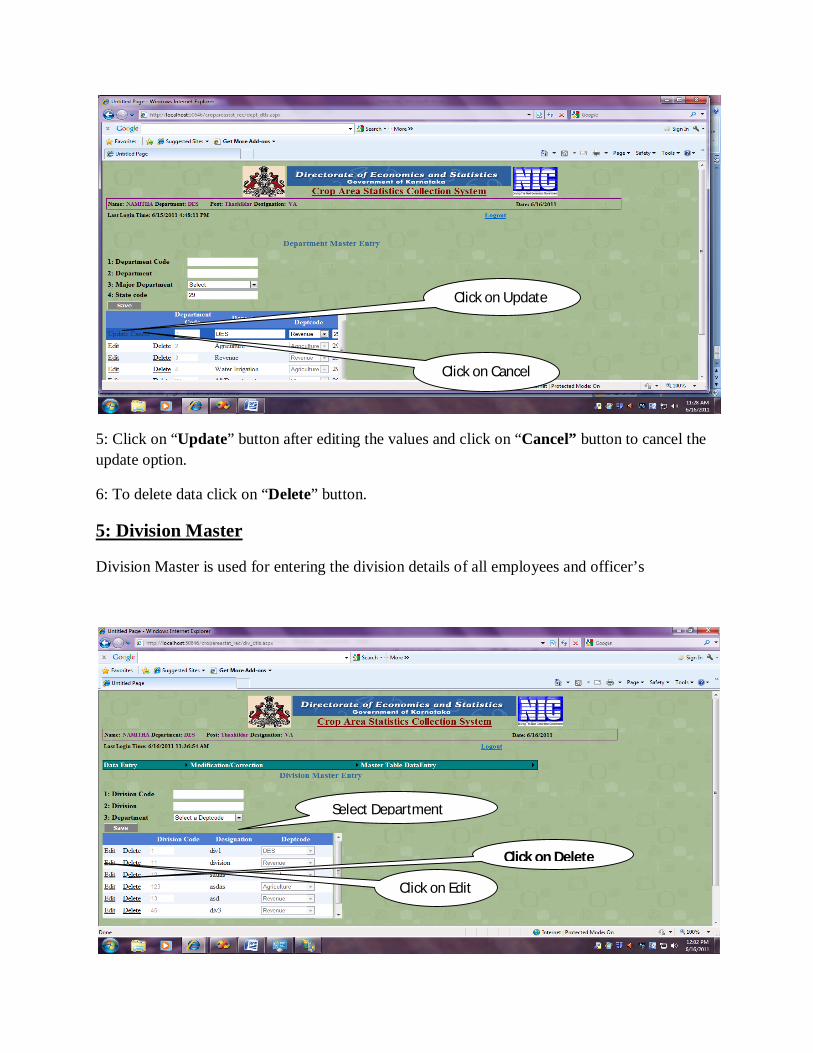
5: Click on “Update” button after editing the values and click on “Cancel” button to cancel the update option.
6: To delete data click on “Delete” button.
5: Division Master
Division Master is used for entering the division details of all employees and officer’s
Click on Update
Click on Cancel
Select Department
Click on Edit
Click on Delete
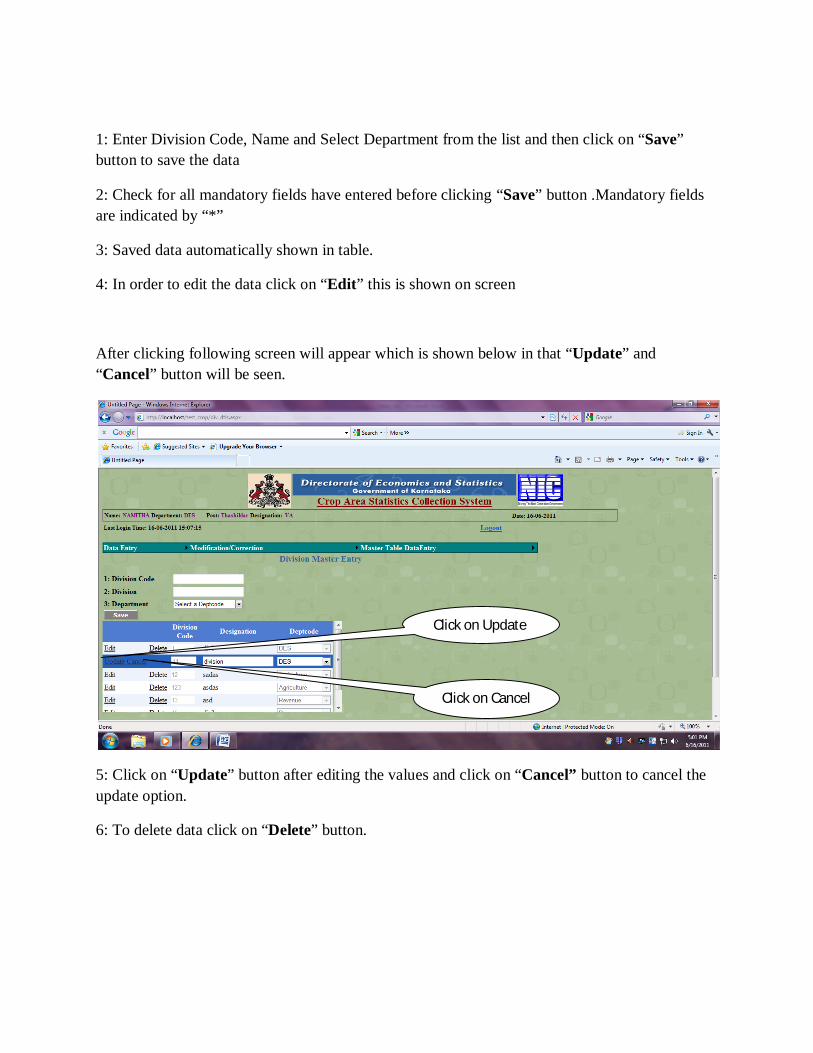
1: Enter Division Code, Name and Select Department from the list and then click on “Save” button to save the data
2: Check for all mandatory fields have entered before clicking “Save” button .Mandatory fields are indicated by “*”
3: Saved data automatically shown in table.
4: In order to edit the data click on “Edit” this is shown on screen
After clicking following screen will appear which is shown below in that “Update” and “Cancel” button will be seen.
5: Click on “Update” button after editing the values and click on “Cancel” button to cancel the update option.
6: To delete data click on “Delete” button.
Click on Update
Click on Cancel
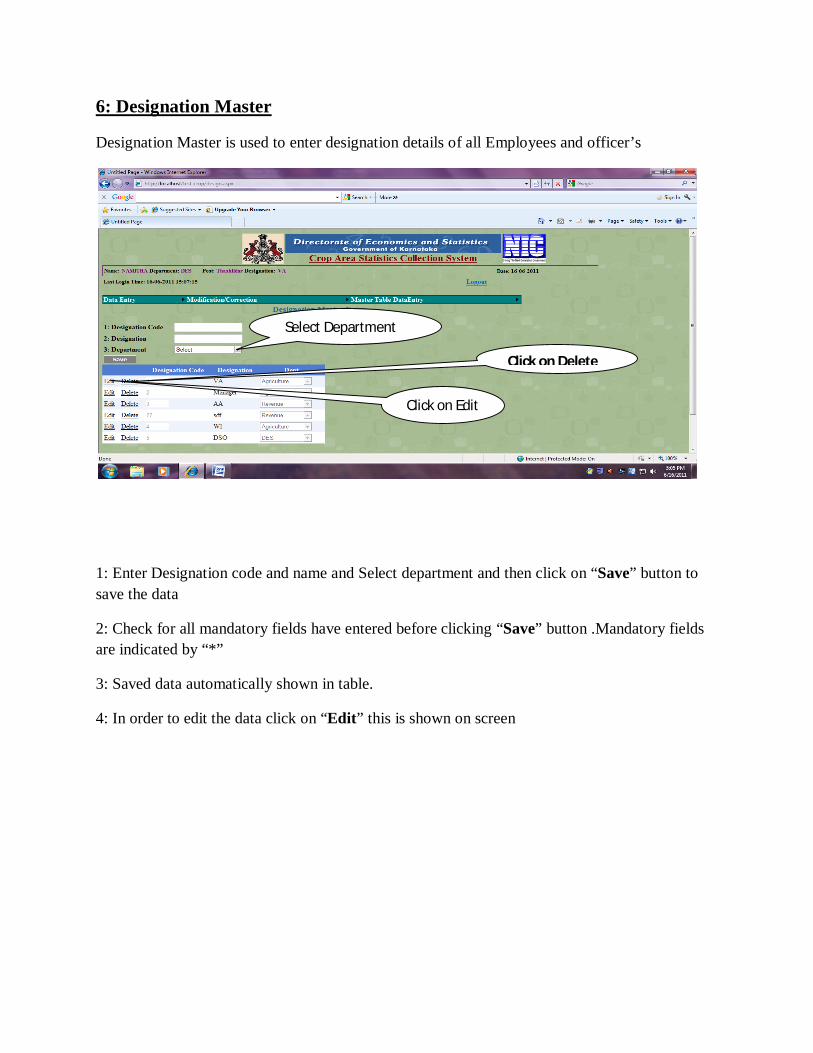
6: Designation Master
Designation Master is used to enter designation details of all Employees and officer’s
1: Enter Designation code and name and Select department and then click on “Save” button to save the data
2: Check for all mandatory fields have entered before clicking “Save” button .Mandatory fields are indicated by “*”
3: Saved data automatically shown in table.
4: In order to edit the data click on “Edit” this is shown on screen
Click on Edit
Click on Delete
Select Department
After clicking following screen will appear which is shown below in that “Update” and “Cancel” button will be seen.
5: Click on “Update” button after editing the values and click on “Cancel” button to cancel the update option.
6: To delete data click on “Delete” button.
7: Post Master
Post Master is used for entering post details of all officers in which post they belong to.
1: Enter Post code and Post name and Select office and department and then click on “Save” button to save data.
2: Check for all mandatory fields have entered before clicking “Save” button .Mandatory fields are indicated by “*”
3: Saved data automatically shown in table.
4: In order to edit the data click on “Edit” this is shown on screen
Click on Update
Click on Cancel
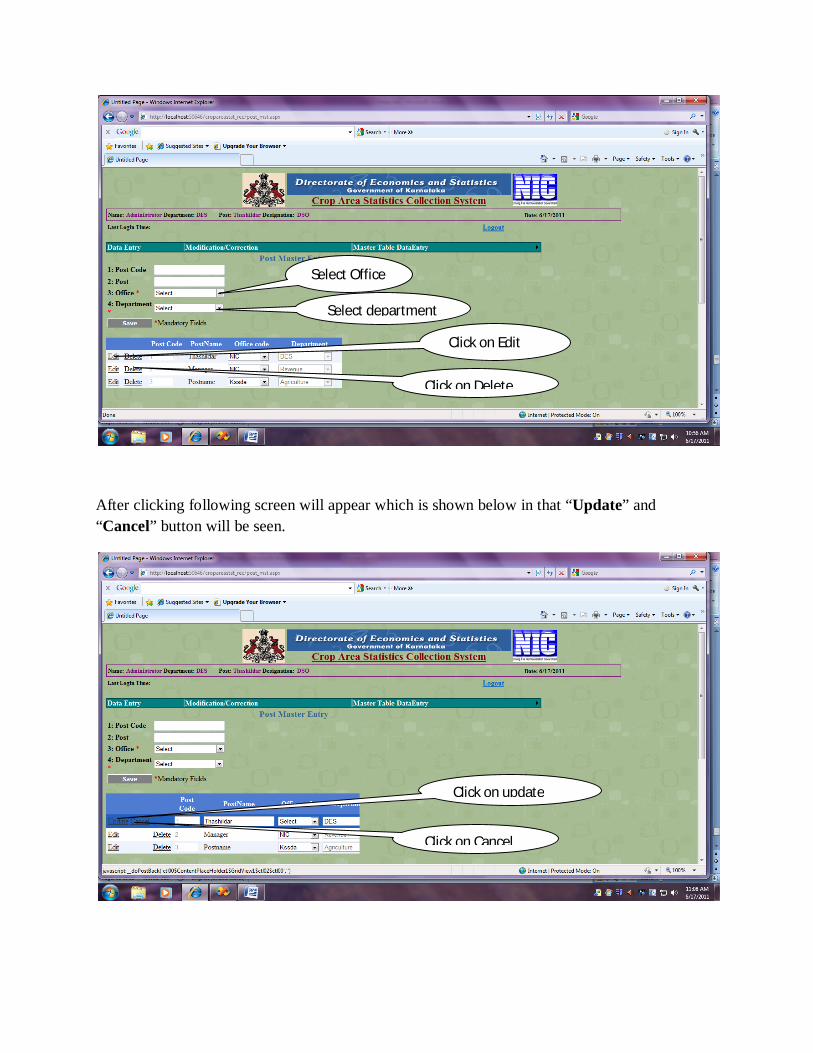
After clicking following screen will appear which is shown below in that “Update” and “Cancel” button will be seen.
Click on Edit
Click on Delete
Select Office
Select department
Click on update
Click on Cancel

5: Click on “Update” button after editing the values and click on “Cancel” button to cancel the update option.
6: To delete data click on “Delete” button.
8: Office Master
Office Master is used for entering Office details based on District, Taluk, Hobli and Village level. Each Office may or may not have Head Quarters so in order to know whether Office has Head Quarters or not we have provided “Is HQ” option on screen. If Office has HQ then Select “Y”, if not Select “N”.
1: Enter Office code (census code), Office name, District, Taluk, Hobli, Village, Address, Department, Division, Telephone number, Office Head Employee code, Internal number, Post, Place, Office Head Date of posting. In “Is HQ” option, if selected Option is “Y” then “HQ Type” option will pop up in that select whether Office is State level, District level, Hobli level, Taluk level, Village level. Click on “Save” button to save the data entered.
2: Check for all mandatory fields have entered before clicking “Save” button .Mandatory fields are indicated by “*”
3: Click on “Modify” button to edit the data if any modification has to be done.
Select for HQ(Y/N)
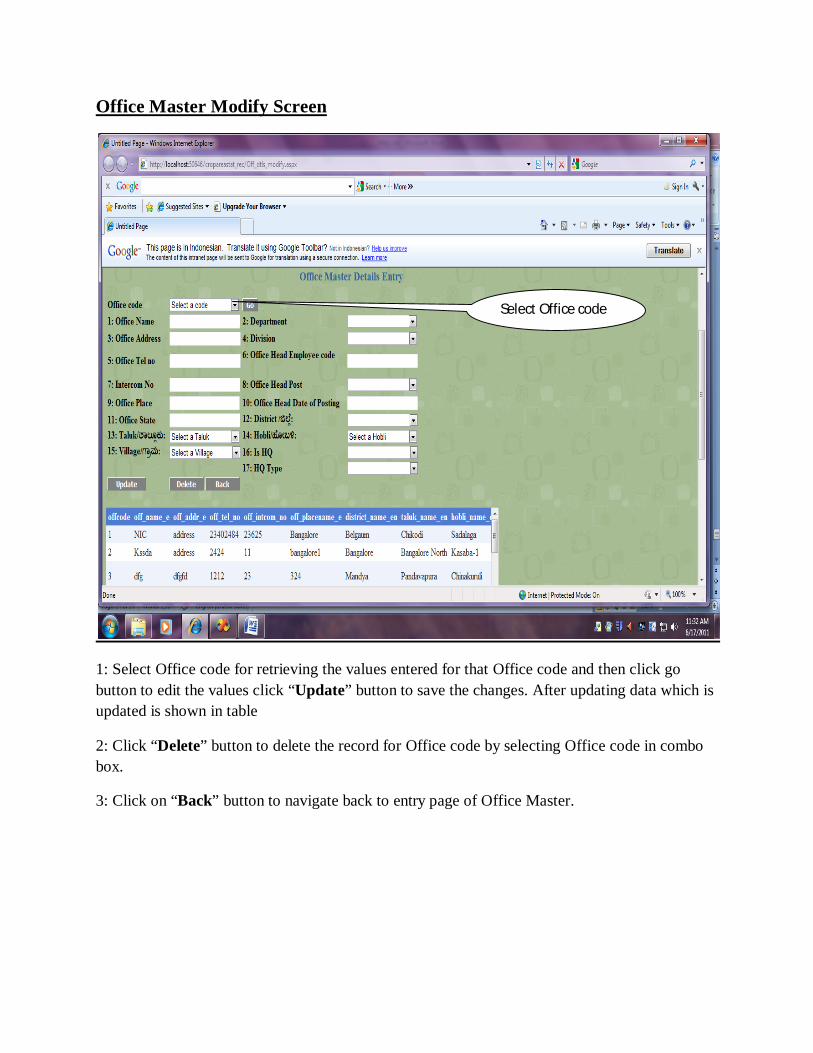
Office Master Modify Screen
1: Select Office code for retrieving the values entered for that Office code and then click go button to edit the values click “Update” button to save the changes. After updating data which is updated is shown in table
2: Click “Delete” button to delete the record for Office code by selecting Office code in combo box.
3: Click on “Back” button to navigate back to entry page of Office Master.
Select Office code
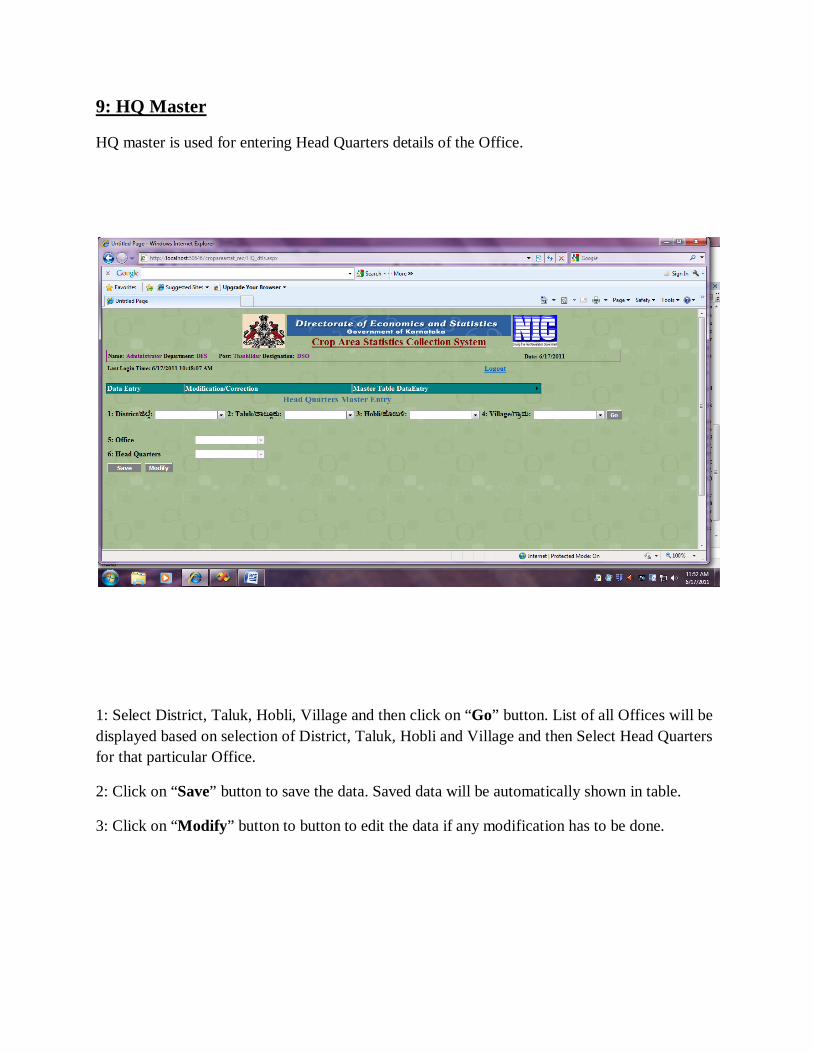
9: HQ Master
HQ master is used for entering Head Quarters details of the Office.
1: Select District, Taluk, Hobli, Village and then click on “Go” button. List of all Offices will be displayed based on selection of District, Taluk, Hobli and Village and then Select Head Quarters for that particular Office.
2: Click on “Save” button to save the data. Saved data will be automatically shown in table.
3: Click on “Modify” button to button to edit the data if any modification has to be done.
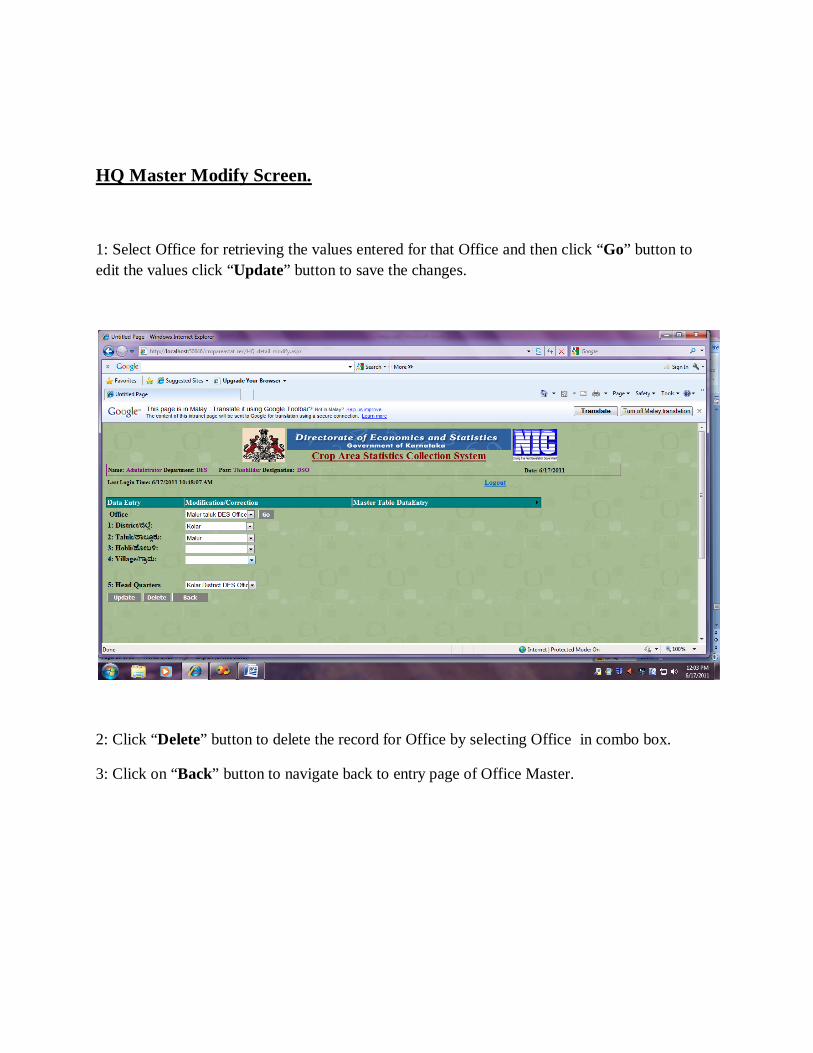
HQ Master Modify Screen.
1: Select Office for retrieving the values entered for that Office and then click “Go” button to edit the values click “Update” button to save the changes.
2: Click “Delete” button to delete the record for Office by selecting Office in combo box.
3: Click on “Back” button to navigate back to entry page of Office Master.
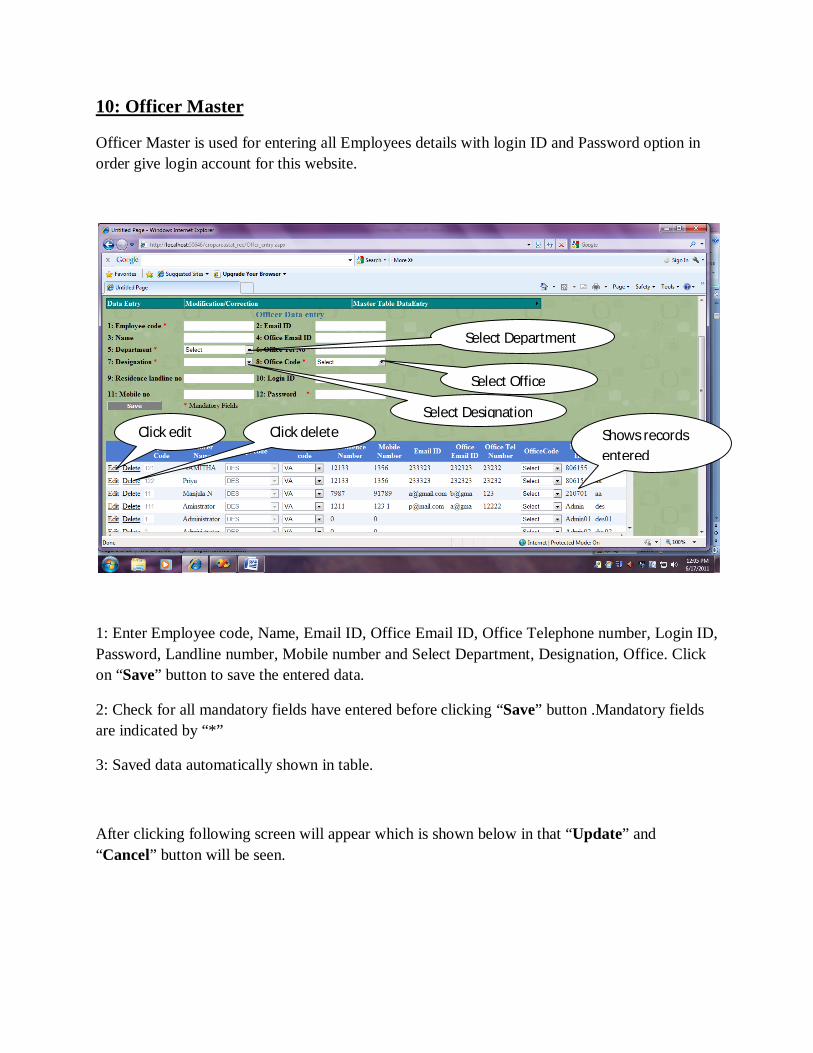
10: Officer Master
Officer Master is used for entering all Employees details with login ID and Password option in order give login account for this website.
1: Enter Employee code, Name, Email ID, Office Email ID, Office Telephone number, Login ID, Password, Landline number, Mobile number and Select Department, Designation, Office. Click on “Save” button to save the entered data.
2: Check for all mandatory fields have entered before clicking “Save” button .Mandatory fields are indicated by “*”
3: Saved data automatically shown in table.
After clicking following screen will appear which is shown below in that “Update” and “Cancel” button will be seen.
Shows records entered
Select Department
Select Office
Select Designation Click edit Click delete
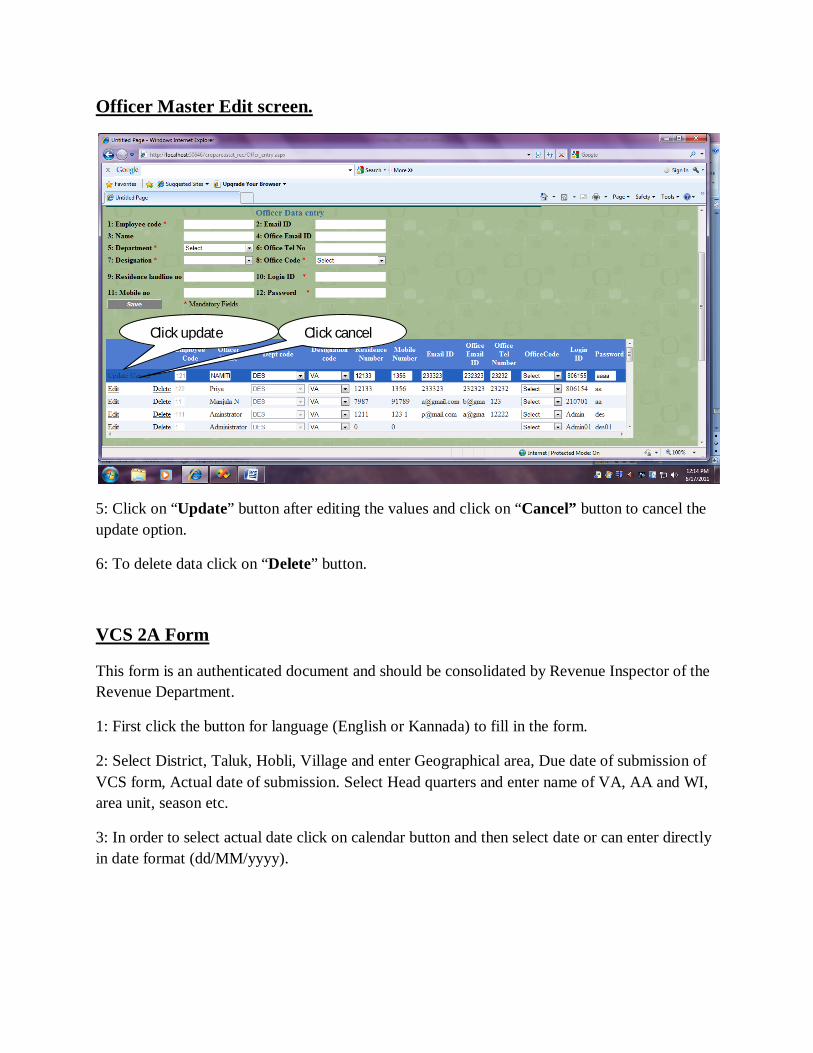
Officer Master Edit screen.
5: Click on “Update” button after editing the values and click on “Cancel” button to cancel the update option.
6: To delete data click on “Delete” button.
VCS 2A Form
This form is an authenticated document and should be consolidated by Revenue Inspector of the Revenue Department.
1: First click the button for language (English or Kannada) to fill in the form.
2: Select District, Taluk, Hobli, Village and enter Geographical area, Due date of submission of VCS form, Actual date of submission. Select Head quarters and enter name of VA, AA and WI, area unit, season etc.
3: In order to select actual date click on calendar button and then select date or can enter directly in date format (dd/MM/yyyy).
Click update Click cancel
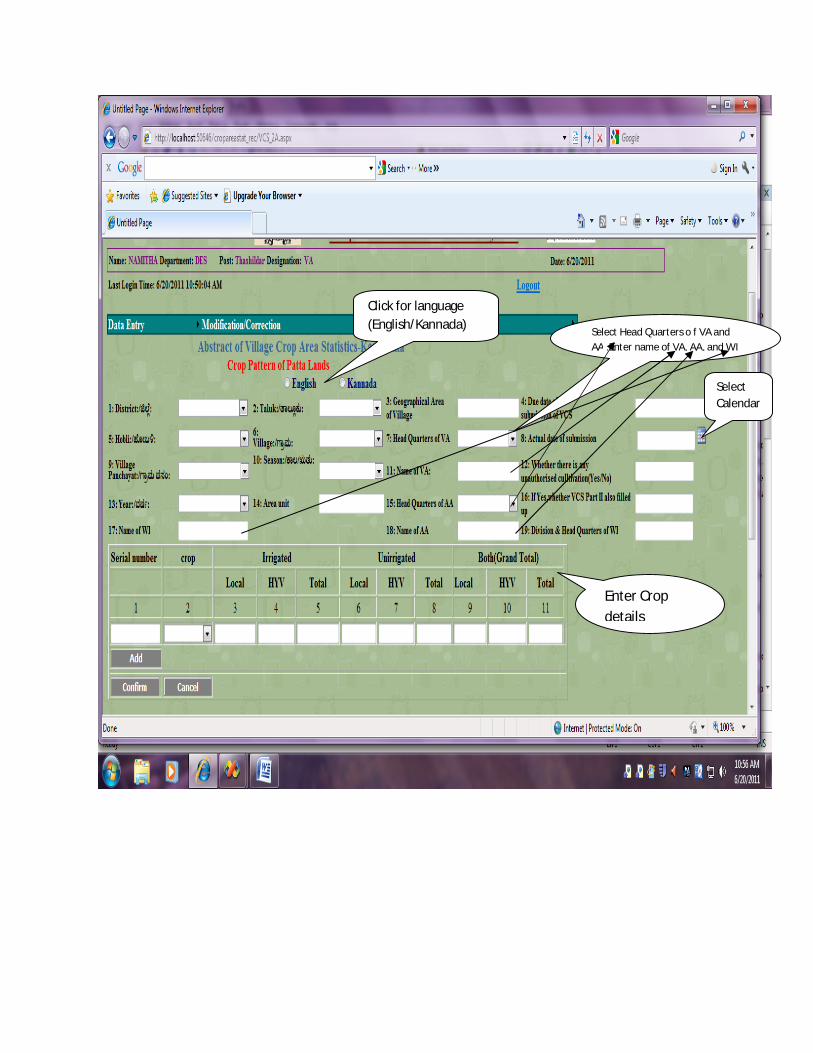
Select Head Quarters o f VA and AA .Enter name of VA, AA, and WI
Click for language (English/Kannada)
Select Calendar
Enter Crop details
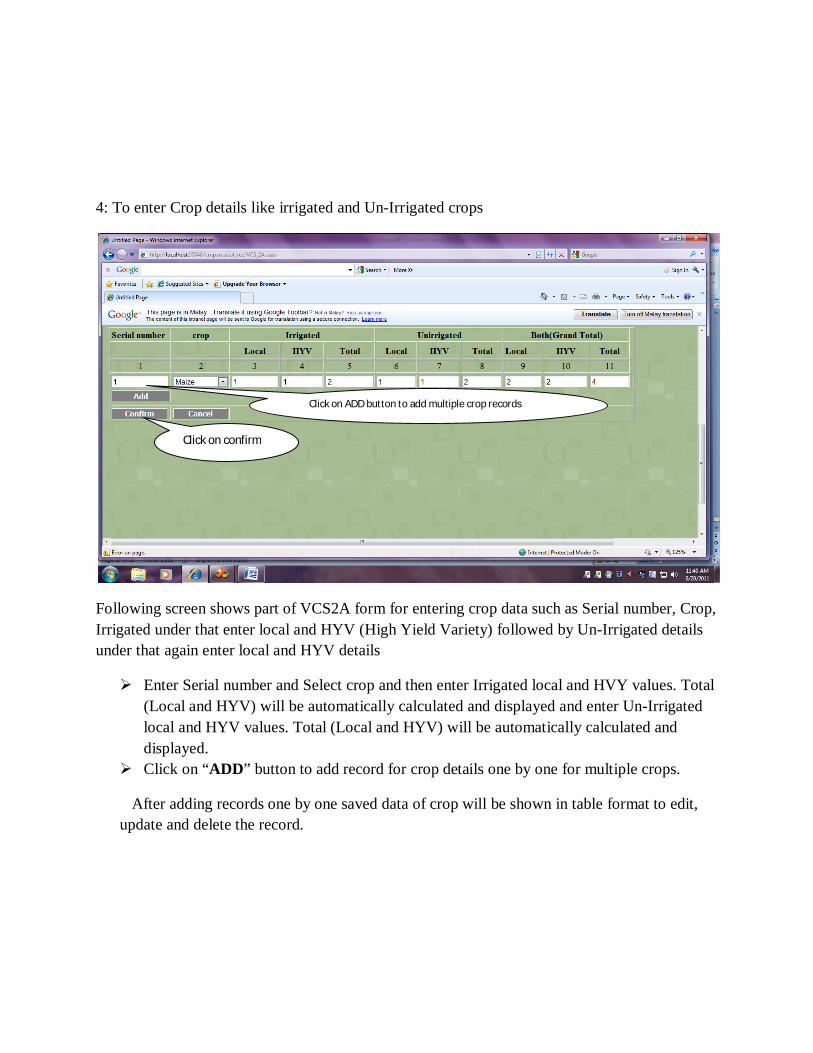
4: To enter Crop details like irrigated and Un-Irrigated crops
Following screen shows part of VCS2A form for entering crop data such as Serial number, Crop, Irrigated under that enter local and HYV (High Yield Variety) followed by Un-Irrigated details under that again enter local and HYV details
Enter Serial number and Select crop and then enter Irrigated local and HVY values. Total (Local and HYV) will be automatically calculated and displayed and enter Un-Irrigated local and HYV values. Total (Local and HYV) will be automatically calculated and displayed.
Click on “ADD” button to add record for crop details one by one for multiple crops.
After adding records one by one saved data of crop will be shown in table format to edit, update and delete the record.
Click on ADD button to add multiple crop records
Click on confirm
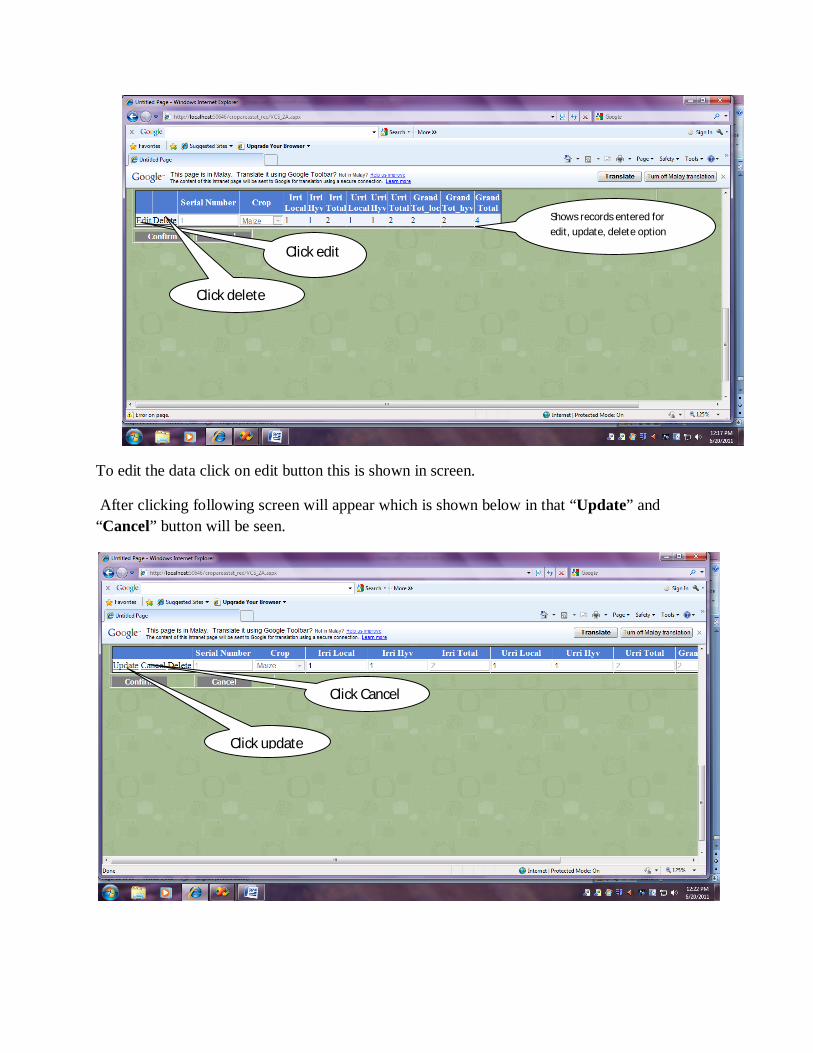
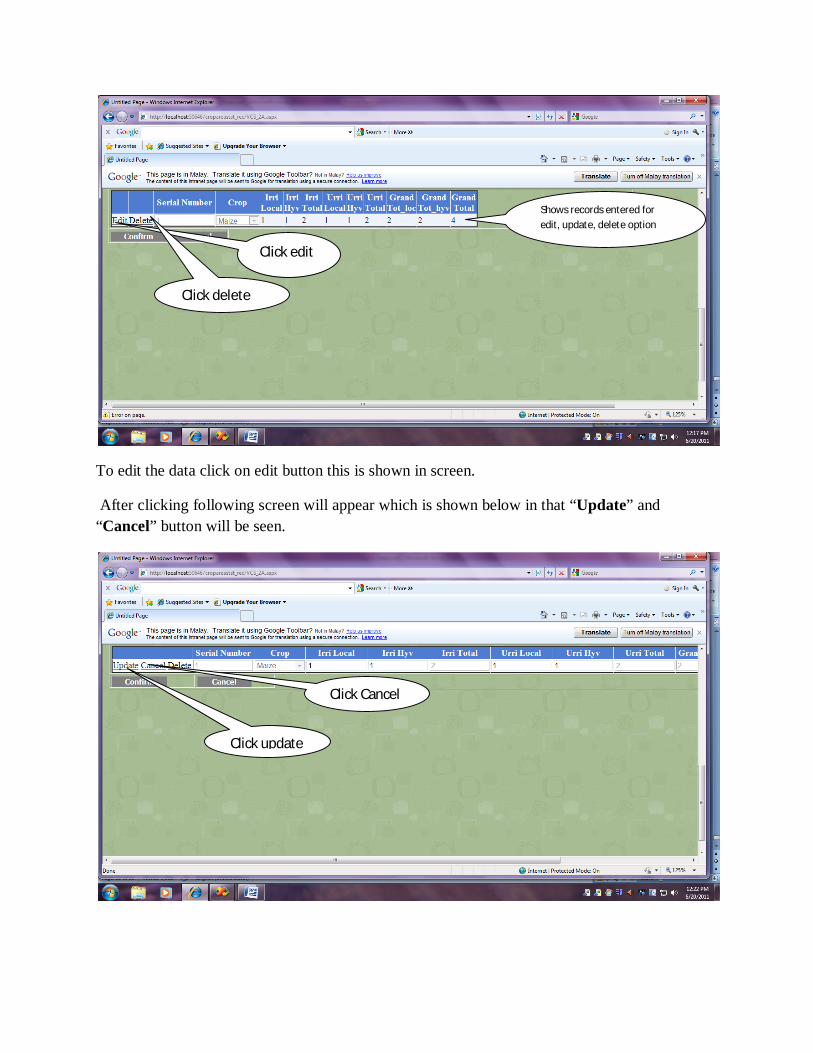
To edit the data click on edit button this is shown in screen.
After clicking following screen will appear which is shown below in that “Update” and “Cancel” button will be seen.
Shows records entered for edit, update, delete option
Click edit
Click delete
Click update
Click Cancel
To update data click on “Update” button after all modification. To cancel data to be updated click on “Cancel” button.
Click on “Confirm” button to confirm all details of VCS 2A and Crop data entered correctly in order to save the data.
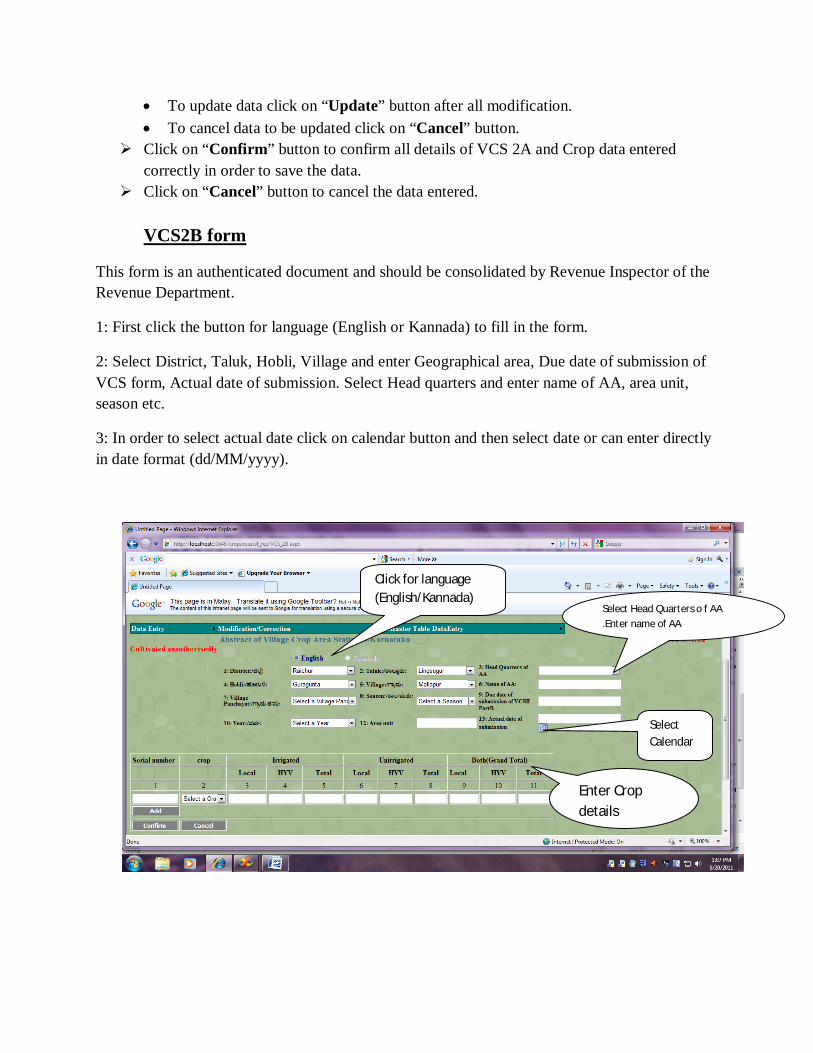
Click on “Cancel” button to cancel the data entered. VCS2B form
This form is an authenticated document and should be consolidated by Revenue Inspector of the Revenue Department.
1: First click the button for language (English or Kannada) to fill in the form.
2: Select District, Taluk, Hobli, Village and enter Geographical area, Due date of submission of VCS form, Actual date of submission. Select Head quarters and enter name of AA, area unit, season etc.
3: In order to select actual date click on calendar button and then select date or can enter directly in date format (dd/MM/yyyy).
Select Calendar
Select Head Quarters o f AA .Enter name of AA
Click for language (English/Kannada)
Enter Crop details
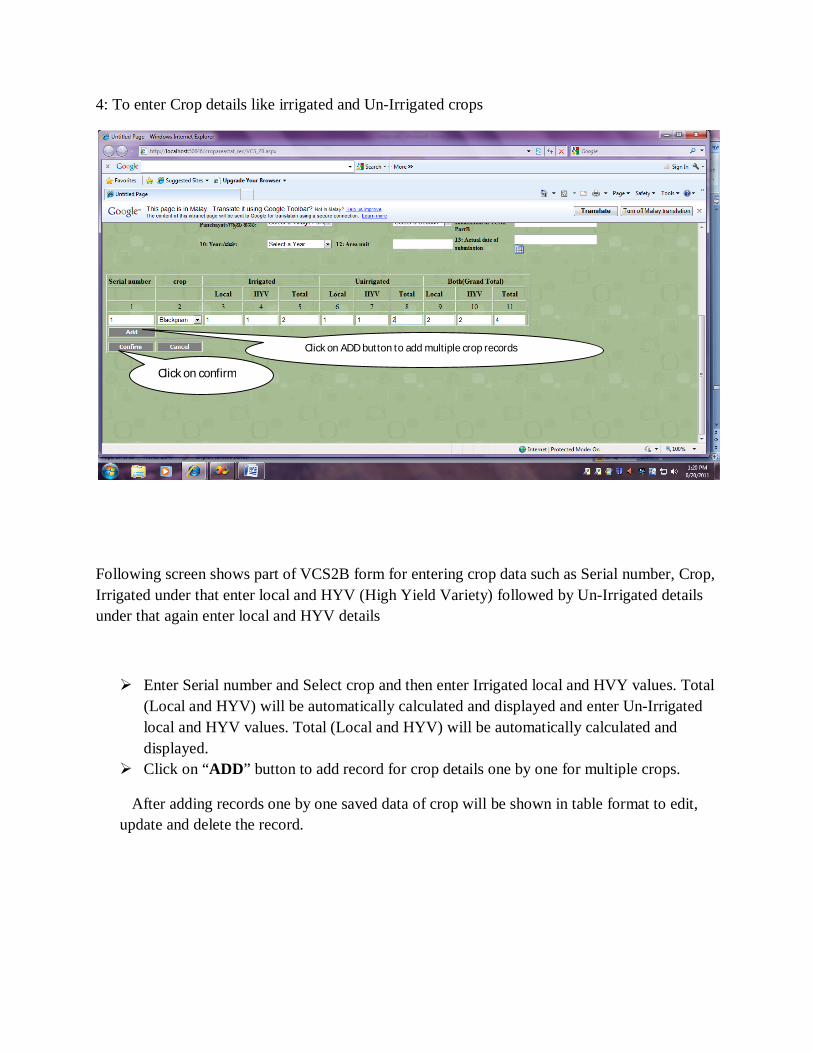
4: To enter Crop details like irrigated and Un-Irrigated crops
Following screen shows part of VCS2B form for entering crop data such as Serial number, Crop, Irrigated under that enter local and HYV (High Yield Variety) followed by Un-Irrigated details under that again enter local and HYV details
Enter Serial number and Select crop and then enter Irrigated local and HVY values. Total (Local and HYV) will be automatically calculated and displayed and enter Un-Irrigated local and HYV values. Total (Local and HYV) will be automatically calculated and displayed.
Click on “ADD” button to add record for crop details one by one for multiple crops.
After adding records one by one saved data of crop will be shown in table format to edit, update and delete the record.
Click on ADD button to add multiple crop records
Click on confirm
To edit the data click on edit button this is shown in screen.
After clicking following screen will appear which is shown below in that “Update” and “Cancel” button will be seen.
Shows records entered for edit, update, delete option
Click update
Click Cancel
Click edit
Click delete
To update data click on “Update” button after all modification. To cancel data to be updated click on “Cancel” button.
Click on “Confirm” button to confirm all details of VCS 2B and Crop data entered correctly in order to save the data.
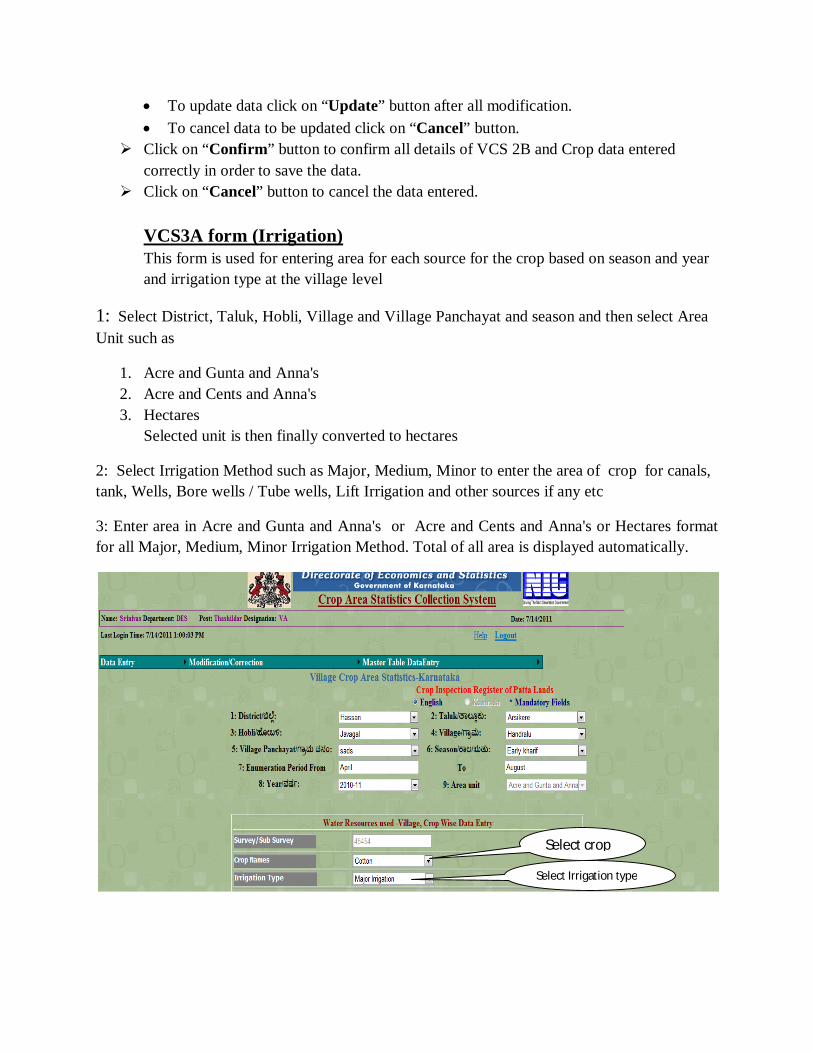
Click on “Cancel” button to cancel the data entered. VCS3A form (Irrigation) This form is used for entering area for each source for the crop based on season and year and irrigation type at the village level
1: Select District, Taluk, Hobli, Village and Village Panchayat and season and then select Area Unit such as
1. Acre and Gunta and Anna's 2. Acre and Cents and Anna's 3. Hectares
Selected unit is then finally converted to hectares
2: Select Irrigation Method such as Major, Medium, Minor to enter the area of crop for canals, tank, Wells, Bore wells / Tube wells, Lift Irrigation and other sources if any etc
3: Enter area in Acre and Gunta and Anna's or Acre and Cents and Anna's or Hectares format for all Major, Medium, Minor Irrigation Method. Total of all area is displayed automatically.
Select crop
Select Irrigation type
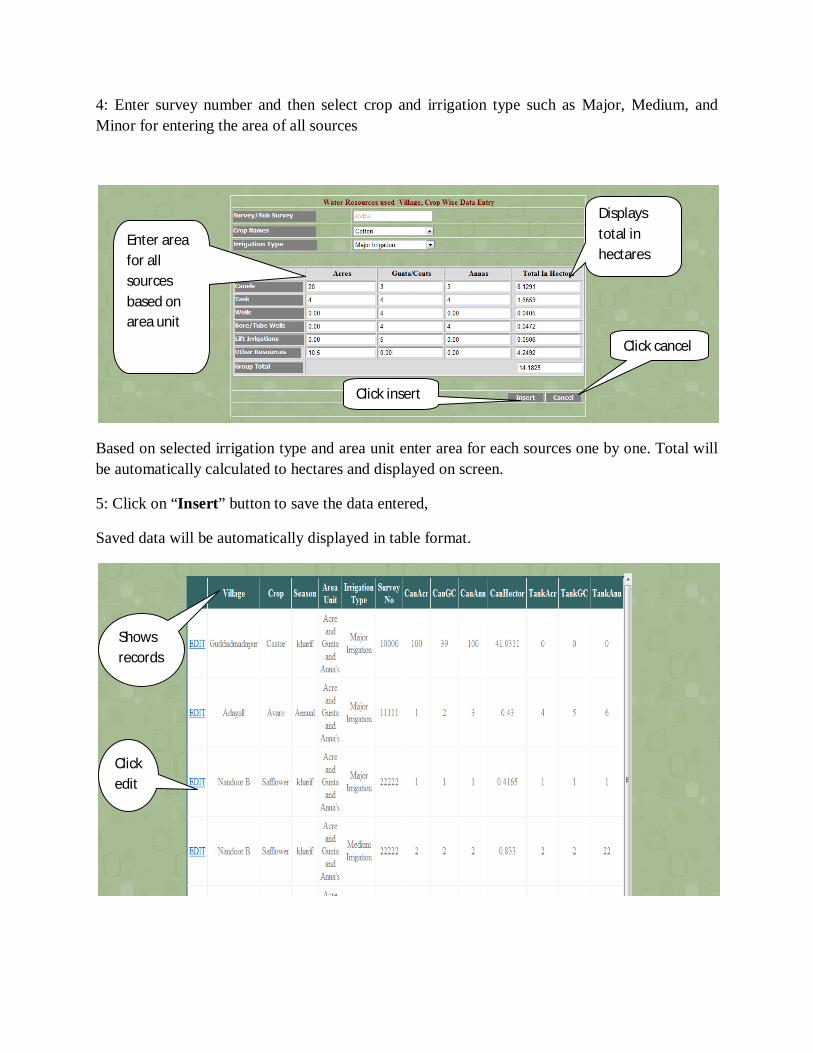
4: Enter survey number and then select crop and irrigation type such as Major, Medium, and Minor for entering the area of all sources
Based on selected irrigation type and area unit enter area for each sources one by one. Total will be automatically calculated to hectares and displayed on screen.
5: Click on “Insert” button to save the data entered,
Saved data will be automatically displayed in table format.
Enter area for all sources based on area unit
Displays total in hectares
Click insert
Click cancel
Shows records
Click edit
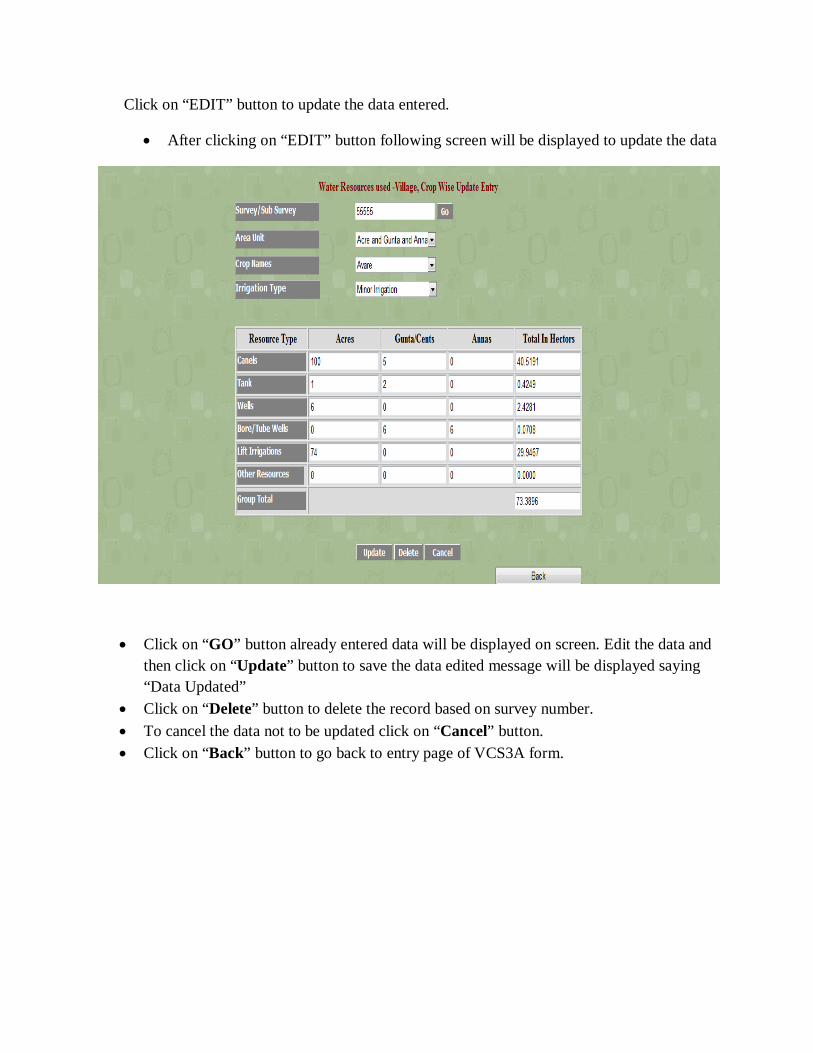
Click on “EDIT” button to update the data entered.
After clicking on “EDIT” button following screen will be displayed to update the data
Click on “GO” button already entered data will be displayed on screen. Edit the data and then click on “Update” button to save the data edited message will be displayed saying “Data Updated”
Click on “Delete” button to delete the record based on survey number. To cancel the data not to be updated click on “Cancel” button. Click on “Back” button to go back to entry page of VCS3A form.
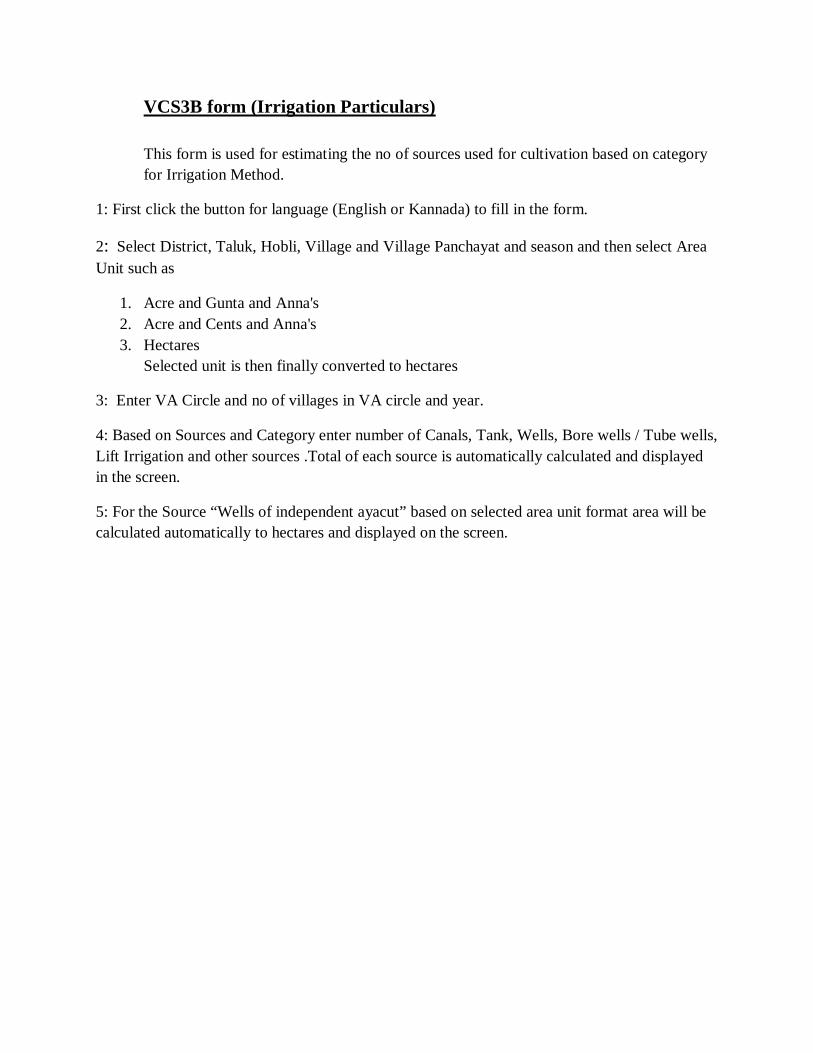
VCS3B form (Irrigation Particulars) This form is used for estimating the no of sources used for cultivation based on category for Irrigation Method.
1: First click the button for language (English or Kannada) to fill in the form.
2: Select District, Taluk, Hobli, Village and Village Panchayat and season and then select Area Unit such as
1. Acre and Gunta and Anna's 2. Acre and Cents and Anna's 3. Hectares
Selected unit is then finally converted to hectares
3: Enter VA Circle and no of villages in VA circle and year.
4: Based on Sources and Category enter number of Canals, Tank, Wells, Bore wells / Tube wells, Lift Irrigation and other sources .Total of each source is automatically calculated and displayed in the screen.
5: For the Source “Wells of independent ayacut” based on selected area unit format area will be calculated automatically to hectares and displayed on the screen.
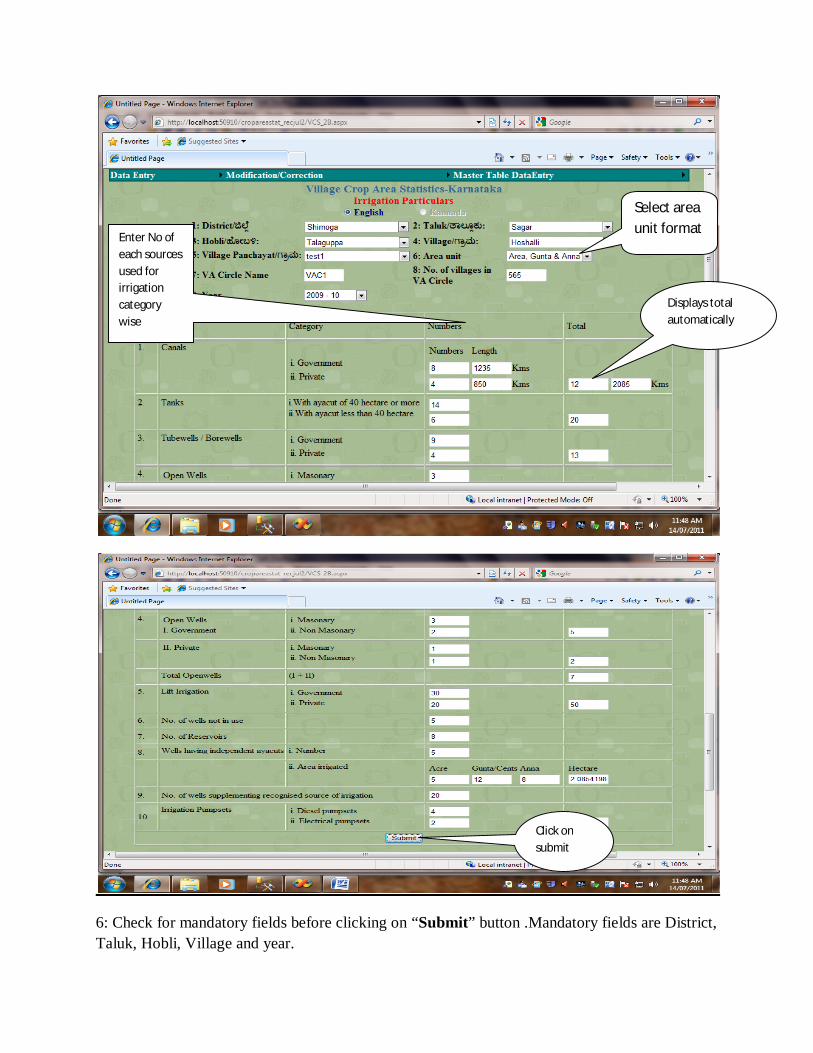
6: Check for mandatory fields before clicking on “Submit” button .Mandatory fields are District, Taluk, Hobli, Village and year.
Select area unit format
Enter No of each sources used for irrigation category wise
Displays total automatically
Click on submit
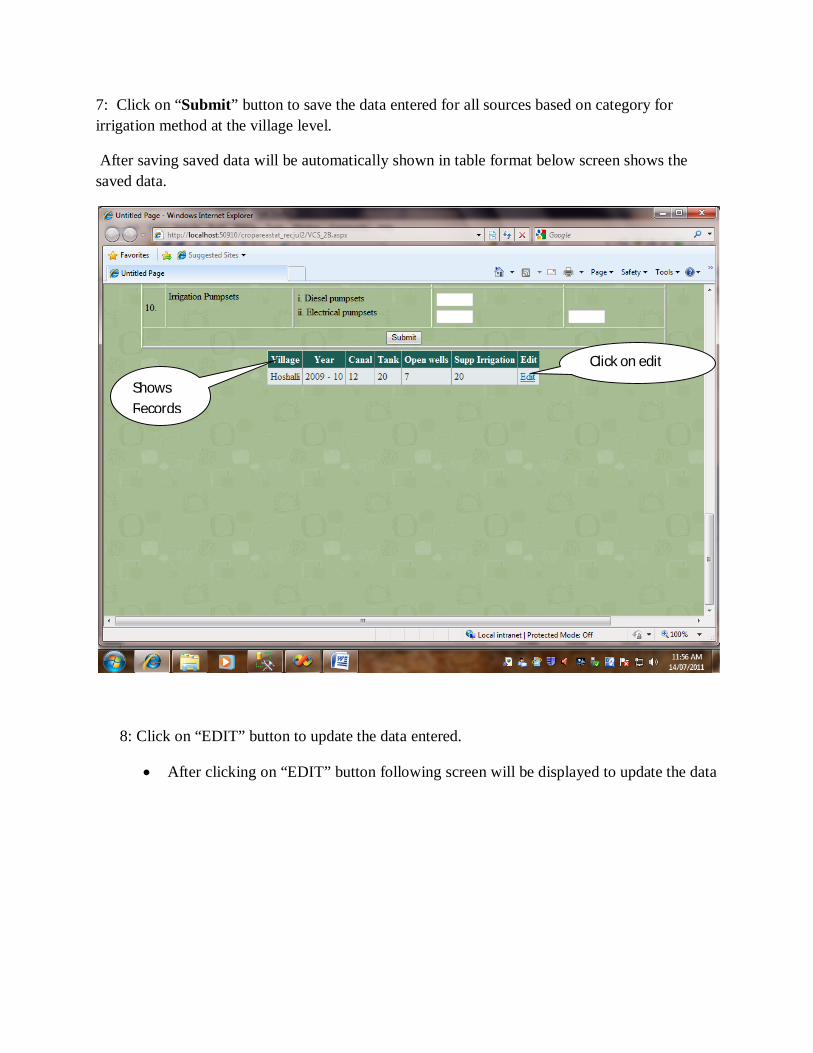
7: Click on “Submit” button to save the data entered for all sources based on category for irrigation method at the village level.
After saving saved data will be automatically shown in table format below screen shows the saved data.
8: Click on “EDIT” button to update the data entered.
After clicking on “EDIT” button following screen will be displayed to update the data
Shows Records
Click on edit
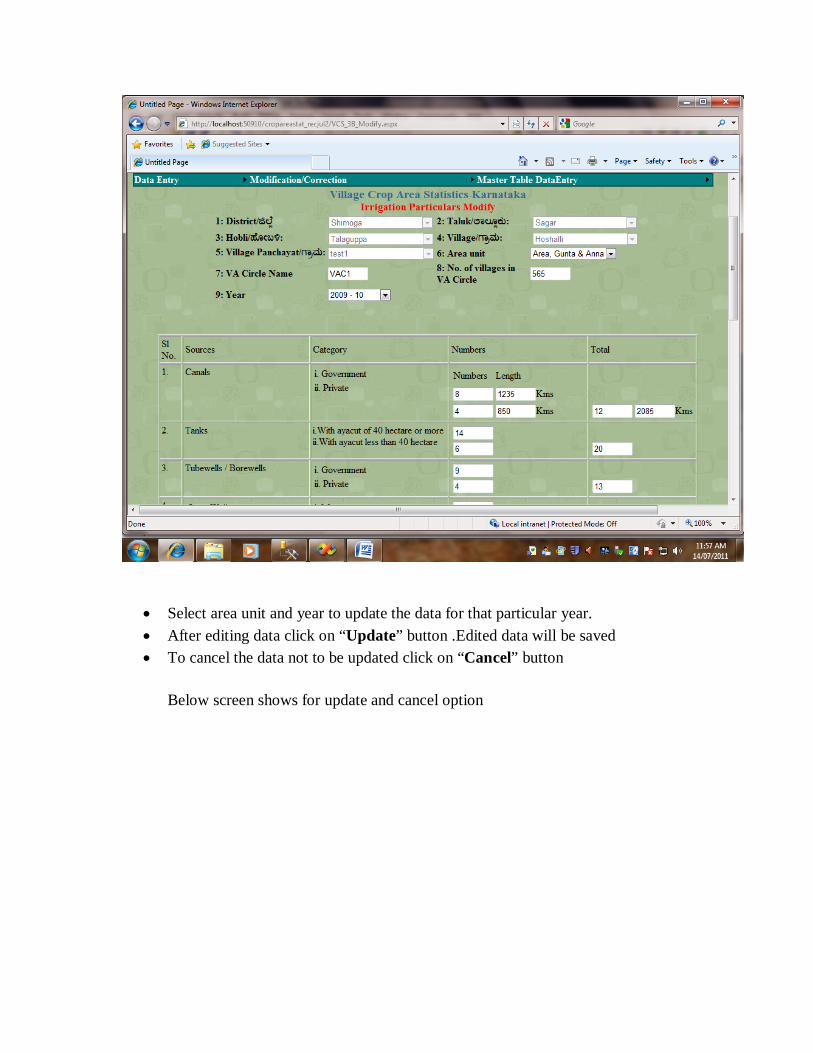
Select area unit and year to update the data for that particular year. After editing data click on “Update” button .Edited data will be saved To cancel the data not to be updated click on “Cancel” button
Below screen shows for update and cancel option
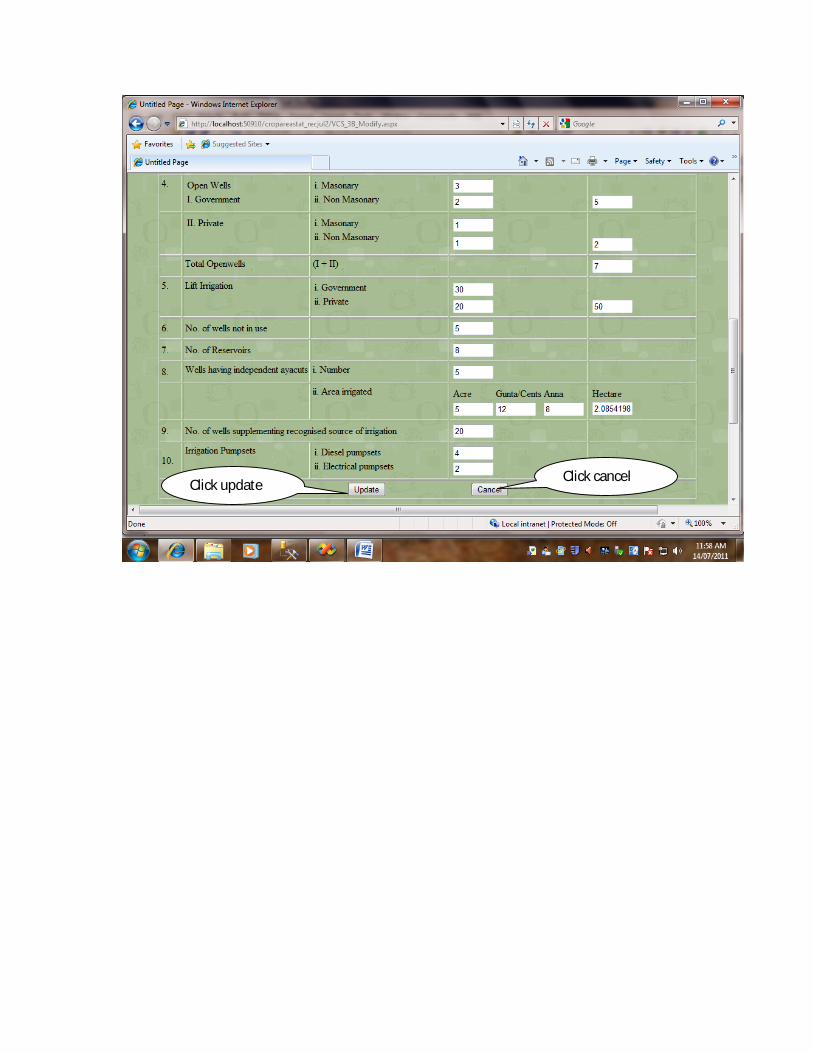
Click update Click cancel


![IN DEX [stg1.kar.nic.in]stg1.kar.nic.in/dparservices/IAS Telephone Directory.pdf · IN DEX 43. Guest houses ... Administrative TrainingInstitute(ATI) 258 49. IndianInstituteofManagement](https://img.pdfslide.us/doc/110x75/5a9e1cfe7f8b9ad2298d713d/in-dex-stg1karnicinstg1karnicindparservicesias-telephone-dex-43-guest.jpg)