Embed Size (px)
Citation preview

Everything Kamado JoeUser Guide for ClassicJoe and BigJoe
KamadoJoe.com

SIGNATURE TASTE. UNMATCHED VALUE.
Like many of you, I’m passionate about outdoor cooking. Over the years, I’ve cooked on everything from high-end stainless steel gas grills to inexpensive briquette charcoal grills. If those were my only choices I would pick the latter for one simple reason; the taste. There is nothing better than the mouth-watering taste of charcoal grilled food. Fortunately there is a better option–the Kamado Joe.
My passion for that signature taste led me to the Kamado style of cooking. With Natural Lump Charcoal, these ceramic grills are the prevailing choice for cooking flexibility and temperature range.
After using a Kamado grill for years I decided to design one with better materials and offer it at a competitive price. That was the start of the Kamado Joe Company, and today my passion for that signature taste still drives the innovation I put into all of our grills and accessories.
When you compare the cooking advantages and cost per use, our grills and accessories are unmatched in their value.
We have some exciting products and accessories in development and my promise to you is to continue to innovate, inform you and provide superior products that function as promised.
Thank you for considering Kamado Joe.
Robert “Bobby” Brennan Founder & President Kamado Joe Grills
Happy Grilling!

TABLE OF CONTENTS
Assembling Your Kamado Joe Grill ………………………… Page 1
Lighting Instructions ………………………………………… Page 3
Controlling the Temperature ………………………………… Page 4
Cooking Temperature Guide ………………………………… Page 5
Using Your Kamado Joe: Baking …………………………… Page 6
Using Your Kamado Joe: Roasting …………………………… Page 7
Using Your Kamado Joe: Grilling …………………………… Page 8
Using Your Kamado Joe: Smoking …………………………… Page 9
Cooking Configurations ……………………………………… Page 10
Care & Maintenance ………………………………………… Page 14
Safe Use of Your Kamado Joe Grill …………………………… Page 16
Kamado Joe Grills …………………………………………… Page 17
Kamado Joe Accessories …………………………………… Page 19
Warranty ……………………………………………………… Page 23
Online Warranty Registration ………………………………… Page 24

1
ASSEMBLING YOUR CLASSICJOE/BIGJOE GRILL
ASSEMBLING YOUR KAMADO JOE GRILL WITH A CART
1. Cut the plastic bands and remove the top and side panels of the shipping box.
2. Remove the top and base of the cart and attach them. Use the four stainless steel screws provided to secure the cart components together. Depress the tabs on the two locking casters (the locking casters indicate the front of the cart).
3. Open the grill and remove the components.
4. Place assembled cart on a secure level surface before inserting the grill.
5. Gently lift the grill and place it in the cart. Adjust the position so the front of the grill is centered between the legs with the two locking casters. We highly recommend that two people lift the grill into the cart due to the weight.
ADVISORY: DO NOT LIFT THE GRILL INTO THE CART BY THE HINGE MECHANISM OR SIDE SHELF SUPPORT TABS.
6. Open the grill and fully open the bottom draft door. Place the fire box inside the grill and align the opening at the bottom of the fire box with the opening in the draft door. This allows the air to flow freely into the grill and to remove ash residue with the included ash tool.
7. Place the cast iron grate in the bottom of the fire box. The ash will fall through the holes in the grate and collect underneath the fire box.
8. Place the fire ring on top of the fire box with the “notches up”. The notches are used to secure the legs of the Heat Deflector accessory when cooking indirectly (see page 10).
9. Place the stainless steel cooking grate on top of the fire ring with the hinged door in the front of the grill.
10. Close the grill dome and place the cast iron top vent on top of the dome neck. The “Kamado Joe” logo should face the front of the grill.
11. Attach the side shelves by placing the front pins in the slots of the shelf brackets.
12. See the section on “Grill Bands” on page 14 to ensure that the bands of your grill have the proper tension.

2
ASSEMBLING YOUR CLASSICJOE “STAND ALONE” GRILL AND INSERTING IT INTO YOUR KAMADO JOE GRILL TABLE
1. Follow steps 1 and 3 on the previous page.
2. Open the dome and attach the thermometer with a 14mm wrench. Do not over tighten.3. Place the three grill feet on the bottom shelf of the grill table to form a triangle s with the top being the back of the grill table. The other two feet should be placed just to the left and right of the draft door (See page 22).
4. Gently place the grill into the table and adjust the feet. Be careful not to catch the bottom draft door handle on the edge of the hole to avoid damaging the handle or grill table surface. We recommend that two people lift the grill into the grill table.5. Follow steps 6 through 10 on the previous page.
Thermometer
Welded Utensil Pins
(4 Each Side)
BambooSide Shelves
Draft DoorAsh Screen (BigJoe)
Cast Iron Cart
Bamboo Handle
Grill Dome
Grill Base
Top Vent
INTERNAL COMPONENTS
Fire Ring
Fire Grate
Fire Box
Cooking Grate
Locking Wheels

LIGHTING YOUR KAMADO JOE GRILL
Kamado Joe Fire Starter Cubes are one of the quickest ways to start your grill. They are odorless, smokeless and environmentally safe. Each cube burns up to 1300°F for 8-12 minutes to ensure that you’re ready to cook in 15 minutes.
CHARCOAL & AIR FLOW 1. Build a mound of charcoal that starts just below the holes in the side of the fire box with the peak of the mound just below the top of the fire ring.
2. Build the mound with large chunks at the bottom and smaller ones as you build it. Dumping charcoal directly into the fire box will allow small pieces to block the air holes in the fire grate, which can prevent you from reaching grilling and searing temperatures.
3. Charcoal can be relit 2-3 times for multiple cookings. Use the ash tool to stir the used charcoal, so the ashes will drop through the fire grate. Add 1/3 new charcoal to the existing charcoal and build a new mound. This works for well for roasting and grill temperatures. A full fire box of only fresh charcoal is recommended for smoking and searing temperatures.
Charcoal Tip: You can’t have too much charcoal, but you can have too little.
LIGHTING1. Light the charcoal with a fire starter cube or two, chimney starter, electric starter or other method.
2. Open the bottom draft door and leave the dome up.
3. Wait 8-10 minutes for the charcoal to build a small bed of embers.
4. Close the dome, open the top vent fully and adjust the air flow as needed as you near the target temperature.
Lighting Tip: Never use lighter fluid or any other combustible liquid.
CAUTIONSDo not use lighter fluid, gas or other combustible liquids. Liquid chemicals are a fire hazard and they will impregnate the ceramic material and impart an undesirable taste to food.
Do not use “Instant Light” briquettes. It will impart an undesirable taste.
Do not use briquette charcoal. This type of charcoal cannot reach temperatures above 500°F and it does not offer true charcoal flavor.
3

4
CONTROLLING THE TEMPERATURE
Achieving a consistent temperature as high as 750°F or as low as 225°F is easy on your Kamado Joe Grill. In fact, you can maintain low temperatures for up to 12 hours without adding any 100% Natural Lump Charcoal.
CONTROLLING THE TEMPERATURE1. Close the dome and fully open the top vent.
2. When you are 25°F from your target temperature, close the top vent down to about 1/4 open.
3. Wait one minute and close or open the top vent to lower or increase the temperature. A 1/4” can change the temperature by as much as 25°F.
Temperature Tip: Use all fresh charcoal for high temperature searing.
ACHIEVING LOW TEMPERATURES 1. For “low and slow” temperatures like 225°F, start with a very small fire in one area of the charcoal.
2. Close the dome and allow the temperature to come up slowly with the draft door open 2” and the top vent open 1/2” and the daisy wheel holes fully open.
3. This method may take 30-45 minutes to reach your target temperature, but it will ensure a long and slow cooking period.
Low Temperature Tip: It is easy to raise the temperature, but very difficult to lower the temperature if you go over your target temperature.
Diagram of air flow.

COOKING TEMPERATURE GUIDE
Grill Temperature Ranges
Internal Temperatures for Food
* Includes: chicken, duck, goose, turkey and all other foul.
To download (°F) and (°C) PDF versions of this guide: www.kamadojoe.com/download_info.html
5
Meat Type Rare Medium Rare Medium Medium
Well Well
Beef, Lamb, Veal Chops, Roasts & Steaks
120°F 125°F 135°F 145°F 155°F
Beef, Lamb, Veal Ground Meat
– – 140°F 150°F 160°F
Pork Chops, Roasts & Steaks
125°F 130°F 140°F 150°F 155°F
Pork Ground Meat – – 140°F 150°F 160°F
Pork Ham (Fresh) Use smoking or roasting temperatures. 140°F
Pork Ham (Precooked) Use smoking or roasting temperatures. 135°F
Pork Shoulder (Boston Butt)
Use smoking temperatures. 200°F
Poultry* Whole & PiecesUse smoking, roasting or grilling temperatures.
160°F
Seafood Fin FishCook until flesh is opaque, firm and separates easily with a fork.
Seafood Crab, Lobster & Shrimp
Cook until flesh is opaque and pearl white.
Seafood Clams & Oysters
Cook until shells open during cooking.
Seafood Scallops Cook until flesh is milky white, opaque and firm.
Smoking Baking/Roasting Grilling Searing
225-275°F 275-350°F 350-500°F 500-750°F

6
KAMADO JOE GRILL: BAKING
The top vent has two cast iron disks that are attached by a screw. The top disk with the small holes is called a “daisy wheel” and it’s used for low temperature cooking (smoking) when the bottom disk completely covers the opening. For baking, it’s best to use the bottom disk for achieving your desired temperature.
STEPS
1. When the 100% Natural Lump Charcoal is fully lit, secure the Heat Deflector legs in the notches of the fire ring and place the ceramic plate in the top position.
2. Place the Pizza Stone on top of the Heat Deflector. Close the dome and allow the plates to preheat for 10 minutes.
3. Make sure the bottom draft door is fully open. Open the top vent fully and monitor the temperature until it reaches your desired temperature.
3. Close the top vent half way, wait 1-2 minutes and check the temperature.
4. Adjusting the top vent by either closing it more (lower temperature) or opening it more (higher temperature) by a ¼” can change the temperature as much as 25°F.
5. Monitor the temperature during cooking and if you notice that the temperature has moved outside your desired range, adjust the top vent in very small increments.
COOKING TIP If you’re baking a pizza, sprinkle corn meal on Pizza Stone just before adding you pizza to prevent it from sticking.
TIP See all the available cooking configurations starting on page 10.
Baking configuration.

7
KAMADO JOE GRILL: ROASTING
The top vent has two cast iron disks that are attached by a screw. The top disk with the small holes is called a “daisy wheel” and it’s used for low temperature cooking (smoking) when the bottom disk completely covers the opening. For roasting, it’s best to use the bottom disk for achieving your desired temperature.
STEPS
1. When the 100% Natural Lump Charcoal is fully lit, secure the Heat Deflector legs in the notches of the fire ring and place the ceramic plate in the top or bottom position. The bottom position should be used if you want to place a drip pan between the Heat Deflector and the cooking grate. You will not damage the ceramic plate if you allow the drippings to fall onto it. For Heat Deflector cleaning instructions, see page 16.
2. Place the cooking grate on top of the Heat Deflector, and close the dome.
3. Make sure the bottom draft door is fully open. Open the top vent fully and monitor the temperature until it reaches your desired temperature.
4. Close the top vent half way, wait 1-2 minutes and check the temperature.
5. Adjusting the top vent by either closing it more (lower temperature) or opening it more (higher temperature) by a ¼” can change the temperature as much as 25°F.
6. Monitor the temperature during cooking and if you notice that the temperature has moved outside your desired range, adjust the top vent in very small increments.
TIP See all the available cooking configurations starting on page 10.
Roasting “Bottom” configuration.
8
KAMADO JOE GRILL: GRILLING
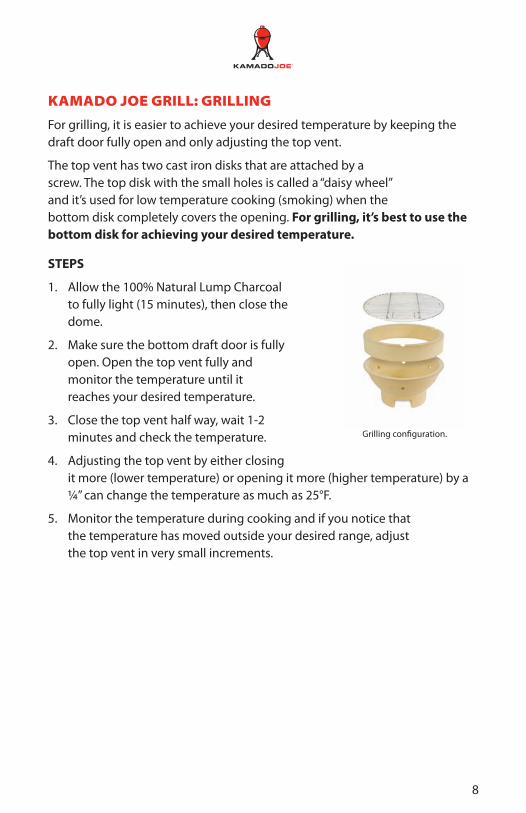
For grilling, it is easier to achieve your desired temperature by keeping the draft door fully open and only adjusting the top vent.
The top vent has two cast iron disks that are attached by a screw. The top disk with the small holes is called a “daisy wheel” and it’s used for low temperature cooking (smoking) when the bottom disk completely covers the opening. For grilling, it’s best to use the bottom disk for achieving your desired temperature.
STEPS
1. Allow the 100% Natural Lump Charcoal to fully light (15 minutes), then close the dome.
2. Make sure the bottom draft door is fully open. Open the top vent fully and monitor the temperature until it reaches your desired temperature.
3. Close the top vent half way, wait 1-2 minutes and check the temperature.
4. Adjusting the top vent by either closing it more (lower temperature) or opening it more (higher temperature) by a ¼” can change the temperature as much as 25°F.
5. Monitor the temperature during cooking and if you notice that the temperature has moved outside your desired range, adjust the top vent in very small increments.
Grilling configuration.
9
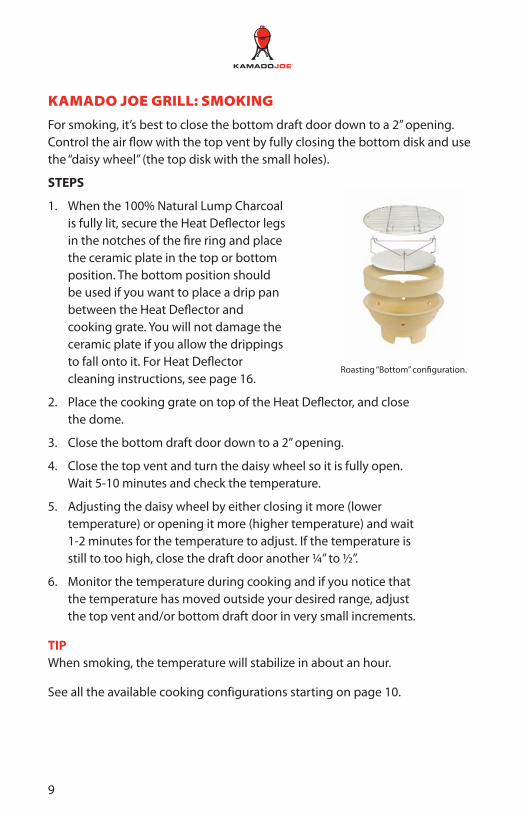
KAMADO JOE GRILL: SMOKING
For smoking, it’s best to close the bottom draft door down to a 2” opening. Control the air flow with the top vent by fully closing the bottom disk and use the “daisy wheel” (the top disk with the small holes).
STEPS
1. When the 100% Natural Lump Charcoal is fully lit, secure the Heat Deflector legs in the notches of the fire ring and place the ceramic plate in the top or bottom position. The bottom position should be used if you want to place a drip pan between the Heat Deflector and cooking grate. You will not damage the ceramic plate if you allow the drippings to fall onto it. For Heat Deflector cleaning instructions, see page 16.
2. Place the cooking grate on top of the Heat Deflector, and close the dome.
3. Close the bottom draft door down to a 2” opening.
4. Close the top vent and turn the daisy wheel so it is fully open. Wait 5-10 minutes and check the temperature.
5. Adjusting the daisy wheel by either closing it more (lower temperature) or opening it more (higher temperature) and wait 1-2 minutes for the temperature to adjust. If the temperature is still to too high, close the draft door another ¼” to ½”.
6. Monitor the temperature during cooking and if you notice that the temperature has moved outside your desired range, adjust the top vent and/or bottom draft door in very small increments.
TIP When smoking, the temperature will stabilize in about an hour.
See all the available cooking configurations starting on page 10.
Roasting “Bottom” configuration.

10
Figure 1 Figure 2
BAKING (Figure 1) Use this configuration for heating foods that can be cooked in ceramic or metal containers like casseroles and hot appetizers. A pizza cannot be baked directly on the Heat Deflector. The bottom crust will burn.
Accessories: Heat Deflector
BAKING (Figure 2) The perfect configuration for baking pizza, cookies or bread.
Accessories: Heat Deflector, Pizza Stone
COOKING CONFIGURATION: BAKING

11
Figure 1 Figure 2
ROASTING (Figure 1) This configuration works well for roasting chicken (with or without a Chicken Stand), turkey or other foods with indirect heat. Use this set up if you do not use a drip pan. It’s also a better set up than Figure 2 for adding wood chips.
Accessories: Heat Deflector, Chicken Stand (optional)
ROASTING (Figure 2) This configuration works just as well as Figure 1, but it allows you to use a drip pan between the Heat Deflector and cooking grate.
Accessories: Heat Deflector, Chicken Stand (optional)
COOKING CONFIGURATION: ROASTING

12
Figure 1 Figure 2
GRILLING (Figure 1) This configuration is the standard way of grilling on your Kamado Joe Grill. Great for steaks, hamburgers, chicken breasts or anything you want to cook directly over the 100% Natural Lump Charcoal.
Accessories: None
GRILLING (Figure 2) If you’re grilling delicate foods like seafood, fish or vegetables you can use the Heat Deflector metal stand to raise the food higher in your Kamado Joe Grill. Moving food away from the direct heat prevent the outside from charring as much as Figure 1.
To simulate Figure 2 without a Heat Deflector, you can use a Kamado Joe Grill Expander (see page 20).
Accessories: Heat Deflector
COOKING CONFIGURATION: GRILLING

13
Figure 1 Figure 2
SMOKING (Figure 1) This configuration works well for smoking Boston butts, brisket, ribs other foods with indirect heat. Use this set up if you do not use a drip pan. It’s also a better set up than Figure 2 for adding wood chips. Food will tend to cook faster with this set up.
Accessories: Heat Deflector
SMOKING (Figure 2) This configuration is the standard choice for low-temperature cooking with indirect heat. Use this set up if you use a drip pan.
Accessories: Heat Deflector
COOKING CONFIGURATION: SMOKING

14
Continued on next page.
CARE & MAINTENANCE
Your Kamado Joe Grill is made of quality materials, so general care and maintenance is minimal. The best way to protect your Kamado Joe from the elements is with a Grill Cover.
REMOVING ASHES Occasionally, you will need to remove the ashes underneath the fire box. Your Kamado Joe includes an ash tool and here are the steps for removing ashes from a grill in a cart and a grill table:
STEPS
1. If there is partially used charcoal in the grill, stir the charcoal so any ash in the fire box will drop down.
2. Open the bottom draft door, and place a small container under the opening to catch the ash. For grill tables, use a dust pan, paper plate or newspaper to catch the ash.
3. Insert the ash tool through the draft door and pull the ash out into the container.
Optional: Remove the cooking grate, fire ring and fire box from the grill, and use a small scoop to remove the ash. Reinsert the internal components.
GRILL BANDS Check the position and tightness of the bands at the beginning of each grilling season or annually.
If the bands are in the proper position, use a 10mm wrench and Allen wrench to check the tightness of each band connector. You should not be able to easily turn the Allen wrench while holding the nut in place. If loose, tighten firmly.
If a band is not centered on the gasket material, loosen the band enough to push it back in place. You can also place a block of wood on top of the band and lightly tap the wood with a hammer until the band is in position. Tighten the band connector with a 10mm wrench and Allen wrench.

15
CARE & MAINTENANCE
MOLD If your Kamado Joe Grill is not used for an extended period of time, moisture can be trapped inside the grill and you may see areas of mold or mildew on the cooking grate or internal ceramics. This can easily be eliminated, because Kamado Joe Grills are self-cleaning. Do not use bleach or other cleaning products. It will add an unpleasant taste to food.
Self-cleaning your Kamado Joe Grill:1. Add charcoal, light it and allow the grill to heat to a temperature of 600°F for 15 minutes with the dome closed.
2. Allow the grill to cool down completely.
3. Before cooking, brush the cooking grate with a standard grill brush. You can also use a soft bristle brush on the ceramics to remove any residue.
GASKET REPLACEMENT The gasket material will degrade over time. Depending on the amount of grill use, the exposed gasket material on the base and dome and the neck of the dome may need to be replaced every 2-3 years.
Gasket Replacement InstructionsSee the back of the insert included with the replacement kit or go to our website for detailed step-by-step instructions: www.kamadojoe.com/maintenance_gasket.html
ADJUSTING THE TENSION OF YOUR BIGJOE HINGE Over time, the hinge on your BigJoe may need to have the tension adjusted. This will ensure that the least amount of effort is required to fully raise the dome, and that it remains stationary when fully open.
Adjusting the Tension:1. Place the dome in the “closed” position.
2. Facing the back of the grill, use a 10mm Allen wrench to tighten the two largest bolts located on the lower back of the hinge case.
3. Check that the dome remains stationary in the “fully open” position. If not, close the dome, tighten the two bolts and recheck.
If fully tightening the two bolts still does not allow the dome to remain stationary in the “fully open” position, contact Kamado Joe for replacement springs and installation instructions.

16
CARE & MAINTENANCE
HEAT DEFLECTOR AND PIZZA STONE
Care and Cleaning of the Ceramic Plates1. Allow ceramics to cool completely before cleaning and indoor storage.2. Wipe off food material with a brush and store inside in a dry place.
TIPS • Do not place on tables or surfaces that are not heat-resistant.• Do not use either ceramic plate to cook with on a stove top.• Do not season with olive oil or other cooking oils.• Do not use cleaning chemicals or soap and water.• Do not soak in water. It may cause it to crack with the next use.
SAFETYFollow these safety guidelines at all times:1. Do not move your Kamado Joe grill while cooking or if hot ashes are present in the grill.
2. Do not use your Kamado Joe grill indoors or in an enclosed area. For outdoor use only, unless for commercial use by a licensed restaurant
professional in a properly ventilated area approved by building officials.
3. Do not use combustible liquids to light your Kamado Joe grill. Use only firelighters complying to EN 1860-3.
4. Keep children and pets away while using your Kamado Joe grill.
5. Do not remove your Kamado Joe grill from the cart or approved grill table and place it on a wooden deck, table or other surface. It can damage the surface or cause a fire.
6. Wait until the ashes are completely cool before removing them from your grill and disposing of them.
Important: How to Avoid a “Flashback” When CookingIf you operate your grill, then deprive the fire of oxygen by closing the top and bottom air vents, a sudden surge of flame called a “flashback” can occur if you suddenly open the dome of the grill. This occurs due to the sudden exposure to oxygen, which causes a brief but intense amount of white heat.
To prevent a flashback, open both vents and wait 5 seconds, then raise the dome about 1” for 2-3 seconds, then fully open the dome.

17
KAMADO JOE CLASSICJOE AND BIGJOE (WITH CART)
ClassicJoe and BigJoe are Available in Two Colors:• Red with Natural Bamboo Side Shelves and Handle• BlackwithTeak-finishedBambooSideShelvesandHandle
Our grills come fully assembled. Simply place the empty grill in the cart, insert the internal components and attach the top vent and side shelves. Set up time take about 15 minutes.
We build every Kamado Joe grill with high quality materials for years of beauty and use.
MATERIALS Base/Dome …………………… High Fire Heat-Resistant CeramicsGlaze …………………………… Heat-Resistant Ceramic CoatingHandle/Shelves (Red) ………… Finished BambooHandle/Shelves (Blk) ………… Bamboo/Teak FinishTop Vent/Fire Grate …………… Cast IronBands …………………………… Powder Coated Galvanized SteelSpring Hinge …………………… Powder Coated Galvanized Iron
ClassicJoe 18” BigJoe 24”

18
KAMADO JOE CLASSICJOE “STAND ALONE”
Kamado Joe “Stand Alone” Grills are designed to be used with Kamado Joe Grill Tables or in an outdoor kitchen. They carry the same materials, quality and dimensions as our standard configuration, with the elimination of the side shelves and cart.
Available in Two Colors and Four Configurations:• Red with Natural Bamboo, Black Steel Bands & Hinge• Red with Natural Bamboo, Stainless Steel Bands, Hinge & Handle• BlackwithTeak-finishedBamboo,BlackSteelBands&Hinge• BlackwithTeak-finishedBamboo,StainlessSteelBands,Hinge&Handle
Stand Alone Grills come fully assembled. Simply place the empty grill in the Grill Table, insert the internal components and attach the top vent. Set up time is less than 30 minutes.
MATERIALS Base/Dome …………………… High Fire Heat-Resistant CeramicsGlaze …………………………… Heat-Resistant Ceramic CoatingHandle/Shelves (Red) ………… Finished BambooHandle/Shelves (Blk) ………… Bamboo/Teak FinishTop Vent/Fire Grate …………… Cast IronBands (Black) …………………… Powder Coated Galvanized SteelBands (Stainless Steel) ………… Stainless SteelSpring Hinge …………………… Powder Coated Galvanized Iron
Set of 3 Matching Grill Feet in
Black or Red Included

19
CHICKEN STANDThe Kamado Joe Chicken Stand is the perfect way to roast chicken. Fill the stand with beer, juices or your favorite marinade for incredibly tender chicken.
100% NATURAL LUMP CHARCOALOur 100% Natural Lump Charcoal burns cleaner, hotter and longer than other brands, and adds true charcoal flavor to. Cook as low as 225°F or as high as 750°F. Available in 22 lb/10kg bags.
FIRE STARTER CUBESKamado Joe Fire Starter Cubes are a quick and easy way to light your grill. They are odorless, smokeless, environmentally safe and will light when wet. Each cube burns up to 1300°F for 8-12 minutes.
GRILL COVERSOur Premium Gill Covers for ClassicJoe and BigJoe are made of durable vinyl for all-weather protection of your Kamado Joe Grill. Custom fit and available in black.
20
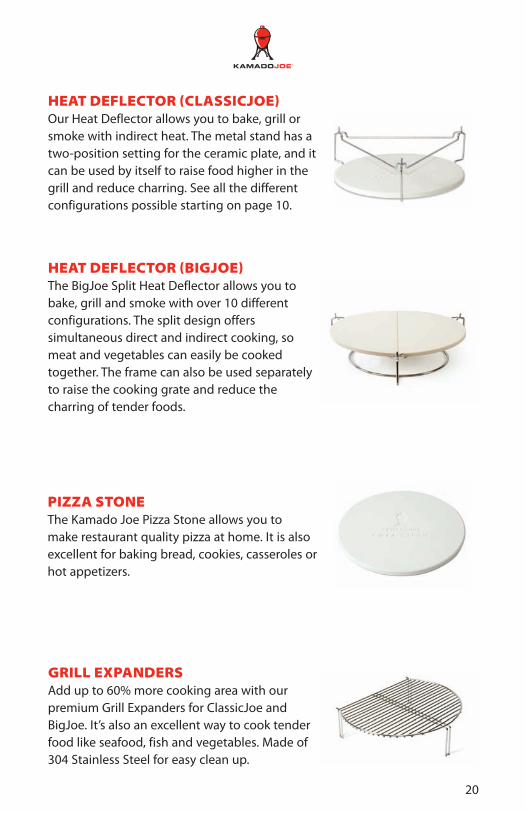
GRILL EXPANDERSAdd up to 60% more cooking area with our premium Grill Expanders for ClassicJoe and BigJoe. It’s also an excellent way to cook tender food like seafood, fish and vegetables. Made of 304 Stainless Steel for easy clean up.
PIZZA STONEThe Kamado Joe Pizza Stone allows you to make restaurant quality pizza at home. It is also excellent for baking bread, cookies, casseroles or hot appetizers.
HEAT DEFLECTOR (CLASSICJOE)Our Heat Deflector allows you to bake, grill or smoke with indirect heat. The metal stand has a two-position setting for the ceramic plate, and it can be used by itself to raise food higher in the grill and reduce charring. See all the different configurations possible starting on page 10.
HEAT DEFLECTOR (BIGJOE)The BigJoe Split Heat Deflector allows you to bake, grill and smoke with over 10 different configurations. The split design offers simultaneous direct and indirect cooking, so meat and vegetables can easily be cooked together. The frame can also be used separately to raise the cooking grate and reduce the charring of tender foods.

21
RIB RACKOur 304 stainless steel rib rack allows you to cook more ribs by placing the ribs vertically into your grill. You can also place other cuts of meat in the rib rack like chicken pieces or pork chops.
GRILL GRIPPERMade of durable 304 stainless steel for years of beauty and use, our grill gripper securely clamps onto any cooking grate. Avoid the mess and potential burn hazard of moving or repositioning your cooking grate.

22
STAINLESS STEEL GRILL TABLEOur Stainless Steel Grill Table is the ultimate in beauty and weather resistance. Constructed of brushed 304 stainless steel. Comes fully assembled.
Features:• Fold-downSideShelves• LockingCastersforstability• Spaciousstoragearea• CondimentTray
TEAK GRILL TABLEEnjoy the beauty and weather-resistance of a Kamado Joe Teak Grill Table. Designed for plenty of working area on the large table top. Assembly is quick and easy in as little as 15 minutes.
Features:• SolidTeakconstruction• LockingCastersforstability

23
KAMADO JOE LIMITED WARRANTY
Models Covered: ClassicJoe, ClassicJoe Stand Alone and BigJoe
Limited Lifetime Warranty on Ceramic Parts Kamado Joe warrants that all ceramic parts used in this Kamado Joe grill and smoker are free of defects in material and workmanship for as long as the original purchaser owns the grill.
5-Year Warranty on Metal Parts Kamado Joe warrants that all metal and cast iron parts used in this Kamado Joe grill and smoker are free of defects in material and workmanship for a period of five (5) years.
3-Year Warranty on Heat Deflector and Pizza Stone Kamado Joe warrants that the heat deflector frame and ceramic plate(s) and the pizza stone used for the Kamado Joe grill and smoker are free of defects in material and workmanship for a period of five (3) years.
1-Year Warranty on Thermometer and Gaskets Kamado Joe warrants that the thermometer and gaskets used in this Kamado Joe grill and smoker are free of defects in material and workmanship for a period of one (1) year.
When Does Warranty Coverage Begin? Warranty coverage commences on the original date of purchase and covers only the original purchaser. For the warranty to apply, you must register your grill at: www.kamadojoe.com/form_grill_registration.html
If a defect in material or workmanship is discovered during the applicable warranty period under normal use and maintenance, Kamado Joe will, at our sole option, replace or repair the defective component at no cost to you for the component itself. This warranty does not apply to labor, freight, or any other cost associated with the service, repair or operation of the grill.
What is Not Covered? This warranty does not apply to damage caused by abuse or use of the product for purposes other than that for which it is designed, damage caused by lack of proper use, assembly, maintenance or installation, damages caused by accidents or natural disasters, damage caused by unauthorized attachments or modifications, or damage during transport. This warranty does not cover thermometers or felt gaskets. This warranty does not cover damage from normal wear and tear from use of the product (for example, scratches, dents, dings and chipping) or changes in the appearance of the grill that do not affect its performance.
THIS LIMITED WARRANTY IS EXCLUSIVE AND IN LIEU OF ANY OTHER WARRANTY, WRITTEN OR ORAL, EXPRESS OR IMPLIED, INCLUDING BUT NOT LIMITED TO THE WARRANTY OF MERCHANTABILITY OR FITNESS FOR A PARTICULAR PURPOSE. THE DURATION OF ANY IMPLIED WARRANTIES, INCLUDING ANY IMPLIED WARRANTY OF MERCHANTABILITY OR FITNESS FOR A PARTICULAR PURPOSE IS EXPRESSLY LIMITED TO THE DURATION OF THE WARRANTY PERIOD FOR THE APPLICABLE COMPONENT. Some states do not allow limitations on how long an implied warranty lasts, so the above limitation may not apply to you.

24
THE PURCHASER’S EXCLUSIVE REMEDY FOR BREACH OF THIS LIMITED WARRANTY OR OF ANY IMPLIED WARRANTY SHALL BE LIMITED AS SPECIFIED HEREIN TO REPLACEMENT. IN NO CASE SHALL KAMADO JOE BE LIABLE FOR ANY SPECIAL, INCIDENTAL OR CONSEQUENTIAL DAMAGES. Some states do not allow the exclusion or limitation of special, incidental or consequential damages, so the above limitation or exclusion may not apply to you.
What Will Void the Warranty? Purchasing any Kamado Joe product through an unauthorized dealer voids the warranty. An unauthorized dealer is defined as, but not limited to online retailers, discount clubs, big box stores or any retailer who has not been expressly granted permission by Kamado Joe to sell Kamado Joe products.
For Warranty Service For warranty service, please contact your local dealer. For international warranty service, you must contact the distributor for the country of origin of sale (See www.kamadojoe.com/stores.html). Before you call, please have the following information available:
•ModelNumber(seeratingplate)•SerialNumber(seeratingplate)•Proofofpurchasebytheoriginalowner•Dateofinstallation•Briefdescriptionoftheproblem
Your satisfaction is importance to us. If a problem cannot be resolved to your satisfaction, please write, call or email us.
Kamado Joe 2865 N. Berkeley Lake Rd. NW, Suite 6Duluth, Georgia 30096Tel: (678) 866-0642 or (877) 215-6299Fax: (678) 866-4175
This limited warranty gives you specific legal rights and you may have other rights that vary from state to state.
ONLINE WARRANTY REGISTRATION
REGISTER YOUR KAMADO JOE AT WWW.KAMADOJOE.COM
REGISTER ONLINE Registering your Kamado Joe grill is easy. Go to our website and fill out the online registration form.
If you do not have an internet connection. Write down your serial number located on the bottom of your grill and take it to your local retailer. They will be happy to help you register your Kamado Joe grill.

KAMADO JOE2865 North Berkeley Lake Road NW, Suite 6
Duluth, Georgia 30096 USA
Rev 7/12