Embed Size (px)
Citation preview
User Guide for Cisco Digital Media Manager 4.1
Americas HeadquartersCisco Systems, Inc.170 West Tasman DriveSan Jose, CA 95134-1706 USAhttp://www.cisco.comTel: 408 526-4000
800 553-NETS (6387)Fax: 408 527-0883
Text Part Number: OL-13984-01

THE SPECIFICATIONS AND INFORMATION REGARDING THE PRODUCTS IN THIS MANUAL ARE SUBJECT TO CHANGE WITHOUT NOTICE. ALL STATEMENTS, INFORMATION, AND RECOMMENDATIONS IN THIS MANUAL ARE BELIEVED TO BE ACCURATE BUT ARE PRESENTED WITHOUT WARRANTY OF ANY KIND, EXPRESS OR IMPLIED. USERS MUST TAKE FULL RESPONSIBILITY FOR THEIR APPLICATION OF ANY PRODUCTS.
THE SOFTWARE LICENSE AND LIMITED WARRANTY FOR THE ACCOMPANYING PRODUCT ARE SET FORTH IN THE INFORMATION PACKET THAT SHIPPED WITH THE PRODUCT AND ARE INCORPORATED HEREIN BY THIS REFERENCE. IF YOU ARE UNABLE TO LOCATE THE SOFTWARE LICENSE OR LIMITED WARRANTY, CONTACT YOUR CISCO REPRESENTATIVE FOR A COPY.
The Cisco implementation of TCP header compression is an adaptation of a program developed by the University of California, Berkeley (UCB) as part of UCB’s public domain version of the UNIX operating system. All rights reserved. Copyright © 1981, Regents of the University of California.
NOTWITHSTANDING ANY OTHER WARRANTY HEREIN, ALL DOCUMENT FILES AND SOFTWARE OF THESE SUPPLIERS ARE PROVIDED “AS IS” WITH ALL FAULTS. CISCO AND THE ABOVE-NAMED SUPPLIERS DISCLAIM ALL WARRANTIES, EXPRESSED OR IMPLIED, INCLUDING, WITHOUT LIMITATION, THOSE OF MERCHANTABILITY, FITNESS FOR A PARTICULAR PURPOSE AND NONINFRINGEMENT OR ARISING FROM A COURSE OF DEALING, USAGE, OR TRADE PRACTICE.
IN NO EVENT SHALL CISCO OR ITS SUPPLIERS BE LIABLE FOR ANY INDIRECT, SPECIAL, CONSEQUENTIAL, OR INCIDENTAL DAMAGES, INCLUDING, WITHOUT LIMITATION, LOST PROFITS OR LOSS OR DAMAGE TO DATA ARISING OUT OF THE USE OR INABILITY TO USE THIS MANUAL, EVEN IF CISCO OR ITS SUPPLIERS HAVE BEEN ADVISED OF THE POSSIBILITY OF SUCH DAMAGES.
Any Internet Protocol (IP) addresses used in this document are not intended to be actual addresses. Any examples, command display output, and figures included in the document are shown for illustrative purposes only. Any use of actual IP addresses in illustrative content is unintentional and coincidental.
User Guide for Cisco Digital Media Manager 4.1 © 2006–2007 Cisco Systems, Inc. All rights reserved.
CCSP, the Cisco Square Bridge logo, Follow Me Browsing, and StackWise are trademarks of Cisco Systems, Inc.; Changing the Way We Work, Live, Play, and Learn, and iQuick Study are service marks of Cisco Systems, Inc.; and Access Registrar, Aironet, ASIST, BPX, Catalyst, CCDA, CCDP, CCIE, CCIP, CCNA, CCNP, Cisco, the Cisco Certified Internetwork Expert logo, Cisco IOS, Cisco Press, Cisco Systems, Cisco Systems Capital, the Cisco Systems logo, Cisco Unity, Empowering the Internet Generation, Enterprise/Solver, EtherChannel, EtherFast, EtherSwitch, Fast Step, FormShare, GigaDrive, GigaStack, HomeLink, Internet Quotient, IOS, IP/TV, iQ Expertise, the iQ logo, iQ Net Readiness Scorecard, LightStream, Linksys, MeetingPlace, MGX, the Networkers logo, Networking Academy, Network Registrar, Packet, PIX, Post-Routing, Pre-Routing, ProConnect, RateMUX, ScriptShare, SlideCast, SMARTnet, StrataView Plus, SwitchProbe, TeleRouter, The Fastest Way to Increase Your Internet Quotient, TransPath, and VCO are registered trademarks of Cisco Systems, Inc. and/or its affiliates in the United States and certain other countries.
All other trademarks mentioned in this document or Website are the property of their respective owners. The use of the word partner does not imply a partnership relationship between Cisco and any other company. (0501R)
OL-13984-01
C O N T E N T S
Preface vii
Document Conventions vii
Obtaining Documentation, Obtaining Support, and Security Guidelines viii
C H A P T E R 1 Overview 1-1
Basic DMS Concepts and Vocabulary 1-1
Client System Requirements 1-1
Understanding DMM Modules and Features 1-1
C H A P T E R 2 Using DMM-Admin to View and Install Licenses 2-1
Viewing the Installed Licenses 2-1
Installing A License 2-1
C H A P T E R 3 Using DMM-DSM for Digital Signage 3-1
Logging in to DMM-DSM for the First Time 3-2
Configuring DMPs to Support Centralized Management 3-2
Enabling the CVBS (Component Video) Interface on DMPs 3-3
Managing and Grouping DMPs 3-3
Creating Categories and Organizing Assets for Digital Signage 3-8
Developing Presentations, Templates, and Playlists for Signage 3-12
Before You Start to Use Digital Media Designer 3-13
Getting Started with DMD 3-14
DMD User Interface Reference 3-16
Understanding the Menus and Their Options 3-17
Understanding the Toolbar and Its Options 3-20
Understanding the Panels and Their Options 3-21
Creating and Organizing Playlists for Your Presentations 3-27
Understanding the Playlist Items Area and Its Options 3-28
Understanding the Content Chooser and Its Options 3-29
Supported Fonts 3-31
Supported X11 Bitmap Fonts 3-32
Supported TrueType Fonts 3-33
iiiUser Guide for Cisco Digital Media Manager 4.1

Contents
Using Advanced Tasks 3-34
Deploying Saved Commands and Presentations to Your DMPs 3-42
Deploying Commands and Presentations Immediately 3-42
Scheduling Future Deployments of Commands and Presentations 3-43
Understanding Tooltips in the Scheduler Timeline 3-45
Understanding Popup Windows in the Scheduler Timeline 3-46
Preempting a Recurring Deployment for a One-time Event 3-48
Using Deployment Reports 3-48
Using Administrative Options 3-49
Configuring DMM-DSM User Accounts 3-49
Limiting User Permissions 3-51
Configuring DMM-DSM Server Settings 3-54
Configuring DMM-DSM to Send Notification Settings 3-54
Configuring DMM-DSM to Use ACNS 3-55
Configuring DMM-DSM to Deploy to External Servers 3-56
Viewing the DMM-DSM ‘About Box’ 3-57
Testing for the Presence of, and Obtaining, the Required Java Version 3-57
Common Scenarios for Using DMM-DSM 3-58
Understanding and Using Digital Signage Status Report Charts 3-59
Viewing the DMP Access Status Summary 3-59
Viewing Available and Used Disk Space 3-60
C H A P T E R 4 Using DMM-VPM for Desktop Video 4-1
Using Features Under the Setup Tab 4-1
Configuring Administrative and Network Settings 4-2
Viewing and Understanding Environment Parameters 4-3
Configuring the Settings to Use a Video Portal 4-3
Configuring the Location Settings for Deployments 4-5
Using Features Under the Users Tab 4-6
Creating and Working with User Accounts 4-6
Configuring Authentication Settings 4-10
Using Features Under the Video Portal Tab 4-15
Working with Programs, Videos and Video Parts 4-16
Approving or Denying the Request to Approve a Video Part 4-21
Understanding the Live Event Module 4-22
Understanding and Working with Synchronized Slides 4-22
Best Practices for Generating the Slides to Be Synchronized 4-23
Best Practices for Importing the Slides to Be Synchronized 4-23
Operating a Slide Show 4-24
ivUser Guide for Cisco Digital Media Manager 4.1
OL-13984-01
Contents
What Video Portal Audiences See When You Use Synchronized Slides 4-24
Understanding and Working with Audience Questions 4-24
Moderating Questions 4-25
Answering Questions 4-27
Creating and Working with Playlists 4-27
Creating and Working with Content Categories 4-30
Creating and Working with Interstitials 4-31
Creating and Working with Interstitial Sequences 4-33
Creating and Working with Tickers 4-35
Customizing Your Video Portal 4-36
Configuring the Settings to Manage Deployments 4-39
Understanding Event Types 4-40
Scheduling a New Deployment 4-40
Scheduling a Pre-Event Listing 4-42
Scheduling a Live Event 4-43
Scheduling a Post-Event Listing 4-43
Scheduling an On-Demand Deployment 4-44
Learning the URL for a Deployed Video Part 4-44
Using Features Under the Encoders Tab 4-45
Adding an Encoder to DMM-VPM 4-45
Testing the Ability to Publish Streams 4-46
Capturing a Live Stream and Publishing the Output File as Video On-Demand 4-47
Managing Push Configurations 4-48
Creating and Working with Encoding Formats 4-48
Managing Transcoding Jobs 4-49
Using Your DME 1000 or DME 2000 to Set Up a Live Event 4-51
Setting Up Live Events Using Third-Party Live Streams 4-53
vUser Guide for Cisco Digital Media Manager 4.1
OL-13984-01

Contents
viUser Guide for Cisco Digital Media Manager 4.1
OL-13984-01
Preface
Cisco Digital Media System is the collective name for a product family that consists of Cisco Digital Media Manager (DMM) appliances, Cisco Video Portal appliances, Cisco Digital Media Player (DMP) endpoints, Cisco Digital Media Encoder (DME) devices, and all associated software components.
This guide tells you how to use the modules that you licensed for your Cisco Digital Media Manager 4.0 software and how to use the Cisco Video Portal Reports 4.0 software that is preinstalled on a Video Portal appliance. Depending on the module licenses that you purchase, DMM helps you to create and manage an online video portal, create and manage a digital signage network, or create and manage both.
The intended audience for this guide is DMM users who create, publish, or manage media for a video portal or a digital signage network. This guide is not meant for systems or network administrators who install, configure, or troubleshoot DMS products. See Cisco.com for related DMS and DMM user documentation
Document ConventionsThis guide uses these text formatting conventions:
Note Means reader take note. Notes contain helpful suggestions or references to material not covered in the publication.
Item Convention
Commands and keywords boldface font
Variables for which you supply values italic font
Displayed session and system information screen font
Information you enter boldface screen font
Variables you enter italic screen font
Menu items and button names boldface font
Selecting a menu item in paragraphs Option > Network Preferences
Selecting a menu item in tables Option > Network Preferences
viiUser Guide for Cisco Digital Media Manager 4.1
OL-13984-01
Preface Obtaining Documentation, Obtaining Support, and Security Guidelines
Caution Means reader be careful. In this situation, you might do something that could result in equipment damage or loss of data.
Tip Means the following information will help you solve a problem. The tips information might not be troubleshooting or even an action, but could be useful information, similar to a Timesaver.
Obtaining Documentation, Obtaining Support, and Security Guidelines
For information on obtaining documentation, obtaining support, providing documentation feedback, security guidelines, and also recommended aliases and general Cisco documents, see the monthly What’s New in Cisco Product Documentation, which also lists all new and revised Cisco technical documentation, at:
http://www.cisco.com/en/US/docs/general/whatsnew/whatsnew.html
viiiUser Guide for Cisco Digital Media Manager 4.1
OL-13984-01
OL-13984-01
C H A P T E R1
OverviewThis overview contains the following sections:
• Basic DMS Concepts and Vocabulary, page 1-1
• Client System Requirements, page 1-1
• Understanding DMM Modules and Features, page 1-1
Basic DMS Concepts and VocabularyDMS helps organizations of any size to create, manage, organize, and deliver video content (whether live or on-demand) and digital signage content over an IP network to any general or targeted audience. With DMS, you can:
• Communicate with targeted customers, investors, press, and analysts.
• Deliver live and on-demand events to audiences in any location.
• Deliver critical information and training to employees, suppliers, and partners.
• Deliver educational content to students.
To understand some of the most commonly used DMS terms, abbreviations, and initialisms, see FAQs and Troubleshooting Guide for Cisco Digital Media System 4.x on Cisco.com.
Client System RequirementsTo understand the client system requirements to use DMS products, see Release Notes for Cisco Digital Media System 4.1 on Cisco.com.
Understanding DMM Modules and FeaturesDMM features are organized into modules; you purchase separately the licenses to use the modules. Depending on what you purchase, you can use DMM to:
• Manage a digital video network and deliver video content to any audience.
• Manage a digital signage network and deliver many kinds of content throughout your network.
• Manage both a digital video network and a digital signage network.
1-1User Guide for Cisco Digital Media Manager 4.1

Chapter 1 Overview Understanding DMM Modules and Features
DMM includes an administrative module at no additional cost that helps you to install licenses to use the other modules. To understand the modules and learn about their features, see:
• Chapter 2, “Using DMM-Admin to View and Install Licenses.”
• Chapter 3, “Using DMM-DSM for Digital Signage.”
• Chapter 4, “Using DMM-VPM for Desktop Video.”
1-2User Guide for Cisco Digital Media Manager 4.1
OL-13984-01
OL-13984-01
C H A P T E R2
Using DMM-Admin to View and Install LicensesRevised October 6, 2007 This chapter describes DMM licensing options and features for software modules. See:
• Viewing the Installed Licenses, page 2-1
• Installing A License, page 2-1
Viewing the Installed LicensesTo see which DMM features you have licensed:
Step 1 Select Administrator Module from the untitled list at the top far-right of any page.
Step 2 Click View Current License.
Installing A LicenseTo obtain a DMM software license key and use it to activate the modules that you purchased, do the following:
Step 1 Confirm that you know the serial number and IP address for your DMM appliance. If you do not know the serial number or IP address, do the following:
a. At the login prompt on your DMM appliance, use the admin username and its associated password to log in to AAI. In the displayed menu, the SHOW_INFO option is highlighted by default.
b. Press Enter, then write down these values that AAI shows to you:
• The IP address for for your DMM appliance.
• The serial number for your DMM appliance.
2-1User Guide for Cisco Digital Media Manager 4.1
Chapter 2 Using DMM-Admin to View and Install Licenses Installing A License
Step 2 Compose an email message that includes or identifies all of the following:
• The Cisco sales order number for your DMM purchase.
• The DMM appliance serial number.
• Your email address.
• The name of your organization.
• The department name within your organization.
• The DMM module (or modules) that you purchased.
• If you purchased the DMM module for digital signage, include the number of Cisco Digital Media Player (DMP) devices that you will manage centrally. Permitted increments for the number of DMP devices are multiples of 10.
Step 3 Send the email message to [email protected].
Step 4 After you receive the license key file from Cisco, save a local copy of it.
Step 5 To load DMM in a web browser, use the DMM appliance IP address that you saw in AAI (http://<DMM_IP_address>:8080/). Alternatively, if you already loaded DMM in your browser for any reason, select Administrator Module from the untitled list at the top far-right of any page.
Step 6 Click Install/Upgrade License.
Step 7 Click Browse, find and select the license file where you saved it, then click Open.
Step 8 Click Install License.
The DMM software features and modules that you purchased are now enabled.
Tip If you receive multiple license files, repeat the procedure until all of your licenses are installed.
2-2User Guide for Cisco Digital Media Manager 4.1
OL-13984-01
OL-13984-01
C H A P T E R3
Using DMM-DSM for Digital SignageRevised April 29, 2008
Tip Features in DMM-DSM are available to you if you purchased and installed the required license. For information about licensing, see Chapter 2, “Using DMM-Admin to View and Install Licenses.”
DMM-DSM is a flexible environment from which to create, manage, and run a digital signage network. Its simple but powerful design and publishing features help you to deliver compelling presentations for digital signage, while its centralized management features help you to manage a global network of on-premise DMP displays for any purpose. The possible use cases for DMM-DSM include:
• Marketing — Describe products and services directly to your in-store customers.
• Customer experience — Deliver entertainment and information to reduce perceived wait times.
• Messaging — Broadcast executive and internal communications in real time.
• Training — Deliver cost-effective, flexible training.
• Information — Deliver real-time schedules, news, and way-faring information where people need it.
• Advertising — Sell advertising time and space to third parties.
• Branding — Communicate about your brand consistently.
This chapter describes DMM-DSM features and options in these sections:
• Logging in to DMM-DSM for the First Time, page 3-2
• Configuring DMPs to Support Centralized Management, page 3-2
• Enabling the CVBS (Component Video) Interface on DMPs, page 3-3
• Managing and Grouping DMPs, page 3-3
• Creating Categories and Organizing Assets for Digital Signage, page 3-8
• Developing Presentations, Templates, and Playlists for Signage, page 3-12
• Using Advanced Tasks, page 3-34
• Deploying Saved Commands and Presentations to Your DMPs, page 3-42
• Using Administrative Options, page 3-49
• Common Scenarios for Using DMM-DSM, page 3-58
• Understanding and Using Digital Signage Status Report Charts, page 3-59
3-1User Guide for Cisco Digital Media Manager 4.1
Chapter 3 Using DMM-DSM for Digital Signage Logging in to DMM-DSM for the First Time
Logging in to DMM-DSM for the First TimeThe first time that you log in to DMM-DSM, the username is admin and the password is default. We strongly recommend that you change at least the password immediately. To learn how to change the username as well as the password, see Configuring DMM-DSM User Accounts, page 3-49.
Configuring DMPs to Support Centralized ManagementYou must configure your DMPs to recognize the authority of your DMM appliance, so that you can manage them centrally in DMM-DSM. This process occurs automatically when you autodiscover DMPs, but if autodiscovery is somehow not suitable, you can also perform the required steps manually.
• To understand autoregistration, see Managing and Grouping DMPs, page 3-3.
• To learn how to use autoregistration, see the “{Add New | Edit} DMP Group” row in Table 3-1 on page 3-5.
DMM-DSM and your DMPs communicate over TCP port 7777 when centralized management is enabled.
Caution To stop untrusted DMM appliances from being able to seize control of your DMPs, you must configure your network firewall to restrict which devices you will permit to send inbound traffic to your DMP over TCP port 7777. If you do not know how to work with access control lists, see the manufacturer documentation for your firewall.
Do the following for each DMP that you will manage centrally.
Step 1 To log in to the embedded device management software, point your browser to the DMP IP address.
Step 2 At the login prompt, enter the username and the password that you configured for the DMP.
Step 3 In the Settings area, click Centralized Management, then enter the required values:
• DMM Appliance IP Address — The IP address of your DMM appliance.
• DMM-DSM Server Timeout (in seconds) — The maximum number of seconds that your DMP should wait for a response from your DMM appliance.
Step 4 To confirm your entries and to implement them until you change them or until you restart the DMP, click Apply.
Step 5 In the Administration area, to make your configuration changes permanent even after you restart your DMP, click Save Configuration, then (after you see the Save Configuration page) click Save.
Step 6 Click Restart DMP, then (after you see the Restart DMP page) click Restart.
3-2User Guide for Cisco Digital Media Manager 4.1
OL-13984-01
Chapter 3 Using DMM-DSM for Digital Signage Enabling the CVBS (Component Video) Interface on DMPs
Enabling the CVBS (Component Video) Interface on DMPsTo take advantage of the latest features, options, and modern technologies, most digital signage environments use digital displays. However, some networks might include legacy devices and technologies, including analog displays. If you use analog displays or have any other reason to use Component Video cables when you connect your DMPs to their displays, you must first enable the CVBS interface on your DMPs.
Step 1 Select Digital Signage Module from the untitled list at the top far-right of any page.
Step 2 Select Digital Media Players > Advanced Tasks, then click the System Tasks row in the Application Types list.
Step 3 Click Add New Application.
Step 4 After the page is refreshed, select the required options and enter the required values for this task:
a. In the Name field, enter DMP_Enable_CVBS_(Component_Video).
b. In the Description field, enter Enable DMP support for Component Video output.
c. From the Request Type list, select Set.
d. In the Request field, enter sigma.conn=6&sigma.tvst=91&sigma.cspc=1&mib.save=1.
Step 5 To save your selections, click Submit.
Step 6 To deploy to any of your DMPs the “DMP_Enable_CVBS_(Component_Video)” task that you defined and saved, see Deploying Saved Commands and Presentations to Your DMPs, page 3-42.
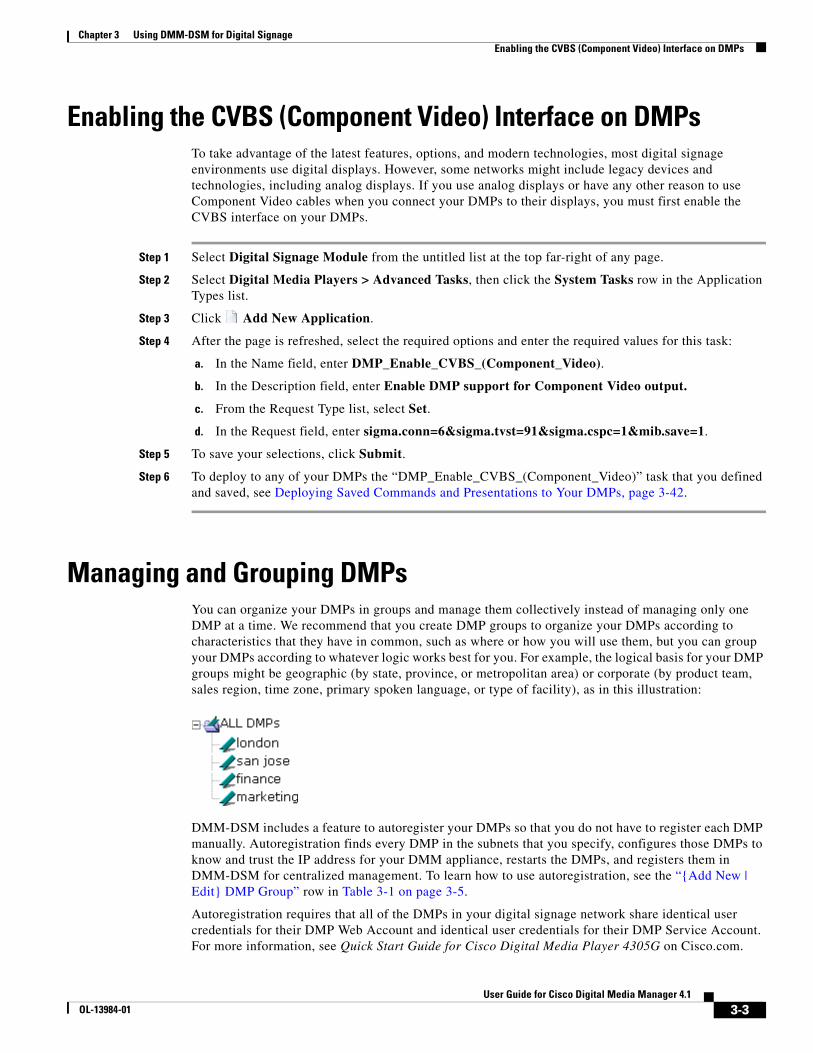
Managing and Grouping DMPsYou can organize your DMPs in groups and manage them collectively instead of managing only one DMP at a time. We recommend that you create DMP groups to organize your DMPs according to characteristics that they have in common, such as where or how you will use them, but you can group your DMPs according to whatever logic works best for you. For example, the logical basis for your DMP groups might be geographic (by state, province, or metropolitan area) or corporate (by product team, sales region, time zone, primary spoken language, or type of facility), as in this illustration:
DMM-DSM includes a feature to autoregister your DMPs so that you do not have to register each DMP manually. Autoregistration finds every DMP in the subnets that you specify, configures those DMPs to know and trust the IP address for your DMM appliance, restarts the DMPs, and registers them in DMM-DSM for centralized management. To learn how to use autoregistration, see the “{Add New | Edit} DMP Group” row in Table 3-1 on page 3-5.
Autoregistration requires that all of the DMPs in your digital signage network share identical user credentials for their DMP Web Account and identical user credentials for their DMP Service Account. For more information, see Quick Start Guide for Cisco Digital Media Player 4305G on Cisco.com.
3-3User Guide for Cisco Digital Media Manager 4.1
OL-13984-01
Chapter 3 Using DMM-DSM for Digital Signage Managing and Grouping DMPs
TCP ports 6666 and 7777 are open on DMPs and you cannot close them. DMM-DSM uses TCP port 7777 to communicate with DMPs and Cisco staff use TCP port 6666 to troubleshoot DMPs.
Step 1 Select Digital Signage Module from the untitled list at the top far-right of any page.
Step 2 Select Digital Media Players > DMP Manager.
Step 3 Select the options and enter the values that meet your requirements.
If you do not understand your options, see Table 3-1 on page 3-5. When you make selections anywhere on the DMP Manager page, it is updated automatically to show the options and features that are relevant to your selection.
Note Important considerations apply to your digital signage network if any of your DMPs uses an HTTP proxy server. It is unusual and not scalable to manage many DMPs that share one HTTP proxy server. We recommend that you do not use proxies.
• We recommend that you use Web Cache Communication Protocol (WCCP) to reroute HTTP requests transparently, instead of using a proxy server. To learn how to use WCCP if you do not already know how, see Cisco.com.
• To configure one DMP to use one proxy server, use DMPDM, not DMM-DSM. See the “Adjusting Basic Network Settings” topic in User Guide for Cisco Digital Media Player Device Manager 1.1 on Cisco.com.
• To configure many DMPs to share one proxy server, even though we recommend that you do not, Select Digital Media Players > Advanced Tasks, click System Tasks in the list of defined tasks, then click Add New Application. Enter a name and description, then select Set from the Request Type list and use this syntax in the Request field: init.BROWSER_PROXY=<on | off>&init.BROWSER_PROXY_IP= <proxy_server_IP_address>&init.BROWSER_PROXY_PORT=<proxy_server_logical_port>.
For example, if the proxy server uses 192.168.12.12 as its IP address and delivers proxy services through port 5678, the Request string would look like this: init.BROWSER_PROXY=on&init. BROWSER_PROXY_IP=192.168.12.12&init.BROWSER_PROXY_PORT=5678&mib.save=1&mng.reboot=1.
To remove that example proxy, you would select Set from the Request type list, then enter this Request string: init.BROWSER_PROXY_IP=&init.BROWSER_PROXY_PORT=&init.BROWSER_PROXY=off &mib.save=1&mng.reboot=1.
3-4User Guide for Cisco Digital Media Manager 4.1
OL-13984-01
Chapter 3 Using DMM-DSM for Digital Signage Managing and Grouping DMPs
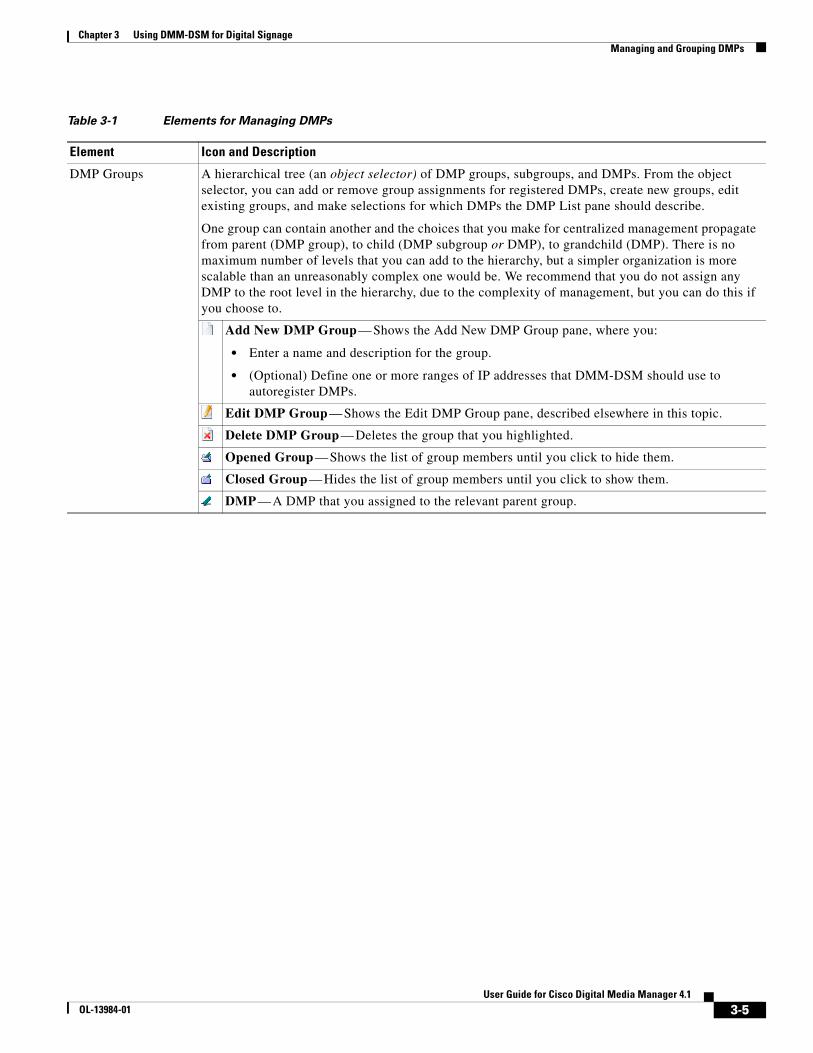
Table 3-1 Elements for Managing DMPs
Element Icon and Description
DMP Groups A hierarchical tree (an object selector) of DMP groups, subgroups, and DMPs. From the object selector, you can add or remove group assignments for registered DMPs, create new groups, edit existing groups, and make selections for which DMPs the DMP List pane should describe.
One group can contain another and the choices that you make for centralized management propagate from parent (DMP group), to child (DMP subgroup or DMP), to grandchild (DMP). There is no maximum number of levels that you can add to the hierarchy, but a simpler organization is more scalable than an unreasonably complex one would be. We recommend that you do not assign any DMP to the root level in the hierarchy, due to the complexity of management, but you can do this if you choose to.
Add New DMP Group — Shows the Add New DMP Group pane, where you:
• Enter a name and description for the group.
• (Optional) Define one or more ranges of IP addresses that DMM-DSM should use to autoregister DMPs.
Edit DMP Group — Shows the Edit DMP Group pane, described elsewhere in this topic.
Delete DMP Group — Deletes the group that you highlighted.
Opened Group — Shows the list of group members until you click to hide them.
Closed Group — Hides the list of group members until you click to show them.
DMP — A DMP that you assigned to the relevant parent group.
3-5User Guide for Cisco Digital Media Manager 4.1
OL-13984-01
Chapter 3 Using DMM-DSM for Digital Signage Managing and Grouping DMPs
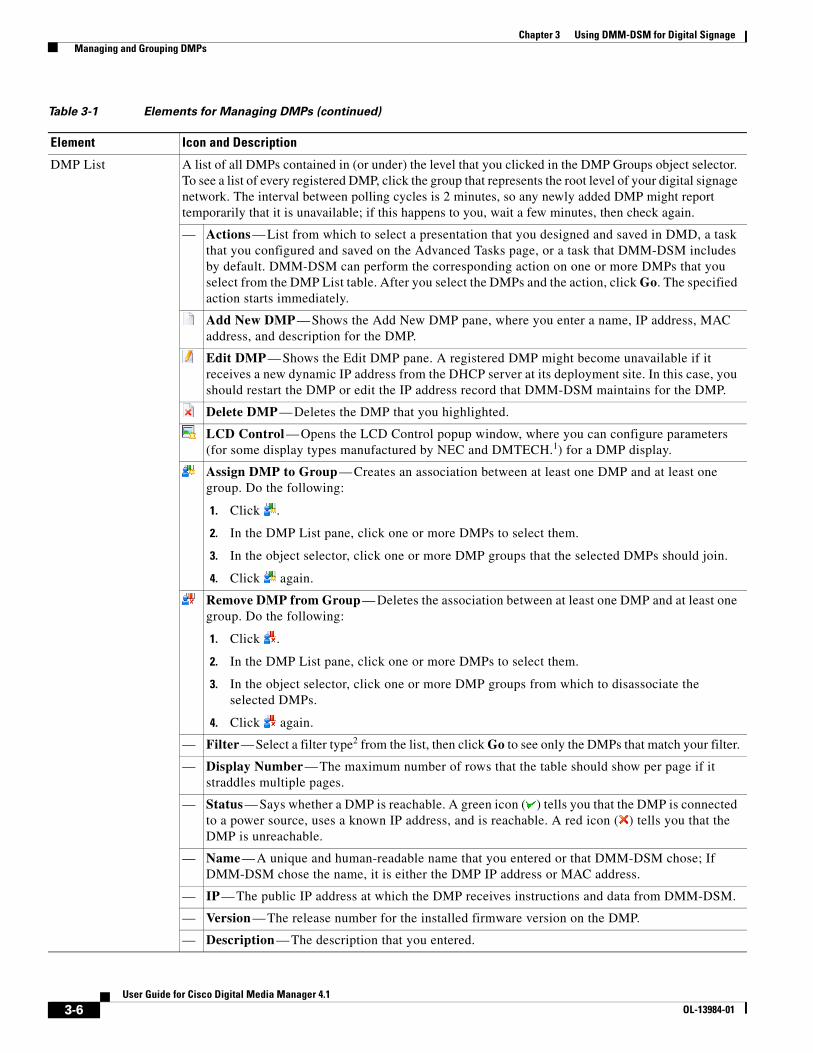
DMP List A list of all DMPs contained in (or under) the level that you clicked in the DMP Groups object selector. To see a list of every registered DMP, click the group that represents the root level of your digital signage network. The interval between polling cycles is 2 minutes, so any newly added DMP might report temporarily that it is unavailable; if this happens to you, wait a few minutes, then check again.
— Actions — List from which to select a presentation that you designed and saved in DMD, a task that you configured and saved on the Advanced Tasks page, or a task that DMM-DSM includes by default. DMM-DSM can perform the corresponding action on one or more DMPs that you select from the DMP List table. After you select the DMPs and the action, click Go. The specified action starts immediately.
Add New DMP — Shows the Add New DMP pane, where you enter a name, IP address, MAC address, and description for the DMP.
Edit DMP — Shows the Edit DMP pane. A registered DMP might become unavailable if it receives a new dynamic IP address from the DHCP server at its deployment site. In this case, you should restart the DMP or edit the IP address record that DMM-DSM maintains for the DMP.
Delete DMP — Deletes the DMP that you highlighted.
LCD Control — Opens the LCD Control popup window, where you can configure parameters (for some display types manufactured by NEC and DMTECH.1) for a DMP display.
Assign DMP to Group — Creates an association between at least one DMP and at least one group. Do the following:
1. Click .
2. In the DMP List pane, click one or more DMPs to select them.
3. In the object selector, click one or more DMP groups that the selected DMPs should join.
4. Click again.
Remove DMP from Group — Deletes the association between at least one DMP and at least one group. Do the following:
1. Click .
2. In the DMP List pane, click one or more DMPs to select them.
3. In the object selector, click one or more DMP groups from which to disassociate the selected DMPs.
4. Click again.
— Filter — Select a filter type2 from the list, then click Go to see only the DMPs that match your filter.
— Display Number — The maximum number of rows that the table should show per page if it straddles multiple pages.
— Status — Says whether a DMP is reachable. A green icon ( ) tells you that the DMP is connected to a power source, uses a known IP address, and is reachable. A red icon ( ) tells you that the DMP is unreachable.
— Name — A unique and human-readable name that you entered or that DMM-DSM chose; If DMM-DSM chose the name, it is either the DMP IP address or MAC address.
— IP — The public IP address at which the DMP receives instructions and data from DMM-DSM.
— Version — The release number for the installed firmware version on the DMP.
— Description — The description that you entered.
Table 3-1 Elements for Managing DMPs (continued)
Element Icon and Description
3-6User Guide for Cisco Digital Media Manager 4.1
OL-13984-01
Chapter 3 Using DMM-DSM for Digital Signage Managing and Grouping DMPs
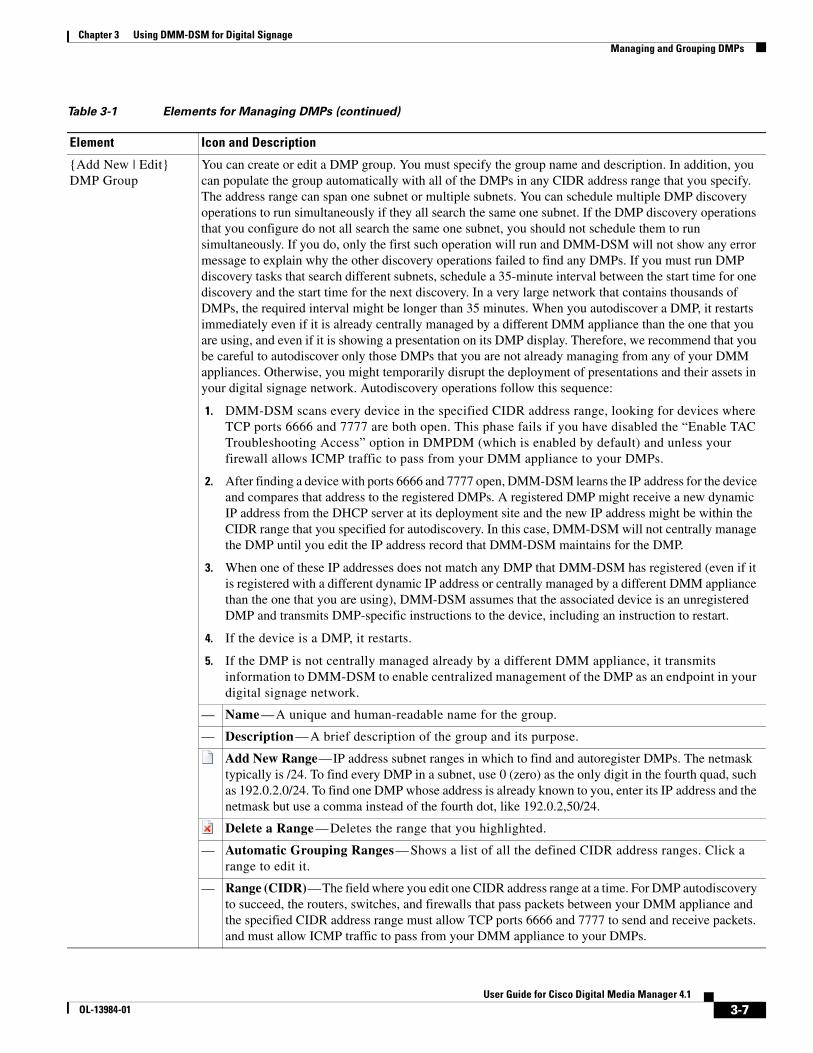
{Add New | Edit} DMP Group
You can create or edit a DMP group. You must specify the group name and description. In addition, you can populate the group automatically with all of the DMPs in any CIDR address range that you specify. The address range can span one subnet or multiple subnets. You can schedule multiple DMP discovery operations to run simultaneously if they all search the same one subnet. If the DMP discovery operations that you configure do not all search the same one subnet, you should not schedule them to run simultaneously. If you do, only the first such operation will run and DMM-DSM will not show any error message to explain why the other discovery operations failed to find any DMPs. If you must run DMP discovery tasks that search different subnets, schedule a 35-minute interval between the start time for one discovery and the start time for the next discovery. In a very large network that contains thousands of DMPs, the required interval might be longer than 35 minutes. When you autodiscover a DMP, it restarts immediately even if it is already centrally managed by a different DMM appliance than the one that you are using, and even if it is showing a presentation on its DMP display. Therefore, we recommend that you be careful to autodiscover only those DMPs that you are not already managing from any of your DMM appliances. Otherwise, you might temporarily disrupt the deployment of presentations and their assets in your digital signage network. Autodiscovery operations follow this sequence:
1. DMM-DSM scans every device in the specified CIDR address range, looking for devices where TCP ports 6666 and 7777 are both open. This phase fails if you have disabled the “Enable TAC Troubleshooting Access” option in DMPDM (which is enabled by default) and unless your firewall allows ICMP traffic to pass from your DMM appliance to your DMPs.
2. After finding a device with ports 6666 and 7777 open, DMM-DSM learns the IP address for the device and compares that address to the registered DMPs. A registered DMP might receive a new dynamic IP address from the DHCP server at its deployment site and the new IP address might be within the CIDR range that you specified for autodiscovery. In this case, DMM-DSM will not centrally manage the DMP until you edit the IP address record that DMM-DSM maintains for the DMP.
3. When one of these IP addresses does not match any DMP that DMM-DSM has registered (even if it is registered with a different dynamic IP address or centrally managed by a different DMM appliance than the one that you are using), DMM-DSM assumes that the associated device is an unregistered DMP and transmits DMP-specific instructions to the device, including an instruction to restart.
4. If the device is a DMP, it restarts.
5. If the DMP is not centrally managed already by a different DMM appliance, it transmits information to DMM-DSM to enable centralized management of the DMP as an endpoint in your digital signage network.
— Name — A unique and human-readable name for the group.
— Description — A brief description of the group and its purpose.
Add New Range — IP address subnet ranges in which to find and autoregister DMPs. The netmask typically is /24. To find every DMP in a subnet, use 0 (zero) as the only digit in the fourth quad, such as 192.0.2.0/24. To find one DMP whose address is already known to you, enter its IP address and the netmask but use a comma instead of the fourth dot, like 192.0.2,50/24.
Delete a Range — Deletes the range that you highlighted.
— Automatic Grouping Ranges — Shows a list of all the defined CIDR address ranges. Click a range to edit it.
— Range (CIDR) — The field where you edit one CIDR address range at a time. For DMP autodiscovery to succeed, the routers, switches, and firewalls that pass packets between your DMM appliance and the specified CIDR address range must allow TCP ports 6666 and 7777 to send and receive packets. and must allow ICMP traffic to pass from your DMM appliance to your DMPs.
Table 3-1 Elements for Managing DMPs (continued)
Element Icon and Description
3-7User Guide for Cisco Digital Media Manager 4.1
OL-13984-01
Chapter 3 Using DMM-DSM for Digital Signage Creating Categories and Organizing Assets for Digital Signage
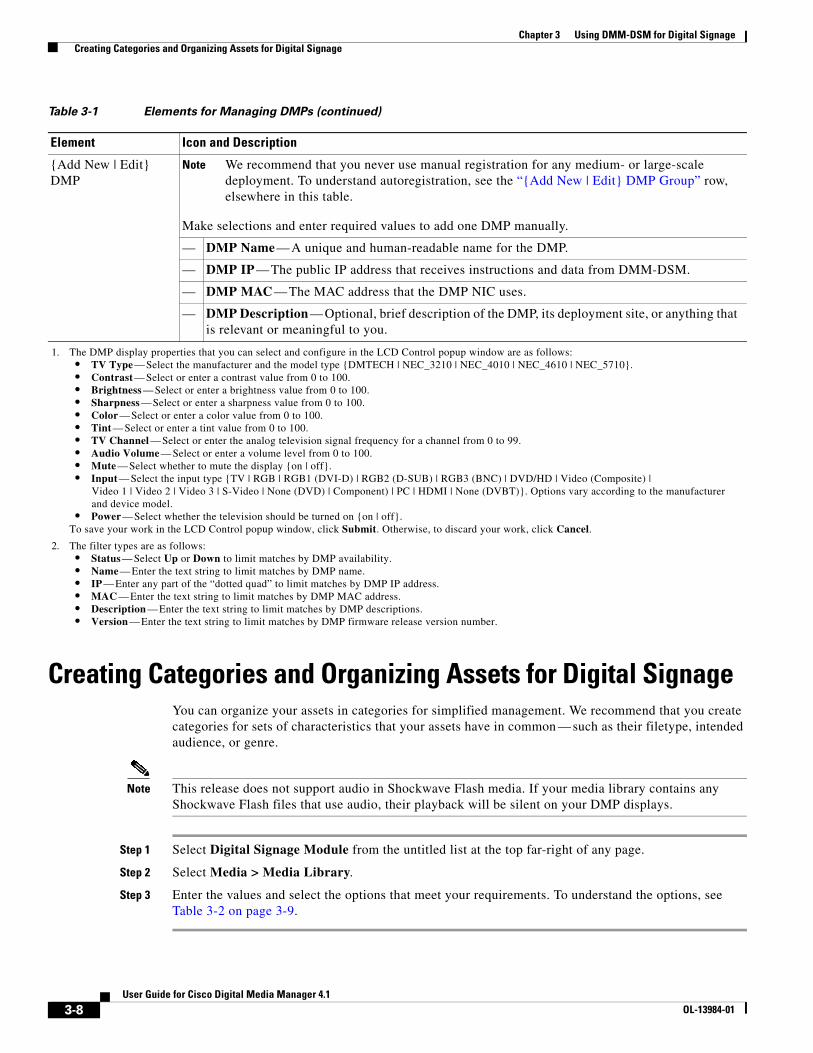
Creating Categories and Organizing Assets for Digital SignageYou can organize your assets in categories for simplified management. We recommend that you create categories for sets of characteristics that your assets have in common — such as their filetype, intended audience, or genre.
Note This release does not support audio in Shockwave Flash media. If your media library contains any Shockwave Flash files that use audio, their playback will be silent on your DMP displays.
Step 1 Select Digital Signage Module from the untitled list at the top far-right of any page.
Step 2 Select Media > Media Library.
Step 3 Enter the values and select the options that meet your requirements. To understand the options, see Table 3-2 on page 3-9.
{Add New | Edit} DMP
Note We recommend that you never use manual registration for any medium- or large-scale deployment. To understand autoregistration, see the “{Add New | Edit} DMP Group” row, elsewhere in this table.
Make selections and enter required values to add one DMP manually.
— DMP Name — A unique and human-readable name for the DMP.
— DMP IP — The public IP address that receives instructions and data from DMM-DSM.
— DMP MAC — The MAC address that the DMP NIC uses.
— DMP Description — Optional, brief description of the DMP, its deployment site, or anything that is relevant or meaningful to you.
1. The DMP display properties that you can select and configure in the LCD Control popup window are as follows: • TV Type — Select the manufacturer and the model type {DMTECH | NEC_3210 | NEC_4010 | NEC_4610 | NEC_5710}. • Contrast — Select or enter a contrast value from 0 to 100. • Brightness — Select or enter a brightness value from 0 to 100. • Sharpness — Select or enter a sharpness value from 0 to 100. • Color — Select or enter a color value from 0 to 100. • Tint — Select or enter a tint value from 0 to 100. • TV Channel — Select or enter the analog television signal frequency for a channel from 0 to 99. • Audio Volume — Select or enter a volume level from 0 to 100. • Mute — Select whether to mute the display {on | off}. • Input — Select the input type {TV | RGB | RGB1 (DVI-D) | RGB2 (D-SUB) | RGB3 (BNC) | DVD/HD | Video (Composite) | Video 1 | Video 2 | Video 3 | S-Video | None (DVD) | Component) | PC | HDMI | None (DVBT)}. Options vary according to the manufacturer and device model. • Power — Select whether the television should be turned on {on | off}. To save your work in the LCD Control popup window, click Submit. Otherwise, to discard your work, click Cancel.
2. The filter types are as follows: • Status — Select Up or Down to limit matches by DMP availability. • Name — Enter the text string to limit matches by DMP name. • IP — Enter any part of the “dotted quad” to limit matches by DMP IP address. • MAC — Enter the text string to limit matches by DMP MAC address. • Description — Enter the text string to limit matches by DMP descriptions. • Version — Enter the text string to limit matches by DMP firmware release version number.
Table 3-1 Elements for Managing DMPs (continued)
Element Icon and Description
3-8User Guide for Cisco Digital Media Manager 4.1
OL-13984-01
Chapter 3 Using DMM-DSM for Digital Signage Creating Categories and Organizing Assets for Digital Signage
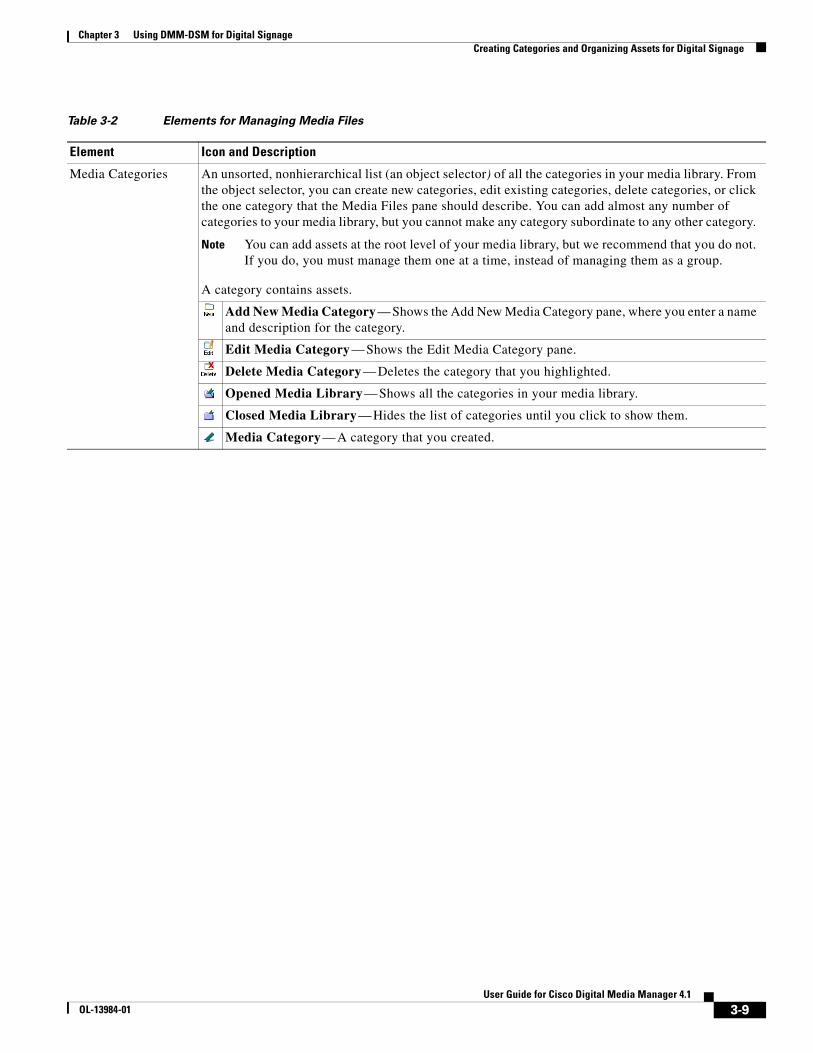
Table 3-2 Elements for Managing Media Files
Element Icon and Description
Media Categories An unsorted, nonhierarchical list (an object selector) of all the categories in your media library. From the object selector, you can create new categories, edit existing categories, delete categories, or click the one category that the Media Files pane should describe. You can add almost any number of categories to your media library, but you cannot make any category subordinate to any other category.
Note You can add assets at the root level of your media library, but we recommend that you do not. If you do, you must manage them one at a time, instead of managing them as a group.
A category contains assets.
Add New Media Category — Shows the Add New Media Category pane, where you enter a name and description for the category.
Edit Media Category — Shows the Edit Media Category pane.
Delete Media Category — Deletes the category that you highlighted.
Opened Media Library — Shows all the categories in your media library.
Closed Media Library — Hides the list of categories until you click to show them.
Media Category — A category that you created.
3-9User Guide for Cisco Digital Media Manager 4.1
OL-13984-01
Chapter 3 Using DMM-DSM for Digital Signage Creating Categories and Organizing Assets for Digital Signage
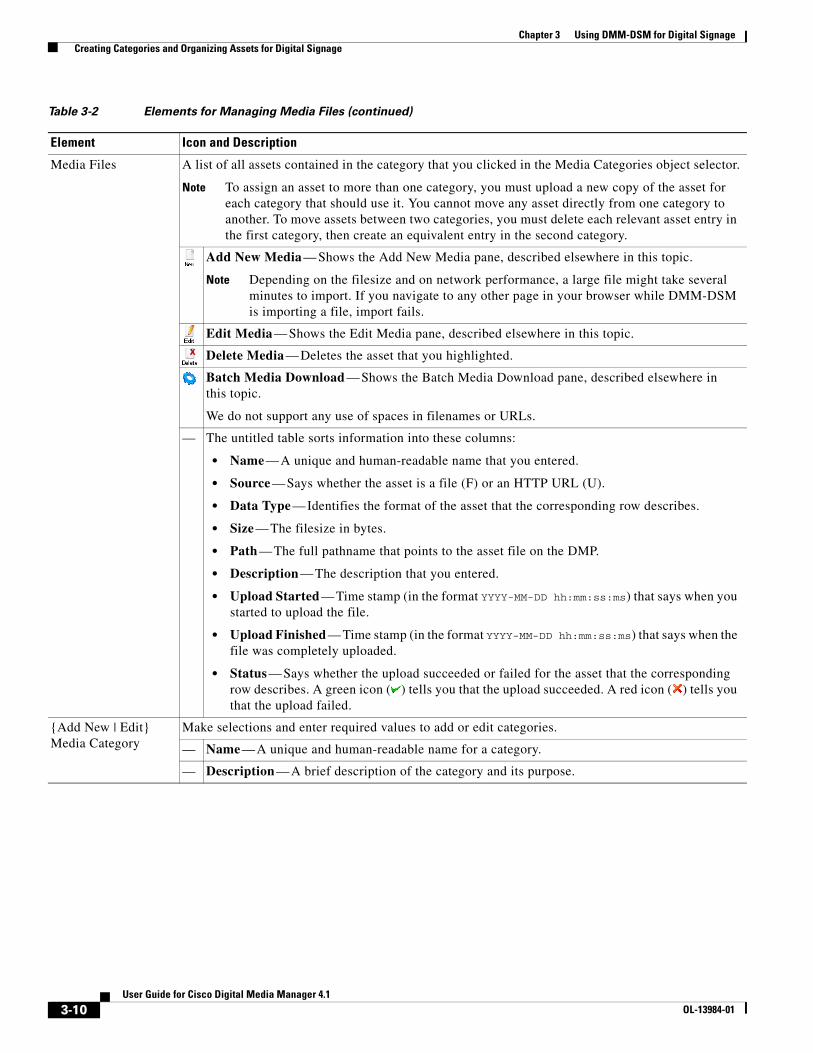
Media Files A list of all assets contained in the category that you clicked in the Media Categories object selector.
Note To assign an asset to more than one category, you must upload a new copy of the asset for each category that should use it. You cannot move any asset directly from one category to another. To move assets between two categories, you must delete each relevant asset entry in the first category, then create an equivalent entry in the second category.
Add New Media — Shows the Add New Media pane, described elsewhere in this topic.
Note Depending on the filesize and on network performance, a large file might take several minutes to import. If you navigate to any other page in your browser while DMM-DSM is importing a file, import fails.
Edit Media — Shows the Edit Media pane, described elsewhere in this topic.
Delete Media — Deletes the asset that you highlighted.
Batch Media Download — Shows the Batch Media Download pane, described elsewhere in this topic.
We do not support any use of spaces in filenames or URLs.
— The untitled table sorts information into these columns:
• Name — A unique and human-readable name that you entered.
• Source — Says whether the asset is a file (F) or an HTTP URL (U).
• Data Type — Identifies the format of the asset that the corresponding row describes.
• Size — The filesize in bytes.
• Path — The full pathname that points to the asset file on the DMP.
• Description — The description that you entered.
• Upload Started — Time stamp (in the format YYYY-MM-DD hh:mm:ss:ms) that says when you started to upload the file.
• Upload Finished — Time stamp (in the format YYYY-MM-DD hh:mm:ss:ms) that says when the file was completely uploaded.
• Status — Says whether the upload succeeded or failed for the asset that the corresponding row describes. A green icon ( ) tells you that the upload succeeded. A red icon ( ) tells you that the upload failed.
{Add New | Edit} Media Category
Make selections and enter required values to add or edit categories.
— Name — A unique and human-readable name for a category.
— Description — A brief description of the category and its purpose.
Table 3-2 Elements for Managing Media Files (continued)
Element Icon and Description
3-10User Guide for Cisco Digital Media Manager 4.1
OL-13984-01
Chapter 3 Using DMM-DSM for Digital Signage Creating Categories and Organizing Assets for Digital Signage
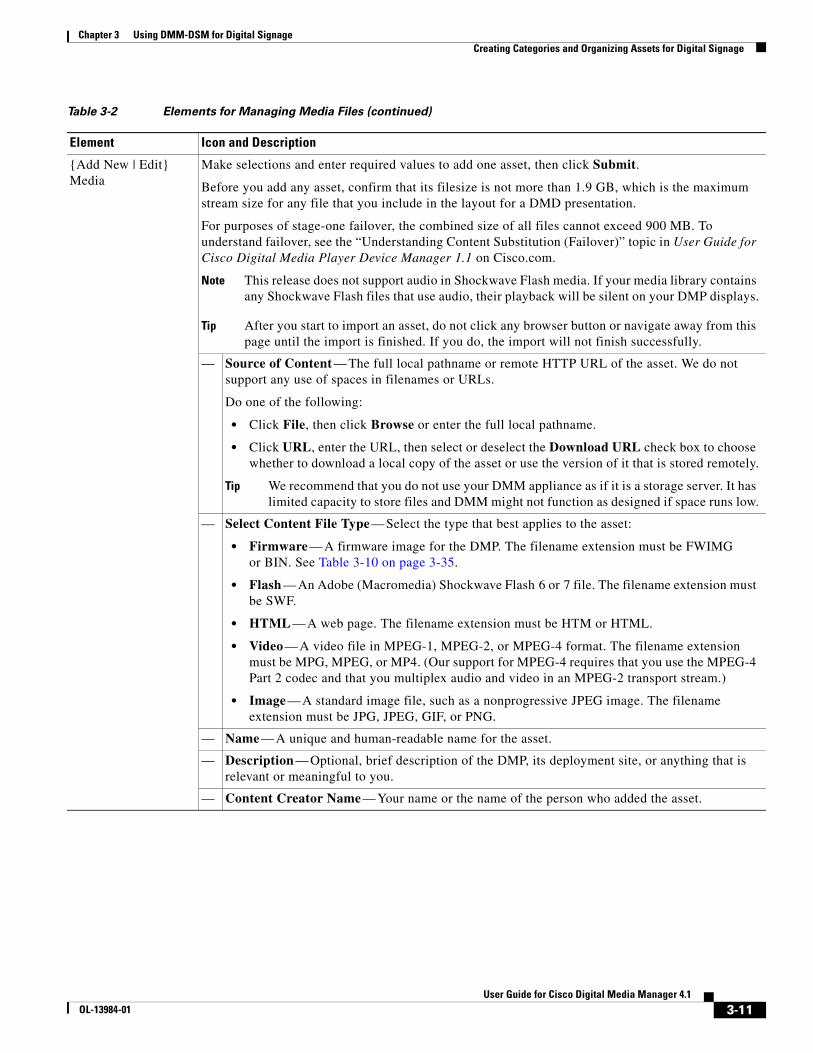
{Add New | Edit} Media
Make selections and enter required values to add one asset, then click Submit.
Before you add any asset, confirm that its filesize is not more than 1.9 GB, which is the maximum stream size for any file that you include in the layout for a DMD presentation.
For purposes of stage-one failover, the combined size of all files cannot exceed 900 MB. To understand failover, see the “Understanding Content Substitution (Failover)” topic in User Guide for Cisco Digital Media Player Device Manager 1.1 on Cisco.com.
Note This release does not support audio in Shockwave Flash media. If your media library contains any Shockwave Flash files that use audio, their playback will be silent on your DMP displays.
Tip After you start to import an asset, do not click any browser button or navigate away from this page until the import is finished. If you do, the import will not finish successfully.
— Source of Content — The full local pathname or remote HTTP URL of the asset. We do not support any use of spaces in filenames or URLs.
Do one of the following:
• Click File, then click Browse or enter the full local pathname.
• Click URL, enter the URL, then select or deselect the Download URL check box to choose whether to download a local copy of the asset or use the version of it that is stored remotely.
Tip We recommend that you do not use your DMM appliance as if it is a storage server. It has limited capacity to store files and DMM might not function as designed if space runs low.
— Select Content File Type — Select the type that best applies to the asset:
• Firmware — A firmware image for the DMP. The filename extension must be FWIMG or BIN. See Table 3-10 on page 3-35.
• Flash — An Adobe (Macromedia) Shockwave Flash 6 or 7 file. The filename extension must be SWF.
• HTML — A web page. The filename extension must be HTM or HTML.
• Video — A video file in MPEG-1, MPEG-2, or MPEG-4 format. The filename extension must be MPG, MPEG, or MP4. (Our support for MPEG-4 requires that you use the MPEG-4 Part 2 codec and that you multiplex audio and video in an MPEG-2 transport stream.)
• Image — A standard image file, such as a nonprogressive JPEG image. The filename extension must be JPG, JPEG, GIF, or PNG.
— Name — A unique and human-readable name for the asset.
— Description — Optional, brief description of the DMP, its deployment site, or anything that is relevant or meaningful to you.
— Content Creator Name — Your name or the name of the person who added the asset.
Table 3-2 Elements for Managing Media Files (continued)
Element Icon and Description
3-11User Guide for Cisco Digital Media Manager 4.1
OL-13984-01
Chapter 3 Using DMM-DSM for Digital Signage Developing Presentations, Templates, and Playlists for Signage
Developing Presentations, Templates, and Playlists for SignageDigital Media Designer (DMD) is a powerful, drag-and-drop design tool that helps you to create customized presentations for digital signage. It includes predesigned templates that you can use as a jumping-off point for your designs or you can create designs that are entirely your own. DMD supports horizontal and vertical screen orientations. With DMD, you:
• Subdivide the screen space on a DMP display into rectangular areas called screen zones.
• Select the media objects, called assets, to play back in those screen zones — including media from digital video files, JPEG files, SWF files, RSS feeds, ordinary web pages, and other popular media types.
• Add assets to, and configure the timeline for, any screen zone that represents a playlist.
Batch Content Download
Make selections and enter required values to add multiple assets, then click Submit. The amount of time that the batch download operation requires depends on the speed of your connection, the number of directory levels that you search for downloadable files, and the total combined filesize of all files that you transfer.
Before you add any asset, confirm that its filesize is not more than 1.9 GB, which is the maximum stream size for any file that you include in the layout for a DMD presentation.
Note This release does not support audio in Shockwave Flash media. If your media library contains any Shockwave Flash files that use audio, their playback will be silent on your DMP displays.
— Base URL — An HTTP URL that points to a directory on a server. The directory that you point to serves as the root-level URL for the batch download operation; every file that you download is retrieved from this directory or from one of its children at a lower level. We do not support any use of spaces in URLs.
— Pattern — The filename pattern that identifies which files to download. For example, to download every file that uses the three-letter MPG filename extension, the pattern is *.MPG. We do not support any use of spaces in filenames.
Note Do not enter the filename pattern to use any unsupported filetype.
— Content Type — Select the type that best applies to files in the batch download:
• Firmware — Firmware image files for the DMP. The filename extension must be FWIMG or BIN. See Table 3-10 on page 3-35.
• Flash — Adobe (Macromedia) Shockwave Flash 6 or 7 files. The filename extension must be SWF.
• HTML — Web pages. The filename extension must be HTM or HTML.
• Video — Video files in MPEG-1, MPEG-2, or MPEG-4 format. The filename extension must be MPG, MPEG, or MP4.
• Image — Standard image files, such as nonprogressive JPEG images. The filename extension must be JPG, JPEG, GIF, or PNG.
— Levels — The number of levels below the specified base URL to search for (and download) files with filenames that match the specified pattern.
Table 3-2 Elements for Managing Media Files (continued)
Element Icon and Description
3-12User Guide for Cisco Digital Media Manager 4.1
OL-13984-01
Chapter 3 Using DMM-DSM for Digital Signage Developing Presentations, Templates, and Playlists for Signage
Although you use your browser to start DMD, it runs outside your browser, in Java Web Start. You can open and work with only one template or one presentation at a time. Presentations for digital signage most commonly divide screen space into two, three, or four screen zones, but you can create more zones for a presentation in DMD if you need more.
After you create, edit, and save a presentation, you can deploy it to your DMPs from the DMM-DSM scheduler. Each affected DMP then restarts automatically before it starts to show the presentation. To learn how to deploy a presentation to your DMPs, see Deploying Saved Commands and Presentations to Your DMPs, page 3-42.
This section contains these topics:
• Before You Start to Use Digital Media Designer, page 3-13
• Getting Started with DMD, page 3-14
• DMD User Interface Reference, page 3-16
• Creating and Organizing Playlists for Your Presentations, page 3-27
• Supported Fonts, page 3-31
Before You Start to Use Digital Media DesignerUse the following checklist to track your compliance with the requirements and recommended best practices for using DMD successfully.
Requirements and Recommendations
Prerequisites
1. Ensure that Java Runtime Engine (JRE) 1.6.0 or later is installed on your PC. Also confirm that it is configured to use English as its language, and that it is working correctly. The JRE 1.6.0 release is part of Java Version 6.
• To learn exactly which JRE release you are using and to confirm that it is working correctly, go to http://java.com/en/download/help/testvm.xml.
• To understand the Java release naming conventions, which have changed over time, see http://java.sun.com/javase/namechange.html.
• To obtain the required JRE, go to http://javasoft.com, click Java SE, then download the latest JRE version.
• Apple maintains and distributes its own implementations of Java software for Mac OS users. To learn if Apple has made available any JRE that is based on JRE 1.6.0, see http://www.apple.com/java. Alternatively, registered Apple Developer Connection (http://connect.apple.com/) members might find that Apple has released a preview version of a compatible JRE. We make no claims about the suitability of such software for any purpose and recommend that you test all software thoroughly before you rely on it.
2. If you use Windows, select Start > Settings > Control Panel > Internet Options, then click the Advanced tab. Scroll to the Browsing area, deselect the Enable third party browser extensions (requires restart) check box, then click OK.
3. Ensure that your DMPs use firmware version 2.43. You cannot use DMD if your DMPs use any earlier firmware version. To check the firmware version on a DMP, log in to its local instance of DMPDM, then click About. If you learn that you must obtain new firmware, go to http://www.cisco.com/cgi-bin/tablebuild.pl/dms.
4. You must enable popup windows in your web browser. See the manufacturer documentation for your browser and for any installed third-party browser extensions, such as toolbars that provide popup-blocking features.
3-13User Guide for Cisco Digital Media Manager 4.1
OL-13984-01
Chapter 3 Using DMM-DSM for Digital Signage Developing Presentations, Templates, and Playlists for Signage
Getting Started with DMDYou can create the layout for a new presentation or edit a presentation that you created previously.
Step 1 Select Digital Signage Module from the untitled list at the top far-right of any page.
Step 2 To start Digital Media Designer so that you can define a set of screen zones, select the Designs tab, then click Start Digital Media Designer.
Step 3 When prompted, select the option to use Java Web Start.
DMD opens.
In DMD, select the options and enter the values that meet your requirements. To understand the options, see DMD User Interface Reference, page 3-16.
Step 4 To save your work in DMD when you are done, select File > Save.
Step 5 To close DMD when you are done, select File > Exit.
Step 6 (Optional) Deploy the presentation to a DMP group. See Deploying Saved Commands and Presentations to Your DMPs, page 3-42.
5. You must already have created and saved the media files that your presentation will show. See Creating Categories and Organizing Assets for Digital Signage, page 3-8.
6. Confirm that none of the individual assets that you will show has a file size any larger than 1.9 GB. If any file has a larger file size, the presentation that should show the file shows nothing and your DMP device logs will describe many errors. This size is constrained by the limits of streaming.
7. Make note of the collective file size for the assets in your presentation. If you will use the advanced task called “File Transfer to DMP or Server” to deploy your presentation to the SD memory card inside a DMP, confirm that the combined file size for all assets that you will show in the presentation is not collectively any larger than:
• For playback on a DMP 4300G — 900 MB.
• For playback on a DMP 4305G — 1.9 GB
This size is constrained by the storage capacity of the SD memory card in a DMP. If you deploy a presentation to the SD memory card, the assets from that presentation will serve as the basis for stage-one failover on that DMP. If the combined file size for a presentation is too large, only stage-two failover is available. See the “Understanding Content Substitution (Failover)” topic in User Guide for Cisco Digital Media Player Device Manager 1.1 on Cisco.com.
Recommended Best Practices
8. Understand the factors that can interfere with smooth playback in streaming media. Playback of media in a presentation might be slow or jerky or might fail if:
• You neglect to carefully consider the network bandwidth requirements and DMP memory and CPU requirements for the sum total of all assets that you will play simultaneously in a presentation.
• Your presentation uses too many processor-intensive assets. Remember that some file types (SWF, for example) are more likely than others to require extra processing to play back.
9. Understand the effects on your presentations of the “safe area” on your DMP displays. If you use analog DMP displays that are old or inexpensive, be sure that your layouts for signage do not extend past the dotted line in DMD that designates the safe area all around the edge of a screen object. The safe area helps you to compensate for such displays, which use only approximately 90 percent of their screens.
Requirements and Recommendations
3-14User Guide for Cisco Digital Media Manager 4.1
OL-13984-01
Chapter 3 Using DMM-DSM for Digital Signage Developing Presentations, Templates, and Playlists for Signage
Note • To show a presentation during stage-one failovers on a DMP, you must first create and deploy a “File Transfer to DMP or Server” task that saves copies of the presentation and its assets to the SD memory card inside the DMP. When you do this, DMM-DSM automatically creates a “Go to URL” task. The name by default for this generated task is “failover - <name_of_presentation>.” If a DMP should show its locally stored presentation at any time other than during stage-one failover, you must deploy the corresponding Go to URL task to the DMP. See Deploying Saved Commands and Presentations to Your DMPs, page 3-42.
• After you delete a presentation for which DMM-DSM automatically generated a corresponding Go to URL task, you must also delete that Go to URL task.
3-15User Guide for Cisco Digital Media Manager 4.1
OL-13984-01
Chapter 3 Using DMM-DSM for Digital Signage Developing Presentations, Templates, and Playlists for Signage
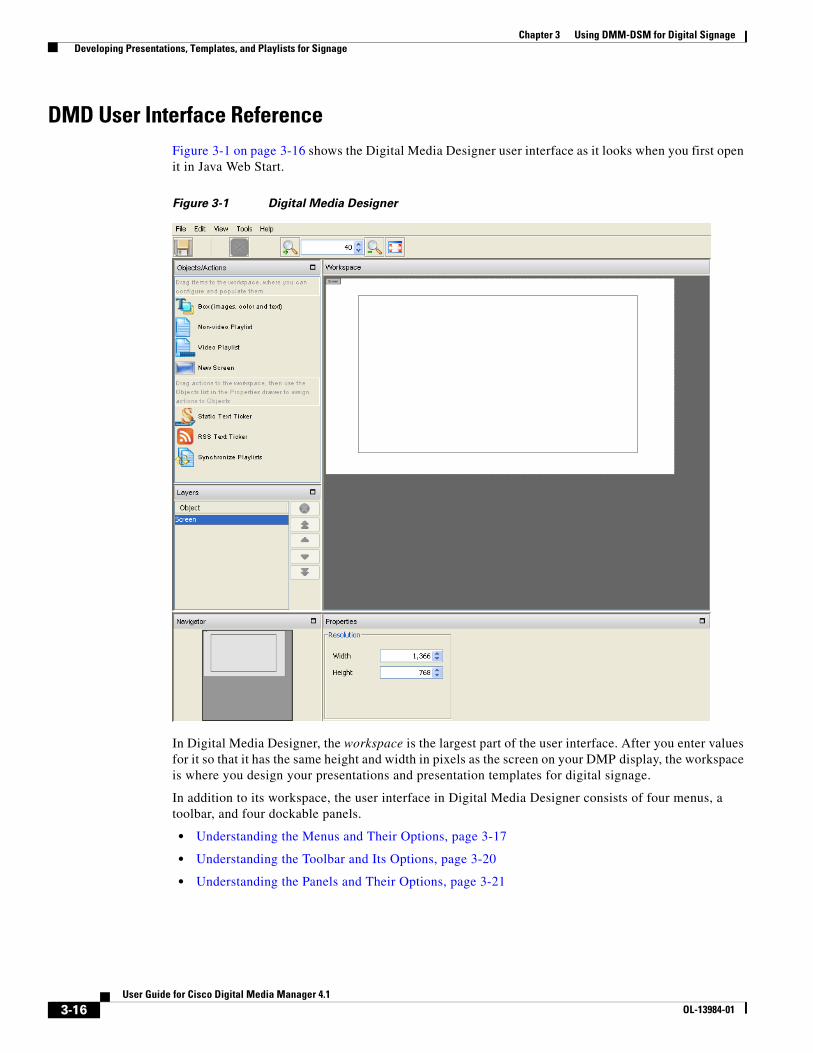
DMD User Interface ReferenceFigure 3-1 on page 3-16 shows the Digital Media Designer user interface as it looks when you first open it in Java Web Start.
Figure 3-1 Digital Media Designer
In Digital Media Designer, the workspace is the largest part of the user interface. After you enter values for it so that it has the same height and width in pixels as the screen on your DMP display, the workspace is where you design your presentations and presentation templates for digital signage.
In addition to its workspace, the user interface in Digital Media Designer consists of four menus, a toolbar, and four dockable panels.
• Understanding the Menus and Their Options, page 3-17
• Understanding the Toolbar and Its Options, page 3-20
• Understanding the Panels and Their Options, page 3-21
3-16User Guide for Cisco Digital Media Manager 4.1
OL-13984-01
Chapter 3 Using DMM-DSM for Digital Signage Developing Presentations, Templates, and Playlists for Signage
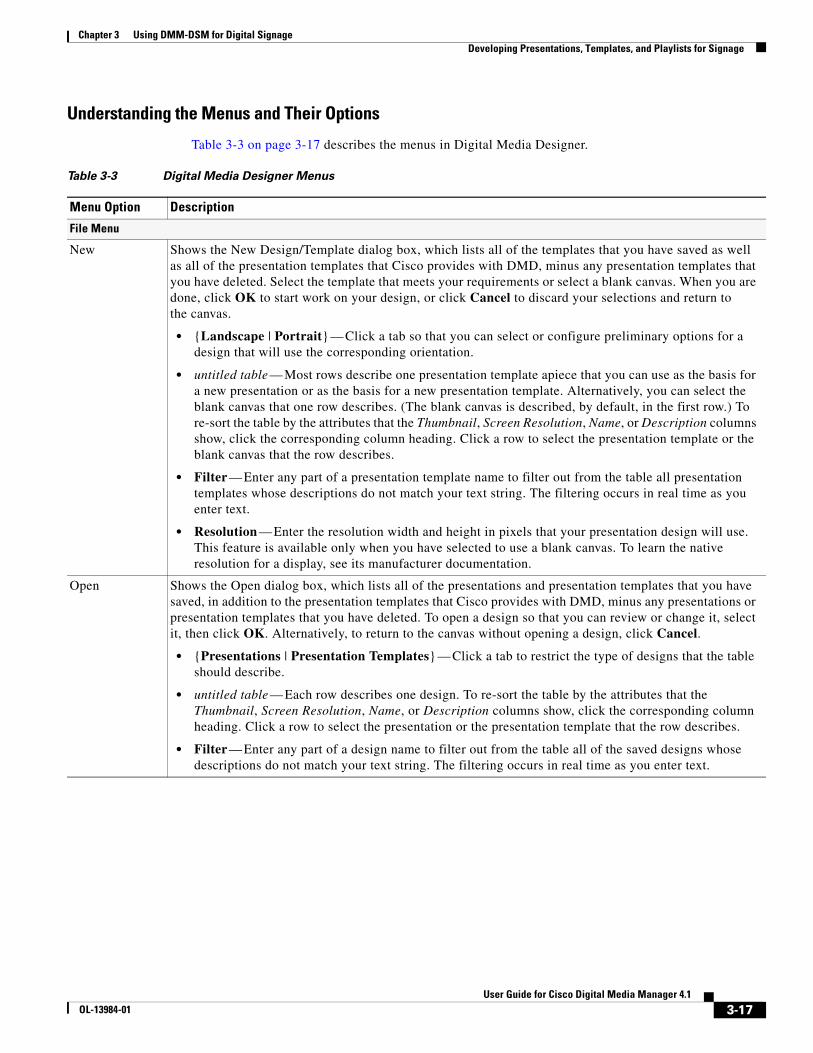
Understanding the Menus and Their Options
Table 3-3 on page 3-17 describes the menus in Digital Media Designer.
Table 3-3 Digital Media Designer Menus
Menu Option Description
File Menu
New Shows the New Design/Template dialog box, which lists all of the templates that you have saved as well as all of the presentation templates that Cisco provides with DMD, minus any presentation templates that you have deleted. Select the template that meets your requirements or select a blank canvas. When you are done, click OK to start work on your design, or click Cancel to discard your selections and return to the canvas.
• {Landscape | Portrait} — Click a tab so that you can select or configure preliminary options for a design that will use the corresponding orientation.
• untitled table — Most rows describe one presentation template apiece that you can use as the basis for a new presentation or as the basis for a new presentation template. Alternatively, you can select the blank canvas that one row describes. (The blank canvas is described, by default, in the first row.) To re-sort the table by the attributes that the Thumbnail, Screen Resolution, Name, or Description columns show, click the corresponding column heading. Click a row to select the presentation template or the blank canvas that the row describes.
• Filter — Enter any part of a presentation template name to filter out from the table all presentation templates whose descriptions do not match your text string. The filtering occurs in real time as you enter text.
• Resolution — Enter the resolution width and height in pixels that your presentation design will use. This feature is available only when you have selected to use a blank canvas. To learn the native resolution for a display, see its manufacturer documentation.
Open Shows the Open dialog box, which lists all of the presentations and presentation templates that you have saved, in addition to the presentation templates that Cisco provides with DMD, minus any presentations or presentation templates that you have deleted. To open a design so that you can review or change it, select it, then click OK. Alternatively, to return to the canvas without opening a design, click Cancel.
• {Presentations | Presentation Templates} — Click a tab to restrict the type of designs that the table should describe.
• untitled table — Each row describes one design. To re-sort the table by the attributes that the Thumbnail, Screen Resolution, Name, or Description columns show, click the corresponding column heading. Click a row to select the presentation or the presentation template that the row describes.
• Filter — Enter any part of a design name to filter out from the table all of the saved designs whose descriptions do not match your text string. The filtering occurs in real time as you enter text.
3-17User Guide for Cisco Digital Media Manager 4.1
OL-13984-01
Chapter 3 Using DMM-DSM for Digital Signage Developing Presentations, Templates, and Playlists for Signage
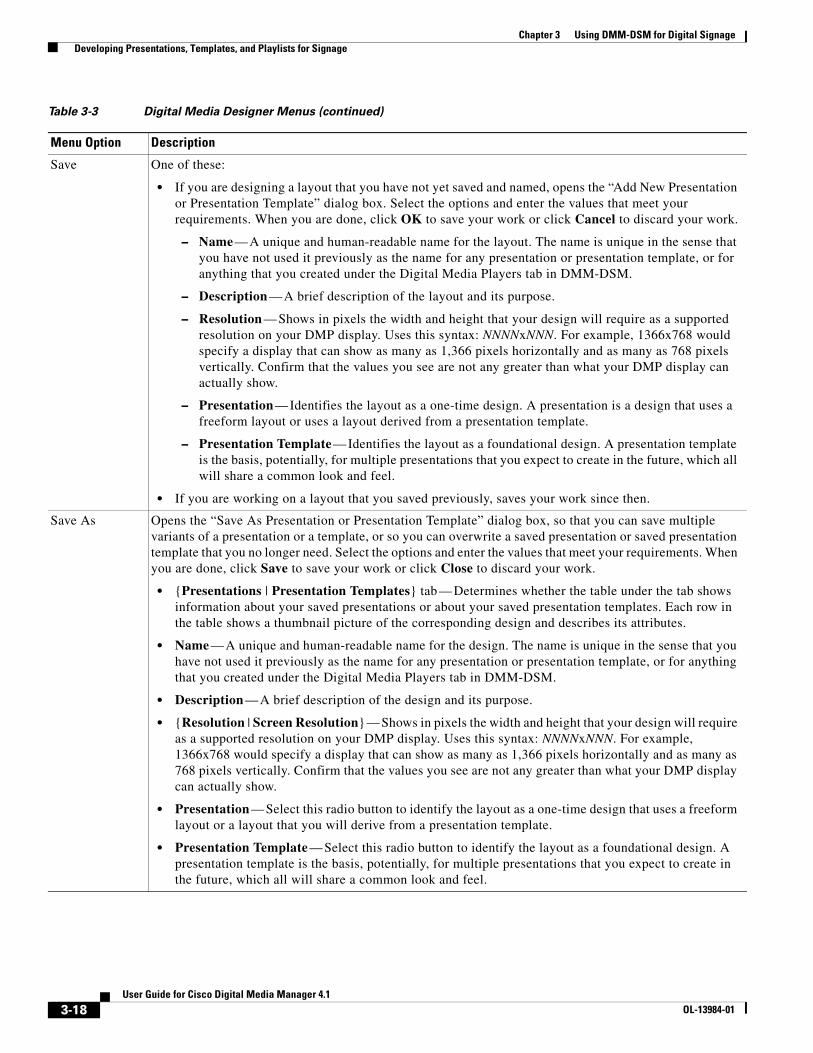
Save One of these:
• If you are designing a layout that you have not yet saved and named, opens the “Add New Presentation or Presentation Template” dialog box. Select the options and enter the values that meet your requirements. When you are done, click OK to save your work or click Cancel to discard your work.
– Name — A unique and human-readable name for the layout. The name is unique in the sense that you have not used it previously as the name for any presentation or presentation template, or for anything that you created under the Digital Media Players tab in DMM-DSM.
– Description — A brief description of the layout and its purpose.
– Resolution — Shows in pixels the width and height that your design will require as a supported resolution on your DMP display. Uses this syntax: NNNNxNNN. For example, 1366x768 would specify a display that can show as many as 1,366 pixels horizontally and as many as 768 pixels vertically. Confirm that the values you see are not any greater than what your DMP display can actually show.
– Presentation — Identifies the layout as a one-time design. A presentation is a design that uses a freeform layout or uses a layout derived from a presentation template.
– Presentation Template — Identifies the layout as a foundational design. A presentation template is the basis, potentially, for multiple presentations that you expect to create in the future, which all will share a common look and feel.
• If you are working on a layout that you saved previously, saves your work since then.
Save As Opens the “Save As Presentation or Presentation Template” dialog box, so that you can save multiple variants of a presentation or a template, or so you can overwrite a saved presentation or saved presentation template that you no longer need. Select the options and enter the values that meet your requirements. When you are done, click Save to save your work or click Close to discard your work.
• {Presentations | Presentation Templates} tab — Determines whether the table under the tab shows information about your saved presentations or about your saved presentation templates. Each row in the table shows a thumbnail picture of the corresponding design and describes its attributes.
• Name — A unique and human-readable name for the design. The name is unique in the sense that you have not used it previously as the name for any presentation or presentation template, or for anything that you created under the Digital Media Players tab in DMM-DSM.
• Description — A brief description of the design and its purpose.
• {Resolution | Screen Resolution} — Shows in pixels the width and height that your design will require as a supported resolution on your DMP display. Uses this syntax: NNNNxNNN. For example, 1366x768 would specify a display that can show as many as 1,366 pixels horizontally and as many as 768 pixels vertically. Confirm that the values you see are not any greater than what your DMP display can actually show.
• Presentation — Select this radio button to identify the layout as a one-time design that uses a freeform layout or a layout that you will derive from a presentation template.
• Presentation Template — Select this radio button to identify the layout as a foundational design. A presentation template is the basis, potentially, for multiple presentations that you expect to create in the future, which all will share a common look and feel.
Table 3-3 Digital Media Designer Menus (continued)
Menu Option Description
3-18User Guide for Cisco Digital Media Manager 4.1
OL-13984-01
Chapter 3 Using DMM-DSM for Digital Signage Developing Presentations, Templates, and Playlists for Signage
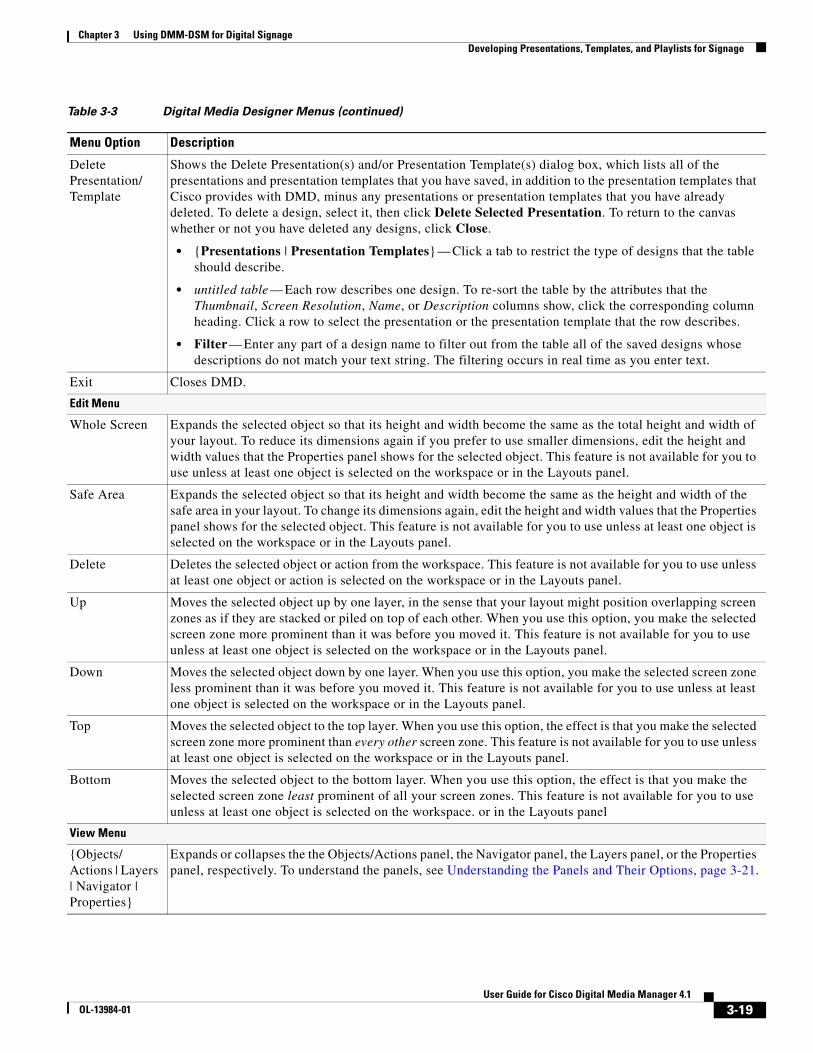
Delete Presentation/ Template
Shows the Delete Presentation(s) and/or Presentation Template(s) dialog box, which lists all of the presentations and presentation templates that you have saved, in addition to the presentation templates that Cisco provides with DMD, minus any presentations or presentation templates that you have already deleted. To delete a design, select it, then click Delete Selected Presentation. To return to the canvas whether or not you have deleted any designs, click Close.
• {Presentations | Presentation Templates} — Click a tab to restrict the type of designs that the table should describe.
• untitled table — Each row describes one design. To re-sort the table by the attributes that the Thumbnail, Screen Resolution, Name, or Description columns show, click the corresponding column heading. Click a row to select the presentation or the presentation template that the row describes.
• Filter — Enter any part of a design name to filter out from the table all of the saved designs whose descriptions do not match your text string. The filtering occurs in real time as you enter text.
Exit Closes DMD.
Edit Menu
Whole Screen Expands the selected object so that its height and width become the same as the total height and width of your layout. To reduce its dimensions again if you prefer to use smaller dimensions, edit the height and width values that the Properties panel shows for the selected object. This feature is not available for you to use unless at least one object is selected on the workspace or in the Layouts panel.
Safe Area Expands the selected object so that its height and width become the same as the height and width of the safe area in your layout. To change its dimensions again, edit the height and width values that the Properties panel shows for the selected object. This feature is not available for you to use unless at least one object is selected on the workspace or in the Layouts panel.
Delete Deletes the selected object or action from the workspace. This feature is not available for you to use unless at least one object or action is selected on the workspace or in the Layouts panel.
Up Moves the selected object up by one layer, in the sense that your layout might position overlapping screen zones as if they are stacked or piled on top of each other. When you use this option, you make the selected screen zone more prominent than it was before you moved it. This feature is not available for you to use unless at least one object is selected on the workspace or in the Layouts panel.
Down Moves the selected object down by one layer. When you use this option, you make the selected screen zone less prominent than it was before you moved it. This feature is not available for you to use unless at least one object is selected on the workspace or in the Layouts panel.
Top Moves the selected object to the top layer. When you use this option, the effect is that you make the selected screen zone more prominent than every other screen zone. This feature is not available for you to use unless at least one object is selected on the workspace or in the Layouts panel.
Bottom Moves the selected object to the bottom layer. When you use this option, the effect is that you make the selected screen zone least prominent of all your screen zones. This feature is not available for you to use unless at least one object is selected on the workspace. or in the Layouts panel
View Menu
{Objects/ Actions | Layers | Navigator | Properties}
Expands or collapses the the Objects/Actions panel, the Navigator panel, the Layers panel, or the Properties panel, respectively. To understand the panels, see Understanding the Panels and Their Options, page 3-21.
Table 3-3 Digital Media Designer Menus (continued)
Menu Option Description
3-19User Guide for Cisco Digital Media Manager 4.1
OL-13984-01
Chapter 3 Using DMM-DSM for Digital Signage Developing Presentations, Templates, and Playlists for Signage
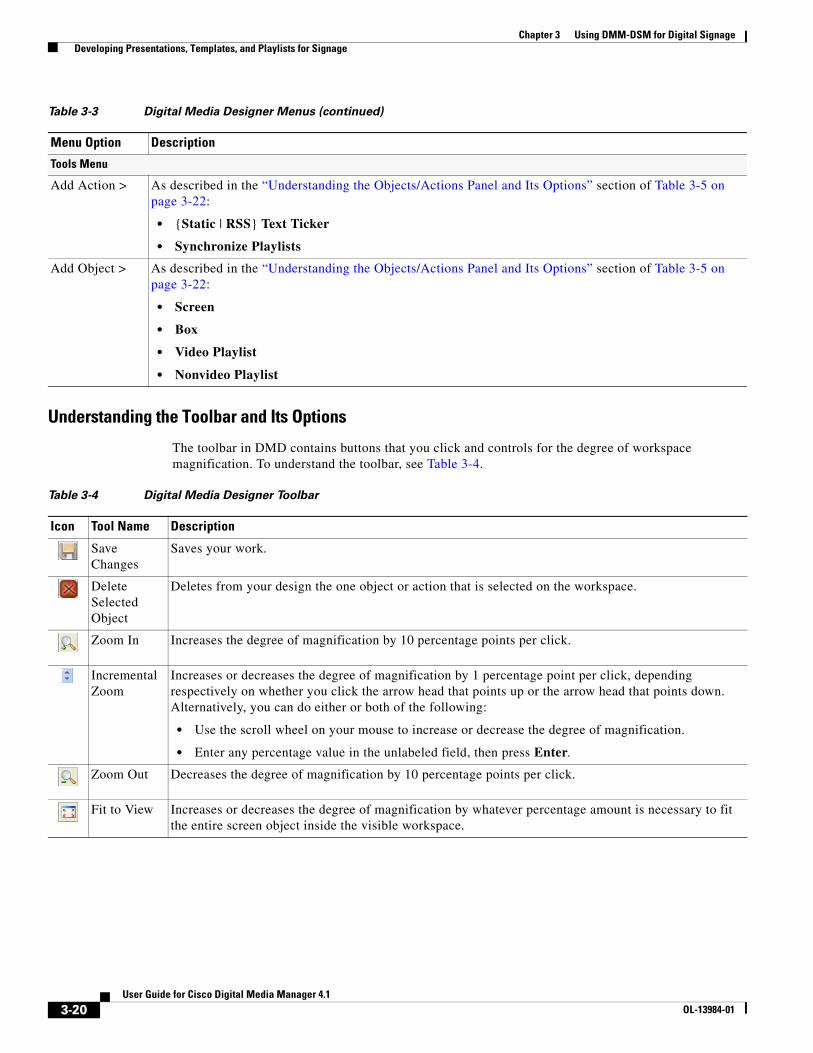
Understanding the Toolbar and Its Options
The toolbar in DMD contains buttons that you click and controls for the degree of workspace magnification. To understand the toolbar, see Table 3-4.
Tools Menu
Add Action > As described in the “Understanding the Objects/Actions Panel and Its Options” section of Table 3-5 on page 3-22:
• {Static | RSS} Text Ticker
• Synchronize Playlists
Add Object > As described in the “Understanding the Objects/Actions Panel and Its Options” section of Table 3-5 on page 3-22:
• Screen
• Box
• Video Playlist
• Nonvideo Playlist
Table 3-3 Digital Media Designer Menus (continued)
Menu Option Description
Table 3-4 Digital Media Designer Toolbar
Icon Tool Name Description
Save Changes
Saves your work.
Delete Selected Object
Deletes from your design the one object or action that is selected on the workspace.
Zoom In Increases the degree of magnification by 10 percentage points per click.
Incremental Zoom
Increases or decreases the degree of magnification by 1 percentage point per click, depending respectively on whether you click the arrow head that points up or the arrow head that points down. Alternatively, you can do either or both of the following:
• Use the scroll wheel on your mouse to increase or decrease the degree of magnification.
• Enter any percentage value in the unlabeled field, then press Enter.
Zoom Out Decreases the degree of magnification by 10 percentage points per click.
Fit to View Increases or decreases the degree of magnification by whatever percentage amount is necessary to fit the entire screen object inside the visible workspace.
3-20User Guide for Cisco Digital Media Manager 4.1
OL-13984-01
Chapter 3 Using DMM-DSM for Digital Signage Developing Presentations, Templates, and Playlists for Signage
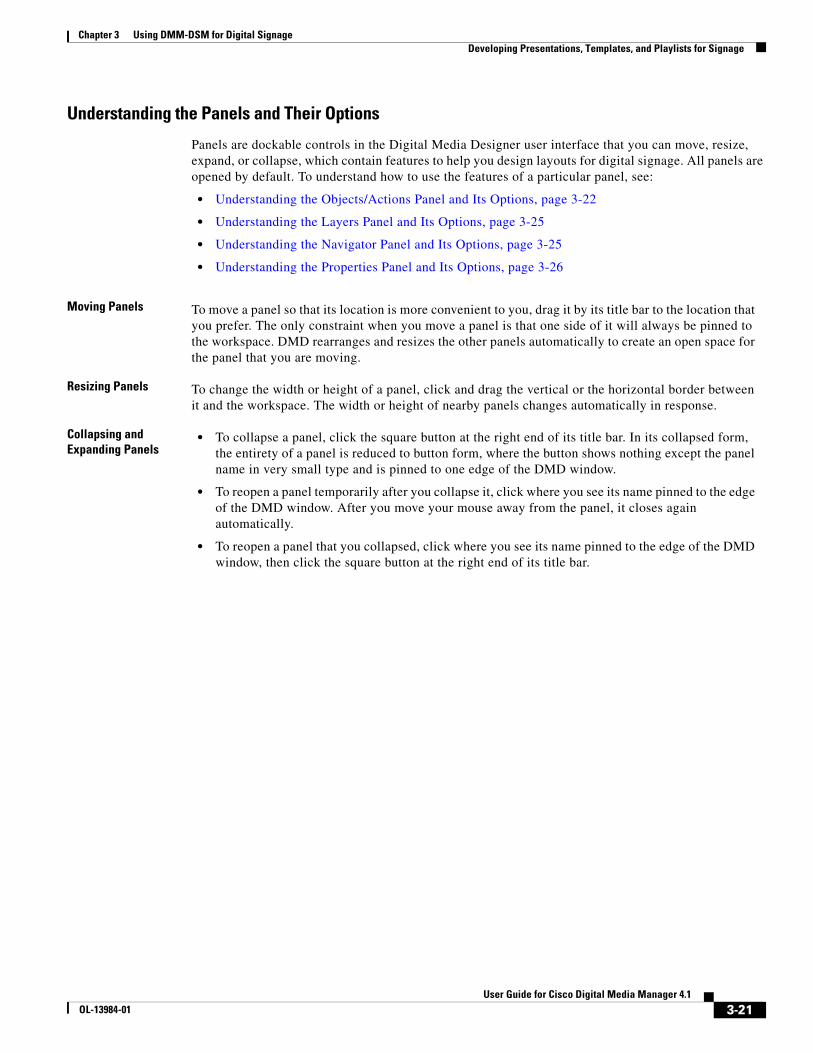
Understanding the Panels and Their Options
Panels are dockable controls in the Digital Media Designer user interface that you can move, resize, expand, or collapse, which contain features to help you design layouts for digital signage. All panels are opened by default. To understand how to use the features of a particular panel, see:
• Understanding the Objects/Actions Panel and Its Options, page 3-22
• Understanding the Layers Panel and Its Options, page 3-25
• Understanding the Navigator Panel and Its Options, page 3-25
• Understanding the Properties Panel and Its Options, page 3-26
Moving Panels To move a panel so that its location is more convenient to you, drag it by its title bar to the location that you prefer. The only constraint when you move a panel is that one side of it will always be pinned to the workspace. DMD rearranges and resizes the other panels automatically to create an open space for the panel that you are moving.
Resizing Panels To change the width or height of a panel, click and drag the vertical or the horizontal border between it and the workspace. The width or height of nearby panels changes automatically in response.
Collapsing and Expanding Panels
• To collapse a panel, click the square button at the right end of its title bar. In its collapsed form, the entirety of a panel is reduced to button form, where the button shows nothing except the panel name in very small type and is pinned to one edge of the DMD window.
• To reopen a panel temporarily after you collapse it, click where you see its name pinned to the edge of the DMD window. After you move your mouse away from the panel, it closes again automatically.
• To reopen a panel that you collapsed, click where you see its name pinned to the edge of the DMD window, then click the square button at the right end of its title bar.
3-21User Guide for Cisco Digital Media Manager 4.1
OL-13984-01
Chapter 3 Using DMM-DSM for Digital Signage Developing Presentations, Templates, and Playlists for Signage
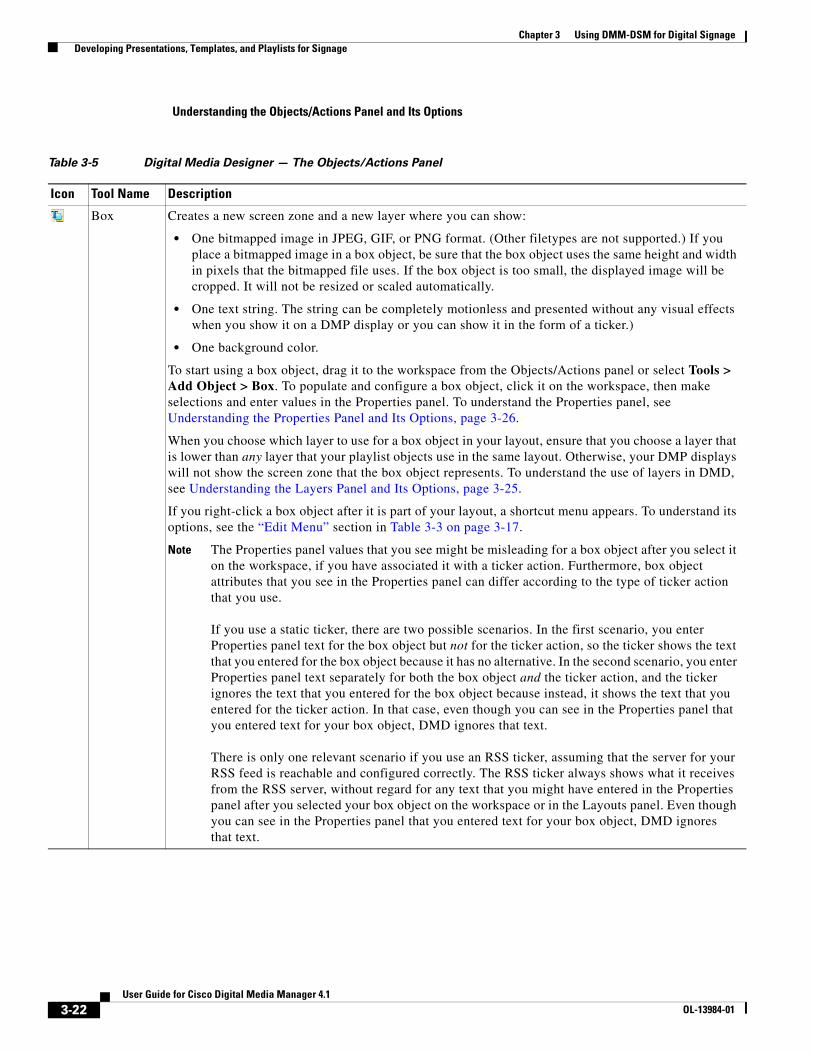
Understanding the Objects/Actions Panel and Its Options
Table 3-5 Digital Media Designer — The Objects/Actions Panel
Icon Tool Name Description
Box Creates a new screen zone and a new layer where you can show:
• One bitmapped image in JPEG, GIF, or PNG format. (Other filetypes are not supported.) If you place a bitmapped image in a box object, be sure that the box object uses the same height and width in pixels that the bitmapped file uses. If the box object is too small, the displayed image will be cropped. It will not be resized or scaled automatically.
• One text string. The string can be completely motionless and presented without any visual effects when you show it on a DMP display or you can show it in the form of a ticker.)
• One background color.
To start using a box object, drag it to the workspace from the Objects/Actions panel or select Tools > Add Object > Box. To populate and configure a box object, click it on the workspace, then make selections and enter values in the Properties panel. To understand the Properties panel, see Understanding the Properties Panel and Its Options, page 3-26.
When you choose which layer to use for a box object in your layout, ensure that you choose a layer that is lower than any layer that your playlist objects use in the same layout. Otherwise, your DMP displays will not show the screen zone that the box object represents. To understand the use of layers in DMD, see Understanding the Layers Panel and Its Options, page 3-25.
If you right-click a box object after it is part of your layout, a shortcut menu appears. To understand its options, see the “Edit Menu” section in Table 3-3 on page 3-17.
Note The Properties panel values that you see might be misleading for a box object after you select it on the workspace, if you have associated it with a ticker action. Furthermore, box object attributes that you see in the Properties panel can differ according to the type of ticker action that you use. If you use a static ticker, there are two possible scenarios. In the first scenario, you enter Properties panel text for the box object but not for the ticker action, so the ticker shows the text that you entered for the box object because it has no alternative. In the second scenario, you enter Properties panel text separately for both the box object and the ticker action, and the ticker ignores the text that you entered for the box object because instead, it shows the text that you entered for the ticker action. In that case, even though you can see in the Properties panel that you entered text for your box object, DMD ignores that text. There is only one relevant scenario if you use an RSS ticker, assuming that the server for your RSS feed is reachable and configured correctly. The RSS ticker always shows what it receives from the RSS server, without regard for any text that you might have entered in the Properties panel after you selected your box object on the workspace or in the Layouts panel. Even though you can see in the Properties panel that you entered text for your box object, DMD ignores that text.
3-22User Guide for Cisco Digital Media Manager 4.1
OL-13984-01
Chapter 3 Using DMM-DSM for Digital Signage Developing Presentations, Templates, and Playlists for Signage
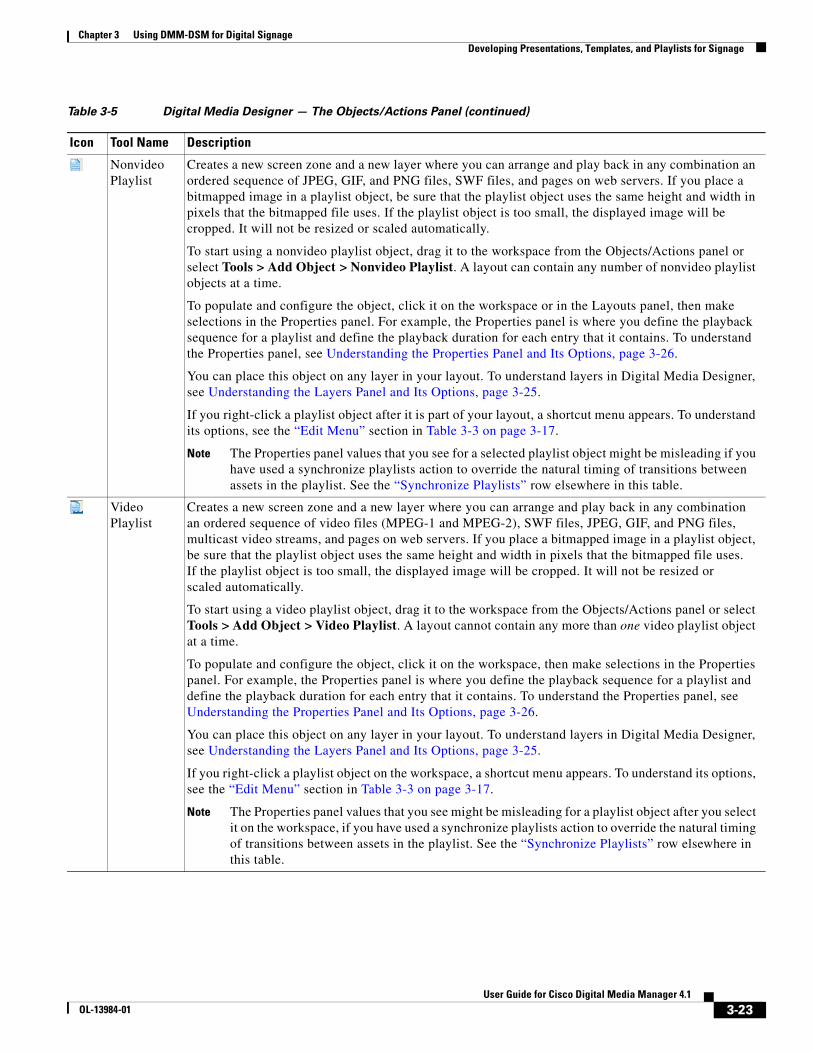
Nonvideo Playlist
Creates a new screen zone and a new layer where you can arrange and play back in any combination an ordered sequence of JPEG, GIF, and PNG files, SWF files, and pages on web servers. If you place a bitmapped image in a playlist object, be sure that the playlist object uses the same height and width in pixels that the bitmapped file uses. If the playlist object is too small, the displayed image will be cropped. It will not be resized or scaled automatically.
To start using a nonvideo playlist object, drag it to the workspace from the Objects/Actions panel or select Tools > Add Object > Nonvideo Playlist. A layout can contain any number of nonvideo playlist objects at a time.
To populate and configure the object, click it on the workspace or in the Layouts panel, then make selections in the Properties panel. For example, the Properties panel is where you define the playback sequence for a playlist and define the playback duration for each entry that it contains. To understand the Properties panel, see Understanding the Properties Panel and Its Options, page 3-26.
You can place this object on any layer in your layout. To understand layers in Digital Media Designer, see Understanding the Layers Panel and Its Options, page 3-25.
If you right-click a playlist object after it is part of your layout, a shortcut menu appears. To understand its options, see the “Edit Menu” section in Table 3-3 on page 3-17.
Note The Properties panel values that you see for a selected playlist object might be misleading if you have used a synchronize playlists action to override the natural timing of transitions between assets in the playlist. See the “Synchronize Playlists” row elsewhere in this table.
Video Playlist
Creates a new screen zone and a new layer where you can arrange and play back in any combination an ordered sequence of video files (MPEG-1 and MPEG-2), SWF files, JPEG, GIF, and PNG files, multicast video streams, and pages on web servers. If you place a bitmapped image in a playlist object, be sure that the playlist object uses the same height and width in pixels that the bitmapped file uses. If the playlist object is too small, the displayed image will be cropped. It will not be resized or scaled automatically.
To start using a video playlist object, drag it to the workspace from the Objects/Actions panel or select Tools > Add Object > Video Playlist. A layout cannot contain any more than one video playlist object at a time.
To populate and configure the object, click it on the workspace, then make selections in the Properties panel. For example, the Properties panel is where you define the playback sequence for a playlist and define the playback duration for each entry that it contains. To understand the Properties panel, see Understanding the Properties Panel and Its Options, page 3-26.
You can place this object on any layer in your layout. To understand layers in Digital Media Designer, see Understanding the Layers Panel and Its Options, page 3-25.
If you right-click a playlist object on the workspace, a shortcut menu appears. To understand its options, see the “Edit Menu” section in Table 3-3 on page 3-17.
Note The Properties panel values that you see might be misleading for a playlist object after you select it on the workspace, if you have used a synchronize playlists action to override the natural timing of transitions between assets in the playlist. See the “Synchronize Playlists” row elsewhere in this table.
Table 3-5 Digital Media Designer — The Objects/Actions Panel (continued)
Icon Tool Name Description
3-23User Guide for Cisco Digital Media Manager 4.1
OL-13984-01
Chapter 3 Using DMM-DSM for Digital Signage Developing Presentations, Templates, and Playlists for Signage
New Screen Restarts your design process by closing the open layout — discarding any design work in it that you have not saved — and showing to you a completely new representation of a blank DMP display as your workspace. Because each presentation and each presentation template can contain only one screen, the new workspace does not have any objects, actions, or playlists associated with it — even if the closed layout used them.
To start using a new screen, drag it to the workspace from the Objects/Actions panel or select Tools > Add Object > Screen. DMD asks you if you really want to proceed. By proceeding, you will discard any unsaved work in the layout that you close.
Static Text Ticker
Places a static ticker action on your workspace. Its size and placement on the workspace do not matter because actions do not, by themselves, occupy any space on a screen.
A ticker action will not produce a visible ticker on your DMP displays until you finish configuring the association between the action and the object, save your work, and deliver your presentation to a DMP as part of a scheduled deployment. You can use only one ticker per box object.
The workflow for this action is as follows:
1. To add the potential for a static text ticker to your layout, drag its action type to the workspace from the Objects/Actions panel or select its type from the Tools menu.
2. Select the action on your workspace.
3. In the Properties panel:
a. Enter text for your ticker in the Text field.
b. From the Assign to Object list, select the box object that should contain the ticker.
RSS Text Ticker
Places an RSS ticker action on your workspace. Its size and placement on the workspace do not matter because actions do not, by themselves, occupy any space on a screen.
A ticker action will not produce a visible ticker on your DMP displays until you finish configuring the association between the action and the object, save your work, and deliver your presentation to DMPs as part of a scheduled deployment. Your DMPs will check the RSS feed and update the ticker every 15 minutes. You can use only one ticker per box object.
The workflow for this action is as follows:
1. To add the potential for an RSS ticker to your layout, drag its action type to the workspace from the Objects/Actions panel or select its type from the Tools menu.
2. Select the action on your workspace.
3. In the Properties panel:
a. Enter the RSS feed source URL for your ticker in the RSS URL field.
The feed that you specify should be one that does not include any file enclosures. We recommend as a best practice that you use only RSS feeds over which you have direct editorial control.
b. From the Assign to Object list, select the box object that should contain the ticker.
Table 3-5 Digital Media Designer — The Objects/Actions Panel (continued)
Icon Tool Name Description
3-24User Guide for Cisco Digital Media Manager 4.1
OL-13984-01
Chapter 3 Using DMM-DSM for Digital Signage Developing Presentations, Templates, and Playlists for Signage
Understanding the Layers Panel and Its Options
The Layers panel lists all of the objects that you have dragged to your workspace, sorted by their placement on different layers. Each layer holds one object only, and each object represents one screen zone.
• The object at the bottom of the list is also the screen zone that is behind or under all of your other screen zones in this layout.
• The object at the top of the list is also the screen zone that is in front of or on top of all of your other screen zones in this layout.
• If you select an object in the list, you can use buttons in the Properties panel to manipulate the selected object.
Understanding the Navigator Panel and Its Options
The Navigator panel shows a wireframe thumbnail view of, and scrolling controller for, your workspace in DMD. The Navigator panel is especially useful when you design presentations for high-definition DMP displays, because you might not be able to see the entire design all at one time in the workspace area.
To scroll the workspace vertically and horizontally, click and move the small gray rectangle from place to place inside the Navigator panel.
Synchronize Playlists
Places a synchronization action on your workspace. Its size and placement on the workspace do not matter because actions do not, by themselves, occupy any space on a screen.
You use a synchronization action to bind two playlist objects together in a layout, imposing the playback timing from the primary playlist on, and overriding, the playback timing for the secondary playlist. In this way, you can synchronize transitions in two playlists, no matter how asynchronous those transitions would be ordinarily. The workflow is as follows:
1. To add the potential for synchronization to your layout, drag a Synchronize Playlists action to the workspace from the Objects/Actions panel or select Tools > Add Action > Synchronize Playlists.
2. In the Properties panel:
a. From the Primary Playlist list, select the primary playlist object.
b. From the Secondary Playlist list, select the secondary playlist object.
Note If you plan ahead, you can keep in mind the eventual synchronization of two playlists when you populate them and configure the playback duration for each asset. If you do not plan ahead, synchronization might truncate the playback for one or more assets in the secondary playlist.
Table 3-5 Digital Media Designer — The Objects/Actions Panel (continued)
Icon Tool Name Description
Table 3-6 Digital Media Designer — The Layers Panel
Icon Tool Name Description
Remove Deletes the selected object.
Bring to Front Moves the selected object to the absolute top layer.
Move Up Moves the selected object up by one layer per click.
Move Down Moves the selected object down by one layer per click.
Send to Back Moves the selected object to the absolute bottom layer.
3-25User Guide for Cisco Digital Media Manager 4.1
OL-13984-01
Chapter 3 Using DMM-DSM for Digital Signage Developing Presentations, Templates, and Playlists for Signage
Understanding the Properties Panel and Its Options
Shows the editable and uneditable properties of the selected object or action. The type of properties that you see depend on the type of object or action that you select on the workspace or in the Layouts panel.
Table 3-7 Digital Media Designer — The Properties Panel
Element Icon and Description
Border {Style | Width | Color}
Make selections to define the border attributes, if your box object should be enclosed in a border.
Assign to Object Select the box object that represents the screen zone where the selected ticker action should show its ticker.
Duration Shows the playback duration for each asset in the selected playlist. If you use the Synchronize Playlists action to make the selected playlist secondary, the duration values shown here might not have any bearing on how long an asset plays back before the playlist transitions to the next asset. There is no factory default duration value for nonvideo assets, so you must enter all such duration values manually.
Type Signifies the type of playlist. This value is not editable.
Name An editable field or an uneditable column in a table:
• Enter a unique and meaningful name in the Name field to identify the selected object or action.
• Click the Name column heading to sort the table by the values in that column.
Playlist Items To understand the elements in the Playlist Items area, see Understanding the Playlist Items Area and Its Options, page 3-28.
To learn about the workflow to create a playlist, see Creating and Organizing Playlists for Your Presentations, page 3-27.
Primary Playlist Select the playlist object whose transition timing between assets during playback should override the equivalent transition timing of a secondary playlist.
RSS URL Enter the source URL for the RSS feed.
Secondary Playlist Select the playlist object whose transition timing between assets during playback should be overridden by the equivalent transition timing from the primary playlist.
Text {Size | Color | Horizontal Alignment | Vertical Alignment | Text}
Increases or decreases the text size (in pixels), depending respectively on whether you click the arrow head that points up or the arrow head that points down. Changes the text size (in pixels) to the numeric value that you enter. Changes the text color to match a color that you select after you click ... or to match a hexidecimal color value that you enter.1 Changes the horizontal or vertical alignment of text to match the alignment types that you select. Shows exactly the text that you enter in the Text field.
1. The text color that you use should be one that results in clear and legible text against the background color that you specified; if there is not enough difference between the two colors, your audience might not see information clearly when you use this layout to show text on a DMP display.
URL An uneditable column in a table, where each row shows the URLfor one remote playlist asset.
{Width | Height} Enter in pixels the respective width and height of the selected screen zone object.
{X | Y} X and Y coordinates that represent the placement of the first pixel (when reading from left to right and top to bottom) of the selected object.
3-26User Guide for Cisco Digital Media Manager 4.1
OL-13984-01
Chapter 3 Using DMM-DSM for Digital Signage Developing Presentations, Templates, and Playlists for Signage
Creating and Organizing Playlists for Your PresentationsThe presentations that you design in DMD can contain playlists that you configure. A playlist contains assets from one or more media library categories or remote servers and shows these assets in the order that you specify. The only way to save a playlist and deploy it to your DMPs is inside a presentation.
Before You Begin
• You must add assets to your media library before you can organize them in a playlist. See the “{Add New | Edit} Media” row in Table 3-2 on page 3-9.
• You must add a DMP to DMM-DSM before you can deploy any presentations to it, and you must organize your DMPs into groups before you can deploy any presentation to a group. The DMP Groups list does not show any DMPs until you add at least one. See Managing and Grouping DMPs, page 3-3.
• You must add an external deployment server to DMM-DSM before you can deploy any presentations to it. The DMP Groups list does not show any external servers until you add at least one. You cannot use the Schedules > Immediate Deployment feature with external deployment servers. All deployments to your external deployment servers require that you use the Schedules > Future Deployment feature. See Configuring DMM-DSM to Deploy to External Servers, page 3-56.
Tip We recommend that you use the advanced task called DMP Startup URL and enter a value for either the Video URL or the Browser URL. If both values are blank, you might find that your DMP sometimes loses its ability to play even the Shockwave Flash files that it has played successfully in the past. To learn how to use advanced tasks, see Using Advanced Tasks, page 3-34. To understand this advanced task, see the “DMP Startup URL” row in Table 3-10 on page 3-35.
Step 1 If you have not done so already, start DMD. To learn how to start it, see Getting Started with DMD, page 3-14.
Step 2 In DMD, do any of the following:
• Drag a playlist object (video or nonvideo) to the workspace from the Objects/Actions panel.
• Select a playlist object that you already placed on your workspace.
• Select a playlist object in the Layers panel.
The Properties panel now contains an area called “Playlist Items,” where you can make selections that add, remove, or rearrange assets in a playlist.
Step 3 In the Playlist Items area, enter values and select options that meet your requirements. To understand the Playlist Items area, see Table 3-8 on page 3-28.
Step 4 To open the Content Chooser dialog box, where you configure a playlist, click . To understand the Content Chooser dialog box, see Table 3-9 on page 3-30.
Step 5 To save a playlist after you have populated and organized it and set the playback duration for each of its assets, click Submit in the Content Chooser dialog box.
Step 6 To save a presentation or a template after you have finished designing it, select File > Save in DMD. To understand the dialog box for saving your designs, see the “File Menu” section of Table 3-3 on page 3-17.
Step 7 Deploy the presentation to the DMP displays that should show it. See Deploying Saved Commands and Presentations to Your DMPs, page 3-42.
3-27User Guide for Cisco Digital Media Manager 4.1
OL-13984-01
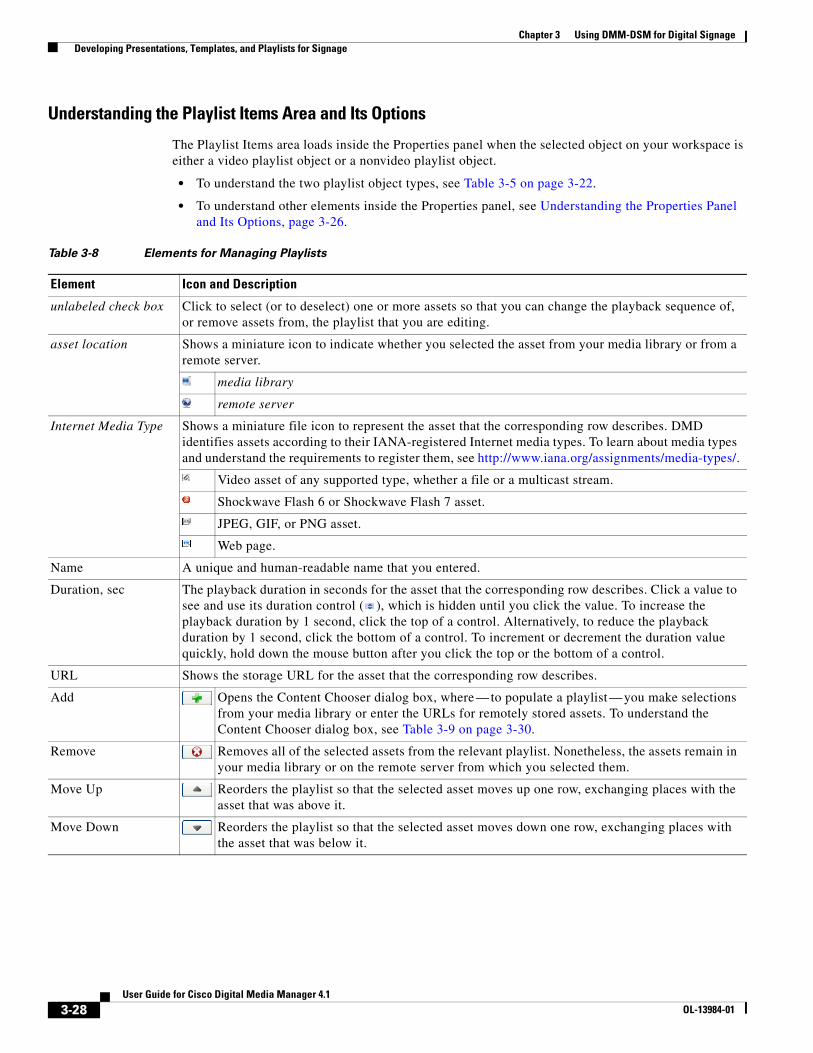
Chapter 3 Using DMM-DSM for Digital Signage Developing Presentations, Templates, and Playlists for Signage
Understanding the Playlist Items Area and Its Options
The Playlist Items area loads inside the Properties panel when the selected object on your workspace is either a video playlist object or a nonvideo playlist object.
• To understand the two playlist object types, see Table 3-5 on page 3-22.
• To understand other elements inside the Properties panel, see Understanding the Properties Panel and Its Options, page 3-26.
Table 3-8 Elements for Managing Playlists
Element Icon and Description
unlabeled check box Click to select (or to deselect) one or more assets so that you can change the playback sequence of, or remove assets from, the playlist that you are editing.
asset location Shows a miniature icon to indicate whether you selected the asset from your media library or from a remote server.
media library
remote server
Internet Media Type Shows a miniature file icon to represent the asset that the corresponding row describes. DMD identifies assets according to their IANA-registered Internet media types. To learn about media types and understand the requirements to register them, see http://www.iana.org/assignments/media-types/.
Video asset of any supported type, whether a file or a multicast stream.
Shockwave Flash 6 or Shockwave Flash 7 asset.
JPEG, GIF, or PNG asset.
Web page.
Name A unique and human-readable name that you entered.
Duration, sec The playback duration in seconds for the asset that the corresponding row describes. Click a value to see and use its duration control ( ), which is hidden until you click the value. To increase the playback duration by 1 second, click the top of a control. Alternatively, to reduce the playback duration by 1 second, click the bottom of a control. To increment or decrement the duration value quickly, hold down the mouse button after you click the top or the bottom of a control.
URL Shows the storage URL for the asset that the corresponding row describes.
Add Opens the Content Chooser dialog box, where — to populate a playlist — you make selections from your media library or enter the URLs for remotely stored assets. To understand the Content Chooser dialog box, see Table 3-9 on page 3-30.
Remove Removes all of the selected assets from the relevant playlist. Nonetheless, the assets remain in your media library or on the remote server from which you selected them.
Move Up Reorders the playlist so that the selected asset moves up one row, exchanging places with the asset that was above it.
Move Down Reorders the playlist so that the selected asset moves down one row, exchanging places with the asset that was below it.
3-28User Guide for Cisco Digital Media Manager 4.1
OL-13984-01
Chapter 3 Using DMM-DSM for Digital Signage Developing Presentations, Templates, and Playlists for Signage
Understanding the Content Chooser and Its Options
The Content Chooser dialog box is part of DMD. You use the Content Chooser to populate a playlist. To save your work and use a playlist that you have populated, click Submit. Alternatively, to discard your work, click Cancel.
Tip We recommend that you use the advanced task called DMP Startup URL and enter a value for either the Video URL or the Browser URL. If both values are blank, you might find that your DMP sometimes loses its ability to play even the Shockwave Flash files that it has played successfully in the past. To learn how to use advanced tasks, see Using Advanced Tasks, page 3-34. To understand this advanced task, see the “DMP Startup URL” row in Table 3-10 on page 3-35.
3-29User Guide for Cisco Digital Media Manager 4.1
OL-13984-01
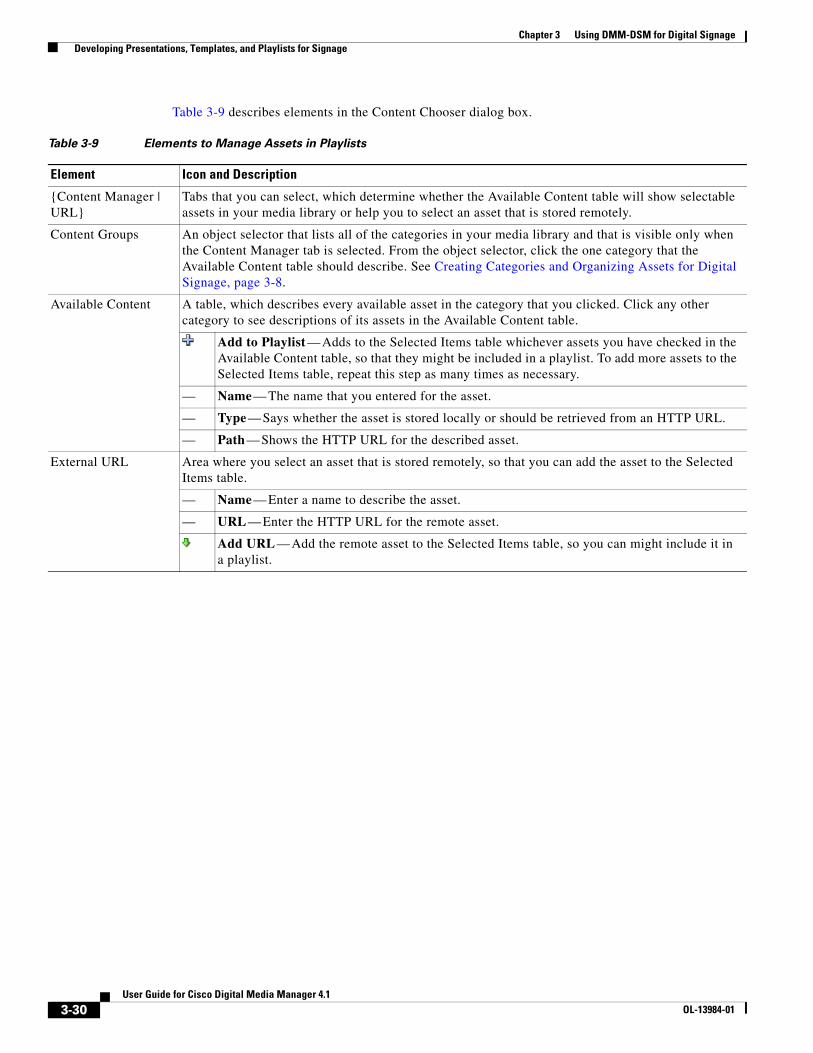
Chapter 3 Using DMM-DSM for Digital Signage Developing Presentations, Templates, and Playlists for Signage
Table 3-9 describes elements in the Content Chooser dialog box.
Table 3-9 Elements to Manage Assets in Playlists
Element Icon and Description
{Content Manager | URL}
Tabs that you can select, which determine whether the Available Content table will show selectable assets in your media library or help you to select an asset that is stored remotely.
Content Groups An object selector that lists all of the categories in your media library and that is visible only when the Content Manager tab is selected. From the object selector, click the one category that the Available Content table should describe. See Creating Categories and Organizing Assets for Digital Signage, page 3-8.
Available Content A table, which describes every available asset in the category that you clicked. Click any other category to see descriptions of its assets in the Available Content table.
Add to Playlist — Adds to the Selected Items table whichever assets you have checked in the Available Content table, so that they might be included in a playlist. To add more assets to the Selected Items table, repeat this step as many times as necessary.
— Name — The name that you entered for the asset.
— Type — Says whether the asset is stored locally or should be retrieved from an HTTP URL.
— Path — Shows the HTTP URL for the described asset.
External URL Area where you select an asset that is stored remotely, so that you can add the asset to the Selected Items table.
— Name — Enter a name to describe the asset.
— URL — Enter the HTTP URL for the remote asset.
Add URL — Add the remote asset to the Selected Items table, so you can might include it in a playlist.
3-30User Guide for Cisco Digital Media Manager 4.1
OL-13984-01
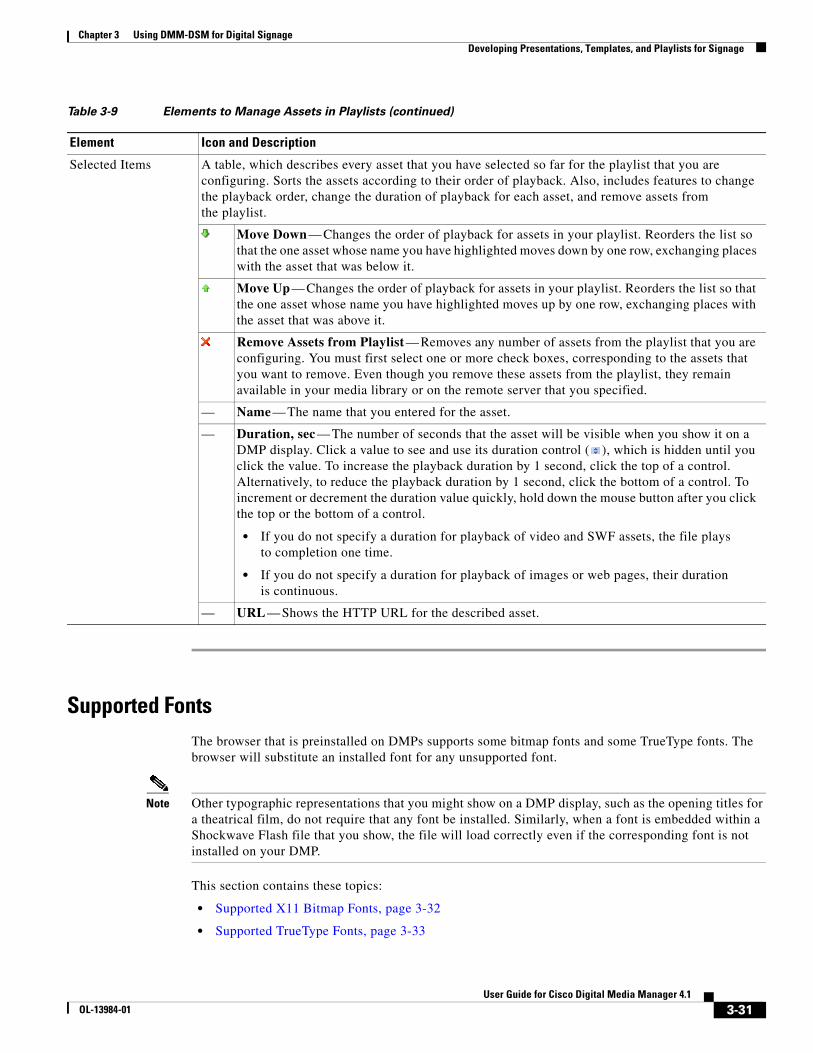
Chapter 3 Using DMM-DSM for Digital Signage Developing Presentations, Templates, and Playlists for Signage
Supported FontsThe browser that is preinstalled on DMPs supports some bitmap fonts and some TrueType fonts. The browser will substitute an installed font for any unsupported font.
Note Other typographic representations that you might show on a DMP display, such as the opening titles for a theatrical film, do not require that any font be installed. Similarly, when a font is embedded within a Shockwave Flash file that you show, the file will load correctly even if the corresponding font is not installed on your DMP.
This section contains these topics:
• Supported X11 Bitmap Fonts, page 3-32
• Supported TrueType Fonts, page 3-33
Selected Items A table, which describes every asset that you have selected so far for the playlist that you are configuring. Sorts the assets according to their order of playback. Also, includes features to change the playback order, change the duration of playback for each asset, and remove assets from the playlist.
Move Down — Changes the order of playback for assets in your playlist. Reorders the list so that the one asset whose name you have highlighted moves down by one row, exchanging places with the asset that was below it.
Move Up — Changes the order of playback for assets in your playlist. Reorders the list so that the one asset whose name you have highlighted moves up by one row, exchanging places with the asset that was above it.
Remove Assets from Playlist — Removes any number of assets from the playlist that you are configuring. You must first select one or more check boxes, corresponding to the assets that you want to remove. Even though you remove these assets from the playlist, they remain available in your media library or on the remote server that you specified.
— Name — The name that you entered for the asset.
— Duration, sec — The number of seconds that the asset will be visible when you show it on a DMP display. Click a value to see and use its duration control ( ), which is hidden until you click the value. To increase the playback duration by 1 second, click the top of a control. Alternatively, to reduce the playback duration by 1 second, click the bottom of a control. To increment or decrement the duration value quickly, hold down the mouse button after you click the top or the bottom of a control.
• If you do not specify a duration for playback of video and SWF assets, the file plays to completion one time.
• If you do not specify a duration for playback of images or web pages, their duration is continuous.
— URL — Shows the HTTP URL for the described asset.
Table 3-9 Elements to Manage Assets in Playlists (continued)
Element Icon and Description
3-31User Guide for Cisco Digital Media Manager 4.1
OL-13984-01
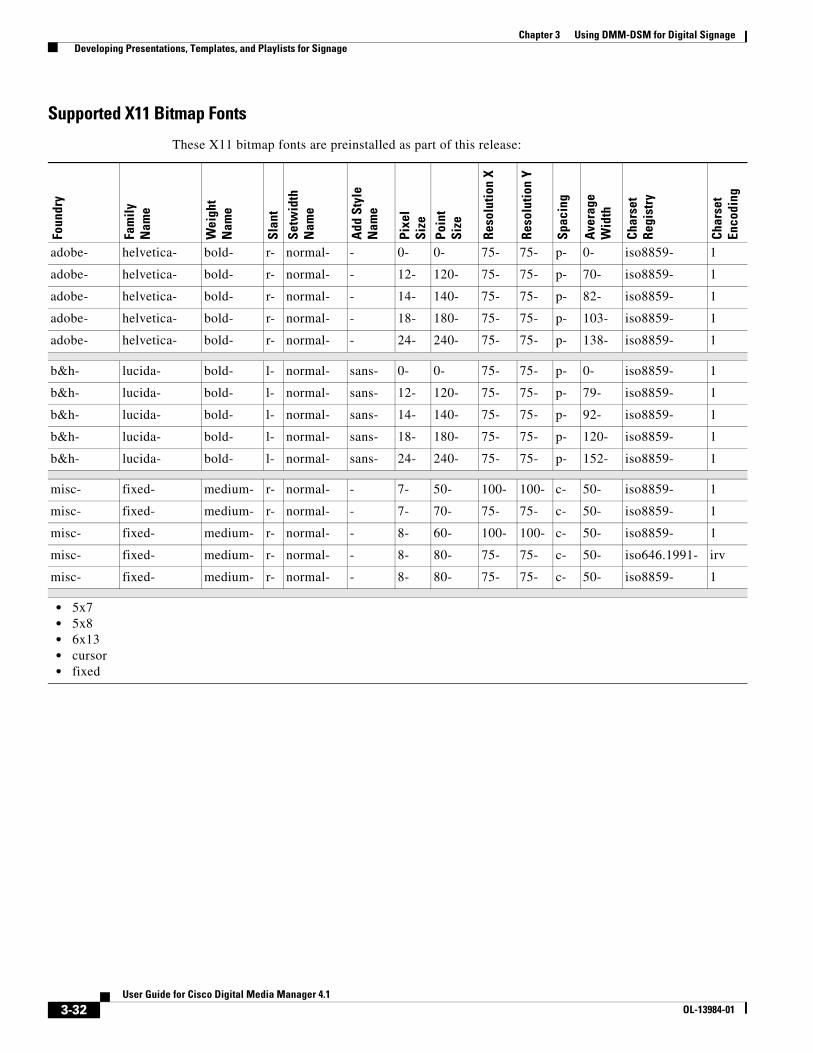
Chapter 3 Using DMM-DSM for Digital Signage Developing Presentations, Templates, and Playlists for Signage
Supported X11 Bitmap Fonts
These X11 bitmap fonts are preinstalled as part of this release:
Foun
dry
Fam
ily
Nam
e
Wei
ght
Nam
e
Slan
tSe
twid
th
Nam
e
Add
Sty
le
Nam
e
Pixe
l Si
zePo
int
Size
Reso
lutio
n X
Reso
lutio
n Y
Spac
ing
Aver
age
Wid
th
Char
set
Regi
stry
Char
set
Enco
ding
adobe- helvetica- bold- r- normal- - 0- 0- 75- 75- p- 0- iso8859- 1
adobe- helvetica- bold- r- normal- - 12- 120- 75- 75- p- 70- iso8859- 1
adobe- helvetica- bold- r- normal- - 14- 140- 75- 75- p- 82- iso8859- 1
adobe- helvetica- bold- r- normal- - 18- 180- 75- 75- p- 103- iso8859- 1
adobe- helvetica- bold- r- normal- - 24- 240- 75- 75- p- 138- iso8859- 1
b&h- lucida- bold- l- normal- sans- 0- 0- 75- 75- p- 0- iso8859- 1
b&h- lucida- bold- l- normal- sans- 12- 120- 75- 75- p- 79- iso8859- 1
b&h- lucida- bold- l- normal- sans- 14- 140- 75- 75- p- 92- iso8859- 1
b&h- lucida- bold- l- normal- sans- 18- 180- 75- 75- p- 120- iso8859- 1
b&h- lucida- bold- l- normal- sans- 24- 240- 75- 75- p- 152- iso8859- 1
misc- fixed- medium- r- normal- - 7- 50- 100- 100- c- 50- iso8859- 1
misc- fixed- medium- r- normal- - 7- 70- 75- 75- c- 50- iso8859- 1
misc- fixed- medium- r- normal- - 8- 60- 100- 100- c- 50- iso8859- 1
misc- fixed- medium- r- normal- - 8- 80- 75- 75- c- 50- iso646.1991- irv
misc- fixed- medium- r- normal- - 8- 80- 75- 75- c- 50- iso8859- 1
• 5x7 • 5x8 • 6x13 • cursor • fixed
3-32User Guide for Cisco Digital Media Manager 4.1
OL-13984-01
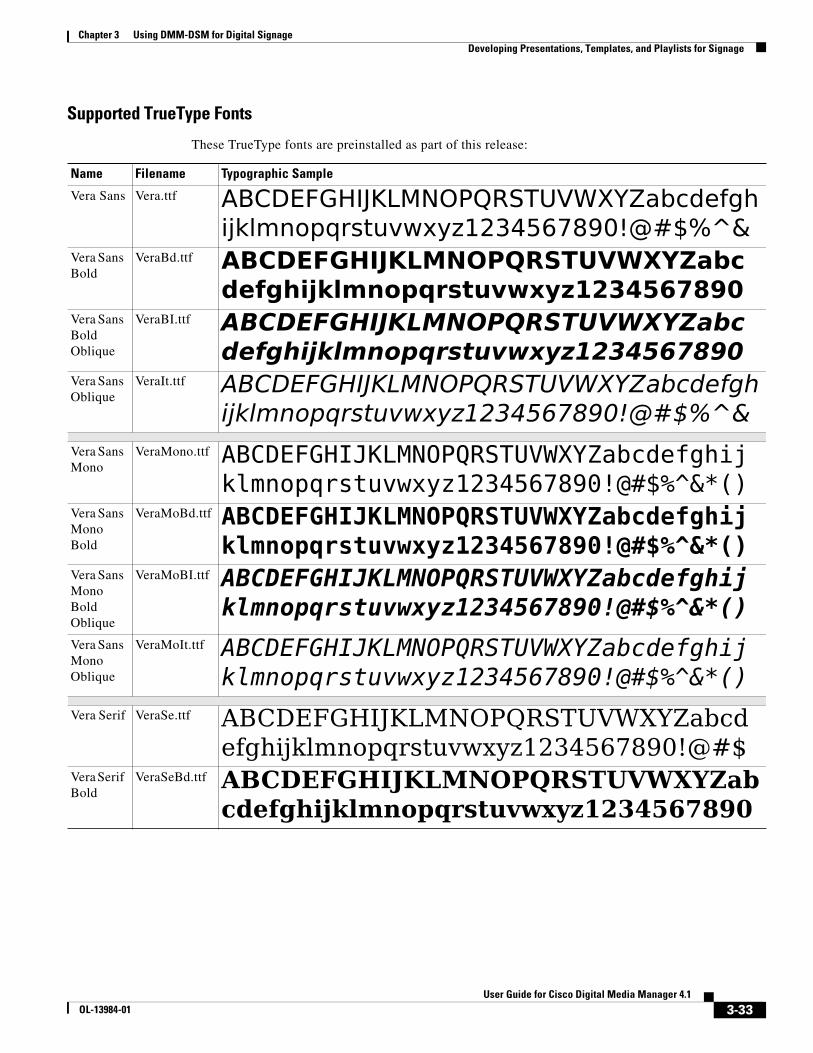
Chapter 3 Using DMM-DSM for Digital Signage Developing Presentations, Templates, and Playlists for Signage
Supported TrueType Fonts
These TrueType fonts are preinstalled as part of this release:
Name Filename Typographic Sample
Vera Sans Vera.ttf ABCDEFGHIJKLMNOPQRSTUVWXYZabcdefgh
ijklmnopqrstuvwxyz1234567890!@#$%^&Vera Sans Bold
VeraBd.ttf ABCDEFGHIJKLMNOPQRSTUVWXYZabc
defghijklmnopqrstuvwxyz1234567890Vera Sans Bold Oblique
VeraBI.ttf ABCDEFGHIJKLMNOPQRSTUVWXYZabc
defghijklmnopqrstuvwxyz1234567890Vera Sans Oblique
VeraIt.ttf ABCDEFGHIJKLMNOPQRSTUVWXYZabcdefgh
ijklmnopqrstuvwxyz1234567890!@#$%^&
Vera Sans Mono
VeraMono.ttf ABCDEFGHIJKLMNOPQRSTUVWXYZabcdefghij
klmnopqrstuvwxyz1234567890!@#$%^&*()Vera Sans Mono Bold
VeraMoBd.ttf ABCDEFGHIJKLMNOPQRSTUVWXYZabcdefghijklmnopqrstuvwxyz1234567890!@#$%^&*()
Vera Sans Mono Bold Oblique
VeraMoBI.ttf ABCDEFGHIJKLMNOPQRSTUVWXYZabcdefghijklmnopqrstuvwxyz1234567890!@#$%^&*()
Vera Sans Mono Oblique
VeraMoIt.ttf ABCDEFGHIJKLMNOPQRSTUVWXYZabcdefghijklmnopqrstuvwxyz1234567890!@#$%^&*()
Vera Serif VeraSe.ttf ABCDEFGHIJKLMNOPQRSTUVWXYZabcdefghijklmnopqrstuvwxyz1234567890!@#$
Vera Serif Bold
VeraSeBd.ttf ABCDEFGHIJKLMNOPQRSTUVWXYZabcdefghijklmnopqrstuvwxyz1234567890
3-33User Guide for Cisco Digital Media Manager 4.1
OL-13984-01
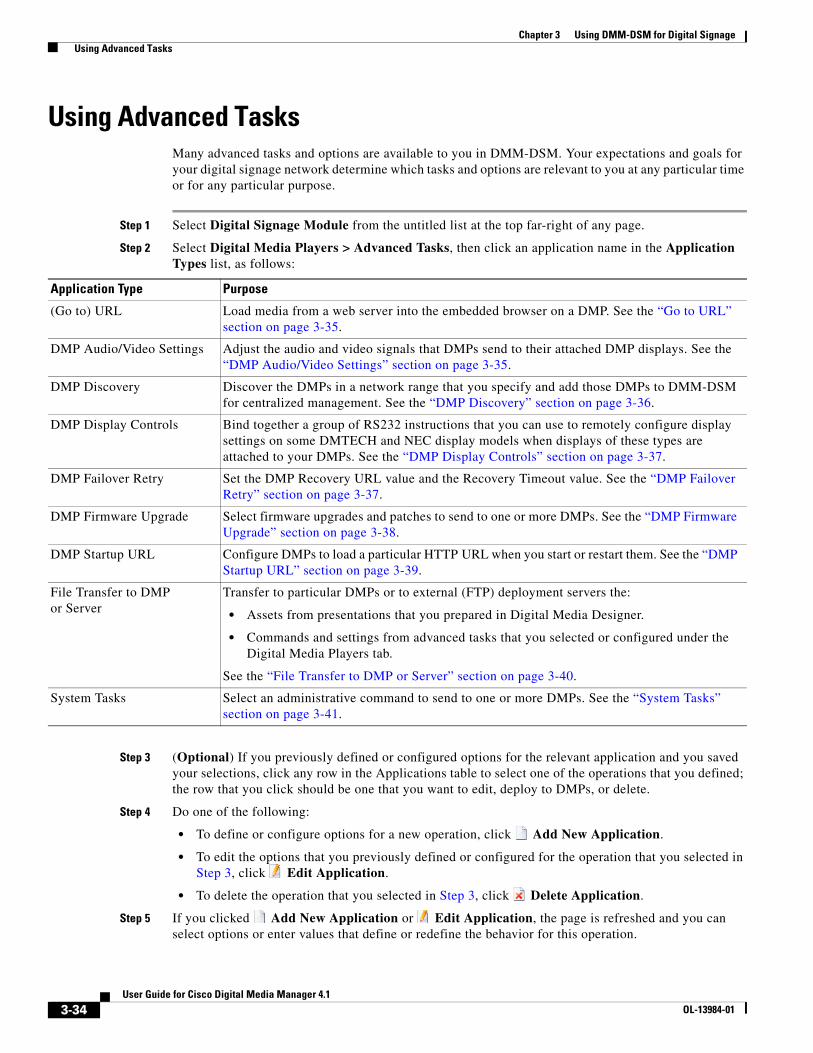
Chapter 3 Using DMM-DSM for Digital Signage Using Advanced Tasks
Using Advanced TasksMany advanced tasks and options are available to you in DMM-DSM. Your expectations and goals for your digital signage network determine which tasks and options are relevant to you at any particular time or for any particular purpose.
Step 1 Select Digital Signage Module from the untitled list at the top far-right of any page.
Step 2 Select Digital Media Players > Advanced Tasks, then click an application name in the Application Types list, as follows:
Step 3 (Optional) If you previously defined or configured options for the relevant application and you saved your selections, click any row in the Applications table to select one of the operations that you defined; the row that you click should be one that you want to edit, deploy to DMPs, or delete.
Step 4 Do one of the following:
• To define or configure options for a new operation, click Add New Application.
• To edit the options that you previously defined or configured for the operation that you selected in Step 3, click Edit Application.
• To delete the operation that you selected in Step 3, click Delete Application.
Step 5 If you clicked Add New Application or Edit Application, the page is refreshed and you can select options or enter values that define or redefine the behavior for this operation.
Application Type Purpose
(Go to) URL Load media from a web server into the embedded browser on a DMP. See the “Go to URL” section on page 3-35.
DMP Audio/Video Settings Adjust the audio and video signals that DMPs send to their attached DMP displays. See the “DMP Audio/Video Settings” section on page 3-35.
DMP Discovery Discover the DMPs in a network range that you specify and add those DMPs to DMM-DSM for centralized management. See the “DMP Discovery” section on page 3-36.
DMP Display Controls Bind together a group of RS232 instructions that you can use to remotely configure display settings on some DMTECH and NEC display models when displays of these types are attached to your DMPs. See the “DMP Display Controls” section on page 3-37.
DMP Failover Retry Set the DMP Recovery URL value and the Recovery Timeout value. See the “DMP Failover Retry” section on page 3-37.
DMP Firmware Upgrade Select firmware upgrades and patches to send to one or more DMPs. See the “DMP Firmware Upgrade” section on page 3-38.
DMP Startup URL Configure DMPs to load a particular HTTP URL when you start or restart them. See the “DMP Startup URL” section on page 3-39.
File Transfer to DMP or Server
Transfer to particular DMPs or to external (FTP) deployment servers the:
• Assets from presentations that you prepared in Digital Media Designer.
• Commands and settings from advanced tasks that you selected or configured under the Digital Media Players tab.
See the “File Transfer to DMP or Server” section on page 3-40.
System Tasks Select an administrative command to send to one or more DMPs. See the “System Tasks” section on page 3-41.
3-34User Guide for Cisco Digital Media Manager 4.1
OL-13984-01

Chapter 3 Using DMM-DSM for Digital Signage Using Advanced Tasks
Step 6 To save your selections, click Submit. Otherwise, click Cancel to discard your selections.
Step 7 To deploy to your DMPs the commands that you saved in Step 6, see Deploying Saved Commands and Presentations to Your DMPs, page 3-42.
Table 3-10 Understanding and Using Advanced Tasks
Application Name Description, Icons, and Options
Go to URL Load media from a web server into the embedded DMP browser.
— Name — A unique and human-readable name for the website that you will select to show in this task. You must enter a name. The name is unique in the sense that you have not used it previously as the name for any presentation or presentation template, or for any task that you created under the Digital Media Players tab in DMM-DSM.
— Description — A brief description. The description is optional.
— URL — The full and correct HTTP URL that points to a page or file on a webserver. The URL that you enter should point to a page that is dynamic and does not require any human interaction (such as clicking or scrolling) to be useful or interesting. You must enter a URL.
DMP Audio/Video Settings
Adjust the audio and video signals that DMPs send to their attached DMP displays.
— Name — A unique and human-readable name for the settings that you configure in this task. For example, you might adjust the brightness setting to accommodate a locale where the lighting is dim, then enter a name that identifies that kind of locale. You must enter a name. The name is unique in the sense that you have not used it previously as the name for any presentation or presentation template, or for any task that you created under the Digital Media Players tab in DMM-DSM.
— Description — A brief description. The description is optional.
— Brightness — The setting that compensates for any deficiencies in the on-screen brightness of your DMP displays. Brightness compensation values can range from –128 to 127.
— Contrast — The setting that compensates for any deficiencies in the on-screen contrast of your DMP displays. Contrast compensation values can range from 0 to 255. The default is 128.
— Saturation — The setting that compensates for any deficiencies in the on-screen color saturation of your DMP displays. Saturation compensation values can range from 0 to 255. The default is 128.
— Left Audio Channel Volume — The setting to control how loudly or softly your DMP display speakers play sound in the left audio channel. Volume can range from 0 to 100, where 0 is silent. The default is 50.
— Right Audio Channel Volume — The setting to control how loudly or softly your DMP display speakers play sound in the left audio channel. Volume can range from 0 to 100, where 0 is silent. The default is 50.
3-35User Guide for Cisco Digital Media Manager 4.1
OL-13984-01
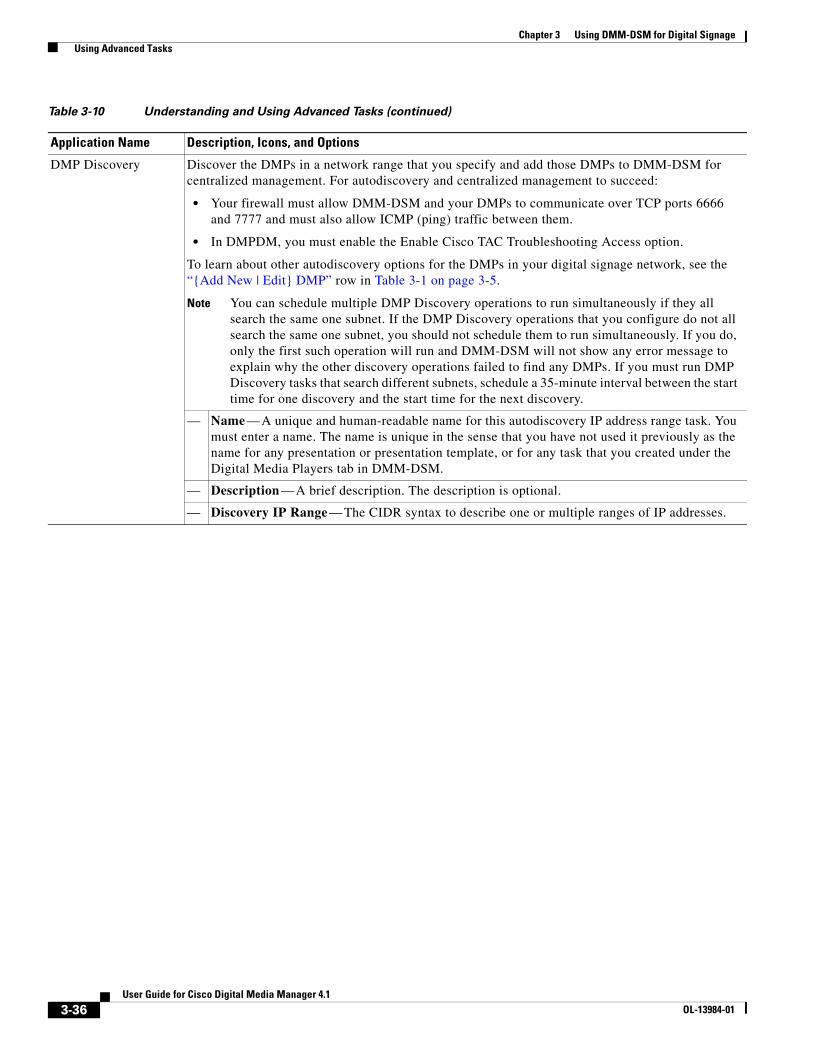
Chapter 3 Using DMM-DSM for Digital Signage Using Advanced Tasks
DMP Discovery Discover the DMPs in a network range that you specify and add those DMPs to DMM-DSM for centralized management. For autodiscovery and centralized management to succeed:
• Your firewall must allow DMM-DSM and your DMPs to communicate over TCP ports 6666 and 7777 and must also allow ICMP (ping) traffic between them.
• In DMPDM, you must enable the Enable Cisco TAC Troubleshooting Access option.
To learn about other autodiscovery options for the DMPs in your digital signage network, see the “{Add New | Edit} DMP” row in Table 3-1 on page 3-5.
Note You can schedule multiple DMP Discovery operations to run simultaneously if they all search the same one subnet. If the DMP Discovery operations that you configure do not all search the same one subnet, you should not schedule them to run simultaneously. If you do, only the first such operation will run and DMM-DSM will not show any error message to explain why the other discovery operations failed to find any DMPs. If you must run DMP Discovery tasks that search different subnets, schedule a 35-minute interval between the start time for one discovery and the start time for the next discovery.
— Name — A unique and human-readable name for this autodiscovery IP address range task. You must enter a name. The name is unique in the sense that you have not used it previously as the name for any presentation or presentation template, or for any task that you created under the Digital Media Players tab in DMM-DSM.
— Description — A brief description. The description is optional.
— Discovery IP Range — The CIDR syntax to describe one or multiple ranges of IP addresses.
Table 3-10 Understanding and Using Advanced Tasks (continued)
Application Name Description, Icons, and Options
3-36User Guide for Cisco Digital Media Manager 4.1
OL-13984-01

Chapter 3 Using DMM-DSM for Digital Signage Using Advanced Tasks
DMP Display Controls Note Before you can use this feature, you must enable RS-232 support for your displays. Select Digital Media Players > Advanced Tasks > System Tasks, then name, save, and deploy one of these as the correct option for your display type: • Turn On DMTech RS-232 Control. • Turn On NEC RS-232 Control.
Bind together a group of RS-232 instructions that you can use to remotely configure display settings.
— TV Type — Select the manufacturer and the model type:
• {DMTECH | NEC_3210 | NEC_4010 | NEC_4610 | NEC_5710}
— Contrast — Select or enter a contrast value from 0 to 100.
— Brightness — Select or enter a brightness value from 0 to 100.
— Sharpness — Select or enter a sharpness value from 0 to 100.
— Color — Select or enter a color value from 0 to 100.
— Tint — Select or enter a tint value from 0 to 100.
— TV Channel — Select or enter the analog television signal frequency for a channel from 0 to 99.
— Audio Volume — Select or enter a volume level from 0 to 100.
— Mute — Select whether to mute the display.
• {on | off}
— Input — Select the input type. Options differ, according to your selection from the TV Type list.
• {TV | RGB | RGB1 (DVI-D) | RGB2 (D-SUB) | RGB3 (BNC) | DVD/HD | Video (Composite) | Video 1 | Video 2 | Video 3 | S-Video | None (DVD) | Component | PC | HDMI | None (DVBT)}
— Power — Select whether the television should be turned on.
• {on | off}
DMP Failover Retry Configure the recovery URL to use in case of failover and the interval between attempts to reload that URL if the connection to it is disrupted.
— Name — A unique and human-readable name for the DMP failover retry task that you are configuring. You must enter a name. The name is unique in the sense that you have not used it previously as the name for any presentation or presentation template, or for any task that you created under the Digital Media Players tab in DMM-DSM.
— Description — A brief description. The description is optional.
— Recovery URL — The URL to show immediately on a DMP display after its attached DMP restarts for any reason, unless other content is scheduled to be shown. If this value is blank, your DMP will reuse the most recent URL that failed to load.
— Recovery Timeout (in seconds) — The maximum number of seconds that your DMP will wait for a response from the server that you identify in the Recovery URL field before it tries again to reach that server. There is no maximum number of retry attempts.
Table 3-10 Understanding and Using Advanced Tasks (continued)
Application Name Description, Icons, and Options
3-37User Guide for Cisco Digital Media Manager 4.1
OL-13984-01
Chapter 3 Using DMM-DSM for Digital Signage Using Advanced Tasks
DMP Firmware Upgrade
Caution Before you install an upgrade, you must run the “Stop All Applications” system task on all the affected DMPs. To do so, click the Schedules tab, select the DMP group that you will upgrade, select Stop All Applications from the Actions list, then click Go.
Note Before you transfer a firmware upgrade file to the SD memory card in a DMP, you must configure, save, and deploy a system task that causes your DMP to accept the transfer. Select Digital Media Players > Advanced Tasks, click System Tasks in the list of defined tasks, then click Add New Application. Enter a name and description, then select Set from the Request Type list and use this syntax in the Request field: init.startService_shell=yes&mib.save=1&mng.exit=1. To restore DMP security after the file transfer is finished, repeat the procedure but use this syntax instead: init.startService_shell=no&mib.save=1&mng.exit=1.
Send a DMP firmware image from your media library to a DMP and send commands to install the new firmware image.
— Name — A unique and human-readable name for the upgrade task that you are configuring. You must enter a name. The name is unique in the sense that you have not used it previously as the name for any presentation or presentation template, or for any task that you created under the Digital Media Players tab in DMM-DSM.
— Description — A brief description. The description is optional.
— Content Categories — An object selector that lists all the categories in your media library. From the object selector, click the one category that the Available Content table should describe. To learn more about categories, see Creating Categories and Organizing Assets for Digital Signage, page 3-8.
• Opened Media Library — Shows all the categories in your media library until you click to hide them.
• Closed Media Library — Hides the list of media library categories until you click to show them.
• Content Category — A media library category that you created.
— Available Content — A table in which you can click any row to select one asset in the specified category. The table sorts information into these columns:
• Name — A unique and human-readable name that you entered.
• Type — Says whether the asset is a file (F) or an HTTP URL (U).
• Size — The filesize in bytes.
• Path — The full pathname that points to the file on the DMP.
• Description — A brief description. The description is optional.
• Upload Started — Time stamp (in the format YYYY-MM-DD hh:mm:ss:ms) that says when you started to upload the file.
• Upload Finished — Time stamp (in the format YYYY-MM-DD hh:mm:ss:ms) that says when the file was completely uploaded.
• Status — Says whether a DMP is reachable. A green icon ( ) tells you that the DMP is connected to a power source, uses a known IP address, and is reachable. A red icon ( ) tells you that the DMP is unreachable.
Table 3-10 Understanding and Using Advanced Tasks (continued)
Application Name Description, Icons, and Options
3-38User Guide for Cisco Digital Media Manager 4.1
OL-13984-01
Chapter 3 Using DMM-DSM for Digital Signage Using Advanced Tasks
DMP Startup URL Causes DMPs to load and show media that you specify, immediately after every restart.
Tip We recommend that you enter a value for either the Video URL or the Browser URL. If both values are blank, you might find that your DMP sometimes loses its ability to play even the Shockwave Flash files that it has played successfully in the past.
— Name — A unique and human-readable name for the startup URL task that you are configuring. You must enter a name. The name is unique in the sense that you have not used it previously as the name for any presentation or presentation template, or for any task that you created under the Digital Media Players tab in DMM-DSM.
— Description — A brief description. The description is optional.
— Video URL — The HTTP URL (or local path on the DMP) that points to an encoded digital video file that a DMP should load automatically and show immediately after every restart. We do not support any use of spaces in filenames or URLs. The supported transport protocols and URL types are:
• http://<ip_address>/<path_and_filename>
• udp://<ip_address_of_multicast_server>/<port_number>
— Browser URL — The HTTP URL of any document that the embedded browser on a DMP should load automatically and show immediately after each restart. We do not support any use of spaces in URLs. We recommend that you do not point to any document or site that requires human interaction to be useful, interesting, or entertaining, because there is no keyboard or mouse that you can use to interact with what you show on a DMP display.
— Reboot — Select the check box if a DMP should restart immediately when it receives this instruction. Deselect the check box if no immediate restart is required.
Table 3-10 Understanding and Using Advanced Tasks (continued)
Application Name Description, Icons, and Options
3-39User Guide for Cisco Digital Media Manager 4.1
OL-13984-01
Chapter 3 Using DMM-DSM for Digital Signage Using Advanced Tasks
File Transfer to DMP or Server
Caution Before you use a file transfer application to deploy the assets from a new or updated presentation to any of your DMPs, you must first run the “Stop All Applications” system task on each affected DMP. To do so, click the Schedules tab, select the DMP group that will use the presentation, select Stop All Applications from the Actions list, then click Go.
Transfer to particular DMPs or to external (FTP) deployment servers the:
• Assets from presentations that you prepared in Digital Media Designer.
• Commands and settings from advanced tasks that you selected or configured under the Digital Media Players tab.
See Deploying Saved Commands and Presentations to Your DMPs, page 3-42.
Tip Although it is technically possible, it is not useful to transfer a system task, a go to URL task, or a startup URL task.
— Name — A unique and human-readable name for the file transfer task that you are configuring. You must enter a name. The name is unique in the sense that you have not used it previously as the name for any presentation or presentation template, or for any task that you created under the Digital Media Players tab in DMM-DSM.
— Description — A brief description. The description is optional.
— Application Types — The list of categories for advanced tasks. Click a category to see its tasks.
— Available Applications — Advanced tasks in the category that you clicked. Click anywhere in a row to select the corresponding task.
• Select Applications — Moves from the Available Applications table to the Selected Applications table the tasks that you selected.
• Name — The unique and human-readable name that identifies a particular task.
• Description — A brief description. The description is optional.
— Selected Applications — Advanced tasks that you selected from the Available Applications table, so that you could include them in the file transfer operation that you are configuring. Click a file transfer task to select its assets for deployment.
• Move Selected Item Up — Reorders the list so that the highlighted item moves up one row, exchanging places with the item that was above it.
• Move Selected Item Down — Reorders the list so that the highlighted item moves down one row, exchanging places with the item that was below it.
• Delete Selected Item — Moves from the Selected Applications table to the Available Applications table the applications that you selected.
• Zoom In — Shows only the Selected Applications table, hiding the Available Applications table.
• Zoom Out — Shows the Selected Applications table and the Available Applications table simultaneously.
Table 3-10 Understanding and Using Advanced Tasks (continued)
Application Name Description, Icons, and Options
3-40User Guide for Cisco Digital Media Manager 4.1
OL-13984-01

Chapter 3 Using DMM-DSM for Digital Signage Using Advanced Tasks
System Tasks
Caution If you restore factory-default settings on a DMP, you must set it up again, exactly as you would set up a brand-new DMP. (To learn how to set up a DMP, see Quick Start Guide for Cisco Digital Media Player 4305G on Cisco.com.) If you restart a DMP, you will disrupt whatever it is doing at that time. If you save any configuration settings mistakenly, you must reenter the correct settings manually.
Predefined system commands that you can send to a DMP. If you will use this feature to pass RS-232 commands through your DMPs and to your DMP displays, first confirm that an RS-232 cable connects each DMP to its associated DMP display; otherwise, your displays will not receive the commands that you define for them.
When you create or edit a system task, these are the elements:
• Name — A unique and human-readable name for the system task that you are configuring. You must enter a name. The name is unique in the sense that you have not used it previously as the name for any presentation or presentation template, or for any task that you created under the Digital Media Players tab in DMM-DSM.
• Description — A brief description. The description is optional.
• Request Type — A list in which the options are Get and Set, in the sense that you can set new values on a DMP or instruct DMM-DSM to get information from a DMP and show that information in a popup window.
• Request — The command string.
— Default — Restore factory default settings.
— FTP {Off | On} — Enable or disable the FTP service.
— HDMI Autodetection {Off | On} — Enable or disable DMP display type autodetection.
— Reboot — Restart.
— Save Settings — Save the active settings.
— Save Settings and Reboot — Save the active settings, then restart.
— Screen Resolution Autodetection {Off | On} — Enable or disable autodetection of the resolutions that your DMP displays support.
— Show {Browser | Video} — Show one content plane but hide the other.
— Status — See the DMP status message in real time.
— Stop All Applications — Stop every application that DMPs are running.
— Transparency 50% — Set the browser plane to be partially transparent and show the video plane through it.
— Turn On DMTech RS-232 LCD Control — Cause DMPs to send RS-232 management instructions to an LCD display manufactured by DMTech.
— Turn On NEC RS-232 LCD Control — Cause DMPs to send RS-232 management instructions to an LCD display manufactured by NEC.
— Upgrade Status — See the DMP upgrade status message in real time.
— Version — See the installed firmware version number.
Table 3-10 Understanding and Using Advanced Tasks (continued)
Application Name Description, Icons, and Options
3-41User Guide for Cisco Digital Media Manager 4.1
OL-13984-01
Chapter 3 Using DMM-DSM for Digital Signage Deploying Saved Commands and Presentations to Your DMPs
Deploying Saved Commands and Presentations to Your DMPs
Tip Network congestion or other performance problems at a DMP deployment site might cause the assets that you deploy to pause, stop, or play at unacceptably low speeds. To work around this problem, troubleshoot network performance at the deployment site and consider upgrading its network or applying policies to shape and prioritize its traffic.
Topics in this section tell you how to deploy (deliver to your DMPs or to external deployment servers) the presentations and commands that you saved elsewhere in DMM-DSM.
• Deploying Commands and Presentations Immediately, page 3-42
• Scheduling Future Deployments of Commands and Presentations, page 3-43
• Preempting a Recurring Deployment for a One-time Event, page 3-48
• Using Deployment Reports, page 3-48
Note To learn how to configure DMM-DSM support for ACNS, see Configuring DMM-DSM to Use ACNS, page 3-55.
Deploying Commands and Presentations ImmediatelyYou can deploy commands or presentations immediately to one DMP or to multiple DMPs that all use the same one DMP group as their parent.
Note • In this release, we do not support immediate deployments to external (FTP) servers.
• We recommend that you avoid using immediate deployments with ACNS, due to the amount of time required to distribute assets throughout your network and to its edge. If you do so despite this recommendation, DMM-DSM always uses the default ACNS channel. You cannot select any other channel.
Before You Begin
• You must already have created and saved the commands or the presentations that you will deploy. See Creating Categories and Organizing Assets for Digital Signage, page 3-8.
• You must already have created the DMP group whose member DMPs should receive the deployment. See Managing and Grouping DMPs, page 3-3.
Step 1 Select Digital Signage Module from the untitled list at the top far-right of any page.
Step 2 Select Schedules > Immediate Deployment.
Step 3 In the DMP Groups object selector, click the name of a DMP group to see its member DMPs in the DMP List table.
Step 4 In the DMP List table, select the check box for each DMP that should receive the deployment.
Step 5 Select from the Actions list the name of the advanced task or presentation that you want to deploy.
3-42User Guide for Cisco Digital Media Manager 4.1
OL-13984-01
Chapter 3 Using DMM-DSM for Digital Signage Deploying Saved Commands and Presentations to Your DMPs
Options in the Actions list are sorted into categories, based on their purpose. The Actions list contains a particular category only if you have created what the category should describe; for example, if you have not defined any presentations, the Actions list does not show the Digital Media Designer category.
Step 6 Click Go.
Scheduling Future Deployments of Commands and PresentationsYou can schedule future one-time or repeated deployment of commands or presentations to:
• One registered DMP.
• Multiple registered DMPs that all use the same one DMP group as their parent.
• All of your registered external (FTP) deployment servers; DMM-DSM treats all of your registered external servers identically.
In addition, you can view two types of summary for any scheduled deployment. See:
• Understanding Tooltips in the Scheduler Timeline, page 3-45
• Understanding Popup Windows in the Scheduler Timeline, page 3-46
You can deploy only one presentation at a time if the assets that it contains should be stored directly on your DMPs. If you want a particular presentation to play during stage-one failover on a DMP, the combined filesize of all its assets must not be any more than 900 MB (on a DMP 4300G) or 1.9 GB (on a DMP 4305G).
Caution Do not delete the scheduled deployment job for a presentation to stop it from playing on your DMPs. If you delete the deployment job, your DMPs will continue to use the presentation as if you did nothing. This happens because each deployment job includes an instruction to stop, but you delete that instruction when you delete the deployment job that contains it. To stop your DMPs from using a presentation in this case, create and deploy an advanced task to stop all applications. See the “System Tasks” row in Table 3-10 on page 3-35.
Note It is important that you understand all of the possible limitations and effects of deploying to an FTP server, as well as the exact circumstances that lead to these effects. Files are sometimes unplayable or deleted automatically, subdirectories are sometimes created automatically, and values that you enter in DMM-DSM are sometimes changed automatically.
• Video files do not play at all if you deploy a presentation to an FTP server when the presentation uses MPEG files that are:
– Served from Microsoft Internet Information Server (IIS). On Windows, we support only Apache.
– Requested through Microsoft Proxy Server.
– Requested through Microsoft Internet Security and Acceleration Server.
• When your media library in DMM-DSM is the source for a file that you deploy as part of a presentation, and when you select an FTP server as the target to receive that file, DMM-DSM transfers copies of the relevant file to all of the FTP servers that you have registered. After the
3-43User Guide for Cisco Digital Media Manager 4.1
OL-13984-01
Chapter 3 Using DMM-DSM for Digital Signage Deploying Saved Commands and Presentations to Your DMPs
transfer is completed, DMM-DSM deletes the original file from its media library, then changes the relevant presentation so that it uses a URL instead of a local path. The URL that DMM-DSM enters automatically is specific to whichever FTP server you registered first.
• When an HTTP URL is the source for a deployed file, and when the pathname on the source server contains subdirectories that do not exist on the target FTP server, DMM-DSM automatically creates the required subdirectories on the FTP server.
You can schedule a deployment to occur at any time and recur any number of times, and you can schedule any number of deployments. DMM-DSM can make multiple deployments simultaneously and — assuming that a DMP has a fast network connection and you send deployments to it that are not mutually exclusive — a DMP can receive multiple deployments simultaneously.
Before You Begin
• You must already have created and saved the commands or the presentations that you will deploy. See Creating Categories and Organizing Assets for Digital Signage, page 3-8.
• You must already have created the DMP group that should receive a deployment. See Managing and Grouping DMPs, page 3-3.
Step 1 Select Digital Signage Module from the untitled list at the top far-right of any page.
Step 2 Select Schedules > Future Deployment.
Tip If the user interface for the scheduler does not load correctly in your browser, see the “Client System Requirements to Use DMM 4.1 Modules or Video Portal 4.1” section in Release Notes for Cisco Digital Media System 4.1 on Cisco.com.
Step 3 Click (the large “Select Target Date” button near the left edge of the user interface).
Step 4 In the Select Target Date dialog box, click the calendar date for the first deployment, then click OK.
Step 5 Do one of the following:
• If you are scheduling a new deployment, select from the DMP Groups list the DMPs or the external (FTP) deployment servers that should receive the deployment.
• If you are editing a scheduled deployment, find that task in the timeline row that names the recipient DMP group. You might have to scroll horizontally through the timeline to see earlier or later times. When you find the task, click it to select it.
Step 6 Set or edit the timing for deployment:
a. From the How Often list, select the interval between deployments.
b. In the From area, click , then select the hour and minute to start the deployment.
c. In the To area, click , then select the calendar date, hour, and minute to stop the deployment.
The times that you configure for deployments are relative to the time zone where you deployed your DMM appliance, not to the time zone where you deployed any DMP. You set the time zone value when you used AAI to set up your DMM appliance and you can change the time zone value if it is wrong. To learn how to set or reset the time zone, see the “Administering a DMM Appliance” chapter in Appliance Administration Guide for Cisco Digital Media System 4.1 on Cisco.com.
Step 7 From the Applications list, select the option that names what you want to deploy.
3-44User Guide for Cisco Digital Media Manager 4.1
OL-13984-01
Chapter 3 Using DMM-DSM for Digital Signage Deploying Saved Commands and Presentations to Your DMPs
Options in the Applications list are sorted into categories, based on their purpose. For example, the Digital Media Designer category contains every presentation that you have saved. The Applications list contains a particular category only if you have created what the category should describe.
Step 8 Do one of the following:
• If you are scheduling a new deployment, click Add Task.
• If you are editing a scheduled deployment, click Update Task.
• If you are deleting a scheduled deployment, click Remove Task.
Step 9 To save your selections, click Save.
If you do not save your selections for a deployment that you add or update, DMM-DSM discards your selections immediately after you refresh your browser or load any other page in it.
Step 10 (Optional) To make copies of a deployment, so that it recurs as many times as you want and at any interval that you specify, click Multiply Task.
a. At the first prompt, enter the hours and minutes between copied instances of the deployment. Use the format for military time (24 hours that increment from 0100 to 2400) and the format HH:MM.
b. At the second prompt, enter the number of copies to make.
Step 11 To transmit the deployment according to the schedule that you defined — and synchronize it if you use ACNS — click Publish.
Understanding Tooltips in the Scheduler Timeline
Whenever your pointer hovers over a scheduled deployment in the timeline, DMM-DSM displays a tooltip. Information in the tooltip describes the current status of the corresponding deployment and summarizes its most important attributes. Information in the tooltip is organized as follows:
Category Description
Status One of the following:
• New — You made selections to define a new deployment. However, because you have not yet clicked Save, DMM-DSM will discard your selections if you refresh your browser or load any other page in it.
• Saved — You made selections to define a new deployment and you clicked Save. DMM-DSM created a permanent record for the deployment, but has not scheduled it yet to run.
• Published — You made selections to define a deployment, you saved your selections, and DMM-DSM has scheduled the deployment to run at the times that you specified.
• Scheduled — The deployment is occurring now.
• Finished — The deployment occurred at the scheduled time and is now stopped.
App The selection that you made from the Applications list.
Group The selection that you made from the DMP Groups list.
From The date and time when the deployment is (or was) scheduled to start.
To The date and time when the deployment is (or was) scheduled to stop.
How Often The number of times that the deployment is scheduled to recur.
3-45User Guide for Cisco Digital Media Manager 4.1
OL-13984-01
Chapter 3 Using DMM-DSM for Digital Signage Deploying Saved Commands and Presentations to Your DMPs
Understanding Popup Windows in the Scheduler Timeline
Whenever you double-click a scheduled deployment in the timeline, DMM-DSM opens a popup window. Information in the popup describes the current status of the corresponding deployment and summarizes its most important attributes. Information in the popup is organized as follows:
Start Cmd Result (Total/OK/Failed)
N/N/N, where:
• The first N is a color-coded (black) numeral that counts the total number of times that DMM-DSM tried to deploy the command to start the designated task.
• The second N is a color-coded (green) numeral that counts the number of times that DMM-DSM succeeded in deploying the command to start the designated task.
• The third N is a color-coded (red) numeral that counts the number of times that DMM-DSM failed to deploy the command to start the designated task.
Stop Cmd Result (Total/OK/Failed)
N/N/N, where:
• The first N is a color-coded (black) numeral that counts the total number of times that DMM-DSM tried to deploy the command to stop the designated task.
• The second N is a color-coded (green) numeral that counts the number of times that DMM-DSM succeeded in deploying the command to stop the designated task.
• The third N is a color-coded (red) numeral that counts the number of times that DMM-DSM failed to deploy the command to stop the designated task.
Category Description
Category Description
Application Name The selection that you made from the Applications list.
Application Type Either Digital Media Designer (see Developing Presentations, Templates, and Playlists for Signage, page 3-12) or one of the following (see Using Advanced Tasks, page 3-34):
• (Go to) URL
• DMP Audio/Video Settings
• DMP Discovery
• DMP Display Controls
• DMP Failover Retry
• DMP Firmware Upgrade
• DMP Startup URL
• File Transfer to DMP or Server
• System Tasks
From The date and time when the deployment is (or was) scheduled to start.
To The date and time when the deployment is (or was) scheduled to stop.
How Often The number of times that the deployment is scheduled to recur.
3-46User Guide for Cisco Digital Media Manager 4.1
OL-13984-01
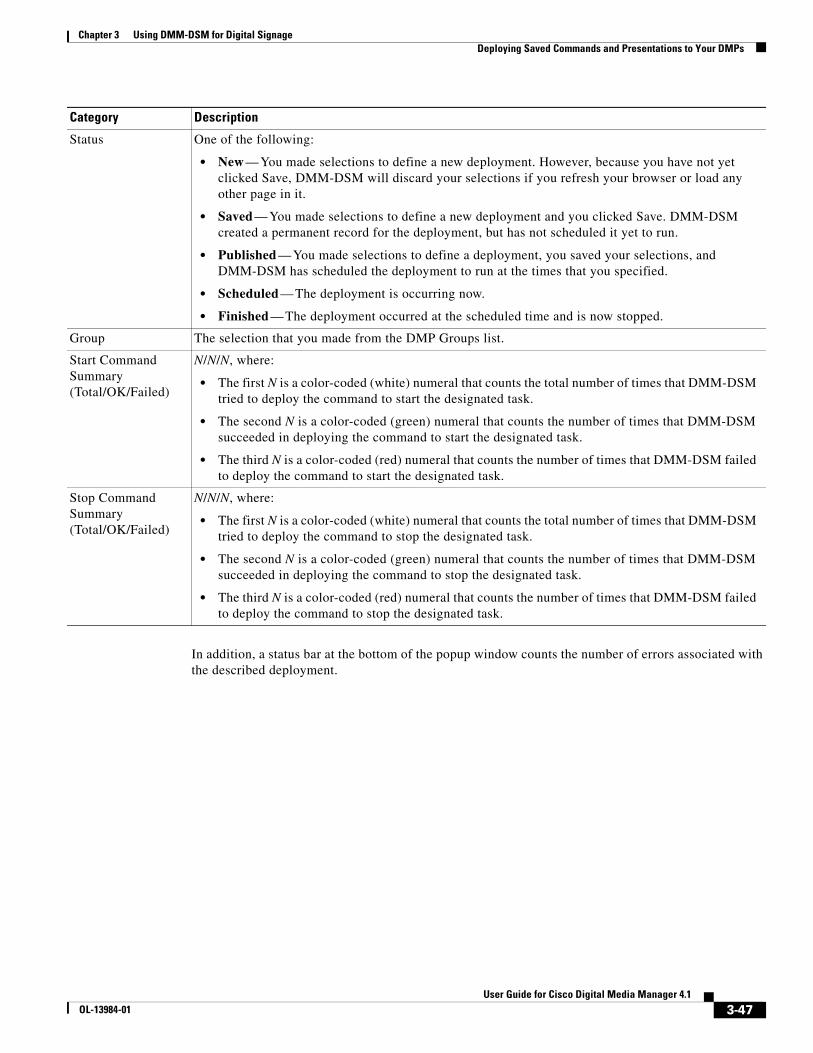
Chapter 3 Using DMM-DSM for Digital Signage Deploying Saved Commands and Presentations to Your DMPs
In addition, a status bar at the bottom of the popup window counts the number of errors associated with the described deployment.
Status One of the following:
• New — You made selections to define a new deployment. However, because you have not yet clicked Save, DMM-DSM will discard your selections if you refresh your browser or load any other page in it.
• Saved — You made selections to define a new deployment and you clicked Save. DMM-DSM created a permanent record for the deployment, but has not scheduled it yet to run.
• Published — You made selections to define a deployment, you saved your selections, and DMM-DSM has scheduled the deployment to run at the times that you specified.
• Scheduled — The deployment is occurring now.
• Finished — The deployment occurred at the scheduled time and is now stopped.
Group The selection that you made from the DMP Groups list.
Start Command Summary (Total/OK/Failed)
N/N/N, where:
• The first N is a color-coded (white) numeral that counts the total number of times that DMM-DSM tried to deploy the command to start the designated task.
• The second N is a color-coded (green) numeral that counts the number of times that DMM-DSM succeeded in deploying the command to start the designated task.
• The third N is a color-coded (red) numeral that counts the number of times that DMM-DSM failed to deploy the command to start the designated task.
Stop Command Summary (Total/OK/Failed)
N/N/N, where:
• The first N is a color-coded (white) numeral that counts the total number of times that DMM-DSM tried to deploy the command to stop the designated task.
• The second N is a color-coded (green) numeral that counts the number of times that DMM-DSM succeeded in deploying the command to stop the designated task.
• The third N is a color-coded (red) numeral that counts the number of times that DMM-DSM failed to deploy the command to stop the designated task.
Category Description
3-47User Guide for Cisco Digital Media Manager 4.1
OL-13984-01
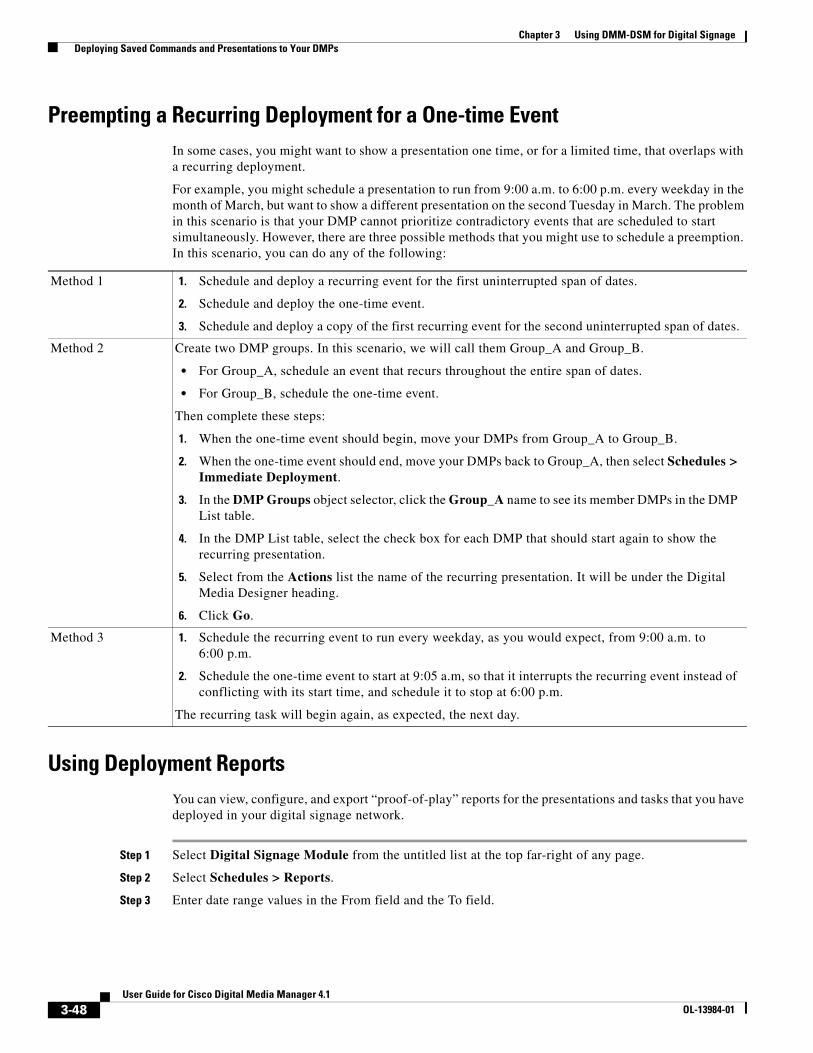
Chapter 3 Using DMM-DSM for Digital Signage Deploying Saved Commands and Presentations to Your DMPs
Preempting a Recurring Deployment for a One-time EventIn some cases, you might want to show a presentation one time, or for a limited time, that overlaps with a recurring deployment.
For example, you might schedule a presentation to run from 9:00 a.m. to 6:00 p.m. every weekday in the month of March, but want to show a different presentation on the second Tuesday in March. The problem in this scenario is that your DMP cannot prioritize contradictory events that are scheduled to start simultaneously. However, there are three possible methods that you might use to schedule a preemption. In this scenario, you can do any of the following:
Using Deployment ReportsYou can view, configure, and export “proof-of-play” reports for the presentations and tasks that you have deployed in your digital signage network.
Step 1 Select Digital Signage Module from the untitled list at the top far-right of any page.
Step 2 Select Schedules > Reports.
Step 3 Enter date range values in the From field and the To field.
Method 1 1. Schedule and deploy a recurring event for the first uninterrupted span of dates.
2. Schedule and deploy the one-time event.
3. Schedule and deploy a copy of the first recurring event for the second uninterrupted span of dates.
Method 2 Create two DMP groups. In this scenario, we will call them Group_A and Group_B.
• For Group_A, schedule an event that recurs throughout the entire span of dates.
• For Group_B, schedule the one-time event.
Then complete these steps:
1. When the one-time event should begin, move your DMPs from Group_A to Group_B.
2. When the one-time event should end, move your DMPs back to Group_A, then select Schedules > Immediate Deployment.
3. In the DMP Groups object selector, click the Group_A name to see its member DMPs in the DMP List table.
4. In the DMP List table, select the check box for each DMP that should start again to show the recurring presentation.
5. Select from the Actions list the name of the recurring presentation. It will be under the Digital Media Designer heading.
6. Click Go.
Method 3 1. Schedule the recurring event to run every weekday, as you would expect, from 9:00 a.m. to 6:00 p.m.
2. Schedule the one-time event to start at 9:05 a.m, so that it interrupts the recurring event instead of conflicting with its start time, and schedule it to stop at 6:00 p.m.
The recurring task will begin again, as expected, the next day.
3-48User Guide for Cisco Digital Media Manager 4.1
OL-13984-01
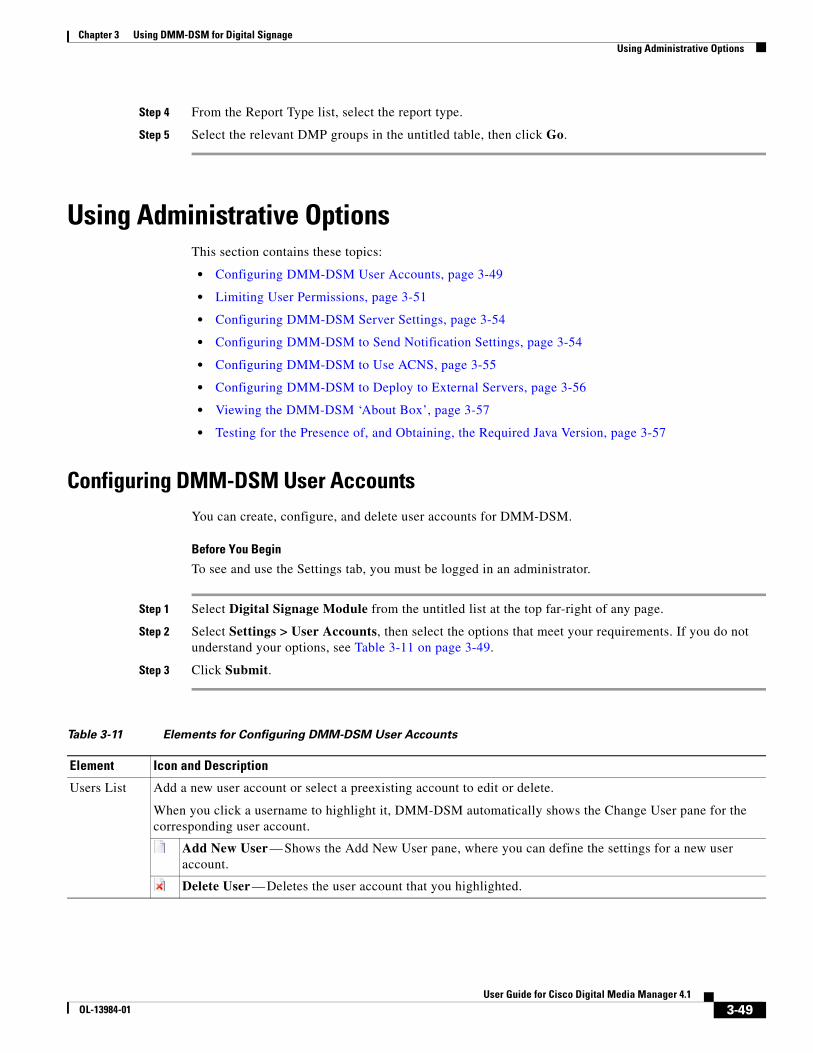
Chapter 3 Using DMM-DSM for Digital Signage Using Administrative Options
Step 4 From the Report Type list, select the report type.
Step 5 Select the relevant DMP groups in the untitled table, then click Go.
Using Administrative OptionsThis section contains these topics:
• Configuring DMM-DSM User Accounts, page 3-49
• Limiting User Permissions, page 3-51
• Configuring DMM-DSM Server Settings, page 3-54
• Configuring DMM-DSM to Send Notification Settings, page 3-54
• Configuring DMM-DSM to Use ACNS, page 3-55
• Configuring DMM-DSM to Deploy to External Servers, page 3-56
• Viewing the DMM-DSM ‘About Box’, page 3-57
• Testing for the Presence of, and Obtaining, the Required Java Version, page 3-57
Configuring DMM-DSM User AccountsYou can create, configure, and delete user accounts for DMM-DSM.
Before You Begin
To see and use the Settings tab, you must be logged in an administrator.
Step 1 Select Digital Signage Module from the untitled list at the top far-right of any page.
Step 2 Select Settings > User Accounts, then select the options that meet your requirements. If you do not understand your options, see Table 3-11 on page 3-49.
Step 3 Click Submit.
Table 3-11 Elements for Configuring DMM-DSM User Accounts
Element Icon and Description
Users List Add a new user account or select a preexisting account to edit or delete.
When you click a username to highlight it, DMM-DSM automatically shows the Change User pane for the corresponding user account.
Add New User — Shows the Add New User pane, where you can define the settings for a new user account.
Delete User — Deletes the user account that you highlighted.
3-49User Guide for Cisco Digital Media Manager 4.1
OL-13984-01
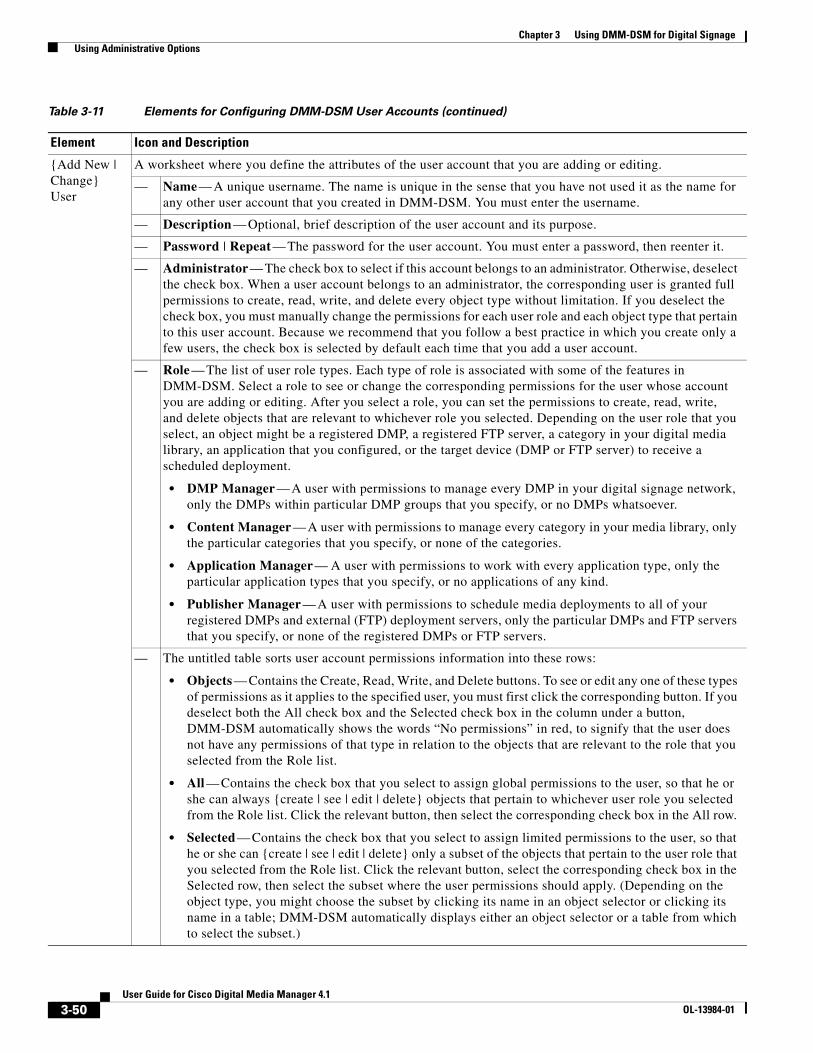
Chapter 3 Using DMM-DSM for Digital Signage Using Administrative Options
{Add New | Change} User
A worksheet where you define the attributes of the user account that you are adding or editing.
— Name — A unique username. The name is unique in the sense that you have not used it as the name for any other user account that you created in DMM-DSM. You must enter the username.
— Description — Optional, brief description of the user account and its purpose.
— Password | Repeat — The password for the user account. You must enter a password, then reenter it.
— Administrator — The check box to select if this account belongs to an administrator. Otherwise, deselect the check box. When a user account belongs to an administrator, the corresponding user is granted full permissions to create, read, write, and delete every object type without limitation. If you deselect the check box, you must manually change the permissions for each user role and each object type that pertain to this user account. Because we recommend that you follow a best practice in which you create only a few users, the check box is selected by default each time that you add a user account.
— Role — The list of user role types. Each type of role is associated with some of the features in DMM-DSM. Select a role to see or change the corresponding permissions for the user whose account you are adding or editing. After you select a role, you can set the permissions to create, read, write, and delete objects that are relevant to whichever role you selected. Depending on the user role that you select, an object might be a registered DMP, a registered FTP server, a category in your digital media library, an application that you configured, or the target device (DMP or FTP server) to receive a scheduled deployment.
• DMP Manager — A user with permissions to manage every DMP in your digital signage network, only the DMPs within particular DMP groups that you specify, or no DMPs whatsoever.
• Content Manager — A user with permissions to manage every category in your media library, only the particular categories that you specify, or none of the categories.
• Application Manager — A user with permissions to work with every application type, only the particular application types that you specify, or no applications of any kind.
• Publisher Manager — A user with permissions to schedule media deployments to all of your registered DMPs and external (FTP) deployment servers, only the particular DMPs and FTP servers that you specify, or none of the registered DMPs or FTP servers.
— The untitled table sorts user account permissions information into these rows:
• Objects — Contains the Create, Read, Write, and Delete buttons. To see or edit any one of these types of permissions as it applies to the specified user, you must first click the corresponding button. If you deselect both the All check box and the Selected check box in the column under a button, DMM-DSM automatically shows the words “No permissions” in red, to signify that the user does not have any permissions of that type in relation to the objects that are relevant to the role that you selected from the Role list.
• All — Contains the check box that you select to assign global permissions to the user, so that he or she can always {create | see | edit | delete} objects that pertain to whichever user role you selected from the Role list. Click the relevant button, then select the corresponding check box in the All row.
• Selected — Contains the check box that you select to assign limited permissions to the user, so that he or she can {create | see | edit | delete} only a subset of the objects that pertain to the user role that you selected from the Role list. Click the relevant button, select the corresponding check box in the Selected row, then select the subset where the user permissions should apply. (Depending on the object type, you might choose the subset by clicking its name in an object selector or clicking its name in a table; DMM-DSM automatically displays either an object selector or a table from which to select the subset.)
Table 3-11 Elements for Configuring DMM-DSM User Accounts (continued)
Element Icon and Description
3-50User Guide for Cisco Digital Media Manager 4.1
OL-13984-01
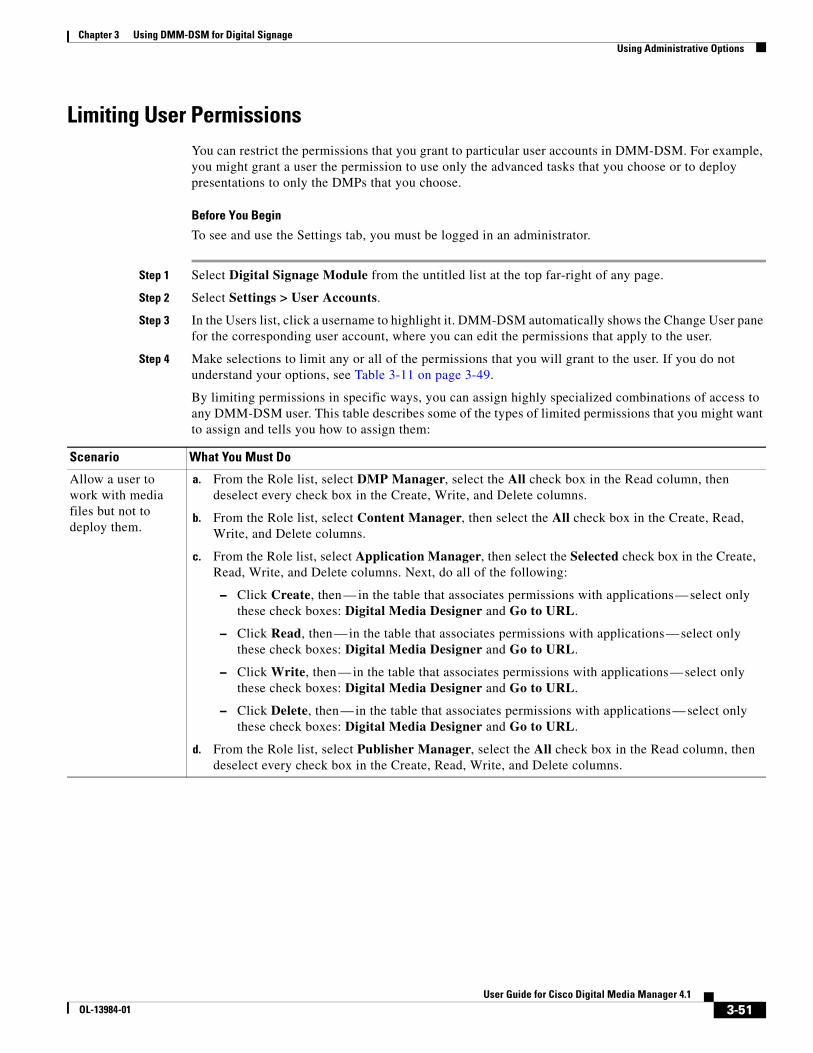
Chapter 3 Using DMM-DSM for Digital Signage Using Administrative Options
Limiting User PermissionsYou can restrict the permissions that you grant to particular user accounts in DMM-DSM. For example, you might grant a user the permission to use only the advanced tasks that you choose or to deploy presentations to only the DMPs that you choose.
Before You Begin
To see and use the Settings tab, you must be logged in an administrator.
Step 1 Select Digital Signage Module from the untitled list at the top far-right of any page.
Step 2 Select Settings > User Accounts.
Step 3 In the Users list, click a username to highlight it. DMM-DSM automatically shows the Change User pane for the corresponding user account, where you can edit the permissions that apply to the user.
Step 4 Make selections to limit any or all of the permissions that you will grant to the user. If you do not understand your options, see Table 3-11 on page 3-49.
By limiting permissions in specific ways, you can assign highly specialized combinations of access to any DMM-DSM user. This table describes some of the types of limited permissions that you might want to assign and tells you how to assign them:
Scenario What You Must Do
Allow a user to work with media files but not to deploy them.
a. From the Role list, select DMP Manager, select the All check box in the Read column, then deselect every check box in the Create, Write, and Delete columns.
b. From the Role list, select Content Manager, then select the All check box in the Create, Read, Write, and Delete columns.
c. From the Role list, select Application Manager, then select the Selected check box in the Create, Read, Write, and Delete columns. Next, do all of the following:
– Click Create, then — in the table that associates permissions with applications — select only these check boxes: Digital Media Designer and Go to URL.
– Click Read, then — in the table that associates permissions with applications — select only these check boxes: Digital Media Designer and Go to URL.
– Click Write, then — in the table that associates permissions with applications — select only these check boxes: Digital Media Designer and Go to URL.
– Click Delete, then — in the table that associates permissions with applications — select only these check boxes: Digital Media Designer and Go to URL.
d. From the Role list, select Publisher Manager, select the All check box in the Read column, then deselect every check box in the Create, Read, Write, and Delete columns.
3-51User Guide for Cisco Digital Media Manager 4.1
OL-13984-01
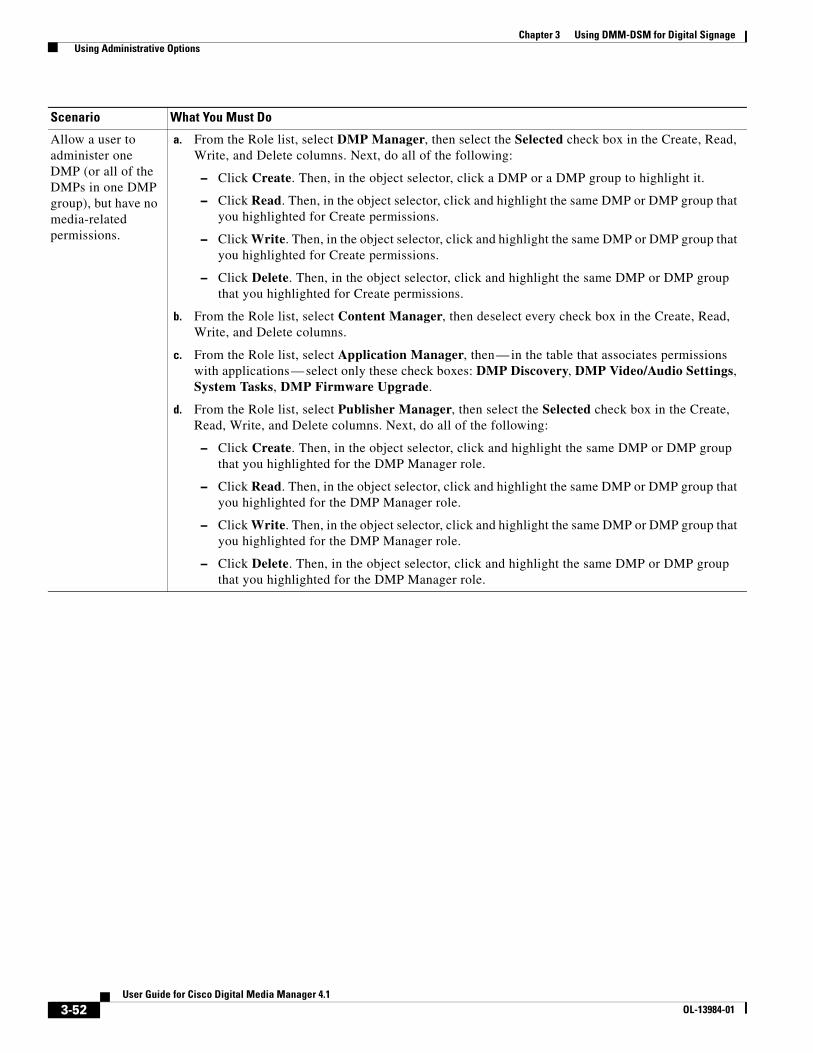
Chapter 3 Using DMM-DSM for Digital Signage Using Administrative Options
Allow a user to administer one DMP (or all of the DMPs in one DMP group), but have no media-related permissions.
a. From the Role list, select DMP Manager, then select the Selected check box in the Create, Read, Write, and Delete columns. Next, do all of the following:
– Click Create. Then, in the object selector, click a DMP or a DMP group to highlight it.
– Click Read. Then, in the object selector, click and highlight the same DMP or DMP group that you highlighted for Create permissions.
– Click Write. Then, in the object selector, click and highlight the same DMP or DMP group that you highlighted for Create permissions.
– Click Delete. Then, in the object selector, click and highlight the same DMP or DMP group that you highlighted for Create permissions.
b. From the Role list, select Content Manager, then deselect every check box in the Create, Read, Write, and Delete columns.
c. From the Role list, select Application Manager, then — in the table that associates permissions with applications — select only these check boxes: DMP Discovery, DMP Video/Audio Settings, System Tasks, DMP Firmware Upgrade.
d. From the Role list, select Publisher Manager, then select the Selected check box in the Create, Read, Write, and Delete columns. Next, do all of the following:
– Click Create. Then, in the object selector, click and highlight the same DMP or DMP group that you highlighted for the DMP Manager role.
– Click Read. Then, in the object selector, click and highlight the same DMP or DMP group that you highlighted for the DMP Manager role.
– Click Write. Then, in the object selector, click and highlight the same DMP or DMP group that you highlighted for the DMP Manager role.
– Click Delete. Then, in the object selector, click and highlight the same DMP or DMP group that you highlighted for the DMP Manager role.
Scenario What You Must Do
3-52User Guide for Cisco Digital Media Manager 4.1
OL-13984-01
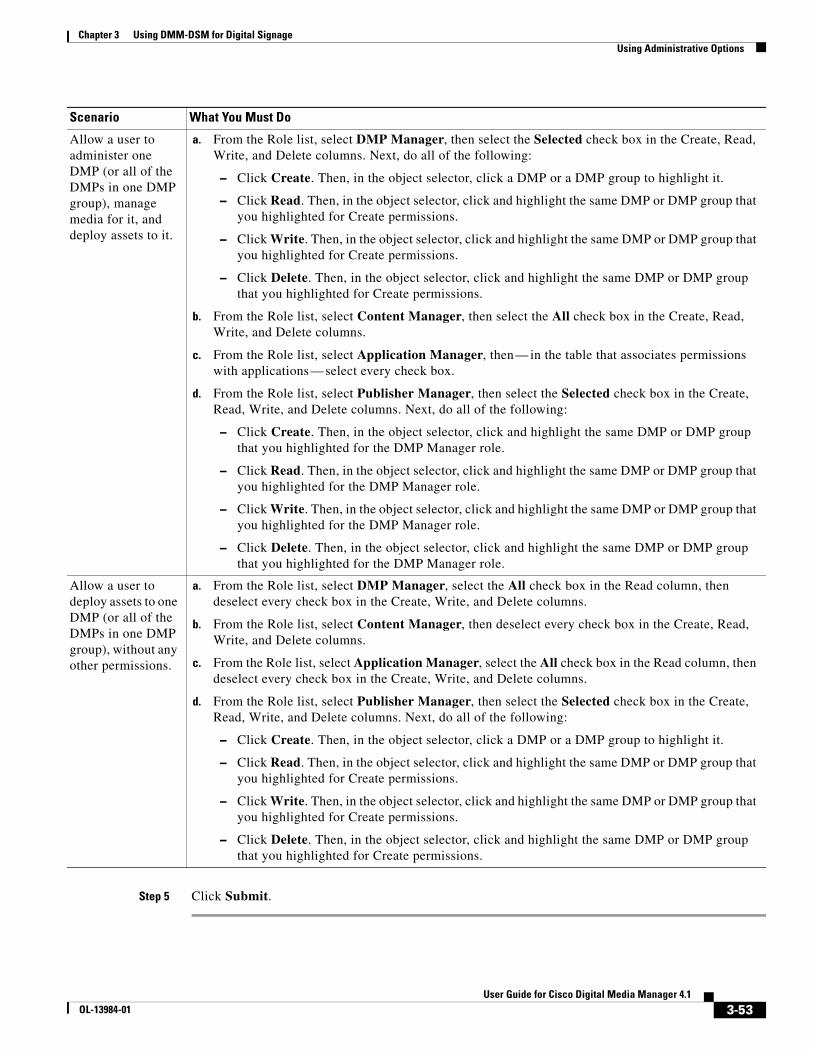
Chapter 3 Using DMM-DSM for Digital Signage Using Administrative Options
Step 5 Click Submit.
Allow a user to administer one DMP (or all of the DMPs in one DMP group), manage media for it, and deploy assets to it.
a. From the Role list, select DMP Manager, then select the Selected check box in the Create, Read, Write, and Delete columns. Next, do all of the following:
– Click Create. Then, in the object selector, click a DMP or a DMP group to highlight it.
– Click Read. Then, in the object selector, click and highlight the same DMP or DMP group that you highlighted for Create permissions.
– Click Write. Then, in the object selector, click and highlight the same DMP or DMP group that you highlighted for Create permissions.
– Click Delete. Then, in the object selector, click and highlight the same DMP or DMP group that you highlighted for Create permissions.
b. From the Role list, select Content Manager, then select the All check box in the Create, Read, Write, and Delete columns.
c. From the Role list, select Application Manager, then — in the table that associates permissions with applications — select every check box.
d. From the Role list, select Publisher Manager, then select the Selected check box in the Create, Read, Write, and Delete columns. Next, do all of the following:
– Click Create. Then, in the object selector, click and highlight the same DMP or DMP group that you highlighted for the DMP Manager role.
– Click Read. Then, in the object selector, click and highlight the same DMP or DMP group that you highlighted for the DMP Manager role.
– Click Write. Then, in the object selector, click and highlight the same DMP or DMP group that you highlighted for the DMP Manager role.
– Click Delete. Then, in the object selector, click and highlight the same DMP or DMP group that you highlighted for the DMP Manager role.
Allow a user to deploy assets to one DMP (or all of the DMPs in one DMP group), without any other permissions.
a. From the Role list, select DMP Manager, select the All check box in the Read column, then deselect every check box in the Create, Write, and Delete columns.
b. From the Role list, select Content Manager, then deselect every check box in the Create, Read, Write, and Delete columns.
c. From the Role list, select Application Manager, select the All check box in the Read column, then deselect every check box in the Create, Write, and Delete columns.
d. From the Role list, select Publisher Manager, then select the Selected check box in the Create, Read, Write, and Delete columns. Next, do all of the following:
– Click Create. Then, in the object selector, click a DMP or a DMP group to highlight it.
– Click Read. Then, in the object selector, click and highlight the same DMP or DMP group that you highlighted for Create permissions.
– Click Write. Then, in the object selector, click and highlight the same DMP or DMP group that you highlighted for Create permissions.
– Click Delete. Then, in the object selector, click and highlight the same DMP or DMP group that you highlighted for Create permissions.
Scenario What You Must Do
3-53User Guide for Cisco Digital Media Manager 4.1
OL-13984-01

Chapter 3 Using DMM-DSM for Digital Signage Using Administrative Options
Configuring DMM-DSM Server SettingsYou must configure DMM-DSM to use the correct Java servlet server and to use one, consistent username and password for administrative access to all of the DMPs that you will manage centrally.
Before You Begin
To see and use the Settings tab, you must be logged in an administrator.
Step 1 Select Digital Signage Module from the untitled list at the top far-right of any page.
Step 2 Select Settings > Server Settings.
Step 3 In the Servlet Server Address field, enter the routable IP address or resolvable DNS hostname for your DMM appliance. It will not be updated automatically if you use AAI to change the IP address of your DMM appliance.
Step 4 In the DMP User Name field, enter the one administrative username that you have configured all of your DMPs to share.
Step 5 In the DMP User Password field, enter the one administrative password that you have configured all of your DMPs to share.
Step 6 Click Save.
Configuring DMM-DSM to Send Notification SettingsYou can configure DMM-DSM to notify you or other interested parties automatically whenever important events affect your digital signage network.
Before You Begin
To see and use the Settings tab, you must be logged in an administrator.
Step 1 Select Digital Signage Module from the untitled list at the top far-right of any page.
Step 2 Select Settings > Email Notifications, then select the options that meet your requirements. If you do not understand your options, see Table 3-12 on page 3-54.
Table 3-12 Elements for Configuring Notification Settings
Element Description
SMTP Mail Server Configuration
Enter the required values for DMM-DSM to use an SMTP server. You must enter these values or you cannot send notification messages.
• Host — Enter the routable IP address or resolvable DNS hostname for the SMTP server.
• User — Enter the username for an email account on the SMTP server.
• Password — Enter the password for the email user account on the SMTP server.
Administrator Email Address — Enter the administrator email address.
3-54User Guide for Cisco Digital Media Manager 4.1
OL-13984-01
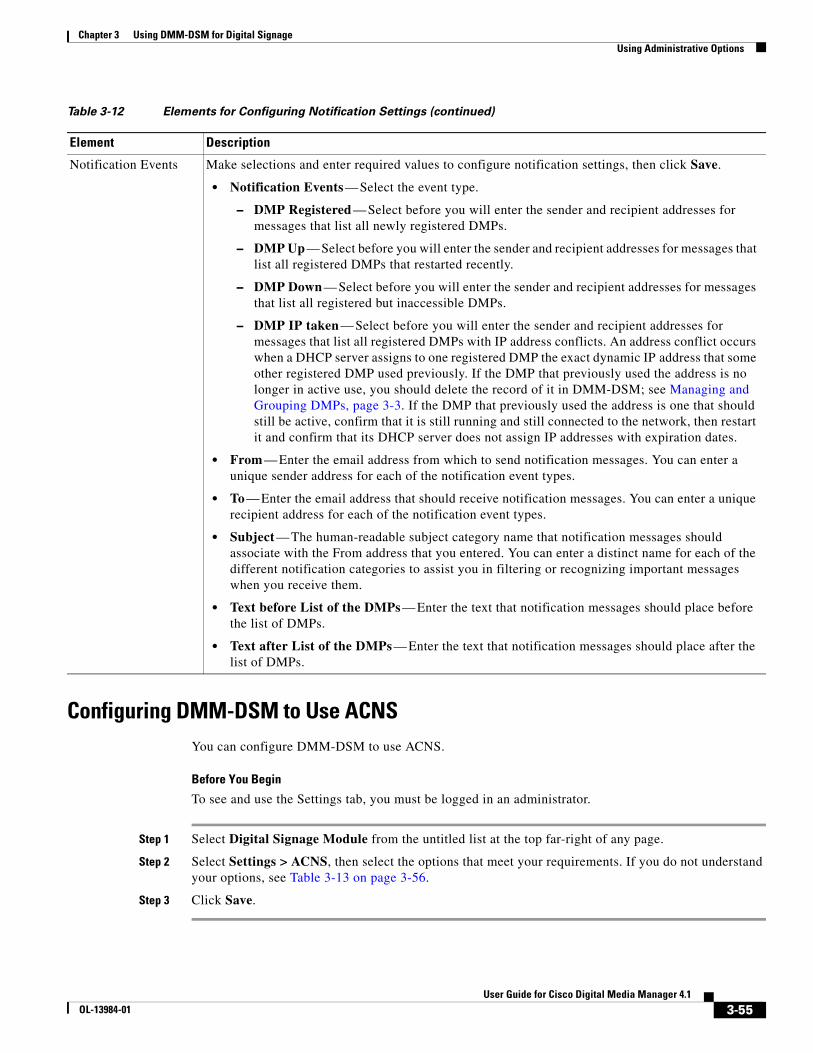
Chapter 3 Using DMM-DSM for Digital Signage Using Administrative Options
Configuring DMM-DSM to Use ACNSYou can configure DMM-DSM to use ACNS.
Before You Begin
To see and use the Settings tab, you must be logged in an administrator.
Step 1 Select Digital Signage Module from the untitled list at the top far-right of any page.
Step 2 Select Settings > ACNS, then select the options that meet your requirements. If you do not understand your options, see Table 3-13 on page 3-56.
Step 3 Click Save.
Notification Events Make selections and enter required values to configure notification settings, then click Save.
• Notification Events — Select the event type.
– DMP Registered — Select before you will enter the sender and recipient addresses for messages that list all newly registered DMPs.
– DMP Up — Select before you will enter the sender and recipient addresses for messages that list all registered DMPs that restarted recently.
– DMP Down — Select before you will enter the sender and recipient addresses for messages that list all registered but inaccessible DMPs.
– DMP IP taken — Select before you will enter the sender and recipient addresses for messages that list all registered DMPs with IP address conflicts. An address conflict occurs when a DHCP server assigns to one registered DMP the exact dynamic IP address that some other registered DMP used previously. If the DMP that previously used the address is no longer in active use, you should delete the record of it in DMM-DSM; see Managing and Grouping DMPs, page 3-3. If the DMP that previously used the address is one that should still be active, confirm that it is still running and still connected to the network, then restart it and confirm that its DHCP server does not assign IP addresses with expiration dates.
• From — Enter the email address from which to send notification messages. You can enter a unique sender address for each of the notification event types.
• To — Enter the email address that should receive notification messages. You can enter a unique recipient address for each of the notification event types.
• Subject — The human-readable subject category name that notification messages should associate with the From address that you entered. You can enter a distinct name for each of the different notification categories to assist you in filtering or recognizing important messages when you receive them.
• Text before List of the DMPs — Enter the text that notification messages should place before the list of DMPs.
• Text after List of the DMPs — Enter the text that notification messages should place after the list of DMPs.
Table 3-12 Elements for Configuring Notification Settings (continued)
Element Description
3-55User Guide for Cisco Digital Media Manager 4.1
OL-13984-01
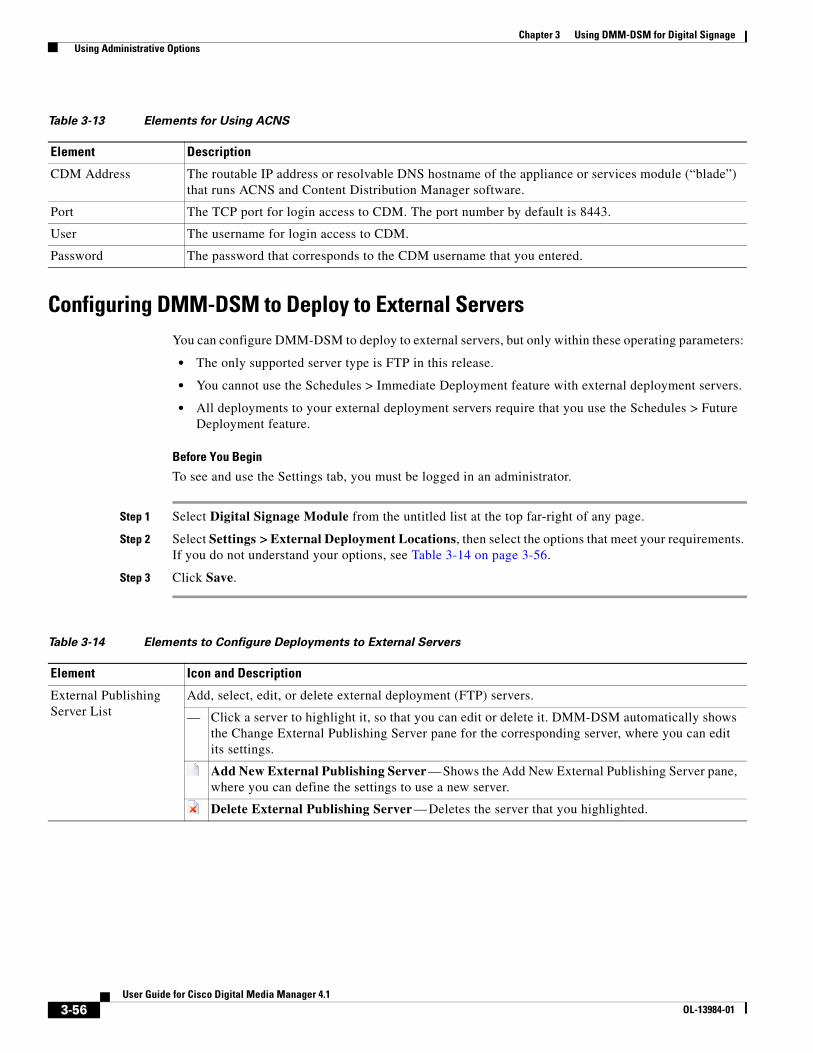
Chapter 3 Using DMM-DSM for Digital Signage Using Administrative Options
Configuring DMM-DSM to Deploy to External ServersYou can configure DMM-DSM to deploy to external servers, but only within these operating parameters:
• The only supported server type is FTP in this release.
• You cannot use the Schedules > Immediate Deployment feature with external deployment servers.
• All deployments to your external deployment servers require that you use the Schedules > Future Deployment feature.
Before You Begin
To see and use the Settings tab, you must be logged in an administrator.
Step 1 Select Digital Signage Module from the untitled list at the top far-right of any page.
Step 2 Select Settings > External Deployment Locations, then select the options that meet your requirements. If you do not understand your options, see Table 3-14 on page 3-56.
Step 3 Click Save.
Table 3-13 Elements for Using ACNS
Element Description
CDM Address The routable IP address or resolvable DNS hostname of the appliance or services module (“blade”) that runs ACNS and Content Distribution Manager software.
Port The TCP port for login access to CDM. The port number by default is 8443.
User The username for login access to CDM.
Password The password that corresponds to the CDM username that you entered.
Table 3-14 Elements to Configure Deployments to External Servers
Element Icon and Description
External Publishing Server List
Add, select, edit, or delete external deployment (FTP) servers.
— Click a server to highlight it, so that you can edit or delete it. DMM-DSM automatically shows the Change External Publishing Server pane for the corresponding server, where you can edit its settings.
Add New External Publishing Server — Shows the Add New External Publishing Server pane, where you can define the settings to use a new server.
Delete External Publishing Server — Deletes the server that you highlighted.
3-56User Guide for Cisco Digital Media Manager 4.1
OL-13984-01
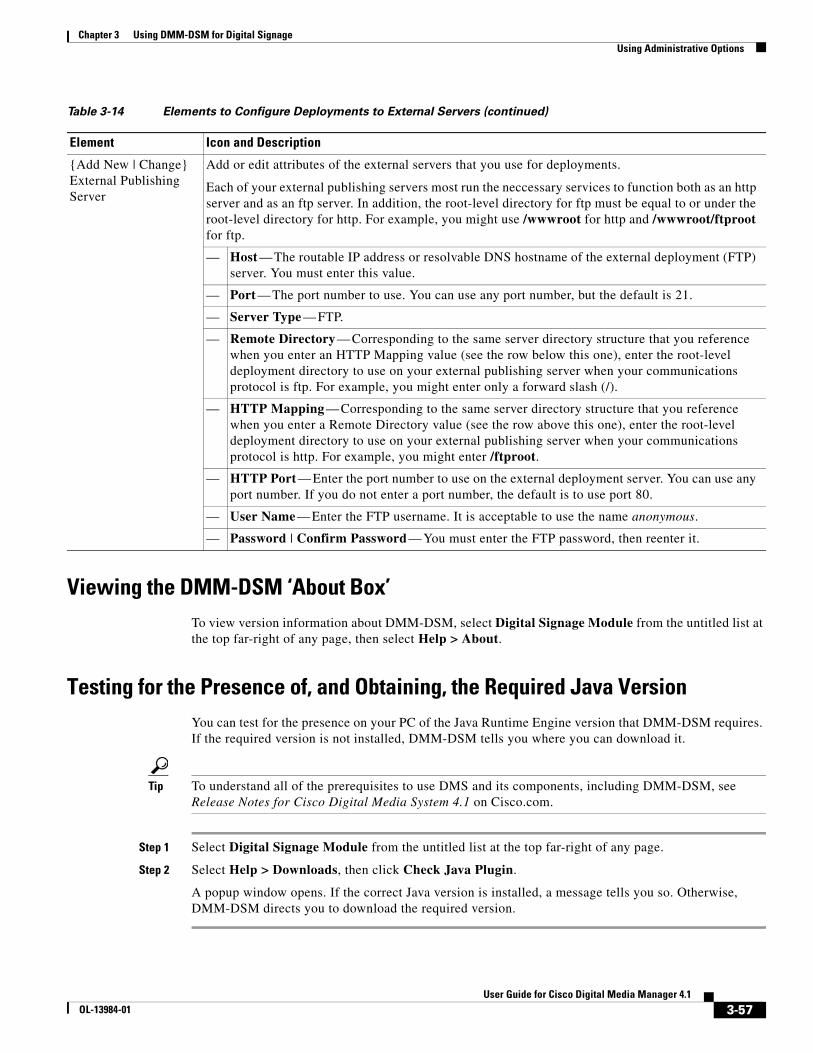
Chapter 3 Using DMM-DSM for Digital Signage Using Administrative Options
Viewing the DMM-DSM ‘About Box’To view version information about DMM-DSM, select Digital Signage Module from the untitled list at the top far-right of any page, then select Help > About.
Testing for the Presence of, and Obtaining, the Required Java VersionYou can test for the presence on your PC of the Java Runtime Engine version that DMM-DSM requires. If the required version is not installed, DMM-DSM tells you where you can download it.
Tip To understand all of the prerequisites to use DMS and its components, including DMM-DSM, see Release Notes for Cisco Digital Media System 4.1 on Cisco.com.
Step 1 Select Digital Signage Module from the untitled list at the top far-right of any page.
Step 2 Select Help > Downloads, then click Check Java Plugin.
A popup window opens. If the correct Java version is installed, a message tells you so. Otherwise, DMM-DSM directs you to download the required version.
{Add New | Change} External Publishing Server
Add or edit attributes of the external servers that you use for deployments.
Each of your external publishing servers most run the neccessary services to function both as an http server and as an ftp server. In addition, the root-level directory for ftp must be equal to or under the root-level directory for http. For example, you might use /wwwroot for http and /wwwroot/ftproot for ftp.
— Host — The routable IP address or resolvable DNS hostname of the external deployment (FTP) server. You must enter this value.
— Port — The port number to use. You can use any port number, but the default is 21.
— Server Type — FTP.
— Remote Directory — Corresponding to the same server directory structure that you reference when you enter an HTTP Mapping value (see the row below this one), enter the root-level deployment directory to use on your external publishing server when your communications protocol is ftp. For example, you might enter only a forward slash (/).
— HTTP Mapping — Corresponding to the same server directory structure that you reference when you enter a Remote Directory value (see the row above this one), enter the root-level deployment directory to use on your external publishing server when your communications protocol is http. For example, you might enter /ftproot.
— HTTP Port — Enter the port number to use on the external deployment server. You can use any port number. If you do not enter a port number, the default is to use port 80.
— User Name — Enter the FTP username. It is acceptable to use the name anonymous.
— Password | Confirm Password — You must enter the FTP password, then reenter it.
Table 3-14 Elements to Configure Deployments to External Servers (continued)
Element Icon and Description
3-57User Guide for Cisco Digital Media Manager 4.1
OL-13984-01
Chapter 3 Using DMM-DSM for Digital Signage Common Scenarios for Using DMM-DSM
Common Scenarios for Using DMM-DSMThis section describes common scenarios for using DMM-DSM.
Uploading Files to a DMP for Local Storage and Immediate Deployment
You can create a presentation that shows video files from a playlist, then transfer the presentation and its assets to the local Secure Digital (SD) flash memory card in a DMP for playback on its attached DMP display.
Note • The total amount of available file space for local storage is 0.9 GB on a DMP 4300G, or 1.9 GB on a DMP 4305G.
• A presentation cannot play any file with a filesize greater than 1.9 GB on a DMP 4300G or on a DMP 4305G. This size is constrained by the limits of streaming.
• For purposes of stage-one failover, the combined size of all files cannot exceed 900 MB on a DMP 4300G or 1.9 GB on a DMP 4305G. This size is constrained by the storage capacity of the SD memory card inside a DMP. To understand failover, see the “Understanding Content Substitution (Failover)” topic in User Guide for Cisco Digital Media Player Device Manager 1.1 on Cisco.com.
Step 1 Select Digital Signage Module from the untitled list at the top far-right of any page.
Step 2 To learn how to create a playlist in Digital Media Designer, so that you can show the playlist as part of a presentation, see Creating and Organizing Playlists for Your Presentations, page 3-27.
Step 3 To create an advanced task that will transfer the assets for your playlist anywhere in your digital signage network, select Digital Media Players > Advanced Tasks > File Transfer to DMP or Server, then do the following:
a. Click Add New Application, then enter a name for the new file transfer task in the Name field; for example, you might enter the name LocalPublishing.
You must enter a name. The name is unique in the sense that you have not used it previously as the name for any presentation or presentation template, or for anything that you created under the Digital Media Players tab in DMM-DSM.
b. In the Applications list, click Digital Media Designer.
c. In the Available Content table, click a row to highlight the presentation, then click Select Applications. Doing this moves the highlighted presentation to the Selected Content table, so that its assets become available for deployment.
d. To save your work, click Submit.
Step 4 To deploy the file transfer task to a DMP or DMP group, select Schedules > Immediate Deployment, then do the following:
a. From the DMP Groups object selector, select the DMP or DMP group that should receive the deployment.
b. From the Actions list, select the name of the advanced task that you configured and saved for this file transfer operation, then click Go.
DMM-DSM deploys the assets and commands immediately to the DMPs that you selected, and the targeted DMPs restart automatically.
3-58User Guide for Cisco Digital Media Manager 4.1
OL-13984-01

Chapter 3 Using DMM-DSM for Digital Signage Understanding and Using Digital Signage Status Report Charts
Note • After they restart, your DMPs will not show the newly received presentation automatically on their attached DMP displays. The presentation will not play unless stage-one failover occurs or until you deploy the Go to URL task that DMM-DSM generated automatically when you deployed assets to the SD memory card.
• After you create and deploy any “File Transfer to DMP or Server” task to save the assets from a DMD presentation to the SD memory card inside a DMP, DMM-DSM automatically creates a Go to URL task. The name by default for the Go to URL task is “failover - <name_of_presentation>.” If any of your DMPs should show the presentation at any time other than during stage-one failover, you must deploy the corresponding Go to URL task to those DMPs. See Deploying Saved Commands and Presentations to Your DMPs, page 3-42.
• After you delete a presentation for which DMM-DSM automatically generated a corresponding Go to URL task, you must also delete that Go to URL task.
Understanding and Using Digital Signage Status Report ChartsThis section contains these topics:
• Viewing the DMP Access Status Summary, page 3-59
• Viewing Available and Used Disk Space, page 3-60
Viewing the DMP Access Status SummaryYou can view a color-coded chart that illustrates in real time how many of the DMPs you registered in DMM-DSM are reachable for centralized management.
• The color green represents registered DMPs that are reachable.
• The color red represents registered DMPs that are unreachable.
Step 1 Select Digital Signage Module from the untitled list at the top far-right of any page.
Step 2 Select Digital Media Players > Network Status.
Tip The interval between polling cycles is 2 minutes, so any newly added DMP might report temporarily that it is unavailable; if this happens to you, wait a few minutes, then check again.
If you notice that any of your DMPs are unreachable, see FAQs and Troubleshooting Guide for Cisco Digital Media System 4.1 on Cisco.com.
3-59User Guide for Cisco Digital Media Manager 4.1
OL-13984-01
Chapter 3 Using DMM-DSM for Digital Signage Understanding and Using Digital Signage Status Report Charts
Viewing Available and Used Disk Space You can view a color-coded chart that illustrates the percentages of free disk space and used disk space on the /dm2 partition that your DMM appliance uses to store local copies of digital signage assets after you upload them.
• The color green represents available space in gigabytes.
• The color blue represents used space in gigabytes.
Step 1 Select Digital Signage Module from the untitled list at the top far-right of any page.
Step 2 Select Media > Disk Space.
Tip To check the free space on the SD memory card in a DMP, log in to its local instance of DMPDM, then click Internal Storage.
3-60User Guide for Cisco Digital Media Manager 4.1
OL-13984-01
OL-13984-01
C H A P T E R4
Using DMM-VPM for Desktop VideoRevised April 28, 2007
Tip Features in DMM-VPM are available to you if you purchased and installed the required license. For information about licensing, see Chapter 2, “Using DMM-Admin to View and Install Licenses.”
DMM-VPM features are organized under four tabs. The tab that you select determines what you see:
• Using Features Under the Setup Tab, page 4-1
• Using Features Under the Users Tab, page 4-6
• Using Features Under the Video Portal Tab, page 4-15
• Using Features Under the Encoders Tab, page 4-45
Using Features Under the Setup Tab
Tip To understand what you should do if you are setting up DMM-VPM on a brand-new DMM appliance, see Quick Start Guide for Cisco Digital Media System 4.1 on Cisco.com.
Administrators, content authors, and designers use options under the Setup tab to enter or edit the configuration and deployment settings for DMM-VPM on a DMM appliance that is already in use. This section contains these topics:
• Configuring Administrative and Network Settings, page 4-2
• Viewing and Understanding Environment Parameters, page 4-3
• Configuring the Settings to Use a Video Portal, page 4-3
• Configuring the Location Settings for Deployments, page 4-5
4-1User Guide for Cisco Digital Media Manager 4.1
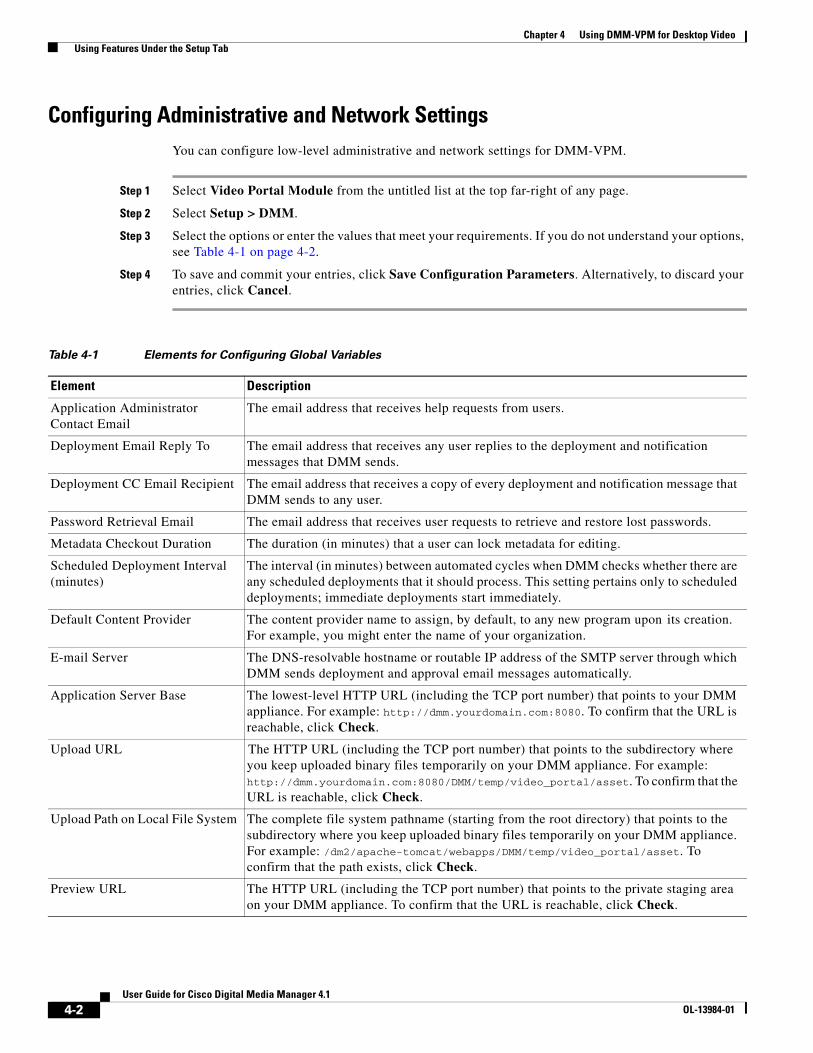
Chapter 4 Using DMM-VPM for Desktop Video Using Features Under the Setup Tab
Configuring Administrative and Network SettingsYou can configure low-level administrative and network settings for DMM-VPM.
Step 1 Select Video Portal Module from the untitled list at the top far-right of any page.
Step 2 Select Setup > DMM.
Step 3 Select the options or enter the values that meet your requirements. If you do not understand your options, see Table 4-1 on page 4-2.
Step 4 To save and commit your entries, click Save Configuration Parameters. Alternatively, to discard your entries, click Cancel.
Table 4-1 Elements for Configuring Global Variables
Element Description
Application Administrator Contact Email
The email address that receives help requests from users.
Deployment Email Reply To The email address that receives any user replies to the deployment and notification messages that DMM sends.
Deployment CC Email Recipient The email address that receives a copy of every deployment and notification message that DMM sends to any user.
Password Retrieval Email The email address that receives user requests to retrieve and restore lost passwords.
Metadata Checkout Duration The duration (in minutes) that a user can lock metadata for editing.
Scheduled Deployment Interval (minutes)
The interval (in minutes) between automated cycles when DMM checks whether there are any scheduled deployments that it should process. This setting pertains only to scheduled deployments; immediate deployments start immediately.
Default Content Provider The content provider name to assign, by default, to any new program upon its creation. For example, you might enter the name of your organization.
E-mail Server The DNS-resolvable hostname or routable IP address of the SMTP server through which DMM sends deployment and approval email messages automatically.
Application Server Base The lowest-level HTTP URL (including the TCP port number) that points to your DMM appliance. For example: http://dmm.yourdomain.com:8080. To confirm that the URL is reachable, click Check.
Upload URL The HTTP URL (including the TCP port number) that points to the subdirectory where you keep uploaded binary files temporarily on your DMM appliance. For example: http://dmm.yourdomain.com:8080/DMM/temp/video_portal/asset. To confirm that the URL is reachable, click Check.
Upload Path on Local File System The complete file system pathname (starting from the root directory) that points to the subdirectory where you keep uploaded binary files temporarily on your DMM appliance. For example: /dm2/apache-tomcat/webapps/DMM/temp/video_portal/asset. To confirm that the path exists, click Check.
Preview URL The HTTP URL (including the TCP port number) that points to the private staging area on your DMM appliance. To confirm that the URL is reachable, click Check.
4-2User Guide for Cisco Digital Media Manager 4.1
OL-13984-01
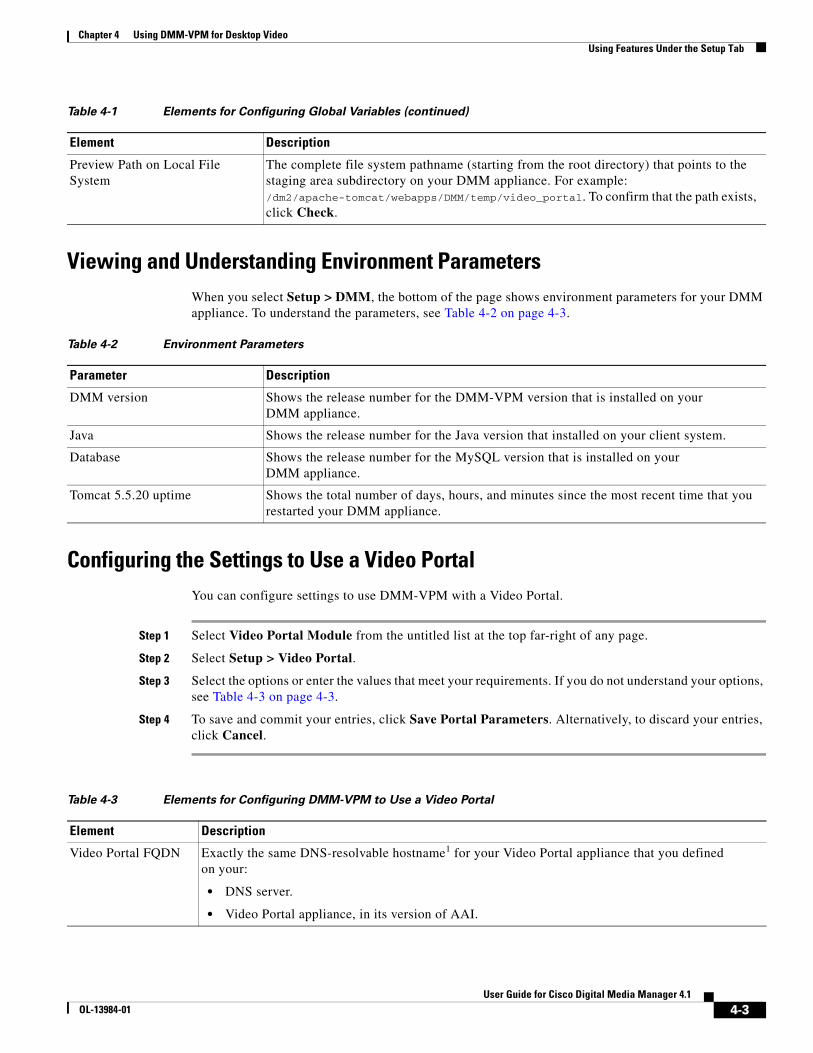
Chapter 4 Using DMM-VPM for Desktop Video Using Features Under the Setup Tab
Viewing and Understanding Environment ParametersWhen you select Setup > DMM, the bottom of the page shows environment parameters for your DMM appliance. To understand the parameters, see Table 4-2 on page 4-3.
Configuring the Settings to Use a Video PortalYou can configure settings to use DMM-VPM with a Video Portal.
Step 1 Select Video Portal Module from the untitled list at the top far-right of any page.
Step 2 Select Setup > Video Portal.
Step 3 Select the options or enter the values that meet your requirements. If you do not understand your options, see Table 4-3 on page 4-3.
Step 4 To save and commit your entries, click Save Portal Parameters. Alternatively, to discard your entries, click Cancel.
Preview Path on Local File System
The complete file system pathname (starting from the root directory) that points to the staging area subdirectory on your DMM appliance. For example: /dm2/apache-tomcat/webapps/DMM/temp/video_portal. To confirm that the path exists, click Check.
Table 4-1 Elements for Configuring Global Variables (continued)
Element Description
Table 4-2 Environment Parameters
Parameter Description
DMM version Shows the release number for the DMM-VPM version that is installed on your DMM appliance.
Java Shows the release number for the Java version that installed on your client system.
Database Shows the release number for the MySQL version that is installed on your DMM appliance.
Tomcat 5.5.20 uptime Shows the total number of days, hours, and minutes since the most recent time that you restarted your DMM appliance.
Table 4-3 Elements for Configuring DMM-VPM to Use a Video Portal
Element Description
Video Portal FQDN Exactly the same DNS-resolvable hostname1 for your Video Portal appliance that you defined on your:
• DNS server.
• Video Portal appliance, in its version of AAI.
4-3User Guide for Cisco Digital Media Manager 4.1
OL-13984-01
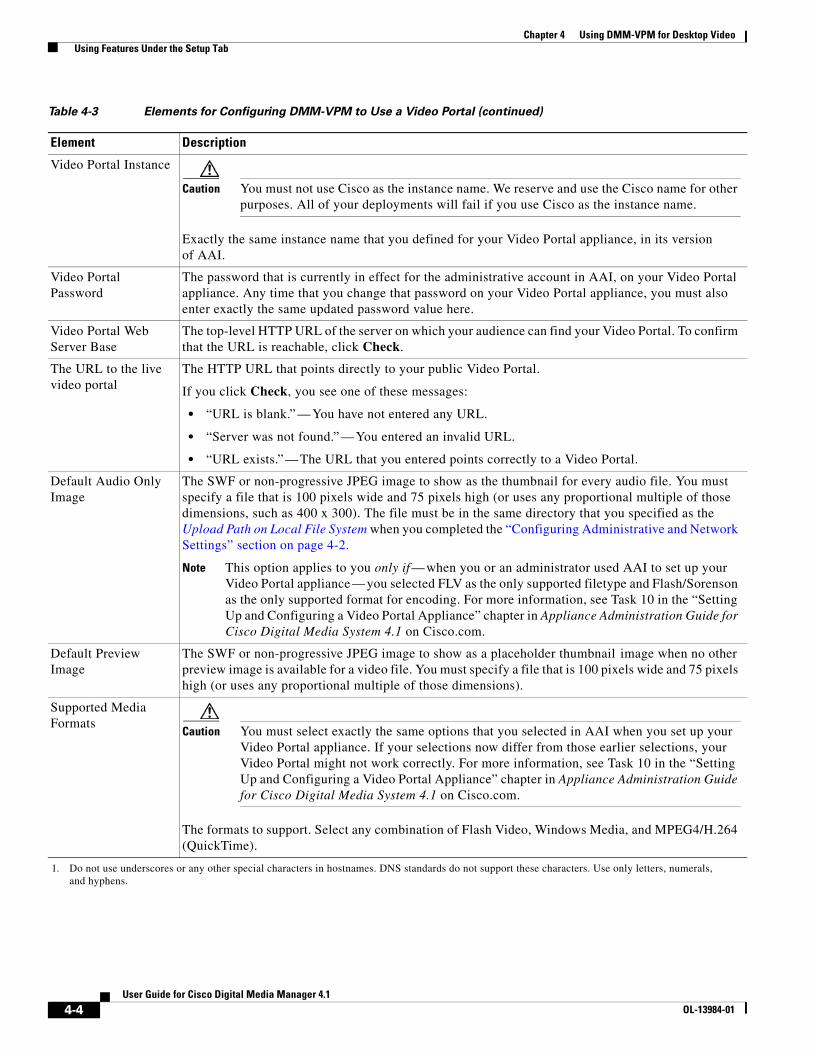
Chapter 4 Using DMM-VPM for Desktop Video Using Features Under the Setup Tab
Video Portal Instance
Caution You must not use Cisco as the instance name. We reserve and use the Cisco name for other purposes. All of your deployments will fail if you use Cisco as the instance name.
Exactly the same instance name that you defined for your Video Portal appliance, in its version of AAI.
Video Portal Password
The password that is currently in effect for the administrative account in AAI, on your Video Portal appliance. Any time that you change that password on your Video Portal appliance, you must also enter exactly the same updated password value here.
Video Portal Web Server Base
The top-level HTTP URL of the server on which your audience can find your Video Portal. To confirm that the URL is reachable, click Check.
The URL to the live video portal
The HTTP URL that points directly to your public Video Portal.
If you click Check, you see one of these messages:
• “URL is blank.” — You have not entered any URL.
• “Server was not found.” — You entered an invalid URL.
• “URL exists.” — The URL that you entered points correctly to a Video Portal.
Default Audio Only Image
The SWF or non-progressive JPEG image to show as the thumbnail for every audio file. You must specify a file that is 100 pixels wide and 75 pixels high (or uses any proportional multiple of those dimensions, such as 400 x 300). The file must be in the same directory that you specified as the Upload Path on Local File System when you completed the “Configuring Administrative and Network Settings” section on page 4-2.
Note This option applies to you only if — when you or an administrator used AAI to set up your Video Portal appliance — you selected FLV as the only supported filetype and Flash/Sorenson as the only supported format for encoding. For more information, see Task 10 in the “Setting Up and Configuring a Video Portal Appliance” chapter in Appliance Administration Guide for Cisco Digital Media System 4.1 on Cisco.com.
Default Preview Image
The SWF or non-progressive JPEG image to show as a placeholder thumbnail image when no other preview image is available for a video file. You must specify a file that is 100 pixels wide and 75 pixels high (or uses any proportional multiple of those dimensions).
Supported Media Formats
Caution You must select exactly the same options that you selected in AAI when you set up your Video Portal appliance. If your selections now differ from those earlier selections, your Video Portal might not work correctly. For more information, see Task 10 in the “Setting Up and Configuring a Video Portal Appliance” chapter in Appliance Administration Guide for Cisco Digital Media System 4.1 on Cisco.com.
The formats to support. Select any combination of Flash Video, Windows Media, and MPEG4/H.264 (QuickTime).
1. Do not use underscores or any other special characters in hostnames. DNS standards do not support these characters. Use only letters, numerals, and hyphens.
Table 4-3 Elements for Configuring DMM-VPM to Use a Video Portal (continued)
Element Description
4-4User Guide for Cisco Digital Media Manager 4.1
OL-13984-01
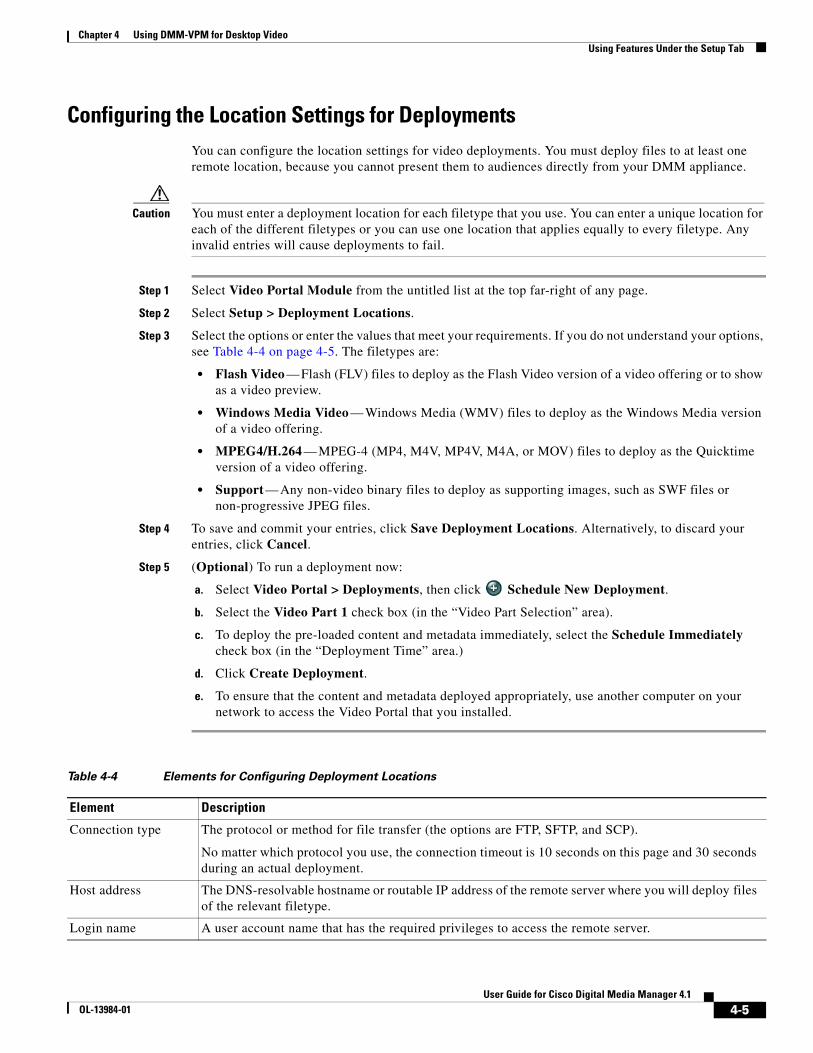
Chapter 4 Using DMM-VPM for Desktop Video Using Features Under the Setup Tab
Configuring the Location Settings for DeploymentsYou can configure the location settings for video deployments. You must deploy files to at least one remote location, because you cannot present them to audiences directly from your DMM appliance.
Caution You must enter a deployment location for each filetype that you use. You can enter a unique location for each of the different filetypes or you can use one location that applies equally to every filetype. Any invalid entries will cause deployments to fail.
Step 1 Select Video Portal Module from the untitled list at the top far-right of any page.
Step 2 Select Setup > Deployment Locations.
Step 3 Select the options or enter the values that meet your requirements. If you do not understand your options, see Table 4-4 on page 4-5. The filetypes are:
• Flash Video — Flash (FLV) files to deploy as the Flash Video version of a video offering or to show as a video preview.
• Windows Media Video — Windows Media (WMV) files to deploy as the Windows Media version of a video offering.
• MPEG4/H.264 — MPEG-4 (MP4, M4V, MP4V, M4A, or MOV) files to deploy as the Quicktime version of a video offering.
• Support — Any non-video binary files to deploy as supporting images, such as SWF files or non-progressive JPEG files.
Step 4 To save and commit your entries, click Save Deployment Locations. Alternatively, to discard your entries, click Cancel.
Step 5 (Optional) To run a deployment now:
a. Select Video Portal > Deployments, then click Schedule New Deployment.
b. Select the Video Part 1 check box (in the “Video Part Selection” area).
c. To deploy the pre-loaded content and metadata immediately, select the Schedule Immediately check box (in the “Deployment Time” area.)
d. Click Create Deployment.
e. To ensure that the content and metadata deployed appropriately, use another computer on your network to access the Video Portal that you installed.
Table 4-4 Elements for Configuring Deployment Locations
Element Description
Connection type The protocol or method for file transfer (the options are FTP, SFTP, and SCP).
No matter which protocol you use, the connection timeout is 10 seconds on this page and 30 seconds during an actual deployment.
Host address The DNS-resolvable hostname or routable IP address of the remote server where you will deploy files of the relevant filetype.
Login name A user account name that has the required privileges to access the remote server.
4-5User Guide for Cisco Digital Media Manager 4.1
OL-13984-01
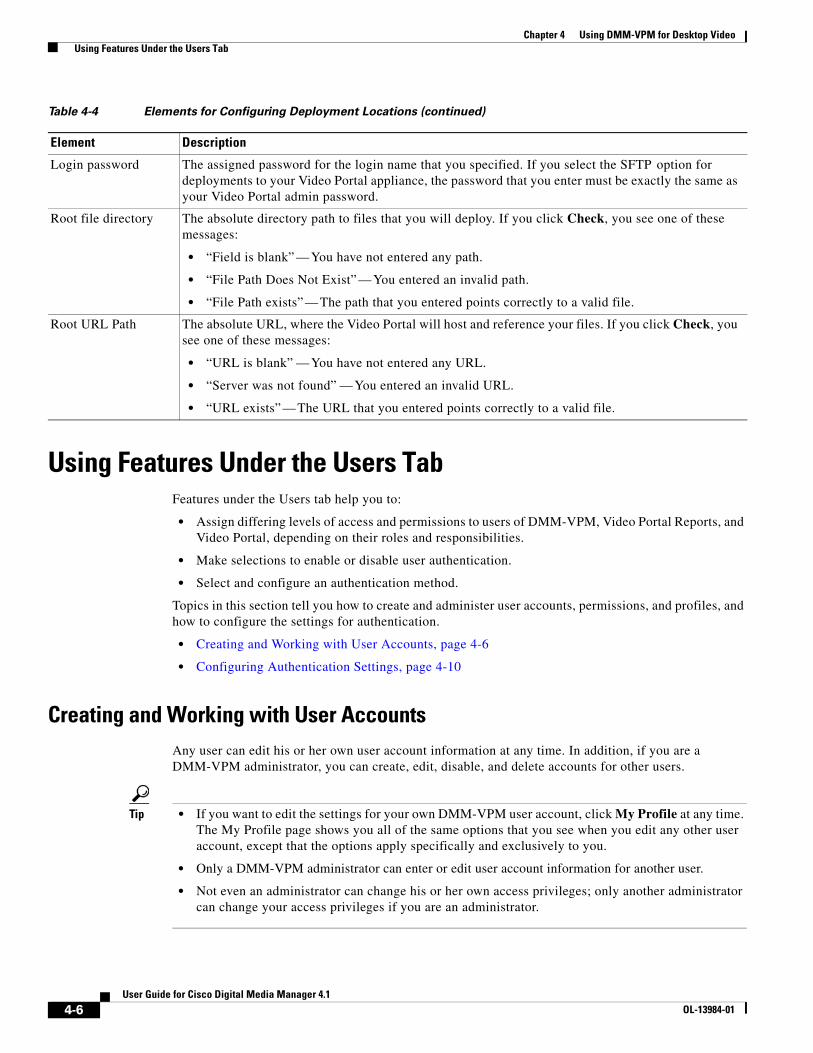
Chapter 4 Using DMM-VPM for Desktop Video Using Features Under the Users Tab
Using Features Under the Users TabFeatures under the Users tab help you to:
• Assign differing levels of access and permissions to users of DMM-VPM, Video Portal Reports, and Video Portal, depending on their roles and responsibilities.
• Make selections to enable or disable user authentication.
• Select and configure an authentication method.
Topics in this section tell you how to create and administer user accounts, permissions, and profiles, and how to configure the settings for authentication.
• Creating and Working with User Accounts, page 4-6
• Configuring Authentication Settings, page 4-10
Creating and Working with User AccountsAny user can edit his or her own user account information at any time. In addition, if you are a DMM-VPM administrator, you can create, edit, disable, and delete accounts for other users.
Tip • If you want to edit the settings for your own DMM-VPM user account, click My Profile at any time. The My Profile page shows you all of the same options that you see when you edit any other user account, except that the options apply specifically and exclusively to you.
• Only a DMM-VPM administrator can enter or edit user account information for another user.
• Not even an administrator can change his or her own access privileges; only another administrator can change your access privileges if you are an administrator.
Login password The assigned password for the login name that you specified. If you select the SFTP option for deployments to your Video Portal appliance, the password that you enter must be exactly the same as your Video Portal admin password.
Root file directory The absolute directory path to files that you will deploy. If you click Check, you see one of these messages:
• “Field is blank” — You have not entered any path.
• “File Path Does Not Exist” — You entered an invalid path.
• “File Path exists” — The path that you entered points correctly to a valid file.
Root URL Path The absolute URL, where the Video Portal will host and reference your files. If you click Check, you see one of these messages:
• “URL is blank” — You have not entered any URL.
• “Server was not found” — You entered an invalid URL.
• “URL exists” — The URL that you entered points correctly to a valid file.
Table 4-4 Elements for Configuring Deployment Locations (continued)
Element Description
4-6User Guide for Cisco Digital Media Manager 4.1
OL-13984-01
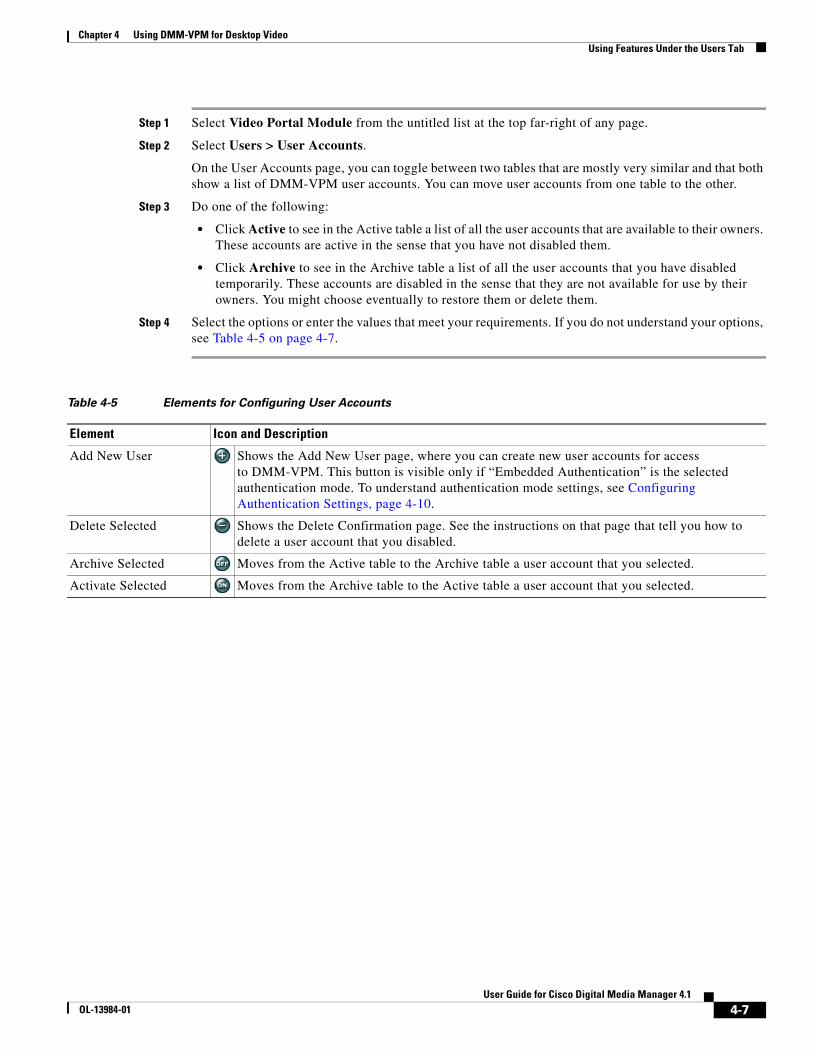
Chapter 4 Using DMM-VPM for Desktop Video Using Features Under the Users Tab
Step 1 Select Video Portal Module from the untitled list at the top far-right of any page.
Step 2 Select Users > User Accounts.
On the User Accounts page, you can toggle between two tables that are mostly very similar and that both show a list of DMM-VPM user accounts. You can move user accounts from one table to the other.
Step 3 Do one of the following:
• Click Active to see in the Active table a list of all the user accounts that are available to their owners. These accounts are active in the sense that you have not disabled them.
• Click Archive to see in the Archive table a list of all the user accounts that you have disabled temporarily. These accounts are disabled in the sense that they are not available for use by their owners. You might choose eventually to restore them or delete them.
Step 4 Select the options or enter the values that meet your requirements. If you do not understand your options, see Table 4-5 on page 4-7.
Table 4-5 Elements for Configuring User Accounts
Element Icon and Description
Add New User Shows the Add New User page, where you can create new user accounts for access to DMM-VPM. This button is visible only if “Embedded Authentication” is the selected authentication mode. To understand authentication mode settings, see Configuring Authentication Settings, page 4-10.
Delete Selected Shows the Delete Confirmation page. See the instructions on that page that tell you how to delete a user account that you disabled.
Archive Selected Moves from the Active table to the Archive table a user account that you selected.
Activate Selected Moves from the Archive table to the Active table a user account that you selected.
4-7User Guide for Cisco Digital Media Manager 4.1
OL-13984-01
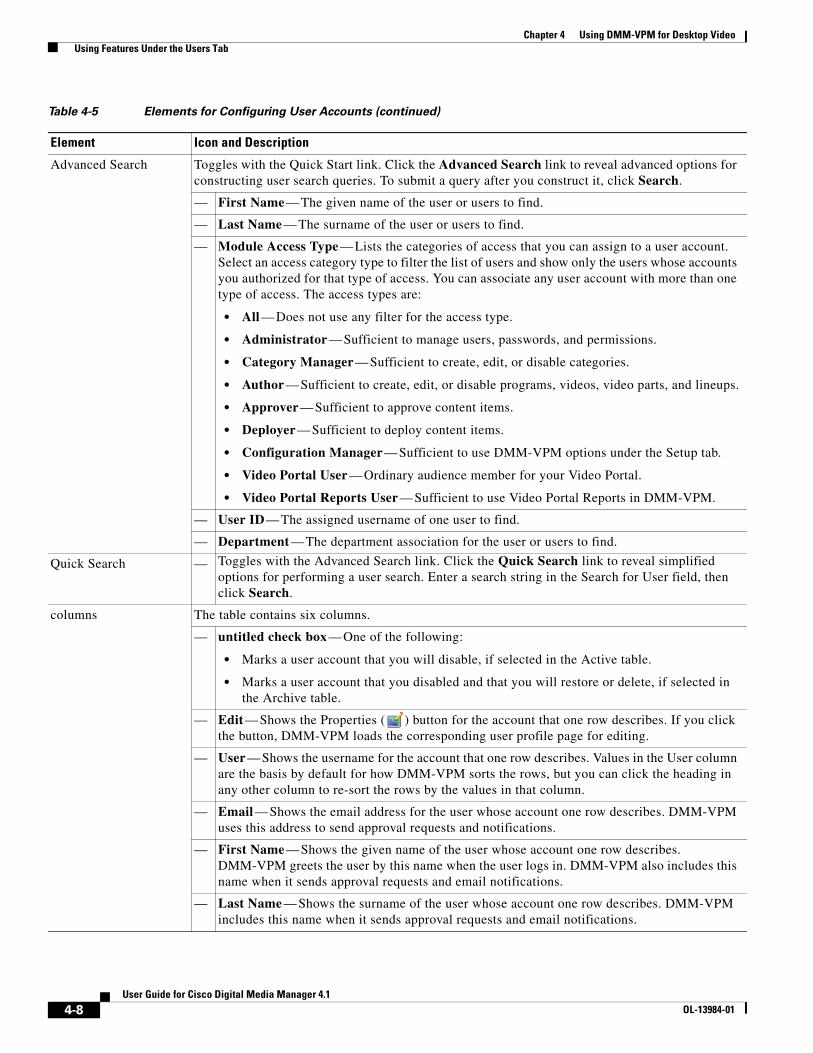
Chapter 4 Using DMM-VPM for Desktop Video Using Features Under the Users Tab
Advanced Search Toggles with the Quick Start link. Click the Advanced Search link to reveal advanced options for constructing user search queries. To submit a query after you construct it, click Search.
— First Name — The given name of the user or users to find.
— Last Name — The surname of the user or users to find.
— Module Access Type — Lists the categories of access that you can assign to a user account. Select an access category type to filter the list of users and show only the users whose accounts you authorized for that type of access. You can associate any user account with more than one type of access. The access types are:
• All — Does not use any filter for the access type.
• Administrator — Sufficient to manage users, passwords, and permissions.
• Category Manager — Sufficient to create, edit, or disable categories.
• Author — Sufficient to create, edit, or disable programs, videos, video parts, and lineups.
• Approver — Sufficient to approve content items.
• Deployer — Sufficient to deploy content items.
• Configuration Manager — Sufficient to use DMM-VPM options under the Setup tab.
• Video Portal User — Ordinary audience member for your Video Portal.
• Video Portal Reports User — Sufficient to use Video Portal Reports in DMM-VPM.
— User ID — The assigned username of one user to find.
— Department — The department association for the user or users to find.
Quick Search — Toggles with the Advanced Search link. Click the Quick Search link to reveal simplified options for performing a user search. Enter a search string in the Search for User field, then click Search.
columns The table contains six columns.
— untitled check box — One of the following:
• Marks a user account that you will disable, if selected in the Active table.
• Marks a user account that you disabled and that you will restore or delete, if selected in the Archive table.
— Edit — Shows the Properties ( ) button for the account that one row describes. If you click the button, DMM-VPM loads the corresponding user profile page for editing.
— User — Shows the username for the account that one row describes. Values in the User column are the basis by default for how DMM-VPM sorts the rows, but you can click the heading in any other column to re-sort the rows by the values in that column.
— Email — Shows the email address for the user whose account one row describes. DMM-VPM uses this address to send approval requests and notifications.
— First Name — Shows the given name of the user whose account one row describes. DMM-VPM greets the user by this name when the user logs in. DMM-VPM also includes this name when it sends approval requests and email notifications.
— Last Name — Shows the surname of the user whose account one row describes. DMM-VPM includes this name when it sends approval requests and email notifications.
Table 4-5 Elements for Configuring User Accounts (continued)
Element Icon and Description
4-8User Guide for Cisco Digital Media Manager 4.1
OL-13984-01
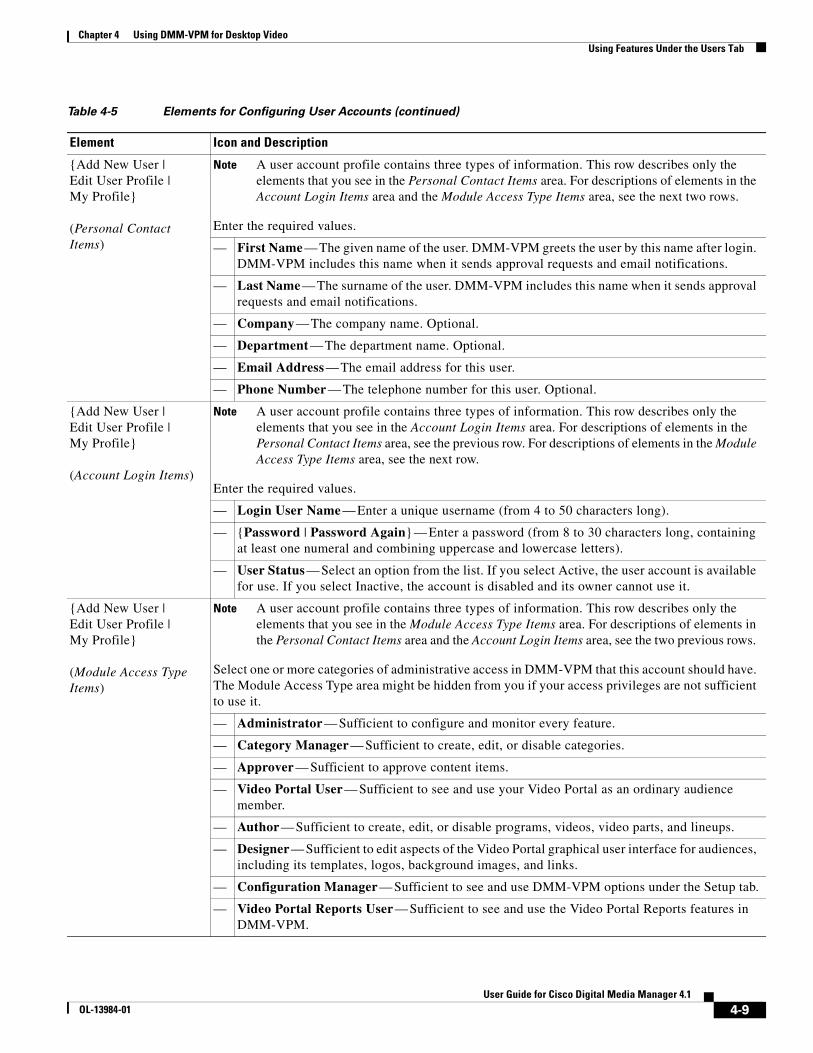
Chapter 4 Using DMM-VPM for Desktop Video Using Features Under the Users Tab
{Add New User | Edit User Profile | My Profile} (Personal Contact Items)
Note A user account profile contains three types of information. This row describes only the elements that you see in the Personal Contact Items area. For descriptions of elements in the Account Login Items area and the Module Access Type Items area, see the next two rows.
Enter the required values.
— First Name — The given name of the user. DMM-VPM greets the user by this name after login. DMM-VPM includes this name when it sends approval requests and email notifications.
— Last Name — The surname of the user. DMM-VPM includes this name when it sends approval requests and email notifications.
— Company — The company name. Optional.
— Department — The department name. Optional.
— Email Address — The email address for this user.
— Phone Number — The telephone number for this user. Optional.
{Add New User | Edit User Profile | My Profile} (Account Login Items)
Note A user account profile contains three types of information. This row describes only the elements that you see in the Account Login Items area. For descriptions of elements in the Personal Contact Items area, see the previous row. For descriptions of elements in the Module Access Type Items area, see the next row.
Enter the required values.
— Login User Name — Enter a unique username (from 4 to 50 characters long).
— {Password | Password Again} — Enter a password (from 8 to 30 characters long, containing at least one numeral and combining uppercase and lowercase letters).
— User Status — Select an option from the list. If you select Active, the user account is available for use. If you select Inactive, the account is disabled and its owner cannot use it.
{Add New User | Edit User Profile | My Profile} (Module Access Type Items)
Note A user account profile contains three types of information. This row describes only the elements that you see in the Module Access Type Items area. For descriptions of elements in the Personal Contact Items area and the Account Login Items area, see the two previous rows.
Select one or more categories of administrative access in DMM-VPM that this account should have. The Module Access Type area might be hidden from you if your access privileges are not sufficient to use it.
— Administrator — Sufficient to configure and monitor every feature.
— Category Manager — Sufficient to create, edit, or disable categories.
— Approver — Sufficient to approve content items.
— Video Portal User — Sufficient to see and use your Video Portal as an ordinary audience member.
— Author — Sufficient to create, edit, or disable programs, videos, video parts, and lineups.
— Designer — Sufficient to edit aspects of the Video Portal graphical user interface for audiences, including its templates, logos, background images, and links.
— Configuration Manager — Sufficient to see and use DMM-VPM options under the Setup tab.
— Video Portal Reports User — Sufficient to see and use the Video Portal Reports features in DMM-VPM.
Table 4-5 Elements for Configuring User Accounts (continued)
Element Icon and Description
4-9User Guide for Cisco Digital Media Manager 4.1
OL-13984-01
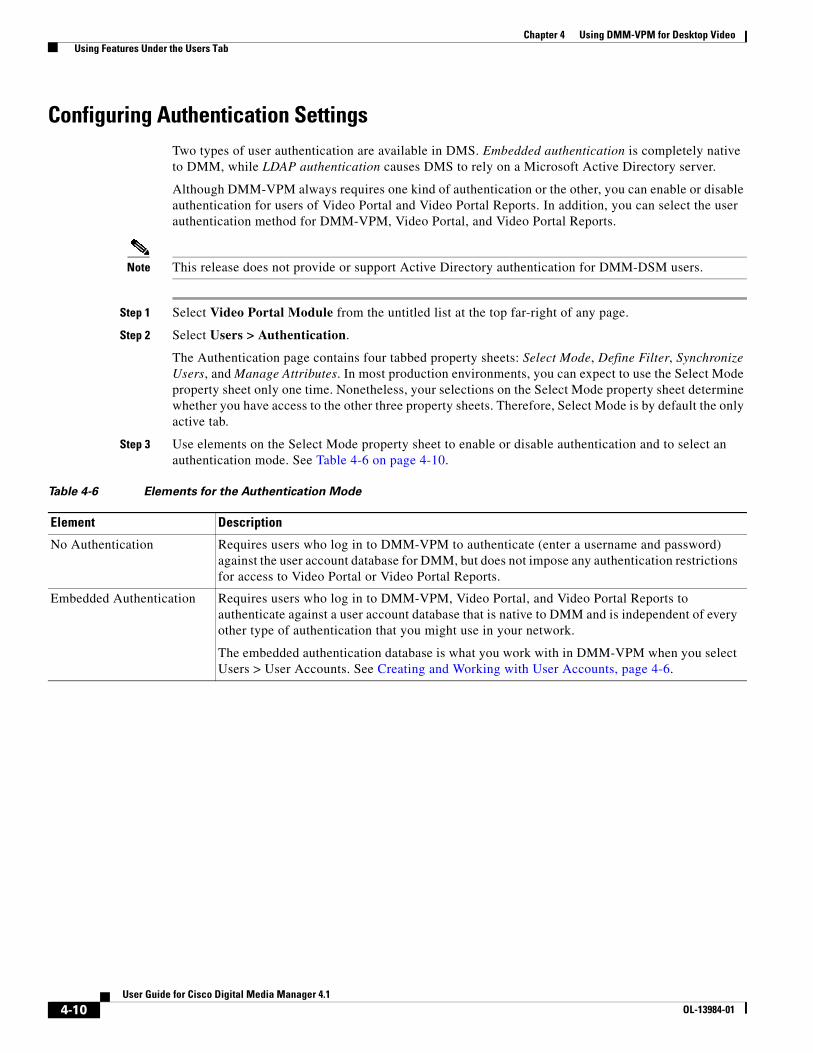
Chapter 4 Using DMM-VPM for Desktop Video Using Features Under the Users Tab
Configuring Authentication SettingsTwo types of user authentication are available in DMS. Embedded authentication is completely native to DMM, while LDAP authentication causes DMS to rely on a Microsoft Active Directory server.
Although DMM-VPM always requires one kind of authentication or the other, you can enable or disable authentication for users of Video Portal and Video Portal Reports. In addition, you can select the user authentication method for DMM-VPM, Video Portal, and Video Portal Reports.
Note This release does not provide or support Active Directory authentication for DMM-DSM users.
Step 1 Select Video Portal Module from the untitled list at the top far-right of any page.
Step 2 Select Users > Authentication.
The Authentication page contains four tabbed property sheets: Select Mode, Define Filter, Synchronize Users, and Manage Attributes. In most production environments, you can expect to use the Select Mode property sheet only one time. Nonetheless, your selections on the Select Mode property sheet determine whether you have access to the other three property sheets. Therefore, Select Mode is by default the only active tab.
Step 3 Use elements on the Select Mode property sheet to enable or disable authentication and to select an authentication mode. See Table 4-6 on page 4-10.
Table 4-6 Elements for the Authentication Mode
Element Description
No Authentication Requires users who log in to DMM-VPM to authenticate (enter a username and password) against the user account database for DMM, but does not impose any authentication restrictions for access to Video Portal or Video Portal Reports.
Embedded Authentication Requires users who log in to DMM-VPM, Video Portal, and Video Portal Reports to authenticate against a user account database that is native to DMM and is independent of every other type of authentication that you might use in your network.
The embedded authentication database is what you work with in DMM-VPM when you select Users > User Accounts. See Creating and Working with User Accounts, page 4-6.
4-10User Guide for Cisco Digital Media Manager 4.1
OL-13984-01
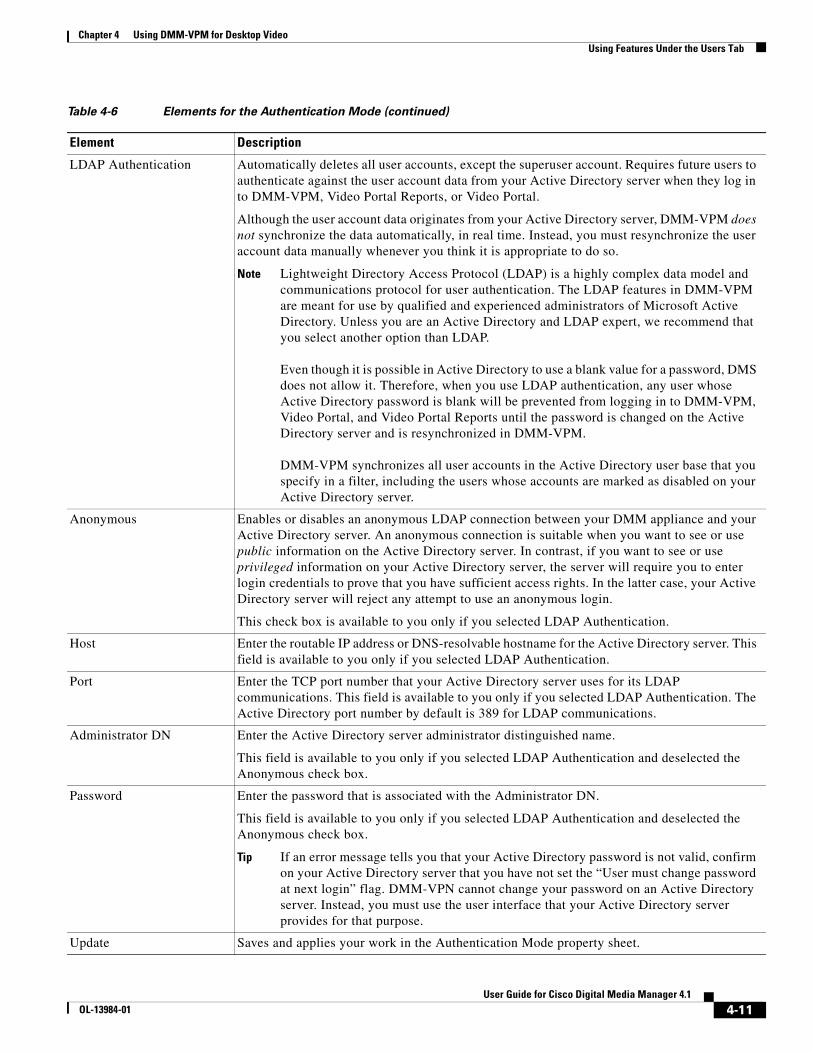
Chapter 4 Using DMM-VPM for Desktop Video Using Features Under the Users Tab
LDAP Authentication Automatically deletes all user accounts, except the superuser account. Requires future users to authenticate against the user account data from your Active Directory server when they log in to DMM-VPM, Video Portal Reports, or Video Portal.
Although the user account data originates from your Active Directory server, DMM-VPM does not synchronize the data automatically, in real time. Instead, you must resynchronize the user account data manually whenever you think it is appropriate to do so.
Note Lightweight Directory Access Protocol (LDAP) is a highly complex data model and communications protocol for user authentication. The LDAP features in DMM-VPM are meant for use by qualified and experienced administrators of Microsoft Active Directory. Unless you are an Active Directory and LDAP expert, we recommend that you select another option than LDAP. Even though it is possible in Active Directory to use a blank value for a password, DMS does not allow it. Therefore, when you use LDAP authentication, any user whose Active Directory password is blank will be prevented from logging in to DMM-VPM, Video Portal, and Video Portal Reports until the password is changed on the Active Directory server and is resynchronized in DMM-VPM. DMM-VPM synchronizes all user accounts in the Active Directory user base that you specify in a filter, including the users whose accounts are marked as disabled on your Active Directory server.
Anonymous Enables or disables an anonymous LDAP connection between your DMM appliance and your Active Directory server. An anonymous connection is suitable when you want to see or use public information on the Active Directory server. In contrast, if you want to see or use privileged information on your Active Directory server, the server will require you to enter login credentials to prove that you have sufficient access rights. In the latter case, your Active Directory server will reject any attempt to use an anonymous login.
This check box is available to you only if you selected LDAP Authentication.
Host Enter the routable IP address or DNS-resolvable hostname for the Active Directory server. This field is available to you only if you selected LDAP Authentication.
Port Enter the TCP port number that your Active Directory server uses for its LDAP communications. This field is available to you only if you selected LDAP Authentication. The Active Directory port number by default is 389 for LDAP communications.
Administrator DN Enter the Active Directory server administrator distinguished name.
This field is available to you only if you selected LDAP Authentication and deselected the Anonymous check box.
Password Enter the password that is associated with the Administrator DN.
This field is available to you only if you selected LDAP Authentication and deselected the Anonymous check box.
Tip If an error message tells you that your Active Directory password is not valid, confirm on your Active Directory server that you have not set the “User must change password at next login” flag. DMM-VPN cannot change your password on an Active Directory server. Instead, you must use the user interface that your Active Directory server provides for that purpose.
Update Saves and applies your work in the Authentication Mode property sheet.
Table 4-6 Elements for the Authentication Mode (continued)
Element Description
4-11User Guide for Cisco Digital Media Manager 4.1
OL-13984-01
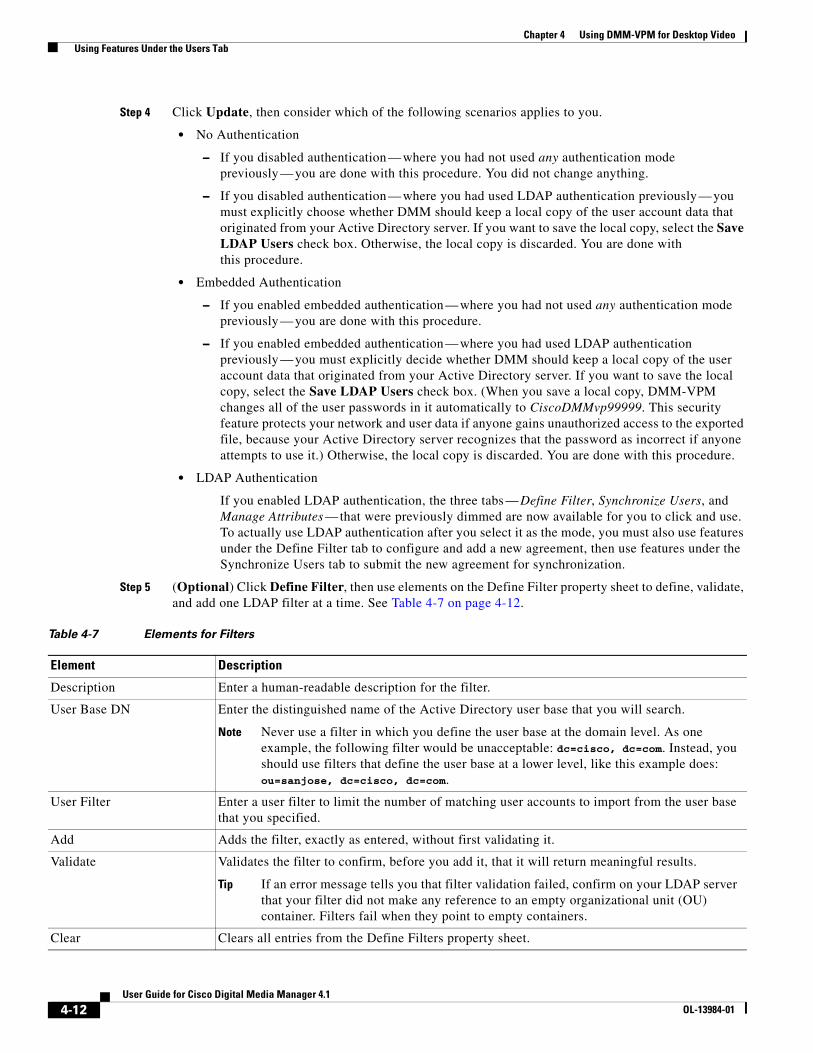
Chapter 4 Using DMM-VPM for Desktop Video Using Features Under the Users Tab
Step 4 Click Update, then consider which of the following scenarios applies to you.
• No Authentication
– If you disabled authentication — where you had not used any authentication mode previously — you are done with this procedure. You did not change anything.
– If you disabled authentication — where you had used LDAP authentication previously — you must explicitly choose whether DMM should keep a local copy of the user account data that originated from your Active Directory server. If you want to save the local copy, select the Save LDAP Users check box. Otherwise, the local copy is discarded. You are done with this procedure.
• Embedded Authentication
– If you enabled embedded authentication — where you had not used any authentication mode previously — you are done with this procedure.
– If you enabled embedded authentication — where you had used LDAP authentication previously — you must explicitly decide whether DMM should keep a local copy of the user account data that originated from your Active Directory server. If you want to save the local copy, select the Save LDAP Users check box. (When you save a local copy, DMM-VPM changes all of the user passwords in it automatically to CiscoDMMvp99999. This security feature protects your network and user data if anyone gains unauthorized access to the exported file, because your Active Directory server recognizes that the password as incorrect if anyone attempts to use it.) Otherwise, the local copy is discarded. You are done with this procedure.
• LDAP Authentication
If you enabled LDAP authentication, the three tabs — Define Filter, Synchronize Users, and Manage Attributes — that were previously dimmed are now available for you to click and use. To actually use LDAP authentication after you select it as the mode, you must also use features under the Define Filter tab to configure and add a new agreement, then use features under the Synchronize Users tab to submit the new agreement for synchronization.
Step 5 (Optional) Click Define Filter, then use elements on the Define Filter property sheet to define, validate, and add one LDAP filter at a time. See Table 4-7 on page 4-12.
Table 4-7 Elements for Filters
Element Description
Description Enter a human-readable description for the filter.
User Base DN Enter the distinguished name of the Active Directory user base that you will search.
Note Never use a filter in which you define the user base at the domain level. As one example, the following filter would be unacceptable: dc=cisco, dc=com. Instead, you should use filters that define the user base at a lower level, like this example does: ou=sanjose, dc=cisco, dc=com.
User Filter Enter a user filter to limit the number of matching user accounts to import from the user base that you specified.
Add Adds the filter, exactly as entered, without first validating it.
Validate Validates the filter to confirm, before you add it, that it will return meaningful results.
Tip If an error message tells you that filter validation failed, confirm on your LDAP server that your filter did not make any reference to an empty organizational unit (OU) container. Filters fail when they point to empty containers.
Clear Clears all entries from the Define Filters property sheet.
4-12User Guide for Cisco Digital Media Manager 4.1
OL-13984-01
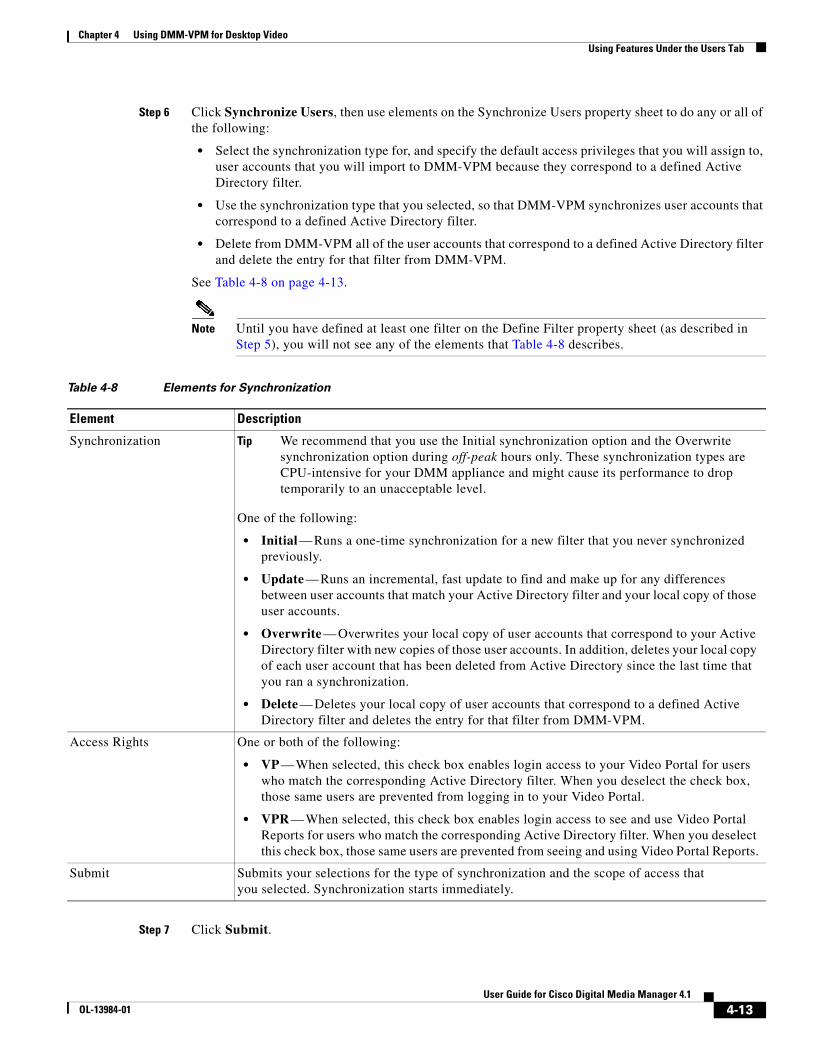
Chapter 4 Using DMM-VPM for Desktop Video Using Features Under the Users Tab
Step 6 Click Synchronize Users, then use elements on the Synchronize Users property sheet to do any or all of the following:
• Select the synchronization type for, and specify the default access privileges that you will assign to, user accounts that you will import to DMM-VPM because they correspond to a defined Active Directory filter.
• Use the synchronization type that you selected, so that DMM-VPM synchronizes user accounts that correspond to a defined Active Directory filter.
• Delete from DMM-VPM all of the user accounts that correspond to a defined Active Directory filter and delete the entry for that filter from DMM-VPM.
See Table 4-8 on page 4-13.
Note Until you have defined at least one filter on the Define Filter property sheet (as described in Step 5), you will not see any of the elements that Table 4-8 describes.
Step 7 Click Submit.
Table 4-8 Elements for Synchronization
Element Description
Synchronization Tip We recommend that you use the Initial synchronization option and the Overwrite synchronization option during off-peak hours only. These synchronization types are CPU-intensive for your DMM appliance and might cause its performance to drop temporarily to an unacceptable level.
One of the following:
• Initial — Runs a one-time synchronization for a new filter that you never synchronized previously.
• Update — Runs an incremental, fast update to find and make up for any differences between user accounts that match your Active Directory filter and your local copy of those user accounts.
• Overwrite — Overwrites your local copy of user accounts that correspond to your Active Directory filter with new copies of those user accounts. In addition, deletes your local copy of each user account that has been deleted from Active Directory since the last time that you ran a synchronization.
• Delete — Deletes your local copy of user accounts that correspond to a defined Active Directory filter and deletes the entry for that filter from DMM-VPM.
Access Rights One or both of the following:
• VP — When selected, this check box enables login access to your Video Portal for users who match the corresponding Active Directory filter. When you deselect the check box, those same users are prevented from logging in to your Video Portal.
• VPR — When selected, this check box enables login access to see and use Video Portal Reports for users who match the corresponding Active Directory filter. When you deselect this check box, those same users are prevented from seeing and using Video Portal Reports.
Submit Submits your selections for the type of synchronization and the scope of access that you selected. Synchronization starts immediately.
4-13User Guide for Cisco Digital Media Manager 4.1
OL-13984-01
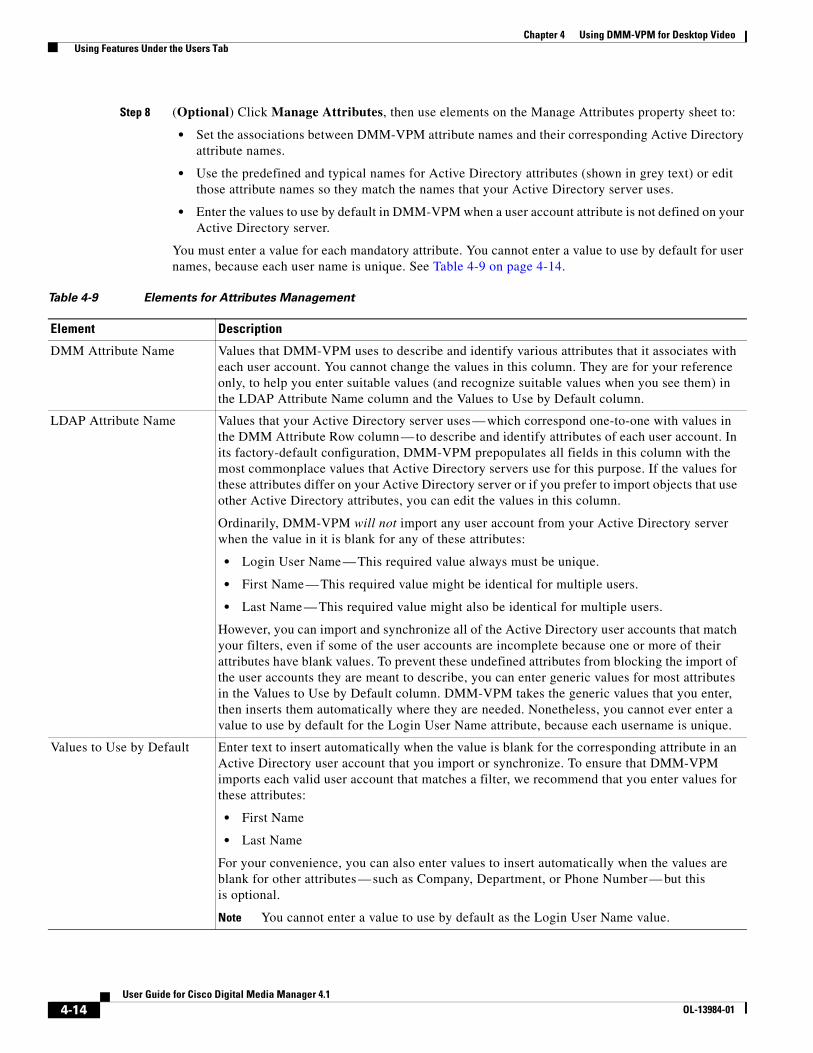
Chapter 4 Using DMM-VPM for Desktop Video Using Features Under the Users Tab
Step 8 (Optional) Click Manage Attributes, then use elements on the Manage Attributes property sheet to:
• Set the associations between DMM-VPM attribute names and their corresponding Active Directory attribute names.
• Use the predefined and typical names for Active Directory attributes (shown in grey text) or edit those attribute names so they match the names that your Active Directory server uses.
• Enter the values to use by default in DMM-VPM when a user account attribute is not defined on your Active Directory server.
You must enter a value for each mandatory attribute. You cannot enter a value to use by default for user names, because each user name is unique. See Table 4-9 on page 4-14.
Table 4-9 Elements for Attributes Management
Element Description
DMM Attribute Name Values that DMM-VPM uses to describe and identify various attributes that it associates with each user account. You cannot change the values in this column. They are for your reference only, to help you enter suitable values (and recognize suitable values when you see them) in the LDAP Attribute Name column and the Values to Use by Default column.
LDAP Attribute Name Values that your Active Directory server uses — which correspond one-to-one with values in the DMM Attribute Row column — to describe and identify attributes of each user account. In its factory-default configuration, DMM-VPM prepopulates all fields in this column with the most commonplace values that Active Directory servers use for this purpose. If the values for these attributes differ on your Active Directory server or if you prefer to import objects that use other Active Directory attributes, you can edit the values in this column.
Ordinarily, DMM-VPM will not import any user account from your Active Directory server when the value in it is blank for any of these attributes:
• Login User Name — This required value always must be unique.
• First Name — This required value might be identical for multiple users.
• Last Name — This required value might also be identical for multiple users.
However, you can import and synchronize all of the Active Directory user accounts that match your filters, even if some of the user accounts are incomplete because one or more of their attributes have blank values. To prevent these undefined attributes from blocking the import of the user accounts they are meant to describe, you can enter generic values for most attributes in the Values to Use by Default column. DMM-VPM takes the generic values that you enter, then inserts them automatically where they are needed. Nonetheless, you cannot ever enter a value to use by default for the Login User Name attribute, because each username is unique.
Values to Use by Default Enter text to insert automatically when the value is blank for the corresponding attribute in an Active Directory user account that you import or synchronize. To ensure that DMM-VPM imports each valid user account that matches a filter, we recommend that you enter values for these attributes:
• First Name
• Last Name
For your convenience, you can also enter values to insert automatically when the values are blank for other attributes — such as Company, Department, or Phone Number — but this is optional.
Note You cannot enter a value to use by default as the Login User Name value.
4-14User Guide for Cisco Digital Media Manager 4.1
OL-13984-01
Chapter 4 Using DMM-VPM for Desktop Video Using Features Under the Video Portal Tab
Step 9 Click Update.
The authentication settings that you changed are now in effect.
Using Features Under the Video Portal TabThis section contains these topics:
• Working with Programs, Videos and Video Parts, page 4-16
• Approving or Denying the Request to Approve a Video Part, page 4-21
• Understanding the Live Event Module, page 4-22
• Understanding and Working with Synchronized Slides, page 4-22
• Understanding and Working with Audience Questions, page 4-24
• Creating and Working with Playlists, page 4-27
• Creating and Working with Content Categories, page 4-30
• Creating and Working with Tickers, page 4-35
• Creating and Working with Interstitials, page 4-31
• Creating and Working with Interstitial Sequences, page 4-33
• Customizing Your Video Portal, page 4-36
• Configuring the Settings to Manage Deployments, page 4-39
Note To understand the features of Video Portal Reports, which are also available under the Video Portal tab, see Appendix A, “Using Video Portal Reports.”
Reset to Factory Default Returns all values in the LDAP Attribute Name column to the most commonplace values that Active Directory servers use. If you entered different values manually because the labels for these attributes differ on your Active Directory server or because you prefer to import user accounts that use other Active Directory attributes, DMM-VPM deletes what you entered.
Update Saves and applies your work in the Manage Attributes property sheet.
Table 4-9 Elements for Attributes Management (continued)
Element Description
4-15User Guide for Cisco Digital Media Manager 4.1
OL-13984-01
Chapter 4 Using DMM-VPM for Desktop Video Using Features Under the Video Portal Tab
Working with Programs, Videos and Video Parts
Note • Programs, videos, and video parts are all content objects. You can create, edit, disable, and delete content objects at any time, according to your requirements.
• Although a program can contain multiple videos, you cannot add any video to more than one program.
• Each program that you create must contain at least one video before you can show it to any audience.
• Each video that you create must contain at least one video part before you can show it to any audience.
You can create programs and populate them with videos and video parts, then deliver the programs to your audiences live or on demand.
You can also configure DMM-VPM to track approvals for video parts. The approval process workflow does not help you to enforce any security policy; instead, it helps your organization to formalize communication. Content developers can request approval for video parts, then a designated approver can approve or deny the requests. A designated approver is someone whose DMM-VPM user type (which you configured under the Users tab) is Approver. Not even a designated approver can approve his or her own requests. Approval and denial have no effect on whether a video part can be deployed.
Step 1 Select Video Portal Module from the untitled list at the top far-right of any page, then select Video Portal > Programs.
On the Programs page, you can toggle between two tables that are mostly very similar and that both show a list of DMM-VPM programs. You can move programs from one table to the other.
Step 2 Do one of the following:
• Click Active to see in the Active table a list of all the programs that are available to show to your audience. These programs are active in the sense that you have not disabled them. If you have not created any programs or if you archived every program, the table is empty.
• Click Archive to see in the Archive table a list of all the programs that you have disabled temporarily. These programs are disabled in the sense that they are not available for your audience to find or see and you cannot add them to playlists. You might choose eventually to restore or delete these programs.
Step 3 Select the options or enter the values that meet your requirements. If you do not understand your options, see Table 4-10 on page 4-17.
Step 4 Click Save.
4-16User Guide for Cisco Digital Media Manager 4.1
OL-13984-01
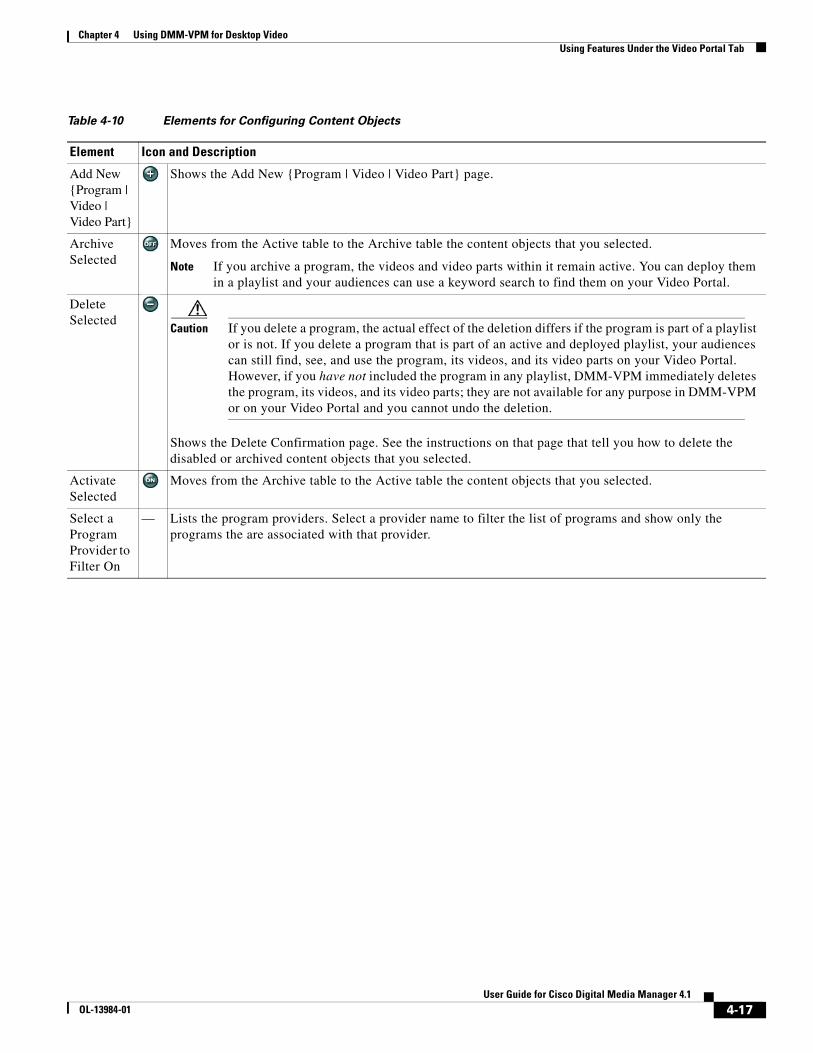
Chapter 4 Using DMM-VPM for Desktop Video Using Features Under the Video Portal Tab
Table 4-10 Elements for Configuring Content Objects
Element Icon and Description
Add New {Program | Video | Video Part}
Shows the Add New {Program | Video | Video Part} page.
Archive Selected
Moves from the Active table to the Archive table the content objects that you selected.
Note If you archive a program, the videos and video parts within it remain active. You can deploy them in a playlist and your audiences can use a keyword search to find them on your Video Portal.
Delete Selected
Caution If you delete a program, the actual effect of the deletion differs if the program is part of a playlist or is not. If you delete a program that is part of an active and deployed playlist, your audiences can still find, see, and use the program, its videos, and its video parts on your Video Portal. However, if you have not included the program in any playlist, DMM-VPM immediately deletes the program, its videos, and its video parts; they are not available for any purpose in DMM-VPM or on your Video Portal and you cannot undo the deletion.
Shows the Delete Confirmation page. See the instructions on that page that tell you how to delete the disabled or archived content objects that you selected.
Activate Selected
Moves from the Archive table to the Active table the content objects that you selected.
Select a Program Provider to Filter On
— Lists the program providers. Select a provider name to filter the list of programs and show only the programs the are associated with that provider.
4-17User Guide for Cisco Digital Media Manager 4.1
OL-13984-01
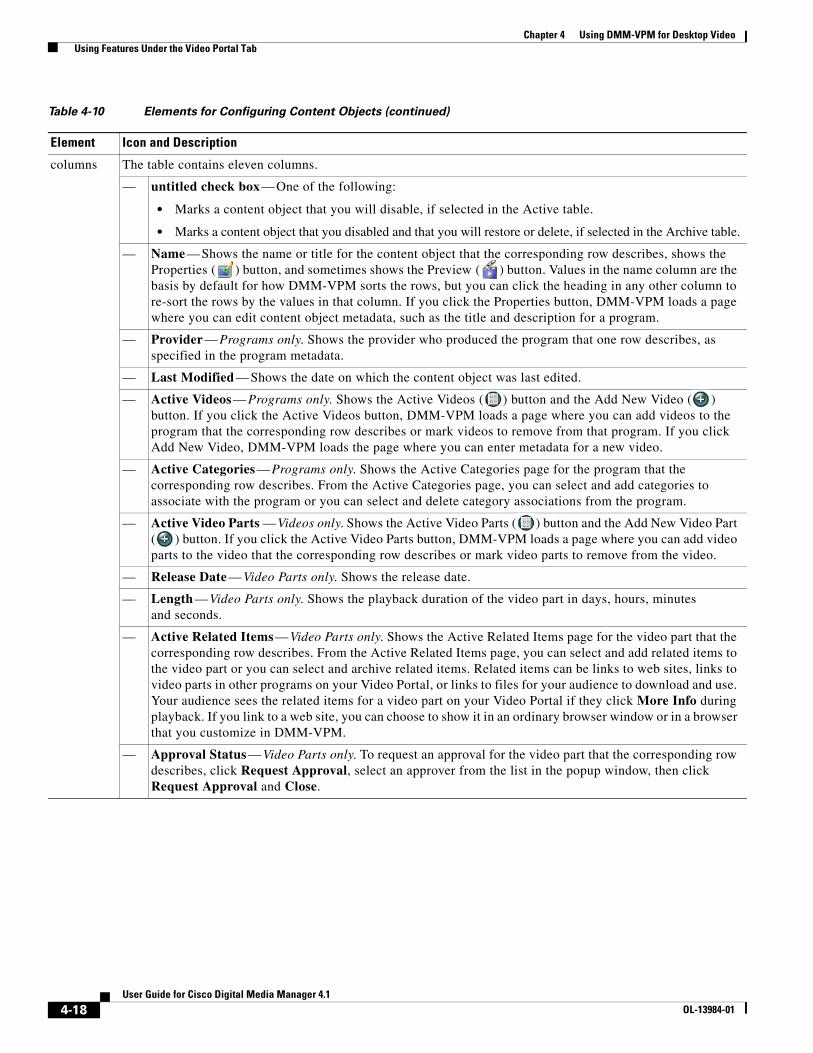
Chapter 4 Using DMM-VPM for Desktop Video Using Features Under the Video Portal Tab
columns The table contains eleven columns.
— untitled check box — One of the following:
• Marks a content object that you will disable, if selected in the Active table.
• Marks a content object that you disabled and that you will restore or delete, if selected in the Archive table.
— Name — Shows the name or title for the content object that the corresponding row describes, shows the Properties ( ) button, and sometimes shows the Preview ( ) button. Values in the name column are the basis by default for how DMM-VPM sorts the rows, but you can click the heading in any other column to re-sort the rows by the values in that column. If you click the Properties button, DMM-VPM loads a page where you can edit content object metadata, such as the title and description for a program.
— Provider — Programs only. Shows the provider who produced the program that one row describes, as specified in the program metadata.
— Last Modified — Shows the date on which the content object was last edited.
— Active Videos — Programs only. Shows the Active Videos ( ) button and the Add New Video ( ) button. If you click the Active Videos button, DMM-VPM loads a page where you can add videos to the program that the corresponding row describes or mark videos to remove from that program. If you click Add New Video, DMM-VPM loads the page where you can enter metadata for a new video.
— Active Categories — Programs only. Shows the Active Categories page for the program that the corresponding row describes. From the Active Categories page, you can select and add categories to associate with the program or you can select and delete category associations from the program.
— Active Video Parts — Videos only. Shows the Active Video Parts ( ) button and the Add New Video Part ( ) button. If you click the Active Video Parts button, DMM-VPM loads a page where you can add video parts to the video that the corresponding row describes or mark video parts to remove from the video.
— Release Date — Video Parts only. Shows the release date.
— Length — Video Parts only. Shows the playback duration of the video part in days, hours, minutes and seconds.
— Active Related Items — Video Parts only. Shows the Active Related Items page for the video part that the corresponding row describes. From the Active Related Items page, you can select and add related items to the video part or you can select and archive related items. Related items can be links to web sites, links to video parts in other programs on your Video Portal, or links to files for your audience to download and use. Your audience sees the related items for a video part on your Video Portal if they click More Info during playback. If you link to a web site, you can choose to show it in an ordinary browser window or in a browser that you customize in DMM-VPM.
— Approval Status — Video Parts only. To request an approval for the video part that the corresponding row describes, click Request Approval, select an approver from the list in the popup window, then click Request Approval and Close.
Table 4-10 Elements for Configuring Content Objects (continued)
Element Icon and Description
4-18User Guide for Cisco Digital Media Manager 4.1
OL-13984-01
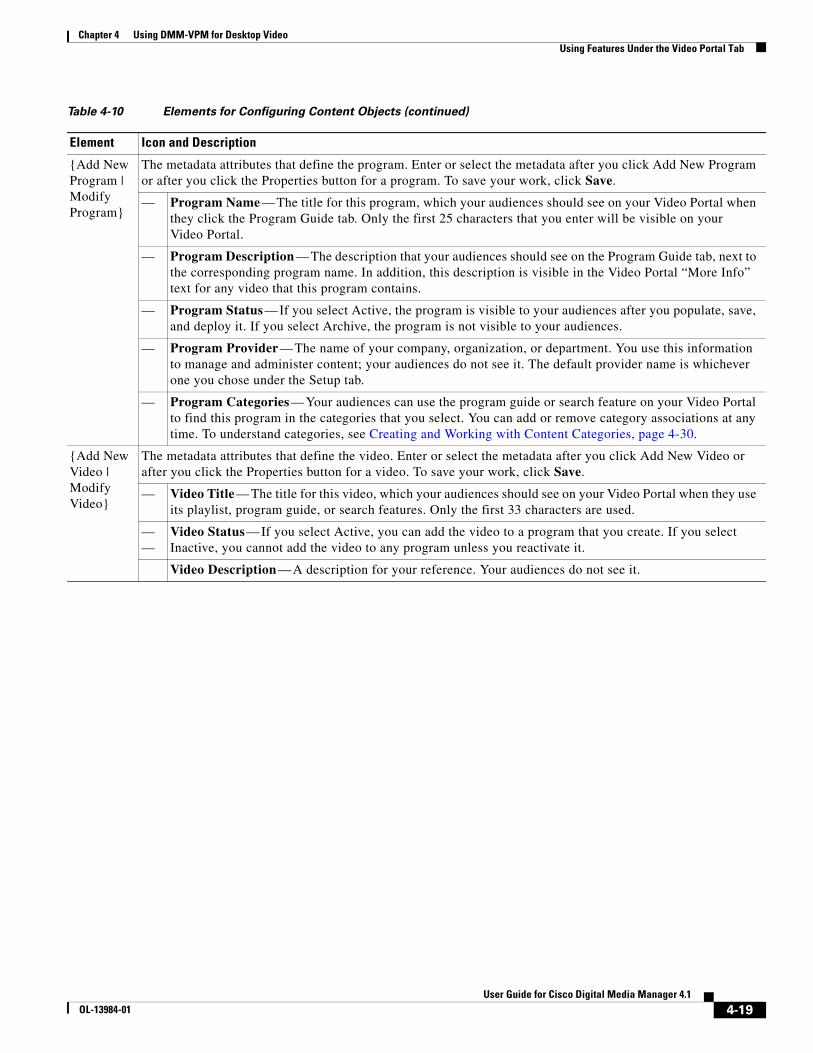
Chapter 4 Using DMM-VPM for Desktop Video Using Features Under the Video Portal Tab
{Add New Program | Modify Program}
The metadata attributes that define the program. Enter or select the metadata after you click Add New Program or after you click the Properties button for a program. To save your work, click Save.
— Program Name — The title for this program, which your audiences should see on your Video Portal when they click the Program Guide tab. Only the first 25 characters that you enter will be visible on your Video Portal.
— Program Description — The description that your audiences should see on the Program Guide tab, next to the corresponding program name. In addition, this description is visible in the Video Portal “More Info” text for any video that this program contains.
— Program Status — If you select Active, the program is visible to your audiences after you populate, save, and deploy it. If you select Archive, the program is not visible to your audiences.
— Program Provider — The name of your company, organization, or department. You use this information to manage and administer content; your audiences do not see it. The default provider name is whichever one you chose under the Setup tab.
— Program Categories — Your audiences can use the program guide or search feature on your Video Portal to find this program in the categories that you select. You can add or remove category associations at any time. To understand categories, see Creating and Working with Content Categories, page 4-30.
{Add New Video | Modify Video}
The metadata attributes that define the video. Enter or select the metadata after you click Add New Video or after you click the Properties button for a video. To save your work, click Save.
— Video Title — The title for this video, which your audiences should see on your Video Portal when they use its playlist, program guide, or search features. Only the first 33 characters are used.
——
Video Status — If you select Active, you can add the video to a program that you create. If you select Inactive, you cannot add the video to any program unless you reactivate it.
Video Description — A description for your reference. Your audiences do not see it.
Table 4-10 Elements for Configuring Content Objects (continued)
Element Icon and Description
4-19User Guide for Cisco Digital Media Manager 4.1
OL-13984-01
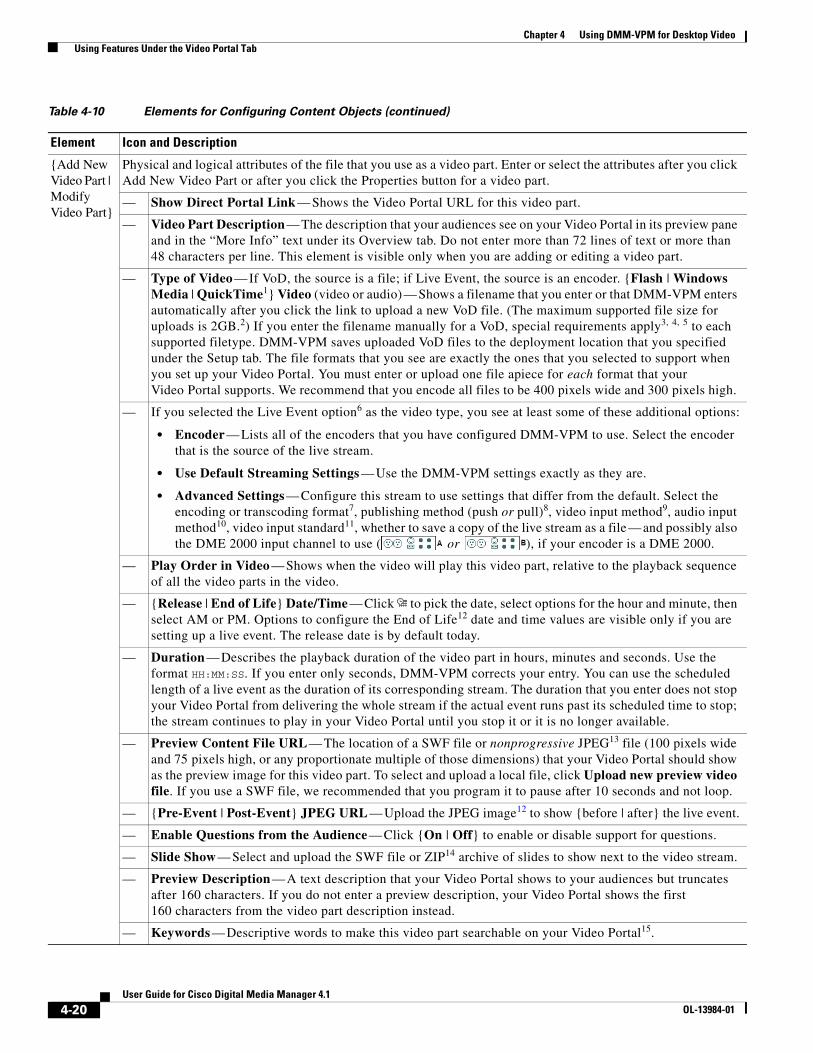
Chapter 4 Using DMM-VPM for Desktop Video Using Features Under the Video Portal Tab
{Add New Video Part | Modify Video Part}
Physical and logical attributes of the file that you use as a video part. Enter or select the attributes after you click Add New Video Part or after you click the Properties button for a video part.
— Show Direct Portal Link — Shows the Video Portal URL for this video part.
— Video Part Description — The description that your audiences see on your Video Portal in its preview pane and in the “More Info” text under its Overview tab. Do not enter more than 72 lines of text or more than 48 characters per line. This element is visible only when you are adding or editing a video part.
— Type of Video — If VoD, the source is a file; if Live Event, the source is an encoder. {Flash | Windows Media | QuickTime1} Video (video or audio) — Shows a filename that you enter or that DMM-VPM enters automatically after you click the link to upload a new VoD file. (The maximum supported file size for uploads is 2GB.2) If you enter the filename manually for a VoD, special requirements apply3, 4, 5 to each supported filetype. DMM-VPM saves uploaded VoD files to the deployment location that you specified under the Setup tab. The file formats that you see are exactly the ones that you selected to support when you set up your Video Portal. You must enter or upload one file apiece for each format that your Video Portal supports. We recommend that you encode all files to be 400 pixels wide and 300 pixels high.
— If you selected the Live Event option6 as the video type, you see at least some of these additional options:
• Encoder — Lists all of the encoders that you have configured DMM-VPM to use. Select the encoder that is the source of the live stream.
• Use Default Streaming Settings — Use the DMM-VPM settings exactly as they are.
• Advanced Settings — Configure this stream to use settings that differ from the default. Select the encoding or transcoding format7, publishing method (push or pull)8, video input method9, audio input method10, video input standard11, whether to save a copy of the live stream as a file — and possibly also the DME 2000 input channel to use ( or ), if your encoder is a DME 2000.
— Play Order in Video — Shows when the video will play this video part, relative to the playback sequence of all the video parts in the video.
— {Release | End of Life} Date/Time — Click to pick the date, select options for the hour and minute, then select AM or PM. Options to configure the End of Life12 date and time values are visible only if you are setting up a live event. The release date is by default today.
— Duration — Describes the playback duration of the video part in hours, minutes and seconds. Use the format HH:MM:SS. If you enter only seconds, DMM-VPM corrects your entry. You can use the scheduled length of a live event as the duration of its corresponding stream. The duration that you enter does not stop your Video Portal from delivering the whole stream if the actual event runs past its scheduled time to stop; the stream continues to play in your Video Portal until you stop it or it is no longer available.
— Preview Content File URL — The location of a SWF file or nonprogressive JPEG13 file (100 pixels wide and 75 pixels high, or any proportionate multiple of those dimensions) that your Video Portal should show as the preview image for this video part. To select and upload a local file, click Upload new preview video file. If you use a SWF file, we recommended that you program it to pause after 10 seconds and not loop.
— {Pre-Event | Post-Event} JPEG URL — Upload the JPEG image12 to show {before | after} the live event.
— Enable Questions from the Audience — Click {On | Off} to enable or disable support for questions.
— Slide Show — Select and upload the SWF file or ZIP14 archive of slides to show next to the video stream.
— Preview Description — A text description that your Video Portal shows to your audiences but truncates after 160 characters. If you do not enter a preview description, your Video Portal shows the first 160 characters from the video part description instead.
— Keywords — Descriptive words to make this video part searchable on your Video Portal15.
Table 4-10 Elements for Configuring Content Objects (continued)
Element Icon and Description
4-20User Guide for Cisco Digital Media Manager 4.1
OL-13984-01

Chapter 4 Using DMM-VPM for Desktop Video Using Features Under the Video Portal Tab
Approving or Denying the Request to Approve a Video PartAfter anyone submits a video part approval request, DMM-VPM sends email to the designated approver. The email message contains a link to preview and approve or deny the video part. If you receive the message, do the following:
Step 1 Click the email link to preview the video part and, when your browser loads the Approval Request page, click Preview Now.
Step 2 Watch the video part, enter comments if you have any, then use the controls at the bottom of the window to approve or deny the request.
1. We use the terms MPEG-4, QuickTime, and H.264 interchangeably in DMM-VPM. These formats coexist.
2. You cannot upload any video part that is larger than 2GB. To work around this limitation, post the file to a public webserver and merely enter the corresponding HTTP URL here instead of entering a filename.
3. You must use HTTP to point to any remote Flash file that you will upload. Flash files must use {FLV | FLA} for their filename extension. You cannot select Flash as the media format for a live event because Cisco Video Portal does not support Flash video streaming.
4. You must use {MMS | RTSP} to point to any remote Windows Media file that you will upload. Windows Media files must use {WMV | WMA | ASF} for their filename extension.
5. You must use {HTTP | RTSP} to point to any remote QuickTime (or H.264) file that you will upload. These files must use {MOV | MP4 | M4V | MP4V | M4A} for their filename extension.
6. When you point to a live stream, a filename is not necessary. In most cases, you point instead to a directory on the streaming server. If you are unsure about the configuration that your organization uses, ask your systems administrator for details. Streaming options are available for Windows Media, but not for Flash video.
7. Encoding format options are 1.5M, 350K, 50K, and 768K. Transcoding format options are 1.5M, 2M, 350K, 50K, and 768K.
8. See Managing Push Configurations, page 4-48.
9. One of these: • Composite/RCA • S-Video
10. One of these: • Unbalanced (RCA) • XLR Balanced
11. One of these: • NTSC_M (US) • NTSC_M_J (Japan) • PAL_B • PAL_D • PAL_H • PAL_I • SECAM_B • SECAM_D • SECAM_G • SECAM_H • SECAM_K • SECAM_K1 • SECAM_L • SECAM_L1
12. If you are setting up a live event, you must explicitly enter the End of Life Date/Time value. DMM-VPM does not parse it automatically from the Release Date/Time value. If you do not enter an End of Life Date/Time value, your live event will not occur.
13. Your Video Portal cannot display progressive JPEG images.
14. The ZIP archive that you upload must contain JPEG files that you exported from PowerPoint (or similar software), whose sequence of filenames is numbered correctly to preserve their natural order. See Best Practices for Generating the Slides to Be Synchronized, page 4-23.
15. There is no reason to enter commas, semicolons, or other word separators; your Video Portal ignores them if you do.
4-21User Guide for Cisco Digital Media Manager 4.1
OL-13984-01
Chapter 4 Using DMM-VPM for Desktop Video Using Features Under the Video Portal Tab
DMM-VPM is updated immediately and notifies the requestor through email that you approved or denied the request.
Step 3 To return to DMM-VPM, click Close and Return.
Understanding the Live Event ModuleThe Live Event Module is a separately licensed add-on to DMM-VPM that helps you to:
• Synchronize presentation slides with live audio and video streams that you show on your Video Portal. See Understanding and Working with Synchronized Slides, page 4-22.
• Receive and work with text-based questions that remote audience members submit to you while they are viewing live events on your Video Portal. Understanding and Working with Audience Questions, page 4-24.
Note Every time that you will host a live event, you must start the encoder remotely from the DMM-VPM encoder dashboard. If you use any physical control on the encoder chassis to start the encoder, your live events will not be available to your Video Portal audience members.
Understanding and Working with Synchronized SlidesIf you have purchased a license to use the Live Event Module, the moderators at your live events can synchronize slides with their live event streams. The slide synchronization option requires that you use the Windows Media format and requires that you use either a DME 1000 or DME 2000 as your encoder. Windows Media and the DMEs use types of APIs that are not currently available with other encoding formats, to support tight synchronization between slides and streams of audio and video.
Note Unless a /slides subdirectory exists within the root directory that you specified in the Support area on the Deployment Locations page, deployments will fail for your synchronized slides. For information about the Deployment Locations page, see Configuring the Location Settings for Deployments, page 4-5. DMM-VPM creates the /slides subdirectory for you automatically if you use forward slashes ( / ) in the Root File Directory field but does not create the directory if you use back slashes ( \ ). If you used back slashes, you must log in to the server that you specified and create the required subdirectory manually.
After your live event is finished, you can publish a VoD file from it that includes its synchronized slides, for viewing by your Video Portal users who could not attend the live event.
This section contains these topics:
• Best Practices for Generating the Slides to Be Synchronized, page 4-23
• Best Practices for Importing the Slides to Be Synchronized, page 4-23
• Operating a Slide Show, page 4-24
• What Video Portal Audiences See When You Use Synchronized Slides, page 4-24
4-22User Guide for Cisco Digital Media Manager 4.1
OL-13984-01
Chapter 4 Using DMM-VPM for Desktop Video Using Features Under the Video Portal Tab
Best Practices for Generating the Slides to Be Synchronized
In most cases, the synchronized slides that you show during live events will be derived from Microsoft PowerPoint presentations that your organization prepared for this purpose. Alternatively, your organization might use similar software from another vendor to develop its presentation slides.
There are two ways to import your slides for use with the Live Event Module.
• You can export sequentially numbered JPEG files from a presentation, then save those exported images inside a ZIP archive, which you import. One advantage to this method is that it does not require your organization to buy any additional software. However, the exported images might not provide a high-quality viewing experience for your audience members who opt to view the slides in their own resizeable window on your Video Portal. See Creating and Importing a ZIP File for Synchronization, page 4-23.
• You can use a third-party add-on that converts a presentation into a SWF file, which you can then import. The advantages to using this method are that it generates only a single file to be distributed and it offers a potentially higher-quality viewing experience when viewers select the option to open the slides in a new window and re-size this window. See Creating and Importing a SWF File for Synchronization, page 4-23.
The following descriptions assume that PowerPoint is your preferred software.
Creating and Importing a ZIP File for Synchronization
1. After you finish preparing your PowerPoint slide deck, select File > Save As.
2. From the Save as type list, select JPEG file Interchange Format (*.jpg).
3. Using a method that your operating system provides for this purpose, create and name a new folder where the exported JPEG versions of your slides should be saved. The name that you enter should not contain any spaces.
4. To start exporting your slides, click OK.
A prompt asks you, “Do you want to export every slide in the presentation or only the current slide?”
5. Click Every Slide.
PowerPoint then extracts each slide and saves it as a separate JPEG file in the folder that you created and named. Each JPEG file receives an ascending number as its filename.
6. After PowerPoint is finished saving all of the JPEG versions of your slides, compress the folder that contains them so that it is the basis for a new ZIP archive.
Creating and Importing a SWF File for Synchronization
After you finish preparing your PowerPoint slide deck, you can use a third-party application or a separately purchased PowerPoint plug-in to convert your slides into a single SWF file.
Best Practices for Importing the Slides to Be Synchronized
If you will show synchronized slides during a live event, we recommend that you create the live event and upload the slides for it no later than 30 minutes before the live event should start. This best practice allows sufficient time in most cases for the slides to reach and be cached on all of the web servers and content delivery devices that your organization has configured in support of live streaming.
4-23User Guide for Cisco Digital Media Manager 4.1
OL-13984-01
Chapter 4 Using DMM-VPM for Desktop Video Using Features Under the Video Portal Tab
Operating a Slide Show
For most live events, a designated synchronization operator will use one of the two provided consoles to synchronize slides with the actions of the live presenter. When the presenter advances by one slide in a presentation, for example, the synchronization operator uses the synchronization console to do the same. There are two supported ways to synchronize slides.
• Simple — The first synchronization method uses a simple, full-screen interface that shows each slide. To change or synchronize a slide, the synchronization operator or presenter presses the right or left arrow keys on a keyboard to move forward or backward through a presentation one slide at a time. This method is ideal for small events or in-studio events where the presenter (not a separate synchronization operator) should manage slides.
• Advanced — The second method uses a more advanced view that includes slide selection controls along its right side. By using this method, a synchronization operator or presenter can choose to selectively skip slides and can move quickly forward or backward to any slide in the slide deck.
Each time that a slide is synchronized, the Live Event Module inserts a command into the stream:
• If you converted presentation slides into a sequence of numbered JPEG images that you uploaded inside a ZIP archive, the command in the stream instructs your Video Portal to fetch the relevant JPEG file and display it to audience members.
• If you converted presentation slides into a SWF file, the command in the stream instructs your Video Portal to find the relevant section in the SWF file and display it to audience members.
This process ensures that slides are tightly synchronized to streams.
Each time a slide synchronization takes place, the action is noted in the encoder console event window.
What Video Portal Audiences See When You Use Synchronized Slides
When you associate synchronized slides with a live event or a VoD, changes occur automatically in the user interface that Video Portal audience members see. By default, video is displayed on the left and synchronized slides are on the right. Audience members can choose to view slides inside a resizeable popup window, which is useful to them if information on a slide is not easily readable at the default size.
The popup view also provides audience members with an option to review past slides that were already presented. To select a past slide to view at full size, audience members click its thumbnail preview in a scrolling list on the right.
Understanding and Working with Audience QuestionsIf you have purchased a license to use the Live Event Module, your Video Portal audience members can submit text-based questions during the live events in which you have enabled this feature.
During a live event, audience members who click the Ask Question button on your Video Portal will open a new window where they can enter and submit questions for the presenters. All of the submitted questions appear first in the Question Manager console in DMM-VPM, which your live event moderators can monitor. At selected times during a live event, your moderators can submit prescreened questions to the presenters either in the Presenter console or verbally. The presenters are then able to answer questions from remote audience members during the live event. Submitted questions are not visible to audience members.
In this release, audience member names are not associated with their questions or displayed to your live event moderators and presenters.
4-24User Guide for Cisco Digital Media Manager 4.1
OL-13984-01
Chapter 4 Using DMM-VPM for Desktop Video Using Features Under the Video Portal Tab
Because the live events that you show on your Video Portal can have thousands of audience members and it might be difficult for just one moderator to prescreen all of the submitted questions, multiple moderators can open and manage multiple instances of the Question Manager console simultaneously. After the event is finished, you can export all of the submitted questions and, if it meets your requirements to do so, publish them on a separate server.
Moderators and presenters at live events use the Question Manager console in DMM-VPM to work with questions from Video Portal audience members.
This section contains these topics:
• Moderating Questions, page 4-25
• Answering Questions, page 4-27
Moderating Questions
If you are a moderator for a live event, you can prescreen questions for the presenters.
Step 1 Select Video Portal Module from the untitled list at the top far-right of any page.
Step 2 Use your preferred method to open the moderation features:
Step 3 Select the options or enter the values that meet your requirements. If you do not understand your options, see Table 4-11 on page 4-26.
Method 1 Method 2
a. Select Encoders > Encoder Dashboard.
b. In the list of encoders, find and click the icon ( ) for the encoder that your live event will use.
DMM-VPM shows ad-hoc streaming controls for the encoder that you clicked.
c. Click View Audience Questions.
a. Select Video Portal > Programs.
b. Click the Active tab.
c. On the Active Programs page, click the Active Videos ( ) button that corresponds to the relevant program.
d. On the Active Videos page, click the Active Video Parts ( ) button that corresponds to the relevant video.
e. On the Active Video Parts page, click the Properties ( ) button that corresponds to the relevant live event stream.
f. For more information, see Working with Programs, Videos and Video Parts, page 4-16.
g. Scroll to the bottom of the displayed page, then click Review Audience Questions.
4-25User Guide for Cisco Digital Media Manager 4.1
OL-13984-01

Chapter 4 Using DMM-VPM for Desktop Video Using Features Under the Video Portal Tab
Table 4-11 Elements for Moderating Live Events
Element Icon and Description
Questions tab Shows a scrolling list of the questions that audience members have submitted. The list is updated in real time whenever new questions arrive.
— {Show | Hide} Filters — Toggle that shows or hides options for configuring and applying text string filters to the list of active questions. There are two filter types:
• Show Questions — Click On to enable, or click Off to disable, filtering against a text string that you enter. While enabled, the filter constrains the list so that it includes only the questions that contain your text string.
• Auto-remove Questions — Click On to enable, or click Off to disable, filtering against a text string that you enter. While enabled, the filter constrains the list so that it excludes all questions that contain your text string.
Note If you enable both of the filters and enter the identical text string for both of them to use, the filters become mutually-exclusive. In this case, all questions are moved under the Removed Questions tab. (To restore them to the list of active questions, click Removed Questions, then click Reactivate All.)
Export Questions — Creates a delimited text file that contains all of the questions and other data, including timestamps, that are visible in the list of active questions. If you have configured your browser correctly to use helper applications, the file will open automatically in your preferred software for editing spreadsheets.
— Columns — Information about the questions is sorted into these columns:
• Question — The literal text of the question, exactly as it was submitted.
• Time Asked — The date, hour, minute, and second when the question was submitted.
• Actions — Buttons for moderating the corresponding question. You can highlight it, send it under the Presenter View tab, or move it under the Removed Questions tab.
Removed Questions tab Shows a scrolling list of the questions that you have hidden, at least temporarily, from the presenter. The list is updated as you add questions to it manually and as your filters remove questions automatically from the list of active questions under the Questions tab.
— Reactivate All — Moves all questions back to the list of active questions, under the Questions tab.
— Columns — Information about the questions is sorted into these columns:
• Question — The literal text of the question, exactly as it was submitted.
• Time Asked — The date, hour, minute, and second when the question was submitted.
• Actions — Buttons for moderating the corresponding question. You can highlight it, send it under the Presenter View tab, or move it under the Removed Questions tab.
4-26User Guide for Cisco Digital Media Manager 4.1
OL-13984-01
Chapter 4 Using DMM-VPM for Desktop Video Using Features Under the Video Portal Tab
Answering Questions
If you are the presenter at a live event, you can see and answer the questions that your moderator has prescreened for you.
Tip The moderator or another member of the stage crew at your live event might already have opened the Q&A Administration window for you, where you can see the list of questions that await your answer. Otherwise, if no one did this for you already, complete Step 1 through Step 2c in the “Moderating Questions” procedure on page 4-25, then click the Presenter’s View tab.
Under the Presenter’s View tab, you will see a list of the questions that the moderator has screened and edited for you to answer. The list is updated whenever your moderator adds a question to it manually. Information about the questions is sorted into these columns:
• Question — The literal text of the question, exactly as it was submitted.
• Time Asked — The date, hour, minute, and second when the question was submitted.
• Actions — A button to move the corresponding question under the Removed Questions tab.
Creating and Working with Playlists
Note Each playlist that you create must contain at least one video part before you can show it to any audience.
DMM-VPM can help you to emphasize particular content offerings by showing key videos on your Video Portal under its Featured Playlist tab.
You can also configure DMM-VPM to track approvals for playlists. The approval process workflow does not help you to enforce any security policy; instead, it helps your organization to formalize communication. Content developers can request approval for playlists, then a designated approver can approve or deny the requests. A designated approver is someone whose DMM-VPM user type (which you configured under the Users tab) is Approver. Not even a designated approver can approve his or her own requests. Approval and denial have no effect on whether a playlist can be deployed.
Step 1 Select Video Portal Module from the untitled list at the top far-right of any page, then select Video Portal > Playlists.
On the Playlists page, you can toggle between two tables that are mostly very similar and that both show a list of DMM-VPM playlists. You can move playlists from one table to the other.
Step 2 Do one of the following:
• Click Active to see in the Active table a list of all the playlists that are available to show to your audience. These playlists are active in the sense that you have not disabled them. If you have not created any playlists or if you archived every playlist, the table is empty.
• Click Archive to see in the Archive table a list of all the playlists that you have disabled temporarily. These playlists are disabled in the sense that they are not available for your audience to find or see. You might choose eventually to restore or delete these playlists.
4-27User Guide for Cisco Digital Media Manager 4.1
OL-13984-01
Chapter 4 Using DMM-VPM for Desktop Video Using Features Under the Video Portal Tab
Step 3 Select the options or enter the values that meet your requirements. If you do not understand your options, see Table 4-12 on page 4-28.
Step 4 Click Save.
Table 4-12 Elements for Configuring Playlists
Element Icon and Description
Add New Playlist Shows the Add New Playlist page.
Archive Selected Moves from the Active table to the Archive table the playlists that you selected.
Delete Selected Shows the Delete Confirmation page. See the instructions on that page that tell you how to delete the archived playlist that you selected.
Activate Selected Moves from the Archive table to the Active table the playlists that you selected.
columns The table contains seven columns.
— untitled check box — One of the following:
• Marks a playlist that you will disable, if selected in the Active table.
• Marks a playlist that you disabled and that you will restore or delete, if selected in the Archive table.
— Name — The title of the playlist that the corresponding row describes, the Properties ( ) button, and the Preview ( ) button. Values in the name column are the basis by default for how DMM-VPM sorts the rows, but you can click the heading in any other column to re-sort the rows by the values in that column. If you click the Properties button, DMM-VPM loads a page where you can edit metadata, such as the title and description, for the playlist that the corresponding row describes. If you click the Preview button, your Video Portal shows to you the playlist that the corresponding row describes.
— Publish Dates — The range of dates when which the playlist is valid, between the release date and the end of life date.
— Last Modified — The date on which the content object was last edited.
— Active Video Parts — Shows the Active Video Parts ( ) button and the Add New Video Part ( ) button. If you click the Active Video Parts button, DMM-VPM loads a page where you can add video parts to the playlist that the corresponding row describes or mark video parts to remove from the playlist.
— Current Status — Describes the approval status and helps you to request playlist approval from a DMM-VPM user with approver permissions. To request approval for the playlist that the corresponding row describes, click Request Approval, select an approver from the list in the popup window, then click Request Approval and Close.
— Deployment Choice — Says whether the playlist that the corresponding row describes is the default playlist for deployments.
4-28User Guide for Cisco Digital Media Manager 4.1
OL-13984-01
Chapter 4 Using DMM-VPM for Desktop Video Using Features Under the Video Portal Tab
Approving or Denying the Request to Approve a Playlist
After anyone submits a playlist approval request, DMM-VPM sends email to the designated approver. The email message contains a link to preview and approve or deny the playlist. If you receive the message, do the following:
Step 1 Click the email link to preview the playlist and, when your browser loads the Approval Request page, click Preview Now.
Step 2 Watch the playlist, enter comments if you have any, then use the controls at the bottom of the window to approve or deny the request.
DMM-VPM is updated immediately and notifies the requestor through email that you approved or denied the request.
Step 3 To return to DMM-VPM, click Close and Return.
{Add New Playlist | Modify Playlist}
Metadata attributes that define the playlist. Enter or select the metadata after you click Add New Playlist or after you click the Properties button for a playlist.
— Name — The title for this playlist.
— Status — Active or Inactive. If you select Active, the playlist is visible to your audiences after you populate, save, and deploy it. If you select Inactive, the playlist is not visible to your audiences. The default is Active.
— Description — Enter a description that is meaningful to you. The description is optional and is only for your reference.
— Make this lineup default choice for deployments? — Yes or No. To use this playlist by default in every deployment, select Yes. Otherwise, select No.
— Release Date — This date is optional and is only for your reference.
— End of Life Date — This date is optional and is only for your reference.
{Add New Video Part | Modify Video Part}
Select a video part to add in the playlist that the corresponding row describes. To save your work, click Save.
— Video Part Link — The title of the video part that you selected. DMM-VPM enters the title automatically after you select the video part.
— Select Video Part — Opens or reopens a popup window where you can select a video part to add to the playlist. Select a program from the Program list, then select a video part from the Video list. The popup window then closes automatically. If you select the wrong video part, try again.
— Play Order Position — Select a playlist position for the video part, relative to the position of other video parts in the playlist.
— Status — Active or Inactive. The default is Active.
Table 4-12 Elements for Configuring Playlists (continued)
Element Icon and Description
4-29User Guide for Cisco Digital Media Manager 4.1
OL-13984-01
Chapter 4 Using DMM-VPM for Desktop Video Using Features Under the Video Portal Tab
Creating and Working with Content CategoriesYou can categorize programs according to characteristics that they have in common, such as their topic, subject matter, target audience, featured executive, or business function. Your audiences use corresponding categories on your Video Portal to find or browse content. The videos and video parts in a program inherit its category associations automatically.
The program guide on your Video Portal describes only the programs that you have categorized. If you deploy a program but do not associate it with any categories, it is not visible in the program guide. In this case, your audiences must either perform a keyword search or know and use the absolute URL to find and see a video that the program contains. Therefore, to improve the user experience for your audiences, we recommend that you associate each program with at least one category.
To create and manage categories and to associate programs with them, use the Categories page.
Step 1 Select Video Portal Module from the untitled list at the top far-right of any page, then select Video Portal > Categories.
On the Categories page, you can toggle between two tables that are mostly very similar and that both show a list of DMM-VPM content categories. You can move categories from one table to the other.
Step 2 Do one of the following:
• Click Active to see in the Active table a list of all the categories that are available to associate with content objects and show to your audience. These categories are active in the sense that you have not disabled them. If you have not created any categories or if you archived every category, the table is empty.
• Click Archive to see in the Archive table a list of all the categories that you have disabled temporarily. These categories are disabled in the sense that they are not available for your audience to find or see and you cannot associate them with any content objects. You might choose eventually to restore or delete these categories.
Step 3 Select the options or enter the values that meet your requirements. If you do not understand your options, see Table 4-13 on page 4-30.
Table 4-13 Elements for Configuring Categories
Element Icon and Description
Add New Category Shows the Add New Category page.
Archive Selected Moves from the Active table to the Archive table the categories that you selected.
Delete Selected Shows the Delete Confirmation page. See the instructions on that page that tell you how to delete the archived category that you selected.
Activate Selected Moves from the Archive table to the Active table the categories that you selected.
4-30User Guide for Cisco Digital Media Manager 4.1
OL-13984-01

Chapter 4 Using DMM-VPM for Desktop Video Using Features Under the Video Portal Tab
Creating and Working with InterstitialsIn DMM-VPM, an interstitial is a short segment that your Video Portal shows when you have not scheduled anything else to show. To create a new interstitial, follow these steps:
Step 1 Select Video Portal Module from the untitled list at the top far-right of any page, then select Video Portal > Interstitials.
On the Interstitials page, you can toggle between two tables that are mostly very similar and that both show a list of DMM-VPM interstitials. You can move interstitials from one table to the other.
columns The table contains five columns.
— untitled check box — One of the following:
• Marks a category that you will disable, if selected in the Active table.
• Marks a category that you disabled and that you will restore or delete, if selected in the Archive table.
— Name — The name of the category that the corresponding row describes and the Properties ( ) button. Values in the Name column are the basis by default for how DMM-VPM sorts the rows, but you can click the heading in any other column to re-sort the rows by the values in that column. If you click the Properties button, DMM-VPM loads a page where you can edit metadata, such as the name and description, for the category that the corresponding row describes.
— Last Modified — The date and time when the category was last edited.
— Date Added — The date and time when the category was created.
— # of Programs — Shows the Active Associated Programs ( ) button. If you click the button, DMM-VPM loads a page where you can associate programs with the category that the corresponding row describes or mark programs to disassociate from the category.
{Add New Category | Modify Category}
Metadata attributes that define the category. Enter or select the metadata after you click Add New Category or after you click the Properties button for a category. To save your work, click Save.
— Category Name — The name for this category. Your audiences see this category name on your Video Portal when they use its the Program Guide tab to browser by category.
— Category Status — Active or Inactive. If you select Active, the category is visible to your audiences and you can associate programs with it. If you select Inactive, the category is not visible to your audiences and you cannot associate programs with it. The default is Active.
— Associated Programs — Lists all programs, so that you can select any of them to associate with the category or deselect any of them to disassociate from the category. You must associate each category with at least one program, but there is no upper limit to the number of programs that you can associate with any category. You can add or remove category associations at any time.
— Category Description — Enter a description that is meaningful to you. The description is optional and is only for your reference.
Table 4-13 Elements for Configuring Categories (continued)
Element Icon and Description
4-31User Guide for Cisco Digital Media Manager 4.1
OL-13984-01
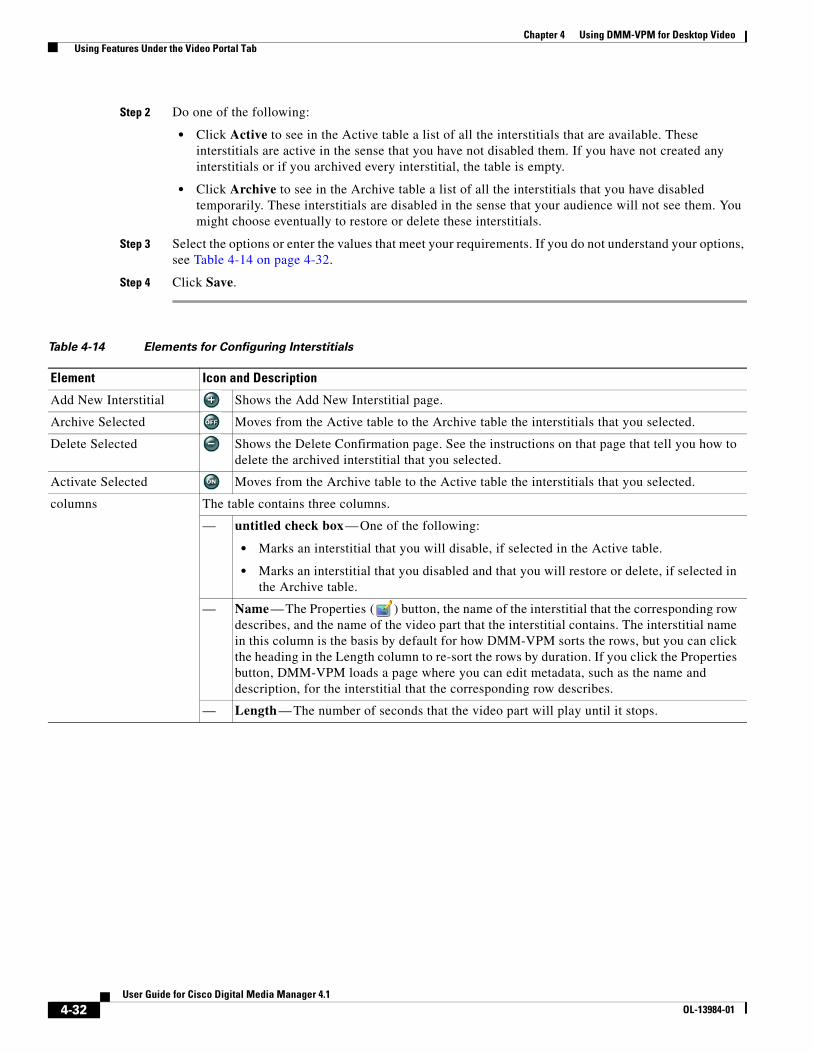
Chapter 4 Using DMM-VPM for Desktop Video Using Features Under the Video Portal Tab
Step 2 Do one of the following:
• Click Active to see in the Active table a list of all the interstitials that are available. These interstitials are active in the sense that you have not disabled them. If you have not created any interstitials or if you archived every interstitial, the table is empty.
• Click Archive to see in the Archive table a list of all the interstitials that you have disabled temporarily. These interstitials are disabled in the sense that your audience will not see them. You might choose eventually to restore or delete these interstitials.
Step 3 Select the options or enter the values that meet your requirements. If you do not understand your options, see Table 4-14 on page 4-32.
Step 4 Click Save.
Table 4-14 Elements for Configuring Interstitials
Element Icon and Description
Add New Interstitial Shows the Add New Interstitial page.
Archive Selected Moves from the Active table to the Archive table the interstitials that you selected.
Delete Selected Shows the Delete Confirmation page. See the instructions on that page that tell you how to delete the archived interstitial that you selected.
Activate Selected Moves from the Archive table to the Active table the interstitials that you selected.
columns The table contains three columns.
— untitled check box — One of the following:
• Marks an interstitial that you will disable, if selected in the Active table.
• Marks an interstitial that you disabled and that you will restore or delete, if selected in the Archive table.
— Name — The Properties ( ) button, the name of the interstitial that the corresponding row describes, and the name of the video part that the interstitial contains. The interstitial name in this column is the basis by default for how DMM-VPM sorts the rows, but you can click the heading in the Length column to re-sort the rows by duration. If you click the Properties button, DMM-VPM loads a page where you can edit metadata, such as the name and description, for the interstitial that the corresponding row describes.
— Length — The number of seconds that the video part will play until it stops.
4-32User Guide for Cisco Digital Media Manager 4.1
OL-13984-01
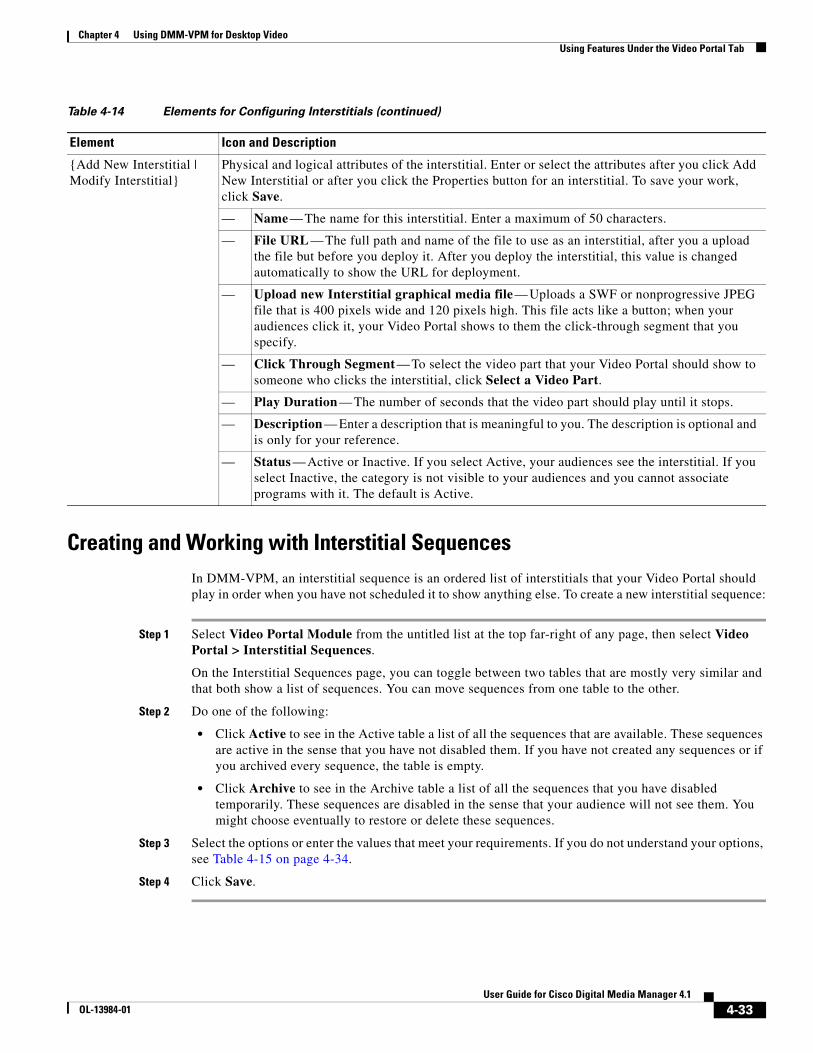
Chapter 4 Using DMM-VPM for Desktop Video Using Features Under the Video Portal Tab
Creating and Working with Interstitial SequencesIn DMM-VPM, an interstitial sequence is an ordered list of interstitials that your Video Portal should play in order when you have not scheduled it to show anything else. To create a new interstitial sequence:
Step 1 Select Video Portal Module from the untitled list at the top far-right of any page, then select Video Portal > Interstitial Sequences.
On the Interstitial Sequences page, you can toggle between two tables that are mostly very similar and that both show a list of sequences. You can move sequences from one table to the other.
Step 2 Do one of the following:
• Click Active to see in the Active table a list of all the sequences that are available. These sequences are active in the sense that you have not disabled them. If you have not created any sequences or if you archived every sequence, the table is empty.
• Click Archive to see in the Archive table a list of all the sequences that you have disabled temporarily. These sequences are disabled in the sense that your audience will not see them. You might choose eventually to restore or delete these sequences.
Step 3 Select the options or enter the values that meet your requirements. If you do not understand your options, see Table 4-15 on page 4-34.
Step 4 Click Save.
{Add New Interstitial | Modify Interstitial}
Physical and logical attributes of the interstitial. Enter or select the attributes after you click Add New Interstitial or after you click the Properties button for an interstitial. To save your work, click Save.
— Name — The name for this interstitial. Enter a maximum of 50 characters.
— File URL — The full path and name of the file to use as an interstitial, after you a upload the file but before you deploy it. After you deploy the interstitial, this value is changed automatically to show the URL for deployment.
— Upload new Interstitial graphical media file — Uploads a SWF or nonprogressive JPEG file that is 400 pixels wide and 120 pixels high. This file acts like a button; when your audiences click it, your Video Portal shows to them the click-through segment that you specify.
— Click Through Segment — To select the video part that your Video Portal should show to someone who clicks the interstitial, click Select a Video Part.
— Play Duration — The number of seconds that the video part should play until it stops.
— Description — Enter a description that is meaningful to you. The description is optional and is only for your reference.
— Status — Active or Inactive. If you select Active, your audiences see the interstitial. If you select Inactive, the category is not visible to your audiences and you cannot associate programs with it. The default is Active.
Table 4-14 Elements for Configuring Interstitials (continued)
Element Icon and Description
4-33User Guide for Cisco Digital Media Manager 4.1
OL-13984-01
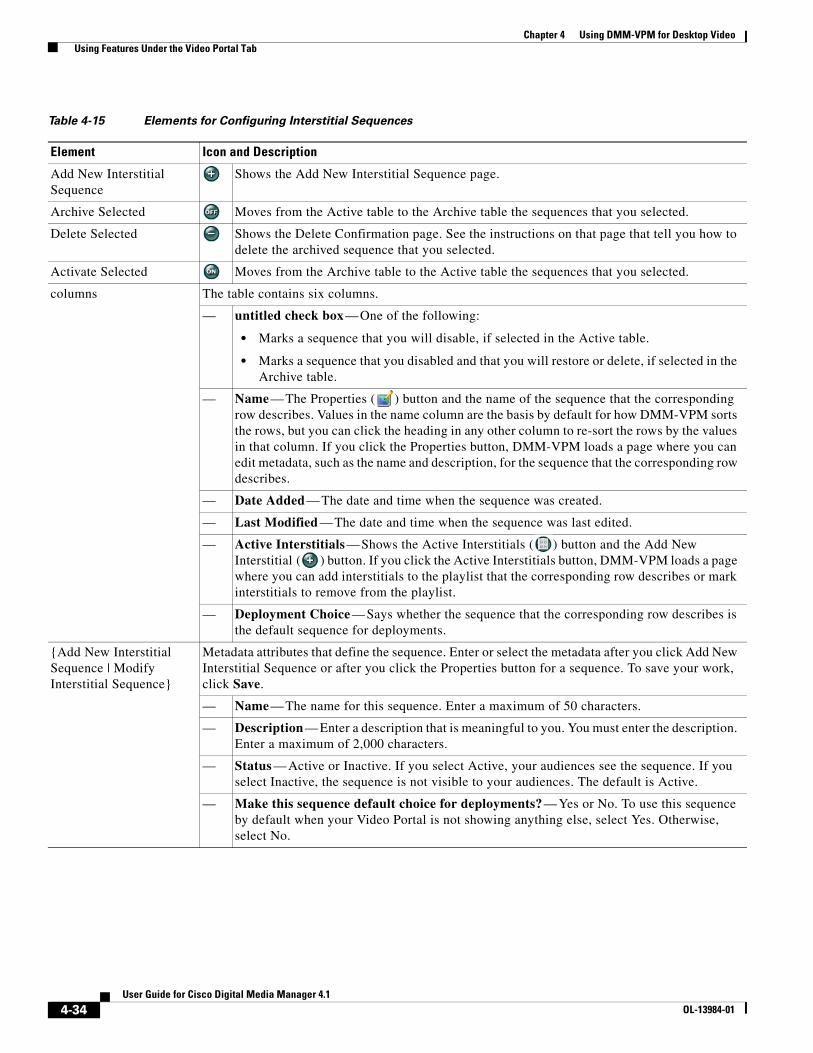
Chapter 4 Using DMM-VPM for Desktop Video Using Features Under the Video Portal Tab
Table 4-15 Elements for Configuring Interstitial Sequences
Element Icon and Description
Add New Interstitial Sequence
Shows the Add New Interstitial Sequence page.
Archive Selected Moves from the Active table to the Archive table the sequences that you selected.
Delete Selected Shows the Delete Confirmation page. See the instructions on that page that tell you how to delete the archived sequence that you selected.
Activate Selected Moves from the Archive table to the Active table the sequences that you selected.
columns The table contains six columns.
— untitled check box — One of the following:
• Marks a sequence that you will disable, if selected in the Active table.
• Marks a sequence that you disabled and that you will restore or delete, if selected in the Archive table.
— Name — The Properties ( ) button and the name of the sequence that the corresponding row describes. Values in the name column are the basis by default for how DMM-VPM sorts the rows, but you can click the heading in any other column to re-sort the rows by the values in that column. If you click the Properties button, DMM-VPM loads a page where you can edit metadata, such as the name and description, for the sequence that the corresponding row describes.
— Date Added — The date and time when the sequence was created.
— Last Modified — The date and time when the sequence was last edited.
— Active Interstitials — Shows the Active Interstitials ( ) button and the Add New Interstitial ( ) button. If you click the Active Interstitials button, DMM-VPM loads a page where you can add interstitials to the playlist that the corresponding row describes or mark interstitials to remove from the playlist.
— Deployment Choice — Says whether the sequence that the corresponding row describes is the default sequence for deployments.
{Add New Interstitial Sequence | Modify Interstitial Sequence}
Metadata attributes that define the sequence. Enter or select the metadata after you click Add New Interstitial Sequence or after you click the Properties button for a sequence. To save your work, click Save.
— Name — The name for this sequence. Enter a maximum of 50 characters.
— Description — Enter a description that is meaningful to you. You must enter the description. Enter a maximum of 2,000 characters.
— Status — Active or Inactive. If you select Active, your audiences see the sequence. If you select Inactive, the sequence is not visible to your audiences. The default is Active.
— Make this sequence default choice for deployments? — Yes or No. To use this sequence by default when your Video Portal is not showing anything else, select Yes. Otherwise, select No.
4-34User Guide for Cisco Digital Media Manager 4.1
OL-13984-01
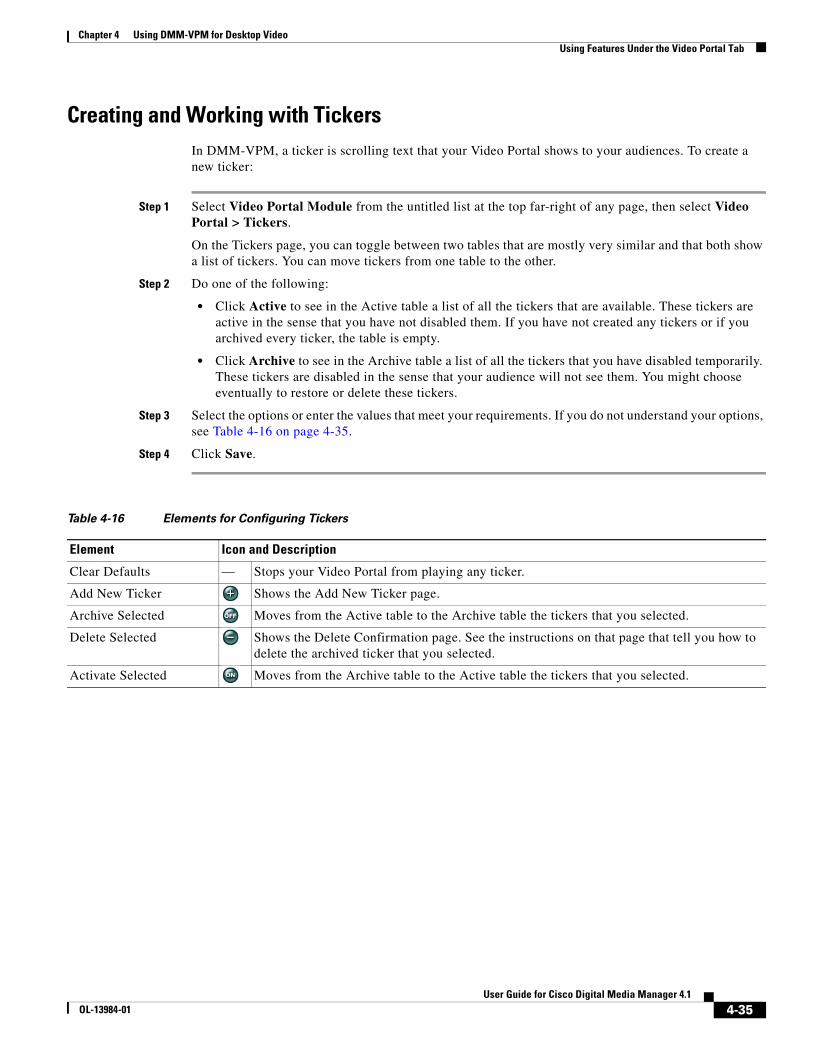
Chapter 4 Using DMM-VPM for Desktop Video Using Features Under the Video Portal Tab
Creating and Working with TickersIn DMM-VPM, a ticker is scrolling text that your Video Portal shows to your audiences. To create a new ticker:
Step 1 Select Video Portal Module from the untitled list at the top far-right of any page, then select Video Portal > Tickers.
On the Tickers page, you can toggle between two tables that are mostly very similar and that both show a list of tickers. You can move tickers from one table to the other.
Step 2 Do one of the following:
• Click Active to see in the Active table a list of all the tickers that are available. These tickers are active in the sense that you have not disabled them. If you have not created any tickers or if you archived every ticker, the table is empty.
• Click Archive to see in the Archive table a list of all the tickers that you have disabled temporarily. These tickers are disabled in the sense that your audience will not see them. You might choose eventually to restore or delete these tickers.
Step 3 Select the options or enter the values that meet your requirements. If you do not understand your options, see Table 4-16 on page 4-35.
Step 4 Click Save.
Table 4-16 Elements for Configuring Tickers
Element Icon and Description
Clear Defaults — Stops your Video Portal from playing any ticker.
Add New Ticker Shows the Add New Ticker page.
Archive Selected Moves from the Active table to the Archive table the tickers that you selected.
Delete Selected Shows the Delete Confirmation page. See the instructions on that page that tell you how to delete the archived ticker that you selected.
Activate Selected Moves from the Archive table to the Active table the tickers that you selected.
4-35User Guide for Cisco Digital Media Manager 4.1
OL-13984-01
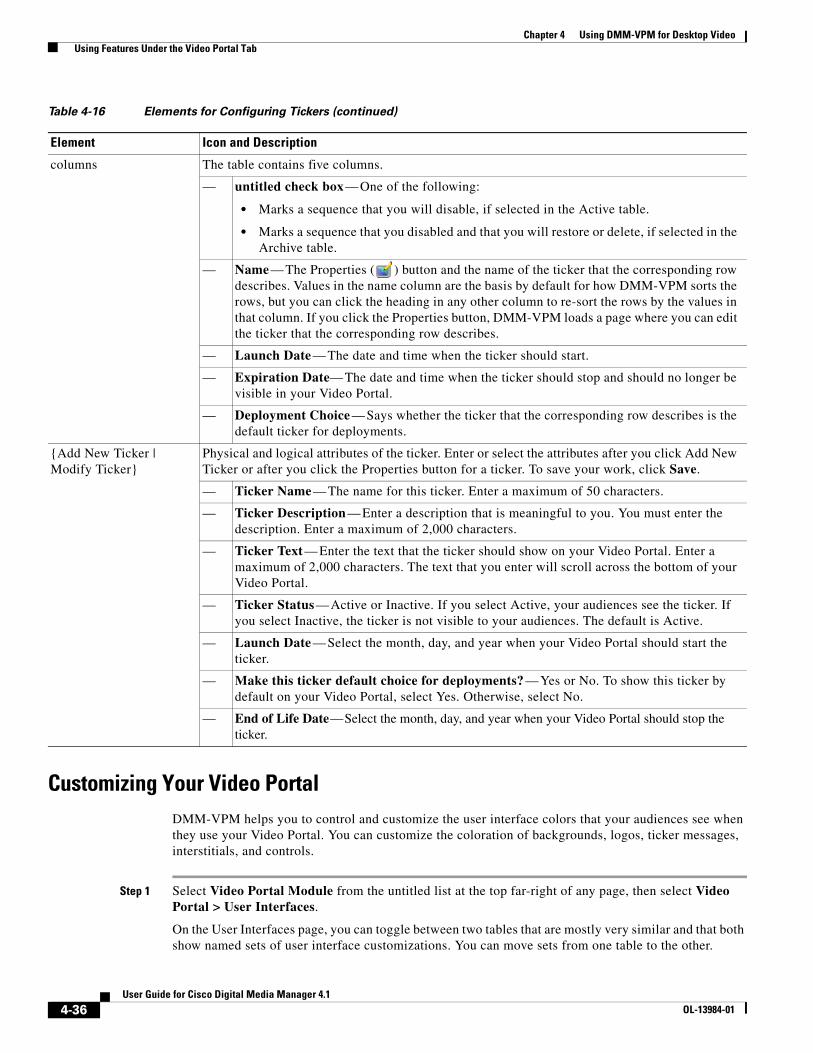
Chapter 4 Using DMM-VPM for Desktop Video Using Features Under the Video Portal Tab
Customizing Your Video PortalDMM-VPM helps you to control and customize the user interface colors that your audiences see when they use your Video Portal. You can customize the coloration of backgrounds, logos, ticker messages, interstitials, and controls.
Step 1 Select Video Portal Module from the untitled list at the top far-right of any page, then select Video Portal > User Interfaces.
On the User Interfaces page, you can toggle between two tables that are mostly very similar and that both show named sets of user interface customizations. You can move sets from one table to the other.
columns The table contains five columns.
— untitled check box — One of the following:
• Marks a sequence that you will disable, if selected in the Active table.
• Marks a sequence that you disabled and that you will restore or delete, if selected in the Archive table.
— Name — The Properties ( ) button and the name of the ticker that the corresponding row describes. Values in the name column are the basis by default for how DMM-VPM sorts the rows, but you can click the heading in any other column to re-sort the rows by the values in that column. If you click the Properties button, DMM-VPM loads a page where you can edit the ticker that the corresponding row describes.
— Launch Date — The date and time when the ticker should start.
— Expiration Date— The date and time when the ticker should stop and should no longer be visible in your Video Portal.
— Deployment Choice — Says whether the ticker that the corresponding row describes is the default ticker for deployments.
{Add New Ticker | Modify Ticker}
Physical and logical attributes of the ticker. Enter or select the attributes after you click Add New Ticker or after you click the Properties button for a ticker. To save your work, click Save.
— Ticker Name — The name for this ticker. Enter a maximum of 50 characters.
— Ticker Description — Enter a description that is meaningful to you. You must enter the description. Enter a maximum of 2,000 characters.
— Ticker Text — Enter the text that the ticker should show on your Video Portal. Enter a maximum of 2,000 characters. The text that you enter will scroll across the bottom of your Video Portal.
— Ticker Status — Active or Inactive. If you select Active, your audiences see the ticker. If you select Inactive, the ticker is not visible to your audiences. The default is Active.
— Launch Date — Select the month, day, and year when your Video Portal should start the ticker.
— Make this ticker default choice for deployments? — Yes or No. To show this ticker by default on your Video Portal, select Yes. Otherwise, select No.
— End of Life Date — Select the month, day, and year when your Video Portal should stop the ticker.
Table 4-16 Elements for Configuring Tickers (continued)
Element Icon and Description
4-36User Guide for Cisco Digital Media Manager 4.1
OL-13984-01
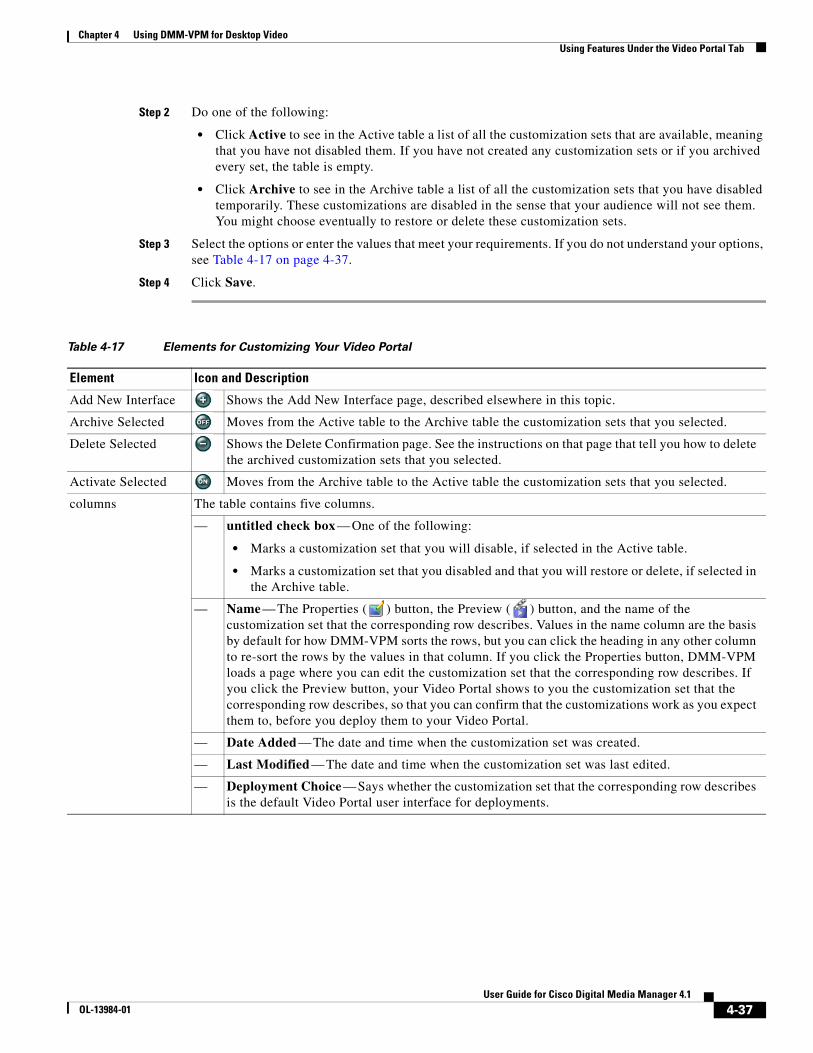
Chapter 4 Using DMM-VPM for Desktop Video Using Features Under the Video Portal Tab
Step 2 Do one of the following:
• Click Active to see in the Active table a list of all the customization sets that are available, meaning that you have not disabled them. If you have not created any customization sets or if you archived every set, the table is empty.
• Click Archive to see in the Archive table a list of all the customization sets that you have disabled temporarily. These customizations are disabled in the sense that your audience will not see them. You might choose eventually to restore or delete these customization sets.
Step 3 Select the options or enter the values that meet your requirements. If you do not understand your options, see Table 4-17 on page 4-37.
Step 4 Click Save.
Table 4-17 Elements for Customizing Your Video Portal
Element Icon and Description
Add New Interface Shows the Add New Interface page, described elsewhere in this topic.
Archive Selected Moves from the Active table to the Archive table the customization sets that you selected.
Delete Selected Shows the Delete Confirmation page. See the instructions on that page that tell you how to delete the archived customization sets that you selected.
Activate Selected Moves from the Archive table to the Active table the customization sets that you selected.
columns The table contains five columns.
— untitled check box — One of the following:
• Marks a customization set that you will disable, if selected in the Active table.
• Marks a customization set that you disabled and that you will restore or delete, if selected in the Archive table.
— Name — The Properties ( ) button, the Preview ( ) button, and the name of the customization set that the corresponding row describes. Values in the name column are the basis by default for how DMM-VPM sorts the rows, but you can click the heading in any other column to re-sort the rows by the values in that column. If you click the Properties button, DMM-VPM loads a page where you can edit the customization set that the corresponding row describes. If you click the Preview button, your Video Portal shows to you the customization set that the corresponding row describes, so that you can confirm that the customizations work as you expect them to, before you deploy them to your Video Portal.
— Date Added — The date and time when the customization set was created.
— Last Modified — The date and time when the customization set was last edited.
— Deployment Choice — Says whether the customization set that the corresponding row describes is the default Video Portal user interface for deployments.
4-37User Guide for Cisco Digital Media Manager 4.1
OL-13984-01

Chapter 4 Using DMM-VPM for Desktop Video Using Features Under the Video Portal Tab
{Add New | Modify} Interface (Required Items)
Tip This row describes elements that you see in the Required Items area, where you must enter or select values to add or edit a Video Portal user interface. For descriptions of other, optional values, see the next row.
Attributes of the user interface. Enter or select these values after you click Add New Interface or after you view properties of a customized user interface. To save your work, click Save.
— Name — The name for this set of customizations. Enter a maximum of 50 characters.
— Background Image — The nonprogressive JPEG file that serves as the background image. The file that you select should be 720 pixels wide by 540 pixels high, and should not distract or detract from the content that you want to emphasize. To upload a new image, click Upload New Background Image File. Alternatively, to select a factory-default image or a file that you uploaded previously, click Existing Images.
— Video Portal Colors — Hexadecimal color values1 and contrast scale values for the public user interface on your Video Portal. Enter hexadecimal color values and contrast scale values for the background panel, tab text, and listing text, as well as the buttons and sliders. Alternatively, to make selections from palettes and see a preview of them in real time, click Preview Colors.
The color-picker popup window includes a dynamic preview pane that shows the effect of your color and contrast selections in real time, exactly as audience members will see them if you use them on your Video Portal. To select colors and make selections for Video Portal user interface subcomponents, click {Panel Background Color | Tab Text Color | Content Listing Text Color | Button and Slider Color}. The options are as follows:
• To select a hue, drag the handle up and down the color slider, meaning the vertical, rectangular area that shows a gradient and is always red along both its top and its bottom edges. Alternatively, enter a number from 0 to 360 in the H field, where each value within that range signifies one of the hues that is possible, relative to RGB intensities.
• To select a color range, click it in the color space, meaning the square area that shows a gradient and is always black along its bottom edge. The horizontal x-axis here signifies color saturation (corresponding to the S field), while the vertical y-axis signifies the value of color brightness (corresponding to the V field). Alternatively, to adjust the color saturation, enter a number from 0 to 100 in the S field; and, to adjust the value of color brightness, enter a number from 0 to 100 in the V field.
• To select the numeric “intensity multiplier” for contrast, which affects the magnitude of difference between foreground luminance and background luminance, use the Contrast slider. Higher values increase the color saturation, while lower values desaturate colors.
To save your work in the color-picker popup window and automatically populate or repopulate the corresponding fields on the {Add New Interface | Modify Interface} page, click Save. Alternatively, to discard your work in the color-picker popup window, click Cancel.
— Interface Idle Duration — In seconds, the idle time that you allow after any one of your scheduled shows has stopped, before your Video Portal starts to show (and loop) interstitials.
— Make this template default choice for deployments? — Yes or No. To show this user interface customization set by default on your Video Portal, select Yes. Otherwise, select No.
— Status — Active or Inactive. If you select Active, you can select the customization set as one for your audiences to see. If you select Inactive, the customization set is not selectable as one that your audiences might see. The default is Active.
Table 4-17 Elements for Customizing Your Video Portal (continued)
Element Icon and Description
4-38User Guide for Cisco Digital Media Manager 4.1
OL-13984-01
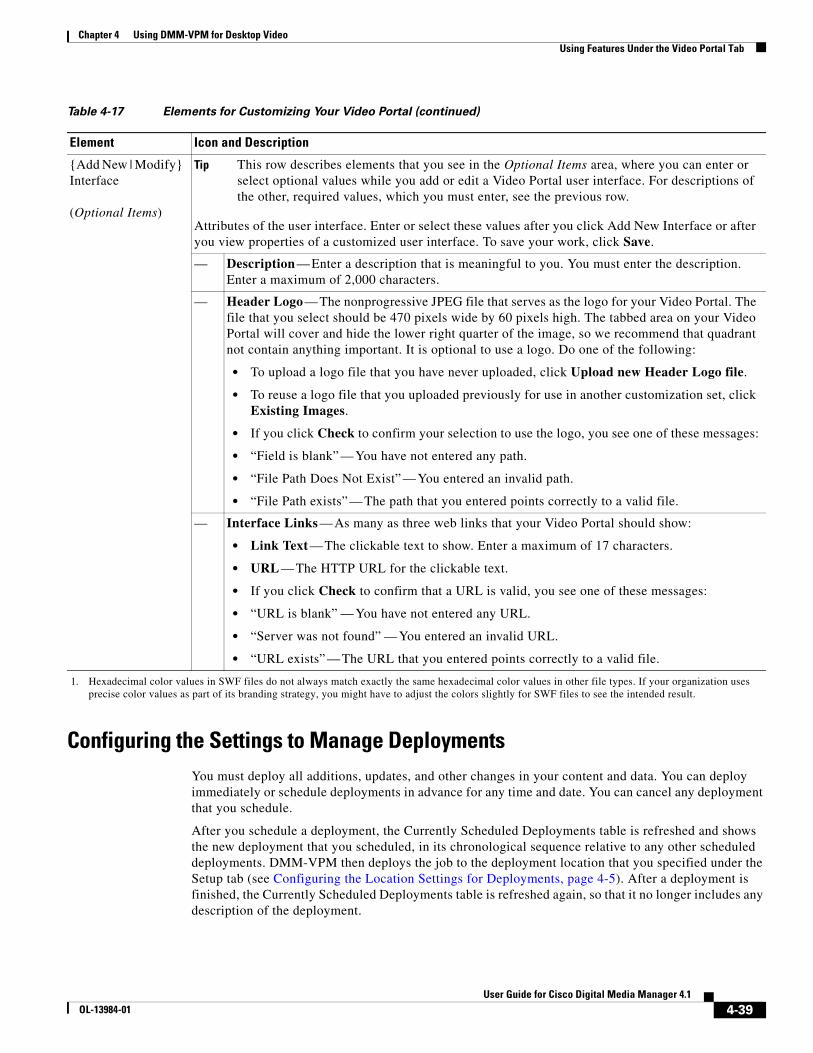
Chapter 4 Using DMM-VPM for Desktop Video Using Features Under the Video Portal Tab
Configuring the Settings to Manage DeploymentsYou must deploy all additions, updates, and other changes in your content and data. You can deploy immediately or schedule deployments in advance for any time and date. You can cancel any deployment that you schedule.
After you schedule a deployment, the Currently Scheduled Deployments table is refreshed and shows the new deployment that you scheduled, in its chronological sequence relative to any other scheduled deployments. DMM-VPM then deploys the job to the deployment location that you specified under the Setup tab (see Configuring the Location Settings for Deployments, page 4-5). After a deployment is finished, the Currently Scheduled Deployments table is refreshed again, so that it no longer includes any description of the deployment.
{Add New | Modify} Interface (Optional Items)
Tip This row describes elements that you see in the Optional Items area, where you can enter or select optional values while you add or edit a Video Portal user interface. For descriptions of the other, required values, which you must enter, see the previous row.
Attributes of the user interface. Enter or select these values after you click Add New Interface or after you view properties of a customized user interface. To save your work, click Save.
— Description — Enter a description that is meaningful to you. You must enter the description. Enter a maximum of 2,000 characters.
— Header Logo — The nonprogressive JPEG file that serves as the logo for your Video Portal. The file that you select should be 470 pixels wide by 60 pixels high. The tabbed area on your Video Portal will cover and hide the lower right quarter of the image, so we recommend that quadrant not contain anything important. It is optional to use a logo. Do one of the following:
• To upload a logo file that you have never uploaded, click Upload new Header Logo file.
• To reuse a logo file that you uploaded previously for use in another customization set, click Existing Images.
• If you click Check to confirm your selection to use the logo, you see one of these messages:
• “Field is blank” — You have not entered any path.
• “File Path Does Not Exist” — You entered an invalid path.
• “File Path exists” — The path that you entered points correctly to a valid file.
— Interface Links — As many as three web links that your Video Portal should show:
• Link Text — The clickable text to show. Enter a maximum of 17 characters.
• URL — The HTTP URL for the clickable text.
• If you click Check to confirm that a URL is valid, you see one of these messages:
• “URL is blank” — You have not entered any URL.
• “Server was not found” — You entered an invalid URL.
• “URL exists” — The URL that you entered points correctly to a valid file.
1. Hexadecimal color values in SWF files do not always match exactly the same hexadecimal color values in other file types. If your organization uses precise color values as part of its branding strategy, you might have to adjust the colors slightly for SWF files to see the intended result.
Table 4-17 Elements for Customizing Your Video Portal (continued)
Element Icon and Description
4-39User Guide for Cisco Digital Media Manager 4.1
OL-13984-01
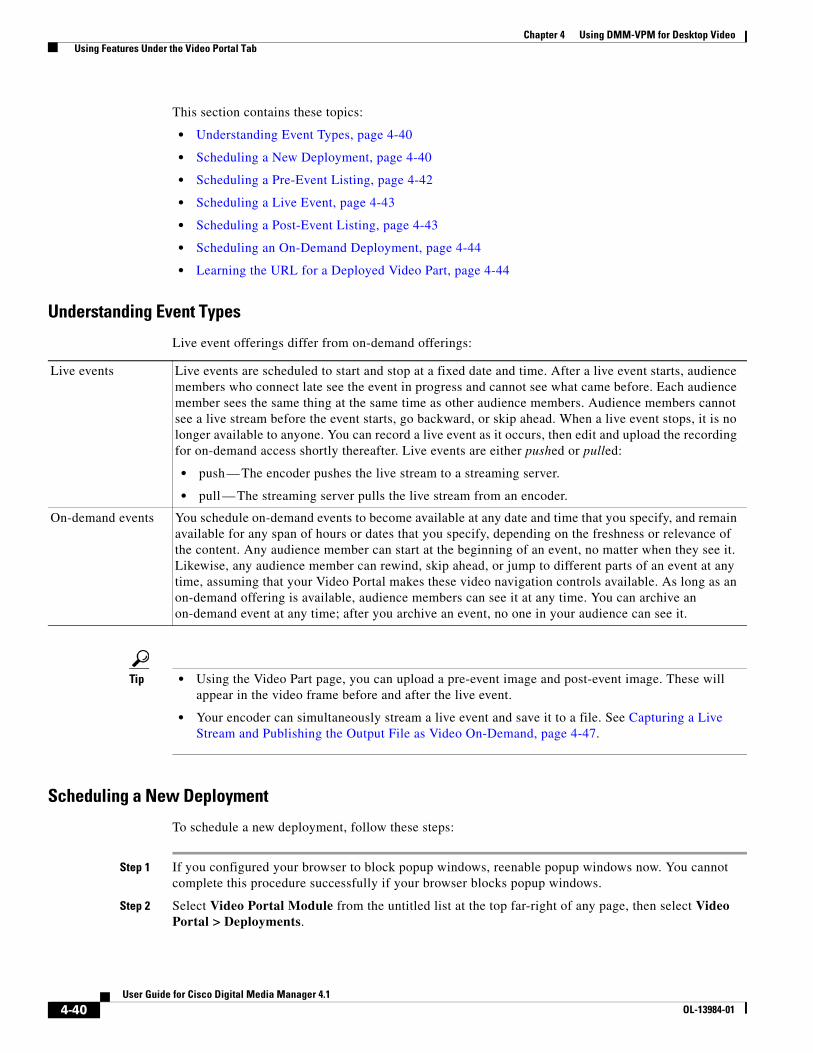
Chapter 4 Using DMM-VPM for Desktop Video Using Features Under the Video Portal Tab
This section contains these topics:
• Understanding Event Types, page 4-40
• Scheduling a New Deployment, page 4-40
• Scheduling a Pre-Event Listing, page 4-42
• Scheduling a Live Event, page 4-43
• Scheduling a Post-Event Listing, page 4-43
• Scheduling an On-Demand Deployment, page 4-44
• Learning the URL for a Deployed Video Part, page 4-44
Understanding Event Types
Live event offerings differ from on-demand offerings:
Tip • Using the Video Part page, you can upload a pre-event image and post-event image. These will appear in the video frame before and after the live event.
• Your encoder can simultaneously stream a live event and save it to a file. See Capturing a Live Stream and Publishing the Output File as Video On-Demand, page 4-47.
Scheduling a New Deployment
To schedule a new deployment, follow these steps:
Step 1 If you configured your browser to block popup windows, reenable popup windows now. You cannot complete this procedure successfully if your browser blocks popup windows.
Step 2 Select Video Portal Module from the untitled list at the top far-right of any page, then select Video Portal > Deployments.
Live events Live events are scheduled to start and stop at a fixed date and time. After a live event starts, audience members who connect late see the event in progress and cannot see what came before. Each audience member sees the same thing at the same time as other audience members. Audience members cannot see a live stream before the event starts, go backward, or skip ahead. When a live event stops, it is no longer available to anyone. You can record a live event as it occurs, then edit and upload the recording for on-demand access shortly thereafter. Live events are either pushed or pulled:
• push — The encoder pushes the live stream to a streaming server.
• pull — The streaming server pulls the live stream from an encoder.
On-demand events You schedule on-demand events to become available at any date and time that you specify, and remain available for any span of hours or dates that you specify, depending on the freshness or relevance of the content. Any audience member can start at the beginning of an event, no matter when they see it. Likewise, any audience member can rewind, skip ahead, or jump to different parts of an event at any time, assuming that your Video Portal makes these video navigation controls available. As long as an on-demand offering is available, audience members can see it at any time. You can archive an on-demand event at any time; after you archive an event, no one in your audience can see it.
4-40User Guide for Cisco Digital Media Manager 4.1
OL-13984-01
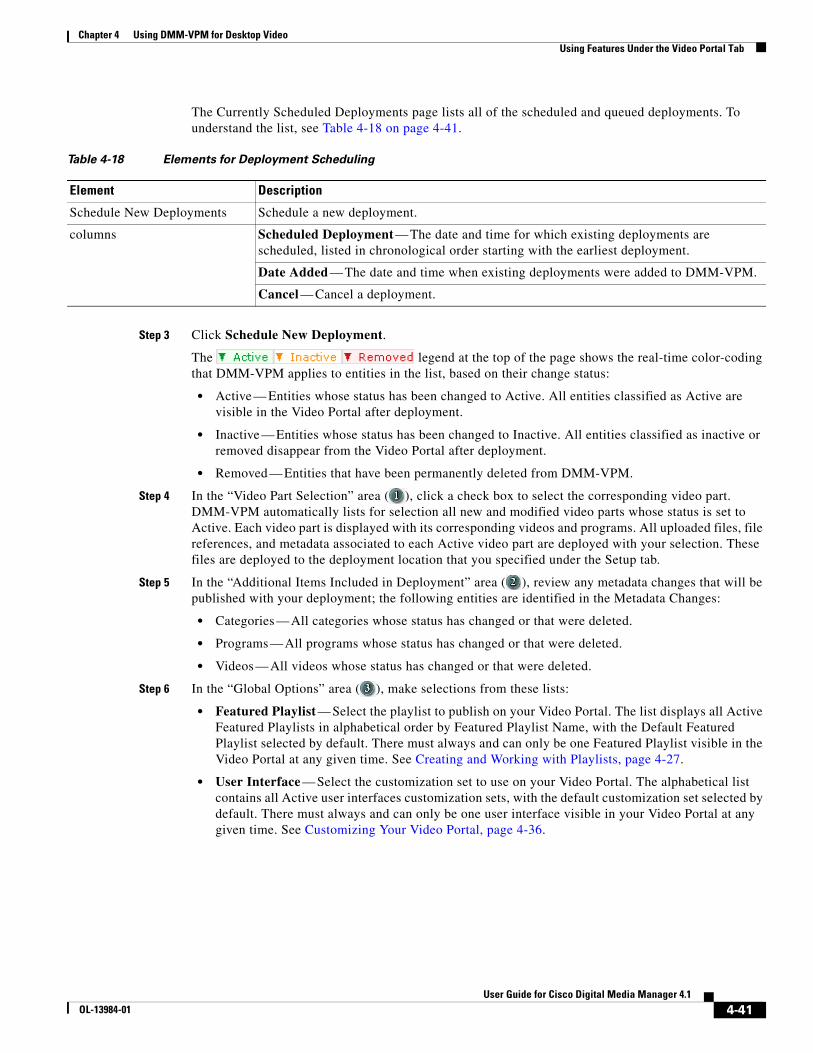
Chapter 4 Using DMM-VPM for Desktop Video Using Features Under the Video Portal Tab
The Currently Scheduled Deployments page lists all of the scheduled and queued deployments. To understand the list, see Table 4-18 on page 4-41.
Step 3 Click Schedule New Deployment.
The legend at the top of the page shows the real-time color-coding that DMM-VPM applies to entities in the list, based on their change status:
• Active — Entities whose status has been changed to Active. All entities classified as Active are visible in the Video Portal after deployment.
• Inactive — Entities whose status has been changed to Inactive. All entities classified as inactive or removed disappear from the Video Portal after deployment.
• Removed — Entities that have been permanently deleted from DMM-VPM.
Step 4 In the “Video Part Selection” area ( ), click a check box to select the corresponding video part. DMM-VPM automatically lists for selection all new and modified video parts whose status is set to Active. Each video part is displayed with its corresponding videos and programs. All uploaded files, file references, and metadata associated to each Active video part are deployed with your selection. These files are deployed to the deployment location that you specified under the Setup tab.
Step 5 In the “Additional Items Included in Deployment” area ( ), review any metadata changes that will be published with your deployment; the following entities are identified in the Metadata Changes:
• Categories — All categories whose status has changed or that were deleted.
• Programs — All programs whose status has changed or that were deleted.
• Videos — All videos whose status has changed or that were deleted.
Step 6 In the “Global Options” area ( ), make selections from these lists:
• Featured Playlist — Select the playlist to publish on your Video Portal. The list displays all Active Featured Playlists in alphabetical order by Featured Playlist Name, with the Default Featured Playlist selected by default. There must always and can only be one Featured Playlist visible in the Video Portal at any given time. See Creating and Working with Playlists, page 4-27.
• User Interface — Select the customization set to use on your Video Portal. The alphabetical list contains all Active user interfaces customization sets, with the default customization set selected by default. There must always and can only be one user interface visible in your Video Portal at any given time. See Customizing Your Video Portal, page 4-36.
Table 4-18 Elements for Deployment Scheduling
Element Description
Schedule New Deployments Schedule a new deployment.
columns Scheduled Deployment — The date and time for which existing deployments are scheduled, listed in chronological order starting with the earliest deployment.
Date Added — The date and time when existing deployments were added to DMM-VPM.
Cancel — Cancel a deployment.
4-41User Guide for Cisco Digital Media Manager 4.1
OL-13984-01
Chapter 4 Using DMM-VPM for Desktop Video Using Features Under the Video Portal Tab
• Ticker — Select the ticker to publish on your Video Portal. The list displays all Active tickers in alphabetical order by name, with the default ticker selected by default. (To hide the ticker, click Don’t Show a Ticker.) You can use no more than one ticker at a time on your Video Portal. See Creating and Working with Tickers, page 4-35.
• Interstitial Sequence — Select the sequence to publish on your Video Portal. The list displays all Active Interstitial Sequences in alphabetical order by Interstitial Sequence Name, with the Default Interstitial Sequence selected by default. There must always and can only be one Interstitial Sequence visible in the Video Portal at any given time. See Creating and Working with Interstitial Sequences, page 4-33.
Step 7 In the “Deployment Time” area ( ), select the deployment date and time or select the Schedule Immediately check box. If you select a scheduled deployment, the default date is 7 days from today.
Note • The relevant time zone is the one that you specified when you set up your DMM appliance. If an administrator set up your DMM appliance and you cannot guess what time zone is in effect at its deployment location, contact its system administrator.
• To conduct a live online event successfully, you must complete either three or four separate deployments in exactly this sequence:
1. Prepare the pre-event listing, which tells Video Portal audience members about the upcoming live event. See Scheduling a Pre-Event Listing, page 4-42.
2. Prepare the actual live event offering. See Scheduling a Live Event, page 4-43
3. Prepare the post-event listing, which tells Video Portal audience members that the live event has concluded and is no longer available. See Scheduling a Post-Event Listing, page 4-43.
4. (Optional) Prepare the on-demand offering, which is a recorded version of the live event. See Scheduling an On-Demand Deployment, page 4-44.
Step 8 To save your work and schedule the deployment, click Create Deployment.
Scheduling a Pre-Event Listing
You can schedule a pre-event listing. We recommend that you use targeted email messages or a web site to preannounce your live events. The notifications that you prepare can describe, for example, the event date and time, its subject matter, the speaker, and the moderator. A notification can also link directly to the pre-event listing on your Video Portal.
Before You Begin
Ensure that your video part metadata is set appropriately for a pre-event listing.
Step 1 If you configured your browser to block popup windows, reenable popup windows now. You cannot complete this procedure successfully if your browser blocks popup windows.
Step 2 Complete Steps 1–6 in the “Scheduling a New Deployment” procedure.
4-42User Guide for Cisco Digital Media Manager 4.1
OL-13984-01
Chapter 4 Using DMM-VPM for Desktop Video Using Features Under the Video Portal Tab
Step 3 In the “Deployment Time” area ( ), select the deployment date and time when your pre-event listing should become available on your Video Portal. The deployment date is by default today.
Note The relevant time zone is the one that you specified when you set up your DMM appliance. If an administrator set up your DMM appliance and you cannot guess what time zone is in effect at its deployment location, contact its system administrator.
Step 4 To schedule the deployment, click Create Deployment.
Scheduling a Live Event
You can schedule a live event.
Before You Begin
Ensure that your video part metadata is set appropriately for a pre-event listing.
Step 1 If you configured your browser to block popup windows, reenable popup windows now. You cannot complete this procedure successfully if your browser blocks popup windows.
Step 2 Complete Steps 1–6 in the “Scheduling a New Deployment” procedure.
Step 3 In the “Deployment Time” area ( ), select the deployment date and time when your live event should become available on your Video Portal. The default date is 7 days from today.
Note The relevant time zone is the one that you specified when you set up your DMM appliance. If an administrator set up your DMM appliance and you cannot guess what time zone is in effect at its deployment location, contact its system administrator.
We recommend that your Video Portal show a countdown to the live event for 10-15 minutes, then replace the countdown with the audio-video stream when the live event actually starts.
Step 4 To schedule the deployment, click Create Deployment.
Scheduling a Post-Event Listing
You can schedule a post-event listing.
Before You Begin
Ensure that your video part metadata is set appropriately for a post-event listing.
Step 1 If you configured your browser to block popup windows, reenable popup windows now. You cannot complete this procedure successfully if your browser blocks popup windows.
Step 2 Complete Steps 1–6 in the “Scheduling a New Deployment” procedure.
Step 3 In the “Deployment Time” area ( ), select the deployment date and time when the post-event listing should become available on your Video Portal. The default date is 7 days from today.
4-43User Guide for Cisco Digital Media Manager 4.1
OL-13984-01
Chapter 4 Using DMM-VPM for Desktop Video Using Features Under the Video Portal Tab
Note The relevant time zone is the one that you specified when you set up your DMM appliance. If an administrator set up your DMM appliance and you cannot guess what time zone is in effect at its deployment location, contact its system administrator.
Step 4 To schedule the deployment, click Create Deployment.
Scheduling an On-Demand Deployment
You can schedule an on-demand deployment.
Before You Begin
Ensure that your video part metadata is set appropriately for an on-demand deployment.
Step 1 If you configured your browser to block popup windows, reenable popup windows now. You cannot complete this procedure successfully if your browser blocks popup windows.
Step 2 Complete Steps 1–6 in Scheduling a New Deployment, page 4-40.
Step 3 In the “Deployment Time” area ( ), select the deployment date and time when the on-demand deployment should become available on your Video Portal. The default date is 7 days from today.
Note The relevant time zone is the one that you specified when you set up your DMM appliance. If an administrator set up your DMM appliance and you cannot guess what time zone is in effect at its deployment location, contact its system administrator.
Step 4 To schedule the deployment, click Create Deployment.
Learning the URL for a Deployed Video Part
There is no need for you to navigate through your Video Portal to find a video part after you deploy it successfully, because DMM-VPM links directly to it as a convenience to you. The link is not specific to any particular media format, because your Video Portal determines automatically which format to deliver to each audience member according to his or her system configuration.
Step 1 Select Video Portal > Programs, find the row that describes the relevant program, then click Active Videos ( ) in that row.
Step 2 Find the row that describes the relevant video, then click Active Video Parts ( ) in that row.
Step 3 Find the row that describes the relevant video part, then do one of the following:
• To play the video part, click Preview ( ) in that row.
• To learn the actual URL for the video part, click Properties ( ) in that row, then click Show Direct Portal Link.
4-44User Guide for Cisco Digital Media Manager 4.1
OL-13984-01
Chapter 4 Using DMM-VPM for Desktop Video Using Features Under the Encoders Tab
Using Features Under the Encoders TabTopics in this section tell you how to add and manage DME 1000 and DME 2000 encoders in DMM-VPM.
• Adding an Encoder to DMM-VPM, page 4-45
• Testing the Ability to Publish Streams, page 4-46
• Capturing a Live Stream and Publishing the Output File as Video On-Demand, page 4-47
• Managing Push Configurations, page 4-48
• Creating and Working with Encoding Formats, page 4-48
• Managing Transcoding Jobs, page 4-49
Adding an Encoder to DMM-VPMYou can add an encoder to DMM-VPM.
Step 1 Set up and connect the encoder according to the procedures in its documentation.
Step 2 Select Video Portal Module from the untitled list at the top far-right of any page.
Step 3 Determine whether the encoder will push streams to the streaming server, or the streaming server will pull streams from the encoder, then complete the steps that apply to you in Table 4-19 on page 4-46.
4-45User Guide for Cisco Digital Media Manager 4.1
OL-13984-01
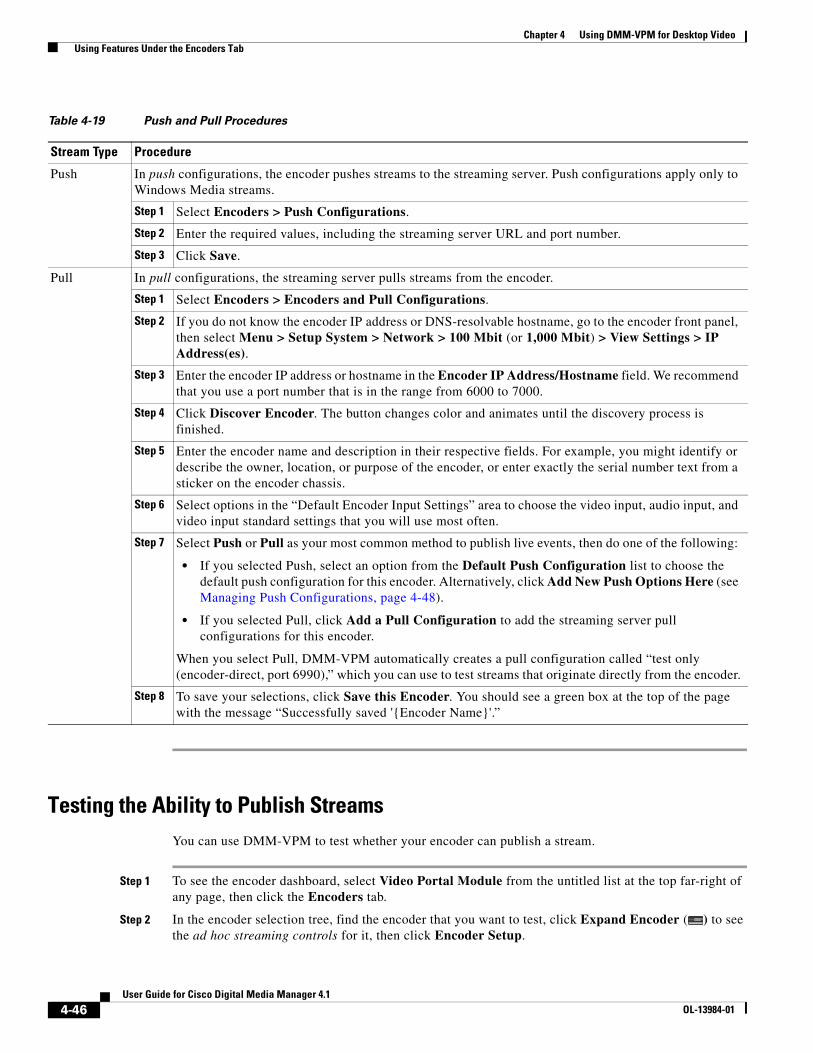
Chapter 4 Using DMM-VPM for Desktop Video Using Features Under the Encoders Tab
Testing the Ability to Publish StreamsYou can use DMM-VPM to test whether your encoder can publish a stream.
Step 1 To see the encoder dashboard, select Video Portal Module from the untitled list at the top far-right of any page, then click the Encoders tab.
Step 2 In the encoder selection tree, find the encoder that you want to test, click Expand Encoder ( ) to see the ad hoc streaming controls for it, then click Encoder Setup.
Table 4-19 Push and Pull Procedures
Stream Type Procedure
Push In push configurations, the encoder pushes streams to the streaming server. Push configurations apply only to Windows Media streams.
Step 1 Select Encoders > Push Configurations.
Step 2 Enter the required values, including the streaming server URL and port number.
Step 3 Click Save.
Pull In pull configurations, the streaming server pulls streams from the encoder.
Step 1 Select Encoders > Encoders and Pull Configurations.
Step 2 If you do not know the encoder IP address or DNS-resolvable hostname, go to the encoder front panel, then select Menu > Setup System > Network > 100 Mbit (or 1,000 Mbit) > View Settings > IP Address(es).
Step 3 Enter the encoder IP address or hostname in the Encoder IP Address/Hostname field. We recommend that you use a port number that is in the range from 6000 to 7000.
Step 4 Click Discover Encoder. The button changes color and animates until the discovery process is finished.
Step 5 Enter the encoder name and description in their respective fields. For example, you might identify or describe the owner, location, or purpose of the encoder, or enter exactly the serial number text from a sticker on the encoder chassis.
Step 6 Select options in the “Default Encoder Input Settings” area to choose the video input, audio input, and video input standard settings that you will use most often.
Step 7 Select Push or Pull as your most common method to publish live events, then do one of the following:
• If you selected Push, select an option from the Default Push Configuration list to choose the default push configuration for this encoder. Alternatively, click Add New Push Options Here (see Managing Push Configurations, page 4-48).
• If you selected Pull, click Add a Pull Configuration to add the streaming server pull configurations for this encoder.
When you select Pull, DMM-VPM automatically creates a pull configuration called “test only (encoder-direct, port 6990),” which you can use to test streams that originate directly from the encoder.
Step 8 To save your selections, click Save this Encoder. You should see a green box at the top of the page with the message “Successfully saved '{Encoder Name}'.”
4-46User Guide for Cisco Digital Media Manager 4.1
OL-13984-01
Chapter 4 Using DMM-VPM for Desktop Video Using Features Under the Encoders Tab
Step 3 From the Video Format list, select the bit rate that you want to test, then select the Publish as a Streaming Video check box.
Step 4 Select a Push publishing configuration or a Pull publishing configuration.
Tip To test a stream directly from the encoder, select the test only (encoder-direct, port 6990) pull configuration.
Step 5 Confirm that a live video source is connected to your encoder, then select the options from these lists that match your video source:
• Video Input
• Audio Input
• Video Input Standard
Step 6 Click Start Encoder.
The button becomes animated and the animation continues until the encoder starts. A delay that ranges from 10 to 25 seconds is normal.
Step 7 After the encoder starts, click Close in the Encoder Setup window.
Step 8 Do either or both of the following to test the video stream:
• Click View Live Video. A popup window plays your current live stream.
• To test the video stream as a static image that is updated periodically, click Click to start preview. Your encoder serves the static image directly, independent of your streaming server.
Step 9 Click Stop Encoder.
Capturing a Live Stream and Publishing the Output File as Video On-DemandYour encoder can capture and save a live stream as a file, which you can publish as video on-demand.
Step 1 Select Video Portal Module from the untitled list at the top far-right of any page, then click the Encoders tab to see the encoder dashboard.
Step 2 In the encoder selection tree, find the encoder that you will use, click Expand Encoder ( ) to see the ad hoc streaming controls for it, then click Encoder Setup.
Step 3 Select the Store as File check box, then enter a filename for the saved file.
Step 4 Confirm that a live video source is connected to your encoder, then select the options from these lists that match your video source:
• Video Input
• Audio Input
• Video Input Standard
Step 5 Click Start Encoder.
The button becomes animated and the animation continues until the encoder starts. A delay that ranges from 10 to 25 seconds is normal.
Step 6 After the encoder starts, click Close in the Encoder Setup window.
4-47User Guide for Cisco Digital Media Manager 4.1
OL-13984-01
Chapter 4 Using DMM-VPM for Desktop Video Using Features Under the Encoders Tab
Step 7 When you are ready to stop adding video from the stream to the output file that you are creating, click Stop Encoder.
Step 8 To retrieve the output file from your encoder, point your web browser to ftp://<encoder_IP_address>/AVFiles/Out, then right-click the filename in the directory listing and select the option to download the file.
Step 9 (Optional) Use third-party software to edit the file.
Step 10 Before you can deliver the downloaded output file to your Video Portal audiences as a video on-demand offering, you must deploy it as a VoD video part. See Working with Programs, Videos and Video Parts, page 4-16, and Scheduling an On-Demand Deployment, page 4-44.
Managing Push ConfigurationsYou can manage push configurations, which apply only to Windows Media streams.
Step 1 Select Video Portal Module from the untitled list at the top far-right of any page, then select Encoders > Push Configurations.
Step 2 Enter the push configuration name and description in their respective fields.
Tip The push configuration name that you enter now will be an option that you can select from a list before you start your encoder.
Step 3 Enter and confirm the other values:
• Format — Windows Media is the only supported option in this release.
• Streaming Server Base URL — Enter the base URL and port number for your streaming server.
• Name of Publishing Point — Enter the name of your Publishing Point.
• Confirm that the URL under the “Full Stream URL” heading is the valid URL for your publishing point.
• User ID and Password — (Optional) Enter the username and password to push a stream to your streaming server, if it requires that you log in.
Step 4 Click Save.
Creating and Working with Encoding FormatsAn encoding format is a collection of settings to specify a particular combination of media type and video dimensions, and to limit video bandwidth consumption and video quality.
DMM-VPM is preconfigured with the recommended encoding formats for your Video Portal. You can recognize these predefined and preferred formats in the Encoding Formats list when you first start to use DMM-VPM, because it appends the word “default” to their names. If you select other encoding formats as your defaults, the “default” label no longer signifies that any encoding format is one that Cisco defined.
4-48User Guide for Cisco Digital Media Manager 4.1
OL-13984-01
Chapter 4 Using DMM-VPM for Desktop Video Using Features Under the Encoders Tab
You can select only one default encoding format apiece for each supported media type. For example, you might select one encoding format as the default for Windows Media and a different encoding format as the default for Flash Video.
You can add or edit an encoding format.
Step 1 Select Video Portal Module from the untitled list at the top far-right of any page.
Step 2 Select Encoders > Encoding Formats, then do one of the following:
• To create and define a new encoding format, click Add a new Encoding Format.
• To edit an encoding format that you saved, click its name in the list.
Step 3 Enter or select the required values to define the encoding format:
• Encoding Format Name — Enter a unique and meaningful name for this encoding format.
• Profile Description — Enter a description.
• Set as a Default Format — Select the check box if DMM-VPM should use this encoding format automatically when you select the Use Default Streaming Settings option on the {Add New | Modify} Video Part page.
• Format — Click a radio button to select its corresponding media format as the one that this encoding format should use.
• Dimensions — Select an option from the list or select Custom to use dimensions that the list does not contain.
• Pixel Proportion — Standard (square pixel) is the correct choice for most applications.
• Audio Capture {On | Off} — Enable or disable audio capture.
• Windows Media Capture Profiles — Select an option to limit bandwidth usage.
Step 4 Click Save.
Managing Transcoding JobsTranscoding is a process of deriving digital media files that use one codec from digital media files that use a different codec; the source file is not changed or destroyed. Because codecs are typically lossy, you might notice that the fidelity of the output file is not as high as the fidelity of the source file.
Your encoders can transcode AVI and MPEG2 files into Windows Media files. You can use DMM-VPM to manage your transcoding jobs. We recommend that you schedule your transcoding jobs so that they do not run at the same time as any other encoder tasks, such as streaming a live event or saving a live stream to a file. A transcoding job might take as long as, or possibly longer than, the duration of the source file, depending on multiple factors that include which codecs you use.
Step 1 Copy the source file to your encoder.
a. Plug a keyboard, mouse, and monitor into your encoder.
b. Add the file to a USB 2.0 hard drive or flash drive.
c. Use Windows Explorer to copy the source file from the USB drive to D:\AVFiles\In.
4-49User Guide for Cisco Digital Media Manager 4.1
OL-13984-01

Chapter 4 Using DMM-VPM for Desktop Video Using Features Under the Encoders Tab
Step 2 Log in to DMM-VPM, then select Video Portal Module from the untitled list at the top far-right of any page.
Step 3 Select Encoders > Transcoding, then click Add a New Transcoding Task.
Step 4 Enter or select the required values to define the transcoding job:
• Transcoding Task Name — Enter a unique and meaningful name.
• Encoder Name — Select the encoder that will transcode the source file.
• Start Date/Time — Select the date and time when the transcoding job should start.
• Input Encoding Format — Select the media format that the source file uses (AVI or MPEG2).
• Input Directory Path — Select Input - Local Encoder Drive.
• Input File Name — Enter the source filename. Do not include a path.
• Output Encoding Format — Select a format that includes the word “transcode” in its title.
• Output Directory Path — Select Output - Local Encoder Drive.
• Output File Name — Enter the output filename, which must use WMV as its extension. Do not include a path.
Step 5 Click Save.
Tip In the list, a color-coded icon next to the name of your transcoding job helps you to track its status. The icon is blue (scheduled or postponed); animated green (in progress); solid green (completed); or red (error). To learn more, mouse over the icon.
Step 6 To copy the output file from your encoder, do one of the following:
• If you plugged a keyboard, mouse, and monitor into your encoder, use Windows Explorer to copy the output file from D:\AVFiles\Out to the USB drive.
• Point your web browser to ftp://<encoder_IP_address>/AVFiles/Out, then right-click the filename in the directory listing and select the option to download the file.
4-50User Guide for Cisco Digital Media Manager 4.1
OL-13984-01
Chapter 4 Using DMM-VPM for Desktop Video Using Features Under the Encoders Tab
Using Your DME 1000 or DME 2000 to Set Up a Live EventYou can use your DME 1000 or 2000 to set up live events. Use the checklist to track your progress while you complete the required tasks.
Task
1. Add a live event to DMM-VPM and enter required values for it. Do the following:
a. Select Video Portal Module from the untitled list at the top far-right of any page, then click the Video Portal tab. The Video Portal Programs page appears.
b. Create or edit the program that should include the live event. See Working with Programs, Videos and Video Parts, page 4-16.
c. In the Add New Video Part page, enter or select these required values:
• Type of Video — Select Live Event; you must use Windows Media as the video format.
• Encoder — From the list, select the encoder to use, then do one of the following: If you previously configured default streaming settings for the relevant encoder and those default settings are appropriate for this event, click Use Default Streaming Settings. If any of the default settings are not appropriate for this event or if you have not configured default settings for the relevant encoder, click Advanced Settings, then make selections and enter values to define the settings for this stream:
– Encoding Format — From the list, select the method to use for encoding or transcoding the live stream.
– DME 2000 Input Channel — Click or .
– Publish via Push — Select whether the encoder should push the live stream to a streaming server.
– Publish via Pull — Select whether the streaming server should pull the live stream from the encoder.
– Video Input — From the list, select either Composite or SVideo.
– Audio Input — Select the option to use balanced or unbalanced audio in the live stream.
– Video Input Standard — From the list, select the standard that is relevant to your country and the equipment that you use.
– Store as a File — Select the check box to enable automatic archiving or deselect the check box to disable automatic archiving.
• Play Order in Video — From the list, select where in the video to show this video part.
• Release Date/Time and End of Life Date/Time — Enter a date in the format shown or click (“Show Calendar”) to select a date from a calendar. Then select the hour, the minute, and AM or PM.
Note You must explicitly enter the End of Life Date/Time value. (DMS does not parse it automatically from the Release Date/Time value.) If you do not enter a End of Life Date/Time value, your live event will not occur.
• Duration — Indicates the duration of the live event, based on the start and stop times that you set.
4-51User Guide for Cisco Digital Media Manager 4.1
OL-13984-01
Chapter 4 Using DMM-VPM for Desktop Video Using Features Under the Encoders Tab
2. (Optional) In the Add New Video Part page, enter or select these additional values:
• Preview Content File URL — The location of a SWF file or nonprogressive JPEG1 file (100 pixels wide and 75 pixels high, or any proportionate multiple of those dimensions) that your Video Portal should show as the preview image for this video part. To select and upload a local file, click Upload new preview video file. If you use a SWF file, we recommended that you program it to pause after 10 seconds and not loop.
• {Pre-Event | Post-Event} JPEG URL — Upload the JPEG image1 to show {before | after} the live event.
• Enable Questions from the Audience — Click {On | Off} to enable or disable support for questions.
• Slide Show — Select and upload the SWF file or ZIP2 archive of slides to show next to the video stream.
• Preview Description — A text description that your Video Portal shows to your audiences but truncates after 160 characters. If you do not enter a preview description, your Video Portal shows the first 160 characters from the video part description instead.
• Keywords — Descriptive words to make this video part searchable on your Video Portal3.
3. Save your configuration entries for the live event and show a program listing for it.
a. Click Save.
b. When you want your Video Portal to show a program listing for this live event, see the deployment instructions in Scheduling a New Deployment, page 4-40.
4. Test the live stream and start the live event. Do the following:
a. Approximately 30 minutes before the live event, click the Encoders tab. The Encoder Dashboard page appears.
b. In the encoder selection tree, find the encoder that you will use for this live event, then click Expand Encoder ( ) to see the ad hoc streaming controls for the encoder.
c. Click Encoder Setup, enter the relevant values, then click Start Encoder and wait 10-to-20 seconds for it to start.
d. After an encoder setup message confirms that the encoder started, click Close.
e. To open a preview window that should show the live stream from your encoder, click View Live Video.
If you see the live stream, your streaming server is successfully streaming output from the encoder.
f. When you are ready for the live event to start, click Start Broadcast.
Approximately 5-to-20 seconds later, the live stream should start for anyone who selected to see it.
g. When you are ready to end the event, click Stop Broadcast, then click Stop Encoder.
Tip If you stop the broadcast accidentally or too soon, but the encoder is still running, click Start Broadcast to start showing the live stream again.
1. Your Video Portal cannot display progressive JPEG images.
2. The ZIP archive that you upload must contain JPEG files that you exported from PowerPoint (or similar software), whose sequence of filenames is numbered correctly to preserve their natural order. See Best Practices for Generating the Slides to Be Synchronized, page 4-23.
3. There is no reason to enter commas, semicolons, or other word separators; your Video Portal ignores them if you do.
Task
4-52User Guide for Cisco Digital Media Manager 4.1
OL-13984-01
Chapter 4 Using DMM-VPM for Desktop Video Using Features Under the Encoders Tab
Setting Up Live Events Using Third-Party Live StreamsYou can use streams from a third party to set up live events. Use the checklist to track your progress while you complete the required tasks.
Task
1. Create a pre-event listing to notify your audience about the upcoming event offering. See Scheduling a Pre-Event Listing, page 4-42.
2. Show the actual live offering. See Scheduling a Live Event, page 4-43. You must deploy this video part at the start at the event. In the “Add New Video Part” page where you configure the metadata attributes for this video part, you must select VoD as the Type of Video. VoD is the correct option for third-party live events, because the Live Event option is reserved for use with the Cisco Digital Media Encoder 1000 and Digital Media Encoder 2000.
The offering should include information for end users to use during the live event, such as an agenda or downloadable materials.
Note We recommend that you schedule the live event to start 10 to 15 minutes before the published start date and time. It is customary to offer live “hold” music for end users who attend the event early, to signal them that the event will start soon.
3. (Optional) Create a post-event listing to notify your audience that they missed the event and it is no longer available. See Scheduling a Post-Event Listing, page 4-43.
4. (Optional) Publish a recorded copy of the event for delivery on demand to audience members who missed the live stream. See Scheduling an On-Demand Deployment, page 4-44.
4-53User Guide for Cisco Digital Media Manager 4.1
OL-13984-01

Chapter 4 Using DMM-VPM for Desktop Video Using Features Under the Encoders Tab
4-54User Guide for Cisco Digital Media Manager 4.1
OL-13984-01
A P P E N D I X AA P P E N D I X
Using Video Portal Reports
Revised October 6, 2007
Tip Features in Video Portal Reports are available to you if you purchased and installed the required license. For information about licensing, see Chapter 2, “Using DMM-Admin to View and Install Licenses.”
Video Portal Reports software is preinstalled on your Video Portal appliance. It maintains a record for the number of page views, the number of video streams, the exact referrers, and the number of unique visitors per day.
• Page view — Any click in the Video Portal that causes the displayed information to change, but does not play a video stream or change a playlist.
• Video stream — Any click of the Play button in your Video Portal.
• Unique visitor — The total number of browser cookies in use on any particular day. Each browser that loads your Video Portal receives a browser cookie for tracking purposes. Any day when a browser connects to your Video Portal, it is a unique visitor on that day. Even if a browser reconnects multiple times in one day, your Video Portal counts it as only one unique visitor on that day.
• Referrer — The HTTP URL for whatever page was active in a browser immediately before the browser loaded your Video Portal.
Before You Begin
Video Portal Reports uses scalable vector graphics in its charting. The minimum browser requirement to support SVG differs for each supported client operating system:
• Windows — Either of these:
– Firefox 1.5 or greater.
– Internet Explorer 5.5 or greater and Adobe SVG plug-in 3.0 or greater.
• Linux or Unix: Firefox 1.5 or greater.
• Mac OS X: Firefox 1.5 or greater.
Step 1 To see a report, point your browser to http://<video_portal_IP_address>:8080/CvpMetrics/.
Step 2 If user authentication is enabledand Video Portal Reports prompts you to log in, enter your login credentials and log in.
A-1Book Title
OL-xxxxx-xx

Appendix A Using Video Portal Reports
Tip If you are confident that you entered your login credentials correctly, but an error message tells you, “You entered an invalid username or password, or your password has expired. Please try again,” we recommend that you contact the administrator for your LDAP server. It is possible that your Video Portal Reports user account is derived from an LDAP user account for which you are required to use a unique and dynamically generated password each time that you log in.
Step 3 Click the link that loads a particular type of report. In many cases, you can use the “Export” feature to export a table to a spreadsheet and save it in a file. In many graphs, you can mouse over a graph point to see an exact count.
Step 4 Enter or select the range of dates that the report should describe.
Step 5 Click Go.
Site-Wide Traffic Any of these:
• Summary — A line graph and table that cross-correlates page views, unique visitors, and video streams.
– Page Views — A line graph and table that correlates dates with traffic levels.
– Unique Visitors — A line graph and table that correlates dates with the number of unique visitors.
– Video Streams — A line graph and table that correlates dates with the number of streams.
• Referrers — A list of all HTTP URLs for the pages that were active in browsers immediately before they loaded your Video Portal, sorted by the number of browsers that each page delivered to you. Click a URL to see the corresponding page in your browser.
• User System Info — A bar graph that shows how many visitors used particular browsers, particular operating systems, and particular plugins when they used your Video Portal.
Per-Video Traffic Any of these:
• Video Streams — A line graph and table that correlates dates with the number of streams.
• Page Views — A line graph and table that correlates dates with traffic levels.
• More Info — Shows how many Video Portal visitors clicked More Info. You can specify a particular video stream to filter the results.
A-2User Guide for Cisco Digital Media Manager 4.1
OL-13984-01