Embed Size (px)
Citation preview
Cloud Container Engine
User Guide
Issue 01
Date 2018-08-13
HUAWEI TECHNOLOGIES CO., LTD.
Copyright © Huawei Technologies Co., Ltd. 2018. All rights reserved.No part of this document may be reproduced or transmitted in any form or by any means without prior writtenconsent of Huawei Technologies Co., Ltd. Trademarks and Permissions
and other Huawei trademarks are trademarks of Huawei Technologies Co., Ltd.All other trademarks and trade names mentioned in this document are the property of their respectiveholders. NoticeThe purchased products, services and features are stipulated by the contract made between Huawei and thecustomer. All or part of the products, services and features described in this document may not be within thepurchase scope or the usage scope. Unless otherwise specified in the contract, all statements, information,and recommendations in this document are provided "AS IS" without warranties, guarantees orrepresentations of any kind, either express or implied.
The information in this document is subject to change without notice. Every effort has been made in thepreparation of this document to ensure accuracy of the contents, but all statements, information, andrecommendations in this document do not constitute a warranty of any kind, express or implied.
Huawei Technologies Co., Ltd.Address: Huawei Industrial Base
Bantian, LonggangShenzhen 518129People's Republic of China
Website: http://www.huawei.com
Email: [email protected]
Issue 01 (2018-08-13) Huawei Proprietary and ConfidentialCopyright © Huawei Technologies Co., Ltd.
i
Contents
1 Cloud Container Engine Documentation................................................................................. 1
2 Operations Causing Unavailable Nodes...................................................................................2
3 Cluster Management.....................................................................................................................33.1 Cluster Overview............................................................................................................................................................33.2 Creating a VM Cluster....................................................................................................................................................53.3 Creating a Windows Cluster......................................................................................................................................... 103.4 Creating a BMS Cluster................................................................................................................................................113.5 Connecting to the Kubernetes Cluster Using kubectl...................................................................................................133.6 Configuring kube-dns HA Using kubectl.....................................................................................................................143.7 Creating a Node in a VM Cluster (Pay-per-use).......................................................................................................... 153.8 Creating a Node in a VM Cluster (Yearly/Monthly).................................................................................................... 183.9 Adding Existing Nodes to a VM Cluster......................................................................................................................213.10 Creating a Linux LVM Partition for Docker.............................................................................................................. 243.11 Cluster Auto Scaling...................................................................................................................................................263.12 Changing Cluster Specifications................................................................................................................................ 283.13 Managing Node Labels...............................................................................................................................................293.14 Upgrading a Cluster....................................................................................................................................................303.15 Deleting a Cluster....................................................................................................................................................... 313.16 Cluster Lifecycle.........................................................................................................................................................323.17 Monitoring a Node......................................................................................................................................................333.18 Managing Namespaces............................................................................................................................................... 34
4 Workload Management..............................................................................................................374.1 Workload Overview......................................................................................................................................................374.2 Creating a Deployment.................................................................................................................................................384.3 Creating a StatefulSet................................................................................................................................................... 454.4 Basic Operations on Workloads....................................................................................................................................514.5 Setting Container Specifications.................................................................................................................................. 554.6 Setting the Lifecycle of a Container............................................................................................................................. 564.7 Setting the Container Startup Command...................................................................................................................... 594.8 Configuring Health Check for a Container...................................................................................................................604.9 Setting Environment Variables..................................................................................................................................... 624.10 Affinity and Anti-Affinity Scheduling....................................................................................................................... 63
Cloud Container EngineUser Guide Contents
Issue 01 (2018-08-13) Huawei Proprietary and ConfidentialCopyright © Huawei Technologies Co., Ltd.
ii

4.11 Workload Scaling........................................................................................................................................................714.12 Interconnection with Prometheus (Monitoring)......................................................................................................... 744.13 Monitoring Java Workloads........................................................................................................................................754.14 Using a Third-Party Image......................................................................................................................................... 75
5 Network Management................................................................................................................785.1 Overview...................................................................................................................................................................... 785.2 Intra-Cluster Access..................................................................................................................................................... 795.3 Intra-VPC Access......................................................................................................................................................... 845.4 External Access - Elastic IP Address........................................................................................................................... 925.5 External Access - Elastic Load Balancer......................................................................................................................965.6 ExternalAccess - NAT Gateway................................................................................................................................. 1005.7 External Access - Layer-7 Load Balancing................................................................................................................ 1055.8 Network Policies.........................................................................................................................................................110
6 Job Management........................................................................................................................1136.1 Creating a One-time Job............................................................................................................................................. 1136.2 Creating a Cron Job.................................................................................................................................................... 117
7 Configuration Center................................................................................................................1227.1 Creating a ConfigMap................................................................................................................................................ 1227.2 Using a ConfigMap.................................................................................................................................................... 1257.3 Creating a Secret.........................................................................................................................................................1277.4 Using a Secret.............................................................................................................................................................130
8 Storage Management................................................................................................................ 1338.1 Overview.................................................................................................................................................................... 1338.2 Using Local Hard Disks for Storage...........................................................................................................................1348.3 Using EVS Disks for Storage..................................................................................................................................... 1388.4 Using SFS File Systems for Storage...........................................................................................................................1438.5 Using OBS Buckets for Storage................................................................................................................................. 148
9 Log Management....................................................................................................................... 1549.1 Collecting Standard Output Logs of Containers.........................................................................................................1549.2 Collecting Logs in a Specified Path of a Container....................................................................................................154
10 Container Orchestration.........................................................................................................15610.1 Container Orchestration - Huawei Official Charts................................................................................................... 15610.2 Customizing a Helm Chart to Simplify Workload Deployment...............................................................................15910.2.1 Preparing a Chart Package.....................................................................................................................................15910.2.2 Uploading a Chart..................................................................................................................................................16110.2.3 Creating a Chart-based Workload..........................................................................................................................16110.2.4 Using an EVS Disk................................................................................................................................................16210.2.5 Using Load Balancers............................................................................................................................................163
11 Image Repository.....................................................................................................................165
Cloud Container EngineUser Guide Contents
Issue 01 (2018-08-13) Huawei Proprietary and ConfidentialCopyright © Huawei Technologies Co., Ltd.
iii
12 Application O&M....................................................................................................................166
13 CTS............................................................................................................................................. 17213.1 List of CCE Operations Supported by CTS..............................................................................................................17213.2 Querying CTS Logs..................................................................................................................................................174
14 kubectl Usage Guide...............................................................................................................177
15 Reference...................................................................................................................................17915.1 NodeResource Reservation Computing Formulas................................................................................................... 17915.2 How Do I Troubleshoot Insufficient EIPs When a Node Is Added?........................................................................180
Cloud Container EngineUser Guide Contents
Issue 01 (2018-08-13) Huawei Proprietary and ConfidentialCopyright © Huawei Technologies Co., Ltd.
iv
1 Cloud Container Engine Documentation
Cloud Container Engine (CCE) is a highly reliable and high-performance service that enablesyou to deploy and manage containerized applications. It supports Kubernetes-nativeapplications and tools, and simplifies the process of establishing an environment for runningcontainers on cloud.
You can use the CCE service through the console, Kubectl and API Reference.
l Junior users: You are advised to create clusters and workloads on the CCE console.l Senior users: You are advised to perform operations by referring to Kubectl and API
Reference. You must have kubectl-related development skills and understand kubectl-related operations. For details, see Kubernetes API and Overview of kubectl.
Cloud Container EngineUser Guide 1 Cloud Container Engine Documentation
Issue 01 (2018-08-13) Huawei Proprietary and ConfidentialCopyright © Huawei Technologies Co., Ltd.
1
2 Operations Causing Unavailable Nodes
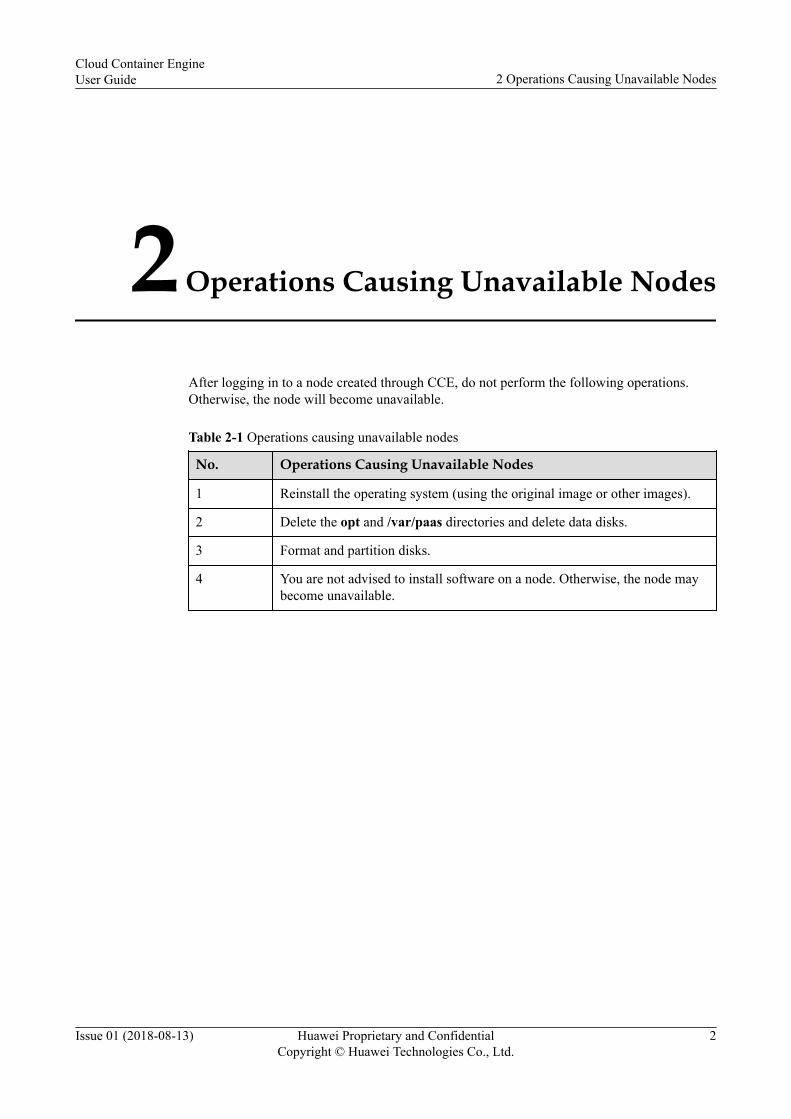
After logging in to a node created through CCE, do not perform the following operations.Otherwise, the node will become unavailable.
Table 2-1 Operations causing unavailable nodes
No. Operations Causing Unavailable Nodes
1 Reinstall the operating system (using the original image or other images).
2 Delete the opt and /var/paas directories and delete data disks.
3 Format and partition disks.
4 You are not advised to install software on a node. Otherwise, the node maybecome unavailable.
Cloud Container EngineUser Guide 2 Operations Causing Unavailable Nodes
Issue 01 (2018-08-13) Huawei Proprietary and ConfidentialCopyright © Huawei Technologies Co., Ltd.
2
3 Cluster Management
3.1 Cluster Overview
3.2 Creating a VM Cluster
3.3 Creating a Windows Cluster
3.4 Creating a BMS Cluster
3.5 Connecting to the Kubernetes Cluster Using kubectl
3.6 Configuring kube-dns HA Using kubectl
3.7 Creating a Node in a VM Cluster (Pay-per-use)
3.8 Creating a Node in a VM Cluster (Yearly/Monthly)
3.9 Adding Existing Nodes to a VM Cluster
3.10 Creating a Linux LVM Partition for Docker
3.11 Cluster Auto Scaling
3.12 Changing Cluster Specifications
3.13 Managing Node Labels
3.14 Upgrading a Cluster
3.15 Deleting a Cluster
3.16 Cluster Lifecycle
3.17 Monitoring a Node
3.18 Managing Namespaces
3.1 Cluster OverviewKubernetes coordinates a highly available cluster of cloud resources, such as nodes and VPCs,required for running containers.
Cloud Container EngineUser Guide 3 Cluster Management
Issue 01 (2018-08-13) Huawei Proprietary and ConfidentialCopyright © Huawei Technologies Co., Ltd.
3
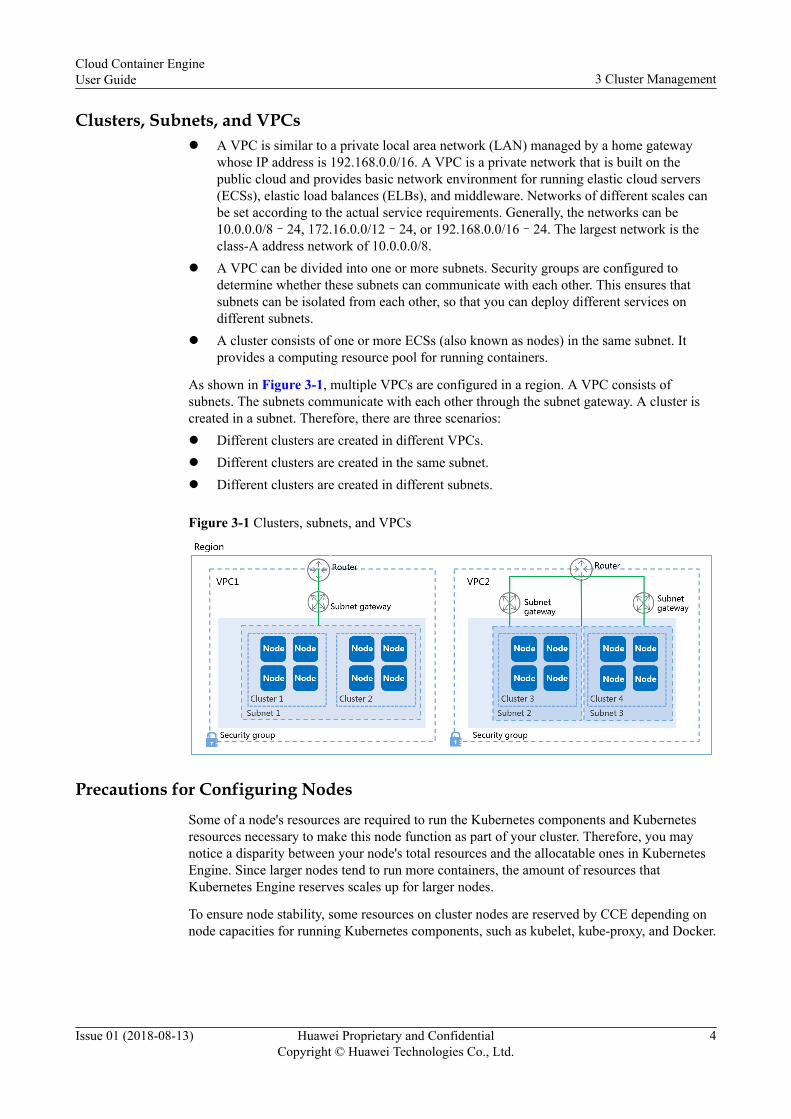
Clusters, Subnets, and VPCsl A VPC is similar to a private local area network (LAN) managed by a home gateway
whose IP address is 192.168.0.0/16. A VPC is a private network that is built on thepublic cloud and provides basic network environment for running elastic cloud servers(ECSs), elastic load balances (ELBs), and middleware. Networks of different scales canbe set according to the actual service requirements. Generally, the networks can be10.0.0.0/8–24, 172.16.0.0/12–24, or 192.168.0.0/16–24. The largest network is theclass-A address network of 10.0.0.0/8.
l A VPC can be divided into one or more subnets. Security groups are configured todetermine whether these subnets can communicate with each other. This ensures thatsubnets can be isolated from each other, so that you can deploy different services ondifferent subnets.
l A cluster consists of one or more ECSs (also known as nodes) in the same subnet. Itprovides a computing resource pool for running containers.
As shown in Figure 3-1, multiple VPCs are configured in a region. A VPC consists ofsubnets. The subnets communicate with each other through the subnet gateway. A cluster iscreated in a subnet. Therefore, there are three scenarios:l Different clusters are created in different VPCs.l Different clusters are created in the same subnet.l Different clusters are created in different subnets.
Figure 3-1 Clusters, subnets, and VPCs
Precautions for Configuring NodesSome of a node's resources are required to run the Kubernetes components and Kubernetesresources necessary to make this node function as part of your cluster. Therefore, you maynotice a disparity between your node's total resources and the allocatable ones in KubernetesEngine. Since larger nodes tend to run more containers, the amount of resources thatKubernetes Engine reserves scales up for larger nodes.
To ensure node stability, some resources on cluster nodes are reserved by CCE depending onnode capacities for running Kubernetes components, such as kubelet, kube-proxy, and Docker.
Cloud Container EngineUser Guide 3 Cluster Management
Issue 01 (2018-08-13) Huawei Proprietary and ConfidentialCopyright © Huawei Technologies Co., Ltd.
4
3.2 Creating a VM ClusterBefore you create a containerized workload, at least one cluster must be available. At present,a maximum of five clusters can be created.
Basic Resources of a Cluster
Table 3-1 lists the basic resources that you need for creating a cluster.
Table 3-1 Basic resources of a cluster
Resource Description
Masters and relatedresources
Associated with CCE resource tenants, and invisible to you.
ECSs (optional) An ECS corresponds to a cluster node that provides computingresources.An ECS is named in the format of Cluster name-Randomnumber. The name format is user-defined. ECSs created inbatches are named in the format of Cluster name-Randomnumber 1-Random number 2.
Security groups Two security groups are created for a cluster: one for managingcluster masters, and the other for managing cluster nodes.NOTICE
To ensure that a cluster runs properly, retain the settings of securitygroups and security group rules configured during cluster creation.
1. Security group for mastersName format: Cluster name-cce-controller-RandomnumberFunctions:l Allows outbound traffic.l Allows other nodes to access Kubernetes services of
masters.2. Security group for nodes
Name format: Cluster name-cce-node-Random numberFunctions:l Allows outbound traffic.l Allows remote login to Linux or Windows operating
systems using ports 22 and 3389.l Allows communication between Kubernetes
components using ports 4789 and 10250.l Allows external nodes to access Kubernetes using ports
30000 to 32676.l Allows communication between nodes in the same
security group.
Cloud Container EngineUser Guide 3 Cluster Management
Issue 01 (2018-08-13) Huawei Proprietary and ConfidentialCopyright © Huawei Technologies Co., Ltd.
5
Resource Description
Disks (optional) Two disks are configured for each node. One is the systemdisk, and the other is the data disk used to run Docker.
Elastic IP address(optional)
An elastic IP address (EIP) must be associated with a node inorder to enable communication with a public network.
PrerequisitesBefore creating your first cluster, ensure that you have an available VPC and key pair.
NOTE
Once you have created a VPC and key pair, you can use them for all clusters you subsequently create.
Table 3-2 Creating a VPC and key pair
No. Task Procedure
1 Creating aVPC
You need to create a VPC to provide an isolated, configurable,and manageable virtual network for CCE clusters.1. Log in to the management console.2. Choose Service List > Network > Virtual Private Cloud
from the main menu.3. On the Dashboard page, click Create VPC.4. Follow the online instructions to create a VPC. Retain the
default settings for the parameters unless otherwise specified.
2 Creating a keypair
You need to create a key pair for identity authentication upon aremote node login.1. Log in to the management console.2. Choose Service List > Computing > Elastic Cloud Server
from the main menu.3. In the navigation pane, choose Key Pair. Click Create Key
Pair.4. Enter a key pair name, and click OK.5. In the dialog box that is displayed, click OK.
View and save the key pair. For security purposes, a key paircan be downloaded only once. Keep it secure to avoid loginproblems.
If the service mesh function is required, ensure that the cluster version is later than 1.9. Inaddition, a load balancer must be available for external access to the workload.
Creating a Cluster
Step 1 Log in to the CCE console. In the navigation pane, choose Resource Management > VMClusters, and click Create Kubernetes Cluster.
Cloud Container EngineUser Guide 3 Cluster Management
Issue 01 (2018-08-13) Huawei Proprietary and ConfidentialCopyright © Huawei Technologies Co., Ltd.
6
Step 2 Set the parameters listed in Table 3-3. The parameters marked with * are mandatory.
Table 3-3 Parameters for creating a cluster
Parameter Description
* Billing Mode l Pay-per-use: Fees are charged by hour based on resource usage.l Yearly/Monthly: Fees are charged by period. The yearly or monthly
clusters cannot be deleted after creation. To stop usage, go to the usercenter and unsubscribe them.
Cluster Setting
* Cluster Name Name of the cluster to be created.
* Version Cluster version, which corresponds to the Kubernetes base version.
* ManagementScale
Size of the cluster to be created.
* HighAvailability
l Yes: The HA cluster contains multiple masters. If a single master isfaulty, the cluster is still available.
l No: A common cluster is a single master. If the management node isfaulty, the cluster becomes unavailable, but running workloads arenot affected.
*Validity Period If you want to create a yearly or monthly cluster, set the requiredduration.
* VPC VPC where the new cluster is located.If no VPC is available, click Create a VPC to create one.
* Subnet Subnet in which the VM on the node runs.
* NetworkModel
l Tunnel network: A virtual network built on top of a VPC network,applicable to common scenarios.
l VPC network: A VPC network that delivers higher performance andapplies to high-performance and intensive interaction scenarios. Onlyone cluster using the VPC network model can be created under asingle VPC.
* ContainerNetworkSegment
Container network segment that contains IP addresses that can beallocated to container instances.
* ServiceForwardingMode
This parameter is displayed only when the cluster version is v1.9.2.ipvs is recommended because it delivers a higher throughput and a fasterforwarding speed.l iptables: Traditional kube-proxy mode.l ipvs: Optimized kube-proxy mode with higher throughput and faster
speed. This mode applies to large-scale scenarios.
Cloud Container EngineUser Guide 3 Cluster Management
Issue 01 (2018-08-13) Huawei Proprietary and ConfidentialCopyright © Huawei Technologies Co., Ltd.
7

Parameter Description
*Service Mesh The service mesh function is in the Open Beta Test. Select Yes to get atrial.Service mesh provides service governance capabilities such as circuitbreaker, fault tolerance, fault injection, and rate limiting in a non-intrusive way.l Yes: To enable the service mesh function and install the istio control
plane application, select an available load balancer.l No: Do not enable the service mesh function. Create a common
cluster.
ClusterDescription
Description of the cluster.
Step 3 After the configuration is complete, click Next.
Step 4 Select whether to create a node in the cluster.
l Yes: Create the first node for the cluster. Go to Step 5.
NOTE
If the service mesh function is required, select Yes to create at least one node to be installed on thecontrol plane.
l No: Create a cluster without adding nodes. Click Create Now.
Step 5 Set the payment type and region.
l Billing Mode: pay-per-use and yearly/monthly.
l Region > Current Region : Physical location of a node instance.
l Region > AZ: Physical region where resources use independent power supplies andnetworks. AZs are physically isolated but interconnected through an internal network. Toimprove workload reliability, you are advised to create ECSs in different AZs. If GPU-accelerated nodes are required, select an AZ with GPU nodes.
Step 6 Configure the node specifications and quantity.
l Node Name: Create a node name.
l Node Specifications: Click to select the required specifications. Set the CPU andmemory quotas of the node to be created based on service requirements.
l Operating System: Select an operating system running on the node.
l Node Quantity > Node Quantity: Node Quantity.
Step 7 Configure the network. An elastic IP address is an independent public IP address.
NOTE
To enable access to a node from a public network, choose Automatically Assign or Use Existing EIPto bind an elastic IP address to the node.
l Do Not Use: An ECS without an EIP is not accessible from a public network. It can beused only as an ECS for deploying services or clusters on a private network.
Cloud Container EngineUser Guide 3 Cluster Management
Issue 01 (2018-08-13) Huawei Proprietary and ConfidentialCopyright © Huawei Technologies Co., Ltd.
8

l Automatically Assign: An EIP with exclusive bandwidth is automatically assigned toeach ECS. When creating an ECS, ensure an ECS that the EIP quota is sufficient. Set thespecifications and bandwidth as required.
l Use Existing EIP: An existing EIP is assigned to the ECS.
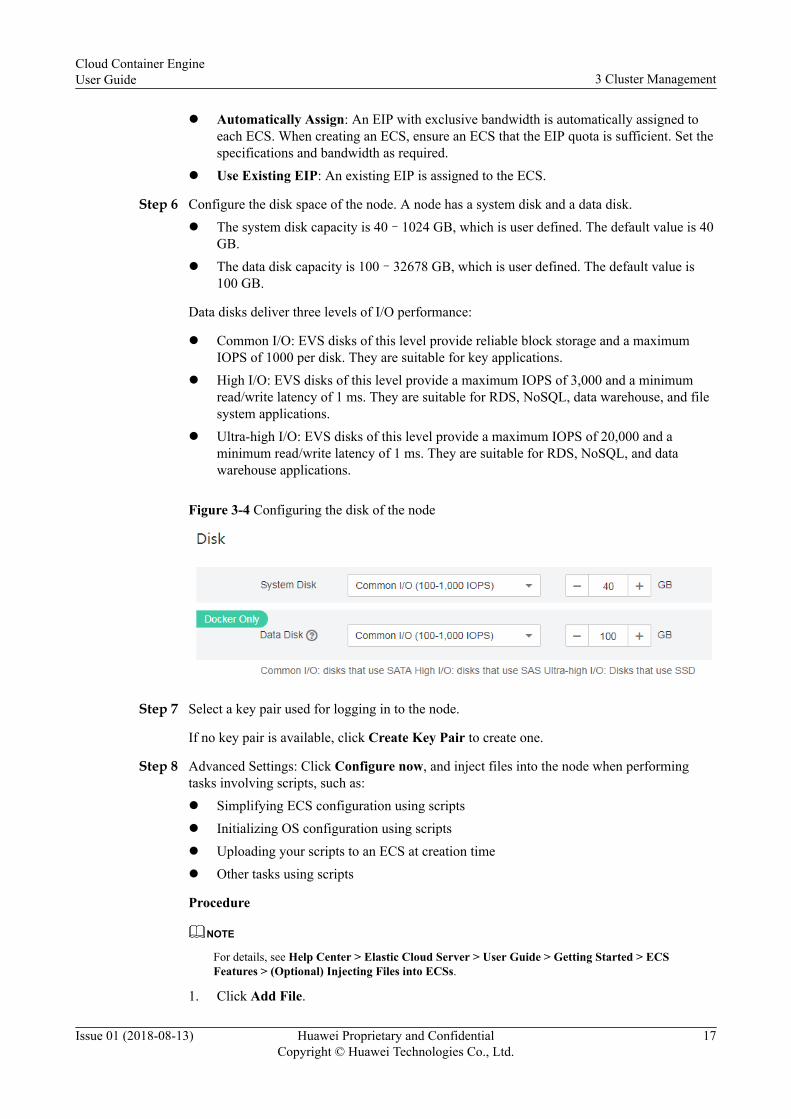
Step 8 Configure the disk space of the node. A node has a system disk and a data disk.l The system disk capacity is 40–1024 GB, which is user defined. The default value is 40
GB.l The data disk capacity is 100–32678 GB, which is user defined. The default value is
100 GB.
Data disks deliver three levels of I/O performance:
l Common I/O: EVS disks of this level provide reliable block storage and a maximumIOPS of 1000 per disk. They are suitable for key applications.
l High I/O: EVS disks of this level provide a maximum IOPS of 3,000 and a minimumread/write latency of 1 ms. They are suitable for RDS, NoSQL, data warehouse, and filesystem applications.
l Ultra-high I/O: EVS disks of this level provide a maximum IOPS of 20,000 and aminimum read/write latency of 1 ms. They are suitable for RDS, NoSQL, and datawarehouse applications.
Figure 3-2 Configuring the disk of the node
Step 9 Select a key pair used for logging in to the node.
If no key pair is available, click Create Key Pair to create one.
Step 10 Advanced Settings: Click Configure now, and inject files into the node when performingtasks involving scripts, such as:l Simplifying ECS configuration using scriptsl Initializing OS configuration using scriptsl Uploading your scripts to an ECS at creation timel Other tasks using scripts
Procedure
NOTE
For details, see Help Center > Elastic Cloud Server > User Guide > Getting Started > ECSFeatures > (Optional) Injecting Files into ECSs.
1. Click Add File.
Cloud Container EngineUser Guide 3 Cluster Management
Issue 01 (2018-08-13) Huawei Proprietary and ConfidentialCopyright © Huawei Technologies Co., Ltd.
9

2. Enter the path of the file or the file name. In Linux, enter the path where the file to beinjected resides (for example, /etc/foo.txt). The file name can contain only letters anddigits.
3. Click Select File, and select a written script that meets the OS requirements.
Step 11 Click Next, review the details, and click Create Now.
It takes 6 to 10 minutes to create a cluster. Information indicating the progress of the creationprocess will be displayed.
If you want to create a yearly or monthly package cluster, perform payment as prompted.
----End
Related OperationsAfter creating a cluster, you can:
l Use the Kubernetes command line (CLI) tool kubectl to connect to the cluster. Fordetails, see 3.5 Connecting to the Kubernetes Cluster Using kubectl.
l Add one or more nodes to the cluster. For details, see 3.7 Creating a Node in a VMCluster (Pay-per-use) and 3.8 Creating a Node in a VM Cluster (Yearly/Monthly).
l Log in to a node. For details, see Logging In to a VM Node.l Change the specifications of a cluster. For details, see 3.12 Changing Cluster
Specifications.l Create a namespace. You can create multiple namespaces in a cluster and classify them
into different logical groups to share cluster resources. The logical groups can bemanaged separately. For more information about how to create a namespace for a cluster,see 3.18 Managing Namespaces.
l Click the cluster name to view cluster details. Table 3-4 describes the cluster details tabs.
Table 3-4 Cluster details
Tab Description
Cluster Details View the details and operating status of the cluster.
Monitoring Check the CPU and memory usage of the cluster over the past 1hour, 3 hours, or 12 hours.
Events l View cluster events on the Events tab page.l Set search criteria. For example, you can set the time segment or
enter an event name to view corresponding events.
3.3 Creating a Windows ClusterThis section describes how to create a Windows cluster. A Windows cluster is a Kubernetescontainer cluster that runs on the Windows operating system and delivers high computing andhigh network performance.
You can use a Windows container on CCE only after you participate in the Open Beta Test(OBT).
Cloud Container EngineUser Guide 3 Cluster Management
Issue 01 (2018-08-13) Huawei Proprietary and ConfidentialCopyright © Huawei Technologies Co., Ltd.
10
Constraints
The Windows container is now in the OBT. Adhere to the following rules when using theWindows container:
l The Windows 1709 is the first release in the new Semi-Annual Channel of Microsoft.Mainstream production support is available for 18 months from the initial release, andwill expire in March, 2019. The version can be upgraded in half a year.The operating system must be restarted during the upgrade in the Semi-Annual Channel.After the Windows operating system is upgraded, the current base container imagescannot be used directly. You must create application images using the base Windowscontainer images of the new version.
l In the current Windows operating system, the size of a base Nano image is 100 MB, andthe .NET version is .NET Core. If you want to use the old .NET version, you need to usethe base Windows Server Core 1709 images whose current size is 3 GB. The images arebeing developed and will be optimized and cropped later.
l Windows container orchestration supports only Windows images.
3.4 Creating a BMS ClusterPrivate bare metal server (BMS) clusters are Kubernetes container clusters with highcomputing and high network performance. To use a BMS cluster, enable the BMS servicefirst.
To provide a high-speed container network, you need to add a high-speed NIC when creatinga BMS.
Prerequisitesl Before creating your first cluster, you must create a VPC.
NOTE
If you already have a VPC available, skip the tasks in this section.
Table 3-5 Creating a VPC
Task Procedure
Creating aVPC
You need to create a VPC to provide an isolated, configurable, andmanageable virtual network for CCE clusters.1. Log in to the management console.2. Choose Service List > Network > Virtual Private Cloud from
the main menu.3. On the Dashboard page, click Create VPC.4. Follow the online instructions to create a VPC. Retain the
default settings for the parameters unless otherwise specified.
l The BMS service has been enabled. For details, see Help Center > Bare Metal Server> User Guide > Getting Started > Purchasing a BMS.
Cloud Container EngineUser Guide 3 Cluster Management
Issue 01 (2018-08-13) Huawei Proprietary and ConfidentialCopyright © Huawei Technologies Co., Ltd.
11

l A high-speed network has been created. For details, visit here. The high-speed networkis the internal network for BMSs on HUAWEI CLOUD. It provides a network withunlimited bandwidth for BMSs in the same AZ.
Creating a Cluster
Step 1 Log in to the CCE console. In the navigation pane, choose Resource Management > BMSClusters, and click Create Kubernetes Cluster.
Step 2 Set the parameters listed in Table 3-6. The parameters marked with * are mandatory.
Table 3-6 Parameters for creating a cluster
Parameter Description
Billing l Pay-per-use: Fees are charged by hour based on resource usage.l Yearly/Monthly: Fees are charged by period. The yearly or monthly
clusters cannot be deleted after creation. To stop usage, go to the usercenter and unsubscribe them.
Specifications
* Name Name of the cluster to be created.
* Version Cluster version, which corresponds to the Kubernetes base version.
* Size Maximum number of nodes that can be managed by the cluster. If youselect 10 nodes, it means that the cluster can manage up to 10 nodes.
* HighAvailability
l Yes: The HA cluster contains multiple management nodes. If a singlemanagement node is faulty, the cluster is still available.
l No: A common cluster is a single management node. If themanagement node is faulty, the cluster becomes unavailable, butrunning workloads are not affected.
* ValidityPeriod
If you want to create a yearly or monthly cluster, set the requiredduration.
* VPC VPC where the new cluster is located.If no VPC is available, click Create a VPC to create one.
*Subnet Subnet environment where the VM on the node runs.
* High-SpeedNetwork
Select a high-speed network.The high-speed network is the internal network for BMSs on HUAWEICLOUD. It provides a network with unlimited bandwidth for BMSs inthe same AZ.For details, see Help Center > Bare Metal Server > User Guide >Configuration and Management > Managing the Network >Creating and Configuring a High-Speed Network.
* ContainerNetworkSegment
Container network segment that contains IP addresses that can beallocated to container instances.
Cloud Container EngineUser Guide 3 Cluster Management
Issue 01 (2018-08-13) Huawei Proprietary and ConfidentialCopyright © Huawei Technologies Co., Ltd.
12
Parameter Description
ClusterDescription
Description of the new container cluster.
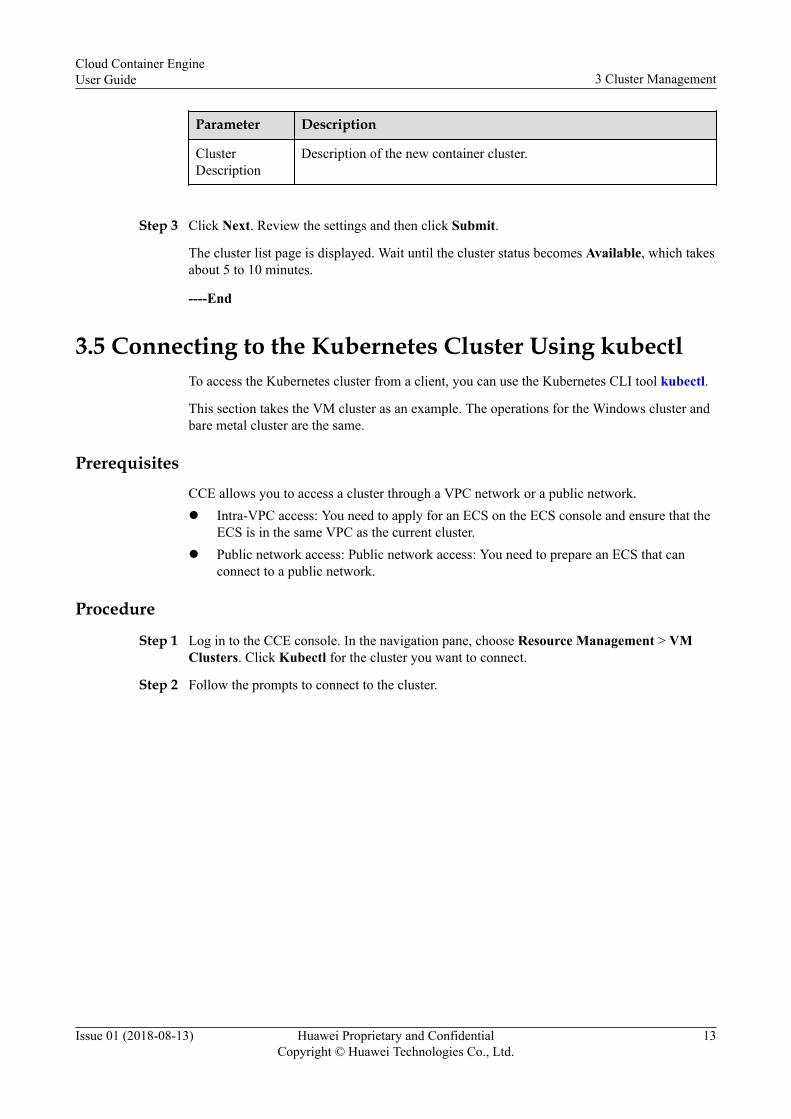
Step 3 Click Next. Review the settings and then click Submit.
The cluster list page is displayed. Wait until the cluster status becomes Available, which takesabout 5 to 10 minutes.
----End
3.5 Connecting to the Kubernetes Cluster Using kubectlTo access the Kubernetes cluster from a client, you can use the Kubernetes CLI tool kubectl.
This section takes the VM cluster as an example. The operations for the Windows cluster andbare metal cluster are the same.
PrerequisitesCCE allows you to access a cluster through a VPC network or a public network.l Intra-VPC access: You need to apply for an ECS on the ECS console and ensure that the
ECS is in the same VPC as the current cluster.l Public network access: Public network access: You need to prepare an ECS that can
connect to a public network.
Procedure
Step 1 Log in to the CCE console. In the navigation pane, choose Resource Management > VMClusters. Click Kubectl for the cluster you want to connect.
Step 2 Follow the prompts to connect to the cluster.
Cloud Container EngineUser Guide 3 Cluster Management
Issue 01 (2018-08-13) Huawei Proprietary and ConfidentialCopyright © Huawei Technologies Co., Ltd.
13
Figure 3-3 Connecting to the Kubernetes cluster using kubectl
----End
Related Operations
After connecting to the cluster, you can use the Kubernetes to manage workloads. For details,see 14 kubectl Usage Guide.
3.6 Configuring kube-dns HA Using kubectlkube-dns provides the domain name service (DNS) for clusters. If only one kube-dns isdeployed in a cluster, the entire cluster will not run properly if the kube-dns fails. Therefore,you are advised to configure kube-dns HA for a cluster.
This section describes how to use kubectl to configure kube-dns HA.
Prerequisites
The cluster is accessible from a public network, or the cluster and the client are in the sameVPC.
Procedure
Step 1 Log in to the CCE console. In the navigation pane, choose Resource Management > VMClusters. Click Kubectl for the cluster you want to connect.
Step 2 Set the API access mode for the cluster.
Step 3 Configure the CLI tool.
After the CLI tool is successfully configured, you can use it to manually configure kube-dnsHA.
Cloud Container EngineUser Guide 3 Cluster Management
Issue 01 (2018-08-13) Huawei Proprietary and ConfidentialCopyright © Huawei Technologies Co., Ltd.
14
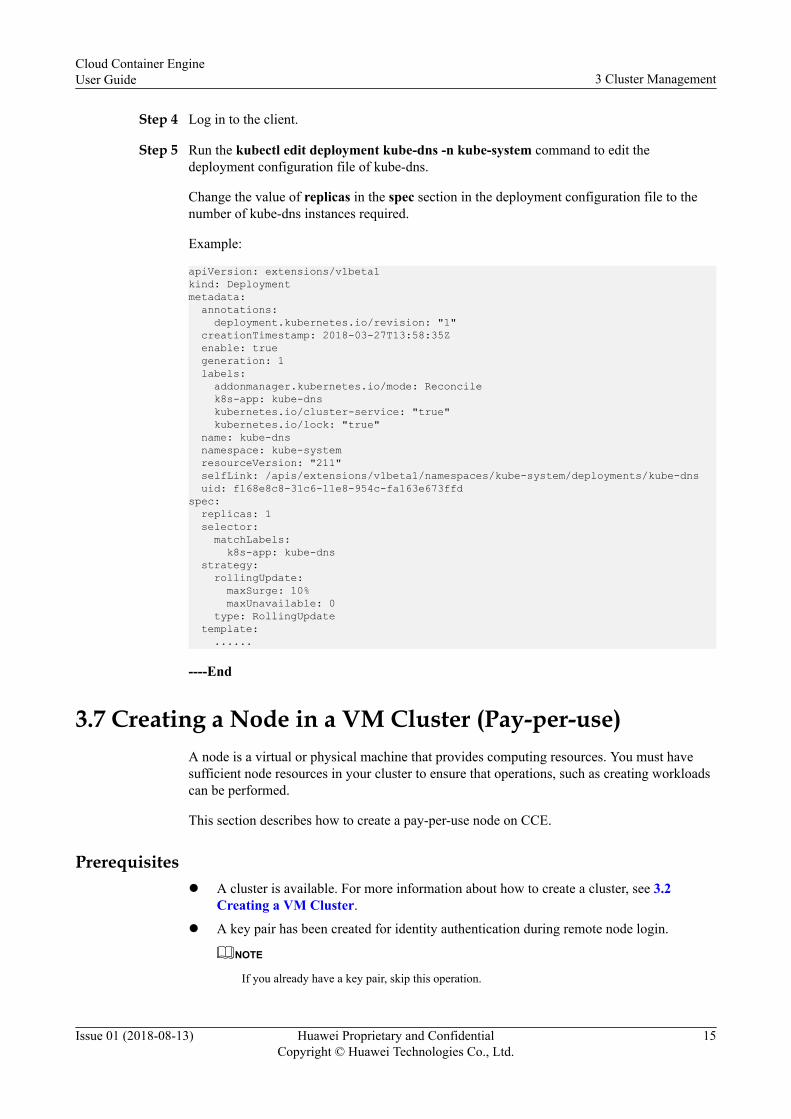
Step 4 Log in to the client.
Step 5 Run the kubectl edit deployment kube-dns -n kube-system command to edit thedeployment configuration file of kube-dns.
Change the value of replicas in the spec section in the deployment configuration file to thenumber of kube-dns instances required.
Example:
apiVersion: extensions/v1beta1kind: Deploymentmetadata: annotations: deployment.kubernetes.io/revision: "1" creationTimestamp: 2018-03-27T13:58:35Z enable: true generation: 1 labels: addonmanager.kubernetes.io/mode: Reconcile k8s-app: kube-dns kubernetes.io/cluster-service: "true" kubernetes.io/lock: "true" name: kube-dns namespace: kube-system resourceVersion: "211" selfLink: /apis/extensions/v1beta1/namespaces/kube-system/deployments/kube-dns uid: f168e8c8-31c6-11e8-954c-fa163e673ffdspec: replicas: 1 selector: matchLabels: k8s-app: kube-dns strategy: rollingUpdate: maxSurge: 10% maxUnavailable: 0 type: RollingUpdate template: ......
----End
3.7 Creating a Node in a VM Cluster (Pay-per-use)A node is a virtual or physical machine that provides computing resources. You must havesufficient node resources in your cluster to ensure that operations, such as creating workloadscan be performed.
This section describes how to create a pay-per-use node on CCE.
Prerequisitesl A cluster is available. For more information about how to create a cluster, see 3.2
Creating a VM Cluster.
l A key pair has been created for identity authentication during remote node login.
NOTE
If you already have a key pair, skip this operation.
Cloud Container EngineUser Guide 3 Cluster Management
Issue 01 (2018-08-13) Huawei Proprietary and ConfidentialCopyright © Huawei Technologies Co., Ltd.
15

Table 3-7 Creating a key pair
Task Procedure
Creating a keypair
Create a key pair before you create a containerized workload. Keypairs are used for identity authentication during remote node login.If you have a key pair already, skip this task.1. Log in to the management console.2. Choose Service List > Computing > Elastic Cloud Server
from the main menu.3. In the navigation pane, choose Key Pair. Click Create Key
Pair.4. Enter a key pair name, and click OK.5. In the dialog box that is displayed, click OK.
You can view and save the key pair. For security purposes, a keypair can be downloaded only once. Keep it secure to ensuresuccessful login.
Creating a Node
Step 1 Log in to the CCE console. In the navigation pane, choose Resource Management > VMClusters. Click Add Node > Create Node for the cluster where you want to create a node.
Step 2 Set Billing mode to Pay-per-use or Yearly/Monthly. A pay-per-use node is used as anexample in this section. For details about how to create a node billed on a yearly/monthlybasis, see 3.8 Creating a Node in a VM Cluster (Yearly/Monthly).
Step 3 Select a region and an AZ.
l Region > Current Region: Physical location of a node instance.
l Region > AZ: Physical region where resources use independent power supplies andnetworks. AZs are physically isolated but interconnected through an internal network. Toimprove workload reliability, you are advised to create ECSs in different AZs.
Step 4 Configure the node specifications and quantity.
l Node Name: Create a node name.
l Node Specifications: Click to select the required specifications. Set the CPU andmemory quotas of the node to be created based on service requirements.
l Operating System: Select an operating system running on the node.
l Node Quantity > Node Quantity: Node Quantity.
Step 5 Configure the network. An elastic IP address is an independent public IP address.
NOTE
To enable access to a node from a public network, choose Automatically Assign or Use Existing EIPto bind an elastic IP address to the node.
l Do Not Use: An ECS without an EIP is not accessible from a public network. It can beused only as an ECS for deploying services or clusters on a private network.
Cloud Container EngineUser Guide 3 Cluster Management
Issue 01 (2018-08-13) Huawei Proprietary and ConfidentialCopyright © Huawei Technologies Co., Ltd.
16
l Automatically Assign: An EIP with exclusive bandwidth is automatically assigned toeach ECS. When creating an ECS, ensure an ECS that the EIP quota is sufficient. Set thespecifications and bandwidth as required.
l Use Existing EIP: An existing EIP is assigned to the ECS.
Step 6 Configure the disk space of the node. A node has a system disk and a data disk.l The system disk capacity is 40–1024 GB, which is user defined. The default value is 40
GB.l The data disk capacity is 100–32678 GB, which is user defined. The default value is
100 GB.
Data disks deliver three levels of I/O performance:
l Common I/O: EVS disks of this level provide reliable block storage and a maximumIOPS of 1000 per disk. They are suitable for key applications.
l High I/O: EVS disks of this level provide a maximum IOPS of 3,000 and a minimumread/write latency of 1 ms. They are suitable for RDS, NoSQL, data warehouse, and filesystem applications.
l Ultra-high I/O: EVS disks of this level provide a maximum IOPS of 20,000 and aminimum read/write latency of 1 ms. They are suitable for RDS, NoSQL, and datawarehouse applications.
Figure 3-4 Configuring the disk of the node
Step 7 Select a key pair used for logging in to the node.
If no key pair is available, click Create Key Pair to create one.
Step 8 Advanced Settings: Click Configure now, and inject files into the node when performingtasks involving scripts, such as:l Simplifying ECS configuration using scriptsl Initializing OS configuration using scriptsl Uploading your scripts to an ECS at creation timel Other tasks using scripts
Procedure
NOTE
For details, see Help Center > Elastic Cloud Server > User Guide > Getting Started > ECSFeatures > (Optional) Injecting Files into ECSs.
1. Click Add File.
Cloud Container EngineUser Guide 3 Cluster Management
Issue 01 (2018-08-13) Huawei Proprietary and ConfidentialCopyright © Huawei Technologies Co., Ltd.
17
2. Enter the path of the file or the file name. In Linux, enter the path where the file to beinjected resides (for example, /etc/foo.txt). The file name can contain only letters anddigits.
3. Click Select File, and select a written script that meets the OS requirements.
Step 9 Click Next, review the details, and click Create Now. Node creation takes 6 to 10 minutes.Please wait.
Step 10 Click Back to Node List. The node has been created successfully if it is in the availablestatus.
----End
Logging In to a VM NodeLog in to a VM node in the key authentication mode. For more information, see Login Usingan SSH Key.
NOTE
When you use the Windows OS to log in to the Linux node, set Auto-login username to root.
Deleting a NodeDeleting a node will also delete workloads and services running on the node. Exercise cautionwhen performing this operation.
Step 1 Click Delete in the same row as the node to be deleted.
Step 2 Follow the prompts to delete the node.
----End
3.8 Creating a Node in a VM Cluster (Yearly/Monthly)A node is a virtual or physical machine that provides computing resources. You must havesufficient node resources in your cluster to ensure that operations, such as creating workloadscan be performed.
This section describes how to create a node billed on a yearly/monthly basis on CCE.
Prerequisitesl A cluster is available. For more information about how to create a cluster, see 3.2
Creating a VM Cluster.l A key pair has been created for identity authentication during remote node login.
NOTE
If you already have a key pair, skip this operation.
Cloud Container EngineUser Guide 3 Cluster Management
Issue 01 (2018-08-13) Huawei Proprietary and ConfidentialCopyright © Huawei Technologies Co., Ltd.
18
Table 3-8 Creating a key pair
Task Procedure
Creating a keypair
Create a key pair before you create a containerized workload. Keypairs are used for identity authentication during remote node login.If you have a key pair already, skip this task.1. Log in to the management console.2. Choose Service List > Computing > Elastic Cloud Server
from the main menu.3. In the navigation pane, choose Key Pair. Click Create Key
Pair.4. Enter a key pair name, and click OK.5. In the dialog box that is displayed, click OK.
You can view and save the key pair. For security purposes, a keypair can be downloaded only once. Keep it secure to ensuresuccessful login.
Creating a Node
Step 1 Log in to the CCE console. In the navigation pane, choose Resource Management > VMClusters. Click Add Node > Create Node for the cluster where you want to create a node.
Step 2 Set Billing mode to Pay-per-use or Yearly/Monthly. A node billed on a yearly/monthlybasis is used as an example in this section. For details about how to create a pay-per-use node,see 3.7 Creating a Node in a VM Cluster (Pay-per-use).
Step 3 Select a region and an AZ.
l Region > Current Region: Physical location of a node instance.
l Region > AZ: Physical region where resources use independent power supplies andnetworks. AZs are physically isolated but interconnected through an internal network. Toimprove workload reliability, you are advised to create ECSs in different AZs.
Step 4 Configure the node specifications and quantity.
l Node Name: Create a node name.
l Node Specifications: Click to select the required specifications. Set the CPU andmemory quotas of the node to be created based on service requirements.
l Operating System: Select an operating system running on the node.
l Node Quantity > Node Quantity: Node Quantity.
Step 5 Configure the network. An elastic IP address is an independent public IP address.
NOTE
To enable access to a node from a public network, choose Automatically Assign or Use Existing EIPto bind an elastic IP address to the node.
l Do Not Use: An ECS without an EIP is not accessible from a public network. It can beused only as an ECS for deploying services or clusters on a private network.
Cloud Container EngineUser Guide 3 Cluster Management
Issue 01 (2018-08-13) Huawei Proprietary and ConfidentialCopyright © Huawei Technologies Co., Ltd.
19

l Automatically Assign: An EIP with exclusive bandwidth is automatically assigned toeach ECS. When creating an ECS, ensure an ECS that the EIP quota is sufficient. Set thespecifications and bandwidth as required.
l Use Existing EIP: An existing EIP is assigned to the ECS.
Step 6 Configure the disk space of the node. A node has a system disk and a data disk.l The system disk capacity is 40–1024 GB, which is user defined. The default value is 40
GB.l The data disk capacity is 100–32678 GB, which is user defined. The default value is
100 GB.
Data disks deliver three levels of I/O performance:
l Common I/O: EVS disks of this level provide reliable block storage and a maximumIOPS of 1000 per disk. They are suitable for key applications.
l High I/O: EVS disks of this level provide a maximum IOPS of 3,000 and a minimumread/write latency of 1 ms. They are suitable for RDS, NoSQL, data warehouse, and filesystem applications.
l Ultra-high I/O: EVS disks of this level provide a maximum IOPS of 20,000 and aminimum read/write latency of 1 ms. They are suitable for RDS, NoSQL, and datawarehouse applications.
Figure 3-5 Configuring the disk of the node
Step 7 Select a key pair used for logging in to the node.
If no key pair is available, click Create Key Pair to create one.
Step 8 Advanced Settings: Click Configure now, and inject files into the node when performingtasks involving scripts, such as:l Simplifying ECS configuration using scriptsl Initializing OS configuration using scriptsl Uploading your scripts to an ECS at creation timel Other tasks using scripts
Procedure
NOTE
For details, see Help Center > Elastic Cloud Server > User Guide > Getting Started > ECSFeatures > (Optional) Injecting Files into ECSs.
1. Click Add File.
Cloud Container EngineUser Guide 3 Cluster Management
Issue 01 (2018-08-13) Huawei Proprietary and ConfidentialCopyright © Huawei Technologies Co., Ltd.
20
2. Enter the path of the file or the file name. In Linux, enter the path where the file to beinjected resides (for example, /etc/foo.txt). The file name can contain only letters anddigits.
3. Click Select File, and select a written script that meets the OS requirements.
Step 9 Click Next, review the details, and click Create Now. Follow the prompts to complete thepayment.
The node list page is displayed. If the node status is Available, the node is added successfully.It takes about 6 to 10 minutes to create a node.
NOTE
l If you are prompted that the elastic IP address quota is insufficient during node creation, increase thequota by following the instructions provided in 15.2 How Do I Troubleshoot Insufficient EIPsWhen a Node Is Added?.
l An ECS is automatically created during node creation. If the node creation fails and a rollbackoccurs, you will be charged for the rollback based on the unified billing rules. In such a case, youcan fill in a work order to apply for refund.
----End
Logging In to a VM Node
Log in to a VM node in the key authentication mode. For more information, see Login Usingan SSH Key.
NOTE
When you use the Windows OS to log in to the Linux node, set Auto-login username to root.
Deleting a Node
Deleting a node will also delete workloads and services running on the node. Exercise cautionwhen performing this operation.
Step 1 Click Delete in the same row as the node to be deleted.
Step 2 Follow the prompts to delete the node.
----End
3.9 Adding Existing Nodes to a VM ClusterIn CCE, there are two methods to add nodes. This section describes how to add existing nodesto a VM cluster. Managing nodes is to add ECSs you have purchased to a VM cluster onCCE.
Prerequisites
An ECS to be added must meet the following conditions:
l The ECS is a Huawei ECS in Running state.l The ECS is in the same subnet as the cluster to which the ECS belongs.l The operating system is EulerOS 2.2 64-bit or CentOS 7.4.
Cloud Container EngineUser Guide 3 Cluster Management
Issue 01 (2018-08-13) Huawei Proprietary and ConfidentialCopyright © Huawei Technologies Co., Ltd.
21
l The ECS uses the CPU with two cores or more, and the memory of 2 GB or above.
NOTICEl You are advised to add newly purchased ECSss to the cluster. Adding legacy ECSs to the
cluster may fail because the configurations of the legacy ECSs may be modified.l If Docker has been installed on the ECS to be added, a highly reliable Docker version will
be installed to replace the original version to ensure container service reliability.l When a node is managed for the first time, an organization is created in the Software
Repository for Container (SWR) to store user-related configuration files. The size of thefiles is about tens of KB. Ensure that the organization has sufficient quota.
Procedure
Step 1 Log in to the CCE console. In the navigation pane, choose Resource Management > VMClusters. Click Add Node for the target cluster, and choose Add to Cluster. The ECSs thatcan be added to the cluster are displayed.
Step 2 Select the ECS to be added to the cluster, and click Next.
Step 3 Follow the instructions to add the ECS to the cluster.
1. Mount a data disk to Docker separately, or create a Linux LVM disk partition for Docker.
NOTE
You can use a specified block device as a Docker data disk. If no block device is specified, the firstavailable raw disk is used as the Docker data disk.
– Mount a data disk to Docker separately. A data disk of 80 GB or larger isrecommended. For details, see Help Center > Elastic Volume Service > UserGuide > Getting Started > Attaching an EVS Disk > Attaching a Shared EVSDisk.
– Create a Linux LVM disk partition for Docker. For details, see 3.10 Creating aLinux LVM Partition for Docker.
2. (Optional) Bind an elastic IP address to the ECS. This operation is performed only whenno elastic IP address is bound to the selected ECS.
a. Log in to the management console.b. On the homepage, choose Network > Virtual Private Cloud.c. In the navigation pane, choose Elastic IP. Click Buy EIP.d. Retain the default specifications for the elastic IP address. Set the number of elastic
IP addresses based on the service requirements. Each ECS can be bound with oneelastic IP address. Click Next and then Pay Now.
e. In the elastic IP address list, click Bind in the Operation column for the elastic IPaddress to be bound. Select the ECS to be bound with the elastic IP address andclick OK.
3. Log in to the ECS to be added to the cluster as the root user. For details, see HelpCenter > Elastic Cloud Server > User Guide > Getting Started > Logging In to anECS.
4. Follow the prompts to complete steps 4 to 6.
Cloud Container EngineUser Guide 3 Cluster Management
Issue 01 (2018-08-13) Huawei Proprietary and ConfidentialCopyright © Huawei Technologies Co., Ltd.
22
NOTE
When compiling the install.yaml file in step 5, you can also specify the volume group and usagefor Docker. For details, see Advanced Settings for Mounting a Disk to a Docker.
Step 4 Click Next, and then click Finish.
The node management page is automatically displayed. Wait until the ECS is added.
----End
Advanced Settings for Mounting a Disk to a Docker
When a docker is mounted to a disk, the following advanced options are supported:
l dockerBlockDevices: indicates the block storage devices of dockers that use storagedrivers in direct-lvm mode, and supports raw disks and Linux LVM partitions.Example:user: domainName: test username: test password: "" projectName: southchinaapiGatewayIp: 100.125.*.*iamHostname: iam.cn-north-1.myhuaweicloud.comserverEndpoint: 100.125.*.*:*clusterID: 87b87621-2c4a-11e8-9c6f-0255ac180ce6hosts: - host: 10.0.*.* user: root password: "password" nodeConfig: dockerBlockDevices: "/dev/xvdb1,/dev/xvdb2" # Specifies the block storage devices used by the docker and separated by commas (,). If this parameter is left blank, the first available raw disk is used by default.The parameters are described as follows:– dockerBlockDevices: Path of a block storage device. If there are multiple block
storage devices, separate them with commas (,). If this parameter is not set, thesystem uses the first block storage device on the node to be managed by default.
– The values of other parameters must be the same as those in the install.yaml file instep 5.
l dockerThinpool and kubernetesLV:dockerThinpool specifies the volume group and usage for dockers that use storagedrivers in direct-lvm mode. kubernetesLV specifies the volume group and usage for thekubelet component of Kubernetes on the managed node.
NOTICEdockerThinpool and kubernetesLV must be configured at the same time and cannot beused together with dockerBlockDevices.
Example:user: domainName: test username: test
Cloud Container EngineUser Guide 3 Cluster Management
Issue 01 (2018-08-13) Huawei Proprietary and ConfidentialCopyright © Huawei Technologies Co., Ltd.
23

password: "" projectName: southchinaapiGatewayIp: 100.125.*.*iamHostname: iam.cn-north-1.myhuaweicloud.comserverEndpoint: 100.125.*.*:*clusterID: 87b87621-2c4a-11e8-9c6f-0255ac180ce6hosts: - host: 10.0.*.* user: root password: "password" nodeConfig: dockerThinpool: "vgdocker/100G" kubernetesLV: "vgdocker/100%FREE"
The parameters are described as follows:– dockerThinpool: It is used to create thinpool for dockers for data storage during
node management. The value format is volume group name/usage. The usage unitcan be M, G, T, %VG (percentage of the total volume in the volume group), or%FREE (percentage of the remaining volume in the volume group).
– kubernetesLV: It is used for data storage for workloads during node management.The value format is volume group name/usage. The usage unit can be M, G, T,%VG (percentage of the total volume in the volume group), or %FREE (percentageof the remaining volume in the volume group).
– The values of other parameters must be the same as those in the install.yaml file instep 5.
Removing a Node
Removing a node indicates removing an ECS from a cluster. This operation will not delete theECS or uninstall the CCE components that have been installed. Only managed nodes can beremoved.
NOTE
Only managed nodes can be removed. Newly added nodes can only be deleted.
Step 1 Log in to the CCE console. In the navigation pane, choose Resource Management > NodeManagement. Select the node you want to remove, and click Remove from Cluster.
Step 2 On the page that is displayed, enter the managed node that needs to be removed, and clickOK.
Step 3 In the preceding steps, a node (namely, the ECS) is removed from the cluster. However,removing a node from the cluster does not delete the node or uninstall the CCE componentsthat have been installed. Therefore, in this step, delete CCE resources as prompted.
----End
3.10 Creating a Linux LVM Partition for DockerThis section describes how to check whether raw disks and Linux LVM partitions areavailable and how to create a Linux LVM disk partition.
Prerequisites
An exclusive data disk has been mounted to Docker in direct-lvm mode.
Cloud Container EngineUser Guide 3 Cluster Management
Issue 01 (2018-08-13) Huawei Proprietary and ConfidentialCopyright © Huawei Technologies Co., Ltd.
24

Procedure
Step 1 Check whether the current node has raw disks available.
1. Log in to the node as the root user.2. View the raw disks.
lsblk -l | grep diskThe following output indicates that the raw disks, xvda and xvdb, exist on the node.xvda 202:0 0 40G 0 diskxvdb 202:16 0 100G 0 disk
3. Check whether the raw disks are in use.lsblk /dev/<devicename>Devicename indicates the raw disk name. In the preceding step, xvda and xvdb are theraw disk names.Run the lsblk /dev/xvda and lsblk /dev/xvdb commands. The following output indicatesthat raw disk xvda has been partitioned and is in use, and raw disk xvdb is available. Ifno raw disk is available, bind an EVS disk to the node. For more information, see HelpCenter > Elastic Volume Service > User Guide > Getting Started > Attaching anEVS Disk > Attaching a Shared EVS Disk. An EVS disk of 80 GB or larger isrecommended.NAME MAJ:MIN RM SIZE RO TYPE MOUNTPOINTxvda 202:0 0 40G 0 disk├─xvda1 202:1 0 100M 0 part /boot└─xvda2 202:2 0 39.9G 0 part /NAME MAJ:MIN RM SIZE RO TYPE MOUNTPOINTxvdb 202:16 0 100G 0 disk
Step 2 Check whether available partitions exist on the node. Currently, only Linux LVM partitionsare supported.
1. Log in to the node as the root user.2. View the Linux LVM partitions.
sfdisk -l 2>>/dev/null| grep "Linux LVM"The following output indicates that two Linux LVM partitions, /dev/nvme0n1p1and /dev/nvme0n1p2, exist on the node./dev/nvme0n1p1 1 204800 204800 209715200 8e Linux LVM/dev/nvme0n1p2 204801 409600 204800 209715200 8e Linux LVM
3. Check whether the partitions are in use.lsblk <partdevice>partdevice indicates the Linux LVM partition name obtained in the preceding step.In this example, run the lsblk /dev/nvme0n1p1 and lsblk /dev/nvme0n1p2 commands.The following output indicates that partition nvme0n1p is in use and nvme0n1p2 isavailable.NAME MAJ:MIN RM SIZE RO TYPE MOUNTPOINTnvme0n1p1 259:3 0 200G 0 part└─vgpaas-thinpool_tdata 251:8 0 360G 0 lvm └─vgpaas-thinpool 251:10 0 360G 0 lvmNAME MAJ:MIN RM SIZE RO TYPE MOUNTPOINTnvme0n1p2 259:1 0 100G 0 part
If no partition is available, go to step Step 3 to create one.
Step 3 Create a Linux LVM partition for Docker.
Cloud Container EngineUser Guide 3 Cluster Management
Issue 01 (2018-08-13) Huawei Proprietary and ConfidentialCopyright © Huawei Technologies Co., Ltd.
25
1. Run the following command to create a partition, where devicename indicates the nameof an available raw disk, such as xvdb obtained in step Step 1.fdisk /dev/devicename
2. Enter n to create a new partition. Enter p to display the primary partition numbers. Enter1 to select the fourth primary partition.Command (m for help): nPartition type: p primary (0 primary, 0 extended, 4 free) e extended Select (default p): pPartition number (1-4, default 1): 1
3. Configure the start sector and the last sector. In this example, the sectors are configuredas follows:First sector (2048-4294967295, default 2048): Using default value 2048 Last sector, +sectors or +size{K,M,G} (2048-4294967294, default 4294967294): +100G Partition 1 of type Linux and of size 100 GiB is setThe preceding command sets partition 4 as a 100-GB Linux partition.
4. Enter t to change the partition type. Enter 8e at the Hex code prompt to change thepartition type to Linux LVM.Command (m for help): t Selected partition 1 Hex code (type L to list all codes): 8e Changed type of partition 'Linux' to 'Linux LVM'
5. Enter w to save the partition settings.Command (m for help): wThe partition table has been altered!
6. Run the partprobe command to refresh the disk partitions.
----End
3.11 Cluster Auto ScalingCluster auto scaling dynamically changes the number of nodes in a cluster based on serviceloads. Auto scaling is triggered to reduce labor costs when workloads cannot be scheduleddue to insufficient resources in a cluster.
NOTE
CCE supports auto scaling out, but scaling in must be performed manually.
Procedure
Step 1 Log in to the CCE console. In the navigation pane, choose Resource Management > VMClusters. Click the desired cluster. On the Cluster Details page, click the Auto Scaling tab.
Step 2 Click Edit, and set the parameters for configuring AS policies in Table 3-9 as specified.
Cloud Container EngineUser Guide 3 Cluster Management
Issue 01 (2018-08-13) Huawei Proprietary and ConfidentialCopyright © Huawei Technologies Co., Ltd.
26
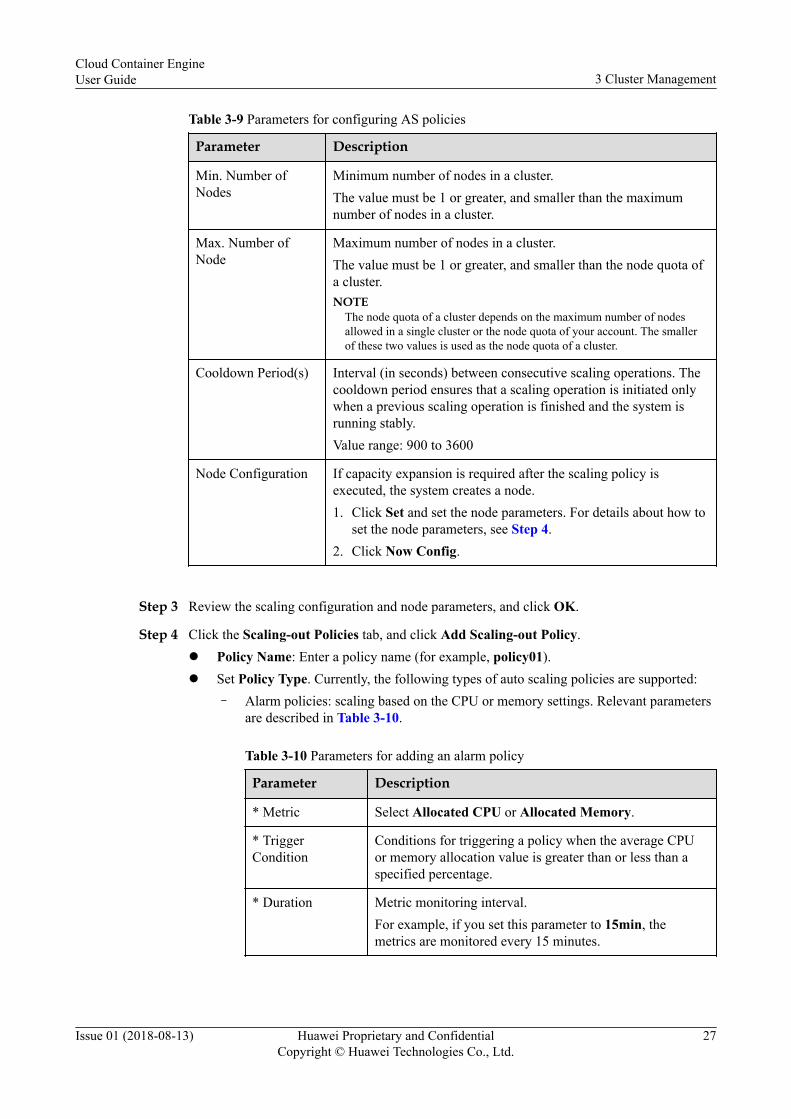
Table 3-9 Parameters for configuring AS policies
Parameter Description
Min. Number ofNodes
Minimum number of nodes in a cluster.The value must be 1 or greater, and smaller than the maximumnumber of nodes in a cluster.
Max. Number ofNode
Maximum number of nodes in a cluster.The value must be 1 or greater, and smaller than the node quota ofa cluster.NOTE
The node quota of a cluster depends on the maximum number of nodesallowed in a single cluster or the node quota of your account. The smallerof these two values is used as the node quota of a cluster.
Cooldown Period(s) Interval (in seconds) between consecutive scaling operations. Thecooldown period ensures that a scaling operation is initiated onlywhen a previous scaling operation is finished and the system isrunning stably.Value range: 900 to 3600
Node Configuration If capacity expansion is required after the scaling policy isexecuted, the system creates a node.1. Click Set and set the node parameters. For details about how to
set the node parameters, see Step 4.2. Click Now Config.
Step 3 Review the scaling configuration and node parameters, and click OK.
Step 4 Click the Scaling-out Policies tab, and click Add Scaling-out Policy.l Policy Name: Enter a policy name (for example, policy01).l Set Policy Type. Currently, the following types of auto scaling policies are supported:
– Alarm policies: scaling based on the CPU or memory settings. Relevant parametersare described in Table 3-10.
Table 3-10 Parameters for adding an alarm policy
Parameter Description
* Metric Select Allocated CPU or Allocated Memory.
* TriggerCondition
Conditions for triggering a policy when the average CPUor memory allocation value is greater than or less than aspecified percentage.
* Duration Metric monitoring interval.For example, if you set this parameter to 15min, themetrics are monitored every 15 minutes.
Cloud Container EngineUser Guide 3 Cluster Management
Issue 01 (2018-08-13) Huawei Proprietary and ConfidentialCopyright © Huawei Technologies Co., Ltd.
27
Parameter Description
* ConsecutiveTimes
If you set this parameter to 3, the action is triggered if themetrics meet the specified threshold three consecutivetimes.
* Action Action executed after all the conditions for a specifiedpolicy are met.
– Scheduled policies: Scaling at a specified time. Relevant parameters are described
in Table 3-11.
Table 3-11 Parameters for adding a scheduled policy
Parameter Description
* Policy Type Set this parameter to Scheduled Policy.
* Trigger Time Time at which a policy is triggered.
* Action Action executed after all the conditions for a specifiedpolicy are met.
– Periodic Policy: Scaling at a specified time on a daily, weekly, or monthly basis.
Relevant parameters are described in Table 3-12.
Table 3-12 Parameters for adding a periodic policy
Parameter Description
* Policy Type Set this parameter to Periodic Policy.
* Select Time Time at which a policy is triggered.
* Action Action executed after all the conditions for a specifiedpolicy are met.
Step 5 Click OK.
----End
3.12 Changing Cluster SpecificationsThis section describes how to change cluster specifications.
The procedures for changing specifications of other types of clusters are similar.
Procedure
Step 1 Log in to the CCE console. In the navigation pane, choose Resource Management > VMClusters.
Cloud Container EngineUser Guide 3 Cluster Management
Issue 01 (2018-08-13) Huawei Proprietary and ConfidentialCopyright © Huawei Technologies Co., Ltd.
28
Step 2 Choose More > Change Specifications.
Step 3 Change the cluster management scale as required and click Next. Review the details and clickSubmit.
----End
3.13 Managing Node LabelsNode labels are attached to nodes to define different attributes for the nodes, facilitating nodemanagement and affinity or anti-affinity configuration.
Application Scenarios
Node labels are mainly used in the following scenarios:
l Node management: Labels are used to classify and manage nodes.
l Affinity or anti-affinity between workloads and nodes:– Memory size, I/O performance, and the number of CPU cores required for
workloads vary depending on service demands. You can attach labels to definethese attributes for nodes, so that workloads can be deployed on appropriate nodesbased on affinity or anti-affinity policies.
– A system can be divided into modules, where each module consists of multiplemicroservices. To ensure efficient O&M, you can attach module labels to nodes, sothat the modules can be deployed on their corresponding nodes. These moduleswork independently without affecting each other and can be easily maintained.
Fixed Labels
Table 3-13 lists the fixed labels attached to a node when it is created.
Table 3-13 Fixed labels
Key Value
failure-domain.beta.kubernetes.io/region
Region where a node is located.For example, cn-south-1 indicates Region 1 in SouthChina.
failure-domain.beta.kubernetes.io/zone
AZ where a node is located.For example, cn-south-1a indicates AZ 1 of Region 1 inSouth China.
kubernetes.io/availablezone AZ where a node is located.
os.architecture Node processor architecture.For example, amd64 indicates a 64-bit AMD processor.
os.name Operating system name of a node.For example, EulerOS_2.0_SP2 indicates that the EulerOS2.2 is used.
Cloud Container EngineUser Guide 3 Cluster Management
Issue 01 (2018-08-13) Huawei Proprietary and ConfidentialCopyright © Huawei Technologies Co., Ltd.
29
Key Value
os.version Kernel version of a node.For example, 3.10.0-327.59.59.46.h38.x86_64
supportContainer Whether a node can run containerized workloads.For example, true indicates that the node can runcontainerized workloads.
Creating a Node Label
Step 1 Log in to the CCE console. In the navigation pane, choose Resource Management > NodeManagement. The node list is displayed. Click Manage Label in the Operation column.
Step 2 Click Add Label, specify the key and value of the label that you want to create, and clickOK.
For example, to indicate that the node is used to deploy a QA (test) environment, you cancreate a node label in which Key is set to deploy_qa and Value is set to true.
Step 3 After "Label updated successfully." is displayed, click Manage Label. The label that youhave added is displayed.
----End
Deleting a Node Label
Only the labels you created can be deleted. Fixed labels cannot be deleted.
Step 1 Log in to the CCE console. In the navigation pane, choose Resource Management > NodeManagement. The node list is displayed. Click Manage Label in the Operation column.
Step 2 Click Delete and click OK to delete the label.
----End
3.14 Upgrading a ClusterYou can upgrade your cluster to the latest Kubernetes version or a bug fixing version, so thatnew features can be used.
If your cluster version is up-to-date, the Upgrade Cluster button is unavailable.
This section describes how to upgrade a VM cluster. The procedures for upgrading other typesof clusters are similar and therefore are not provided here.
Cluster Version Description
Table 3-14 lists the cluster versions available for upgrade. The cluster version is in theKubernetes version-CCE patch version format, for example, v1.7.3-r0, where v1.7.3 indicatesthe Kubernetes version, and r0 indicates the CCE patch version.
Cloud Container EngineUser Guide 3 Cluster Management
Issue 01 (2018-08-13) Huawei Proprietary and ConfidentialCopyright © Huawei Technologies Co., Ltd.
30

Table 3-14 Cluster versions
Cluster Version Description
v1.7.3-r0 Base version of a cluster, where the workloads supportelastic load balance (ELB), and EVS disks can bemounted to Xen VMs.
v1.7.3-r1 kube-dns supports resolution of external domain names.
v1.7.3-r2 SFS is supported for workloads.
v1.7.3-r3 EVS disks can be mounted to KVMs.
v1.7.3-r4 The cluster performance is optimized.
v1.7.3-r5 The HA cluster is supported.
v1.7.3-r6 The cluster storage system can connect to the native EVSinterface.
v1.7.3-r7 The container tunnel network cluster supports SUSE12sp2 node management.Docker supports the direct-lvm mode.
v1.7.3-r8 The cluster supports auto scaling of nodes.
v1.7.3-r9 The cluster supports nodes in multiple AZs.The container storage supports Object Storage Service(OBS).
Upgrading a Cluster
Step 1 Log in to the CCE console. In the navigation pane, choose Resource Management, and thenchoose VM Clusters.
Step 2 Click More for the cluster you want to upgrade, and choose Upgrade Cluster.
Follow the prompts to upgrade the cluster.
----End
3.15 Deleting a ClusterExercise caution when deleting a cluster because this operation will delete the nodes in thecluster and running workloads and services.
This section describes how to delete a VM cluster. The procedures for deleting other types ofclusters are similar and therefore are not provided here.
Procedure
Step 1 Log in to the CCE console. In the navigation pane, choose Resource Management > VMClusters.
Cloud Container EngineUser Guide 3 Cluster Management
Issue 01 (2018-08-13) Huawei Proprietary and ConfidentialCopyright © Huawei Technologies Co., Ltd.
31
Step 2 Choose More > Delete Cluster. Follow the prompts to delete the cluster.
----End
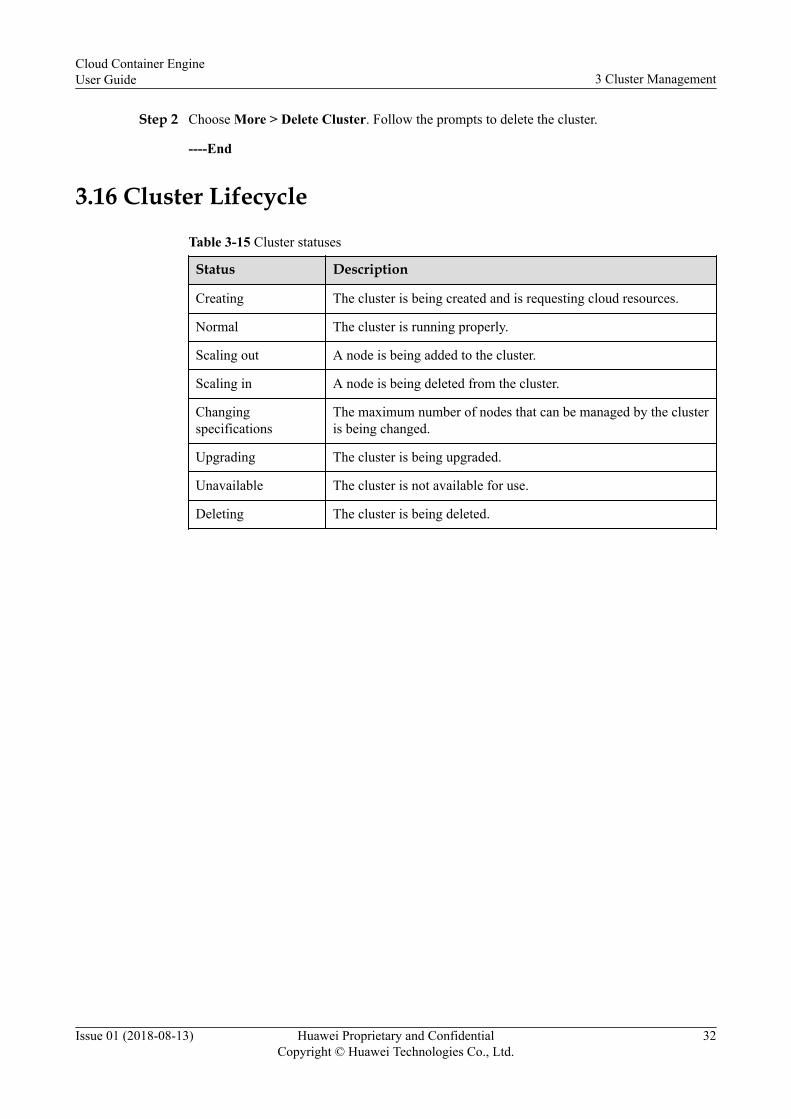
3.16 Cluster Lifecycle
Table 3-15 Cluster statuses
Status Description
Creating The cluster is being created and is requesting cloud resources.
Normal The cluster is running properly.
Scaling out A node is being added to the cluster.
Scaling in A node is being deleted from the cluster.
Changingspecifications
The maximum number of nodes that can be managed by the clusteris being changed.
Upgrading The cluster is being upgraded.
Unavailable The cluster is not available for use.
Deleting The cluster is being deleted.
Cloud Container EngineUser Guide 3 Cluster Management
Issue 01 (2018-08-13) Huawei Proprietary and ConfidentialCopyright © Huawei Technologies Co., Ltd.
32
Figure 3-6 Cluster statuses
3.17 Monitoring a NodeCCE supports monitoring of the following information of clusters and nodes:
l Resource usage of clustersl Resource usage of each node
Procedure
Step 1 Log in to the CCE console.
Step 2 Monitor the resource usage of a node in the cluster.
1. In the navigation pane, choose Resource Management > Node Management.2. Click Monitoring in the same row of a target node, and check CPU Usage, Disks Read
Rate, and Disks Read Requests on the Cloud Eye console.
Step 3 Monitor the cluster resource usage.
1. In the navigation pane, choose Resource Management > VM Clusters. Click the nameof the cluster to be monitored. The cluster details page is displayed.
2. Click the Monitoring tab to view the CPU and memory information.
----End
Cloud Container EngineUser Guide 3 Cluster Management
Issue 01 (2018-08-13) Huawei Proprietary and ConfidentialCopyright © Huawei Technologies Co., Ltd.
33

3.18 Managing NamespacesNamespaces enable division of cluster resources and objects among multiple users. Typically,namespaces are best suited for scenarios where a large number of users work across multipleprojects. Multiple namespaces can be created in a single cluster with the data isolated fromeach other. This enables namespaces to share the services of the same cluster withoutaffecting each other.
For example, you can deploy workloads in a development environment in one namespace, anddeploy workloads in a test environment in another namespace.
Prerequisites
You have created at least one cluster. For details, see 3.2 Creating a VM Cluster.
Namespace Types
Namespaces can be created automatically or manually.
l Created automatically by a cluster: When the cluster is started, the default, kube-public,and kube-system namespaces are created by default.– default: Used by default if no namespace is specified.– kube-public: Used for deploying public plug-ins and container templates.– kube-system: Used for deploying the Kubernetes system components.
l Created manually: You can create namespaces as required. For example, you can createdifferent namespaces for a development environment, joint debugging environment, andtest environment. You can also create namespaces for different workloads. For example,you can create one namespace for login services and one for game services.
Creating a Namespace
Step 1 Log in to the CCE console. In the navigation pane, choose Resource Management >Namespaces, and click Create Namespace.
Step 2 Set the parameters for creating a namespace listed in Table 3-16. The parameters marked withan asterisk (*) are mandatory.
Table 3-16 Parameters for creating a namespace
Parameter Description
*Namespace Name of the namespace, which must be unique in a cluster.
*Cluster Name Cluster to which the namespace belongs.
Description Description of the namespace.
Step 3 Click OK.
----End
Cloud Container EngineUser Guide 3 Cluster Management
Issue 01 (2018-08-13) Huawei Proprietary and ConfidentialCopyright © Huawei Technologies Co., Ltd.
34
Using Namespaces
Step 1 When you create a workload, you can select a namespace for it.
Step 2 When you query workloads, select a namespace to view all workloads in the namespace.
----End
Namespace Application Scenariosl Dividing workloads into namespaces by environment type
Before being released, a workload generally goes through the phases of development,joint debugging, testing, and production. You can create different clusters or differentnamespaces in the same cluster.– Creating clusters for different environments:
Resources cannot be shared among different clusters. A load balancer is required inorder to enable mutual access between services in different environments.
– Creating namespaces in the same cluster for different environments:Workloads in the same namespace access each other using service names, whileworkloads in different namespaces access each other using service names andnamespace names.Figure1 Dividing namespaces by environment types shows namespacesrespectively created for the development, joint debugging, and testingenvironments.
Figure 3-7 Dividing workloads into namespaces by environment type
l Dividing workloads into namespaces by workload typeYou are advised to use this method if a large number of workloads are deployed in thesame environment. As shown in the following figure, different namespaces are createdfor App 1 and App 2. Workloads in a namespace are managed as a workload group.Workloads in the same namespace access each other using service names, whileworkloads in different namespaces access each other using service names and namespacenames.
Cloud Container EngineUser Guide 3 Cluster Management
Issue 01 (2018-08-13) Huawei Proprietary and ConfidentialCopyright © Huawei Technologies Co., Ltd.
35

Figure 3-8 Dividing workloads into namespaces by workload type
Cloud Container EngineUser Guide 3 Cluster Management
Issue 01 (2018-08-13) Huawei Proprietary and ConfidentialCopyright © Huawei Technologies Co., Ltd.
36
4 Workload Management
4.1 Workload Overview
4.2 Creating a Deployment
4.3 Creating a StatefulSet
4.4 Basic Operations on Workloads
4.5 Setting Container Specifications
4.6 Setting the Lifecycle of a Container
4.7 Setting the Container Startup Command
4.8 Configuring Health Check for a Container
4.9 Setting Environment Variables
4.10 Affinity and Anti-Affinity Scheduling
4.11 Workload Scaling
4.12 Interconnection with Prometheus (Monitoring)
4.13 Monitoring Java Workloads
4.14 Using a Third-Party Image
4.1 Workload OverviewA workload is the abstract model of a group of pods in Kubernetes. It describes the runningcarriers of services. Workloads include Deployment, StatefulSet, Job, and DeamonSet.
In the latest CCE version, the original name Application Management is changed toWorkload. This function provides Kubernetes-native lifecycle management, including loadcreation, configuration, and deletion for Deployment, StatefulSet and other workloads.
Basic Conceptsl Deployment instances are independent from each other and provide the same functions.
They support elastic scaling and rolling upgrades. Examples of Deployments include
Cloud Container EngineUser Guide 4 Workload Management
Issue 01 (2018-08-13) Huawei Proprietary and ConfidentialCopyright © Huawei Technologies Co., Ltd.
37
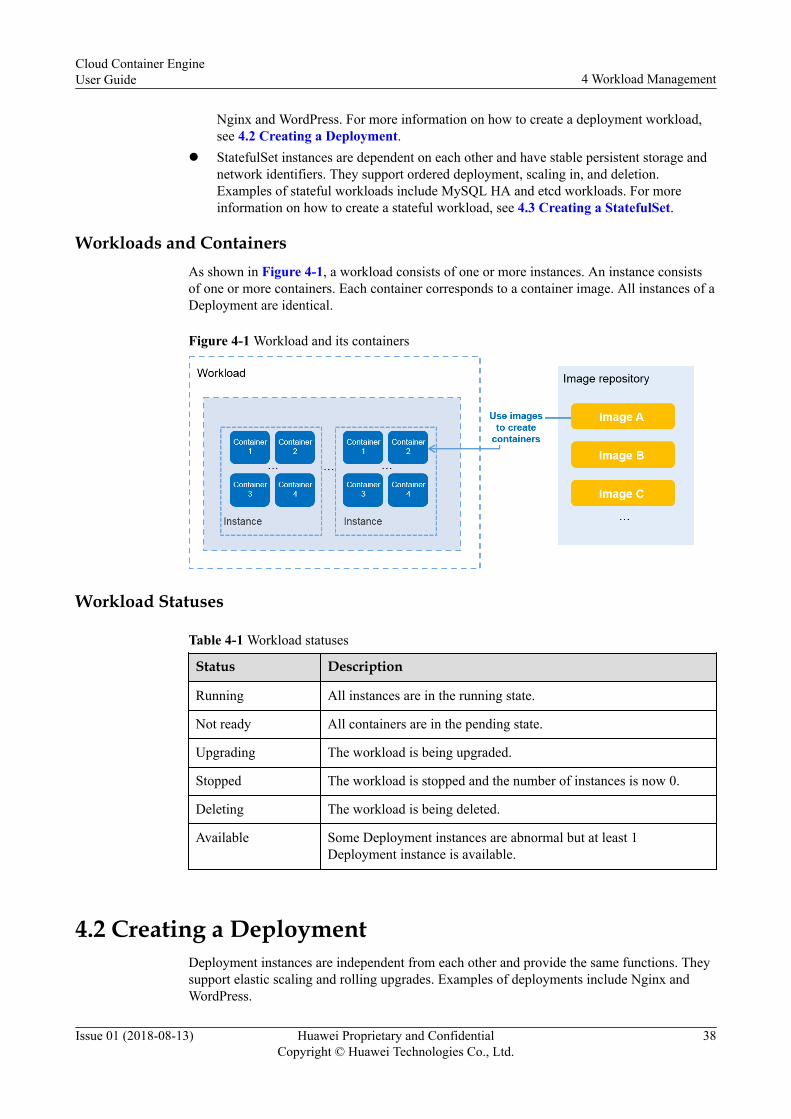
Nginx and WordPress. For more information on how to create a deployment workload,see 4.2 Creating a Deployment.
l StatefulSet instances are dependent on each other and have stable persistent storage andnetwork identifiers. They support ordered deployment, scaling in, and deletion.Examples of stateful workloads include MySQL HA and etcd workloads. For moreinformation on how to create a stateful workload, see 4.3 Creating a StatefulSet.
Workloads and ContainersAs shown in Figure 4-1, a workload consists of one or more instances. An instance consistsof one or more containers. Each container corresponds to a container image. All instances of aDeployment are identical.
Figure 4-1 Workload and its containers
Workload Statuses
Table 4-1 Workload statuses
Status Description
Running All instances are in the running state.
Not ready All containers are in the pending state.
Upgrading The workload is being upgraded.
Stopped The workload is stopped and the number of instances is now 0.
Deleting The workload is being deleted.
Available Some Deployment instances are abnormal but at least 1Deployment instance is available.
4.2 Creating a DeploymentDeployment instances are independent from each other and provide the same functions. Theysupport elastic scaling and rolling upgrades. Examples of deployments include Nginx andWordPress.
Cloud Container EngineUser Guide 4 Workload Management
Issue 01 (2018-08-13) Huawei Proprietary and ConfidentialCopyright © Huawei Technologies Co., Ltd.
38

Prerequisitesl A cluster is available. For details on how to create a cluster, see 3.2 Creating a VM
Cluster.
NOTE
When creating multiple containerized workloads, ensure that each workload has a unique port.Otherwise, workload deployment will fail.
l To enable access to a workload from a public network, an elastic IP address must havebeen bound to or a load balancer has been configured for at least one node in the cluster.
Creating a Deployment on the CCE Console
Step 1 (Optional) If you are creating a workload using your own image, upload the image to theimage management service. For details about how to upload an image, see Help Center > SftWare Repository for Container > User Guide > Image Management.. If you create aworkload using an official Docker Hub image, you do not need to upload an image.
Step 2 In the navigation pane, choose Workload. Click Create Workload, and set Workload Typeto Deployments.
Step 3 Set basic workload parameters as described in Table 4-2. The parameters marked with anasterisk (*) are mandatory.
Table 4-2 Basic workload parameters
Parameter Description
* Workload Name Name of the containerized workload to be created. The name must beunique.
* Cluster Name Cluster in which the workload resides.
* Namespace In a single cluster, data in different namespaces is isolated from eachother. This enables applications to share the services of the samecluster without interfering each other. If no namespace is set, thedefault namespace is used.
Workload Group A workload group is a set of associated workloads. You can manageworkloads by group.
* InstanceQuantity
Number of instances in the workload. Each workload has at least oneinstance. You can specify the number of instances as required.Each workload instance consists of the same containers. Configuringmultiple instances for a workload ensures that the workload can stillrun properly even if an instance is faulty.
Time zonesynchronization
After opening, the local storage guaranteed container time zone willbe the same as the node time zone.
Description Description of the workload.
Step 4 Click Next to add a container.
1. Click and select the image to be deployed. Click OK.
Cloud Container EngineUser Guide 4 Workload Management
Issue 01 (2018-08-13) Huawei Proprietary and ConfidentialCopyright © Huawei Technologies Co., Ltd.
39

– My images: Create a workload using an image in the image repository you created.– Official Docker Hub Images: reate a workload using an official image in the
Docker Hub repository.– Third-party Images: Create a workload using an image pulled from a third-party
image repository, rather than a public cloud image repository or a Docker Hubimage repository. When you create a workload using a third-party image, ensurethat the node where the workload is running can access public networks. For detailsabout how to create a workload using a third-party image, see 4.14 Using a Third-Party Image.n If your image repository does not require authentication, set Authenticate
Secret to No, enter an image address, and then click OK.n If your image repository is accessible only after being authenticated by
account and password, set Authenticate Secret to Yes. You need to create asecret first and then use a third-party image to create a workload. For details,see 4.14 Using a Third-Party Image.
2. Set image parameters.
Table 4-3 Image parameters
Parameter Description
Image Name Name of the image. You can click Change Image to update it.
*Image Version Version of the image to be deployed.
*Container Name Name of the container. You can modify it.
ContainerResource
For more information about Request and Limit, see 4.5 SettingContainer Specifications.– Request: the amount of resources that CCE will guarantee to a
container.– Limit: the maximum amount of resources that CCE will allow
a container to use. You can set Limit to prevent system faultscaused by container overload.
3. Configure the lifecycle settings, including the commands to be executed in different
lifecycle phases.– Startup Command: executed when the workload is started. For more information,
see 4.7 Setting the Container Startup Command.– Post-Start Processing: executed after the workload is successfully run. For more
information, see 4.6 Setting the Lifecycle of a Container.– Pre-Stop Processing: executed to delete logs or temporary files before the
workload ends. For more information, see 4.6 Setting the Lifecycle of aContainer.
4. Set the health check function that checks whether containers and services are runningproperly. Two types of probes are set: workload liveness probe and workload serviceprobe. For more information, see 4.8 Configuring Health Check for a Container.– Workload Liveness Probe: Restarts the workload when detecting that the
workload instance is unhealthy.
Cloud Container EngineUser Guide 4 Workload Management
Issue 01 (2018-08-13) Huawei Proprietary and ConfidentialCopyright © Huawei Technologies Co., Ltd.
40
– Workload Service Probe: Sets the workload to the unready state when detectingthat the workload instance is unhealthy. In this way, the service traffic will not bedirected to the workload instance.
5. Set environment variables.Click Add Environment Variables. Add an environment variable in one of thefollowing ways:– Manual Addition: Set Variable Name and Variable/Variable Reference.– Add From Secret: Set Variable Name and select the desired secret name and data.
A secret must be created in advance. For details, see 7.3 Creating a Secret.– Add From ConfigMap: Set Variable Name and select the desired ConfigMap
name and data. A ConfigMap must be created in advance. For details, see 7.1Creating a ConfigMap.
6. Set data storage.You can mount a host directory, EVS disk, SFS, and configuration items and secrets tothe corresponding directories of a container instance. For details, see 8 StorageManagement.
7. Configure container permissions to protect CCE and other containers from beingaffected.Enter the user ID. The container will run as the specified user.
8. Set the Log Policy.Set a policy and log directory for collecting workload logs and preventing logs fromexceeding size limits. For details, see 9 Log Management.
Step 5 Click Next. Then, click Add Access Mode and set the workload access mode.
To enable access to the workload from other workloads or public networks, set the workloadaccess mode.
The workload access mode determines the network attributes of the workload. Workloadswith different access modes can provide different network capabilities.
At present, the following access modes are provided:
l 5.2 Intra-Cluster Access: A workload is accessible to other workloads in the samecluster by using an internal domain name.
l 5.3 Intra-VPC Access: A workload is accessible to other workloads in the same VPC byusing the IP address of the cluster node or the IP address of the private network loadbalancer.
l 5.4 External Access - Elastic IP Address: A workload is accessible to public networksby using an elastic IP address. This access mode is applicable to services that need to beexposed to public networks. To enable access to a workload from a public network, anelastic IP address must be bound to a node in the cluster, and a mapping port numbermust be set. The port number ranges from 30000 to 32676, for example, the accessaddress can be 10.117.117.117:30000.
l 5.5 External Access - Elastic Load Balancer: A workload is accessible from publicnetworks by using the IP address of a load balancer. This access mode provides higherreliability than EIP-based access and is applicable to services that need to be exposed topublic networks. The access address consists of the IP address of public network loadbalancer and the configured access port, for example, 10.117.117.117:80.
l Network Address Translation (NAT) Gateway: It provides network address translationservices for cluster nodes so that multiple nodes can share an elastic IP address.
Cloud Container EngineUser Guide 4 Workload Management
Issue 01 (2018-08-13) Huawei Proprietary and ConfidentialCopyright © Huawei Technologies Co., Ltd.
41

Compared with the elastic IP address mode, the NAT gateway mode enhances reliabilitybecause no elastic IP address needs to be bound to a single node and no abnormal nodescan affect public network access. The access address consists of an elastic IP address ofthe public network and an access port, for example, 10.117.117.117:80.
l 5.7 External Access - Layer-7 Load Balancing: Based on the Layer-4 load balancing,Layer-7 load balancing uses enhanced load balancer and allows you to configure URIsfor distributing access traffic to corresponding services. In addition, different functionsare implemented based on various URIs. The access address consists of the IP address ofthe public network load balancer, access port, and defined URI, for example,10.117.117.117:80/helloworld.
Step 6 Click Next and configure advanced settings.l Upgrade Policy: In-place Upgrade and Rolling Upgrade.
– In-place Upgrade : In this upgrade mode, the old instance needs to be deleted beforea new instance is created. Services are interrupted during the upgrade.
– Rolling Upgrade : The instance of the old version is gradually replaced with theinstance of the new version. During the upgrade, service traffic is evenly distributedbetween new and old instances, so services are not interrupted.
l Configure the graceful scale-in policy by entering the time. The graceful scale-in policyprovides a time window for workload deletion, which is reserved for executingcommands in the PreStop phase of the lifecycle. If the process has not yet ended after thetime window elapses, the workload will be forcibly deleted.
l Configure the migration policy. Specify the time window for re-scheduling a workloadinstance to another available node when the node where the workload instance is locatedis unavailable. The default value is 0 second.
l Configure the scheduling policy. You can combine static global scheduling policies ordynamic runtime scheduling policies as required. For details, see 4.10 Affinity andAnti-Affinity Scheduling.
l Configure the monitoring policy. The monitoring system provides this metrics collectionmechanism that allows you to define the names of the metrics to be collected and thepath and port for reporting the metric data when deploying a workload. When aworkload is running, the monitoring system collects metric data using the specified pathand port regularly. For details, see 4.12 Interconnection with Prometheus(Monitoring).
l APM Settings: APM helps you quickly locate workload problems and identifyperformance bottlenecks to improve user experience. For details, see 4.13 MonitoringJava Workloads.
Step 7 Click Create. Click Back to Workload List.
In the workload list, if the workload status is Running, the workload has been createdsuccessfully. Workload status is not updated in real time. To view the workload status, pressF5.
Step 8 To access the workload in a browser, go to the workload list on the Workload page. Copy thecorresponding External Access Address and paste it into the address box in the browser.
NOTE
External access addresses can be obtained only when the workload access mode is set to Elastic IPAddress or Elastic Load Balancer.
----End
Cloud Container EngineUser Guide 4 Workload Management
Issue 01 (2018-08-13) Huawei Proprietary and ConfidentialCopyright © Huawei Technologies Co., Ltd.
42

Creating a Deployment Using kubectl
The following procedure uses an Nginx workload as an example to describe how to create aworkload using kubectl.
Prerequisites
You have configured the kubectl commands and connected an ECS to the cluster. For details,see 3.5 Connecting to the Kubernetes Cluster Using kubectl.
Procedure
Step 1 Log in to the ECS on which the kubectl commands have been configured. For details, seeLogging In to a Linux ECS.
Step 2 Create and edit the nginx-deployment.yaml file. nginx-deployment.yaml is an example filename, and you can change it as required.
vi nginx-deployment.yaml
The following provides an example of the description file contents. For more information ondeployment, see the Kubernetes documentation.
apiVersion: extensions/v1beta1kind: Deploymentmetadata: name: nginxspec: replicas: 1 selector: matchLabels: app: nginx strategy: type: RollingUpdate template: metadata: labels: app: nginx spec: containers: - image: nginx imagePullPolicy: Always name: nginx imagePullSecrets: - name: default-secret
For details about deployment.yaml parameters, see Table 4-4.
Table 4-4 Deployment.yaml parameters
Parameter Description Mandatory/Optional
apiVersion Version of an API. Mandatory
kind Type of a created object. Mandatory
metadata Metadata of a resource object. Mandatory
name Name of a deployment. Mandatory
Spec Detailed description of the deployment. Mandatory
Cloud Container EngineUser Guide 4 Workload Management
Issue 01 (2018-08-13) Huawei Proprietary and ConfidentialCopyright © Huawei Technologies Co., Ltd.
43
Parameter Description Mandatory/Optional
replicas Number of instances. Mandatory
selector Container instance that can be managed bythe deployment.
Mandatory
strategy Upgrade mode. Currently, the following twomodes are supported:l RollingUpdatel ReplaceUpdateBy default, the rolling upgrade mode isused.
Optional
template Detailed description of a created containerinstance.
Mandatory
metadata Metadata. Mandatory
labels Label of a container. Optional
spec:containers
l image (mandatory): Name of a containerimage.
l imagePullPolicy (optional): Policy forobtaining an image. The options includeAlways (attempting to download imageseach time), Never (only using localimages), and IfNotPresent (using localimages if they are available;downloading images if local images areunavailable). The default value isAlways.
l name (mandatory): Container name.
Mandatory
imagePullSecrets Name of the secret used during imagepulling. If a private image is used, thisparameter is mandatory.l To pull an image from a container image
repository of HUAWEI CLOUD, set thisparameter to the fixed value default-secret.
l To pull an image from a third-partyimage repository, set this parameter tothe name of the created secret.
Optional
Step 3 Create a deployment workload.
kubectl create -f nginx-deployment.yaml
If the following information is displayed, the workload is being created.
deployment "nginx" created
Cloud Container EngineUser Guide 4 Workload Management
Issue 01 (2018-08-13) Huawei Proprietary and ConfidentialCopyright © Huawei Technologies Co., Ltd.
44
Step 4 Query the deployment status.
kubectl get po
If the following information is displayed, the workload is running.
NAME READY STATUS RESTARTS AGEicagent-m9dkt 0/0 Running 0 3dnginx-1212400781-qv313 1/1 Running 0 3d
Step 5 If the workload needs to be accessed by other nodes in the same cluster, in the same VPC, orin a public network, set the workload access mode. For details, see 5 Network Management.
----End
4.3 Creating a StatefulSetThe workload whose data or status is stored during running is called StatefulSet. For example,MySQL is StatefulSet because it needs to store new data.
A container can be migrated between different hosts, but data is not stored on the hosts. Tostore StatefulSet data persistently, attach HA storage volumes provided by the CCE to thecontainer.
Prerequisites
A cluster is available. For details on how to create a cluster, see 3.2 Creating a VM Cluster.
NOTE
When creating multiple containerized workloads, ensure that each workload has a unique port.Otherwise, workload deployment will fail.
Creating a StatefulSet Through GUI
Step 1 (Optional) If you are creating a workload using your own image, upload the image to theimage management service. For details about how to upload an image, see Help Center >SoftWare Repository for Container > User Guide > Image Management.. If you create aworkload using an official Docker Hub image, you do not need to upload an image.
Step 2 In the navigation pane, choose Workload. Click Create Workload, and set Workload Typeto StatefulSets.
Step 3 Set basic workload parameters as listed in Table 4-5. The parameters marked with an asterisk(*) are mandatory.
Table 4-5 Basic workload parameters
Parameter Description
* Workload Name Name of the containerized workload to be created. The name must beunique.
* Cluster Name Cluster in which the workload resides.
* Namespace Namespace in which the workload resides. By default, this parameteris set to default.
Cloud Container EngineUser Guide 4 Workload Management
Issue 01 (2018-08-13) Huawei Proprietary and ConfidentialCopyright © Huawei Technologies Co., Ltd.
45
Parameter Description
Workload Group A workload group is a set of associated workloads. You can manageworkloads by group.
* InstanceQuantity
Number of instances in the workload. Each workload has at least oneinstance. You can specify the number of instances as required.Each workload instance consists of the same containers. Configuringmultiple instances for a workload ensures that the workload can stillrun properly even if an instance is faulty.
Time zonesynchronization
After opening, the local storage guaranteed container time zone willbe the same as the node time zone.
Description Description of the workload.
Step 4 Click Next to add a container.
1. Click and select the image to be deployed. Click OK.– My images: Create a workload using an image in the image repository you created.– Official Docker Hub Images: reate a workload using an official image in the
Docker Hub repository.– Third-party Images: Create a workload using an image pulled from a third-party
image repository, rather than a public cloud image repository or a Docker Hubimage repository. When you create a workload using a third-party image, ensurethat the node where the workload is running can access public networks. For detailsabout how to create a workload using a third-party image, see 4.14 Using a Third-Party Image.n If your image repository does not require authentication, set Authenticate
Secret to No, enter an image address, and then click OK.n If your image repository is accessible only after being authenticated by
account and password, set Authenticate Secret to Yes. You need to create asecret first and then use a third-party image to create a workload. For details,see 4.14 Using a Third-Party Image.
2. Set image parameters.
Table 4-6 Image parameters
Parameter Description
Image Name Name of the image. You can click Change Image to update it.
* Image Version Version of the image to be deployed.
* ContainerName
Name of the container. You can modify it.
Cloud Container EngineUser Guide 4 Workload Management
Issue 01 (2018-08-13) Huawei Proprietary and ConfidentialCopyright © Huawei Technologies Co., Ltd.
46
Parameter Description
ContainerResource
For more information about Request and Limit, see 4.5 SettingContainer Specifications.– Request: the amount of resources that CCE will guarantee to a
container.– Limit: the maximum amount of resources that CCE will allow
a container to use. You can set Limit to prevent system faultscaused by container overload.
3. Configure the lifecycle settings, including the commands to be executed in different
lifecycle phases.– Startup Command: executed when the workload is started. For more information,
see 4.7 Setting the Container Startup Command.– Post-Start Processing: executed after the workload is successfully run. For more
information, see 4.6 Setting the Lifecycle of a Container.– Pre-Stop Processing: executed to delete logs or temporary files before the
workload ends. For more information, see 4.6 Setting the Lifecycle of aContainer.
4. Set the health check function that checks whether containers and services are runningproperly. Two types of probes are set: workload liveness probe and workload serviceprobe. For more information, see 4.8 Configuring Health Check for a Container.– Workload Liveness Probe: Restarts the workload when detecting that the
workload instance is unhealthy.– Workload Service Probe: Sets the workload to the unready state when detecting
that the workload instance is unhealthy. In this way, the service traffic will not bedirected to the workload instance.
5. Set environment variables.Click Add Environment Variables. Add an environment variable in one of thefollowing ways:– Manual Addition: Set Variable Name and Variable/Variable Reference.– Add From Secret: Set Variable Name and select the desired secret name and data.
A secret must be created in advance. For details, see 7.3 Creating a Secret.– Add From ConfigMap: Set Variable Name and select the desired ConfigMap
name and data. A ConfigMap must be created in advance. For details, see 7.1Creating a ConfigMap.
6. Set data storage.You can mount a host directory, EVS disk, SFS, and configuration items and secrets tothe corresponding directories of a container instance. For details, see 8 StorageManagement.
7. Configure container permissions to protect CCE and other containers from beingaffected.Enter the user ID. The container will run as the specified user.
8. Set the Log Policy.Set a policy and log directory for collecting workload logs and preventing logs fromexceeding size limits. For details, see 9 Log Management.
Cloud Container EngineUser Guide 4 Workload Management
Issue 01 (2018-08-13) Huawei Proprietary and ConfidentialCopyright © Huawei Technologies Co., Ltd.
47

9. (Optional) One workload instance contains one or more related containers. If your
workload contains multiple containers, click andthen add containers.
Step 5 Click Next. Set the headless service parameters listed in Table 4-7.
Table 4-7 Headless service parameters
Parameter Description
* ServiceName
Name of the service corresponding to the workload for mutual accessbetween instances. This service is used for internal discovery of instances,and does not require an independent IP address or load balancing.
* Port Name Name of the container port. You are advised to enter a name that indicatesthe function of the port.
* ContainerPort
Listening port of the container.
Step 6 Click Add Access Mode and set the workload access mode.
To enable access to the workload from other workloads or public networks, set the workloadaccess mode.
The workload access mode determines the network attributes of the workload. Workloadswith different access modes can provide different network capabilities.
At present, the following access modes are provided:
l 5.2 Intra-Cluster Access: A workload is accessible to other workloads in the samecluster by using an internal domain name.
l 5.3 Intra-VPC Access: A workload is accessible to other workloads in the same VPC byusing the IP address of the cluster node or the IP address of the private network loadbalancer.
l 5.4 External Access - Elastic IP Address: A workload is accessible to public networksby using an elastic IP address. This access mode is applicable to services that need to beexposed to public networks. To enable access to a workload from a public network, anelastic IP address must be bound to a node in the cluster, and a mapping port numbermust be set. The port number ranges from 30000 to 32676, for example, the accessaddress can be 10.117.117.117:30000.
l 5.5 External Access - Elastic Load Balancer: A workload is accessible from publicnetworks by using the IP address of a load balancer. This access mode provides higherreliability than EIP-based access and is applicable to services that need to be exposed topublic networks. The access address consists of the IP address of public network loadbalancer and the configured access port, for example, 10.117.117.117:80.
l Network Address Translation (NAT) Gateway: It provides network address translationservices for cluster nodes so that multiple nodes can share an elastic IP address.Compared with the elastic IP address mode, the NAT gateway mode enhances reliability
Cloud Container EngineUser Guide 4 Workload Management
Issue 01 (2018-08-13) Huawei Proprietary and ConfidentialCopyright © Huawei Technologies Co., Ltd.
48

because no elastic IP address needs to be bound to a single node and no abnormal nodescan affect public network access. The access address consists of an elastic IP address ofthe public network and an access port, for example, 10.117.117.117:80.
l 5.7 External Access - Layer-7 Load Balancing: Based on the Layer-4 load balancing,Layer-7 load balancing uses enhanced load balancer and allows you to configure URIsfor distributing access traffic to corresponding services. In addition, different functionsare implemented based on various URIs. The access address consists of the IP address ofthe public network load balancer, access port, and defined URI, for example,10.117.117.117:80/helloworld.
Step 7 Click Next to perform advanced settings.l Upgrade policy: Only Rolling Upgrade is supported.l PodManagementPolicy:
– OrderedReady: OrderedReadyPodManagement will create pods in strictlyincreasing order on scale up and strictly decreasing order on scale down,progressing only when the previous pod is ready or terminated.
– Parallel: StatefulSet controller to launch or terminate all Pods in parallel, and to notwait for Pods to become Running and Ready or completely terminated prior tolaunching or terminating another Pod.
l Configure the graceful scale-in policy by entering the time. The graceful scale-in policyprovides a time window for workload deletion, which is reserved for executingcommands in the PreStop phase of the lifecycle. If the process has not yet ended after thetime window elapses, the workload will be forcibly deleted.
l Configure the scheduling policy. You can combine static global scheduling policies ordynamic runtime scheduling policies as required. For details, see 4.10 Affinity andAnti-Affinity Scheduling.
l Configure the monitoring policy. The monitoring system provides this metrics collectionmechanism that allows you to define the names of the metrics to be collected and thepath and port for reporting the metric data when deploying a workload. When aworkload is running, the monitoring system collects metric data using the specified pathand port regularly. For details, see 4.12 Interconnection with Prometheus(Monitoring).
l APM Settings: APM helps you quickly locate workload problems and identifyperformance bottlenecks to improve user experience. For details, see 4.13 MonitoringJava Workloads.
Step 8 Click Create. Click Back to Workload List.
In the workload list, if the workload status is Running, the workload has been createdsuccessfully. Workload status is not updated automatically in real time. To update theworkload status, press F5.
----End
Creating a StatefulSet Using kubectlThe following procedure uses an etcd workload as an example to describe how to create aworkload using kubectl.
Prerequisites
You have configured the kubectl commands and connected an ECS to the cluster. For details,see 3.5 Connecting to the Kubernetes Cluster Using kubectl.
Cloud Container EngineUser Guide 4 Workload Management
Issue 01 (2018-08-13) Huawei Proprietary and ConfidentialCopyright © Huawei Technologies Co., Ltd.
49
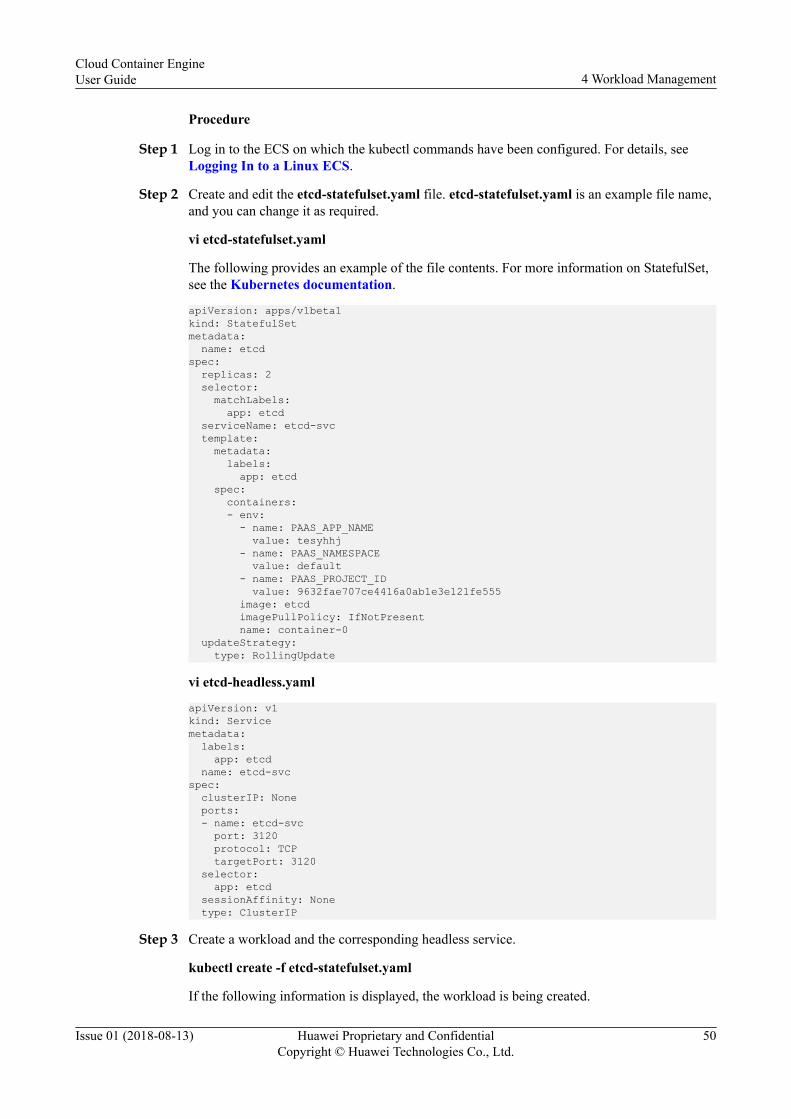
Procedure
Step 1 Log in to the ECS on which the kubectl commands have been configured. For details, seeLogging In to a Linux ECS.
Step 2 Create and edit the etcd-statefulset.yaml file. etcd-statefulset.yaml is an example file name,and you can change it as required.
vi etcd-statefulset.yaml
The following provides an example of the file contents. For more information on StatefulSet,see the Kubernetes documentation.
apiVersion: apps/v1beta1kind: StatefulSetmetadata: name: etcdspec: replicas: 2 selector: matchLabels: app: etcd serviceName: etcd-svc template: metadata: labels: app: etcd spec: containers: - env: - name: PAAS_APP_NAME value: tesyhhj - name: PAAS_NAMESPACE value: default - name: PAAS_PROJECT_ID value: 9632fae707ce4416a0ab1e3e121fe555 image: etcd imagePullPolicy: IfNotPresent name: container-0 updateStrategy: type: RollingUpdate
vi etcd-headless.yaml
apiVersion: v1kind: Servicemetadata: labels: app: etcd name: etcd-svcspec: clusterIP: None ports: - name: etcd-svc port: 3120 protocol: TCP targetPort: 3120 selector: app: etcd sessionAffinity: None type: ClusterIP
Step 3 Create a workload and the corresponding headless service.
kubectl create -f etcd-statefulset.yaml
If the following information is displayed, the workload is being created.
Cloud Container EngineUser Guide 4 Workload Management
Issue 01 (2018-08-13) Huawei Proprietary and ConfidentialCopyright © Huawei Technologies Co., Ltd.
50

statefulset "etcd" created
kubectl create -f etcd-headless.yaml
If the following information is displayed, the headless service has been created.
service "etcd-svc" created
Step 4 If the workload needs to be accessed by other nodes in the same cluster, in the same VPC, orin a public network, set the workload access mode. For details, see 5 Network Management.
----End
4.4 Basic Operations on Workloads
Starting or Stopping a WorkloadYou can start or stop a workload based on your needs. You will not incur additional fees forstarting and stopping workloads.
Step 1 Log in to the CCE console. In the navigation pane, choose Workload.
Step 2 To stop a workload, choose More > Stop in the same row as the workload to be stopped.
NOTE
When a workload is stopped, the original container is deleted. When a workload is started, anotherinstance is created.
Step 3 To start a workload, choose More > Start in the same row as a stopped workload.
----End
Deleting a WorkloadDelete a workload that you do not need to use any longer. Workloads cannot be restored afterbeing deletion. Exercise caution when you perform this operation.
Step 1 Log in to the CCE console. In the navigation pane, choose Workload.
Step 2 Click More > Delete in the same row as the workload to be deleted, and follow the promptsto delete the cluster.
Step 3 Click OK.
----End
Upgrading a WorkloadCCE enables you to quickly upgrade workloads by replacing images or image versionswithout interrupting services.
To replace an image or image version, you need to upload the image to the image repositoryin advance. For more information, see 11 Image Repository.
NOTE
For a stateful workload whose upgrade type is Replace Upgrade, you need to manually delete thecorresponding instance before the upgrade. Otherwise, the upgrade status is always displayed asUpgrading.
Cloud Container EngineUser Guide 4 Workload Management
Issue 01 (2018-08-13) Huawei Proprietary and ConfidentialCopyright © Huawei Technologies Co., Ltd.
51
Step 1 Log in to the CCE console. In the navigation pane, choose Workload. On the page that isdisplayed, click the workload to be upgraded. On the Workload Details page, click theUpgrade tab.
Step 2 Upgrade the workload based on service requirements.l To replace the image, click Replace Image and select a new image.l To replace the image version, select a version from the Image Version drop-down list.
l To change the container name, click next to Container Name and enter a new name.l Perform advanced settings as listed in Table 4-8.
Table 4-8 Advanced settings
Parameter Description
Lifecycle Commands that are executed in each lifecycle phase of aworkload.– Startup Command: executed when the workload is started.
For more information, see 4.7 Setting the Container StartupCommand.
– Post-start Processing: executed after the workload issuccessfully run. For more information, see 4.6 Setting theLifecycle of a Container.
– Pre-stop Processing: executed to delete logs or temporaryfiles before the workload ends. For more information, see 4.6Setting the Lifecycle of a Container.
Health Check Set the health check function that checks whether containers andservices are running properly. Two types of probes are set:workload liveness probe and workload service probe. For moreinformation, see 4.8 Configuring Health Check for aContainer.– Workload Liveness Probe: Restarts the workload when
detecting that the workload instance is unhealthy.– Workload Service Probe: Sets the workload to the unready
state when detecting that the workload instance is unhealthy.In this way, the service traffic will not be directed to theworkload instance.
Cloud Container EngineUser Guide 4 Workload Management
Issue 01 (2018-08-13) Huawei Proprietary and ConfidentialCopyright © Huawei Technologies Co., Ltd.
52
Parameter Description
EnvironmentVariables
Add environment variables to the container. On the EnvironmentVariables tab page, click Add Environment Variables.Currently, environment variables can be added using any of thefollowing methods:– Manual Addition: Set Variable Name and Variable/
Variable Reference.– Add From Secret: Set Variable Name and select the desired
secret name and data. A secret must be created in advance. Fordetails, see 7.3 Creating a Secret.
– Add From ConfigMap: Set Variable Name and select thedesired ConfigMap name and data. A ConfigMap must becreated in advance. For details, see 7.1 Creating aConfigMap.
Data Storage This parameter cannot be updated.
Security Context Set the container permissions for security purposes.Enter the user ID. The container will run as the specified user.
Log Policy This parameter cannot be updated.
Step 3 Click Submit.
----End
Monitoring a WorkloadAfter a workload is created, you can go to the Monitor page to monitor the CPU usage andmemory usage of the container in which the workload resides.
Step 1 Log in to the CCE console. In the navigation pane, choose Workload.
Step 2 Click the name of the workload to be monitored. On the workload details page that isdisplayed, click the Monitor tab to view the CPU usage and memory usage of the workload.
Step 3 Click the Instances tab. Click next to an instance to be monitored and click Monitoring.
Step 4 Check the CPU usage and memory usage of the instance.l CPU usage
The horizontal axis indicates time while the vertical axis indicates the CPU usage. Thegreen line indicates the CPU usage while the red line indicates the CPU usage limit.
NOTE
CCE needs time to compute CPU usage. Therefore, when CPU and memory usage are displayedfor the first time, CPU usage is displayed about one minute later than memory usageCPU and memory usage are displayed only for instances in the running state.
l Memory usageThe horizontal axis indicates time while the vertical axis indicates the memory usage.The green line indicates the memory usage while the red line indicates the memory usagelimit.
Cloud Container EngineUser Guide 4 Workload Management
Issue 01 (2018-08-13) Huawei Proprietary and ConfidentialCopyright © Huawei Technologies Co., Ltd.
53
NOTE
Memory usage is displayed only for a running instance.
----End
Viewing the YAML File of a Workload
Step 1 Log in to the CCE console. In the navigation pane, choose Workload. On the page that isdisplayed, choose More > Show YAML next to the workload to be queried.
Step 2 Click Copy to copy the YAML file.
----End
Attaching Labels to Workloads
Labels are attached to workloads using key-value pairs. Workloads with labels attached can beeasily selected for setting affinity and anti-affinity scheduling rules. You can add labels tomultiple workloads or a specified workload.
In the following figure, three labels release, env, and role are defined for the workloads APP1,APP2, and APP3. The values of these labels vary with workloads.
l Label of APP 1: [release:alpha;env:development;role:frontend]
l Label of APP 2: [release:beta;env:testing;role:frontend]
l Label of APP 3: [release:alpha;env:production;role:backend]
If you set key to role and value to frontend when using workload scheduling or anotherfunction, the function will apply to APP1 and APP2.
Figure 4-2 Label example
Step 1 In the navigation pane, choose Workload.
Step 2 Click the workload for which a label is to be added. The Workload Details page is displayed.
Step 3 Click Manage Labels and Add Label, specify the key and value of the label that you want tocreate, and click OK.
NOTE
A key-value pair must start and end with a letter or digit and consist of a maximum of 63 characters,including letters, digits, hyphens (-), underscores (_), and periods (.).
----End
Cloud Container EngineUser Guide 4 Workload Management
Issue 01 (2018-08-13) Huawei Proprietary and ConfidentialCopyright © Huawei Technologies Co., Ltd.
54

4.5 Setting Container SpecificationsCCE allows you to set specifications for added containers during workload creation. You canset Request and Limit for CPU and memory resources used by each instance in a workloadon.
NOTE
If you select Request next to CPU and Memory and specify a value for Request, CCE schedules theworkload instance to a node that has the resources specified. If you deselect Request, CCE schedules aworkload instance to a random node. If you select Limit and specify a value for Limit, CCE limits theresources that can be used by the workload instance based on the value specified. If you deselect Limit,CCE does not limit the resources that can be used by the workload instance. The workload or the nodemay be unavailable when the memory resources used by the instance exceed the memory that the nodecan allocate.
l CPU quotas
Table 4-9 CPU quotas
Parameter Description
Request Minimum number of CPU cores required by a container. A container isscheduled to a node on which the total number of available CPU coresis greater than or equal to the value specified by Request. Thisparameter does not limit the maximum number of CPU cores availablefor a container.
Limit Maximum number of CPU cores available for a container.
You are advised to configure the CPU quotas as follows: Actual number of CPU coresavailable for a node ≥ Sum of CPU Limits for all containers of the current instance ≥Sum of CPU Limits for all containers of the current instance. For details about the actualnumber of CPU cores available for a node, go to Resource Management > NodeManagement and obtain the value from the Available CPUs (Cores) column of thecorresponding node.
l Memory quotas
Table 4-10 Memory quotas
Parameter Description
Request Minimum amount of memory required by a container. A container isscheduled to a node on which the total amount of available memory isgreater than or equal to the value specified by Request.
Limit Maximum amount of memory available for a container. When thememory usage exceeds the configured limit, the instance may berestarted, which affects running of workloads.
You are advised to configure the memory quotas as follows: Actual amount of memoryavailable for a node ≥ Sum of memory Limits for all containers of the current instance ≥
Cloud Container EngineUser Guide 4 Workload Management
Issue 01 (2018-08-13) Huawei Proprietary and ConfidentialCopyright © Huawei Technologies Co., Ltd.
55
Sum of memory Limits for all containers of the current instance. For details about theactual amount of memory available for a node, go to Resource Management > NodeManagement and obtain the value from the Available Memory (GB) column of thecorresponding node.
Configuration Example
In this example, a cluster contains a node with 4 CPU cores and 8-GB memory, and aworkload containing instance 1 and instance 2 has been deployed in the cluster, and theresource quotas are set for instance 1 and instance 2 as follows: {CPU Request, CPU Limit,Memory Request, Memory Limit} = {1 core, 2 cores, 2 GB, 2 GB}
The CPU usage and memory usage of the node are as follows:
l Number of CPU cores available on the node = 4 core – (1 core requested by instance 1+ 1 core requested by instance 1) = 2 cores
l Amount of memory available on the node = 8 GB – (2 GB requested by instance 1 + 2GB core requested by instance 2) = 4 GB
Therefore, the node has 2 CPU cores and 4 GB memory available.
4.6 Setting the Lifecycle of a ContainerCCE provides callback functions for the lifecycle management of containerized workloads.For example, if you want a container to perform a certain operation before stopping, you canregister a hook function. CCE provides the following lifecycle callback functions:
l Start Command: executed to start a container. For details, see 4.7 Setting theContainer Startup Command.
l Post-Start Processing: executed immediately after a workload is started.l Pre-Stop Processing: executed before a workload is stopped.
Commands and Parameters Used to Run a Container
The Docker image has metadata that stores image information. If lifecycle commands andparameters are not set, CCE runs the default commands and parameters, that is, Docker nativecommands Entrypoint and CMD, provided during image creation. For details, see thedescription of Entrypoint and CMD.
If the commands and parameters used to run a container are set during workload creation, thedefault commands Entrypoint and CMD are overwritten during image building. The rules areas follows:
Table 4-11 Commands and parameters used to run a container
DockerEntrypoint
Docker CMD Command toRun aContainer
Parameters toRun aContainer
CommandExecuted
[touch] [/root/test] Not set Not set [touch /root/test]
[touch] [/root/test] [mkdir] Not set [mkdir]
Cloud Container EngineUser Guide 4 Workload Management
Issue 01 (2018-08-13) Huawei Proprietary and ConfidentialCopyright © Huawei Technologies Co., Ltd.
56
DockerEntrypoint
Docker CMD Command toRun aContainer
Parameters toRun aContainer
CommandExecuted
[touch] [/root/test] Not set [/opt/test] [touch /opt/test]
[touch] [/root/test] [mkdir] [/opt/test] [mkdir /opt/test]
Post-start Processing
Step 1 Log in to the CCE console. Expand Lifecycle when creating a workload.
Step 2 Set the parameters for processing after startup, as listed in Table 4-12.
Table 4-12 Container lifecycle parameters
Parameter Description
CLI Mode Set the command to be executed in the container to the command tobe executed. The command format is Command Args[1] Args[2]….Command is a system command or a user-defined executableprogram. If no path is specified, find an executable program in thedefault path. If multiple commands need to be executed, you areadvised to write the commands in the script for execution.For example, the following command needs to be executed:exec: command: - /install.sh - install_agentEnter /install install_agent in the script.This command indicates that install_agent needs to be executed afterthe container is created successfully.
HttpGet RequestMode
HTTP invocation request. The related parameters are described asfollows:l Path: (optional) request URL.l Port: (mandatory) request port.l Host address: (optional) IP address of the request. The default
value is the IP address of the node where the container resides.
----End
Pre-stop Processing
Step 1 Log in to the CCE console. Click the Pre-Stop Processing tab during the lifecycleconfiguration when a workload is created.
Step 2 Set pre-stop parameters, as shown in Table 4-12.
----End
Cloud Container EngineUser Guide 4 Workload Management
Issue 01 (2018-08-13) Huawei Proprietary and ConfidentialCopyright © Huawei Technologies Co., Ltd.
57
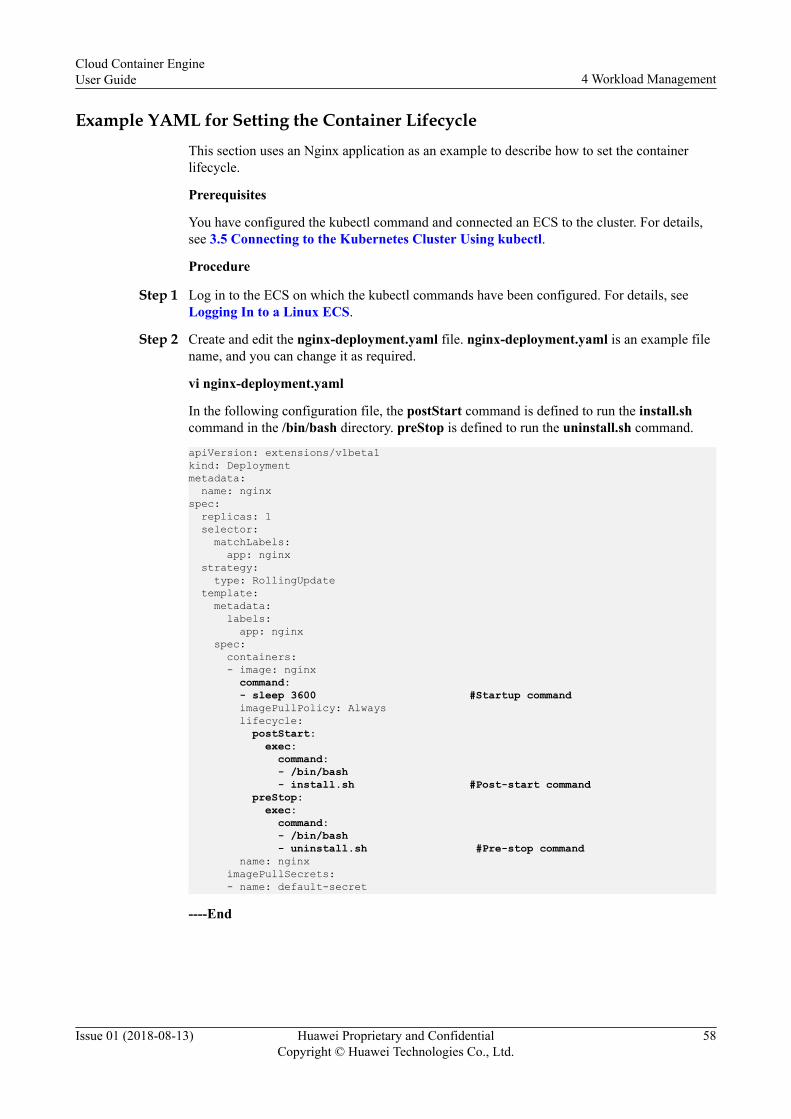
Example YAML for Setting the Container LifecycleThis section uses an Nginx application as an example to describe how to set the containerlifecycle.
Prerequisites
You have configured the kubectl command and connected an ECS to the cluster. For details,see 3.5 Connecting to the Kubernetes Cluster Using kubectl.
Procedure
Step 1 Log in to the ECS on which the kubectl commands have been configured. For details, seeLogging In to a Linux ECS.
Step 2 Create and edit the nginx-deployment.yaml file. nginx-deployment.yaml is an example filename, and you can change it as required.
vi nginx-deployment.yaml
In the following configuration file, the postStart command is defined to run the install.shcommand in the /bin/bash directory. preStop is defined to run the uninstall.sh command.
apiVersion: extensions/v1beta1kind: Deploymentmetadata: name: nginxspec: replicas: 1 selector: matchLabels: app: nginx strategy: type: RollingUpdate template: metadata: labels: app: nginx spec: containers: - image: nginx command: - sleep 3600 #Startup command imagePullPolicy: Always lifecycle: postStart: exec: command: - /bin/bash - install.sh #Post-start command preStop: exec: command: - /bin/bash - uninstall.sh #Pre-stop command name: nginx imagePullSecrets: - name: default-secret
----End
Cloud Container EngineUser Guide 4 Workload Management
Issue 01 (2018-08-13) Huawei Proprietary and ConfidentialCopyright © Huawei Technologies Co., Ltd.
58
4.7 Setting the Container Startup CommandWhen creating a workload, you can specify the commands to be run in the container inimages. By default, an image runs the default commands. To run specific commands orrewrite the default commands in the image, configure the following settings:
l Work directory: Specifies the work directory where the command runs.
NOTE
If the work directory is not specified in the image or on the CCE console, the default directory / isused.
l Command: specifies the command that controls running of an image.l Parameters: specify parameter carried in the command to run.
Commands and Parameters Used to Run a Container
The Docker image has metadata that stores image information. If lifecycle commands andparameters are not set, CCE runs the default commands and parameters, that is, Docker nativecommands Entrypoint and CMD, provided during image creation. For details, see thedescription of Entrypoint and CMD.
If the commands and parameters used to run a container are set during workload creation, thedefault commands Entrypoint and CMD are overwritten during image building. The rules areas follows:
Table 4-13 Commands and parameters used to run a container
DockerEntrypoint
Docker CMD Command toRun aContainer
Parameters toRun aContainer
CommandExecuted
[touch] [/root/test] Not set Not set [touch /root/test]
[touch] [/root/test] [mkdir] Not set [mkdir]
[touch] [/root/test] Not set [/opt/test] [touch /opt/test]
[touch] [/root/test] [mkdir] [/opt/test] [mkdir /opt/test]
Setting the Container Startup Command
Step 1 Log in to the CCE console. Expand Lifecycle when creating a workload.
Step 2 Enter the startup command, as shown in Table 4-14.
NOTE
l The current startup command is provided as a string array and corresponds to the ENTRYPOINTstartup command of the Docker. The format is as follows: ["executable", "param1", "param2",..].
l The lifecycle of a container is the same as that of the startup command, that is, the lifecycle of thecontainer ends after the command is executed.
Cloud Container EngineUser Guide 4 Workload Management
Issue 01 (2018-08-13) Huawei Proprietary and ConfidentialCopyright © Huawei Technologies Co., Ltd.
59
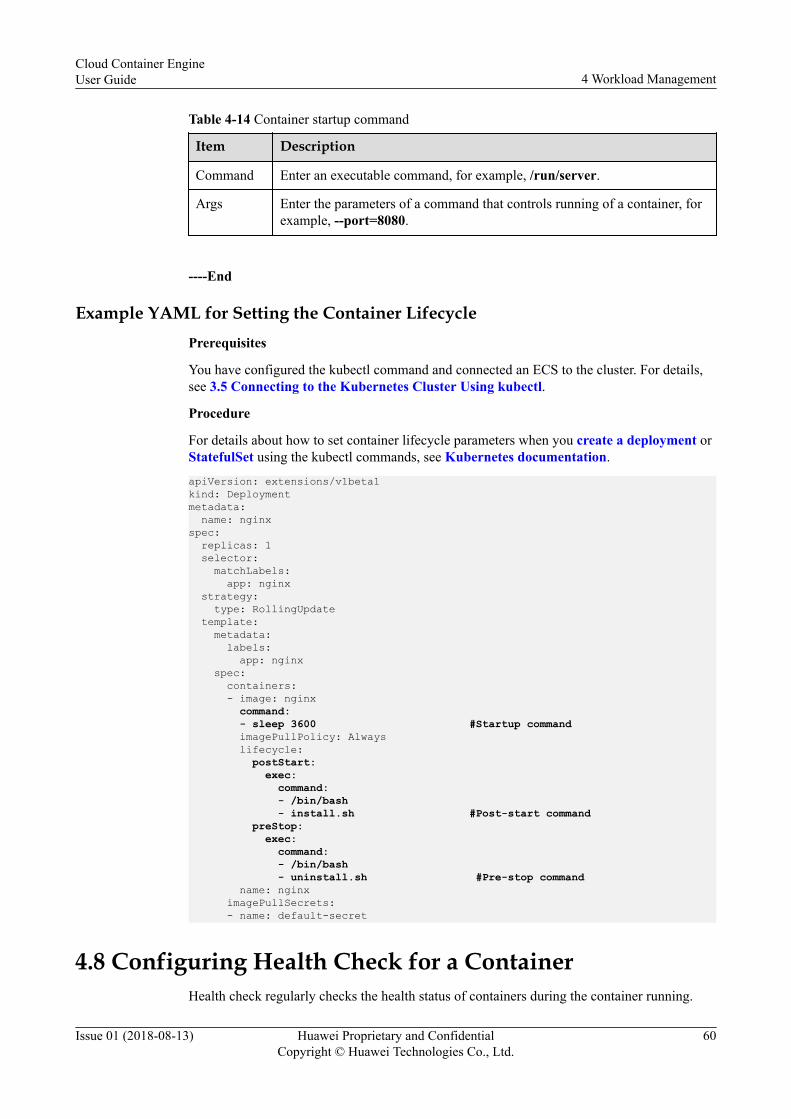
Table 4-14 Container startup command
Item Description
Command Enter an executable command, for example, /run/server.
Args Enter the parameters of a command that controls running of a container, forexample, --port=8080.
----End
Example YAML for Setting the Container LifecyclePrerequisites
You have configured the kubectl command and connected an ECS to the cluster. For details,see 3.5 Connecting to the Kubernetes Cluster Using kubectl.
Procedure
For details about how to set container lifecycle parameters when you create a deployment orStatefulSet using the kubectl commands, see Kubernetes documentation.
apiVersion: extensions/v1beta1kind: Deploymentmetadata: name: nginxspec: replicas: 1 selector: matchLabels: app: nginx strategy: type: RollingUpdate template: metadata: labels: app: nginx spec: containers: - image: nginx command: - sleep 3600 #Startup command imagePullPolicy: Always lifecycle: postStart: exec: command: - /bin/bash - install.sh #Post-start command preStop: exec: command: - /bin/bash - uninstall.sh #Pre-stop command name: nginx imagePullSecrets: - name: default-secret
4.8 Configuring Health Check for a ContainerHealth check regularly checks the health status of containers during the container running.
Cloud Container EngineUser Guide 4 Workload Management
Issue 01 (2018-08-13) Huawei Proprietary and ConfidentialCopyright © Huawei Technologies Co., Ltd.
60
CCE provides following health check methods:
l Workload Liveness Probe: checks whether a container exists. It is similar to the pscommand that checks whether a process exists. If the liveness check of a container fails,the cluster restarts the container. If the liveness check is successful, no operation isexecuted.
l Workload Service Probe: checks whether a container is ready to process user requests.It may take a long time for some workloads to start up before they can provide services.For example, loading disk data or relying on startup of an external module. In this case,the workload process is running, but the workload cannot provide services. If thecontainer readiness check fails, the cluster masks all requests sent to the container. If thecontainer readiness check is successful, the container can be accessed.
Health Check Modesl HTTP Request Mode
This health check mode is applicable to containers that provide HTTP/HTTPS services.The cluster periodically initiates an HTTP/HTTPS GET request to such containers. If thereturn code of the HTTP/HTTPS response is within 200–399, the probe is successful.Otherwise, the probe fails. In this health check mode, you must specify a containerlistening port and an HTTP/HTTPS request path.For example, if you have an HTTP service container, after you specify port 80 forcontainer listening and the HTTP request path /health-check, the cluster periodicallyinitiates the GET http://containerIP:80/health-check request to the container.
l TCP Port ModeFor a container that provides TCP communication services, the cluster periodicallyestablishes a TCP connection to the container. If the connection is successful, the probeis successful. Otherwise, the probe fails. In this health check mode, you must specify acontainer listening port. For example, if you have an Nginx container with service port80, after you configure TCP port probe for the container and specify port 80 for theprobe, the cluster periodically initiates a TCP connection to port 80 of the container. Ifthe connection is successful, the probe is successful. Otherwise, the probe fails.
l CLI ModeThe CLI mode is an efficient health check mode. In this mode, you must specify anexecutable command in a container. The cluster will periodically execute the commandin the container. If the command output is 0, the health check is successful. Otherwise,the health check fails.The CLI mode can be used to replace the following two modes.– TCP Link Setup Mode: Write a program script to connect to a container port. If
the connection is successful, the script returns 0. Otherwise, the script returns –1.– HttpGet Request Mode: Write a program script to run the wget command for a
container.wget http://127.0.0.1:80/health-checkCheck the return code of the response. If the return code is within 200–399, thescript returns 0. Otherwise, the script returns –1.
Cloud Container EngineUser Guide 4 Workload Management
Issue 01 (2018-08-13) Huawei Proprietary and ConfidentialCopyright © Huawei Technologies Co., Ltd.
61

NOTICEl Put the program to be executed in the container image so that the program can be
executed.l If the command to be executed is a shell script, do not directly specify the script as
the command, but add a script interpreter. For example, if the script is /data/scripts/health_check.sh, you must specify sh/data/scripts/health_check.shfor commandexecution. The reason is that the cluster is not in the terminal environment whenexecuting programs in a container.
Common Parameter Description
Table 4-15 Common parameter description
Parameter Description
Check Delay Time (s) Interval between two health checks. Unit: second. For example, ifthe parameter is set to 10, the health check interval is 10s.
Timeout Time (s) Timeout duration. Unit: second. For example, if this parameter isset to 10, the timeout wait time for performing a health check is10s. If the wait time elapses, the health check is regarded as afailure. If the parameter is left blank or set to 0, the defaulttimeout time is 1s.
4.9 Setting Environment VariablesEnvironment variables are set in the running environment of a container. These variablesprovide flexibility for workloads as they can be modified after workloads are deployed. Thefunction of setting environment variables on CCE is the same as that of specifying ENV inDockerfile.
On the CCE, you can add environment variables manually, from secrets, or from ConfigMaps.
Manually Adding Environment Variables
Step 1 After adding a container image during workload creation, expand Environment Variablesand click Add Environment Variables.
Step 2 For example, set Variable Name to demo and Variable/Variable Reference to value.
Cloud Container EngineUser Guide 4 Workload Management
Issue 01 (2018-08-13) Huawei Proprietary and ConfidentialCopyright © Huawei Technologies Co., Ltd.
62
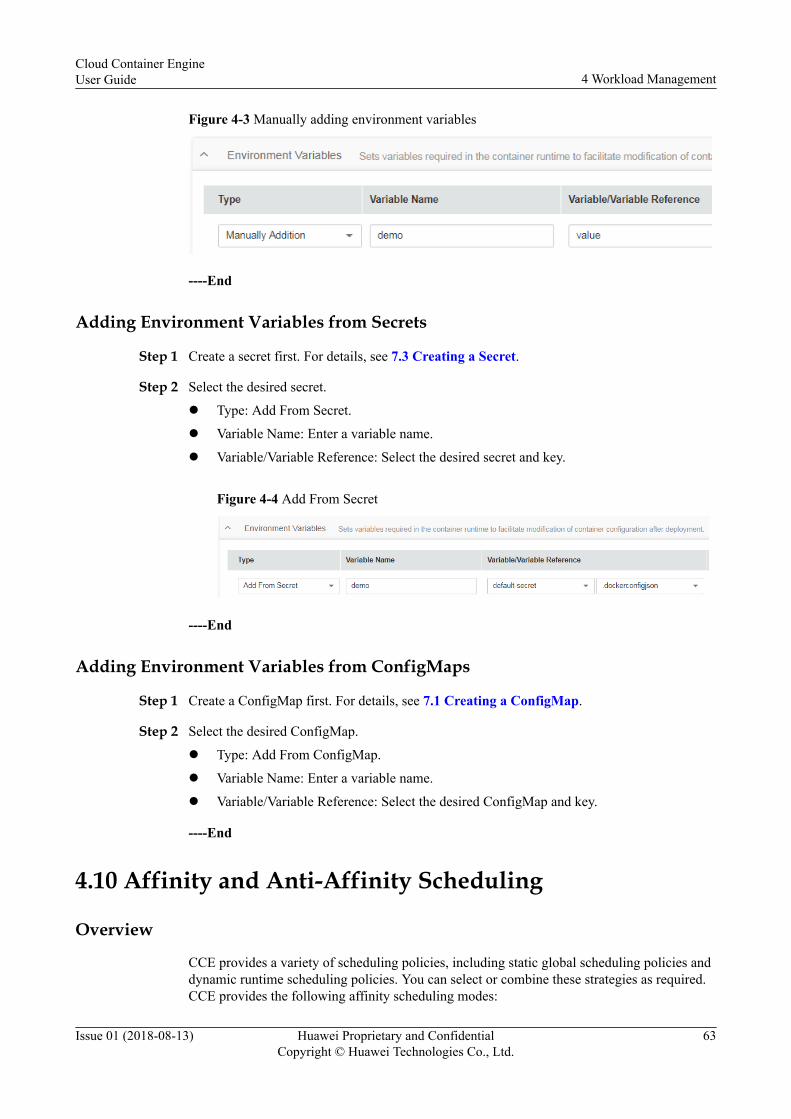
Figure 4-3 Manually adding environment variables
----End
Adding Environment Variables from Secrets
Step 1 Create a secret first. For details, see 7.3 Creating a Secret.
Step 2 Select the desired secret.
l Type: Add From Secret.
l Variable Name: Enter a variable name.
l Variable/Variable Reference: Select the desired secret and key.
Figure 4-4 Add From Secret
----End
Adding Environment Variables from ConfigMaps
Step 1 Create a ConfigMap first. For details, see 7.1 Creating a ConfigMap.
Step 2 Select the desired ConfigMap.
l Type: Add From ConfigMap.
l Variable Name: Enter a variable name.
l Variable/Variable Reference: Select the desired ConfigMap and key.
----End
4.10 Affinity and Anti-Affinity Scheduling
Overview
CCE provides a variety of scheduling policies, including static global scheduling policies anddynamic runtime scheduling policies. You can select or combine these strategies as required.CCE provides the following affinity scheduling modes:
Cloud Container EngineUser Guide 4 Workload Management
Issue 01 (2018-08-13) Huawei Proprietary and ConfidentialCopyright © Huawei Technologies Co., Ltd.
63

NOTICEWhen setting Workload Affinity, Affinity Between Workloads and Available Zone andAffinity Between Workloads and Nodes, ensure that the affinity relationships are notmutually exclusive; otherwise, workload deployment will fail. For example, workloaddeployment will fail when the following conditions are met:
l Anti-affinity is configured for two apps. That is, one app is deployed on one node and asecond app is deployed on another node.
l When a third app is deployed on a third node and goes online, affinity is configuredbetween this app and the second app.
l Workload-AZ Affinity and Anti-Affinity
– Affinity with AZs: Workloads can be deployed in specific AZs.
– Anti-affinity with AZs: Workloads cannot be deployed in specific AZs.
l Workload-Node Affinity and Anti-Affinity
– Affinity with Node: Workloads can be deployed on specific nodes.
– Anti-affinity with Node: Workloads cannot be deployed on specific nodes.
l Workload-Workload Affinity and Anti-Affinity: Determines whether workloads aredeployed on the same or different nodes.
– Affinity with Workload: Workloads are deployed on the same node. You candeploy workloads based on service requirements. The nearest route betweencontainers is used to reduce network consumption. For example, Figure 4-5 showsaffinity deployment, in which all worloads are deployed on the same node.
Figure 4-5 Workload affinity
– Anti-affinity with Workload: Different workloads or multiple instances of thesame workload are deployed on different nodes. Anti-affinity deployment formultiple instances of the same workload reduces the impact of system breakdowns.Anti-affinity deployment for workloads can prevent interference between theworkloads.
In Figure 4-6, four workloads are deployed on four different nodes. The fourworkloads are deployed in anti-affinity mode.
Cloud Container EngineUser Guide 4 Workload Management
Issue 01 (2018-08-13) Huawei Proprietary and ConfidentialCopyright © Huawei Technologies Co., Ltd.
64
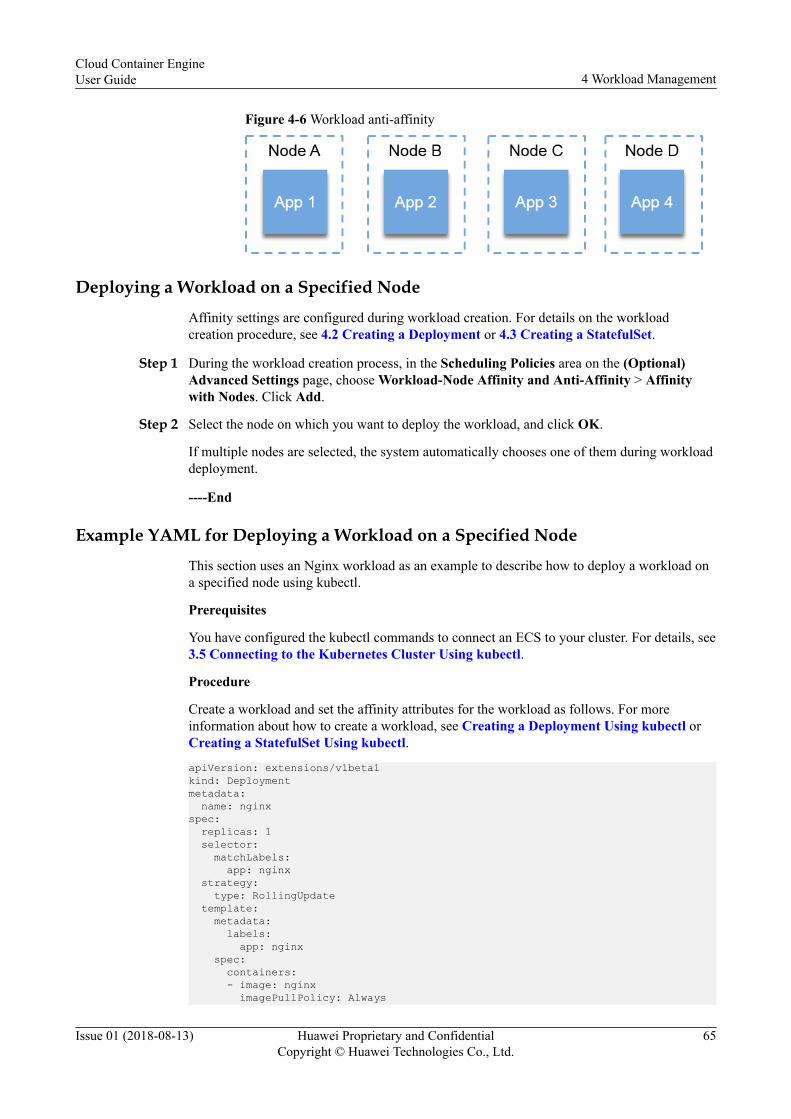
Figure 4-6 Workload anti-affinity
Deploying a Workload on a Specified Node
Affinity settings are configured during workload creation. For details on the workloadcreation procedure, see 4.2 Creating a Deployment or 4.3 Creating a StatefulSet.
Step 1 During the workload creation process, in the Scheduling Policies area on the (Optional)Advanced Settings page, choose Workload-Node Affinity and Anti-Affinity > Affinitywith Nodes. Click Add.
Step 2 Select the node on which you want to deploy the workload, and click OK.
If multiple nodes are selected, the system automatically chooses one of them during workloaddeployment.
----End
Example YAML for Deploying a Workload on a Specified Node
This section uses an Nginx workload as an example to describe how to deploy a workload ona specified node using kubectl.
Prerequisites
You have configured the kubectl commands to connect an ECS to your cluster. For details, see3.5 Connecting to the Kubernetes Cluster Using kubectl.
Procedure
Create a workload and set the affinity attributes for the workload as follows. For moreinformation about how to create a workload, see Creating a Deployment Using kubectl orCreating a StatefulSet Using kubectl.
apiVersion: extensions/v1beta1kind: Deploymentmetadata: name: nginxspec: replicas: 1 selector: matchLabels: app: nginx strategy: type: RollingUpdate template: metadata: labels: app: nginx spec: containers: - image: nginx imagePullPolicy: Always
Cloud Container EngineUser Guide 4 Workload Management
Issue 01 (2018-08-13) Huawei Proprietary and ConfidentialCopyright © Huawei Technologies Co., Ltd.
65

name: nginx imagePullSecrets: - name: default-secret affinity: nodeAffinity: requiredDuringSchedulingIgnoredDuringExecution: nodeSelectorTerms: - matchExpressions: - key: nodeName #Label key of a node operator: In values: - test-node-1 #Key value of a node
Deploying a Workload with Node Anti-AffinityAffinity settings are configured during workload creation. For details on the workloadcreation procedure, see 4.2 Creating a Deployment or 4.3 Creating a StatefulSet.
Step 1 During the workload creation process, in the Scheduling Policies area on the (Optional)Advanced Settings page, choose Workload-Node Affinity and Anti-Affinity > Anti-Affinity with Node. Click Add.
Step 2 Select the node on which you do not want to deploy the workload, and click OK.
If multiple nodes are selected, the workload will not be deployed on any of these nodes.
----End
Example YAML for Deploying a Workload with Node Anti-AffinityThis section uses an Nginx workload as an example to describe how to deploy a workloadwith node anti-affinity using kubectl.
Procedure
You have configured the kubectl commands to connect an ECS to your cluster. For details, see3.5 Connecting to the Kubernetes Cluster Using kubectl.
Procedure
Create a workload and set the affinity attributes for the workload as follows. For moreinformation about how to create a workload, see Creating a Deployment Using kubectl orCreating a StatefulSet Using kubectl.
apiVersion: extensions/v1beta1kind: Deploymentmetadata: name: nginxspec: replicas: 1 selector: matchLabels: app: nginx strategy: type: RollingUpdate template: metadata: labels: app: nginx spec: containers: - image: nginx imagePullPolicy: Always name: nginx
Cloud Container EngineUser Guide 4 Workload Management
Issue 01 (2018-08-13) Huawei Proprietary and ConfidentialCopyright © Huawei Technologies Co., Ltd.
66
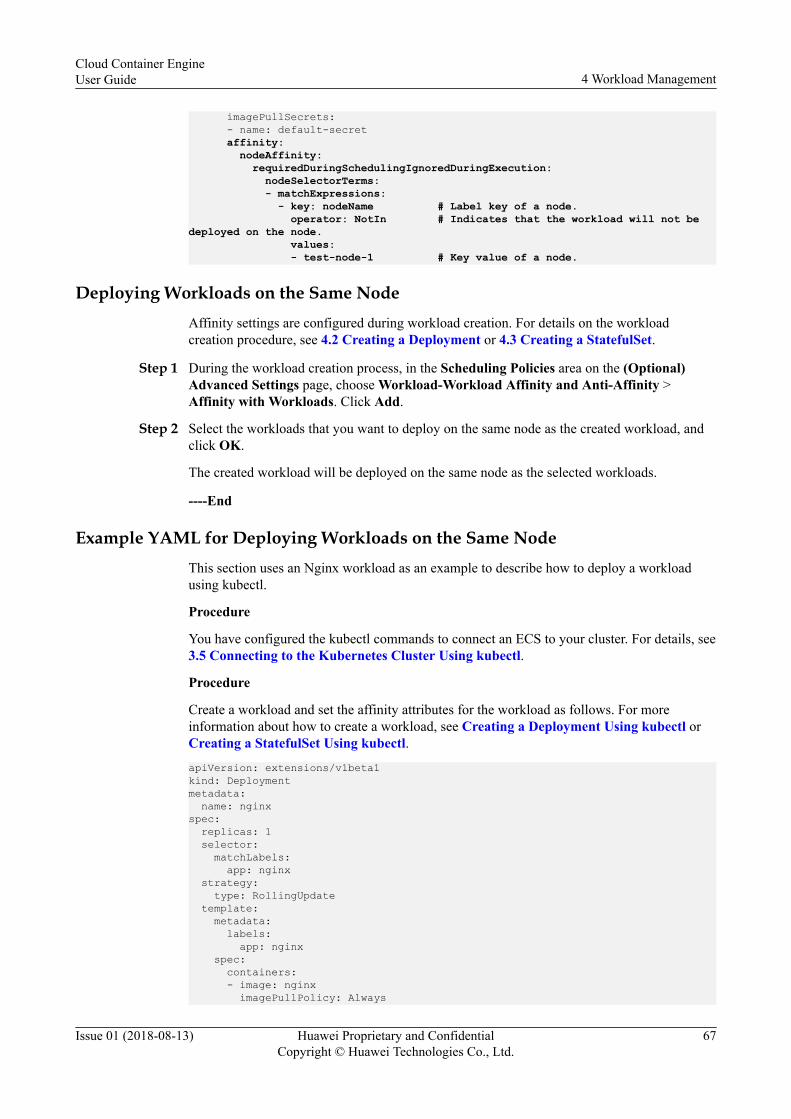
imagePullSecrets: - name: default-secret affinity: nodeAffinity: requiredDuringSchedulingIgnoredDuringExecution: nodeSelectorTerms: - matchExpressions: - key: nodeName # Label key of a node. operator: NotIn # Indicates that the workload will not be deployed on the node. values: - test-node-1 # Key value of a node.
Deploying Workloads on the Same NodeAffinity settings are configured during workload creation. For details on the workloadcreation procedure, see 4.2 Creating a Deployment or 4.3 Creating a StatefulSet.
Step 1 During the workload creation process, in the Scheduling Policies area on the (Optional)Advanced Settings page, choose Workload-Workload Affinity and Anti-Affinity >Affinity with Workloads. Click Add.
Step 2 Select the workloads that you want to deploy on the same node as the created workload, andclick OK.
The created workload will be deployed on the same node as the selected workloads.
----End
Example YAML for Deploying Workloads on the Same NodeThis section uses an Nginx workload as an example to describe how to deploy a workloadusing kubectl.
Procedure
You have configured the kubectl commands to connect an ECS to your cluster. For details, see3.5 Connecting to the Kubernetes Cluster Using kubectl.
Procedure
Create a workload and set the affinity attributes for the workload as follows. For moreinformation about how to create a workload, see Creating a Deployment Using kubectl orCreating a StatefulSet Using kubectl.
apiVersion: extensions/v1beta1kind: Deploymentmetadata: name: nginxspec: replicas: 1 selector: matchLabels: app: nginx strategy: type: RollingUpdate template: metadata: labels: app: nginx spec: containers: - image: nginx imagePullPolicy: Always
Cloud Container EngineUser Guide 4 Workload Management
Issue 01 (2018-08-13) Huawei Proprietary and ConfidentialCopyright © Huawei Technologies Co., Ltd.
67
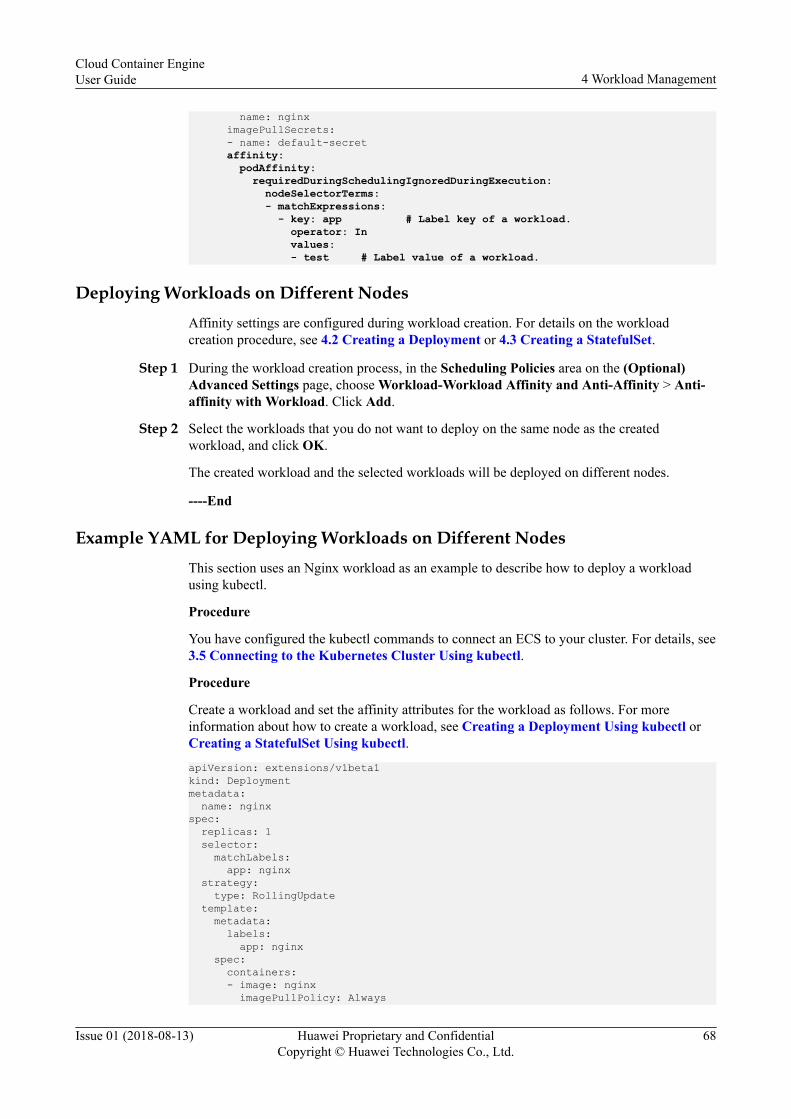
name: nginx imagePullSecrets: - name: default-secret affinity: podAffinity: requiredDuringSchedulingIgnoredDuringExecution: nodeSelectorTerms: - matchExpressions: - key: app # Label key of a workload. operator: In values: - test # Label value of a workload.
Deploying Workloads on Different NodesAffinity settings are configured during workload creation. For details on the workloadcreation procedure, see 4.2 Creating a Deployment or 4.3 Creating a StatefulSet.
Step 1 During the workload creation process, in the Scheduling Policies area on the (Optional)Advanced Settings page, choose Workload-Workload Affinity and Anti-Affinity > Anti-affinity with Workload. Click Add.
Step 2 Select the workloads that you do not want to deploy on the same node as the createdworkload, and click OK.
The created workload and the selected workloads will be deployed on different nodes.
----End
Example YAML for Deploying Workloads on Different NodesThis section uses an Nginx workload as an example to describe how to deploy a workloadusing kubectl.
Procedure
You have configured the kubectl commands to connect an ECS to your cluster. For details, see3.5 Connecting to the Kubernetes Cluster Using kubectl.
Procedure
Create a workload and set the affinity attributes for the workload as follows. For moreinformation about how to create a workload, see Creating a Deployment Using kubectl orCreating a StatefulSet Using kubectl.
apiVersion: extensions/v1beta1kind: Deploymentmetadata: name: nginxspec: replicas: 1 selector: matchLabels: app: nginx strategy: type: RollingUpdate template: metadata: labels: app: nginx spec: containers: - image: nginx imagePullPolicy: Always
Cloud Container EngineUser Guide 4 Workload Management
Issue 01 (2018-08-13) Huawei Proprietary and ConfidentialCopyright © Huawei Technologies Co., Ltd.
68
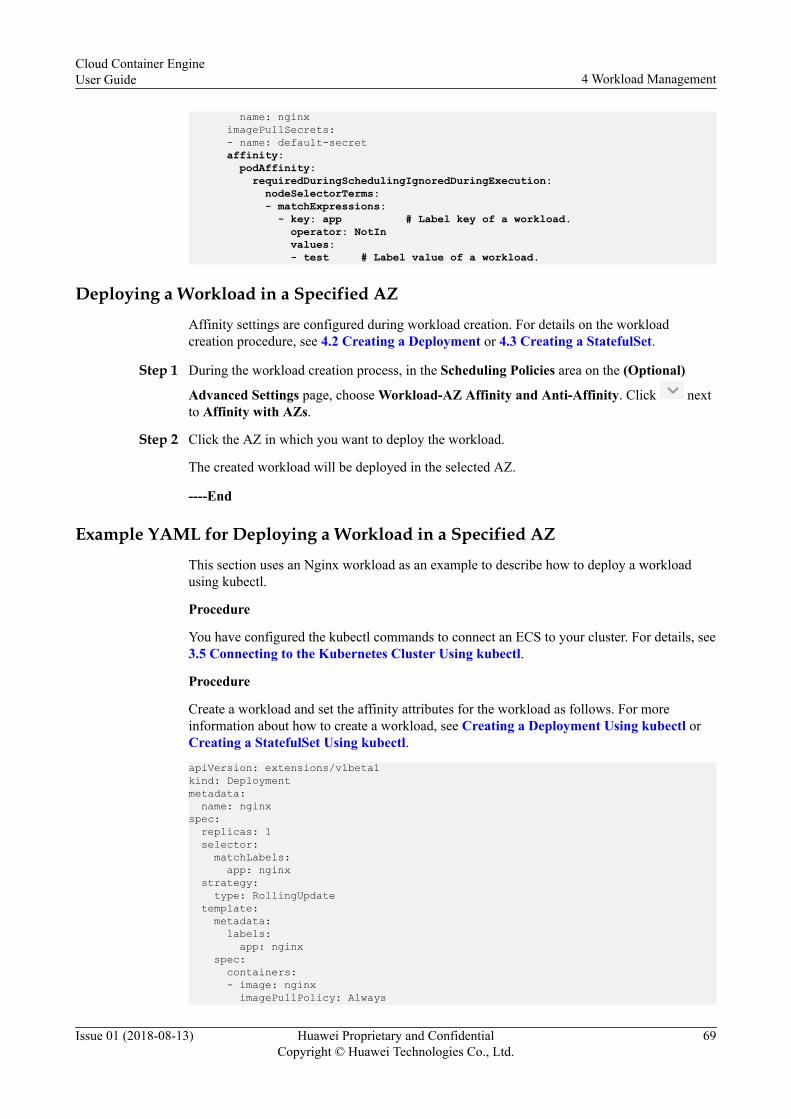
name: nginx imagePullSecrets: - name: default-secret affinity: podAffinity: requiredDuringSchedulingIgnoredDuringExecution: nodeSelectorTerms: - matchExpressions: - key: app # Label key of a workload. operator: NotIn values: - test # Label value of a workload.
Deploying a Workload in a Specified AZ
Affinity settings are configured during workload creation. For details on the workloadcreation procedure, see 4.2 Creating a Deployment or 4.3 Creating a StatefulSet.
Step 1 During the workload creation process, in the Scheduling Policies area on the (Optional)
Advanced Settings page, choose Workload-AZ Affinity and Anti-Affinity. Click nextto Affinity with AZs.
Step 2 Click the AZ in which you want to deploy the workload.
The created workload will be deployed in the selected AZ.
----End
Example YAML for Deploying a Workload in a Specified AZ
This section uses an Nginx workload as an example to describe how to deploy a workloadusing kubectl.
Procedure
You have configured the kubectl commands to connect an ECS to your cluster. For details, see3.5 Connecting to the Kubernetes Cluster Using kubectl.
Procedure
Create a workload and set the affinity attributes for the workload as follows. For moreinformation about how to create a workload, see Creating a Deployment Using kubectl orCreating a StatefulSet Using kubectl.
apiVersion: extensions/v1beta1kind: Deploymentmetadata: name: nginxspec: replicas: 1 selector: matchLabels: app: nginx strategy: type: RollingUpdate template: metadata: labels: app: nginx spec: containers: - image: nginx imagePullPolicy: Always
Cloud Container EngineUser Guide 4 Workload Management
Issue 01 (2018-08-13) Huawei Proprietary and ConfidentialCopyright © Huawei Technologies Co., Ltd.
69

name: nginx imagePullSecrets: - name: default-secret affinity: nodeAffinity: requiredDuringSchedulingIgnoredDuringExecution: nodeSelectorTerms: - matchExpressions: - key: kubernetes.io/availablezone # Label key of a node. operator: NotIn values: - az1 # Key value of a node.
Deploying a Workload with AZ Anti-Affinity
Affinity settings are configured during workload creation. For details on the workloadcreation procedure, see 4.2 Creating a Deployment or 4.3 Creating a StatefulSet.
Step 1 During the workload creation process, in the Scheduling Policies area on the (Optional)
Advanced Settings page, choose Workload-AZ Affinity and Anti-Affinity. Click nextto Anti-affinity with AZs.
Step 2 Click the AZ in which you do not want to deploy the workload.
The created workload will not be deployed in the selected AZ.
----End
Example YAML for Deploying a Workload with AZ Anti-Affinity
This section uses an Nginx workload as an example to describe how to deploy a workloadwith AZ anti-affinity using kubectl.
Procedure
You have configured the kubectl commands to connect an ECS to your cluster. For details, see3.5 Connecting to the Kubernetes Cluster Using kubectl.
Procedure
Create a workload and set the affinity attributes for the workload as follows. For moreinformation about how to create a workload, see Creating a Deployment Using kubectl orCreating a StatefulSet Using kubectl.
apiVersion: extensions/v1beta1kind: Deploymentmetadata: name: nginxspec: replicas: 1 selector: matchLabels: app: nginx strategy: type: RollingUpdate template: metadata: labels: app: nginx spec: containers: - image: nginx imagePullPolicy: Always
Cloud Container EngineUser Guide 4 Workload Management
Issue 01 (2018-08-13) Huawei Proprietary and ConfidentialCopyright © Huawei Technologies Co., Ltd.
70
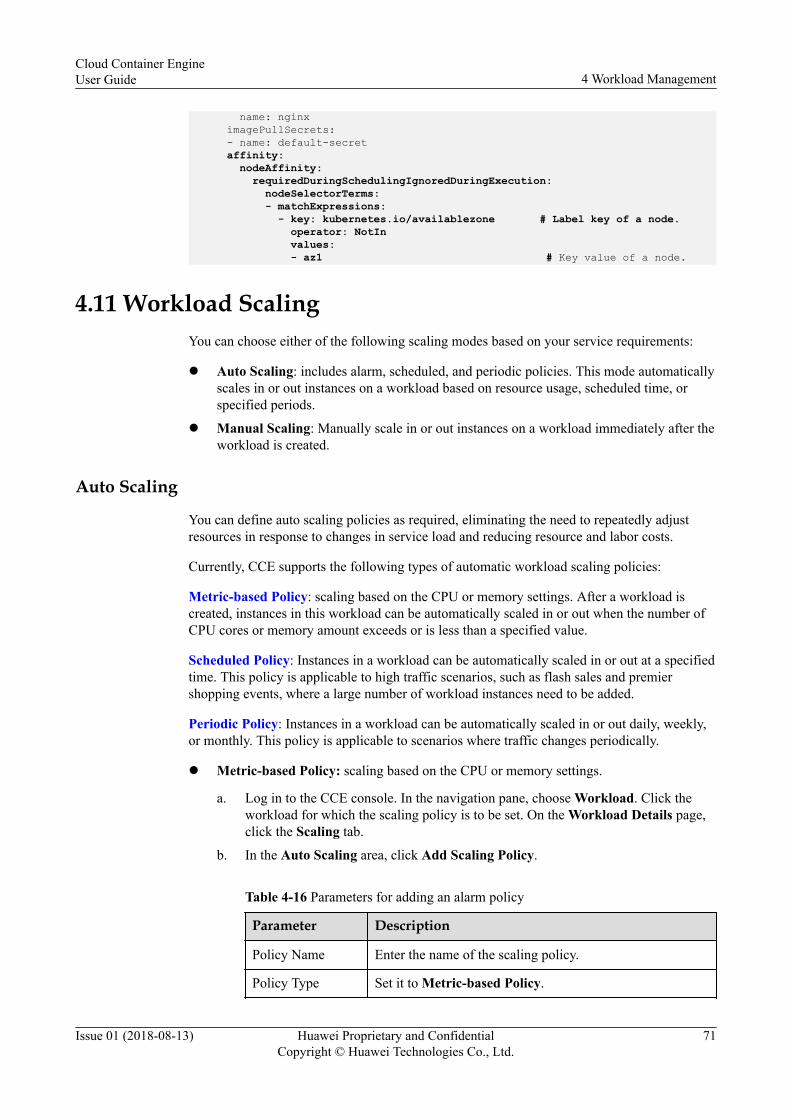
name: nginx imagePullSecrets: - name: default-secret affinity: nodeAffinity: requiredDuringSchedulingIgnoredDuringExecution: nodeSelectorTerms: - matchExpressions: - key: kubernetes.io/availablezone # Label key of a node. operator: NotIn values: - az1 # Key value of a node.
4.11 Workload ScalingYou can choose either of the following scaling modes based on your service requirements:
l Auto Scaling: includes alarm, scheduled, and periodic policies. This mode automaticallyscales in or out instances on a workload based on resource usage, scheduled time, orspecified periods.
l Manual Scaling: Manually scale in or out instances on a workload immediately after theworkload is created.
Auto Scaling
You can define auto scaling policies as required, eliminating the need to repeatedly adjustresources in response to changes in service load and reducing resource and labor costs.
Currently, CCE supports the following types of automatic workload scaling policies:
Metric-based Policy: scaling based on the CPU or memory settings. After a workload iscreated, instances in this workload can be automatically scaled in or out when the number ofCPU cores or memory amount exceeds or is less than a specified value.
Scheduled Policy: Instances in a workload can be automatically scaled in or out at a specifiedtime. This policy is applicable to high traffic scenarios, such as flash sales and premiershopping events, where a large number of workload instances need to be added.
Periodic Policy: Instances in a workload can be automatically scaled in or out daily, weekly,or monthly. This policy is applicable to scenarios where traffic changes periodically.
l Metric-based Policy: scaling based on the CPU or memory settings.
a. Log in to the CCE console. In the navigation pane, choose Workload. Click theworkload for which the scaling policy is to be set. On the Workload Details page,click the Scaling tab.
b. In the Auto Scaling area, click Add Scaling Policy.
Table 4-16 Parameters for adding an alarm policy
Parameter Description
Policy Name Enter the name of the scaling policy.
Policy Type Set it to Metric-based Policy.
Cloud Container EngineUser Guide 4 Workload Management
Issue 01 (2018-08-13) Huawei Proprietary and ConfidentialCopyright © Huawei Technologies Co., Ltd.
71

Parameter Description
Metric Set the metrics that describe the resource performance dataor status.l Disk Read Rate: indicates the data volume read from
the disk per second.l Disk Write Rate: indicates the data volume written into
the disk per second.l Error Packets Received: indicates the number of error
packets received by the measured object.l CPU Core Used: indicates the number of CPU cores
used by the measured object.l CPU Usage: indicates the CPU usage of the measured
object, that is, the percentage of the CPU cores actuallyused by the measured object to the total CPU cores thatthe measured object has applied for.
l Physical Memory Usage: indicates the percentage of thephysical memory size used by the measured object tothe physical memory size that the measured object hasapplied for.
l Physical Memory Size: indicates the total physicalmemory size that the measured object has applied for.
l Physical Memory Used: indicates the physical memorysize used by the measured object.
l Data Sending Rate: indicates the data volume sent bythe measured object per second.
l Data Receive Rate: indicates the data volume receivedby the measured object per second.
Trigger Condition Set it to CPU Usage or Physical Memory Usage.If you set this parameter to Physical Memory Usage andset the average value to be greater than 70%, the scalingpolicy is triggered when memory usage exceeds 70%.
Duration Metric statistics period. Select a value from the drop-downlist box.If the parameter is set to 20s, metric statistics is collectedevery 20 seconds.
Consecutive Times If the parameter is set to 3, the action is triggered ifthreshold is reached for three consecutive measurementperiods.
Action Whether a scale-in or scale-out is triggered.
c. Click OK.d. In the Auto Scaling area, check that the policy has been started.
When the trigger condition is met, the auto scaling policy starts automatically.
Cloud Container EngineUser Guide 4 Workload Management
Issue 01 (2018-08-13) Huawei Proprietary and ConfidentialCopyright © Huawei Technologies Co., Ltd.
72
l Scheduled Policy: scaling at a specified time.
a. In the Auto Scaling area, click Add Scaling Policy.
Table 4-17 Parameters for adding a scheduled policy
Parameter Description
Policy Name Enter the name of the scaling policy.
Policy Type Set this parameter to Scheduled Policy.
Trigger Time Time at which the policy is enforced.
Action Whether a scale-in or scale-out is triggered.
b. Click OK.c. In the Auto Scaling area, check that the policy has been started.
When the trigger time is reached, you can see on the Instance List tab page that theauto scaling policy has taken effect.
l Periodic Policy: scaling at a specified time on a daily, weekly, or monthly basis.
a. In the Auto Scaling area, click Add Scaling Policy.
Table 4-18 Parameters for adding a periodic policy
Parameter Description
Policy Name Enter the name of the scaling policy.
Policy Type Set this parameter to Periodic Policy.
Select Time Specify the time for triggering the policy.
Action Action executed after a policy is triggered.
b. Click OK.c. In the Auto Scaling area, check that the policy has been started.
When the trigger condition is met, the auto scaling policy starts automatically.
Manual Scaling
Step 1 Log in to the CCE console. In the navigation pane, choose Workload. On the page that isdisplayed, click the workload to be scaled. On the Workload Details page, click the Scalingtab.
Step 2 In the Manual Scaling area, click to modify the number of instances, and click Save. Theinstance scaling takes effect immediately.
Step 3 On the Instances tab page, check that a new instance is being created. When the instancestatus becomes Running, instance scaling is complete.
----End
Cloud Container EngineUser Guide 4 Workload Management
Issue 01 (2018-08-13) Huawei Proprietary and ConfidentialCopyright © Huawei Technologies Co., Ltd.
73

4.12 Interconnection with Prometheus (Monitoring)CCE allows you to obtain user-defined metrics. Currently, only the Gauge Metric Types ofPrometheus can be obtained and displayed in Operation Management > Setting > Metrics >User-defined Metrics. You can use this method to report user-defined metrics.
Before customizing monitoring, you must know about the Prometheus and provide GET APIrequests for obtaining user-defined metrics in your workload.
Procedure
Step 1 When creating a workload, configure User-Defined Monitoring in Advanced Settings.
Step 2 Configure the values by referring to Table 4-19. Reported port and report path of the user-defined metrics must be specified in your exporter. After the configuration, CCE will obtainthe user-defined metric data in response to the GET request "http://PodIP:reported port/reportpath", for example, http://192.168.1.19:8080/metrics.
Table 4-19 Parameter description
Parameter Description Mandatory (Yes/No)
Report Path URL provided by the exporter for CCE toobtain user-defined metric data.The path consists of letters, digits,backslashes (/), and underscores (_), andmust start with a backslash (/). Forexample, /metrics.
Yes
Reported Port Port provided by the exporter for CCE toobtain user-defined metric data.The port number is an integer from 1 to65535. For example, 8080.
Yes
Cloud Container EngineUser Guide 4 Workload Management
Issue 01 (2018-08-13) Huawei Proprietary and ConfidentialCopyright © Huawei Technologies Co., Ltd.
74

Parameter Description Mandatory (Yes/No)
MonitoringMetrics
Name of the user-defined metric provided bythe exporter.The name of a user-defined metric is a stringof 5 to 100 characters. Only letters, digits,and underscores (_) are allowed. The formatis as follows: ["User-defined metric name1","User-defined metric name 2"]. Usecommas (,) to separate multiple user-definedmetric names. For example,["cpu_usage","mem_usage"].l If this parameter is not configured, CCE
obtains all user-defined metric data.l If this parameter is configured, for
example, ["cpu_usage","mem_usage"],CCE filters user-defined metrics andobtains only the data of cpu_usage andmem_usage.
No
----End
4.13 Monitoring Java WorkloadsCurrently, the CCE provides tracing and topology monitoring capabilities for Java-classworkloads. If you use a Java-class workload and need to monitor its status, select Java probeand enter a monitoring group name.
Setting Java Workload Monitoring
Step 1 When creating a workload, configure APM Settings in Advanced Settings.
Step 2 Select JAVA probe. This operation will start APM and install Java probes, enabling you tomonitor Java workloads using the call chains and topologies.
Step 3 Enter a monitoring group name, for example, testapp. You can also select an existingmonitoring group from the drop-down list.
----End
4.14 Using a Third-Party ImageCCE allows you to create a workload using an image pulled from a third-party imagerepository, rather than a HUAWEI CLOUD image repository or a Docker Hub imagerepository.
Generally, you are required to pass authentication using your account and password beforeaccessing a third-party image repository. The secret authentication mode is used for pullingimages from a CCE container. Therefore, you must create a secret for accessing the imagerepository before pulling images.
Cloud Container EngineUser Guide 4 Workload Management
Issue 01 (2018-08-13) Huawei Proprietary and ConfidentialCopyright © Huawei Technologies Co., Ltd.
75
PrerequisitesThe node where the workload is running is accessible from public networks.
Operations on the GUI
Step 1 Create a secret for accessing a third-party image repository.
In the navigation pane, choose Configuration Center > Secrets, and click Create Secret.Secret Type must be set to dockerconfigjson. For more information, see 7.3 Creating aSecret.
Enter the user name and password used to access the third-party image repository.
Step 2 Create a workload. For details, see 4.2 Creating a Deployment or 4.3 Creating aStatefulSet. When selecting a third-party image, set the parameters as follows:
1. Set Authenticate Secret to Yes.2. Select the secret created in step Step 1.3. Enter the image address.
Step 3 Click OK.
----End
Operations on CLI
Step 1 Configure kubectl. For details, see 3.5 Connecting to the Kubernetes Cluster Usingkubectl.
Step 2 Log in to the ECS where kubectl is configured. For details, see Logging In to a Linux ECS.
Step 3 Create a secret of the dockercfg type using kubectl.kubectl create secret docker-registry myregistrykey --docker-server=DOCKER_REGISTRY_SERVER --docker-username=DOCKER_USER --docker-password=DOCKER_PASSWORD --docker-email=DOCKER_EMAIL
In the preceding commands, myregistrykey indicates the secret name, and other parametersare described as follows:l DOCKER_REGISTRY_SERVER: address of a third-party image repository, for
example, www.3rdregistry.com or 10.10.10.10:443.l DOCKER_USER: account used for logging in to a third-party image repositoryl DOCKER_PASSWORD: password used for logging in to a third-party image
repositoryl DOCKER_EMAIL: email of a third-party image repository
Step 4 Use a third-party image to create a workload.
The secret of the dockecfg type is used for authentication when you obtain a private image.The following is an example of using the myregistrykey for authentication.apiVersion: v1kind: Podmetadata: name: foo namespace: defaultspec: containers: - name: foo
Cloud Container EngineUser Guide 4 Workload Management
Issue 01 (2018-08-13) Huawei Proprietary and ConfidentialCopyright © Huawei Technologies Co., Ltd.
76
image: www.3rdregistry.com/janedoe/awesomeapp:v1 imagePullSecrets: - name: myregistrykey #Use the secret created in step 3.
----End
Cloud Container EngineUser Guide 4 Workload Management
Issue 01 (2018-08-13) Huawei Proprietary and ConfidentialCopyright © Huawei Technologies Co., Ltd.
77
5 Network Management
5.1 Overview
5.2 Intra-Cluster Access
5.3 Intra-VPC Access
5.4 External Access - Elastic IP Address
5.5 External Access - Elastic Load Balancer
5.6 ExternalAccess - NAT Gateway
5.7 External Access - Layer-7 Load Balancing
5.8 Network Policies
5.1 OverviewCCE provides the following modes that allow access between workloads in differentscenarios:
l Intra-Cluster AccessA workload can be accessed by other workloads in the same cluster using an internaldomain name. The internal domain name is in the format of <User-defined accessmode>.<Namespace of the workload>.svc.cluster.local, for example,nginx.default.svc.cluster.local.
l Intra-VPC AccessA workload is accessible to other workloads in the same VPC by using the IP address ofa cluster node or the ELB service IP address of a private network. Typical scenario:Workloads in a kubernetes cluster are accessed by other workloads in the same VPC.
l External Access - Elastic IP AddressAn EIP is used to access workloads from a public network. This access mode isapplicable to services that need to be exposed to a public network in the system. In thisaccess mode, an EIP must be bound to a node in the cluster, and a port must be mappedto the node. The port range is 30000–32676. For example, the access address could be10.0.0.0:30000.
l ExternalAccess - NAT Gateway
Cloud Container EngineUser Guide 5 Network Management
Issue 01 (2018-08-13) Huawei Proprietary and ConfidentialCopyright © Huawei Technologies Co., Ltd.
78

A workload is accessible to public networks through NAT Gateway that enables multiplenodes to share an elastic IP address.This access mode provides higher reliability thanelastic IP address-based access. In this mode, an elastic IP address can be shared bymultiple nodes, and the elastic IP address-based access of any node will not be affectedby the other nodes. The access address consists of the IP address of a public network,followed by the access port number, for example, 10.117.117.117:80.
l External Access - Elastic Load BalancerThis access mode is applicable to services that need to be exposed to public networks.Compared with EIP-based access, ELB allows access to workloads from a publicnetwork with higher reliability. The access address consists of the ELB service in thepublic network, followed by the configured access port number; for example,10.117.117.117:80.
l External Access - Layer-7 Load BalancingBased on the Layer-4 load balancing, Layer-7 load balancing uses enhanced loadbalancer and allows you to configure URIs for distributing access traffic tocorresponding services. In addition, different functions are implemented based onvarious URIs. The access address consists of the IP address of the public network loadbalancer, followed by the configured access port and URI, for example,10.117.117.117:80/helloworld.
5.2 Intra-Cluster AccessA workload is accessible to other workloads in the same cluster through the use of an internaldomain name. The internal domain name is in the format of <User-defined accessmode>.<Namespace of the workload>.svc.cluster.local, for example,nginx.default.svc.cluster.local.
Figure 5-1 shows the mapping relationships between access channels, container ports, and anaccess port.
Figure 5-1 Intra-cluster access
Cloud Container EngineUser Guide 5 Network Management
Issue 01 (2018-08-13) Huawei Proprietary and ConfidentialCopyright © Huawei Technologies Co., Ltd.
79

Methods for Setting the Access ModeYou can set the access mode using either of the following two methods:
l Set the access mode when creating a workload. For details, see Creating a Workload onthe CCE Console and Using kubectl for Intra-Cluster Access.
l Set the access mode after creating a workload. For details, see Setting the Access ModeAfter Creating a Workload.
Creating a Workload on the CCE Console
Step 1 Create a workload. For details, see 4.2 Creating a Deployment or 4.3 Creating aStatefulSet. In the Workload Access Settings step, click Add Access Mode and set thefollowing parameters:l Service Name: Specify a service name. You can use the workload name as the service
name.l Access Mode: Select Intra-cluster access.l Protocol: Select a protocol used by the service.l Container Port: Specify a port on which the workload in the container image listens.
The Nginx workload listens on port 80.l Access Port: Specify a port to map a container port to the cluster virtual IP address. The
port range is 1–65535. The port will be used when the workload is accessed using thecluster virtual IP address.
Step 2 Click OK, and then click Next. On the (Optional) Advanced Settings page that is displayed,click Create.
Step 3 Click View Workload Details. On the Access Mode tab page, obtain the access address, forexample: 10.247.74.100:2.
Step 4 Log in to any node in the cluster where the workload is located. For details, see Logging In toa Linux ECS.
Step 5 Run the curl command to check whether the workload can be accessed normally. You canperform the verification by using the IP address or domain name.l IP address
curl 10.247.74.100:210.247.74.100:2 is the access address obtained in Step 3.If the following information is displayed, the workload is accessible.<html><head><title>Welcome to nginx!</title><style> body { width: 35em; margin: 0 auto; font-family: Tahoma, Verdana, Arial, sans-serif; }</style></head><body><h1>Welcome to nginx!</h1><p>If you see this page, the nginx web server is successfully installed andworking. Further configuration is required.</p>
<p>For online documentation and support please refer to
Cloud Container EngineUser Guide 5 Network Management
Issue 01 (2018-08-13) Huawei Proprietary and ConfidentialCopyright © Huawei Technologies Co., Ltd.
80

<a href="http://nginx.org/">nginx.org</a>.<br/>Commercial support is available at<a href="http://nginx.com/">nginx.com</a>.</p>
<p><em>Thank you for using nginx.</em></p></body></html>
l Domain namecurl nginx.default.svc.cluster.local:2nginx.default.svc.cluster.local is the domain name access address obtained in Step 3.If the following information is displayed, the workload is accessible.<html><head><title>Welcome to nginx!</title><style> body { width: 35em; margin: 0 auto; font-family: Tahoma, Verdana, Arial, sans-serif; }</style></head><body><h1>Welcome to nginx!</h1><p>If you see this page, the nginx web server is successfully installed andworking. Further configuration is required.</p>
<p>For online documentation and support please refer to<a href="http://nginx.org/">nginx.org</a>.<br/>Commercial support is available at<a href="http://nginx.com/">nginx.com</a>.</p>
<p><em>Thank you for using nginx.</em></p></body></html>
----End
Setting the Access Mode After Creating a Workload
Step 1 Log in to the CCE console. In the navigation pane, choose Resource Management >Network Management. On the Service tab page, click Create Service. Select Intra-clusteraccess.
Step 2 Set the parameters for intra-cluster access.l Service Name: Specify a service name. You can use the workload name as the service
name.l Cluster Name: Specify a cluster for the service.l Namespace: Specify a namespace for the service.l Workload: Select a workload for which you want to add the service.l Port Configuration:
– Protocol: Select a protocol used by the service.– Container Port: Specify a listening port for the workload in a container image.
Port 80 is the listening port for the Nginx workload.– Access Port: Specify a port to map a container port to the cluster virtual IP address.
The port range is 1–65535. The port will be used when the workload is accessedusing the virtual IP address.
Cloud Container EngineUser Guide 5 Network Management
Issue 01 (2018-08-13) Huawei Proprietary and ConfidentialCopyright © Huawei Technologies Co., Ltd.
81
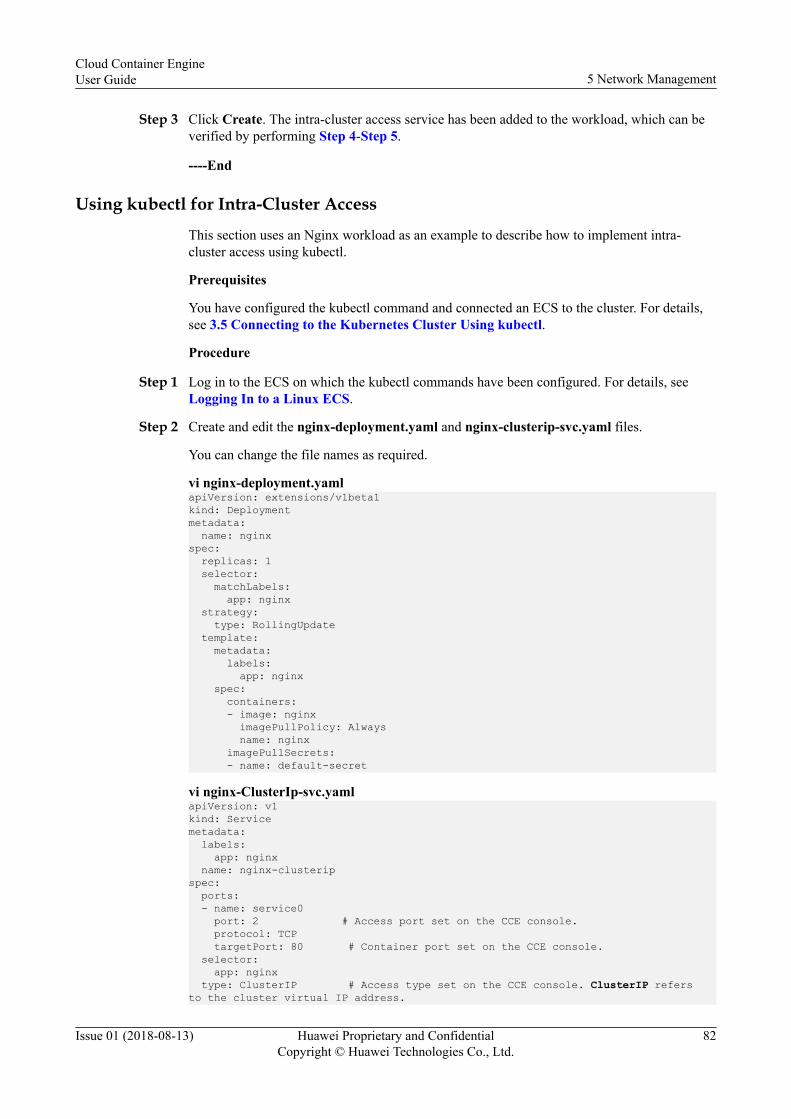
Step 3 Click Create. The intra-cluster access service has been added to the workload, which can beverified by performing Step 4-Step 5.
----End
Using kubectl for Intra-Cluster Access
This section uses an Nginx workload as an example to describe how to implement intra-cluster access using kubectl.
Prerequisites
You have configured the kubectl command and connected an ECS to the cluster. For details,see 3.5 Connecting to the Kubernetes Cluster Using kubectl.
Procedure
Step 1 Log in to the ECS on which the kubectl commands have been configured. For details, seeLogging In to a Linux ECS.
Step 2 Create and edit the nginx-deployment.yaml and nginx-clusterip-svc.yaml files.
You can change the file names as required.
vi nginx-deployment.yamlapiVersion: extensions/v1beta1kind: Deploymentmetadata: name: nginxspec: replicas: 1 selector: matchLabels: app: nginx strategy: type: RollingUpdate template: metadata: labels: app: nginx spec: containers: - image: nginx imagePullPolicy: Always name: nginx imagePullSecrets: - name: default-secret
vi nginx-ClusterIp-svc.yamlapiVersion: v1kind: Servicemetadata: labels: app: nginx name: nginx-clusteripspec: ports: - name: service0 port: 2 # Access port set on the CCE console. protocol: TCP targetPort: 80 # Container port set on the CCE console. selector: app: nginx type: ClusterIP # Access type set on the CCE console. ClusterIP refers to the cluster virtual IP address.
Cloud Container EngineUser Guide 5 Network Management
Issue 01 (2018-08-13) Huawei Proprietary and ConfidentialCopyright © Huawei Technologies Co., Ltd.
82
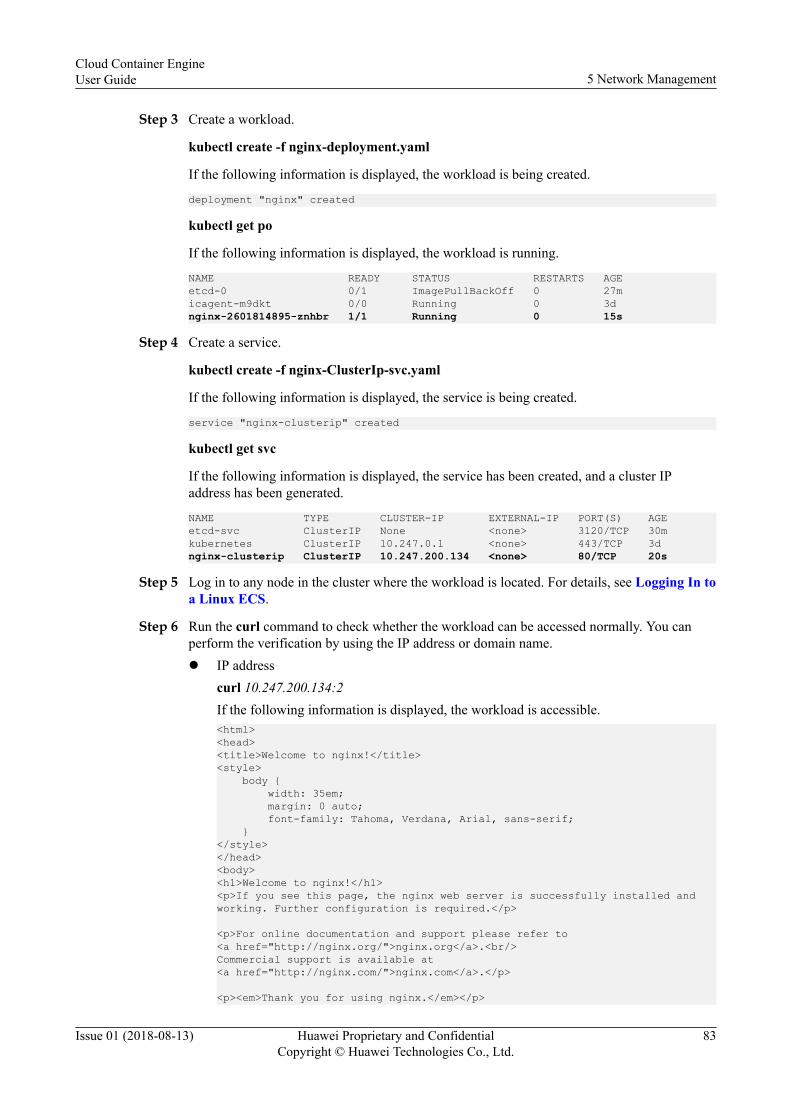
Step 3 Create a workload.
kubectl create -f nginx-deployment.yaml
If the following information is displayed, the workload is being created.
deployment "nginx" created
kubectl get po
If the following information is displayed, the workload is running.
NAME READY STATUS RESTARTS AGEetcd-0 0/1 ImagePullBackOff 0 27micagent-m9dkt 0/0 Running 0 3dnginx-2601814895-znhbr 1/1 Running 0 15s
Step 4 Create a service.
kubectl create -f nginx-ClusterIp-svc.yaml
If the following information is displayed, the service is being created.
service "nginx-clusterip" created
kubectl get svc
If the following information is displayed, the service has been created, and a cluster IPaddress has been generated.
NAME TYPE CLUSTER-IP EXTERNAL-IP PORT(S) AGEetcd-svc ClusterIP None <none> 3120/TCP 30mkubernetes ClusterIP 10.247.0.1 <none> 443/TCP 3dnginx-clusterip ClusterIP 10.247.200.134 <none> 80/TCP 20s
Step 5 Log in to any node in the cluster where the workload is located. For details, see Logging In toa Linux ECS.
Step 6 Run the curl command to check whether the workload can be accessed normally. You canperform the verification by using the IP address or domain name.l IP address
curl 10.247.200.134:2If the following information is displayed, the workload is accessible.<html><head><title>Welcome to nginx!</title><style> body { width: 35em; margin: 0 auto; font-family: Tahoma, Verdana, Arial, sans-serif; }</style></head><body><h1>Welcome to nginx!</h1><p>If you see this page, the nginx web server is successfully installed andworking. Further configuration is required.</p>
<p>For online documentation and support please refer to<a href="http://nginx.org/">nginx.org</a>.<br/>Commercial support is available at<a href="http://nginx.com/">nginx.com</a>.</p>
<p><em>Thank you for using nginx.</em></p>
Cloud Container EngineUser Guide 5 Network Management
Issue 01 (2018-08-13) Huawei Proprietary and ConfidentialCopyright © Huawei Technologies Co., Ltd.
83
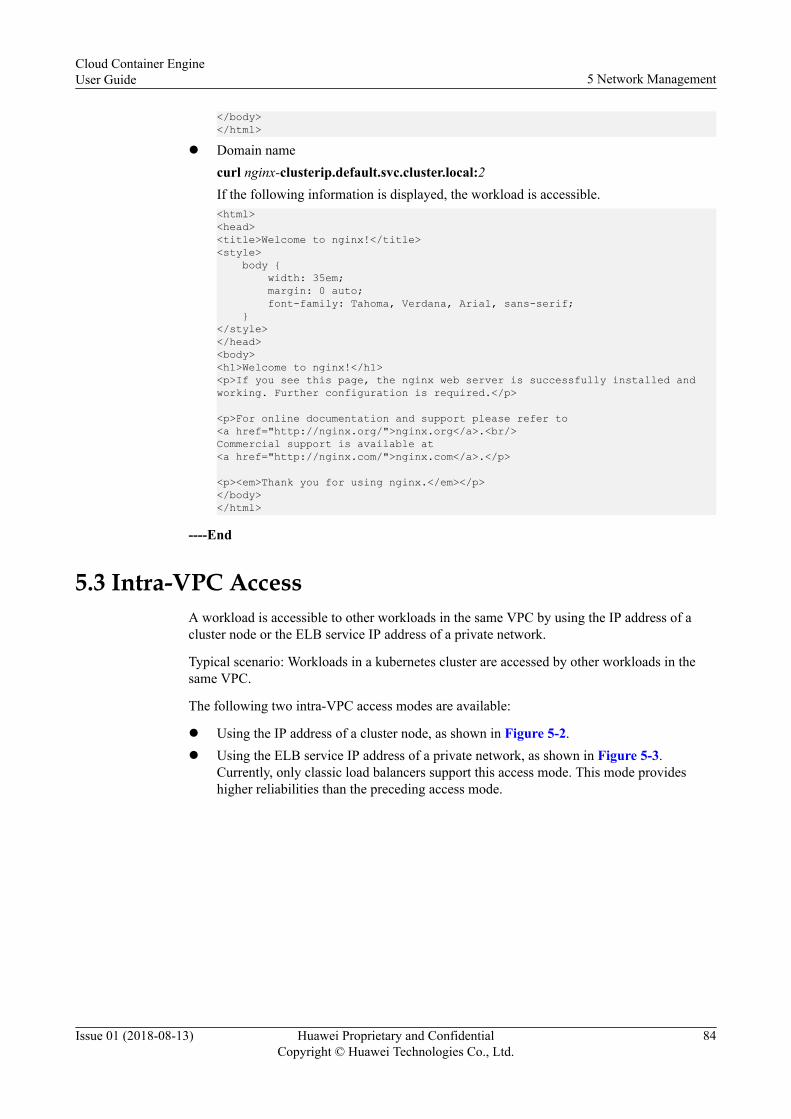
</body></html>
l Domain namecurl nginx-clusterip.default.svc.cluster.local:2If the following information is displayed, the workload is accessible.<html><head><title>Welcome to nginx!</title><style> body { width: 35em; margin: 0 auto; font-family: Tahoma, Verdana, Arial, sans-serif; }</style></head><body><h1>Welcome to nginx!</h1><p>If you see this page, the nginx web server is successfully installed andworking. Further configuration is required.</p>
<p>For online documentation and support please refer to<a href="http://nginx.org/">nginx.org</a>.<br/>Commercial support is available at<a href="http://nginx.com/">nginx.com</a>.</p>
<p><em>Thank you for using nginx.</em></p></body></html>
----End
5.3 Intra-VPC AccessA workload is accessible to other workloads in the same VPC by using the IP address of acluster node or the ELB service IP address of a private network.
Typical scenario: Workloads in a kubernetes cluster are accessed by other workloads in thesame VPC.
The following two intra-VPC access modes are available:
l Using the IP address of a cluster node, as shown in Figure 5-2.l Using the ELB service IP address of a private network, as shown in Figure 5-3.
Currently, only classic load balancers support this access mode. This mode provideshigher reliabilities than the preceding access mode.
Cloud Container EngineUser Guide 5 Network Management
Issue 01 (2018-08-13) Huawei Proprietary and ConfidentialCopyright © Huawei Technologies Co., Ltd.
84

Figure 5-2 Intra-VPC access (by using the IP address of a cluster node)
Figure 5-3 Intra-VPC access (by using the ELB service IP address of a private network)
Cloud Container EngineUser Guide 5 Network Management
Issue 01 (2018-08-13) Huawei Proprietary and ConfidentialCopyright © Huawei Technologies Co., Ltd.
85

Prerequisites
A classic load balancer must be created if you set the load balancer access mode to Privatenetwork. For details, see Help Center > Elastic Load Balance > User Guide > Quick Start> Creating a Classic Load Balancer. Type must be set to Private network, and the classicload balancer must be in the same VPC as the cluster to which the workload belongs.
Methods for Setting the Access Mode
You can set the access mode using either of the following two methods:
l Set the access mode when creating a workload. For details, see Creating a Workload onthe CCE Console and Using kubectl for Intra-VPCAccess - Node IP Address.
l Set the access mode after creating a workload. For details, see Setting the Access ModeAfter Creating a Workload.
Creating a Workload on the CCE Console
The following procedure uses an Nginx workload as an example.
Step 1 Create a workload. For details, see 4.2 Creating a Deployment or 4.3 Creating aStatefulSet. In the Workload Access Settings step, click Add Access Mode, and set thefollowing parameters:l Service Name: Specify a service name. You can use the workload name as the service
name.l Access Mode: Select Intra-VPC access.
– If Intra-VPC load balancing is disabled, nodes in the cluster are accessible usingthe cluster IP address.
– If Intra-VPC load balancing is enabled, nodes in the cluster are accessible usingthe elastic load balancers. If no elastic load balancer is available, click Create anenhanced ELB instance to create a classic load balancer.
NOTICESet Type to Private network when creating a classic load balancer.
l Protocol: Select a protocol used by the service.l Container Port: Specify a port to map a container port to the node's port. The port range
is 30000–32676. The port will be used when the workload is accessed using the node'sprivate IP address. You are advised to select Automatically Generated.
l Access Port:– Access a node in a cluster using the IP address of the node: Specify a port to map a
container port to the node's private IP address. The port range is 30000–32676.The port will be used when the workload is accessed using the node's private IPaddress. You are advised to select Automatically Generated.n Automatically Generated: The system automatically assigns a port number.n Specified Port: Specify a fixed node port. The port range is 30000–32767.
Ensure that the port is unique in its cluster.
Cloud Container EngineUser Guide 5 Network Management
Issue 01 (2018-08-13) Huawei Proprietary and ConfidentialCopyright © Huawei Technologies Co., Ltd.
86
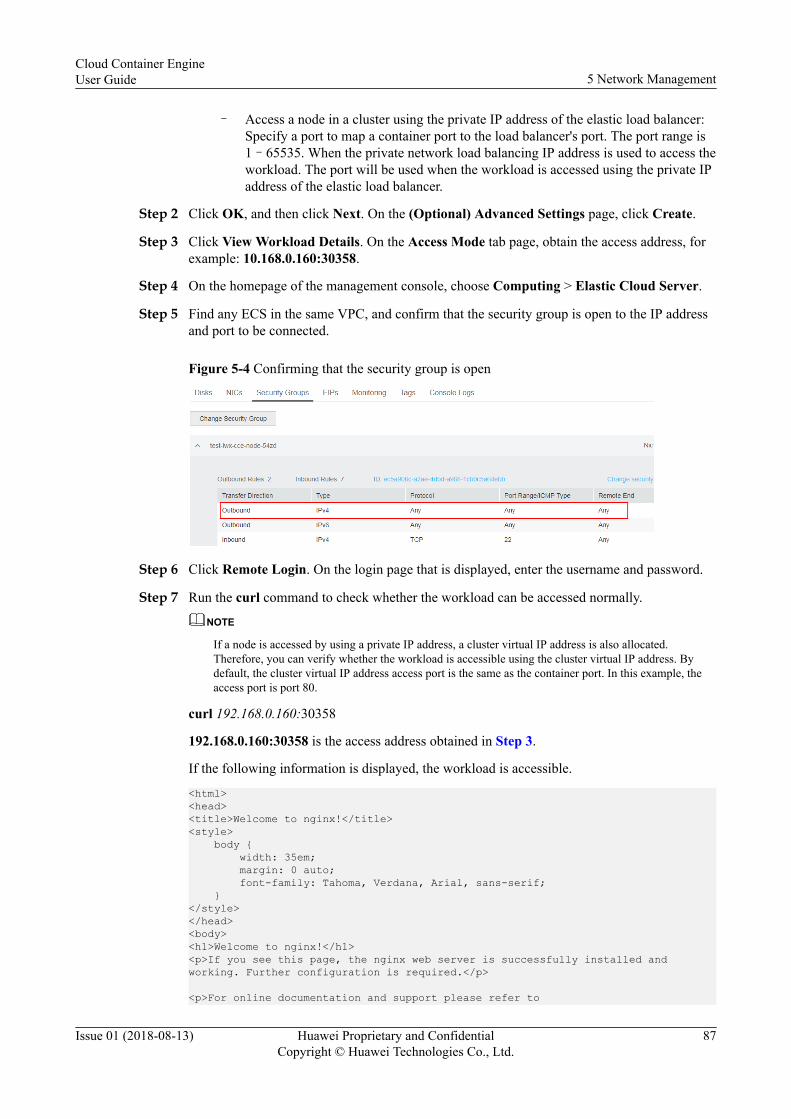
– Access a node in a cluster using the private IP address of the elastic load balancer:Specify a port to map a container port to the load balancer's port. The port range is1–65535. When the private network load balancing IP address is used to access theworkload. The port will be used when the workload is accessed using the private IPaddress of the elastic load balancer.
Step 2 Click OK, and then click Next. On the (Optional) Advanced Settings page, click Create.
Step 3 Click View Workload Details. On the Access Mode tab page, obtain the access address, forexample: 10.168.0.160:30358.
Step 4 On the homepage of the management console, choose Computing > Elastic Cloud Server.
Step 5 Find any ECS in the same VPC, and confirm that the security group is open to the IP addressand port to be connected.
Figure 5-4 Confirming that the security group is open
Step 6 Click Remote Login. On the login page that is displayed, enter the username and password.
Step 7 Run the curl command to check whether the workload can be accessed normally.
NOTE
If a node is accessed by using a private IP address, a cluster virtual IP address is also allocated.Therefore, you can verify whether the workload is accessible using the cluster virtual IP address. Bydefault, the cluster virtual IP address access port is the same as the container port. In this example, theaccess port is port 80.
curl 192.168.0.160:30358
192.168.0.160:30358 is the access address obtained in Step 3.
If the following information is displayed, the workload is accessible.
<html><head><title>Welcome to nginx!</title><style> body { width: 35em; margin: 0 auto; font-family: Tahoma, Verdana, Arial, sans-serif; }</style></head><body><h1>Welcome to nginx!</h1><p>If you see this page, the nginx web server is successfully installed andworking. Further configuration is required.</p>
<p>For online documentation and support please refer to
Cloud Container EngineUser Guide 5 Network Management
Issue 01 (2018-08-13) Huawei Proprietary and ConfidentialCopyright © Huawei Technologies Co., Ltd.
87
<a href="http://nginx.org/">nginx.org</a>.<br/>Commercial support is available at<a href="http://nginx.com/">nginx.com</a>.</p>
<p><em>Thank you for using nginx.</em></p></body></html>
----End
Setting the Access Mode After Creating a Workload
The access mode that uses the ELB service IP address of a private network cannot beconfigured in the following way.
Step 1 Log in to the CCE console. In the navigation pane, choose Resource Management >Network Management. On the Service tab page, click Create Service. Select Intra-VPCaccess.
Step 2 Set the parameters for intra-VPC access.l Service Name: Specify a service name. You can use the workload name as the service
name.l Cluster Name: Specify a cluster for the service.l Namespace: Specify a namespace for the service.l Workload: Select a workload for which you want to add the service.l Port Configuration:
– Protocol: Select a protocol used by the service.– Container Port: Specify a port on which the workload in the container image
listens. The Nginx workload listens on port 80.– Access Port: Specify a port to map a container port to the node's private IP address.
The port range is 30000–32767. The port will be used when the workload isaccessed using the node's private IP address. You are advised to selectAutomatically Generated.n Automatically Generated: The system automatically assigns a port number.n Specified Port: Specify a fixed node port. The port range is 30000–32767.
Ensure that the port is unique in its cluster.
Step 3 Click Create. The intra-VPC access service has been added to the workload, which can beverified by performing Step 4-Step 7.
----End
Using kubectl for Intra-VPCAccess - Node IP Address
This section uses an Nginx workload as an example to describe how to implement intra-VPCaccess using kubectl.
Prerequisites
You have configured the kubectl command and connected an ECS to the cluster. For details,see 3.5 Connecting to the Kubernetes Cluster Using kubectl.
Procedure
Cloud Container EngineUser Guide 5 Network Management
Issue 01 (2018-08-13) Huawei Proprietary and ConfidentialCopyright © Huawei Technologies Co., Ltd.
88

Step 1 Log in to the ECS on which the kubectl commands have been configured. For details, seeLogging In to a Linux ECS.
Step 2 Create and edit the nginx-deployment.yaml and nginx-nodeport-svc.yaml files.
You can change the file names as required.
vi nginx-deployment.yaml
apiVersion: extensions/v1beta1kind: Deploymentmetadata: name: nginxspec: replicas: 1 selector: matchLabels: app: nginx strategy: type: RollingUpdate template: metadata: labels: app: nginx spec: containers: - image: nginx imagePullPolicy: Always name: nginx imagePullSecrets: - name: default-secret
vi nginx-nodeport-svc.yaml
apiVersion: v1kind: Servicemetadata: labels: app: nginx name: nginx-nodeportspec: ports: - name: service# nodePort: 30000 # Access port set on the CCE console. If this parameter is not specified, the system automatically allocates an access port. port: 80 # Cluster virtual IP address access port. protocol: TCP targetPort: 80 # Container port set on the CCE console. selector: app: nginx type: NodePort # Access type set on the CCE console. NodePort refers to the node's private IP address.
Step 3 Create a workload.
kubectl create -f nginx-deployment.yaml
If the following information is displayed, the workload is being created.
deployment "nginx" created
kubectl get po
If the following information is displayed, the workload is running.
NAME READY STATUS RESTARTS AGEetcd-0 0/1 ImagePullBackOff 0 48micagent-m9dkt 0/0 Running 0 3dnginx-2601814895-qhxqv 1/1 Running 0 9s
Cloud Container EngineUser Guide 5 Network Management
Issue 01 (2018-08-13) Huawei Proprietary and ConfidentialCopyright © Huawei Technologies Co., Ltd.
89
Step 4 Create a service.
kubectl create -f nginx-nodeport-svc.yaml
If the following information is displayed, the service is being created.
service "nginx-nodeport" created
kubectl get svc
If the following information is displayed, the service has been created.
NAME TYPE CLUSTER-IP EXTERNAL-IP PORT(S) AGEetcd-svc ClusterIP None <none> 3120/TCP 49mkubernetes ClusterIP 10.247.0.1 <none> 443/TCP 3dnginx-nodeport NodePort 10.247.4.225 <none> 80:30000/TCP 7s
Step 5 Run the curl command to check whether the workload can be accessed normally.
curl 192.168.2.240:30000
192.168.2.240 is the IP address of any node in the cluster, and 30000 is the number of the portopened by the node.
If the following information is displayed, the workload is accessible.
<html><head><title>Welcome to nginx!</title><style> body { width: 35em; margin: 0 auto; font-family: Tahoma, Verdana, Arial, sans-serif; }</style></head><body><h1>Welcome to nginx!</h1><p>If you see this page, the nginx web server is successfully installed andworking. Further configuration is required.</p>
<p>For online documentation and support please refer to<a href="http://nginx.org/">nginx.org</a>.<br/>Commercial support is available at<a href="http://nginx.com/">nginx.com</a>.</p>
<p><em>Thank you for using nginx.</em></p></body></html>
----End
Using kubectl for Intra-VPC Access - IP Address of a Private Network LoadBalancer
This section uses an Nginx workload as an example to describe how to implement intra-VPCaccess using kubectl.
Prerequisites
You have configured the kubectl command and connected an ECS to the cluster. For details,see 3.5 Connecting to the Kubernetes Cluster Using kubectl.
Step 1 Log in to the ECS on which the kubectl commands have been configured. For details, seeLogging In to a Linux ECS.
Cloud Container EngineUser Guide 5 Network Management
Issue 01 (2018-08-13) Huawei Proprietary and ConfidentialCopyright © Huawei Technologies Co., Ltd.
90

Step 2 Create and edit the nginx-deployment.yamland nginx-loadbalance-svc.yaml files.
You can change the file names as required.
vi nginx-deployment.yamlapiVersion: extensions/v1beta1kind: Deploymentmetadata: name: nginxspec: replicas: 1 selector: matchLabels: app: nginx strategy: type: RollingUpdate template: metadata: labels: app: nginx spec: containers: - image: nginx imagePullPolicy: Always name: nginx imagePullSecrets: - name: default-secret
vi nginx-loadbalance-svc.yamlapiVersion: v1 kind: Service metadata: annotations: kubernetes.io/elb.class: elasticity #Classic load balancer is used. kubernetes.io/elb.vpc.id: 0e86e303-7a82-4e03-a435-9be0c4771c93 #ID of the VPC to which the load balancer belongs. labels: app: nginx name: nginxspec: loadBalancerIP: 10.154.187.52 #IP address of the elastic load balancer. ports: - name: service port: 80 #Access port mapped to the private IP address of the load balancer. protocol: TCP targetPort: 80 #Container port. selector: app: nginx type: LoadBalancer #Access type. LoadBalancer indicates elastic load balancer.
Step 3 Create a workload.
kubectl create -f nginx-deployment.yaml
If the following information is displayed, the workload is being created.deployment "nginx" created
kubectl get po
If the following information is displayed, the workload is running.NAME READY STATUS RESTARTS AGEetcd-0 0/1 ImagePullBackOff 0 48micagent-m9dkt 0/0 Running 0 3dnginx-2601814895-qhxqv 1/1 Running 0 9s
Cloud Container EngineUser Guide 5 Network Management
Issue 01 (2018-08-13) Huawei Proprietary and ConfidentialCopyright © Huawei Technologies Co., Ltd.
91

Step 4 Create a service.
kubectl create -f nginx-loadbalance-svc.yaml
If the following information is displayed, the service is being created.
service "nginx" created
kubectl get svc
If the following information is displayed, the service has been created.
NAME TYPE CLUSTER-IP EXTERNAL-IP PORT(S) AGEkubernetes ClusterIP 10.247.0.1 <none> 443/TCP 3d nginx LoadBalancer 10.247.4.225 192.168.0.177 80:30713/TCP 7s
Step 5 Run the curl command to check whether the workload can be accessed normally.
curl 192.168.0.177:80
In the preceding command, 192.168.0.177 is the IP address of the load balancer, and 80 is theaccess port mapped to the private IP address of the load balancer.
If the following information is displayed, the workload is accessible.
<html><head><title>Welcome to nginx!</title><style> body { width: 35em; margin: 0 auto; font-family: Tahoma, Verdana, Arial, sans-serif; }</style></head><body><h1>Welcome to nginx!</h1><p>If you see this page, the nginx web server is successfully installed andworking. Further configuration is required.</p>
<p>For online documentation and support please refer to<a href="http://nginx.org/">nginx.org</a>.<br/>Commercial support is available at<a href="http://nginx.com/">nginx.com</a>.</p>
<p><em>Thank you for using nginx.</em></p></body></html>
----End
5.4 External Access - Elastic IP AddressA workload is accessible to public networks through an elastic IP address. This access modeis applicable to services that need to be exposed to a public network. To enable access to aworkload from a public network, an elastic IP address must be bound to a node in the cluster,and a port must be mapped to the node. The port number must be in the 30000–32767 range.For example, the access address could be 10.117.117.117:30000.
Cloud Container EngineUser Guide 5 Network Management
Issue 01 (2018-08-13) Huawei Proprietary and ConfidentialCopyright © Huawei Technologies Co., Ltd.
92
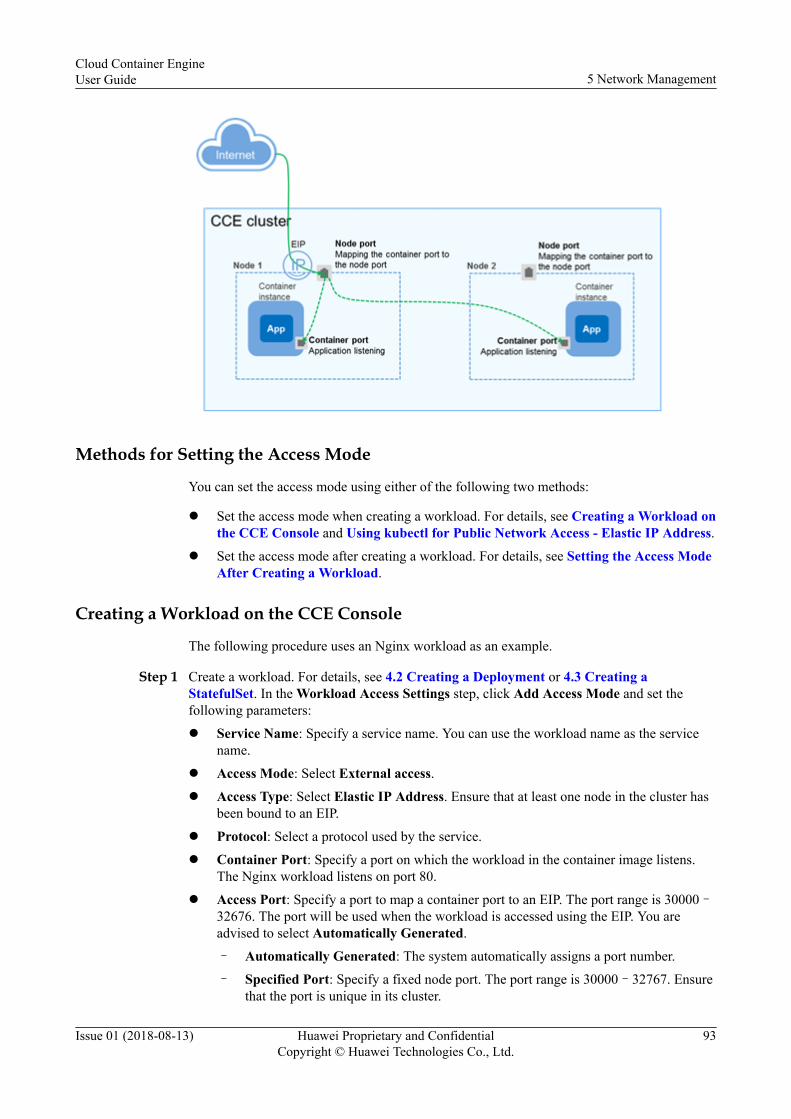
Methods for Setting the Access Mode
You can set the access mode using either of the following two methods:
l Set the access mode when creating a workload. For details, see Creating a Workload onthe CCE Console and Using kubectl for Public Network Access - Elastic IP Address.
l Set the access mode after creating a workload. For details, see Setting the Access ModeAfter Creating a Workload.
Creating a Workload on the CCE Console
The following procedure uses an Nginx workload as an example.
Step 1 Create a workload. For details, see 4.2 Creating a Deployment or 4.3 Creating aStatefulSet. In the Workload Access Settings step, click Add Access Mode and set thefollowing parameters:
l Service Name: Specify a service name. You can use the workload name as the servicename.
l Access Mode: Select External access.
l Access Type: Select Elastic IP Address. Ensure that at least one node in the cluster hasbeen bound to an EIP.
l Protocol: Select a protocol used by the service.
l Container Port: Specify a port on which the workload in the container image listens.The Nginx workload listens on port 80.
l Access Port: Specify a port to map a container port to an EIP. The port range is 30000–32676. The port will be used when the workload is accessed using the EIP. You areadvised to select Automatically Generated.
– Automatically Generated: The system automatically assigns a port number.
– Specified Port: Specify a fixed node port. The port range is 30000–32767. Ensurethat the port is unique in its cluster.
Cloud Container EngineUser Guide 5 Network Management
Issue 01 (2018-08-13) Huawei Proprietary and ConfidentialCopyright © Huawei Technologies Co., Ltd.
93
Step 2 Click OK. Click Next. On the (Optional) Advanced Settings page that is displayed, clickCreate.
Step 3 Click View Workload Details. On the Access Mode tab page, obtain the access address, forexample: 10.78.27.59:30911.
Step 4 Click the access address to go to the access page.
Figure 5-5 Accessing the Nginx workload
----End
Setting the Access Mode After Creating a Workload
Step 1 Log in to the CCE console. In the navigation pane, choose Resource Management >Network Management. On the Service tab page, click Create Service. Select Externalaccess.
Step 2 Set the parameters for external access.
l Service Name: Specify a service name. You can use the workload name as the servicename.
l Cluster Name: Specify a cluster for the service.
l Namespace: Specify a namespace for the service.
l Workload: Select a workload for which you want to add the service.
l Access Type: Select EIP.
l Port Configuration:
– Protocol: Select a protocol used by the service.
– Container Port: Specify a port on which the workload in the container imagelistens. The Nginx workload listens on port 80.
– Access Port: Specify a port to map a container port to the node's private IP address.The port range is 30000–32767. The port will be used when the workload isaccessed using the node's private IP address. You are advised to selectAutomatically Generated.
n Automatically Generated: The system automatically assigns a port number.
n Specified Port: Specify a fixed node port. The port range is 30000–32767.Ensure that the port is unique in its cluster.
Cloud Container EngineUser Guide 5 Network Management
Issue 01 (2018-08-13) Huawei Proprietary and ConfidentialCopyright © Huawei Technologies Co., Ltd.
94

Step 3 Click Create. The public external access - elastic IP address service has been added to theworkload.
----End
Using kubectl for Public Network Access - Elastic IP AddressThis section uses an Nginx workload as an example to describe how to implement publicnetwork access using kubectl.
Prerequisites
You have configured the kubectl command and connected an ECS to the cluster. For details,see 3.5 Connecting to the Kubernetes Cluster Using kubectl.
Procedure
Step 1 Log in to the ECS on which the kubectl commands have been configured. For details, seeLogging In to a Linux ECS.
Step 2 Create and edit the nginx-deployment.yaml and nginx-eip-svc.yaml files.
You can change the file names as required.
vi nginx-deployment.yaml
apiVersion: extensions/v1beta1kind: Deploymentmetadata: name: nginxspec: replicas: 1cc selector: matchLabels: app: nginx strategy: type: RollingUpdate template: metadata: labels: app: nginx spec: containers: - image: nginx imagePullPolicy: Always name: nginx imagePullSecrets: - name: default-secret
vi nginx-eip-svc.yaml
apiVersion: v1kind: Servicemetadata: annotations: service.protal.kubernetes.io/access-ip: 10.78.44.60 # EIP. At least one node in the cluster has been bound to this EIP. service.protal.kubernetes.io/type: EIP # Set the external access type to Elastic IP Address. labels: app: nginx name: nginx-eipspec: ports: - name: service0 nodePort: 30000 # Access port set on the CCE console. If this parameter
Cloud Container EngineUser Guide 5 Network Management
Issue 01 (2018-08-13) Huawei Proprietary and ConfidentialCopyright © Huawei Technologies Co., Ltd.
95
is not specified, the system automatically allocates an access port. port: 80 # Cluster virtual IP address access port. protocol: TCP targetPort: 80 # Container port set on the CCE console. selector: app: nginx type: NodePort # The EIP must be based on an NodePort service.
Step 3 Create a workload.
kubectl create -f nginx-deployment.yaml
If the following information is displayed, the workload is being created.
deployment "nginx" created
kubectl get po
If the following information is displayed, the workload is running.
NAME READY STATUS RESTARTS AGEetcd-0 0/1 ImagePullBackOff 0 59micagent-m9dkt 0/0 Running 0 3dnginx-2601814895-sf71t 1/1 Running 0 8s
Step 4 Create a service.
kubectl create -f nginx-eip-svc.yaml
If the following information is displayed, the service has been created.
service "nginx-eip" created
kubectl get svc
If the following information is displayed, the service access mode has been set successfully.
NAME TYPE CLUSTER-IP EXTERNAL-IP PORT(S) AGEetcd-svc ClusterIP None <none> 3120/TCP 59mkubernetes ClusterIP 10.247.0.1 <none> 443/TCP 3dnginx-eip NodePort 10.247.120.135 <none> 80:30000/TCP 7s
Step 5 In the address bar of your browser, enter 10.78.44.60:30000 and press Enter.
10.78.44.60 is the EIP, and 30000 is the node port number obtained in the previous step.
Figure 5-6 Accessing the Nginx workload
----End
5.5 External Access - Elastic Load BalancerA workload is accessible to public networks through an elastic load balancer. This accessmode provides higher reliability than EIP-based access and is applicable to services that need
Cloud Container EngineUser Guide 5 Network Management
Issue 01 (2018-08-13) Huawei Proprietary and ConfidentialCopyright © Huawei Technologies Co., Ltd.
96

to be exposed to public networks. The access address consists of the IP address of a publicnetwork load balancer, followed by the access port number, for example, 10.117.117.117:80.
PrerequisitesYou have created a load balancer by performing the following steps:
1. Log in to the management console, and choose Network > Elastic Load Balance.2. In the upper right corner of the page, click Create Load Balancer to create a classic
load balancer for a public network.
Methods for Setting the Access ModeYou can set the access mode using either of the following two methods:
l Set the access mode when creating a workload. For details, see Creating a Workload onthe CCE Console and Using kubectl for Public Network Access - Load Balancer.
l Set the access mode after creating a workload. For details, see Setting the Access ModeAfter Creating a Workload.
Creating a Workload on the CCE ConsoleThe following procedure uses an Nginx workload as an example.
Step 1 Create a workload. For details, see 4.2 Creating a Deployment or 4.3 Creating aStatefulSet. In the Workload Access Settings step, click Add Access Mode and set thefollowing parameters:l Service Name: Specify a service name. You can use the workload name as the service
name.
Cloud Container EngineUser Guide 5 Network Management
Issue 01 (2018-08-13) Huawei Proprietary and ConfidentialCopyright © Huawei Technologies Co., Ltd.
97

l Access Mode: Select External access.l Access Type: Select Elastic Load Balancer. You must create a load balancer first.
Currently, classic and enhanced load balancers are supported.l Container Port: Specify a port on which the workload in the container image listens.
The Nginx workload listens on port 80.l Access Port: Specify a port to map a container port to the IP address of a load balancer.
The port range is 1–65535. The port will be used when the workload is accessed usingthe IP address of a load balancer.
l Protocol: Select TCP.
Step 2 Click OK. Click Next. On the (Optional) Advanced Settings page that is displayed, clickCreate.
Step 3 Click View Workload Details. On the Access Mode tab page, obtain the access address, forexample: 10.4.10.230:2.
Step 4 Click the access address to go to the access page.
----End
Setting the Access Mode After Creating a Workload
Step 1 Log in to the CCE console. In the navigation pane, choose Resource Management >Network Management. On the Service tab page, click Create Service. Select Externalaccess.
Step 2 Set the parameters for external access.l Service Name: Specify a service name. You can use the workload name as the service
name.l Cluster Name: Specify a cluster for the service.l Namespace: Specify a namespace for the service.l Workload: Select a workload for which you want to add the service.l Access Type: Select ELB. You must create a load balancer first. Currently, classic and
enhanced load balancers are supported.l Port Configuration:
– Protocol: TCP.– Container Port: Specify a port on which the workload in the container image
listens. The Nginx workload listens on port 80.– Access Port: Specify a port to map a container port to the IP address of a load
balancer. The port range is 1–65535. The port will be used when the workload isaccessed using the IP address of a load balancer.
Step 3 Click Create. The public external access - elastic IP address service has been added to theworkload.
----End
Using kubectl for Public Network Access - Load Balancer
This section uses an Nginx workload as an example to describe how to implement publicnetwork access using kubectl.
Cloud Container EngineUser Guide 5 Network Management
Issue 01 (2018-08-13) Huawei Proprietary and ConfidentialCopyright © Huawei Technologies Co., Ltd.
98
Prerequisites
You have configured the kubectl command and connected an ECS to the cluster. For details,see 3.5 Connecting to the Kubernetes Cluster Using kubectl.
Procedure
Step 1 Log in to the ECS on which the kubectl commands have been configured. For details, seeLogging In to a Linux ECS.
Step 2 Create and edit the nginx-deployment.yaml and nginx-elb-svc.yaml files.
You can change the file names as required.
vi nginx-deployment.yaml
apiVersion: extensions/v1beta1kind: Deploymentmetadata: name: nginxspec: replicas: 1 selector: matchLabels: app: nginx strategy: type: RollingUpdate template: metadata: labels: app: nginx spec: containers: - image: nginx imagePullPolicy: Always name: nginx imagePullSecrets: - name: default-secret
vi nginx-elb-svc.yaml
apiVersion: v1kind: Servicemetadata: labels: app: nginx name: nginxspec: loadBalancerIP: 117.78.42.242 # IP address of the public network load balancer. ports: - name: service0 nodePort: 31540 # Access port set on the CCE console. If this parameter is not specified, the system automatically allocates an access port. port: 80 # Cluster virtual IP address access port, which has been registered with a load balancer. protocol: TCP targetPort: 80 # Container port set on the CCE console. selector: app: nginx type: LoadBalancer # The elastic IP address must be based on a Node Port service.
Step 3 Create a workload.
kubectl create -f nginx-deployment.yaml
If the following information is displayed, the workload is being created.
Cloud Container EngineUser Guide 5 Network Management
Issue 01 (2018-08-13) Huawei Proprietary and ConfidentialCopyright © Huawei Technologies Co., Ltd.
99
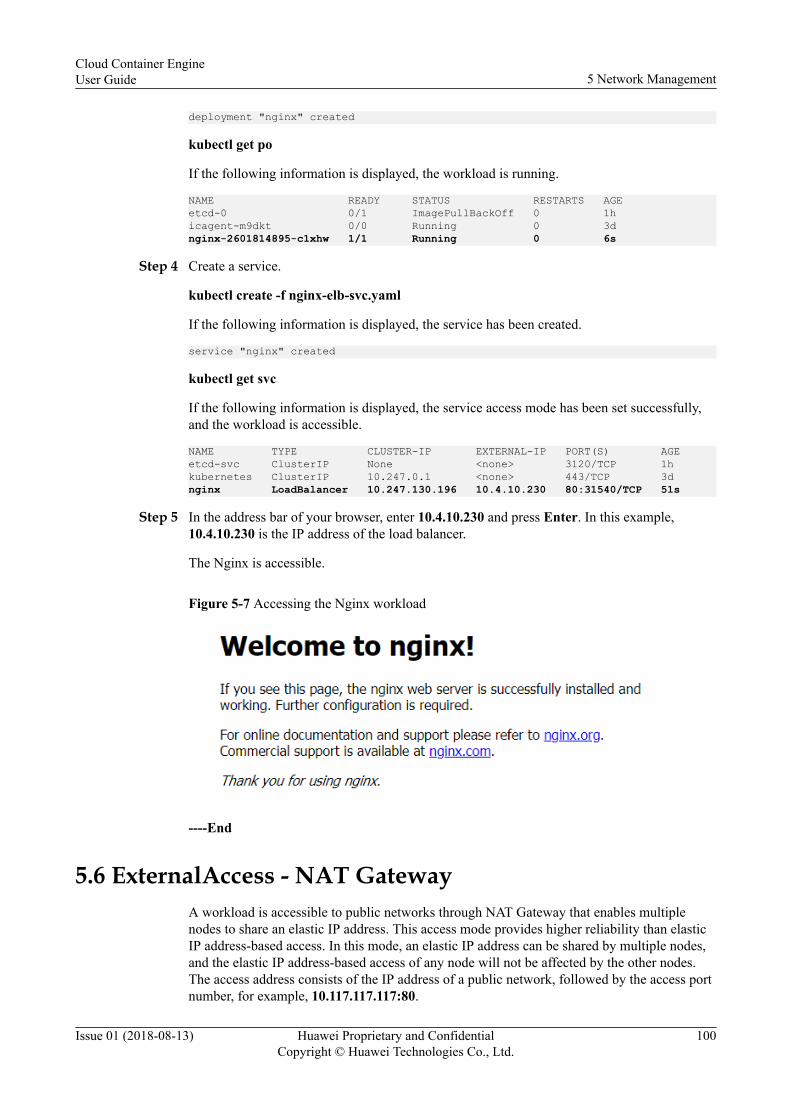
deployment "nginx" created
kubectl get po
If the following information is displayed, the workload is running.
NAME READY STATUS RESTARTS AGEetcd-0 0/1 ImagePullBackOff 0 1hicagent-m9dkt 0/0 Running 0 3dnginx-2601814895-c1xhw 1/1 Running 0 6s
Step 4 Create a service.
kubectl create -f nginx-elb-svc.yaml
If the following information is displayed, the service has been created.
service "nginx" created
kubectl get svc
If the following information is displayed, the service access mode has been set successfully,and the workload is accessible.
NAME TYPE CLUSTER-IP EXTERNAL-IP PORT(S) AGEetcd-svc ClusterIP None <none> 3120/TCP 1hkubernetes ClusterIP 10.247.0.1 <none> 443/TCP 3dnginx LoadBalancer 10.247.130.196 10.4.10.230 80:31540/TCP 51s
Step 5 In the address bar of your browser, enter 10.4.10.230 and press Enter. In this example,10.4.10.230 is the IP address of the load balancer.
The Nginx is accessible.
Figure 5-7 Accessing the Nginx workload
----End
5.6 ExternalAccess - NAT GatewayA workload is accessible to public networks through NAT Gateway that enables multiplenodes to share an elastic IP address. This access mode provides higher reliability than elasticIP address-based access. In this mode, an elastic IP address can be shared by multiple nodes,and the elastic IP address-based access of any node will not be affected by the other nodes.The access address consists of the IP address of a public network, followed by the access portnumber, for example, 10.117.117.117:80.
Cloud Container EngineUser Guide 5 Network Management
Issue 01 (2018-08-13) Huawei Proprietary and ConfidentialCopyright © Huawei Technologies Co., Ltd.
100
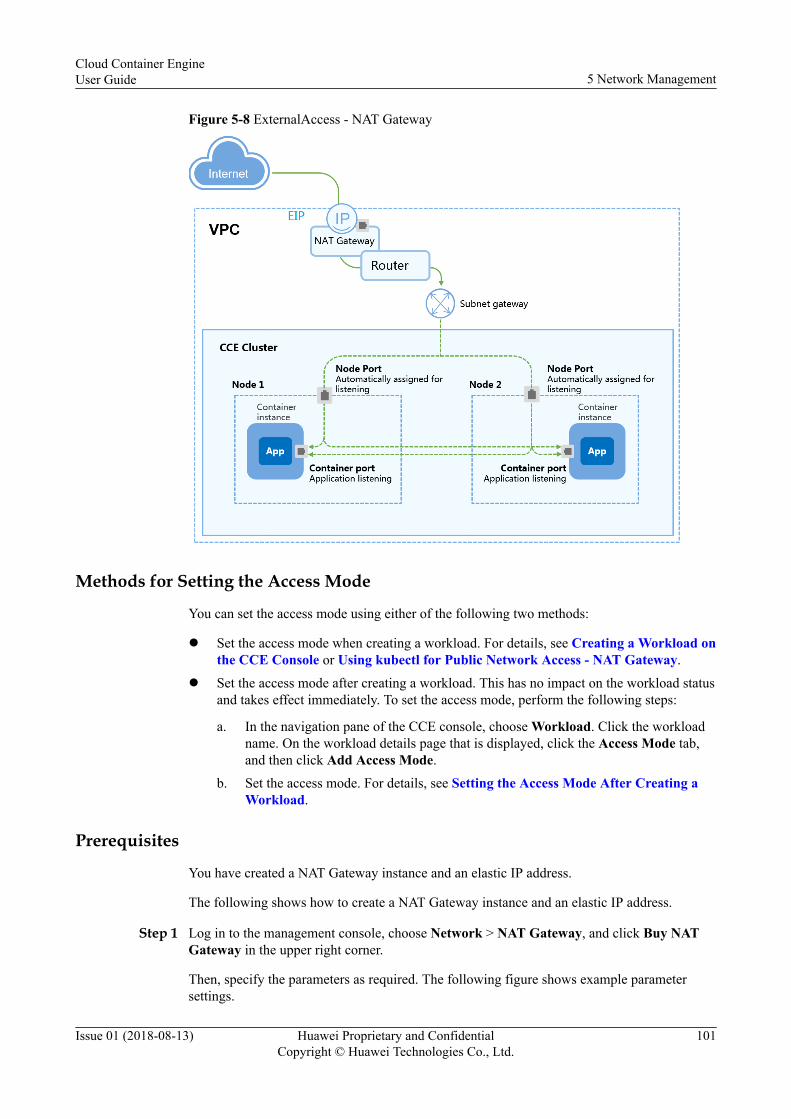
Figure 5-8 ExternalAccess - NAT Gateway
Methods for Setting the Access Mode
You can set the access mode using either of the following two methods:
l Set the access mode when creating a workload. For details, see Creating a Workload onthe CCE Console or Using kubectl for Public Network Access - NAT Gateway.
l Set the access mode after creating a workload. This has no impact on the workload statusand takes effect immediately. To set the access mode, perform the following steps:
a. In the navigation pane of the CCE console, choose Workload. Click the workloadname. On the workload details page that is displayed, click the Access Mode tab,and then click Add Access Mode.
b. Set the access mode. For details, see Setting the Access Mode After Creating aWorkload.
Prerequisites
You have created a NAT Gateway instance and an elastic IP address.
The following shows how to create a NAT Gateway instance and an elastic IP address.
Step 1 Log in to the management console, choose Network > NAT Gateway, and click Buy NATGateway in the upper right corner.
Then, specify the parameters as required. The following figure shows example parametersettings.
Cloud Container EngineUser Guide 5 Network Management
Issue 01 (2018-08-13) Huawei Proprietary and ConfidentialCopyright © Huawei Technologies Co., Ltd.
101
NOTE
When buying a NAT gateway, select the same VPC and subnet as those of the cluster where the serviceis running on CCE.
Step 2 On the management console, choose Network > Elastic IP, and click Buy EIP in the upperright corner. Then, specify the parameters as required. The following figure shows exampleparameter settings.
Figure 5-9 Buying an elastic IP address
----End
Creating a Workload on the CCE ConsoleThe following procedure uses an Nginx workload as an example.
Step 1 Create a workload. For details, 4.2 Creating a Deployment or 4.3 Creating a StatefulSet. Inthe Workload Access Settings step, click Add Access Mode and set the followingparameters:l Service Name: Specify a service name. You can use the workload name as the service
name.l Access Mode: Select External access.l Access Type: Select NATGATEWAY.
– Select a NAT gateway. If no NAT gateways are available, click Create an NATgateway to create one.
– Select an elastic IP address. If no elastic IP addresses are available, click Create anElastic IP to create one.
l Protocol: Select TCP or UDP.l Container Port: Specify a port on which the workload in the container image listens.
The Nginx workload listens on port 80.l Access Port: Specify a port to map a container port. The port range is 1–65535. The
port will be used when the workload is accessed using the IP address of a load balancer.
Cloud Container EngineUser Guide 5 Network Management
Issue 01 (2018-08-13) Huawei Proprietary and ConfidentialCopyright © Huawei Technologies Co., Ltd.
102

Step 2 Click OK. Click Next. On the (Optional) Advanced Settings page that is displayed, clickCreate.
Step 3 Click View Application Details. On the Access Mode tab page, obtain the access address, forexample, 10.154.78.160:2.
Step 4 Click the access address to go to the access page.
Figure 5-10 Accessing the Nginx workload
----End
Setting the Access Mode After Creating a Workload
Step 1 Log in to the CCE console. In the navigation pane, choose Resource Management >Network Management. On the Service tab page, click Create Service. Select Externalaccess.
Step 2 Set the parameters for external access.
l Service Name: Specify a service name. You can use the workload name as the servicename.
l Cluster Name: Specify a cluster for the service.
l Namespace: Specify a namespace for the service.
l Workload: Select a workload for which you want to add the service.
l Access Type: Select DNAT. Select the created NAT gateway and elastic IP address.
l Port Configuration:
– Protocol: Select a protocol used by the service, which can be TCP or UDP.
– Container Port: Specify a port on which the workload in the container imagelistens. The Nginx workload listens on port 80.
– Access Port: Specify a port to map a container port. The port range is 1–65535.The port will be used when the workload is accessed using the IP address of a loadbalancer.
Step 3 Click Create. The public external access - NAT Gateway service has been added to theworkload.
----End
Cloud Container EngineUser Guide 5 Network Management
Issue 01 (2018-08-13) Huawei Proprietary and ConfidentialCopyright © Huawei Technologies Co., Ltd.
103

Using kubectl for Public Network Access - NAT GatewayThis section uses an Nginx workload as an example to describe how to implement publicnetwork access using kubectl.
Prerequisites
You have configured the kubectl command and connected an ECS to the cluster. For details,see 3.5 Connecting to the Kubernetes Cluster Using kubectl.
Step 1 Log in to the ECS on which the kubectl commands have been configured. For details, seeLogging In to a Linux ECS.
Step 2 Create and edit the nginx-deployment.yaml and nginx-nat-svc.yaml files.
You can change the file names as required.
vi nginx-deployment.yamlapiVersion: extensions/v1beta1kind: Deploymentmetadata: name: nginxspec: replicas: 1 selector: matchLabels: app: nginx strategy: type: RollingUpdate template: metadata: labels: app: nginx spec: containers: - image: nginx imagePullPolicy: Always name: nginx imagePullSecrets: - name: default-secret
For descriptions of the preceding fields, see Table 4-4.
vi nginx-nat-svc.yamlapiVersion: v1 kind: Service metadata: labels: app: nginx name: nginx annotations: kubernetes.io/elb.class: dnat #This parameter is set to dnat for interconnecting with NAT Gateway and adding DNAT rules. kubernetes.io/natgateway.id: e4a1cfcf-29df-4ab8-a4ea-c05dc860f554 #NAT gateway ID.spec: loadBalancerIP: 10.78.42.242 #Elastic IP address. ports: - name: service0 port: 80 #Access port on the CCE console. protocol: TCP targetPort: 80 #Container port on the CCE console. selector: app: nginx type: LoadBalancer #This parameter must be set to LoadBalancer for NAT Gateway.
Cloud Container EngineUser Guide 5 Network Management
Issue 01 (2018-08-13) Huawei Proprietary and ConfidentialCopyright © Huawei Technologies Co., Ltd.
104
Step 3 Creating a workload.
kubectl create -f nginx-deployment.yaml
If the following information is displayed, the workload is being created.
deployment "nginx" created
kubectl get po
If the following information is displayed, the workload is running.
NAME READY STATUS RESTARTS AGEetcd-0 0/1 ImagePullBackOff 0 59micagent-m9dkt 0/0 Running 0 3dnginx-2601814895-sf71t 1/1 Running 0 8s
Step 4 Create a service.
kubectl create -f nginx-nat-svc.yaml
If the following information is displayed, the service has been created.
service "nginx-eip" created
kubectl get svc
If the following information is displayed, the service access mode has been set successfully,and the workload is accessible.
NAME TYPE CLUSTER-IP EXTERNAL-IP PORT(S) AGE etcd-svc ClusterIP None <none> 3120/TCP 59m kubernetes ClusterIP 10.247.0.1 <none> 443/TCP 3d nginx-nat LoadBalancer 10.247.226.2 10.154.74.98 80:30589/TCP 5s
Step 5 In the address bar of your browser, enter 10.154.74.98:80 and press Enter.
In this example, 10.154.74.98 is the elastic IP address and 80 is the port number obtained inthe previous step.
----End
5.7 External Access - Layer-7 Load BalancingThis access mode is applicable to services that need to be exposed to a public network.Compared with EIP-based access, ELB allows access to workloads from a public networkwith higher reliability. This access mode uses the IP address of a public network load balancerand the access port, for example, 10.117.117.117:80/helloworld.
Precautions
Currently, only the CN East-Shanghai2 region supports layer-7 load balancing, and theregion requires clusters of 1.7.3.r10 or later versions.
Prerequisites
You have created a load balancer by performing the following steps:
1. Log in to the management console, and choose Network > Elastic Load Balance.
Cloud Container EngineUser Guide 5 Network Management
Issue 01 (2018-08-13) Huawei Proprietary and ConfidentialCopyright © Huawei Technologies Co., Ltd.
105
2. Click Buy Enhanced Load Balancer. For details, see Help Center>Elastic LoadBalance>Quick Start>Creating an Enhanced Load Balancer.
Methods for Setting the Access Mode
You can set the access mode using either of the following two methods:
l Set the access mode when creating a workload. For details, see Creating a Workload onthe CCE Console and Implementing Public Network Access (ELB) Using kubectl.
l Set the access mode after creating a workload. The setting has no impact on theworkload status and takes effect immediately.
Creating a Workload on the CCE Console
The following procedure uses an Nginx workload as an example.
Step 1 Create a workload. For details, see 4.2 Creating a Deployment or 4.3 Creating aStatefulSet.
Set the workload access mode to Intra-VPC access. If no access mode has been set, go toStep 2 to create a service.
Step 2 (Optional) If the workload access mode is not set to Intra-VPC access, perform the followingsteps:
1. In the navigation pane, choose Resource Management > Network Management.2. On the Service tab page, click Create Service, and select Intra-VPC access.
– Service Name: Specify a service name. You can use the workload name as theservice name.
– Cluster Name: Select the cluster for which a service is to be created.– Namespace: Select the namespace for which a service is to be created.– Workload: Click Select a workload, select the workload for which you want to
configure intra-VPC access, and click OK.– Port Configuration:
n Protocol: Select a protocol based on service requirements.n Container Port: Specify a port on which the workload in the container image
listens. The Nginx workload listens on port 80.n Access Port: Specify a port to map a container port. The port range is 30000–
32676. The port will be used when the workload is accessed using the EIP.You are advised to select Automatically Generated.○ Automatically Generated: The system automatically assigns a port
number.○ Specified Port: Specify a fixed node port. The port range is 30000–
32767. Ensure that the port is unique in its cluster.3. Click Create.
Step 3 Create an ingress.
1. In the navigation pane, choose Resource Management > Network Management.2. On the Ingress tab page, click Create Ingress.
– Ingress Name: Specify an ingress name, for example, ingress-demo.
Cloud Container EngineUser Guide 5 Network Management
Issue 01 (2018-08-13) Huawei Proprietary and ConfidentialCopyright © Huawei Technologies Co., Ltd.
106
– Cluster Name: Select the cluster for which an ingress is to be created.
– Namespace: Select the namespace for which an ingress is to be created.
– ULB Instance: Select the load balancer created in Prerequisites, for example, ulb-glf.
– External Port: Specify any port opened by ELB. The default port number is 80.
– Domain Name: Set this parameter to the domain name of the ELB service. Youneed to purchase a new domain name. This field is optional.
– Route Configuration:
n Route Match Rule: Prefix match, Exact match, Regular expression match.
○ Prefix match: If the mapping URL is set to /healthz, URLs with thisprefix, such as /healthz/v1 and /healthz/v2, can be accessed.
○ Exact match: Only an URL matching the set mapping URL is accessible.For example, if the mapping URL is set to /healthz, only URL /healthzcan be accessed.
○ Regular expression match: Set a mapping URL rule, for example, /[A-Za-z0-9_.-]+/test. URLs, such as /abcA9/test and /v1-Ab/test, that meet therule can be accessed.
n Mapping URL: Specify an access path to be registered, for example: /healthz.
n Service Name: Select an intra-VPC network service for which the ingress is tobe created.
n Container Port: Specify a port on which the workload in the container imagelistens. The defaultbackend listens on port 8080.
Step 4 Click Create.
After the ingress is created, it is displayed in the ingress list.
Step 5 Access the /healthz interface of a workload, for example, workload defaultbackend.
1. Obtain the access address of the /healthz interface of the defaultbackend workload. Theaccess address consists of a load balancer, external port, and mapping URL. Forexample, 10.154.76.63:80/healthz.
2. To access the workload, enter the access address of the /healthz interface in the addressbar of a browser, as shown in Figure 5-11, and press Enter.
Figure 5-11 Accessing the /healthz interface of the defaultbackend workload
----End
Cloud Container EngineUser Guide 5 Network Management
Issue 01 (2018-08-13) Huawei Proprietary and ConfidentialCopyright © Huawei Technologies Co., Ltd.
107
Using kubectl for Public Network Access - Load BalancerThis section uses an Nginx workload as an example to describe how to implement publicnetwork access using kubectl.
Prerequisites
You have configured the kubectl command and connected an ECS to the cluster. For details,see 3.5 Connecting to the Kubernetes Cluster Using kubectl.
Procedure
Step 1 Log in to the ECS on which the kubectl commands have been configured. For details, seeLogging In to a Linux ECS.
Step 2 Create the ingress-test-deployment.yaml, ingress-test-svc.yaml, and ingress-test-ingress.yaml files.
You can change the file names as required.
vi ingress-test-deployment.yamlapiVersion: extensions/v1beta1kind: Deploymentmetadata: name: ingress-testspec: replicas: 1 selector: matchLabels: app: ingress-test strategy: type: RollingUpdate template: metadata: labels: app: ingress-test spec: containers: # Third-party public image. You can obtain the address by referring to the preceding instructions, or use your own image. - image: nginx imagePullPolicy: Always name: nginx
vi ingress-test-svc.yamlapiVersion: v1 kind: Service metadata: labels: app: ingress-test name: ingress-test spec: ports: - name: service0 port: 8080 #Cluster virtual IP address access port. protocol: TCP targetPort: 8080 #Container port on the console, that is, the port listened by an application. #If needed, set multiple ports as follows: - name: service1 port: 8081 protocol: TCP targetPort: 8081 selector: app: ingress-test type: NodePort #Connects to ELB through NodePort.
Cloud Container EngineUser Guide 5 Network Management
Issue 01 (2018-08-13) Huawei Proprietary and ConfidentialCopyright © Huawei Technologies Co., Ltd.
108
vi ingress-test-ingress.yaml
apiVersion: extensions/v1beta1 kind: Ingress metadata: annotations: ingress.kubernetes.io/secure-backends: 'false' ingress.beta.kubernetes.io/role: data kubernetes.io/elb.ip: 10.154.76.63 #Service address of a load balancer. kubernetes.io/elb.port: "80" #External port on the console, that is, the port registered with ELB. labels: zone: "data" isExternal: "true" deploy-ingress: ingress-test name: ingress-test spec: rules: - http: paths: - backend: serviceName: ingress-test #Service name of ingress-test-svc.yaml. servicePort: 8080 #Target port, that is, container port, of ingress-test-svc.yaml. property: ingress.beta.kubernetes.io/url-match-mode: EQUAL_TO path: "/healthz" #User-defined route.
Step 3 Create a workload.
kubectl create -f ingress-test-deployment.yaml
If the following information is displayed, the workload is being created.
deployment "nginx" created
kubectl get po
If the following information is displayed, the workload is running.
NAME READY STATUS RESTARTS AGEingress-test-1627801589-r64pk 1/1 Running 0 6s
Step 4 Create a service.
kubectl create -f ingress-test-svc.yaml
If the following information is displayed, the service has been created.
service "ingress-test" created
kubectl get svc
If the following information is displayed, the service access mode has been set successfully,and the workload is accessible.
NAME TYPE CLUSTER-IP EXTERNAL-IP PORT(S) AGEingress-test NodePort 10.247.189.207 <none> 8080:30532/TCP 5skubernetes ClusterIP 10.247.0.1 <none> 443/TCP 3d
kubectl create -f ingress-test-ingress.yaml
If the following information is displayed, the ingress has been created.
ingress "ingress-test" created
kubectl get ingress
Cloud Container EngineUser Guide 5 Network Management
Issue 01 (2018-08-13) Huawei Proprietary and ConfidentialCopyright © Huawei Technologies Co., Ltd.
109
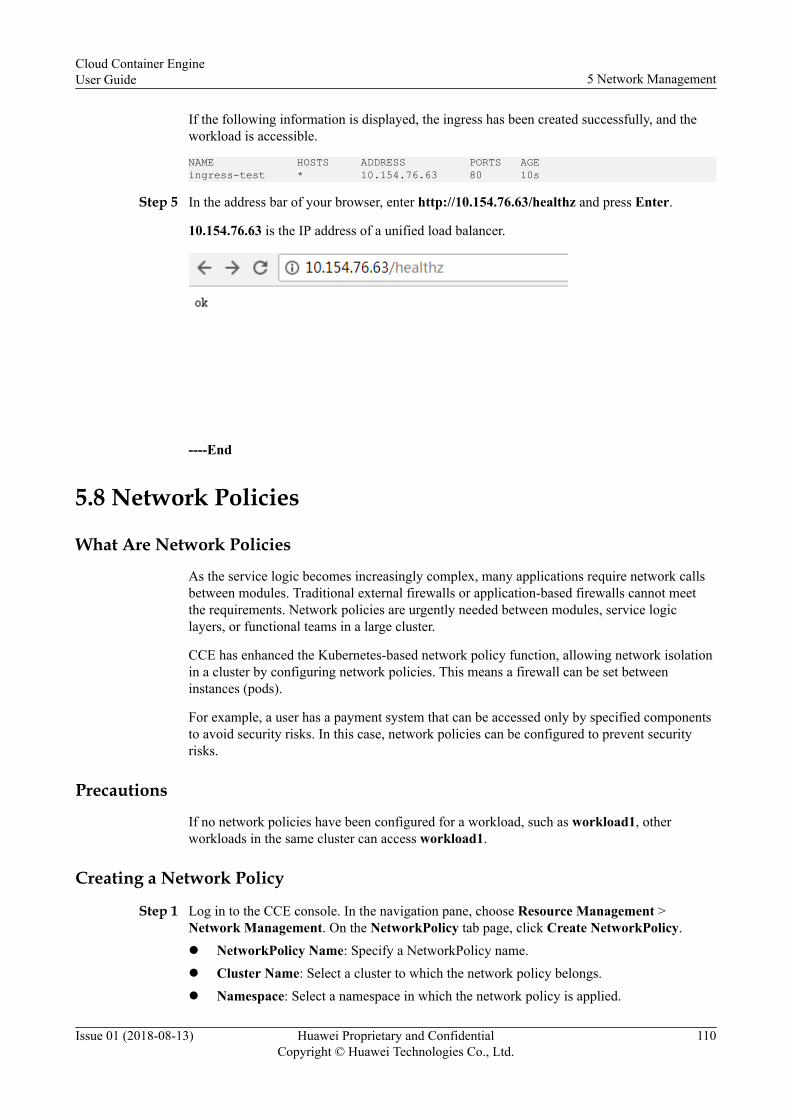
If the following information is displayed, the ingress has been created successfully, and theworkload is accessible.
NAME HOSTS ADDRESS PORTS AGEingress-test * 10.154.76.63 80 10s
Step 5 In the address bar of your browser, enter http://10.154.76.63/healthz and press Enter.
10.154.76.63 is the IP address of a unified load balancer.
----End
5.8 Network Policies
What Are Network Policies
As the service logic becomes increasingly complex, many applications require network callsbetween modules. Traditional external firewalls or application-based firewalls cannot meetthe requirements. Network policies are urgently needed between modules, service logiclayers, or functional teams in a large cluster.
CCE has enhanced the Kubernetes-based network policy function, allowing network isolationin a cluster by configuring network policies. This means a firewall can be set betweeninstances (pods).
For example, a user has a payment system that can be accessed only by specified componentsto avoid security risks. In this case, network policies can be configured to prevent securityrisks.
Precautions
If no network policies have been configured for a workload, such as workload1, otherworkloads in the same cluster can access workload1.
Creating a Network Policy
Step 1 Log in to the CCE console. In the navigation pane, choose Resource Management >Network Management. On the NetworkPolicy tab page, click Create NetworkPolicy.l NetworkPolicy Name: Specify a NetworkPolicy name.l Cluster Name: Select a cluster to which the network policy belongs.l Namespace: Select a namespace in which the network policy is applied.
Cloud Container EngineUser Guide 5 Network Management
Issue 01 (2018-08-13) Huawei Proprietary and ConfidentialCopyright © Huawei Technologies Co., Ltd.
110
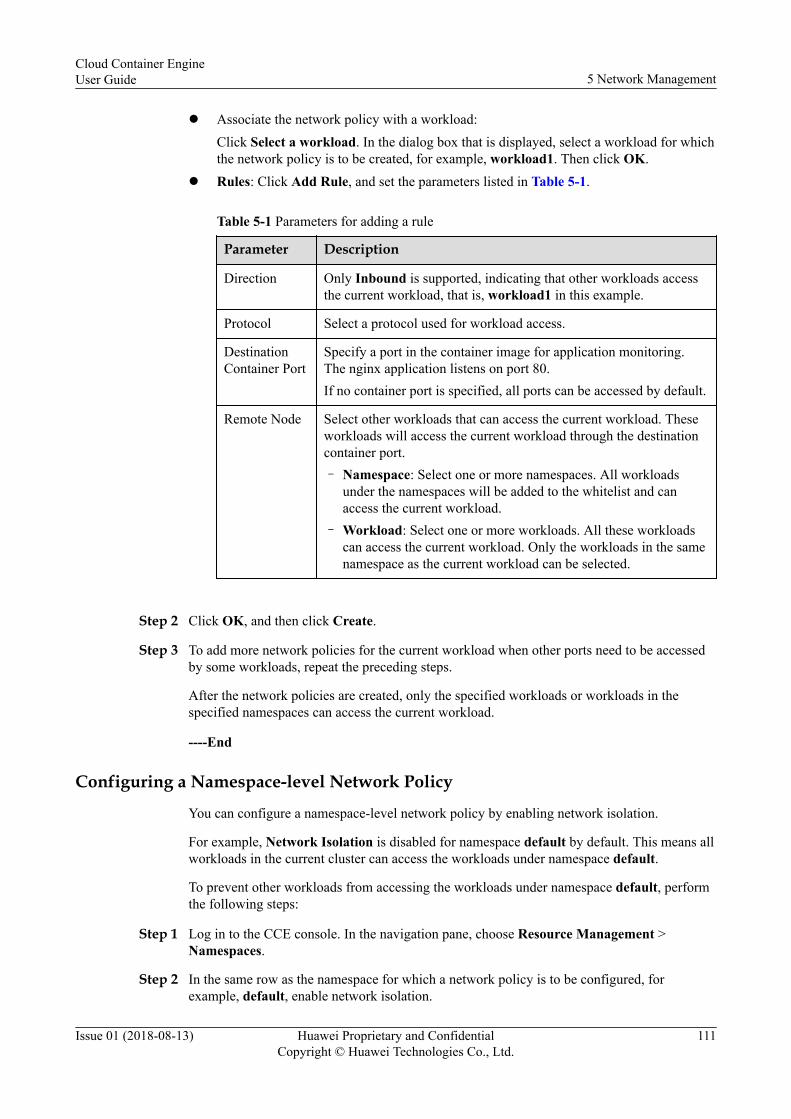
l Associate the network policy with a workload:Click Select a workload. In the dialog box that is displayed, select a workload for whichthe network policy is to be created, for example, workload1. Then click OK.
l Rules: Click Add Rule, and set the parameters listed in Table 5-1.
Table 5-1 Parameters for adding a rule
Parameter Description
Direction Only Inbound is supported, indicating that other workloads accessthe current workload, that is, workload1 in this example.
Protocol Select a protocol used for workload access.
DestinationContainer Port
Specify a port in the container image for application monitoring.The nginx application listens on port 80.If no container port is specified, all ports can be accessed by default.
Remote Node Select other workloads that can access the current workload. Theseworkloads will access the current workload through the destinationcontainer port.– Namespace: Select one or more namespaces. All workloads
under the namespaces will be added to the whitelist and canaccess the current workload.
– Workload: Select one or more workloads. All these workloadscan access the current workload. Only the workloads in the samenamespace as the current workload can be selected.
Step 2 Click OK, and then click Create.
Step 3 To add more network policies for the current workload when other ports need to be accessedby some workloads, repeat the preceding steps.
After the network policies are created, only the specified workloads or workloads in thespecified namespaces can access the current workload.
----End
Configuring a Namespace-level Network Policy
You can configure a namespace-level network policy by enabling network isolation.
For example, Network Isolation is disabled for namespace default by default. This means allworkloads in the current cluster can access the workloads under namespace default.
To prevent other workloads from accessing the workloads under namespace default, performthe following steps:
Step 1 Log in to the CCE console. In the navigation pane, choose Resource Management >Namespaces.
Step 2 In the same row as the namespace for which a network policy is to be configured, forexample, default, enable network isolation.
Cloud Container EngineUser Guide 5 Network Management
Issue 01 (2018-08-13) Huawei Proprietary and ConfidentialCopyright © Huawei Technologies Co., Ltd.
111
After the configuration is complete, other workloads in the current cluster cannot access theworkloads under namespace default.
----End
Cloud Container EngineUser Guide 5 Network Management
Issue 01 (2018-08-13) Huawei Proprietary and ConfidentialCopyright © Huawei Technologies Co., Ltd.
112
6 Job Management
In Kubernetes, a job creates one or more pods and ensures that a specified number of themsuccessfully terminate. There are three main types of jobs:
l Non-parallel job: A job that creates only one pod and that is completed when the podterminates successfully.
l Parallel jobs with a fixed completion count: A job that creates one or more pods and thatis completed when a specified number of pods terminate successfully.
l Parallel jobs with a work queue: A job that creates one or more pods and that iscompleted with success when at least one pod has terminated with success and all podsare terminated.
A cron job runs periodically at a specified time. A cron job object is like one line of a Linuxcron table file. Cron jobs are useful for creating periodic and recurring tasks, like runningbackups or sending emails.
6.1 Creating a One-time Job
6.2 Creating a Cron Job
6.1 Creating a One-time JobA one-time job is executed only once immediately after being deployed. Before creating aworkload, you can execute a one-time job to upload an image to the image repository.
PrerequisitesNodes have been added. For more information, see 3.7 Creating a Node in a VM Cluster(Pay-per-use).
Procedure
Step 1 (Optional) If you use a private container image to create your one-time job, upload thecontainer image to the image repository.
For details about how to upload an image, see Help Center > SoftWare Repository forContainer > User Guide > Image Management..
Step 2 Log in to the CCE console, choose Job Management > One-time Jobs, and click CreateJob.
Cloud Container EngineUser Guide 6 Job Management
Issue 01 (2018-08-13) Huawei Proprietary and ConfidentialCopyright © Huawei Technologies Co., Ltd.
113

Step 3 Configure the basic job information listed in Table 6-1. The parameters marked with anasterisk (*) are mandatory.
Table 6-1 Basic job information
Parameter Description
* Job Name Name of a new job. The name must be unique.
* ContainerCluster
Cluster to which a new job belongs.
* Namespace Namespace to which a job belongs.
Description Description of a job.
Step 4 Click Next to add a container.
1. Click to select the image to be deployed.– My Images: displays all image repositories you create.– Official Docker Hub Images: display the official images in the Docker Hub
repository.– Third-party Images: CCE allows you to create a workload using an image pulled
from a third-party image repository, rather than a public cloud image repository or aDocker Hub image repository. When you create a workload using a third-partyimage, ensure that the node where the workload is running can access publicnetworks. For details about how to use a third-party image, see 4.14 Using a Third-Party Image.n If your image repository does not require authentication, set Authenticate
Secret to No, enter an image address in Image Address, and then click OK.n If your image repository is accessible only after being authenticated by
account and password, set Authenticate Secret to Yes. You need to create asecret first and then use a third-party image to create a workload. For details,see 4.14 Using a Third-Party Image.
2. Set image parameters.
Table 6-2 Image parameters
Parameter Description
Image Name Name of the image. You can click Change Image to update it.
* Image Version Version of the image to be deployed.
* ContainerName
Name of the container. You can modify it.
Cloud Container EngineUser Guide 6 Job Management
Issue 01 (2018-08-13) Huawei Proprietary and ConfidentialCopyright © Huawei Technologies Co., Ltd.
114
Parameter Description
ContainerResource
For more information about Request and Limit, see 4.5 SettingContainer Specifications.– Request: the amount of resources that CCE will guarantee to a
container.– Limit: the maximum amount of resources that CCE will allow
a container to use. You can set Limit to prevent system faultscaused by container overload.
3. (Optional) Configure advanced settings.
Table 6-3 Advanced settings
Parameter Description
Lifecycle Lifecycle scripts define the actions taken for container-relatedjobs when a lifecycle event occurs. For details, see 4.6 Settingthe Lifecycle of a Container.– Start: If you enter a container startup command, the command
is immediately executed after the container starts.– Post-Start Processing: The command is triggered after a job
starts.– Pre-Stop Processing: The command is triggered before a job
is stopped.
EnvironmentVariables
Add environment variables to the container. On the EnvironmentVariables tab page, click Add Environment Variables.Currently, environment variables can be added using any of thefollowing methods:– Manually added: Set Variable Name and Variable/Variable
Reference.– Importing a secret: Set Variable Name and select the desired
secret name and data. The prerequisite of this method is that asecret has been created. For details, see 7.3 Creating a Secret.
– Importing a ConfigMap: Set Variable Name and select thedesired ConfigMap name and data. The prerequisite of thismethod is that a ConfigMap has been created. For details, see7.1 Creating a ConfigMap.
Data Storage You can mount a host directory, EVS disk, SFS file system, andConfigMap and secrets to the corresponding directories of acontainer instance. For details, see 8 Storage Management.
Log Policy Set a log policy and log path for collecting workload logs andpreventing logs from being over-sized. For details, see 9.1Collecting Standard Output Logs of Containers.
Cloud Container EngineUser Guide 6 Job Management
Issue 01 (2018-08-13) Huawei Proprietary and ConfidentialCopyright © Huawei Technologies Co., Ltd.
115
4. (Optional) One job instance contains one or more related containers. If your job contains
multiple containers, click and then add containers.
Step 5 Click Create.
If the status is Execution completed, the common job has been created successfully.
----End
Creating a Job Using kubectl
A job has the following configuration parameters:
l spec.template: has the same schema as a pod.l RestartPolicy: can only be set to Never or OnFailure.l For a single-pod job, the job ends after the pod runs successfully by default.l .spec.completions: indicates the number of pods that need to run successfully to end a
job. The default value is 1.l .spec.parallelism: indicates the number of pods that run concurrently. The default value
is 1.l spec.backoffLimit: indicates the maximum number of retries performed if a pod fails.
When the limit is reached, the pod will not try again.l .spec.activeDeadlineSeconds: indicates the running time of pods. Once the time is
reached, all pods of the job are terminated. The priority of .spec.activeDeadlineSecondsis higher than that of .spec.backoffLimit. That is, if a job reachesthe .spec.activeDeadlineSeconds before reaching the spec.backoffLimit, the pods areterminated..
Based on the .spec.completions and .spec.Parallelism settings, jobs are classified into thefollowing types.
Table 6-4 Job types
Job Type Description Example
One-shot jobs A single pod runs once untilsuccessful termination.
Database migration
Jobs with a fixedcompletioncount
One pod runs until reaching thespecified completions count.
Work queue processing pod
Parallel jobswith a fixedcompletioncount
Multiple pods run until reachingthe specified completions count.
Multiple pods processing from acentralized work queue
Parallel jobs One or more pods run untilsuccessful termination.
Multiple pods processing from acentralized work queue
Cloud Container EngineUser Guide 6 Job Management
Issue 01 (2018-08-13) Huawei Proprietary and ConfidentialCopyright © Huawei Technologies Co., Ltd.
116

The following is an example job, which calculates π till the 2000th digit and prints the output.
apiVersion: batch/v1kind: Jobmetadata: name: pi-with-timeoutspec: completions: 50 # Indicates that 50 pods need to run to end the job. In this example, the value of π is printed 50 times. parallelism: 5 # Indicates 5 parallel pods. backoffLimit: 5 # Indicates that a pod that fails retries a maximum of 5 times.
template: spec: containers: - name: pi image: perl command: ["perl", "-Mbignum=bpi", "-wle", "print bpi(2000)"] restartPolicy: Never
Related Operations
After a one-time job is created, you can perform operations listed in Table 6-5.
Table 6-5 Other operations
Operation Description
Viewing the YAML file Click Show YAML in the Operation column of a one-time jobto view the corresponding YAML file.
Deleting a one-time job 1. Select the job to be deleted and click Delete in theOperation column.
2. Click OK.Deleted jobs cannot be restored. Therefore, exercise cautionwhen deleting a job.
6.2 Creating a Cron JobA cron job is a short-lived job that runs at a specified time. You can perform timesynchronization for all active nodes at a fixed time point.
Prerequisites
Nodes have been added. For more information, see 3.7 Creating a Node in a VM Cluster(Pay-per-use).
Procedure
Step 1 (Optional) If you use a private container image to create your containerized cron job, uploadthe container image to the image repository.
For details about how to upload an image, see Help Center > SoftWare Repository forContainer > User Guide > Image Management..
Cloud Container EngineUser Guide 6 Job Management
Issue 01 (2018-08-13) Huawei Proprietary and ConfidentialCopyright © Huawei Technologies Co., Ltd.
117
Step 2 Log in to the CCE console, choose Job Management > Cron Jobs, and click Create Job.
Step 3 Configure the basic job information listed in Table 6-6. The parameters marked with anasterisk (*) are mandatory.
Table 6-6 Basic job information
Parameter Description
* Job Name Name of a new job. The name must be unique.
* ContainerCluster
Cluster to which a new job belongs.
* Namespace Namespace to which a cron job belongs.
Description Description of a job.
Step 4 Click Next.
Step 5 Set the scheduling rule.
Table 6-7 Scheduling rule parameters
Parameter Description
* ConcurrentPolicy
The following three modes are supported:l Allow: New cron jobs can be created continuously.l Forbid: A new job cannot be created before the previous job is
complete.l Replace: A new job replaces the previous job when it is time to
create the new job but the previous job is not complete.
* Timing Rule Specifies the time when a new cron job is executed.
Job Record You can set the number of job execution records (successful or failed)that can be retained.
Step 6 Click Next to add a container.
1. Click to select the image to be deployed.– My Images: displays all image repositories you create.– Official Docker Hub Images: display the official images in the Docker Hub
repository.– Third-party Images: CCE allows you to create a workload using an image pulled
from a third-party image repository, rather than a public cloud image repository or aDocker Hub image repository. When you create a workload using a third-partyimage, ensure that the node where the workload is running can access publicnetworks. For details about how to use a third-party image, see 4.14 Using a Third-Party Image.n If your image repository does not require authentication, set Authenticate
Secret to No, enter an image address in Image Address, and then click OK.
Cloud Container EngineUser Guide 6 Job Management
Issue 01 (2018-08-13) Huawei Proprietary and ConfidentialCopyright © Huawei Technologies Co., Ltd.
118
n If your image repository is accessible only after being authenticated byaccount and password, set Authenticate Secret to Yes. You need to create asecret first and then use a third-party image to create a workload. For details,see 4.14 Using a Third-Party Image.
2. Set image parameters.
Table 6-8 Image parameters
Parameter Description
Image Name Name of the image. You can click Change Image to update it.
*Image Version Version of the image to be deployed.
*Container Name Name of the container. You can modify it.
ContainerResource
For more information about Request and Limit, see 4.5 SettingContainer Specifications.– Request: the amount of resources that CCE will guarantee to a
container.– Limit: the maximum amount of resources that CCE will allow
a container to use. You can set Limit to prevent system faultscaused by container overload.
3. (Optional) Perform advanced settings.
Table 6-9 Advanced settings
Parameter Description
Lifecycle Lifecycle scripts define the actions taken for container-relatedjobs when a lifecycle event occurs. For details, see 4.6 Settingthe Lifecycle of a Container.– Start: If you enter a container startup command, the command
is immediately executed after the container starts.– Post-Start Processing: The command is triggered after a job
starts.– Pre-Stop Processing: The command is triggered before a job
is stopped.
Cloud Container EngineUser Guide 6 Job Management
Issue 01 (2018-08-13) Huawei Proprietary and ConfidentialCopyright © Huawei Technologies Co., Ltd.
119
Parameter Description
EnvironmentVariables
Add environment variables to the container. On the EnvironmentVariables tab page, click Add Environment Variables.Currently, environment variables can be added using any of thefollowing methods:– Manually added: Set Variable Name and Variable/Variable
Reference.– Importing a secret: Set Variable Name and select the desired
secret name and data. The prerequisite of this method is that asecret has been created. For details, see 7.3 Creating a Secret.
– Importing a ConfigMap: Set Variable Name and select thedesired ConfigMap name and data. The prerequisite of thismethod is that a ConfigMap has been created. For details, see7.1 Creating a ConfigMap.
4. (Optional) One job instance contains one or more related containers. If your job contains
multiple containers, click and then add containers.
Step 7 Click Create.
If the status is Started, the cron job has been created successfully.
----End
Creating a Cron Job Using kubectlA Cron job has the following configuration parameters:
l .spec.schedule: takes a Cron format string, for example, 0 * * * * or @hourly, asschedule time of jobs to be created and executed.
l .spec.jobTemplate: specifies jobs to be run, and has exactly the same schema as a job.For details, see Creating a Job Using kubectl.
l .spec.startingDeadlineSeconds: specifies the deadline for starting a job.l .spec.concurrencyPolicy: specifies how to treat concurrent executions of a job created
by the Cron job. The following options are supported:– Allow (default value): allows concurrently running jobs.– Forbid: forbids concurrent runs, skipping next run if previous has not finished yet.– Replace: cancels the currently running job and replaces it with a new one.
The following is an example Cron job, which is saved in the cronjob.yaml file.
apiVersion: batch/v2alpha1kind: CronJobmetadata: name: hellospec: schedule: "*/1 * * * *" jobTemplate: spec:
Cloud Container EngineUser Guide 6 Job Management
Issue 01 (2018-08-13) Huawei Proprietary and ConfidentialCopyright © Huawei Technologies Co., Ltd.
120
template: spec: containers: - name: hello image: busybox args: - /bin/sh - -c - date; echo Hello from the Kubernetes cluster restartPolicy: OnFailure
1. Run the following command to create a Cron job.$ kubectl create -f cronjob.yamlcronjob "hello" created
2. After the creation, run the following commands to view the running status of the job.$ kubectl get cronjobNAME SCHEDULE SUSPEND ACTIVE LAST-SCHEDULEhello */1 * * * * False 0 <none>$ kubectl get jobsNAME DESIRED SUCCESSFUL AGEhello-1202039034 1 1 49s$ pods=$(kubectl get pods --selector=job-name=hello-1202039034 --output=jsonpath={.items..metadata.name} -a)$ kubectl logs $podsMon Aug 29 21:34:09 UTC 2016Hello from the Kubernetes cluster
$ kubectl delete cronjob hellocronjob "hello" deleted
NOTICEDeleting a Cron job will not automatically delete its jobs. You can delete the jobs by runningthe kubectl delete job command.
Related Operations
After a cron job is created, you can perform operations listed in Table 6-10.
Table 6-10 Other operations
Operation Description
Viewing the YAML file Choose More > Show YAML in the Operation column of acron job to view the corresponding YAML file.
Stopping a cron job 1. Select the job to be stopped and click Stop in the Operationcolumn.
2. Click OK.
Deleting a cron job 1. Select the job to be deleted and click Delete in theOperation column.
2. Click OK.Deleted jobs cannot be restored. Therefore, exercise cautionwhen deleting a job.
Cloud Container EngineUser Guide 6 Job Management
Issue 01 (2018-08-13) Huawei Proprietary and ConfidentialCopyright © Huawei Technologies Co., Ltd.
121

7 Configuration Center
7.1 Creating a ConfigMap
7.2 Using a ConfigMap
7.3 Creating a Secret
7.4 Using a Secret
7.1 Creating a ConfigMapA ConfigMap is a type of resource that stores configuration information required by aworkload. Its content is user-defined. After creating ConfigMaps, you can use them as files orenvironment variables in a containerized workload.
ConfigMaps allow you to decouple configuration files from container images to enhance theportability of containerized workloads.
Benefits of ConfigMaps:
l Manage configurations of different environments and services.l Deploy workloads in different environments. Multiple versions are supported for
configuration files so that you can update and roll back workloads easily.l Quickly import your configurations files to containers.
PrerequisitesCluster and node resources have been created. For more information, see 3.2 Creating a VMCluster.
Procedure
Step 1 Log in to the CCE console. In the navigation pane, choose Configuration Center >ConfigMaps, and click Create ConfigMap.
Step 2 ConfigMaps can be created manually or by uploading a configuration file.l To create a ConfigMap manually, set the parameters for creating a ConfigMap listed in
Table 7-1. The parameters marked with an asterisk (*) are mandatory. After setting theparameters, click Create ConfigMap.
Cloud Container EngineUser Guide 7 Configuration Center
Issue 01 (2018-08-13) Huawei Proprietary and ConfidentialCopyright © Huawei Technologies Co., Ltd.
122

Table 7-1 Parameters for creating a ConfigMap
Parameter Description
Basic Information
Configuration Name Name of a ConfigMap, which must be unique in anamespace.
Home Cluster Cluster that will use the ConfigMap you create.
Cluster Namespace Namespace to which the ConfigMap belongs. If you do notspecify this parameter, the value default is used by default.
Description Description of the ConfigMap.
Configuration Data The workload configuration data can be used in a containeror used to store the configuration data. Key indicates a filename. Value indicates the content in the file.1. Click Add Data.2. Set Key and Value.
Configuration Labels Labels are attached to objects such as workloads, nodes, andservices in key-value pairs.Labels define the identifiable attributes of these objects andare used to manage and select the objects.1. Click Add Label.2. Set Key and Value.
Step 3 After the configuration is complete, click Create.
The new ConfigMap is displayed in the ConfigMap list.
----End
ConfigMap Requirements for ConfigMap
A ConfigMap resource file can be in JSON or YAML format, and the file size cannot exceed2 MB.
l JSON formatThe file name is configmap.json and the following shows a configuration example.{ "kind": "ConfigMap", "apiVersion": "v1", "metadata": { "name": "paas-broker-app-017", "namespace": "lcqtest", "enable": true }, "data": { "context": "{\"applicationComponent\":{\"properties\":{\"custom_spec\":{}},\"node_name\":\"paas-broker-app\",\"stack_id\":\"0177eae1-89d3-cb8a-1f94-c0feb7e91d7b\"},\"softwareComponents\":[{\"properties\":{\"custom_spec\":{}},\"node_name\":\"paas-broker\",\"stack_id\":\"0177eae1-89d3-cb8a-1f94-c0feb7e91d7b\"}]}"
Cloud Container EngineUser Guide 7 Configuration Center
Issue 01 (2018-08-13) Huawei Proprietary and ConfidentialCopyright © Huawei Technologies Co., Ltd.
123
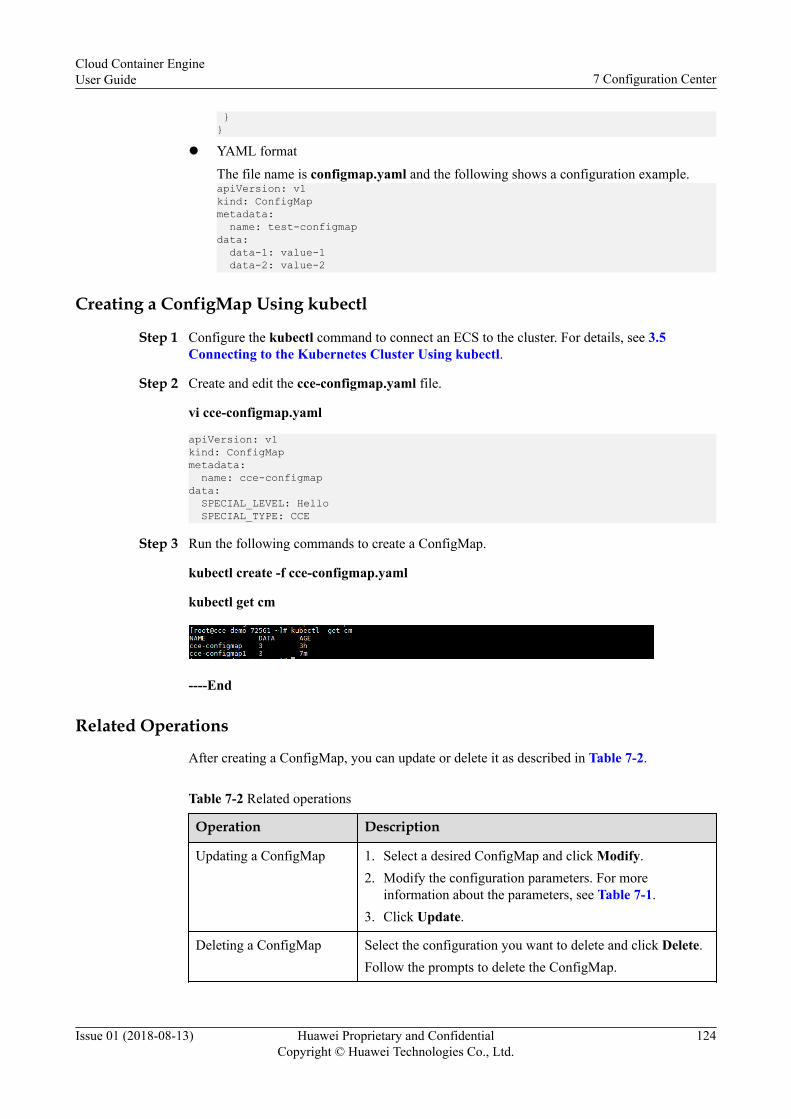
}}
l YAML format
The file name is configmap.yaml and the following shows a configuration example.apiVersion: v1kind: ConfigMapmetadata: name: test-configmapdata: data-1: value-1 data-2: value-2
Creating a ConfigMap Using kubectl
Step 1 Configure the kubectl command to connect an ECS to the cluster. For details, see 3.5Connecting to the Kubernetes Cluster Using kubectl.
Step 2 Create and edit the cce-configmap.yaml file.
vi cce-configmap.yaml
apiVersion: v1kind: ConfigMapmetadata: name: cce-configmapdata: SPECIAL_LEVEL: Hello SPECIAL_TYPE: CCE
Step 3 Run the following commands to create a ConfigMap.
kubectl create -f cce-configmap.yaml
kubectl get cm
----End
Related Operations
After creating a ConfigMap, you can update or delete it as described in Table 7-2.
Table 7-2 Related operations
Operation Description
Updating a ConfigMap 1. Select a desired ConfigMap and click Modify.2. Modify the configuration parameters. For more
information about the parameters, see Table 7-1.3. Click Update.
Deleting a ConfigMap Select the configuration you want to delete and click Delete.Follow the prompts to delete the ConfigMap.
Cloud Container EngineUser Guide 7 Configuration Center
Issue 01 (2018-08-13) Huawei Proprietary and ConfidentialCopyright © Huawei Technologies Co., Ltd.
124
7.2 Using a ConfigMapAfter a ConfigMap is created, it can be used in the following scenarios:
l Setting Workload Environment Variablesl Setting Command Line Parametersl Mounting a ConfigMap to a Workload Data Volume
The following example shows how to use a ConfigMap.
apiVersion: v1kind: ConfigMapmetadata: name: cce-configmapdata: SPECIAL_LEVEL: Hello SPECIAL_TYPE: CCE
NOTICEWhen ConfigMap is used in a pod, the pod and ConfigMap must be in the same cluster andnamespace.
Setting Workload Environment VariablesWhen creating a workload, you can set the ConfigMap to an environment variable and use thevalueFrom parameter to obtain the key-value pair in ConfigMap.
apiVersion: v1 kind: Pod metadata: name: configmap-pod-1 spec: containers: - name: test-container image: busybox command: [ "/bin/sh", "-c", "env" ] env: - name: SPECIAL_LEVEL_KEY valueFrom: ##Use valueFrom to obtain the environment value. configMapKeyRef: name: cce-configmap ##Name of the configuration file referenced. key: SPECIAL_LEVEL ##Key of the configuration file referenced. restartPolicy: Never
If you need to define the values of multiple ConfigMaps as the environment variables of thepods, add multiple environment parameters to the pods.
env: - name: SPECIAL_LEVEL_KEY valueFrom: configMapKeyRef: name: cce-configmap key: SPECIAL_LEVEL - name: SPECIAL_TYPE_KEY
Cloud Container EngineUser Guide 7 Configuration Center
Issue 01 (2018-08-13) Huawei Proprietary and ConfidentialCopyright © Huawei Technologies Co., Ltd.
125

valueFrom: configMapKeyRef: name: cce-configmap key: SPECIAL_TYPE
To add all data in a ConfigMap to environment variables, use the envFrom parameter. Thekeys in the ConfigMap will become names of environment variables in pods.
apiVersion: v1 kind: Pod metadata: name: configmap-pod-2 spec: containers: - name: test-container image: busybox command: [ "/bin/sh", "-c", "env" ] envFrom: - configMapRef: name: cce-configmap restartPolicy: Never
Setting Command Line Parameters
You can use a ConfigMap to set the commands or parameter values for a container by usingenvironment variable substitution syntax $(VAR_NAME). The following shows an example.
apiVersion: v1 kind: Pod metadata: name: configmap-pod-3 spec: containers: - name: test-container image: busybox command: [ "/bin/sh", "-c", "echo $(SPECIAL_LEVEL_KEY) $(SPECIAL_TYPE_KEY)" ] env: - name: SPECIAL_LEVEL_KEY valueFrom: configMapKeyRef: name: cce-configmap key: SPECIAL_LEVEL - name: SPECIAL_TYPE_KEY valueFrom: configMapKeyRef: name: cce-configmap key: SPECIAL_TYPE restartPolicy: Never
The following information is displayed after the pod is run.
Hello CCE
Mounting a ConfigMap to a Workload Data Volume
The ConfigMap can also be used in a data volume. You only need to mount the ConfigMap toa workload when creating the workload. After the mounting is complete, a configuration filewith key as the file name and value as the file content is generated.
apiVersion: v1 kind: Pod metadata: name: configmap-pod-4 spec: containers:
Cloud Container EngineUser Guide 7 Configuration Center
Issue 01 (2018-08-13) Huawei Proprietary and ConfidentialCopyright © Huawei Technologies Co., Ltd.
126
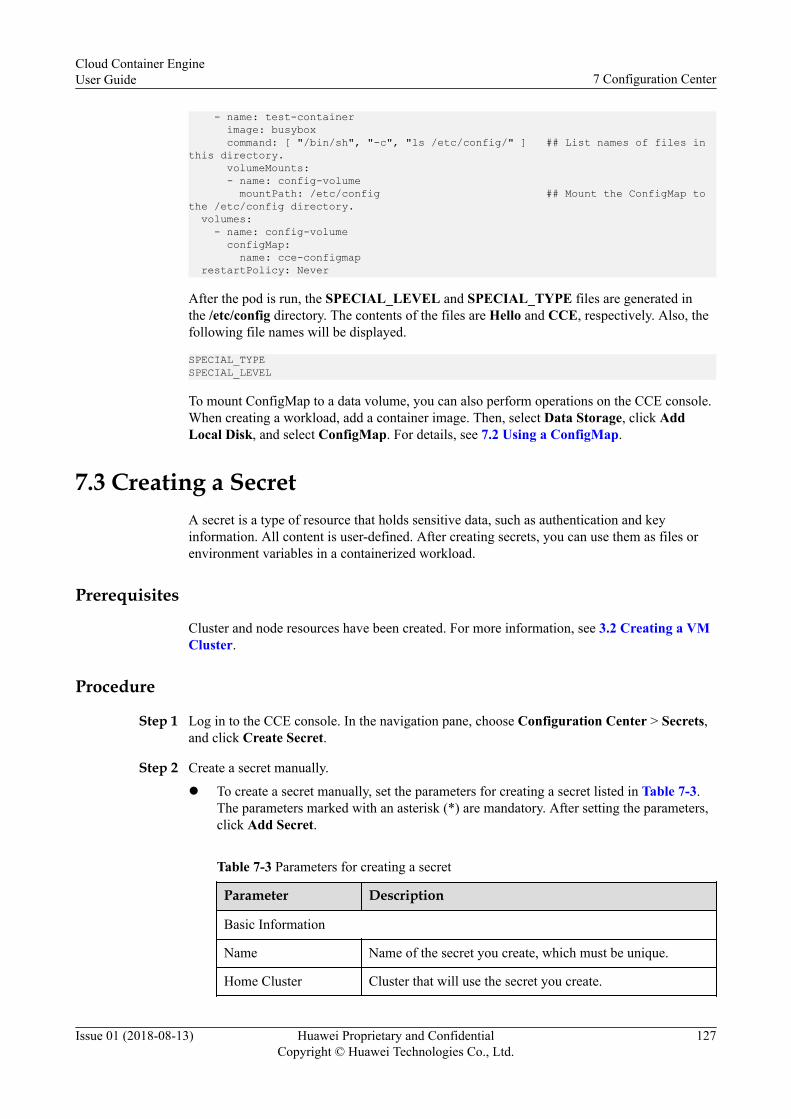
- name: test-container image: busybox command: [ "/bin/sh", "-c", "ls /etc/config/" ] ## List names of files in this directory. volumeMounts: - name: config-volume mountPath: /etc/config ## Mount the ConfigMap to the /etc/config directory. volumes: - name: config-volume configMap: name: cce-configmap restartPolicy: Never
After the pod is run, the SPECIAL_LEVEL and SPECIAL_TYPE files are generated inthe /etc/config directory. The contents of the files are Hello and CCE, respectively. Also, thefollowing file names will be displayed.
SPECIAL_TYPE SPECIAL_LEVEL
To mount ConfigMap to a data volume, you can also perform operations on the CCE console.When creating a workload, add a container image. Then, select Data Storage, click AddLocal Disk, and select ConfigMap. For details, see 7.2 Using a ConfigMap.
7.3 Creating a SecretA secret is a type of resource that holds sensitive data, such as authentication and keyinformation. All content is user-defined. After creating secrets, you can use them as files orenvironment variables in a containerized workload.
Prerequisites
Cluster and node resources have been created. For more information, see 3.2 Creating a VMCluster.
Procedure
Step 1 Log in to the CCE console. In the navigation pane, choose Configuration Center > Secrets,and click Create Secret.
Step 2 Create a secret manually.
l To create a secret manually, set the parameters for creating a secret listed in Table 7-3.The parameters marked with an asterisk (*) are mandatory. After setting the parameters,click Add Secret.
Table 7-3 Parameters for creating a secret
Parameter Description
Basic Information
Name Name of the secret you create, which must be unique.
Home Cluster Cluster that will use the secret you create.
Cloud Container EngineUser Guide 7 Configuration Center
Issue 01 (2018-08-13) Huawei Proprietary and ConfidentialCopyright © Huawei Technologies Co., Ltd.
127
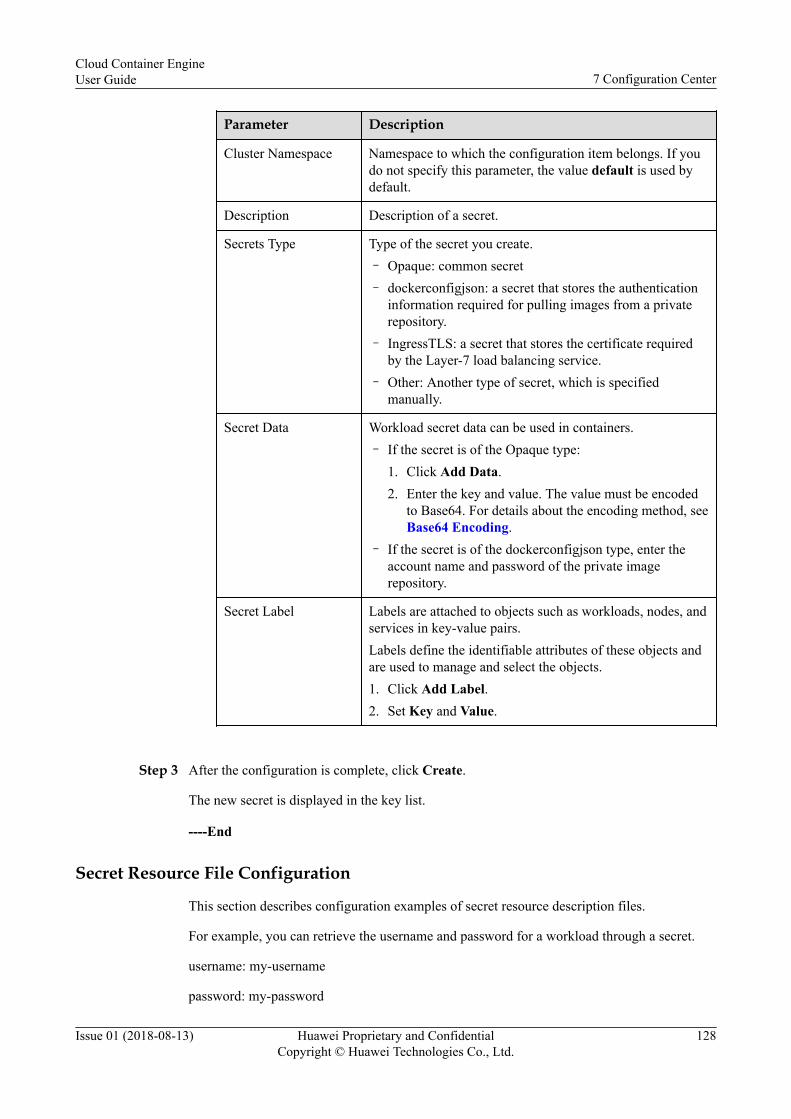
Parameter Description
Cluster Namespace Namespace to which the configuration item belongs. If youdo not specify this parameter, the value default is used bydefault.
Description Description of a secret.
Secrets Type Type of the secret you create.– Opaque: common secret– dockerconfigjson: a secret that stores the authentication
information required for pulling images from a privaterepository.
– IngressTLS: a secret that stores the certificate requiredby the Layer-7 load balancing service.
– Other: Another type of secret, which is specifiedmanually.
Secret Data Workload secret data can be used in containers.– If the secret is of the Opaque type:
1. Click Add Data.2. Enter the key and value. The value must be encoded
to Base64. For details about the encoding method, seeBase64 Encoding.
– If the secret is of the dockerconfigjson type, enter theaccount name and password of the private imagerepository.
Secret Label Labels are attached to objects such as workloads, nodes, andservices in key-value pairs.Labels define the identifiable attributes of these objects andare used to manage and select the objects.1. Click Add Label.2. Set Key and Value.
Step 3 After the configuration is complete, click Create.
The new secret is displayed in the key list.
----End
Secret Resource File Configuration
This section describes configuration examples of secret resource description files.
For example, you can retrieve the username and password for a workload through a secret.
username: my-username
password: my-password
Cloud Container EngineUser Guide 7 Configuration Center
Issue 01 (2018-08-13) Huawei Proprietary and ConfidentialCopyright © Huawei Technologies Co., Ltd.
128
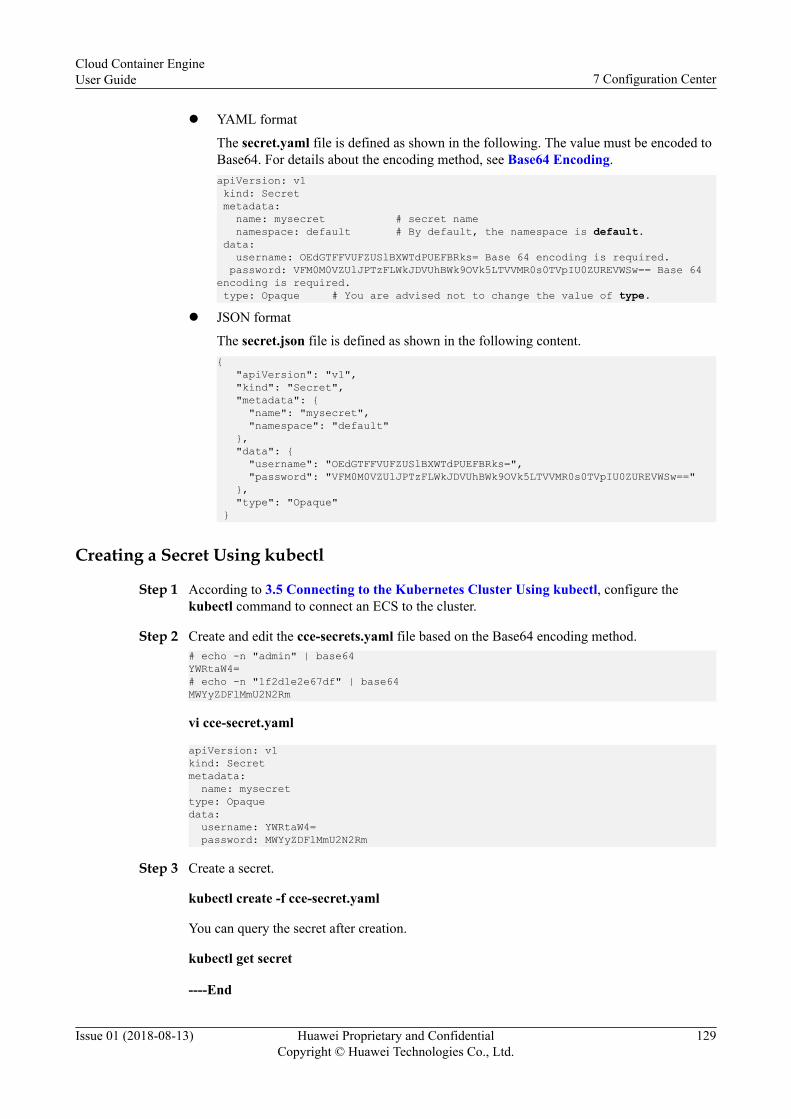
l YAML format
The secret.yaml file is defined as shown in the following. The value must be encoded toBase64. For details about the encoding method, see Base64 Encoding.apiVersion: v1 kind: Secret metadata: name: mysecret # secret name namespace: default # By default, the namespace is default. data: username: OEdGTFFVUFZUSlBXWTdPUEFBRks= Base 64 encoding is required. password: VFM0M0VZUlJPTzFLWkJDVUhBWk9OVk5LTVVMR0s0TVpIU0ZUREVWSw== Base 64 encoding is required. type: Opaque # You are advised not to change the value of type.
l JSON format
The secret.json file is defined as shown in the following content.{ "apiVersion": "v1", "kind": "Secret", "metadata": { "name": "mysecret", "namespace": "default" }, "data": { "username": "OEdGTFFVUFZUSlBXWTdPUEFBRks=", "password": "VFM0M0VZUlJPTzFLWkJDVUhBWk9OVk5LTVVMR0s0TVpIU0ZUREVWSw==" }, "type": "Opaque" }
Creating a Secret Using kubectl
Step 1 According to 3.5 Connecting to the Kubernetes Cluster Using kubectl, configure thekubectl command to connect an ECS to the cluster.
Step 2 Create and edit the cce-secrets.yaml file based on the Base64 encoding method.# echo -n "admin" | base64 YWRtaW4= # echo -n "1f2d1e2e67df" | base64 MWYyZDFlMmU2N2Rm
vi cce-secret.yaml
apiVersion: v1 kind: Secret metadata: name: mysecret type: Opaque data: username: YWRtaW4= password: MWYyZDFlMmU2N2Rm
Step 3 Create a secret.
kubectl create -f cce-secret.yaml
You can query the secret after creation.
kubectl get secret
----End
Cloud Container EngineUser Guide 7 Configuration Center
Issue 01 (2018-08-13) Huawei Proprietary and ConfidentialCopyright © Huawei Technologies Co., Ltd.
129
Base64 EncodingTo encrypt a character string to Base64, you can run the echo -n encoding content | base64command. The following is an example.root@ubuntu:~# echo -n "3306" | base64 MzMwNg==
Related OperationsAfter creating a configuration item, you can update or delete it as described in Table 7-4.
NOTE
The secret list contains system secret resources that can be queried only. The system secret resourcescannot be updated or deleted.
Table 7-4 Related Operations
Operation Description
Updating a secret 1. Select a key you want to modify and click Modify.2. Modify the secret data. For more information, see Table
7-3.3. Click Update.
Deleting a secret Select the secret you want to delete and click Delete.Follow the prompts to delete the secret.
Deleting secrets in batches 1. Select the secrets to be deleted.2. Click Delete above the secret list.3. Follow the prompts to delete the secrets.
7.4 Using a SecretAfter a secret is created, it can be used in the following scenarios:
l Configuring the Data Volume of a Podl Setting Environment Variables of a Pod
The following example shows how to use a secret.apiVersion: v1 kind: Secret metadata: name: mysecret type: Opaque data: username: YWRtaW4= password: MWYyZDFlMmU2N2Rm
NOTICEWhen a secret is used in a pod, the pod and secret must be in the same cluster and namespace.
Cloud Container EngineUser Guide 7 Configuration Center
Issue 01 (2018-08-13) Huawei Proprietary and ConfidentialCopyright © Huawei Technologies Co., Ltd.
130
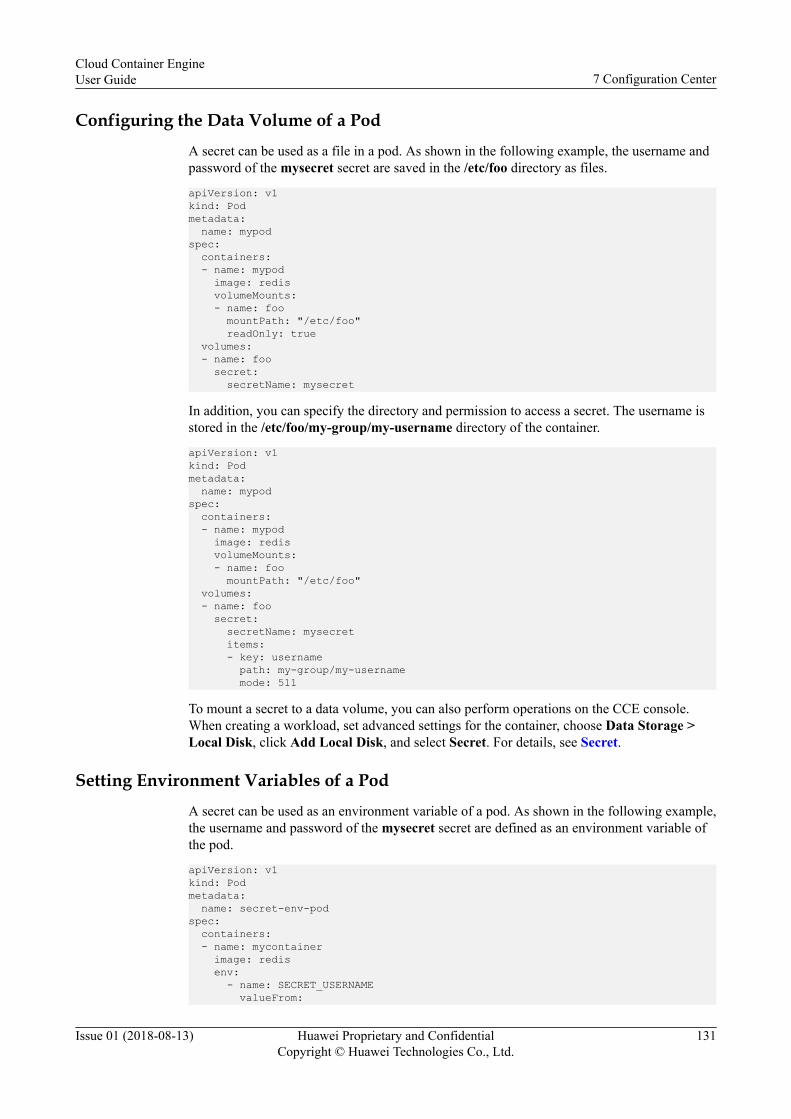
Configuring the Data Volume of a Pod
A secret can be used as a file in a pod. As shown in the following example, the username andpassword of the mysecret secret are saved in the /etc/foo directory as files.
apiVersion: v1 kind: Pod metadata: name: mypod spec: containers: - name: mypod image: redis volumeMounts: - name: foo mountPath: "/etc/foo" readOnly: true volumes: - name: foo secret: secretName: mysecret
In addition, you can specify the directory and permission to access a secret. The username isstored in the /etc/foo/my-group/my-username directory of the container.
apiVersion: v1 kind: Pod metadata: name: mypod spec: containers: - name: mypod image: redis volumeMounts: - name: foo mountPath: "/etc/foo" volumes: - name: foo secret: secretName: mysecret items: - key: username path: my-group/my-username mode: 511
To mount a secret to a data volume, you can also perform operations on the CCE console.When creating a workload, set advanced settings for the container, choose Data Storage >Local Disk, click Add Local Disk, and select Secret. For details, see Secret.
Setting Environment Variables of a Pod
A secret can be used as an environment variable of a pod. As shown in the following example,the username and password of the mysecret secret are defined as an environment variable ofthe pod.
apiVersion: v1 kind: Pod metadata: name: secret-env-pod spec: containers: - name: mycontainer image: redis env: - name: SECRET_USERNAME valueFrom:
Cloud Container EngineUser Guide 7 Configuration Center
Issue 01 (2018-08-13) Huawei Proprietary and ConfidentialCopyright © Huawei Technologies Co., Ltd.
131

secretKeyRef: name: mysecret key: username - name: SECRET_PASSWORD valueFrom: secretKeyRef: name: mysecret key: password restartPolicy: Never
Cloud Container EngineUser Guide 7 Configuration Center
Issue 01 (2018-08-13) Huawei Proprietary and ConfidentialCopyright © Huawei Technologies Co., Ltd.
132
8 Storage Management
8.1 Overview
8.2 Using Local Hard Disks for Storage
8.3 Using EVS Disks for Storage
8.4 Using SFS File Systems for Storage
8.5 Using OBS Buckets for Storage
8.1 OverviewStorage is a component that provides storage for containerized workloads. Multiple types ofstorage are supported.
Selecting a Storage TypeYou can use the following types of storages when creating a workload:
l Local disksThe following types of local disk volumes are available: HostPath, EmptyDir,ConfigMap, and Secret. A HostPath volume mounts a specified host path to a path of thecontainer for persistent data storage. An EmptyDir volume mounts a default temporarypath to a path of the container for temporary data storage. For details, see section 8.2Using Local Hard Disks for Storage. You can also mount the ConfigMap and secret tothe container. For details, see 7 Configuration Center.
l EVS disksCCE supports creating EVS disks and mounting them to a path of a container. Inaddition, the EVS disks in a container are migrated during container migration. The EVSdisks are used to store data persistently. For details, see section 8.3 Using EVS Disks forStorage.
l SFS file systemsCCE supports creating SFS file systems and mounting them to a path of a container. TheSFS file systems created by the underlying SFS service can also be used. The SFS filesystems are applicable to persistent storage for frequent read/write in multiple scenarios,including media processing, content management, big data analysis, and applicationanalysis. For details, see section 8.4 Using SFS File Systems for Storage.
Cloud Container EngineUser Guide 8 Storage Management
Issue 01 (2018-08-13) Huawei Proprietary and ConfidentialCopyright © Huawei Technologies Co., Ltd.
133

l OBS bucketsCCE allows you to create OBS buckets and mount them to a path of the container. OBSapplies to scenarios such as cloud applications, data analysis, content analysis, andhotspot objects. For details, see 8.5 Using OBS Buckets for Storage.
8.2 Using Local Hard Disks for Storage
Application ScenariosLocal hard disks are applicable to the following scenarios:
l HostPath: Mount the file directory of the host where a container is located to thespecified mounting point of the container. If the container needs to access /etc/hosts, useHostPath to map /etc/hosts.
l EmptyDir: Used for temporary storage. The lifecycle is the same as that of a containerinstance. When a container instance disappears, EmptyDir will be deleted and the datawill be permanently lost.
l ConfigMap: Keys in the configuration items of ConfigMap are mapped to a container sothat configuration files can be mounted to the specified container directory. For detailson how to create ConfigMap, see section 7.1 Creating a ConfigMap. For details aboutConfigMap usage, see section 7.2 Using a ConfigMap.
l Secret: Secret data is mounted to a path of the container. A secret is a type of resourcethat holds sensitive data, such as authentication information. All content is user-defined.For details about how to create a secret, see section 7.3 Creating a Secret. For detailsabout secret usage, see section 7.4 Using a Secret.
HostPathThe file or directory of the host is mounted to the container. HostPath is used to storecontainerized workload logs that need to be stored permanently, or to store containerizedworkloads that need to access internal data structure of the Docker engine on the host.
Step 1 Create a workload by following the procedure in section 4.2 Creating a Deployment orsection 4.3 Creating a StatefulSet. Choose Data Storage > Local Disk. On the page that isdisplayed, click Add Local Disk.
Step 2 Set parameters for adding a local disk, as listed in Table 8-1.
Table 8-1 Volume type set to HostPath
Parameter Description
Volume Type HostPath.
Host Path Path of the host to which the local volume is to be mounted, forexample, /etc/hosts.
Cloud Container EngineUser Guide 8 Storage Management
Issue 01 (2018-08-13) Huawei Proprietary and ConfidentialCopyright © Huawei Technologies Co., Ltd.
134

Parameter Description
Add ContainerPath
1. Click Add Container Path.2. Enter the container path to which the data volume is mounted.
NOTICE– Do not mount a data volume to a system directory such as / or /var/run
because this action may cause a container error to occur. You areadvised to mount the data volume to an empty directory. If thedirectory is not empty, ensure that the directory does not contain anyfiles that affect container startup; otherwise, the files will be replaced,making it impossible for the container to be properly started.
– When the data volume is mounted to a high-risk directory, you areadvised to use a low-permission account to start the container;otherwise, high-risk files on the host machine may be damaged.
3. Set permissions.– Read-only: allows you only to read data volumes in the
container path.– Read/Write: allows you to modify the data volumes in the
container path. To prevent data loss, newly written data willnot be migrated during container migration.
4. Click OK.
----End
EmptyDirEmptyDir applies to temporary data storage, disaster recovery, and shared running. It will bedeleted upon deletion or transfer of workload instances.
Step 1 Create a workload by following the procedure in section 4.2 Creating a Deployment orsection 4.3 Creating a StatefulSet. Add a container, expand Data Storage, and click AddLocal Disk.
Step 2 Set parameters for adding a local disk, as shown in Table 8-2.
Table 8-2 Volume type set to emptyDir
Parameter Description
Volume Type Type of the local disk to be mounted. It is set to EmptyDir here.
Storage MediaType
l Deselect In-memory storage: Data is stored in disks, which isapplicable to a large amount of data with low requirements onreading and writing efficiency.
l Select In-memory storage: Data is stored in memory, which isapplicable to a small amount of data with high requirements onreading and writing efficiency.
Cloud Container EngineUser Guide 8 Storage Management
Issue 01 (2018-08-13) Huawei Proprietary and ConfidentialCopyright © Huawei Technologies Co., Ltd.
135

Parameter Description
Add Container Path 1. Click Add Container Path.2. Enter the container path to which the data volume is mounted.
NOTICE– Do not mount a data volume to a system directory such as /
or /var/run because this action may cause a container error to occur.You are advised to mount the data volume to an empty directory. Ifthe directory is not empty, ensure that the directory does not containany files that affect container startup; otherwise, the files will bereplaced, making it impossible for the container to be properly started.
– When the data volume is mounted to a high-risk directory, you areadvised to use a low-permission account to start the container;otherwise, high-risk files on the host machine may be damaged.
3. Set permissions.– Read-only: allows you only to read data volumes in the
container path.– Read/Write: allows you to modify the data volumes in the
container path. To prevent data loss, newly written data willnot be migrated during container migration
4. Click OK.
----End
ConfigMapCCE separates the workload codes from configuration files. The ConfigMap volume is usedto process workload configuration parameters. You need to create workload configurations inadvance. For details, see 7.1 Creating a ConfigMap.
Step 1 Create a workload by following the procedure in section 4.2 Creating a Deployment orsection 4.3 Creating a StatefulSet. Add a container, expand Data Storage, and click AddLocal Disk.
Step 2 Set parameters for adding a local disk, as shown in Table 8-3.
Table 8-3 Volume type set to ConfigMap
Parameter Description
Volume Type Type of the local disk to be mounted. It is set to ConfigMap here.
ConfigMap Name of the ConfigMap.NOTE
A ConfigMap must be created in advance. For details, see 7.1 Creating aConfigMap.
Cloud Container EngineUser Guide 8 Storage Management
Issue 01 (2018-08-13) Huawei Proprietary and ConfidentialCopyright © Huawei Technologies Co., Ltd.
136

Parameter Description
Add Container Path 1. Click Add Container Path.2. Container Path: Enter the container path to which the data
volume is mounted.NOTICE
– Do not mount a data volume to a system directory such as /or /var/run because this action may cause a container error to occur.You are advised to mount the data volume to an empty directory. Ifthe directory is not empty, ensure that the directory does not containany files that affect container startup; otherwise, the files will bereplaced, making it impossible for the container to be properly started,and the workload creation will fail.
– When the data volume is mounted to a high-risk directory, you areadvised to use a low-permission account to start the container;otherwise, high-risk files on the host machine may be damaged.
3. Set the permission to read/write. This setting allows you tomodify the data volumes in the container path. To prevent dataloss, newly written data will not be migrated during containermigration.
4. Click OK.
----End
SecretMount the data in the key to the specified container. The content of the key is user-defined.You need to create workload configurations in advance. For more information, see 7.3Creating a Secret.
Step 1 Create a workload by following the procedure in section 4.2 Creating a Deployment orsection 4.3 Creating a StatefulSet. Add a container, expand Data Storage, and click AddLocal Disk.
Step 2 Set parameters for adding a local disk, as shown in Table 8-4.
Table 8-4 Volume type set to Secret
Parameter Description
Volume Type Type of the local disk to be mounted. It is set to Secret here.
Secret Item Select the desired secret name.NOTE
A secret must be created in advance. For details, see 7.3 Creating a Secret tocreate a Secret.
Cloud Container EngineUser Guide 8 Storage Management
Issue 01 (2018-08-13) Huawei Proprietary and ConfidentialCopyright © Huawei Technologies Co., Ltd.
137
Parameter Description
Add Container Path 1. Click Add Container Path.2. Container Path: Enter the container path to which the data
volume is mounted.NOTICE
– Do not mount a data volume to a system directory such as /or /var/run because this action may cause a container error to occur.You are advised to mount the data volume to an empty directory. Ifthe directory is not empty, ensure that the directory does not containany files that affect container startup; otherwise, the files will bereplaced, making it impossible for the container to be properly started,and the workload creation will fail.
– When the data volume is mounted to a high-risk directory, you areadvised to use a low-permission account to start the container;otherwise, high-risk files on the host machine may be damaged.
3. Set the permission to read/write. This setting allows you tomodify the data volumes in the container path. To prevent dataloss, newly written data will not be migrated during containermigration.
4. Click OK.
----End
8.3 Using EVS Disks for StorageTo meet data persistency requirements, CCE allows EVS disks to be mounted to containers.By using EVS disks, you can mount the remote file directory of the SFS to the container sothat data in the data volume is permanently stored. Even if the container is deleted, only theattached data volume is deleted. The data in the data volume is still stored in the storagesystem.
Application Scenarios
Currently, EVS disks of three specifications are supported: common I/O, high I/O, and ultra-high I/O.
l Common I/O: The backend storage is provided by the SATA storage media. CommonI/O is applicable to scenarios where large capacity and low read/write rate are required,and the volume of transactions is low. Examples include development testing andenterprise office applications.
l High I/O: The backend storage is provided by the SAS storage media. High I/O isapplicable to scenarios where relatively high performance, high read/write rate, and real-time data storage are required. Examples include creating file systems and sharingdistributed files.
l Ultra-high I/O: The backend storage is provided by the SSD storage media. Super-highI/O is applicable to scenarios where high performance, high read/write rate, and data-intensive applications are required. Examples include NoSQL, relational database, anddata warehouse (such as Oracle RAC and SAP HANA).
Cloud Container EngineUser Guide 8 Storage Management
Issue 01 (2018-08-13) Huawei Proprietary and ConfidentialCopyright © Huawei Technologies Co., Ltd.
138
Constraintsl BMS clusters in CCE do not support EVS disks.l Since data in a shared disk cannot be shared between nodes in a cluster, mounting the
same EVS disk to multiple nodes may result in problems such as read/write conflicts anddata cache conflicts. Therefore, you are advised to select only one instance whencreating a deployment workload that uses an EVS disk.
Creating an EVS Disk
Step 1 Log in to the CCE console. In the navigation pane, choose Resource Management > StorageManagement and then click Create EVS Disk.
Step 2 Configure basic disk information, as shown in Table 8-5.
Table 8-5 Basic disk information
Parameter Description
* PVC Name Name of the PVC. A storage volume is automatically created whena PVC is created. One PVC corresponds to one storage volume.The name of a storage volume is automatically generated when aPVC is created.
Cluster Name Cluster where the new EVS disk is deployed.
Namespace Namespace where the EVS disk is deployed.
Type Type of the new EVS disk.
Volume Capacity Capacity of the new EVS disk.
Access Mode ReadWriteMany: The volume can be mounted as read-write bymany nodes.
AZ Physical region where resources use independent power suppliesand networks. AZs are physically isolated but interconnectedthrough an internal network.
Step 3 Click Next. Confirm order details, click Submit, Click Go to Storage Management, andwait until the EVS disk is created successfully.
If the status of the EVS is Bound, the EVS disk has been created successfully.
Step 4 Click the EVS disk name to view information such as the disk name and storage capacity.
----End
Using an EVS Disk
Step 1 Create a workload. For details, see section 4.2 Creating a Deployment or 4.3 Creating aStatefulSet. Choose Data Storage > Cloud Storage. On the page that is displayed, clickAdd Cloud Storage.
Step 2 Set the storage type to EVS Disk.
Cloud Container EngineUser Guide 8 Storage Management
Issue 01 (2018-08-13) Huawei Proprietary and ConfidentialCopyright © Huawei Technologies Co., Ltd.
139

Table 8-6 Parameters required for mounting EVS disks
Parameter Description
Storage Type EVS: The usage of an EVS disk is the same as that of a traditional disk.EVS disks have higher data reliability and I/O throughput and are moreuser-friendly than traditional disks. EVS disks are available for filesystems, databases, and system software or applications that requireblock storage devices.
Allocation Mode
Manual Select a created storage. If no storage is available, follow the promptsto create one.
Automatic An EVS disk is created automatically. You need to enter the storagecapacity.1. If you have selected EVS Disks for the storage type, select an AZ
for creating the EVS disk first.2. Select a storage subtype.
– Common I/O: EVS disks that use Serial Advanced TechnologyAttachment (SATA)
– High I/O: EVS disks that use Serial Attached SCSI (SAS)– Ultra-high I/O: EVS disks that use Solid-State Drive (SSD)
3. Enter the storage capacity, in the unit of GB. Ensure that the storagecapacity quota is not exceeded; otherwise, creation will fail.
Add ContainerPath
1. Click Add Container Path.2. Container Path: Enter the container path to which the data volume is
mounted.NOTICE
– Do not mount a data volume to a system directory such as / or /var/run;this action may cause a container error to occur. You are advised tomount the data volume to an empty directory. If the directory is notempty, ensure that the directory does not contain any files that affectcontainer startup; otherwise, the files will be replaced, making itimpossible for the container to be properly started, and the applicationcreation will fail.
– When the data volume is mounted to a high-risk directory, you areadvised to use a low-permission account to start the container; otherwise,high-risk files on the host machine may be damaged.
3. Set permissions.– Read-only: allows you only to read data volumes in the container
path.– Read/Write: allows you to modify the data volumes in the
container path. To prevent data loss, newly written data will notbe migrated during container migration.
Step 3 Click OK.
----End
Cloud Container EngineUser Guide 8 Storage Management
Issue 01 (2018-08-13) Huawei Proprietary and ConfidentialCopyright © Huawei Technologies Co., Ltd.
140

Attaching and Mounting EVS DisksCCE allows you to import existing EVS disks.
Step 1 Log in to the CCE console. In the navigation pane, choose Resource Management > StorageManagement. On the EVS tab page, click Attach and Mount.
Step 2 Select one or more EVS disks that you want to attach and mount.
Step 3 Click OK.
----End
Unbinding an EVS DiskAfter an EVS disk is successfully created or attached, the EVS disk is automatically bound tothe current cluster and cannot be used by other clusters. After the EVS disk is unbound fromthe cluster, it can be attached and used by other clusters.
If the EVS disk has been mounted to a workload, the EVS disk cannot be unbound from thecluster.
Step 1 In the EVS disk list, click Unbind on the row where the desired EVS disk is located.
Step 2 In the dialog box that is displayed, click OK.
----End
Creating an EVS Disk Using kubectlCCE supports the creation of EVS disks in the form of PersistentVolumeClaim (PVC).
Prerequisites
You have configured the kubectl command and connected an ECS to the cluster. For details,see 3.5 Connecting to the Kubernetes Cluster Using kubectl.
Step 1 Log in to the ECS on which the kubectl commands have been configured. For details, seeLogging In to a Linux ECS.
Step 2 Run the following commands to configure the pvc-evs-auto-example.yaml file, which isused to create a PVC.
touch pvc-evs-auto-example.yaml
vi pvc-evs-auto-example.yaml
The following shows an example of creating an EVS disk.
apiVersion: v1 kind: PersistentVolumeClaim metadata: annotations: volume.beta.kubernetes.io/storage-class: sas # Storage type; Currently, EVS supports sas, ssd, and sata volume.beta.kubernetes.io/storage-provisioner: flexvolume-huawei.com/fuxivol # The value is fixed at flexvolume-huawei.com/fuxivol. labels: failure-domain.beta.kubernetes.io/region: southchina failure-domain.beta.kubernetes.io/zone: az1.dc1 name: pvc-evs-auto-
Cloud Container EngineUser Guide 8 Storage Management
Issue 01 (2018-08-13) Huawei Proprietary and ConfidentialCopyright © Huawei Technologies Co., Ltd.
141

example # PVC name namespace: default spec: accessModes: - ReadWriteMany resources: requests: storage: 10Gi # Storage capacity in Gi.
In the preceding example:
l volume.beta.kubernetes.io/storage-class is the EVS disk type. Currently, high I/O(SAS), ultra-high I/O (SSD), and common I/O (SATA) are supported.
l volume.beta.kubernetes.io/storage-provisioner must be set to flexvolume-huawei.com/fuxivol.– failure-domain.beta.kubernetes.io/region indicates the region where the cluster is
located.– failure-domain.beta.kubernetes.io/zone indicates the AZ where the EVS disk is
created. It must be the same as the AZ planned for the workload.l name indicates the name of the PVC to be created.l storage indicates the storage capacity in Gi.
Step 3 Run the following command to create a PVC:
kubectl create -f pvc-evs-auto-example.yaml
After the command is executed, an EVS disk is created in the partition where the cluster islocated. You can go to Resource Management > EVS Disks to view the EVS disk.Alternatively, you can view the EVS disk by volume name on the EVS console.
----End
Mounting an EVS Disk Using kubectlAfter an EVS disk is created or imported to the CCE console, you can mount it in a workload.
NOTICEEVS disks cannot be mounted across AZs. Before mounting, you can run the kubectl get pvccommand to query the available PVCs in the partition where the current cluster is located.
Step 1 Run the following commands to configure the evs-pod-example.yaml file, which is used tocreate a pod.
touch evs-pod-example.yaml
vi evs-pod-example.yaml
The following shows an example of mounting an EVS disk.
apiVersion: extensions/v1beta1 kind: Deployment metadata: name: evs-pod-example
Cloud Container EngineUser Guide 8 Storage Management
Issue 01 (2018-08-13) Huawei Proprietary and ConfidentialCopyright © Huawei Technologies Co., Ltd.
142

namespace: default spec: replicas: 1 selector: matchLabels: app: evs-pod-example template: metadata: labels: app: evs-pod-example spec: containers: - image: nginx:1.1 name: container-0 volumeMounts: - mountPath: /tmp name: pvc-evs-example restartPolicy: Always volumes: - name: pvc-evs-example persistentVolumeClaim: claimName: pvc-evs-auto-example
In the preceding example:
l name is the name of the pod to be created.l app is the name of a pod workload.l mountPath is the mount path in a container. In the example, the EVS disk is mounted to
the /tmp directory.l spec.template.spec.containers.volumeMounts.name and
spec.template.spec.volumes.name must be consistent because they have a mappingrelationship.
Step 2 Run the following command to create a pod:
kubectl create -f evs-pod-example.yaml
After the pod is created, choose Storage Management > EVS Disks on the CCE console toview the binding relationship between the workload and PVC.
----End
Related OperationsAfter the EVS disk is created, you can perform operations described in Table 8-7.
Table 8-7 Other operations
Operation Description
Deleting an EVS disk 1. Select the EVS disk to be deleted and click Delete in theOperation column.
2. Follow the prompts to delete the EVS disk.
8.4 Using SFS File Systems for StorageSFS applies to a wide range of scenarios, including media processing, content management,big data, and analytic applications.
Cloud Container EngineUser Guide 8 Storage Management
Issue 01 (2018-08-13) Huawei Proprietary and ConfidentialCopyright © Huawei Technologies Co., Ltd.
143
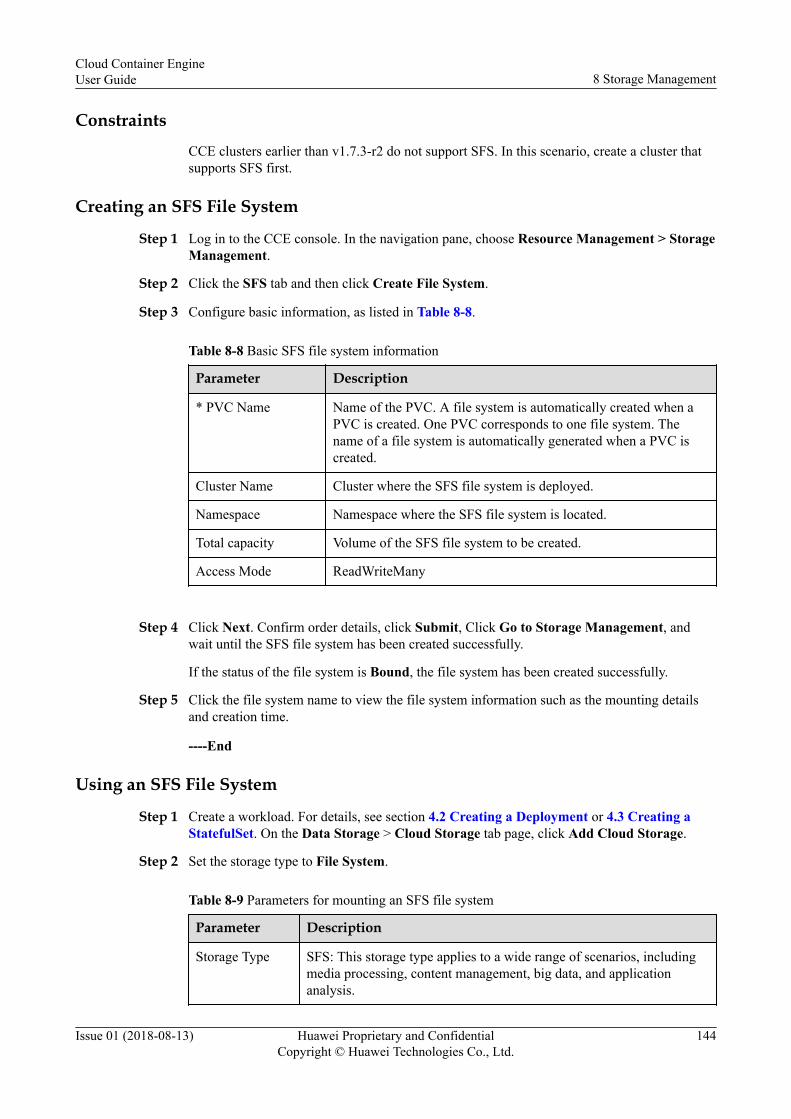
Constraints
CCE clusters earlier than v1.7.3-r2 do not support SFS. In this scenario, create a cluster thatsupports SFS first.
Creating an SFS File System
Step 1 Log in to the CCE console. In the navigation pane, choose Resource Management > StorageManagement.
Step 2 Click the SFS tab and then click Create File System.
Step 3 Configure basic information, as listed in Table 8-8.
Table 8-8 Basic SFS file system information
Parameter Description
* PVC Name Name of the PVC. A file system is automatically created when aPVC is created. One PVC corresponds to one file system. Thename of a file system is automatically generated when a PVC iscreated.
Cluster Name Cluster where the SFS file system is deployed.
Namespace Namespace where the SFS file system is located.
Total capacity Volume of the SFS file system to be created.
Access Mode ReadWriteMany
Step 4 Click Next. Confirm order details, click Submit, Click Go to Storage Management, andwait until the SFS file system has been created successfully.
If the status of the file system is Bound, the file system has been created successfully.
Step 5 Click the file system name to view the file system information such as the mounting detailsand creation time.
----End
Using an SFS File System
Step 1 Create a workload. For details, see section 4.2 Creating a Deployment or 4.3 Creating aStatefulSet. On the Data Storage > Cloud Storage tab page, click Add Cloud Storage.
Step 2 Set the storage type to File System.
Table 8-9 Parameters for mounting an SFS file system
Parameter Description
Storage Type SFS: This storage type applies to a wide range of scenarios, includingmedia processing, content management, big data, and applicationanalysis.
Cloud Container EngineUser Guide 8 Storage Management
Issue 01 (2018-08-13) Huawei Proprietary and ConfidentialCopyright © Huawei Technologies Co., Ltd.
144
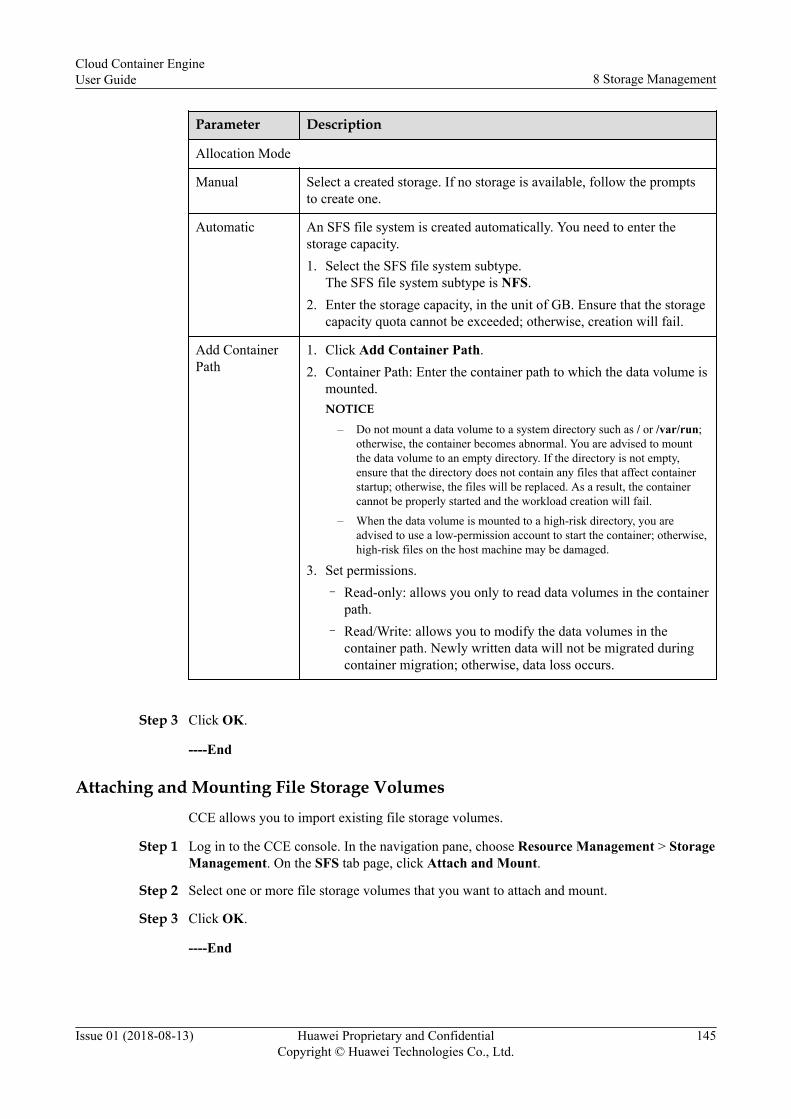
Parameter Description
Allocation Mode
Manual Select a created storage. If no storage is available, follow the promptsto create one.
Automatic An SFS file system is created automatically. You need to enter thestorage capacity.1. Select the SFS file system subtype.
The SFS file system subtype is NFS.2. Enter the storage capacity, in the unit of GB. Ensure that the storage
capacity quota cannot be exceeded; otherwise, creation will fail.
Add ContainerPath
1. Click Add Container Path.2. Container Path: Enter the container path to which the data volume is
mounted.NOTICE
– Do not mount a data volume to a system directory such as / or /var/run;otherwise, the container becomes abnormal. You are advised to mountthe data volume to an empty directory. If the directory is not empty,ensure that the directory does not contain any files that affect containerstartup; otherwise, the files will be replaced. As a result, the containercannot be properly started and the workload creation will fail.
– When the data volume is mounted to a high-risk directory, you areadvised to use a low-permission account to start the container; otherwise,high-risk files on the host machine may be damaged.
3. Set permissions.– Read-only: allows you only to read data volumes in the container
path.– Read/Write: allows you to modify the data volumes in the
container path. Newly written data will not be migrated duringcontainer migration; otherwise, data loss occurs.
Step 3 Click OK.
----End
Attaching and Mounting File Storage VolumesCCE allows you to import existing file storage volumes.
Step 1 Log in to the CCE console. In the navigation pane, choose Resource Management > StorageManagement. On the SFS tab page, click Attach and Mount.
Step 2 Select one or more file storage volumes that you want to attach and mount.
Step 3 Click OK.
----End
Cloud Container EngineUser Guide 8 Storage Management
Issue 01 (2018-08-13) Huawei Proprietary and ConfidentialCopyright © Huawei Technologies Co., Ltd.
145
Unbinding an SFS File System
After an SFS file system is successfully created or imported, the SFS file system isautomatically bound to the current cluster and cannot be used by other clusters. After the SFSfile system is unbound from the cluster, other clusters can import and use the file system.
If the SFS file system has been mounted to a workload, the SFS file system cannot beunbound from the cluster.
Step 1 In the SFS file system list, click Unbind in the row where the desired EVS disk is located.
Step 2 In the dialog box that is displayed, click OK.
----End
Using kubectl to Create a File Storage
CCE allows you to create an SFS file system in the form of PersistentVolumeClaim (PVC).
Prerequisites
You have configured the kubectl command and connected an ECS to the cluster. For details,see 3.5 Connecting to the Kubernetes Cluster Using kubectl.
Step 1 Log in to the ECS on which the kubectl commands have been configured. For details, seeLogging In to a Linux ECS.
Step 2 Run the following commands to configure the pvc-sfs-auto-example.yaml file, which is usedto create a PVC.
touch pvc-sfs-auto-example.yaml
vi pvc-sfs-auto-example.yaml
The following shows an example of creating an SFS file system.
apiVersion: v1 kind: PersistentVolumeClaim metadata: annotations: volume.beta.kubernetes.io/storage-class: nfs-rw name: pvc-sfs-auto-example namespace: default spec: accessModes: - ReadWriteMany resources: requests: storage: 10Gi
In the preceding example:
l volume.beta.kubernetes.io/storage-class indicates the SFS file system type. Currently,the standard file protocol type (nfs-rw) is supported.
l name indicates the name of the PVC to be created.l storage indicates the storage capacity in Gi.
Step 3 Run the following command to create a PVC:
kubectl create -f pvc-sfs-auto-example.yaml
Cloud Container EngineUser Guide 8 Storage Management
Issue 01 (2018-08-13) Huawei Proprietary and ConfidentialCopyright © Huawei Technologies Co., Ltd.
146
After the command is executed, an SFS file system is created in the VPC to which the clusterbelongs. Choose Storage Management > File Storage or log in to the SFS console to viewthe file system.
----End
Mounting a File Storage Using kubectl
Step 1 Run the following commands to configure the sfs-pod-example.yaml file, which is used tocreate a pod.
touch sfs-pod-example.yaml
vi sfs-pod-example.yaml
The following shows an example of mounting an SFS file system.
apiVersion: extensions/v1beta1 kind: Deployment metadata: name: sfs-pod-example # Application name namespace: default spec: replicas: 1 selector: matchLabels: app: sfs-pod-example template: metadata: labels: app: sfs-pod-example spec: containers: - image: nginx:1.1 name: container-0 volumeMounts: - mountPath: /tmp # Mounting path name: pvc-sfs-example restartPolicy: Always volumes: - name: pvc-sfs-example persistentVolumeClaim: claimName: pvc-sfs-auto-example # Mount the PVC.
In the preceding example:
l name is the name of the pod to be created.l app is the name of a pod workload.l mountPath is the mount path in a container. In the example, the mount path is /tmp.l spec.template.spec.containers.volumeMounts.name and
spec.template.spec.volumes.name must be consistent because they have a mappingrelationship.
Step 2 Run the following command to create a pod:
kubectl create -f sfs-pod-example.yaml
After the pod is created, you can go to Storage Management > File Storage on the CCEconsole to view the binding relationship between the workload and PVC.
----End
Cloud Container EngineUser Guide 8 Storage Management
Issue 01 (2018-08-13) Huawei Proprietary and ConfidentialCopyright © Huawei Technologies Co., Ltd.
147
Related Operations
After the SFS file system is created, you can perform the operation described in Table 8-10.
Table 8-10 Other operations
Operation Description
Deleting an SFS filesystem
1. Select the name of the SFS file system to be deleted andclick Delete in the Operation column.
2. Follow the prompts to delete the SFS file system.
8.5 Using OBS Buckets for StorageCCE allows you to create OBS buckets. The supported OBS bucket types are as follows:
l Standard OBS buckets:
This type of OBS buckets applies to scenarios where a large number of hotspot files orsmall-sized files need to be accessed frequently (multiple times per month on average)and fast data access is required. For example, cloud applications, data analysis, contentanalysis, and hotspot objects.
l Infrequent access OBS buckets:
This type of OBS buckets applies to scenarios where data is not frequently accessed (lessthan 12 times per year on average) and fast data access is required. For example, staticwebsite hosting, backup/active archiving, storage resource pools for cloud services, orbackup storage.
Constraintsl CCE clusters of v1.7.3-r8 or earlier do not support OBS bucket creation. In this scenario,
create a cluster that supports OBS first.
l The Windows clusters and BMS clusters of CCE do not support OBS.
l CCE allows you to mount OBS buckets as shared storage to nodes based on s3fs. Thisstorage mode applies to scenarios where file objects of different sizes are saved one timebut read and write frequently. However, this storage mode does not apply to scenarioswhere saved files are frequently modified. To achieve higher access performance, youare advised to use the OBS SDK mode. For details, see the s3fs official website. Bucketsmounted based on s3fs cannot offer performance or semantics as a local file system. Therestrictions are as follows:
– Random writes or appends to files require rewriting the entire file.
– Metadata operations such as listing directories have poor performance due tonetwork latency.
– Eventual consistency can temporarily yield stale data.
– No atomic rename is performed on files or directories.
– No coordination is performed between multiple clients mounting the same bucket.
– Hard links are not supported.
Cloud Container EngineUser Guide 8 Storage Management
Issue 01 (2018-08-13) Huawei Proprietary and ConfidentialCopyright © Huawei Technologies Co., Ltd.
148
Creating an OBS Bucket
Step 1 Log in to the CCE console. In the navigation pane, choose Resource Management > StorageManagement.
Step 2 Click the OBS tab and click Create OBS Bucket.
Set basic information about an OBS bucket, as listed in Table 8-11.
Table 8-11 Basic information about an OBS bucket
Parameter Description
*PVC Name Name of the PVC. An OBS bucket is automatically created whenyou create a PVC. Each PVC corresponds to one OBS bucket. TheOBS bucket name is automatically generated when the PVC iscreated.
Cluster Name Cluster to which the OBS bucket belongs.
Namespace Namespace of the OBS bucket. The default value is default.
Storage Class The following OBS bucket types are supported:l Standard: This type of OBS buckets applies to scenarios where
a large number of hotspot files or small-sized files need to beaccessed frequently (multiple times per month on average) andrequire fast access response.
l Infrequent Access: This type of OBS buckets applies toscenarios where data is not frequently accessed (less than 12times per year on average) but requires fast access response.
NOTICEInfrequent access OBS buckets have extra data read costs.
Bucket Policy For a private OBS bucket, only the bucket owner has full controlover the OBS bucket.
Access Mode ReadWriteMany
Step 3 Click Next. Confirm order details and click Submit.
After the OBS bucket is successfully created, it is displayed in the storage management list.You can click a bucket name to view the basic information and attributes of the OBS bucket.
----End
Using OBS Buckets
Step 1 Create a workload by referring to 4.2 Creating a Deployment or 4.3 Creating a StatefulSet.Add a container, expand Data Storage, and click the Cloud Storage tab. On the tab page,click Add Cloud Storage.
Step 2 Set Storage Type to OBS.
Cloud Container EngineUser Guide 8 Storage Management
Issue 01 (2018-08-13) Huawei Proprietary and ConfidentialCopyright © Huawei Technologies Co., Ltd.
149
Table 8-12 OBS bucket parameters
Parameter Description
Storage Type OBS: Standard OBS buckets and infrequent access OBS buckets aresupported. OBS buckets apply to scenarios such as big data analysis,native cloud application data, static website hosting, and backup/activearchiving.
Allocation Mode
Manual Select a created storage type. The storage type must be created inadvance.
Automatic Select a storage subtype.OBS buckets are classified into standard OBS buckets and infrequentaccess OBS buckets.
Add ContainerPath
1. Click Add Container Path.2. Set Container Path, a path to which the data volume is mounted.
NOTICE– The container path cannot be a system directory, such as / or /var/run.
Otherwise, the container may not function properly. You are advised tomount the container to an empty directory. If the directory is not empty,ensure that there are no files affecting container startup in the directory.Otherwise, such files will be replaced, resulting in failures to start thecontainer and create the workload.
– When the container is mounted to a high-risk directory, you are advisedto use an account with minimum permissions to start the container;otherwise, high-risk files on the host machine may be damaged.
3. Set permissions.– Read-only: You can only read the data volumes in the path.– Read/Write: You can modify the data volumes in the path.
Newly written data is not migrated if the container is migrated,which may cause a data loss.
Step 3 Click OK.
----End
Attaching and Mounting Object Storage VolumesCCE allows you to import existing object storage volumes.
Step 1 Log in to the CCE console. In the navigation pane, choose Resource Management > StorageManagement. On the OBS tab page, click Attach and Mount.
Step 2 Select one or more object storage volumes that you want to attach and mount.
Step 3 Select the cluster and namespace to which you want to attach and mount the object storagevolumes.
Step 4 Click OK.
----End
Cloud Container EngineUser Guide 8 Storage Management
Issue 01 (2018-08-13) Huawei Proprietary and ConfidentialCopyright © Huawei Technologies Co., Ltd.
150

Unbinding an OBS Bucket
After an OBS bucket is successfully created, the OBS bucket is automatically bound to thecurrent cluster and cannot be used by other clusters. After the OBS bucket is unbound fromthe cluster, other clusters can use the OBS bucket.
If the OBS bucket has been mounted to a workload, the OBS bucket cannot be unbound fromthe cluster.
Step 1 In the OBS bucket list, click Unbind on the row where the desired OBS bucket is located.
Step 2 In the dialog box that is displayed, click OK.
----End
Related Operations
After OBS buckets are created, you can perform operations listed in Table 8-13.
Table 8-13 Related operations
Operation Description
Deleting an OBS bucket 1. Select the OBS bucket to be deleted and click Delete inthe Operation column.
2. Follow the prompts to delete the OBS bucket.
Attaching an OBS bucket CCE allows you to attach an existing OBS bucket.1. On the Object Storage tab page, choose More > Attach.2. Select the desired OBS bucket in the list.3. Select the cluster and namespace of the desired OBS
bucket.4. Click OK.
Using kubectl to Create an OBS Bucket
During the use of OBS, the expected OBS bucket can be automatically created and mounted.Currently, standard OBS buckets (obs-standard) and infrequent access OBS buckets (obs-standard-ia) are supported.
Step 1 Configure the kubectl command. For details, see 3.5 Connecting to the Kubernetes ClusterUsing kubectl.
Step 2 Run the following commands to configure the pvc-obs-auto-example.yaml file, which isused to create a PVC. touch pvc-obs-auto-example.yaml
vi pvc-obs-auto-example.yaml
For example:
apiVersion: v1 kind: PersistentVolumeClaim metadata: annotations:
Cloud Container EngineUser Guide 8 Storage Management
Issue 01 (2018-08-13) Huawei Proprietary and ConfidentialCopyright © Huawei Technologies Co., Ltd.
151
volume.beta.kubernetes.io/storage-class: obs-standard # OBS bucket type. Currently, obs-standard and obs-standard-ia are supported. volume.beta.kubernetes.io/storage-provisioner: flexvolume-huawei.com/fuxiobs # The value is fixed at flexvolume-huawei.com/fuxiobs. name: pvc-obs-auto-example # PVC name. namespace: default spec: accessModes: - ReadWriteMany resources: requests: storage: 1Gi # Storage capacity, in the unit of Gi. For OBS buckets, this parameter is used only for verification (the value cannot be empty or 0). The value setting does not take effect for OBS buckets.
The fields in the preceding information are described as follows:
l volume.beta.kubernetes.io/storage-class: bucket type. Currently, obs-standard and obs-standard-ia are supported.– name: indicates the name of the PVC to be created.– storage: indicates the storage capacity, in the unit of Gi. For OBS buckets, this
parameter is used only for verification (cannot be empty or 0). The value settingdoes not take effect for OBS buckets.
Step 3 Run the following command to create a PVC:
kubectl create -f pvc-obs-auto-example.yaml
After the command is executed, an OBS bucket is created in the VPC to which the clusterbelongs. To view the OBS bucket, you can choose Resource Management > StorageManagement in the navigation pane of CCE and click the Object Storage tab; alternatively,you can view the OBS bucket on the OBS console.
----End
Using kubectl to Mount an OBS Bucket
Step 1 Run the following commands to configure the obs-pod-example.yaml file, which is used tocreate a pod:
touch obs-pod-example.yaml
vi obs-pod-example.yaml
For example:
apiVersion: extensions/v1beta1 kind: Deployment metadata: name: obs-pod-example # Application name. namespace: default spec: replicas: 1 selector: matchLabels: app: obs-pod-example template: metadata: labels: app: obs-pod-example spec: containers: - image: nginx:1.1
Cloud Container EngineUser Guide 8 Storage Management
Issue 01 (2018-08-13) Huawei Proprietary and ConfidentialCopyright © Huawei Technologies Co., Ltd.
152
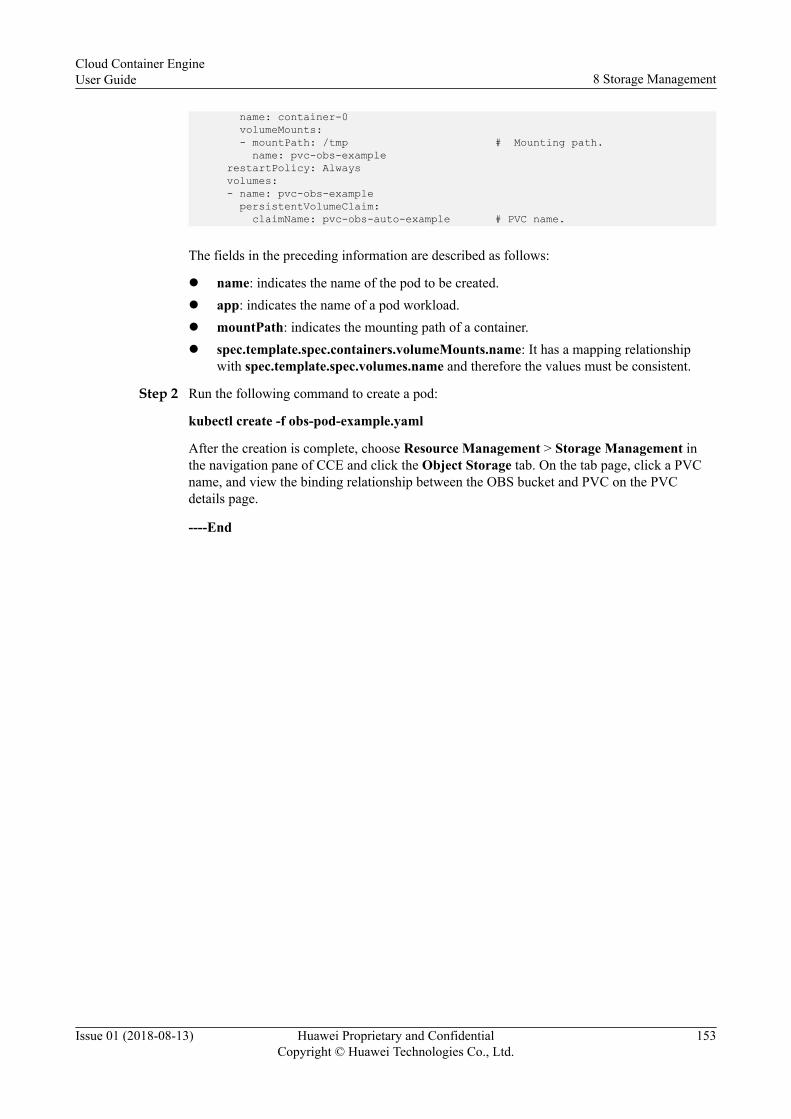
name: container-0 volumeMounts: - mountPath: /tmp # Mounting path. name: pvc-obs-example restartPolicy: Always volumes: - name: pvc-obs-example persistentVolumeClaim: claimName: pvc-obs-auto-example # PVC name.
The fields in the preceding information are described as follows:
l name: indicates the name of the pod to be created.l app: indicates the name of a pod workload.l mountPath: indicates the mounting path of a container.l spec.template.spec.containers.volumeMounts.name: It has a mapping relationship
with spec.template.spec.volumes.name and therefore the values must be consistent.
Step 2 Run the following command to create a pod:
kubectl create -f obs-pod-example.yaml
After the creation is complete, choose Resource Management > Storage Management inthe navigation pane of CCE and click the Object Storage tab. On the tab page, click a PVCname, and view the binding relationship between the OBS bucket and PVC on the PVCdetails page.
----End
Cloud Container EngineUser Guide 8 Storage Management
Issue 01 (2018-08-13) Huawei Proprietary and ConfidentialCopyright © Huawei Technologies Co., Ltd.
153

9 Log Management
CCE allows you to configure policies for collecting and analyzing workload logs periodicallyto prevent logs from being over-sized.
9.1 Collecting Standard Output Logs of Containers
9.2 Collecting Logs in a Specified Path of a Container
9.1 Collecting Standard Output Logs of Containers
Procedure
Step 1 When creating a workload, add a container, and expand Log Policy.
Step 2 If you do not configure any parameters when you create a workload, the system collects thestandard output logs of the container by default.
Step 3 View logs.
After the workload is created, access the nginx workload. On the Workload O&M tab, selectAll instances.
----End
9.2 Collecting Logs in a Specified Path of a Container
Procedure
Step 1 When creating a workload, add a container, and expand Log Policy.
Step 2 Click Add Log Policy. Set the parameters to configure log policies based on workloadrequirements. The following uses an Nginx workload as an example.
Table 9-1 Parameters for adding log policies
Parameter Description
Storage Type Currently, only HostPath is supported.
Cloud Container EngineUser Guide 9 Log Management
Issue 01 (2018-08-13) Huawei Proprietary and ConfidentialCopyright © Huawei Technologies Co., Ltd.
154
Parameter Description
Host Path Enter the log storage path on the host.
Add Container Path
Container Path 1. Click Add Container Path.2. Enter the container path to which the data volume is mounted.
NOTICE– Do not mount a data volume to a system directory such as / or /var/run;
this action may cause a container error to occur. You are advised tomount the data volume to an empty directory. If the directory is notempty, ensure that the directory does not contain any files that affectcontainer startup; otherwise, the files will be replaced, making itimpossible for the container to be properly started, and the applicationcreation will fail.
– When the data volume is mounted to a high-risk directory, you areadvised to use a low-permission account to start the container;otherwise, high-risk files on the host machine may be damaged.
Extended HostPath
none: No extended path is configured.
Aging Period l Hourly: Log files are scanned every hour. If a log file exceeds 20MB, it will be dumped to a historical file in the directory where thelog file is saved and then will be cleared.
l Daily: Log files are scanned every day. If a log file exceeds 20MB, it will be dumped to a historical file in the directory where thelog file is saved and then will be cleared.
l Weekly: Log files are scanned every week. If a log file exceeds 20MB, it will be dumped to a historical file in the directory where thelog file is saved and then will be cleared.
Step 3 Click OK. A workload is created.
Step 4 View logs.
After the workload is created, access the nginx workload. On the Workload O&M tab, selectAll instances.
----End
Cloud Container EngineUser Guide 9 Log Management
Issue 01 (2018-08-13) Huawei Proprietary and ConfidentialCopyright © Huawei Technologies Co., Ltd.
155
10 Container Orchestration
10.1 Container Orchestration - Huawei Official Charts
10.2 Customizing a Helm Chart to Simplify Workload Deployment
10.1 Container Orchestration - Huawei Official ChartsA Huawei official chart is a chart provided by Huawei for deploying workload . Currently,Huawei official charts such as Redis, etcd, MySQL NDB, and mongodb are supported.
The following uses etcd as an example to describe how to create a workload using a chart.The procedure for installing other charts is the same as that for installing etcd.
Procedure
Step 1 Log in to the CCE console. In the navigation pane, choose Container Orchestration.
Step 2 On the Official Chart tab page, you can view all available charts.l Official Chart: provided by Huawei to deploy workloads
You can click a chart to view the chart details, including: chart introduction (chartintroduction and example), version record (update record of the current chart), andinstallation record (list of workloads created by the user based on this chart).
l Installed Workloads: List of workloads installed based on the chart.
Step 3 Click Install under the chart name, for example, etcd. The installation page is displayed.
Step 4 Set the installation parameters listed in Table 10-1. The parameters marked with an asterisk(*) are mandatory.
Table 10-1 Installation parameters
Parameter Description
* Chart Workload Name of a workload, for example, etcd-test.
* Chart Version Version of an official chart.
* Cluster Cluster to which the workload belongs.
Cloud Container EngineUser Guide 10 Container Orchestration
Issue 01 (2018-08-13) Huawei Proprietary and ConfidentialCopyright © Huawei Technologies Co., Ltd.
156
Parameter Description
* Namespace Namespace to which the new workload belongs. By default, thisparameter is set to default.
* WorkloadDeploymentSpecifications
Specifications of the workload. You can customize the workloadspecifications based on service requirements.
* Description Description of a workload chart.
Step 5 After the configuration is complete, you can choose to install all or custom installation.l Install at One Click: Click Install at One Click, confirm specifications, and click
Submit. Go to Step 7 to view the chart workload that is successfully installed.l Customize Installation: Set the parameters for custom installation as described in Step 6.
Step 6 (Optional) If you select Customize Installation, set related parameters.
1. Set the storage and access mode parameters listed in Table 10-2.
Table 10-2 Advanced settings for custom installation
Parameter Description
Cloud Storage 1. If this parameter is set to Yes, the cloud storage is enabled.2. You can use the default storage allocation or click Edit to modify
the storage subtype and capacity.
Access Mode The default access mode is Internal access > Intra-cluster access.Cluster access: The system automatically allocates a virtual IPaddress that can be accessed only in the cluster for the containers inthe cluster to access.You can also click Edit to modify the access mode. For details aboutthe access mode, see the 5 Network Management.
2. Click Next, review the specifications, and click Submit. Click Back to Workload List.
After the installation is successful, on the Installed Workloads tab page, you can see that thestatus is Installation Successful.
Step 7 Click the installed workload to view the details.
Table 10-3 Details of an installed workload
Tab Type Description
Workload List Running status, type, and number of instances of a workload.1. Click the workload name to view the details of the workload
instance.
2. Click next to an instance name to view the CPU usage, memoryusage, events, and container details.
Cloud Container EngineUser Guide 10 Container Orchestration
Issue 01 (2018-08-13) Huawei Proprietary and ConfidentialCopyright © Huawei Technologies Co., Ltd.
157

Tab Type Description
TemplateWorkloadparameters
Parameters that are configured.
----End
Upgrading a Chart-based Workload
Step 1 Choose Container Orchestration in the navigation pane of CCE, and click the InstalledWorkloads tab.
Step 2 Click Upgrade in the row where the desired workload resides and set the parameters for theworkload.
Step 3 Select a chart version for Chart Version.
Step 4 Follow the prompts to modify the chart parameters.
Step 5 Select an upgrade mode.l If no more configuration is required, click Upgrade at One Click.l To change the access mode, click Upgrade. For details about how to set the access
mode, see Table 10-2. Click Next and then click Submit.
Step 6 Click Back to Workload List. If the chart status changes to Upgrade successful, theworkload is successfully upgraded.
----End
Rolling Back a Chart-based Workload
Step 1 Choose Container Orchestration in the navigation pane of CCE, and click the InstalledWorkloads tab.
Step 2 Click More > Roll back in the row where the desired workload resides, select the workloadversion, and click Roll back to this version.
In the workload list, if the status is rollback successfully, the workload is rolled backsuccessfully.
----End
Uninstalling a Chart-based Workload
Step 1 Choose Container Orchestration > Installed Workloads.
Step 2 Click the name of the workload to be uninstalled. The workload details page is displayed.
Step 3 Click Uninstall in the upper right corner of the page to uninstall the workload. Exercisecaution when performing this operation because workloads cannot be restored after beinguninstalled.
----End
Cloud Container EngineUser Guide 10 Container Orchestration
Issue 01 (2018-08-13) Huawei Proprietary and ConfidentialCopyright © Huawei Technologies Co., Ltd.
158

10.2 Customizing a Helm Chart to Simplify WorkloadDeployment
10.2.1 Preparing a Chart PackageTwo methods are available to prepare a chart package:
l Customizing a Chart Packagel Using a Kubernetes Official Chart Package
NOTICEIf the created workload requires the EVS disk and ELB functions, you need to modify thechart package. For details, see 10.2.4 Using an EVS Disk and 10.2.5 Using Load Balancers.
Customizing a Chart Package
Step 1 Customize the content of a chart package as required.
For details about how to create a chart package, see https://github.com/kubernetes/helm/blob/master/docs/charts.md.
Step 2 Set the chart package directory structure and name the chart package based on therequirements defined in Chart Package Specifications.
----End
Using a Kubernetes Official Chart Package
Step 1 Access https://github.com/kubernetes/charts to obtain the required community chartpackage.
Step 2 Log in to a Linux machine.
Step 3 Upload the chart package obtained in Step 1.
Step 4 Run the following command to compress the chart package.l If the Helm client is not installed on the Linux machine, run the following command:
tar pzcf {name}-{version}.tgz {name}/In the preceding command,{name} indicates the actual name of the chart package.{version} indicates the actual version of the chart package.
l If the Helm client is installed on the Linux machine, run the following command:helm package {name}/In the preceding command, {name} indicates the actual name of the chart package.
Cloud Container EngineUser Guide 10 Container Orchestration
Issue 01 (2018-08-13) Huawei Proprietary and ConfidentialCopyright © Huawei Technologies Co., Ltd.
159
Step 5 Set the chart package directory structure and name the chart package based on therequirements defined in Chart Package Specifications.
----End
Chart Package Specifications
The following uses Redis as an example. Prepare the Redis package according to the chartpackage specifications.
l Naming rulesA chart package is named in the format of workload name-major versionnumber.minor version number.revision number.tgz, for example, redis-0.4.2.tgz.
NOTE
The version number of the template package must comply with semantic version rules.
l The main version number and minor version number are mandatory, and the revision numberis optional.
l The version number cannot exceed 64 characters.
l The main version number, minor version number, and revision number must be integers. Theymust be ≥ 0 and ≤ 99.
l The revision number consists of digits, letters, and hyphens (-). For example, [0-9A-Za-z-].
l Directory structureThe directory structure of a chart package is as follows:redis/ templates/ values.yaml README.md Chart.yaml .helmignore
Table 10-4 lists the parameters of the directory structure of a chart package. Parametersmarked with an asterisk (*) are mandatory.
Table 10-4 Parameters of the directory structure of a chart
Parameter Description
*templates All templates
*values.yaml Configuration parameters that describe the chart
README.md Markdown file that contains the following:l Applications or services provided by Chart.l Prerequisites for running Chart.l Configurations in the values.yaml file.l Information about Chart installation and configuration.
*Chart.yaml Basic information about the chart.
.helmignore Files or data that do not need to read charts during workloadinstallation.
Cloud Container EngineUser Guide 10 Container Orchestration
Issue 01 (2018-08-13) Huawei Proprietary and ConfidentialCopyright © Huawei Technologies Co., Ltd.
160
10.2.2 Uploading a ChartUpload the chart to Container Orchestration > Charts for workload creation.
Procedure
Step 1 In the navigation pane, choose Container Orchestration > Charts.
Step 2 Click Upload Chart.
Step 3 In the Chart Package area, click , select the workload package to be uploaded, and clickUpload.
----End
Follow-up Procedure
After a chart is created, you can perform operations listed in Table 10-5 on the Charts page.
Table 10-5 Other operations
Operation Description
Installing aChart
Click Install to install the chart for creating workloads. For details, see10.2.3 Creating a Chart-based Workload.
Updating aChart
Click Update to update the chart version. After the updating process,only the content of the chart is updated, and the version of the chart isnot updated. The procedure is similar to that of uploading a chart.
Downloading aChart
Click Download to download the chart to the local host.
Deleting aChart Click to delete the created chart. Caution: Once a chart is deleted, it
cannot be restored.
10.2.3 Creating a Chart-based Workload
Procedure
Step 1 Choose Container Orchestration > Charts from the main menu.
Step 2 Select the chart uploaded in 10.2.2 Uploading a Chart and click Install to create a workloadbased on the chart.
Step 3 Set the installation parameters listed in Table 10-6. The parameters marked with an asterisk(*) are mandatory.
Cloud Container EngineUser Guide 10 Container Orchestration
Issue 01 (2018-08-13) Huawei Proprietary and ConfidentialCopyright © Huawei Technologies Co., Ltd.
161
Table 10-6 Parameters for creating a workload
Parameter Description
* Chart Workload Name of the chart.
* Chart Version Version of the chart.
* Cluster Cluster to which the workload is deployed.
* Namespace Namespace to which the workload is deployed
* Description Description of a workload chart.
Advanced Settings You can import and replace the values.yaml file or directly edit thechart parameters online.NOTE
l An imported values.yaml file must comply with YAML specifications,that is, in the KEY:VALUE format. The fields in the file are not restricted.
l The key value of the imported value.yaml file must be the same as that ofthe values.yaml file of the selected template package. Otherwise, thevalues.yaml file does not take effect. That is, the key value cannot bechanged.
1. Click Import Configuration File.2. Select the corresponding values.yaml file and click Open.
Step 4 After the configuration is complete, click Customize Installation.
Step 5 Confirm the order and click Submit.
Step 6 Click Back to Workload List to view the running status of the chart workload, or click ViewWorkload Details to view the details of the chart workload.
----End
10.2.4 Using an EVS DiskThe CCE uses Huawei plug-ins to connect to EVS disks to support persistent storage.
The following example shows how to define an EVS disk in a chart. When creating the chartworkload, the container dynamically creates a 10 Gi EVS disk and attaches it to the container.
NOTICECurrently, the CCE supports only creating EVS disks in a dynamic way.
apiVersion: apps/v1beta1kind: StatefulSetmetadata: name: {{ .Release.Name }}-slavespec: updateStrategy: type: "RollingUpdate" serviceName: {{ .Release.Name }}-slave-headless replicas: 1
Cloud Container EngineUser Guide 10 Container Orchestration
Issue 01 (2018-08-13) Huawei Proprietary and ConfidentialCopyright © Huawei Technologies Co., Ltd.
162
template: metadata: labels: app: {{ .Release.Name }}-slave type: slave release: "{{ .Release.Name }}" spec: containers: - name: {{ .Release.Name }}-slave image: {{ .Values.chartimage.app_image }} volumeMounts: - mountPath: /redis-data name: {{ .Release.Name }}-slave - mountPath: /opt/rancher/ name: utility - mountPath: /etc/redis/ name: redis-conf ports: - containerPort: 6379 volumeClaimTemplates: - metadata: labels: app: {{ .Release.Name }}-slave type: slave release: "{{ .Release.Name }}" name: {{ .Release.Name }}-slave annotations: "volume.beta.kubernetes.io/storage-class": sas "volume.beta.kubernetes.io/storage-provisioner": flexvolume-huawei.com/fuxivol spec: accessModes: [ "ReadWriteOnce" ] resources: requests: storage: 10Gi
Table 10-7 Key parameters
Parameter Description
*annotations Used for console display. volume.beta.kubernetes.io/storage-classindicates the EVS disk type (SAS, SATA, or SSD). For details, see thedefinition of the EVS service. The value ofvolume.beta.kubernetes.io/storage-provisioner is fixed atflexvolume-huawei.com/fuxivol.
*accessModes EVS access mode. Three options are available:l ReadWriteOncel ReadOnlyManyl ReadWriteMany
*resource.request.storage
Size of the EVS disk, in Gi. The minimum value is 10.
10.2.5 Using Load BalancersThe chart workload supports service types using load balancers. Its definition method is thesame as that of the community.
Cloud Container EngineUser Guide 10 Container Orchestration
Issue 01 (2018-08-13) Huawei Proprietary and ConfidentialCopyright © Huawei Technologies Co., Ltd.
163
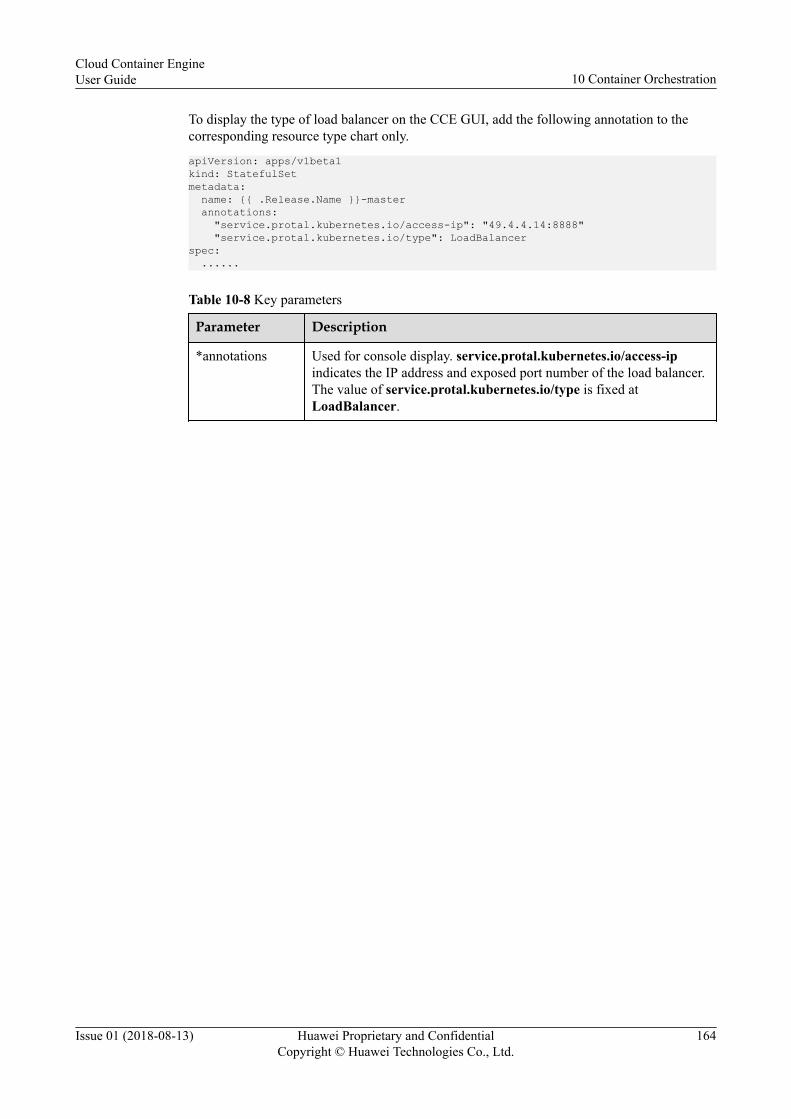
To display the type of load balancer on the CCE GUI, add the following annotation to thecorresponding resource type chart only.
apiVersion: apps/v1beta1kind: StatefulSetmetadata: name: {{ .Release.Name }}-master annotations: "service.protal.kubernetes.io/access-ip": "49.4.4.14:8888" "service.protal.kubernetes.io/type": LoadBalancerspec: ......
Table 10-8 Key parameters
Parameter Description
*annotations Used for console display. service.protal.kubernetes.io/access-ipindicates the IP address and exposed port number of the load balancer.The value of service.protal.kubernetes.io/type is fixed atLoadBalancer.
Cloud Container EngineUser Guide 10 Container Orchestration
Issue 01 (2018-08-13) Huawei Proprietary and ConfidentialCopyright © Huawei Technologies Co., Ltd.
164
11 Image Repository
Image Repository is a service provided by SoftWare Repository for storing and managingDocker container images. Image Repository allows you to easily store, manage, and deployDocker container images.
Uploading an ImageUpload images on SoftWare Repository. For details, see Uploading an Image Through theClient.
Using an ImageAfter the image is uploaded successfully, you can choose an image from My Images to createa workload on CCE. The following uses a game workload as an example.
Step 1 Log in to the CCE console. In the navigation pane, choose Workload. Click CreateWorkload, and set Workload Type to Deployments.
Step 2 Set the following parameters, and retain the default settings for other parameters:l Workload Name: gamel Cluster Name: Cluster in which the workload residesl Instance Quantity: 1
Step 3 Click Next to add a container.
Click and select the image to be deployed. Click OK.
Step 4 Create a workload. For details, see 4.2 Creating a Deployment or 4.3 Creating aStatefulSet.
----End
Cloud Container EngineUser Guide 11 Image Repository
Issue 01 (2018-08-13) Huawei Proprietary and ConfidentialCopyright © Huawei Technologies Co., Ltd.
165

12 Application O&M
After creating workloads on CCE, you can operate and maintain the workloads on AOM. Thisfollowing introduces several AOM O&M scenarios by using the nginx as an example.
AOM is the one-stop platform for O&M personnel to monitor application and resourcerunning statuses in real time. By analyzing dozens of metrics, alarms, and logs, you canquickly locate root causes to ensure smooth running of services.
l Create threshold rules for metrics of these resources to monitor changes of certainresources. For details, see Using AOM: Creating Threshold Rules.
l Use the dashboard to learn comprehensive information in real time during routine O&M.You can create and add concerned contents to the dashboard. For details, see UsingAOM: Creating Dashboard.
l Perform routine preventive maintenance inspection (PMI). For details, see Using AOM:Monitoring Applications.
Using AOM: Creating Threshold RulesThreshold rules define upper and lower thresholds for metrics. When these rules are met,AOM reports threshold alarms. It can also send resource change information to you by shortmessage service (SMS) or email, so you are able to rapidly detect and handle abnormalities toensure resource running.
Step 1 When you need to obtain resource change information in real time, create a topic first and addsubscribers to this topic. That is, add email addresses or mobile phone numbers of recipientsto the system. In this way, you can select corresponding recipients when creating thresholdrules.
1. Create a topic on the Simple Message Notification (SMN) page. To learn how to createtopics, click here.
2. Configure topic policies.Select APM for Services that can publish messages, as shown in the following figure.Otherwise, notifications fail to be sent. To learn how to configure topic policies, clickhere.
Cloud Container EngineUser Guide 12 Application O&M
Issue 01 (2018-08-13) Huawei Proprietary and ConfidentialCopyright © Huawei Technologies Co., Ltd.
166

3. Add subscribers to the topic. To learn how to add subscribers to a topic, click here.
Step 2 Create a threshold rule and enable notification.
1. In the navigation pane, choose Setting > Threshold Rules. Then, click Add Threshold,select a metric, set parameters including Time Range and Statistic Method, and clickNext. The following uses the CPU usage of the nginx application as an example.
2. Configure basic information about the threshold rule and enable notification. Forexample, if you want to receive notifications when the CPU usage exceeds 85%,configure threshold conditions by referring to the following figure.
Cloud Container EngineUser Guide 12 Application O&M
Issue 01 (2018-08-13) Huawei Proprietary and ConfidentialCopyright © Huawei Technologies Co., Ltd.
167

NOTE
You can select multiple trigger conditions. For example, if you want to receive notifications aboutthreshold status changing from normal to other states, select both Threshold crossing andInsufficient data. If you want to receive notifications upon any threshold status change, select alltrigger conditions.
----End
Using AOM: Creating DashboardDuring routine O&M, you can create a dashboard and add clusters, application metrics, andstatus graphs to the dashboard to learn comprehensive information. You can also add metricsfor routine O&M to the customized dashboard so that you can perform routine check withoutre-selecting metrics.
The dashboard can display metric data and status data. For different metric data, differenticons can be added based on demands. To monitor change trends or compare metrics, you cancreate line graphs. To learn the latest values, you can create digit graphs. The following showshow to create a dashboard:
Cloud Container EngineUser Guide 12 Application O&M
Issue 01 (2018-08-13) Huawei Proprietary and ConfidentialCopyright © Huawei Technologies Co., Ltd.
168
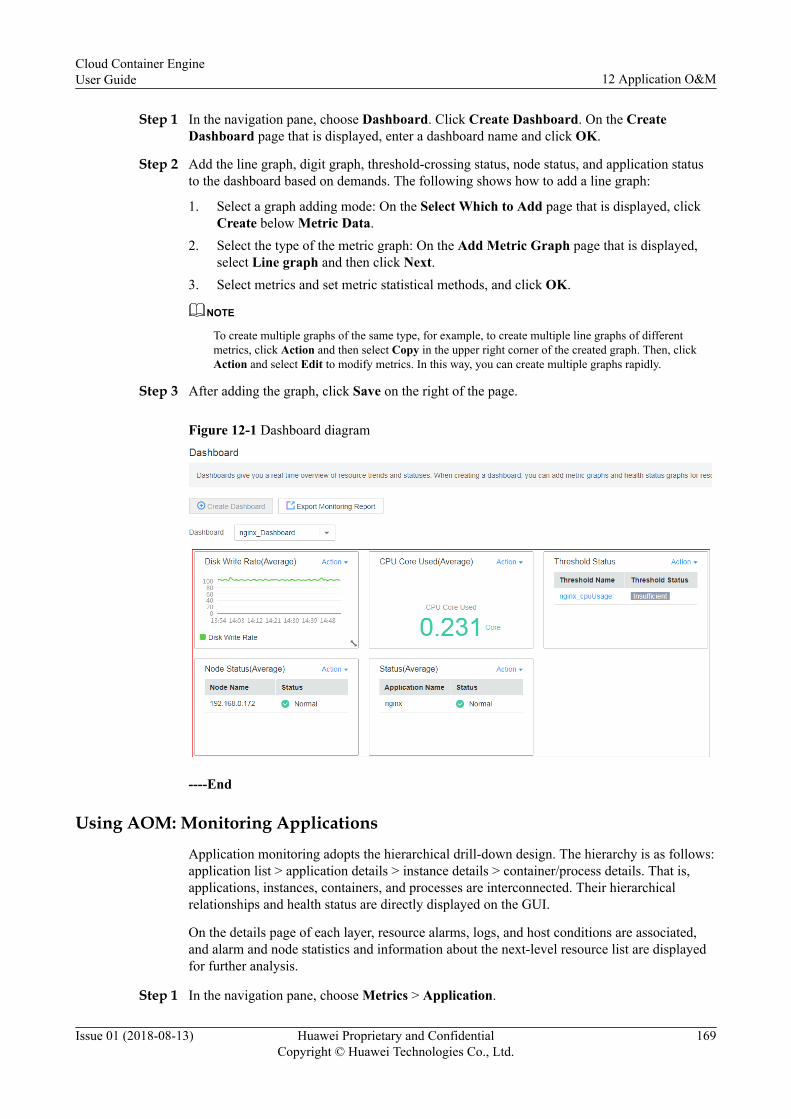
Step 1 In the navigation pane, choose Dashboard. Click Create Dashboard. On the CreateDashboard page that is displayed, enter a dashboard name and click OK.
Step 2 Add the line graph, digit graph, threshold-crossing status, node status, and application statusto the dashboard based on demands. The following shows how to add a line graph:
1. Select a graph adding mode: On the Select Which to Add page that is displayed, clickCreate below Metric Data.
2. Select the type of the metric graph: On the Add Metric Graph page that is displayed,select Line graph and then click Next.
3. Select metrics and set metric statistical methods, and click OK.
NOTE
To create multiple graphs of the same type, for example, to create multiple line graphs of differentmetrics, click Action and then select Copy in the upper right corner of the created graph. Then, clickAction and select Edit to modify metrics. In this way, you can create multiple graphs rapidly.
Step 3 After adding the graph, click Save on the right of the page.
Figure 12-1 Dashboard diagram
----End
Using AOM: Monitoring Applications
Application monitoring adopts the hierarchical drill-down design. The hierarchy is as follows:application list > application details > instance details > container/process details. That is,applications, instances, containers, and processes are interconnected. Their hierarchicalrelationships and health status are directly displayed on the GUI.
On the details page of each layer, resource alarms, logs, and host conditions are associated,and alarm and node statistics and information about the next-level resource list are displayedfor further analysis.
Step 1 In the navigation pane, choose Metrics > Application.
Cloud Container EngineUser Guide 12 Application O&M
Issue 01 (2018-08-13) Huawei Proprietary and ConfidentialCopyright © Huawei Technologies Co., Ltd.
169

Step 2 Click the to-be-queried application in the application list or configure filter criteria to find theto-be-queried application. Click the application name. The Application Overview page isdisplayed.
In the upper right corner of the page, select a statistical period from the drop-down list. Youcan view details about application monitoring during the selected period.
Click Add Metric Monitoring Graph to the right of Metric Monitoring Graphs tocustomize the display of metric graphs. This helps you monitor metrics concerned and viewmetric trends in real time.
In the Instances list, view information about all instances of the application. Click an instancename. On the Instances Overview page that is displayed, monitor the application instance.Click an IP address. On the Process Overview page that is displayed, monitor the process.
Step 3 Click an instance name. On the Instances Overview page that is displayed, monitor theapplication instance.
Step 4 Click a container name. On the Container Overview page that is displayed, monitor thecontainer.
When you select Add Threshold from the More drop-down list in a metric graph, you can seta threshold rule for the metric.
When you select Details from the More drop-down list in a metric graph, the Metrics page isdisplayed. You can adjust the statistical cycle and time range to view the metric graph indifferent dimensions.
Cloud Container EngineUser Guide 12 Application O&M
Issue 01 (2018-08-13) Huawei Proprietary and ConfidentialCopyright © Huawei Technologies Co., Ltd.
170

In the Alarm Statistics area, view statistics of threshold-crossing alarms at different alarmseverities for application metrics.
In the Nodes area, view the status statistics of the nodes where all instances of the applicationreside.
Step 5 In the navigation pane, choose Threshold-Crossing Alarms to view or set threshold ruleinformation.
Step 6 In the navigation pane, choose Running Logs to view running logs of the application.
----End
Cloud Container EngineUser Guide 12 Application O&M
Issue 01 (2018-08-13) Huawei Proprietary and ConfidentialCopyright © Huawei Technologies Co., Ltd.
171

13 CTS
Cloud Trace Service (CTS) provides you with a history of operations performed on cloudservice resources. With CTS, you can query, audit, and backtrack operations. The tracesinclude the operation requests sent using the public cloud management console or open APIsand the operation results.
13.1 List of CCE Operations Supported by CTS
13.2 Querying CTS Logs
13.1 List of CCE Operations Supported by CTS
Table 13-1 CCE operations supported by CTS
Operation Name Description
createCluster Creating a cluster
updateCluster Updating a cluster
deleteCluster Deleting a cluster
createNode Creating a node
addStaticNode Adding a static node
updateNode Updating a node
deleteOneHost Deleting a host
deleteAllHosts Deleting all hosts
suspendUserResource Suspending user resources
createConfigmaps Creating a ConfigMap
createDaemonsets Creating a DaemonSet
createDeployments Creating a Deployment
createEvents Creating an event
Cloud Container EngineUser Guide 13 CTS
Issue 01 (2018-08-13) Huawei Proprietary and ConfidentialCopyright © Huawei Technologies Co., Ltd.
172
Operation Name Description
createIngresses Creating an ingress
createJobs Creating a job
createNamespaces Creating a namespace
createNodes Creating a node
createPersistentvolumeclaims Creating a PersistentVolumeClaim
createPods Creating a pod
createReplicaSets Creating a ReplicaSet
createResourcequotas Creating a ResourceQuota
createSecrets Creating a secret
createServices Creating a service
createStatefulsets Creating a StatefulSet
createVolumes Creating a volume
deleteConfigmaps Deleting a ConfigMap
deleteDaemonsets Deleting a DaemonSet
deleteDeployments Deleting a Deployment
deleteEvents Deleting an event
deleteIngresses Deleting an ingress
deleteJobs Deleting a job
deleteNamespaces Deleting a namespace
deleteNodes Deleting a node
deletePods Deleting a pod
deleteReplicaSets Deleting a ReplicaSet
deleteResourcequotas Deleting a ResourceQuota
deleteSecrets Deleting a secret
deleteServices Deleting a service
deleteStatefulsets Deleting a StatefulSet
deleteVolumes Deleting a volume
updateConfigmaps Replacing the specified ConfigMap
updateDaemonsets Replacing the specified DaemonSet
updateDeployments Replacing the specified Deployment
Cloud Container EngineUser Guide 13 CTS
Issue 01 (2018-08-13) Huawei Proprietary and ConfidentialCopyright © Huawei Technologies Co., Ltd.
173
Operation Name Description
updateEvents Replacing the specified event
updateIngresses Replacing the specified ingress
updateJobs Replacing the specified job
updateNamespaces Replacing the specified namespace
updateNodes Replacing the specified node
updatePersistentvolumeclaims Replacing the specified PersistentVolumeClaim
updatePods Replacing the specified pod
updateReplicaSets Replacing the specified ReplicaSet
updateResourcequotas Replacing the specified ResourceQuota
updateSecrets Replacing the specified secret
updateServices Replacing the specified service
updateStatefulsets Replacing the specified Statefulset
updateStatus Replacing the specified status
uploadChart Uploading a component chart
updateChart Updating a component chart
deleteChart Deleting a chart
createRelease Creating a chart-based workload
updateRelease Updating a chart-based workload
deleteRelease Deleting a chart-based workload
13.2 Querying CTS Logs
Scenario
After you enable CTS, the system starts recording operations on CCE resources. Operationrecords of the last 7 days can be viewed on the CTS management console.
This section describes how to query operation records for the last 7 days on the CTS console.
Procedure
Step 1 Log in to the management console.
Step 2 Click in the upper left corner of the management console to select the desired region andproject.
Cloud Container EngineUser Guide 13 CTS
Issue 01 (2018-08-13) Huawei Proprietary and ConfidentialCopyright © Huawei Technologies Co., Ltd.
174

Step 3 Choose Service List from the main menu. Choose Management & Deployment > CloudTrace Service.
Step 4 In the navigation pane of the CTS console, choose Cloud Trace Service > Trace List.
Step 5 On the Trace List page, query operation records based on the search criteria. Currently, thetrace list supports trace query based on the combination of the following search criteria:l Trace Source, Resource Type, and Search By
Select the search criteria from the drop-down lists. Select CCE from the Trace Sourcedrop-down list.If you select Trace name from the Search By drop-down list, specify the trace name.If you select Resource ID from the Search By drop-down list, select or enter a specificresource ID.If you select Resource name from the Search By drop-down list, select or enter aspecific resource name.
l Operator: Select a specific operator (at user level rather than tenant level).l Trace Status: Set this parameter to any of the following values: All trace statuses,
normal, warning, and incident.l Start Date and End Date: You can specify the time period to query traces.
Step 6 Click on the left of a trace to expand its details, as shown in Figure 13-1.
Figure 13-1 Expanding trace details
Step 7 Click View Trace in the Operation column. In the dialog box shown in Figure 13-2, thetrace structure details are displayed.
Cloud Container EngineUser Guide 13 CTS
Issue 01 (2018-08-13) Huawei Proprietary and ConfidentialCopyright © Huawei Technologies Co., Ltd.
175
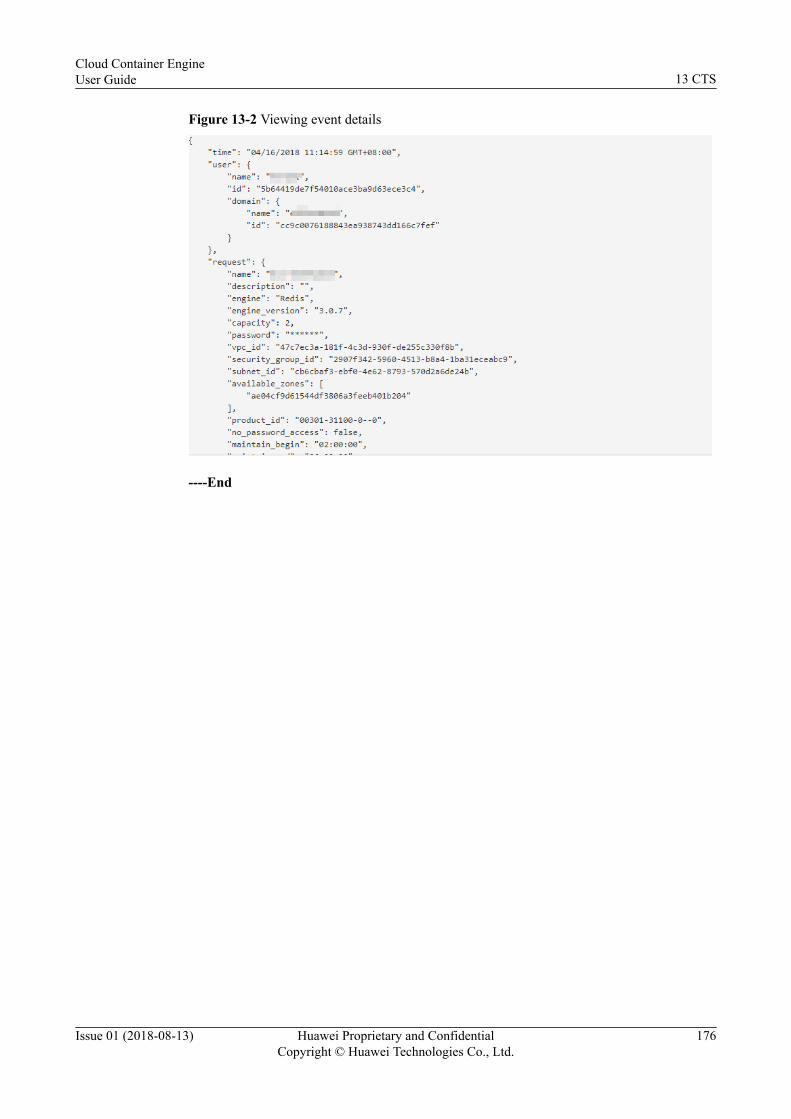
Figure 13-2 Viewing event details
----End
Cloud Container EngineUser Guide 13 CTS
Issue 01 (2018-08-13) Huawei Proprietary and ConfidentialCopyright © Huawei Technologies Co., Ltd.
176

14 kubectl Usage Guide
Before running kubectl commands, you must master the kubectl development skills and havea basic understanding on kubectl operations. For details, see Kubernetes API and KubectlCLI.
Table 14-1 Using kubectl
Task How to Use kubectl
Connecting toa cluster
3.5 Connecting to the Kubernetes Cluster Using kubectl
kube-dns HA 3.6 Configuring kube-dns HA Using kubectl
Creating aworkload
Creating a Deployment Using kubectl
Creating a StatefulSet Using kubectl
Applicationaffinity andanti-affinityscheduling
Example YAML for Deploying a Workload on a Specified Node
Example YAML for Deploying a Workload with Node Anti-Affinity
Example YAML for Deploying Workloads on the Same Node
Example YAML for Deploying Workloads on Different Nodes
Example YAML for Deploying a Workload in a Specified AZ
Example YAML for Deploying a Workload with AZ Anti-Affinity
Applicationaccess modesettings
Using kubectl for Intra-Cluster Access
Using kubectl for Intra-VPCAccess - Node IP Address
Using kubectl for Public Network Access - Elastic IP Address
Using kubectl for Public Network Access - Load Balancer
Applicationadvancedsettings
Example YAML for Setting the Container Lifecycle
Cloud Container EngineUser Guide 14 kubectl Usage Guide
Issue 01 (2018-08-13) Huawei Proprietary and ConfidentialCopyright © Huawei Technologies Co., Ltd.
177

Task How to Use kubectl
Taskmanagement
Creating a Job Using kubectl
Creating a Cron Job Using kubectl
Configurationcenter
Creating a ConfigMap Using kubectl
Creating a Secret Using kubectl
Storagemanagement
Creating an EVS Disk Using kubectl
Mounting an EVS Disk Using kubectl
Using kubectl to Create a File Storage
Mounting a File Storage Using kubectl
Using kubectl to Create an OBS Bucket
Using kubectl to Mount an OBS Bucket
Cloud Container EngineUser Guide 14 kubectl Usage Guide
Issue 01 (2018-08-13) Huawei Proprietary and ConfidentialCopyright © Huawei Technologies Co., Ltd.
178

15 Reference
15.1 NodeResource Reservation Computing Formulas
15.2 How Do I Troubleshoot Insufficient EIPs When a Node Is Added?
15.1 NodeResource Reservation Computing FormulasA node needs to run some necessary Kubernetes system components and Kubernetes systemresources. You can make such a node as part of your cluster. In this case, there is a differencebetween the total number of node resources and the assignable resources of nodes inKubernetes. When nodes support larger specifications, more containers may be deployed onthese nodes. Therefore, more resources need to be reserved for Kubernetes.
To ensure node stability, CCE cluster nodes reserve some resources based on nodespecifications for Kubernetes components, such as kubelet, kube-proxy, and Docker.
The CCE calculates the resources that can be allocated to user nodes as follows:
Allocatable = Capacity - Reserved - Eviction Threshold
Allocable amount on the node = Total amount – Reserved amount – Eviction threshold
l The CCE reserves the memory as follows:
a. total_mem <= 4GB, reserved_value= total_mem*25%b. 4GB < total_mem <= 8GB, reserved_value= 4GB*25% + (total_mem –
4GB)*20%c. 8GB < total_mem < =16GB, reserved_value= 4GB*25% + 4GB*20% +
(total_mem – 8GB)*10%d. 16GB < total_mem < =128GB, reserved_value= 4GB*25% + 4GB*20%
+ 8GB*10% + (total_mem – 16GB)*6%e. total_mem > 128GB, eserved_value= 4GB*25% + 4GB*20% + 8GB*10%
+ 112GB*6% +(total_mem – 128GB)*2%
In the preceding information, total_mem indicates the total memory amount, andreserved_value indicates the reserved value.
l The CCE reserves the CPU as follows:
a. total_cpu <= 1core, reserved_value= total_cpu *6%
Cloud Container EngineUser Guide 15 Reference
Issue 01 (2018-08-13) Huawei Proprietary and ConfidentialCopyright © Huawei Technologies Co., Ltd.
179
b. 1core < total_cpu <= 2core, reserved_value= 1core*6% + (total_cpu– 1core)*1 %c. 2core < total_cpu <= 4core, reserved_value= 1core*6% + 1core*1% + (total_cpu–
2core)*0.5%d. total_cpu > 4core, reserved_value= 1core*6% + 1core*1% + 2core*0.5% +
(total_cpu– 4core)*0.25%
In the preceding information, total_cpu indicates the total CPU amount, andreserved_value indicates the reserved value.
15.2 How Do I Troubleshoot Insufficient EIPs When aNode Is Added?
SymptomWhen a node is added, Elastic IP Address is set to Buy Now. The node cannot be created,and an insufficient EIP message is displayed.
SolutionTwo methods are available to resolve the problem.
l Method 1: Unbind the VMs bound with EIPs and add a node again.
a. Log in to the management console https://console.huaweicloud.com/console/?locale=zh-cn#/home.
b. Under Network, click Virtual Private Cloud.c. Click Unbind next to an ECS to unbind its EIP, and click OK.
The following message is displayed: You can purchase x more elastic IP addresses.The value of x must be 1 or larger.
l Method 2: To increase the quota of an EIP, submit an application on Service Tickets.Quotas are used to limit the number of resources available to users. If the existingresource quota cannot meet your service requirements, you can submit a work order toincrease your quota. Once your application is approved, your quota will be updated and anotification will be sent to you.
Cloud Container EngineUser Guide 15 Reference
Issue 01 (2018-08-13) Huawei Proprietary and ConfidentialCopyright © Huawei Technologies Co., Ltd.
180