Embed Size (px)
Citation preview

User Guide
© 2001-2011 Panstoria, Inc.

Artisan 4.0 User Guide
Contents
Welcome to Panstoria Artisan 4.0................................................................................................... 1
Windows System Requirements.................................................................................................. 1
Installing the Software................................................................................................................. 2
Activating Panstoria Artisan 4.0 ................................................................................................. 5
Enter a Product Key ..................................................................................................................... 5
Viewing Software Details............................................................................................................. 7
Technical Support ........................................................................................................................ 8
Help Buttons ................................................................................................................................ 8
Accessing the Internet ................................................................................................................. 8
Workspace....................................................................................................................................... 9
Basic vs. Advanced....................................................................................................................... 9
When application starts .......................................................................................................... 9
Changing Modes...................................................................................................................... 9
Dialog boxes .......................................................................................................................... 10
Navigating the Screen Layout.................................................................................................... 11
Using the File Menu .............................................................................................................. 15
Using Ribbons........................................................................................................................ 17
Using Panels .......................................................................................................................... 18
Using the Toolbar .................................................................................................................. 19
Using the Welcome Page........................................................................................................... 20
Software Options....................................................................................................................... 22
Understanding Page Elements .................................................................................................. 25
Flattening Elements............................................................................................................... 26
Using Pop‐up Menus ................................................................................................................. 26
Using Right‐Click ........................................................................................................................ 27
Panels and Palettes ....................................................................................................................... 28
Using the Color Picker ............................................................................................................... 28
List ......................................................................................................................................... 28
Sample a color ....................................................................................................................... 29
Color Models ......................................................................................................................... 30
RGB Color .............................................................................................................................. 30
HSB Color............................................................................................................................... 30
Save This Color ...................................................................................................................... 31
Using the Elements Panel .......................................................................................................... 31
Rearrange Elements .............................................................................................................. 32
Hide Elements ....................................................................................................................... 33
Lock Elements........................................................................................................................ 33
© 2001-2011 Panstoria, Inc. i

Artisan 4.0 User Guide
Tabs Panel.................................................................................................................................. 33
Content Tab........................................................................................................................... 33
Cut this shape out of a piece of paper .................................................................................. 44
Photos Tab............................................................................................................................. 45
Get More Photos ................................................................................................................... 45
Change Screen Layout ........................................................................................................... 46
Sort Photos ............................................................................................................................ 46
Ribbons and Menus....................................................................................................................... 47
The File Menu............................................................................................................................ 47
How to Open an Existing Project........................................................................................... 48
Open an Existing Page ........................................................................................................... 49
Pages vs. Projects .................................................................................................................. 49
Saving .................................................................................................................................... 50
Save ....................................................................................................................................... 51
Save Project As ...................................................................................................................... 51
Save As................................................................................................................................... 52
Export Current Page .............................................................................................................. 53
Export Multiple Pages ........................................................................................................... 54
Export to PDF......................................................................................................................... 55
Convert .................................................................................................................................. 56
Print ....................................................................................................................................... 57
Sharing....................................................................................................................................... 58
Creating a Slideshow ............................................................................................................. 59
Home Ribbon............................................................................................................................. 60
Using the Arrange Section..................................................................................................... 61
Aligning Objects..................................................................................................................... 62
Ordering Objects ................................................................................................................... 64
Group and Flatten ................................................................................................................. 65
Flatten ................................................................................................................................... 67
Rotating Objects .................................................................................................................... 68
Adding Pages ......................................................................................................................... 69
Recovering pages................................................................................................................... 70
Changing Templates .............................................................................................................. 71
Coordinate Colors.................................................................................................................. 72
Using the Canvas Section ...................................................................................................... 73
Cropping the Canvas.............................................................................................................. 74
Resizing the Canvas ............................................................................................................... 75
Rotating the Canvas .............................................................................................................. 76
The Photos Section................................................................................................................ 77
Insert a Photo ........................................................................................................................ 77
© 2001-2011 Panstoria, Inc. ii

Artisan 4.0 User Guide
Insert an Empty Frame .......................................................................................................... 78
Replace or Remove Frame .................................................................................................... 78
Text Section ........................................................................................................................... 80
Format Text ............................................................................................................................... 81
Inserting a Text Path.............................................................................................................. 81
Content Section ......................................................................................................................... 87
Inserting an Embellishment................................................................................................... 87
Other Section............................................................................................................................. 95
Insert Lines ............................................................................................................................ 95
Inserting a Rubber Stamp...................................................................................................... 97
Inserting a Calendar .............................................................................................................. 99
Align......................................................................................................................................... 102
Ordering Objects ................................................................................................................. 103
Group and Flatten ................................................................................................................... 104
Grouping and Ungrouping................................................................................................... 104
Flatten ................................................................................................................................. 106
Rotating Objects .................................................................................................................. 107
The Cutters Section ............................................................................................................. 108
Using the Straight Cutter..................................................................................................... 109
Using the Shapes Cutter ...................................................................................................... 112
Using the Text Cutter .......................................................................................................... 114
Using the Custom Cutter ..................................................................................................... 116
Using the Wand Cutter........................................................................................................ 118
Using the Corner Cutter ...................................................................................................... 121
Using the Grid Cutter........................................................................................................... 122
The Fill Section......................................................................................................................... 123
Using Color Fill..................................................................................................................... 123
Using Gradient Fill ............................................................................................................... 124
Customized Gradients ......................................................................................................... 126
Blend Options ...................................................................................................................... 127
Color Blend .......................................................................................................................... 127
Working with Tabs............................................................................................................... 128
Using the Paper Fill.............................................................................................................. 128
Using the Convert Section ....................................................................................................... 130
Black & White ...................................................................................................................... 130
Sepia .................................................................................................................................... 131
The Color and Light Section..................................................................................................... 132
Adjusting Hue ...................................................................................................................... 133
Add a Color Wash................................................................................................................ 134
Adjusting Brightness and Light ............................................................................................ 135
Adjusting Color Balance ...................................................................................................... 136
© 2001-2011 Panstoria, Inc. iii

Artisan 4.0 User Guide
Modifying Temperature ...................................................................................................... 137
Adjusting Levels................................................................................................................... 138
Adjusting Color Curves ........................................................................................................ 139
General Section ....................................................................................................................... 140
Modifying Element Properties ............................................................................................ 140
Size and Location................................................................................................................. 141
Memory Usage .................................................................................................................... 142
Copyrights............................................................................................................................ 142
Text Wrapping ..................................................................................................................... 143
Adjusting Opacity ................................................................................................................ 144
Wrapping Text ..................................................................................................................... 145
Shadows................................................................................................................................... 146
Applying Shadows ............................................................................................................... 146
Add a Pre‐Defined Shadow ................................................................................................. 147
Customized Shadow ............................................................................................................ 148
Apply a Light or Heavy Shadow........................................................................................... 148
Remove a Shadow............................................................................................................... 149
Applying Glows.................................................................................................................... 149
Add a Pre‐Defined Glow...................................................................................................... 150
Customized Glow................................................................................................................. 151
Remove a Glow.................................................................................................................... 151
Effects Section ......................................................................................................................... 152
Applying Surfaces ................................................................................................................ 152
Applying Filters.................................................................................................................... 153
Using Quick Fix......................................................................................................................... 162
Auto Fix................................................................................................................................ 162
Remove Redeye................................................................................................................... 163
Image Editor ........................................................................................................................ 164
The Image Editor Ribbons ................................................................................................... 165
Rotating and Flipping Image................................................................................................ 167
Free Rotate.......................................................................................................................... 167
Quick Fix .................................................................................................................................. 168
Auto Color ........................................................................................................................... 168
Light ..................................................................................................................................... 169
Sharpen ............................................................................................................................... 169
Adjust Ribbon .......................................................................................................................... 170
Adjust Color and Light ......................................................................................................... 170
Adjust Focus ........................................................................................................................ 170
Adjust Other ............................................................................................................................ 171
Image Size............................................................................................................................ 171
Filters ................................................................................................................................... 171
© 2001-2011 Panstoria, Inc. iv

Artisan 4.0 User Guide
Touchup Ribbon....................................................................................................................... 172
Clone.................................................................................................................................... 172
Brushes ................................................................................................................................ 173
Selection Ribbon...................................................................................................................... 174
Select Options ..................................................................................................................... 174
Shape................................................................................................................................... 174
Wand ................................................................................................................................... 175
Deselect ............................................................................................................................... 175
Invert ................................................................................................................................... 175
Selection Display...................................................................................................................... 176
Color and Light......................................................................................................................... 177
Focus Section........................................................................................................................... 179
Applying Soften ................................................................................................................... 179
Applying Sharpen ................................................................................................................ 181
Cleaning Up Photos ............................................................................................................. 182
Median ................................................................................................................................ 182
Despeckle ............................................................................................................................ 183
Using the Photo in Frame Section ........................................................................................... 184
Rotate .................................................................................................................................. 184
Zoom Photo ......................................................................................................................... 185
Frames Section ........................................................................................................................ 186
Sampling Applying a Frame ................................................................................................. 186
Selecting a Mat.................................................................................................................... 187
Using Frame Effects............................................................................................................. 189
Access the Frame Effects List .............................................................................................. 189
Customize an Existing Frame............................................................................................... 190
Basic Text Formatting .............................................................................................................. 191
Using Style Sampling................................................................................................................ 193
Using the Layout Section ......................................................................................................... 194
Text Shape ........................................................................................................................... 194
Edit Path .............................................................................................................................. 196
Using the Preview Section ....................................................................................................... 197
Using the Settings Section ....................................................................................................... 198
Changing Screen Layouts..................................................................................................... 198
Using the Grid Display ......................................................................................................... 198
Using the Grid...................................................................................................................... 199
The Content Manager ................................................................................................................. 200
Organizing Content.............................................................................................................. 200
Viewing Content .................................................................................................................. 200
Managing Content............................................................................................................... 200
© 2001-2011 Panstoria, Inc. v

Artisan 4.0 User Guide
Organizing Content.................................................................................................................. 201
Library.................................................................................................................................. 201
Categories............................................................................................................................ 202
Create New Category .......................................................................................................... 203
Editing Categories................................................................................................................ 203
Assigning Kits to Categories ................................................................................................ 203
Tags...................................................................................................................................... 204
Create New Tag ................................................................................................................... 205
Editing Tags ......................................................................................................................... 205
Tagging Items ...................................................................................................................... 206
Search Using Tags................................................................................................................ 208
Managing Content ................................................................................................................... 209
Create Art Kit ....................................................................................................................... 209
Create a New Art Kit............................................................................................................ 209
Adding Items in Content Manager ...................................................................................... 211
Creating New Elements from Scratch ................................................................................. 213
Create a New Element......................................................................................................... 214
Create a New Color ............................................................................................................. 215
Shape Editor ........................................................................................................................ 216
Editing Points....................................................................................................................... 217
Working with multiple figures............................................................................................. 219
Importing Content............................................................................................................... 220
Activating Content................................................................................................................... 221
Activate a Kit........................................................................................................................ 221
Back up Your Activation Codes............................................................................................ 223
Saving a Selected Element................................................................................................... 223
Save to a File........................................................................................................................ 224
Save to an Art Kit ................................................................................................................. 225
Renaming a Personal Art Kit................................................................................................ 226
Deleting A Personal Art Kit .................................................................................................. 227
How to Start Scrapping Digitally.................................................................................................. 228
How to Create a New Project .................................................................................................. 232
How to Import Photos ............................................................................................................. 235
Modifying Lines ....................................................................................................................... 237
How to Add and Format Text .................................................................................................. 238
Add Text to a Page............................................................................................................... 238
Search Using Tags .................................................................................................................... 239
How to Design Your Cover Page .............................................................................................. 240
Remove the Cover Page ...................................................................................................... 241
How to Undo an Action ........................................................................................................... 241
© 2001-2011 Panstoria, Inc. vi

Artisan 4.0 User Guide
© 2001-2011 Panstoria, Inc. vii
How to Switch Between Open Projects................................................................................... 242
How to Download New Art...................................................................................................... 242
Importing Content............................................................................................................... 243
How to Close a Project ........................................................................................................ 244
Using Keyboard Shortcuts ....................................................................................................... 245
Using Mouse Shortcuts............................................................................................................ 246
Differentiating Books and Pages ............................................................................................. 247
Importing Using Drag and Drop............................................................................................... 248
Trimming and Printing: Understanding Bleed......................................................................... 249
Locking and Hiding Elements................................................................................................... 250
Zooming Pages......................................................................................................................... 251
Selecting and Resizing Items ................................................................................................... 252
Entering Custom Sizes ......................................................................................................... 253
Adjusting Aspect Ratio............................................................................................................. 254
Cropping Photos ...................................................................................................................... 255
Using a Photo as a Fill .............................................................................................................. 256
Understanding Layering and Flattening .................................................................................. 257
Flattening Text......................................................................................................................... 258
Creating a Custom Shape by Tracing ....................................................................................... 260
Creating a Translucent Frame Effect ....................................................................................... 262
Editing a Graphic with Artisan ................................................................................................. 264

Artisan 4.0 User Guide
Welcome to Panstoria Artisan 4.0
Capture your memories with a computer and a click. From pictures to proud in three steps,
Panstoria Artisan 4.0 is your tool for creating a professionally printed, hardbound photo book,
pages printed to your own printer, or desktop wallpaper for your PC.
1. Install. Start by installing the software to your PC. Installation takes just minutes.
2. Design. Create scrapbook pages on your computer. Import photos, then drop them into your choice of page templates. Download countless themes, containing hundreds of page templates.
3. Print.When your scapbook is complete, click Print to print to your local printer.
Windows System Requirements Make sure your system configuration meets these minimum requirements:
Notes: - Actual requirements and product functionality may vary based on your system configuration. -To order your projects, download themes, upgrades, and updates, you need an Internet connection.
Operating System: Windows XP Service Pack 2, Windows Vista, or Windows 7
Processor: 1.5 GHz (2 GHz or higher recommended), 32-bit (x86) or 64-bit (x64) processor
System memory (RAM): 1 GB (2 GB recommended)
Monitor: 1024 x 768 resolution or greater with 32-bit color
Disk space: 2 GB free space on system drive for software installation; as needed on system drive or other drive for storage of projects and content.
Other: Mouse or other pointing device; high-speed Internet connection is recommended
© 2001-2011 Panstoria, Inc. 1

Artisan 4.0 User Guide
Installing the Software Make sure your system meets the minimum system requirements.
Perform the following steps:
1. Insert the CD, or run the downloaded file.
2. The InstallShield Wizard displays. Click Next to begin installation.
© 2001-2011 Panstoria, Inc. 2

Artisan 4.0 User Guide
3. Review the license agreement. Scroll to read the agreement or click Print to print a hard copy. Click I accept the terms in order to continue with the installation.
Note: If you do not accept the terms in the license agreement, installation quits.
4. Click Next to continue.
5. Enter your name in the User Name field. Optionally, you may also enter your organization/company.
6. Click Next to continue.
© 2001-2011 Panstoria, Inc. 3
Artisan 4.0 User Guide
7. The software automatically installs to C:\Program Files\Caspedia\Publisher 4. If you want to install the software in a different directory, click Change and browse to a new location.
8. Click Next to continue.
9. Review the displayed information. If any information is incorrect, click Back and make the necessary changes. If the information is correct, click Install.
10. The software installs to your machine. This may take a several minutes. If installing from a CD, insert the second install disc when prompted.
11. The InstallShield Wizard displays a completed message. Click Finish.
12. You can now launch Panstoria Artisan 4.0 from the icon on your desktop or from your Start Menu.
© 2001-2011 Panstoria, Inc. 4

Artisan 4.0 User Guide
Activating Panstoria Artisan 4.0 You need to activate Panstoria Artisan 4.0 to use itbeyond the 30‐day trial and access features
like local printing of page sets and ordering.
You must enter a product key to activate Panstoria Artisan 4.0 Plus. If you do not yet have a
product key, click the Help menu in the Welcome screen.
Note: You must be connected to the Internet to upgrade.
On the web site, you can learn about the features and benefits of Panstoria Artisan 4.0 Plus and
purchase a product key.
Enter a Product Key To enter your product key, perform the following steps:
1. When you first launch Panstoria Artisan 4.0, a dialog box appears. You can also click Activation/Upgrade from the blue Help button on the ribbon bar.
2. Click Activate.
3. Enter your Product Key in the dialog box.
© 2001-2011 Panstoria, Inc. 5

Artisan 4.0 User Guide
4. If you have not set up a Panstoria Account, click I need to create a Panstoria account and enter your e-mail, a password, and a security question and answer.
5. If you already have an account, select Use my existing Panstoria account and enter your e-mail and password.
6. Click Register or Login.
7. Click OK.
Note: Your product key is either on the software packaging or you received it when you downloaded the software.
© 2001-2011 Panstoria, Inc. 6

Artisan 4.0 User Guide
Viewing Software Details You can learn more about your software and your machine by clicking About from the blue Help
button.
The About Panstoria Artisan 4.0 dialog box displays.
From here you can view system information, your user agreement, and copyright information.
Options Explanation
System Info Displays information about your system. You can easily copy
this information to the clipboard.
License Info Displays the End User License Agreement you agreed to when
installing the software.
Copyright Info Displays copyright information for the software and associated
content.
© 2001-2011 Panstoria, Inc. 7

Artisan 4.0 User Guide
Technical Support If you encounter problems not addressed within the included documentation, contact Panstoria
Customer Support at:
http://www.panstoria.com/support
You can also go to the support community at the getsatisfaction web site:
http://www.getsatisfaction.com/panstoria.
Help Buttons
Help buttons are available throughout Panstoria Artisan 4.0.
A Help button is always available on the ribbon bar, dialog boxes, and on the Home Page.
Accessing the Internet There are several instances where you may need to access the Internet while using the
software. Whether your software is automatically updating or you're trying to upgrade or
purchase items, your computer will try to go online.
When this happens, you may see a warning from your firewall protection program (such as
Norton, McAfee, Windows Firewall, or others). If available, choose Always Allow from the
options to allow the software to access the Internet now and on future occasions.
© 2001-2011 Panstoria, Inc. 8

Artisan 4.0 User Guide
Workspace
Basic vs. Advanced With Panstoria Artisan 4.0 you can choose to operate in Basic or Advanced mode. Basic mode
displays a simplified interface with fewer options. The advanced mode displays all options and
ribbons.
For example, in basic mode you see the following options in the Cutters section:
In advanced mode, you see all of these options:
When application starts When you start the application, you can choose Basic or Advanced. You can check Don't show
this again checkbox to not display this choose each time you start.
Changing Modes You can change the mode at anytime above the ribbon bar:
© 2001-2011 Panstoria, Inc. 9

Artisan 4.0 User Guide
Dialog boxes In basic mode, you also see simplified dialog boxes. At anytime, you can click More options to
see the advanced mode dialog box.
Here is an example of the Soften dialog box in basic mode:
Here is an example in advanced mode, or after you click More options:
© 2001-2011 Panstoria, Inc. 10

Artisan 4.0 User Guide
Navigating the Screen Layout Once you launch a project and leave the Welcome Page, you enter the design area of the
software. This area contains several different aspects that you may use while designing your
projects.
Option Explanation
File Button
The File button opens the File menu. From the File menu you can easily
switch between projects, view project properties, and quickly open and
create new projects.
Ribbons
The ribbon bar runs across the top of the software.The software includes
several different tabbed ribbons:
Home
Insert
Arrange (only in Advanced mode)
Cut & Fill
Color
Format
Format Photos
Format Text
View
Each ribbon contains one or more labeled sections. Each section
contains a series of related buttons.
© 2001-2011 Panstoria, Inc. 11

Artisan 4.0 User Guide
Option Explanation
Help Button
The blue Help button launches a menu that is accessible from anywhere
in the software. The following options are included:
Help contents: Click this button to launch the complete Help file for the software.
User guide: View the printable User Guide in PDF format. This option requires the free Adobe Acrobat Reader.
Tutorials: Click the button to view a Web page with short lessons to get you started with the software.
Activate/Upgrade: Click to activate or upgrade Artisan.
Options: Adjust these settings to control how the software behaves. To learn how to use these settings, refer to Adjusting User Settings.
About: Click this button to display software licensing and copyright information.
Elements Panel
Each element on your page is displayed in the Elements panel. You can rearrange, hide, and lock elements using the panel.
© 2001-2011 Panstoria, Inc. 12

Artisan 4.0 User Guide
Option Explanation
Work Area
The work area is where you will create your pages and drag elements
onto each page.
Tabs Panel
The Tabs panel has three tabs and changes names based on the selected
tab:
Pages: In the Pages tab, you can select, add, rearrange, and delete pages in your project.
Photos: From the Photos tab, you can add, rearrange, and modify photos.
Content: In the Content panel, you can access and modify Papers, Embellishments, and Shapes.
© 2001-2011 Panstoria, Inc. 13

Artisan 4.0 User Guide
Option Explanation
Zoom Tools
Use the zoom tools to view your page at different sizes. For example,
you can zoom in when editing individual photos and zoom out to view
your entire page.
Toolbar
The toolbar, located at the top of the working area, includes commonly
used buttons:
Undo/Redo
Save
Previous (previous page in book order)
Next (next page in book order)
Close
Undo, Redo, and Save are only available after you have made a change
to the page.
© 2001-2011 Panstoria, Inc. 14

Artisan 4.0 User Guide
Using the File Menu The File button is located in the top left corner of the software.
The File button opens the File menu, and is available on every screen. It provides an easy way to
access key functions, such as Save, Create New, Open, Print, and Order.
The Recent project section of the File menu displays any recent projects. This provides a quick
way open recent projects.
Click Exit to close and exit Panstoria Artisan 4.0.
Click Cancel to close the menu.
Click Properties to view the Properties dialog box. The Properties dialog box gives you
information about the current project.
© 2001-2011 Panstoria, Inc. 15

Artisan 4.0 User Guide
Options Explanation
Current Page Displays information about the displayed page. It includes the page file name, file size, and date/time of last save.
Project Displays information about the current project. It includes the location of the project files and the total size of the project.
© 2001-2011 Panstoria, Inc. 16

Artisan 4.0 User Guide
Using Ribbons The ribbon bar runs across the top of the software. The ribbon setup should make it easier for
you to navigate the software and find what you need faster.
The software includes several different tabbed ribbons:
Home Insert Arrange Cut & Fill Color Format Format Photos Format Text View
Each ribbon contains one or more labeled sections. Each section contains a series of related
buttons.
A button may have an arrow next to it. Click the arrow to select from a list of drop‐down
options.
© 2001-2011 Panstoria, Inc. 17

Artisan 4.0 User Guide
The Panels Panels are displayed on the sides and bottom of the software. In the default layout, the Tabs
panel is to the right and the Elements panel is to the left.
Depending on the screen layout chosen, the Photos panel may be located at the bottom of the
screen or in the tabbed panel. To learn more about changing the default screen layout, refer to
Using Options.
The Tabs panel is located to the right of the main editing area. Click each tab to view Pages,
Photos, and Content. Each tab has different options.
The Elements panel is docked to the left of the main editing area.
The Tabbed Content Panel is docked to the right of the main editing area.
© 2001-2011 Panstoria, Inc. 18

Artisan 4.0 User Guide
The Toolbar The toolbar, located at the top of the working area, includes commonly used buttons:
Undo: After a change is made, click Undo to revert to the previous state.
Redo: Reverse an undo.
Save: Save the project at any point.
Previous and Next: Move forward or backward through the pages of a book.
Close: Close the project.
Undo, Redo, and Save are only available after you have made a change to the page.
© 2001-2011 Panstoria, Inc. 19

Artisan 4.0 User Guide
The Welcome Page The Welcome Page displays when you launch the software. You can also reach the Welcome
Page from anywhere in the software by clicking on the Welcome tab..
Option Explanation
Home Ribbon
The Home ribbon changes depending on your view. On the Welcome page, the
Home ribbon includes the following options:
Create project: Creates a new project. You can create unbound pages, pages for your local printer, and bound books. To learn more, refer to How to Create a New Project.
Open project: Launches a project you have previously created in the software. To learn more, refer to How to Open a Used Project.
Import content: Import content into Artisan.
Manage content: Opens the content manager. The Content Manager view gives you one location from which you can manage art kits you purchase and those you create yourself. To learn more, refer to How to Import Art Kits.
Buy content: Launches the web site so you can explore to learn about the latest prices and special deals. To learn more, refer to How to Download New Art.
Note: You must be connected to the Internet to use this option.
Watch Tutorials:Launches several tutorials to walk you through key points of the software.
© 2001-2011 Panstoria, Inc. 20

Artisan 4.0 User Guide
Option Explanation
Help Button
The blue Help button launches a menu that is accessible from anywhere in the
software. The following options are included:
Help contents: Launches the Help file.
User guide: View the printable User Guide in PDF format. This option requires the free Adobe Acrobat Reader.
Tutorials:View a Web page with short lessons to get you started with the software.
Activate/Upgrade: Activate or upgrade Artisan.
Options: Adjust these settings to control how the software behaves. To learn how to use these settings, refer to User Options.
About: Displays software licensing and copyright information.
Application Update
The Application Update panel lets you know when your software needs updating.
The application will automatically check your software when you open it. You can
adjust your software update settings in the User Settings dialog box. For more
information, refer to Adjusting User Settings.
News
The News panel displays the latest news and information. The News is updated
once per day.
Note: This news feed will only update if you are connected to the Internet.
© 2001-2011 Panstoria, Inc. 21

Artisan 4.0 User Guide
Software Options You can adjust several functions of the software in the Software options dialog box, including
warning display, auto save, and software updates.
Perform the following steps to adjust the software options:
1. Click the Help button.
2. Select Options.
3. The Software Options dialog box displays. Adjust the setting to your preferences.
Options Explanation
General options How do you want the Software to start? Controls whether the
application starts in Basic or Advanced mode. The options are:
Basic Mode
Advanced Mode
Ask each time
Magnify recent project selectionWhen checked, the project your mouse
is over is magnified.
Use online help (requires connection to Internet) Artisan uses online
help to provide up‐to‐date help and a better help experience. If you are
using the application without an Internet connection, and need to access
help, you can unselect it.
Show all messages I turned off using "Don't show this again" This resets
all the messages to show by default.
Reset File associations resets the Windows file associations for the built‐
in PAPAGE and PAPROJ files so that they are associated with (and open
with) Artisan. It also gives the user the option to make Artisan the
default handler for .page, .projectx, .png, and .jpg files.
© 2001-2011 Panstoria, Inc. 22

Artisan 4.0 User Guide
Options Explanation
Page Editing Auto save pages: This option turns on Auto Save. Auto Save does not save your project on a regular basis. Instead, Auto Save saves your page whenever you move to a different page in your project.
Save a backup when saving changes to a page: This saves a backup copy of the page in a separate location.
Use smooth element positioning: When checked, drag-and-drop moves smoother.
Use aggressive memory management: Artisan uses less memory, but the application will run slower.
Text style Set the default style for new text boxes.
Reset to system default Returns the text settings to their original
defaults.
Spell checking Set defaults for spell checking. You can also edit the user dictionary if you have added an incorrect word.
© 2001-2011 Panstoria, Inc. 23

Artisan 4.0 User Guide
Options Explanation
Warning levels You can set the warning levels for the:
Page editor
Elements list
Order preview
The settings can be set to:
Hide all warnings
Show only critical warnings
Show all warnings
A Critical Warning indicates that something that will impact the quality
of the print. This includes a low pixel count, or text that does not fit in
the text box. If the warning is regarding low pixel count for a frame, this
is not considered a critical warning.
Indicates the image has a low pixel count. This could impact print
quality.
Indicates that not all text is appearing on the page.
Projects Show prompt when opening a page file from a
project folder When checked, Artisan asks you if you want to open the project a page belongs to when you try to open the page itself.
Maximum number of pages kept in the recycle bins: This sets the maximum number of pages stored in a recycle bin by Artisan. Once the maximum number is reached, the oldest deleted page is removed to make room for the next page.
Software updates Specify how often the software should search online for updates. When
an update is available, the software will notify you in a dialog box upon
opening and in the Software Updates panel of the Welcome Page.
Note: You must be connected to the Internet to search for updates.
© 2001-2011 Panstoria, Inc. 24

Artisan 4.0 User Guide
Options Explanation
Technical support Provides a link to support as well as reports to help support
representatives to resolve your issue.
Upload diagnostic report This links allows you to easily upload
information that a support representative can use to resolve your issue.
System Info This button can be used at the direction of support
representatives to help troubleshoot an issue.
3. Click OK. Your settings are applied and saved.
Understanding Page Elements When you create a project, it contains pre‐defined pages. Each page has different elements.
Each element can be manipulated, changed, and edited. There are several different elements
that may reside on your pages:
Element Explanation
Papers Papers are used for the background of your images. You may also cut shapes out of papers. Papers are selected within the Papers option of the Content panel.
Embellishments Embellishments are decorative elements that can be added and manipulated. Embellishments are selected within the Embellishments option of the Content panel.
Shapes Shapes are decorative elements you can add to a page or frame. Shapes are selected in the Shapes option of the Content panel.
Photos Photos are images that you bring into the project. Photos can be edited in multiple ways and can be added via the Insert option or Drag and Drop.
Frames Frames are objects that serve as placeholders for photos. You can modify the frames style, size, color, and matting. An element added to a frame takes on the size of that frame. Frames can be added from the Insert ribbon.
Text Boxes Text boxes are small boxes of text that describe the photo or event. Text boxes can be added from the Insert ribbon.
Text Path Text Paths are routes that text follow. They can be added in the text section of the Insert ribbon when you are in advanced mode. The Text Path option does not appear in basic mode.
© 2001-2011 Panstoria, Inc. 25

Artisan 4.0 User Guide
Element Explanation
Calendar Calendar is a special element that allows you to easily create a calendar.
Line Lines can be created with a variety of styles, thicknesses, and ends.
Each page element is displayed in the Elements panel to the left of the page. Elements can be
locked down using the Lock icon or hidden using the Eye icon. You can also rearrange the order
of elements by dragging them within the Elements panel. For more information, refer to Using
the Elements Panel.
Flattening Elements When you flatten an element it becomes a simple bitmap and can no longer be edited as
flexibly. When you add a shape to a page, it is automatically flattened, and you can no longer
edit its properties like colors and lines.
Using Popup Menus Pop‐up menus appear in panels.
1. Hover your mouse over an item in a panel. In this example, we hovered over a page in the Pages panel. An arrow appears to the right of the item.
2. Click the arrow (or right-click the thumbnail) to view the pop-up menu.
3. Select the option.
© 2001-2011 Panstoria, Inc. 26

Artisan 4.0 User Guide
Using RightClick You can right‐click any element with your mouse to view different menu options.
Tip: When you right-click an element in a panel, the menu will be the same as the pop-up menus. For more information, refer to Using Pop-up Menus.
© 2001-2011 Panstoria, Inc. 27

Artisan 4.0 User Guide
Panels and Palettes
Using the Color Picker The color picker lets you choose a color as well as create and save a customized color.
There are several locations in the software where you can access the color picker. The Color
Picker has four sections:
1. List 2. Sample 3. RGB 4. HSB
List The list section contains a number of colors to choose from. The lists vary depending on where
in the application you are. Standard, Skin and Hair colors appear on most screens, if you are
editing the color of the text on a page, one of the lists will be Colors on this page. This lists all the
colors currently in use on the page. In addition you may see a list of colors from your current
theme.
© 2001-2011 Panstoria, Inc. 28
Artisan 4.0 User Guide
Sample a color
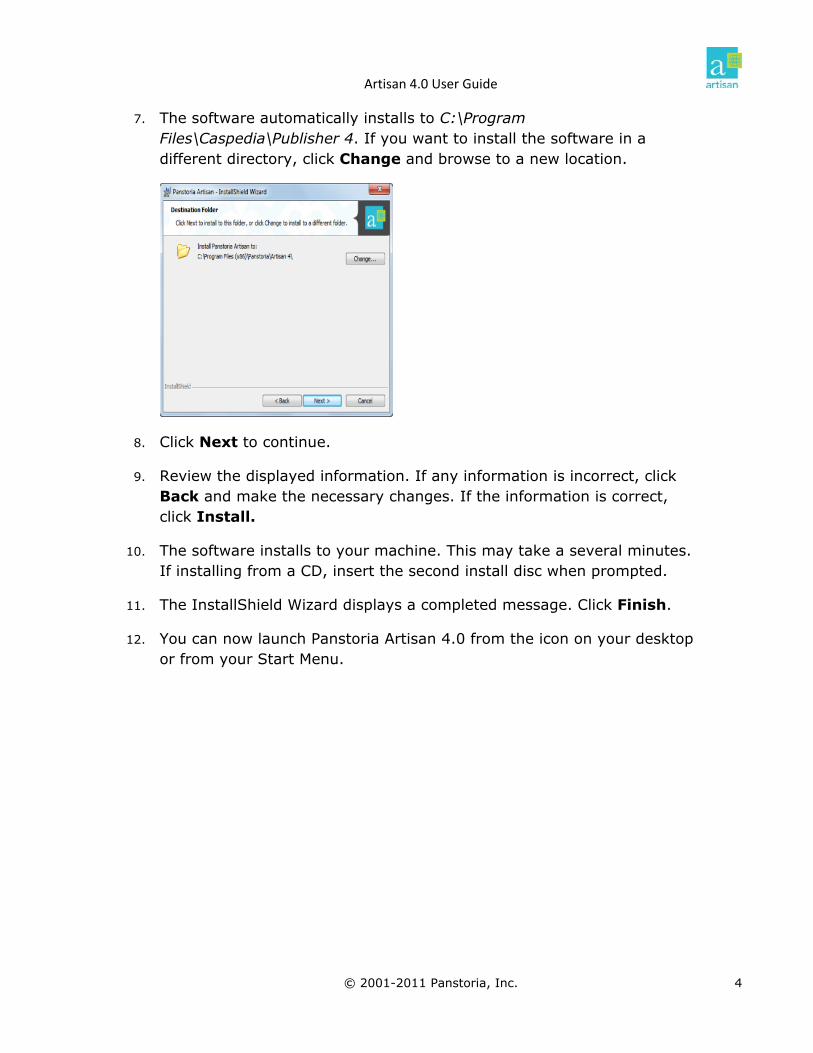
1. Select a starting color. You may select a color from the Named Colors chart or by choosing a sample color. A sample color is chosen from outside the Color Palette dialog box.
2. Click Sample Color to select a sample color.
3. Move the mouse around the software. As you pass over different colors, they are displayed in the sample box.
4. When you identify a color you like, click the area with the eyedropper. The color is displayed in the sample box.
5. When you have created a satisfactory color, click Save this color.
© 2001-2011 Panstoria, Inc. 29
Artisan 4.0 User Guide
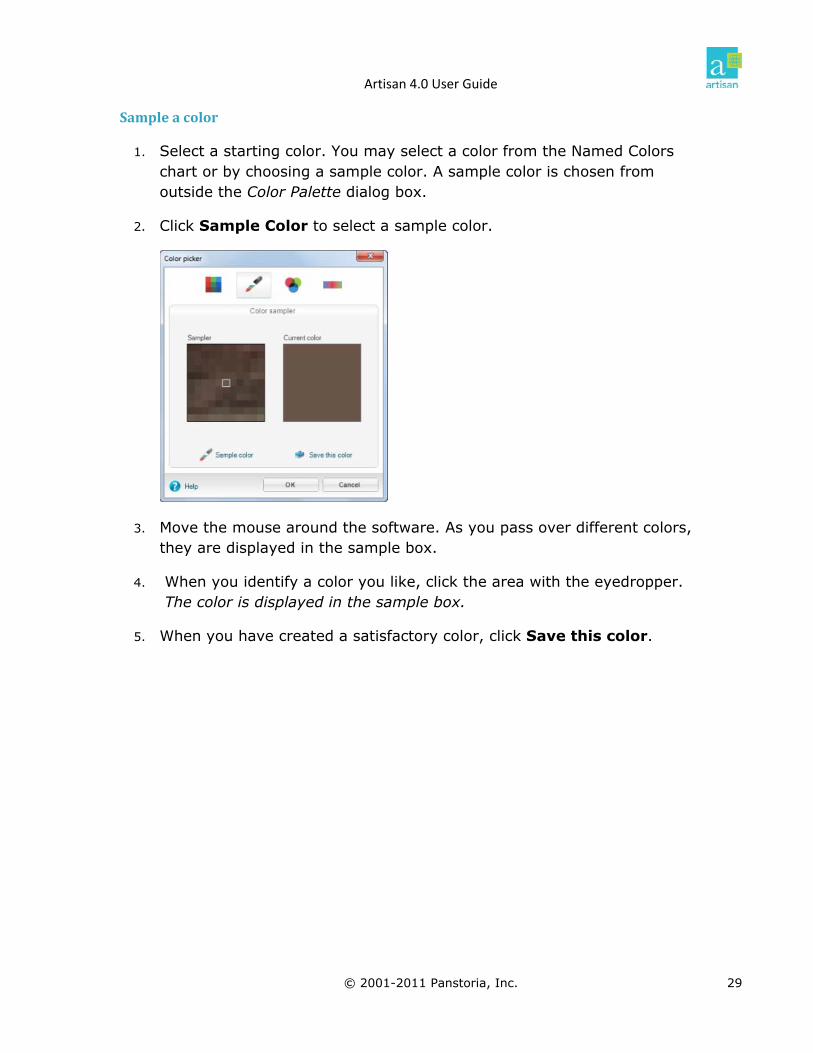
Color Models You can also create a color using RGB (Red, Green, Blue) or HSB (Hue, Saturation, and
Brightness) models. If you know the values, you can enter them, or you can use the slider to
adjust the values and see a preview in real‐time.In both tabs you can use the Sample color tool
to get a starting point.
RGB Color
HSB Color
© 2001-2011 Panstoria, Inc. 30

Artisan 4.0 User Guide
Save This Color Once you have created a color you like, you can save it to a an Art Kit.
1. Click Save this color in the Color picker dialog box.
2. Enter a name for the color.
3. Select a kit name.
4. Click Save.
Note: You can also create a new kit from this dialog box by clicking Create new kit.
Using the Elements Panel The Elements panel is located to the left of the page editing area.
Each element on your page is displayed in the Elements panel. They are listed in the order they
are placed on the page. You can rearrange, hide, and lock elements using the panel.
Note: The last element in the list is the background. The background is indicated by diagonal lines and cannot be moved.
Tip: You can also right-click on items in the Elements panel to access standard right-click options.
© 2001-2011 Panstoria, Inc. 31

Artisan 4.0 User Guide
Rearrange Elements Sometimes an element may sit on top of another. To prevent this from happening, or to stack
items decoratively, drag them in the Elements panel.
View an example.
In this example, the picture is covering the text.
After dragging the text to the top of the Elements panel, it now sits appears on top of the photo.
© 2001-2011 Panstoria, Inc. 32

Artisan 4.0 User Guide
Hide Elements If you have several elements on a page, it may be easier to hide one or two while working with
others. Hiding does not delete an element. Hiding makes your job easier while designing a page.
Note: Hidden items do not print.
To hide an element, click the eye icon next to the item in the Elements panel. Click the icon
again to display the item.
Lock Elements If you have several elements on a page, you may accidentally move one or two with your
mouse. In order to keep your elements in the exact place you put them, you can lock them
down. No changes can be made to a locked element.
To lock an element, click the lock icon next to the item in the Elements panel. Click the icon
again to unlock.
Tabs Panel By default, the Tabs panel is located to the right of the main editing area. It contains the Pages
and Content tab, and by default, the Photos tab.
Content Tab The Content tab contains additional tabs to view you papers, embellishments, and shapes.
© 2001-2011 Panstoria, Inc. 33

Artisan 4.0 User Guide
Using the Pages Tab By default, the Content panel is located to the right of the main editing area. To view pages,
select the Pages tab.
Use the Pages panel to view the available pages in your project. Scroll through all of your pages
using the scroll bar. To view more, and smaller pages, change the thumbnail size using the
button at the bottom of the panel.
In the Pages panel, you may open, insert, duplicate, and remove pages. To rearrange pages,
refer to Rearranging Pages.
© 2001-2011 Panstoria, Inc. 34

Artisan 4.0 User Guide
Open a Page There are two ways to switch between pages in the Pages panel:
Click the thumbnail of the new page.
OR
Right‐click the new page to view the drop‐down arrow. Click Open from the menu.
If auto‐save is turned off, a confirmation box appears asking you to save your work. If auto‐save
is turned on, the current page will be saved automatically. To learn more about auto‐save, refer
s.to User Option
Insert a Page You can insert a new page in the project. Perform the following steps:
1. Select the page that you want the new page to precede.
2. Right-click or hover your mouse over the page. The drop-down arrow appears.
3. Select Insert a blank page or insert a predesigned page.
© 2001-2011 Panstoria, Inc. 35

Artisan 4.0 User Guide
4. If you select a predesigned page, the Add a page to a Project dialog box appears. Enter the necessary information.
Option Explanation
Select a theme Select a theme from the drop-down list. You can mix and match themes within a project.
Select page type Select page type from the list. Only page types available in that template will display.
Select a template Select a template from the displayed thumbnails. You must select your page type before you choose your template.
Add a blank page Add a blank page without an associated template or theme.
Note: You will only be able to see pages from art kits that are the same size as your current Art Kit. For example, if you are working on a 12x12 art kit, you will not be able to view pages from an 8x8 art kit.
5. Click Add page. The new page is inserted front of your selected page.
6. A confirmation box appears asking you to save your work.
7. The new page is displayed.
© 2001-2011 Panstoria, Inc. 36

Artisan 4.0 User Guide
Duplicate Pages To duplicate a page, perform the following steps:
1. Select a page in the Pages panel. The selected page highlights yellow.
2. Click the arrow that appears when your mouse hovers over the selected page.
3. From the resulting menu, select Duplicate page.
4. The new
Remove Pages
page appears beside the original page.
You may remove unwanted pages from your project. To remove a page, perform the following
steps:
1. Select a page in the Pages panel. The selected page highlights yellow.
2. Click the arrow that appears when your mouse hovers over the selected page.
3. From the resulting menu, select Remove page.
4. The page is removed from your project.
© 2001-2011 Panstoria, Inc. 37

Artisan 4.0 User Guide
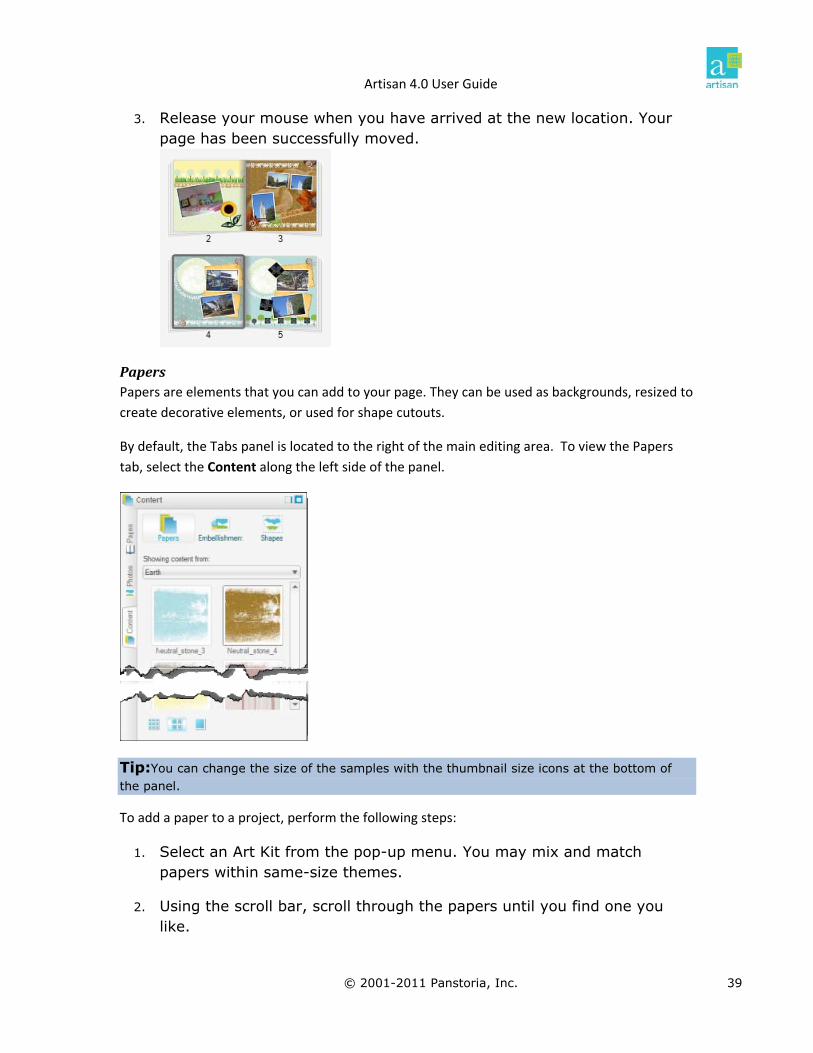
Rearranging Pages By default, the Tabs panel is located to the right of the main editing area. To view pages, select
the Pages tab.
This topic covers rearranging pages. To learn more about other Pages tab options, refer to Using
the Pages Tab.
You can rearrange the order of pages in your current project within the Pages tab. Perform the
following steps:
1. Select a page in the Pages tab. The selected page has a gray border (#3 below).
2. Using your mouse, drag the image to the new location in the Pages tab.
© 2001-2011 Panstoria, Inc. 38
Artisan 4.0 User Guide
3. Release your mouse when you have arrived at the new location. Your page has been successfully moved.
Papers Papers are elements that you can add to your page. They can be used as backgrounds, resized to
create decorative elements, or used for shape cutouts.
By default, the Tabs panel is located to the right of the main editing area. To view the Papers
tab, select the Content along the left side of the panel.
Tip:You can change the size of the samples with the thumbnail size icons at the bottom of the panel.
To add a paper to a project, perform the following steps:
1. Select an Art Kit from the pop-up menu. You may mix and match papers within same-size themes.
2. Using the scroll bar, scroll through the papers until you find one you like.
© 2001-2011 Panstoria, Inc. 39

Artisan 4.0 User Guide
3. Grab the paper with your mouse and drag it onto the page.
4. There are several things you can do with the paper.
If the paper is too large, you can resize it by dragging the small handles on the corners inward.
If you are using the paper as a background and it is too large, go to the View ribbon and select Trimmed.
To use papers for a shape, refer to Using the Shapes Option.
If the paper is sitting on top of your other elements, drag it to the appropriate location in the left-hand Elements panel.
Note: It's okay if the paper is larger than the page. To learn more, refer to Trimming and Printing: Understanding Bleed.
© 2001-2011 Panstoria, Inc. 40

Artisan 4.0 User Guide
Embellishments Embellishments are decorative elements that you can add to your page.
By default, the Tabs panel is located to the right of the main editing area. To view the
Embellishments option, select the Content tab and choose Embellishments.
To add an embellishment to your project, perform the following steps:
1. Select an art kit from the pop-up menu. You may mix and match embellishments within same-size themes.
2. Using the scroll bar, scroll through the embellishments until you find one you like.
3. Grab the embellishment with your mouse and drag it onto the page.
4. There are several things you can do with the element.
If the embellishment is too large or small, you can resize it by dragging the small handles on the corners inward.
You can rotate the embellishment by grabbing the green handle and pulling in the direction you want to rotate.
© 2001-2011 Panstoria, Inc. 41

Artisan 4.0 User Guide
Shapes Shapes are decorative elements you can add to your page.
By default, the Tabs panel is located to the right of the main editing area. To view the Shapes
option, select the Content tab and choose Shapes.
Tip:To view more or fewer shapes, use the zoom slider at the bottom of the panel.
© 2001-2011 Panstoria, Inc. 42

Artisan 4.0 User Guide
To add a shape from an art kit, perform the following steps:
1. Select an art kit from the drop-down menu. There are several default art kits included.
2. Using the scroll bar, scroll through the Shapes until you find one you like.
3. Hold your mouse over the shape to view the drop-down arrow.
4. Select your choice from the drop-down arrow (see below).
Create this Shape
To create a shape from scratch, perform the following steps:
1. Select Create this shape from the drop-down list.
2. Select a color. You can also change your shape.
Note: For more information on color, refer to Using the Color Picker_Ref-1606893836
3. Click Use Original aspect ratio to prevent your shape from being skewed.
4. Click Create.
5. The shape appears on your page. You may resize and rearrange the shape.
© 2001-2011 Panstoria, Inc. 43

Artisan 4.0 User Guide
Cut this shape out of a piece of paper To create a shape from paper, perform the following steps:
1. Select Cut this shape out of a piece of paper from the drop-down list.
2. Select a paper. You may also change your shape.
3. Click Use Original aspect ratio to prevent your shape from being skewed.
4. Position the cutter over the area of the paper you wish to use.
5. Click OK
6. The shape appears on your page. You may resize and rearrange the shape.
© 2001-2011 Panstoria, Inc. 44

Artisan 4.0 User Guide
Photos Panel
By default, the Photos panel is located to the right of the editing area.
You can add photos to your page from the Photos panel, sort the photos, and get more photos
to display in the tab. You can also change the screen layout.
Tip:To show the photos not used in your project, click Show photos not used in the Show drop-down at the top of the tab.
- To show the photos already used in your project, click Show photos already used in the Show drop-down at the top of the tab. - To view more or less of the thumbnails, use the zoom slider at the bottom of the tab.
Photos Tab To add photos in the Photos panel to your project, perform the following steps:
1. Use the scroll bar to scroll through all of your photos.
2. Select the photo you want to use.
3. Grab the photo with your mouse and drag it onto the page.
Tip: You may also drag and drop, or copy and paste, a photo from Windows into your project.
4. Resize, rearrange, and rotate the photo using the handles.
Get More Photos To add more photos to the Photos panel, perform the following steps:
1. Click Get photos at the top of the Photos panel.
2. Select From My Computer, or a desired source like Flickr or Facebook.
3. Select the image(s) you want to add.
Tip: To select more than one image, press the CTRL key as you click each image.
4. Click Get selected photos to import only the selected images or click Get all photos to import all photos in the folder.
5. The photos are added to the end of the Photos tab.
© 2001-2011 Panstoria, Inc. 45

Artisan 4.0 User Guide
Change Screen Layout You may also view the Photos tab along the bottom. To choose this layout, perform the
following steps:
1. Click the View ribbon.
2. Select the Show photos on bottom.
3. The Photos tab moves from the Tabs panel to the bottom of your screen.
Sort Photos You can sort the images in the Photos tab in different ways.
Use the Show menu to view used, not used, and all images.
Use the Sort button to sort images based on time.
© 2001-2011 Panstoria, Inc. 46
Artisan 4.0 User Guide
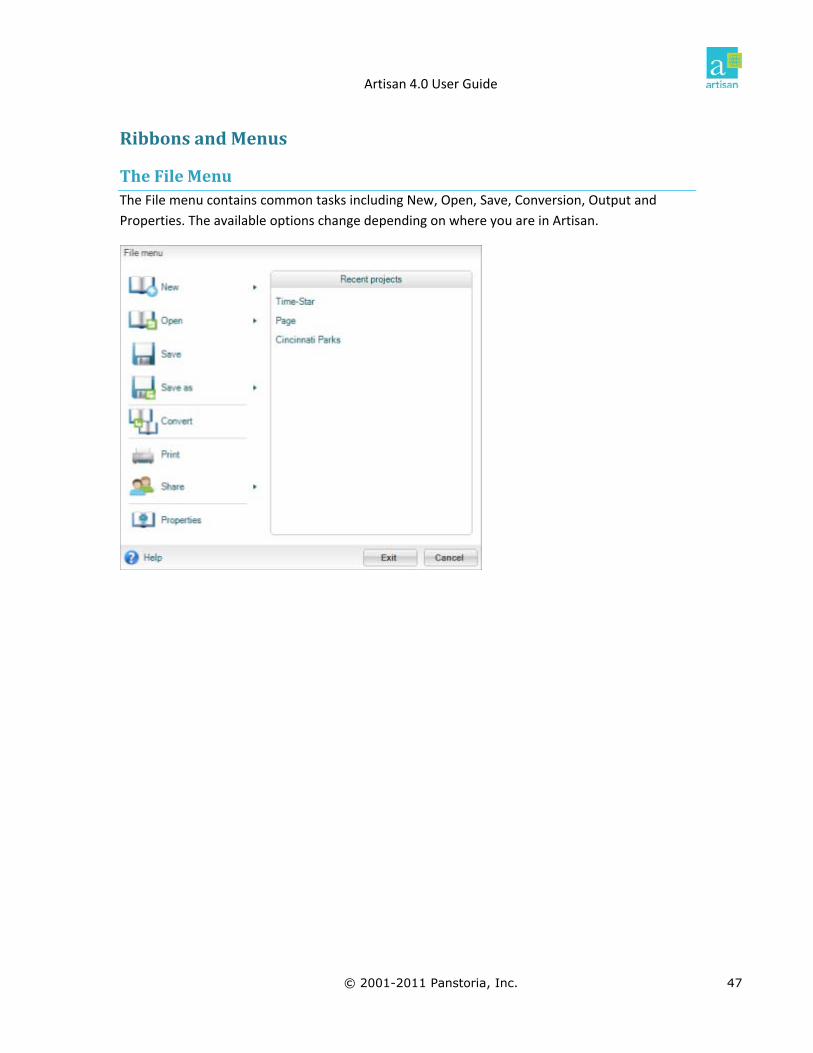
Ribbons and Menus
The File Menu The File menu contains common tasks including New, Open, Save, Conversion, Output and
Properties. The available options change depending on where you are in Artisan.
© 2001-2011 Panstoria, Inc. 47
Artisan 4.0 User Guide
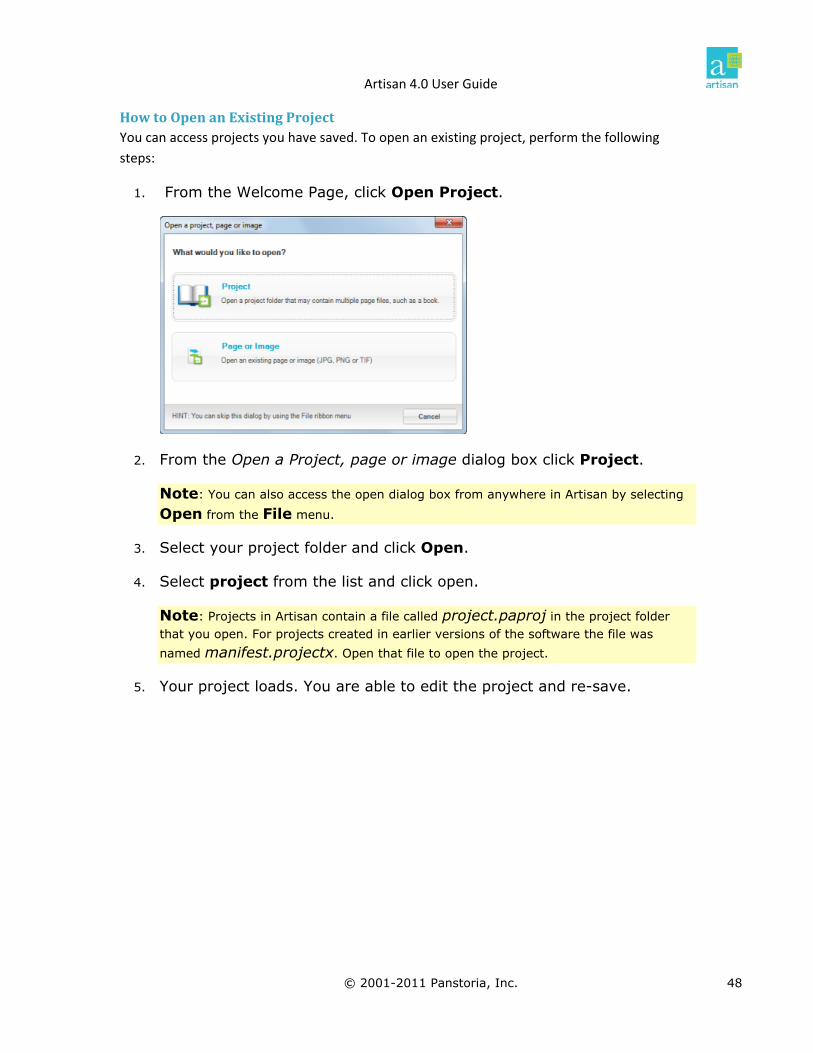
How to Open an Existing Project You can access projects you have saved. To open an existing project, perform the following
steps:
1. From the Welcome Page, click Open Project.
2. From the Open a Project, page or image dialog box click Project.
Note: You can also access the open dialog box from anywhere in Artisan by selecting
Open from the File menu.
3. Select your project folder and click Open.
4. Select project from the list and click open.
Note: Projects in Artisan contain a file called project.paproj in the project folder that you open. For projects created in earlier versions of the software the file was
named manifest.projectx. Open that file to open the project.
5. Your project loads. You are able to edit the project and re-save.
© 2001-2011 Panstoria, Inc. 48

Artisan 4.0 User Guide
Open an Existing Page You can access projects you have saved. To open an existing project, perform the following
steps:
1. From the Welcome Page, click Page or Image.
2. From the Open a Project, page or image dialog box click Project.
3. Select the desired page and click Open.
Note: You can also access the open dialog box from anywhere in Artisan by selecting
Open from the File menu.
4. Your page loads.
Pages vs. Projects Every project is a collection of pages. The page file contains all of the elements that make up
that page. The project contains project‐wide elements like imported photos. If a page is part of a
project, Artisan will ask you if you want to open the page to edit, or the entire project. By
opening the project, you will have access to things like the photos imported into the project but
not already added to the page.
© 2001-2011 Panstoria, Inc. 49

Artisan 4.0 User Guide
Saving The Save option saves any changes to your current file (project or page) under the current
name. The Save As option on the File menu changes based on whether you are working with a
project or a page.
If you are working with a page, the options are slightly different:
Option Explanation
Save Project As...
Save As...
Saves the current project or page (depending on what you are working with) under a new name and location you specify.
Export Current Page... Exports the current page as your choice of PAGE, JPG, PNG, TIF, or PDF file. If working with a page, it exports it as a PDF.
Export Multiple Pages Exports multiple pages as individual PAGE, JPG, PNG, TIF or PDF files.
Export to PDF Exports multiple pages from a project or a single PDF.
In addition to the Save options available in the Project section, the software auto‐saves your
project whenever you switch between pages.
Note: You must have auto-save enabled in the User Settings dialog box. To learn more, refer to Adjusting User Settings.
© 2001-2011 Panstoria, Inc. 50

Artisan 4.0 User Guide
Save To save a project with its current file name, perform one of the following:
Clicking Save on the toolbar.
OR
Click the File drop-down menu and select Save.
Save Project As Use Save Project As when you want to save a copy of your project with a new file name. To use
Save Project As, perform the following steps:
1. Click the File menu.
2. Click Save As.
3. Select Save Project As from the list.
4. The Save project as dialog box appears. Enter the new file name. If you want to change the location of the file, click Browse to select a different location.
5. Click Save as. The new file is created.
Note: You are now working in your new project and not the original file.
© 2001-2011 Panstoria, Inc. 51

Artisan 4.0 User Guide
Save As Use Save As when you want to save a copy of your page with a new file name. To use Save As,
perform the following steps:
1. Click the File menu.
2. Click Save As.
3. Select Save As from the list.
4. The Save page as dialog box appears. The dialog will change depending on the version of Windows you are running. Enter the new file name and change the location if desired.
Note: You can change the type of file by clicking on the Save as type drop-down list.
5. Click Save. The new file is created.
Note: You are now working in your new project and not the original file.
© 2001-2011 Panstoria, Inc. 52

Artisan 4.0 User Guide
Export Current Page You can export a single page from a project. You can save it as an Artisan Page file, JPG, PNG,
TIFF, or PDF.
1. Click the File menu.
2. Click Save as.
3. Select Export current page.
4. Select a location and name, and click Save.
5. Choose options and click OK.
© 2001-2011 Panstoria, Inc. 53
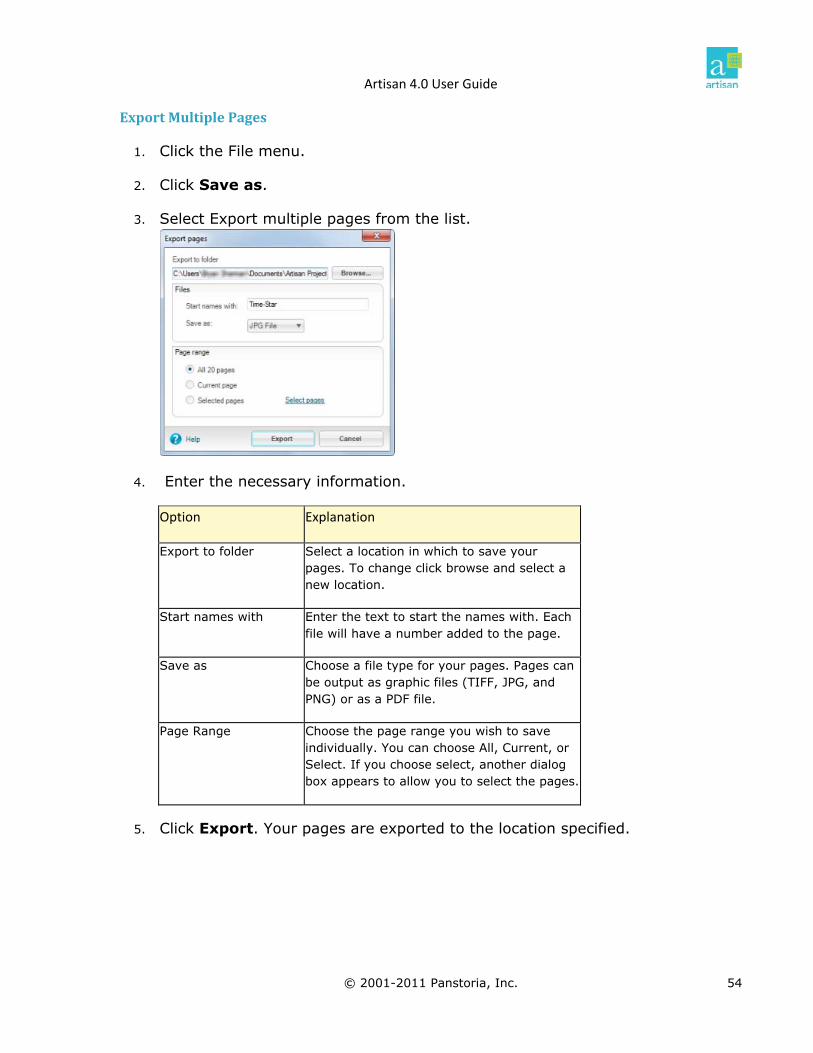
Artisan 4.0 User Guide
Export Multiple Pages
1. Click the File menu.
2. Click Save as.
3. Select Export multiple pages from the list.
4. Enter the necessary information.
Option Explanation
Export to folder Select a location in which to save your pages. To change click browse and select a new location.
Start names with Enter the text to start the names with. Each file will have a number added to the page.
Save as Choose a file type for your pages. Pages can be output as graphic files (TIFF, JPG, and PNG) or as a PDF file.
Page Range Choose the page range you wish to save individually. You can choose All, Current, or Select. If you choose select, another dialog box appears to allow you to select the pages.
5. Click Export. Your pages are exported to the location specified.
© 2001-2011 Panstoria, Inc. 54

Artisan 4.0 User Guide
Export to PDF You can export a single to a PDF.
1. Click the File menu.
2. Click Save as.
3. Select Export to PDF.
4. Select a location and name, and click Save.
5. Choose options and click OK.
© 2001-2011 Panstoria, Inc. 55

Artisan 4.0 User Guide
Convert If you want to create a new copy of a project, but keep the same format, you can use save it as a
new project. If you need it in a different format (8 by 8 book instead of 12 by 12 for example)
you can use the convert option. This process allows you to select a new project format and
converts your current project to that format. The existing project is retained, and a new
converted copy is made.
1. From the File menu, click Convert.
2. A number of dialog boxes walk you through selecting a new project.
3. Click Convert. The software converts your file.
4. Choose whether you want to work in your new file or the current file.
© 2001-2011 Panstoria, Inc. 56
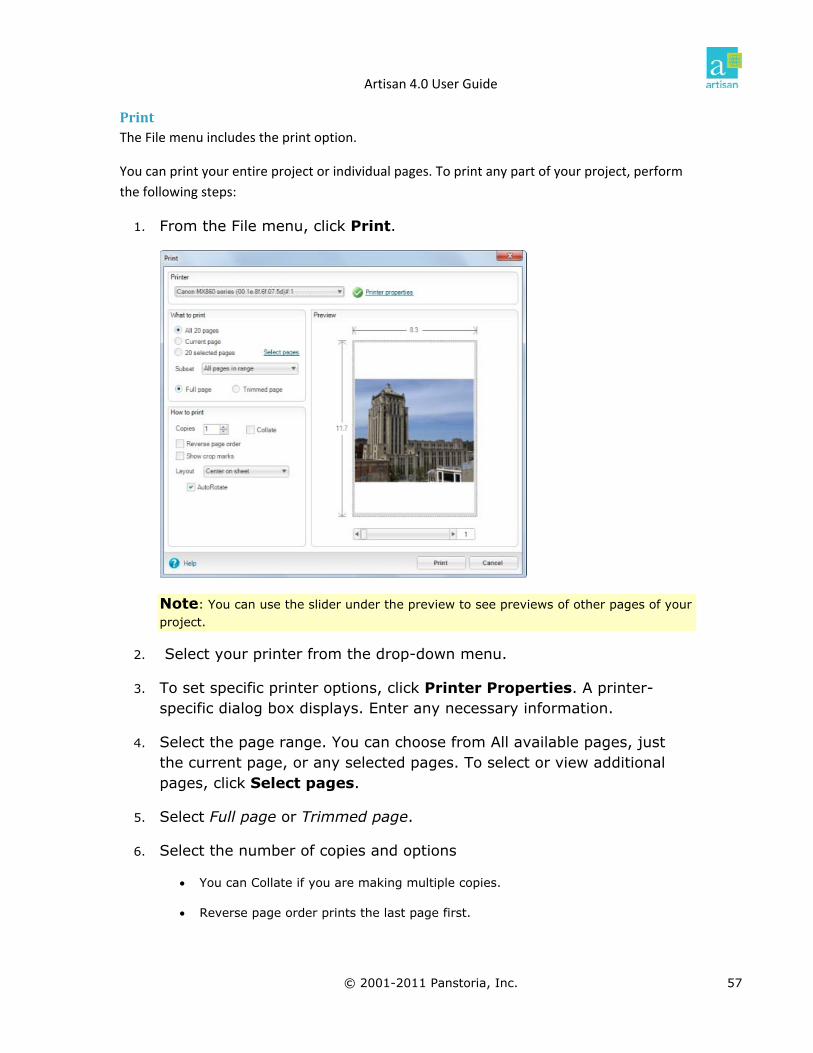
Artisan 4.0 User Guide
Print The File menu includes the print option.
You can print your entire project or individual pages. To print any part of your project, perform
the following steps:
1. From the File menu, click Print.
Note: You can use the slider under the preview to see previews of other pages of your project.
2. Select your printer from the drop-down menu.
3. To set specific printer options, click Printer Properties. A printer-specific dialog box displays. Enter any necessary information.
4. Select the page range. You can choose from All available pages, just the current page, or any selected pages. To select or view additional pages, click Select pages.
5. Select Full page or Trimmed page.
6. Select the number of copies and options
You can Collate if you are making multiple copies.
Reverse page order prints the last page first.
© 2001-2011 Panstoria, Inc. 57

Artisan 4.0 User Guide
Show crop marks Adds printer crop marks to aid you in manually trimming the page.
Layout controls how the page is printed (for example, if you are printing and 8 x 8 on letter size paper, how to align the image).
AutoRotate rotates the page so that it fits on the target page size.
7. Click Print. Your document should print to the specified printer.
Sharing If you have an account on a social network, and are connected to the internet, you can share
your project or page with the site. Artisan currently supports:
Flickr
Picasa
Note: You must be connected to the Internet and have an account with the service to share.
1. Click Share from the File menu.
2. Select the service you wish to share with.
3. Select the pages of the project to share.
4. The login differs according to the service.
© 2001-2011 Panstoria, Inc. 58

Artisan 4.0 User Guide
Creating a Slideshow The Slideshow option allows you to create a slideshow.
To create a slideshow, perform the following steps:
1. Click Share from the File menu.
2. Click Slideshow.
3. Enter the necessary information.
Options Explanation
Show Choose whether to show all images or selected images.
View Items Displays thumbnails of all images in the slideshow. You may remove
images by selecting Remove from List in the dialog box.
Using Choose the transition style from the list. Click each option to view a sample transition.
Repeat when done
Repeats the slideshow after the last image is shown.
Delay (in seconds)
Sets how long each image is viewed before transitioning.
Play background music
Add background music to your slideshow. Browse for a music file on your computer. Music files may be .wav or .mp3.
4. Click OK. The slideshow starts.
5. Click on the slideshow at any time or press the Esc key to view the navigation buttons. Click stop to exit the slideshow.
© 2001-2011 Panstoria, Inc. 59

Artisan 4.0 User Guide
Home Ribbon The Home ribbon appears in two different versions depending on what you are editing.
If it is multi‐page three sections appear called Edit, Arrange, Project, and Pages:
If you are editing a single page the sections are Clipboard, Arrange, Canvas, and Page:
Using the Edit Section
The Edit section consists of several options: Cut, Copy, Paste, Delete, Edit and Redo.
Note: You must have an item selected to access these options.
When you cut, copy and paste, you save things to your computer clipboard. The clipboard is
a non‐viewable area used for storing data that you have cut or copied. The clipboard can hold
only one group of information at a time. If you select more than one item at once, using the
Shift or Control keys, Clipboard functions will apply to all items in the selected group. Items can
be cut, copied, and pasted within one page and between pages.
Options Explanations
Cut Remove your selection and save it to the Clipboard. To place the item in a new
location, select Paste.
Copy Duplicate your selection to the Clipboard. To place the duplicate in a new location,
select Paste.
Paste Insert an item from the Clipboard.
© 2001-2011 Panstoria, Inc. 60

Artisan 4.0 User Guide
Options Explanations
Delete Remove your selected item from the page.
Undo Undo the last task.
Redo Redo the last undo.
Using the Arrange Section The Arrange section allow you to align, order, group, flatten, and rotate your objects.
The option is grayed‐out if it is not available. For example, if you do not have more than one
object selected, you cannot group them.
Options Explanation
Align Aligns selected objects.
Order Changes the order of objects. For example, you may want an embellishment to appear behind, or on top of a photograph.
Group Group objects that you want to stay together.
Flatten Flattening an object makes it a simple graphic. This can be done with text or rotated pictures.
Rotate Allows you to rotate and flip objects.
© 2001-2011 Panstoria, Inc. 61

Artisan 4.0 User Guide
Aligning Objects The align option in the Arrange section provides multiple options to align elements on the page.
The Alignment section includes 14 different options for aligning your elements.
Note: You must have more than one item selected to access these options. To select multiple items, press the [SHIFT] key and click each item.
When you align elements by their edges, one of the elements remains in place. For example,
clicking aligns the left edges of all selected elements with the left edge of the last selected
element. The last selected element does not move, and the other elements are aligned relative
to it.
When you align elements by their centers, the elements are aligned along a horizontal or
vertical line that represents the average of the original positions. No element necessarily
remains stationary; all the elements may move.
Tip: Depending on the alignment option you choose, elements will move straight up, down, left, or right, and might cover another element. If
your elements end up stacked on top of each other, click to undo and try a different option.
© 2001-2011 Panstoria, Inc. 62

Artisan 4.0 User Guide
The following icons are used for aligning your elements:
Options Explanations
Aligns selections to the left edge of the last selected element.
Aligns selections to their vertical centers.
Aligns selections to the right edge of the last selected element.
Aligns selections to the top edge of the last selected element.
Aligns selections to their horizontal centers.
Aligns selections to the bottom edge of the last selected element.
Distributes items equally across a horizontal axis.
Distributes items equally across a vertical axis.
Makes selections the same size as the last selected element.
Makes selections the same width as the last selected element.
Makes selections the same height as the last selected element.
Center horizontally Center selection left-to-right on the page.
Center vertically Center selection top-to-bottom on the page.
Center on page Center selection on the page.
© 2001-2011 Panstoria, Inc. 63

Artisan 4.0 User Guide
Ordering Objects Use the Ordering section when you want to rearrange elements stacked on top of each other.
This is called Z‐Ordering. When elements are stacked on top of each other, each element is a
layer. To learn more about layering, refer to Understanding Layering and Flattening.
Tips: If elements are stacked on top of each other, it may be easier to select each item in the Elements panel.
The following icons are used for ordering elements:
Options Explanations
Bring to front Brings an element from its current layer to the front, or top, of the stack.
Send to back Moves an element from its current layer to the back, or bottom, of the stack.
Move forward Moves an element one layer forward from its previous location.
Send backward
Moves an element one layer backward from its previous location.
The right‐click menu provides an additional option: Make the background. To access this option,
perform the following steps:
Note: This differs from creating a background image from a photo. This option only affects the order of elements. For more information on creating a background image, refer to Use a Photo as a Background.
© 2001-2011 Panstoria, Inc. 64

Artisan 4.0 User Guide
1. Right-click an element on a page.
2. The right-click menu appears. Click Order.
3. From the sub-menu, click Make the background.
4. The element is moved to the bottom of the stack. It will appear at the bottom of the Elements panel.
Group and Flatten You can group items together. Grouping is good when you want to apply changes to a set of
items at once. A group can move together and any changes applied affect all elements in the
group. You can also flatten elements to combine them. However, groups can be separated, or
ungrouped. Once elements are flattened, there is not an unflatten option.
Grouping and Ungrouping
To group several elements, perform the following steps:
1. Press the SHIFT key on your keyboard while clicking on each item you want in the group.
2. Click Group from the Grouping section.
© 2001-2011 Panstoria, Inc. 65

Artisan 4.0 User Guide
3. The handles expand to include the entire group. These elements are now connected.
Tip: The group displays as one item in the Elements panel.
To ungroup several elements, perform the following steps:
1. Select the group on the page or in the Elements panel.
2. Click Ungroup from the Grouping section.
3. The elements are disconnected.
Tip: The items display separately in the Elements panel.
© 2001-2011 Panstoria, Inc. 66

Artisan 4.0 User Guide
Flatten Each item in the Elements panel is considered a separate layer. If you want multiple layers to
become one layer, you need to flatten. For more information on layers, refer to Understanding
Layering and Flattening.
To flatten multiple layers, perform the following steps:
1. Select the items you want to combine into one layer.
Tip: If the items are stacked on top of each other, it may be easier to select them in the Elements panel.
2. Click Flatten.
3. The layers are combined into one.
Tip: The layers display as one item in the Elements panel.
4. You may click Undo to immediately change your mind. However, a flattened set cannot be undone later.
Tip: If you think you may want the elements separate later, use grouping instead of flattening.
© 2001-2011 Panstoria, Inc. 67

Artisan 4.0 User Guide
Rotating Objects The Rotate section includes five different options for rotating your elements. The Rotate section
differs from the rotation options available in the Format Photos ribbon > Photo in Frame. The
Photo in Frame options rotate the element without rotating the frame. The Rotate section
rotates the element and the frame.
Sometimes you may need to rotate an image due to camera angle or for artistic value. In the
example shown, the original image on the left is in portrait, when it should be landscape.
Rotating the image 90° corrects the problem.
The following icons are used for rotating your elements:
© 2001-2011 Panstoria, Inc. 68

Artisan 4.0 User Guide
Adding Pages You can add a page with the Add page button. When adding a page you can select any theme
and template.
To add a page to a project, perform the following steps:
1. Click Add page from the Project section.
2. The Add a page to a project dialog box appears. Enter the necessary information.
Option Explanation
Select a theme Select a theme from the drop-down list. You can mix and match same size themes within a project.
Select a type of page Select a type of page from the list. Only page types available in that template will display.
Select a template Select a template from the displayed thumbnails. You must select your page type before you choose your template.
Add a blank page Add a blank page without an associated template or theme.
3. Click Add page.
© 2001-2011 Panstoria, Inc. 69

Artisan 4.0 User Guide
Recovering pages You can recover a page that you have removed from a project.
To recover a page, perform the following steps:
1. Click Recover page from the Project section.
2. The Recover Pages dialog box appears. Select the pages you want to add back into your project.
3. Click Recover. Your page is returned to the project.
© 2001-2011 Panstoria, Inc. 70

Artisan 4.0 User Guide
Changing Templates You may want to change the theme or template of a page in your project.
To change a page, perform the following steps:
1. Click Change template from the Pages section.
Note: If you have text on the page, a dialog box appears. Changing the template may remove text from your page. Any removed text will be available in the Windows clipboard.
Click Yes to continue.
2. Select the necessary information.
© 2001-2011 Panstoria, Inc. 71

Artisan 4.0 User Guide
Option Explanation
Select a theme Select a theme from the drop-down list. You can mix and match same-size themes within a project.
Select a type of page Select a type of page from the list. Only page types available in that template will display.
Select a template Select a template from the displayed thumbnails. You must select your page type before you choose your template.
3. Click Change template.
Coordinate Colors You can coordinate the pages color based on any element on your page. For example, you can
change it to coordinate with dress in a photo.
To coordinate colors:
1. Select the image you want to coordinate to.
2. Click Coordinate colors.
3. Select the desired scheme and click OK.
© 2001-2011 Panstoria, Inc. 72

Artisan 4.0 User Guide
Using the Canvas Section The Canvas section appears only when editing a single‐page project or graphic.
The Canvas options include
Options Explanation
Crop Allows you to select the part of the graphic you want to retain and delete the remaining. After cropping, the page is resized to the selected area. There is no Undo after cropping.
Resize Allows you to change the size of the page. You can also choose to resize the contents of the page.
Rotate Rotates the entire canvas.
© 2001-2011 Panstoria, Inc. 73

Artisan 4.0 User Guide
Cropping the Canvas The Canvas ribbon provides the ability to crop the canvas. The canvas is the container for the
page.
To crop the canvas:
1. Click Crop from the Canvas section.
2. Use the yellow handles to resize the selection of what you want.
3. Click Accept.
© 2001-2011 Panstoria, Inc. 74

Artisan 4.0 User Guide
Resizing the Canvas The Canvas ribbon provides the ability to resize the canvas. The canvas is the container for the
page.
To resize the canvas:
1. Click Resize from the Canvas section.
Option Explanation
Width and Height You can enter the width and height in inches, mm, or pixels.
Resolution If you enter width/height in inches or centimeters, you also need to enter the resolution. The higher the resolution, the better the quality, but larger the file.
Maintain Aspect Ratio
If you checkmark this, the canvas retains the same proportions. If you change the width, the height is calculated by the ration and vice versa.
Resize/Reposition Elements
If checked, the graphic on the page is resized with the canvas. If not, the graphic retains it size.
2. Click Accept.
© 2001-2011 Panstoria, Inc. 75

Artisan 4.0 User Guide
Rotating the Canvas The Canvas ribbon provides the ability to rotate the canvas. This rotates the entire canvas, not
just individual objects like the rotate option in the arrange section.
To rotate the canvas:
1. Click Rotate from the Canvas section.
2. Select the desired option.
3. A warning appears about rotating the entire canvas. Click OK.
© 2001-2011 Panstoria, Inc. 76

Artisan 4.0 User Guide
The Photos Section The Photos section contains tools that work with photo frames.
Insert a Photo To insert a photo that is not already in your photo panel, you can use the Photo option in the
Insert ribbon.
To import images from file, perform the following steps:
Note: You can also insert an image by drag and dropping from the Photos tab or from your Windows desktop. For more information, refer to Import Using Drag and Drop.
1. Click Photo from the Photos section.
2. Select From My Computer from the drop-down menu.
3. Select the image you want to add and click Open.
© 2001-2011 Panstoria, Inc. 77

Artisan 4.0 User Guide
4. The photo is added to your page and displays at the end of the Photos tab of the Content panel.
Insert an Empty Frame You can insert an empty frame into your project. Remember that if you neglect to add a photo
to the frame, it will print as a gray square.
To add an empty frame to a page, simply click the Empty frame button on the Photos section of
the Insert ribbon. A gray box will display on your page. You may move and resize the box as
necessary.
Replace or Remove Frame In the Photos section , you can change a photo or remove a photo from a page.
© 2001-2011 Panstoria, Inc. 78

Artisan 4.0 User Guide
Change Photo You can change a photo you inserted on a page. To change your photo, perform the following:
1. Select the photo you want to change.
2. Click Replace Photo in frame in the Photos section.
3. The Get Photos dialog box appears. Browse to the appropriate location.
4. Select the image you want to insert.
5. Click Open. The photo appears on the page.
6. Drag and resize the image if necessary.
Remove Photo The Remove photo from frame option removes a photo from a page but the photo is not
deleted from the project. To remove a photo from a page, perform the following steps:
Note: You may also remove a photo using the right-click menu.
1. Select the photo on the page.
2. Click Remove photo from frame from the Photos section.
3. The photo is no longer on the page.
Note: The photo will leave behind a gray placeholder frame. This can be deleted by selecting the frame and pressing the Delete key.
© 2001-2011 Panstoria, Inc. 79

Artisan 4.0 User Guide
Text Section You can insert text a number of ways in Artisan. As a Text Box, Fancy text, shapes and symbols. If
you are in advanced mode, you can also add text on a custom path.
Inserting Text You can add an empty text box to a page, add text from your clipboard, and set the default font
using the Text button.
Add Text to a Page To add text to a page, perform the following steps:
1. Click Text.
2. Place the text box anywhere on the page.
3. Using the handles, resize the box if necessary.
4. Click Create. The text box is now available on your page.
© 2001-2011 Panstoria, Inc. 80

Artisan 4.0 User Guide
Insert Text from the Clipboard To add text to a page, perform the following steps:
1. Insert a text box as previously described.
2. Check the box Add the text from the clipboard into the new text.
Format Text You can format text using the Format Text Ribbon. There are sections for Basic Text formatting,
Style sampling and Layout.
Inserting a Text Path A text path is a shape you create for text to follow. You can create and edit text paths. The text
path option is only available in advanced mode.
To create a text path, perform the following steps:
1. Click the Text Path button.
2. Choose whether you want the text to repeat itself in order to fill your entire path.
© 2001-2011 Panstoria, Inc. 81
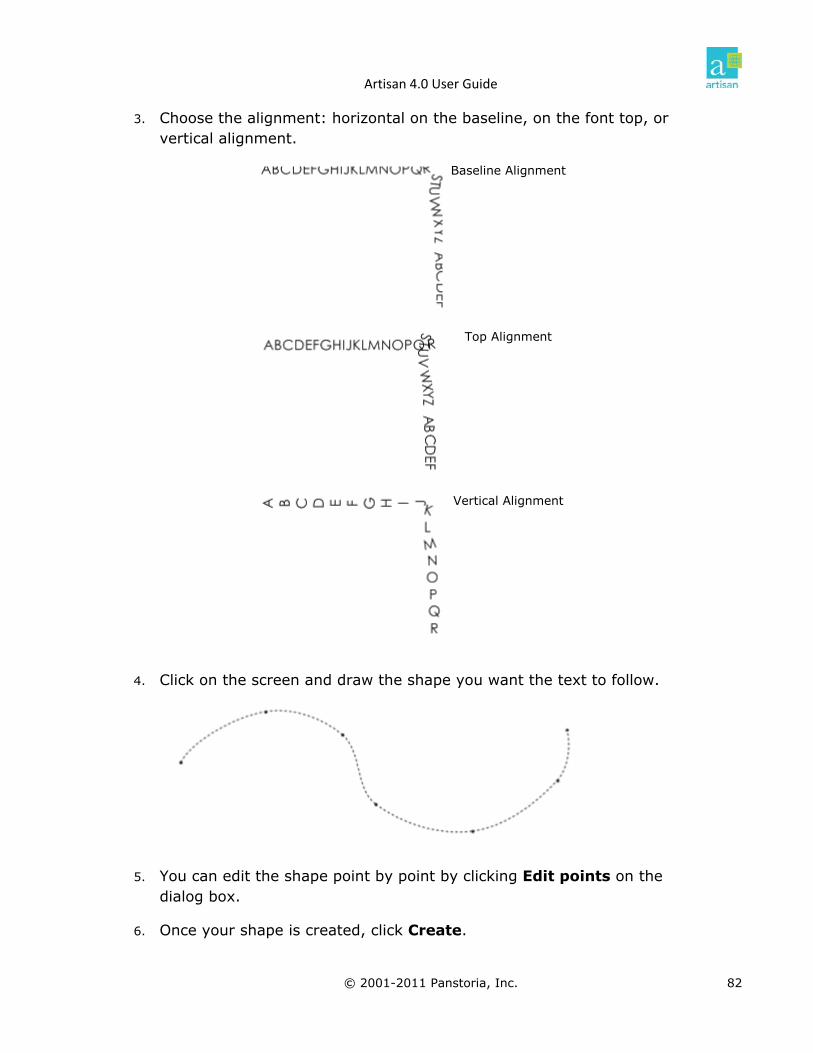
Artisan 4.0 User Guide
3. Choose the alignment: horizontal on the baseline, on the font top, or vertical alignment.
Baseline Alignment
Top Alignment
Vertical Alignment
4. Click on the screen and draw the shape you want the text to follow.
5. You can edit the shape point by point by clicking Edit points on the dialog box.
6. Once your shape is created, click Create.
© 2001-2011 Panstoria, Inc. 82

Artisan 4.0 User Guide
7. Your path is displayed in a square box.
8. Double click the dialog box and enter text. You may need to format the text.
Note: When you are typing text, it will not appear to be following the path.
9. Click outside of the text box when you have finished typing and formatting. The text follows your path.
Edit a Text Path You can edit a text path by right‐clicking the text box. For more information go to Edit Path.
Option Explanation
Edit text Edit text lets you edit the text on the text path.
Edit path points
This offers detailed editing of each point on the text path.
Alignment This changes the alignment of the text path to either Baseline, Top, or Vertical.
© 2001-2011 Panstoria, Inc. 83

Artisan 4.0 User Guide
Inserting Fancy Text The Fancy option allows you to work with Alpha sets. You can add text using any alpha set
loaded into Artisan.
Alpha sets are predefined sets of letters that are similar to stickers. Alpha sets appear in a group,
but can be ungrouped and moved individually around a page. Alpha sets are included in art kits
and can be purchased from the web site.
Add Alpha Set Text to a Page To add alpha set text to a page, perform the following steps:
1. Click Fancy.
2. Select an alpha set from the Fancy text drop-down list.
3. Enter the text you want to create.
Note: You may receive an error that the text you entered contains letters that are not available in the alpha set. This is a common error. Not all letters are available in both upper and lower case and punctuation is also not available. However, the software will
try to approximate your request. Click OK.
4. Click Create.
Note: The alpha set text is grouped. You can ungroup the text to access the individual letters.
© 2001-2011 Panstoria, Inc. 84
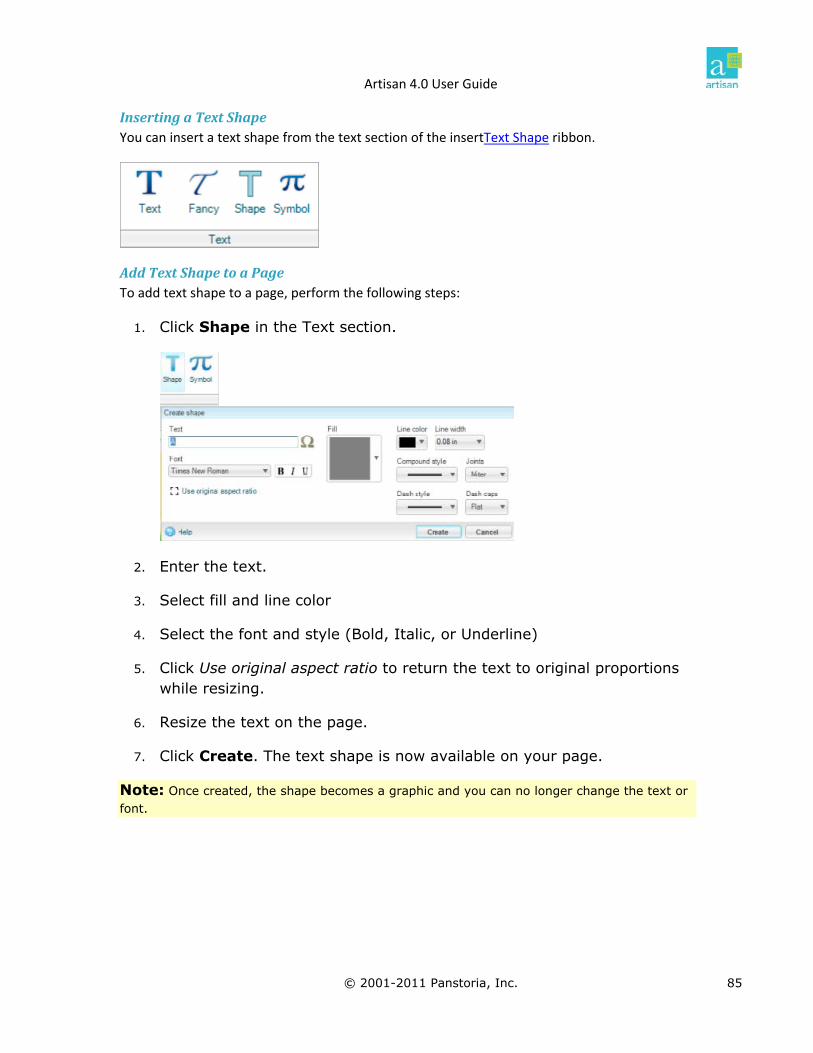
Artisan 4.0 User Guide
Inserting a Text Shape You can insert a text shape from the text section of the insertText Shape ribbon.
Add Text Shape to a Page To add text shape to a page, perform the following steps:
1. Click Shape in the Text section.
2. Enter the text.
3. Select fill and line color
4. Select the font and style (Bold, Italic, or Underline)
5. Click Use original aspect ratio to return the text to original proportions while resizing.
6. Resize the text on the page.
7. Click Create. The text shape is now available on your page.
Note: Once created, the shape becomes a graphic and you can no longer change the text or font.
© 2001-2011 Panstoria, Inc. 85

Artisan 4.0 User Guide
Inserting a Symbol Sometimes you may need to insert a special symbol, such as a copyright or registered trademark
symbol, or letters used in other languages.
Perform the following steps:
Note: You must be editing text in order to insert a symbol.
1. Make sure you have double-clicked on a text box and your cursor is located where you wish to insert a symbol.
2. From the Insert ribbon, click Symbol.
3. The Symbols dialog box appears.
4. Click the symbol you wish to add to your text.
5. The symbol appears in your text.
© 2001-2011 Panstoria, Inc. 86
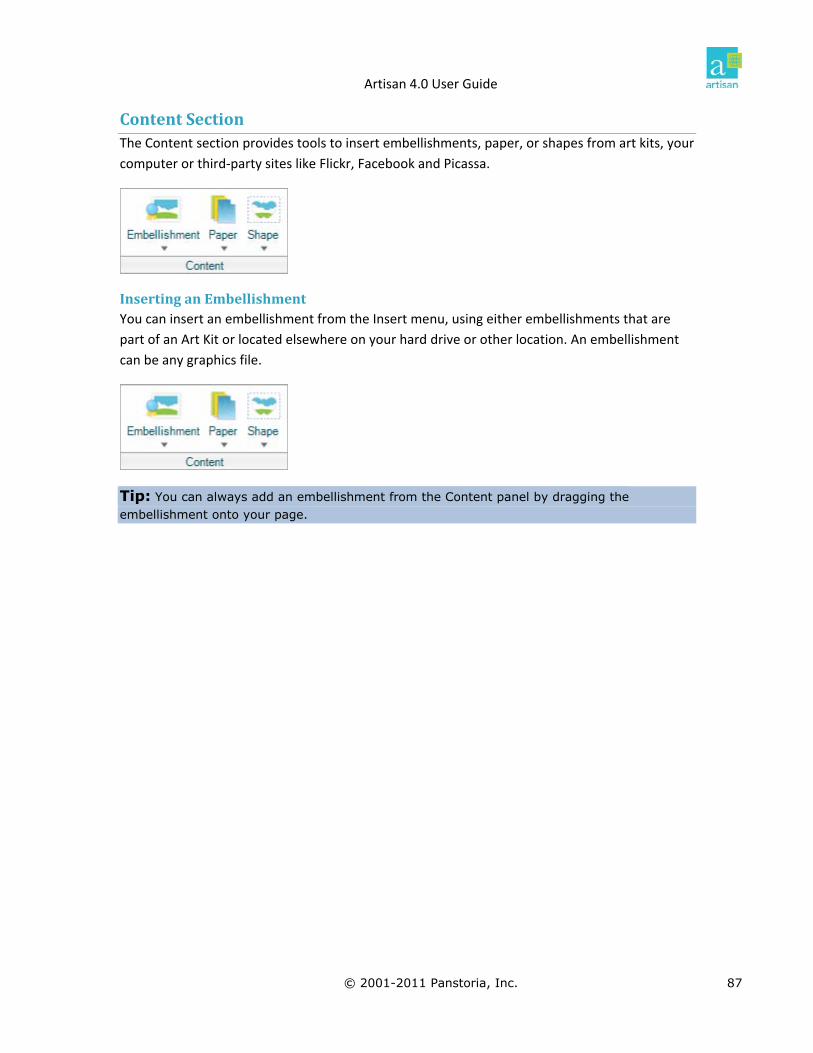
Artisan 4.0 User Guide
Content Section The Content section provides tools to insert embellishments, paper, or shapes from art kits, your
computer or third‐party sites like Flickr, Facebook and Picassa.
Inserting an Embellishment You can insert an embellishment from the Insert menu, using either embellishments that are
part of an Art Kit or located elsewhere on your hard drive or other location. An embellishment
can be any graphics file.
Tip: You can always add an embellishment from the Content panel by dragging the embellishment onto your page.
© 2001-2011 Panstoria, Inc. 87

Artisan 4.0 User Guide
Insert an Embellishment from File To insert an embellishment from outside of the application, perform the following steps:
1. From the Insert ribbon, click Embellishment. A drop-down menu displays.
2. Click From My Computer. The Get Image dialog box displays.
3. Browse to the image file you want to use as an embellishment and click Open.
4. The image displays on your page and in the Elements panel.
Tip: You can add the new embellishment to your own personal Art Kit. To learn more, refer to Saving a Selected Element.
© 2001-2011 Panstoria, Inc. 88

Artisan 4.0 User Guide
Insert an Embellishment from art kit To insert an embellishment from an existing art kit, perform the following steps:
1. From the Insert ribbon, click Embellishment.
2. Choose From art kit. The Select Content dialog box appears.
3. Choose the embellishment you would like to add to your page. You can change kits by choosing from the library window or by categories, tags, or recent.
4. The embellishment is added to your page and to the Elements panel.
© 2001-2011 Panstoria, Inc. 89

Artisan 4.0 User Guide
Inserting Papers You can insert a paper from the Insert menu, using either papers that are part of art kits or
located elsewhere on your hard drive or other location. A paper can be any graphics file.
Tip: You can always add papers from the Content panel by dragging the paper onto your page.
Insert a Paper from File To insert papers from outside of the application, perform the following steps:
1. From the Insert ribbon, click Paper.
2. Click From My Computer. The Get Photos dialog box appears.
3. Browse to the image file you want to use as a paper and click Open.
© 2001-2011 Panstoria, Inc. 90

Artisan 4.0 User Guide
4. The image displays on your page and in the Elements panel.
Tip: You can add the new paper to your own Personal Art Kit. To learn more, refer to Saving a Selected Element.
Insert a Paper from Your Art Kit To insert papers from an existing Art Kit, perform the following steps:
1. From the Insert ribbon, click Paper.
2. Choose From art kit. The Select paper dialog box appears.
3. Choose the paper you would like to add to your page. You can change Art Kit by choosing from the library.
4. Click Insert content. You are prompted if you want to make it the background for the current page.
© 2001-2011 Panstoria, Inc. 91

Artisan 4.0 User Guide
Insert PreDefined & Custom Shapes The Shape button gives you several options for adding a shape to your page:
Art kit
Custom shape (straight or curved lines)
Insert a Shape from the Art kit
1. From the Insert ribbon, choose Shape.
2. Choose From Art kit. The Select Shape dialog displays.
3. Choose the shape you would like to add to your page. You can change art kits by choosing from the library.
© 2001-2011 Panstoria, Inc. 92
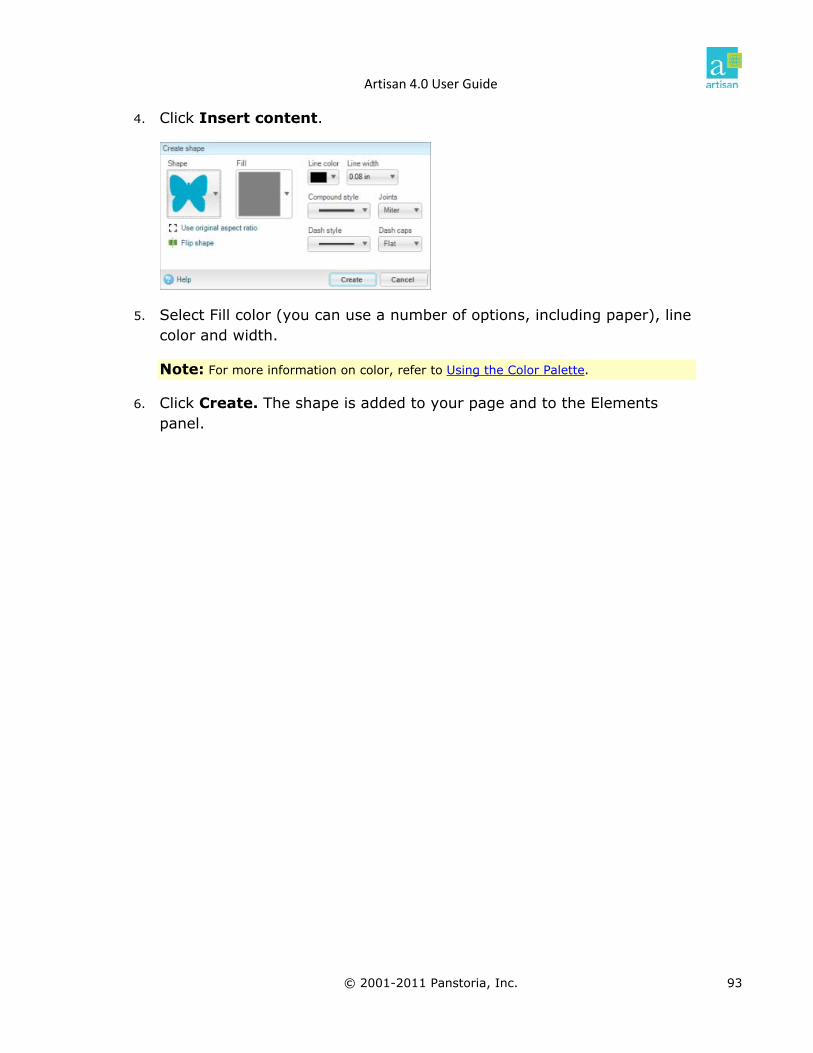
Artisan 4.0 User Guide
4. Click Insert content.
5. Select Fill color (you can use a number of options, including paper), line color and width.
Note: For more information on color, refer to Using the Color Palette.
6. Click Create. The shape is added to your page and to the Elements panel.
© 2001-2011 Panstoria, Inc. 93

Artisan 4.0 User Guide
Create a Custom Shape Using Straight or Curved Lines
1. From the Insert menu, choose Shape.
2. Choose Custom shape using straight lines or Custom shape using curved lines.
3. Choose the color for your shape.
Note:For more information on color, refer to Using the Color Palette.
4. Design your custom shape by clicking repeatedly with your mouse in the shape you want to create. If you chose straight lines, the dots will connect straight. If you chose curved lines, the dots will connect curved.
5. Click Edit points to modify individual locations along the drawing.
6. Click Save shape in personal art kit to add the shape to your personal art kit. To learn more, refer to Saving Selected Elements.
7. Click Create to add the shape to your page and the Elements panel.
© 2001-2011 Panstoria, Inc. 94

Artisan 4.0 User Guide
Other Section The Other section contains tools for Line, Rubber Stamp and Calendar.
Insert Lines The Insert Line option is visible in the Other section only if you are in advanced mode. If it is not
displayed, change to Advanced mode.
The Line button gives you two general options for adding a line to your page:
Straight line
Path (straight or curved)
Insert a Straight Line
1. From the Insert ribbon, choose Line.
2. Choose Straight line.
3. Choose the color and width for your shape.
Note:For more information on color, refer to Using the Color Palette.
© 2001-2011 Panstoria, Inc. 95

Artisan 4.0 User Guide
4. Move your cursor where you wish to start the line and click.
5. Move the cursor to the point where you wish to end and click again.
Create a Path Using Straight or Curved Lines A path differs from a line in that you can edit various points along the path. A straight path uses
all straight edges, whereas a curved path has rounded edges.
Straight Path
Curved Path
1. From the Insert ribbon, choose Line.
2. Choose Straight path or Curved path.
© 2001-2011 Panstoria, Inc. 96

Artisan 4.0 User Guide
3. The Create a path dialog displays. Choose the color and line width for your shape .
Note: For more information on color, refer to Using the Color Palette.
4. Place your cursor where you wish to start the path and click.
5. Click each place in the path.
Note: You can also press and hold your mouse button to draw the path.
6. Click edit points to modify each individual point on the path.
7. Click Create. Your path appears on your page and in the Elements panel.
Inserting a Rubber Stamp The Rubber Stamp tool acts just like a rubber stamp and ink pad. You can control the pressure,
and therefore the texture, of the stamp, as well as the color.
To insert a rubber stamp, perform the following steps:
1. Select an element on your page that you would like to repeat with the rubber stamp tool.
2. Click Rubber Stamp on the Insert ribbon.
© 2001-2011 Panstoria, Inc. 97
Artisan 4.0 User Guide
3. Select your stamp style. The preview image changes based on your selection.
4. Choose the color you want. This is like picking the color of ink you would use for the stamp.
Note: For more information on color, refer to>Using the Color Palette.
5. Click More Options to adjust the sliders for ink coverage and/or threshold.
6. More Options will also allow you to choose a pattern from the drop-down list to further enhance your stamp.
7. Click Create. The new stamp appears on your page.
Tip: You can add the new embellishment to your own art kit. To learn more, refer to Saving a Selected Element.
© 2001-2011 Panstoria, Inc. 98

Artisan 4.0 User Guide
Inserting a Calendar The calendar tool creates calendar elements you can add to your page..
Creating a Calendar
1. From the Insert Ribbon click Calendar.
2. Position and size the box on the page and click Create.
© 2001-2011 Panstoria, Inc. 99
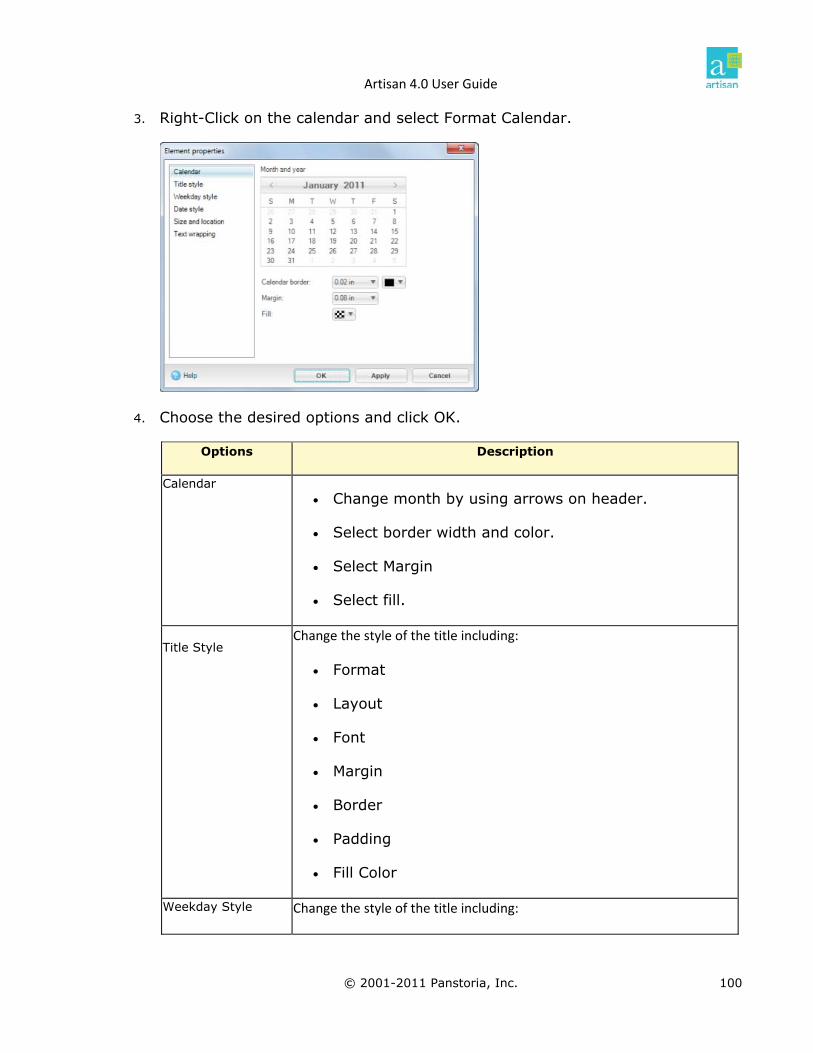
Artisan 4.0 User Guide
3. Right-Click on the calendar and select Format Calendar.
4. Choose the desired options and click OK.
Options Description
Calendar Change month by using arrows on header.
Select border width and color.
Select Margin
Select fill.
Title Style Change the style of the title including:
Format
Layout
Font
Margin
Border
Padding
Fill Color
Weekday Style Change the style of the title including:
© 2001-2011 Panstoria, Inc. 100

Artisan 4.0 User Guide
Options Description
Format
Font
Margin
Border
Padding
Fill Color
Date style Change the style of the title including:
Show/Hide days from previous month
Font
Margin
Border
Padding
Fill Color
Size and location Set size and location.
Text wrapping Control how text wraps around the calendar.
© 2001-2011 Panstoria, Inc. 101

Artisan 4.0 User Guide
Align The align section in the Arrange ribbon provides multiple options to align elements on the page.
The Alignment section has 11 different options for aligning your elements.
Note: You must have more than one item selected to access these options. To select multiple items, press the SHIFT key and click each item.
When you align elements by their edges, one of the elements remains in place. For example,
clicking aligns the left edges of all selected elements with the left edge of the last selected
element. The last selected element does not move, and the other elements are aligned relative
to it.
When you align elements by their centers, the elements are aligned along a horizontal or
vertical line that represents the average of the original positions. No element necessarily
remains stationary; all the elements may move.
Tip: Depending on the alignment option you choose, elements will move straight up, down, left, or right, and might cover another element. If
your elements end up stacked on top of each other, click to undo and try a different option.
The following icons are used for aligning your elements:
Options Explanations
Aligns selections to the left edge of the last selected element.
Aligns selections to their vertical centers.
Aligns selections to the right edge of the last selected element.
Aligns selections to the top edge of the last selected element.
Aligns selections to their horizontal centers.
Aligns selections to the bottom edge of the last selected element.
© 2001-2011 Panstoria, Inc. 102

Artisan 4.0 User Guide
Options Explanations
Distributes items equally across a horizontal axis.
Distributes items equally across a vertical axis.
Makes selections the same size as the last selected element.
Makes selections the same width as the last selected element.
Makes selections the same height as the last selected element.
Ordering Objects Use the Ordering section when you want to rearrange elements stacked on top of each other.
This is called Z‐Ordering. When elements are stacked on top of each other, each element is a
layer. To learn more about layering, refer to Understanding Layering and Flattening.
Tips: If elements are stacked on top of each other, it may be easier to select each item in the Elements panel.
The following icons are used for ordering elements:
Options Explanations
Move to front Brings an element from its current layer to the front, or top, of the stack.
Move to back Moves an element from its current layer to the back, or bottom, of the stack.
Move forward Moves an element one layer forward from its previous location.
Move backward
Moves an element one layer backward from its previous location.
© 2001-2011 Panstoria, Inc. 103

Artisan 4.0 User Guide
Group and Flatten You can group items together. Grouping is good when you want to apply changes to a set of
items at once. A group can move together and any changes applied affect all elements in the
group. You can also flatten elements to combine them. However, groups can be separated, or
ungrouped. Once elements are flattened, there is not an unflatten option.
Grouping and Ungrouping To group several elements, perform the following steps:
1. Press the SHIFT key on your keyboard while clicking on each item you want in the group.
2. Click Group from the Grouping section.
3. The handles expand to include the entire group. These elements are now connected.
Tip: The group displays as one item in the Elements panel.
© 2001-2011 Panstoria, Inc. 104

Artisan 4.0 User Guide
To ungroup several elements, perform the following steps:
1. Select the group on the page or in the Elements panel.
2. Click Ungroup from the Grouping section.
3. The elements are disconnected.
Tip: The items display separately in the Elements panel.
© 2001-2011 Panstoria, Inc. 105

Artisan 4.0 User Guide
Flatten Each item in the Elements panel is considered a separate layer. If you want multiple layers to
become one layer, you need to flatten. For more information on layers, refer to Understanding
Layering and Flattening.
To flatten multiple layers, perform the following steps:
1. Select the items you want to combine into one layer.
Tip: If the items are stacked on top of each other, it may be easier to select them in the Elements panel.
2. Click Flatten.
3. The layers are combined into one.
Tip: The layers display as one item in the Elements panel.
4. You may click Undo to immediately change your mind. However, a flattened set cannot be undone later.
Tip: If you think you may want the elements separate later, use grouping instead of flattening.
© 2001-2011 Panstoria, Inc. 106

Artisan 4.0 User Guide
Rotating Objects The Rotate section includes five different options for rotating your elements. The Rotate section
differs from the rotation options available in the Format Photos ribbon > Photo in Frame. The
Photo in Frame options rotate the element without rotating the frame. The Rotate section
rotates the element and the frame.
Sometimes you may need to rotate an image due to camera angle or for artistic value. In the
example shown, the original image on the left is in portrait, when it should be landscape.
Rotating the image 90° corrects the problem.
The following icons are used for rotating your elements:
© 2001-2011 Panstoria, Inc. 107

Artisan 4.0 User Guide
The Cutters Section The Cut & Fill ribbon includes two sections: Cutters and Fill. This topic covers the Cutters
section.
The Cutters allows you to cut any object on your page. The cutters available depend on the
mode you are in.
In advanced mode:
In Basic Mode:
Cutter tools allow you to create perfect shapes using any element on the page. Cutters are
useful for enhancing elements already on your page.
Cutter Description
Straight The Straight cutter cuts the object with a straight line. The edge
can be a number of styles including smooth and rough.
Shapes The shape cutter uses any shape to cut out an object.
Text The text cutter uses a letter as a shape to cut.
Custom (Advanced)
The custom cutter cuts the object with a shape created by
straight lines or curves.
Wand (Advanced)
The wand tool allows you to create a shape with the wand selection to cut.
Corner The corner cutter cuts decorative corners in the selected object.
Grid (Advanced)
The grid cutter cuts the object up into a grid of objects.
© 2001-2011 Panstoria, Inc. 108
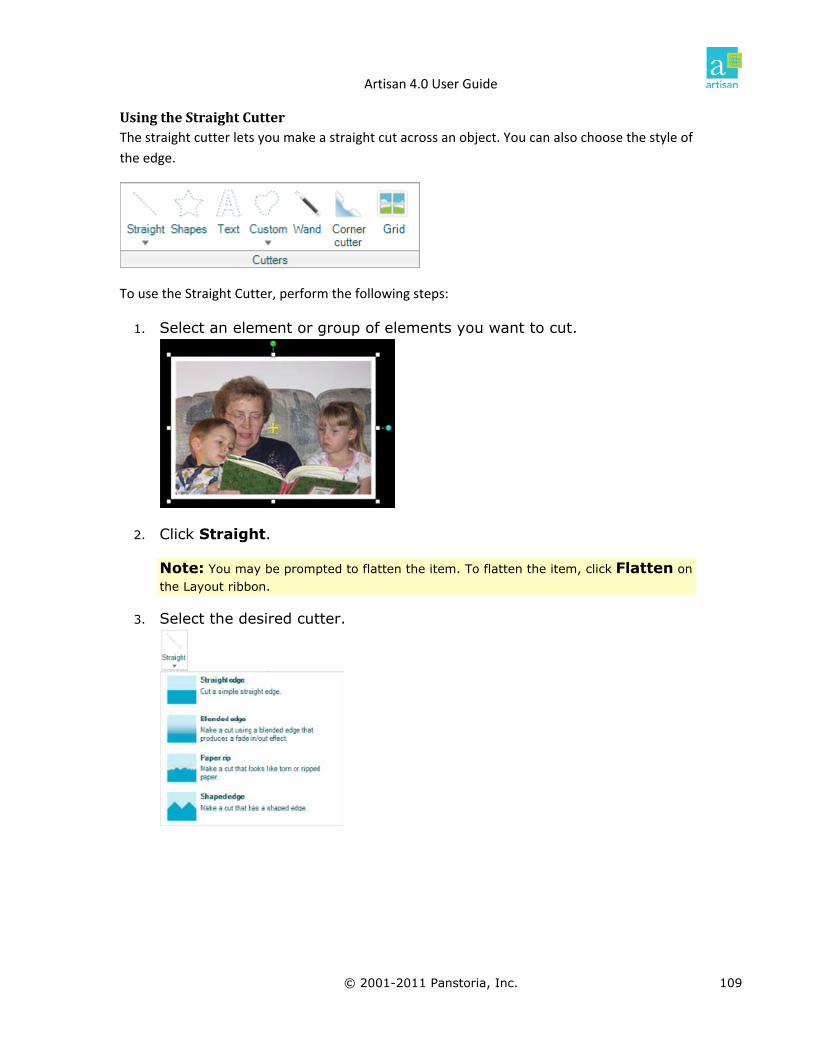
Artisan 4.0 User Guide
Using the Straight Cutter The straight cutter lets you make a straight cut across an object. You can also choose the style of
the edge.
To use the Straight Cutter, perform the following steps:
1. Select an element or group of elements you want to cut.
2. Click Straight.
Note: You may be prompted to flatten the item. To flatten the item, click Flatten on the Layout ribbon.
3. Select the desired cutter.
© 2001-2011 Panstoria, Inc. 109

Artisan 4.0 User Guide
Selection Example
Straight Edge
Blended Edge
Paper Rip
Shaped Edge
© 2001-2011 Panstoria, Inc. 110

Artisan 4.0 User Guide
4. Adjust the angle and location of the cutting tool.
5. Choose a cutting option from the dialog. Each option displays a shaded area that can be duplicated or cut.
Note: The options in each dialog may differ slightly, based on the edge chosen.
Option Explanation
Swap the shaded and unshaded sections
This option flips the shaded area covering the element to the
opposite half.
Keep the shaded section
Keeps the shaded section, and removes the unshaded.
Keep the unshaded section
Keeps the unshaded section, and removes the shaded.
Keep both sections
Keeps both sections.
6. Your cut is applied.
Tip: It is often hard to see a straight cut as the element does not move. Look for your slices in the Elements panel.
© 2001-2011 Panstoria, Inc. 111

Artisan 4.0 User Guide
Using the Shapes Cutter With the Shape cutter, you can use any of your shapes to cut out a portion of an element. The
Shapes Cutter is similar to a punch.
Tip: The Shape cutter is a great way to create decorative borders.
To use the Shapes Cutter, perform the following steps:
1. Select an element or group of elements you want to cut.
2. Click Shapes.
Note: You may be prompted to flatten the item. To flatten the item, click Flatten on the Layout ribbon.
3. The Select Shape dialog box appears. Select a shape from the available options.
© 2001-2011 Panstoria, Inc. 112

Artisan 4.0 User Guide
4. The Shape Cutout dialog box displays and a shape appears on your selection. Adjust the selection to the right size and location.
5. You can click More Options to see additional cutting options.
Option Explanation
Swap the shaded and unshaded sections
This option flips the shaded area covering the element to
the opposite half.
Keep the shaded section Keeps the shaded section, and removes the unshaded.
Keep the unshaded section
Keeps the unshaded section, and removes the shaded.
Keep both sections Keeps both sections.
© 2001-2011 Panstoria, Inc. 113

Artisan 4.0 User Guide
6. Your cut is applied. In this example, we applied the Shapes Cutter with Keep the unshaded section.
Using the Text Cutter With the Text cutter you can use any letter to cut out a portion of an element. The Text Cutter is
similar to a punch.
To use the Text Cutter, perform the following steps:
1. Select an element or group of elements you want to cut.
© 2001-2011 Panstoria, Inc. 114

Artisan 4.0 User Guide
2. Click Text in the Cutters section.
Note: You may be prompted to flatten the item. To flatten the item, click Flatten on the Layout ribbon.
3. Enter the text, and choose the formatting.
4. The Shape Cutout dialog box displays and a shape appears on your selection. Adjust the selection to the right size and location.
5. Choose a cutting option from the dialog. Each option displays a shaded area that can be duplicated or cut.
Option Explanation
Swap the shaded and unshaded sections
This option flips the shaded area covering the element
to the opposite half.
Keep the shaded section
Keeps the shaded section, and removes the unshaded.
Keep the unshaded section
Keeps the unshaded section, and removes the shaded.
Keep both sections
Keeps both sections.
© 2001-2011 Panstoria, Inc. 115

Artisan 4.0 User Guide
6. Your cut is applied. In this example, we applied the Shapes Cutter with Keep the unshaded section.
Using the Custom Cutter Using the Custom Cutter you can create your own shape or trace around an existing item. The
custom cutter is only available in advanced mode.
To use the Custom Cutter, perform the following steps:
1. Select an element or group of elements you want to cut.
2. Click Custom.
Note: You may be prompted to flatten the item. To flatten the item, click Flatten on the Layout ribbon.
3. Choose either Straight path or Curved path.
Tip: A path differs from a line. On a path, you can edit the placement of individual points.
4. The Custom Cutout dialog box appears and the page appears highlighted. Design your custom shape by clicking repeatedly with your mouse in the shape you want to create.
© 2001-2011 Panstoria, Inc. 116

Artisan 4.0 User Guide
5. Adjust any individual points by clicking Edit points in the dialog box.
6. Choose a cutting option from the dialog. Each option displays a shaded area that can be duplicated or cut.
Option Explanation
Swap the shaded and unshaded sections
This option flips the shaded area covering the
element to the opposite half.
Keep the shaded Keeps the shaded section, and removes the section unshaded.
Keep the unshaded Keeps the unshaded section, and removes the section shaded.
Keep both sections sections. Keeps both
7. t is applied. e cu with the Custom Cutter using
Cut around the shaded area.
Your cuIn this example, w t out the rosebud
© 2001-2011 Panstoria, Inc. 117

Artisan 4.0 User Guide
Using the Wand Cutter The Wand option selects like objects within your selection. The wand cutter is only available in
advanced mode.
Tip: You can use the Wand tool to make custom fancy text. To learn more, refer to Creating Cutout Text.
To use the Wand Cutter, perform the following steps:
1. Select an element or group of elements you want to cut.
2. Click Wand.
Note: You may be prompted to flatten the item. To flatten the item, click Flatten on the Layout ribbon.
© 2001-2011 Panstoria, Inc. 118

Artisan 4.0 User Guide
3. Adjust the sensitivity of the color and intensity. This helps guide the wand when it searches for like items.
4. Touch the magic wand to an area on the selection. The wand will highlight similar areas. Here we increased the threshold a little bit to get more matches.
5. Choose a cutting option from the dialog. Each option displays a shaded area that can be duplicated or cut.
Option Explanation
Swap the shaded and unshaded sections
This option flips the shaded area covering the
element to the opposite half.
Keep the shaded section
Keeps the shaded section, and removes the
unshaded.
Keep the unshaded Keeps the unshaded section, and removes the section shaded.
Keep both sections Keeps both sections.
© 2001-2011 Panstoria, Inc. 119
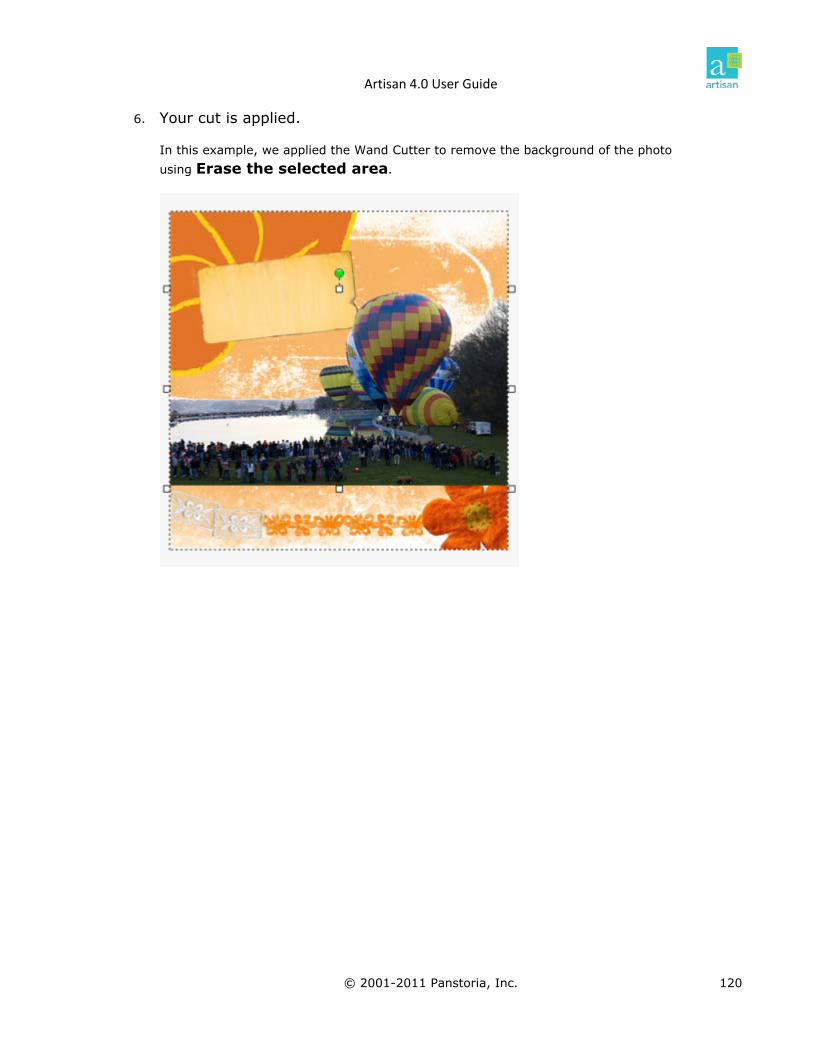
Artisan 4.0 User Guide
6. Your cu
ample, we applied the Wand Cutter to remove the background of the photo
using Erase the selected area.
t is applied.
In this ex
© 2001-2011 Panstoria, Inc. 120
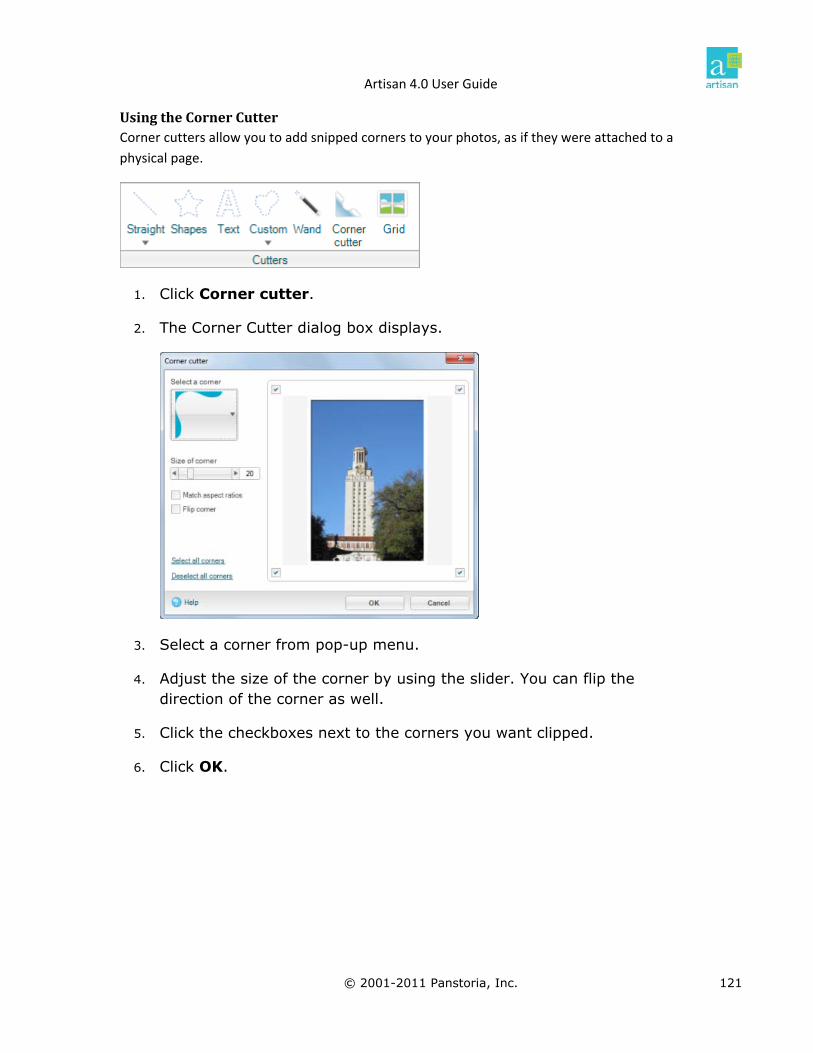
Artisan 4.0 User Guide
Using the Corner Cutter Corner cutters allow you to add snipped corners to your photos, as if they were attached to a
physical page.
1. Click Corner cutter.
2. The Corner Cutter dialog box displays.
3. Select a corner from pop-up menu.
4. Adjust the size of the corner by using the slider. You can flip the direction of the corner as well.
5. Click the checkboxes next to the corners you want clipped.
6. Click OK.
© 2001-2011 Panstoria, Inc. 121

Artisan 4.0 User Guide
Using the Grid Cutter Grid cutters allow you to slide an element into equally sized squares. The Grid cutter is only
available in advanced mode.
1. Click Grid.
2. Adjust the size of the grid (number of boxes) that you want to cut into the element.
3. Adjust the spacing between the grid boxes using the slider.
4. Click Accept. Your element is sliced.
© 2001-2011 Panstoria, Inc. 122

Artisan 4.0 User Guide
The Fill Section Options in the Fill section paint the inside of an element. You can choose from colors, papers
and gradients. The area that is
,
painted is called the fill area.
Using Color Fill Options in the Fill section paint the inside of an element. You can choose from colors, papers,
and gradients. The area that is painted is called the fill area.
To add a color fill to an object, perform the following steps:
1. Select an element on the page.
2. Click Color from the Fill section. The Select Color dialog box appears. fill your element. To learn more
about selecting colors, refer to Using the Color PaletteSelect the color with which you want to
.
3. Click OK. The element is now filled with your color.
© 2001-2011 Panstoria, Inc. 123

Artisan 4.0 User Guide
Using Gradient Fill The Gradient fill option is available in the Fill section, and has a number of options.
You can create gradients with e Two Color th tab that lets you chose among 16 presets, or create
customized gradients with the Straight, Radial, or Rectangle options.
others. You can select any two
colors, and then any one of 16 preset straight gradients, 4 radial or four rectangle.
To add a Two color gradient fill to an object, perform the following steps:
1. Select an element on the page.
Two Color Gradient
The two color gradient option is a simplified version of all the
2. Click Gradient from the Fill section. The Gradient Fills dialog box appears.
© 2001-2011 Panstoria, Inc. 124
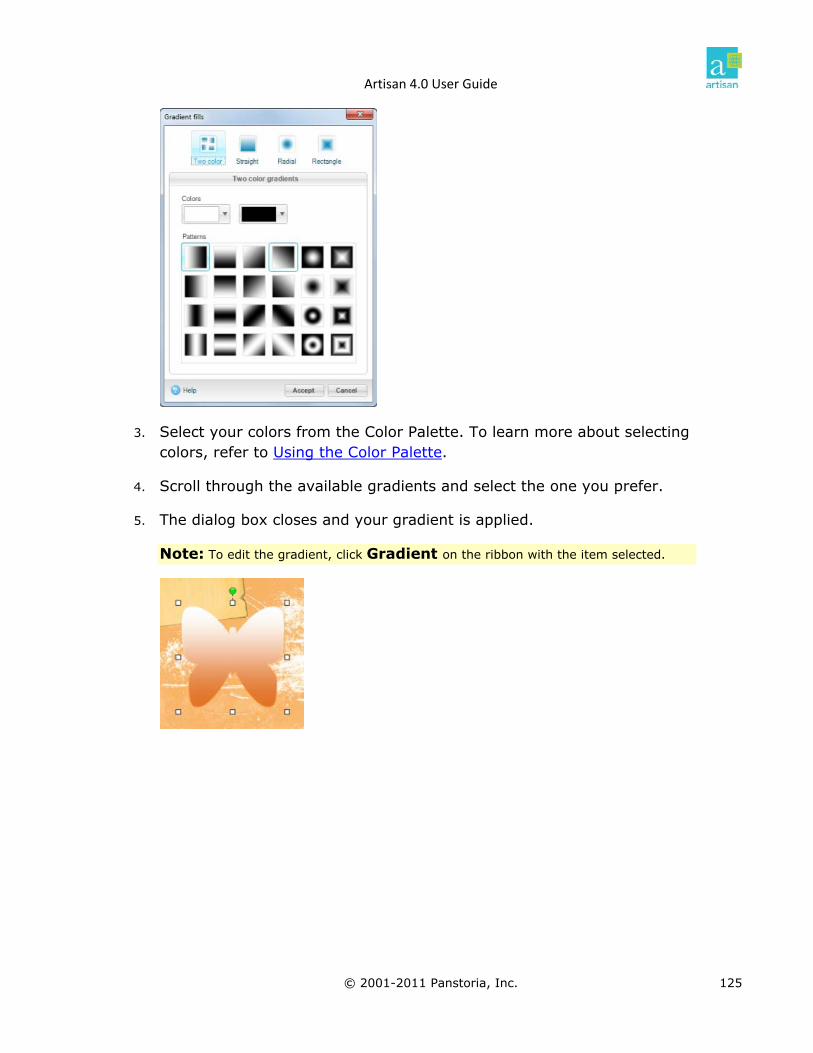
Artisan 4.0 User Guide
3. Select your colors from the Color Palette. To learn more about selecting tecolors, refer to Using the Color Palet .
4. Scroll through the available gradients and select the one you prefer.
5. The dialog box closes and your gradient is applied.
Note: To edit the gradient, click Gradient on the ribbon with the item selected.
© 2001-2011 Panstoria, Inc. 125

Artisan 4.0 User Guide
Customized Gradients You can create a customized gradient using the tabs straight, radial, and rectangle. The common
options are:
Color blend
More blend options
Gradient Options Description
Straight Directi
on
The angle of the gradient.
Radial Scaling The size of the gradient, and shape. The aspect ratio changes it from c ar to eliptical. ircul
Aspect Ratio
Rectangle None
No special options.
The St
Direction
Color
Blend Options
Color Blend
raight option provides more control over your gradient. You can specify:
© 2001-2011 Panstoria, Inc. 126

Artisan 4.0 User Guide
Blend Options There are a number of blend options. They start with default colors that you can change as you
wish. Depending on the blend option, the Color blend slider colors and tabs change.
Option Explanation
Reverse the colors from left to right. Reverse colors
Rese s to the standar . t Reset d blend option
Smooth bBlends oothly. Provides
curved effect. lending a morefrom color to color more sm
Straight blending Blends in direct proportion from one color to the next.
Black and white Two col ors, black and white.
Vibrant Rain lors, bright colors. bow Six co
Pastel Rain Six colobow rs , pastel colors.
Earth and s colors,earth tones. ky Three
Sunset Four colors.
Color Blend er allows you to set the color and where the color changes. In the example
below you see the default position on a black and white gradient:
The Color blend slid
If you move the black slider to the left, you see that the gradient transitions to black sooner, and
color stays black to the right of that slider.
© 2001-2011 Panstoria, Inc. 127

Artisan 4.0 User Guide
Working with Tabs Option How to
Change color Click on the tab, and choose a new color from the lor pickerCo .
Change position Drag the tab to the desired location.
Add tab Point in the blend area and click.
Delete tab Shift-click on tab.
Using the Paper Fill The Cut & r option of
the Fill section.
Fill ribbon includes two sections: Cutters and Fill. This topic covers the Colo
Options in paint the can choose from colors, papers,
and gradi area that is pa the fill area.
To add a paper fill to an object, perform the following steps:
the Fill section inside of an element. You
ents. The inted is called
1. Select an element on the page.
2. Click Paper from the Fill section.You can create a paper from any file on your computer, or select from one of your art kits.
© 2001-2011 Panstoria, Inc. 128

Artisan 4.0 User Guide
3. Scroll to select the paper you want to use. You may choose from your own collections or from installed art kits.
4. Select the pape rand click Insert content.
© 2001-2011 Panstoria, Inc. 129

Artisan 4.0 User Guide
Using the Convert Section The Convert section includes two options: Black & White and Sepia.
We'll start with an original photo:
Black & White The Black & White conversion provides multiple alternatives to converting to Black and White.
The Selected examples option lets you choose among multiple presets. You can also use Hue and
color channel options to fine tune the conversion.
To convert an element to black and white, perform the following steps:
1. Select an element on the page.
2. Click Black & White in the Convert section.
© 2001-2011 Panstoria, Inc. 130
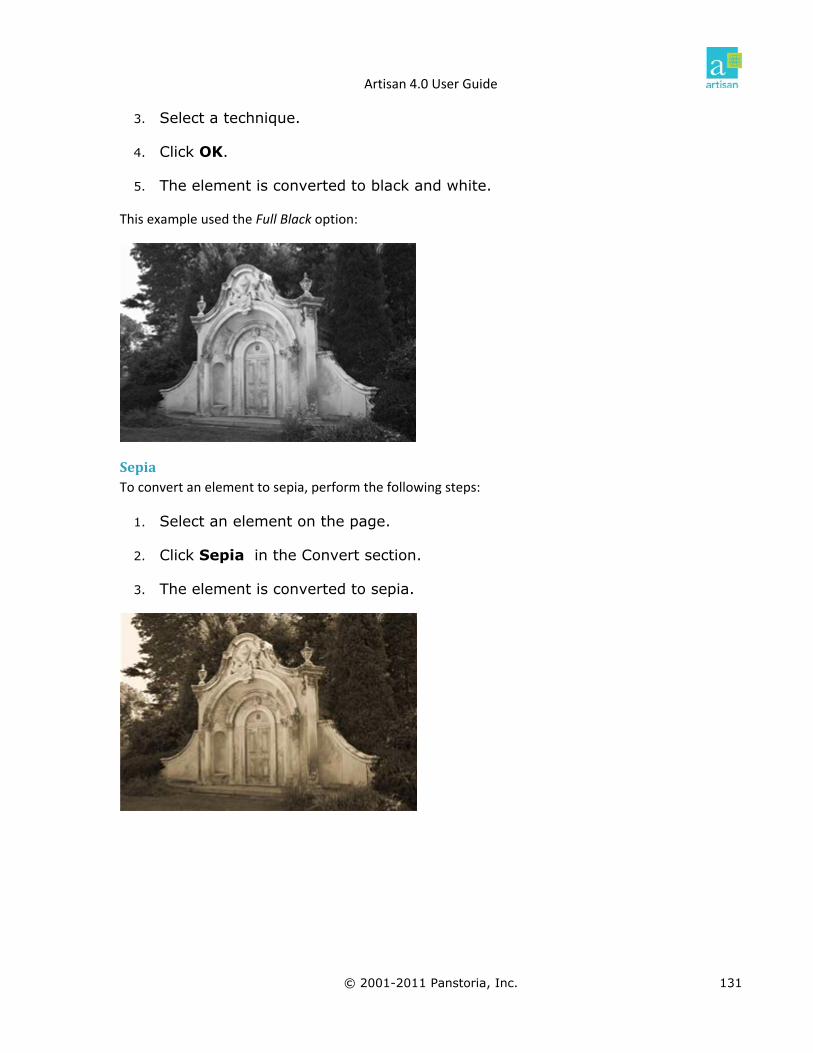
Artisan 4.0 User Guide
3. Select a technique.
4. Click OK.
5. The element is converted to black and white.
This example used the Full Black option:
Sepia To convert an element to sepia, perform the following steps:
1. Select an element on the page.
2. Click Sepia in the Convert section.
3. The element is converted to sepia.
© 2001-2011 Panstoria, Inc. 131

Artisan 4.0 User Guide
The Color and Light Section The Color ribbon inc
and Light section.
ludes two sections: Convert and Color and Light. This topic covers the Color
in.
Advanced Mode:
The Color and Light section changes based on what mode you are
Basic Mode:
© 2001-2011 Panstoria, Inc. 132

Artisan 4.0 User Guide
Adjusting Hue The Hue option adjusts the amount of color in your image. A hue is the amount of color in a
pixel, creating the color itself.
element on the page.
2. Experiment with the sliders to adjust the amount of color.
Adjusting the hue slider changes the overall color of the image. You can also select a sample hue in the color palette. To learn about sample hues and the color palette, refer to Using the Color Palette
Perform the following steps:
1. Select the
.
Adjusting the saturation slider changes the amount of the chosen color.
The Intensity slider affects the deepness of the color.
3. Click OK to accept the changes.
This is the original image. This is after modifying the hue.
© 2001-2011 Panstoria, Inc. 133
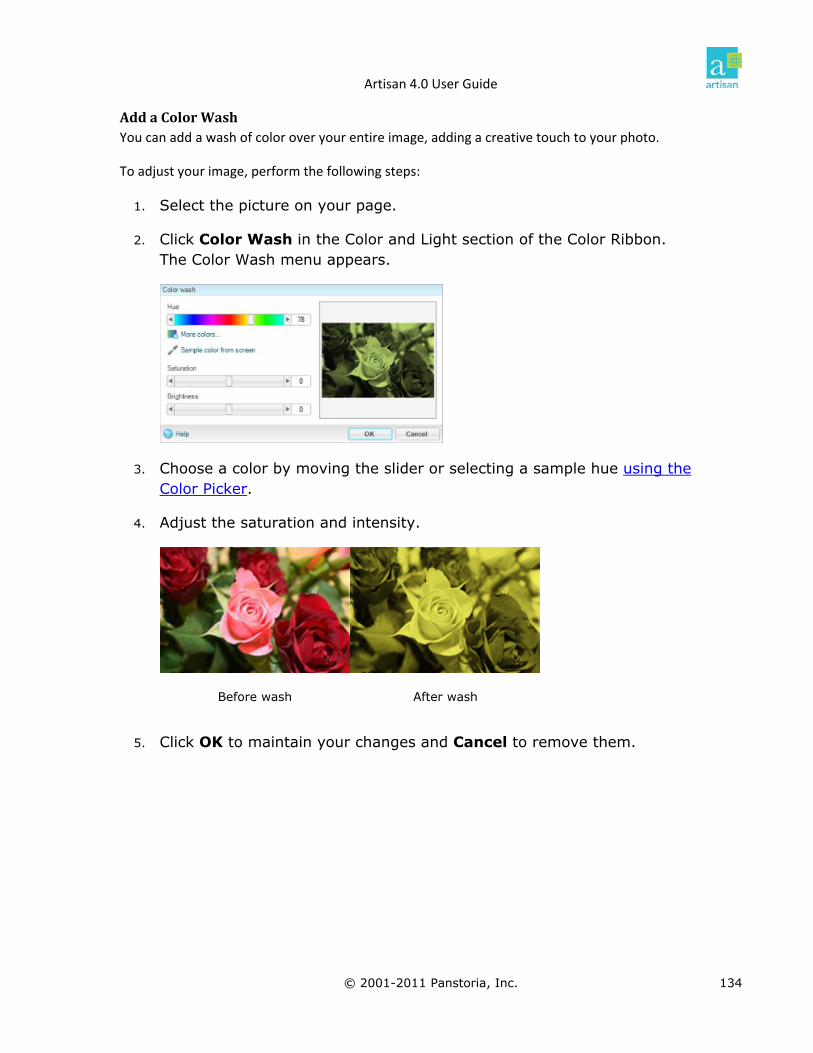
Artisan 4.0 User Guide
Add a Color Wash
To adjust your image, perform the following steps:
1. Select the picture on your page.
2. Click Color Wash in the Color and Light section of the Color Ribbon.
You can add a wash of color over your entire image, adding a creative touch to your photo.
The Color Wash menu appears.
3. Choose a color by moving the slider or selecting a sample hue using the Color Picker.
4. Adjust the saturation and intensity.
Before wash After wash
5. Click OK to maintain your changes and Cancel to remove them.
© 2001-2011 Panstoria, Inc. 134

Artisan 4.0 User Guide
Adjusting Brightness and Light ,
perform the following steps:
1. Select the element on the page.
2. Click on Brightness and Light.
The Brightness and Light option adjusts the amount of light in your image. To adjust the light
3. To access options beyond Contrast and Brightness, click More options.
Option Explanation
Contrast Adjusts the difference in brightness between light and dark areas of an image. Contrast determines the number of shades in the element.
Brightness Adjusts the relative lightness or darkness of an element, determining the intensity of colors.
Highlights Adjusts the brightest parts of an element
Midtones Adjusts the area that falls between the brightest highlight and the darkest shadow.
Shadows Adjusts the darkest parts of an image, and the degree of detail that is discernible in those dark portions.
© 2001-2011 Panstoria, Inc. 135
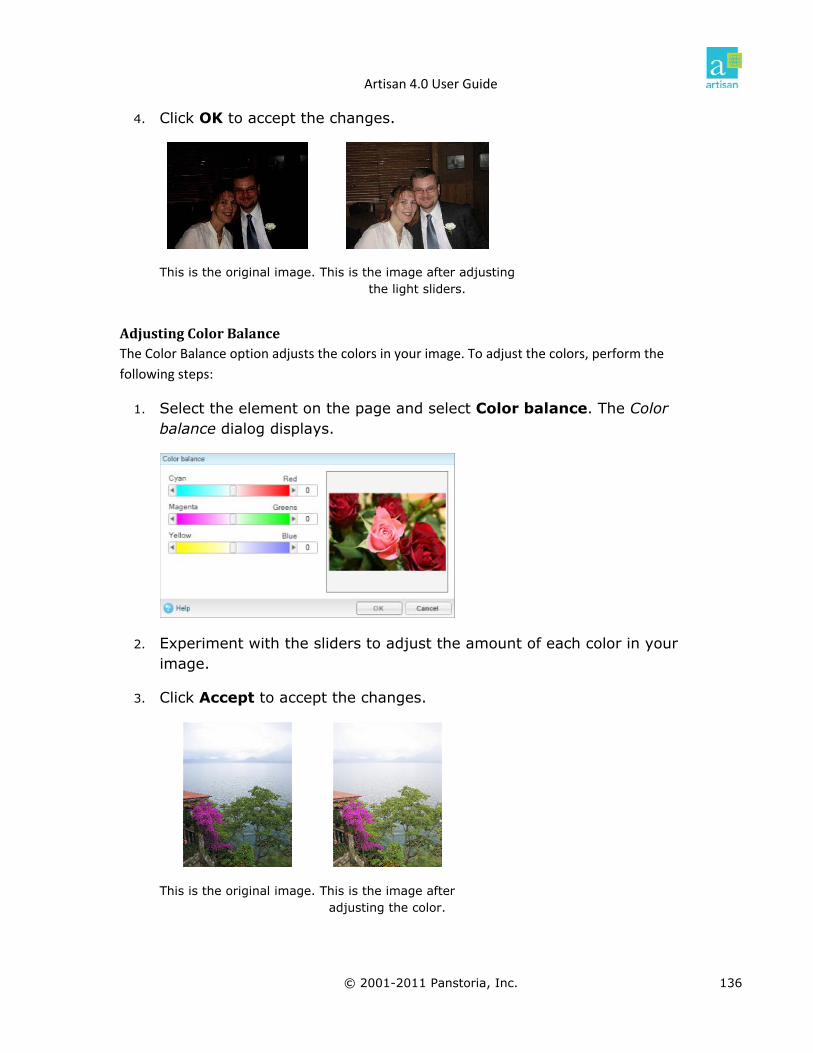
Artisan 4.0 User Guide
4. Click OK to accept the changes.
This is the original image. This is the image after adjustingthe light sliders.
Adjusting Color Balance The Color Balance option adjusts the colors in your image. To adjust the colors, perform the
following steps:
1. Select the element on the page and select Color balance. The Color balance dialog displays.
2. Experiment with the sliders to adjust the amount of each color in your image.
3. Click pt to accept the changes. Acce
inal image.This is the orig This is the image after adjusting the color.
© 2001-2011 Panstoria, Inc. 136

Artisan 4.0 User Guide
Modifying Temperature The Temperature option allows you to adjust the degree of heat that an object would have to
absorb before it glows in a certai color. Each color is associated with a color temperature, as
are various kinds of light. To adjust the temperature, perform the following steps:
1. Select the element on the page and click Temperature. The Color temperature dialog displays.
2. .
n
Experiment with the sliders to adjust your image
3. Click OK to accept the changes.
This is the original image.
This is the image with a Cooler temperature applied.
This is the image with a Warmer temperature applied.
© 2001-2011 Panstoria, Inc. 137

Artisan 4.0 User Guide
Adjusting Levels Sometimes an image appears too dark or too bright. If you want precise control over the
adjustment, use the Levels option. To adjust the levels, perform the following steps:
1. Select the element on the page and click Levels.
ack and forth to manually adjust the levels. The color blocks on the left affect the light level of red, green,
2. In the graph, move the slider b
and blue. The bottom block affects all colors.
3. Click OK to accept the cha snge .
This is the original image. This is the image after adjusting levels.
© 2001-2011 Panstoria, Inc. 138

Artisan 4.0 User Guide
Adjusting Color Curves
ur
element or to add a more creative touch. To adjust the color curves, perform the following
2. Select a color in the color blocks. The color blocks affect the balance of red, green, and blue. The bottom block affects all colors.
3. In the graph, click on the solid line and drag. If you drag towards the upper left corner, you will intensify your chosen color. If you drag towards the low ight corner, you will remove the chosen color.
The Color Curves option intensifies overall color in an element. Using curves achieves an overall
shift in shadows, midtones, and highlights. You might do this to adjust the colors in yo
steps:
1. Select the element on the page and click Curves. The Color curves dialog box displays.
er r
4. Click Accept to accept the changes.
This is the original image. This is the image after modifying the blue and all-color curves.
© 2001-2011 Panstoria, Inc. 139

Artisan 4.0 User Guide
General Section The General section lets you view the properties, set opacity, and apply text wrapping to
elements on the page.
Modifying Element Properties Elements have properties. Properties include measurement units, location, aspect ratio,
Right-click an element in the Elements panel and select Properties
Right-click an element on a page and select Properties
The Properties dialog box displays.
Changing the properties allows you to make manual, exact modifications to the element.
degrees, and copyright. You can modify access element properties in several ways:
Click the Properties button on the Format ribbon
Note: Different options appear based on the element selected.
© 2001-2011 Panstoria, Inc. 140

Artisan 4.0 User Guide
Size and Location This section displays and allows you to edit the size and location of the selected element.
Option Explanation
Units Choose the units of measurement from the drop-down
menu. Choose from inches or millimeters.
Left Enter the distance away from the left edge.
Top Enter the distance away from the top edge.
Width Enter the width of the element.
Height Enter the height of the element.
Lock Aspect Ratio A locked aspect ratio keeps your image from being skewed. Adjusting width automatically adjusts the height and vice versa.
Rotation Adjust the angle of the element in degrees.
Tip: This is useful for adjusting multiple items to the exact same rotation angle.
Copyright Notice If the element is copyrighted, that information appears
here.
© 2001-2011 Panstoria, Inc. 141

Artisan 4.0 User Guide
Memory Usage Memory Usage display how much memory the selected element takes up in your project. You
can also view how much the entire page takes up. You can resize the selected element to save
space. This optimally reduces the element to the ideal resolution for the current size. Once you
do this, making the element larger will decrease the quality of the image.
Copyrights element has any the Copyright section. If the copyrights assigned to it, you can see them in
© 2001-2011 Panstoria, Inc. 142

Artisan 4.0 User Guide
Text Wrapping Text wrapping controls how text will flow regarding the element, if the element is in front of th
text. You can also set wrapping in the shortcut menu for the element. For more information, go
to Wrapping Text
e
.
Option Explana ion t
No Text Wrapping The text will run across the element.
Bounding Box Text will form a square around the element.
Element Shape Text follows the shape of the element.
Space around the element
From the drop-down list, select the amount of space you want to leave around the image.
Click Apply to view the change and click OK to exit the dialog box.
© 2001-2011 Panstoria, Inc. 143

Artisan 4.0 User Guide
Adjusting Opacity You can adjust the opacity of an element, making it more transparent if needed. This is often
used on backgrounds or embellishments.
Tip: You can use this option to create a translucent frame. To learn more, refer to Creating a Translucent Frame Effect.
To adjust the opacity, perform the following steps:
1. Select an element on the page.
2. Click Opacity from the General section. The Opacity dialog box appears.
3. Adjust the slider. The image will preview your selection.
4. Click Accept. The opacity is adjusted.
© 2001-2011 Panstoria, Inc. 144

Artisan 4.0 User Guide
Wrapping Text You can adjust how text wraps around objects on your page.
Note: Text only wraps around objects in front of the text. See Rearranging Elements.
To adjust text wrapping, perform the following steps:
1. Select the object that you wish the text to wrap around (not the text).
2. Click Text Wrapping from the Format ribbon.
3. Choose the appropriate option.
Option Example
4. Choose the amount of space between the text and the element.
5. Click Accept. The text wraps around the element.
© 2001-2011 Panstoria, Inc. 145

Artisan 4.0 User Guide
Shadows The Format ribbon includes four sections: General, Shadows, Effects, and Lines.
The Shadow section has quick buttons to remove a shadow/glow, or to add a standard light or
heavy shadow. In addition, you can further customize the shadow or add a glow.
Applying Shadows
The Shadows option adds shadows to any selected element. You perform any of the following:
Add a pre-defined shadow
Add a customized shadow
Add a light or heavy shadow
Remove a shadow
In these examples, we will be using a selected shape:
© 2001-2011 Panstoria, Inc. 146

Artisan 4.0 User Guide
Add a PreDefined Shadow
1. Select an element on your page.
2. Click Shadow in the Format ribbon. The Shadows dialog box displays.
To add a pre‐defined shadow to an object, perform the following steps:
3. Select a shadow option from the dialog box.
4. The element displays the shadow.
© 2001-2011 Panstoria, Inc. 147

Artisan 4.0 User Guide
Customized Shadow To add a customized shadow to an object, perform the following steps:
1. Select an element on the page.
2. Click Shadow from the Format ribbon. The Shadows dialog box displays.
3. At the bottom of the Shadows list, choose Select a custom shadow. A dialog box appears.
Options Explanation
Depth Select the depth (width) of the shadow.
Softness Adjust the softness of the shadow. A soft shadow is more blurred or transparent.
Direction Drag the arrow to adjust the direction of the shadow.
Expansion Adjust how far the shadow reaches.
Color Choose a color for the shadow. To learn more about selecting colors, refer to Using the Color Palette.
4. Click OK. There is now a shadow attached to the element.
Apply a Light or Heavy Shadow To add a light or heavy shadow to an object, perform the following steps:
1. Select an element on the page.
© 2001-2011 Panstoria, Inc. 148

Artisan 4.0 User Guide
2. Click Light Shadow or Heavy Shadow from the Shadows section.
3. Click Accept. There is now a shadow attached to the element.
Remove a Shadow
1. Select an element on the page.
he Shadows section.
3. The shadow is removed.
Applying Glows The Shadows option allows you to add a glow to any selected element. You can:
Add a pre-defined glow
To remove a shadow from an object, perform the following steps:
2. Click Remove from t
Add a customized glow
Remove a glow
In these examples, we will be using a selected shape:
© 2001-2011 Panstoria, Inc. 149

Artisan 4.0 User Guide
Add a PreDefined Glow To add a pre‐defined shadow to an object, perform the following steps:
1. Select an element on your page.
ialog box displays.
2. Click Glow from the Format ribbon. The Glows d
3. Select a glow option from the dialog box.
4. The element displays the glow.
© 2001-2011 Panstoria, Inc. 150

Artisan 4.0 User Guide
Customized Glow To add a customized glow to an object, perform the following steps:
1. Select an element on the page.
2. Click Glow from the Format ribbon. The Glows dialog box displays.
3. At the bottom of the Glows list, choose Select a custom shadow.
Options Explanation
Softness Adjust the softness of the shadow. A soft shadow is rred or transparent. more blu
Expansion Adjust how far the shadow reaches.
Color Choose a color for the shadow. To learn more about selecting colors, refer to Using the Color Palette.
4. Click OK. There is now a glow attached to the element.
Remove a Glow To remove a glow from an object, perform the following steps:
1. Select an element on the page.
2. Click Remove from the Shadows section.
3. The glow is removed.
© 2001-2011 Panstoria, Inc. 151

Artisan 4.0 User Guide
Effects Section In the Effects section you can apply surfaces or a variety of filters to selected elements.
Applying Surfaces You can add surfaces to an element by applying a texture.
To add surfaces, perform the following steps:
1. Select an element on the page.
2. Click Surface from box appears. Select a surface from the displayed choices. In the preview
m.
the Effects section. The Surfaces dialog
pane, the surface takes on the coloring of your selected ite
3. Adjust the slider to the texture larger or smaller.
to the element.
make
4. Click Preview to preview your element.
5. Click OK. The surface is applied
© 2001-2011 Panstoria, Inc. 152

Artisan 4.0 User Guide
Applying Filters You can apply a number of filters to photos to create interesting effects.
You can easily apply filters to an element. The Filters button launches the Filters Gallery.
y displays.
lters. Each filter has individual settings, such as pattern, softness, and levels. Experiment with each setting to find the customized filter you prefer.
4. Click Preview to apply the filter to the left-hand preview image.
1. Select an element on the page.
2. Click Filters. The Image Filter Galler
3. Choose from any of the available fi
© 2001-2011 Panstoria, Inc. 153

Artisan 4.0 User Guide
Artistic Option Example
Diffuse Glow
Rough Painting
Oil Painting
© 2001-2011 Panstoria, Inc. 154

Artisan 4.0 User Guide
Option Example
Angled Spray
Fractal Map
Stylize Option Example
Emboss
© 2001-2011 Panstoria, Inc. 155

Artisan 4.0 User Guide
Option Example
Threshold
Palettize
Invert
Canny Edge
Show Edges
Posterize
© 2001-2011 Panstoria, Inc. 156

Artisan 4.0 User Guide
Distort Option Example
Vibrations
Rippled Glass
Ocean Waves
© 2001-2011 Panstoria, Inc. 157

Artisan 4.0 User Guide
Option Example
Old Glass
Water Drop
Sphereize
© 2001-2011 Panstoria, Inc. 158

Artisan 4.0 User Guide
Option Example
Swirl
Edge Option Example
Alpha Gradient
Soften Edge
© 2001-2011 Panstoria, Inc. 159

Artisan 4.0 User Guide
Option Example
3D Edge
Focus Option Example
Blur effect
Despeckle
© 2001-2011 Panstoria, Inc. 160

Artisan 4.0 User Guide
Surface Option Example
Frosted Glass
Film Grain
Mosaic Tiles (4)
© 2001-2011 Panstoria, Inc. 161

Artisan 4.0 User Guide
Option Example
Mosaic Tiles (6)
Using Quick Fix The Quick fix section provides tools to quickly adjust your photos.
Auto fix balances the colors and light within your image. Redeye removes red eyes from images,
the image editor launches the integrated image editor.
1. Select the element you want to modify.
2. Click Auto fix in the Quick Fix section.
Auto Fix
3. Select the version you like best and click OK.
Tip: Color and contrast can be applied to any element on the page, not just photos
© 2001-2011 Panstoria, Inc. 162

Artisan 4.0 User Guide
Rem eye
photo you want to modify and click Redeye.
ove Red
1. Select the
2. The cursor changes to a crosshair. Click in the center of the eye you wish to modify.
3. Redeye is removed.
© 2001-2011 Panstoria, Inc. 163

Artisan 4.0 User Guide
Image Editor The Photos ribbon includes an integrated Image editor.
The Image editor provides tools to edit you images.
2. Click Image Editor.
r
1. To launch the Image Editor, select the image
© 2001-2011 Panstoria, Inc. 164

Artisan 4.0 User Guide
The Image Editor Ribbons
Image
The Image Editor contains four ribbons of tools:
Adjust
Touchup
Selection
Image Ribbon The Image ribbon contains four sections. Crop and rotate, Quick fix, Red‐eye, and Convert
Cropping Images The crop tool lets you crop your image to standard formats, or custom. To crop:
1. Click Crop in the Crop and Rotate section.
© 2001-2011 Panstoria, Inc. 165

Artisan 4.0 User Guide
2. Select a crop for a standard layout, or chose custom. You can also , portrait or landscape. choose the orientation of the crop
3. You can move the crop area where you want it, the crosshairs split the
4. Click OK to accept the crop.
area into thirds.
© 2001-2011 Panstoria, Inc. 166

Artisan 4.0 User Guide
Rotating and Flipping Image You can rotate and flip images using the buttons in the Crop and Rotate section, or do a free
rotate.
Button Example
Free Rotate
Rotate 90 degrees counter-clockwise
Rotate 90 degrees clockwise
Rotate 180 degrees
Flip Horizontal
Flip Vertical
Free Rotate The Free Rotate tool allows you to rotate the image by any degree you want. I grid on screen
helps you align the image:
© 2001-2011 Panstoria, Inc. 167
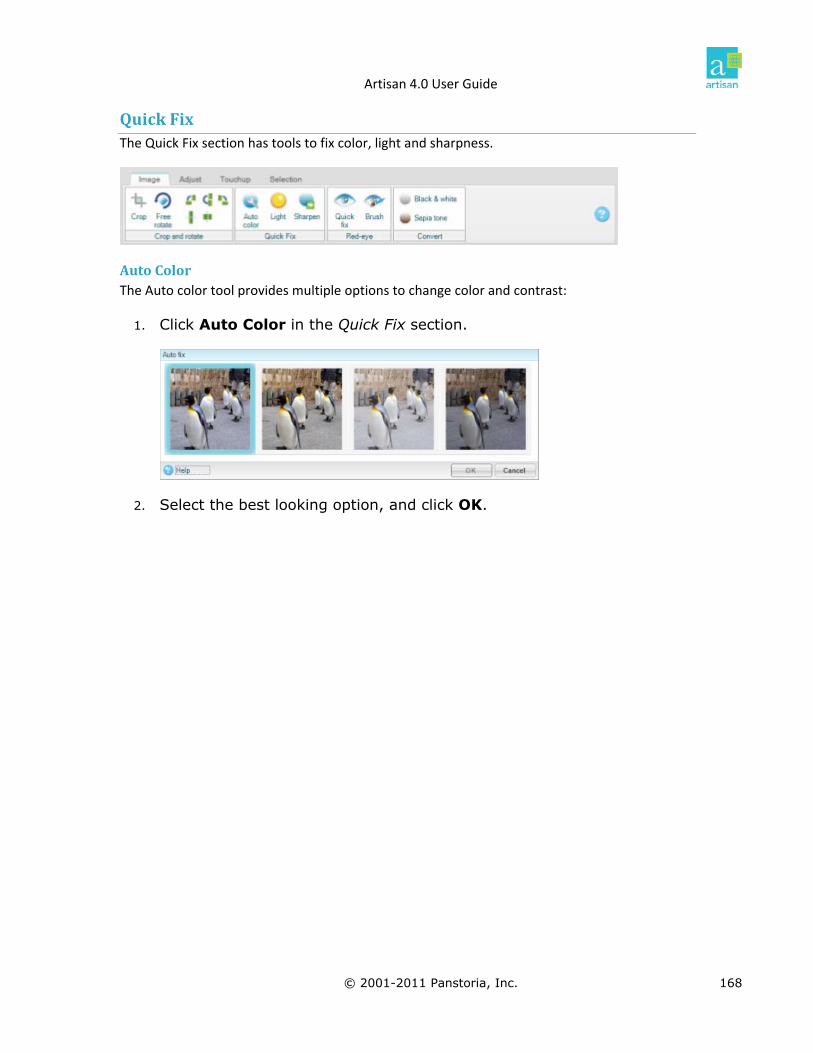
Artisan 4.0 User Guide
Quick Fix The Quick Fix section has tools to fix color, light and sharpness.
Auto Color The Auto co r tool p ltiple options to change color and contrast:
1. Click Auto ction.
lo rovides mu
Color in the Quick Fix se
2. Select the best looking option, and click OK.
© 2001-2011 Panstoria, Inc. 168

Artisan 4.0 User Guide
Light The light tool allows you to adjust the light settings of your photograph.
1. Click Light in the Quick Fix section.
2. Adjust the sliders.
Slider Example
Contrast Adjusts the contrast of the image.
Brightness Adjust the overall brightness of theimage.
Highlights Adjust the brighter areas of the image.
Midtones Adjust the middle areas of the image.
Shadows Adjust the dark areas of the image.
Sharpen Sharpen allows you to sharpen the image with a single click. This can make fuzzy pictures look
sharper. Too much sharpening can make a picture look worse.
© 2001-2011 Panstoria, Inc. 169

Artisan 4.0 User Guide
Adjust Ribbon The Adjust ribbon is organized by:
Color and Light
Focus
Other
Adjust Color and Light ins the same features available in the Color and Light sectionThe color and light option conta of
the Color ribbon.
Adjust Focus Adjusting th add tograph. From the toolbar
you can acce :
Soften
e focus can artistic effect, or cleanup noise in a pho
ss tools to
Sharpen
Cleanup
© 2001-2011 Panstoria, Inc. 170

Artisan 4.0 User Guide
Adjust Other The Other section provides tools to adjust the image size and apply artistic filters to your
photograph.
Image Size Image size lets you set the size by pixels, inches, or millimeters. The size drop‐down lets you
change the size of the image.
Filters among a number of artistic filters. See Applying FiltersYou can choose for more details.
© 2001-2011 Panstoria, Inc. 171

Artisan 4.0 User Guide
Touchup Ribbon The Touchup ribbon provides tools to edit your image.
Clone The Clone tool allows you to pick an area of the image to copy.
1. Click Clone.
2. Click on the area of the photo you want to clone.
4. Click OK.
3. Click and drag to paint the area with the area selected.
© 2001-2011 Panstoria, Inc. 172

Artisan 4.0 User Guide
Brushes The brushes tools allow you to:
Brush Explanation
Erase Brush erases the area. Change the size and pressure of the eraser.
Smudge Brush smudges the area. Change stroke
length of the smudge. the size, hardness and
Lighten Brush lightens the area. Change the size and pressure of the eraser.
Darken Brush darkens the area. Change the size and pressure of the eraser.
Blur Brush blurs the area. Change the size and pressure of the eraser.
Color Brush to add, or subtract color. ve
color from an image. You can even use it to remo
© 2001-2011 Panstoria, Inc. 173

Artisan 4.0 User Guide
Selection Ribbon The Selection ribbon contains sections for Select, Selection Display, Color and Light, and Focus.
Select Options The Select tools provide multiple was to select portions of the image.
Shape The Shape tool lets you use any shape as tool.
1. Click Shape.
2. Select a sha
a selection
pe.
3. Move and resize shape as desired.
4. Click on an Option to make the shape the selection, add to current selection. or remove from current selection.
5. Click Close.
© 2001-2011 Panstoria, Inc. 174

Artisan 4.0 User Guide
Wand The wand tool selects adjacent pixels in a photo based on color. It allows you to quickly select
irregularly shaped items in a photo.
1. Click Wand.
2. Select a Threshold
area in the photo.
4. dd.
5. Click on a slected area while holding [Alt] to remove from selection.
This is a sample where multiple uses of the select told selected the background:
3. Click on an
Click again on an unselected area while holding the [Shift] to a
Note: Sometimes it is easier to select the background, and use the inverse selection to reverse the selected and unselected area.
Deselect Deselect unselect everything on the photo.
Invert
Swaps the selected and unselected areas.
© 2001-2011 Panstoria, Inc. 175

Artisan 4.0 User Guide
Selection Display Selection Display changes the way the selection appears on the screen.
Option Explanation
Moving Selected area is bordered by moving dashes.
Outline Selected area is bordered by dashes.
Inside The selected area appear grayed out.
Outline The unselected area appears grayed out.
Color Selected area appears in color.
© 2001-2011 Panstoria, Inc. 176

Artisan 4.0 User Guide
Color and Light The Color and Light section modifies the selected area.
The options affect only a portion of edit options include:
Color Wash
Curves
Levels
Color Fill
Artistic Filters
Here is an example of Black and White on selected areas (inside selection).
the image. The
B&W
Sepia
Light
Color Balance
Hue and saturation
© 2001-2011 Panstoria, Inc. 177

Artisan 4.0 User Guide
Here is a preview on unselect areas (outside selection).
© 2001-2011 Panstoria, Inc. 178

Artisan 4.0 User Guide
Focus Section The Focus section allows you to adjust the focus of the photo. You can soften, sharpen, or
cleanup the image.
Applying Soften Soften makes the picture less focused, providing a nice blur effect.
The Soften dialog includes several options: Soften, Soft focus, and Blur.
Applying focus is more than just taking the blur out of a blurry image. You can soften the edges
of portraits and other scenes, making an image more romantic.
Soften Filter Example
You can apply a wash of soften across your entire
image automatically, including the edges. Choose
Soften > Soften.
© 2001-2011 Panstoria, Inc. 179

Artisan 4.0 User Guide
Soften Filter Example
Soft focus is softening the edges of portraits and
other scenes. Choose Soften > Soft Focus.
The Blur Tool blurs the entire photo. Choose Soften >
Blur.
© 2001-2011 Panstoria, Inc. 180

Artisan 4.0 User Guide
Applying SharpenSharpening is about restoring edges that have been lost during the photo‐taking process. While
er to soften the overall effect, in other images,
age contents.
The Sharpen dialog includes Sharpen and Sharpen more. You can also use custom options to
control the range and threshold for sharpening.
you may want fuzzy edges in a photograph, in ord
you will want to sharpen the lines of the im
Sharpen Filter Example
Sharpen starts to bring out the edges in a soft or
slightly blurry image. In many cases, but not all,
Sharpen may improve a slightly out‐of‐focus image.
Choose Sharpen > Sharpen.
Sharpen More brings out the edges in the
composition of the image. In the example shown,
notice how the edges of the sculpture begin to slightly
p after the filter is applied. Choose Sharpen >
Sharpen More.
po
© 2001-2011 Panstoria, Inc. 181

Artisan 4.0 User Guide
Cleaning Up Photos The Cleanup tool has two options: Median and Despeckle.
Median The median option is normally used to reduce noise in an element. To reduce noise, perform the
following steps:
1. Select an element on the page.
2. Click Cleanup in the Focus section.
3. Select Medianin the drop-down menu. Click More options to see the slider.
4. Adjust the Range slider.
5. Click OK to accept the changes.
This is the original image. This is the image after removing the noise
with the median slider.
© 2001-2011 Panstoria, Inc. 182

Artisan 4.0 User Guide
Despeckle Sometimes an item appears to have spots or speckles. Despeckle applies a filter to the element
to help decrease and remove the speckles. Despeckle differs for every item and you will have to
play with the controls to find the right amount of filter. To apply the Despeckle filter, perform
the following steps:
1. Select an element on the page.
ck Cleanup in the Focus section.
Click More options to see the sliders.
2. Cli
3. Select Despeckle .
4.
5. Adjust the Range slider. Range controls the amount of smoothing applied by the filter.
r. Threshold controls the amount of color allowed into the smoothing. A smaller number looks at less color.
7. Click OK to accept the changes.
6. Adjust the Threshold slide
This is the original image. This is the image after adjusting the range and threshold.
© 2001-2011 Panstoria, Inc. 183

Artisan 4.0 User Guide
Using the Photo in Frame Section The Photo in Frame section allows you to rotate and zoom your images. These options rotate
the photo within the frame, but do not rotate the frame itself.
Rotate To rotate a photo, perform the following steps:
1. Select the photo on the page.
2. Click the correct rotation icon. Continue clicking the icon until the image has rotated correctly.
Icon Explanation
Rotate counter-clockwise.
Flip either horizontally or vertically, depending on the orientation of the image.
Rotate clockwise.
© 2001-2011 Panstoria, Inc. 184

Artisan 4.0 User Guide
Zoom Photo To zoom in on a specific location in a photo, perform the following steps:
1. Select the photo on the page.
2. Drag the zoom slider until you are at the desired magnification.
3. Grab the p oto with your mouse and drag until the correct portion of the photo is displayed.
h
Before Zoom After Zoom
4. You hoto by using the blue handle on a selected item.
can also zoom in on a p
© 2001-2011 Panstoria, Inc. 185

Artisan 4.0 User Guide
Frames Section
The Frames se es tools to: ction provid
Select a mat
Select a frame
Customize mats and frames
Sample and apply frame
Sampling Applying a Frame You can sample any existing frame to apply its frame style and mat to other elements on your
he object with the frame you would like to sample.
2. Click Sample frame.
3. Select the object you would like to apply the frame to.
4. Click Apply frame.
pages. To Sample a frame:
1. Select t
© 2001-2011 Panstoria, Inc. 186

Artisan 4.0 User Guide
Selecting a Mat You can add a mat to any object.
To add a mat around a photo, perform the following steps:
on the page.
The Basic Mats dialog box appears.
1. Select the photo
2. Click the Select Mat button.
© 2001-2011 Panstoria, Inc. 187

Artisan 4.0 User Guide
3. Choose the appropriate settings:
Option Explanation
Change Mat Fill
Select an option from the drop‐down. You can choose to
fill the mat with papers, colors, or gradients. For more
information, refer to the following:
Using the Color Fill
Using the Color Palette
Using the Gradient Fill
Using the Paper Fill
Width Use the slider to set the width of the mat.
Note: To remove a mat, set the width to 0.
Cutout If you want the mat to appear as a cutout shape, choose the shape from the popup menu.
Relief Adjust the Relief slider to control the amount of shadow from the image.
4. Choose OK to add the mat.
Tip: After you add a mat, you can then add an edge to soften the matting.
© 2001-2011 Panstoria, Inc. 188

Artisan 4.0 User Guide
Using Frame Effects You can choose from several different frame effects for your photos, including full frames and
corner effec
ts.
Access the Frame Effects List
ting Mat / Frame Format an Exis
Access the Frame
1. Select an image on your page.
2. elect fr Select Content dialog displays.
Effects List
Click S ame from the Frames section. The
3. Select frames and scroll through to find the one you want.
4. Select the frame you wish and click OK.
5. The new frame is applied to your photo.
© 2001-2011 Panstoria, Inc. 189

Artisan 4.0 User Guide
Customize an Existing Frame
Add New Effects
Remove Effects
Modify Effects
reorganize effects
The effects are stacked on top of each other. The effect on the left appears on top of the effects
to the right.
frame.
You can format an existing mat or frame. You can:
Perform the following steps:
1. Select an image already in a mat or
2. Click Customize.
3. Make any necessary changes.
4. Click OK. The changes are applied to the selected mat/frame.
© 2001-2011 Panstoria, Inc. 190

Artisan 4.0 User Guide
Basic Text Formatting The Font and Paragraph sections display standard word processing options for formatting text.
You can format an entire text box or simply select the words you wish to change. Unless
ill appear in default style. To learn about setting the default, refer manually modified, all text w
to Inserting Text.
Note: You must have a text box selected to access these options. For more information on adding a text box, refer to Inserting Text.
Tip: However, you can convert You cannot add features such as gradient or edges to text. the text into an image by flattening. To learn more, refer to Flattening Text.
lable as you format your text: The following options are avai
Options Explanation
Click the down arrow to select a font family from the Font Family
dialog box. The dialog box displays all available fonts on your
computer.
View the dialog box.
© 2001-2011 Panstoria, Inc. 191

Artisan 4.0 User Guide
Options Explanation
Click the down arrow to select a font size from the Font Size dialog
box. Sizes are given in points and previewed.
Click the drop-down arrow to select a color from the Color Palette. You can also create your own custom color. To learn more about the Color Palette, refer to Using the Color Palette.
Apply bold, italic or underline to selected text.
These three buttons represent normal alignment, indented, and
bulleted.
View example.
© 2001-2011 Panstoria, Inc. 192

Artisan 4.0 User Guide
Options Explanation
The box represents where the text is aligned relative to the text block. The size of the text block will affect the horizontal and vertical alignment. In the example to the left, the text will align to the top left of the text block.
The margin sets the distance the text is located relative to the edges of the text box.
Using Style Sampling Style Sampling is similar to format paintbrushes in word processing programs. Style sampling is
an easy way to copy a text style allows you to copy the look and style of selected text and apply
it to other pieces of text on your page.
To sample a text style, perfor
1. Find the text style series of words.
m the following steps:
you like and select either the text box or a
Tip: The Style Sampl
2. Select the Sample eyedropper.
3. Select eith r a text box or series of words you want to change.
er can copy font, styles, alignment, color, and more.
e
Tip: By selecting multiple text boxes, you can apply the formatting to several text selections at once.
4. Click the Apply ey
5. The text is now formatted in the same style as your original selection.
edropper.
© 2001-2011 Panstoria, Inc. 193

Artisan 4.0 User Guide
Using the Layout Section You can control the shape of
section. Edit path only appea
your text paragraph, or the path of your text with the Layout
rs when in advanced mode.
Text Shape Text shape controls the shape of a paragraph of text.
2. With the text box selected, choose Text shape from the Layout section.
To format your text as a shape, perform the following steps:
1. Create a text box and enter your text content.
3. Choose the shape you want your text to reflect.
4. Your text is re-shaped.
Tip: You may see the Warning Symbol. To learn more, refer to Removing the Warning Symbol.
© 2001-2011 Panstoria, Inc. 194

Artisan 4.0 User Guide
Before Shape
After Shape
© 2001-2011 Panstoria, Inc. 195

Artisan 4.0 User Guide
Edit Path Edit path allows you to edit the path of your text.
To edit your text path, perform the following steps:
1. Create a text path and enter your text content.
2. With the text box selected, choose Edit path from the Layout section.
3. When you point to a point on the path, it is highlighted.
4. You can click and drag the point to change the path.
5. You can right-click on the point to get the pop-up menu.
6. When you point to the line between points, that segment is highlighted.
7. Right-Click on the segment to get the option to either straighten a curved line, or curve a straight one.
8. Click off the text path to exit edit path mode.
© 2001-2011 Panstoria, Inc. 196

Artisan 4.0 User Guide
Using the Preview Section The View ribbon includes three sections: Preview, and Settings. This topic covers the Preview
Section.
The Preview section includes several different options for viewing your project.
Notes: - If you are working with unbound pages, you will see two different options.
- If you are working with a cover page, you will see options that include Back, Spine, and
Front.
The following icons are used for viewing your project:
Options Explanations
All Displays everything, including item larger than or outside the boundaries of the page. s
Page Displays everything within the boundaries of the page, including the bleed. To learn more
g Bleedabout bleed, refer to Trimming and Printing: Understandin .
Trimmed Displays everything after trimming and previews how the page will look after professional
printing. To learn more about bleed, refer to Trimming and Printing: Understanding Bleed.
Two Pages Displays both pages of the book, although only one page is active for editing. You can click
o the re‐only page to automatically begin editing that page. You will be prompted to save n
the previous page if you have made any changes.
Rotate Rotates the page 90 degrees clockwise.
Back Displays the back page of your book cover.
This option is only available in the cover page view.
Spine Displays only the spine of your book cover.
This option is only available in the cover page view.
Front Displays only the front page of your book cover.
This option is only available in the cover page view.
© 2001-2011 Panstoria, Inc. 197
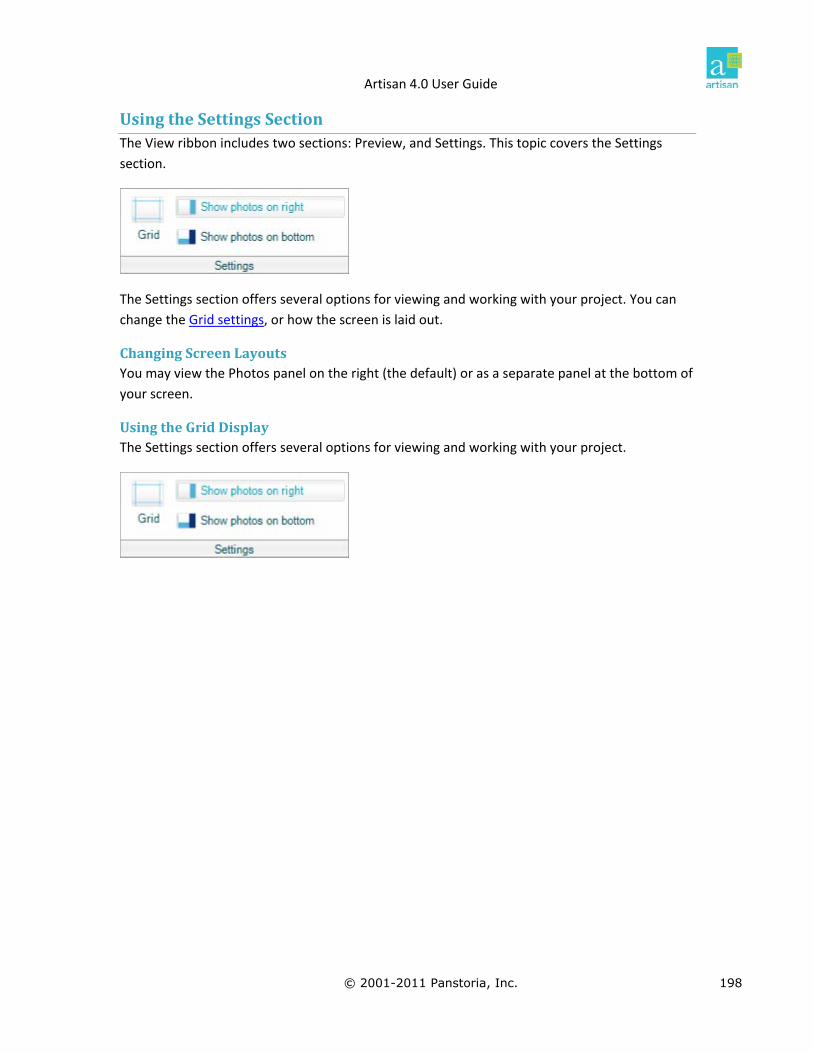
Artisan 4.0 User Guide
Using the Settings Section The View ribbon includes two sections: Preview, and Settings. This topic covers the Settings
section.
The Settings section offers several options for viewing and working with your project. You can
change the Grid settings, or how the screen is laid out.
iew the Photos panel on the right (the default) or as a separate panel at the bottom of
your screen.
Using the Grid Display The S tion offers several options for viewing and ur project.
Changing Screen Layouts You may v
ettings sec working with yo
© 2001-2011 Panstoria, Inc. 198

Artisan 4.0 User Guide
Using the Grid The grid can be turned on, with snap to grids, to help position your elements.
Note: The grid is invisible at all times and cannot be seen.
You can set spacing between grid lines by choosing from a range of preset measurements. The
grid includes an option called snap to grid, which aligns objects to the nearest intersection of
the grid or to another object as you draw or move objects. Turning on snap to grid will not
change the positions or sizes of existin elements and does not restrict positioning set in the
Properties dialog box.
on.
. The Grid Settings dialog box appears. Adjust as necessary.
g
To set grid options, perform the following steps:
1. Click the View ribb
2. Click Grid
Option Explanation
Ruler guides: Show lines
Displays movable lines from the rulers.
Ruler guides: Snap to rulers
Snaps any object placed in the document to the nearest ruler increment.
Rotation Snap Snaps the rotation to the nearest guide. Set the degree to which you want the rotation to snap.
Grid: Show lines Show grid lines on the active page.
Grid: Snap to grid Aligns text, pictures, and other objects as you place or move them on the page
Line color Choose the color for the grid lines on the page.
Grid spacing Choose the amount of spacing for the grid lines.
3. Click Accept.
© 2001-2011 Panstoria, Inc. 199
Artisan 4.0 User Guide
The Content Manager The Content
includes papers, embellishments, shapes, edges, corners, and colors.
Manager is where you store all the elements you want to add to pages. This
in folders in the Library, by categories and by tags.
You can view the kits, a kit preview or the contents.
All these elements are stored in Art Kits. An Art Kit can be a kit you purchase, or one you create
yourself.
Organizing Content You can organize content
Viewing Content
Managing Content You can create an art kit, import an existing content, and manage activation codes.
© 2001-2011 Panstoria, Inc. 200

Artisan 4.0 User Guide
Organizing Content You can organize content three ways.
Options Explanation
Library Library contains folders that you can store art kits in. Built-in Kits is the default
location for those included with Artisan. Personal Art Kits is the default location for created and purchased art kits. You can create additional folders.
Categories You can assign kits to categories that you define. A kit can belong to more than one category.
Tags You can assign individual elements to tags that you define. An element can belong to more than one tag.
Library Library contains folders that you can store art kits in. To view the Library click Libraryin the
ntent section: Co
Options Explanation
All Kits Displays all kits regardless of folder.
Built-in Kits Displayed all kits included with Artisan.
Personal Art Kits
Displays all imported or added kits.
Other You can create addtional folders to organize your art kits.
© 2001-2011 Panstoria, Inc. 201
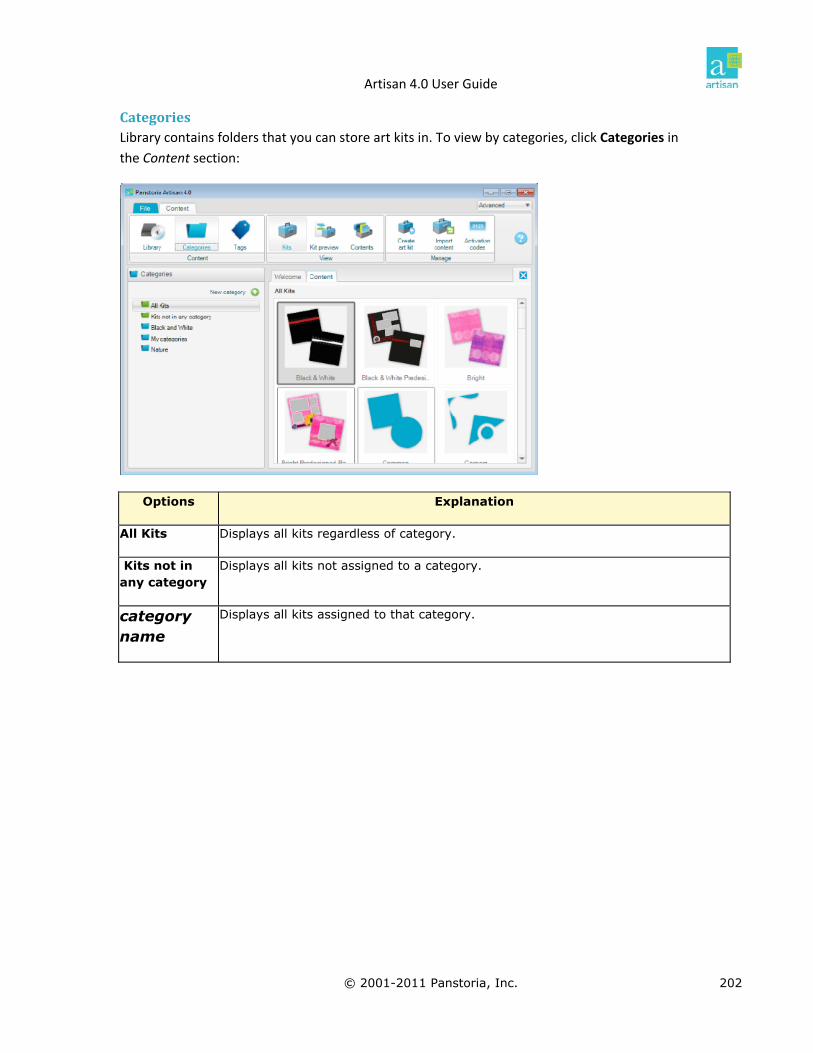
Artisan 4.0 User Guide
Categories Library contains folders that you can store art kits in. To view by categories, click Categories in
the Content section:
Options Explanation
All Kits Displays all kits regardless of category.
Kits not in any category
Displays all kits not assigned to a category.
category name
Displays all kits assigned to that category.
© 2001-2011 Panstoria, Inc. 202

Artisan 4.0 User Guide
Create New Category
ories in the Content section.
2. Click New Category.
1. Click Categ
3. Enter a category name and click OK.
Editing Categories You can rename or delete a category from the category screen.
1. Click Categories in the Content section.
2. Right-Click on the Category.
3. Chose rename to Rename the category, or Delete to delete it.
ssigning Kits to Categories
1. Click Categories in the Content section.
2. Find the art kit you want to categorize.
3. Drag and drop the kit on the desired category.
A
© 2001-2011 Panstoria, Inc. 203
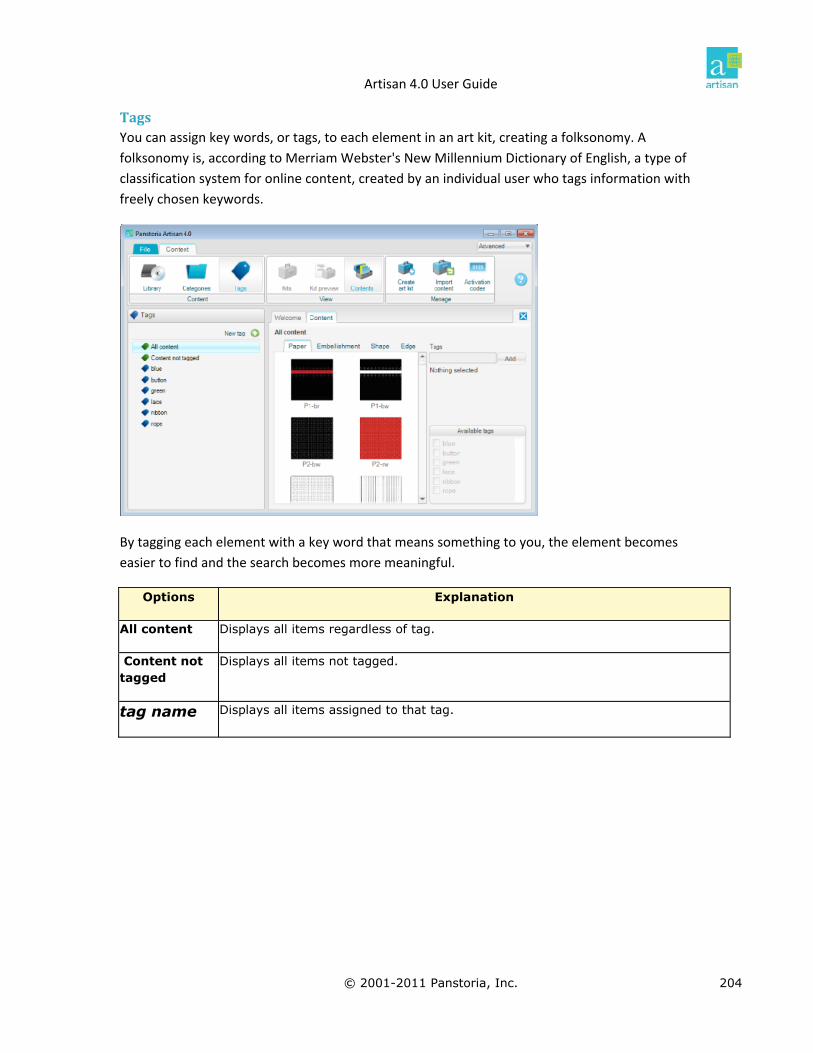
Artisan 4.0 User Guide
Tags You can assign key words, or tags, to each element in an art kit, creating a folksonomy. A
nium Dictionary of English, a type of
ent, created by an individual user who tags information with
freely chosen keywords.
folksonomy is, according to Merriam Webster's New Millen
classification system for online cont
By tagging each element with a key word that means something to you, the element becomes
easier to find and the search becomes more meaningful.
Options Explanation
All content Displays all items regardless of tag.
Content not tagged
Displays all items not tagged.
tag name Displays all items assigned to that tag.
© 2001-2011 Panstoria, Inc. 204

Artisan 4.0 User Guide
Create New Tag
1. Click Tags in the Content section.
2. Click New Tag.
3. Enter a tag name and click OK.
Editing Tags You can rename or delete a tag from the tag screen.
1. Click Tags in the Content section.
2. Right-Click on the Tag.
3. Chose r Delete to delete it. ename to Rename the category, or
© 2001-2011 Panstoria, Inc. 205

Artisan 4.0 User Guide
Tagging Items
1. Click Tags in the Content section.
2. Find the item you want to tag.
3. Drag and drop the item on the desired tag.
Or alternatively:
1. From the Content Manager screen click Tags.
2. Select All content or Content not tagged.
3. If their are multiple types of items, select the one you want (Page, Embellishment, Shapes, or others)
4. Select the item, or items to tag.
5. Select an available tag.
© 2001-2011 Panstoria, Inc. 206
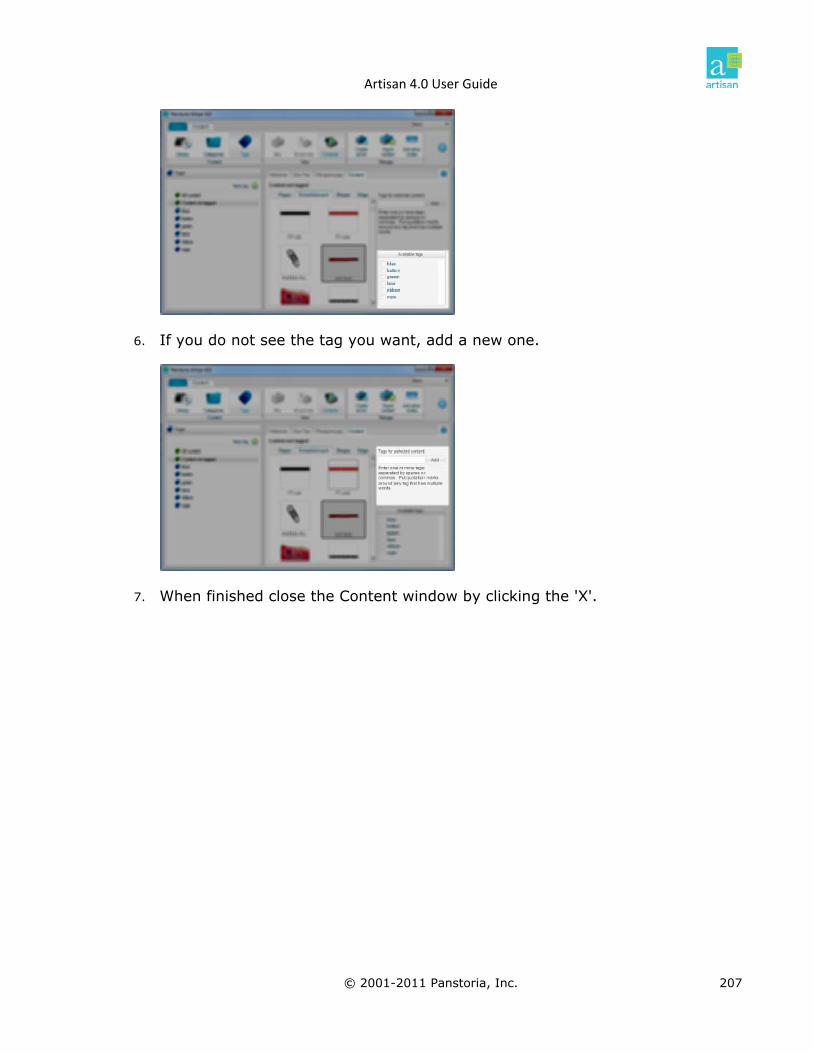
Artisan 4.0 User Guide
6. If you do not see the tag you want, add a new one.
7. When finished close the Content window by clicking the 'X'.
© 2001-2011 Panstoria, Inc. 207

Artisan 4.0 User Guide
Search Using Tags Once you have defined tags for your elements, you can search for specific items.
Learn more about assigning tags.
To search using tags, perform the following steps:
1. From the Content Browser, click Tags.
2. Checkmark the tags you wish to look for.
3. You can choose to show items matching all selected, or any selected.
4. Click Select kit.
5. Your Content panel now displays only items matching your tags.
© 2001-2011 Panstoria, Inc. 208

Artisan 4.0 User Guide
Managing Content You can organize content three ways.
Options Explanation
Create Art Kit Library contains folders that you can store art kits in. Built-in Kits is the default
. Personal Art Kits is the default kits. You can create additional folders.
location for those included with Artisanlocation for created and purchased art
Import Content
You can assign kits to categories that you define. A kit can belong to more than one category.
Activation Codes
You can assign individual elements to tags that you define. An element can belong to more than one tag.
Create Art Kit You can create your own personal library of favorite elements, including papers and
embellishments. You can save free art, art you personally created, or single elements saved
from your projects or created elsewhere. You can view your Personal Art Kits in the Content
Manager.
All of your saved and created items need to be stored in a Personal Art Kit.
Create a New Art Kit To create a new art kit, perform the following steps:
1. Open the Content Manager
2. From the Folders in Library panel, right-click Personal Art Kits.
© 2001-2011 Panstoria, Inc. 209
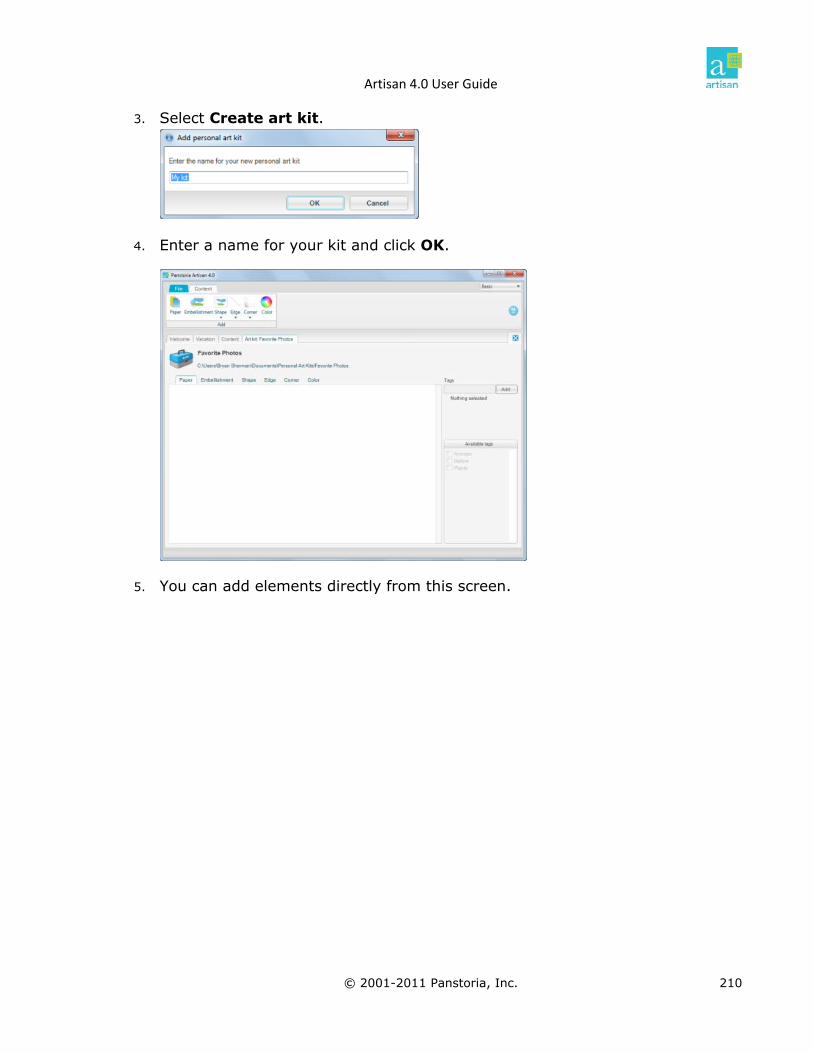
Artisan 4.0 User Guide
3. Select Create art kit.
name for your kit and click OK. 4. Enter a
5. You can add elements directly from this screen.
© 2001-2011 Panstoria, Inc. 210

Artisan 4.0 User Guide
Adding Items in Content Manager You can add items directly from the Art Kit window by using the Content ribbon:
Item Method
Paper Import a graphic (.jpg, .png, .bmp, .tif or .gif format) to be used as a paper.
Embellishment Import a graphic to be used as an embellishment.
Shape Import an existing shape (in .pash or .shape format).
Create a new shape with the editor.
Edge Import an existing edge (in .pash or .shape format). Create a new edge with the editor.
Corner Import an existing corner (in .pash or .shape format). Create a new corner with the editor.
Color Use the Color Picker to create a color.
© 2001-2011 Panstoria, Inc. 211

Artisan 4.0 User Guide
Adding Items from the Work Area You can add an element to a personal Art kit from any page:
1. Right-Click on object.
2. Select Save in personal art kit.
3. Choose options and click Save.
© 2001-2011 Panstoria, Inc. 212
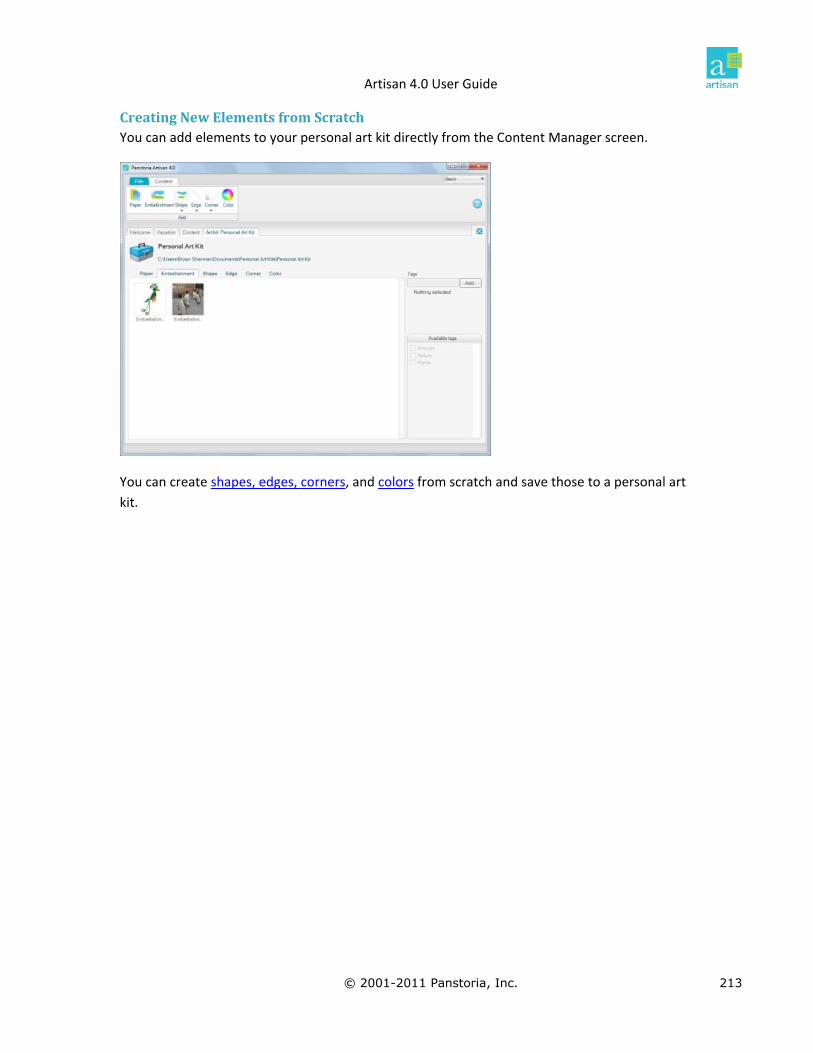
Artisan 4.0 User Guide
Creating New Elements from Scratch e Content Manager screen. You can add elements to your personal art kit directly from th
You can create shapes, edges, corners, and colors from scratch and save those to a personal art
kit.
© 2001-2011 Panstoria, Inc. 213

Artisan 4.0 User Guide
Create a New Element To create a new element, perform the following steps:
1. Open the personal art kit you want to add the element to.
2. In the Create section of the Content ribbon, ClickShape, Edge, or Corner.
3. Choose Create a new shape (or edge, or corner).
4. Using the tools in the Shape editor to draw a new element.
5. Click OK.
© 2001-2011 Panstoria, Inc. 214

Artisan 4.0 User Guide
Create a New Color To create a new element, perform the following steps:
1. Open the personal art kit to add the color to.
2. In the Create section of the Content ribbon, choose Color.
3. Select or create the color you want.
4. Click OK.
Go to Using the Color Palette for more information.
© 2001-2011 Panstoria, Inc. 215

Artisan 4.0 User Guide
Shape Editor The shape editor provides the tools you need to create a shape that can be added to a kit as a
shape, corner, or edge.
To create a shape, you follow these basic steps:
1. Insert a figure (rectangle, ellipse or custom).
2. Edit the figure.
3. Save.
© 2001-2011 Panstoria, Inc. 216

Artisan 4.0 User Guide
Editing Points Click on the line to add a point. If you right‐click on a point, you can select an option from the
shortcut menu.
Option Explanation
Delete Point Deletes the selected point.
Smooth
Straight
Corner
1. Right-click on a point.
2. Select Delete.
Editing lines If you right‐click on a line segment you can change between curved and straight. When you click
on a curved segment you get the option to Make straight:
If you click on a straight segment, you get the option to Make curved:
© 2001-2011 Panstoria, Inc. 217
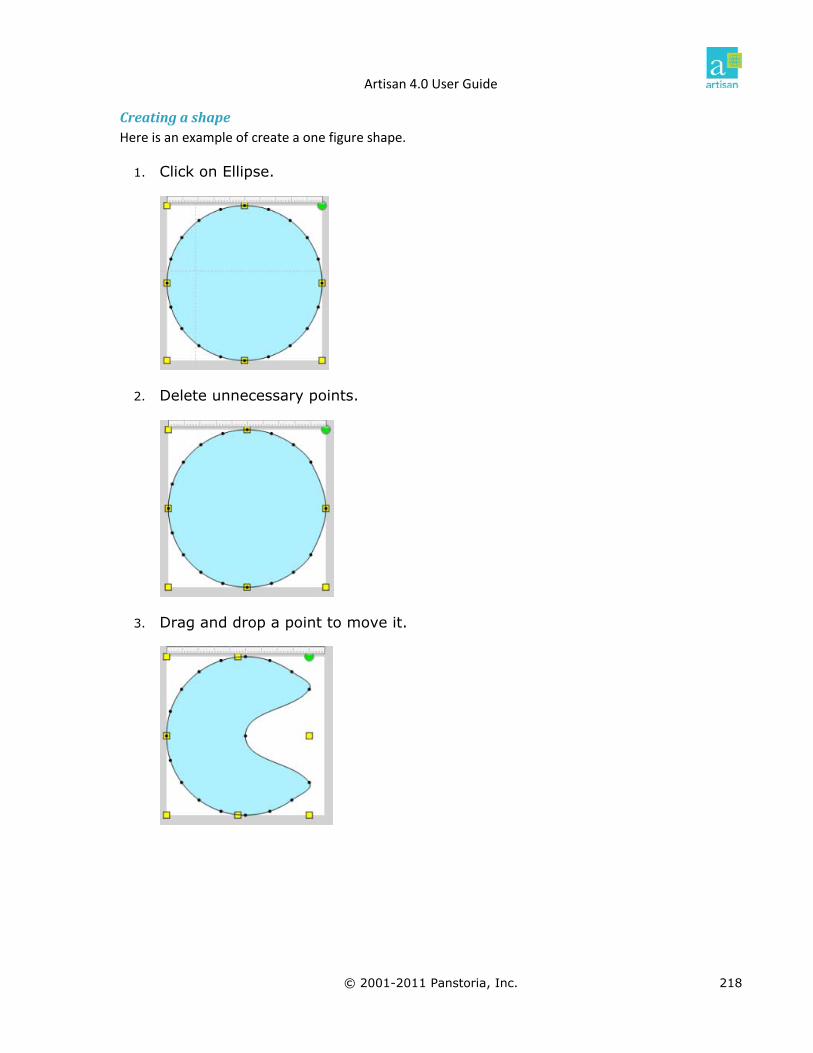
Artisan 4.0 User Guide
Creating a shape
1. Click on Ellipse.
Here is an example of create a one figure shape.
2. Delete nnecessary points. u
Drag and drop a point to move it. 3.
© 2001-2011 Panstoria, Inc. 218

Artisan 4.0 User Guide
4. Straighten lines.
Working with multiple figures You can create multiple figures and use them together to create a new shape. You can choose
how the editor blends selected figures along with background figures.
1. Select the figure(s).
2. Click Blend.
3. Select the option.
© 2001-2011 Panstoria, Inc. 219

Artisan 4.0 User Guide
Importing Content You can easily download new art to use in your projects. To learn more about downloading art,
refer to Downloading New Art. Your art comes in art kits . Once you have downloaded your kits,
you must import the art into Panstoria Artisan 4.0.
Perform the following steps to import art kits into the software:
1. From the Welcome Page, click Manage my content.
2. Click Import content on the Content ribbon.
3. Select Commercial Art Kit.
4. Select your downloaded art kit and click Open.
© 2001-2011 Panstoria, Inc. 220

Artisan 4.0 User Guide
5. If your art kit is displayed with a key in the Content panel, then you need to activate your art kit. Your activation code was provided at checkout when you purchased the art kit.
Note: The Import content button is also available on the Welcome toolbar.
Activating Content You may need to activate your art kit before you can use it. If your package displays a key in the
Content panel, then you require an activation code.
Activate a Kit
1. Click Activation Code in the Manage section. s
2. Click Add a new activation code.
3. Enter your activation code and click OK.
4. A confirmation box displays, informing you exactly what was unlocked.
© 2001-2011 Panstoria, Inc. 221

Artisan 4.0 User Guide
5. Click OK. Your package appears in the Activation Codes list.
6. Enter more codes, or click Close to exit.
© 2001-2011 Panstoria, Inc. 222

Artisan 4.0 User Guide
Back up Your Activation Codes You can make a backup copy of all your activation codes. This is useful in case of computer
malfunctions or when you need to re‐install your software and packages.
Note: You will need to repeat these steps each time you acquire a new activation code.
1. Click Activation Codes in the Mange section.
2. Click Make a backup copy of my codes.
3. Click File > Save As and save the file in the folder of your choice.
Do not delete this file. It is also recommended to print a copy of this file.
Saving a Selected Element You can save out a selection as an individual file
To make a backup copy, perform the following steps:
to use in applications other than Artisan. You
can also save an individual element as content, to build your own Art kit.
© 2001-2011 Panstoria, Inc. 223

Artisan 4.0 User Guide
Save to a File To save an individual selection to your computer, perform the following steps:
1. Select an item on a page.
2. Right-click the item.
3. From the menu, select Save Selection.
4. Select Export to image file.
Note: The copyright notice appears when you are saving a selection that is copyrighted. You can still save the item. However, the copyright imposes a restriction that you can only use the item within the software. You must click the checkbox to accept responsibility. Often, the copyright notice will occur when you are working with elements or modified elements originally part of a downloaded art kit.
5. The Save As dialog box appears. You can save your item in any location.
© 2001-2011 Panstoria, Inc. 224

Artisan 4.0 User Guide
Save to an Art Kit viewable in the
Content Manager.
To save an item as content, perform the following steps:
Select an item on a page.
2. Right-click the item.
3. From the menu, select Save Selection.
4. Select Save in personal art kit.
You can save an individual element to your own collections. Your collections are
1.
Options Explanation
Personal art kit Choose the personal art kit to which you want to add the element from the drop-down menu. To create a new art kit, refer to Creating New Art Kits.
Content type Choose a content type from the drop-down menu. Your choices are embellishments and papers.
File type Choose a file type from the drop‐down menu. You can choose from JPG
and PNG.
Tip: Embellishments should be saved as PNG files. Papers can be saved as PNG or JPG files.
Background color
Use the Color picker to select a background color.
Render with If the item has been rotated, you can choose to save it with the rotation rotation or without.
© 2001-2011 Panstoria, Inc. 225

Artisan 4.0 User Guide
Options Explanation
Image Size Set the resolution for the element. The size updates based on the resolution.
Quality Choose the appropriate resolution from the drop-down menu. A higher resolution is better for printing but results in a larger file size.
5. Click Save. The item is saved to your art kit. You can now access this element from any project.
Renaming a Personal Art Kit You can rename an Art Kit that you created. To rename a collection, perform the following
steps:
1. In the Content panel of the Content Manager, hover your mouse over the art kit you want to rename.
2. Click the drop-down arrow.
3. From the pop-up menu, select Rename.
isplays. Ente4. A dialog box d r the new name for the art kit and click OK.
© 2001-2011 Panstoria, Inc. 226

Artisan 4.0 User Guide
Deleting A l Art Kit You can delete an art kit that you created. To delete a collection, perform the following steps:
1. In the Content he Content Manager, hover your mouse over kit you
2. Click the drop-down
Persona
panel of tthe art want to delete.
arrow.
From the pop-up menu, select Delete. 3.
4. Click OK to confirm.
© 2001-2011 Panstoria, Inc. 227

Artisan 4.0 User Guide
How to Start Scrapping Digitally It's easy to get started with scrapping digitally. All you need are photos, your imagination, and
this software. It's ten easy steps between beginning and publishing.
1. Browse through your photoscreating a scrapbook of a dan
and decide on a theme. Maybe you're ce recital or of your son's baseball season.
Tip: Remember that you do not need to scrapbook every photo, so pick your favorites to showcase.
2. Select an Art Kit that reflects your theme. If a default Art Kit doesn't quite fit the bill, you can purchase and download other Art Kits. You can also create blank pages and create your own design from scratch.
Where can I learn more?
Create a New Project
Downloading New Art
Importing New Art Kits
3. Browse the Content tab in the Tabs panel to find backgrounds and designs that complement your photos. Experiment with paper combinations until you find the perfect design for your theme and photos.
Tip: You can mix and match papers within different art kits and add your own elements as well.
© 2001-2011 Panstoria, Inc. 228

Artisan 4.0 User Guide
Where can I learn more?
Using Panels
Using the Content Tab
4. As you start to design your page, choose a photo or two to showcasSelect a well composed photo with sharp edges, bright colors, and
e.
good lighting.
Tip: You can use the tools in the Format Photos ribbon to spruce up your images.
Where can I learn more?
Importing Photos
Importing Using Drag and Drop
Using the Photos Tab
Using the Quick Fix Section
5. Now you can cut, shape and mat your photos. You can mat your photos with multiple mats or wide edges and easily create
ols work just like scissors or punches. Because itally, you don't have to worry about cutting a photo.
Your original image file is preserved and Panstoria Artisan 4.0 makes its
shapes. The Cutter toyou’re working dig
own copy.
© 2001-2011 Panstoria, Inc. 229

Artisan 4.0 User Guide
Where can I learn more?
Using the Straight Cutter
Using the Custom Cutter
6. You can now add text. A scrapbook is not finished until you have expressed your thoughts. Your scrapbook should evoke pleasant feelings years from now, so make sure you really capture the moment in your narrative.
Where can I learn more?
Inserting and Modifying Text
7. It's time to add embellishments. Embellishments are decorative objects that help fill in the page and define the mood. Use these items sparingly, as you don't want them to detract from your photos and story.
© 2001-2011 Panstoria, Inc. 230
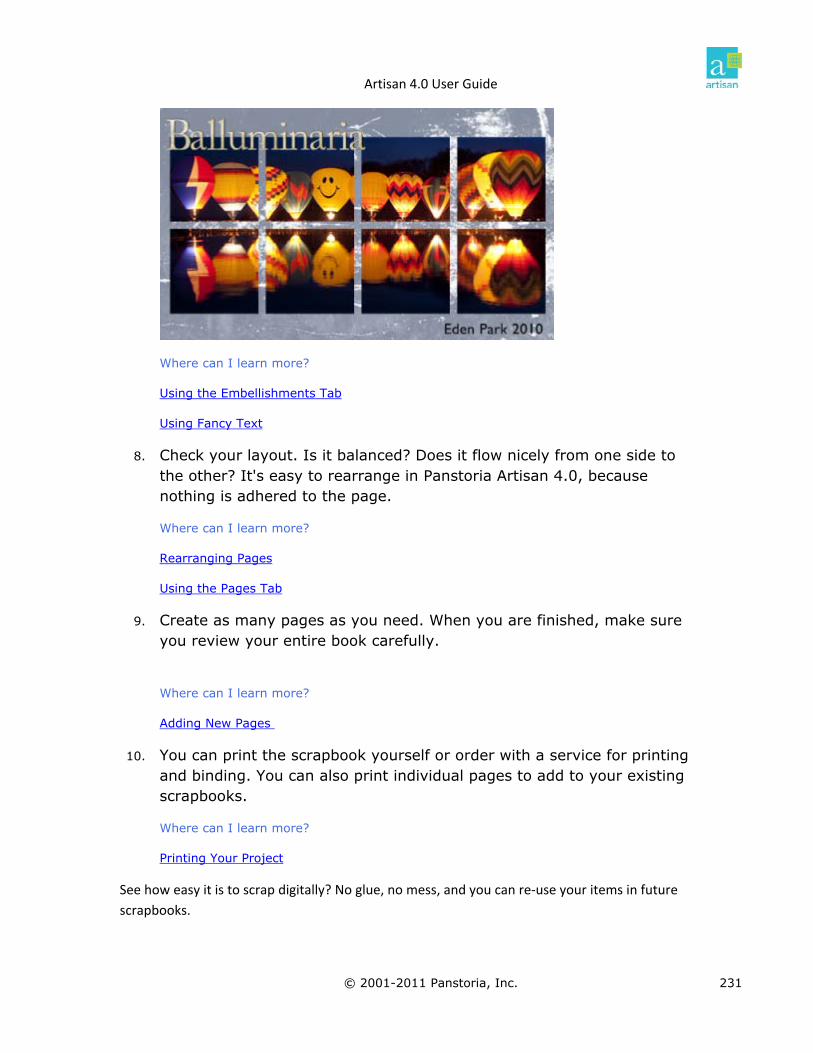
Artisan 4.0 User Guide
Where can I learn more?
Using the Embellishments Tab
Using Fancy Text
8. Check your layout. Is it balanced? Does it flow nicely from one side to the other? It's easy to rearrange in Panstoria Artisan 4.0, because nothing is adhered to the page.
Where can I learn more?
Rearranging Pages
Using the Pages Tab
9. Create as many pages as you need. When you are finished, make sure you review your entire book carefully.
Where can I learn more?
Adding New Pages
10. You can print the scrapbook yourself or order with a service for printing print individual pages to add to your existing
Your Project
and binding. You can alsoscrapbooks.
Where can I learn more?
Printing
See how easy it is to scrap digitally? No glue, no mess, and you can re‐use your items in future
scrapbooks.
© 2001-2011 Panstoria, Inc. 231
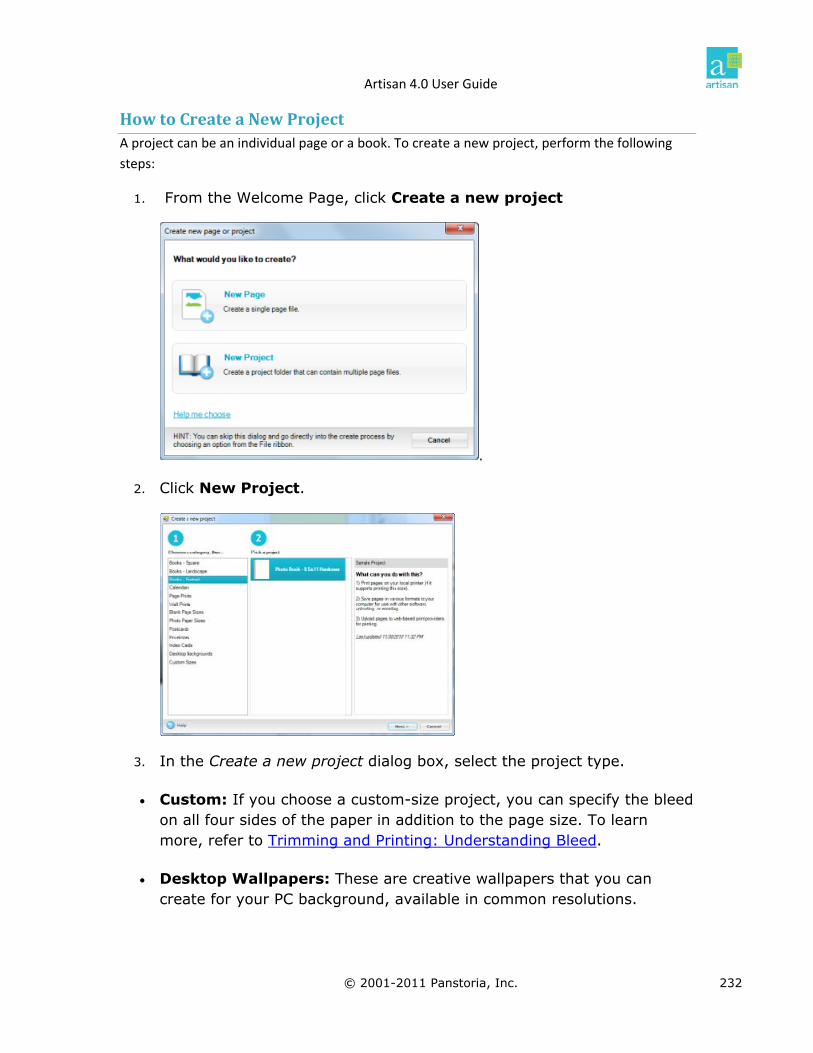
Artisan 4.0 User Guide
How to Create a New Project A project can be an individual page or a book. To create a new project, perform the following
steps:
1. From the Welcome Page, click Create a new project
.
2. Click New Project.
3. In the Create a new project dialog box, select the project type.
Custom: If you choose a custom-size project, you can specify the bleed e paper in addition to the page size. To learn
more, refer to Trimming and Printing: Understanding Bleedon all four sides of th
.
Desktop Wallpapers: These are creative wallpapers that you can create for your PC background, available in common resolutions.
© 2001-2011 Panstoria, Inc. 232

Artisan 4.0 User Guide
4. Select the template for your project by clicking an image in the
Click Next.
hoose to browse photos on your computer, Flickr, Facebook or Picasa.
Template area of the dialog box.
5.
6. Add photos to your project. Click Add Photos You can c
7. After you select the pictures, you can choose to have Artisan automatically place them in the book by selecting the Do you want your photos automatically placed on pages in the project? checkbox
Note: If you have chosen to use a blank template, the auto-populate feature is not available.
© 2001-2011 Panstoria, Inc. 233

Artisan 4.0 User Guide
8. Name your project. Make sure it is a unique and easily identifiabname.
le
9. The project defaults to C:\Users\YourName\Documents\Artisan Projects. If you want to save the project in a differe t location, click Browse. You can also save the project in the Most Recent Location.
n
Notes: - If you choose a new location, your system will save all future projects in that location unless a different location is specified. - The default location may differ slightly in Windows 95.
Tip: Pay attention to where your project is located to avoid "losing" your project.
10. Click Create. creates your new project. This may take a few minutes.
Note: If you are creating custom-sized pages, the Custom Size dialog box appears. To learn more, refer to Setting Custom Sizes.
11. Your new project opens for editing.
© 2001-2011 Panstoria, Inc. 234

Artisan 4.0 User Guide
How to Import Photos You can easily import your digital photos into the software. You can import multiple photos or
one at a time. Photos are displayed in the Photos panel.
1. Click Get photosin the Photos panel .
OR
Select Photo > From My Computer in the Insert ribbon.
2. hotos from Folders dialog box appears. Browse to the The Get Pappropriate location.
3. Select the image(s) you want to add.
Note: You can add multiple images if you access the dialog box through the Photos
tab. You can only select one image if you access the dialog via the Insert ribbon.
© 2001-2011 Panstoria, Inc. 235

Artisan 4.0 User Guide
Tip: To select more than one image, press the CTRL key as you click each image.
folder.
Photos panel.
4. Click Get selected photos to import only the selected images. Click Get all photos to import all photos in the
5. The photos are added to the bottom of the
© 2001-2011 Panstoria, Inc. 236

Artisan 4.0 User Guide
Modifying Lines You can format any line already on your page.
Note: You must first insert a line in order to access this option. To learn more, refer to Inserting Lines.
1. Select a line on the page.
2. Right-click on the line and select Format line.
3. Choose from any of the options in the Lines section.
Option Explanation
Color Choose a new color for the line. Learn more about Using the Color Palette.
Width Change the width of the line, making it wider or thinner.
Compound Style
Change the style of the line.
Start and End Cap
Choose whether or not the line will have rounded end caps.
Dash Style Change the style of the line. This can include solid, as well as a number of dash and dot styles.
Dash Caps Change the ends of the dashes to be flat, round or pointed.
Joints Change the style of any corners in a line.
4. Click OK.
© 2001-2011 Panstoria, Inc. 237

Artisan 4.0 User Guide
How to Add and Format Text Add text to your page by using the Insert ribbon. You can add your own text boxes or use the
text boxes that are embedded in the themes.
age steps:
1. Click Text.
Add Text to a PTo add text to a page, perform the following
2. Pla ext box anywhere on
3. the ha
4. Create
Format Your Text
You ca at the text in the Format Text ribbon
ce the t the page.
Using ndles, resize the box if necessary.
Click . The text box is now available on your page.
n form .
Tip: Y convert ou cannot add features such as gradient or edges to text. However, you canthe tex an image by flattening. To learn more, refer to Flattening Textt into .
© 2001-2011 Panstoria, Inc. 238
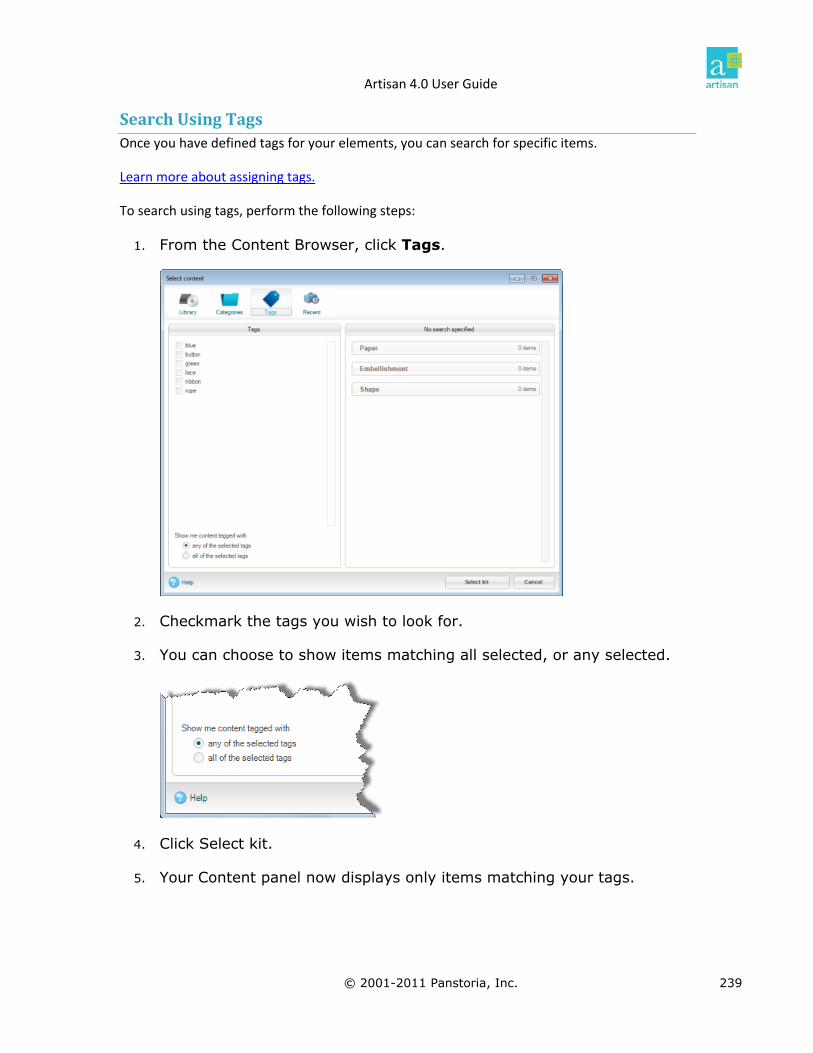
Artisan 4.0 User Guide
Search Using Tags Once you have defined tags for your elements, you can search for specific items.
Learn more about assigning tags.
ntent Browser, click Tags.
To search using tags, perform the following steps:
1. From the Co
2. Checkmark the tags you wish to look for.
3. You can choose to show items matching all selected, or any selected.
4. Click Select kit.
5. Your Content panel now displays only items matching your tags.
© 2001-2011 Panstoria, Inc. 239

Artisan 4.0 User Guide
How to Design Your Cover Page When you're putting together your project, don't forget to design your cover page! The cover
page is a book cover that includes a front, back, and spine. You can easily personalize the cover.
Note: nts and local printer pages do not have the Only books can have a cover page. Page pricover page option.
To view your cover page and make changes, perform the following steps:
1. From the Pages panel, click the Cover.
2. The Cover Page view displays in the work area.
3. Design your cover in the same way you design a page, adding papers, embellishments, photos, and shapes. You can design the back cover, front cover, and spine.
cting the appropriate Preview buttons in the View ribbon. To learn more, refer to
4. You can view the back, spine, and front individually by sele
Using the Preview Section.
5. You can select a different cover template or import an existing cover page.
inished, click Save. 6. When you have f
© 2001-2011 Panstoria, Inc. 240

Artisan 4.0 User Guide
Remove the Cover Page A cover page is optional. To remove the cover page, perform the following steps:
Note: Some book types require a cover page. If your book requires a cover page, the
Remove option will be unavailable.
1. In the Pages panel, click the drop-down arrow beside the page you
3. A confirmation box appears. Click Yes to remove the cover page.
How to Undo an Action
want to remove.
2. From the list, choose Remove page.
Sometimes you may change your mind about an edit, add, or delete. If you change your mind,
click Undo at the top of the page on which you're working. The Undo button is only visible after
a change has been applied to the page.
Note: You may also undo by using CTRL+Z on your keyboard. For more information on keyboard shortcuts, refer to Using Keyboard Shortcuts.
© 2001-2011 Panstoria, Inc. 241

Artisan 4.0 User Guide
How to Switch Between Open Projects Sometimes you'll have more than one project open at a time. It's easy to switch between open
projects. You can easily move between projects (as well as the welcome page and contents
page) by selecting the tab located below the ribbons:
How to Download New Art You can download different art kits and templates from the web. Each art kit includes items
such as papers, embellishments, and shapes. Several of these art kits are free downloads, but
others may incur a small charge.
Note: You must be connected to the Internet to download new art.
To download new art from the web, perform the following steps:
1. Click Buy content from the Welcome page.
2. The web site launches. Browse the web site and download your art kit.
3. Once you have downloaded your art, you will need to import, and in some cases, activate the art kit. For more information, refer to How to Import New Art Kits.
© 2001-2011 Panstoria, Inc. 242

Artisan 4.0 User Guide
Importing Content You can easily download new art to use in your projects. To learn more about downloading art,
refer to Downloading New Art. Your art comes in art kits . Once you have downloaded your kits,
you must import the art into Panstoria Artisan 4.0.
Perform the following steps to import art kits into the software:
1. From the Welcome Page, click Manage my content.
2. Click Import content on the Content ribbon.
3. Select Commercial Art Kit.
4. Select your downloaded art kit and click Open.
© 2001-2011 Panstoria, Inc. 243

Artisan 4.0 User Guide
5. If your art kit is displayed with a key in the Content panel, then you need to activate your art kit. Your activation code was provided at checkout when you purchased the art kit.
Note: The Import content button is also available on the Welcome toolbar.
How to Close a Project ct, perform the
following steps:
1. Save your project.
2. Click the small X in the top right corner of the working area.
You can close a project without exiting the software. To close a single proje
Note: The X in the top right corner of your screen will exit the software.
3. The project closes but the software remains open. If no other projects are open, you are returned to the Welcome Page.
© 2001-2011 Panstoria, Inc. 244

Artisan 4.0 User Guide
Using Keyboard Shortcuts There are many keyboard shortcuts in the software. As you use the software more and mo
you'll appreciate the convenience of these shortcuts.
re,
Shortcut Explanation
Delete Deletes the selected object.
Escape Stops the current edit.
Ctrl-A Select all.
Ctrl-C Copy selected objects to the clipboard.
Ctrl-X Cut selected objects.
Ctrl-V Paste from the clipboard.
Ctrl-Z Undo an action.
Arrow Keys
Left Move selected objects one pixel left.
Right Move selected objects one pixel right.
Up Move selected objects one pixel up.
Down Move selected objects one pixel down.
Ctrl-Left Move selected objects left by one grid increment.
Ctrl-Right Move selected objects right by one grid increment.
Ctrl-Up Move selected objects up by one grid increment.
Ctrl-Down Move selected objects down by one grid increment.
Shift-Left Shrink width of selected objects by one pixel.
Shift-Right Grow width of selected objects by one pixel.
© 2001-2011 Panstoria, Inc. 245

Artisan 4.0 User Guide
Shortcut Explanation
Shift-Up Shrink height of selected objects by one pixel.
Shift-Down Grow height of selected objects by one pixel
Ctrl-Shift-Left Shrink width of selected objects by one grid increment.
Ctrl-Shift-Right ow width of selected objects by one grid increment. Gr
Ctrl-Shift-Up Shrink height of selected objects by one grid increment.
Ctrl-Shift-Down d objects by one grid increment. Grow height of selecte
Using M hortcutsouse S There are some mouse shortcuts in the software. As you use the software more and more, you'll
appreciate the convenience of these shortcuts.
Shortcut Explanation
Alt-Mouse mousing lets Holding the Alt key down while
you click and pan the current view. The ged when the current selection is not chan
Alt key is pressed.
Shif -Mouse Holding the Shift
than one object. If an object is already
hold the Shift key when you resize an image with your mouse. When you let go of
back on. To learn more about aspect ratio, refer
t
key while mousing lets you select more
selected when it is clicked, then it is unselected.
To temporarily turn off the aspect ratio,
the Shift key, Aspect Ratio is turned
to Adjusting Aspect Ratio.
© 2001-2011 Panstoria, Inc. 246

Artisan 4.0 User Guide
Differentiat s and Pages ing BookPanstoria A s yo
When you t, yo ch as an 8x8 or a
12x12 book, or you can create unbound pages that are not associated with any sort of book.
Options within the software ch based on your choice. Unbound pages are both Page Prints
and Local pri e Prints printer pages can
be printed locally.
Unbound p o ything else that you
can imagine. You are not limit oking in the use of unbound pages. For example, you
might use un to creat
To create a new project, whet unbound pages, refer to How to Create a New
rtisan 4.0 allow u to create both books and unbound pages.
create a projec u can choose to create a specific bound book, su
ange
nter pages. Pag and books can be sent for printing. Local
ages can be used t complement your existing scrapbooks or an
ed to scrapbo
bound pages e holiday cards or brochures.
her a book or
Project.
Books can be sent for pri
your photos and memories. printed.
In the Create a new project ted for your
local printer.
nting. You will receive a bound book with a cover page, showcasing
Individual, unbound pages,called Page Prints, can also be
dialog box, you can also select projects that are crea
© 2001-2011 Panstoria, Inc. 247

Artisan 4.0 User Guide
Importing Using Drag and Drop In addition to using the ribbons and buttons within Panstoria Artisan 4.0, you can also drag and
drop items from Windows.
esktop.
5. Drag the element from Windows into Panstoria Artisan 4.0. The element appears on your page.
Perform the following steps to drag and drop an element from Windows:
1. Make sure you can view both the Panstoria Artisan 4.0 page and your Windows d
2. If the element is not on the Windows desktop, open the correct folder.
3. Display both the Windows folder and Panstoria Artisan 4.0 on your desktop.
4. In the Windows folder, grab the element with your mouse.
© 2001-2011 Panstoria, Inc. 248

Artisan 4.0 User Guide
Trimming and Printing: Understanding Bleed As you design your album pages, keep in mind the printing and trimming process.
Understanding bleed and trimming helps you position elements on the page so they are not lost
in printing.
Each page will be slightly trimmed during the printing and binding process. The page is trimmed
not have this capability, but rather print pieces with white
edge.
.0 allows you to easily design a page so that no important page elements are
cut off in printing and no white edges are printed in your project. The View ribbon offers several
at your page
will look like after printing, accounting for bleed.
due to the bleed of the page. Bleed is the term for printing that goes right to the edge of the
paper; however most printers do
margins. These margins are then trimmed down so that it appears the colors go right to the
Panstoria Artisan 4
preview options, including Page and Trimmed. Trimmed view allows you to see wh
Page View: In this image, you can see the entire
“full‐bleed” page, out to the edges. Make sure
that you fill this entire view with a background
paper or color.
Trimmed View: In this image, you can see what the page will look like after trimming. The outer gray outline is the original page size, while the inner black outline is the bounds of the trimmed page. Make sure that all your
important photos, text, and embellishments are inside the trim bounds.
To learn more about the View ribbon, refer to View Ribbon: Using the Preview section.
© 2001-2011 Panstoria, Inc. 249

Artisan 4.0 User Guide
Locking and Hiding Elements If you have several elements on a page, it may be easier to hide one or two while w
others. Hiding does not delete an element. Hiding makes your job easier while designing a page.
orking with
Note: Hidden items do not print.
To hide an element, click the eye icon next to the item in the Elements panel. Click the icon
again to display the item.
If you have several elements on a page, you may accidentally move one or two with your
mouse. In order to keep your elements in the exact place you put them, you can lock them
down. No changes can be made to a locked element.
To lock an element, click the lock icon next to the item in the Elements panel. Click the icon
again to unlock.
Removing the Warning Symbol
Occasionally you may add an element to your page and see the warning symbol.
Symbol Explanation
Your element will not print at best quality. To remove the warning symbol, shrink your element until the symbol disappears. When the symbol is no longer visible, your element will print at best quality.
All of the text is not fitting in the text box or path. Resize the box or path, and remove some text.
You can hide the warning symbol in the User Set
Welcome Page: Adjust User Settings
tings dialog box. To learn more, refer to
.
Note: If you choose to hide or turn off the warning symbol, you will not be notified if your element is at less than best quality.
© 2001-2011 Panstoria, Inc. 250
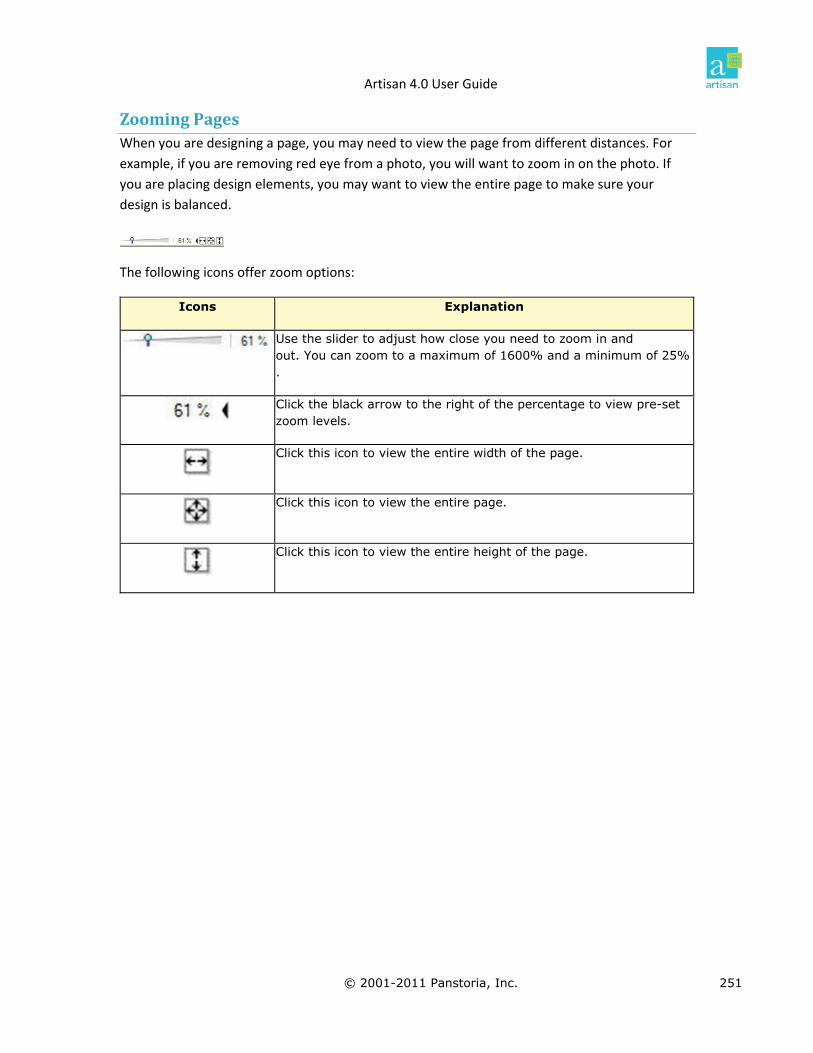
Artisan 4.0 User Guide
Zooming Pages When you are designing a page, you may need to view the page from different distances. For
example, if you are removing red eye from a photo, you will want to zoom in on the photo. If
you are placing design elements, you may want to view the entire page to make sure your
design is balanced.
The following icons offer zoom options:
Icons Explanation
Use the slider to adjust how close you need to zoom in and f 25%out. You can zoom to a maximum of 1600% and a minimum o
.
Click the black arrow to the right of the percentage to view pre-set zoom levels.
Click this icon to view the entire width of the page.
Click this icon to view the entire page.
Click this icon to view the entire height of the page.
© 2001-2011 Panstoria, Inc. 251
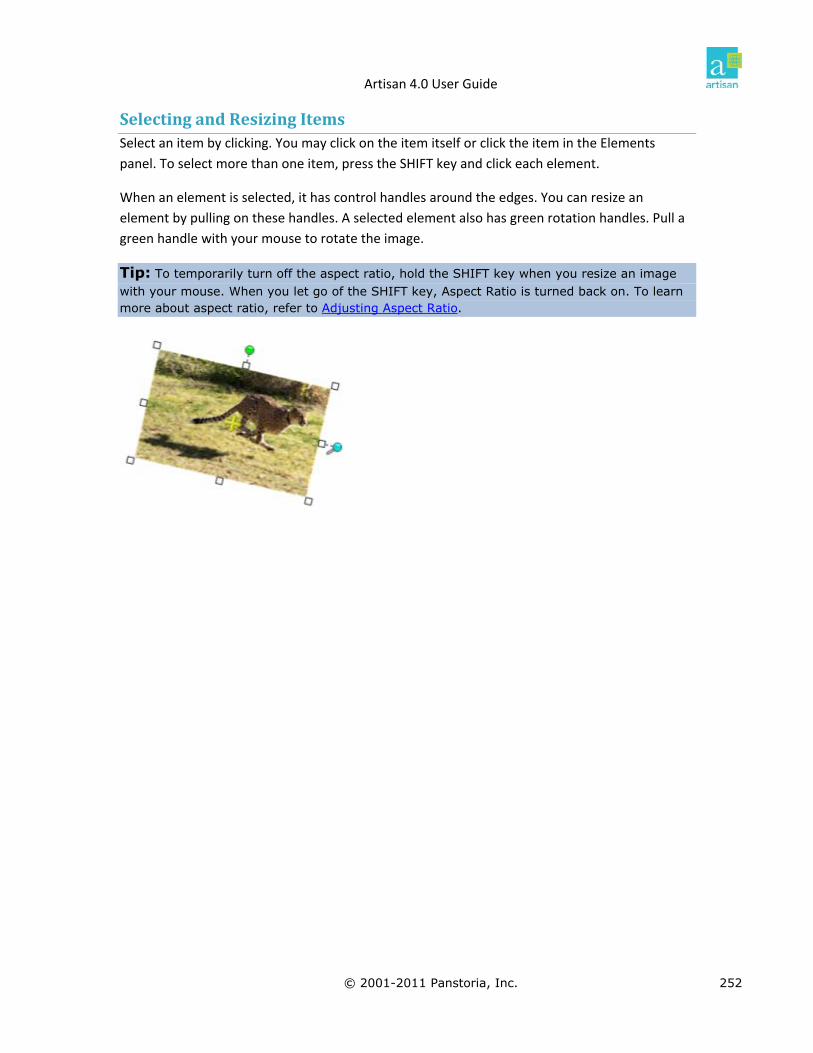
Artisan 4.0 User Guide
Selecting and Resizing Items Select an item by clicking. You may click on the item itself or click the item in the Elements
panel. To select more than one item, press the SHIFT key and click each element.
When an element is selected, it has control handles around the edges. You can resize an
element by pulling on these handles. A selected element also has green rotation handles. Pull a
green handle wit your mouse to rotate the image. h
Tip: To temporarily turn off the aspect ratio, hold the SHIFT key when you resize an image with your mouse. When you let go of the SHIFT key, Aspect Ratio is turned back on. To learn more about aspect ratio, refer to Adjusting Aspect Ratio.
© 2001-2011 Panstoria, Inc. 252

Artisan 4.0 User Guide
Entering Custom Sizes When you are creating a new, custom‐sized page for your local printer, you need to specify
page size. The Custom Size dialog box appears after you have named the new proj
the
ect.
1. From the Create a new project select Custom Sizes.
2. Select your unit of measurement from the drop-down menu.
3. Select the Resolution from the drop-down menu.
4. Enter the width and height for your page. The minimum width and height is 3 inches; the maximum is 24 inches.
5. Enter the trim for the page.
6. Click Save.
7. Provide a name and click Save.
8. Continue creating your project.
© 2001-2011 Panstoria, Inc. 253

Artisan 4.0 User Guide
Adjusting Aspect Ratio The aspect ratio is the ratio of the width of the item to the height. You can choose to leave the
aspect ratio turned on for your elements or set a specific aspect ratio.
To access the aspect ratio options, right‐click an element and click Aspect ratio. The Aspect
Ratio menu appears.
You can unlock the aspect ratio of an item by selecting Unlock aspect ratio. Turning off aspect
to its
size by selecting Restore original aspect ratio.
ct 3x5, 4x6, 5x7, or 8x10
in either portrait or landscape.
ratio and resizing an element corrupts the integrity of the item. You can return the item
original
The other options of the menu allow you to resize the image to a perfe
Tip: To temporarily turn off the aspect ratio, hold the SHIFT key when you resize an image with your mouse. When you let go of the SHIFT key, Aspect Ratio is turned back on.
© 2001-2011 Panstoria, Inc. 254

Artisan 4.0 User Guide
Cropping Photos You may need to crop a photo to a smaller size. Cropping is easy in Panstoria Artisan 4.0. To cro
an image, perform the following steps:
p
s
2. Right-click the photo.
3. Choose Crop from the pop-up menu.
4. The Crop an Image dialog box appears. Adjust your cropping square to the right location.
1. Select a photo. You can select the photo on your page or in the Photopanel.
5. Click Crop. The image is cropped down.
© 2001-2011 Panstoria, Inc. 255

Artisan 4.0 User Guide
Using a Photo as a Fill A fill paints the inside of an enclosed element. You can use one of your photos as a
fill for an element on your page. To use your photo as a fill, perform the following steps:
1. Select the element on your page that you want to fill.
2. Hover your mouse over the photo you want to use.
3. Click the pop-up arrow.
4. From the pop-up menu, select Fill the selected element with this photo.
5. The element is now filled with the photo.
© 2001-2011 Panstoria, Inc. 256

Artisan 4.0 User Guide
Understanding Layering and Flattening When objects are stacked on top of each other, each object is a layer. This is similar
cake, where you might have chocolate cake and vanilla cake separated by icing. The cakes
to a layer
and
icing are all different layers of the cake.
In this example, an embellishment is stacked on a photo that is on a background, creating three
layers.
When you flatten an image, you are combining layers. This is best demonstrated by watching
the Elements panel.
You must have the layers selected you want to combine.
In this example we have flattened (combined) both the embellishment and the photo. Then we
flatten that layer and combine it with the background.
3 layers 2 layers 1 layer
© 2001-2011 Panstoria, Inc. 257

Artisan 4.0 User Guide
Flattening Text You may want to add features to your text. In order to do this, you must first flatten the text.
Perform the following steps:
1. Select your text box.
2. Click Flatten from the Arrange ribbon.
3. Your text is converted to an image.
Note: Once you have flattened text, you can no longer edit the content.
Create Cutout Text
ou can use the wand tool to create your own fancy text. Y
To create simple cutout text, perform the following steps:
Using the Shapes panel,create a solid co1. lor shape on a background.
2. From the text bar, create a text box.
3. Create and format the text and then apply Flatten from the Arrange ribbon.
© 2001-2011 Panstoria, Inc. 258

Artisan 4.0 User Guide
4. Move the text layer on top of the solid layer and select both layers.
5. Apply Flatten from the Layout menu to merge the layers.
Using the Wand Cutter, select the letter. 6.
7. In the Magic Wand dialog box, click Erase the selected area.
8. Your text is created.
© 2001-2011 Panstoria, Inc. 259

Artisan 4.0 User Guide
Creating a Custom Shape by Tracing You can create a custom shape by tracing an image. Perform the following steps:
1. Select an image on your page for tracing.
2. Click Shape from the Insert menu.
3. From the drop-down list, choose either Create a custom shape from ,
depending on your needs. straight lines or Create a custom shape using curved lines
4. Select a color and edge type (straight or curved) for your shape.
Note: For more information on color, refer to Using the Color Palette.
5. Click the workspace. The cursor will display as a cross-hair. Click spots on the paper to draw your shape. Each line will connect.
6. Click as many times as necessary to trace the outline of your image.
© 2001-2011 Panstoria, Inc. 260

Artisan 4.0 User Guide
7. Click Create on the dialog box.
8. Your shape is created. You can now modify and fill the shape as needed.
© 2001-2011 Panstoria, Inc. 261

Artisan 4.0 User Guide
Creating a Translucent Frame Effect You can easily create a translucent frame effect for your elements. In this example, the top layer
has been made translucent, which emphasizes the circled part of the lower layer.
To create this effect, perform the following steps:
1. Decide what element you want to be hidden highlighted.
2. Use the Shapes palette to create a shape in the same size. Make sure the shape is a solid color. In this case, we used light pink.
3. Select the solid shape and adjust the opacity using Opacity from the Format ribbon.
© 2001-2011 Panstoria, Inc. 262

Artisan 4.0 User Guide
4. Place your solid shape on top of your original image.
5. Select the translucent layer. Use a cutter tool to remove a small section. In this example, we used the Ellipse cutter.
6. Your image is complete. You may want to group the image.
© 2001-2011 Panstoria, Inc. 263
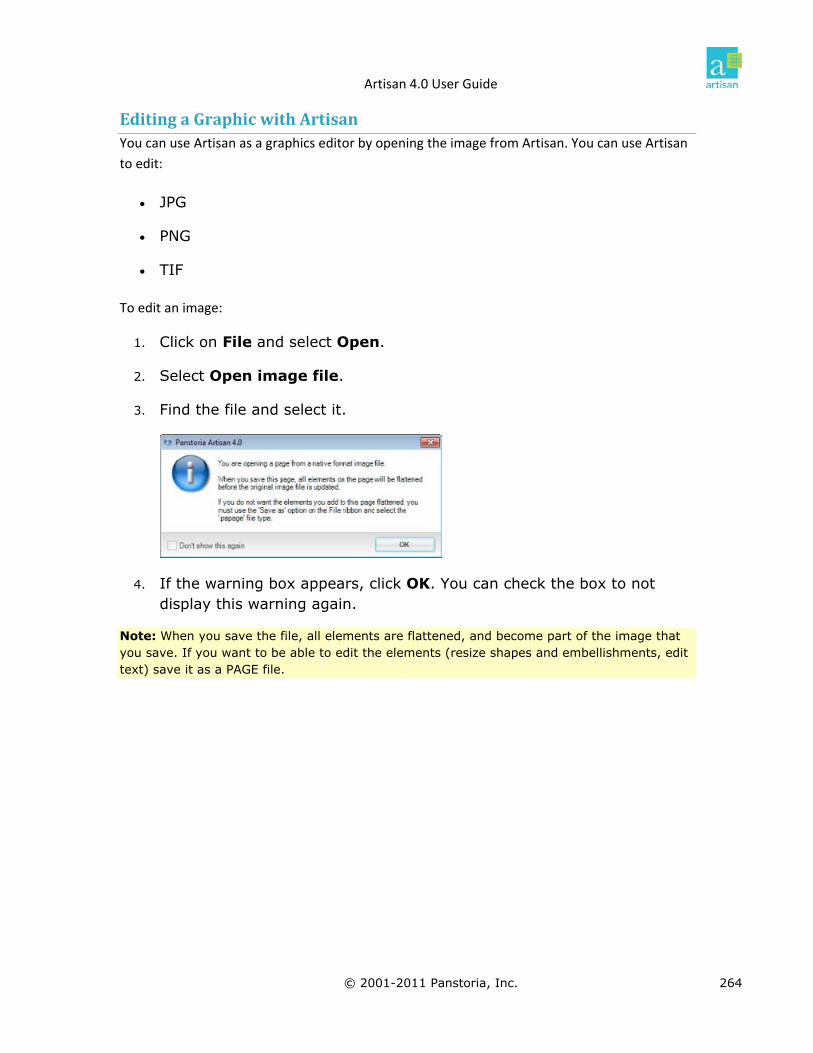
Artisan 4.0 User Guide
© 2001-2011 Panstoria, Inc. 264
Editing a Graphic with Artisan You can use Artisan as a graphics editor by opening the image from Artisan. You can use Artisan
to edit:
JPG
PNG
To edit an image:
1. Click on File and select Open.
2. Select Open image file.
TIF
3. Find the file and select it.
4. If the warning box appears, click OK. You can check the box to not display this warning again.
Note: When you save the file, all elements are flattened, and become part of the image that you save. If you want to be able to edit the elements (resize shapes and embellishments, edit text) save it as a PAGE file.