Embed Size (px)
Citation preview
Emsisoft Ltd - [email protected] - www.emsisoft.com Page 2
Contents
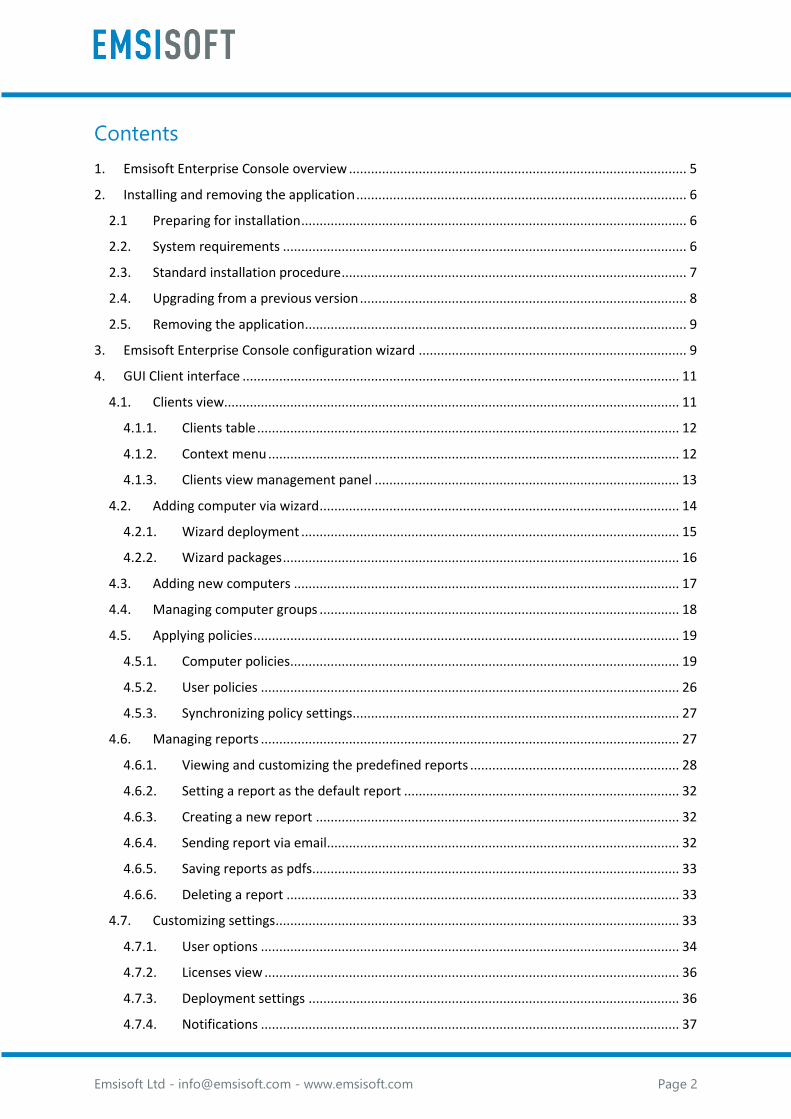
1. Emsisoft Enterprise Console overview ............................................................................................ 5
2. Installing and removing the application .......................................................................................... 6
2.1 Preparing for installation ......................................................................................................... 6
2.2. System requirements .............................................................................................................. 6
2.3. Standard installation procedure .............................................................................................. 7
2.4. Upgrading from a previous version ......................................................................................... 8
2.5. Removing the application ........................................................................................................ 9
3. Emsisoft Enterprise Console configuration wizard ......................................................................... 9
4. GUI Client interface ....................................................................................................................... 11
4.1. Clients view............................................................................................................................ 11
4.1.1. Clients table ................................................................................................................... 12
4.1.2. Context menu ................................................................................................................ 12
4.1.3. Clients view management panel ................................................................................... 13
4.2. Adding computer via wizard .................................................................................................. 14
4.2.1. Wizard deployment ....................................................................................................... 15
4.2.2. Wizard packages ............................................................................................................ 16
4.3. Adding new computers ......................................................................................................... 17
4.4. Managing computer groups .................................................................................................. 18
4.5. Applying policies .................................................................................................................... 19
4.5.1. Computer policies .......................................................................................................... 19
4.5.2. User policies .................................................................................................................. 26
4.5.3. Synchronizing policy settings......................................................................................... 27
4.6. Managing reports .................................................................................................................. 27
4.6.1. Viewing and customizing the predefined reports ......................................................... 28
4.6.2. Setting a report as the default report ........................................................................... 32
4.6.3. Creating a new report ................................................................................................... 32
4.6.4. Sending report via email................................................................................................ 32
4.6.5. Saving reports as pdfs.................................................................................................... 33
4.6.6. Deleting a report ........................................................................................................... 33
4.7. Customizing settings .............................................................................................................. 33
4.7.1. User options .................................................................................................................. 34
4.7.2. Licenses view ................................................................................................................. 36
4.7.3. Deployment settings ..................................................................................................... 36
4.7.4. Notifications .................................................................................................................. 37
Emsisoft Ltd - [email protected] - www.emsisoft.com Page 3
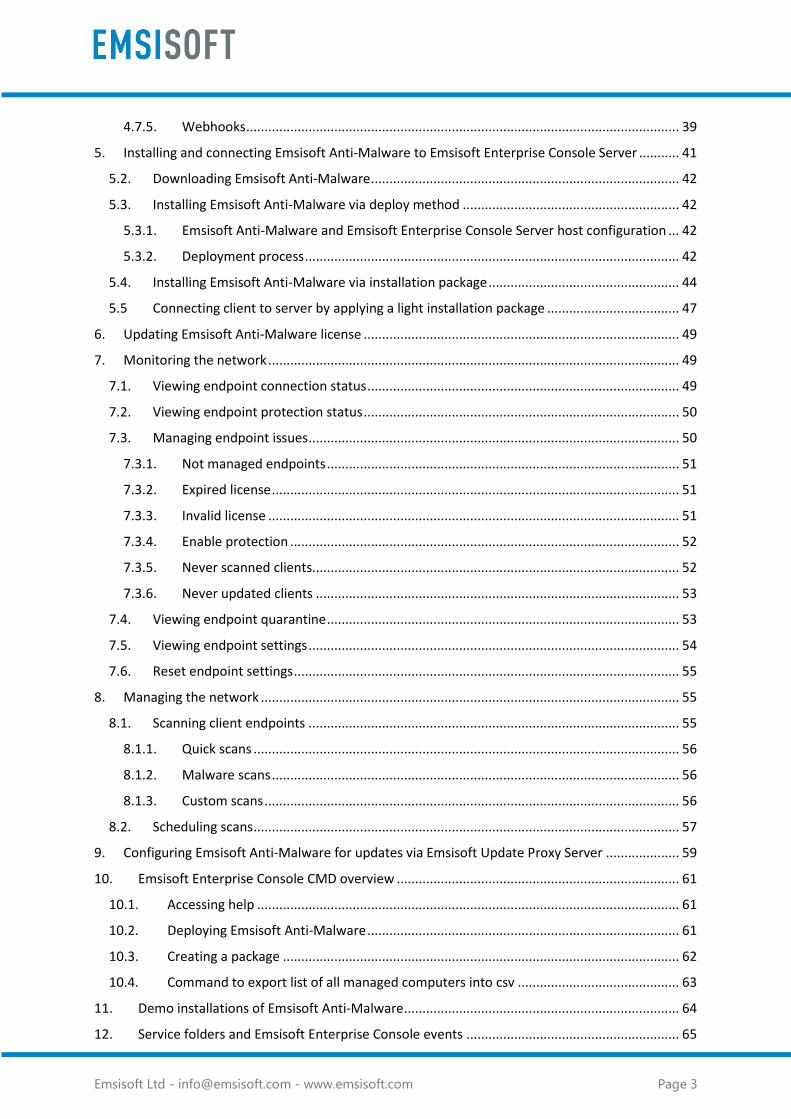
4.7.5. Webhooks ...................................................................................................................... 39
5. Installing and connecting Emsisoft Anti-Malware to Emsisoft Enterprise Console Server ........... 41
5.2. Downloading Emsisoft Anti-Malware .................................................................................... 42
5.3. Installing Emsisoft Anti-Malware via deploy method ........................................................... 42
5.3.1. Emsisoft Anti-Malware and Emsisoft Enterprise Console Server host configuration ... 42
5.3.2. Deployment process ...................................................................................................... 42
5.4. Installing Emsisoft Anti-Malware via installation package .................................................... 44
5.5 Connecting client to server by applying a light installation package .................................... 47
6. Updating Emsisoft Anti-Malware license ...................................................................................... 49
7. Monitoring the network ................................................................................................................ 49
7.1. Viewing endpoint connection status ..................................................................................... 49
7.2. Viewing endpoint protection status ...................................................................................... 50
7.3. Managing endpoint issues ..................................................................................................... 50
7.3.1. Not managed endpoints ................................................................................................ 51
7.3.2. Expired license ............................................................................................................... 51
7.3.3. Invalid license ................................................................................................................ 51
7.3.4. Enable protection .......................................................................................................... 52
7.3.5. Never scanned clients.................................................................................................... 52
7.3.6. Never updated clients ................................................................................................... 53
7.4. Viewing endpoint quarantine ................................................................................................ 53
7.5. Viewing endpoint settings ..................................................................................................... 54
7.6. Reset endpoint settings ......................................................................................................... 55
8. Managing the network .................................................................................................................. 55
8.1. Scanning client endpoints ..................................................................................................... 55
8.1.1. Quick scans .................................................................................................................... 56
8.1.2. Malware scans ............................................................................................................... 56
8.1.3. Custom scans ................................................................................................................. 56
8.2. Scheduling scans .................................................................................................................... 57
9. Configuring Emsisoft Anti-Malware for updates via Emsisoft Update Proxy Server .................... 59
10. Emsisoft Enterprise Console CMD overview ............................................................................. 61
10.1. Accessing help ................................................................................................................... 61
10.2. Deploying Emsisoft Anti-Malware ..................................................................................... 61
10.3. Creating a package ............................................................................................................ 62
10.4. Command to export list of all managed computers into csv ............................................ 63
11. Demo installations of Emsisoft Anti-Malware ........................................................................... 64
12. Service folders and Emsisoft Enterprise Console events .......................................................... 65
Emsisoft Ltd - [email protected] - www.emsisoft.com Page 4
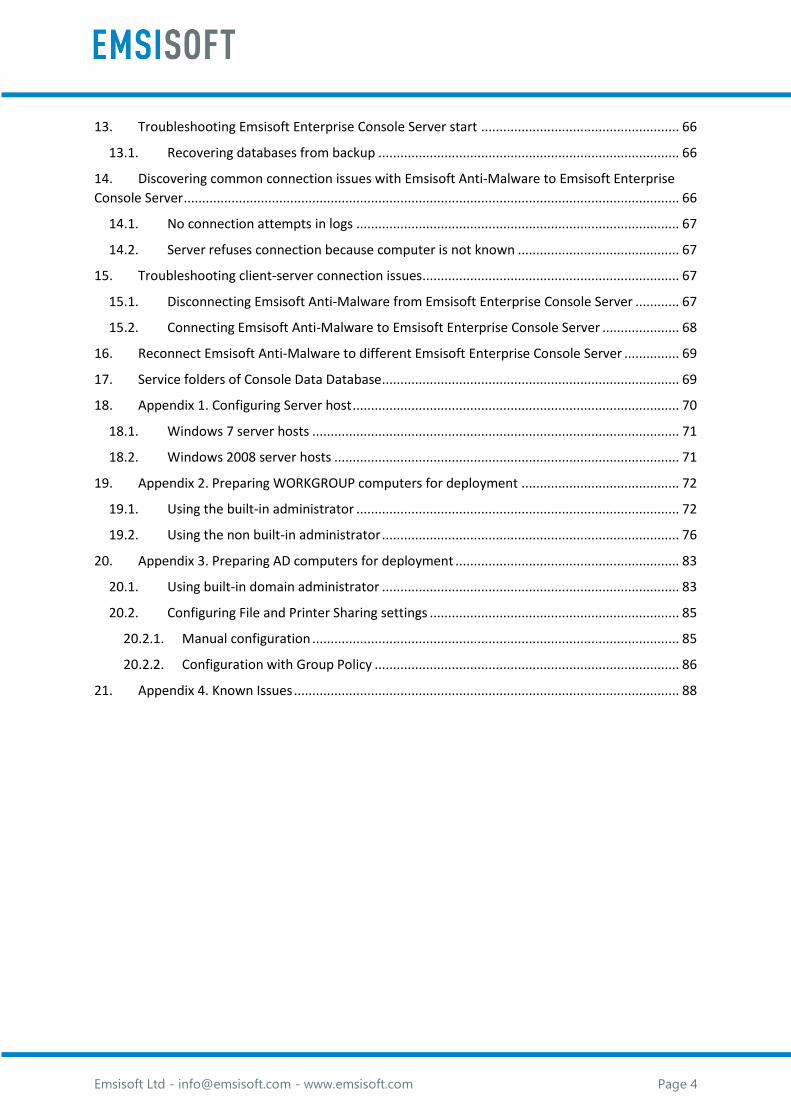
13. Troubleshooting Emsisoft Enterprise Console Server start ...................................................... 66
13.1. Recovering databases from backup .................................................................................. 66
14. Discovering common connection issues with Emsisoft Anti-Malware to Emsisoft Enterprise
Console Server ....................................................................................................................................... 66
14.1. No connection attempts in logs ........................................................................................ 67
14.2. Server refuses connection because computer is not known ............................................ 67
15. Troubleshooting client-server connection issues ...................................................................... 67
15.1. Disconnecting Emsisoft Anti-Malware from Emsisoft Enterprise Console Server ............ 67
15.2. Connecting Emsisoft Anti-Malware to Emsisoft Enterprise Console Server ..................... 68
16. Reconnect Emsisoft Anti-Malware to different Emsisoft Enterprise Console Server ............... 69
17. Service folders of Console Data Database ................................................................................. 69
18. Appendix 1. Configuring Server host ......................................................................................... 70
18.1. Windows 7 server hosts .................................................................................................... 71
18.2. Windows 2008 server hosts .............................................................................................. 71
19. Appendix 2. Preparing WORKGROUP computers for deployment ........................................... 72
19.1. Using the built-in administrator ........................................................................................ 72
19.2. Using the non built-in administrator ................................................................................. 76
20. Appendix 3. Preparing AD computers for deployment ............................................................. 83
20.1. Using built-in domain administrator ................................................................................. 83
20.2. Configuring File and Printer Sharing settings .................................................................... 85
20.2.1. Manual configuration .................................................................................................... 85
20.2.2. Configuration with Group Policy ................................................................................... 86
21. Appendix 4. Known Issues ......................................................................................................... 88
Emsisoft Ltd - [email protected] - www.emsisoft.com Page 5
1. Emsisoft Enterprise Console overview
Emsisoft Enterprise Console is designed to control distributed installations and manage Emsisoft Anti-
Malware on clients and servers on a network. Emsisoft Enterprise Console supports computers on
domain and workgroup networks.
Emsisoft Enterprise Console has the following main components:
Emsisoft Enterprise Console Server Service (starts as EECServer service) - It is the core of the
Emsisoft Enterprise Console solution.
Emsisoft Enterprise Console GUI – GUI client that provides easy access to Server and its
configuration. It also provides a visual status overview of the entire Emsisoft Anti-Malware
network. It can connect to a Server which is installed on the same host or on a different
computer on the network.
Emsisoft Enterprise Console CMD – Command line client that helps to automate the
generation of Emsisoft Anti-Malware installation packages and the deployment of Emsisoft
Anti-Malware to network computers.
Emsisoft Emsisoft Enterprise Console Update Proxy Service (starts as EECUpdateProxy
service) - Serves as an update mirror server for Emsisoft Anti-Malware and also helps to reduce
network traffic.
Emsisoft Ltd - [email protected] - www.emsisoft.com Page 6
2. Installing and removing the application
This chapter contains information regarding installation and removal of Emsisoft Enterprise Console
Server.
2.1 Preparing for installation
Before installing Emsisoft Enterprise Console, make sure that:
The system fulfills all the minimum System requirements.
The computer has an active internet connection.
The computer has access to *.emsisoft.com
The computer is configured properly
Access to *.emsisoft.com is necessary to obtain updates to Emsisoft Enterprise Console, installers for
Emsisoft Anti-Malware, cache signatures by Emsisoft Enterprise Console Update Proxy, etc.
An internet connection is necessary for performing the following actions:
Downloading the installer.
Downloading the additional required software (e.g., if .NET framework and Microsoft Visual
C++ 2010 Redistributable Package are not already installed, Emsisoft Enterprise Console will
download them from Microsoft’s server).
Emsisoft Enterprise Console Server host requires the following TCP ports to be added to firewall
exceptions:
31200 TCP – Allows connections to Emsisoft Enterprise Console Server for management.
31201 TCP – Allows streaming of packages to Emsisoft Enterprise Console GUI Client.
8082 TCP – Allows Emsisoft Anti-Malware connections to Emsisoft Enterprise Console
Server.
8080 TCP – Allows the update proxy to cache Emsisoft Anti-Malware updates to reduce
download traffic in multi-client environments.
Configuration of ports can either be performed manually, set up during the configuration wizard or by
using the following pre-configured batch file (see here for details).
2.2. System requirements
Operating systems:
Windows 2016 Server
Windows 2012R2 Server
Windows 2008R2 Server - 32bit & 64bit
Windows 10 - 32bit & 64bit
Windows 8 - 32bit & 64bit
Emsisoft Ltd - [email protected] - www.emsisoft.com Page 7
Windows 7 SP1 - 32bit & 64bit
Hardware:
Emsisoft Enterprise Console requires an average memory of about 100 MB during normal
operation. We therefore recommend at least 1 GB RAM or ideally 2 GB RAM.
Other requirements:
.NET framework 4.5 or newer
Microsoft Visual C++ 2010 Redistributable Package (x86) or newer
Emsisoft Anti-Malware: Latest stable versions are fully supported.
2.3. Standard installation procedure
Emsisoft Enterprise Console can be downloaded from the official website:
https://www.emsisoft.com/en/software/enterprise/. Once the installer has downloaded locally, perform
the following steps:
1. Login with an admin account.
2. Locate the downloaded file and double click the .exe file to start the installation.
3. Read the license agreement. To accept the agreement and continue, choose Accept and
click Next.
4. Choose the destination location and click Next.
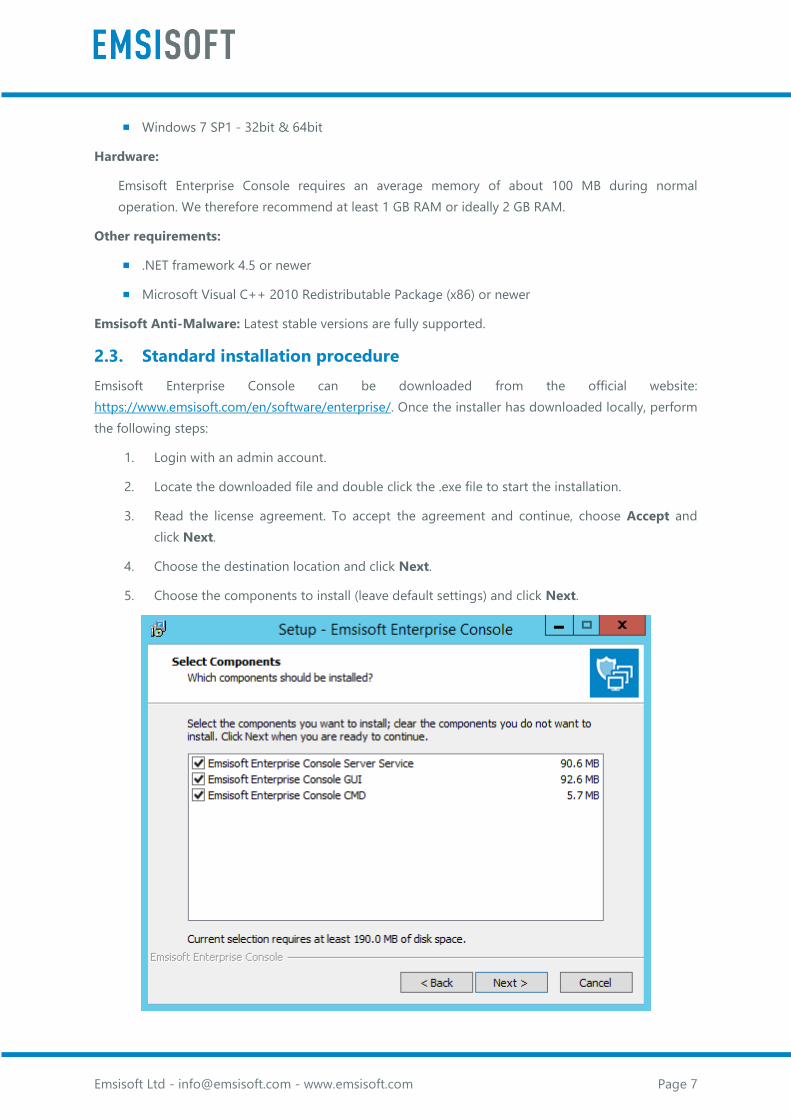
5. Choose the components to install (leave default settings) and click Next.

Emsisoft Ltd - [email protected] - www.emsisoft.com Page 8
6. Choose whether Emsisoft Enterprise Console will be started after installation (leave default
settings) and click Next.
7. Emsisoft Enterprise Console depends on Microsoft Visual C++ 2010 Redistributable, so if this
dependency is not installed on the localhost, an additional step to download and install it is
required. Click Install to start the installation.
8. Once the installation has completed, the GUI Client starts the wizard to configure the most
important settings.
2.4. Upgrading from a previous version
At the beginning of the installation process, Emsisoft Enterprise Console detects if the system already
contains an older application version. If so, it informs the user that a new version will be installed and
requires the user’s confirmation.
If the user chooses to proceed with the update, the regular installation process will follow with the only
difference being that the user will not be able to change the configuration of the selected
components.
Emsisoft Ltd - [email protected] - www.emsisoft.com Page 9
After installation is complete, the user is redirected to Clients view. The new version will preserve all
previous computers, groups and users’ data.
2.5. Removing the application
To uninstall Emsisoft Enterprise Console, the user must complete the following steps:
1. Open Control Panel.
2. Go to Programs > Programs and Features.
3. Right click on Emsisoft Enterprise Console and click on Uninstall.
4. Click Yes (remove Emsisoft Enterprise Console and its components)
5. Emsisoft Enterprise Console should now be uninstalled from the system.
Note: At the end, the uninstaller asks “Do you want to keep settings for future installations?” If the
answer is Yes, the uninstaller does not remove the hidden configuration folder. As a result, the current
settings can be restored during a new installation.
3. Emsisoft Enterprise Console configuration wizard
The configuration wizard requires the user to complete the following steps:
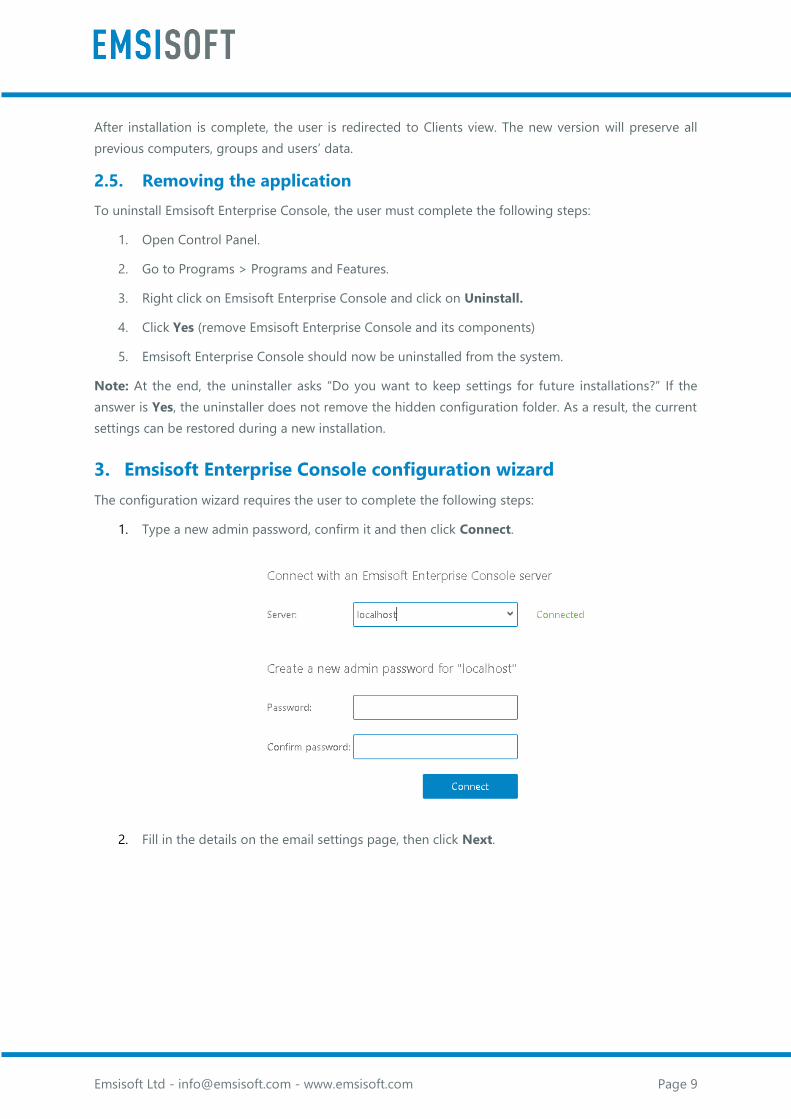
1. Type a new admin password, confirm it and then click Connect.
2. Fill in the details on the email settings page, then click Next.
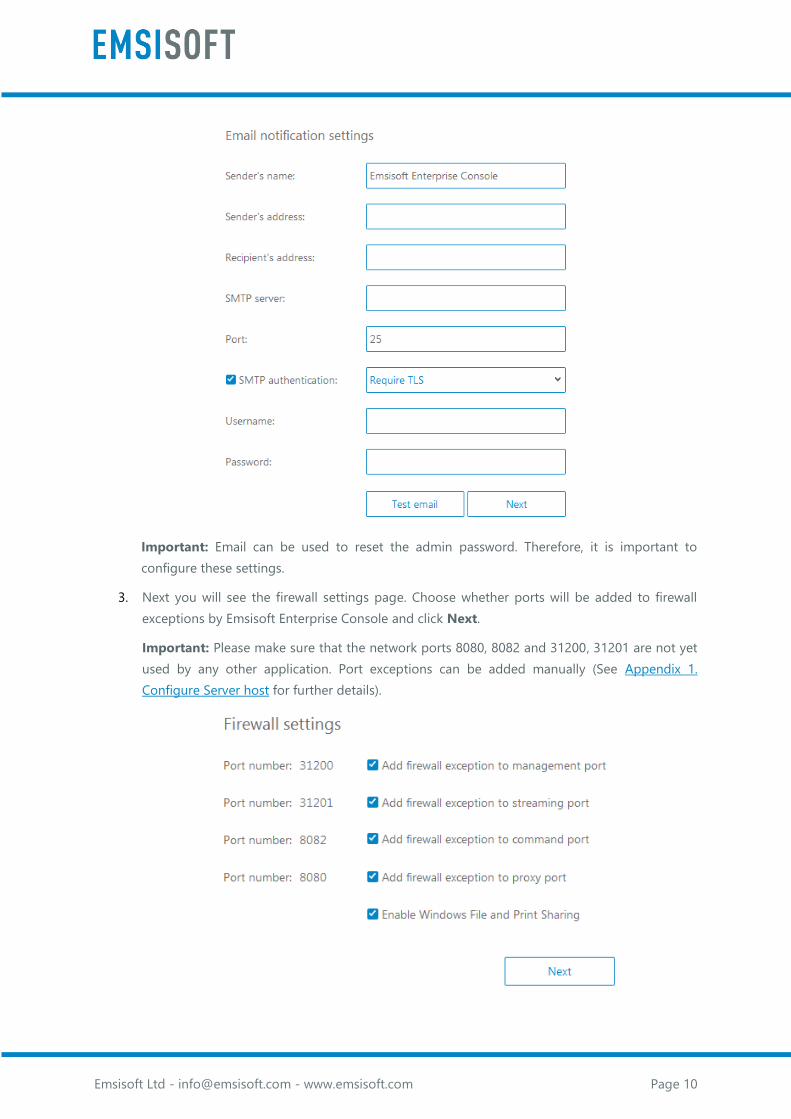
Emsisoft Ltd - [email protected] - www.emsisoft.com Page 10
Important: Email can be used to reset the admin password. Therefore, it is important to
configure these settings.
3. Next you will see the firewall settings page. Choose whether ports will be added to firewall
exceptions by Emsisoft Enterprise Console and click Next.
Important: Please make sure that the network ports 8080, 8082 and 31200, 31201 are not yet
used by any other application. Port exceptions can be added manually (See Appendix 1.
Configure Server host for further details).
Emsisoft Ltd - [email protected] - www.emsisoft.com Page 11
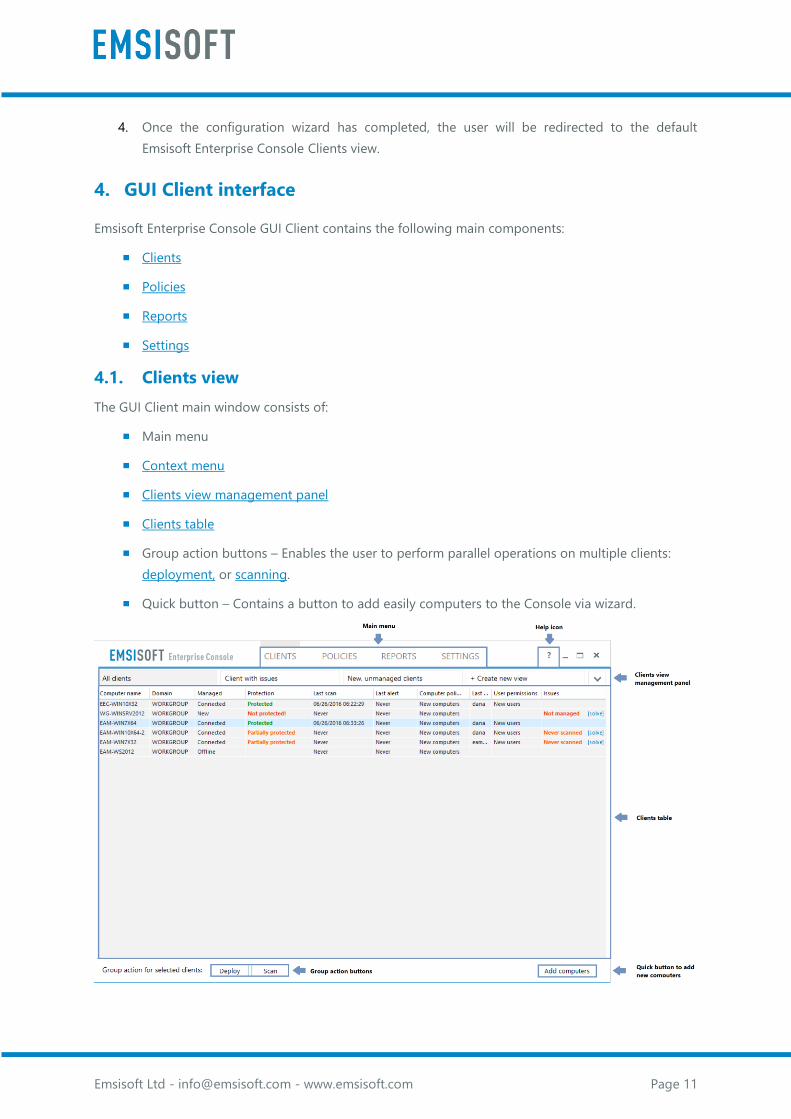
4. Once the configuration wizard has completed, the user will be redirected to the default
Emsisoft Enterprise Console Clients view.
4. GUI Client interface
Emsisoft Enterprise Console GUI Client contains the following main components:
Clients
Policies
Reports
Settings
4.1. Clients view
The GUI Client main window consists of:
Main menu
Context menu
Clients view management panel
Clients table
Group action buttons – Enables the user to perform parallel operations on multiple clients:
deployment, or scanning.
Quick button – Contains a button to add easily computers to the Console via wizard.

Emsisoft Ltd - [email protected] - www.emsisoft.com Page 12
4.1.1. Clients table
The Clients table shows a visual status overview of Emsisoft Anti-Malware on the network. The table
can display many columns, with the most useful ones visible by default:
Computer name – Name of the computer.
IP – Address of the computer as provided by Emsisoft Anti-Malware to the Server.
Domain – Name of the computer’s domain or workgroup.
OS – Operating system of the computer as provided by Emsisoft Anti-Malware to the Server.
Managed – Computer status (New, Connected or Offline). For more details please see
Viewing endpoint connection status section of the document.
Last connected – The last time Emsisoft Anti-Malware connected to the Server.
Version – Shows the installed version of Emsisoft Anti-Malware.
License – Shows license key of Emsisoft Anti-Malware.
Protection – Shows the endpoint protection status (Not Protected, Partially Protected,
Protected). For more details please see Viewing endpoint protection status section of the
document.
Surf Protection – Shows whether Surf Protection is enabled.
File Guard – Shows whether File Guard is enabled.
Behavior Blocker – Shows whether Behavior Blocker is enabled.
Last update - Date when Emsisoft Anti-Malware was last updated.
Last scan – Date when computer was last scanned with Emsisoft Anti-Malware.
Last alert – Date when Emsisoft Anti-Malware last detected malware.
Computer policy – Name of computer group which is applied to Emsisoft Anti-Malware (Note:
When computer policies are updated from Emsisoft Anti-Malware clients, the change will be
highlighted with an [edited] flag in the Clients table)
Last user – Last logged in user of computer.
User permissions – Name of user group that is applied to Emsisoft Anti-Malware.
Findings in the last 24h – Displays detected infections count for the last 24 hours.
Issues – Displays a description of the problem with the client endpoint and a button to solve
the issue. For more details please see the Managing endpoint issues section of the document.
4.1.2. Context menu
The Clients table context menu provides quick access to the following operations:
Deploy – Deploys Emsisoft Anti-Malware to the computer.
Create package – Creates installation package for the computer.
Emsisoft Ltd - [email protected] - www.emsisoft.com Page 13
Scan – Performs a scan by Emsisoft Anti-Malware.
View quarantine – Shows quarantine of Emsisoft Anti-Malware.
Update – Initiates updating of Emsisoft Anti-Malware.
Change license – Changes license of Emsisoft Anti-Malware.
Disconnect Emsisoft Anti-Malware – Disconnects Emsisoft Anti-Malware from the Console.
Uninstall Emsisoft Anti-Malware – Uninstalls Emsisoft Anti-Malware and disconnects it from
the Console.
Delete computer – Deletes computer from the Console.
Show settings – Shows local settings of Emsisoft Anti-Malware.
Reset settings to group policy defaults – Resets settings of Emsisoft Anti-Malware to
configured policies.
Best fit columns
Select columns
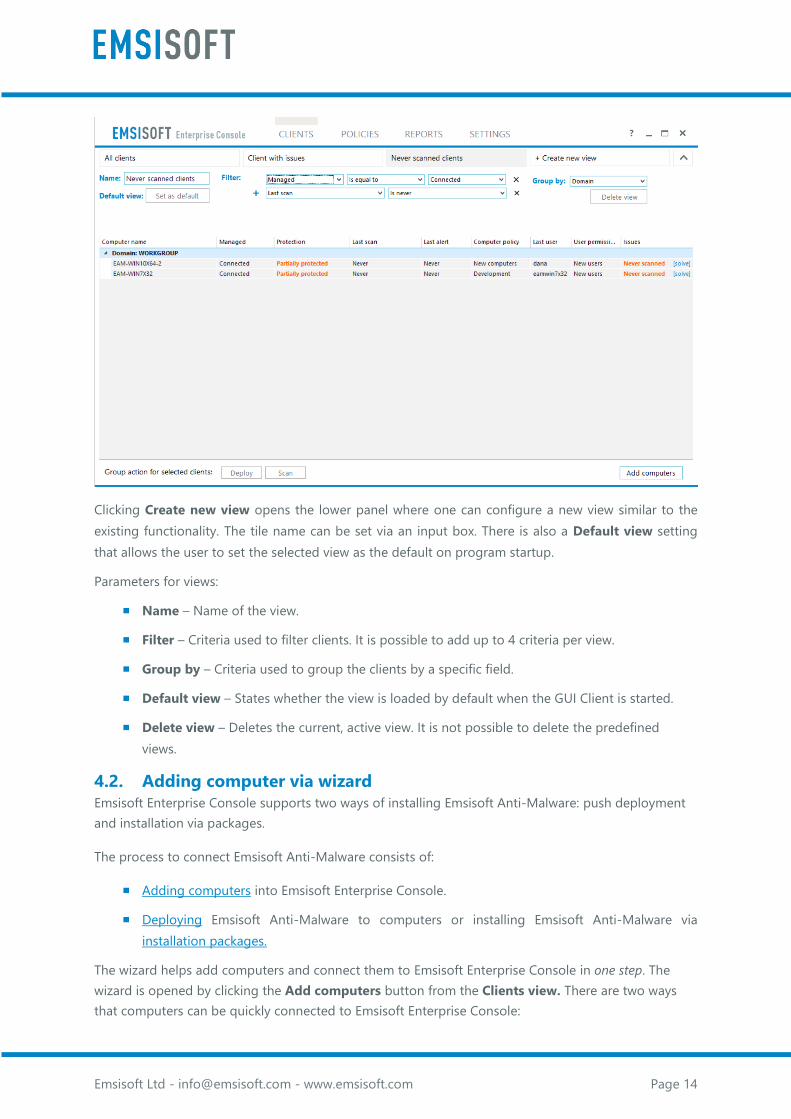
4.1.3. Clients view management panel
The Clients view management panel gives the user the tools to customize the information displayed in
the main Clients table through the filtering and grouping functions:
Filter functionality allows the user to see only the clients matching specified criteria, i.e. show
only clients which are connected.
Grouping functionality helps to group clients based on some specific data fields (i.e. group
clients according to the version of Emsisoft Anti-Malware). It is possible to add up to 12 views
to the GUI Client.
The "All clients", "Clients with issues" etc areas are view shortcut tiles that can be flexibly edited by
admin. By default, Emsisoft Enterprise Console Server comes with a set of three predefined standard
views that can be customized, but cannot be deleted:
All clients – Displays all the clients added to Emsisoft Enterprise Console Server.
Clients with issues – Displays the clients for which the Issues field is not blank.
New unmanaged clients – Displays any online computers that don’t have Emsisoft Anti-
Malware installed.
The arrow on the right side opens the full list of tiles (if there is more than 1 row), plus the settings for
the selected tile.
Emsisoft Ltd - [email protected] - www.emsisoft.com Page 14
Clicking Create new view opens the lower panel where one can configure a new view similar to the
existing functionality. The tile name can be set via an input box. There is also a Default view setting
that allows the user to set the selected view as the default on program startup.
Parameters for views:
Name – Name of the view.
Filter – Criteria used to filter clients. It is possible to add up to 4 criteria per view.
Group by – Criteria used to group the clients by a specific field.
Default view – States whether the view is loaded by default when the GUI Client is started.
Delete view – Deletes the current, active view. It is not possible to delete the predefined
views.
4.2. Adding computer via wizard
Emsisoft Enterprise Console supports two ways of installing Emsisoft Anti-Malware: push deployment
and installation via packages.
The process to connect Emsisoft Anti-Malware consists of:
Adding computers into Emsisoft Enterprise Console.
Deploying Emsisoft Anti-Malware to computers or installing Emsisoft Anti-Malware via
installation packages.
The wizard helps add computers and connect them to Emsisoft Enterprise Console in one step. The
wizard is opened by clicking the Add computers button from the Clients view. There are two ways
that computers can be quickly connected to Emsisoft Enterprise Console:
Emsisoft Ltd - [email protected] - www.emsisoft.com Page 15
Wizard deployment
Wizard packages
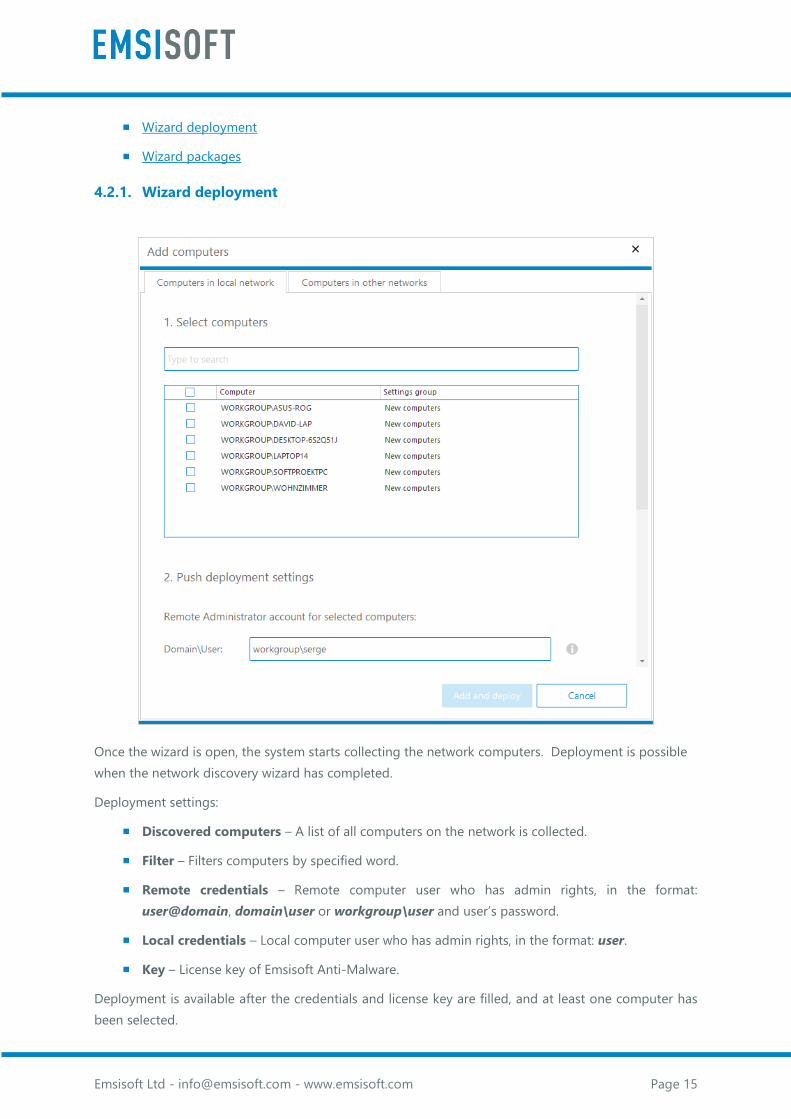
4.2.1. Wizard deployment
Once the wizard is open, the system starts collecting the network computers. Deployment is possible
when the network discovery wizard has completed.
Deployment settings:
Discovered computers – A list of all computers on the network is collected.
Filter – Filters computers by specified word.
Remote credentials – Remote computer user who has admin rights, in the format:
user@domain, domain\user or workgroup\user and user’s password.
Local credentials – Local computer user who has admin rights, in the format: user.
Key – License key of Emsisoft Anti-Malware.
Deployment is available after the credentials and license key are filled, and at least one computer has
been selected.
Emsisoft Ltd - [email protected] - www.emsisoft.com Page 16
Note: In order to install Emsisoft Anti-Malware via the deploy method, both the Emsisoft Anti-Malware
client and Emsisoft Enterprise Console Server hosts must be configured properly. Configuration differs
depending on network type (workgroup or domain), operating systems and the type of user that will
be used for deployment. For more details regarding the configurations, please see Appendix 2.
Preparing WORKGROUP computers for deployment and Appendix 3. Preparing AD computers for
deployment
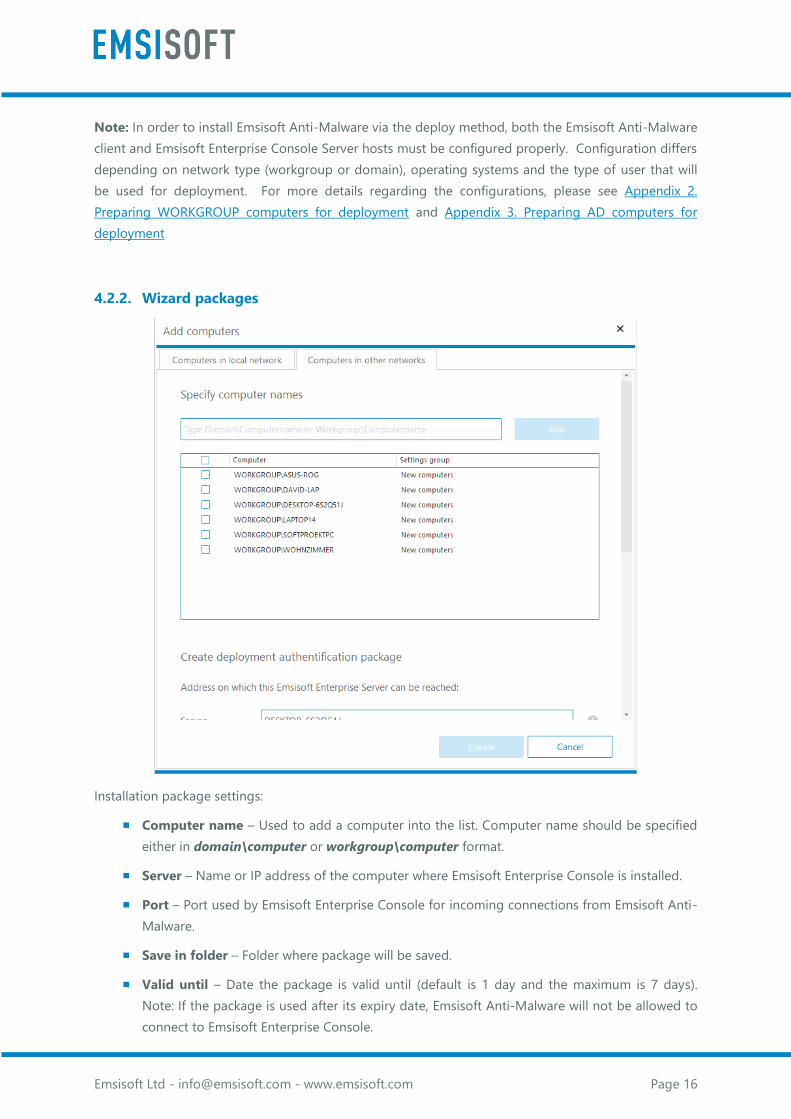
4.2.2. Wizard packages
Installation package settings:
Computer name – Used to add a computer into the list. Computer name should be specified
either in domain\computer or workgroup\computer format.
Server – Name or IP address of the computer where Emsisoft Enterprise Console is installed.
Port – Port used by Emsisoft Enterprise Console for incoming connections from Emsisoft Anti-
Malware.
Save in folder – Folder where package will be saved.
Valid until – Date the package is valid until (default is 1 day and the maximum is 7 days).
Note: If the package is used after its expiry date, Emsisoft Anti-Malware will not be allowed to
connect to Emsisoft Enterprise Console.
Emsisoft Ltd - [email protected] - www.emsisoft.com Page 17
Package for installed Emsisoft Anti-Malware – If unchecked (default state), the full package
for performing new installations of Emsisoft Anti-Malware will be generated. If checked, the
light package will be generated for connecting an existing Emsisoft Anti-Malware installation
to Emsisoft Enterprise Console.
Key – License key of Emsisoft Anti-Malware.
After the package has been created it can be used on the computer for:
New installations (full package) – Copy the package to a computer and start Install.bat with
elevated privileges. Emsisoft Anti-Malware will be installed silently and connected to Emsisoft
Enterprise Console.
Connection of Emsisoft Anti-Malware installations to Emsisoft Enterprise Console (light
package) – Copy the package to a computer and start Connect.bat with elevated privileges.
Emsisoft Anti-Malware will be connected to Emsisoft Enterprise Console.
Important: Packages can be used to install Emsisoft Anti-Malware and connect it to the Emsisoft
Enterprise Console Server only during the period of time when the token is still valid (not expired). If a
token has expired, the Server will not accept it and the client will not be able to connect.
Important: Batch files must be started with elevated privileges.
4.3. Adding new computers
Computers can be added in two ways:
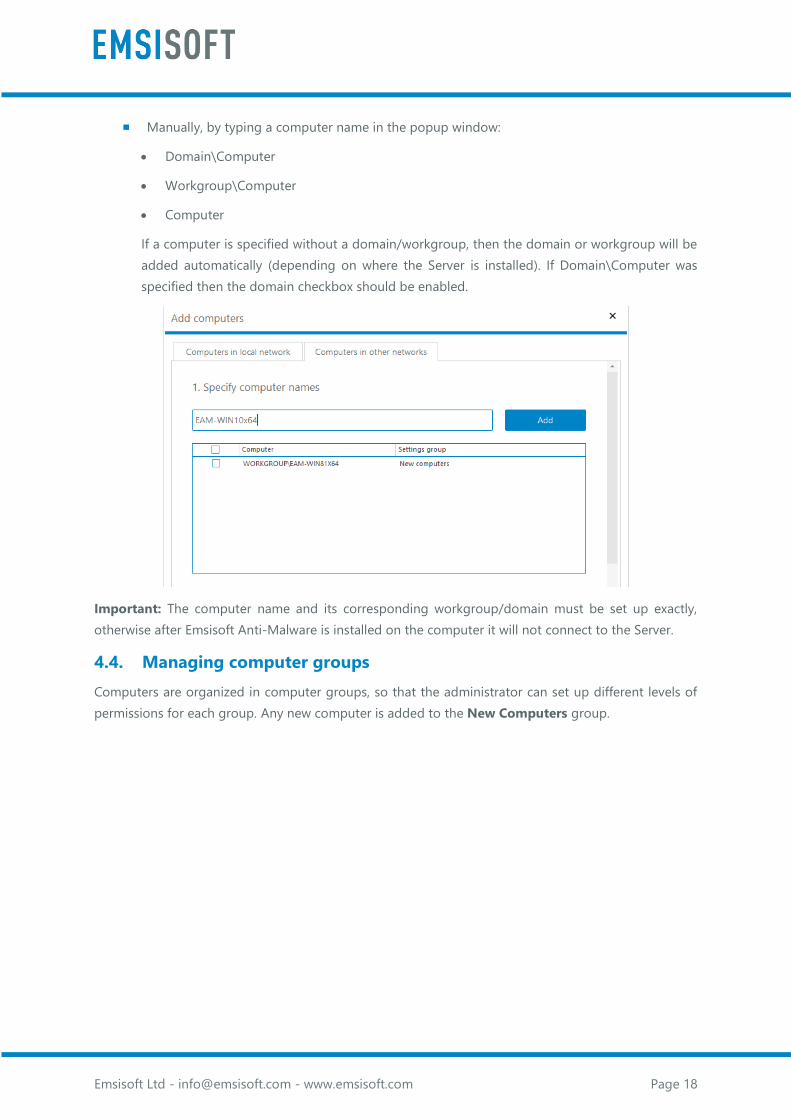
Automatically, using the system’s Add network function, which retrieves all the computers
visible in the network. Computers are collected depending on the configuration of the network
where the Server is installed:
• Domain computers for a domain server.
• Workgroup computers for computers in workgroup.
When the user clicks on the Add network button, a list of all computers on the network is
collected and added to the popup window.
Emsisoft Ltd - [email protected] - www.emsisoft.com Page 18
Manually, by typing a computer name in the popup window:
• Domain\Computer
• Workgroup\Computer
• Computer
If a computer is specified without a domain/workgroup, then the domain or workgroup will be
added automatically (depending on where the Server is installed). If Domain\Computer was
specified then the domain checkbox should be enabled.
Important: The computer name and its corresponding workgroup/domain must be set up exactly,
otherwise after Emsisoft Anti-Malware is installed on the computer it will not connect to the Server.
4.4. Managing computer groups
Computers are organized in computer groups, so that the administrator can set up different levels of
permissions for each group. Any new computer is added to the New Computers group.
Emsisoft Ltd - [email protected] - www.emsisoft.com Page 19
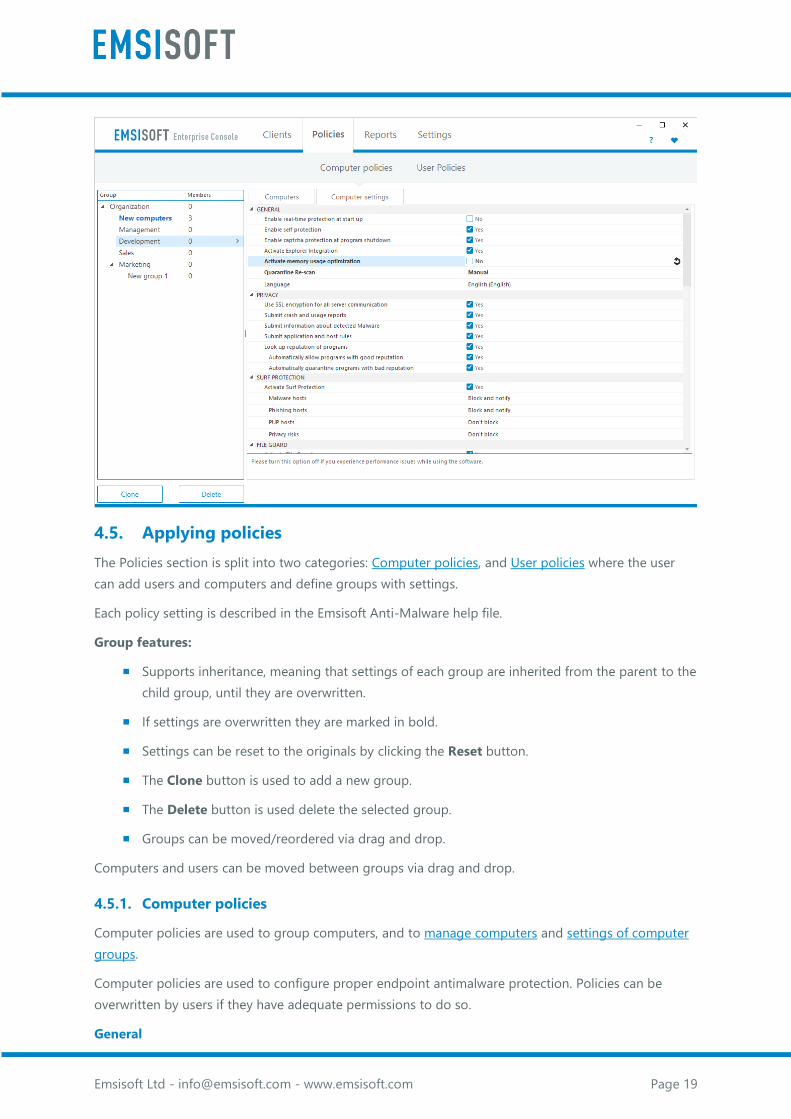
4.5. Applying policies
The Policies section is split into two categories: Computer policies, and User policies where the user
can add users and computers and define groups with settings.
Each policy setting is described in the Emsisoft Anti-Malware help file.
Group features:
Supports inheritance, meaning that settings of each group are inherited from the parent to the
child group, until they are overwritten.
If settings are overwritten they are marked in bold.
Settings can be reset to the originals by clicking the Reset button.
The Clone button is used to add a new group.
The Delete button is used delete the selected group.
Groups can be moved/reordered via drag and drop.
Computers and users can be moved between groups via drag and drop.
4.5.1. Computer policies
Computer policies are used to group computers, and to manage computers and settings of computer
groups.
Computer policies are used to configure proper endpoint antimalware protection. Policies can be
overwritten by users if they have adequate permissions to do so.
General
Emsisoft Ltd - [email protected] - www.emsisoft.com Page 20
Enable real-time protection at startup - To prevent new Malware infections, it is essential
that real-time protection is always enabled.
Enable self-protection - Protects Emsisoft Anti-Malware from any external modification
attempts to the software's installation folder and configuration. It is recommended that you
leave this option enabled.
Enable captcha protection on program shutdown - Displays a challenge-response test to
determine whether or not the user is human. This prevents automated termination of
Emsisoft's real-time protection by Malware.
Enable Explorer integration - Allows scanning of individual files or folders via the Explorer
context menu (right-click).
Enable memory usage optimization - When enabled this option reduces the amount of RAM
being used by swapping out non-active data (such as signatures) to the pagefile. On older
computers this may result in system slowdowns. If computer have sufficient RAM, you may
wish to disable this feature to ensure maximum speed.
Quarantine Re-scan - The dropdown menu allows the user to customize the re-scanning of
quarantined objects after each signature update to identify any false detections (false alerts)
and restore them if necessary. You can select from [Automatic], [Manual] or [No re-scan].
Language - The dropdown menu allows the user to define the language used for the user
interface and alerts.
Privacy
Use SSL encryption for all server communication - Disable this option if you would like to
analyze the information that is being sent to and received from Emsisoft's web servers.
Submit crash and usage reports - Sends anonymous reports to Emsisoft that are essential for
the development team to fix bugs and improve the software.
Submit information about detected Malware - Detection information is used for statistical
purposes only. No personal data is sent.
Submit application and host rules - Helps to analyze the reputation of individual programs
and online hosts. No personal data is sent.
Look up reputation of programs - Provides useful recommendations on the best way to
handle alerted programs.
o Automatically allow programs with good reputation - Greatly reduces the number
of false alerts for programs that behave in similar ways to Malware.
o Automatically quarantine programs with bad reputation - Improves the quality of
detections and reduces required user interactions
Surf Protection
Emsisoft Ltd - [email protected] - www.emsisoft.com Page 21
Activate Surf Protection - Surf Protection provides an extra layer of security to protect
against suspicious websites when the user is surfing the Internet.
Hosts - Lists all rules created for blocked and allowed hosts.
Malware hosts - Hosts engaged in Malware distribution (e.g. Adware, Spyware, Trojans, and
Viruses, etc).
Phishing hosts - Hosts that are involved in phishing. Phishing is a method that uses fake
websites to capture passwords and other private data.
PUP hosts - Hosts that are engaged in the distribution of potentially unwanted programs
(PUPs) purposes.
Privacy risks - Hosts that are used for advertising or tracking purposes.
You can configure the default mode [Don't block], [Alert], [Block and notify] or [Block silently] to take
for each of the categories of hosts.
File Guard
Activate File Guard - The File Guard not only scans files before they are executed, but
depending on your chosen settings, it can also scan before all other file actions such as
moving or downloading from the Internet.
Scan level - Allows the user to balance the File Guard's scan level between best performance
and best protection as follows:
o Fast - Scans programs when they are started. This option has the least effect on the
performance of the system while still ensuring that Malware is prevented from
executing. Inactive Malware may remain undetected until a manual scan is run.
o Balanced - Scans all files when they are created or modified, e.g. when a file is
downloaded or copied onto your computer from a USB stick. Balanced is the
recommended setting.
o Thorough - Scans all files when they are read by any program so that simply selecting
a file is sufficient to cause it to be scanned. This option has the greatest impact on
system performance and doesn't offer a significant advantage in detection when
compared to the other options.
Malware detections – Choose how you want the File Guard to behave when Malware is
detected by selecting either [Alert], [Quarantine silently], or [Quarantine with notification] from
the drop down menu.
PUP detections - Choose how you want the File Guard to behave when Potentially Unwanted
Programs are detected by selecting either [Alert], [Quarantine silently], [Quarantine with
notification], or [No detection] from the drop down menu.
Protect the computer even if no user is logged on - Ensures that the File Guard is started
during system boot and that it remains running in the background even if real-time protection
is shut down. You may wish to enable email notifications in conjunction with this option to
ensure you are alerted to quarantined objects. If the option is disabled, File Guard starts when
the first user logs on.
Only scan files with specific extensions - When this check box is selected, the File Guard
only scans files with extensions that are specified in the list. On the one hand this setting can
improve the speed of your system because only some files on the hard drive are scanned but
on the other hand this also reduces the level of system protection. You can edit the list of
specified file extensions by using the Edit button.

Emsisoft Ltd - [email protected] - www.emsisoft.com Page 22
Files with extensions – List of specific extensions.
Email Notifications
Send an email if malware is detected – Select this option to enable email notifications to be
automatically sent on the selected events in the events list.
Mailbox parameters can then be configured by entering the appropriate details into the fields for
Sender's address, Recipient's address, SMTP server and Port. If authentication is required, select the
option SMTP Authentication, choose your desired setting ([Without TLS], [Implicit TLS), [Require TLS],
or [Explicit TLS]) from the adjacent drop down menu and then enter your username and password into
the appropriate fields.
Behavior Blocker
Activate Behavior Blocker – The Behavior Blocker monitors all running processes.
Behavior Blocker default action – If a program shows suspicious behavior but can't be
exactly verified - Choose whether the Behavior Blocker should [Display alert window], [Always
allow the program], [Use recommended option], or [Always quarantine the program] from the
drop down menu.
Scheduled Scans
Scans – Scans contains a list of all scheduled scan jobs. Each scan lists the scan type and a
summary of the scan interval.
Don't start scheduled scans in Game Mode – Prevents interruptions in resource intensive
games by ensuring that scheduled scans don't start if Game Mode is active.
Clicking on the Add new scan button (or clicking an existing scan job tile if you wish to edit it) opens
a dialog with the following tabs for configuring scan time, frequency and other advanced options:
When
Scan the computer
Every [x] hour [x] min between [x] and [x] – At specified hour/minute intervals during
selected time frames (e.g every 5 hours between 12:00 AM and 11:59 PM).
At [x] – Run at a set time (e.g 1.00 PM).
After – Computer startup/Online update
Recur
Monthly – On a particular day of the month (e.g. the 1st of every month).
At [x] – On selected days of the week ( e.g. only on Fridays and Saturdays).
After – Every day.
The checkbox Enabled indicates whether this specific scan is currently enabled or disabled. The Run
now button allows you to manually start this scan and the Delete schedule button allows you to
remove this scan from the list of scheduled scans.
What
Emsisoft Ltd - [email protected] - www.emsisoft.com Page 23
Scan type - The dropdown menu allows you select from either [Quick Scan], [Malware Scan], or
[Custom Scan]. If Custom Scan is selected, a Configure button will be visible and open a further dialog
with all Custom Scan settings.
Advanced settings
Update before scanning – Configures the software to check for updates before performing
the scheduled scan, if the last update was more than 30 minutes ago. It is recommended that
you enable this option if automatic updates are disabled or set to a long interval. This option
will be unavailable when "After online update" is selected in the "When" tab.
Scan silently – Configures the scheduled scan to run in a minimized window to prevent
disruption to your work. An animated system tray icon is displayed to indicate the active scan.
The Scanner window will only appear if an object is detected, to provide you with information.
If nothing is detected the Scanner automatically terminates when it is finished.
Run missed scans on next startup – If the computer is not turned on at the specified time,
the missed scan will be executed when you next start the computer, unless more than a third
of the time before the next scan interval has already passed.
The checkbox Enabled indicates whether this specific scan is currently enabled or disabled. The Run
now button allows you to manually start this scan and the Delete schedule button allows you to
remove this scan from the list of scheduled scans.
If you are scanning a large number of files that are expected to take a long time then you may wish to
use the On scan completion button to define what the program should do when the scan finishes:
Report only – Report the results of the scan but do not automatically perform any other
actions.
Quarantine detected objects – Automatically move all detected objects into quarantine
immediately after the scan finishes.
Shut down computer – Automatically shut down the computer when the scan finishes and
either of the previous options has been executed. This can be especially useful if the computer
is being left to scan for Malware overnight.
Notifications
Real-time detections – Allows you to configure the number of seconds that real-time
detection notifications should remain on the screen for before fading out.
Recommended reading and news – When this box is checked (default setting) a notification
is displayed during online updates when a new Emsisoft news article become available.
Removable device connections – When this box is checked a notification is displayed when a
removable storage device is detected (such as a USB stick or external harddisk).
Software updates – When this box is checked (default setting) a notification is displayed after
a software version update.
Signature and pattern updates – When this box is checked (default setting) a notification is
displayed after a Malware signature update.
Application restarts – When this box is checked a notification is displayed when the program
needs to restart (e.g. after a program version update). When unchecked, application restarts
are performed automatically.
Emsisoft Ltd - [email protected] - www.emsisoft.com Page 24
Required computer restarts – When this box is checked (default setting) a notification is
displayed when a computer restart is required (e.g. after certain program version updates).
When unchecked, restarts are performed automatically.
Don't show notifications in Game Mode – Prevents interruptions in resource intensive
games by ensuring that notifications are not displayed if Game Mode is active.
Notifications location – The drop down menu allows you to adjust the location in which
notification popups are displayed on your screen. You can choose from [Left top], [Left center],
[Left bottom], [Right top], [Right center], and [Right bottom]. The default location is Left
center.
Exclusions
The Exclusions section allows you to view and edit the list of files, folders and programs that should be
exempt from scanning or monitoring.
You may use wildcards or environment variables. When using wildcards: ? specifies one random
character and * specifies a sequence of random characters. Clicking on the dropdown of any exclusion
opens the Environment variables tester.
Variables as they are seen by the software service do not necessarily resolve to the same paths that
you can see in your user context. Most variables resolve to multiple paths because the software
protects at system level, across all user accounts.
The Environment variables tester is invaluable for verifying exactly what paths will be excluded if you
use a particular variable. Simply select a variable placeholder from the scrollable list on the left and the
corresponding paths will be displayed in the adjacent pane to the right.
The Copy selected button copies the placeholder to the text edit, allowing you to then quickly and
easily paste it when creating an exclusion. Please note that a trailing slash must be added after the
placeholder to indicate that it is a path, for example: %temp%\
Exclude from scanning
This list displays the path of any files or folders that have been excluded from signature based
detection by the Scanner and the File Guard.
The Add file and Add folder buttons can be used to specify new exclusions to add to the list.
An exclusion can be easily removed at any time by clicking the red x in the Remove column.
Exclude from monitoring
This list displays the path of any programs for which all activities have been excluded from Real-Time
Protection.
The Add program and Add folder buttons can be used to add new exclusions to this list.
An exclusion can be easily removed at any time by clicking the red x in the Remove column.
Logging
Enable logging, maximum records – Define the maximum number of entries to be kept for
activity logging. Use a value of 0 for unlimited logging. The default value is 300.
Emsisoft Ltd - [email protected] - www.emsisoft.com Page 25
Update
Update the software and detection patterns automatically – Enables automatic updating
of the software. If this option is checked, the frequency of automatic updates can then be
configured as follows.
o Every [x] hour [x] min between [x] and [x] – At specified hour/minute intervals
during selected time frames (e.g every 30 minutes between 12:00 AM and 11:59 PM).
o Once a day at [x] – Run daily at a set time (e.g 1.00 PM).
Don't run automatic updates in Game Mode – Prevents interruptions in resource intensive
games by ensuring that automatic updates don't run if Game Mode is active.
Maximum simultaneous update connections – This option allows you to adjust the
maximum number of connections (1-10) that may be used simultaneously for downloading
updates. Use of multiple connections speeds up the transfer of online updates. If you
experience problems with simultaneous downloads due to a slow or unstable connection,
please enter a value of 1 to use consecutive downloads instead.
Update feed:
o Stable – Select this option if you want to receive well-tested stable versions only
(recommended).
o Beta – Select this option if you want to receive the latest untested software updates
fresh from our development team. We recommend that only experienced users select
this option, or when you are requested to do this for fault-finding purposes. Beta
updates may still contain bugs and cause unpredictable problems.
o Delayed – Select this option if you are an administrator who wants to serve your
clients only stable versions that you have tested via the Stable feed. This option is
useful for large enterprises which require internal software tests prior to updating their
workstations.
Use Emsisoft Enterprise Console Update Proxy – Enables usage of Emsisoft Enterprise
Console Update Proxy by Emsisoft Anti-Malware to get updates.
Use Proxy – Enables usage of proxy server to get access to the *.emsisoft.com servers. If it is
enabled then proper Server, Port, Authentication required, Username and Password should be
specified.
Customer care
Disable license expiration notifications – Disables all notification popups that are displayed
30, 14 and 7 days before the license period ends. Note: This potentially puts users at risk of
losing protection if a license doesn't get renewed in time. Notifications will still be displayed 3
days before license ends.
Hide customer referral rewards program – Hides all suggestions to renew a license for free
by referring new software users.
Hide license key – Prevents users from reading and changing the license key, to prevent it
from being misused somewhere else.
Disable purchase and renewal buttons – Stops users from buying a license online.
Emsisoft Ltd - [email protected] - www.emsisoft.com Page 26
Alternative message for purchase and renewal buttons – Insert administrator contact
details or alternative notes for user, i.e. "To obtain a license, please contact Company Ltd, +1
234 567 89".
Alternative URL for purchase and renewal buttons – Specify a website address where user
can find purchase information, i.e. "https://www.company.com/order/".
Hide news area on overview screen – Hides the entire news section on the bottom of the
main Overview screen. Note: No advertising is displayed there, only security education and
product news.
Alternative static text – Insert administrator contact details or alternative notes for user, i.e.
"Managed by Company Ltd, +1 234 567 89".
Alternative URL – Specify a website address where user can find purchase information, i.e.
"https://www.company.com/order/".
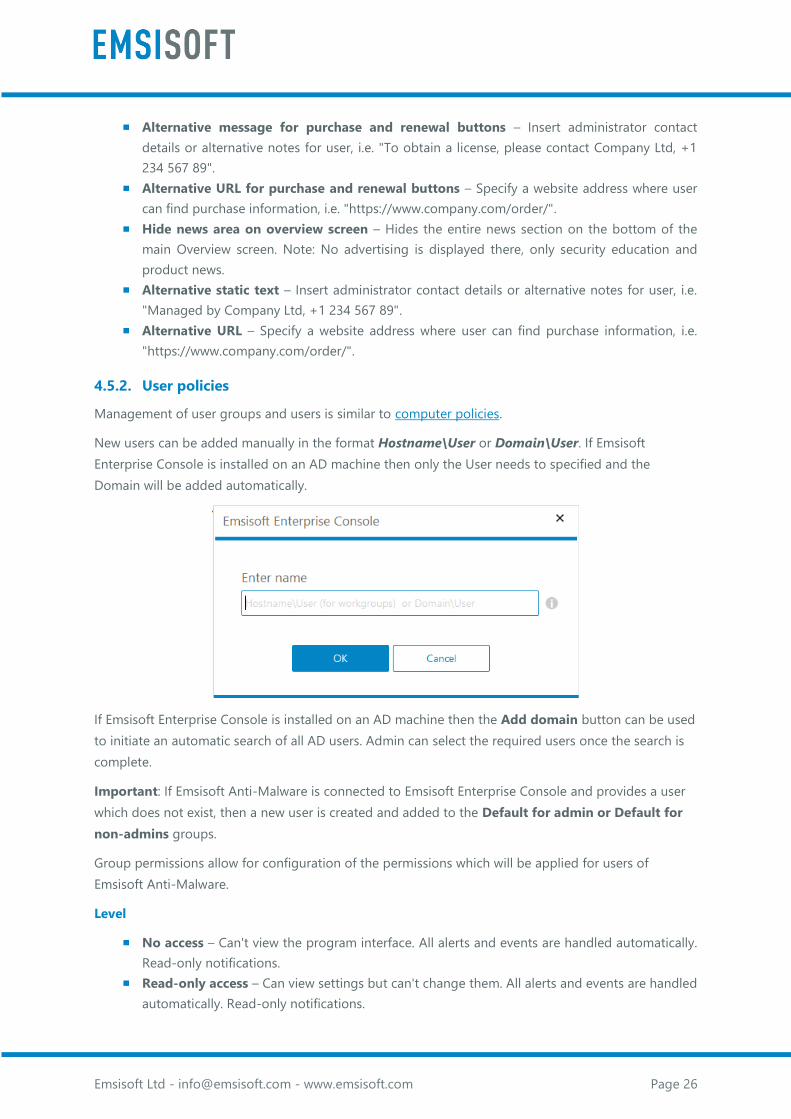
4.5.2. User policies
Management of user groups and users is similar to computer policies.
New users can be added manually in the format Hostname\User or Domain\User. If Emsisoft
Enterprise Console is installed on an AD machine then only the User needs to specified and the
Domain will be added automatically.
If Emsisoft Enterprise Console is installed on an AD machine then the Add domain button can be used
to initiate an automatic search of all AD users. Admin can select the required users once the search is
complete.
Important: If Emsisoft Anti-Malware is connected to Emsisoft Enterprise Console and provides a user
which does not exist, then a new user is created and added to the Default for admin or Default for
non-admins groups.
Group permissions allow for configuration of the permissions which will be applied for users of
Emsisoft Anti-Malware.
Level
No access – Can't view the program interface. All alerts and events are handled automatically.
Read-only notifications.
Read-only access – Can view settings but can't change them. All alerts and events are handled
automatically. Read-only notifications.
Emsisoft Ltd - [email protected] - www.emsisoft.com Page 27
Basic access – Can view settings but can't change them. Can run scans and quarantine
detected objects. Can decide what to do on alerts.
Full access – Unrestricted full access to all components of the software.
4.5.3. Synchronizing policy settings
Typically, policy settings are sent from Emsisoft Enterprise Console to the connected Emsisoft Anti-
Malware clients within six minutes of last modification. However, there are cases when these settings
may need to be sent instantly, and this can be done through the Sync button.
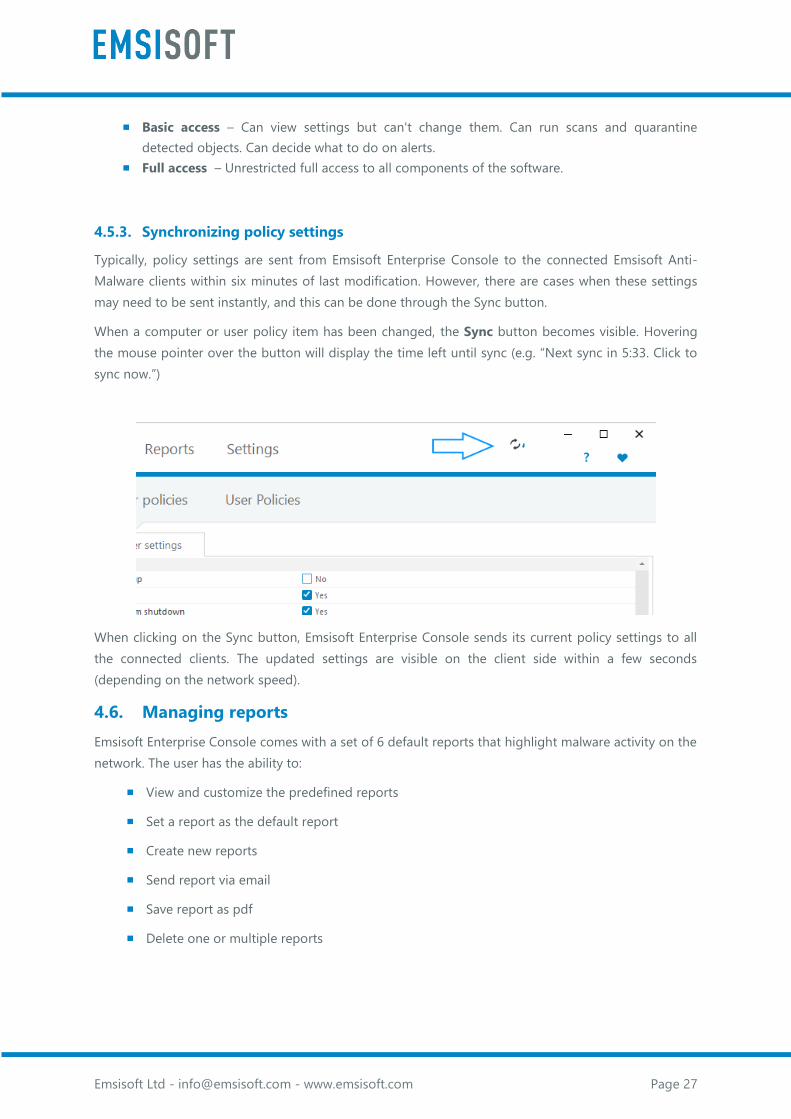
When a computer or user policy item has been changed, the Sync button becomes visible. Hovering
the mouse pointer over the button will display the time left until sync (e.g. “Next sync in 5:33. Click to
sync now.”)
When clicking on the Sync button, Emsisoft Enterprise Console sends its current policy settings to all
the connected clients. The updated settings are visible on the client side within a few seconds
(depending on the network speed).
4.6. Managing reports
Emsisoft Enterprise Console comes with a set of 6 default reports that highlight malware activity on the
network. The user has the ability to:
View and customize the predefined reports
Set a report as the default report
Create new reports
Send report via email
Save report as pdf
Delete one or multiple reports
Emsisoft Ltd - [email protected] - www.emsisoft.com Page 28
4.6.1. Viewing and customizing the predefined reports
Each predefined report can be configured according to the user’s needs. The user can change various
report settings: report layout, time interval, grouping field etc. The only thing that cannot be changed
for the default reports is the report name.
CLIENTS OVERVIEW REPORT
Provides a quick overview of the clients with issues. The list items can be grouped by various fields
(Computer Name, Domain, Operating system, Group, Last user group, Issues etc.)
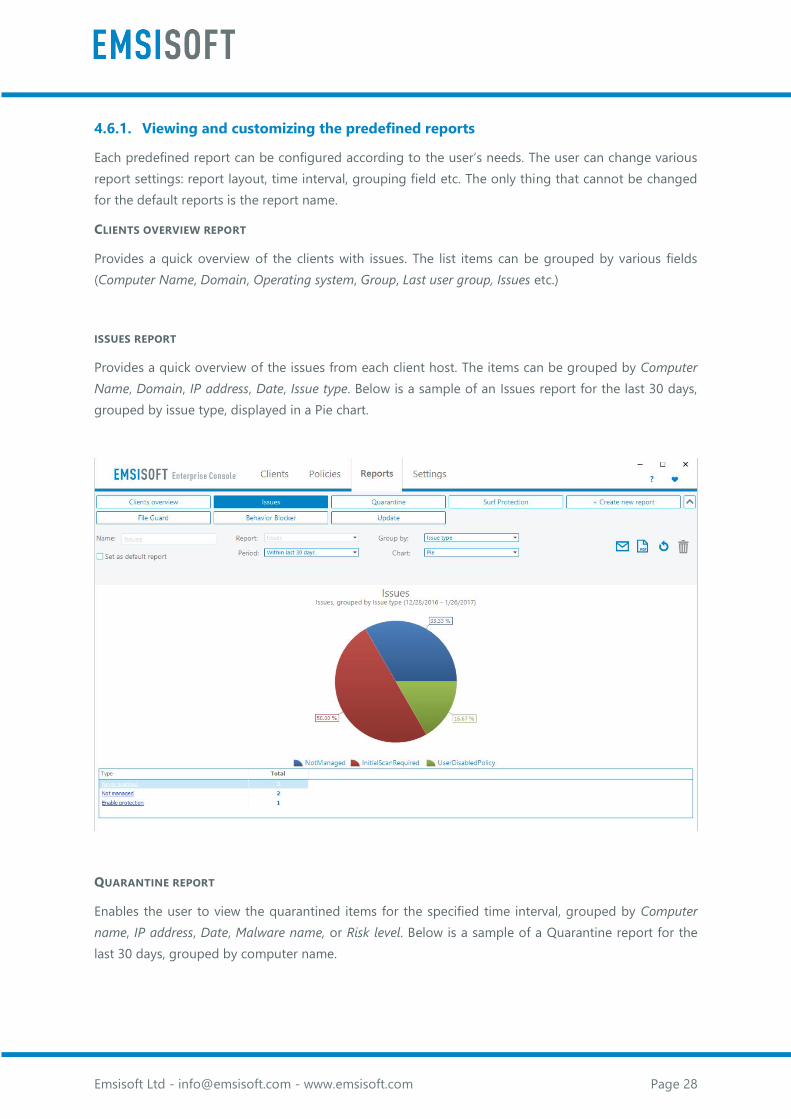
ISSUES REPORT
Provides a quick overview of the issues from each client host. The items can be grouped by Computer
Name, Domain, IP address, Date, Issue type. Below is a sample of an Issues report for the last 30 days,
grouped by issue type, displayed in a Pie chart.
QUARANTINE REPORT
Enables the user to view the quarantined items for the specified time interval, grouped by Computer
name, IP address, Date, Malware name, or Risk level. Below is a sample of a Quarantine report for the
last 30 days, grouped by computer name.

Emsisoft Ltd - [email protected] - www.emsisoft.com Page 29
SURF PROTECTION REPORT
Enables visualizing the blocked hosts for the selected time interval, grouped by Host type, Date, IP
address or Computer name. Below is a sample of a Surf Protection report for the last 30 days, grouped
by computer name.
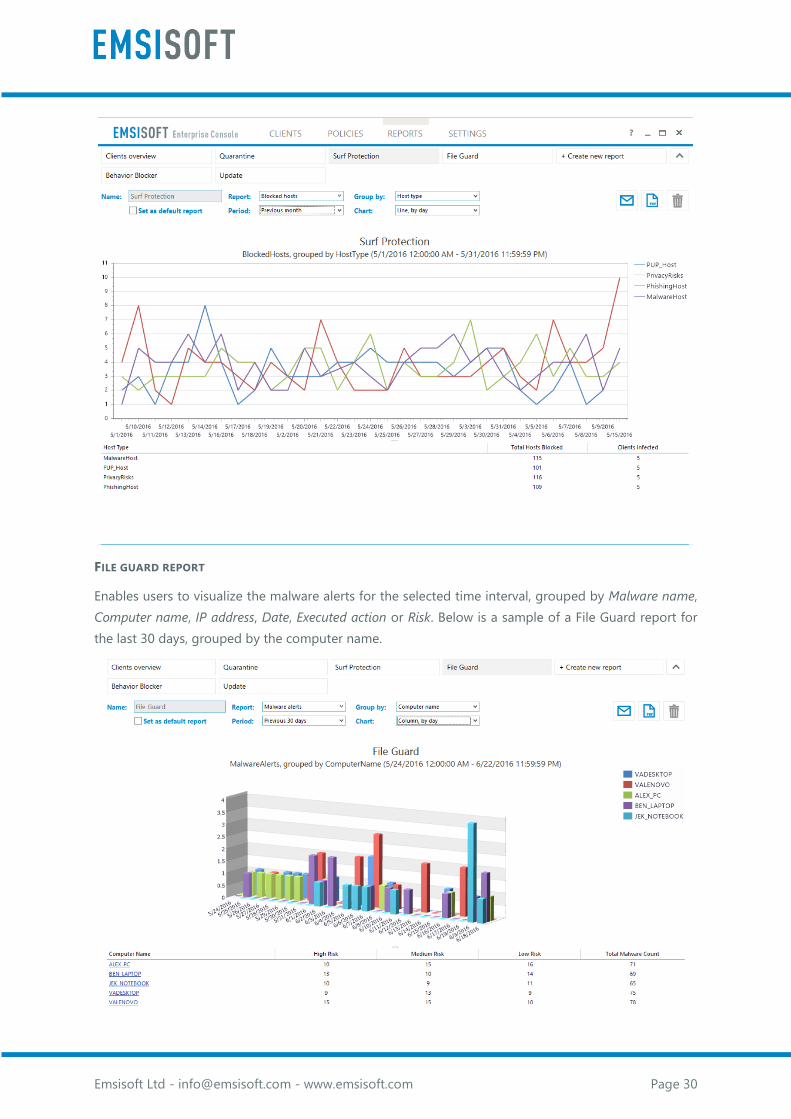
Emsisoft Ltd - [email protected] - www.emsisoft.com Page 30
FILE GUARD REPORT
Enables users to visualize the malware alerts for the selected time interval, grouped by Malware name,
Computer name, IP address, Date, Executed action or Risk. Below is a sample of a File Guard report for
the last 30 days, grouped by the computer name.
Emsisoft Ltd - [email protected] - www.emsisoft.com Page 31
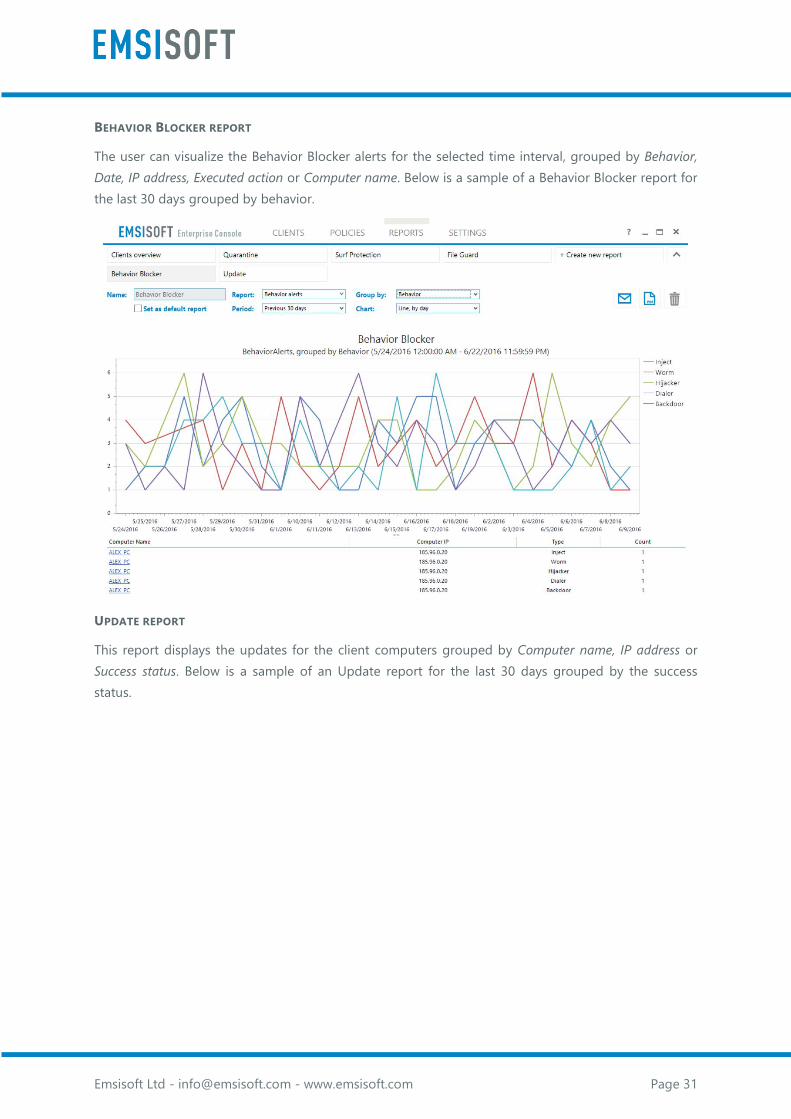
BEHAVIOR BLOCKER REPORT
The user can visualize the Behavior Blocker alerts for the selected time interval, grouped by Behavior,
Date, IP address, Executed action or Computer name. Below is a sample of a Behavior Blocker report for
the last 30 days grouped by behavior.
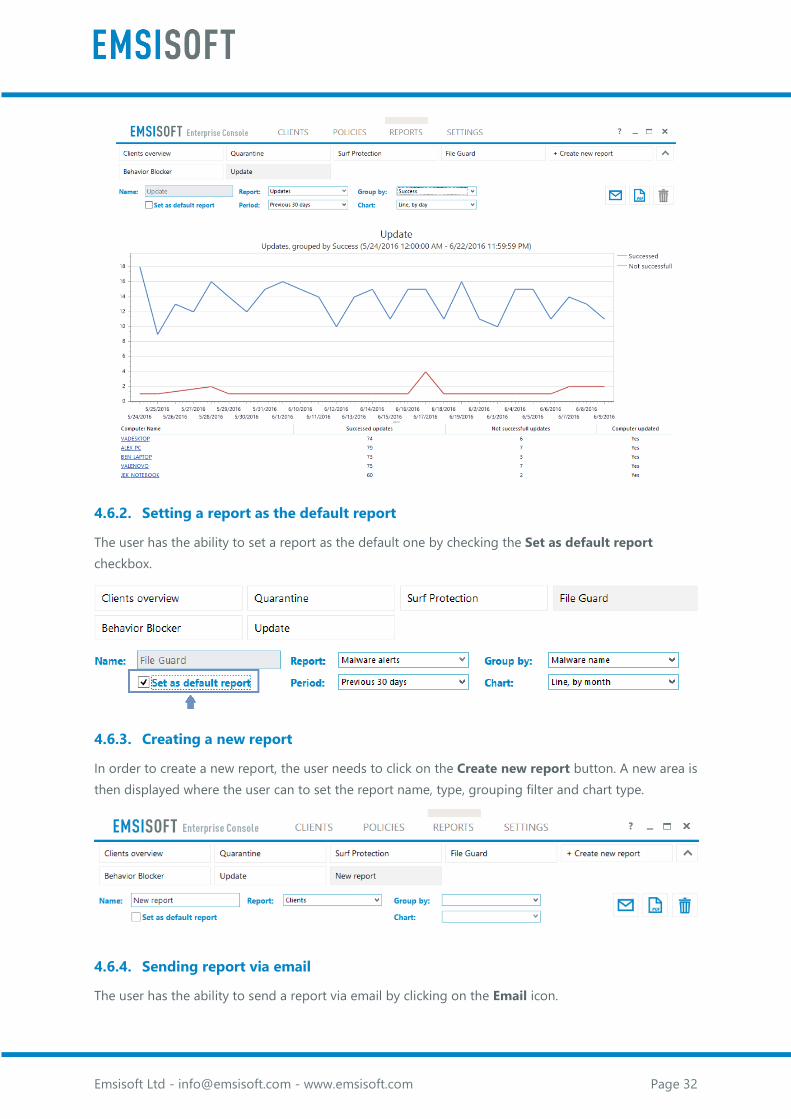
UPDATE REPORT
This report displays the updates for the client computers grouped by Computer name, IP address or
Success status. Below is a sample of an Update report for the last 30 days grouped by the success
status.
Emsisoft Ltd - [email protected] - www.emsisoft.com Page 32
4.6.2. Setting a report as the default report
The user has the ability to set a report as the default one by checking the Set as default report
checkbox.
4.6.3. Creating a new report
In order to create a new report, the user needs to click on the Create new report button. A new area is
then displayed where the user can to set the report name, type, grouping filter and chart type.
4.6.4. Sending report via email
The user has the ability to send a report via email by clicking on the Email icon.
Emsisoft Ltd - [email protected] - www.emsisoft.com Page 33
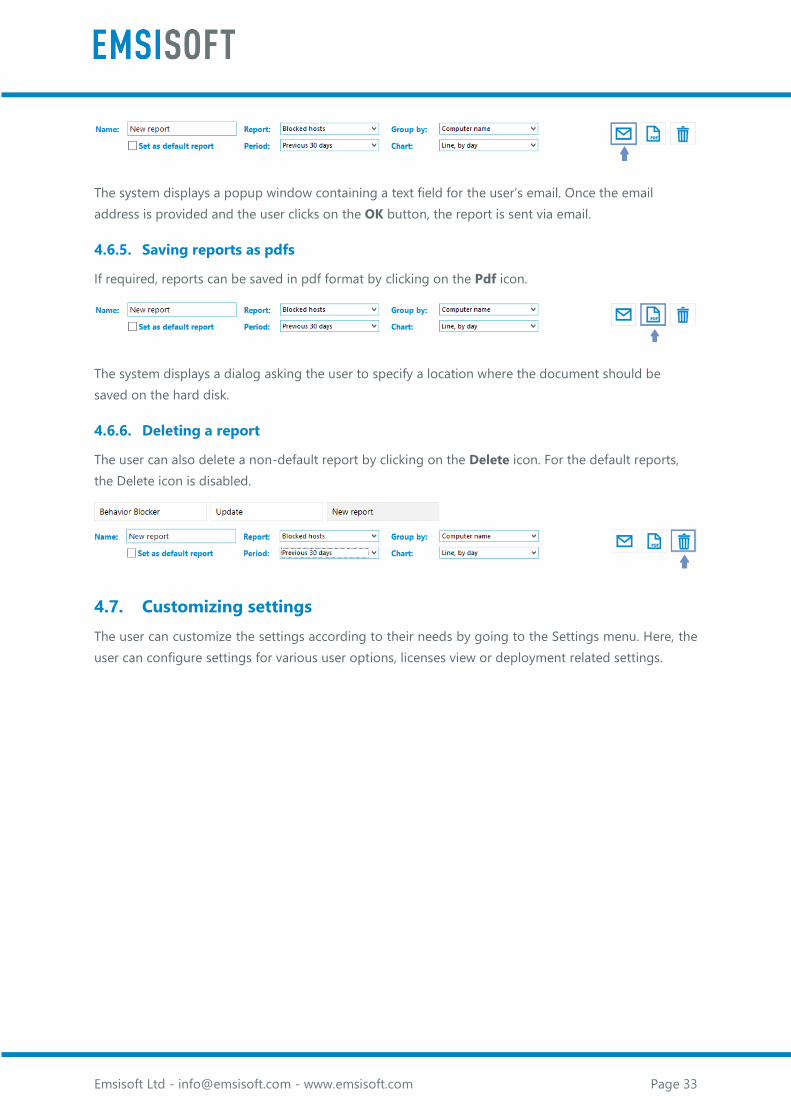
The system displays a popup window containing a text field for the user’s email. Once the email
address is provided and the user clicks on the OK button, the report is sent via email.
4.6.5. Saving reports as pdfs
If required, reports can be saved in pdf format by clicking on the Pdf icon.
The system displays a dialog asking the user to specify a location where the document should be
saved on the hard disk.
4.6.6. Deleting a report
The user can also delete a non-default report by clicking on the Delete icon. For the default reports,
the Delete icon is disabled.
4.7. Customizing settings
The user can customize the settings according to their needs by going to the Settings menu. Here, the
user can configure settings for various user options, licenses view or deployment related settings.
Emsisoft Ltd - [email protected] - www.emsisoft.com Page 34
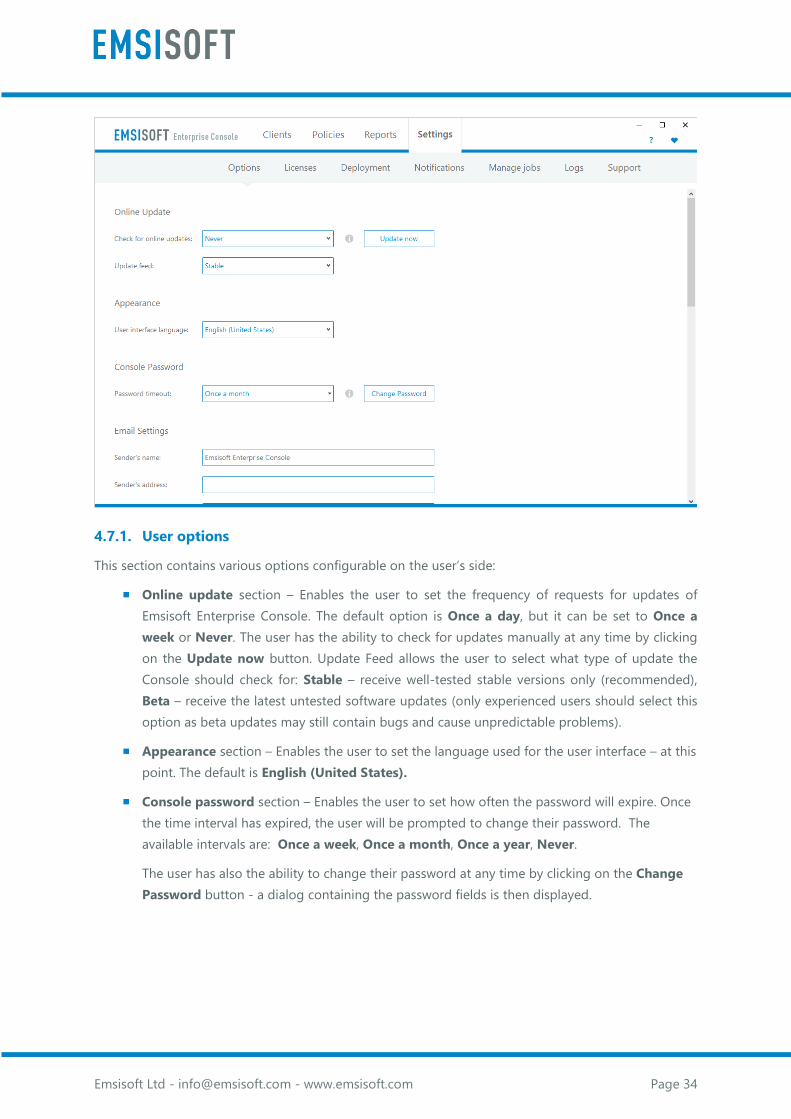
4.7.1. User options
This section contains various options configurable on the user’s side:
Online update section – Enables the user to set the frequency of requests for updates of
Emsisoft Enterprise Console. The default option is Once a day, but it can be set to Once a
week or Never. The user has the ability to check for updates manually at any time by clicking
on the Update now button. Update Feed allows the user to select what type of update the
Console should check for: Stable – receive well-tested stable versions only (recommended),
Beta – receive the latest untested software updates (only experienced users should select this
option as beta updates may still contain bugs and cause unpredictable problems).
Appearance section – Enables the user to set the language used for the user interface – at this
point. The default is English (United States).
Console password section – Enables the user to set how often the password will expire. Once
the time interval has expired, the user will be prompted to change their password. The
available intervals are: Once a week, Once a month, Once a year, Never.
The user has also the ability to change their password at any time by clicking on the Change
Password button - a dialog containing the password fields is then displayed.

Emsisoft Ltd - [email protected] - www.emsisoft.com Page 35
Email settings – Allows the user to configure the settings for their email provider. Mailbox
parameters can be configured by entering the appropriate details into the fields for Sender's
address, Recipient's address, SMTP server and Port. If authentication is required, the user
must select the option SMTP Authentication and provide the username and the password.
To check if the mailbox parameters have been configured correctly, the user can click on the
Test email button. If all the settings are okay, a confirmation popup will be displayed and the
email should be sent to the user’s inbox.
Important: The email address is used to reset the admin password if it has been lost.
Proxy settings – Allows the user to configure access to the Internet via proxy server. To setup
proxy settings:
• Enable Use Proxy option
• Specify Address in a format proxy:port
• Optionally set User and Password if proxy server requires authorization
Update Proxy Server settings – Allows the user to configure the settings for the update proxy
server. Emsisoft Update Proxy Server is used as a mirror for Emsisoft Anti-Malware updates. To
setup Emsisoft Update Proxy Server:
• Set a value for the Port, 8080 is used by default
• Optionally, the user can set up the server’s Bind address
Additionally, the user has the ability to Start Update Proxy automatically, to Start, Stop or
Restart the proxy server. Restart is required after settings of Update Proxy server have been
changed.
Database settings – Provides the ability to customize various settings regarding the databases:
• Backup period – How often backups of the database are created.
• Purge backups after – Maximum time to keep database backups. Expired backups are
deleted automatically.
• Limit log size to – Maximum size of logs. If size of logs is increased, old log entries are
deleted from the database automatically.
Emsisoft Ltd - [email protected] - www.emsisoft.com Page 36
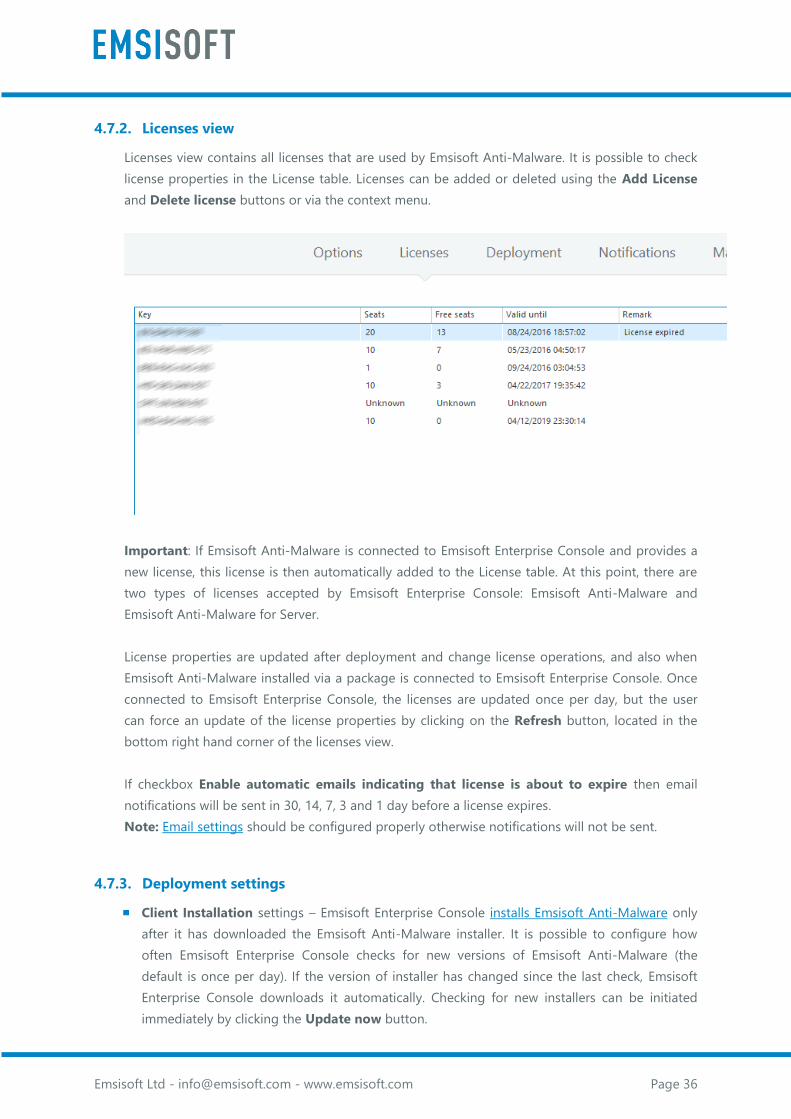
4.7.2. Licenses view
Licenses view contains all licenses that are used by Emsisoft Anti-Malware. It is possible to check
license properties in the License table. Licenses can be added or deleted using the Add License
and Delete license buttons or via the context menu.
Important: If Emsisoft Anti-Malware is connected to Emsisoft Enterprise Console and provides a
new license, this license is then automatically added to the License table. At this point, there are
two types of licenses accepted by Emsisoft Enterprise Console: Emsisoft Anti-Malware and
Emsisoft Anti-Malware for Server.
License properties are updated after deployment and change license operations, and also when
Emsisoft Anti-Malware installed via a package is connected to Emsisoft Enterprise Console. Once
connected to Emsisoft Enterprise Console, the licenses are updated once per day, but the user
can force an update of the license properties by clicking on the Refresh button, located in the
bottom right hand corner of the licenses view.
If checkbox Enable automatic emails indicating that license is about to expire then email
notifications will be sent in 30, 14, 7, 3 and 1 day before a license expires.
Note: Email settings should be configured properly otherwise notifications will not be sent.
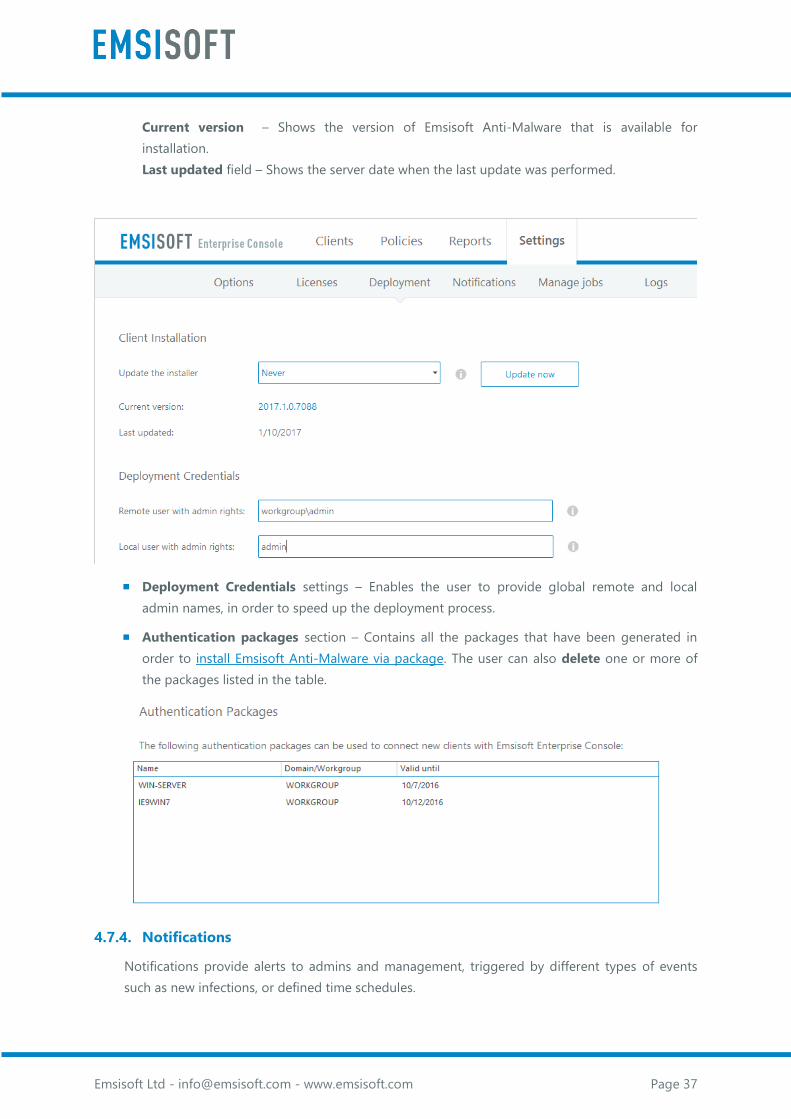
4.7.3. Deployment settings
Client Installation settings – Emsisoft Enterprise Console installs Emsisoft Anti-Malware only
after it has downloaded the Emsisoft Anti-Malware installer. It is possible to configure how
often Emsisoft Enterprise Console checks for new versions of Emsisoft Anti-Malware (the
default is once per day). If the version of installer has changed since the last check, Emsisoft
Enterprise Console downloads it automatically. Checking for new installers can be initiated
immediately by clicking the Update now button.
Emsisoft Ltd - [email protected] - www.emsisoft.com Page 37
Current version – Shows the version of Emsisoft Anti-Malware that is available for
installation.
Last updated field – Shows the server date when the last update was performed.
Deployment Credentials settings – Enables the user to provide global remote and local
admin names, in order to speed up the deployment process.
Authentication packages section – Contains all the packages that have been generated in
order to install Emsisoft Anti-Malware via package. The user can also delete one or more of
the packages listed in the table.
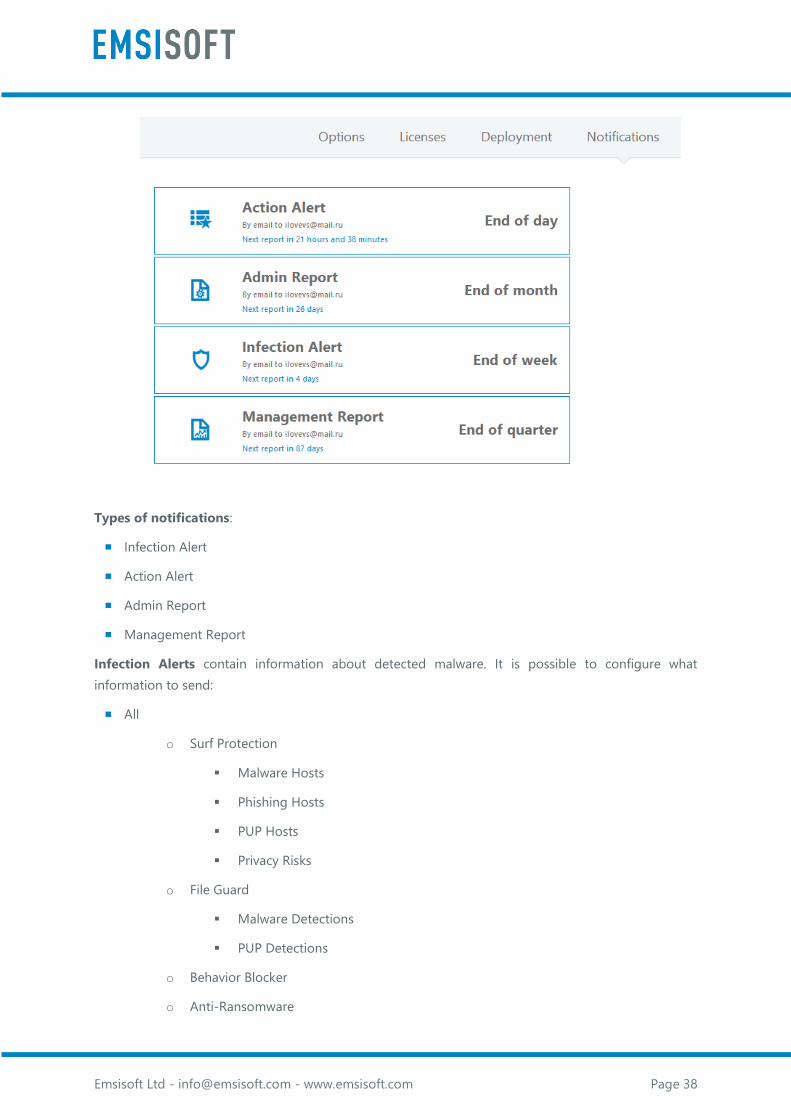
4.7.4. Notifications
Notifications provide alerts to admins and management, triggered by different types of events
such as new infections, or defined time schedules.
Emsisoft Ltd - [email protected] - www.emsisoft.com Page 38
Types of notifications:
Infection Alert
Action Alert
Admin Report
Management Report
Infection Alerts contain information about detected malware. It is possible to configure what
information to send:
All
o Surf Protection
▪ Malware Hosts
▪ Phishing Hosts
▪ PUP Hosts
▪ Privacy Risks
o File Guard
▪ Malware Detections
▪ PUP Detections
o Behavior Blocker
o Anti-Ransomware

Emsisoft Ltd - [email protected] - www.emsisoft.com Page 39
Action Alerts can be configured to send:
All
o Finished scan
o Finished deployment
o Changed license
Infection Alerts and Action Alerts can be sent:
As it happens
End of day
End of week
Management Reports are used to receive short information about the state of managed clients and
detected infections.
Admin Reports additionally contain information about the current state of the Clients view.
Admin and Management Reports can be sent:
As it happens
End of day
End of week
End of month
End of quarter
End of year
All types of notifications can be configured to be sent via email. Infection and Action alerts can also be
sent via webhooks. Webhooks perform a web request (POST) to the specified HTTP or HTTPS URL. The
posted json array contains data of the event.
Note: If notifications are configured to be sent via email, it is important to ensure that email settings
have been configured properly in the Options section.
Note: If email settings were specified during the wizard, then 4 predefined notifications are added
automatically:
Infection alerts for all categories - as it happens
Action alerts - as it happens for all categories
Management reports - end of the quarter
Admin reports - end of the month
4.7.5. Webhooks
Once you start receiving webhooks, it is important to know all the available hook types and their
format. Currently, there are two types of hooks:

Emsisoft Ltd - [email protected] - www.emsisoft.com Page 40
Infection hook
Action hook
Example of immediate infection alert:
{
"source":"Emsisoft Enterprise Console",
"computername":"SERVER",
"type":"Immediate infection alert",
"timestamp":"2017-04-30T03:20:01.663511Z",
"notification":[
{
"object_name":"Gen:Variant.CryptoPack.1 (B)",
"object_path":"C:\\Users\\Administrator\\Desktop\\Game.exe",
"object_type":"Malware",
"risk_level":"High"
"module":"File Guard",
"action":"Detected",
"computername":"WORKGROUP\\CLIENTPC",
"username":"Administrator",
"timestamp":"2017-04-30T03:20:00.000Z"
}]}
Parameter Description
type Type of hook, possible values: “Immediate infection alert”, “End of day infection
alert”, “End of week infection alert”, “Immediate action alert”, “End of day action
alert”, “End of week action alert”
module Module which detected malware, possible values: “File Guard”, “Surf Protection”,
“Behavior Blocker”
object_type Type of infection, possible values:
if module is “File Guard” - “Malware”, “Privacy Risk”, “Potentially Unwanted
Program”, “Potentially Unwanted Modification”, “Heuristic”
if module is “Surf Protection” - Malware Host”, “Phishing Host”,“ PUP Host”,
“Privacy Risks”, “User's Own”
if module is “Behavior Blocker” - “Worm”, “Dialer”, “Backdoor”, “Hijacker”,
“Inject”, “Downloader”, “Spyware”, “Service”, “Keylogger”, “Startup”, “Hidden
install”, “Virus”, “Hosts”, “Rootkit”, “Browser settings”, “Debugger”, “Remote
control”, “Direct disk access”, “System polices”, “Exploit”, “Crypto malware”
action Action which was performed on malware, possible values: “Detected”, “Allowed”,
“Blocked”, “Allowed by Rule”, “Quarantined”, “Deleted”
risk_level Risk level of infection, possible values: “Low”, “Medium”, “High”, “Unknown”,

Emsisoft Ltd - [email protected] - www.emsisoft.com Page 41
“Hidden”, “Signed”
computername Name of the computer where malware was detected
Example of immediate action alert:
{
"source":"Emsisoft Enterprise Console",
"computername":"SERVER",
"type":"Immediate action alert",
"timestamp":"2017-04-30T03:20:01.663511Z",
"notification":[
{
"computername":"WORKGROUP\\JOHNPC",
"job_id":52,
"job_type":"Scan",
"job_result":"Completed",
"timestamp":"2017-04-30T03:20:00.000Z"
}]}
Parameter Description
job_type Type of job, possible values: “ChangeLicense”, “Deployment”, “Scan”, “Uninstall”,
“Update”
job_result Whether job was successful, possible values: “Unknown”, “Completed”, “Failed”,
“Aborted”
job_error Description of the reason if job was not successful
notification (Only for Scan job) Any malware which was detected during scan
There are three types of webhooks:
Webhook without authorization – data is posted as a json object to the provided URL.
Webhook with API authorization – data is posted as a json object to the provided URL, the key
is passed as Authentication-Token into the requests header.
Webhook with basic authorization - data is posted as a json object to the provided URL if the
right set of credentials (user and password) is specified.
5. Installing and connecting Emsisoft Anti-Malware to Emsisoft
Enterprise Console Server
Emsisoft Anti-Malware can be installed on a client host directly from Emsisoft Enterprise Console via
deployment or full package.

Emsisoft Ltd - [email protected] - www.emsisoft.com Page 42
Emsisoft Anti-Malware can also be installed as a standalone installer on a client and then connected to
Emsisoft Enterprise Console by applying a light package.
5.2. Downloading Emsisoft Anti-Malware
The first step that needs to be performed in order to be able to install Emsisoft Anti-Malware on a
client host is to make sure that the installer is downloaded. The default configuration option upon
installation of Emsisoft Enterprise Console is to check hourly if there are any Emsisoft Anti-Malware
updates. To check whether the Emsisoft Anti-Malware installer has been downloaded, the user needs
to perform the following steps:
1. Open Emsisoft Enterprise Console and go to Settings > Deployment tab
2. Go to the Client Installation panel and check if the Emsisoft Anti-Malware installer has been
downloaded. If it has, Emsisoft Enterprise Console should display the Emsisoft Anti-Malware
installer status as Available and also list its current version.
If the Emsisoft Anti-Malware installer is not downloaded yet, the user can click on the Check now
button. Download of the installer will start in a few seconds.
5.3. Installing Emsisoft Anti-Malware via deploy method
In order to install Emsisoft Anti-Malware via the deploy method, the user needs to perform the
following steps:
Configure Emsisoft Enterprise Console server host
Configure the Emsisoft Anti-Malware client host
Perform the actual deployment
5.3.1. Emsisoft Anti-Malware and Emsisoft Enterprise Console Server host
configuration
In order to install Emsisoft Anti-Malware via the deploy method, both the Emsisoft Anti-Malware client
and Emsisoft Enterprise Console Server hosts must be configured properly. Configuration differs
depending on network type (workgroup or domain), operating systems and the type of user that will
be used for deployment. For more details regarding the configurations, please see Appendix 2.
Preparing WORKGROUP computers for deployment and Appendix 3. Preparing AD computers for
deployment
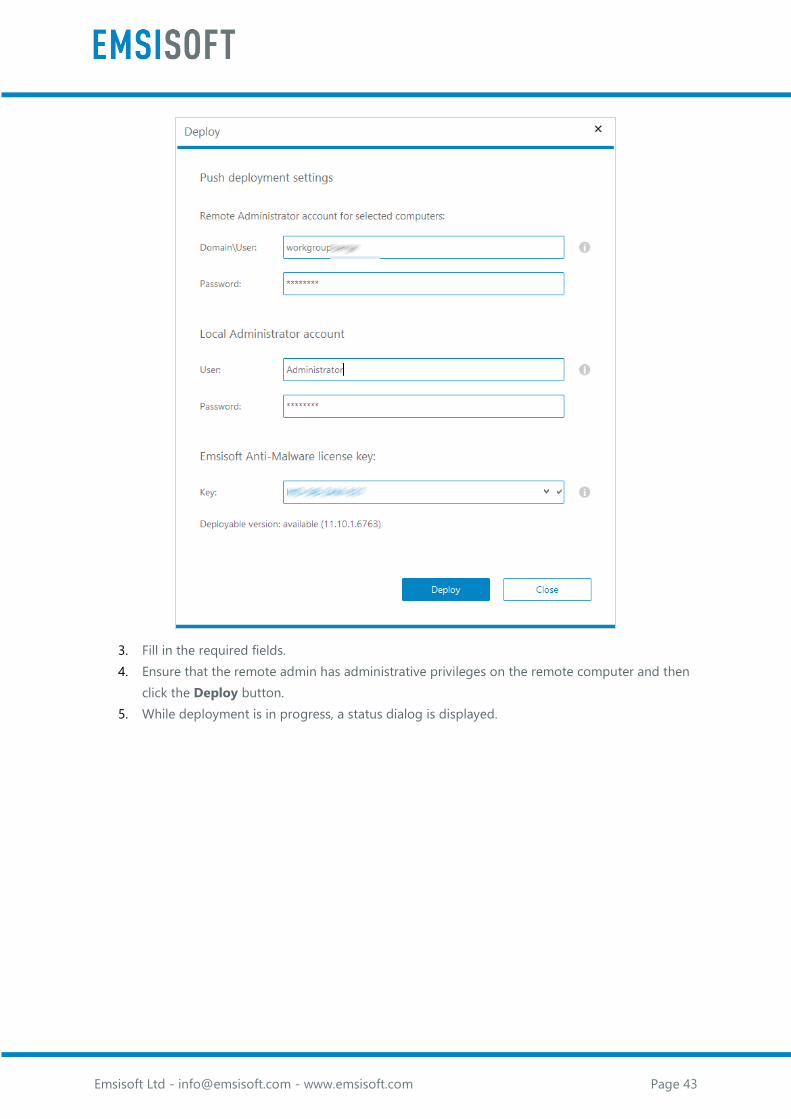
5.3.2. Deployment process
Once you have completed the appropriate system configurations, you need to perform the following
steps to install Emsisoft Anti-Malware on the client host:
1. Add computers to Emsisoft Enterprise Console if this has not already been done.
2. From the Clients table, choose computers and click the Deploy button. A new window
containing the Deploy settings is displayed.
Emsisoft Ltd - [email protected] - www.emsisoft.com Page 43
3. Fill in the required fields.
4. Ensure that the remote admin has administrative privileges on the remote computer and then
click the Deploy button.
5. While deployment is in progress, a status dialog is displayed.
Emsisoft Ltd - [email protected] - www.emsisoft.com Page 44
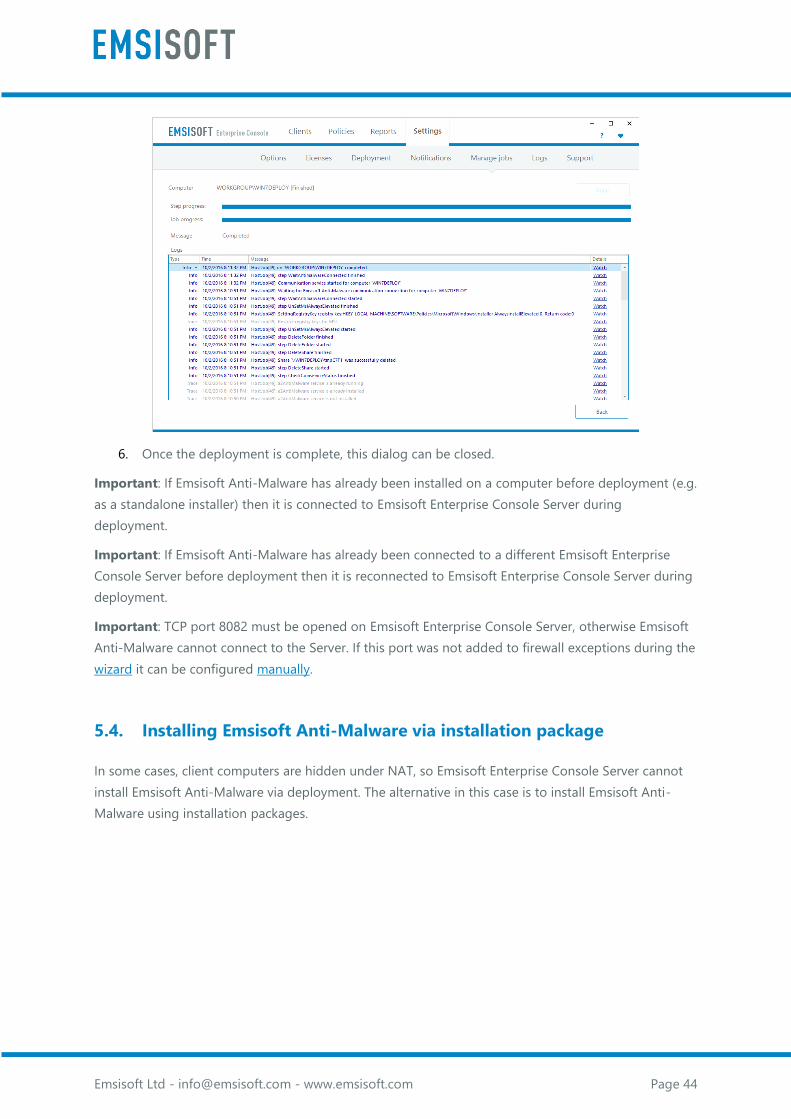
6. Once the deployment is complete, this dialog can be closed.
Important: If Emsisoft Anti-Malware has already been installed on a computer before deployment (e.g.
as a standalone installer) then it is connected to Emsisoft Enterprise Console Server during
deployment.
Important: If Emsisoft Anti-Malware has already been connected to a different Emsisoft Enterprise
Console Server before deployment then it is reconnected to Emsisoft Enterprise Console Server during
deployment.
Important: TCP port 8082 must be opened on Emsisoft Enterprise Console Server, otherwise Emsisoft
Anti-Malware cannot connect to the Server. If this port was not added to firewall exceptions during the
wizard it can be configured manually.
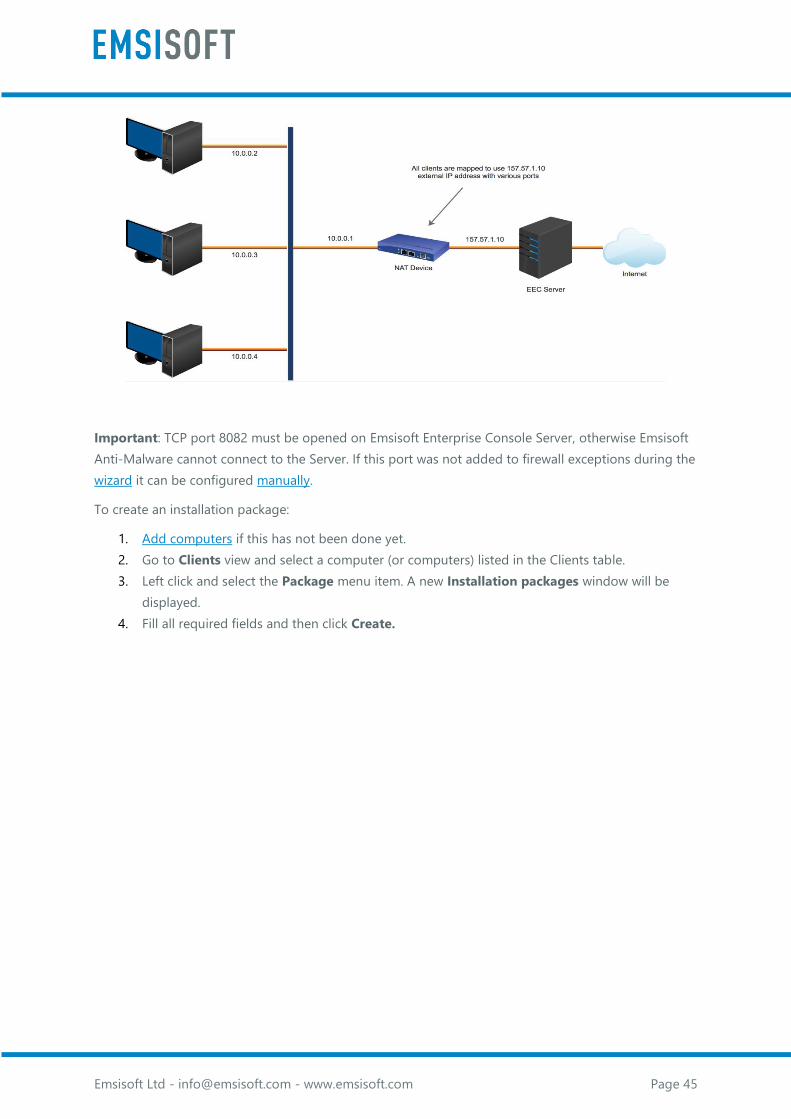
5.4. Installing Emsisoft Anti-Malware via installation package
In some cases, client computers are hidden under NAT, so Emsisoft Enterprise Console Server cannot
install Emsisoft Anti-Malware via deployment. The alternative in this case is to install Emsisoft Anti-
Malware using installation packages.
Emsisoft Ltd - [email protected] - www.emsisoft.com Page 45
Important: TCP port 8082 must be opened on Emsisoft Enterprise Console Server, otherwise Emsisoft
Anti-Malware cannot connect to the Server. If this port was not added to firewall exceptions during the
wizard it can be configured manually.
To create an installation package:
1. Add computers if this has not been done yet.
2. Go to Clients view and select a computer (or computers) listed in the Clients table.
3. Left click and select the Package menu item. A new Installation packages window will be
displayed.
4. Fill all required fields and then click Create.
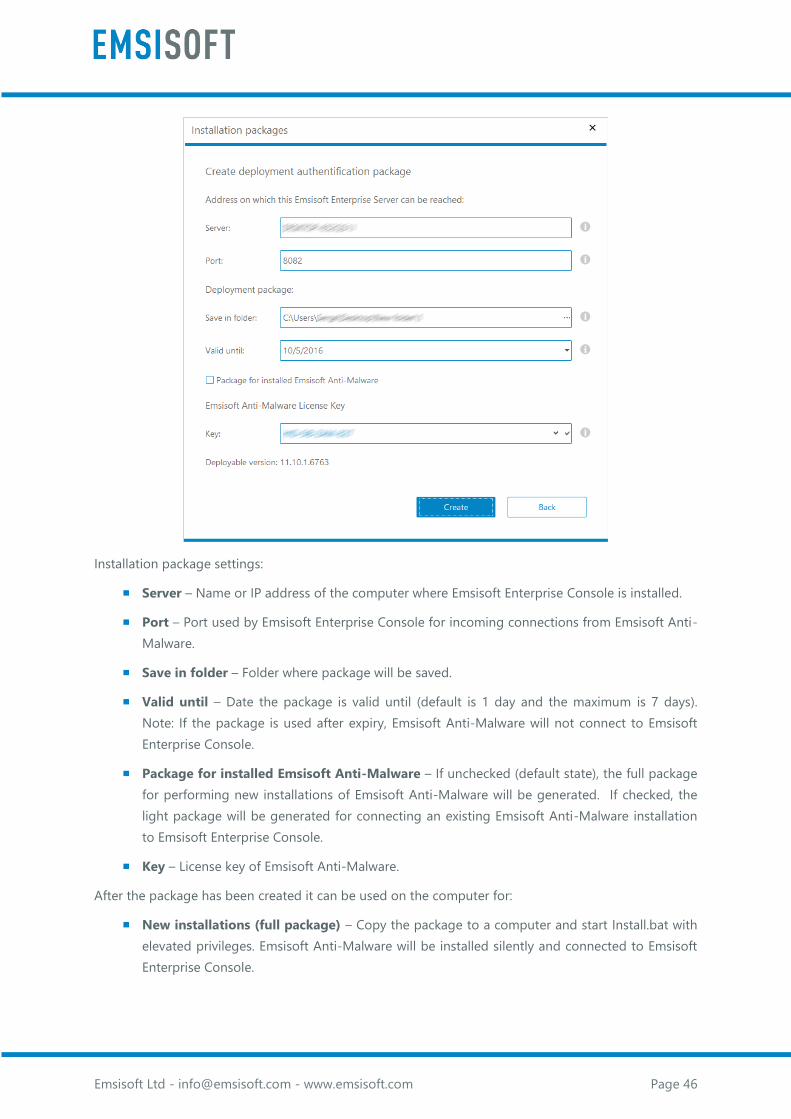
Emsisoft Ltd - [email protected] - www.emsisoft.com Page 46
Installation package settings:
Server – Name or IP address of the computer where Emsisoft Enterprise Console is installed.
Port – Port used by Emsisoft Enterprise Console for incoming connections from Emsisoft Anti-
Malware.
Save in folder – Folder where package will be saved.
Valid until – Date the package is valid until (default is 1 day and the maximum is 7 days).
Note: If the package is used after expiry, Emsisoft Anti-Malware will not connect to Emsisoft
Enterprise Console.
Package for installed Emsisoft Anti-Malware – If unchecked (default state), the full package
for performing new installations of Emsisoft Anti-Malware will be generated. If checked, the
light package will be generated for connecting an existing Emsisoft Anti-Malware installation
to Emsisoft Enterprise Console.
Key – License key of Emsisoft Anti-Malware.
After the package has been created it can be used on the computer for:
New installations (full package) – Copy the package to a computer and start Install.bat with
elevated privileges. Emsisoft Anti-Malware will be installed silently and connected to Emsisoft
Enterprise Console.
Emsisoft Ltd - [email protected] - www.emsisoft.com Page 47
Connection of Emsisoft Anti-Malware installations to Emsisoft Enterprise Console (light
package) – Copy the package to a computer and start Connect.bat with elevated privileges.
Emsisoft Anti-Malware will be connected to Emsisoft Enterprise Console.
An error message will be displayed if Install.bat or Connect.bat are unable to be executed,
Important: Packages can be used to install Emsisoft Anti-Malware and connect it to Emsisoft
Enterprise Console Server only during the period of time when the token is still valid (not expired). If a
token has expired, the Server will not accept it and the client will not be able to connect.
Important: Batch files must be started with elevated privileges.
Important for experienced admins: The content of batch files generated by default can be modified
in <Server installation>/Scripts in ConnectStub.tp and InstallStub.tpl files.
5.5 Connecting client to server by applying a light installation package
There are circumstances where local network machines have the Emsisoft Anti-Malware client installed
(e.g. as a standalone installer) but are not yet connected to Emsisoft Enterprise Console Server. In order
to connect an Emsisoft Anti-Malware client to an Emsisoft Enterprise Console Server, the user needs to
perform the following steps:
1. Login to the Enterprise Console Server machine and generate a light package. To do this, right
click on the client machine listed in Clients view and select the Create Package option. The
Installation packages window is then displayed.
2. Check the Package for installed Emsisoft Anti-Malware option.
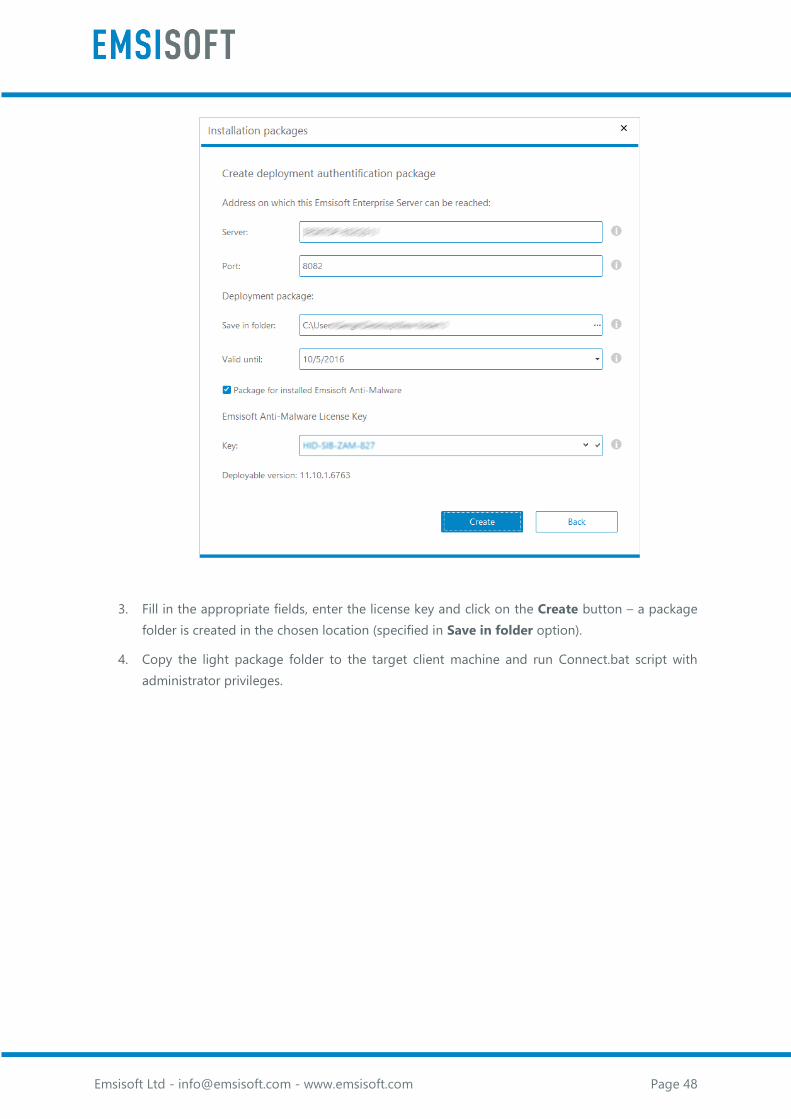
Emsisoft Ltd - [email protected] - www.emsisoft.com Page 48
3. Fill in the appropriate fields, enter the license key and click on the Create button – a package
folder is created in the chosen location (specified in Save in folder option).
4. Copy the light package folder to the target client machine and run Connect.bat script with
administrator privileges.

Emsisoft Ltd - [email protected] - www.emsisoft.com Page 49
6. Updating Emsisoft Anti-Malware license
If you want to update one or more Emsisoft Anti-Malware licenses, complete the following steps:
1. Make sure that Emsisoft Anti-Malware is currently connected to the Emsisoft Enterprise
Console Server.
2. Go to Clients view.
3. Select Clients from the Clients table, right click and select Change license from the context
menu.
4. Enter or select a new license and click the Change button.
7. Monitoring the network
Emsisoft Enterprise Console server provides a centralized view of the endpoint connection and
protection status, and also provides tools to fix any potential issues that exist on the client side.
7.1. Viewing endpoint connection status
You can verify the Emsisoft Enterprise Console to Emsisoft Anti-Malware connection status, by going
to Clients view and checking the information from the Managed column.
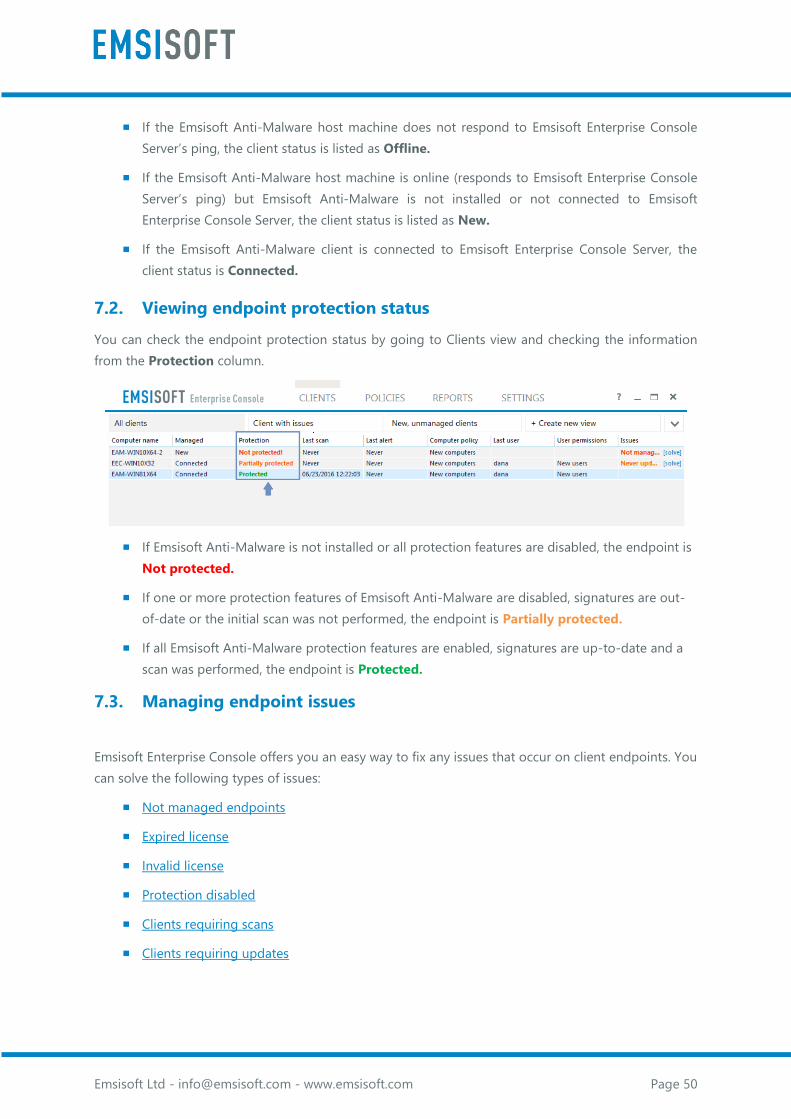
Emsisoft Ltd - [email protected] - www.emsisoft.com Page 50
If the Emsisoft Anti-Malware host machine does not respond to Emsisoft Enterprise Console
Server’s ping, the client status is listed as Offline.
If the Emsisoft Anti-Malware host machine is online (responds to Emsisoft Enterprise Console
Server’s ping) but Emsisoft Anti-Malware is not installed or not connected to Emsisoft
Enterprise Console Server, the client status is listed as New.
If the Emsisoft Anti-Malware client is connected to Emsisoft Enterprise Console Server, the
client status is Connected.
7.2. Viewing endpoint protection status
You can check the endpoint protection status by going to Clients view and checking the information
from the Protection column.
If Emsisoft Anti-Malware is not installed or all protection features are disabled, the endpoint is
Not protected.
If one or more protection features of Emsisoft Anti-Malware are disabled, signatures are out-
of-date or the initial scan was not performed, the endpoint is Partially protected.
If all Emsisoft Anti-Malware protection features are enabled, signatures are up-to-date and a
scan was performed, the endpoint is Protected.
7.3. Managing endpoint issues
Emsisoft Enterprise Console offers you an easy way to fix any issues that occur on client endpoints. You
can solve the following types of issues:
Not managed endpoints
Expired license
Invalid license
Protection disabled
Clients requiring scans
Clients requiring updates
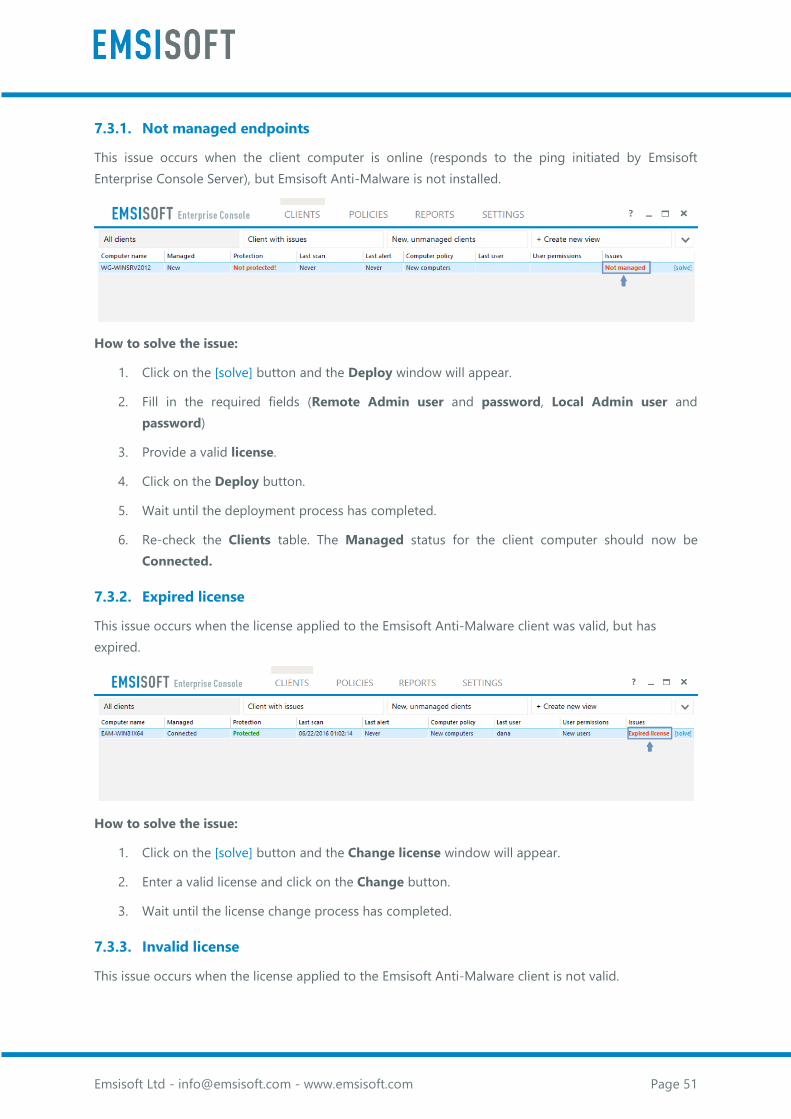
Emsisoft Ltd - [email protected] - www.emsisoft.com Page 51
7.3.1. Not managed endpoints
This issue occurs when the client computer is online (responds to the ping initiated by Emsisoft
Enterprise Console Server), but Emsisoft Anti-Malware is not installed.
How to solve the issue:
1. Click on the [solve] button and the Deploy window will appear.
2. Fill in the required fields (Remote Admin user and password, Local Admin user and
password)
3. Provide a valid license.
4. Click on the Deploy button.
5. Wait until the deployment process has completed.
6. Re-check the Clients table. The Managed status for the client computer should now be
Connected.
7.3.2. Expired license
This issue occurs when the license applied to the Emsisoft Anti-Malware client was valid, but has
expired.
How to solve the issue:
1. Click on the [solve] button and the Change license window will appear.
2. Enter a valid license and click on the Change button.
3. Wait until the license change process has completed.
7.3.3. Invalid license
This issue occurs when the license applied to the Emsisoft Anti-Malware client is not valid.

Emsisoft Ltd - [email protected] - www.emsisoft.com Page 52
How to solve the issue:
1. Click on the [solve] button and the Change license window will appear.
2. Enter a valid license and click on the Change button.
3. Wait until the license change process has completed.
7.3.4. Enable protection
This issue occurs when one or more components are disabled - either from the client side due to
specific changes made by the local user, or from the Emsisoft Enterprise Console side through changes
in the computer policies.
How to solve the issue:
When components are disabled on the client side:
1. Click on the [solve] button.
2. The settings on the client side will be overwritten by the settings applied on the server
side.
When components are disabled due to server policies:
1. Click on the [solve] button. The user is then redirected to Policies > Computer policies >
Computer settings, and to the first policy item that is not checked.
2. Enable the required components and then click on the Sync button – the new settings
should be sent instantly to the client.
7.3.5. Never scanned clients
This issue occurs with connected client endpoints that have not been scanned yet.
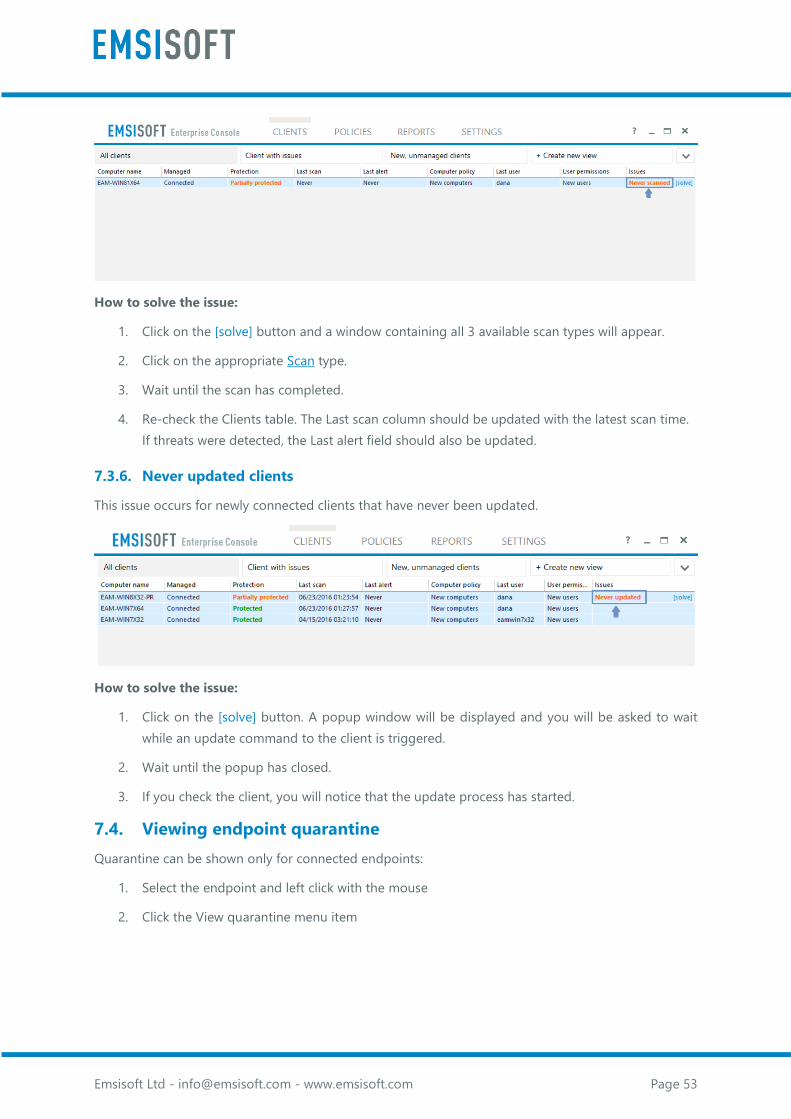
Emsisoft Ltd - [email protected] - www.emsisoft.com Page 53
How to solve the issue:
1. Click on the [solve] button and a window containing all 3 available scan types will appear.
2. Click on the appropriate Scan type.
3. Wait until the scan has completed.
4. Re-check the Clients table. The Last scan column should be updated with the latest scan time.
If threats were detected, the Last alert field should also be updated.
7.3.6. Never updated clients
This issue occurs for newly connected clients that have never been updated.
How to solve the issue:
1. Click on the [solve] button. A popup window will be displayed and you will be asked to wait
while an update command to the client is triggered.
2. Wait until the popup has closed.
3. If you check the client, you will notice that the update process has started.
7.4. Viewing endpoint quarantine
Quarantine can be shown only for connected endpoints:
1. Select the endpoint and left click with the mouse
2. Click the View quarantine menu item
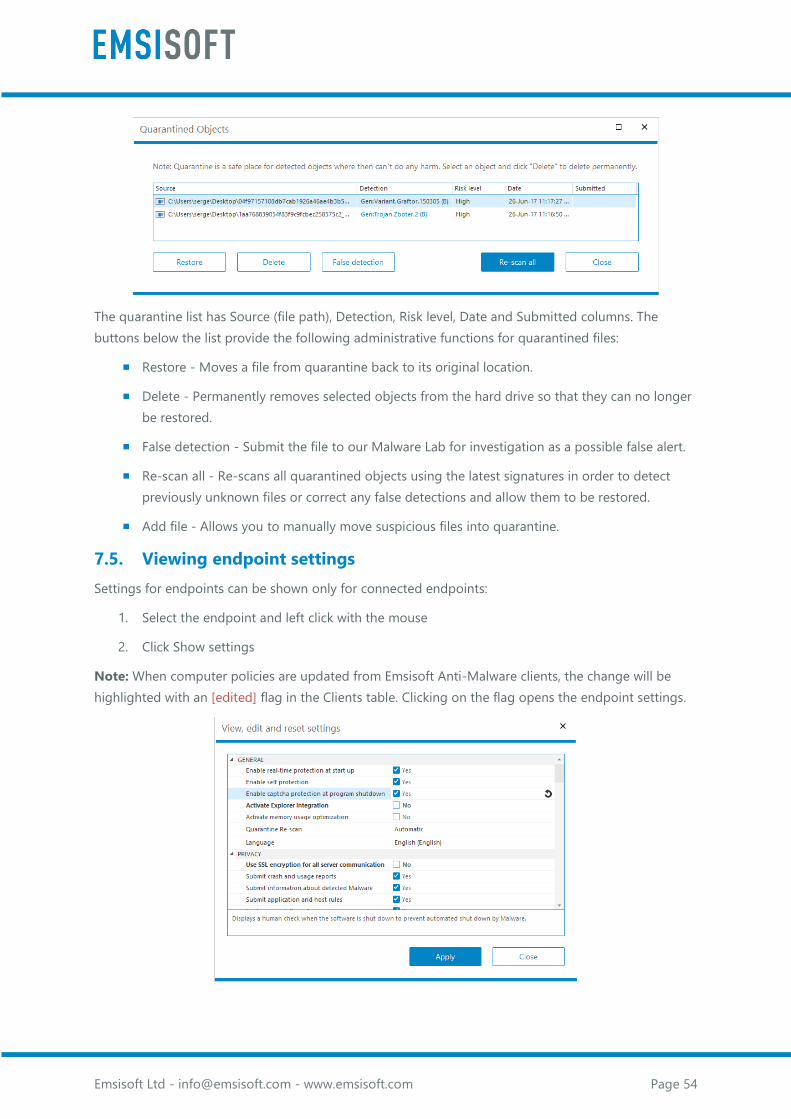
Emsisoft Ltd - [email protected] - www.emsisoft.com Page 54
The quarantine list has Source (file path), Detection, Risk level, Date and Submitted columns. The
buttons below the list provide the following administrative functions for quarantined files:
Restore - Moves a file from quarantine back to its original location.
Delete - Permanently removes selected objects from the hard drive so that they can no longer
be restored.
False detection - Submit the file to our Malware Lab for investigation as a possible false alert.
Re-scan all - Re-scans all quarantined objects using the latest signatures in order to detect
previously unknown files or correct any false detections and allow them to be restored.
Add file - Allows you to manually move suspicious files into quarantine.
7.5. Viewing endpoint settings
Settings for endpoints can be shown only for connected endpoints:
1. Select the endpoint and left click with the mouse
2. Click Show settings
Note: When computer policies are updated from Emsisoft Anti-Malware clients, the change will be
highlighted with an [edited] flag in the Clients table. Clicking on the flag opens the endpoint settings.
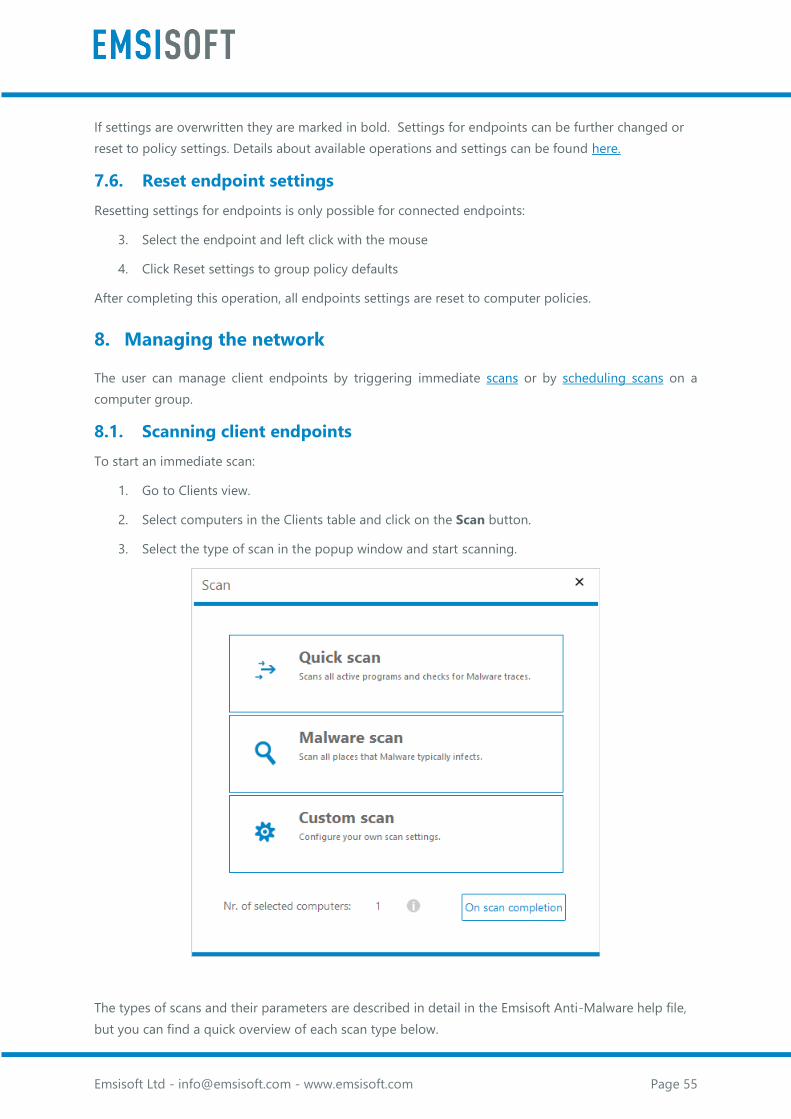
Emsisoft Ltd - [email protected] - www.emsisoft.com Page 55
If settings are overwritten they are marked in bold. Settings for endpoints can be further changed or
reset to policy settings. Details about available operations and settings can be found here.
7.6. Reset endpoint settings
Resetting settings for endpoints is only possible for connected endpoints:
3. Select the endpoint and left click with the mouse
4. Click Reset settings to group policy defaults
After completing this operation, all endpoints settings are reset to computer policies.
8. Managing the network
The user can manage client endpoints by triggering immediate scans or by scheduling scans on a
computer group.
8.1. Scanning client endpoints
To start an immediate scan:
1. Go to Clients view.
2. Select computers in the Clients table and click on the Scan button.
3. Select the type of scan in the popup window and start scanning.
The types of scans and their parameters are described in detail in the Emsisoft Anti-Malware help file,
but you can find a quick overview of each scan type below.
Emsisoft Ltd - [email protected] - www.emsisoft.com Page 56
8.1.1. Quick scans
The Quick scan is the fastest scan, but it does not scan any files or folders except for the following:
Rootkit scan (consists of boot records scan and drivers scan)
Memory scan (scans objects loaded in memory)
Traces scan
8.1.2. Malware scans
The Malware scan scans the above objects, as well as the file system specified in the Smart Scan Paths
(a2smart.dat) which consists of a list of locations that are commonly used by PUPs and malware. The
advantage of the Malware scan is that certain large folders that are almost never used by malware or
PUPs can be excluded, which ensures that the scan time will be considerably shorter. The malware scan
only scans the Windows system partition.
8.1.3. Custom scans
The Custom Scan can be used to create a scan configuration that combines any of the above as well
as the possibility to scan all attached fixed volumes without using the smart scan paths configuration.
It also allows a user to use Direct Disk Access for the entire scan (normally this is only used in the
Rootkit scan) while also using a file extension filter.
Use the Add folder and Remove folder buttons to add or remove folders to be scanned.
Under Scan Objects the following options can be enabled or disabled:
Scan for active Rootkits - Rootkits are a type of Malware that manipulate the system in a way
that causes it not to show specific information or files anymore.
Scan memory for active Malware - Scans all currently loaded programs and their
components.
Scan for Malware Traces - Malware Traces are manipulated registry settings or non-
executable Malware data or configuration files that are indicative of an infection.
Under Scan Settings you can configure detailed settings for the actual scan by enabling or disabling
the following options can be configured:
Detect Potentially Unwanted Programs (PUPs) - PUPs are programs that are not dangerous
by definition, but are usually unwanted by most users as they display ads or manipulate
browsers.
Scan in compressed archives (zip, rar, cab) - Malware sometimes hides in compressed
archives. Please note that scanning of archives may take extra time.
Scan in NTFS Alternate Data Streams - Data streams are hidden layers in regular files that
may be used to hide malicious code.
Use file extension filter - Limits the scan to the specified list of file extensions.

Emsisoft Ltd - [email protected] - www.emsisoft.com Page 57
Use direct disk access - Direct disk access is a more effective (but slower) alternative method
of reading files from the hard disk for scanning. It should be used only for finding Rootkits, not
for scanning the entire hard disk.
8.2. Scheduling scans
The Scheduled Scans section contains a list of all scheduled scan jobs displayed as tiles. Each tile lists
the scan type, a summary of the scan interval and the amount of time remaining until the next scan
interval.
Scheduled scans are mapped to the computer groups and allow the user to execute scans
automatically on the client endpoints protected by Emsisoft Anti Malware. In order to add a new
scheduled scan, perform the following steps:
1. Go to Policies > Computer Policies.
2. Go to the Computer settings tab and navigate to the SCHEDULED SCANS section.
3. Click on the Custom Scan tile and the Custom scan window will appear.
4. Click on the New scan button and a new scan window will appear.
5. Set up the scan type and the options for recurrence, and then save the scheduled scan.
Scheduled scans can run unattended, which means they can run without showing the scan screen or
scan progress to the user. Unattended scans can run if no user is logged on in Windows. The animated
scan icon (magnifier glass in the system tray) indicates that an unattended scan is running. The scanner
Emsisoft Ltd - [email protected] - www.emsisoft.com Page 58
window can be opened by clicking on the animated system tray icon. The scan will continue after
closing the scanner window. Unattended scan results are notified as follows:
If no administrator account is logged in: the scan results are saved to the scan log.
If one administrator account is logged in: the Scanner window will appear, to provide
information.
If more than one administrator account is logged in: a notification will be shown to all
administrator accounts. For the administrator whom confirms first, the Scanner window will
appear. Notifications for the other administrator accounts will be closed automatically.
Don't start scheduled scans in Game Mode - Prevents interruptions in resource intensive
games by ensuring that scheduled scans don't start if Game Mode is active.
Clicking on the Add new scan button (or clicking an existing scan job tile if you wish to edit it) opens
a dialog with the following tabs for configuring scan time, frequency and other advanced options:
When
Scan the computer
Every [x] hour [x] min between [x] and [x] - At specified hour/minute intervals during selected
time frames (e.g every 5 hours between 12:00 AM and 11:59 PM).
At [x] - Run at a set time (e.g 1.00 PM).
After - PC startup/Online update
Recur
Monthly - On a particular day of the month (e.g. the 1st of every month).
Weekly - On selected days of the week ( e.g. only on Fridays and Saturdays).
Daily - Every day.
The checkbox Enabled indicates whether this specific scan is currently enabled or disabled. The Run
now button allows you to manually start this scan and the Delete schedule button allows you to
remove this scan from the list of scheduled scans.
What
Scan type - The dropdown menu allows you select from either:
Quick Scan - Scans only active programs and checks for Malware traces. Run a Quick Scan if it
is assumed that the system is clean (e.g. on a freshly installed operating system).
Malware Scan - Scans all places that Malware typically infects. A Malware Scan is the best
choice for most users. It's fast and thoroughly examines the whole computer for any active
Malware infections.
Custom Scan - All scanner settings can be manually set and stored for later use. This is
particularly useful for scanning additional drives for any inactive Malware files.
Emsisoft Ltd - [email protected] - www.emsisoft.com Page 59
If Custom Scan is selected, a Configure button will be visible and open a further dialog with all
Custom Scan settings.
Advanced settings
Update before scanning - Configures the software to check for updates before performing
the scheduled scan, if the last update was more than 30 minutes ago. It is recommended to
enable this option if automatic updates are disabled or set to a long interval. This option will
be unavailable when "After online update" is selected in the "When" tab.
Scan silently - Configures the scheduled scan to run invisibly to prevent disruption to work.
An animated system tray icon is displayed to indicate the active scan. The scanner window can
be opened by clicking on the animated system tray icon.
Run missed scans on next startup - If the computer is not turned on at the specified time,
the missed scan will be executed after next start of the computer, unless more than a third of
the time before the next scan interval has already passed.
The On scan completion button defines what the program should do when the scan finishes:
Report only - Report the results of the scan but do not automatically perform any other
actions.
Quarantine detected objects - Automatically move all detected objects into quarantine
immediately after the scan finishes.
Shut down computer - Automatically shut down the computer when the scan finishes and
either of the previous options has been executed. This can be especially useful if the computer
is being left to scan for Malware overnight.
The checkbox Enabled indicates whether this specific scan is currently enabled or disabled. The Run
now button manually starts this scan and the Delete schedule button removes this scan from the list
of scheduled scans.
9. Configuring Emsisoft Anti-Malware for updates via Emsisoft
Update Proxy Server
Emsisoft Update Proxy Server is a mirror server for updates of Emsisoft Anti-Malware.
Emsisoft Anti-Malware can be configured to receive updates via Emsisoft Update Proxy Server as
follows:
• Enable usage of Emsisoft Update Proxy Server via computer policies (update section)
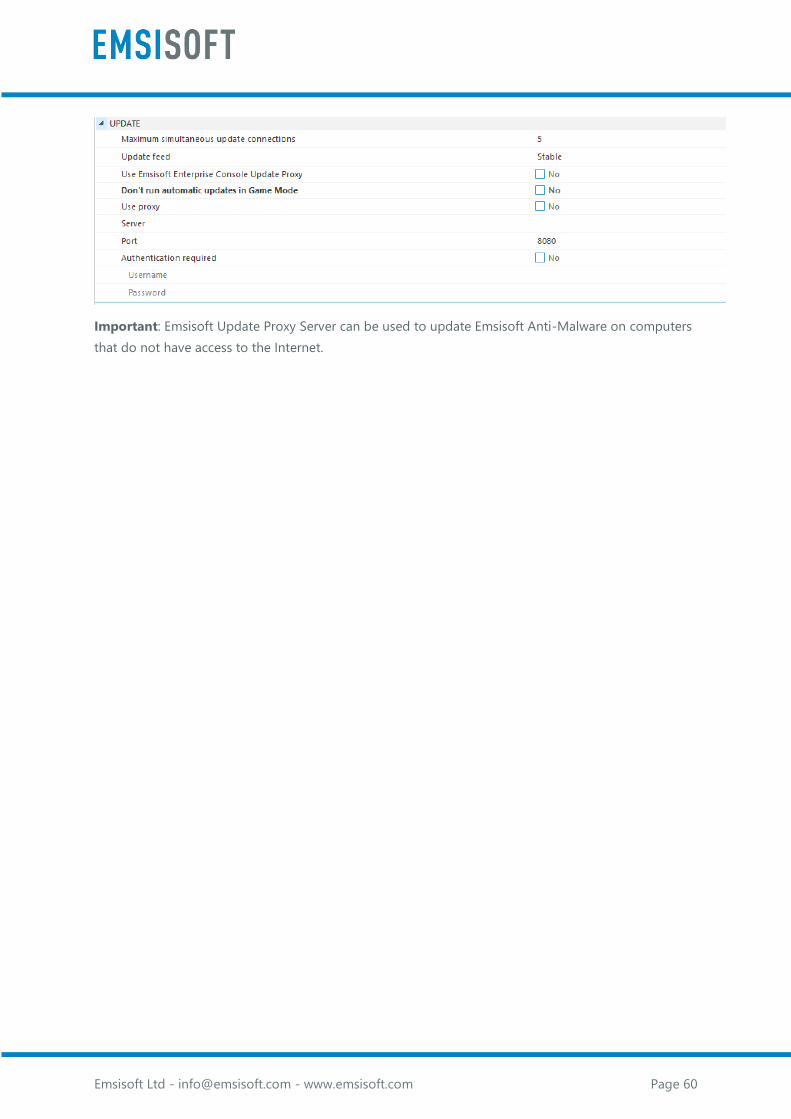
Emsisoft Ltd - [email protected] - www.emsisoft.com Page 60
Important: Emsisoft Update Proxy Server can be used to update Emsisoft Anti-Malware on computers
that do not have access to the Internet.

Emsisoft Ltd - [email protected] - www.emsisoft.com Page 61
10. Emsisoft Enterprise Console CMD overview
The Console CMD can be used in automation scripts to automate some operations.
Important: Remote Emsisoft Anti-Malware computers must be configured appropriately (see
Appendix 2. Prepare WORKGROUP computers for deployment, Appendix 3. Prepare AD computers for
deploymentAppendix 3. Preparing AD computers for deployment) for the deploy command.
Configuration differs depending on network type (workgroup or domain), operating systems and the
type of user that will be used for deployment.
Important: If the Emsisoft Enterprise Console was installed recently, ensure that it has downloaded the
Emsisoft Anti-Malware installer for deploy and package commands.
10.1. Accessing help
Help – Provides help for commands and their parameters.
Parameters: not available
Examples:
Show help
> EECCmd.exe help
Output:
HELP
DEPLOY Installs Emsisoft Anti-Malware remotely to computer.
PACKAGE Creates Emsisoft Anti-Malware package.
10.2. Deploying Emsisoft Anti-Malware
Deploy – Deploys Emsisoft Anti-Malware (see here for details).
Parameters:
PASSWORD – Password for Emsisoft Enterprise Server user
LOGIN – Name of Emsisoft Enterprise Server user
COMPUTER – Processed computer in the format DOMAIN | WORKGROUP\COMPUTER
REMOTEUSER – User who has administrative privileges on remote computer in the format
RemoteComputerName\RemoteUserName:RemoteUserPassword
LOCALUSER – User who has administrative privileges on Emsisoft Enterprise Server in the
format LocalComputerName\LocalUserName:LocalUserPassword
KEY – License key of Emsisoft Anti-Malware in the format XXX-XXX-XXX-XXX or license key of
Emsisoft Anti-Malware for Server in the format XXX-XXX-XXX-XXXS
LOG – Log options; can be combination of v | x | j, where v – verbose output, x – include debug
logs, j – include job logs. Default value is vj.
Examples:
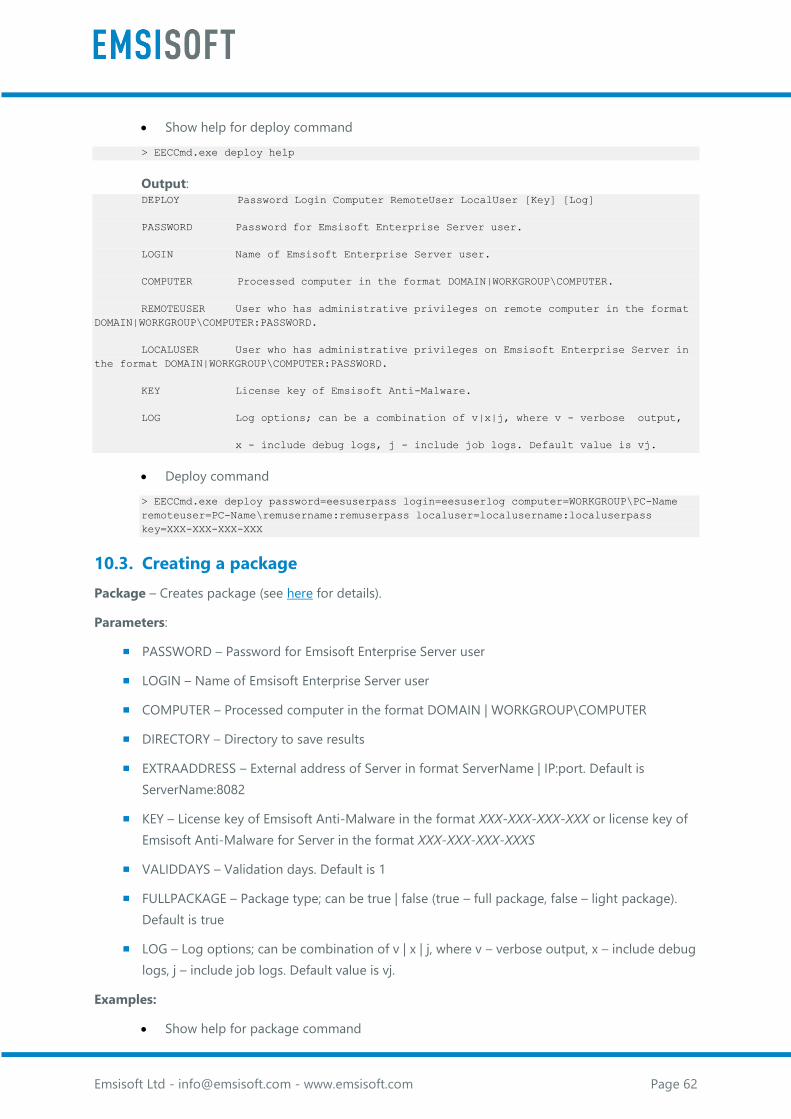
Emsisoft Ltd - [email protected] - www.emsisoft.com Page 62
• Show help for deploy command
> EECCmd.exe deploy help
Output: DEPLOY Password Login Computer RemoteUser LocalUser [Key] [Log]
PASSWORD Password for Emsisoft Enterprise Server user.
LOGIN Name of Emsisoft Enterprise Server user.
COMPUTER Processed computer in the format DOMAIN|WORKGROUP\COMPUTER.
REMOTEUSER User who has administrative privileges on remote computer in the format
DOMAIN|WORKGROUP\COMPUTER:PASSWORD.
LOCALUSER User who has administrative privileges on Emsisoft Enterprise Server in
the format DOMAIN|WORKGROUP\COMPUTER:PASSWORD.
KEY License key of Emsisoft Anti-Malware.
LOG Log options; can be a combination of v|x|j, where v - verbose output,
x - include debug logs, j - include job logs. Default value is vj.
• Deploy command
> EECCmd.exe deploy password=eesuserpass login=eesuserlog computer=WORKGROUP\PC-Name
remoteuser=PC-Name\remusername:remuserpass localuser=localusername:localuserpass
key=XXX-XXX-XXX-XXX
10.3. Creating a package
Package – Creates package (see here for details).
Parameters:
PASSWORD – Password for Emsisoft Enterprise Server user
LOGIN – Name of Emsisoft Enterprise Server user
COMPUTER – Processed computer in the format DOMAIN | WORKGROUP\COMPUTER
DIRECTORY – Directory to save results
EXTRAADDRESS – External address of Server in format ServerName | IP:port. Default is
ServerName:8082
KEY – License key of Emsisoft Anti-Malware in the format XXX-XXX-XXX-XXX or license key of
Emsisoft Anti-Malware for Server in the format XXX-XXX-XXX-XXXS
VALIDDAYS – Validation days. Default is 1
FULLPACKAGE – Package type; can be true | false (true – full package, false – light package).
Default is true
LOG – Log options; can be combination of v | x | j, where v – verbose output, x – include debug
logs, j – include job logs. Default value is vj.
Examples:
• Show help for package command
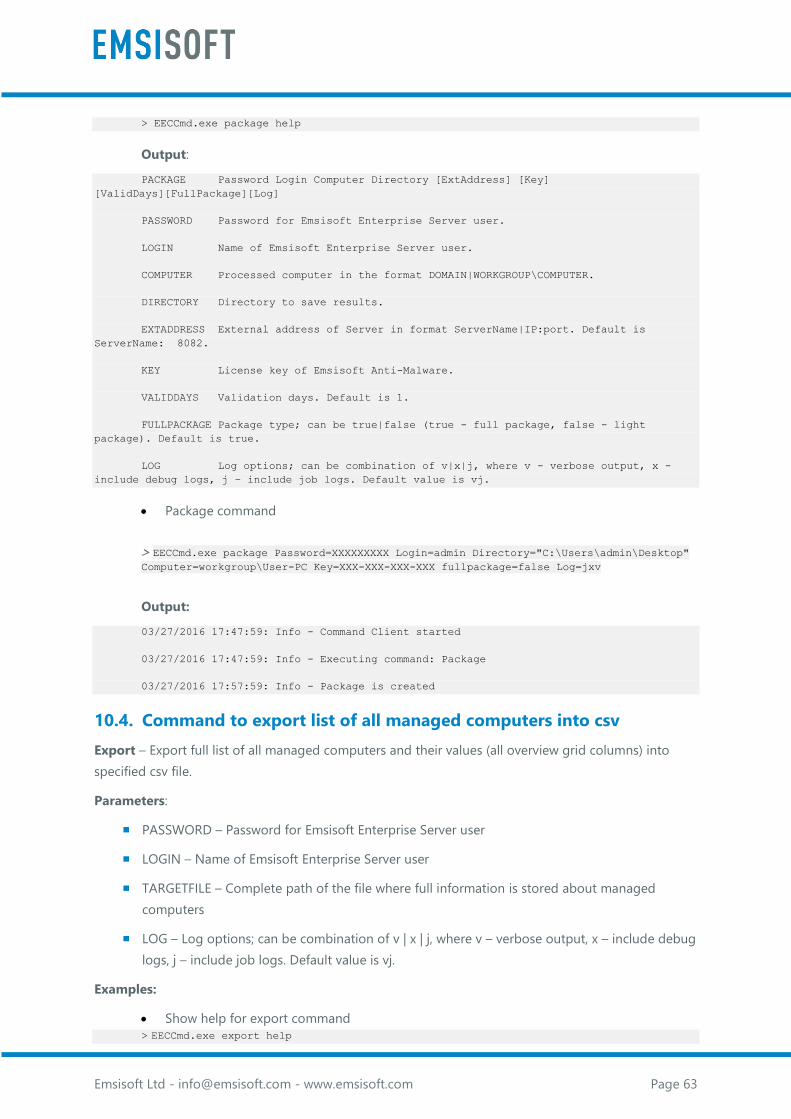
Emsisoft Ltd - [email protected] - www.emsisoft.com Page 63
> EECCmd.exe package help
Output:
PACKAGE Password Login Computer Directory [ExtAddress] [Key]
[ValidDays][FullPackage][Log]
PASSWORD Password for Emsisoft Enterprise Server user.
LOGIN Name of Emsisoft Enterprise Server user.
COMPUTER Processed computer in the format DOMAIN|WORKGROUP\COMPUTER.
DIRECTORY Directory to save results.
EXTADDRESS External address of Server in format ServerName|IP:port. Default is
ServerName: 8082.
KEY License key of Emsisoft Anti-Malware.
VALIDDAYS Validation days. Default is 1.
FULLPACKAGE Package type; can be true|false (true - full package, false - light
package). Default is true.
LOG Log options; can be combination of v|x|j, where v - verbose output, x -
include debug logs, j – include job logs. Default value is vj.
• Package command
> EECCmd.exe package Password=XXXXXXXXX Login=admin Directory="C:\Users\admin\Desktop" Computer=workgroup\User-PC Key=XXX-XXX-XXX-XXX fullpackage=false Log=jxv
Output:
03/27/2016 17:47:59: Info - Command Client started
03/27/2016 17:47:59: Info - Executing command: Package
03/27/2016 17:57:59: Info - Package is created
10.4. Command to export list of all managed computers into csv
Export – Export full list of all managed computers and their values (all overview grid columns) into
specified csv file.
Parameters:
PASSWORD – Password for Emsisoft Enterprise Server user
LOGIN – Name of Emsisoft Enterprise Server user
TARGETFILE – Complete path of the file where full information is stored about managed
computers
LOG – Log options; can be combination of v | x | j, where v – verbose output, x – include debug
logs, j – include job logs. Default value is vj.
Examples:
• Show help for export command
> EECCmd.exe export help
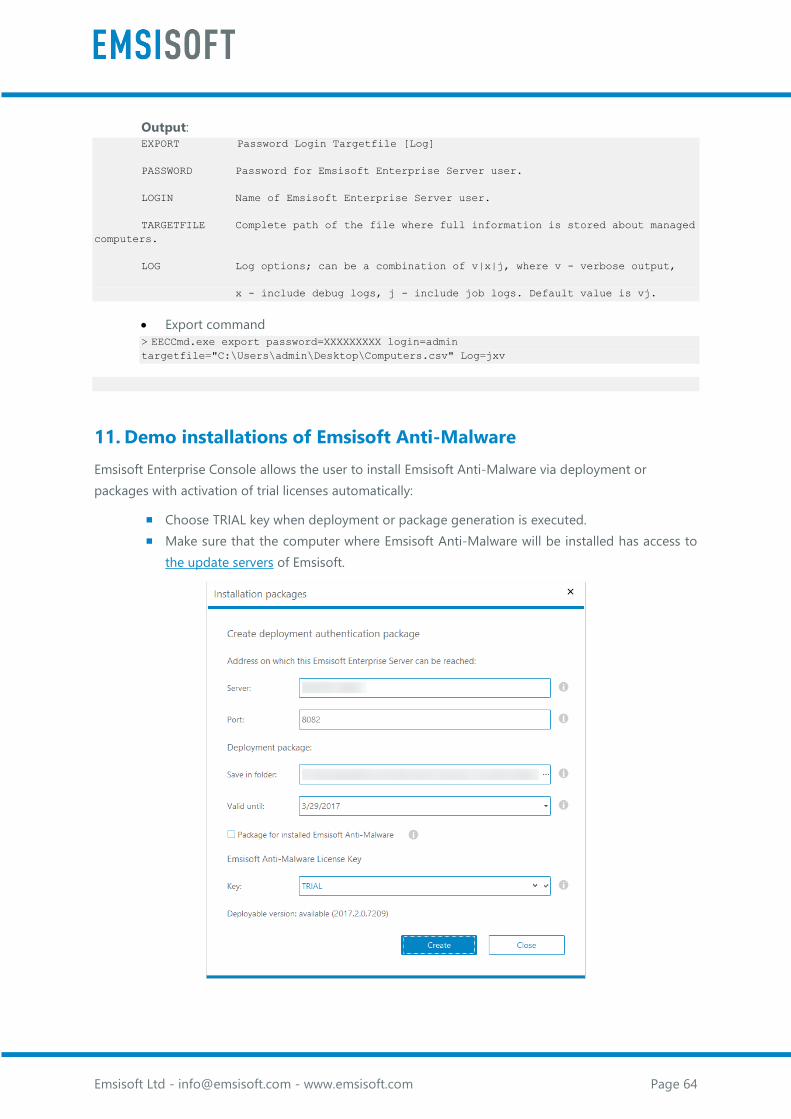
Emsisoft Ltd - [email protected] - www.emsisoft.com Page 64
Output: EXPORT Password Login Targetfile [Log]
PASSWORD Password for Emsisoft Enterprise Server user.
LOGIN Name of Emsisoft Enterprise Server user.
TARGETFILE Complete path of the file where full information is stored about managed
computers.
LOG Log options; can be a combination of v|x|j, where v - verbose output,
x - include debug logs, j - include job logs. Default value is vj.
• Export command
> EECCmd.exe export password=XXXXXXXXX login=admin targetfile="C:\Users\admin\Desktop\Computers.csv" Log=jxv
11. Demo installations of Emsisoft Anti-Malware
Emsisoft Enterprise Console allows the user to install Emsisoft Anti-Malware via deployment or
packages with activation of trial licenses automatically:
Choose TRIAL key when deployment or package generation is executed.
Make sure that the computer where Emsisoft Anti-Malware will be installed has access to
the update servers of Emsisoft.
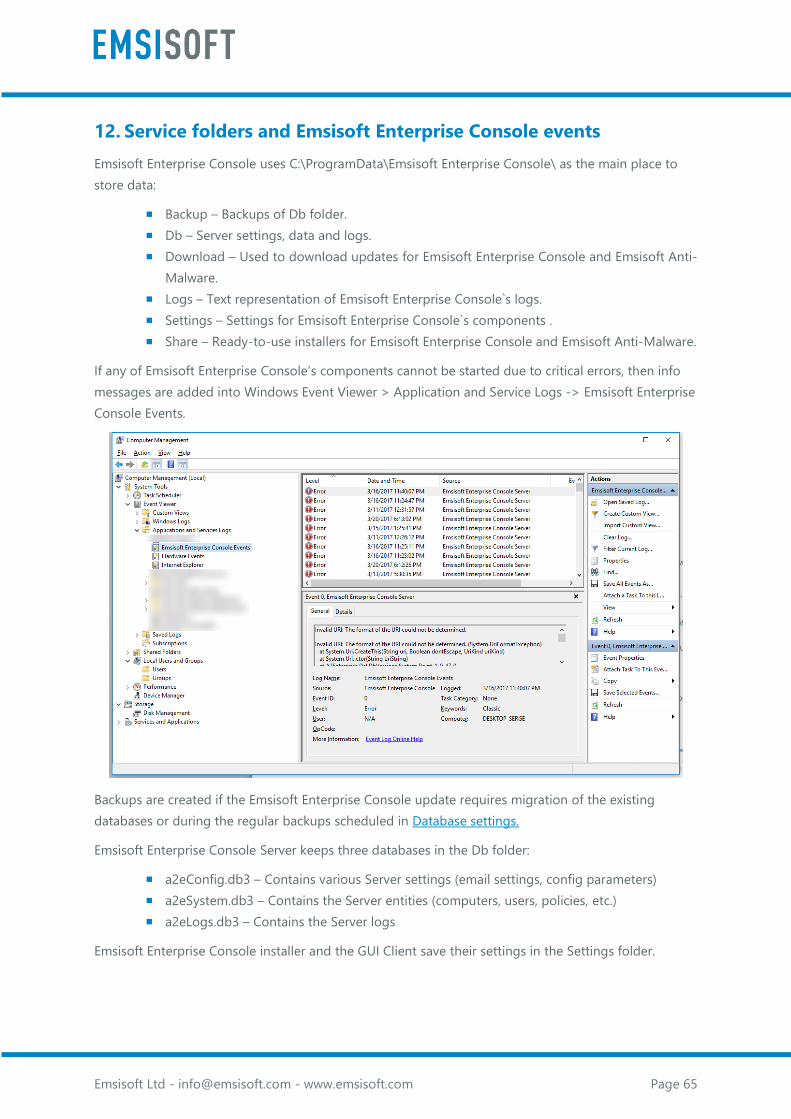
Emsisoft Ltd - [email protected] - www.emsisoft.com Page 65
12. Service folders and Emsisoft Enterprise Console events
Emsisoft Enterprise Console uses C:\ProgramData\Emsisoft Enterprise Console\ as the main place to
store data:
Backup – Backups of Db folder.
Db – Server settings, data and logs.
Download – Used to download updates for Emsisoft Enterprise Console and Emsisoft Anti-
Malware.
Logs – Text representation of Emsisoft Enterprise Console`s logs.
Settings – Settings for Emsisoft Enterprise Console`s components .
Share – Ready-to-use installers for Emsisoft Enterprise Console and Emsisoft Anti-Malware.
If any of Emsisoft Enterprise Console’s components cannot be started due to critical errors, then info
messages are added into Windows Event Viewer > Application and Service Logs -> Emsisoft Enterprise
Console Events.
Backups are created if the Emsisoft Enterprise Console update requires migration of the existing
databases or during the regular backups scheduled in Database settings.
Emsisoft Enterprise Console Server keeps three databases in the Db folder:
a2eConfig.db3 – Contains various Server settings (email settings, config parameters)
a2eSystem.db3 – Contains the Server entities (computers, users, policies, etc.)
a2eLogs.db3 – Contains the Server logs
Emsisoft Enterprise Console installer and the GUI Client save their settings in the Settings folder.
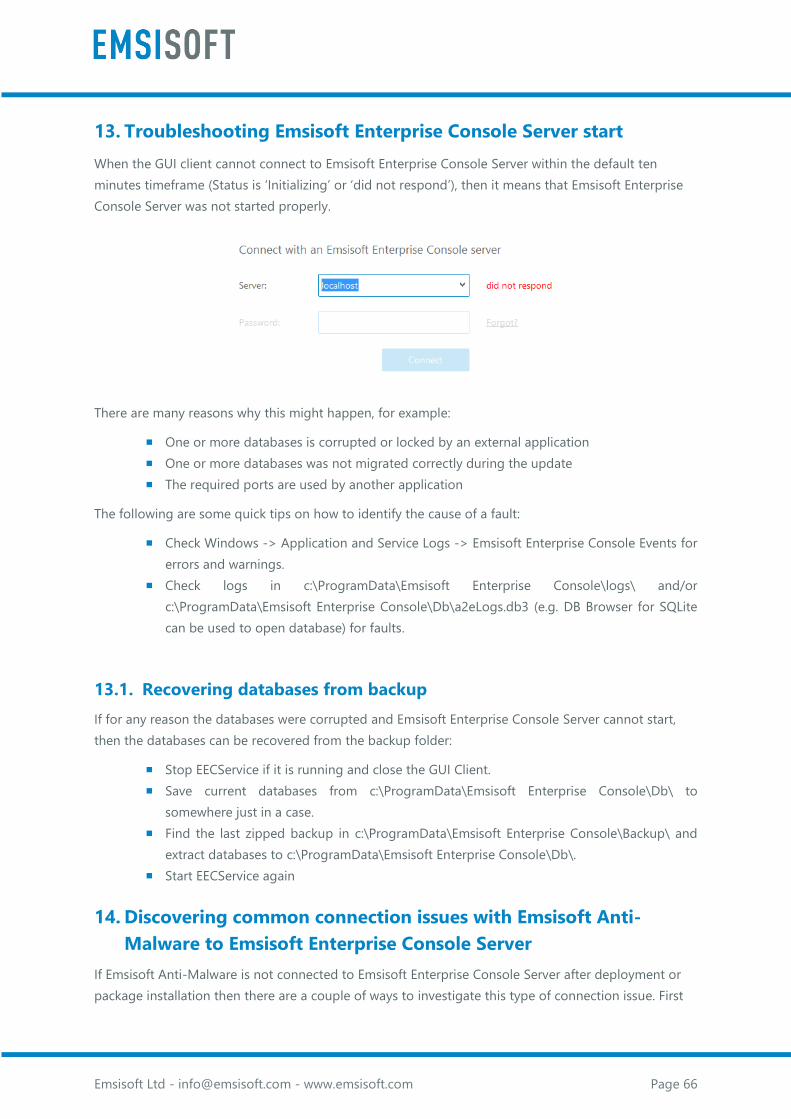
Emsisoft Ltd - [email protected] - www.emsisoft.com Page 66
13. Troubleshooting Emsisoft Enterprise Console Server start
When the GUI client cannot connect to Emsisoft Enterprise Console Server within the default ten
minutes timeframe (Status is ‘Initializing’ or ‘did not respond’), then it means that Emsisoft Enterprise
Console Server was not started properly.
There are many reasons why this might happen, for example:
One or more databases is corrupted or locked by an external application
One or more databases was not migrated correctly during the update
The required ports are used by another application
The following are some quick tips on how to identify the cause of a fault:
Check Windows -> Application and Service Logs -> Emsisoft Enterprise Console Events for
errors and warnings.
Check logs in c:\ProgramData\Emsisoft Enterprise Console\logs\ and/or
c:\ProgramData\Emsisoft Enterprise Console\Db\a2eLogs.db3 (e.g. DB Browser for SQLite
can be used to open database) for faults.
13.1. Recovering databases from backup
If for any reason the databases were corrupted and Emsisoft Enterprise Console Server cannot start,
then the databases can be recovered from the backup folder:
Stop EECService if it is running and close the GUI Client.
Save current databases from c:\ProgramData\Emsisoft Enterprise Console\Db\ to
somewhere just in a case.
Find the last zipped backup in c:\ProgramData\Emsisoft Enterprise Console\Backup\ and
extract databases to c:\ProgramData\Emsisoft Enterprise Console\Db\.
Start EECService again
14. Discovering common connection issues with Emsisoft Anti-
Malware to Emsisoft Enterprise Console Server
If Emsisoft Anti-Malware is not connected to Emsisoft Enterprise Console Server after deployment or
package installation then there are a couple of ways to investigate this type of connection issue. First
Emsisoft Ltd - [email protected] - www.emsisoft.com Page 67
of all, enable the debug logs for Emsisoft Enterprise Console in Settings to see more details about
client`s connections in Emsisoft Enterprise Console`s logs.
Note: Debug logs should be disabled once the cause of the connection issue has been discovered.
Emsisoft Enterprise Console Server logs can be found in c:\ProgramData\Emsisoft Enterprise
Console\logs\Emsisoft Enterprise Console Server.log and/or c:\ProgramData\Emsisoft Enterprise
Console\Db\a2eLogs.db3 (e.g. DB Browser for SQLite can be used to open database).
14.1. No connection attempts in logs
If logs show that there was no connection attempt, then:
Make sure that Emsisoft Enterprise Console server`s ports are opened.
Make sure that the Emsisoft Enterprise Console Server host is accessible from the
computer where Emsisoft Anti-Malware is installed.
14.2. Server refuses connection because computer is not known
The computer was specified incorrectly or was already deleted from Emsisoft Enterprise Console if the
logs contain entries like:
[PC1]: computer can not be connected to server. Information was not found: name = PC1,
workgroup/domain = WORKGROUP
When adding a new computer to Emsisoft Enterprise Console, the user must specify the exact
computer and workgroup/domain names. If this did not occur or there were some typos while entering
the computer/domain/workgroup name, the computer should be removed from Emsisoft Enterprise
Console and added back again. Then, follow the procedure specified below.
15. Troubleshooting client-server connection issues
In certain situations, Emsisoft Anti-Malware may disconnect from Emsisoft Enterprise Console server. In
order to reconnect, the user needs to first disconnect Emsisoft Anti-Malware from Emsisoft Enterprise
Console Server, and then reconnect the client to the server.
The user can also connect a new client machine on which Emsisoft Anti-Malware has been installed
from a standalone installer, by following the steps described in Connect Emsisoft Anti-Malware to
Emsisoft Enterprise Console Server section.
15.1. Disconnecting Emsisoft Anti-Malware from Emsisoft Enterprise
Console Server
In order to properly disconnect Emsisoft Anti-Malware from Emsisoft Enterprise Console Server, the
user needs to do the following:
1. Login on the Emsisoft Enterprise Console Server machine and copy
Disconnect_EAM_from_EEC.bat script (located in Emsisoft Enterprise Console installation
folder) to the Emsisoft Anti-Malware client machine.
2. Login on the client machine.

Emsisoft Ltd - [email protected] - www.emsisoft.com Page 68
3. Run Disconnect_EAM_from_EEC.bat script with elevated privileges.
Upon completing these steps, Emsisoft Anti-Malware will no longer be connected to Emsisoft
Enterprise Console Server, but the client host continues to be protected by Emsisoft Anti-Malware
software.
15.2. Connecting Emsisoft Anti-Malware to Emsisoft Enterprise Console
Server
In order to connect Emsisoft Anti-Malware client to an Emsisoft Enterprise Console Server, the user
needs to perform the following steps:
1. Login on the Enterprise Console Server machine and generate a light package. To do this, right
click on the client machine listed in Clients view and select the Create Package option. The
Installation packages window will then be displayed.
2. Check Package for installed Emsisoft Anti-Malware option.
3. Enter the license key and click on the Create button – a package folder is created in the
chosen location.
4. Copy the light package folder to the client machine and run Install.bat script with
administrator privileges.
Emsisoft Ltd - [email protected] - www.emsisoft.com Page 69
16. Reconnect Emsisoft Anti-Malware to different Emsisoft
Enterprise Console Server
For many reasons, it is possible that the user may need to move Emsisoft Enterprise Console to a
different computer. Reconnection of all Emsisoft Anti-Malware installations to a new Emsisoft
Enterprise Console can be achieved with the following procedure:
1. Login to the old computer where Enterprise Console Server is installed and copy all files from
c:\ProgramData\Emsisoft Enterprise Console\Db\
2. Install Emsisoft Enterprise Console on the new computer.
3. Stop Emsisoft Enterprise Console Server Service, place the saved files from the old Emsisoft
Enterprise Console in c:\ProgramData\Emsisoft Enterprise Console\Db\ and then start Emsisoft
Enterprise Console Server Service.
4. Reconnect Emsisoft Anti-Malware installations from the new Emsisoft Enterprise Console via
deployment or light packages.
If admin does not have access to the old Emsisoft Enterprise Console then steps 1 and 3 can be
omitted, but in such case all computers must be added again before reconnection.
17. Service folders of Console Data Database
Emsisoft Enterprise Console uses c:\ProgramData\Emsisoft Enterprise Console\ as main place to keep
data:
Backup – backups of Db folder.
Db – Server settings, data and logs.
Download – used to download updates of Console and Emsisoft Anti-Malware.
logs – text representation of Console`s logs.
Settings – or management.
Share – ready-to-use installers of Console and Emsisoft Anti-Malware.
If any component of Console cannot be started due to critical errors, then informational message is
added to Application and Service Logs -> Emsisoft Enterprise Console Events
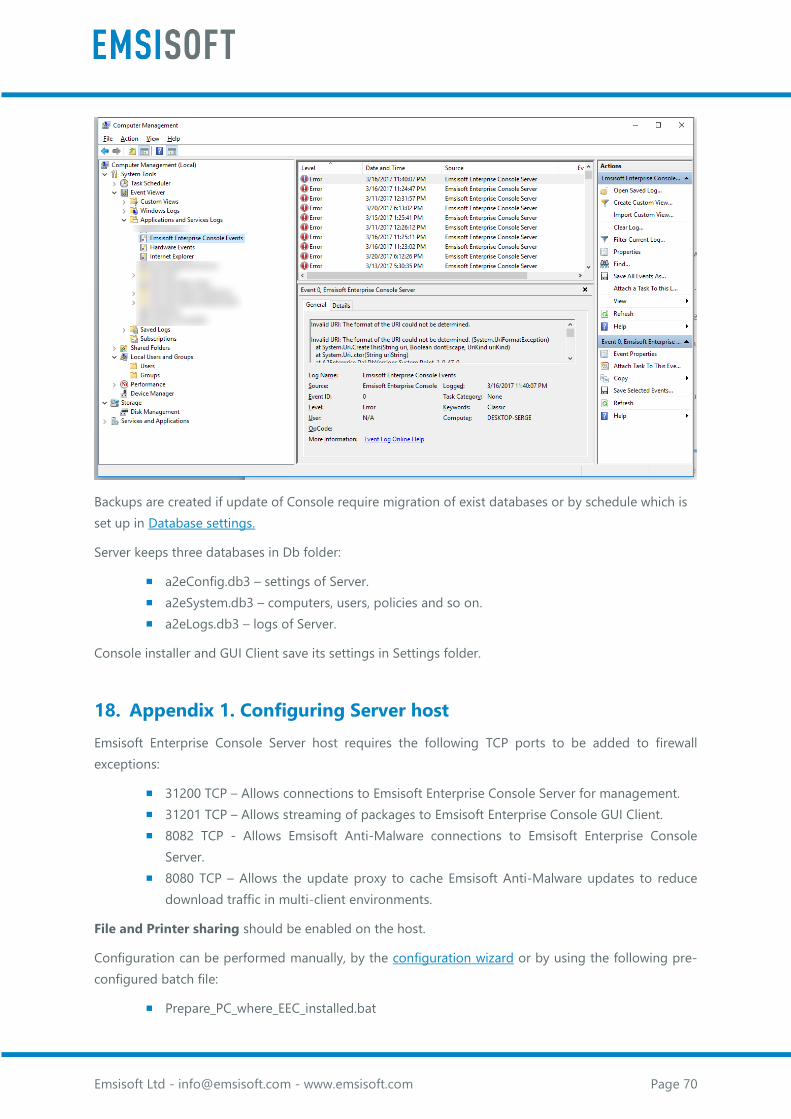
Emsisoft Ltd - [email protected] - www.emsisoft.com Page 70
Backups are created if update of Console require migration of exist databases or by schedule which is
set up in Database settings.
Server keeps three databases in Db folder:
a2eConfig.db3 – settings of Server.
a2eSystem.db3 – computers, users, policies and so on.
a2eLogs.db3 – logs of Server.
Console installer and GUI Client save its settings in Settings folder.
18. Appendix 1. Configuring Server host
Emsisoft Enterprise Console Server host requires the following TCP ports to be added to firewall
exceptions:
31200 TCP – Allows connections to Emsisoft Enterprise Console Server for management.
31201 TCP – Allows streaming of packages to Emsisoft Enterprise Console GUI Client.
8082 TCP - Allows Emsisoft Anti-Malware connections to Emsisoft Enterprise Console
Server.
8080 TCP – Allows the update proxy to cache Emsisoft Anti-Malware updates to reduce
download traffic in multi-client environments.
File and Printer sharing should be enabled on the host.
Configuration can be performed manually, by the configuration wizard or by using the following pre-
configured batch file:
Prepare_PC_where_EEC_installed.bat
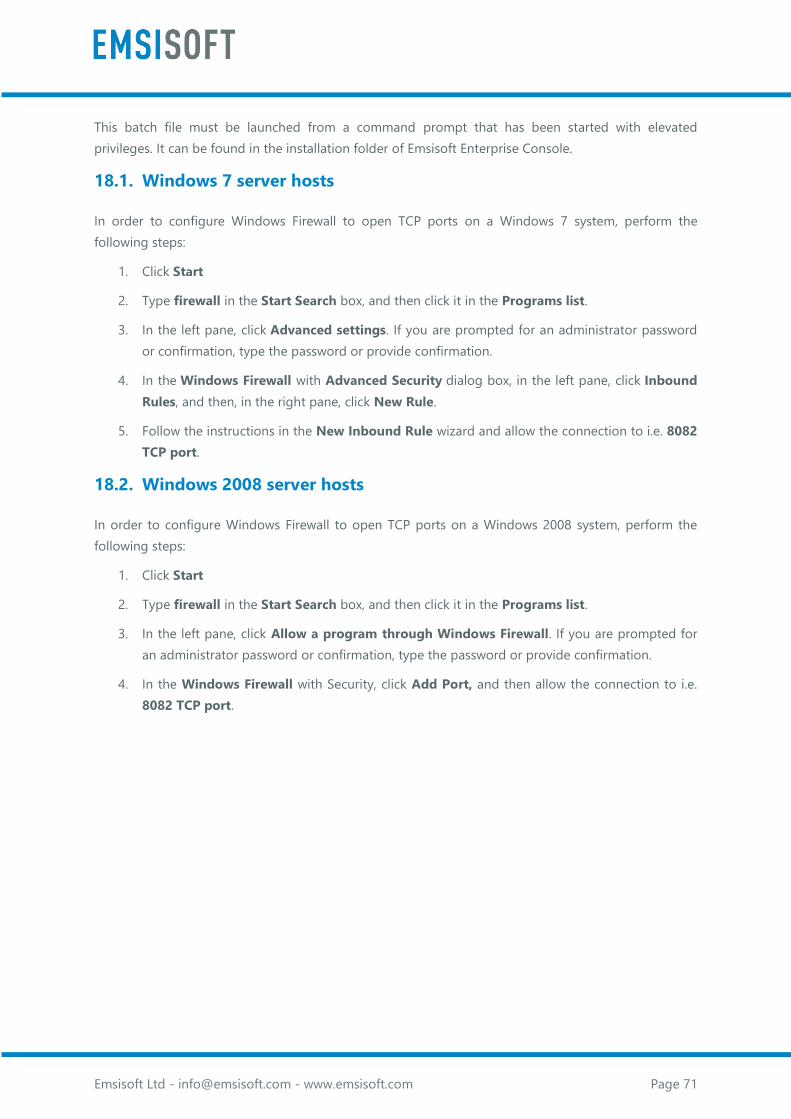
Emsisoft Ltd - [email protected] - www.emsisoft.com Page 71
This batch file must be launched from a command prompt that has been started with elevated
privileges. It can be found in the installation folder of Emsisoft Enterprise Console.
18.1. Windows 7 server hosts
In order to configure Windows Firewall to open TCP ports on a Windows 7 system, perform the
following steps:
1. Click Start
2. Type firewall in the Start Search box, and then click it in the Programs list.
3. In the left pane, click Advanced settings. If you are prompted for an administrator password
or confirmation, type the password or provide confirmation.
4. In the Windows Firewall with Advanced Security dialog box, in the left pane, click Inbound
Rules, and then, in the right pane, click New Rule.
5. Follow the instructions in the New Inbound Rule wizard and allow the connection to i.e. 8082
TCP port.
18.2. Windows 2008 server hosts
In order to configure Windows Firewall to open TCP ports on a Windows 2008 system, perform the
following steps:
1. Click Start
2. Type firewall in the Start Search box, and then click it in the Programs list.
3. In the left pane, click Allow a program through Windows Firewall. If you are prompted for
an administrator password or confirmation, type the password or provide confirmation.
4. In the Windows Firewall with Security, click Add Port, and then allow the connection to i.e.
8082 TCP port.

Emsisoft Ltd - [email protected] - www.emsisoft.com Page 72
19. Appendix 2. Preparing WORKGROUP computers for deployment
Computers can be prepared manually for deployment or by using pre-configured batch files:
Prepare_PC_for_Deployment.bat
Prepare_PC_for_Deployment_UAC_Disabled.bat
Prepare_PC_where_EEC_installed.bat
These batch files must be launched from a command prompt that has been started with elevated
privileges. They can be found in the installation folder of Emsisoft Enterprise Console.
19.1. Using the built-in administrator
Client host - Allow inbound file and printer sharing
Use the following steps in the Local Group Policy Editor to enable Allow inbound file and printer
sharing on workgroup computers:
1. Click Start.
2. Type gpedit.msc in the Start Search box, and then click it in the Programs list.
3. Under the Local Computer Policy heading, double-click Computer Configuration.
4. Double-click Administrative Templates, Network, Network Connections, and then
Windows Firewall.
5. Double-click Standard Profile.
6. Click Windows Firewall: Allow inbound file and printer sharing.
7. On the Action menu, select Properties.
8. Click Enable, and then click OK.
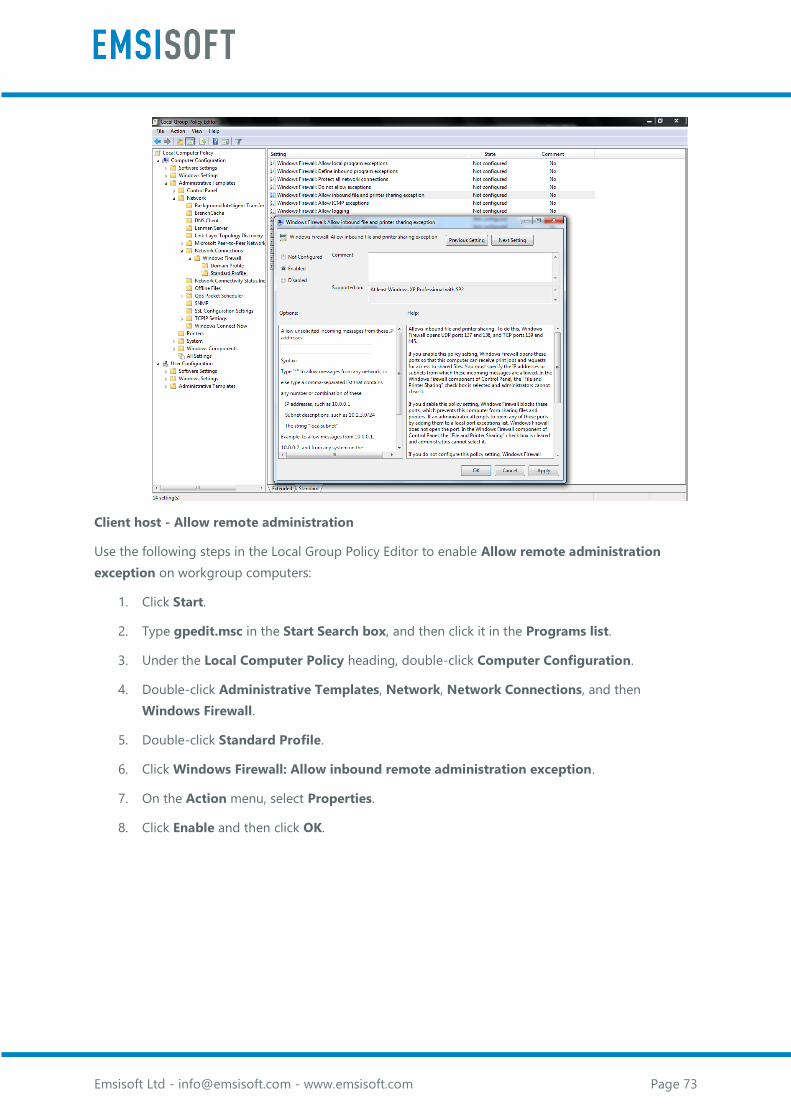
Emsisoft Ltd - [email protected] - www.emsisoft.com Page 73
Client host - Allow remote administration
Use the following steps in the Local Group Policy Editor to enable Allow remote administration
exception on workgroup computers:
1. Click Start.
2. Type gpedit.msc in the Start Search box, and then click it in the Programs list.
3. Under the Local Computer Policy heading, double-click Computer Configuration.
4. Double-click Administrative Templates, Network, Network Connections, and then
Windows Firewall.
5. Double-click Standard Profile.
6. Click Windows Firewall: Allow inbound remote administration exception.
7. On the Action menu, select Properties.
8. Click Enable and then click OK.
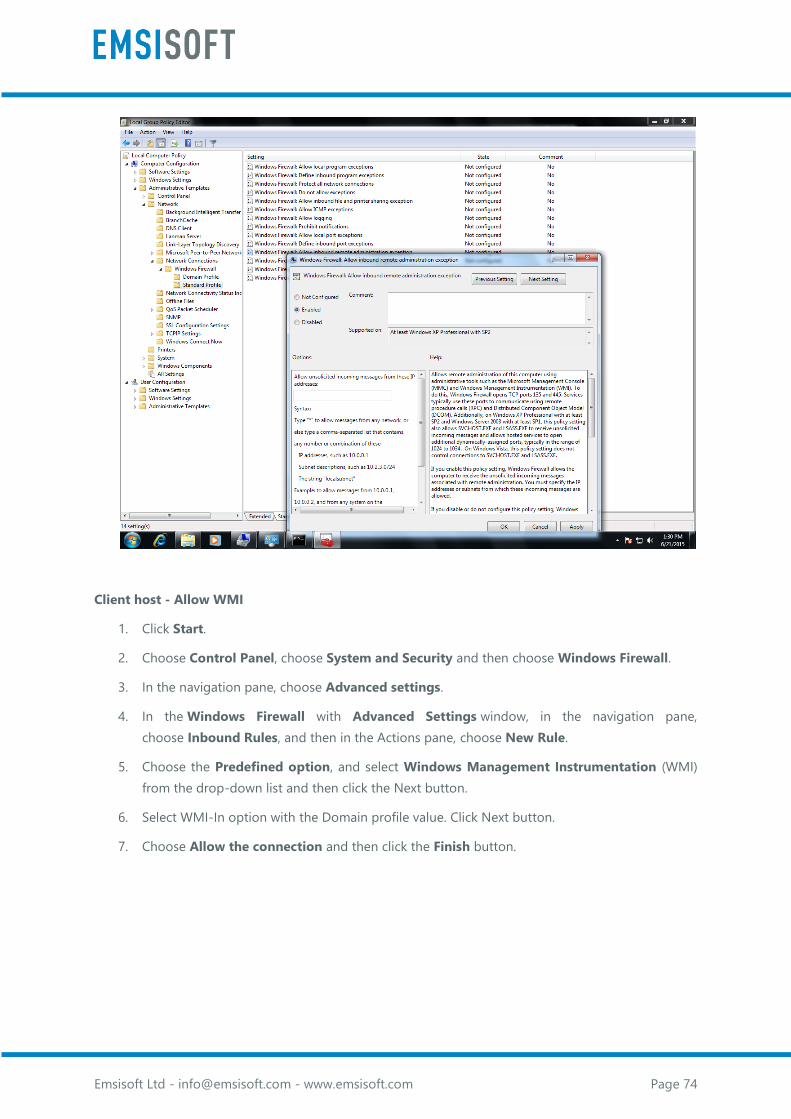
Emsisoft Ltd - [email protected] - www.emsisoft.com Page 74
Client host - Allow WMI
1. Click Start.
2. Choose Control Panel, choose System and Security and then choose Windows Firewall.
3. In the navigation pane, choose Advanced settings.
4. In the Windows Firewall with Advanced Settings window, in the navigation pane,
choose Inbound Rules, and then in the Actions pane, choose New Rule.
5. Choose the Predefined option, and select Windows Management Instrumentation (WMI)
from the drop-down list and then click the Next button.
6. Select WMI-In option with the Domain profile value. Click Next button.
7. Choose Allow the connection and then click the Finish button.

Emsisoft Ltd - [email protected] - www.emsisoft.com Page 75
Client host - Allow ICMP
1. Use the following steps in the Local Group Policy Editor to enable Allow ICMP exceptions on
workgroup computers:
2. Click Start.
3. Type gpedit.msc in the Start Search box, and then click it in the Programs list.
4. Under the Local Computer Policy heading, double-click Computer Configuration.
5. Double-click Administrative Templates, Network, Network Connections, and
then Windows Firewall.
6. Double-click Standard Profile.
7. Click Windows Firewall: Allow ICMP exceptions.
8. On the Action menu select Properties.
9. Click Enable, enable Allow inbound echo request and then click OK.

Emsisoft Ltd - [email protected] - www.emsisoft.com Page 76
19.2. Using the non built-in administrator
Client host - Allow inbound file and printer sharing
Use the following steps in the Local Group Policy Editor to enable Allow inbound file and printer
sharing on workgroup computers:
1. Click Start.
2. Type gpedit.msc in the Start Search box, and then click it in the Programs list.
3. Under the Local Computer Policy heading, double-click Computer Configuration.
4. Double-click Administrative Templates, Network, Network Connections, and
then Windows Firewall.
5. If the computer is in the domain, then double-click Domain Profile; otherwise, double-
click Standard Profile.
6. Click Windows Firewall: Allow inbound file and printer sharing.
7. On the Action menu, select Properties.
8. Click Enable, and then click OK.
Emsisoft Ltd - [email protected] - www.emsisoft.com Page 77
Client host - Allow remote administration
Use the following steps in the Local Group Policy Editor to enable Allow Remote Administration
Exception on workgroup computers:
1. Click Start.
2. Type gpedit.msc in the Start Search box, and then click it in the Programs list.
3. Under the Local Computer Policy heading, double-click Computer Configuration.
4. Double-click Administrative Templates, Network, Network Connections, and then
Windows Firewall.
5. If the computer is in the domain, then double-click Domain Profile; otherwise, double-
click Standard Profile.
6. Click Windows Firewall: Allow inbound remote administration exception.
7. On the Action menu, select Properties.
8. Click Enable, and then click OK.
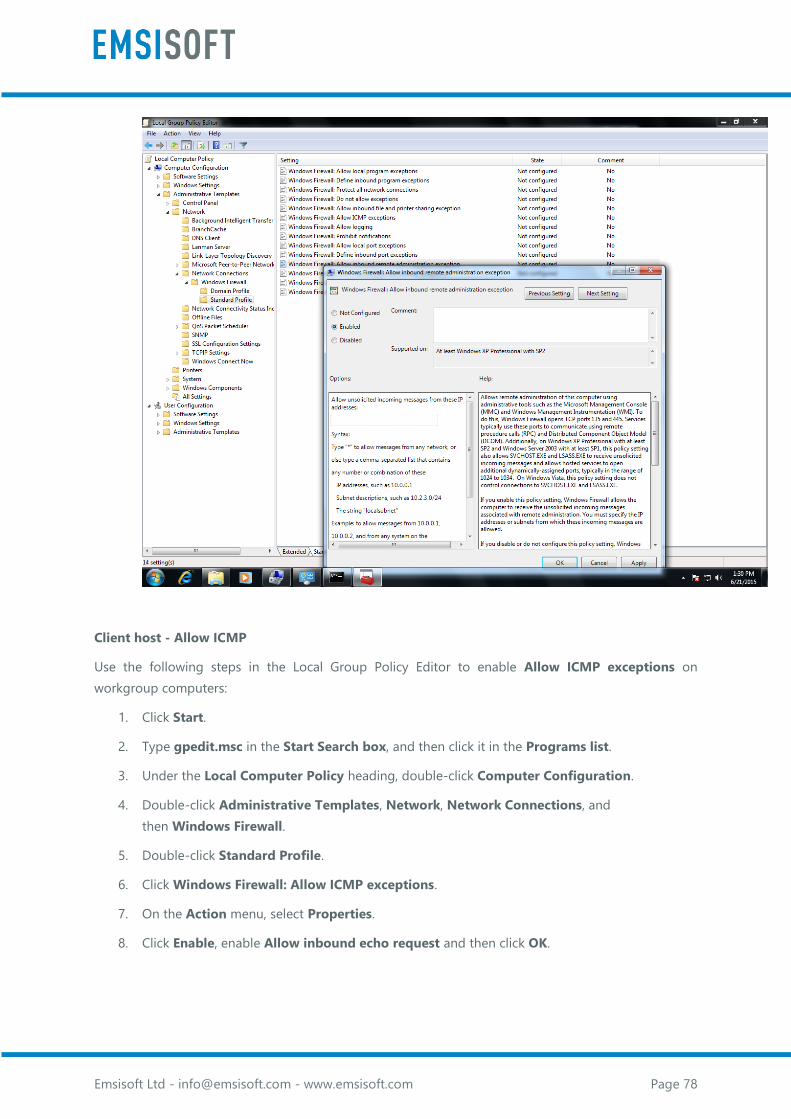
Emsisoft Ltd - [email protected] - www.emsisoft.com Page 78
Client host - Allow ICMP
Use the following steps in the Local Group Policy Editor to enable Allow ICMP exceptions on
workgroup computers:
1. Click Start.
2. Type gpedit.msc in the Start Search box, and then click it in the Programs list.
3. Under the Local Computer Policy heading, double-click Computer Configuration.
4. Double-click Administrative Templates, Network, Network Connections, and
then Windows Firewall.
5. Double-click Standard Profile.
6. Click Windows Firewall: Allow ICMP exceptions.
7. On the Action menu, select Properties.
8. Click Enable, enable Allow inbound echo request and then click OK.
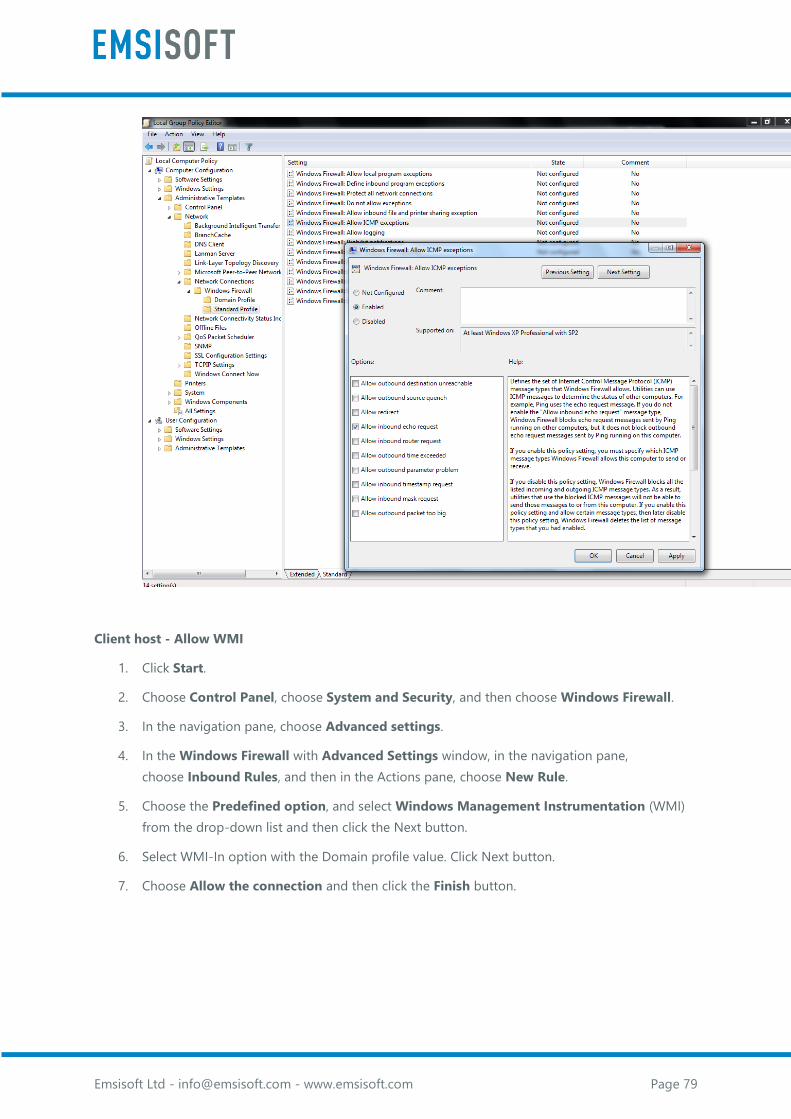
Emsisoft Ltd - [email protected] - www.emsisoft.com Page 79
Client host - Allow WMI
1. Click Start.
2. Choose Control Panel, choose System and Security, and then choose Windows Firewall.
3. In the navigation pane, choose Advanced settings.
4. In the Windows Firewall with Advanced Settings window, in the navigation pane,
choose Inbound Rules, and then in the Actions pane, choose New Rule.
5. Choose the Predefined option, and select Windows Management Instrumentation (WMI)
from the drop-down list and then click the Next button.
6. Select WMI-In option with the Domain profile value. Click Next button.
7. Choose Allow the connection and then click the Finish button.
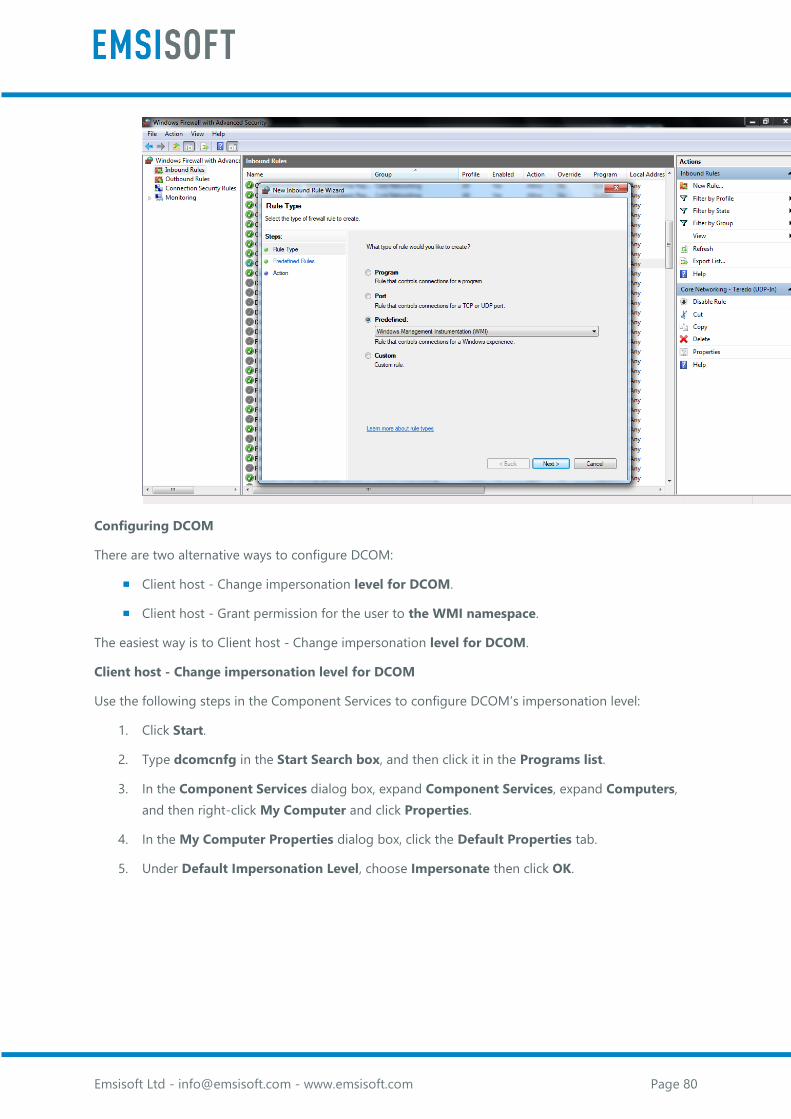
Emsisoft Ltd - [email protected] - www.emsisoft.com Page 80
Configuring DCOM
There are two alternative ways to configure DCOM:
Client host - Change impersonation level for DCOM.
Client host - Grant permission for the user to the WMI namespace.
The easiest way is to Client host - Change impersonation level for DCOM.
Client host - Change impersonation level for DCOM
Use the following steps in the Component Services to configure DCOM’s impersonation level:
1. Click Start.
2. Type dcomcnfg in the Start Search box, and then click it in the Programs list.
3. In the Component Services dialog box, expand Component Services, expand Computers,
and then right-click My Computer and click Properties.
4. In the My Computer Properties dialog box, click the Default Properties tab.
5. Under Default Impersonation Level, choose Impersonate then click OK.
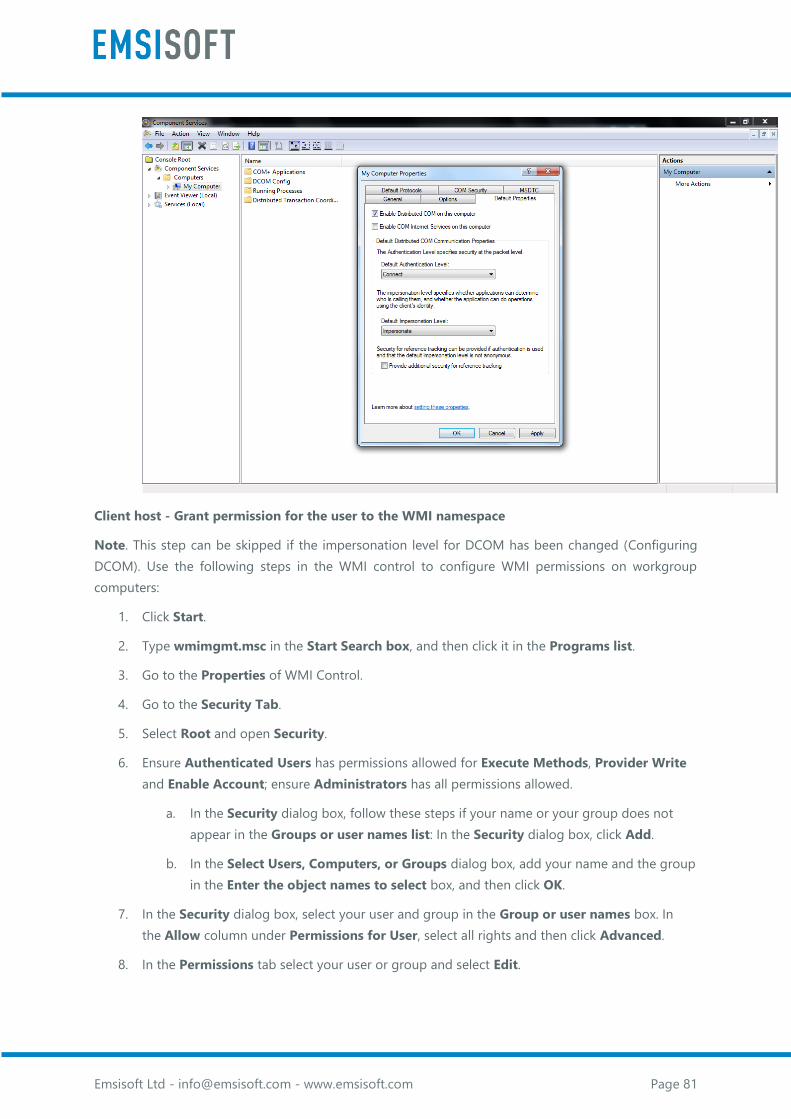
Emsisoft Ltd - [email protected] - www.emsisoft.com Page 81
Client host - Grant permission for the user to the WMI namespace
Note. This step can be skipped if the impersonation level for DCOM has been changed (Configuring
DCOM). Use the following steps in the WMI control to configure WMI permissions on workgroup
computers:
1. Click Start.
2. Type wmimgmt.msc in the Start Search box, and then click it in the Programs list.
3. Go to the Properties of WMI Control.
4. Go to the Security Tab.
5. Select Root and open Security.
6. Ensure Authenticated Users has permissions allowed for Execute Methods, Provider Write
and Enable Account; ensure Administrators has all permissions allowed.
a. In the Security dialog box, follow these steps if your name or your group does not
appear in the Groups or user names list: In the Security dialog box, click Add.
b. In the Select Users, Computers, or Groups dialog box, add your name and the group
in the Enter the object names to select box, and then click OK.
7. In the Security dialog box, select your user and group in the Group or user names box. In
the Allow column under Permissions for User, select all rights and then click Advanced.
8. In the Permissions tab select your user or group and select Edit.

Emsisoft Ltd - [email protected] - www.emsisoft.com Page 82
9. In the Permissions dialog choose this namespace and sub namespaces and ensure that all
rights are given for your user or group. Enable Apply these permissions to objects and
containers within this container only then click OK.
Client host - Enable Remote UAC LocalAccountTokenFilterPolicy registry setting
1. Use the following steps in the Registry Editor to disable remote restrictions on workgroup
computers:
2. Click Start.
3. Type regedit in the Start Search box, and then click it in the Programs list.
4. Expand the following subkey:
HKEY_LOCAL_MACHINE\SOFTWARE\Microsoft\Windows\CurrentVersion\Policies\System
5. If the LocalAccountTokenFilterPolicy registry entry does not exist, follow these steps:
6. On the Edit menu, click New, and then click DWORD Value.
7. Type LocalAccountTokenFilterPolicy, and then press ENTER.
8. Right-click LocalAccountTokenFilterPolicy, and then click Modify.
9. In the Value data box, type 1, and then click OK.
Emsisoft Ltd - [email protected] - www.emsisoft.com Page 83
20. Appendix 3. Preparing AD computers for deployment
The chapter describes the operations required to prepare the computers from an AD (Active Directory)
network for deployment.
Depending on company policy, computers may need to be prepared for deployment from either the
computer or server side. Pre-configured batch files can be used for preparation:
Prepare_PC_for_Deployment.bat
Prepare_PC_for_Deployment_UAC_Disabled.bat
Prepare_PC_where_EEC_installed.bat
These batch files can be found in the installation folder of Emsisoft Enterprise Console.
Client host side preparation:
Batch files must be launched from a command prompt which has been started with elevated
privileges.
Server side preparation:
Computer startup scripts must be used if the batch files are deployed via Group Policy.
Servers can be configured manually as shown below.
20.1. Using built-in domain administrator
Server host - Allow inbound file and printer sharing
Use the following steps in the Group Policy Management Console to enable Allow inbound file and
printer sharing on domain computers:
1. Click Start.
2. Type gpmc.msc in the Start Search box, and then click it in the Programs list.
3. Under the domain heading, right-click Default Domain Policy.
4. Double-click Computer Configuration, Policies, Administrative Templates, Network,
Network Connections, and then Windows Firewall.
5. Double-click Domain Profile.
6. Click Windows Firewall: Allow inbound file and printer sharing.
7. On the Action menu, select Properties.
8. Click Enable, and then click OK.
Server host - Allow remote administration
1. Use the following steps in the Group Policy Management Console to enable Allow remote
administration on domain computers:
2. Click Start.
3. Type gpmc.msc in the Start Search box, and then click it in the Programs list.

Emsisoft Ltd - [email protected] - www.emsisoft.com Page 84
4. Under the domain heading, right-click Default Domain Policy.
5. Double-click Computer Configuration, Policies, Administrative Templates, Network,
Network Connections, and then Windows Firewall.
6. Double-click Domain Profile.
7. Click Windows Firewall: Allow remote administration exception.
8. On the Action menu, select Properties.
9. Click Enable, and then click OK.
Server host - Allow ICMP
Use the following steps in the Group Policy Management Console to enable Allow ICMP exceptions
on domain computers:
1. Click Start.
2. Type gpmc.msc in the Start Search box, and then click it in the Programs list.
3. Under the domain heading, right-click Default Domain Policy.
4. Double-click Computer Configuration, Policies, Administrative
Templates, Network, Network Connections, and then Windows Firewall.
5. Double-click Domain Profile.
6. Click Windows Firewall: Allow ICMP exceptions.
7. On the Action menu, select Properties.
8. Click Enable, and then click OK.
Server host - Enable Remote UAC LocalAccountTokenFilterPolicy registry setting
Use the following steps in the Group Policy Management Console to disable remote restrictions on
domain computers:
1. Click Start.
2. Type gpmc.msc in the Start Search box, and then click it in the Programs list.
3. Under the domain heading, right-click Default Domain Policy.
4. Double-click Computer Configuration, Preferences, Windows Setting and Registry.
5. Right click and select new registry item.
6. Expand the following subkey in Key Path:
HKEY_LOCAL_MACHINE\SOFTWARE\Microsoft\Windows\CurrentVersion\Policies\System
7. Set Value name to LocalAccountTokenFilterPolicy.
8. Set Value type to REG_DWORD.
9. In the Value data box, type 1, and then click OK.
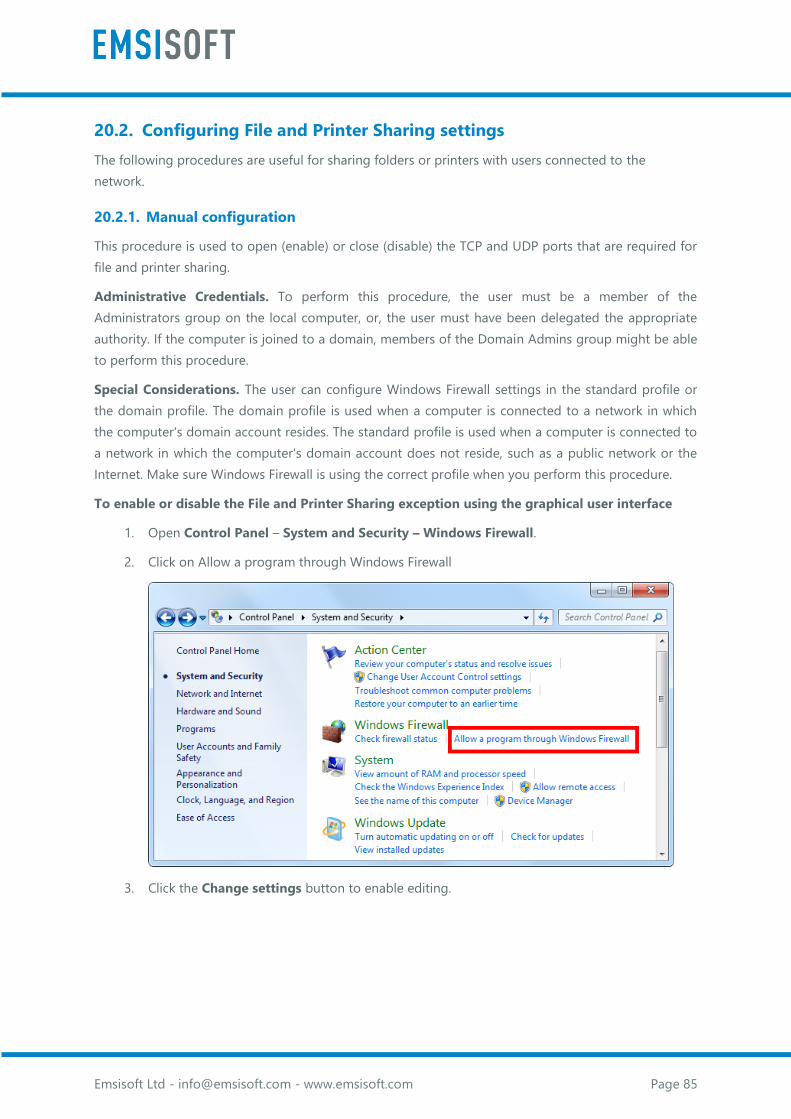
Emsisoft Ltd - [email protected] - www.emsisoft.com Page 85
20.2. Configuring File and Printer Sharing settings
The following procedures are useful for sharing folders or printers with users connected to the
network.
20.2.1. Manual configuration
This procedure is used to open (enable) or close (disable) the TCP and UDP ports that are required for
file and printer sharing.
Administrative Credentials. To perform this procedure, the user must be a member of the
Administrators group on the local computer, or, the user must have been delegated the appropriate
authority. If the computer is joined to a domain, members of the Domain Admins group might be able
to perform this procedure.
Special Considerations. The user can configure Windows Firewall settings in the standard profile or
the domain profile. The domain profile is used when a computer is connected to a network in which
the computer's domain account resides. The standard profile is used when a computer is connected to
a network in which the computer's domain account does not reside, such as a public network or the
Internet. Make sure Windows Firewall is using the correct profile when you perform this procedure.
To enable or disable the File and Printer Sharing exception using the graphical user interface
1. Open Control Panel – System and Security – Windows Firewall.
2. Click on Allow a program through Windows Firewall
3. Click the Change settings button to enable editing.
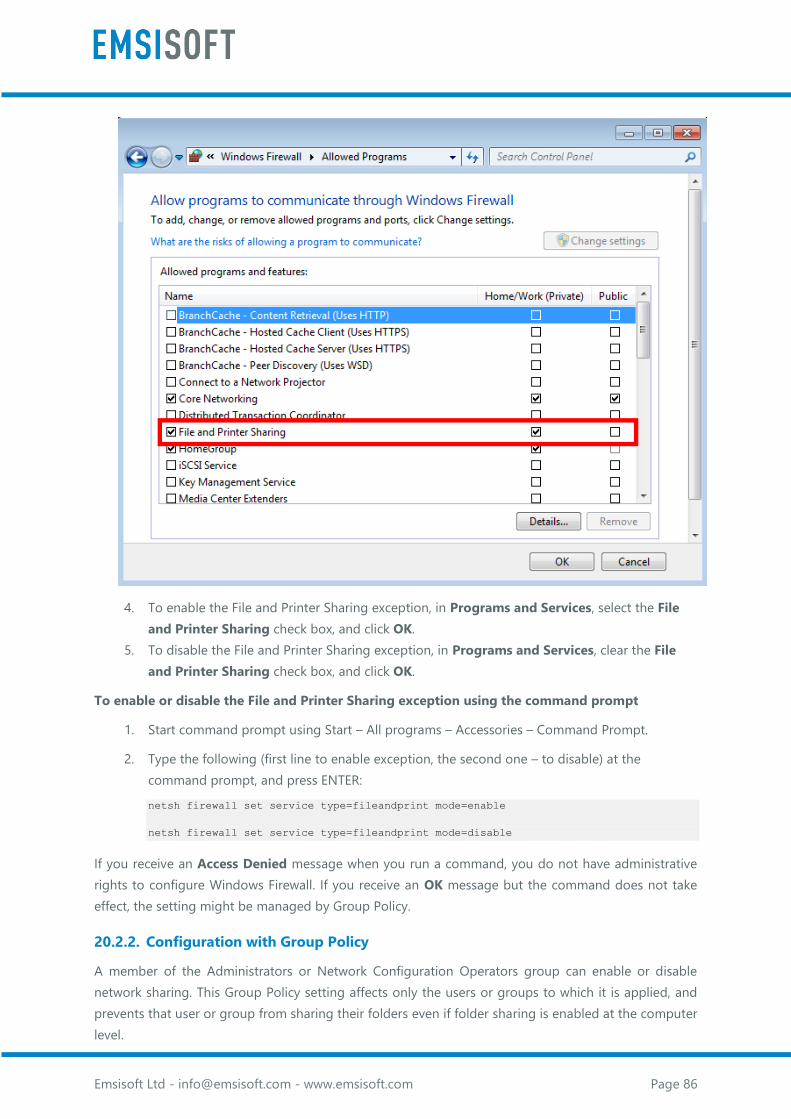
Emsisoft Ltd - [email protected] - www.emsisoft.com Page 86
4. To enable the File and Printer Sharing exception, in Programs and Services, select the File
and Printer Sharing check box, and click OK.
5. To disable the File and Printer Sharing exception, in Programs and Services, clear the File
and Printer Sharing check box, and click OK.
To enable or disable the File and Printer Sharing exception using the command prompt
1. Start command prompt using Start – All programs – Accessories – Command Prompt.
2. Type the following (first line to enable exception, the second one – to disable) at the
command prompt, and press ENTER:
netsh firewall set service type=fileandprint mode=enable
netsh firewall set service type=fileandprint mode=disable
If you receive an Access Denied message when you run a command, you do not have administrative
rights to configure Windows Firewall. If you receive an OK message but the command does not take
effect, the setting might be managed by Group Policy.
20.2.2. Configuration with Group Policy
A member of the Administrators or Network Configuration Operators group can enable or disable
network sharing. This Group Policy setting affects only the users or groups to which it is applied, and
prevents that user or group from sharing their folders even if folder sharing is enabled at the computer
level.

Emsisoft Ltd - [email protected] - www.emsisoft.com Page 87
Membership in the local Administrators group, or equivalent, is the minimum required to complete
this procedure.
To enable or disable file sharing for a user or group by using Group Policy:
1. Start Group Policy Management Console (GPMC). To do so, click Start, and then in the Start
Search box, type gpedit.msc and press ENTER.
2. In the navigation pane, open the following folders: Local Computer Policy, User
Configuration, Administrative Templates, Windows Components, and Network Sharing.
3. In the details pane, double-click Prevent users from sharing files within their profile.
4. Do one of the following:
To enable the Group Policy setting, and disable the user's ability to share files, click
Enabled.
To disable the Group Policy setting, and enable the user's ability to share files, click
Disabled.

Emsisoft Ltd - [email protected] - www.emsisoft.com Page 88
5. Click OK to save your changes.
21. Appendix 4. Known Issues
This chapter contains information about known issues for Emsisoft Enterprise Console.
Updated: March 8, 2016
• Empty interactive service detection window appears on remote computer with Windows 7 x86
installed during deployment.