Embed Size (px)
Citation preview
Histology OnLineHistology OnLine (HOL) is a virtual microscopy web site developed by the West Virginia University Neurobiology and Anatomy Department. The site features: • Normal histological specimens representational of all major tissues and organ systems in the human body • Collection of digitized whole slide images appropriate for medical, dental, and paramedical courses • Annotated images viewed at any magnification and in relation to surrounding tissues • Organized lists of specimens and IDs • Comprehensive, easily referenced annotations on many slides • Multi-level search function that allows cross referencing of organs, tissues, cells, and structures
Content organization The Histology Online slide collection consists of normal histological specimens representational of all major tissues and organ systems in the human body, including oral histology specimens suitable for use in dental histology. The site is organized around the familiar notion of a physical glass slide. A slide is selected by flexible means in the Selector window, which then opens a Viewer window to see its image. In the Viewer window the image can be zoomed and panned to see any part of the slide up to its maximum scanned resolution. Multiple Viewer windows can be opened showing the same or different slides allowing for their direct comparison.
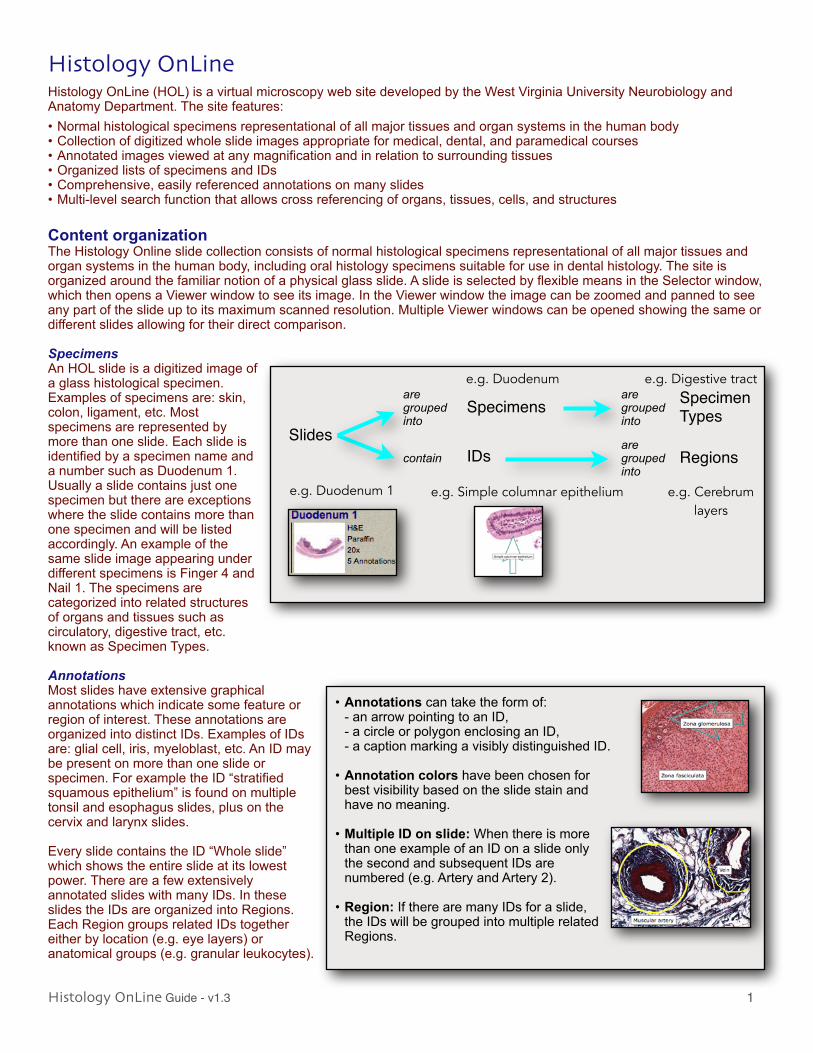
Specimens An HOL slide is a digitized image of a glass histological specimen. Examples of specimens are: skin, colon, ligament, etc. Most specimens are represented by more than one slide. Each slide is identified by a specimen name and a number such as Duodenum 1. Usually a slide contains just one specimen but there are exceptions where the slide contains more than one specimen and will be listed accordingly. An example of the same slide image appearing under different specimens is Finger 4 and Nail 1. The specimens are categorized into related structures of organs and tissues such as circulatory, digestive tract, etc. known as Specimen Types.
Annotations Most slides have extensive graphical annotations which indicate some feature or region of interest. These annotations are organized into distinct IDs. Examples of IDs are: glial cell, iris, myeloblast, etc. An ID may be present on more than one slide or specimen. For example the ID “stratified squamous epithelium” is found on multiple tonsil and esophagus slides, plus on the cervix and larynx slides.
Every slide contains the ID “Whole slide” which shows the entire slide at its lowest power. There are a few extensively annotated slides with many IDs. In these slides the IDs are organized into Regions. Each Region groups related IDs together either by location (e.g. eye layers) or anatomical groups (e.g. granular leukocytes).
Histology OnLine Guide - v1.3 � 1
• Annotations can take the form of:- an arrow pointing to an ID, - a circle or polygon enclosing an ID,- a caption marking a visibly distinguished ID.
• Annotation colors have been chosen for best visibility based on the slide stain and have no meaning.
• Multiple ID on slide: When there is more than one example of an ID on a slide only the second and subsequent IDs are numbered (e.g. Artery and Artery 2).
• Region: If there are many IDs for a slide, the IDs will be grouped into multiple related Regions.
Slides
are grouped into
Specimensare grouped into
Specimen Types
e.g. Duodenum e.g. Digestive tract
e.g. Duodenum 1 e.g. Simple columnar epithelium
are grouped into
Regions
e.g. Cerebrum layers
contain IDs
Site access The HOL site requires an access code for entry into the site. See your instructor or site administrator to gain entry to the full set of content. Logout to end a session.
Browser use • The HOL site requires that Javascript be enabled in your browser. • Most up to date browsers work correctly, see the HOL site help for supported browser versions. • Do not use the zoom controls of the browser to adjust the magnification of the slide image, it does not change the zoom
resolution of the slide. Use the navigation controls of the Viewer for increased/decreased detail instead. • Do not use the browser history, the Viewer Control column has replacement history controls. • It is not possible to bookmark a Viewer window directly. Use the Link button in the Viewer to create a bookmark/favorite.
Site overview The HOL site uses multiple windows: the Selector window is the site’s main page and creates transient Viewer windows that each show a single slide. Multiple Viewer windows can be opened simultaneously so that slides can be seen on different windows allowing for their direct comparison. These windows show as individual tabs in the browser. Drag a window out of the tab bar to see multiple Viewers at the same time.
Selector window The Selector presents a list of slides that can be viewed and controls the Viewer windows and options. It has three scrollable columns: • Selection column: a list of specimens, IDs or search
results. Choosing a specimen name or ID will show a list of available slides. There are four methods to make a selection.
• Available Slides column: a list of slides matching a choice made in the Selection column. Choosing a slide here will show that slide in a Viewer, either replacing the last slide or creating a new Viewer window.
• Viewer Control column: Viewer windows and their options are managed here.
Viewer window Slides are shown in individual windows (tabs). The slide can be zoomed to its maximum magnification and panned to look at any portion of it. Slides are annotated with IDs allowing the showing of specific structures. If the slide was selected by an ID then the image will start at that ID, otherwise it will start by showing the whole specimen. IDs can also be shown by using the ID dropdown menus. The image can be zoomed and panned by multiple means: button controls, mouse, keyboard, or touch on appropriate devices.
Selector: Selection & Available Slides columns The buttons at the top of the Selector window allow four methods to find the desired slide or ID. Choosing a specimen name or ID in the selection column will show a list of matching slides in the Available Slides column, choosing a slide there will create a Viewer window. The Selector and Available Slides columns scroll, not all the choices may be visible at once.
A list of available slides will be presented after choosing a term in any of the methods listed below: • Specimen Types: The specimens are organized by their type, tissues followed by organ/
systems. Choose a term to show all slides of that specimen in the Available Slides column. This is the same list as Specimens but organized by their type.
• Specimens: All the specimens are listed alphabetically. Choose a term to show all slides of that specimen in the Available Slides column.
• IDs: All the IDs and Regions within all the slides are listed alphabetically. Choose a term to show the slides that contain the ID or Region in the Available Slides column.
• Search: Enter a search term to find corresponding specimen names, specimen types, IDs, regions, or descriptions. Choose a found term to show all the corresponding slides in the Available Slides column. See the search function details below.
Histology OnLine Guide - v1.3 � 2
Selection method
Selection column Available Slides column
Viewer Control column
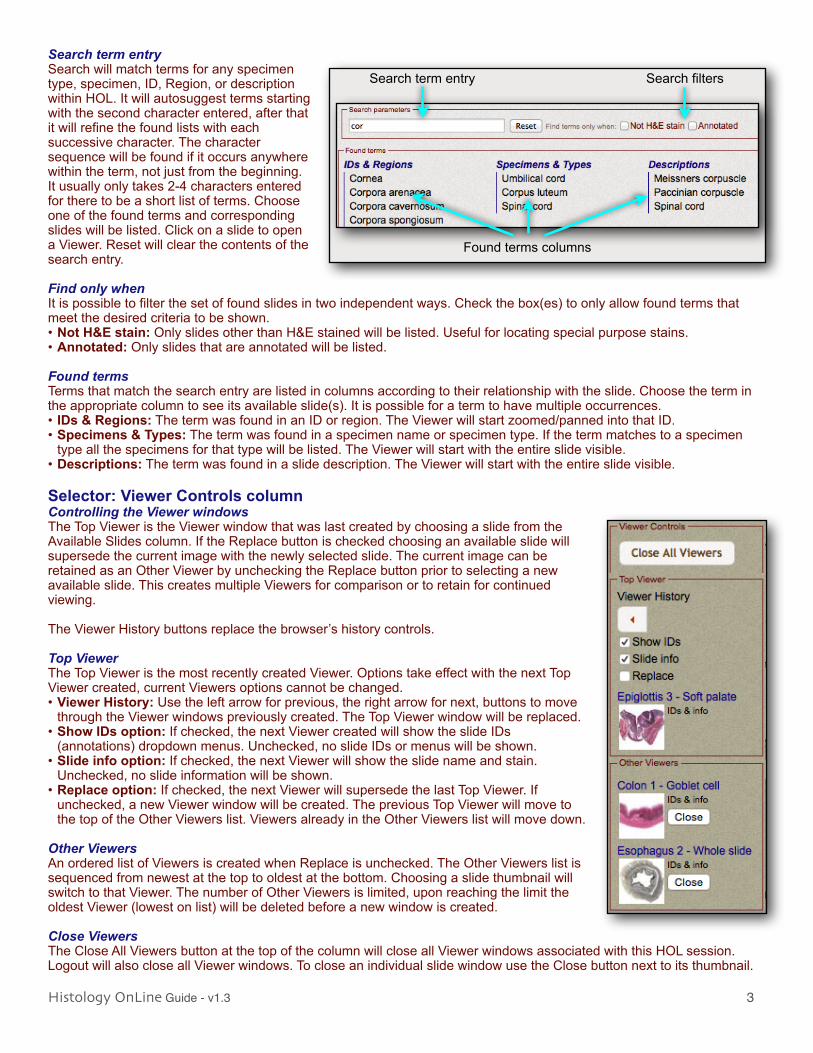
Search term entry Search will match terms for any specimen type, specimen, ID, Region, or description within HOL. It will autosuggest terms starting with the second character entered, after that it will refine the found lists with each successive character. The character sequence will be found if it occurs anywhere within the term, not just from the beginning. It usually only takes 2-4 characters entered for there to be a short list of terms. Choose one of the found terms and corresponding slides will be listed. Click on a slide to open a Viewer. Reset will clear the contents of the search entry.
Find only when It is possible to filter the set of found slides in two independent ways. Check the box(es) to only allow found terms that meet the desired criteria to be shown. • Not H&E stain: Only slides other than H&E stained will be listed. Useful for locating special purpose stains. • Annotated: Only slides that are annotated will be listed.
Found terms Terms that match the search entry are listed in columns according to their relationship with the slide. Choose the term in the appropriate column to see its available slide(s). It is possible for a term to have multiple occurrences. • IDs & Regions: The term was found in an ID or region. The Viewer will start zoomed/panned into that ID. • Specimens & Types: The term was found in a specimen name or specimen type. If the term matches to a specimen
type all the specimens for that type will be listed. The Viewer will start with the entire slide visible. • Descriptions: The term was found in a slide description. The Viewer will start with the entire slide visible. Selector: Viewer Controls column Controlling the Viewer windows The Top Viewer is the Viewer window that was last created by choosing a slide from the Available Slides column. If the Replace button is checked choosing an available slide will supersede the current image with the newly selected slide. The current image can be retained as an Other Viewer by unchecking the Replace button prior to selecting a new available slide. This creates multiple Viewers for comparison or to retain for continued viewing.
The Viewer History buttons replace the browser’s history controls.
Top Viewer The Top Viewer is the most recently created Viewer. Options take effect with the next Top Viewer created, current Viewers options cannot be changed. • Viewer History: Use the left arrow for previous, the right arrow for next, buttons to move
through the Viewer windows previously created. The Top Viewer window will be replaced. • Show IDs option: If checked, the next Viewer created will show the slide IDs
(annotations) dropdown menus. Unchecked, no slide IDs or menus will be shown. • Slide info option: If checked, the next Viewer will show the slide name and stain.
Unchecked, no slide information will be shown. • Replace option: If checked, the next Viewer will supersede the last Top Viewer. If
unchecked, a new Viewer window will be created. The previous Top Viewer will move to the top of the Other Viewers list. Viewers already in the Other Viewers list will move down.
Other Viewers An ordered list of Viewers is created when Replace is unchecked. The Other Viewers list is sequenced from newest at the top to oldest at the bottom. Choosing a slide thumbnail will switch to that Viewer. The number of Other Viewers is limited, upon reaching the limit the oldest Viewer (lowest on list) will be deleted before a new window is created.
Close Viewers The Close All Viewers button at the top of the column will close all Viewer windows associated with this HOL session. Logout will also close all Viewer windows. To close an individual slide window use the Close button next to its thumbnail.
Histology OnLine Guide - v1.3 � 3
Search term entry Search filters
Found terms columns
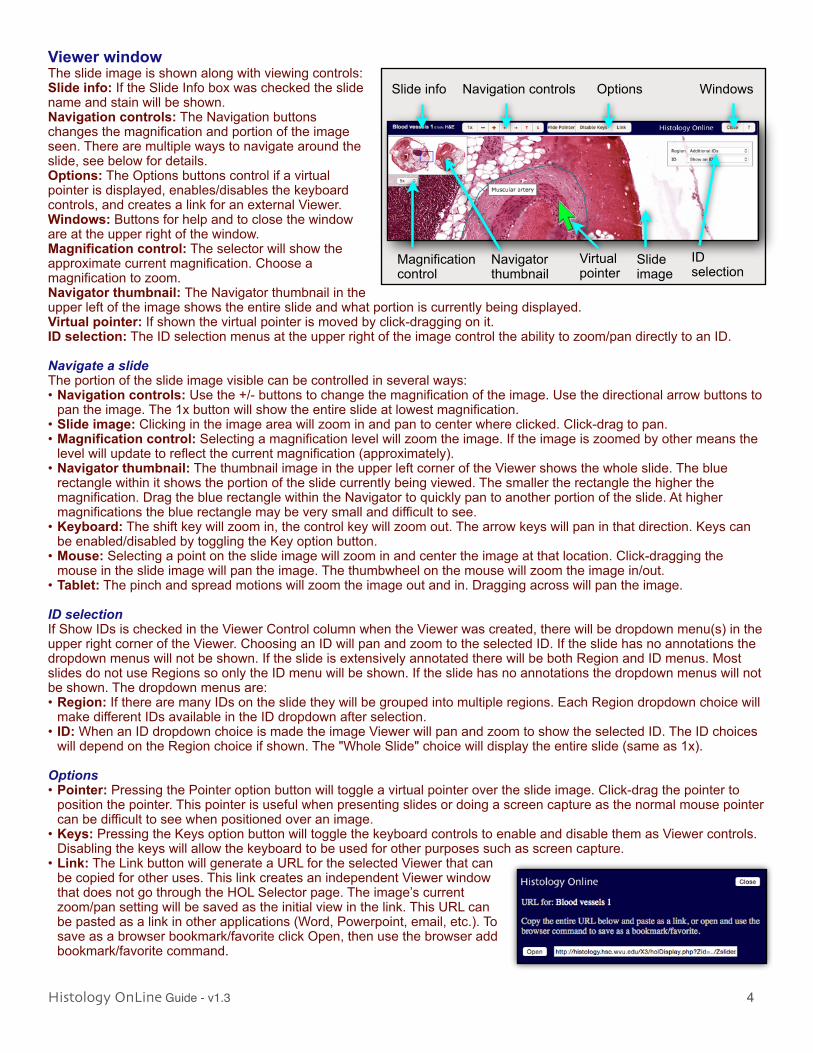
Viewer window The slide image is shown along with viewing controls: Slide info: If the Slide Info box was checked the slide name and stain will be shown. Navigation controls: The Navigation buttons changes the magnification and portion of the image seen. There are multiple ways to navigate around the slide, see below for details. Options: The Options buttons control if a virtual pointer is displayed, enables/disables the keyboard controls, and creates a link for an external Viewer. Windows: Buttons for help and to close the window are at the upper right of the window. Magnification control: The selector will show the approximate current magnification. Choose a magnification to zoom. Navigator thumbnail: The Navigator thumbnail in the upper left of the image shows the entire slide and what portion is currently being displayed. Virtual pointer: If shown the virtual pointer is moved by click-dragging on it. ID selection: The ID selection menus at the upper right of the image control the ability to zoom/pan directly to an ID.
Navigate a slide The portion of the slide image visible can be controlled in several ways: • Navigation controls: Use the +/- buttons to change the magnification of the image. Use the directional arrow buttons to
pan the image. The 1x button will show the entire slide at lowest magnification. • Slide image: Clicking in the image area will zoom in and pan to center where clicked. Click-drag to pan. • Magnification control: Selecting a magnification level will zoom the image. If the image is zoomed by other means the
level will update to reflect the current magnification (approximately). • Navigator thumbnail: The thumbnail image in the upper left corner of the Viewer shows the whole slide. The blue
rectangle within it shows the portion of the slide currently being viewed. The smaller the rectangle the higher the magnification. Drag the blue rectangle within the Navigator to quickly pan to another portion of the slide. At higher magnifications the blue rectangle may be very small and difficult to see.
• Keyboard: The shift key will zoom in, the control key will zoom out. The arrow keys will pan in that direction. Keys can be enabled/disabled by toggling the Key option button.
• Mouse: Selecting a point on the slide image will zoom in and center the image at that location. Click-dragging the mouse in the slide image will pan the image. The thumbwheel on the mouse will zoom the image in/out.
• Tablet: The pinch and spread motions will zoom the image out and in. Dragging across will pan the image.
ID selection If Show IDs is checked in the Viewer Control column when the Viewer was created, there will be dropdown menu(s) in the upper right corner of the Viewer. Choosing an ID will pan and zoom to the selected ID. If the slide has no annotations the dropdown menus will not be shown. If the slide is extensively annotated there will be both Region and ID menus. Most slides do not use Regions so only the ID menu will be shown. If the slide has no annotations the dropdown menus will not be shown. The dropdown menus are: • Region: If there are many IDs on the slide they will be grouped into multiple regions. Each Region dropdown choice will
make different IDs available in the ID dropdown after selection. • ID: When an ID dropdown choice is made the image Viewer will pan and zoom to show the selected ID. The ID choices
will depend on the Region choice if shown. The "Whole Slide" choice will display the entire slide (same as 1x).
Options • Pointer: Pressing the Pointer option button will toggle a virtual pointer over the slide image. Click-drag the pointer to
position the pointer. This pointer is useful when presenting slides or doing a screen capture as the normal mouse pointer can be difficult to see when positioned over an image.
• Keys: Pressing the Keys option button will toggle the keyboard controls to enable and disable them as Viewer controls. Disabling the keys will allow the keyboard to be used for other purposes such as screen capture.
• Link: The Link button will generate a URL for the selected Viewer that can be copied for other uses. This link creates an independent Viewer window that does not go through the HOL Selector page. The image’s current zoom/pan setting will be saved as the initial view in the link. This URL can be pasted as a link in other applications (Word, Powerpoint, email, etc.). To save as a browser bookmark/favorite click Open, then use the browser add bookmark/favorite command.
Histology OnLine Guide - v1.3 � 4
Slide info Navigation controls
ID selection
Navigator thumbnail
Options
Magnification control
Slide image
Windows
Virtual pointer


![Histology Slides - mediconotes.commediconotes.com/freenotes/basic/histology_laboratory_slides.pdf[Histology] Histology Slides MedicoNotes provides real laboratory Histological slides](https://img.pdfslide.us/doc/110x75/5ae110e87f8b9a5a668e6aa3/histology-slides-histology-histology-slides-mediconotes-provides-real-laboratory.jpg)