Embed Size (px)
Citation preview
MobileConnect User documentation
Sennheiser electronic GmbH & Co. KG
Am Labor 1, 30900 Wedemark, Germany, www.sennheiser.com MobileConnect & CinemaConnect - v1.6.1
Table of contentsProduct overview 5
Typical applications 5Features 6
Bring your own device 6Personal Hearing Assistant 6
Components 7ConnectStation 7MobileConnect App 8Access Point (optional) 9
System planning 10Country variants 11
Country variants for Standalone Mode 11Country variants for Integrated Mode 12
Network integration 13Selecting the network mode 13Standalone Mode 14
Using a single Access Point 14Using multiple Access Points 15
Increasing the number of clients per ConnectStation (Standalone Mode) 16Integrated Mode 17
Network connection 17Increasing the number of clients per ConnectStation (In-tegrated Mode) 18Requirements/Recommendations towards your network (Integrated Mode) 19
Traffic Structure to expect with a MobileConnect/Ci-nemaConnect installation 20Important recommendations towards WiFi 21General network requirements 21Switches, Access Points and QoS 22Network bandwidth 22
Cluster discovery (Integrated Mode) 23Order of methods for Cluster Discovery 23Explicit server selection 24Automatic cluster setup via multicast announcement 24Overriding the default multicast group address and port for multicast announcements 25
Service discovery (Integrated Mode) 26Order of methods for Service Discovery 26Explicit service registration via DNS-SD (PTR/SRV) 26Automatic discovery via multicast announcement 27
1
Discovery via hostname “sennheiser-connect” 28Discovery via hostname “local.connect” 28DHCP and DNS Search Domains 28Setting a single Search Domain with DHCP Option 15 29Setting multiple Search Domains 29
WiFi planning 30WiFi coverage 30Antenna pattern Ruckus Zoneflex 7273 30WiFi Design 31
Planning audio level and latency 32Overview audio chain 32List of tested mobile devices 33
Americans with Disabilities Act (ADA) 34California Building Standards 34ADA Standards for Accessible Design 34
Installation and configuration 35ConnectStation hardware overview 36
Product overview - front 36Product overview - back 36
Installation 37Power and audio cabling 38
Connecting/Disconnecting the ConnectStation to/from the mains power supply 38Switching the ConnectStation on/off 38Connecting audio signals 39Stereo audio 40
Network cabling 40Placement of Ethernet ports on the back panel of the ConnectStation 40
Access and initial configuration 41Configuration guide 42
Getting started 42Standalone Mode 43
Setup 43System Overview 47Network 50WiFi 51
Integrated Mode 53Setup 53System Overview 55Client Balancing 57Network 58
General configuration 59App Interface 59
2
Channel Groups 61Protected Channels 66Client Monitoring 67Audio Inputs 68Captions 71Log 73
Maintenance and troubleshooting 74Usage Recommendations 75
Powering off the ConnectStation 75Frequency of powering on and off the ConnectStation in Integrated Mode 75
System update 76Factory reset 78
Resetting the ConnectStation via Admin Interface 78Resetting the ConnectStation via USB keyboard 78Resetting the access point 78
Forgotten password 79Service access 80
Connecting to the Internet for service and support ac-cess 80
Troubleshooting 81Apps 81
Mobile device does not see the MobileConnect/Cine-maConnect WiFi (Standalone Mode) 81MobileConnect/CinemaConnect WiFi is visible but mobile device does not connect 81Mobile device is frequently disconnecting from Mobi-leConnect/CinemaConnectWiFi 81MobileConnect/CinemaConnect App shows no chan-nels to select 81 MobileConnect/CinemaConnect app shows “No connection” 81MobileConnect/CinemaConnect app shows “Client li-mit has been reached” 82
Audio quality 84MobileConnect/CinemaConnect App does show channels to select from but when selected there is no audio 84MobileConnect/CinemaConnect App does provide au-dio but it is distorted or has drop outs 84Audio latency is higher than expected 84Audio is ahead of the video 84The audio level is low 85There is a lot of noise 85There is clipping noise 85
Integrated Mode 86
3
The admin interface cannot be accessed or shows “Configuration problem” 86The user enters a wrong static IP for LAN2 in Integra-ted Mode 86A ConnectStation cannot join or rejoin a cluster in In-tegrated Mode 86Client Balancing or Client Monitoring are not visible on the admin interface page 86
4
Product overview
Product overviewMobileConnect - Sennheiser's WiFi based system for your venue that en-ables low-latency transmission of audio content to mobile devices such assmartphones and tablets. With our real time audio streaming server andthe MobileConnect App, you can easily provide assistive listening for hea-ring impaired, audio description for blind people, interpretation channels oraudio for silent screens to your venue as well as movie subtitles.
Sennheiser's MobileConnect system embraces the bring-your-own-device(BYOD) principle enabling users to use their own mobile devices on the Mo-bileConnect WiFi network. The system consists of a ConnectStation, acentral unit for integrating different audio streams and transmitting themvia WiFi access points to the personal mobile devices.
Typical applications
Assistive listening
Audio description
Interpretation / Multi-language audio
Digital signage / Silent screens
5
Features
Features
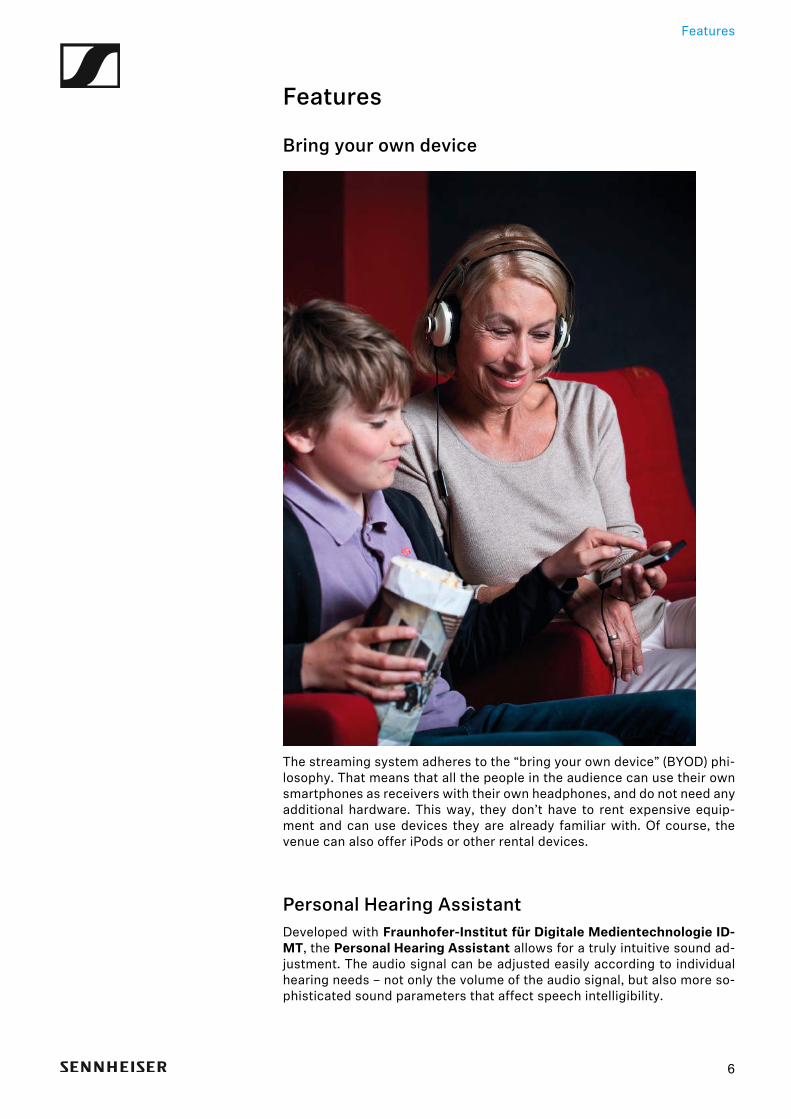
Bring your own device►
The streaming system adheres to the “bring your own device” (BYOD) phi-losophy. That means that all the people in the audience can use their ownsmartphones as receivers with their own headphones, and do not need anyadditional hardware. This way, they don’t have to rent expensive equip-ment and can use devices they are already familiar with. Of course, thevenue can also offer iPods or other rental devices.
Personal Hearing AssistantDeveloped with Fraunhofer-Institut für Digitale Medientechnologie ID-MT, the Personal Hearing Assistant allows for a truly intuitive sound ad-justment. The audio signal can be adjusted easily according to individualhearing needs – not only the volume of the audio signal, but also more so-phisticated sound parameters that affect speech intelligibility.
6
Components
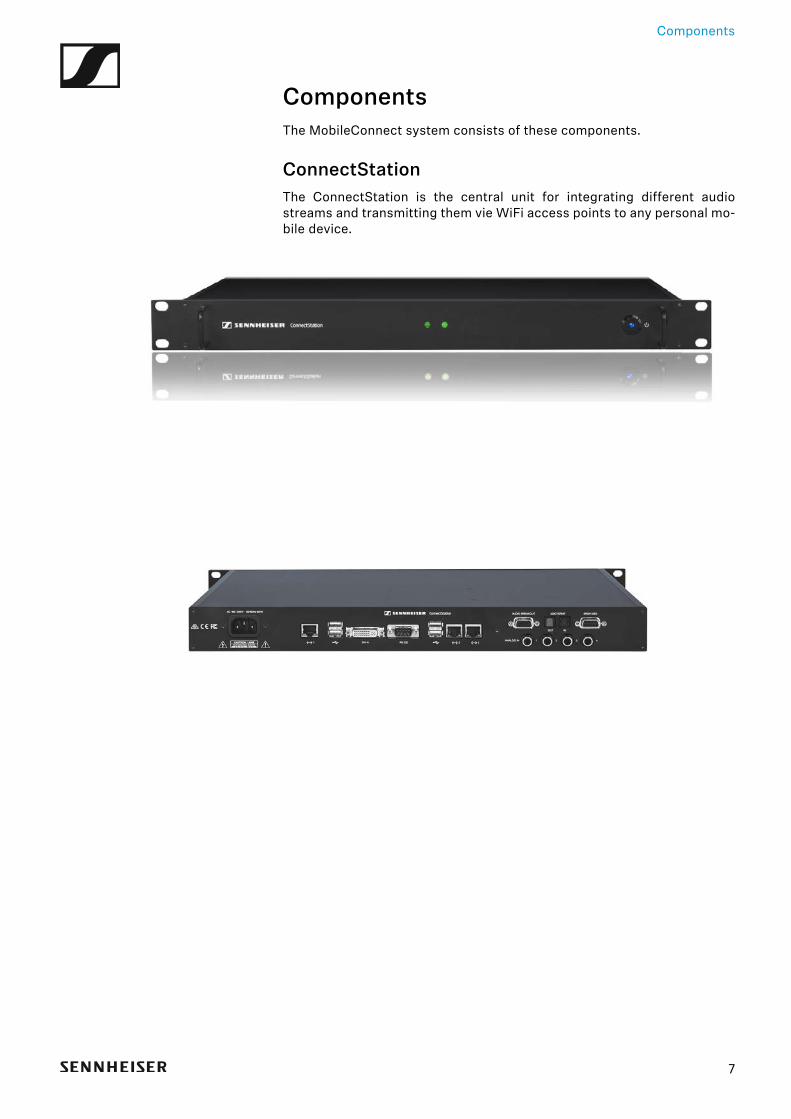
ComponentsThe MobileConnect system consists of these components.
ConnectStationThe ConnectStation is the central unit for integrating different audiostreams and transmitting them vie WiFi access points to any personal mo-bile device.
7
Components
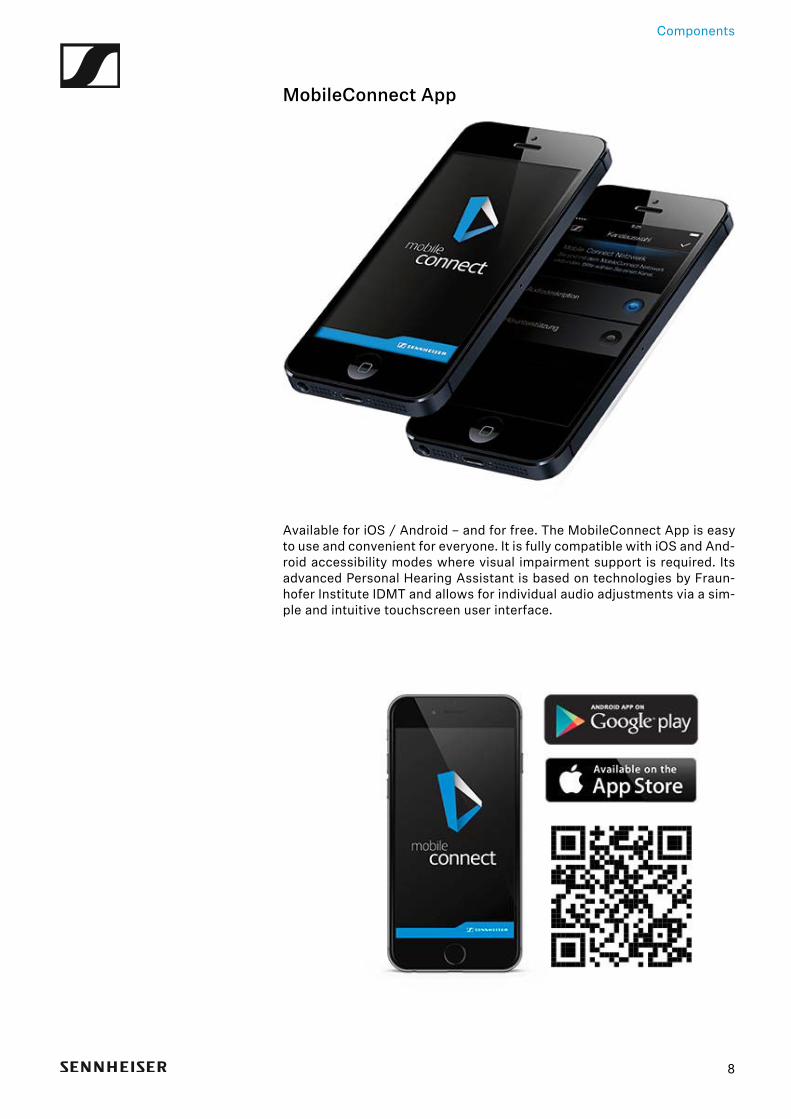
MobileConnect App►
Available for iOS / Android – and for free. The MobileConnect App is easyto use and convenient for everyone. It is fully compatible with iOS and And-roid accessibility modes where visual impairment support is required. Itsadvanced Personal Hearing Assistant is based on technologies by Fraun-hofer Institute IDMT and allows for individual audio adjustments via a sim-ple and intuitive touchscreen user interface.►
8
Components
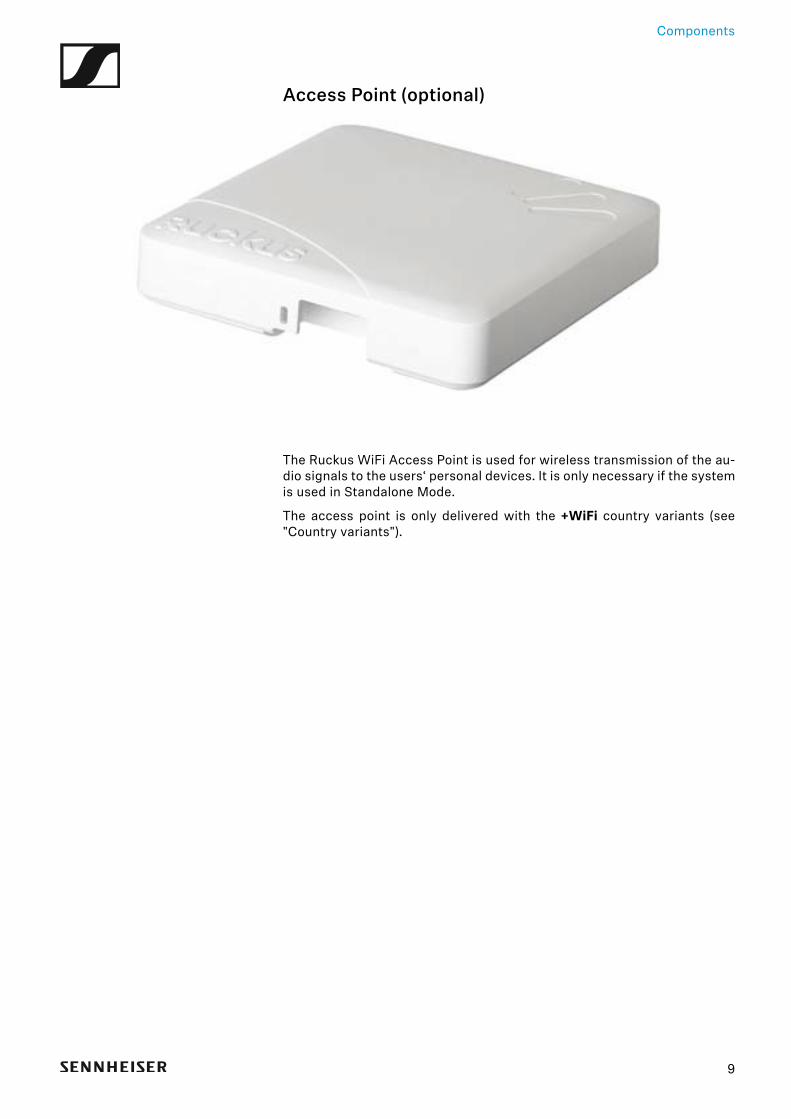
Access Point (optional)►
The Ruckus WiFi Access Point is used for wireless transmission of the au-dio signals to the users‘ personal devices. It is only necessary if the systemis used in Standalone Mode.
The access point is only delivered with the +WiFi country variants (see"Country variants").
9
System planning
System planningThe following sections can help you with your system planning. You willfind Information on the following topics.
A list of country variants of the MobileConnect and CinemaConnect sys-tems including the delivery contents of the different variants.
See "Country variants"
Information on network integration of the MobileConnect and Cinema-Connect systems for both Standalone Mode and Integrated Mode.
See:
• "Network integration"• "Standalone Mode"• "Integrated Mode"
Information on the audio level and latency in the device chain.
See "Planning audio level and latency"
Special information for installations in the USA concerning the Americanswith Disabilities Act (ADA).
See "Americans with Disabilities Act (ADA)"
10
Country variants
Country variantsBefore purchasing you can refer to the list of country variants to find thesystem suitable for you.
Country variants for Standalone Mode
▷ Select your country variant:►
▷ Scope of supply►
The following Access Points can be delivered: Ruckus ZoneFlex 7372or R500 or R510.
MobileConnect +WiFi EU Article no. 506733
MobileConnect +WiFi UK Article no. 506734
MobileConnect +WiFi US Article no. 506735
CinemaConnect +WiFi EU Article no. 506736
CinemaConnect +WiFi UK Article no. 506731
CinemaConnect +WiFi US Article no. 506732
1x ConnectStation CS1-M or CS1-C
1x power supply cable, 1.8 m
1x 15-pin D-sub to 4x RCA analog, 2x MIDI, 1x phones
1x 9-pin D-sub to 2x RCA digital (SPDIF)
1x Toslink cable 2 mm, 2 m
3x Ethernet cable Cat5e, 1 m
1x WiFi access point
1x PoE power over Ethernet injector EU/US/UK/AU for access point
1x Quick Guide
2x Safety Guide
11
Country variants
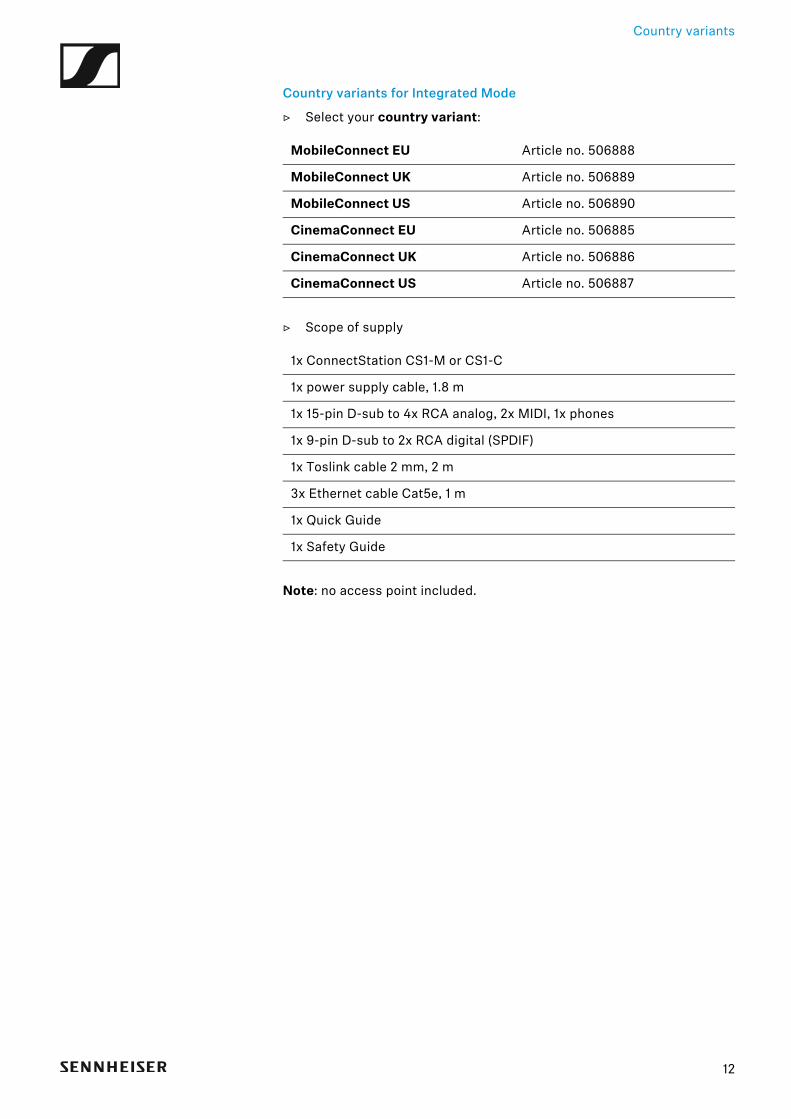
Country variants for Integrated Mode
▷ Select your country variant:►
▷ Scope of supply►
Note: no access point included.
MobileConnect EU Article no. 506888
MobileConnect UK Article no. 506889
MobileConnect US Article no. 506890
CinemaConnect EU Article no. 506885
CinemaConnect UK Article no. 506886
CinemaConnect US Article no. 506887
1x ConnectStation CS1-M or CS1-C
1x power supply cable, 1.8 m
1x 15-pin D-sub to 4x RCA analog, 2x MIDI, 1x phones
1x 9-pin D-sub to 2x RCA digital (SPDIF)
1x Toslink cable 2 mm, 2 m
3x Ethernet cable Cat5e, 1 m
1x Quick Guide
1x Safety Guide
12
Network integration
Network integrationThe MobileConnect&CinemaConnect product can be used as a standalonesystem or can be integrated in your existing network infrastructure. Tochoose the most suitable configuration please read this section carefully.
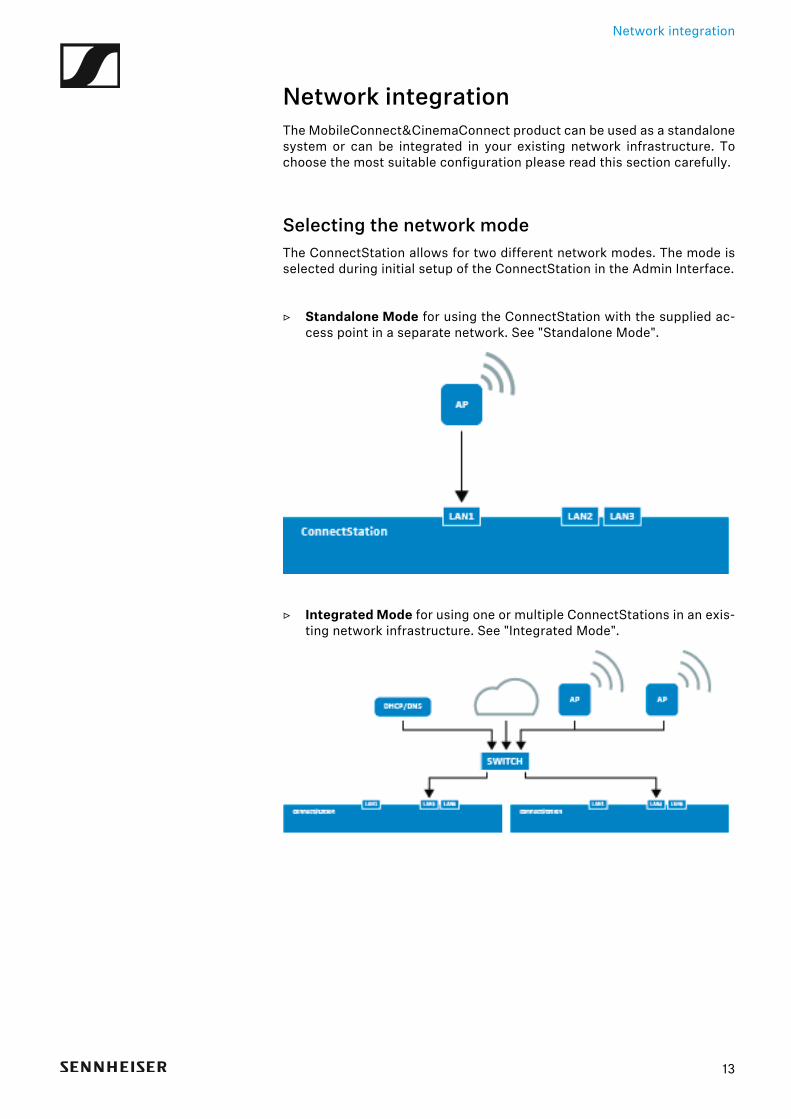
Selecting the network modeThe ConnectStation allows for two different network modes. The mode isselected during initial setup of the ConnectStation in the Admin Interface.
▷ Standalone Mode for using the ConnectStation with the supplied ac-cess point in a separate network. See "Standalone Mode".
►
▷ Integrated Mode for using one or multiple ConnectStations in an exis-ting network infrastructure. See "Integrated Mode".
►
13
Network integration
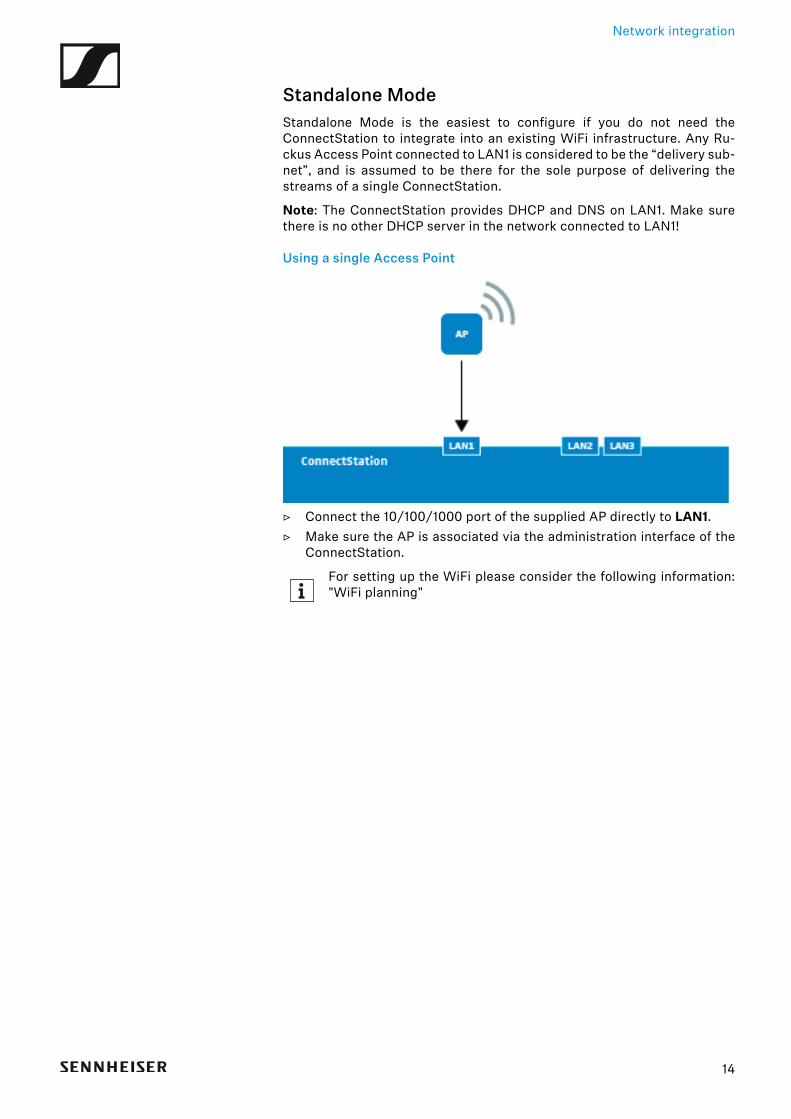
Standalone ModeStandalone Mode is the easiest to configure if you do not need theConnectStation to integrate into an existing WiFi infrastructure. Any Ru-ckus Access Point connected to LAN1 is considered to be the “delivery sub-net”, and is assumed to be there for the sole purpose of delivering thestreams of a single ConnectStation.
Note: The ConnectStation provides DHCP and DNS on LAN1. Make surethere is no other DHCP server in the network connected to LAN1!
Using a single Access Point►
▷ Connect the 10/100/1000 port of the supplied AP directly to LAN1.▷ Make sure the AP is associated via the administration interface of the
ConnectStation.
For setting up the WiFi please consider the following information:"WiFi planning"
14
Network integration
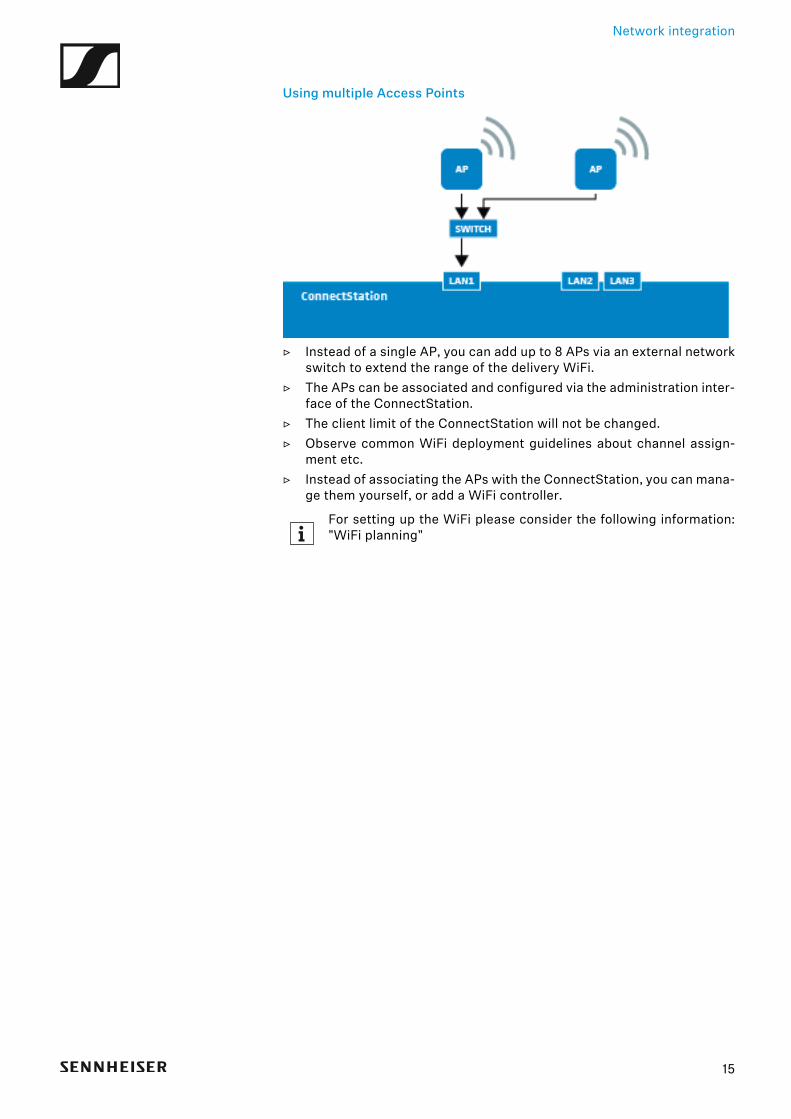
Using multiple Access Points►
▷ Instead of a single AP, you can add up to 8 APs via an external networkswitch to extend the range of the delivery WiFi.
▷ The APs can be associated and configured via the administration inter-face of the ConnectStation.
▷ The client limit of the ConnectStation will not be changed.▷ Observe common WiFi deployment guidelines about channel assign-
ment etc.▷ Instead of associating the APs with the ConnectStation, you can mana-
ge them yourself, or add a WiFi controller.
For setting up the WiFi please consider the following information:"WiFi planning"
15
Network integration
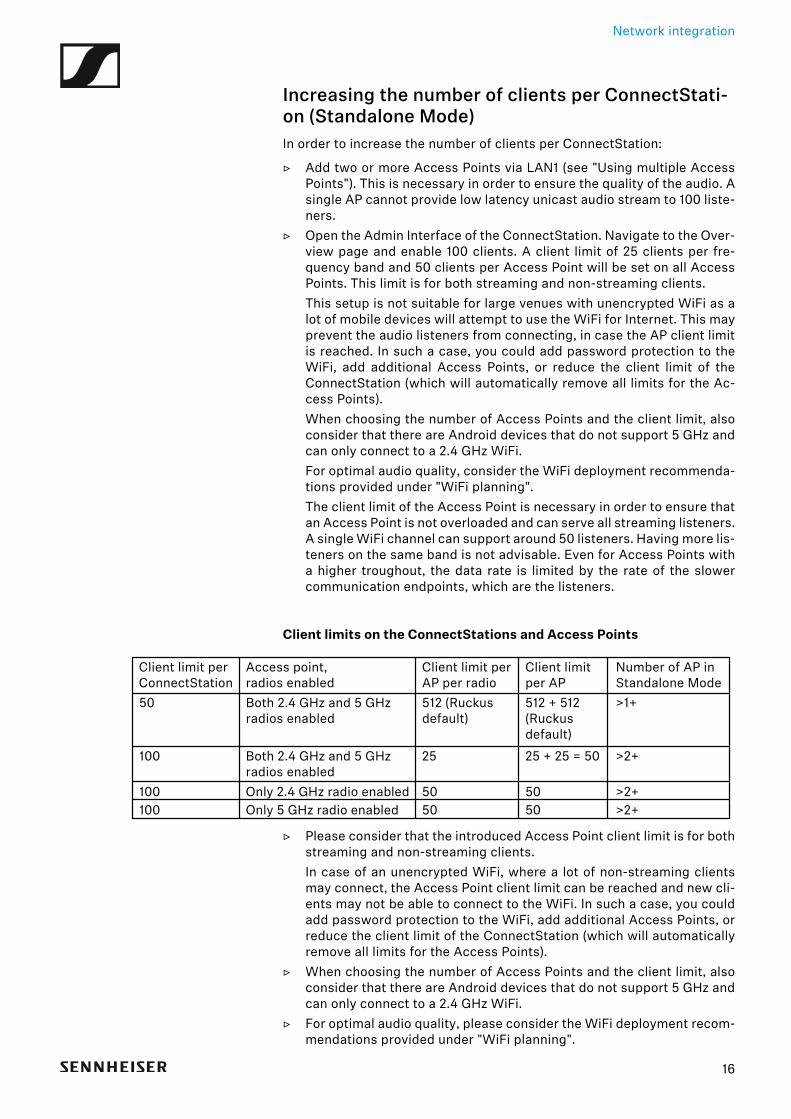
Client limit per ConnectStation
Acceradio
50 Bothradio
Bothradio
100
100 Only100 Only
Increasing the number of clients per ConnectStati-on (Standalone Mode)In order to increase the number of clients per ConnectStation:
▷ Add two or more Access Points via LAN1 (see "Using multiple AccessPoints"). This is necessary in order to ensure the quality of the audio. Asingle AP cannot provide low latency unicast audio stream to 100 liste-ners.
▷ Open the Admin Interface of the ConnectStation. Navigate to the Over-view page and enable 100 clients. A client limit of 25 clients per fre-quency band and 50 clients per Access Point will be set on all AccessPoints. This limit is for both streaming and non-streaming clients.This setup is not suitable for large venues with unencrypted WiFi as alot of mobile devices will attempt to use the WiFi for Internet. This mayprevent the audio listeners from connecting, in case the AP client limitis reached. In such a case, you could add password protection to theWiFi, add additional Access Points, or reduce the client limit of theConnectStation (which will automatically remove all limits for the Ac-cess Points).When choosing the number of Access Points and the client limit, alsoconsider that there are Android devices that do not support 5 GHz andcan only connect to a 2.4 GHz WiFi.For optimal audio quality, consider the WiFi deployment recommenda-tions provided under "WiFi planning".The client limit of the Access Point is necessary in order to ensure thatan Access Point is not overloaded and can serve all streaming listeners.A single WiFi channel can support around 50 listeners. Having more lis-teners on the same band is not advisable. Even for Access Points witha higher troughout, the data rate is limited by the rate of the slowercommunication endpoints, which are the listeners.
Client limits on the ConnectStations and Access Points►
▷ Please consider that the introduced Access Point client limit is for bothstreaming and non-streaming clients.In case of an unencrypted WiFi, where a lot of non-streaming clientsmay connect, the Access Point client limit can be reached and new cli-ents may not be able to connect to the WiFi. In such a case, you couldadd password protection to the WiFi, add additional Access Points, orreduce the client limit of the ConnectStation (which will automaticallyremove all limits for the Access Points).
▷ When choosing the number of Access Points and the client limit, alsoconsider that there are Android devices that do not support 5 GHz andcan only connect to a 2.4 GHz WiFi.
▷ For optimal audio quality, please consider the WiFi deployment recom-mendations provided under "WiFi planning".
ss point, s enabled
Client limit per AP per radio
Client limit per AP
2.4 GHz and 5 GHz s enabled
2.4 GHz and 5 GHz s enabled
512 (Ruckus default)
512 + 512 (Ruckus default)
25 25 + 25 = 50
2.4 GHz radio enabled 50 50 5 GHz radio enabled 50 50
Number of AP in Standalone Mode>1+
>2+
>2+>2+
16
Network integration
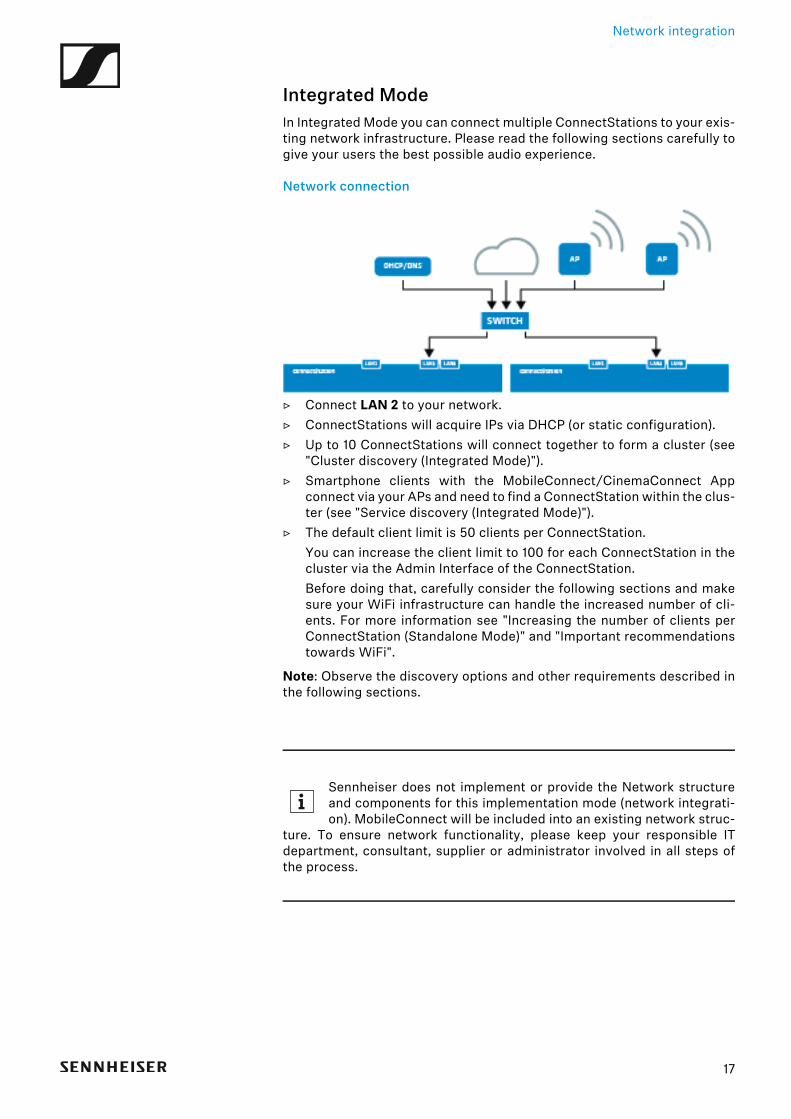
Integrated ModeIn Integrated Mode you can connect multiple ConnectStations to your exis-ting network infrastructure. Please read the following sections carefully togive your users the best possible audio experience.
Network connection►
▷ Connect LAN 2 to your network.▷ ConnectStations will acquire IPs via DHCP (or static configuration).▷ Up to 10 ConnectStations will connect together to form a cluster (see
"Cluster discovery (Integrated Mode)").▷ Smartphone clients with the MobileConnect/CinemaConnect App
connect via your APs and need to find a ConnectStation within the clus-ter (see "Service discovery (Integrated Mode)").
▷ The default client limit is 50 clients per ConnectStation.You can increase the client limit to 100 for each ConnectStation in thecluster via the Admin Interface of the ConnectStation.Before doing that, carefully consider the following sections and makesure your WiFi infrastructure can handle the increased number of cli-ents. For more information see "Increasing the number of clients perConnectStation (Standalone Mode)" and "Important recommendationstowards WiFi".
Note: Observe the discovery options and other requirements described inthe following sections.
Sennheiser does not implement or provide the Network structureand components for this implementation mode (network integrati-on). MobileConnect will be included into an existing network struc-
ture. To ensure network functionality, please keep your responsible ITdepartment, consultant, supplier or administrator involved in all steps ofthe process.
17

Network integration
Increasing the number of clients per ConnectStati-on (Integrated Mode)
In order to increase the number of clients per ConnectStation in IntegratedMode:▷ Make sure that your network and WiFi infrastructure can handle the in-
creased number of clients. Otherwise enabling more clients may leadto audio and connectivity problems for all listeners.For more information see "Increasing the number of clients perConnectStation (Standalone Mode)" and "Important recommendationstowards WiFi".
18
Network integration
Requirements/Recommendations towards your network (Integrated Mode)While MobileConnect/CinemaConnect might function also in networkswith cheap and / or misconfigured infrastructure, users might well experi-ence increased audio latency, audio dropouts or even failure of the streamsespecially when more than a handful of clients try to connect.
To optimize your network for perfect MobileConnect/CinemaConnectreception, please observe the recommendations made by this documentclosely and keep monitoring the system during use.
Yet, detailing strategies for deployment of a workable WiFi network wouldexceed the scope of this document. If you want to provide excellent strea-ming service to a maximum number of users, you’ll have to be careful in de-signing your infrastructure to high standards.
Please keep in mind that MobileConnect needs to be implementedin a professional IT infrastructure which is not comparable with acommon home network. Always keep your keep your responsible IT
department, consultant, supplier or administrator involved in all steps ofthe process to ensure network functionality.
The following application note on the Sennheiser website gives a short andcomprehensive overview of the network requirements:
Application Note Network Requirements in Integrated Mode (PDF)
For detailed information continue reading the following paragraphs.
19
Network integration
Traffic Structure to expect with a MobileConnect/CinemaConnect instal-lation
To estimate the impact on your WiFi network to expect from a Mobile-Connect/CinemaConnect installation, we give some insight into what traf-fic to expect:
1. Multicast Announcement Packets
When using multicast discovery, the server ConnectStation will send outsmall announcement packets on the port specified, to the multicast groupaddress specified, twice per second.
2. Inter-Cluster communication
ConnectStations that form a cluster will communicate with each other onports in the 8000-9000 range, both via TCP and UDP. The traffic involvedshould stay minimal and not pose a problem to any cabled infrastructure.
3. Service Discovery, Registration and Control Connection
WiFi Clients with the MobileConnect/CinemaConnect App will use a dis-covery method as described above, and cause some registration traffic viahttp on port 8000, and keep a TCP control connection open in the 8000-9000 range. Whenever a change in configuration is detected, clients aretriggered to re-request the channel configuration via http. If many clientsare connected, this will cause http transfers which vary in size dependingon the amount of ConnectStations and Channels configured in the cluster.
4. Audio streaming data
The most serious amount of traffic though will obviously be the audio stre-aming data which is sent via UDP on ports 3200-3400. Audio data is sentvia UDP unicasting to each client registered for a stream. Every clientreceives around 100 packets per second, each 96 bytes plus UDP/IP/WiFioverhead. That is with our current recommended settings. In some circum-stances, the system might increase the packet count up to 400 packets/s,and while the payload size per packet will go down accordingly, obviouslyheader overhead stays the same, resulting in a higher overall data rate.
Note: It's important that these packets are delivered by your infrastructurein a timely fashion, ideally without any frame aggregation taking place, tokeep audio latency down.
To allow prioritization of the streaming data on both your cabled infrastruc-ture and - more importantly - with your WiFi equipment, we are tagging thetraffic with DSCP 0x2E (EF). Please ensure that this traffic is handled ac-cordingly, for example, it should usually end up in the WiFi Access Point’sVO queue.
20
Network integration
Important recommendations towards WiFi
With the Access Points delivered with the MobileConnect/CinemaConnectSystem (Ruckus ZF7372), we’ve seen the best results with 40MHz channelwidth in the 5GHz bands, but 20MHz on 2.4GHz.
In order to ensure best possible streaming quality, we recommend to havemaximum of 50 clients per Ruckus 7372 access point due to the followingreasons:
• A single WiFi channel can support around 50 listeners. Having more cli-ents on the same band is not advisable. Even for Access Points with ahigher troughput, the data rate is limited by the rate of the slower com-munication endpoints, which are the clients.
• The Ruckus 7273 Access Point can support around 60 to 70 streamingclients. Having more clients can cause high CPU for the Access Point.
When using more than one ConnectStation or increasing the number of cli-ents per ConnectStation with your own WiFi infrastructure, especially if cli-ents also use the WiFi for other purposes, you will have to take measuresto ensure that enough bandwidth is available for streaming.
We recommend:• keeping a strict client limit per access point, active load balancing, or si-
milar• providing active load balancing, or similar• usage example: a cluster with 3 ConnectStations with a limit of 100 cli-
ents per ConnectStation should have at least 6 Access Points to supportthe number of streaming clients.
For more information see "WiFi planning".
General network requirements
1. Short path
Smartphone clients need to be able to connect to the ConnectStations asdirectly as possible. They need to get IPs assigned from your DHCP that arein the same broadcast domain as those assigned to the ConnectStations.
As far as possible, avoid too many switches and routing on Layer 2 bet-ween smartphone clients and ConnectStations. Any switch can introducejitter and congestion, which will increase audio latency experienced by Mo-bileConnect/CinemaConnect users or even cause the streams to stop wor-king altogether.
2. Discovery
You’ll need to support one of the service discovery option for the clients,as described in "Service discovery (Integrated Mode)".
If you want to integrate more than one ConnectStation into your network,you’ll also need to support a cluster discovery option as described in"Cluster discovery (Integrated Mode)".
3. Connectivity
Modern mobile devices require an internet connection at all times. Whenconnecting to a WiFi the devices may reject the network if there is no inter-net access. The MobileConnect/CinemaConnect system provides additio-nal features to allow mobile devices to seamlessly connect to theMobileConnect/CinemaConnect WiFi. However, we cannot guarantee thatall mobile devices on the market will be covered. We recommend providinginternet access in the network for better client connectivity.
21
Network integration
Switches, Access Points and QoS
1. Use Quality Equipment
We strongly recommend to use enterprise-grade switches and WiFi equip-ment and keep a close eye on the delivery of our data especially when theinstallation needs to support a large amount of simultaneous listeners.
2. “Just like VoIP”
Our audio streaming traffic is similar in structure to VoIP traffic, so lots oflessons learned there will apply here, too. The main difference is that ourtraffic is mostly unidirectional, i.e., there is not much data traffic origina-ting from the client devices. Keep this in mind when configuring WMM andQoS settings in your network and WiFi controllers.
3. Requirements for Switches
Any cabled infrastructure should be Gigabit Ethernet or better.
All involved switches should:• support QoS with strict priorities,• not queue up any of our traffic (especially the audio payload on ports
32xx) and• have energy saving functionality disabled.
Network bandwidth
The bandwidth usage is similar as for Voice over IP.
The system creates a bandwidth of 90 - 200 kbit/s per client. Please beaware that in WiFi, the actual throughput can diverge significantly from thebasic rate.
22
Network integration
Cluster discovery (Integrated Mode)When integrating multiple ConnectStations into a network, they need away to find each other to set up the cluster. There are two options:
1. Explicit server selection via DNS SRV records2. Automatic discovery by multicast announcements (with the opti-
on to override the default multicast address and port)
Order of methods for Cluster Discovery
The discovery process follows a strict order:
1. Explicit SRV▷ When starting up, a ConnectStation will first query your DNS for _cn-
ct._tcp SRV records. If it finds entries, it will try to connect to the spe-cified server(s).
2. Multicast announcement on overridden address▷ If no DNS SRV records are found, it will query your DNS for a _cnct._u-
dp SRV record that can specify the multicast group and port for disco-very. If found, it will use these values for the discovery process asdescribed below.
3. Multicast announcement on default address▷ If not specified in your DNS, it will use the default multicast group ad-
dress 224.2.2.2 and port 32001 for the discovery process as describedbelow.
23
Network integration
Explicit server selection
You can explicitly set any of 1, 3 or 5 ConnectStation(s) as a server for yourcluster. For that purpose, create a SRV record for _cnct._tcp pointing tothe IP (or, if set in your DNS, hostname) for each of the ConnectStations youwant to select as a server.
▷ It is advisable to select the stations with the least expected load (interms of connected listeners and number of streams) to be servers.
▷ Note that the ConnectStations will observe DNS search domains as setby your DHCP server, and you will usually want to create the SRVentries under one of those search domains.
▷ If any of the explicitly selected servers are not reachable, the result isundefined and the whole cluster of ConnectStations might stop functi-oning.
▷ If you configure an illegal number of servers (any number other than 1,3 or 5), the result again is undefined.
Example:
1. Assume you have a network setup with three ConnectStations, and youwant to make one of those to be the server for your cluster explicitly.
2. Your DHCP hands out IP addresses to the ConnectStations connectedvia their LAN2 port- we’ll assume for this example that they are:192.168.0.101, 192.168.0.102 and 192.168.0.103.
3. Your DHCP sets the domain field (DHCP Option 15) to an arbitrary do-main name, let’s assume it is “your-domain.com”.
4. Create SRV entries for the ConnectStation you want to be the server.The priority and weight field are currently irrelevant. Set the TTL to asane value according to your network requirements. Set the port to8000:
►
5. When started up, the selected ConnectStation will discover it is set tobe the single server and start listening for other ConnectStations toform a cluster.
6. The other ConnectStations will discover the selected server andconnect to it to form a cluster.
7. You can configure the cluster via any connected station. If you areconnected to the same network, you can browse to http://192.168.0.101/ to open the administration interface.
Automatic cluster setup via multicast announcement
▷ When no _cnct._tcp SRV records are found, the ConnectStations willfall back to automatic discovery via a simple multicast announcementprotocol.
▷ On startup, a ConnectStation will listen for announcements on multi-cast address 224.2.2.2 and port 32001. The multicast group addressand port can be overridden by _cnct._udp SRV entries in your DNS.
▷ If it detects announcements, it will connect to the ConnectStation sen-ding them. If no announcements are detected, it will assume the serverrole and start sending announcements itself.
▷ If the Server ConnectStation disappears from the cluster, another sta-tion will take over the server role automatically.
Service name
_cnct._tcp.your-domain.com 192.168.0.1013600 IN SRV 0 0 8000
TTL Class Type Priority Weight Port Target
24
Network integration
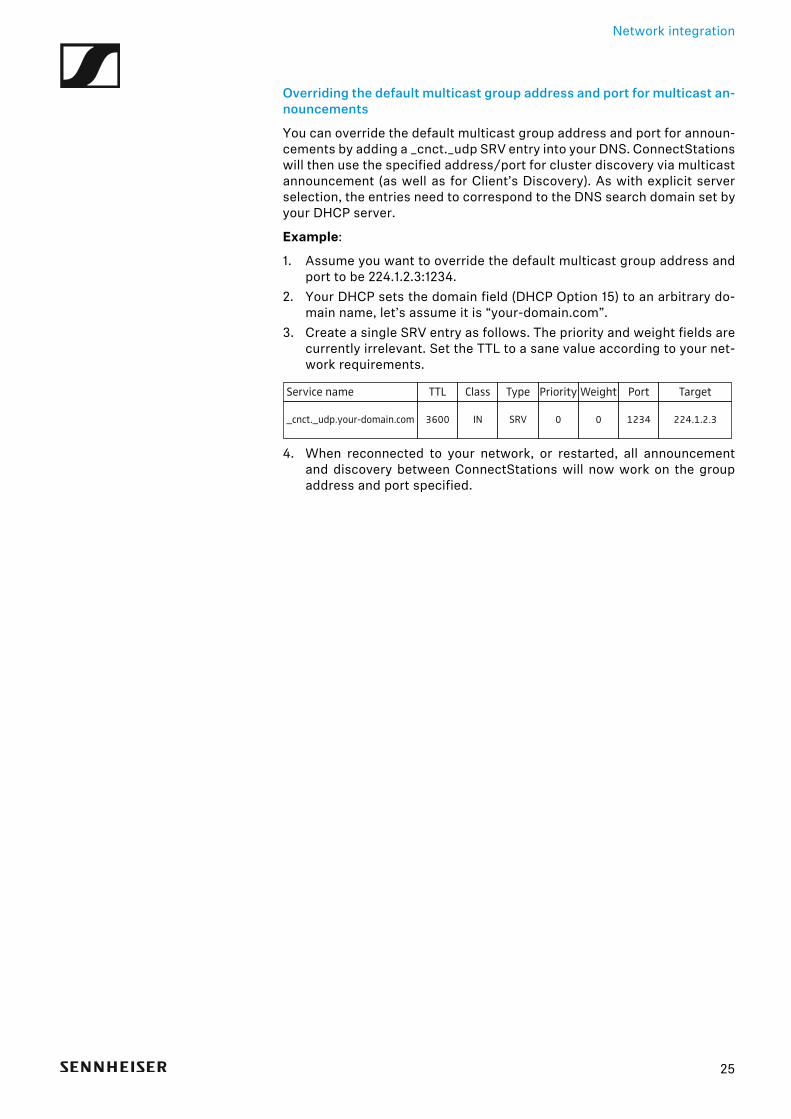
Overriding the default multicast group address and port for multicast an-nouncements
You can override the default multicast group address and port for announ-cements by adding a _cnct._udp SRV entry into your DNS. ConnectStationswill then use the specified address/port for cluster discovery via multicastannouncement (as well as for Client’s Discovery). As with explicit serverselection, the entries need to correspond to the DNS search domain set byyour DHCP server.
Example:
1. Assume you want to override the default multicast group address andport to be 224.1.2.3:1234.
2. Your DHCP sets the domain field (DHCP Option 15) to an arbitrary do-main name, let’s assume it is “your-domain.com”.
3. Create a single SRV entry as follows. The priority and weight fields arecurrently irrelevant. Set the TTL to a sane value according to your net-work requirements.
►
4. When reconnected to your network, or restarted, all announcementand discovery between ConnectStations will now work on the groupaddress and port specified.
Service name
_cnct._udp.your-domain.com 224.1.2.33600 IN SRV 0 0 1234
TTL Class Type Priority Weight Port Target
25
Network integration
Service discovery (Integrated Mode)Similar to the discovery process between the ConnectStations, the smart-phone clients running our MobileConnect/CinemaConnect App (“the App”)need a way to find at least one ConnectStation in your network. The pro-cess is roughly similar to the cluster discovery described above, except theDNS SRV records are accompanied with a single PTR record to adhere tothe DNS-SD specification more closely. Finally, the App can discover theConnectStation cluster via DNS A records (i.e., “hostnames”).
Order of methods for Service Discovery
The discovery process again follows a strict order:
1. Explicit DNS-SD (PTR/SRV)▷ When starting up, the App will query your DNS for _cnct._tcp PTR re-
cords. If it finds entries, it will resolve the corresponding SRV recordsand try to connect to any of the specified server(s).
2. Multicast announcement on overridden address▷ If no DNS PTR records are found, or none of the specified servers are
reachable, it will query your DNS for a _cnct._udp SRV record that canspecify the multicast group and port for discovery. If found, it will usethese values for the discovery process as described below.
3. Multicast announcement on default address▷ If not specified in your DNS, it will use the default multicast group ad-
dress 224.2.2.2 and port 32001 for the discovery process as describedbelow.
4. Simple hostname “sennheiser-connect”▷ If none of the methods above yield a valid result, the App will try to re-
solve the hostname “sennheiser-connect” (searching within any se-arch domains given via DHCP). If it can be resolved, it will connect tothis station.
5. hostname/TLD “local.connect”▷ As a last resort, the App will try to resolve the hostname
“local.connect”.6. Pause, repeat▷ Finally, if all of the method fails, the App will pause and restart the dis-
covery from step 1.
Explicit service registration via DNS-SD (PTR/SRV)
Explicit Service Registration is the preferred discovery method because itis standardized, explicit and usually well understood. It closely follows theDNS-SD specification (RFC6763 - see:
https://tools.ietf.org/html/rfc6763)
At the moment, only a single service name should be registered with a PTRrecord; multiple SRV records can be set to provide redundancy. The servicename for MobileConnect/CinemaConnect discovery by Apps is _cnct._t-cp. Contrary to Cluster Discovery (see "Cluster discovery (Integrated Mo-de)"), Apps will not directly look up a SRV record for _cnct._tcp, but insteadtake the indirection via a PTR record. Also, the ConnectStations registeredvia this method do not assume the “server” role for clustering; instead, anyConnectStation in a cluster can serve as the entry point for service disco-very. If multiple SRV records are found, the App will probe them until itfinds a station that is available. Apps will honor any search domains set viaDHCP.
26
Network integration
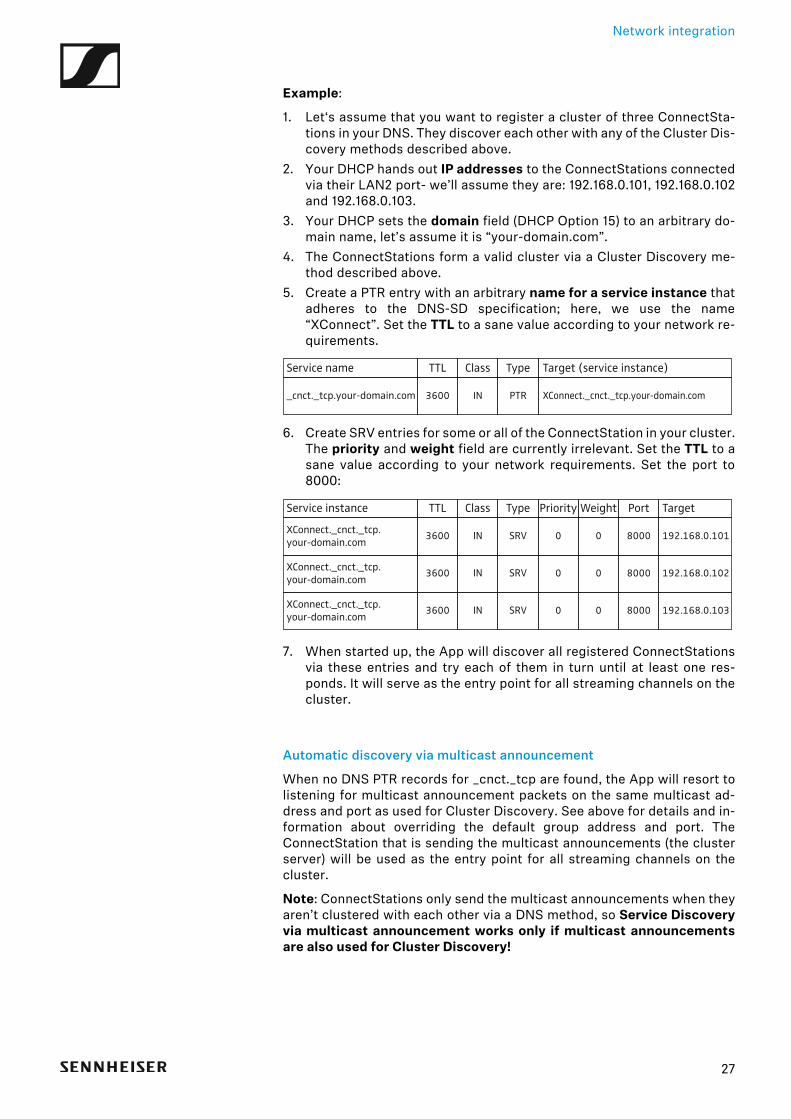
Example:
1. Let‘s assume that you want to register a cluster of three ConnectSta-tions in your DNS. They discover each other with any of the Cluster Dis-covery methods described above.
2. Your DHCP hands out IP addresses to the ConnectStations connectedvia their LAN2 port- we’ll assume they are: 192.168.0.101, 192.168.0.102and 192.168.0.103.
3. Your DHCP sets the domain field (DHCP Option 15) to an arbitrary do-main name, let’s assume it is “your-domain.com”.
4. The ConnectStations form a valid cluster via a Cluster Discovery me-thod described above.
5. Create a PTR entry with an arbitrary name for a service instance thatadheres to the DNS-SD specification; here, we use the name“XConnect”. Set the TTL to a sane value according to your network re-quirements.
►
6. Create SRV entries for some or all of the ConnectStation in your cluster.The priority and weight field are currently irrelevant. Set the TTL to asane value according to your network requirements. Set the port to8000:
►
7. When started up, the App will discover all registered ConnectStationsvia these entries and try each of them in turn until at least one res-ponds. It will serve as the entry point for all streaming channels on thecluster.
Automatic discovery via multicast announcement
When no DNS PTR records for _cnct._tcp are found, the App will resort tolistening for multicast announcement packets on the same multicast ad-dress and port as used for Cluster Discovery. See above for details and in-formation about overriding the default group address and port. TheConnectStation that is sending the multicast announcements (the clusterserver) will be used as the entry point for all streaming channels on thecluster.
Note: ConnectStations only send the multicast announcements when theyaren’t clustered with each other via a DNS method, so Service Discoveryvia multicast announcement works only if multicast announcementsare also used for Cluster Discovery!
Service name
_cnct._tcp.your-domain.com XConnect._cnct._tcp.your-domain.com3600 IN PTR
TTL Class Type Target (service instance)
Service instance
XConnect._cnct._tcp.your-domain.com
192.168.0.1013600 IN SRV 0 0 8000
XConnect._cnct._tcp.your-domain.com
192.168.0.1023600 IN SRV 0 0 8000
XConnect._cnct._tcp.your-domain.com
192.168.0.1033600 IN SRV 0 0 8000
TTL Class Type Priority Weight Port Target
27
Network integration
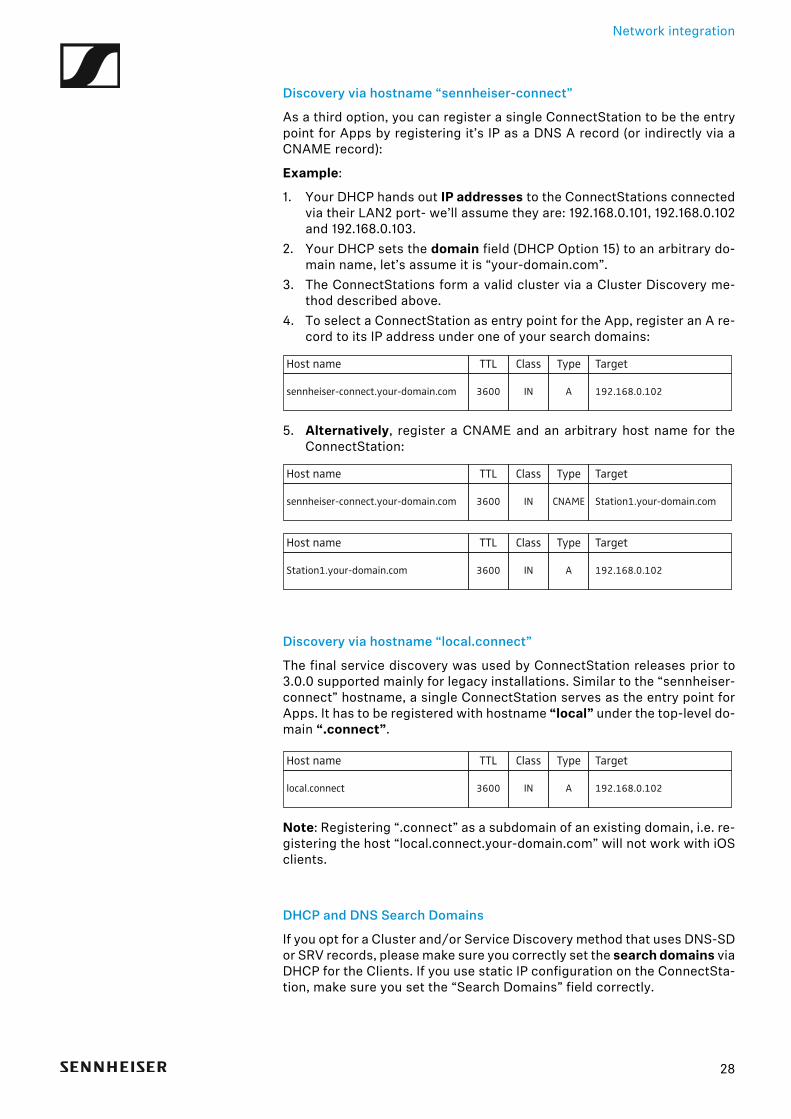
Discovery via hostname “sennheiser-connect”
As a third option, you can register a single ConnectStation to be the entrypoint for Apps by registering it’s IP as a DNS A record (or indirectly via aCNAME record):
Example:
1. Your DHCP hands out IP addresses to the ConnectStations connectedvia their LAN2 port- we’ll assume they are: 192.168.0.101, 192.168.0.102and 192.168.0.103.
2. Your DHCP sets the domain field (DHCP Option 15) to an arbitrary do-main name, let’s assume it is “your-domain.com”.
3. The ConnectStations form a valid cluster via a Cluster Discovery me-thod described above.
4. To select a ConnectStation as entry point for the App, register an A re-cord to its IP address under one of your search domains:
►
5. Alternatively, register a CNAME and an arbitrary host name for theConnectStation:
►
►
Discovery via hostname “local.connect”
The final service discovery was used by ConnectStation releases prior to3.0.0 supported mainly for legacy installations. Similar to the “sennheiser-connect” hostname, a single ConnectStation serves as the entry point forApps. It has to be registered with hostname “local” under the top-level do-main “.connect”.►
Note: Registering “.connect” as a subdomain of an existing domain, i.e. re-gistering the host “local.connect.your-domain.com” will not work with iOSclients.
DHCP and DNS Search Domains
If you opt for a Cluster and/or Service Discovery method that uses DNS-SDor SRV records, please make sure you correctly set the search domains viaDHCP for the Clients. If you use static IP configuration on the ConnectSta-tion, make sure you set the “Search Domains” field correctly.
Host name
sennheiser-connect.your-domain.com 192.168.0.1023600 IN A
TTL Class Type Target
Host name
sennheiser-connect.your-domain.com Station1.your-domain.com3600 IN CNAME
TTL Class Type Target
Host name
Station1.your-domain.com 192.168.0.1023600 IN A
TTL Class Type Target
Host name
local.connect 192.168.0.1023600 IN A
TTL Class Type Target
28
Network integration
Setting a single Search Domain with DHCP Option 15
If you only need a single DNS search domain, simply set it via DHCP Option15. This is standardized and well supported across all operating systems.Again, if you use static IP Configuration for LAN2 on a ConnectStation,make sure you manually set the “Search Domains” field there.
Setting multiple Search Domains
Most Operating Systems allow multiple search domains for their DNS loo-kups which will be used one by one for DNS lookups. By standardization,the DHCP Option 15 allows setting only a single domain, and there is afurther DHCP Option (119) to set multiple additional search domains.
Note: We found that Option 119 is not supported widely enough to be fun-ctional for the purposes described here. Most notably, Android smartpho-nes ignore the option completely in all versions we tested (4.1 to 6.0.1).
If you do need to set multiple search domains, we can suggest to add mul-tiple search domains separated by space characters into DHCP Option15. From our tests, this correctly works across iOS versions, it works for theConnectStation, and it “mostly works” for Android clients. Although ourtests have not been exhaustive, Windows-based clients seem to ignore anydomain after the first entry in this list.
On Android, our Apps (MobileConnect and CinemaConnect) correctly usethe full list of search domains passed via Option 15 to look up PTR and SRVrecords. Discovery via hostname “sennheiser-connect” works only if thehostname is configured with the first domain in the list.
Beware though that this use of Option 15 is outside the standard use of DH-CP, yet seems a common practical solution to setting multiple search do-mains. If you have services in your network that depend on the primarydomain setting from DHCP, make sure to test these after setting multipledomains.
29
Network integration
WiFi planningPlease observe the following information when planning the WiFi setup ofthe ConnectStation for Standalone Mode. The same recommendations canalso be taken into consideration for WiFi planning with different AccessPoints or in Integrated Mode.
WiFi coverage
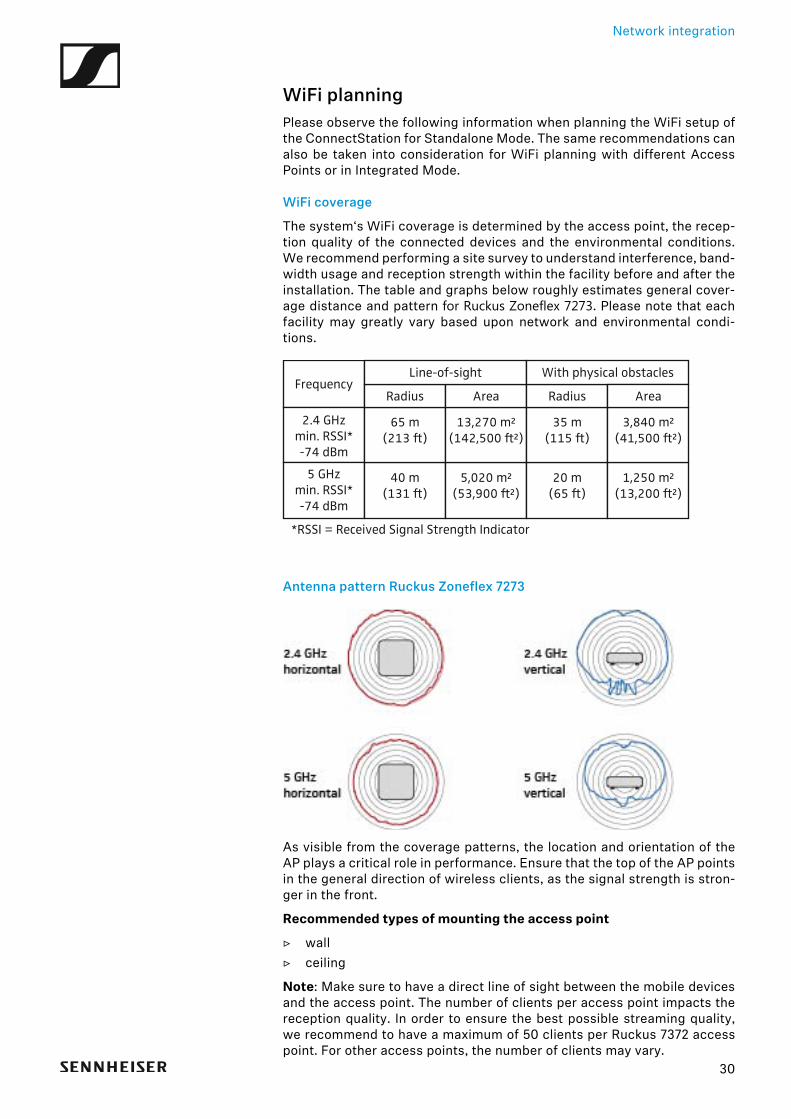
The system‘s WiFi coverage is determined by the access point, the recep-tion quality of the connected devices and the environmental conditions.We recommend performing a site survey to understand interference, band-width usage and reception strength within the facility before and after theinstallation. The table and graphs below roughly estimates general cover-age distance and pattern for Ruckus Zoneflex 7273. Please note that eachfacility may greatly vary based upon network and environmental condi-tions.►
Antenna pattern Ruckus Zoneflex 7273►
As visible from the coverage patterns, the location and orientation of theAP plays a critical role in performance. Ensure that the top of the AP pointsin the general direction of wireless clients, as the signal strength is stron-ger in the front.
Recommended types of mounting the access point
▷ wall▷ ceiling
Note: Make sure to have a direct line of sight between the mobile devicesand the access point. The number of clients per access point impacts thereception quality. In order to ensure the best possible streaming quality,we recommend to have a maximum of 50 clients per Ruckus 7372 accesspoint. For other access points, the number of clients may vary.
FrequencyLine-of-sight
Radius Area AreaRadius
With physical obstacles
2.4 GHzmin. RSSI*-74 dBm
*RSSI = Received Signal Strength Indicator
65 m(213 ft)
13,270 m²(142,500 ft²)
5,020 m²(53,900 ft²)
3,840 m²(41,500 ft²)
1,250 m²(13,200 ft²)
35 m(115 ft)
40 m(131 ft)
20 m(65 ft)
5 GHzmin. RSSI*-74 dBm
30
Network integration
WiFi Design
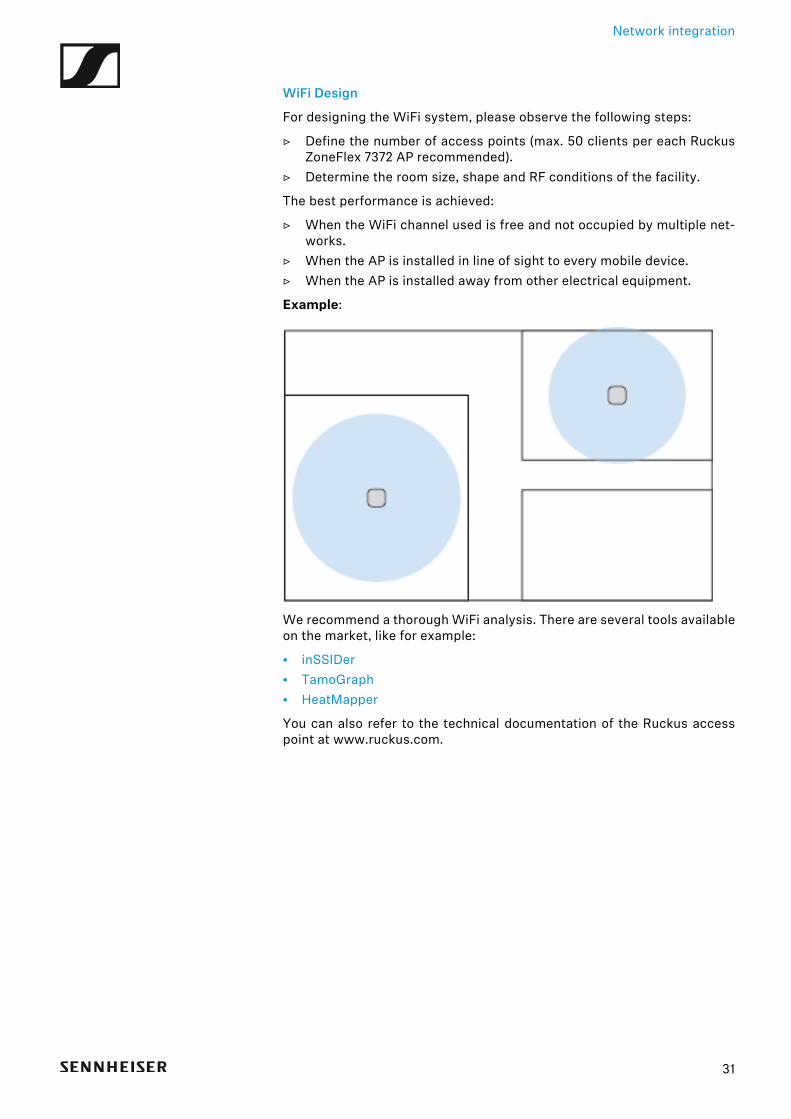
For designing the WiFi system, please observe the following steps:
▷ Define the number of access points (max. 50 clients per each RuckusZoneFlex 7372 AP recommended).
▷ Determine the room size, shape and RF conditions of the facility.
The best performance is achieved:
▷ When the WiFi channel used is free and not occupied by multiple net-works.
▷ When the AP is installed in line of sight to every mobile device.▷ When the AP is installed away from other electrical equipment.
Example:►
We recommend a thorough WiFi analysis. There are several tools availableon the market, like for example:
• inSSIDer• TamoGraph• HeatMapper
You can also refer to the technical documentation of the Ruckus accesspoint at www.ruckus.com.
31
Planning audio level and latency
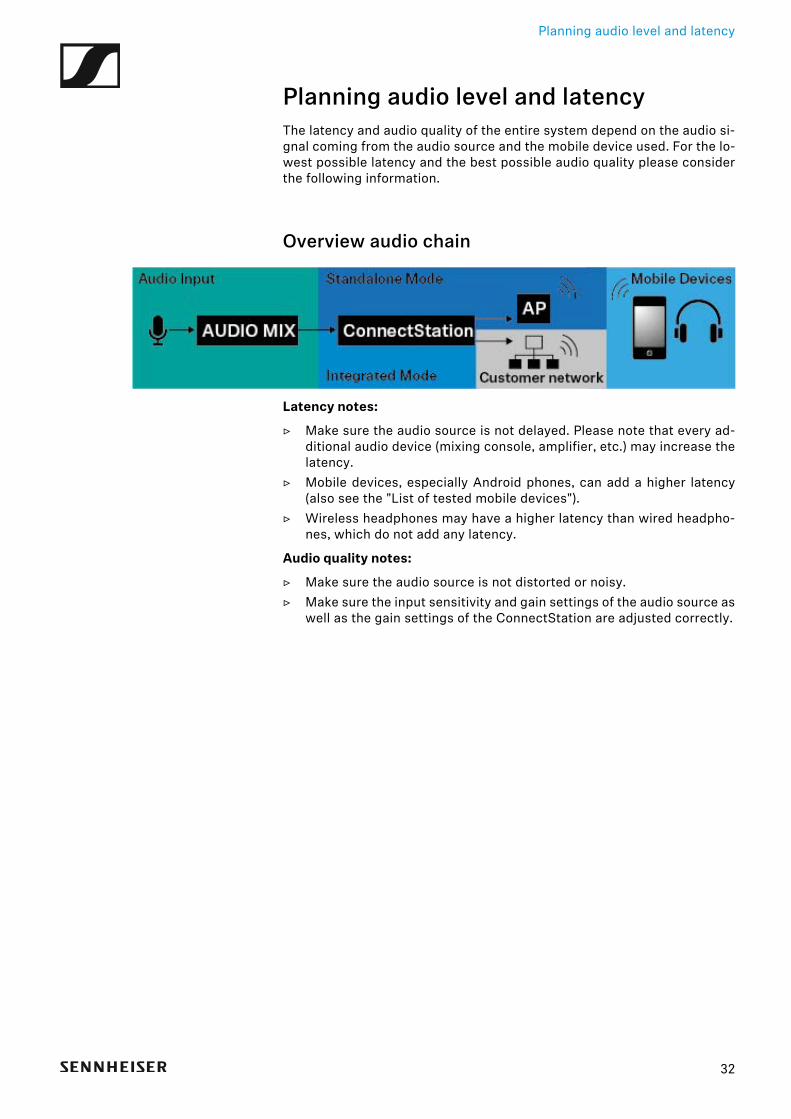
Planning audio level and latencyThe latency and audio quality of the entire system depend on the audio si-gnal coming from the audio source and the mobile device used. For the lo-west possible latency and the best possible audio quality please considerthe following information.
Overview audio chain►
Latency notes:
▷ Make sure the audio source is not delayed. Please note that every ad-ditional audio device (mixing console, amplifier, etc.) may increase thelatency.
▷ Mobile devices, especially Android phones, can add a higher latency(also see the "List of tested mobile devices").
▷ Wireless headphones may have a higher latency than wired headpho-nes, which do not add any latency.
Audio quality notes:
▷ Make sure the audio source is not distorted or noisy.▷ Make sure the input sensitivity and gain settings of the audio source as
well as the gain settings of the ConnectStation are adjusted correctly.
32
Planning audio level and latency
List of tested mobile devicesTo provide a quantitative and qualitative scale on the performance of thesystem, we measured the performance of our system in combination withvarious smartphones. Latencies may vary in reality depending on installedsoftware of the respective device and reception strength within the facility.We have tested the following devices in a defined test environment.
Latency < 80 ms:
• iPod (iOS 8.3-10.0.0)• iPhone (iOS 8.3-10.1.1)• Pixel (Android 8.1)• Samsung S8 (Android 8.0)• Samsung S7 Edge (Android 7.0)• Samsung S6 (Android 6.0.1)• LG G4S H735 (Android 5.1.1)• Asus Zenfone2 Laser Z00ED (Android 5.0.2)• Phicomm Energy L (Android 5.0.2)• Moto G3 (Android 6.0)• Moto E2 (Android 5.0.2)• Sony Experia (Android 5.1.1)
Latency 80-100 ms:
• Nexus 5 (Android 6.0.0)• Nexus 5X (Android 6.0.0-7.1.1)• Samsung Galaxy J5 (Android 5.1.1)• Asus Nexus 7 Tab (Android 5.1)
33
Americans with Disabilities Act (ADA)
Americans with Disabilities Act (ADA)For US installations/usage, please refer to the ADA information providedbelow.
The Americans with Disabilities Act (ADA) was signed into law on July 26,1990. The ADA prohibits discrimination and includes provisions to accom-modate hard of hearing people. Please see below for informational resour-ces regarding ADA compliance.
▷ U.S. Department of Justice ADA▷ 2010 Standards for Accessible Design
California Building Standards
While they’ve adopted the format of the ADA, the State of California relieson the California Building Code to outline their compliance laws. This me-ans that the requirements for assistive listening systems in California area little different. You can find the requirements listen under sections 11B-219 and 11B-706 in the CBC, which gets updated every three years.
▷ California Building Standards Commission
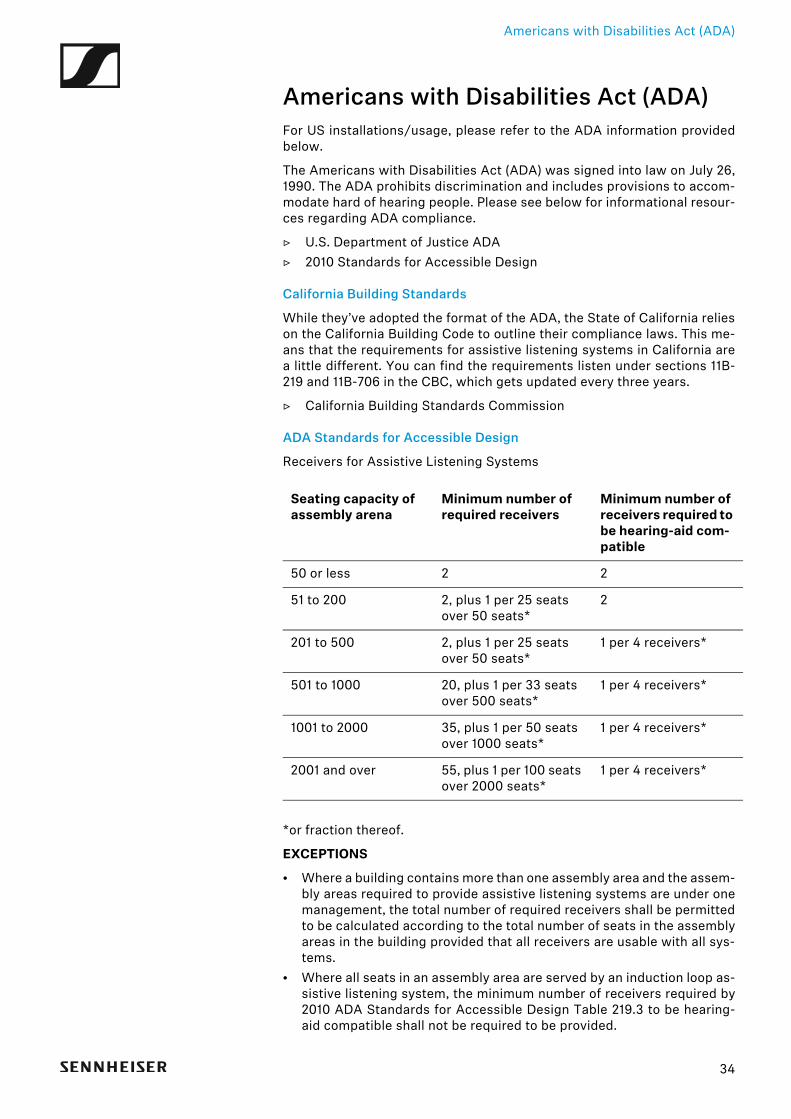
ADA Standards for Accessible Design
Receivers for Assistive Listening Systems►
*or fraction thereof.
EXCEPTIONS
• Where a building contains more than one assembly area and the assem-bly areas required to provide assistive listening systems are under onemanagement, the total number of required receivers shall be permittedto be calculated according to the total number of seats in the assemblyareas in the building provided that all receivers are usable with all sys-tems.
• Where all seats in an assembly area are served by an induction loop as-sistive listening system, the minimum number of receivers required by2010 ADA Standards for Accessible Design Table 219.3 to be hearing-aid compatible shall not be required to be provided.
Seating capacity of assembly arena
Minimum number of required receivers
Minimum number of receivers required to be hearing-aid com-patible
50 or less 2 2
51 to 200 2, plus 1 per 25 seats over 50 seats*
2
201 to 500 2, plus 1 per 25 seats over 50 seats*
1 per 4 receivers*
501 to 1000 20, plus 1 per 33 seats over 500 seats*
1 per 4 receivers*
1001 to 2000 35, plus 1 per 50 seats over 1000 seats*
1 per 4 receivers*
2001 and over 55, plus 1 per 100 seats over 2000 seats*
1 per 4 receivers*
34
Installation and configuration
Installation and configurationThe following sections will give you an overview on how to install and con-figure the MobileConnect or CinemaConnect system. You will find Informa-tion on the following topics.
A hardware overview of the ConnectStation including all sockets andconnectors and how to use them.
See "ConnectStation hardware overview"
Information on installing the system including cabling for power supply,audio signals and network connectivity.
See "Installation"
Information on access to the Admin Interface for the initial configurationof the system.
See "Access and initial configuration"
A detailed Configuration Guide with step by step information on configu-ring the system after the installation.
See "Configuration guide"
35
ConnectStation hardware overview
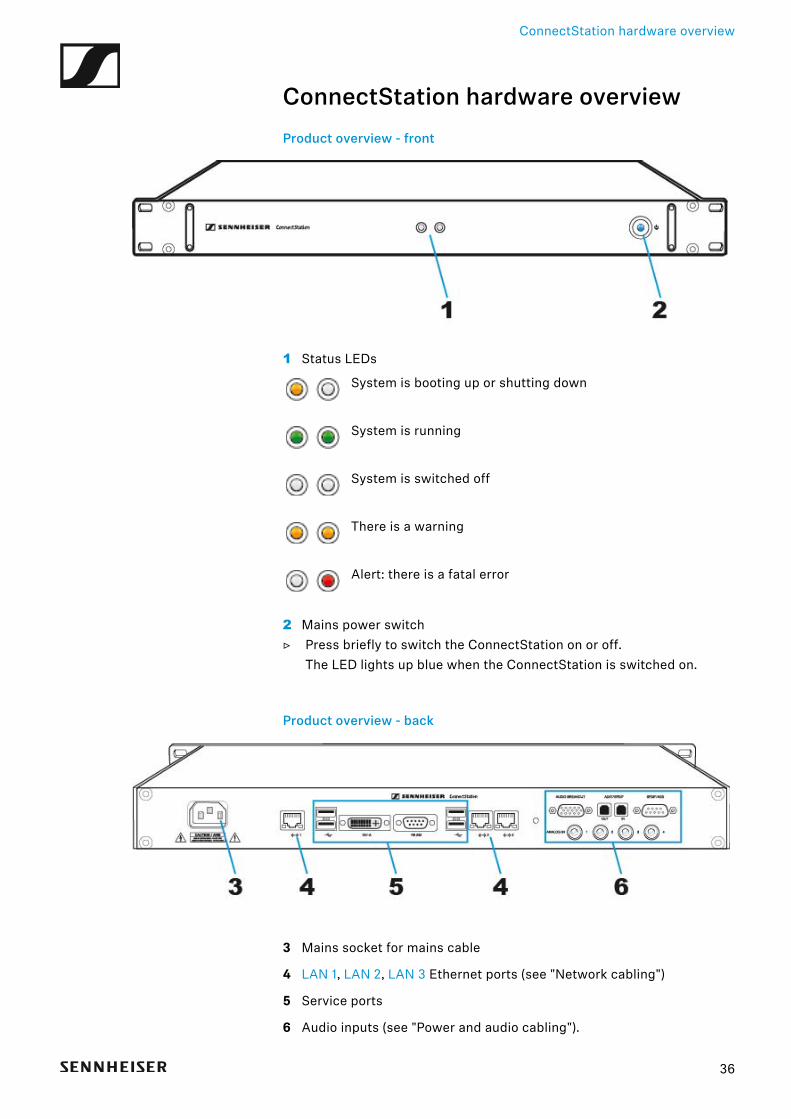
ConnectStation hardware overviewProduct overview - front►
1 Status LEDs
System is booting up or shutting down
System is running
System is switched off
There is a warning
Alert: there is a fatal error
2 Mains power switch▷ Press briefly to switch the ConnectStation on or off.
The LED lights up blue when the ConnectStation is switched on.
Product overview - back►
3 Mains socket for mains cable
4 LAN 1, LAN 2, LAN 3 Ethernet ports (see "Network cabling")
5 Service ports
6 Audio inputs (see "Power and audio cabling").
36

Installation
InstallationFor connecting the ConnectStation to the mains power supply and forconnecting audio signals, see "Power and audio cabling".
For establishing the network connection of the ConnectStation see "Net-work cabling".
37
Installation
Power and audio cablingFor the product overview of the ConnectStation also see"ConnectStation hardware overview".
Connecting/Disconnecting the ConnectStation to/from the mains power supply
To connect the ConnectStation to the mains power supply:▷ Connect the IEC connector of the supplied mains cable to the mains so-
cket.▷ Connect the mains plug of the mains cable to a suitable electrical so-
cket.
To disconnect the ConnectStation from the mains power supply:▷ Switch the ConnectStation off.▷ Pull the mains plug of the mains cable out of the electrical socket.
Switching the ConnectStation on/off
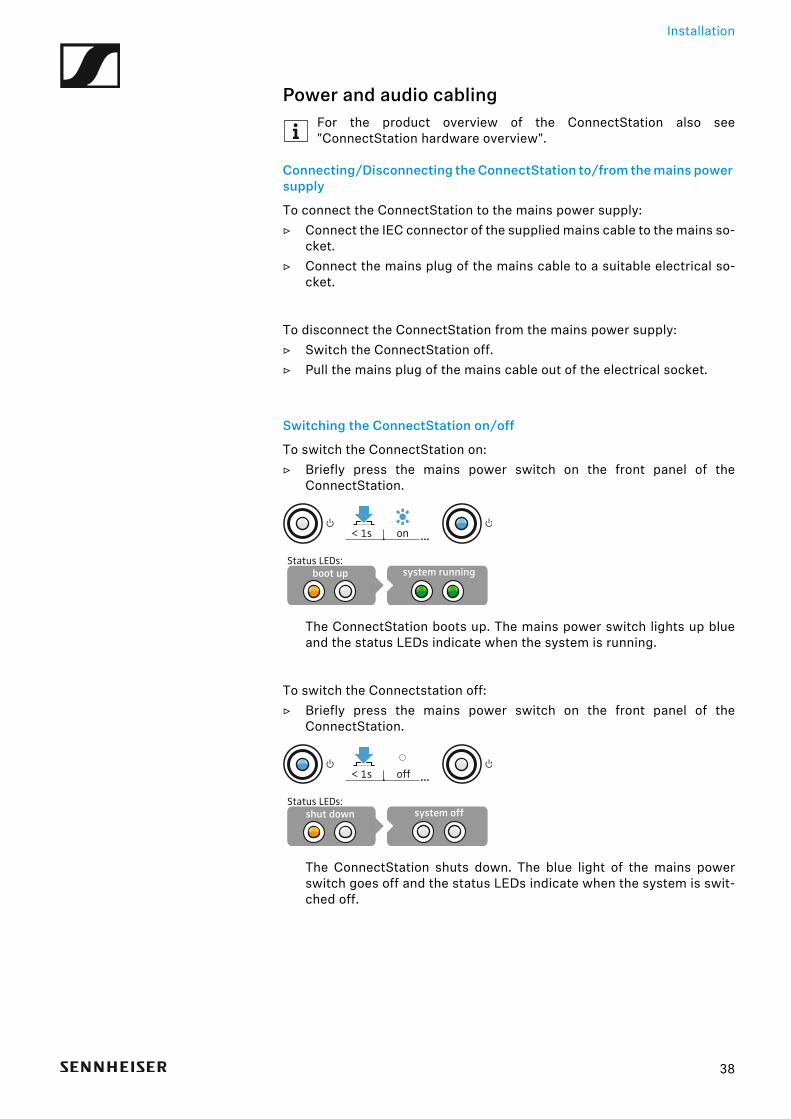
To switch the ConnectStation on:▷ Briefly press the mains power switch on the front panel of the
ConnectStation.►
The ConnectStation boots up. The mains power switch lights up blueand the status LEDs indicate when the system is running.
To switch the Connectstation off:▷ Briefly press the mains power switch on the front panel of the
ConnectStation.►
The ConnectStation shuts down. The blue light of the mains powerswitch goes off and the status LEDs indicate when the system is swit-ched off.
< 1s on
boot up system runningStatus LEDs:
< 1s off
shut down system offStatus LEDs:
38
Installation
Connecting audio signals
The ConnectStation offers various possibilities to connect audio signals.
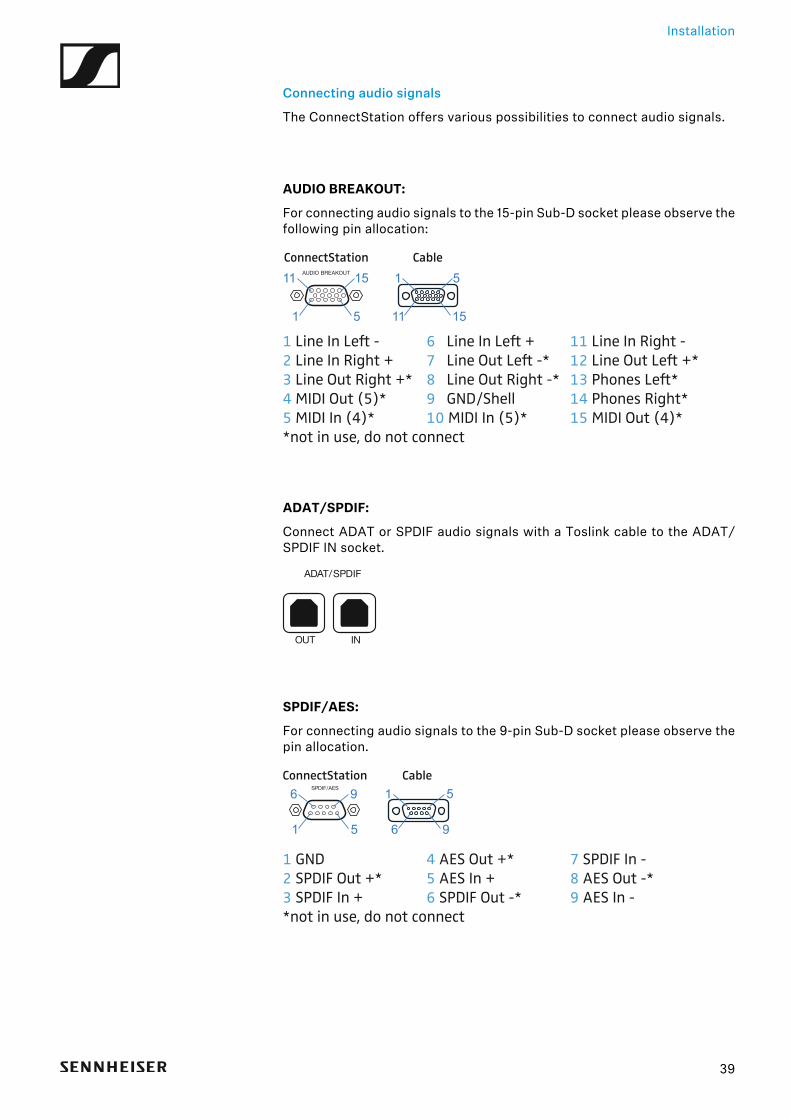
AUDIO BREAKOUT:
For connecting audio signals to the 15-pin Sub-D socket please observe thefollowing pin allocation:►
►
ADAT/SPDIF:
Connect ADAT or SPDIF audio signals with a Toslink cable to the ADAT/SPDIF IN socket.►
SPDIF/AES:
For connecting audio signals to the 9-pin Sub-D socket please observe thepin allocation.►
►
1
11 15
5 11
1 5
15
ConnectStation Cable
1 Line In Left - 6 Line In Left + 11 Line In Right -2 Line In Right + 7 Line Out Left -* 12 Line Out Left +*3 Line Out Right +* 8 Line Out Right -* 13 Phones Left*4 MIDI Out (5)* 9 GND/Shell 14 Phones Right*5 MIDI In (4)* 10 MIDI In (5)* 15 MIDI Out (4)**not in use, do not connect
1
6 9
5 6
1 5
9
ConnectStation Cable
1 GND 4 AES Out +* 7 SPDIF In -2 SPDIF Out +* 5 AES In + 8 AES Out -*3 SPDIF In + 6 SPDIF Out -* 9 AES In -*not in use, do not connect
39
Installation
ANALOG IN:
Four analog jack inputs are available.►
Stereo audio
Note: Stereo audio is disabled by default.
▷ To enable and configure stereo streaming please go to the Audio Inputssection of the admin interface (see "Access and initial configuration").
▷ For stereo audio you have to combine two mono audio inputs. More de-tails regarding cabling see above.
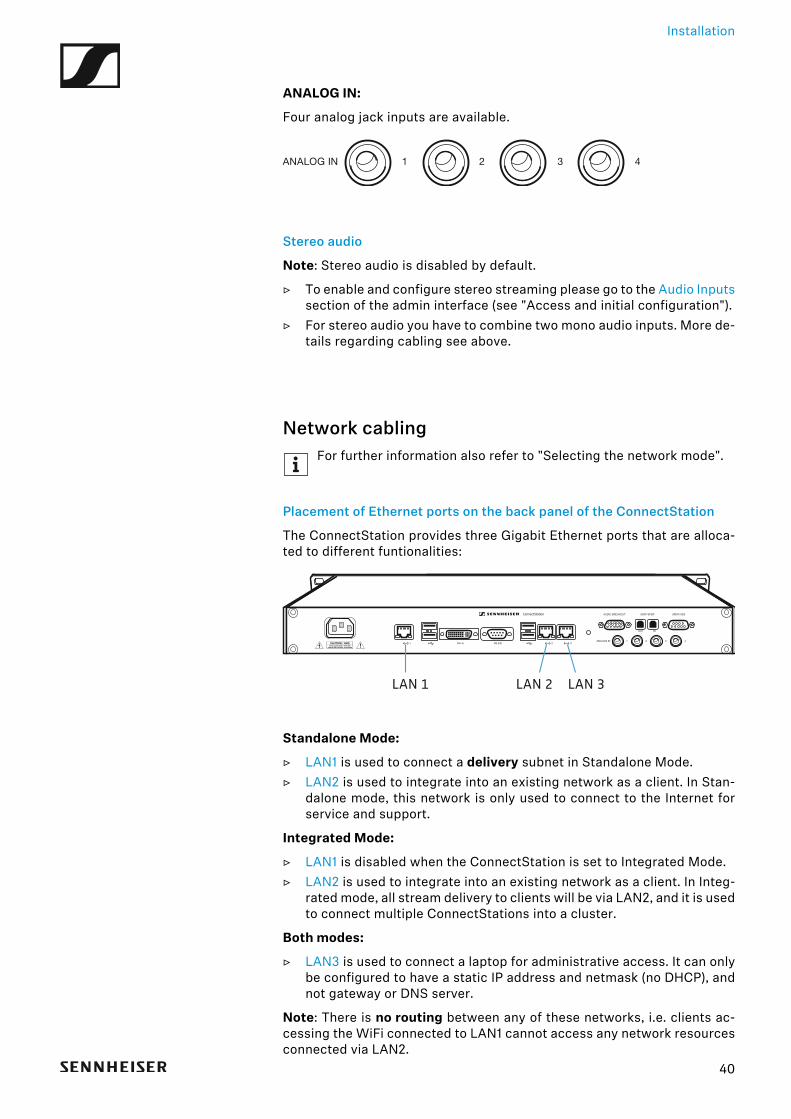
Network cablingFor further information also refer to "Selecting the network mode".
Placement of Ethernet ports on the back panel of the ConnectStation
The ConnectStation provides three Gigabit Ethernet ports that are alloca-ted to different funtionalities:►
Standalone Mode:
▷ LAN1 is used to connect a delivery subnet in Standalone Mode.▷ LAN2 is used to integrate into an existing network as a client. In Stan-
dalone mode, this network is only used to connect to the Internet forservice and support.
Integrated Mode:
▷ LAN1 is disabled when the ConnectStation is set to Integrated Mode.▷ LAN2 is used to integrate into an existing network as a client. In Integ-
rated mode, all stream delivery to clients will be via LAN2, and it is usedto connect multiple ConnectStations into a cluster.
Both modes:
▷ LAN3 is used to connect a laptop for administrative access. It can onlybe configured to have a static IP address and netmask (no DHCP), andnot gateway or DNS server.
Note: There is no routing between any of these networks, i.e. clients ac-cessing the WiFi connected to LAN1 cannot access any network resourcesconnected via LAN2.
LAN 1 LAN 3LAN 2
40
Access and initial configuration
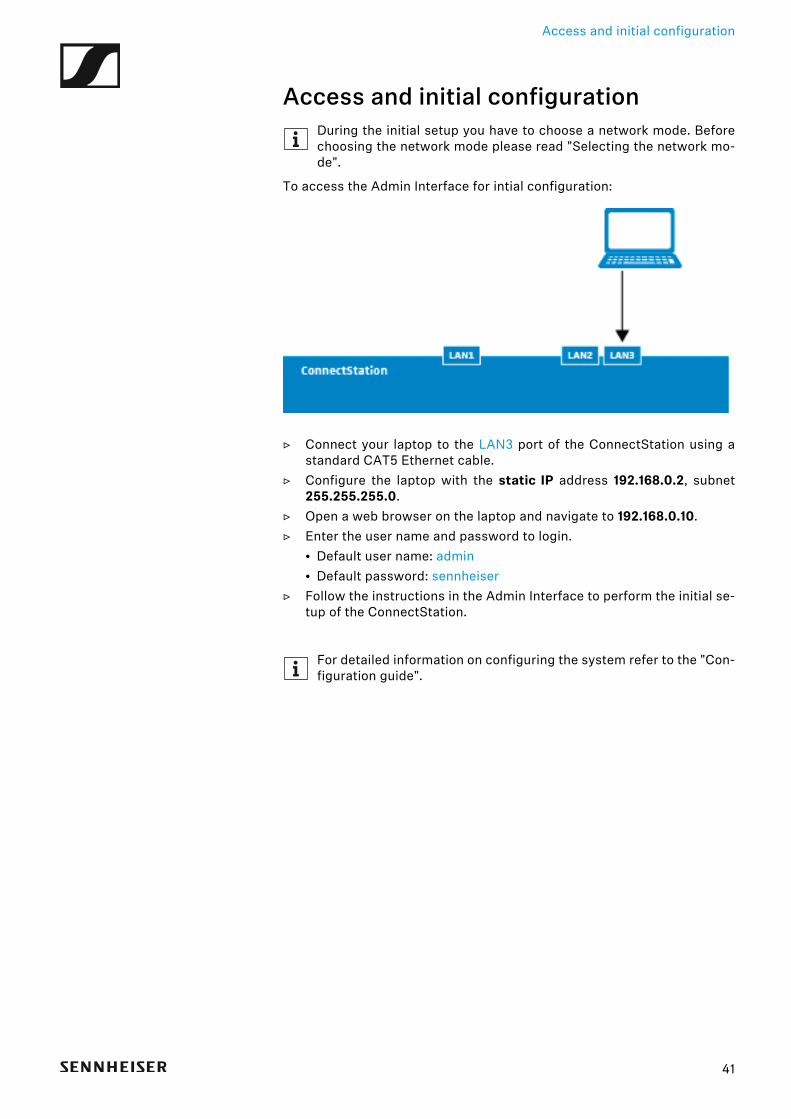
Access and initial configurationDuring the initial setup you have to choose a network mode. Beforechoosing the network mode please read "Selecting the network mo-de".
To access the Admin Interface for intial configuration:►
▷ Connect your laptop to the LAN3 port of the ConnectStation using astandard CAT5 Ethernet cable.
▷ Configure the laptop with the static IP address 192.168.0.2, subnet255.255.255.0.
▷ Open a web browser on the laptop and navigate to 192.168.0.10.▷ Enter the user name and password to login.
• Default user name: admin• Default password: sennheiser
▷ Follow the instructions in the Admin Interface to perform the initial se-tup of the ConnectStation.
For detailed information on configuring the system refer to the "Con-figuration guide".
41
Configuration guide
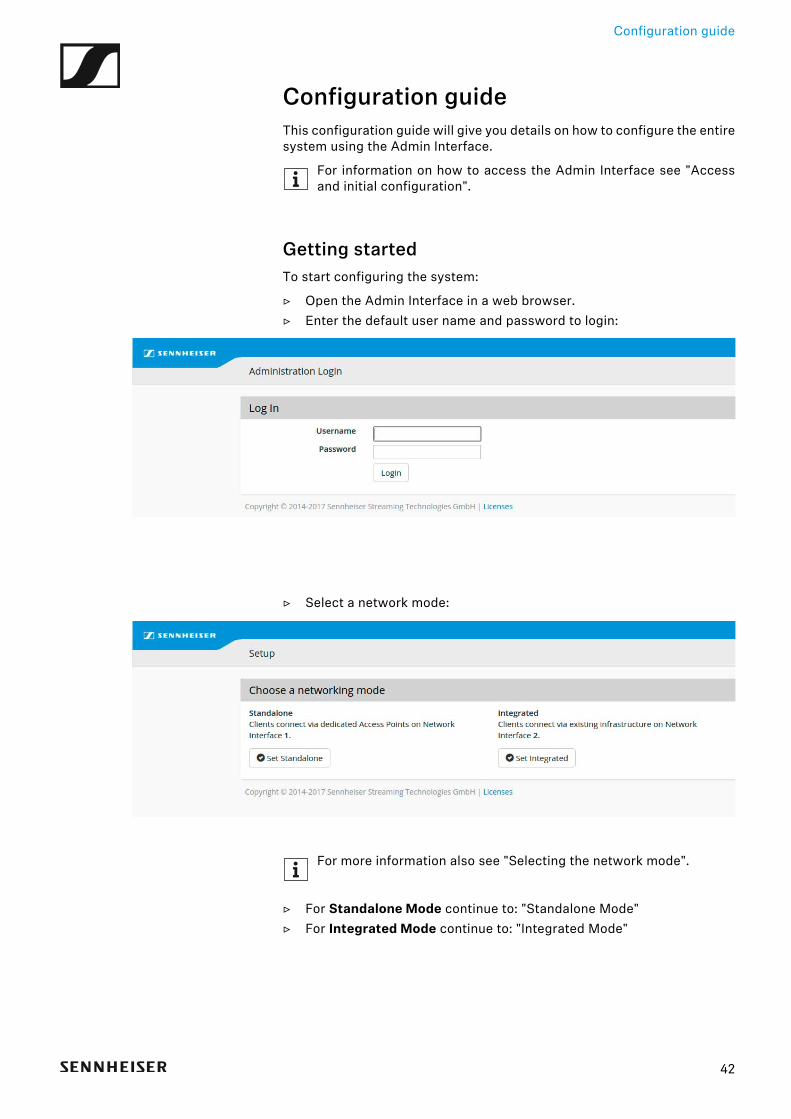
Configuration guideThis configuration guide will give you details on how to configure the entiresystem using the Admin Interface.
For information on how to access the Admin Interface see "Accessand initial configuration".
Getting startedTo start configuring the system:
▷ Open the Admin Interface in a web browser.▷ Enter the default user name and password to login:►
▷ Select a network mode:►
For more information also see "Selecting the network mode".
▷ For Standalone Mode continue to: "Standalone Mode"▷ For Integrated Mode continue to: "Integrated Mode"
42
Configuration guide
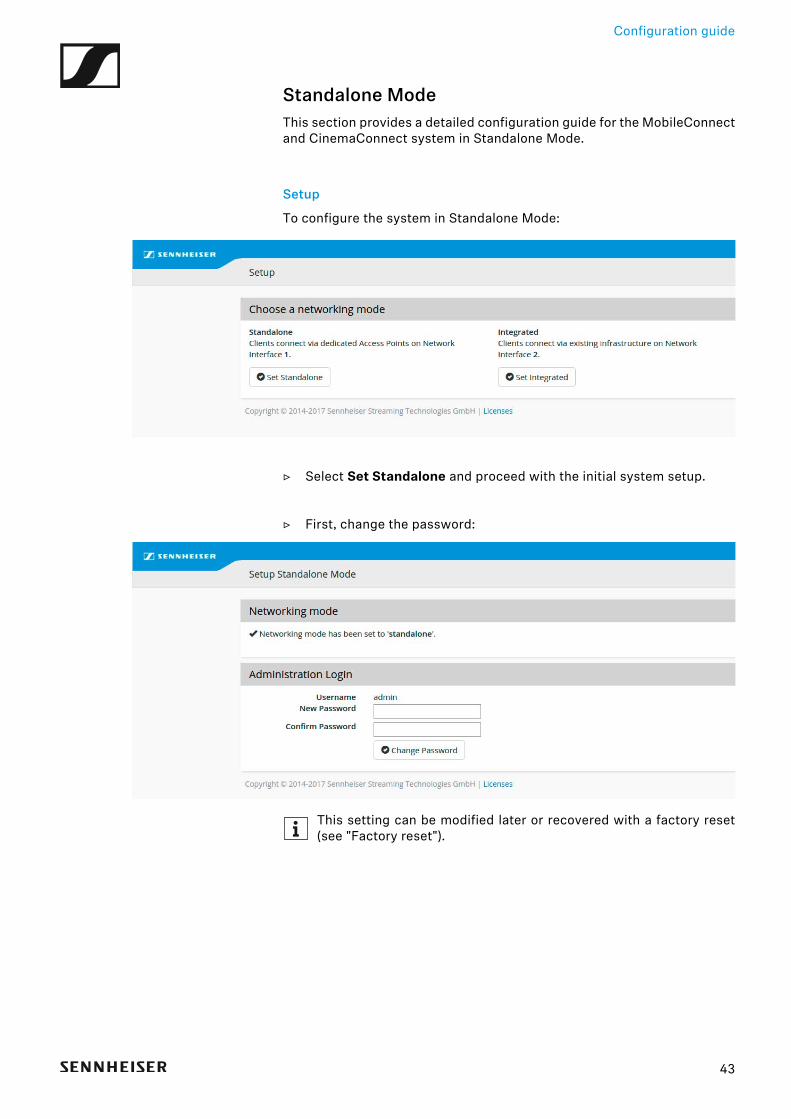
Standalone ModeThis section provides a detailed configuration guide for the MobileConnectand CinemaConnect system in Standalone Mode.
Setup
To configure the system in Standalone Mode:►
▷ Select Set Standalone and proceed with the initial system setup.
▷ First, change the password:►
This setting can be modified later or recovered with a factory reset(see "Factory reset").
43
Configuration guide
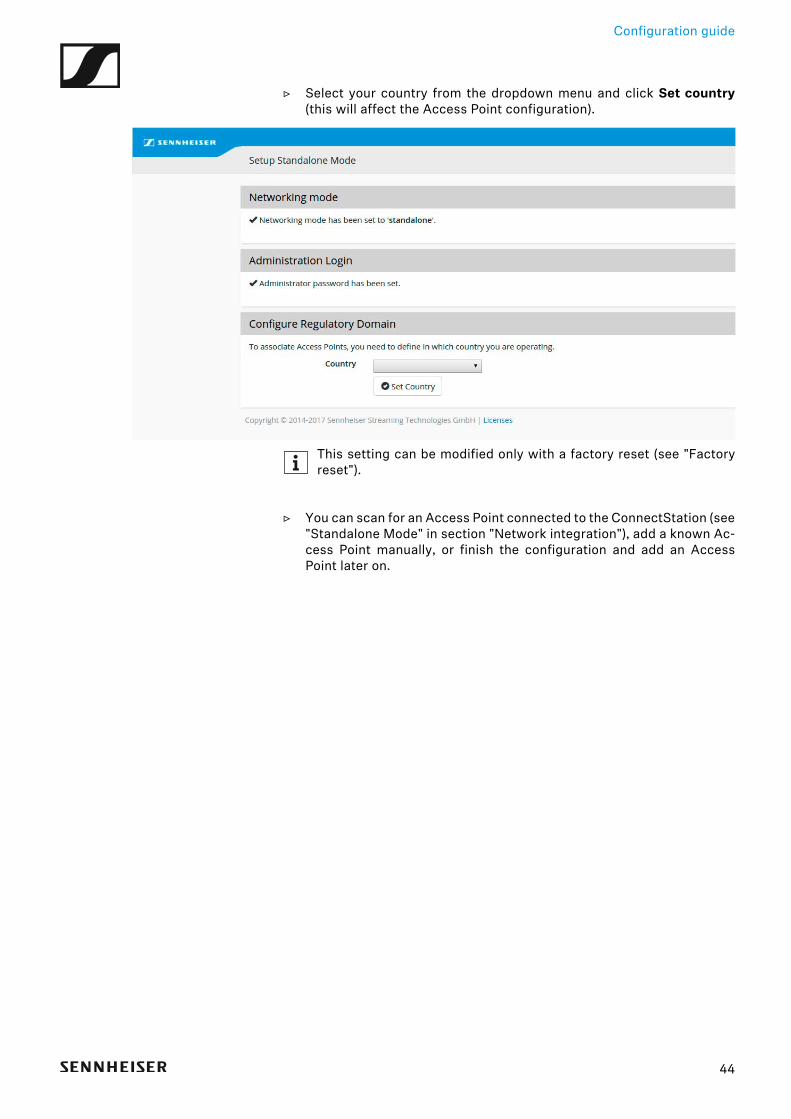
▷ Select your country from the dropdown menu and click Set country(this will affect the Access Point configuration).
►
This setting can be modified only with a factory reset (see "Factoryreset").
▷ You can scan for an Access Point connected to the ConnectStation (see"Standalone Mode" in section "Network integration"), add a known Ac-cess Point manually, or finish the configuration and add an AccessPoint later on.
44
Configuration guide
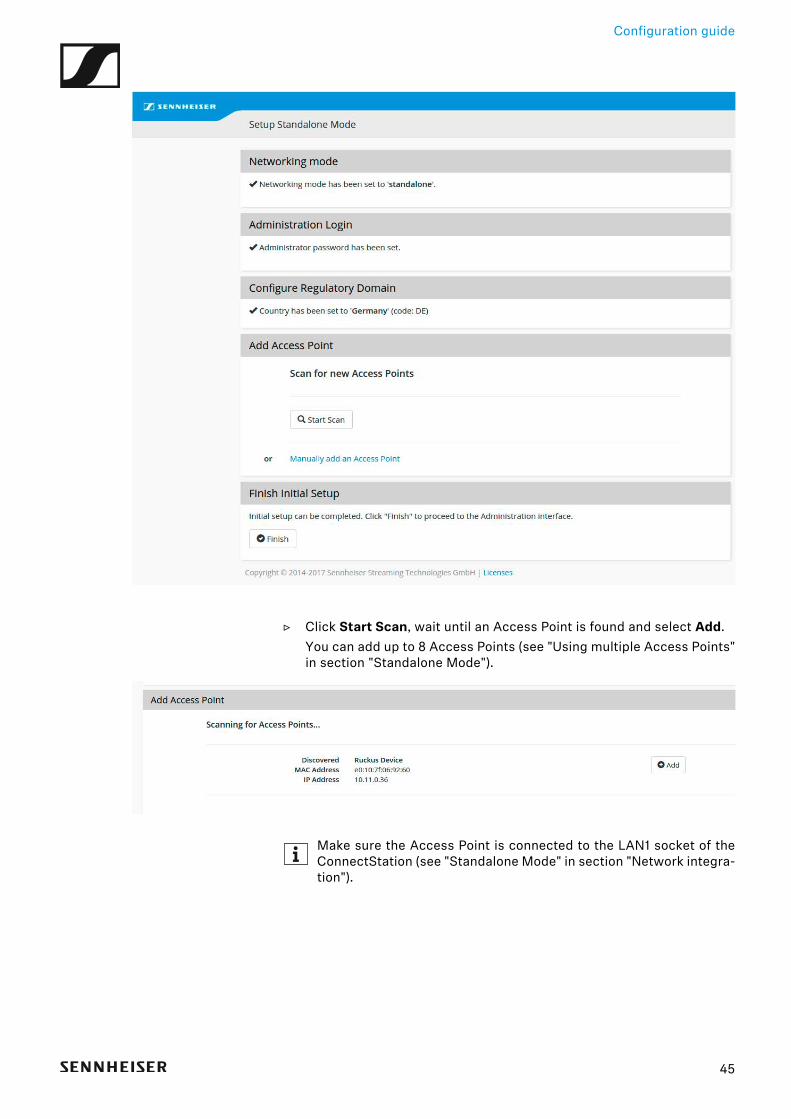
►
▷ Click Start Scan, wait until an Access Point is found and select Add.You can add up to 8 Access Points (see "Using multiple Access Points"in section "Standalone Mode").
►
Make sure the Access Point is connected to the LAN1 socket of theConnectStation (see "Standalone Mode" in section "Network integra-tion").
45
Configuration guide
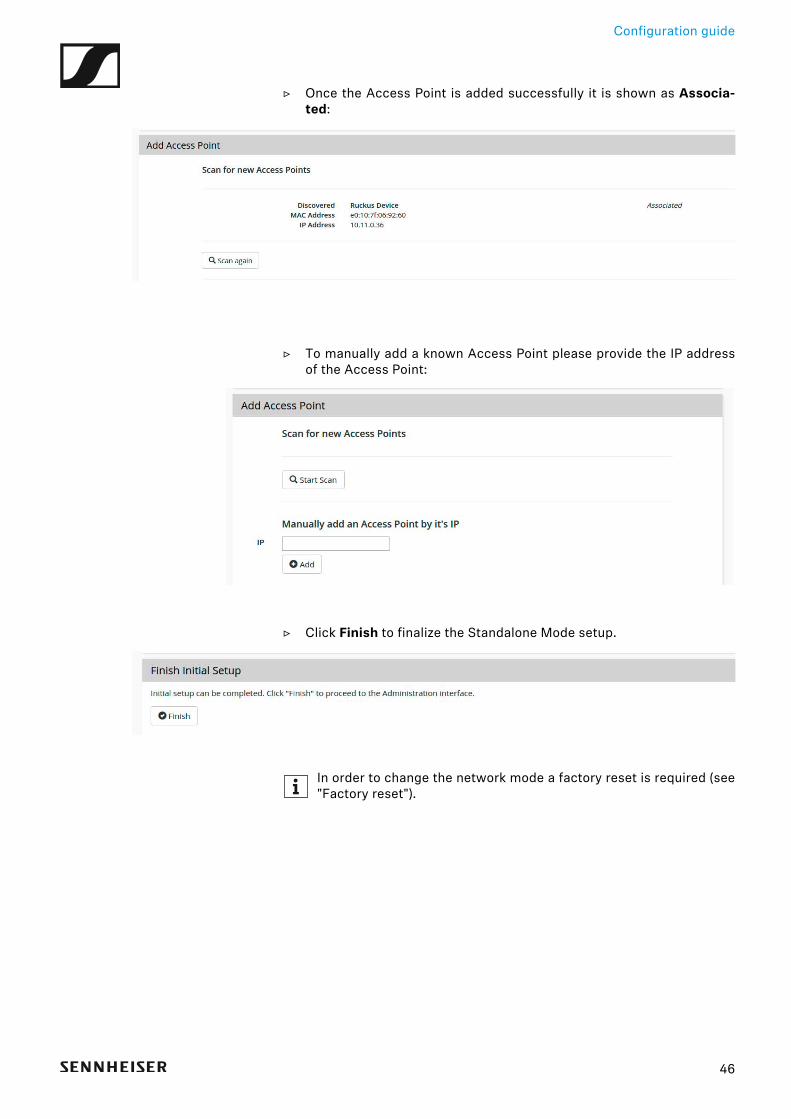
▷ Once the Access Point is added successfully it is shown as Associa-ted:
►
▷ To manually add a known Access Point please provide the IP addressof the Access Point:
►
▷ Click Finish to finalize the Standalone Mode setup.►
In order to change the network mode a factory reset is required (see"Factory reset").
46
Configuration guide
System Overview
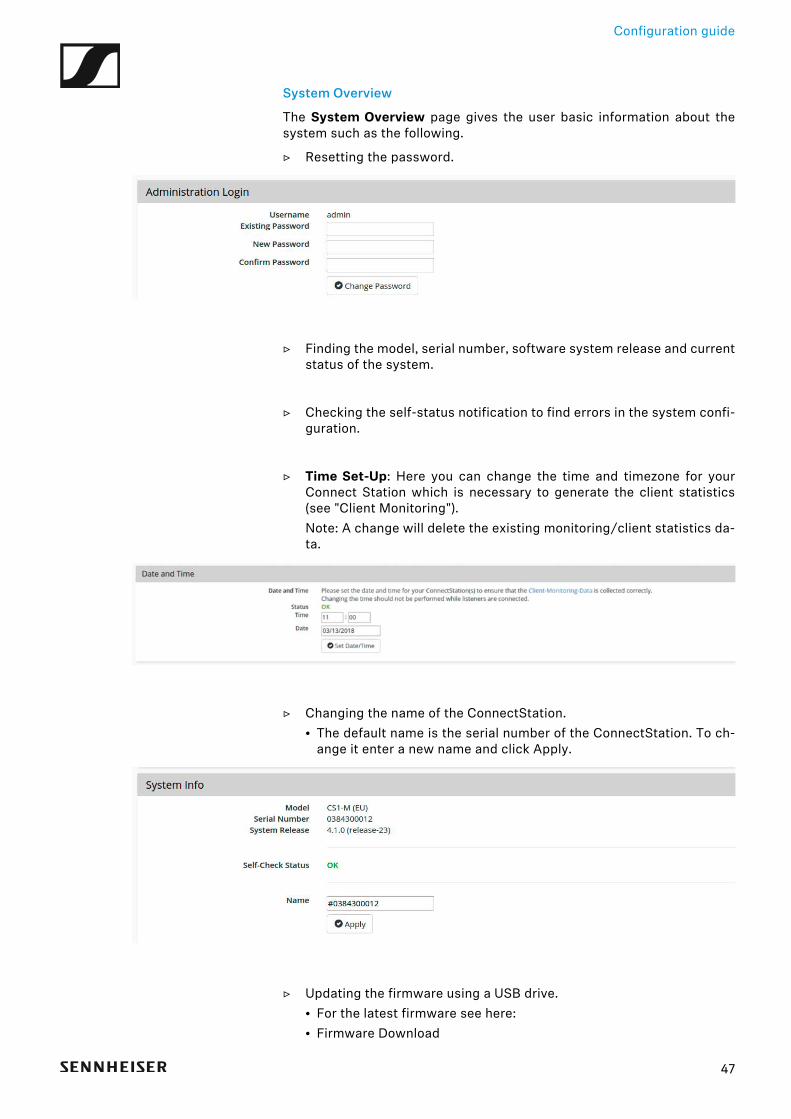
The System Overview page gives the user basic information about thesystem such as the following.
▷ Resetting the password.►
▷ Finding the model, serial number, software system release and currentstatus of the system.
▷ Checking the self-status notification to find errors in the system confi-guration.
▷ Time Set-Up: Here you can change the time and timezone for yourConnect Station which is necessary to generate the client statistics(see "Client Monitoring").Note: A change will delete the existing monitoring/client statistics da-ta.
►
▷ Changing the name of the ConnectStation.• The default name is the serial number of the ConnectStation. To ch-
ange it enter a new name and click Apply.►
▷ Updating the firmware using a USB drive.• For the latest firmware see here:• Firmware Download
47
Configuration guide
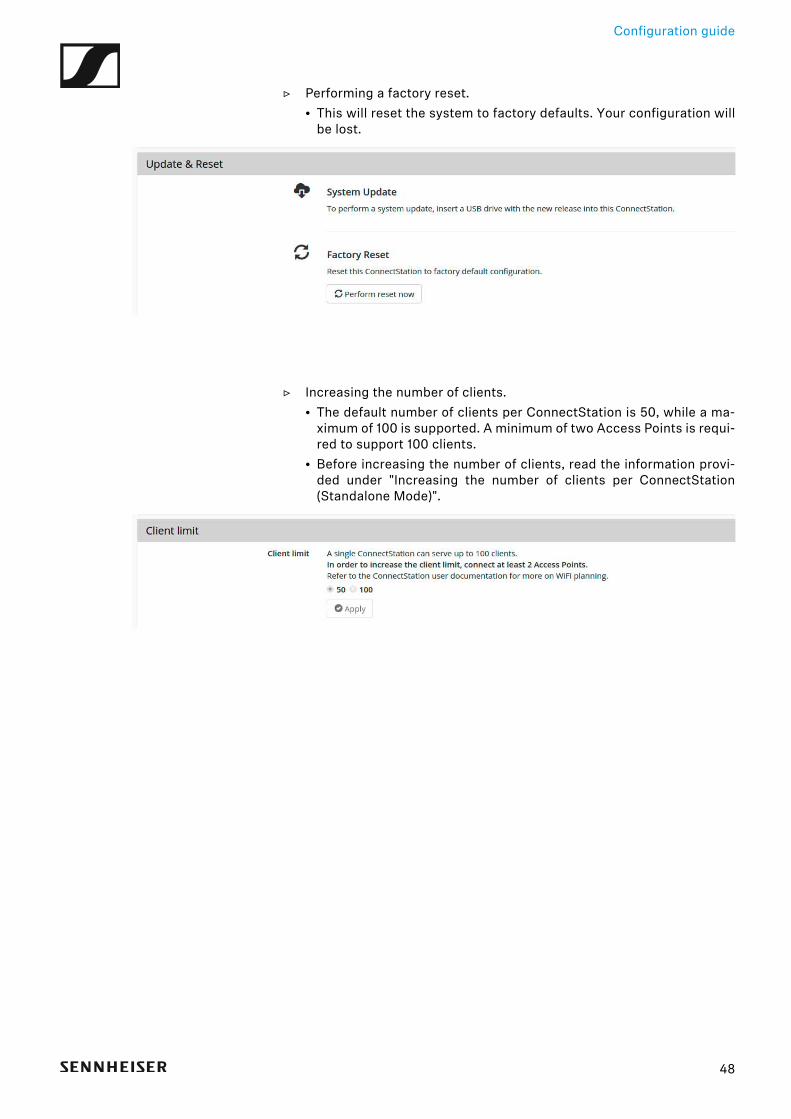
▷ Performing a factory reset.• This will reset the system to factory defaults. Your configuration will
be lost.►
▷ Increasing the number of clients.• The default number of clients per ConnectStation is 50, while a ma-
ximum of 100 is supported. A minimum of two Access Points is requi-red to support 100 clients.
• Before increasing the number of clients, read the information provi-ded under "Increasing the number of clients per ConnectStation(Standalone Mode)".
►
48
Configuration guide
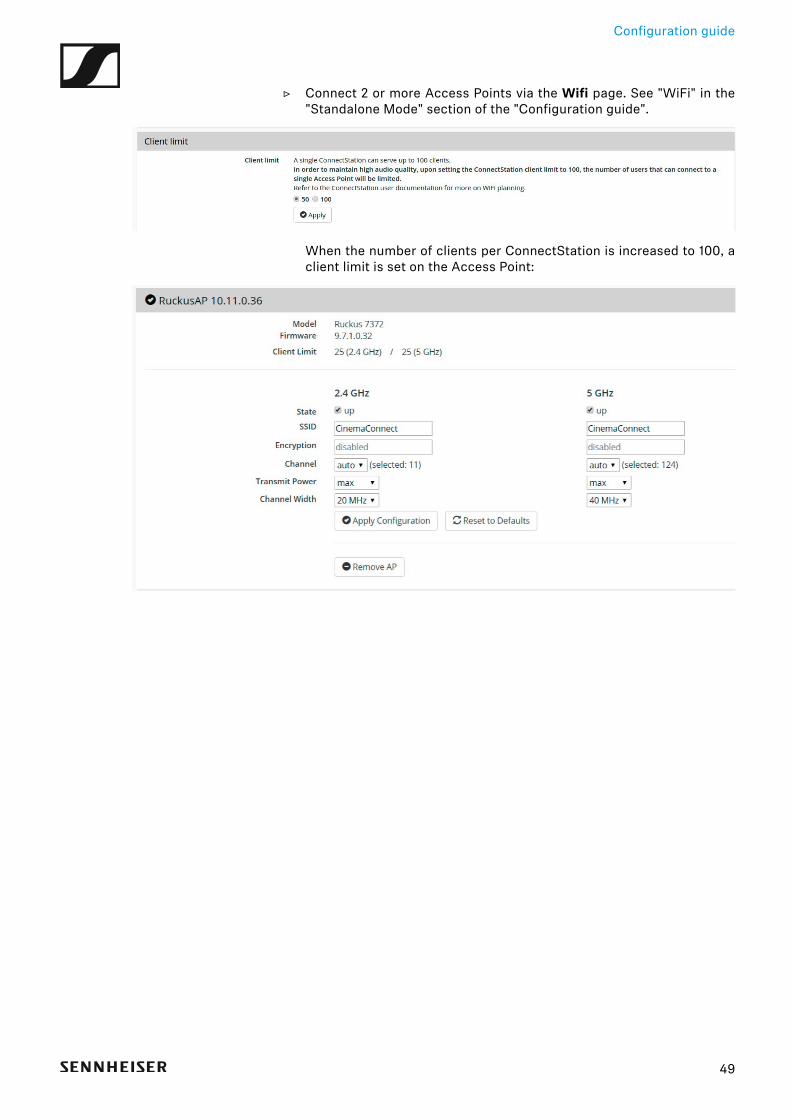
▷ Connect 2 or more Access Points via the Wifi page. See "WiFi" in the"Standalone Mode" section of the "Configuration guide".
►
When the number of clients per ConnectStation is increased to 100, aclient limit is set on the Access Point:
►
49
Configuration guide
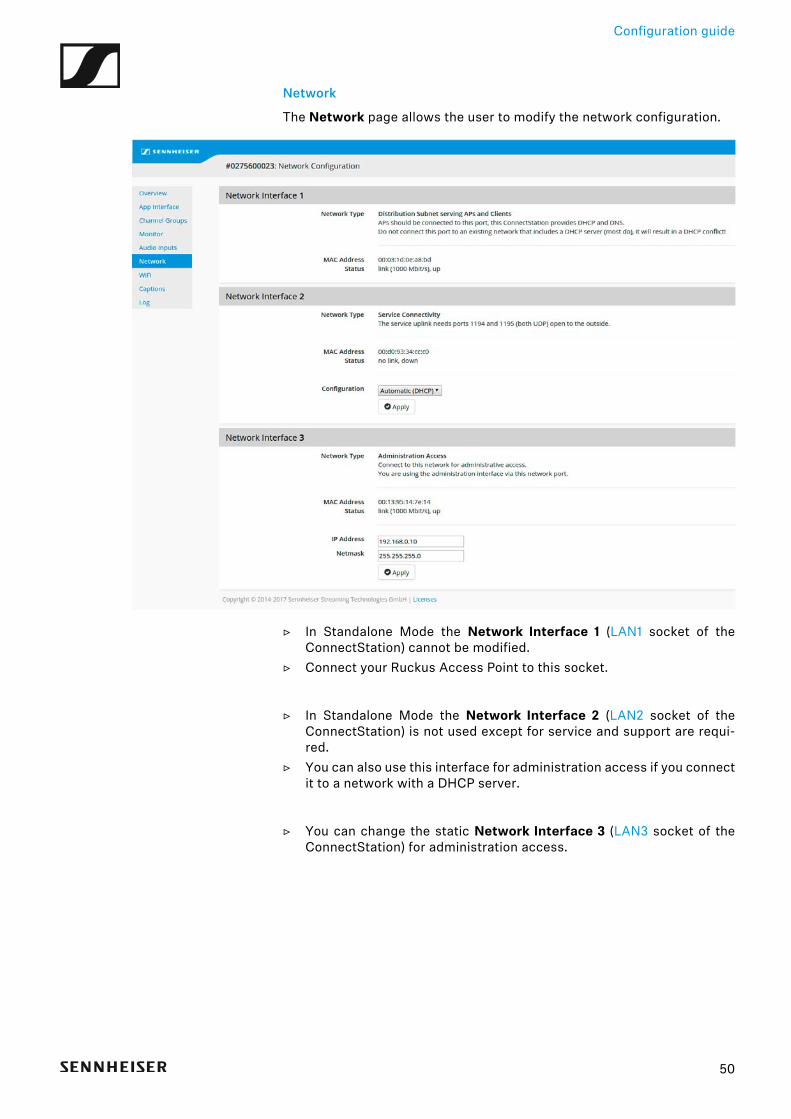
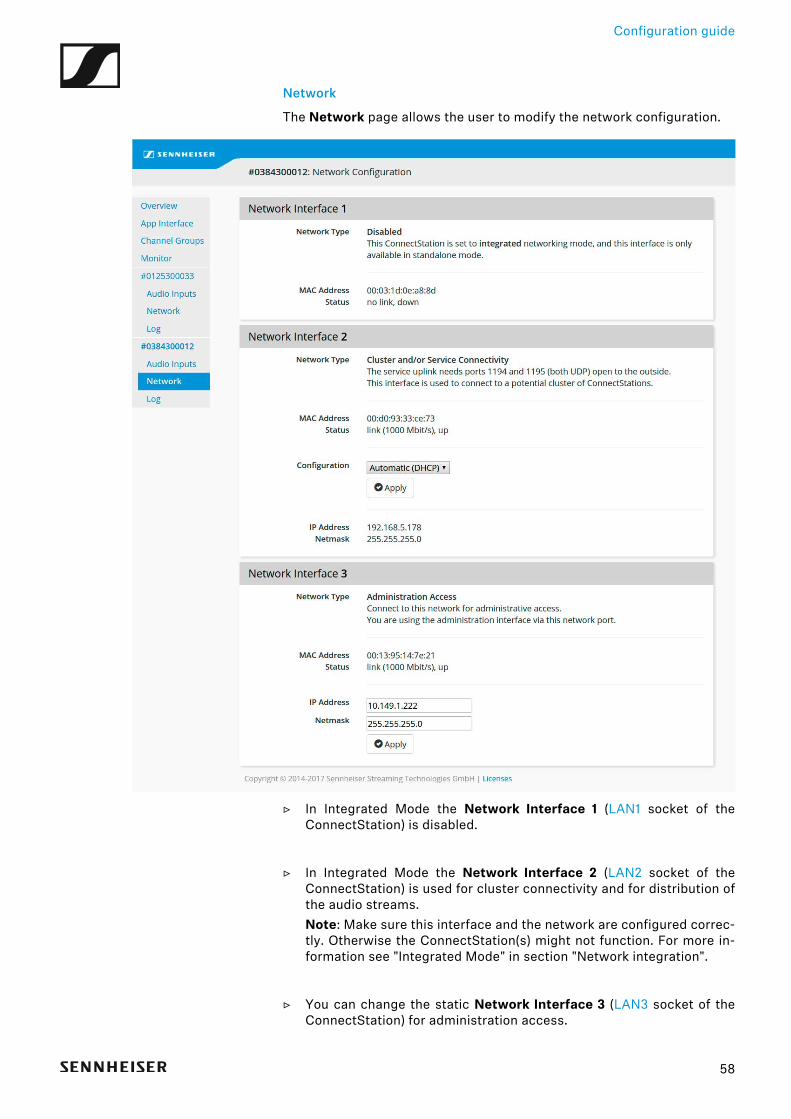
Network
The Network page allows the user to modify the network configuration.►
▷ In Standalone Mode the Network Interface 1 (LAN1 socket of theConnectStation) cannot be modified.
▷ Connect your Ruckus Access Point to this socket.
▷ In Standalone Mode the Network Interface 2 (LAN2 socket of theConnectStation) is not used except for service and support are requi-red.
▷ You can also use this interface for administration access if you connectit to a network with a DHCP server.
▷ You can change the static Network Interface 3 (LAN3 socket of theConnectStation) for administration access.
50
Configuration guide
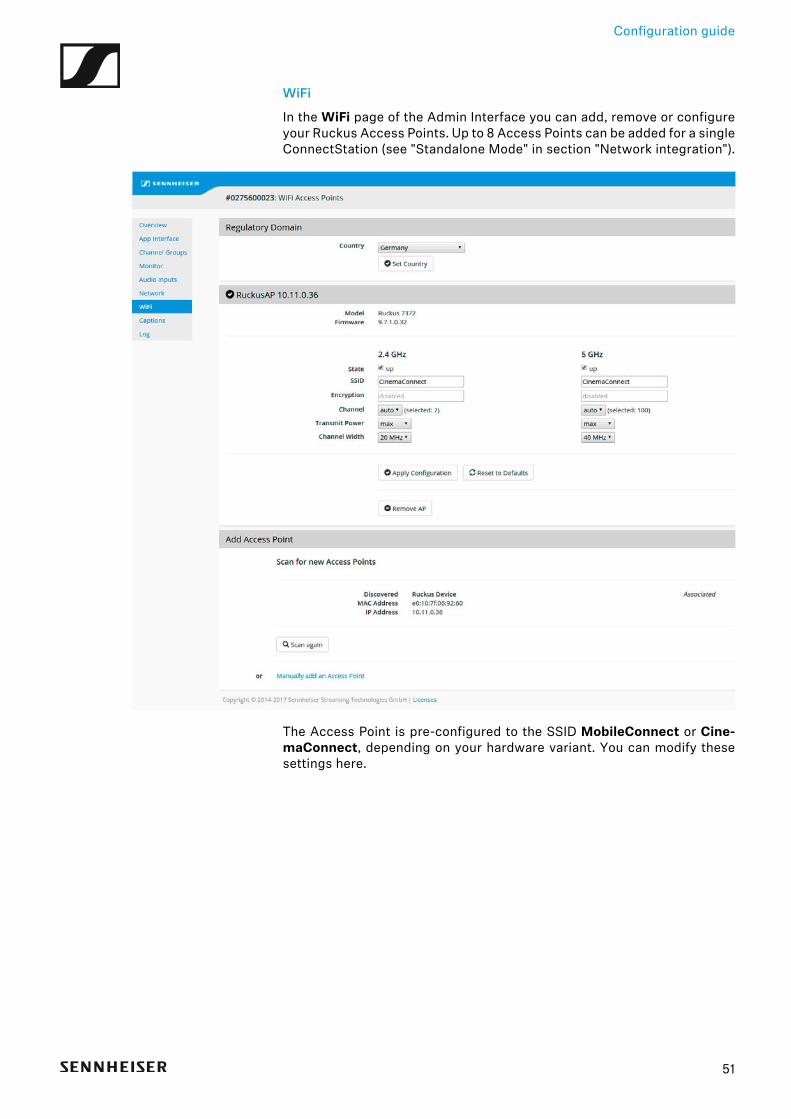
WiFi
In the WiFi page of the Admin Interface you can add, remove or configureyour Ruckus Access Points. Up to 8 Access Points can be added for a singleConnectStation (see "Standalone Mode" in section "Network integration").►
The Access Point is pre-configured to the SSID MobileConnect or Cine-maConnect, depending on your hardware variant. You can modify thesesettings here.
51

Configuration guide
WiFi recommendations:
If more than one Access Point is used, make sure that they use channelswhich do not overlap.
At 2.4 GHz, you can use channels 1, 5, 9, and 13 with a bandwidth of 20 MHz(13 is not available in some countries).
If you use more than 4 Access Points in that band, try applying the samefrequencies for Access Points which are further apart.
If all Access Points are in close proximity, it might be better to turn off the2.4 GHz band in some Access Points in order to avoid overlapping.
You can check if your Access Points use overlapping frequencies by meansof a WiFi analyzer app in an Android phone. At 5 GHz, also avoid usingchannels that overlap, and prefer channels with indexes lower than 50,which do not have to do DFS.
Click here for a list of channels.
If you use the default setting for channel selection, set to “auto”, make sureyou give enough time for the Access Point to find the optimal channel.
The Ruckus Access Point may switch frequently for 1 to 2 hours after boo-ting up, until the optimal channel is found. If the Access Point is in use du-ring that time, the clients may experience the connection breaking up fromtime to time.
52
Configuration guide
Integrated ModeThis section provides a detailed configuration guide for the MobileConnectand CinemaConnect system in Integrated Mode.
Setup►
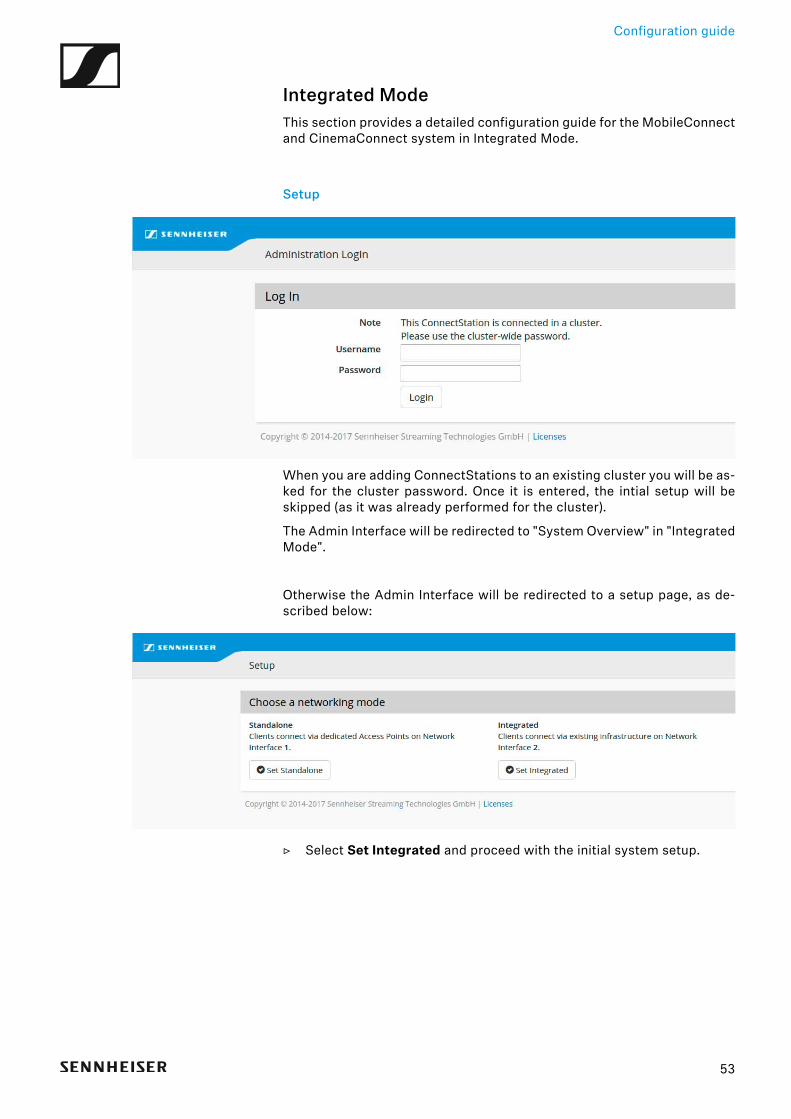
When you are adding ConnectStations to an existing cluster you will be as-ked for the cluster password. Once it is entered, the intial setup will beskipped (as it was already performed for the cluster).
The Admin Interface will be redirected to "System Overview" in "IntegratedMode".
Otherwise the Admin Interface will be redirected to a setup page, as de-scribed below:►
▷ Select Set Integrated and proceed with the initial system setup.
53
Configuration guide
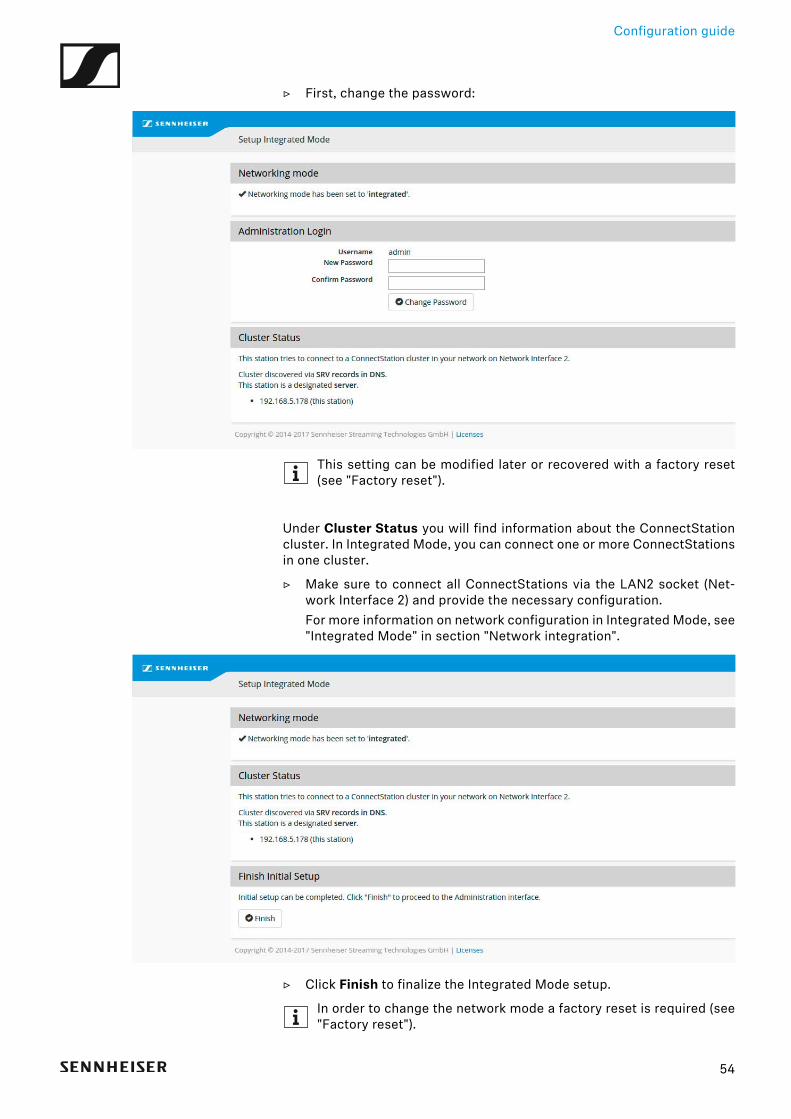
▷ First, change the password:►
This setting can be modified later or recovered with a factory reset(see "Factory reset").
Under Cluster Status you will find information about the ConnectStationcluster. In Integrated Mode, you can connect one or more ConnectStationsin one cluster.
▷ Make sure to connect all ConnectStations via the LAN2 socket (Net-work Interface 2) and provide the necessary configuration.For more information on network configuration in Integrated Mode, see"Integrated Mode" in section "Network integration".
►
▷ Click Finish to finalize the Integrated Mode setup.
In order to change the network mode a factory reset is required (see"Factory reset").
54
Configuration guide
System Overview
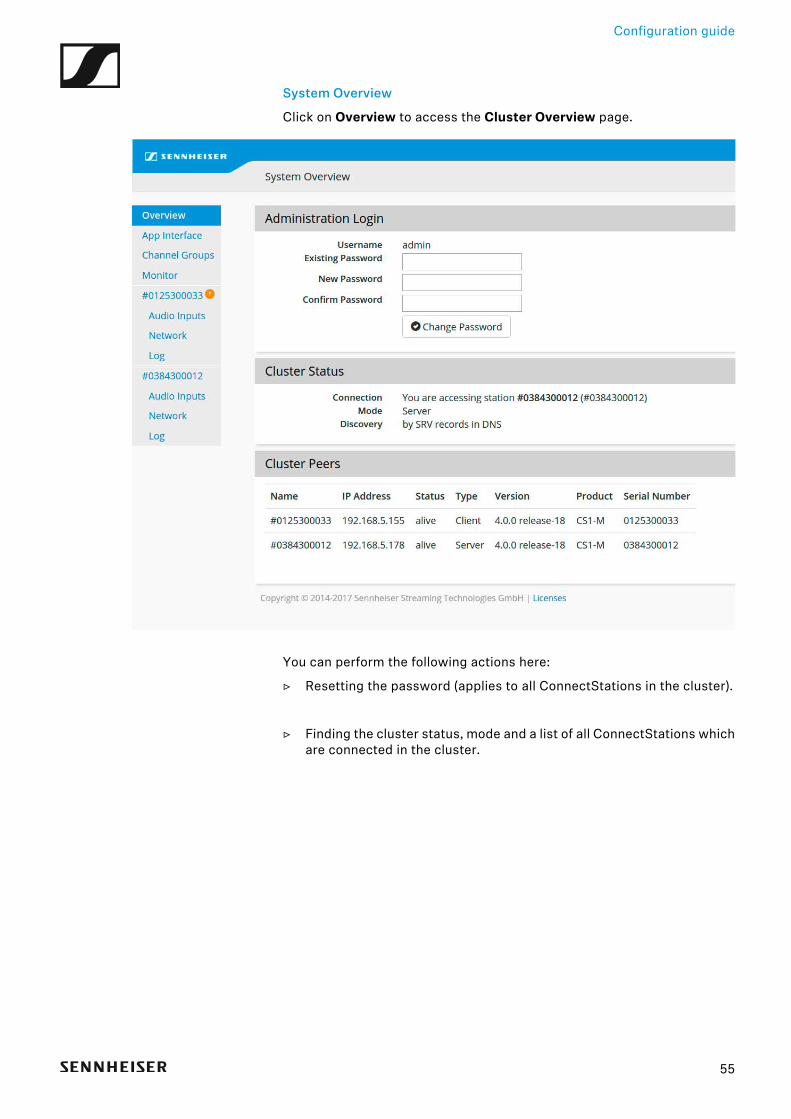
Click on Overview to access the Cluster Overview page.►
You can perform the following actions here:
▷ Resetting the password (applies to all ConnectStations in the cluster).
▷ Finding the cluster status, mode and a list of all ConnectStations whichare connected in the cluster.
55
Configuration guide
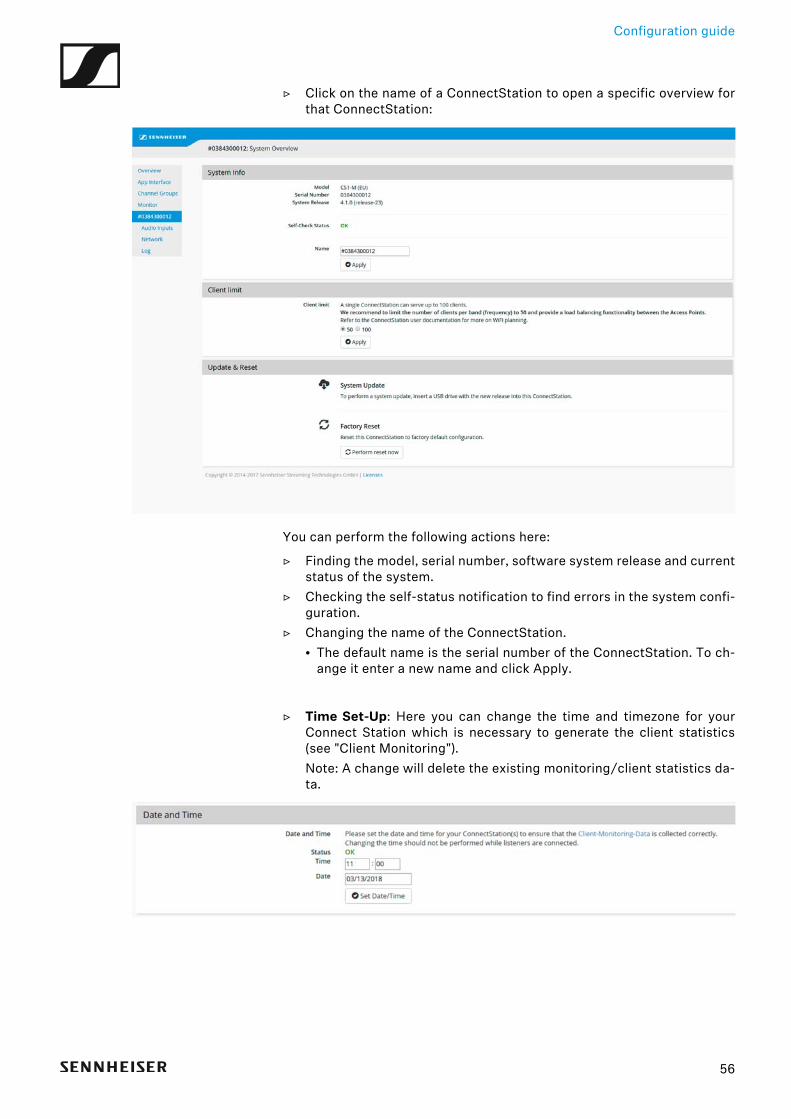
▷ Click on the name of a ConnectStation to open a specific overview forthat ConnectStation:
►
You can perform the following actions here:
▷ Finding the model, serial number, software system release and currentstatus of the system.
▷ Checking the self-status notification to find errors in the system confi-guration.
▷ Changing the name of the ConnectStation.• The default name is the serial number of the ConnectStation. To ch-
ange it enter a new name and click Apply.
▷ Time Set-Up: Here you can change the time and timezone for yourConnect Station which is necessary to generate the client statistics(see "Client Monitoring").Note: A change will delete the existing monitoring/client statistics da-ta.
►
56
Configuration guide
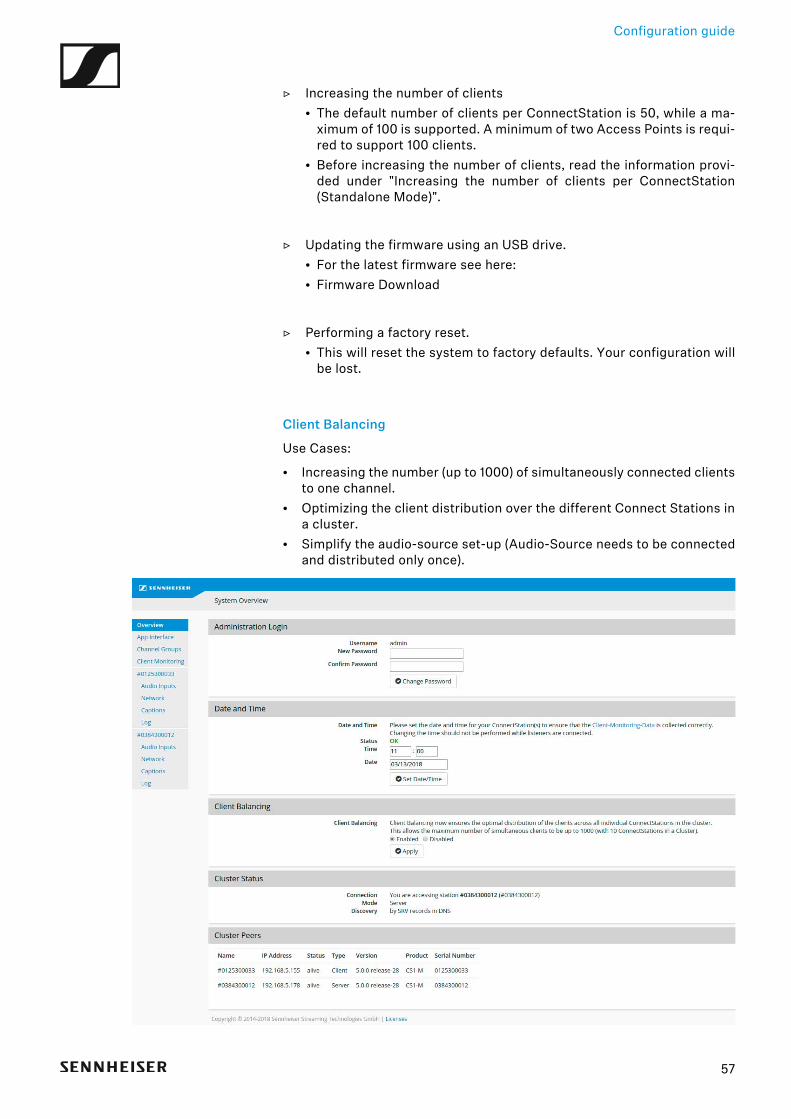
▷ Increasing the number of clients• The default number of clients per ConnectStation is 50, while a ma-
ximum of 100 is supported. A minimum of two Access Points is requi-red to support 100 clients.
• Before increasing the number of clients, read the information provi-ded under "Increasing the number of clients per ConnectStation(Standalone Mode)".
▷ Updating the firmware using an USB drive.• For the latest firmware see here:• Firmware Download
▷ Performing a factory reset.• This will reset the system to factory defaults. Your configuration will
be lost.
Client Balancing
Use Cases:
• Increasing the number (up to 1000) of simultaneously connected clientsto one channel.
• Optimizing the client distribution over the different Connect Stations ina cluster.
• Simplify the audio-source set-up (Audio-Source needs to be connectedand distributed only once).
►
57
Configuration guide
Network
The Network page allows the user to modify the network configuration.►
▷ In Integrated Mode the Network Interface 1 (LAN1 socket of theConnectStation) is disabled.
▷ In Integrated Mode the Network Interface 2 (LAN2 socket of theConnectStation) is used for cluster connectivity and for distribution ofthe audio streams.Note: Make sure this interface and the network are configured correc-tly. Otherwise the ConnectStation(s) might not function. For more in-formation see "Integrated Mode" in section "Network integration".
▷ You can change the static Network Interface 3 (LAN3 socket of theConnectStation) for administration access.
58
Configuration guide
General configurationThe following configuration section applies to both Standalone and Integ-rated Mode.
App Interface
You can configure the text that is shown in the MobileConnect and Cine-maConnect Apps when the users connect to the network.►
German, English, Spanish and French are the four default languages of theConnectStation.
When you add new languages, please provide the text accordingly (Enlishwill be displayed by default for any new language).
59
Configuration guide
The text and title configured here will then appear in the MobileConnectand CinemaConnect Apps connected to the WiFi.►
▷ For the channel list configuration see next section Channel Groups.
60
Configuration guide
Channel Groups
You can configure how the channels are displayed in the MobileConnectand CinemaConnect Apps.►
In Standalone Mode the maximum number of channels is 4. In Integ-rated Mode it depends on the number of ConnectStations in the clus-ter.
For each channel you can provide your own title, view the audio input andthe status:►
▷ Click on the Station link to see the audio input configuration.
61
Configuration guide
You can rename the channel titles:►
This is how the renamed channel is displayed in the App:►
62

Configuration guide
Channels can be organized in groups:
• you can add a group• you can modify the group title• you can add channels to the groups by dragging them into the group
container►
►
For more information on how to drag and drop click the ? button in theAdmin Interface.
63

Configuration guide
You can use headlines to add additional text above the channels:►
This is how the headline is displayed in the App:►
64
Configuration guide
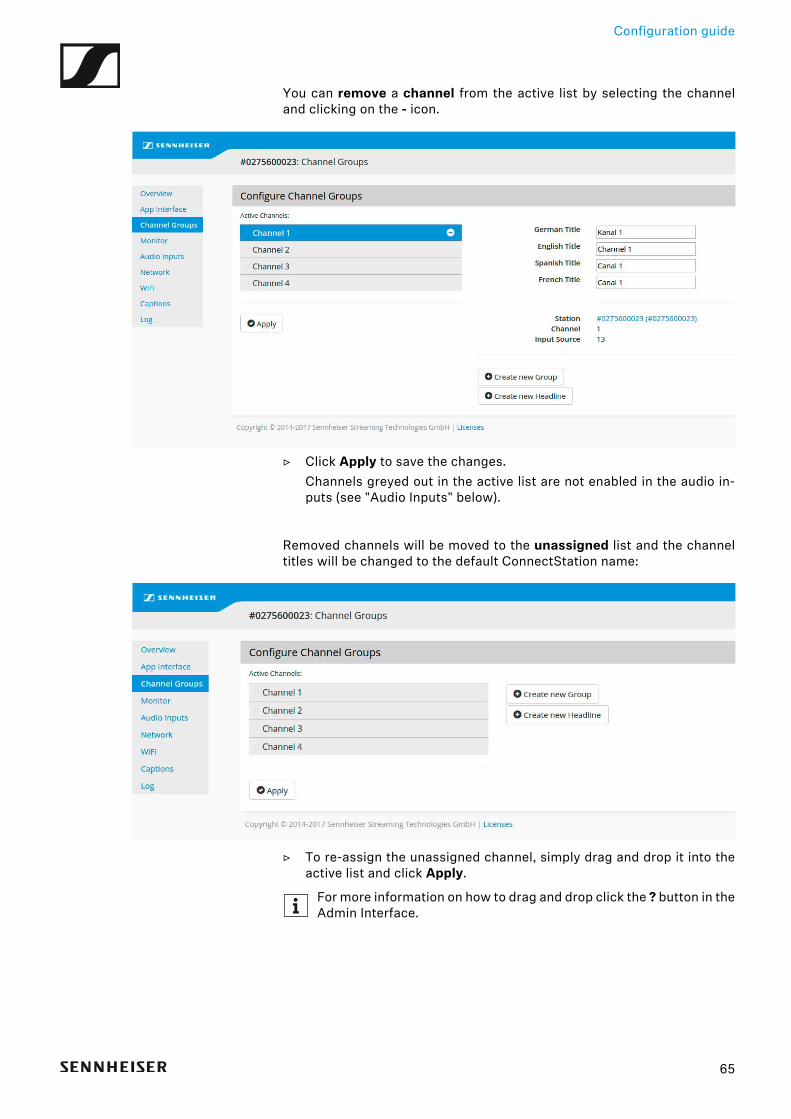
You can remove a channel from the active list by selecting the channeland clicking on the - icon.►
▷ Click Apply to save the changes.Channels greyed out in the active list are not enabled in the audio in-puts (see "Audio Inputs" below).
Removed channels will be moved to the unassigned list and the channeltitles will be changed to the default ConnectStation name:►
▷ To re-assign the unassigned channel, simply drag and drop it into theactive list and click Apply.
For more information on how to drag and drop click the ? button in theAdmin Interface.
65
Configuration guide
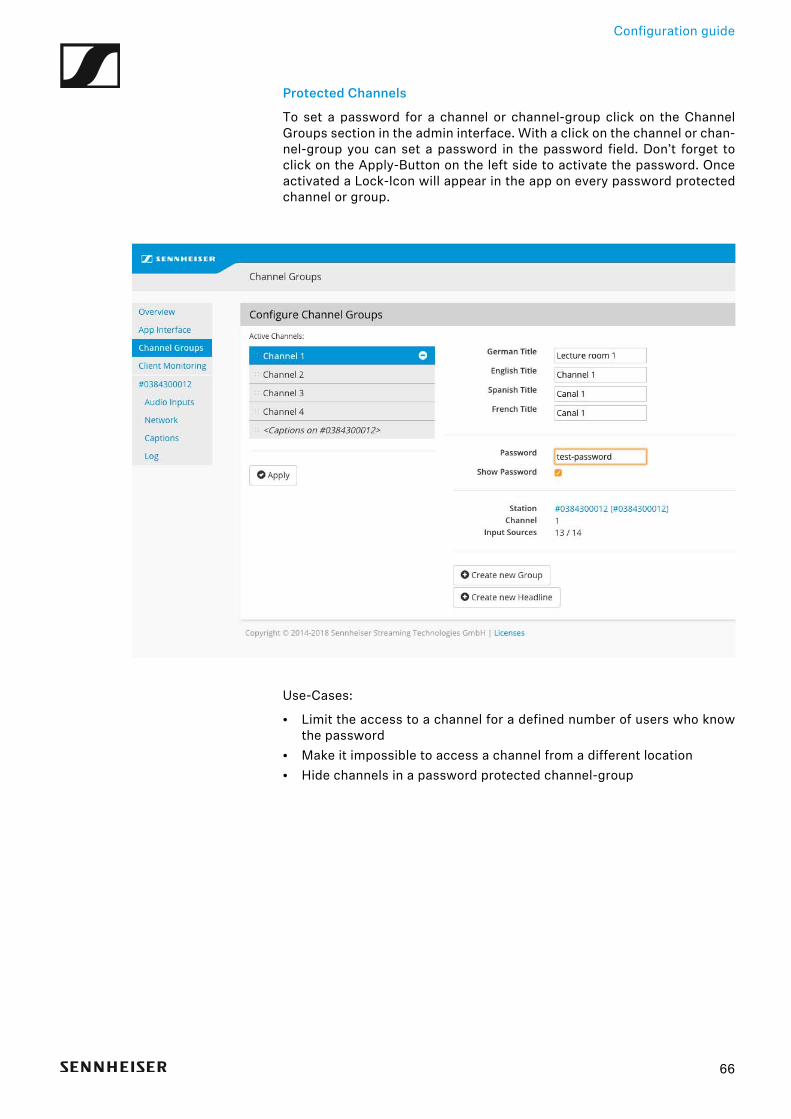
Protected Channels
To set a password for a channel or channel-group click on the ChannelGroups section in the admin interface. With a click on the channel or chan-nel-group you can set a password in the password field. Don’t forget toclick on the Apply-Button on the left side to activate the password. Onceactivated a Lock-Icon will appear in the app on every password protectedchannel or group.
►
Use-Cases:
• Limit the access to a channel for a defined number of users who knowthe password
• Make it impossible to access a channel from a different location• Hide channels in a password protected channel-group
66
Configuration guide
Client Monitoring
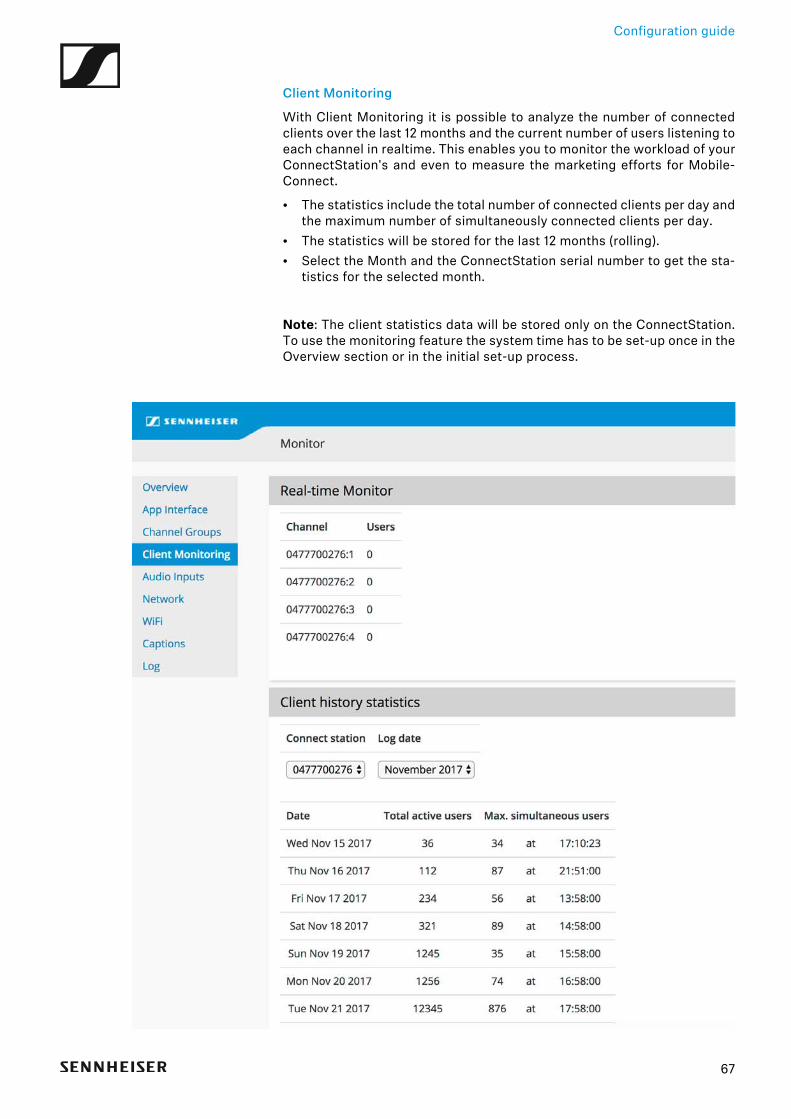
With Client Monitoring it is possible to analyze the number of connectedclients over the last 12 months and the current number of users listening toeach channel in realtime. This enables you to monitor the workload of yourConnectStation's and even to measure the marketing efforts for Mobile-Connect.
• The statistics include the total number of connected clients per day andthe maximum number of simultaneously connected clients per day.
• The statistics will be stored for the last 12 months (rolling).• Select the Month and the ConnectStation serial number to get the sta-
tistics for the selected month.
Note: The client statistics data will be stored only on the ConnectStation.To use the monitoring feature the system time has to be set-up once in theOverview section or in the initial set-up process.
►
67
Configuration guide
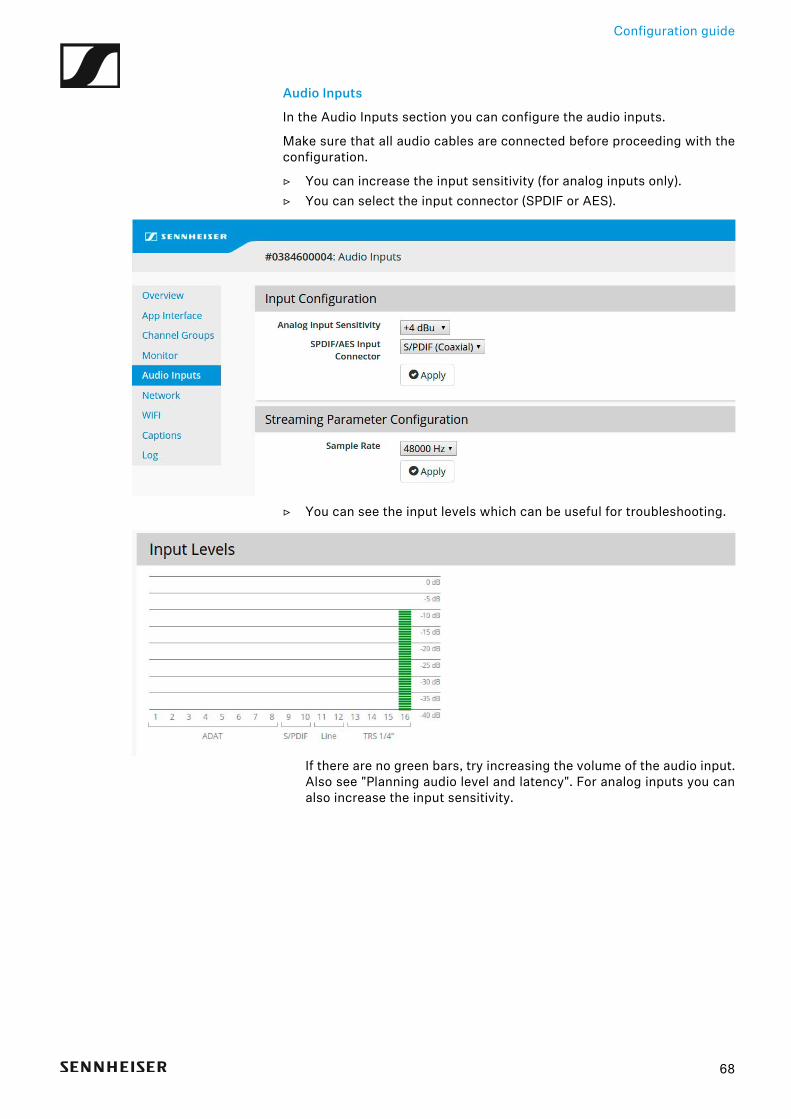
Audio Inputs
In the Audio Inputs section you can configure the audio inputs.
Make sure that all audio cables are connected before proceeding with theconfiguration.
▷ You can increase the input sensitivity (for analog inputs only).▷ You can select the input connector (SPDIF or AES).►
▷ You can see the input levels which can be useful for troubleshooting.►
If there are no green bars, try increasing the volume of the audio input.Also see "Planning audio level and latency". For analog inputs you canalso increase the input sensitivity.
68
Configuration guide
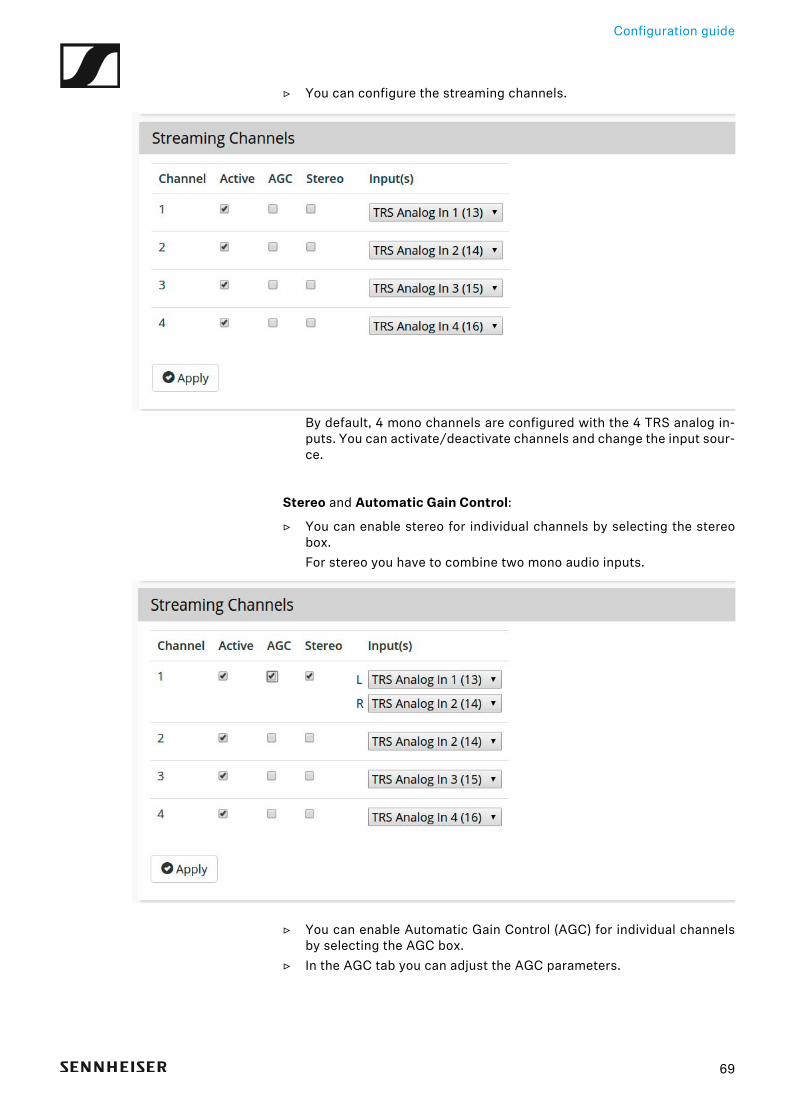
▷ You can configure the streaming channels.►
By default, 4 mono channels are configured with the 4 TRS analog in-puts. You can activate/deactivate channels and change the input sour-ce.
Stereo and Automatic Gain Control:
▷ You can enable stereo for individual channels by selecting the stereobox.For stereo you have to combine two mono audio inputs.
►
▷ You can enable Automatic Gain Control (AGC) for individual channelsby selecting the AGC box.
▷ In the AGC tab you can adjust the AGC parameters.
69
Configuration guide
►
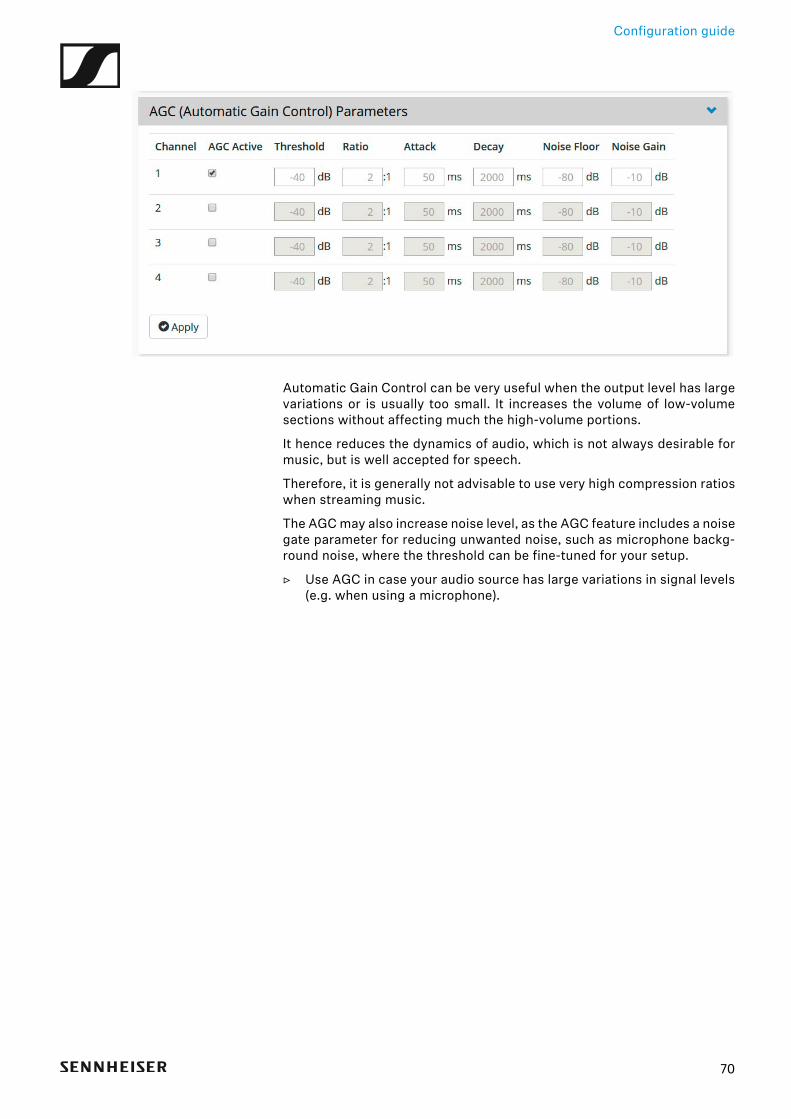
Automatic Gain Control can be very useful when the output level has largevariations or is usually too small. It increases the volume of low-volumesections without affecting much the high-volume portions.
It hence reduces the dynamics of audio, which is not always desirable formusic, but is well accepted for speech.
Therefore, it is generally not advisable to use very high compression ratioswhen streaming music.
The AGC may also increase noise level, as the AGC feature includes a noisegate parameter for reducing unwanted noise, such as microphone backg-round noise, where the threshold can be fine-tuned for your setup.
▷ Use AGC in case your audio source has large variations in signal levels(e.g. when using a microphone).
70

Configuration guide
Captions
This feature is available for both the CinemaConnect and the Mobile-Connect systems with firmware versions 5.0.0 and higher. You may useLAN2 or LAN3 for providing the captions content. Make sure the networkis correctly configured (Gateway address) in case of static configuration.►
To enable caption/subtitle channels:▷ Provide a server address and port and click Apply.
►
▷ Check the status and verify it is correct.
71
Configuration guide
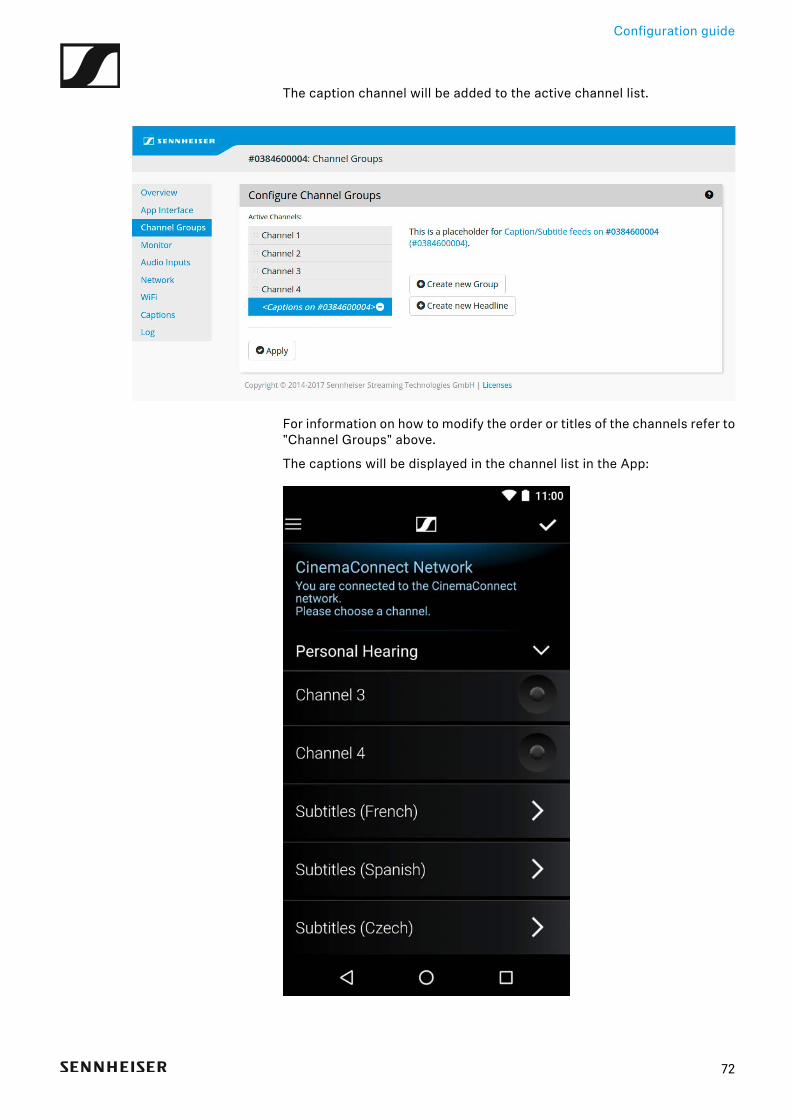
The caption channel will be added to the active channel list.
For information on how to modify the order or titles of the channels refer to"Channel Groups" above.
The captions will be displayed in the channel list in the App:►
72
Configuration guide
Log
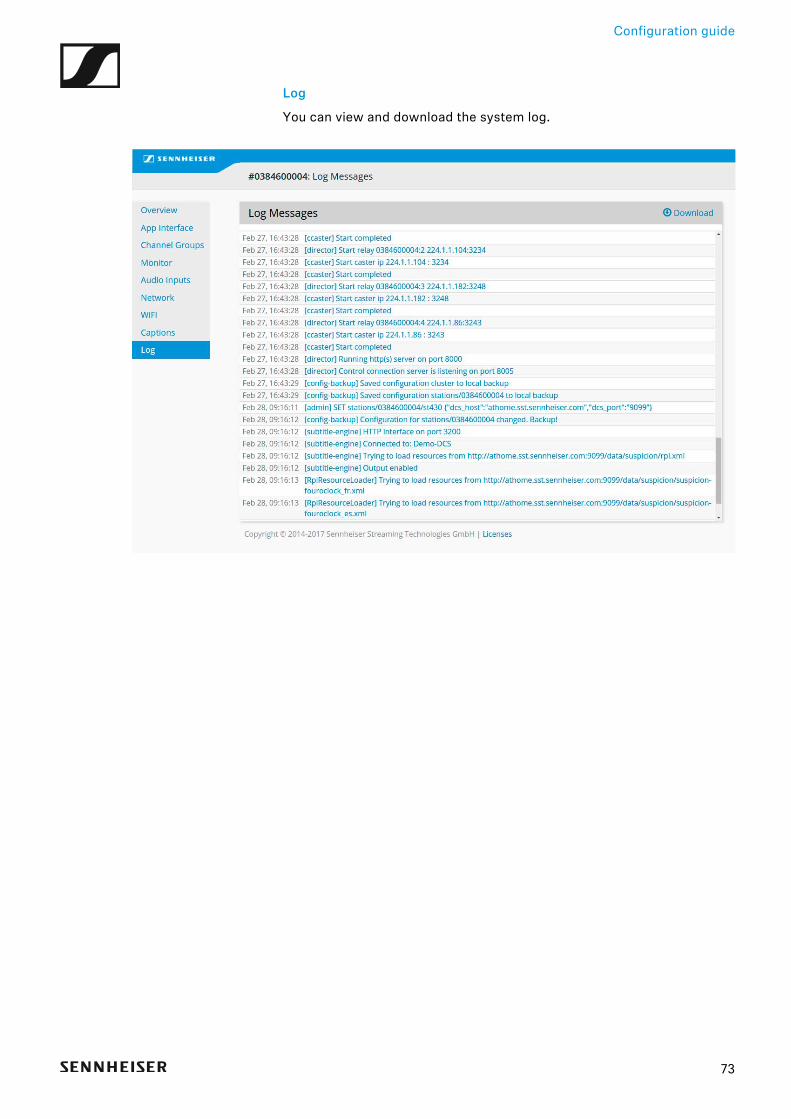
You can view and download the system log.
73

Maintenance and troubleshooting
Maintenance and troubleshootingThe following sections will give you an overview on how to perform updatesand resets and deal with troubleshooting. You will find Information on thefollowing topics.
Information on powering off the ConnectStation.
See "Usage Recommendations"
Information on performing a software update of the system.
See "System update"
Information on resetting the components to their factory settings.
See "Factory reset"
Information on how to reset the password in case you have forgotten it.
See "Forgotten password"
Information on how to grant the Sennheiser service access to your systemfor servicing.
See "Service access"
A troubleshooting guide with information on various topics and how tohandle them.
See "Troubleshooting"
74
Usage Recommendations
Usage RecommendationsPowering off the ConnectStation
We recommend that the ConnectStations are powered off using the but-ton.
Frequency of powering on and off the ConnectStation in Integrated Mode
• We recommend that you power on the Connect Stations in a cluster oneby one, especially in case of cluster discovery by multicast announce-ments.
• In case of cluster discovery by DNS-SD, make sure that the configurecluster server(s) are powered on first.
• For larger clusters (3 and more ConnectStations) preferably do not fre-quently power on and off the ConnectStations, as the cluster takes timeto form.
75
System update
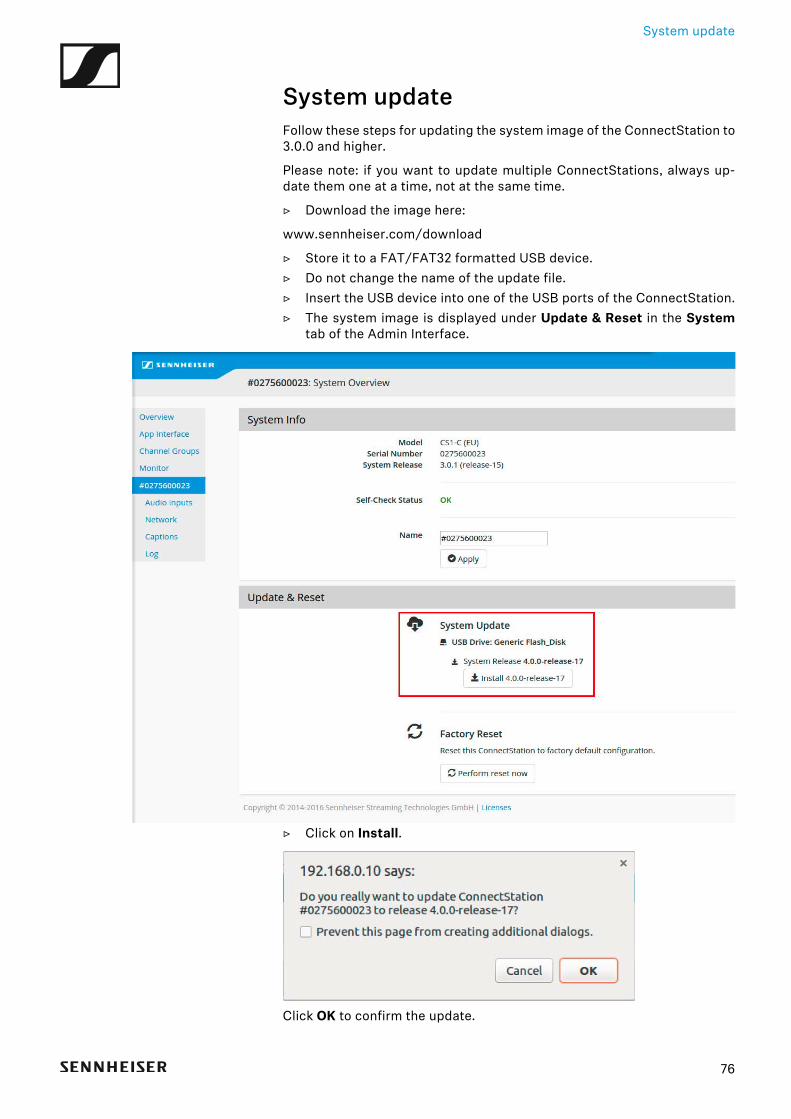
System updateFollow these steps for updating the system image of the ConnectStation to3.0.0 and higher.
Please note: if you want to update multiple ConnectStations, always up-date them one at a time, not at the same time.
▷ Download the image here:
www.sennheiser.com/download
▷ Store it to a FAT/FAT32 formatted USB device.▷ Do not change the name of the update file.▷ Insert the USB device into one of the USB ports of the ConnectStation.▷ The system image is displayed under Update & Reset in the System
tab of the Admin Interface.►
▷ Click on Install.►
Click OK to confirm the update.
76
System update
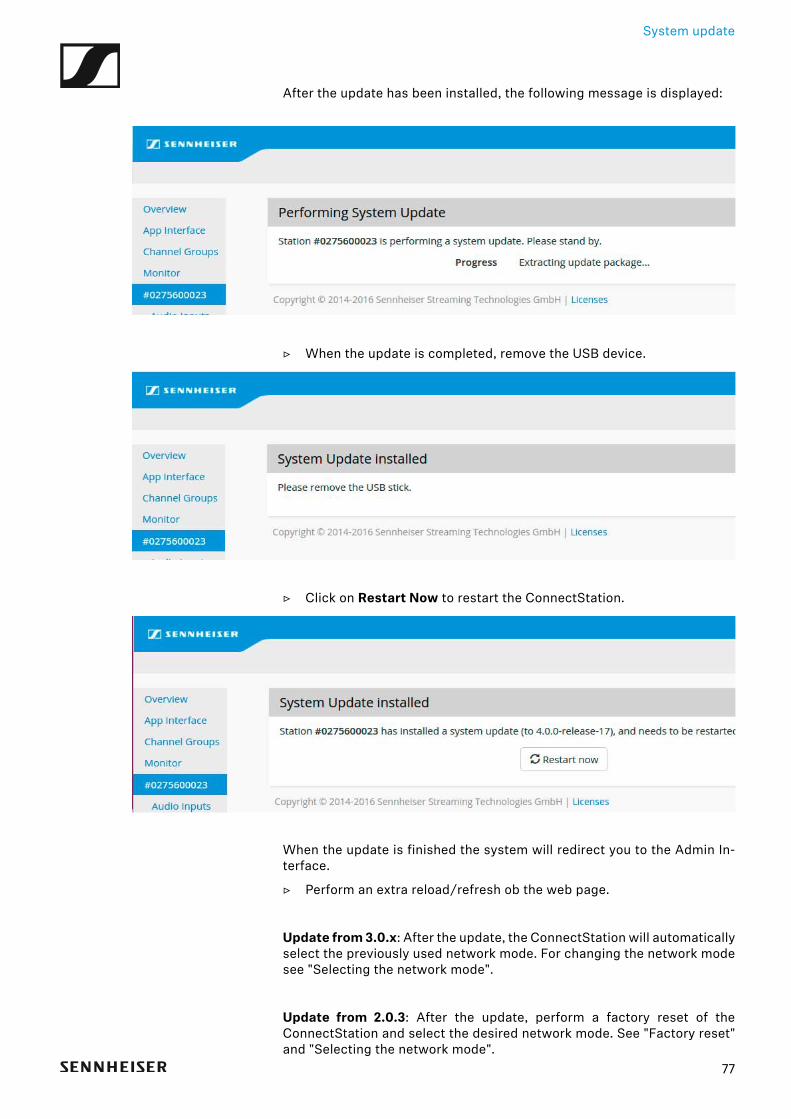
After the update has been installed, the following message is displayed:
▷ When the update is completed, remove the USB device.►
▷ Click on Restart Now to restart the ConnectStation.►
When the update is finished the system will redirect you to the Admin In-terface.
▷ Perform an extra reload/refresh ob the web page.
Update from 3.0.x: After the update, the ConnectStation will automaticallyselect the previously used network mode. For changing the network modesee "Selecting the network mode".
Update from 2.0.3: After the update, perform a factory reset of theConnectStation and select the desired network mode. See "Factory reset"and "Selecting the network mode".
77
Factory reset
Factory resetResetting the ConnectStation via Admin Interface
To reset the ConnectStation to factory settings:
▷ Connect your computer to LAN3 of the ConnectStation.▷ Open a browser and navigate to 192.168.0.10.▷ Login with your user credentials.▷ In the Update & Reset tab click on Perform reset now.
The ConnectStation will be reset to factory settings.
Resetting the ConnectStation via USB keyboard
To reset the ConnectStation via USB keyboard:
▷ Connect the access point to the ConnectStation.▷ Power up both the ConnectStation and the access point.▷ Wait until the system is ready (2-3 min).▷ Connect a USB keyboard to one of the USB sockets of the ConnectSta-
tion.▷ Type reset and press Enter.▷ The ConnectStation and the access point will be reset to factory set-
tings.▷ Log into the admin interface with the default login details:
• Username: admin• Password: sennheiser
▷ If the admin interface shows that the access point is not gettingconnected, a hard reset of the access point has to be performed. Seebelow: "Resetting the access point").
Resetting the access point
To reset the access point Ruckus ZoneFlex 7372 to factory settings:
▷ Disconnect the access point from its power supply.▷ Press and hold the RST (reset) button of the access point.▷ Insert the power supply into the access point while holding the RST
button.▷ Hold the RST button for approximately 15 seconds.
The access point will be reset to factory settings.
78

Forgotten password
Forgotten passwordIf you have forgotten your password for the Admin Interface of theConnectStation, you need to reset the ConnectStation to the factory set-tings. This will reset all settings of the ConnectStation and the accesspoint.
See "Resetting the ConnectStation via USB keyboard".
79
Service access
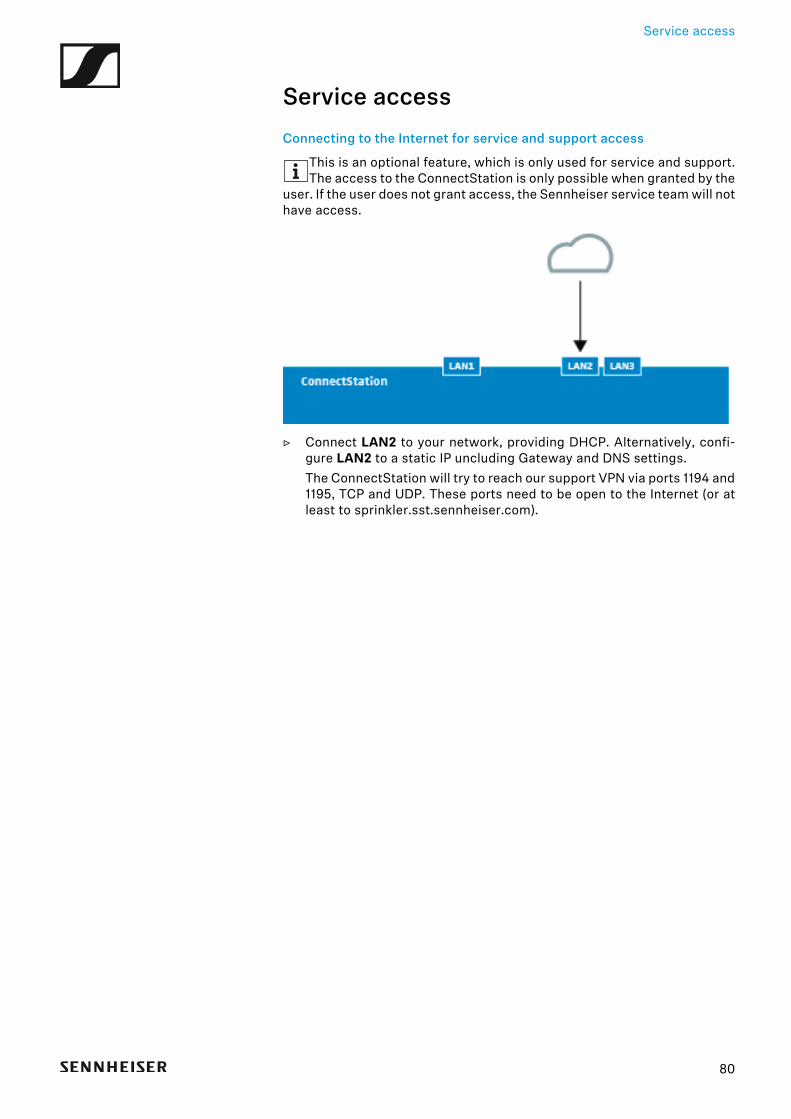
Service accessConnecting to the Internet for service and support access
This is an optional feature, which is only used for service and support.The access to the ConnectStation is only possible when granted by the
user. If the user does not grant access, the Sennheiser service team will nothave access.►
▷ Connect LAN2 to your network, providing DHCP. Alternatively, confi-gure LAN2 to a static IP uncluding Gateway and DNS settings.The ConnectStation will try to reach our support VPN via ports 1194 and1195, TCP and UDP. These ports need to be open to the Internet (or atleast to sprinkler.sst.sennheiser.com).
80
Troubleshooting
Troubleshooting
Apps
Mobile device does not see the MobileConnect/CinemaConnect WiFi (Standalone Mode)
▷ Make sure that the AP is connected to the LAN1 port of the ConnectSta-tion.
▷ Make sure that the ConnectStation is powered on by checking that thetwo status LEDs on the front light up green.
▷ Make sure that the AP is powered on by checking if the PWR light isgreen.
▷ Make sure that the AP 2.4G and 5G lights are either amber or green.▷ Make sure you are looking for the correct SSID (default: MobileConnect
or CinemaConnect).
MobileConnect/CinemaConnect WiFi is visible but mobile device does not connect
▷ Make sure that the AP is connected to the LAN1 port of the ConnectSta-tion.
▷ Make sure that the ConnectStation is powered on by checking that thetwo status LEDs on the front light up green.
▷ Restart the whole system by switching off and on again.
Mobile device is frequently disconnecting from MobileConnect/Cinema-ConnectWiFi
▷ Make sure that the AP is using a fixed channel or you allowed enoughtime for the Ruckus AP to select a channel.(Note: the Ruckus AP frequently changes the channel in order to selectthe optimal one. This can take up to 1-2 hours after boot.)
▷ Enable “Use network as it is” on the mobile device if the mobile deviceruns on Android 7 and your network does not provide internet access(Standalone Mode).
▷ Provide internet access for better connectivity if the system is runningin Integrated Mode (see "General network requirements" in "Require-ments/Recommendations towards your network (Integrated Mode)").
MobileConnect/CinemaConnect App shows no channels to select
▷ Make sure that the mobile device is still connected to the Mobile-Connect WiFi/CinemaConnect WiFi.
▷ Make sure that the channels are activated in the admin interface.
MobileConnect/CinemaConnect app shows “No connection”
▷ Make sure that the mobile device is connected to the correct Mobile-Connect/CinemaConnect WiFi.
▷ In Integrated Mode, if your system is configured with multicast disco-very, make sure that the whole network is configured for multicast.
▷ In Integrated Mode, if your system is configured with DNS-SD, make
81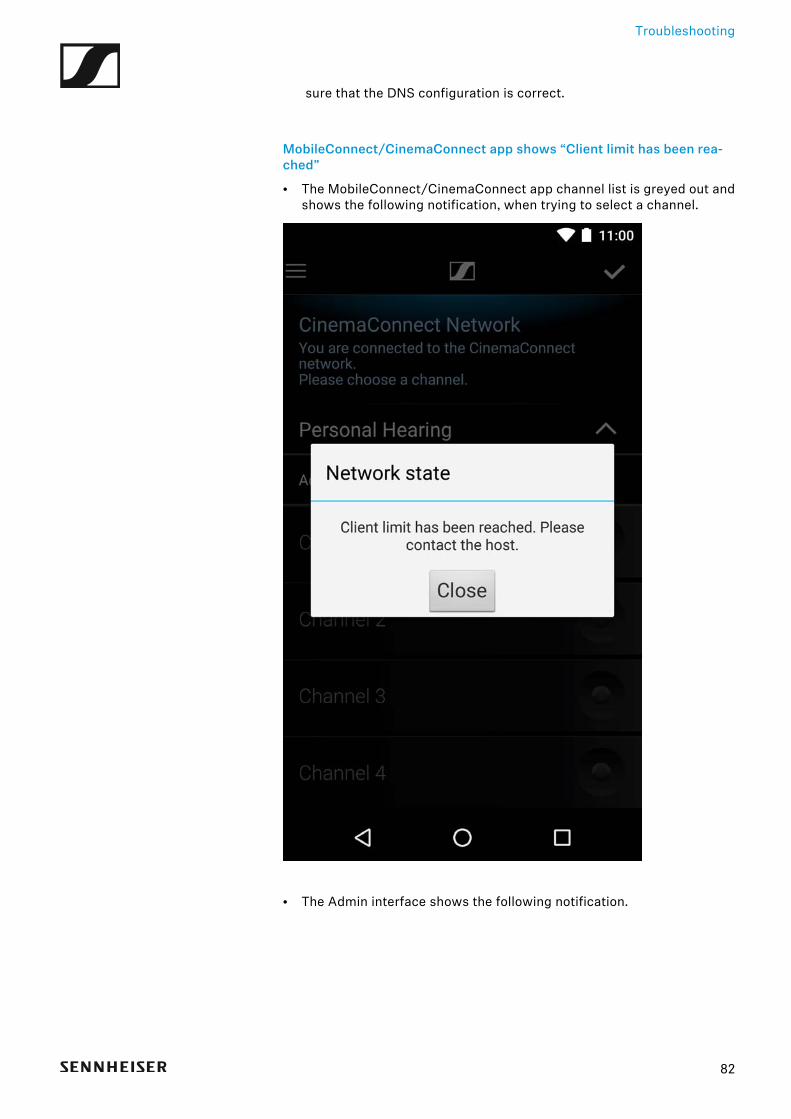
Troubleshooting
sure that the DNS configuration is correct.
MobileConnect/CinemaConnect app shows “Client limit has been rea-ched”
• The MobileConnect/CinemaConnect app channel list is greyed out andshows the following notification, when trying to select a channel.
►
• The Admin interface shows the following notification.
82
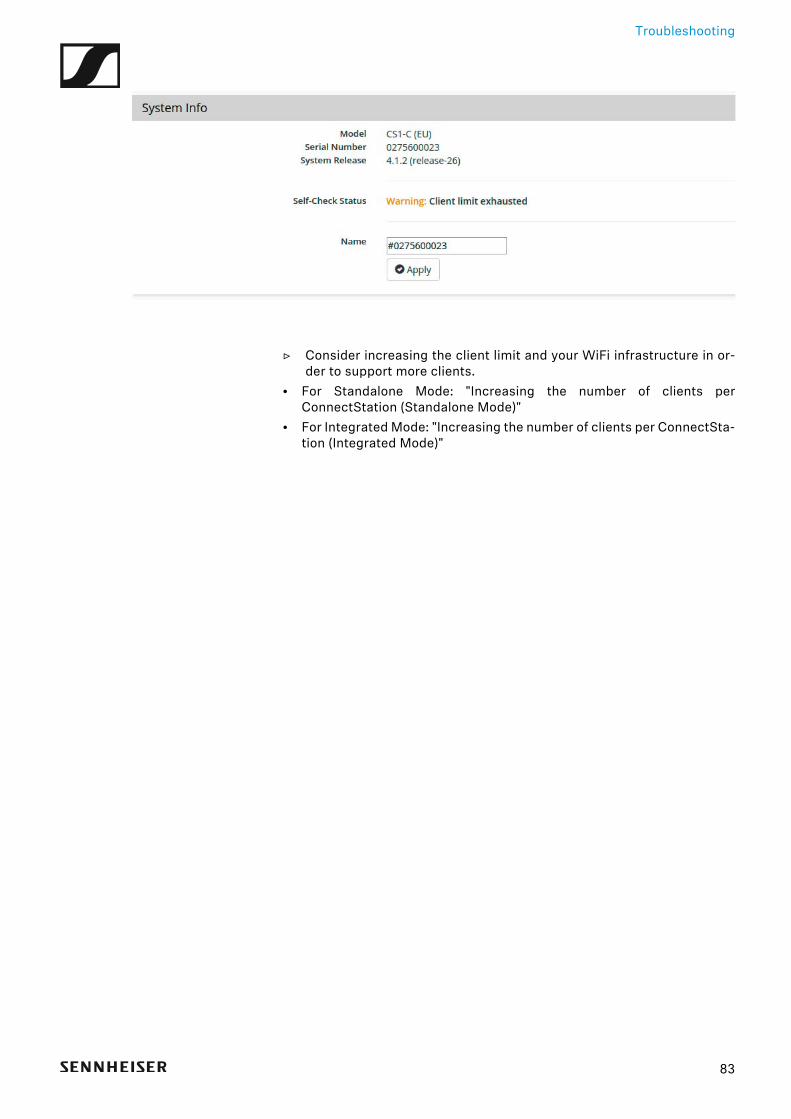
Troubleshooting
►
▷ Consider increasing the client limit and your WiFi infrastructure in or-der to support more clients.
• For Standalone Mode: "Increasing the number of clients perConnectStation (Standalone Mode)"
• For Integrated Mode: "Increasing the number of clients per ConnectSta-tion (Integrated Mode)"
83
Troubleshooting
Audio quality
MobileConnect/CinemaConnect App does show channels to select from but when selected there is no audio
▷ Make sure that the audio source is playing and has sufficient gain.▷ Make sure you have activated a channel in the app (indicated by blue
light).▷ Make sure that the mobile device's volume is turned up.▷ Make sure that the mobile device's headphones/loudspeakers are wor-
king properly.
MobileConnect/CinemaConnect App does provide audio but it is distor-ted or has drop outs
▷ Check the audio source for any interference.▷ Make sure the input sensitivity and gain settings of the audio source as
well as the gain settings of the ConnectStation are adjusted correctly.▷ Make sure you have a direct line of sight to the WiFi AP.▷ Disable location based service (Android devices).▷ Try to disable Mobile data or enter Airplane mode with WiFi on the mo-
bile device. In a WiFi without internet, the mobile device will try to stayconnected using mobile data and can cause interference with the audiostreaming.
▷ Use a WiFi analyser software to make sure to use a channel where noother WiFi or disturber is active as well as the gain settings of theConnectStation are adjusted correctly.
Audio latency is higher than expected
▷ Make sure the audio source is not delayed. Please note that every ad-ditional audio device (mixing console, amplifier, etc.) between the sour-ce and the ConnectStation audio input may increase the latency.
▷ Make sure you have a direct line of sight to the WiFi AP.▷ Mobile devices, especially Android phones, can add a higher latency
(see "List of tested mobile devices").▷ Wireless headphones may have a higher latency than wired headpho-
nes, which do not add any latency.
Audio is ahead of the video
▷ Check the audio source.
84

Troubleshooting
The audio level is low
▷ Check the amplitude of the audio signal in the Input Levels tab on theAudio Inputs page of the Admin Interface. See "Audio Inputs" in section"General configuration".
▷ Make sure the amplitude is high enough. If it is always lower the -20 dB,increase the sensitivity of the analog audio input from +4 dBu to -10dBu.
▷ Enable the AGC. If the audio level remains low, increase the parameterratio from 2:1 to 3:1 or higher. Alternatively, reduce the threshold from-40 dB to -60 dB or -80 dB to provide extra gain on the low-volume por-tions of the input.
There is a lot of noise
▷ In case you are streaming from a microphone or other noisy source: Adjust the noise threshold and noise gain in the AGC tab on the AudioInputs page of the Admin Interface. See "Audio Inputs" in section "Ge-neral configuration".Increasing the noise threshold, e.g. from -80 dB to -60 dB, will causethe noise gate to trigger faster. This results in less noise streaming, ho-wever, risking to reduce the non-noise portions of the audio.Decreasing the noise gain, e.g. from -10 dB to -20 dB, will increase theattenuation of the noise.
There is clipping noise
▷ Check the amplitude of the audio signal in the Input Levels tab on theAudio Inputs page of the Admin Interface. See "Audio Inputs" in section"General configuration". If the audio level is too high, reduce the analoginput sensitivity to +4 dBu.
85
Troubleshooting
Integrated Mode
The admin interface cannot be accessed or shows “Configuration prob-lem”
▷ Make sure you are accessing via the correct IP address.▷ In case of the admin interface cannot be accessed via LAN2, check if
the lights on the LAN2 port are blinking. If not, remove the network ca-ble, wait 15 seconds and plug it in again. In case that does not help, plugin the cable and reboot the ConnectStation.
▷ In case of notification “Configuration problem” in a system in Integra-ted Mode, using DNS-SD, make sure the cluster server is accessible.
▷ In case of notification “Configuration problem” in a system in Integra-ted Mode, using multicast announcements, make sure that the wholenetwork is configured for multicast. Restart the ConnectStation.
The user enters a wrong static IP for LAN2 in Integrated Mode
▷ When a wrong IP or IP address of different subnet is entered for LAN2for a client ConnectStation in a cluster in Integrated Mode, it leaves thecluster to form a cluster of its own.
▷ In order to correct the IP address and the ConnectStation to rejoin clus-ter, first access the cluster Admin interface and click on the "Removefrom this cluster" button. Try to change the IP address, in case itdoesn't work perform a factory reset of the ConnectStation.
A ConnectStation cannot join or rejoin a cluster in Integrated Mode
▷ Make sure that the LAN2 cable is connected and the ConnectStationhas a valid IP address in the same network as the cluster.
▷ In case the network cable is unplugged, wait for at least 20 seconds be-fore reconnecting. In case the ConnectStation still doesn’t join the clus-ter, restart it after plugging the LAN2 cable back.
▷ In case of a cluster using DNS-SD, make sure that configuration is cor-rect, and the cluster server is reachable.
▷ In case of a cluster using multicast announcement, make sure that thewhole network is configured for multicast. If the ConnectStations arefrequently leaving a cluster, that is an indication for filtered multicastpackets.
Client Balancing or Client Monitoring are not visible on the admin interfa-ce page
▷ Make sure that all your ConnectStations are updated to firmware ver-sion 5.0.0 or higher.
86