Embed Size (px)
Citation preview

part# MG977484
USE+MAINTENANCE BOOK
USA
GUZum_breva750USA_####.book Page 1 Thursday, June 29, 2006 12:31 PM

© 2006 Moto Guzzi S.p.A. TRODUCTION
is manual is divided by subject intoctions, chapters and paragraphs. Thecedures described are laid out step byp, and each operation is indicated by a u.
e numbered parts shown in the figures arentified in the text with the number in
rentheses, or the symbol representing them.
ample (the following text is generic andes not refer to this specific vehicle:tion MAIN INDEPENDENT CONTROLS
pterSTEERING LOCK
ety rning Never attempt to place the ignition
switch in the locked “ ” (LOCK)position while the vehicle is moving.
agraphOPERATION
ration To lock the steering:♦ Turn the handlebar completely to the
left or to the right.ition (2)
♦ Turn the key (2) to position “ ”.bol “ ”
♦ Press the key and turn it to position “ ”.♦ Remove the key.
WARNINGWARNING
GUZum_breva750USA_####.book Page 2 Thursday, June 29, 2006 12:31 PM
use and maintenance Breva 2
Mandello del Lario (LECCO)
First edition: March 2006
Reprinted: May 2006
Produced and printed by:VALLEY FORGE DECARavenna , Modena, TorinoDECA S.r.l. Registered Main OfficeVia Vincenzo Giardini, 11 48022 Lugo (RA) - Italy Tel. +39 - 0545 216611 Fax +39 - 0545 216610 E-mail: [email protected]
on behalf of:Moto Guzzi S.p.A.via E. V. Parodi, 5723826 Mandello del Lario (LECCO) - ItalyPhone +39 - 0341 70 91 11Fax +39 - 0341 70 92 20www. motoguzzi.it
FOREWORD
NOTES This manual is an importantand integral part of your vehicle. Keep itwith your vehicle at all times, even if yourvehicle is resold.
Moto Guzzi has prepared this manual tosupply you, the user, with correct andcurrent information. However, since MotoGuzzi constantly improves the design of itsvehicles, there may be slight discrepanciesbetween your vehicle and the materialgiven in this manual. If you have anyquestions about your vehicle, contact yourLocal Moto Guzzi Dealer, as he will havethe very latest technical informationavailable from the factory.For tests and repairs not expresslydescribed in this manual, to purchaseMoto Guzzi genu ine spare par ts ,accessories, and other products, and forhelp with specific problems, please contactyour Local Moto Guzzi Dealer or servicecenter. These professionals will be able toassist you promptly and accurately.
Thank you for choosing Moto Guzzi. Havea great ride!
This manual is copyrighted in all countries,and reproduction thereof in full or in part byany print or electronic means is strictlyprohibited.
IN
Thseproste
Thidepa
Exdosec
cha
safwa
par
ope
pos
sym

3use and maintenance Breva
immediately. Should you accidentally getgasoline get your eyes, flush with abundantcool, clear water and seek professionalmedical assistance immediately.
WARNINGGasoline is extremely flammable andbecomes explosive under certainconditions.
KEEP GASOLINE AWAY FROMCHILDREN.
HOT COMPONENTS
WARNINGThe engine and all parts of the exhaustsystem, as well as the braking system,become very hot and remain hot forsome time after the vehicle and theengine are stopped. Before handling anycomponent of your vehicle after riding,make sure that it has cooled sufficientlyto be safe to handle.
USED ENGINE OIL
WARNINGUse latex gloves for those maintenanceoperations that require contact withused oil. Used engine oil may cause skincancer if repeatedly left in contact withthe skin for prolonged periods. Althoughthis is unlikely unless you handle usedoil on a daily basis, it is advisable tothoroughly wash your hands with soapand water after handling used oil.
KEEP OIL AWAY FROM CHILDREN.
GUZum_breva750USA_####.book Page 3 Thursday, June 29, 2006 12:31 PM
SAFET
SAFETY WARNINGS
The following precautionary warnings areused throughout this manual to convey thefollowing messages:
Safety Warning: When you seethis symbol on the vehicle or in the
manual, pay particular attention to thepotential risk of personal injury ordeath. Failure to comply with theinstructions given in the warningmessages preceded by this symbol mayresult in grave risk for your own safetyand that of others, as well as for thevehicle.
WARNINGIndicates a potential hazard which mayresult in serious injury or even death.
CAUTIONIndicates a potential hazard which mayresult in personal injury or damage tothe vehicle or other property.
NOTE The word “NOTE” in this manualprecedes impor tant in format ion orinstructions.
GENERAL SAFETY RULES
CARBON MONOXIDEIf it is necessary to run the engine in orderto car ry ou t a g iven ma in tenanceoperation, make sure that the area in whichyou are operating is properly ventilated.Never run the engine in enclosed spaces.If it is necessary to work indoors, use anexhaust evacuation system.
WARNINGThe exhaust fumes contain carbonmonoxide, a poisonous gas that cancause loss of consciousness and evendeath.
WARNINGCarbon monoxide is both colorless andodorless, and cannot be detected bysmell, vision, or any other sense. Avoidbreathing exhaust fumes under anycircumstances.
GASOLINEKeep gasoline away from children. Gasolineis also poisonous. Never attempt to siphongasoline using your mouth. Never allowgasoline to contact your skin. If you shouldaccidentally spill gasoline on yourself,change your clothes immediately andthoroughly wash the area upon which thegasoline was splashed with hot water andsoap. Should you accidentally swallowgasoline, do not induce vomiting. Drinkabundant cool water or milk and seekpro fess iona l medica l ass is tance

pletely cooled down. The coolant iser pressure and may splash out andse burns.
TTERY HYDROGEN GAS D ELECTROLYTE
WARNINGe battery gives off noxious andlosive gases; keep cigarettes, flames sparks away from the battery.vide adequate ventilation whenrating or recharging the battery.
ing recharging and use, make sure that the is properly ventilated and avoid inhaling
gases released during recharging. battery contains sulphuric acid
ctrolyte). Contact with the skin or eyesy cause serious burns. Always weartective clothing, rubber gloves, and tightg goggles or a face shield when workingnd the battery, especially when filling the
ery with either water or electrolyte.ase of contact with the skin, flushediately with plenty of water. In case oftact with the eyes, flush with plenty ofer for at least 15 minutes. Immediatelysult a health professional. electrolyte is poisonous.e electrolyte is accidentally swallowed,k abundant quantities of water or milk,wed by milk of magnesia or vegetable Immediate ly consul t a heal thessional.P BATTERIES AND ELECTROLYTE
AY FROM CHILDREN.
GUZum_breva750USA_####.book Page 4 Thursday, June 29, 2006 12:31 PM
use and maintenance Breva 4
BRAKE FLUID
CAUTIONBrake fluid is extremely poisonous. Donot ever allow brake fluid to be ingestedor swallowed. Should brake fluidaccidental ly be swallowed, dr inkabundant milk or clear water and seekprofessional medical assistanceimmediately. Brake fluid is highlydestructive of skin and eye tissue. Shouldyou accidentally spill brake fluid onyourself, remove the contaminatedclothing, wash your body with soap andwarm water immediately and seekprofessional medical assistanceimmediately. Should you accidentallysplash brake fluid into your eyes, flushwith abundant cool, clear water and seekprofessional medical assistanceimmediately.
KEEP BRAKE FLUID AWAY FROMCHILDREN.
CLUTCH FLUID
CAUTIONClutch fluid is extremely poisonous. Do notever allow clutch fluid to be ingested orswallowed. Should clutch fluid accidentallybe swallowed, drink large quantities of milkor clear water and seek professionalmedical assistance immediately. Clutchfluid is highly destructive of skin and eyetissue. Should you accidentally spill clutchfluid on yourself, immediately remove the
contaminated clothing, wash your bodywith soap and warm water and seekprofessional medical assistanceimmediately. Should you accidentallysplash clutch fluid into your eyes, flushwith abundant cool, clear water and seekprofessional medical assistanceimmediately.
KEEP CLUTCH FLUID AWAY FROMCHILDREN.
COOLANT
In certain conditions, the ethylene glycolcontained in the engine coolant is flammable:its flame is invisible, but you can be burnedanyway.
WARNINGAvoid spilling the engine coolant on theexhaust system or engine components.They may be hot enough to cause thecoolant to ignite and burn without avisible flame. The coolant (ethyleneglycol) can cause skin irritation and ispoisonous if swallowed. Coolant and coolant/water mixtures aresweet to the taste and brightly colored,and therefore are highly attractive to petsand children. Take extra precautions tokeep new and used coolant out of reachof children and animals.
KEEP COOLANT AWAY FROMCHILDREN.
Risk of burns.Do not remove the radiator cap when theengine is hot. Wait until the engine has
comundcau
BAAN
ThexpandProope
Durroomthe The(elemaprofittinaroubattIn cimmconwatconTheIf thdrinfollooi l .profKEEAW

5use and maintenance Breva
INFORMATION ON THE NOISE AND EXHAUST GAS EMISSION CONTROL SYSTEMORIGIN OF THE EMISSIONSThe combustion process produces carbonmonoxide and hydrocarbons. The controlof hydrocarbons is very important, becauseunder certain conditions they react toexposure to sun l igh t and p roducephotochemical smog. Carbon monoxide does not react in thesame way, but it is toxic and poisonous.Moto Guzzi utilizes "lean" carburetorsettings and other systems to reduce theproduction of carbon monoxide andhydrocarbons.
TAMPERING WARNINGTampering with the noise control system isprohibited. Federal law prohibits thefollowing acts or causing thereof:
a) The removal or rendering inoperative byany person other than for purposes ofmaintenance, repair, or replacement, ofany device or e lement of designincorporated into any new vehicle forthe purpose of noise control prior to itssa le o r de l i ve ry to the u l t imatepurchaser or while it is in use, or
b) Use of the vehicle after such device orelement of design has been removed orrendered inoperative by any person.
GUZum_breva750USA_###01i01.fm Page 5 Thursday, October 19, 2006 9:08 AM
WARNINGS - PRECAUTIONS -GENERAL ADVICE
Before starting the engine, carefully read thismanual and in particular the chapters"WARNINGS - PRECAUTIONS - GENERALADVICE" and "SAFE DRIVE" see p. 17.Your safety and that of those around youdepends not only on your skill as a rider,but also your knowledge of your vehicleand about riding safely. Therefore it isessential that you not operate your vehicleon public streets or highways until youhave received instructions from a qualifiedsafety organization such as the MotorcycleSafety Foundation, and are properlytrained and licensed.
REPORTING DEFECTS THAT AFFECT SAFETYIf you believe that your vehicle has a defectwhich could cause a crash or could causeinjury or death, you should immediately informthe National Highway Traff ic SafetyAdministration (NHTSA) in addition to notifyingMoto Guzzi. If NHTSA receives similarcomplaints, it may open an investigation, and ifit finds that a safety defect exists in a group ofvehicles, it may order a recall and remedycampaign. However, NHTSA cannot becomeinvolved in individual problems between you,your dealer, or Moto Guzzi. To contactNHTSA, you may either call the Auto SafetyHotline toll free at 1-800-424-9393 (or 366-0123 in the Washington, D.C. area) or write to:NHTSA, U.S. Department of Transportation,Washington, D.C. 20590. You can also obtain other information aboutmotor vehicle safety from the Hotline.
ROAD REGULATIONS AND USING THE VEHICLERules of the road vary from country tocountry. It is essential that you understandin advance the rules of the road of thecountry in which your vehicle will be used.
WARNINGThis vehicle has been designed andbuilt for use only on paved roads. It isnot designed to be used on evensmooth graded dirt roads, or trails. It isnot designed for off road competition,or for cross country riding. Do not usethis vehicle on rough or unimprovedsurfaces, or in other off road areas.Failure to heed this warning could leadto an upset with subsequent injury andeven death.
NOISE EMISSION WARRANTYMoto Guzzi s.p.a. warrants that thisexhaust system, at the time of sale, meetsall applicable U.S. EPA Federal noisestandards. This warranty extends to thefirst person who buys this exhaust systemfor purposes other than resale, and to allsubsequent buyers. Warranty claims should be directed to:Moto Guzzi USA140 East 45th Street, 17th FloorNew York, NY 10017Tel: 877. 277.4552 (877.Aprilia) Fax: 001.212.380.4459

FORMATION CONTAINED THE VEHICLE ENTIFICATION NUMBERscription of the vehicle identificationmber (V.I.N.), stamped on the steeringad o f the f rame (A) and on thentification plate (B).
B
GUZum_breva750USA_####.book Page 6 Thursday, June 29, 2006 12:31 PM
use and maintenance Breva 6
Among those acts presumed to constitutetampering are the acts listed below:a) Removal or puncturing of the muffler,
baffles, header pipes or any othercomponent which conducts exhaustgases.
b) Removal or puncturing of any part of theintake system.
c) Lack of proper maintenance.d) Replacing any moving part of the
vehicle, or parts of the exhaust or intakesystem, with parts other than thosespecified by the manufacturer.
CAUTIONThis product should be checked forrepair or replacement if the vehiclenoise has increased significantlythrough use. Otherwise, the owner maybecome subject to penalties under stateand local ordinances.
PROBLEMS THAT MAY AFFECTVEHICLE EMISSIONSIf any of the following symptoms areobserved, have your vehicle immediatelyinspected and repaired by your Local MotoGuzzi Dealer
Symptoms:– Difficult starting or stalling after starting.– Irregular idle.– Misfiring or backfiring during acceleration.– After-burning (backfiring).– Poor engine performance, degraded
handling, or poor fuel economy.
VEHICLE IDENTIFICATION NUMBER (V.I.N.) (FRAME NUMBER)Every vehicle produced by Moto Guzzireceives a vehicle identification number(V.I.N.) stamped:– on the steering head of the frame (A), as
shown above;and also:– on the identification plate (B) which is
located on the front portion near thesteering head of the frame.
ININIDDenuheide

7use and maintenance Breva
LLC**#YM******
GUZum_breva750USA_####.book Page 7 Thursday, June 29, 2006 12:31 PM
DIGIT MEANING1) Manufacturer's identification alphanumeric code.2) Vehicle type.3) Model.4) Country for which the vehicle is intended.5) #= Check digit number.6) Model year (Y).7) Assembling factory designation
(M = MANDELLO).8) Sequential serial number
.
ZGU

11
GUZum_breva750USA_####.book Page 8 Thursday, June 29, 2006 12:31 PM
use and maintenance Breva 8
POSITION OF THE WARNING ADHESIVE LABELS
10
33
1 9 3
5 8 13 2 4
1276
14

9use and maintenance Breva
Description
Follow
GUZum_breva750USA_####.book Page 9 Thursday, June 29, 2006 12:31 PM
7
WARNING ADHESIVE LABELS CHART Ref. Description
1
2
3
4
5
6
Ref.
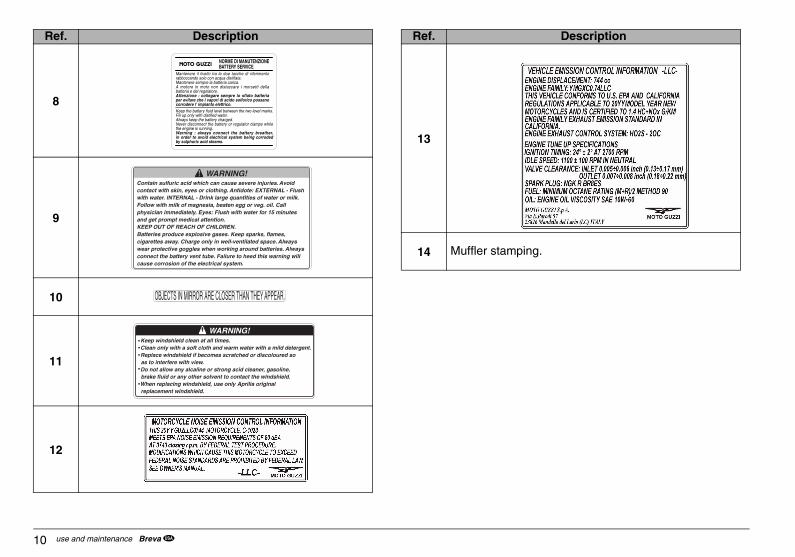
13
14 Muffler stamping.
Ref. Description
GUZum_breva750USA_####.book Page 10 Thursday, June 29, 2006 12:31 PM
use and maintenance Breva 10
12
8
9
10
11
Ref. Description
NORME DI MANUTENZIONEBATTERY SERVICE
Keep the battery fluid level between the two level marks.Fill up only with distilled water.Always keep the battery charged.Never disconnect the battery or regulator clamps whilethe engine is running.Warning : always connect the battery breather,in order to avoid electrical system being corrodedby sulphuric acid steams.
Mantenere il livello tra le due tacche di riferimentorabboccando solo con acqua distillata.Mantenere sempre la batteria carica.A motore in moto non distaccare i morsetti dellabatteria e del regolatore.Attenzione : collegare sempre lo sfiato batteriaper evitare che i vapori di acido solforico possanocorrodere l' impianto elettrico.

11use and maintenance Breva
526
3 4
GUZum_breva750USA_####.book Page 11 Thursday, June 29, 2006 12:31 PM
EVAPORATIVE EMISSION SYSTEM
The system consist of:1) Canister - "T"-fitting pipe 2) Canister vacuum fitting 3) Canister - Airbox pipe 4) Tank - pressure valve pipe 5) Pressure valve6) "T"-fitting - Lt. Throttle pipe 7) "T"-fitting8) "T"-fitting - Rt. throttle pipe 9) Pressure valve - Canister pipe 10) Carbon canister
NOTES In the event of a fuel systemmalfunction, contact your Local MotoGuzzi Dealer
78
9
10
1 2

NER'S WARRANTY SPONSIBILITIES
As the motorcycle owner, you areresponsible for the performance of therequired maintenance l isted in yourowner's manual. Moto Guzzi recommendsthat you retain al l receipts coveringmaintenance on your motorcycle, but MotoGuzzi cannot deny warranty solely for thelack of receipts or for your failure to ensurethe pe r fo rmance o f a l l schedu ledmaintenance.You are responsible for presenting yourmotorcycle to an Moto Guzzi dealer assoon as a problem exists. The warrantyrepa i rs shou ld be comple ted in areasonable amount of time, not to exceed30 days.As the motorcycle owner, you should beaware that Moto Guzzi may deny yourwarranty coverage if your motorcycle or apart has failed due to abuse, neglect,improper maintenance or unapprovedmodifications.you have any questions regarding yourrranty rights and responsibilities, you
ould contact
to Guzzi USA0 East 45th Street, 17th Floorw York, NY 10017l: 877. 277.4552 (877.Aprilia) x: 001.212.380.4459
GUZum_breva750USA_###01i01.fm Page 12 Thursday, October 19, 2006 9:12 AM
use and maintenance Breva 12
Moto Guzzi S.p.A. - EMISSION CONTROL SYSTEM WARRANTY STATEMENT
YOUR WARRANTY RIGHTS AND OBLIGATIONSThe California Air Resources Board andMoto Guzzi S.p.A. (hereinafter "MotoGuzzi" ) are p leased to expla in theemission control system warranty on your1999 and later motorcycle. In California,new motor vehicles must be designed, builtand equipped to meet the State's stringentanti-smog standards. Moto Guzzi mustwarrant the emission control system onyour motorcycle for the periods of timelisted below provided there has been noabuse, neglect or improper maintenance ofyour motorcycle.
Your emission control system may includeparts such as the carburetor or fuelinjection system, ignition system, catalyticconverter and engine computer. Alsoincluded may be hoses, belts, connectorsand other emission-related assemblies.
Where a warrantable condition exists,Moto Guzzi will repair your motorcycle atno cost to you, including diagnosis, partsand labor.
MANUFACTURER'S EMISSIONS SYSTEM WARRANTY COVERAGEClass I motorcycles (50 - 169 cm3): for aperiod of use of five (5) years or 7,456miles (12,000 kilometers), whichever firstoccurs.
Class II motorcycles (170 - 279 cm3): for aperiod of use of five (5) years or 11,185miles (18,000 kilometers), whichever firstoccurs.
Class III motorcycles (280 cm3 and larger):for a period of use of five (5) years or18 ,641 mi les (30 ,000 k i lometers ) ,whichever first occurs.
I f an emission-re lated part on yourmotorcycle is defective, the part will berepaired or replaced by Moto Guzzi. Thisis your emission control system DEFECTSWARRANTY.
OWRE–
–
–
If wash
Mo14NeTeFa

13use and maintenance Breva
Administrative Code, may be performedby other than an authorized Moto Guzzidealer. An emergency situation occurswhen an authorized Moto Guzzi dealer isnot reasonably available, a part is notavailable within 30 days, or a repair is notcomplete wi th in 30 days. Anyreplacement part can be used in anemergency repair. Moto Guzzi willreimburse the owner for the expenses,including diagnosis, not to exceed MotoGuzzi's suggested retail price for allwarranted parts replaced and laborcharges based on Moto Guzzi ' srecommended time allowance for thewarranty repair and the geographicallyappropriate hourly labor rate. The ownermay be required to keep receipts andfai led parts in order to receivecompensation.
GUZum_breva750USA_####.book Page 13 Thursday, June 29, 2006 12:31 PM
Moto Guzzi S.p.A. - LIMITED WARRANTY ON EMISSIONCONTROL SYSTEMMoto Guzzi S.p.A., Via E. V. Parodi, 5723826 Mandella del Lario (LECCO) Italy(hereinafter "Moto Guzzi") warrants thateach new 1999 and later Moto Guzzimotorcycle, which includes as standardequipment a headl ight, tai l l ight andstoplight, and is street legal:
A) iis designed, built and equipped so as toconform at the time of initial retailpurchase with all applicable regulationsof the United States EnvironmentalProtection Agency, and the CaliforniaAir Resources Board; and
B) is free from defects in material andworkmanship which may cause suchmotorcycle to fail to conform withapplicable regulations of the UnitedStates Environmental Protection Agencyor the California Air Resources Board fora period of use, depending on the enginedisplacement, of 12,000 kilometers(7,456 miles), if the motorcycle's enginedisplacement is less than 170 cubiccentimeters; of 18,000 kilometers (11,185miles), i f the motorcycle's enginedisplacement is equal to or greater than170 cubic centimeters but less than 280cubic centimeters; or of 30,000 kilometers(18,641 miles), if the motorcycle's enginedisplacement is 280 cubic centimeters orgreater; or 5 (five) years from the date ofinitial retail delivery, whichever firstoccurs.
I. COVERAGE. Warranty defects shall beremedied during customary businesshours at any authorized Moto Guzzimotorcycle dealer located within theUnited States of America in compliancewith the Clean Air Act and applicableregulat ions of the Uni ted StatesEnvironmental Protection Agency and theCalifornia Air Resources Board. Any partor parts replaced under this warranty shallbecome the property of Moto Guzzi.
In the State of California only, emissionrelated warranted parts are specificallydefined by the state's Emission WarrantyParts List. These warranted parts are:carburetor and internal parts; intakemanifold; fuel tank; fuel injection system;spark advance mechanism; crankcasebreather; air cutoff valves; fuel tank capfor evaporative emission controlledvehicles; oil filler cap; pressure controlvalve; fuel/vapor separator; canister;igniters; breaker governors; ignition coils;ignition wires; ignition points; condensers,and spark plugs if failure occurs prior tothe first scheduled replacement; andhoses, clamps, fittings and tubing useddirectly in these parts. Since emissionrelated parts may vary from model tomodel, certain models may not contain allof these parts and certain models maycontain functionally equivalent parts.
In the State of California only, EmissionControl System emergency repairs, asprovided for in the Cal i forn ia

NO EXPRESS EMISSION CONTROLSYSTEM WARRANTY IS GIVEN BYMoto Guzz i EXCEPT ASSPECIFICALLY SET FORTH HEREIN.ANY EMISSION CONTROL SYSTEMWARRANTY IMPLIED BY LAW,INCLUDING ANY WARRANTY OFMERCHANTABILITY OR FITNESSFOR A PARTICULAR PURPOSE, ISL IMITED TO THE EXPRESSEMISSION CONTROL SYSTEMWARRANTY TERMS STATED IN THISWARRANTY. THE FOREGOINGSTATEMENTS OF WARRANTY AREEXCLUSIVE AND IN LIEU OF ALLOTHER REMEDIES. SOME STATESDO NOT ALLOW LIMITATIONS ONHOW LONG AN IMPLIED WARRANTYLASTS SO THE ABOVE LIMITATIONSMAY NOT APPLY TO YOU.No dealer is authorized to modify thisMoto Guzzi Limited Emission ControlSystem Warranty.
.LEGAL RIGHTS. THIS WARRANTYGIVES YOU SPECIF IC LEGALRIGHTS, AND YOU MAY ALSO HAVEOTHER RIGHTS WHICH VARY FROMSTATE TO STATE.
THIS WARRANTY IS IN ADDITION TOTHE Moto Guzzi L IMITEDMOTORCYCLE WARRANTY.
GUZum_breva750USA_####.book Page 14 Thursday, June 29, 2006 12:31 PM
use and maintenance Breva 14
II. LIMITATIONS. This Emission ControlSystem warranty shall not cover any ofthe following:
A) Repair or replacement required as aresult of(1) accident,(2) misuse,(3) repairs improperly performed orreplacements improperly installed,,(4) use of replacement parts oraccessories not conforming to MotoGuzzi specifications which adverselyaffect performance and/or(5) use in competitive racing or relatedevents.
B) Inspections, replacement of parts andother serv ices and ad jus tmentsrequired for required maintenance.
C) Any motorcycle on which the odometermileage has been changed so thatactual mi leage cannot be readi lydetermined.
III. LIMITED LIABILITYA) The liability of Moto Guzzi under this
Emission Control System Warranty islimited solely to the remedying ofdefects in material or workmanship byan authorized Moto Guzzi motorcycledealer at its place of business duringcustomary bus iness hours . Th iswarranty does not cover inconvenienceor loss of use of the motorcycle ortransportation of the motorcycle to orfrom the Moto Guzzi dealer. MotoGuzzi SHALL NOT BE LIABLE FORANY OTHER EXPENSES, LOSS ORDAMAGE, WHETHER DIRECT,INCIDENTAL, CONSEQUENTIAL OREXEMPLARY ARISING INCONNECTION WITH THE SALE ORUSE OF OR INABILITY TO USE THEMoto Guzzi MOTORCYCLE FOR ANYPURPOSE. SOME STATES DO NOTALLOW THE EXCLUSION ORLIMITATION OF ANY INCIDENTAL ORCONSEQUENTIAL DAMAGES, SOTHE ABOVE LIMITATIONS MAY NOTAPPLY TO YOU.
B)
C)
IV
V.

15use and maintenance Breva
vice USA, Inc.ew York, NY 10012
ty Defects
ich could cause a crash or could cause the National Highway Traffic Safety aprilia World Service USA, Inc.
pen an investigation, and if it finds that a ay order a recall and remedy campaign. ny individual problems between you,
Safety Hotline toll-free at 1-888-327-4236
TIONgton, DC 20590
tor vehicle safety from the Hotline.
GUZum_breva750USA_###01i01.fm Page 15 Thursday, October 19, 2006 9:11 AM
VI.ADDITIONAL INFORMATION. Anyreplacement part that is equivalent inperformance and durability may beused in the per formance o f anymaintenance or repairs. However, MotoGuzzi is not liable for these parts. Theowner i s respons ib le fo r theper fo rmance o f a l l requ i redmaintenance. Such maintenance maybe per fo rmed a t a serv iceestablishment or by any individual. Thewarranty period begins on the date themotorcycle is delivered to an ultimatepurchaser.
Moto GuzziVia E. V. Parodi, 5723826 Mandello del Lario (LECCO) Italy
Moto Guzzi USA140 East 45th Street, 17th FloorNew York, NY 10017
PART 575.6, CONSUMER INFORMATION
aprilia World Ser140 E 45th Street, 17C, N
Reporting Safe
If you believe that your vehicle has a defect whinjury or death, you should immediately informAdministration (NHTSA) in addition to notifying
If NHTSA receives similar complaints, it may osafety defect exists in a group of vehicles, it mHowever, NHTSA cannot become involved in ayour dealer, or aprilia World Service USA, Inc.
To contact NHTSA you may either call the Autoor write to:
NHTSA U.S. DEPARTMENT of TRANSPORTA 400 7th Street SW, (NVS-223) Washin
You can also obtain other information about mo

GUZum_breva750USA_####.book Page 16 Thursday, June 29, 2006 12:31 PM
use and maintenance Breva 16
GENERAL INSTRUCTIONS
The operations preceded by thissymbol must also be repeated on
the opposite side of the vehicle.
If not expressly indicated otherwise, toreassemble the un i t s repea t thedisassembly operations in reverse order.
The terms "right" and "left" refer to the riderseated on the vehicle in the normal ridingposition.
These data indicate:– year of manufacture (Y, 1, 2, …);– modification code (A, B, C, …);– country of homologation (I, UK, A, …)..and are to be supplied to the Local MotoGuzzi Dealer as reference data for thepurchase of spare parts or specif icaccessories of the model you haveacquired.
In this manual the various versions areindicated by the following symbols:
optional
supplied as standard, if provided
VERSION:
Italy Singapore
United Kingdom Slovenia
Austria Israel
Portugal South Korea
Finland Malaysia
Belgium Chile
Germany Croatia
France Australia
Spain United Statesof America
Greece Brazil
Holland South Africa
Switzerland New Zealand
Denmark Canada
Japan
OPT
I SGP
UK SLO
A IL
P ROK
SF MAL
B RCH
D HR
F AUS
E USA
GR BR
NL RSA
CH NZ
DK CDN
J

17use and maintenance Breva
BREAKING-IN.......................................................66STOPPING ...........................................................67PARKING..............................................................67POSITIONING THE VEHICLE ON THE SIDE STAND ................................................68SUGGESTIONS TO PREVENT THEFT ...............70
MAINTENANCE........................................... 70SCHEDULED MAINTENANCE CHART ...............72MAINTENANCE RECORD ...................................75IDENTIFYING INFORMATION.............................79JOINTS WITH SCREW CLAMPS.........................79CHECKING AND TOPPING UP THE ENGINE OIL LEVEL.....................................79FRONT WHEEL.................................................... 82REAR WHEEL ......................................................82FRONT BRAKE CALIPER....................................83CHECKING THE CARDAN SHAFT OIL LEVEL...85REMOVING THE SIDE PANELS..........................85REMOVING THE REARVIEW MIRRORS ............86REMOVING THE FRONT FAIRING .....................86INSPECTING THE FRONT AND REAR SUSPENSIONS.................................................... 87FRONT SUSPENSION.........................................87REAR SUSPENSION ...........................................87CHECKING THE BRAKE PAD WEAR .................88ADJUSTING THE THROTTLE CONTROL...........89SPARK PLUGS.....................................................91CHECKING THE SIDE STAND ............................93BATTERY .............................................................94EXTENDED BATTERY STORAGE ......................95CHECKING AND CLEANING THE TERMINALS .95REMOVING THE BATTERY.................................96CHECKING THE LEVEL OF BATTERY ELECTROLYTE.................................................... 97BATTERY RECHARGING....................................98BATTERY INSTALLATION...................................98CHECKING THE SWITCHES............................... 99CHANGING FUSES............................................ 100ADJUSTING THE HEADLIGHT BEAM............... 102BULBS ................................................................ 103CHANGING HEADLIGHT BULBS ...................... 104CHANGING THE FRONT AND REAR DIRECTION INDICATOR LAMPS ...................... 105
GUZum_breva750USA_####.book Page 17 Thursday, June 29, 2006 12:31 PM
TABLE OF CONTENTSFOREWORD................................................... 2
INTRODUCTION............................................2
SAFETY WARNINGS ..................................... 3
GENERAL SAFETY RULES............................3CARBON MONOXIDE............................................ 3GASOLINE ............................................................. 3HOT COMPONENTS ............................................. 3USED ENGINE OIL ................................................ 3BRAKE FLUID ........................................................ 4CLUTCH FLUID...................................................... 4COOLANT .............................................................. 4BATTERY HYDROGEN GAS AND ELECTROLYTE ............................................. 4
WARNINGS - PRECAUTIONS - GENERAL ADVICE .........................................................5
REPORTING DEFECTS THAT AFFECT SAFETY ........................................ 5ROAD REGULATIONS AND USING THE VEHICLE ........................................................ 5NOISE EMISSION WARRANTY ............................ 5INFORMATION ON THE NOISE AND EXHAUST GAS EMISSION CONTROL SYSTEM ................... 5TAMPERING WARNING........................................ 5VEHICLE IDENTIFICATION NUMBER (V.I.N.) (FRAME NUMBER) ................................................ 6INFORMATION CONTAINED IN THE VEHICLE IDENTIFICATION NUMBER .................................. 6DIGIT MEANING .................................................... 7EVAPORATIVE EMISSION SYSTEM.................. 11MOTO GUZZI S.P.A. - EMISSION CONTROL SYSTEM WARRANTY STATEMENT .................. 12MOTO GUZZI S.P.A. - LIMITED WARRANTY ON EMISSION CONTROL SYSTEM.......................... 13
GENERAL INSTRUCTIONS ......................... 16INDICE GENERALE............................................. 17BASIC SAFETY RULES....................................... 20CLOTHING ........................................................... 25ACCESSORIES.................................................... 26LOAD.................................................................... 26
LOCATIONS OF MAIN PARTS - LEGEND .... 28
LOCATIONS OF CONTROLS/INSTRUMENTS ........................................... 30
INSTRUMENTS AND INDICATORS............. 30TABLE OF INSTRUMENTS AND INDICATORS.. 31MULTIFUNCTION DIGITAL DISPLAY ................. 32
MAIN INDIVIDUAL CONTROLS .................. 34CONTROLS ON THE LEFT SIDE OF THE HANDLEBAR........................................................ 34CONTROLS ON THE RIGHT SIDE OF THE HANDLEBAR........................................................ 35IGNITION SWITCH............................................... 36STEERING LOCK................................................. 36
AUXILIARY EQUIPMENT ............................ 37LOCKING/RELEASING THE SADDLE ................ 37GLOVE/TOOL KIT COMPARTMENTS ................ 37LUGGAGE RACK FASTENER............................. 38WHERE PROVIDED (OR AS AN ACCESSORY) 39ADDITIONAL ACCESSORIES ............................. 39INSTRUCTIONS FOR INSTALLING SOFT BAGS AND TOP CASE ........................................ 40SEAT BAG............................................................ 42
MAIN COMPONENTS .................................. 43FUEL..................................................................... 43LUBRICANTS....................................................... 45ENGINE OIL ......................................................... 45BRAKES ............................................................... 46DISK BRAKES...................................................... 47FRONT BRAKE .................................................... 49REAR BRAKE....................................................... 50TOPPING UP........................................................ 50TIRES ................................................................... 51ENGINE OIL ......................................................... 52ADJUSTING THE REAR BRAKE LEVER CLEARANCE........................................................ 53MUFFLER/EXHAUST SILENCER........................ 53
INSTRUCTIONS .......................................... 54GETTING ON AND OFF THE VEHICLE .............. 54PRELIMINARY CHECKS ..................................... 56TABLE OF PRELIMINARY CHECKS ................... 58STARTING............................................................ 59TAKE-OFF AND RIDING...................................... 62

CHANGING THE TAILLIGHT BULB .................. 106
GUZum_breva750USA_####.book Page 18 Thursday, June 29, 2006 12:31 PM
use and maintenance Breva 18
CHANGING THE LICENSE PLATE BULB......... 107
TRANSPORT ............................................. 108DRAINING THE FUEL TANK............................. 108
CLEANING ................................................ 109PERIODS OF EXTENDED STORAGE .............. 111
TECHNICAL SPECIFICATIONS................. 112LUBRICANT CHART.......................................... 115AUTHORIZED DEALERS AND SERVICE CENTERS .......................................................... 116

SAFE DRIVE
GUZum_breva750USA_####.book Page 19 Thursday, June 29, 2006 12:31 PM

ysical condition and not ill before ridingur vehicle. Do not ride your vehicle whenu are particularly tired or fatigued.cohol, drugs and fatigue are leadinguses of vehicle accidents.any accidents are caused by the rider'sxperience and lack of training. Do note your vehicle until you have receivedin ing f rom a recognized t ra in ing
ganization such as the Motorcycle Safetyundation. Remember that riding a two-eeled vehicle, though easy and fun, isite different from driving a car. Do notsume that you can operate your vehiclefely just because you are a competenttomobile driver.
ver lend your vehicle to others unlessu are sure that they are competent andoperly licensed vehicle operators.
GUZum_breva750USA_####.book Page 20 Thursday, June 29, 2006 12:31 PM
use and maintenance Breva 20
BASIC SAFETY RULESThe instructions given below cover normaloperation of your vehicle and must becarefully observed. By following theserules you will enhance your own safety andthe safety of those around you. You willalso maximize the life and utility of yourvehicle.
Two-wheeled vehicles obviously do notprovide some of the protection provided byautomobiles, therefore it is essential thatyou wear appropriate protective clothing.Especially, never operate your vehiclewithout wearing your helmet, gloves, eyeprotection, a heavy jacket, sturdy footwear,and sturdy full length pants.
However, do not assume that even thebest clothing and helmet will protect you inthe event of an upset or a crash withanother vehicle. At best, this gear providessome protect ion f rom scrapes andscratches, but very little, if any, impactprotection.
Be sure that you meet all the requirementsprescribed by local law, including driver'slicense, minimum age, training, insurance,taxes, vehicle registration, license plate,etc.
When you first receive your vehicle,practice by riding in areas where there islittle traffic. Do not attempt to ride in heavytraffic until you are thoroughly experiencedand riding your vehicle has becomesecond nature to you.
Although this vehicle is legal for operationon freeways and expressways, i t isadvisable to not ride on these high speedhighways until you are thoroughly familiarwith your vehicle, and have attained a highdegree of skill in its operation.
A new vehicle must be carefully broken in,see p. 66 (BREAKING-IN).Before starting the engine, make sure thatthe brakes, clutch, transmission andthrottle controls function properly and thatthe fuel and oil supply is adequate.
The exhaust system, brakes, and someother parts of the vehicle become very hotduring operation. Do not touch any of theseparts.
Some medicines or drugs, i l legal orprescription, and alcohol significantlyincrease the risk of accidents. Do not ridewhile you are under the influence ofa lcoho l o r d rugs , be they i l l i c i t o rprescription. Make sure you are in good
phyoyoAlcaMineridtraorFowhquassaau
Neyopr

21use and maintenance Breva
Always r ide with both hands on thehandlebars and feet on the footrests.Never shift gear without using the clutch, ifthe vehicle is so equipped. Do not operatethe shift lever or other controls suddenly orabruptly. Such misuse can damage theinternal components of the vehicle andconsequently cause seizure, loss ofcontrol, accidents and serious injuries oreven death.
Remain in the seat when you are riding. Donot stand up or attempt to stretch while youare riding your vehicle. If you need to rest,pull over to the side of the road when it canbe safely done.
GUZum_breva750USA_####.book Page 21 Thursday, June 29, 2006 12:31 PM
Observe a l l ru les of the road. Paypar t icu lar a t tent ion to a l l warn ing,regulatory and informational signs.
Avoid showing off (i.e., popping wheelies).Especially observe speed limits; rememberthat road conditions change with theweather and wet and icy pavements arepart icularly dangerous for vehicles,especial ly i f you are riding too fast.Remember that automobile drivers have ahard time seeing two wheeled vehicles, soalways give the automobile the right ofway, even if it is legally yours.
Before changing lanes, look over yourshoulder to make sure that the way isclear. Do not rely exclusively on the rear-view mirror: you may miscalculate thedistance and speed of a vehicle, or youmay even not see it at all.
Avoid obstacles that could damage thevehicle or make you lose control.Do not tailgate, do not attempt to increaseyour gas mileage by following in the slipstream of cars or trucks in front of you.In case of accident motorcycles, scootersand mopeds do not provide the samedegree o f p ro tec t ion ensured byautomobiles. The legs, in particular, areexposed to the risk of being injured.However, the additional installation of legguards may actually increase the risk ofinjuries and their seriousness in case ofaccident.Do not install leg guards available on themarket as spare parts and accessories.Failure to comply with these instructionsmay result in serious injuries or evendeath.
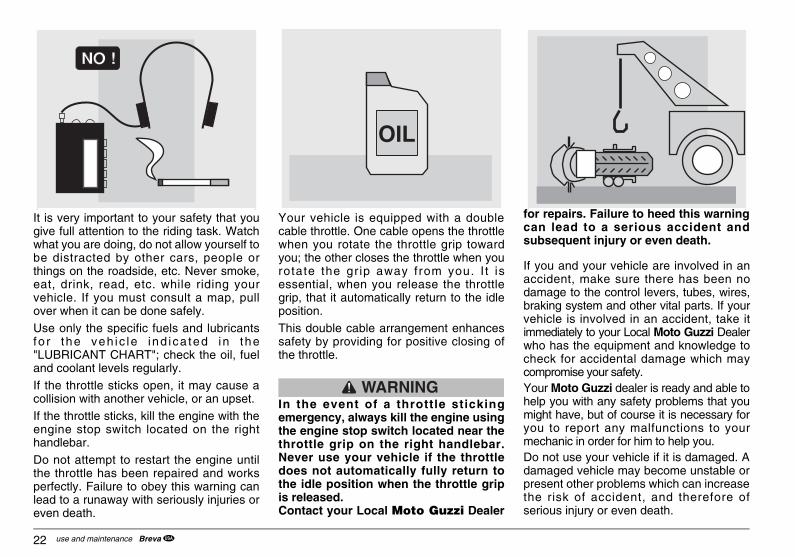
r repairs. Failure to heed this warningn lead to a serious accident andbsequent injury or even death.
you and your vehicle are involved in ancident, make sure there has been nomage to the control levers, tubes, wires,aking system and other vital parts. If yourhicle is involved in an accident, take itmediately to your Local Moto Guzzi Dealero has the equipment and knowledge toeck for accidental damage which maympromise your safety.ur Moto Guzzi dealer is ready and able tolp you with any safety problems that yought have, but of course it is necessary foru to report any malfunctions to yourchanic in order for him to help you. not use your vehicle if it is damaged. Amaged vehicle may become unstable oresent other problems which can increasee risk of accident, and therefore ofrious injury or even death.
GUZum_breva750USA_####.book Page 22 Thursday, June 29, 2006 12:31 PM
use and maintenance Breva 22
It is very important to your safety that yougive full attention to the riding task. Watchwhat you are doing, do not allow yourself tobe distracted by other cars, people orthings on the roadside, etc. Never smoke,eat, drink, read, etc. while riding yourvehicle. If you must consult a map, pullover when it can be done safely.Use only the specific fuels and lubricantsfo r the veh ic le ind ica ted in the"LUBRICANT CHART"; check the oil, fueland coolant levels regularly.
If the throttle sticks open, it may cause acollision with another vehicle, or an upset.If the throttle sticks, kill the engine with theengine stop switch located on the righthandlebar.Do not attempt to restart the engine untilthe throttle has been repaired and worksperfectly. Failure to obey this warning canlead to a runaway with seriously injuries oreven death.
Your vehicle is equipped with a doublecable throttle. One cable opens the throttlewhen you rotate the throttle grip towardyou; the other closes the throttle when yourotate the gr ip away from you. I t isessential, when you release the throttlegrip, that it automatically return to the idleposition.This double cable arrangement enhancessafety by providing for positive closing ofthe throttle.
WARNINGIn the event of a throttle stickingemergency, always kill the engine usingthe engine stop switch located near thethrottle grip on the right handlebar.Never use your vehicle if the throttledoes not automatically fully return tothe idle position when the throttle gripis released.Contact your Local Moto Guzzi Dealer
focasu
If acdabrveimwhchcoYohemiyomeDodaprthse
OIL

23use and maintenance Breva
This vehicle was not designed to beequipped with a sidecar or to be used totow trailers or other vehicles.
Moto Guzzi does not manufacturesidecars or trailers and therefore cannotpredict the effects of such accessories onthe maneuverability or stability of thevehicle: it can only warn that such effectsmay be negative and that any damage tothe vehicle components caused by the useof such accessories will not be covered bythe warranty.
GUZum_breva750USA_####.book Page 23 Thursday, June 29, 2006 12:31 PM
Do not attempt to modify the position,angle or color of your license plate. Do notcover it even with a clear plastic covering.Do not modify any of the safety equipmentof your vehicle, especially such safetyrelated items as directional indicators, rearview mirrors, lights or horns.
Any modification to your vehicle willinvalidate the warranty.
Do not modify your engine in an attempt toincrease the horsepower. This can result inirreparable damage to the engine, as wellas degradation of the performance andhandling of the vehicle which could lead toan upset, and serious injury or even death.
Have your vehicle repaired only withoriginal parts, and use only original MotoGuzz i o r Moto Guzz i approvedaccessories. The use of aftermarketaccessories and parts can seriouslycompromise the safety of your vehicle aswell as its performance and serviceability.Any mod i f i ca t ion wh ich a f fec tsperformance or safety voids your warrantycompletely.
Tampering with the emissions or noisecontrol systems on your vehicle is againstthe law, and can be punished by largefines.In some jurisdictions, it can even lead tothe confiscation of your vehicle.
A12345
ONLY ORIGINALS

adually open and close the throttle, tooid spinning or skidding the rear wheel. rough road surfaces, slow down ande with particular care.
y to avo id w ide open th ro t t lecelerations, unless they are necessaryr such things as passing.
n't allow your engine to "lug," that is, run too low an rpm. Shift down to a lowerar. Also, don't over-rev the engine.serve the redline on the tachometer.member that excessively aggressive
rnering can cause your vehicle's tires toe sideways traction, which can result in upset and serious injury or even death.
GUZum_breva750USA_####.book Page 24 Thursday, June 29, 2006 12:31 PM
use and maintenance Breva 24
Never race other vehicles with yourvehicle.Brake with both the front and rear brakes.The use of one brake only for suddenbraking may cause the vehicle to skid ormake the rider lose control of the vehicleitself.
When riding down a steep hill, use theengine as a brake by selecting the samegear, or a lower gear, than you would useto climb the hill. Use front and rear brakessparingly.
Always ride at the appropriate speed andavoid unnecessary hard acceleration. Thisnot only is safer, but also reduces fuelconsumption and increases the life of thevehicle.If you must ride your vehicle in rainyweather, or on loose surfaces, rememberthat traction is greatly reduced. Underthese conditions, the vehicle must alwaysbe handled gradual ly and smoothly.Sudden acceleration, braking or turningmay make you lose control of your vehicle.When traction is reduced, accelerate andslow using your vehicle's engine brakinginsofar as possible. Avoid rapid, harshapplication of the brakes.
GravOnrid
Tracfo
DoatgeObRecolosan

25use and maintenance Breva
Inevitably, the driver will look right at you,and yet swear that they did not see youbefore they turned directly into your path.Ride alert!
Wear protective clothing, preferably in lightand/or reflecting colors. In this way you willmake yourself more visible to the otherdrivers, thus notably reducing the risk ofbeing knocked down, and you will be moreprotected in case of fall.
Always wear your crash helmet. Manyaccidents are fatal because of injuries tothe head.
This clothing should be very tight-fittingand fastened at the wrists and ankles.Strings, belts and ties should not behanging loose; prevent these and otherobjects from interfering with driving bygetting entangled with moving parts ordriving mechanisms.
GUZum_breva750USA_####.book Page 25 Thursday, June 29, 2006 12:31 PM
Always observe posted and statutoryspeed limits, but do not assume that youcan ride as fast as the speed limit under allroad conditions. Slowing down a little cangreatly increase your safety under all roadconditions.
Do not ride your vehicle off road.
Do not tamper with the muffler system orthe emissions control system of yourvehicle. This is not only bad for theenvironment, it can subject you to seriousfines.
CLOTHINGBefore riding your vehicle, ensure that yourriding gear is in good condition. To beeffective, your helmet must fit properly, andthe visor or other eye protection must beclean.Both research and experience have shownthat drivers of other vehicles often do notsee vehicles or riders. In order to makeyourself more conspicuous to thesedrivers, wear bright reflective clothing,such as a reflective vest, or clothing withreflective sections sewn into the jacket,pants and gloves. Be particularly aware ofapproaching automobiles and trucks thatmight be trying to turn left in front of you.Many vehicle accidents are caused by anopposing automobile driver making a leftturn without warning in front of the vehicle.

ake sure that anything you carry on yourhicle is securely attached, and cannotme loose and jam the wheels, forks, etc. not install any electrical accessories,d do not modify the electrical system ofur vehicle. Anything that could cause anectrical overload or other fault coulduse the vehicle to suddenly stop, thehts to dim or quit, or the horn and otherfety accessories not to work. Use onlynuine Moto Guzzi accessories.
AD not overload your vehicle. Attachgage or packages as close as possible
the center of your vehicle, and distributee load from side to side as evenly asssible, to keep imbalance to a minimum.member that loads tend to loosen withing, so frequently check the security ofur load.
GUZum_breva750USA_####.book Page 26 Thursday, June 29, 2006 12:31 PM
use and maintenance Breva 26
Do not carry sharp objects in your pocketsthat could be dangerous in case of anupset, for example, pens or mechanicalpencils, etc. Also, make sure that yourpassengers follow this recommendation.
ACCESSORIESThe owner of the vehicle is responsible forthe choice, installation and use of anyaccessory.
Installing inappropriate accessories oroverloading the vehicle may result in theinstability of the vehicle itself and causeaccidents, with consequent risk of seriousinjuries or even death. Windshields couldbe particularly dangerous, as they canbreak and injure or cut the rider in case ofaccident. In case of doubts with regard toany accessory you would like to install orany load you would like to carry, firstconsult your Local Moto Guzzi Dealer.
Avoid installing accessories that coverhorns or lights or that could impair theirfunctions, limit the suspension stroke andsteering angle, hamper operation of thecontrols and reduce the distance from theground and the angle of inclination in turns.
Avoid using accessories that hamperaccess to the controls, since this canpro long reac t ion t imes dur ing anemergency.
Fairings and windshields installed on thevehicle may produce aerodynamic forcesthat will affect the stability of the vehicleduring use, especially at high speeds.
MvecoDoanyoelcaligsage
LODolugtothpoReridyo

27use and maintenance Breva
Never carry loosely packaged items; makesure that everything you carry on yourvehicle is carefully secured.
Do not carry packages that protrude fromthe luggage rack or that cover any of thesignal lights, the headlight, or the horn.
Never carry animals or children on theglove compartment or luggage rack.Never exceed the labeled maximum loadfor each saddlebag.
Overloading your vehicle seriously reducesits stability and maneuverability and canlead to an upset with subsequent seriousinjury or death.
KG!
GUZum_breva750USA_####.book Page 27 Thursday, June 29, 2006 12:31 PM
Do not hang anything from your vehiclehandlebars, fenders, or forks, because thiswill upset the handling of your vehicle, andcould prevent you from avoiding anaccident. Failure to heed this warning canlead to an upset with subsequent seriousinjury or even death.
Do not ride with your crash helmet hungfrom the strap because it could easily foulthe wheels, fenders, or forks, causing anupset and subsequent serious injury oreven death.
Carry a passenger only if your vehicle isequipped with passenger footrests,handgrips for the passenger to hold on to,and a passenger saddle.
When carrying a passenger, rememberthat your vehicle's handling is degraded,that the brakes are less efficient, and thecenter of gravity is higher and further to therear.
This makes it more likely that the frontwheel wi l l come up of f the ground,especially on acceleration. Therefore, youshould avoid hard acceleration and hardbraking. Many accidents are caused byinexperienced riders carrying passengers.Remember that allowance must be madefor the extra weight of the passenger for alldriving maneuvers.
Avoid abrupt and excessive acceleration.Always slow down in time and calculatelonger s topp ing and maneuver ingdistances. Failure to comply with theseinstructions may lead to overturning thevehic le or to o ther acc idents , wi thconsequent serious injuries or even death.

) Left passenger footrest ) Swinging arm) Side stand) Left rider footrest) Gearshift lever) Engine oil dipstick) Left front reflector
13 1112
GUZum_breva750USA_####.book Page 28 Thursday, June 29, 2006 12:31 PM
use and maintenance Breva 28
LOCATIONS OF MAIN PARTS - LEGEND
LEGEND1) Headlight2) Instrument panel3) Left rearview mirror 4) Fuel tank cap5) Fuel tank6) Left side panel7) Main fuse holder (30A)
8) Battery9) Rider/passenger saddle
10) Passenger grab handle11) Left rear reflector 12) Tool compartment 13) Rear left shock absorber 14) Saddle lock
15161718192021
9 1087
14151617181920
2 3 4 5 6 9 10871
21
29use and maintenance Breva
5) Electronic control unit6) Right rider footrest7) Cardan shaft8) Rear brake master cylinder9) Right passenger footrest0) Right rear shock absorber 1) Right rear reflector
10
GUZum_breva750USA_####.book Page 29 Thursday, June 29, 2006 12:31 PM
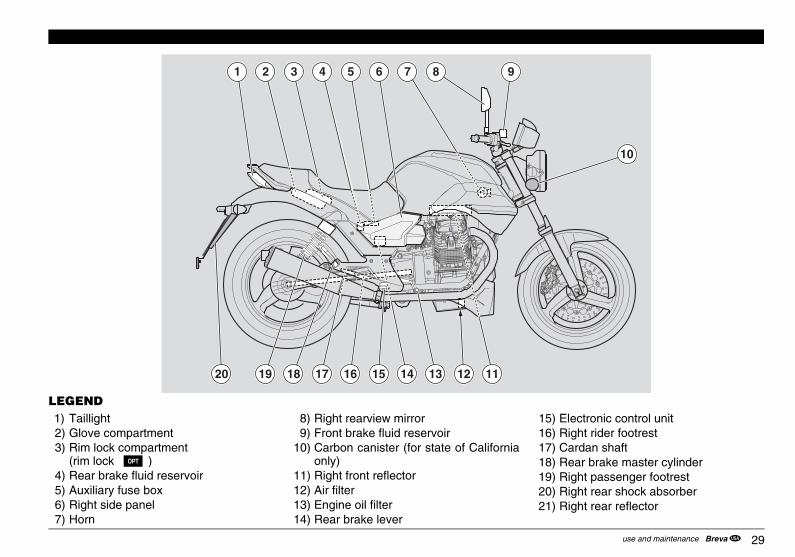
LEGEND1) Taillight2) Glove compartment3) Rim lock compartment
(rim lock )4) Rear brake fluid reservoir5) Auxiliary fuse box6) Right side panel7) Horn
8) Right rearview mirror9) Front brake fluid reservoir
10) Carbon canister (for state of Californiaonly)
11) Right front reflector 12) Air filter13) Engine oil filter14) Rear brake lever
1111122
1920 18 15 13
9861
17 16 1114
2 3 4 5 7
12
OPT

D INDICATORS
TROLS/INSTRUMENTS - LEGENDtor LED ( ) ( ) re LED ( ) arning LED ( )
r LED ( )
ers button( ) ction display)isplay
70 9 8
3 4 5
6
GUZum_breva750USA_####.book Page 30 Thursday, June 29, 2006 12:31 PM
use and maintenance Breva 30
9) Directional indicator switch ( )10)Horn button ( )11)Engine stop switch ( - )12)Start button ( )
9) TRIP button (multifun10)Multifunction digital d11)Speedometer
LOCATIONS OF CONTROLS/INSTRUMENTS
LOCATIONS OF CONTROLS/INSTRUMENTS - LEGEND 1) Clutch lever2) Ignition switch/steering lock ( - - )3) Instruments and indicators4) Front brake lever5) Throttle handgrip6) High beam flasher button( )7) Light dimmer ( - )8) Cold start lever ( )
1 2 3 4 5
6
7
10
8
9
11
12
INSTRUMENTS AN
LOCATIONS OF CON1) Green direction indica2) Blue high beam LED 3) Red engine oil pressu4) Amber fuel reserve w5) Red " " LED 6) Green neutral indicato7) Tachometer8) Red emergency flash
11 1
2
1

31use and maintenance Breva
or when the high beams are flashed.
gine is not running, thus performing a functional
uzzi Authorized Dealer.( ) remains on after starting or comes onmally, this means that the engine oil pressuree immediately and contact a Moto Guzzi
the tank.3 (FUEL).
nition switch is set to " " and the engine is nottem. The LED must shut off three seconds after
is running normally, this means that a problemel injection system. In this case stop the engine
rpm (redline) for the engine, see page 66
imultaneousl
veled To togg lebe tweendisp lays, seepage 32(MULTIFUNCTION DIGITALDISPLAY)
GUZum_breva750USA_####.book Page 31 Thursday, June 29, 2006 12:31 PM
TABLE OF INSTRUMENTS AND INDICATORS
Description Function
Direction indicator LED ( ) Flashes when the turn signal is on..
High beam LED ( ) Lights when the high beam bulb of the headlight is activated,
Engine oil pressure LED ( ) Lights whenever the ignition switch is set to " " and the entest of the LEDIf the light does not come on in this phase, contact a Moto G
If the engine oil pressure LED while the engine is running nor
in the circuit is too low. In this case stop the enginAuthorized Dealer.
Fuel reserve LED ( ) Comes on when approximately 1.32 US gal. of fuel are left inWhen this occurs, refuel as soon as possible, see page 4
Electronic fuel injection control LED( )
Comes on for approximately three seconds whenever the igrunning, thus performing a functional test of the injection systhe engine starts.
If the LED lights while the enginehas occurred in the electronic fu
immediately and contact a Moto Guzzi Authorized Dealer.
Neutral indicator LED ( ) Lights when the gear is in neutral.
Tachometer (rpm) Indicates the engine rpm.Do not exceed the maximum(BREAKING-IN).
Emergency indicator button ( ) Flashes when the emergency button is pressed. It indicates that all direction indicators have been activated s
Mul t i funct iondigital display
Odometer / t r ipmeter (km - mi)
Displays the partial or total number of kilometers or miles tra
Clock Displays the hour and minutes based on the setting..
Externaltemperature
Displays the external temperature.
Speedometer Indicates the driving speed
CAUTION
CAUTION
CAUTION

ometer (km/mi) (ODO)splays the total distance traveled.
is figure will be stored for at least fivears, even if the battery is removed.
ch time the key is turned to ON, the totalometers traveled (ODO) are displayed,gard less o f wh ich func t ion waseviously selected.
ip meter (km/mi) (TRIP)splays the distance traveled since thet time the counter was reset.
reset the trip meter, proceed as follows:
ess the TRIP button (1) to enter "TRIP"ode: the parameters listed in the tablell be displayed in rotation.
ld down the TRIP key (1) for more thanseconds.
GUZum_breva750USA_####.book Page 32 Thursday, June 29, 2006 12:31 PM
use and maintenance Breva 32
MULTIFUNCTION DIGITAL DISPLAYWhen you turn the ignition key to " ", thefollowing dashboard lights will come on:– (Red) engine oil pressure LED ( ), which
will remain lit until you start the engine.– all segments of the multifunction digital
display light for approximately 2 secondsfor test ing purposes. The LCD thenswitches to show the total km (ODO).
– The lights of both multifunction displayinstruments and the hazard button comeon.
– The EFI LED lights for approximately 3seconds if the switch is set to " ".
– The pointers of both instruments go to fullscale, then return to zero.
Press the TRIP button (1) repeatedly todisplay the fol lowing information, insequence:
OdDi
Thye
Eakilrepr
TrDilas
To
prmwi
Ho3 TRIP
Odometer (km/mi) (ODO)
TRIP
Trip meter (km/mi) (TRIP)
TRIP
Clock
TRIP
External temperature °C/°F
TRIP
1

33use and maintenance Breva
HAZARD button operationPressing the hazard button turns on all fourdirection indicators at the same time, whilethe key itself flashes. The HAZARD blinkerstays on even when the key is removedfrom the ignition, but cannot be turned off.In order to switch off the hazard blinker,you must first set the ignition switch to" ", then press the HAZARD button.
GUZum_breva750USA_####.book Page 33 Thursday, June 29, 2006 12:31 PM
ClockSet the clock as follows:
press the TRIP button (1) to enter "clock"mode: the parameters listed in the tablewill be displayed in rotation.
Hold down the TRIP key (1) for more than3 seconds.
When you enter the hours setting mode,the hour digits will flash. The hours will by 1hour for every second the "TRIP" button isheld down. The hours will stop flashing 3seconds after the "TRIP" button has beenreleased. When the hours sett ing isconfirmed you will automatically enterminutes setting mode. The minutes digitswill flash. The minutes will increase by 1minute for every second the "TRIP" buttonis held down. The minutes will stop flashing3 seconds after the "TRIP" button hasbeen released, and the new setting isconfirmed.
NOTE The clock setting mode will onlywork when the motorcycle is at a standstilland with the engine off.
External temperature (°C / °F)Indicates the external temperature reading.When the external temperature is below37.4°F, the LCD switches to ICE mode towarn against the possibility of icy roads.Th is d isp lay mode f lashes the a i rtemperature regardless of the functiondisplayed. ICE mode remains active for 10seconds, then the LCD returns to thepreviously displayed function. If theexternal temperature remains below37.4°F, the ICE procedure is repeated upto 3 times at 5-minute intervals.
In the event o f an e r ro r in the a i rtemperature sensor (faulty or disconnectedsensor), two flashing horizontal lines willappear on the display.
- ) the high beam; set to " " to enable the
R BUTTON ( )sh the high beam in case of danger or
ton to stop flashing the high beam.
( )ownward to activate the starter for cold
er, return the lever ( ) to its original
GUZum_breva750USA_####.book Page 34 Thursday, June 29, 2006 12:31 PM
use and maintenance Breva 34
MAIN INDIVIDUAL CONTROLS
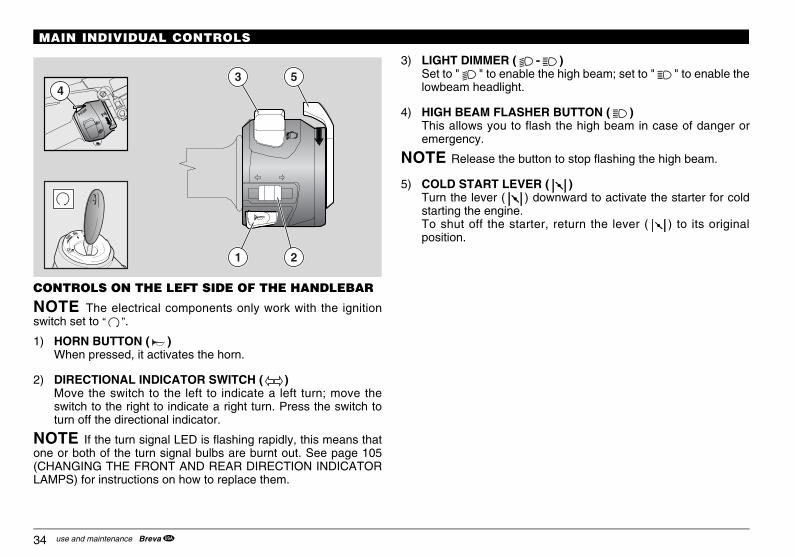
CONTROLS ON THE LEFT SIDE OF THE HANDLEBAR
NOTE The electrical components only work with the ignitionswitch set to “ ”.
1) HORN BUTTON ( )When pressed, it activates the horn.
2) DIRECTIONAL INDICATOR SWITCH ( )Move the switch to the left to indicate a left turn; move theswitch to the right to indicate a right turn. Press the switch toturn off the directional indicator.
NOTE If the turn signal LED is flashing rapidly, this means thatone or both of the turn signal bulbs are burnt out. See page 105(CHANGING THE FRONT AND REAR DIRECTION INDICATORLAMPS) for instructions on how to replace them.
3) LIGHT DIMMER (Set to " " to enablelowbeam headlight.
4) HIGH BEAM FLASHEThis allows you to flaemergency.
NOTE Release the but
5) COLD START LEVERTurn the lever ( ) dstarting the engine.To shut off the startposition.
43 5
1 2
35use and maintenance Breva
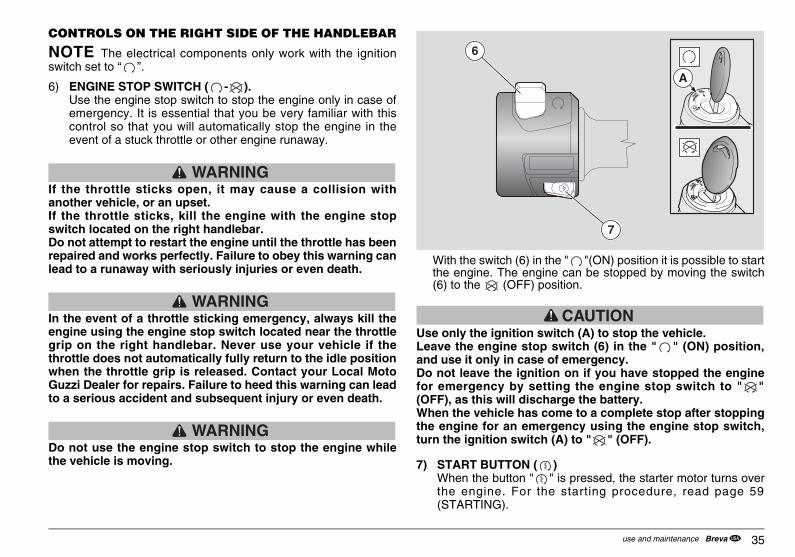
n the " "(ON) position it is possible to startgine can be stopped by moving the switch position.
CAUTION switch (A) to stop the vehicle.p switch (6) in the " " (ON) position,e of emergency.ition on if you have stopped the engineetting the engine stop switch to " "charge the battery. come to a complete stop after stoppingergency using the engine stop switch,
ch (A) to " " (OFF).
( )" is pressed, the starter motor turns over
the starting procedure, read page 59
7
A
GUZum_breva750USA_####.book Page 35 Thursday, June 29, 2006 12:31 PM
to a serious accident and subsequent injury or even death.
WARNINGDo not use the engine stop switch to stop the engine whilethe vehicle is moving.
for emergency by s(OFF), as this will disWhen the vehicle hasthe engine for an emturn the ignition swit
7) START BUTTON When the button "the engine. For (STARTING).
CONTROLS ON THE RIGHT SIDE OF THE HANDLEBAR
NOTE The electrical components only work with the ignitionswitch set to “ ”.
6) ENGINE STOP SWITCH ( - ).Use the engine stop switch to stop the engine only in case ofemergency. It is essential that you be very familiar with thiscontrol so that you will automatically stop the engine in theevent of a stuck throttle or other engine runaway.
WARNINGIf the throttle sticks open, it may cause a collision withanother vehicle, or an upset.If the throttle sticks, kill the engine with the engine stopswitch located on the right handlebar.Do not attempt to restart the engine until the throttle has beenrepaired and works perfectly. Failure to obey this warning canlead to a runaway with seriously injuries or even death.
WARNINGIn the event of a throttle sticking emergency, always kill theengine using the engine stop switch located near the throttlegrip on the right handlebar. Never use your vehicle if thethrottle does not automatically fully return to the idle positionwhen the throttle grip is released. Contact your Local MotoGuzzi Dealer for repairs. Failure to heed this warning can lead
With the switch (6) ithe engine. The en(6) to the (OFF)
Use only the ignitionLeave the engine stoand use it only in casDo not leave the ign
6

osition Function Key removal
teering lock
The steeringis locked. It is possibleneither to startthe engine noropera te thelights
The key maybe removed.
Ne i the r theeng ine no rlights can beswitched on.
The key maybe removed.
The eng ineand l i gh tsmay beswitched on.
The key mayno t beremoved.
GUZum_breva750USA_####.book Page 36 Thursday, June 29, 2006 12:31 PM
use and maintenance Breva 36
IGNITION SWITCHThe ignition switch (1) is located on the forkhead of the steering shaft.
NOTE The key operates the ignitionswitch/steering lock, fuel reservoir cap lockand saddle lock.
Two keys ( including one spare) aredelivered with the vehicle.
NOTE Store the spare key separatelyfrom the vehicle.
STEERING LOCK
WARNINGNever turn the key to " " whilerunning, to avoid losing control of thevehicle.
OPERATIONTo lock the steering:
u Turn the handlebar all the way to the left.u Turn the key to " ". u Press the key and turn it to the position
( )u Remove the key.
P
S

37use and maintenance Breva
GLOVE/TOOL KIT COMPARTMENTS
To access the g love / tool k i tcompartments:
u Remove the passenger saddle, see page37 (LOCKING/RELEASING THESADDLE).
GUZum_breva750USA_####.book Page 37 Thursday, June 29, 2006 12:31 PM
AUXILIARY EQUIPMENT
LOCKING/RELEASING THE SADDLE u Place the vehicle on the stand, see page
68 (POSITIONING THE VEHICLE ONTHE SIDE STAND).
u Insert the key (1) in the seat lock.u Turn the key (1) counter-clockwise, lift
and pull the seat (2) out from behind.
NOTE Before lowering and locking thesea t (2 ) , make su re you have no taccidentally left the key in the glove/tool kitcompartments.
To lock the saddle (2):
u Place the front part of the saddle in itshousing and lower the rear.
u Press on the rear end until the locksnaps into place.
WARNINGBefore riding, make sure that the seat(2) is properly locked.
Below the saddle is a handy rim lockcompar tment (d isc lock )compartment. Simply release and removethe door (3) to access it.
2
1
3
OPT

GGAGE RACK FASTENER all luggage rack may be fastened
ove the back of the saddle, using elasticnds hooked to the two fasteners (10).
ximum allowed weight: 11 lbs (5 Kg)
WARNINGe luggage must be compact in sized firmly anchored in place.
1010
GUZum_breva750USA_####.book Page 38 Thursday, June 29, 2006 12:31 PM
use and maintenance Breva 38
The tools supplied include:– 5, 6 ,8 mm bent male hex wrenches (2);– 13 - 14 mm double open-end wrench (3);– 22 - 27 mm double open-end wrench (4);– 22 mm pipe wrench for spark plug (5);– dual-tipped Philips/blade screwdriver (6);– shock absorber preload adjustment wrench
(7);– pliers (8);– 14 mm hex adapter;– two tool bags (9).
Maximum allowed weight: 11 lbs (5 kg)inside the glove compartment + 11 lbs(5 kg) inside the tool kit compartment. LU
Smabba
Ma
Than
5
7
8
69

39use and maintenance Breva
SSORIESable:
s
te for further details:
cessories
GUZum_breva750USA_####.book Page 39 Thursday, June 29, 2006 12:31 PM
WHERE PROVIDED (or as an accessory)The following are available:– center stand (1), – headlight fairing (2)– soft side bags (3) – luggage rack (4)– soft top case (5)
ADDITIONAL ACCEThe following are avail– disk lock – large windshield– 30/40 l. side pannier
Please visit our web si
www.motoguzzi.it - Ac
1
2 35
4

sure that the support is properly in placethe fastener lower/upper seats. lock the bag onto the fastener, turn they inside the bag clockwise by 90°
GUZum_breva750USA_####.book Page 40 Thursday, June 29, 2006 12:31 PM
use and maintenance Breva 40
INSTRUCTIONS FOR INSTALLING SOFT BAGS AND TOP CASECarefully follow instructions for correctins ta l la t ion and cor rec tdistribution/fastening of any load wheninstalling the bags and top case. This isimportant to avoid vehicle handling frombeing compromised, which could result in afall, serious accident, or even death.
Fastening the bag and top caseu Move the bag close to the fasteneru Center the bag fastener onto the bag
support small tube section, and movethe bag downward until it clicks in place.
Enin Toke

41use and maintenance Breva
Retainers of the two side buckles musta lways be secured to bag bodyfasteners A, no matter if bellow is openor closed.
Use the suitable protection in case ofrain.
A
A
GUZum_breva750USA_####.book Page 41 Thursday, June 29, 2006 12:31 PM
Removing the bag and top caseu Work the top lever as shown and lift the
bag off the support.
Note: use the first zip to open the bag,use the second one to increase bagcapacity by opening the bellow.

GUZum_breva750USA_####.book Page 42 Thursday, June 29, 2006 12:31 PM
use and maintenance Breva 42
SEAT BAG Seat bag is supplied together with the topcase and can be ins ta l led on thepassenger seat. It is therefore impossibleto ride with a passenger when bag is fitted.
Carefully follow instructions for correctins ta l la t ion and cor rec tdistribution/fastening of any load wheninstalling the bags and top case. This isimportant to avoid vehicle handling frombeing compromised, which could result in afall, serious accident, or even death.
Fastening the bagu Position the bag on the passenger seat.u Fasten the four straps 1 (two on each
side) to the side bag support frame, andtension them so as to center the loadonto the seat.
If fitted together with top case, ensure thatthe Velcro fastener 2 on both parts isproperly jointed in the contact area.
2
1

43use and maintenance Breva
Use only premium unleaded gasoline witha minimum octane rating of (M+R)/2method 90.FUEL TANK CAPACITY
(including reserve): 4.75 US gal (18 b ).RESERVE TANK: 1.32 US gal (5 b ).
REFUELINGTo refuel, proceed as follows:
Place the vehicle on the stand, see p. 68(POSITIONING THE VEHICLE ON THESIDE STAND).
If dirt has accumulated on or around thefuel filler cap, wipe the cap and thesurrounding area with a clean cloth.Prevent any foreign material fromgetting into the fuel tank, as this couldlead to serious engine damage.
GUZum_breva750USA_####.book Page 43 Thursday, June 29, 2006 12:31 PM
MAIN COMPONENTS
FUEL
WARNINGGasoline is extremely flammable and canbecome explosive in some conditions. Therefore, it is necessary to refuel andcarry out maintenance operationsinvolving the fuel system in a well-ventilated area with the engine off. Do not refuel or do any maintenance onthe fuel system with the engine running. Do not smoke while refueling or near fuelvapors. Never allow any portion of the fuelsystem to come into contact with openflames, sparks or other heat sources. Becareful to avoid spilling fuel when you arerefueling. Spilled fuel could ignite when itcontacts hot engine or exhaust systemsurfaces. If you accidentally spill somefuel, make sure that it is wiped up orcompletely evaporated before starting thevehicle. Since gasoline expands in the fuel tankwhen the vehicle is sitting in the opensun, never fill the tank completely to thebrim. Leave at least one inch ofexpansion space. Avoid any contact between the fuel andyour skin, and avoid inhaling fuel vapors.Never attempt to siphon fuel from onecontainer to another using your mouth assuction for a siphon hose.
WARNINGGasoline is poisonous and carcinogenicand contains chemical substances thatcause birth defects and otherreproductive problems. If gasoline shouldbe accidentally spilled on the skin orclothes, immediately wash it off with soapand water and change clothes.Should you accidentally spill gasoline inyour eyes, flush with abundant water andcontact a health professionalimmediately. Should you accidentally getgasoline into your mouth, do not inducevomiting. Drink a large quantity of milk orclear water and contact a healthprofessional immediately. Never try to siphon gasoline by sucking itwith your mouth. Use a manual pump orsimilar system.If your vehicle overturns it will leakgasoline, which is extremely flammable.Flames or sparks may ignite this, whichwill not only destroy the vehicle but alsocould seriously damage surroundingproperty and cause serious injuries oreven death.
ALWAYS KEEP GASOLINE AWAYFROM CHILDREN.
DISPOSE OF UNWANTED GASOLINEPROPERLY, DO NOT DUMP IT INTOSTORM SEWERS OR INTO A SINK ORTOILET.
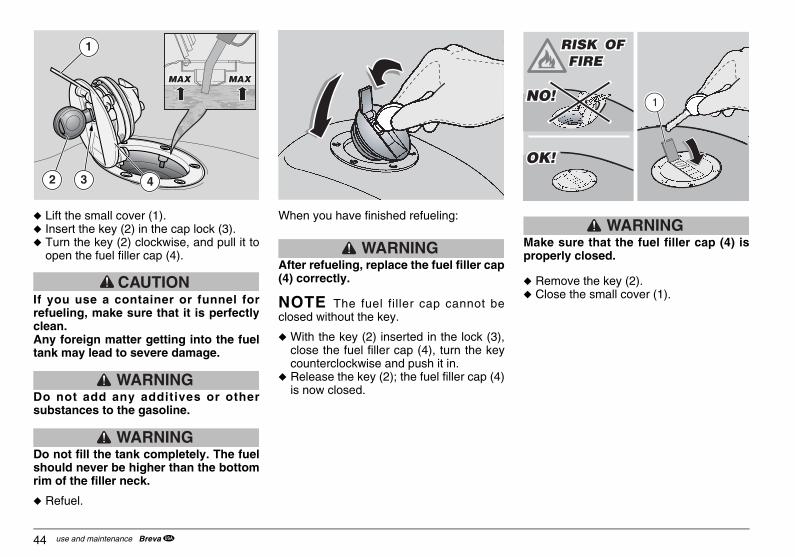
WARNINGake sure that the fuel filler cap (4) isoperly closed.
Remove the key (2).Close the small cover (1).
GUZum_breva750USA_####.book Page 44 Thursday, June 29, 2006 12:31 PM
use and maintenance Breva 44
u Lift the small cover (1).u Insert the key (2) in the cap lock (3).u Turn the key (2) clockwise, and pull it to
open the fuel filler cap (4).
CAUTIONIf you use a container or funnel forrefueling, make sure that it is perfectlyclean.Any foreign matter getting into the fueltank may lead to severe damage.
WARNINGDo not add any additives or othersubstances to the gasoline.
WARNINGDo not fill the tank completely. The fuelshould never be higher than the bottomrim of the filler neck.
u Refuel.
When you have finished refueling:
WARNINGAfter refueling, replace the fuel filler cap(4) correctly.
NOTE The fuel filler cap cannot beclosed without the key.
u With the key (2) inserted in the lock (3),close the fuel filler cap (4), turn the keycounterclockwise and push it in.
u Release the key (2); the fuel filler cap (4)is now closed.
Mpr
u
u
1
2 3 4

45use and maintenance Breva
CAUTIONPerform these maintenance operationsat double the specified intervals if yourvehicle is often used in rainy or verydusty conditions, on unpaved roads, orin any kind of competition.
Check the engine oil level every 300 mi(500 km), see p. 79 (CHECKING ANDTOPPING UP THE ENGINE OIL LEVEL).
CAUTIONHave your Local Moto Guzzi Dealerchange the engine oil after the first 600mi (1,000 km), and every 6213 mi (10000km) thereafter.
NOTE Use high-quality 5W - 40 oil, seep. 115 (LUBRICANT CHART).
GUZum_breva750USA_####.book Page 45 Thursday, June 29, 2006 12:31 PM
LUBRICANTS
WARNINGProper vehicle lubrication is critical to safeoperation. Failure to maintain properlubricant levels or to use the proper type ofclean, new lubricant, can lead to an engineor transmission seizure with subsequentaccident, serious injury or death.
WARNINGUse latex gloves for the maintenanceoperations that require contact with usedoil. Used engine oil may cause skincancer if repeatedly left in contact withthe skin for prolonged periods. Althoughthis is unlikely unless you handle used oilon a daily basis, it is advisable tothoroughly wash your hands with soapand water after handling used oil.
KEEP OIL AWAY FROM CHILDREN.DISPOSE OF OIL PROPERLY.
CAUTIONBe very careful to avoid spills when puttingoil in your vehicle. Clean up any spilled oilimmediately, because oil can damage thefinish of your vehicle. Also, oil on the tirescreates an extremely slippery and thereforedangerous situation.
CAUTIONIn case of oil leakage do not ride yourvehicle. Before using the vehicle, haveit repaired by your Local Moto GuzziDealer.
ENGINE OIL
WARNINGIf the engine oil pressure warning lightLED " " (1) remains on after theengine has started, or if it comes onwhile you are riding your vehicle, thismeans that the oi l system is notdeveloping sufficient pressure. In thiscase, stop the engine immediately andcontact your Local Moto Guzzi Dealer.Failure to heed this warning can lead toengine seizure, upset, and seriousinjury or even death.
1

WARNINGke special care to ensure that brake
sks are not greasy or oily, especiallyter per forming maintenanceerations or checks.
ake sure that the brake lines are notisted or worn.ke care to prevent water and dustm accidentally entering the system.
e recommend that you wear latexoves when servicing the hydraulicstem.e brake fluid may cause irritation inntact with the skin or eyes.
GUZum_breva750USA_####.book Page 46 Thursday, June 29, 2006 12:31 PM
use and maintenance Breva 46
BRAKES
WARNINGDo not ride your vehicle with worn ormalfunctioning brakes! The brakes arethe most important safety system onyour vehicle, and using the bike withbrakes that are anything less thanperfect is very l ikely to lead to acollision or upset, with consequent riskof serious injury or death.
Check the brake pad wear, as shown onp. 88 (CHECKING THE BRAKE PADWEAR). Have your brakes serviced byyour Local Moto Guzzi Dealer
WARNINGWet conditions seriously degrade theperformance of your brakes. When theroad is wet from rain, you should planto use double normal s toppingdistances s ince both the brakesthemselves and the traction of the tireson the road are reduced by thepresence of water. Water on the brakes from washing yourvehicle, or splashed up from wet roads,or crossing puddles or ditches, can wetthe brakes sufficiently to greatly reducetheir effectiveness. Failure to heedthese warnings may lead to a seriousaccident with consequent r isk ofserious injury or even death.
NOTE This vehicle is equipped withfront and rear disk brakes, with separatehydraulic circuits.
The following information refers to a singlebrake system, but is applicable to both.
WARNINGThe brakes are extremely important toyour safety. Do not use the vehicle if thebrakes do not work perfectly. Alwayscheck the brake efficiency before riding.
WARNINGSudden changes in clearance or elasticresistance on the brake lever are due toproblems with the hydraulic system.Contact a Moto Guzzi AuthorizedDealer, should you be in doubt as towhether your braking system is workingperfectly, and if you are unable to carryout normal checks.
Tadia fopMtwTafroWglsyThco

47use and maintenance Breva
NOTE This vehicle is equipped with twofront and rear disk braking systems, withseparate hydraulic circuits.The front brake system is single disk (leftside).The rear brake system is single disk (leftside).The following information refers to a singlebrake system, but is applicable to both.When the disk pads wear out, the fluidleve l decreases to au tomat ica l l ycompensate for their wear.
GUZum_breva750USA_####.book Page 47 Thursday, June 29, 2006 12:31 PM
WARNINGCarefully wash any parts of the bodythat have come into contact with thefluid. In case of contact with the eyes,see an eye doctor or other physician.DISPOSE OF THE FLUID INCOMPLIANCE WITH ENVIRONMENTALREGULATIONS.KEEP OUT OF REACH OF CHILDREN.
CAUTIONWhen using brake fluid, be careful notto spill it onto the plastic and paintedparts, as it will damage them.
DISK BRAKES
WARNINGThe brakes are the parts that mostensure your safety, and for this reasonthey must always be kept in perfectworking order. Check them before everytrip.
A dirty disk soils the pads, reducingbraking effectiveness. Dirty pads must be replaced, while thedirty disk must be cleaned using a highquality solvent.The brake fluid must be changed everytwo years by a Moto Guzzi AuthorizedDealer.Use the type of brake fluid specified inthe lubricant chart, see page 115(LUBRICANT CHART).

ve the brake disks checked by a Motozzi Authorized Dealer after the first 930
i (1500 km) and every 2000 km (1243 mi)ereafter.fore departure, check the brake fluid
vel in the reservoirs, see page 49RONT BRAKE), page 50 (REARAKE), as well as the wear of the pads,e page 88 (CHECKING THE BRAKED WEAR). Have the brake f lu id
anged every 20000 km (12427 mi) orery 2 years by a Moto Guzzi Authorizedaler.
WARNINGver use the vehicle if you notice anyid leaking from the brake system.
GUZum_breva750USA_####.book Page 48 Thursday, June 29, 2006 12:31 PM
use and maintenance Breva 48
The front brake fluid reservoir is located onthe right handlebar, near the front brakelever connection.The rear brake fluid reservoir is locatedbehind the footrest support bracket, on theright side of the vehicle.
NOTE Perform maintenance operationsat double the prescribed frequency if thevehicle is often used in rainy or very dustyconditions, on unpaved roads, or in anykind of competition.
HaGumthBele(FBRsePAchevDe
Neflu

49use and maintenance Breva
Do not add addi t ives or o thersubstances to the fluid.If using a funnel or other tool, makesure it is perfectly clean.u Top up the tank (2) with brake fluid, see
page 115 (LUBRICANT CHART), untilthe proper level is reached, between thetwo reference marks "MIN" and "MAX".
CAUTIONNever top up past the "MAX" level.
Top up to "MAX" only when new padsare installed.Do not top up to the "MAX" level withworn brake pads, since this will causefluid to leak out when the pads arechanged.Check the braking efficiency.In case of excessive brake lever strokeor reduced efficiency of the brakingsystem, contact a Moto GuzziAuthor ized Dealer , as i t may benecessary to bleed the system.
GUZum_breva750USA_####.book Page 49 Thursday, June 29, 2006 12:31 PM
FRONT BRAKECHECKING
NOTE Carry out these checks only on afirm, flat surface such as a concrete garagefloor.
u Place the vehicle on the stand, see page68 (POSITIONING THE VEHICLE ONTHE SIDE STAND).
u Turn the handlebar all the way to the right.u Make sure that the fluid in the tank is
above the reference mark "MIN".MIN= minimum level
MAX= maximum level
If the fluid does not at least reach the "MIN"reference mark:
CAUTIONThe fluid level gradually decreases asthe pads become worn.
u Check the brake pad wear, see page 88(CHECKING THE BRAKE PAD WEAR)
and the disk.If the pads and/or disk are not to bereplaced, top up.
TOPPING UP
Carefully read page 46 (BRAKES).
CAUTIONDanger of brake fluid leaking. Do notoperate the front brake lever with thescrews (1) loosened or, especially, withthe brake fluid reservoir cover removed.
u Use a short Philips screwdriver tounscrew the two screws (1) of the brakefluid reservoir (2).
WARNINGAvoid prolonged exposure of the brakefluid to open air.
The brake fluid is hygroscopic andabsorbs moisture in contact with air.
Leave the brake fluid reservoir openONLY as long as necessary for toppingup.
u Raise and remove the cover (3)including the screws (1).
u Remove the gasket (4).
CAUTIONTo avoid spilling brake fluid whiletopping up, make sure to avoid rockingthe vehicle.
1 1
3
4
2

CAUTION avoid spilling the brake fluid whilepping up, keep the f luid in theservoir parallel to the tank rim (inrizontal position).
o not add addi t ives or o therbstances to the fluid.using a funnel or other tool, makere it is perfectly clean.Remove the gasket (3).Top up the tank (1) with brake fluid, seepage 115 (LUBRICANT CHART), untilthe proper level is reached between thetwo reference marks "MIN" and "MAX".
CAUTIONp up to "MAX" only when new padse installed. Do not top up to theAX" level with worn brake pads,
nce this will cause fluid to leak outen the pads are changed.
eck the braking efficiency.
case of excessive brake lever stroke reduced efficiency of the brakingstem, contact a Moto Guzzi
uthor ized Dealer , as i t may becessary to bleed the system.
GUZum_breva750USA_####.book Page 50 Thursday, June 29, 2006 12:31 PM
use and maintenance Breva 50
REAR BRAKECHECKING
NOTES Carry out these checks only ona firm, flat surface such as a concretegarage floor.
u Keep the vehicle in an upright positionso that the fluid in the reservoir (1) isparallel to the cap (2).
u Make sure that the fluid in the tank isabove the reference mark "MIN".
MIN= minimum levelMAX= maximum level
If the fluid does not at least reach the "MIN"reference mark:
CAUTIONThe fluid level gradually decreases asthe pads become worn.u Check the wear of the brake pads, page
88 (CHECKING THE BRAKE PADWEAR) and the disk.
If the pads and/or disk are not to bereplaced, top up.
TOPPING UP
Carefully read page 46 (BRAKES).
CAUTIONDanger of brake fluid leaking. Do notoperate the rear brake lever with thebrake fluid reservoir cap loosened orremoved.
WARNINGAvoid prolonged exposure of the brakefluid to open air.
The brake fluid is hygroscopic andabsorbs moisture in contact with air. Leave the brake fluid reservoir openONLY as long as necessary for toppingup.u Unscrew and remove the cap (2).
TotorehoDsuIf suu
u
Toar"Msiwh
Ch
InorsyAne
2
1 1
3
2

51use and maintenance Breva
WARNINGTires must be replaced with others ofthe type and model recommended bythe manufacturer , see page 112(TECHNICAL SPECIFICATIONS); usingtires other than those prescribed mayadversely affect the driving ease of thevehicle.
Do not install tires with inner tube onrims for tubeless tires and vice-versa.Make sure the inflation valves (2) arealways capped, to prevent the tires fromdeflating suddenly. Change, repair, maintenance andbalancing operations are very importantand must therefore be performed byqualified technicians using appropriatetools.For this reason, it is advisable to havethe above operations carried out by aMoto Guzzi Authorized Dealer orqualified tire specialist.
GUZum_breva750USA_####.book Page 51 Thursday, June 29, 2006 12:31 PM
TIRESThis vehicle is equipped with tubeless tires.
NOTE Perform maintenance operationsat double the prescribed frequency if thevehicle is often used in rainy or very dustyconditions, on unpaved roads, or in anykind of competition.
WARNINGCheck the inflation pressure every twoweeks at ambient temperature. Check the condition of the tires andtheir inflation pressure at ambienttemperature after the first 930 mi (1500km) and every 6213 mi (10000 km)thereafter, see page 112 (TECHNICALSPECIFICATIONS).If the tires are warm, the measurementwill not be correct.Always measure before and after anylong trips.If the inflation pressure is too high, theshocks o f rough ter ra in are notabsorbed and are transmitted to thehandlebars , mak ing for anuncomfor tab le r ide and a lsodiminishing the vehicle's ability toadhere to curves. If, on the contrary, the inflation pressureis too low, the sidewalls (1) are undergreater stress and the tire may slip onthe rim or become loose, leading to lossof control over the vehicle.
In case of sudden braking the tirescould even come off the rims entirely. Finally, the vehicle may skid on curves.
WARNINGCheck the surface and wear of the tires,since tires in poor condition do notadhere proper ly to the road andadversely affect vehicle handling. Some types of tires, approved for useon this vehicle, come equipped withwear indicators. Various kinds of wear indicators areavailable. Ask your local dealer forinstructions on how to check for wear. Visually inspect the tire condition andhave them replaced if they are worn.Have the tire replaced if worn or if thetread area contains any puncture largerthan 5 mm across.After repairing a tire, have the wheelsbalanced.
2

CAUTIONoceed with care.
not spill any oil! careful not to spil l oi l on anymponents, the work area and therrounding area . I f necessary ,
oroughly clean any traces of oil. case of leaks or malfunctions,ntact a Moto Guzzi Authorizedaler.riodically check the engine oil level, seege 79 (CHECKING AND TOPPING UPE ENGINE OIL LEVEL). change the engine oil contact a Motozzi Authorized Dealer, see page 72
CHEDULED MAINTENANCE CHART).
OTE Use good quality oil, see page5 (LUBRICANT CHART).
GUZum_breva750USA_####.book Page 52 Thursday, June 29, 2006 12:31 PM
use and maintenance Breva 52
If the tires are new, they may be coveredwith a slippery coating: drive carefullyfor the first few miles. Do not grease thetires with inappropriate substances. Ifthe tires are old, even if they are notcompletely worn out, they may hardenand be unable to ensure goodadherence.
In this case replace the tires.
MINIMUM TREAD DEPTH LIMIT (3):
front and rear 0.12 inc, (3mm), and in anycase not less than prescribed by currentregulations in the country where thevehicle is used.
ENGINE OIL
WARNINGEngine oil can seriously damage skinthrough repeated and prolongedexposure.
Always wash your hands thoroughlyafter handling it.KEEP OUT OF REACH OF CHILDREN. ALWAYS DISPOSE OF OIL INCOMPLIANCE WITH ENVIRONMENTALREGULATIONS.Put it in a sealed container and take it tothe filling station where you usually buyit, or to an oil salvage center.We recommend that you wear latexgloves while performing maintenanceoperations.
CAUTIONIf the engine oil pressure LED " "lights while the engine is runningnormally, this means that the engine oilpressure in the circuit is too low.
In this case check the engine oil level,see page 79 (CHECKING AND TOPPINGUP THE ENGINE OIL LEVEL); if the levelis not correct , s top the engineimmediately and contact a Moto GuzziAuthorized Dealer.
Pr
DoBecosuthIncoDePepaTHToGu(S
N11

53use and maintenance Breva
MUFFLER/EXHAUST SILENCER
WARNINGIt is prohibited to tamper with the noisecontrol system.
The vehicle owner is hereby warnedthat the law may prohibit the following:
– the removal and any action,performed by any person unless formaintenance, repair or replacementpurposes, a imed at render inginoperative any device or elementbuil t into a new vehicle for thepurpose of contro l l ing no iseemissions before said vehicle is soldor delivered to the final purchaser, orwhile the vehicle is in use;
– the use of the vehicle after saiddevice or element has been removedor rendered inoperative.
Check the muffler/exhaust silencer andmuffler lines, making sure there are nosigns of rust or holes and that the exhaustsystem is in good working order.If which the noise produced by the exhaustsystem increases, contact a Moto GuzziAuthorized Dealer immediately.
GUZum_breva750USA_####.book Page 53 Thursday, June 29, 2006 12:31 PM
ADJUSTING THE REAR BRAKE LEVER CLEARANCE The b rake lever i s e rgonomica l l ypositioned during vehicle assembly.The brake lever c learance may beadjusted if necessary:
u Loosen the lock nut (1).u Unscrew the master cylinder push rod
(2) to ensure a minimum clearance of0.02-0.04 inch (0.5-1 mm) between itand the master cylinder piston.
CAUTIONMake sure there is enough idle strokeon the lever (3). If not, the brake willremain slightly applied, causing thebrake components to wear outprematurely.
Lever (3) idle stroke: 0.16 inch (4 mm)(measured at the end of the lever).u Lock the master cylinder push rod (2)
using the lock nut (1).
CAUTIONAfter completing the adjustment, makesure that the wheel turns freely whenthe brake is released.
Check the braking efficiency.If necessary, contact a Moto GuzziAuthorized Dealer.
2 1 3

OTE The rider must always be the firstrson to get on the vehicle and the last tot off and it is the rider who controls thelance and stability of the vehicle when
e passenger gets on and off.
GUZum_breva750USA_####.book Page 54 Thursday, June 29, 2006 12:31 PM
use and maintenance Breva 54
INSTRUCTIONS
GETTING ON AND OFF THE VEHICLEThe instructions below must be followedwith the maximum care in order to avoidany injury to persons and damage toproperty and to the vehicle, caused by thefalling of the rider or the passenger fromthe vehicle and/or the falling or overturningof the vehicle itself.
WARNINGRisk of falling and overturning.Proceed with care.The operations and movements required toget on and of f the vehic le must beperformed with complete freedom ofmovement and with the hands free fromobstruction caused by holding objects, thehelmet, gloves or glasses. Get on and offthe vehicle only from the left side andalways with extended side stand.
CAUTIONDo not apply the load of your weight orof the passenger’s weight onto the sidestand.
The stand has been designed to supportthe weight of the vehicle and a minimumload, without the rider and the passenger.
Getting on the vehicle into the ridingposit ion with extended side stand ispermi t ted on ly fo r the purpose o fpreventing the vehicle from falling oroverturning and does not envision theloading of the weight of the rider andpassenger onto the side stand.While getting on and off, the weight of thevehicle may cause an unbalance and theconsequent loss of equilibrium, and thevehicle may fall or overturn.
Npegebath

55use and maintenance Breva
WARNINGMake sure that the parking surface isfree from obstacles, firm and flat.
u With the left shoe heel, extend the sidestand completely by acting on theappropriate lever.
NOTE If it is impossible for you to placeboth feet on the ground, place the right footon the ground (in case of unbalance, theleft side of the vehicle is prevented fromfalling over by the side stand) and keep theleft foot ready to rest on the ground.
u Place both feet on the ground, keepingthe vehicle in balance in riding position.
u Instruct the passenger how to safely getoff the vehicle.
CAUTIONRisk of falling and overturning. Makesure that the passenger has got off thevehicle. Do not load your weight ontothe side stand.
u Incline the vehicle until the stand restson the ground.
u Grasp the handlebar correctly and getoff the vehicle.
u Rotate the handlebar completelyleftwards.
u Lift the passenger footpegs.
CAUTIONMake sure that the vehicle is stable.
GUZum_breva750USA_####.book Page 55 Thursday, June 29, 2006 12:31 PM
When getting on and off the vehicle, thepassenger must make careful movements,in order to maintain the balance of thevehicle and the rider.
NOTE The rider is responsible forinstructing the passenger how to safely geton and off the vehicle.
The vehicle is equipped with specialpassenger footpegs to make it easier to geton and off the vehicle. The passenger mustalways use the left footpeg to get on andoff the vehicle.
Neither get off, nor try to get off the vehicleby jumping or stretching your leg down tothe ground. In both cases this wouldcompromise the stability and balance ofthe vehicle.
NOTE Bags or objects strapped to therear of the vehicle can represent anobstacle while getting on and off.
NOTE In any case, perform a controlled
movement with your right leg, which mustavoid striking and safely pass the rear partof the fairing or the luggage withoutcreating unbalance.
GETTING ON THE VEHICLEu Grasp the handlebar correctly and get
on the vehicle without loading yourweight onto the side stand.
NOTE If it is impossible for you to placeboth feet on the ground, place the right footon the ground (in case of unbalance, theleft side of the vehicle is prevented fromfalling over by the side stand) and keep theleft foot ready to rest on the ground.
u Place both feet on the ground andstraighten the vehicle into riding positionwhile keeping it in balance.
NOTE The rider must not extract orattempt to extract the passenger footrestwhile seated astride the vehicle, becausethis might compromise the stability andbalance of the vehicle.
u Have the passenger extract the twopassenger footpegs.
u Instruct the passenger how to safely geton the vehicle.
u Kick the side stand completely backusing your left foot.
GETTING OFF THE VEHICLEu Choose the parking area, see p. p. 67
(To park the vehicle:).u Stop the vehicle, see p. p. 67
(STOPPING).

CAUTIONthe message " " (1) appears whilee engine is running normally, it meansat the electronic control unit hastected an error.
many cases the engine continues ton, with limited performance; contact aoto Guzzi Author ized Dealermediately.
1
GUZum_breva750USA_####.book Page 56 Thursday, June 29, 2006 12:31 PM
use and maintenance Breva 56
PRELIMINARY CHECKS
WARNINGBefore departure, always perform apreliminary inspection of the vehicle tomake sure it functions correctly andsafe ly , see page 58 (TABLE OFPRELIMINARY CHECKS).
Failure to perform these operations maylead to serious personal injury ordamage to the vehicle.
Do not hesitate to contact a Moto GuzziAuthorized Dealer if there is anything youdo not understand about how somecontro ls work, or i f you suspect orencounter any malfunctions.
This inspection takes very little time, butmakes riding a great deal safer.
NOTE This vehicle is designed so thatany serious malfunction stored in theelectronic control unit can be identified inreal time.
Whenever the ignition switch is set to" ", the message " " (1) will appearon the right side of the multifunctiondisplay, for approximately three seconds. The LED " " (1) also remains lit for thefirst 3 seconds after the motorcycle isstarted, to make sure the injection systemis working properly.
If ththde
InruMim

57use and maintenance Breva
GUZum_breva750USA_####.book Page 57 Thursday, June 29, 2006 12:31 PM
CAUTIONIf the throttle sticks open, it may causea collision with another vehicle, or anupset.If the throttle sticks, kill the engine withthe engine stop switch located on theright handlebar.Do not attempt to restart the engineuntil the throttle has been repaired andworks perfectly. Failure to obey thiswarning can lead to a runaway withseriously injuries or even death.
CAUTIONIn the event of a throttle stickingemergency, always kill the engine usingthe engine stop switch located near thethrottle grip on the right handlebar.Never use your vehicle if the throttledoes not automatically fully return tothe idle position when the throttle gripis released. Contact your Local MotoGuzzi Dealer for repairs. Failure to heedthis warning can lead to a seriousaccident and subsequent injury or evendeath.If any fastener is loose, the rider maylose control of the vehicle and risk anaccident. Both situations may cause seriousinjuries or even death.

Page
and make sure there are no 46, 47 ,49 ,50, 88
d completely, in all steering 89
45, 79
r any damage. 51
-
old, the clearance should be -
e or slack. -
e stand is raised or lowered, 93, 99
-
43
35
order. Replace the bulbs or 103, 104, 105, 106
anic. 85
GUZum_breva750USA_####.book Page 58 Thursday, June 29, 2006 12:31 PM
use and maintenance Breva 58
TABLE OF PRELIMINARY CHECKS
Part Check
Front and rear disk brake Check the operation, the idle stroke of the control levers, the fluid level, leaks. Check the wear of the pads. Top up the fluid reservoir if necessary.
Throttle Make sure that it works smoothly and that it can be opened and closepositions. Adjust and/or lubricate if necessary.
Engine oil Check and/or top up if necessary.
Wheels/Tires Check the surface condition of the tires, the inflation pressure, wear and foRemove any foreign matter that may be stuck in the tread grooves.
Brake levers Make sure they work smoothly.Lubricate the joints if necessary (rear brake control).
Clutch Check the operation and idle stroke of the control lever (with the engine cless than 1 mm).The clutch must operate without jerking and/or slipping.
Steering Make sure that the steering rotates smoothly and evenly, with no clearanc
Side stand Make sure that it works properly. Make sure that there is no friction when thand that the spring tension returns it to its normal position.Lubricate couplings and joints if necessary.
Fasteners Make sure that the fasteners are not loose. Adjust or tighten if necessary.
Fuel tank Check the fuel level and top up if necessary. Check for any leaks from the circuit. Make sure the fuel reservoir cap is properly closed.
Engine stop switch ( - ) Make sure it is in good working order.
Lights, warning lights, horn,brake l ight swi tches andelectrical devices
Make sure the acoustic and visual warning devices are in good workingrepair any faults.
Transmission fluid Check. If it needs to be topped up, contact a Moto Guzzi Authorized Mech

59use and maintenance Breva
u Make sure that the light dimmer (1) is setto " ".
u Set the engine stop switch (2) to " ".u Turn the key (3) and set the ignition
switch to " ".
At this point:– -the indicators of the two instruments go to
base scale, then return to zero.– -the (red) engine oil pressure LED " "
(4) on the instrument panel lights, andremains lit until the engine is started;
– -the multifunction digital display (5) teststhe digits, activating them all at once forapproximately two seconds, then switchesto display the total km (ODO);
– -whenever the ignition switch is set to " ",the LED " " (6) lights for approximatelythree seconds;
– -the fuel pump will pressurize the fuelsupply circuit, making a buzzing noise forapproximately three seconds.
CAUTIONIf the fuel reserve LED " " (7) on theinstrument panel lights, this means thatthere is still 1.32 US gal (5 b) of fuelavailable. Top up the fuel level as soonas possible, see page 43 (FUEL).
GUZum_breva750USA_####.book Page 59 Thursday, June 29, 2006 12:31 PM
STARTING
WARNINGThis vehicle is quite powerful and mustbe used gradually and with the greatestcare.
Do not place any items inside the frontfairing (between the handlebar andinstrument panel), in order to not hinderrotation of the handlebar and visibilityof the instrument panel
NOTES Before starting the engine,carefully read the chapter "safe riding", seepage 5 (SAFE RIDING).
WARNINGExhaust fumes conta in carbonmonoxide , a substance that isextremely toxic if inhaled.
Avoid starting the engine in enclosed orpoorly ventilated spaces.
Failure to observe this recommendationcould cause you to lose consciousnessor even lead to death by asphyxiation.
NOTES With the side stand down, theengine may be started only if the gears arein neutral; in this case, the engine will shutoff if you attempt to engage the gears.
With the side stand retracted, the enginemay be started in neutral or with the gearsengaged and the clutch lever pulled.
u Straddle the vehicle as though to ride it,see page 54 (GETTING ON AND OFFTHE VEHICLE).
u Make sure that the stand is completelyretracted.
3
1 211
12
4
5
7 6
10
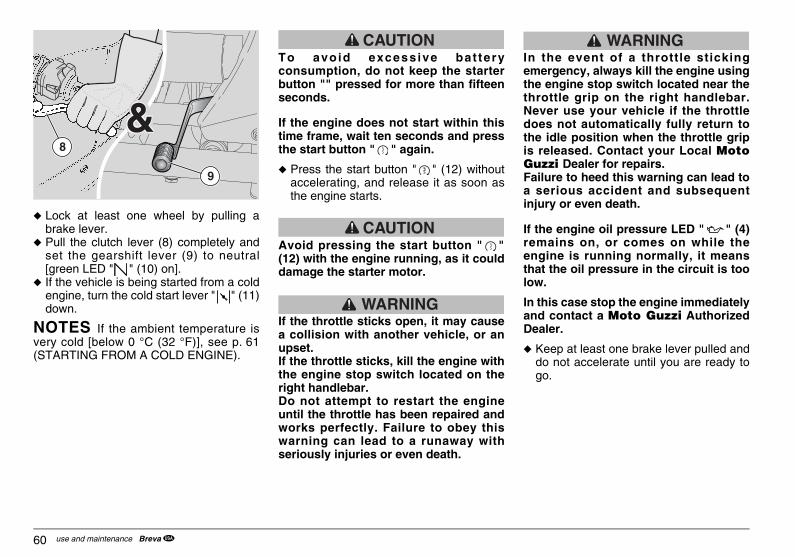
WARNING the event of a throttle stickingergency, always kill the engine using
e engine stop switch located near therottle grip on the right handlebar.ver use your vehicle if the throttlees not automatically fully return to
e idle position when the throttle grip released. Contact your Local Motozzi Dealer for repairs.
ilure to heed this warning can lead toserious accident and subsequentjury or even death.
the engine oil pressure LED " " (4)mains on, or comes on while thegine is running normally, it means
at the oil pressure in the circuit is toow.
this case stop the engine immediatelyd contact a Moto Guzzi Authorizedaler.
Keep at least one brake lever pulled anddo not accelerate until you are ready togo.
GUZum_breva750USA_####.book Page 60 Thursday, June 29, 2006 12:31 PM
use and maintenance Breva 60
u Lock at least one wheel by pulling abrake lever.
u Pull the clutch lever (8) completely andset the gearshift lever (9) to neutral[green LED " " (10) on].
u If the vehicle is being started from a coldengine, turn the cold start lever " " (11)down.
NOTES If the ambient temperature isvery cold [below 0 °C (32 °F)], see p. 61(STARTING FROM A COLD ENGINE).
CAUTIONTo avoid excessive bat teryconsumption, do not keep the starterbutton "" pressed for more than fifteenseconds.
If the engine does not start within thistime frame, wait ten seconds and pressthe start button " " again.
u Press the start button " " (12) withoutaccelerating, and release it as soon asthe engine starts.
CAUTIONAvoid pressing the start button " "(12) with the engine running, as it coulddamage the starter motor.
WARNINGIf the throttle sticks open, it may causea collision with another vehicle, or anupset.If the throttle sticks, kill the engine withthe engine stop switch located on theright handlebar.Do not attempt to restart the engineuntil the throttle has been repaired andworks perfectly. Failure to obey thiswarning can lead to a runaway withseriously injuries or even death.
InemththNedothisGuFaa in
If reenthlo
InanDe
u
9
8

61use and maintenance Breva
If the engine starts:
u Release the start button " " (12) andthe throttle handgrip (13).
u Turn the cold start lever " " (11)upwards.
u If idling is unstable, twist the throttlehandgrip (13) slightly and frequently toeven out the engine speed.
If the engine does not start:
Wait a few seconds and repeat theprocedure for (STARTING FROM A COLDENGINE).
GUZum_breva750USA_####.book Page 61 Thursday, June 29, 2006 12:31 PM
CAUTIONDo not take off suddenly when theengine is cold.
To limit emissions of air pollutants aswell as fuel consumption, warm up theengine by riding at low speed for thefirst few miles.
u Turn the cold start lever " " (11) uponce the engine has warmed up.
CAUTIONIf the LED " " (6) in the instrumentpanel comes on while the engine isrunning normally, it means that theelectronic control unit has detected anerror.
In many cases the engine continues torun, with limited performance; contact aMoto Guzzi Author ized Dealerimmediately.
STARTING FROM A COLD ENGINEIf the ambient temperature is low (aroundor below 0°C/32°F) it may be difficult tostart the engine at first.
In this case:
u Turn the cold start lever “ “ (11)downward.
u Insist for at least ten seconds with thestart button " " (12) pressed, and at thesame time turn the throttle handgrip (13)moderately.
12
13

WARNINGyou carry a passenger, instruct
m/her not to move around unduly, and keep his/her body aligned with yoursring turns. Failure to do this couldset the stability of the vehicle.
fore departure, make sure that theand is completely retracted.
OTE Before riding away, be sure thate rear v iew mir rors are correct lyjusted.
2
3
4
GUZum_breva750USA_####.book Page 62 Thursday, June 29, 2006 12:31 PM
use and maintenance Breva 62
TAKE-OFF AND RIDING
WARNINGThis vehicle is quite powerful and mustbe used gradually and with the greatestcare.
Do not place any items inside the frontfairing (between the handlebar andinstrument panel), in order to not hinderrotation of the handlebar and visibilityof the instrument panel
NOTES Before departure, carefullyread the chapter "safe riding", see page 5(SAFE RIDING).
CAUTIONIf the LED fuel reserve " " (1) on theinstrument panel lights while you areriding, it means that 1.32 US gal (5 b) offuel is still available.
Top up the fuel level as soon aspossible, see page 43 (FUEL).
WARNINGWhen traveling without a passenger,make sure that the passenger footrestsare closed.
Keep your hands firmly on the grips andyour feet on the footrests while riding.
NEVER RIDE IN ANY OTHER POSITION.
If hitoduup
Best
Nthad
1

63use and maintenance Breva
CAUTIONDo not exceed the recommended rpm,see page 66 (BREAKING-IN).
u Increase the speed by gradually turningthe thrott le handgrip (2) (Pos. B),without exceeding the recommendedrpm, see page 66 (BREAKING-IN).
2
34
5
GUZum_breva750USA_####.book Page 63 Thursday, June 29, 2006 12:31 PM
CAUTIONWhen the vehicle is new to you, practicelooking in the rear view mirrors.Reflecting surfaces are convex, thereforeobjects seem to be farther away than theyactually are. The mirrors provide a wideangle view, and only experience will allowyou to correctly determine how far behindyou following vehicles are.
To start: u Start the engine, see page 59
(STARTING).u Properly adjust the angle of the rearview
mirrors.u With the throttle handgrip (2) released
(Pos. A) and the engine idling, pull theclutch lever (3) completely.
u Engage the first gear by pushing thegearshift lever down (4).
u Release the brake lever (pulled duringstarting).
WARNINGIf you release the clutch lever tooabruptly when starting out, it may causethe engine to cut out or the vehicle tojerk forward.
Never acce lerate abrupt ly orexcessively when releasing the clutchlever, so as to prevent the clutch fromslipping (released too slowly) or thefront wheel from rearing up (releasedtoo quickly).
u Slowly release the clutch lever (3) andsimultaneously accelerate, turning thethrottle handgrip (2) moderately (Pos.B).
The vehicle will begin to move forward.
u For the first miles, ride at moderatespeed to allow the engine to warm up.

downshift":
Release the throttle handgrip (2) (Pos.A).If necessary, pull the brake leversmoderately and decrease the vehiclespeed.Pull the clutch lever (3) and lower thegearshift lever (4) to engage the lowergear.Release the brake levers if pulled.Release the clutch lever and acceleratemoderately.
CAUTIONthe message " " appears on thestrument panel while the engine isnning normally, it means that theectronic control unit has detected anror.
2
3
4
5a
4a
3a
2a
5a
4a
3a
2a
GUZum_breva750USA_####.book Page 64 Thursday, June 29, 2006 12:31 PM
use and maintenance Breva 64
To engage the second gear:
CAUTIONShift gears fairly quickly but withoutgreat force. Develop a "feel" for shiftingwith your left toe. Never lug the engine,that is, running it at too low an rpmwhich can damage the vehicle's engine,and causes rough and shudderingacceleration.
u Release the throttle handgrip (2) (Pos.A), operate the clutch lever (3), raise thegearshift lever (4), release the clutchlever (3) and accelerate.
u Repeat the last two operations andswitch to a higher gear.
CAUTIONIf the engine oil pressure LED " " (5)lights while the engine is runningnormally, it means that the oil pressureengine in the circuit is too low.
In this case stop the engine immediatelyand contact a Moto Guzzi AuthorizedDealer.
Shifting from a higher to a lower gear,known as "downshifting", should becarried out in the following situations:
u When riding downhill or braking, toincrease the braking action using theengine compression.
u When riding uphill, if the gear engaged isnot suited to the speed (high gear,moderate speed) and the engine rpmdecreases.
CAUTIONShif t down one gear a t a t ime;downshifting by several gears maymake you exceed the maximum rpm(redline).
Before and while downshifting, releasethe throttle and decelerate to avoidredlining.
To
u
u
u
u
u
If inrueler
2
34
5

65use and maintenance Breva
WARNINGBe attentive to any obstacle or changein the road surface.
Rough roads, train or trolley tracks,manhole covers, indications painted onthe road surface, the metal plates ofwork sites, all become slippery in therain. Use the utmost caution, avoidingsharp turns and tilting the vehicle aslittle as possible.
Always use the direction indicators tosignal lane or direction changes in time,avoid ing abrupt and dangerousmovements.
Turn off the indicators immediately afterchanging lane or direction.
Exercise extremely caution whenpassing or being passed by othervehicles.
In case of rain, the water splashescaused by large vehic les cansignificantly reduce visibility; the airwave may cause you to lose control ofthe vehicle.
GUZum_breva750USA_####.book Page 65 Thursday, June 29, 2006 12:31 PM
In many cases the engine continues torun, with limited performance; contact aMoto Guzzi Author ized Dealerimmediately.
To avoid overheating the clutch, keepthe engine running with the vehicle atrest, engaged gears and pulled clutchlever as little as possible.
WARNINGDo not open and close the throttlerepeatedly and continually, as thiscould cause you to inadvertently losecontrol of the vehicle. When braking,decelerate and pull both brakes toensure even deceleration, exerting theappropriate pressure on the brakingdevices.
Pulling only the front or rear brakeconsiderably reduces the braking force,and runs the risk of locking a wheel andthus losing grip on the road surface.
When stopping uphil l , deceleratecompletely and use only the brakes tokeep the vehicle steady.
Using the engine to keep the vehiclesteady may cause the c lu tch tooverheat.
Before braking on curves, reduce speedor brake while continuing to ride at thesame constant or slightly acceleratingmoderate speed; avoid slamming on thebrakes: this greatly increases yourlikelihood of skidding.
If you repeatedly use the brakes ondownhill stretches, the friction gasketscould overheat, leading to reducedbraking effectiveness. Take advantageof engine compression by downshiftingusing both brakes intermittently.
Never ride downhill with the engine shutoff.
On wet or slippery roads (snow, ice,mud, etc.), drive at moderate speed,avoid braking abruptly or turning thesteering column sharply; this couldcause you to lose adherence to the roadand fall.

Between the first 930 mi (1500 km ) and1243 mi (2000 km), use a livelier ridingstyle, varying speed and opening thethrottle to maximum acceleration onlybriefly, to ensure better coupling of thecomponents; never exceed 7,500 rpm(see table).After the first 1243 mi (2000 km) you canexpect better engine performance,w i thou t however exceed ing themaximum allowed [7600 rpm].
aximum recommended engine rpm
Mileage mi (km) (rpm)
0 – 930 (0 – 1500) 5000
30 – 1243 (1500 – 2000) 6000
over 1243 ( 2000) 7600
GUZum_breva750USA_####.book Page 66 Thursday, June 29, 2006 12:31 PM
use and maintenance Breva 66
BREAKING-INThe engine must be properly broken in toensure a long l i fe and dependableoperation.
If possible, while breaking in your vehicle,ride on hilly roads and/or roads with manycurves so that the engine and transmissionundergo lots of speed changes.
Vary your speed often while breaking in thevehicle.
Th is a l lows you to "cha rge" thecomponents to work , as we l l as"discharge" them and cool the engineparts.
Although it is important to work the enginecomponents during the breaking-in period,be very careful not to go overboard.
NOTE The vehicle does not achieve itstop performance until after the first 1243 mi(2000 km).
Obey the following rules:u Do not open the throttle fully when the
engine speed is low, either during orafter breaking-in.
u Use the brakes cautiously during the first62 mi (100 km), avoiding sharp andprolonged braking. This ensures that thepad friction material will settle properlyaround the brake disks.
u Never exceed 5000 rpm during the first930 mi (1500 km) traveled.
WARNINGAfter the first 930 mi (1500 km), have aMoto Guzzi Authorized Dealer performthe checks l is ted in the "end ofbreaking-in" column of the scheduledmaintenance chart , see page 72(SCHEDULED MAINTENANCE CHART),to avoid hurting yourself or otherpeople and/or damaging the vehicle.
u
u
M
9

67use and maintenance Breva
CAUTIONDo not apply the load of your weight orthe passenger's weight to the sidestand.
To park the vehicle:
u Choose the parking area.u Stop the vehicle, see page 67
(STOPPING).u Set the engine stop switch (3) to " ".u Turn the key (4) and set the ignition
switch (5) to " ".
3 4
5
GUZum_breva750USA_####.book Page 67 Thursday, June 29, 2006 12:31 PM
STOPPING
WARNINGWhenever possible, avoid stopping orslowing the vehicle abruptly, andslamming the brakes.
WARNINGFai lure to comply wi th theseinstructions may cause an accidentwith consequent risk of serious injuriesor even death.
u Release the throttle handgrip (1) (Pos.A), pull the brakes gradually and, at thesame time, downshift to decelerate, seepage 62 (TAKE-OFF AND RIDING).
Once the speed has decreased, butbefore the vehicle has come to acomplete stop:
u Operate the clutch lever (2) to preventthe engine from stalling.
When the vehicle has come to a completestop:u Set the gearshift lever to neutral (green
LED " " on).u Release the clutch lever (2).u When stopping only briefly, keep at least
one brake activated at all times.
PARKINGIt is very important to choose a suitableparking area, in observance of road signsand the indications given below.
WARNINGPark the vehicle on a flat, hard surfaceto keep it from falling over.
Do not lean the vehicle against a wall orlay it on the ground.
Make sure that the vehicle, especiallyits hottest parts, do not represent ahazard to people, including children. Donot leave the vehicle unattended withthe engine running or with the keyinserted in the ignition.
WARNINGIf the vehicle falls or inclines too far,fuel may spill out of the tank.
Gasoline is extremely flammable and insome condi t ions can becomeexplosive.

Push the side stand with your right foot,extending it completely (8). Tilt the vehicle until the stand is restingon the ground.Twist the handlebar all the way to theleft.
WARNINGake sure the vehicle is stable whenrked. If it falls down, it will certainly damaged and could injure others asll.
WARNING
7
8
6
GUZum_breva750USA_####.book Page 68 Thursday, June 29, 2006 12:31 PM
use and maintenance Breva 68
WARNINGCarefully follow the directions forgetting on and off the vehicle, see page54 (GETTING ON AND OFF THEVEHICLE).u Following the instructions given, wait
until your passenger (if present) hasgotten off before alighting from thevehicle yourself.
u Lock the steering, see page 36(STEERING LOCK)and remove the key(4).
WARNINGMake sure the vehicle is stable.
POSITIONING THE VEHICLE ON THE SIDE STAND
SIDE STANDTo rest the vehicle on the side stand whileseated astride the vehicle, see page 54(GETTING ON AND OFF THE VEHICLE).
During any operation (such as moving thevehicle) that requires retracting the stand,proceed as follows to replace the vehicleon the stand:
WARNINGMake sure that the parking area surfaceis free from obstacles, firm and flat.
u Choose the parking area, see page 67(PARKING).
u Grasp the left handgrip (6) and rest yourright hand on the upper rear of thevehicle (7).
u
u
u
Mpabewe

69use and maintenance Breva
WARNINGMake sure that the vehicle is stable.
WARNINGLet the side stand up.
10
BB
CC
GUZum_breva750USA_####.book Page 69 Thursday, June 29, 2006 12:31 PM
CENTER STAND
WARNINGIt is forbidden to position the vehicle onthe center stand while seated astridethe vehicle in riding position.
WARNINGMake sure that the parking surface isfree of obstacles, stable and level.
u Choose a suitable parking area, seepage 67 (PARKING).
u Grasp the left grip (6) and the passengergrab rail (9).
CAUTIONFor safety reasons, the lowering of theside stand is suggested, in order toprevent the vehicle from falling oroverturning in case of unbalance.
NOTE Do not let the side stand touchthe ground. Keep the vehicle in verticalposition.
u Press the side stand with your right footand extend it completely (8).
u Push onto center stand lever (10) (Pos.A) and rest it onto the ground.
CAUTIONProceed with care.The positioning of the vehicle on thecenter stand may be difficult, since thevehicle is very heavy. Release thehandgrip (6) and handle (9) only whenthe vehicle is steady on the stand.
u Load your weight on the lever (10)(Pos.B) of the center stand and at thesame time move your center of gravitytowards the rear part of the vehicle(Pos.C).
9
10
6
10
AA

AINTENANCE
refully read page 2 (FOREWORD)andNTRODUCTION) , p . 3 (SAFETYARNINGS)and (GENERAL SAFETYULES) , p . 5 (WARNINGS -ECAUTIONS - GENERAL ADVICE).
WARNINGsk of fire.eep fue l and other f lammablebstances away from the electricalmponents.fore beginning any maintenanceeration or vehicle inspection, stop
e engine, remove the key (1) from thenition switch (2), wait until the engined the exhaust system have cooledwn and if possible lift the vehicle by
eans of the proper equipment, on firmd flat ground. fore proceeding, make sure that theom in which you are working isoperly ventilated.
GUZum_breva750USA_####.book Page 70 Thursday, June 29, 2006 12:31 PM
use and maintenance Breva 70
SUGGESTIONS TO PREVENT THEFT
CAUTIONDo not use any “brake lock” devices.Fai lure to heed this warning canseriously damage the braking systemand lead to an accident thus provokingserious injuries or death.NEVER leave the key (1) in the ignitionswitch (2), always use the steering lock" " (LOCK).Try to park your vehicle in a safe place, if atall possible, in a garage or other protectedplace.Lock your vehicle up using a chain andpadlock around the rear wheel. Chain therear wheel to the swinging arm.Make sure that all legal requirements:registration, license plates, insurance, etc.are in order.
Write down your name, address andte lephone number and the veh ic leidentification number in the space below,to facilitate finding the owner in case yourvehicle is recovered after theft.
SURNAME: ...............................................
NAME: ......................................................
ADDRESS: ...............................................
...................................................................
TELEPHONE NO.: ...................................
NOTE Very often stolen vehicles areidentified thanks to the data written in theuse/maintenance manual.
M
Ca( IWRPR
RiKsucoBeopthigandomanBeropr

71use and maintenance Breva
NOTES This vehicle is designed so thatany serious malfunction stored in thecontrol unit can be identified in real time.
Whenever the ignition switch is set to" ", the message " " appears lit onthe instrument panel for approximatelythree seconds.
CAUTIONIf the message " " (1) appears whilethe engine is running normally, it meansthat the electronic control unit hasdetected an error.
In many cases the engine continues torun, with limited performance; contact aMoto Guzzi Author ized Dealerimmediately.
GUZum_breva750USA_####.book Page 71 Thursday, June 29, 2006 12:31 PM
Be careful to avoid hot parts of theengine and exhaust system. They arehot enough to cause serious burns.Avoid the temptation to hold any part ofthe vehicle in your mouth. The coatings,platings and components used are notedible and, in some cases, are noxiousor even toxic.
CAUTIONIn general, reassembly is performed inreverse order of the disassemblyinstructions given here.For some maintenance operations,especially those in which your handsare likely to come in contact withcoolant, engine oil, gasoline, or brakef lu id , i t is advisable to use th indisposable gloves, such as those madeof latex, rubber or nitrile.
The routine maintenance operationsdescribed in this manual can usually beperformed by the user. However, in somecases, speci f ic tools and technicalexpertise may be required.
Do not hesitate to contact your Local MotoGuzzi Dealer for repairs who has all thelatest factory information and tools toproperly service your vehicle.
Remember that many service operations, ifdone improperly, can be very hazardous. Ifyou have any questions about your abilityto carry out the operations described here,contact your Local Moto Guzzi Dealer.
In all cases, personally carry out the"preliminary checking operations" after anymaintenance, see p. 56 (PRELIMINARYCHECKS).
WARNINGRemember that tightening torques of allfasteners on the wheels, brakes, axles,suspension are extremely important toensure safety, and must be maintainedat the prescribed values.
Regularly check the tightening torquesof the fasteners, and always use atorque wrench when installing them.Failure to adhere to this warning couldcause critical fasteners to loosen andbe subsequently lost, which couldcause a wheel to lock or other handlingproblems with consequent overturning,and the risk of serious injury or evendeath.
WARNINGFasteners must be ne i therovertightened or undertightened. If theyare overtightened, the threads may bedamaged and the fasteners will bedestroyed, whereas i f they areundertightened, they can vibrate andbecome lost. Obviously, under thesecircumstances, a serious accident withresultant serious injury or death couldensue.

LSO BE CARRIED OUT BY THE USER).
mi (7500 km) months
Every 9320 mi (15000 km) or 24 months
every 4660 mi/7500 km:
start-up:
ery trip and every 1243 mi (2000 km):
or dusty areas, on unpaved roads, or for
GUZum_breva750USA_####.book Page 72 Thursday, June 29, 2006 12:31 PM
use and maintenance Breva 72
SCHEDULED MAINTENANCE CHART
OPERATIONS TO BE CARRIED OUT BY THE Moto Guzzi Authorized Dealer (WHICH MAY A
Components End of breaking-in[625 mi (1000 km)]
Every 4660 or 12
Spark plugs (*)
Engine oil filter (*)
Fork
Light operation/direction
Light system
Safety switches
Brake fluid
Engine oil
Tires
Tire pressure (**)
Engine idle rpm
Tightening battery terminals
Tightening head bolts
Engine oil pressure LED at every
Brake pad wear before ev
= check and clean, adjust, lubricate or replace if necessary. = clean; = replace; = adjust.Perform the maintenance operations more frequently than indicated if the vehicle is used in rainycompetitive riding.(*) = For competitive use, replace every 2330 mi (3750 km).(**) = Check every two weeks or at the intervals indicated.

73use and maintenance Breva
60 mi (7500 km) 12 months
Every 9320 mi (15000 km) or 24 months
or 12427 mi (20000 km)
d every 14000 mi (22500 km) thereafter:
nd every 14000 mi (22500 km) thereafter:
000 km: - if worn:
= clean; = replace; = adjust.in rainy or very dusty conditions, on unpaved
GUZum_breva750USA_####.book Page 73 Thursday, June 29, 2006 12:31 PM
OPERATIONS TO BE CARRIED OUT BY THE Moto Guzzi Authorized Dealer
Components End of breaking-in[625 mi (1000 km)]
Every 46or
Idle mixture (CO)
Transmission cables and controls
Steering bearings and clearance
Wheel bearings
Brake disks
Engine oil filter (*)
Air filter
General vehicle operation
Brake systems
Brake fluid every 2 years:
Gearbox oil
Fork oil after the first 4660 mi (7500 km) an
Engine oil
Fork oil seals after the first 18640 mi (30000 km) a
Brake pads every 1243 mi/2
Valve clearance adjustment
Wheels/Tires
Tighten nuts and bolts
= check and clean, adjust, lubricate or replace if necessary (as specified in the Service Manual). Perform maintenance operations at double the prescribed frequency if the vehicle is often used roads, or in any kind of competition.(*) = For competitive use, check every 2330 mi (3750 km).

every 4 years:
every 4 years:
mi (7500 km) months
Every 9320 mi (15000 km) or 24 months
lean; = replace; = adjust.ainy or very dusty conditions, on unpaved
GUZum_breva750USA_####.book Page 74 Thursday, June 29, 2006 12:31 PM
use and maintenance Breva 74
Tightening battery terminals
Cylinder synchronization
Suspensions and riding position
Final transmission fluid
Fuel lines
Brake lines
Clutch wear (*)
Components End of breaking-in[625 mi (1000 km)]
Every 4660 or 12
= check and clean, adjust, lubricate or replace if necessary (as specified in the Service Manual). = cPerform maintenance operations at double the prescribed frequency if the vehicle is often used in rroads, or in any kind of competition.(*) = For competitive use, check every 2330 mi (3750 km).

75use and maintenance Breva
for parts you purchase.
Dealer Stamp
Follow
GUZum_breva750USA_####.book Page 75 Thursday, June 29, 2006 12:31 PM
MAINTENANCE RECORD
The following is to help you keep anaccurate record of maintenance work. Information recorded is not considered as
proof that maintenance has been carriedout. Keep copies of work orders and/or receipts
Owner Name
Owner Address
Owner Telephone Number
Vehicle Identification Number (V.I.N.) (frame number)see p. 79 (IDENTIFYING INFORMATION)
Eng ine Number see p . 79 ( IDENTIFYINGINFORMATION)
Local Moto Guzzi Dealer Name
Local Moto Guzzi Dealer Address
Local Moto Guzzi Dealer Telephone Number
Warranty Activation Date(from Retail Purchase Warranty Activation Form)
Date Odometerreading
Maintenance Performed

Dealer Stamp
Follow
Follow
GUZum_breva750USA_####.book Page 76 Thursday, June 29, 2006 12:31 PM
use and maintenance Breva 76
Date Odometerreading
Maintenance Performed

77use and maintenance Breva
Dealer Stamp
Follow
GUZum_breva750USA_####.book Page 77 Thursday, June 29, 2006 12:31 PM
Date Odometerreading
Maintenance PerformedFollow

Dealer Stamp
Follow
GUZum_breva750USA_####.book Page 78 Thursday, June 29, 2006 12:31 PM
use and maintenance Breva 78
Date Odometerreading
Maintenance Performed

79use and maintenance Breva
WARNINGBefore removing a clamp, make surethat its removal will not cause any fluidleaks; if so, take the necessary steps toprevent said leaks and protect the partsaround the joint accordingly.
SCREW CLAMPSA simple screwdriver is sufficient forremoving and mounting these clamps.
CAUTIONCheck the condition of the clamp andreplace it if necessary with another ofthe same type and size, purchased froma Moto Guzzi Authorized Dealer.
When fastening the clamp, make surethe joint is firmly sealed.
CHECKING AND TOPPING UP THE ENGINE OIL LEVEL
Careful ly read page 45 (ENGINEOIL)and page 70 (MAINTENANCE).
NOTES Per fo rm ma in tenanceoperations at double the prescribedfrequency if the vehicle is often used inrainy or very dusty conditions, or onunpaved roads.
GUZum_breva750USA_####.book Page 79 Thursday, June 29, 2006 12:31 PM
IDENTIFYING INFORMATIONIt is highly recommended to note the frameand engine numbers in the spacesprovided in this booklet.The f rame number may be used topurchase spare parts.
NOTE Tamper ing wi th the ser ia lnumbers is subject to serious sanctionsunder criminal and civil law. Altering theframe number will void the warrantyeffective immediately.
FRAME NUMBERThe frame number (1) is stamped on theright side of the steering column.
Frame n° _________________________
ENGINE NUMBERThe engine number (2) is stamped on theleft-hand side of the vehicle, near theengine oil level filler cap.
Engine n° _________________________
JOINTS WITH SCREW CLAMPS
CAUTIONRemove ONLY the clamps indicated inthe servicing procedures.
This text is not to be construed asauthorization to arbitrarily remove theclamps present on the vehicle.

WARNINGhaust gases conta in carbon
onoxide , which is ext remelyisonous if inhaled. not start the engine in closed ordly-ventilated rooms.ilure to observe this warning mayuse loss of consciousness or even
ad to death by asphyxia.
1
GUZum_breva750USA_####.book Page 80 Thursday, June 29, 2006 12:31 PM
use and maintenance Breva 80
Periodically check the engine oil level, seepage 79 (CHECKING AND TOPPING UPTHE ENGINE OIL LEVEL).To change the engine oil contact a MotoGuzzi Authorized Dealer, see page 72(SCHEDULED MAINTENANCE CHART).
WARNINGIt is critical to the safe operation of yourvehicle that the proper lubricants,maintained at the proper levels, beused. Failure to heed this warning can lead toan engine seizure with subsequentaccident, serious injury or death.
To check:
NOTE Place the vehicle on firm and flatground.
CAUTIONThe engine oil level must be checkedwhile the engine is warm and with thedipstick (1) fully inserted.
If you check the engine oil level whenthe engine is cold, the oi l mighttemporarily fall below the "MIN" level.
This is not a problem as long as theengine oil pressure LED " " does notl ight , see page 31 (TABLE OFINSTRUMENTS AND INDICATORS).
NOTES To heat the engine and bringthe engine oil up to running temperature,do not let the engine idle with the vehiclestopped. To follow the correct procedure,check the oil after traveling the equivalentof at least 10 mi (15 km) on country roads(this should be enough to bring the engineoil to temperature).
ExmpoDobaFacale
1

81use and maintenance Breva
CAUTIONBefore unscrewing and removing thef i l le r cap (1 ) , c lean i t and thesurrounding area of the tank with aclean cloth. Prevent any foreign matterfrom falling into the oil tank, as thiscould cause serious engine damage.Do not use any flammable solventssuch as alcohol or gasoline whenwiping the oil tank. The oil tank is hotenough to cause flammable solvents toignite. Use only a natural fiber cloth, i.e.cotton. Man made fabrics such aspolyester, etc. could ignite.
GUZum_breva750USA_####.book Page 81 Thursday, June 29, 2006 12:31 PM
u Stop the engine, see page 67(STOPPING).
u Keep the vehicle upright with bothwheels resting on the ground.
WARNINGShould your vehicle overturn, it will leakgasoline, which is extremely flammable.Flames or sparks may cause a fire,which could destroy not only thevehicle, but also the building in which itis located, and cause serious injuries oreven death.
u Unscrew the filler cap/engine oil dipstick(1).
u Use the dipstick (1) to check the engineoil level.
MAX = maximum level.MIN = minimum level.
The difference between "MAX" and "MIN"is approximately 400 cm3.u The level is correct if it reaches
approximately the "MAX" level.
CAUTIONDo not go above the "MAX" marking orbelow the "MIN" marking, as this couldseriously damage the engine.
Top up the engine oil level if necessary:
u Unscrew and remove the filler cap (1).
WARNINGWhen warmed up, the engine containshot oil and the engine oil tank (4) iswarm; therefore, be especially carefulwhen carrying out the operationsdescribed here below, in order to avoidburns.
CAUTIONUse thick gloves to prevent burns.

AR WHEEL
CAUTIONnski l led operators may f indsassembly and reassembly of the reareel rather challenging and complex.
ntact a Moto Guzzi Authorizedaler.
WARNINGiding wi th damaged r ims wi l lmpromise your safety as well as that others and of the vehicle itself.
eck the condition of the wheel rim,d have it replaced if damaged.
GUZum_breva750USA_####.book Page 82 Thursday, June 29, 2006 12:31 PM
use and maintenance Breva 82
CAUTIONDo not add addi t ives or o thersubstances to the oil.
If using a funnel or other tool, makesure it is perfectly clean.
NOTES Use good quality premium oilsg raded 15W - 50 , see page 115(LUBRICANT CHART).
Top up to restore the correct level, seepage 115 (LUBRICANT CHART).
WARNINGNever ride your vehicle with low engineoil, with contaminated oil, or withunapproved oil. Any of these will greatlyaccelerate wear of your engine, andcause irreparable damage.
FRONT WHEEL
CAUTIONUnski l led operators may f inddisassembly and reassembly of thefront wheel rather challenging.
Contact a Moto Guzzi AuthorizedDealer.
WARNINGRiding wi th damaged r ims wi l lcompromise your safety as well as thatof others and of the vehicle itself.
Check the condition of the wheel rim,and have it replaced if damaged.
RE
Udiwh
CoDe
Rcoof
Chan

83use and maintenance Breva
DISASSEMBLY
CAUTIONMake sure the vehicle is stable.
u Manually turn the wheel so that thespace between two spokes of the rim isaligned with the brake caliper.
u Have someone hold the handlebarssteady, in riding position, so that thesteering is locked.
Tightening torque for brake caliperscrews (1): 36.16 FtLb (50 Nm).
u Unscrew and remove the two brakecaliper screws (1).
CAUTIONDo not operate the brake lever afterremoving the brake caliper, otherwisethe pistons could leave their housings,causing brake fluid to leak out.
I f th is should occur , contact anAuthorized Moto Guzzi Dealer who willperform the necessary maintenanceoperations.
u Extract the brake caliper (2) from thedisk, leaving it attached to the pipe (3).
GUZum_breva750USA_####.book Page 83 Thursday, June 29, 2006 12:31 PM
FRONT BRAKE CALIPER
Carefu l ly read page 70(MAINTENANCE).
WARNINGThe disassembly and reassembly of thefront brake calipers can be difficult forthose unfami l iar wi th vehic lemaintenance. You may wish to haveyour Local Moto Guzzi Dealer carryout these operations.If you wish to perform these operationsyoursel f , careful ly read page 70(MAINTENANCE).
WARNINGA dirty disk soils the pads, reducingbraking effectiveness. Dirty pads mustbe replaced, while the dirty disk mustbe cleaned using a high quality solvent.
CAUTIONWhile disassembling and reassemblingthe wheel, be careful not to damage thebrake lines, disks and pads.
NOTES To remove the front brakecaliper you must keep the vehicle securelyin a stable, upright position, keeping thefront wheel raised.
1
3
2
reduced in any way, have yourhicle serviced by your Local Motouzzi Dealer. It may be necessary tove your dealer bleed the system, orere may be some other problem withe brake system.
ver r ide your vehicle in traff icmediately after servicing the brakes.ways apply the brake pedal or leververal times before riding your vehicle.en, try your vehicle in a parking lot orher safe area with little traffic tosure that the brakes are workingoperly. Fai lure to observe thisrning can lead to a serious accident
ith subsequent serious injury orath.
GUZum_breva750USA_####.book Page 84 Thursday, June 29, 2006 12:31 PM
use and maintenance Breva 84
REASSEMBLY
CAUTIONBe very careful to avoid damaging thebrake pads.
WARNINGKeep your fingers clear, do not allowthem to become crushed between thewheel, the caliper or the fork. Do notattempt to align the holes in the caliperusing your fingers. Failure to obey thiswarning can cause serious injury.
u Slip the brake caliper (2) onto the disk,and position it so that the fastener holesare al igned with the holes on thesupport.
WARNINGWhen reassembling the brake caliper,replace the brake caliper holdingscrews (1) with two new screws of thesame type.
u Screw and tighten the two brake caliperfastener screws (1).
Tightening torque for brake caliperscrews: 36.16 ft-Lb (50 Nm).
u Carefully remove the support.
WARNINGAfter servicing the brakes, always makesure they function properly. If the strokeof the lever or pedal is excessive, or ifyou detect that the brak ingeffectiveness
isveGhathth
NeimAlseThotenprwawde

85use and maintenance Breva
CAUTIONHandle a l l p last ic and pa intedcomponents with care to avoid scrapingor scratching them.
u Gently release the pin (2) from its rubberfastener.
u Remove the side panel (3).
NOTES When reassembling, makesure the reference pin (4) is positionedcorrectly.
Repeat the steps to remove the other sidepanel.
3 12
4
GUZum_breva750USA_####.book Page 85 Thursday, June 29, 2006 12:31 PM
CHECKING THE CARDAN SHAFT OIL LEVEL
NOTE Perform maintenance operationsat double the prescribed frequency if thevehicle is often used in rainy or dustyconditions, or on unpaved roads.
Check the cardan shaft oil level at regularintervals. Change after the first 930 mi(1500 km) and every 6213 mi (10000 km)thereafter.
To check:
u Keep the vehicle upright with bothwheels resting on the ground.
u Unscrew e remove the dip stick cap (1).u Make sure that the oil skims the hole for
the dip stick cap (1). Top up if the oil isbelow the prescribed level.
You must contact an Authorized MotoGuzzi Dealer to top up or change thecardan shaft oil.
REMOVING THE SIDE PANELS
WARNINGBefore carrying out the followingoperations, let the engine and theexhaust silencer cool down until theyreach room temperature.Failure to observe this warning can leadto serious burns.
u Remove the rider saddle, see page 37(LOCKING/RELEASING THESADDLE).
u Unscrew and remove the screw (1).
1

MOVING THE FRONT FAIRINGPlace the vehicle on the stand, see page68 (POSITIONING THE VEHICLE ONTHE SIDE STAND).Unscrew and remove the two lowerscrews (4).
CAUTIONhen reassembling tighten the screws) only moderately, since they fasten toastic.
CAUTIONndle plastic and painted components
ith care; do not scrape or scratchem.
Remove the front fairing completely.
ter reassembly:
Make sure the front fairing is securelyfastened to the vehicle.
4
GUZum_breva750USA_####.book Page 86 Thursday, June 29, 2006 12:31 PM
use and maintenance Breva 86
REMOVING THE REARVIEW MIRRORSu Place the vehicle on the stand, see page
68 (POSITIONING THE VEHICLE ONTHE SIDE STAND).
u Raise the protection rubber (1) and turnthe lock nut (2).
CAUTIONHandle a l l p last ic and pa intedcomponents with care to avoid scrapingor scratching them.
u Remove the rearview mirror (3).
NOTES Repeat the steps to remove theother rearview mirror.
CAUTIONAfter reassembly, adjust the rearviewmirrors properly and tighten the nuts toensure their stability.
After reassembly:
u Replace the protection rubber (1)correctly.
REu
u
W(4pl
Hawth
u
Af
u
1
2
3
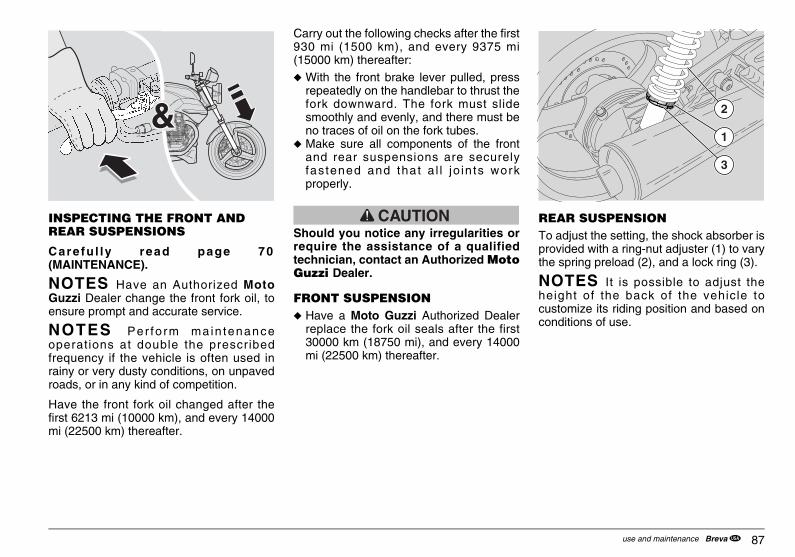
87use and maintenance Breva
REAR SUSPENSION To adjust the setting, the shock absorber isprovided with a ring-nut adjuster (1) to varythe spring preload (2), and a lock ring (3).
NOTES It is possible to adjust theheight of the back of the vehicle tocustomize its riding position and based onconditions of use.
3
1
2
GUZum_breva750USA_####.book Page 87 Thursday, June 29, 2006 12:31 PM
INSPECTING THE FRONT AND REAR SUSPENSIONS
Carefu l ly read page 70(MAINTENANCE).
NOTES Have an Authorized MotoGuzzi Dealer change the front fork oil, toensure prompt and accurate service.
NOTES Per fo rm ma in tenanceoperations at double the prescribedfrequency if the vehicle is often used inrainy or very dusty conditions, on unpavedroads, or in any kind of competition.
Have the front fork oil changed after thefirst 6213 mi (10000 km), and every 14000mi (22500 km) thereafter.
Carry out the following checks after the first930 mi (1500 km), and every 9375 mi(15000 km) thereafter:
u With the front brake lever pulled, pressrepeatedly on the handlebar to thrust thefork downward. The fork must slidesmoothly and evenly, and there must beno traces of oil on the fork tubes.
u Make sure all components of the frontand rear suspensions are securelyfastened and that a l l jo in ts workproperly.
CAUTIONShould you notice any irregularities orrequire the assistance of a qualifiedtechnician, contact an Authorized MotoGuzzi Dealer.
FRONT SUSPENSIONu Have a Moto Guzzi Authorized Dealer
replace the fork oil seals after the first30000 km (18750 mi), and every 14000mi (22500 km) thereafter.

ECKING THE BRAKE PAD WEAR
efully read page 46 (BRAKES), page(DISK BRAKES) and page 70INTENANCE).
TES The following information refersa s ing le b rak ing sys tem, bu t i slicable to both.
TES Per fo rm ma in tenancerations at double the prescribeduency if the vehicle is often used iny or very dusty conditions, on unpaveds, or in any kind of competition.
ck the brake pad wear after the first mi (1500 km) and every 1250 mi (2000 thereafter, and before every trip.
k brake pad wear depends on use,g style and road conditions.
21
GUZum_breva750USA_####.book Page 88 Thursday, June 29, 2006 12:31 PM
use and maintenance Breva 88
ADJUSTING THE REAR SHOCKABSORBERS
NOTES Per fo rm ma in tenanceoperations at double the prescribedfrequency if the vehicle is often used inrainy or very dusty conditions, on unpavedroads, or in any kind of competition.
Check and if necessary adjust the rearshock absorber every 9375 mi (15000 km).
CAUTIONDo not force rotation of the adjuster (1)beyond the end of stroke in bothdirections, to avoid damaging it.
u Use the wrench provided to unscrew thelock ring (3).
u Use the appropriate pin wrench in thetool bag to turn the ring-nut (1), to adjustthe preload of spring (A).
u Tighten to increase the preload; on thecontrary, loosen to reduce the preload.
u After the adjustment, tighten the ring-nut(3).
CAUTIONTo ensure vehicle stability, it is always agood idea to make sure that both shockabsorbers are adjusted to the sameposition. If necessary, contact anAuthorized Moto Guzzi Dealer.
CH
Car47 (MA
NOto app
NOopefreqrainroad
Che930km)
Disridin
390
A390
A
1
3

89use and maintenance Breva
ADJUSTING THE THROTTLE CONTROL
Carefu l ly read page 70(MAINTENANCE).
WARNINGIf the throttle sticks open, it may causea collision with another vehicle, or anupset.
If the throttle sticks, kill the engine withthe engine stop switch located on theright handlebar.Do not attempt to restart the engineuntil the throttle has been repaired andworks perfectly. Failure to obey thiswarning can lead to a runaway withseriously injuries or even death.If any fastener in the throttle systembecomes loose, likewise you will losecontrol of your vehicle.Either situation can lead to an upset orcollision with subsequent serious injuryor death.
GUZum_breva750USA_####.book Page 89 Thursday, June 29, 2006 12:31 PM
WARNINGBe especially careful to check the brakepad wear before every trip.
To quickly check the wear on the pads:
u Place the vehicle on the stand, seepage68 (POSITIONING THE VEHICLE ONTHE SIDE STAND).
u Visually inspect between the disk andthe pads, proceeding:
– from the top rear for the front brake caliper(1);
– from the bottom rear for the rear brakecaliper (2).
WARNINGExcessive wear of the friction materialwould cause the pad metal support tocome into contact with the disk, therebycausing metallic noise and producingsparks from the caliper; the brakingeffectiveness, safety and integrity of thedisk would thus be compromised.
Have all of the brake caliper pads replacedif the thickness of the pad friction material[even of a single front (3) or rear (4) pad] isreduced to approximately 0.06 inch (1.5mm) (or if even just one of the wearindicators is no longer visible).
WARNINGTo change, contact an Authorized MotoGuzzi Dealer.
3
1
1
0.06 inc(1.5 mm)0.06 inc(1.5 mm)
4
2
0.06 inc(1.5 mm)0.06 inc(1.5 mm)

WARNINGhaust gases conta in carbon
onoxide , which is ext remelyisonous if inhaled. not start the engine in closed ordly-ventilated rooms.ilure to observe this warning mayuse loss of consciousness or even
ad to death by asphyxia.
CAUTIONter completing the adjustment, makere that turning the handlebar doest alter the engine idle speed, and thaten the throttle is released it returnsntly and automatically to its originalsition.
GUZum_breva750USA_####.book Page 90 Thursday, June 29, 2006 12:31 PM
use and maintenance Breva 90
WARNINGIn the event of a throttle stickingemergency, always kill the engine usingthe engine stop switch located near thethrottle grip on the right handlebar.Never use your vehicle if the throttledoes not automatically fully return tothe idle position when the throttle gripis released. Contact your Local MotoGuzzi Dealer for repairs. Failure to heedthis warning can lead to a seriousaccident and subsequent injury or evendeath.
NOTE Perform maintenance operationsat double the prescribed frequency if thevehicle is often used in rainy or very dustyconditions, on unpaved roads, or in anykind of competition.
Have the throttle control cables checked bya Moto Guzzi Authorized Dealer after thefirst 930 mi (1500 km), and every 6213 mi(10000 km) thereafter.The idle stroke of the throttle adjuster mustbe 0.08-0.12 inch (2-3 mm), measured atthe edge of the grip itself.
If not:
u Place the vehicle on the stand, see page68 (POSITIONING THE VEHICLE ONTHE SIDE STAND).
u Pull back the rubber boot (1).u Loosen the lock nut (2).u Rotate the adjuster (3) so as to restore
the prescribed clearance.u After completing the adjustment, tighten
the lock nut (2) and double-check theidle stroke.
u Replace the rubber boot (1).
ExmpoDobaFacale
Afsunowhgepo
2 3 1
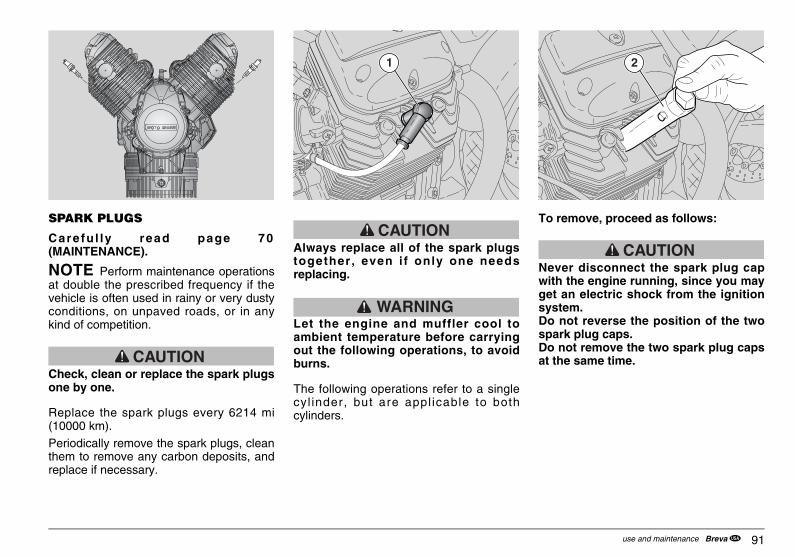
91use and maintenance Breva
To remove, proceed as follows:
CAUTIONNever disconnect the spark plug capwith the engine running, since you mayget an electric shock from the ignitionsystem.Do not reverse the position of the twospark plug caps.Do not remove the two spark plug capsat the same time.
2
GUZum_breva750USA_####.book Page 91 Thursday, June 29, 2006 12:31 PM
SPARK PLUGS
Carefu l ly read page 70(MAINTENANCE).
NOTE Perform maintenance operationsat double the prescribed frequency if thevehicle is often used in rainy or very dustyconditions, on unpaved roads, or in anykind of competition.
CAUTIONCheck, clean or replace the spark plugsone by one.
Replace the spark plugs every 6214 mi(10000 km).
Periodically remove the spark plugs, cleanthem to remove any carbon deposits, andreplace if necessary.
CAUTIONAlways replace all of the spark plugstogether, even i f only one needsreplacing.
WARNINGLet the engine and muffler cool toambient temperature before carryingout the following operations, to avoidburns.
The following operations refer to a singlecyl inder, but are appl icable to bothcylinders.
1

CAUTIONhen replacing a spark plug, alwayseck the pitch and length of the
read.
the threaded portion is too short,rbon deposits can build up on theternal thread of the head; this maymage to the engine when thepropriate kind is then installed. e only the recommended type ofark plugs, see page 112 (TECHNICALECIFICATIONS)otherwise you maympromise the performance and life-an of the engine. e a wire thickness gauge (7) to check
e spark plug gap, to avoid damaginge platinum coating. Check the spark plug gap using a wirethickness gauge (7).
8
7
0.024 - 0.028 inc (0,6 - 0,7 mm)
GUZum_breva750USA_####.book Page 92 Thursday, June 29, 2006 12:31 PM
use and maintenance Breva 92
WARNINGDuring this operation, always weargoggles that provide your eyes with360° protection. Be very careful whenusing compressed air jets, as they cancause ser ious personal in jury i fdirected towards your body.
u Remove the cap (1) of the spark plug.u Remove all traces of dirt from the base
of the spark plug.u Fit the special wrench supplied in the
tool kit onto the spark plug.u Insert the wrench (2) with its handle
provided in the tool kit on the hexagonalseat of the spark plug spanner .
u Unscrew the spark plug and remove itfrom its seat, being careful not to let anydust or other substances into thecylinder.
To check and clean the spark plugs,proceed as follows:
CAUTIONThis vehicle is fitted with spark plugsfeaturing platinum-type electrodes.Never use metal brushes and/orabrasive products for cleaning, butcompressed air only.
Legend:– center electrode (3);– insulation (4);– side electrode (5).u Make sure that that there are no carbon
deposits or signs of corrosion on thespark plug electrodes and insulation;clean with pressurized air if needed.
If the spark plug shows cracks in theinsulation, corroded electrodes, excessivedeposits, or if the tip of the center electrode(3) is rounded (6), it must be replaced.
Wchth
If caindaapUsspSPcospUsththu
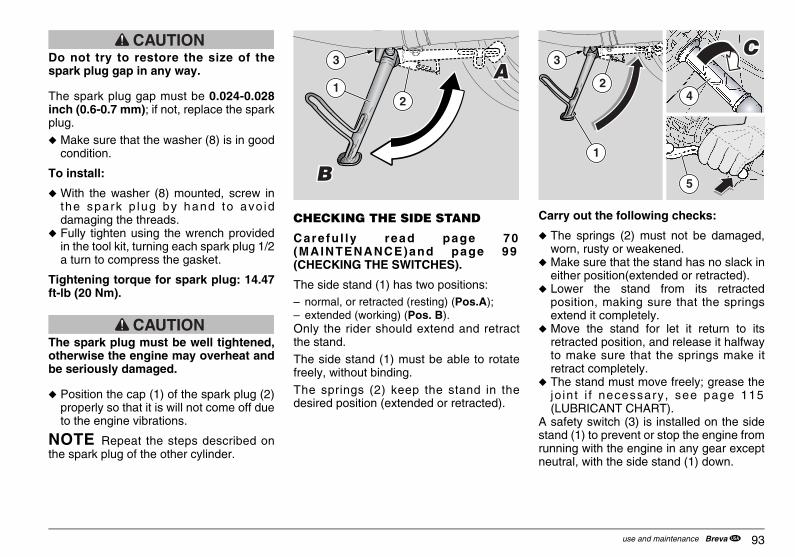
93use and maintenance Breva
Carry out the following checks:
u The springs (2) must not be damaged,worn, rusty or weakened.
u Make sure that the stand has no slack ineither position(extended or retracted).
u Lower the stand from its retractedposition, making sure that the springsextend it completely.
u Move the stand for let it return to itsretracted position, and release it halfwayto make sure that the springs make itretract completely.
u The stand must move freely; grease thejo in t i f necessary, see page 115(LUBRICANT CHART).
A safety switch (3) is installed on the sidestand (1) to prevent or stop the engine fromrunning with the engine in any gear exceptneutral, with the side stand (1) down.
1
4
5
2
3
GUZum_breva750USA_####.book Page 93 Thursday, June 29, 2006 12:31 PM
CAUTIONDo not try to restore the size of thespark plug gap in any way.
The spark plug gap must be 0.024-0.028inch (0.6-0.7 mm); if not, replace the sparkplug.
u Make sure that the washer (8) is in goodcondition.
To install:
u With the washer (8) mounted, screw inthe spark p lug by hand to avo iddamaging the threads.
u Fully tighten using the wrench providedin the tool kit, turning each spark plug 1/2a turn to compress the gasket.
Tightening torque for spark plug: 14.47ft-lb (20 Nm).
CAUTIONThe spark plug must be well tightened,otherwise the engine may overheat andbe seriously damaged.
u Position the cap (1) of the spark plug (2)properly so that it is will not come off dueto the engine vibrations.
NOTE Repeat the steps described onthe spark plug of the other cylinder.
CHECKING THE SIDE STAND
Carefu l ly read page 70(MAINTENANCE)and page 99(CHECKING THE SWITCHES).
The side stand (1) has two positions:– normal, or retracted (resting) (Pos.A);– extended (working) (Pos. B).Only the rider should extend and retractthe stand.The side stand (1) must be able to rotatefreely, without binding.
The springs (2) keep the stand in thedesired position (extended or retracted).
12
3

TTERY
refully read page 70 (MAINTENANCE).
ter the first 930 mi (1500 km) and every50 mi (6000 km) thereafter, check theectrolyte level and make sure therminals are firmly tightened.
WARNINGnger of fire. el and other flammable substances
ust be kept away from electricalmponents.
ttery electrolyte is toxic, caustic anday burn in contact with the skin, since itntains sulfuric acid. Wear protectiveothing, a face mask and/or safetyggles when performing maintenance. Ify electrolyte fluid comes into contactth the skin, rinse thoroughly with coolnning water.ould it accidentally contact your eyes,sh immediately with running water forteen minutes, then immediately seekofessional medical attention.ould you accidentally swallow batteryctrolyte, drink large amounts of milk orter, then continue with milk of magnesia vegetable oil . See a physicianmediately.nce the battery gives off explosivedrogen gas, keep away from openmes, sparks or cigarettes, or any otherurce of heat.
GUZum_breva750USA_####.book Page 94 Thursday, June 29, 2006 12:31 PM
use and maintenance Breva 94
To check the side stand safety switch (3):
u Straddle the vehicle as though you wereriding.
u Retract the side stand (1).
WARNINGExhaust gases conta in carbonmonox ide , which is ext remelypoisonous if inhaled. Do not start the engine in closed orbadly-ventilated rooms.Failure to observe this warning maycause loss of consciousness or evenlead to death by asphyxia.
u Start the engine, see page 59(STARTING).
u With the throttle handgrip (4) released(Pos. C) and the engine idling, pull theclutch lever (5) completely
u Engage the first gear by pushing thegearshift lever (6) down.
u Lower the side stand (1), which willactivate the safety switch (3).
At this point:
– the engine should stop;
If the engine does not stop, contact anAuthorized Moto Guzzi Dealer.
BA
Ca
Af37elte
DaFumco
BamcoclgoanwiruShflufifprShelewaorimSihyflaso
1
6
2
3

95use and maintenance Breva
CHECKING AND CLEANING THE TERMINALS
Carefully read page 91 (BATTERY).
u Make sure that the ignition switch is setto " ".
u Remove the rider saddle, see page 37(LOCKING/RELEASING THESADDLE).
u Remove the left side panel, see page 82(Handle plastic and painted componentswith care, do not drag or damage them.).
u Raise the battery fastening bracket (1),taking care not to scratch the tank. (Usesoft material for protection if necessary.)
1
GUZum_breva750USA_####.book Page 95 Thursday, June 29, 2006 12:31 PM
Make sure the area is adequatelyventilated during recharging or whilerunning the engine; avoid inhaling thefumes emitted while recharging thebattery.
KEEP OUT OF REACH OF CHILDREN.
Be careful not to tilt the vehicle too far,to avoid hazardous battery fluid leaks.
WARNINGNever reverse the bat tery cableconnections.
Make sure the ignition switch is set to" " before connect ing anddisconnecting the battery, otherwisesome components may be damaged.First connect the positive cable (+), thenthe negative (-) cable. Disconnect inreverse order.
The battery fluid is corrosive.
Do not spill or spatter it, especially onplastic parts.
If you are installing a "MAINTENANCE-FREE" battery, recharge using aspecifically designed battery charger(with constant voltage/amperage orconstant voltage).
Using a conventional battery chargercould damage the battery.
EXTENDED BATTERY STORAGEIf the vehicle is not used for more than twoweeks, you must recharge the battery toavoid sulphation, see page 98 (BATTERYRECHARGING):
u Remove the battery, see page 96(REMOVING THE BATTERY) and storeit in a cool, dry place.
Over the winter, or whenever the vehicleremains unused, periodically check thebattery charge (once a month o r so ) , to p reven t i t f romdeteriorating.
u Recharge it completely with a normalcharge, see page 98 (BATTERYRECHARGING).
If the battery remains on the vehicle,disconnect the cables from the terminals.

MOVING THE BATTERY
CAUTIONmoving the battery resets the digital
ock function to zero. For reset thisnct ion, see page 17ULTIFUNCTION DIGITAL DISPLAY).
refully read page 91 (BATTERY).
Make sure that the ignition switch is setto " ".Remove the rider saddle, see page 37(LOCKING/RELEASING THESADDLE).Remove the left side panel, see page 85(Hand le a l l p las t i c and pa in tedcomponents with care to avoid scrapingor scratching them.).Raise the battery fastening bracket (1),taking care not to scratch the tank. (Usesoft material for protection if necessary.)
1
GUZum_breva750USA_####.book Page 96 Thursday, June 29, 2006 12:31 PM
use and maintenance Breva 96
u Partially remove the battery from itscompartment.
u Make sure that the battery cables andterminals are:
– in good condition (not corroded orencrusted with deposits);
– covered with neutral grease or Vaseline.
If necessary:
u Remove the battery, see page 96(REMOVING THE BATTERY).
u Brush the cable terminals and batteryterminals with a wire brush to remove alltraces of corrosion.
u Install the battery, see page 98(BATTERY INSTALLATION).
RE
Reclfu(M
Ca
u
u
u
u

97use and maintenance Breva
CHECKING THE LEVEL OF BATTERY ELECTROLYTE To check the electrolyte level:
u Make sure that the battery fluid level isbetween the "MIN" and "MAX" notcheson the side of the battery.
Otherwise:u Remove the plugs from the elements.
CAUTIONUse only distilled water to top up theelectrolyte fluid. Do not exceed the"MAX" notch, since the level rises whencharging the battery.
u Restore the fluid level by adding distilledwater.
GUZum_breva750USA_####.book Page 97 Thursday, June 29, 2006 12:31 PM
u Unscrew and remove the screw (2) fromthe negative terminal (-).
u Move the negative cable (3) to one side.u Unscrew and remove the screw (4) from
the positive terminal (+).u Move the positive cable (5) to one side.u Disconnect the battery breather hose.u Firmly grasp the battery (6) and lift it out
of its compartment.
WARNINGThe removed battery must be stored ina safe place and out of the reach ofchildren.
u Store the battery on a flat surface and ina cool, dry place.
u Lower the holding bracket (1).u Refit the left side panel, see page 82
(Handle plastic and painted componentswith care, do not drag or damage them.).
u Return the rider saddle to its position,see page 37 (LOCKING/RELEASINGTHE SADDLE).
NOTE For instructions on installing theba t te ry , see page 98 (BATTERYINSTALLATION).
6
5 243

Partially insert the battery (1) in itscompartment.Connect the battery breather hose.
WARNINGhen reassembling, first connect theble to the positive terminal (+), thene negative (-).
Connect the positive terminal (+) bymeans of the screw (2).Connect the negative terminal (-) bymeans of the screw (3).Coat the terminals with neutral grease orVaseline.Position the battery properly by insertingit fully into its seat.
4
5
GUZum_breva750USA_####.book Page 98 Thursday, June 29, 2006 12:31 PM
use and maintenance Breva 98
BATTERY RECHARGINGu Remove the battery, see page 96
(REMOVING THE BATTERY).
WARNINGThe battery gives off noxious andexplosive gases; keep it away fromflames, sparks, cigarettes and any othersource of heat.During recharging or use, make surethat the room is properly ventilated andavoid inhaling the gases releasedduring the recharging.
u Remove the plugs from the elements.u Check the battery fluid level, see page
97 (CHECKING THE LEVEL OFBATTERY ELECTROLYTE) alongside.
u Connect the battery to a battery charger.u The recommended charging amperage
is 1/10 of battery capacity.u After charging the battery, check the
fluid level again and top up if neededwith distilled water.
u Replace the plugs on the elements.
WARNINGWait 5-10 minutes after shutting off thecharging device before mounting thebattery, since it will continue to producegas for a short time.
BATTERY INSTALLATION
Carefully read page 91 (BATTERY).
u Make sure that the ignition switch is setto " ".
u Remove the rider saddle, see page 37(LOCKING/RELEASING THESADDLE).
u Remove the left side panel, see page 85(Hand le a l l p las t i c and pa in tedcomponents with care to avoid scrapingor scratching them.).
u Raise the battery fastening bracket (4),taking care not to scratch the tank. (Usesoft material for protection if necessary.)
NOTE The ba t te ry (1 ) mus t bepositioned in its compartment with theterminals facing the rear of the vehicle.
u
u
Wcath
u
u
u
u
1
4
32

99use and maintenance Breva
u Make sure there is not dirt or mud on theswitch; the pin must be able to movewi thou t imped iment and re tu rnautomatically to its original position.
u Make sure that the cables are connectedcorrectly.
3
4
GUZum_breva750USA_####.book Page 99 Thursday, June 29, 2006 12:31 PM
CAUTIONReturn the rider saddle to its position,see page 37 (LOCKING/RELEASINGTHE SADDLE).
u Lower the battery fastening bracket (4),attaching it to the reference pin (5).
u Refit the left side panel, see page 85(Hand le a l l p las t i c and pa in tedcomponents with care to avoid scrapingor scratching them.).
CAUTIONRemoving the battery resets the digitalclock function to zero. To restore thisfunction, see page 32 (MULTIFUNCTIONDIGITAL DISPLAY).
CHECKING THE SWITCHES
Carefu l ly read page 70(MAINTENANCE).
The vehicle has four switches:
1) Brake light switch on the rear brakelever;
2) Brake light switch on the front brakelever;
3) Safety switch on the side stand;4) Switch on the clutch lever.
1
2
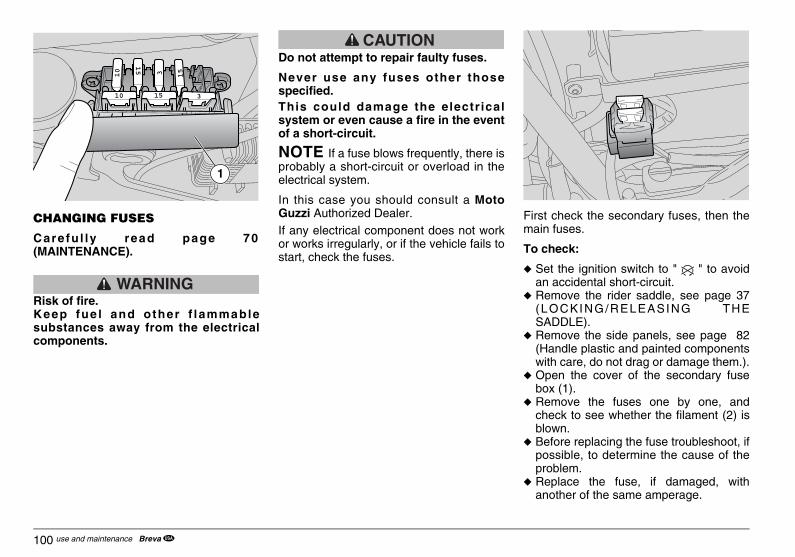
rst check the secondary fuses, then thein fuses.
check:
Set the ignition switch to " " to avoidan accidental short-circuit.Remove the rider saddle, see page 37(LOCKING/RELEASING THESADDLE).Remove the side panels, see page 82(Handle plastic and painted componentswith care, do not drag or damage them.).Open the cover of the secondary fusebox (1).Remove the fuses one by one, andcheck to see whether the filament (2) isblown.Before replacing the fuse troubleshoot, ifpossible, to determine the cause of theproblem.Replace the fuse, if damaged, withanother of the same amperage.
GUZum_breva750USA_####.book Page 100 Thursday, June 29, 2006 12:31 PM
use and maintenance Breva 100
CHANGING FUSES
Carefu l ly read page 70(MAINTENANCE).
WARNINGRisk of fire.Keep fue l and other f lammablesubstances away from the electricalcomponents.
CAUTIONDo not attempt to repair faulty fuses.
Never use any fuses other thosespecified.This could damage the electricalsystem or even cause a fire in the eventof a short-circuit.
NOTE If a fuse blows frequently, there isprobably a short-circuit or overload in theelectrical system.
In this case you should consult a MotoGuzzi Authorized Dealer.If any electrical component does not workor works irregularly, or if the vehicle fails tostart, check the fuses.
Fima
To
u
u
u
u
u
u
u
1
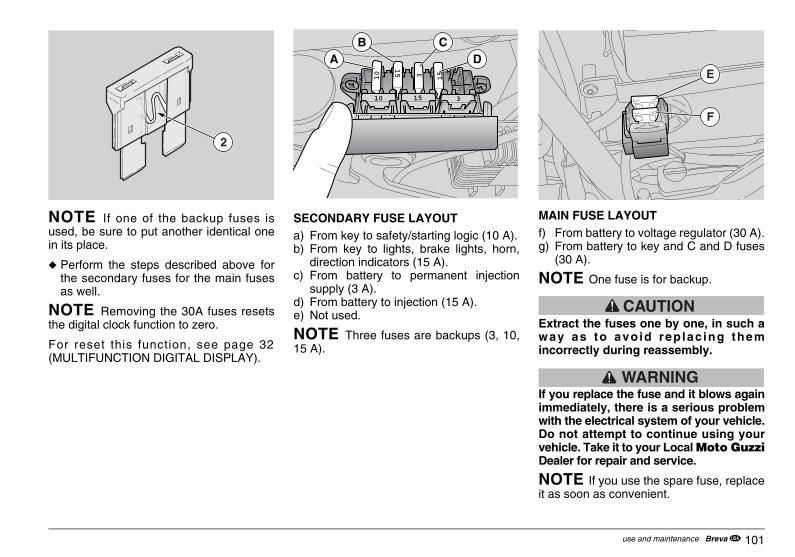
101use and maintenance Breva
MAIN FUSE LAYOUT f) From battery to voltage regulator (30 A).g) From battery to key and C and D fuses
(30 A).
NOTE One fuse is for backup.
CAUTIONExtract the fuses one by one, in such away as to avoid rep lac ing themincorrectly during reassembly.
WARNINGIf you replace the fuse and it blows againimmediately, there is a serious problemwith the electrical system of your vehicle.Do not attempt to continue using yourvehicle. Take it to your Local Moto GuzziDealer for repair and service.
NOTE If you use the spare fuse, replaceit as soon as convenient.
E
F
GUZum_breva750USA_####.book Page 101 Thursday, June 29, 2006 12:31 PM
NOTE If one of the backup fuses isused, be sure to put another identical onein its place.
u Perform the steps described above forthe secondary fuses for the main fusesas well.
NOTE Removing the 30A fuses resetsthe digital clock function to zero.
For reset this function, see page 32(MULTIFUNCTION DIGITAL DISPLAY).
SECONDARY FUSE LAYOUT a) From key to safety/starting logic (10 A).b) From key to lights, brake lights, horn,
direction indicators (15 A).c) From battery to permanent injection
supply (3 A).d) From battery to injection (15 A).e) Not used.
NOTE Three fuses are backups (3, 10,15 A).
2
A DB C

VERTICALLY ADJUST THEADLIGHT BEAM:
Place the vehicle in an upright position.Slightly loosen the screws (1) fasteningthe front fairing to the headlights, andmanually adjust the headlight beam tothe desired position.When you are satisfied with theadjustment, tighten the screws (1).
CAUTIONhen reassembling, tighten the screws) only moderately, since they fasten toastic.
ter completing the adjustment:
WARNINGake sure the headlight beam isoperly adjusted vertically.
21
GUZum_breva750USA_####.book Page 102 Thursday, June 29, 2006 12:31 PM
use and maintenance Breva 102
ADJUSTING THE HEADLIGHT BEAM
WARNINGDo not use the vehicle if the lights arenot functioning properly.Do not use the vehicle if the headlight isadjusted incorrect ly . This couldtemporarily blind oncoming cars, andalso reduce the rider's ability to see anyobstacle along the road while riding atnight.It is always advisable to reduce speedwhen riding at night, so as to be able toavoid obstacles in time and to adapt tothe poorer visibility that inevitablyresults from darkness. Failure toobserve this warning can cause you tocol l ide with another object , withconsequent risk of serious injury oreven death.
NOTE The procedure described here isin compliance with the Italian standard thatestablishes the maximum height of theheadlight beam. For vehicles used in other countries, youmust conform with local regulations.
To quickly make sure the beam is correctlyadjusted, place the vehicle on flat ground,32.81 ft (10 m) away from a wall.
Turn on the low beam, sit on the vehicleand make sure that the beam projected onthe wall is slightly below the horizontal lineof the headlight (about 9/10th of the totalheight). TO
HEu
u
u
W(1pl
Af
Mpr

103use and maintenance Breva
WARNINGRisk of fire.Fuel and other flammable substancesmust not be placed near electricalcomponents.
GUZum_breva750USA_####.book Page 103 Thursday, June 29, 2006 12:31 PM
TO HORIZONTALLY ADJUST THEHEADLIGHT BEAM:
WARNINGDo not use the vehicle if the lights arenot functioning properly. Do not use the vehicle if the headlight isadjusted incorrect ly . This couldtemporarily blind oncoming cars, andalso reduce the rider's ability to see anyobstacle along the road while riding atnight.It is always advisable to reduce speedwhen riding at night, so as to be able toavoid obstacles in time and to adapt tothe poorer visibility that inevitablyresults from darkness. Failure toobserve this warning can cause you tocol l ide with another object , withconsequent risk of serious injury oreven death.
NOTE The terms "right" and "left" referto the rider seated on the vehicle in thenormal riding position.
u Place the vehicle on the stand, see page68 (POSITIONING THE VEHICLE ONTHE SIDE STAND).
u Using a screwdriver, adjust the screw (2)until the headlight beam is in the desiredposition.
After completing the adjustment:
WARNINGMake sure that the hor izonta ladjustment of the headlight beam iscorrect. Different jurisdictions havedifferent requirements for horizontalheadlight aiming. Make sure that youconform wi th the ru les of thejurisdictions in which your vehicle isbeing used.
BULBS
Carefu l ly read page 70(MAINTENANCE).
WARNINGDo not use the vehicle if the lights arenot functioning properly. Do not use the vehicle if the headlight isadjusted incorrect ly . This couldtemporarily blind oncoming cars, andalso reduce the rider's ability to see anyobstacle along the road while riding atnight.It is always advisable to reduce speedwhen riding at night, so as to be able toavoid obstacles in time and to adapt tothe poorer visibility that inevitablyresults from darkness. Failure toobserve this warning can cause you tocol l ide with another object , withconsequent risk of serious injury oreven death.

WBEAM/HIGHBEAM BULBDo not pull on the electrical wires toremove the bulb socket.Grasp the bulb socket (4), pull it anddisconnect it from the bulb.Pull back the boot (5) with your fingers.Release the two ends of the retainerspring (6) located on the bulb socket (7).Remove the bulb from its seat.
OTE Insert the bulb in the bulb socket,ing up the positioning notches provided.
Correctly install a new bulb of the sametype.
5
6
7
GUZum_breva750USA_####.book Page 104 Thursday, June 29, 2006 12:31 PM
use and maintenance Breva 104
CAUTIONBefore replacing a bulb, set the ignitionswitch to "1" and wait a few minutes toallow it to cool.
Wear clean gloves or use a clean, drycloth when replacing the bulb.Do not leave fingerprints on the bulb,since they could caused it to overheatand break.If you touch the bulb with your barehands, clean it with alcohol to removeany fingerprints, to avoid any damage.DO NOT FORCE THE ELECTRICALCABLES.
NOTE Before replacing a bulb check thefuses , see page 100 (CHANGINGFUSES).
CHANGING HEADLIGHT BULBS
Carefully read page 103 (Risk of fire.Fuel and other flammable substancesmust not be placed near electricalcomponents.).
The headlight houses:
– one low/high beam bulb (1) (upper).– one parking light bulb (2) (lower);
To replace:
u Place the vehicle on the stand, see page68 (POSITIONING THE VEHICLE ONTHE SIDE STAND).
u Remove the complete reflector from theheadlight body by unscrewing the screw(3).
LO–
u
u
u
u
Nlin
u
PUSH
2
4
1
3 2

105use and maintenance Breva
CAUTIONDuring reassembly, correctly positionthe lens in its corresponding seat.Tighten the screw (1) gently andcarefully to avoid damaging the lens.
GUZum_breva750USA_####.book Page 105 Thursday, June 29, 2006 12:31 PM
PARKING LIGHT BULB
CAUTIONTo remove the bulb socket do not pullthe electrical cables.
u Grasp the parking light socket (8), pull itand disconnect it from its seat.
u Remove the bulb (2) and replace it withanother of the same type.
NOTE Make sure the bulb is correctlyinserted in the bulb socket.
CHANGING THE FRONT AND REAR DIRECTION INDICATOR LAMPS
Carefully read page 103 (Risk of fire.Fuel and other flammable substancesmust not be placed near electricalcomponents.).
u Place the vehicle on the stand, see page68 (POSITIONING THE VEHICLE ONTHE SIDE STAND).
u Unscrew and remove the screw (1).
CAUTIONWhile removing the lens, be extracareful not to break the tab.
u Remove the lens (2).
8
2
1
4
32

Place the vehicle on the stand, see page68 (POSITIONING THE VEHICLE ONTHE SIDE STAND).Unscrew and remove the two screws (1).Remove the lens (2).Push the bulb (2) in slightly and rotate itcounter-clockwise.Remove the bulb (1) from its seat.
2 3
GUZum_breva750USA_####.book Page 106 Thursday, June 29, 2006 12:31 PM
use and maintenance Breva 106
u Push the bulb (2) in slightly and rotate itcounter-clockwise.
u Remove the bulb (1) from its seat.
CAUTIONInsert the bulb in the bulb socket,carefully aligning the two bulb pins withtheir guides in the socket.
u Correctly install a new bulb of the sametype.
CAUTIONIf the bulb socket (4) leaves its seat,reinsert it correctly, lining up the radialopening of the bulb socket with the seatof the screw.
CHANGING THE TAILLIGHT BULB
Carefully read page page 103 (Risk off i re . Fuel and other f lammablesubstances must not be placed nearelectrical components.).
WARNINGDo not ride your vehicle if the taillightand brake l ight are not work ingproperly. The brake light is particularlyimportant to prevent other vehiclesfrom rearending you. Obviously, failureto comply with these instructions couldlead to a ser ious acc ident wi thsubsequent injuries or even death.
Before replacing the bulb, check theefficiency of the brake light switches, seepage 99 (CHECKING THE SWITCHES).
u
u
u
u
u
11

107use and maintenance Breva
CAUTIONTo remove the bulb socket do not pullthe electrical cables.
u Grasp the parking light socket (8), pull itand remove it from its seat.
u Remove the bulb and replace it withanother of the same type.
NOTE Make sure the bulb is correctlyinserted in the bulb socket.
GUZum_breva750USA_####.book Page 107 Thursday, June 29, 2006 12:31 PM
CAUTIONInsert the bulb in the socket, lining upthe two bulb p ins wi th thecorresponding guides on the socket.
Correctly install a new bulb of the sametype.
NOTE Upon reassembly, place the lenscorrectly in its seat.
Use caut ion and moderat ion whent ightening the screws (2) , to avoiddamaging the lens.
CHANGING THE LICENSE PLATE BULB
Carefully read page 103 (Risk of fire.Fuel and other flammable substancesmust not be placed near electricalcomponents.).
u Place the vehicle on the stand, see page68 (POSITIONING THE VEHICLE ONTHE SIDE STAND).
1

AINING THE FUEL TANK
CAUTIONver drain the fuel tank, either partially
completely. This may cause damage the inner components of the fuelnk, or to other parts of the fuelstem.
ways ensure that the fuel filler cap isrrectly closed.
GUZum_breva750USA_####.book Page 108 Thursday, June 29, 2006 12:31 PM
use and maintenance Breva 108
TRANSPORT
WARNINGNever drain the fuel tank, either partiallyor completely. This may cause damageto the inner components of the fueltank, or to other parts of the fuelsystem.
Always ensure that the fuel filler cap iscorrectly closed.
WARNINGNever attempt to tow your vehicle withanother vehicle.
WARNINGWhile your vehicle is being transported,it must be kept in a vertical position,firmly tied down, and with the wheelsblocked.
Transport your vehicle in neutral gearonly.
Failure to heed this warning couldcause ser ious damage to thetransmission due to vibration of thetransport truck.
DR
Neortotasy
Alco
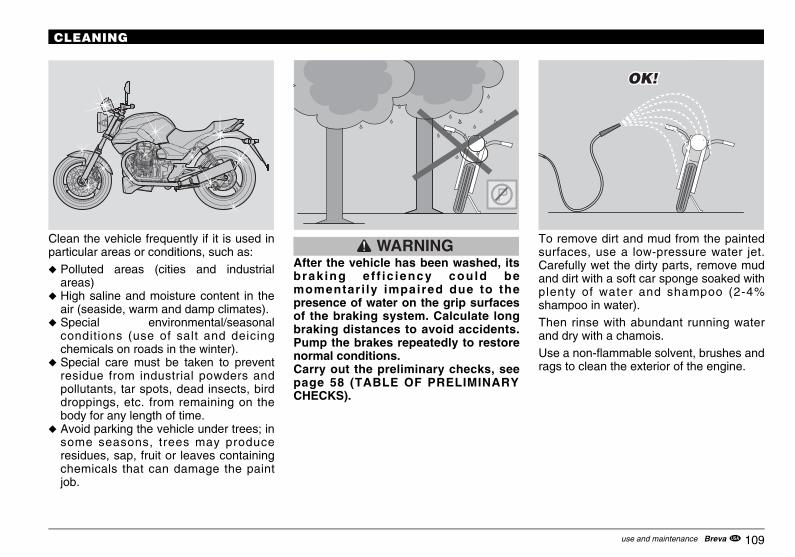
109use and maintenance Breva
To remove dirt and mud from the paintedsurfaces, use a low-pressure water jet.Carefully wet the dirty parts, remove mudand dirt with a soft car sponge soaked withplenty of water and shampoo (2-4%shampoo in water). Then rinse with abundant running waterand dry with a chamois.
Use a non-flammable solvent, brushes andrags to clean the exterior of the engine.
GUZum_breva750USA_####.book Page 109 Thursday, June 29, 2006 12:31 PM
CLEANING
Clean the vehicle frequently if it is used inparticular areas or conditions, such as:
u Polluted areas (cities and industrialareas)
u High saline and moisture content in theair (seaside, warm and damp climates).
u Special environmental/seasonalconditions (use of salt and deicingchemicals on roads in the winter).
u Special care must be taken to preventresidue from industrial powders andpollutants, tar spots, dead insects, birddroppings, etc. from remaining on thebody for any length of time.
u Avoid parking the vehicle under trees; insome seasons, trees may produceresidues, sap, fruit or leaves containingchemicals that can damage the paintjob.
WARNINGAfter the vehicle has been washed, itsbrak ing e f f ic iency could bemomentar i ly impaired due to thepresence of water on the grip surfacesof the braking system. Calculate longbraking distances to avoid accidents.Pump the brakes repeatedly to restorenormal conditions.Carry out the preliminary checks, seepage 58 (TABLE OF PRELIMINARYCHECKS).

CAUTIONver aim jets of water, pressurized air steam at the following parts: wheelbs, controls on the right and left side the handlebar, bearings, brakeaster cylinders, instruments anddicators, exhaust pipes, glove/tool kitmpartment, ignition switch/steering
ck.
ch cleaning machinery will forceater into critical portions of yourhicle, which could damage yourhicle through corrosion or short
rcuiting.
e only water and neutral soap toean all rubber and plastic parts. Nevere alcohol, gasoline or other solvents.
not use solvents or oil-derived fluidsuch as acetone, trichloroethylene,rpentine, fuel, thinners) to clean theat. You can use detergents withrface-active agents up to 5% (mildap, degreasing agents) or alcohol.refully dry the seat after cleaning.
WARNING not use protective waxes on the
at, as they may make it too slippery.
GUZum_breva750USA_####.book Page 110 Thursday, June 29, 2006 12:31 PM
use and maintenance Breva 110
CAUTIONRules for washing the vehicle
1) Remove all the items from the glove,tool kit and saddle compartments;remove the mat from inside thesaddle compartment.
2) Make sure to close allcompartments securely;
CAUTIONUse only a neutral cleanser to wash thevehicle, rinsing with running water notunder pressure (see page 109(CLEANING) of this booklet).
CAUTIONTo clean the lights, use a spongesoaked with neutral cleansers andwater , gently rubbing i t over thesurfaces and rinsing frequently withplenty of water.
Remember that silicone wax may beused to polish the vehicle only after ithas been thoroughly washed.
Do not use abrasive polishing pastes onmatte paints.
Do not wash the vehicle under the sun,especially during the summer, when thebody is still warm, since the shampoomay dry before it has been rinsed anddamage the paint job.
Do not use liquids at a temperatureabove 104 °F (40 °C) to clean the plasticcomponents of the vehicle.
Neorhuofmincolo
Suwveveci
Usclus
Do(stusesusoCa
Dose

111use and maintenance Breva
AFTER EXTENDED STORAGE
NOTE Remove the plastic bags from theexhaust pipe and muffler.
u Uncover and clean the vehicle, see page109 (CLEANING).
u Check the battery charge status, seepage 98 (BATTERY RECHARGING)and install it, see page 98 (BATTERYINSTALLATION).
u Fill the fuel tank, see page 43 (FUEL).u Carry out the preliminary checks, see
page 58 (TABLE OF PRELIMINARYCHECKS).
WARNINGRide a few miles at moderate speed totest the vehicle, away from traffic.
GUZum_breva750USA_####.book Page 111 Thursday, June 29, 2006 12:31 PM
PERIODS OF EXTENDED STORAGE
CAUTIONIf the vehicle remains unused for morethan three weeks, disconnect the 30Afuses to prevent the battery fromdeteriorating.
NOTE Removing the 30A fuses resetsthe digital clock function to zero. For resetth is func t ion , see page 32(MULTIFUNCTION DIGITAL DISPLAY).
After a long period of inactivity, someprecautions are necessary to avoid anyproblems with the vehicle. In addition, make sure to carry out allrepairs and perform an overall checkbefore putting the vehicle away, sinceotherwise you may forget to do them later.
Proceed as follows:
u Remove the battery, see page 96(REMOVING THE BATTERY) and page95 (EXTENDED BATTERY STORAGE).
u Wash and dry the vehicle, see page 109(CLEANING).
u Spread wax over the painted surfaces.u Inflate the tires, see page 51 (TIRES).u Place the vehicle in an unheated, dry
room, away from sunlight and exposedto minimal temperature variations.
WARNINGBefore carrying out the followingoperations, let the engine and theexhaust silencer cool down until theyreach room temperature.Failure to observe this warning can leadto serious burns.
u Cover the exhaust pipe and muffler witha plastic bag and tie it in place, to keepmoisture out.
NOTE It is best to place the vehicle onstable supports that keep both tires raisedoff the ground.
u Cover the vehicle, avoiding the use ofplastic or waterproof materials.
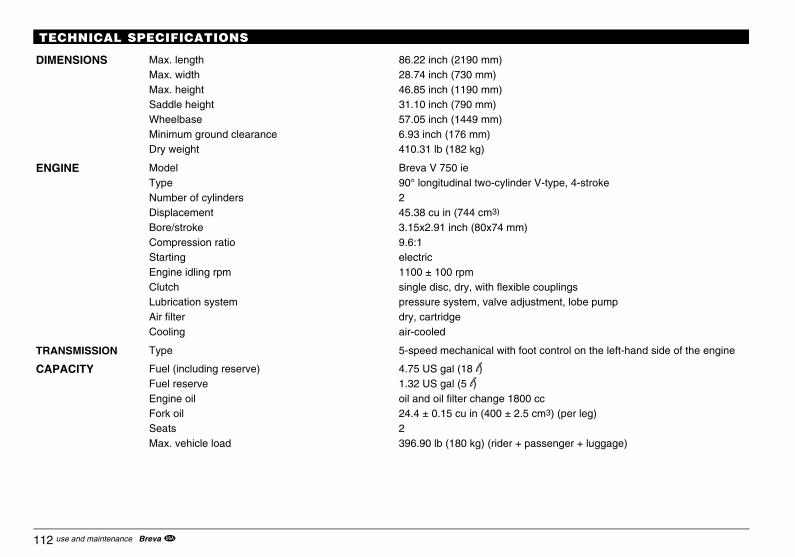
V-type, 4-stroke
ouplingstment, lobe pump
t control on the left-hand side of the engine
ccm3) (per leg)
ssenger + luggage)
GUZum_breva750USA_####.book Page 112 Thursday, June 29, 2006 12:31 PM
use and maintenance Breva 112
TECHNICAL SPECIFICATIONS
DIMENSIONS Max. length 86.22 inch (2190 mm)Max. width 28.74 inch (730 mm)Max. height 46.85 inch (1190 mm)Saddle height 31.10 inch (790 mm)Wheelbase 57.05 inch (1449 mm)Minimum ground clearance 6.93 inch (176 mm)Dry weight 410.31 lb (182 kg)
ENGINE Model Breva V 750 ieType 90° longitudinal two-cylinder Number of cylinders 2Displacement 45.38 cu in (744 cm3)
Bore/stroke 3.15x2.91 inch (80x74 mm)Compression ratio 9.6:1Starting electricEngine idling rpm 1100 ± 100 rpmClutch single disc, dry, with flexible cLubrication system pressure system, valve adjusAir filter dry, cartridgeCooling air-cooled
TRANSMISSION Type 5-speed mechanical with foo
CAPACITY Fuel (including reserve) 4.75 US gal (18 b)Fuel reserve 1.32 US gal (5 b)Engine oil oil and oil filter change 1800 Fork oil 24.4 ± 0.15 cu in (400 ± 2.5 cSeats 2Max. vehicle load 396.90 lb (180 kg) (rider + pa

113use and maintenance Breva
Final ratiocardan-type 8/33= 1: 4,825
r - Marelli)
um octane rating of 95 (RON) or 85 (MON).
lar cradles of high-resistance steel
opic adjustable fork Ø 40 mm
t alloy with 2 shock absorbers featuring spring
disc Ø 12.60 inch (320 mm), calipers with 4
Ø 10.24 inch (260 mm)
m alloy
or, alternatively, PIRELLI SPORT DAEMON
si (220 kpa)senger: 32.36+4.47 psi (220+30 kpa)
si (240 kpa)senger: 35.30+4.47. psi (240+30 kpa)
GUZum_breva750USA_####.book Page 113 Thursday, June 29, 2006 12:31 PM
GEAR RATIOS Ratio Primary Secondary1st gear-type 11/26 = 1: 2,36362ª 16/21 = 1: 1,3125 14/23 = 1: 1,64293ª 18/23 = 1: 1,27784ª 18/19 = 1: 1,05565ª 22/25 = 1: 0,9
FUELSUPPLY SYSTEMS
Type electronic injection (WebeChoke Ø 1.42 inch (36 mm)
FUEL SUPPLY Fuel unleaded gasoline, minim
FRAME Type tube frame with two moduSteering inclination angle 27.5°Trail 4.29 inch (109 mm)
SUSPENSIONS Front Marzocchi hydraulic telescStroke 5.12 inch (130 mm)Rear die-cast swingarm in ligh
preload adjustment.Wheel stroke 4.65 inch (118 mm)
BRAKES Front stainless steel floating separate opposed pistons
Rear stainless steel disc brake
WHEEL RIMS Type 3-spoke, die-cast aluminuFront 3" x 17"Rear 3.50" x 17"
TIRES Type BRIDGESTONE BATLAXFront Size: 110/70 - ZR 17
Inflation pressure: 32.36 pInflation pressure with pas
Rear Size: 130/80 - ZR 17Inflation pressure: 35.30 pInflation pressure with pas

- 0.7 mm)
orange bulb)
GUZum_breva750USA_####.book Page 114 Thursday, June 29, 2006 12:31 PM
use and maintenance Breva 114
SPARK PLUGS Standard NGK BR8ES
Spark plug gap 0.024-0.028 inch (0.6
Resistance 5 kΩ
ELECTRICAL SYSTEM Battery 12 V - 14 Amp/h
Main fuses 30 A
Secondary fuses 3A - 10 A - 15 A
Alternator (with permanent magnet) 12 V - 330 W
BULBS Low beam/high beam (halogen) 12 V - 55/60 W H4
Front parking light 12 V - 5 W
Direction indicators 12 V - 10 W (RY 10 W
Rear parking/brake lights 12 V - 5/21 W
Instrument lighting LED
EFI LED
License plate lamp 12V - 5W
LEDS Gearshift in neutral LED
Direction indicators LED
Fuel reserve LED
High beam LED
Engine oil pressure LED

115use and maintenance Breva
-4 A.P.I. specifications may be used SG.
with a working temperature range of -30 °Ctance to water and oxidation.
king sure the bases are compatible.
e system is also compatible with DOT 5).ceed SAE J1703, NHTSA 116 DOT 4, ISO
GUZum_breva750USA_####.book Page 115 Thursday, June 29, 2006 12:31 PM
LUBRICANT CHARTEngine oil (recommended) (1800 cc): RACING 4T 10 W 60.As an alternative to the recommended oils, premium brand oils that meet or exceed CCMC G
Transmission oil (recommended) (170 cc): TRUCK GEAR 85 W 140.
Transmission oil (recommended) (1000 cc): ROTRA MP/S 80 W 90.
Fork oil (recommended): FORK 5W or FORK 20W-
Bearings and other lubrication points (recommended): GREASE SM2.
As an alternative to the recommended product, use brand-name grease for rolling bearings, ... +140 °C, drip point 150 °C ...230 °C, offering high protection against corrosion, good resis
Battery lead protection: Neutral grease, or Vaseline.
WARNINGUse only fresh brake fluid. Do not mix different brands or types of oil without ma
Brake fluid (recommended): the system is filled with BRAKE 5.1 DOT 4 (the brakAs an alternative to the recommended fluid, those with performance ratings that meet or ex4925 synthetic fluid specifications may be used.

1
T uthorized Network mechanics are whollyfa maintenance and repairs.
T oper maintenance at the recommendedin
F llow Pages or look directly on the map ato
O hat has been developed and tested whileth d to quality control procedures, to ensureth
GUZum_breva750USA_####.book Page 116 Thursday, June 29, 2006 12:31 PM
use a16
hanks miliar
he relitervals
or infour Offic
nly bye vehieir full
nd maintenance Breva
AUTHORIZED DEALERS AND SERVICE CENTERS
THE VALUE OF SERVICE
to ongoing technical progress and product-specific technical training, only Moto Guzzi Awith every detail of this motorcycle, and have the special equipment needed for correct
ability of the vehicle also depends on its mechanical condition. Pre-ride checks, pr and using genuine Moto Guzzi spare parts are other key factors!
rmation about the Authorized Dealer and/or Service Center nearest you, check the Yeial Web Site:
www.motoguzzi.it
requesting Original Moto Guzzi spare parts can you be assured of buying a product tcle was being engineered. Original Moto Guzzi spare parts are systematically subjecte reliability and life-span.

117
NOTES
use and maintenance Breva
USE GENUINE SPARE PARTS ONLY
GUZum_breva750USA_####.book Page 117 Thursday, June 29, 2006 12:31 PM

use and maintenance Breva 118
NOTES
USE GENUINE SPARE PARTS ONLY
GUZum_breva750USA_####.book Page 118 Thursday, June 29, 2006 12:31 PM

119
NOTES
use and maintenance Breva
USE GENUINE SPARE PARTS ONLY
GUZum_breva750USA_####.book Page 119 Thursday, June 29, 2006 12:31 PM
use and maintenance Breva 120
Moto Guzzi S.p.A. thanks you, as a customer, for choosing this vehicle, and offers the following suggestions:
– Do not dispose of oil, fuel, or polluting substances and components in theenvironment.
– Do not keep the engine running when not necessary.
– Avoid unnecessary loud noise.
– Respect the environment.
GUZum_breva750USA_####.book Page 120 Thursday, June 29, 2006 12:31 PM


![[~L741] - ThisOldTractor](https://img.pdfslide.us/doc/110x75/6177115a41552c2c1d5ccf6e/l741-thisoldtractor.jpg)


