Embed Size (px)
DESCRIPTION
http://www.m-sora.si/en/files/default/katalogi/Use%20and%20maintenance%20instructions-ENG.pdf
Citation preview

USE AND MAINTENANCE INSTRUCTIONS
Issue 06 (June 2013)
2
INDEX OF PICTURES:
Picture 1: Opening and closing of windows 7
Picture 2: Sash lifting device 7
Picture 3: Mechamism for opening double-sash window or balcony door without a mullion 7
Picture 4: Folding windows 8
Picture 5: Lift-slide windows 8
Picture 6: Lift-slide windows 9
Picture 7: Possible directions of opening 9
Picture 8: Different ways of opening Handle 10
Picture 9: Transom window 10
Picture 10: Different ways of opening transom windows 10
Picture 11: Types of Venetian blinds 11
Picture 12: Different ways of operating Venetian blinds 11
Picture 13: Various types of roller blinds 12
Picture 14: Different roller blinds operating mechanisms 12
Picture 15: Various types of shutters 12
Picture 16: Various types of insect screens 13
Picture 17: Allen key 14
Picture 18: Height adjustment of window (bottom hinge) 14
Picture 19: Moving the sash to the frame (bottom hinge) 14
Picture 20: Horizontal movement of window (bottom hinge) 15
Picture 21: Horizontal movement of the window (top hinge) 15
Picture 22: Tightening of the upper part of the window (top hinge) 15
Picture 23: Locking cam for adjusting window seals 15
Picture 24: Gasket compression adjustment 16
Picture 25: Pin extractor handle for taking off window sash 16
Picture 26: Picture of hinge 17
Picture 27: Pulling the hinge out 17
Picture 28: Taking the sash off 17
Picture 29: Cleaning kit 18
Picture 30: Application of cleaning agent 18
Picture 31: Application of wood balm 18
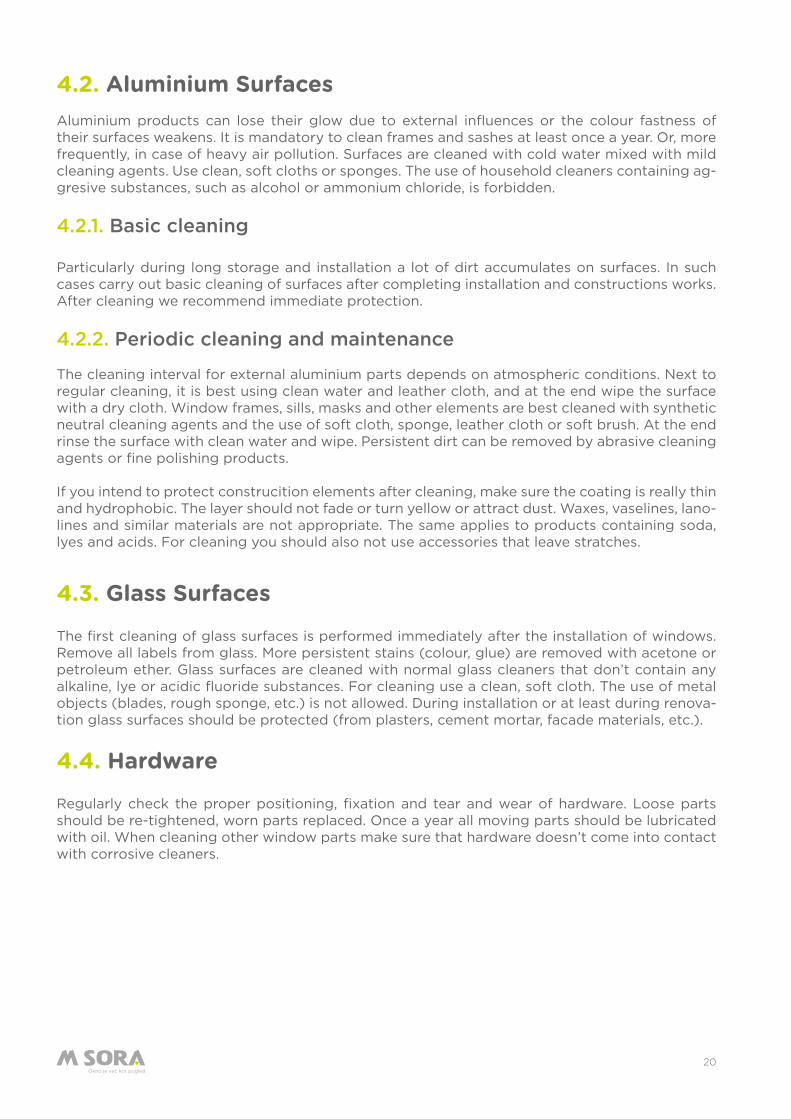
Picture 32: Annual lubrication 21
Picture 33: Use of oil 21
Picture 34: Lubrication of shutter hardware 21
Picture 35: Dew-point temperature in relation to relative humidity 22
Picture 36: Graph of favourable temperature ranges 22

Use and maintenance instructions3
INDEX
1. WARNINGS 51.1. General Guidance 51.2. Follow the Instructions 5
2. USE OF PRODUCTS 72.1. Windows and Balcony Doors 72.2. Panoramic Windows 8
2.2.1. Folding Windows 82.2.2. Lift-Slide Windows 82.2.3. Slide-Tilt Windows 9
2.3. Front Doors 92.4. Additional Equipment 10
2.4.1. Opening of Transom Windows 102.4.2. Venetian Blinds 102.4.3. Roller Blinds 112.4.4. Shutters 122.4.5. Insect Screens 13
3. SETTING OF HARDWARE 143.1. Windows and Balcony Doors 14
4. CLEANING AND MAINTENANCE OF PRODUCTS 184.1. Wooden Surfaces 184.2. Aluminium Surfaces 20
4.2.1. Basic cleaning 204.2.2. Periodic cleaning and maintenance 20
4.3. Glass Surfaces 204.4. Hardware 204.5. Seals 21
5. STEAMING UP OF WINDOWS AND AIRING OF ROOMS 215.1. Steaming Up of Windows 215.2. Airing of Rooms 22
6. WARRANTY CERTIFICATE 23
4
Congratulations!
You have decided to purchase M SORA products, that were created with state-of-the-art knowledge, technology and quality. Our products are the result of long-running development and tradition. Our in-tention is to connect the warmth of nature with the familiarity of your home. Thank you for your purchase.
IMPORTANT IN A NUTSHELL!- Remove labels on glass and do the first cleaning of glass surfaces immediately after the installation of windows.- For your well-being and benefit it is important to air out the rooms sufficiently.- Better durability of windows is achieved by maintaining appropriate moisture in rooms.
The use and maintenance instructions are part of general sales conditions.We reserve the right to change details, technology and types.The warranty is valid only if accompanied by the receipt.We allow the possibility of inconsistencies in the text.
Use and maintenance instructions5
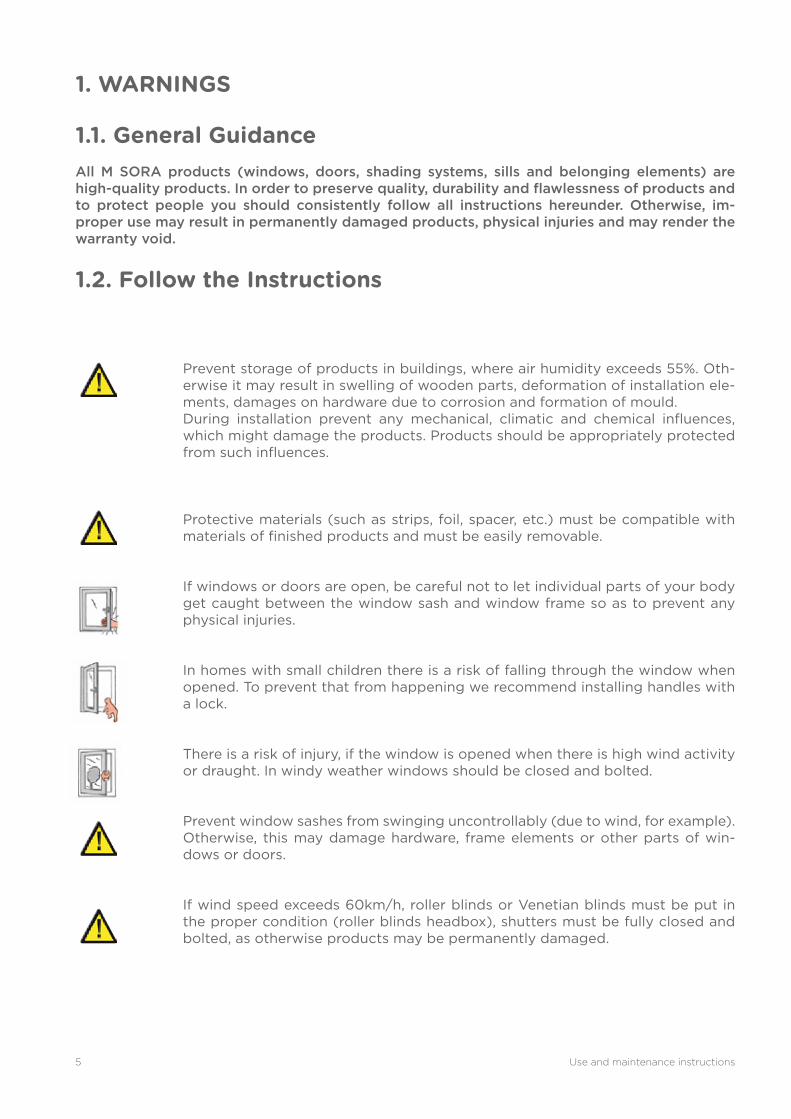
1. WARNINGS
1.1. General Guidance All M SORA products (windows, doors, shading systems, sills and belonging elements) are high-quality products. In order to preserve quality, durability and flawlessness of products and to protect people you should consistently follow all instructions hereunder. Otherwise, im-proper use may result in permanently damaged products, physical injuries and may render the warranty void.
1.2. Follow the Instructions
Prevent storage of products in buildings, where air humidity exceeds 55%. Oth-erwise it may result in swelling of wooden parts, deformation of installation ele-ments, damages on hardware due to corrosion and formation of mould.During installation prevent any mechanical, climatic and chemical influences, which might damage the products. Products should be appropriately protected from such influences.
Protective materials (such as strips, foil, spacer, etc.) must be compatible with materials of finished products and must be easily removable.
If windows or doors are open, be careful not to let individual parts of your body get caught between the window sash and window frame so as to prevent any physical injuries.
In homes with small children there is a risk of falling through the window when opened. To prevent that from happening we recommend installing handles with a lock.
There is a risk of injury, if the window is opened when there is high wind activity or draught. In windy weather windows should be closed and bolted.
Prevent window sashes from swinging uncontrollably (due to wind, for example). Otherwise, this may damage hardware, frame elements or other parts of win-dows or doors.
If wind speed exceeds 60km/h, roller blinds or Venetian blinds must be put in the proper condition (roller blinds headbox), shutters must be fully closed and bolted, as otherwise products may be permanently damaged.
6
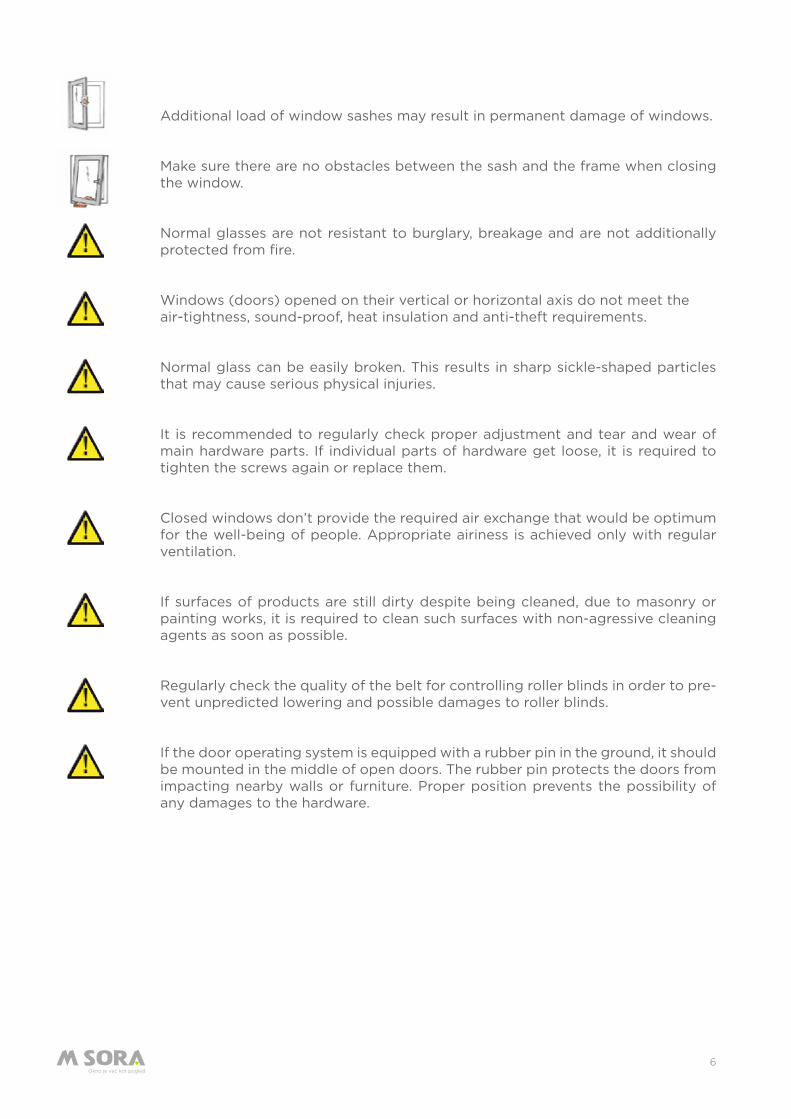
Additional load of window sashes may result in permanent damage of windows.
Make sure there are no obstacles between the sash and the frame when closing the window.
Normal glasses are not resistant to burglary, breakage and are not additionally protected from fire.
Windows (doors) opened on their vertical or horizontal axis do not meet the air-tightness, sound-proof, heat insulation and anti-theft requirements.
Normal glass can be easily broken. This results in sharp sickle-shaped particles that may cause serious physical injuries.
It is recommended to regularly check proper adjustment and tear and wear of main hardware parts. If individual parts of hardware get loose, it is required to tighten the screws again or replace them.
Closed windows don’t provide the required air exchange that would be optimum for the well-being of people. Appropriate airiness is achieved only with regular ventilation.
If surfaces of products are still dirty despite being cleaned, due to masonry or painting works, it is required to clean such surfaces with non-agressive cleaning agents as soon as possible.
Regularly check the quality of the belt for controlling roller blinds in order to pre-vent unpredicted lowering and possible damages to roller blinds.
If the door operating system is equipped with a rubber pin in the ground, it should be mounted in the middle of open doors. The rubber pin protects the doors from impacting nearby walls or furniture. Proper position prevents the possibility of any damages to the hardware.
Use and maintenance instructions7
2. USE OF PRODUCTS
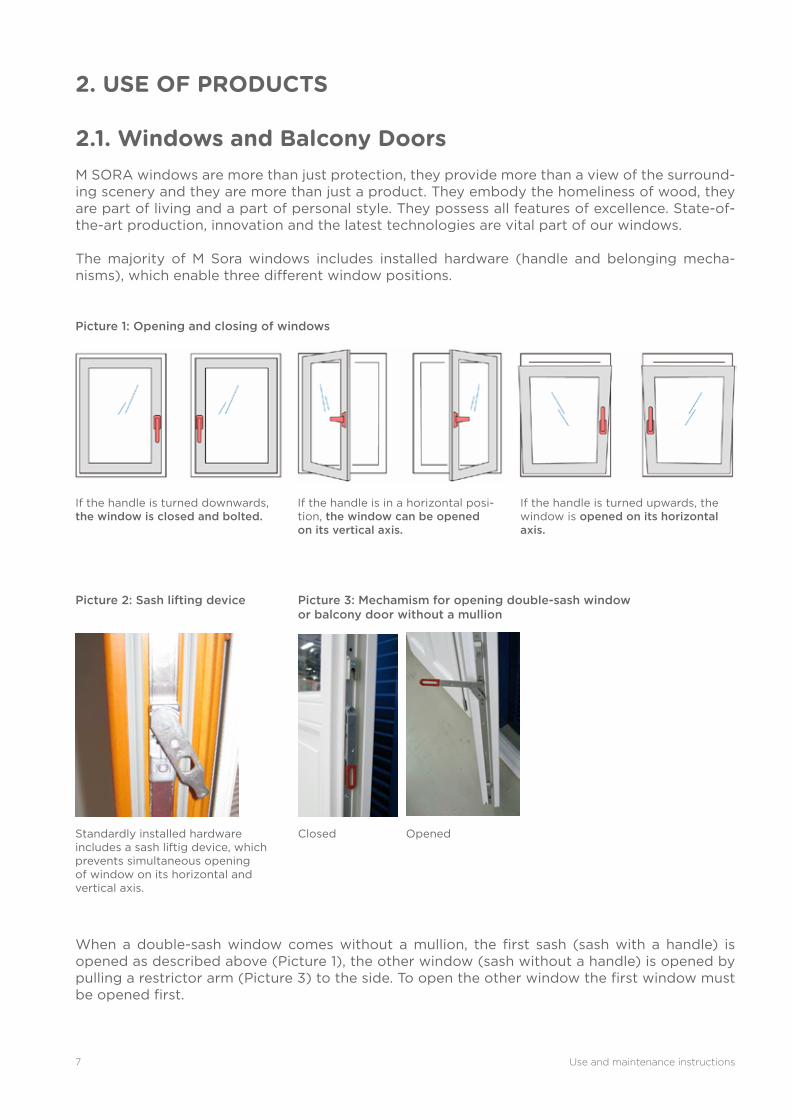
2.1. Windows and Balcony DoorsM SORA windows are more than just protection, they provide more than a view of the surround-ing scenery and they are more than just a product. They embody the homeliness of wood, they are part of living and a part of personal style. They possess all features of excellence. State-of-the-art production, innovation and the latest technologies are vital part of our windows.
The majority of M Sora windows includes installed hardware (handle and belonging mecha-nisms), which enable three different window positions.
If the handle is turned downwards, the window is closed and bolted.
If the handle is in a horizontal posi-tion, the window can be opened on its vertical axis.
If the handle is turned upwards, the window is opened on its horizontal axis.
Standardly installed hardware includes a sash liftig device, which prevents simultaneous opening of window on its horizontal and vertical axis.
Closed Opened
Picture 1: Opening and closing of windows
Picture 2: Sash lifting device Picture 3: Mechamism for opening double-sash window or balcony door without a mullion
When a double-sash window comes without a mullion, the first sash (sash with a handle) is opened as described above (Picture 1), the other window (sash without a handle) is opened by pulling a restrictor arm (Picture 3) to the side. To open the other window the first window must be opened first.
8
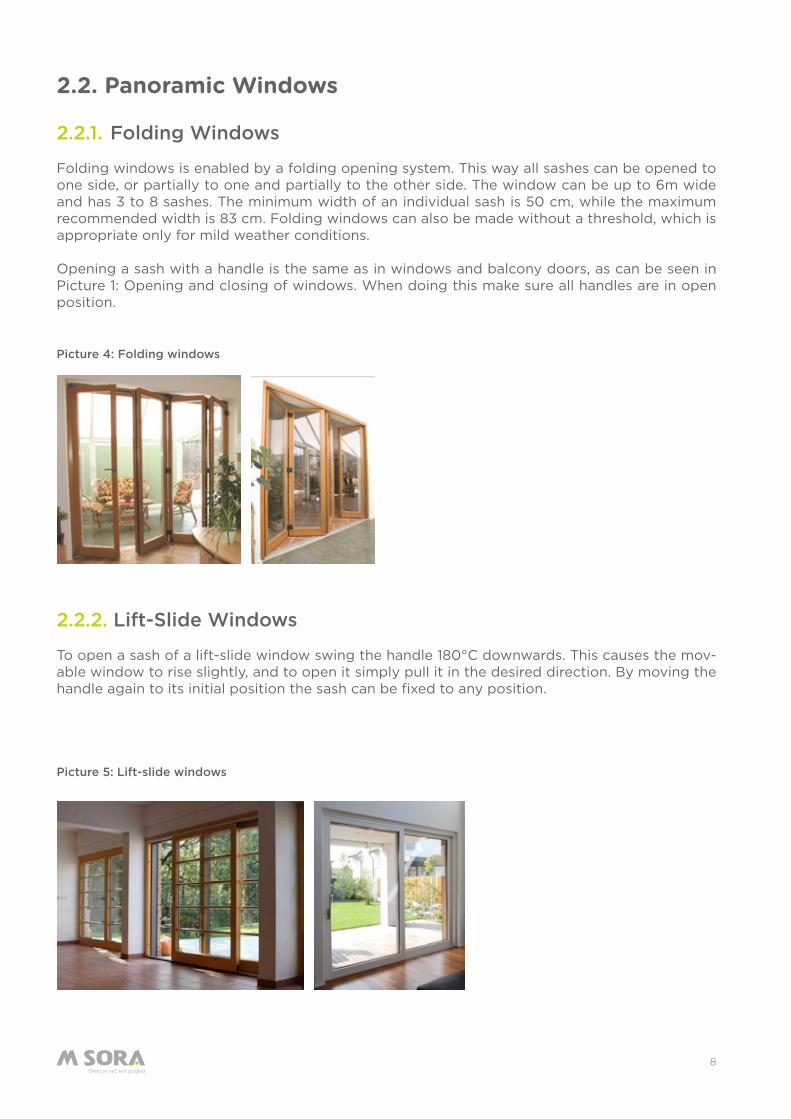
Picture 4: Folding windows
Picture 5: Lift-slide windows
2.2. Panoramic Windows
2.2.1. Folding Windows
Folding windows is enabled by a folding opening system. This way all sashes can be opened to one side, or partially to one and partially to the other side. The window can be up to 6m wide and has 3 to 8 sashes. The minimum width of an individual sash is 50 cm, while the maximum recommended width is 83 cm. Folding windows can also be made without a threshold, which is appropriate only for mild weather conditions.
Opening a sash with a handle is the same as in windows and balcony doors, as can be seen in Picture 1: Opening and closing of windows. When doing this make sure all handles are in open position.
2.2.2. Lift-Slide Windows
To open a sash of a lift-slide window swing the handle 180°C downwards. This causes the mov-able window to rise slightly, and to open it simply pull it in the desired direction. By moving the handle again to its initial position the sash can be fixed to any position.
Use and maintenance instructions9
2.2.3. Slide-Tilt Windows
M SORA panoramic windows standardly include the HKS 160S hardware. At the request of a customer and for additional payment we can also install the HKS 160Z hardware.
The difference between the S and Z mechanism is that in S mechanism a window passes from one position to another without connection and requires a mechanical pull and push of a sash from or into a frame. Quite the contrary, movement from one position to another in the Z system is connected and runs simultaneously by moving a handle. The latter is recommended particu-larly in bigger dimensions of wall.
2.3. Front Doors
M SORA offers classic front doors or doors made of massive plates with metal reinforcements inside. We also make passive-type doors. The dimension and design of doors can be adapted to your wishes. Each door produced by M SORA is a unique specimen.
Doors can be opened by pushing the handle down. The locking system depends on the installed lock. Instead of a doorhandle you can use a grip on the outside. This way door can be opened or unlocked from the outside only with a key. When electrical receive is installed, unlocked door can be opened with a switch (such as, intercom). To open locked door with an electrical signal you need an electronic lock. However, it should be noted we don’t perform connections of electronic locks; this will be done by an electrician.
Picture 6: Lift-slide windows
Picture 7: Possible directions of opening
OPENING INWARDS OPENING OUTWARDS
outwards outwards
LEFT RIGHT LEFT RIGHT
outwards outwards
inwardinward inwardinward
10
2.4. Additional Equipment
2.4.1. Opening of Transom Windows
Tramsom windows provide additional light to the room. Users seem to opt for them particular-ly when there are big openings and a single window would be to big or when we want to make the opening appear smaller.
There are four systems of opening transom windows, which are presented on pictures below:• handle• lifting handle• single-command rotation handle• remote controlled electric motor.
Picture 8: Different ways of opening
Picture 9: Transom window
Picture 10: Different ways of opening transom windows
Handle
opening with handle
Doorknob
single-command driven
Grip
lifting handle driven remote controlled
Use and maintenance instructions11
remote controlled motor drive operating chain
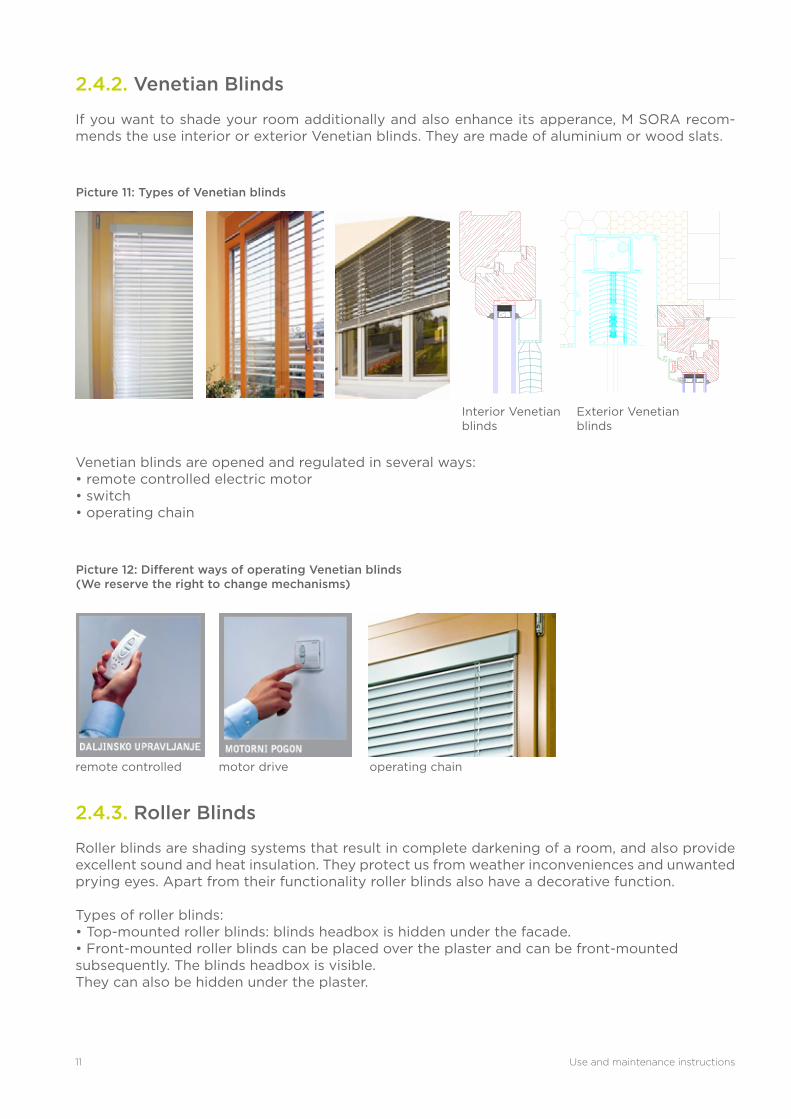
2.4.2. Venetian Blinds
If you want to shade your room additionally and also enhance its apperance, M SORA recom-mends the use interior or exterior Venetian blinds. They are made of aluminium or wood slats.
2.4.3. Roller Blinds
Roller blinds are shading systems that result in complete darkening of a room, and also provide excellent sound and heat insulation. They protect us from weather inconveniences and unwanted prying eyes. Apart from their functionality roller blinds also have a decorative function.
Types of roller blinds:• Top-mounted roller blinds: blinds headbox is hidden under the facade. • Front-mounted roller blinds can be placed over the plaster and can be front-mounted subsequently. The blinds headbox is visible. They can also be hidden under the plaster.
Venetian blinds are opened and regulated in several ways:• remote controlled electric motor• switch• operating chain
Picture 11: Types of Venetian blinds
Picture 12: Different ways of operating Venetian blinds (We reserve the right to change mechanisms)
Interior Venetian blinds
Exterior Venetian blinds

12
2.4.4. Shutters
Shutters are a traditional means of shading and in some cases they are an irreplaceable protec-tion against weather nuisances and burglaries. They also significantly enhance your facade.
Shutters can be opened manually, by means of an internal guide or with an electric motor.Shutters are available with fixed louvers, movable louvers or as full shutters.
Picture 13: Various types of roller blinds
Picture 14: Different roller blinds operating mechanisms
Picture 15: Various types of shutters
Top-mounted, under-plaster Front-mounted, under-plaster Front-mounted, over-plaster
belt motor operated remote controlled
Use and maintenance instructions13
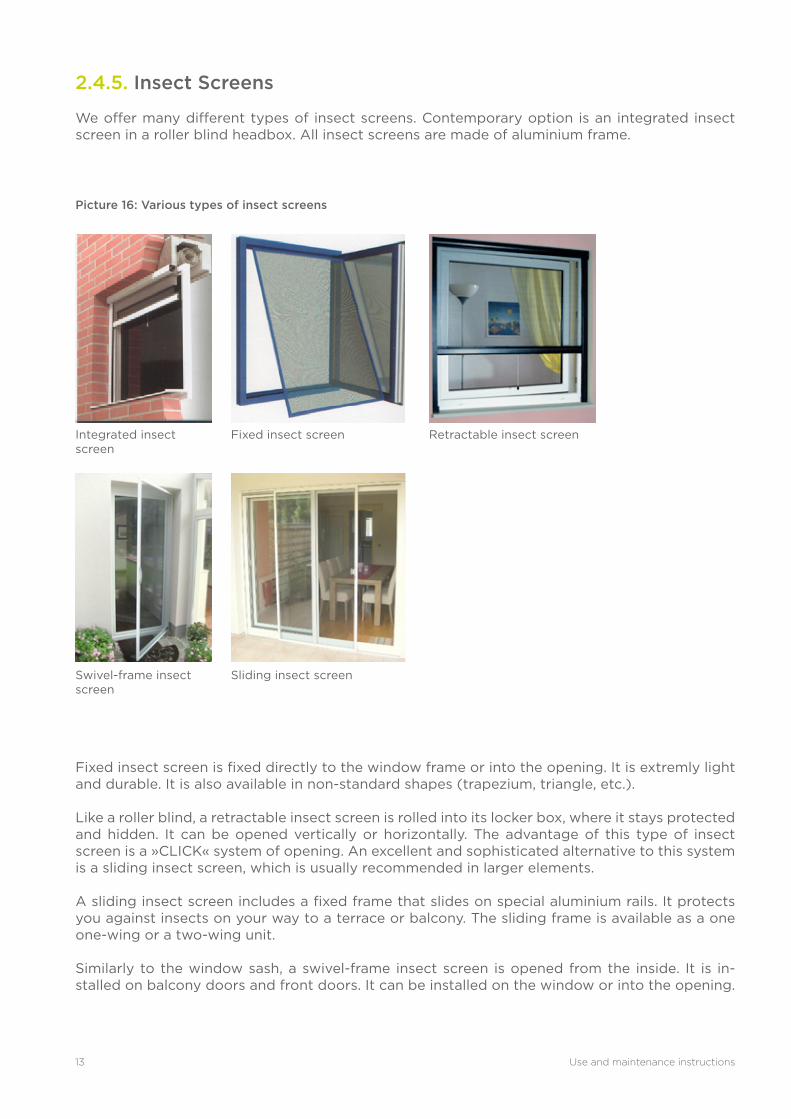
2.4.5. Insect Screens
We offer many different types of insect screens. Contemporary option is an integrated insect screen in a roller blind headbox. All insect screens are made of aluminium frame.
Fixed insect screen is fixed directly to the window frame or into the opening. It is extremly light and durable. It is also available in non-standard shapes (trapezium, triangle, etc.).
Like a roller blind, a retractable insect screen is rolled into its locker box, where it stays protected and hidden. It can be opened vertically or horizontally. The advantage of this type of insect screen is a »CLICK« system of opening. An excellent and sophisticated alternative to this system is a sliding insect screen, which is usually recommended in larger elements.
A sliding insect screen includes a fixed frame that slides on special aluminium rails. It protects you against insects on your way to a terrace or balcony. The sliding frame is available as a one one-wing or a two-wing unit.
Similarly to the window sash, a swivel-frame insect screen is opened from the inside. It is in-stalled on balcony doors and front doors. It can be installed on the window or into the opening.
Picture 16: Various types of insect screens
Integrated insect screen
Swivel-frame insect screen
Fixed insect screen
Sliding insect screen
Retractable insect screen
14
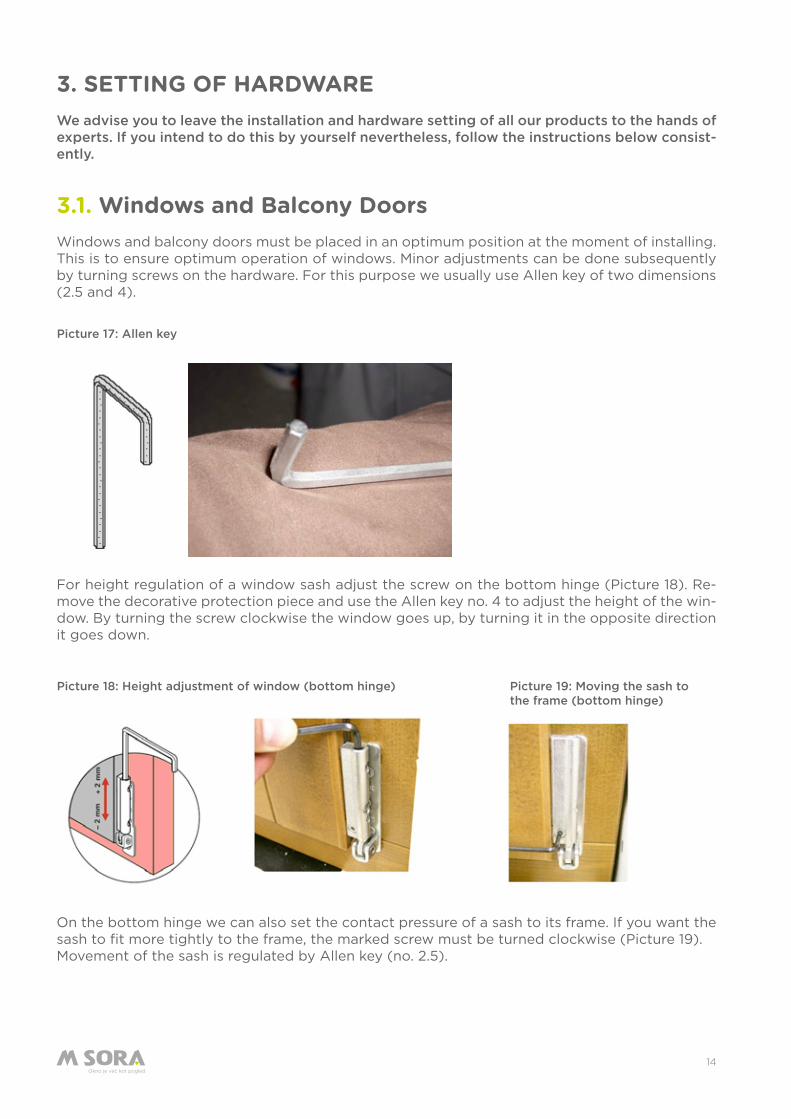
For height regulation of a window sash adjust the screw on the bottom hinge (Picture 18). Re-move the decorative protection piece and use the Allen key no. 4 to adjust the height of the win-dow. By turning the screw clockwise the window goes up, by turning it in the opposite direction it goes down.
On the bottom hinge we can also set the contact pressure of a sash to its frame. If you want the sash to fit more tightly to the frame, the marked screw must be turned clockwise (Picture 19).Movement of the sash is regulated by Allen key (no. 2.5).
Picture 18: Height adjustment of window (bottom hinge) Picture 19: Moving the sash to the frame (bottom hinge)
Picture 17: Allen key
3. SETTING OF HARDWARE We advise you to leave the installation and hardware setting of all our products to the hands of experts. If you intend to do this by yourself nevertheless, follow the instructions below consist-ently.
3.1. Windows and Balcony DoorsWindows and balcony doors must be placed in an optimum position at the moment of installing. This is to ensure optimum operation of windows. Minor adjustments can be done subsequently by turning screws on the hardware. For this purpose we usually use Allen key of two dimensions (2.5 and 4).
Use and maintenance instructions15
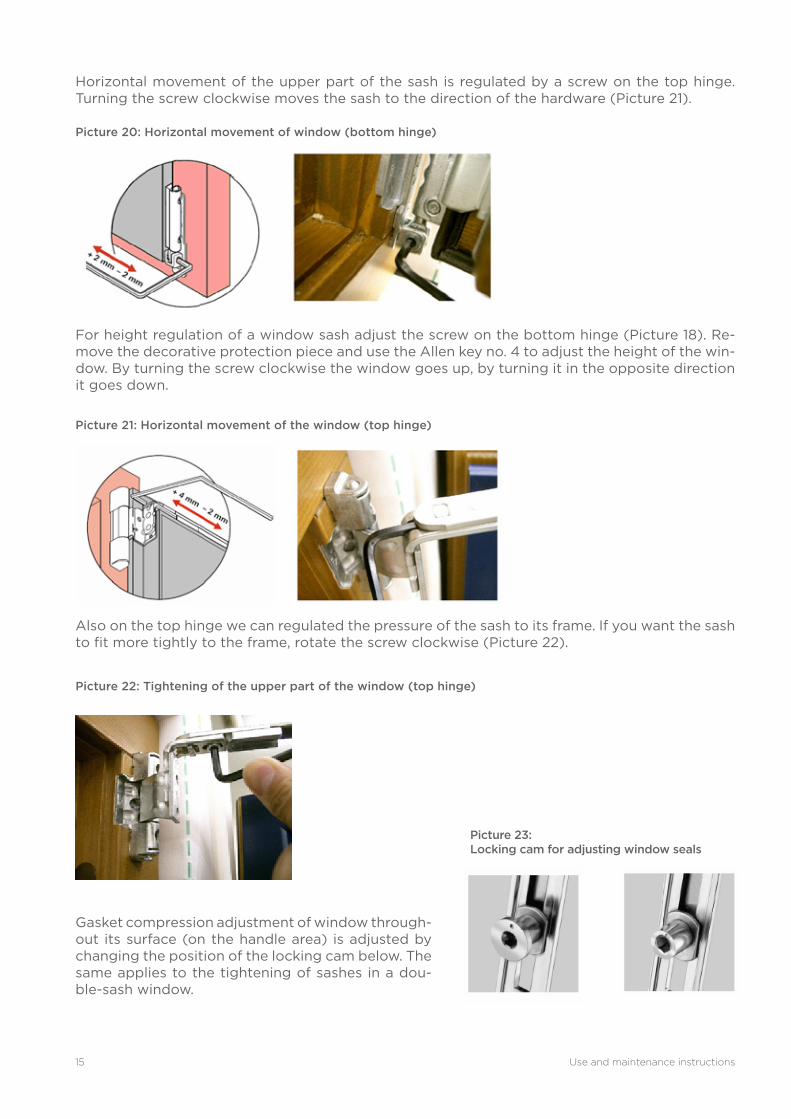
Horizontal movement of the upper part of the sash is regulated by a screw on the top hinge. Turning the screw clockwise moves the sash to the direction of the hardware (Picture 21).
For height regulation of a window sash adjust the screw on the bottom hinge (Picture 18). Re-move the decorative protection piece and use the Allen key no. 4 to adjust the height of the win-dow. By turning the screw clockwise the window goes up, by turning it in the opposite direction it goes down.
Also on the top hinge we can regulated the pressure of the sash to its frame. If you want the sash to fit more tightly to the frame, rotate the screw clockwise (Picture 22).
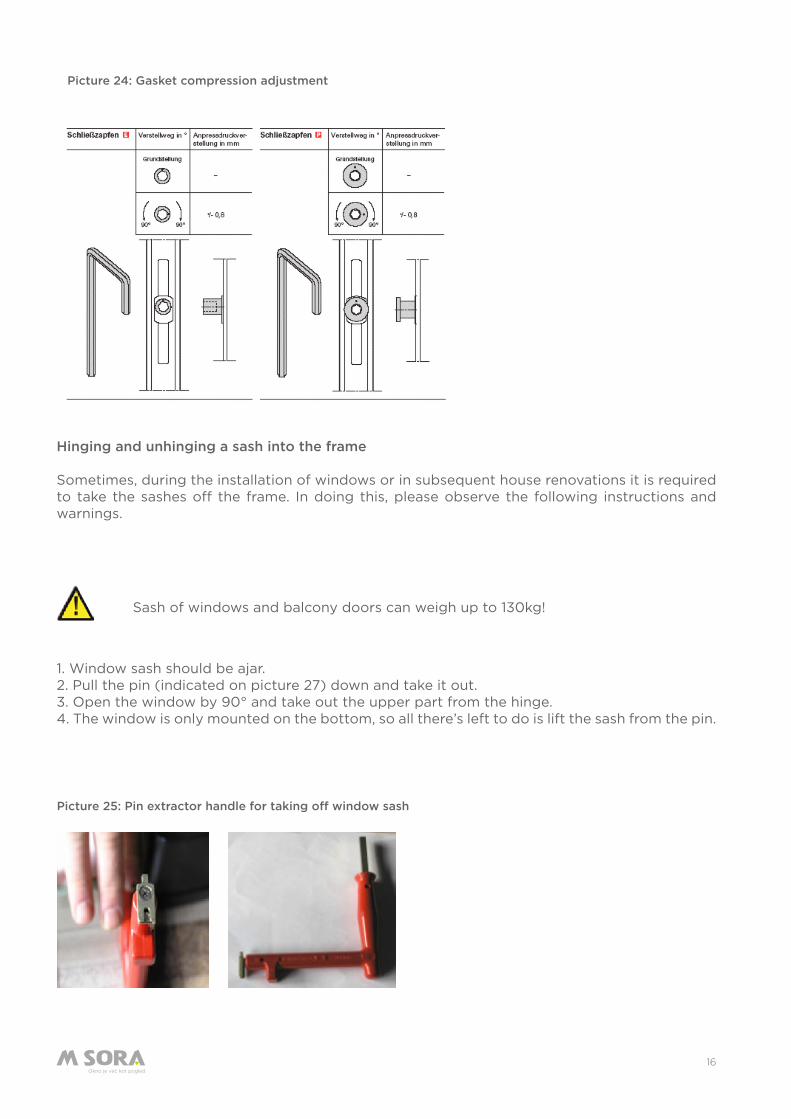
Gasket compression adjustment of window through-out its surface (on the handle area) is adjusted by changing the position of the locking cam below. The same applies to the tightening of sashes in a dou-ble-sash window.
Picture 20: Horizontal movement of window (bottom hinge)
Picture 21: Horizontal movement of the window (top hinge)
Picture 22: Tightening of the upper part of the window (top hinge)
Picture 23: Locking cam for adjusting window seals
16
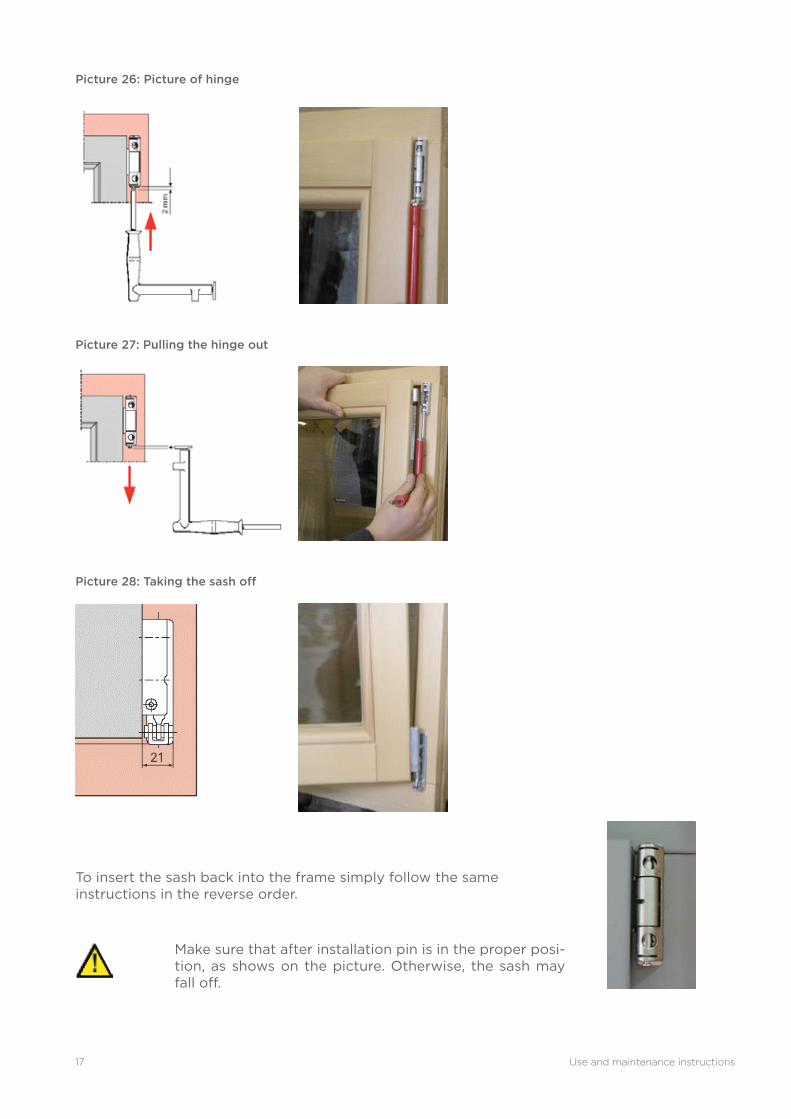
Hinging and unhinging a sash into the frame
Sometimes, during the installation of windows or in subsequent house renovations it is required to take the sashes off the frame. In doing this, please observe the following instructions and warnings.
1. Window sash should be ajar.2. Pull the pin (indicated on picture 27) down and take it out.3. Open the window by 90° and take out the upper part from the hinge.4. The window is only mounted on the bottom, so all there’s left to do is lift the sash from the pin.
Picture 25: Pin extractor handle for taking off window sash
Picture 24: Gasket compression adjustment
Sash of windows and balcony doors can weigh up to 130kg!
Use and maintenance instructions17
Picture 26: Picture of hinge
Picture 27: Pulling the hinge out
Picture 28: Taking the sash off
To insert the sash back into the frame simply follow the same instructions in the reverse order.
Make sure that after installation pin is in the proper posi-tion, as shows on the picture. Otherwise, the sash may fall off.
18
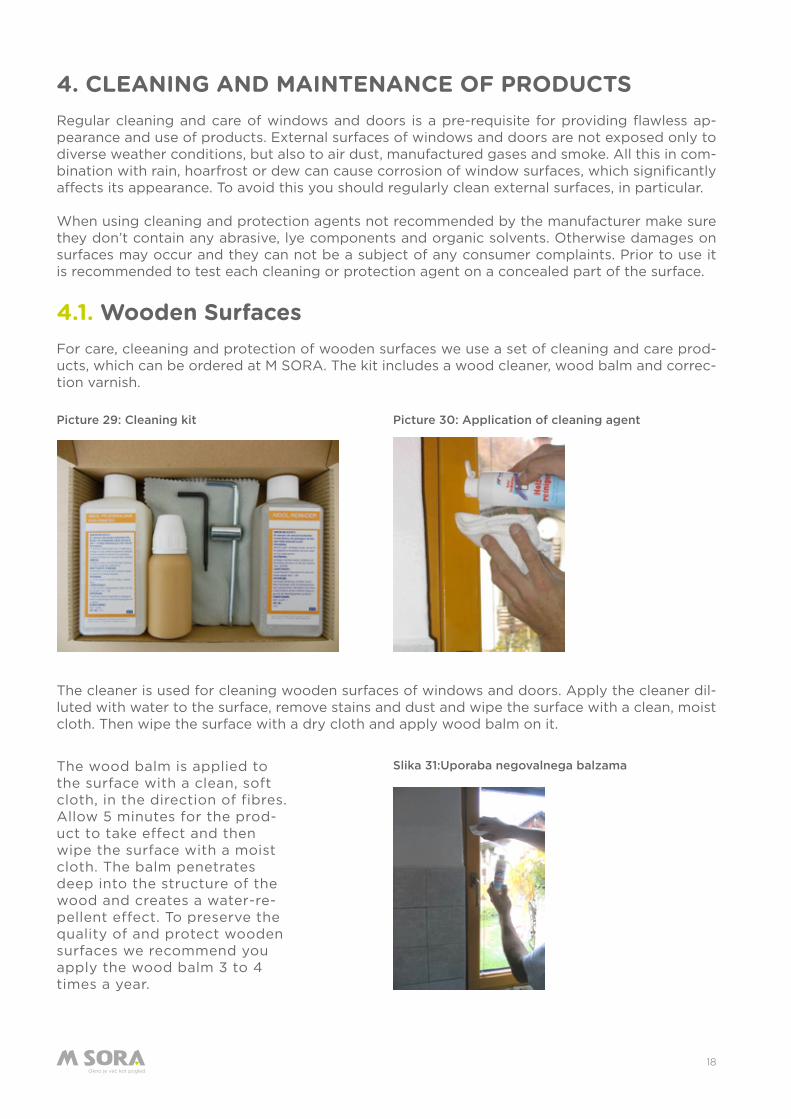
Picture 29: Cleaning kit Picture 30: Application of cleaning agent
4. CLEANING AND MAINTENANCE OF PRODUCTSRegular cleaning and care of windows and doors is a pre-requisite for providing flawless ap-pearance and use of products. External surfaces of windows and doors are not exposed only to diverse weather conditions, but also to air dust, manufactured gases and smoke. All this in com-bination with rain, hoarfrost or dew can cause corrosion of window surfaces, which significantly affects its appearance. To avoid this you should regularly clean external surfaces, in particular.
When using cleaning and protection agents not recommended by the manufacturer make sure they don’t contain any abrasive, lye components and organic solvents. Otherwise damages on surfaces may occur and they can not be a subject of any consumer complaints. Prior to use it is recommended to test each cleaning or protection agent on a concealed part of the surface.
4.1. Wooden SurfacesFor care, cleeaning and protection of wooden surfaces we use a set of cleaning and care prod-ucts, which can be ordered at M SORA. The kit includes a wood cleaner, wood balm and correc-tion varnish.
The cleaner is used for cleaning wooden surfaces of windows and doors. Apply the cleaner dil-luted with water to the surface, remove stains and dust and wipe the surface with a clean, moist cloth. Then wipe the surface with a dry cloth and apply wood balm on it.
Slika 31:Uporaba negovalnega balzama
The wood balm is applied to the surface with a clean, soft cloth, in the direction of fibres. Allow 5 minutes for the prod-uct to take effect and then wipe the surface with a moist cloth. The balm penetrates deep into the structure of the wood and creates a water-re-pellent effect. To preserve the quality of and protect wooden surfaces we recommend you apply the wood balm 3 to 4 times a year.
Use and maintenance instructions19
Repair of damagesIf there are mechanical damages on wood, affected surfaces must be repaired in the shortest time possible. Otherwise, water may penetrate under the damaged surface of the varnish layer. And this results in activity, lifting and change in colour of wood and the colour coating comes off.The surface should be thoroughly cleaned and smoothed with sandpaper. On areas, where var-nish came off completely, first restore the wood impregnation. When dry, slightly smooth it with fine sandpaper and clean again. Then use a brush to apply two layers of appropriate trim coat-ing. This can be done only on the damaged area or throughout the product. When using coating observe manufacturer’s instructions.
Restoration of coatingWith time the coating on wooden surfaces gets thinner, which can result in water penetrating under the layer of coating and in wood deterioration. Renovation of coating serves for the resto-ration of surfaces that are not irreparably damaged. In the event of damages follow the instruc-tions in the paragraph above.Thoroughly clean the entire surface, smooth with sandpaper and finally thoroughly clean again to create a dust-free surface. In places where the coating totally came off the wood must be impregnated first. When impregnation is totally dry, smooth again slightly with a fine sandpaper and clean the surface again. Be careful not to over-polish the impregnation. At the end use a brush to apply two layers of trim coating. When using coating observe manufacturer’s instruc-tions.
Complete restoration of coatingThis procedure is required, when windows were not cleaned and maintained as provided above. When the layer of coating begins to decompose totally, this is reflected in graying of wood and coming off of coating. Restoration of coating hence includes complete removal of deteriorated coating by polishing or paint removal. Then clean the surface thoroughly. If you have been us-ing paint removal, neutralize and wash the surface or wait a few days before continuing with the procedure. Then first apply impregnation and when dry enough, smooth with a fine sandpaper and clean again. This is followed by applying two layers of trim coating with a brush. When using coating observe manufacturer’s instructions.WARNING: Contact of larch tree or oak tree wood with concrete or lime causes a reaction that results in dark stains deep inside the wood! Such stains cannot be removed! If that happens, the only solution is the restoration with top coatings!
Temporary formations on the surface of coating
Water stainsAll thick-layered coatings, which can be dilluted with water, dry outside in. The layer of coating is therefore completely dry or dried up after one month. If, after installation, the product comes into contact with water (rain), milky gry stains can appear. This can happen in lacquer stain treatment of surfaces. Stains should not be wiped, wait for them to dry naturally. When dried, they completely disappear and don’t affect the quality of coating. When the surface of coating is finally dry, stains no longer appear.
Fading out of colourIn all wooden surfaces treated with the surface treatment system (RAL colours), colours can oc-cur fade out. This happends when cleaning products with a cloth. This occurs, if all pigments in the layer of coating are not yet cohesive and stabnd out. This happens more frequently, if there are strongly coloured organic pigments. But it is a temporary thing and disappears. Of course, it does not affect the quality of coating.
Maintenance of wooden surfaces that are surface-treated with oilsSurfaces must be thoroughly checked once to twice a year. Considering the product’s exposure to weather conditions, surfaces should be restored by applying oil for external protection. When using to restore the layer observe the instructions of the oil manufacturer.
20
4.2. Aluminium Surfaces Aluminium products can lose their glow due to external influences or the colour fastness of their surfaces weakens. It is mandatory to clean frames and sashes at least once a year. Or, more frequently, in case of heavy air pollution. Surfaces are cleaned with cold water mixed with mild cleaning agents. Use clean, soft cloths or sponges. The use of household cleaners containing ag-gresive substances, such as alcohol or ammonium chloride, is forbidden.
4.2.1. Basic cleaning
Particularly during long storage and installation a lot of dirt accumulates on surfaces. In such cases carry out basic cleaning of surfaces after completing installation and constructions works. After cleaning we recommend immediate protection.
4.2.2. Periodic cleaning and maintenance
The cleaning interval for external aluminium parts depends on atmospheric conditions. Next to regular cleaning, it is best using clean water and leather cloth, and at the end wipe the surface with a dry cloth. Window frames, sills, masks and other elements are best cleaned with synthetic neutral cleaning agents and the use of soft cloth, sponge, leather cloth or soft brush. At the end rinse the surface with clean water and wipe. Persistent dirt can be removed by abrasive cleaning agents or fine polishing products.
If you intend to protect construcition elements after cleaning, make sure the coating is really thin and hydrophobic. The layer should not fade or turn yellow or attract dust. Waxes, vaselines, lano-lines and similar materials are not appropriate. The same applies to products containing soda, lyes and acids. For cleaning you should also not use accessories that leave stratches.
4.3. Glass Surfaces
The first cleaning of glass surfaces is performed immediately after the installation of windows. Remove all labels from glass. More persistent stains (colour, glue) are removed with acetone or petroleum ether. Glass surfaces are cleaned with normal glass cleaners that don’t contain any alkaline, lye or acidic fluoride substances. For cleaning use a clean, soft cloth. The use of metal objects (blades, rough sponge, etc.) is not allowed. During installation or at least during renova-tion glass surfaces should be protected (from plasters, cement mortar, facade materials, etc.).
4.4. Hardware
Regularly check the proper positioning, fixation and tear and wear of hardware. Loose parts should be re-tightened, worn parts replaced. Once a year all moving parts should be lubricated with oil. When cleaning other window parts make sure that hardware doesn’t come into contact with corrosive cleaners.
Use and maintenance instructions21
4.5. Seals
Check all seals once a year, clean them and lubricate them with a smoothing agent. This increase the quality of sealing and slows down the ageing of seals.
Picture 32: Annual lubrication of hardware with oil
Picture 34: Lubrication of shutter hardware
Picture 33: Use of oil
5. STEAMING UP OF WINDOWS AND AIRING OF ROOMS 5.1. Steaming Up of WindowsParticulary in winter months, steaming frequently appears on the external and internal side of windowpanes. This is a consequence of the laws of physics. Namely, warm air can take more moisture than cold air. When air cools (difference bewteen internal and external window tem-perature), it gets saturated with moisture and water is formed as steam.
Windowpanes steaming up on the inside are usually found in rooms with high moisture (kitchen, bathroom, washroom, bedroom). Steaming starts on the edges of windowpanes. The cause for this is lower temprature of glass on edges, in comparison to the temperature of glass in the middle of the surface. This can partially be avoided by using well-isolated windowpanes with a low Ug factor and by appropriate airing of rooms. This also prevents stuffiness and formation of harmful mould. In harsh frost, high moisture and poorly heated room even well-isolated window-panes can steam up.
External surfaces of windows steam up, because energy-efficient glazing prevents heat from passing out. Internal temperature this way does not effect the external windowpane, so it gets cold faster. The temperature on the outside reaches the dew-point temperature and windows steam up. Edges of windowpanes usually don’t steam up due to reduced insulation properties and consequently greater heat conduction.
In the past steaming up was not as problemtic for residents, because houses were more aired, particularly at the expense of weaker sealing of windows. Because there was a lot of moisture in the air, condensate accumulated on low-quality glazing, which was consequently colder. In frost conditions condensate created frost flowers and the quantity of moisture in the air kept reduc-ing.
22
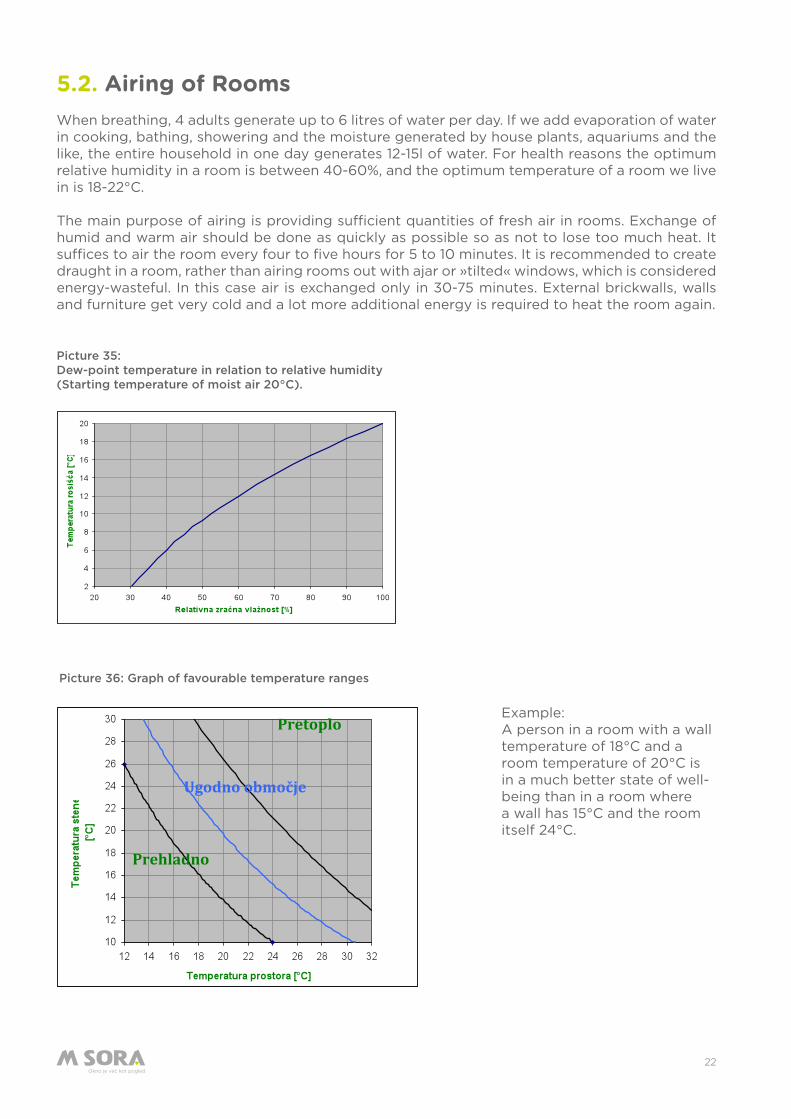
Picture 35: Dew-point temperature in relation to relative humidity(Starting temperature of moist air 20°C).
5.2. Airing of RoomsWhen breathing, 4 adults generate up to 6 litres of water per day. If we add evaporation of water in cooking, bathing, showering and the moisture generated by house plants, aquariums and the like, the entire household in one day generates 12-15l of water. For health reasons the optimum relative humidity in a room is between 40-60%, and the optimum temperature of a room we live in is 18-22°C.
The main purpose of airing is providing sufficient quantities of fresh air in rooms. Exchange of humid and warm air should be done as quickly as possible so as not to lose too much heat. It suffices to air the room every four to five hours for 5 to 10 minutes. It is recommended to create draught in a room, rather than airing rooms out with ajar or »tilted« windows, which is considered energy-wasteful. In this case air is exchanged only in 30-75 minutes. External brickwalls, walls and furniture get very cold and a lot more additional energy is required to heat the room again.
Prehladno
Ugodno območje
Pretoplo
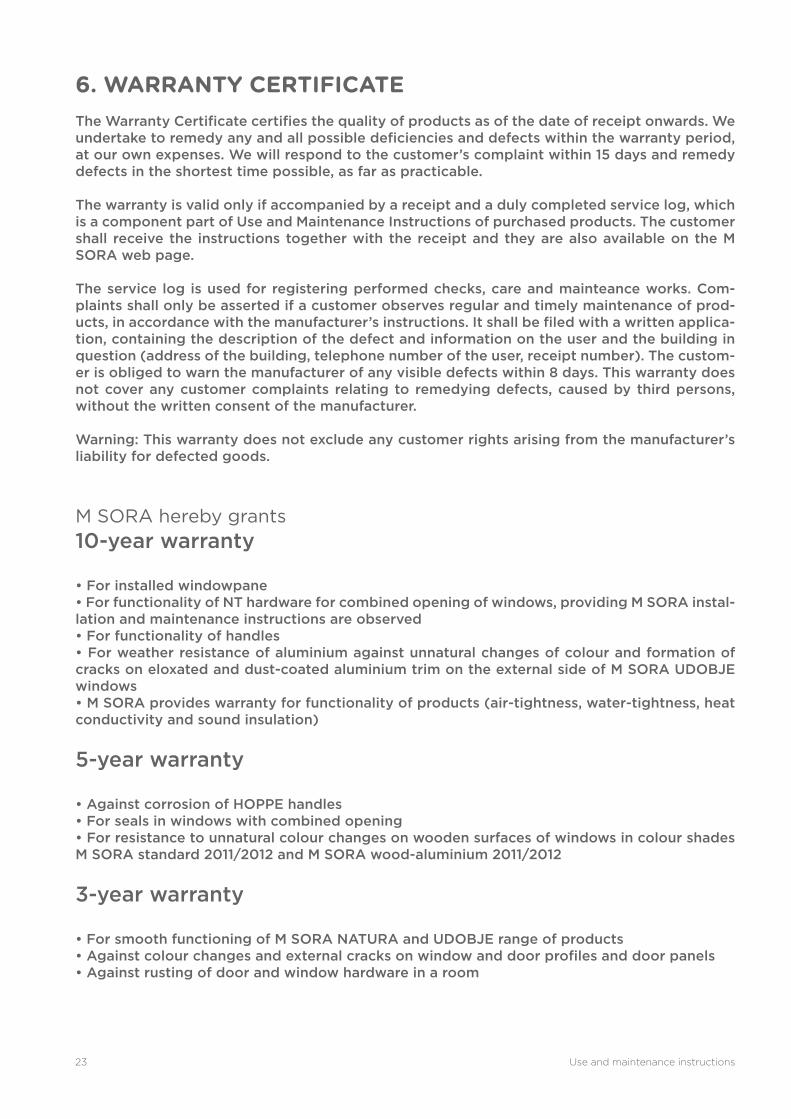
Picture 36: Graph of favourable temperature ranges
Example:A person in a room with a wall temperature of 18°C and a room temperature of 20°C is in a much better state of well-being than in a room where a wall has 15°C and the room itself 24°C.
Use and maintenance instructions23
6. WARRANTY CERTIFICATEThe Warranty Certificate certifies the quality of products as of the date of receipt onwards. We undertake to remedy any and all possible deficiencies and defects within the warranty period, at our own expenses. We will respond to the customer’s complaint within 15 days and remedy defects in the shortest time possible, as far as practicable.
The warranty is valid only if accompanied by a receipt and a duly completed service log, which is a component part of Use and Maintenance Instructions of purchased products. The customer shall receive the instructions together with the receipt and they are also available on the M SORA web page.
The service log is used for registering performed checks, care and mainteance works. Com-plaints shall only be asserted if a customer observes regular and timely maintenance of prod-ucts, in accordance with the manufacturer’s instructions. It shall be filed with a written applica-tion, containing the description of the defect and information on the user and the building in question (address of the building, telephone number of the user, receipt number). The custom-er is obliged to warn the manufacturer of any visible defects within 8 days. This warranty does not cover any customer complaints relating to remedying defects, caused by third persons, without the written consent of the manufacturer.
Warning: This warranty does not exclude any customer rights arising from the manufacturer’s liability for defected goods.
M SORA hereby grants
10-year warranty
• For installed windowpane • For functionality of NT hardware for combined opening of windows, providing M SORA instal-lation and maintenance instructions are observed• For functionality of handles• For weather resistance of aluminium against unnatural changes of colour and formation of cracks on eloxated and dust-coated aluminium trim on the external side of M SORA UDOBJE windows• M SORA provides warranty for functionality of products (air-tightness, water-tightness, heat conductivity and sound insulation)
5-year warranty
• Against corrosion of HOPPE handles• For seals in windows with combined opening• For resistance to unnatural colour changes on wooden surfaces of windows in colour shades M SORA standard 2011/2012 and M SORA wood-aluminium 2011/2012
3-year warranty
• For smooth functioning of M SORA NATURA and UDOBJE range of products• Against colour changes and external cracks on window and door profiles and door panels• Against rusting of door and window hardware in a room
24
• Against colour changes, external cracks on aluminium window sills• Against colour changes and external cracks on component part of aluminium roller blinds and insect screens• To weather resistance against unnatural colour changes and formation of cracks on surfaces of roller blinds and aluminium Venetian blinds• For resistance to unnatural colour changes on external wooden surfaces of windows in colour shades M SORA standard 2011/2012 and M SORA wood-aluminium 2011/2012• For surface treatment of windows in colour shades M SORA – system Italy 2011/2012
1-year warranty
• Against colour changes, external cracks and rusting of other handles and parts of hardware, which are outdoors• For smooth functioning of shutters, shades, electrical devices and parts• For other things not provided above
Use and maintenance instructions25
THE WARRANTy DOES NOT APPLy IN THE FOLLOWING CASES:
• If windows and doors were used for the purpose not predicted for this type of product;• If the customer demands to have windows and doors in dimensions not recommended by the manufacturer, the industry or the hardware manufacturer;• For wood defects, allowed according to the DIN EN 942 standard, which defines wood quality for doors and windows;• For defects resulting from improper product storage and handling;• If, during storage, windows were exposed to direct weather conditions (rain, snow, sun light) or stored in humid rooms;• If the windows were installed despite visible defects;• If the windows were installed in the building with fresh walls and rooms were not sufficiently aired during building construction;• If installation was not performed by the manufacturer or a duly qualified installer authorized by the manufacturer;• If installation of electrical elements was not performed by a qualified electrician;• If the products were exposed to conditions of humidity higher than 70%;• If the customer handled the product negligently and unprofessionally;• If front doors are installed on the south or west side and don’t have a projecting roof and a windbreak;• If the products were damages due to hail, fire, burglary;• If the damages occurred due to mechanical and chemical influences on the surface (impact, scratches, cleaning), unprofessional and aggresive use or overload of windows and doors;• If the products were exposed of the activity of salty sea water or aggresive influences;• If the wood came into contact with lime, which resulted in stains that cannot be removed;• For aesthetic deficiencies within the scope of the internal standard;• For temporary anomalies on the surface, such as water stains or fading out of colour;• If a buyer performed surface treatment by himself or via third persons;• If the customer demands surface treatment of windows with transparent colours or very light coatings that are not UV-resistant;• For windows treated with very dark lacquer stains or top coatings, which cause overheating of wood;• For colour incompatibility between a sample slat from the colour chart and individual parts of windows and doors, which is the result of different batches of coatings, natural structure of woods and different absorption capacity of coatings in lacquer stain treatment;• In additional or renewed order colour variations are not the subject of complaint;• For any changes in the apperance of surface resulting from pollution;• For defects in glass not permitted in the Guidelines for Assessing the Visual Quality of Isolating Glass;• For visual defects not visible from a distance of 1 meter;• For defects and damages resulting from other defects and deficiencies that were not timely eliminated or reported in writing to the supplier within 15 days of their occurrence;• If windows and doors are not regularly and properly maintained.
Company and head office: M SORA d.d., Trg svobode 2, 4226 Žiri Authorized service: M SORA d.d., Trg svobode 2, 4226 Žiri
26
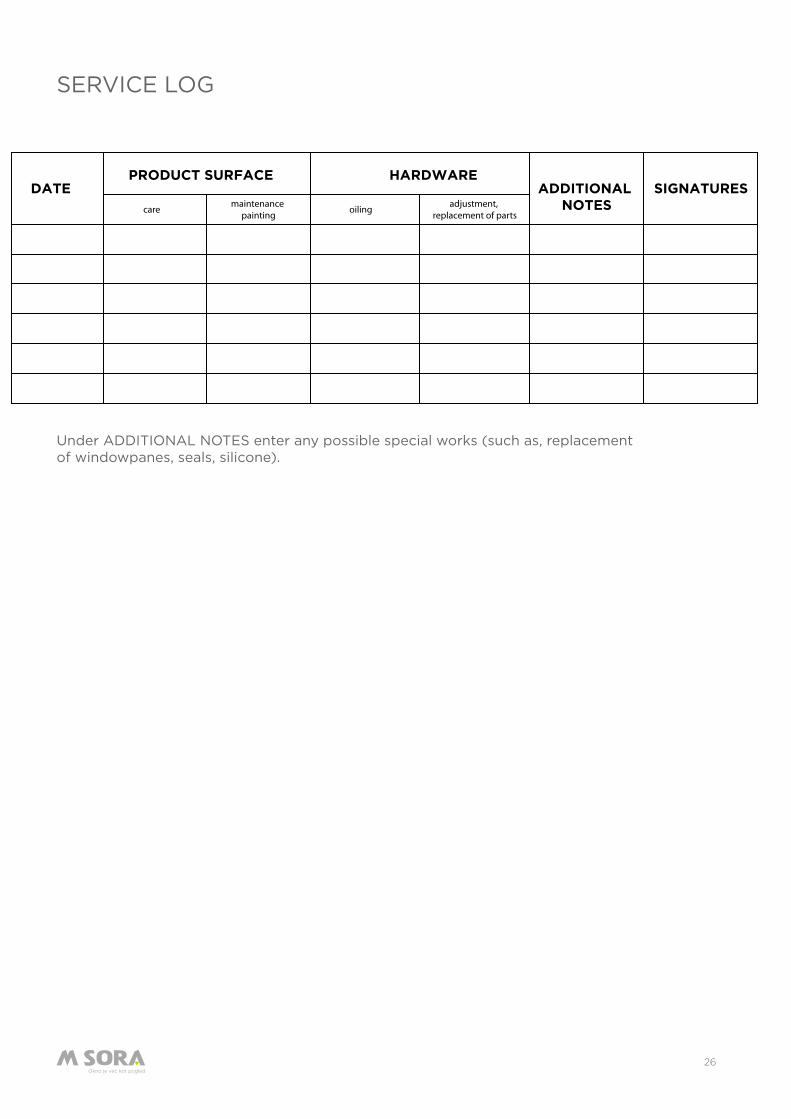
Under ADDITIONAL NOTES enter any possible special works (such as, replacement of windowpanes, seals, silicone).
SERVICE LOG
DATE ADDITIONAL NOTES
SIGNATURESPRODUCT SURFACE HARDWARE
care oilingmaintenance painting
adjustment, replacement of parts


![Food%20and%20 celebration[2]](https://img.pdfslide.us/doc/110x75/55c34af1bb61eb941f8b47b2/food20and20-celebration2.jpg)


![Initial%20 ideas%20and%20feedback[1]](https://img.pdfslide.us/doc/110x75/5463f735b4af9f493f8b4762/initial20-ideas20and20feedback1.jpg)