Embed Size (px)
Citation preview
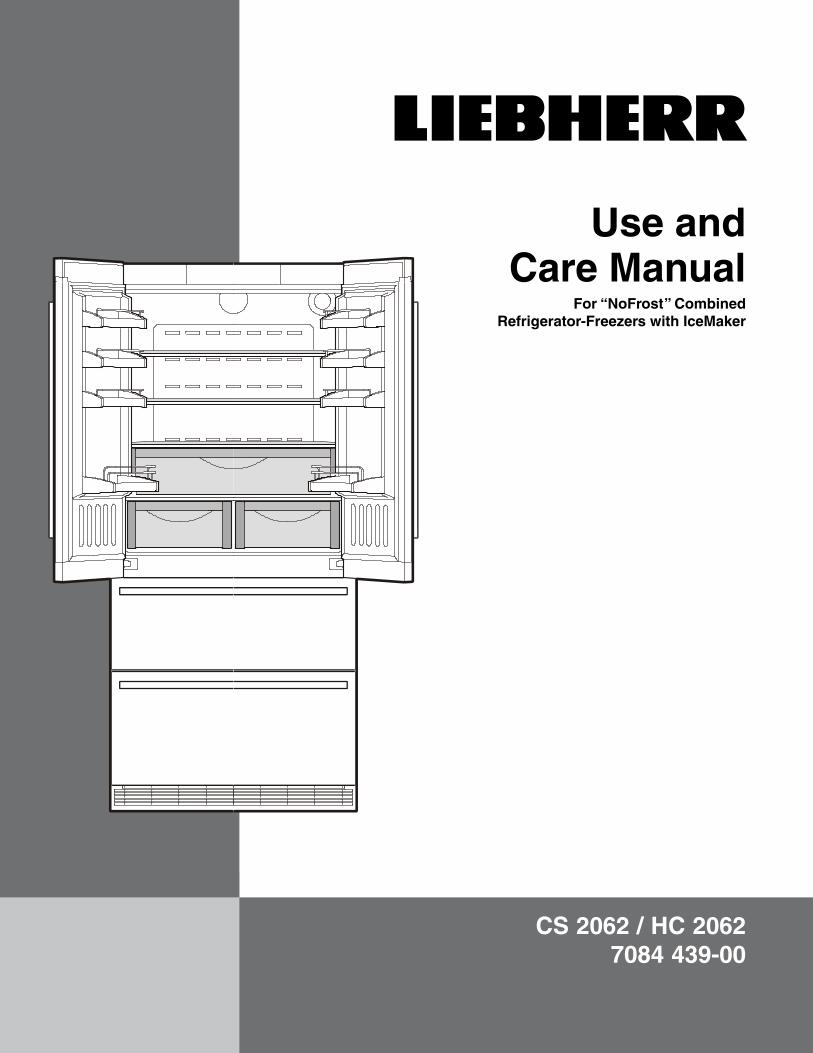
CS 2062 / HC 20627084 439-00
Use and Care Manual
For “NoFrost” Combined Refrigerator-Freezers with IceMaker

2
Congratulations on your purchase. Choosing this appliance means you want all the ben-efits of state-of-the-art refrigeration technology, guaranteeing you top quality, a long appli-ance life span and excellent reliability.
The features on your appliance have been designed to ensure maximum convenience - day in, day out.
This appliance has been manufactured with recyclable materials using an environmentally friendly process, so together we’re making an active contribution to the preservation of our environment.
To get to know all the benefits of your new appliance, please read the information con-tained in these operating instructions carefully.
We know you will be pleased with your new appliance.
Additional benefits• CFC-free
• Energy-optimizedrefrigerantcircuit
• Energy-efficientinsulation
• Lowenergyconsumption
• User-friendlyelectroniccontrols
• Displayoffunctionsswitchedon
• Temperaturecanbecontrolledwithinclimateratingrange,regardless of room temperature
• Refrigeratorandfreezercompartmentsdefrostautomatically-no need to spend time defrosting
• Bignetrefrigeratorcapacity
• Variableandpracticalfeatures
• Safety-glassstorageshelves
• Bignetfreezercapacity
• Automaticicemaker
• Waterfilterforgoodwaterqualityiceproduction
• Freezertemperatureincreasealarm
• Audibledooropenalarm
• Powerfailure/“frost-control”display
• Freshfoodcanbefast-frozenasrequired
• Alldrawerssuitableforfastfreezing
• Integratedtransportgripsonappliancehousing
• Transportcastors
• Easytoclean
• ThisunitiscertifiedasSabbathcompliantbytheStar-Korga-nizationthusallowingtheappliancetobeusedduringreligiousholidays.FormoreinformationpleasevisitStar-Konthewebat www.star-k.org.
3
IMPORTANTAll types and models are subject to continuous improvement. The manufacturer reserves the right to make modifications in the shape, equipment and technology.
Table of ConTenTs
Contents PageDisposalofoldappliance .............................................. 4Electricalsafety .............................................................. 4Importantsafetyinformation .......................................... 5Safetyregulations .......................................................... 6Disposalofcarton .......................................................... 6 Water filter ...................................................................... 7InstallingtheWaterfilter ................................................ 7RemovingtheWaterfilter .............................................. 7Descriptionofapplianceandequipment ..................... 8Operating and control elements .................................... 9Turning the appliance on and off ................................. 10Settingthetemperature ............................................... 10Temperature display .................................................... 11Audiblealarmsignal .................................................... 11Powerfailure/Frost-controldisplay .............................. 11Supercool ...................................................................... 11 Setupmode ........................................................... 12 - 15Arrangingfood ............................................................. 16Shelfarrangement ....................................................... 16Interiorlight .................................................................. 17Freezercompartmentdescription ............................... 18RemovingtheFreezerCompartmentContainers ......... 18Freezing ....................................................................... 19FreezingwithSuperfrost ............................................... 19FreezingandStorage .................................................. 19IceMaker ...................................................................... 20Safetyinstructionsandwarnings ................................. 20BleedingtheIceMaker .................................................. 20ToStarttheIceMaker ................................................... 20IceMakeratvacations .................................................. 21Cleaning ....................................................................... 22Cleaning the air filter ..................................................... 23Defrosting ..................................................................... 23VacationTips ............................................................... 23Troubleshooting ........................................................... 24IceMakerTroubleshooting ........................................... 25CustomerService ........................................................ 25ApplianceInformation .................................................. 25LiebherrWarrantyPlan ................................................ 26
Please read and follow these instructionsTheseinstructionscontainDanger,WarningandCaution statements.
This information is important for safe and efficient installation and operation.
AlwaysreadandfollowallDanger,WarningandCaution statements!
DANGER!
Danger indicates a hazard which will cause serious injury or death if precautions are not followed.
WARNING!
Warning indicates a potentially hazardous situation which, if not avoided, could result in death or serious injury.
CAUTION!
Caution indicates a potentially hazardous situation which, if not avoided, may result in minor or moderate injury.
IMPORTANTThis highlights information that is especially relevant to a problem-free installation and operation.
4
safeTy
Disposal of old appliance
DANGER!
Risk of child entrapment.
Child entrapment and suffocation are not problems of the past.
Junked or abandoned refrigerators are still dangerous – eveniftheywillsitfor“justafewdays.”
Ifyouaregettingridofyouroldrefrigerator,pleasefollow these instructions to help prevent accidents.
Before you discard old appliances:
• Removethedoors.
• Leavetheshelvesinplacesothatchildrenmay not easily climb inside.
• Cutoffthepowercablefromthediscardedappliance. Discard separately from the appliance.
• Besuretofollowyourlocalrequirementsfordisposal of appliances.
Contact the trash collection agency in your area for additional information.
Disposal of this applianceThis appliance contains flamable gases within the refrigeration circuit and insulation foam.
Contact the Municipality or Disposal Company in your area for information on approved recycling or disposal.
R600a refrigerant
WARNING!
The refrigerant contained within the appliance R600a is environmentally friendly,butflammable.Leakingrefrigerant can ignite.
To prevent possible ignition follow the warnings below:
• Keep ventilation openings, in the appliance enclosure or in the built-in structure, clear of obstruction.
• Donotusemechanicaldevicesorothermeans to accelerate the defrosting process, other than those recommended by the manufacturer.
• Donotdamagetherefrigerantcircuit.
• Anyrepairsandworkontheapplianceshould only be performed by the customer service department.
• Donotuseelectricalappliancesinsidethefood storage compartments of the appliance, unless they are of the type recommended by the manufacturer.
Disposal of cartonThe packaging is designed to protect the appliance and individual components during moving and is made of recyclable materials.
WARNING! Keep packaging materials away from children. Polythene sheets and bags can cause suffocation!
Pleaserecyclepackagingmaterialwherefacilitiesareavailable.
Setting upAvoidplacingtheapplianceindirectsunlightornearthe stove, range top, radiators and similar heat sources.
Assoonasyouuncratetheunit:
• Examinetheunitandpackagingforshippingdam-age. Contact the carrier immediately if you suspect there is any damage.
• Notethetype(modelnumber),index,appliance/serial number, date of purchase and where pur-chased on the spaces provided in the back of this manual.
5
safeTy
Important safety information• Topreventinjurytoyouordamagetotheunit,
the appliance should be unpacked and set up by two people.
• Iftheapplianceisdamagedondelivery,contactthe supplier immediately before connecting to the power source.
• Toguaranteesafeoperation,ensurethattheappliance is set up and connected as described in these operating instructions.
• Disconnecttheappliancefromthepowersourceifafaultoccurs.Pullouttheplug,turnofforremove the fuse.
• Whendisconnectingtheappliance,usetheplug.Donotpullonthecable.
• Anyrepairsandworkontheapplianceshouldonly be carried out by the customer service department.Unauthorizedworkmaybedangerous to the user. Changing the power source cable should only be done by the customer service department.
• Donoteaticecream,particularlyicecreamtreats, or ice cubes, immediately from the freezercompartment.Thereisariskof“burning”because of the very cold temperatures.
• Donotconsumefoodwhichhasbeenstoredfortoo long; it could cause food poisoning.
• Donotstoreexplosivesorspraysusingcombustible propellants such as butane, propane, pentane, etc. in the appliance. Electricalcomponentsmightcauseleakinggasto ignite. You may identify such sprays by the printed contents or a flame symbol.
• Donotallowchildrentoplaywiththeappliance.Children must not climb, sit or stand on the shelves, drawers or door.
• Topreventpossibleinjuryduetoanelectricalshock, be sure to disconnect the power cord or turn off the circuit breaker before cleaning the appliance.
• Toavoidinjuryordamagetotheappliance,donot use steam cleaning equipment to clean the appliance.
• Donotoperatetherefrigeratorinthepresenceof explosive fumes.
• Intheeventofapoweroutage,minimizeopeningtherefrigeratordoor(s).Protectthefoodeither by placing dry ice on top of the packages orusingalocalfrozenfoodlockerifthepowerfailureisofalongduration.Donotattempttore-freezeanypreviouslyfrozenfoodthathasthawed.

6
safeTy
Safety regulationsTheapplianceisdesignedtocool,freezeandstorefoodandtomakeice.Itisdesignedasahouseholdappli-ance.
IMPORTANTThe appliance is not intended for outdoor use.
The appliance is manufactured to operate within spe-cific ambient temperature limits according to its climate rating.
The climate rating indicates the ambient temperature at which the appliance may be operated in order to achieve full refrigeration performance.
Climate Rating Ambient Temperature SN-T 50°Fto109°F(10°Cto43°C)
IMPORTANTDo not operate the appliance outside the specified ambient temperature range.
- The refrigerant circuit has been tested for leaks.- The appliance complies with current safety regula-tionsUL250andCSAC22.2#63.
We recommend cleaning the appliance before turning it onforthefirsttime.SeeCleaning.
Turn on the appliance several hours before loading it.
Donotloadwithfrozenfooduntilthetemperatureshowsapproximately0°F(-18°C).
WARNING!
Do not allow children to play with the appliance. Children must not climb, sit or stand on the racks or door.
Failure to follow these instructions may result in death or serious injury.
Electrical safetyConnect this appliance to a 15 amp or 20 amp, 110-120VAC,circuitwhichisgroundedandprotectedbyacircuit breaker or fuse.
We recommend using a dedicated circuit for this appli-ance to prevent circuit overload and the chance of interruption to the appliance.
Thisapplianceisequippedwithathree-prong(ground-ing)polarizedplugforyourprotectionagainstpossibleshockhazards.
Where a two-prong wall receptacle is encountered, contact a qualified electrician and have it replaced with a properly grounded three-prong receptacle in accor-dance with all local codes and ordinances.
WARNING!
Electrocution hazard.
Electricalgroundingrequired.
• Do not remove the round grounding prong from the plug.
• Do not use extension cords or ungrounded (two prong) adapters.
• Donotuseapowercordthatisfrayed or damaged.
• Do not use a power strip.
Failure to follow these instructions may result in fire, electrical shock or death.
7
WaTer filTer
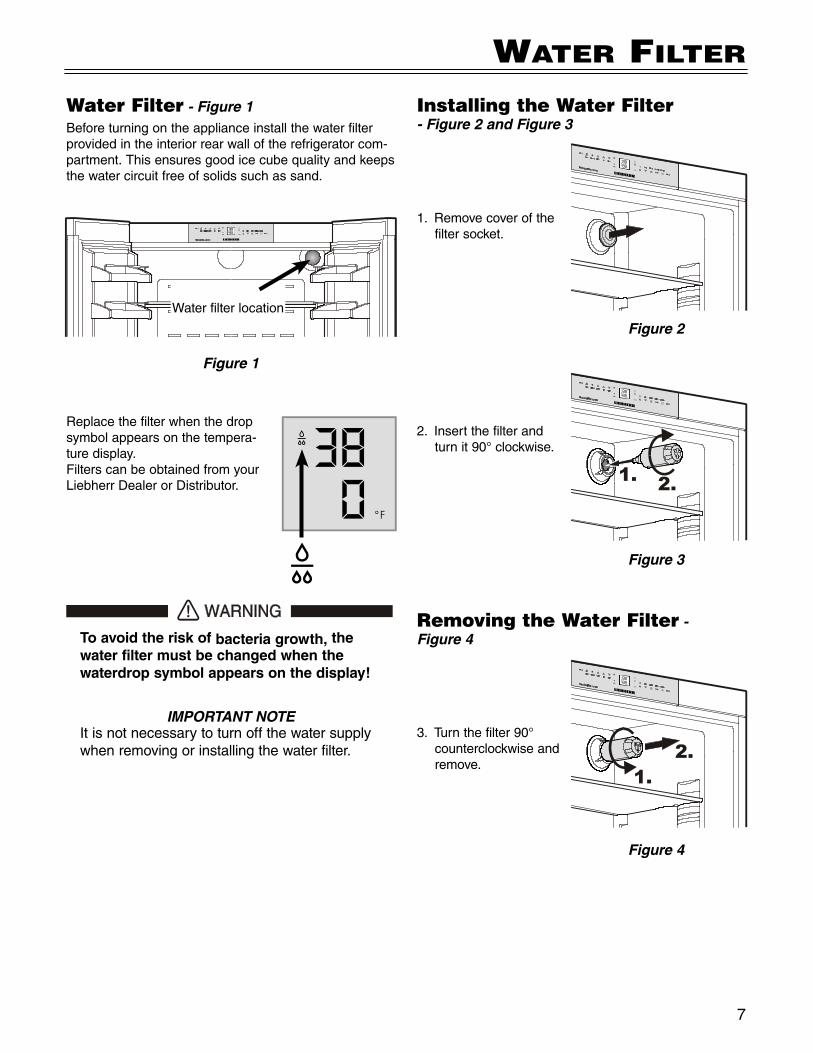
Water Filter - Figure 1Beforeturningontheapplianceinstallthewaterfilterprovided in the interior rear wall of the refrigerator com-partment. This ensures good ice cube quality and keeps the water circuit free of solids such as sand.
Water filter location
Installing the Water Filter - Figure 2 and Figure 3
1. Removecoverofthefilter socket.
2. Insertthefilterandturnit90°clockwise.
Removing the Water Filter - Figure 4
3. Turnthefilter90°counterclockwise and remove.
Figure 1
Figure 2
Figure 3
Figure 4
IMPORTANT NOTEItisnotnecessarytoturnoffthewatersupplywhen removing or installing the water filter.
Replacethefilterwhenthedropsymbol appears on the tempera-ture display. FilterscanbeobtainedfromyourLiebherrDealerorDistributor.
To avoid the risk of bacteria growth, the water filter must be changed when the waterdrop symbol appears on the display!
8
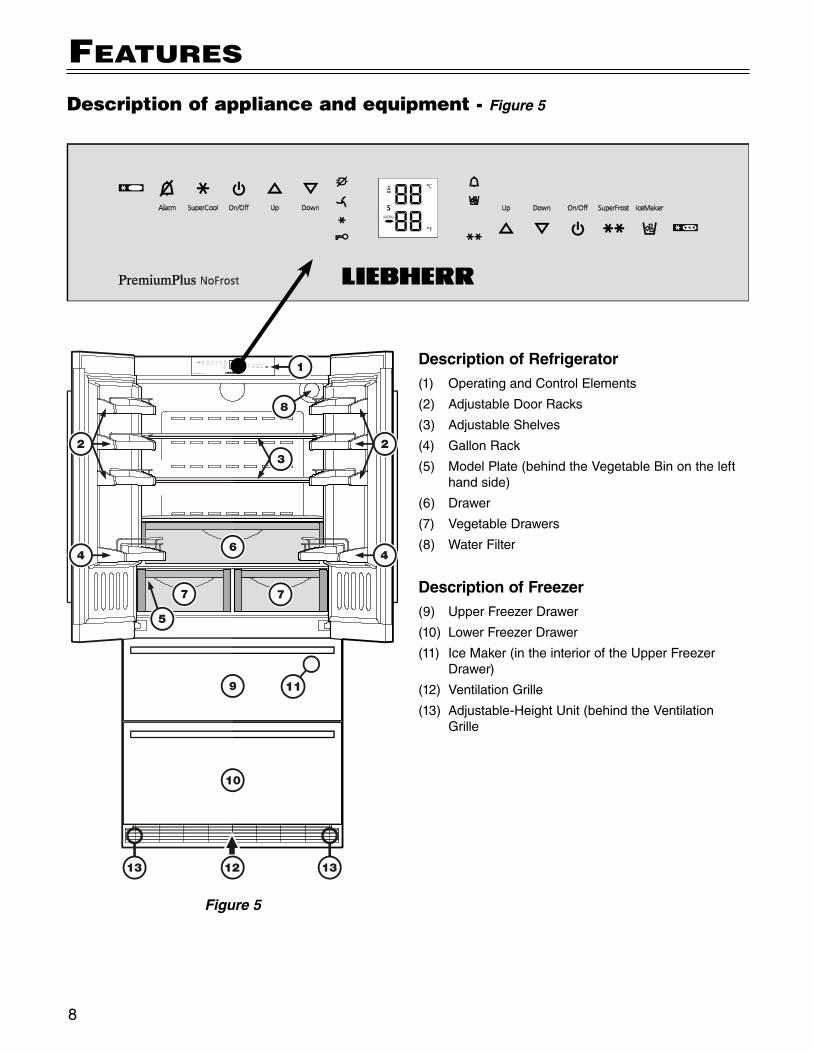
Description of Refrigerator(1) OperatingandControlElements
(2) AdjustableDoorRacks
(3) AdjustableShelves
(4) GallonRack
(5) ModelPlate(behindtheVegetableBinonthelefthandside)
(6) Drawer
(7) VegetableDrawers
(8) WaterFilter
Description of Freezer(9) UpperFreezerDrawer
(10) LowerFreezerDrawer
(11) IceMaker(intheinterioroftheUpperFreezerDrawer)
(12) VentilationGrille
(13) Adjustable-HeightUnit(behindtheVentilationGrille
feaTures
Figure 5
Description of appliance and equipment - Figure 5
9
feaTures
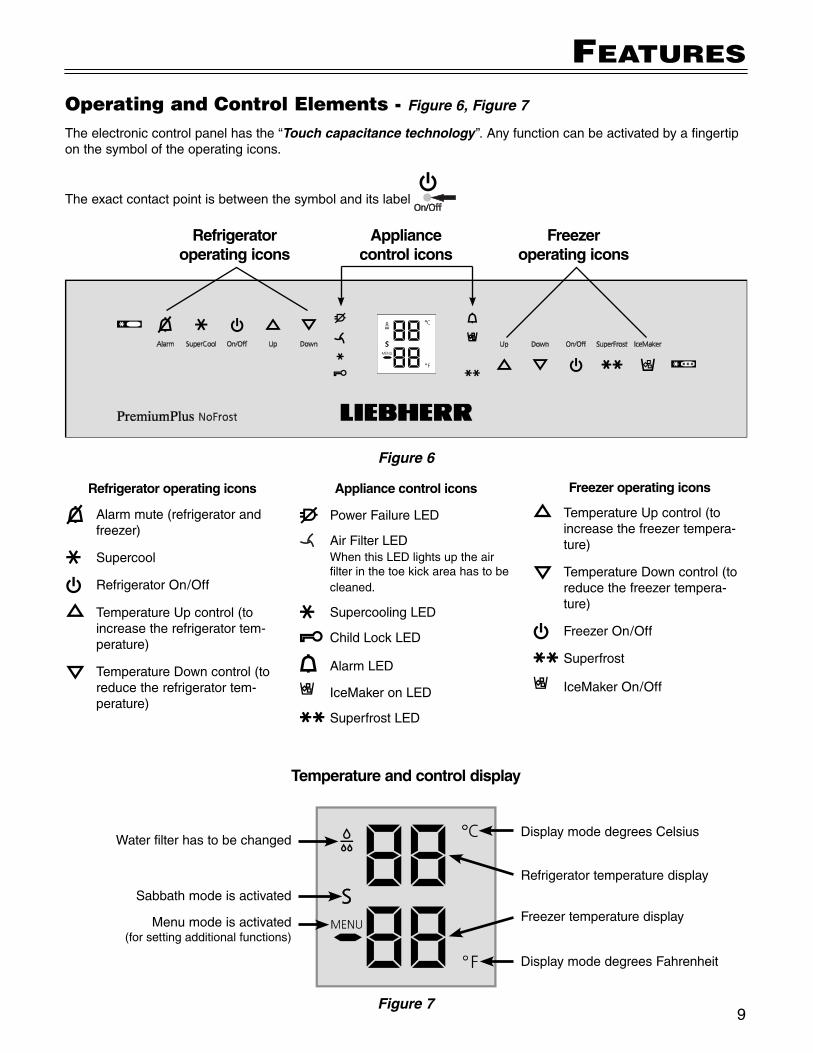
Freezer operating icons
TemperatureUpcontrol(toincreasethefreezertempera-ture)
TemperatureDowncontrol(toreducethefreezertempera-ture)
FreezerOn/Off
Superfrost
IceMakerOn/Off
Figure 6
Refrigerator operating icons
Alarmmute(refrigeratorandfreezer)
Supercool
RefrigeratorOn/Off
TemperatureUpcontrol(toincrease the refrigerator tem-perature)
TemperatureDowncontrol(toreduce the refrigerator tem-perature)
Refrigerator operating icons
Appliancecontrol icons
Freezeroperating icons
Temperature and control display
Figure 7
DisplaymodedegreesCelsius
DisplaymodedegreesFahrenheit
Refrigeratortemperaturedisplay
Freezertemperaturedisplay
Water filter has to be changed
Sabbathmodeisactivated
Menumodeisactivated(forsettingadditionalfunctions)
Operating and Control Elements - Figure 6, Figure 7
Theelectroniccontrolpanelhasthe“Touch capacitance technology”.Anyfunctioncanbeactivatedbyafingertipon the symbol of the operating icons.
The exact contact point is between the symbol and its label
Appliance control icons
PowerFailureLED
AirFilterLED WhenthisLEDlightsuptheair
filter in the toe kick area has to be cleaned.
SupercoolingLED
ChildLockLED
AlarmLED
IceMakeronLED
SuperfrostLED
10
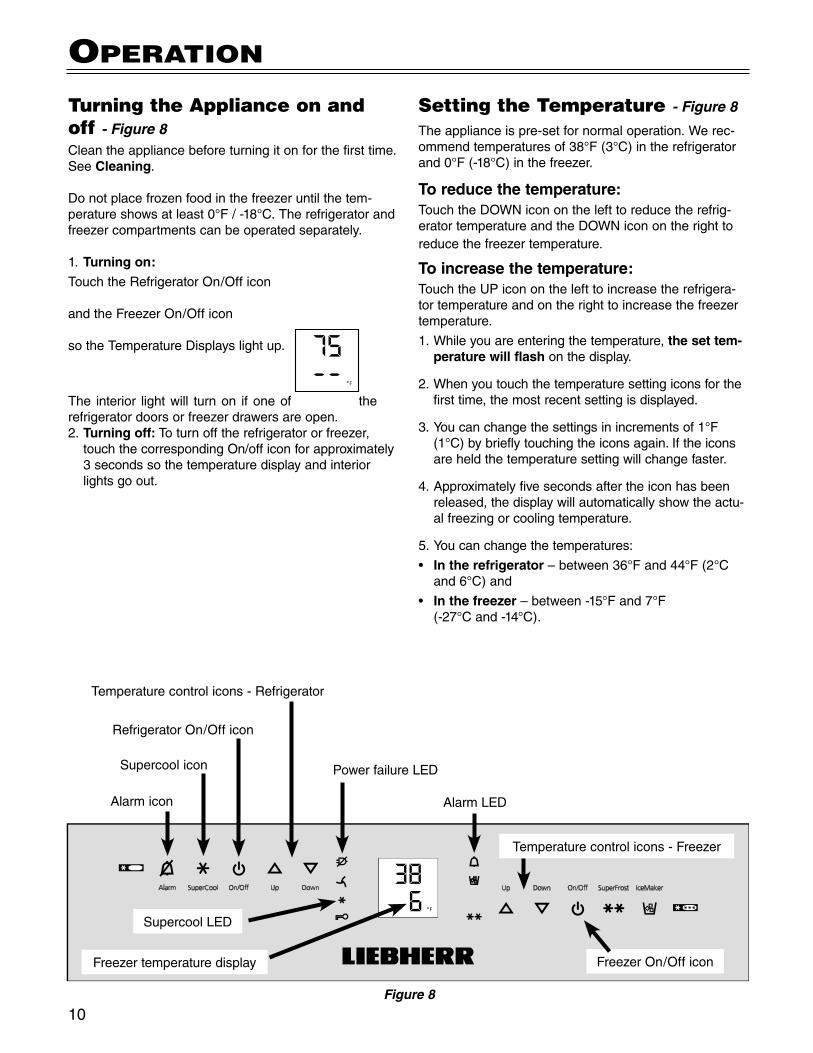
Turning the Appliance on and off - Figure 8Clean the appliance before turning it on for the first time. SeeCleaning.
Donotplacefrozenfoodinthefreezeruntilthetem-peratureshowsatleast0°F/-18°C.Therefrigeratorandfreezercompartmentscanbeoperatedseparately.
1. Turning on: TouchtheRefrigeratorOn/Officon
andtheFreezerOn/Officon
sotheTemperatureDisplays light up.
The interior light will turn on if one of the refrigeratordoorsorfreezerdrawersareopen.2. Turning off:Toturnofftherefrigeratororfreezer,touchthecorrespondingOn/officonforapproximately3 seconds so the temperature display and interior lights go out.
operaTion
Setting the Temperature - Figure 8
The appliance is pre-set for normal operation. We rec-ommendtemperaturesof38°F(3°C)intherefrigeratorand0°F(-18°C)inthefreezer.
To reduce the temperature:TouchtheDOWNicononthelefttoreducetherefrig-eratortemperatureandtheDOWNiconontherighttoreducethefreezertemperature.
To increase the temperature:TouchtheUPicononthelefttoincreasetherefrigera-tortemperatureandontherighttoincreasethefreezertemperature.
1. While you are entering the temperature, the set tem-perature will flash on the display.
2. When you touch the temperature setting icons for the first time, the most recent setting is displayed.
3.Youcanchangethesettingsinincrementsof1°F(1°C)bybrieflytouchingtheiconsagain.Iftheiconsare held the temperature setting will change faster.
4.Approximatelyfivesecondsaftertheiconhasbeenreleased, the display will automatically show the actu-alfreezingorcoolingtemperature.
5.Youcanchangethetemperatures:
• In the refrigerator –between36°Fand44°F(2°Cand6°C)and
• In the freezer–between-15°Fand7°F (-27°Cand-14°C).
Figure 8
FreezerOn/Officon
Temperaturecontrolicons-Freezer
AlarmLED
PowerfailureLED
RefrigeratorOn/Officon
Temperaturecontrolicons-Refrigerator
Alarmicon
Freezertemperature display
Supercoolicon
SupercoolLED
11
operaTion
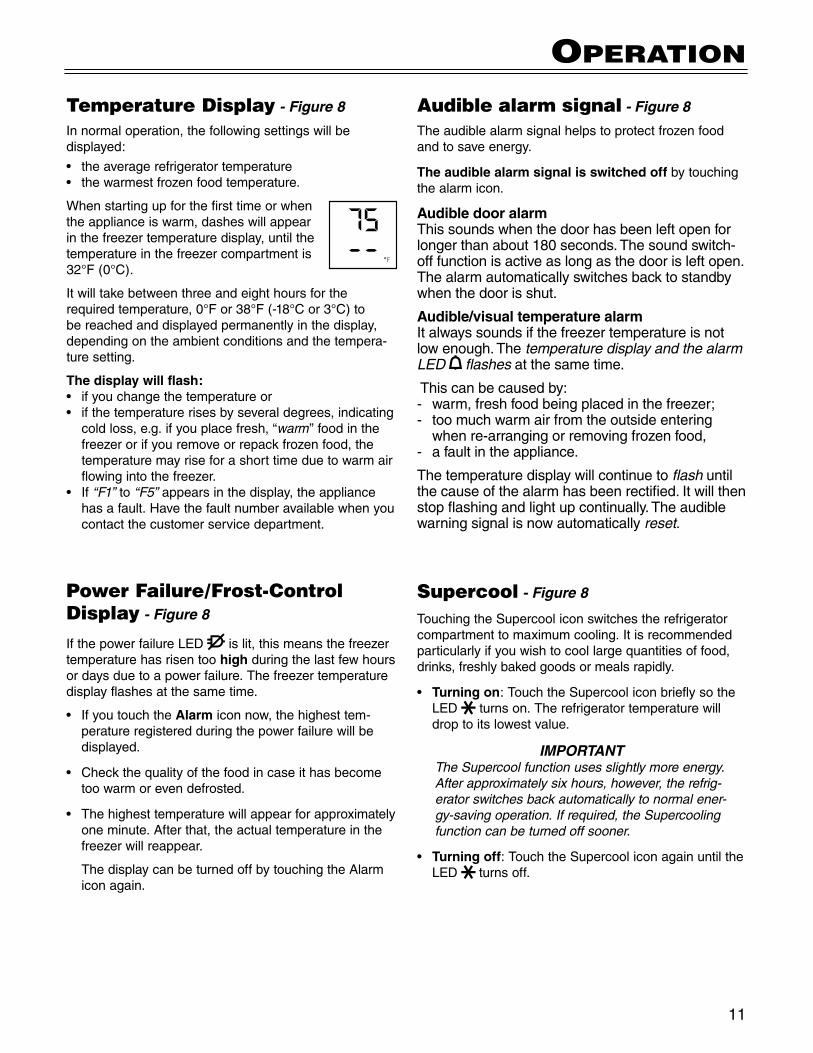
Temperature Display - Figure 8
Innormaloperation,thefollowingsettingswillbedisplayed:
• theaveragerefrigeratortemperature• thewarmestfrozenfoodtemperature.
When starting up for the first time or when the appliance is warm, dashes will appear inthefreezertemperaturedisplay,untilthetemperatureinthefreezercompartmentis32°F(0°C).
Itwilltakebetweenthreeandeighthoursfortherequiredtemperature,0°For38°F(-18°Cor3°C)tobe reached and displayed permanently in the display, depending on the ambient conditions and the tempera-ture setting.
The display will flash: • ifyouchangethetemperatureor• ifthetemperaturerisesbyseveraldegrees,indicatingcoldloss,e.g.ifyouplacefresh,“warm”foodinthefreezerorifyouremoveorrepackfrozenfood,thetemperature may rise for a short time due to warm air flowingintothefreezer.
• If“F1” to “F5” appears in the display, the appliance hasafault.Havethefaultnumberavailablewhenyoucontact the customer service department.
Audible alarm signal - Figure 8
Theaudiblealarmsignalhelpstoprotectfrozenfoodand to save energy.
The audible alarm signal is switched off by touching the alarm icon.
Audible door alarmThis sounds when the door has been left open for longer than about 180 seconds. The sound switch-off function is active as long as the door is left open. The alarm automatically switches back to standby when the door is shut.
Audible/visual temperature alarmItalwayssoundsifthefreezertemperatureisnotlow enough. The temperature display and the alarm LED flashes at the same time.
Thiscanbecausedby:- warm,freshfoodbeingplacedinthefreezer;- too much warm air from the outside entering whenre-arrangingorremovingfrozenfood,
- a fault in the appliance.
The temperature display will continue to flash until thecauseofthealarmhasbeenrectified.Itwillthenstop flashing and light up continually. The audible warning signal is now automatically reset.
Power Failure/Frost-Control Display - Figure 8
IfthepowerfailureLED islit,thismeansthefreezertemperature has risen too high during the last few hours ordaysduetoapowerfailure.Thefreezertemperaturedisplay flashes at the same time.
• IfyoutouchtheAlarm icon now, the highest tem-perature registered during the power failure will be displayed.
• Checkthequalityofthefoodincaseithasbecometoo warm or even defrosted.
• Thehighesttemperaturewillappearforapproximatelyoneminute.Afterthat,theactualtemperatureinthefreezerwillreappear.
ThedisplaycanbeturnedoffbytouchingtheAlarmicon again.
Supercool - Figure 8
TouchingtheSupercooliconswitchestherefrigeratorcompartmenttomaximumcooling.Itisrecommendedparticularly if you wish to cool large quantities of food, drinks, freshly baked goods or meals rapidly.
• Turning on:TouchtheSupercoolicon briefly so the LED turns on. The refrigerator temperature will drop to its lowest value.
IMPORTANTThe Supercool function uses slightly more energy. After approximately six hours, however, the refrig-erator switches back automatically to normal ener-gy-saving operation. If required, the Supercooling function can be turned off sooner.
• Turning off:TouchtheSupercooliconagainuntiltheLED turns off.
12
operaTion
How to activate the setup mode - Figure 9
• TouchtheSuperfrost icon for approximately five sec-onds
- the SuperfrostLED turns on for 5 seconds
- after 5 seconds will flash in the display.
The appliance is in the setup mode now.
You can select the setup mode functions by touching thefreezercompartmentUp/Down icons.
Note
In the setup mode the display will flash continuously.
Exit setup mode:• TouchthefreezercompartmentOn/Off icon. The
appliance will change back to normal operation.
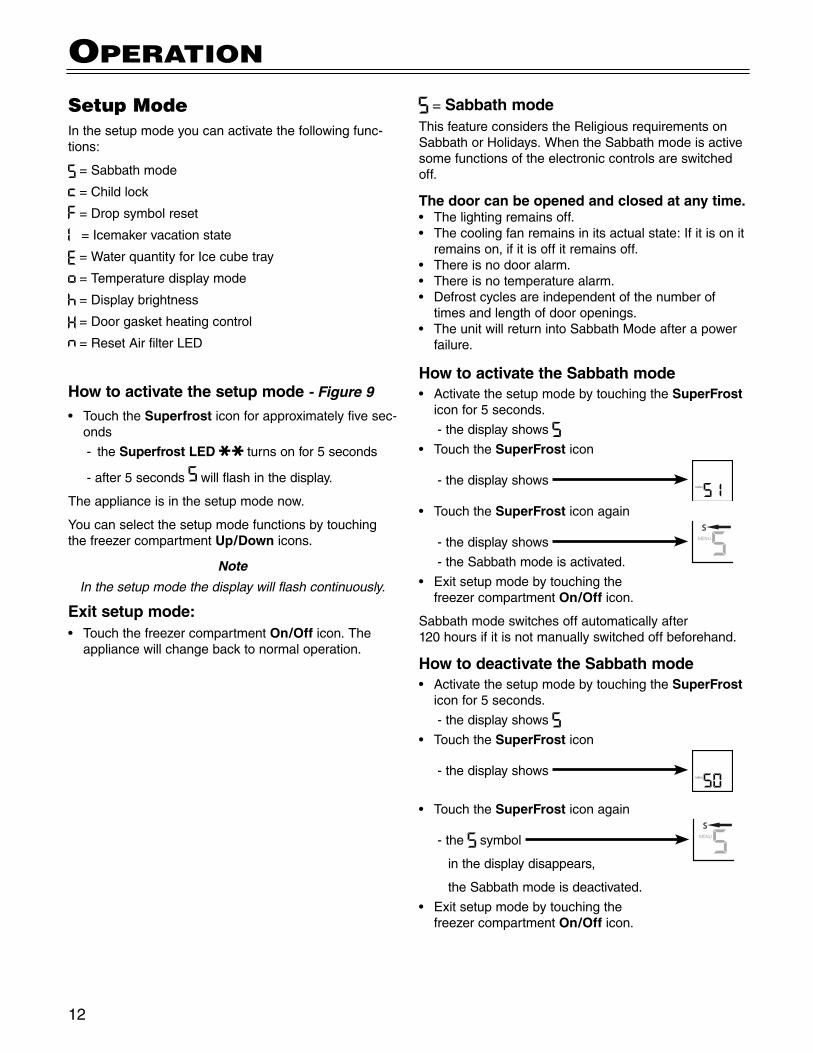
Setup ModeInthesetupmodeyoucanactivatethefollowingfunc-tions:
=Sabbathmode
= Child lock
=Dropsymbolreset
=Icemakervacationstate
=WaterquantityforIcecubetray
= Temperature display mode
=Displaybrightness
=Doorgasketheatingcontrol
=ResetAirfilterLED
= Sabbath modeThisfeatureconsiderstheReligiousrequirementsonSabbathorHolidays.WhentheSabbathmodeisactivesome functions of the electronic controls are switched off.
The door can be opened and closed at any time.• Thelightingremainsoff.• Thecoolingfanremainsinitsactualstate:Ifitisonit
remains on, if it is off it remains off.• Thereisnodooralarm.• Thereisnotemperaturealarm.• Defrostcyclesareindependentofthenumberof
times and length of door openings.• TheunitwillreturnintoSabbathModeafterapower
failure.
How to activate the Sabbath mode• ActivatethesetupmodebytouchingtheSuperFrost
icon for 5 seconds.
- the display shows
• TouchtheSuperFrost icon
- the display shows
• TouchtheSuperFrost icon again
- the display shows
-theSabbathmodeisactivated.
• Exitsetupmodebytouchingthe freezercompartmentOn/Off icon.
Sabbathmodeswitchesoffautomaticallyafter120 hours if it is not manually switched off beforehand.
How to deactivate the Sabbath mode• ActivatethesetupmodebytouchingtheSuperFrost
icon for 5 seconds.
- the display shows
• TouchtheSuperFrost icon
- the display shows
• TouchtheSuperFrost icon again
- the symbol
in the display disappears,
theSabbathmodeisdeactivated.
• Exitsetupmodebytouchingthe freezercompartmentOn/Off icon.
13
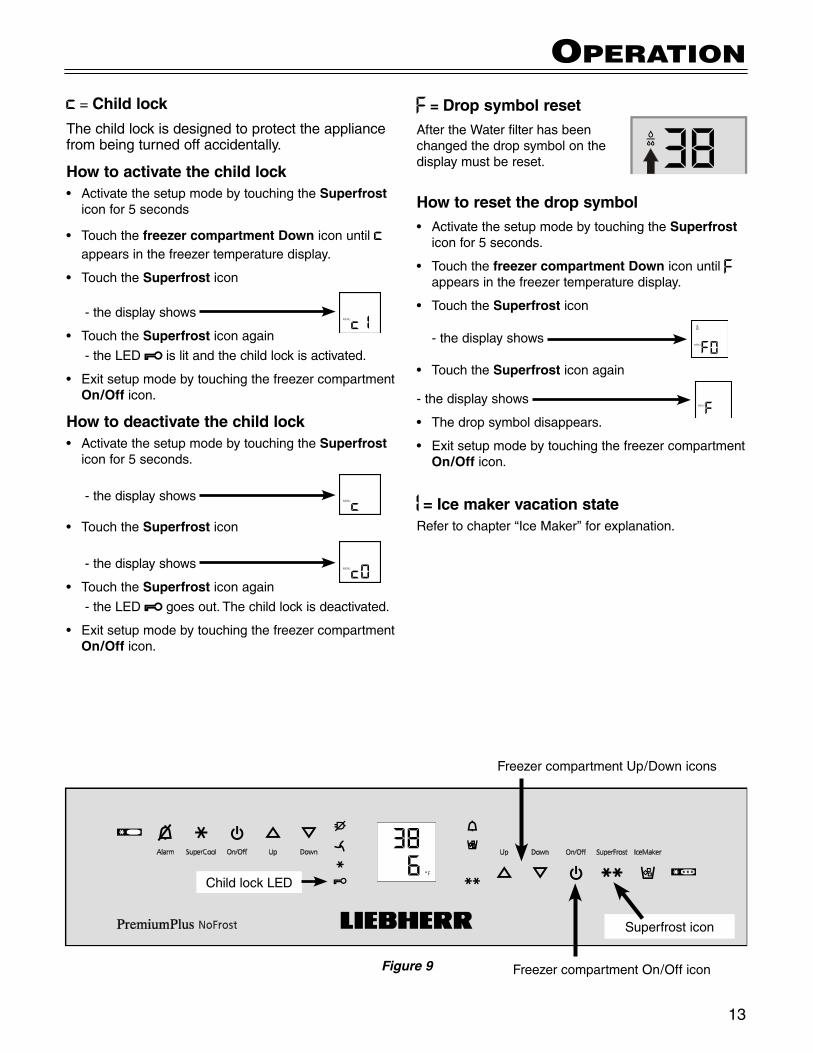
operaTion = Drop symbol resetAftertheWaterfilterhasbeenchanged the drop symbol on the display must be reset.
How to reset the drop symbol• ActivatethesetupmodebytouchingtheSuperfrost
icon for 5 seconds.
• Touchthefreezer compartment Down icon until appearsinthefreezertemperaturedisplay.
• TouchtheSuperfrost icon
- the display shows
• TouchtheSuperfrost icon again
- the display shows
• Thedropsymboldisappears.
• ExitsetupmodebytouchingthefreezercompartmentOn/Off icon.
= Ice maker vacation stateRefertochapter“IceMaker”forexplanation.
Figure 9
Superfrosticon
FreezercompartmentUp/Downicons
FreezercompartmentOn/Officon
ChildlockLED
= Child lock
The child lock is designed to protect the appliance from being turned off accidentally.
How to activate the child lock• ActivatethesetupmodebytouchingtheSuperfrost
icon for 5 seconds
• Touch the freezer compartment Down icon until appearsinthefreezertemperaturedisplay.
• TouchtheSuperfrost icon
- the display shows
• TouchtheSuperfrost icon again
-theLED is lit and the child lock is activated.
• ExitsetupmodebytouchingthefreezercompartmentOn/Off icon.
How to deactivate the child lock• ActivatethesetupmodebytouchingtheSuperfrost
icon for 5 seconds.
- the display shows
• TouchtheSuperfrost icon
- the display shows
• TouchtheSuperfrost icon again
-theLED goes out. The child lock is deactivated.
• ExitsetupmodebytouchingthefreezercompartmentOn/Off icon.
14
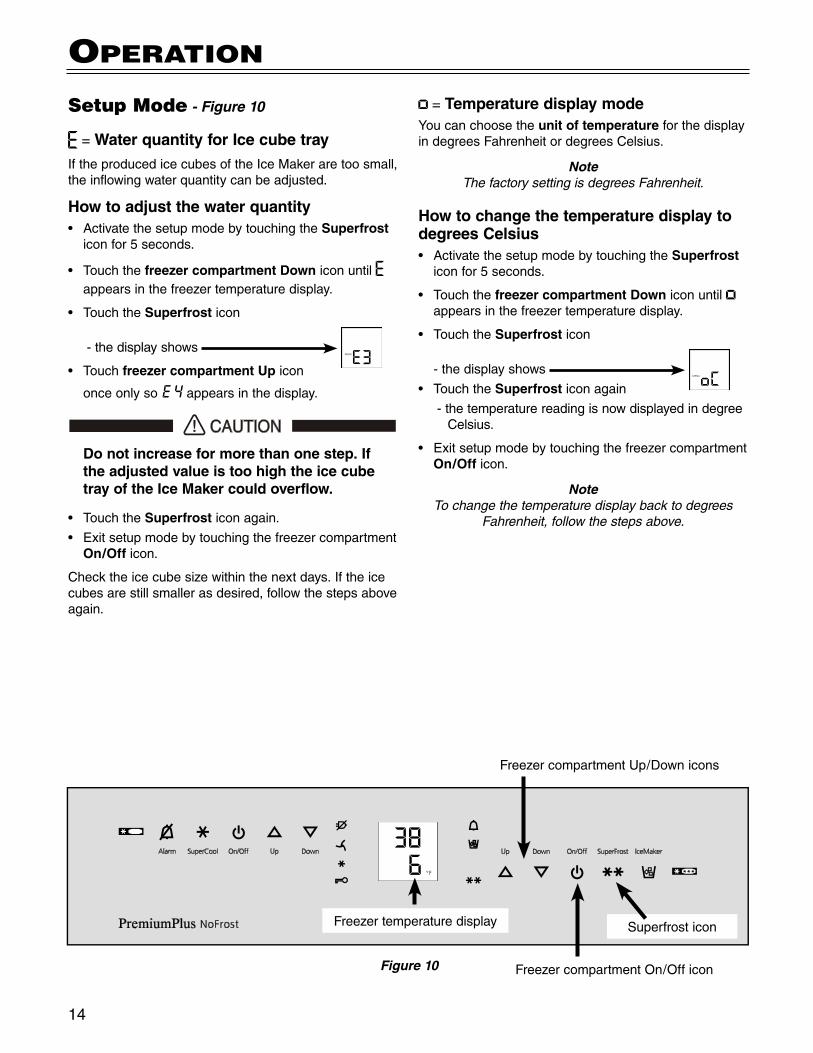
= Temperature display modeYou can choose the unit of temperature for the display indegreesFahrenheitordegreesCelsius.
NoteThe factory setting is degrees Fahrenheit.
How to change the temperature display to degrees Celsius• ActivatethesetupmodebytouchingtheSuperfrost
icon for 5 seconds.
• Touchthefreezer compartment Down icon until appearsinthefreezertemperaturedisplay.
• TouchtheSuperfrost icon
- the display shows
• TouchtheSuperfrost icon again
- the temperature reading is now displayed in degree Celsius.
• ExitsetupmodebytouchingthefreezercompartmentOn/Off icon.
NoteTo change the temperature display back to degrees
Fahrenheit, follow the steps above.
operaTion
= WaterquantityforIcecubetrayIftheproducedicecubesoftheIceMakeraretoosmall,theinflowingwaterquantitycanbeadjusted.
Howtoadjustthewaterquantity• ActivatethesetupmodebytouchingtheSuperfrost
icon for 5 seconds.
• Touch the freezer compartment Down icon until appearsinthefreezertemperaturedisplay.
• TouchtheSuperfrost icon
- the display shows
• Touchfreezer compartment Up icon
once only so E 4 appears in the display.
Do not increase for more than one step. If the adjusted value is too high the ice cube tray of the Ice Maker could overflow.
• TouchtheSuperfrost icon again.
• ExitsetupmodebytouchingthefreezercompartmentOn/Off icon.
Checktheicecubesizewithinthenextdays.Iftheicecubes are still smaller as desired, follow the steps above again.
Figure 10
Superfrosticon
FreezercompartmentUp/Downicons
FreezercompartmentOn/Officon
Freezertemperature display
Setup Mode - Figure 10
15
operaTion
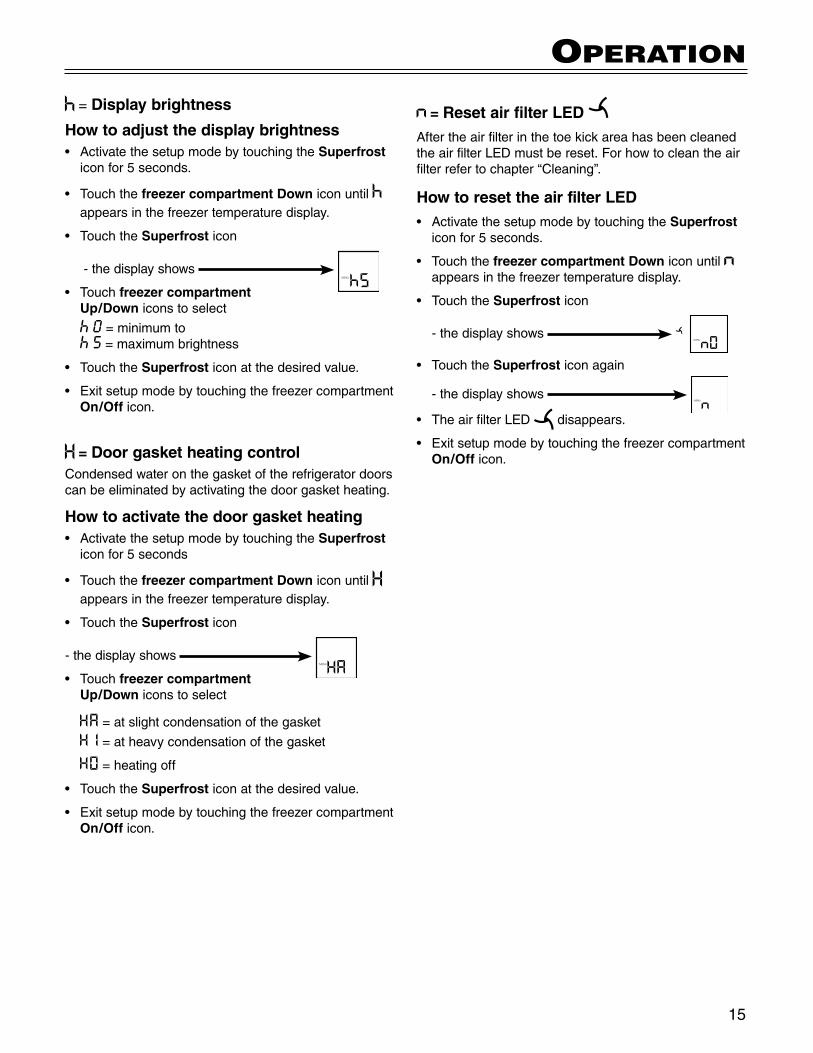
= Door gasket heating control Condensed water on the gasket of the refrigerator doors can be eliminated by activating the door gasket heating.
How to activate the door gasket heating• ActivatethesetupmodebytouchingtheSuperfrost
icon for 5 seconds
• Touch the freezer compartment Down icon until appearsinthefreezertemperaturedisplay.
• TouchtheSuperfrost icon
- the display shows
• Touchfreezer compartment Up/Down icons to select
= at slight condensation of the gasket
= at heavy condensation of the gasket
= heating off
• TouchtheSuperfrost icon at the desired value.
• ExitsetupmodebytouchingthefreezercompartmentOn/Off icon.
= Display brightness
How to adjust the display brightness• ActivatethesetupmodebytouchingtheSuperfrost
icon for 5 seconds.
• Touch the freezer compartment Down icon until appearsinthefreezertemperaturedisplay.
• TouchtheSuperfrost icon
- the display shows
• Touchfreezer compartment Up/Down icons to select
0 = minimum to 5 = maximum brightness
• TouchtheSuperfrost icon at the desired value.
• ExitsetupmodebytouchingthefreezercompartmentOn/Off icon.
= ResetairfilterLEDAftertheairfilterinthetoekickareahasbeencleanedtheairfilterLEDmustbereset.Forhowtocleantheairfilterrefertochapter“Cleaning”.
HowtoresettheairfilterLED• ActivatethesetupmodebytouchingtheSuperfrost
icon for 5 seconds.
• Touchthefreezer compartment Down icon until appearsinthefreezertemperaturedisplay.
• TouchtheSuperfrost icon
- the display shows
• TouchtheSuperfrost icon again
- the display shows
• TheairfilterLED disappears.
• ExitsetupmodebytouchingthefreezercompartmentOn/Off icon.
16
Shelf Arrangement
To avoid possible injury, only adjust an empty shelf or door rack. Do not attempt to adjust a shelf or door rack with food on it.
You can rearrange the height of the shelves and door racks as required.
Repositioning the door racks - Figure 12Slidethedoorrackup,pull-out toward you and replace in reverse order.
refrigeraTor ComparTmenT
To remove the vegetable drawerPullthedrawerstraightout,gripatthebackandliftout- Figure 13.
To install the vegetable drawerPlacethedrawerontherails.Therailsmustbefullyextendedandalignedwiththefrontofthedrawer.Slidethe drawer in.
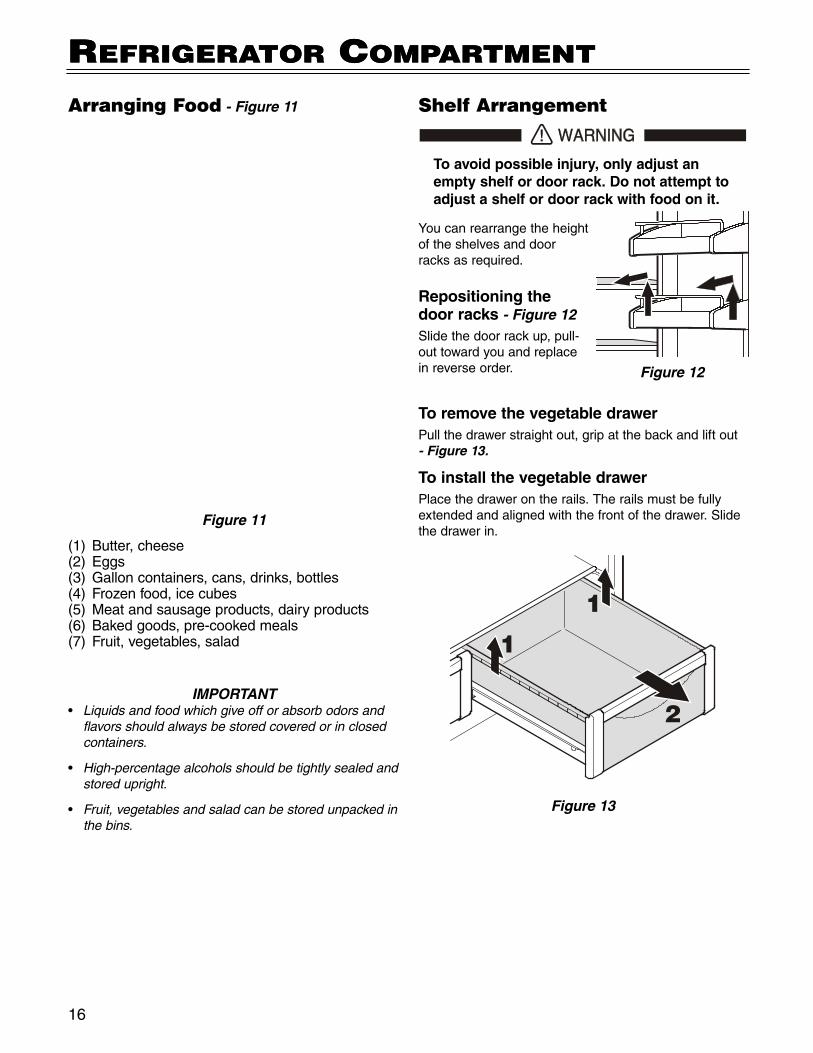
Arranging Food - Figure 11
Figure 11
(1) Butter,cheese(2) Eggs(3)Galloncontainers,cans,drinks,bottles(4) Frozenfood,icecubes(5)Meatandsausageproducts,dairyproducts(6) Bakedgoods,pre-cookedmeals(7) Fruit,vegetables,salad
IMPORTANT• Liquids and food which give off or absorb odors and
flavors should always be stored covered or in closed containers.
• High-percentage alcohols should be tightly sealed and stored upright.
• Fruit, vegetables and salad can be stored unpacked in the bins.
Figure 12
Figure 13
refrigeraTor ComparTmenT
17
refrigeraTor ComparTmenT
Interior LightThe interior light is located at the left, right and top in the refrigerator compartment (Figure 16) and above each drawerinthefreezercomartment.Itturnsonifoneofthedoorsoronefreezerdrawerisopened.
The interior light emits class 1M laser radiation. DO NOT look directly at light or through any optical instruments when the light cover is removed. Severe eye injury can occur.
The light turns off automatically if one of the doors or onefreezerdrawerhasbeenopenedforapproximately15 minutes. The audible alarm sounds at the same time.
Ifonelightisnotlit,itisdefective.
The interior light may only be replaced by the customer service technician or by competent skilled personnel! Do not try to change the defective lighting yourself!
Figure 16
Removing the shelves - Figure 151.Followthefirstthreestepsinthechapterabove.2.Lifttheshelfdownandstopjustovertheupperveg-
etable bin.3.Movethefrontoftheshelfupwardsuntiltheshelfis
in a vertical position.4. Turn the shelf out at left and remove.
To avoid it falling down, always hold the shelf with both hands when removing.
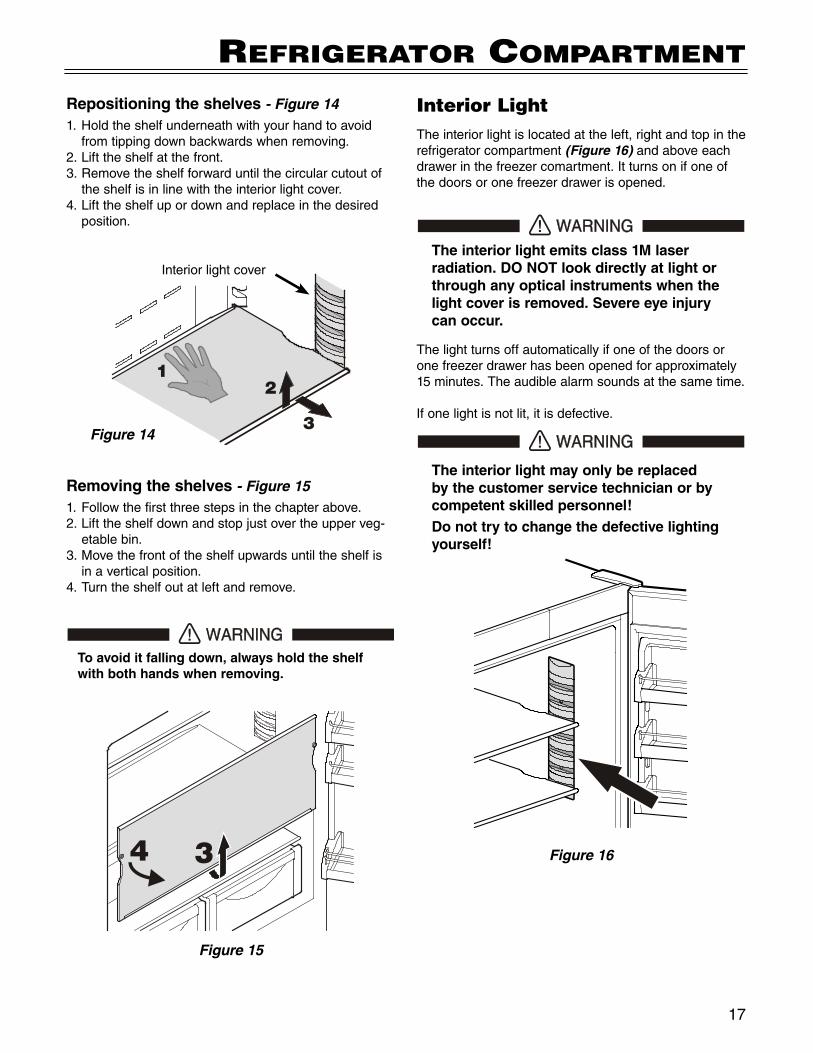
Repositioning the shelves - Figure 141.Holdtheshelfunderneathwithyourhandtoavoid
from tipping down backwards when removing.2.Lifttheshelfatthefront.3.Removetheshelfforwarduntilthecircularcutoutof
the shelf is in line with the interior light cover.4.Lifttheshelfupordownandreplaceinthedesired
position.
Figure 14
Interiorlightcover
Figure 15
18
freezer ComparTmenT
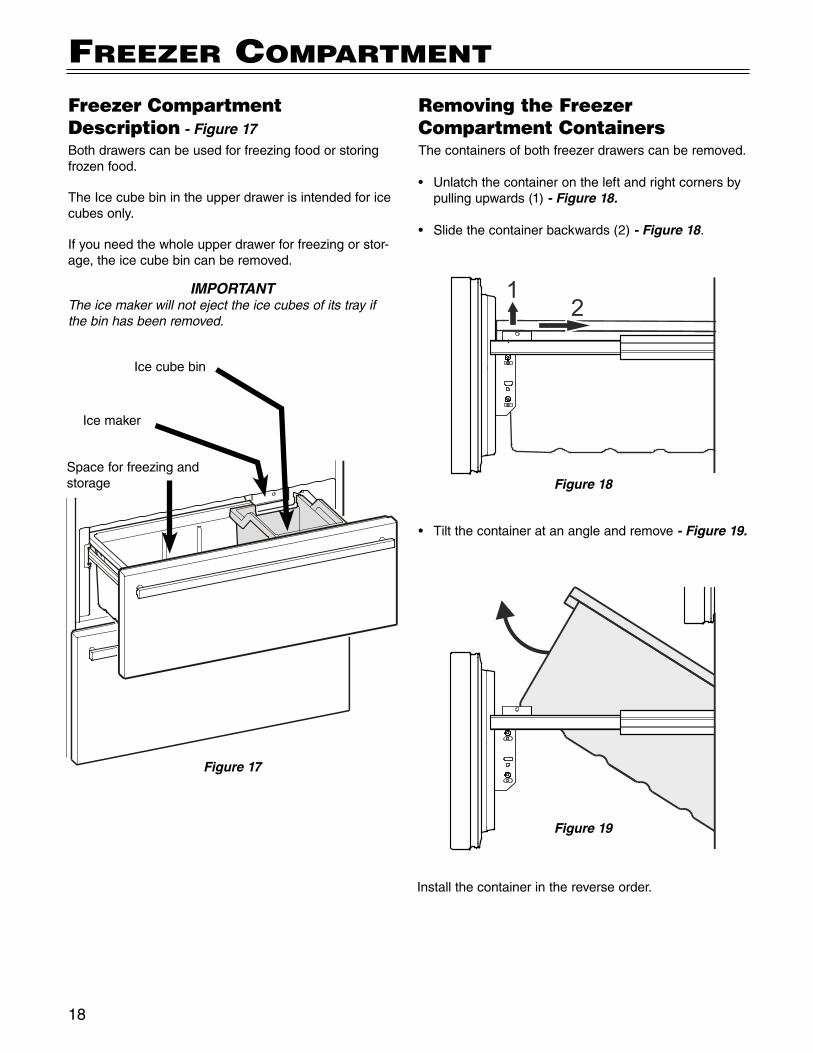
Freezer Compartment Description - Figure 17Bothdrawerscanbeusedforfreezingfoodorstoringfrozenfood.
TheIcecubebinintheupperdrawerisintendedforicecubes only.
Ifyouneedthewholeupperdrawerforfreezingorstor-age, the ice cube bin can be removed.
IMPORTANTThe ice maker will not eject the ice cubes of its tray if the bin has been removed.
Spaceforfreezingandstorage
Icemaker
Icecubebin
Figure 17
Removing the Freezer Compartment ContainersThecontainersofbothfreezerdrawerscanberemoved.
• Unlatchthecontainerontheleftandrightcornersbypullingupwards(1)- Figure 18.
• Slidethecontainerbackwards(2)- Figure 18.
Figure 18
• Tiltthecontaineratanangleandremove- Figure 19.
Installthecontainerinthereverseorder.
Figure 19
19
freezer ComparTmenT
FreezingFreshfoodshouldbefrozencompletelyandasrapidlyaspossible.ThisisprovidedbytheSuperfrostfeatureand ensures that the nutritional value, appearance and flavor of the food remains intact.
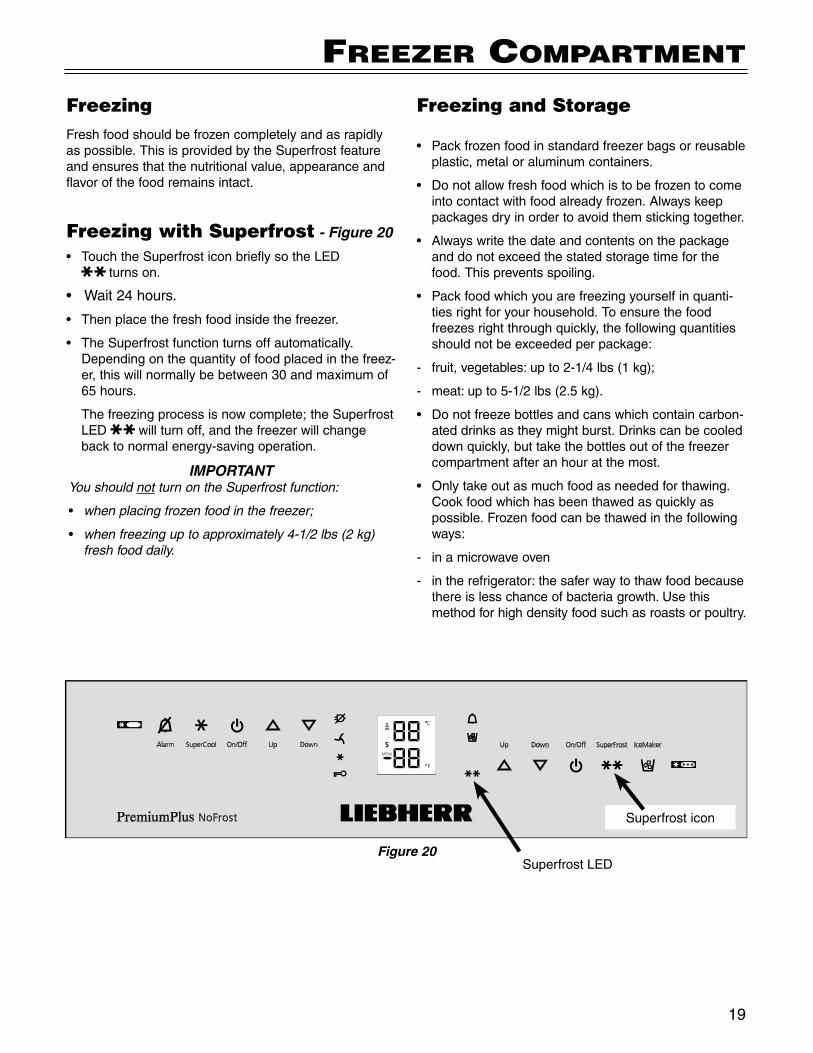
Freezing with Superfrost - Figure 20
• TouchtheSuperfrosticonbrieflysotheLED turns on.
• Wait24hours.
• Thenplacethefreshfoodinsidethefreezer.
• TheSuperfrostfunctionturnsoffautomatically.Dependingonthequantityoffoodplacedinthefreez-er, this will normally be between 30 and maximum of 65 hours.
Thefreezingprocessisnowcomplete;theSuperfrostLED willturnoff,andthefreezerwillchangeback to normal energy-saving operation.
IMPORTANTYou should not turn on the Superfrost function:
• when placing frozen food in the freezer;
• when freezing up to approximately 4-1/2 lbs (2 kg) fresh food daily.
Figure 20
Superfrosticon
SuperfrostLED
Freezing and Storage
• Packfrozenfoodinstandardfreezerbagsorreusableplastic, metal or aluminum containers.
• Donotallowfreshfoodwhichistobefrozentocomeintocontactwithfoodalreadyfrozen.Alwayskeeppackages dry in order to avoid them sticking together.
• Alwayswritethedateandcontentsonthepackageand do not exceed the stated storage time for the food. This prevents spoiling.
• Packfoodwhichyouarefreezingyourselfinquanti-ties right for your household. To ensure the food freezesrightthroughquickly,thefollowingquantitiesshouldnotbeexceededperpackage:
- fruit,vegetables:upto2-1/4lbs(1kg);
- meat:upto5-1/2lbs(2.5kg).
• Donotfreezebottlesandcanswhichcontaincarbon-ateddrinksastheymightburst.Drinkscanbecooleddownquickly,buttakethebottlesoutofthefreezercompartment after an hour at the most.
• Onlytakeoutasmuchfoodasneededforthawing.Cook food which has been thawed as quickly as possible.Frozenfoodcanbethawedinthefollowingways:
- in a microwave oven
- intherefrigerator:thesaferwaytothawfoodbecausethereislesschanceofbacteriagrowth.Usethismethod for high density food such as roasts or poultry.
20
iCemaker
Safety Instructions and Warnings • Theicemakerisdesignedexclusivelytomakeice
cubes in quantities needed by a household and may only be operated with water appropriate for this pur-pose.
• Allrepairsandworkontheicemakermayonlybedone by customer service personnel or other appro-priately trained personnel.
• Do not consume or use the first three batches of ice. This applies both to using the appliance for the first time and also using it after it has not been used for a long period of time.
• The manufacturer cannot accept liability for dam-agecausedbyequipmentorwaterlinesbetweenthe solenoid valve and the water supply.
• Theicemakerwillonlyworkifthecombinedrefrig-erator-freezerisconnectedtotheelectricaloutlet.Itwillonlymakeicecubesifthefreezercompartmentisoperating.
• Theicemakercanonlymakeicecubesiftheupperfreezerdraweriscompletelyclosedandtheicecubebin is installed correctly (Figure 17).
Bleeding the Ice MakerIMPORTANT
To ensure a proper fuction of the Ice Maker the water pipe system must be purged of any air.
• TurntheIceMakeronbytouchingtheIceMakericon(Figure 23).
• Openthetopfreezerdrawer.
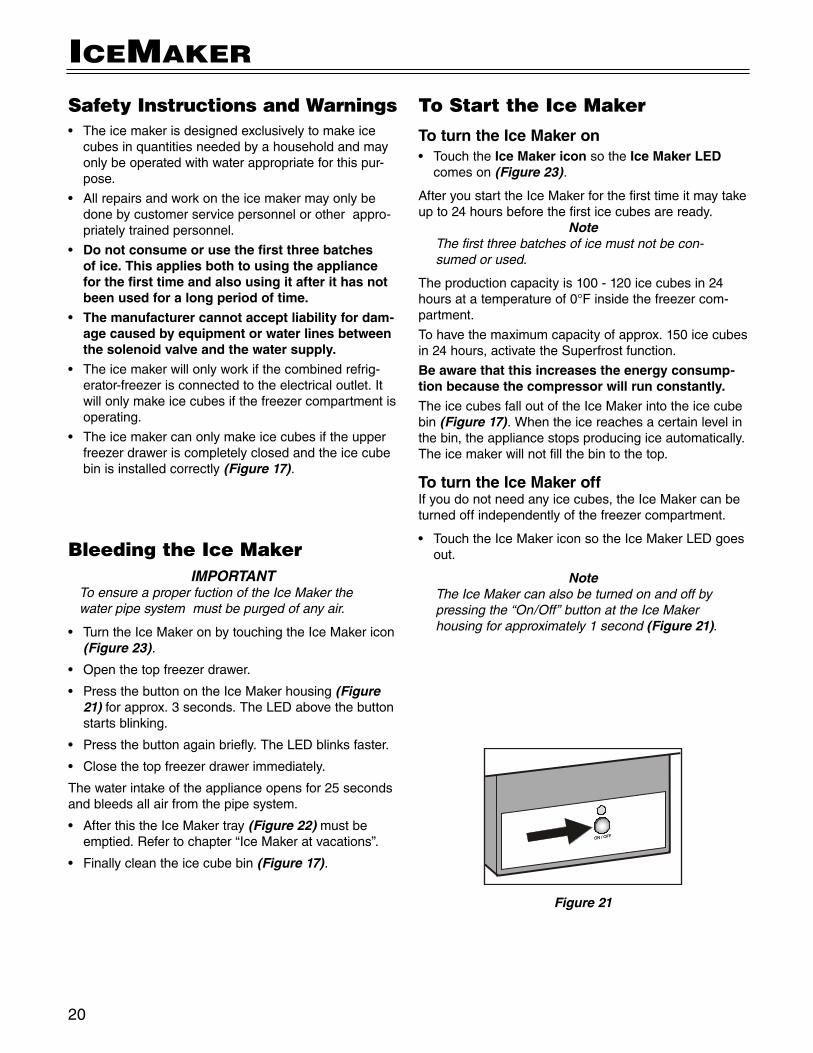
• PressthebuttonontheIceMakerhousing(Figure 21)forapprox.3seconds.TheLEDabovethebuttonstarts blinking.
• Pressthebuttonagainbriefly.TheLEDblinksfaster.
• Closethetopfreezerdrawerimmediately.
The water intake of the appliance opens for 25 seconds and bleeds all air from the pipe system.
• AfterthistheIceMakertray(Figure 22) must be emptied.Refertochapter“IceMakeratvacations”.
• Finallycleantheicecubebin(Figure 17).
To Start the Ice MakerTo turn the Ice Maker on• TouchtheIce Maker icon so the IceMakerLED
comes on (Figure 23).
AfteryoustarttheIceMakerforthefirsttimeitmaytakeup to 24 hours before the first ice cubes are ready.
NoteThe first three batches of ice must not be con-sumed or used.
The production capacity is 100 - 120 ice cubes in 24 hoursatatemperatureof0°Finsidethefreezercom-partment.
To have the maximum capacity of approx. 150 ice cubes in24hours,activatetheSuperfrostfunction.
Be aware that this increases the energy consump-tion because the compressor will run constantly.TheicecubesfalloutoftheIceMakerintotheicecubebin (Figure 17). When the ice reaches a certain level in the bin, the appliance stops producing ice automatically. The ice maker will not fill the bin to the top.
To turn the Ice Maker offIfyoudonotneedanyicecubes,theIceMakercanbeturnedoffindependentlyofthefreezercompartment.
• TouchtheIceMakericonsotheIceMakerLEDgoesout.
NoteThe Ice Maker can also be turned on and off by pressing the “On/Off” button at the Ice Maker housing for approximately 1 second (Figure 21).
Figure 21
21
iCemaker
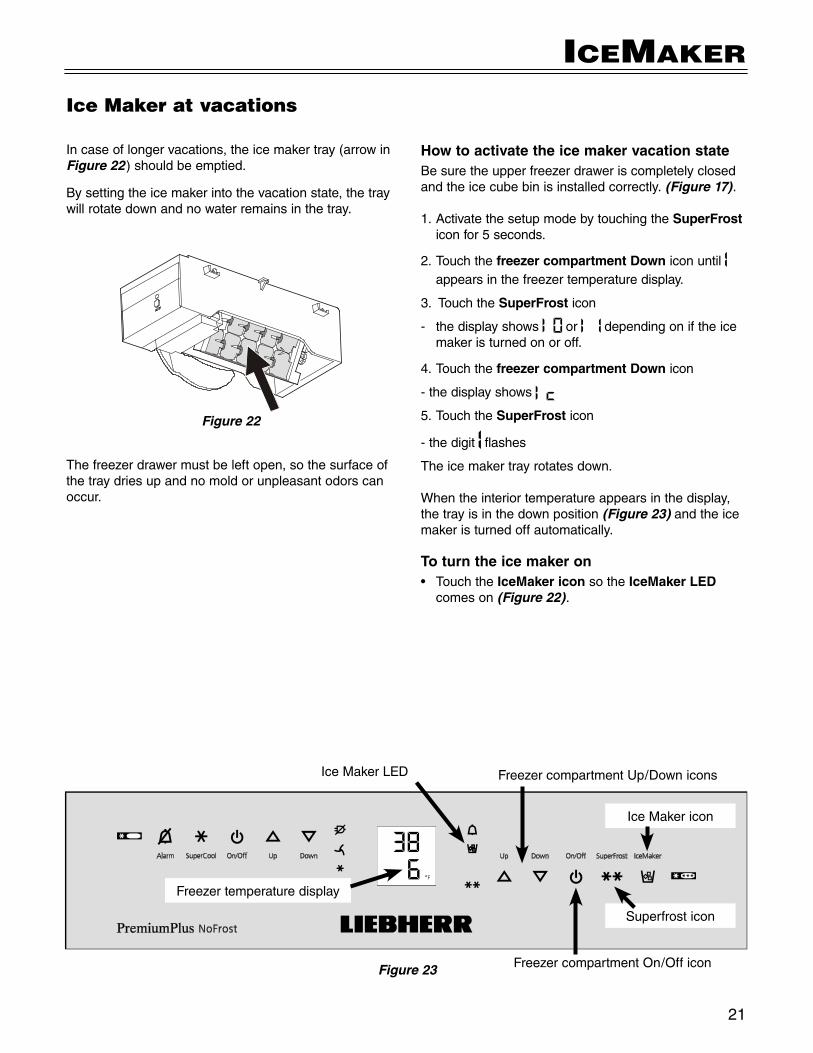
Figure 23
Superfrosticon
FreezercompartmentUp/Downicons
FreezercompartmentOn/Officon
Freezertemperature display
IceMakericon
IceMakerLED
Ice Maker at vacations
Incaseoflongervacations,theicemakertray(arrowinFigure 22)shouldbeemptied.
Bysettingtheicemakerintothevacationstate,thetraywill rotate down and no water remains in the tray.
Figure 22
Thefreezerdrawermustbeleftopen,sothesurfaceofthe tray dries up and no mold or unpleasant odors can occur.
How to activate the ice maker vacation stateBesuretheupperfreezerdraweriscompletelyclosedand the ice cube bin is installed correctly. (Figure 17).
1.ActivatethesetupmodebytouchingtheSuperFrost icon for 5 seconds.
2. Touch the freezer compartment Down icon until appearsinthefreezertemperaturedisplay.
3. Touch the SuperFrost icon
- the display shows or depending on if the ice maker is turned on or off.
4. Touch the freezer compartment Down icon
- the display shows
5. Touch the SuperFrost icon
- the digit flashes
The ice maker tray rotates down.
When the interior temperature appears in the display, the tray is in the down position (Figure 23) and the ice maker is turned off automatically.
To turn the ice maker on• TouchtheIceMaker icon so the IceMakerLED
comes on (Figure 22).
22
Cleaning
• To prevent possible injury due to an electrical shock, be sure to disconnect the power cord or turn off the circuit breaker before cleaning the appliance.
• To avoid injury or damage, do not use steam clea-ningequipmenttocleantheappliance.
Acompoundoflukewarmwateranddishwasherdeter-gent is recommended for cleaning the appliance and equipment parts.
Useforstainlesssteelsurfacesagoodqualitystainlesssteel cleaner only.
Do not use abrasive or scouring sponges. Do not use concentrated cleaning agents. NEVER use abrasive or acid cleaners or chemical solvents.
To avoid short-circuits, ensure no cleaning water penetrates into the electrical components when cleaning the appliance. Do not use a sponge or cloth that is overly wet.• Removeallfoodfromtherefrigeratorandfreezer
compartments and store on a cool place temporarily. Storefrozenfoodinotherfreezersifavailable.
• RemovethedoorracksasshowninFigure 12.
• RemovevegetabledrawersasshowninFigure 13.
• RemoveglassshelvesasshowninFigure 15.
• Pullouttheupperfreezerdrawercompletely.Removethe ice cube bin by moving upwards. The position of the ice cube bin is shown in Figure 17.
• RemovethefreezerdrawercontainersasshowninFigure 18 and Figure 19.
• Cleantheequipmentpartsbyhandwithlukewarmwater and dishwasher detergent.
Donotcleantheequipmentpartsinadishwasher. Strips of these parts could get loose.• Cleantherefrigeratorandfreezerdrawersinterior
with lukewarm water and dishwasher detergent.
• Dryallpartswellwithacloth.
• Do not damage or remove the model plate on the insideoftheappliance.Itisveryimportantforservic-ing your appliance.
Cleaning
Keepyourstainlesssteellookingnewbycleaningwitha good quality stainless steel cleaner or polish monthly. Highqualitystainlesssteelcleanersandconditionersare commercially available.
DONOTCLEANWITHSTEELWOOLPADSorABRASIVE PADS. Do not use cleaners that are not for use on stainless steel, such as glass, tile or counter cleaners. These types of cleaners can dam-age the surface permanently.
Stainlesssteelthatisexposedtochlorinegasandmois-ture may have some discoloration. This discoloration is normal.Ifyourunitisusedinthisenvironment,cleanand polish your stainless steel more often.
Ifthesurfacediscolorsorrustingappears,cleanitquicklywithanon-abrasiveclothandprotectit.Alwaysclean and polish in the direction of the grain and finish.
23
DefrosTing/VaCaTion
DefrostingRefrigerator compartment:The refrigerator compartment defrosts automatically. The water that forms on the rear wall drains into a res-ervoir at the back of the appliance and evaporates auto-matically through the compressor heat.
Freezer compartment:TheNo-frostsystemautomaticallydefroststhefreezercompartment.Anymoisturewillcollectontheevapora-torandfreeze.Itwillperiodicallydefrostandevaporate.
Vacation TipsShort vacations:Itisnotnecessarytoturnofftherefrigeratorandfreezerif you will be away for less than four weeks.
• Useallperishables.
• Freezeotheritems.
• Turnofftheicemaker.
• Shutoffthewatersupplytotheicemaker.
Longvacations:Ifyouwillbeawayforamonthormore:
• Settheicemakertothevacationstate.Refertochapter"IceMakeratvacations".
• Removeallfoodfromtherefrigeratorandfreezercompartments.
• Turnofftherefrigeratorandfreezercompartments.
• Cleantheappliance.RefertoCleaning.
• Leavethedooropentopreventunpleasantodors.This will also keep mold from building up.
• Shutoffthewatersupplytotheicemaker.
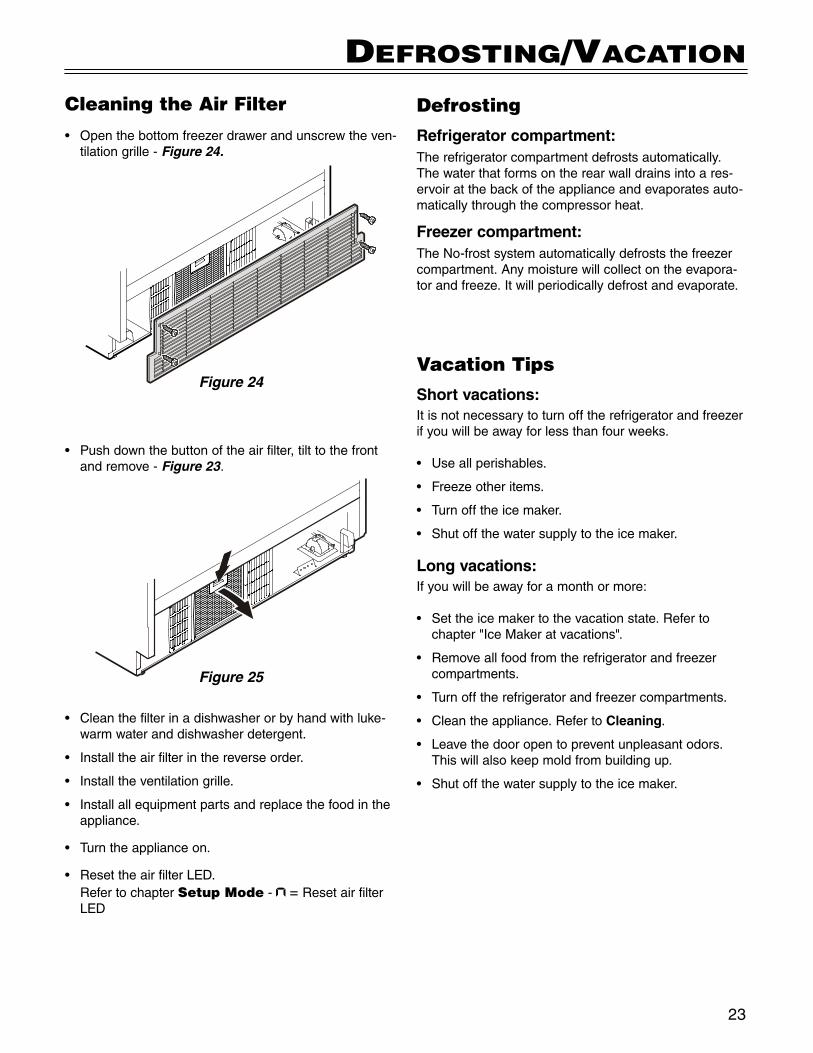
Figure 25
Figure 24
• Openthebottomfreezerdrawerandunscrewtheven-tilation grille - Figure 24.
• Cleanthefilterinadishwasherorbyhandwithluke-warm water and dishwasher detergent.
• Installtheairfilterinthereverseorder.
• Installtheventilationgrille.
• Installallequipmentpartsandreplacethefoodintheappliance.
• Turntheapplianceon.
• ResettheairfilterLED. RefertochapterSetup Mode - = ResetairfilterLED
• Pushdownthebuttonoftheairfilter,tilttothefrontand remove - Figure 23.
Cleaning the Air Filter
24
TroubleshooTing
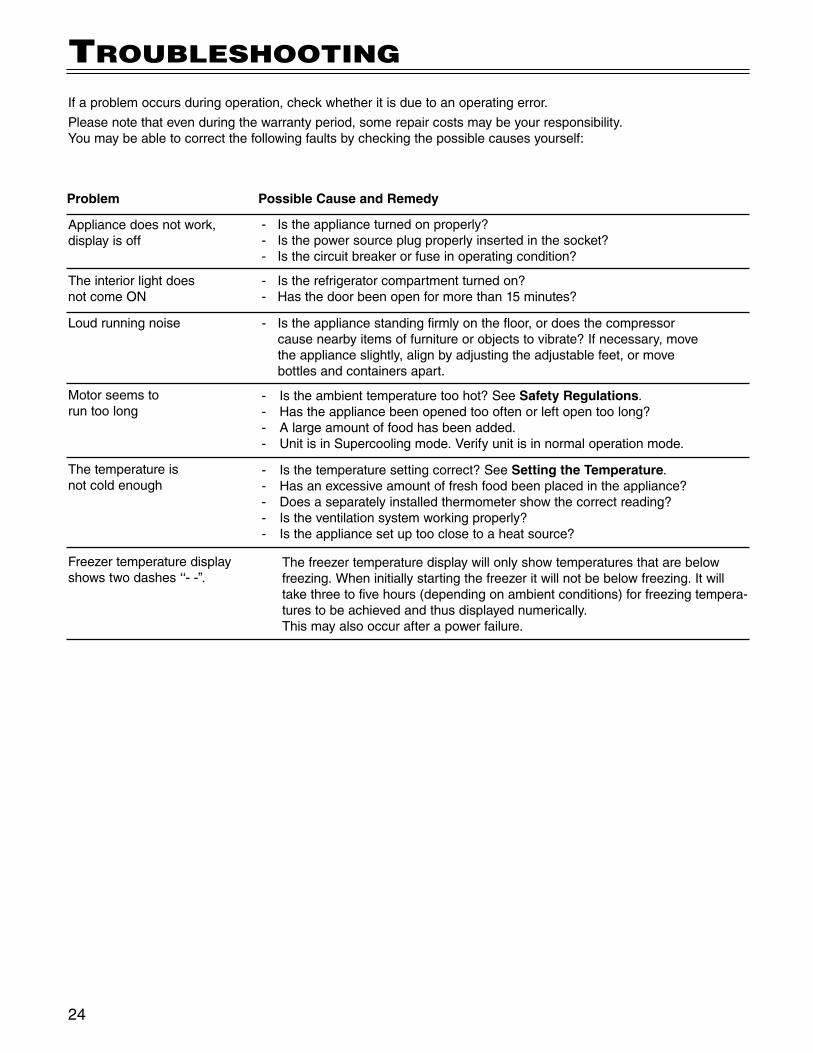
Motorseemstorun too long
- Istheambienttemperaturetoohot?SeeSafety Regulations. - Hastheappliancebeenopenedtoooftenorleftopentoolong? - Alargeamountoffoodhasbeenadded. - UnitisinSupercoolingmode.Verifyunitisinnormaloperationmode.
The temperature is not cold enough
Appliancedoesnotwork,display is off
The interior light doesnotcomeON
Loudrunningnoise
- Istheapplianceturnedonproperly? - Isthepowersourceplugproperlyinsertedinthesocket? - Isthecircuitbreakerorfuseinoperatingcondition?
- Istherefrigeratorcompartmentturnedon? - Hasthedoorbeenopenformorethan15minutes?
- Isthetemperaturesettingcorrect?SeeSetting the Temperature.- Hasanexcessiveamountoffreshfoodbeenplacedintheappliance?- Doesaseparatelyinstalledthermometershowthecorrectreading?- Istheventilationsystemworkingproperly?- Istheappliancesetuptooclosetoaheatsource?
- Istheappliancestandingfirmlyonthefloor,ordoesthecompressor causenearbyitemsoffurnitureorobjectstovibrate?Ifnecessary,move theapplianceslightly,alignbyadjustingtheadjustablefeet,ormove bottles and containers apart.
Ifaproblemoccursduringoperation,checkwhetheritisduetoanoperatingerror.
Pleasenotethatevenduringthewarrantyperiod,somerepaircostsmaybeyourresponsibility.Youmaybeabletocorrectthefollowingfaultsbycheckingthepossiblecausesyourself:
Problem Possible Cause and Remedy
Freezertemperaturedisplayshowstwodashes‘‘--”.
Thefreezertemperaturedisplaywillonlyshowtemperaturesthatarebelowfreezing.Wheninitiallystartingthefreezeritwillnotbebelowfreezing.Itwilltakethreetofivehours(dependingonambientconditions)forfreezingtempera-tures to be achieved and thus displayed numerically.This may also occur after a power failure.
25
TroubleshooTing
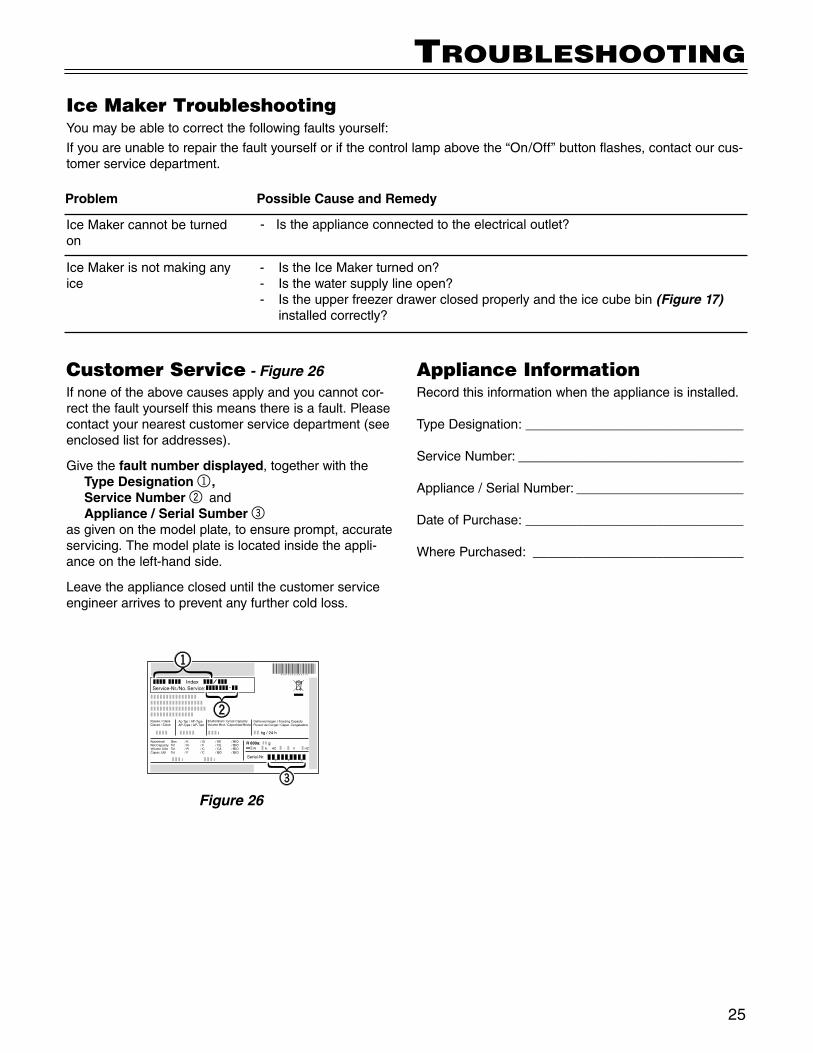
Appliance InformationRecordthisinformationwhentheapplianceisinstalled.
TypeDesignation: ______________________________
ServiceNumber: _______________________________
Appliance/SerialNumber: _______________________
DateofPurchase: ______________________________
WherePurchased: _____________________________
Customer Service - Figure 26Ifnoneoftheabovecausesapplyandyoucannotcor-rectthefaultyourselfthismeansthereisafault.Pleasecontactyournearestcustomerservicedepartment(seeenclosedlistforaddresses).
Givethefault number displayed, together with the Type Designation 1, Service Number 2 and Appliance / Serial Sumber 3as given on the model plate, to ensure prompt, accurate servicing. The model plate is located inside the appli-ance on the left-hand side.
Leavetheappliancecloseduntilthecustomerserviceengineer arrives to prevent any further cold loss.
Figure 26
Ice Maker TroubleshootingYoumaybeabletocorrectthefollowingfaultsyourself:
Ifyouareunabletorepairthefaultyourselforifthecontrollampabovethe“On/Off”buttonflashes,contactourcus-tomer service department.
IceMakercannotbeturnedon
IceMakerisnotmakinganyice
- Istheapplianceconnectedtotheelectricaloutlet?
- IstheIceMakerturnedon?- Isthewatersupplylineopen?- Istheupperfreezerdrawerclosedproperlyandtheicecubebin(Figure 17) installedcorrectly?
Problem Possible Cause and Remedy
26
WarranTy
LIEBHERR WARRANTY PLAN
FULLTWOYEARWARRANTYFortwoyearsfromthedateoforiginalpurchase,yourLiebherrwarrantycoversallpartsandlabortorepairorreplace any part of the product which proves to be defective in materials or workmanship.
FULLFIVEYEARWARRANTY Forfiveyearsfromthedateoforiginalpurchase,yourLiebherrwarrantycoversallpartsandlabortorepairorreplaceanycomponentsthatprovetobedefectiveinmaterialsorworkmanshipinthesealedsystem.The“SealedSystem”meansonlythecompressor,condenser,evaporator,drierandallconnectingtubing.
LIMITED6THTHROUGH12THYEARWARRANTY Fromthe6ththrough12thyearfromthedateoforiginalpurchase,yourLiebherrwarrantycoversallpartsthatprovetobedefectiveinmaterialsorworkmanshipintheSealedSystem(partsonly).
TERMSAPPLICABLETOEACHWARRANTYAllserviceprovidedbyLiebherrunderthewarrantymustbeperformedbyauthorizedLiebherrservicerepresenta-tives,unlessotherwisespecifiedbyLiebherr.Servicewillbeprovidedinthehomeduringnormalbusinesshours.Thiswarrantyappliesonlytoproductsinstalledfornormalresidentialuse.Detailsregardinganon-residentialwar-ranty are available on request.
ThewarrantyappliesonlytoproductsinstalledinCanadaandanyoneofthefiftystatesoftheUnitedStatesortheDistrictofColumbia.Thiswarrantydoesnotcoveranypartsorlabortocorrectanydefectcausedbynegligence,accident or improper use, maintenance, installation, service or repair, including but not limited to improper removal and reinstallation of the condensing unit.
THEWARRANTIESDESCRIBEDABOVEAREMADEEXPRESSLYINLIEUOFANYOTHERWARRANTIES,EXPRESSEDORIMPLIED,INCLUDINGANYIMPLIEDWARRANTYOFMERCHANTABILITYORFITNESSFORAPARTICULARPURPOSE,ANDOFANYOTHEROBLIGATIONORLIABILITYONTHEPARTOFLIEBHERR.INNOEVENTSHALLLIEBHERRBELIABLEFORSPECIAL,INCIDENTALORCONSEQUENTIALDAMAGESARISINGFROMTHEBREACHOFTHESEWARRANTIESORANYOTHERWARRANTIES,WHETHEREXPRESS,IMPLIEDORSTATUTORY.
SomeStatesdonotallowtheexclusionorlimitationofincidentalorconsequentialdamagessotheabovelimitationor exclusion may not apply to you. This warranty gives you specific legal rights and you may also have other rights whichvaryfromStatetoState.
Toreceivepartsand/orserviceandthenameoftheLiebherrauthorizedservicerepresentativenearestyou,contactyourLiebherrdealerordistributororcontacttheLiebherrdesignatednationalserviceprovider:
intheUS:[email protected],orcall1-866-LIEBHERor1-866-543-2437inCanada:www.euro-parts.ca,orcall1-888-LIEBHER,1-888-543-2437.