Embed Size (px)
Citation preview

USDA APHIS PPQ 1
United States Department of Agriculture
USDA APHIS PPQ EAB Trapping Protocols 2018 Emerald Ash Borer Survey
A. Trap Assembly (should be completed in the field) 1. Items needed: a. Traps (pre-glued) b. Cable ties - 7 inches long (3 per trap; 2 to hold the trap together, 1 to attach the lures) c. Parchment or wax paper d. Utility knife e. Spreader f. Lure 2. Two traps will be delivered together with the glued faces touching. You should peel these apart. If you are only going to use one of the traps at a site, cover the exposed, sticky face of the other trap with the parchment (or wax) paper to protect it and yourself.
Figure 1. Diagram of prism trap

USDA APHIS PPQ 2
3. The line (A) on the side containing the two slots should be scored with a utility knife (or similar item), taking care not to cut completely through the line. This can be accomplished by exposing a small portion of the blade, and gently cutting down the length on one side of the trap. The two tabs (B) should be placed inside the slots (see picture below). Cable ties can be inserted into the holes marked (1) on Figure 1, and as shown below to secure the two sides together.
4. The spreader can be attached to the holes in the trap labeled (3) as shown below. The lures can be attached to the spreader on a loop located on the underside of the spreader.
USDA APHIS PPQ 3
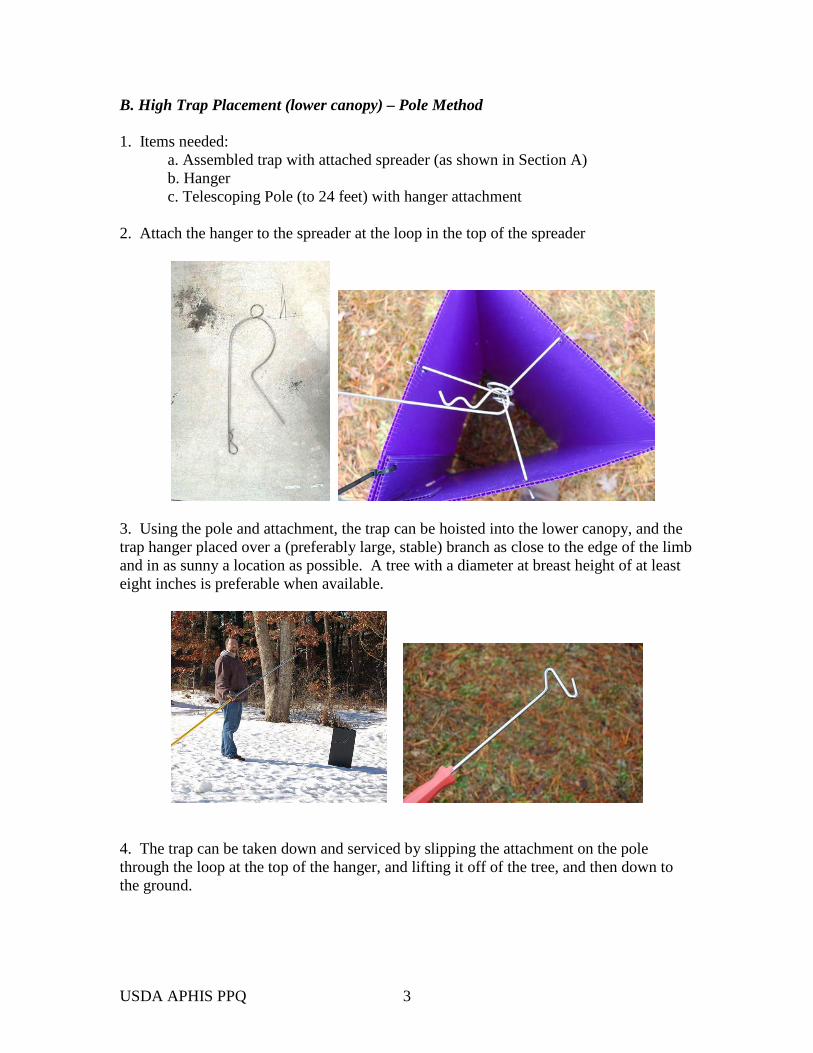
B. High Trap Placement (lower canopy) – Pole Method 1. Items needed: a. Assembled trap with attached spreader (as shown in Section A) b. Hanger c. Telescoping Pole (to 24 feet) with hanger attachment 2. Attach the hanger to the spreader at the loop in the top of the spreader
3. Using the pole and attachment, the trap can be hoisted into the lower canopy, and the trap hanger placed over a (preferably large, stable) branch as close to the edge of the limb and in as sunny a location as possible. A tree with a diameter at breast height of at least eight inches is preferable when available.
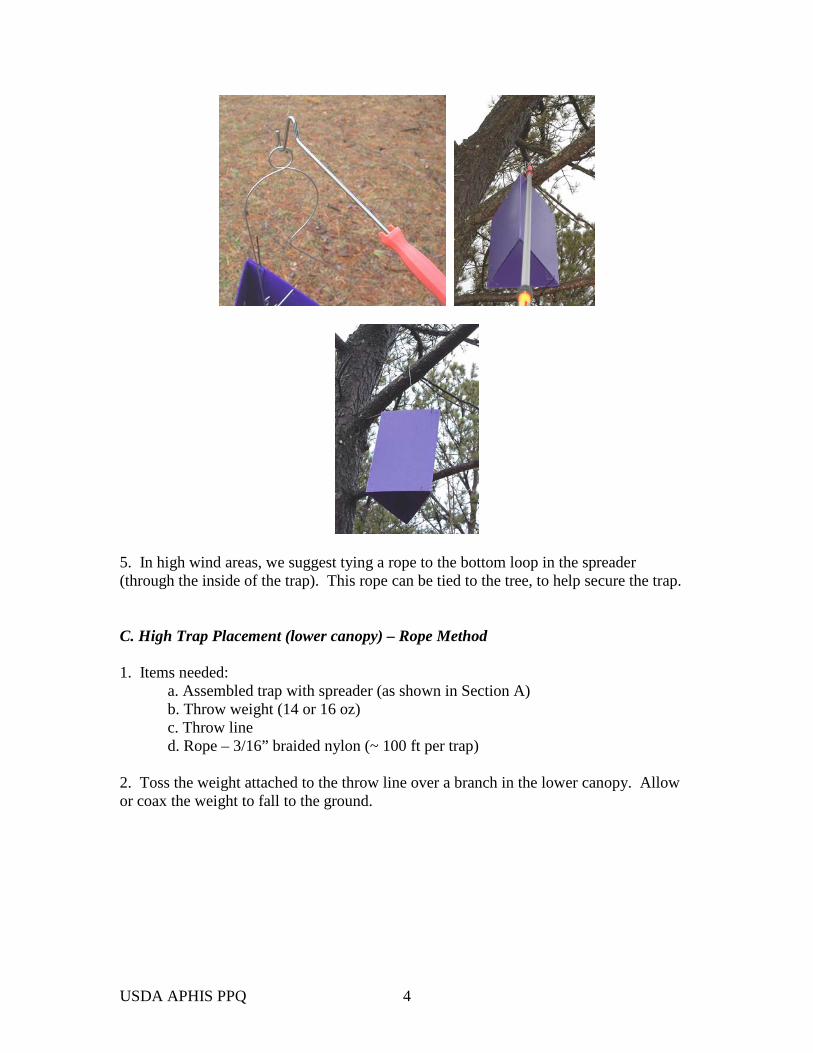
4. The trap can be taken down and serviced by slipping the attachment on the pole through the loop at the top of the hanger, and lifting it off of the tree, and then down to the ground.
USDA APHIS PPQ 4
5. In high wind areas, we suggest tying a rope to the bottom loop in the spreader (through the inside of the trap). This rope can be tied to the tree, to help secure the trap. C. High Trap Placement (lower canopy) – Rope Method 1. Items needed: a. Assembled trap with spreader (as shown in Section A) b. Throw weight (14 or 16 oz) c. Throw line d. Rope – 3/16” braided nylon (~ 100 ft per trap) 2. Toss the weight attached to the throw line over a branch in the lower canopy. Allow or coax the weight to fall to the ground.
USDA APHIS PPQ 5
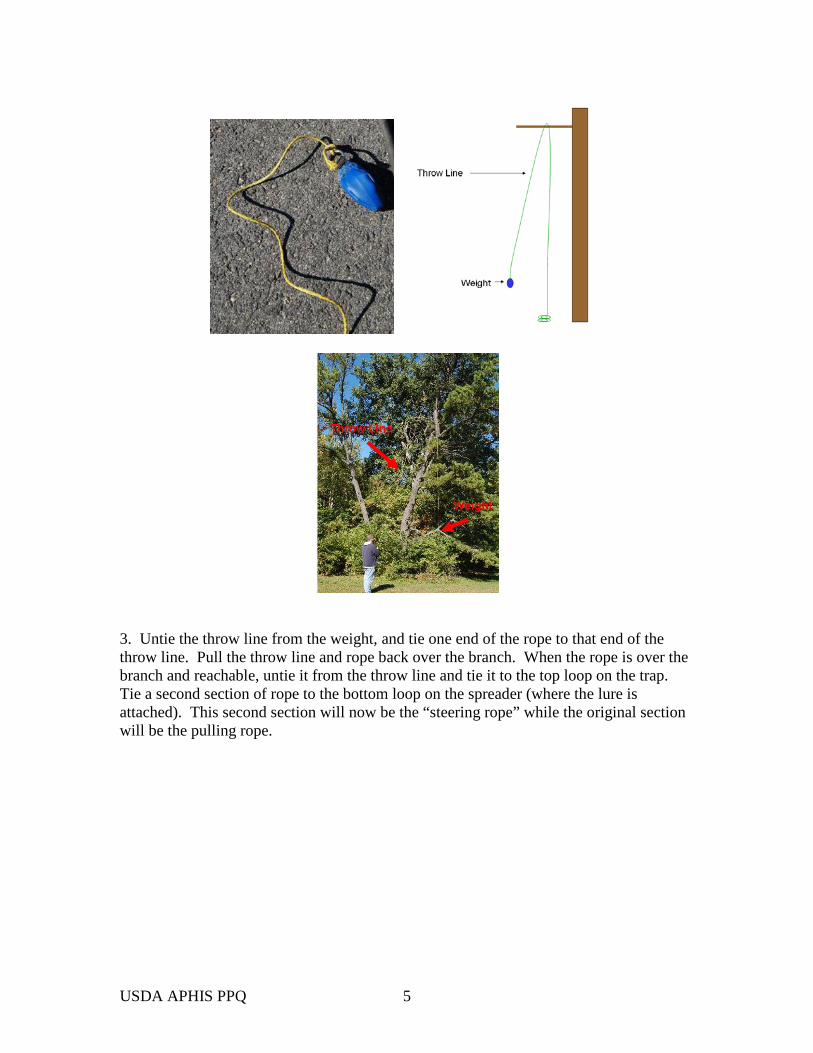
3. Untie the throw line from the weight, and tie one end of the rope to that end of the throw line. Pull the throw line and rope back over the branch. When the rope is over the branch and reachable, untie it from the throw line and tie it to the top loop on the trap. Tie a second section of rope to the bottom loop on the spreader (where the lure is attached). This second section will now be the “steering rope” while the original section will be the pulling rope.
USDA APHIS PPQ 6
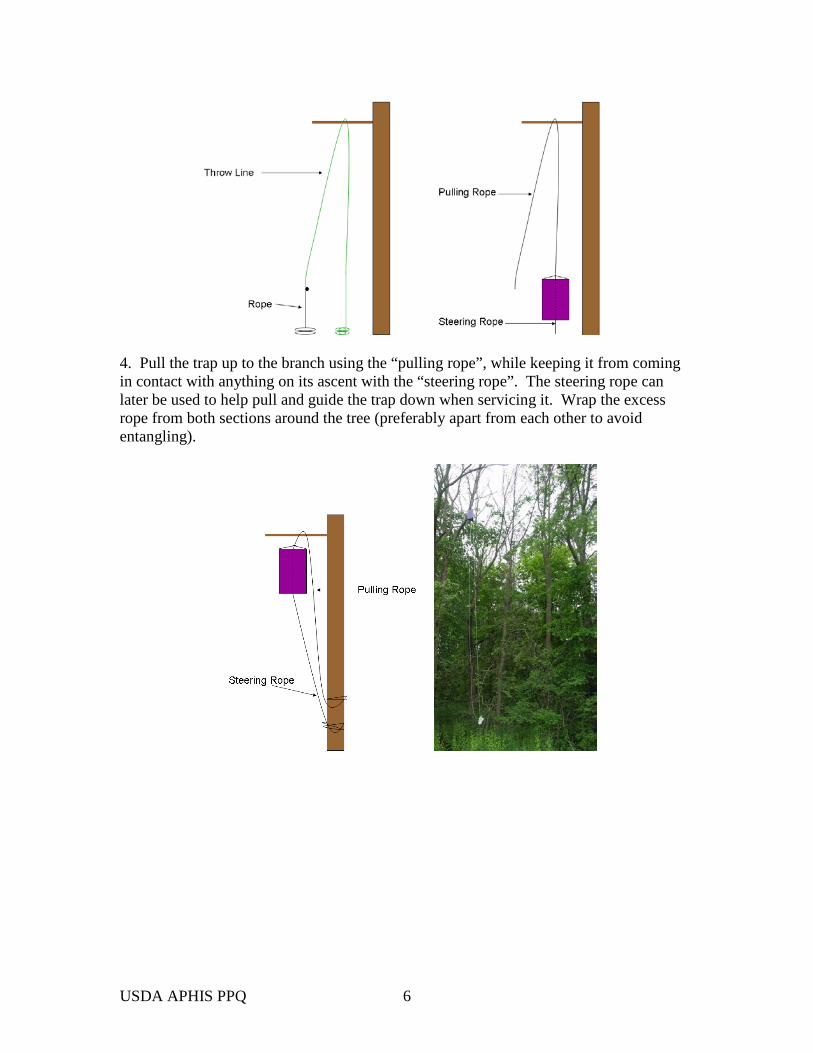
4. Pull the trap up to the branch using the “pulling rope”, while keeping it from coming in contact with anything on its ascent with the “steering rope”. The steering rope can later be used to help pull and guide the trap down when servicing it. Wrap the excess rope from both sections around the tree (preferably apart from each other to avoid entangling).
USDA APHIS PPQ 7
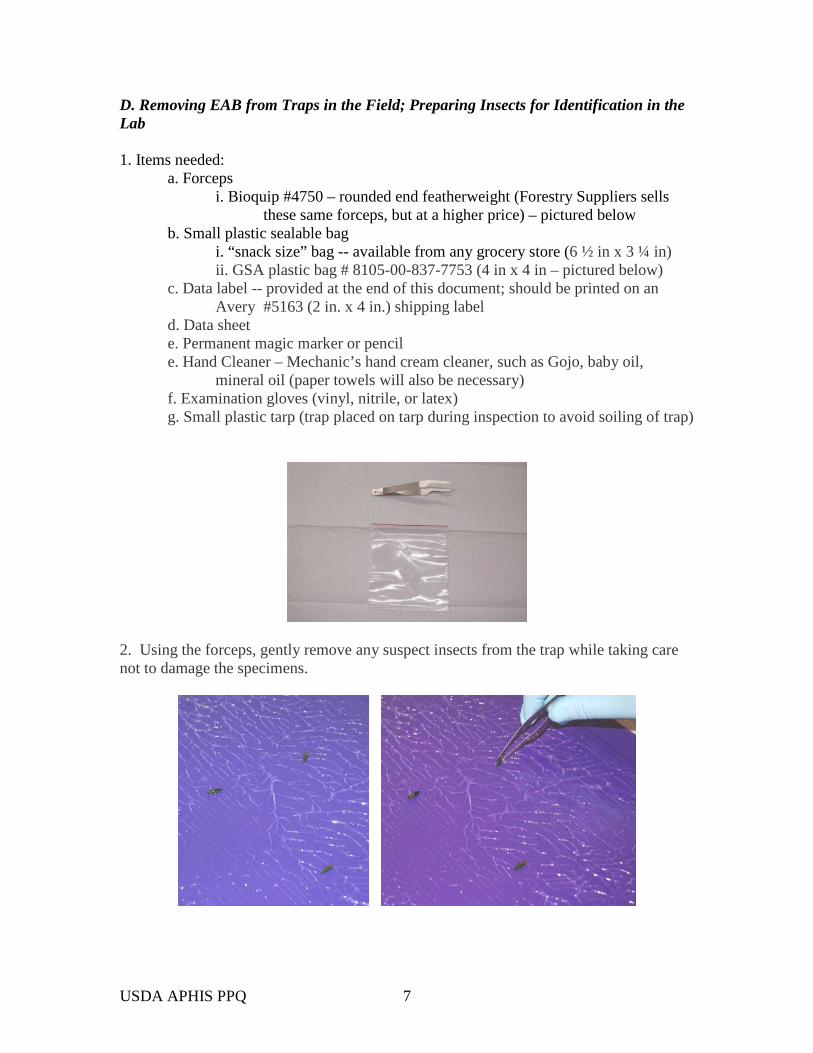
D. Removing EAB from Traps in the Field; Preparing Insects for Identification in the Lab 1. Items needed: a. Forceps i. Bioquip #4750 – rounded end featherweight (Forestry Suppliers sells these same forceps, but at a higher price) – pictured below b. Small plastic sealable bag i. “snack size” bag -- available from any grocery store (6 ½ in x 3 ¼ in) ii. GSA plastic bag # 8105-00-837-7753 (4 in x 4 in – pictured below) c. Data label -- provided at the end of this document; should be printed on an Avery #5163 (2 in. x 4 in.) shipping label d. Data sheet e. Permanent magic marker or pencil e. Hand Cleaner – Mechanic’s hand cream cleaner, such as Gojo, baby oil, mineral oil (paper towels will also be necessary) f. Examination gloves (vinyl, nitrile, or latex) g. Small plastic tarp (trap placed on tarp during inspection to avoid soiling of trap)
2. Using the forceps, gently remove any suspect insects from the trap while taking care not to damage the specimens.
USDA APHIS PPQ 8
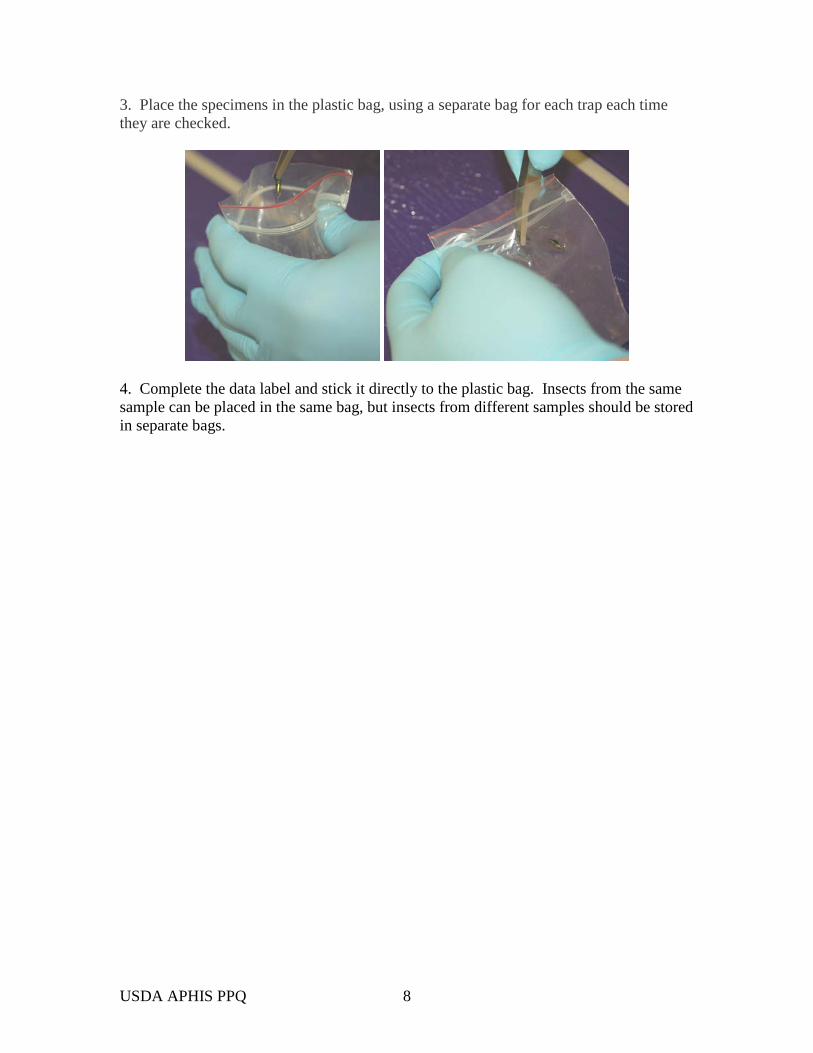
3. Place the specimens in the plastic bag, using a separate bag for each trap each time they are checked.
4. Complete the data label and stick it directly to the plastic bag. Insects from the same sample can be placed in the same bag, but insects from different samples should be stored in separate bags.

USDA APHIS PPQ 9
Trap Disposition: While the polypropylene material of the traps is recyclable, the glue that is adhered to the panels renders the traps undesirable to most recyclers. Alternatively, one may seek a user of waste fuel material for trap disposition. Hangers and spreaders are reusable and should be retained for future use. Hangers and spreaders that cannot be reused should be recycled. MATERIALS
Prism Trap (unassembled)
Spreader
Trap Hanger
USDA APHIS PPQ 10
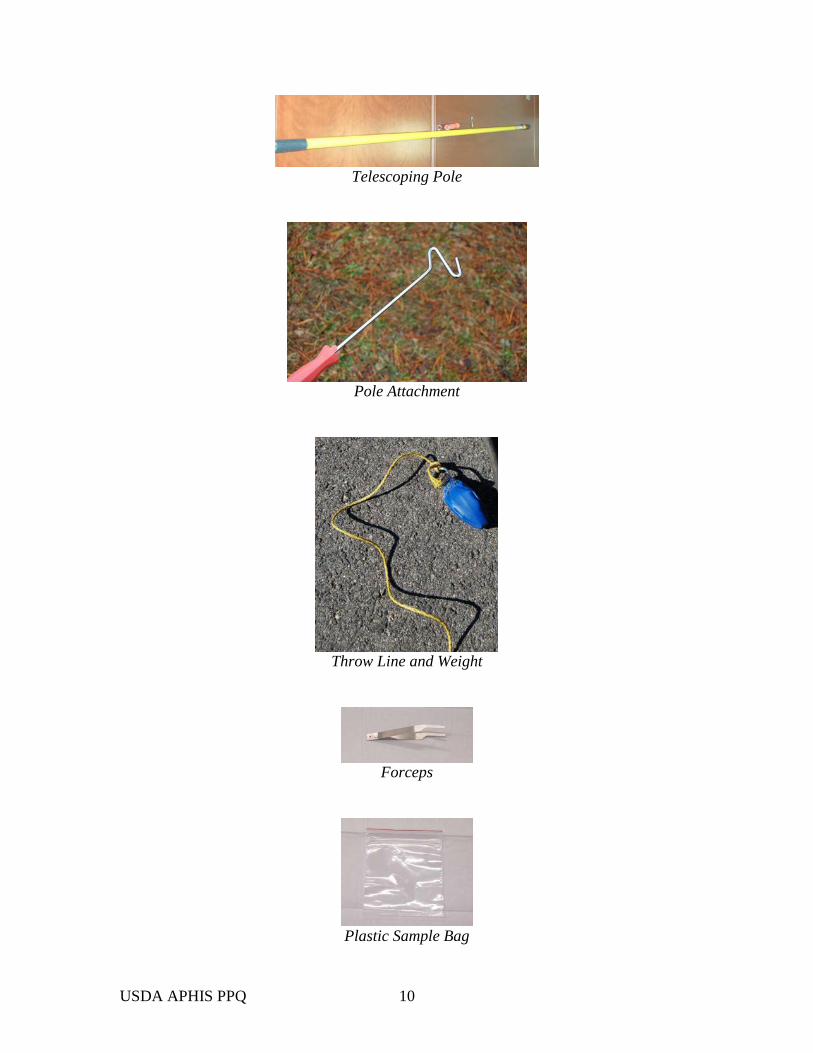
Telescoping Pole
Pole Attachment
Throw Line and Weight
Forceps
Plastic Sample Bag
USDA APHIS PPQ 11
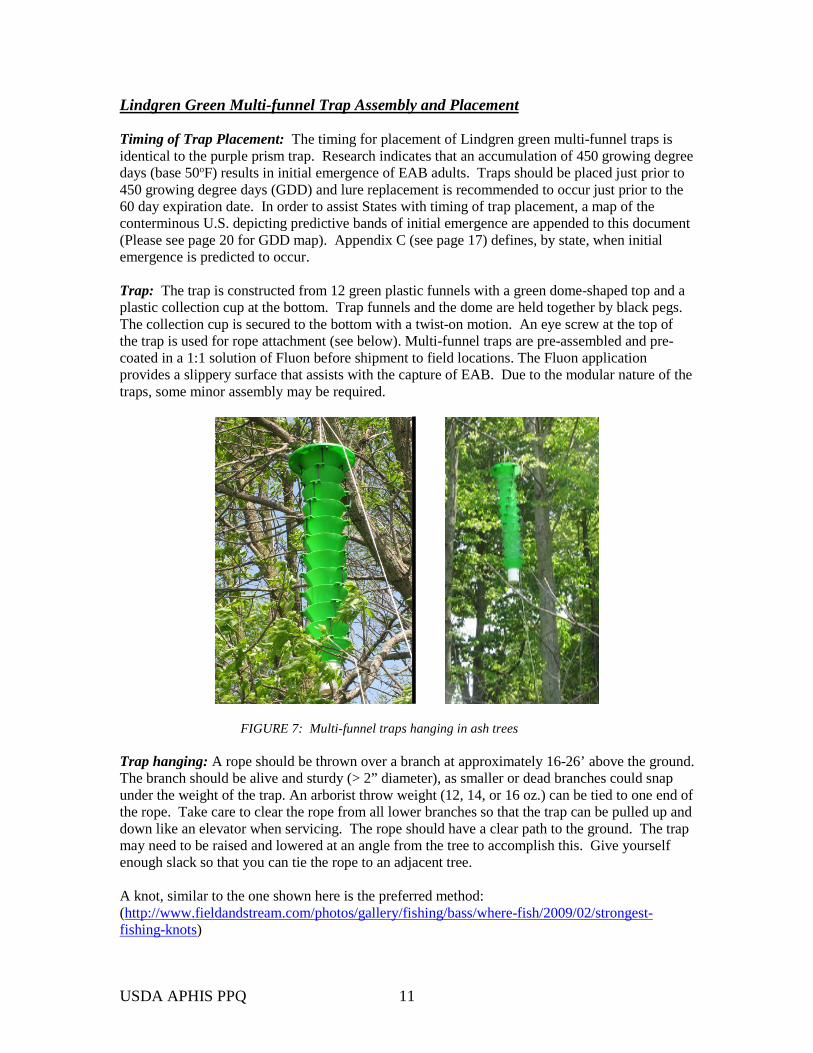
Lindgren Green Multi-funnel Trap Assembly and Placement Timing of Trap Placement: The timing for placement of Lindgren green multi-funnel traps is identical to the purple prism trap. Research indicates that an accumulation of 450 growing degree days (base 50oF) results in initial emergence of EAB adults. Traps should be placed just prior to 450 growing degree days (GDD) and lure replacement is recommended to occur just prior to the 60 day expiration date. In order to assist States with timing of trap placement, a map of the conterminous U.S. depicting predictive bands of initial emergence are appended to this document (Please see page 20 for GDD map). Appendix C (see page 17) defines, by state, when initial emergence is predicted to occur. Trap: The trap is constructed from 12 green plastic funnels with a green dome-shaped top and a plastic collection cup at the bottom. Trap funnels and the dome are held together by black pegs. The collection cup is secured to the bottom with a twist-on motion. An eye screw at the top of the trap is used for rope attachment (see below). Multi-funnel traps are pre-assembled and pre-coated in a 1:1 solution of Fluon before shipment to field locations. The Fluon application provides a slippery surface that assists with the capture of EAB. Due to the modular nature of the traps, some minor assembly may be required.
FIGURE 7: Multi-funnel traps hanging in ash trees
Trap hanging: A rope should be thrown over a branch at approximately 16-26’ above the ground. The branch should be alive and sturdy (> 2” diameter), as smaller or dead branches could snap under the weight of the trap. An arborist throw weight (12, 14, or 16 oz.) can be tied to one end of the rope. Take care to clear the rope from all lower branches so that the trap can be pulled up and down like an elevator when servicing. The rope should have a clear path to the ground. The trap may need to be raised and lowered at an angle from the tree to accomplish this. Give yourself enough slack so that you can tie the rope to an adjacent tree. A knot, similar to the one shown here is the preferred method: (http://www.fieldandstream.com/photos/gallery/fishing/bass/where-fish/2009/02/strongest-fishing-knots)

USDA APHIS PPQ 12
Using these knots, tie the rope to two points on each trap. For the multi-funnel trap these points are the top metal hanger and one of the three holes on the bottom funnel used for peg attachment. The knot is important as high winds will sometimes cause the traps to come down if the knots are not tied properly. When hanging the traps try to rest the top of the trap against the bottom of the tree limb. This should prevent the rope from twisting on itself. When attaching the collection cup, take care to make sure that it is securely attached to the bottom funnel.
FIGURE 8. Green multi-funnel trap with attachment points for ropes and lures. Prior to raising the trap, in the tree, fill the cup with approximately 2 inches of propylene glycol (RV antifreeze; usually pink in color). Do NOT use any product containing ethanol as products containing this will evaporate over time, especially in hot, dry climates or under drought conditions. Propylene glycol should not be diluted with water prior to filling the cup as it will be diluted by rainwater over time. Once the trap is hoisted, tie it off to a tree (the one it is hanging from will work for this). Take care when tying this rope off to place it out of the reach of children or others who may want to pull it down. Trap checking: When checking the multi-funnel trap, the contents of the trap should be poured through a paper filter. A paper cone paint strainer is the preferred method, although a coffee filter may also work but will retain more moisture. The strainer should then be placed inside a leak proof plastic bag. While wire closed bags (e.g., Whirlpaks) are the preferred method, a plastic zipper (e.g., Ziploc) bag will also work. Please make sure to label and seal the bag completely to prevent leaks. A small amount (one teaspoon) of ethanol may be added to the bag to help preserve the specimens for sorting in the lab. As long as the liquid in the cup is still pink, and

USDA APHIS PPQ 13
does not smell too badly, it can be re-used instead of discarded during traps checks. Place a propylene glycol collection container under the filter when pouring out the sample.
FIGURE 9. Paper cone paint strainer containing a sample of beetles
A (Z)-3-hexanol lure pouch should be hung from the lower loop of the prism trap spreader or from one of the holes used for peg attachment near the top of the multi-funnel trap with a small plastic cable tie. The lure should be changed after 60 days. Trap and Sign Placement: Traps must be placed in ash trees (Fraxinus spp.). If possible, ash trees should be 8” or greater in diameter with larger or largest ash tree in a stand of trees located along edges, in open areas, or in open stands such as in parks within the grid cell. Traps should be placed in the lower to mid canopy, but with the bottom edge of the trap no lower than five feet above the ground. They should be placed on the sunny side of the tree, most typically, the south or southwest side.
FIGURE 10. Survey sign.
Trap Maintenance: The lure will last approximately 60 days and should be replaced just prior to expiration. Multi-funnel traps should be checked every two-three weeks (and any insects that are captured should be collected). When reattaching cups, please make sure that all pegs are securely locked in place as they may come loose under some weather conditions. Trap Disposition: Multi-funnel traps are designed to be used over several field seasons. At the end of the season, the collection cups may be gently scrubbed, and dirt may be wiped away from funnels with a cloth (take care not to remove too much of the slippery Fluon coating). Traps will collapse into a smaller form for storage and subsequent reuse.

USDA APHIS PPQ 14
NATIONAL EAB SURVEY Date __________ State _____ Trap No. _______ Collector Initials ______ GPS Coordinates _______________ N ________________ W Trap Cleaned Y / N Lure Replaced Y / N No. Insects Collected From Trap ___________
NATIONAL EAB SURVEY Date __________ State _____ Trap No. _______ Collector Initials ______ GPS Coordinates _______________ N ________________ W Trap Cleaned Y / N Lure Replaced Y / N No. Insects Collected From Trap ___________
NATIONAL EAB SURVEY Date __________ State _____ Trap No. _______ Collector Initials ______ GPS Coordinates _______________ N ________________ W Trap Cleaned Y / N Lure Replaced Y / N No. Insects Collected From Trap ___________
NATIONAL EAB SURVEY Date __________ State _____ Trap No. _______ Collector Initials ______ GPS Coordinates _______________ N ________________ W Trap Cleaned Y / N Lure Replaced Y / N No. Insects Collected From Trap ___________
NATIONAL EAB SURVEY Date __________ State _____ Trap No. _______ Collector Initials ______ GPS Coordinates _______________ N ________________ W Trap Cleaned Y / N Lure Replaced Y / N No. Insects Collected From Trap ___________
NATIONAL EAB SURVEY Date __________ State _____ Trap No. _______ Collector Initials ______ GPS Coordinates _______________ N ________________ W Trap Cleaned Y / N Lure Replaced Y / N No. Insects Collected From Trap ___________
NATIONAL EAB SURVEY Date __________ State _____ Trap No. _______ Collector Initials ______ GPS Coordinates _______________ N ________________ W Trap Cleaned Y / N Lure Replaced Y / N No. Insects Collected From Trap ___________
NATIONAL EAB SURVEY Date __________ State _____ Trap No. _______ Collector Initials ______ GPS Coordinates _______________ N ________________ W Trap Cleaned Y / N Lure Replaced Y / N No. Insects Collected From Trap ___________
NATIONAL EAB SURVEY Date __________ State _____ Trap No. _______ Collector Initials ______ GPS Coordinates _______________ N ________________ W Trap Cleaned Y / N Lure Replaced Y / N No. Insects Collected From Trap ___________
NATIONAL EAB SURVEY Date __________ State _____ Trap No. _______ Collector Initials ______ GPS Coordinates _______________ N ________________ W Trap Cleaned Y / N Lure Replaced Y / N No. Insects Collected From Trap ___________