Embed Size (px)
Citation preview

FSF-ed5006
FSF
Usage and Maintenance
Shirt finisher

FSF-ed5006

FSF-ed5006
3FSF Index
Index
1. Introduction 4
1.1. Content and purpose of this manual 4
1.2. Safety precautions 4
1.3. Residual risks 4
1.4. Manufacturer’s liability 4
2. Description of the machine 5
2.1. How to identify the machine 5
2.2. Technical specifications 5
3. Installation 6
3.1. Upon receiving the goods 6
3.2. Packing list 6
3.3. Electrical connections 6
3.4. Compressed air connection 6
3.5. Steam connection 6
4. Use 8
4.1. Safety precautions 8
4.2. Before starting 8
4.3. Operation 8
4.4. In case of emergency 8
4.5. Upon terminating work 8
4.6. Fine adjustments 8
5. Use of the control board 11
5.1. PROGRAMMING section - basic features 11
5.2. PROGRAMMING section - advanced features 11
5.3. Pressing cycle counter meters 11
5.4. EXCLUSION section 11
5.5. MANUAL CONTROLS section 12
5.6. Operating MODE 12
6. Maintenance 14
6.1. Maintenance allowed to the user 14
6.2. Maintenance to be carried out by the technician every six months 14
7. Troubleshooting 15
7.1 Control board self-diagnosis 15
8. Machine stop 17
8.1. Prolonged stop 17
8.2. Transportation 17
8.3. Decommissioning 17
9. Technical diagrams 19
10. Spare parts diagrams 24

FSF-ed5006
4 FSF
1. Introduction
1.1. Content and purpose of this manualThis manual contains instructions concerning the installation and maintenance of pressing equipment in conformity to the present European Community Directive. Therefore you will find information on the following subjects:
• Informationonmachinetechnicalfeatures;• Instructionsoninstallationandoperatingofthemachine.• Instructionsonmaintenanceandservicing.• Technicaldiagrams• Explodedviewsofspareparts
Thismanualisfortheuser,theinstallerandthetechnician;theywillhave to read and understand it carefully before installing, using or servicing the machine.This manual should be kept with the machine and read before operation; in caseof lossordamagepleaseask thebuilder foranew copy.The builder is not responsible for any consequences arising from the neglecting of all instructions reported in this manual.
The content of this manual is property of the manufacturer. Duplication of this manual is forbidden.
1.2. Safety precautionsIgnoring the following safety precautions can cause damage either to people, linen, animals and to the machine.The following symbols, on the machine and in this manual, advise about possible risks.
Legend of the safety symbols found on the machine and in this book:
Warning: live electricity
General warning: follow instructions to avoid damage to the machine or to people.
Warning: hot surface / burn hazard
Warning: high temperature
Risk of injury to hands of feet
Wear gloves
Wear protective shoes
Wear a helmet
i Information, notice, advice
Carefully read the entire manual before installing, operating or servicing the machine.Installation and maintenance the product described in this manual must be performed by authorised and qualified technicians who know the products and are acquainted with standards for installation of industrial pressing equipment.The builder is not responsible for external connections not duly performed.
The product described in this manual must be used only to iron garments and linen. Any other use is forbidden unless builder authorizes it in writing.Do not press fabrics contaminated by dangerous substances such as explosives, inflammable, etc. Make sure they are rinsed or aired before ironing.
To prevent fire hazard or explosions do not stand near the machine with explosive or inflammable products.
Use of the machine is allowed only to professional operators who have been trained on how to operate the machine. In any case the use of the machine is forbidden to children under 14 years of age.
Do not remove safety protection devices.
Do not leave machine unattended while in operation.
Do not remove safety symbols from the machine
1.3. Residual risksResidual risks are defined as those derived from normal machine utilisation that could not be eliminated by manufacturer.The risk assessment has determined only one risk that cannot be eliminated: the risk of touching the heated front clamp. The risk is highlighted to the user in this manual and on the machine.
WARNING - BURN HAZARD - The front clamp may reach very high temperature. Do not touch it while
the machine is on.
1.4. Manufacturer’s liabilityThis manual instructions are not intended to substitute, but only to combine obligations of current legislation on safety standards. With reference to information included in this manual, the manufacturer is not responsible in case of:• neglectoflocalsafetystandardsduringmachineutilisation;• incorrectinstallationofthemachine;• neglectorincorrectobservanceofinstructionsincludedinthis
manual;• faultsofvoltageorofthefeedingsystems;• connection to electrical plant non compliant with EC safety
requirement, in particular if the plant lacks grounding, thermal magneticprotectionanddifferentialprotection;
• unauthorizedchangesonthemachine;• utilisationofthemachinebyunauthorized,untrainedornon-
professionaloperators;• neglectofmaintenanceoperations;• useofnonoriginalspareparts.
Introduction

FSF-ed5006
5FSF
Type
5202 5202T226T 5212 5222 5232
400V 3N50Hz 220V 3 60Hz 400V 3N 50Hz 400V 3N 50Hz 220V 3 60Hz
1/2” 1/2” 1/2” 1/2” 1/2”
1/2” 1/2” 1/2” 1/2” 1/2”
1/4” 1/4” 1/4” 1/4” 1/4”
2,85kW 3,8 HP 2,85kW 2,85kW 3,8 HP
0,6kW 0,8 HP 0,6kW 0,6kW 0,8 HP
1000W 1000W 1000W 1000W 1000W
500 - 600 kPa 80 PSI 500 - 600 kPa 500 - 600 kPa 80 PSI
600 - 700 kPa 80 PSI 600 - 700 kPa 600 - 700 kPa 80 PSI
45 - 50 kg/h 100 - 110 lbs/hr 45 - 50 kg/h 45 - 50 kg/h 100 - 110 lbs/hr
14 nl/min 0,5 cfm 14 nl/min 14 nl/min 0,5 cfm
270/300 kg 595/660 lbs 290/320 kg 300/330 kg 640/705 lbs
15 to 40 °C 60 to 105 °F 15 to 40 °C 15 to 40 °C 60 to 105 °F
Table 2.3 - Technical specifications
Electrical requirements
Steam inlet
Condensate return
Air inlet
Blowing motor
Suction motor
Front clamp
Steam pressure
Air pressure
Steam comsumption
Air consumption
Net/Gross Weight
Noise
Ambient temperature
Figure 2.2 - Machine dimensions
Description of the machine
Figure 2.1 - Identification plate
2. Description of the machineThe unit described in this manual is a form finisher for pressing wet shirts. This shirt finisher is designed for:• Garmentmanufacturingindustries;• LargeandsmallIndustrialdrycleaners;• Garmentfinishingindustries.The shirt finisher must be utilized by only qualified personnel, who have been specifically trained on this type of machinery. The manufacturer does not accept any responsibility for damage caused to persons or things due to improper, erroneous or unreason-able utilization of the machine.
2.1. How to identify the machineThe machine is identified by a technical data plate. The plate is found on the back of the machine, as shown in Figure 2.1. Do not alter or modify in any way the data on the identification plate. Do not remove the identification plate.
Description of the data in the identification plate
Serial N 5 digits serial number
Type Product code
V Tension
Hz Frequency (cycles)
kW Power absorption
Date Date of production
2.2. Technical specificationsRefer to Table 2.3 for technical specifications.Figure 2.1 shows the dimensions of the machine.
i This manual describes all the versions of the machine. Be-fore reading the manual identify the version of the ma-
chine you own by reading the machine “type” in the technical data plate. While reading the manual take into account only the information related to the version of machine you own.

FSF-ed5006
6 FSF
i INDICATION - If a Ground Fault Interrupt protection is in-stalled: every month test the safety of the circuit by press-
ing the Test button of the circuit breaker. The protection ought to trip. If it does not, call a technician immediately, as the safety of the equipment is impaired.
Table 3.5 - Data for electric connection
Installation Plug Power cord
400V 50Hz Plug 3P+N+T 400V 3N 16A as per standard IEC60309
Type H05VV-F5 x 1,5mm2
210-240V 60Hz
3P+T 210-240V 3 25A Type H05VV5-F4 x 14AWG
WARNING - The power cord can be replaced only by an authorised service center.
3.4. Compressed air connection
WARNING - The steam connection is to be made by a li-censed technician only and according to local safety regu-
lations.
Refer to Figure 3.4.
1. Connect the machine to a compressed air source with pressure 6 bar (90 PSI) minimum
2. Make connections as indicated3. Set the general pressure regulator on the machine at 6 bar (90
PSI)
WARNING - Do not set the pressure higher than 6 bar. Risk of damage to the machine.
3.5. Steam connection
WARNING - The steam connection is to be made by a li-censed technician only and according to local safety regu-
lations.
Refer to Figure 3.5.
Connect the machine to a steam source with steam pressure at 5 bar (75 PSI) capable of providing 30 Kg/h (66 lbs/hr) of steam.The numbers in the figure indicate the following parts (not supplied with the machine): 1 – Steam line 2 – Condensate return line 3 – Ball valve 4 – Check valve 5 – Steam trap
WARNING - Do not connect the machine to a steam line having pressure exceeding recommended values. Risk of
serious damage to the machine and injury to people.
Installation
3. Installation
3.1. Upon receiving the goodsThe machine is delivered mounted on crate and protected by a plastic film and, in some cases, by a cardboard box.1. Position the crated machine near to the final location of in-
stallation. The crated machine must be moved using suitable devices, such as a forklift (Figure 3.1)
2. Unpack the machine and separate cardboard from plastic. Dis-pose of carton and plastic according to local regulations.
3. Unscrew the bolts that fix the machine to the crate4. Move the machine from the crate to its final position.
CAUTION - To avoid damaging the machine, do not move the machine by grabbing the form or the clamps.
CAUTION - The machine can be moved by hand by experienced personnel only. Wear
gloves, helmet and protective shoes when moving the ma-chine.
3.2. Packing listThe package contains:1. Machine, complete with all mechanical parts and tensioning
devices. 2. Plastic bag containing covers and padding (if not already in
place on the machine).3. Mirror.4. Instruction manual.5. Boxes of optional items ordered with the machine (if any)Upon receiving the goods, check that the package contains all the above listed items.
3.2.1 Assembling disassembled partsThe machine is supplied with the control panel folded against the side of the machine. Rotate the support of the control panel to bring it in the most comfortable position.
Mount the mirror on the machine cabinet (see Figure 3.2):1. Loosenthescrewsthatholdsupport(2)inplace;2. Insertthetube(1)intothesupport(2);3. Choose the right position for the mirror and tighten the
screws.
3.3. Electrical connections
WARNING - The electrical connection is to be made by a licensed electrician only and according to local safety
regulations.
The manufacturer is not responsible for damage or injury caused by improper installation.
Refer to Figure 3.3.
1. Install a multi-pole switch (circuit breaker) to facilitate installation and service operations. See table 3.5 for rating and type of connection.
2. In most countries the circuit breaker should include a protection against overcurrents (e.g. thermal-magnetic circuit breaker or fuse). If using a fuse, see power absorbtion on the identification plate of the appliance (see figure 2.1). In some countries the circuit breaker must include a ground fault interrupt protection.
3. Mount a plug on the power cord, see table 3.5 for rating4. Connect the plug to the circuit breaker. The cable should hang
in a gentle curve.5. Check that the motor is rotating counterclockwise, otherwise
switch two of three phases wires.
WARNING -The electrical line must be properly grounded to insure the safety of the operator.
Grounding instructions
For 220V 3-Phase Models:When permanently connecting this machine this appliance must beconnectedtoagrounded,metal,permanentwiringsystem;oran equipment-grounding conductor must be run with the circuit conductors and connected to the equipment-grounding terminal or lead on the appliance.
When using a cord connector this appliance must be grounded. In the event of malfunction or breakdown, grounding provides a path of least resistance for electric current to reduce the risk of electric shock. This appliance is equipped with a cord having an equipment-grounding conductor and a grounding plug. The plug must be plugged into an appropriate outlet that is properly installed and grounded in accordance with all local codes and ordinances.

FSF-ed5006
7FSF
min 16A @ 400V 50Hzmin 25A @ 220V 60Hz
!
Figure 3.1 - How to move the crated machine
Figure 3.4 - Compressed air connection
Figure 3.3 - Electrical connection
Figure 3.5 - Steam connections
Installation
Figure 3.2 - Assembling the mirror
DANGER – Improper connection of the equipment ground-ing conductor can result in a risk of electric shock. The
conductor with insulation having an outer surface that is green with or without yellow stripes is the equipment-grounding con-ductor. If repair or replacement of the cord or plug is necessary, do not connect the equipment grounding conductor to a live terminal. Check with a qualified electrician or serviceman if the grounding instructions are not completely understood, or if doubt as to whether the appliance is properly grounded. Do not modify the plug provided with the appliance – if it will not fit the outlet, have a proper outlet installed by a qualified elec-trician. This appliance is for use on a circuit having a nominal rating more than 120 V and is factory equipped with a specific electric cord and plug. No adaptor should be used with this appliance. If the appliance must be reconnected for use on a different type of electric circuit, the reconnection must be made by qualified service personnel; and after the reconnection, the appliance should comply with all local codes and ordinances.
For 120V Models This appliance is for use on a nominal 120V circuit, and has a grounding plug. Under no circumstances shall the grounding plug be bypassed. No adaptor or extension cord should be used with this appliance. If the appliance must be reconnected for use on a different type of electric circuit, the reconnection should be made by qualified servicepersonnel;andafterthereconnection,theapplianceshouldcomply with all local codes and ordinances.

FSF-ed5006
8 FSF
4. UseThe form finisher here described is made for pressing wet cleaned shirts.
This shirt finisher is designed for:• Garmentmanufacturingindustries;• LargeandsmallIndustrialdrycleaners;• Garmentfinishingindustries.
The shirt finisher must be utilized by qualified personnel, who have been specifically trained on this type of machinery.
4.1. Safety precautions
During operation the unit is under electrical tension:
• Donotoperatemachinerywithpartiallyexposedorfrayedwiring.
• Neverpermitwater tocome intocontactwithmachine:danger of electrical shock, short-circuiting and damage to machine may result.
• Donotopenthemachinecabinet.
The unit has various parts that reach extremely high tem-peratures:
• Donotleavethemachineunattendedwhileitison;• Keep all flammable substances away frommachine, to
avoid risk of fire;• Donotopenmachinebody• Donotreplacecoverandpaddingwhilemachineishot
(wait at least 2 hours after turning it off). Always check the temperature of the form before proceeding to substi-tute covers.
The unit generates hot steam vapors - Stay clear of steam reflex jet.
4.2. Before starting1. Open the steam and condensate return valves2. Open the air delivery valve3. Turn on main power switch (2 - Figure 4.3)
4.3. OperationRefer to figures 4.2 and 4.3
WARNING - BURN HAZARD - The front clamp may reach very high temperature. Do not touch it while
the machine is on.
4.3.1. Position of the operatorDuring dressing, cycle start and undressing the operator stands in front of the machine.
4.3.2. Settings1. Select program number with buttons (A) on the control panel2. Select blowing power shifting the lever (12)
Check the general pressure in the machine, displayed by the gauge located on the air filter (3). The gauge should
display 6 bar. Use the knob on top of the air filter (3) to adjust the general pressure.
4.3.3. PressingPress the Start pedal (13) to move one step forward in the dressing sequence. If you make a mistake, press the BACK CYCLE button on the control panel to “undo” the last step.1. Place the shirt on the form and adjust shoulder width with the
buttons(E)and(F)onthecontrolpanel;2. Steponthestartpedal(13)toclosethecollarclamp;3. Steponthestartpedaltofindtheheight;
4. Grab the sides of the shirt and tense the back part of the shirt against the form while stepping on the start pedal: the rear clamp closes. During this operation, look in the mirror (14) to check that there are no wrinkles in the area where the rear clampcloses;
5. Grab the two front edges of the shirt and position them parallel alongthefrontpartoftheform;
6. The suction keeps the two parts in position. Smooth the front edgestomakesuretherearenowrinkles;
7. Step on the start pedal to close the front clamp and expand sides;
8. Insert a cuff in the cuff clamp and push button (8) to close the clamp. If you want to re-open the clamp, push the button again. To avoid marks insert the cuff unbuttoned and as shown infigure4.1;
9. Insert the other cuff in to the other clamp and push the button to close. When the second cuff clamp closes, the machine au-tomaticallystartsthecycle;
10. Adjust sleeve arms height so that there are no wrinkles in the armpitarea(seeparagraph4.6.1);
11. At the end of the cycle the clamps are automatically released.
4.3.4. Use of the iron (optional)If your shirt finisher is equipped with an iron for touch-ups (the iron is an optional feature), the iron can be used at any time during the pressing cycle to perfect finishing.If you want to keep full control of the quality of the garment proceed as follows:1. Insert the MANUAL END function located in the “mode” section
of the control panel (C). At the end of the pressing cycle the clamps are not released and the garment is kept in place for visualinspection;
2. If the garment needs touch-ups: press AIR in the “manual con-trols” section of the control panel (D) to start the blowing and inflatethegarment;
3. Use the iron to finish the garment or add manual steam by
pressingthebuttonSTEAMinsection(D)ofthecontrolpanel;4. Press END CYCLE in the “manual controls” section of the con-
trol panel (D) to release the clamps.
- Theironmustbeusedandrestedonastablesurface;- when placing the iron on its stand, ensure that the surface on
whichthestandisplacedisstable;- the iron is not to be used if it has been dropped, if there are
visible signs of damage or if it is leaking.
4.4. In case of emergencyIn case of emergency at any time during the cycle, push the red mushroom (G). The machine will stop imme-diately any operation and the clamps will be released. To reset the machine, turn the mushroom clockwise.
4.5. Upon terminating work1. Turn off the main power switch.2. Close steam and condensate return valves. 3. Close air delivery valve.
4.6. Fine adjustmentsRefer to Figure 4.3 if not otherwise specifiedThe machine has several fine adjustment, to match any kind of ap-plication.Front clamp temperature: Rotate the temperature dial to adjust the
temperature of the front clamp. The temperature needed for most fabrics is between 160 and 180 °C. This temperature must be selected according to type of fabric and degree of extrac-tion.
Rear clamp and side clamps pressure adjustment: pull knob (18) and rotate clockwise to increase the pressure on rear clamp and side clamps. The pressure value is indicated by gauge (17). When finished, push knob in to lock in position. The recom-mended value is 3 bar.
Strength of additional sleeve tension: When additional sleeve ten-sion is activated (see parameter H04 in the next para-graph) the strength of the tension can be adjusted.
Use
(> Continued on page 10)

FSF-ed5006
9FSF
Figure 4.3 - Machine parts
Figure 4.2 - Control panel
(1) Control panel(2) Main power switch(3) Air filter(4) Collar clamp(5) Front clamp(6) Front clamp temperature adjustment(7) Cuff clamp(8) Cuff clamp button(9) Side expander(10) Side clamp(11) Front hem clamps(12) Blowing strength adjustment(13) START pedal(14) Mirror(15) Sleeves tensioning pressure adjustment (16) Arms counter-pressure adjustment(17) Clamps* pressure adjustment(18) Clamps* pressure gauge (19) Arms counter-pressure gauge(20) Sleeves tensioning pressure gauge
* Rear clamps, side clamps and front hem clamps
Use
(A) Program selection buttons(B) Exclusion section(C) Mode section(D) Manual controls section(E) Expand shoulders
(F) Retract shoulders(G) Emergency stop(L) Antistretch exclusion(M) Carriage down
Figure 4.1 - How to clamp the cuff

FSF-ed5006
10 FSF
The higher the value displayed by gauge (15), the lower the tension on the sleeves. To adjust the tnesion, pull knob (20) and turn to change the value displayed. Push the knob to lock the value**.
Sleeve arms counter-pressure: This pressure determines how fast the sleeve arms return to their rest position after releasing the shirt cuffs. Check periodically that the value displayed by gauge (16) is correct*. Otherwise, pull knob (19) and rotate to adjust the pressure. When finished, push knob in to lock in position.
Antistretch exclusion: To exclude the antistretch, push the button (L) on the console prior to starting a cycle. When the button is pushed in, the side expanders keep stretching the shirt during the cycle. When the button is released out the antistretch feature is activated, that is, it prevents the side expanders from ovestretching the fabric.
Carriage down button: Push and hold button (M) on the console to lower the carriage. This feature allows to manually increase vertical tension during the cycle.
See the next chapter “Use of the control board” to learn how to program pressing cycles and to discover the power of the control board.
* The recommended value is 4 bar.** The recommended value is 2 bar.
Use
4.6.1. Adjusting sleeve arms height1. Loosen the knob located on the sleeve arm2. Slide the topper part of the arm to the desired height3. Tighten the knob

FSF-ed5006
11FSF
5. Use of the control boardThe microprocessor programmer manages the pressing cycle in all of its functions. The user can pre-set 9 pressing programs.The control panel is subdivided into 4 sections:• PROGRAMMING:allowsstorageof9differentworkprograms
with programmable times and modes.• EXCLUSION:allowspartialortotalexclusionofvariouspress-
ing functions.• MODE:permitschoiceofvariouspressingcyclemodes• MANUALCONTROLS:allowsmanualfunctionofmainpress-
ing functions.When the machine is switched on the control panel shows the last program used.
It is possible to adjust the brightness of the display: press to increase, press to decrease.
5.1. PROGRAMMING section - basic fea-turesThe programming section consists of:• Programnumberdisplay:from1to9• STEAMtimedisplay:from00to99seconds• MIX/PAUSEtimedisplay.Thetwo-figuredisplayissharedby
the two functions MIX (mixed steam + air) and PAUSE (pause betweensteamandblowing;usede.g.fortouchups)
• AIRtimedisplay:blowingtime• 5programmingbuttons.
To program a pressing cycle, do as follows:1. Press the button PROG ( ) on the panel. A letter “P” ap-
pears in the PROG display and the STEAM time display begins to flash.
1. Press buttons or to increase or reduce the steam time.2. Press the PROG. button ( ) to memorize the steam time.3. The green light MIX and the display below begin to flash: press
or to set a time of mixed steam + air after steaming, if needed.
4. Press the PROG. button to memorize the mix time5. The green light PAUSE and the display below begin to flash:
press or to set a pause time between steam and blowing, if needed (e.g. for touch ups with the iron)
6. Press the PROG. button to memorize the pause time.7. The AIR indicator starts to flash. Press or to set blowing
time.8. Press the PROG. button. The display stops to flash. Program-
ming is finished
If you need to change only one of the times, repeat all steps without modifying the other times.
Mix and Pause times can be used or not, depending on the needs. Table 5.1 shows the possible combinations.
5.2. PROGRAMMING section - advanced featuresThe PROGRAMMING sections allows adjustment of several param-eters. Refer to Table 5.2 for description of the parameters and their status. Figure 5.3 shows the look of the displays during programming of advanced parameters.
1. To access advanced programming press the PROG. button until the letter H appears in the program number display
2. The steam time display shows the number of the parameter under programming. Press PROG. to step forward to another parameter
3. The air time display shows a flashing number indicating the parameter value. Press or to change parameter value
4. Press PROG. to memorize the value
Use of the control board
Figure 5.3 - Displays during advanced parameters programming
5. Press PROG. several times, until the displays return to normal pressing times visualization.
The settings of the advanced parameters remain stored in the memo-ry associated to the program in which they were entered. For example: if the machine is running program number 5 and the user enters advanced programming and excludes sleeve arms, the sleeve arms will remain excluded for future use of program number 5, even after switching off the machine.
5.3. Pressing cycle counter meters The machine is equipped with two cycle counters:• Thetotalcountercountsall thepressingcyclescarriedoutby
the machine in its work life and cannot be reset. • Thepartialcountercanberesetandcanbeutilized,forexam-
ple, to count the number of garments processed in one day.
Partial counter meter• Toaccessthecounterspresspushbuttons and together
for two seconds.• Theletter“C”appearsonthePROGdisplay.Theotherdisplays
show the number of cycles. • Toresetthecounterpress“PROG”.• Toexitmetermode,press and together till the displays
STEAM, MIX, PAUSE, AIR show pressing times.
Total counter meter• Toaccessthecounterspresspushbuttons and together
for two seconds.• Theletter“C”appearsonthePROGdisplay.Theotherdisplays
show the number of cycles. • Press+toviewthetotalcyclescountermeter.Thetotalcycles
counter cannot be reset.• Toexitmetermode,press and together till the displays
STEAM, MIX, PAUSE, AIR show pressing times.The machine can work while the counter is visualized.
5.4. EXCLUSION sectionThis section consists of 4 buttons with red LED. The buttons allow exclusion of the following functions:• rearclampmovement• frontclampmovement• sleevearmsmovement• collarclampmovementPushing the button relative to the function effects exclusion. When the LED is on, the relative function is excluded.Exclusions remain stored in the memory of the selected program.
Excludes the rear clamp. When the light is on the clamp does not close. If the button is pushed during a cycle, the clamp opens but the cycle continues.
Excludes the front clamp. When the light is on the clamp does not close. If the button is pushed during a cycle, the clamp opens but the cycle continues.
Excludes the sleeve arms and cuff clamps. When the light is on the sleeve arms do not operate. If the button is pushed during a cycle, the cuff clamps open but the cycle continues.
Excludes the collar clamp. When the light is on the collar clamp does not operate. If the button is pushed during a cycle, the collar clamp opens but the cycle continues.

FSF-ed5006
12 FSF
5.5. MANUAL CONTROLS sectionAIR Press once to start blowing. Press it again to stop blowing. In
order to have manual MIX press STEAM during the blowing operation.
REPEATCYCLERepeatsthecyclewithoutfurthertensioning;thisbut-ton is enabled only at end of the pressing cycle and only if the MANUAL END mode is selected.
END CYCLE Ends the cycle immediately, interrupts all ongoing com-mands, opens all clamps. When the MANUAL END mode is selected, press this button to open the clamps at the end of the cycle.
STEAM Keep pressed to steam the shirt.BACK CYCLE Use this button to undo the last step in the dressing
sequence.
5.6. Operating MODEThe Mode section consists of 3 buttons with green LED.To select a mode press the relative button: the green LED turns on.
5.6.1. Button When the LED is ON: the side clamps (10 - Figure 4.3) close at
the beginning of the cycle and open automatically after the time programmed in the H03 parameter (see table 5.2). This mode is useful for thick fabric or low extraction, because closed clamps may hinder proper drying of the area.
When the LED is OFF: the side clamps stay closed during the whole cycle.
The button has no function if the side clamps are excluded (param-eter H05 = 00).
5.6.2. Button
The MANUAL END function is utilized when it is necessary to verify garment pressing quality at the end of a cycle.
When the MANUAL END function is active (the green LED of the but-ton “MANUAL END” is on), the clamps remain are not released at end of the cycle.This allows to:• runanothercyclebypushingREPEATCYCLE• manually steamandblow thegarmentwithbuttonsAIRand
STEAM• manually touchup thegarmentwith the iron (ifmountedon
your machine).When the garment is properly finished, end the cycle and open the clamps by pressing the “END CYCLE” button (in the “manual con-trols” section).
Use of the control board
5.6.3. Button The button is not active.

FSF-ed5006
13FSF
Table 5.1 - Setting mix and pause times
What is your need? What you should do How the displays will look
I do not need mix or pause times
Set both times at zero Mix and pause lights are off.The displays show no numbers.
I want both mix and air times
Set the two times according to the procedure de-scribed in chapter 5.1.1.Note that each of the two times cannot exceed 9 seconds.
Mix and pause lights are on.The digit on the left is mix time.The digit on the right is pause time.
I need only a mix time, no pause
Set mix time at the desired value. If this value is below 10 seconds, you must set pause time at zero. If mix time is 10 seconds or above, the pause time is automatically set at zero.
Mix light is on.Pause light is off.The two displays show mix time (8 seconds and 12 seconds in the example).
I need only a pause time, no mix
Set mix time at zero. Set pause time at the de-sired value.
Mix light is off.Pause light is on.The two displays show pause time.
Use of the control board
Table 5.2 - Advanced programming parameters
Parameter number
Parameter description Meaning of the number in the display AIR(press + or - to change the value)
H 01 Garment positioning time. This parameter allows to vary the distance of the rim of the garment from the bottom of the form. The higher this time, the greater the distance. The machine is pre-set with 0,1 seconds positioning time
Positioning time in 1/10 of second
H 02 Vertical tension time. The machine is pre-set with 0,2 second tension-ing time. Longer tensioning time means more vertical tension to the shirt. The machine is pre-set with 2/10 of second tensioning time
Tensioning time in 1/10 of second
H 03 Side clamps (10 - Figure 4.3) opening time. If the "TIMER SIDE CLAMPS" function is activated, the value of this parameter indicates when the clamps will open. The pre-set value is 5 seconds.
Opening time in seconds (from the beginning of blow-ing)
H 04 Sleeve arms additional tension. This parameter allows to add extra-tension to the sleeves during the cycle. The pre-set value is 00. This pressure can be adjusted by means of knob (20 - Figure 4.3)
00 means no additional tension01 means additional tension after 3 seconds of steam02 means additional tension after 10 seconds of air
H 05 Side clamps exclusion. The side clamps (10 - Figure 4.3) can be excluded.
00 means side clamps excluded01 means side clamps activated
H 06 This parameter allows to program several actions:•positionofthecarriageattheendofthecycle:thecarriagecan
either return to its lowest position or stay in the same position (this is useful when pressing several identical shirts)
•additionaltensioningtotheshirt:atthebeginningofthecycle,thecarriage moves down to tension the shirt. This parameter allows to add two additional downward movements during the cycle
•fastmode:forhighproductivity.Whenthismodeisselected,themachine automatically closes the clamps without stepping on the start pedal. The operator must keep the machine pace.
00=carriage down - no additional tension01=carriage down - additional tension, light02=carriage down - additional tension, stronger03=carriage still - no additional tension04=carriage still - additional tension, light05=carriage still - additional tension, stronger06=fast mode - no additional tension07=fast mode - additional tension, light08=fast mode - additional tension, stronger
H 07 Automatic positioning of sleeve arms height (only model with short sleeve device)
00 means automatic positioning OFF01 means automatic positioning ON

FSF-ed5006
14 FSF
6. Maintenance
6.1. Maintenance allowed to the user
WARNING: Before performing any maintenance on the machine, disconnect from electric power.
6.1.1. Every week• Cleanmachinebodywithasoftnonabrasivecloth.
WARNING: Do not use aggressive detergents or sol-vents that may ruin machine parts
• Verifyvisuallythatsteam,condensateandcompressedaircon-nections do not leak
• Verifythatvisibleelectricalcablingandairandsteamconnec-tion tubing are in perfect working order
• Verifythatpadsandcoversareingoodcondition.Iftheyshowany sign of deterioration replace them immediately. Pressing quality may decrease dramatically if pads and covers are dirty or damaged.
WARNING: Do not run a machine that does not look in proper order
INDICATION: always ask for original spare parts. Non original parts may damage to the machine or decrease
its safety
Mainenance
6.1.2. Every six monthsCall the authorised technician to perform the maintenance opera-tions described in the following chapter.
6.2. Maintenance to be carried out by the technician every six months
WARNING: The maintenance operations described in this chapter must only be carried out by qualified personnel.
WARNING for the technician:Before any kind of maintenance or control intervention:• Disconnectthemachinefromelectricity,airandsteam• Dischargeairpressurefromthepneumaticcircuitbyopening
the valve at the air inlet• Makesurethatallthepartsofthemachinehavecooleddown
6.2.1. Electrical circuit maintenance• Verifythatelectricalconnectionsareproperlytightenedanddo
notshowoxidation;• Verifytighteningofsolenoidvalvecoils;• Verifystateofcableandelectricalwiringconditions.
6.2.2. Steam circuit maintenance• Verifythatsteamandcondensatereturnconnectionsareprop-
erly tightened and do not leak• Verifythatsteamvalveisingoodworkingorderanddoesnot
present leakage
6.2.3. Air circuit maintenance• Verifythatvalvesandcylindersdonotshowanylossofair;
6.2.4. Other controls• Checkthatfanbladesarefreeofdirtandlintdeposits.
Use only Original spare parts.

FSF-ed5006
15FSF
Figure 7.3 - Self diagnosis example
7. TroubleshootingRefer to Table 7.4 for solutions to the most common malfunction situ-ations. If the proposed solutions do not work, enter self-diagnosis (para-graph 7.1) to determine if there are failed components.
WARNING - DO NOT SERVICE THE MACHINE YOURSELF Call the service center in any of the following cases:
• themachinehasaproblemthatisnotlistedintable7.4• noneoftheremediesproposedbythetablework• controlboardself-diagnosisshowsoneormorefailures.
7.1Controlboardself-diagnosisThe control board is equipped with a self-diagnosis software that can detect common problems to the pneumatic circuit.1. To enter self-diagnosis mode, press and together for two
seconds. The letter “C” appears on the PROG display.2. Press button once. The letter F appears on the PROG dis-
play. The other displays (STEAM, MIX/ PAUSE, AIR) show infor-mation concerning the status of the pneumatic circuit:• Ifthereisnofailure,thedisplaysshow:F------• Iftherearefailures,thedisplaySTEAMshowsthenumber
of failures occurred (use + or – to scroll all the referenc-es). The display MIX/PAUSE shows the code of the failed component. The display AIR shows the code of the type of failure.
Failure references are displayed using the codes in tables 7.1 and 7.2.
Figure 7.3 shows an example: The pneumatic circuit has more than one failures. The displays show information regarding failure number 2: the back clamp solenoid valve has no power.
To erase faults memory, press PROG until the displays show: F -- -- --
To exit self-diagnosis program, press and together until the displays STEAM, MIX, PAUSE, AIR show pressing times.
Table 7.1
Number displayed in the Air display
The following fault has occurred
00 Neutral and phase are inverted
01 No power to the component
02 Short circuit at the component
Table 7.2
Number in the Mix Pause dis-play
The following component has failed
06 Solenoid valve E7 - Sleeve arms relaxation
07 Solenoid valve E5 - Open front clamp
08 Solenoid valve E6 - Sleeve arms positioning
09 Solenoid valve E4 - Front clamp side move-ment
10 Solenoid valve E3 - Rear clamp
11 Coil of remote control switch VT2 - Suction motor
12 Solenoid valve E2 - Suction
13 Solenoid valve E1 - Collar clamp
14 Coil of remote control switch VT1 - Blower motor
15 Solenoid valve E11 - Cuff clamp right
16 Steam valve E12
17 Solenoid valve E10- Cuff clamp left
21 Solenoid valve E14 - Carriage down
22 Solenoid valve E13 - Carriage up
23 Solenoid valve E8 - Side clamps
24 Solenoid valve E17 - Open side expanders
28 Solenoid valve E26 - Sleeve arms counter-pressure
Troubleshooting

FSF-ed5006
16 FSF Troubleshooting
Table 7.4 - Troubleshooting
Problem Possible cause What the user should do
The machine does not start
No power to machine Check there is electrical power in the facilityCheck connection to power linesTurn on the main power switch
The display is dim Brightness of the display set too low
Increase brightness by pressing button + on the control panel
The collar clamp does not close
The clamp is excluded Press the COLLAR exclusion button on the control panel to deselect (when the light is off the clamp works)
Air pressure is inadequate or ab-sent
Check and regulate general pressure to 6 bar (Figure 4.3, knob and gauge on filter 3)
The carriage does not move
The parameter H06 is set to 03, 04 or 05
Change the setting of the parameter (see table 5.2)
Reflective material is worn out Replace reflective material stripThe photocell beam does not hit the reflective material
Check that the photocell has not been moved. If necessary, redirect the photocell beam on the reflective material and lock well the photocell position
The front clamp does not move
Clamp is excluded Remove the exclusion by pressing the FRONT button on the control panel (when the light is off the clamp is active)
Air pressure is inadequate or ab-sent
Check and regulate general pressure to 6 bar (Figure 4.3, knob and gauge on filter 3)
The rear clamp does not move
Clamp is excluded Remove the exclusion by pressing the REAR button on the control panel (when the light is off the clamp is active)
Air pressure is inadequate or ab-sent
Check and regulate general pressure to 6 bar (Figure 4.3, knob and gauge on filter 3)Check and regulate clamps pressure. Minimum pressure is 3 bar(Figure 4.3, knob 18 and gauge 17)
Both side clamps do not move
Clamps are excluded (parameter H05 set to 00)
Set parameter H05 to 01
Air pressure is inadequate or ab-sent
Check and regulate general pressure to 6 bar (Figure 4.3, knob and gauge on filter 3)Check and regulate clamps pressure. Minimum pressure is 3 bar(Figure 4.3, knob 18 and gauge 17)
Both side expanders do not move
Air pressure is inadequate or ab-sent
Check and regulate general pressure to 6 bar (Figure 4.3, knob and gauge on filter 3)Check and regulate clamps pressure. Minimum pressure is 3 bar(Figure 4.3, knob 18 and gauge 17)
Both sleeve arms do not move
The arms are excluded Press the ARMS exclusion button on the control panel to deselect (when the light is off the arms work)
Air pressure is inadequate or ab-sent
Check and regulate general pressure to 6 bar (Figure 4.3, knob and gauge on filter 3)
No steam from ma-chine
Steam feed valve closed Open steam feed valveSteam time set at zero Set steam time greater than zero
No blowing Blowing time set at zero Set blowing time greater than zeroInadequate ventila-tion
Blowing adjustment set too low Shift the blowing adjustment lever (12 - Figure 4.3) towards the + mark

FSF-ed5006
17FSF Machine stop
8. Machine stop
8.1. Prolonged stop
In case of prolonged stop of the machine:1. Close steam and air connections2. Disconnect from electrical power3. Discharge the pressure in the air circuit4. Discharge residual condensate5. Clean the cabinet and the grids from dust and lint6. Protect the form so that the covers do not get dirty
8.2. TransportationIn case the machine must be moved, follow the instructions below.1. Close steam and air connections2. Disconnect from electrical power3. Discharge the pressure in the air circuit4. Disconnect air, steam and condensate return connections5. Discharge residual condensate6. Clean the cabinet and the grids from dust and lint7. Move the machine to a crate of suitable size8. Screw the machine to the crate, using suitable brackets (Figure
8.1)9. Fold any protruding elements (such as the control panel)10. Protect the form so that the covers do not get dirty11. Wrap the machine in cellophane or bubble plastic12. If necessary, cover the whole machine with a cardboard box
and tighten it to the crate
8.3. DecommissioningAt the end of its life the machine must be properly dismantled and its parts must be disposed of according to local regulations.1. Close steam and air connections2. Disconnect from electrical power3. Discharge the pressure in the air circuit4. Disconnect air, steam and condensate return connections5. Discharge residual water condensate6. Move the machine to a crate of suitable size7. Screw the machine to the crate, using suitable brackets (Figure
8.1)8. Fold any protruding elements (such as the control panel)9. Give the machine to a specialized recycling center for proper
separation and recycling of all materials (painted steel, stain-less steel, copper, plastic, fiberglass, cloth)
Figure 8.2. - How to pack the machine for transportation
Figure 8.1. - How to screw the machine to the crate
Disposal of Waste Electric and Electronic Equipment (WEEE) in the European UnionThis symbol on the product or on its packaging indicates that this product is subject to separate collection and recycling.It is your responsibility to dispose of your waste equipment by handing it over to a designated collection point for the recycling of waste electrical and electronic equipment. The separate collec-tion and recycling of your waste equipment at the time of disposal will help to conserve natural resources and ensure that it is re-cycled in a manner that protects human health and the environ-ment. For more information about where you can drop off your waste equipment for recycling, please contact the dealer where you purchased the product.

FSF-ed5006
18 FSF
FSF-ed5006
19FSF
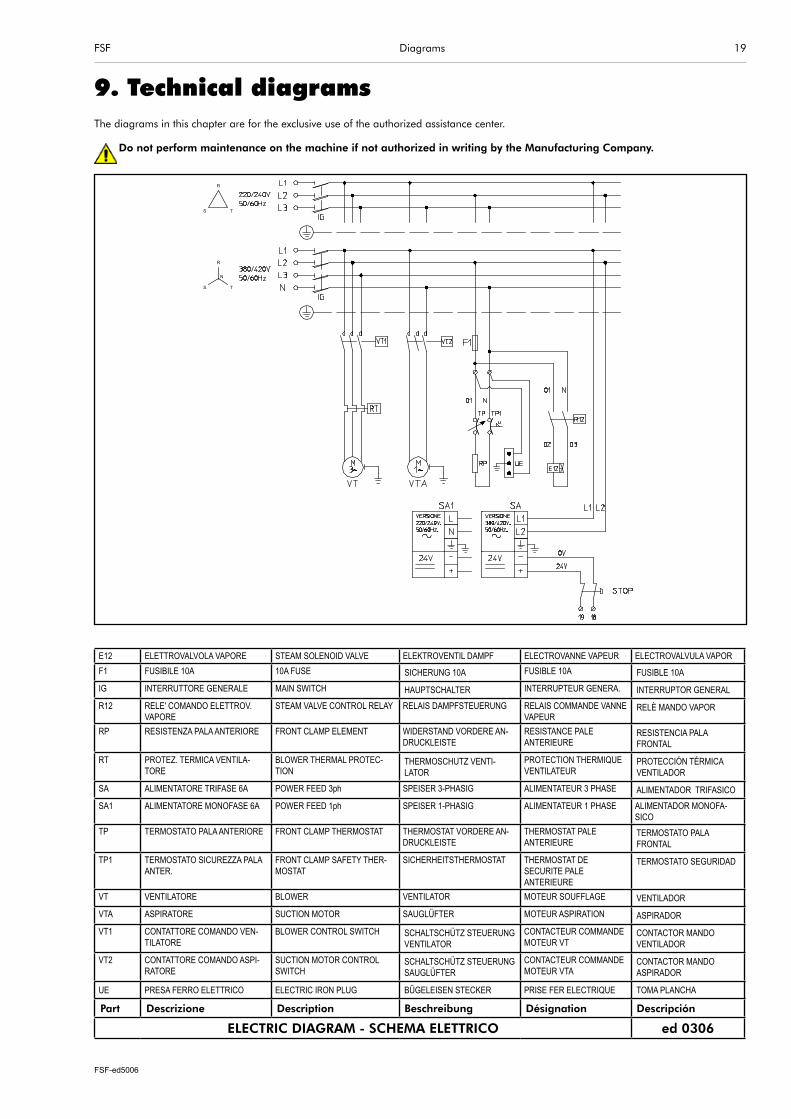
E12 ELETTROVALVOLA VAPORE STEAM SOLENOID VALVE ELEKTROVENTIL DAMPF ELECTROVANNE VAPEUR ELECTROVALVULA VAPORF1 FUSIBILE 10A 10A FUSE SICHERUNG 10A FUSIBLE 10A FUSIBLE 10AIG INTERRUTTORE GENERALE MAIN SWITCH HAUPTSCHALTER INTERRUPTEUR GENERA. INTERRUPTOR GENERALR12 RELE' COMANDO ELETTROV.
VAPORESTEAM VALVE CONTROL RELAY RELAIS DAMPFSTEUERUNG RELAIS COMMANDE VANNE
VAPEURRELÈ MANDO VAPOR
RP RESISTENZA PALA ANTERIORE FRONT CLAMP ELEMENT WIDERSTAND VORDERE AN-DRUCKLEISTE
RESISTANCE PALE ANTERIEURE
RESISTENCIA PALA FRONTAL
RT PROTEZ. TERMICA VENTILA-TORE
BLOWER THERMAL PROTEC-TION
THERMOSCHUTZ VENTI-LATOR
PROTECTION THERMIQUE VENTILATEUR
PROTECCIÓN TÉRMICA VENTILADOR
SA ALIMENTATORE TRIFASE 6A POWER FEED 3ph SPEISER 3-PHASIG ALIMENTATEUR 3 PHASE ALIMENTADOR TRIFASICOSA1 ALIMENTATORE MONOFASE 6A POWER FEED 1ph SPEISER 1-PHASIG ALIMENTATEUR 1 PHASE ALIMENTADOR MONOFA-
SICOTP TERMOSTATO PALA ANTERIORE FRONT CLAMP THERMOSTAT THERMOSTAT VORDERE AN-
DRUCKLEISTETHERMOSTAT PALE ANTERIEURE
TERMOSTATO PALA FRONTAL
TP1 TERMOSTATO SICUREZZA PALA ANTER.
FRONT CLAMP SAFETY THER-MOSTAT
SICHERHEITSTHERMOSTAT THERMOSTAT DE SECURITE PALE ANTERIEURE
TERMOSTATO SEGURIDAD
VT VENTILATORE BLOWER VENTILATOR MOTEUR SOUFFLAGE VENTILADORVTA ASPIRATORE SUCTION MOTOR SAUGLÜFTER MOTEUR ASPIRATION ASPIRADORVT1 CONTATTORE COMANDO VEN-
TILATOREBLOWER CONTROL SWITCH SCHALTSCHÜTZ STEUERUNG
VENTILATORCONTACTEUR COMMANDE MOTEUR VT
CONTACTOR MANDO VENTILADOR
VT2 CONTATTORE COMANDO ASPI-RATORE
SUCTION MOTOR CONTROL SWITCH
SCHALTSCHÜTZ STEUERUNG SAUGLÜFTER
CONTACTEUR COMMANDE MOTEUR VTA
CONTACTOR MANDO ASPIRADOR
UE PRESA FERRO ELETTRICO ELECTRIC IRON PLUG BÜGELEISEN STECKER PRISE FER ELECTRIQUE TOMA PLANCHA
Part Descrizione Description Beschreibung Désignation Descripción
ELECTRIC DIAGRAM - SCHEMA ELETTRICO ed 0306
R
S T
N
R
S T
Diagrams
9. Technical diagramsThe diagrams in this chapter are for the exclusive use of the authorized assistance center.
Do not perform maintenance on the machine if not authorized in writing by the Manufacturing Company.

FSF-ed5006
20 FSF
CONTROL BOARD CONNECTIONS part 1/2INGRESSI E USCITE PANNELLO DI CONTROLLO parte 1/2
ed 4506
Diagrams
Blower motor control switchRT = Thermal relay
Cuff clamp left
Steam
Cuff clamp right
Collar clamp
Suction
Suction motor control switch
Front hem clamps
Rear clamp
Front clamp side movement
Sleeve arms position
Front clamp open/close
Sleeve arms release
Right cuff clamp button
Left cuff clamp button
Front clamp micro switch
Start pedal
Photocell
Front hem clamps relay
* Non-standard features: available only on some models or only upon request
Metal deflector

FSF-ed5006
21FSF
CONTROL BOARD CONNECTIONS part 2/2INGRESSI E USCITE PANNELLO DI CONTROLLO parte 2/2
ed 4506
Diagrams
Side clamps exclusion
Side expanders close
Side expanders close aux relay
Side expanders open. SW2 = microswitch; M9 = Antistretch-ing exclusion buttonSide clamps
Carriage up
Carriage down
Power supply 24V +
Power supply 0V -
Shoulders close. M3 = button
Shoulders open. M4 = button
Sleeve arms damper
Microswitch arms up
Microswitch arms down
M8 = Carriage down button
Front clamp safety

FSF-ed5006
22 FSF Diagrams
Sleeve arms motion
Collar clamp
Front clamp open/close
Front clamp side move-ment
Suction
Shoulders movement
Carriage
Damper Raise Release
Front clamp safety

FSF-ed5006
23FSF
E1 Elettrov. Fermacollo Collar clamp valve P4 Pistone traslazione pala frontale Front clamp side movement cylinderE2 Elettrov. Aspirazione Suction valve P5 Pistone apri/chiudi pala frontale Front clamp open/close cylinderE3 Elettrov. Pala posteriore Rear clamp valve P6.7 Pistone posizionamento braccio SX Left arm positioning cylinderE4 Elettrov. Traslazione pala anteriore Front clamp side movement valve P6.7A Pistone posizionamento braccio DX Right arm positioning cylinderE5 Elettrov. apertura/chiusura pala anteriore Front clamp open/close valve P8 Pistone paletta laterale SX Left side clamp cylinderE6 Elettrov. posizionamento bracci Arms positioning valve P8A Pistone paletta laterale DX Right side clamp cylinderE7 Elettrov. rilascio bracci Arms release valve P10 Pistone pinza polso SX Left cuff clamp cylinderE8 Elettrov. palette laterali Side clamps valve P11 Pistone pinza polso DX Right cuff clamp cylinderE10 Elettrov. pinza polso sinistra Left cuff clamp valve P13, P14 Pistoni salita/discesa carro Carriage up/down cylindersE11 Elettrov. pinza polso destra Right cuff clamp valve P15, P16 Pistoni apri/chiudi spalla SX Left shoulder open/close cylinderE13, E14 Elettrov. salita e discesa carro Carriage up/down valve P17, P18 Pistroni apri/chiudi espansori Side expanders open/close cylindersE15, E16 Elettrov. apri/chiudi spalle Shoulders open/close valve P15, P16A Pistoni apri/chiudi spalla DX Right shoulder open/close cylinderE17, E18 Elettrov. apri/chiudi espansori Side expanders open/close valve RF Regolatori di flusso Flow regulatorsE26 Elettrov. ammortizzatore Damper valve R1, R2, R3 Riduttori di pressione Pressure reducersGFR Gruppo entrata aria Air in group SL Silenziatori SilencersM1, M2, M3 Manometri Pressure gauges ST Valvola di strozzamento Speed controlsP1 Pistone fermacollo Collar clamp cyclinder V, V1 Valvola OR Logic OR valveP2 Pistone aspirazione Suction cylinderP3 Pistone pala posteriore Rear clamp cylinder
Pos. Descrizione Description Pos. Descrizione Description
PNEUMATIC DIAGRAM - SCHEMA PNEUMATICO ed 3605
Diagrams
Rear clamp
Side clamps
Expanders movement
Right cuff clamp
Left cuff clamp

FSF-ed5006
24 FSF
2 0220581 1 PEDALE PEDALE MOBILE PEDAL PEDAL PEDAL1 0220574 1 MICRO PEDALE MICROINTERRUPTEUR MIKROSCHALTER MICRO MICROINTERR. PEDAL
pos Code Q.ty Descrizione Designation Beschreibung Description Descripción
5200A06 PEDAL - PEDALE ed 0905
6 ZC01 1 KIT GUARNIZIONI KIT JOINTS DICHTUNGEN GASKET KIT KIT EMPAQUET.5 T603015 1 PRONTO TOP PRONTO TOP PRONTO TOP PAD+COVER MULLIDO+ TELA COB.4 C29 1 CILINDRO Ø20 CYLINDRE Ø20 ZYLINDER CYLINDER CILINDRO D=20 C=253 0210304 1 RACCORDO RACCORD VERBINDUNG CONNECTION CODO2 0210110 1 RACCORDO RACCORD VERBINDUNG CONNECTION CODO1 0180321 1 MANIGLIA F. M8 POIGNEE GRIFF HANDLE MANIJA F. M8
pos Code Q.ty Descrizione Designation Beschreibung Description Descripción
5200A35 COLLAR CLAMP - GRUPPO PALA FERMACOLLO ed 1004
Spare parts
10. Spare parts diagramsPlease refer to the following diagrams when ordering spare parts.To avoid mistakes, always provide code and description of the required spare part.
Always use original spare parts.

FSF-ed5006
25FSF
14 ZC02 1 KIT GUARNIZIONI KIT JOINTS DICHTUNGEN GASKET KIT KIT EMPAQUET.
13 ZC01 2 KIT GUARNIZIONI KIT JOINTS DICHTUNGEN GASKET KIT KIT EMPAQUET.
12 T603040 1 PRONTO TOP PRONTO TOP PRONTO TOP PAD+COVER MULLIDO+TELA COP.
11 C33 2 REGOLATORE REGULATEUR FLUX REGLER REGULATOR REGULADOR
10 C22 1 SILENZIATORE SILENCIEUX 1/8” SCHALLDÄMPFER SILENCER SILENCIADOR
9 C10 2 CILINDRO Ø20 CYLINDRE Ø20 ZYLINDER CYLINDER CILINDRO D=20 C=125
8 C030 1 CILINDRO Ø32 CYLINDRE Ø32 ZYLINDER CYLINDER CILINDRO D=32 C=400
7 35293005 24 CUSCINETTO PALLIER LAGER BEARING COJINETE
6 0240107 1 MOLLA RESSORT FEDER SPRING MUELLE
5 0221424 2 FOTOCELLULA PHOTOCELLULE FOTOZELLE PHOTOCELL FOTOCÉLULA
4 0210302 3 RACCORDO M 1/8” RACCORD M 1/8” VERBINDUNG CONNECTION CODO
3 0190509 1 CLIPS FORCELLA CLIPS FOURCHE CLIPS CLIPS CLIPS HORQUILLA
2 0190508 1 FORCELLA M8 FOURCHE M8 GABEL FORK HORQUILLA
1 0190503 4 TESTINA CONNEXION ANSCHLUSSE CONNECTION CODO
pos Code Q.ty Descrizione Designation Beschreibung Description Descripción
5200A33 CARRIAGE ASSEMBLY - GRUPPO CARRO ed 2106
Spare parts

FSF-ed5006
26 FSF
7 Z500 1 INTERRUTT. EMERG. INTERRUPT. EMERG. STOP-SCHALTER EMERG. SWITCH INTERRUPT. STOP
6 0221412 1 SCHEDA CARTE ELECTRONIQUE PLATINE CARD TARJETA
5 022140901 1 PANNELLO PANNEAU PANEEL PANNEL PANEL
4 0221409 1 PANNELLO COMPL. PANNEAU COMPLET ELEKTR. COMPLETE PANEL PANEL COMPLETO
3 0220591FAS 1 CONDENSATORE CAPACITOR KONDENSATOR CONDENSATEUR CONDENSADOR
2 0220583 1 INTERRUTT. COMPL. INTERRUPTEUR COMPL. SCHALTER COMPLETE SWITCH PULSANTE COMPL.
1 0220570 3 INTERRUTT. PULS. INTERRUPTEUR COMPL. SCHALTER COMPLETE SWITCH PULSANTE COMPL.
pos Code Q.ty Descrizione Designation Beschreibung Description Descripción
5200A60 CONTROL PANEL - PANNELLO DI CONTROLLO ed4705
5 C06 3 REGOLATORE REGULATEUR REGLER REGULATOR REGULADOR4 0280501 3 MANOMETRO MANOMETRE 0-6bar DRUCKWACHTER PRESSURE GAUGE MANÓMETRO 0-6bar3 0210106 3 RACCORDO RACCORD VERBINDUNG CONNECTION CODO2 0210104 6 RACCORDO RACCORD VERBINDUNG CONNECTION CODO1 0210103 3 RACCORDO RACCORD VERBINDUNG CONNECTION CODO
pos Code Q.ty Descrizione Designation Beschreibung Description Descripción
5200A5004PNEUMATIC ADJUSTMENTS -
GRUPPO REGOLAZIONI PNEUMATICHEed 1004
Spare parts
FSF-ed5006
27FSF
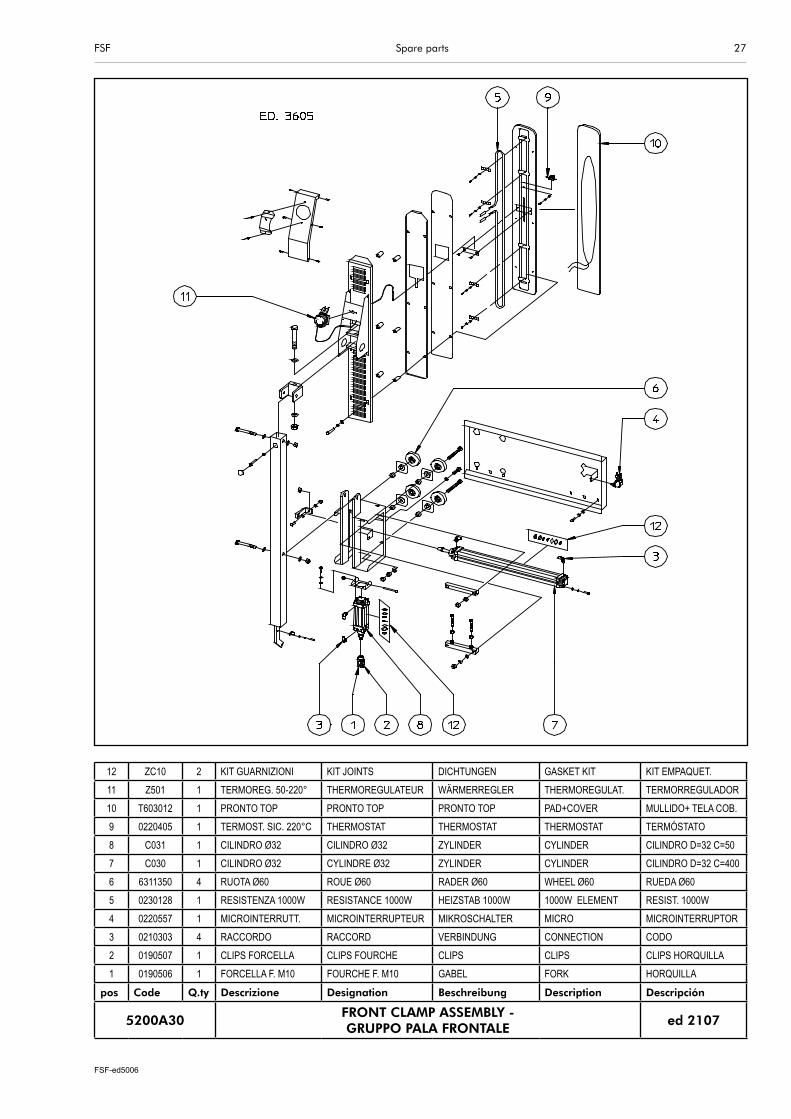
12 ZC10 2 KIT GUARNIZIONI KIT JOINTS DICHTUNGEN GASKET KIT KIT EMPAQUET.11 Z501 1 TERMOREG. 50-220° THERMOREGULATEUR WÄRMERREGLER THERMOREGULAT. TERMORREGULADOR10 T603012 1 PRONTO TOP PRONTO TOP PRONTO TOP PAD+COVER MULLIDO+ TELA COB.9 0220405 1 TERMOST. SIC. 220°C THERMOSTAT THERMOSTAT THERMOSTAT TERMÓSTATO8 C031 1 CILINDRO Ø32 CILINDRO Ø32 ZYLINDER CYLINDER CILINDRO D=32 C=507 C030 1 CILINDRO Ø32 CYLINDRE Ø32 ZYLINDER CYLINDER CILINDRO D=32 C=4006 6311350 4 RUOTA Ø60 ROUE Ø60 RADER Ø60 WHEEL Ø60 RUEDA Ø605 0230128 1 RESISTENZA 1000W RESISTANCE 1000W HEIZSTAB 1000W 1000W ELEMENT RESIST. 1000W4 0220557 1 MICROINTERRUTT. MICROINTERRUPTEUR MIKROSCHALTER MICRO MICROINTERRUPTOR3 0210303 4 RACCORDO RACCORD VERBINDUNG CONNECTION CODO2 0190507 1 CLIPS FORCELLA CLIPS FOURCHE CLIPS CLIPS CLIPS HORQUILLA1 0190506 1 FORCELLA F. M10 FOURCHE F. M10 GABEL FORK HORQUILLA
pos Code Q.ty Descrizione Designation Beschreibung Description Descripción
5200A30FRONT CLAMP ASSEMBLY -GRUPPO PALA FRONTALE
ed2107
Spare parts

FSF-ed5006
28 FSF
10 ZC05 2 KIT GUARNIZIONI KIT JOINTS DICHTUNGEN GASKET KIT KIT EMPAQUETAD.9 Z506 1 KIT MOLLE+GANCI KIT RESSORTS FEDER SPRING KIT KIT MUELLE+GANCHO8 Z505 1 KIT MOLLE+GANCI KIT RESSORTS FEDER SPRING KIT KIT MUELLE+GANCHO7 T603037 2 SOFFIETTO LATERALE BALG SIDE COVER EXTENCIÓN LATERAL6 T603011 1 PAD-MAT CAMICIE MOLLETTON PAD-MAT VERKLEIDUNG PADDING MULLIDO CAMISA5 T603038 1 CAMICIOTTO COUVERTURE BEZUG COVER CAMISA4 C30 2 CILINDRO Ø25 CYLINDRE Ø25 ZYLINDER CYLINDER CILINDRO D=25 C=503 0210533 2 RACCORDO RACCORD VERBINDUNG CONNECTION CODO2 0210304 4 RACCORDO RACCORD VERBINDUNG CONNECTION CODO1 0210110 2 RACCORDO RACCORD VERBINDUNG CONNECTION CODO
pos Code Q.ty Descrizione Designation Beschreibung Description Descripción
STANDARD SIZE FORM -GRUPPO BUSTO UOMO
ed 3105
Spare parts
FSF-ed5006
29FSF
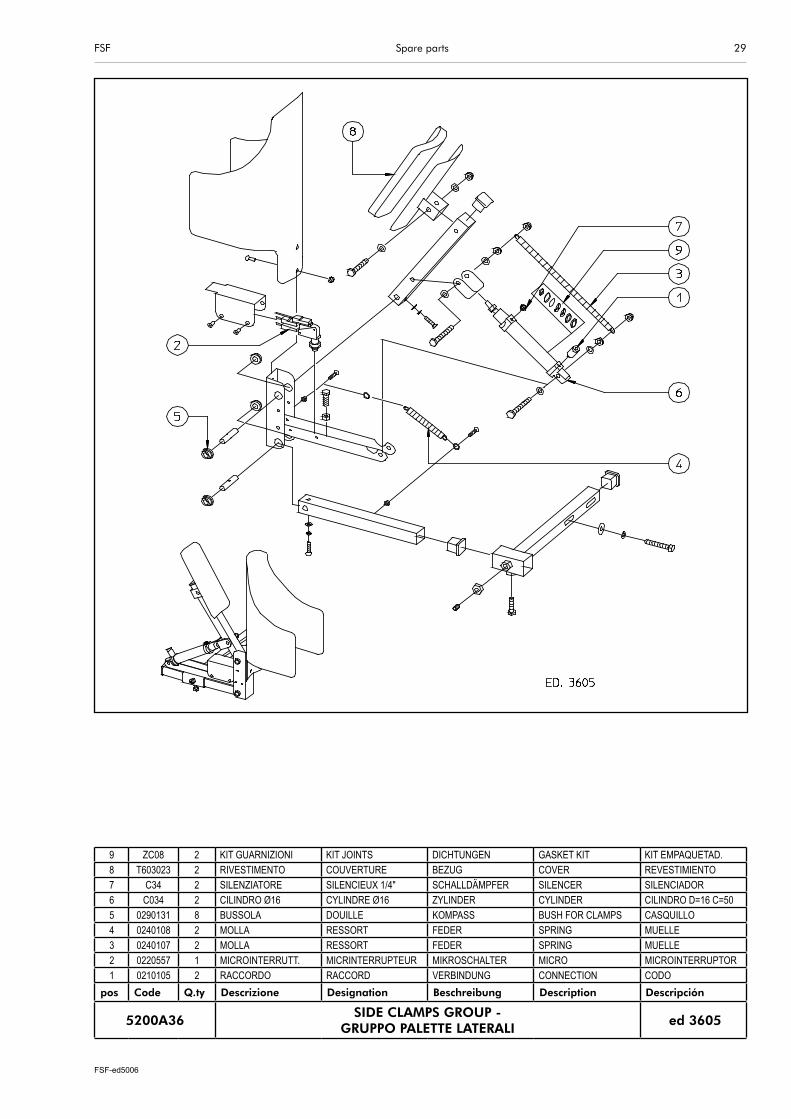
9 ZC08 2 KIT GUARNIZIONI KIT JOINTS DICHTUNGEN GASKET KIT KIT EMPAQUETAD.8 T603023 2 RIVESTIMENTO COUVERTURE BEZUG COVER REVESTIMIENTO7 C34 2 SILENZIATORE SILENCIEUX 1/4" SCHALLDÄMPFER SILENCER SILENCIADOR6 C034 2 CILINDRO Ø16 CYLINDRE Ø16 ZYLINDER CYLINDER CILINDRO D=16 C=505 0290131 8 BUSSOLA DOUILLE KOMPASS BUSH FOR CLAMPS CASQUILLO4 0240108 2 MOLLA RESSORT FEDER SPRING MUELLE3 0240107 2 MOLLA RESSORT FEDER SPRING MUELLE2 0220557 1 MICROINTERRUTT. MICRINTERRUPTEUR MIKROSCHALTER MICRO MICROINTERRUPTOR1 0210105 2 RACCORDO RACCORD VERBINDUNG CONNECTION CODO
pos Code Q.ty Descrizione Designation Beschreibung Description Descripción
5200A36SIDE CLAMPS GROUP -
GRUPPO PALETTE LATERALI ed 3605
Spare parts

FSF-ed5006
30 FSF
6 ZC01 2 KIT GUARNIZIONI KIT JOINTS DICHTUNGEN GASKET KIT KIT EMPAQUETAD.5 T603013 2 PRONTO TOP PRONTO TOP PRONTO TOP PAD+COVER MULLIDO+ TELA COB.4 C36 2 CILINDRO Ø20 CYLINDRE Ø20 ZYLINDER Ø20 CYLINDER Ø20 CILINDRO Ø203 C12 4 REGOLATORE REGULATEUR REGLER REGULATOR REGULADOR2 0280904 2 CREMAGLIERA CREMAILLERE ZAHNSTANGE TOOTHED RACK CREMALLERA1 0280903 2 RUOTA DENTATA ROUE RADER WHEEL RUEDA
pos Code Q.ty Descrizione Designation Beschreibung Description Descripción
L550SIDE EXPANDERS AND FRONT HEM CLAMPS
ESPANSORI LATERALI CON PALETTE ANTERIORIed 4505
Spare parts

FSF-ed5006
31FSF
9 ZC00 1 KIT GUARNIZIONI KIT JOINTS DICHTUNGEN GASKET KIT KIT EMPAQUET.8 C26 1 CILINDRO Ø25 CYLINDRE Ø25 ZYLINDER CYLINDER Ø25 CILINDRO D=25 C=507 A3138502 1 VENTOLA DX ROTOR VENTIL. DX RECHTE GEBLäSE RIGHT FAN ROTOR DERECHO6 A3138501 1 MOTORE 230/400-50 MOTEUR 230/400-50 MOTOR 230/400-50 MOTOR 230/400-50 MOTOR 230/400-505 A31385 1 GR. MOT. 230/400-50 GR. MOT. 230/400-50 GR. MOT. 230/400-50 GR. MOT. 230/400-50 GR. MOT. 230/400-504 A03225 1 ASPIRATORE ASPIRATEUR ABSAUGER VACUUM ASPIRADOR3 0210103 2 RACCORDO M 1/8” RACCORD M 1/8” VERBINDUNG CONNECTION CODO2 0190507 1 CLIPS FORCELLA CLIPS FOURCHE CLIPS CLIPS CLIPS HORQUILLA1 0190506 1 FORCELLA F. M10 FOURCHE F. M10 GABEL FORK HORQUILLA
pos Code Q.ty Descrizione Designation Beschreibung Description Descripción
MOTOR ASSEMBLY 50Hz - GRUPPO ARIA 50Hz ed 3605 Part of: all models at 50Hz
9 ZC00 1 KIT GUARNIZIONI KIT JOINTS DICHTUNGEN GASKET KIT KIT EMPAQUET.8 C26 1 CILINDRO Ø25 CYLINDRE Ø25 ZYLINDER CYLINDER Ø25 CILINDRO D=25 C=507 A3138502 1 VENTOLA DX ROTOR VENTIL DX RECHTE GEBLäSE RIGHT FAN ROTOR DERECHO6 A3138505 1 MOTORE 220/380-60 MOTEUR 220/380-60 MOTOR 220/380-60 MOTOR 220/380-60 MOTOR 220/380-605 A31386 1 GR. MOT. 220/380-60 GR. MOT. 220/380-60 GR. MOT. 220/380-60 GR. MOT. 220/380-60 GR. MOT. 220/380-604 A03226 1 ASPIRATORE ASPIRATEUR ABSAUGER VACUUM ASPIRADOR3 0210103 2 RACCORDO M 1/8” RACCORD M 1/8” VERBINDUNG CONNECTION CODO2 0190507 1 CLIPS FORCELLA CLIPS FOURCHE CLIPS CLIPS CLIPS HORQUILLA1 0190506 1 FORCELLA F. M10 FOURCHE F. M10 GABEL FORK HORQUILLA
pos Code Q.ty Descrizione Designation Beschreibung Description Descripción
MOTOR ASSEMBLY 60Hz - GRUPPO ARIA 60Hz ed 3605 Part of: all models at 60Hz
Spare parts

FSF-ed5006
32 FSF
9 S025901 1 COIBENTAZIONE ISOLATION ISOLIERUNG ISOLATION AISLAMIENTO8 S025401 1 RECIP. DI VAPORE GENERATEUR KESSEL BOILER CALDERA7 E028235 1 ELETTROVALVOLA ELECTROVANNE ELEKTROVENTIL SOLENOID VALVE ELECTROVALVULA6 0230702 1 BATTERIA A PACCO BATTERIE BATTERIE BATTERY BATERIA5 0220750 3 GUAINA METALIZZ. GAINE METALLISEE HÜLLE COVER VAINA METALIZADA4 0220402 6 DISTANZIALE ENTRETOISE ABSTÄNDER SPACER RIOSTRA3 0160407 1 GOMITO GENOUILLERE KNIE ELBOW CODO2 0160109 6 RACCORDO RACCORD VERBINDUNG CONNECTION CODO1 0160108 1 RACCORDO RACCORD VERBINDUNG CONNECTION CODO
pos Code Q.ty Descrizione Designation Beschreibung Description Descripción
5200A40 STEAM GROUP - GRUPPO VAPORE ed 4404
Spare parts

FSF-ed5006
33FSF
7 0221419 1 ALIMENTATORE 6A ALIMENTATEUR 6A SPEISER FEEDING CARD 6A ALIMENTADOR 6A6 0220817 1 PORTAFUSIBILE PORTE FUSIBLE SICHERUNGHALTER FUSE SUPPORT PORTAFUSIBLE5 0220801 1 FUSIBILE 10Ax38 FUSIBLE 10AX38 SICHERUNG FUSE FUSIBLE 10A4 0220763 1 INTERRUT. BLOCC. INTERRUPTEUR BLOC HAUPTSCHALTER MAIN SWITCH INTERRUPTOR3 0220586 3 RELE’ RELAIS RELAIS RELAY RELÉ2 0220529 1 RELE’ TERMICO RELAIS THERMIQUE RELAIS RELAY RELÉ TÉRMICO1 0220566 2 CONTATTORE 20A CONTACTEUR 20A KONTAKTOR CONTACTOR CONTACTOR 20A
pos Code Q.ty Descrizione Designation Beschreibung Description Descripción
5200A61ELECTRIC PANEL 400V 50Hz
GRUPPO ELETTRICO 400V 50Hzed 3605
Part of: all models at 50Hz
7 0221414 1 ALIMENTATORE 6A ALIMENTATEUR 6A SPEISER FEEDING CARD 6A ALIMENTADOR 6A6 0220817 1 PORTAFUSIBILE PORTE FUSIBLE SICHERUNGHALTER FUSE SUPPORT PORTAFUSIBLE5 0220801 1 FUSIBILE 10Ax38 FUSIBLE 10AX38 SICHERUNG FUSE FUSIBLE 10A4 0220517 1 INTERRUT. BLOCC. INTERRUPTEUR BLOC HAUPTSCHALTER MAIN SWITCH INTERRUPTOR3 0220586 3 RELE’ RELAIS RELAIS RELAY RELÉ2 0220594 1 RELE’ TERMICO RELAIS THERMIQUE RELAIS RELAY RELÉ TÉRMICO1 0220566 2 CONTATTORE 20A CONTACTEUR 20A KONTAKTOR CONTACTOR CONTACTOR 20A
pos Code Q.ty Descrizione Designation Beschreibung Description Descripción
5200A63ELECTRIC PANEL 60Hz
GRUPPO ELETTRICO 60Hzed 3605
Part of: all models at 60Hz
Spare parts

FSF-ed5006
34 FSF
14 W02 2 VALVOLA DI RITEGNO NON RETURN VALVE RÜCKSCHLAUGVENTIL VANNE NON RETOURN VÁLVULA DE RETENCIÓN
13 S0191001 1 SOTTOFERRO IRON REST BÜGELEISENABLAGE REPOSE FER ALFOMBRA PLANCHA12 F316 1 FERRO TUTTO VAPORE ALL STEAM IRON ALLE-DAMPF BUEGELEISEN FER TOUT-VAPEUR PLANCHA TODO VAPOR11 1230106 1 POGGIAFERRO IRON REST BÜGELEISENS-HALTER SUPPORT FER APOYO PLANCHA10 0280101 1 VALVOLA SFERA BALL VALVE KUGELVENTIL VANNE À BILLE VÁLVULA DE BOLA 9 0240203 2 GANCIO FORATO HOOK HAKEN CROCHET GANCHO AGUJERADO8 0240202 2 GANCIO FILETTATO HOOK HAKEN CROCHET GANCHO7 0240109 2 ANELLO SUPP. MOLLA RING RING BAGUE ANILLO6 0240103 2 MOLLA REGGICAVO SPRING PEITSCHE RESSORT MUELLE5 0220777 2 RIVESTIMENTO COVER ABDECKUNG REVÊTEMENT REVESTIMIENTO 4 0220750 2 GUAINA INSULATION HüLLE GAINE METALLISEE VAINA METALIZADA 3 0130416 1 TUBO 7x5 HOSE 7x5 SCHLAUCH 7x5 TUYAU 7x5 TUBO 7x52 0130407 1 TUBO 5.5x3.5 HOSE 5.5x3.5 SCHLAUCH 5.5x3.5 TUYAU 5.5x3.5 TUBO 5.5x3.51 0090202 1 NIPPLO NIPPLE NIPPEL NIPPLE NIPLE
pos Code Q.ty Descrizione Designation Beschreibung Description Descripción
L520ALL-STEAM IRON GROUP (option)
GRUPPO FERRO TUTTO VAPORE (opzionale)ed 0905
Spare parts

FSF-ed5006
35FSF
9 P409 1 PISTOLA A TRASCINAMENTO GUN PISTOLE PISTOLET PISTOLA8 C06 2 REGOLATORE REGULATOR REGLER REGULATEUR REGULADOR7 C05 1 FILTRO FILTER FILTER FILTRE FILTRO6 12042004 2 MANOMETRO PRESSURE GAUGE MANOMETER MANOMETRE MANÓMETRO5 0240109 2 ANELLO SUPP. MOLLA RING RING BAGUE ANILLO4 0240103 2 MOLLA REGGICAVO SPRING PEITSCHE RESSORT MUELLE3 0210104 5 RACCORDO CONNECTION VERBINDUNG RACCORD CODO2 0170201 1 RACCORDO A T T-CONNECTION VERBINDUNG T RACCORD À T CODO T1 0160404 1 RACCORDO A L L-CONNECTION VERBINDUNG L RACCORD À L CODO L
pos Code Q.ty Descrizione Designation Beschreibung Description Descripción
L523SPRAY GROUP (option)
GRUPPO NEBULIZZATORE (opzionale)ed 1203
Spare parts

FSF-ed5006
36 FSF
5 ZX00 1 ASTA REGGICAVO CABLE HOLDER ROD KABELHALTER TIGE SOUTIEN CABLES ASTA SUJETACABLE4 S0191001 1 SOTTOFERRO SILICONE SILICON IRON REST SILIKONABLAGE REPOSE FER SILICONE ALFOMBRA PLANCHA SIL.2 F012 1 FERRO ELETTRICO ELECTRIC IRON BÜGELEISEN FER ELECTRIQUE PLANCHA ELÉCTRICA1 1230106 1 POGGIAFERRO IRON REST BÜGELEISENABLAGE SUPPORT FER APOYO PLANCHA1 0220588 1 SPINA PLUG STECKER FICHE ENCHUFE
pos Code Q.ty Descrizione Designation Beschreibung Description Descripción
L541ELECTRIC IRON (option)
FERRO ELETTRICO (opzionale)ed 4204
1 0221424 2 FOTOCELLULA PHOTOCELL FOTOZELLE PHOTOCELLULE FOTOCÉLULApos Code Q.ty Descrizione Designation Beschreibung Description Descripción
L522CLAMPS PHOTOCELL (option)
FOTOCELLULA PINZE (opzionale)ed 2106
Spare parts
FSF-ed5006
37FSF
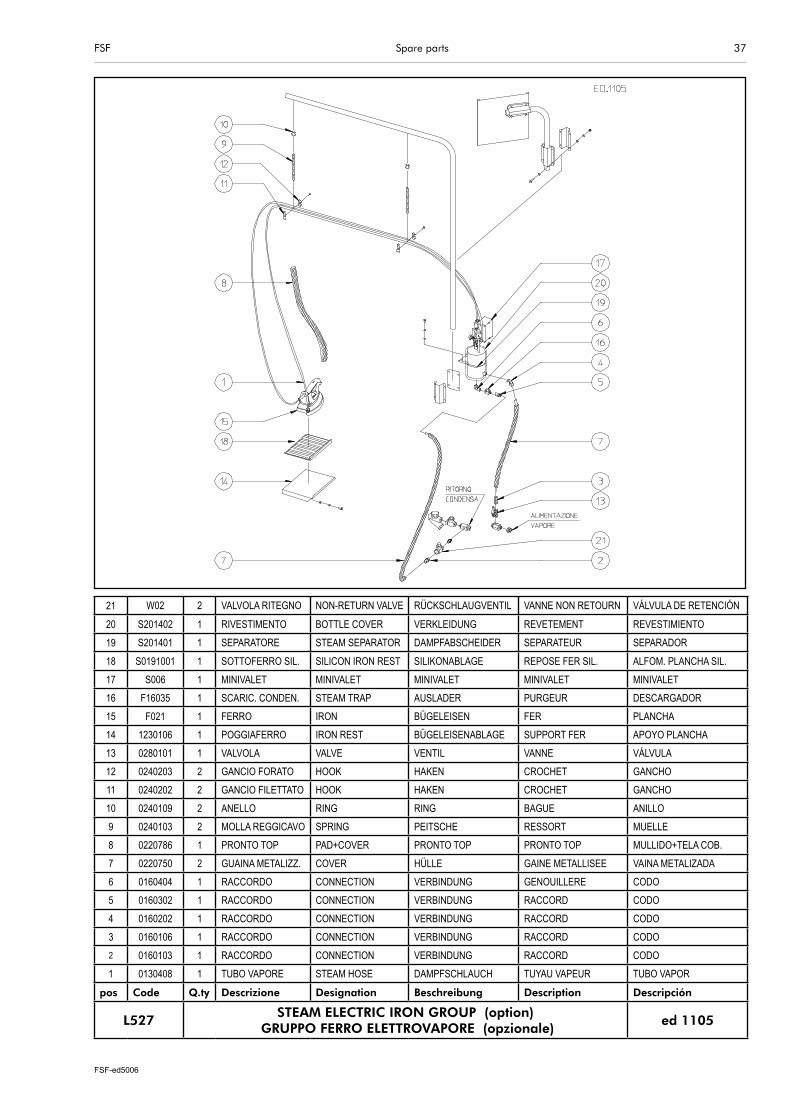
21 W02 2 VALVOLA RITEGNO NON-RETURN VALVE RÜCKSCHLAUGVENTIL VANNE NON RETOURN VÁLVULA DE RETENCIÓN
20 S201402 1 RIVESTIMENTO BOTTLE COVER VERKLEIDUNG REVETEMENT REVESTIMIENTO19 S201401 1 SEPARATORE STEAM SEPARATOR DAMPFABSCHEIDER SEPARATEUR SEPARADOR
18 S0191001 1 SOTTOFERRO SIL. SILICON IRON REST SILIKONABLAGE REPOSE FER SIL. ALFOM. PLANCHA SIL.17 S006 1 MINIVALET MINIVALET MINIVALET MINIVALET MINIVALET16 F16035 1 SCARIC. CONDEN. STEAM TRAP AUSLADER PURGEUR DESCARGADOR15 F021 1 FERRO IRON BÜGELEISEN FER PLANCHA14 1230106 1 POGGIAFERRO IRON REST BÜGELEISENABLAGE SUPPORT FER APOYO PLANCHA13 0280101 1 VALVOLA VALVE VENTIL VANNE VÁLVULA12 0240203 2 GANCIO FORATO HOOK HAKEN CROCHET GANCHO11 0240202 2 GANCIO FILETTATO HOOK HAKEN CROCHET GANCHO10 0240109 2 ANELLO RING RING BAGUE ANILLO9 0240103 2 MOLLA REGGICAVO SPRING PEITSCHE RESSORT MUELLE8 0220786 1 PRONTO TOP PAD+COVER PRONTO TOP PRONTO TOP MULLIDO+TELA COB.7 0220750 2 GUAINA METALIZZ. COVER HÜLLE GAINE METALLISEE VAINA METALIZADA6 0160404 1 RACCORDO CONNECTION VERBINDUNG GENOUILLERE CODO5 0160302 1 RACCORDO CONNECTION VERBINDUNG RACCORD CODO4 0160202 1 RACCORDO CONNECTION VERBINDUNG RACCORD CODO3 0160106 1 RACCORDO CONNECTION VERBINDUNG RACCORD CODO2 0160103 1 RACCORDO CONNECTION VERBINDUNG RACCORD CODO1 0130408 1 TUBO VAPORE STEAM HOSE DAMPFSCHLAUCH TUYAU VAPEUR TUBO VAPOR
pos Code Q.ty Descrizione Designation Beschreibung Description Descripción
L527STEAM ELECTRIC IRON GROUP (option)
GRUPPO FERRO ELETTROVAPORE (opzionale)ed 1105
Spare parts

FSF-ed5006
38 FSF
6 S210 1 SEPARATORE SEPARATEUR ABSCHEIDER SEPARATOR SEPARADOR
5 P10 1 NEBULIZZATORE NEBULISEUR ZERSTAENKES SPRAY NEBULIZADOR4 0240109 1 ANELLO RING RING BAGUE ANILLO3 0240103 1 MOLLA REGGICAVO SPRING PEITSCHE RESSORT MUELLE2 0160110 1 RACCORDO CONNECTION VERBINDUNG GENOUILLERE CODO1 0130408 3mt TUBO VAPORE STEAM HOSE DAMPFSCHLAUCH TUYAU VAPEUR TUBO VAPOR
pos Code Q.ty Descrizione Description Beschreibung Designation Descripción
L563SPRAY GROUP WITH P10 (option)
GRUPPO NEBULIZZATORE CON P10 (opzionale)ed 0606
Spare parts

FSF-ed5006
39FSF
19 E700001 9 CORPO ELETTROVALVOLA CORPS ELECTROVANNE VENTILBODEN SOLENOID VALVE BODY CUERPO ELECTR.18 E600024 9 BOBINA BOBINE SPÜLE COIL BOBINA 24V DC17 E2524 3 ELETTROV. 5/3 VIE ELECTROVANNE 5/3 V ELEKTROVENTIL SOLENOID VALVE ELECTROV. 5/3 V16 E2124 4 ELETTROV. 5/2 VIE ELECTROVANNE 5/2 V ELEKTROVENTIL SOLENOID VALVE ELECTROV. 5/2 V15 E0212006 10 BOBINA BOBINE SPÜLE COIL BOBINA 24V DC14 C12 1 REGOLATORE REGULATEUR 1/8” REGLER REGULATOR REGULADOR13 C22 14 SILENZIATORE SILENCIEUX 1/8” SCHALLDÄMPFER SILENCER SILENCIADOR12 C16 1 GRUPPO FILTRO FLITRE FILTER FILTER GR. FILTRO11 35251001 1 MANOMETRO MANOMETRE DRUCKWACHTER PRESSURE GAUGE MANÓMETRO10 0280303 2 SELETTORE CIRC. SELECTEUR 1/8 OR WÄHLER SELECTOR SELECTOR9 0210521 1 RACCORDO RACCORD VERBINDUNG CONNECTION CODO8 0210520 3 RACCORDO RACCORD VERBINDUNG CONNECTION CODO7 0210511 5 RACCORDO RACCORD VERBINDUNG CONNECTION CODO6 0210506 1 RACCORDO RACCORD VERBINDUNG CONNECTION CODO5 0210501 2 RACCORDO RACCORD VERBINDUNG CONNECTION CODO4 0210303 3 RACCORDO RACCORD VERBINDUNG CONNECTION CODO3 0210302 2 RACCORDO RACCORD VERBINDUNG CONNECTION CODO2 0210107 26 RACCORDO RACCORD VERBINDUNG CONNECTION CODO1 0210103 14 RACCORDO RACCORD VERBINDUNG CONNECTION CODO
pos Code Q.ty Descrizione Designation Beschreibung Description Descripción
5202A50 PNEUMATIC COMPONENTS - GRUPPO PNEUMATICO ed 3605
Spare parts

FSF-ed5006
40 FSF
14 ZC01 2 KIT GUARNIZIONI KIT JOINTS DICHTUNGEN GASKET KIT KIT EMPAQUETAD.13 ZC00 2 KIT GUARNIZIONI KIT JOINTS DICHTUNGEN GASKET KIT KIT EMPAQUETAD.12 C26 2 CILINDRO Ø25 CYLINDRE Ø25 ZYLINDER CYLINDER CILINDRO D=25 C=5011 C22 2 SILENZIATORE SILENCIEUX 1/8” SCHALLDÄMPFER SILENCER SILENCIADOR10 C12 4 REGOLATORE REGULATEUR 1/8” REGLER REGULATOR REGULADOR9 C10 2 CILINDRO Ø20 CYLINDRE Ø20 ZYLINDER CYLINDER CILINDRO D=20 C=1258 5210379 4 FISSAGGIO POLSINO RUBBER MOUSSE CAOUTCHOUTEE GUMMI GOMA7 0240132 2 MOLLA RESSORT FEDER SPRING MUELLE6 0220611 2 PRESSACAVO PRESSE-CABLE KABELPRESSEN CABLE HOLDER PISACABLE5 0220570 2 INTERRUTT. PULS. INTERRUPTEUR SCHALTER COMPLETE SWITCH PULSANTE COMPL.4 0210302 2 RACCORDO RACCORD VERBINDUNG CONNECTION CODO3 0190509 2 CLIPS FORCELLA CLIPS FOURCHE CLIPS CLIPS CLIPS HORQUILLA2 0190508 2 FORCELLA M8 FOURCHE M8 GABEL FORK HORQUILLA1 0180301 2 MANIGLIA A RIPR. POIGNEE GRIFF HANDLE MANIJA
pos Code Q.ty Descrizione Designation Beschreibung Description Descripción
5200A34 MANUAL SLEEVE CLAMP - PINZA MANICHE MANUALE ed 3605
Spare parts

FSF-ed5006
41FSF Spare parts

FSF-ed5006
42 FSF Spare parts

FSF-ed5006

FSF-ed5006
5006
15/09/2005
01/06/2007
Edition:
Date created:
Date last edited:
Document code:
Dealer
Manufacturer
Document identification