Embed Size (px)
Citation preview
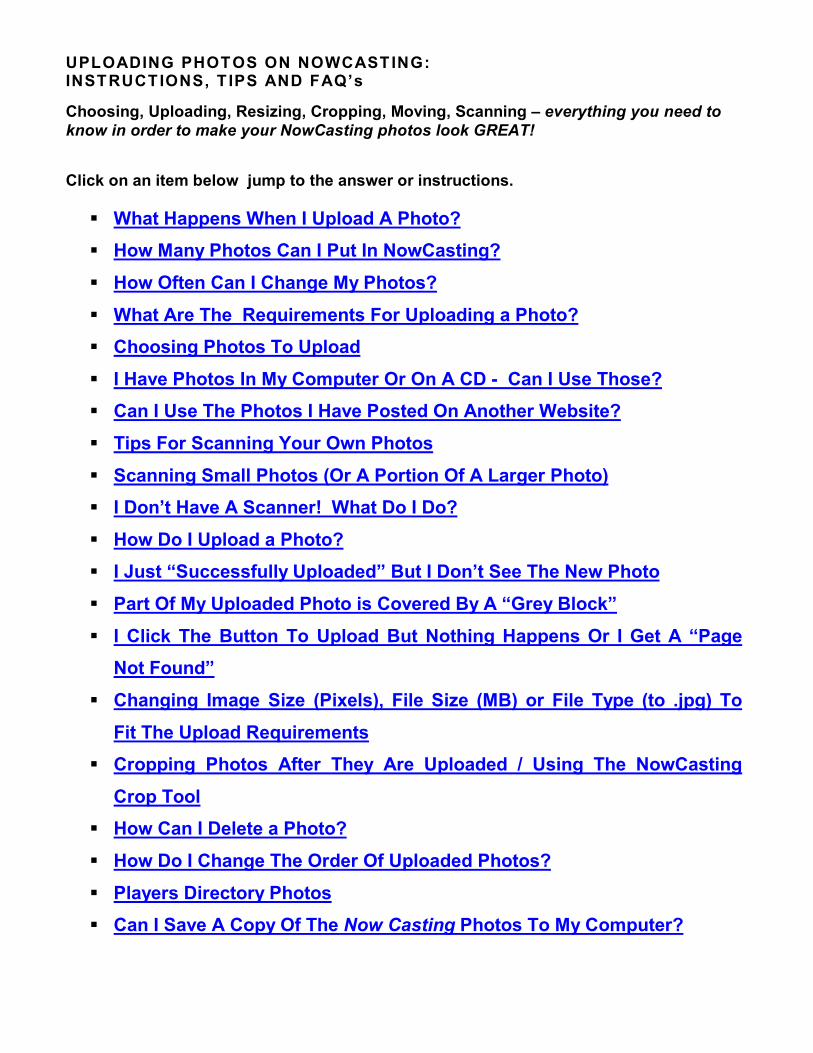
UPLOADING PHOTOS ON NOWCASTING: INSTRUCTIONS, T IPS AND FAQ’s Choosing, Uploading, Resizing, Cropping, Moving, Scanning – everything you need to know in order to make your NowCasting photos look GREAT! Click on an item below jump to the answer or instructions. What Happens When I Upload A Photo? How Many Photos Can I Put In NowCasting?
How Often Can I Change My Photos?
What Are The Requirements For Uploading a Photo? Choosing Photos To Upload
I Have Photos In My Computer Or On A CD - Can I Use Those? Can I Use The Photos I Have Posted On Another Website?
Tips For Scanning Your Own Photos
Scanning Small Photos (Or A Portion Of A Larger Photo) I Don’t Have A Scanner! What Do I Do?
How Do I Upload a Photo? I Just “Successfully Uploaded” But I Don’t See The New Photo
Part Of My Uploaded Photo is Covered By A “Grey Block”
I Click The Button To Upload But Nothing Happens Or I Get A “Page Not Found”
Changing Image Size (Pixels), File Size (MB) or File Type (to .jpg) To
Fit The Upload Requirements Cropping Photos After They Are Uploaded / Using The NowCasting
Crop Tool How Can I Delete a Photo?
How Do I Change The Order Of Uploaded Photos?
Players Directory Photos Can I Save A Copy Of The Now Casting Photos To My Computer?

What Happens When I Upload A Photo? The Now Casting database checks the photo for the size and file type requirements and if everything is OK, accepts the file. It formats the Photo to fit the three different sizes that can be seen on the website and renames them so they appear in the proper places. Photos are never automatically cropped, rotated or altered in any way other than viewable size. Each uploaded photo can be deleted, swapped from slot to slot and even cropped online. How Many Photos Can I Put In NowCasting? Your Profile will hold up to 6 photos. We consulted with managers, theatrical agents and professional CD’s and the consensus was that 6 photos were enough. How Often Can I Change My Photos? As often as you like and for FREE when you upload them yourself. WARNING!! – Each time you submit to a casting notice and select a photo as your
default (the pic the CD sees first on that role submission), you are actually flagging the SLOT “#” and not the image itself. So, if you delete, overwrite or move a photo after submitting on a project, it will alter what the CD sees when they look at the submissions for that role. If you are submitting to casting notices, don’t change photos around more often then is necessary. If you upload a photo to use on a specific submission, you need to leave it posted until you think the CD has viewed the submissions for that project.
What Are The Requirements For Uploading a Photo? In order for an image file to be uploaded directly into NowCasting it has to meet the following basic requirements:
• Image files must be a .jpg type. ”tif”, ”gif”, “bmp”, “psd” or other formats need to be converted first.
• "Image” size must be at least 500 pixels wide. More than 500 pixels wide is fine. • "File" size must be less than 2.0 MB (2000KB). If larger, open it in a photo editor,
reduce the resolution (dpi) and save new version to your computer. (NOTE - The finalized image files that you take to or get from the headshot printer are usually over 2MB.)
Almost any photo can be adjusted to meet the above requirements using a photo editor (Photoshop, etc.) or in the scanning process. For more info see Tips For Scanning Your Own Photos or Changing Image Size (Pixels), File Size (MB) or File Type (to .jpg) To Fit The Upload Requirements Choosing Photos To Upload In most cases, the first photo the CD sees when they open submissions or perform a search is about the size of a passport photo. Keep this in mind when you are selecting photos to upload. Sometimes a great “headshot” is not a great “online shot.” Whatever photo you choose to upload can be cropped after uploading to make the small versions tighter. Even so, you will want the full size version to look good in case anyone views that version or prints out a copy of your Now Casting profile.
• As a rule, “the more face, the better.” This is especially true for the #1 photo since that is the one that will always appear first when you come up in a name or criteria search. Of course, there are some exceptions. For instance, showing your body type might be the very purpose of a particular photo.
• Composition may make some hardcopy photos look more interesting, but is usually wasted space in a smaller photo. For instance, a shot that is ¾ “black sweater” translates into only ¼ of “what you really look like.”
• Horizontal / Landscape photos - All uploaded photos will be formatted to fit in a vertical frame, but will not be automatically cropped by the system. This means that horizontal photos will appear even smaller in the frame. We suggest cropping horizontal shots to more of a square or vertical layout.
• Flyers, Production Shots, Zed Cards – You can upload any of these if you wish, but keep in mind that they may be difficult to decipher and would have to be clicked on individually to enlarge.
I Have Photos In My Computer Or On A CD - Can I Use Those? Absolutely – so long as they meet the requirements for uploading to Now Casting. Here are a few issues that sometimes occur when actors use files saved by the photographer, retoucher or printer:
• If the disc has the full size versions that you would take to (or get from) the printer for reproductions, the files might be too large and/or the wrong format. They might be “.tif” format and also saved at a very high resolution which would put them over the 2mb limit.
• If you have a “final” version with the name and border then you might want to crop that out before uploading or use the NowCasting crop tool after uploading.
• Many photographers or printers will format photos for uploading and put those on a disc with the large versions if you ask. Be sure to give them the specs for NOWCASTING before they burn the disc. (The NowCasting versions should post on most other sites.)
Can I Use The Photos I Have Posted On Another Website? You can save the images from another site to your computer and upload them to Now Casting only if they meet all the image requirements. However…
• You must upload the image file itself – NOT a “link” to the image location on another site.
• If you save a photo from another site and it is not at least 500 pixels wide, DO NOT enlarge it to upload – the image quality will almost certainly be very poor.
Tips For Scanning Your Own Photos There is no way for us to give you step-by-step instructions because everybody’s scanner works a little differently. You will need to consult the scanners manual for detailed instructions, but here are some general tips that will help you get a better result:
• The scan is only as good as the original. Start with a good, clean photo. • Settings – Generally you will be fine if you leave the setting alone when scanning a
normal size headshot. If anything, you may end up with a image file that is too large – which can then be changed later (see Changing Image Size (Pixels), File Size (MB) or File Type (to .jpg) To Fit The Upload Requirements)
• If the scanner software is asking you for settings:
o Resolution should be 150 to 200 dpi (see below for exceptions) o Output type should be .jpg or .jpeg o Don’t select “Optimize for Web” if offered. Our system will do that for you.
• Don’t scan the border. Most flatbed scanners have a “preview” step where you can use the mouse to select only the portion of the entire area you want to use. Just use the image itself.
• Be sure to “save” the photo somewhere that’s easy to find, such as your “desktop.” The scanner software may select some obscure folder in your hard drive, but you can direct it to save where you wish.
Scanning Small Photos (Or A Small Part Of A Larger Photo) You can scan almost any size photo you wish – and you can choose to scan and post only a portion of a larger photo. For instance, you may want to turn a ¾ shot into a headshot or want to scan a shot you had printed only as a 4x6. Here are some things to keep in mind:
• Thumbnails from a proof sheet are too small to scan properly. • If the image or portion that you are using is less than 4 inches wide, then you should
increase the scanning resolution (dpi) to make sure the resulting photo file is at least 600 pixels wide. Why? Because DPI means “dots per inch” and dot = pixel, so you have to do a little basic math. If the selected image is only 3 inches wide and you are scanning at 150dpi the result may be 450 pixels wide. Increase the resolution to 300dpi and the result will be 900 pixels wide – 3inches x 300 dots per inch = 900 dots (pixels) wide.
I Don’t Have A Scanner! What Do I Do?
Don’t panic, you have options!
• Use a friend’s scanner. Ask around – we’ll bet you have more friends with scanners than you think. Photos can be uploaded from any computer, so they wouldn’t even have to save them to a disc for you.
• Use your agent of manager’s scanner. Many reps routinely scan photos – some even upload them to their clients’ files.
• Send them to NowCasting.com to scan and upload: o Our address is 2210 W. Olive Ave., Ste. 320, Burbank, CA 91506. o We charge only $10 per Photo for this service. o Indicate whether to add to or overwrite existing Photos. (If your agent and/or
manager are using Now Casting, please consult with them before overwriting any Photos.)
o It can take up to 5 business days to scan and upload your photo. o We do not save the photo after scanning – so do not send originals. o You are welcome to deliver the photos to the office in person M-F 10am-6pm and
they will be scanned and uploaded within 5 business days – usually much sooner. How Do I Upload a Photo? Uploading photos to your Now Casting profile is FREE and easier than you think. There are tens of thousands of actors in Now Casting and very few actors ask (and pay) us to scan and upload. Most actors these days upload their own photos or perhaps get a friend to show them how. It takes far less time to upload a photo then it does to read the instructions – trust us! To upload your photo:
• Log in and go to your Edit Photos page (in the menu under Edit Profile along the top.). • Scroll down below the “Instructions” to the column of Now Casting Photos. • Choose a Slot number (NC #) for the new photo.
o You can change (swap) the order of photos later. o If you have an empty slot, use that one first just to make sure the photo uploads. o WARNING – if you upload into a slot that is not empty, you will DELETE the
current photo!!! • Click the Browse or Choose button. This will open a Choose File or Find box. • Direct the “Choose File” box to the place on your computer or photo disc where you
have the photos / image files saved. • Highlight the file you want to upload and click the Open or Choose button. (Double
clicking the file usually does the same thing.) • Note that the empty box for that NC Photo slot now contains the location on your
computer of that file. • Click Upload or Move (or Click Here to Update Photos farther down the page.) The Edit
Photo page will reload / refresh in a few moments. This may take a little while depending upon your internet connection, the file sizes and the number of files uploaded at one time.
• When the page reloads look at the top for the success or failure message. o If the database accepts the file, it will always give you this message: “Photo #
Uploaded Successfully.” o If the system rejects the upload, you will get a red message explaining what was
wrong with the file. o If the page seems to take a long time to reload and there is no new image
and also no error message – this probably means the “file size” is way over 2MB. The file is TOO LARGE.
• See below for solutions to other uploading problems. I Just “Successfully Uploaded” But I Don’t See The New Photo Sometimes you may not see the new photos on your Edit Photo page or in your profile even though you uploaded them correctly. This is because of your web browser’s “cache” – a sort of “short term memory.” Your browser saves recently visited web pages and the images on them as a way of helping load them faster when you revisit pages on the internet. Depending upon how your browser is set up, it might keep trying to display the same page and images that it has in its “cache” (from before the changes were made). You need to force the browser to go back to the source (the nowcasting.com web servers) and get the web page info that currently lives on the site and not your computer’s hardrive. In other words, “Don’t show me what you presume the page looks like. Go back to the source (nowcastintg.com) and get the latest version!” That is the purpose of your browser’s “reload” or “refresh” feature. There are several different ways to refresh / reload your web page. In most cases you simply:
• Click the reload or refresh button on the browsers control panel. It will be near the Back, Forward and Stop buttons and probably has a symbol like swooshy arrows.
If you are viewing a web page or pop-up that does not have the control panel on top of the page, try the following:
• On a PC computer:
o On the keyboard press the F5 key along the top or press Ctrl+r -or - o With the mouse, on a blank area of the window, use the right click and a little
submenu will pop up. Select and click “reload” or “refresh”. • On a MAC (Apple) computer:
o On the keyboard press apple key+r ( - +r ) -or- o With the mouse, on a blank area of the window, click and hold (or the control key
and hold click) and a little submenu will pop up. Select and click “reload” or “refresh”.
Sometimes the browser’s cache can be very stubborn and you will have to reload / refresh multiple times or maybe you won’t see the changes until you have logged all the way out, closed the browser and then come all the way back. We have noticed that AOL can be particularly difficult in this respect. IF YOU SEE THE CORRECT PHOTO ANYWHERE IN YOUR PROFILE THEN YOU CAN BE ASSURED THAT EVERY OTHER COMPUTER IS SEEING THE CORRECT PHOTO EVERYWHERE! It’s only a browser on a computer that recently viewed your profile that may need to “catch up.” If you use multiple computers to access your profile you may need to refresh them all. Part Of My Uploaded Photo is Covered By A “Grey Block” Your image file is too large and is only partially uploading. Usually this happens when the file size is close to the maximum (2mb) and/or your Internet connection couldn’t handle the file. Some solutions:
• Upload only 1 file at a time. • Resize the image and reduce the resolution (dpi) so that the file is well below 2mb. (See
Changing Image Size (Pixels), File Size (MB) or File Type (to .jpg) To Fit The Upload Requirements below.)
I Click The Button To Upload But Nothing Happens Or I Get A “Page Not Found” If you are trying to upload but nothing seems to happen - or the page reloads with no photo and no error message - or you get a “Page Not Found” error -
it is usually because of one of the reasons below: • No image file has actually been selected to upload. Make sure that after you
Browse/Choose there is text in the previously empty box next to the NC photo slot. • Your computer has been bumped “offline.” • You are uploading too much for your internet connection to handle. Try uploading 1 file
at a time. o If you are only uploading 1 file and have the same problem, then the image file is
probably way over 2mb. You will need to edit the image to reduce the resolution and upload the new version.
Changing Image Size (Pixels), File Size (MB) or File Type (to .jpg) To Fit The Upload Requirements This section assumes you already have the photo in a digital format! If you only have hardcopy you should refer to the sections regarding SCANNING. This is a tricky issue because there is no standard answer for all users. It depends on the photo editing software that you have available. Most new computers come with some kind of basic photo editing software, but sometimes it is a trial version that eventually expires. There are many free and easy to use photo editors that you can download from the web, but mostly only for PC computers. One that we like a lot is IrfanView (www.irfanview.com). Another slightly more complicated but versatile one is the Fast Stone Image Viewer (www.faststone.org). Both of these programs let you resize and crop and photos – along with a lot of other features that you can easily teach yourself. Most MAC users should already have iPhoto, which will also do the trick. (See further down for iPhoto instructions.) Step by step instructions vary from program to program, but below are some basic steps that will apply to most Photo Editing Software that we have come across (except iPhoto). This is much, much easier to actually do then it looks on paper – believe us! • Get the Photo into the Editor (either by dragging and dropping onto the editor’s icon or by
opening the editor first then use the top menu to File>Open). • Once you see the correct photo in the editor, find and select ”Image Size” or “Resize /
Resample” or something similar. o Look under the menu headings for “Image” or “Edit”. o TIP: in many programs ctrl+r will take you right there! (In Adobe Photoshop it’s
alt+i+i.) • CHANGING THE IMAGE SIZE (Pixels). When the resizing options appear look for the pixel
“width” near something like “Pixels” or “Pixel Dimensions” or “Set New Size”. If the width is not already displayed in pixels there should be a place to change that.
o Change the pixel width to 550. Don’t touch the height. o WARNING! If the image is currently less than 500 pixels wide you should not enlarge
it to upload unless the resolution (dpi) is very high (200dpi or over)! The image will lose too much quality.
o Make sure that “Preserve Aspect Ratio”, “Constrain Proportions” or anything similar is checked or says “Yes”.
o Ignore the “Document” or “Print” width and height if it is available. o Click OK unless you also need to change the file size.
• REDUCING THE FILE SIZE (mbs). If you have already reduced the pixel width, the file size will have reduced somewhat. However, to make sure that the file is less then 2mb before uploading you also need to reduce the resolution. Think of it as changing dense lead to thin aluminum foil: looks the same on the computer but weighs much less!
o Look for “Resolution” or “DPI”. o Change the Resolution/DPI to 150 unless it is already 150 or less. o Click OK unless you also need to change the Image size.
• CHANGING THE FILE TYPE TO JPG OR JPEG. This is done in when you Save the edited image to your computer. If you don’t need to resize anything, you can skip the two steps above and jump right to the one below.
• Save the adjusted image file. Select “File>Save” or “File>Save As” from the top menu. (keyboard = Ctrl+S in most programs.)
o Save the photo somewhere easy to find – such as your “Desktop”. You can file it into some folder later.
o RENAME THE FILE! If you don’t, you might overwrite the original. Also, you want to be able to identify the photo without opening it every time. Example: “Red Dress Smile 650wide”.
o MAKE SURE THE FILE TYPE IS .jpg or .jpeg. o Click Save.
iPhoto Users – Follow these steps! The steps below work for the basic iPhoto that is standard on new MACs. If you use Adobe Photoshop or another editing program instead, you should refer to the basic steps above.
• Open the image file in iPhoto (either drag it onto the iPhoto icon or open iPhoto and use File>Open.)
• Double-click on it the image you want to change. This will put it in Edit mode. o In iPhoto, you don’t resize images in the Edit mode. You can crop the image in
this step or adjust brightness, color, etc. • In the top menu select File>Export. A File Export box will appear.
o On top, use “File Export” (not Web) o “Format” should be “JPG” o Under “Size”, check “Scale images no larger than:” and set the width at “650”. o Under “Name”, check “Use filename.” o Click Export – another little box will appear. o Next to “Save As” you should rename the file! If you don’t, you might overwrite
the original. Also, you want to be able to identify the photo without opening it every time. Example: “Red Dress Smile 650wide”.
o “Where:” - Save the photo somewhere easy to find, such as your “Desktop”. You can file it into some folder later.
o Click OK. Cropping Photos After They Are Uploaded / Using The NowCasting Crop Tool When should I crop my NowCasting photos? Use the Rule of Thumb(nails): “More Face, Less Other Stuff.” Most of the time people will be looking at the smaller version of your uploaded photo instead of opening it full-size. “Head shots” work better than ½, ¾ or full body shots (unless the body is the point of the
Photo.) The “frame” is vertical, so horizontal (landscape) layouts don’t work as well. Your online headshot does not need the border or name on it.
You can crop your Photos before uploading or use the NowCasting Crop Tool. The Crop Tool allows you to leave the “full size version” as is and create tighter headshots for the small versions. Since the full size version is unchanged you can re-crop the photo anytime.
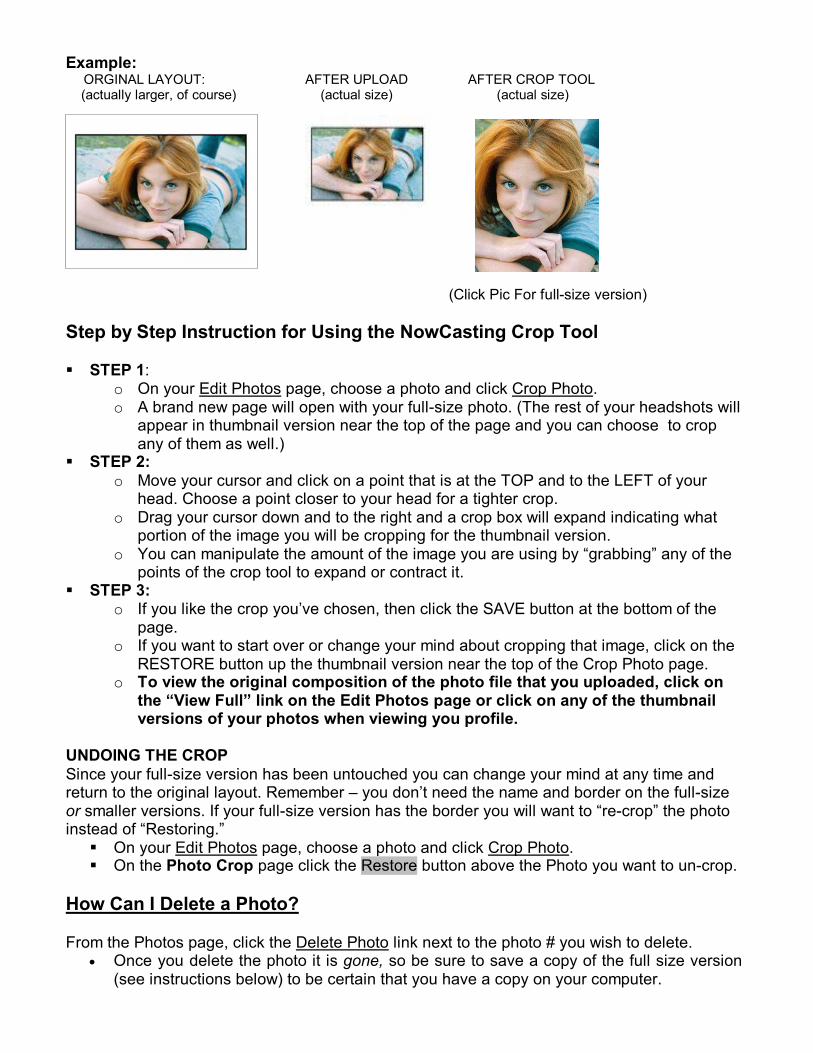
Example: ORGINAL LAYOUT: AFTER UPLOAD AFTER CROP TOOL (actually larger, of course) (actual size) (actual size)
(Click Pic For full-size version) Step by Step Instruction for Using the NowCasting Crop Tool STEP 1:
o On your Edit Photos page, choose a photo and click Crop Photo. o A brand new page will open with your full-size photo. (The rest of your headshots will
appear in thumbnail version near the top of the page and you can choose to crop any of them as well.)
STEP 2: o Move your cursor and click on a point that is at the TOP and to the LEFT of your
head. Choose a point closer to your head for a tighter crop. o Drag your cursor down and to the right and a crop box will expand indicating what
portion of the image you will be cropping for the thumbnail version. o You can manipulate the amount of the image you are using by “grabbing” any of the
points of the crop tool to expand or contract it. STEP 3:
o If you like the crop you’ve chosen, then click the SAVE button at the bottom of the page.
o If you want to start over or change your mind about cropping that image, click on the RESTORE button up the thumbnail version near the top of the Crop Photo page.
o To view the original composition of the photo file that you uploaded, click on the “View Full” link on the Edit Photos page or click on any of the thumbnail versions of your photos when viewing you profile.
UNDOING THE CROP Since your full-size version has been untouched you can change your mind at any time and return to the original layout. Remember – you don’t need the name and border on the full-size or smaller versions. If your full-size version has the border you will want to “re-crop” the photo instead of “Restoring.” On your Edit Photos page, choose a photo and click Crop Photo. On the Photo Crop page click the Restore button above the Photo you want to un-crop.
How Can I Delete a Photo? From the Photos page, click the Delete Photo link next to the photo # you wish to delete.
• Once you delete the photo it is gone, so be sure to save a copy of the full size version (see instructions below) to be certain that you have a copy on your computer.
• If your agent and/or manager are using Now Casting, please consult with them before deleting any photos, especially if you see Agt/Mgr Default Photo to the right of the image.
How Do I Change The Order Of Uploaded Photos? On the Edit Photos page look for the Move/Swap To: option next to the photo you want to change. –Select-- the slot number to where you want to put the photo. Scroll to the bottom and choose Click Here to Update Photos. The page will refresh/reload with the photo in the new slot. If there was a photo in that other slot previously, they will have changed places.
• You can only move one photo at a time (except the one it swaps with, of course.) • TIP: The photo in the NC#1 slot is what people see first when they find you in any
kind of search in the database. NC#1 should be your favorite, go-to photo and should be a good, clean close-up cropped shot. The Photo order after NC#1 really does not matter very much.
• Your agent or manager can select any of the photo slots as their “default” for you, so you don’t need to worry about putting their choice in NC#1. However, if you see Agt/Mgr Default Photo next to a photo then you should think twice about moving or deleting it. (The Agt/Mgr Default Photo flag is linked to the NC# slot, not the image itself.)
Players Directory Photos Now Casting Inc. is the parent company of the Players Directory. All actors on Now Casting automatically have an online profile with playersdirectory.com and vice versa. 2 websites, 1 database!
• Updating your photos on Now Casting will automatically update your photos on playersdirectory.com. Again: 2 websites, 1 database.
• You can update your photos by logging on to either site with your same Now Casting username & password.
Can I Save A Copy Of The Now Casting Photos To My Computer? Yes. You are welcome to save a copy of any of your NowCasting photos and use them however you like. Remember though, the image that is posted online is probably 72dpi resolution, which is correct for the web. If you wish to use the image for printing purposes (on postcards or your resume), the resolution may not be as sharp as one scanned directly into your computer or off a CD. To “Save” the largest version of a photo:
• On the Edit Photo page, put your cursor on the View Full link next to the photo you want to save. (Or open/view your profile and click any thumbnail version to open to full size.)
• On the image itself, right click (PC) or hold click (MAC) and a little submenu will pop up. • Select "Save Target As" (or “Save Image As”) • The “Save As” box will pop up asking where on your computer you would like to save the
image file and what it should be named. Be sure to save it to the Desktop or some other folder where you can find it later and name it whatever you like.
To “Save” the smaller versions of a photo: • Find the photo and version you want either on the Edit Photo page or in your profile.
(The medium size is only visible from your Resume or Bio & Pics pages in the profile when you mouse-over the small version.)
• Follow the steps above to save your photo file.