Embed Size (px)
Citation preview
1
UNIX Configuration Guide
V2.24
Date of Issue: Feb. 08, 2007
2
Contents
1 Introduction Unix Common Application Supported Matrix*
2 Drive Dip Switch Settings SAIT AIT DDS 3 Platform Configuration Sun Systems PC Systems HP Systems IBM Systems SGI Systems Compaq Tru64 Unix (v5.0x)
4 Emulation Mode 5 UNIX Switch Locations
6 Hardware Jumper Settings
7 DIP Switch
8 S-AIT/Petasite Environment Sun Microsystems Solaris SGI IRIX HP HP-UX PetaApp Linux RedHat Linux IBM AIX Microsoft Windows FC Switch Information PSC
SONY MAKES NO WARRANTY OF ANY KIND WITH REGARD TO THIS DOCUMENT. Sony shall not be liable for errors contained herein, or indirect, special, incidental or consequential damages in connection with the furnishing, performance, or use of this document!
3
1. INTRODUCTION
This UNIX Compatibility Guide allows Sony tape streamer products to be configured to work with workstations in popular open systems environments:
+SUN workstations and servers +HP workstations and servers +IBM workstations and servers +Linux RedHat +SGI workstations and servers +Verifying your install is correct +Hardware Dipswitch Settings +Hardware Jumper Settings
The guide intends to be used in conjunction with and in addition to the hardware and software
installation and operation instructions that accompany your tape drive and your workstation.
This guide covers the following devices (Table1):
Model Format Capacity
(Uncompressed) Inquiry String Minimum Firmware Level
SDZ-100 SDZ-130
SAIT1 500GB SDZ-100 SDZ-130
0100
SDX-1100V AIT5 400GB SDX-1100 0100
SDX-900V AIT4 200GB SDX-900V 0100
SDX-800V AIT3Ex 150GB SDX-800V 0101
SDX-700V AIT3 100GB SDX-700V 0100
SDX-700C AIT3 100GB SDX-700C 0101
SDX-550V AIT2 Turbo 80GB SDX-550V 0100
SDX-500V AIT2 50GB SDX-500V 0101
SDX-500C AIT2 50GB SDX-500C 0108
TSL-A500C AIT2 200GB TSL-A500C L201
SDX-450V AIT1 Turbo 40GB SDX-450V 0100
SDX-400V AIT1 35GB SDX-400V 0101
SDX-400C AIT1 35GB SDX-400C 0700
SDX-300C AIT1 35GB SDX-300C 0300
SDX-250V AIT-E Turbo 20GB SDX-250V 0100
SDT-10000 SDT-11000
DDS4 20GB SDT-10000 SDT-11000
0110
TSL-11000 DDS4 140GB TSL-11000 L100
SDT-9000 DDS3 12GB SDT-9000 0600
TSL-9000 DDS3 84GB TSL-9000 L300
SDT-7000 DDS2 4GB SDT-7000 0300
Note: Sony drive models that are not listed in this table do not have UNIX support (i.e. SDT-5000 and before)
UNIX Common Application Supported Matrix
http://sony.storagesupport.com/
Return to Contents.
4
2. Drive Dip Switch Settings
SAIT
Unix Platform Supported Sony Drives Dip Switch Setting Need Current OS Patches
Sun Solaris 8, 9 SDZ-100/130 *Default Need Current OS Patches
IBM AIX 5L 5.x SDZ-100/130 Switch A: A1 ON
Switch B: A2 ON
HP UX 11.x SDZ-100/130 Switch A: A1 ON
Switch B: A2 ON ** No DC
Switch A: A1 ON
Switch B: A2 ON
Older IRIX and 5.3 might need current OS
Patches SGI IRIX 6.5 SDZ-100/130
*Default Need to purchase APD module from SGI
Red Hat SDZ-100/130 *Default
* Default settings are as follows:
� Switch ‘A’ settings: 1-6, 8 off, and 7 on
� Switch ‘B’ settings: 1-8 off
** No DC means "Data Compression settings are NOT available with the Device File. You need to use the
DIP switch settings on the device."
Note: To locate switches A and B, refer to the SDZ-100 Product Description Manual located at:
http://sony.storagesupport.com.
AIT
Unix Platform Supported Sony Drives Dip Switch Setting Need Current OS Patches
Sun Solaris 8, 9
SDX-400C, SDX-500C, SDX-700C, SDX-
400V, SDX-500V, SDX-700V, SDX-250V,
SDX-450V, SDX-550V, SDX-800V, SDX-
900V, SDX-1100V
*Default ** Need to install the
Recommended Patches
Sun Solaris 10 SDX-800V, SDX-900V, SDX-1100V *Default ** Need to install the Recommended Patches
IBM AIX 5L 5.x
SDX-400C, SDX-500C, SDX-700C, SDX-
400V, SDX-500V, SDX-700V, SDX-250V,
SDX-450V, SDX-550V, SDX-900V
*Default
HP UX 9.x, 10.x, 11.x
SDX-400C, SDX-500C, SDX-700C, SDX-
400V, SDX-500V, SDX-700V, SDX-250V,
SDX-450V, SDX-550V, SDX-900V
*Default *** No DC
SDX-400C, SDX-500C, SDX-700C, SDX-
400V, SDX-500V, SDX-700V, SDX-250V,
SDX-450V, SDX-550V, SDX-900V
*Default Need to purchase APD
module from SGI SGI IRIX 6.5
SDX-300C DIP SW 1, 2: ON
5
Linux RedHat
SDX-400C, SDX-500C, SDX-700C, SDX-
400V, SDX-500V, SDX-700V, SDX-250V,
SDX-450V, SDX-550V, SDX-800V, SDX-
900V, SDX-1100V
*Default
SunOS
SDX-400C, SDX-500C, SDX-700C, SDX-
400V, SDX-500V, SDX-700V, SDX-250V,
SDX-450V, SDX-550V, SDX-900V
*Default
� SDX-300C, SDX-400C, SDX-500C, SDX-700C, SDX-400V, SDX-500V, SDX-700V, SDX-250V, SDX-450V, SDX-550V and SDX-900V
* Default Switch Setting: 1-4, 6, 8 OFF/ 5, 7 ON
** The latest recommend patch Cluster + Device Driver patch according to HBA. Review the following
SUN's web site and SUN's documentation.
http://sunsolve.sun.com/pub-cgi/show.pl?target=patches/patch-access
HBA document
http://www.sun.com/products-n-solutions/hardware/docs/Network_Storage_Solutions/Adapters/index.html
*** No DC means "Data Compression settings are NOT available with the Device File. You need to use the
DIP switch settings on the device."
� Switches 5 controls termination power- User needs to check how this switch should be set.
Data compression settings for Solaris
- If using "/dev/rmt/0", then disable the drive's data compression function.
- If using "/dev/rmt/0c" or "/dev/rmt/0u", then enable the drive's data compression function.
DDS
Unix Platform Supported Sony Drives DIP Switch Setting Need Current OS Patches
Sun Solaris 8, 9 SDT-7000, 9000, 10000, 11000 1 & 3 Off 2 & 4 On Need Current Patches
IBM AIX 5L 5.x SDT-7000, 9000, 10000, 11000 1 & 3 On 2 & 4 Off
HP UX 11.x SDT-7000, 9000, 10000, 11000 1, 3, & 4 On 2 Off
SGI IRIX 6.5 SDT-7000, 9000, 10000, 11000 1 & 2 On 3 & 4 off Older IRIX and 5.3 might need
current OS Patches
� For SDT-10000 and 11000, please leave the rest of the switches as default.
� Switches 5 controls terminator power- User needs to check how this switch should be set.
We have verified the following:
+the drive can be recognized by the system +the user can perform simple tar and dd operations
We do not specifically check the following:
+drive performance +host control over block-size changes +host control over hardware compression +compatibility w/ fancy GUI or 3rd party backup utilities
6
DRIVE FIRMWARE
These instructions apply only to Sony tape drives with firmware supporting UNIX operation (see table1 on Page 3). If there is any doubt that your Sony tape drive has UNIX firmware support, check the firmware level reported through the drive inquiry command. If your tape drive has a lower level of firmware than shown in this document and you experience problems using the drive in one of the supported environments, contact your reseller for a firmware upgrade or download latest firmware from <http://sony.storagesupport.com>.
UNIX CONFIGURATION SWITCH SETTINGS
Sony DDS tape drives were designed with a set of UNIX configuration switches on the bottom of the drive mechanism to accommodate various Unix Operating Systems. The factory settings may need to be changed to customize the drive for top performance and capacity with your workstation. Ensure also that your drive is configured correctly with regards to SCSI ID, termination, etc. (see DIP switch configuration or Hardware Jumpers). However, these Unix OS dependent switch settings have been eliminated in general for both the AIT and SAIT drives.
MEDIA USAGE
Sony recommends the use of Sony branded media on its drives. Sony media is specifically manufactured for full compatibility with its drives. Please see table1 above for drive and media compatibility. This is especially true for Sony AIT (8mm) and SAIT tape drives since the media is an Advanced Metal Evaporative (AME) type manufactured exclusively for Sony tape drives. Cartridges and media for these drives are not interchangeable with other tape products.
REGARDING AUTOLOADERS
Sony Autoloaders are compatible with various UNIX systems. However, full functionality may not always be available without third-party software.
In general the autoloader can be configured using the same method as a standalone drive. For example, on an SGI system change the required files using the correct loader inquiry string instead of the standalone drive inquiry string. “TSL-A300C” instead of “SDX-300C”.
Autoloaders can be used with the various UNIX workstations via the following methods:
The TSL-9000 and TSL-11000 have a single-tape mode function, where only slot 8 of the magazine is loaded with a tape. In this mode the autoloader will behave as a standalone DAT drive, without any autoloader functionality.
The TSL-9000, TSL-11000, TSL-A300C and TSL-A500C have a Sequential Mode. By default, the autoloader enters this mode when the select button has been pressed and the selected tape is loaded successfully. In this mode the, the autoloader will load cartridges sequentially. Upon receiving a SCSI UNLOAD command to LUN 0 the cartridge will be automatically replaced in its slot in the magazine and the next highest cartridge is loaded. This continues for each UNLOAD command until there are no more cartridges. If the UNLOAD command is received for the last cartridge (#8) then the autoloader will simply place it back in the magazine and no further action is
7
taken. On some UNIX systems the mt command will allow you to send the UNLOAD command (see the man pages for your particular system and the product manual for your particular autoloader). For example, IRIX uses the SCSIcontrol command and SCO Openserver uses the tape command with the unload flag.
On Linux systems the MTX utility can be utilized w/ shell scripting to create automated backups on autoloaders. More info regarding MTX can be found here: http://mtx.sourceforge.net/
*Note: The TSL-7000 does not support UNIX systems.
Return to Contents.

8
3. Platform configuration
SUN SYSTEMS
Hardware Operating System
SDT-7000
SDT-9000
TSL-9000
SDT-10000
SDT-11000 / TSL-11000
TSL-A400C/-A500C
SDX-250V/300C/400C/400V450V/
500C/500V/550V/700C/700V/800V*
/900V*/1100V*
UltraSparc Solaris
Web reference: http://www.sun.com
1 [for SunOS] – Mode Selects for non-buffer mode are accepted but ignored for performance reasons.
2 [for Solaris] – Mode Selects for non-buffer mode are accepted and will set non-buffer mode.
* For SDX-800V, SDX-900V and SDX1100V, Dip Switch 3 On for Library mode.
SAIT
Unix Platform Supported Sony Drives Dip Switch Setting Need Current OS Patches
Sun Solaris 8, 9 SDZ-100/130 *Default Need Current OS Patches
Default settings and location of switches A and B, refer to the 6 Hardware Jumper Settings and SDZ-100/130 Installation Manual.
Solaris 8, 9 & 10
Connection with Sun Solaris 8, 9 and 10
This connectivity documentation is described on Solaris 8 and Solaris 9. We recommend upgrading to these OS level for the connectivity of HBA, Fibre Channel switch and Application software.
Reconfiguration of Device Driver
SCSI tape (st) driver should be configured for AIT / S-AIT tape drives, or it will be configured as “unknown tape drive” and the following restrictions will be occurred;
•Block size larger than 64 KB cannot be achieved.
•Timeout of Rewind and Erase will be short for AIT/S-AIT..
St configuration procedure: .
Directory : /kernel/drv/st.conf : st driver configuration file

9
1. Add the following entry to the tape-config-list for generating your configuration entries.
The tape-config-list specifies
Each entry consists on three parts,
Inquiry data : i.e. "SONY_ _ _ _SDX-1100" (“_ _ _ _” means four spaces)
Model Name : i.e. "AIT-5 drive" : Model name in the system..
Configuration Data entry : i.e. "ait-data", : name of the configuration parameters
Each part is marked off by comma and the list should be closed by semi-colon.
Inquiry Data consists on Vendor ID and Product ID. Four spaces are required between Vendor ID (SONY) and Product ID (SDT-/SDX-/SDZ-/TSL-).
The example of tape-config-list for SONY tape drives as followings,
tape-config-list =
"SONY SDT-7000", "Sony DDS-2 4mm DAT", "SONY_DAT", "SONY SDT-9000", "Sony DDS-3 4mm DAT", " SONY_DAT ", "SONY TSL-9000", "Sony DDS-3 4mm DAT Autoloader", " SONY_DAT ", "SONY SDT-10000", "Sony DDS-4 4mm DAT", " SONY_DAT ", "SONY SDT-11000", "Sony DDS-4 4mm DAT", " SONY_DAT ", "SONY TSL-11000", "Sony DDS-4 4mm DAT Autoloader", "SONY_DAT", "SONY SDZ-100", "Sony Super-AIT1", "SONY_SAIT", "SONY SDZ-130", "Sony Super-AIT1", "SONY_SAIT", "SONY SDX-250V", "Sony AIT-E Turbo 8mm", "SONY_AIT", "SONY SDX-400V", "Sony AIT1 8mm", "SONY_AIT", "SONY SDX-450V", "Sony AIT1 Turbo 8mm", "SONY_AIT", "SONY SDX-500V", "Sony AIT2 8mm", "SONY_AIT", "SONY SDX-550V", "Sony AIT2 Turbo 8mm", "SONY_AIT", "SONY SDX-700C", "Sony AIT3 8mm", "SONY_AIT", "SONY SDX-700V", "Sony AIT3 8mm", "SONY_AIT", "SONY SDX-800V", "Sony AIT3EX 8mm", "SONY_AIT", "SONY SDX-900V", "Sony AIT4 8mm", "SONY_AIT", "SONY SDX-1100", "Sony AIT5 8mm", "SONY_AIT", <--- Caution : Not ‘1100V’, but ‘1100.’ "SONY TSL-A500C", "Sony AIT2 8mm Autoloader", "SONY_AIT", "SONY SDX-500C", "Sony AIT2 8mm", "SONY_AIT", "SONY TSL-A400C", "Sony AIT1 8mm Autoloader", "SONY_AIT", "SONY SDX-400C", "Sony AIT1 8mm", "SONY_AIT"; <- Notice the semi-colon! /*---- (4 spaces are required between SONY and SDT-/SDX-/SDZ-/TSL-)*/
2. Add Configuration Data entry.
Configuration Data Entry specify the configuration options of device driver.
2.1 for Solaris 8, and Solaris 9 with version 1 st driver configuration.
SONY_AIT = 1, 0x36, 0, 0x19639, 4, 0x00, 0x00, 0x00, 0x00, 0;
SONY_SAIT = 1, 0x36, 0, 0x19639, 4, 0x00, 0x00, 0x00, 0x00, 0;
10
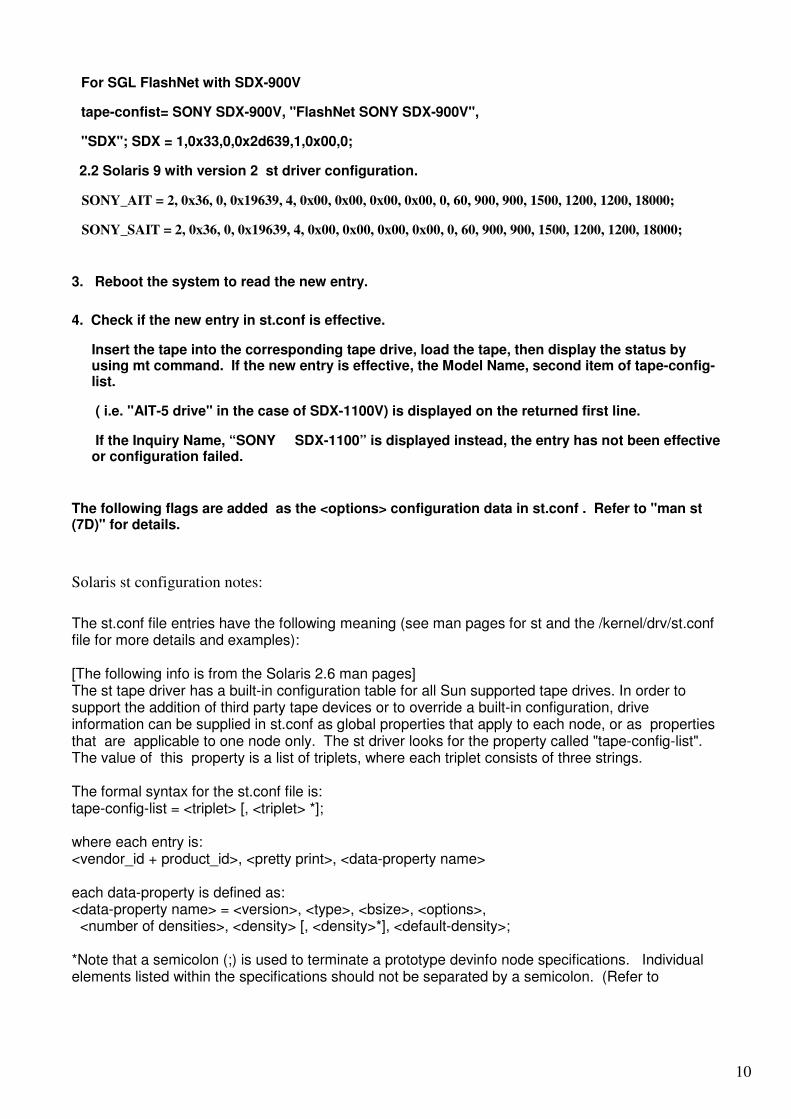
For SGL FlashNet with SDX-900V
tape-confist= SONY SDX-900V, "FlashNet SONY SDX-900V",
"SDX"; SDX = 1,0x33,0,0x2d639,1,0x00,0;
2.2 Solaris 9 with version 2 st driver configuration.
SONY_AIT = 2, 0x36, 0, 0x19639, 4, 0x00, 0x00, 0x00, 0x00, 0, 60, 900, 900, 1500, 1200, 1200, 18000;
SONY_SAIT = 2, 0x36, 0, 0x19639, 4, 0x00, 0x00, 0x00, 0x00, 0, 60, 900, 900, 1500, 1200, 1200, 18000;
3. Reboot the system to read the new entry.
4. Check if the new entry in st.conf is effective.
Insert the tape into the corresponding tape drive, load the tape, then display the status by using mt command. If the new entry is effective, the Model Name, second item of tape-config-list.
( i.e. "AIT-5 drive" in the case of SDX-1100V) is displayed on the returned first line.
If the Inquiry Name, “SONY SDX-1100” is displayed instead, the entry has not been effective or configuration failed.
The following flags are added as the <options> configuration data in st.conf . Refer to "man st (7D)" for details.
Solaris st configuration notes:
The st.conf file entries have the following meaning (see man pages for st and the /kernel/drv/st.conf file for more details and examples): [The following info is from the Solaris 2.6 man pages] The st tape driver has a built-in configuration table for all Sun supported tape drives. In order to support the addition of third party tape devices or to override a built-in configuration, drive information can be supplied in st.conf as global properties that apply to each node, or as properties that are applicable to one node only. The st driver looks for the property called "tape-config-list". The value of this property is a list of triplets, where each triplet consists of three strings. The formal syntax for the st.conf file is: tape-config-list = <triplet> [, <triplet> *];
where each entry is: <vendor_id + product_id>, <pretty print>, <data-property name> each data-property is defined as: <data-property name> = <version>, <type>, <bsize>, <options>, <number of densities>, <density> [, <density>*], <default-density>; *Note that a semicolon (;) is used to terminate a prototype devinfo node specifications. Individual elements listed within the specifications should not be separated by a semicolon. (Refer to
11
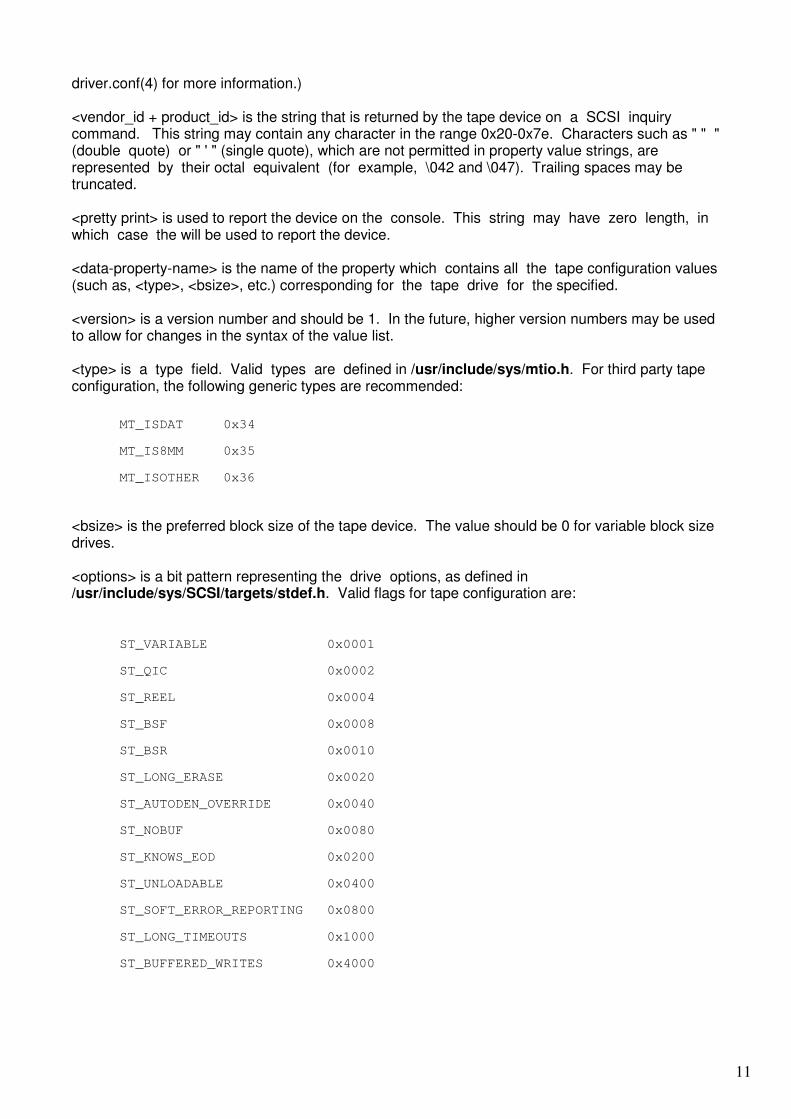
driver.conf(4) for more information.)
<vendor_id + product_id> is the string that is returned by the tape device on a SCSI inquiry command. This string may contain any character in the range 0x20-0x7e. Characters such as " " " (double quote) or " ' " (single quote), which are not permitted in property value strings, are represented by their octal equivalent (for example, \042 and \047). Trailing spaces may be truncated. <pretty print> is used to report the device on the console. This string may have zero length, in which case the will be used to report the device. <data-property-name> is the name of the property which contains all the tape configuration values (such as, <type>, <bsize>, etc.) corresponding for the tape drive for the specified. <version> is a version number and should be 1. In the future, higher version numbers may be used to allow for changes in the syntax of the value list. <type> is a type field. Valid types are defined in /usr/include/sys/mtio.h. For third party tape configuration, the following generic types are recommended:
MT_ISDAT 0x34
MT_IS8MM 0x35
MT_ISOTHER 0x36
<bsize> is the preferred block size of the tape device. The value should be 0 for variable block size drives. <options> is a bit pattern representing the drive options, as defined in /usr/include/sys/SCSI/targets/stdef.h. Valid flags for tape configuration are:
ST_VARIABLE 0x0001
ST_QIC 0x0002
ST_REEL 0x0004
ST_BSF 0x0008
ST_BSR 0x0010
ST_LONG_ERASE 0x0020
ST_AUTODEN_OVERRIDE 0x0040
ST_NOBUF 0x0080
ST_KNOWS_EOD 0x0200
ST_UNLOADABLE 0x0400
ST_SOFT_ERROR_REPORTING 0x0800
ST_LONG_TIMEOUTS 0x1000
ST_BUFFERED_WRITES 0x4000
12
ST_NO_RECSIZE_LIMIT 0x8000
ST_MODE_SEL_COMP 0x10000
ST_NO_RESERVE_RELEASE 0x20000
ST_READ_IGNORE_ILI 0x40000
ST_READ_IGNORE_EOFS 0x80000
ST_SHORT_FILEMARKS 0x100000
<number of densities> is the number of densities specified. Each tape drive can support up to four densities. The value entered should therefore be between 1 and 4; if less than 4, the remaining densities will be assigned a value of 0x0. <density> is a single-byte hexadecimal number. It can either be found in the drive specification manual or be obtained from the drive vendor. <default density> has a value between 0 and (<number of densities> - 1). The following files may be helpful in debugging: /kernel/drv/st.conf driver configuration file /usr/include/sys/mtio.h structures and definitions for mag tape io control commands /usr/include/sys/SCSI/targets/stdef.h definitions for SCSI tape drives /dev/rmt/[0- 127][l,m,h,u,c][b][n] where l,m,h,u,c specifies the density (low, medium, high, ultra/compressed), b the optional BSD behavior (see mtio(7I)), and n the optional no rewind behavior. For example, /dev/rmt/0lbn specifies unit 0, low density, BSD behavior, and no rewind
Note:
For Sony DDS, AIT, and SAIT tape drives c or u enable drive data compression. For example, /dev/rmt/0cn
or /dev/rmt/0un specifies unit 0, drive data compression enabled, and no rewind.
Online manual
st, mt
st(7)
http://docs.sun.com/app/docs/doc/801-6680-07/6i11qdqv4?a=view
mt(1)
http://docs.sun.com/app/docs/doc/801-6680-01/6i11qc0h9?a=view
Return to Contents.
13
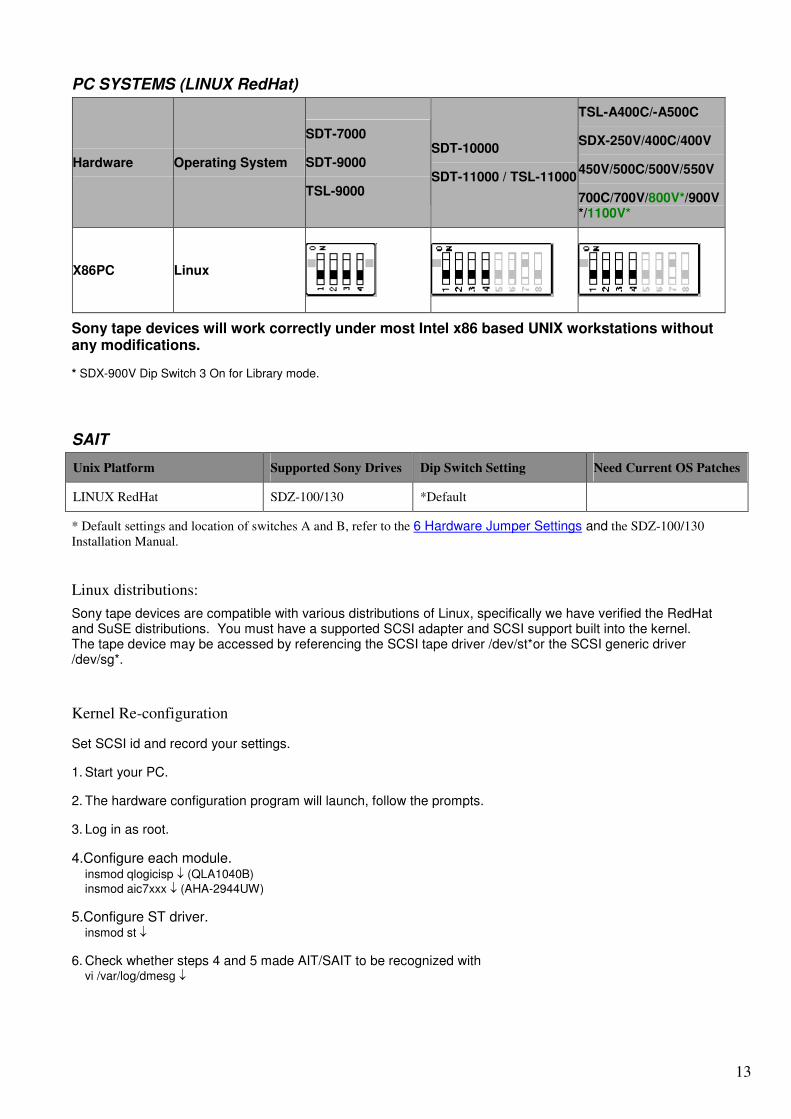
PC SYSTEMS (LINUX RedHat)
Hardware Operating System
SDT-7000
SDT-9000
TSL-9000
SDT-10000
SDT-11000 / TSL-11000
TSL-A400C/-A500C
SDX-250V/400C/400V
450V/500C/500V/550V
700C/700V/800V*/900V*/1100V*
X86PC Linux
Sony tape devices will work correctly under most Intel x86 based UNIX workstations without any modifications.
* SDX-900V Dip Switch 3 On for Library mode.
SAIT
Unix Platform Supported Sony Drives Dip Switch Setting Need Current OS Patches
LINUX RedHat SDZ-100/130 *Default
* Default settings and location of switches A and B, refer to the 6 Hardware Jumper Settings and the SDZ-100/130
Installation Manual.
Linux distributions:
Sony tape devices are compatible with various distributions of Linux, specifically we have verified the RedHat and SuSE distributions. You must have a supported SCSI adapter and SCSI support built into the kernel. The tape device may be accessed by referencing the SCSI tape driver /dev/st*or the SCSI generic driver /dev/sg*.
Kernel Re-configuration
Set SCSI id and record your settings.
1. Start your PC.
2. The hardware configuration program will launch, follow the prompts.
3. Log in as root.
4.Configure each module. insmod qlogicisp ↓ (QLA1040B) insmod aic7xxx ↓ (AHA-2944UW)
5.Configure ST driver. insmod st ↓
6. Check whether steps 4 and 5 made AIT/SAIT to be recognized with vi /var/log/dmesg ↓
14
7. Make a image file with mkinitrd Boot
8. Verify the returned status if the tape device is connected with mt -f /dev/st0 status ↓

15
HP SYSTEMS
Hardware Operating System
SDT-7000
SDT-9000
TSL-9000
SDT-10000
SDT-11000 / TSL-11000
TSL-A400C/-A500C
SDX-250V/400C/400V
450V/500C/500V/550V
700V/700C/900V*
Workstation
Server
HP UX 9.x
HP UX 10.x
HP UX 11.x
Web reference: http://www.hp.com
* SDX-900V Dip On for Library mode. Sony tape drives are not officially supported by HPUX so DC will be disabled.
SAIT
Unix Platform Supported Sony Drives Dip Switch Setting Need Current OS Patches
HPUX 11.x SDZ-100/130 *Default ** No DC
* Default settings and location of switches A and B, refer to refer to the 6 Hardware Jumper Settings and the
SDZ-100/130 Installation Manual.
** No DC means "Data Compression settings are NOT available with the Device File. You need to use the
DIP switch settings on the device."
Kernel Re-configuration
When connecting AIT/SAIT with GSC Fast/Wide, HSC Fast/Wide, or PCI Fast/Wide SCSI board, it is automatically recognized, so that setup is not required. However, in the case that stape device driver is not selected at the time of installing the OS, it is necessary to add stape driver by Kernel Config.
On the other hand, HP-PB SCSI board or EISA SCSI board cannot be used to connect AIT/SAIT because the device will not be recognized.
Creating Device Files
When connecting AIT/SAIT with GSC Fast/Wide, HSC Fast/Wide, or PCI Fast/Wide SCSI board, no setup is required since stape device driver is automatically selected and device files are created at the time of boot.
<How to Confirm the Connection>
After the device is connected with a cable, turn on the power of the device. After initialization is completed, perform reboot. Login as root. Using "ioscan -fn -C tape" command, you can confirm the device file name.
Device file name
/dev/rmt/X[n][b]
X: sequential number indicating the order of the recognized tape devices
16
n: + No Rewind
b: Berkeley mode (AT&T mode if [b] is omitted)
/dev/rmt/cXtYd0BEST[n][b]
X: sequential number of SCSI board
Y: SCSI ID
n: + No Rewind
b: Berkeley mode (AT&T mode if [b] is omitted)
< Difference between Berkeley mode and AT&T mode >
Use Berkeley mode normally.
When you close a device file which is opened on READ:
Berkeley mode: Reading position on the tape is fixed.
AT&T mode: Reading position on the tape automatically moves to right after the next FileMark position, that is, "Forward SpaceFileMark" is issued.
Changing Files
Setup for stape device driver is not required. At the time of booting, stape device driver performs negotiation and its setup automatically.
Note: Configuraiton using sam
1) Log on as root. 2) Run SAM: $ /usr/bin/sam 3) Choose Peripheral Devices and activate [Open]. 4) Choose Tape Drives and activate [Open] 5) From the "Actions" menu in the "Tape Device Manager" window, choose Add... 6) Within the "Add a Tape Drive" window, read the instructions, then active [OK]. 7) SAM may detect that your HP-UX kernel lacks the drivers necessary to make use of the tape drive. If so, within the "Device Driver Check" window, read the messages and choose the appropriate action. If you choose, Build a new kernel and shutdown the system immediately, SAM will create the kernel you need and reboot your computer. The rebooted system will be able to use the tape drive. 8) If you had to shutdown your system in order to physically connect the tape drive, re-enter SAM and repeat step 3 through 6 above. 9) Choose the new tape drive. 10) From the "Actions" menu, choose Create Device Files. 11) Activate [OK] and exist SAM. *Note: 800 Series systems will not recognize Sony tape devices if running HP-UX 10.x. However, they will recognize Sony devices if running HP-UX 11.x.
17
IBM SYSTEMS
Hardware Operating System
SDT-7000
SDT-9000
TSL-9000
SDT-10000
SDT-11000/ TSL-11000
TSL-A400C/-A500C
SDX-250V/300C/400C/400V
450V/500C/500V/550V
700V/700C/900V*
Workstation AIX 5.2
Web reference: http://www.ibm.com
* SDX-900V Dip Switch 3 On for Library mode.
SAIT
Unix Platform Supported Sony Drives Dip Switch Setting Need Current OS Patches
AIX 5L 5.x SDZ-100/130 * Default
* Default settings and location of switches A and B, refer to refer to the 6 Hardware Jumper Settings and the
SDZ-100/130 Installation Manual.
AIX 5L 5.x
< How to Confirm the Connection >
After the device is connected with a cable, turn on the power of the device. After initialization is completed, reboot the device, and then, login as root. You can check whether the tape drive is recognized by the “lsdev” command.
# lsdev -Csscsi
rmt0 Available 04-04-00-3,0 Other SCSI tape drive
Device name
/dev/rmtX.Y
X: serial number indicating the order of the recognized tape devices
Y: the number indicating a function switch
rmtX : default
rmtX.1 : default + No rewind
18
Changing Files
Almost all of the default settings for ost (Other SCSI Tape) can be used without being changed. However, in the default settings, the data transfer rate is not fast enough and also the actual rewinding time takes longer; therefore, some changes are required to be made by "smit" command.
< How to Change the Setup >
1. Login as root and start up "smit" command.
2. Select menus as shown below to display the setup window.
�Devices
� Tape Drive
� Edit / Show attributions of a Tape Device
� scsi? (select the SCSI card to which GY is connected.)
3. Change values of "block size" and "timeout" which are set by default.
----- Setup window example -----
Tape Drive rmt0
Tape Drive type ost
Tape Drive interface scsi
Description Other SCSI Tape Drive
Status Available
Location 04-04-00-3,0
Host adapter scsi1
Connection address 3,0
Block size (0 = variable length) [0]
change from [512] to [0] �
Use DEVICE BUFFERS during writing yes
Use EXTENDED file marks
yes
RESERVE/RELEASE support no
Variable BLOCK SIZE support [0]
DENSITY setting #1 [0]
DENSITY setting #2 [0]
19
delay time after a command is FAILED [45]
Timeout for the READ/WRITE command
[600] change from [144] to [600] �
Since the values of "Location", "Host adapter" and "Connection Address" vary according to the environment in which the SCSI card is installed, the list shown above is only an example. Transfer rate will be drastically slowed down if you set "block size" to any value other than "0."
SGI SYSTEMS
The Sony SDT-9000 and SDX-300C are command-line compatible with Irix 6.x using the configuration switch settings for SGI workstations. For device file control and tape access from the Irix desktop, the Kernel needs to be modified or the correct patch must be loaded. However, not all functionality is available under all versions of Irix.
Hardware Operating System
SDT-7000
SDT-9000
TSL-9000
SDT-10000
SDT-11000 / TSL-11000
TSL-A400C/-A500C
SDX-250V/400C/400V
450V/500C/500V/550V
700V/700C/900V*
Indy Irix 5.3
Indigo Irix 6.2
O2 Irix 6.3 (limited)*
Octane 6.4
IRIX 6.5
IRIX 6.x
IRIX 6.4
IRIX 6.5
Hardware Operating system SDT-7000 SDT-10000
SDT-11000 / TSL-11000
Indy Irix 5.3
Indigo Irix 6.2
02 Irix 6.3 (limited)*
Octane 6.4
IRIX 6.5
IRIX 6.5
* SDX-900V Dip Switch 3 On for Library mode.
20
SAIT
Unix Platform Supported Sony Drives Dip Switch Setting Need Current OS Patches
*Default Older IRIX and 5.3 might
need current OS Patches SGI IRIX 6.5 SDZ-100/130
*Default Need to purchase APD
module from SGI.
* Default settings and location of switches A and B, refer to refer to the 6 Hardware Jumper Settings and the
SDZ-100/130 Installation Manual:
Web reference: http://www.sgi.com
*under 6.3 SDX-300C drive compression cannot be controlled via the device types, it is always enabled. However compression can always be enabled/disabled via drive hardware settings.
Set the configuration switches as shown above. Make sure that the current SGI recommended
patch sets are installed. See SGI support website for current releases, you will need a support contract for access to most of the patches.
As of 9/21/98 these are the patches needed:
IRIX Version Patch# Description
IRIX 6.2 2861 +6.2 Tape Driver rollup
IRIX 6.3 2838 +6.3 Tape driver fixes
IRIX 6.4 3301 2998 3305
+SCSI rollup +6.4 Tape driver fixes +HINV rollup
To start looking for the latest available SGI patches look here: http://www.sgi.com/support/patch_intro.html A searchable patches database is available here: http://support.sgi.com/surfzone/patches *You'll need to register to access this area.

21
2. For IRIX 6.2, and 6.3 you must do two things:
+add the following entry to /dev/MAKEDEV.d/TPS_base
search for the following entry:
*Drive?type:*DAT*|*Drive?type:*8mm?8200*)
set s nrs ns "" nrns nr sv nrsv nsv v nrnsv nrv ;
for add in 0 1 2 2 3 3 4 5 6 6 7 7 ; do
mdev=`expr $minor + $add`;
mknod ${prf}$1 c ${C_TPS} $mdev;
case "$stat" {
*Device:*Python*01931*) # DDS2 drive with compression
mdev=`expr $mdev + 8`;
mknod ${prf}$1c c ${C_TPS} $mdev;
;;
}
shift;
done ;;
add the (blue) entry so that the entire entry looks like this:
*Drive?type:*DAT*|*Drive?type:*8mm?8200*)
set s nrs ns "" nrns nr sv nrsv nsv v nrnsv nrv ;
for add in 0 1 2 2 3 3 4 5 6 6 7 7 ; do
mdev=`expr $minor + $add`;
mknod ${prf}$1 c ${C_TPS} $mdev;
case "$stat" {
*Device:*Python*01931*) # DDS2 drive with compression
mdev=`expr $mdev + 8`;
mknod ${prf}$1c c ${C_TPS} $mdev;
;;
*Device:*SDT-9000*)
mdev=`expr $mdev + 8`;
mknod ${prf}$1c c ${C_TPS} $mdev;
;;
}
shift;
done ;;
* +add the following entry to /var/sysgen/master.d/SCSI
{ DATTAPE,TPDAT,4,8,"SONY","SDT-9000",0,0,{0,0,0,0}, MTCAN_BSF|MTCAN_BSR|MTCAN_APPEND|MTCAN_SETMK|MTCAN_PART| MTCAN_PREV|MTCAN_SYNC|MTCAN_SPEOD|MTCAN_CHKRDY| MTCAN_VAR|MTCAN_SETSZ|MTCAN_SILI|MTCAN_SEEK| MTCAN_CHTYPEANY|MTCAN_SETDEN, 60,4*60,4*60,6*60,512,512*512 },
22
3. After modifying the SCSI file use autoconfig to rebuild the kernel. (see the autoconfig man page)
For IRIX 6.4 support fo SDT-9000 you must get at least the following patches from SGI. (It is always a good idea to search the SGI website for the latest available patches, see patch table above): #2837 SCSI rollup #2863 Tape driver updates #2871 HINV rollup After loading the required patches you may need to follow the IRIX 6.5 procedure above to modify the kernel. If the /dev/MAKEDEV.d/TPS_base and the /var/sysgen/master.d/SCSI files already contain the appropriate entries you will just need to run autoconfig. For IRIX 6.5 support for SDT-9000 no kernel modifications are necessary.
SGI specific notes:
1. Kernel must be rebuilt with Sony drive configuration information or correct patch must be loaded for drive to appear on desktop. *SGI is always releasing patches, for the latest patches please check SGI support website.
MTCAN notes for /var/sysgen/master.d/SCSI file: These device file names can be interpreted as follows: Device Name Function nr No rewind on close v Device supports variable block sizes ns Device does not byte-swap s Device does byte-swap stat Allows the device to be used when one of the other device files specifying the same physical device is already opened The MTCAN values have the following functions: MTCAN value Capability Enabled APPEND Append to existing tape data BSF Backspace file BSR Backspace record CHKRDY Determine if tape cartridge is present CHTYPEANY Change density and/or fixed to variable at points other than beginning of tape PART Multiple Partitions PREV Prevent media removal SEEK Seek to a particular block SETMK Setmarks SETSZ Fixed Block Size can be set SILI Suppress illegal length indicators SPEOD Space to end of data SYNC Synchronous Mode SCSI VAR Variable block sizes
23
The constants have the following functions: Constant Description 40 Transfer time-out in "inverse ticks" 4*60 Minimum time-out in seconds for any command 4*60 Space command time-out in seconds 5*60 Time-out in seconds for long operations (such as rewinds) 512 Default block size in bytes for fixed block size mode 64*512 Recommended blocking factor in bytes for the upper limit of read/write commands
24
Compaq Tru64 Unix (v5.0x)
Sony tape devices will run on Tru64 Unix without any kernel modifications as generic devices. However for explicit support you can do the following: 1) log in as root 2) cd /etc 3) make a backup copy of the DDR database source file cp ddr.dbase ddr.dbase_orig 4) edit the DDR database source file: vi ddr.dbase 5) locate the SCSIDEVICE entry for whichever tape device you wish to add. For example, search for “SDX-300C” or “SDX-500C” for AIT products or “SDT-9000” or “SDT-11000” for DDS products . Make a copy of this entire entry. Change "COMPAQ" to "SONY". Save your changes and exit vi. Compile the DDR database: #ddr_config -c ddr.dbase
Return to Contents.
25
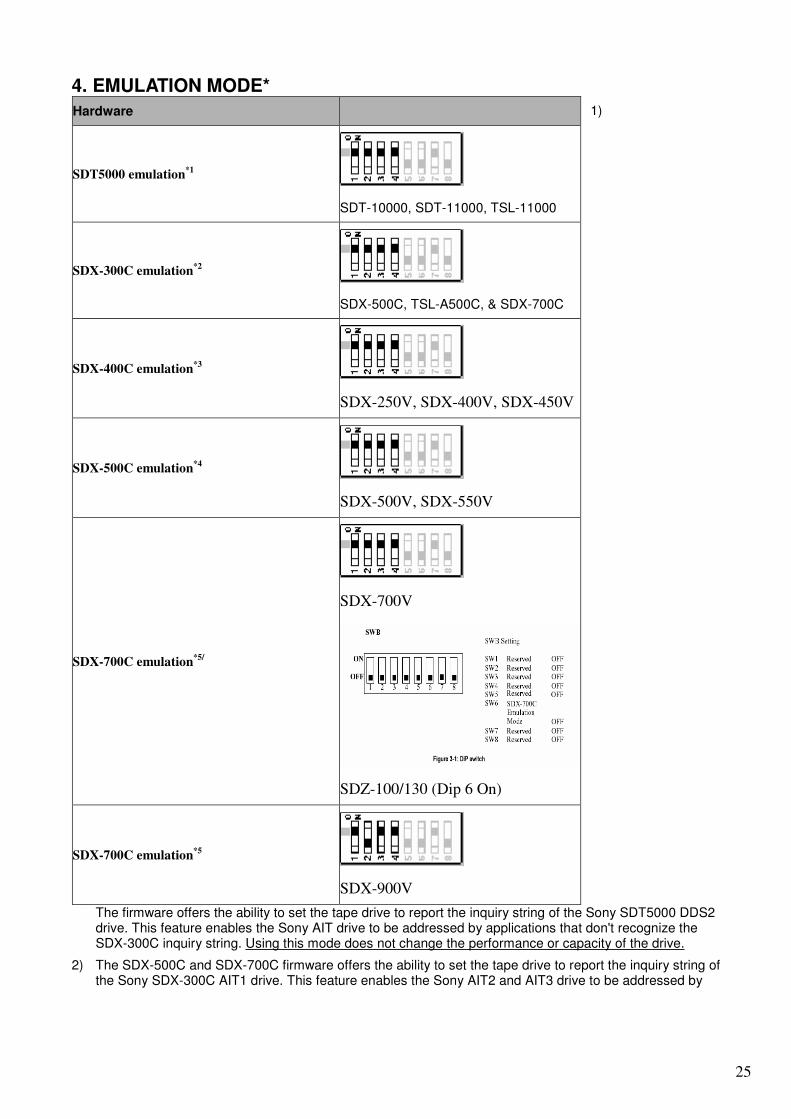
4. EMULATION MODE*
1)
The firmware offers the ability to set the tape drive to report the inquiry string of the Sony SDT5000 DDS2 drive. This feature enables the Sony AIT drive to be addressed by applications that don't recognize the SDX-300C inquiry string. Using this mode does not change the performance or capacity of the drive.
2) The SDX-500C and SDX-700C firmware offers the ability to set the tape drive to report the inquiry string of the Sony SDX-300C AIT1 drive. This feature enables the Sony AIT2 and AIT3 drive to be addressed by
Hardware
SDT5000 emulation*1
SDT-10000, SDT-11000, TSL-11000
SDX-300C emulation*2
SDX-500C, TSL-A500C, & SDX-700C
SDX-400C emulation*3
SDX-250V, SDX-400V, SDX-450V
SDX-500C emulation*4
SDX-500V, SDX-550V
SDX-700C emulation*5/
SDX-700V
SDZ-100/130 (Dip 6 On)
SDX-700C emulation*5
SDX-900V
26
applications that don't recognize the SDX-500C or SDX-700C inquiry string. Using this mode does not change the performance or capacity of the drive.
3) The SDX-250V, SDX-400V and SDX-450V drives offer the ability to set the drives to report the inquiry string of the Sony SDX-400C AIT1 drive. This feature enables the drive to be addressed by applications that don't recognize the inquiry string of SDX-250V, SDX-400V and SDX-450V. Using this mode does not change the performance or capacity of the drive.
4) The SDX-500V and SDX-550V drives offer the ability to set the drives to report the inquiry string of the Sony SDX-500C AIT2 drive. This feature enables the drive to be addressed by applications that don't recognize the inquiry string of SDX-500V and SDX-550V. Using this mode does not change the performance or capacity of the drive.
5) The SDX-700V and SDX-900V drives offer the ability to set the drives to report the inquiry string of the Sony SDX-700C AIT3 drive. This feature enables the drive to be addressed by applications that don't recognize the inquiry string of SDX-700V and SDX-900V. Using this mode does not change the performance or capacity of the drive.
6) The SDZ-100 SAIT drive offers the ability to set the SAIT tape drive to report the inquiry string of the Sony SDX-700C AIT3 drive. Dip switch 6 must be On for emulation mode. This feature enables the Sony SAIT drive to be addressed by applications that don't recognize the SDZ-100 inquiry string. Using this mode does not change the performance or capacity of the drive.
VERIFYING INSTALLATION
If you are having trouble with your installation, verify the following items first: + Correct and valid SCSI bus +no ID conflicts +proper termination +proper SCSI signal type, for example single-ended to single-ended, etc + Device is powered on. + The new device is recognized by the system hardware (host controller, system console, etc). + The new device is recognized by the operating system and knows how to communicate with the device
via proper kernel configuration and device files. + If you are using a 3rd part backup application, make sure that the new device is supported. As part of the installation process, you will have installed the appropriate device driver for your UNIX system, and created device files to communicate with the tape drive. In outline, the procedure is as follows: 1. Write test data to a tape using tar. 2. Read the test data from the tape using tar. 3. Compare the data read from the tape with the original data on disk using cmp.
Return to Contents.
27
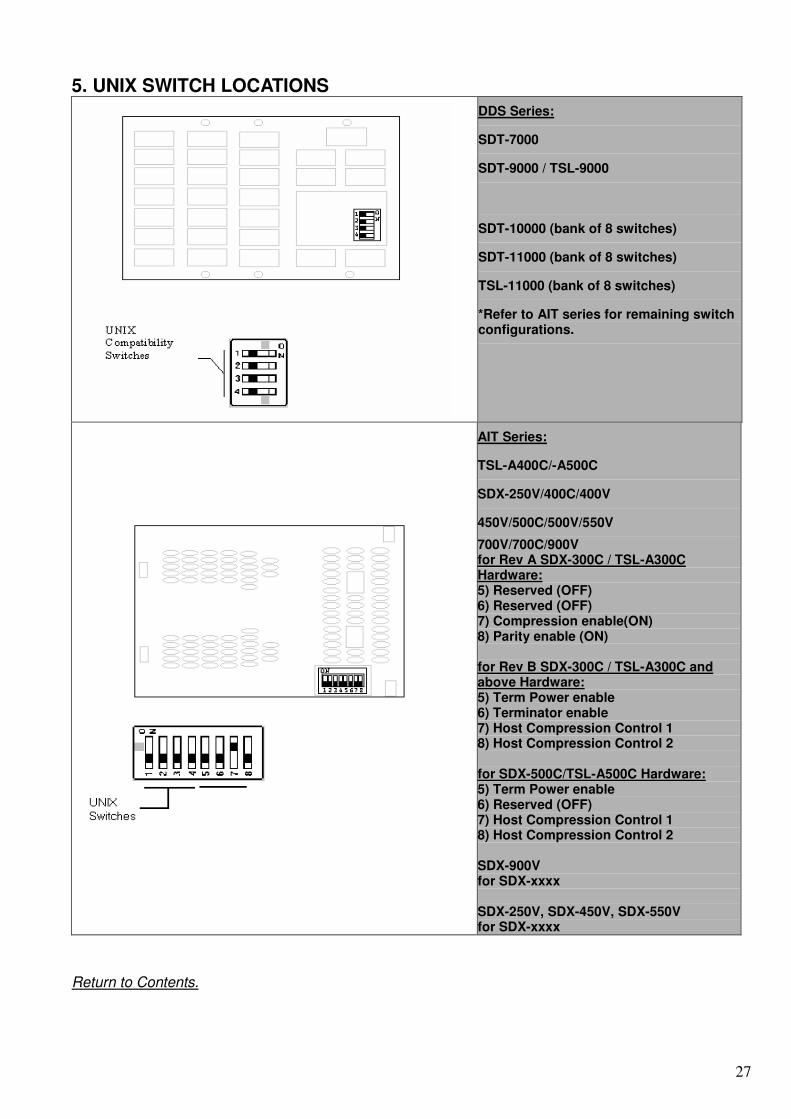
5. UNIX SWITCH LOCATIONS
DDS Series:
SDT-7000
SDT-9000 / TSL-9000
SDT-10000 (bank of 8 switches)
SDT-11000 (bank of 8 switches)
TSL-11000 (bank of 8 switches)
*Refer to AIT series for remaining switch configurations.
AIT Series:
TSL-A400C/-A500C
SDX-250V/400C/400V
450V/500C/500V/550V
700V/700C/900V for Rev A SDX-300C / TSL-A300C Hardware: 5) Reserved (OFF) 6) Reserved (OFF) 7) Compression enable(ON) 8) Parity enable (ON) for Rev B SDX-300C / TSL-A300C and above Hardware: 5) Term Power enable 6) Terminator enable 7) Host Compression Control 1 8) Host Compression Control 2 for SDX-500C/TSL-A500C Hardware: 5) Term Power enable 6) Reserved (OFF) 7) Host Compression Control 1 8) Host Compression Control 2 SDX-900V for SDX-xxxx SDX-250V, SDX-450V, SDX-550V for SDX-xxxx
Return to Contents.
28
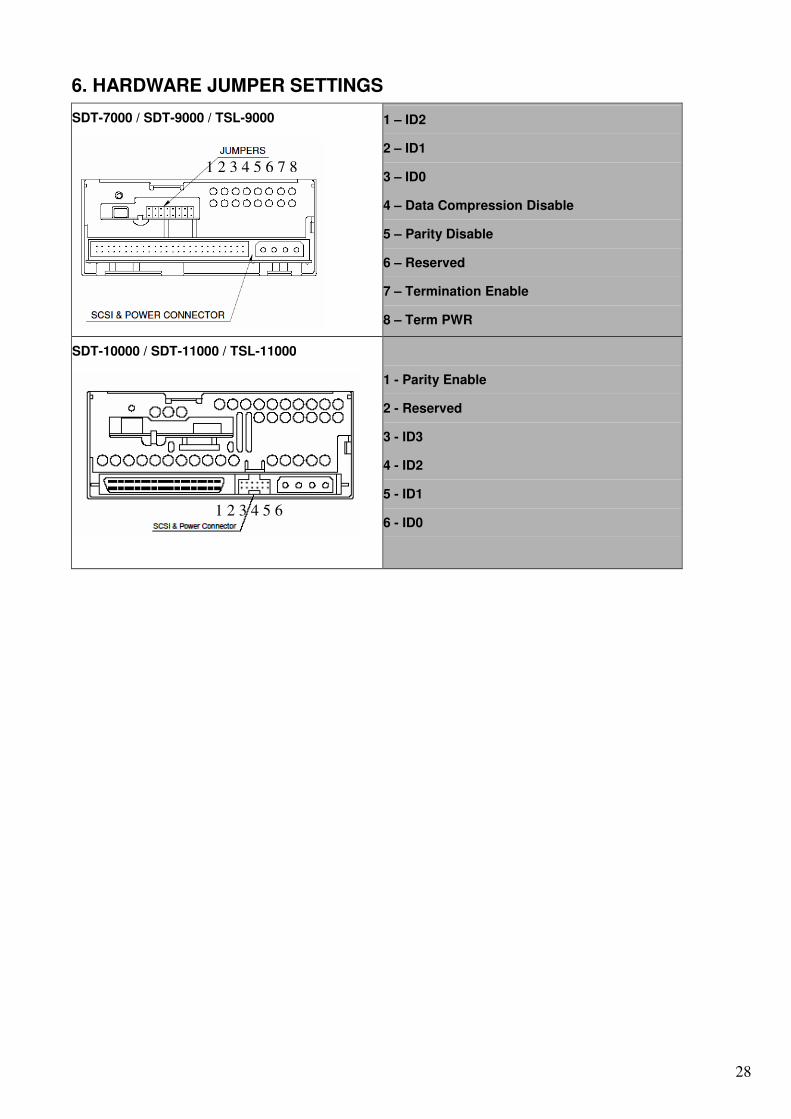
6. HARDWARE JUMPER SETTINGS
SDT-7000 / SDT-9000 / TSL-9000
1 – ID2
2 – ID1
3 – ID0
4 – Data Compression Disable
5 – Parity Disable
6 – Reserved
7 – Termination Enable
8 – Term PWR
SDT-10000 / SDT-11000 / TSL-11000
1 - Parity Enable
2 - Reserved
3 - ID3
4 - ID2
5 - ID1
6 - ID0
1 2 3 4 5 6 7 8
1 2 3 4 5 6
29
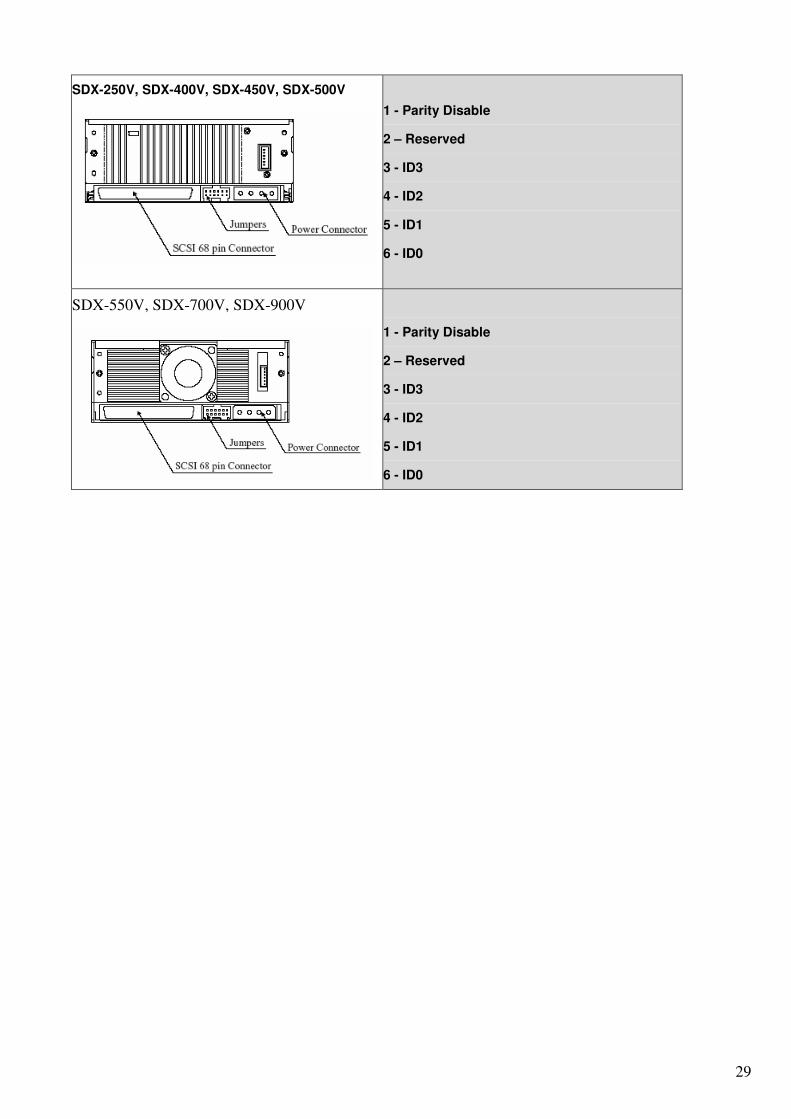
SDX-250V, SDX-400V, SDX-450V, SDX-500V
1 - Parity Disable
2 – Reserved
3 - ID3
4 - ID2
5 - ID1
6 - ID0
SDX-550V, SDX-700V, SDX-900V
1 - Parity Disable
2 – Reserved
3 - ID3
4 - ID2
5 - ID1
6 - ID0
30
SDX-250V, SDX-400V, SDX-450V, SDX-500V, SDX-550V, SDX-700V, SDX-900V
31
SDZ-100
32
SDZ-130
Return to Contents.
33
7 DIP Switch
SDX-250V, SDX-450V, SDX-550V
SDX-700V
SDX-900V
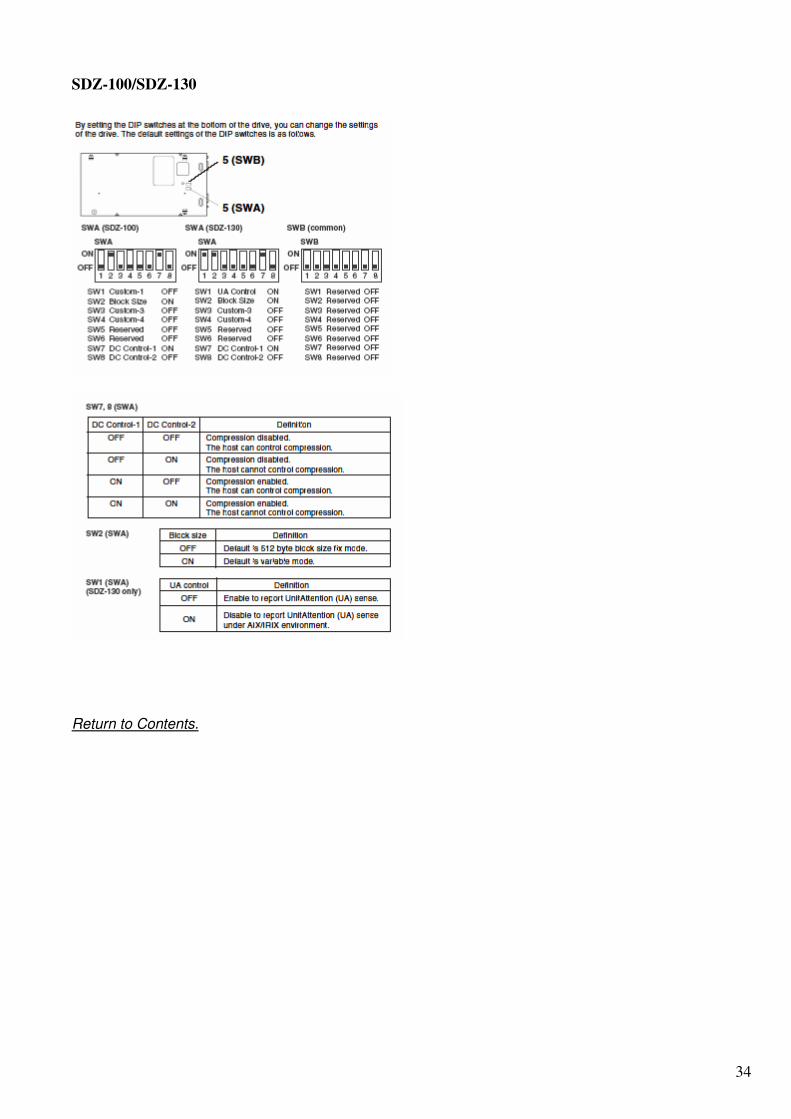
34
SDZ-100/SDZ-130
Return to Contents.

35
8. S-AIT/PetaSite Environment
Sun Microsystems Solaris
OS: Sun Microsystems Solaris 8, 9
SCSI HBA: Sun Microsystems X6758A (PCI Dual Channel LVD SCSI HBA)
But you need a patch from Sun Microsystems to use this card. "Sun StorEdge PCI Dual Ultra3 SCSI Host Adapter version 1", Latest "Solaris Recommended Patch Cluster", "QUS Driver Patch (Solaris 9) #112706-XX" or "QUS Driver Patch (Solaris 8) #112697-XX"
FC HBA: Emulex LP8000 for Sun Solaris SCSI/IP v4.02d v4.10g
Emulex LP9002 for Sun Solaris v5.01e
QLogic QLA2310
QLogic QLA2342
Sun Microsystems X6767A (PCI 2Gb FC HBA/QLA2212F)
Sun Microsystems X6727A (PCI 1Gb FC HBA/QLA2310F)
Config File: st.conf
"SONY SDZ-100", "SONY SAIT 1/2 inch", "SONY_SAIT",
"SONY SDZ-130", "SONY SAIT 1/2 inch", "SONY_SAIT";
SONY_SAIT = 1,0x36,0,0x19659,4,0x00,0x00,0x00,0x00,0;
MT_ISOTHER 0x36
* ST_VARIABLE 0x0001
ST_QIC 0x0002
ST_REEL 0x0004
* ST_BSF 0x0008
* ST_BSR 0x0010
* ST_LONG_ERASE 0x0020
(*) ST_AUTODEN_OVERRIDE 0x0040
ST_NOBUF 0x0080
* ST_KNOWS_EOD 0x0200
* ST_UNLOADABLE 0x0400
ST_SOFT_ERROR_REPORTING 0x0800
* ST_LONG_TIMEOUTS 0x1000
36
(*)ST_BUFFERED_WRITES 0x4000
* ST_NO_RECSIZE_LIMIT 0x8000
* ST_MODE_SEL_COMP 0x10000
ST_NO_RESERVE_RELEASE 0x20000
ST_READ_IGNORE_ILI 0x40000
ST_READ_IGNORE_EOFS 0x80000
ST_SHORT_FILEMARKS 0x100000
SGI IRIX
OS SGI IRIX 6.5.19m, 6.5.21m & APD2.7
Minimum SAIT Drive Firmware is version 0200
SCSI HBA
FC HBA SGI PCI-FC-1P(QLA2200) IRIX native
QLogic QLA2340 IRIX native (need IRIX 6.5.18m or later)
TPSC Config File
In the IRIX environment when testing the SAIT1drive without APD2.7, the following entry must be added to the "/var/sysgen/master.d/scsi" file. (similar to st.conf)
{ SONYAIT, TP8MM_AIT, 4, 7, "SONY", "SDZ-130" /*SAIT*/, 0, 0, {0},
MTCAN_BSF | MTCAN_BSR | MTCAN_APPEND | MTCAN_SETMK |
MTCAN_PREV | MTCAN_SYNC | MTCAN_SPEOD | MTCAN_CHKRDY |
MTCAN_VAR | MTCAN_SETSZ | MTCANT_IMM | MTCAN_SILI |
MTCAN_SEEK | MTCAN_CHTYPEANY | MTCAN_COMPRESS,
40, 10*60, 10*60, 15*60, 10*3600, 512, 512*512,
tpsc_default_dens_count, tpsc_default_hwg_dens_names,
tpsc_default_alias_dens_names,
{0}, 0, 0, 0,
0, (u_char *)0 },
Changes from the AIT-3 entry:
1. Removed MTSCAN_PART because we do not support multiple partitions.
2. Increased the timeout values for SAIT1.
tp_mintimeo 4 -> 10 minutes
37
tp_spacetimeo: 4 -> 10 minutes
tp_rewtimeo: 5 -> 15 minutes
tp_maxtimeo: 3 -> 10 hours
APD Config File
Install APD2.7 Package
Install APD License for SDZ-130 and SDZ-100
Rename /etc/config/ts.config.N to ts.config
Rename /var/sysgen/master.d/scsi.N to scsi
After reboot, find out this line by hinv command
Fabric Tape: node <WWPN> port <PORTID> on SCSI controller N : Async Personality Device
HP HP-UX
OS HP HP-UX 11.0i
Minimum SAIT Drive Firmware is v1.01
SCSI HBA
FC HBA A5158A (PCI 1Gb FC Tachyon LT) HP-UX 11.0 native
Emulex LP9002 for HP-UX 11 SCSI v4.11.08
Config File
PetaApp Linux
OS PetaApp Linux v2.00
Minimum SAIT Drive Firmware is v1.00
SCSI HBA Adaptec AHA39320 (PCI-X Dual Ultra320 LVD/SE SCSI) RedHat8 native
Adaptec AHA39160 (PCI-X Dual Ultra160 LVD/SE SCSI) RedHat8 native
FC HBA HP FCA2214 (QLA2340) for PetaApp Linux device driver
Config File
RedHat Linux
OS RedHat RedHat Linux8.0
Minimum SAIT Drive Firmware is v1.00
38
SCSI HBA
FC HBA QLogic QLA2200F qla2x00-v6.04.00
HP FCA2214 (QLA2340) for PetaApp Linux device driver
OS RedHat RedHat Linux9.0
Minimum SAIT Drive Firmware is v1.00
SCSI HBA
FC HBA QLogic QLA2200F qla2x00-v6.06.00
HP FCA2214 (QLA2340) qla2x00-v6.06.00
IBM AIX
OS IBM AIX AIX 5L 5.1, 4.3.3
Minimum SAIT Drive Firmware is v1.01
SCSI HBA
FC HBA FC6238 (PCI 2Gb FC HBA/Emulex LP9002) for AIX SCSI/IP v4.4.20.3
FC6227/FC6228 (PCI 1Gb FC HBA/Emulex LP8000) for AIX SCSI v3.9.19
SAIT DIP Switch
Default
Config File
SMIT Write Device Buffer : YES
Block Size: 0
Expande FileMark: YES
Unit Reserve/Release: YES
Read/Write Timeout: 300 sec
Microsoft Windows
OS Microsoft Windows 2000, XP
Minimum SAIT Drive Firmware is v1.00
SCSI HBA Adaptec AHA29320 (PCI-X Ultra320 LVD/SE SCSI)
Adaptec AHA39320 (PCI-X Dual Ultra320 LVD/SE SCSI)
Adaptec AHA39160 (PCI-X Dual Ultra160 LVD/SE SCSI)
FC HBA QLogic QLA2200F
39
QLogic QLA2310
QLogic QLA2340
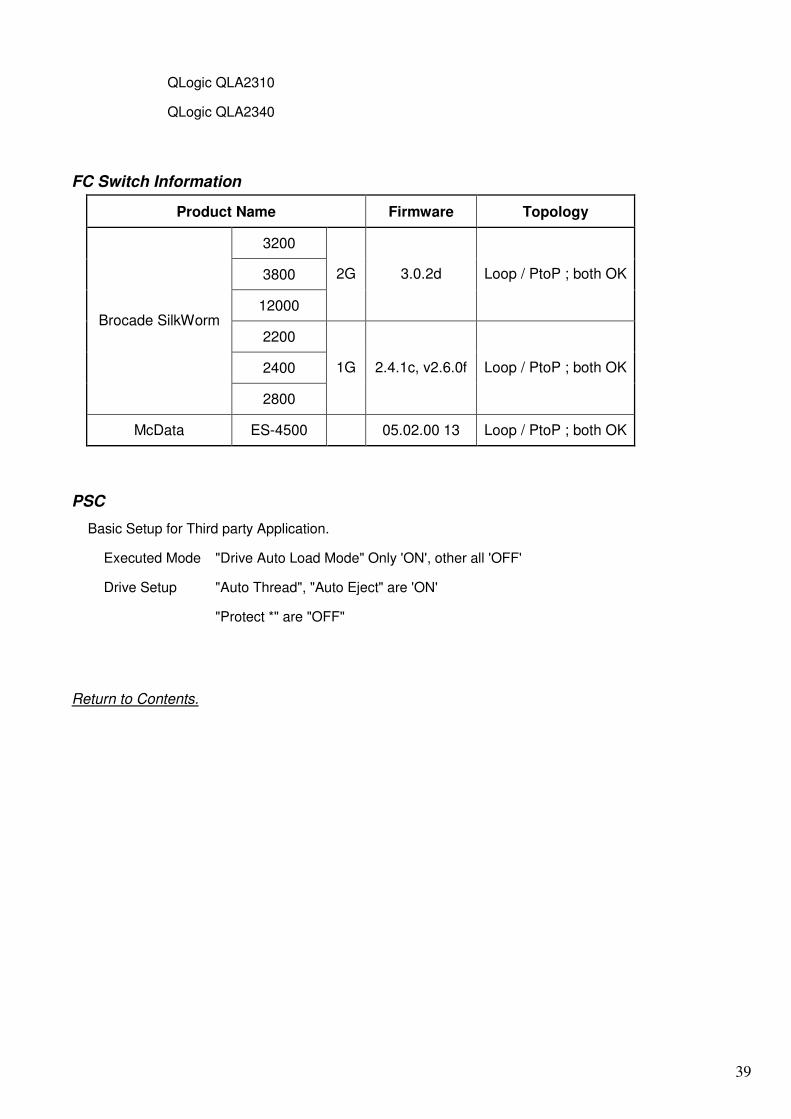
FC Switch Information
Product Name Firmware Topology
3200
3800
12000
2G 3.0.2d Loop / PtoP ; both OK
2200
2400
Brocade SilkWorm
2800
1G 2.4.1c, v2.6.0f Loop / PtoP ; both OK
McData ES-4500 05.02.00 13 Loop / PtoP ; both OK
PSC
Basic Setup for Third party Application.
Executed Mode "Drive Auto Load Mode" Only 'ON', other all 'OFF'
Drive Setup "Auto Thread", "Auto Eject" are 'ON'
"Protect *" are "OFF"
Return to Contents.
40
Appendix A: Configuration information for Old OS.
Solaris 2.3
To configure Solaris 2.3 to use the SDT-7000, SDT-9000, TSL-9000, SDT-10000, SDT-11000, TSL-11000, SDX-500C, TSL-A500C and SDX-700C add the following (blue)lines to the /kernel/drv/st.conf file and reboot the system using the boot -r option:
tape-config-list =
"SONY SDT-7000", "Sony DDS-2 4mm DAT", "SONY_TAPE",
"SONY SDT-9000", "Sony DDS-3 4mm DAT", "SONY_TAPE",
"SONY TSL-9000", "Sony DDS-3 4mm DAT Autoloader", "SONY_TAPE",
"SONY SDT-10000", "Sony DDS-4 4mm DAT", "SONY_TAPE",
"SONY SDT-11000", "Sony DDS-4 4mm DAT", "SONY_TAPE", "SONY TSL-11000", "Sony DDS-4 4mm DAT Autoloader", "SONY_TAPE",
"SONY SDX-400V", "Sony AIT1 8mm", "SONY_TAPE",
"SONY SDX-500V", "Sony AIT2 8mm", "SONY_TAPE",
"SONY SDX-700V", "Sony AIT3 8mm", "SONY_TAPE",
"SONY SDX-700C", "Sony AIT3 8mm", "SONY_TAPE",
"SONY TSL-A500C", "Sony AIT2 8mm Autoloader", "SONY_TAPE",
"SONY SDX-500C", "Sony AIT2 8mm", "SONY_TAPE",
"SONY TSL-A400C", "Sony AIT1 8mm Autoloader", "SONY_TAPE", "SONY SDX-400C", "Sony AIT1 8mm", "SONY_TAPE";<- notice the semi-
colon!
/*---- (4 spaces between SONY and SDX)*/
SONY_TAPE = 1, 0x34, 1024, 0x1639, 4, 0x13, 0x8c, 0x8c, 0x8c,3;
Please note that the tape-config-list can be limited to support only the device needed. For example, to support only the SDX-300C the following is all that is required:
tape-config-list = "SONY SDX-400C", "Sony AIT1 8mm", "SONY_TAPE"; <- notice the semi-
colon!
/*---- (4 spaces between SONY and SDX)*/
SONY_TAPE = 1, 0x34, 1024, 0x1639, 4, 0x13, 0x8c, 0x8c, 0x8c,3;
Now, reboot the system using the boot -r option. The -r option will force the system to check for any new devices and will update the /dev device file directory. ***The difference between configuring Solaris 2.3 and Solaris 2.4 or later is that the block size specified for the third parameter of SONY_TAPE is different. For Solaris 2.3 that parameter is 1024 and for Solaris 2.4 and later the parameter is zero (0). A block size of zero (0) indicates variable block mode. Solaris 2.3 must have this value set to something other than zero (0). In this case it should be set to 1024.***
41
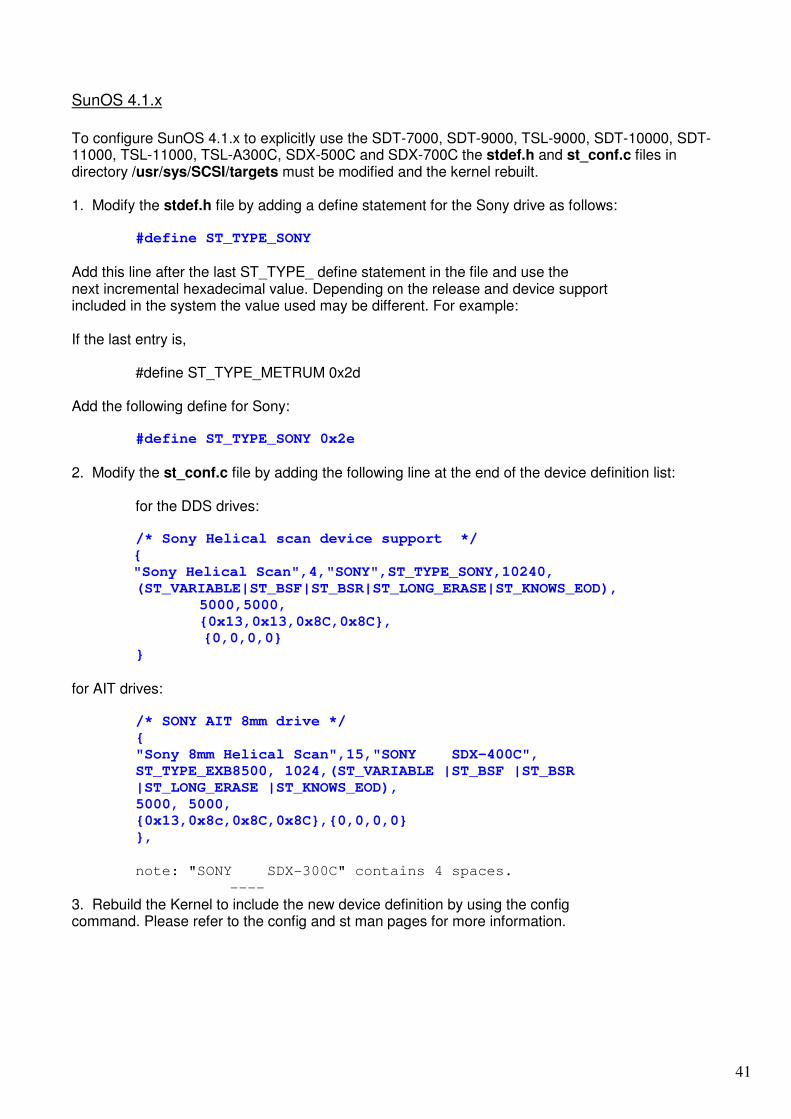
SunOS 4.1.x
To configure SunOS 4.1.x to explicitly use the SDT-7000, SDT-9000, TSL-9000, SDT-10000, SDT-11000, TSL-11000, TSL-A300C, SDX-500C and SDX-700C the stdef.h and st_conf.c files in directory /usr/sys/SCSI/targets must be modified and the kernel rebuilt. 1. Modify the stdef.h file by adding a define statement for the Sony drive as follows:
#define ST_TYPE_SONY
Add this line after the last ST_TYPE_ define statement in the file and use the next incremental hexadecimal value. Depending on the release and device support included in the system the value used may be different. For example: If the last entry is,
#define ST_TYPE_METRUM 0x2d
Add the following define for Sony:
#define ST_TYPE_SONY 0x2e
2. Modify the st_conf.c file by adding the following line at the end of the device definition list:
for the DDS drives:
/* Sony Helical scan device support */
{
"Sony Helical Scan",4,"SONY",ST_TYPE_SONY,10240,
(ST_VARIABLE|ST_BSF|ST_BSR|ST_LONG_ERASE|ST_KNOWS_EOD),
5000,5000,
{0x13,0x13,0x8C,0x8C}, {0,0,0,0}
}
for AIT drives:
/* SONY AIT 8mm drive */
{
"Sony 8mm Helical Scan",15,"SONY SDX-400C",
ST_TYPE_EXB8500, 1024,(ST_VARIABLE |ST_BSF |ST_BSR
|ST_LONG_ERASE |ST_KNOWS_EOD),
5000, 5000, {0x13,0x8c,0x8C,0x8C},{0,0,0,0}
},
note: "SONY SDX-300C" contains 4 spaces.
----
3. Rebuild the Kernel to include the new device definition by using the config command. Please refer to the config and st man pages for more information.
42
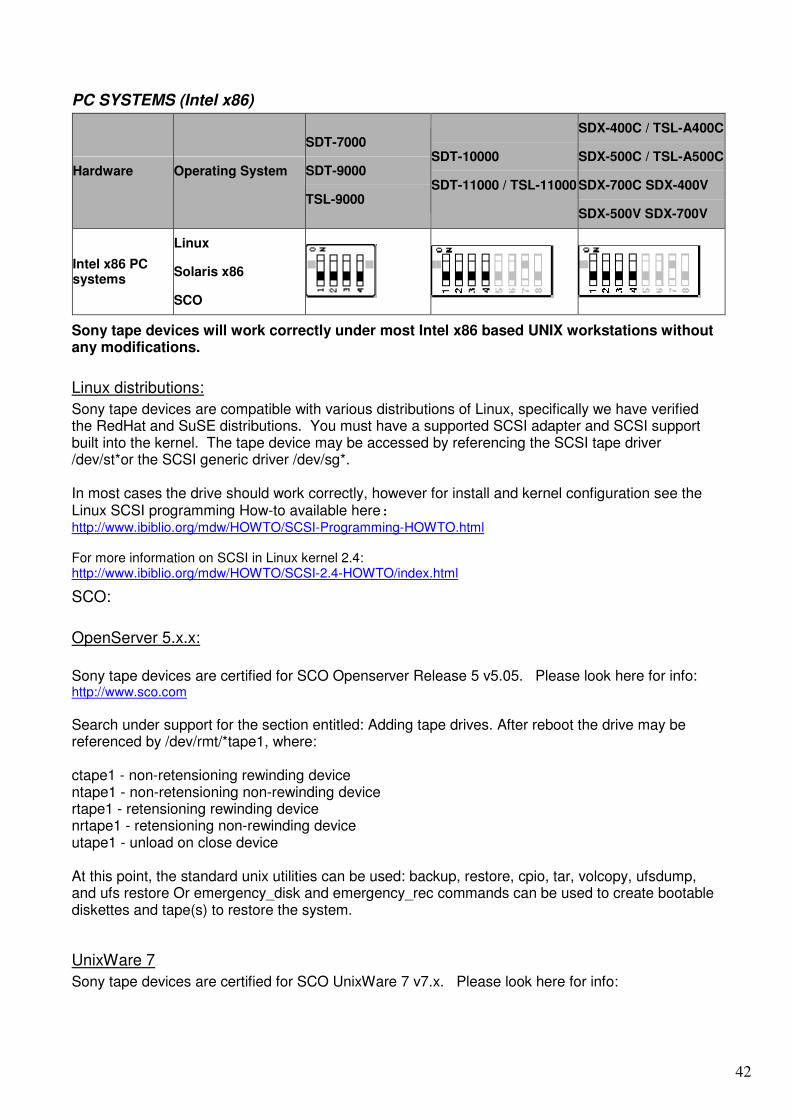
PC SYSTEMS (Intel x86)
Hardware Operating System
SDT-7000
SDT-9000
TSL-9000
SDT-10000
SDT-11000 / TSL-11000
SDX-400C / TSL-A400C
SDX-500C / TSL-A500C
SDX-700C SDX-400V
SDX-500V SDX-700V
Intel x86 PC systems
Linux
Solaris x86
SCO
Sony tape devices will work correctly under most Intel x86 based UNIX workstations without any modifications.
Linux distributions:
Sony tape devices are compatible with various distributions of Linux, specifically we have verified the RedHat and SuSE distributions. You must have a supported SCSI adapter and SCSI support built into the kernel. The tape device may be accessed by referencing the SCSI tape driver /dev/st*or the SCSI generic driver /dev/sg*. In most cases the drive should work correctly, however for install and kernel configuration see the Linux SCSI programming How-to available here: http://www.ibiblio.org/mdw/HOWTO/SCSI-Programming-HOWTO.html For more information on SCSI in Linux kernel 2.4: http://www.ibiblio.org/mdw/HOWTO/SCSI-2.4-HOWTO/index.html
SCO:
OpenServer 5.x.x:
Sony tape devices are certified for SCO Openserver Release 5 v5.05. Please look here for info: http://www.sco.com Search under support for the section entitled: Adding tape drives. After reboot the drive may be referenced by /dev/rmt/*tape1, where: ctape1 - non-retensioning rewinding device ntape1 - non-retensioning non-rewinding device rtape1 - retensioning rewinding device nrtape1 - retensioning non-rewinding device utape1 - unload on close device At this point, the standard unix utilities can be used: backup, restore, cpio, tar, volcopy, ufsdump, and ufs restore Or emergency_disk and emergency_rec commands can be used to create bootable diskettes and tape(s) to restore the system.
UnixWare 7
Sony tape devices are certified for SCO UnixWare 7 v7.x. Please look here for info:

43
http://www.sco.com Also Computer Associates ArcServeIT 6.6 supports some of the tape products.
Sun Microsystems:
Solaris 7 x86:
http://access1.sun.com/drivers/hcl/7/oct98/files/c0111.htm
*The SDT-5000, SDT-5200, SDT-7000, and SDT-9000 SDX-300C, SDX-400C, SDX-500C and SDX-700C, SDX-400V, SDX-500V, SDX-700V, SDZ-100 will work on the above platforms in Sony default mode.
Return to Contents.

44
Revision History:
+2.24 02/05/07 Added SDX-800V and SDX-1100V. Added Solaris 10. Removed past update related indications. +2.23 01/18/06 Refer to “(Updated v2.23).” +2.22 03/03/05 Refer to “(Updated v2.22).” +2.21 01/29/05 Added SDX-250V/450V/550V/900V SDZ-100 to Platform Configuration section.
Removed ‘How to create device files in compressed mode’ from Platform Configuration / HP Systems section. Removed duplicate SDZ-100 from st.conf tape-config-list and added SDZ-130 to Platform Configuration / Sun Systems.
+2.20 12/21/04 Added SDZ-130 to Table 1 on Page 3. Removed the media info from Table 1 on Page 3. Added AIT4 (SDX-900V), AIT Turbo drives (SDX-250V, SDX-450V, SDX-550V) to AIT Table on Page 5
+2.19 10/29/04 Added AIT4 (SDX-900V), AIT Turbo drives (SDX-250V, SDX-450V, SDX-550V) and S-AIT/Peta site environment info
+2.18 5/21/04 Added SDX-400V, SDX-500V and SDX-700V support +2.17 12/04/03 [dky] Completed SAIT support entries and modified Unix Common Application matrix. +2.16 07/09/03 Added SAIT1 support entries for Sun Solaris +2.15 10/28/02 spelling corrections. Added SDX-700C to default switch settings sentence. Corrected tape
config list for AIT & DDS in Sun Solaris +2.14 12/14/01 updated Linux SCSI Programming How-To link. Added Linux kernel 2.4 SCSI How-To link. +2.13 11/28/01 added AIT3 (SDX-700C). +2.12 07/25/01 added AIT and DDS reference guide. Add Unix common application support matrix +2.11 05/17/01 changed jumpers setting to default on all AIT drives, and updated all the firmware revision.
Add SDX-400C configuration to the guide. +2.10 08/31/00 added info about TSL-A500C and clarified some other loader details, added HP-UX 11.x. +2.09 08/16/00 added info about Linux autoloader control using mtx (updated link to sourceforge), added info
about Compaq Tru64 Unix, added embedded clickable hyperlinks, updated SCO data under PC-based section, and cleaned up some formatting.
+2.08 02/28/00 added SDT-11000 and TSL-11000 notes. +2.07 09/30/99 modified info for st.conf file under Solaris for better performance, added more info on HP 800
series systems, added AIT2 density code for Digital UNIX, modified colors so doc is more fax friendly, added note about lack of SDT5000 support, added SCO unixware devices, fixed SDX dipswitch graphics to reflect default settings, added AIT2 170m media length, removed other IBM setting (combined in firmware), clarified differences between Sun settings, changed table colors for better faxing.
+2.06 05/10/99 added more TSL info, added all Sony drives to Sun tape_config, removed references to SDT-5000 emulation mode for AIT2, added SDX-300C emulation mode for AIT2.
+2.05 04/15/99 added info on SDX-500C (AIT2) and SDT-10000 (DDS4), removed references to TSL-7000, new format, better jumper/dipswitch graphics, pdf format.
+2.04 01/04/99 added more detail for Digital Unix 3.x., Rev.B AIT dipswitch settings were incorrect for Termination and Term Power.
+2.03 11/09/98 added more detail for PC-based UNIX systems. +2.02 11/06/98 clarified Irix 6.4 details. +2.01 11/04/98 changed AIX 4.x details and Sun Ultra series hardware using Symbios 8c375 SCSI chips. +2.0 10/14/98 Official Release +1.x 10/01/98 First draft.
SONY MAKES NO WARRANTY OF ANY KIND WITH REGARDS TO THIS DOCUMENT. Sony shall not be liable for errors contained herein, or indirect, special, incidental or consequential damages in connection with the furnishing, performance, or use of this document!