Embed Size (px)
Citation preview
Honors Project
University Physics II
Jaymin Patel Kelvin Water Dropper
Monday April 25, 2012
Patel 1
Kelvin Water Dropper
For my honors project I chose to create an electrostatic generator. The particular
electrostatic generator I decided to create was one based off of Lord Kelvin’s water
dropper.
British physicist, William Thompson known as Lord Kelvin, was born on June
24, 1824. He was one of the most influential scientists in the nineteenth century, and
studied a variety of areas. One of his main regions of study was electricity. He
introduced many accurate methods and apparatuses to calculate electricity. In the 1860’s
Lord Kelvin created the Kelvin water dropper (Burchfield).
The Kelvin Water Dropper, also known as the Kelvin Electrostatic Generator, is
created to show the electrostatic charge generated by the movement of water through
stationary objects. As the water collects into the containers below, the electric field
between the two cans increases. The electric field between the two cans gets so high that
eventually the air conducts electricity, this process is called dielectric breakdown of air.
Since air is normally an insulator, charge doesn’t move through it, but because it becomes
a conductor, the charge moves through the air and a spark is observed (Water Drops).
The Kelvin Water dropper is a very simple concept disguised by hard
engineering. Water normally has a net zero charge because it contains a lot of equal and
opposite charges. Since the charges move freely in the water, it is easy to separate the
charge from within water.

Patel 2
(“Kelvin Water Dropper”).
As seen in the picture above, assume the left can has a net positive charge, and the right
can has a net negative charge. The rings above the cans are attached to the opposite side
can. So the left ring has a net negative charge, while the right ring has a net positive
charge. The rings are close to the openings in the water bucket. As the water leaves the
bucket, the negative ions in the water are attracted to the positive ring on the right, and
the droplet of water going through the ring ends up having a negative charge. The
droplet then collects in the can below and as more and more droplets of water fall in the
can it keeps building a stronger negative charge. The same thing happens on the other
side but with opposite charges. The negative ring attracts a positive ion, and as the
positive ions collect in the can below, the can builds a strong positive charge. The insides
Patel 3 of the can become neutral and the charge collects on the outsides of the cans (“Kelvin
Electrostatic Generator”). When the charge becomes very strong on the outside of the
cans, the potential difference between the two cans can no longer be withheld, and the
cans discharge creating a spark.
The water dripping from the water bucket should stream uniformly with
being proportional with :
Where is a positive constant depending on the design of the project and the water flow.
The previous equation can be solved by using the equation:
Where is the potential when time equals zero (Vanderkooy). According to these
formulas, this will create the best chance for the water dropper to generate its own charge
and cause the system to work.
The basic construction of the Kelvin Water Dropper is two metal cans attached to
metal hollow rings on the opposite sides. Above the hollow rings is a water bucket. The
water bucket has two holes, each with a stopper connected to it, so it can control the
amount of water being dripped out. The water should be traveling through the rings at
about the time it starts separating into drips. (Beaty).
During the construction of the Kelvin Water Dropper, I had to run many test in
order to find the best way it could work. First, I had to build a base that would act as an
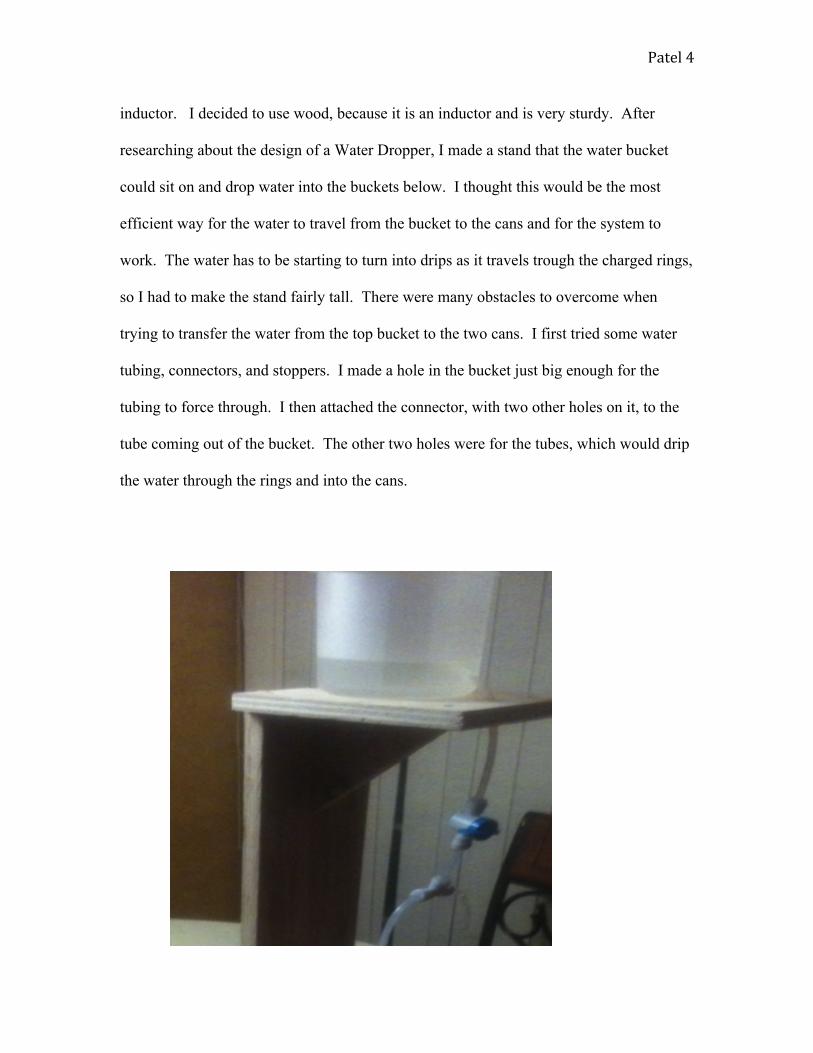
Patel 4 inductor. I decided to use wood, because it is an inductor and is very sturdy. After
researching about the design of a Water Dropper, I made a stand that the water bucket
could sit on and drop water into the buckets below. I thought this would be the most
efficient way for the water to travel from the bucket to the cans and for the system to
work. The water has to be starting to turn into drips as it travels trough the charged rings,
so I had to make the stand fairly tall. There were many obstacles to overcome when
trying to transfer the water from the top bucket to the two cans. I first tried some water
tubing, connectors, and stoppers. I made a hole in the bucket just big enough for the
tubing to force through. I then attached the connector, with two other holes on it, to the
tube coming out of the bucket. The other two holes were for the tubes, which would drip
the water through the rings and into the cans.
Patel 5 I attached the stoppers onto each tube, trying to control the amount of water able to drip
into the cans. This attempt failed to work because I could never get the same amount of
water to run through each ring because I had two stoppers. I changed the plan to one
stopper as seen in the picture above. This also caused a dilemma because the stopper
would cause more water to run through the left side and hardly any water through the
right. After that failed, I decided to make another hole into the water bucket and place
the tube through the hole. I then placed two straight straws on the ends on the tubing,
hoping the water would stream straight through. This caused a problem because the
tubing wasn’t straight, so the straws were not able to line up straight either. I placed two
straws with flexible tips on the ends of the tube so I could adjust them as needed. A setup
of this method can be seen in the picture below. This seemed to work the best because
the flexible tip straw gave the water a straight path to the cans.
After getting the water system to work, I moved on to the placement of the rings
and the cans. I placed two cans on the bottom stand. I taped some thin copper wire to the
inside of each can, and the other end would hold the hollow copper rings that the water
would travel through. Attaching the copper ring to the wire was fairly difficult. I had to
wrap the wire around the ring and then create a knot for the wire to hold the ring in place.
Since the wire is not as loose and flexible as string, the knots were not as tight as they
should have been, and the rings were barley able to stand up straight. I attached each
hollow ring to its own wire. I moved the can around until each ring was under the
opposite side’s water straw, and was under the opposite can. I poured water into the
bucket and watched for any sign of electric discharge. No static electricity was seen
because there was a problem with the design. The water was not going through the ring
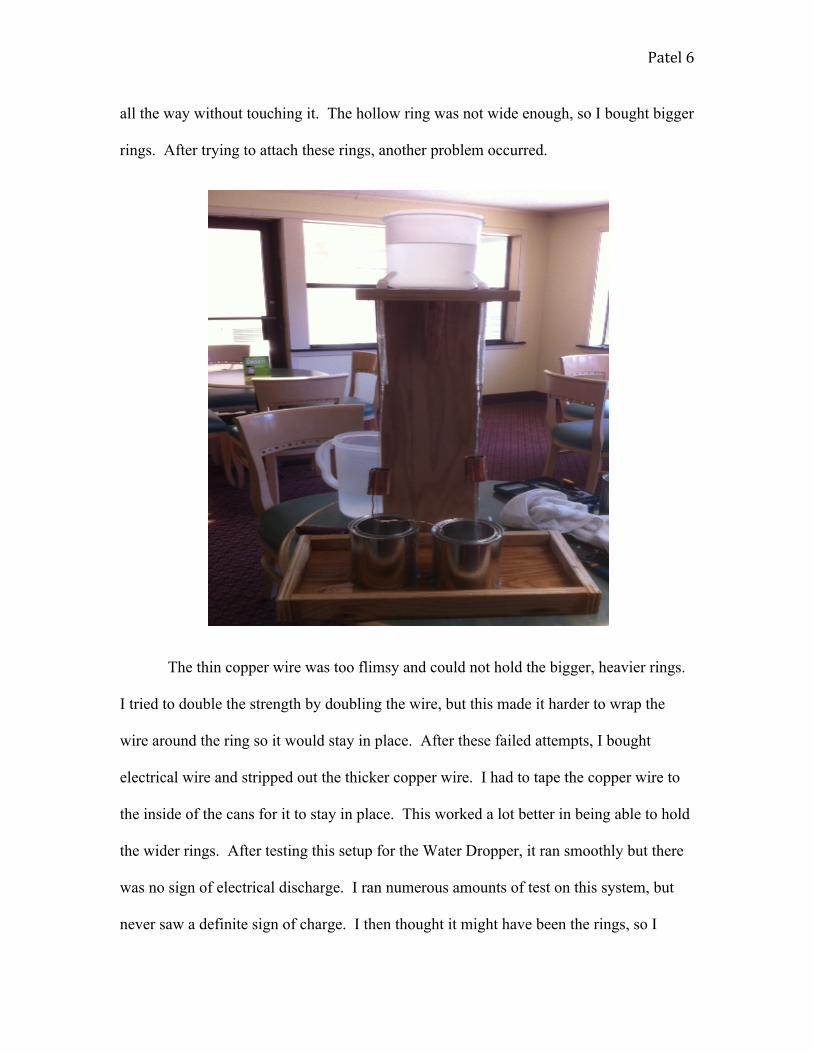
Patel 6 all the way without touching it. The hollow ring was not wide enough, so I bought bigger
rings. After trying to attach these rings, another problem occurred.
The thin copper wire was too flimsy and could not hold the bigger, heavier rings.
I tried to double the strength by doubling the wire, but this made it harder to wrap the
wire around the ring so it would stay in place. After these failed attempts, I bought
electrical wire and stripped out the thicker copper wire. I had to tape the copper wire to
the inside of the cans for it to stay in place. This worked a lot better in being able to hold
the wider rings. After testing this setup for the Water Dropper, it ran smoothly but there
was no sign of electrical discharge. I ran numerous amounts of test on this system, but
never saw a definite sign of charge. I then thought it might have been the rings, so I
Patel 7 changed them to cut out circles of aluminum cans. I thought the aluminum cans would
work because they are very light and have a bigger radius. After trying the aluminum
cans for a few trials, I heard a sound, which sounded like the cans were discharging, but I
still could not see any sort of spark or shock. I placed two of thin copper wires near each
other, one off of each can, to see if any spark was created. I ran the test again and heard
the same sound occur about 4 to 5 seconds apart for 25 to 30 seconds, but still no spark. I
ran two more tests and had the same results. It became very dark outside so I waited till
the next day to have more test runs. This could have been a bad idea, because after
running test the next morning nothing was observed. I didn’t hear any discharge or see
any spark. I thought about possible factors I could change to improve the water dropper.
I tried to figure out what the flaws could be in the experiment. I made sure that the
copper wires were attached to the cans securely, and they were not touching each other. I
also connected the small, thin copper wire to each metal can and positioned the other end
really close to each other to try and create a spark gap. Since one can was supposed to
have a little more of a certain charge then the other, I tried rubbing a plastic sack on a
towel, to build up charge, and then touching one of the cans with the sack. I checked to
see if the sack had net charge by bringing it close to a piece of tissue, and when I did the
piece of tissue would rise. I knew the bag had a charge so I made contact with one of the
cans, and grounded the other by just touching it with my hand. This caused a definite
unbalance in charge for both cans. After testing the water dropper with these
modifications, there was still no sight of a spark. I also thought that the cut out aluminum
cans had a few sharp edges on them. This would cause the charge to bleed off at the
Patel 8 points making it very hard to see any discharge, so I replaced the cans with the rings
again. I ran a few more test, but nothing
was observed. After running various test on different methods of the water dropper, and
not seeing any conclusive results that it worked, I decided that my creation of the Kelvin
Water Dropper was not working.
Looking back on the different ideas I used and through more research on why my
Kelvin Water Dropper did not work, I came across a few things that I could have changed
to possibly effect its result. First off is that using wood as the base is not a good idea. The
reason behind this is because it is too conductive, and some charge will be absorbed by
the wooden base (Beaty). I should have put some other material such as Styrofoam under
the metal cans to separate it from the wooden base. Also, I should have placed the hollow
copper rings closer to the ends of the straw, where the water was dripping. The charge of
the ring was supposed to attract the oppositely charged water ion. By the ends of the
straws being closer to the rings, this effect might have actually taken place in my
experiment, and could have possibly changed the outcome. Another change that could
have been made was to use more flexible wires with clips on the ends instead of copper
wire. The copper wires I used in the experiment were hard to manage and sometimes too
stiff to use the way they were intended. The use of more flexible wire may have made it
easier to move the hollow copper rings closer to the straws. After many attempts and
trying different ways to make the Kelvin Water Dropper, a spark was never detected. I
built and tested different various models of the Electrostatic Generator, but I could not
figure out the perfect model for it to make itself discharge.
Patel 9
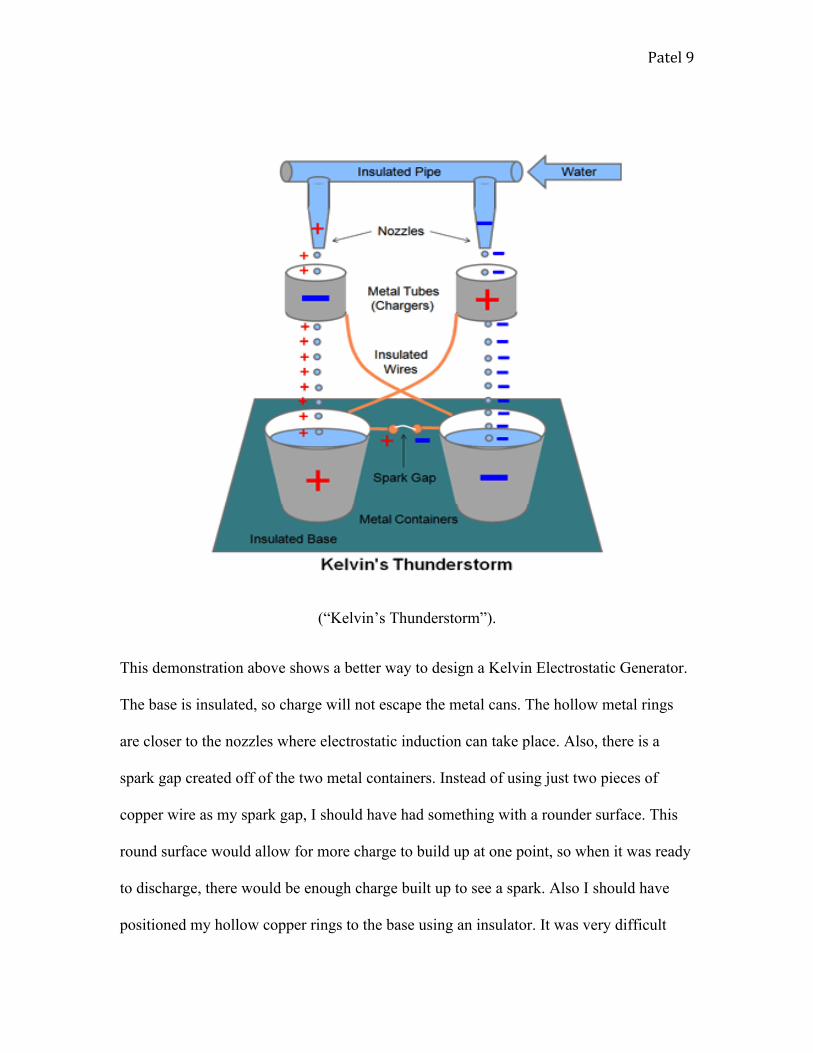
(“Kelvin’s Thunderstorm”).
This demonstration above shows a better way to design a Kelvin Electrostatic Generator.
The base is insulated, so charge will not escape the metal cans. The hollow metal rings
are closer to the nozzles where electrostatic induction can take place. Also, there is a
spark gap created off of the two metal containers. Instead of using just two pieces of
copper wire as my spark gap, I should have had something with a rounder surface. This
round surface would allow for more charge to build up at one point, so when it was ready
to discharge, there would be enough charge built up to see a spark. Also I should have
positioned my hollow copper rings to the base using an insulator. It was very difficult
Patel 10 trying to attach it to the wires and then position the rings so the water could drip through
them. If I would have supported them to my base, I could have used a more flexible wire
to connect the rings to the metal cans, and the water would easily drip right through the
rings.
Constructing the Kelvin Water Dropper was a more difficult task than I thought it
would be. Even after all the hard work researching and constructing the model, it did not
show any definite sign of charge build up. Through all the trials and errors, I have learned
a lot about Lord Kelvin and the physics and concepts behind the Electrostatic Generator.
Even though my project wasn’t successful I still have a better knowledge of how
electrostatic induction, potential differences, and electrostatic generators work. This
project has taught me a lot about physics, and that even though the physics concepts can
be simple there are a lot of factors that contribute to making things work.
Patel 11 References:
Beaty,Bill. “”Kelvin’s Thunderstorm” Lord Kelvin’s water-drop electrostatic generator.” 1995. Web. 15 Feb. 2012. <http://www.eskimo.com/~billb/emotor/kelvin.html>.
Burchfield, Joe D. “Lord Kelvin and the Age of the Earth.” 1975. Introduction:1-10.
Print. Encyclopedia Britannica Online, s. v. "electrostatic induction," accessed February
15, 2012, <http://www.britannica.com/EBchecked/topic/184035/electrostatic-induction>. Hill,M., and DJ Jacobs. “A Novel Kelvin Electrostatic Generator.” New Approaches:
60-63. Print. “Kelvin Electrostatic Generator”. Web. 12 Apr. 2012.
<http://www.splung.com/content/sid/3/page/electrostatic_machines>. “Kelvin’s Thunderstorm”. Electropeadia. Web. 2005. 20 Apr. 2012
<http://www.mpoweruk.com/homebrew.htm>. “Kelvin Water Dropper”. 2012. Web. Apr 15. 2012. Picture.
<http://en.wikipedia.org/wiki/Kelvin_water_dropper>.
Vanderkooy, John. “An Electrostatic Experiment of Lord Kelvin with Running
Water.” January 1984. Web. 20 Mar. 2020. <https://docs.google.com/viewer?a=v&q=cache:UF6UFyJVynUJ:web.cvcaroyals.org/~rheckathorn/documents/KelvinWaterDropGeneratorPhys13News-Mine.doc+lord+kelvin+electrostatic&hl=en&gl=us&pid=bl&srcid=ADGEESjnwS2fjMbpcppDkp2yMXw2ixtfnQ3AuwO3sDdlKJJhtV3mc1MRpr3BQcS_5fV0Brp3-gRXinUE43P3HSkUzsaJbnNPy19n2OLKU1mQ54Fh0GCy-UBmEcsOJBaPIIL1YTaFMXwV&sig=AHIEtbS_2dnbkVhw-uuIdn-7sp8BQCvAew>.
“Water Drops and Sparks! Experimenting with a Kelvin Electrostatic Generator.”
Web. 13 Apr. 2012. < http://www.sciencebuddies.org/science-fair-projects/project_ideas/Elec_p069.shtml>.


![HOG BUNG DROPPER - Kentmaster · rev b: 08/10 operator’s manual [english]: hog bung dropper including: operation, instruction, installation and maintenance important: read this](https://img.pdfslide.us/doc/110x75/5b4789b27f8b9a5e5f8c2eeb/hog-bung-dropper-rev-b-0810-operators-manual-english-hog-bung-dropper.jpg)