Embed Size (px)
Citation preview

University of Wisconsin System
SFS Business Process
ePro.1.01 – Requester Documentation
11/6/2019 1 of 40
CONTENTS
I. Overview ............................................................................................................ 2 1. EProcurement Overview ..................................................................................... 2 2. Log into SFS to Create eProcurement Requisition ............................................. 2
II. Requisition Settings (Optional) - Create Requisition Specific Defaults ....... 3
III. Methods to Create Requisitions ....................................................................... 6 3. Special Request – Most Common ........................................................................ 6
4. Template ............................................................................................................ 10 5. Express Item Entry - Abbreviated order entry .................................................. 12 6. Favorites ........................................................................................................... 13
7. Recently Ordered .............................................................................................. 14
IV. Checkout – Review and Submit Requisition ................................................ 15
V. View requisitions from Other Users .............................................................. 22
VI. Manage Requisition Page ............................................................................... 24 8. View Status, Lifespan, and Perform Actions on the Requisitions ..................... 24
VII. System Steps .................................................................................................... 28
9. Copy Requisition (Can be used to create a NEW requisition and resubmit a
DENIED requisition) ........................................................................................ 28 10. Cancel a Requisition ......................................................................................... 33
VIII. Entering New Fiscal Year Requisitions ........................................................ 35 11. New Year Requisitions (May 1 – June 30) ........................................................ 35
IX. Create Templates and Favorites .................................................................... 37 12. Creating Templates ........................................................................................... 37
13. Creating Favorites ............................................................................................ 38
Revision Control.............................................................................................................. 40

University of Wisconsin System
SFS Business Process
ePro.1.01 – Requester Documentation
11/6/2019 2 of 40
I. Overview
EProcurement Overview
Eprocurement is being rolled out to create efficiencies in the purchasing process by
implementing electronic approval workflow. This streamlines the approval process by
allowing a requester to create and submit for approval a request for purchase
electronically, thus eliminating the current manual paper process.
Log into SFS to Create eProcurement Requisition
eProcurement Requisitions are created in SFS. Most people use SFS to enter and/or
approve Expense reports. This is the same system. Go to the below link to access SFS.
https://portal.sfs.wisconsin.edu
If you have trouble logging in, please reach out to your Business Unit Administrator or
contact Security using the below link.
https://www.wisconsin.edu/sfs/security/

University of Wisconsin System
SFS Business Process
ePro.1.01 – Requester Documentation
11/6/2019 3 of 40
II. Requisition Settings (Optional) - Create Requisition Specific Defaults
Requisition settings are requisition specific. It allows the Requesters to select a Business
Unit, Line, Shipping, and Distribution defaults per requisition. The defaults will apply to
all requisition line item(s), but can be changed if necessary. This is similar to PO
Defaults.
This can be the first step when creating requisitions, but is not a
requirement. If you do not want to enter requisition defaults, skip to
Section III (Methods to Create Requisitions.)
1. To create Requisition Settings, navigate to Requisitions
Navigator: eProcurement > Requisition
2. Click Requisition Settings at the top of the Create Requisition page
3. The below page will appear. Use the magnifying glass to select a Business Unit, if
the business unit you need is not displayed.
4. Please note, the Business Unit you select, must be the same as the GL Unit used
on the requisition chart field string. See the above screen shot.

University of Wisconsin System
SFS Business Process
ePro.1.01 – Requester Documentation
11/6/2019 4 of 40
5. If you select a different Business Unit, you will be brought back to the Create
Requisition page.
6. If you do not need to create other Requisition Setting defaults, choose the method
to create a requisition and continue the requisition creation process. Otherwise
click Requisition Settings again to go back into the Requisition Settings to select
the other defaults. You will notice the Business Unit has changed.
7. Enter Line, Shipping, and/or Distribution Defaults. Use the magnifying glass to
populate the fields. Enter as few or as many defaults as needed.
8. The selection of a category, will default an account into the requisition.
Accounts have been added to each category profile, based on the history. Do not
enter an account in the requisition settings page, if a category is selected. The
account in the category profile will override an account input. Please note, the
account defaulted into the requisition can be changed if necessary, once in
the requisition.

University of Wisconsin System
SFS Business Process
ePro.1.01 – Requester Documentation
11/6/2019 5 of 40
9. Click Chartfieds2 to enter chart field combination defaults
10. The requisition defaults will apply to all created requisition lines. These can be
changed on the requisition, if necessary.
11. Verify the Business Unit and GL unit are the same. If they are not the same, make
the update.
12. After entering in the desired Requisition Setting(s), click
13. The Create Requisition page will appear.
14. Click the hyperlink on the selected method to create the requisition.

University of Wisconsin System
SFS Business Process
ePro.1.01 – Requester Documentation
11/6/2019 6 of 40
III. Methods to Create Requisitions
The below screen will appear after the Requisition Settings are entered or the
Requester navigates to the Create Requisition page. Select the method to create the
requisition.
Navigator: eProcurement > Requisition
Special Request – Most Common
1. Click Special Request icon .
2. The below screen will appear.
3. Supplier, Category, and Unit of Measure may already be populated, if selected in
the Requisitions Settings.
4. Populate all the Item Detail fields. These are required inputs, as indicated by the
“*”.

University of Wisconsin System
SFS Business Process
ePro.1.01 – Requester Documentation
11/6/2019 7 of 40
a. * Item Description. – Enter as much information as you can about the
product/service you are requesting. For example the model #, terms,
contract information, and any other pertinent information.
b. * Price
c. * Quantity
d. * Category – Use the magnifying glass to select a category number. The
below screen will appear. This step may not be a necessary, if category
number was selected in the Requisition Settings.
Click the link on the selected category. The create requisition page will be
displayed, with the category name populated in the field. The account per
the category’s profile will be populated in the requisition chart field string.
e. Currency – defaults to USD and cannot be updated.
f. * Unit of Measure – Use the magnifying glass to select a Unit of Measure.
This step may not be a necessary, if you selected a UOM in the
Requisition Settings.
University of Wisconsin System
SFS Business Process
ePro.1.01 – Requester Documentation
11/6/2019 8 of 40
g. Supplier is not a required input. It can be entered in by the Buyer once the
requisition is converted to a Purchase Order. This step may also not be a
necessary, if you already selected a Supplier in the Requisition Settings.
h. If entering in a Supplier, use the magnifying glass on the Supplier ID or
Name. Select a Supplier. Suppliers for all Business Units will be under
Set ID: SHARE, with the exception of UWMSN, Bursars, and DPD.
5. Use the “Additional Information” space for any information you may typically
write on paper requisitions today. Examples include contract numbers, special
instructions, etc.
6. The below boxes can be checked off to provide further instructions for the
requisition.
7. After entering in the information, click .

University of Wisconsin System
SFS Business Process
ePro.1.01 – Requester Documentation
11/6/2019 9 of 40
8. The Special Request page will be blank. Enter in additional items if needed. If no
additional items need to be added, view the shopping cart to verify ordered items.
9. The shopping cart will display the requested order.
Some browser versions may not display the shopping cart. The process can still
proceed.
10. If ready to proceed, click from the Shopping Cart or at the top
of Requisition page.
11. The Checkout – Review and Submit Page will be displayed.
12. Go to the Section IV Checkout – Review and Submit Section of this document to
continue the requisition creation process.

University of Wisconsin System
SFS Business Process
ePro.1.01 – Requester Documentation
11/6/2019 10 of 40
Template
Templates are used to order sets of items that are frequently ordered together.
Templates can be used to create requisitions. Instructions on creating a Template for
future use, are in the Create Template and Favorites section of this document.
1. After Navigating to the Create Requisition page, click the icon,
if Templates are available.
2. Available Templates will be displayed.
3. Click the carrot to expand the selected Template. The information highlighted
below will carry over into the requisition.

University of Wisconsin System
SFS Business Process
ePro.1.01 – Requester Documentation
11/6/2019 11 of 40
4. Enter the Quantity
5. Click
6. The Shopping Cart will appear. If OK with the order, Click at
the top of the page or from the shopping cart.
7. The Checkout – Review and Submit Page will be displayed.
8. Go to the Section IV Checkout – Review and Submit Section of this document to
continue the requisition creation process.

University of Wisconsin System
SFS Business Process
ePro.1.01 – Requester Documentation
11/6/2019 12 of 40
Express Item Entry - Abbreviated order entry
1. After Navigating to Requisition, Click the icon.
2. The below page will be displayed
3. Use the magnifying glass to populate the highlighted fields.
a. Description – Item you are requesting
b. Quantity
c. UOM – Unit of Measure
d. Price
4. Click .
5. The ordered item will be in a Shopping Cart
6. Enter another item, if desired, and click
7. All the ordered item(s) will be in the Shopping Cart.
8. If done, click from the shopping cart or from the top of the
page
9. The Checkout – Review and Submit Page will be displayed.
10. Go to the Section IV Checkout – Review and Submit Section of this document to
continue the requisition creation process.

University of Wisconsin System
SFS Business Process
ePro.1.01 – Requester Documentation
11/6/2019 13 of 40
Favorites
Favorites are used to order high frequency items. Favorites can be used to create
requisitions.
Instructions on creating Favorites for future use, are in the Create Template and
Favorites section of this document.
1. After Navigating to Requisition, click the icon, if Favorites are
available.
2. All the Favorites will be listed. Select a favorite.
3. Enter the quantity, and click for each selected item.
4. The ordered item(s) will be in a Shopping Cart.
5. When done selecting items, click at the top of the page or from
the shopping cart.
6. The Checkout – Review and Submit Page will be displayed.
7. Go to the Section IV Checkout – Review and Submit Section of this document to
continue the requisition creation process.

University of Wisconsin System
SFS Business Process
ePro.1.01 – Requester Documentation
11/6/2019 14 of 40
Recently Ordered
Recently ordered items will be listed.
1. After Navigating to Requisition, click the icon
2. All the Recently Ordered items will be listed. Select a recently ordered item.
3. Enter the quantity, and click for each ordered item.
4. The ordered item(s) will be in the shopping cart.
5. When done selecting items, click at the top of the page or from
the shopping cart.
6. The Checkout – Review and Submit Page will be displayed.
7. Go to the Section IV Checkout – Review and Submit Section of this document to
continue the requisition creation process.

University of Wisconsin System
SFS Business Process
ePro.1.01 – Requester Documentation
11/6/2019 15 of 40
IV. Checkout – Review and Submit Requisition
Once is clicked the from the Create Requisition page, the
Checkout – Review and Submit page will be displayed.
1. Enter a Requisition Name. If a name is not entered, the Requisition Name will be
the Requisition ID.
When populating this field, use a name that is descriptive and meaningful. For
New Year requisitions created in the current year, use this field to label the
requisition as a New Year request. Go to the Entering New Fiscal Year
Requisition section of this document, for more details.
2. If adding comments and/or attachments to a requisition line, click the .

University of Wisconsin System
SFS Business Process
ePro.1.01 – Requester Documentation
11/6/2019 16 of 40
3. The Line Comments page will be displayed.
4. Add commentary
5. If adding attachment(s), click and upload the
document. Make sure the name on the attachment is valid.
6. To add multiple comments, click the “+” at the top of the page. Make sure to
enter a comment in the comments section for each attachment.
7. Click after adding commentary and/or uploading the attachment(s).
The Submit page will be displayed.

University of Wisconsin System
SFS Business Process
ePro.1.01 – Requester Documentation
11/6/2019 17 of 40
8. The next steps are for adding Ship To, Location, and chart field string data.
If Requisitions Setting defaults were entered, the data has already been
populated. If there are no changes to the selected defaults and/or a single
line requisition was created, skip to step 16.
9. Click at each requisition line, to display Ship To, Location, and chart field
combination. .
10. The below will display. Click the carrot next to Account Lines if the accounting
line details are not already displayed. Click the magnifying glass to enter the Ship
To, the Location, and the GL Unit. The GL Unit, must be the same as the
Business Unit.
University of Wisconsin System
SFS Business Process
ePro.1.01 – Requester Documentation
11/6/2019 18 of 40
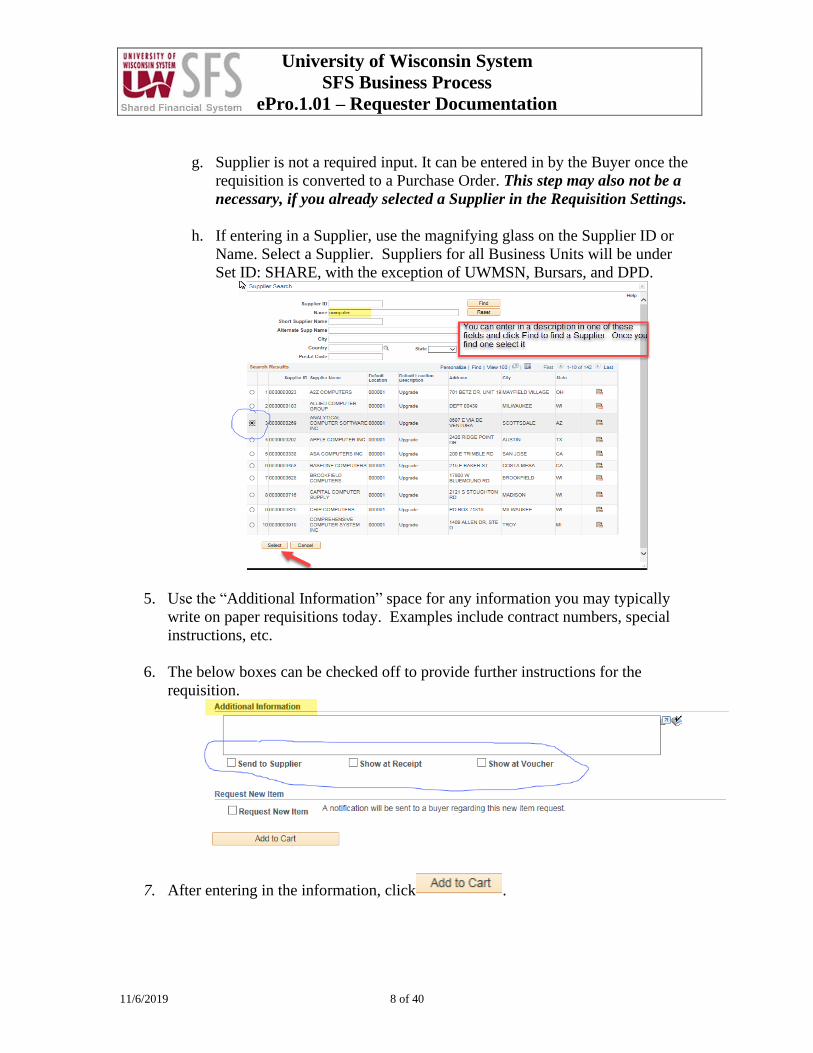
11. At the Accounting Line, click the Chartfield2 tab to display the chart field.
12. Enter a valid chart field combination. Use the magnifying glass if necessary.
• Account
• Fund
• Dept
• Program
• Class (optional)
• GL Unit (required input if you enter in a Project number)
• Project (optional)
13. If you receive an error message on the chart field combinations, the chartfield
string is invalid. Your department manager or Accounts Payable Group can
provide a valid chart field combination. If you still have issues, go into WISDM
(Main Menu/Other/Funding Validation/Inquiry) for chartfield assistance.
https://wisdm2.doit.wisc.edu/wisdm2/EditQuery/EditQuery.aspx
14. Please note, if the requisition has multiple lines, the above steps will have to be
completed for each line.

University of Wisconsin System
SFS Business Process
ePro.1.01 – Requester Documentation
11/6/2019 19 of 40
15. Once all the information has been entered for the line item(s), enter Requisition
Comments and/or Approval Justification if desired.
16. Look over the requisition to verify inputs.
17. If done and ready to submit the requisition for approval, click .
If the requisition is not complete and/or ready to be submitted for approval click
This will save the requisition at an Open Status.
18. To finish an Open Status requisition at a later date, select “Edit” Action from the
Manage Requisition page. The Manage Requisition section of this document
provides more information on completing this action.

University of Wisconsin System
SFS Business Process
ePro.1.01 – Requester Documentation
11/6/2019 20 of 40
19. The below confirmation page will appear after the requisition has been submitted
for approval. It will display the Requisition Name and ID and the required
Approvals prior to Purchase Order creation.
20. Workflow emails will be automatically generated and routed to the approvers in
the workflow. The email will contain a link to the approval page in SFS.
21. Once the requisition is submitted for approval, the requisition creation process is
completed. The Status of the requisition can be monitored from the Manage
Requisition page.
Navigator: eProcurement > Manage Requisition
University of Wisconsin System
SFS Business Process
ePro.1.01 – Requester Documentation
11/6/2019 21 of 40
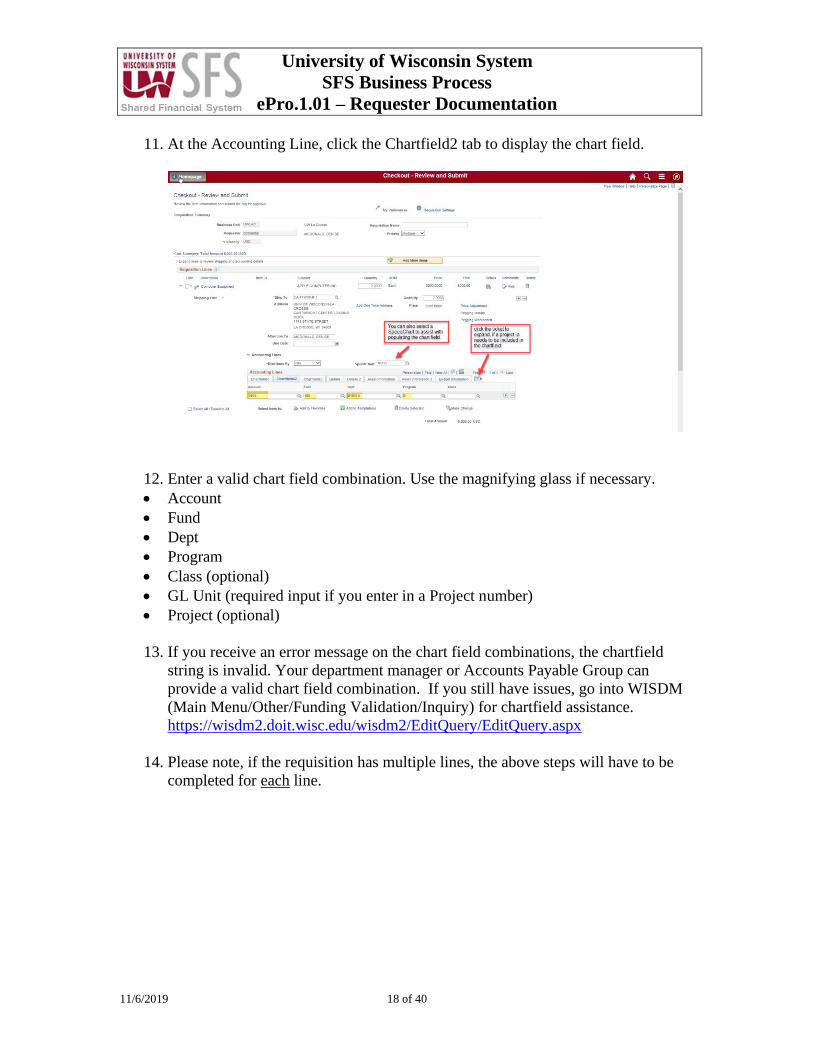
22. From the Manage Requisiton page, enter the Business Unit and/or Requisition ID
and click Search.
23. Expand the carrot on the Requisition to view the status of the requisition.
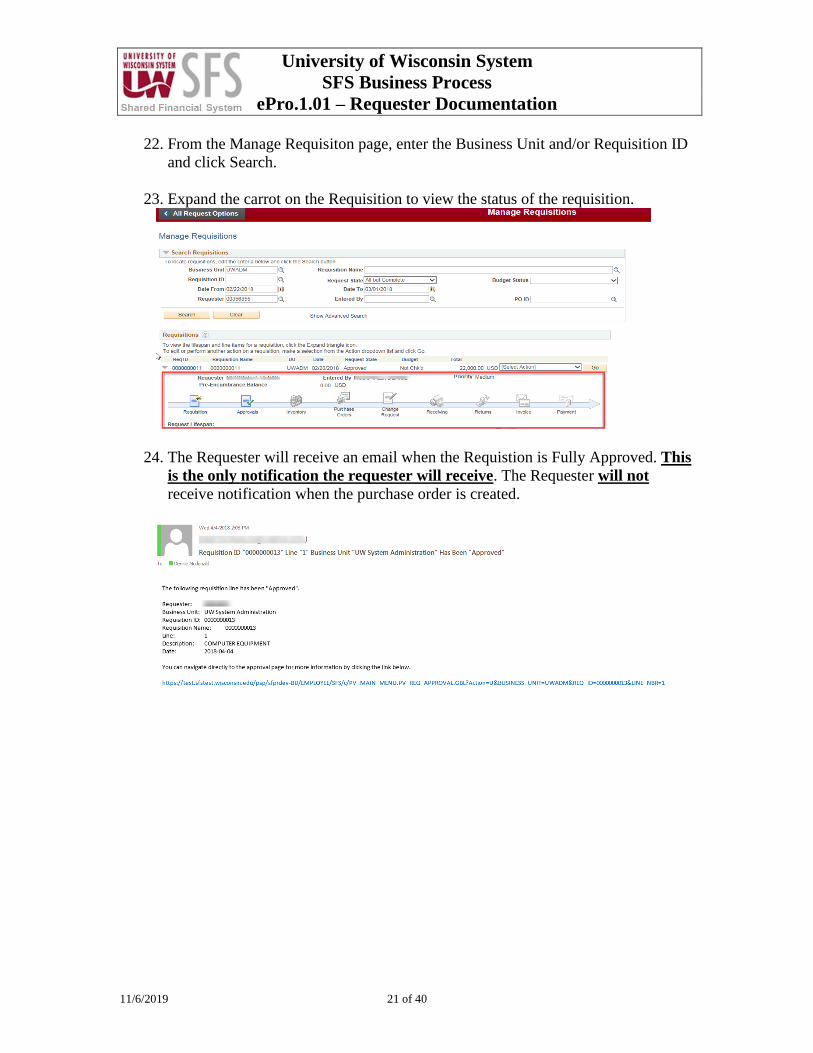
24. The Requester will receive an email when the Requistion is Fully Approved. This
is the only notification the requester will receive. The Requester will not
receive notification when the purchase order is created.

University of Wisconsin System
SFS Business Process
ePro.1.01 – Requester Documentation
11/6/2019 22 of 40
V. View requisitions from Other Users
Users may occasionally have the need to view requisitions from other users. This can be
accomplished from the Manage Requisitions page, which will be discussed in step V1. If
your current security does not allow you to view other user’s requisitions, contact your
BU Administrator to adjust your Requisition Authorization. Below are the screen shots
to make updates to the Requester’s Requisition Authorization.
Navigation to the User Preference Screen (Requisition Authorization)
Navigator > Set Up Financials/Supply Chain > Common Definitions > User
Preferences >Define User Preferences

University of Wisconsin System
SFS Business Process
ePro.1.01 – Requester Documentation
11/6/2019 23 of 40

University of Wisconsin System
SFS Business Process
ePro.1.01 – Requester Documentation
11/6/2019 24 of 40
VI. Manage Requisition Page
View Status, Lifespan, and Perform Actions on the Requisitions
To view the status or perform actions on your requisition, navigate to the Manage
Requisition page. Depending on your security, you may also be able to view the status of
a requisition from another user. See Section V.
The navigation to the Manage Requisitions page is as follows
Navigator: eProcurement > Manage Requisitions
View Status of Requisition
1. Enter one or more of the below criteria to select the requisition to review.
Business Unit Requisition Name
Requisition ID Requests Status
Date From Date To
Requester (EMPL ID) PO ID
2. Click
3. Select the requisition to review.
4. The Request State column provides the status of the requisition.
Open: Saved, but not Submitted.
Pending: Requisition is completed and waiting on Approvals
Approved: Requisition has been approved, but purchase order has not been created
PO Created: Purchase Order has been created
PO Dispatched: Purchase Order has been dispatched to Supplier

University of Wisconsin System
SFS Business Process
ePro.1.01 – Requester Documentation
11/6/2019 25 of 40
5. Click next to the Requisition ID to view the Lifespan of the requisition.
6. Click on any highlighted icon for stage details.
a. Approvals Icon - View the Approvals
b. Purchase Orders - Obtain PO ID number and other Purchase Order
information.
c. Invoice - Review Supplier Invoice
d. Payment - View payment details
A highlighted icon in the Lifespan indicates the stage is complete and available for
review.
Perform Actions on a requisition
7. The following actions are available
a. Copy
b. Edit (can be used to complete a requisition at an Open status (Saved for Later)
and edit an existing requisition)
c. Approvals
d. View Print
e. Cancel
f. Budget Check (Only available to the ePro Buyer)
8. Use the drop down to select an action and Click “Go” to trigger the action. In the
below example, the “Copy” action was selected.

University of Wisconsin System
SFS Business Process
ePro.1.01 – Requester Documentation
11/6/2019 26 of 40
Copy Requisition
Allows you to take an existing requisition and copy it for the creation of a new
requisition.
1. Enter the Business Unit and/or the Requisition ID to find the requisition.
2. Use the drop down to select Copy and Click Go
3. You will be brought back to the requisition. Make modifications if needed, and
click . The same requistion with a New ID number will
be created.
Copy function can also be used to handle Denied requisitions.
If a requisition is DENIED you cannot make updates to the requisition and re-submit
it. You have to create a NEW Requisition. The copy function gives you an easy way
to do this. You can copy the denied requisition, make the appropriate
corrections/updates and click Save & Submit for approval to create a New
Requisition.

University of Wisconsin System
SFS Business Process
ePro.1.01 – Requester Documentation
11/6/2019 27 of 40
Edit Requisition (Can be used to complete Saved, but not Submitted Requisitions)
1. Select this Action to complete requisitions at an Open Status. These are
requisitions that have been Saved, but not Submitted. Edit can also be used to
make edits on existing requisitions. Please note, depending on the edit, the
change(s) may reinitiate the approval workflow.
2. Enter the Business Unit and or the Requisition ID as the criteria and click
.
3. The requisition should be displayed.
4. Use the drop down to select “Edit” and click “Go”
5. The Checkout – Review and Submit page will be displayed
6. Finish or modify the requisition.
7. If done and ready to submit the requistion for approval, click
8. The requisition will we routed for approval.
Approvals – Displays the approvers on the requisition
View Print – Allows you to view a printable version of the requisition
Check Budget – This function cannot be performed by the requester. This is performed
by the Buyer after the requisition is fully approved.

University of Wisconsin System
SFS Business Process
ePro.1.01 – Requester Documentation
11/6/2019 28 of 40
VII. System Steps
Copy Requisition (Can be used to create a NEW requisition and resubmit a DENIED requisition)
The copy function is an efficient way to create new requisitions when some or all of the
required fields are the same as existing requisitions. As was previously mentioned, this is
an efficient way to handle denied requisitions.
1. Follow the below navigation access the Manage Requisition page
Navigator: eProcurement > Manage Requisitions
2. Search for the requisition to Copy using one or more of the below criteria.
Business Unit Requisition Name
Requisition ID Requests Status (i.e. Approved, Completed, etc.)
Date From Date To
Requester (Employee ID) PO ID
3. Find the requisition to copy, select “Copy”, and click “Go.”

University of Wisconsin System
SFS Business Process
ePro.1.01 – Requester Documentation
11/6/2019 29 of 40
4. The Checkout-Review and Submit page will be displayed.
5. If no changes are needed, click at the bottom of the
page.

University of Wisconsin System
SFS Business Process
ePro.1.01 – Requester Documentation
11/6/2019 30 of 40
6. To update the item information, click the item hyperlink. Make all the updates,
and click Apply.

University of Wisconsin System
SFS Business Process
ePro.1.01 – Requester Documentation
11/6/2019 31 of 40
7. To update the chart field information, click the carrot next to the chart to display
the accounting line details.
8. If adding comments and/or attachments to a requisition line, click the .
9. The Line Comments page will be displayed.
10. Add commentary
11. If adding attachment(s), click and upload the
document. Make sure the name on the attachment is valid.
12. To add multiple comments, click the “+” at the top of the page. Make sure to enter
a comment in the comments section for each attachment.

University of Wisconsin System
SFS Business Process
ePro.1.01 – Requester Documentation
11/6/2019 32 of 40
13. Review the requisition one more time. After all the appropriate updates have been
made, Click at the bottom of the page.
14. The Confirmation Page will be displayed. It will provide the new name of the
requisition and the required Approvals.
15. Once the Denied requisition has been copied, cancel the Denied requisition. The
next set of instructions, provides information on canceling requisitions.

University of Wisconsin System
SFS Business Process
ePro.1.01 – Requester Documentation
11/6/2019 33 of 40
Cancel a Requisition
To cancel a created requisition, go to the below Navigation. Denied requisitions should
be cancelled.
Navigator: eProcurement > Manage Requisitions
1. The below screen will appear.
2. Enter in one or more criteria to bring in the requisition to cancel. The more fields
populated, the quicker the search. It is recommended to have at least the Business
Unit populated in the criteria. It would also be ideal to have the Requisition ID
that needs to be canceled.
3. Find the requisition to cancel. Go to the menu to the right and use the drop down
to find “Cancel.”

University of Wisconsin System
SFS Business Process
ePro.1.01 – Requester Documentation
11/6/2019 34 of 40
4. Once it is selected, click Go. The below screen will appear.
Click
5. The Manage Requisition page will be displayed. The requisition should have a
status of Canceled and a Total Dollar Amount of $0.

University of Wisconsin System
SFS Business Process
ePro.1.01 – Requester Documentation
11/6/2019 35 of 40
VIII. Entering New Fiscal Year Requisitions
New Year Requisitions (May 1 – June 30)
It is recommended to create requisitions in the same fiscal year as the created purchase
order. If for some reason a requisition needs to be created in the current year for a
purchase order in the new fiscal year, follow the below instructions.
May 1st through June 30th, requisitions for the New Fiscal can be entered into the System.
These requisitions must be flagged as NEW YEAR requisitions. The screen shots
assume FY19 is the NEW YEAR.
1. Follow the path below to create a requisition.
Navigator: eProcurement > Requisition
2. Enter item information, per the Create Requisition section of this document.
3. Once Checkout is clicked, the Checkout – Review and Submit page will be
displayed.
4. Enter FY19 at the beginning of the Requisition Name and in the Requisition
Comments section.

University of Wisconsin System
SFS Business Process
ePro.1.01 – Requester Documentation
11/6/2019 36 of 40
5. Finish updating the page using the same instructions, per the Checkout – Review
and Submit section of this document.
6. If the requisition is complete and ready to be approved, click
7. The Approvers and Buyers should know the requisition is for a New Year
Purchase Order. No vouchering should be done against the created New Year
purchase order until after July 2nd.
8. Click if the requisition is not completed and/or not ready to
be submitted for approval.
9. The requisition will be at an Open Status. The requisition can be completed
before or after the New Year using the Manage Requisition page, Edit action.

University of Wisconsin System
SFS Business Process
ePro.1.01 – Requester Documentation
11/6/2019 37 of 40
IX. Create Templates and Favorites
Creating Templates
1. Once Checkout is clicked, the Checkout – Review and Submit page will be
displayed. From here a Template can be created from the requisition that is
currently being created.
2. Check the box next to the line item and Click
3. The below page will appear. Enter a Template Name and description.

University of Wisconsin System
SFS Business Process
ePro.1.01 – Requester Documentation
11/6/2019 38 of 40
4. The next time a requisition is created, the Template method can be used as a
starting point in the creation of a new requisition.
Creating Favorites
1. Once Checkout is clicked, the Checkout – Review and Submit page will be
displayed. From here a Favorite can be created from the requisition that is
currently being created.
2. Check the box next to the line item and Click
3. The below confirmation page will appear. Click OK

University of Wisconsin System
SFS Business Process
ePro.1.01 – Requester Documentation
11/6/2019 39 of 40
4. The next time a requisition is created, the Favorite method can be used as a
starting point in the creation of a new requisition.

University of Wisconsin System
SFS Business Process
ePro.1.01 – Requester Documentation
11/6/2019 40 of 40
Revision Control
VERSION DATE NAME COMMENTS
1.0 12/5/2016 Aaron Dise UAT
1.1 2/7/2017 Denise McDonald Updated Per Training Feedback
1.2 10/10/2017 Denise McDonald Updated Per Training Feedback
1.3 5/25/2018 Denise Mcdonald 9.2 Upgrade
1.4 08/16/2018 Denise Mcdonald Updated to include comments on
Requisition Authorization
1.5 09/10/2018 Denise Mcdonald Updated per UAT and Roadshow Feedback