Embed Size (px)
Citation preview

PLANET UNI-NMS Universal Network Management Software
Software Installation Guide

1 / 30
Sections
System Requirements
Installing Software
Importing Open Virtualization Format
How to Set Up
How to Operate

2 / 30
System Requirements
CPU: Intel Core i5 3.4 GHz dual-core or above RAM: 4 GB minimum or above
HDD: 200 GB (actual requirement is dependent on log size)
OS: Microsoft Windows 7/8/8.1/10 Note: Supported OS is dependent on virtualization product Virtualization: Oracle VirtualBox 5.0 or later
Browser: Chrome 31.0 or better
3 / 30
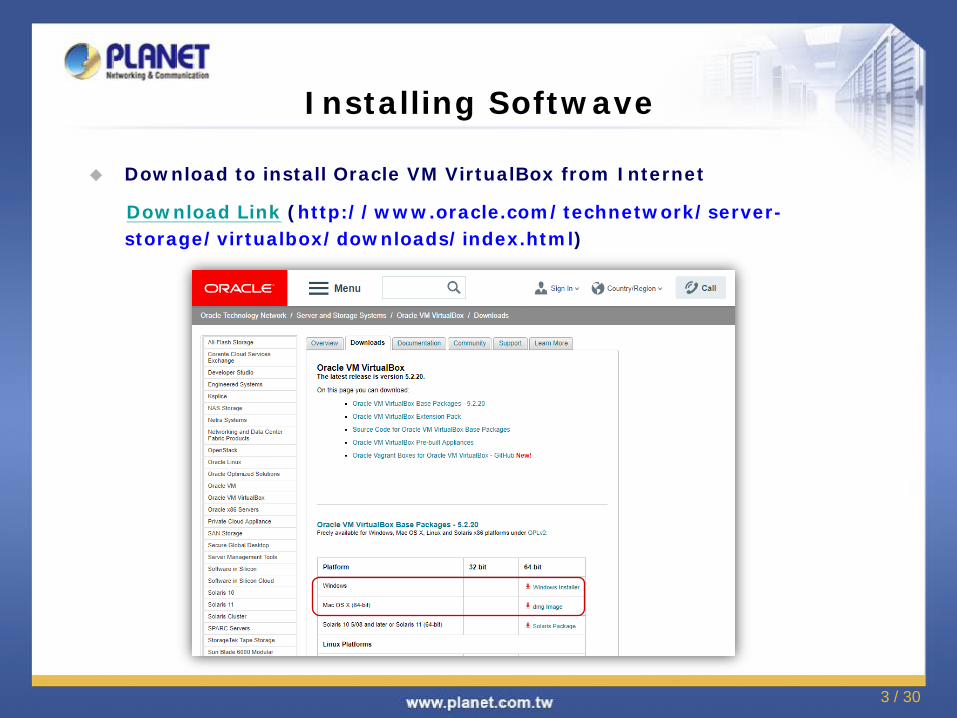
Installing Softwave
Download to install Oracle VM VirtualBox from Internet
Download Link (http://www.oracle.com/technetwork/server-storage/virtualbox/downloads/index.html)

4 / 30
Installing Softwave
Select items from the menus to download UNI-NMS
(UNI-NMS_v1.0b181102.ova.zip)
Download Link

5 / 30
Importing Open Virtualization Format
Double-click “UNI-NMS_v1.0b181102.ova” to import (or import it through the VM VirtualBox Manager)
Uncheck the following items if existed
USB Controller
DVD
Sound Card
Select
Reinitialize the MAC … 1.
2.
3.
Uncheck
Check

6 / 30
Right-click “UNI-NMS”.
Select “Create Shortcut on Desktop”.
1. Right click
2.
How to Set Up

7 / 30
2.Click Settings
1. Select VM 3. Modify Network
4. Enable Network Adapter 5. Use Bridged Adapter
6. Select the Out-going Network Card
How to Set Up Please ensure your Network Adapter 1 is connected to the local network
(Managed devices included).
* If the system shows network card setting is in error, please enable the VirtualBox Host-only Network and try again.

8 / 30
How to Operate
Select the VM.
Press “Start” to run the UNI-NMS.
2.
1.
*Press the setting button to define the General Name of VM.

9 / 30
How to Operate When the “UNI-NMS login” appears, please enter user login account
“adminuser”, and password “adminuser”.
When the “preferred command” appears, please enter command “3” to restart network command. (It will not be necessary if you cannot be connected to UNI-NMS Web UI.)

10 / 30
Open Chrome to log in the UNI-NMS.
Please use Chrome to get fully supported.
1. Press the “ADVANCED” button
2. Press “Proceed to…”
How to Operate

11 / 30
The UNI-MMS web GUI login screen.
Username: admin
Password: admin
How to Operate

12 / 30
On the dashboard, press the “Domain” icon shown below as No. 1, “Discovery” shown as No. 2 and then “Search” shown as No.3 to find the managed APs and continue other settings.
Dashboard Web UI
1.
2. 3.
How to Operate

13 / 30
Select devices shown below as No. 1 by checking the boxes, and then press the “Apply” icon to add devices to management list.
1. 2.
How to Operate

14 / 30
Press “Topology View” to see the domain network topology after one minute.
※If you do not see the topology, please check devices, like switches, routers, etc. to enable SNMP and LLDP functions.
How to Operate

15 / 30
Press the “Double Arrow” icon shown below as No. 1 to see the fully managed devices information.
Press the “Identification” icon shown as No. 2 to modify the device description, type, and web protocol information.
1.
2.
How to Operate
16 / 30
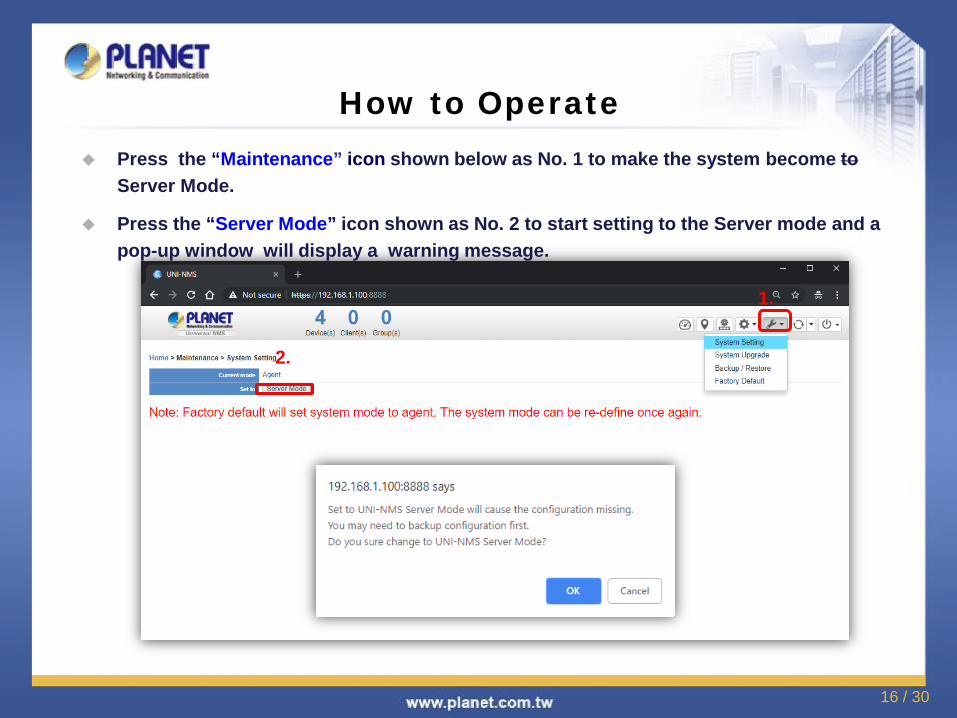
Press the “Maintenance” icon shown below as No. 1 to make the system become to Server Mode.
Press the “Server Mode” icon shown as No. 2 to start setting to the Server mode and a pop-up window will display a warning message.
1.
2.
How to Operate

17 / 30
Press the “Maintenance” icon shown below as No. 1 to make the system become Server Mode.
Press the “Server Mode” icon shown as No. 2 to start setting to Server mode, and a pop-up window will display a warning message.
1.
2.
How to Operate

18 / 30
Press the “OK” icon shown below as No. 3 to start changing system to Server Mode.
3.
How to Operate
19 / 30
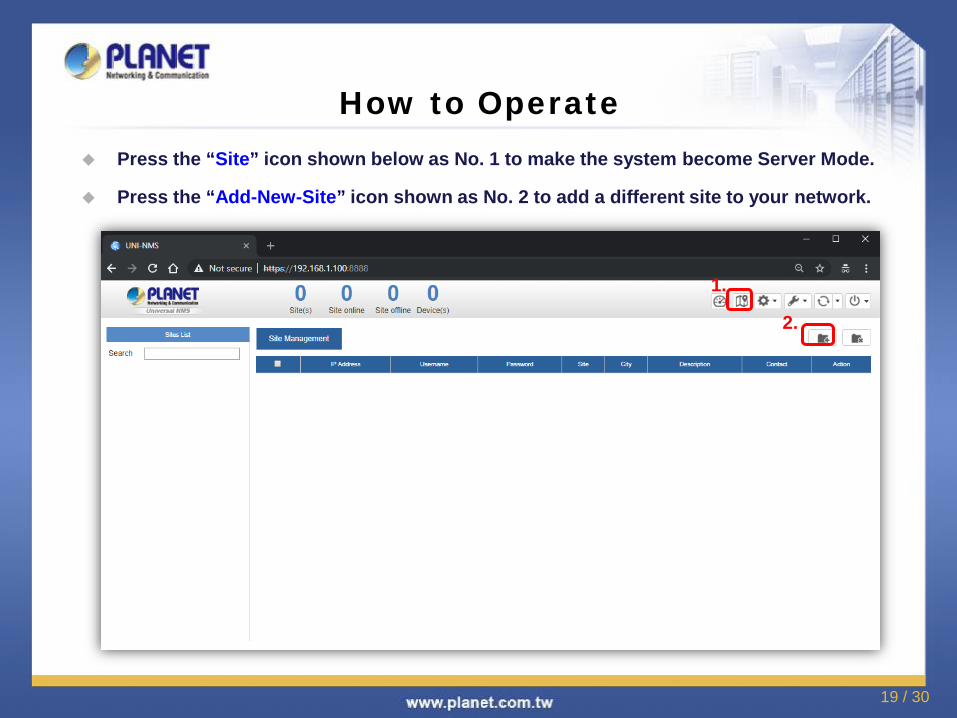
Press the “Site” icon shown below as No. 1 to make the system become Server Mode.
Press the “Add-New-Site” icon shown as No. 2 to add a different site to your network.
1.
2.
How to Operate

20 / 30
Fill out the fields to build a new site (shown below as No. 1)
Press the “Apply” icon shown as No. 2 to add a new site.
1. 2.
How to Operate

21 / 30
After adding a new site, please wait for the system to be connected.
The colored buttons show different statuses like:
Blue: connected
Red: disconnected
Gray: connecting
Press the colored button to see the detailed information.
How to Operate

22 / 30
UNI-NMS is set to the static IP: 192.168.1.100, so configure the network card to log in in the same network segment.
How to Operate

23 / 30
Press the “Maintenance” icon to select “System Upgrade” to load patch file so as to upgrade UNI-NMS system.
How to Operate

24 / 30
On System Upgrade screen, select “UNI-NMS_xxx.enc” patch file and then click the “System Upgrade” icon to start system upgrade.
1.
2.
3.
How to Operate

25 / 30
If System Upgrade is successful, Web UI will show “Upgrade finished.”
Press the OK button to go to the Dashboard page.
How to Operate

26 / 30
Press the “Exit” icon and select “Shutdown” to shut down the
UNI-NMS system and VM; otherwise, it may cause the system to be
abnormal at the next restart.
How to Operate

27 / 30
Do Not select “Power Off” to shut down the VM; otherwise, it may cause the system to be abnormal at the next restart.
1.
2.
3.
How to Operate

28 / 30
Do Not select “Power Off” to shut down the VM; otherwise, it may cause the system to be abnormal at the next restart.
1.
2. 3.
How to Operate
29 / 30
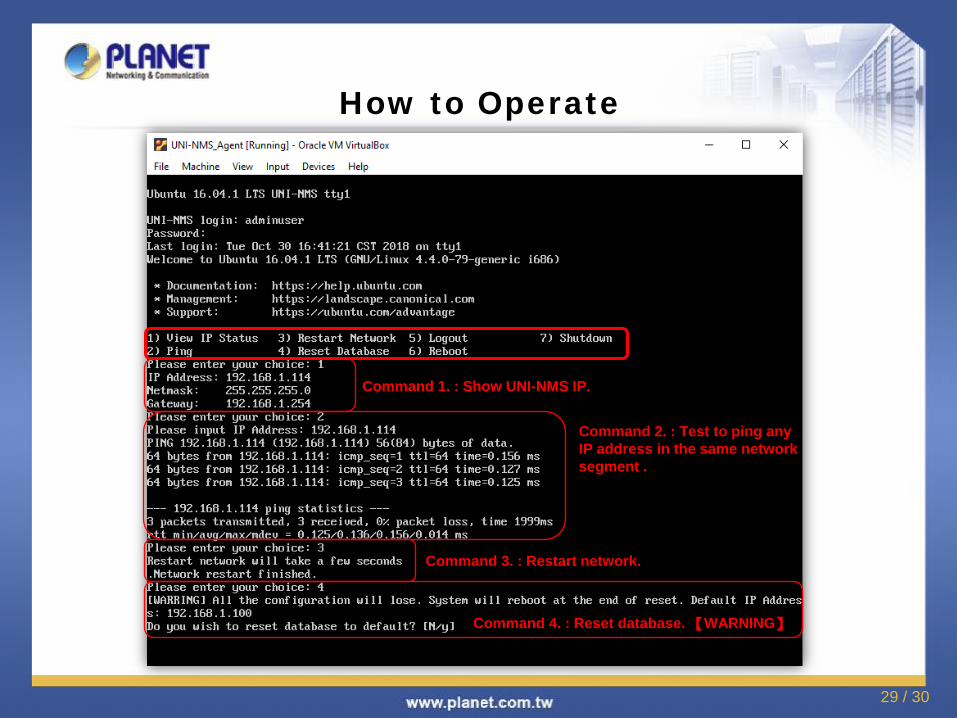
Command 1. : Show UNI-NMS IP.
Command 2. : Test to ping any IP address in the same network segment .
Command 3. : Restart network.
Command 4. : Reset database. 【WARNING】
How to Operate
30 / 30