Embed Size (px)
Citation preview
CR18
UNIVERSAL MULTI-CHARGING SPEAKERS
Tablets & MIDs
� Charges and Holds 3 Devices in Cradle Holders � SCD (Smart Current Detection) Technology �FM Clock Radio With Alarm �AUX IN for External Device � Tidy-Cable Organizer
Remove

Features
01
ContentsThank you for purchasing our product. For operation and security, read this manualcarefully and keep it handy for future reference.
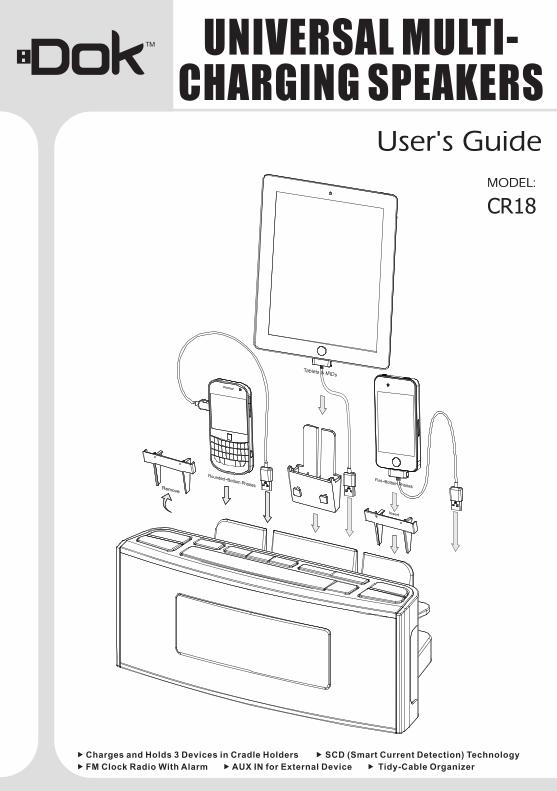
Multi-Charge Docking Station with Clock Radio
• SCD Technology
Features "Smart Current Detection" (SCD) that ensures device protection by adjusting the current/voltage required for each device. It will stop when your device is fully charged and will not overcharge.
• Easy Access
Cradles and holds 3 smart devices while charging and viewing. Vertical USB Charging Ports allow you to plug in your devices easily.
• Speaker System
Play while charging multiple devices simultaneously. Display, listen and view one device while charging others.
• FM Clock Radio Alarm
Wake up to the Alarm, listen to FM radio or play music from your smart device.
• Organization
The Tidy-Cable Organizer and 3 Cradle Holders eliminate the need to charge multiple devices in multiple locations. Hide and store excess cables and eliminate the clutter.
Note: Recognizes all smart devices (phones and tablets) of 5V from 0-2.1A.
Contents............................................................................................................................................................................01
Features............................................................................................................................................................................01
Warnings And Precautions..............................................................................................................................................02
Important Safety Instructions.........................................................................................................................................03
Quick Start On Charging Your Devices.....................................................................................................................04-08
What’s In The Gift Box......................................................................................................................................................09
Location Of Functions......................................................................................................................................................10
Operation.......................................................................................................................................................................11-15Setting Up The UnitUsing The Unit................................................................................................................................................................11-15
Troubleshooting................................................................................................................................................................16
..............................................................................................................................................................11
02
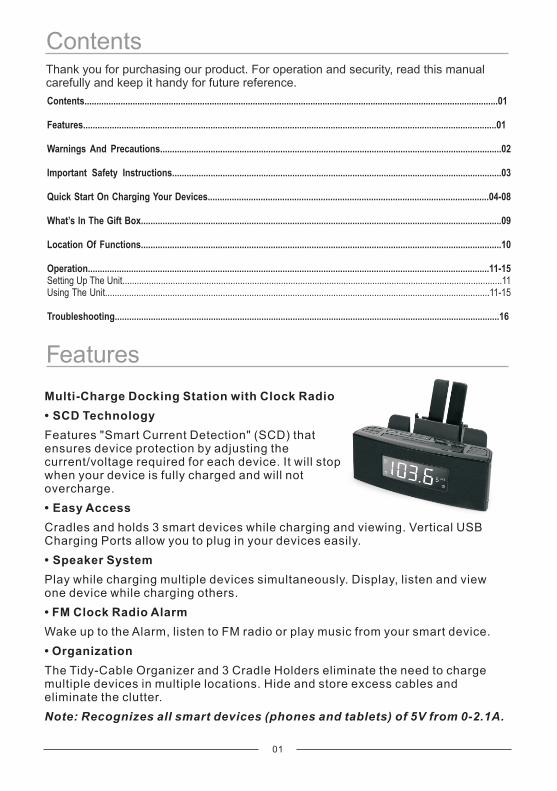
CAUTION
MOISTURE AND CONDENSATION
For units with an insertable AC Power Adapter cordset:
• The power adapter should remain operable for its intended use. Disconnect the AC Power Adapter if you are not intending to use the unit for a long period of time.
• When connecting or disconnecting the AC Power Adapter Cord, grip the plug and not the cord itself. Pulling the cord may cause damage and create a hazard.
For units with a Rechargeable Battery:
• Do not expose batteries to excessive conditions – extreme cold, heat, sun or fire.
SAFETY
WHEN IN USE
FCC INFORMATION
WARNING:
CAUTION:
To reduce the risk of fire or electric shock, do not expose this unit to rain or moisture.
Use of controls or adjustments or performance of procedures other than those specified may result in hazardous radiation exposure.
“Caution Marking and Rating Label” is affixed under the lid or on the bottom of the unit with a mass not exceeding 7kg.
RISK OF ELECTRIC SHOCK,
DO NOT OPEN.
CAUTION: TO PREVENT THE RISK OF ELECTRIC SHOCK – DO NOT REMOVE COVER OR BACK. NO USER-SERVICEABLE PARTS INSIDE. REFER SERVICING TO QUALIFIED PERSONNEL.
This symbol is intended to alert you to the presence of uninsulated, dangerous voltage within the unit's enclosure that might be of a sufficient magnitude to constitute a risk of electric shock. DO NOT OPEN THE UNITS CASE.
This symbol is intended to inform you that important operating and maintenance instructions are included in the literature accompanying this product.
If the unit is exposed to moisture and extreme cold temperatures and moved to a warm environment, condensation may form on the units internal components. Under these circumstances, turning the power “ON” may cause damage to the unit or cause harm to the user. Allow the unit to stand in a warm environment for 1 to 3 hours and allow the unit to air dry safely.
• Do not use this unit in conditions that are
extreme – hot, cold, dusty or humid.
• Do not restrict the air flow of the unit by placing it on a soft surface like a bed, carpet or covering.
This unit complies with part 15 of the “FCC Rules.” Operation is subject to the following conditions:
1. This unit may not cause harmful interference.
2. This unit must accept any interference received, including interference that may cause undesirable operation.
Double insulation. This is a Class II apparatus.
Warnings And Precautions
For Units with Disposable Batteries:
Battery Warning:• Do not mix with used or other battery types/brands.• Replace all batteries at the same time.• Do not open batteries.• Do not dispose of in fire.• Do not heat above 75°C.• Do not expose contents to water.• Do not charge or recharge.• Do not install backwards.
0303
1. Read These Instructions: All safety and operations manual should be read before the product is operated.
2. Keep These Instructions: The safety and operations manual should be retained for future reference.
3. Heed All Warnings: All warnings applicable to the unit and in the operations manual should be adhered to.
4. Follow All Instructions: All operations manual should be followed.
5. Water and Moisture: Do not use this unit near water. For example, do not use near a bath tub, wash bowl, kitchen sink, or laundry tub. Do not use this unit in a wet basement or near a swimming pool or similar location. The unit shall not be exposed to dripping or splashing and no objects filled with liquids (ex: vases), shall be placed on or near this unit.
6. Cleaning: Clean the unit only with a dry cloth. Unit must be unplugged from the wall outlet before cleaning. Do not use liquid cleaners or aerosol cleaners on the unit.
7. Ventilation: Slots and openings in the cabinet of the unit are provided to ensure reliable operation and ventilation and to protect the unit from overheating. The openings must not be covered and should never be blocked by placing the product on a soft surface like a bed, sofa, or rug. This unit should not be placed in a built-in installation like a bookcase or rack, unless proper ventilation is provided.
8. Heat: Do not install the unit near any heat source like a radiator, heat register, stove or other device that produces heat, including amplifiers.
9. Grounding or Polarization: If applicable, do not disable or circumvent the polarized or grounding-type plug. A polarized plug has 2 blades with 1 wider than the other. A grounding-type plug has 2
rdblades and a 3 grounding plug. The
rdwide blade, or the 3 prong, is provided for your safety. If the provided plug does not fit into an outlet, consult a qualified electrician for replacement of this outlet.
10. Power Cord Protection: Protect the power cord from being walked on, pinched or cut or damaged in any
way. If any damage occurs, consult with a trained technician for repair.
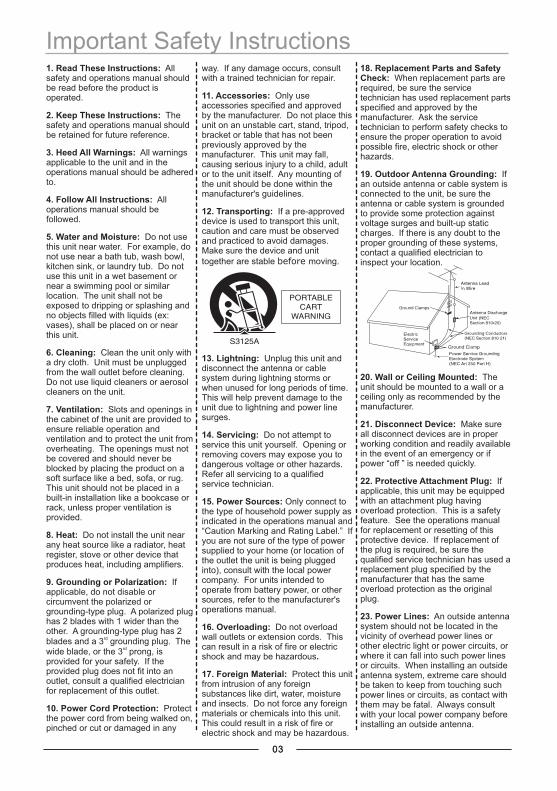
11. Accessories: Only use accessories specified and approved by the manufacturer. Do not place this unit on an unstable cart, stand, tripod, bracket or table that has not been previously approved by the manufacturer. This unit may fall, causing serious injury to a child, adult or to the unit itself. Any mounting of the unit should be done within the manufacturer's guidelines.
12. Transporting: If a pre-approved device is used to transport this unit, caution and care must be observed and practiced to avoid damages. Make sure the device and unit together are stable before moving.
13. Lightning: Unplug this unit and disconnect the antenna or cable system during lightning storms or when unused for long periods of time. This will help prevent damage to the unit due to lightning and power line surges.
14. Servicing: Do not attempt to service this unit yourself. Opening or removing covers may expose you to dangerous voltage or other hazards. Refer all servicing to a qualified service technician.
15. Power Sources: Only connect to the type of household power supply as indicated in the operations manual and “Caution Marking and Rating Label.” If you are not sure of the type of power supplied to your home (or location of the outlet the unit is being plugged into), consult with the local power company. For units intended to operate from battery power, or other sources, refer to the manufacturer's operations manual.
16. Overloading: Do not overload wall outlets or extension cords. This can result in a risk of fire or electric shock and may be hazardous.
17. Foreign Material: Protect this unit from intrusion of any foreign substances like dirt, water, moisture and insects. Do not force any foreign materials or chemicals into this unit. This could result in a risk of fire or electric shock and may be hazardous.
18. Replacement Parts and Safety Check: When replacement parts are required, be sure the service technician has used replacement parts specified and approved by the manufacturer. Ask the service technician to perform safety checks to ensure the proper operation to avoid possible fire, electric shock or other hazards.
19. Outdoor Antenna Grounding: If an outside antenna or cable system is connected to the unit, be sure the antenna or cable system is grounded to provide some protection against voltage surges and built-up static charges. If there is any doubt to the proper grounding of these systems, contact a qualified electrician to inspect your location.
20. Wall or Ceiling Mounted: The unit should be mounted to a wall or a ceiling only as recommended by the manufacturer.
21. Disconnect Device: Make sure all disconnect devices are in proper working condition and readily available in the event of an emergency or if power “off ” is needed quickly.
22. Protective Attachment Plug: If applicable, this unit may be equipped with an attachment plug having overload protection. This is a safety feature. See the operations manual for replacement or resetting of this protective device. If replacement of the plug is required, be sure the qualified service technician has used a replacement plug specified by the manufacturer that has the same overload protection as the original plug.
23. Power Lines: An outside antenna system should not be located in the vicinity of overhead power lines or other electric light or power circuits, or where it can fall into such power lines or circuits. When installing an outside antenna system, extreme care should be taken to keep from touching such power lines or circuits, as contact with them may be fatal. Always consult with your local power company before installing an outside antenna.
Quick Start On Charging Your Devices
04
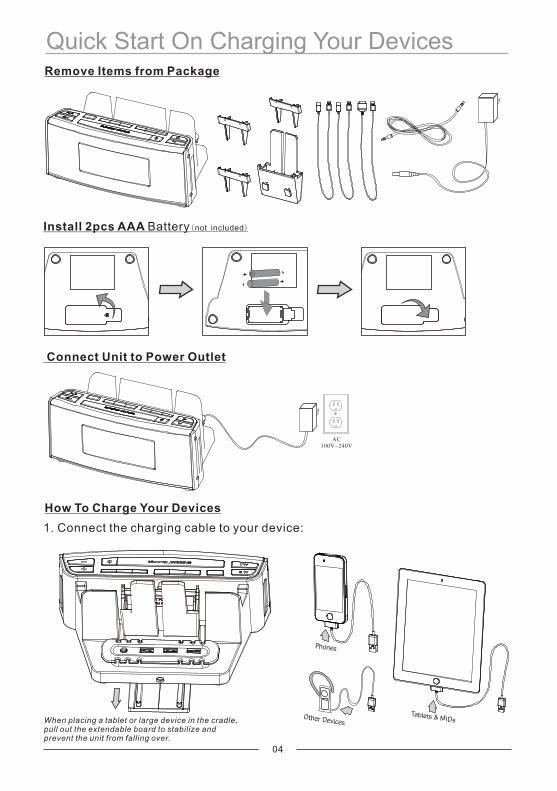
Remove Items from Package
How To Charge Your Devices
Install 2pcs AAA Battery(not included)
1. Connect the charging cable to your device:
Connect Unit to Power Outlet
Phones
Tablets & MIDsWhen placing a tablet or large device in the cradle, pull out the extendable board to stabilize and prevent the unit from falling over.
Other Devices
AC100V~240V
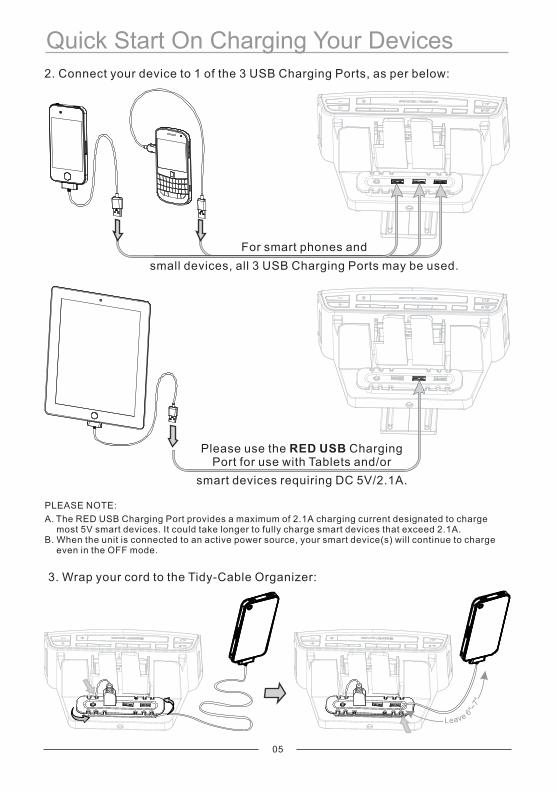
For smart phones and
small devices, all 3 USB Charging Ports may be used.
Please use the RED USB ChargingPort for use with Tablets and/or
2. Connect your device to 1 of the 3 USB Charging Ports, as per below:
3. Wrap your cord to the Tidy-Cable Organizer:
05
Quick Start On Charging Your Devices
"7
~"6 evaLe
smart devices requiring DC 5V/2.1A.
PLEASE NOTE:
A. The RED USB Charging Port provides a maximum of 2.1A charging current designated to charge most 5V smart devices. It could take longer to fully charge smart devices that exceed 2.1A.
B. When the unit is connected to an active power source, your smart device(s) will continue to charge even in the OFF mode.
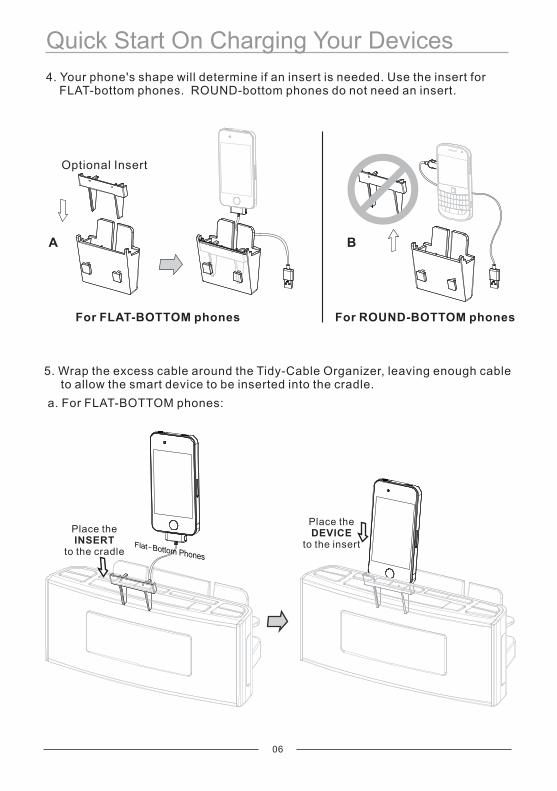
4. Your phone's shape will determine if an insert is needed. Use the insert for FLAT-bottom phones. ROUND-bottom phones do not need an insert.
5. Wrap the excess cable around the Tidy-Cable Organizer, leaving enough cable to allow the smart device to be inserted into the cradle.
A
For FLAT-BOTTOM phones
a. For FLAT-BOTTOM phones:
B
For ROUND-BOTTOM phones
Optional Insert
06
Quick Start On Charging Your Devices
Place the INSERT
to the cradle
Place the DEVICE
to the insert
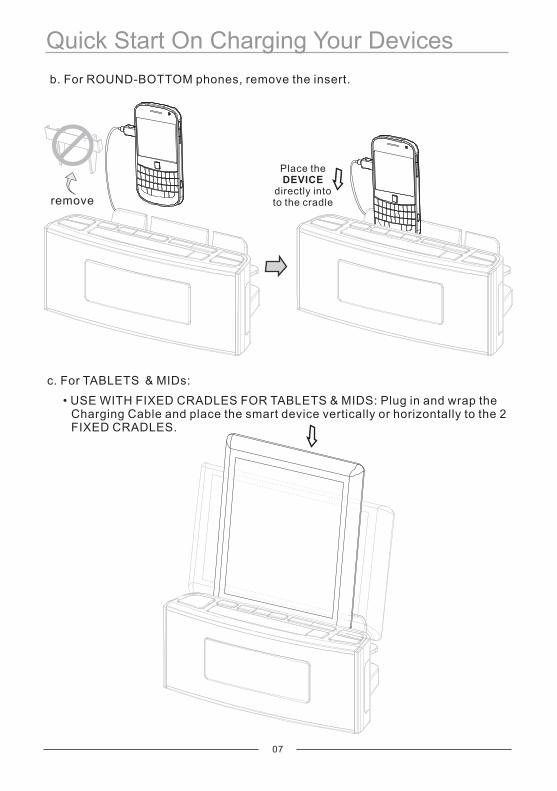
b. For ROUND-BOTTOM phones, remove the insert.
Quick Start On Charging Your Devices
07
Place the DEVICE
directly intoto the cradle
c. For TABLETS & MIDs:
remove
• USE WITH FIXED CRADLES FOR TABLETS & MIDS: Plug in and wrap the Charging Cable and place the smart device vertically or horizontally to the 2 FIXED CRADLES.
08
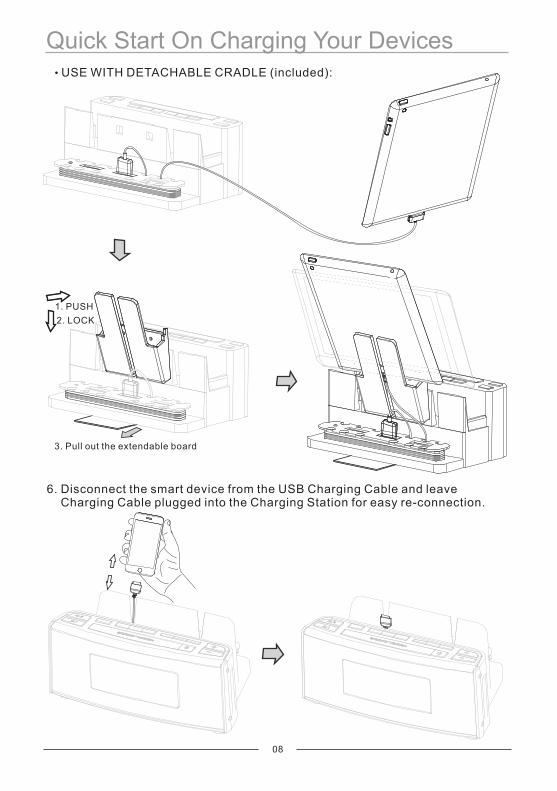
Quick Start On Charging Your Devices• USE WITH DETACHABLE CRADLE (included):
3. Pull out the extendable board
1. PUSH
2. LOCK
6. Disconnect the smart device from the USB Charging Cable and leave Charging Cable plugged into the Charging Station for easy re-connection.

1 Device Cradle &3 Cradle Inserts
CR18 Base Unit
09
3.5mm HEADPHONE JACKAUX-IN CABLE CONNECTOR
User’s Manual
AC adapter
USB Phone Charging Cable
What’s In The Gift Box?
Location Of Functions
10
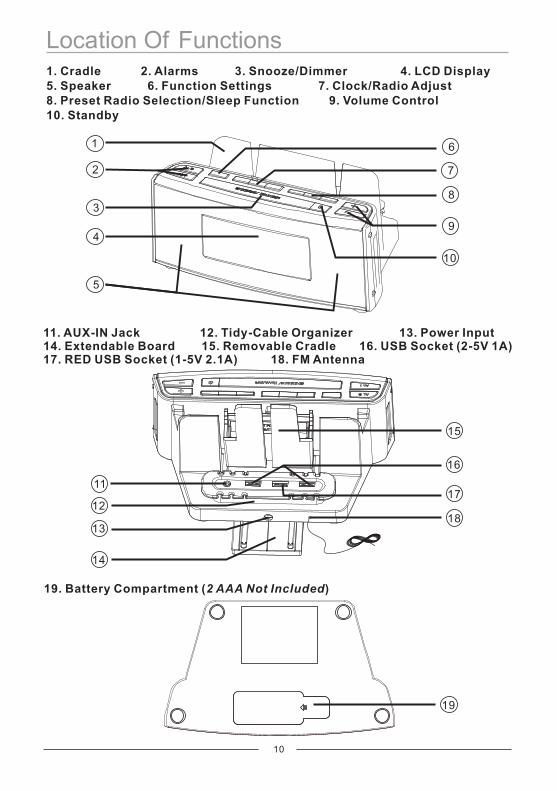
1. Cradle 2. Alarms 3. Snooze/Dimmer 4. LCD Display 5. Speaker 6. Function Settings 7. Clock/Radio Adjust 8. Preset Radio Selection/Sleep Function 9. Volume Control 10. Standby
11. AUX-IN Jack 12. Tidy-Cable Organizer 13. Power Input14. Extendable Board 15. Removable Cradle 16. USB Socket (2-5V 1A) 17. RED USB Socket (1-5V 2.1A) 18. FM Antenna
5
3
61
2
4
7
8
9
10
11
12
13
14
15
18
17
16
19
19. Battery Compartment (2 AAA Not Included)
11
OperationSETTING UP THE UNIT
1. Install 2 AAA Batteries (batteries not included in this package.)
2. Connect the DC Jack to the unit and the AC Power Adaptor to a standard 120V AC wall socket. (The AC Adaptor is for operation and the batteries are for backup.)
3. Setting the TIME (in STANDBY mode only):
a. Press and hold the CLOCK SET button until the display begins to flash.
b. Select the 12H or 24H mode with the TUNE/TIME � or �.
c. Press the CLOCK SET button again to confirm. Next selection is for HOUR.
d. Select the HOUR by pressing and releasing the TUNE/TIME � or � (hold button down for faster setting). Next selection is for MINUTE.
e. Press and release the CLOCK SET button again to select the MINUTE setting, andadjust by pressing and releasing the TUNE/TIME � or �.
f. Press and release the CLOCK SET button again to final set and confirm.
USING THE UNIT
A. ALARM FEATURES: This unit has a DUAL ALARM system with BUZZER or RADIO feature. You can set 2 separate alarm times with 2 different alarm sources. Procedure for setting ALARM1 and ALARM2 are identical.
1. Setting the Dual Alarm(s) (in STANDBY mode only):
a. Press and hold the AL button (1 or 2) until the ALARM HOUR display flashes.b. Press and release TUNE/TIME � or � to adjust HOUR. Next selection is for MINUTE.c. Press the AL button again to go to MINUTE.d. Set MINUTE time by pressing TUNE/TIME � or �. Next selection is ALARM SOURCE.e. Press the AL button again to select ALARM SOURCE and press TUNE/TIME � or �to
select RADIO or BUZZER source.f. Press and release the AL button again to confirm and exit the setting mode.
2. Reviewing, Arming and Disarming Alarm (Turning Alarm ON and OFF):
a. Alarms are automatically armed when set. Active alarms are indicated by alarm types on the display.
b. To review the ALARM TIME, press and release the AL (1 or 2) button one time. The selected ALARM SOURCE and ALARM TIME will show on the display for 7 seconds.
c. In STANDBY mode, press the AL (1 or 2) button 2 times to toggle between ALARM ON or ALARM OFF. If the ALARM is armed, the ALARM SOURCE will light up.
3. Stopping the Alarm:
When the alarm is sounding, press and release the button or the related AL button to STOP the alarm and reset it to the next day.
4. Snooze Operation:
The default SNOOZE time is 9 minutes. Press and release the SNOOZE/DIMMER button after the alarm sounds. The alarm will be silenced for the SNOOZE time, then sound again. SNOOZE/DIMMER button can be pressed several times.
B. RADIO FEATURES:
1. Setting up the Antenna: Extend the FM Antenna wire fully for the best reception. Do not strip, alter or attach to any other antenna or wire.
12
Operation2. Tuning and Playing the Radio:
a. Press and release the button, as needed, to activate the unit and select SOURCE to the FM mode to display and cycle through FM.
b. When the desired FM mode is selected, press and release the TUNE/TIME � or � button to tune in the radio to a desired station. The current radio frequency will appear on the display.
c. Press and HOLD the TUNE/TIME � or � button for a few seconds to scan to the next clear radio station.
3. Memorizing a Station as a Preset:
a. Tune into a desired radio station using the TUNE/TIME � or � buttons.
b. Press and HOLD the CLOCK SET button until the preset number is flashing. You can select and set up to 10 preset stations.
c. Next, press and release the TUNE/TIME � or � button to choose the number (1 through 10) you wish to memorize for the tuned-in station.
d. While the number is flashing, press and release CLOCK SET to confirm the memorizedpreset station.
e. Repeat these steps when selecting and confirming a radio station to an assigned memorized number.
4. Selecting a Preset Memorized Station: Press and release the FM PRESET � or � button, as needed, to chose the desired memorized preset station.
5. Adjusting Volume: Press and release the + or - button.
6. Turning the Unit OFF: Press the button. The TIME will only be displayed.
Your devices will continue charging if still connected to the USB port.
C. DIMMER OPERATION:
During normal operation, meaning when there is not an alarm sounding, press and release the SNOOZE/DIMMER button to control the brightness of the LCD display.
D. SLEEP OPERATION:
SLEEP mode allows you to fall asleep to your favorite radio station or AUX-IN music until the unit shuts off at the pre-selected time.
1. Press the SLEEP button to enter SLEEP mode. The sleep time and the “zzz" icon will show on the display.
2. Press the SLEEP button again, as needed, to adjust the sleep timer from 10 minutes to 120 minutes. The timer will count down the sleep, as selected.
3. To stop music from playing, at any time, press the button and the unit will turn OFF.
13
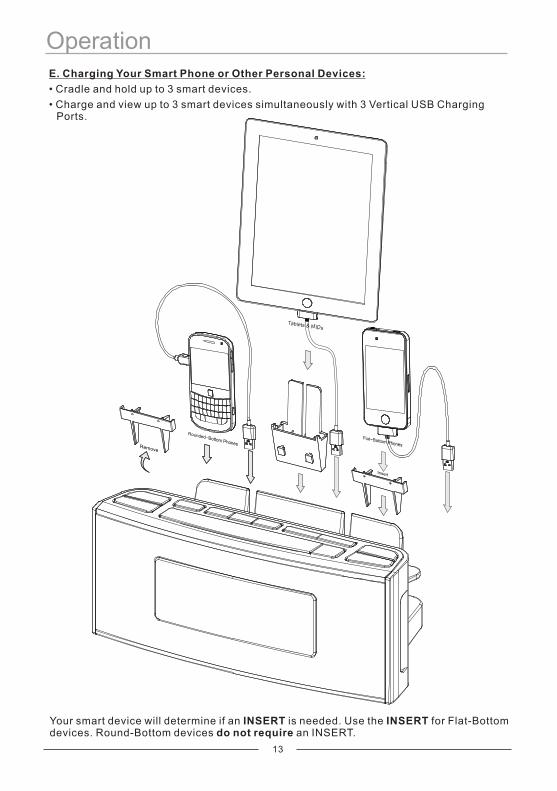
OperationE. Charging Your Smart Phone or Other Personal Devices:
• Cradle and hold up to 3 smart devices.
• Charge and view up to 3 smart devices simultaneously with 3 Vertical USB Charging Ports.
Tablets & MIDs
Remove
Your smart device will determine if an INSERT is needed. Use the INSERT for Flat-Bottom devices. Round-Bottom devices do not require an INSERT.
14
Operation
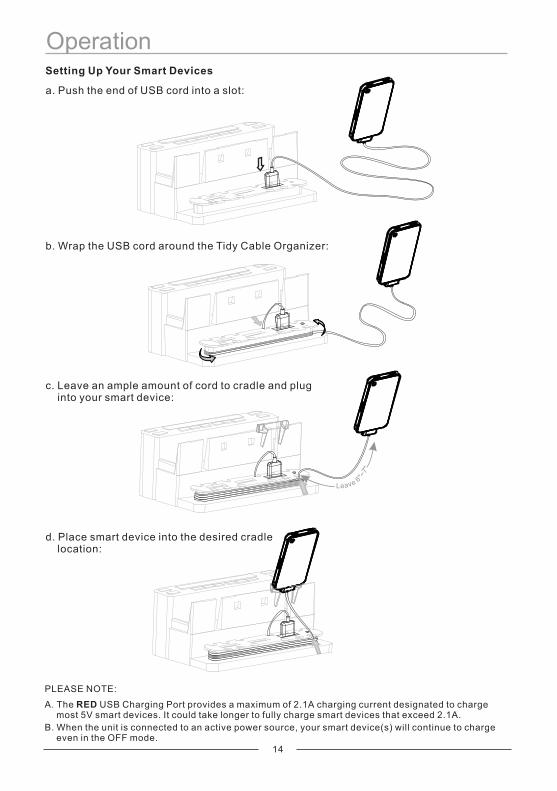
a. Push the end of USB cord into a slot:
b. Wrap the USB cord around the Tidy Cable Organizer:
c. Leave an ample amount of cord to cradle and plug into your smart device:
d. Place smart device into the desired cradle location:
Setting Up Your Smart Devices
PLEASE NOTE:
A. The RED USB Charging Port provides a maximum of 2.1A charging current designated to charge most 5V smart devices. It could take longer to fully charge smart devices that exceed 2.1A.
B. When the unit is connected to an active power source, your smart device(s) will continue to charge even in the OFF mode.
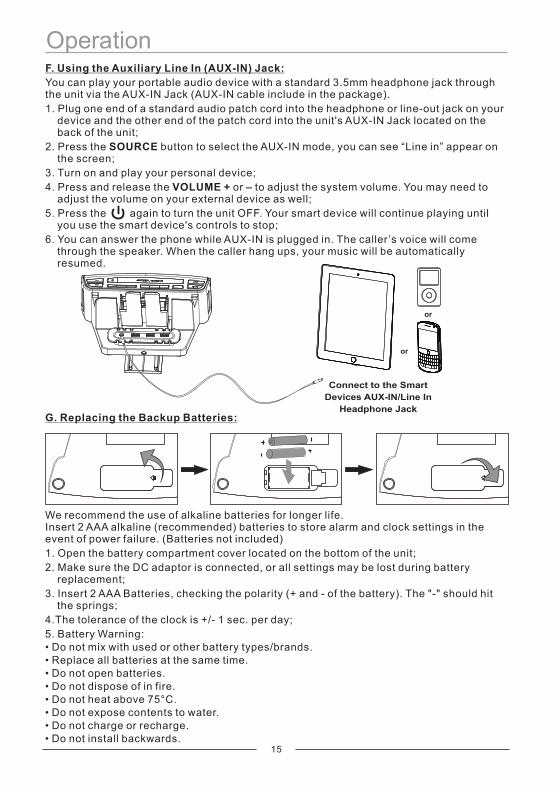
F. Using the Auxiliary Line In (AUX-IN) Jack:
You can play your portable audio device with a standard 3.5mm headphone jack through the unit via the AUX-IN Jack (AUX-IN cable include in the package).
1. Plug one end of a standard audio patch cord into the headphone or line-out jack on your device and the other end of the patch cord into the unit's AUX-IN Jack located on the back of the unit;
2. Press the SOURCE button to select the AUX-IN mode, you can see “Line in” appear on the screen;
3. Turn on and play your personal device;
4. Press and release the VOLUME + or – to adjust the system volume. You may need to adjust the volume on your external device as well;
5. Press the again to turn the unit OFF. Your smart device will continue playing until you use the smart device's controls to stop;
6. You can answer the phone while AUX-IN is plugged in. The caller ’s voice will come through the speaker. When the caller hang ups, your music will be automatically resumed.
G. Replacing the Backup Batteries:
We recommend the use of alkaline batteries for longer life. Insert 2 AAA alkaline (recommended) batteries to store alarm and clock settings in theevent of power failure. (Batteries not included)
1. Open the battery compartment cover located on the bottom of the unit;
2. Make sure the DC adaptor is connected, or all settings may be lost during battery replacement;
3. Insert 2 AAA Batteries, checking the polarity (+ and - of the battery). The "-" should hit the springs;
4.The tolerance of the clock is +/- 1 sec. per day;
5. Battery Warning:• Do not mix with used or other battery types/brands.• Replace all batteries at the same time.• Do not open batteries.• Do not dispose of in fire.• Do not heat above 75°C.• Do not expose contents to water.• Do not charge or recharge.• Do not install backwards.
Operation
15
Connect to the Smart
Devices AUX-IN/Line In
Headphone Jack
or
or
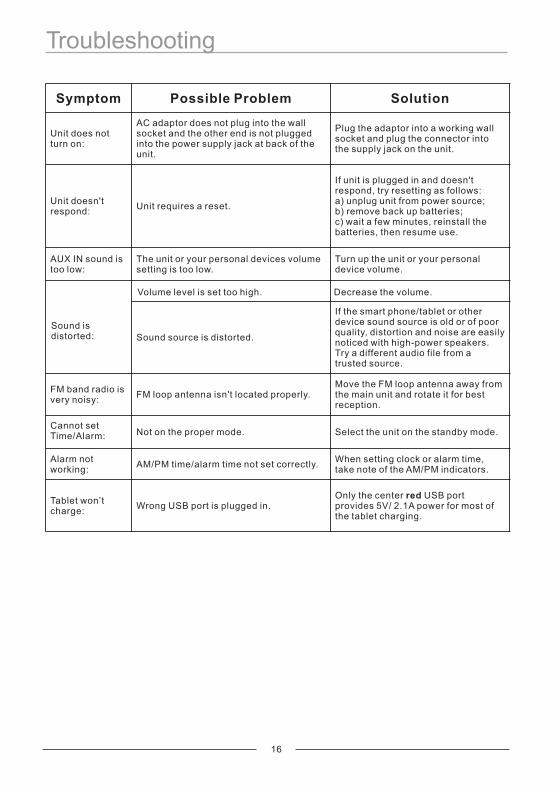
Troubleshooting
Symptom Possible Problem Solution
Unit does not turn on:
AC adaptor does not plug into the wall socket and the other end is not plugged into the power supply jack at back of the unit.
Plug the adaptor into a working wall socket and plug the connector into the supply jack on the unit.
Unit doesn't respond:
Unit requires a reset.
If unit is plugged in and doesn't respond, try resetting as follows:a) unplug unit from power source;b) remove back up batteries;c) wait a few minutes, reinstall thebatteries, then resume use.
AUX IN sound is too low:
The unit or your personal devices volume setting is too low.
Turn up the unit or your personal device volume.
Sound source is distorted.
If the smart phone/tablet or other device sound source is old or of poor quality, distortion and noise are easily noticed with high-power speakers. Try a different audio file from a trusted source.
FM band radio is very noisy:
FM loop antenna isn't located properly.Move the FM loop antenna away from the main unit and rotate it for best reception.
Cannot set Time/Alarm: Not on the proper mode. Select the unit on the standby mode.
Alarm not working:
AM/PM time/alarm time not set correctly.When setting clock or alarm time, take note of the AM/PM indicators.
Tablet won’t charge:
Wrong USB port is plugged in.Only the center red USB port provides 5V/ 2.1A power for most of the tablet charging.
Volume level is set too high. Decrease the volume.
Sound is distorted:
16


ORDER FORM ACCESSORY USB CHARGING CORDS
PLEASE PRINT CLEARLY
Name:
Address:
City:
Phone:
Email:
State: Zip:
USB charging cords for pre-Smart Phone generations
Brand of Phone: Model No.:
q Visa q MasterCard q Discover q AMEX
CC#
Exp Date: / CVV Signature:
Make Checks or Money Orders Payable to: DOK Solution, LLC. Add $3.00 S&H.
AP DevicesPrice: $5.00Sku: UCAPBuy Now q
Micro USBPrice: $5.00Sku: UCMV8Buy Now q
Mini USBPrice: $5.00Sku: UCMV3Buy Now q
Samsung/Tablet Price: $5.00Sku: UC800Buy Now q