Embed Size (px)
Citation preview

2016 - 2018
UNIT PLAN
PRIMARY SCHOOL
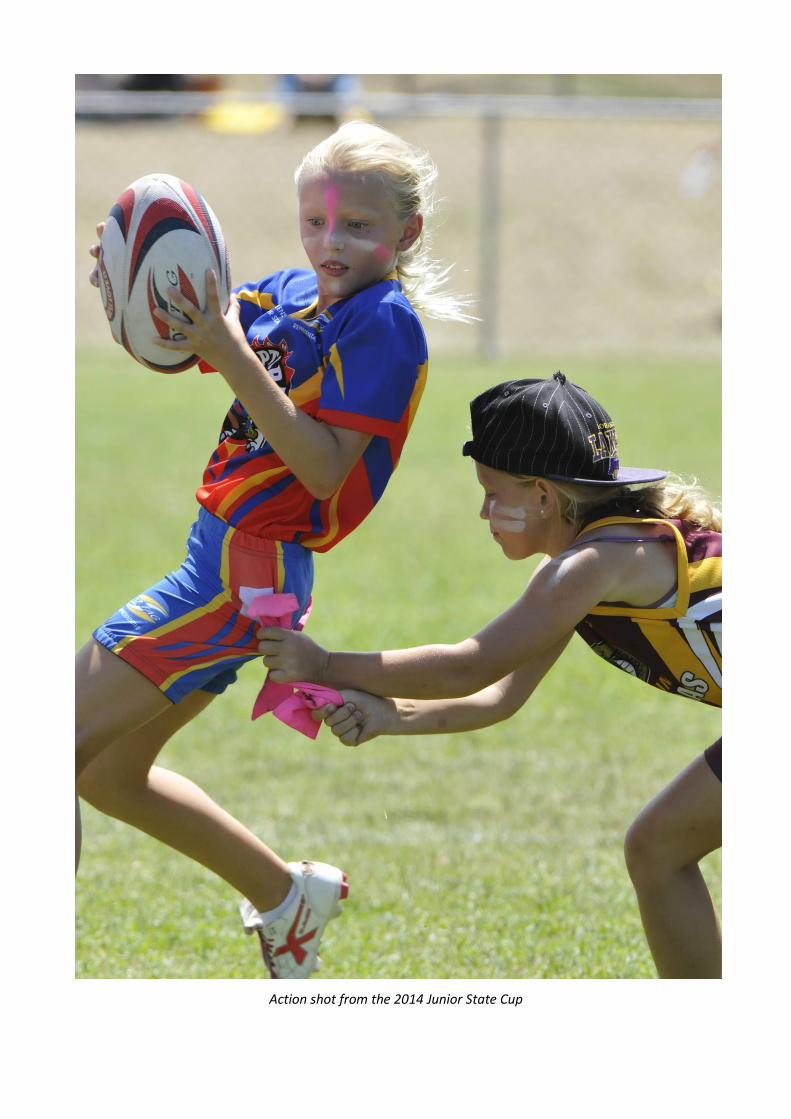
Action shot from the 2014 Junior State Cup
Unit Plan Primary (Years 1-7)
PRIMARY UNIT PLAN
©2010-2016 Jigsaw Sports Pty Ltd ABN 82 135 455 613 page i
Table of Contents
Unit Summary ........................................................................................................................................ 1
Overview ............................................................................................................................................................ 2
Implementation ................................................................................................................................................. 3
Lesson Summary ................................................................................................................................................ 4
Oztag Assessment Sheet.................................................................................................................................... 8
Year 1 Lesson Plans .............................................................................................................................. 10
Year 1 - Lesson Plan 1 ...................................................................................................................................... 11
Year 1 - Lesson Plan 2 ...................................................................................................................................... 16
Year 1 - Lesson Plan 3 ...................................................................................................................................... 20
Year 1 - Lesson Plan 4 ...................................................................................................................................... 24
Year 1 - Lesson Plan 5 ...................................................................................................................................... 28
Year 2 Lesson Plans .............................................................................................................................. 30
Year 2 - Lesson Plan 1 ...................................................................................................................................... 31
Year 2 - Lesson Plan 2 ...................................................................................................................................... 36
Year 2 - Lesson Plan 3 ...................................................................................................................................... 41
Year 2 - Lesson Plan 4 ...................................................................................................................................... 46
Year 2 - Lesson Plan 5 ...................................................................................................................................... 50
Year 3 Lesson Plans .............................................................................................................................. 52
Year 3 - Lesson Plan 1 ...................................................................................................................................... 53
Year 3 - Lesson Plan 2 ...................................................................................................................................... 58
Year 3 - Lesson Plan 3 ...................................................................................................................................... 63
Year 3 - Lesson Plan 4 ...................................................................................................................................... 68
Year 3 - Lesson Plan 5 ...................................................................................................................................... 73
Year 4 Lesson Plans .............................................................................................................................. 75
Year 4 - Lesson Plan 1 ...................................................................................................................................... 76
Year 4 - Lesson Plan 2 ...................................................................................................................................... 82
Year 4 - Lesson Plan 3 ...................................................................................................................................... 88
Year 4 - Lesson Plan 4 ...................................................................................................................................... 92
Year 4 - Lesson Plan 5 ...................................................................................................................................... 97
PRIMARY UNIT PLAN
©2010-2016 Jigsaw Sports Pty Ltd ABN 82 135 455 613 page ii
Year 5 Lesson Plans ............................................................................................................................ 100
Year 5 - Lesson Plan 1 .................................................................................................................................... 101
Year 5 - Lesson Plan 2 .................................................................................................................................... 107
Year 5 - Lesson Plan 3 .................................................................................................................................... 113
Year 5 - Lesson Plan 4 .................................................................................................................................... 116
Year 5 - Lesson Plan 5 .................................................................................................................................... 120
Year 6 Lesson Plans ............................................................................................................................ 122
Year 6 - Lesson Plan 1 .................................................................................................................................... 123
Year 6 - Lesson Plan 2 .................................................................................................................................... 130
Year 6 - Lesson Plan 3 .................................................................................................................................... 136
Year 6 - Lesson Plan 4 .................................................................................................................................... 141
Year 6 - Lesson Plan 5 .................................................................................................................................... 145
Advanced Lesson Plans ....................................................................................................................... 148
Advanced - Lesson Plan 1 .............................................................................................................................. 149
Advanced - Lesson Plan 2 .............................................................................................................................. 156
Advanced - Lesson Plan 3 .............................................................................................................................. 161
Advanced - Lesson Plan 4 .............................................................................................................................. 167
Advanced - Lesson Plan 5 .............................................................................................................................. 172
Additional Drills ................................................................................................................................. 175
Tagging, Twisting and Spinning ..................................................................................................................... 176
Passing ........................................................................................................................................................... 179
Kicking ............................................................................................................................................................ 181
Attacking Moves ............................................................................................................................................ 182
Decision Making/Reaction ............................................................................................................................. 184
PRIMARY UNIT PLAN
©2010-2016 Qld Oztag Group Inc ABN 16 873 614 527 page 1
Unit Summary
PRIMARY UNIT PLAN
©2010-2016 Qld Oztag Group Inc ABN 16 873 614 527 page 2
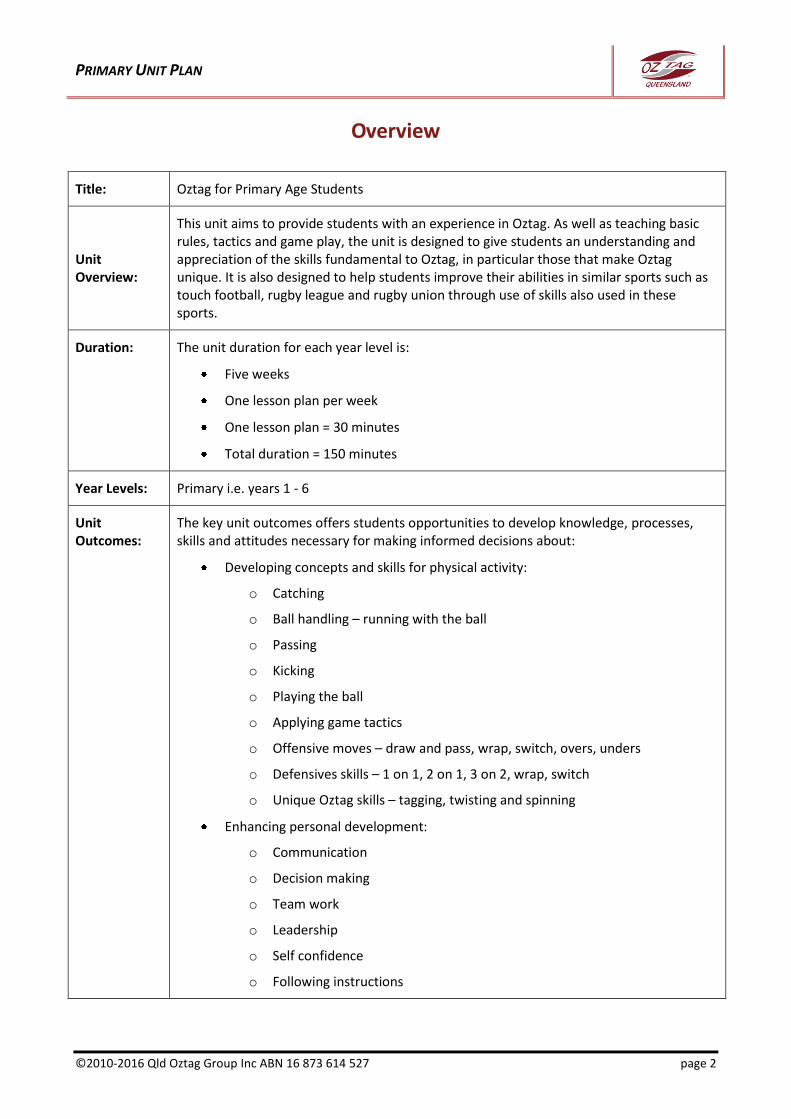
Overview
Title: Oztag for Primary Age Students
Unit Overview:
This unit aims to provide students with an experience in Oztag. As well as teaching basic rules, tactics and game play, the unit is designed to give students an understanding and appreciation of the skills fundamental to Oztag, in particular those that make Oztag unique. It is also designed to help students improve their abilities in similar sports such as touch football, rugby league and rugby union through use of skills also used in these sports.
Duration: The unit duration for each year level is:
Five weeks
One lesson plan per week
One lesson plan = 30 minutes
Total duration = 150 minutes
Year Levels: Primary i.e. years 1 - 6
Unit Outcomes:
The key unit outcomes offers students opportunities to develop knowledge, processes, skills and attitudes necessary for making informed decisions about:
Developing concepts and skills for physical activity:
o Catching
o Ball handling – running with the ball
o Passing
o Kicking
o Playing the ball
o Applying game tactics
o Offensive moves – draw and pass, wrap, switch, overs, unders
o Defensives skills – 1 on 1, 2 on 1, 3 on 2, wrap, switch
o Unique Oztag skills – tagging, twisting and spinning
Enhancing personal development:
o Communication
o Decision making
o Team work
o Leadership
o Self confidence
o Following instructions
PRIMARY UNIT PLAN
©2010-2016 Qld Oztag Group Inc ABN 16 873 614 527 page 3
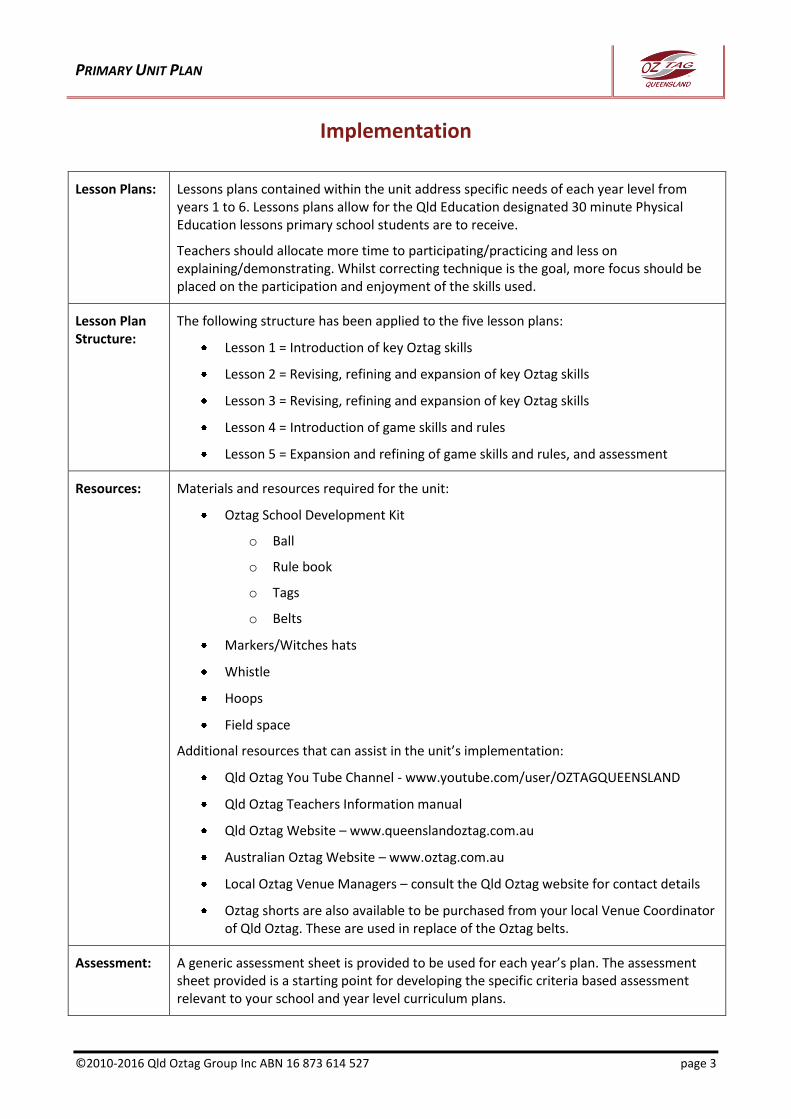
Implementation
Lesson Plans: Lessons plans contained within the unit address specific needs of each year level from years 1 to 6. Lessons plans allow for the Qld Education designated 30 minute Physical Education lessons primary school students are to receive.
Teachers should allocate more time to participating/practicing and less on explaining/demonstrating. Whilst correcting technique is the goal, more focus should be placed on the participation and enjoyment of the skills used.
Lesson Plan Structure:
The following structure has been applied to the five lesson plans:
Lesson 1 = Introduction of key Oztag skills
Lesson 2 = Revising, refining and expansion of key Oztag skills
Lesson 3 = Revising, refining and expansion of key Oztag skills
Lesson 4 = Introduction of game skills and rules
Lesson 5 = Expansion and refining of game skills and rules, and assessment
Resources: Materials and resources required for the unit:
Oztag School Development Kit
o Ball
o Rule book
o Tags
o Belts
Markers/Witches hats
Whistle
Hoops
Field space
Additional resources that can assist in the unit’s implementation:
Qld Oztag You Tube Channel - www.youtube.com/user/OZTAGQUEENSLAND
Qld Oztag Teachers Information manual
Qld Oztag Website – www.queenslandoztag.com.au
Australian Oztag Website – www.oztag.com.au
Local Oztag Venue Managers – consult the Qld Oztag website for contact details
Oztag shorts are also available to be purchased from your local Venue Coordinator of Qld Oztag. These are used in replace of the Oztag belts.
Assessment: A generic assessment sheet is provided to be used for each year’s plan. The assessment sheet provided is a starting point for developing the specific criteria based assessment relevant to your school and year level curriculum plans.
PRIMARY UNIT PLAN
©2010-2016 Qld Oztag Group Inc ABN 16 873 614 527 page 4
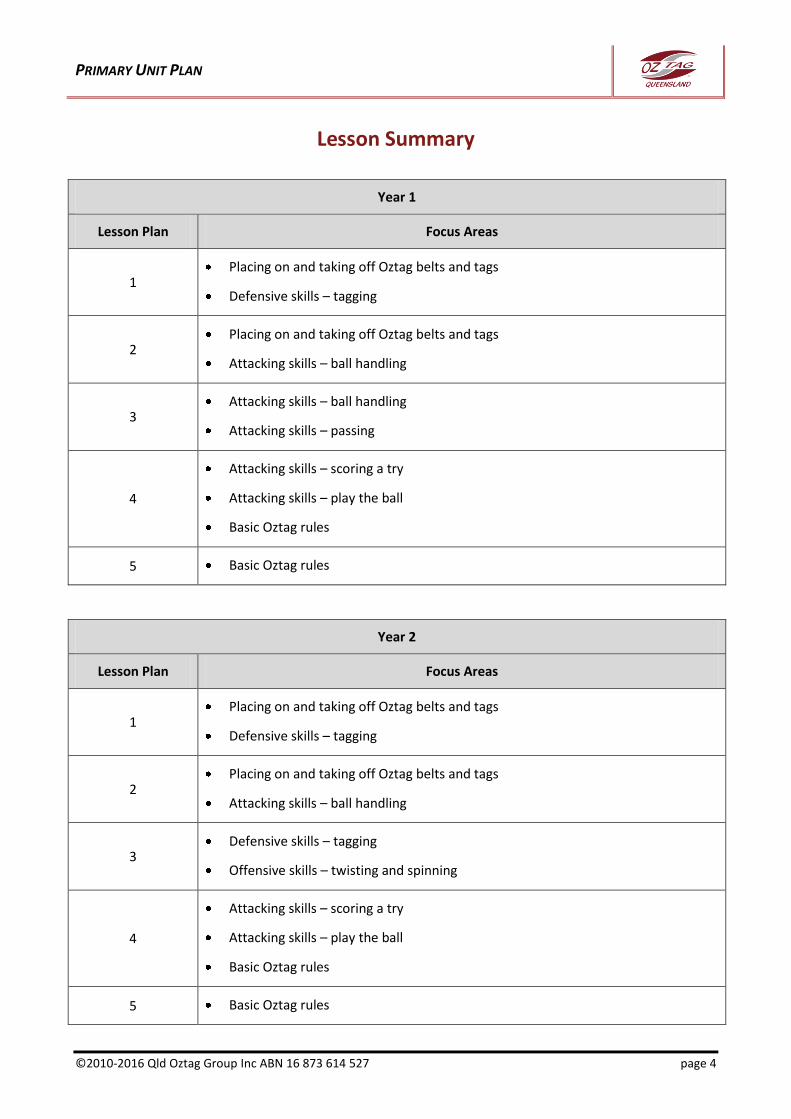
Lesson Summary
Year 1
Lesson Plan Focus Areas
1 Placing on and taking off Oztag belts and tags
Defensive skills – tagging
2 Placing on and taking off Oztag belts and tags
Attacking skills – ball handling
3 Attacking skills – ball handling
Attacking skills – passing
4
Attacking skills – scoring a try
Attacking skills – play the ball
Basic Oztag rules
5 Basic Oztag rules
Year 2
Lesson Plan Focus Areas
1 Placing on and taking off Oztag belts and tags
Defensive skills – tagging
2 Placing on and taking off Oztag belts and tags
Attacking skills – ball handling
3 Defensive skills – tagging
Offensive skills – twisting and spinning
4
Attacking skills – scoring a try
Attacking skills – play the ball
Basic Oztag rules
5 Basic Oztag rules

PRIMARY UNIT PLAN
©2010-2016 Qld Oztag Group Inc ABN 16 873 614 527 page 5
Year 3
Lesson Plan Focus Areas
1 Placing on and taking off Oztag belts and tags
Defensive skills – tagging
2
Placing on and taking off Oztag belts and tags
Offensive skills – passing
Offensive skills – ball handling
3 Defensive skills – tagging
Offensive skills – twisting and spinning
4
Attacking Skills - scoring a try
Attacking Skills - play the ball
Basic Oztag rules
5 Basic Oztag rules
Year 4
Lesson Plan Focus Areas
1
Placing on and taking off Oztag belts and tags
Offensive skills – passing
Offensive skills – ball handling
2
Placing on and taking off Oztag belts and tags
Defensive skills – tagging
Offensive skills – twisting and spinning
3 Offensive skills – kicking
4
Attacking Skills - scoring a try
Attacking Skills - play the ball
Basic Oztag rules
5 Basic Oztag rules
Attacking skills - 2 on 1 attacking (draw and pass)
PRIMARY UNIT PLAN
©2010-2016 Qld Oztag Group Inc ABN 16 873 614 527 page 6
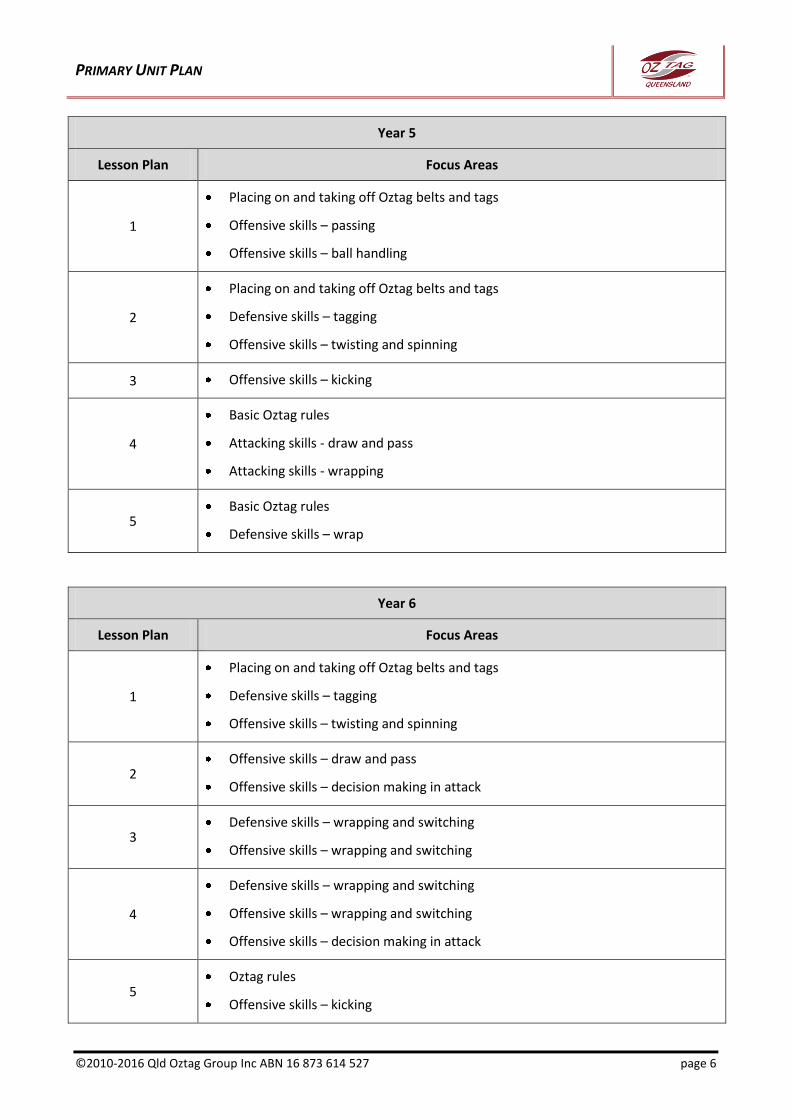
Year 5
Lesson Plan Focus Areas
1
Placing on and taking off Oztag belts and tags
Offensive skills – passing
Offensive skills – ball handling
2
Placing on and taking off Oztag belts and tags
Defensive skills – tagging
Offensive skills – twisting and spinning
3 Offensive skills – kicking
4
Basic Oztag rules
Attacking skills - draw and pass
Attacking skills - wrapping
5 Basic Oztag rules
Defensive skills – wrap
Year 6
Lesson Plan Focus Areas
1
Placing on and taking off Oztag belts and tags
Defensive skills – tagging
Offensive skills – twisting and spinning
2 Offensive skills – draw and pass
Offensive skills – decision making in attack
3 Defensive skills – wrapping and switching
Offensive skills – wrapping and switching
4
Defensive skills – wrapping and switching
Offensive skills – wrapping and switching
Offensive skills – decision making in attack
5 Oztag rules
Offensive skills – kicking
PRIMARY UNIT PLAN
©2010-2016 Qld Oztag Group Inc ABN 16 873 614 527 page 7
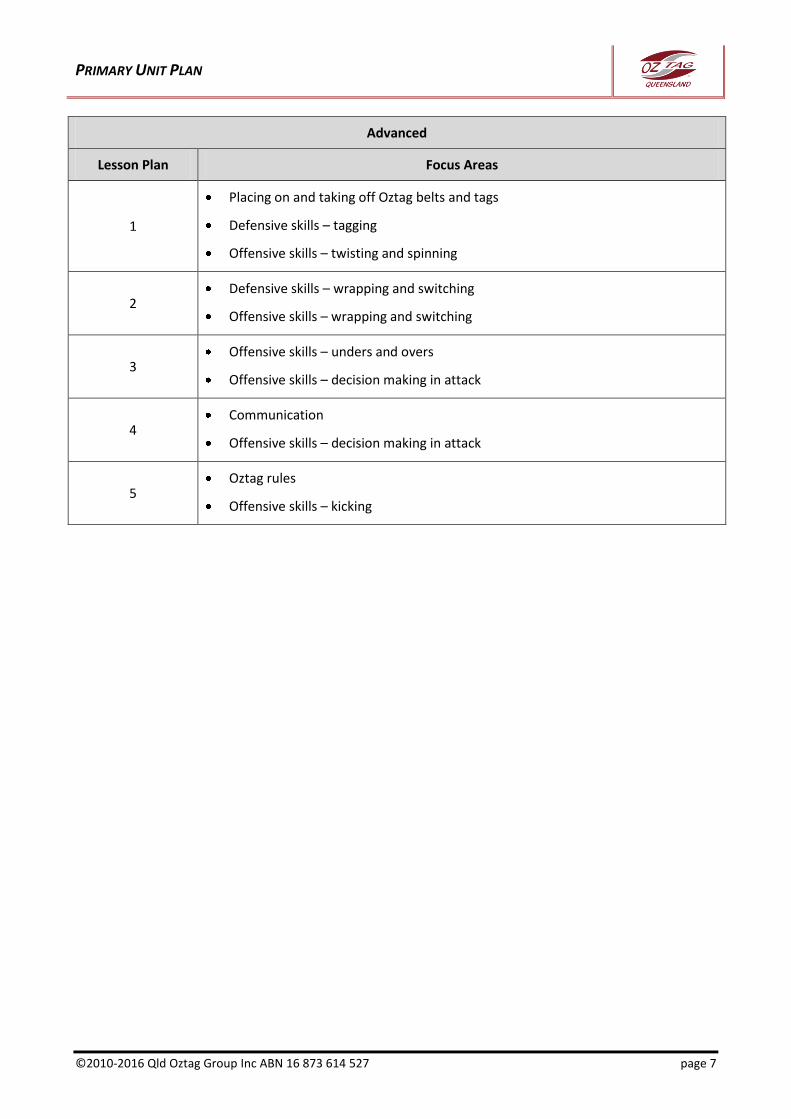
Advanced
Lesson Plan Focus Areas
1
Placing on and taking off Oztag belts and tags
Defensive skills – tagging
Offensive skills – twisting and spinning
2 Defensive skills – wrapping and switching
Offensive skills – wrapping and switching
3 Offensive skills – unders and overs
Offensive skills – decision making in attack
4 Communication
Offensive skills – decision making in attack
5 Oztag rules
Offensive skills – kicking
PRIMARY UNIT PLAN
©2010-2016 Jigsaw Sports Pty Ltd ABN 82 135 455 613 page 8
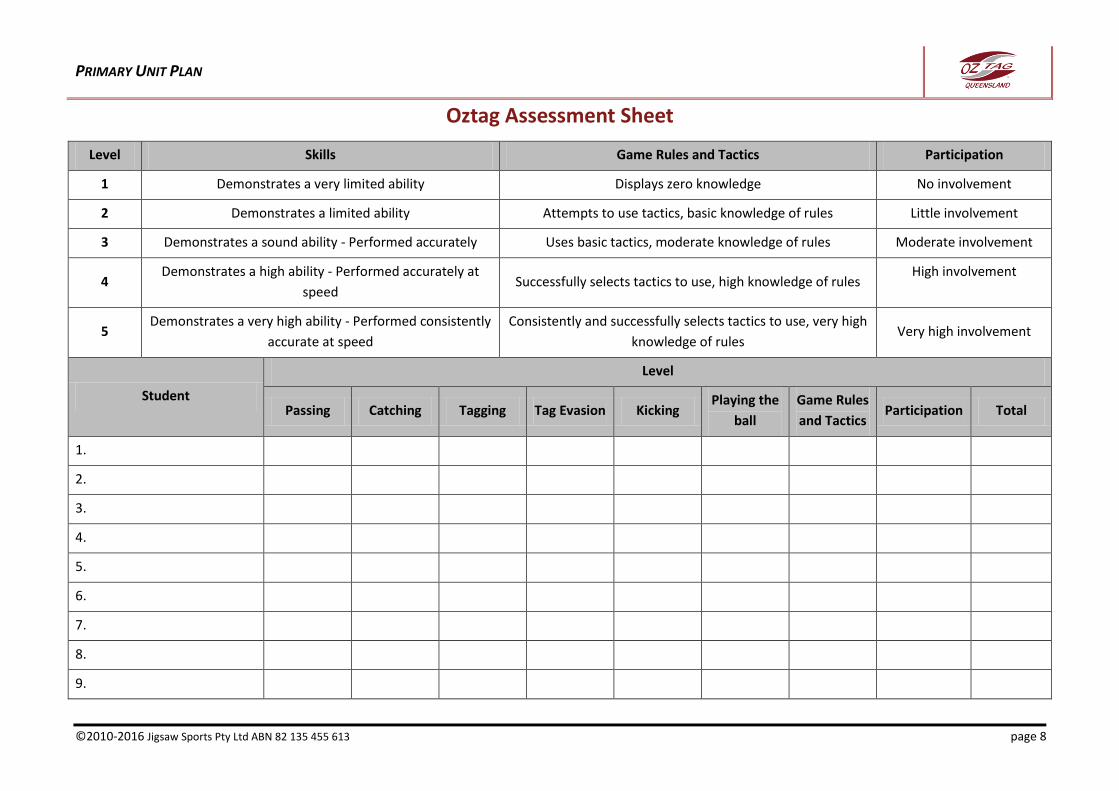
Oztag Assessment Sheet
Level Skills Game Rules and Tactics Participation
1 Demonstrates a very limited ability Displays zero knowledge No involvement
2 Demonstrates a limited ability Attempts to use tactics, basic knowledge of rules Little involvement
3 Demonstrates a sound ability - Performed accurately Uses basic tactics, moderate knowledge of rules Moderate involvement
4 Demonstrates a high ability - Performed accurately at
speed Successfully selects tactics to use, high knowledge of rules
High involvement
5 Demonstrates a very high ability - Performed consistently
accurate at speed
Consistently and successfully selects tactics to use, very high
knowledge of rules Very high involvement
Student
Level
Passing Catching Tagging Tag Evasion Kicking Playing the
ball
Game Rules
and Tactics Participation Total
1.
2.
3.
4.
5.
6.
7.
8.
9.
PRIMARY UNIT PLAN
©2010-2016 Jigsaw Sports Pty Ltd ABN 82 135 455 613 page 9
10.
11.
12.
13.
14.
15.
16.
17.
18.
19.
20.
21.
22.
23.
24.
25.
26.
27.
28.
29.
30.

PRIMARY UNIT PLAN
©2010-2016 Jigsaw Sports Pty Ltd ABN 82 135 455 613 page 10
Year 1 Lesson Plans
PRIMARY UNIT PLAN
©2010-2016 Jigsaw Sports Pty Ltd ABN 82 135 455 613 page 11
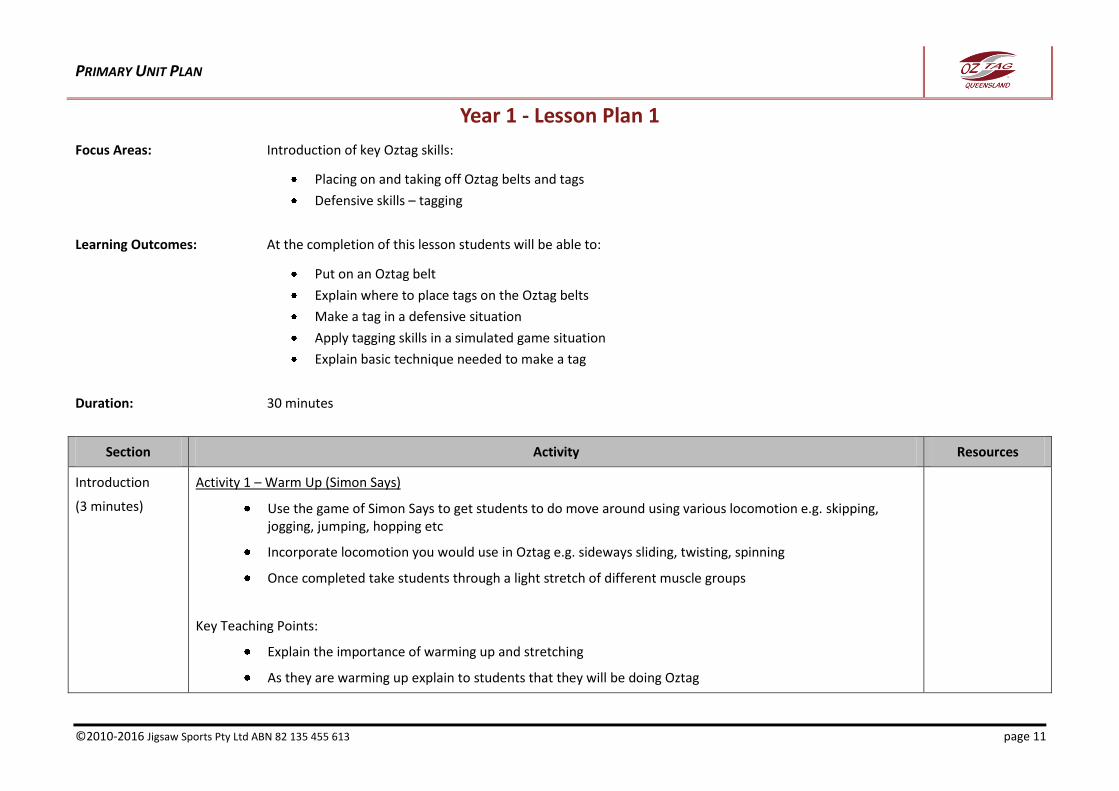
Year 1 - Lesson Plan 1
Focus Areas: Introduction of key Oztag skills:
Placing on and taking off Oztag belts and tags
Defensive skills – tagging
Learning Outcomes: At the completion of this lesson students will be able to:
Put on an Oztag belt
Explain where to place tags on the Oztag belts
Make a tag in a defensive situation
Apply tagging skills in a simulated game situation
Explain basic technique needed to make a tag
Duration: 30 minutes
Section Activity Resources
Introduction
(3 minutes)
Activity 1 – Warm Up (Simon Says)
Use the game of Simon Says to get students to do move around using various locomotion e.g. skipping, jogging, jumping, hopping etc
Incorporate locomotion you would use in Oztag e.g. sideways sliding, twisting, spinning
Once completed take students through a light stretch of different muscle groups
Key Teaching Points:
Explain the importance of warming up and stretching
As they are warming up explain to students that they will be doing Oztag

PRIMARY UNIT PLAN
©2010-2016 Jigsaw Sports Pty Ltd ABN 82 135 455 613 page 12
Body
(5 minutes)
Activity 2 – Putting on a Belt and Tags
Have students sitting as a group
Explain how to put on a belt and tags and demonstrate
Have students place on their own belts (assistance will be required)
Allocate students into two different groups (reflective of the two different colour tags). As you call out a colour have that student go and put on that colour tags
Key Teaching Points:
Furry side of the belt to the outside
Oztag logo on the belt to the front and middle
Have the belt rap around your waist
Tags to sit on either side of your waist and hanging straight down
Special Oztag shorts can be used and if you play at a competition you will have to play in a pair
Oztag Belts
Tags
Body
(2 minutes)
Activity 3 – Tagging
Have students sit as a group
Demonstrate to the students how to make a tag – use a student as a volunteer
Ask students to stand up and practice tagging them selves
Key Teaching Points:
Use two hands – it’s easier to make the tag
Use the palm of your hands NOT fingers – just like swatting a mosquito
When you make the tag just throw it on the ground – make sure you throw it straight down not away from where you are standing
STRESS: Zero contact including that the attacker is not allowed to push the defenders hand away
No jumping by the attacker in avoiding being tagged
Oztag Belts
Tags

PRIMARY UNIT PLAN
©2010-2016 Jigsaw Sports Pty Ltd ABN 82 135 455 613 page 13
Body
(8 minutes)
Activity 4 – Tagging One-on-One
Split class into two teams
Create channels using markers 2 m wide and 4 m long – enough for each member of a team
Have both teams at the end either end of the channels, 1 player from each team per channel standing in the middle of the markers
Team A runs towards team B and try to run over the line without being tagged
Team B must try and make the tag on team A
Get 5 turns each and rotate
Make a game of it by seeing how many tries/tags each team can make and have the other team try to beat it
Key Teaching Points:
Students must stay in their channel or they have run out
No contact
Use both hands and palms to make the tag
Explain that the end line between the markers is like the tryline in Oztag
Oztag Belts
Tags
Markers
2m
4m
B B
A A
B
A
PRIMARY UNIT PLAN
©2010-2016 Jigsaw Sports Pty Ltd ABN 82 135 455 613 page 14
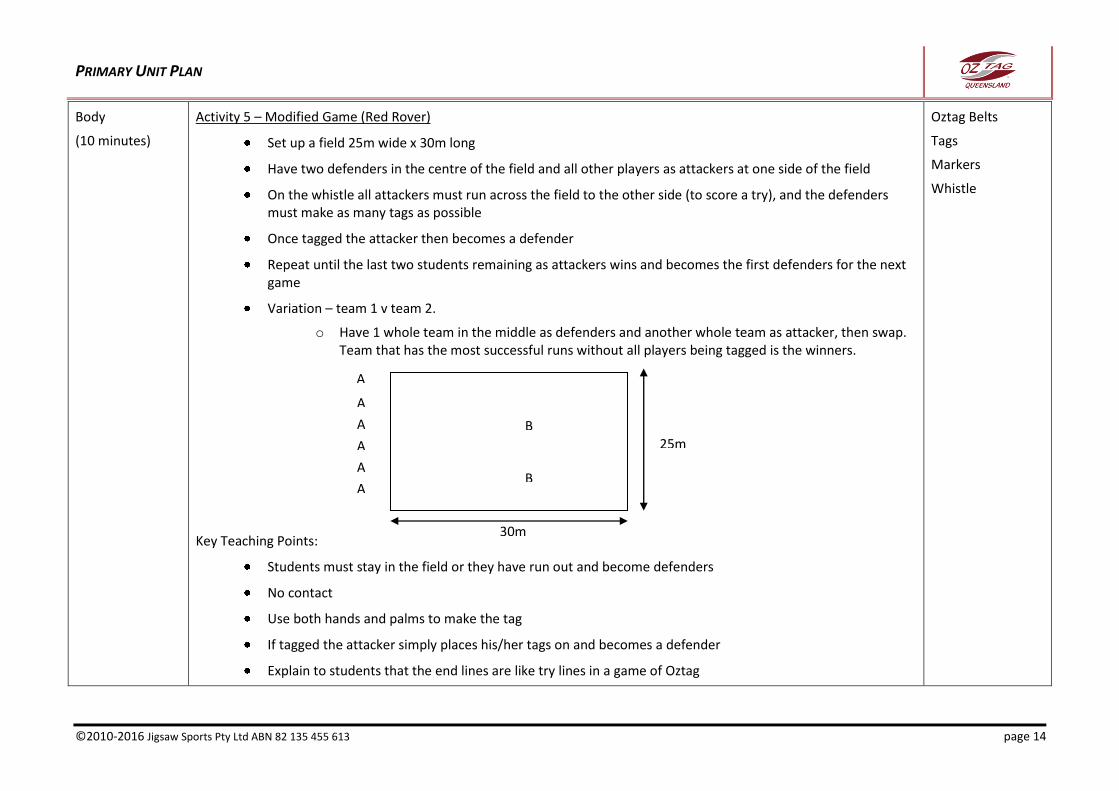
Body
(10 minutes)
Activity 5 – Modified Game (Red Rover)
Set up a field 25m wide x 30m long
Have two defenders in the centre of the field and all other players as attackers at one side of the field
On the whistle all attackers must run across the field to the other side (to score a try), and the defenders must make as many tags as possible
Once tagged the attacker then becomes a defender
Repeat until the last two students remaining as attackers wins and becomes the first defenders for the next game
Variation – team 1 v team 2.
o Have 1 whole team in the middle as defenders and another whole team as attacker, then swap. Team that has the most successful runs without all players being tagged is the winners.
Key Teaching Points:
Students must stay in the field or they have run out and become defenders
No contact
Use both hands and palms to make the tag
If tagged the attacker simply places his/her tags on and becomes a defender
Explain to students that the end lines are like try lines in a game of Oztag
Oztag Belts
Tags
Markers
Whistle
A
A
A
A
A
A
B
B
30m
25m
PRIMARY UNIT PLAN
©2010-2016 Jigsaw Sports Pty Ltd ABN 82 135 455 613 page 15
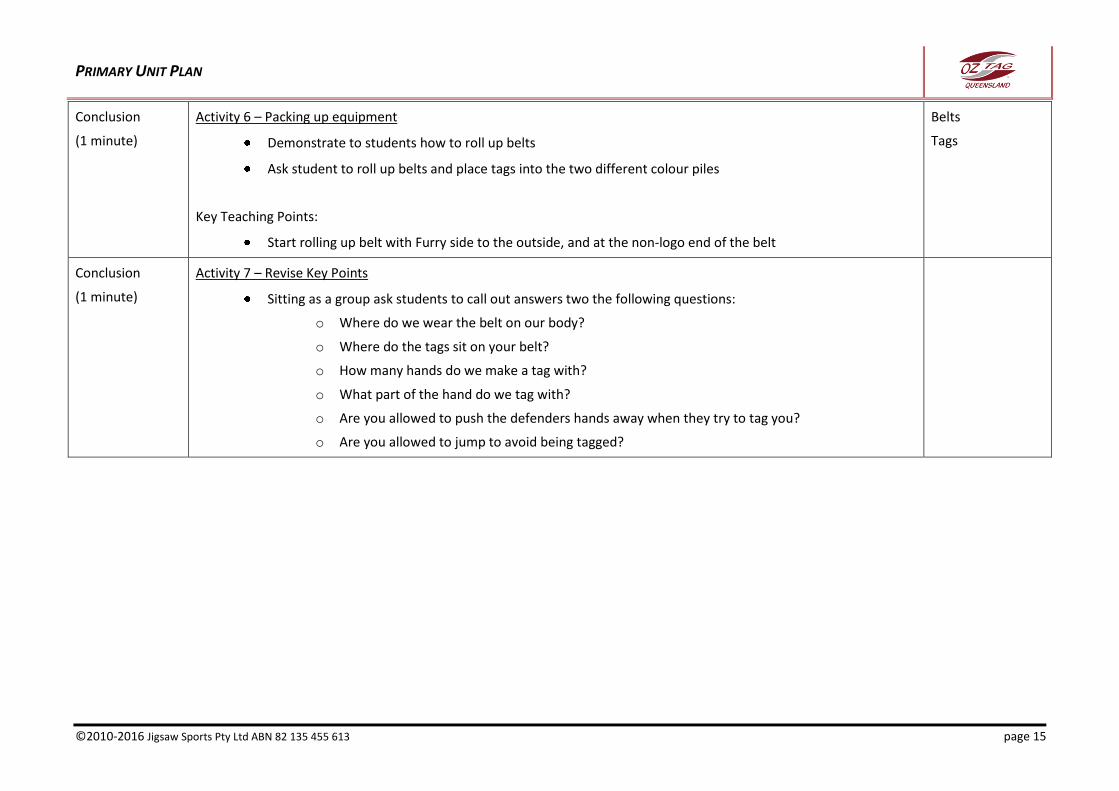
Conclusion
(1 minute)
Activity 6 – Packing up equipment
Demonstrate to students how to roll up belts
Ask student to roll up belts and place tags into the two different colour piles
Key Teaching Points:
Start rolling up belt with Furry side to the outside, and at the non-logo end of the belt
Belts
Tags
Conclusion
(1 minute)
Activity 7 – Revise Key Points
Sitting as a group ask students to call out answers two the following questions:
o Where do we wear the belt on our body?
o Where do the tags sit on your belt?
o How many hands do we make a tag with?
o What part of the hand do we tag with?
o Are you allowed to push the defenders hands away when they try to tag you?
o Are you allowed to jump to avoid being tagged?

PRIMARY UNIT PLAN
©2010-2016 Jigsaw Sports Pty Ltd ABN 82 135 455 613 page 16
Year 1 - Lesson Plan 2
Focus Areas: Revising, refining and expansion of key Oztag skills:
Placing on and taking off Oztag belts and tags
Attacking skills – ball handling
Learning Outcomes: At the completion of this lesson students will be able to:
Put on an Oztag belt
Explain where to place tags on the Oztag belts
Apply ball handling skills in a simulated game situation
Explain basic technique used in ball handling
Duration: 30 minutes
Section Activity Resources
Introduction
(3 minutes)
Activity 1 - Revise putting on belts and tags
Sit students as a whole group and ask if they can remember how to put on belts and tags - ask for volunteers to explain
Ensure correct technique is mentioned
Ask student to place on the belts and tags ensuring there is even numbers between the two different tags colours – provide assistance as required
Key Teaching Points:
Furry side of the belt to the outside
Oztag logo on the belt to the front and middle
Have the belt rap around your waist
Tags to sit on either side of your waist and hanging straight down
Belts
Tags
PRIMARY UNIT PLAN
©2010-2016 Jigsaw Sports Pty Ltd ABN 82 135 455 613 page 17
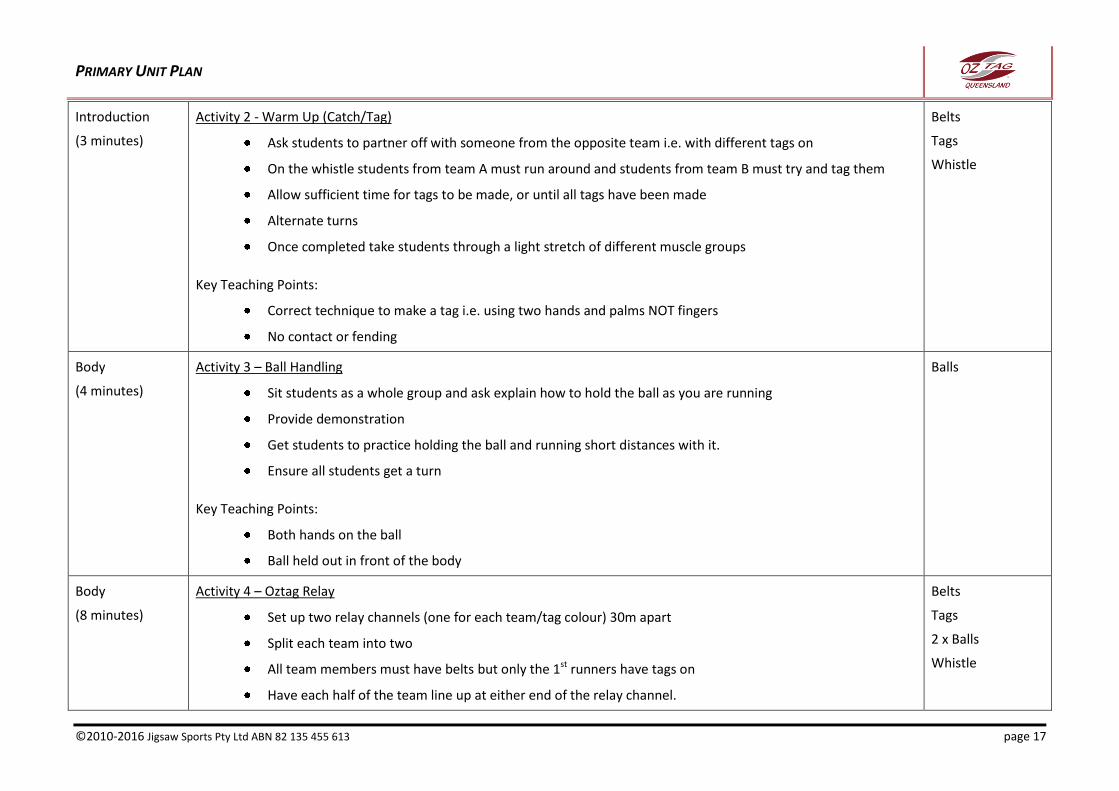
Introduction
(3 minutes)
Activity 2 - Warm Up (Catch/Tag)
Ask students to partner off with someone from the opposite team i.e. with different tags on
On the whistle students from team A must run around and students from team B must try and tag them
Allow sufficient time for tags to be made, or until all tags have been made
Alternate turns
Once completed take students through a light stretch of different muscle groups
Key Teaching Points:
Correct technique to make a tag i.e. using two hands and palms NOT fingers
No contact or fending
Belts
Tags
Whistle
Body
(4 minutes)
Activity 3 – Ball Handling
Sit students as a whole group and ask explain how to hold the ball as you are running
Provide demonstration
Get students to practice holding the ball and running short distances with it.
Ensure all students get a turn
Key Teaching Points:
Both hands on the ball
Ball held out in front of the body
Balls
Body
(8 minutes)
Activity 4 – Oztag Relay
Set up two relay channels (one for each team/tag colour) 30m apart
Split each team into two
All team members must have belts but only the 1st runners have tags on
Have each half of the team line up at either end of the relay channel.
Belts
Tags
2 x Balls
Whistle
PRIMARY UNIT PLAN
©2010-2016 Jigsaw Sports Pty Ltd ABN 82 135 455 613 page 18
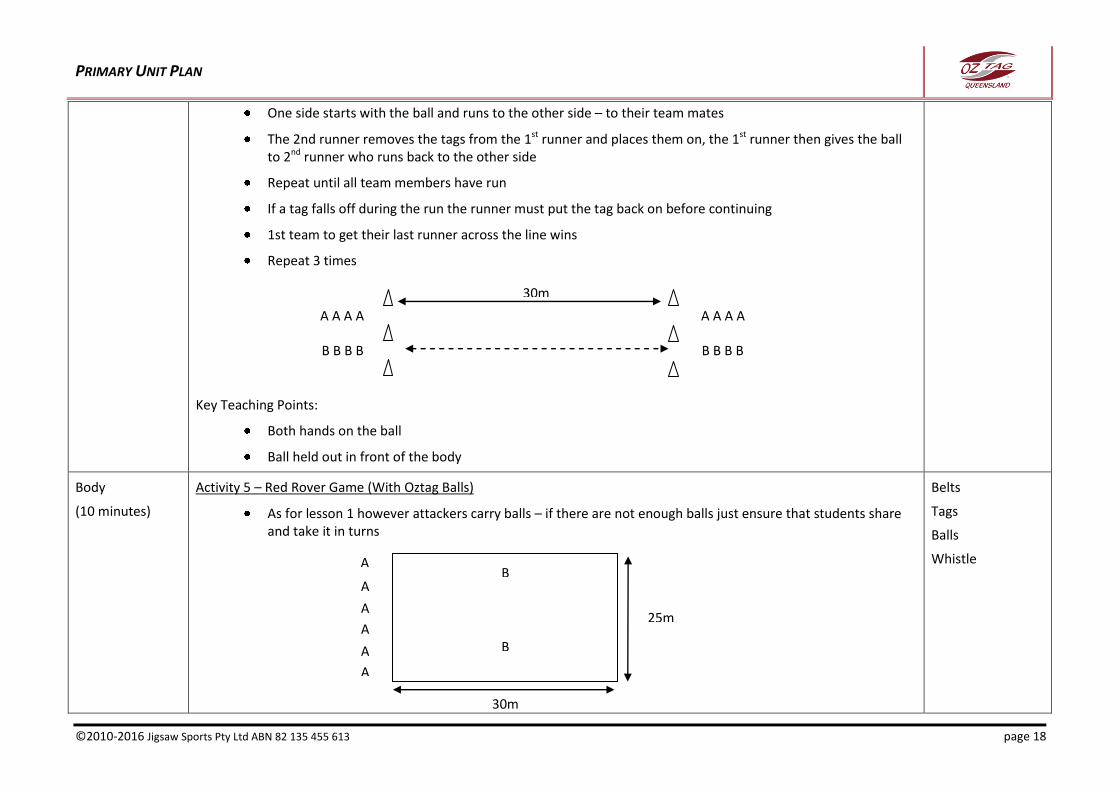
One side starts with the ball and runs to the other side – to their team mates
The 2nd runner removes the tags from the 1st runner and places them on, the 1st runner then gives the ball to 2nd runner who runs back to the other side
Repeat until all team members have run
If a tag falls off during the run the runner must put the tag back on before continuing
1st team to get their last runner across the line wins
Repeat 3 times
Key Teaching Points:
Both hands on the ball
Ball held out in front of the body
Body
(10 minutes)
Activity 5 – Red Rover Game (With Oztag Balls)
As for lesson 1 however attackers carry balls – if there are not enough balls just ensure that students share and take it in turns
Belts
Tags
Balls
Whistle
30m
A A A A A A A A
B B B B B B B B
A
A
A
A
A
A B
B
30m
25m

PRIMARY UNIT PLAN
©2010-2016 Jigsaw Sports Pty Ltd ABN 82 135 455 613 page 19
Key Teaching Points:
Students must stay in the field or they have run out and become defenders
No contact
Use both hands and palms to make the tag
Carry ball with both hands and out in front of body
Explain to students that the end lines are like try lines in a game of Oztag
Conclusion
(1 minute)
Activity 6 – Revise Packing up equipment
Ask student how we roll up the belts. Demonstrate if needed
Ask student to roll up belts and place tags into the two different colour piles
Key Teaching Points:
Start rolling up belt with Furry side to the outside, and at the non-logo end of the belt
Belts
Tags
Conclusion
(1 minute)
Activity 7 – Revise Key Points
Sitting as a group ask students to call out answers two the following questions:
o Where do we wear the belt on our body?
o Where do the tags sit on your belt?
o How many hands do we make a tag with?
o What part of the hand do we tag with?
o How many hands do we carry the ball with?
o Where do we carry the ball?
PRIMARY UNIT PLAN
©2010-2016 Jigsaw Sports Pty Ltd ABN 82 135 455 613 page 20
Year 1 - Lesson Plan 3
Focus Areas: Revising, refining and expansion of key Oztag skills:
Attacking skills – ball handling
Attacking skills – passing
Learning Outcomes: At the completion of this lesson students will be able to:
Pass a ball in an attacking situation
Explain basic technique needed to pass a ball
Run with an Oztag ball
Explain basic technique used in running with the ball
Apply running and passing skills in a simulated game situation
Duration: 30 minutes
Section Activity Resources
Introduction
(5 minutes)
Activity 1 – Warm Up
Have students place on tags and belts – ensure even numbers in teams
Set out a grid 20m x 20m – no one is allowed outside of the grid
On the whistle students have to run around and tag as many people as they can while still avoiding having their own tags removed
The person with the most tags wins
Repeat as needed
Once completed take students through a light stretch of different muscle groups
Key Teaching Points:
Enforce correct technique to make a tag – two hands and using palms
Tags
Belts
Markers
Whistle
PRIMARY UNIT PLAN
©2010-2016 Jigsaw Sports Pty Ltd ABN 82 135 455 613 page 21
Body
(5 minutes)
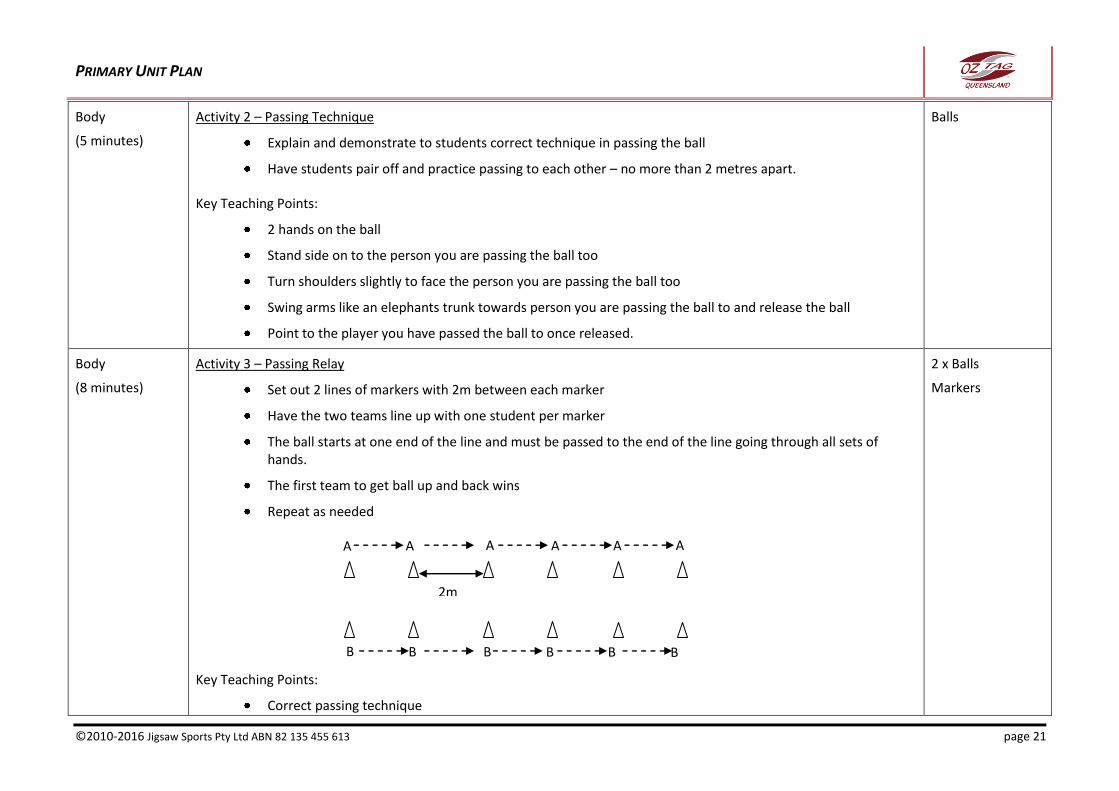
Activity 2 – Passing Technique
Explain and demonstrate to students correct technique in passing the ball
Have students pair off and practice passing to each other – no more than 2 metres apart.
Key Teaching Points:
2 hands on the ball
Stand side on to the person you are passing the ball too
Turn shoulders slightly to face the person you are passing the ball too
Swing arms like an elephants trunk towards person you are passing the ball to and release the ball
Point to the player you have passed the ball to once released.
Balls
Body
(8 minutes)
Activity 3 – Passing Relay
Set out 2 lines of markers with 2m between each marker
Have the two teams line up with one student per marker
The ball starts at one end of the line and must be passed to the end of the line going through all sets of hands.
The first team to get ball up and back wins
Repeat as needed
Key Teaching Points:
Correct passing technique
2 x Balls
Markers
2m
A
B
A A A A A
B B B B B
PRIMARY UNIT PLAN
©2010-2016 Jigsaw Sports Pty Ltd ABN 82 135 455 613 page 22
Body
(10 minutes)
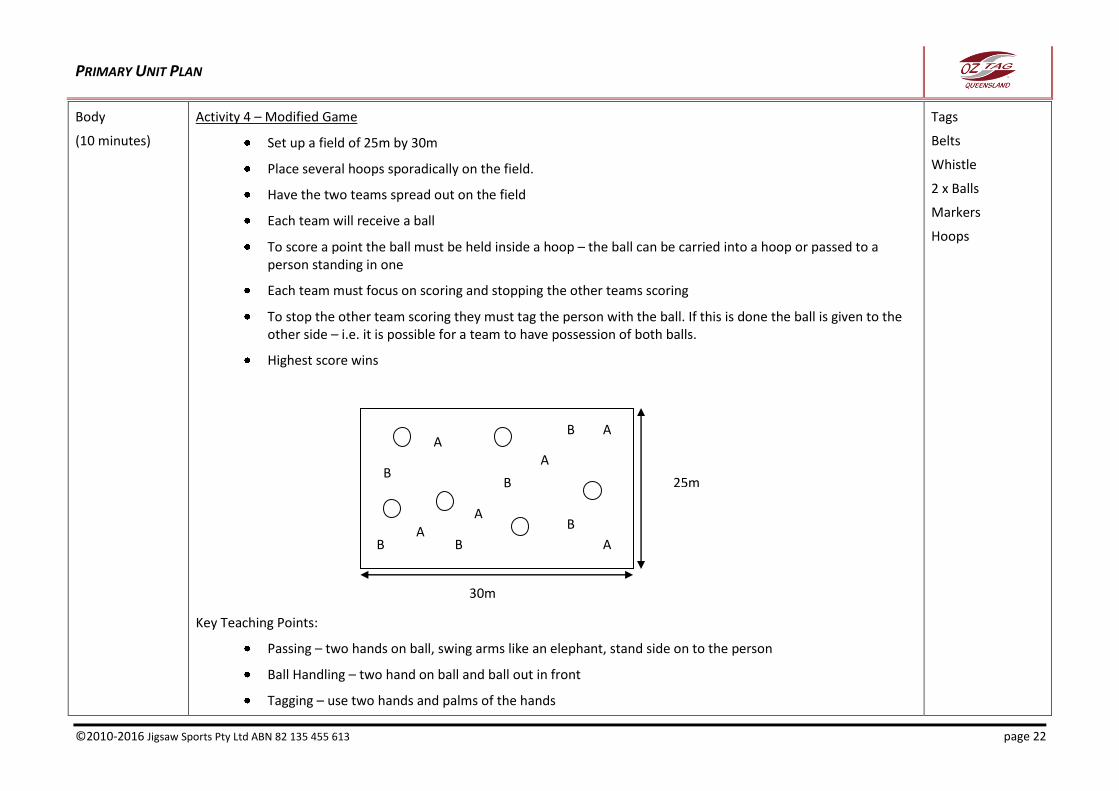
Activity 4 – Modified Game
Set up a field of 25m by 30m
Place several hoops sporadically on the field.
Have the two teams spread out on the field
Each team will receive a ball
To score a point the ball must be held inside a hoop – the ball can be carried into a hoop or passed to a person standing in one
Each team must focus on scoring and stopping the other teams scoring
To stop the other team scoring they must tag the person with the ball. If this is done the ball is given to the other side – i.e. it is possible for a team to have possession of both balls.
Highest score wins
Key Teaching Points:
Passing – two hands on ball, swing arms like an elephant, stand side on to the person
Ball Handling – two hand on ball and ball out in front
Tagging – use two hands and palms of the hands
Tags
Belts
Whistle
2 x Balls
Markers
Hoops
30m
25m
A
A A
A
A
A B
B B
B
B
B
PRIMARY UNIT PLAN
©2010-2016 Jigsaw Sports Pty Ltd ABN 82 135 455 613 page 23
Conclusion
(2 minutes)
Activity 5 – Revise Key Points
Once students roll up their belts have them sitting as a group ask students to call out answers two the following questions:
o How many hands do we use when passing the ball?
o How do we swing our arms when we pass?
o How do we stand when passing – side on or facing the person we are passing to?
o How many hands do we carry the ball with?
o Where do we carry the ball?
PRIMARY UNIT PLAN
©2010-2016 Jigsaw Sports Pty Ltd ABN 82 135 455 613 page 24
Year 1 - Lesson Plan 4
Focus Areas: Introduction of game skills and rules:
Attacking skills – scoring a try
Attacking skills – play the ball
Basic Oztag rules
Learning Outcomes: At the completion of this lesson students will be able to:
Explain how to score a try in a game of Oztag
Demonstrate how to play the ball if tagged in a game of Oztag
Demonstrate dummy half skills – run or pass
Apply play the ball skills in a game situation
Explain basic rules used in a game of Oztag
Duration: 30 minutes
Section Activity Resources
Introduction
(5 minutes)
Activity 1 – Warm Up
Have students place on tags and belts – ensure even numbers in teams
Set out a grid 20m x 20m – no one is allowed outside of the grid
Give 4 or 5 students a ball
On the whistle students with a ball have to run around and avoid being tagged
Students without balls have to tags those with the balls
Once tagged the person must give the ball to the person who made the tag
Once completed take students through a light stretch of different muscle groups
Belts
Tags
Balls
Markers
Whistle

PRIMARY UNIT PLAN
©2010-2016 Jigsaw Sports Pty Ltd ABN 82 135 455 613 page 25
Key Teaching Points:
Ball Handling – two hand on ball and ball out in front
Tagging – use two hands and palms of the hands
Body
(3 minutes)
Activity 2 – Play the Ball Demonstration
Explain and demonstrate how and when to play the ball
In threes have student practice playing the ball – 1 as the defender who removes the tag, 1 as the attacker who plays the ball and one as the dummy half who picks the ball up and runs
Key Teaching Points:
Defender removes tag and then holds up the tag and drops it to the ground marking where the play the ball should occur
Run back to where tag is on the ground, face your try line
Place the ball on ground in front with ends of ball pointing to sidelines
Place the ball horizontally on the ground
Put one foot on top of the ball & heel or gently roll the ball behind to dummy half
Pick up and re-attach tag quickly
Dummy half can either run with the ball or pass to the 1st receiver
Belts
Tags
Balls
Body
(5 minutes)
Activity 3 – Play the Ball Tunnel Ball
Set up two relay channels (one for each team/tag colour) 10m apart
Have 1m intervals between markers
All team members must have belts and tags on
Have each team line up on the markers (1 player to each marker) all facing the same direction
One side starts with the ball
Have 1st person play the ball, to the 2nd person who picks the ball up and plays it to the 3rd person etc
Belts
Tags
Balls
Markers
Whistle
PRIMARY UNIT PLAN
©2010-2016 Jigsaw Sports Pty Ltd ABN 82 135 455 613 page 26
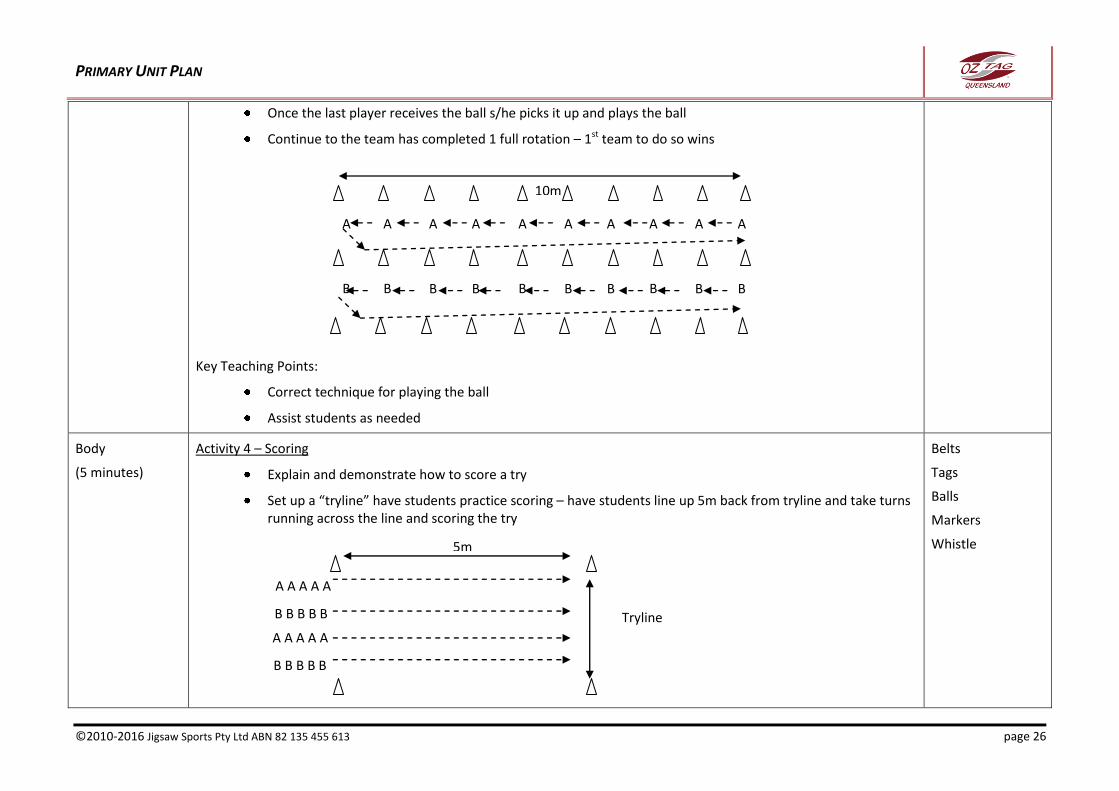
Once the last player receives the ball s/he picks it up and plays the ball
Continue to the team has completed 1 full rotation – 1st team to do so wins
Key Teaching Points:
Correct technique for playing the ball
Assist students as needed
Body
(5 minutes)
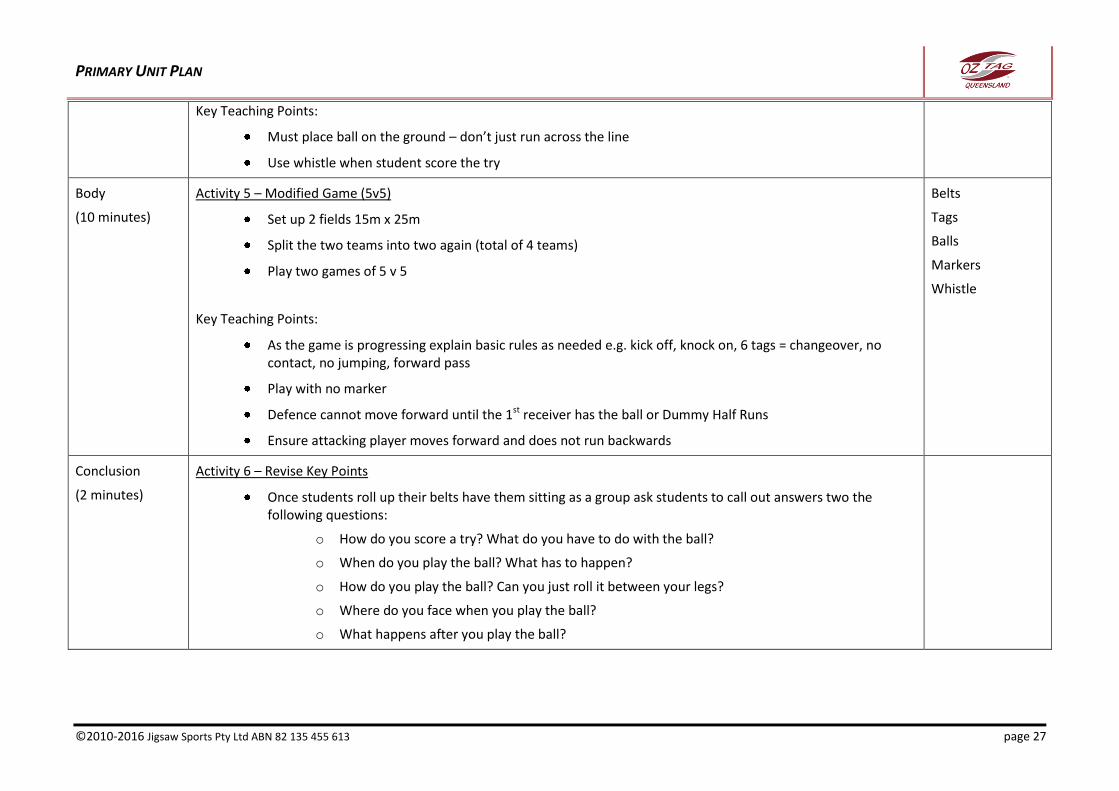
Activity 4 – Scoring
Explain and demonstrate how to score a try
Set up a “tryline” have students practice scoring – have students line up 5m back from tryline and take turns running across the line and scoring the try
Belts
Tags
Balls
Markers
Whistle
10m
A A A
B B B
Z
5m
A A A A A
A A A A A
B B B B B
B B B B B
Tryline
A A A A A A A
B B B
Z
B B B
Z
B
Z
PRIMARY UNIT PLAN
©2010-2016 Jigsaw Sports Pty Ltd ABN 82 135 455 613 page 27
Key Teaching Points:
Must place ball on the ground – don’t just run across the line
Use whistle when student score the try
Body
(10 minutes)
Activity 5 – Modified Game (5v5)
Set up 2 fields 15m x 25m
Split the two teams into two again (total of 4 teams)
Play two games of 5 v 5
Key Teaching Points:
As the game is progressing explain basic rules as needed e.g. kick off, knock on, 6 tags = changeover, no contact, no jumping, forward pass
Play with no marker
Defence cannot move forward until the 1st receiver has the ball or Dummy Half Runs
Ensure attacking player moves forward and does not run backwards
Belts
Tags
Balls
Markers
Whistle
Conclusion
(2 minutes)
Activity 6 – Revise Key Points
Once students roll up their belts have them sitting as a group ask students to call out answers two the following questions:
o How do you score a try? What do you have to do with the ball?
o When do you play the ball? What has to happen?
o How do you play the ball? Can you just roll it between your legs?
o Where do you face when you play the ball?
o What happens after you play the ball?
PRIMARY UNIT PLAN
©2010-2016 Jigsaw Sports Pty Ltd ABN 82 135 455 613 page 28
Year 1 - Lesson Plan 5
Focus Areas: Expansion and refining of game skills and rules, and assessment:
Basic Oztag rules
Learning Outcomes: At the completion of this lesson students will be able to:
Apply Oztag skills in a game situation
Explain basic rules used in a game of Oztag
Duration: 30 minutes
Section Activity Resources
Introduction
(5 minutes)
Activity 1 – Warm Up (Oztag Stuck in the Mud)
Have students place on tags and belts – ensure even numbers in teams
Set up a field 15m x 15m – no player allowed outside of the field
Nominate two students to be the defenders, every other student as attackers (i.e. avoid being tagged)
If tagged the students can only be unstuck if they play the ball – dummy half must be present
o Have 3 or 4 balls on the field – if stuck another attacker must get the ball to them
Rotate defenders
Once completed take students through a light stretch of different muscle groups
Key Teaching Points:
Ball Handling – two hand on ball and ball out in front
Tagging – use two hands and palms of the hands
Play the ball – place ball on ground, must use one foot on the ball and roll backwards to dummy half
Tags
Belts
Balls
Markers
PRIMARY UNIT PLAN
©2010-2016 Jigsaw Sports Pty Ltd ABN 82 135 455 613 page 29
Body
(20 minutes)
Activity 2 – Full Game
Play full game of Oztag with 8 v 8
Field size for juniors = 40m x 25m
Ensure subbing of players if frequent to involve all players
Key Teaching Points:
As the game is progressing explain basic rules as needed e.g. kick off, knock on, 6 tags = changeover, no contact, no jumping, forward pass
Play with no marker
Defence cannot move forward until the 1st receiver has the ball
Ensure attacking player moves forward and does not run backwards
Belts
Tags
Balls
Markers
Whistle
Body
Assessment
As students are playing the game complete assessment sheet
Note: You will require another person to referee the game. Alternatively complete the assessment sheet post game being played
Assessment Sheet
Conclusion
(5 minutes)
Activity 3 – Revise Key Points
Once students roll up their belts have them sitting as a group ask students to call out answers two the following questions:
o How many people in one team for Oztag?
o Are you allowed to jump to avoid being tagged?
o Can you push someone away when they try and tag you?
o What is the best way to make a tag?
o How do you play the ball?
PRIMARY UNIT PLAN
©2010-2016 Jigsaw Sports Pty Ltd ABN 82 135 455 613 page 30
Year 2 Lesson Plans
PRIMARY UNIT PLAN
©2010-2016 Jigsaw Sports Pty Ltd ABN 82 135 455 613 page 31
Year 2 - Lesson Plan 1
Focus Areas: Introduction of key Oztag skills:
Placing on and taking off Oztag belts and tags
Defensive skills – tagging
Learning Outcomes: At the completion of this lesson students will be able to:
Put on an Oztag belt
Explain where to place tags on the Oztag belts
Make a tag in a defensive situation
Apply tagging skills in a simulated game situation
Explain basic technique needed to make a tag
Duration: 30 minutes
Section Activity Resources
Introduction
(3 minutes)
Activity 1 – Warm Up (Simon Says)
Use the game of Simon Says to get students to do move around using various locomotion e.g. skipping, jogging, jumping, hopping etc
Incorporate locomotion you would use in Oztag e.g. sideways sliding, twisting, spinning
Once completed take students through a light stretch of different muscle groups
Key Teaching Points:
Explain the importance of warming up and stretching
As they are warming up explain to students that they will be doing Oztag
PRIMARY UNIT PLAN
©2010-2016 Jigsaw Sports Pty Ltd ABN 82 135 455 613 page 32
Body
(5 minutes)
Activity 2 – Putting on a Belt and Tags
Have students sitting as a group
Explain how to put on a belt and tags and demonstrate
Have students place on their own belts (assistance will be required)
Allocate students into two different groups (reflective of the two different colour tags). As you call out a colour have that student go and put on that colour tags
Key Teaching Points:
Furry side of the belt to the outside
Oztag logo on the belt to the front and middle
Have the belt rap around your waist
Tags to sit on either side of your waist and hanging straight down
Special Oztag shorts can be used and if you play at a competition you will have to play in a pair
Oztag Belts
Tags
Body
(2 minutes)
Activity 3 – Tagging
Have students sit as a group
Demonstrate to the students how to make a tag – use a student as a volunteer
Ask students to stand up and practice tagging them selves
Key Teaching Points:
Use two hands – it’s easier to make the tag
Use the palm of your hands NOT fingers – just like swatting a mosquito
When you make the tag just throw it on the ground – make sure you throw it straight down not away from where you are standing
STRESS: Zero contact including that the attacker is not allowed to push the defenders hand away
No jumping by the attacker in avoiding being tagged
Oztag Belts
Tags
PRIMARY UNIT PLAN
©2010-2016 Jigsaw Sports Pty Ltd ABN 82 135 455 613 page 33
Body
(8 minutes)
Activity 4 – Tagging One-on-One
Split class into two teams
Create channels using markers 2 m wide and 4 m long – enough for each member of a team
Have both teams at the end either end of the channels, 1 player from each team per channel standing in the middle of the markers
Team A runs towards team B and try to run over the line without being tagged
Team B must try and make the tag on team A
Get 5 turns each and rotate
Make a game of it by seeing how many tries/tags each team can make and have the other team try to beat it
Key Teaching Points:
Students must stay in their channel or they have run out
No contact
Use both hands and palms to make the tag
Explain that the end line between the markers is like the tryline in Oztag
Oztag Belts
Tags
Markers
2m
4m
B B
A A
B
A
PRIMARY UNIT PLAN
©2010-2016 Jigsaw Sports Pty Ltd ABN 82 135 455 613 page 34
Body
(10 minutes)
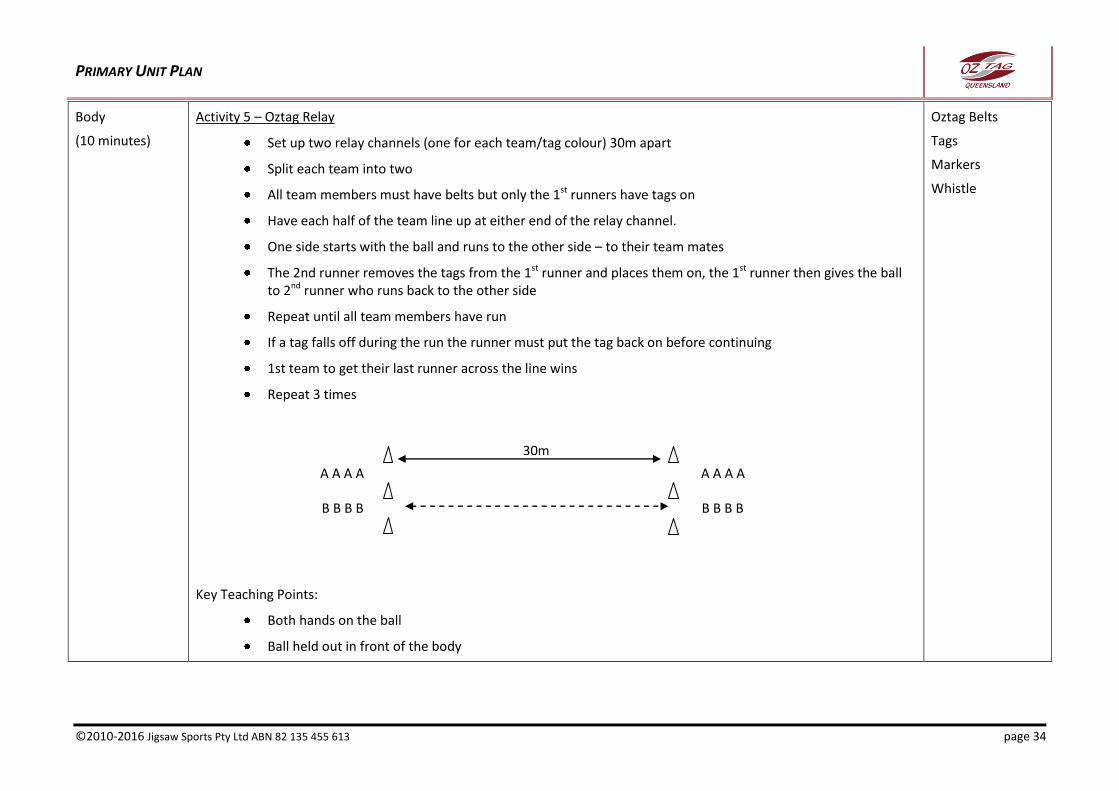
Activity 5 – Oztag Relay
Set up two relay channels (one for each team/tag colour) 30m apart
Split each team into two
All team members must have belts but only the 1st runners have tags on
Have each half of the team line up at either end of the relay channel.
One side starts with the ball and runs to the other side – to their team mates
The 2nd runner removes the tags from the 1st runner and places them on, the 1st runner then gives the ball to 2nd runner who runs back to the other side
Repeat until all team members have run
If a tag falls off during the run the runner must put the tag back on before continuing
1st team to get their last runner across the line wins
Repeat 3 times
Key Teaching Points:
Both hands on the ball
Ball held out in front of the body
Oztag Belts
Tags
Markers
Whistle
30m
A A A A A A A A
B B B B B B B B
PRIMARY UNIT PLAN
©2010-2016 Jigsaw Sports Pty Ltd ABN 82 135 455 613 page 35
Conclusion
(1 minute)
Activity 6 – Packing up equipment
Demonstrate to students how to roll up belts
Ask student to roll up belts and place tags into the two different colour piles
Key Teaching Points:
Start rolling up belt with Furry side to the outside, and at the non-logo end of the belt
Belts
Tags
Conclusion
(1 minute)
Activity 7 – Revise Key Points
Sitting as a group ask students to call out answers two the following questions:
o Where do we wear the belt on our body?
o Where do the tags sit on your belt?
o How many hands do we make a tag with?
o What part of the hand do we tag with?
o Are you allowed to push the defenders hands away when they try to tag you?
o Are you allowed to jump to avoid being tagged?

PRIMARY UNIT PLAN
©2010-2016 Jigsaw Sports Pty Ltd ABN 82 135 455 613 page 36
Year 2 - Lesson Plan 2
Focus Areas: Revising, refining and expansion of key Oztag skills:
Placing on and taking off Oztag belts and tags
Attacking skills – ball handling
Learning Outcomes: At the completion of this lesson students will be able to:
Put on an Oztag belt
Explain where to place tags on the Oztag belts
Apply ball handling skills in a simulated game situation
Explain basic technique used in ball handling
Duration: 30 minutes
Section Activity Resources
Introduction
(3 minutes)
Activity 1 - Revise putting on belts and tags
Sit students as a whole group and ask if they can remember how to put on belts and tags - ask for volunteers to explain
Ensure correct technique is mentioned
Ask student to place on the belts and tags ensuring there is even numbers between the two different tags colours – provide assistance as required
Key Teaching Points:
Furry side of the belt to the outside
Oztag logo on the belt to the front and middle
Have the belt rap around your waist
Tags to sit on either side of your waist and hanging straight down
Belts
Tags
PRIMARY UNIT PLAN
©2010-2016 Jigsaw Sports Pty Ltd ABN 82 135 455 613 page 37
Introduction
(3 minutes)
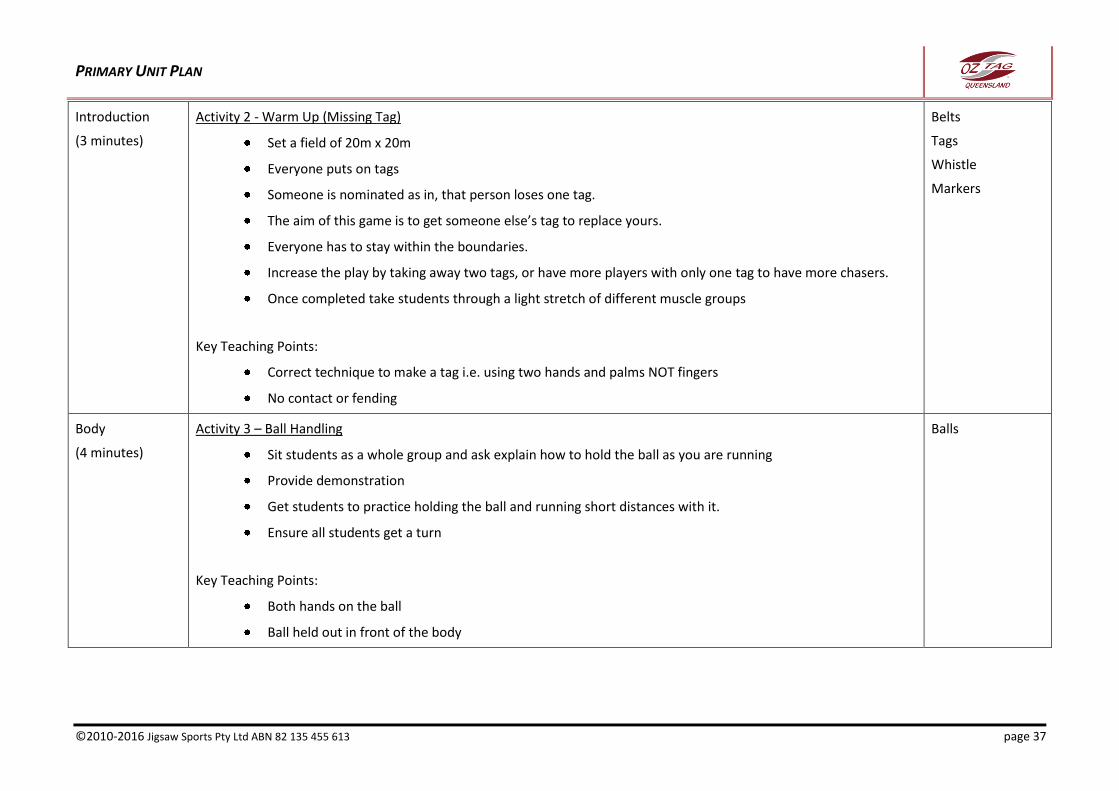
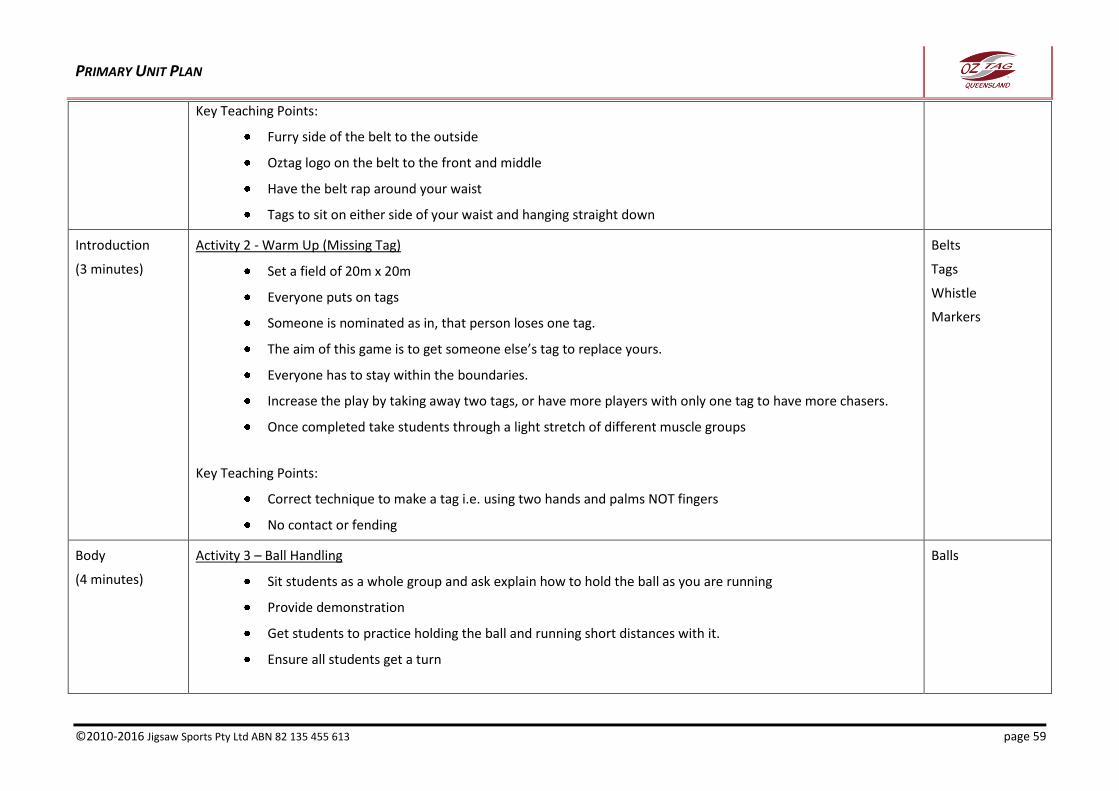
Activity 2 - Warm Up (Missing Tag)
Set a field of 20m x 20m
Everyone puts on tags
Someone is nominated as in, that person loses one tag.
The aim of this game is to get someone else’s tag to replace yours.
Everyone has to stay within the boundaries.
Increase the play by taking away two tags, or have more players with only one tag to have more chasers.
Once completed take students through a light stretch of different muscle groups
Key Teaching Points:
Correct technique to make a tag i.e. using two hands and palms NOT fingers
No contact or fending
Belts
Tags
Whistle
Markers
Body
(4 minutes)
Activity 3 – Ball Handling
Sit students as a whole group and ask explain how to hold the ball as you are running
Provide demonstration
Get students to practice holding the ball and running short distances with it.
Ensure all students get a turn
Key Teaching Points:
Both hands on the ball
Ball held out in front of the body
Balls

PRIMARY UNIT PLAN
©2010-2016 Jigsaw Sports Pty Ltd ABN 82 135 455 613 page 38
Body
(8 minutes)
Activity 4 – Rob the Nest
Set up a grid 20m x 20m
Split each team into two (total of 4 teams)
Each team only has 1 set of tags – given to the first runner
On whistle, one player from each team run to the centre and pick up a ball from the centre hoop then run back to place ball in their teams’ hoop
When returned, the next player takes the tags off the runner and places them on and runs to collect another football
If there are no footballs left in the centre, players may rob another teams nest.
After 1 minute, blow the whistle and the team with the most footballs wins.
Repeat as needed
Key Teaching Points:
Cannot collect balls without tags on – only 1 person can collect balls at a time
Both hands on the ball
Ball held out in front of the body
Correct technique to make a tag i.e. using two hands and palms NOT fingers
Belts
Tags
Balls
Hoops
Whistle
20m A A A A
A A A A B B B B
B B B B
20m Balls in the hoop
PRIMARY UNIT PLAN
©2010-2016 Jigsaw Sports Pty Ltd ABN 82 135 455 613 page 39
Body
(10 minutes)
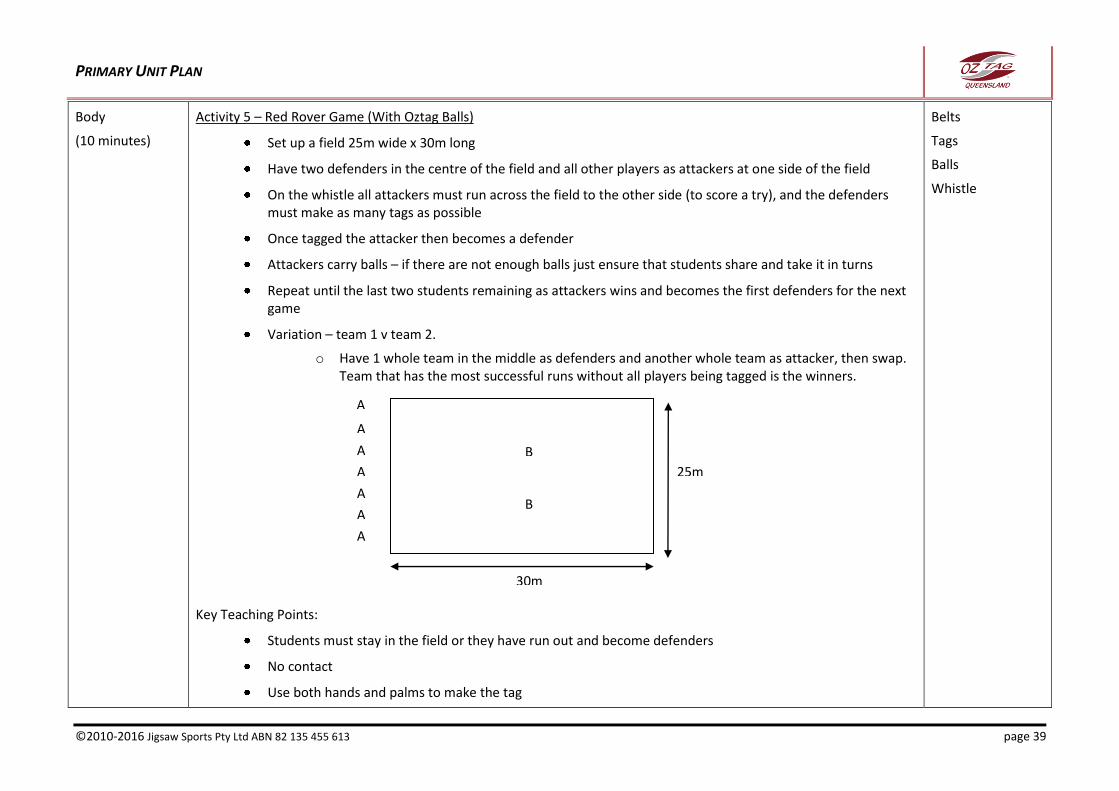
Activity 5 – Red Rover Game (With Oztag Balls)
Set up a field 25m wide x 30m long
Have two defenders in the centre of the field and all other players as attackers at one side of the field
On the whistle all attackers must run across the field to the other side (to score a try), and the defenders must make as many tags as possible
Once tagged the attacker then becomes a defender
Attackers carry balls – if there are not enough balls just ensure that students share and take it in turns
Repeat until the last two students remaining as attackers wins and becomes the first defenders for the next game
Variation – team 1 v team 2.
o Have 1 whole team in the middle as defenders and another whole team as attacker, then swap. Team that has the most successful runs without all players being tagged is the winners.
Key Teaching Points:
Students must stay in the field or they have run out and become defenders
No contact
Use both hands and palms to make the tag
Belts
Tags
Balls
Whistle
A
A
A
A
A
A
A
B
B
30m
25m
PRIMARY UNIT PLAN
©2010-2016 Jigsaw Sports Pty Ltd ABN 82 135 455 613 page 40
If tagged the attacker simply places his/her tags on and becomes a defender
Explain to students that the end lines are like try lines in a game of Oztag
Conclusion
(1 minute)
Activity 6 – Revise Packing up equipment
Ask student how we roll up the belts. Demonstrate if needed
Ask student to roll up belts and place tags into the two different colour piles
Key Teaching Points:
Start rolling up belt with Furry side to the outside, and at the non-logo end of the belt
Belts
Tags
Conclusion
(1 minute)
Activity 7 – Revise Key Points
Sitting as a group ask students to call out answers two the following questions:
o Where do we wear the belt on our body?
o Where do the tags sit on your belt?
o How many hands do we make a tag with?
o What part of the hand do we tag with?
o How many hands do we carry the ball with?
o Where do we carry the ball?

PRIMARY UNIT PLAN
©2010-2016 Jigsaw Sports Pty Ltd ABN 82 135 455 613 page 41
Year 2 - Lesson Plan 3
Focus Areas: Revising, refining and expansion of key Oztag skills:
Defensive skills – tagging
Offensive skills – twisting and spinning
Learning Outcomes: At the completion of this lesson students will be able to:
Explain the offensive and defensive skills that make Oztag Unique
Demonstrate correct technique for making a tag
Demonstrate correct technique for evading a tag – twisting and spinning
Apply tagging and tag evasion skills in a simulated game situation
Duration: 30 minutes
Section Activity Resources
Introduction
(5 minutes)
Activity 1 – Warm Up (Equipment Race)
Set up a channel 30m in length
At one end have all the belts and tags for student tom place on
Have students run up and back the length of the channel and gradually place on the equipment:
o 1st = belt, 2nd = tag 1, 3rd = tag 2
First person to have all equipment on correctly is the winner
Once completed take students through a light stretch of different muscle groups
Key Teaching Points:
Ensure there are even number of different colour tags to ensure team numbers are even
Redistribute tags to ensure team have even number of player abilities (if required)
Tags
Belts
Markers
Whistle
PRIMARY UNIT PLAN
©2010-2016 Jigsaw Sports Pty Ltd ABN 82 135 455 613 page 42
Body
(5 minutes)
Activity 2 – Twisting and Spinning Demonstration
Stress the two key differences in attack between Oztag and other football sports is the use of spinning and swivelling hips
Demonstrate how to do both twisting and spinning without defenders
Demonstrate with students as defenders – use 2 students creating a channel approx 1m wide
Have students practice each skill
Key Teaching Points:
Ensure key teaching points for spinning:
Spinning of left foot:
o Plant left foot inside shoulder of the right hand side defender
o Look over right shoulder and spin
o Be sure not to raise elbows so not to collide with defenders
o Be sure not to jump
o Do not spin too early
Spinning of right foot:
o As above but opposite
Ensure key teaching points for swivel hips:
o You want to try and get your hips perpendicular to the defenders as you cross the line of defence
o Easiest method is to slightly lift the front foot as moving forward through the line of defence
o Try to do this at speed
o Be sure not to jump
o Think of doing the twist (rock and roll dancing)
o Do not do the twist too early.
Tags
Belts
PRIMARY UNIT PLAN
©2010-2016 Jigsaw Sports Pty Ltd ABN 82 135 455 613 page 43
Body
(10 minutes)
Activity 3 – Oztag Core Drill 1
Set up 2 rows of 10 markers
o 1 Line of Blue markers approx 1m apart and 1 Line of White markers 1m apart
o Ensure width between each set of different coloured markers is minimum 4 m. Note: This can be modified to suit ability of students
Allocate a specific tag colour to specific marker colour. E.g. All Pink Tags stand on the white markers. Line up facing the middle
Give each student a number in each line starting from 1.
Call a number. Each person called to run in the opposite direction on the outside of the line into the middle of the drill. One player is the defender trying to stop a try, the other is an attacker trying to score a try at the end of the drill
Ensure all numbers on one side have a go, and then repeat so other side then becomes defenders or attackers.
Tags
Belts
Markers
4m
1 2 3 4 5 6 7 8 9 10
A A A A A A A A A A
Δ Δ Δ Δ Δ Δ Δ Δ Δ Δ
Δ Δ Δ Δ Δ Δ Δ Δ Δ Δ
B B B B B B B B B B
10 9 8 7 6 5 4 3 2 1
10m
PRIMARY UNIT PLAN
©2010-2016 Jigsaw Sports Pty Ltd ABN 82 135 455 613 page 44
Key Teaching Points:
Use of spinning and twisting to avoid being tagged
Use of correct tagging technique
o Use of palms
o Don’t attack the tags fingers first
o Like you are swatting a mossie on the side of their hip
Stress Safety points
o Cannot palm
o Cannot jump
o Cannot tackle
o Cannot hit hand away OR cover tags with arms or hands
o Cannot run into players
Body
(8 minutes)
Activity 4 – Modified Game (End Ball)
Set up a field of 25m x 30m
The class should be divided equally and positioned on the field.
The ball is passed among team mates until it can be passed to a person who is stationed over the oppositions try line to gain a try.
Players can only run five steps before of loading the ball to a team mate.
Passes can be no more than 5m in length (short passes only).
If an attacker is tagged with the ball a changeover is awarded.
Variations:
o Restrict timeframe that the ball can be held.
o Introduction of a 2nd ball
o Change so that backward passes are the only pass allowed.
o You cannot pass the ball to the same person you received it from.
Tags
Belts
Whistle
Balls
Markers
PRIMARY UNIT PLAN
©2010-2016 Jigsaw Sports Pty Ltd ABN 82 135 455 613 page 45
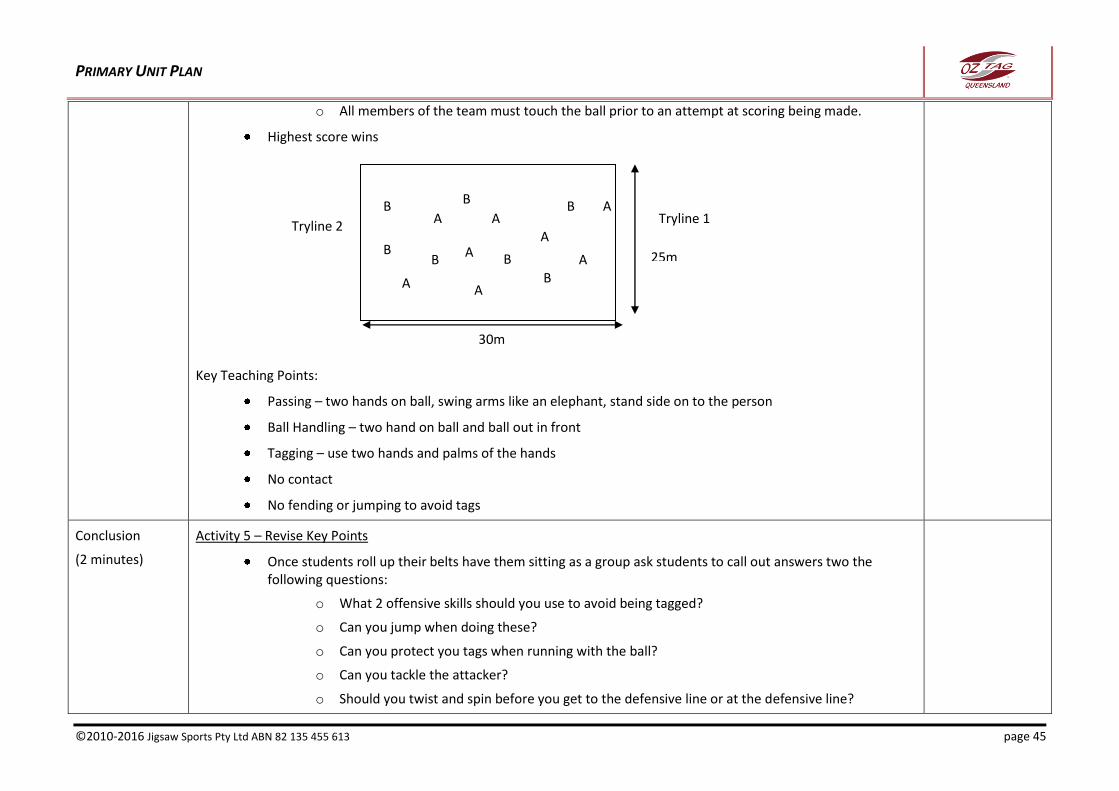
o All members of the team must touch the ball prior to an attempt at scoring being made.
Highest score wins
Key Teaching Points:
Passing – two hands on ball, swing arms like an elephant, stand side on to the person
Ball Handling – two hand on ball and ball out in front
Tagging – use two hands and palms of the hands
No contact
No fending or jumping to avoid tags
Conclusion
(2 minutes)
Activity 5 – Revise Key Points
Once students roll up their belts have them sitting as a group ask students to call out answers two the following questions:
o What 2 offensive skills should you use to avoid being tagged?
o Can you jump when doing these?
o Can you protect you tags when running with the ball?
o Can you tackle the attacker?
o Should you twist and spin before you get to the defensive line or at the defensive line?
30m
25m
A
A A
A
A A
B
B B
B
B
B A
A B
Tryline 1 Tryline 2
PRIMARY UNIT PLAN
©2010-2016 Jigsaw Sports Pty Ltd ABN 82 135 455 613 page 46
Year 2 - Lesson Plan 4
Focus Areas: Introduction of game skills and rules:
Attacking skills – scoring a try
Attacking skills – play the ball
Basic Oztag rules
Learning Outcomes: At the completion of this lesson students will be able to:
Explain how to score a try in a game of Oztag
Demonstrate how to play the ball if tagged in a game of Oztag
Demonstrate dummy half skills – run or pass
Apply play the ball skills in a game situation
Explain basic rules used in a game of Oztag
Duration: 30 minutes
Section Activity Resources
Introduction
(5 minutes)
Activity 1 – Warm Up (4 to Score)
Have students place on tags and belts – ensure even numbers in teams
Set out grids 10m x 10m – no one is allowed outside of the grid
Split class up into groups of 4-8
Teams must pass the ball four times between their team mates to score 1 point
Students are not allowed to run with the ball in their possession.
A change over occurs when the opposing side drops the ball or intercepted, or a player is tagged while holding the ball
Repeat as needed – highest score wins
Once completed take students through a light stretch of different muscle groups
Belts
Tags
Balls
Markers
Whistle
PRIMARY UNIT PLAN
©2010-2016 Jigsaw Sports Pty Ltd ABN 82 135 455 613 page 47
Key Teaching Points:
Ball Handling – two hand on ball and ball out in front
Tagging – use two hands and palms of the hands
Body
(3 minutes)
Activity 2 – Play the Ball Demonstration
Explain and demonstrate how and when to play the ball
In threes have student practice playing the ball – 1 as the defender who removes the tag, 1 as the attacker who plays the ball and one as the dummy half who picks the ball up and runs
Key Teaching Points:
Defender removes tag and then holds up the tag and drops it to the ground marking where the play the ball should occur
Run back to where tag is on the ground, face your try line
Place the ball on ground in front with ends of ball pointing to sidelines
Place the ball horizontally on the ground
Put one foot on top of the ball & heel or gently roll the ball behind to dummy half
Pick up and re-attach tag quickly
Dummy half can either run with the ball or pass to the 1st receiver
Belts
Tags
Balls
Body
(5 minutes)
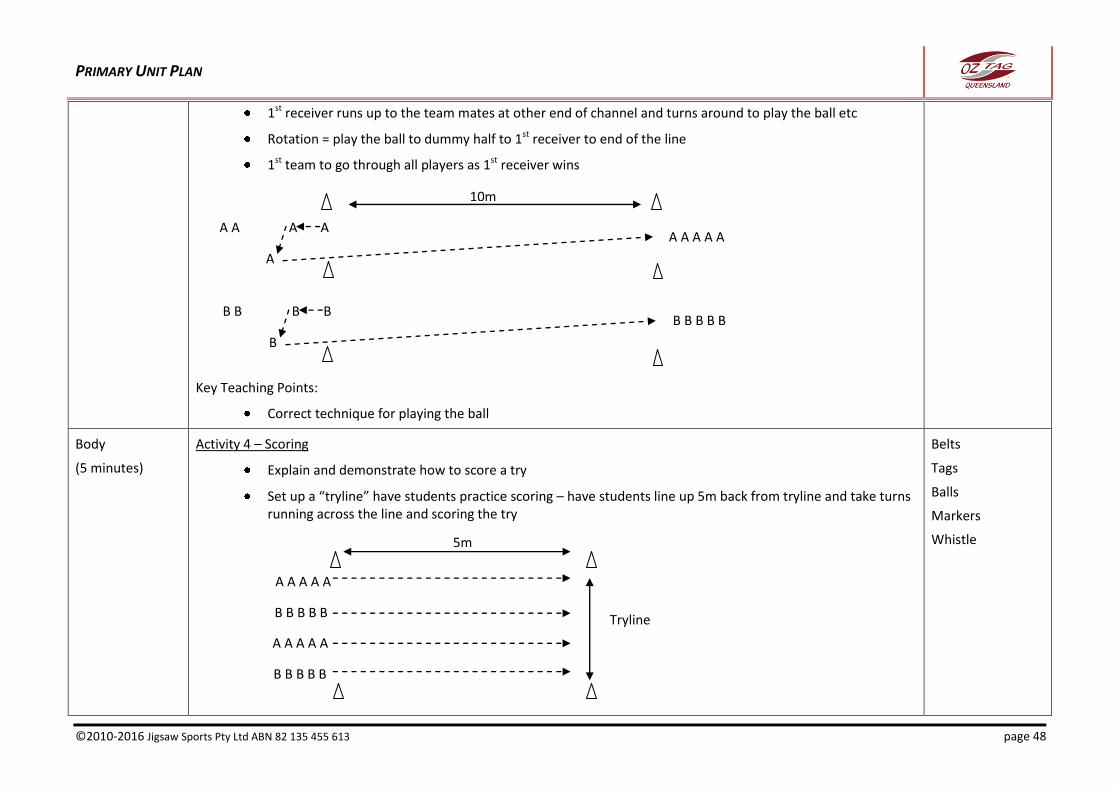
Activity 3 – Play the ball relay
Set up two relay channels (one for each team/tag colour) 10m apart
Split each team into two
All team members must have belts and tags on
Have each half of the team line up at either end of the relay channel.
One side starts with the ball
Have 1 person play the ball, next person act as dummy half and pass the ball to 1st receiver
Belts
Tags
Balls
Markers
Whistle
PRIMARY UNIT PLAN
©2010-2016 Jigsaw Sports Pty Ltd ABN 82 135 455 613 page 48
1st receiver runs up to the team mates at other end of channel and turns around to play the ball etc
Rotation = play the ball to dummy half to 1st receiver to end of the line
1st team to go through all players as 1st receiver wins
Key Teaching Points:
Correct technique for playing the ball
Body
(5 minutes)
Activity 4 – Scoring
Explain and demonstrate how to score a try
Set up a “tryline” have students practice scoring – have students line up 5m back from tryline and take turns running across the line and scoring the try
Belts
Tags
Balls
Markers
Whistle
10m
A A
A
A A A A A A A
B B
B
Z
B B B B B B B
5m
A A A A A
A A A A A
B B B B B
B B B B B
Tryline
PRIMARY UNIT PLAN
©2010-2016 Jigsaw Sports Pty Ltd ABN 82 135 455 613 page 49
Key Teaching Points:
Must place ball on the ground – don’t just run across the line
Use whistle when student score the try
Body
(10 minutes)
Activity 5 – Modified Game (5v5)
Set up 2 fields 15m x 25m
Split the two teams into two again (total of 4 teams)
Play two games of 5 v 5
Key Teaching Points:
As the game is progressing explain basic rules as needed e.g. kick off, knock on, 6 tags = changeover, no contact, no jumping, forward pass
Play with no marker
Defence cannot move forward until the 1st receiver has the ball
Ensure attacking player moves forward and does not run backwards
Belts
Tags
Balls
Markers
Whistle
Conclusion
(2 minutes)
Activity 6 – Revise Key Points
Once students roll up their belts have them sitting as a group ask students to call out answers two the following questions:
o How do you score a try? What do you have to do with the ball?
o When do you play the ball? What has to happen?
o How do you play the ball? Can you just roil it between your legs?
o Where do you face when you play the ball?
o What happens after you play the ball?
PRIMARY UNIT PLAN
©2010-2016 Jigsaw Sports Pty Ltd ABN 82 135 455 613 page 50
Year 2 - Lesson Plan 5
Focus Areas: Expansion and refining of game skills and rules, and assessment:
Basic Oztag rules
Learning Outcomes: At the completion of this lesson students will be able to:
Apply Oztag skills in a game situation
Explain basic rules used in a game of Oztag
Duration: 30 minutes
Section Activity Resources
Introduction
(5 minutes)
Activity 1 – Warm Up (Oztag Stuck in the Mud)
Have students place on tags and belts – ensure even numbers in teams
Set up a field 15m x 15m – no player allowed outside of the field
Nominate two students to be the defenders, every other student as attackers (i.e. avoid being tagged)
If tagged the students can only be unstuck if they play the ball – dummy half must be present
o Have 3 or 4 balls on the field – if stuck another attacker must get the ball to them
Rotate defenders
Once completed take students through a light stretch of different muscle groups
Key Teaching Points:
Ball Handling – two hand on ball and ball out in front
Tagging – use two hands and palms of the hands
Play the ball – place ball on ground, must use one foot on the ball and roll backwards to dummy half
Tags
Belts
Balls
Markers

PRIMARY UNIT PLAN
©2010-2016 Jigsaw Sports Pty Ltd ABN 82 135 455 613 page 51
Body
(20 minutes)
Activity 2 – Full Game
Play full game of Oztag with 8 v 8
Field size for juniors = 40m x 25m
Ensure subbing of players if frequent to involve all players
Key Teaching Points:
As the game is progressing explain basic rules as needed e.g. kick off, knock on, 6 tags = changeover, no contact, no jumping, forward pass
Play with no marker
Defence cannot move forward until the 1st receiver has the ball
Ensure attacking player moves forward and does not run backwards
Belts
Tags
Balls
Markers
Whistle
Body
Assessment
As students are playing the game complete assessment sheet
Note: You will require another person to referee the game. Alternatively complete the assessment sheet post game being played
Assessment Sheet
Conclusion
(5 minutes)
Activity 3 – Revise Key Points
Once students roll up their belts have them sitting as a group ask students to call out answers two the following questions:
o How many people in one team for Oztag?
o Are you allowed to jump to avoid being tagged?
o Can you push someone away when they try and tag you?
o What is the best way to make a tag?
o How do you play the ball?

PRIMARY UNIT PLAN
©2010-2016 Jigsaw Sports Pty Ltd ABN 82 135 455 613 page 52
Year 3 Lesson Plans
PRIMARY UNIT PLAN
©2010-2016 Jigsaw Sports Pty Ltd ABN 82 135 455 613 page 53
Year 3 - Lesson Plan 1
Focus Areas: Introduction of key Oztag skills:
Placing on and taking off Oztag belts and tags
Defensive skills – tagging
Learning Outcomes: At the completion of this lesson students will be able to:
Put on an Oztag belt
Explain where to place tags on the Oztag belts
Make a tag in a defensive situation
Apply tagging skills in a simulated game situation
Duration: 30 minutes
Section Activity Resources
Introduction
(3 minutes)
Activity 1 – Warm Up (4 to Score)
Have students place on tags and belts – ensure even numbers in teams
Set out grids 10m x 10m – no one is allowed outside of the grid
Split class up into groups of 4-8
Teams must pass the ball four times between their team mates to score 1 point
Students are not allowed to run with the ball in their possession.
A change over occurs when the opposing side drops the ball or intercepted, or a player is tagged while holding the ball
Repeat as needed – highest score wins
Once completed take students through a light stretch of different muscle groups
Belts
Tags
Balls
Markers
Whistle
PRIMARY UNIT PLAN
©2010-2016 Jigsaw Sports Pty Ltd ABN 82 135 455 613 page 54
Key Teaching Points:
Ball Handling – two hand on ball and ball out in front
Tagging – use two hands and palms of the hands
Attackers move to spaces to receive the ball
Body
(5 minutes)
Activity 2 – Putting on a Belt and Tags
Have students sitting as a group
Explain how to put on a belt and tags and demonstrate
Have students place on their own belts (assistance will be required)
Allocate students into two different groups (reflective of the two different colour tags). As you call out a colour have that student go and put on that colour tags
Key Teaching Points:
Furry side of the belt to the outside
Oztag logo on the belt to the front and middle
Have the belt rap around your waist
Tags to sit on either side of your waist and hanging straight down
Special Oztag shorts can be used and if you play at a competition you will have to play in a pair
Oztag Belts
Tags
Body
(2 minutes)
Activity 3 – Tagging
Have students sit as a group
Demonstrate to the students how to make a tag – use a student as a volunteer
Ask students to pair off and practice tagging on each other
Key Teaching Points:
Use two hands – it’s easier to make the tag
Use the palm of your hands NOT fingers – just like swatting a mosquito
Oztag Belts
Tags
PRIMARY UNIT PLAN
©2010-2016 Jigsaw Sports Pty Ltd ABN 82 135 455 613 page 55
Step forward to the attacker - stay on your toes, do not step backwards on your heels
When you make the tag just throw it on the ground – make sure you throw it straight down not away from where you are standing
STRESS: Zero contact including that the attacker is not allowed to push the defenders hand away
No jumping by the attacker in avoiding being tagged
Body
(8 minutes)
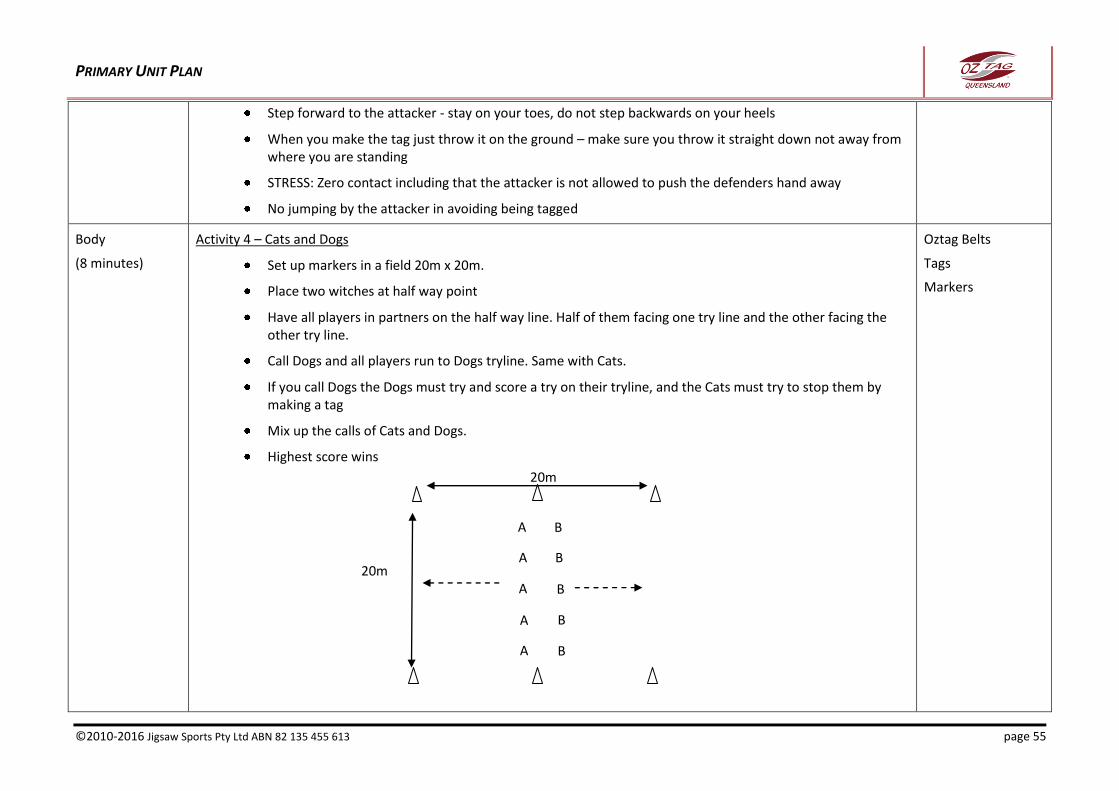
Activity 4 – Cats and Dogs
Set up markers in a field 20m x 20m.
Place two witches at half way point
Have all players in partners on the half way line. Half of them facing one try line and the other facing the other try line.
Call Dogs and all players run to Dogs tryline. Same with Cats.
If you call Dogs the Dogs must try and score a try on their tryline, and the Cats must try to stop them by making a tag
Mix up the calls of Cats and Dogs.
Highest score wins
Oztag Belts
Tags
Markers
20m B
B
A
A
A
A
A
20m
B
B
B
PRIMARY UNIT PLAN
©2010-2016 Jigsaw Sports Pty Ltd ABN 82 135 455 613 page 56
Key Teaching Points:
No contact
Use both hands and palms to make the tag
Explain that the end line between the markers is like the tryline in Oztag
Body
(10 minutes)
Activity 5 – Tag Timer
Set up a field 25m wide x 30m long
Have 2 teams as attackers and defenders – teams start at opposite sides of the field
On the whistle start the stop watch and all attackers must run around the field, and the defenders must make all the tags
Once all tags are made stop the stop watch
Repeat for the other side as attackers
Fastest time wins
Introduce balls – time stops immediately once all attackers carrying balls are tagged
Key Teaching Points:
Students must stay in the field or they have run out and become defenders
No contact
Use both hands and palms to make the tag
Oztag Belts
Tags
Markers
Whistle
Stop watch
Conclusion
(1 minute)
Activity 6 – Packing up equipment
Demonstrate to students how to roll up belts
Ask student to roll up belts and place tags into the two different colour piles
Key Teaching Points:
Start rolling up belt with Furry side to the outside, and at the non-logo end of the belt
Belts
Tags
PRIMARY UNIT PLAN
©2010-2016 Jigsaw Sports Pty Ltd ABN 82 135 455 613 page 57
Conclusion
(1 minute)
Activity 7 – Revise Key Points
Sitting as a group ask students to call out answers two the following questions:
o Where do we wear the belt on our body?
o Where do the tags sit on your belt?
o How many hands do we make a tag with?
o What part of the hand do we tag with?
o Are you allowed to push the defenders hands away when they try to tag you?
o Are you allowed to jump to avoid being tagged?
PRIMARY UNIT PLAN
©2010-2016 Jigsaw Sports Pty Ltd ABN 82 135 455 613 page 58
Year 3 - Lesson Plan 2
Focus Areas: Revising, refining and expansion of key Oztag skills:
Placing on and taking off Oztag belts and tags
Offensive skills – passing
Offensive skills – ball handling
Learning Outcomes: At the completion of this lesson students will be able to:
Put on an Oztag belt
Explain where to place tags on the Oztag belts
Pass a ball in an attacking situation
Explain basic technique needed to pass a ball
Run with an Oztag ball
Explain basic technique used in running with the ball
Apply running and passing skills in a simulated game situation
Duration: 30 minutes
Section Activity Resources
Introduction
(3 minutes)
Activity 1 - Revise putting on belts and tags
Sit students as a whole group and ask if they can remember how to put on belts and tags - ask for volunteers to explain
Ensure correct technique is mentioned
Ask student to place on the belts and tags ensuring there is even numbers between the two different tags colours – provide assistance as required
Belts
Tags
PRIMARY UNIT PLAN
©2010-2016 Jigsaw Sports Pty Ltd ABN 82 135 455 613 page 59
Key Teaching Points:
Furry side of the belt to the outside
Oztag logo on the belt to the front and middle
Have the belt rap around your waist
Tags to sit on either side of your waist and hanging straight down
Introduction
(3 minutes)
Activity 2 - Warm Up (Missing Tag)
Set a field of 20m x 20m
Everyone puts on tags
Someone is nominated as in, that person loses one tag.
The aim of this game is to get someone else’s tag to replace yours.
Everyone has to stay within the boundaries.
Increase the play by taking away two tags, or have more players with only one tag to have more chasers.
Once completed take students through a light stretch of different muscle groups
Key Teaching Points:
Correct technique to make a tag i.e. using two hands and palms NOT fingers
No contact or fending
Belts
Tags
Whistle
Markers
Body
(4 minutes)
Activity 3 – Ball Handling
Sit students as a whole group and ask explain how to hold the ball as you are running
Provide demonstration
Get students to practice holding the ball and running short distances with it.
Ensure all students get a turn
Balls
PRIMARY UNIT PLAN
©2010-2016 Jigsaw Sports Pty Ltd ABN 82 135 455 613 page 60
Key Teaching Points:
Both hands on the ball
Ball held out in front of the body
Thumbs running down the ball and Fingers curled underneath (like holding a hamburger)
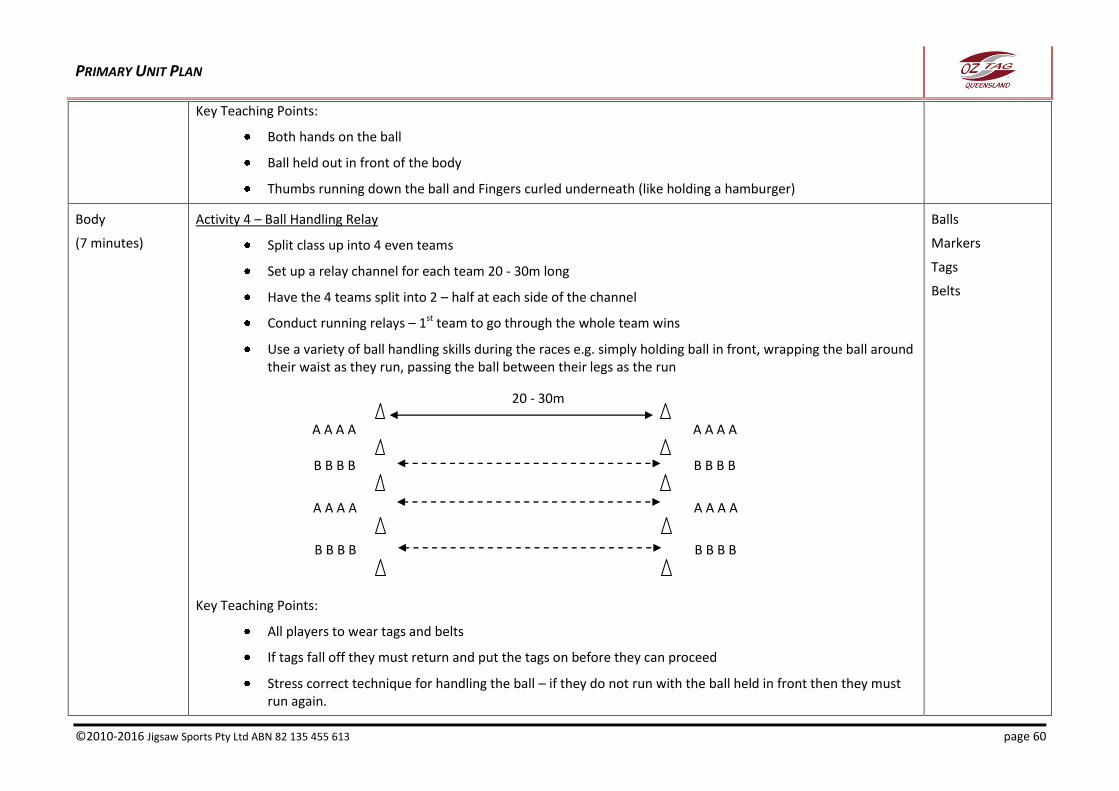
Body
(7 minutes)
Activity 4 – Ball Handling Relay
Split class up into 4 even teams
Set up a relay channel for each team 20 - 30m long
Have the 4 teams split into 2 – half at each side of the channel
Conduct running relays – 1st team to go through the whole team wins
Use a variety of ball handling skills during the races e.g. simply holding ball in front, wrapping the ball around their waist as they run, passing the ball between their legs as the run
Key Teaching Points:
All players to wear tags and belts
If tags fall off they must return and put the tags on before they can proceed
Stress correct technique for handling the ball – if they do not run with the ball held in front then they must run again.
Balls
Markers
Tags
Belts
20 - 30m
A A A A A A A A
B B B B B B B B
B B B B B B B B
A A A A A A A A
PRIMARY UNIT PLAN
©2010-2016 Jigsaw Sports Pty Ltd ABN 82 135 455 613 page 61
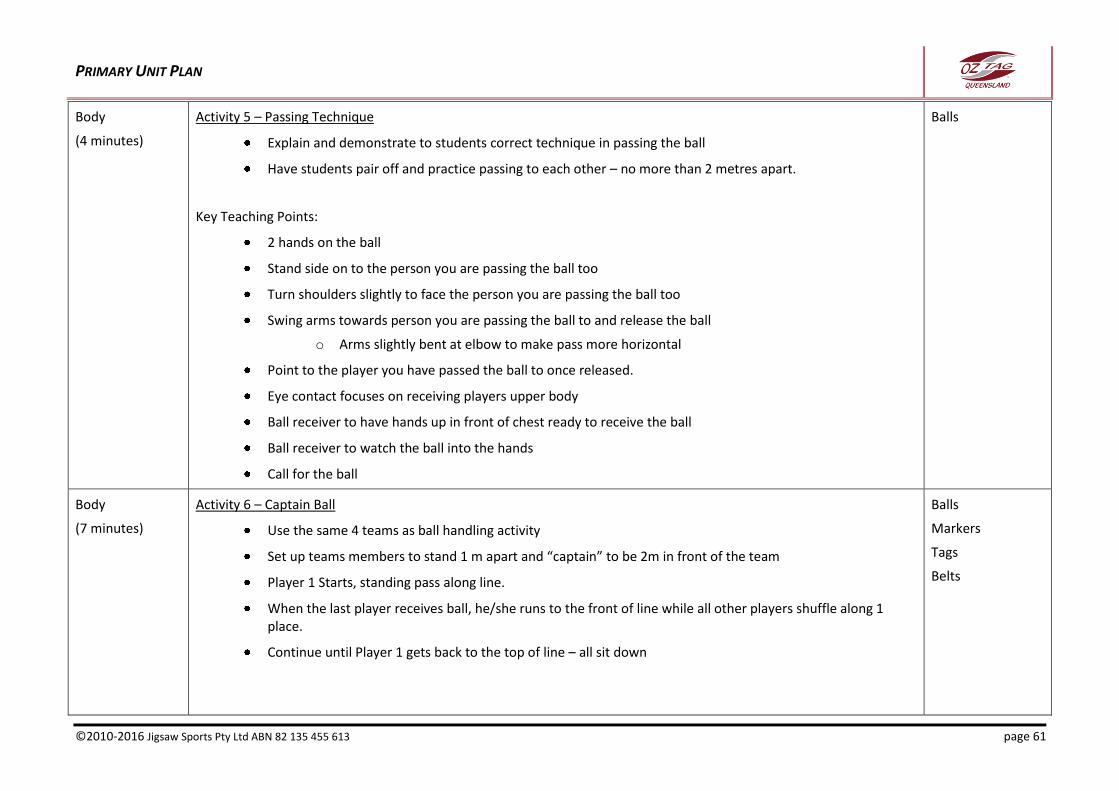
Body
(4 minutes)
Activity 5 – Passing Technique
Explain and demonstrate to students correct technique in passing the ball
Have students pair off and practice passing to each other – no more than 2 metres apart.
Key Teaching Points:
2 hands on the ball
Stand side on to the person you are passing the ball too
Turn shoulders slightly to face the person you are passing the ball too
Swing arms towards person you are passing the ball to and release the ball
o Arms slightly bent at elbow to make pass more horizontal
Point to the player you have passed the ball to once released.
Eye contact focuses on receiving players upper body
Ball receiver to have hands up in front of chest ready to receive the ball
Ball receiver to watch the ball into the hands
Call for the ball
Balls
Body
(7 minutes)
Activity 6 – Captain Ball
Use the same 4 teams as ball handling activity
Set up teams members to stand 1 m apart and “captain” to be 2m in front of the team
Player 1 Starts, standing pass along line.
When the last player receives ball, he/she runs to the front of line while all other players shuffle along 1 place.
Continue until Player 1 gets back to the top of line – all sit down
Balls
Markers
Tags
Belts

PRIMARY UNIT PLAN
©2010-2016 Jigsaw Sports Pty Ltd ABN 82 135 455 613 page 62
Key Teaching Points:
All players to wear tags and belts
Correct passing technique
Conclusion
(2 minutes)
Activity 7 – Revise Key Points
Once students roll up their belts have them sitting as a group ask students to call out answers two the following questions:
o Where do we wear the belt on our body?
o Where do the tags sit on your belt?
o How many hands do we carry the ball with?
o Where do we carry the ball?
o How many hands do we use when passing the ball?
o How do we swing our arms when we pass? Do we use straight or bent arms?
o How do we stand when passing – side on or facing the person we are passing to?
o What should the ball receiver do?
A
A
A
A
A
A
B
B
B
B
B
B
A
A
A
A
A
A
B
B
B
B
B
B
1.5m
2m

PRIMARY UNIT PLAN
©2010-2016 Jigsaw Sports Pty Ltd ABN 82 135 455 613 page 63
Year 3 - Lesson Plan 3
Focus Areas: Revising, refining and expansion of key Oztag skills:
Defensive skills – tagging
Offensive skills – twisting and spinning
Learning Outcomes: At the completion of this lesson students will be able to:
Explain the offensive and defensive skills that make Oztag Unique
Demonstrate correct technique for making a tag
Demonstrate correct technique for evading a tag – twisting and spinning
Apply tagging and tag evasion skills in a simulated game situation
Duration: 30 minutes
Section Activity Resources
Introduction
(5 minutes)
Activity 1 – Warm Up (Equipment Race)
Set up a channel 30m in length
At one end have all the belts and tags for student tom place on
Have students run up and back the length of the channel and gradually place on the equipment:
o 1st = belt, 2nd = tag 1, 3rd = tag 2
First person to have all equipment on correctly is the winner
Once completed take students through a light stretch of different muscle groups
Key Teaching Points:
Ensure there are even number of different colour tags to ensure team numbers are even
Redistribute tags to ensure team have even number of player abilities (if required)
Tags
Belts
Markers
Whistle

PRIMARY UNIT PLAN
©2010-2016 Jigsaw Sports Pty Ltd ABN 82 135 455 613 page 64
Body
(5 minutes)
Activity 2 – Twisting and Spinning Demonstration
Stress the two key differences in attack between Oztag and other football sports is the use of spinning and swivelling hips
Demonstrate how to do both twisting and spinning without defenders
Demonstrate with students as defenders – use 2 students creating a channel approx 1m wide
Have students practice each skill
Key Teaching Points:
Ensure key teaching points for spinning:
Spinning of left foot:
o Plant left foot inside shoulder of the right hand side defender
o Look over right shoulder and spin
o Be sure not to raise elbows so not to collide with defenders
o Be sure not to jump
o Do not spin too early
Spinning of right foot:
o As above but opposite
Ensure key teaching points for swivel hips:
o You want to try and get your hips perpendicular to the defenders as you cross the line of defence
o Easiest method is to slightly lift the front foot as moving forward through the line of defence
o Try to do this at speed
o Be sure not to jump
o Think of doing the twist (rock and roll dancing)
o Do not do the twist too early.
Tags
Belts
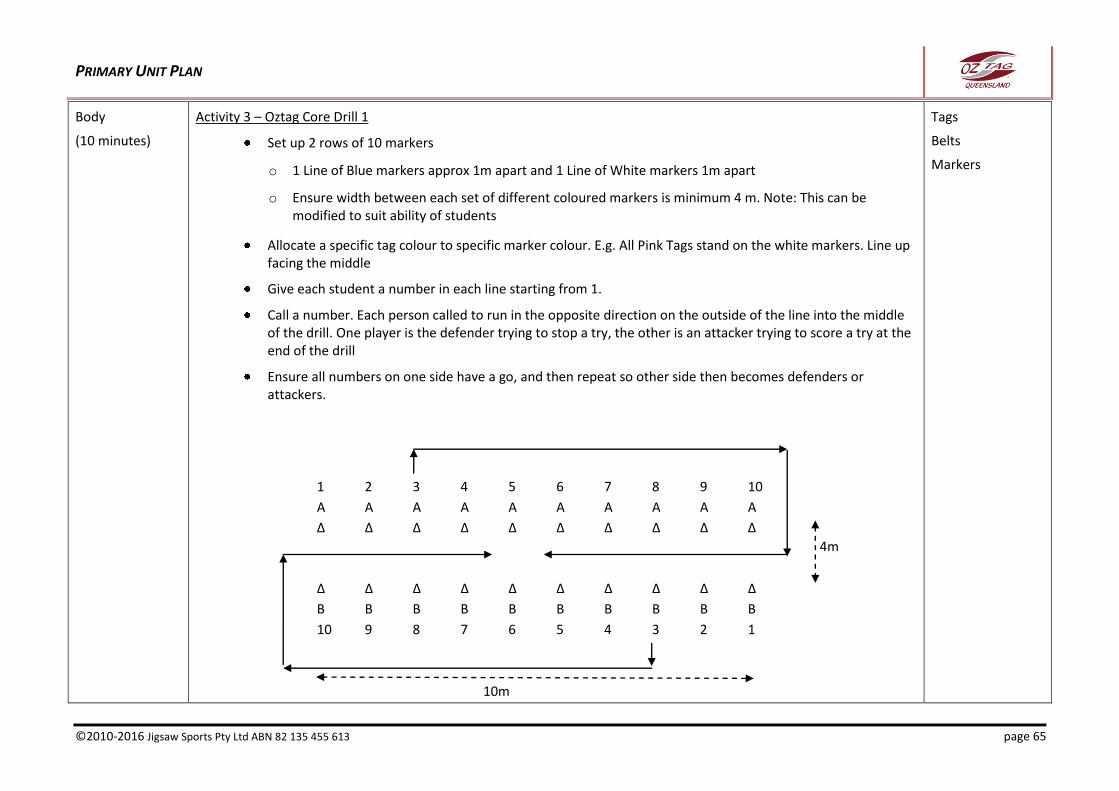
PRIMARY UNIT PLAN
©2010-2016 Jigsaw Sports Pty Ltd ABN 82 135 455 613 page 65
Body
(10 minutes)
Activity 3 – Oztag Core Drill 1
Set up 2 rows of 10 markers
o 1 Line of Blue markers approx 1m apart and 1 Line of White markers 1m apart
o Ensure width between each set of different coloured markers is minimum 4 m. Note: This can be modified to suit ability of students
Allocate a specific tag colour to specific marker colour. E.g. All Pink Tags stand on the white markers. Line up facing the middle
Give each student a number in each line starting from 1.
Call a number. Each person called to run in the opposite direction on the outside of the line into the middle of the drill. One player is the defender trying to stop a try, the other is an attacker trying to score a try at the end of the drill
Ensure all numbers on one side have a go, and then repeat so other side then becomes defenders or attackers.
Tags
Belts
Markers
4m
1 2 3 4 5 6 7 8 9 10
A A A A A A A A A A
Δ Δ Δ Δ Δ Δ Δ Δ Δ Δ
Δ Δ Δ Δ Δ Δ Δ Δ Δ Δ
B B B B B B B B B B
10 9 8 7 6 5 4 3 2 1
10m
PRIMARY UNIT PLAN
©2010-2016 Jigsaw Sports Pty Ltd ABN 82 135 455 613 page 66
Key Teaching Points:
Use of spinning and twisting to avoid being tagged
Use of correct tagging technique
o Use of palms
o Don’t attack the tags fingers first
o Like you are swatting a mossie on the side of their hip
Stress Safety points
o Cannot palm
o Cannot jump
o Cannot tackle
o Cannot hit hand away OR cover tags with arms or hands
o Cannot run into players
Body
(8 minutes)
Activity 4 – Modified Game
Four teams are positioned in two 30m by 20m grids.
Each team has a score a try by placing the ball over the opposition’s goal line.
There is no offside and forward passes are allowed to be thrown.
Each team has six allocated tags per set with a change over occurring at the end of the set.
Once an attacking player is tagged they simply place on the tags and pass the ball to a team mate.
All players are allowed to move freely even when in possession of the ball
Once the ball is dropped or an interception occurs then there is a change over.
No kicking is allowed
Balls
Tags
Belts
Markers
Whistle
PRIMARY UNIT PLAN
©2010-2016 Jigsaw Sports Pty Ltd ABN 82 135 455 613 page 67
Key Teaching Points:
Correct tagging technique
Correct tag evasion (twisting and spinning) technique
Attacking players moving to gaps to allow the ball carrier options to pass the ball
Communication amongst players in attack and defence
Conclusion
(2 minutes)
Activity 5 – Revise Key Points
Once students roll up their belts have them sitting as a group ask students to call out answers two the following questions:
o What 2 offensive skills should you use to avoid being tagged?
o Can you jump when doing these?
o Can you protect you tags when running with the ball?
o Can you tackle the attacker?
o Should you twist and spin before you get to the defensive line or at the defensive line?
PRIMARY UNIT PLAN
©2010-2016 Jigsaw Sports Pty Ltd ABN 82 135 455 613 page 68
Year 3 - Lesson Plan 4
Focus Areas: Introduction of game skills and rules:
Attacking Skills - Scoring a try
Attacking Skills - Play the ball
Basic Oztag rules
Learning Outcomes: At the completion of this lesson students will be able to:
Explain how to score a try in a game of Oztag
Demonstrate how to play the ball if tagged in a game of Oztag
Demonstrate dummy half skills – run or pass
Apply play the ball skills in a game situation
Explain basic rules used in a game of Oztag
Duration: 30 minutes
Section Activity Resources
Introduction
(5 minutes)
Activity 1 – Warm Up (4 to Score)
Have students place on tags and belts – ensure even numbers in teams
Set out grids 10m x 10m – no one is allowed outside of the grid
Split class up into groups of 4-8
Teams must pass the ball four times between their team mates to score 1 point
Students are not allowed to run with the ball in their possession.
A change over occurs when the opposing side drops the ball or intercepted, or a player is tagged while holding the ball
Repeat as needed – highest score wins
Belts
Tags
Balls
Markers
Whistle
PRIMARY UNIT PLAN
©2010-2016 Jigsaw Sports Pty Ltd ABN 82 135 455 613 page 69
Once completed take students through a light stretch of different muscle groups
Key Teaching Points:
Ball Handling – two hand on ball, thumbs on tops, fingers wrapped underneath, and ball out in front
Tagging – use two hands and palms of the hands, stepping towards the attacker
Body
(3 minutes)
Activity 2 – Play the Ball Demonstration
Explain and demonstrate how and when to play the ball
In threes have student practice playing the ball – 1 as the defender who removes the tag, 1 as the attacker who plays the ball and one as the dummy half who picks the ball up and runs
Key Teaching Points:
Defender removes tag and then holds up the tag and drops it to the ground marking where the play the ball should occur
Run back to where tag is on the ground, face your try line
Place the ball on ground in front with ends of ball pointing to sidelines
Place the ball horizontally on the ground
Put one foot on top of the ball & heel or gently roll the ball behind to dummy half
Pick up and re-attach tag quickly
Dummy half can either run with the ball or pass to the 1st receiver
Belts
Tags
Balls
Body
(5 minutes)
Activity 3 – Play the ball relay
Set up two relay channels (one for each team/tag colour) 10m apart
Split each team into two
All team members must have belts and tags on
Have each half of the team line up at either end of the relay channel.
Belts
Tags
Balls
Markers
Whistle
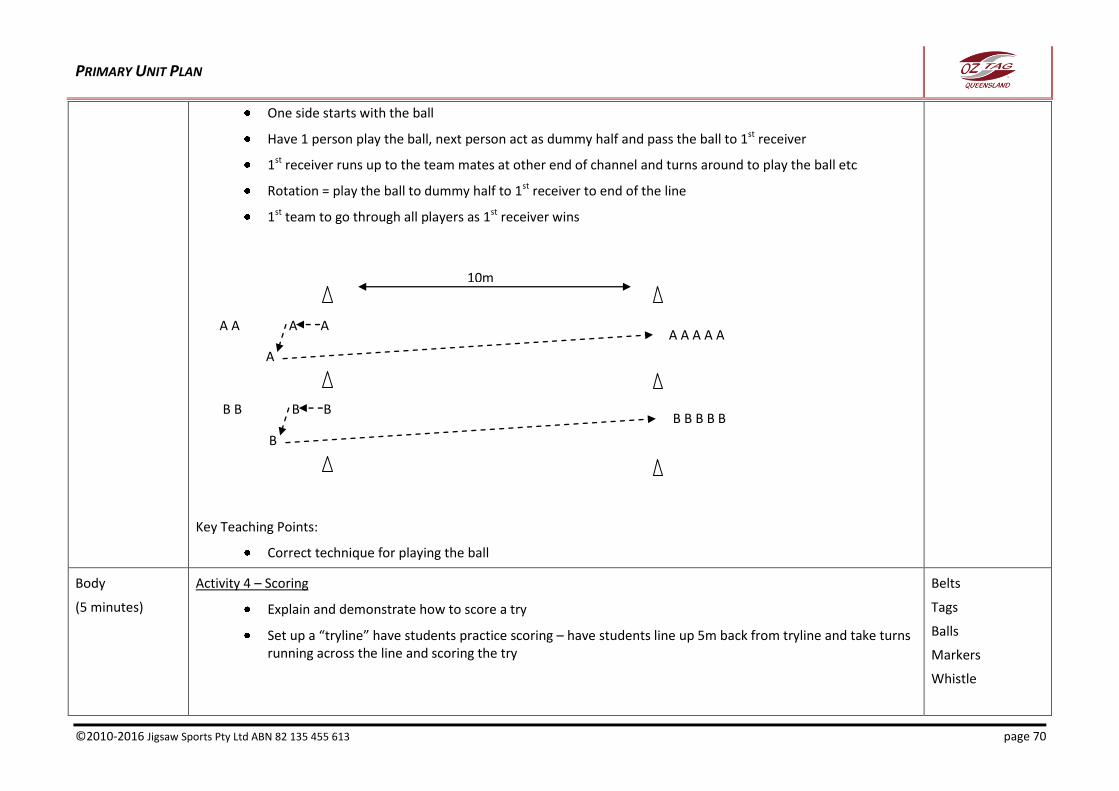
PRIMARY UNIT PLAN
©2010-2016 Jigsaw Sports Pty Ltd ABN 82 135 455 613 page 70
One side starts with the ball
Have 1 person play the ball, next person act as dummy half and pass the ball to 1st receiver
1st receiver runs up to the team mates at other end of channel and turns around to play the ball etc
Rotation = play the ball to dummy half to 1st receiver to end of the line
1st team to go through all players as 1st receiver wins
Key Teaching Points:
Correct technique for playing the ball
Body
(5 minutes)
Activity 4 – Scoring
Explain and demonstrate how to score a try
Set up a “tryline” have students practice scoring – have students line up 5m back from tryline and take turns running across the line and scoring the try
Belts
Tags
Balls
Markers
Whistle
10m
A A
A
A A A A A A A
B B
B
Z
B B B B B B B
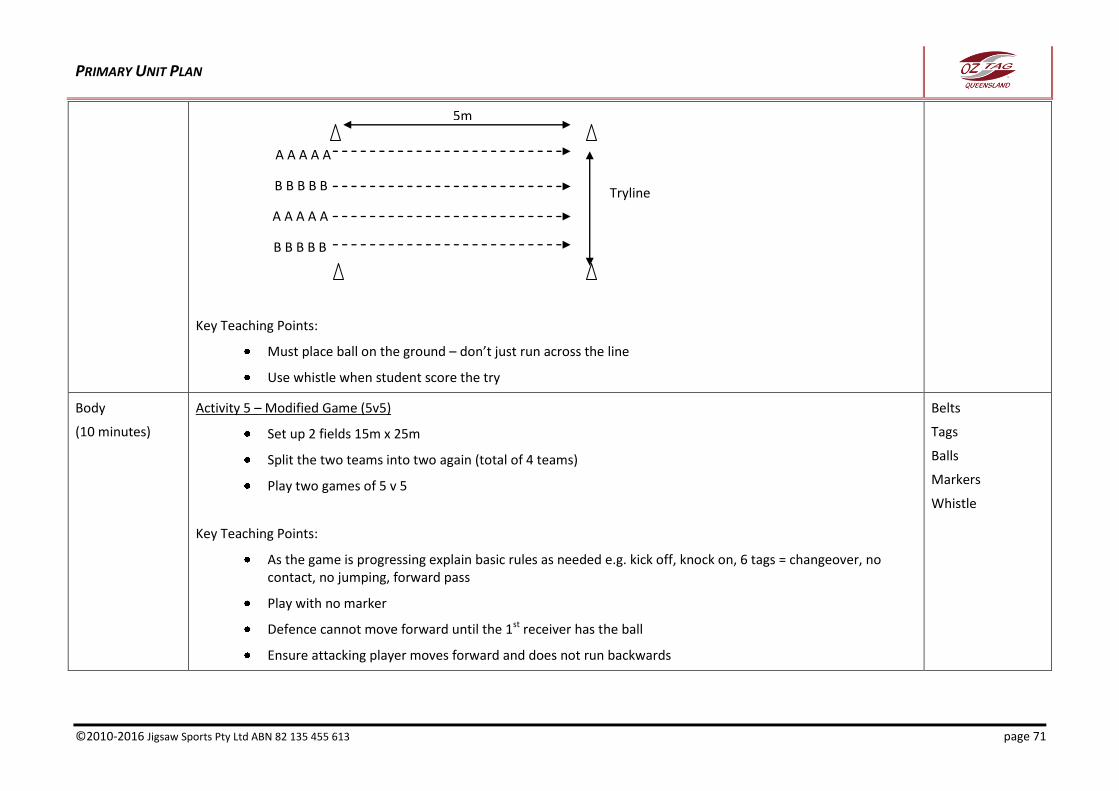
PRIMARY UNIT PLAN
©2010-2016 Jigsaw Sports Pty Ltd ABN 82 135 455 613 page 71
Key Teaching Points:
Must place ball on the ground – don’t just run across the line
Use whistle when student score the try
Body
(10 minutes)
Activity 5 – Modified Game (5v5)
Set up 2 fields 15m x 25m
Split the two teams into two again (total of 4 teams)
Play two games of 5 v 5
Key Teaching Points:
As the game is progressing explain basic rules as needed e.g. kick off, knock on, 6 tags = changeover, no contact, no jumping, forward pass
Play with no marker
Defence cannot move forward until the 1st receiver has the ball
Ensure attacking player moves forward and does not run backwards
Belts
Tags
Balls
Markers
Whistle
5m
A A A A A
A A A A A
B B B B B
B B B B B
Tryline
PRIMARY UNIT PLAN
©2010-2016 Jigsaw Sports Pty Ltd ABN 82 135 455 613 page 72
Conclusion
(2 minutes)
Activity 6 – Revise Key Points
Once students roll up their belts have them sitting as a group ask students to call out answers two the following questions:
o How do you score a try? What do you have to do with the ball?
o When do you play the ball? What has to happen?
o How do you play the ball? Can you just roil it between your legs?
o Where do you face when you play the ball?
o What happens after you play the ball?
PRIMARY UNIT PLAN
©2010-2016 Jigsaw Sports Pty Ltd ABN 82 135 455 613 page 73
Year 3 - Lesson Plan 5
Focus Areas: Expansion and refining of game skills and rules, and assessment:
Basic Oztag rules
Learning Outcomes: At the completion of this lesson students will be able to:
Apply Oztag skills in a game situation
Explain basic rules used in a game of Oztag
Duration: 30 minutes
Section Activity Resources
Introduction
(5 minutes)
Activity 1 – Warm Up (Oztag Stuck in the Mud)
Have students place on tags and belts – ensure even numbers in teams
Set up a field 15m x 15m – no player allowed outside of the field
Nominate two students to be the defenders, every other student as attackers (i.e. avoid being tagged)
If tagged the students can only be unstuck if they play the ball – dummy half must be present
o Have 3 or 4 balls on the field – if stuck another attacker must get the ball to them
Rotate defenders
Once completed take students through a light stretch of different muscle groups
Key Teaching Points:
Ball Handling – two hand on ball, thumbs on tops, fingers wrapped underneath, and ball out in front
Tagging – use two hands and palms of the hands, stepping towards the attacker
Play the ball – place ball on ground, must use one foot on the ball and roll backwards to dummy half
Tags
Belts
Balls
Markers
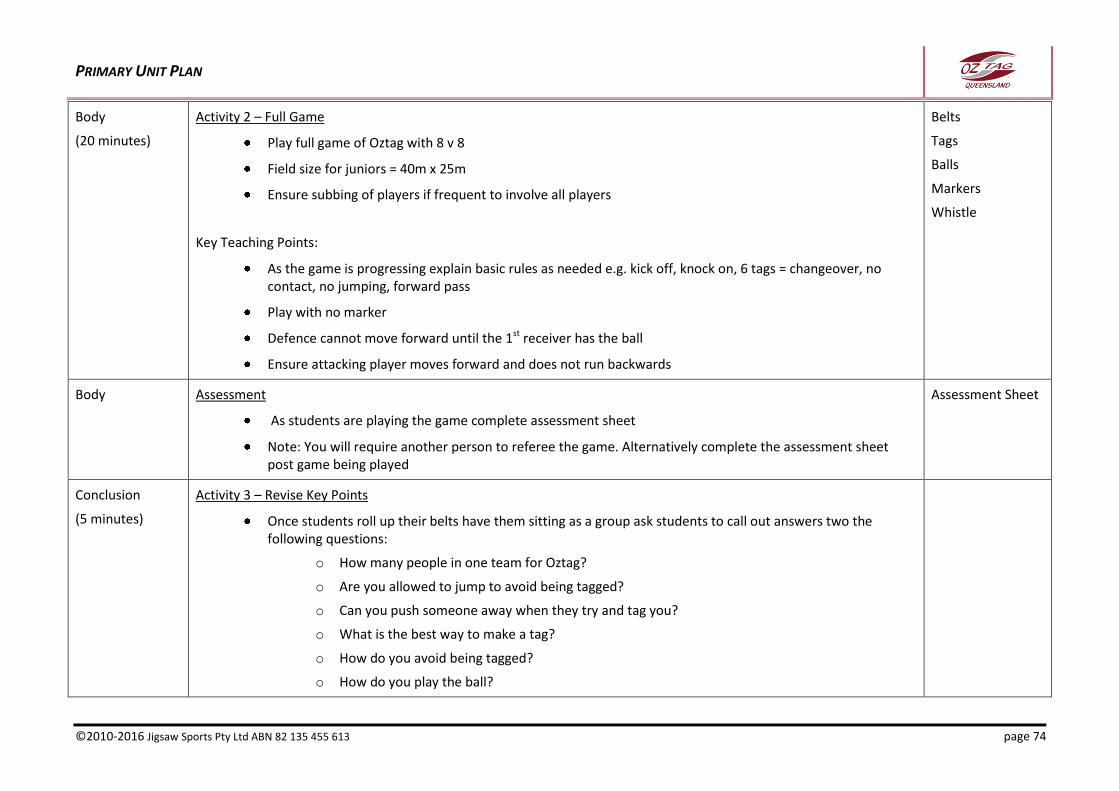
PRIMARY UNIT PLAN
©2010-2016 Jigsaw Sports Pty Ltd ABN 82 135 455 613 page 74
Body
(20 minutes)
Activity 2 – Full Game
Play full game of Oztag with 8 v 8
Field size for juniors = 40m x 25m
Ensure subbing of players if frequent to involve all players
Key Teaching Points:
As the game is progressing explain basic rules as needed e.g. kick off, knock on, 6 tags = changeover, no contact, no jumping, forward pass
Play with no marker
Defence cannot move forward until the 1st receiver has the ball
Ensure attacking player moves forward and does not run backwards
Belts
Tags
Balls
Markers
Whistle
Body
Assessment
As students are playing the game complete assessment sheet
Note: You will require another person to referee the game. Alternatively complete the assessment sheet post game being played
Assessment Sheet
Conclusion
(5 minutes)
Activity 3 – Revise Key Points
Once students roll up their belts have them sitting as a group ask students to call out answers two the following questions:
o How many people in one team for Oztag?
o Are you allowed to jump to avoid being tagged?
o Can you push someone away when they try and tag you?
o What is the best way to make a tag?
o How do you avoid being tagged?
o How do you play the ball?

PRIMARY UNIT PLAN
©2010-2016 Jigsaw Sports Pty Ltd ABN 82 135 455 613 page 75
Year 4 Lesson Plans
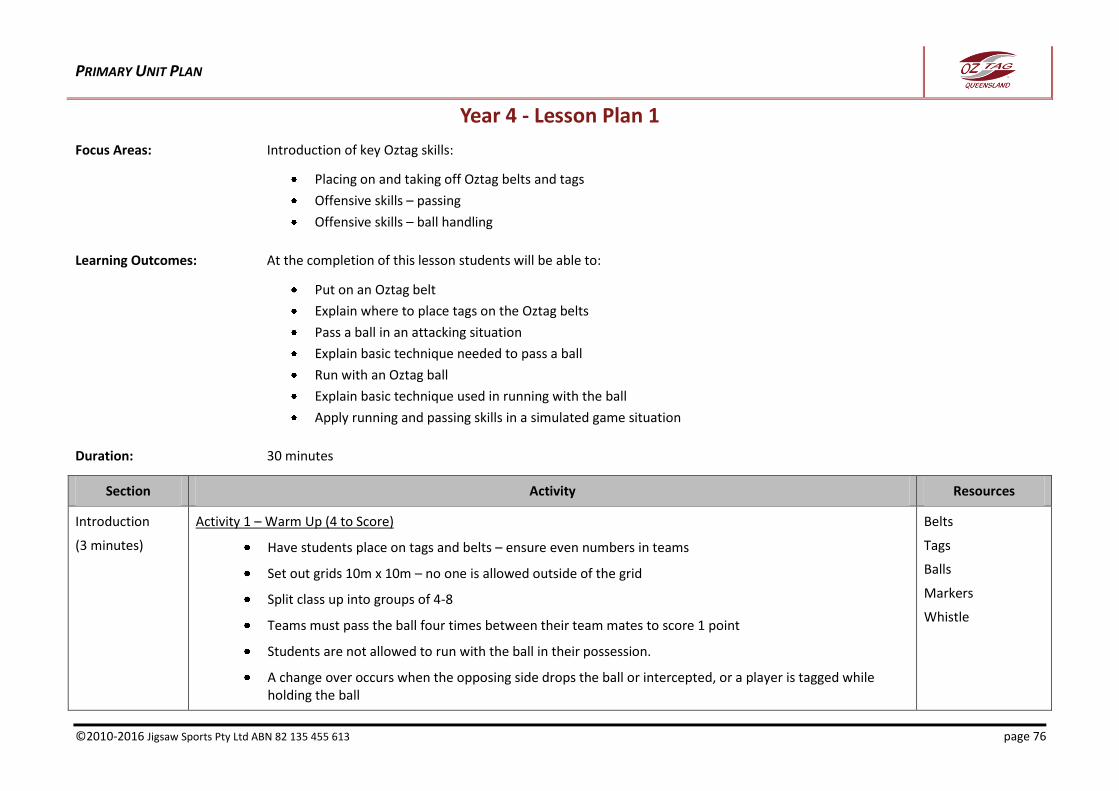
PRIMARY UNIT PLAN
©2010-2016 Jigsaw Sports Pty Ltd ABN 82 135 455 613 page 76
Year 4 - Lesson Plan 1
Focus Areas: Introduction of key Oztag skills:
Placing on and taking off Oztag belts and tags
Offensive skills – passing
Offensive skills – ball handling
Learning Outcomes: At the completion of this lesson students will be able to:
Put on an Oztag belt
Explain where to place tags on the Oztag belts
Pass a ball in an attacking situation
Explain basic technique needed to pass a ball
Run with an Oztag ball
Explain basic technique used in running with the ball
Apply running and passing skills in a simulated game situation
Duration: 30 minutes
Section Activity Resources
Introduction
(3 minutes)
Activity 1 – Warm Up (4 to Score)
Have students place on tags and belts – ensure even numbers in teams
Set out grids 10m x 10m – no one is allowed outside of the grid
Split class up into groups of 4-8
Teams must pass the ball four times between their team mates to score 1 point
Students are not allowed to run with the ball in their possession.
A change over occurs when the opposing side drops the ball or intercepted, or a player is tagged while holding the ball
Belts
Tags
Balls
Markers
Whistle
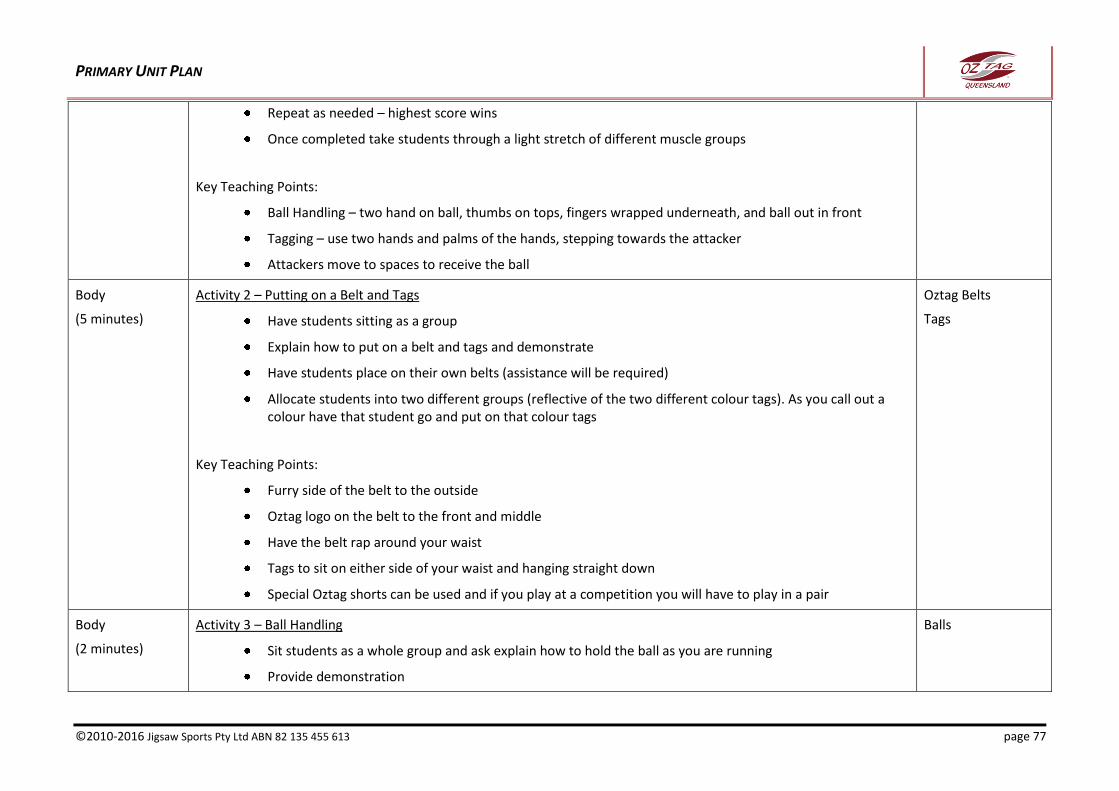
PRIMARY UNIT PLAN
©2010-2016 Jigsaw Sports Pty Ltd ABN 82 135 455 613 page 77
Repeat as needed – highest score wins
Once completed take students through a light stretch of different muscle groups
Key Teaching Points:
Ball Handling – two hand on ball, thumbs on tops, fingers wrapped underneath, and ball out in front
Tagging – use two hands and palms of the hands, stepping towards the attacker
Attackers move to spaces to receive the ball
Body
(5 minutes)
Activity 2 – Putting on a Belt and Tags
Have students sitting as a group
Explain how to put on a belt and tags and demonstrate
Have students place on their own belts (assistance will be required)
Allocate students into two different groups (reflective of the two different colour tags). As you call out a colour have that student go and put on that colour tags
Key Teaching Points:
Furry side of the belt to the outside
Oztag logo on the belt to the front and middle
Have the belt rap around your waist
Tags to sit on either side of your waist and hanging straight down
Special Oztag shorts can be used and if you play at a competition you will have to play in a pair
Oztag Belts
Tags
Body
(2 minutes)
Activity 3 – Ball Handling
Sit students as a whole group and ask explain how to hold the ball as you are running
Provide demonstration
Balls
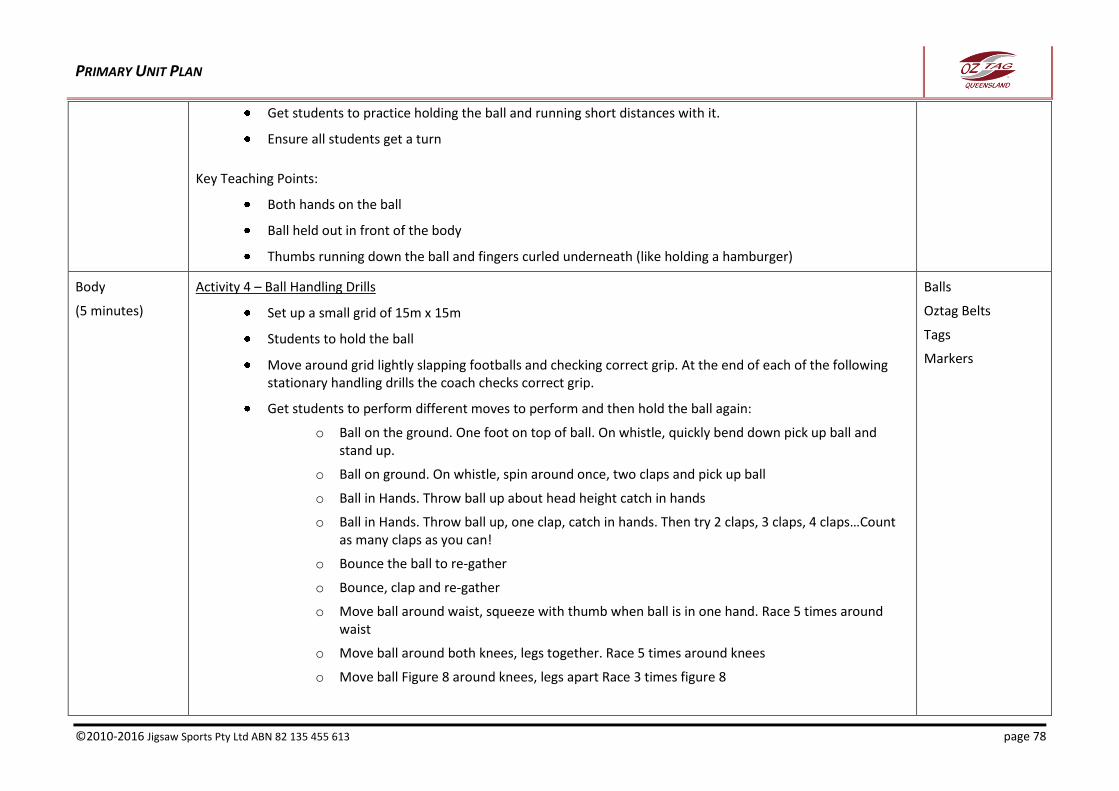
PRIMARY UNIT PLAN
©2010-2016 Jigsaw Sports Pty Ltd ABN 82 135 455 613 page 78
Get students to practice holding the ball and running short distances with it.
Ensure all students get a turn
Key Teaching Points:
Both hands on the ball
Ball held out in front of the body
Thumbs running down the ball and fingers curled underneath (like holding a hamburger)
Body
(5 minutes)
Activity 4 – Ball Handling Drills
Set up a small grid of 15m x 15m
Students to hold the ball
Move around grid lightly slapping footballs and checking correct grip. At the end of each of the following stationary handling drills the coach checks correct grip.
Get students to perform different moves to perform and then hold the ball again:
o Ball on the ground. One foot on top of ball. On whistle, quickly bend down pick up ball and stand up.
o Ball on ground. On whistle, spin around once, two claps and pick up ball
o Ball in Hands. Throw ball up about head height catch in hands
o Ball in Hands. Throw ball up, one clap, catch in hands. Then try 2 claps, 3 claps, 4 claps…Count as many claps as you can!
o Bounce the ball to re-gather
o Bounce, clap and re-gather
o Move ball around waist, squeeze with thumb when ball is in one hand. Race 5 times around waist
o Move ball around both knees, legs together. Race 5 times around knees
o Move ball Figure 8 around knees, legs apart Race 3 times figure 8
Balls
Oztag Belts
Tags
Markers
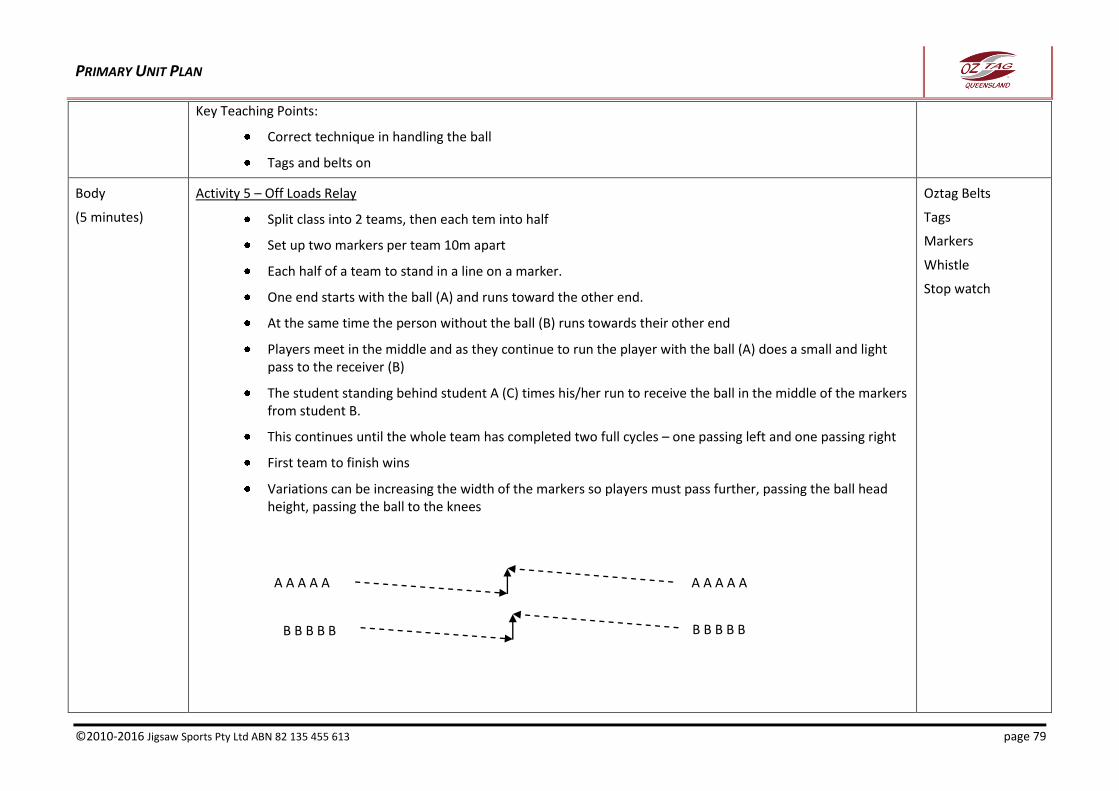
PRIMARY UNIT PLAN
©2010-2016 Jigsaw Sports Pty Ltd ABN 82 135 455 613 page 79
Key Teaching Points:
Correct technique in handling the ball
Tags and belts on
Body
(5 minutes)
Activity 5 – Off Loads Relay
Split class into 2 teams, then each tem into half
Set up two markers per team 10m apart
Each half of a team to stand in a line on a marker.
One end starts with the ball (A) and runs toward the other end.
At the same time the person without the ball (B) runs towards their other end
Players meet in the middle and as they continue to run the player with the ball (A) does a small and light pass to the receiver (B)
The student standing behind student A (C) times his/her run to receive the ball in the middle of the markers from student B.
This continues until the whole team has completed two full cycles – one passing left and one passing right
First team to finish wins
Variations can be increasing the width of the markers so players must pass further, passing the ball head height, passing the ball to the knees
Oztag Belts
Tags
Markers
Whistle
Stop watch
A A A A A
B B B B B
A A A A A
B B B B B
PRIMARY UNIT PLAN
©2010-2016 Jigsaw Sports Pty Ltd ABN 82 135 455 613 page 80
Key Teaching Points:
Correct ball handling
Correct passing technique:
o 2 hands on the ball
o Stand side on to the person you are passing the ball too
o Turn shoulders slightly to face the person you are passing the ball too
o Swing arms towards person you are passing the ball to and release the ball
Arms slightly bent at elbow to make pass more horizontal
o Point to the player you have passed the ball to once released.
o Eye contact focuses on receiving players upper body
o Ball receiver to have hands up in front of chest ready to receive the ball
o Ball receiver to watch the ball into the hands
o Call for the ball
Timing of the run so that players meet in the middle
Do not pass too hard
Body
(8 minutes)
Activity 6 – Tag Timer
Set up a field 25m wide x 30m long
Have 2 teams as attackers and defenders – teams start at opposite sides of the field
On the whistle start the stop watch and all attackers must run around the field, and the defenders must make all the tags
Once all tags are made stop the stop watch
Repeat for the other side as attackers
Fastest time wins
Introduce balls – time stops immediately once all attackers carrying balls are tagged
Oztag Belts
Tags
Markers
Whistle
Stop watch
PRIMARY UNIT PLAN
©2010-2016 Jigsaw Sports Pty Ltd ABN 82 135 455 613 page 81
o Ball scan be passed amongst the attacking players
Key Teaching Points:
Students must stay in the field or they have run out and become defenders
No contact
Use both hands and palms to make the tag
Correct passing technique
Correct ball handling technique
Conclusion
(1 minute)
Activity 7 – Packing up equipment
Demonstrate to students how to roll up belts
Ask student to roll up belts and place tags into the two different colour piles
Key Teaching Points:
Start rolling up belt with Furry side to the outside, and at the non-logo end of the belt
Belts
Tags
Conclusion
(1 minute)
Activity 8 – Revise Key Points
Sitting as a group ask students to call out answers two the following questions:
o Where do we wear the belt on our body?
o Where do the tags sit on your belt?
o How should you hold a ball?
o How do you pass a ball?
PRIMARY UNIT PLAN
©2010-2016 Jigsaw Sports Pty Ltd ABN 82 135 455 613 page 82
Year 4 - Lesson Plan 2
Focus Areas: Revising, refining and expansion of key Oztag skills:
Placing on and taking off Oztag belts and tags
Defensive skills – tagging
Offensive skills – twisting and spinning
Learning Outcomes: At the completion of this lesson students will be able to:
Put on an Oztag belt
Explain where to place tags on the Oztag belts
Explain the offensive and defensive skills that make Oztag Unique
Demonstrate correct technique for making a tag
Demonstrate correct technique for evading a tag – twisting and spinning
Duration: 30 minutes
Section Activity Resources
Introduction
(5 minutes)
Activity 1 – Warm Up (Off Loads Relay)
Split class into 2 teams, then each tem into half
Set up two markers per team 10m apart
Each half of a team to stand in a line on a marker.
One end starts with the ball (A) and runs toward the other end.
At the same time the person without the ball (B) runs towards their other end
Players meet in the middle and as they continue to run the player with the ball (A) does a small and light pass to the receiver (B)
The student standing behind student A (C) times his/her run to receive the ball in the middle of the markers from student B.
Oztag Belts
Tags
Markers
Whistle
Stop watch
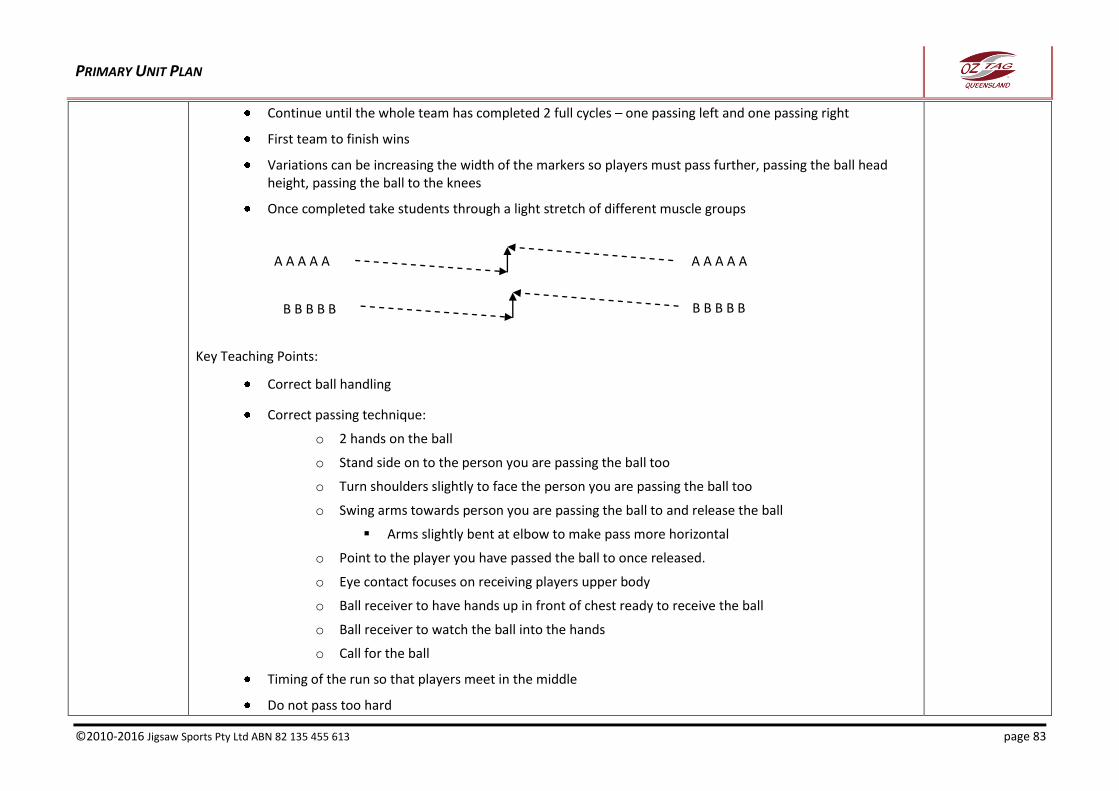
PRIMARY UNIT PLAN
©2010-2016 Jigsaw Sports Pty Ltd ABN 82 135 455 613 page 83
Continue until the whole team has completed 2 full cycles – one passing left and one passing right
First team to finish wins
Variations can be increasing the width of the markers so players must pass further, passing the ball head height, passing the ball to the knees
Once completed take students through a light stretch of different muscle groups
Key Teaching Points:
Correct ball handling
Correct passing technique:
o 2 hands on the ball
o Stand side on to the person you are passing the ball too
o Turn shoulders slightly to face the person you are passing the ball too
o Swing arms towards person you are passing the ball to and release the ball
Arms slightly bent at elbow to make pass more horizontal
o Point to the player you have passed the ball to once released.
o Eye contact focuses on receiving players upper body
o Ball receiver to have hands up in front of chest ready to receive the ball
o Ball receiver to watch the ball into the hands
o Call for the ball
Timing of the run so that players meet in the middle
Do not pass too hard
A A A A A
B B B B B
A A A A A
B B B B B
PRIMARY UNIT PLAN
©2010-2016 Jigsaw Sports Pty Ltd ABN 82 135 455 613 page 84
Body
(2 minutes)
Activity 2 – Tagging
Have students sit as a group
Demonstrate to the students how to make a tag – use a student as a volunteer
Ask students to pair off and practice tagging on each other
Key Teaching Points:
Use two hands – it’s easier to make the tag
Use the palm of your hands NOT fingers – just like swatting a mosquito
Step forward to the attacker - stay on your toes, do not step backwards on your heels
When you make the tag just throw it on the ground – make sure you throw it straight down not away from where you are standing
STRESS: Zero contact including that the attacker is not allowed to push the defenders hand away
No jumping by the attacker in avoiding being tagged
Oztag Belts
Tags
Body
(5 minutes)
Activity 3 – Twisting and Spinning
Stress the two key differences in attack between Oztag and other football sports is the use of spinning and swivelling hips
Demonstrate how to do both twisting and spinning without defenders
Demonstrate with students as defenders – use 2 students creating a channel approx 1m wide
Have students practice each skill
Key Teaching Points:
Ensure key teaching points for spinning:
Spinning of left foot:
o Plant left foot inside shoulder of the right hand side defender
o Look over right shoulder and spin
Tags
Belts
PRIMARY UNIT PLAN
©2010-2016 Jigsaw Sports Pty Ltd ABN 82 135 455 613 page 85
o Be sure not to raise elbows so not to collide with defenders
o Be sure not to jump
o Do not spin too early
Spinning of right foot:
o As above but opposite
Ensure key teaching points for swivel hips:
o You want to try and get your hips perpendicular to the defenders as you cross the line of defence
o Easiest method is to slightly lift the front foot as moving forward through the line of defence
o Try to do this at speed
o Be sure not to jump
o Think of doing the twist (rock and roll dancing)
o Do not do the twist too early.
Body
(8 minutes)
Activity 3 – Oztag Core Drill 2
Split the class into males and females and then split each gender into 2 groups (pink and green for each) to total 4 groups
Set up 4 channels
o 2 horizontal witches hats approx 10m apart
o 2 vertical witches 1m apart set half way along (5m) the horizontal witches hats
Have each group line up behind 1 set of horizontal witches hats
Have 2 students on the vertical markers as defenders
Have 1 student from the start of each line move through on your signal. DO NOT let student go through at their own will.
Repeat to all students have gone through and then allow to pick up tags.
Switch defenders and repeat until all students have had a go at defending twice.
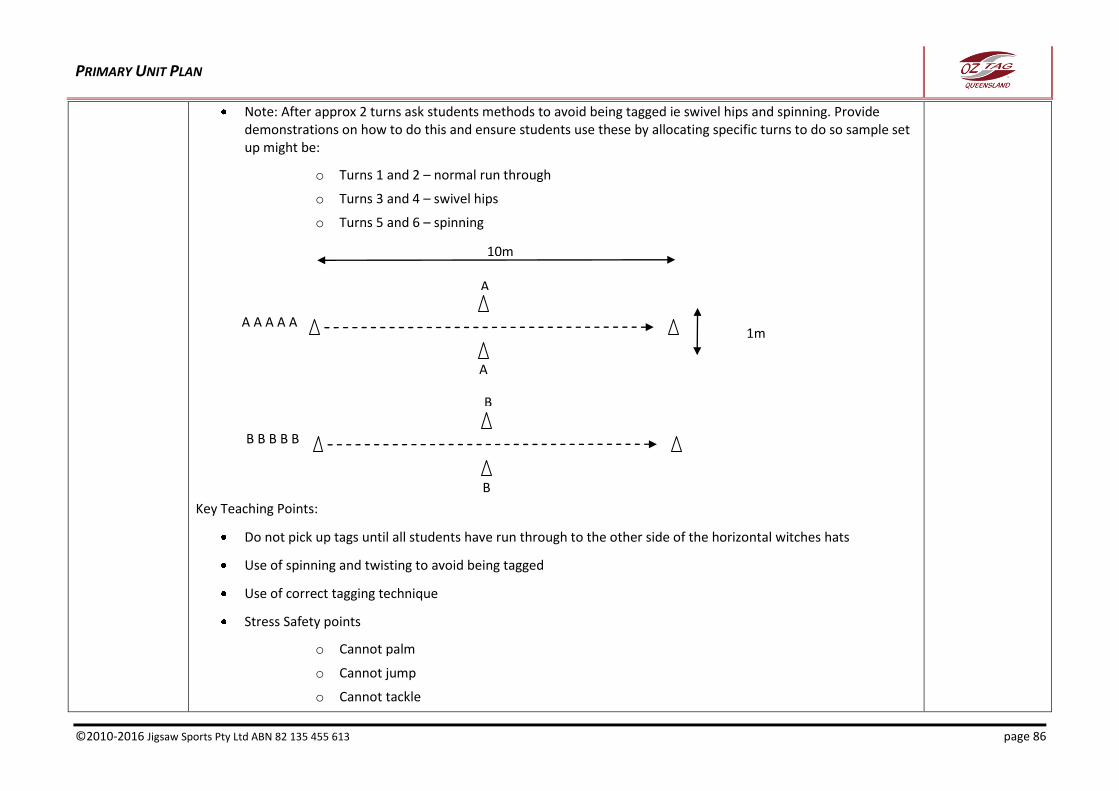
PRIMARY UNIT PLAN
©2010-2016 Jigsaw Sports Pty Ltd ABN 82 135 455 613 page 86
Note: After approx 2 turns ask students methods to avoid being tagged ie swivel hips and spinning. Provide demonstrations on how to do this and ensure students use these by allocating specific turns to do so sample set up might be:
o Turns 1 and 2 – normal run through
o Turns 3 and 4 – swivel hips
o Turns 5 and 6 – spinning
Key Teaching Points:
Do not pick up tags until all students have run through to the other side of the horizontal witches hats
Use of spinning and twisting to avoid being tagged
Use of correct tagging technique
Stress Safety points
o Cannot palm
o Cannot jump
o Cannot tackle
10m
A
A
A A A A A
B
B
B B B B B
1m
PRIMARY UNIT PLAN
©2010-2016 Jigsaw Sports Pty Ltd ABN 82 135 455 613 page 87
o Cannot hit hand away OR cover tags with arms or hands
Cannot run into players
Body
(8minutes)
Activity 4 – Modified Game
Four teams are positioned in two 30m by 20m grids.
Each team has a score a try by placing the ball over the opposition’s goal line.
There is no offside and forward passes are allowed to be thrown.
Each team has six allocated tags per set with a change over occurring at the end of the set.
Once an attacking player is tagged they simply place on the tags and pass the ball to a team mate.
All players are allowed to move freely even when in possession of the ball
Once the ball is dropped or an interception occurs then there is a changeover.
No kicking is allowed
Key Teaching Points:
Correct tagging technique
Correct tag evasion (twisting and spinning) technique
Attacking players moving to gaps to allow the ball carrier options to pass the ball
Communication amongst players in attack and defence
Balls
Tags
Belts
Markers
Whistle
Conclusion
(2 minutes)
Activity 5 – Revise Key Points
Once students roll up their belts have them sitting as a group ask students to call out answers two the following questions:
o How do you make a tag?
o What two things can be done when you have the ball to help score more tries?
o How do you do a spin? A twist?
o Should they be done before the defensive line of at the defensive line?
PRIMARY UNIT PLAN
©2010-2016 Jigsaw Sports Pty Ltd ABN 82 135 455 613 page 88
Year 4 - Lesson Plan 3
Focus Areas: Revising, refining and expansion of key Oztag skills:
Offensive skills – kicking
Learning Outcomes: At the completion of this lesson students will be able to:
Explain the rules surrounding kicking in a game of Oztag
Describe correct technique for kicking
Demonstrate correct technique for kicking in a game situation
Duration: 30 minutes
Section Activity Resources
Introduction
(3 minutes)
Activity 1 – Warm Up (Back Line movement)
Split class into two teams
Have teams form a line across the field
Have class run up and down field as back line play ie passing ball along the line
Repeat as needed
Once completed take students through a light stretch of different muscle groups
Key Teaching Points:
Passing backwards
Calling for ball
Balls
Tags
Belts
PRIMARY UNIT PLAN
©2010-2016 Jigsaw Sports Pty Ltd ABN 82 135 455 613 page 89
Body
(5 minutes)
Activity 2 – Kicking Demonstration
Explain the rules surrounding kicking in Oztag:
o Can only kick in general play on zero (not after a play the ball), 4 or 5
o Kicks have to be below referees should during normal play but can go any height for kick restart and drop outs
o Attacking players cannot dive on the ball following a kick
Explain that for kicks during play it is best to do a grubber
Demonstrate how to do a grubber
Get student in pairs to practice grubbers to each other
Key Teaching Points:
Head down over the ball
Don’t lean back when kicking
Hold ball straight down so that it is vertical when you kick it – fingers running straight down the ball
Kick the top of the ball to make it roll end over end
Balls
Body
(10 minutes)
Activity 3 – Gate Ball
Split class into 4 teams – 2 separate games
Set up two fields consisting of two makers opposite each other (approx 30m apart) and at the halfway of those markers another two markers approx 10m apart.
Each team stands at spreads out on the field within their own half.
Each team takes it in turn to grubber the ball between the gate – team A starts with the ball and team B has a gate keeper standing at the gate and trying to stop the ball rolling through the gate.
Once the person has kicked the ball they run up to the gate to be the gate keeper, and the defending side now become the attacking side to try and kick the ball between the gates. To do this they simply regather the ball and pass it to their team mate waiting on the marker to kick the ball
Teams must rotate kickers
Balls
Markers
Tags
Belts
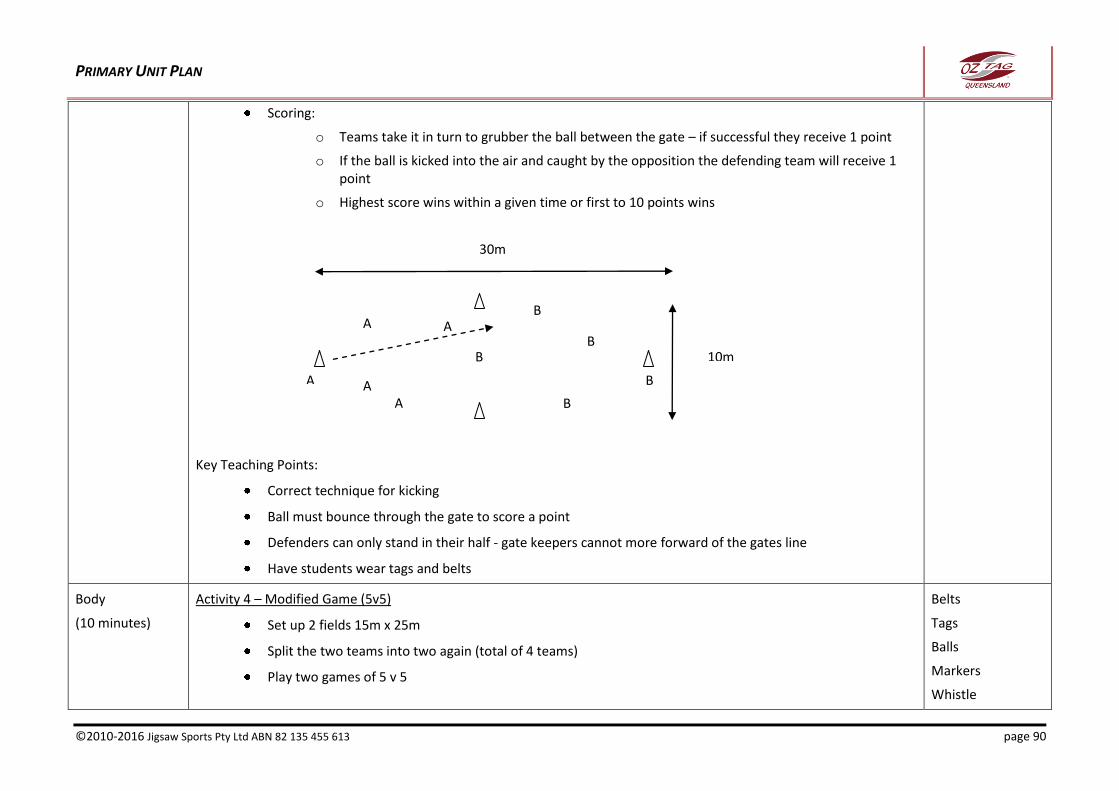
PRIMARY UNIT PLAN
©2010-2016 Jigsaw Sports Pty Ltd ABN 82 135 455 613 page 90
Scoring:
o Teams take it in turn to grubber the ball between the gate – if successful they receive 1 point
o If the ball is kicked into the air and caught by the opposition the defending team will receive 1 point
o Highest score wins within a given time or first to 10 points wins
Key Teaching Points:
Correct technique for kicking
Ball must bounce through the gate to score a point
Defenders can only stand in their half - gate keepers cannot more forward of the gates line
Have students wear tags and belts
Body
(10 minutes)
Activity 4 – Modified Game (5v5)
Set up 2 fields 15m x 25m
Split the two teams into two again (total of 4 teams)
Play two games of 5 v 5
Belts
Tags
Balls
Markers
Whistle
30m
A
A
10m
A A
A
B
B
B
B
B
PRIMARY UNIT PLAN
©2010-2016 Jigsaw Sports Pty Ltd ABN 82 135 455 613 page 91
Key Teaching Points:
As the game is progressing explain basic rules as needed e.g. kick off, knock on, 6 tags = changeover, no contact, no jumping, forward pass
Ensure kicking is used during the games – variation to use double points for scoring off kicking
Play with no marker
Defence cannot move forward until the 1st receiver has the ball
Ensure attacking player moves forward and does not run backwards
Conclusion
(2 minutes)
Activity 5 – Revise Key Points
Once students roll up their belts have them sitting as a group ask students to call out answers two the following questions:
o When can you kick during a game?
o What happens if the ball is kicked over the referees should on the full? What if it bounces that high?
o What is the best way to kick the ball during normal play?
PRIMARY UNIT PLAN
©2010-2016 Jigsaw Sports Pty Ltd ABN 82 135 455 613 page 92
Year 4 - Lesson Plan 4
Focus Areas: Introduction of game skills and rules:
Attacking Skills - Scoring a try
Attacking Skills - Play the ball
Basic Oztag rules
Learning Outcomes: At the completion of this lesson students will be able to:
Explain how to score a try in a game of Oztag
Demonstrate how to play the ball if tagged in a game of Oztag
Demonstrate dummy half skills – run or pass
Apply play the ball skills in a game situation
Explain basic rules used in a game of Oztag
Duration: 30 minutes
Section Activity Resources
Introduction
(5 minutes)
Activity 1 – Warm Up
6 stations
20m between each station
Each station stretch a different muscle group
Each station = stretching for 1 minute
Start at jogging and move class around each station
Between each station use a variety of locomotion e.g. jogging, high knees, side steps etc
Ask students to provide the different locomotion used
Belts
Tags
Markers
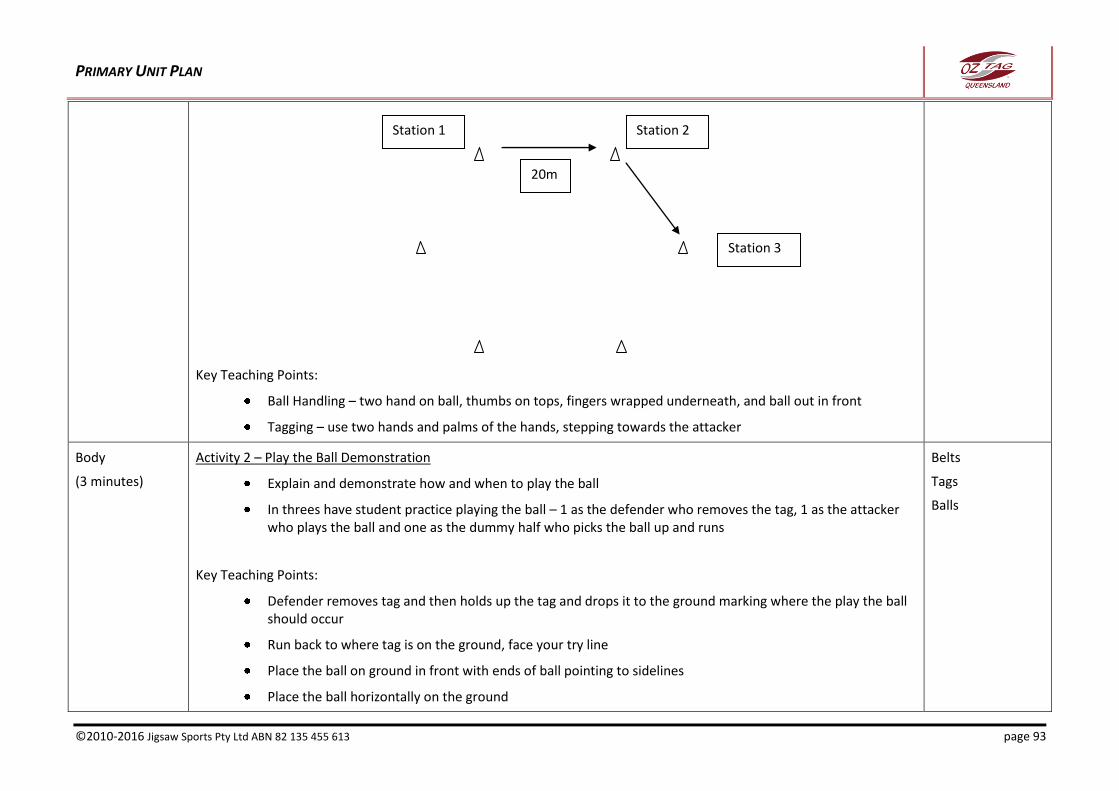
PRIMARY UNIT PLAN
©2010-2016 Jigsaw Sports Pty Ltd ABN 82 135 455 613 page 93
Key Teaching Points:
Ball Handling – two hand on ball, thumbs on tops, fingers wrapped underneath, and ball out in front
Tagging – use two hands and palms of the hands, stepping towards the attacker
Body
(3 minutes)
Activity 2 – Play the Ball Demonstration
Explain and demonstrate how and when to play the ball
In threes have student practice playing the ball – 1 as the defender who removes the tag, 1 as the attacker who plays the ball and one as the dummy half who picks the ball up and runs
Key Teaching Points:
Defender removes tag and then holds up the tag and drops it to the ground marking where the play the ball should occur
Run back to where tag is on the ground, face your try line
Place the ball on ground in front with ends of ball pointing to sidelines
Place the ball horizontally on the ground
Belts
Tags
Balls
20m
Station 2 Station 1
Station 3
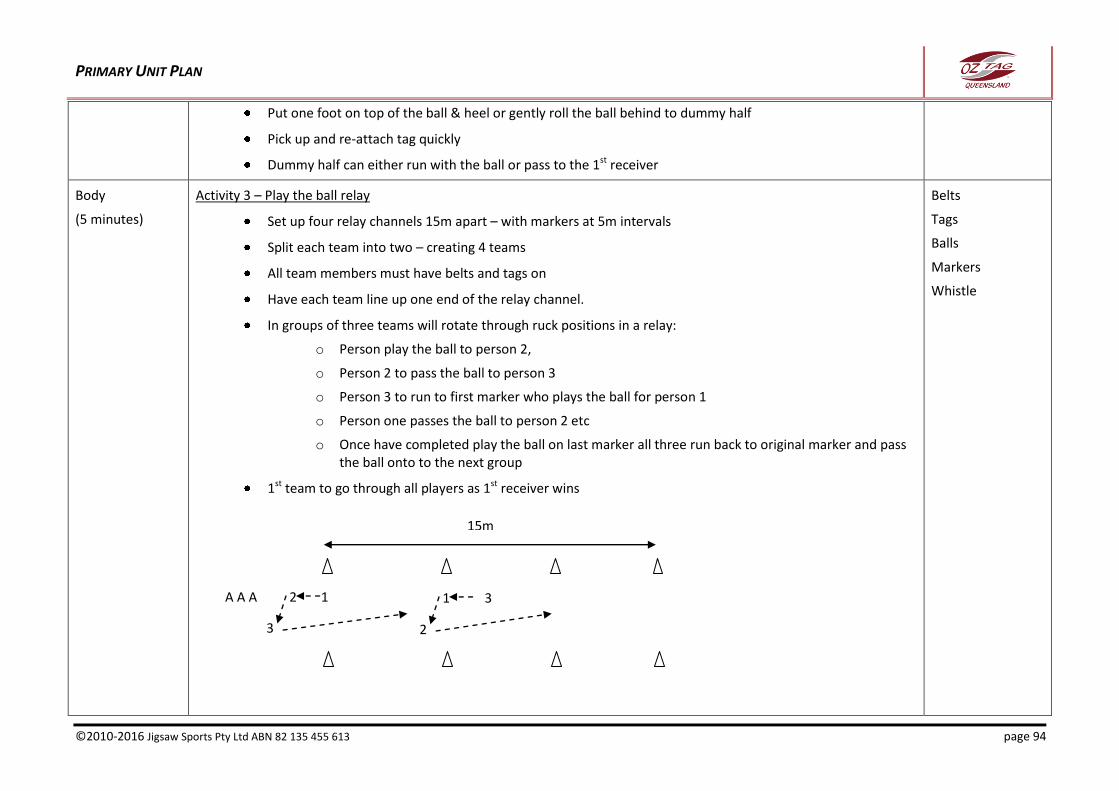
PRIMARY UNIT PLAN
©2010-2016 Jigsaw Sports Pty Ltd ABN 82 135 455 613 page 94
Put one foot on top of the ball & heel or gently roll the ball behind to dummy half
Pick up and re-attach tag quickly
Dummy half can either run with the ball or pass to the 1st receiver
Body
(5 minutes)
Activity 3 – Play the ball relay
Set up four relay channels 15m apart – with markers at 5m intervals
Split each team into two – creating 4 teams
All team members must have belts and tags on
Have each team line up one end of the relay channel.
In groups of three teams will rotate through ruck positions in a relay:
o Person play the ball to person 2,
o Person 2 to pass the ball to person 3
o Person 3 to run to first marker who plays the ball for person 1
o Person one passes the ball to person 2 etc
o Once have completed play the ball on last marker all three run back to original marker and pass the ball onto to the next group
1st team to go through all players as 1st receiver wins
Belts
Tags
Balls
Markers
Whistle
15m
1 2
3
A A A 1
2
3
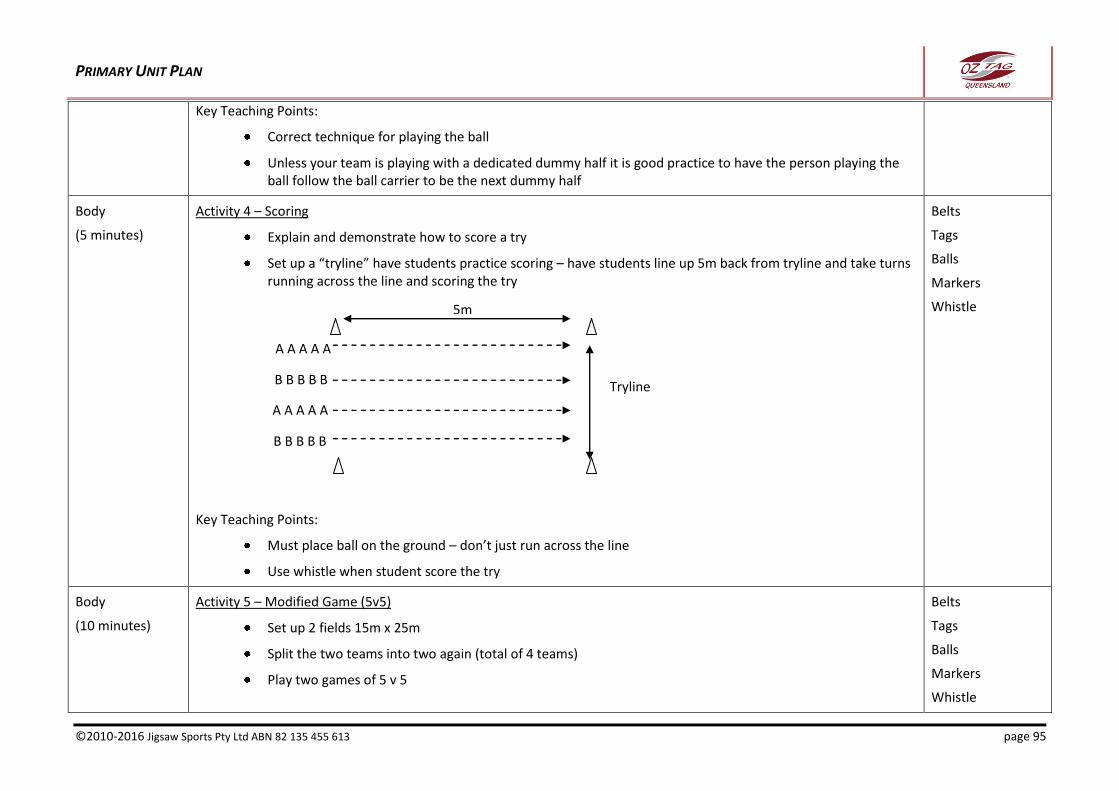
PRIMARY UNIT PLAN
©2010-2016 Jigsaw Sports Pty Ltd ABN 82 135 455 613 page 95
Key Teaching Points:
Correct technique for playing the ball
Unless your team is playing with a dedicated dummy half it is good practice to have the person playing the ball follow the ball carrier to be the next dummy half
Body
(5 minutes)
Activity 4 – Scoring
Explain and demonstrate how to score a try
Set up a “tryline” have students practice scoring – have students line up 5m back from tryline and take turns running across the line and scoring the try
Key Teaching Points:
Must place ball on the ground – don’t just run across the line
Use whistle when student score the try
Belts
Tags
Balls
Markers
Whistle
Body
(10 minutes)
Activity 5 – Modified Game (5v5)
Set up 2 fields 15m x 25m
Split the two teams into two again (total of 4 teams)
Play two games of 5 v 5
Belts
Tags
Balls
Markers
Whistle
5m
A A A A A
A A A A A
B B B B B
B B B B B
Tryline
PRIMARY UNIT PLAN
©2010-2016 Jigsaw Sports Pty Ltd ABN 82 135 455 613 page 96
Key Teaching Points:
As the game is progressing explain basic rules as needed e.g. kick off, knock on, 6 tags = changeover, no contact, no jumping, forward pass
Defence cannot move forward until the 1st receiver has the ball
Ensure attacking player moves forward and does not run backwards
Conclusion
(2 minutes)
Activity 6 – Revise Key Points
Once students roll up their belts have them sitting as a group ask students to call out answers two the following questions:
o How do you score a try? What do you have to do with the ball?
o When do you play the ball? What has to happen?
o How do you play the ball? Can you just roil it between your legs?
o Where do you face when you play the ball?
o What happens after you play the ball?
o Which player should follow the ball carrier?
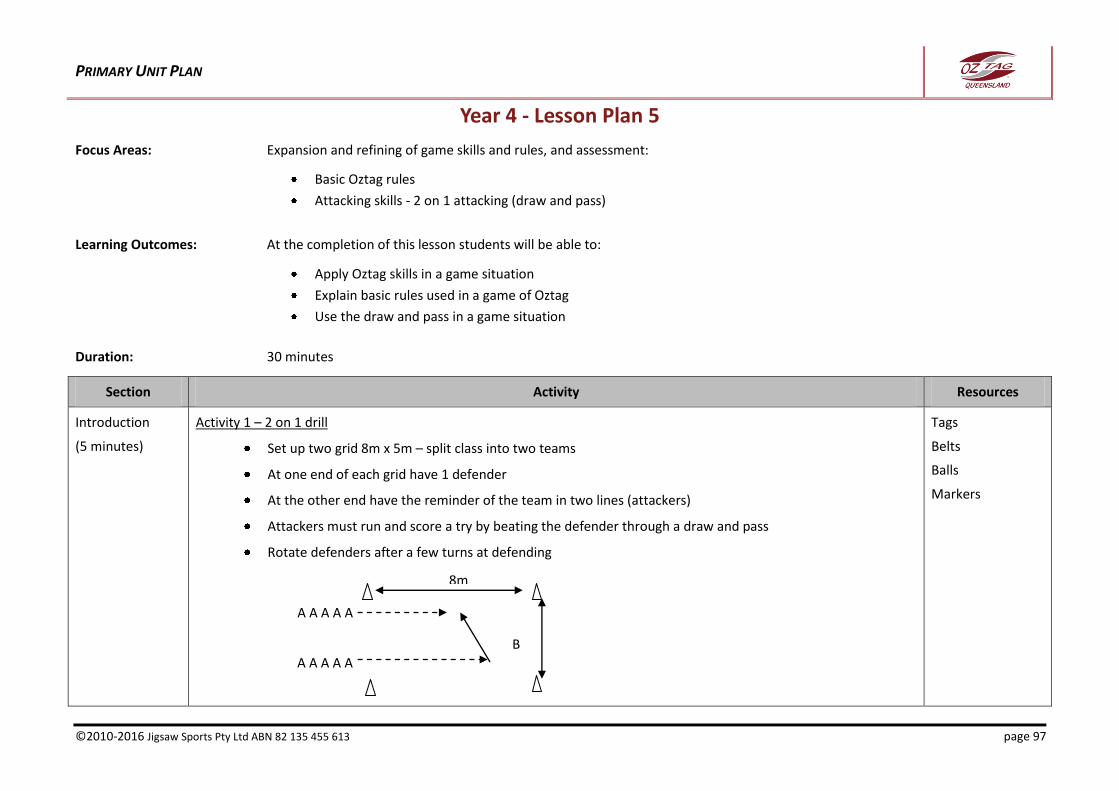
PRIMARY UNIT PLAN
©2010-2016 Jigsaw Sports Pty Ltd ABN 82 135 455 613 page 97
Year 4 - Lesson Plan 5
Focus Areas: Expansion and refining of game skills and rules, and assessment:
Basic Oztag rules
Attacking skills - 2 on 1 attacking (draw and pass)
Learning Outcomes: At the completion of this lesson students will be able to:
Apply Oztag skills in a game situation
Explain basic rules used in a game of Oztag
Use the draw and pass in a game situation
Duration: 30 minutes
Section Activity Resources
Introduction
(5 minutes)
Activity 1 – 2 on 1 drill
Set up two grid 8m x 5m – split class into two teams
At one end of each grid have 1 defender
At the other end have the reminder of the team in two lines (attackers)
Attackers must run and score a try by beating the defender through a draw and pass
Rotate defenders after a few turns at defending
Tags
Belts
Balls
Markers
8m
A A A A A
A A A A A
B
PRIMARY UNIT PLAN
©2010-2016 Jigsaw Sports Pty Ltd ABN 82 135 455 613 page 98
Key Teaching Points:
Ball Handling – two hand on ball, thumbs on tops, fingers wrapped underneath, and ball out in front
Tagging – use two hands and palms of the hands, stepping towards the attacker
Correct draw and pass technique:
o Do no pass ball too early or late
o Only pass if the defender comes to the ball carrier – do not force the pass
o Pass the ball off the back foot and rotating the shoulders towards the receiver
o Receiver to stay wide of the defender
Body
(20 minutes)
Activity 2 – Full Game
Play full game of Oztag with 8 v 8
Field size for juniors = 40m x 25m
Ensure subbing of players if frequent to involve all players
Key Teaching Points:
As the game is progressing explain basic rules as needed e.g. kick off, knock on, 6 tags = changeover, no contact, no jumping, forward pass
Defence cannot move forward until the 1st receiver has the ball
Ensure attacking player moves forward and does not run backwards
Belts
Tags
Balls
Markers
Whistle
Body
Assessment
As students are playing the game complete assessment sheet
Note: You will require another person to referee the game. Alternatively complete the assessment sheet post game being played
Assessment Sheet
PRIMARY UNIT PLAN
©2010-2016 Jigsaw Sports Pty Ltd ABN 82 135 455 613 page 99
Conclusion
(5 minutes)
Activity 3 – Revise Key Points
Once students roll up their belts have them sitting as a group ask students to call out answers two the following questions:
o How many people in one team for Oztag?
o Are you allowed to jump to avoid being tagged?
o Can you push someone away when they try and tag you?
o What is the best way to make a tag?
o How do you avoid being tagged?
o How do you play the ball?
o How do you do a draw and pass?

PRIMARY UNIT PLAN
©2010-2016 Jigsaw Sports Pty Ltd ABN 82 135 455 613 page 100
Year 5 Lesson Plans
PRIMARY UNIT PLAN
©2010-2016 Jigsaw Sports Pty Ltd ABN 82 135 455 613 page 101
Year 5 - Lesson Plan 1
Focus Areas: Introduction of key Oztag skills:
Placing on and taking off Oztag belts and tags
Offensive skills – passing
Offensive skills – ball handling
Learning Outcomes: At the completion of this lesson students will be able to:
Put on an Oztag belt
Explain where to place tags on the Oztag belts
Pass a ball in an attacking situation
Explain basic technique needed to pass a ball
Run with an Oztag ball
Explain basic technique used in running with the ball
Apply running and passing skills in a simulated game situation
Duration: 30 minutes
Section Activity Resources
Introduction
(3 minutes)
Activity 1 – Warm Up (4 to Score)
Have students place on tags and belts – ensure even numbers in teams
Set out grids 10m x 10m – no one is allowed outside of the grid
Split class up into groups of 4-8
Teams must pass the ball four times between their team mates to score 1 point
Students are not allowed to run with the ball in their possession.
A change over occurs when the opposing side drops the ball or intercepted, or a player is tagged while holding the ball
Belts
Tags
Balls
Markers
Whistle
PRIMARY UNIT PLAN
©2010-2016 Jigsaw Sports Pty Ltd ABN 82 135 455 613 page 102
Repeat as needed – highest score wins
Once completed take students through a light stretch of different muscle groups
Key Teaching Points:
Ball Handling – two hand on ball, thumbs on tops, fingers wrapped underneath, and ball out in front
Tagging – use two hands and palms of the hands, stepping towards the attacker
Attackers move to spaces to receive the ball
Body
(5 minutes)
Activity 2 – Putting on a Belt and Tags
Have students sitting as a group
Explain how to put on a belt and tags and demonstrate
Have students place on their own belts (assistance will be required)
Allocate students into two different groups (reflective of the two different colour tags). As you call out a colour have that student go and put on that colour tags
Key Teaching Points:
Furry side of the belt to the outside
Oztag logo on the belt to the front and middle
Have the belt rap around your waist
Tags to sit on either side of your waist and hanging straight down
Special Oztag shorts can be used and if you play at a competition you will have to play in a pair
Oztag Belts
Tags
Body
(2 minutes)
Activity 3 – Ball Handling
Sit students as a whole group and ask explain how to hold the ball as you are running
Provide demonstration
Get students to practice holding the ball and running short distances with it.
Ensure all students get a turn
Balls
PRIMARY UNIT PLAN
©2010-2016 Jigsaw Sports Pty Ltd ABN 82 135 455 613 page 103
Key Teaching Points:
Both hands on the ball
Ball held out in front of the body
Thumbs running down the ball and fingers curled underneath (like holding a hamburger)
Body
(5 minutes)
Activity 4 – Ball Handling Drills
Set up a small grid of 15m x 15m
Students to hold the ball
Move around grid lightly slapping footballs and checking correct grip. At the end of each of the following stationary handling drills the coach checks correct grip.
Get students to perform different moves to perform and then hold the ball again:
o Ball on the ground. One foot on top of ball. On whistle, quickly bend down pick up ball and stand up.
o Ball on ground. On whistle, spin around once, two claps and pick up ball
o Ball in Hands. Throw ball up about head height catch in hands
o Ball in Hands. Throw ball up, one clap, catch in hands. Then try 2 claps, 3 claps, 4 claps…Count as many claps as you can!
o Bounce the ball to re-gather
o Bounce, clap and re-gather
o Move ball around waist, squeeze with thumb when ball is in one hand. Race 5 times around waist
o Move ball around both knees, legs together. Race 5 times around knees
o Move ball Figure 8 around knees, legs apart Race 3 times figure 8
Key Teaching Points:
Correct technique in handling the ball
Tags and belts on
Balls
Oztag Belts
Tags
Markers
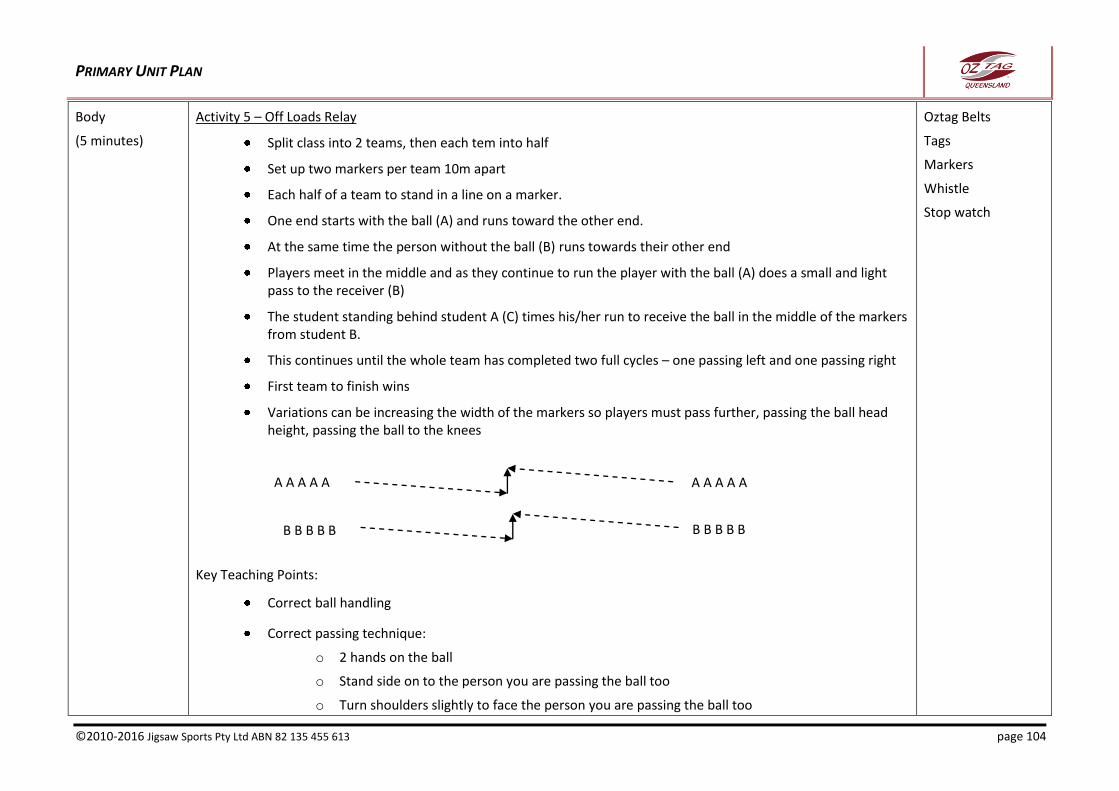
PRIMARY UNIT PLAN
©2010-2016 Jigsaw Sports Pty Ltd ABN 82 135 455 613 page 104
Body
(5 minutes)
Activity 5 – Off Loads Relay
Split class into 2 teams, then each tem into half
Set up two markers per team 10m apart
Each half of a team to stand in a line on a marker.
One end starts with the ball (A) and runs toward the other end.
At the same time the person without the ball (B) runs towards their other end
Players meet in the middle and as they continue to run the player with the ball (A) does a small and light pass to the receiver (B)
The student standing behind student A (C) times his/her run to receive the ball in the middle of the markers from student B.
This continues until the whole team has completed two full cycles – one passing left and one passing right
First team to finish wins
Variations can be increasing the width of the markers so players must pass further, passing the ball head height, passing the ball to the knees
Key Teaching Points:
Correct ball handling
Correct passing technique:
o 2 hands on the ball
o Stand side on to the person you are passing the ball too
o Turn shoulders slightly to face the person you are passing the ball too
Oztag Belts
Tags
Markers
Whistle
Stop watch
A A A A A
B B B B B
A A A A A
B B B B B

PRIMARY UNIT PLAN
©2010-2016 Jigsaw Sports Pty Ltd ABN 82 135 455 613 page 105
o Swing arms towards person you are passing the ball to and release the ball
Arms slightly bent at elbow to make pass more horizontal
o Point to the player you have passed the ball to once released.
o Eye contact focuses on receiving players upper body
o Ball receiver to have hands up in front of chest ready to receive the ball
o Ball receiver to watch the ball into the hands
o Call for the ball
Timing of the run so that players meet in the middle
Do not pass too hard
Body
(8 minutes)
Activity 6 – Tag Timer
Set up a field 25m wide x 30m long
Have 2 teams as attackers and defenders – teams start at opposite sides of the field
On the whistle start the stop watch and all attackers must run around the field, and the defenders must make all the tags
Once all tags are made stop the stop watch
Repeat for the other side as attackers
Fastest time wins
Introduce balls – time stops immediately once all attackers carrying balls are tagged
o Ball scan be passed amongst the attacking players
Key Teaching Points:
Students must stay in the field or they have run out and become defenders
No contact
Use both hands and palms to make the tag
Correct passing technique
Oztag Belts
Tags
Markers
Whistle
Stop watch
PRIMARY UNIT PLAN
©2010-2016 Jigsaw Sports Pty Ltd ABN 82 135 455 613 page 106
Correct ball handling technique
Conclusion
(1 minute)
Activity 7 – Packing up equipment
Demonstrate to students how to roll up belts
Ask student to roll up belts and place tags into the two different colour piles
Key Teaching Points:
Start rolling up belt with Furry side to the outside, and at the non-logo end of the belt
Belts
Tags
Conclusion
(1 minute)
Activity 8 – Revise Key Points
Sitting as a group ask students to call out answers two the following questions:
o Where do we wear the belt on our body?
o Where do the tags sit on your belt?
o How should you hold a ball?
o How do you pass a ball?
PRIMARY UNIT PLAN
©2010-2016 Jigsaw Sports Pty Ltd ABN 82 135 455 613 page 107
Year 5 - Lesson Plan 2
Focus Areas: Revising, refining and expansion of key Oztag skills:
Placing on and taking off Oztag belts and tags
Defensive skills – tagging
Offensive skills – twisting and spinning
Learning Outcomes: At the completion of this lesson students will be able to:
Put on an Oztag belt
Explain where to place tags on the Oztag belts
Explain the offensive and defensive skills that make Oztag Unique
Demonstrate correct technique for making a tag
Demonstrate correct technique for evading a tag – twisting and spinning
Duration: 30 minutes
Section Activity Resources
Introduction
(5 minutes)
Activity 1 – Warm Up (Tag Gauntlet)
4 Teams of 5 – 7 players
Use tag gauntlet to count number of tags removed.
Team with most tags removed is the winner
Defenders cannot move forward must only move laterally on line
Team 1 Attacks, Team 2 Defends then swap
Repeat as many times as needed
Once completed take students through a light stretch of different muscle groups
Oztag Belts
Tags
Markers
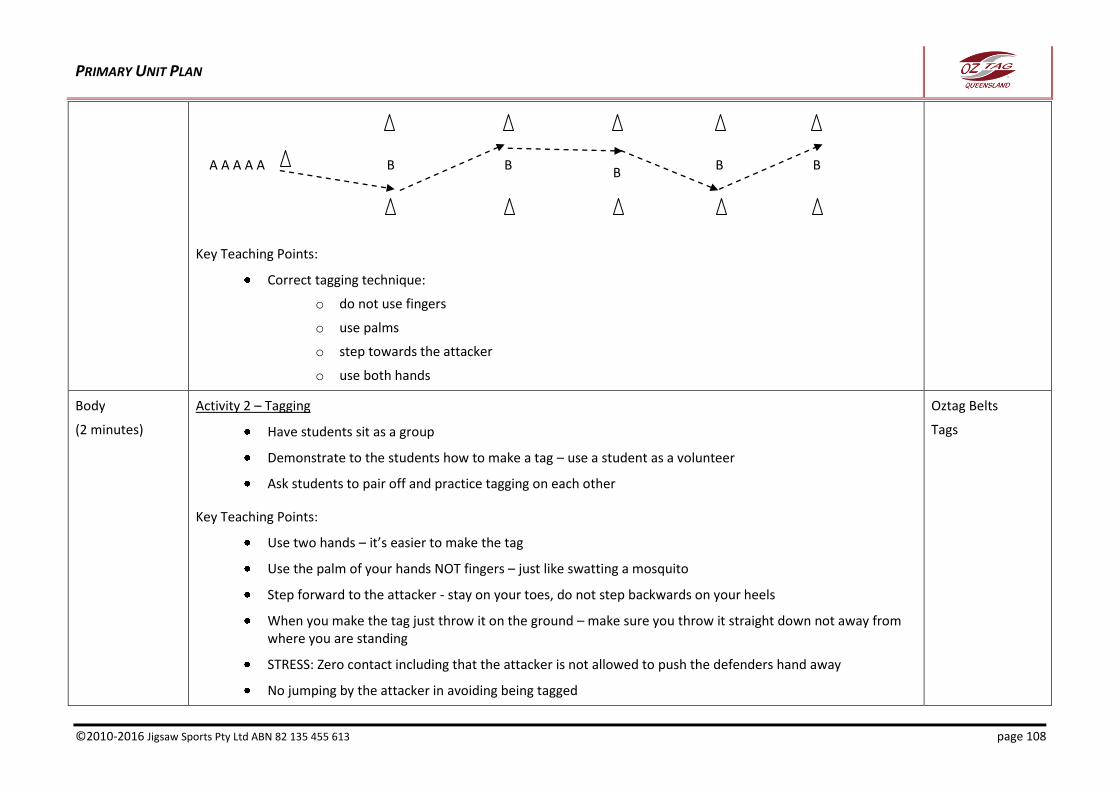
PRIMARY UNIT PLAN
©2010-2016 Jigsaw Sports Pty Ltd ABN 82 135 455 613 page 108
Key Teaching Points:
Correct tagging technique:
o do not use fingers
o use palms
o step towards the attacker
o use both hands
Body
(2 minutes)
Activity 2 – Tagging
Have students sit as a group
Demonstrate to the students how to make a tag – use a student as a volunteer
Ask students to pair off and practice tagging on each other
Key Teaching Points:
Use two hands – it’s easier to make the tag
Use the palm of your hands NOT fingers – just like swatting a mosquito
Step forward to the attacker - stay on your toes, do not step backwards on your heels
When you make the tag just throw it on the ground – make sure you throw it straight down not away from where you are standing
STRESS: Zero contact including that the attacker is not allowed to push the defenders hand away
No jumping by the attacker in avoiding being tagged
Oztag Belts
Tags
A A A A A B B B
B B
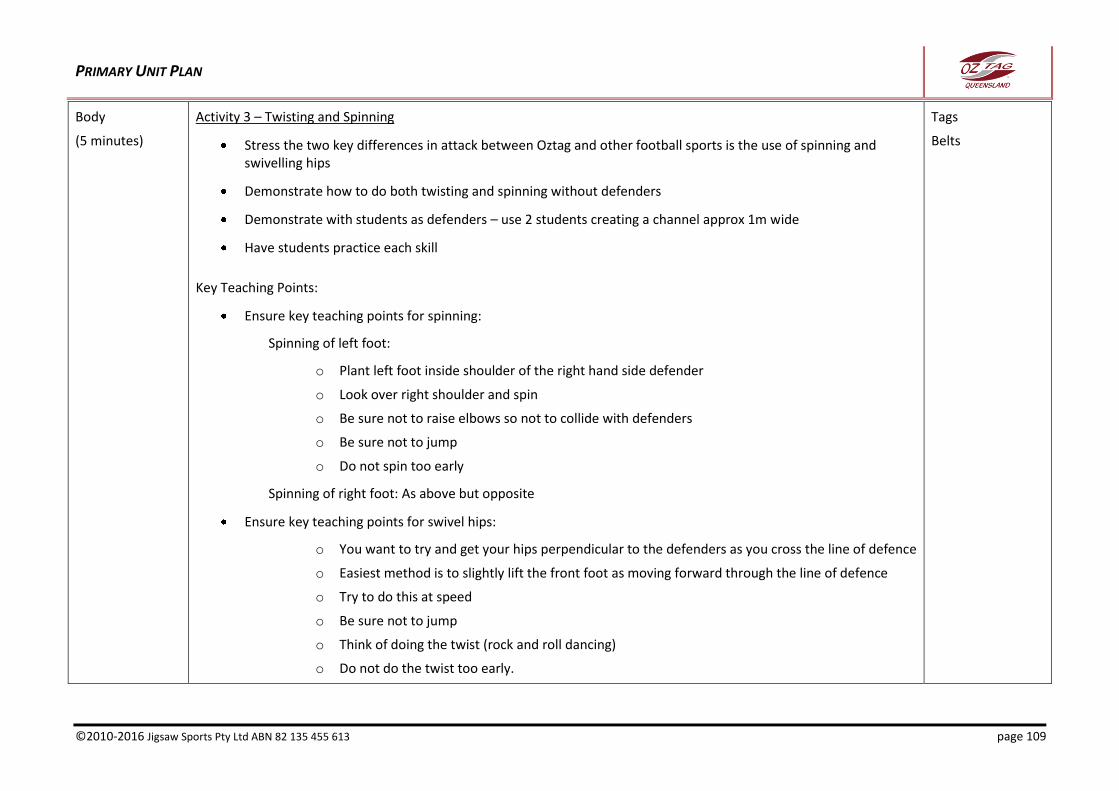
PRIMARY UNIT PLAN
©2010-2016 Jigsaw Sports Pty Ltd ABN 82 135 455 613 page 109
Body
(5 minutes)
Activity 3 – Twisting and Spinning
Stress the two key differences in attack between Oztag and other football sports is the use of spinning and swivelling hips
Demonstrate how to do both twisting and spinning without defenders
Demonstrate with students as defenders – use 2 students creating a channel approx 1m wide
Have students practice each skill
Key Teaching Points:
Ensure key teaching points for spinning:
Spinning of left foot:
o Plant left foot inside shoulder of the right hand side defender
o Look over right shoulder and spin
o Be sure not to raise elbows so not to collide with defenders
o Be sure not to jump
o Do not spin too early
Spinning of right foot: As above but opposite
Ensure key teaching points for swivel hips:
o You want to try and get your hips perpendicular to the defenders as you cross the line of defence
o Easiest method is to slightly lift the front foot as moving forward through the line of defence
o Try to do this at speed
o Be sure not to jump
o Think of doing the twist (rock and roll dancing)
o Do not do the twist too early.
Tags
Belts
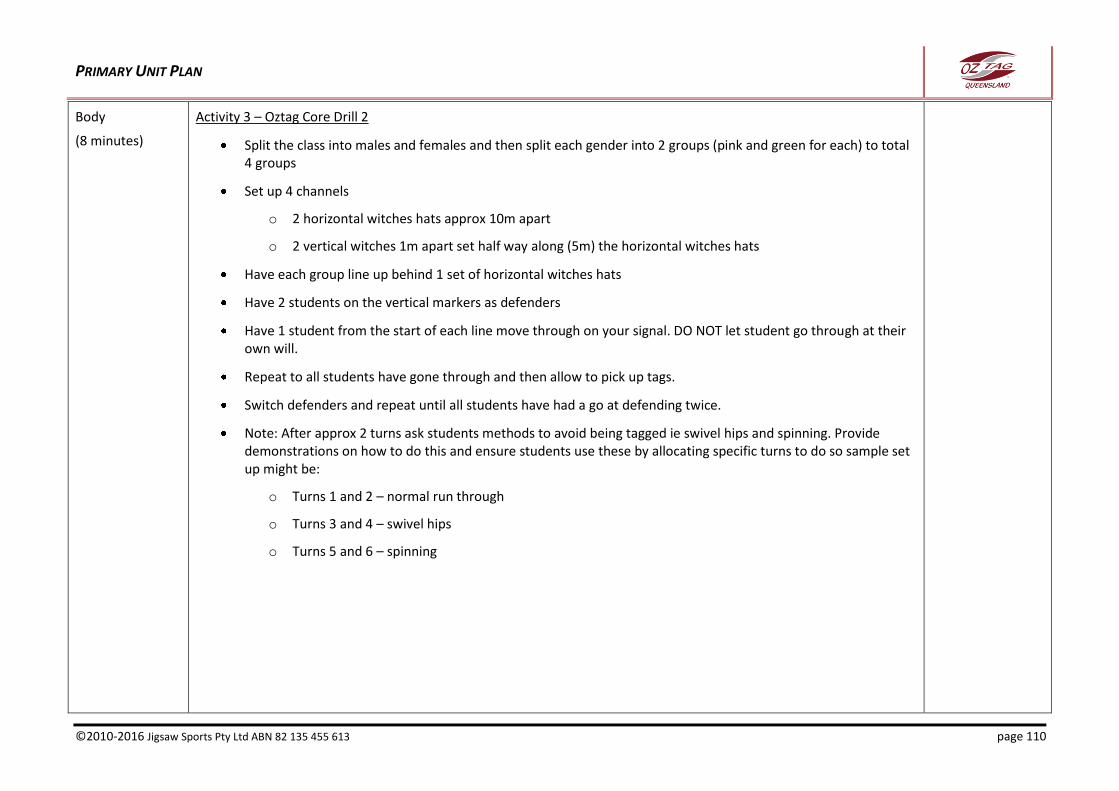
PRIMARY UNIT PLAN
©2010-2016 Jigsaw Sports Pty Ltd ABN 82 135 455 613 page 110
Body
(8 minutes)
Activity 3 – Oztag Core Drill 2
Split the class into males and females and then split each gender into 2 groups (pink and green for each) to total 4 groups
Set up 4 channels
o 2 horizontal witches hats approx 10m apart
o 2 vertical witches 1m apart set half way along (5m) the horizontal witches hats
Have each group line up behind 1 set of horizontal witches hats
Have 2 students on the vertical markers as defenders
Have 1 student from the start of each line move through on your signal. DO NOT let student go through at their own will.
Repeat to all students have gone through and then allow to pick up tags.
Switch defenders and repeat until all students have had a go at defending twice.
Note: After approx 2 turns ask students methods to avoid being tagged ie swivel hips and spinning. Provide demonstrations on how to do this and ensure students use these by allocating specific turns to do so sample set up might be:
o Turns 1 and 2 – normal run through
o Turns 3 and 4 – swivel hips
o Turns 5 and 6 – spinning
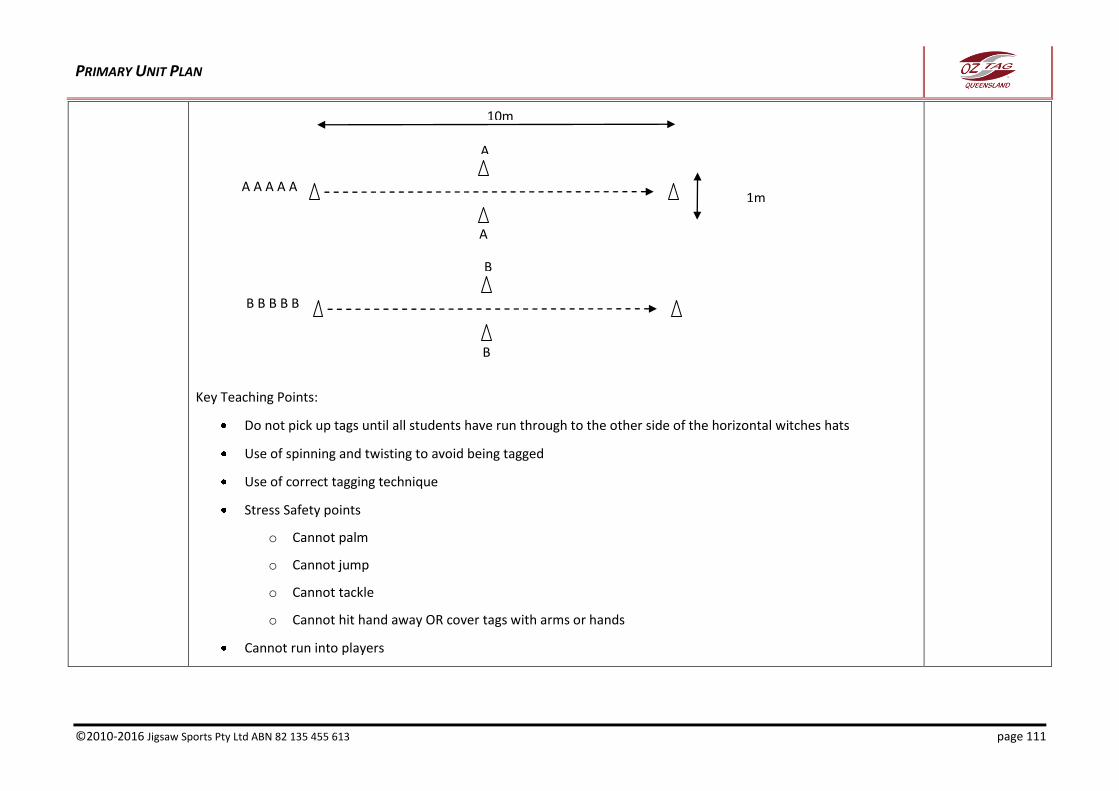
PRIMARY UNIT PLAN
©2010-2016 Jigsaw Sports Pty Ltd ABN 82 135 455 613 page 111
Key Teaching Points:
Do not pick up tags until all students have run through to the other side of the horizontal witches hats
Use of spinning and twisting to avoid being tagged
Use of correct tagging technique
Stress Safety points
o Cannot palm
o Cannot jump
o Cannot tackle
o Cannot hit hand away OR cover tags with arms or hands
Cannot run into players
10m
A
A
A A A A A
B
B
B B B B B
1m
PRIMARY UNIT PLAN
©2010-2016 Jigsaw Sports Pty Ltd ABN 82 135 455 613 page 112
Body
(8minutes)
Activity 4 – Modified Game (Money Ball)
Four teams are positioned in two 30m by 20m grids.
Each team has a score a try by placing the money ball over the opposition’s try line.
The money ball starts in the centre of the field and the two teams at either end of the field
On the whistle 1 person from each team must run to collect the money ball
There is no offside and forward passes are allowed to be thrown.
Once a player is tagged with the ball they are out of play and the ball is given to the opposition.
All players are allowed to move freely even when in possession of the ball
Once the ball is dropped or an interception occurs then there is a changeover.
No kicking is allowed
Once a team has scored all players come back on to the field
Variation – make passes only able to go backwards
Key Teaching Points:
Correct tagging technique
Correct tag evasion (twisting and spinning) technique
Attacking players moving to gaps to allow the ball carrier options to pass the ball
Communication amongst players in attack and defence
Balls
Tags
Belts
Markers
Whistle
Conclusion
(2 minutes)
Activity 5 – Revise Key Points
Once students roll up their belts have them sitting as a group ask students to call out answers two the following questions:
o How do you make a tag?
o What two things can be done when you have the ball to help score more tries?
o How do you do a spin? A twist?
o Should they be done before the defensive line of at the defensive line?
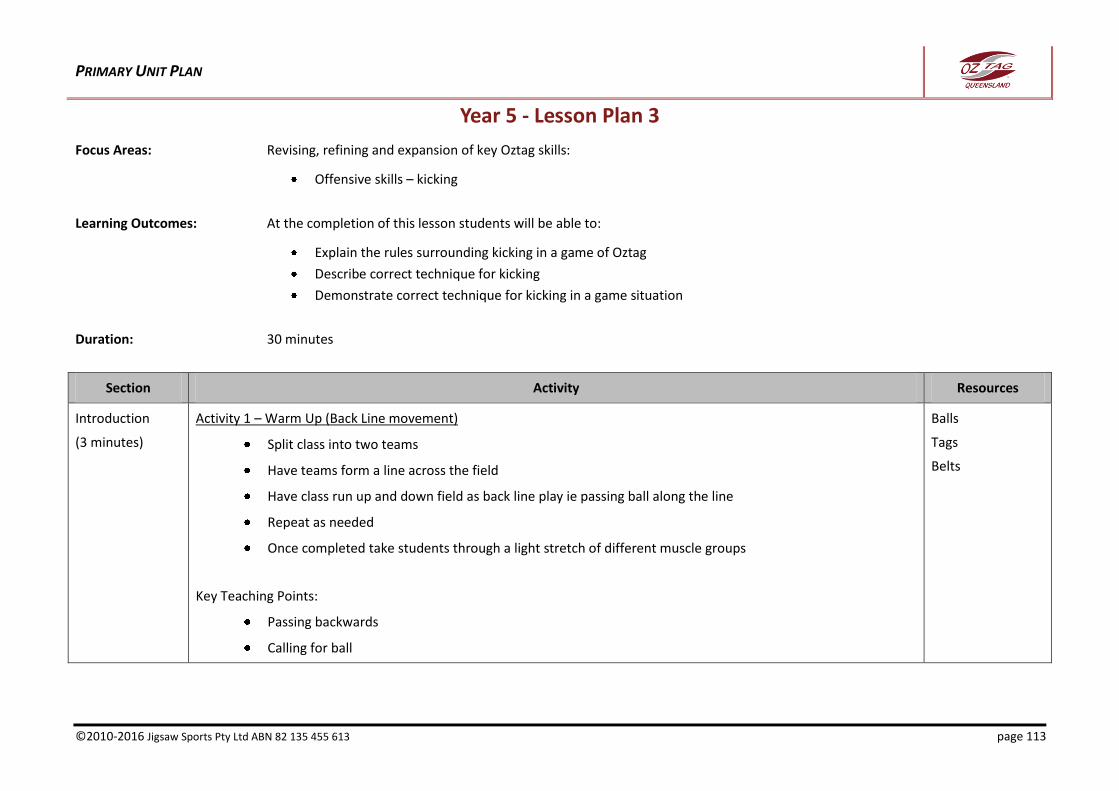
PRIMARY UNIT PLAN
©2010-2016 Jigsaw Sports Pty Ltd ABN 82 135 455 613 page 113
Year 5 - Lesson Plan 3
Focus Areas: Revising, refining and expansion of key Oztag skills:
Offensive skills – kicking
Learning Outcomes: At the completion of this lesson students will be able to:
Explain the rules surrounding kicking in a game of Oztag
Describe correct technique for kicking
Demonstrate correct technique for kicking in a game situation
Duration: 30 minutes
Section Activity Resources
Introduction
(3 minutes)
Activity 1 – Warm Up (Back Line movement)
Split class into two teams
Have teams form a line across the field
Have class run up and down field as back line play ie passing ball along the line
Repeat as needed
Once completed take students through a light stretch of different muscle groups
Key Teaching Points:
Passing backwards
Calling for ball
Balls
Tags
Belts
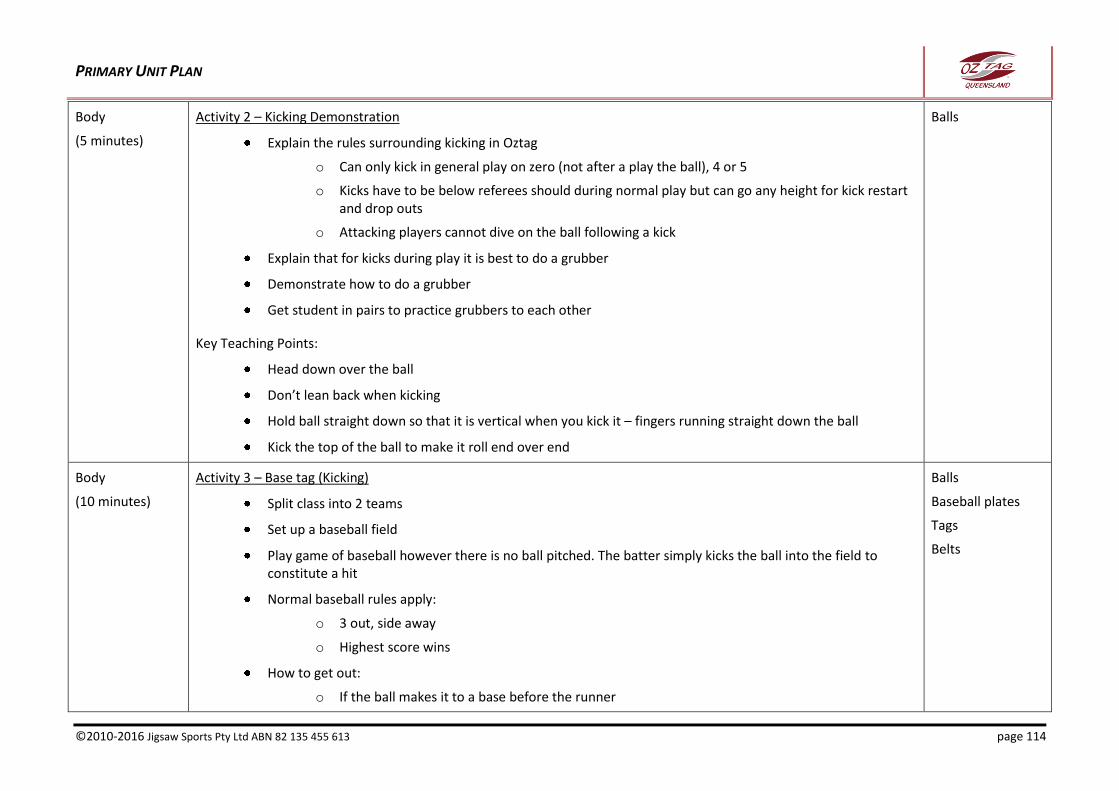
PRIMARY UNIT PLAN
©2010-2016 Jigsaw Sports Pty Ltd ABN 82 135 455 613 page 114
Body
(5 minutes)
Activity 2 – Kicking Demonstration
Explain the rules surrounding kicking in Oztag
o Can only kick in general play on zero (not after a play the ball), 4 or 5
o Kicks have to be below referees should during normal play but can go any height for kick restart and drop outs
o Attacking players cannot dive on the ball following a kick
Explain that for kicks during play it is best to do a grubber
Demonstrate how to do a grubber
Get student in pairs to practice grubbers to each other
Key Teaching Points:
Head down over the ball
Don’t lean back when kicking
Hold ball straight down so that it is vertical when you kick it – fingers running straight down the ball
Kick the top of the ball to make it roll end over end
Balls
Body
(10 minutes)
Activity 3 – Base tag (Kicking)
Split class into 2 teams
Set up a baseball field
Play game of baseball however there is no ball pitched. The batter simply kicks the ball into the field to constitute a hit
Normal baseball rules apply:
o 3 out, side away
o Highest score wins
How to get out:
o If the ball makes it to a base before the runner
Balls
Baseball plates
Tags
Belts
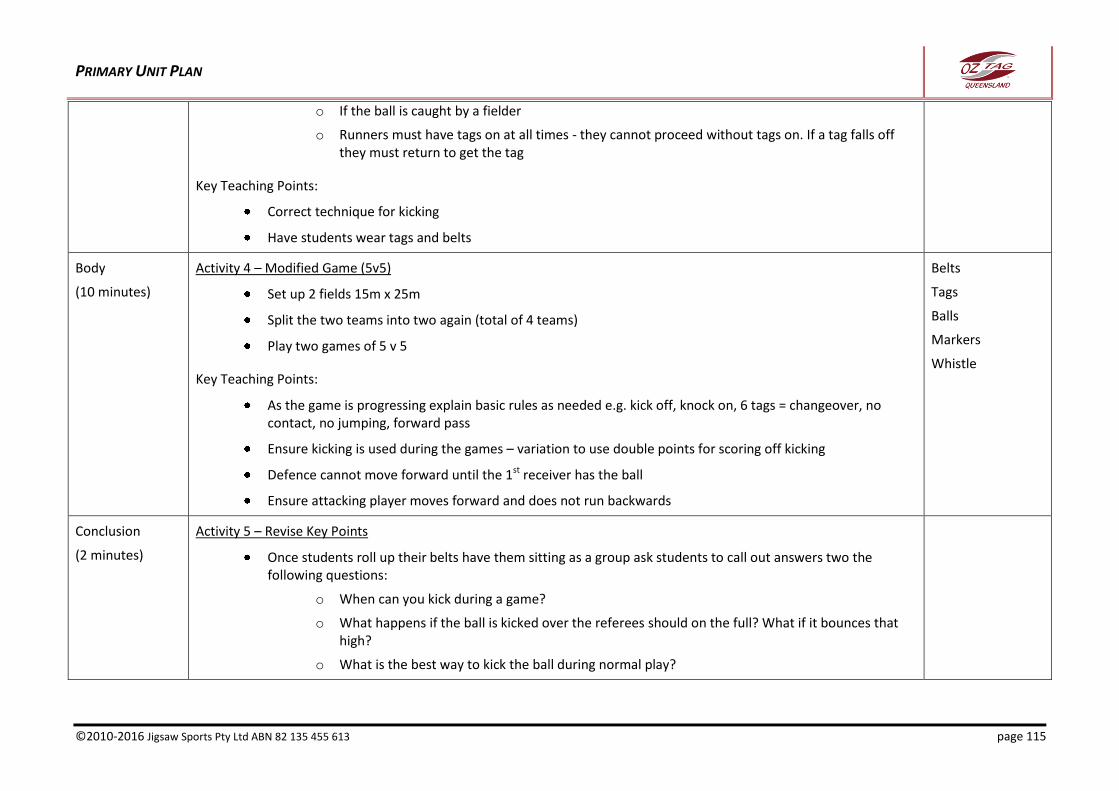
PRIMARY UNIT PLAN
©2010-2016 Jigsaw Sports Pty Ltd ABN 82 135 455 613 page 115
o If the ball is caught by a fielder
o Runners must have tags on at all times - they cannot proceed without tags on. If a tag falls off they must return to get the tag
Key Teaching Points:
Correct technique for kicking
Have students wear tags and belts
Body
(10 minutes)
Activity 4 – Modified Game (5v5)
Set up 2 fields 15m x 25m
Split the two teams into two again (total of 4 teams)
Play two games of 5 v 5
Key Teaching Points:
As the game is progressing explain basic rules as needed e.g. kick off, knock on, 6 tags = changeover, no contact, no jumping, forward pass
Ensure kicking is used during the games – variation to use double points for scoring off kicking
Defence cannot move forward until the 1st receiver has the ball
Ensure attacking player moves forward and does not run backwards
Belts
Tags
Balls
Markers
Whistle
Conclusion
(2 minutes)
Activity 5 – Revise Key Points
Once students roll up their belts have them sitting as a group ask students to call out answers two the following questions:
o When can you kick during a game?
o What happens if the ball is kicked over the referees should on the full? What if it bounces that high?
o What is the best way to kick the ball during normal play?
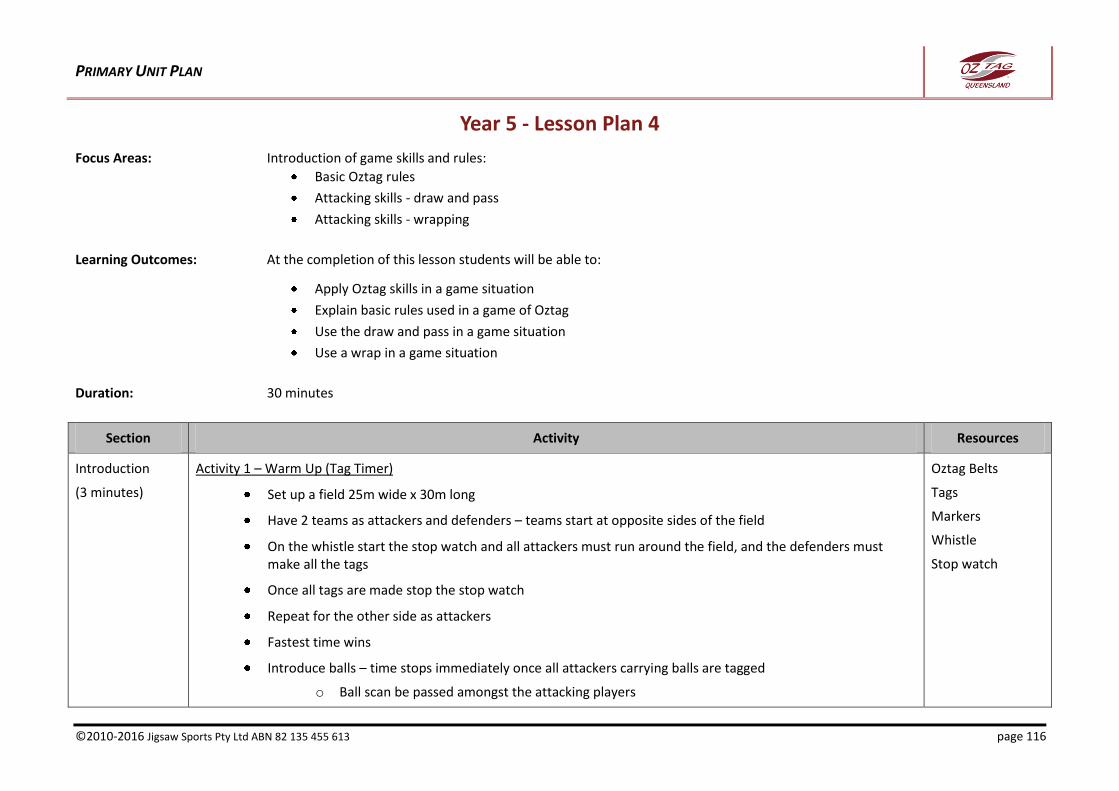
PRIMARY UNIT PLAN
©2010-2016 Jigsaw Sports Pty Ltd ABN 82 135 455 613 page 116
Year 5 - Lesson Plan 4
Focus Areas: Introduction of game skills and rules:
Basic Oztag rules
Attacking skills - draw and pass
Attacking skills - wrapping
Learning Outcomes: At the completion of this lesson students will be able to:
Apply Oztag skills in a game situation
Explain basic rules used in a game of Oztag
Use the draw and pass in a game situation
Use a wrap in a game situation
Duration: 30 minutes
Section Activity Resources
Introduction
(3 minutes)
Activity 1 – Warm Up (Tag Timer)
Set up a field 25m wide x 30m long
Have 2 teams as attackers and defenders – teams start at opposite sides of the field
On the whistle start the stop watch and all attackers must run around the field, and the defenders must make all the tags
Once all tags are made stop the stop watch
Repeat for the other side as attackers
Fastest time wins
Introduce balls – time stops immediately once all attackers carrying balls are tagged
o Ball scan be passed amongst the attacking players
Oztag Belts
Tags
Markers
Whistle
Stop watch
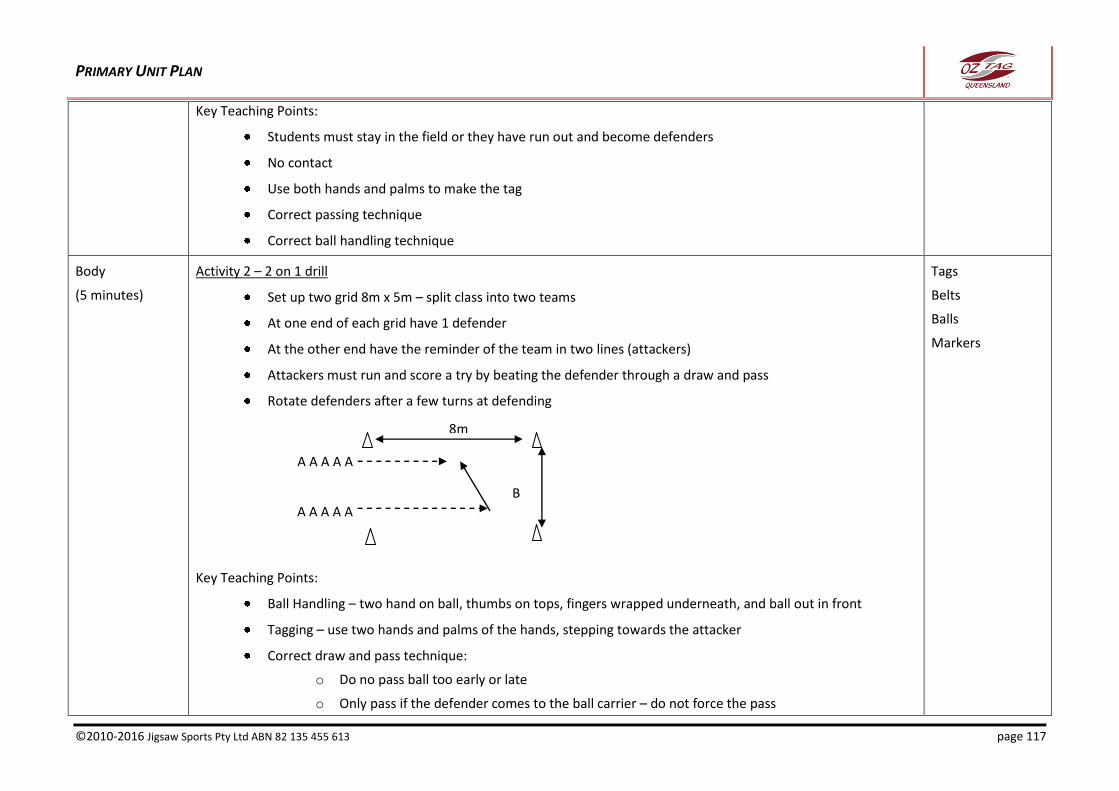
PRIMARY UNIT PLAN
©2010-2016 Jigsaw Sports Pty Ltd ABN 82 135 455 613 page 117
Key Teaching Points:
Students must stay in the field or they have run out and become defenders
No contact
Use both hands and palms to make the tag
Correct passing technique
Correct ball handling technique
Body
(5 minutes)
Activity 2 – 2 on 1 drill
Set up two grid 8m x 5m – split class into two teams
At one end of each grid have 1 defender
At the other end have the reminder of the team in two lines (attackers)
Attackers must run and score a try by beating the defender through a draw and pass
Rotate defenders after a few turns at defending
Key Teaching Points:
Ball Handling – two hand on ball, thumbs on tops, fingers wrapped underneath, and ball out in front
Tagging – use two hands and palms of the hands, stepping towards the attacker
Correct draw and pass technique:
o Do no pass ball too early or late
o Only pass if the defender comes to the ball carrier – do not force the pass
Tags
Belts
Balls
Markers
8m
A A A A A
A A A A A
B
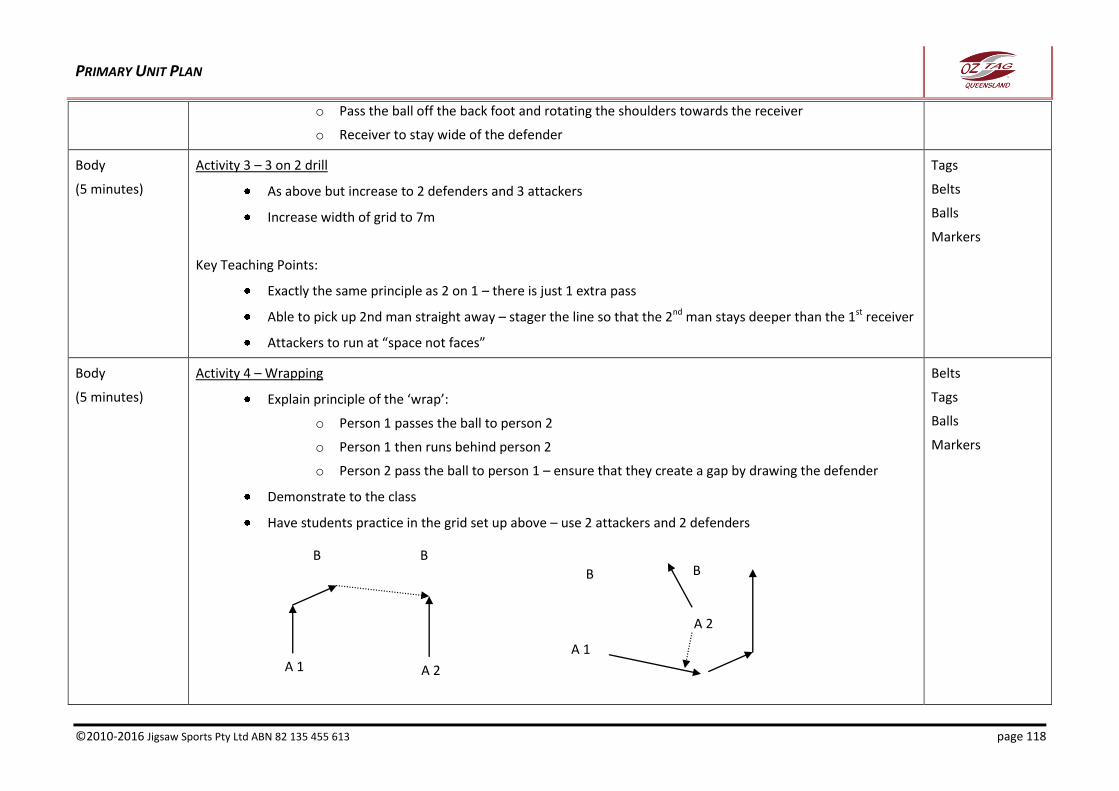
PRIMARY UNIT PLAN
©2010-2016 Jigsaw Sports Pty Ltd ABN 82 135 455 613 page 118
o Pass the ball off the back foot and rotating the shoulders towards the receiver
o Receiver to stay wide of the defender
Body
(5 minutes)
Activity 3 – 3 on 2 drill
As above but increase to 2 defenders and 3 attackers
Increase width of grid to 7m
Key Teaching Points:
Exactly the same principle as 2 on 1 – there is just 1 extra pass
Able to pick up 2nd man straight away – stager the line so that the 2nd man stays deeper than the 1st receiver
Attackers to run at “space not faces”
Tags
Belts
Balls
Markers
Body
(5 minutes)
Activity 4 – Wrapping
Explain principle of the ‘wrap’:
o Person 1 passes the ball to person 2
o Person 1 then runs behind person 2
o Person 2 pass the ball to person 1 – ensure that they create a gap by drawing the defender
Demonstrate to the class
Have students practice in the grid set up above – use 2 attackers and 2 defenders
Belts
Tags
Balls
Markers
B B
A 1 A 2
A 1
A 2
B B
PRIMARY UNIT PLAN
©2010-2016 Jigsaw Sports Pty Ltd ABN 82 135 455 613 page 119
Key Teaching Points:
Stress that the wrapper creates the “3rd person” that they had in the 3 on 2
Person 2 must draw the defender to create the gap for the person doing the wrapping
Body
(10 minutes)
Activity 5 – Full Game
Play full game of Oztag with 8 v 8
Field size for juniors = 40m x 25m
Ensure subbing of players if frequent to involve all players
Key Teaching Points:
As the game is progressing explain basic rules as needed e.g. kick off, knock on, 6 tags = changeover, no contact, no jumping, forward pass
Defence cannot move forward until the 1st receiver has the ball
Ensure attacking player moves forward and does not run backwards
Belts
Tags
Balls
Markers
Whistle
Conclusion
(2 minutes)
Activity 6 – Revise Key Points
Once students roll up their belts have them sitting as a group ask students to call out answers two the following questions:
o How do you draws and pass?
o How do you execute a wrap?
o What are the kicking rules for Oztag?
o What are the contact rules of Oztag?
PRIMARY UNIT PLAN
©2010-2016 Jigsaw Sports Pty Ltd ABN 82 135 455 613 page 120
Year 5 - Lesson Plan 5
Focus Areas: Expansion and refining of game skills and rules, and assessment:
Basic Oztag rules
Defensive skills – wrap
Learning Outcomes: At the completion of this lesson students will be able to:
Apply Oztag skills in a game situation
Explain basic rules used in a game of Oztag
Successfully defend against a wrap in a game situation
Duration: 30 minutes
Section Activity Resources
Introduction
(5 minutes)
Activity 1 – Wrap Defence
Review how to execute a wrap (as covered in previous lesson) – ask students to demonstrate
Now going to show how to defend against it
Defender 1 sees that attacker 1 has passed the ball to attacker 2 and began to wrap.
Defender 1 then yells at defender to “push”, defender 1 then moves sideways to attacker 2 and defender 2 moves to the gap that attacker 1 will move into
Split class into 2
Have students practice in a grid 8m x 7m
Key Teaching Points:
Must communicate
The defence call for the defenders to slide sideways – but must move forward at the defence first
Tags
Belts
Balls
Markers
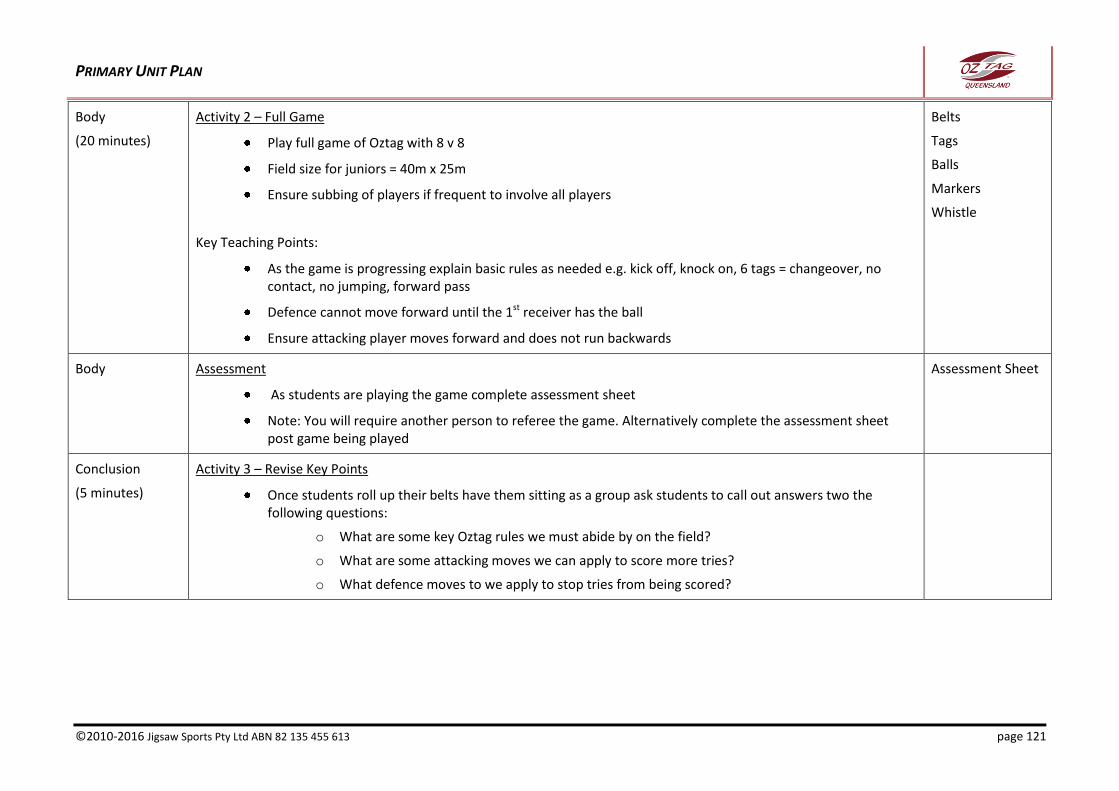
PRIMARY UNIT PLAN
©2010-2016 Jigsaw Sports Pty Ltd ABN 82 135 455 613 page 121
Body
(20 minutes)
Activity 2 – Full Game
Play full game of Oztag with 8 v 8
Field size for juniors = 40m x 25m
Ensure subbing of players if frequent to involve all players
Key Teaching Points:
As the game is progressing explain basic rules as needed e.g. kick off, knock on, 6 tags = changeover, no contact, no jumping, forward pass
Defence cannot move forward until the 1st receiver has the ball
Ensure attacking player moves forward and does not run backwards
Belts
Tags
Balls
Markers
Whistle
Body
Assessment
As students are playing the game complete assessment sheet
Note: You will require another person to referee the game. Alternatively complete the assessment sheet post game being played
Assessment Sheet
Conclusion
(5 minutes)
Activity 3 – Revise Key Points
Once students roll up their belts have them sitting as a group ask students to call out answers two the following questions:
o What are some key Oztag rules we must abide by on the field?
o What are some attacking moves we can apply to score more tries?
o What defence moves to we apply to stop tries from being scored?
PRIMARY UNIT PLAN
©2010-2016 Jigsaw Sports Pty Ltd ABN 82 135 455 613 page 122
Year 6 Lesson Plans
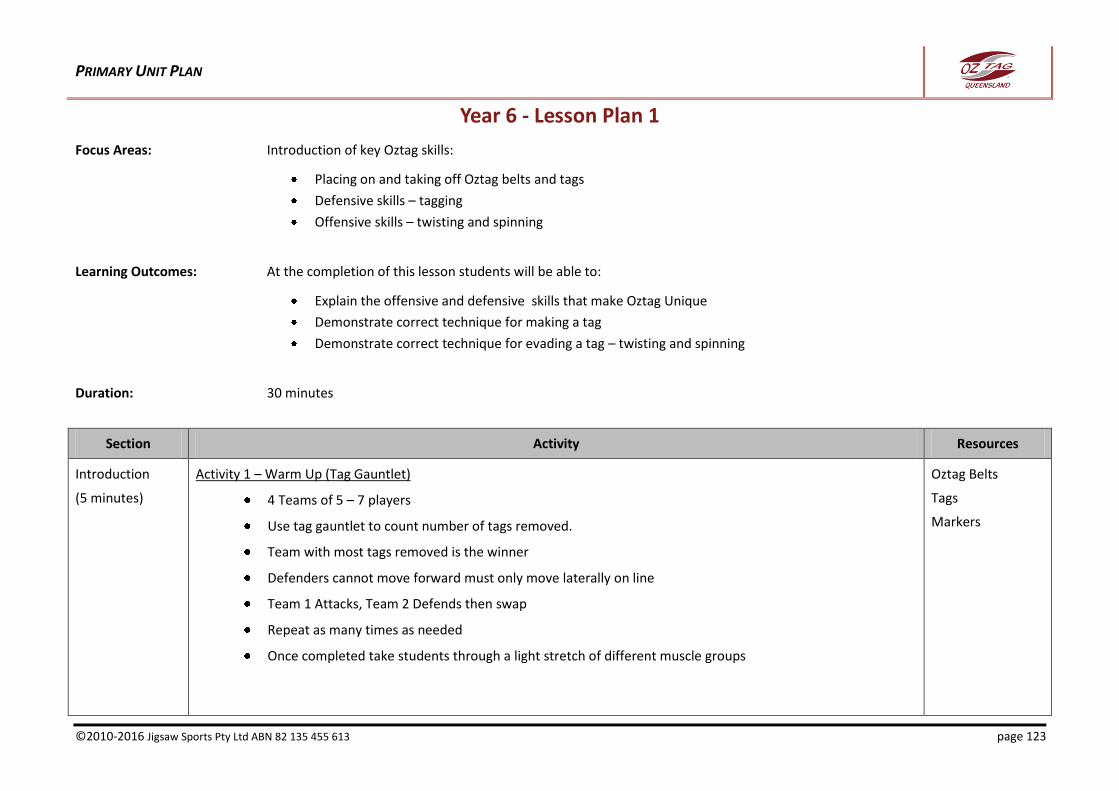
PRIMARY UNIT PLAN
©2010-2016 Jigsaw Sports Pty Ltd ABN 82 135 455 613 page 123
Year 6 - Lesson Plan 1
Focus Areas: Introduction of key Oztag skills:
Placing on and taking off Oztag belts and tags
Defensive skills – tagging
Offensive skills – twisting and spinning
Learning Outcomes: At the completion of this lesson students will be able to:
Explain the offensive and defensive skills that make Oztag Unique
Demonstrate correct technique for making a tag
Demonstrate correct technique for evading a tag – twisting and spinning
Duration: 30 minutes
Section Activity Resources
Introduction
(5 minutes)
Activity 1 – Warm Up (Tag Gauntlet)
4 Teams of 5 – 7 players
Use tag gauntlet to count number of tags removed.
Team with most tags removed is the winner
Defenders cannot move forward must only move laterally on line
Team 1 Attacks, Team 2 Defends then swap
Repeat as many times as needed
Once completed take students through a light stretch of different muscle groups
Oztag Belts
Tags
Markers

PRIMARY UNIT PLAN
©2010-2016 Jigsaw Sports Pty Ltd ABN 82 135 455 613 page 124
Key Teaching Points:
Correct tagging technique:
o use both hands when tagging
o step forward when making tag
o use palms
Correct tagging evasion technique:
o Time hip movements to react to defenders attempts at tagging
o Use movement at the line, not before the line
o Correct technique for twisting - move hips away from attackers attempts e.g. if defenders is attempting to tag the right tag, then the attackers should move that hip away from the defender
o Correct technique for spinning – plant foot and look over opposite shoulder to tag the right tag, then the attackers should move that hip away from the defender
Body
(2 minutes)
Activity 2 – Putting on a Belt and Tags
Have students sitting as a group
Explain how to put on a belt and tags and demonstrate
Have students place on their own belts (assistance will be required)
Allocate students into two different groups (reflective of the two different colour tags). As you call out a colour have that student go and put on that colour tags
Oztag Belts
Tags
A A A A A B B B
B B
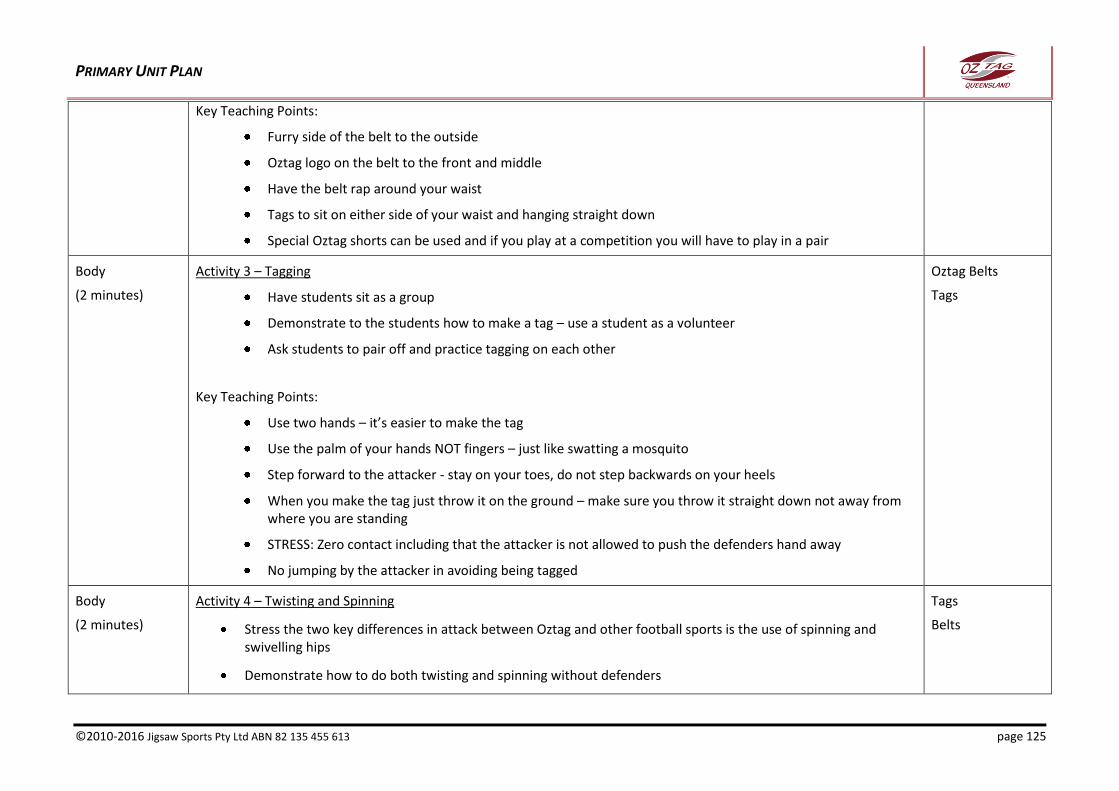
PRIMARY UNIT PLAN
©2010-2016 Jigsaw Sports Pty Ltd ABN 82 135 455 613 page 125
Key Teaching Points:
Furry side of the belt to the outside
Oztag logo on the belt to the front and middle
Have the belt rap around your waist
Tags to sit on either side of your waist and hanging straight down
Special Oztag shorts can be used and if you play at a competition you will have to play in a pair
Body
(2 minutes)
Activity 3 – Tagging
Have students sit as a group
Demonstrate to the students how to make a tag – use a student as a volunteer
Ask students to pair off and practice tagging on each other
Key Teaching Points:
Use two hands – it’s easier to make the tag
Use the palm of your hands NOT fingers – just like swatting a mosquito
Step forward to the attacker - stay on your toes, do not step backwards on your heels
When you make the tag just throw it on the ground – make sure you throw it straight down not away from where you are standing
STRESS: Zero contact including that the attacker is not allowed to push the defenders hand away
No jumping by the attacker in avoiding being tagged
Oztag Belts
Tags
Body
(2 minutes)
Activity 4 – Twisting and Spinning
Stress the two key differences in attack between Oztag and other football sports is the use of spinning and swivelling hips
Demonstrate how to do both twisting and spinning without defenders
Tags
Belts
PRIMARY UNIT PLAN
©2010-2016 Jigsaw Sports Pty Ltd ABN 82 135 455 613 page 126
Demonstrate with students as defenders – use 2 students creating a channel approx 1m wide
Have students practice each skill
Key Teaching Points:
Ensure key teaching points for spinning:
Spinning of left foot:
o Plant left foot inside shoulder of the right hand side defender
o Look over right shoulder and spin
o Be sure not to raise elbows so not to collide with defenders
o Be sure not to jump
o Do not spin too early
Spinning of right foot: As above but opposite
Ensure key teaching points for swivel hips:
o You want to try and get your hips perpendicular to the defenders as you cross the line of defence
o Move hips away from attackers attempts e.g. if defenders is attempting to tag the right tag, then the attackers should move that hip away from the defender
o Easiest method is to slightly lift the front foot as moving forward through the line of defence
o Try to do this at speed
o Be sure not to jump
o Think of doing the twist (rock and roll dancing)
o Do not do the twist too early.
Body
(7 minutes)
Activity 5 – Oztag Core Drill 3
Set up two grids 7m long x 5m wide – one grid for each team
At one end of the grid set up a marker 1 m in from either end – each of the 2 markers a different colour
Tags
Belts
Markers
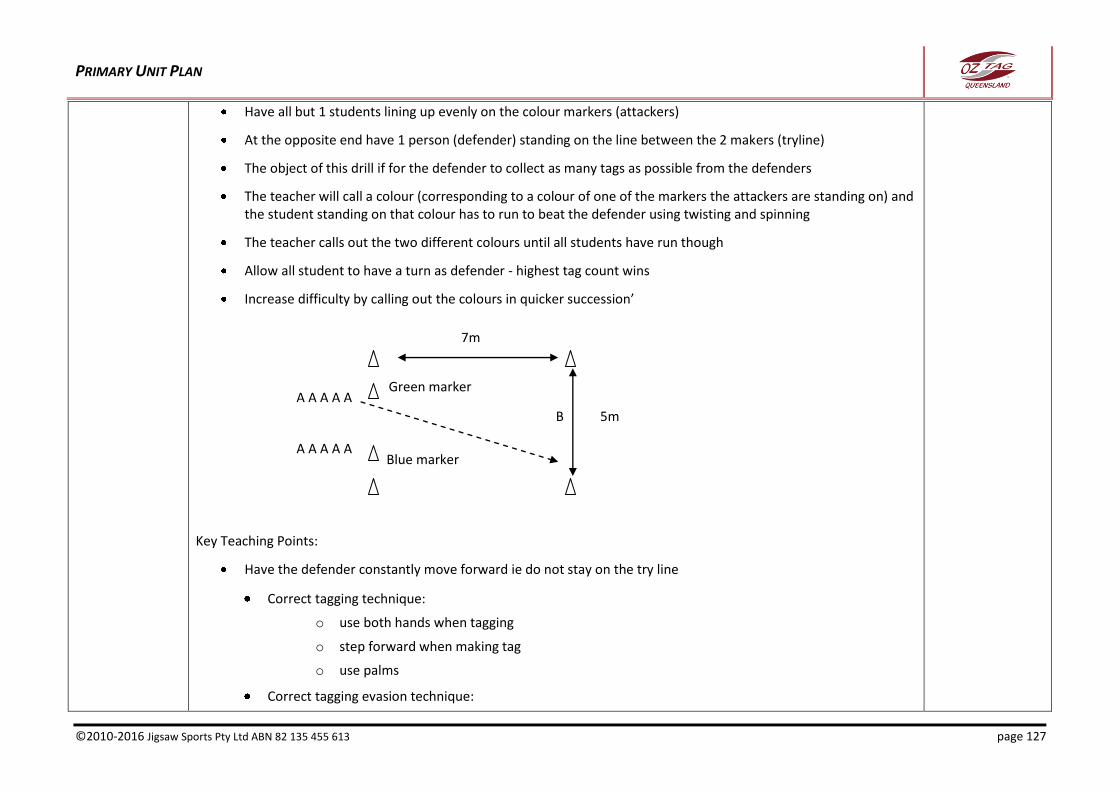
PRIMARY UNIT PLAN
©2010-2016 Jigsaw Sports Pty Ltd ABN 82 135 455 613 page 127
Have all but 1 students lining up evenly on the colour markers (attackers)
At the opposite end have 1 person (defender) standing on the line between the 2 makers (tryline)
The object of this drill if for the defender to collect as many tags as possible from the defenders
The teacher will call a colour (corresponding to a colour of one of the markers the attackers are standing on) and the student standing on that colour has to run to beat the defender using twisting and spinning
The teacher calls out the two different colours until all students have run though
Allow all student to have a turn as defender - highest tag count wins
Increase difficulty by calling out the colours in quicker succession’
Key Teaching Points:
Have the defender constantly move forward ie do not stay on the try line
Correct tagging technique:
o use both hands when tagging
o step forward when making tag
o use palms
Correct tagging evasion technique:
A A A A A
B
A A A A A
Green marker
Blue marker
7m
5m
PRIMARY UNIT PLAN
©2010-2016 Jigsaw Sports Pty Ltd ABN 82 135 455 613 page 128
o Time hip movements to react to defenders attempts at tagging
o Use movement at the line, not before the line
o Correct technique for twisting - move hips away from attackers attempts e.g. if defenders is attempting to tag the right tag, then the attackers should move that hip away from the defender
o Correct technique for spinning – plant foot and look over opposite shoulder to tag the right tag, then the attackers should move that hip away from the defender
Body
(8 minutes)
Activity 6 – Modified Game (Money Ball)
Four teams are positioned in two 30m by 20m grids.
Each team has a score a try by placing the money ball over the opposition’s try line.
The money ball starts in the centre of the field and the two teams at either end of the field
On the whistle 1 person from each team must run to collect the money ball
There is no offside and forward passes are allowed to be thrown.
Once a player is tagged with the ball they are out of play and the ball is given to the opposition.
All players are allowed to move freely even when in possession of the ball
Once the ball is dropped or an interception occurs then there is a changeover.
No kicking is allowed
Once a team has scored all players come back on to the field
Variation – make passes only able to go backwards
Key Teaching Points:
Correct tagging technique:
o use both hands when tagging
o step forward when making tag
o use palms
Balls
Tags
Belts
Markers
Whistle

PRIMARY UNIT PLAN
©2010-2016 Jigsaw Sports Pty Ltd ABN 82 135 455 613 page 129
Correct tagging evasion technique:
o Time hip movements to react to defenders attempts at tagging
o Use movement at the line, not before the line
o Correct technique for twisting - move hips away from attackers attempts e.g. if defenders is attempting to tag the right tag, then the attackers should move that hip away from the defender
o Correct technique for spinning – plant foot and look over opposite shoulder to tag the right tag, then the attackers should move that hip away from the defender
Attacking players moving to gaps to allow the ball carrier options to pass the ball
Communication amongst players in attack and defence
Conclusion
(1 minute)
Activity 7 – Packing up equipment
Demonstrate to students how to roll up belts
Ask student to roll up belts and place tags into the two different colour piles
Key Teaching Points:
Start rolling up belt with Furry side to the outside, and at the non-logo end of the belt
Belts
Tags
Conclusion
(1 minute)
Activity 8 – Revise Key Points
Sitting as a group ask students to call out answers two the following questions:
o Where do we wear the belt on our body?
o Where do the tags sit on your belt?
o How should a tag be made?
o What two things can be down to avoid being tagged?
o How do you best execute the twist and spin?
PRIMARY UNIT PLAN
©2010-2016 Jigsaw Sports Pty Ltd ABN 82 135 455 613 page 130
Year 6 - Lesson Plan 2
Focus Areas: Revising, refining and expansion of key Oztag skills:
Offensive skills – draw and pass
Offensive skills – decision making in attack
Learning Outcomes: At the completion of this lesson students will be able to:
Use the draw and pass in a game situation
Successfully apply decision making skills in attack in a modified game
Duration: 30 minutes
Section Activity Resources
Introduction
(5 minutes)
Activity 1 – Warm Up (Square Passing Grid)
Set up a square grid 5m x 5m
Split students up evenly into 4 each group standing on a marker
Have all students wearing belts and tags
Player A runs with the ball towards player B
Player B starts running towards player C
Player A passes the ball to player B who receives the ball 1/3 way along the path
Player B runs with the caught ball and passes to player C who receives the ball 1/3 way along path etc
Once the ball has been passed player A joins the end of the line of which player B was stationed
Continue as needed
Change directions
Introduce a 2nd ball
Balls
Markers
Belts
Tags
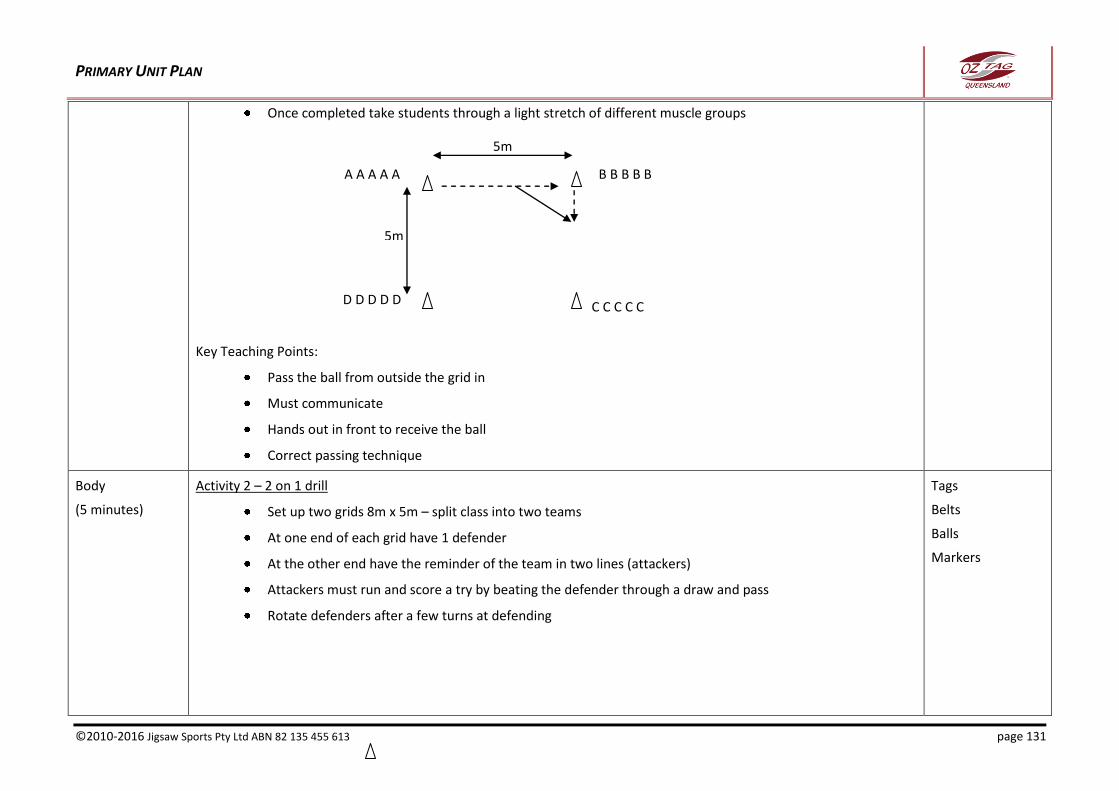
PRIMARY UNIT PLAN
©2010-2016 Jigsaw Sports Pty Ltd ABN 82 135 455 613 page 131
Once completed take students through a light stretch of different muscle groups
Key Teaching Points:
Pass the ball from outside the grid in
Must communicate
Hands out in front to receive the ball
Correct passing technique
Body
(5 minutes)
Activity 2 – 2 on 1 drill
Set up two grids 8m x 5m – split class into two teams
At one end of each grid have 1 defender
At the other end have the reminder of the team in two lines (attackers)
Attackers must run and score a try by beating the defender through a draw and pass
Rotate defenders after a few turns at defending
Tags
Belts
Balls
Markers
A A A A A
D D D D D
5m
5m
B B B B B
C C C C C

PRIMARY UNIT PLAN
©2010-2016 Jigsaw Sports Pty Ltd ABN 82 135 455 613 page 132
Key Teaching Points:
Ball Handling – two hand on ball, thumbs on tops, fingers wrapped underneath, and ball out in front
Correct tagging technique:
o use both hands when tagging
o step forward when making tag
o use palms
Correct tagging evasion technique:
o Time hip movements to react to defenders attempts at tagging
o Use movement at the line, not before the line
o Correct technique for twisting - move hips away from attackers attempts e.g. if defenders is attempting to tag the right tag, then the attackers should move that hip away from the defender
o Correct technique for spinning – plant foot and look over opposite shoulder to tag the right tag, then the attackers should move that hip away from the defender
Correct draw and pass technique:
o Do no pass ball too early or late
o Only pass if the defender comes to the ball carrier – do not force the pass
o Pass the ball off the back foot and rotating the shoulders towards the receiver
o Receiver to stay wide of the defender
8m
A A A A A
A A A A A
B 5m
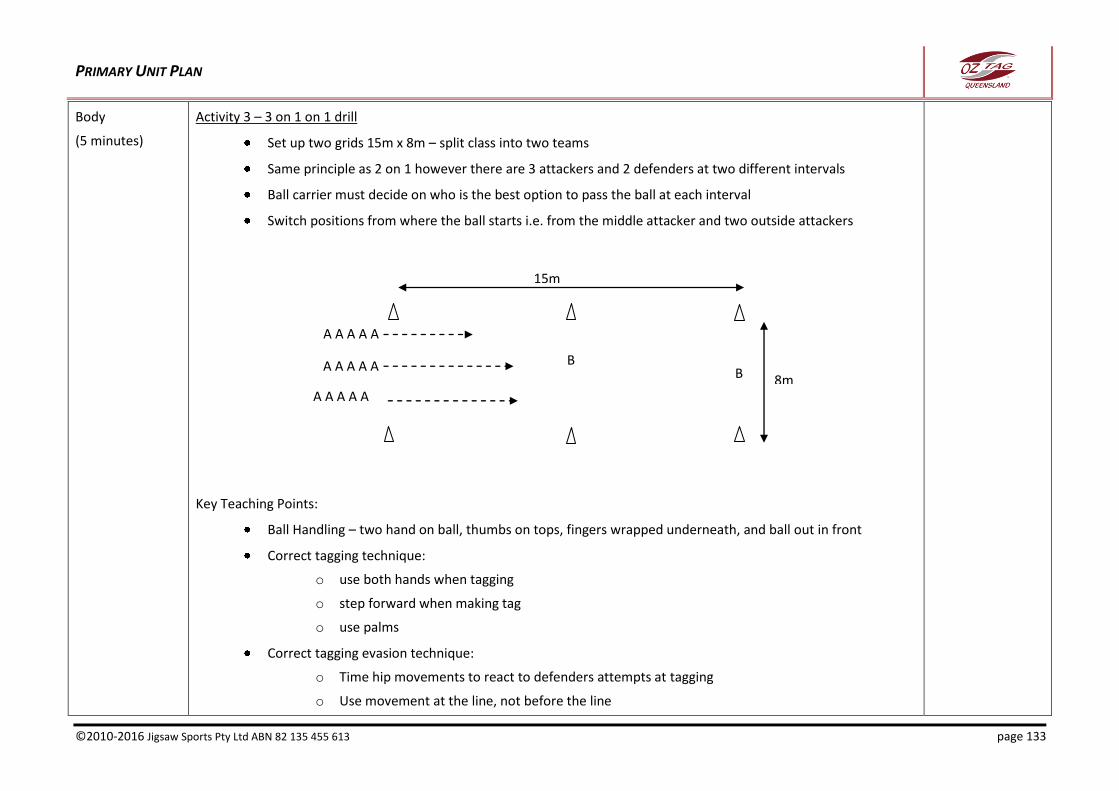
PRIMARY UNIT PLAN
©2010-2016 Jigsaw Sports Pty Ltd ABN 82 135 455 613 page 133
Body
(5 minutes)
Activity 3 – 3 on 1 on 1 drill
Set up two grids 15m x 8m – split class into two teams
Same principle as 2 on 1 however there are 3 attackers and 2 defenders at two different intervals
Ball carrier must decide on who is the best option to pass the ball at each interval
Switch positions from where the ball starts i.e. from the middle attacker and two outside attackers
Key Teaching Points:
Ball Handling – two hand on ball, thumbs on tops, fingers wrapped underneath, and ball out in front
Correct tagging technique:
o use both hands when tagging
o step forward when making tag
o use palms
Correct tagging evasion technique:
o Time hip movements to react to defenders attempts at tagging
o Use movement at the line, not before the line
A A A A A
A A A A A B
8m
15m
B
A A A A A
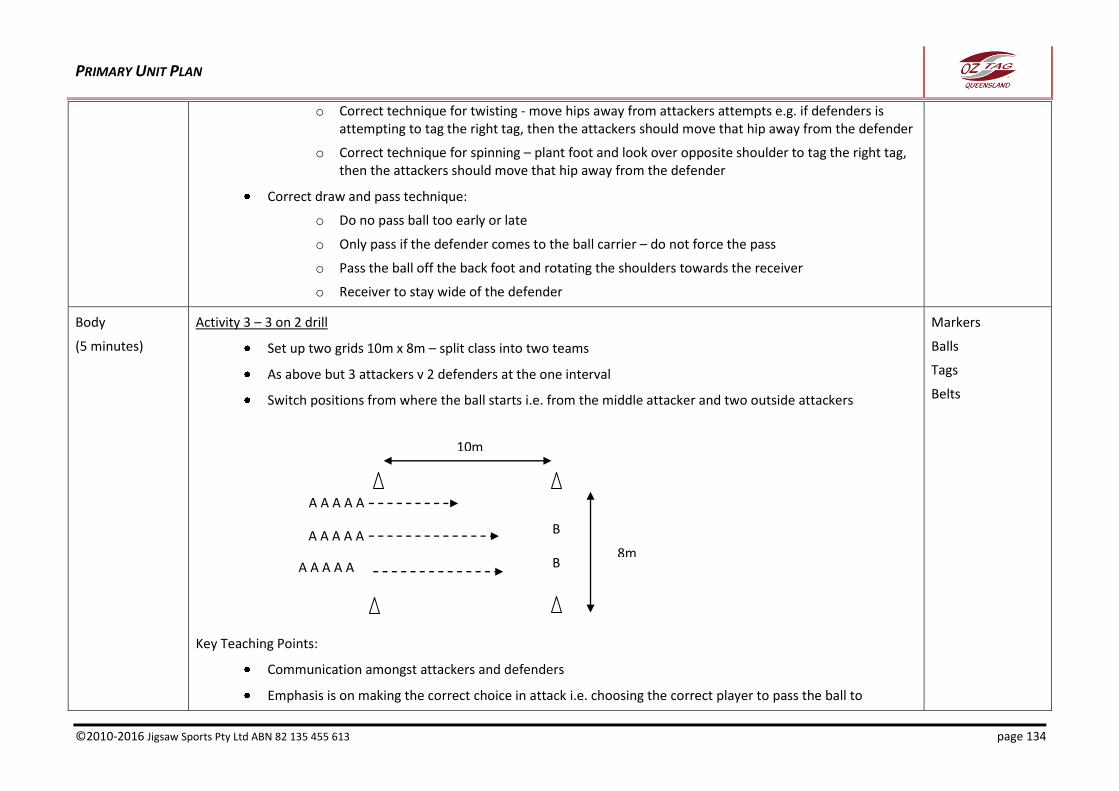
PRIMARY UNIT PLAN
©2010-2016 Jigsaw Sports Pty Ltd ABN 82 135 455 613 page 134
o Correct technique for twisting - move hips away from attackers attempts e.g. if defenders is attempting to tag the right tag, then the attackers should move that hip away from the defender
o Correct technique for spinning – plant foot and look over opposite shoulder to tag the right tag, then the attackers should move that hip away from the defender
Correct draw and pass technique:
o Do no pass ball too early or late
o Only pass if the defender comes to the ball carrier – do not force the pass
o Pass the ball off the back foot and rotating the shoulders towards the receiver
o Receiver to stay wide of the defender
Body
(5 minutes)
Activity 3 – 3 on 2 drill
Set up two grids 10m x 8m – split class into two teams
As above but 3 attackers v 2 defenders at the one interval
Switch positions from where the ball starts i.e. from the middle attacker and two outside attackers
Key Teaching Points:
Communication amongst attackers and defenders
Emphasis is on making the correct choice in attack i.e. choosing the correct player to pass the ball to
Markers
Balls
Tags
Belts
A A A A A
A A A A A B
8m
10m
B A A A A A
PRIMARY UNIT PLAN
©2010-2016 Jigsaw Sports Pty Ltd ABN 82 135 455 613 page 135
Body
(8 minutes)
Activity 5 – Modified Game (5v5)
Set up 2 fields 15m x 25m
Split the two teams into two again (total of 4 teams)
Play two games of 5 v 5
Key Teaching Points:
As the game is progressing explain basic rules as needed e.g. kick off, knock on, 6 tags = changeover, no contact, no jumping, forward pass
Ensure draw and pass is used
Defence cannot move forward until the 1st receiver has the ball
Ensure attacking player moves forward and does not run backwards
Belts
Tags
Balls
Markers
Whistle
Conclusion
(2 minutes)
Activity 6 – Revise Key Points
Once students roll up their belts have them sitting as a group ask students to call out answers two the following questions:
o What things do you need to do when drawing and passing in attack?
o How should you pass the ball?
o Why is communication so important? Who needs to communicate...attackers or defenders?
o What’s the best way to make a tag?
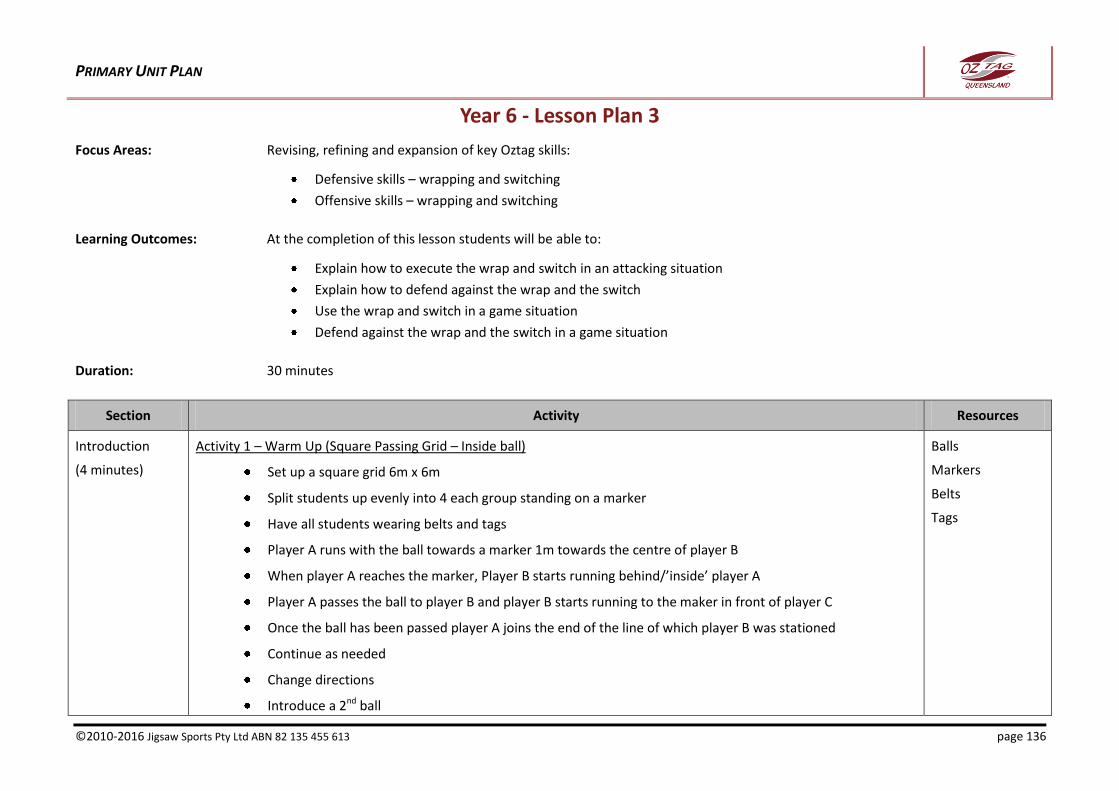
PRIMARY UNIT PLAN
©2010-2016 Jigsaw Sports Pty Ltd ABN 82 135 455 613 page 136
Year 6 - Lesson Plan 3
Focus Areas: Revising, refining and expansion of key Oztag skills:
Defensive skills – wrapping and switching
Offensive skills – wrapping and switching
Learning Outcomes: At the completion of this lesson students will be able to:
Explain how to execute the wrap and switch in an attacking situation
Explain how to defend against the wrap and the switch
Use the wrap and switch in a game situation
Defend against the wrap and the switch in a game situation
Duration: 30 minutes
Section Activity Resources
Introduction
(4 minutes)
Activity 1 – Warm Up (Square Passing Grid – Inside ball)
Set up a square grid 6m x 6m
Split students up evenly into 4 each group standing on a marker
Have all students wearing belts and tags
Player A runs with the ball towards a marker 1m towards the centre of player B
When player A reaches the marker, Player B starts running behind/’inside’ player A
Player A passes the ball to player B and player B starts running to the maker in front of player C
Once the ball has been passed player A joins the end of the line of which player B was stationed
Continue as needed
Change directions
Introduce a 2nd ball
Balls
Markers
Belts
Tags

PRIMARY UNIT PLAN
©2010-2016 Jigsaw Sports Pty Ltd ABN 82 135 455 613 page 137
Once completed take students through a light stretch of different muscle groups
Key Teaching Points:
Turn towards the person you are passing the ball to i.e do not pass the ball ‘blind’
Must communicate
Hands out in front to receive the ball
This is the principle of a switch which we will be going over in today’s lesson
Body
(4 minutes)
Activity 2 – Wrapping
Explain principle of the ‘wrap’:
o Person 1 passes the ball to person 2
o Person 1 then runs behind person 2
o Person 2 pass the ball to person 1 – ensure that they create a gap by drawing the defender
Demonstrate to the class
Have students practice in the grid set up above – use 2 attackers and 2 defenders
Belts
Tags
Balls
Markers
A A A A A
D D D D D
6m
6m
B B B B B
C C C C C
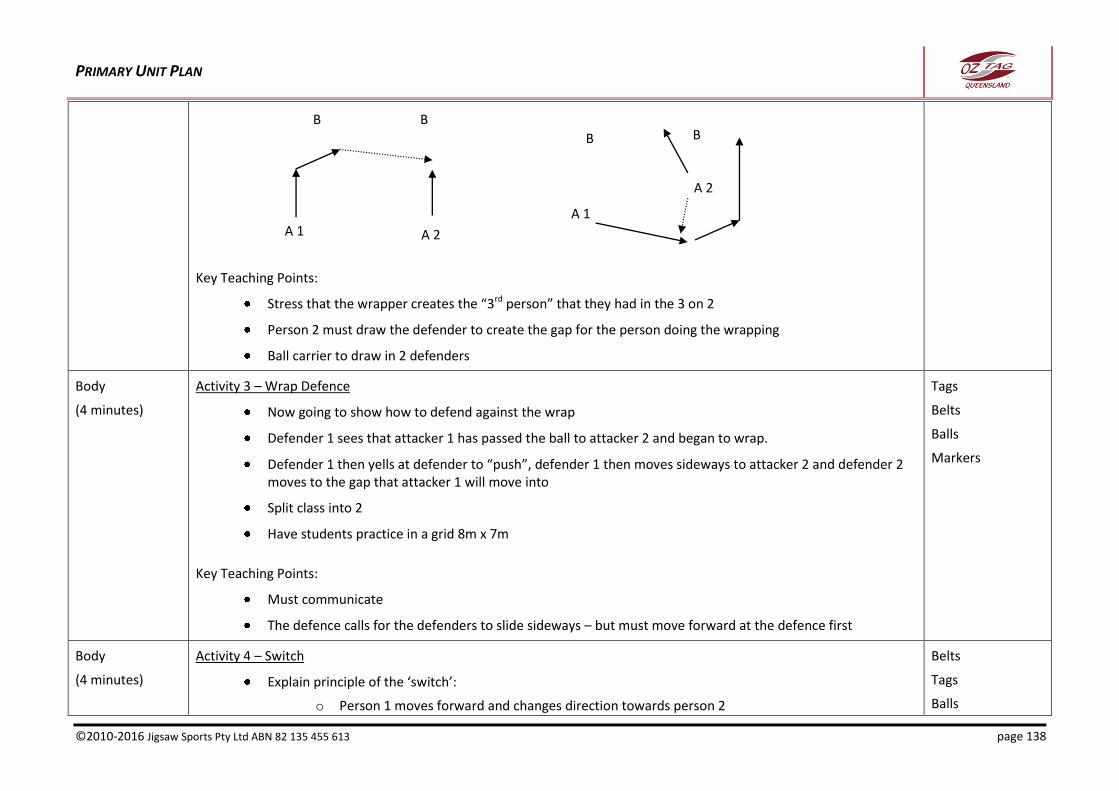
PRIMARY UNIT PLAN
©2010-2016 Jigsaw Sports Pty Ltd ABN 82 135 455 613 page 138
Key Teaching Points:
Stress that the wrapper creates the “3rd person” that they had in the 3 on 2
Person 2 must draw the defender to create the gap for the person doing the wrapping
Ball carrier to draw in 2 defenders
Body
(4 minutes)
Activity 3 – Wrap Defence
Now going to show how to defend against the wrap
Defender 1 sees that attacker 1 has passed the ball to attacker 2 and began to wrap.
Defender 1 then yells at defender to “push”, defender 1 then moves sideways to attacker 2 and defender 2 moves to the gap that attacker 1 will move into
Split class into 2
Have students practice in a grid 8m x 7m
Key Teaching Points:
Must communicate
The defence calls for the defenders to slide sideways – but must move forward at the defence first
Tags
Belts
Balls
Markers
Body
(4 minutes)
Activity 4 – Switch
Explain principle of the ‘switch’:
o Person 1 moves forward and changes direction towards person 2
Belts
Tags
Balls
B B
A 1 A 2
A 1
A 2
B B
PRIMARY UNIT PLAN
©2010-2016 Jigsaw Sports Pty Ltd ABN 82 135 455 613 page 139
o Person 2 moves forward and changes direction towards person 1
o Person 2 runs underneath person 1 – creating an ‘X’
o Person 1 pass the ball to person 2 – ensure that they create a gap by drawing the defender
Demonstrate to the class
Have students practice in the grid set up above – use 2 attackers and 2 defenders
Key Teaching Points:
Stress that the wrapper creates the “3rd person” that they had in the 3 on 2
Person 2 must draw the defender to create the gap for the person doing the wrapping
Ball carrier to draw in 2 defenders
Markers
Body
(4 minutes)
Activity 5 – Switch Defence
Now going to show how to defend against the switch
Defender 2 sees that attacker 2 is going to switch.
Defender 2 then yells at defender 1 to “push – you got the switch”, defender 1 then moves sideways to moves to the gap that attacker 2 will move into, and defender 2 slides to now defend against attacker 1
Split class into 2
Have students practice in a grid 8m x 7m
Tags
Belts
Balls
Markers
B 2 B 1
A 1
A 2
PRIMARY UNIT PLAN
©2010-2016 Jigsaw Sports Pty Ltd ABN 82 135 455 613 page 140
Key Teaching Points:
Must communicate
The defence calls for the defenders to slide sideways – but must move forward at the defence first
Body
(8 minutes)
Activity 6 – Modified Game (5v5)
Set up 2 fields 15m x 25m
Split the two teams into two again (total of 4 teams)
Play two games of 5 v 5
Key Teaching Points:
As the game is progressing explain basic rules as needed e.g. kick off, knock on, 6 tags = changeover, no contact, no jumping, forward pass
Ensure draw and pass is used
Defence cannot move forward until the 1st receiver has the ball
Ensure attacking player moves forward and does not run backwards
Belts
Tags
Balls
Markers
Whistle
Conclusion
(2 minutes)
Activity 6 – Revise Key Points
Once students roll up their belts have them sitting as a group ask students to call out answers two the following questions:
o How do you execute and wrap?
o How do you defend against a wrap?
o How do you execute and switch?
o How do you defend against a switch?
o Why is communication so important? Who needs to communicate...attackers or defenders?
PRIMARY UNIT PLAN
©2010-2016 Jigsaw Sports Pty Ltd ABN 82 135 455 613 page 141
Year 6 - Lesson Plan 4
Focus Areas: Introduction of game skills and rules:
Defensive skills – wrapping and switching
Offensive skills – wrapping and switching
Offensive skills – decision making in attack
Learning Outcomes: At the completion of this lesson students will be able to:
Explain how to execute the wrap and spin in an attacking situation
Explain how to defend against the wrap and the switch
Use the wrap and switch in a game situation
Defend against the wrap and the switch in a game situation
Successfully apply decision making skills in attack in a modified game
Duration: 30 minutes
Section Activity Resources
Introduction
(5 minutes)
Activity 1 – Warm Up (Walk Tag)
Set out a field roughly 30m x 30m
Split class into 2 halves
Play a game of Oztag but walking only
Any person caught running will be penalised
Once completed take students through a light stretch of different muscle groups
Key Teaching Points:
Don’t be so strict on the Oztag rules – the idea is to get the student moving to warm up
Ensure that the quieter students receive the ball
Tags
Belts
Markers
Ball
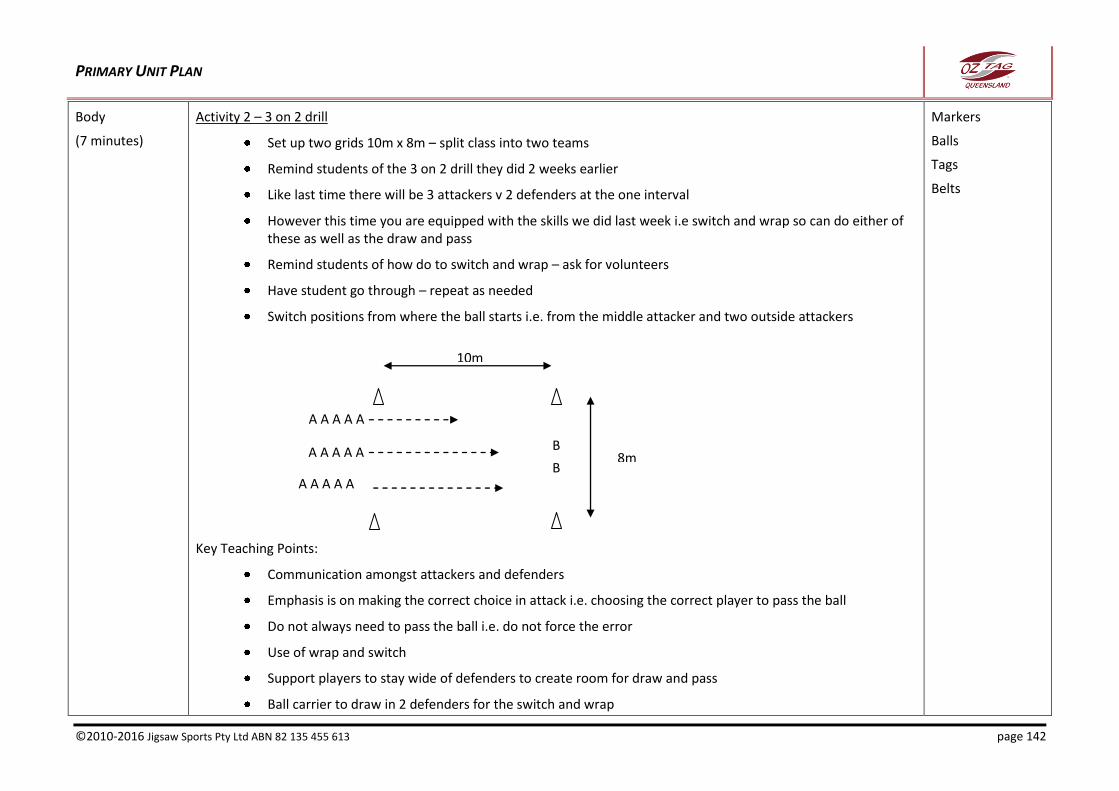
PRIMARY UNIT PLAN
©2010-2016 Jigsaw Sports Pty Ltd ABN 82 135 455 613 page 142
Body
(7 minutes)
Activity 2 – 3 on 2 drill
Set up two grids 10m x 8m – split class into two teams
Remind students of the 3 on 2 drill they did 2 weeks earlier
Like last time there will be 3 attackers v 2 defenders at the one interval
However this time you are equipped with the skills we did last week i.e switch and wrap so can do either of these as well as the draw and pass
Remind students of how do to switch and wrap – ask for volunteers
Have student go through – repeat as needed
Switch positions from where the ball starts i.e. from the middle attacker and two outside attackers
Key Teaching Points:
Communication amongst attackers and defenders
Emphasis is on making the correct choice in attack i.e. choosing the correct player to pass the ball
Do not always need to pass the ball i.e. do not force the error
Use of wrap and switch
Support players to stay wide of defenders to create room for draw and pass
Ball carrier to draw in 2 defenders for the switch and wrap
Markers
Balls
Tags
Belts
A A A A A
A A A A A B 8m
10m
B A A A A A
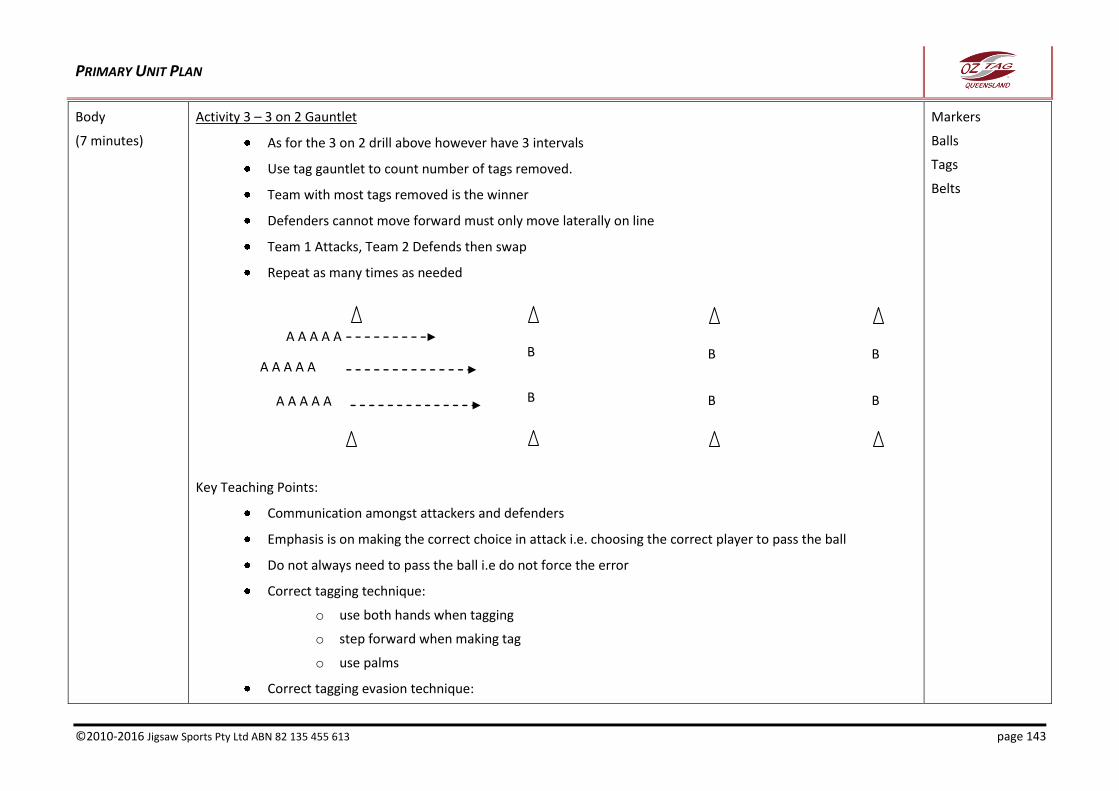
PRIMARY UNIT PLAN
©2010-2016 Jigsaw Sports Pty Ltd ABN 82 135 455 613 page 143
Body
(7 minutes)
Activity 3 – 3 on 2 Gauntlet
As for the 3 on 2 drill above however have 3 intervals
Use tag gauntlet to count number of tags removed.
Team with most tags removed is the winner
Defenders cannot move forward must only move laterally on line
Team 1 Attacks, Team 2 Defends then swap
Repeat as many times as needed
Key Teaching Points:
Communication amongst attackers and defenders
Emphasis is on making the correct choice in attack i.e. choosing the correct player to pass the ball
Do not always need to pass the ball i.e do not force the error
Correct tagging technique:
o use both hands when tagging
o step forward when making tag
o use palms
Correct tagging evasion technique:
Markers
Balls
Tags
Belts
A A A A A
A A A A A
A A A A A
B
B
B
B
B
B
PRIMARY UNIT PLAN
©2010-2016 Jigsaw Sports Pty Ltd ABN 82 135 455 613 page 144
o Time hip movements to react to defenders attempts at tagging
o Use movement at the line, not before the line
o Correct technique for twisting - move hips away from attackers attempts e.g. if defenders is attempting to tag the right tag, then the attackers should move that hip away from the defender
o Correct technique for spinning – plant foot and look over opposite shoulder to tag the right tag, then the attackers should move that hip away from the defender
Body
(9 minutes)
Activity 4 – Full Game
Play full game of Oztag with 8 v 8
Field size for juniors = 40m x 25m
Ensure subbing of players if frequent to involve all players
Key Teaching Points:
As the game is progressing explain basic rules as needed e.g. kick off, knock on, 6 tags = changeover, no contact, no jumping, forward pass
Defence cannot move forward until the 1st receiver has the ball
Ensure attacking player moves forward and does not run backwards
Use of attacking and defensive skills that have been practiced
Belts
Tags
Balls
Markers
Whistle
Conclusion
(2 minutes)
Activity 5 – Revise Key Points
Once students roll up their belts have them sitting as a group ask students to call out answers two the following questions:
o How do you execute and wrap?
o How do you defend against a wrap?
o How do you execute and switch?
o How do you defend against a switch?
o Why is communication so important? Who needs to communicate...attackers or defenders?
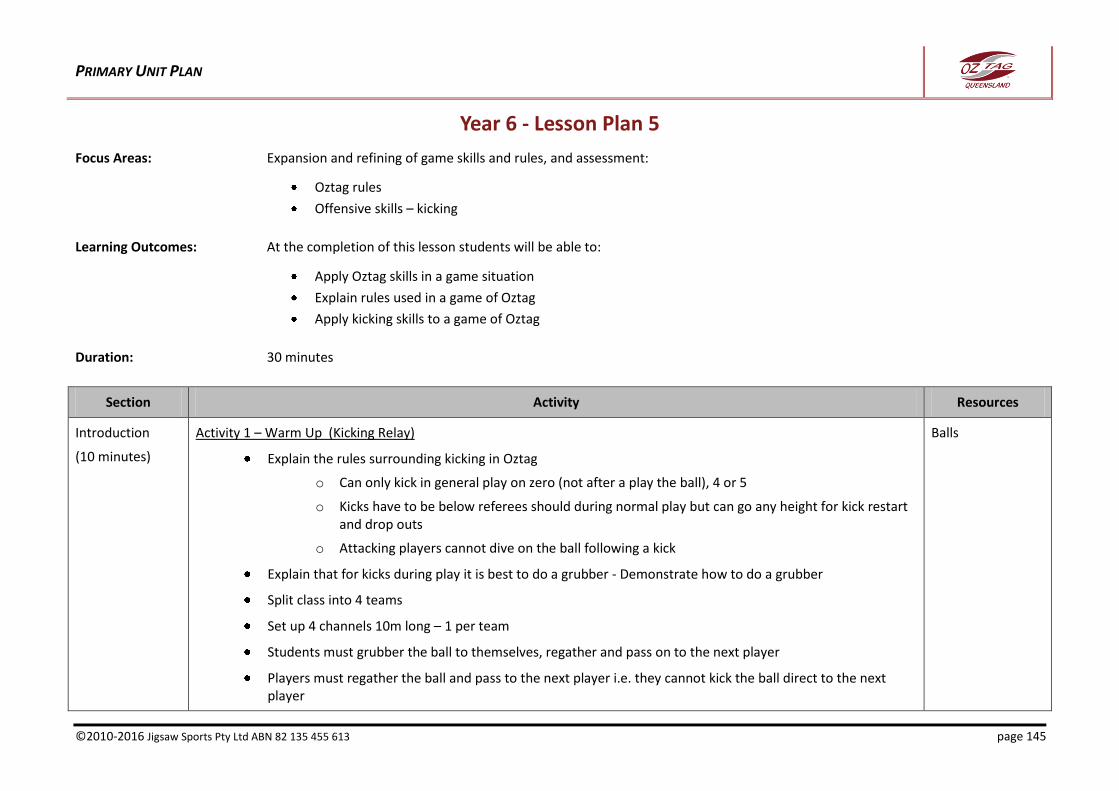
PRIMARY UNIT PLAN
©2010-2016 Jigsaw Sports Pty Ltd ABN 82 135 455 613 page 145
Year 6 - Lesson Plan 5
Focus Areas: Expansion and refining of game skills and rules, and assessment:
Oztag rules
Offensive skills – kicking
Learning Outcomes: At the completion of this lesson students will be able to:
Apply Oztag skills in a game situation
Explain rules used in a game of Oztag
Apply kicking skills to a game of Oztag
Duration: 30 minutes
Section Activity Resources
Introduction
(10 minutes)
Activity 1 – Warm Up (Kicking Relay)
Explain the rules surrounding kicking in Oztag
o Can only kick in general play on zero (not after a play the ball), 4 or 5
o Kicks have to be below referees should during normal play but can go any height for kick restart and drop outs
o Attacking players cannot dive on the ball following a kick
Explain that for kicks during play it is best to do a grubber - Demonstrate how to do a grubber
Split class into 4 teams
Set up 4 channels 10m long – 1 per team
Students must grubber the ball to themselves, regather and pass on to the next player
Players must regather the ball and pass to the next player i.e. they cannot kick the ball direct to the next player
Balls
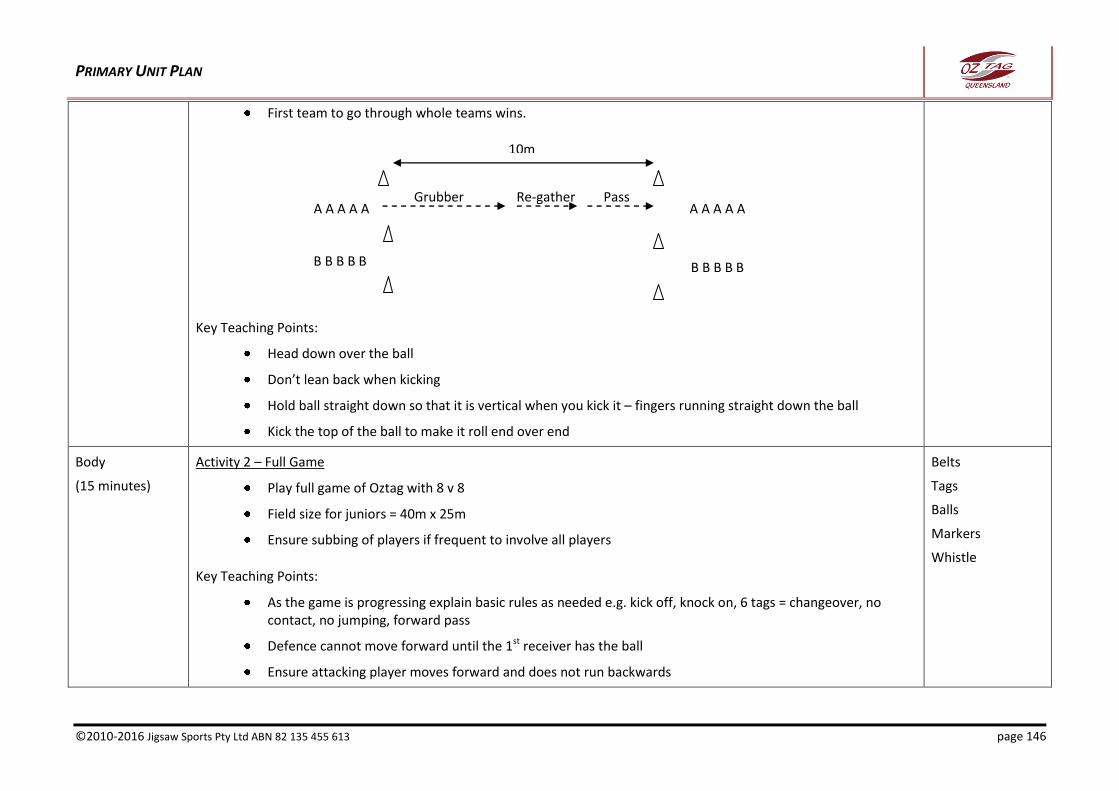
PRIMARY UNIT PLAN
©2010-2016 Jigsaw Sports Pty Ltd ABN 82 135 455 613 page 146
First team to go through whole teams wins.
Key Teaching Points:
Head down over the ball
Don’t lean back when kicking
Hold ball straight down so that it is vertical when you kick it – fingers running straight down the ball
Kick the top of the ball to make it roll end over end
Body
(15 minutes)
Activity 2 – Full Game
Play full game of Oztag with 8 v 8
Field size for juniors = 40m x 25m
Ensure subbing of players if frequent to involve all players
Key Teaching Points:
As the game is progressing explain basic rules as needed e.g. kick off, knock on, 6 tags = changeover, no contact, no jumping, forward pass
Defence cannot move forward until the 1st receiver has the ball
Ensure attacking player moves forward and does not run backwards
Belts
Tags
Balls
Markers
Whistle
A A A A A
B B B B B
A A A A A
10m
B B B B B
Grubber Re-gather Pass
PRIMARY UNIT PLAN
©2010-2016 Jigsaw Sports Pty Ltd ABN 82 135 455 613 page 147
Body
Assessment
As students are playing the game complete assessment sheet
Note: You will require another person to referee the game. Alternatively complete the assessment sheet post game being played
Assessment Sheet
Conclusion
(5 minutes)
Activity 3 – Revise Key Points
Once students roll up their belts have them sitting as a group ask students to call out answers two the following questions:
o What are some key Oztag rules we must abide by on the field?
o What are some attacking moves we can apply to score more tries?
o What defence moves to we apply to stop tries from being scored?
o What is the best way to kick during normal play in Oztag?
o What are the rules involved with kicking during normal play?
PRIMARY UNIT PLAN
©2010-2016 Jigsaw Sports Pty Ltd ABN 82 135 455 613 page 148
Advanced Lesson Plans
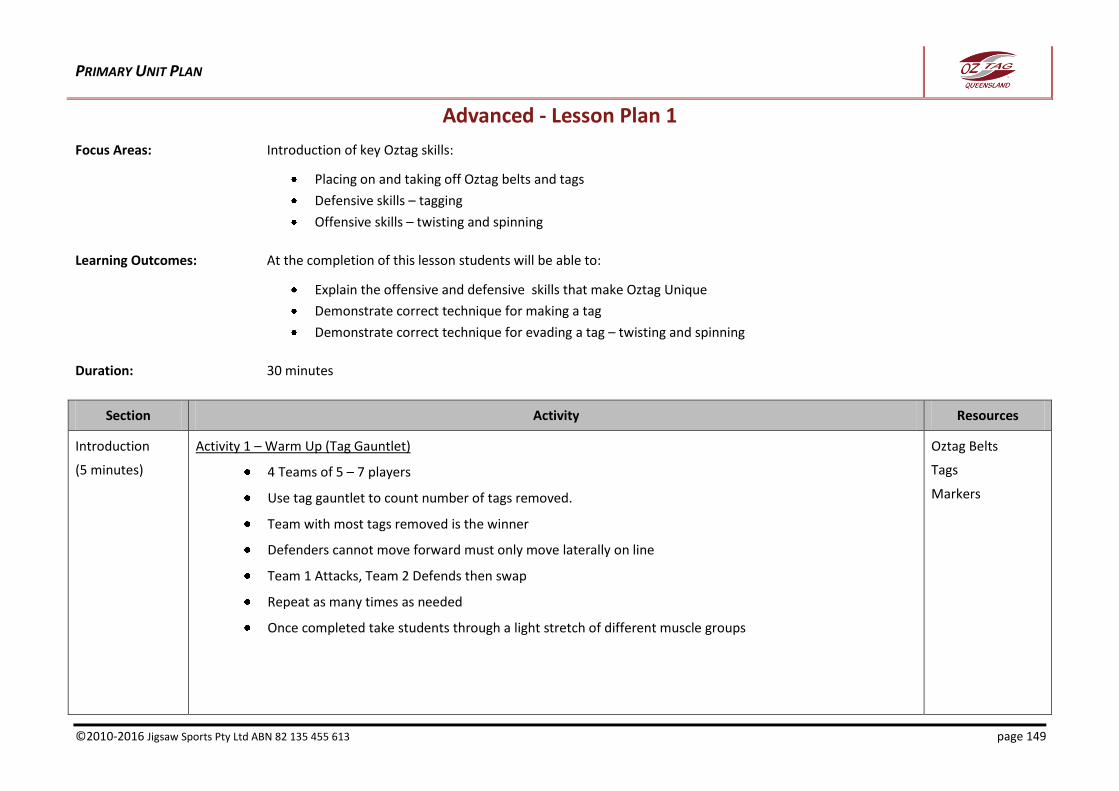
PRIMARY UNIT PLAN
©2010-2016 Jigsaw Sports Pty Ltd ABN 82 135 455 613 page 149
Advanced - Lesson Plan 1
Focus Areas: Introduction of key Oztag skills:
Placing on and taking off Oztag belts and tags
Defensive skills – tagging
Offensive skills – twisting and spinning
Learning Outcomes: At the completion of this lesson students will be able to:
Explain the offensive and defensive skills that make Oztag Unique
Demonstrate correct technique for making a tag
Demonstrate correct technique for evading a tag – twisting and spinning
Duration: 30 minutes
Section Activity Resources
Introduction
(5 minutes)
Activity 1 – Warm Up (Tag Gauntlet)
4 Teams of 5 – 7 players
Use tag gauntlet to count number of tags removed.
Team with most tags removed is the winner
Defenders cannot move forward must only move laterally on line
Team 1 Attacks, Team 2 Defends then swap
Repeat as many times as needed
Once completed take students through a light stretch of different muscle groups
Oztag Belts
Tags
Markers
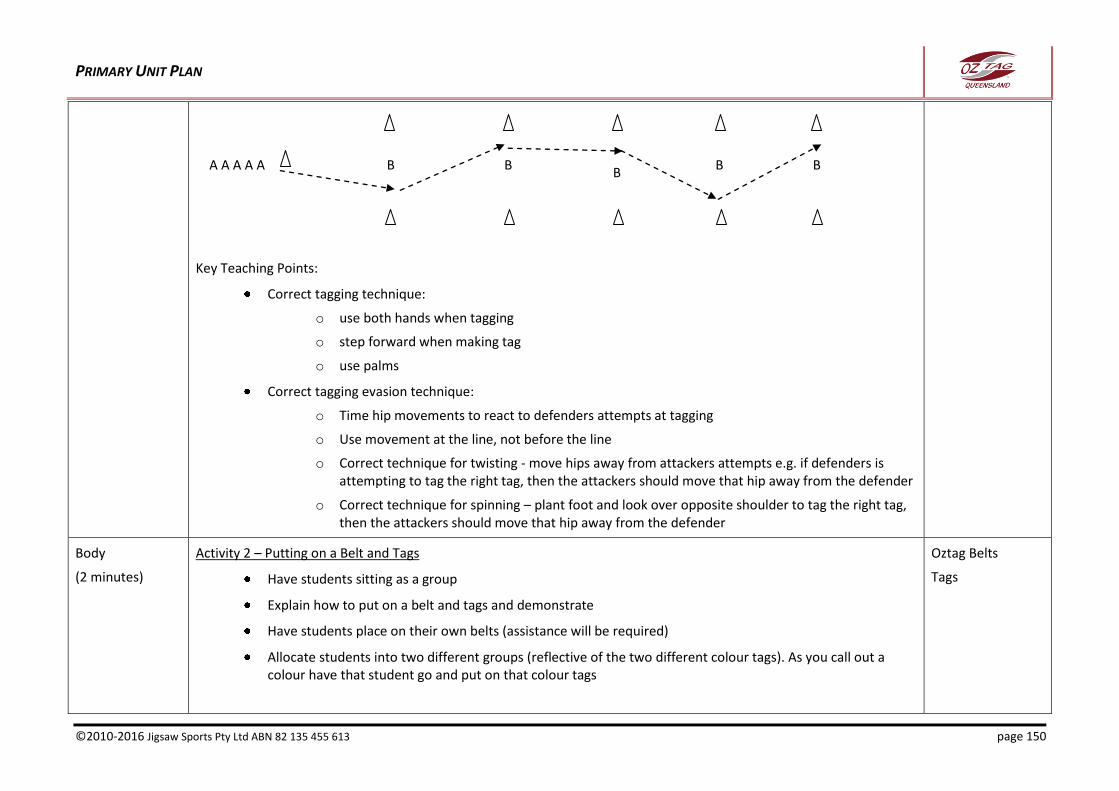
PRIMARY UNIT PLAN
©2010-2016 Jigsaw Sports Pty Ltd ABN 82 135 455 613 page 150
Key Teaching Points:
Correct tagging technique:
o use both hands when tagging
o step forward when making tag
o use palms
Correct tagging evasion technique:
o Time hip movements to react to defenders attempts at tagging
o Use movement at the line, not before the line
o Correct technique for twisting - move hips away from attackers attempts e.g. if defenders is attempting to tag the right tag, then the attackers should move that hip away from the defender
o Correct technique for spinning – plant foot and look over opposite shoulder to tag the right tag, then the attackers should move that hip away from the defender
Body
(2 minutes)
Activity 2 – Putting on a Belt and Tags
Have students sitting as a group
Explain how to put on a belt and tags and demonstrate
Have students place on their own belts (assistance will be required)
Allocate students into two different groups (reflective of the two different colour tags). As you call out a colour have that student go and put on that colour tags
Oztag Belts
Tags
A A A A A B B B
B B
PRIMARY UNIT PLAN
©2010-2016 Jigsaw Sports Pty Ltd ABN 82 135 455 613 page 151
Key Teaching Points:
Furry side of the belt to the outside
Oztag logo on the belt to the front and middle
Have the belt rap around your waist
Tags to sit on either side of your waist and hanging straight down
Special Oztag shorts can be used and if you play at a competition you will have to play in a pair
Body
(2 minutes)
Activity 3 – Tagging
Have students sit as a group
Demonstrate to the students how to make a tag – use a student as a volunteer
Ask students to pair off and practice tagging on each other
Key Teaching Points:
Use two hands – it’s easier to make the tag
Use the palm of your hands NOT fingers – just like swatting a mosquito
Step forward to the attacker - stay on your toes, do not step backwards on your heels
When you make the tag just throw it on the ground – make sure you throw it straight down not away from where you are standing
STRESS: Zero contact including that the attacker is not allowed to push the defenders hand away
No jumping by the attacker in avoiding being tagged
Oztag Belts
Tags
Body
(2 minutes)
Activity 4 – Twisting and Spinning
Stress the two key differences in attack between Oztag and other football sports is the use of spinning and swivelling hips
Demonstrate how to do both twisting and spinning without defenders
Demonstrate with students as defenders – use 2 students creating a channel approx 1m wide
Tags
Belts
PRIMARY UNIT PLAN
©2010-2016 Jigsaw Sports Pty Ltd ABN 82 135 455 613 page 152
Have students practice each skill
Key Teaching Points:
Ensure key teaching points for spinning:
Spinning of left foot:
o Plant left foot inside shoulder of the right hand side defender
o Look over right shoulder and spin
o Be sure not to raise elbows so not to collide with defenders
o Be sure not to jump
o Do not spin too early
Spinning of right foot: As above but opposite
Ensure key teaching points for swivel hips:
o You want to try and get your hips perpendicular to the defenders as you cross the line of defence
o Move hip away from defenders hands e.g. if defenders is attempting to tag the right tag, then the attackers should move that hip away from the defender
o Easiest method is to slightly lift the front foot as moving forward through the line of defence
o Try to do this at speed
o Be sure not to jump
o Think of doing the twist (rock and roll dancing)
o Do not do the twist too early.
Body
(7 minutes)
Activity 5 – Oztag Core Drill 3
Set up two grids 7m long x 5m wide – one grid for each team
At one end of the grid set up a marker 1 m in from either end – each of the 2 markers a different colour
Tags
Belts
Markers
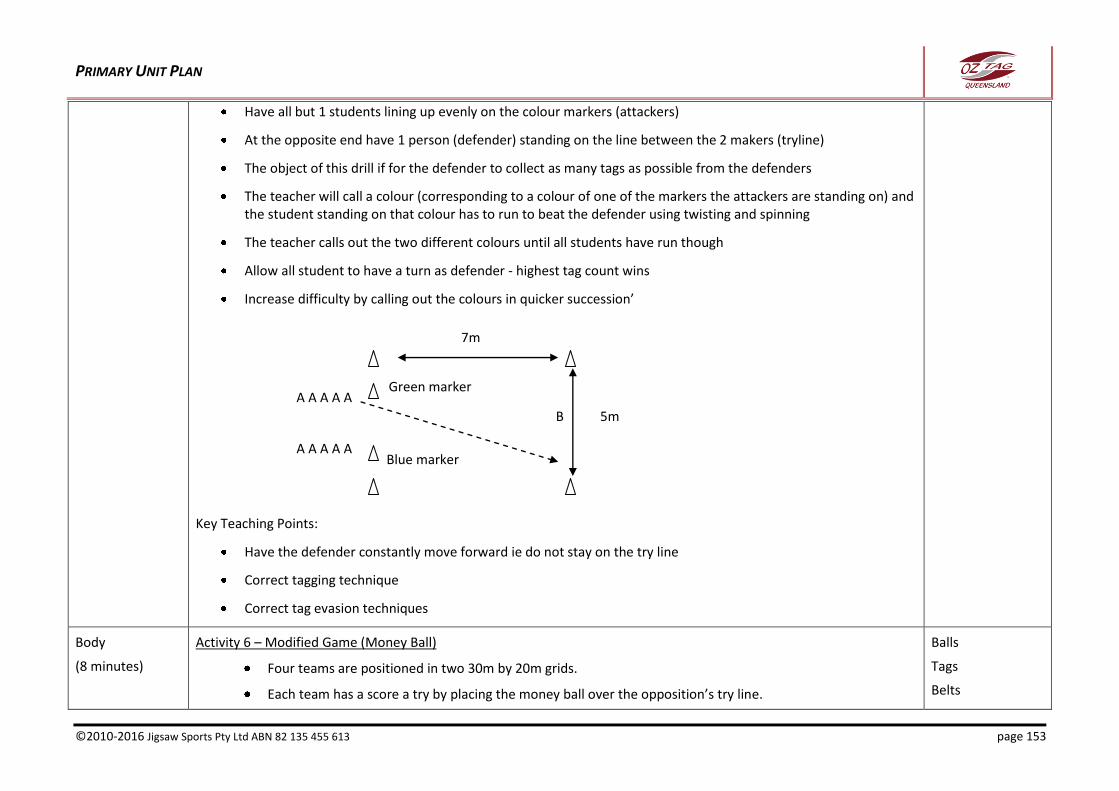
PRIMARY UNIT PLAN
©2010-2016 Jigsaw Sports Pty Ltd ABN 82 135 455 613 page 153
Have all but 1 students lining up evenly on the colour markers (attackers)
At the opposite end have 1 person (defender) standing on the line between the 2 makers (tryline)
The object of this drill if for the defender to collect as many tags as possible from the defenders
The teacher will call a colour (corresponding to a colour of one of the markers the attackers are standing on) and the student standing on that colour has to run to beat the defender using twisting and spinning
The teacher calls out the two different colours until all students have run though
Allow all student to have a turn as defender - highest tag count wins
Increase difficulty by calling out the colours in quicker succession’
Key Teaching Points:
Have the defender constantly move forward ie do not stay on the try line
Correct tagging technique
Correct tag evasion techniques
Body
(8 minutes)
Activity 6 – Modified Game (Money Ball)
Four teams are positioned in two 30m by 20m grids.
Each team has a score a try by placing the money ball over the opposition’s try line.
Balls
Tags
Belts
A A A A A
B
A A A A A
Green marker
Blue marker
7m
5m
PRIMARY UNIT PLAN
©2010-2016 Jigsaw Sports Pty Ltd ABN 82 135 455 613 page 154
The money ball starts in the centre of the field and the two teams at either end of the field
On the whistle 1 person from each team must run to collect the money ball
There is no offside and forward passes are allowed to be thrown.
Once a player is tagged with the ball they are out of play and the ball is given to the opposition.
All players are allowed to move freely even when in possession of the ball
Once the ball is dropped or an interception occurs then there is a changeover.
No kicking is allowed
Once a team has scored all players come back on to the field
Variation – make passes only able to go backwards
Key Teaching Points:
Correct tagging technique:
o use both hands when tagging
o step forward when making tag
o use palms
Correct tagging evasion technique:
o Time hip movements to react to defenders attempts at tagging
o Use movement at the line, not before the line
o Correct technique for twisting - move hips away from attackers attempts e.g. if defenders is attempting to tag the right tag, then the attackers should move that hip away from the defender
o Correct technique for spinning – plant foot and look over opposite shoulder to tag the right tag, then the attackers should move that hip away from the defender
Attacking players moving to gaps to allow the ball carrier options to pass the ball
Communication amongst players in attack and defence
Markers
Whistle
PRIMARY UNIT PLAN
©2010-2016 Jigsaw Sports Pty Ltd ABN 82 135 455 613 page 155
Conclusion
(1 minute)
Activity 7 – Packing up equipment
Demonstrate to students how to roll up belts
Ask student to roll up belts and place tags into the two different colour piles
Key Teaching Points:
Start rolling up belt with Furry side to the outside, and at the non-logo end of the belt
Belts
Tags
Conclusion
(1 minute)
Activity 8 – Revise Key Points
Sitting as a group ask students to call out answers two the following questions:
o Where do we wear the belt on our body?
o Where do the tags sit on your belt?
o How should a tag be made?
o What two things can be down to avoid being tagged?
o How do you best execute the twist and spin?
PRIMARY UNIT PLAN
©2010-2016 Jigsaw Sports Pty Ltd ABN 82 135 455 613 page 156
Advanced - Lesson Plan 2
Focus Areas: Revising, refining and expansion of key Oztag skills:
Defensive skills – wrapping and switching
Offensive skills – wrapping and switching
Learning Outcomes: At the completion of this lesson students will be able to:
Explain how to execute the wrap and switch in an attacking situation
Explain how to defend against the wrap and the switch
Use the wrap and switch in a game situation
Defend against the wrap and the switch in a game situation
Duration: 30 minutes
Section Activity Resources
Introduction
(4 minutes)
Activity 1 – Warm Up (Square Passing Grid)
Set up a square grid 5m x 5m
Split students up evenly into 4 each group standing on a marker
Have all students wearing belts and tags
Player A runs with the ball towards player B
Player B starts running towards player C
Player A passes the ball to player B who receives the ball 1/3 way along the path
Player B runs with the caught ball and passes to player C who receives the ball 1/3 way along path etc
Once the ball has been passed player A joins the end of the line of which player B was stationed
Continue as needed
Balls
Markers
Belts
Tags
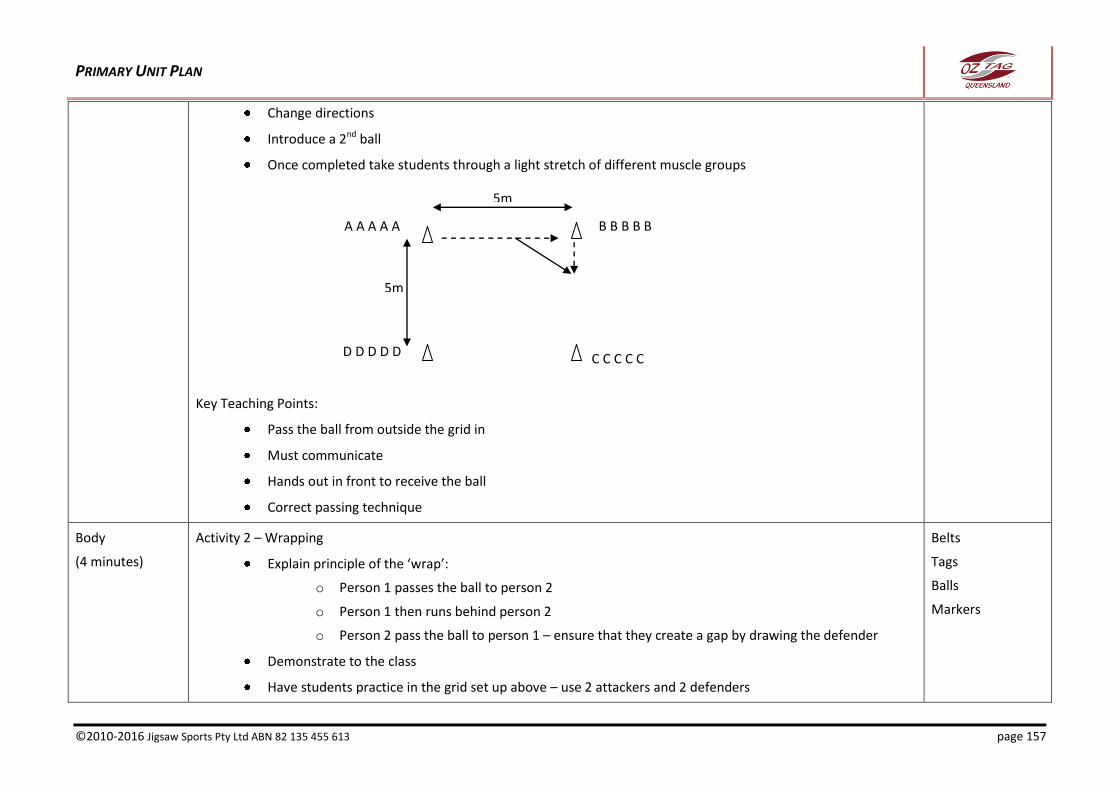
PRIMARY UNIT PLAN
©2010-2016 Jigsaw Sports Pty Ltd ABN 82 135 455 613 page 157
Change directions
Introduce a 2nd ball
Once completed take students through a light stretch of different muscle groups
Key Teaching Points:
Pass the ball from outside the grid in
Must communicate
Hands out in front to receive the ball
Correct passing technique
Body
(4 minutes)
Activity 2 – Wrapping
Explain principle of the ‘wrap’:
o Person 1 passes the ball to person 2
o Person 1 then runs behind person 2
o Person 2 pass the ball to person 1 – ensure that they create a gap by drawing the defender
Demonstrate to the class
Have students practice in the grid set up above – use 2 attackers and 2 defenders
Belts
Tags
Balls
Markers
A A A A A
D D D D D
5m
5m
B B B B B
C C C C C
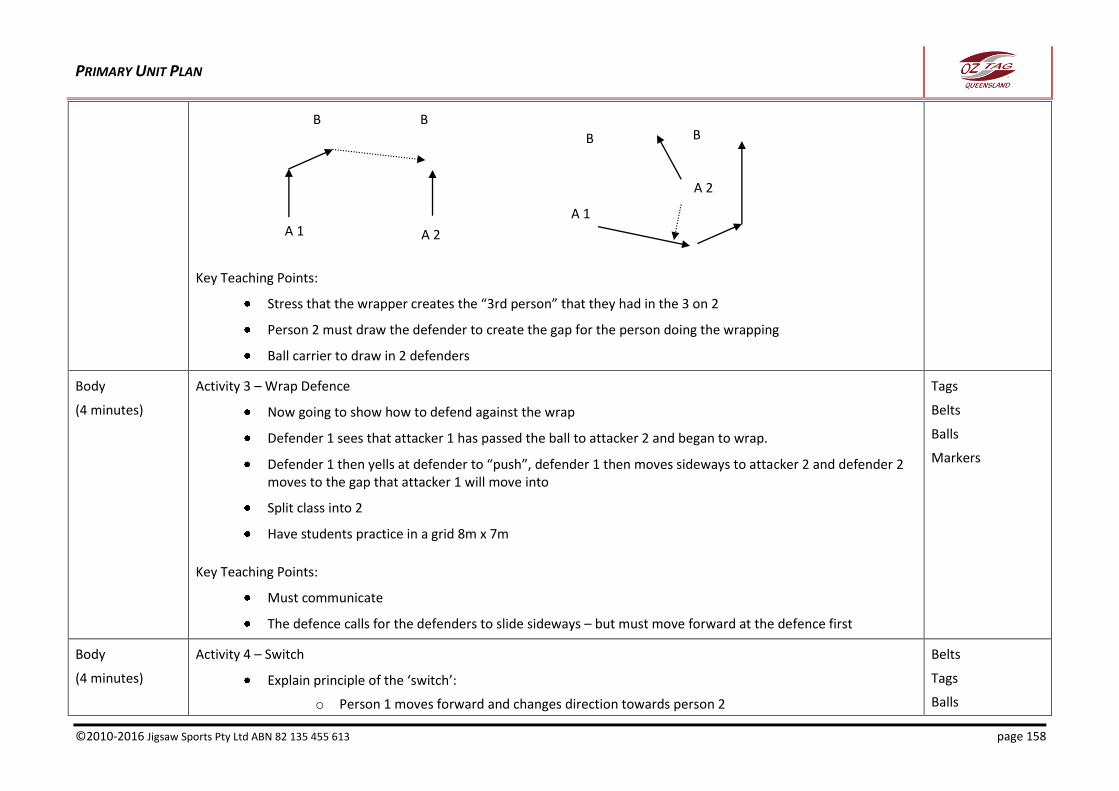
PRIMARY UNIT PLAN
©2010-2016 Jigsaw Sports Pty Ltd ABN 82 135 455 613 page 158
Key Teaching Points:
Stress that the wrapper creates the “3rd person” that they had in the 3 on 2
Person 2 must draw the defender to create the gap for the person doing the wrapping
Ball carrier to draw in 2 defenders
Body
(4 minutes)
Activity 3 – Wrap Defence
Now going to show how to defend against the wrap
Defender 1 sees that attacker 1 has passed the ball to attacker 2 and began to wrap.
Defender 1 then yells at defender to “push”, defender 1 then moves sideways to attacker 2 and defender 2 moves to the gap that attacker 1 will move into
Split class into 2
Have students practice in a grid 8m x 7m
Key Teaching Points:
Must communicate
The defence calls for the defenders to slide sideways – but must move forward at the defence first
Tags
Belts
Balls
Markers
Body
(4 minutes)
Activity 4 – Switch
Explain principle of the ‘switch’:
o Person 1 moves forward and changes direction towards person 2
Belts
Tags
Balls
B B
A 1 A 2
A 1
A 2
B B
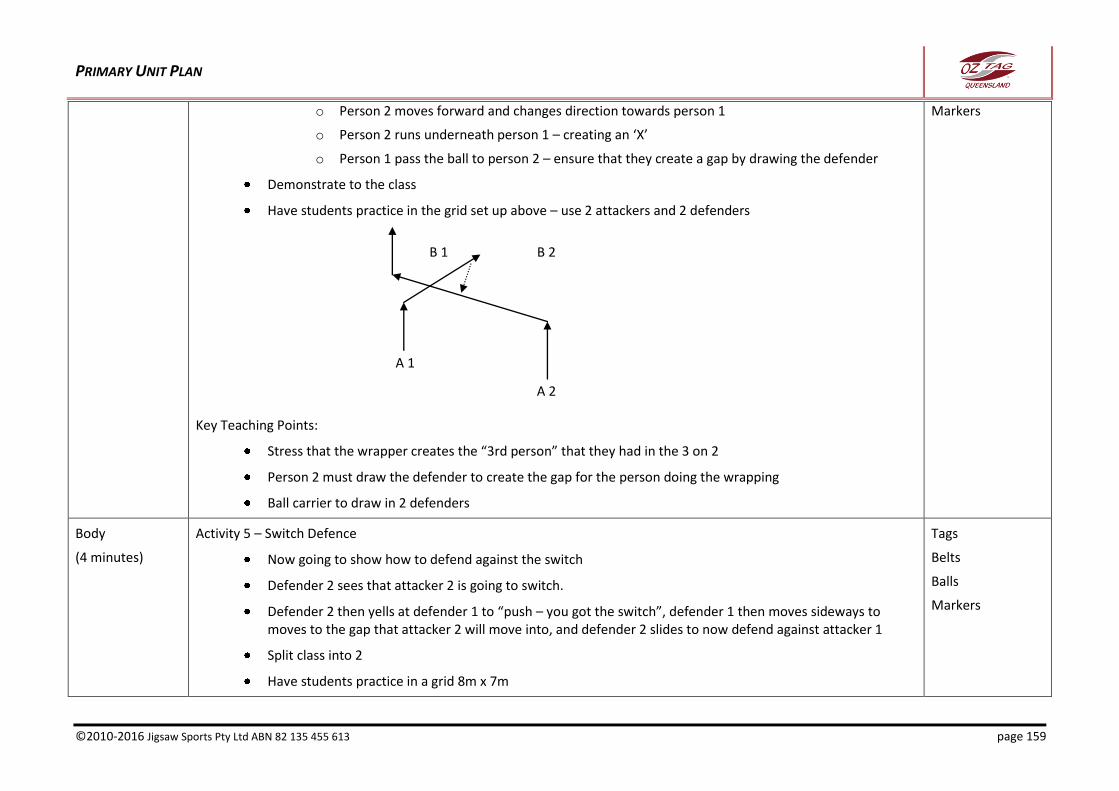
PRIMARY UNIT PLAN
©2010-2016 Jigsaw Sports Pty Ltd ABN 82 135 455 613 page 159
o Person 2 moves forward and changes direction towards person 1
o Person 2 runs underneath person 1 – creating an ‘X’
o Person 1 pass the ball to person 2 – ensure that they create a gap by drawing the defender
Demonstrate to the class
Have students practice in the grid set up above – use 2 attackers and 2 defenders
Key Teaching Points:
Stress that the wrapper creates the “3rd person” that they had in the 3 on 2
Person 2 must draw the defender to create the gap for the person doing the wrapping
Ball carrier to draw in 2 defenders
Markers
Body
(4 minutes)
Activity 5 – Switch Defence
Now going to show how to defend against the switch
Defender 2 sees that attacker 2 is going to switch.
Defender 2 then yells at defender 1 to “push – you got the switch”, defender 1 then moves sideways to moves to the gap that attacker 2 will move into, and defender 2 slides to now defend against attacker 1
Split class into 2
Have students practice in a grid 8m x 7m
Tags
Belts
Balls
Markers
B 2 B 1
A 1
A 2
PRIMARY UNIT PLAN
©2010-2016 Jigsaw Sports Pty Ltd ABN 82 135 455 613 page 160
Key Teaching Points:
Must communicate
The defence calls for the defenders to slide sideways – but must move forward at the defence first
Body
(8 minutes)
Activity 5 – Modified Game (5v5)
Set up 2 fields 15m x 25m
Split the two teams into two again (total of 4 teams)
Play two games of 5 v 5
Key Teaching Points:
As the game is progressing explain basic rules as needed e.g. kick off, knock on, 6 tags = changeover, no contact, no jumping, forward pass
Ensure draw and pass is used
Defence cannot move forward until the 1st receiver has the ball
Ensure attacking player moves forward and does not run backwards
Belts
Tags
Balls
Markers
Whistle
Conclusion
(2 minutes)
Activity 6 – Revise Key Points
Once students roll up their belts have them sitting as a group ask students to call out answers two the following questions:
o How do you execute and wrap?
o How do you defend against a wrap?
o How do you execute and switch?
o How do you defend against a switch?
o Why is communication so important? Who needs to communicate...attackers or defenders?
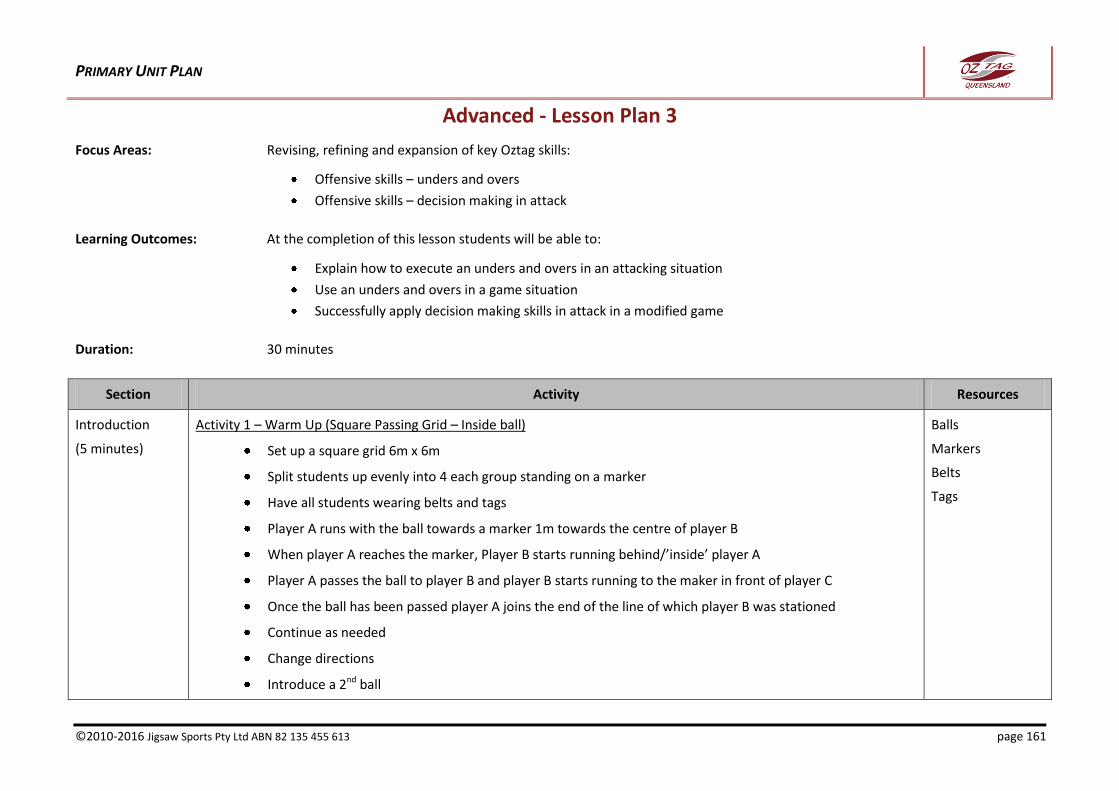
PRIMARY UNIT PLAN
©2010-2016 Jigsaw Sports Pty Ltd ABN 82 135 455 613 page 161
Advanced - Lesson Plan 3
Focus Areas: Revising, refining and expansion of key Oztag skills:
Offensive skills – unders and overs
Offensive skills – decision making in attack
Learning Outcomes: At the completion of this lesson students will be able to:
Explain how to execute an unders and overs in an attacking situation
Use an unders and overs in a game situation
Successfully apply decision making skills in attack in a modified game
Duration: 30 minutes
Section Activity Resources
Introduction
(5 minutes)
Activity 1 – Warm Up (Square Passing Grid – Inside ball)
Set up a square grid 6m x 6m
Split students up evenly into 4 each group standing on a marker
Have all students wearing belts and tags
Player A runs with the ball towards a marker 1m towards the centre of player B
When player A reaches the marker, Player B starts running behind/’inside’ player A
Player A passes the ball to player B and player B starts running to the maker in front of player C
Once the ball has been passed player A joins the end of the line of which player B was stationed
Continue as needed
Change directions
Introduce a 2nd ball
Balls
Markers
Belts
Tags
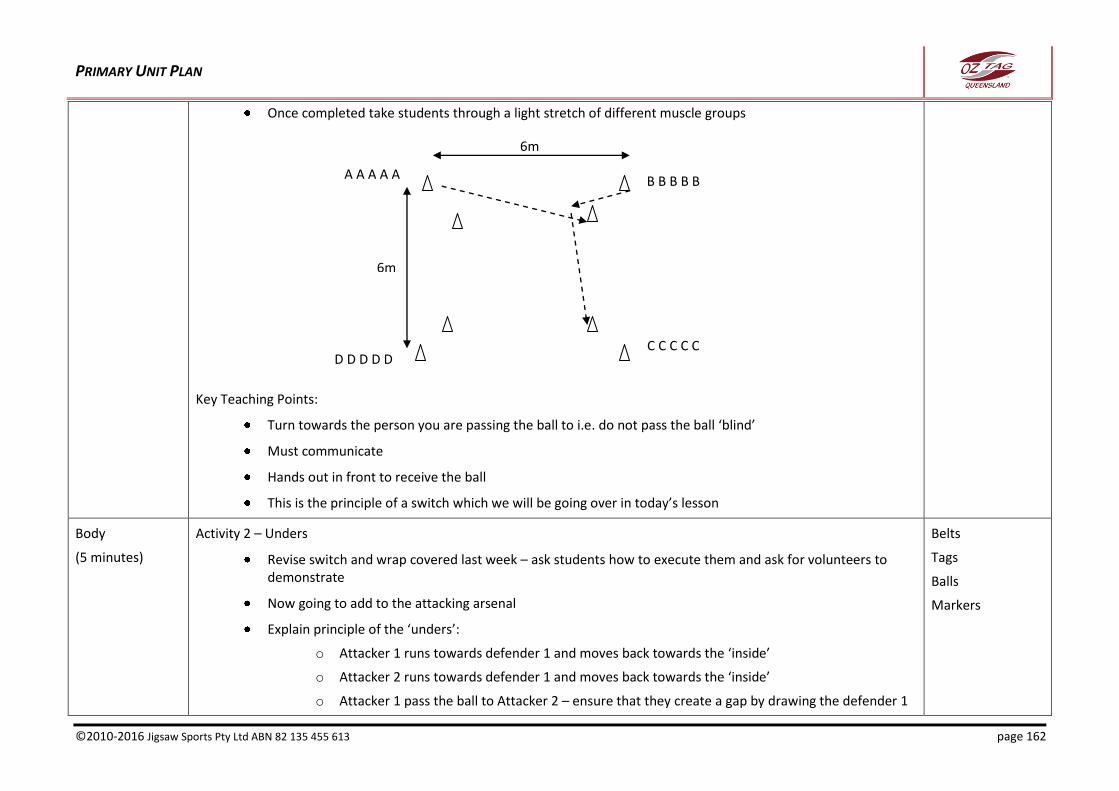
PRIMARY UNIT PLAN
©2010-2016 Jigsaw Sports Pty Ltd ABN 82 135 455 613 page 162
Once completed take students through a light stretch of different muscle groups
Key Teaching Points:
Turn towards the person you are passing the ball to i.e. do not pass the ball ‘blind’
Must communicate
Hands out in front to receive the ball
This is the principle of a switch which we will be going over in today’s lesson
Body
(5 minutes)
Activity 2 – Unders
Revise switch and wrap covered last week – ask students how to execute them and ask for volunteers to demonstrate
Now going to add to the attacking arsenal
Explain principle of the ‘unders’:
o Attacker 1 runs towards defender 1 and moves back towards the ‘inside’
o Attacker 2 runs towards defender 1 and moves back towards the ‘inside’
o Attacker 1 pass the ball to Attacker 2 – ensure that they create a gap by drawing the defender 1
Belts
Tags
Balls
Markers
A A A A A
D D D D D
6m
6m
B B B B B
C C C C C
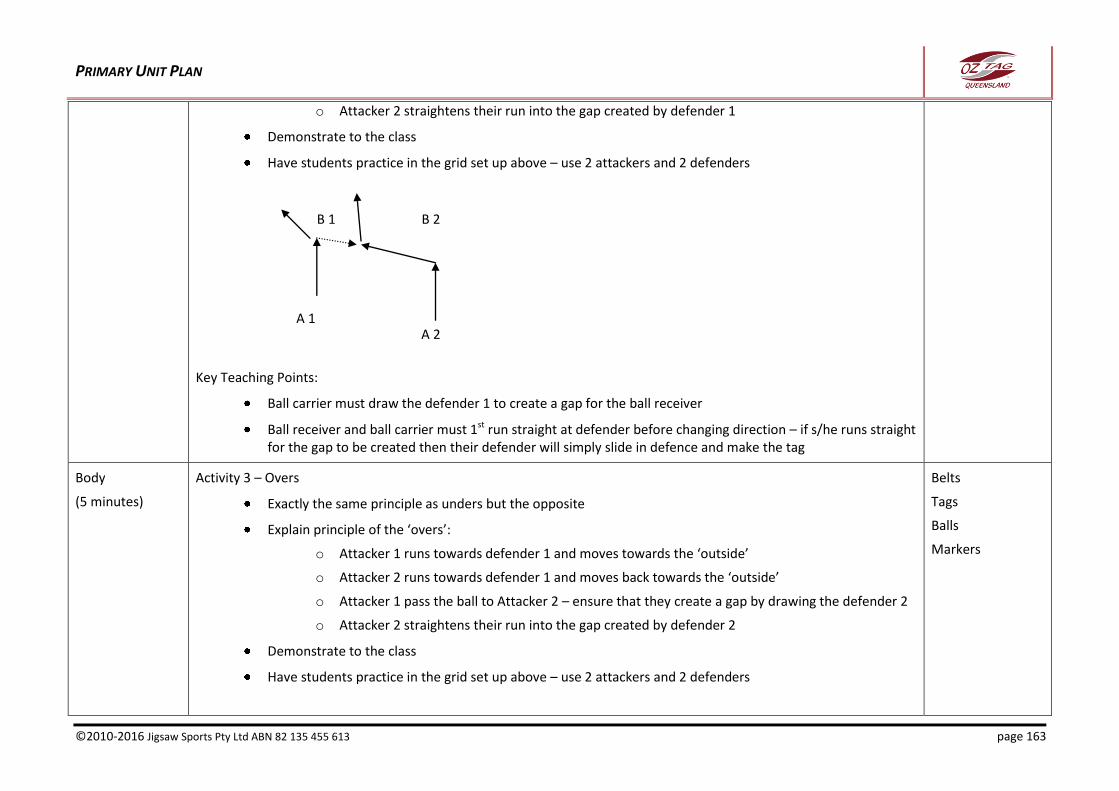
PRIMARY UNIT PLAN
©2010-2016 Jigsaw Sports Pty Ltd ABN 82 135 455 613 page 163
o Attacker 2 straightens their run into the gap created by defender 1
Demonstrate to the class
Have students practice in the grid set up above – use 2 attackers and 2 defenders
Key Teaching Points:
Ball carrier must draw the defender 1 to create a gap for the ball receiver
Ball receiver and ball carrier must 1st run straight at defender before changing direction – if s/he runs straight for the gap to be created then their defender will simply slide in defence and make the tag
Body
(5 minutes)
Activity 3 – Overs
Exactly the same principle as unders but the opposite
Explain principle of the ‘overs’:
o Attacker 1 runs towards defender 1 and moves towards the ‘outside’
o Attacker 2 runs towards defender 1 and moves back towards the ‘outside’
o Attacker 1 pass the ball to Attacker 2 – ensure that they create a gap by drawing the defender 2
o Attacker 2 straightens their run into the gap created by defender 2
Demonstrate to the class
Have students practice in the grid set up above – use 2 attackers and 2 defenders
Belts
Tags
Balls
Markers
B 2 B 1
A 1 A 2
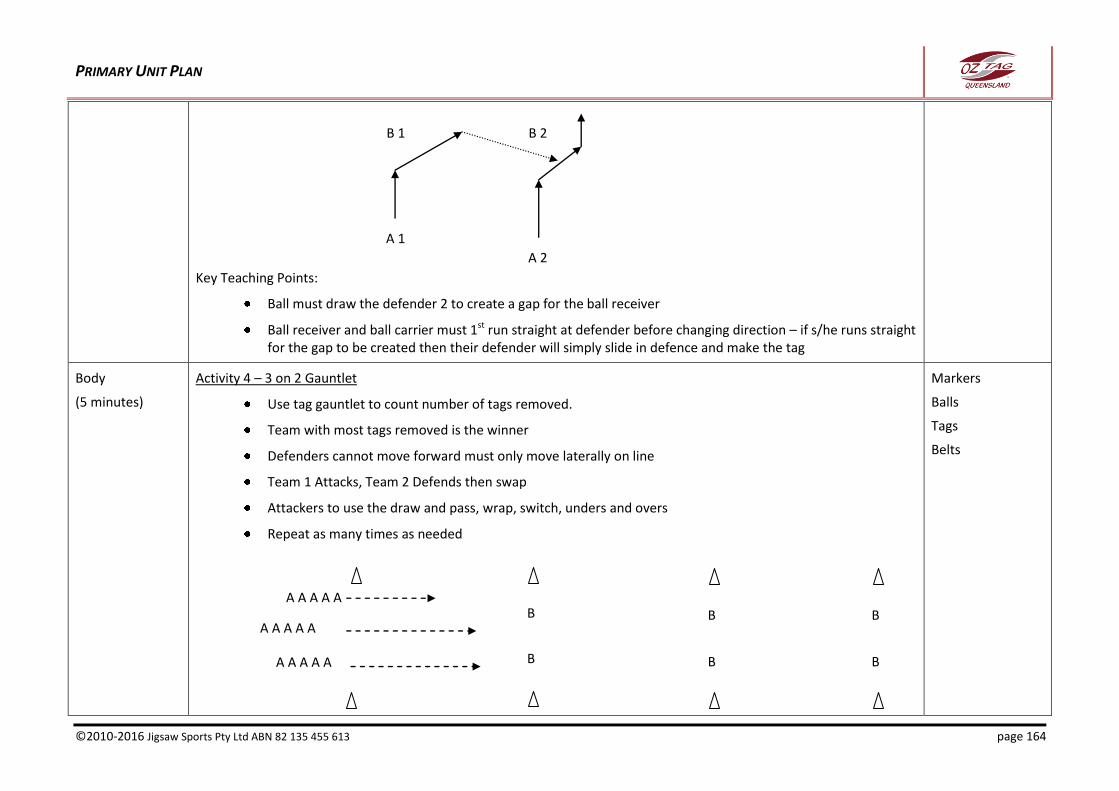
PRIMARY UNIT PLAN
©2010-2016 Jigsaw Sports Pty Ltd ABN 82 135 455 613 page 164
Key Teaching Points:
Ball must draw the defender 2 to create a gap for the ball receiver
Ball receiver and ball carrier must 1st run straight at defender before changing direction – if s/he runs straight for the gap to be created then their defender will simply slide in defence and make the tag
Body
(5 minutes)
Activity 4 – 3 on 2 Gauntlet
Use tag gauntlet to count number of tags removed.
Team with most tags removed is the winner
Defenders cannot move forward must only move laterally on line
Team 1 Attacks, Team 2 Defends then swap
Attackers to use the draw and pass, wrap, switch, unders and overs
Repeat as many times as needed
Markers
Balls
Tags
Belts
A A A A A
A A A A A
A A A A A
B
B
B
B
B
B
B 2 B 1
A 1
A 2
PRIMARY UNIT PLAN
©2010-2016 Jigsaw Sports Pty Ltd ABN 82 135 455 613 page 165
Key Teaching Points:
Communication amongst attackers and defenders
Emphasis is on making the correct choice in attack i.e. choosing the correct player to pass the ball
Do not always need to pass the ball i.e. do not force the error
Use of attacking skills that have been practised
Correct tagging technique:
o use both hands when tagging
o step forward when making tag
o use palms
Correct tagging evasion technique:
o Time hip movements to react to defenders attempts at tagging
o Use movement at the line, not before the line
o Correct technique for twisting Move hips away from attackers attempts e.g. if defenders is attempting to tag the right tag, then the attackers should move that hip away from the defender
o Correct technique for spinning – plant foot and look over opposite shoulder
Body
(8 minutes)
Activity 6 – Modified Game (5v5)
Set up 2 fields 15m x 25m
Split the two teams into two again (total of 4 teams)
Play two games of 5 v 5
Key Teaching Points:
As the game is progressing explain basic rules as needed e.g. kick off, knock on, 6 tags = changeover, no contact, no jumping, forward pass
Ensure draw and pass is used
Defence cannot move forward until the 1st receiver has the ball
Belts
Tags
Balls
Markers
Whistle
PRIMARY UNIT PLAN
©2010-2016 Jigsaw Sports Pty Ltd ABN 82 135 455 613 page 166
Ensure attacking player moves forward and does not run backwards
Conclusion
(2 minutes)
Activity 6 – Revise Key Points
Once students roll up their belts have them sitting as a group ask students to call out answers two the following questions:
o How do you execute an overs?
o How do you execute an unders?
o How do you execute a switch?
o How do you execute a wrap?
o Why is communication so important? Who needs to communicate...attackers or defenders?
PRIMARY UNIT PLAN
©2010-2016 Jigsaw Sports Pty Ltd ABN 82 135 455 613 page 167
Advanced - Lesson Plan 4
Focus Areas: Introduction of game skills and rules:
Communication
Offensive skills – decision making in attack
Learning Outcomes: At the completion of this lesson students will be able to:
Successfully apply communication skills to effect a positive result in attack and defence in a modified game
Successfully apply decision making skills in attack in a modified game
Duration: 30 minutes
Section Activity Resources
Introduction
(5 minutes)
Activity 1 – Warm Up (Walk Tag)
Set out a field roughly 30m x 30m
Split class into 2 halves
Play a game of Oztag but walking only
Any person caught running will be penalised
Once completed take students through a light stretch of different muscle groups
Key Teaching Points:
Don’t be so strict on the Oztag rules – the idea is to get the student moving to warm up
Ensure that the quieter students receive the ball
Tags
Belts
Markers
Ball
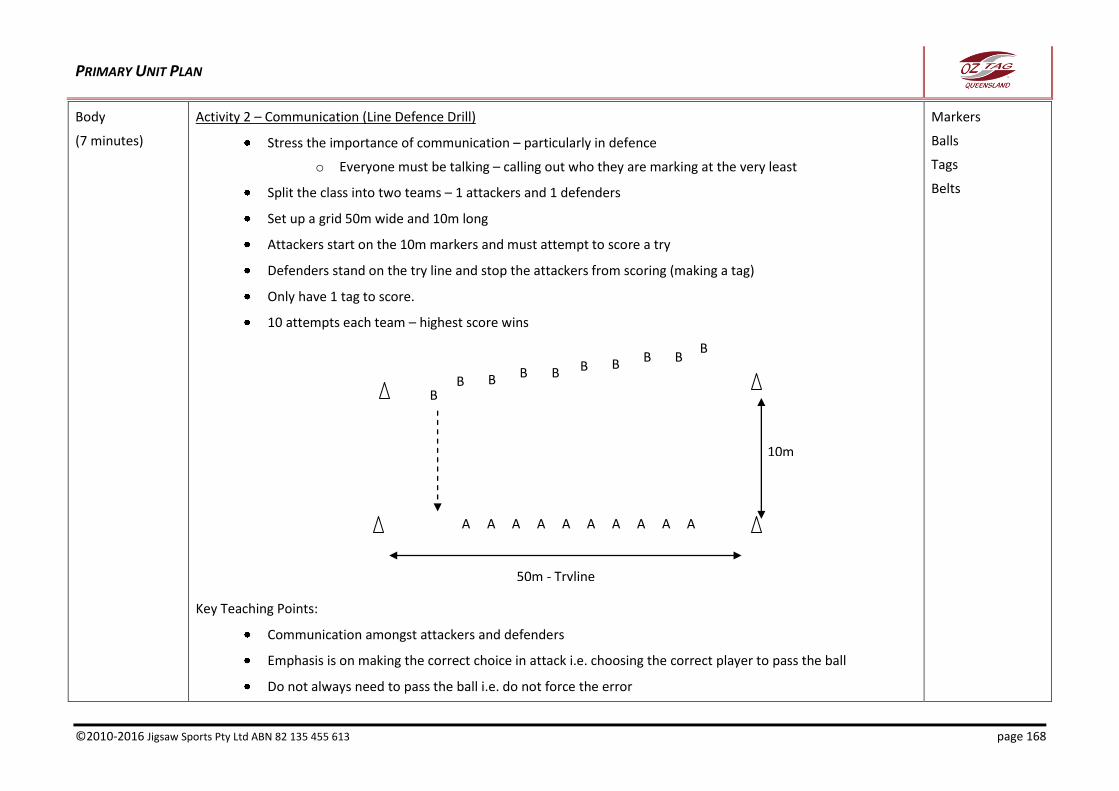
PRIMARY UNIT PLAN
©2010-2016 Jigsaw Sports Pty Ltd ABN 82 135 455 613 page 168
Body
(7 minutes)
Activity 2 – Communication (Line Defence Drill)
Stress the importance of communication – particularly in defence
o Everyone must be talking – calling out who they are marking at the very least
Split the class into two teams – 1 attackers and 1 defenders
Set up a grid 50m wide and 10m long
Attackers start on the 10m markers and must attempt to score a try
Defenders stand on the try line and stop the attackers from scoring (making a tag)
Only have 1 tag to score.
10 attempts each team – highest score wins
Key Teaching Points:
Communication amongst attackers and defenders
Emphasis is on making the correct choice in attack i.e. choosing the correct player to pass the ball
Do not always need to pass the ball i.e. do not force the error
Markers
Balls
Tags
Belts
A A A A A A A A A A
B
10m
50m - Tryline
B B B B B B B B
B
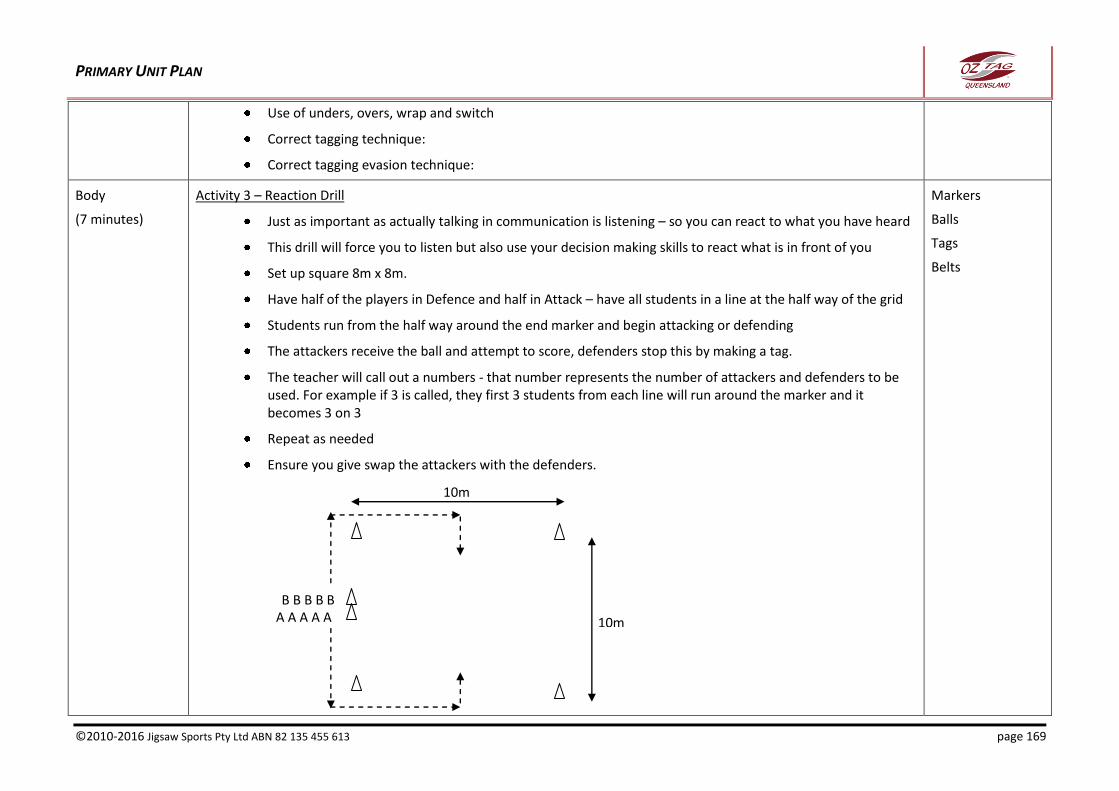
PRIMARY UNIT PLAN
©2010-2016 Jigsaw Sports Pty Ltd ABN 82 135 455 613 page 169
Use of unders, overs, wrap and switch
Correct tagging technique:
Correct tagging evasion technique:
Body
(7 minutes)
Activity 3 – Reaction Drill
Just as important as actually talking in communication is listening – so you can react to what you have heard
This drill will force you to listen but also use your decision making skills to react what is in front of you
Set up square 8m x 8m.
Have half of the players in Defence and half in Attack – have all students in a line at the half way of the grid
Students run from the half way around the end marker and begin attacking or defending
The attackers receive the ball and attempt to score, defenders stop this by making a tag.
The teacher will call out a numbers - that number represents the number of attackers and defenders to be used. For example if 3 is called, they first 3 students from each line will run around the marker and it becomes 3 on 3
Repeat as needed
Ensure you give swap the attackers with the defenders.
Markers
Balls
Tags
Belts
A A A A A B B B B B
10m
10m
PRIMARY UNIT PLAN
©2010-2016 Jigsaw Sports Pty Ltd ABN 82 135 455 613 page 170
Key Teaching Points:
Communication amongst attackers and defenders
Emphasis is on making the correct choice in attack i.e. choosing the correct player to pass the ball
Do not always need to pass the ball i.e. do not force the error
Use of unders, overs, wrap and switch
Correct tagging technique:
o use both hands when tagging
o step forward when making tag
o use palms
Correct tagging evasion technique:
o Time hip movements to react to defenders attempts at tagging
o Use movement at the line, not before the line
o Correct technique for twisting Move hips away from attackers attempts e.g. if defenders is attempting to tag the right tag, then the attackers should move that hip away from the defender
o Correct technique for spinning – plant foot and look over opposite shoulder
Body
(9 minutes)
Activity 4 – Full Game
Play full game of Oztag with 8 v 8
Field size for juniors = 40m x 25m
Ensure subbing of players if frequent to involve all players
Key Teaching Points:
As the game is progressing explain basic rules as needed e.g. kick off, knock on, 6 tags = changeover, no contact, no jumping, forward pass
Defence cannot move forward until the 1st receiver has the ball
Ensure attacking player moves forward and does not run backwards
Belts
Tags
Balls
Markers
Whistle
PRIMARY UNIT PLAN
©2010-2016 Jigsaw Sports Pty Ltd ABN 82 135 455 613 page 171
Use of attacking and defensive skills that have been practiced
Conclusion
(2 minutes)
Activity 5 – Revise Key Points
Once students roll up their belts have them sitting as a group ask students to call out answers two the following questions:
o How do you execute and wrap?
o How do you defend against a wrap?
o How do you execute and switch?
o How do you defend against a switch?
o Why is communication so important? Who needs to communicate...attackers or defenders?
PRIMARY UNIT PLAN
©2010-2016 Jigsaw Sports Pty Ltd ABN 82 135 455 613 page 172
Advanced - Lesson Plan 5
Focus Areas: Expansion and refining of game skills and rules, and assessment:
Oztag rules
Offensive skills – kicking
Learning Outcomes: At the completion of this lesson students will be able to:
Apply Oztag skills in a game situation
Explain rules used in a game of Oztag
Apply kicking skills to a game of Oztag
Duration: 30 minutes
Section Activity Resources
Introduction
(10 minutes)
Activity 1 – Warm Up (Kicking Relay)
Explain the rules surrounding kicking in Oztag
o Can only kick in general play on zero (not after a play the ball), 4 or 5
o Kicks have to be below referees should during normal play but can go any height for kick restart and drop outs
o Attacking players cannot dive on the ball following a kick
Explain that for kicks during play it is best to do a grubber
Demonstrate how to do a grubber
Split class into 4 teams
Set up 4 channels 10m long – 1 per team
Students must grubber the ball to themselves, regather and pass on to the next player
Balls
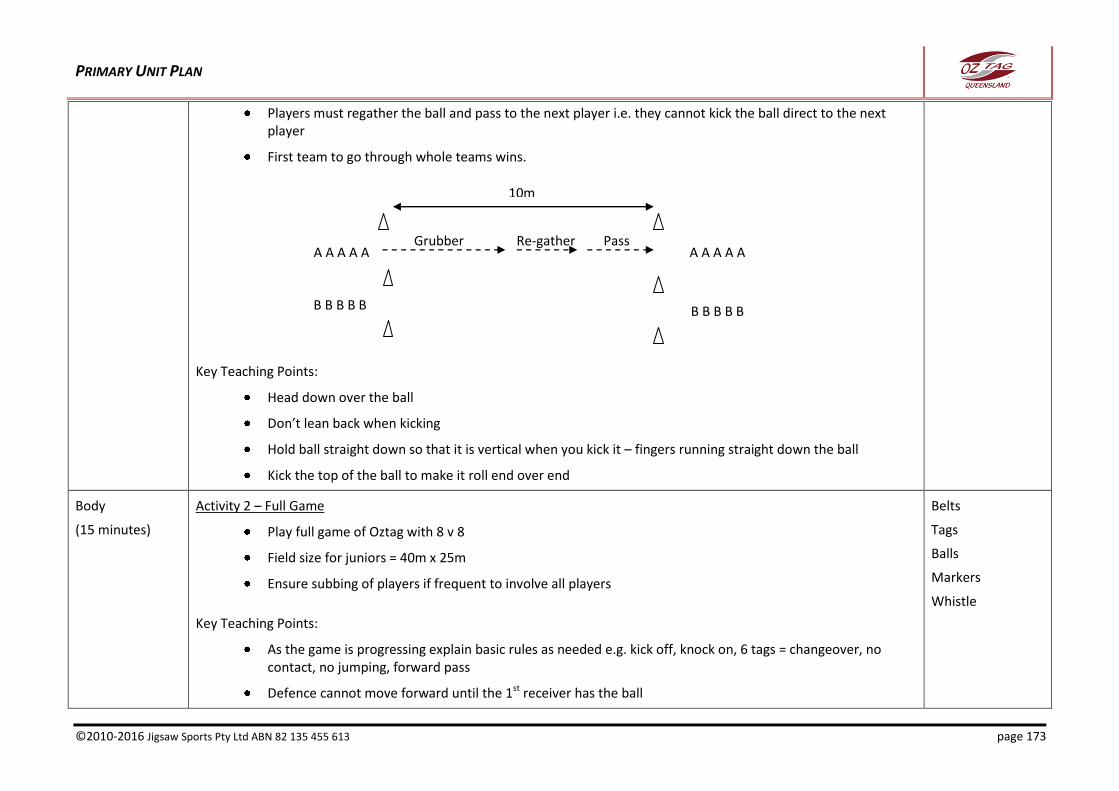
PRIMARY UNIT PLAN
©2010-2016 Jigsaw Sports Pty Ltd ABN 82 135 455 613 page 173
Players must regather the ball and pass to the next player i.e. they cannot kick the ball direct to the next player
First team to go through whole teams wins.
Key Teaching Points:
Head down over the ball
Don’t lean back when kicking
Hold ball straight down so that it is vertical when you kick it – fingers running straight down the ball
Kick the top of the ball to make it roll end over end
Body
(15 minutes)
Activity 2 – Full Game
Play full game of Oztag with 8 v 8
Field size for juniors = 40m x 25m
Ensure subbing of players if frequent to involve all players
Key Teaching Points:
As the game is progressing explain basic rules as needed e.g. kick off, knock on, 6 tags = changeover, no contact, no jumping, forward pass
Defence cannot move forward until the 1st receiver has the ball
Belts
Tags
Balls
Markers
Whistle
A A A A A
B B B B B
A A A A A
10m
B B B B B
Grubber Re-gather Pass
PRIMARY UNIT PLAN
©2010-2016 Jigsaw Sports Pty Ltd ABN 82 135 455 613 page 174
Ensure attacking player moves forward and does not run backwards
Body
Assessment
As students are playing the game complete assessment sheet
Note: You will require another person to referee the game. Alternatively complete the assessment sheet post game being played
Assessment Sheet
Conclusion
(5 minutes)
Activity 3 – Revise Key Points
Once students roll up their belts have them sitting as a group ask students to call out answers two the following questions:
o What are some key Oztag rules we must abide by on the field?
o What are some attacking moves we can apply to score more tries?
o What defence moves to we apply to stop tries from being scored?
o What is the best way to kick during normal play in Oztag?
o What are the rules involved with kicking during normal play?
PRIMARY UNIT PLAN
©2010-2016 Jigsaw Sports Pty Ltd ABN 82 135 455 613 page 175
Additional Drills
PRIMARY UNIT PLAN
©2010-2016 Jigsaw Sports Pty Ltd ABN 82 135 455 613 page 176
Tagging, Twisting and Spinning
Drill 1 – Still Tagging
In pairs students take it in turn tagging each other
Students stand no more than 1m away from each other facing each other
Student are only allowed to move one legs if they are defending (i.e. removing tags), and no legs if they are attacking (i.e. avoiding being tagged). This forces strong movement of hips
Key Teaching Points:
Defenders to:
o use both hands when tagging
o step forward when making tag
o use palms
Attackers to:
o Time hip movements to react to defenders attempts at tagging
o Move hips away from attackers attempts e.g. if defenders is attempting to tag the right tag, then the attackers should move that hip away from the defender
Drill 2 – 4-Way Tagging
Set up a square shape grid approx 10m x 10m
Each corner of the square has a different colour marker
Split the class up into 4 equal groups
Place 1 group on each colour marker (attackers) and 1 defender in the middle of the grid
As the teacher calls out a colour (corresponding to a coloured marker) the attacker at the start of that line must run through to the diagonally opposite marker while trying to avoid being tagged, and the defender must attempt to make the tags
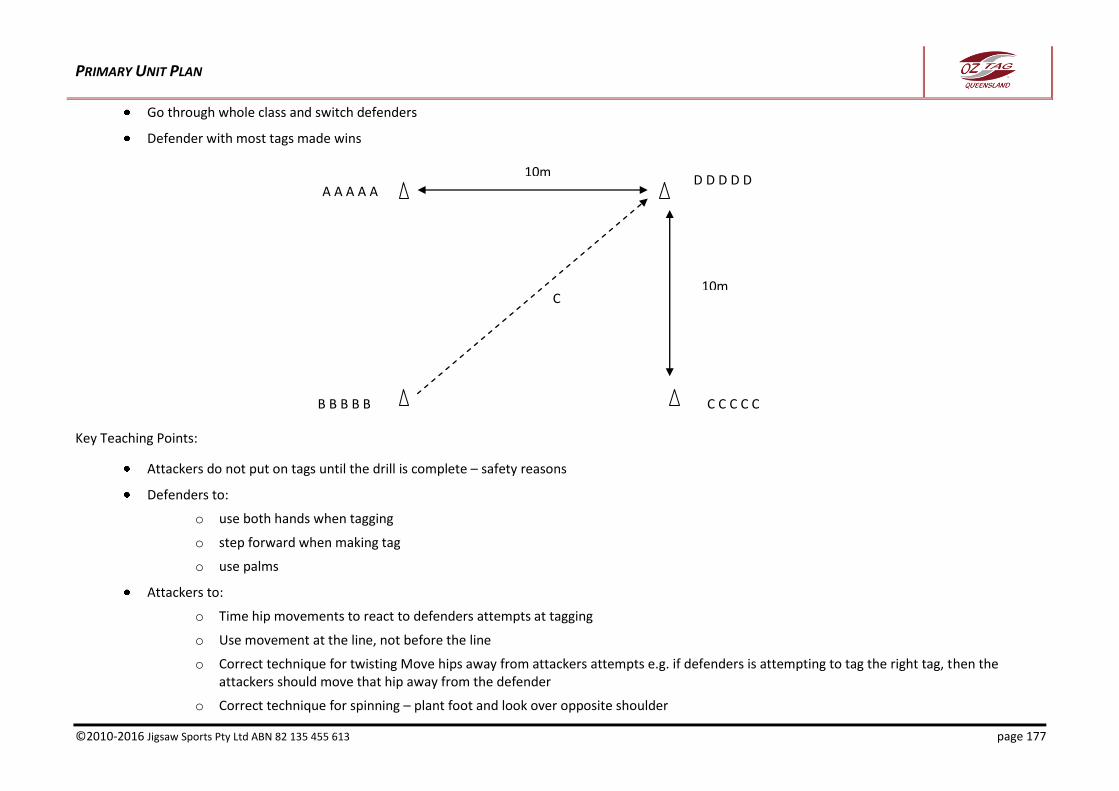
PRIMARY UNIT PLAN
©2010-2016 Jigsaw Sports Pty Ltd ABN 82 135 455 613 page 177
Go through whole class and switch defenders
Defender with most tags made wins
Key Teaching Points:
Attackers do not put on tags until the drill is complete – safety reasons
Defenders to:
o use both hands when tagging
o step forward when making tag
o use palms
Attackers to:
o Time hip movements to react to defenders attempts at tagging
o Use movement at the line, not before the line
o Correct technique for twisting Move hips away from attackers attempts e.g. if defenders is attempting to tag the right tag, then the attackers should move that hip away from the defender
o Correct technique for spinning – plant foot and look over opposite shoulder
A A A A A
B B B B B C C C C C
10m D D D D D
C 10m

PRIMARY UNIT PLAN
©2010-2016 Jigsaw Sports Pty Ltd ABN 82 135 455 613 page 178
Drill 3 – Cover Defence
Set up a square shape grid approx 20m long x 6m wide
Split class into two – attackers and defenders
Attackers are to run straight up the ‘line”
Attackers to carry a ball
Defenders are to run across and make the tag before they score
Students to switch positions i.e. once they have been attacker they rejoin the defenders line
Switch attackers and defenders positions i.e. move attacker from Left side to right etc
Key Teaching Points:
Defenders cannot place hands on the attackers – only remove tags
Defenders to:
o use both hands when tagging
o step forward when making tag
o use palms
Attackers to:
o Time hip movements to react to defenders attempts at tagging
A A A A A
20m B B B B B
6m
PRIMARY UNIT PLAN
©2010-2016 Jigsaw Sports Pty Ltd ABN 82 135 455 613 page 179
o Use movement at the line, not before the line
o Correct technique for twisting Move hips away from attackers attempts e.g. if defenders is attempting to tag the right tag, then the attackers should move that hip away from the defender
o Correct technique for spinning – plant foot and look over opposite shoulder
Passing
Drill 1 – Basetag (Passing)
Split class into 2 teams
Set up a baseball field
Play game of baseball however there is no ball pitched. The batter simply passes the ball into the field to constitute a hit
Normal baseball rules apply:
o 3 out, side away
o Highest score wins
How to get out:
o If the ball makes it to a base before the runner
o If the ball is caught by a fielder
o Runners must have tags on at all times - they cannot proceed without tags on. If a tag falls off they must return to get the tag
Key Teaching Points:
Correct technique for passing
Depending on the age of the students the bases may need to be short in length given the passing may not be very far. This could also create an issue with defending students bunching up in the infield. Creating two games with smaller numbers can alleviate this issue.
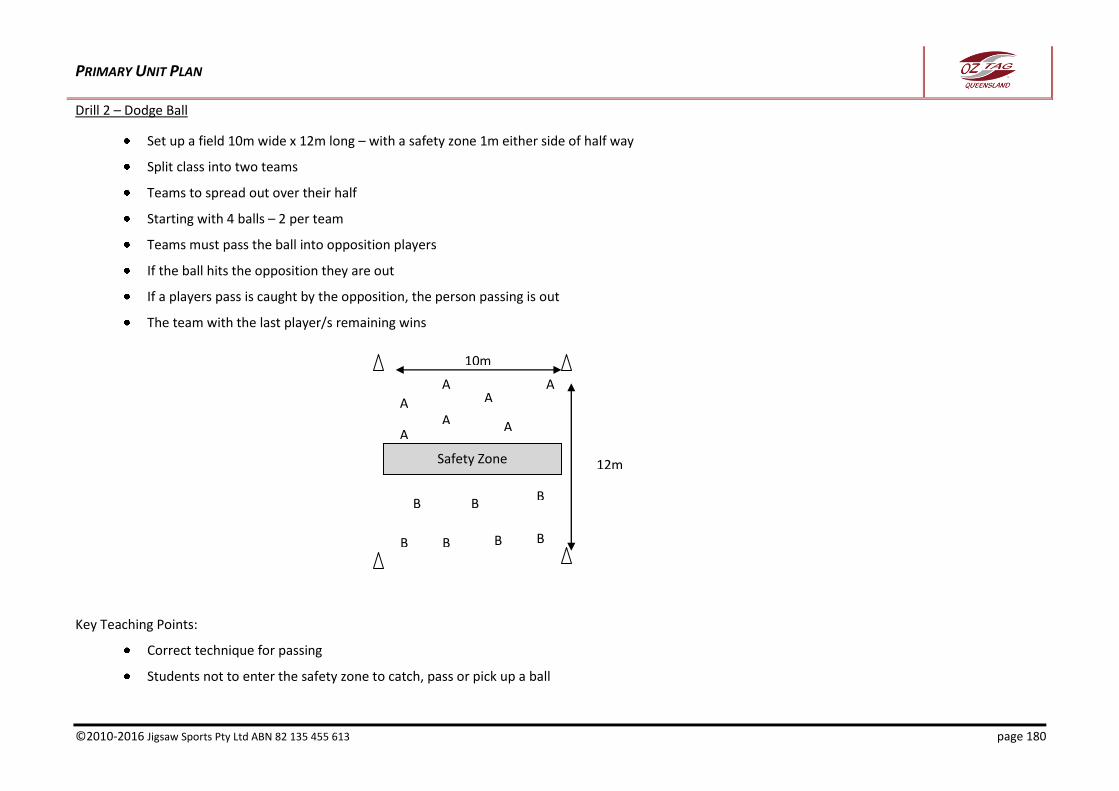
PRIMARY UNIT PLAN
©2010-2016 Jigsaw Sports Pty Ltd ABN 82 135 455 613 page 180
Drill 2 – Dodge Ball
Set up a field 10m wide x 12m long – with a safety zone 1m either side of half way
Split class into two teams
Teams to spread out over their half
Starting with 4 balls – 2 per team
Teams must pass the ball into opposition players
If the ball hits the opposition they are out
If a players pass is caught by the opposition, the person passing is out
The team with the last player/s remaining wins
Key Teaching Points:
Correct technique for passing
Students not to enter the safety zone to catch, pass or pick up a ball
12m
10m
Safety Zone
B
B
B
B
B
B B
A
A
A
A
A
A
A

PRIMARY UNIT PLAN
©2010-2016 Jigsaw Sports Pty Ltd ABN 82 135 455 613 page 181
Kicking
Drill 1 - Bullseye
Set up 6 markers 1m apart in a straight line
Have 7th marker 10m back from the middle of the line
Students are to grubber kick for accuracy
o In between the 1st two marker (them idle goal) = 3 points
o The next goal to the right and left = 2 points
o And the final goal to the right and left = 1 point
Student receive 5 kicks each – highest score wins
No points are relieved for kicking outside the goals or if the kick is not a grubber
Key Teaching Points:
Head down over the ball
Don’t lean back when kicking
Hold ball straight down so that it is vertical when you kick it – fingers running straight down the ball
Kick the top of the ball to make it roll end over end
Grubber kick
3 pts 2 pts 1 pts 1 pts 2 pts
10m
PRIMARY UNIT PLAN
©2010-2016 Jigsaw Sports Pty Ltd ABN 82 135 455 613 page 182
Drill 2 – Drop Kick Competition
Conduct a drop kick competition
Set up different markers surrounding football posts
Each student to receive 1 kick from each position
The student with the most number of successful kicks wins
Variations:
o kicking for distance i.e. longest drop goal
o create a ‘money’ ball from one of the position – this ball is worth more points if the kick is successful
Key Teaching Points:
Head down over the ball
Don’t lean back when kicking
Hold ball straight down so that it is vertical when you drop it
Ball should be dropped so that the point of it hits the ground
Time the kick so that you half volley it i.e. kick at just as the ball bounces up
Kick the bottom of the ball with the top of your foot
Attacking Moves
Drill 1 - Drift
Explain principle of the ‘drift’:
o Attacker 1 (ball carrier) and attacker 2 (1st receiver) run diagonally forward with ball carrier looking to pass the ball to 1st receiver.
o Attacker 3 (2nd receiver) runs back underneath both ball carrier and 1st receiver
o Ball carrier passes the ball to 2nd receiver
o 2nd receiver straightens run into gap that has been created
PRIMARY UNIT PLAN
©2010-2016 Jigsaw Sports Pty Ltd ABN 82 135 455 613 page 183
Demonstrate to the class
Have students practice in the grid set up above – use 3 attackers and 3 defenders
Key Teaching Points:
2nd receiver to run back inside late – if leave too early than defence can react
All attackers to run straight first - this commits defenders
Ball carrier to run to gap between defender 1 and 2
Ball carrier to pass the ball facing the 2nd receiver i.e. do no pass the ball blind
2nd receiver to straighten run into gap that would have been created by defender 1
The 1st receiver must also be ready to receive the ball
Drill 2 – Block
Explain principle of the ‘block’:
o Attacker 3 (2nd receiver) acts as a decoy (block)
o 2nd receiver runs towards gap in between defender 3 and 2
B 2 B 1
A 1 A 2
A 3
B 3
PRIMARY UNIT PLAN
©2010-2016 Jigsaw Sports Pty Ltd ABN 82 135 455 613 page 184
o Attacker 2 (1st receiver) runs behind 2nd receiver towards gap created by defender 3
o Attacker 1 (ball carrier passes the ball to 1st receiver
Demonstrate to the class
Have students practice in the grid set up above – use 3 attackers and 3 defenders
Key Teaching Points:
1st receiver to run behind 2nd receiver late – if leave too early than defence can react
All attackers to run straight first - this commits defenders
Ball carrier to run to gap between defender 1 and 2
2nd reliever to run at gap in between 2nd and 3rd defender
1st receiver to straighten run into gap that would have been created by defender 3
The 2nd reliever (block) must also be ready to receive the ball
Decision Making/Reaction
Drill 1 – Retreat and Attack
Split class into 3 equal groups
B 2 B 1
A 1 A 2
A 3
B 3
PRIMARY UNIT PLAN
©2010-2016 Jigsaw Sports Pty Ltd ABN 82 135 455 613 page 185
Set up a grid 7m wide and 8m long – with additional markers at 5m long
Allocate 2 students to be defenders standing on the line created by 5m makers
The 2 groups are attackers and stand in 3 lines at the start of the grid
On the whistle the first 3 attackers move forward using any attacking moves and try to score a try, and the defenders must first run back to the 8m marker and then towards the attackers to make the tags
Key Teaching Points:
Reaction to what is in front of the – for both the defenders and attackers
Communication
Correct tagging technique
Correct tag evasion technique
Defenders to turn and face the ball when retreating
A A A A A
8m
B B B B B
D
5m
D
8m
C C C C C
PRIMARY UNIT PLAN
©2010-2016 Jigsaw Sports Pty Ltd ABN 82 135 455 613 page 186
Drill 2 – Ruck Plays
Set up a grid with 1 marker in the middle and 3 markers 2m back and spread out approx 2m apart either side so that it resembles a ruck in the middle and 3 attackers either side
Split the class up evenly so that there are students on each marker
From the ruck the teacher calls out a specific move and the students must complete that attacking move
Take it turn passing ball from ruck to left and right side
Introduce defenders if needed
Key Teaching Points:
Ensure students rotate positions
Don’t stand too deep in attack
Must be able to react to what the teacher calls immediately
Support players running correct lines to draw defenders and create holes
A A A A A
B B B B B
C C C C C
B B B B B
C C C C C
D D D D D
D D D D D