Embed Size (px)
Citation preview
EMC® Unisphere™ for VMAX™VERSION 8.1.0
Installation Guide
REV 01
Copyright © 2012 - 2015 EMC Corporation. All rights reserved. Published in the USA.
Published September, 2015
EMC believes the information in this publication is accurate as of its publication date. The information is subject to changewithout notice.
The information in this publication is provided as is. EMC Corporation makes no representations or warranties of any kind withrespect to the information in this publication, and specifically disclaims implied warranties of merchantability or fitness for aparticular purpose. Use, copying, and distribution of any EMC software described in this publication requires an applicablesoftware license.
EMC2, EMC, and the EMC logo are registered trademarks or trademarks of EMC Corporation in the United States and othercountries. All other trademarks used herein are the property of their respective owners.
For the most up-to-date regulatory document for your product line, go to EMC Online Support (https://support.emc.com).
2 Installation Guide
CONTENTS
Preface 11
Chapter 1: Pre-installation considerations 15
Before you begin 16
Unisphere Initial Setup User 16
Local, remote, and embedded installation options 16
Unisphere for VMAX licensing 17
Unisphere for VMAX Virtual Appliance 17
Unisphere Lockbox Password 17
X.509 certificate-based user authentication 18
Environment and system requirements 19
Network requirements 19
Solutions Enabler 19
Supported HYPERMAX OS/Enginuity versions 19
Host systems and storage operating environment 19
Concurrent users 19
Symmetrix Management Console 19
VMware and Hyper-V guests 20
Database Storage Analyzer requirements 20
EMC ControlCenter 20
Client screen requirements 20
Client browser requirements 21
Server requirements 21
Server requirements 21
Other requirements 22
Chapter 2: Installing Unisphere for VMAX 23
Pre-installation configuration 24
Setting the event and statistics daemons to autostart on Linux 24
Setting up the PostgreSQL user on Linux 24
Configuring for eNAS link and launch 25
Installing Unisphere for VMAX 26
Step 1: Accessing the software 26
Step 2: Installing the software 26
3
Step 2A: Installing Unisphere for VMAX using the wizard 27
Step 2B: Installing Unisphere for VMAX from the command line 28
Completing the installation 31
Configuring language and regional settings 31
Installing a Unisphere for VMAX license 31
Configuring third-party utilities 31
Importing CA certificates 32
Starting and stopping the performance database 32
Starting and stopping the SMAS service 34
Launching Unisphere for VMAX 35
Launching Database Storage Analyzer 36
Chapter 3: Upgrading Unisphere for VMAX 37
Upgrade paths 38
Before upgrading Unisphere for VMAX 39
Running the Unisphere for VMAX upgrade 40
Upgrading Unisphere for VMAX on Windows 40
Upgrading Unisphere for VMAX on Linux 40
After upgrading Unisphere for VMAX 41
Renewing link and launch client registrations 41
Restoring and verifying system and performance data 41
Chapter 4: Uninstalling Unisphere for VMAX 43
Before you begin 44
Uninstalling from Windows 45
Using Windows Add/Remove Programs 45
Using the command line 45
Using Windows Explorer 45
Uninstalling from Linux 46
Using the wizard 46
Using the command line 46
Chapter 5: Installing the Unisphere for VMAX virtual appliance 47
Introduction 48
Before you begin 50
Installing the virtual appliance directly on the ESX Server 51
Installing the virtual appliance through a vCenter Server 56
4 Installation Guide

Installing the virtual appliance using OVFTOOL 58
Using OVFTOOL 58
Launching Unisphere or the vApp Manager 61
Launching Unisphere 61
Launching the vApp Manager 61
Connecting to the API server 62
Setting the storevntd daemon to start automatically 62
Registering the VASA Provider with vSphere 63
Upgrading the Unisphere for VMAX Virtual Appliance using an ISO image 64
Re-configuring the virtual appliance IP address 66
Deleting the Unisphere for VMAX Virtual Appliance 68
Backing up and restoring the performance database 69
Backing up performance database files to another host 69
Restoring performance database files from another host 69
Installing licenses 71
Installing VMAX-based licenses 71
Installing host-based licenses 71
Appendix A: Technical notes 73
Technical notes 74
Managing thin pools 74
SYMAPI server 74
Local replication management 74
Advanced configuration settings 74
Resetting the host system stable values 74
Alerts 75
Protecting against POODLE SSL v3 vulnerability 75
Virtual Appliance Technical notes 76
Setting the LDAP user 76
Gatekeeper volumes 76
Host ESX Server configuration 76
Unisphere daemon service 76
Server hostname requirement 76
SSL certificate generation 76
Changing the IP address 76
SYMCLI commands executed/submitted as root 76
Least privileged permission requirements 77
5
Adding gatekeeper volumes 77
Appendix B: Security features 79
Authentication 80
Authorization 81
Appendix C: Replacing the Unisphere for VMAX and CA server certificates 85
Step 1: Obtaining the keystore password 85
Step 2: Generating a certificate request 85
Step 3: Importing the CA-signed certificate into the keystore 86
Step 4: Start the SMAS server 87
Appendix D: Configuring SMAS to work in z/OS 89
Configuring SMAS to work in z/OS 90
6 Installation Guide
FIGURES
Figure Page
Figure 1: Local installation: Unisphere for VMAX 16
Figure 2: Remote installation: Unisphere for VMAX on a server connected to a remote SYMAPIserver 17
7

8 Installation Guide
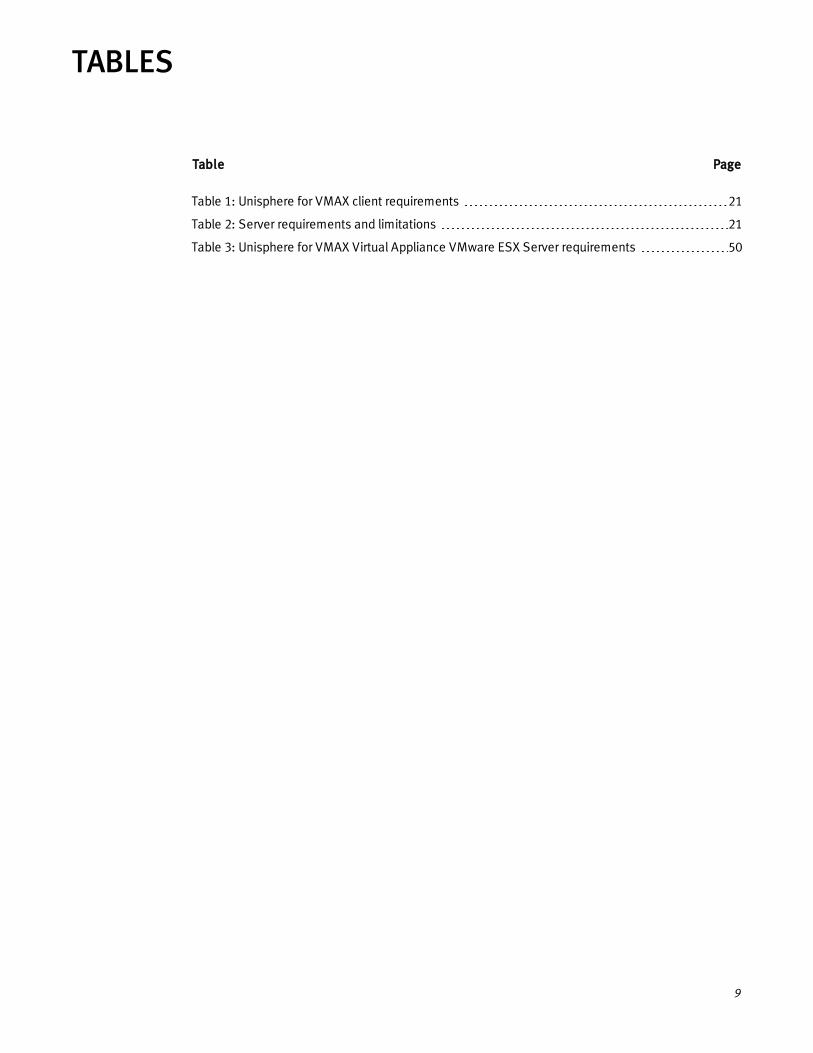
TABLES
Table Page
Table 1: Unisphere for VMAX client requirements 21
Table 2: Server requirements and limitations 21
Table 3: Unisphere for VMAX Virtual Appliance VMware ESX Server requirements 50
9

10 Installation Guide
Preface
As part of an effort to improve its product lines, EMC periodically releases revisions of its softwareand hardware. Therefore, some functions described in this document might not be supported by allversions of the software or hardware currently in use. The product release notes provide the mostup-to-date information on product features.
Contact your EMC representative if a product does not function properly or does not function asdescribed in this document.
This document was accurate at publication time. New versions of this document might be releasedon the EMC Online Support website. Check the EMC Online Support site https://support.EMC.comto ensure that you are using the latest version of this document.
Purpose
This document describes how to configure and use Unisphere for VMAX.
Audience
This document is intended for the host system administrator, storage administrator, systemprogrammer, or operator involved in managing VMAX systems.
Related documentation
The following related documents are available on the EMC Online Support Site athttps://support.EMC.com
◆ EMC Unisphere for VMAX Release Notes
◆ EMC Unisphere for VMAX Online Help
◆ EMC Solutions Enabler Installation Guide
◆ EMC Solutions Enabler Release Notes
◆ EMC Solutions Enabler SRM CLI Product Guide
◆ EMC Solutions Enabler CLI Command Reference
◆ EMC VMAX Family Security Configuration Guide
Conventions used in this document
EMC uses the following conventions for special notices:
Caution, used with the safety alert symbol, indicates a hazardous situation which, if not avoided,could result in minor or moderate injury.
Notice is used to address practices not related to personal injury.
A Note presents information that is important, but not hazard-related.
WARNING indicates a hazardous situation which, if not avoided, could result in death or seriousinjury.
Installation Guide 11
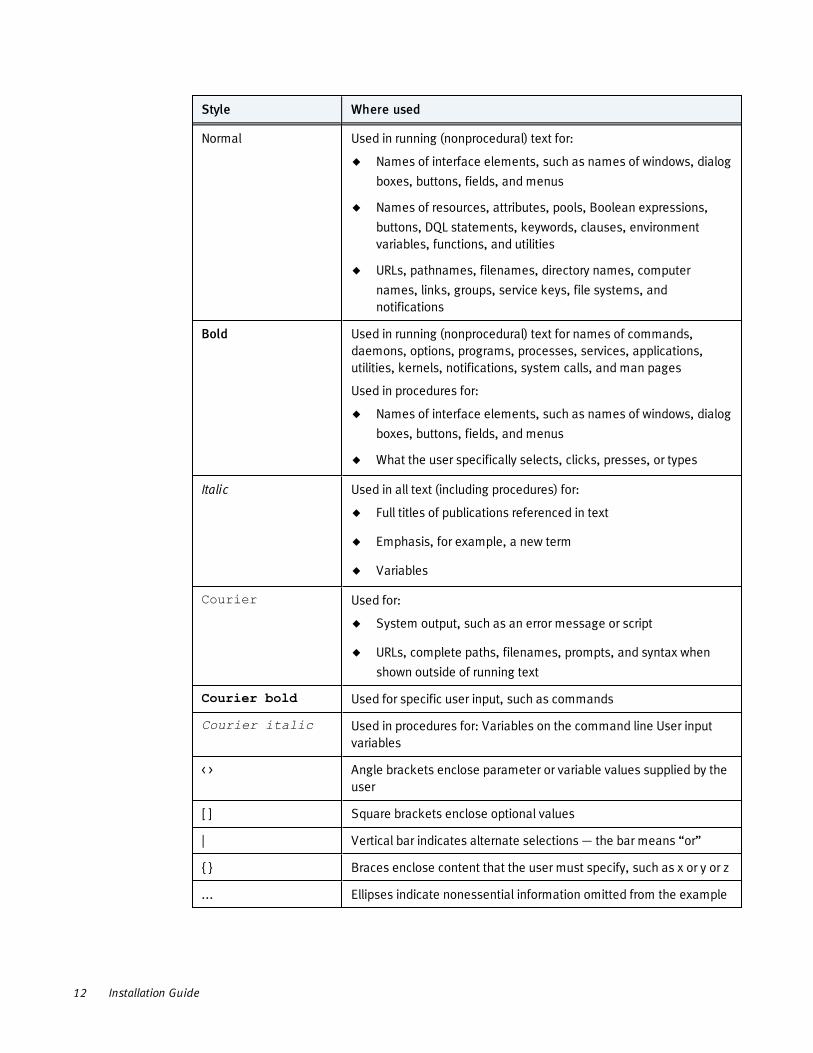
Style Where used
Normal Used in running (nonprocedural) text for:
◆ Names of interface elements, such as names of windows, dialog
boxes, buttons, fields, and menus
◆ Names of resources, attributes, pools, Boolean expressions,
buttons, DQL statements, keywords, clauses, environmentvariables, functions, and utilities
◆ URLs, pathnames, filenames, directory names, computer
names, links, groups, service keys, file systems, andnotifications
Bold Used in running (nonprocedural) text for names of commands,daemons, options, programs, processes, services, applications,utilities, kernels, notifications, system calls, and man pages
Used in procedures for:
◆ Names of interface elements, such as names of windows, dialog
boxes, buttons, fields, and menus
◆ What the user specifically selects, clicks, presses, or types
Italic Used in all text (including procedures) for:
◆ Full titles of publications referenced in text
◆ Emphasis, for example, a new term
◆ Variables
Courier Used for:
◆ System output, such as an error message or script
◆ URLs, complete paths, filenames, prompts, and syntax when
shown outside of running text
Courier bold Used for specific user input, such as commands
Courier italic Used in procedures for: Variables on the command line User inputvariables
< > Angle brackets enclose parameter or variable values supplied by theuser
[ ] Square brackets enclose optional values
| Vertical bar indicates alternate selections — the bar means “or”
{ } Braces enclose content that the user must specify, such as x or y or z
... Ellipses indicate nonessential information omitted from the example
12 Installation Guide
Where to get help
EMC support, product, and licensing information can be obtained on the EMC Online Support site asdescribed next.
To open a service request through the EMC Online Support site, you must have a valid supportagreement. Contact your EMC sales representative for details about obtaining a valid supportagreement or to answer any questions about your account.
Product information
For documentation, release notes, software updates, or for information about EMC products,licensing, and service, refer to EMC online support at: https://support.EMC.com.
Technical support
EMC offers a variety of support options.
Support by Product— EMC offers consolidated, product-specific information on the Web at:
https://support.EMC.com/products.
The Support by Product web pages offer quick links to Documentation, White Papers, Advisories(such as frequently used Knowledgebase articles), and Downloads, as well as more dynamiccontent, such as presentations, discussion, relevant Customer Support Forum entries, and a link toEMC Live Chat.
EMC Live Chat— Open a Chat or instant message session with an EMC Support Engineer.
eLicensing support
To activate your entitlements and obtain your VMAX license files, visit the Service Center onhttps://support.EMC.com, as directed on your License Authorization Code (LAC) letter emailed toyou.
For help with missing or incorrect entitlements after activation (that is, expected functionalityremains unavailable because it is not licensed), contact your EMC Account Representative orAuthorized Reseller.
For help with any errors applying license files through Solutions Enabler, contact the EMC CustomerSupport Center.
If you are missing a LAC letter, or require further instructions on activating your licenses through theOnline Support site, contact EMC's worldwide Licensing team at [email protected] or call:
◆ North America, Latin America, APJK, Australia, New Zealand: SVC4EMC (800-782-4362) and
follow the voice prompts.
◆ EMEA: +353 (0) 21 4879862 and follow the voice prompts.
Your comments
Your suggestions will help us to improve the accuracy, organization, and overall quality of the userpublications. Send your opinions of this document to:
Installation Guide 13

14 Installation Guide
Pre-installation considerations
This section contains steps and information you need to take and consider before the actualinstallation happens.
Before you begin 16
Environment and system requirements 19
Installation Guide 15
CHAPTER 1
Before you beginThe following sections contain steps to take and information to consider before beginning theinstallation.
Unisphere Initial Setup UserWhile installing the software, you are prompted to specify a Unisphere Initial Setup User. You caneither specify the user ID you currently use to access the storage system (if User Authorization isenabled), or you can use the default user ID smc. If you plan on using the default ID, there must beno user IDs listed in the User Authorization database. If there are user IDs in the database(regardless of whether user authorization is enabled), then you must use SYMCLI to add the defaultuser ID (smc) to the database.
For more information about users and roles, see Security features on page 79.
The role of the Unisphere Initial Setup User is to install and set up the Unisphere environment(create users and add roles). It is intended to be a temporary role as it allows you only to performadministrative tasks on storage systems that do not have defined user roles (authorization rules).After an Administrator or a SecurityAdmin is assigned to a storage system, the Unisphere InitialSetup User can no longer access or even see the system from the Unisphere console. Therefore, it isrecommended that users do not operate in this role for any longer than necessary.
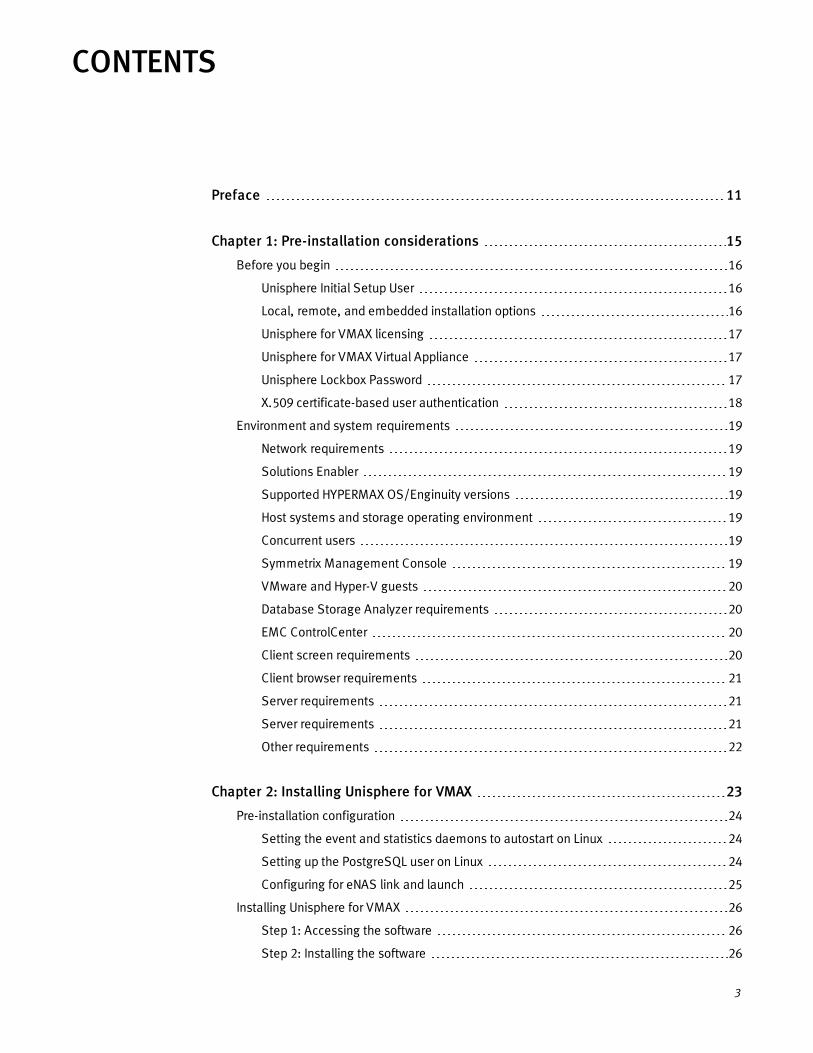
Local, remote, and embedded installation optionsUnisphere for VMAX can be installed in local, remote, or embedded configurations.
In a local configuration, install the Unisphere for VMAX software on a server running SolutionsEnabler attached to storage systems (see the Unisphere server in Figure 1).
Unisphere
Server
Unisphere Clients
SRDF
Figure 1: Local installation: Unisphere for VMAX
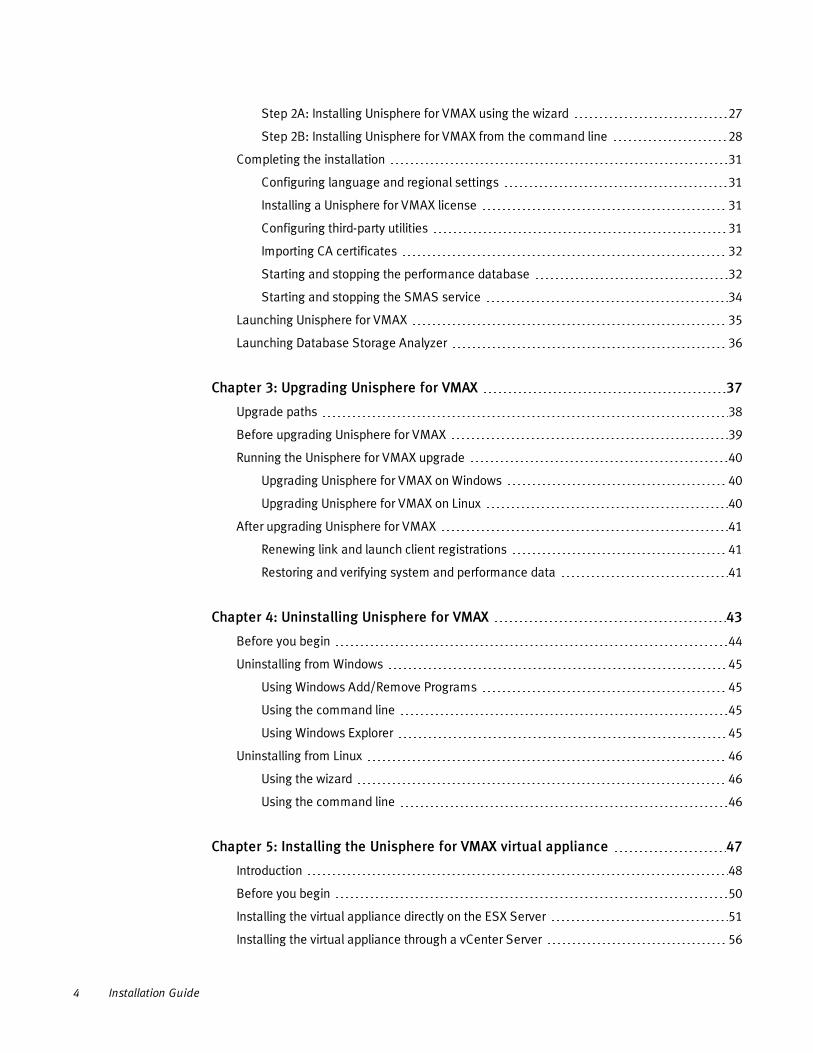
In a remote configuration, install the Unisphere software on a server connected to the SYMAPIserver (see the Unisphere server in Figure 2).
Before you begin
16 Installation Guide
Figure 2: Remote installation: Unisphere for VMAX on a server connected to a remote SYMAPIserver
Alternatively, starting with HYPERMAX OS Q3 2015, you can manage VMAX3 arrays using theEmbedded Management (eManagement) container application. eManagement embeds VMAX3management software (Solutions Enabler, SMI-S, Unisphere for VMAX) on the VMAX3 array,enabling management of the array without requiring software installed on a host.
Unisphere for VMAX licensingUnisphere for VMAX uses VMAX-based eLicensing.
As a result, you can only manage a storage system from a Unisphere host, if the storage arraycontains a Unisphere for VMAX (SMC) eLicense. However, you can use Unisphere for VMAX toobtain and install the proper eLicense on the storage system.
Storage systems running Enginuity 5875.198.148 or lower do not require a license key.
After a storage system that has been managed by SMC is upgraded to Enginuity 5876 or higher,Unisphere will operate with the storage array even if the proper eLicense is not present. TheUnisphere for VMAX (SMC) eLicense is noted as In Use in the Unisphere eLicensing report. Thisdesignation means that the required eLicense is missing, but access to the system is still allowed toavoid service disruption. To clear this designation, you must obtain and apply the proper eLicense.
With the incorporation of Performance Analyzer into Unisphere for VMAX, the former SymmetrixPerformance Analyzer host-based eLicense is no longer required.
For more information on eLicensing, refer to the EMC Solutions Enabler Installation Guide.
Unisphere for VMAX Virtual ApplianceThe Unisphere for VMAX virtual appliance (vApp) is available for ESX/ESXi V4.0 (and higher) serversin a VMware environment.
For more information and instructions on installing the appliance, refer to the Installing theUnisphere for VMAX Virtual Appliance chapter.
Unisphere Lockbox PasswordIn previous releases, a lockbox was created at installation time. The lockbox is a vault containinguser and password information, secured with a key. As a security improvement, you can nowconfigure a password, known as the Unisphere Lockbox Password, for the lockbox.
Before you begin
Installation Guide 17
As part of the installation, you can accept the default password (host_name@Smas-1) or you canconfigure a custom one. If you configure a password other than the default one, you will need thatpassword to perform any subsequent upgrades or support operations that require access to thelockbox.
X.509 certificate-based user authenticationCertificate-based user authentication using X.509 certificates is supported on fresh installations onWindows and Linux servers. You can use a certificate issued by a trusted public third-party certificateauthority (CA) to authenticate your identity when using the Unisphere for VMAX web client or RESTAPI interfaces. The use of digital identity smartcards such as Common Access Card (CAC) andPersonal Identity Verification (PIV) as part of a multi-factor authentication process is also supported.
You can enable certificate-based user authentication as part of the installation and after you haveconfirmed your intentions, the choice becomes irreversible. You must import the CA certificatesbefore certificate-based user authentication can be used.
The EMC VMAX Family Security Configuration Guide provides additional details about certificatemanagement.
Before you begin
18 Installation Guide
Environment and system requirementsThe Unisphere web server is supported on the platforms listed in Table 2 on page 21. Unisphere forVMAX can be used in remote client/server mode to communicate with SYMAPI servers on othersystems, including supported versions of AIX, Linux, Solaris, HP-UX, z/OS, and Windows.
Network requirementsPrior to installing Unisphere for VMAX, verify that the host is in a properly configured IP network andthat it can resolve IP addresses and hostnames.
When installing, the use of IPv6 addresses is supported.
Solutions EnablerSolutions Enabler 64-bit V8.1.0 is required in local and client/server modes. In client/server mode,the storsrvd daemon must be running on the server.
In V8.0.2, and higher, the Solutions Enabler STP daemon collects data using a new format.Therefore, features that rely on the earlier STP data format (for example, the Performance Analyzer)will not support the Solutions Enabler V8.0.2, or higher, STP daemon.
Supported HYPERMAX OS/Enginuity versionsUnisphere for VMAX V8.1.0 supports:
◆ VMAX Family systems running HYPERMAX OS 5977 or higher
◆ Symmetrix VMAX 10K/20K/40K Series systems running Enginuity 5876
◆ Symmetrix DMX systems running Enginuity 5671 and 5773
Host systems and storage operating environmentUnisphere for VMAX runs on a wide range of operating systems and works with certain Enginuityand HYPERMAX OS versions. For detailed interoperability information, refer to E-Lab InteroperabilityNavigator at https://support.EMC.com.
Concurrent usersUnisphere for VMAX supports up to 10 concurrent users, with performance degradation occurringwith more than three users.
Symmetrix Management ConsoleUnisphere cannot be installed on the same host as SMC because Unisphere for VMAX andSMC/SPA are not qualified to run on the same machine together due to system resourcerequirements. However, they can run on separate virtual machines (VMs) on the same server,provided that each VM meets the system and memory requirements.
Environment and system requirements
Installation Guide 19
VMware and Hyper-V guestsUnisphere for VMAX is supported on a guest operating system on the following platforms, providedthe guest is listed in the EMC Support Matrix and in VMware/Hyper-V support documentation, andUnisphere for VMAX supports the platform. Note that the guest must provide the same CPU,memory, disk, gatekeeper, and other requirements as if Unisphere for VMAX were installed on aphysical machine:
◆ VMware ESX/ESXi Server versions 4.0, 4.1, 5.0, 5.1, 5.5, and 6.0 (and all updates of each
version).
◆ Windows Server versions 2008 R2 (Standard and Enterprise), 2012, and 2012 R2.
Virtual machines must not run on shared memory or resources.
Database Storage Analyzer requirementsDatabase Storage Analyzer monitors the performance of the following databases:
◆ Oracle (version 10g or higher)
◆ SQL Server (2008, or higher)
The following operating systems are supported:
◆ AIX, version 5.2 and above (64-bit)
◆ Sun Solaris 10 and above (64-bit, SPARC only)
◆ Red Hat Enterprise Linux 5 and above (64-bit)
◆ Linux SUSE 10 and higher
◆ Oracle Linux Server release 5 and higher
◆ HP UX Itanium, version 11.23 and higher
You can use VMware VMDK virtual disks and RDM virtual environments. Other virtual environments(Solaris containers, AIX VIO, VPLEX, and so on) are not supported.
A monitored Oracle database must have an Oracle diagnostic pack license.
EMC ControlCenterUnisphere cannot be installed on the same host as EMC ControlCenter agents because Unisphererequires a 64-bit version of Solutions Enabler and ControlCenter agents require a 32-bit version ofSolutions Enabler.
Client screen requirementsThe minimum client screen resolution required is 1280 x 1024.
Environment and system requirements
20 Installation Guide
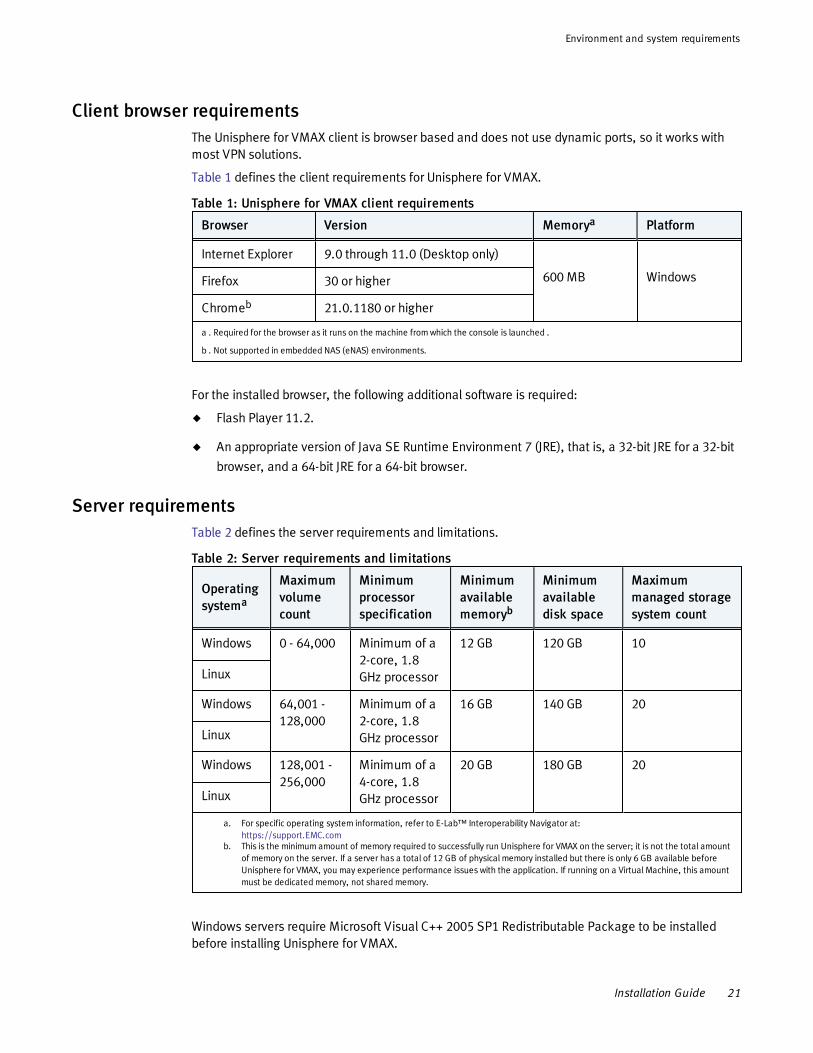
Client browser requirementsThe Unisphere for VMAX client is browser based and does not use dynamic ports, so it works withmost VPN solutions.
Table 1 defines the client requirements for Unisphere for VMAX.
Browser Version Memorya Platform
Internet Explorer 9.0 through 11.0 (Desktop only)
600 MB WindowsFirefox 30 or higher
Chromeb 21.0.1180 or higher
a . Required for the browser as it runs on the machine from which the console is launched .
b . Not supported in embedded NAS (eNAS) environments.
Table 1: Unisphere for VMAX client requirements
For the installed browser, the following additional software is required:
◆ Flash Player 11.2.
◆ An appropriate version of Java SE Runtime Environment 7 (JRE), that is, a 32-bit JRE for a 32-bit
browser, and a 64-bit JRE for a 64-bit browser.
Server requirementsTable 2 defines the server requirements and limitations.
Operatingsystema
Maximumvolumecount
Minimumprocessorspecification
Minimumavailablememoryb
Minimumavailabledisk space
Maximummanaged storagesystem count
Windows 0 - 64,000 Minimum of a2-core, 1.8GHz processor
12 GB 120 GB 10
Linux
Windows 64,001 -128,000
Minimum of a2-core, 1.8GHz processor
16 GB 140 GB 20
Linux
Windows 128,001 -256,000
Minimum of a4-core, 1.8GHz processor
20 GB 180 GB 20
Linux
a. For specific operating system information, refer to E-Lab™ Interoperability Navigator at:https://support.EMC.com
b. This is the minimum amount of memory required to successfully run Unisphere for VMAX on the server; it is not the total amountof memory on the server. If a server has a total of 12 GB of physical memory installed but there is only 6 GB available beforeUnisphere for VMAX, you may experience performance issues with the application. If running on a Virtual Machine, this amountmust be dedicated memory, not shared memory.
Table 2: Server requirements and limitations
Windows servers require Microsoft Visual C++ 2005 SP1 Redistributable Package to be installedbefore installing Unisphere for VMAX.
Environment and system requirements
Installation Guide 21
Other requirements
◆ Ensure that DNS is configured correctly on the host.
◆ The host system must have connectivity to one or more storage systems to add users and set
permissions in Unisphere.
◆ Unisphere for VMAX can be installed on the same system as the SYMAPI server, or on a system
connected to the SYMAPI server. Refer to Figure 1 on page 16 and Figure 2 on page 17,respectively.
◆ Before you attempt to install Unisphere for VMAX on Red Hat Linux 6.0 or a later release, verify
that the following packages are installed. Not all installer packages include these libraries bydefault, so it is important to verify their presence before running the installation program. Donot attempt to run the installation process without them. Without these items, the product failsto install and does not function properly.The packages are:
• libstdc++-devel-4.4.4-13.el6.x86_64.rpm
• libstdc++-4.4.4-13.el6.x86_64.rpm
• libaio-0.3.107-10.el6.x86_64.rpm
• ncurses-libs-5.7-3.20090208.el6.x86_64.rpm
◆ To install PostgreSQL on Linux, a minimum of 2 GB of shared memory must be available.
For more information about how to configure the size of a shared memory segment, using theshmmax kernel parameter, see the documentation for your operating system.
◆ If you are changing your SYMAPI connection type, such as changing from a local connection to
a client/server configuration, you must perform a fresh installation.
◆ Before installing Unisphere for VMAX on a host running Linux, ensure that the maximum
number of open file descriptors allowed is at least 4096. To do this, complete the followingsteps:
a. Check the current limit for the number of open file descriptors. At the command line, enterthe following command:
ulimit -n
b. If the value returned is less than 4096, set it to the correct limit:
ulimit -n 4096
Environment and system requirements
22 Installation Guide
Installing Unisphere for VMAX
This section describes how to access, install, and run the Unisphere for VMAX software.
Pre-installation configuration 24
Installing Unisphere for VMAX 26
Completing the installation 31
Launching Unisphere for VMAX 35
Launching Database Storage Analyzer 36
Installation Guide 23
CHAPTER 2
Pre-installation configurationBefore you install Unisphere for VMAX, complete the following tasks if they are appropriate for yourinstallation environment:
◆ Setting the event and statistics daemons to autostart on Linux below
◆ Setting up the PostgreSQL user on Linux below
◆ Configuring for eNAS link and launch on the facing page
Setting the event and statistics daemons to autostart on LinuxTo install Unisphere for VMAX on a local Linux 64-bit host, complete this task.
To set the event and statistics daemons to autostart:
1. Set the event and statistics daemons to autostart using the following commands:
stordaemon install storevntd -autostart
stordaemon install storstpd -autostart
2. Start the same daemons using the following commands:
stordaemon start storstpd
stordaemon start storevntd
Setting up the PostgreSQL user on LinuxBefore starting a new installation of Unisphere for VMAX on Linux, the PostgreSQL user(postgres) and group (postgres), must be present. In addition, the user must be a member ofthe postgres group.
Use the following commands to create the postgres group and add the postgres user to thepostgres group:
groupadd postgresuseradd -g postgres postgres
Pre-installation configuration
24 Installation Guide
Configuring for eNAS link and launchIf you plan to use the embedded NAS (eNAS) link and launch functionality, you must perform somemanual configuration before you install Unisphere for VMAX.
To configure for eNAS link and launch:
1. Open the following configuration file for editing:
• On Linux systems: /etc/hosts
• On Windows systems: C:\Windows\System32\drivers\etc\hosts
2. Add a mapping for the IP address (in either IPv4 or IPv6 format) and the host name, followingthe format used by the examples in the file.
3. Save the file and exit.
Further configuration must be performed after Unisphere for VMAX has been installed. For moreinformation, refer to the Unisphere for VMAX online help.
Pre-installation configuration
Installation Guide 25
Installing Unisphere for VMAXTo install Unisphere for VMAX:
◆ Step 1: Accessing the software below
◆ Step 2: Installing the software below
◆ Step 2A: Installing Unisphere for VMAX using the wizard on the facing page
◆ Step 2B: Installing Unisphere for VMAX from the command line on page 28
Step 1: Accessing the softwareThe Unisphere for VMAX V8.1.0 software and documentation is available on EMC Online Support at:
https://support.EMC.com
It consists of the following:
◆ For Windows 64-bit:UNIVMAX_V8.1.0.x_WINDOWS_X86_64.exe
◆ For Linux 64-bit:UNIVMAX_V8.1.0.x_LINUX_X86_64.bin
◆ For Virtual Appliance:univmaxpa810_x_suse11__x86_64_vapp_OVF10.ova
In the file names above, x represents the software build number. That number varies, based onwhen the software was built.
◆ Unisphere for VMAX Online Help
◆ Unisphere for VMAX Release Notes
◆ This installation guide.
To access the software from online support:
1. On the EMC Online Support site:
a. Click Support By Product in the main navigation bar.
b. In the Find a Product box, type Unisphere for VMAX and click the arrow.
c. Locate the appropriate kit and download it to a directory on the host drive.
2. Continue with Step 2: Installing the software.
Step 2: Installing the softwareYou can install Unisphere for VMAX using an installation wizard, as described in Step 2A: InstallingUnisphere for VMAX using the wizard , or from the command line, as described in Step 2B: InstallingUnisphere for VMAX from the command line.
Installing Unisphere for VMAX
26 Installation Guide
Step 2A: Installing Unisphere for VMAX using the wizard
To install Unisphere for VMAX using the wizard:
1. Save all files and exit all applications.
2. Change the directory to the location of the kit and run the appropriate executable for youroperating system.
To install Unisphere for VMAX using the wizard in Linux, the display manager must be enabledand the -i swing switch used, for example:
./UNIVMAX_V8.1.0.x_LINUX_X86_64.bin -i swing
If the display manager is not enabled or the -i swing is not used, the installer defaults toconsole mode.
3. On the Introduction page, review the recommendations and click Next.
4. On the Choose Install Folder page, click Next to accept the default directory, or click Chooseto select another directory.
5. On the Initial Setup User and SymAPI Configuration page:
a. Specify a Unisphere Initial Setup User name (default is smc). You can either accept thedefault or use your Windows username if you have authorization enabled on the Unisphereserver host. For more information about the role of the Unisphere Initial Setup User, seeUnisphere Initial Setup User on page 16.
b. Specify a SymAPI Connection Type for the initial login based on the following:
Local — On a host with Solutions Enabler installed and attached to VMAX systems.
Remote— On a remote server connected to a SYMAPI server, specify the SYMAPI serverNode Name and Net Port. The default net port for SYMAPI is 2707.
For more information about each of the connection types, see Local, remote, andembedded installation options on page 16.
c. Click Next.
6. On the Ports Configuration page, specify the ports to use or enable when connecting to theUnisphere server.
The default ports of the Unisphere server (HTTPS Port No) and performance database (DB PortNo) are shown. To use the default ports, verify that they are available, and click Next to acceptand enable them. Or you can specify and enable different ports, and click Next.
7. On the Unisphere Lockbox Password page, configure the lockbox password.
Note: If you configure a Unisphere Lockbox Password other than the default one, ensure thatyou take note of the new password. You will need it for subsequent upgrade and supportoperations.
To accept the default lockbox password, click Next.
To change the lockbox password, complete the following steps:
a. Select Overwrite default Unisphere lockbox password?.
b. In the Lockbox Password field, type the new lockbox password.
c. In the Confirm Lockbox Password field, type the new lockbox password again.
d. Click Next
Installing Unisphere for VMAX
Installation Guide 27
e. In the Default Lockbox Password dialog box, click OK.
8. (Optional) On the X.509 Certificate-based Client Authentication page, configure certificate-based user authentication options. The default behavior is for X.509 certificate-basedauthentication to remain disabled.
To enable X.509 certificate-based authentication, complete the following steps:
a. Select Enable certificate based client authentication?.
b. Specify whether to use the CN or UPN of the client certificate as the certificate alias.Note that instances of the following special characters are stripped from the alias:@:?;|<>[]+=,*/\
c. Click Next.
d. On the Confirm Client Authentication dialog box, click OK.
If you enable X.509 certificate-based authentication, after installation completes, import thecertificate and start SMAS manually. For more information, refer to Importing CA certificates onpage 32 and Starting and stopping the SMAS service on page 34.
9. If the disk space and/or memory requirements are not met, a warning is displayed. If you wantto continue with the installation regardless of the consequences described in the message,click OK.
10. On the Pre-Installation Summary page, verify the summary information, and click Install tocontinue the installation.
11. To install Unisphere for VMAX on a host with more than one network interface configured, youare prompted to choose the IP address to which Unisphere for VMAX will bind. On the Listening(bind) Address Selection page, select the server protocol (IPv4 or IPv6), select the IP address,and then click Next.
12. On the Install Complete page, click Done.
13. Refer to Completing the installation for instructions on completing the installation.
Step 2B: Installing Unisphere for VMAX from the command lineOnline help is available when installing from the command line by entering -?.
To install Unisphere for VMAX from the command line:
1. Save all files and exit all applications.
2. Change the directory to the location of the kit.
3. Run the following command to install Unisphere for VMAX on Windows:
KitName -i console
Run the following commands to install Unisphere for VMAX on Linux:
chmod +x KitName./KitName -i console
Where KitName is one of the following operating system-specific kit names:
• For Windows 64-bit:UNIVMAX_V8.1.0.x_WINDOWS_X86_64.exe
• For Linux 64-bit:UNIVMAX_V8.1.0.x_LINUX_X86_64.bin
Installing Unisphere for VMAX
28 Installation Guide
In the file names above, the x represents the software build number. That number varies basedon when the software was built.
4. On the Introduction panel, review the recommendations and press Enter.
5. On the Choose Install Folder panel, press Enter to accept the default directory, or specify adifferent directory and press Enter.
6. On the postgres User and Group panel, you are instructed to create the postgres group andpostgres user before continuing. When complete, press Enter.
7. On the Initial Setup User and SymAPI Configuration panel, complete the following steps:
a. Specify a Unisphere Initial Setup User name (default is smc).You can either accept the default username or use your Windows username if you haveauthorization enabled on the Unisphere server host. For more information about the role ofthe Unisphere Initial Setup User, see Unisphere Initial Setup User on page 16.
b. Specify a SymAPI Connection Type for the initial login based on the following:
Local — On a host with Solutions Enabler installed and attached to VMAX systems.
Remote— On a remote server connected to a SYMAPI server, specify the SYMAPI serverNode Name and Net Port. The default net port for SYMAPI is 2707.
For more information about each of the connection types, see Local, remote, andembedded installation options on page 16.
8. On the Ports Configuration panel, specify the ports to use or enable when connecting to theUnisphere server.
The default ports of the Unisphere server (HTTPS Port Number) and performance database (DBPort Number) are shown. To use the default ports, verify that they are available and press Enterto accept and enable them. Or you can specify and enable different ports, and press Enter.
9. On the Unisphere Lockbox Password panel, click Enter to accept the default lockboxpassword, or configure a new one and then press Enter.
Note: If you configure a Unisphere Lockbox Password other than the default one, ensure thatyou take note of the new password. You will need it for subsequent upgrade and supportoperations.
10. On the X.509 Certificate-based Client Authentication panel, configure certificate-based userauthentication options. The default behavior is for it not to be enabled.
To enable X.509 certificate-based authentication, complete the following steps:
a. At the Enable certificate based client authentication? prompt, type 2 for Yes.
b. Specify whether to use the CN or UPN of the client certificate as the certificate alias.Note that instances of the following special characters are stripped from the alias:@:?;|<>[]+=,*/\
c. Press Enter to continue.
d. On the Confirm Client Authentication panel, confirm your selection.
If you enable X.509 certificate-based authentication, after installation completes, import thecertificate and start SMAS manually. For more information, refer to Importing CA certificates onpage 32 and Starting and stopping the SMAS service on page 34.
11. If the disk space and/or memory requirements are not met, a warning is displayed. If you wantto continue with the installation regardless of the consequences described in the message,type 1.
Installing Unisphere for VMAX
Installation Guide 29
12. On the Pre-Installation Summary panel, verify the summary information, and then press Enterto continue the installation.
13. On the Listening(bind) Address Selection panel, to install Unisphere for VMAX on a host withmore than one network interface configured, you are prompted to choose the IP address towhich Unisphere for VMAX will bind and specify if it is an IPv4 or an IPv6 address.
14. On the Installation Complete panel, press Enter.
15. Refer to Completing the installation for instructions on completing the installation.
Installing Unisphere for VMAX
30 Installation Guide
Completing the installationThis section describes the tasks to perform after the installation has been completed:
◆ Configuring language and regional settings below
◆ Installing a Unisphere for VMAX license below
◆ Configuring third-party utilities below
◆ Importing CA certificates on the next page
◆ Starting and stopping the performance database on the next page
◆ Starting and stopping the SMAS service on page 34
Configuring language and regional settingsFor Windows users outside the United States, you must configure your regional and languagesettings to English (United States) if you plan on using the graph feature of the Quality of Service(QoS) and Replication Monitors.
The exact steps you need to follow might vary from those listed here, depending on the version ofWindows you are using.
To configure the language and regional settings:
1. Stop the EMC SMAS service (if it is running). See Starting and stopping the SMAS service onpage 34.
2. In the Windows Control Panel, double-click Regional and Language Options.
3. On the Regional Options tab, set the Standards and formats to English (United States).
4. On the Advanced tab, set the Language for non-Unicode programs to English (United States)and select Apply all setting to the current user account and to the default user profile.
5. Restart the service.
Installing a Unisphere for VMAX licenseBefore you can manage a VMAX array running Enginuity 5876 or higher, you must install aUnisphere for VMAX (SMC) eLicense on the VMAX array. For instructions on installing licenses, referto Installing Licenses in the Unisphere for VMAX online help.
Configuring third-party utilitiesTo ensure that third-party software utilities (including virus scanning and backup tools) do not affectthe operation of the Unisphere for VMAX software installed on the host, you might need to carry outsome additional configuration.
Exclude the install_dir\SYMAPI\stp\spa directory and all subdirectories from any virusscan.
Exclude the performance database directory,install_dir\SMAS\jboss\standalone\data\pgsql\data, and all subdirectories, fromthe actions performed by any third-party software utility.
Completing the installation
Installation Guide 31
Not following this advice may lead to data corruption in the performance database orproblems with data collection.
Importing CA certificatesIf you chose to use certificate-based user authentication at installation time, import the CAcertificates before you login.
You must have root/administrator permissions to complete this task.
When certificate-based user authentication is chosen at install time, the SMAS service does notstart automatically after installation completes. After you have imported the CA certificates,manually start the SMAS service.
For more information about starting the SMAS service see Starting and stopping the SMAS serviceon page 34.
To import a CA certificate:
1. Open the domain.xml.init file.
For Linux:
install_dir/jboss/domain/configuration/domain.xml.init
For Windows:
install_dir\jboss\domain\configuration\domain.xml.init
2. Search for the instance of "ssl key-alias="tomcat" password=password"
3. Take note of the value of the password attribute.
4. For each root CA and intermediate CA certificate, run the appropriate commands.
For Windows:
cd install_dir\SMAS\jboss\bin
service.bat importcacert password CA_cert_alias CA_file_path
For Linux:
cd install_dir/SMAS/jboss/bin
initcst.sh importcacert password CA_cert_alias CA_file_path
Where:
• password is the password of the keystore, discovered in step 3.
• CA_cert_alias is the alias of the CA cert chosen at installation time.Note that when either the CN or UPN is chosen as the alias for the CA cert, instances of thefollowing special characters are stripped from the alias:@:?;|<>[]+=,*/\
• CA_file_path is the path to the CA certificate file.
Starting and stopping the performance databaseIf required to do so, you can start and stop the performance database manually.
Completing the installation
32 Installation Guide
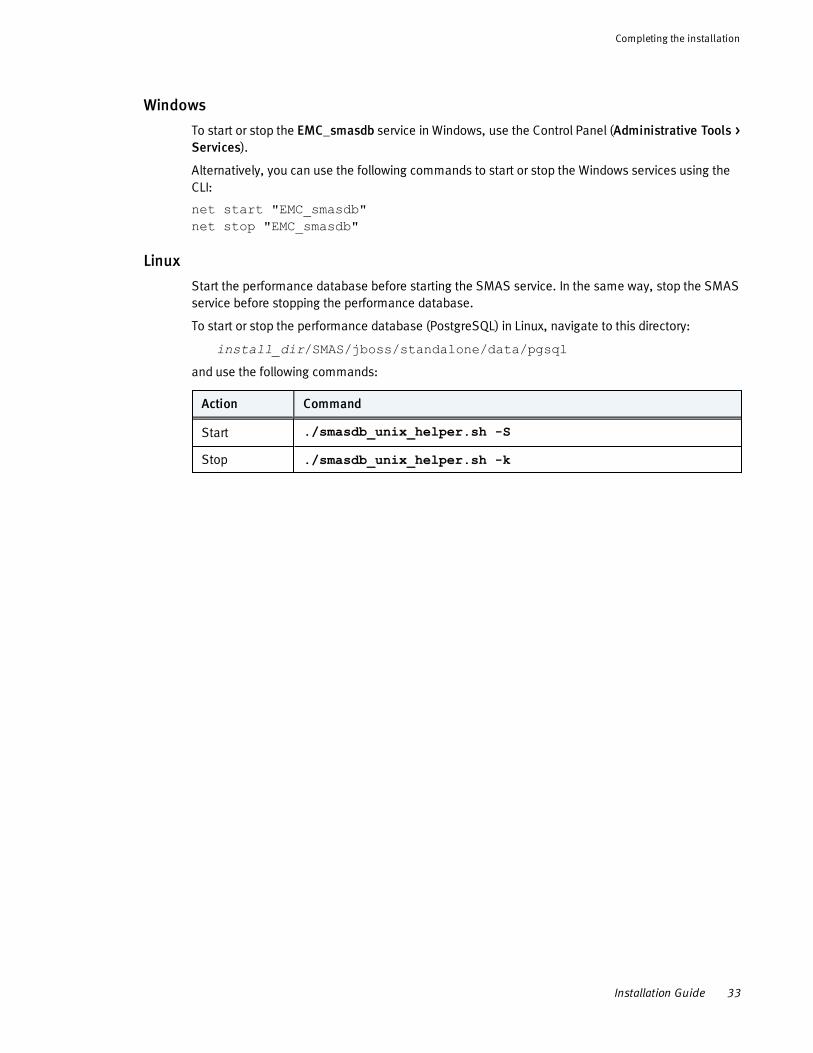
Windows
To start or stop the EMC_smasdb service in Windows, use the Control Panel (Administrative Tools >Services).
Alternatively, you can use the following commands to start or stop the Windows services using theCLI:
net start "EMC_smasdb"net stop "EMC_smasdb"
Linux
Start the performance database before starting the SMAS service. In the same way, stop the SMASservice before stopping the performance database.
To start or stop the performance database (PostgreSQL) in Linux, navigate to this directory:
install_dir/SMAS/jboss/standalone/data/pgsql
and use the following commands:
Action Command
Start ./smasdb_unix_helper.sh -S
Stop ./smasdb_unix_helper.sh -k
Completing the installation
Installation Guide 33
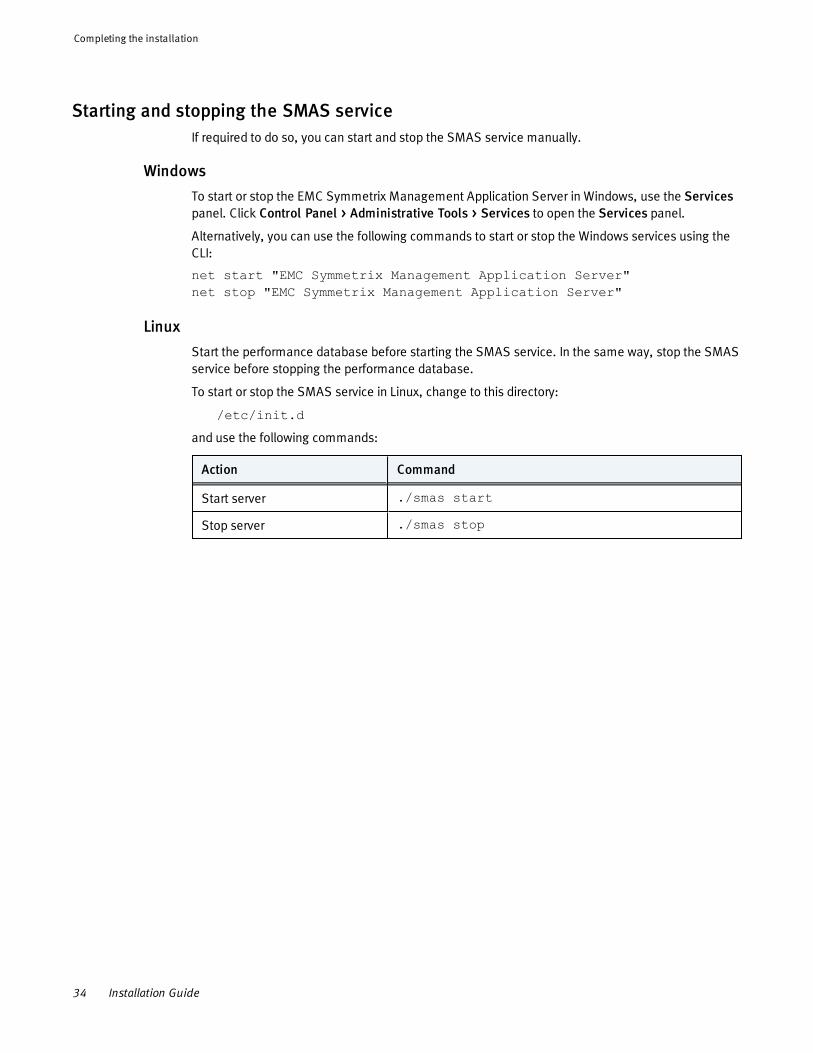
Starting and stopping the SMAS serviceIf required to do so, you can start and stop the SMAS service manually.
Windows
To start or stop the EMC Symmetrix Management Application Server in Windows, use the Servicespanel. Click Control Panel > Administrative Tools > Services to open the Services panel.
Alternatively, you can use the following commands to start or stop the Windows services using theCLI:
net start "EMC Symmetrix Management Application Server"net stop "EMC Symmetrix Management Application Server"
Linux
Start the performance database before starting the SMAS service. In the same way, stop the SMASservice before stopping the performance database.
To start or stop the SMAS service in Linux, change to this directory:
/etc/init.d
and use the following commands:
Action Command
Start server ./smas start
Stop server ./smas stop
Completing the installation
34 Installation Guide
Launching Unisphere for VMAX
To launch Unisphere for VMAX:
1. Type the following URL in a browser:
https://host_IP:port_number
The port number is configured during installation. The default HTTPS port number is 8443.
The use of localhost is not supported.
If the host IP address is an IPv6 address, surround the IP address with square brackets, forexample:
https://[2001:db8:ffff:ffff:ffff:ffff:ffff:ffff]:8443
If the host IP address is an IPv4 address, type the IP address as normal, for example:
https://198.51.100.255:8443
For your browser to access the Unisphere for VMAX console, Flash Player 11.2 or a later releaseis required. Flash Player is available from the Adobe website.
2. Do one of the following:
• At the login window, type the Unisphere Initial Setup User username and password, andclick Login.The default username for the Unisphere Initial Setup User is smc and the default passwordis smc.
• If you are using certificate-based user authentication, click Options to display moreoptions, and select Use Client Certificate. If the Unisphere for VMAX login window doesnot display correctly, ensure that the CA certificates have been imported correctly.
3. Click Login.
Launching Unisphere for VMAX
Installation Guide 35
Launching Database Storage AnalyzerDatabase Storage Analyzer is an application included with Unisphere for VMAX. It provides adatabase performance troubleshooting solution for Oracle databases (version 10g and above)running on EMC storage systems.
When logging into Database Storage Analyzer, you can use the default Unisphere Initial Setup User.If you have removed the smc user or defined another admin user on the system, create a DatabaseStorage Analyzer admin user in Unisphere for VMAX (Home > Administration > Security > AuthorizedUsers & Groups).
To use Database Storage Analyzer with certificate-based user authentication, you mustlaunch Database Storage Analyzer in a standalone fashion, rather than from withinUnisphere for VMAX.
To launch Database Storage Analyzer:
1. Type the following URL in a browser:
https://host_IP:port_number/univmax/dsa
The port number is configured during installation. The default HTTPS port number is 8443.
2. At the login window, type the Unisphere Initial Setup User username and password.
If certificate-based user authentication was enabled when Unisphere for VMAX was installed,the Database Storage Analyzer login window displays with Use Client's X.509 Certificateselected and the User and Password fields dimmed.
3. Click Login.
To launch Database Storage Analyzer from within Unisphere for VMAX:
1. In Unisphere for VMAX, select a storage system.
2. Select Databases > Databases to open the Database list view.
3. Click Database Storage Analyzer.
4. At the login window, type the Unisphere Initial Setup User username and password, and clickLogin.
Launching Database Storage Analyzer
36 Installation Guide
Upgrading Unisphere for VMAX
This chapter explains how to upgrade Unisphere for VMAX:
Upgrade paths 38
Before upgrading Unisphere for VMAX 39
Running the Unisphere for VMAX upgrade 40
After upgrading Unisphere for VMAX 41
Installation Guide 37
CHAPTER 3
Upgrade pathsYou can upgrade to Unisphere for VMAX V8.1.0 from the following releases:
◆ Unisphere for VMAX V1.5
◆ Unisphere for VMAX V1.6.2
◆ Unisphere for VMAX V8.0.x
The installation program automatically upgrades your installation according to the settings used inthe previous installation, including port and connection type.
The following Unisphere for VMAX settings from your previous installation are maintained throughthe upgrade process:
◆ Users
◆ Alert policies and threshold settings
◆ Email Settings: Mailing list and SMTP configuration
◆ Performance dashboard settings
◆ Queries
When upgrading from V1.6.2, or lower, LDAP/AD configuration information is not retained.
When upgrading from V8.0.x, LDAP/AD configuration information is retained.
Upgrade paths
38 Installation Guide
Before upgrading Unisphere for VMAXBefore upgrading Unisphere for VMAX, check the size of the performance database folder. ForUnisphere for VMAX V1.6.1, the performance database folder is install_dir\EMC\SMAS\jboss\standalone\data\msq and for Unisphere for VMAX V8.0.1, andhigher, it is install_dir\EMC\SMAS\jboss\standalone\data\pgsql.
Ensure that the minimum RAM and disk space requirements for Unisphere for VMAX V8.1.0 aremet. For more information about server requirements, see Pre-installation considerations on page15.
Before commencing any upgrade process, ensure that backups of all data have been made.
As a safeguard, follow these steps:
1. For each registered storage system, backup the performance database. You must restore eachdatabase backup after the upgrade.
2. Take note of the systems registered for collecting performance data. Record the settings fordata collection and diagnostic interval for each one.
3. Export the Performance settings (metric and alert definitions and user templates). Thisoperation requires setting a password to use when you import the saved settings to the newsystem.
Refer to the Unisphere for VMAX online help to perform these tasks.
Before upgrading Unisphere for VMAX
Installation Guide 39
Running the Unisphere for VMAX upgradeThis section describes how to upgrade the Unisphere for VMAX software.
Upgrading Unisphere for VMAX on Windows
To upgrade Unisphere for VMAX using the wizard on Windows:
1. Access the software, as described in Step 1: Accessing the software on page 26.
2. Navigate to the location of the kit and run the appropriate executable for your operatingsystem.
3. In the Unisphere for VMAX Instance Detected dialog, click Yes to continue and upgrade.
4. A database backup warning displays. Click OK to continue with the upgrade. To preserveperformance data, ensure that a backup has been performed.
5. In the Introduction - Upgrade Unisphere for VMAX page, click Next.
6. If the disk space and/or memory requirements are not met, a warning is displayed. If you wantto continue with the upgrade regardless of the consequences described in the message, clickOK.
7. In the Pre-Installation Summary page, click Install.
8. When the upgrade process completes, click Done.
Upgrading Unisphere for VMAX on Linux
To upgrade Unisphere for VMAX using the command line on Linux:
1. Stop the SMAS service, as described in Starting and stopping the SMAS service on page 34.
2. Access the software, as described in Step 1: Accessing the software on page 26.
3. Navigate to the location of the kit and run the appropriate executable for your operatingsystem.
4. When prompted to do so, confirm that you want to upgrade the installed features.
5. The installation script displays the current Unisphere version and the version to which you willupgrade. Press Enter.
6. A database backup warning displays. Click OK to continue with the upgrade. To preserveperformance data, ensure that a backup has been performed.
7. In the Introduction - Upgrade Unisphere for VMAX page, click Next.
8. In the Pre-Installation Summary page, click Install. InstallAnywhere guides you through theupgrade installation of Unisphere for VMAX.
9. If the disk space and/or memory requirements are not met, a warning is displayed. If you wantto continue with the upgrade regardless of the consequences described in the message, type 1.
10. Press Enter through each option in the upgrade process.
The upgrade process completes.
11. Complete the tasks described in After upgrading Unisphere for VMAX on the facing page.
Running the Unisphere for VMAX upgrade
40 Installation Guide
After upgrading Unisphere for VMAXThis section describes the tasks to perform after the installation has been completed.
Renewing link and launch client registrationsIf you were using link and launch client registrations to launch Unisphere from ProSphere, orvSphere VSI clients, re-register your host with Unisphere for VMAX. The Unisphere help informationshows how to do this.
Restoring and verifying system and performance data
To restore and verify system and performance data:
1. Re-register the systems that were collecting performance data before the upgrade.
2. Verify your data collection and diagnostic intervals against the values recorded before theupgrade.
3. Restore your performance database backups using the Unisphere for VMAX console and verifyeach database.
4. Verify the Performance settings (metric and alert definitions and user templates). If you need toimport the Performance settings, use the password you set when you exported the settings.
The Unisphere for VMAX Online Help contains instructions on performing these tasks.
After upgrading Unisphere for VMAX
Installation Guide 41

After upgrading Unisphere for VMAX
42 Installation Guide
Uninstalling Unisphere for VMAX
This chapter explains how to uninstall Unisphere for VMAX:
Before you begin 44
Uninstalling from Windows 45
Uninstalling from Linux 46
Installation Guide 43
CHAPTER 4
Before you beginBefore uninstalling Unisphere for VMAX, note the following:
◆ Uninstalling Unisphere removes the performance database. The Unisphere online help provides
instructions on backing up/restoring the performance database should you want to reuse it at alater time.
◆ During an uninstallation, the installation program prompts you to export your customized
performance settings (metrics and threshold settings only) to a file that can be imported toanother Unisphere environment. The Unisphere online help provides instructions onexporting/importing your customized performance settings.
Uninstalling Unisphere terminates all client sessions to the SMAS server and any SYMAPIoperations in progress.
Before you begin
44 Installation Guide
Uninstalling from WindowsYou can uninstall Unisphere for VMAX from a Windows host using either the Windows Add/RemoveProgramswindow, the command line, or Windows Explorer.
Using Windows Add/Remove ProgramsThe exact steps you need to follow might vary from those listed here, depending on the version ofWindows you are using.
To uninstall Unisphere for VMAX from the Windows Add/Remove Programs window:
1. From the Windows Start menu, select Settings, Control Panel, Add/Remove Programs.
2. In the Add/Remove Programs dialog, select EMC Unisphere for VMAX and clickChange/Remove.
3. Complete the remaining steps in the wizard.
Using the command line
To uninstall Unisphere for VMAX using the command line:
1. Change directory location to:
install_dir\SMAS\_EMC_SMAS_installation
2. Type the following to launch the uninstallation wizard:
Uninstall_EMC_SMAS_Installation.exe -i console
3. Complete the steps in the wizard.
A few files remain after the uninstallation operation. To remove them you can delete the SMASfolder.
Using Windows Explorer
To uninstall Unisphere for VMAX using Windows Explorer:
1. Double-click the following to launch the uninstallation wizard:
install_dir\SMAS\_EMC_SMAS_installation\Uninstall_EMC_SMAS_Installation.exe
2. Complete the steps in the wizard.
A few files remain after the uninstallation operation. To remove them you can delete the SMASfolder.
Uninstalling from Windows
Installation Guide 45
Uninstalling from LinuxYou can uninstall Unisphere for VMAX from a Linux host using either the wizard or the commandline.
Using the wizardUsing the wizard to uninstall Unisphere for VMAX is not supported on virtual machines.
To uninstall Unisphere for VMAX from a Linux host using the wizard:
1. Navigate to the following directory:
install_dir/SMAS/_EMC_SMAS_installation
2. Type the following to launch the uninstallation wizard:
./Uninstall_EMC_SMAS_Installation -i swing
3. Complete the steps in the wizard.
A few files remain after the uninstallation operation. To remove them you can delete the SMASfolder.
Using the command line
To uninstall Unisphere for VMAX from a Linux host using the command line:
1. Navigate to the following directory:
install_dir/SMAS/_EMC_SMAS_installation
2. Type the following to launch the uninstallation wizard:
./Uninstall_EMC_SMAS_Installation -i console
3. Complete the steps in the wizard.
A few files remain after the uninstallation operation. To remove them you can delete the SMASfolder.
Uninstalling from Linux
46 Installation Guide
Installing the Unisphere for VMAX virtualappliance
This chapter shows how to install the Unisphere for VMAX Virtual Appliance in a VMwareinfrastructure environment:
Introduction 48
Before you begin 50
Installing the virtual appliance directly on the ESX Server 51
Installing the virtual appliance through a vCenter Server 56
Installing the virtual appliance using OVFTOOL 58
Launching Unisphere or the vApp Manager 61
Registering the VASA Provider with vSphere 63
Upgrading the Unisphere for VMAX Virtual Appliance using an ISO image 64
Re-configuring the virtual appliance IP address 66
Deleting the Unisphere for VMAX Virtual Appliance 68
Backing up and restoring the performance database 69
Installing licenses 71
Installation Guide 47
CHAPTER 5
IntroductionThe Unisphere for VMAX Virtual Appliance is a VMware ESX Server virtual appliance that provides allof the components you need to manage your VMAX environment using the storsrvd daemon andSolutions Enabler network client access. These include:
◆ EMC Unisphere for VMAX V8.1.0.
◆ EMC Solutions Enabler V8.1.0 (solely intended as a SYMAPI server for Solutions Enabler client
access).
◆ Linux OS (SUSE 11 SP3).
Root login is not supported on SUSE 11 SP3 virtual machines.
◆ SMI-S Provider V8.1.0.
In addition, the appliances include a browser-based console to configure your storage environment.The Unisphere for VMAX vApp Manager enables you to perform configuration tasks not available inthe appliances directly.
Using this console, you can perform the following tasks:
◆ Launch Unisphere
◆ Monitor the application status
◆ Start and stop selected daemons
◆ Download persistent data
◆ Configure the nethost file (required for client access)
◆ Discover storage systems
◆ Modify options and daemon options
◆ Add host-based license keys
◆ Run a limited set of Solutions Enabler CLI commands
◆ Configure ESX host and gatekeeper volumes
◆ Load VMAX-based eLicenses
◆ Configure LDAP
◆ Configure iSCSI initiator and map iSCSI gatekeeper volumes
◆ Configure additional NIC card (optional)
◆ Download SYMAPI debug logs
◆ Import CA signed certificate for web browser
◆ Import custom certificate for storsrvd daemon
◆ Check disk usage
Introduction
48 Installation Guide

◆ Clear temporary files
◆ Restart appliance
◆ Configure symavoid entries
◆ Enable SSH
◆ Manage users
◆ Reset hostname
◆ Update /etc/hosts file
For information on using the Unisphere for VMAX vApp Manager, refer to its online help.
Introduction
Installation Guide 49
Before you beginBefore you begin to install Unisphere for VMAX Virtual Appliance, carry out the tasks in this section.
◆ Verify that you are installing the latest version of the appliance by checking EMC Online
Support for updates.
◆ Verify that the client is running:
• VMware vSphere client
• One of the following browsers with cookies and Javascript enabled:
– Internet Explorer 9.0 through 11.0 (Desktop only)
– Firefox 30 or higher
– Chrome 21.0.1180 or higher
Browsers should have Flash Player 11.2 or a later release installed. If your browser has anoutdated version of Flash Player, you are prompted to download the latest version whenyou start the web console.
◆ Verify that the virtual machine is not running shared memory/resources.
◆ Verify that the VMware ESX Server meets the following minimum requirements:
ESX Servercomponent
Requirement
Processor Dual-core or two CPUs
ESX Server version 4.0 or higher
Disk space 120 GB
Memory 16 GB for exclusive use by Unisphere for VMAX
Table 3: Unisphere for VMAX Virtual Appliance VMware ESX Server requirements
If you are upgrading to V8.1.0, the available memory is checked as part of the upgradeoperation. If the requirement is not met, the upgrade is canceled.
Before you begin
50 Installation Guide
Installing the virtual appliance directly on the ESX ServerThis section describes how to install the Unisphere for VMAX Virtual Appliance directly on the ESXServer.
Step 2 has three configuration options, depending on the virtual appliance network connection:
◆ IPv4 only — Step 2A: Powering on and configuring the virtual appliance (IPv4 only) on the next
pageUse this option if the DNS server does not support IPv6 hostnames or the DNS/ESX server isconfigured on an IPv4-only network.
◆ IPv6 only — Step 2B: Powering on and configuring the virtual appliance (IPv6 only) on page 53
Use this configuration if the network configuration for the virtual appliance is IPv6 only. Thevirtual appliance is not able to communicate with an IPv4 host unless IPv6 packets areencapsulated inside IPv6 packets using tunneling.
◆ Dual stack — Step 2C: Powering on and configuring the virtual appliance (Dual stack) on page
54Use this configuration if the system is configured for both IPv4 and IPv6. The system supportsboth formats but IPv6 addresses are used for configuring the vApp Manager, SMAS andstorsrvd. An IPv4 address is used only for reaching IPv4 DNS and ESX servers.
Step 1: Installing the virtual appliance
To install the virtual appliance:
1. On the EMC Online Support site:
a. Click Support By Product in the main navigation bar.
b. In the Find a Product box, type Unisphere for VMAX and click the arrow.
c. Locate the appropriate kit and download the OVF archive file (*.ova) containing theinstallation program to a temporary directory:
Unisphere for VMAX Virtual Appliance file name:univmaxpa810_x_suse11_x86_64_vapp_OVF10.ova
Where x in 810_x represents the build number. That number varies depending on whenthe software was built.
2. Start the vSphere Client and log in to the ESX Server on which you want to install the appliance.
3. Click Ignore in the security warning message.
4. From the Filemenu, select Deploy OVF Template.
5. Browse to the OVF archive file, located in the temporary directory you created earlier. Select theOVF archive file with the suffix *vapp_OVF10.ova.
6. Click Next.
7. On the OVF Template Details page, verify the details about the appliance and click Next.
8. On the End User License Agreement page, select Accept and click Next.
9. On the Name and Location page, specify a name for the appliance and click Next.
10. On the Disk Format page, select the format in which to store the virtual machine’s virtual disksand click Next.
Installing the virtual appliance directly on the ESXServer
Installation Guide 51
11. On the Network Mapping page, select the network you want the virtual appliance to use andclick Next.
12. On the Ready to Complete page, verify the information and click Finish.
13. In the Completed Successfully message, click Close.
Step 2A: Powering on and configuring the virtual appliance (IPv4 only)
When configuring a virtual appliance, for each prompt, type the information requested, press Enter,and then confirm that the information you entered is correct.
To power on and configure the IPv4-only virtual appliance:
1. On the Summary page of the Virtual Infrastructure Client, click Power On.
2. Click the Console tab and watch as the appliance starts up.
3. When prompted to do so, configure an IPv4 IP address:
Please select your static network configuration.
For IPv4: Enter 1
For IPv6: Enter 2
Enter your choice [1]/2:
Select IPv4. The following information is requested:
• IP Address [ ]:
Type the address assigned to the appliance.
The virtual appliance uses this IP address to query the DNS server and get its hostname.Therefore, you must ensure that the IP address has a hostname mapping in the DNSserver.
• Netmask [ ]:
Type the mask of the network on which the appliance is located.
• Gateway [ ]:
Type the gateway address to the network on which the appliance is located.
• DNS1 [ ]:
Type the IP address of the first DNS server and press Enter.
• DNS2 [ ]:
Type the IP address of the second DNS server and press Enter.
• Is a proxy server necessary to reach the internet? y/n [n]:
Type y to configure a proxy server. For each of the following prompts, type the informationrequested, press Enter:
– ProxyServer [ ]:
Type the IP address of the proxy server and press Enter.
– ProxyPort [ ]:
Type the proxy port and press Enter.
Type n to continue the configuration without configuring a proxy server.
Installing the virtual appliance directly on the ESX Server
52 Installation Guide
You have now finished installing the Unisphere Virtual Appliance.
4. Continue with Step 3: Adding gatekeepers.
Step 2B: Powering on and configuring the virtual appliance (IPv6 only)
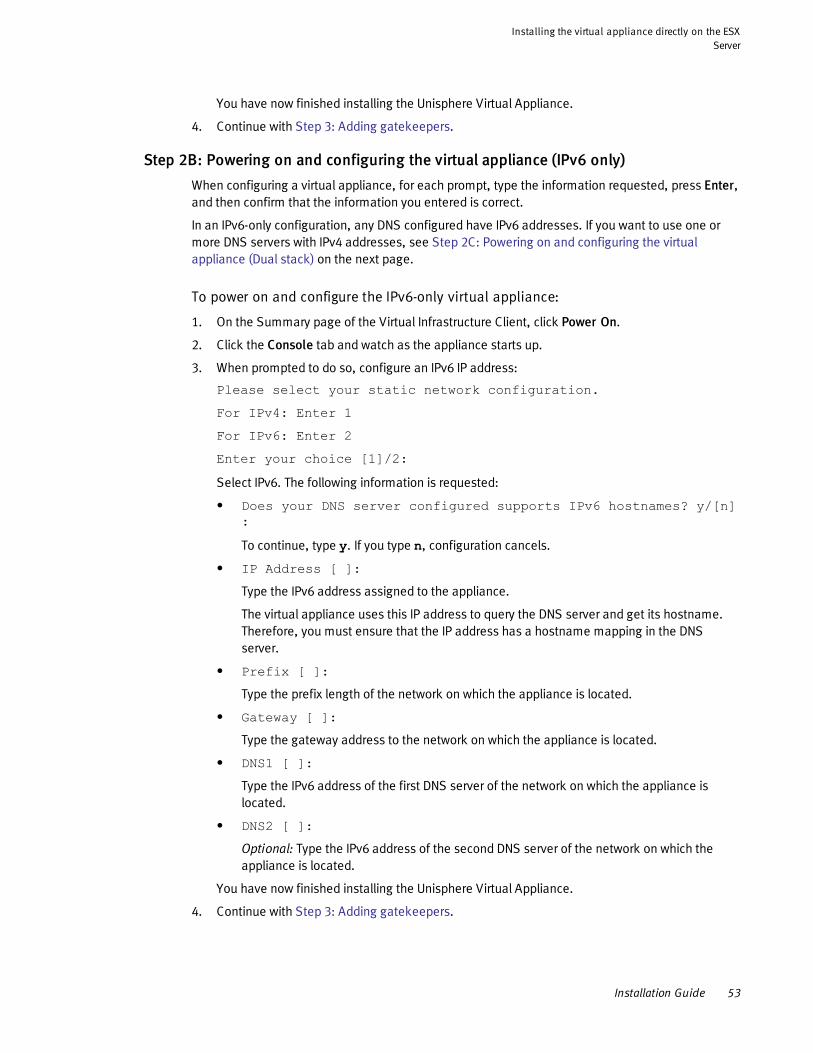
When configuring a virtual appliance, for each prompt, type the information requested, press Enter,and then confirm that the information you entered is correct.
In an IPv6-only configuration, any DNS configured have IPv6 addresses. If you want to use one ormore DNS servers with IPv4 addresses, see Step 2C: Powering on and configuring the virtualappliance (Dual stack) on the next page.
To power on and configure the IPv6-only virtual appliance:
1. On the Summary page of the Virtual Infrastructure Client, click Power On.
2. Click the Console tab and watch as the appliance starts up.
3. When prompted to do so, configure an IPv6 IP address:
Please select your static network configuration.
For IPv4: Enter 1
For IPv6: Enter 2
Enter your choice [1]/2:
Select IPv6. The following information is requested:
• Does your DNS server configured supports IPv6 hostnames? y/[n]:
To continue, type y. If you type n, configuration cancels.
• IP Address [ ]:
Type the IPv6 address assigned to the appliance.
The virtual appliance uses this IP address to query the DNS server and get its hostname.Therefore, you must ensure that the IP address has a hostname mapping in the DNSserver.
• Prefix [ ]:
Type the prefix length of the network on which the appliance is located.
• Gateway [ ]:
Type the gateway address to the network on which the appliance is located.
• DNS1 [ ]:
Type the IPv6 address of the first DNS server of the network on which the appliance islocated.
• DNS2 [ ]:
Optional: Type the IPv6 address of the second DNS server of the network on which theappliance is located.
You have now finished installing the Unisphere Virtual Appliance.
4. Continue with Step 3: Adding gatekeepers.
Installing the virtual appliance directly on the ESXServer
Installation Guide 53
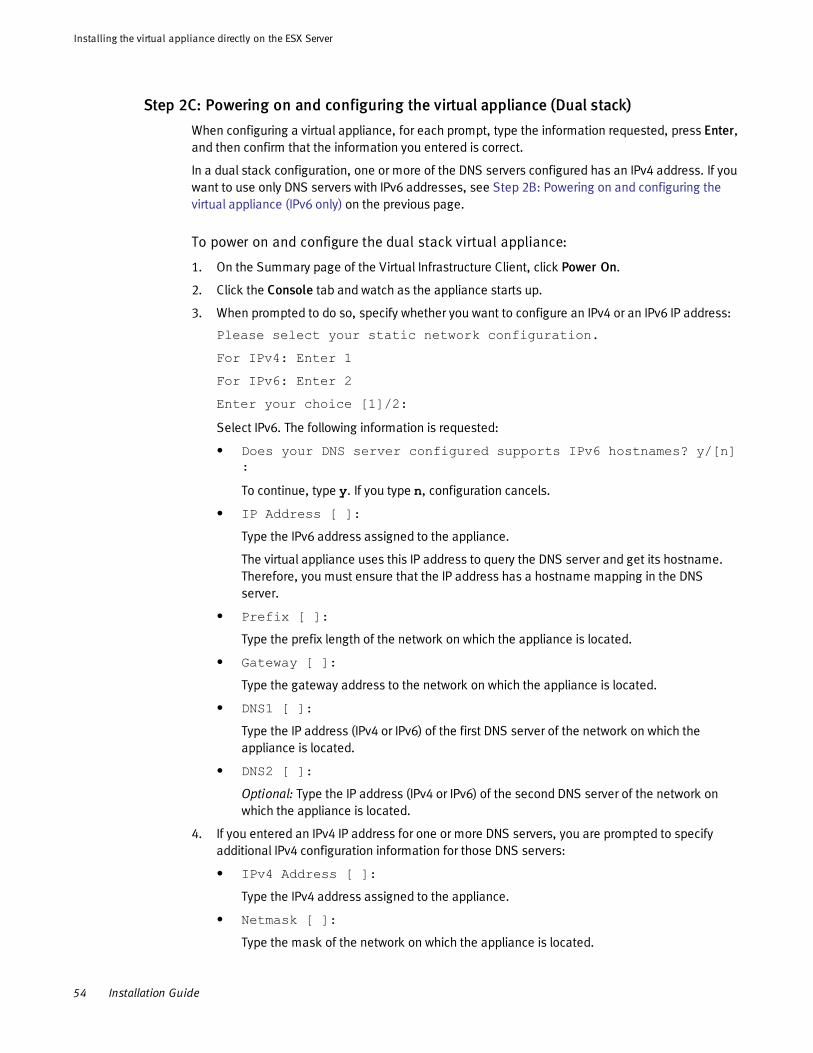
Step 2C: Powering on and configuring the virtual appliance (Dual stack)
When configuring a virtual appliance, for each prompt, type the information requested, press Enter,and then confirm that the information you entered is correct.
In a dual stack configuration, one or more of the DNS servers configured has an IPv4 address. If youwant to use only DNS servers with IPv6 addresses, see Step 2B: Powering on and configuring thevirtual appliance (IPv6 only) on the previous page.
To power on and configure the dual stack virtual appliance:
1. On the Summary page of the Virtual Infrastructure Client, click Power On.
2. Click the Console tab and watch as the appliance starts up.
3. When prompted to do so, specify whether you want to configure an IPv4 or an IPv6 IP address:
Please select your static network configuration.
For IPv4: Enter 1
For IPv6: Enter 2
Enter your choice [1]/2:
Select IPv6. The following information is requested:
• Does your DNS server configured supports IPv6 hostnames? y/[n]:
To continue, type y. If you type n, configuration cancels.
• IP Address [ ]:
Type the IPv6 address assigned to the appliance.
The virtual appliance uses this IP address to query the DNS server and get its hostname.Therefore, you must ensure that the IP address has a hostname mapping in the DNSserver.
• Prefix [ ]:
Type the prefix length of the network on which the appliance is located.
• Gateway [ ]:
Type the gateway address to the network on which the appliance is located.
• DNS1 [ ]:
Type the IP address (IPv4 or IPv6) of the first DNS server of the network on which theappliance is located.
• DNS2 [ ]:
Optional: Type the IP address (IPv4 or IPv6) of the second DNS server of the network onwhich the appliance is located.
4. If you entered an IPv4 IP address for one or more DNS servers, you are prompted to specifyadditional IPv4 configuration information for those DNS servers:
• IPv4 Address [ ]:
Type the IPv4 address assigned to the appliance.
• Netmask [ ]:
Type the mask of the network on which the appliance is located.
Installing the virtual appliance directly on the ESX Server
54 Installation Guide
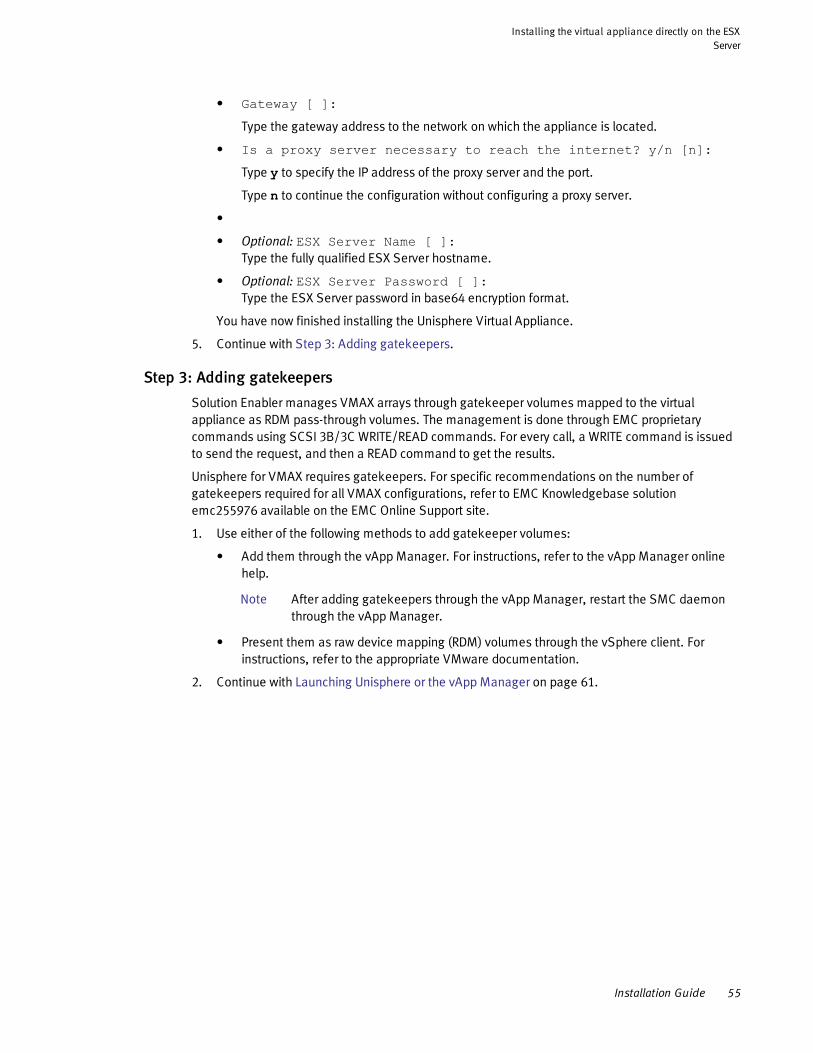
• Gateway [ ]:
Type the gateway address to the network on which the appliance is located.
• Is a proxy server necessary to reach the internet? y/n [n]:
Type y to specify the IP address of the proxy server and the port.
Type n to continue the configuration without configuring a proxy server.
•
• Optional: ESX Server Name [ ]:Type the fully qualified ESX Server hostname.
• Optional: ESX Server Password [ ]:Type the ESX Server password in base64 encryption format.
You have now finished installing the Unisphere Virtual Appliance.
5. Continue with Step 3: Adding gatekeepers.
Step 3: Adding gatekeepers
Solution Enabler manages VMAX arrays through gatekeeper volumes mapped to the virtualappliance as RDM pass-through volumes. The management is done through EMC proprietarycommands using SCSI 3B/3C WRITE/READ commands. For every call, a WRITE command is issuedto send the request, and then a READ command to get the results.
Unisphere for VMAX requires gatekeepers. For specific recommendations on the number ofgatekeepers required for all VMAX configurations, refer to EMC Knowledgebase solutionemc255976 available on the EMC Online Support site.
1. Use either of the following methods to add gatekeeper volumes:
• Add them through the vApp Manager. For instructions, refer to the vApp Manager onlinehelp.
After adding gatekeepers through the vApp Manager, restart the SMC daemonthrough the vApp Manager.
• Present them as raw device mapping (RDM) volumes through the vSphere client. Forinstructions, refer to the appropriate VMware documentation.
2. Continue with Launching Unisphere or the vApp Manager on page 61.
Installing the virtual appliance directly on the ESXServer
Installation Guide 55
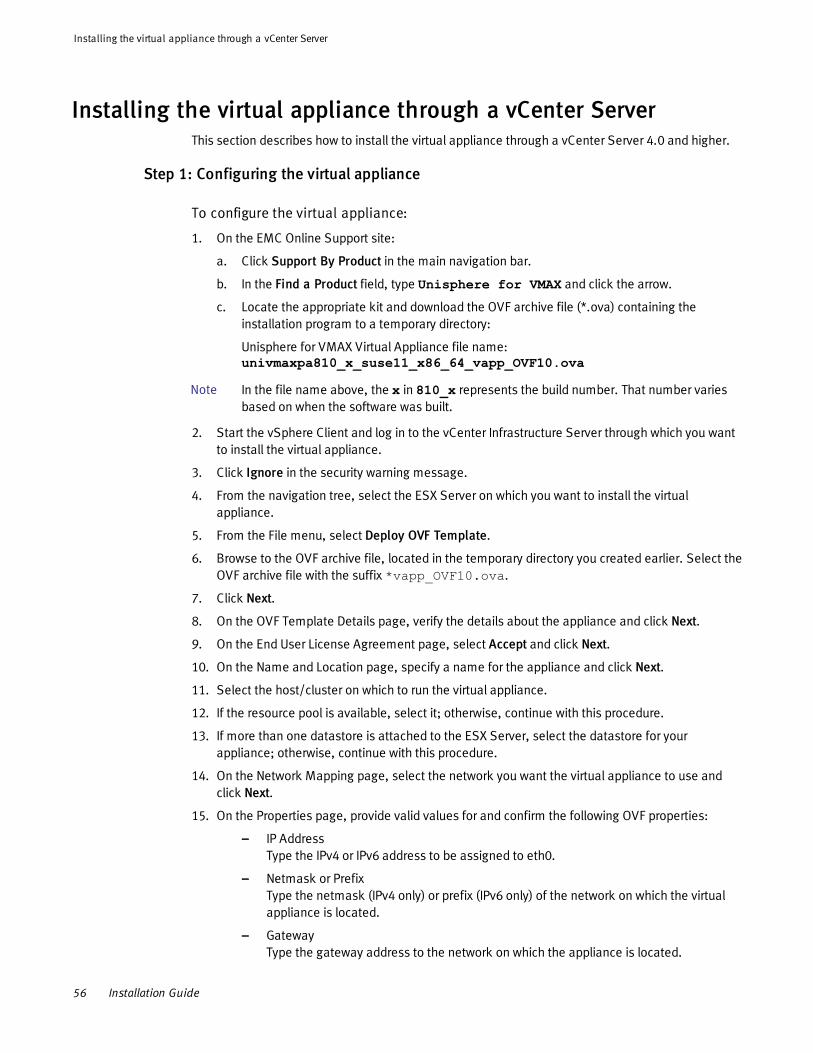
Installing the virtual appliance through a vCenter ServerThis section describes how to install the virtual appliance through a vCenter Server 4.0 and higher.
Step 1: Configuring the virtual appliance
To configure the virtual appliance:
1. On the EMC Online Support site:
a. Click Support By Product in the main navigation bar.
b. In the Find a Product field, type Unisphere for VMAX and click the arrow.
c. Locate the appropriate kit and download the OVF archive file (*.ova) containing theinstallation program to a temporary directory:
Unisphere for VMAX Virtual Appliance file name:univmaxpa810_x_suse11_x86_64_vapp_OVF10.ova
In the file name above, the x in 810_x represents the build number. That number variesbased on when the software was built.
2. Start the vSphere Client and log in to the vCenter Infrastructure Server through which you wantto install the virtual appliance.
3. Click Ignore in the security warning message.
4. From the navigation tree, select the ESX Server on which you want to install the virtualappliance.
5. From the File menu, select Deploy OVF Template.
6. Browse to the OVF archive file, located in the temporary directory you created earlier. Select theOVF archive file with the suffix *vapp_OVF10.ova.
7. Click Next.
8. On the OVF Template Details page, verify the details about the appliance and click Next.
9. On the End User License Agreement page, select Accept and click Next.
10. On the Name and Location page, specify a name for the appliance and click Next.
11. Select the host/cluster on which to run the virtual appliance.
12. If the resource pool is available, select it; otherwise, continue with this procedure.
13. If more than one datastore is attached to the ESX Server, select the datastore for yourappliance; otherwise, continue with this procedure.
14. On the Network Mapping page, select the network you want the virtual appliance to use andclick Next.
15. On the Properties page, provide valid values for and confirm the following OVF properties:
– IP AddressType the IPv4 or IPv6 address to be assigned to eth0.
– Netmask or PrefixType the netmask (IPv4 only) or prefix (IPv6 only) of the network on which the virtualappliance is located.
– GatewayType the gateway address to the network on which the appliance is located.
Installing the virtual appliance through a vCenter Server
56 Installation Guide
– IPv4 Address for dual stack [Optional]IPv4 address for dual stack.
– IPv4 Netmask for dual stack [Optional]IPv4 netmask address for dual stack.
– IPv4 Gateway for dual stack [Optional]IPv4 gateway for address for dual stack.
– DNS Server 1Type the DNS address of the network on which the appliance is located.
– DNS Server 2Optional: Type the DNS address of the network on which the appliance is located
– TimezoneOptional: Select the appropriate time zone.
– Proxy ServerOptional: Enter the IP address of the proxy server and port. For example:proxy_server_IP:port_number
– Optional: ESX Server NameEnter the fully qualified ESX Server hostname.
– Optional: ESX Server PasswordEnter the ESX Server password in base64 encryption format.
Ignore the Network Properties section that appears in vSphere V5.0 and higher.Click Next.
16. On the Ready to Complete page, verify the information and click Finish.
17. In the Completed Successfully dialog, click Close.
Step 2: Powering on the virtual appliance
To power on the virtual appliance:
1. On the Summary page of the Virtual Infrastructure Client, click Power On.
2. Click the Console tab and watch as the appliance starts up.
A Welcome screen opens. You have now finished installing the Virtual Appliance.
3. Continue with Step 3: Selecting gatekeepers.
Step 3: Selecting gatekeepers
Select gatekeepers as described in Step 3: Adding gatekeepers on page 55.
Installing the virtual appliance through a vCenterServer
Installation Guide 57

Installing the virtual appliance using OVFTOOLYou can install the virtual appliance through the command line from any Windows or Linux host. Thissection explains how to install the virtual appliance using OVFTOOL.
To install the virtual appliance using OVFTOOL, the following are required:
◆ vCenter Server 4.0 or a later release.
◆ ESX Server 4.0 or a later release managed by vCenter Server 4.x.
◆ VMware OVFTOOL 1.0 or a later release.
Refer to the appropriate documentation for installing vCenter Server and VMware OVFTOOL.
To install the virtual appliance using OVFTOOL:
1. Install and set up the vCenter Server.
2. Add the ESX Server to the vCenter Server datacenter.
3. Install VMware OVFTOOL on a Windows or Linux host.
4. Move the Unisphere for VMAX Virtual Appliance kit to the same Linux host.
5. Run the ovftool command with necessary command line switches. For more information onusing the command, refer to Using OVFTOOL below.
Unisphere for VMAX Virtual Appliance is installed and powered on automatically.
6. Add gatekeepers.
7. Continue with Launching Unisphere or the vApp Manager on page 61.
Using OVFTOOLWhen deploying an IPv4-only or IPv6-only network configuration, OVFTOOL has the following syntax:
ovftool --acceptAllEulas --overwrite --powerOffTarget --powerOn--prop:ipAddress=<IP-ADDRESS>--prop:netmask_or_prefix=<NETMASK-OR-PREFIX>--prop:gateway=<GATEWAY> --prop:dns1=<DNS1> --prop:dns2=<DNS2>--prop:timezone=<TIMEZONE> --prop:esxServer=<ESX-SERVER-NAME>--prop:encryRootPasswd=<ROOT-PASSWORD> --name=<VAPP-NAME>--datastore=<DATASTORE> --net:Network\ 1=VM\ Network--net:Network\ 2=VM\ Network --network=VM\ Network <OVA-FILE>vi://<VCENTER ADMIN ACCOUNT>:<VCENTER-ADMIN-PASSWORD>@<VCENTER-HOST>/host/<ESX-SERVER-NAME>
Installing the virtual appliance using OVFTOOL
58 Installation Guide
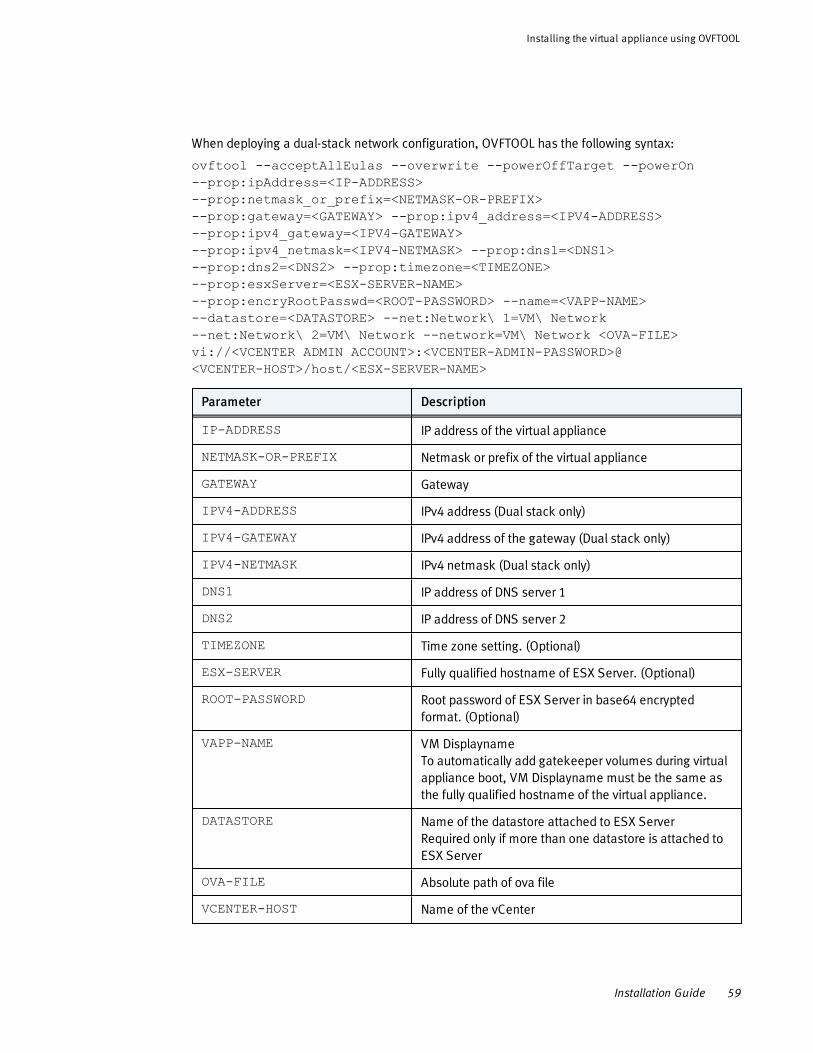
When deploying a dual-stack network configuration, OVFTOOL has the following syntax:
ovftool --acceptAllEulas --overwrite --powerOffTarget --powerOn--prop:ipAddress=<IP-ADDRESS>--prop:netmask_or_prefix=<NETMASK-OR-PREFIX>--prop:gateway=<GATEWAY> --prop:ipv4_address=<IPV4-ADDRESS>--prop:ipv4_gateway=<IPV4-GATEWAY>--prop:ipv4_netmask=<IPV4-NETMASK> --prop:dns1=<DNS1>--prop:dns2=<DNS2> --prop:timezone=<TIMEZONE>--prop:esxServer=<ESX-SERVER-NAME>--prop:encryRootPasswd=<ROOT-PASSWORD> --name=<VAPP-NAME>--datastore=<DATASTORE> --net:Network\ 1=VM\ Network--net:Network\ 2=VM\ Network --network=VM\ Network <OVA-FILE>vi://<VCENTER ADMIN ACCOUNT>:<VCENTER-ADMIN-PASSWORD>@<VCENTER-HOST>/host/<ESX-SERVER-NAME>
Parameter Description
IP-ADDRESS IP address of the virtual appliance
NETMASK-OR-PREFIX Netmask or prefix of the virtual appliance
GATEWAY Gateway
IPV4-ADDRESS IPv4 address (Dual stack only)
IPV4-GATEWAY IPv4 address of the gateway (Dual stack only)
IPV4-NETMASK IPv4 netmask (Dual stack only)
DNS1 IP address of DNS server 1
DNS2 IP address of DNS server 2
TIMEZONE Time zone setting. (Optional)
ESX-SERVER Fully qualified hostname of ESX Server. (Optional)
ROOT-PASSWORD Root password of ESX Server in base64 encryptedformat. (Optional)
VAPP-NAME VM DisplaynameTo automatically add gatekeeper volumes during virtualappliance boot, VM Displayname must be the same asthe fully qualified hostname of the virtual appliance.
DATASTORE Name of the datastore attached to ESX ServerRequired only if more than one datastore is attached toESX Server
OVA-FILE Absolute path of ova file
VCENTER-HOST Name of the vCenter
Installing the virtual appliance using OVFTOOL
Installation Guide 59
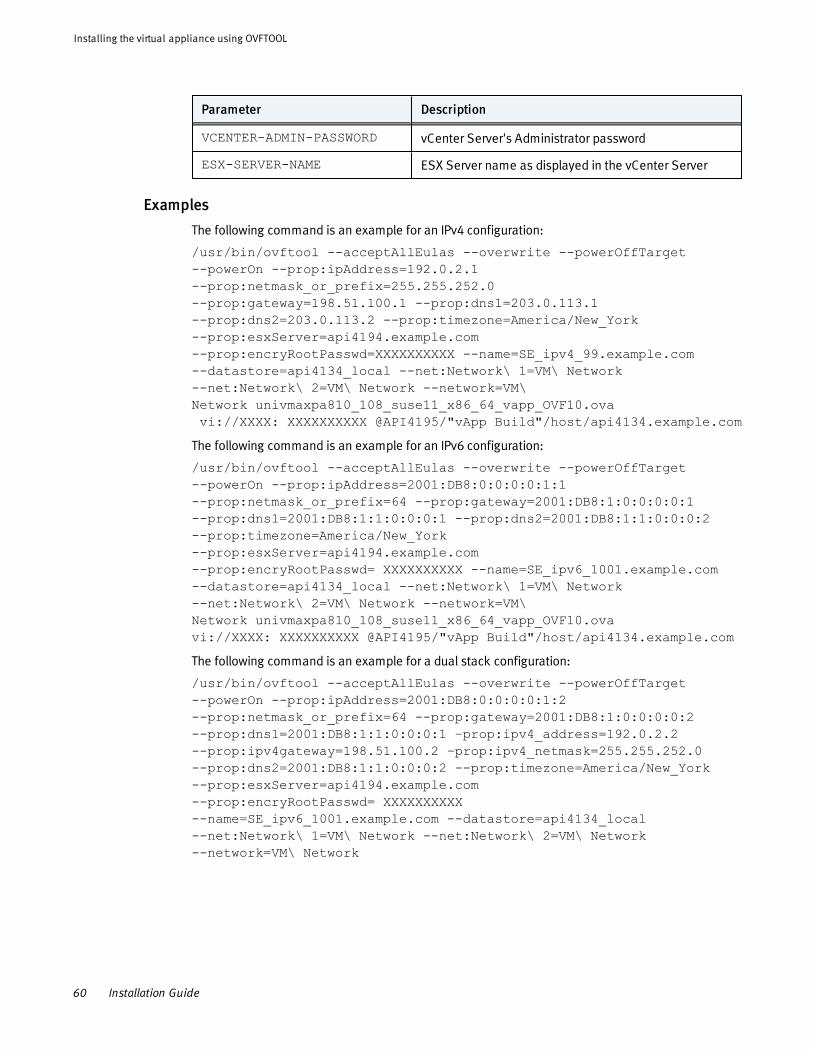
Parameter Description
VCENTER-ADMIN-PASSWORD vCenter Server's Administrator password
ESX-SERVER-NAME ESX Server name as displayed in the vCenter Server
Examples
The following command is an example for an IPv4 configuration:
/usr/bin/ovftool --acceptAllEulas --overwrite --powerOffTarget--powerOn --prop:ipAddress=192.0.2.1--prop:netmask_or_prefix=255.255.252.0--prop:gateway=198.51.100.1 --prop:dns1=203.0.113.1--prop:dns2=203.0.113.2 --prop:timezone=America/New_York--prop:esxServer=api4194.example.com--prop:encryRootPasswd=XXXXXXXXXX --name=SE_ipv4_99.example.com--datastore=api4134_local --net:Network\ 1=VM\ Network--net:Network\ 2=VM\ Network --network=VM\Network univmaxpa810_108_suse11_x86_64_vapp_OVF10.ovavi://XXXX: XXXXXXXXXX @API4195/"vApp Build"/host/api4134.example.com
The following command is an example for an IPv6 configuration:
/usr/bin/ovftool --acceptAllEulas --overwrite --powerOffTarget--powerOn --prop:ipAddress=2001:DB8:0:0:0:0:1:1--prop:netmask_or_prefix=64 --prop:gateway=2001:DB8:1:0:0:0:0:1--prop:dns1=2001:DB8:1:1:0:0:0:1 --prop:dns2=2001:DB8:1:1:0:0:0:2--prop:timezone=America/New_York--prop:esxServer=api4194.example.com--prop:encryRootPasswd= XXXXXXXXXX --name=SE_ipv6_1001.example.com--datastore=api4134_local --net:Network\ 1=VM\ Network--net:Network\ 2=VM\ Network --network=VM\Network univmaxpa810_108_suse11_x86_64_vapp_OVF10.ovavi://XXXX: XXXXXXXXXX @API4195/"vApp Build"/host/api4134.example.com
The following command is an example for a dual stack configuration:
/usr/bin/ovftool --acceptAllEulas --overwrite --powerOffTarget--powerOn --prop:ipAddress=2001:DB8:0:0:0:0:1:2--prop:netmask_or_prefix=64 --prop:gateway=2001:DB8:1:0:0:0:0:2--prop:dns1=2001:DB8:1:1:0:0:0:1 –prop:ipv4_address=192.0.2.2--prop:ipv4gateway=198.51.100.2 –prop:ipv4_netmask=255.255.252.0--prop:dns2=2001:DB8:1:1:0:0:0:2 --prop:timezone=America/New_York--prop:esxServer=api4194.example.com--prop:encryRootPasswd= XXXXXXXXXX--name=SE_ipv6_1001.example.com --datastore=api4134_local--net:Network\ 1=VM\ Network --net:Network\ 2=VM\ Network--network=VM\ Network
Installing the virtual appliance using OVFTOOL
60 Installation Guide
Launching Unisphere or the vApp ManagerAfter you have installed the appliance, you can either launch Unisphere for VMAX or the vAppManager, and/or connect to the API server through the Solutions Enabler client.
Launching Unisphere
To launch Unisphere:
1. Type one of the following URLs in a browser:
https://appliance_IP:unisphere_port_number
or
https://appliance_host_name:unisphere_port_number
The Unisphere port number is configured during installation. The default HTTPS port number is8443.
If the host IP address is an IPv6 address, surround the IP address with square brackets, forexample:
https://[2001:db8:ffff:ffff:ffff:ffff:ffff:ffff]:8443
If the host IP address is an IPv4 address, type the IP address as normal, for example:
https://198.51.100.255:8443
For your browser to access the Unisphere for VMAX console, Flash Player 11.2 or a later releaseis required. Flash Player is available from the Adobe website.
2. At the login window, type the Unisphere Initial Setup User username and password, and clickLogin.The default username for the Unisphere Initial Setup User is smc and the default password issmc.
Launching the vApp Manager
To launch the vApp Manager:
1. Type one of the following URLs in a browser:
https://appliance_IP:5480
or
https://appliance_host_name:5480
If the host IP address is an IPv6 address, surround the IP address with square brackets, forexample:
https://[2001:db8:ffff:ffff:ffff:ffff:ffff:ffff]:8443
If the host IP address is an IPv4 address, type the IP address as normal, for example:
https://198.51.100.255:8443
For either of the URLs above, the browser is redirected as shown in the next table.
Launching Unisphere or the vApp Manager
Installation Guide 61
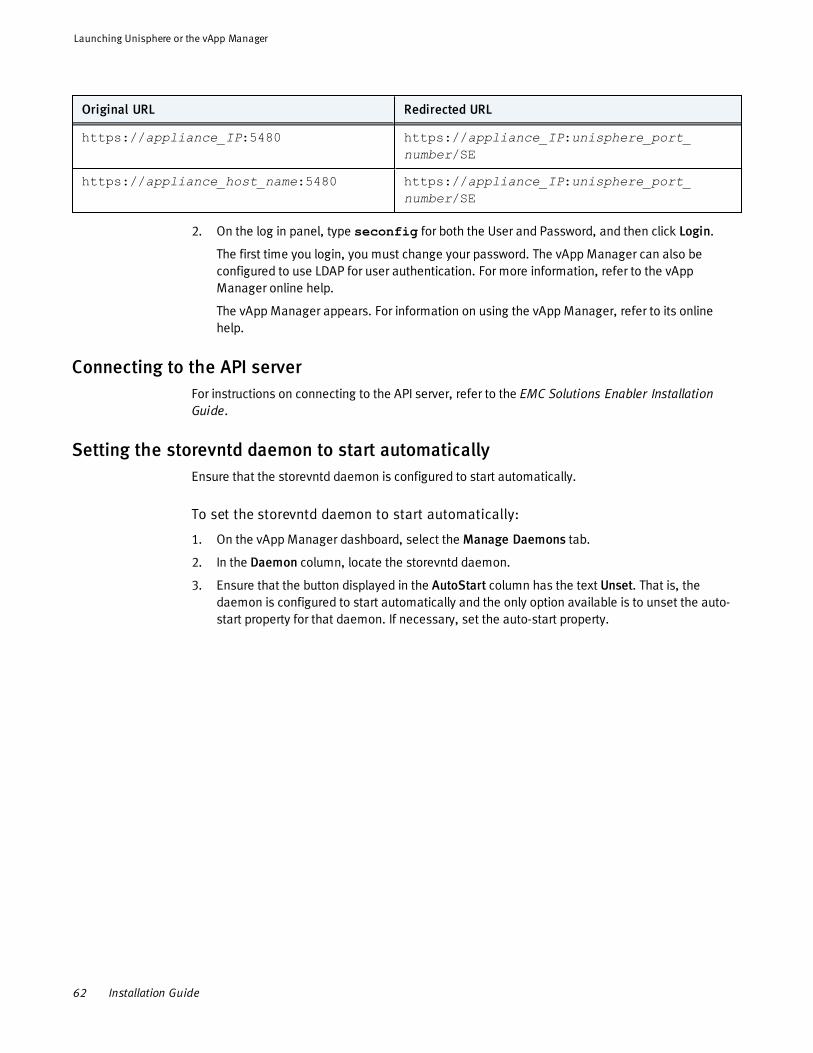
Original URL Redirected URL
https://appliance_IP:5480 https://appliance_IP:unisphere_port_number/SE
https://appliance_host_name:5480 https://appliance_IP:unisphere_port_number/SE
2. On the log in panel, type seconfig for both the User and Password, and then click Login.
The first time you login, you must change your password. The vApp Manager can also beconfigured to use LDAP for user authentication. For more information, refer to the vAppManager online help.
The vApp Manager appears. For information on using the vApp Manager, refer to its onlinehelp.
Connecting to the API serverFor instructions on connecting to the API server, refer to the EMC Solutions Enabler InstallationGuide.
Setting the storevntd daemon to start automaticallyEnsure that the storevntd daemon is configured to start automatically.
To set the storevntd daemon to start automatically:
1. On the vApp Manager dashboard, select theManage Daemons tab.
2. In the Daemon column, locate the storevntd daemon.
3. Ensure that the button displayed in the AutoStart column has the text Unset. That is, thedaemon is configured to start automatically and the only option available is to unset the auto-start property for that daemon. If necessary, set the auto-start property.
Launching Unisphere or the vApp Manager
62 Installation Guide
Registering the VASA Provider with vSphereVMware APIs for Storage Awareness (VASA) Provider improves VMware vSphere's ability to monitorand automate storage-related operations. VASA Provider reports information about storagetopology, capabilities, and status, as well as storage events and alerts to VMware. It is a standardvSphere management plug-in that is installed on each vCenter Server, and it interacts with VMwareAPIs for Storage Awareness.
To register the VASA Provider with vSphere
1. Connect to the VMware vCenter Server 5.0 or a later release using vSphere Client.
2. In the Virtual Data Center, navigate to Home > Administration > Storage Providers, and clickStorage Providers in the navigator bar.
3. In the Vendor Providers pane, select Add.
4. Add the vendor provider properties (name, URL, and login information).
For ECOM login credentials, refer to SMI-S Provider documentation.
For the URL, use https://vapp_ip:5989/vasa/services/vasaService
When the VASA Provider is connected, the VI Client displays the SSL certificate.
5. Click Yes to complete the registration.
6. Verify registration with vSphere:
a. Navigate to Home > Administration > Storage Providers > Vendor Providers.
b. Verify that the VASA Provider is listed and displays the list of managed storage systems.
Registering the VASA Provider with vSphere
Installation Guide 63
Upgrading the Unisphere for VMAX Virtual Appliance using anISO image
Periodically, EMC releases virtual appliances with security patches and hotfixes for the virtualappliance. These are available on the EMC online support website as ISO files. If you are runningUnisphere for VMAX 1.6.x, or higher, you can download and use an ISO upgrade file.
From: To: Complete:
Unisphere V1.6.x or alater release
Unisphere forVMAX V8.1.0
Step 1: Downloading the ISO upgrade filebelow.
Step 2: Uploading the ISO upgrade file to thedatastore below
Step 3: Mounting the ISO image on thefacing page.
Step 4: Completing the upgrade on thefacing page.
Before you begin
Ensure that the ESX Server minimum hardware requirements for the version to which you areupgrading are met before commencing the upgrade procedure. The available memory is checked aspart of the upgrade operation and if the requirements are not met, the upgrade is canceled.
For more information about the ESX Server hardware requirements for Unisphere for VMAX VirtualAppliance, see Unisphere for VMAX Virtual Appliance VMware ESX Server requirements on page 50.
Step 1: Downloading the ISO upgrade file
1. In a browser, navigate to the EMC Online Support site at:
https://support.EMC.com
2. Locate and download the following file:
UNIVMAX810_x_se810_x_vapp_upgrade_x86_64.iso
In the file name above, x in 810_x and the x in 810_x represent software build numbers.Those numbers vary based on when the software was built.
Step 2: Uploading the ISO upgrade file to the datastore
After the download is completed, upload the ISO file to the ESC server using the VI client.
1. Using the VI client, log in to the ESX Server.
2. In the left pane, select the ESX Server.
3. In the right pane, select the Configuration tab.
4. To list the datastores connected to the ESX Server, select Hardware > Storage.
5. Right-click the datastore and select Browse Datastore.
6. In the Datastore Browser window that displays, click Upload files. The Upload Items dialogbox opens.
7. Navigate to where you saved the ISO upgrade file, select the file, and click Open.
Upgrading the Unisphere for VMAX Virtual Appliance using anISO image
64 Installation Guide
8. In the Upload/Download Operation dialog box that displays, click Yes to accept the warning.
Step 3: Mounting the ISO image
1. Right-click the virtual appliance and select Edit Settings.
2. On the Hardware tab, select CD/DVD Drive 1.
3. In the right pane, select Datastore ISO File and click Browse.
4. Browse to the location of the ISO file on the datastore and select the file.
5. Verify that under Device Status, the Connect at power on box is selected and click OK.
Step 4: Completing the upgrade
1. Restart the Guest by selecting Power On Guest.
2. On the Console tab, go to the virtual appliance console.
3. In the lower section of the screen, select Appliance Update from the list of options.
4. Press the Enter key to start the upgrade. After the upgrade has been completed, the consolescreen displays.
Upgrading the Unisphere for VMAX Virtual Appli-ance using an ISO image
Installation Guide 65
Re-configuring the virtual appliance IP addressYou can reconfigure only the network configuration selected when the virtual appliance was firstinstalled.For example, if you initially set up an IPv6-only configuration, you can reconfigure the IPv6 networkparameters but you cannot change it to a dual-stack configuration.
To re-configure a virtual appliance with an IPv4 address configuration:
1. Log in to the vSphere client and navigate to the virtual appliance console.
2. Use theMove Up/Move Down keys to select Configure IP and press Enter.
3. At the following prompt, type y and press Enter to configure the static IP address:
Do you want to configure static IP address?
The following series of prompts enable you to reconfigure your network:
• IP Address [ ]:
Type a valid IP address and press the Enter key.
The virtual appliance uses this IP address to query the DNS server and get its hostname.Therefore, you must ensure that the IP address has hostname mapping on the DNS server.
• Netmask [ ]:
Type the mask of the network on which the appliance is located and press the Enter key.
• Gateway [ ]:
Type the gateway address to the network on which the appliance is located and press theEnter key.
• DNS1 [ ]:
Type the first DNS server address and press the Enter key.
• DNS2 [ ]:
Type the second DNS server address and press the Enter key.
• Is a proxy server necessary to reach the internet? y/[n]:
Type y to specify the IP address of the proxy server and the port.
Type n to continue the configuration without specifying a proxy server.
• Are the above mentioned parameters correct? [y]/n:
Type y to re-configure the virtual appliance IP address and return to the console.
Type n to go back and change your responses.
To re-configure a virtual appliance on an IPv6-only address configured vApp:
1. Log in to the vSphere client and navigate to the virtual appliance console.
2. Use theMove Up/Move Down keys to select Configure IP and press Enter.
3. The following series of prompts enable you to reconfigure your network:
• IP Address [current_ip_address]:
Type a valid IPv6 address and press the Enter key.
• Prefix [current_prefix]:
Re-configuring the virtual appliance IP address
66 Installation Guide
Type the prefix of the network on which the appliance is located and press the Enter key.
• Gateway [current_gateway]:
Type the gateway address to the network on which the appliance is located and press theEnter key.
• DNS1 [current_dns_1]:
Type the first DNS server address and press the Enter key.
• DNS2 [current_dns_2]:
Type the second DNS server address and press the Enter key.
To re-configure a virtual appliance on a dual-stack configured vApp:
1. Log in to the vSphere client and navigate to the virtual appliance console.
2. Use theMove Up/Move Down keys to select Configure IP and press Enter.
3. The following series of prompts enable you to reconfigure your network:
• IP Address [current_ip_address]:
Type a valid IPv6 address and press the Enter key.
• Prefix [current_prefix]:
Type the prefix of the network on which the appliance is located and press the Enter key.
• Gateway [current_gateway]:
Type the gateway address to the network on which the appliance is located and press theEnter key.
• DNS1 [current_dns_1]:
Type the first DNS server address and press the Enter key.
• DNS2 [current_dns_2]:
Type the second DNS server address and press the Enter key.
• IPv4 Address [current_ipv4_address]:
Type the IPv4 address and press the Enter key.
• Netmask [current_netmask]:
Type the netmask of the network on which the appliance is located and press the Enterkey.
• Gateway for IPv4 [current_ipv4_gateway]:
Type the IPv4 gateway address and press the Enter key.
Re-configuring the virtual appliance IP address
Installation Guide 67
Deleting the Unisphere for VMAX Virtual ApplianceTo delete the Unisphere for VMAX Virtual Appliance:
1. Optional: If you plan to restore Unisphere and Solutions Enabler persistent data, back up thepersistent data in the Unisphere for VMAX Virtual Appliance console.
Optional: If you plan to restore the performance database, backup the database according toBacking up and restoring the performance database on the facing page.
2. In the VMware management interface, power off the appliance.
3. Right-click on the appliance and select Delete From Disk.
4. Click Yes in the confirmation message.
Deleting the Unisphere for VMAX Virtual Appliance
68 Installation Guide
Backing up and restoring the performance databaseYou can transfer performance database files between the appliance and another host for filebackup and restoration. There is no facility in the appliance user interface to perform this process.However, when you are logged in to the system with the vappadmin user account, you cantransfer these files.
The vappadmin user account is limited to performing the following commands for transferringdatabase files:
◆ passwd — Changes the login password.
◆ sftp — Transfers database backup files into the appliance from another host, or out of the
appliance to another host.
◆ df — Checks disk usage.
◆ manage_spa_db_backup.sh — Moves files between the backup location and staging
location, and lists and cleans backup and staging locations.
Backing up performance database files to another hostFrom the system console, perform the following steps:
1. Log in to the vApp Manager (https://host_name:port_number) and start the databasebackup process as described in the Unisphere help.
2. Log in to the system using the vappadmin user account. The first time that you log in, use thedefault password vappadmin. After you are logged in, change the password by running thepasswd command, which prompts for the old and new passwords.
3. View the backup files in the backup location:
manage_spa_db_backup.sh -list -backup
4. Move the backup files from the backup location to the staging location:
manage_spa_db_backup.sh -stage
This operation moves the files from the backup area to the staging area (the home directory forthe vappadmin user account).
5. View the backup files in the staging location:
manage_spa_db_backup.sh -list -staging
6. Transfer the backup file copies out of the appliance to the backup host. Use the following sftpcommand to access the backup host and then transfer any files ending in .dat.
sftp user_name@fully_qualified_host_name
Restoring performance database files from another hostFrom the system console perform the following steps:
1. Log in to the system using the vappadmin user account. The first time that you log in, use thedefault password vappadmin. After you have logged in, change the password by running thepasswd command which prompts for the old and new passwords.
2. Check for available disk space:
df -h
Backing up and restoring the performance data-base
Installation Guide 69
3. Transfer the backup file copies from the backup host to the appliance. Use the following sftpcommand to access the backup host and then transfer any files ending in .dat.
sftp user_name@fully_qualified_host_name
4. View the backup files in the staging location:
manage_spa_db_backup.sh -list -staging
5. Move the backup files from the staging location to the backup location:
manage_spa_db_backup.sh -restore
6. Log in to Unisphere (https://host_name:port_number) and start the database restoreprocess as described in the Unisphere help.
7. After the restoration has been completed and backup files are no longer needed, clean thebackup and staging locations:
manage_spa_db_backup.sh -clean -all
Backing up and restoring the performance database
70 Installation Guide
Installing licensesThis section shows how to install VMAX-based and host-based licenses, using the virtual appliance.
For more information on licensing, refer to the EMC Solutions Enabler Installation Guide.
Installing VMAX-based licensesVMAX-based licenses are used to license features on VMAX arrays running Enginuity 5875 orhigher. These licenses are stored on the VMAX array.
Before starting this procedure, verify that the gatekeepers have been added and that the symcfgdiscover command has been run from the Command Execution tab.
To install VMAX-based licenses:
1. Open the vApp Manager.
2. Select License Validation.
3. In the eLicensing panel, click Add License File to open the Add eLicensing License box.
4. In the Upload License panel, click Upload License File.
5. In the file browser screen, navigate to the license file and click Open.
A copy of the license file is transferred to the appliance.
6. In the Add Symmetrix License panel, select the VMAX array on which to install the license file,and click Install License.
Installing host-based licensesHost-based licenses are used mainly to license features on VMAX arrays running Enginuity versionslower than 5875. The one exception is the TimeFinder license, which is a host-based license,regardless of Enginuity level.
To install host-based licenses
1. Open the vApp Manager.
2. Select License Validation.
3. Type the license key (requires four characters per input box) and click Validate.
Installing licenses
Installation Guide 71

Installing licenses
72 Installation Guide

Technical notes
This appendix provides technical notes for advanced configuration of Unisphere for VMAX V8.1.0and Unisphere for VMAX V8.1.0 Virtual Appliance (vApp) Manager.
Technical notes 74
Virtual Appliance Technical notes 76
Installation Guide 73
APPENDIX A

Technical notesThe following technical notes are apply to Unisphere for VMAX but not the Unisphere for VMAXVirtual Appliance (vApp) Manager.
Managing thin poolsIt is recommended that thin pools contain DATA volumes of the roughly the same size.
SYMAPI serverIf you want to change the SYMAPI server that Unisphere is pointing to, uninstall Unisphere, and thenreinstall it.
During the install, you supply the new SYMAPI host name and network port number. The Unispherefor VMAX Installation Guide provides more information on these requirements.
Local replication managementUnisphere manages replication operations (TimeFinder family) through device groups. If the SMASserver does not have visibility to the device groups used to manage replication, you cannot performany replication actions in Unisphere. Similarly, replication sessions managed exclusively by devicefiles cannot be managed by Unisphere.
Advanced configuration settingsUnisphere provides a dialog box for setting storage system preferences, including debug settings.The debug settings are restricted to Unisphere administrators.
Use the debug settings only at the direction of EMC Customer Service.
Resetting the host system stable valuesThis section describes the steps to reset the host system SSVs using the CLI utility.
To reset the lockbox used by Unisphere for VMAX:
1. Stop the SMAS service.
For more information about how to start and stop the server, refer to Starting and stopping theSMAS service on page 34.
2. Find the lockbox_password used on install. For more information on the lockbox password,refer to Unisphere Lockbox Password on page 17.
3. Change directory location to:
Windows: install_location\jboss\bin
Linux: install_location/jboss/bin
4. Type the following command:
Windows: service.bat updatessv lockbox_password
Linux: ./initcst.sh updatessv lockbox_password
5. Restart SMAS service.
Technical notes
74 Installation Guide
AlertsBy default, most Unisphere status alerts are disabled. Managing alert policies in the Unisphere forVMAX help includes instructions on enabling them.
Protecting against POODLE SSL v3 vulnerabilityTo protect your system from the Padding Oracle On Downgraded Legacy Encryption vulnerability,ensure that following is set in your browser:
◆ SSL v3 protocol is disabled
◆ TLS protocol is enabled
For instructions, refer to the documentation for your browser.
Technical notes
Installation Guide 75
Virtual Appliance Technical notesThe following technical notes are specific to the Unisphere for VMAX Virtual Appliance (vApp)Manager.
Setting the LDAP userWhen LDAP is already configured from Unisphere for VMAX, LDAP users need to be added to vAppManager as an admin. This process requires logging into vApp Manager before disabling the localdirectory from Unisphere for VMAX.
Unisphere for VMAX local users will not be visible in vApp Manager.
Gatekeeper volumesFor ESX V4.0 and earlier, vApp Manager does not allow more than 14 gatekeeper volumes to beadded to the Virtual Appliance. Attempting to add more than 14 gatekeepers returns an errormessage.
Host ESX Server configurationHost ESX Server authentication is validated each time you select the Gatekeeper Config tab. If theauthentication fails, the host ESX Server login credentials and hostname information is removedfrom the virtual appliance records and must be added again.
Unisphere daemon serviceWhen you shutdown the SMAS daemon service from vApp Manager, you are prompted to terminatethe browser session. After a few minutes, start a new web session.
Server hostname requirementFor the virtual appliance to resolve a hostname, only use the fully qualified hostname (as entered inDNS server) while configuring nethosts and ESX Servers (for adding gatekeeper volumes).
SSL certificate generationThe virtual appliance generates an SSL certificate (storsrvd - client/server setup) during the initialboot after the IP address is provided, and during every IP change or reboot.
Changing the IP addressStop all daemons with vApp Manager before changing the IP address of the appliance.
SYMCLI commands executed/submitted as rootWhen using vApp Manager with the seconfig account, SYMCLI commands are executed/submittedas root.
Virtual Appliance Technical notes
76 Installation Guide
Least privileged permission requirementsConsult the appropriate VMware documentation for guidance on the least privileged permissionsrequired to deploy a virtual appliance.
Adding gatekeeper volumesAfter adding gatekeeper volumes to the virtual appliance, restart the SMAS daemon from vAppManager; otherwise, the Unisphere for VMAX GUI cannot see the attached volumes.
Virtual Appliance Technical notes
Installation Guide 77

Virtual Appliance Technical notes
78 Installation Guide
Security features
This appendix provides an overview of the features used to secure access to Unisphere for VMAXand VMAX arrays. The Unisphere for VMAX help system contains specific configuration proceduresrequired to enable these features. References to those procedures are provided where appropriate.
Authentication 80
Authorization 81
Installation Guide 79
APPENDIX B
AuthenticationUnisphere for VMAX supports the following types of authentication:
◆ Windows (local and domain-based): Users log in by specifying the Windows domain, username
and password (if they have a Windows account on the SMAS server).
◆ LDAP: Users login with their LDAP-SSL username and password (if they have a user account
stored on a LDAP-SSL server).
To use this method, a Unisphere Administrator or SecurityAdmin sets up LDAP-SSLauthentication in Unisphere for VMAX. The Unisphere for VMAX Online Help containsinstructions on performing these tasks.
◆ Local Unisphere users: Users login with their Unisphere username and password (if they have
a local Unisphere user account).
To use this method, a Unisphere Initial Setup User, Administrator, or SecurityAdmin creates alocal Unisphere user account for the user. Local user accounts are stored locally on the SMASserver host and work in much the same way as the other methods to validate user credentials.The Unisphere for VMAX Online Help contains instructions on performing these tasks.
◆ X.509 certificate-based user authentication: Certificate-based user authentication using
X.509 certificates is supported on fresh installations on Windows and Linux servers. You canuse a certificate issued by a trusted public third-party certificate authority (CA) to authenticateyour identity when using the Unisphere for VMAX web client or REST API interfaces. The use ofdigital identity smartcards such as Common Access Card (CAC) and Personal IdentityVerification (PIV) as part of a multi-factor authentication process is also supported.
Authentication
80 Installation Guide
AuthorizationUser authorization is a tool for restricting the management operations that users can perform on aVMAX array. By default, authorization rules on a VMAX array are enabled for Unisphere users,regardless of whether authorization has been enabled on the VMAX array.
When configuring user authorization, an Administrator or SecurityAdminmaps individual users orgroups of users to specific roles, which determine the operations the users can perform.
The state of authorizations on a VMAX array determines the privileges a Unisphere Initial Setup Userhas on the system. The following details the relationship between the Initial Setup User and VMAXauthorizations:
◆ If VMAX authorization is enabled, authorization rules are always enforced (meaning, the Initial
Setup User could theoretically be locked out if no authorization rule exists for the user).
◆ If VMAX authorization is disabled and there are no authorization rules on the storage system,
the Initial Setup User is granted Admin privileges.
◆ If VMAX authorization is disabled and there are no Admin or Security authorization rules on the
storage system, the Initial Setup User is granted Admin privileges – other rules are enforced asdefined.
◆ If VMAX authorization is disabled and Admin or SecurityAdmin authorization rules are defined
on the storage system, if the Initial Setup User does not have an authorization rule explicitlydefined, the Initial Setup User has no permissions – all other rules are enforced as defined.
User roles
The following list summarizes the available roles. The Unisphere for VMAX Online Help containsmore information on the permissions associated with each role.
◆ None— Provides no permissions.
◆ Monitor — Performs read-only (passive) operations on a VMAX array excluding the ability to
read the audit log or Access Control definitions.
◆ StorageAdmin— Performs all management (active or control) operations on a VMAX array in
addition to all Monitor operations. This role does not allow users to perform security operations.
◆ Administrator — Performs all operations on a VMAX array, including security operations in
addition to all StorageAdmin and Monitor operations.
◆ SecurityAdmin— Performs security operations on a VMAX array in addition to all Monitor
operations.
◆ Auditor — Grants the ability to view, but not modify, security settings for a VMAX array
(including reading the audit log, symacl list, and symauth) in addition to all Monitor operations.This is the minimum role required to view the VMAX audit log.
◆ Perf Monitor — Performs the same operations as a monitor, with the addition of being able to
set performance alerts and thresholds.
Authorization
Installation Guide 81
◆ Initial Setup User — Defined during installation, this temporary role provides administrator-like
permissions for the purpose of adding local users and roles to Unisphere. For more informationon the Initial Setup User, see Unisphere Initial Setup User or the online help.
Individual and group roles
Users gain access to a VMAX array or component either directly through a role assignment and/orindirectly through membership in a user group that has a role assignment.
User groups enable administrators to assign roles to multiple users simultaneously. User groups arecreated on the SMAS server according to its operating system and assigned roles with Unisphere.
If a user has two different role assignments (one as an individual and one as a member of a group),the permissions assigned to the user are combined. For example, if a user is assigned aMonitorrole and a StorageAdmin role through a group, the user is grantedMonitor and StorageAdminrights.
User IDs
The following list summarizes the SYMAPI format for user and role creation. This format appears inthe footer bar of the Unisphere GUI, but not in the user or role list views or creation wizard.
Users and user groups are mapped to their respective roles by IDs. These IDs consist of a three-partstring in the form:
Type:Domain\Name
Where:
Type Specifies the type of security authority used to authenticate the user or group. Possibletypes are:L Indicates a user or group authenticated by LDAP. In this case, Domain
specifies the fully qualified name of the domain controller on the LDAPserver. For example:
L:example.com\Legal
Indicates that user group Legal logs in through domain controllerexample.com.
After they have been configured, individual LDAP users and groups canlog in to Unisphere for VMAX using a simple username or simple groupname respectively. An example is Legal.
C Indicates a user or group is authenticated by the SMAS server.
C:Boston\Finance
Indicates that user group Finance logs in through Unisphere serverBoston.
H Indicates a user or group is authenticated by logging in to a local accounton a Windows host. In this case, Domain specifies the hostname. Forexample, the following indicates that usermasonlogs in on host jupiter.
H:jupiter\mason
Authorization
82 Installation Guide
D Indicates a user or group authenticated by a Windows domain. In thiscase, Domain specifies either the simple domain name (for individualusers) or the fully qualified domain name (for groups). For example thefollowing indicates user putman logs in through Windows domain sales.
D:sales\putman
After they have been configured individual Windows domain users canlog in to Unisphere using a simple username. An example is putman.Group Windows domain users can log in to Unisphere using either asimple domain name and group name or a fully qualified domain nameand group name.
V Indicates a user or group authenticated by a virtualization domain. In thiscase, Domain specifies the virtualization domain name.
Name Specifies the username relative to that authority. It cannot be longer than 32 charactersand spaces are allowed if the username is delimited with quotes. Usernames can be forindividual users or user groups.
Within role definitions, IDs can be either fully qualified (as above), partially qualified, or unqualified.When the Domain portion of the ID string is an asterisk (*), the asterisk is treated as a wildcard,meaning any host or domain.
When configuring group access, the Domain portion of the ID must be fully qualified.
Examples:
D:ENG\jones Fully qualified path with a domain and username (for individualdomain users).
D:ENG.example.com\ExampleGroup
Fully qualified domain name and group name (for domaingroups).
D:*\jones Partially qualified that matches username jones with anydomain.
H:HOST\jones Fully qualified path with a hostname and username.
H:*\jones Partially qualified that matches username jones within anyhost.
jones Unqualified username that matches any jones in any domainon any host.
◆ If an exact match (for example, D:sales\putman) is found, that is used.
◆ If a partial match (for example, D:*\putman) is found, that is used.
◆ If an unqualified match (for example, putman) is found, that is used.
◆ Otherwise, the user is assigned a role of None.
Authorization
Installation Guide 83

Authorization
84 Installation Guide

Replacing the Unisphere for VMAX and CA servercertificates
At installation, the installer generates and installs the self-signed server certificate used for HTTPStransport-level security. This appendix describes the steps to replace this certificate with the oneissued by a trusted third-party.
Step 1: Obtaining the keystore passwordYou need the keystore password to complete the following procedure. The keystore password isgenerated during installation and is stored in the following file:
install_dir/SMAS/jboss/domain/configuration/domain.xml.init
Open the file and search for "ssl key-alias="tomcat" password=".
Generate a new JKS key/trust store file with the server certificate alias “tomcat” and key/storepassword as described above. The key/trust store must contain all CA certificates needed for fullcertificate trust chain verification.
Step 2: Generating a certificate requestTo generate a certificate request:
1. ForWindows, enter the following commands:
cd install_dir\SMAS\jboss\standalone\configuration
install_dir\SMAS\jre\bin\keytool -certreq -alias tomcat^-file tomcatcert.csr -keystore Keystore
For Linux, enter the following commands:
cd install_dir/SMAS/jboss/standalone/configuration
install_dir/SMAS/jre/bin/keytool -certreq -alias tomcat \-file tomcatcert.csr - keystore Keystore
2. When prompted to do so, enter the keystore password.A file named tomcatcert.csr is generated. This file is a certificate request.
If the Failed to establish chain from reply error message appears, your CA isnot in the keystore's default trust chain (the keystore comes with a default set of trusted CAs).
To import a trusted certificate into your keystore:
a. ForWindows, enter the following commands:
cd install_dir\SMAS\jboss\standalone\configuration
install_dir\SMAS\jre\bin\keytool -import -alias root^-file Trusted_CA_cert_file -keystore keystore -trustcacerts
For Linux, enter the following commands:
Installation Guide 85
APPENDIX C
cd install_dir\SMAS\jboss\standalone\configuration
install_dir\SMAS\jre\bin\keytool -import -alias root /-file Trusted_CA_cert_file -keystore keystore -trustcacerts
3. Send the generated certificate request file, tomcatcert.csr, to your CA for validation. Afterthe request file has been validated, you should receive a signed certificate back from CA.
Step 3: Importing the CA-signed certificate into the keystoreStarting with HYPERMAX OS Q1 2015 SR, you can import CA-signed certificates using the CLI orscripts.
In the following instructions:
◆ signed_certificate_file is the signed certificate you received from your CA.
◆ password is the password obtained in Step 1: Obtaining the keystore password on the
previous page
◆ CA_certificate_alias is tomcat.
Using the CLI to import the CA-signed certificate into the keystore
To import the CA-signed certificate into the keystore using the CLI:
1. Stop the SMAS server. For instructions, refer to Starting and stopping the SMAS service onpage 34.
2. ForWindows, enter the following commands:
cd install_dir\SMAS\jboss\standalone\configuration
install_dir\SMAS\jre\bin\keytool -import -alias tomcat^-file signed_certificate_file keystore keystore -trustcacerts
For Linux, enter the following commands:
cd install_dir/SMAS/jboss/standalone/configuration
install_dir/SMAS/jre/bin/keytool -import -alias tomcat \-file signed_certificate_file keystore keystore -trustcacerts
3. When prompted, enter the keystore password.
Using scripts to import the CA-signed certificate into the keystore
To import the CA-signed certificate into the keystore using scripts:
1. Stop the SMAS server. For instructions, refer to Starting and stopping the SMAS service onpage 34.
2. ForWindows, enter the following commands:
cd install_dir\SMAS\jboss\bin
service.bat importcacert password CA_certificate_alias^signed_certificate_file
3. For Linux, enter the following commands:
cd install_dir/SMAS/jboss/bin
86 Installation Guide
initcst.sh importcacert password CA_certificate_alias \signed_certificate_file
Step 4: Start the SMAS serverStart the SMAS server. For instructions, refer to Starting and stopping the SMAS service on page34.
Installation Guide 87

88 Installation Guide
Configuring SMAS to work in z/OS
This appendix describes how to configure the Symmetrix Management Application Server to work ina z/OS environment.
Configuring SMAS to work in z/OS 90
Installation Guide 89
APPENDIX D
Configuring SMAS to work in z/OSThese instructions apply to systems running Enginuity 5876 or higher. Unisphere must be running ona qualified open system server that points to an API server that is running on a mainframe logicalpartition (LPAR).
To configure SMAS to work in a z/OS environment:
1. Shut down the services as described in Starting and stopping the SMAS service on page 34.
2. Do the following on the mainframe side:
a. Install Solutions Enabler 8.0 or a later release on your LPAR. Refer to the EMC SolutionsEnabler Installation Guide for instructions.
b. Start the API server, API base daemon, GNS daemon, and event daemon on the LPAR.
3. Do the following on the qualified open system server:
a. Make the following changes in the file called daemon_option, which is located underinstall_dir/symapi/config on Linux, or install_dir\symapi\config onWindows:
– Enable the DMN_REMOTE_MODE parameter.
– Set the DMN_REMOTE_ADDRESS parameter to the mainframe IP address.
b. Start the STP daemon (storstpd).
c. Open the ejb-jar.xml file, which is found in one of the following locations:
For Linux:
install_dir/SMAS/jboss/domain/deploy0/domain-symm0.ear/domain-symm-ejb.jar/META-INF
ForWindows:
install_dir\SMAS\jboss\domain\deploy0\domain-symm0.ear\domain-symm-ejb.jar\META-INF
4. In the ejb-jar.xml file, make the following updates:
• Set the value of the StatsConnectionType entry toSYMAPI_CONN_TYPE_LOCAL.
• Set the value of the StatsNodeName entry to the IP address of the Unisphere/API server.
The following extract is from a sample ejb-jar.xml file:
<!--The following two entries are only of interest if --><!--we're obtaining stats from the SE STP daemon on an --><!--alternative host other than the localhost --><!--(which is the case in mainframe environments). Otherwise, --><!--we use the same settings as above so there's --><!--no need to configure.--><env-entry>
<env-entry-name>StatsConnectionType</env-entry-name><env-entry-type>java.lang.String</env-entry-type><env-entry-value>SYMAPI_CONN_TYPE_LOCAL</env-entry-value>
</env-entry>
Configuring SMAS to work in z/OS
90 Installation Guide
<env-entry><env-entry-name>StatsNodeName</env-entry-name><env-entry-type>java.lang.String</env-entry-type><env-entry-value>198.51.100.90</env-entry-value>
</env-entry>
5. Restart the services as described in Starting and stopping the SMAS service on page 34.
6. Launch the Unisphere for VMAX console. For more information, see Launching Unisphere forVMAX on page 35.
Configuring SMAS to work in z/OS
Installation Guide 91

Configuring SMAS to work in z/OS
92 Installation Guide