Embed Size (px)
Citation preview
UniSpec II 100710
SECTION 03310(03 3100) –STRUCTURAL CONCRETE AND EXTERIOR CONCRETE SLABS
PART 1 - GENERAL
1.1 SUMMARY
A. Section Includes: 1. Cast-in-place structural concrete for concretestructures and exterior slabs on grade including the following:
2. 3. 4. 5.
a. b. c. d. e. f. g. h. i. j . k. l.
Footing and stemwalls. Dock walls. Truckwell retaining wall. Dock leveler pit. Steps. Interior curbs. Chase wall pit. Truckwell. Door stoops. Exterior sidewalks adjacent to building and entry slab. Compactor and compressor equipment pads. Drive-thru pharmacy driveway.
Aggregate base below slab. Formwork, shoring, bracing, and anchorage. Reinforcement and accessories. Curing and finishing.
B. Related Requirements: 1. Section 01458 - Testing Laboratory Services. Procedures for inspection, testing, and documentation by
Owner furnished testing laboratory. 2. Section 02715 - Base Course: Base for exterior concrete slabs except as otherwise specified herein. 3. Section 03312- Cast-In-Place Concrete Slabs: Concrete for interior slabs on ground. 4. Section 03362 -Burnished Concrete Floor Finishes. 5. Section 05120 - Structural Steel: Column anchor bolts. 6. Section 05500 - Metal Fabrications: Other metal components cast into concrete. 7. Section 07900 - Joint Sealers. Expansion, contraction, and construction joint fillers and sealants.
1.2 REFERENCES
A. The publications listed below form a part of this specification to the extent referenced. Publications are referenced within the text by the basic designation only.
B. Mandatory Provisions: In publications referred to herein, advisory provisions shall be considered to be mandatory.
C. American Association of State Highway and Transportation Officials (AASHTO): Standard Specification For Transportation Materials And Methods Of Sampling and Testing : 1. AASHTO T318 - Water Content of Freshly Mixed Concrete Using Microwave Oven Drying (Formerly
AASHTO TP 23)
D. American Concrete Institute (ACI): 1. ACI 117 - Standard Tolerances for Concrete Construction and Materials. 2. ACI 301 - Structural Concrete. 3. ACI 304.2R - Placing Concrete By Pumping Methods 4. ACI 305.1 – Specifications for Hot Weather Concreting. 5. ACI 306.1 - Cold Weather Concreting 6. ACI 308.1 - Standard Specification for Curing Concrete.
03310-1
Wal-Mart Market #5986 – Frisco, TX (1007028) January 20, 2011
7. ACI 308R - Guide To Curing Concrete 8. ACI 318 - Building Code Requirements for Reinforced Concrete and Commentary. 9. ACI 347 - Guide To Formwork For Concrete 10. ACI SP66 - ACI Detailing Manual
E. ASTM International (ASTM): 1. ASTM A36 - Carbon Structural Steel. 2. ASTM A82 - Steel Wire, Plain, for Concrete Reinforcement. 3. ASTM A185 - Steel Welded Wire Fabric, Plain, for Carbon Steel, 60,000 PSI Tensile Strength Concrete
Reinforcement. 4. ASTM A615 - Deformed and Plain Billet-Steel Bars for Concrete Reinforcement. 5. ASTM A706 - Low-Alloy Steel Deformed and Plain Bars for Concrete Reinforcement 6. ASTM C31 - Making and Curing Concrete Test Specimens in the Field. 7. ASTM C33 - Concrete Aggregates. 8. ASTM C39 - Concrete Specimens, Compressive Strength of. 9. ASTM C94 - Ready-Mixed Concrete. 10. ASTM C136 - Sieve Analysis of Fine and Coarse Aggregates 11. ASTM C150 - Portland cement. 12. ASTM C171 - Sheet Materials for Curing Concrete. 13. ASTM C172 - Sampling Freshly Mixed Concrete. 14. ASTM C260 - Air-Entraining Admixtures for Concrete. 15. ASTM C309 - Liquid Membrane-Forming Compounds for Curing Concrete. 16. ASTM C 403 - Time of Setting of Concrete Mixtures by Penetration Resistance 17. ASTM C494 - Chemical Admixtures for Concrete. 18. ASTM C618 - Fly Ash and Raw or Calcined Natural Pozzolan for use as a Mineral Admixture in Portland
Cement Concrete. 19. ASTM C 881 - Epoxy-Resin-Base Bonding Systems For Concrete 20. ASTM C989 - Ground Granulated Blast-Furnace Slag for Use in Concrete and Mortars 21. ASTM C 1218 - Water-Soluble Chloride in Mortar and Concrete. 22. ASTM C1315 - Liquid Membrane Forming Compounds Having Special Properties for Curing and Sealing
Concrete. 23. ASTM D 98 - Calcium Chloride. 24. ASTM D 698 - Moisture-Density Relations of Soils and Soil-Aggregate Mixtures Using 5.5 lb (2.49 Kg)
Hammerand 12-in (305 mm) Drop. 25. ASTM D1241 - Materials for Soil-Aggregate Subbase, Base and Surface Courses 26. ASTM D1751 - Preformed Expansion Joint Fillers for Concrete Paving and Structural Construction
(Nonextruding and Resilient Bituminous Types). 27. ASTM D1752: Preformed Sponge Rubber and Cork Expansion Joint Fillers for Concrete Paving and
Structural Construction. 28. ASTM D2628 - Preformed Polychloroprene Elastomeric Joint Seals for Concrete Pavements. 29. ASTM D3575: Standard Test Methods for Flexible Cellular Materials Made From Olefin Polymers. 30. ASTM E96 - Water Vapor Transmission of Materials 31. ASTM E154 - Water Vapor Retarders Used in Contact with Earth under Concrete Slabs, on Walls or as
Ground Cove.
F. America Plywood Association (APA): 1. Grading Rules.
G. American Welding Society (AWS): 1. AWS D1.4 - Structural Welding Code Reinforcing Steel.
H. Concrete Reinforcing Steel Institute (CRSI): 1. CRSI Manual of Standard Practice. 2. CRSI Placing Reinforcing Bars.
I. Department of Commerce (National Institute of Standards and Technology) – Product Standard (DOC):
03310-2
Wal-Mart Market #5986 – Frisco, TX (1007028) January 20, 2011
1. DOC PS 1 - Construction and Industrial Plywood.
J. International Code Council, Inc.: 1. InternationalBuilding Code (IBC).
K. National Ready Mixed Concrete Association: 1. NRMCA Inspection Standards
1.3 SUBMITTALS
A. Submittal Procedures: Unless otherwise specified herein, submit in accordance with procedures specified in Section 01330.
B. Submit submittal items required within this Section concurrently. Do not submit submittals of this Section together with submittals in Section 03312 or any other section. Identify submittals explicitly in accordance with Procedures paragraphs in Section 01330.
C. Sieve Analysis for Aggregate Base: Submit current sieve analysis report, sampled and tested within the last 60 days of submittal date, for aggregate base and choker material.
D. Concrete Batch Plant Certifications: Submit name and address of the concrete supplier’s batch plant and plant certification(s) by National Ready-Mix Concrete Association and/or State Department of Transportation.
E. Shop Drawings: Submit shop drawing for field use. Do not use reproductions of Contract Documents as shop drawings. Prepare shop drawings in accordance with Part B, Chapter 3, ACI 315. 1. Reinforcement:
a. Include concrete notes on shop drawings that relate to proper placing of reinforcing. b. Show all reinforcing steel including dowels, embedded steel items, and anchor bolts . c. Include number, grade, size, length, mark, location, splice lengths, and bending diagrams for
reinforcing steel and related products. 2. Placement Drawings:
a. Submit reinforcement placement drawings with bar lists. Include walls, grade beams, and plans of footings and slabs.
b. Show section cuts, details with piece marks, and control joint locations. Show reinforcing size, quantity, spacing, location, length, and required schedules.
F. Samples: Materials as requested by the Structural Engineer of Record (SER), including names, sources, and descriptions.
G. Mix Design: Fill out and submit attached Concrete Mix Design Submittal Form. Submit three copies of each proposed mix design in accordance with ACI 301, Sections 3.9 "Proportioning on the basis of previous field experience or trial mixture", or 3.10 "Proportioning based on empirical data". Submit separate mix design for concrete to be placed by pumping in addition to the mix design for concrete to be placed directly from the truck chute. Submit mix design by emailto the Architect of Record and the Wal-Mart Construction Testing Laboratory. Include applicable information shown on the Mix Design Submittal Form including the following: 1. Proportions of cementitious materials, fine and coarse aggregate, and water. 2. Water-cementitious material ratio, 28-day compressive design strength, slump, and air content. 3. Type of cement, fly ash, slag, and aggregate. 4. Individual aggregate gradation. 5. Type and dosage of admixtures. 6. Special requirements for pumping. 7. Range of ambient temperature and humidity for which design is valid. 8. Special characteristics of mix which require precautions in mixing, placing, or finishing techniques to
achieve finished product specified. 9. Materials and methods for curing concrete.
03310-3
Wal-Mart Market #5986 – Frisco, TX (1007028) January 20, 2011
H. Submit Shop Drawings, and Quality Control Submittals within 5 working days of Contract date.
I. Attachments to Concrete Mix Design: Submit the following as attachments to be included with the Concrete Mix Design: 1. Cementitious materials mill test reports for the following:
a. Portland cement b. Fly ash c. Slag Designation, type, quality, and source (natural or manufactured) of coarse and fine aggregate materials. Sieve Analysis Reports: Provide separate sieve analysis of percentages passing for coarse and fine aggregate. Show values for each sieve size shown on the mix design form. Do not leave any line blank. Sieve analysis sampling and testing for each aggregate source shall be conducted within 60 days of concrete submittal date. Aggregate Supplier Statement: a. Stating if aggregate is possibly alkali-reactive based on tests or past service. b. Stating if aggregate can possibly cause pop-outs, “D” cracking, or other disruptions due to moisture
gain, freezing, or other mechanisms, based on tests or past service. Product data for the following concrete materials admixtures: a. Water reducing b. Set retarding c. Set accelerating d. Data indicating chloride ion content information for each admixture Concrete compressive strength data as required by ACI 318. Concrete Supplier Approval. Chloride-Ion Content: Measured water-soluble chloride-ion content (percent by weight of cementitious materials) in accordance with ASTM C1218. Time of Initial Setting: Initial setting time in accordance with ASTM C403.
2. 3.
4.
5.
6. 7. 8.
9.
J. Product Data: Submit certified laboratory test data or manufacturer’s certificates and data for the items listed below certifying that materials are in conformance requirements specified herein. Submit to the Architect of Record and the Wal-Mart Construction Testing Laboratory for review and approval within 7 calendar days after date of commencement of Work. 1. Portland cement concrete mix design(s) 2. Type and source of Portland cement, fly ash, and slag 3. Aggregate gradations 4. Soft preformed joint filler 5. Pavement joint sealant 6. Dowel bars 7. Tie bars 8. Reinforcing steel bars 9. Welded wire fabric 10. Air entraining admixtures 11. Water-reducing, set-retarding, and set-accelerating admixtures (if used)
K. Pavement Joint and Placement Plan: Provide a placement plan identifying the following: 1. Concrete truck access location. 2. Extent of placements including width, length, slab placement area and volume. 3. Locations of construction joints. 4. Location of sawn contraction joints if different from those shown on the civil drawings.
L. Pre-Slab Installation Meeting: 1. Provide record of notification of pre-slab meeting including company name, persons contacted, and date
and method of contact. 2. Provide meeting minutes to all participants and Wal-Mart Construction Manager including sign-in sheet.
M. Delivery Tickets:
03310-4
Wal-Mart Market #5986 – Frisco, TX (1007028) January 20, 2011
1. Copies of delivery tickets for each load of concrete delivered to site. 2. Indicate information required by ASTM C 94 on each ticket including additional information required for
slabs. 3. Information on ticket shall include quantities of material batched including the amount of free water in the
aggregate and the quantity of water that can be added at the site without exceeding the maximum water cementitious ratio of the approved mix design. Aggregate moisture corrections shall be based on ASTM definitions of aggregate moisture content and absorption.
4. Mix identification number on ticket shall match number on submitted and approved mix design. 5. Submit copies to Wal-Mart Testing Laboratory with each concrete delivery.
N. Installation Certification: Submit certification in writing that final placement is in accordance with specification requirements.
1.4 TESTING
A. Wal-Mart Construction Testing Laboratory (CTL) will perform concrete testing and inspection specified in Part 3
herein at no cost to the Contractor in accordance with Section 01458 - Testing Laboratory Services.
B. CTL is neither authorized to change any specified requirement nor to approve any portion of the work.
C. Failure to detect defective material or Work will neither prevent rejection when defects are discovered later nor will it obligate Owner to make final acceptance.
D. Responsibilities and Duties of Contractor Relative to Owner Testing: 1. Notify Owner’s agency in advance of concrete placement to allow sufficient time to prepare for required
testing. 2. Assist Owner’s agency in securing field specimens 3. Provide and maintain for sole use of CTL, facilities for safe storage and proper curing of concrete test
cylinders at project site as required by ASTM C31 and acceptable to Wal-Mart Testing Laboratory.
1.5 QUALITY ASSURANCE
A. Codes and Standards: Comply with provisions of following codes, specifications, and standards, except where more stringent requirements are shown or specified: 1. ACI 301 - Specifications for Structural Concrete for Buildings. 2. ACI 318 - Building Code Requirements for Reinforced Concrete. 3. CRSI - Manual of Standard Practice.
B. Pumped Concrete: 1. Perform mix design, proportioning, and placement in accordance with ACI 304.2R. 2. Submit documented evidence of experience in placing concrete by pumping on not less than three projects
of similar size and complexity. List available pump size, standby pump size, piping, and other equipment. 3. Submit documented evidence of concrete supplier's ability to dedicate sufficient mixing and delivery
equipment to supply the concrete continuously for the volumes to be placed by pumping.
C. Chemical Admixtures: Set control admixtures may be used only when adverse weather conditions are anticipated. Use of admixtures is subject to Wal-Mart approval. 1. Notify Wal-Mart Construction Manager at Pre-Bid Conference if admixtures will be used in concrete. 2. Provide Wal-Mart Construction Manager with proposed Construction Schedule identifying anticipated
adverse weather conditions justifying use of admixtures. 3. Notify Wal-Mart Construction Manager prior to installation for which admixtures will be used in concrete. 4. Mix design shall indicate ingredients including the admixtures to be used and the slump and air content
range for the project.
D. Concrete Truck Inspection:
03310-5
Wal-Mart Market #5986 – Frisco, TX (1007028) January 20, 2011
1. Conform to ASTM C94, NRMCA, and Department of Transportation standards in state where project is located.
2. Perform inspections immediately before starting concreting operations. 3. Record acceptable truck numbers. 4. Record the identification numbers of those trucks found to be acceptable on the basis of inspections. 5. Do not bring on site for concreting operations, any truck whose identification numbers are not recorded as
acceptable. Notify Wal-Mart Testing Lab if non-conforming trucks are used to deliver concrete for slabs and pavements.
E. Tolerances: 1. Conform to most stringent requirements of ACI 117 and ACI 301 except as specified herein. 2. Conform to ACI 117 thickness tolerances for slabs-on-ground.
F. Concrete Supplier Approval: 1. The concrete supplier shall be fully approved and acceptable by the concrete subcontractor as the producer
of concrete for which the subcontractor is to place and finish. Prepare Statement of Approval of Concrete Supplier stating project name, name of concrete supplier, along with the statement of approval and the signatures of the Contractor and concrete pavement subcontractor. Submit statement as specified in Submittals paragraph above.
G. Workmanship: 1. When directed by the Owner, remove and replace or repair concrete and related Work which does not
conform to specified requirements including strength, tolerances and finishes. 2. Bear cost of corrections or delays to other work affected by, or resulting from, corrections to concrete
Work. 3. If results of compressive strength tests reveal deficiencies in concrete, meet requirements of ACI 318 and
ACI 301. 4. Establish and maintain required lines and elevations. 5. Check surface areas at intervals necessary to eliminate ponding areas.
H. Pre-installation Meeting: Convene a pre-installation meeting at the site at least two weeks prior to commencing work of this Section. Require attendance of parties directly affecting work of this Section, including, but not limited to, the Owner's representative, CTL’s representative and inspector, Contractor, concrete sub-contractor and job foreman, concrete supplier, and base fine grading contractor. I . Contact Wal-Mart Construction Manager Thirty days prior to pre-installation conference to confirm
schedule. Record discussions of meeting and decisions and agreements (or disagreements) reached, and furnish copy of record to each party attending. Review foreseeable methods and procedures related to paving work, including the following: CTL’s testing and inspection procedures. Concrete finishes and finishing. Cold- and hot-weather concreting procedures. Curing procedures. Concrete design mixture and examine procedures for ensuring quality of concrete materials. Proposed sources of concrete materials, including capabilities and location of plant that will manufacture concrete. Tour, inspect and discuss condition of subgrade, drainage structures, and other preparatory work.
10. Requirements for protecting concrete work, including restriction of traffic during installation period and for remainder of construction period.
I I . Review and finalize construction schedule and verify availability of materials. 12. Concrete paving requirements (drawings, specifications and other contract documents). 13. Required submittals, both completed and yet to be completed. 14. Weather and forecasted weather conditions, and procedures for coping with unfavorable conditions. 15. Safety precautions relating to placement of concrete. 16. Changes to the contract documents from recommendations or discussions at the Pre-Construction meeting
shall be approved in writing by the Wal-Mart Construction Manager prior to implementation.
2.
03310-6
Wal-Mart Market #5986 – Frisco, TX (1007028) January 20, 2011
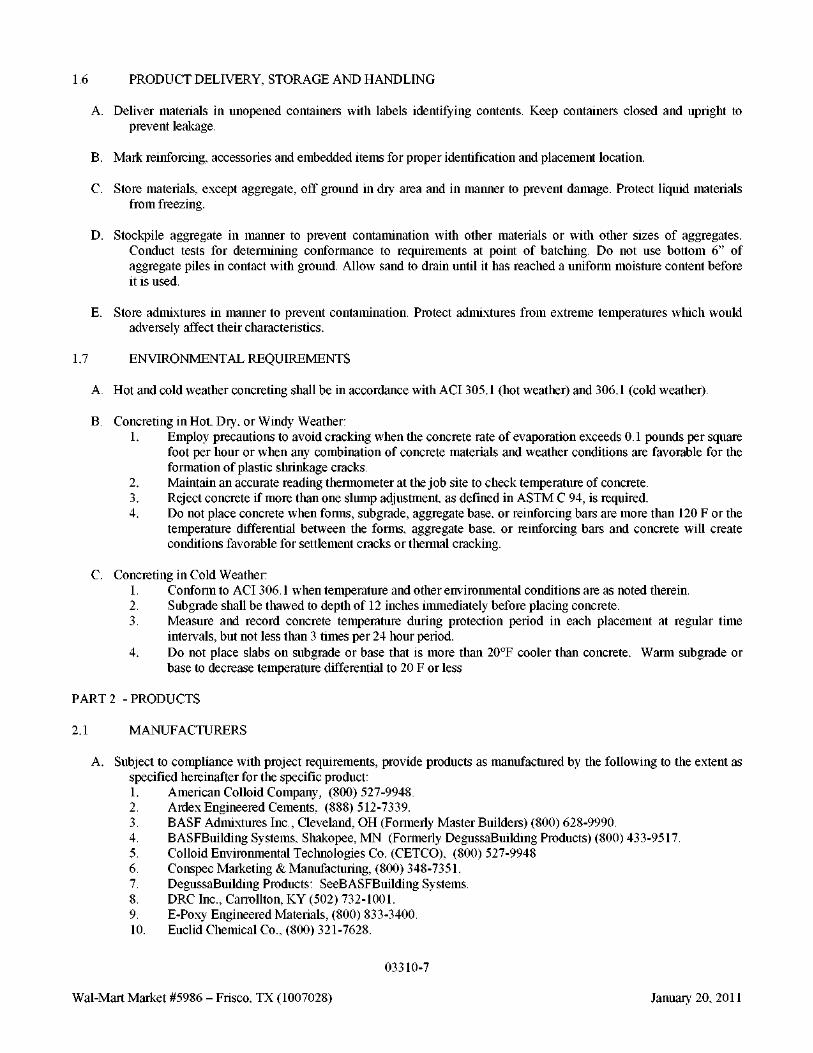
1.6 PRODUCT DELIVERY, STORAGE AND HANDLING
A. Deliver materials in unopened containers with labels identifying contents. Keep containers closed and upright to prevent leakage.
B. Mark reinforcing, accessories and embedded items for proper identification and placement location.
C. Store materials, except aggregate, off ground in dry area and in manner to prevent damage. Protect liquid materials from freezing.
D. Stockpile aggregate in manner to prevent contamination with other materials or with other sizes of aggregates. Conduct tests for determining conformance to requirements at point of batching. Do not use bottom 6” of aggregate piles in contact with ground. Allow sand to drain until it has reached a uniform moisture content before it is used.
E. Store admixtures in manner to prevent contamination. Protect admixtures from extreme temperatures which would adversely affect their characteristics.
1.7 ENVIRONMENTAL REQUIREMENTS
A. Hot and cold weather concreting shall be in accordance with ACI 305.1 (hot weather) and 306.1 (cold weather).
B. Concreting in Hot, Dry, or Windy Weather: 1.
2. 3. 4.
Employ precautions to avoid cracking when the concrete rate of evaporation exceeds 0.1 pounds per square foot per hour or when any combination of concrete materials and weather conditions are favorable for the formation of plastic shrinkage cracks. Maintain an accurate reading thermometer at the job site to check temperature of concrete. Reject concrete if more than one slump adjustment, as defined in ASTM C 94, is required. Do not place concrete when forms, subgrade, aggregate base, or reinforcing bars are more than 120 F or the temperature differential between the forms, aggregate base, or reinforcing bars and concrete will create conditions favorable for settlement cracks or thermal cracking.
C. Concreting in Cold Weather: 1. Conform to ACI 306.1 when temperature and other environmental conditions are as noted therein. 2. Subgrade shall be thawed to depth of 12 inches immediately before placing concrete. 3. Measure and record concrete temperature during protection period in each placement at regular time
intervals, but not less than 3 times per 24 hour period. 4. Do not place slabs on subgrade or base that is more than 20°F cooler than concrete. Warm subgrade or
base to decrease temperature differential to 20 F or less
PART 2 - PRODUCTS
2.1 MANUFACTURERS
A. Subject to compliance with project requirements, provide products as manufactured by the following to the extent as specified hereinafter for the specific product: 1. American Colloid Company, (800) 527-9948. 2. Ardex Engineered Cements, (888) 512-7339. 3. BASF Admixtures Inc., Cleveland, OH (Formerly Master Builders) (800) 628-9990. 4. BASFBuilding Systems, Shakopee, MN (Formerly DegussaBuilding Products) (800) 433-9517. 5. Colloid Environmental Technologies Co. (CETCO), (800) 527-9948 6. Conspec Marketing & Manufacturing, (800) 348-7351. 7. DegussaBuilding Products: SeeBASFBuilding Systems. 8. DRC Inc., Carrollton, KY (502) 732-1001. 9. E-Poxy Engineered Materials, (800) 833-3400. 10. Euclid Chemical Co., (800) 321-7628.
03310-7
Wal-Mart Market #5986 – Frisco, TX (1007028) January 20, 2011
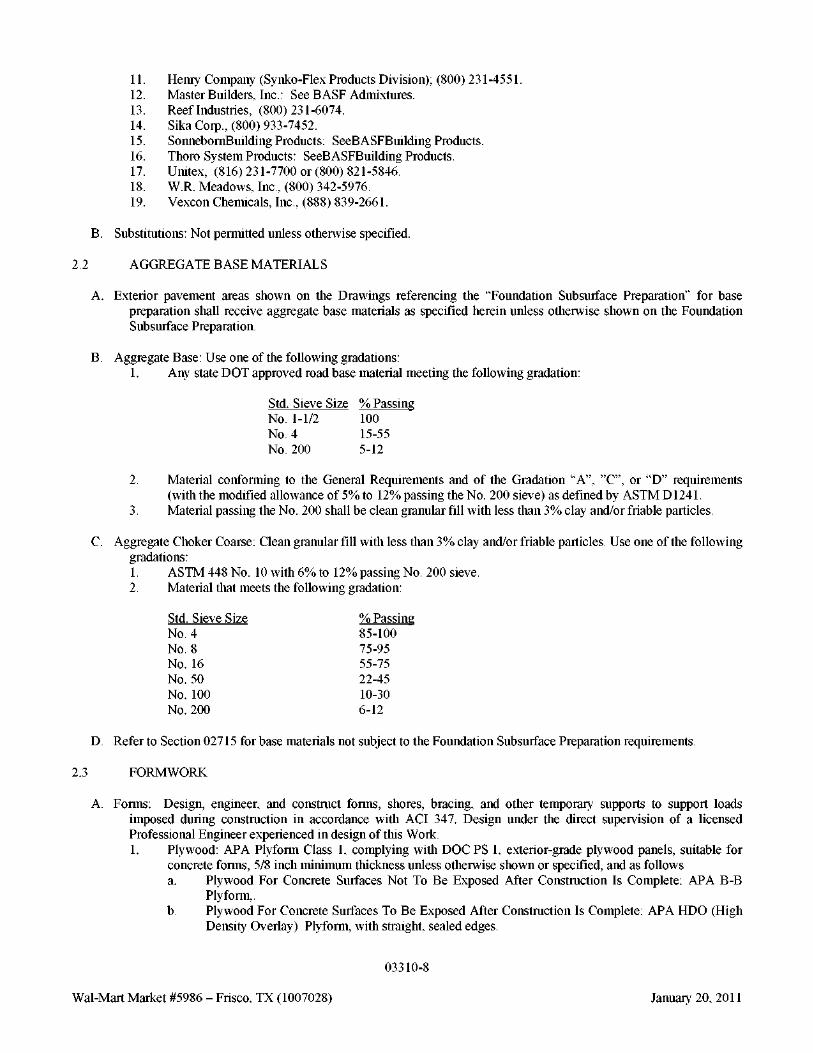
11. Henry Company (Synko-Flex Products Division); (800) 231-4551. 12. Master Builders, Inc.: See BASF Admixtures. 13. Reef Industries, (800) 231-6074. 14. Sika Corp., (800) 933-7452. 15. SonnebornBuilding Products: SeeBASFBuilding Products. 16. Thoro System Products: SeeBASFBuilding Products. 17. Unitex, (816) 231-7700 or (800) 821-5846. 18. W.R. Meadows, Inc., (800) 342-5976. 19. Vexcon Chemicals, Inc., (888) 839-2661.
B. Substitutions: Not permitted unless otherwise specified.
2.2 AGGREGATE BASE MATERIALS
A. Exterior pavement areas shown on the Drawings referencing the “Foundation Subsurface Preparation” for base preparation shall receive aggregate base materials as specified herein unless otherwise shown on the Foundation Subsurface Preparation.
B. Aggregate Base: Use one of the following gradations: 1. Any state DOT approved road base material meeting the following gradation:
Std. Sieve Size % Passing No. 1-1/2 100 No. 4 15-55 No. 200 5-12
2. Material conforming to the General Requirements and of the Gradation “A”, ”C”, or “D” requirements (with the modified allowance of 5% to 12% passing the No. 200 sieve) as defined by ASTM D1241.
3. Material passing the No. 200 shall be clean granular fill with less than 3% clay and/or friable particles.
C. Aggregate Choker Coarse: Clean granular fill with less than 3% clay and/or friable particles. Use one of the following gradations: 1. ASTM 448 No. 10 with 6% to 12% passing No. 200 sieve. 2. Material that meets the following gradation:
Std. Sieve Size % Passing No. 4 85-100 No. 8 75-95 No. 16 55-75 No. 50 22-45 No. 100 10-30 No. 200 6-12
D. Refer to Section 02715 for base materials not subject to the Foundation Subsurface Preparation requirements.
2.3 FORMWORK
A. Forms: Design, engineer, and construct forms, shores, bracing, and other temporary supports to support loads imposed during construction in accordance with ACI 347. Design under the direct supervision of a licensed Professional Engineer experienced in design of this Work. 1. Plywood: APA Plyform Class 1, complying with DOC PS 1, exterior-grade plywood panels, suitable for
concrete forms, 5/8 inch minimum thickness unless otherwise shown or specified, and as follows a. Plywood For Concrete Surfaces Not To Be Exposed After Construction Is Complete: APA B-B
Plyform,. b. Plywood For Concrete Surfaces To Be Exposed After Construction Is Complete: APA HDO (High
Density Overlay) Plyform, with straight, sealed edges.
03310-8
Wal-Mart Market #5986 – Frisco, TX (1007028) January 20, 2011

2. Lumber: Dressed, tongue and grooved, free from loose knots. 3. Metal: Smooth, clean, corrosion-free, without dents or holes and with closely-matching edges. 4. Fiberglass: Smooth, clean, without dents or holes and with closely-matching edges. 5. Laminated Round Fiber Tubes: Spirally laminated paper fiber, wax impregnated on exterior surfaces and
interior ply allowing uniform moisture penetration.
B. Form Release Agent: 1. 100% biodegradable, non-toxic, 100% natural organic chemical release agent. Will not cause surface
imperfections, non-staining, and compatible with field applied paints, toppings, curing compounds, and other coatings. Provide one of the following: a. Form-EZE Natural by Euclid. b. Enviroform by Conspec. c. Certi-Vex V Form Release by Vexcon. d. Farm Fresh by Unitex.
2. Use same brand form release agent for all forms.
C. Ties and Accessories: 1. Provide form ties, anchors, and hangers of sufficient strength to resist displacement of forms due to
construction loads and depositing of concrete. 2. Provide ties and spreader form ties designed so no metal will be within 1 inch of surface when forms are
removed. 3. Where concrete surfaces are exposed to view, use form ties that will leave a depression not more than 1
inch in diameter when removed.
D. Waterstops: Provide one of the following. 1. Waterstop RX-101 Bentonite Waterstop, by CETCO (Colloid Environmental Technologies Co.) 2. SF302-Synko-Flex Waterstop, by Henry Co.
2.4 REINFORCEMENT
A. Reinforcing Bars: 1. ASTM A615, deformed, Grade 60. 2. ASTM A 706, deformed, Grade 60.
B. Joint Dowel Bars: ASTM A615, grade 40 minimum, or ASTM A36, smooth round plain steel bars, cut bars true to
length with ends square and free of burrs. Epoxy coat per State Highway Department Standard Specifications.
C. Welded Wire Mesh: Welded plain cold-drawn steel wire fabric, ASTM A185. Furnish in flat sheets.
2.5 REINFORCEMENT ACCESSORY MATERIALS
A. Tie Wire: Minimum 16 gage annealed type.
B. Reinforcing Support Devices: 1. Manufacturer support devices of metal (wire bar), concrete, or recycled plastic devices conforming to CRSI
Manual of Standard Practice 2. Precast concrete bar supports shall have minimum compressive strength of 3500 psi. 3. Plastic accessories shall have a minimum of 50% recycled content. 4. Do not use wood, clay brick, and other devices that can expand due to moisture gain. 5. For concrete surfaces exposed to view where legs of wire bar supports contact forms, use CRSI Class 1
plastic-protected steel wire or CRSI Class 2 stainless-steel bar supports. 6. When precast concrete bar supports are used over aggregate base, or over waterproof membranes and
vapor retarders, properly embed tie wires to prevent penetration of substrate. 7. Properly size foot of bar supports or similar devices to prevent settlement on base material or prevent
puncture on vapor barrier.
03310-9
Wal-Mart Market #5986 – Frisco, TX (1007028) January 20, 2011
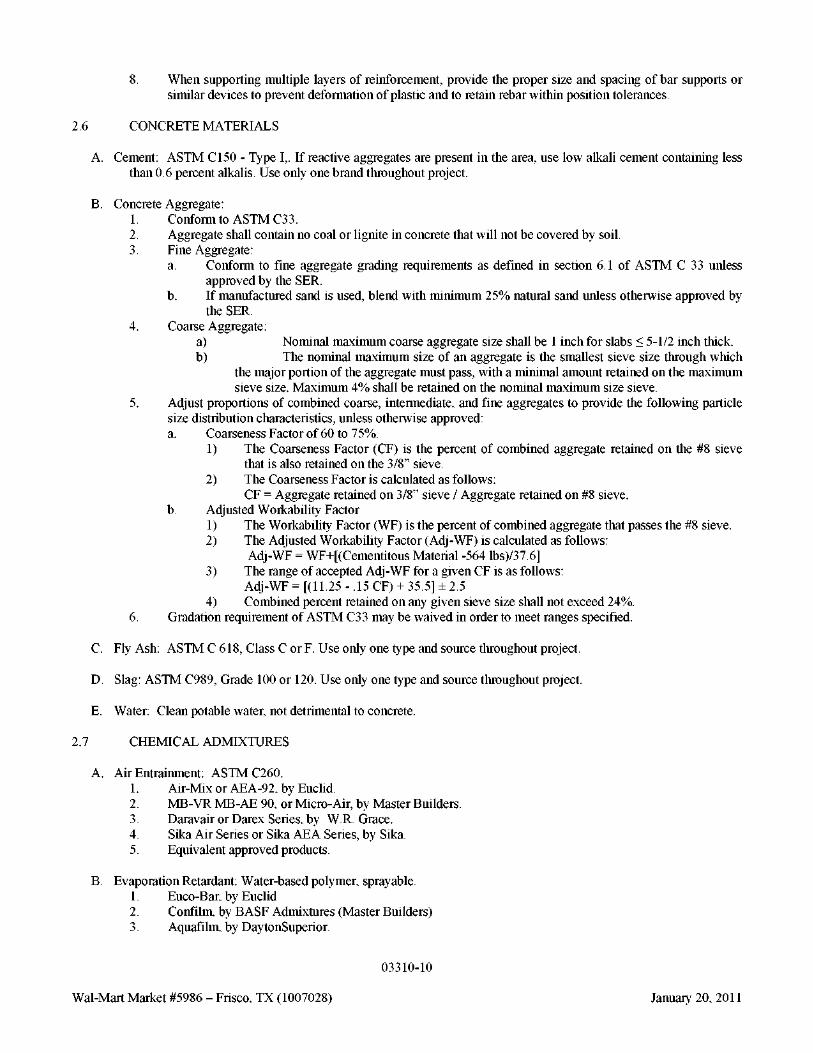
8. When supporting multiple layers of reinforcement, provide the proper size and spacing of bar supports or similar devices to prevent deformation of plastic and to retain rebar within position tolerances.
2.6 CONCRETE MATERIALS
A. Cement: ASTM C150 - Type I,. If reactive aggregates are present in the area, use low alkali cement containing less than 0.6 percent alkalis. Use only one brand throughout project.
B. Concrete Aggregate: 1. Conform to ASTM C33. 2. Aggregate shall contain no coal or lignite in concrete that will not be covered by soil. 3. Fine Aggregate:
a. Conform to fine aggregate grading requirements as defined in section 6.1 of ASTM C 33 unless approved by the SER.
b. If manufactured sand is used, blend with minimum 25% natural sand unless otherwise approved by the SER.
4. Coarse Aggregate: a) Nominal maximum coarse aggregate size shall be 1 inch for slabs ≤ 5-1/2 inch thick. b) The nominal maximum size of an aggregate is the smallest sieve size through which
the major portion of the aggregate must pass, with a minimal amount retained on the maximum sieve size. Maximum 4% shall be retained on the nominal maximum size sieve.
5. Adjust proportions of combined coarse, intermediate, and fine aggregates to provide the following particle size distribution characteristics, unless otherwise approved: a. Coarseness Factor of 60 to 75%.
1) The Coarseness Factor (CF) is the percent of combined aggregate retained on the #8 sieve that is also retained on the 3/8” sieve.
2) The Coarseness Factor is calculated as follows: CF = Aggregate retained on 3/8” sieve / Aggregate retained on #8 sieve.
b. Adjusted Workability Factor 1) The Workability Factor (WF) is the percent of combined aggregate that passes the #8 sieve. 2) The Adjusted Workability Factor (Adj-WF) is calculated as follows:
Adj-WF = WF+[(Cementitous Material -564 lbs)/37.6] 3) The range of accepted Adj-WF for a given CF is as follows:
Adj-WF = [(11.25 - .15 CF) + 35.5] ± 2.5 4) Combined percent retained on any given sieve size shall not exceed 24%.
6. Gradation requirement of ASTM C33 may be waived in order to meet ranges specified.
C. Fly Ash: ASTM C 618, Class C or F. Use only one type and source throughout project.
D. Slag: ASTM C989, Grade 100 or 120. Use only one type and source throughout project.
E. Water: Clean potable water, not detrimental to concrete.
2.7 CHEMICAL ADMIXTURES
A. Air Entrainment: ASTM C260. 1. Air-Mix or AEA-92, by Euclid. 2. MB-VR MB-AE 90, or Micro-Air, by Master Builders. 3. Daravair or Darex Series, by W.R. Grace. 4. Sika Air Series or Sika AEA Series, by Sika. 5. Equivalent approved products.
B. Evaporation Retardant: Water-based polymer, sprayable. 1. Euco-Bar, by Euclid 2. Confilm, by BASF Admixtures (Master Builders) 3. Aquafilm, by DaytonSuperior.
03310-10
Wal-Mart Market #5986 – Frisco, TX (1007028) January 20, 2011
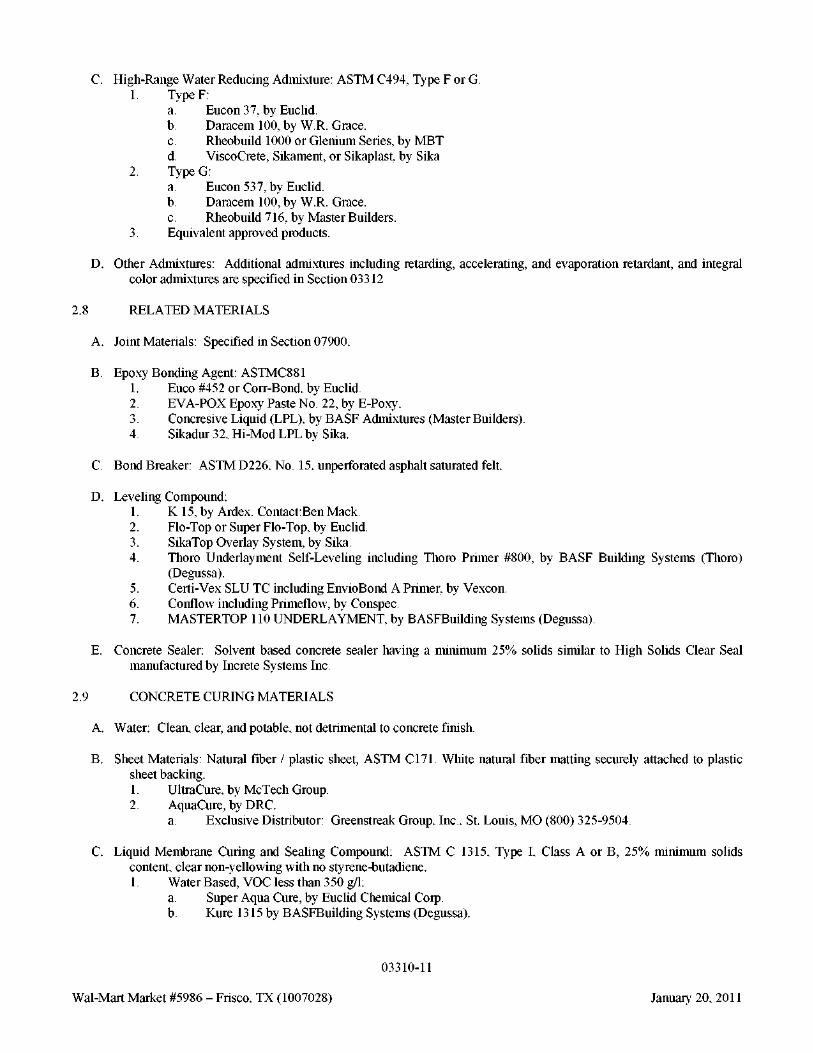
C. High-Range Water Reducing Admixture: ASTM C494, Type F or G. 1. Type F:
a. Eucon 37, by Euclid. b. Daracem 100, by W.R. Grace. c. Rheobuild 1000 or Glenium Series, by MBT d. ViscoCrete, Sikament, or Sikaplast, by Sika
2. Type G: a. Eucon 537, by Euclid. b. Daracem 100, by W.R. Grace. c. Rheobuild 716, by Master Builders.
3. Equivalent approved products.
D. Other Admixtures: Additional admixtures including retarding, accelerating, and evaporation retardant, and integral
color admixtures are specified in Section 03312
2.8 RELATED MATERIALS
A. Joint Materials: Specified in Section 07900.
B. Epoxy Bonding Agent: ASTMC881 1. Euco #452 or Corr-Bond, by Euclid. 2. EVA-POX Epoxy Paste No. 22, by E-Poxy. 3. Concresive Liquid (LPL), by BASF Admixtures (Master Builders). 4. Sikadur 32, Hi-Mod LPL by Sika.
C. Bond Breaker: ASTM D226, No. 15, unperforated asphalt saturated felt.
D. Leveling Compound: 1. K 15, by Ardex. Contact:Ben Mack. 2. Flo-Top or Super Flo-Top, by Euclid. 3. SikaTop Overlay System, by Sika. 4. Thoro Underlayment Self-Leveling including Thoro Primer #800, by BASF Building Systems (Thoro)
(Degussa). 5. Certi-Vex SLU TC including EnvioBond A Primer, by Vexcon. 6. Conflow including Primeflow, by Conspec. 7. MASTERTOP 110 UNDERLAYMENT, by BASFBuilding Systems (Degussa).
E. Concrete Sealer: Solvent based concrete sealer having a minimum 25% solids similar to High Solids Clear Seal
manufactured by Increte Systems Inc.
2.9 CONCRETE CURING MATERIALS
A. Water: Clean, clear, and potable, not detrimental to concrete finish.
B. Sheet Materials: Natural fiber / plastic sheet, ASTM C171. White natural fiber matting securely attached to plastic sheet backing. 1. UltraCure, by McTech Group. 2. AquaCure, by DRC.
a. Exclusive Distributor: Greenstreak Group, Inc., St. Louis, MO (800) 325-9504.
C. Liquid Membrane Curing and Sealing Compound: ASTM C 1315, Type I, Class A or B, 25% minimum solids content, clear non-yellowing with no styrene-butadiene. 1. Water Based, VOC less than 350 g/l:
a. Super Aqua Cure, by Euclid Chemical Corp. b. Kure 1315 by BASFBuilding Systems (Degussa).
03310-11
Wal-Mart Market #5986 – Frisco, TX (1007028) January 20, 2011
D. Dissipating Curing Compound: ASTM C 309 Type 1, Class A or B, solvent or water base, VOC less than 350 g/l. 1. Certi-Vex EnvioCure 100 by Vexcon. (Solvent base) 2. Day Chem REZ Cure (J-11-W) or Safe Cure & Seal (J19) by DaytonSuperior. (Water Base)
3. Kurez DR VOX, by Euclid. (Water Base)
2.10 COLOR TEXTURED (STAMPED) CONCRETE
A. Color textured concrete is specified in Section 03361.
2.11 CONCRETE MIX
A. Mix and deliver concrete in accordance with ASTM C94. Prepare design mixes for each type and strength of concrete by the laboratory trial batch or the field experience method as specified in ACI 301.
B. Exposure Classification: Geographical exposure classification shall be in accordance with Figure 1904.2.2 of the IBC. Uncertainty of classification due to a project location near a border of a classification shall be referred to Wal-Mart Construction Manager for clarification.
C. Exterior Pavement and Slabs on Grade: 1. Compressive Strength and Water-Cementitious (W/C) Ratio: Strength at 28 days and W/C ratio shall be as
follows unless otherwise indicated on the Drawings: a. Negligible exposure classification: 3,500 psi with a maximum water-cementitiuos ratio of 0.53. b. Moderate exposure classification: 4,000 psi with a maximum water-cementitiuos ratio of 0.48. c. Severe exposure classification: 4,500 psi with a maximum water-cementitiuos ratio of 0.45.
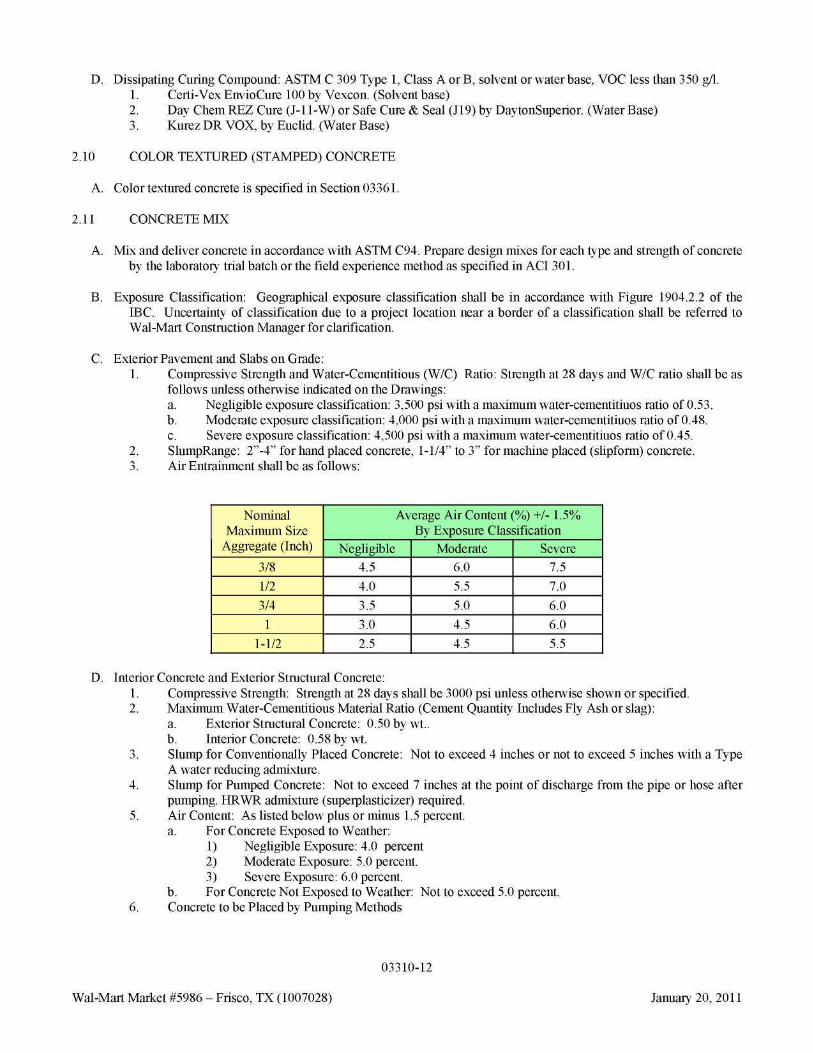
2. SlumpRange: 2”-4” for hand placed concrete, 1-1/4” to 3” for machine placed (slipform) concrete. 3. Air Entrainment shall be as follows:
Nominal Maximum Size
Aggregate (Inch)
3/8
1/2
3/4
1
1-1/2
Average Air Content (%) +/- 1.5% By Exposure Classification
Negligible 4.5
4.0
3.5
3.0
2.5
Moderate 6.0
5.5
5.0
4.5
4.5
Severe 7.5
7.0
6.0
6.0
5.5
D. Interior Concrete and Exterior Structural Concrete: 1. Compressive Strength: Strength at 28 days shall be 3000 psi unless otherwise shown or specified. 2. Maximum Water-Cementitious Material Ratio (Cement Quantity Includes Fly Ash or slag):
a. Exterior Structural Concrete: 0.50 by wt.. b. Interior Concrete: 0.58 by wt.
3. Slump for Conventionally Placed Concrete: Not to exceed 4 inches or not to exceed 5 inches with a Type A water reducing admixture.
4. Slump for Pumped Concrete: Not to exceed 7 inches at the point of discharge from the pipe or hose after pumping. HRWR admixture (superplasticizer) required.
5. Air Content: As listed below plus or minus 1.5 percent. a. For Concrete Exposed to Weather:
1) Negligible Exposure: 4.0 percent 2) Moderate Exposure: 5.0 percent. 3) Severe Exposure: 6.0 percent.
b. For Concrete Not Exposed to Weather: Not to exceed 5.0 percent. 6. Concrete to be Placed by Pumping Methods
03310-12
Wal-Mart Market #5986 – Frisco, TX (1007028) January 20, 2011
a.
b.
The minimum quantity of constituent materials passing the No. 50 sieve (fine aggregate and cementitious materials) shall be 600 pounds per cubic yard. The particle size distribution of the combined fine and coarse aggregate shall be uniform from the largest to the smallest particles.
E. Admixtures: 1. Use water-reducing admixture or high-range water-reducing admixture (Superplasticizer) in concrete as
required for placement and workability. Unless otherwise permitted herein, chemical admixtures shall be dispensed at the batch plant. Use high-range water-reducing admixture (HRWR) in pumped concrete.
2. Use air-entraining admixture in exterior concrete exposed to weather. Add air-entraining admixture at manufacturer's prescribed rate to result in concrete at point of placement having total air content specified above.
3. Use admixtures for water reduction and set control (accelerators and retarders) in strict compliance with manufacturer's directions.
4. Verify with the admixture manufacturer the following: a. The compatibility of the individual admixtures when combined in the concrete mix. b. The compatibility of the individual admixtures with the concrete materials.
F. Supplementary Cementitous Materials (SCM): 1.
2.
3.
4. 5.
Concrete mix shall contain SCM at the amounts specified unless other amounts are approved by SER. Either fly ash or ground granulated blast furnace slag (GGBFS) may be used for the SCM but shall not be used together to form a ternary mix. Use of fly ash or GGBFS in the concrete mix is mandatory. Fly Ash: Substitute fly ash for Portland cement at20% of the total cementitious content. a. If used to mitigate potential aggregate reactivity, only Type F fly ash may be used and shall have the
following maximum properties: 1.5% available alkali and 8.0% CaO. When a maximum of 30% replacement is used, up to 10.0% CaO is permitted.
Ground Granulated Blast Furnace Slag (GGBFS): Substitute GGBFS for Portland cement at 25% of the total cementitious content. If required to mitigate potential sulfate exposure or aggregate reactivity, up to 50% GGBFS substitution for Portland cement may be used. Maintain air-entrainment at specified levels. In cold weather, provide adequate concrete strength gain so concrete will not be damaged from traffic and loads of use.
G. Calcium Chloride Admixture: 1. Calcium chloride (Type L) conforming to ASTM D98 may be used in solution form as part of the mixing
water to accelerate concrete setting and early-strength development. 2. Amount of calcium chloride added shall not be more than necessary to produce the desired results and shall
not exceed 2% by weight of cement. 3. The dosage range for the calcium chloride for the entire project shall not vary by more than 1%. Range is
defined as the difference between the maximum and minimum dosages of calcium chloride for the entire project.
4. Calcium chloride shall not be used in the following applications unless approved by SER: a. concrete containing embedded dissimilar metals or aluminum b. slabs supported on permanent galvanized steel forms c. concrete exposed to deicing chemicals d. prestressed or post-tensioned concrete e. concrete containing aggregates with potentially deleterious reactivity f. concrete exposed to soil or water containing sulfates.
5. Use calcium chloride in accordance with manufacturer’s recommendation. 6. Chloride-ion Concentration: Maximum water-soluble chloride-ion concentrations in hardened concrete at
ages from 28 to 42 days contributed from the ingredients including water, aggregates, cementitious materials, and admixtures shall not exceed the following limits unless approved by SER:
Type of Member
Prestressed concrete
Maximum water-soluble chloride ion (Cl-) content in concrete (percent by weight of cement)
0.06
03310-13
Wal-Mart Market #5986 – Frisco, TX (1007028) January 20, 2011
Reinforced concrete exposed to chloride in service 0.15 Reinforced concrete that will be dry or protected from moisture in service 1.00 Other reinforced concrete construction 0.30
7. When using calcium chloride or other admixtures containing chlorides, measure water-soluble chloride-ion content (percent by weight of cementitious materials) per ASTM C 1218. Sample shall be from concrete representing the submitted mix design and maximum chloride dosage anticipated for the project.
2.12 MIXING
A. Ready-Mixed Concrete: 1. Mix and transport in accordance with ASTM C 94 and ACI 301 except as specified. 2. Reset drum revolution counter to zero on ready mix concrete truck when water is added to drum.
B. Site-Mixed Concrete: 1. Conform to ACI 301. 2. Use central-mix type batch plant.
PART 3 - EXECUTION
3.1 EXAMINATION
A. Verify anchors, seats, plates, reinforcement, and other items to be cast into concrete are accurately placed, held securely, and will not cause hardship in placing concrete.
3.2 PREPARATION
A. Prepare previously placed concrete by cleaning with steel brush and applying bonding agent. Apply bonding agent in accordance with manufacturer's instructions.
B. Preplacement Inspection: All trades and participants involved shall verify that preparations are in conformance with Contract documents. Inspect reinforcement, inserts, and embedded parts before beginning concrete placement to ensure accurate size and location. Use approved sign-off forms.
C. Notify Wal-Mart Testing Laboratory minimum 48 hours prior to commencement of concreting operations
D. Cleaning Equipment: Remove hardened concrete and foreign materials from mixing and conveying equipment.
E. Ensure that all work is properly coordinated: 1. Structural Drawings and Specifications with those of other disciplines.
2. Use final corrected Shop Drawings, Placing Drawings and Material / Equipment Drawings
3.3 AGGREGATE BASE PLACEMENT
A. Where exterior pavement areas are shown on the drawings referencing the “Foundation Subsurface Preparation” for base preparation, place aggregate base in accordance with requirements herein.
B. Aggregate Base: 1. Install aggregate base where shown on Drawings. 2. Compact to final thickness shown in layers not exceeding 6 inches with minimum of 2 passes per layer
with vibratory compactor. 3. Compact fill to 98% of aggregate’s Standard Proctor as determined by Method D of ASTM D698. 4. Leave pad up to 2 inches low until just prior to concrete placement.
C. Aggregate Base Fine Grading:
03310-14
Wal-Mart Market #5986 – Frisco, TX (1007028) January 20, 2011
1. Compact to final thickness noted with 2 passes minimum vibratory compactor to produce smooth, flat, dense surface.
2. Aggregate choaker coarse or top 2” DOT approved road base shall be place dry immediately before placing concrete.
3. Do not allow excess moisture or soft soil beneath vapor retarder at time of placing concrete. 4. Thickness shall not exceed 2 inches. 5. Level off aggregate base top surface with aggregate chocker coarse material as necessary as follows:
a. to reduce surface friction and to meet specified fine grade tolerances specified below. Typically required up to 3/4" thick in areas exposed to rain, traffic, or excavation for pits and buried utilities.
b. where aggregate base material does not have sufficient fine particles to produce a surface that is free of exposed aggregate or surface voids greater than 3/8” in size at time of slab installation.
6. Use laser guided equipment used to establish specified base elevation. 7. Provide dry, smooth, flat, dense surface 8. Proofroll 48 hrs maximum prior to concrete placement. Depression under a fully loaded ready mix truck
shall not exceed 1/2 inch.
D. Pavement Aggregate Base Fine Grade Tolerance: +0 inch, -3/4 inch with transition no greater than 3/4 inch vertically to 8 inches horizontally for level slab.
3.4 FORMWORK
A. Form vertical surfaces of concrete work.
B. Design, construct, erect, support, and remove formwork and related items in accordance with most stringent requirements of ACI 117, 301, 304R, 318 and 347R 1. Camber forms to allow for deflection due to weight of fresh concrete.
C. Formwork for concrete surfaces to be painted or exposed to view after completion of project shall conform to the following: 1. Do not use forms with dents, holes or patches. 2. Individual formwork elements shall be as large as possible. 3. Position individual formwork elements in regular, uniform pattern with joints aligned. 4. Uniformly space and align form ties in horizontal and vertical rows. 5. Construct forms for removal without hammering or prying against concrete. 6. Temporary formwork openings (for cleaning, inspecting, etc) shall be placed on unexposed side or
constructed so that concrete surface at opening will match adjacent concrete in appearance.
D. Form Preparation 1. Clean formwork. 2. Remove rust from steel formwork.
E. Erecting Forms: 1. Solidly butt joints and provide backup at joints as required to prevent leakage of cement paste. 2. Do not tape formwork joints. 3. Just before placing concrete, clean forms and adjacent surfaces again as necessary. Remove wood, sawdust,
chips dirt and other debris. 4. If necessary to grease tie threads, do not allow grease to contact remainder of tie when wall will be exposed
to hydrostatic pressure.
F. Form Release Agent 1. Before placing reinforcing steel, thoroughly coat contact surfaces of forms with form release agent. 2. Apply form release agent evenly without excess drip. 3. Do not allow form release agent to come into contact with concrete surfaces against which fresh concrete
will be placed. 4. Moisten wood forms immediately before placing concrete where form release agents are not used.
03310-15
Wal-Mart Market #5986 – Frisco, TX (1007028) January 20, 2011
G. Form Construction for Paving: 1. Set forms to required grades and lines, rigidly braced and secured. 2. Install sufficient quantity of forms to allow continuance of work and so that forms remain in place
minimum of 24 hours after concrete placement. 3. Check completed formwork for grade and alignment to following tolerances:
a. Top of forms not more than 1/8-inch in 10'-0". b. Vertical face on longitudinal axis, not more than 1/4-inch in 10'-0".
4. Clean forms after each use and coat with form release agent as often as required to ensure separation from concrete without damage.
3.5 PLACING REINFORCEMENT
A. Place reinforcing in accordance with most stringent requirements of ACI 117, 301 and 308 and CRSI Manual of Standard Practice and Placing Reinforcing Bars.
B. Accurately place and secure reinforcement against displacement by firmly wiring at intersections and splices with
not less than No. 18 U.S. Standard Gauge annealed wire.
C. Turn wire ends away from concrete exterior.
D. Ensure reinforcing is clean, free from defects and kinks, loose mill or rust scale or coatings that will reduce bond.
E. Protect exposed reinforcing bars, inserts and plates intended for bonding with future expansion from corrosion.
F. When welding of reinforcement is specified, comply with AWS D1.4. Do not tack weld crossing bars for assembly of reinforcement, supports or embedded items.
G. Slab on Grade and Pavement Dowels: 1. Secure dowels and their sleeves perpendicular to joint and parallel to finished concrete surface. 2. Use prefabricated dowel supports at ends of dowels to maintain alignment. 3. Dowel alignment shall be within specified tolerances. 4. Do not grease plate dowels
3.6 EMBEDMENTS
A. Install anchor bolts and embedded bearing devices provided by others.
B. Provide other anchor bolts and bearing devices shown on Drawings or anchor bolt setting plans or required
equipment installation.
C. Use templates as required for spacing between anchor bolts and set elevations with surveying equipment.
D. Position and anchor steel shapes, anchor bolts, casings, conduit sleeves, masonry anchorages and other materials embedded in concrete.
E. Place and secure against displacement miscellaneous steel, pipe sleeves, inserts, anchors, stair abrasive nosings,
preformed joint fillers, vapor retarders and miscellaneous embedded items.
F. Secure embedments to formwork when possible.
G. Install clean embedments. After concrete placement, clean embedment exposed surfaces of concrete splatter and other foreign substances.
H. Unless noted otherwise on the Drawings, ensure corner protection angles, bars and other similar embedded metal items are continuous between concrete joints. If shorter lengths are required for metal items, connect the ends by butt-welding entire joint and grinding smooth exposed surface. Ensure embedded metal items are discontinued at
03310-16
Wal-Mart Market #5986 – Frisco, TX (1007028) January 20, 2011

construction, contraction and isolation joints.
I. Temporarily fill voids in sleeves and inserts with easily removable materials.
J. Before placing concrete on grade, piping and other utilities under concrete shall be inspected, tested, and excavations backfilled and properly compacted to solid bearing.
K. Allow sufficient time between erection of forms and placing concrete for other trades to install and test their work.
3.7 JOINTS
A. Joints 1. Provide construction, isolation and contraction joints as indicated on Drawings and as noted below. 2. Bulkheads for construction joints shall be 1-1/2 inch minimum lumber. Do not use permanent preformed
metal bulkheads. 3. Provide bulkheads full depth of member. 4. Space joints to allow one continuous placement between bulkheads.
B. Contraction Joints: 1. Unless otherwise shown on the Drawings, do not extend reinforcement, corner protection angles, bars or
other fixed metal items through construction joints or contraction joints in slabs on ground or pavements or through joints between slabs on ground and vertical surfaces.
2. Match joints in walls and curbs with joints in slabs on ground and pavements. 3. Extend joints across tops of walls and curbs unless noted otherwise on Drawings.
C. Pavement Joint Construction: Construct weakened-plane control (contraction), and construction joints straight with face perpendicular to concrete surface. Construct transverse joints perpendicular to centerline, unless otherwise detailed. 1. Weakened-Plane Control or Contraction Joints: Provide joints at spacing of 12'-0" on centers, maximum
each way. Construct control joints for depth equal to at least 1/4 of the concrete thickness, as follows: a. Form tooled joints in fresh concrete by grooving top with recommended tool and finishing edge
with jointer. b. Sawed Contraction Joints:
1) Use saws, blades, skid plates, and accessories by Soff-Cut International, Inc. or approved equal.
2) Start cutting sawed joints as soon as concrete has hardened sufficiently to prevent raveling or dislodging of aggregates. This will typically be from 1 hour in hot weather to 4 hours in cold weather after completing finishing of slab in that joint location.
3) Provide at least two “Soff-Cut” saws on site with blades capable of achieving the required depth of saw cut.
4) Extend sawed joint to the slab boundaries and abutments, including columns, drains, and other penetrations in the path of a defined joint. Implement methods and timing of the saw cut beyond the limits of the Soff-Cut saw reach to provide a consistent depth of cut with minimal raveling of joint edges.
2. Construction Joints: Place construction joints at end of placements and at locations where placement operations are stopped for period of more than 1/2 hour. Construct joints in accordance with details shown.
D. Doweled Joints: Install dowel bars and support assemblies at joints as indicated. Make provision to prevent concrete
bonding to one side of joint by methods shown on the drawings.
3.8 CONVEYING
A. Handle concrete from mixer to place of final deposit as rapidly as practicable and in manner which will assure obtaining specified quality of concrete.
B. Retempering: Discard concrete which has already begun to set. Do not retemper with water.
03310-17
Wal-Mart Market #5986 – Frisco, TX (1007028) January 20, 2011
C. Equipment: Provide mixing and conveying equipment of proper size and design to ensure a continuous flow of concrete to delivery end. Do not use aluminum pipe or equipment in contact with concrete. 1. Mixers, agitators and non-agitating units: Conform to ASTM C 94 and current certification requirements of
Department of Transportation in state where concrete plant is located. 2. Belt Conveyers:
a. Use only types which will not cause segregation. b. Discharge runs over 30 feet into hopper.
3. Chutes: Metal or metal lined not to be installed at slopes greater than 1 vertical to 3 horizontal. 4. Runways:
a. Provide runways or other means above finished concrete level for wheeled conveying equipment. b. Do not support runways on reinforcing. c. Do not wheel equipment directly over reinforcing or metal deck.
5. Pumps: a. Submit to Testing Lab Agency for review, changes to concrete mix to necessitate pumping. b. Use pump hoses and other slickline components with 5 inch minimum inside diameter. c. For slickline reducers, reduction in diameter shall not exceed 1 inch over a 5 foot length.
3.9 PLACING CONCRETE
A. Place concrete in accordance with ACI 301.
B. Ensure reinforcement, inserts, embedded parts and formed joints are not disturbed during concrete placement.
C. Place concrete in uniform layers, horizontal, 12 to 18 inches thick, exercising care to avoid vertical joints or inclined planes. Place concrete continuously between predetermined construction joints shown on structural drawings. Piling up of concrete in forms to cause separation or loss of ingredients is not permitted.
D. Do not deposit concrete which has partially set or hardened. Do not deposit initial lubricating mortar when pumping concrete. Remove hardened or partially hardened concrete which has accumulated on forms or reinforcement. Do not place concrete on previously deposited concrete which has hardened sufficiently to cause formation of seams or planes of weakness within respective member or section except as specified.
E. Deposit concrete as nearly in final position as practical to avoid rehandling. Exercise care to prevent splashing forms or reinforcing with concrete. Do not permit concrete to drop freely a distance greater than 3 feet. Where longer drops are necessary, use chute, tremie, or other conveyance to help avoid separation.
F. Do not deposit concrete into excavation where water is standing. If place of deposit cannot be successfully pumped dry, place through tremie with outlet end near bottom of place of deposit.
G. Do not deposit concrete when plasticity, measured by slump test, is outside specified limits. The addition of water to increase slump will not be permitted.
H. Vibration: As soon as concrete is deposited, thoroughly agitate with mechanical vibrators and suitable hand tools to work mixture into corners of forms and around reinforcing and embedded items. Use mechanical vibrators with minimum frequency of 9000 revolutions/minute. Do not over vibrate or use vibrators to transport concrete within forms. Insert and withdraw vibrators at approximately 18 inches apart. At each insertion, vibrate generally 5-15 seconds, sufficient to consolidate concrete but not long enough to cause segregation. Keep spare vibrator on job site during concrete placement operations. Do not insert vibrator into lower coarses that have begun to set.
I. Excessive honeycomb or embedded debris in concrete is not acceptable. Notify Wal-Mart Construction Manager upon discovery.
J. Pumping: Maintain controls for proportioning, mixing, adjustment of mix, and placement in accordance with ACI 301 and ACI 304.2R
3.10 CURING
03310-18
Wal-Mart Market #5986 – Frisco, TX (1007028) January 20, 2011
A. General: 1. 2. 3. 4. 5.
6.
Cure concrete in accordance with ACI 301, ACI 308R and ACI 308.1, except as noted. Start curing as soon as concrete surface will not be damaged by curing operations. Continuously cure concrete for at least 7 consecutive days. During curing period, do not allow any part of the concrete to become dry. If using forms for curing, keep forms in contact with concrete wet during curing period unless type of form is impervious to water, such as metal or fiberglass. If forms are removed before curing period is complete, continue curing immediately with other approved methods
B. Methods of Curing: 1.
2.
3.
Impervious Sheet Cure:Wet exposed surfaces of concrete after completing finishing and then apply prewetted sheet with edges lapped 6 inches minimum and sealed & secured in such manner as to prevent moisture from escaping from concrete from laps or edges. Remove sheets after 7 day curing period. Curing Compound:
a. Apply curing compounds by spraying or rolling uniformly in a single coat on surfaces immediately following final finishing operation. Apply curing compound in accordance with manufacturer’s recommendations. Do not use curing compound on surface against which additional concrete, other finishing materials, or coatings are to be bonded if their bond will be affected by curing compound. Spraying shall be by power sprayer. Immediately recoat, at the rate specified above, surfaces subjected to rainfall within 3 hours after compound has been applied or surfaces damaged by subsequent construction operations within the curing period. Use solvent based curing compounds when compound is applied below 40 F.
Curing Schedule: a. Unformed surfaces shall receive an impervious sheet cure or curing compound as appropriate except
as follows: b. Use impervious sheet cure for exterior color textured finished surfaces. c. Protect and cure finished concrete paving using curing compound.
f.
3.11 FORM REMOVAL
A. Do not remove forms until concrete has hardened sufficiently to support its own weight and imposed construction loads.
B. Remove forms in manner to avoid damage to concrete.
C. Formwork for slabs and pavements, curbs and other parts not supporting vertical load of concrete may be removed as soon as concrete has hardened sufficiently to resist damage from removal operations, but in no case sooner than 12 hours.
D. Remove wood forms from under floors, ramps, steps, and similar places (through temporary openings if necessary) so no material will be left to rot or to be infested by termites.
3.12 FINISHING PROCEDURE
A. Formed Surfaces: 1. Rough-Form Finish:
a. Patch tie holes and defects. Clip or rub off fins exceeding 1/2 inch in height. Leave surfaces with texture imparted by forms.
b. Apply on concrete surfaces not exposed to public view and where noted on Drawings. 2. Smooth-Form Finish:
a. Patch tie holes and defects. Remove fins exceeding 1/8 inch in height. b. Apply on concrete surfaces exposed to public view and where noted on Drawings.
03310-19
Wal-Mart Market #5986 – Frisco, TX (1007028) January 20, 2011
B. Initial Finishing: 1. Re-straighten surface irregularities with a 10 ft highway screed in two directions as close to perpendicular
as possible before water appears on concrete surface. 2. Do no further working of surface until time for floating; do not work surface while water is present. 3. "Dry Sprinkle" method finishing is not acceptable and will be cause for rejection
C. Floating: 1. Begin float operations when bleed water sheen has disappeared and concrete has stiffened sufficiently to
allow walking on surface without leaving heel prints more than 1/4 inch deep. Check and level the surface lane to an initial tolerance not exceeding ¼ inch in ten feet when tested with a ten foot straight edge. Immediately after leveling, refloat surface to a uniform smooth granular surface. Use magnesium or aluminum power float unless otherwise specified.
2. Avoid premature finishing that brings excessive fines to surface causing finished slab to have soft surface which will dust.
D. Troweling: 1. Delay troweling as long as possible to prevent working excess fines and water to surface. Do not begin
until surface moisture film and shine remaining after floating have disappeared. Trowel in alternate pass directions.
2. Power trowel using riding trowel where possible. Use hand trowel in inaccessible areas. 3. Do not over-trowel floors scheduled to receive curing/sealing compound unless specified otherwise. 4. Do not re-wet surface to trowel. 5. Final hand finish passes shall be done in the same direction. Finish all surfaces within a reasonable time
period to provide uniformity of appearance.
E. Broom Finish: 1. Provide a floated finish, then finish with broom.
a. Heavy Boom Finish: Steel wire or stiff, coarse, fiber broom. b. Light Broom Finish: Soft-bristled fiber broom.
2. Allow surface to harden sufficiently to retain scoring or ridges. 3. Broom transverse to traffic or at right angles to slope of slab.
F. Sealing: Apply concrete sealer to interior concrete curbs in cart storage area.
G. Finish Schedule: 1. Unexposed Exterior Formed Surfaces: Rough form finish. 2. Exposed Exterior Formed Surfaces: Smooth form finish, stone rubbed. 3. Automotive Center Pit Floor and Slab above Pit: Troweled. 4. Equipment Pads:Troweled 5. Dock: Light Broom. 6. Curbs: Troweled 7. Stair Treads: Heavy Broom. 8. Exposed exterior walking surfaces, truckwells, ramps, and outside slabs, unless otherwise noted on
Drawings: Broom Finish.
3.13 JOINT FILLING AND SEALING
A. Joint filling and sealing is specified in Section 07900.
3.14 DEFECTIVE CONCRETE
A. Concrete that does not satisfy the performance requirements of this specification, including but not limited to, tolerance, strength, durability and finish shall be removed and replaced at no extra cost to the Owner if repair cannot be accomplished to the satisfaction of Wal-Mart Construction Manager.
B. Patching;
03310-20
Wal-Mart Market #5986 – Frisco, TX (1007028) January 20, 2011
1. Notify Wal-Mart Construction Management immediately upon discovery and before patching any imperfect areas.
2. Repair and patch imperfect areas, with cement mortar, immediately after discovery. Imperfect areas not acceptable to Wal-Mart Construction Management will be considered defective.
3. Cut out honeycomb, rock pockets, voids over ¼ inch in any dimension, surface imperfections and holes left by tie rods and bolts down to solid concrete, but in no case, to a depth of not less than one inch. Make edges of cut perpendicular to the concrete surface. Thoroughly clean, dampen with water and brush-coat the area to be patched with specified bonding agent. Place patching mortar after bonding compound has dried.
3.15 QUALITY ASSURANCE TESTING AND INSPECTION (BY OWNER)
A. General: 1. Wal-Mart Testing Laboratory will perform concrete testing specified herein at no cost to the Contractor. 2. Perform Tests and Inspections as indicated in Table A – Testing and Inspection Schedule, at the end of this
section. The Testing Agency shall keep records of the testing and inspections. 3. Work on which test have failed shall be corrected as directed by Wal-Mart Construction Manager at no
additional cost and without extension of contract time. 4. Perform testing in accordance with testing standards listed at the beginning of this Section.
B. Qualifications: Unless otherwise specified, work shall be preformed by a Special Inspector – Technical II or Special Inspector – Structural I. In addition to the Inspector and CTL qualifications specified in Section 01458, the following qualifications shall apply for all Cast-in-Place Concrete inspection. 1. Technical I: ACI Certified Grade I inspector. 2. Technical II: ACI Certified Grade II inspector. 3. CTL testing laboratory: C.C.R.L. certification at the National Bureau of Standards. (For multi-story
projects only)
C. Laboratory Testing Requirements: 1. Proportion concrete materials on basis of field experience or by laboratory trial batches in accordance with
ACI 318. 2. Ready-mix concrete supplier may proportion materials by field experience, per ACI 318. 3. Proportioning by Water-Cement ratio per ACI 318 is not acceptable. 4. Submit copies of data and test results to Wal-Mart Construction Manager for review to verify mix designs. 5. Test items such as reinforcing steel, aggregates, and other products suspected of not meeting specified
requirement as directed by Wal-Mart Construction Manager to verify compliance. Provide test report to Wal-Mart Construction Manager.
6. Conduct strength tests: a. During the initial 24 hours (plus or minus 8 hours) after molding, the temperature immediately
adjacent to the specimens shall be maintained in the range of 60 to 80 degrees F. Control loss of moisture from the specimens by shielding from the direct rays of the sun and from radiant heating devices.
b. Specimens transported prior to 48 hours after molding shall not be demolded, but shall continue initial curing at 60 to 80 degrees F until time for transporting.
c. Specimens transported after 48 hours age shall be demolded in 24 hours (plus or minus 8 hours). Curing shall then be continued but in saturated limewater at 73.4 degrees (plus or minus 3 degrees F) until the time of transporting.
d. Date test cylinders and number consecutively. Give each cylinder of each set an identifying letter (i.e. A, B, C, D). Prepare a sketch of the building plan for each test set identifying location of placed concrete.
e. Test one cylinder (A) at 7 days for information. If the compressive strength of the concrete sample is equal to or above the 28 day specified strength, test another cylinder (B) at 7 days. The average of the breaks shall constitute the compressive strength of the concrete sample.
f. Test two cylinders (B and C) at 28 days and the average of the breaks shall constitute the compressive strength of the concrete sample.
7. In addition to required information noted previously in this Section, record the following information on
03310-21
Wal-Mart Market #5986 – Frisco, TX (1007028) January 20, 2011
concrete compression reports: a. Test cylinder number and letter. b. Specific foundations or structures covered by this test. c. Proportions of concrete mix or mix identification. d. Specified compressive strength. e. Tested compressive strength. f. Concrete plastic unit weight. g. Name of technician securing samples. h. Curing conditions for concrete strength test specimens (field and laboratory). i. Date strength specimens transported to laboratory. j . Age of strength specimens when tested. k. Type of fracture during test.
D. Field Testing 1. Perform slump and temperature tests for first truck load of concrete and every 50 cubic yards minimum
thereafter. If the initial slump and temperature fails, make additional slump and temperature tests for every other load from a stationary mixer or truck to test consistency. Test temperature hourly when air temperature is 40 F and below or 80 F and above. Provide test reports to Wal-Mart Construction Manager.
2. Perform air test for first truck and every 100 cubic yards minimum thereafter. Make test at same time as slump test. If initial test fails, perform air test in every other load to insure consistency. Provide test reports to Wal-Mart Construction Manager and other involved parties.
3. When pumping concrete, take samples for tests at point of delivery from pumping line in addition to first slump test noted above for concrete with mid-range or high-range water-reducer. Provide test report to Wal-Mart Construction Manager and other involved parties.
4. During first day of concrete placement and later as directed by Wal-Mart Construction Manager, take concrete sample at point of final placement to verify mix design submittals. Washout sample to remove material finer than no. 200 sieve and perform combined sieve analysis, using sieve sizes specified herein, furnishing percent retained on each sieve. Concrete sample shall be large enough to be representative but is not less than 70 pounds. Conform to ASTM C136. Tolerance for material retained on any 1 sieve shall be -3% and +4% of approved mix design for total combined coarse and fine aggregates except tolerance for material retained on 100 sieve shall be + or -2%.
5. Determine concrete mix water content for first placement of slabs. This test is to be done first by the concrete supplier then at the project site by the testing agency. a. Conform to AASHTO T318 b. Sample size shall be a minimum of 2500g. c. Give verbal results to involved parties as soon as possible but not later than end of same day. d. Submit written report to involved parties by electronic means or hand deliver within 36 hours or
next regularly scheduled working day after placement (Mon-Sat). 6. In addition to required information noted previously in this Section, record the following information on
concrete compression reports: a. Elapsed time from batching at plant to discharge from delivery truck at project. b. Date and time concrete was placed. c. Ambient temperature, wind speed, and relative humidity during concrete placement. d. Curing conditions for concrete strength test specimens (field and laboratory).
7. Note trends of decreasing quality in concrete due to changing seasons, conditions of curing, or other causes and bring to attention of the Wal-Mart Construction Manager. Report and log comments on Non-Conformance Correction Log.
8. Certify each delivery ticket of concrete. Report type of concrete delivered, amount of water added and time at which cement and aggregate were loaded into truck, and time at which concrete was discharged from truck.
E. Inspection: 1. Concrete Form Work: Verify formwork dimensions will result in member size and configuration shown.
Structural adequacy of formwork is the sole responsibility of the Contractor. 2. Concrete Reinforcement:
a. Verify reinforcing bar grade.
03310-22
Wal-Mart Market #5986 – Frisco, TX (1007028) January 20, 2011
b. Verify reinforcing bars are free of dirt, excessive rust, and damage. c. Verify reinforcing bars are adequately tied, chaired, and supported to prevent displacement during
concrete placement. d. Verify proper clear distances between bars and to surfaces of concrete. e. Verify reinforcing bar size and placement. f. Verify bar laps for proper length and stagger.
3. Slab-on-Grade Structural Inspection: Inspect slabs-on-grade for compliance with Drawings and Specifications. Report on the following: a. Preparation of subgrade. b. Slab thickness. c. Size, spacing, placement (cover), and lap of reinforcement. d. Size, spacing, and placement of joint dowels. e. Placement and finishing of concrete. f. Time of saw cuts after placement of concrete.
4. Concrete Foundations Structural Inspections: Inspect foundations for compliance with Drawings and Specifications. Report on the following: a. Concrete footing size and depth. b. Footing bar size, spacing, and placement (cover). c. Placement and vibration of concrete. d. Dowel bar size, orientation, embedment, and spacing.
5. Concrete Mix: a. Verify mixer truck trip ticket conforms to approved mix design. b. Verify that total water added to mix on site does not exceed that allowed by concrete mix design. c. Verify that concrete quality is indicative of adequate mixing time, consistency, and relevant time
limits. d. Work shall be preformed by a Special Inspector – Technical I. Report of results shall be made daily.
6. Preparation and Placement: Inspect preparation and placement of concrete. a. Verify acceptable general condition of concrete base prior to placement. b. Verify that concrete conveyance and depositing avoids segregation and contamination. c. Verify that concrete is properly consolidated. d. Verify reinforcement remains at proper location.
7. Protection and Curing: Observe protection and curing methods. a. Verify specified curing procedures are followed. b. Verify that specified hot and cold weather procedures are followed.
8. Embedded Items: a. Verify specified size, type, spacing, configuration, embedment length, and quantity of anchor bolts
and embedded items. b. Verify proper concrete placement and means have been taken to achieve consolidation around bolts
and embedded items. 9. Slab Joint Filler: Inspect floor slab joint filler installation at beginning of installation and periodically
thereafter for proper installation including cleaning, joint prep, and depth of fill.
3.16 PROTECTION
A. Protect finished work.
B. Immediately after placement, protect concrete from premature drying, excessively hot or cold temperatures, and damage.
C. Patch or replace damaged portions of concrete.
D. Protect wet cured or impervious sheet cured surfaces as follows: 1. Barricade concrete surfaces immediately after finishing 2. Do not allow light traffic, except for curing purposes, on concrete surfaces until concrete has obtained 1800
psi (approx 3 days). 3. Do not allow heavy traffic on concrete surface until concrete has obtained, by test, its design strength as
03310-23
Wal-Mart Market #5986 – Frisco, TX (1007028) January 20, 2011
noted on drawings, but not sooner than 9 days after placement. 4. Permit concrete to dry minimum of 2 additional days after curing is completed before removing barricades.
E. Protect surfaces cured with curing compound as follows: 1. Barricade Concrete surfaces immediately after application of curing compound. 2. Do not allow traffic on concrete surfaces sooner than 3 days after placement.
3.17 CLEANING
A. Remove forms, equipment, protective coverings, and rubbish resulting from concreting operations. Leave finished concrete surfaces in clean conditions. After sweeping with ordinary broom and removing mortar, concrete droppings, loose dirt and mud, wash concrete floors and platforms with soapy water and rinse with clean water.
END OF SECTION
03310-24
Wal-Mart Market #5986 – Frisco, TX (1007028) January 20, 2011
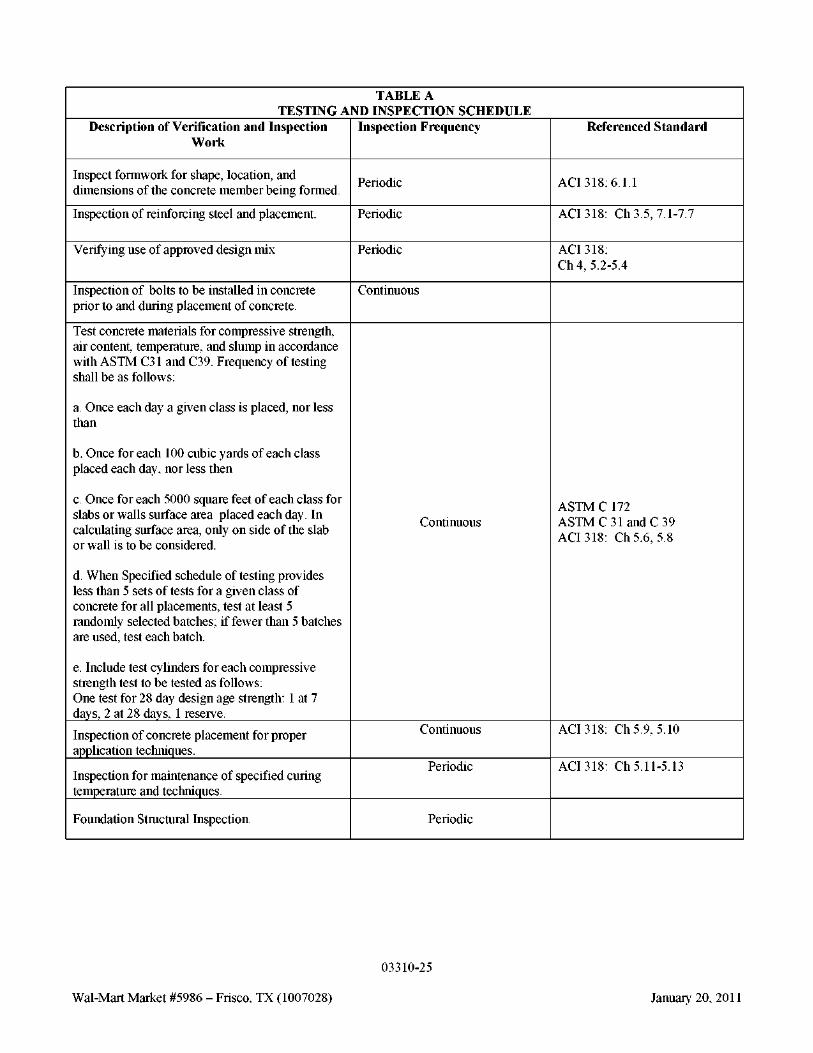
TABLE A TESTING AND INSPECTION SCHEDULE
Description of Verification and Inspection Work
Inspect formwork for shape, location, and dimensions of the concrete member being formed.
Inspection of reinforcing steel and placement.
Verifying use of approved design mix
Inspection of bolts to be installed in concrete prior to and during placement of concrete.
Test concrete materials for compressive strength, air content, temperature, and slump in accordance with ASTM C31 and C39. Frequency of testing shall be as follows:
a. Once each day a given class is placed, nor less than
b. Once for each 100 cubic yards of each class placed each day, nor less then
c. Once for each 5000 square feet of each class for slabs or walls surface area placed each day. In calculating surface area, only on side of the slab or wall is to be considered.
d. When Specified schedule of testing provides less than 5 sets of tests for a given class of concrete for all placements, test at least 5 randomly selected batches; if fewer than 5 batches are used, test each batch.
e. Include test cylinders for each compressive strength test to be tested as follows: One test for 28 day design age strength: 1 at 7 days, 2 at 28 days, 1 reserve.
Inspection of concrete placement for proper application techniques.
Inspection for maintenance of specified curing temperature and techniques.
Foundation Structural Inspection.
Inspection Frequency
Periodic
Periodic
Periodic
Continuous
Continuous
Continuous
Periodic
Periodic
Referenced Standard
ACI 318: 6.1.1
ACI 318: Ch 3.5, 7.1-7.7
ACI 318: Ch 4, 5.2-5.4
ASTM C 172 ASTM C 31 and C 39 ACI 318: Ch 5.6, 5.8
ACI 318: Ch 5.9, 5.10
ACI 318: Ch 5.11-5.13
03310-25
Wal-Mart Market #5986 – Frisco, TX (1007028) January 20, 2011
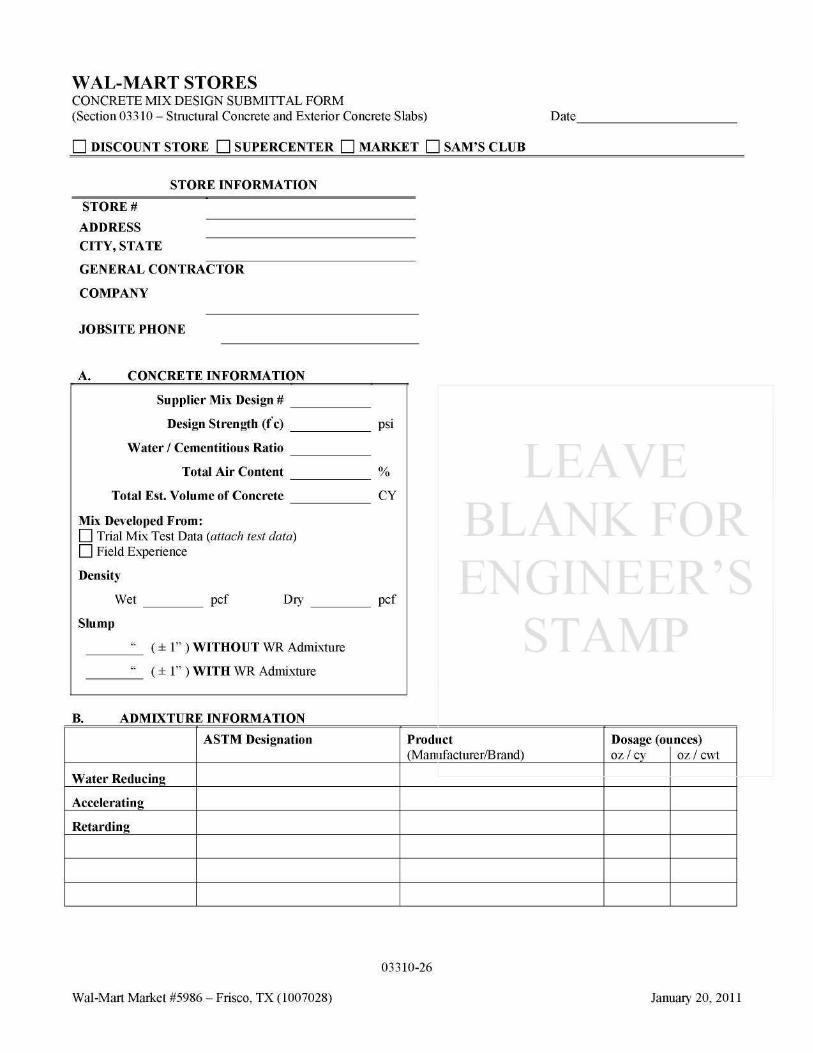
WAL-MART STORES CONCRETE MIX DESIGN SUBMITTAL FORM (Section 03310 – Structural Concrete and Exterior Concrete Slabs)
DISCOUNT STORE SUPERCENTER MARKET SAM’S CLUB
STORE INFORMATION
Date
STORE #
ADDRESS
CITY, STATE
GENERAL CONTRACTOR
COMPANY
JOBSITE PHONE
A. CONCRETE INFORMATION
Supplier Mix Design #
Design Strength (f’c)
Water / Cementitious Ratio
Total Air Content
Total Est. Volume of Concrete
psi
%
CY
Mix Developed From: Trial Mix Test Data (attach test data) Field Experience
Density
Wet
Slump
pcf Dry pcf
( ± 1” ) WITHOUT WR Admixture
( ± 1” ) WITH WR Admixture
STAMP
B. ADMIXTURE INFORMATION
Water Reducing
Accelerating
Retarding
ASTM Designation Product (Manufacturer/Brand)
Dosage (ou oz / cy
inces) oz / cwt
03310-26
Wal-Mart Market #5986 – Frisco, TX (1007028) January 20, 2011
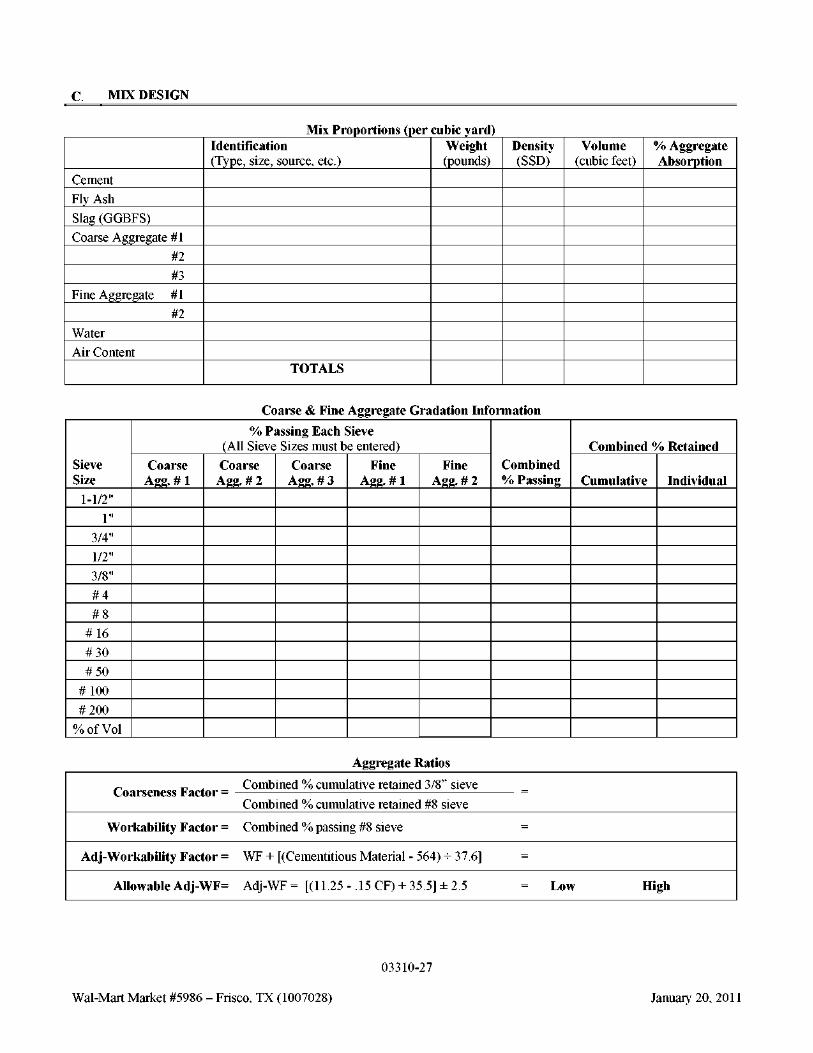
C. MIX DESIGN
Mix Proportions (per cubic yard)
Cement
Fly Ash
Slag (GGBFS)
Coarse Aggregate #1
#2
#3
Fine Aggregate #1
#2
Water
Air Content
Identification (Type, size, source, etc.)
TOTALS
Weight (pounds)
Density (SSD)
Volume (cubic feet)
% Aggregate Absorption
Coarse & Fine Aggregate Gradation Information
Sieve Size
1-1/2"
1"
3/4"
1/2"
3/8"
# 4
# 8
# 16
# 30
# 50
# 100
# 200
% of Vol
% Passing Each Sieve (All Sieve Sizes must be entered)
Coarse Agg. # 1
Coarse Agg. # 2
Coarse Agg. # 3
Fine Agg. # 1
Fine Agg. # 2
Combined % Passing
Combined % Retained
Cumulative Individual
Aggregate Ratios
Coarseness Factor =
Workability Factor =
Adj-Workability Factor =
Allowable Adj-WF=
Combined % cumulative retained 3/8” sieve
Combined % cumulative retained #8 sieve
Combined % passing #8 sieve
WF + [(Cementitious Material - 564) ÷ 37.6]
Adj-WF = [(11.25 - .15 CF) + 35.5] ± 2.5
=
=
=
= Low High
03310-27
Wal-Mart Market #5986 – Frisco, TX (1007028) January 20, 2011
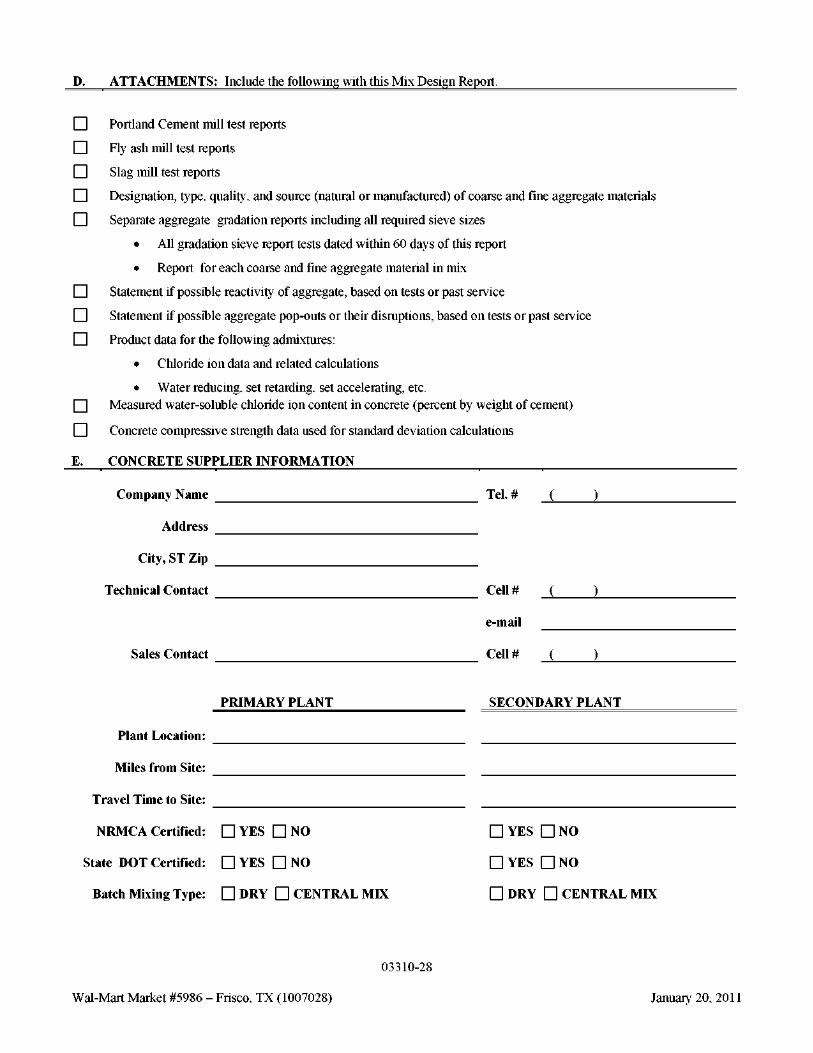
D. ATTACHMENTS: Include the following with this Mix Design Report.
Portland Cement mill test reports
Fly ash mill test reports
Slag mill test reports
Designation, type, quality, and source (natural or manufactured) of coarse and fine aggregate materials
Separate aggregate gradation reports including all required sieve sizes
• All gradation sieve report tests dated within 60 days of this report
• Report for each coarse and fine aggregate material in mix
Statement if possible reactivity of aggregate, based on tests or past service
Statement if possible aggregate pop-outs or their disruptions, based on tests or past service
Product data for the following admixtures:
• Chloride ion data and related calculations
• Water reducing, set retarding, set accelerating, etc. Measured water-soluble chloride ion content in concrete (percent by weight of cement)
Concrete compressive strength data used for standard deviation calculations
E. CONCRETE SUPPLIER INFORMATION
Company Name
Address
City, ST Zip
Technical Contact
Sales Contact
Tel. # ( )
Cell #
Cell #
( )
( )
PRIMARY PLANT
Plant Location:
Miles from Site:
Travel Time to Site:
SECONDARY PLANT
NRMCA Certified: YES NO
State DOT Certified: YES NO
Batch Mixing Type: DRY CENTRAL MIX
YES NO
YES NO
DRY CENTRAL MIX
03310-28
Wal-Mart Market #5986 – Frisco, TX (1007028) January 20, 2011

UniSpec II 100710
SECTION 03312 (03 3012) - CAST-IN-PLACE CONCRETE SLABS (INTERIOR)
PART 1 - GENERAL
1.1 SUMMARY
A. Section Includes: 1.
2. 3. 4.
Cast-in-place concrete slabs including slabs on grade for the following: a. Interior floor slabs. b. Freezer floors. Aggregate base below slab. Reinforcement and accessories. Integral colored concrete.
B. Related Requirements: 1.
2.
3.
4. 5. 6. 7.
Section 01458 - Testing Laboratory Services.Procedures for inspection, testing, and documentation by Owner furnished testing laboratory. Section 03310 - Structural Concrete and Exterior Concrete Slabs. All concrete not included in this section including structural concrete work and exterior slabs including exterior sidewalks, truckwells, door stoops, compactor pads, compressor house equipment pads, drive-thru Pharmacy pavement. Section 03362 - Burnished Concrete Floor Finishes: Cleaning, application of densifier and burnishing of floor slabs. Section 05120 - Structural Steel:Column anchor bolts. Section 05500 - Metal Fabrications:Metal components cast into concrete. Section 07900 - Joint Sealers: Joint fillers and sealants for floor slabs. Section 09650 - Resilient Flooring: a. Joint filler for contraction and construction joints concealed by floor finish material. b. Concrete Slab Moisture & pH Testing.
1.2 REFERENCES
A. The publications listed below form a part of this specification to the extent referenced. Publications are referenced within the text by the basic designation only.
B. American Association of State Highway and Transportation Officials (AASHTO): 1. Standard Specification For Transportation Materials And Methods Of Sampling and Testing:
a. AASHTO T318 - Water Content of Freshly Mixed Concrete Using Microwave Oven Drying (Formerly AASHTO TP 23)
b. AASHTO M147 – Materials for Aggregate and Soil-Aggregate Subbase, Base, and Surface Courses
C. American Concrete Institute (ACI): 1. ACI 117 - Tolerances for Concrete Construction and Materials and Commentary. 2. ACI 301 - Structural Concrete. 3. ACI 305.1 - Hot Weather Concreting. 4. ACI 306.1 - Cold Weather Concreting. 5. ACI 308.1 - Curing Concrete. 6. ACI 318 - Building Code Requirements for Reinforced Concrete and Commentary. 7. ACI 347 - Formwork For Concrete. 8. ACI SP66 - ACI Detailing Manual.
D. ASTM International (ASTM): 1. ASTM A36 - Carbon Structural Steel. 2. ASTM A82 - Steel Wire, Plain, for Concrete Reinforcement. 3. ASTM A185 - Steel Welded Wire Fabric, Plain, for Carbon Steel, 60,000 PSI Tensile Strength Concrete
03312-1
Wal-Mart Market #5986 – Frisco, TX (1007028) January 20, 2011
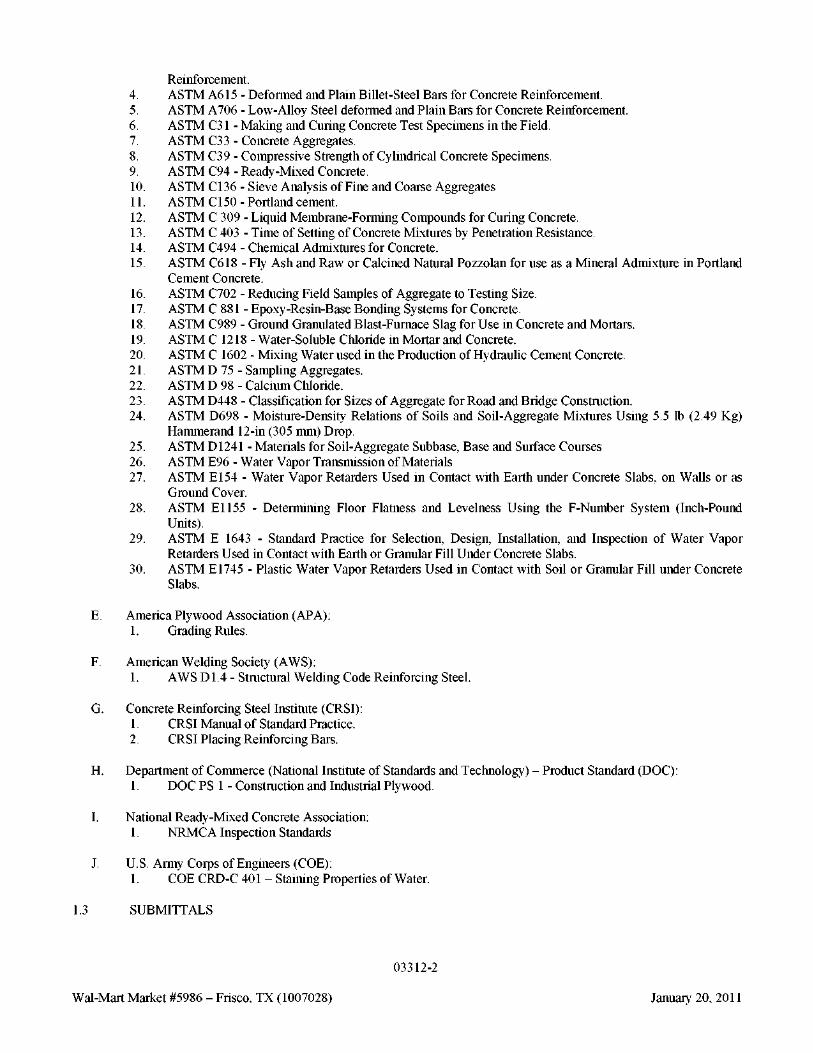
Reinforcement. 4. ASTM A615 - Deformed and Plain Billet-Steel Bars for Concrete Reinforcement. 5. ASTM A706 - Low-Alloy Steel deformed and Plain Bars for Concrete Reinforcement. 6. ASTM C31 - Making and Curing Concrete Test Specimens in the Field. 7. ASTM C33 - Concrete Aggregates. 8. ASTM C39 - Compressive Strength of Cylindrical Concrete Specimens. 9. ASTM C94 - Ready-Mixed Concrete. 10. ASTM C136 - Sieve Analysis of Fine and Coarse Aggregates 11. ASTM C150 - Portland cement. 12. ASTM C 309 - Liquid Membrane-Forming Compounds for Curing Concrete. 13. ASTM C 403 - Time of Setting of Concrete Mixtures by Penetration Resistance. 14. ASTM C494 - Chemical Admixtures for Concrete. 15. ASTM C618 - Fly Ash and Raw or Calcined Natural Pozzolan for use as a Mineral Admixture in Portland
Cement Concrete. 16. ASTM C702 - Reducing Field Samples of Aggregate to Testing Size. 17. ASTM C 881 - Epoxy-Resin-Base Bonding Systems for Concrete. 18. ASTM C989 - Ground Granulated Blast-Furnace Slag for Use in Concrete and Mortars. 19. ASTM C 1218 - Water-Soluble Chloride in Mortar and Concrete. 20. ASTM C 1602 - Mixing Water used in the Production of Hydraulic Cement Concrete. 21. ASTM D 75 - Sampling Aggregates. 22. ASTM D 98 - Calcium Chloride. 23. ASTM D448 - Classification for Sizes of Aggregate for Road and Bridge Construction. 24. ASTM D698 - Moisture-Density Relations of Soils and Soil-Aggregate Mixtures Using 5.5 lb (2.49 Kg)
Hammerand 12-in (305 mm) Drop. 25. ASTM D1241 - Materials for Soil-Aggregate Subbase, Base and Surface Courses 26. ASTM E96 - Water Vapor Transmission of Materials 27. ASTM E154 - Water Vapor Retarders Used in Contact with Earth under Concrete Slabs, on Walls or as
Ground Cover. 28. ASTM E1155 - Determining Floor Flatness and Levelness Using the F-Number System (Inch-Pound
Units). 29. ASTM E 1643 - Standard Practice for Selection, Design, Installation, and Inspection of Water Vapor
Retarders Used in Contact with Earth or Granular Fill Under Concrete Slabs. 30. ASTM E1745 - Plastic Water Vapor Retarders Used in Contact with Soil or Granular Fill under Concrete
Slabs.
E. America Plywood Association (APA): 1. Grading Rules.
F. American Welding Society (AWS): 1. AWS D1.4 - Structural Welding Code Reinforcing Steel.
G. Concrete Reinforcing Steel Institute (CRSI): 1. CRSI Manual of Standard Practice. 2. CRSI Placing Reinforcing Bars.
H. Department of Commerce (National Institute of Standards and Technology) – Product Standard (DOC): 1. DOC PS 1 - Construction and Industrial Plywood.
I. National Ready-Mixed Concrete Association: 1. NRMCA Inspection Standards
J. U.S. Army Corps of Engineers (COE): 1. COE CRD-C 401 – Staining Properties of Water.
1.3 SUBMITTALS
03312-2
Wal-Mart Market #5986 – Frisco, TX (1007028) January 20, 2011
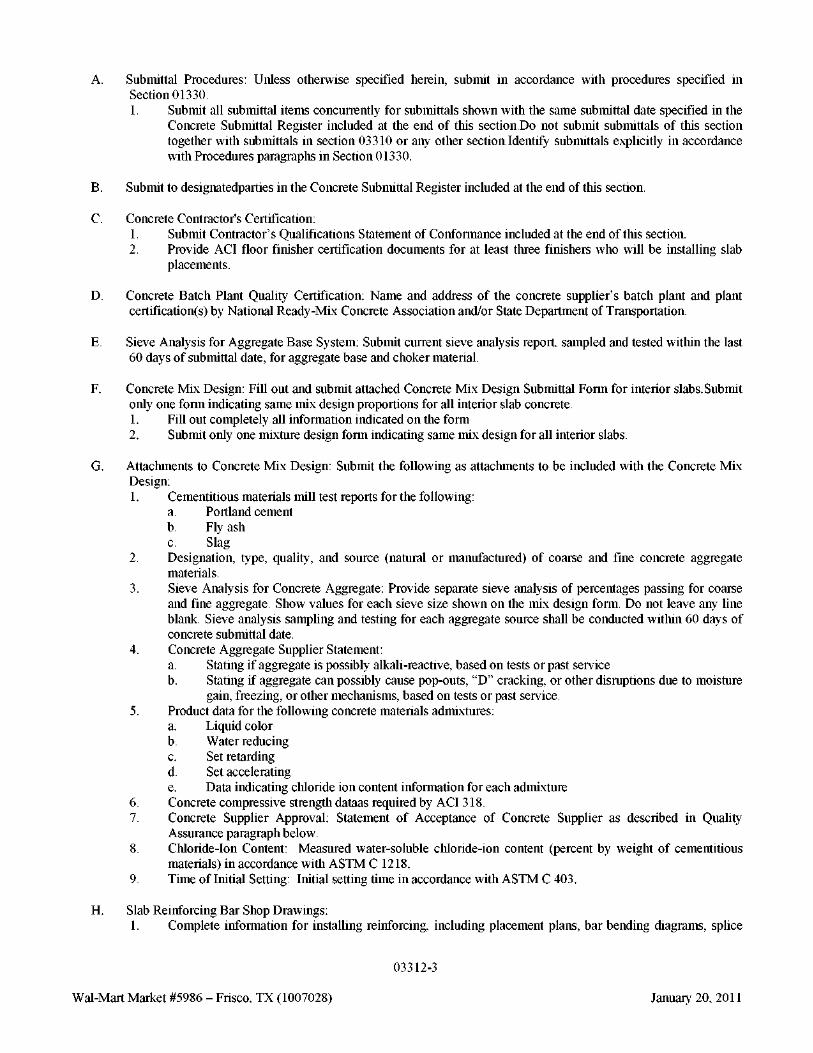
A. Submittal Procedures: Unless otherwise specified herein, submit in accordance with procedures specified in Section 01330. 1. Submit all submittal items concurrently for submittals shown with the same submittal date specified in the
Concrete Submittal Register included at the end of this section.Do not submit submittals of this section together with submittals in section 03310 or any other section.Identify submittals explicitly in accordance with Procedures paragraphs in Section 01330.
B. Submit to designatedparties in the Concrete Submittal Register included at the end of this section.
C. Concrete Contractor's Certification: 1. Submit Contractor’s Qualifications Statement of Conformance included at the end of this section. 2. Provide ACI floor finisher certification documents for at least three finishers who will be installing slab
placements.
D. Concrete Batch Plant Quality Certification: Name and address of the concrete supplier’s batch plant and plant certification(s) by National Ready-Mix Concrete Association and/or State Department of Transportation.
E. Sieve Analysis for Aggregate Base System: Submit current sieve analysis report, sampled and tested within the last 60 days of submittal date, for aggregate base and choker material.
F. Concrete Mix Design: Fill out and submit attached Concrete Mix Design Submittal Form for interior slabs.Submit only one form indicating same mix design proportions for all interior slab concrete. 1. Fill out completely all information indicated on the form 2. Submit only one mixture design form indicating same mix design for all interior slabs.
G. Attachments to Concrete Mix Design: Submit the following as attachments to be included with the Concrete Mix Design: 1. Cementitious materials mill test reports for the following:
a. Portland cement b. Fly ash c. Slag
2. Designation, type, quality, and source (natural or manufactured) of coarse and fine concrete aggregate materials.
3. Sieve Analysis for Concrete Aggregate: Provide separate sieve analysis of percentages passing for coarse and fine aggregate. Show values for each sieve size shown on the mix design form. Do not leave any line blank. Sieve analysis sampling and testing for each aggregate source shall be conducted within 60 days of concrete submittal date.
4. Concrete Aggregate Supplier Statement: a. Stating if aggregate is possibly alkali-reactive, based on tests or past service b. Stating if aggregate can possibly cause pop-outs, “D” cracking, or other disruptions due to moisture
gain, freezing, or other mechanisms, based on tests or past service. 5. Product data for the following concrete materials admixtures:
a. Liquid color b. Water reducing c. Set retarding d. Set accelerating e. Data indicating chloride ion content information for each admixture
6. Concrete compressive strength dataas required by ACI 318. 7. Concrete Supplier Approval: Statement of Acceptance of Concrete Supplier as described in Quality
Assurance paragraph below. 8. Chloride-Ion Content: Measured water-soluble chloride-ion content (percent by weight of cementitious
materials) in accordance with ASTM C 1218. 9. Time of Initial Setting: Initial setting time in accordance with ASTM C 403.
H. Slab Reinforcing Bar Shop Drawings: 1. Complete information for installing reinforcing, including placement plans, bar bending diagrams, splice
03312-3
Wal-Mart Market #5986 – Frisco, TX (1007028) January 20, 2011
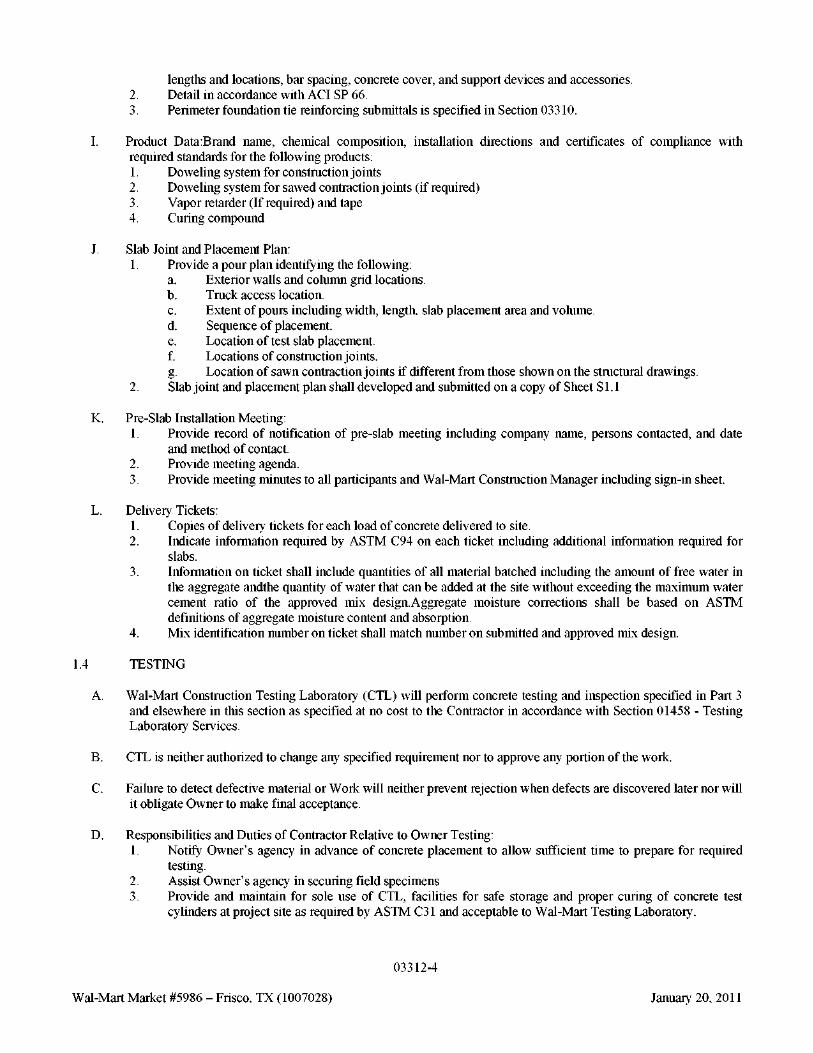
lengths and locations, bar spacing, concrete cover, and support devices and accessories. 2. Detail in accordance with ACI SP 66. 3. Perimeter foundation tie reinforcing submittals is specified in Section 03310.
Product Data:Brand name, chemical composition, installation directions and certificates of compliance with required standards for the following products: 1. Doweling system for construction joints 2. Doweling system for sawed contraction joints (if required) 3. Vapor retarder (If required) and tape 4. Curing compound
J. Slab Joint and Placement Plan: 1.
2.
Provide a pour plan identifying the following: Exterior walls and column grid locations. Truck access location. Extent of pours including width, length, slab placement area and volume. Sequence of placement. Location of test slab placement. Locations of construction joints. Location of sawn contraction joints if different from those shown on the structural drawings.
K. Pre-Slab Installation Meeting: 1. Provide record of notification of pre-slab meeting including company name, persons contacted, and date
and method of contact. 2. Provide meeting agenda. 3. Provide meeting minutes to all participants and Wal-Mart Construction Manager including sign-in sheet.
L. Delivery Tickets: 1. 2.
3.
4.
Copies of delivery tickets for each load of concrete delivered to site. Indicate information required by ASTM C94 on each ticket including additional information required for slabs. Information on ticket shall include quantities of all material batched including the amount of free water in the aggregate andthe quantity of water that can be added at the site without exceeding the maximum water cement ratio of the approved mix design.Aggregate moisture corrections shall be based on ASTM definitions of aggregate moisture content and absorption. Mix identification number on ticket shall match number on submitted and approved mix design.
1.4 TESTING
A. Wal-Mart Construction Testing Laboratory (CTL) will perform concrete testing and inspection specified in Part 3 and elsewhere in this section as specified at no cost to the Contractor in accordance with Section 01458 - Testing Laboratory Services.
B. CTL is neither authorized to change any specified requirement nor to approve any portion of the work.
C. Failure to detect defective material or Work will neither prevent rejection when defects are discovered later nor will it obligate Owner to make final acceptance.
D. Responsibilities and Duties of Contractor Relative to Owner Testing: 1. Notify Owner’s agency in advance of concrete placement to allow sufficient time to prepare for required
testing. 2. Assist Owner’s agency in securing field specimens 3. Provide and maintain for sole use of CTL, facilities for safe storage and proper curing of concrete test
cylinders at project site as required by ASTM C31 and acceptable to Wal-Mart Testing Laboratory.
03312-4
I.
Wal-Mart Market #5986 – Frisco, TX (1007028) January 20, 2011
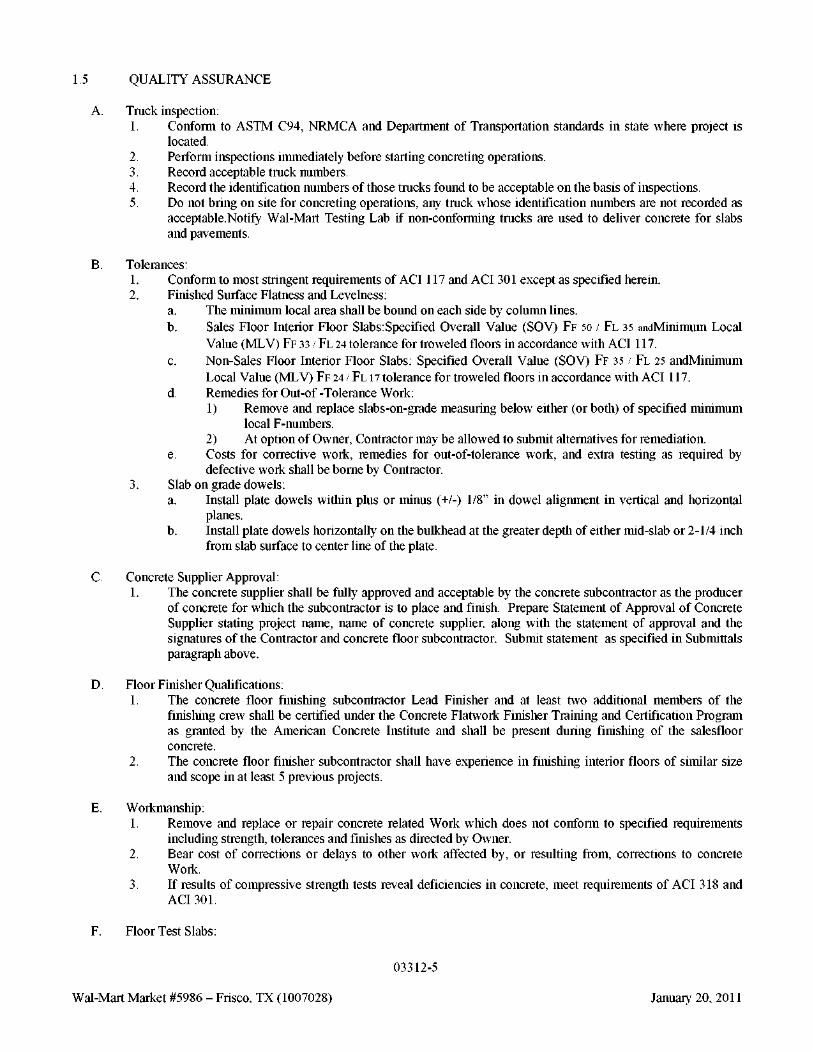
1.5 QUALITY ASSURANCE
A. Truck inspection: 1. Conform to ASTM C94, NRMCA and Department of Transportation standards in state where project is
located. 2. Perform inspections immediately before starting concreting operations. 3. Record acceptable truck numbers. 4. Record the identification numbers of those trucks found to be acceptable on the basis of inspections. 5. Do not bring on site for concreting operations, any truck whose identification numbers are not recorded as
acceptable.Notify Wal-Mart Testing Lab if non-conforming trucks are used to deliver concrete for slabs and pavements.
B. Tolerances: 1. 2.
3.
Conform to most stringent requirements of ACI 117 and ACI 301 except as specified herein. Finished Surface Flatness and Levelness:
The minimum local area shall be bound on each side by column lines. Sales Floor Interior Floor Slabs:Specified Overall Value (SOV) F F 50 / FL 35 andMinimum Local Value (MLV) F F 33 / F L 24 tolerance for troweled floors in accordance with ACI 117. Non-Sales Floor Interior Floor Slabs: Specified Overall Value (SOV) F F 35 / F L 25 andMinimum Local Value (MLV) F F 24 / FL 17 tolerance for troweled floors in accordance with ACI 117. Remedies for Out-of -Tolerance Work: 1) Remove and replace slabs-on-grade measuring below either (or both) of specified minimum
local F-numbers. 2) At option of Owner, Contractor may be allowed to submit alternatives for remediation. Costs for corrective work, remedies for out-of-tolerance work, and extra testing as required by defective work shall be borne by Contractor.
Slab on grade dowels: a. Install plate dowels within plus or minus (+/-) 1/8” in dowel alignment in vertical and horizontal
planes. b. Install plate dowels horizontally on the bulkhead at the greater depth of either mid-slab or 2-1/4 inch
from slab surface to center line of the plate.
e.
C. Concrete Supplier Approval: 1. The concrete supplier shall be fully approved and acceptable by the concrete subcontractor as the producer
of concrete for which the subcontractor is to place and finish. Prepare Statement of Approval of Concrete Supplier stating project name, name of concrete supplier, along with the statement of approval and the signatures of the Contractor and concrete floor subcontractor. Submit statement as specified in Submittals paragraph above.
D. Floor Finisher Qualifications: 1.
2.
The concrete floor finishing subcontractor Lead Finisher and at least two additional members of the finishing crew shall be certified under the Concrete Flatwork Finisher Training and Certification Program as granted by the American Concrete Institute and shall be present during finishing of the salesfloor concrete. The concrete floor finisher subcontractor shall have experience in finishing interior floors of similar size and scope in at least 5 previous projects.
E. Workmanship: 1. Remove and replace or repair concrete related Work which does not conform to specified requirements
including strength, tolerances and finishes as directed by Owner. 2. Bear cost of corrections or delays to other work affected by, or resulting from, corrections to concrete
Work. 3. If results of compressive strength tests reveal deficiencies in concrete, meet requirements of ACI 318 and
ACI 301.
F. Floor Test Slabs:
03312-5
Wal-Mart Market #5986 – Frisco, TX (1007028) January 20, 2011
1. Prior to the Pre-Slab Installation Meeting construct permanent test slab with approved mix design as indicated on the Slab Plan of the Structural Drawings.
2. The Wal-Mart Construction Manager will evaluate the test slab and indicate Owner’s acceptance, corrections noted, or rejection to establish a minimum basis for acceptance of final slabs.
3. Work shall not begin on final areas until an ability to satisfy specified tolerances and other requirements routinely in test areas has been demonstrated.
4. Use same materials, tools, and methods for finishing and curing final slab work as used for test slab. 5. Replace final slab work that does not meet or exceed accepted established test slab standard.
G. Pre-Slab Installation Meeting: 1. Plan, host, and attend a pre-slab installation meeting to be conducted at site by SSI via teleconference. 2. Schedule meeting between 7 and 14 days prior to first concrete slab placement of 10,000 SF or greater and
after placement of the test slab and after all concrete submittals have been submitted and approved. 3. Obtain pre-slab meeting agenda from Wal-Mart Consultant (Structural Services, Inc.(SSI) 4. Require responsible representatives of each party involved with the concrete slab work to attend the
meeting.Representatives to be present shall include personnel who are directly involved in overseeing the work and who have authority to control the concreting work.
5. Notify all required attendees in writing of scheduled time and place at least two weeks in advance of meeting.Include copy of agenda with invitation.
6. The meeting shall convene only when all parties are present. 7. Minutes of the meeting shall be recorded, typed, printed, and distributed to all parties concerned by the
Contractor within 5 days of the meeting.One copy of the minutes shall also be transmitted to the Owner's representative for information purposes.
8. Attendees shall include, but not be limited to the following: a. Wal-Mart Construction Manager b. Wal-Mart Consultant (SSI) (877) 774-2677 c. General Contractor
1) Project manager 2) Superintendent (present during all slab placements)
d. Concrete Subcontractor 1) Project manager 2) Finish Foreman (present during all slab placements)
e. Concrete Supplier 1) Quality Assurance Representative (present during all slab placements)
f. Base Fine Grading Contractor g. Wal-Mart Construction Testing Laboratory (present during all slab placements) h. Densifier manufacturer’s representative i. Densifierapplicator and burnished floor surface installer. j . Integral color manufacturer’s representative k. Polyurea Joint Filler manufacturer’s representative l. Polyurea Joint Filler Subcontractor m. Curing compound manufacturer’s representative
9. Changes to the contract documents from recommendations or discussions at the Pre-Construction meeting shall be approved in writing by the Wal-mart Construction Manager prior to implementation. SSI is not authorized to change any specified requirement or to approve execution of any portion of the work.
H. Notification to Testing Lab for Observation of Installed Formwork and Reinforcement: Notify Testing Lab 3 working days prior to placing concrete to allow time for observation of installed formwork and reinforcing.
1.6 PRODUCT DELIVERY, STORAGE AND HANDLING
A. Deliver materials in unopened containers with labels identifying contents. Keep containers closed and upright to prevent leakage.
B. Mark reinforcing, accessories and embedded items for proper identification and placement location.
03312-6
Wal-Mart Market #5986 – Frisco, TX (1007028) January 20, 2011
C. Store materials, except aggregate, off ground in dry area and in manner to prevent damage.Protect liquid materials from freezing.
D. Stockpile aggregate in manner to prevent contamination with other materials or with other sizes of aggregates. Conduct tests for determining conformance to requirements at point of batching. Do not use bottom 6” of aggregate piles in contact with ground. Allow sand to drain until it has reached a uniform moisture content before it is used.
E. Store admixtures in manner to prevent contamination. Protect admixtures from extreme temperatures which would adversely affect their characteristics.
1.7 ENVIRONMENTAL REQUIREMENTS
A. Concreting in Hot, Dry or Windy Weather: 1.
2. 3. 4.
Employ precautions to avoid cracking when the concrete rate of evaporation exceeds 0.1 pounds per square foot per hour or when any combination of concrete materials and weather conditions are favorable for the formation of plastic shrinkage cracks. Maintain an accurate reading thermometer at the job site to check temperature of concrete Reject concrete ifmore than one slump adjustment, as defined in ASTM C 94, is required. Do not place concrete when forms, subgrade, aggregate base or reinforcing bars are more than 120 F or the temperature differential between the forms, aggregate base, or reinforcing bars and concrete will create conditions favorable for settlement cracks or thermal cracking.
B. Concreting in Cold Weather: 1. Conform to ACI 306.1 when temperature and other environmental conditions are as noted therein and the
following additional requirements: a. Subgrade shall be thawed to depth of 12 inches immediately before placing concrete. b. Measure and record concrete temperature during protection period in each placement at regular time
intervals, but not less than 3 times per 24hour period. 2. Minimum base surface temperature and ambient building air temperature shall be 55F during placement
and maintained through curing period. 3. Do not place slabs on subgrade, or base that is more than 20°F cooler than concrete. Warm subgrade, or
base to decrease temperature differential to 20F or less. 4. Minimum concrete temperature as measured at the point of discharge shall be 65F. 5. Do not use unvented combustion heaters during concrete placementso as to prevent exposure of concrete to
excessive exhaust gases containing carbon dioxide (CO2) or carbon monoxide (CO).During slab placement and curing periods, maximum CO2 levels shall be 4,500 parts per million and maximum CO levels shall be 15 parts per million at concrete surface within 5 feet of any source of exhaust gases to minimize potential damage to concrete.
C. Precipitation Protection: 1. Sales floor concrete shall be placed under watertight roof membrane 2. Non-sales floor concrete shall be protected from precipitation until adequate strength is gained to prevent
damage.
1.8 COORDINATION AND SCHEDULING
A. Pursuant to Article 15 of the General Conditions, the Owner has the right to perform construction work and to award separate contracts on the Project site.
B. The construction work and separate contracts on the Project site associated with the floor slab construction includes Energy Mgt cabling, LP cabling, CCTV cabling, Test and Balance, Telecom, Data cabling, Alarms, and Refrigeration.
03312-7
Wal-Mart Market #5986 – Frisco, TX (1007028) January 20, 2011

C. Owner or Separate Contractor Responsibilities: The following provisions are provided as information with respect to the responsibilities of the Owner or separate contractors doing work on, or related to, the building floor slab construction.The Owner or separate contractors must: 1. Notify General Contractor’s superintendent 1 week prior to the start of the work at the job site. Make sure
superintendent has names and contact phone numbers. 2. Ensure workmen who will be working on or around the floor slab, view the Owner’s Contractors Training
and Instructional Video and Pre-Slab Meeting Video prior to the start of work or installation. 3. Coordinate work and schedule activities with floor slab construction to avoid interference and to minimize
detrimental effects to floor finish and maintain floor protection measures as specified for the General Contractor.
4. Not walk through or on areas where floor construction or finishing operations are being performed. 5. Perform precautionary measures to protect floor finish. Inspect machinery used on floor slab daily, at a
minimum, for embedded items in tires; remove items which may damage or scratch floor. Diaper all lifts and other equipment used on the floor slab. White tires are required on lifts. Take measures to prevent tools or other items that may cause impact damage, discoloration, or other surface blemishes. Owner or separate contractors are required to provide protection to slab in whatever measures are needed i.e. providing plywood, carpet, house wrap etc for impact protection. (Plastic sheets are not approved for protection) Remove or consolidate protection on a regular basis to prevent discoloring.
6. Damage to concrete floor finish determined by Wal-Mart to be the responsibility of the Owner or Separate Contractor will be repaired in accordance with approved methods, materials, and personnel at the expense of the Owner or Separate Contractor.
PART 2 - PRODUCTS
2.1 MATERIALS
A. Subject to compliance with project requirements, provide products as manufactured by the following to the extent as specified hereinafter for the specific product: 1. BASF Admixtures Inc., Cleveland, OH (Formerly Master Builders) (800) 628-9990. 2. BASF Building Systems, Shakopee, MN (Formerly Degussa Building Products) (800) 433-9517. 3. Colloid Environmental Technologies Co. (CETCO),(800) 527-9948 4. Conspec (Dayton Superior)(913) 287-1700 or (877) 416-3439. 5. Davis Colors,(800) 800-6856. 6. Dayton Superior Chemical, (866) 329-8724. 7. Degussa Building Products: See BASF Building Systems. 8. DRC Inc., Carrollton, KY (502) 732-1001. 9. E-Poxy Industries, Inc., (800) 833-3400. 10. Euclid Chemical Co., (877) 438-3826. 11. Henry Company (Synko-Flex Products Division), (800) 231-4551. 12. Fortifiber Building Systems Group, (800) 773-4777. 13. Glad Tech Inc., Nashville, TN (614) 251-8111. 14. Greenstreak Group, Inc., St. Louis, MO (800) 325-9504. 15. Master Builders, Inc.: See BASF Admixtures, Inc. (Formerly Degussa). 16. MBT: See BASF Building Systems (Formerly Master Builders and Degussa). 17. McTech Group, Steve McDonald, (866) 913-8363. 18. PNA Construction Technologies, (800) 542-0214. 19. Raven Industries, Inc., (800) 635-3456. 20. Seal Source (800) 305-9144. www.sealsource.com 21. Sika Corp., (800) 933-7452. 22. Soff-Cut (951) 272-2330 23. Solomon Colors, (800) 624-0261. 24. SpecChem (866) 791-8700. www.specchemllc.com 25. Stego Industries (877) 464-7834 26. Unitex,(816) 231-7700 or (800) 821-5846. 27. W.R. Grace and Co., (713) 223-8353. 28. W. R. Meadows,Inc., (847) 214-2100.
03312-8
Wal-Mart Market #5986 – Frisco, TX (1007028) January 20, 2011
29. Vexcon Chemicals, Inc., (888) 839-2661.
B. Substitutions:Not permitted unless otherwise specified.
2.2 AGGREGATE BASE AND CHOKER MATERIALS
A. Aggregate Base Material: 1. Gradation: Conform to gradation shown on the Structural Drawings. 2. EquivalentGradation: Equivalent gradations may be used upon approval of the Structural Engineer of
Record (SER). Submit proposed equivalent gradation to the Architect for approval within 30 days after the award of contract. Equivalent gradation shall be one of the following. a. Any state DOT approved road base material meeting the following gradation:
Std. Sieve Size 1-1/2” No. 4 No. 200
% Passing 100 15-55 3-12
b. Material conforming to the General Requirements and of the Gradation “A”, ”C”, or “D” requirements (with the modified allowance of 5% to 12% passing the No. 200 sieve) as defined by ASTM D 1241.
3. Material passing the No. 200 sieve shall be clean granular fill with less than 3% clay and/or friable particles.
B. Aggregate ChokerMaterial: Clean granular fill with less than 3% clay and/or friable particles. Use one of the following gradations: 1. ASTM 448 No. 10 with 6% to 12% passing No. 200 sieve. 2. Material meeting the following gradation:
Std. Sieve Size % Passing No. 4 85-100 No. 8 75-95 No. 16 55-75 No. 50 22-45 No. 100 10-30 No. 200 6-12
2.3 FORMWORK
A. Forms: 1. Plywood, metal, metal-framed plywood faced, or other acceptable panel-type materials to provide
continuous, straight, smooth, exposed surfaces. 2. Furnish in largest practicable sizes to minimize number of joints and to conform to joint system shown on
the drawings. 3. Provide lumber dressed on at least two edges and one side for tight fit. 4. Bevel top outside edge of form. 5. Partial depth forms shall not be used.
B. Form Release Agent: 1. 100% biodegradable, non-toxic, 100% natural organic chemical release agent. Will not cause surface
imperfections, non-staining, and compatible with field applied paints, toppings, curing compounds, and other coatings.Provide one of the following: a. Form-EZE Natural by Euclid. b. Enviroform by Conspec. c. Certi-Vex V Form Release by Vexcon. d. Farm Fresh by Unitex.
03312-9
Wal-Mart Market #5986 – Frisco, TX (1007028) January 20, 2011
2. Use same brand form release agent for all forms.
C. Prefabricated Access Pit Form: Pit form at Refrigeration Pit shall be Prefabricated Fiberglass Access Pit and Anchoring Assembly as manufactured by Craigg Manufacturing, Ephrata, PA, (717) 733-1412.
2.4 REINFORCEMENT
A. Reinforcing Bars: 1. ASTM A615, deformed, Grade 60. 2. ASTM A706, deformed, Grade 60.
B. Tie Wire: 1. Minimum 16 gage annealed type.
C. Reinforcing Support Devices: 1. Manufacturer support devices of metal (wire bar), concrete, or recycled plastic devices conforming to CRSI
Manual of Standard Practice. 2. Precast concrete bar supports shall have minimum compressive strength of 3500 psi. 3. Plastic accessories shall have a minimum of 50% recycled content. 4. Do not use wood, clay brick, and other devices that can expand due to moisture gain. 5. For concrete surfaces exposed to view where legs of wire bar supports contact forms, use CRSI Class 1
plastic-protected steel wire or CRSI Class 2 stainless-steel bar supports. 6. When precast concrete bar supports are used over aggregate base, or over waterproof membranes and vapor
retarders, properly embed tie wires to prevent penetration of substrate. 7. Properly size foot of bar supports or similar devices to prevent settlement on base material or prevent
puncture on vapor barrier. 8. When supporting multiple layers of reinforcement, provide the proper size and spacing of bar supports or
similar devices to prevent deformation of plastic and to retain rebar within position tolerances.
D. Plate Dowels - Construction Joints: 1. Plate dowels shall consist of smooth steel plate bars, ASTM A36 steel. Plate dowels shall be one of the
following: a. Diamond Dowel System, by PNA Construction Technologies, size 1/4” x 4.5” dowels. b. EZdowel (including EZform Board) by McTech, Inc., size 6-1/4” x 3-1/2” x 1/4” dowels. c. Speed Plate System by Greenstreak, size 1/4” x 4” x 6” dowels..
2.5 CONCRETE MATERIALS
A. Cement: ASTM C150, Type I. Use only one brand throughout project.
B. Fly Ash: ASTM C 618, Class C or F. Use only one type and source throughout project.
C. Slag: ASTM C989, Grade 100 or 120.Use only one type and source throughout project.
D. Aggregates: 1. ASTM C33 with following requirements:
a. No coal or lignite in concrete that will not be covered by building materials or soil. b. Fine aggregate grading requirements as defined in section 6.1 of ASTM C 33 shall be strictly met
without deviation unless approved by SER. 2. If manufactured sand is used, blend with minimum 25% natural sand unless otherwise approved by SER. 3. Coarse Aggregate Size:
a. Nominal maximum coarse aggregate size shall be 1 inch for slabs ≤ 5-1/2 inch thick. b. The nominal maximum size of an aggregate is the smallest sieve size through which the major
portion of the aggregate must pass, with a minimal amount retained on the maximum sieve size. Maximum 4% shall be retained on the nominal maximum size sieve.
4. Adjust proportions of combined coarse, intermediate, and fine aggregates to provide the following particle
03312-10
Wal-Mart Market #5986 – Frisco, TX (1007028) January 20, 2011
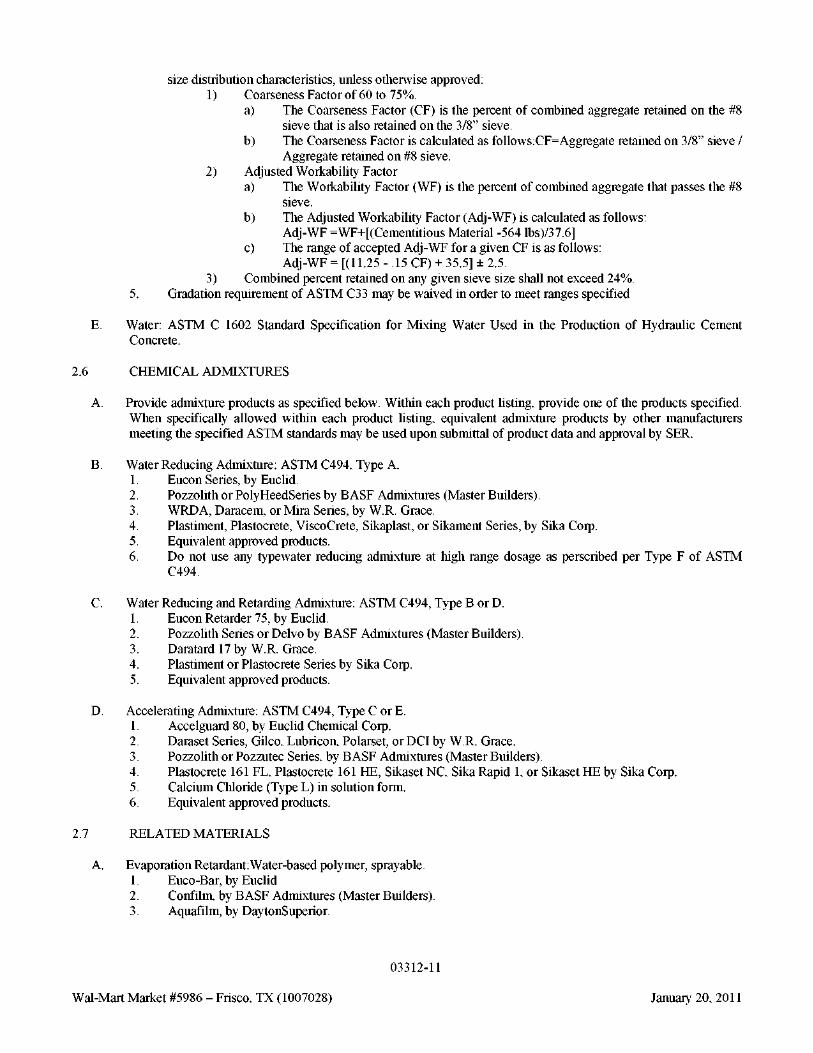
size distribution characteristics, unless otherwise approved: 1) Coarseness Factor of 60 to 75%.
a) The Coarseness Factor (CF) is the percent of combined aggregate retained on the #8 sieve that is also retained on the 3/8” sieve.
b) The Coarseness Factor is calculated as follows:CF=Aggregate retained on 3/8” sieve / Aggregate retained on #8 sieve.
2) Adjusted Workability Factor a) The Workability Factor (WF) is the percent of combined aggregate that passes the #8
sieve. b) The Adjusted Workability Factor (Adj-WF) is calculated as follows:
Adj-WF =WF+[(Cementitious Material -564 lbs)/37.6] c) The range of accepted Adj-WF for a given CF is as follows:
Adj-WF = [(11.25 - .15 CF) + 35.5] ± 2.5. 3) Combined percent retained on any given sieve size shall not exceed 24%.
5. Gradation requirement of ASTM C33 may be waived in order to meet ranges specified
E. Water: ASTM C 1602 Standard Specification for Mixing Water Used in the Production of Hydraulic Cement Concrete.
2.6 CHEMICAL ADMIXTURES
A. Provide admixture products as specified below. Within each product listing, provide one of the products specified. When specifically allowed within each product listing, equivalent admixture products by other manufacturers meeting the specified ASTM standards may be used upon submittal of product data and approval by SER.
B. Water Reducing Admixture: ASTM C494, Type A. 1. Eucon Series, by Euclid. 2. Pozzolith or PolyHeedSeries by BASF Admixtures (Master Builders). 3. WRDA, Daracem, or Mira Series, by W.R. Grace. 4. Plastiment, Plastocrete, ViscoCrete, Sikaplast, or Sikament Series, by Sika Corp. 5. Equivalent approved products. 6. Do not use any typewater reducing admixture at high range dosage as perscribed per Type F of ASTM
C494.
C. Water Reducing and Retarding Admixture: ASTM C494, Type B or D. 1. Eucon Retarder 75, by Euclid. 2. Pozzolith Series or Delvo by BASF Admixtures (Master Builders). 3. Daratard 17 by W.R. Grace. 4. Plastiment or Plastocrete Series by Sika Corp. 5. Equivalent approved products.
D. Accelerating Admixture: ASTM C494, Type C or E. 1. Accelguard 80, by Euclid Chemical Corp. 2. Daraset Series, Gilco, Lubricon, Polarset, or DCI by W.R. Grace. 3. Pozzolith or Pozzutec Series, by BASF Admixtures (Master Builders). 4. Plastocrete 161 FL, Plastocrete 161 HE, Sikaset NC, Sika Rapid 1, or Sikaset HE by Sika Corp. 5. Calcium Chloride (Type L) in solution form. 6. Equivalent approved products.
2.7 RELATED MATERIALS
A. Evaporation Retardant:Water-based polymer, sprayable. 1. Euco-Bar, by Euclid 2. Confilm, by BASF Admixtures (Master Builders). 3. Aquafilm, by DaytonSuperior.
03312-11
Wal-Mart Market #5986 – Frisco, TX (1007028) January 20, 2011
B. Screed Chairs: Metal.
C. Vapor Retarder:ASTM E1745, Class A, sheet membrane material, not less than 10 mils thick unless otherwise shown on the drawings.Color:Mfg. standard. 1. Stego Wrap, by Stego Industries. 2. Moistop Ultra 10,by Fortifiber. 3. Perminator 10 mil,by W.R. Meadows. 4. Vapor Block 10 mil, by Raven Industries. 5. Tape and Adhesive:Tape and adhesives for sealing laps, punctures, tears and penetrations shall bepressure-
sensitive, waterproof adhesive tape, 2 inches minimum width and compatible withretarder.
D. Epoxy Bonding Agent: ASTM C881 1. Euco #452 or Corr-Bond, by Euclid. 2. EVA-POX Fresh Concrete Bonder 2, by E-Poxy Industries. 3. Concresive Liquid (LPL), by BASF Building Systems (Formerly MBT). 4. Sikadur 32, Hi-Mod LPL by Sika.
2.8 CONCRETE CURING MATERIALS
A. Curing Compound:Temporary film forming type curing compound. 1. SC Cure 500 by SpecChem.
2.9 CONCRETE MIX
A. General:
2.
3. 4.
5.
Use only materials and their proportions included on Concrete Mix Design Submittal Forms included at the end of this section. For integral color concrete, maintain same source of fly ash, slag, chemical admixtures, coarse and fine aggregates for entire colored floor slab. Do not change mix proportions of integral color admixture, Portland cement, fly ash or slag. Measure and mix ingredients in accordance with most stringent requirements of ASTM C94. Ready Mix supplier may proportion materials by field experience or proportion concrete materials by laboratory trial batches per ACI 318 for strength compliance. Submit copies of data and test results to Wal-Mart Construction Manager and SER for review to verify mix designs.
B. Strength: As Indicated on the drawings
C. Workability: Concrete shall be of a consistency to be worked readily into forms and around reinforcement without segregation, voids, or excessive bleeding.
D. Total Cementitious Materials Content: Use a minimum 520 pounds of total combined Portland cement and SCM per cubic yard of concrete for interior slab mixes.
E. Supplementary Cementitious Materials (SCM): 1. Concrete mix shall contain SCM in the amounts specified unless other amounts are approved by SER.
Either fly ash or ground granulated blast furnace slag (GGBFS) may be used for the SCM but shall not be used together to form a ternary mix. Use of fly ash or GGBFS in the concrete mix is mandatory.
2. Fly Ash: Substitute fly ash for Portland cement at a minimum of 15% to a maximum of 20% of the total cementitious content. a. If used to mitigate potential aggregate reactivity, only Type F fly ash may be used and shall have the
following maximum properties: 1.5% available alkali and 8.0% CaO. 3. Ground Granulated Blast Furnace Slag (GGBFS):Substitute GGBFS for Portland cement at a minimum of
25% to a maximum of 30% of the total cementitious content. If required to mitigate potential sulfate exposure or aggregate reactivity, up to 50% GGBFS substitution for Portland cement may be used.
03312-12
1.
Wal-Mart Market #5986 – Frisco, TX (1007028) January 20, 2011
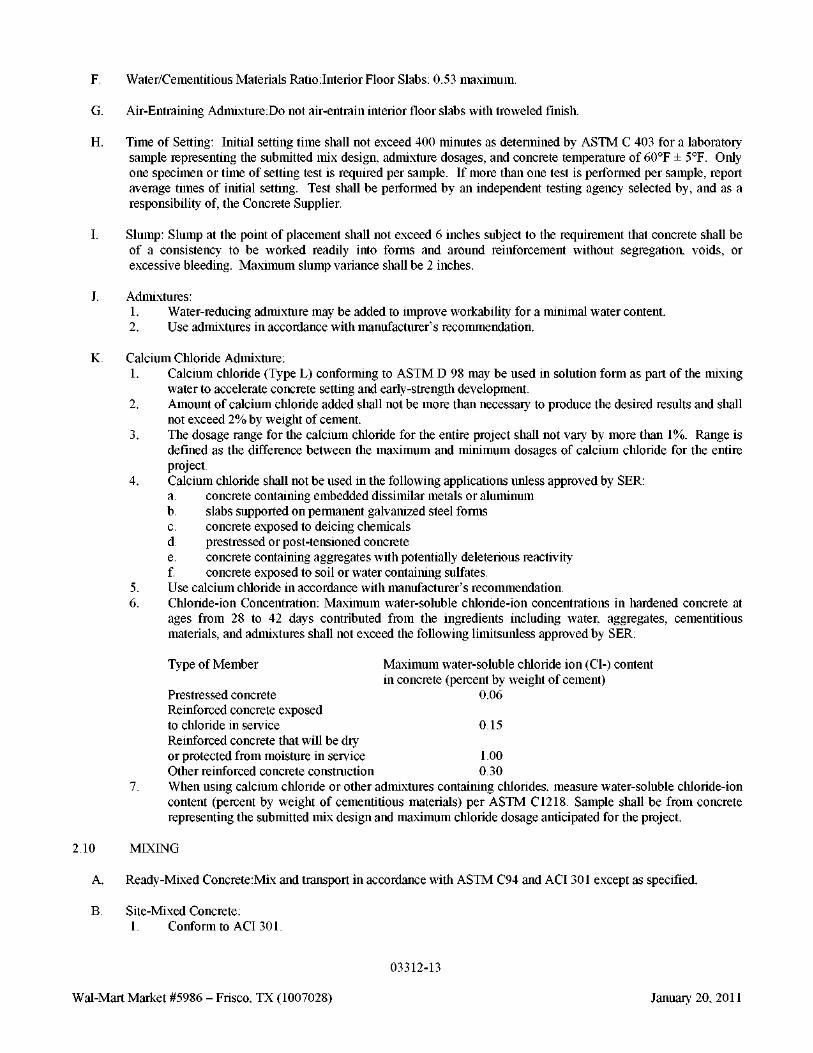
F. Water/Cementitious Materials Ratio:Interior Floor Slabs: 0.53 maximum.
G. Air-Entraining Admixture:Do not air-entrain interior floor slabs with troweled finish.
H. Time of Setting: Initial setting time shall not exceed 400 minutes as determined by ASTM C 403 for a laboratory sample representing the submitted mix design, admixture dosages, and concrete temperature of 60°F ± 5°F. Only one specimen or time of setting test is required per sample. If more than one test is performed per sample, report average times of initial setting. Test shall be performed by an independent testing agency selected by, and as a responsibility of, the Concrete Supplier.
I. Slump: Slump at the point of placement shall not exceed 6 inches subject to the requirement that concrete shall be of a consistency to be worked readily into forms and around reinforcement without segregation, voids, or excessive bleeding. Maximum slump variance shall be 2 inches.
J. Admixtures: 1. Water-reducing admixture may be added to improve workability for a minimal water content. 2. Use admixtures in accordance with manufacturer’s recommendation.
K. Calcium Chloride Admixture: 1. Calcium chloride (Type L) conforming to ASTM D 98 may be used in solution form as part of the mixing
water to accelerate concrete setting and early-strength development. 2. Amount of calcium chloride added shall not be more than necessary to produce the desired results and shall
not exceed 2% by weight of cement. 3. The dosage range for the calcium chloride for the entire project shall not vary by more than 1%. Range is
defined as the difference between the maximum and minimum dosages of calcium chloride for the entire project.
4. Calcium chloride shall not be used in the following applications unless approved by SER: a. concrete containing embedded dissimilar metals or aluminum b. slabs supported on permanent galvanized steel forms c. concrete exposed to deicing chemicals d. prestressed or post-tensioned concrete e. concrete containing aggregates with potentially deleterious reactivity f. concrete exposed to soil or water containing sulfates.
5. Use calcium chloride in accordance with manufacturer’s recommendation. 6. Chloride-ion Concentration: Maximum water-soluble chloride-ion concentrations in hardened concrete at
ages from 28 to 42 days contributed from the ingredients including water, aggregates, cementitious materials, and admixtures shall not exceed the following limitsunless approved by SER:
Type of Member Maximum water-soluble chloride ion (Cl-) content in concrete (percent by weight of cement)
Prestressed concrete 0.06 Reinforced concrete exposed to chloride in service 0.15 Reinforced concrete that will be dry or protected from moisture in service 1.00 Other reinforced concrete construction 0.30
7. When using calcium chloride or other admixtures containing chlorides, measure water-soluble chloride-ion content (percent by weight of cementitious materials) per ASTM C1218. Sample shall be from concrete representing the submitted mix design and maximum chloride dosage anticipated for the project.
2.10 MIXING
A. Ready-Mixed Concrete:Mix and transport in accordance with ASTM C94 and ACI 301 except as specified.
B. Site-Mixed Concrete: 1. Conform to ACI 301.
03312-13
Wal-Mart Market #5986 – Frisco, TX (1007028) January 20, 2011
2. Use central-mix type batch plant.
PART 3 - EXECUTION
3.1 EXAMINATION
A. Conform to manufacturer’s printed instructions for materials and equipment.
3.2 PREPARATION
A. Preplacement Inspection: All trades and participants involved shall verify that preparations are in conformance with Contract documents.Use approved sign-off forms.
B. Notify Wal-Mart Testing Laboratory and SSI a minimum of 48 hours prior to commencement of concreting operations.
C. Cleaning Equipment: Remove hardened concrete and foreign materials from mixing and conveying equipment.
D. Ensure that all work is properly coordinated: 1. Structural Drawings and Specifications with those of other disciplines. 2. Use final corrected Shop Drawings, placing Drawings and material / equipment Drawings
E. Verify anchors, seats, plates, reinforcement, and other items to be cast into concrete are accurately placed, held securely, and will not cause difficulty in placing concrete.
F. Roof construction, RTUs, skylight installation, overhead painting, and roof drainage system shall be complete and weather tight prior to placement of slabs.
3.3 AGGREGATE BASE PLACEMENT
A. Unless otherwise specified on the Drawings, place aggregate base as specified herein.
B. Aggregate Base: 1. Install aggregate base where shown on Drawings. 2. Compact to final thickness shown in layers not exceeding 6 inches with minimum of 2 passes per layer
with vibratory compactor. 3. Compact fill to 98% of aggregate’s Standard Proctor as determined by Method D of ASTM D698. 4. Leave pad up to 2 inches low until just prior to concrete placement.
C. Aggregate Base Fine Grading: 1. Compact to final thickness noted with 2 passes minimum vibratory compactor to produce smooth, flat,
dense surface. 2. Do not allow excess moisture or soft soil beneath vapor retarder at time of placing concrete. 3. Level off aggregate base top surface with aggregate choker material as necessary as follows:
a. to reduce surface friction and to meet specified fine grade tolerances specified below. Typically required up to 3/4" thick in areas exposed to rain, traffic, or excavation for pits and buried utilities.
b. where aggregate base material does not have sufficient fine particles to produce a surface that is free of exposed aggregate or surface voids greater than 3/8” in size at time of slab installation.
4. Wal-Mart Construction Testing Laboratory shall verify adequate fines at surface prior to concrete slab placement.
5. Use laser guided equipment to establish specified base elevation. 6. Provide dry, smooth, flat, dense surface 7. Proof-roll 48 hrs maximum prior to concrete placement. Depression under a fully loaded ready mix truck
shall not exceed 1/2 inch.
03312-14
Wal-Mart Market #5986 – Frisco, TX (1007028) January 20, 2011
D. Slab on Ground Aggregate Base Fine Grade Tolerance: +0 inch, -3/4 inch with transition no greater than 3/4 inch vertically to 8 inches horizontally for level slab.
3.4 FORMWORK
A. Form vertical surfaces of concrete work.
B. Design, construct, and remove formwork and related items in accordance with most stringent requirements of ACI 117 and 347.
C. Form Preparation 1. Clean formwork. 2. Remove rust from steel formwork.
D. Erecting Forms: 1. Butt joints and provide backup splice at joints as required to prevent faulting at form. 2. Do not tape formwork joints. 3. Just before placing concrete, clean forms and adjacent surfaces again as necessary. Remove wood, sawdust,
chips dirt and other debris. 4. If necessary to grease tie threads, do not allow grease to contact remainder of tie when wall will be exposed
to hydrostatic pressure.
E. Form Release Agent 1. Before placing reinforcing steel, thoroughly coat contact surfaces of forms with form release agent. 2. Apply form release agent evenly without excess drip. 3. Do not allow form release agent to come into contact with concrete surfaces against which fresh concrete
will be placed. 4. Moisten wood forms immediately before placing concrete where form release agents are not used.
F. Provide slab side forms, of form materials specified, full depth, with beveled, level, and smooth top surface for all
slabs where SOV is greater than F F 35 / F L 25.
G. Provide slab side forms such that by placing a 10-foot straightedge, form does not exceed 1/8 inch variation.
H. Prefabricated Access Pit Form:Install in accordance with manufacturer’s instructions.
3.5 VAPOR RETARDER INSTALLATION
A. Install vapor retarder in accordance with ASTM E 1643 except that Paragraph 10 – Slab Moisture Content provisions shall not apply.
B. Install vapor retarder directly under slabs where shown on drawings.
C. Seal laps continuously with specified tape.
D. Seal punctures and tears in membrane caused by bar chair feet, screed anchors, or utility penetrations with specified tape.
E. Sequence installation of vapor retarder no more than 40 ft. in advance of laser screed strike-off.
3.6 PLACING REINFORCEMENT
A. Place reinforcing in accordance with most stringent requirements of ACI 117, 301 and 318 and CRSI Manual of Standard Practice and Placing Reinforcing Bars.
03312-15
Wal-Mart Market #5986 – Frisco, TX (1007028) January 20, 2011

B. Accurately place and secure reinforcement against displacement by firmly wiring at intersections and splices with not less than No. 18 U.S. Standard Gauge annealed wire.
C. Turn wire ends away from concrete exterior.
D. Ensure reinforcing is clean, free from defects and kinks, loose mill or rust scale or coatings that will reduce bond.
E. Protect exposed reinforcing bars, inserts and plates intended for bonding with future expansion from corrosion.
F. When welding of reinforcement is specified, comply with AWS D1.4. Do not tack weld crossing bars for assembly of reinforcement, supports or embedded items.
G. Slab on Grade and Pavement Dowels: 1. Secure dowels and their sleeves perpendicular to joint and parallel to finished concrete surface. 2. Use prefabricated dowel supports at ends of dowels to maintain alignment. 3. Dowel alignment shall be within specified tolerances. 4. Do not grease plate dowels 5. Install plate dowels at construction joints in accordance with manufacturer’s recommendations.
3.7 EMBEDMENTS
A. Install anchor bolts and embedded bearing devices provided by others.
B. Provide other anchor bolts and bearing devices shown on Drawings or anchor bolt setting plans or required equipment installation.
C. Use templates as required for spacing between anchor bolts and set elevations with surveying equipment.
D. Position and anchor steel shapes, anchor bolts, casings, conduit sleeves, masonry anchorages and other materials embedded in concrete.
E. Place and secure against displacement miscellaneous steel, pipe sleeves, inserts, anchors, stair abrasive nosings, preformed joint fillers, vapor retarders and miscellaneous embedded items.
F. Secure embedments to formwork when possible.
G. Install clean embedments. After concrete placement, clean embedment exposed surfaces of concrete splatter and other foreign substances.
H. Unless noted otherwise on the Drawings, ensure corner protection angles, bars and other similar embedded metal items are continuous between concrete joints. If shorter lengths are required for metal items, connect the ends by butt-welding entire joint and grinding smooth exposed surface. Ensure embedded metal items are discontinued at construction, contraction and isolation joints.
I. Temporarily fill voids in sleeves and inserts with easily removable materials.
J. Allow sufficient time between erection of forms and placing concrete for other trades to install and test their work.
K. Before placing concrete on grade, piping and other utilities under concrete shall be inspected, tested, and excavations backfilled and properly compacted to solid bearing.
3.8 JOINTS
A. Joints 1. Provide construction, isolation, and contraction joints as indicated on Drawings and as noted below. 2. Bulkheads for construction joints shall be 1-1/2 inch minimum lumber with top outside edge beveled 30
03312-16
Wal-Mart Market #5986 – Frisco, TX (1007028) January 20, 2011
degrees minimum, leaving 1/2" to 3/4" level surface. Do not use permanent preformed metal bulkheads. 3. Provide bulkheads full depth of member. 4. Space joints to allow one continuous placement between bulkheads. 5. Maximum length-to-width ratio for concrete panels defined by walls or joints shall be 1-1/2:1. 6. Do not locate longitudinal construction joints in action alleys. 7. Unless otherwise shown on the Drawings, do not extend reinforcement, corner protection angles, bars, or
other fixed metal items through joints in slabs or through joints between slabs on grade and vertical surfaces.
8. Match joints in walls and curbs with joints in slabs on grade and pavements. 9. Extend joints across tops of walls and curbs unless noted otherwise on Drawings. 10. Isolation Joints: Form isolation joints in accordance with Section 07900.
3.9 CONVEYING
A. Handle concrete from mixer to place of final deposit as rapidly as practicable and in manner which will assure obtaining specified quality of concrete.
B. Re-tempering: Discard concrete which has already begun to set. Do not re-temper with water.
C. Equipment: Provide mixing and conveying equipment of proper size and design to ensure a continuous flow of concrete to delivery end. Do not use aluminum pipe or equipment in contact with concrete. 1. Mixers, agitators and non-agitating units: Conform to ASTM C94 and current certification requirements of
Department of Transportation in state where concrete plant is located. 2. Belt Conveyers:
a. Use only types which will not cause segregation. b. Discharge runs over 30 feet into hopper
3. Chutes: Metal or metal lined not to be installed at slopes greater than 1 vertical to 3 horizontal. 4. Runways:
a. Provide runways or other means above finished concrete level for wheeled conveying equipment. b. Do not support runways on reinforcing. c. Do not wheel equipment directly over reinforcing or metal deck.
5. Pumps: a. Submit to Testing Lab Agency for review, changes to concrete mix to necessitate pumping. b. Use pump hoses and other slickline components with 5 inch minimum inside diameter. c. For slickline reducers, reduction in diameter shall not exceed 1 inch over a 5 foot length.
3.10 PLACING CONCRETE
A. Unless otherwise specified, place concrete in accordance with the requirements of ACI 301.
B. The concrete supplier shall have a quality control representative at site for concrete placements.
C. General Contractor and/or the Concrete Floor Subcontractor representative shall be on site during placement of the concrete.
D. The concrete supplier shall have a quality assurance representative at the site for the entire duration of each concrete slab placement as a resource to the Contractor.
E. Supervision for the General Contractor and the Concrete Floor Subcontractor shall be on site for the entire duration of each concreteslab placement.
F. Depositing 1. Do not deposit concrete which has partially hardened or has been contaminated by foreign matter. 2. Deposit concrete continuously in layers of such thickness that no concrete will be deposited on concrete
which has hardened sufficiently to cause seams or planes of weakness. 3. Between construction joints, place concrete in a continuous operation such that concrete is plastic at all
03312-17
Wal-Mart Market #5986 – Frisco, TX (1007028) January 20, 2011
4. 5. 6.
7.
8. 9.
times and flows readily into spaces between reinforcement. Use placement procedures to avoid segregation. Deposit concrete as near as possible to its final position. Hardened/Densified Floor Slabs:Place concrete in one continuous placement up to a maximum of 20,000 square feet.Placement over 20,000 sq ft may be performed provided written approval by Wal-Mart is obtained contingent upon the Contractor’s demonstration of ability, equipment, and personnel to handle the increased areas. Integral color concrete floor slabs: a. Clean tools to prevent contamination. Clean and bag boots when working on surface. b. Employ methods to prevent dust and air-born debris from entering building and settling on slab
surface during finishing operations. Do not place concrete over standing water, mud, frost, ice or snow. Do not use wet screeds.
G. Consolidation: 1. Consolidate concrete complying with ACI 301 by vibrating, spading or rodding so that concrete is
thoroughly worked around reinforcing, embedded items and into the corner of forms. 2. Consolidate each layer of concrete with previously placed layers in manner that will eliminate air or stone
pockets which may cause honeycombing, pitting or places of weakness. 3. Do not insert vibrator into portions of concrete that have begun to set. 4. Do not use vibrators to transport concrete. 5. Keep spare vibrator on job site during concrete operations. 6. Use internal vibrator for formed elements, not form vibrators. 7. Slabs:
a. Consolidate slabs with vibrating laser screed. b. Use internal vibration along construction joints at both formed and slab abutments.Vibrate
underplate dowels. Mark forms before concreting to properly locate dowels after concreting. c. Do not use grate tampers, jitterbugs, or mesh rollers.
H. After concrete placement, adjust forms and bracing as necessary to maintain proper alignment and eliminate leakage of cement paste.
3.11 FLOOR SLAB AND PAVEMENT FINISHING PROCEDURES
A. General: 1. Do not add water to any slab surface during finishing operations. 2. Do not add cement to any slab surface during finishing operations. 3. Perform no finishing operation while water is present on slab surface.
B. Initial Leveling: 1. Complete bull floating, darbying and straight-edging before any bleed water is present on slab surface. 2. Use a checkrod or highway straightedge 10 feet wide minimum for initial and later leveling instead of bull
float where overall floor tolerances specified are greater than F F 20 / FL15.
C. Hand and Power Floating: 1. Do not start floating until following conditions are met:
a. Bleeding is complete and water is gone, including water sheen on slab surface. b. Concrete will sustain the weight of finishers without creating more than 1/8 to 1/4 inch indentations. c. Mortar is not thrown by rotating blades of power float.
2. The finisher shall determine the proper time to start finishing procedures for interior slab placements on the basis the above conditions. It is noted for advisory purposes, however, that typical setting characteristics of concrete materials will allow for initial power floating to begin 3-1/2 hour’s ± 1 hour after initial strike-off (screeding), at which time the concrete should support a finisher on foot without more than approximately a 1/4 inch indentation in the slab surface.Variations in concrete materials, nature and proportion of supplementary cementing materials, and concrete temperature will cause setting behavior to vary.
3. Do not use following tools for floating:
03312-18
Wal-Mart Market #5986 – Frisco, TX (1007028) January 20, 2011
a. Power troweling machines with trowel blades. b. Fresno or other type of wide metal trowel. c. Power floating machine with water attachment for wetting concrete.
4. Float three times minimum with each floating at right angles to previous floating, and final pass at 45 degrees to previous pass.
D. Troweling for Interior Slabs: 1. Hand or power float floor before starting troweling. 2. For first troweling, keep blade as flat as possible and use low speed, minimizing “washboard” or “chatter
marks” and “pitting”. 3. Trowel two times minimum with first two trowelings at right angles.Some burn marks are acceptable as
determined in review ofthe test slab.Cease troweling before trowel blades scratch surface. 4. Allow time between trowelings for concrete to stiffen and water sheen to disappear. 5. Do not add water to slab surface during troweling. 6. Do not ride trowels on existing hardened concrete slabs. Trowels shall be carried off of slab surfaces. When
parking power trowels on fresh concrete, place on top of plywood or spray area with evaporation retarder before placing trowel on top of slab.
E. Pitch to drains:Form 18 inch radius around floor drains and pitch concrete surface to drains at rate of 1/4 inch per foot nominal, unless noted otherwise in Drawings.
3.12 CONCRETE FINISHES
A. Formed Surfaces: 1. As-Cast Finish:
a. Apply on concrete surfaces not exposed to public view and where noted on Drawings. b. Clip or rub off fins exceeding 1/2 inch in height. Leave surfaces with texture imparted by forms.
2. Smooth-Form Finish: a. Apply on concrete surfaces exposed to public view and where noted on Drawings. b. Remove fins exceeding 1/8 inch in height.
B. Unformed Finishes: 1. Scratched Finish: After floating, as specified, lightly scratch surface with stiff brush.
C. Troweled Finish: 1. After floating, as specified, power trowel or hand trowel surface. 2. Ensure kneeboard impressions, trowel marks or chattered areas are not evident after floor is finished. 3. Provide dense, smooth trowel surface, uniform in texture. Random, modeled burn marks are desired and
acceptable. Refer to approved permanent test panel. 4. Finish surface to produce maximum sheen free of scratches and trowel marks.
D. Floor Finish Schedule: 1. Scratched Finish:
a. Use for surfaces to receive mortar setting beds for tile and other bonded applied cementitious finish flooring materials, except bonded concrete floor toppings.
2. Troweled Finish: a. Use for exposed interior walking surfaces and surfaces to be covered with carpet, resilient flooring
and other thin film finish coating systems.
E. Use the following bonding procedure for bonding new concrete to existing concrete and as noted on Drawings: 1. Roughen surface until coarse aggregate is exposed. 2. Clean surface. 3. Immediately before placing concrete, clean surface again as necessary, dampen surface and remove free
water. 4. Apply a commercial epoxy bonding agent or apply bonding grout approved by SER and composed of one
part cement, 1.5 parts fine sand with 100% passing No. 8 sieve, anda 50:50 bonding admixture with water
03312-19
Wal-Mart Market #5986 – Frisco, TX (1007028) January 20, 2011
to achieve the consistency of thick paint. The W/cm for the bonding admixture shall not exceed that of the new concrete being placed on it.
3.13 FLOOR SLAB CONTRACTION JOINTS
A. General: 1. Provide slab joints as indicated on Drawings. 2. For integral colored concrete, after saw cutting with attached vacuum system, immediately clean slab
surface of all sawing residues. 3. See Drawings for additional requirements. 4. Employ sufficient number of saws and workers to complete cutting saw joints before shrinkage produces
cracking. 5. Saw cut to width of 1/8 inch by 1/4 the slab depth, unless noted otherwise on drawings.
B. Sawed Contraction Joints: 1. Use saws, blades, skid plates, and accessories by Soff-Cut International, Inc. or approved equal 2. Start cutting sawed joints as soon as concrete has hardened sufficiently to prevent raveling or dislodging of
aggregates. This will typically be from 1 hour in hot weather to 4 hours in cold weather after completing finishing of slab in that joint location.
3. Provide at least two “Soff-Cut” saws on site with blades capable of achieving the required depth of saw cut. 4. Extend sawed joint to the slab boundaries and abutments, including columns, drains, and other penetrations
in the path of a defined joint. Implement methods and timing of the saw cut beyond the limits of the Soff-Cut saw reach to provide a consistent depth of cut with minimal raveling of joint edges.
C. Saw-Cut Control Joint Dust Collection 1. Connect a dust collection system directly to each Soff-Cut saw being used. 2. Dust Collection System:
a. ProVac Dust Collection System by Glad Tech Inc. b. SoffVac by Soff-Cut International, Inc.
3.14 CONCRETE CURING
A. Curing Compound(Temporary Film Forming): 1. Apply curing compound after saw joints have been cut and as soon as concrete surface will not be damaged
by curing operations. 2. Clean slab surface and joints and remove loose or compacted saw debris prior to curing compound
application. 3. Apply compound at a rate of 500 to 1000 square feet per gallon with high volume, low pressure, atomized
sprayer in accordance with manufacturer recommendations. Prevent over-application in excess of specified rate.
4. Spread compound evenly using mopping pads. Mopping pads shall be Quickie Professional Mighty Mop 077 or Rubbermaid 24” Microfiber Wet Room Pad.
5. If whitening from over application occurs, consult manufacturer for removal of product with hot water and aggressive scrubbing.
6. Do not allow compound to accumulate and puddle. 7. Do not use polyethylene sheets or other impervious covers on exposed interior floors.
3.15 FORM REMOVAL
A. Do not remove forms until concrete has hardened sufficiently to support its own weight and imposed construction loads.
B. Remove forms in manner to avoid damage to concrete.
03312-20
Wal-Mart Market #5986 – Frisco, TX (1007028) January 20, 2011
C. Formwork for slabs and pavements, curbs and other parts not supporting vertical load of concrete may be removed as soon as concrete has hardened sufficiently to resist damage from removal operations, but in no case sooner than 12 hours.
3.16 JOINT FILLING AND SEALING
A. Joint filling and sealing of concrete floors is specified in Section 07900.
3.17 DENSIFIER TREATMENT
A. Densifier and protective treatment to concrete floor slabs is specified in Section 03362.
3.18 CONCRETE FLOOR POLISHING (BURNISHING)
A. Burnishing concrete floor slabs which have received densifier and a protective treatment is specified in Section 03362.
3.19 QUALITY CONTROL TESTING AND INSPECTION (BY OWNER)
A. General 1. Wal-Mart Testing Laboratory will perform concrete testing specified herein at no cost to the Contractor. 2. Perform Tests and Inspections as indicated in Table A – Testing and Inspection Schedule at the end of this
section. The Testing Agency shall keep records of the testing and inspections. 3. Work on which test have failed shall be corrected as directed by Wal-Mart Construction Manager. 4. Submit copies of data and test results to Wal-Mart Construction Manager and SER for review to verify mix
designs. 5. Perform testing in accordance with testing standards listed at the beginning of this section. 6. Making and curing concrete test specimens shall be in conformance with ASTM C31.
B. Qualifications: Unless otherwise specified, work shall be performed by a Special Inspector – Technical II or Special Inspector – Structural I. In addition to the Inspector and CTL qualifications specified in Section 01458, the following qualifications shall apply for all Cast-in-Place Concrete inspection. 1. Technical I: ACI Certified Grade I inspector. 2. Technical II: ACI Certified Grade II inspector. 3. CTL testing laboratory: C.C.R.L. certification at the National Bureau of Standards. (For multi-story
projects only) 4. Lead technician shall have at least five years experience in projects of this size and complexity. 5. Other technicians shall have at least two years experience.
C. Laboratory Testing Requirements: 1. Test items such as reinforcing steel, aggregates, and other products suspected of not meeting specified
requirement as directed by Wal-Mart Construction Manager to verify compliance. Provide test report to Wal-Mart Construction Manager.
2. Conduct Concrete strength tests: a. During the initial 24 hours (plus or minus 8 hours) after molding, the temperature immediately
adjacent to the specimens shall be maintained in the range of 60 to 80 degrees F. Control loss of moisture from the specimens by shielding from the direct rays of the sun and from radiant heating devices.
b. Specimens transported prior to 48 hours after molding shall not be demolded, but shall continue initial curing at 60 to 80 degrees F until time for transporting.
c. Specimens transported after 48 hours age shall be demolded in 24 hours (plus or minus 8 hours). Curing shall then be continued but in saturated limewater at 73 degrees (plus or minus 3 degrees F) until the time of transporting.
d. During transportation, protect the specimens with suitable cushioning material to prevent damage from jarring. During cold weather, protect specimens from freezing with suitable insulation material. Transportation time shall not exceed four hours.
03312-21
Wal-Mart Market #5986 – Frisco, TX (1007028) January 20, 2011
e. Date test cylinders and number consecutively. Give each cylinder of each set an identifying letter (i.e. A, B, C, and D). Prepare a sketch of the building plan for each test set identifying location of placed concrete.
f. Test two cylinders (C and D) at 28 days and the average of the breaks shall constitute the compressive strength of the concrete sample.
3. In addition to required information noted previously in this Section, record the following information on concrete compressive strength reports: a. Test cylinder number and letter. b. Specific foundations or structures covered by this test. c. Proportions of concrete mix or mix identification. d. Measure uncapped concrete cylinder weight. e. Specified compressive strength. f. Tested compressive strength. g. Concrete plastic unit weight. h. Name of technician securing samples. i. Curing conditions for concrete strength test specimens (field and laboratory). j . Date strength specimens transported to laboratory. k. Age of strength specimens when tested. l. Type of fracture during test. m. Curing condition for concrete strength test specimens (field and laboratory)
D. Field Testing 1. If any test required in Table A fails, repeat failed test for each following truck until compliance is met. 2. Test concrete temperature hourly when air temperature is 40 F and below or 80 F and above. 3. CTL shall notify Contractor to reject concrete if air content is over 3%. 4. When pumping concrete, take samples for slump tests at point of delivery from pumping line in addition to
first slump test noted above for concrete with water-reducer. 5. Stockpile Sieve Analysis: Immediately before first concrete production and later as directed by Wal-Mart
Construction Manager, obtain samples at concrete plant of aggregate size groups used in pertinent mix to verify mix design submittals. Samples shall be obtained from bins as close as possible in time and space to their introduction into mixer. Concrete supplier and aggregate producer shall have representatives available to assist testing agency in obtaining representative samples. Perform sieve analysis on each aggregate size group, using sieve sizes specified herein. Provide following test data: percent passing each sieve, cumulative percent retained on each sieve, percent retained on each sieve, fineness modulus, and combined sieve analysis of material retained on each sieve for aggregates. Conform to ASTM C136, C702 and D75.Record and report results to SER, SSI, and Wal-Mart Construction Manager.
6. When directed by Wal-Mart Construction Manger when irregularities are suspected in the batching of the mix,take concrete sample at point of final placement to verify mix design submittals. Washout sample to remove material finer than no. 200 sieve and perform combined sieve analysis, using sieve sizes specified herein, furnishing percent retained on each sieve.Concrete sample shall be large enough to be representative but is not less than 70 pounds. Conform to ASTM C136. Record and report results to SER, SSI, and Wal-Mart Construction Manager.
7. Test floor slab finished surface areas shown on drawings for flatness and levelness in accordance with ASTM E1155, except as specified herein. Testing shall be performed at random on the first placement of the exposed sales floor slab and randomly on other placements as directed by the Wal-Mart Construction Manager or as directed by Owner.
8. F-Number requirements shall be as follows for all interior floor slabs. a. Slabs on Grade: F F / F L minimum overall for composite of measured values (SOV) for entire day’s
concrete placement; F F /FL minimum for any individual floor section (MLV) as specified in Quality Assurance paragraph in Part 1 above.
b. Bound individual floor sections for testing purposes by the following that provide the smallest sections: construction joints, contraction joints or column and half-column lines.
c. Additional requirements: 1) Conform to F-numbers specified for floor areas within 2 feet of construction and isolation
joints, in lieu of ASTM E1155 requirements that exclude these areas. 2) Limit to 1/4 inch maximum elevation change that may occur within 2 feet of vertical
03312-22
Wal-Mart Market #5986 – Frisco, TX (1007028) January 20, 2011
elements (such as columns or walls) that pass through slab surface. 3) Ensure top of entire floor falls within tolerances specified in Quality Assurance paragraph in
Part 1 above for finished floor elevation. d. General Contractor shall pay for costs for corrective work and extra testing required by defective
work. e. Complete testing, identify defective areas, and give verbal report to Wal-Mart and other parties
concerned within 24 hours after placement. f. Submit written report by electronic means or hand deliver to parties concerned within 36 hours or
next regularly scheduled working day (Mon-Sat), after placement. Include costs for retesting replaced or repaired defective areas.
9. In addition to required information noted previously in this Section, record the following concrete materials information on “Wal-Mart Interior Slabs on Ground Observation Report”: a. Date and time concrete was placed. b. Time of batching at plant. c. Relative humidity, ambient temperature, and base temperature during concrete placement in
accordance with ACI 305.1. d. Time of placing and finishing tasks at location where sampled concrete is placed.
1) Batching at plant 2) Discharge from delivery. 3) Start of initial floating. 4) Start of initial troweling. 5) Completion of finishing. 6) Start of joint sawing. 7) Start of application of curing compound.
10. Note trends of decreasing quality in concrete due to changing seasons, conditions of curing, or other causes and bring to attention of the Wal-Mart Construction Manager. Report and log comments on Non-Conformance Correction Log.
11. Verify each delivery ticket of concrete. Report type of concrete delivered, amount of water added and time at which cement and aggregate were loaded into truck, and time at which concrete was discharged from truck.
12. Verify that the proper amount of densifier has been applied to the concrete floor slab surface.
E. Inspection: 1. Concrete Form Work: Verify formwork dimensions will result in member size and configuration shown.
Structural adequacy of formwork is the sole responsibility of the Contractor. 2. Concrete Reinforcement:
a. Verify reinforcing bar grade. b. Verify reinforcing bars are free of dirt, excessive rust, and damage. c. Verify reinforcing bars are adequately tied, chaired, and supported to prevent displacement during
concrete placement. d. Verify proper clear distances between bars and to surfaces of concrete. e. Verify reinforcing bar size and placement. f. Verify bar laps for proper length and stagger.
3. Slab-on-Grade Structural Inspection: Inspect slabs-on-grade for compliance with Drawings and Specifications. Report on the following: a. Preparation of subgrade. b. Slab thickness. c. Size, spacing, placement (cover), and lap of reinforcement. d. Size, spacing, and placement of joint dowels. e. Placement and finishing of concrete. f. Time of saw cuts after placement of concrete.
4. Concrete Mix: a. Verify mixer truck trip ticket conforms to approved mix design. b. Verify that total water added to mix on site does not exceed that allowed by concrete mix design
based on the concrete company having calibrated or verified the accuracy of the water meters on each truck and the available water indicated on the ticket by the concrete supplier.
03312-23
Wal-Mart Market #5986 – Frisco, TX (1007028) January 20, 2011
c. Verify that concrete quality is indicative of adequate mixing time, consistency, and relevant time limits.
d. Work shall be performed by a Special Inspector – Technical I. Report of results shall be made daily. 5. Preparation and Placement: Inspect preparation and placement of concrete.
a. Verify acceptable general condition of concrete base prior to placement. b. Verify that concrete conveyance and depositing avoids segregation and contamination. c. Verify that concrete is properly consolidated. d. Verify reinforcement remains at proper location. e. Inspections shall be continuous.
6. Protection and Curing: Observe protection and curing methods for all concrete. a. Verify specified curing procedures are followed. b. Verify that specified hot and cold weather procedures are followed.
7. Embedded Items: a. Verify specified size, type, spacing, configuration, embedment length, and quantity of anchor bolts
and embedded items. b. Verify proper concrete placement and means have been taken to achieve consolidation around bolts
and embedded items. 8. Slab Joint Filler: Inspect floor slab joint filler installation at beginning of installation and periodically
thereafter for proper installation including cleaning, joint prep, and depth of fill.Randomly check depth of filled joints at intervals of approximately every 1000 linear ft of joint. Document and report discrepancies to Wal-Mart Construction Manager and General Contractor.
3.20 PROTECTION
A. Provide a “Concrete Floor Protection Plan” to Wal-Mart Construction Manager prior to placement of interior slabs that addresses how the following tasks will be implemented: 1. Communication of protection plan to subcontractors and vendors, including those directly contracted by the
Owner. 2. Keeping the slab clean of dirt and grime. 3. Prevention of stored materials in exposed sales floor areas until completionof construction. 4. When and how floor covering protection will be provided in high traffic areas. 5. Condition, inspection, and operational procedures for construction equipment allowed on the slab surface,
including but not limited to: a. Diapering to contain any potential fluid leaks. b. Use of non-marking tires c. Inspection of tire treads for any debris that may mar the slab surface.
6. Procedures for cleaning up slab spills, including use of and availability of cleaning chemicals and absorptive materials at the site.
B. Slab Protection: 1. Protect finished floors to prevent damage by construction traffic and activities until Owner possession. 2. Protect concrete slabs from staining, gouges and scratching. 3. Diaper hydraulic powered equipment. 4. Place drop cloths or other breathable slab protection under parked vehicles. 5. Do not store structural steel or metal fabrications on slab. 6. Do not allow pipe cutting machine on slab. 7. Adequately protect concrete inserts and other embedded items from movement, mechanical injury, or from
damage by elements. 8. Provide access ramps of compacted earth or other means along exposed concrete edges of floor slabs to
prevent equipment and machinery from impacting edges. Barricade other exposed edges to vehicular traffic which may damage edges.
C. Traffic protect floor surfaces as follows: 1. Barricade concrete surfaces immediately after placing and finishing. 2. 3 days after placement: Foot traffic permitted. No construction materials in contact with slab surface. 3. 5 days after placement: Scissor lift traffic permitted.
03312-24
Wal-Mart Market #5986 – Frisco, TX (1007028) January 20, 2011
4. 9 days after placement: Heavy traffic permitted but not before concrete has obtained, by test, its design strength as noted on drawings.
D. Provide daily scrubbing, using only water, of the entire exposed concrete slab surfacewith fuel powered riding equipment from time of dried initial application of surface densifier until time of store turnover.
END OF SECTION
03312-25
Wal-Mart Market #5986 – Frisco, TX (1007028) January 20, 2011
WAL-MART STORES CONCRETE SLAB MIX DESIGN SUBMITTAL FORM (Section 03312 – Cast-in-Place Concrete Slabs) Date
DISCOUNT STORE SUPERCENTER MARKET SAM’S CLUB
SUBMITTED MIX DESIGN STORE INFORMATION
STORE #
ADDRESS
CITY, ST
GENERAL CONTRACTOR
COMPANY
JOBSITE PHONE
A. CONCRETE INFORMATION
Design Strength (f’c)
Water / Cementitious Ratio
Total Air Content
Mix Developed From
• Trial Mix Test Data (attach test data)
• Field Experience(attach data)
Density
Wet pcf Dry
Slump
( ± 1” ) WITHOUT WR Admixture
( ± 1” ) WITH WR Admixture
B. ADMIXTURE INFORMATION
Water Reducing
Accelerating
Retarding
Liquid Color
ASTM Designation Product (Manufacturer/Brand)
Dosage (ou oz / cy
nces) oz / cwt
03312-26
Interior Building Slabs 03312-SLN Natural Concrete (gray)
Mix ID #
03312-SLC Integrally Colored Concrete
Mix ID #
* Same basic proportions for all interior slab concrete
psi
%
pcf
Wal-Mart Market #5986 – Frisco, TX (1007028) January 20, 2011
C. MIX DESIGN
Mix Proportions (per cubic yard)
Cement
Fly Ash
Slag (GGBFS) Coarse Aggregate #1
#2 #3
Fine Aggregate #1
#2
Water
Air Content
Liquid Color
Identification (Type, size, source, etc.)
TOTALS
Weight (pounds)
Density (SSD)
Volume (cubic feet)
% Aggregate Absorption
Coarse & Fine Aggregate Gradation Information
Sieve Size
1-1/2"
1"
3/4"
1/2"
3/8"
# 4
# 8
# 16
# 30
# 50
# 100
# 200
% of Vol
% Passing Each Sieve (All Sieve Sizes must be entered)
Coarse Agg. # 1
Coarse Agg. # 2
Coarse Agg. # 3
Fine Agg. # 1
Fine Agg. # 2
Combined % Passing
Combined % Retained
Cumulative Individual
Aggregate Ratios
Coarseness Factor =
Workability Factor =
Adj-Workability Factor =
Allowable Adj-WF=
Combined % cumulative retained 3/8” sieve
Combined % cumulative retained #8 sieve
Combined % passing #8 sieve
WF + [(Cementitious Material - 564) ÷ 37.6]
Adj-WF = [(11.25 - .15 CF) + 35.5] ± 2.5
=
=
=
= Low High
03312-27
Wal-Mart Market #5986 – Frisco, TX (1007028) January 20, 2011
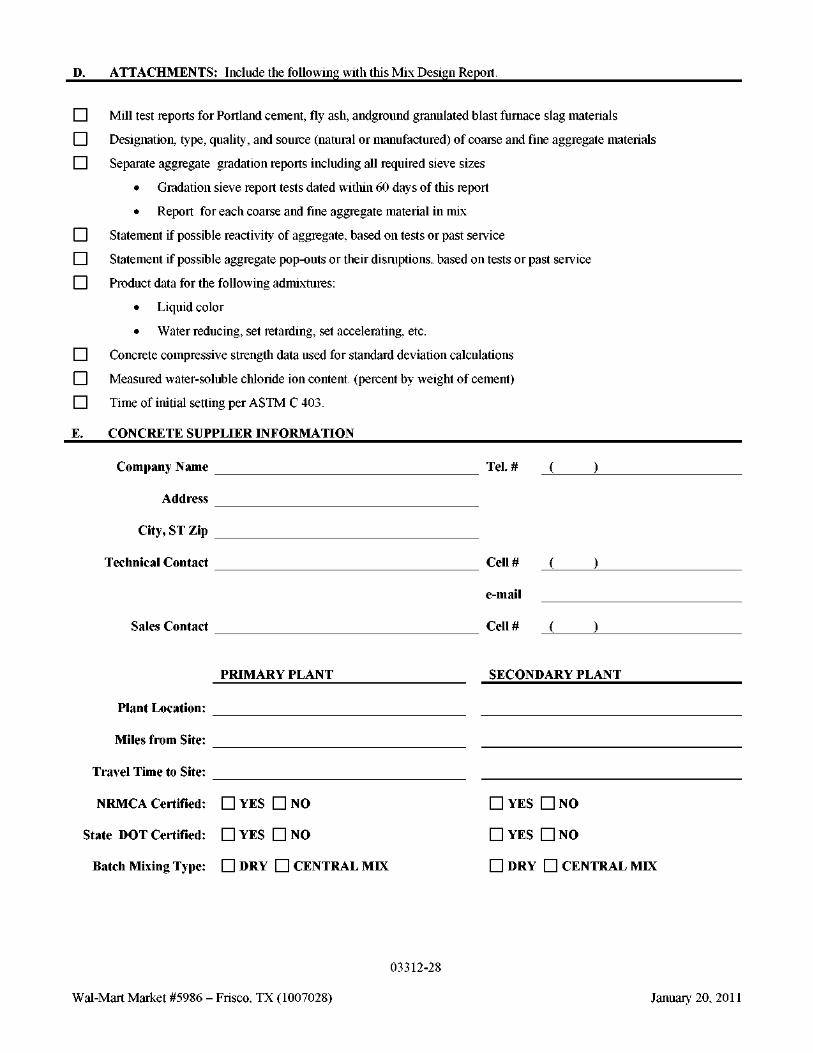
D. ATTACHMENTS: Include the following with this Mix Design Report.
• • •
• • •
• • • E.
Mill test reports for Portland cement, fly ash, andground granulated blast furnace slag materials
Designation, type, quality, and source (natural or manufactured) of coarse and fine aggregate materials
Separate aggregate gradation reports including all required sieve sizes
• Gradation sieve report tests dated within 60 days of this report
• Report for each coarse and fine aggregate material in mix
Statement if possible reactivity of aggregate, based on tests or past service
Statement if possible aggregate pop-outs or their disruptions, based on tests or past service
Product data for the following admixtures:
• Liquid color
• Water reducing, set retarding, set accelerating, etc.
Concrete compressive strength data used for standard deviation calculations
Measured water-soluble chloride ion content. (percent by weight of cement)
Time of initial setting per ASTM C 403.
CONCRETE SUPPLIER INFORMATION
Company Name
Address
City, ST Zip
Technical Contact
Sales Contact
Tel. # ( )
Cell #
Cell #
( )
( )
PRIMARY PLANT
Plant Location:
Miles from Site:
Travel Time to Site:
SECONDARY PLANT
NRMCA Certified: YES NO
State DOT Certified: YES NO
Batch Mixing Type: DRY CENTRAL MIX
YES NO
YES NO
DRY CENTRAL MIX
03312-28
Wal-Mart Market #5986 – Frisco, TX (1007028) January 20, 2011
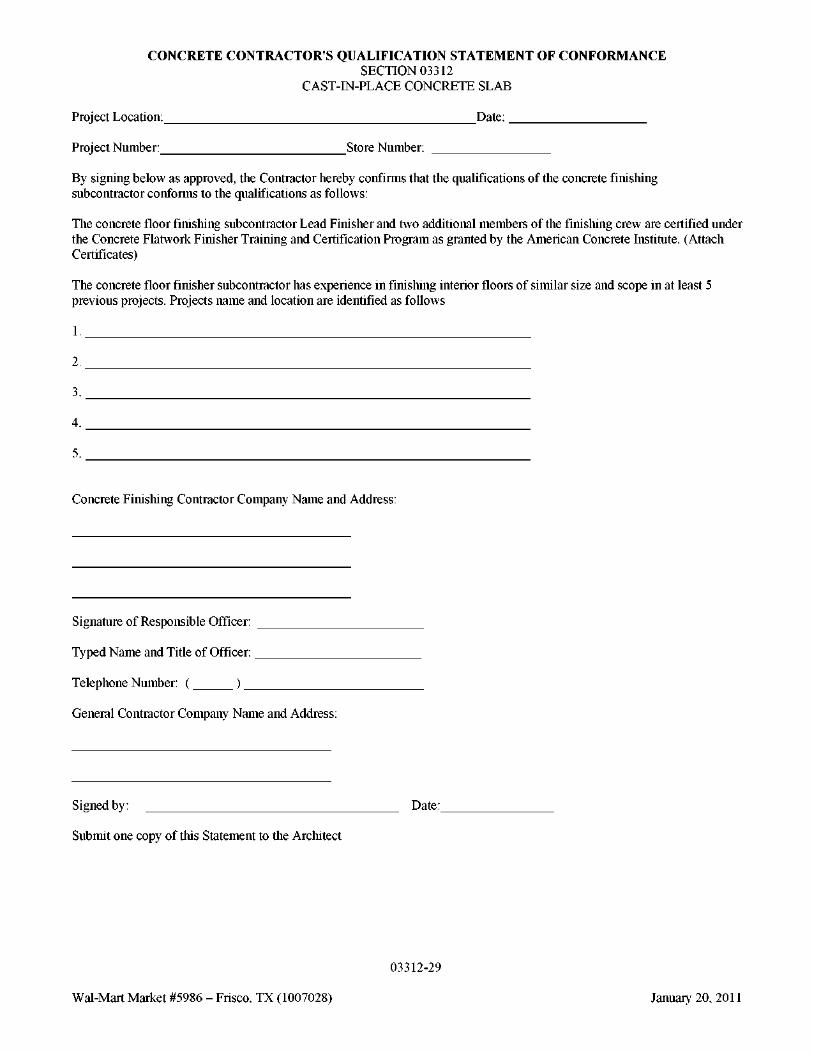
CONCRETE CONTRACTOR'S QUALIFICATION STATEMENT OF CONFORMANCE SECTION 03312
CAST-IN-PLACE CONCRETE SLAB
Project Location: Date:
Project Number: Store Number:
By signing below as approved, the Contractor hereby confirms that the qualifications of the concrete finishing subcontractor conforms to the qualifications as follows:
The concrete floor finishing subcontractor Lead Finisher and two additional members of the finishing crew are certified under the Concrete Flatwork Finisher Training and Certification Program as granted by the American Concrete Institute. (Attach Certificates)
The concrete floor finisher subcontractor has experience in finishing interior floors of similar size and scope in at least 5 previous projects. Projects name and location are identified as follows
1.
2.
3.
4.
5.
Concrete Finishing Contractor Company Name and Address:
Signature of Responsible Officer:
Typed Name and Title of Officer:
Telephone Number: ( )
General Contractor Company Name and Address:
Signed by: Date:
Submit one copy of this Statement to the Architect
03312-29
Wal-Mart Market #5986 – Frisco, TX (1007028) January 20, 2011
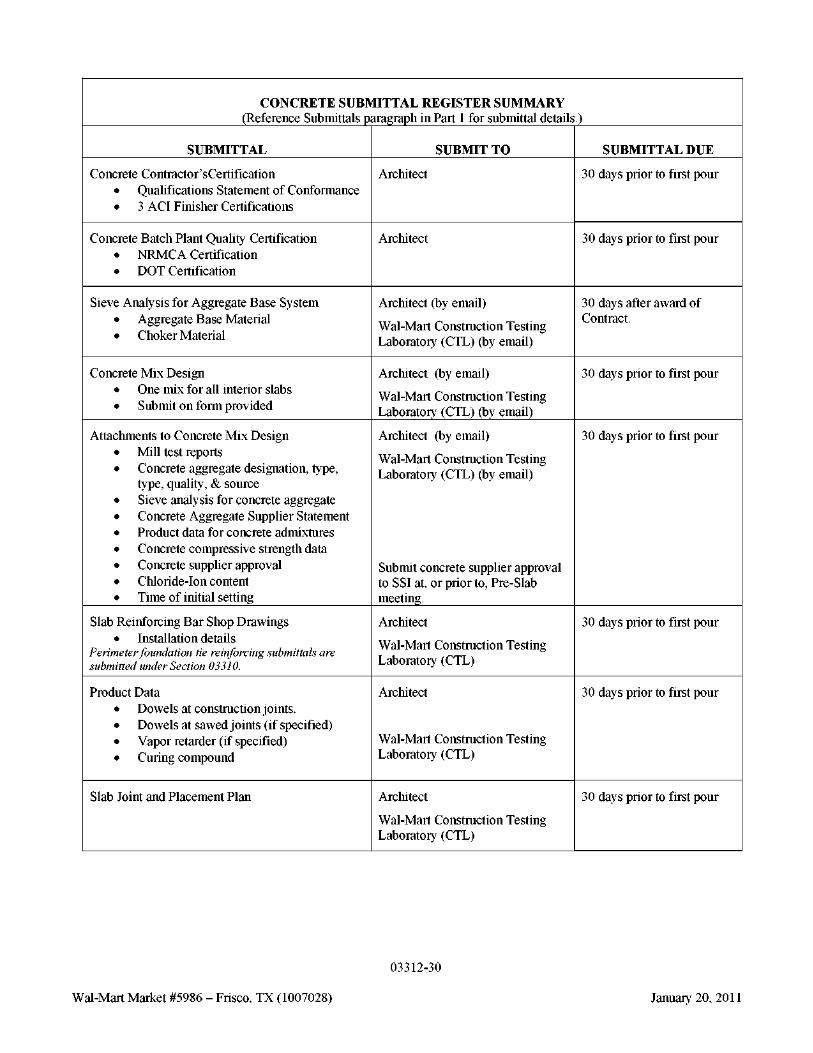
CONCRETE SUBMITTAL REGISTER SUMMARY (Reference Submittals paragraph in Part 1 for submittal details.)
SUBMITTAL
Concrete Contractor’sCertification • Qualifications Statement of Conformance • 3 ACI Finisher Certifications
Concrete Batch Plant Quality Certification • NRMCA Certification • DOT Certification
Sieve Analysis for Aggregate Base System • Aggregate Base Material • Choker Material
Concrete Mix Design • One mix for all interior slabs • Submit on form provided
Attachments to Concrete Mix Design • Mill test reports • Concrete aggregate designation, type,
type, quality, & source • Sieve analysis for concrete aggregate • Concrete Aggregate Supplier Statement • Product data for concrete admixtures • Concrete compressive strength data • Concrete supplier approval • Chloride-Ion content • Time of initial setting
Slab Reinforcing Bar Shop Drawings • Installation details
Perimeter foundation tie reinforcing submittals are submitted under Section 03310.
Product Data • Dowels at construction joints. • Dowels at sawed joints (if specified) • Vapor retarder (if specified) • Curing compound
Slab Joint and Placement Plan
SUBMIT TO
Architect
Architect
Architect (by email)
Wal-Mart Construction Testing Laboratory (CTL) (by email)
Architect (by email)
Wal-Mart Construction Testing Laboratory (CTL) (by email)
Architect (by email)
Wal-Mart Construction Testing Laboratory (CTL) (by email)
Submit concrete supplier approval to SSI at, or prior to, Pre-Slab meeting.
Architect
Wal-Mart Construction Testing Laboratory (CTL)
Architect
Wal-Mart Construction Testing Laboratory (CTL)
Architect
Wal-Mart Construction Testing Laboratory (CTL)
SUBMITTAL DUE
30 days prior to first pour
30 days prior to first pour
30 days after award of Contract.
30 days prior to first pour
30 days prior to first pour
30 days prior to first pour
30 days prior to first pour
30 days prior to first pour
03312-30
Wal-Mart Market #5986 – Frisco, TX (1007028) January 20, 2011
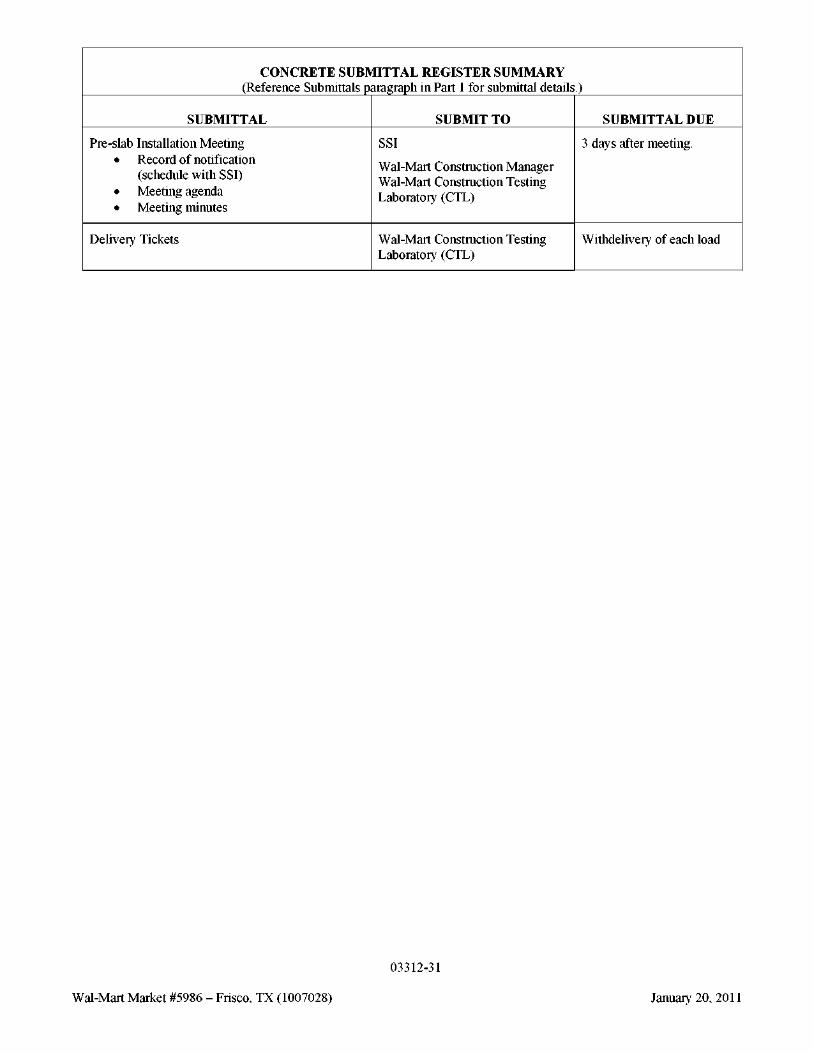
CONCRETE SUBMITTAL REGISTER SUMMARY (Reference Submittals paragraph in Part 1 for submittal details.)
SUBMITTAL
Pre-slab Installation Meeting • Record of notification
(schedule with SSI) • Meeting agenda • Meeting minutes
Delivery Tickets
SUBMIT TO
SSI
Wal-Mart Construction Manager Wal-Mart Construction Testing Laboratory (CTL)
Wal-Mart Construction Testing Laboratory (CTL)
SUBMITTAL DUE
3 days after meeting.
Withdelivery of each load
03312-31
Wal-Mart Market #5986 – Frisco, TX (1007028) January 20, 2011
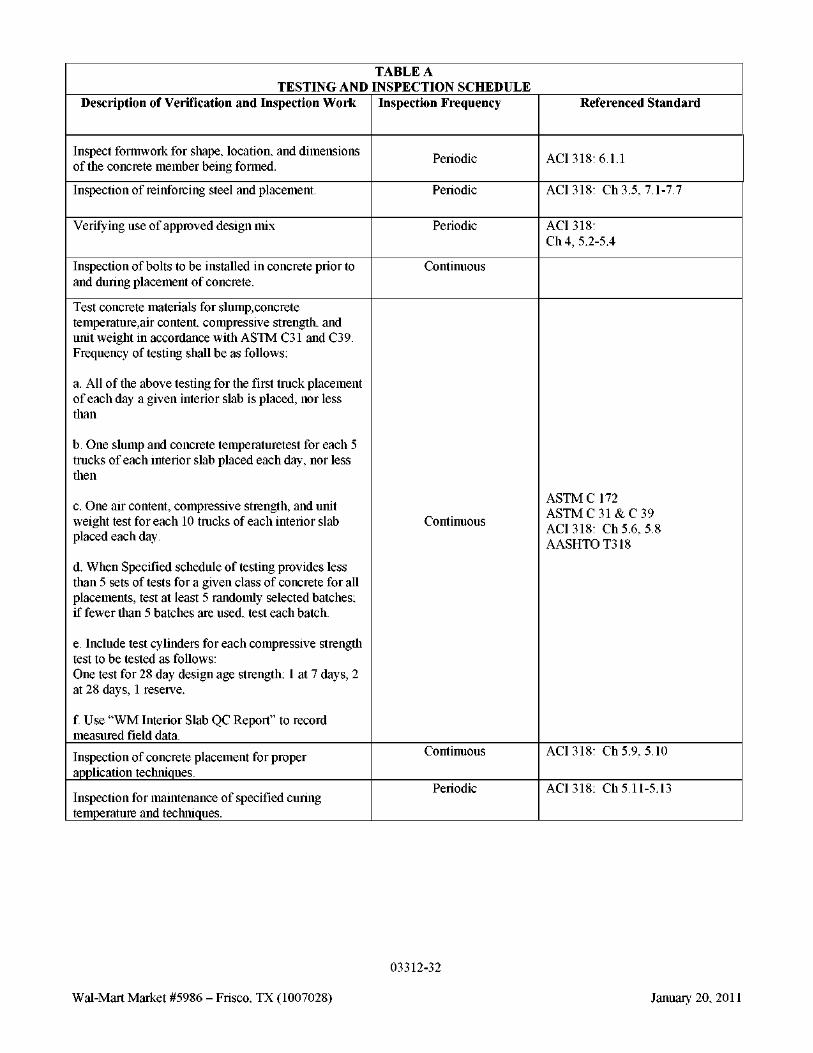
TABLE A TESTING AND INSPECTION SCHEDULE
Description of Verification and Inspection Work
Inspect formwork for shape, location, and dimensions of the concrete member being formed.
Inspection of reinforcing steel and placement.
Verifying use of approved design mix
Inspection of bolts to be installed in concrete prior to and during placement of concrete.
Test concrete materials for slump,concrete temperature,air content, compressive strength, and unit weight in accordance with ASTM C31 and C39. Frequency of testing shall be as follows:
a. All of the above testing for the first truck placement of each day a given interior slab is placed, nor less than
b. One slump and concrete temperaturetest for each 5 trucks of each interior slab placed each day, nor less then
c. One air content, compressive strength, and unit weight test for each 10 trucks of each interior slab placed each day.
d. When Specified schedule of testing provides less than 5 sets of tests for a given class of concrete for all placements, test at least 5 randomly selected batches; if fewer than 5 batches are used, test each batch.
e. Include test cylinders for each compressive strength test to be tested as follows: One test for 28 day design age strength: 1 at 7 days, 2 at 28 days, 1 reserve.
f. Use “WM Interior Slab QC Report” to record measured field data.
Inspection of concrete placement for proper application techniques.
Inspection for maintenance of specified curing temperature and techniques.
Inspection Frequency
Periodic
Periodic
Periodic
Continuous
Continuous
Continuous
Periodic
Referenced Standard
ACI 318: 6.1.1
ACI 318: Ch 3.5, 7.1-7.7
ACI 318: Ch 4, 5.2-5.4
ASTM C 172 ASTM C 31 & C 39 ACI 318: Ch 5.6, 5.8 AASHTO T318
ACI 318: Ch 5.9, 5.10
ACI 318: Ch 5.11-5.13
03312-32
Wal-Mart Market #5986 – Frisco, TX (1007028) January 20, 2011

03312-33
Wal-Mart Market #5986 – Frisco, TX (1007028) January 20, 2011
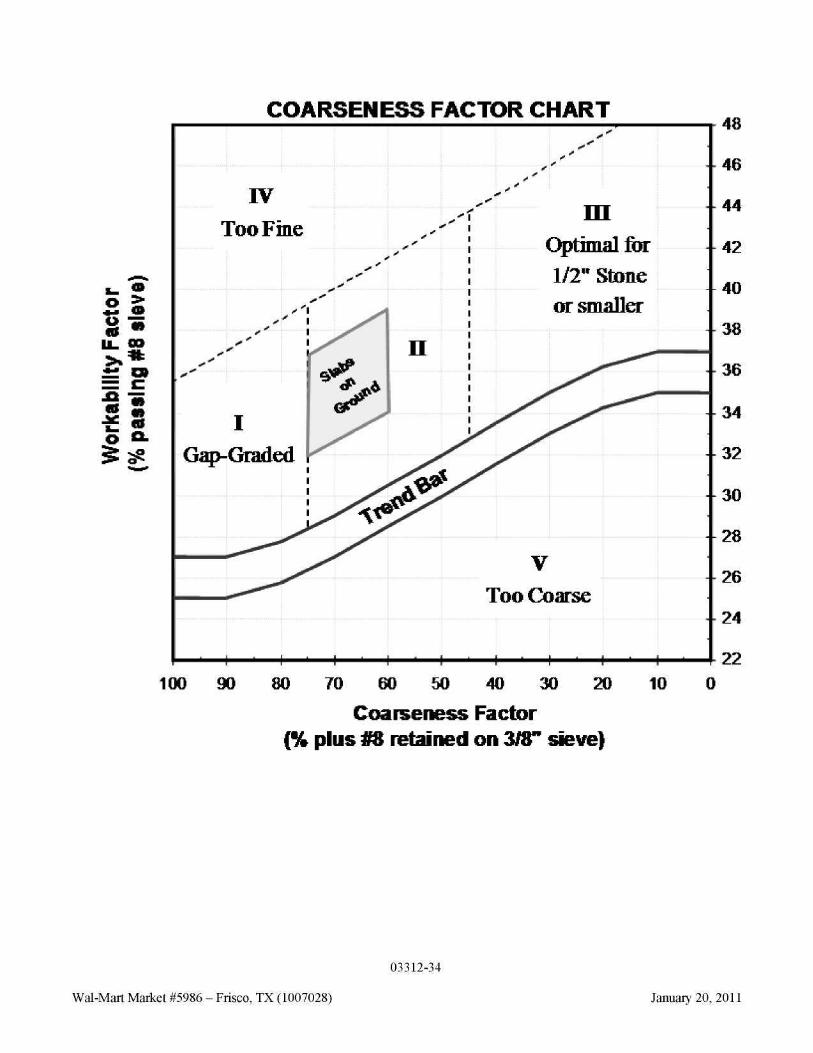
03312-34
Wal-Mart Market #5986 – Frisco, TX (1007028) January 20, 2011
UniSpec II 092410
SECTION 03362 (03 3562)–BURNISHEDCONCRETE FLOOR FINISHES
PART 1 - GENERAL
1.1 SUMMARY
A. Section Includes: Application of densifierand burnishing of concrete floor slabs.
B. Related Requirements:
1. Section 03312- Cast-In-Place Concrete Slabs (Interior).Concrete for interior slabs on grade.
1.2 REFERENCES
A. The publications listed below form a part of this specification to the extent referenced. Publications are referenced within the text by the basic designation only.
B. ASTM International (ASTM): 1. ASTM C1028 - Standard Test Method for Determining the Static Coefficient of Friction (SCOF) of
Ceramic Tile and Other Like Surfaces by the Horizontal Dynamometer Pull-Meter Method.
1.3 SUBMITTALS
A. Section 01330 - Submittal Procedures:Procedures for Submittals.
B. Submit to Architect specified in Section 01330 and to the Wal-Mart ConstructionTesting Laboratoryspecified in Section 01458.
C. Product Data: 1. Densifier: Brand name, chemical composition, installation directions and certificates of compliance with
required standards. Submit 30 days prior to first concrete placement. 2. Burnishing Pads: Submit product data for burnishing pads prior to beginning burnishing operations to
verify pad texture.
D. Applicator Qualifications: 1. Provide documentation showing densifierapplicator is certified by the densifier manufacturer. 2. Letter shall be from the product manufacturer stating that the installer is qualified and certified by the
manufacturer to install the material to be used, citing the specific project and location. 3. Provide list of a minimum of 5 projects performed within the last 3 years of similar type, size and
complexity as this contract. 4. Submit 30 days prior to first concrete placement.
E. Provide name of technically qualified densifier manufacturer’s field representative.
1.4 QUALITY ASSURANCE
A. A technically qualified manufacturer’s field representative of the densifier product shall be onsite during the initial application of the densifier and occasional observations during remainder of the applications.
B. The densifier representative shall ensure that the correct amount of densifier is onsite and in numbered containers
prior to commencement of work.
1.5 PRODUCT DELIVERY, STORAGE AND HANDLING
A. Dispense densifier material from factory numbered and sealed drums. Maintain record of drum numbers. 03362-1
Wal-Mart Market #5986 – Frisco, TX (1007028) January 20, 2011
1.6 ENVIRONMENTAL REQUIREMENTS
A. Limit and control damage from excessive dust caused by burnishing.
B. Limit and control damage from moisture.Remove standing moisture from floor after densifier application.
1.7 WARRANTY
A. Provide manufacturer’s standard warranty for replacement of defective densifier products.
PART 2 - PRODUCTS
2.1 MANUFACTURERS
A. Subject to compliance with project requirements, provide products as manufactured by the following to the extent as specified hereinafter for the specific product: 1. 3M (888) 364-3577 www.3m.com/ 2. Concrete Polishing Solutions (CPS) (877) 472-8200 www.go2cps.com/ 3. Convergent Concrete Technologies,Orem, UT (866) 375-2280 www.convergentconcrete.com/ 4. Stonekor LLC (800) 633-0519 http://stonekor.com 5. ETC of Henderson, Inc (800) 334-6651 www.etcpads.com/ 6. HTC (877) 482-8700 www.htc-america.com/ 7. Norton (Saint-Gobain Abrasives) www.nortonprocleaning.com/ 8. Pioneer Eclipse (800) 367-3550 www.pioneer-eclipse.com 9. Prosoco, Lawrence, KS, (866) 363-4567www.prosoco.com 10. SealSource Int., Orem, Utah, (800) 305-9144 www.sealsource.com/ 11. VIC International Corporation (800) 423-1634 www.vicintl.com/
2.2 DENSIFIER PRODUCTS
A. Pre-Densifier Floor Cleaner: As recommended by densifier manufacturer.
B. Densifier: Concrete lithium based chemical densifier specifically for concrete surface treatment which reacts chemically to the concrete surface forming a clear, dense, durable, hard, abrasion-resistant surface. Product shall be a colorless, odorless, water-based solution that is less than 50 VOC. 1. Prentra-Sil (NL) by Convergent 2. Consolideck LS by Prosoco 3. SS Harden X by SealSource.
C. Sprayer: Manufacturer approved high volume, low pressure sprayer and sprayer tip.
2.3 POLISHING PRODUCTS
A. Burnishing Pads:Pads as follows or equivalent as required to produce specified results: 1. Diamond Impregnated Pads:
a. Twister Diamond Cleaning System Pads by HTC. b. Diamond Polishing Pads by Norton. c. SpinFlex Diamond Polishing Pads by CPS. d. Scotch-Brite Diamond Floor Pads Plus by 3M. e. Optima pad system by VIC.
2. Hogs Hair Pads: a. Niagra Super Hogs Hair Floor Pad 3700N by 3M. b. Ultra Grizzly Bear by Norton. c. Consolideck Heat Pad by Prosoco.
2.4 EQUIPMENT
03362-2
Wal-Mart Market #5986 – Frisco, TX (1007028) January 20, 2011
A. Scrubber Machines Equipment used for cleaning operations shall be Clark Encore Max38 or L38 with a head pressure of 150 lbs. or similar equipment as required to produce the specified results.
B. Burnishing Machine: High speed propane burnisher, with a min. 27 inch head generating pad speeds of 1,500 RPM or
higher as verified with tachometer.
PART 3 - EXECUTION
3.1 GENERAL CLEANING AND BURNISHING REQUIREMENTS
A. Coordinate with joint filling operations. Do not perform wet cleaning within 72 hrs prior to joint filling.
B. Do not use stain or scuff removing agents such as “crete-strip”.
C. Clean floors as specified hereinafter prior to application of densifier.
D. Burnish floors as specified hereinafter after application of densifier.
E. Utilize riding machines to the maximum extent practical to achieve optimum efficiency.
F. Final finish sheen shall be equivalent to that as accepted on the Floor Test Slab as specified in Section 03312 and as specified hereinafter.
3.2 CLEANING
A. Use sweeping compound to control airborne dust. Scrape floor to remove remaining saw cut residue and paint droppings.Remove paint droppings with soft, damp cloth and solvent stripper.Do not use stripper with an acidic pH.
B. Treat oil spots with oil emulsifier and oil absorber materials.
C. Double scrub floor with scrubber machine and appropriate brushes or pads and pH compatible detergent.
3.3 DENSIFIERAPPLICATION
A. Area to be Treated: Apply densifier to all interior concrete floors except floors with color textured concrete finishesand floors to receive resilient flooring.
B. Examination and Preparation: 1. Examine surfaces receiving densifier. Verify that surfaces conform to product manufacturer's requirements
for substrate conditions. 2. Vacuum and clean saw cut joints and surrounding area so that no dust remains to react with concrete finish
material. 3. Remove remnant of temporary film forming curing compound prior to application of densifier. Remove
compound by cleaning and scrubbing in accordance with manufacturer’s instructions. 4. Prior to application, scrub floor with pre-densifier floor cleaner to remove latent salts. Do not proceed until
unsatisfactory conditions have been corrected. 5. Beginning of application indicates acceptance of existing conditions.
C. Application: 1. Application shall be performed by certified applicator in accordance with manufacturers published
instructions. 2. Schedule to begin 7 days after floor slab placement. 3. Employ methods to ensure concrete surface is not damaged during application, including discoloration. 4. Apply densifier finish at the rate of 500 SF per gallon.
03362-3
Wal-Mart Market #5986 – Frisco, TX (1007028) January 20, 2011
5. Apply with low pressure sprayer with enough coverage to keep concrete surface wet for minimum 20 minute period.
6. Apply second coat of densifier 2 weeks prior to Owner Possesion, apply over surfaces to which densifier has been applied.
7. Apply densifier finish at the rate of 1000 SF per gallon. 8. Apply with low pressure sprayer with enough coverage to keep concrete surface wet for minimum 20
minute period.
3.4 BURNISHING PROCEDURE
A. Allow second coat of densifier to dry.
B. Burnish at a slow movement pace using burnishing machine with 800 grit diamond impregnated or hogs hair burnishing pads.
C. Continueburnishing operations until the specified gloss is attained. Achieve specified gloss not later than twoweeks
prior to Owner Possession and maintain specified gloss levels until Owner Possession.
D. Provide final burnishing prior to Owner Possession to eliminate any scratches resulting from construction operations.
3.5 FINISH REQUIREMENTS
A. Gloss: Final surface gloss shall be a Specified Overall Gloss Value (SOGV) of not less than 40 and a Minimum Local Gloss Value (MLGV) of 30 as measured using a Horiba IG-320 Gloss Checker.
B. Slip Resistance: Measured static coefficient of friction (SCOF) shall be not less than 0.50 as measured in accordance
with ASTM C 1028, at time of Owner Possession.
3.6 FLOOR PROTECTION
A. Protect finished floor from construction traffic and weather until time of Owner Possession.
B. Prohibit acids and acidic detergents to come in contact with slab.
3.7 PRODUCT DISPOSAL
A. Upon completion of densifierapplication, dispose of excess material as required by local agency having jurisdiction.
B. Certified applicator shall remove densifier product containers from job site immediately upon completion of treatment.
3.8 QUALITY CONTROLTESTING (BY OWNER)
A. Testing will be performed by Wal-Mart’s Construction Testing Laboratory (CTL) at no expense to the Contractor. A test report of all measurements and a plan and table of the measurements taken will be prepared by the CTLfor submission.
B. Gloss measurements will be taken at 2 weeks prior to Owner Possession and at time of Possession. Contractor shall notify CTL when floors are ready for testing.
C. Measurement and reporting of SOGV and MLGV by CTL shall be as follows: 1. Collect a minimum of three samples per each bay in random, evenly distributed locations. 2. Record measurement locations on copy of sheet S1.1. 3. The average of all samples collected in each bay shall meet or exceed the SOGV.
03362-4
Wal-Mart Market #5986 – Frisco, TX (1007028) January 20, 2011
a. If the average of samples collected do not meet the SOGV, collect an additional 3 samples in each bay for each deficient result unless the individual samples fail to meet the MLGV or the average of all collected samples in each bay fail to meet the SOGV.
b. If samples fail to meet the SOGV, Contractor shall continue burnishing operations until the SOGV is achieved.
4. No single measured value shall be less than MLGV. a. If one or more samples fall below the MLGV, continue burnishing operations until all samples
comply with Specified MLGV and SOGV. 5. Collect and certify final gloss measurements.
D. Slip resistance measurements will be taken at 2 weeks prior to Owner Possession and at time of Possession. Contractor shall notify CTL when floors are ready for testing. Measurement and reporting shall be in accordance with ASTM C1028.
END OF SECTION
03362-5
Wal-Mart Market #5986 – Frisco, TX (1007028) January 20, 2011
UniSpec II 092410
SECTION 03363 (03 3563) - BURNISHED CONCRETE FLOOR FINISHES (EXISTING FLOORS)(SM)
PART 1 - GENERAL
1.1 SUMMARY
A. Section Includes: 1. Removal of existing floor finishes (sealers, coatings, tile, etc.) and underlayments,as necessary. 2. Grinding of slab surface to receive densifier treatment. 3. Application of densifier. 4. Progressive burnishing of slab surface to achieve required gloss values.
B. Related Requirements: 1. Section 03312 - Cast in Place Concrete Slabs (Interior): Concrete for new floors and control joint filler. 2. Section 03930 - Concrete Rehabilitation.
1.2 ADMINISTRATIVE REQUIREMENTS
A. Pre-installation Meeting: 1. Schedule Pre-installation Meeting to be conducted a minimum of one day prior to first burnishing of
existing concrete slab and after installation of mockup and required submittals have been approved. 2. Obtain meeting agenda from Wal-Mart Concrete Consultant Structural Services, Inc., (214) 522-6438. 3. Notify required attendees in writing of scheduled time and meeting location a minimum of 14 days in
advance of Pre-installation Meeting. Include copy of agenda with invitation. 4. Attendees shall include personnel directly involved in overseeing the work, including but not limited to the
following: a. Wal-Mart Construction Manager. b. Wal-Mart Store Manager. c. Wal-Mart Concrete Consultant. d. General Contractor.
1) Project Manager. 2) Superintendent (overseeing burnishing work).
e. Concrete Burnishing Subcontractor. 1) Project Manager. 2) Foreman (representative that will be present during all phases of work).
f. Joint Filler Replacement and Slab Repair Subcontractor (if separate). g. Wal-Mart Construction Testing Laboratory representative. h. Manufacturers’ representatives for products specified in this Section.
5. Convene meeting only when all required parties are in attendance. 6. Review the following:
a. Expectations of finished work specified. b. Scheduling and phasing of work. c. Coordination with other work and personnel. d. Environmental requirements (store working conditions). e. Existing joint filler replacement. f. Repair of existing slab defects. g. Grinding and burnishing procedures, including application of liquid densifier system. h. Field quality control requirements. i. Slab protection after completion of work. j . Protection of adjacent surfaces. k. Surface preparation. l. Repair of defective work. m. Cleaning. n. Application of floor finish.
7. Record and distribute minutes to all parties in attendance within 2 days of the meeting via e-mail in .pdf
03363-1
Wal-Mart Market #5986 – Frisco, TX (1007028) January 20, 2011
format. Completed pre-installation meeting agenda is acceptable.
B. Coordination, Sequencing and Scheduling: 1.
2.
3.
Floor Burnishing Plan Schedule: Provide detailed written schedule for sequence of work to ensure uninterrupted progress of Owner's on-site operations. Coordinate project phasing and relocation of racking, shelving, or merchandise to ensure minimum interference with other aspects of the Work. This may require Applicator to mobilize multiple times on a given project. Conduct grinding and burnishing work in manner to minimize disruption of Owner's normal operations. Work shall be performed after normal hours of operation and shall be completed (including cleanup) each day prior to start of normal store operations.
1.3 SUBMITTALS
A. Comply with the requirements of Section 01330.
B. Product Data: 1. Manufacturer and model of equipment to be used, including all types of grinding heads, saws, and dust
extraction systems for burnishing, joint filler replacement, and slab defect repairs. 2. Reactive surface densifying system including stain guard treatment.
C. Applicator Qualifications: 1. At least 5 projects of similar type, size, and complexity to Project performed by Applicator within last three
years. Submit project names, addresses, contacts, and phone numbers for each project. 2. Manufacturer’s certification, identifying the individuals that are currently certified applicators of the system
and are familiar with proper procedures and installation methods as required by the manufacturer for: a. Surface densifier system. b. Joint filler replacement materials (specified in Section 03930). c. Surface defect repair materials (specified in Section 03930).
3. At least one installer for work requiring certification, possessing manufacturer’s documents that state this individual has been specifically trained and certified, shall be present during all installations of such work.
D. Floor Burnishing Plan: 1. Prior to commencement of work, submitFloor BurnishingPlan (developed from Sheet A-1 “Floor Plan”)
including: a. Size, locationand anticipated progression of individual nightly work areas. b. Location of cracks, spalls and other surface defects requiring repairs. c. Electrical supply locations, including exterior access if generators are utilized.
2. Use plan to document gloss value measurements, as reported weekly from CTL. 3. Floor Burnishing Plan shall be reviewed and accepted by Wal-Mart Construction Manager and Store
Manager prior to start of work.
E. Test Results: 1. Submit final floor gloss and slip resistance test reports (prepared by Wal-Mart’s Construction Testing
Laboratory (CTL)) to Wal-Mart Concrete Consultant and Wal-Mart Construction Manager.
1.4 CLOSEOUT SUBMITTALS
A. Comply with the requirements of Section 01770.
B. Maintenance Data: Submit 7 sets of maintenance data as follows: 1. Manufacturer’s technical product data and literature. 2. Storage and handling requirements and recommendations. 3. Manufacturer’s safety data sheets and related safety requirements. 4. As-built Floor Burnishing Plan. 5. Methods of maintaining burnished concrete, including a listing of approved cleaning and stain removal
03363-2
Wal-Mart Market #5986 – Frisco, TX (1007028) January 20, 2011
products and procedures. 6. Manufacturer’s recommended maintenance schedule. 7. Precautions for cleaning materials and methods that could be detrimental to burnished concrete.
1.5 QUALITY ASSURANCE
A. Mockup: Prior to commencement of work, prepare mockup for evaluation of surface preparation techniques and application workmanship. 1. Designate250 square feetfor mock up of system specified, using same materials, tools, equipment, and
procedures intended for actual surface preparation in Sales floor at location determined by the Wal-Mart Construction Manager.Include properly prepared slab joints, surface spalls and crack repairs if available. Include slab edges adjoining existing partitions/walls.
2. Notify Wal-Mart Construction Manager minimum 7 days prior to date and time when mockups will be performed and completed.
3. Choose mockup location that demonstrates proposed range of aesthetic effects and workmanship. 4. Obtain Wal-Mart Construction Manager’s approval of mockups before proceeding with work. 5. Maintain mockups during construction in undisturbed condition as a standard for judging completed work. 6. Approved mockups installed in sales areas may become part of the completed work if acceptable to Wal-
Mart Construction Manager.
1.6 DELIVERY, STORAGE, AND HANDLING
A. Transport, handle, store, and protect products in compliance with the requirements of Section 01600 and manufacturer's recommendations.
B. Deliver materials to site in original, factory sealed, unopened, new containers (drums) bearing manufacturer’s name and label intact and legible, with the following information: 1. Name or title of material. 2. Manufacturer’s standard container (drum) numbers. 3. Application instructions.
C. Storage: 1. Store materials in protected and well-ventilated area at temperatures between 40 and 90 degrees F unless
otherwise required by manufacturer. 2. Keep containers sealed until ready for use. 3. Do not use materials beyond manufacturer’s shelf life limits.
D. Handling:Protect materials during handling and application to prevent damage or contamination. 1. Dispense penetrating liquid densifier only from factory sealed and numbered containers (drums). 2. Maintain record of container (drum) numbers received and used during floor treatment.
1.7 ENVIRONMENTAL REQUIREMENTS
A. Limit and control damage from excessive dust and moisture caused by surface preparation and burnishing.
B. Comply with manufacturer's written instructions for substrate temperature and moisture content, ambient temperature and humidity, ventilation and other conditions affecting product performance.
C. Replaced concrete shall be cured a minimum of 28 days or until such point equipment can be put on slab without displacing aggregate.
D. Air and Surface Temperatures: Prepare surfaces and apply and cure coatings within air and surface temperature range in accordance with densifier manufacturer’s instructions.
E. Comply with manufacturer’s written instructions for substrate temperature and moisture content, ambient temperature and humidity, ventilation, and other conditions affecting densifier performance.
03363-3
Wal-Mart Market #5986 – Frisco, TX (1007028) January 20, 2011
1.8 WARRANTY
A. Provide manufacturer’s standard warranty for replacement of defective densifier products.
PART 2 - PRODUCTS
2.1 REGULATORY REQUIREMENTS
A. Accessibility Requirements: Comply with applicable requirements of the Americans with Disabilities Act Accessibility Guidelines (ADAAGs) for Buildings and Facilities; Final Guidelines, revisions, and updates for static coefficient of friction for walkway surfaces.
B. Environmental Requirements: Comply with current Federal and local toxicity and air quality regulations and with Federal requirements on content of lead, mercury, and other heavy metals. Do not use solvents in floor polish products that contribute to air pollution.
2.2 MANUFACTURERS
A. Subject to compliance with project requirements, provide products and equipment by the following: 1. 3M (888) 364-3577 www.3m.com 2. Concrete Polishing Solutions (877) 472-8200 www.go2cps.com 3. Convergent Concrete Technologies (866) 375-2280 www.convergentconcrete.com 4. Stonekor LLC (800) 633-0519 http://stonekor.com 5. HTC (877) 482-8700 www.htc-america.com 6. Innovatech (800) 267-6682 www.innovatechproducts.com 7. Norton Abrasives (800) 331-3604 www.nortonprocleaning.com 8. Pioneer Eclipse (800) 367-3550 www.pioneer-eclipse.com 9. Prosoco (800) 255-4255 www.prosoco.com 10. Pullman-Ermator (800) 232-2635 www.pullman-ermator.com 11. Rubbermaid Commercial Products (540) 667-8700. 12. SASE Company, Inc. (800) 522-2606 www.sasecompany.com 13. Seal Source (800) 305-9144 www.sealsource.com 14. Substrate Technology, Inc. (815) 941-4800 www.substratetechnology.com 15. VIC International Corporation (800) 423-1634 www.vicintl.com 16. VMC Technical Assistance Corp (800) 460-4862 www.vmctac.com
B. Substitutions: Comply with the requirements of Section 01600.
2.3 PRODUCTS
A. Joint Filler:Polyurea joint filler as specified in Section 03930.
B. Densifier:Clear,lithium-silicate based liquid. 1. Pentra-Sil (NL) by Convergent Concrete Technologies. 2. Consolideck LS by Prosoco. 3. SS Harden X by SealSource.
C. Breathable Surface Protective Material. Provide one of the following products: 1. EZ-Cover by McTech Group, Loganville, GA (866) 913-8363. 2. Ram Board byRam Board, Burbank, CA (818) 848-0400.
PART 3 - EXECUTION
3.1 EXAMINATION
A. Examine concrete slab in the presence of certified applicator and Wal-Mart Construction Manager.Identify and note joint filler replacement and repairs required for existing slab defects on as-built Floor Burnishing Plan.
03363-4
Wal-Mart Market #5986 – Frisco, TX (1007028) January 20, 2011
3.2 PREPARATION
A. Close areas to traffic during and after floor finish application for time period recommended by product manufacturer.
B. Cover and protect merchandise and racking to prevent damage or contamination of stored products. Provide dust drapes as required to protect merchandise from dust or debris.
C. Clean Substrate: Remove surface contaminants to ensure penetration of reactive surface densifier. No hazardous, flammable, toxic or solvent based cleaning materials are permitted. 1. Remove dust and loose material by brushing, sweeping, vacuuming, and blowing with high pressure air. 2. Remove all curing or sealing compounds, coatings (including epoxy resins), and wax by mechanical means
that will not expose concrete slab coarse aggregate. 3. Remove deep-set oil and grease stains. 4. Remove paint residue with solvent/stripper provided the stripper does not have an acidic pH. 5. Remove grease and general soiling with cleaner/degreaser diluted as recommended by manufacturer in an
auto scrubber. 6. Remove mildew by scrubbing with solution of trisodium phosphate and bleach. Rinse with clean water. 7. Remove tire marks and residue with recommended non-acidic cleaning agents.
a. Comply with manufacturer’s detailed instructions prior to mixing and removal. b. Dilute cleaning agent in recommended proportions to avoid etching concrete and opening of con
crete pores. 8. Power scrub and thoroughly rinse floor surface to remove soap residue and contaminants. 9. Squeegee dry. 10. No hazardous, flammable, toxic or solvent based cleaning materials are permitted.
D. Removeexisting joint filler and replacewith specified filler at slab joints within the limits of required slab burnish-ing,in accordance with Section 03930.
E. Grind protrusions flush with surface.
F. Ensure surfaces are clean, dry, and free of oil, grease, dirt, dust, and contaminants.
G. Protect surrounding and adjacent surfaces in accordance with floor finish manufacturer’s written recommendations. Do not apply tape to floor. If floor is damaged by tape installation or removal, repair damage to satisfaction of Wal-Mart Construction Manager.
H. Repair slab defects within the limits of required slab burnishingin accordance with Section 03930, including previously repaired defects that do not conform to 03930 requirements.
3.3 INSTALLATION/APPLICATION EQUIPMENT
A. Furnish minimum three grinding/burnishing machines in full operating condition during the duration of work. 1. Planetary, counter rotating variable speed floor grinder (3 or 4 head). 2. Minimum 600 pounds of downward pressure.
B. Dust extraction system and pre-separator for grinding and burnishing. 1. Heavy-duty industrial HEPA filtration vacuum system, suitable for extracting and containing large
quantities of fine concrete dust (minimum 350CFM air flow) in conjunction with manufacturer recommended pre-separator.
2. Provide one of the following: a. 86D by HTC. b. T8600 by Pullman-Ermator. c. Bull 1250 by SASE Company, Inc. d. Approved equal.
C. Hand grinder with dust extraction attachment and pads for edge grinding/burnishing.
03363-5
Wal-Mart Market #5986 – Frisco, TX (1007028) January 20, 2011

D. High speed propane burnisher: 1. Minimum 27 inch head generating pad speeds of 1,500 RPM or higher, as verified with tachometer.
E. Diamond Grinding Heads: 1. Use diamond grinding heads from approved manufacturers only. 2. Grinding Diamonds (or approved equivalents):
a. Metal Bonded Diamond Grit Sizes 40, 80, and 150. b. Resin Bonded, Phenolic Diamond Grit Sizes: 100, 200, 400, 800 and 1,500.
3. Grinding/Burnishing Pads for Edges (or approved equivalents): a. Grit Size: 60, 100, 120, 200, 400, 800, 1500, and 3000.
F. Diamond Impregnated Pads (800 and 1500 grit) 1. Twister Diamond Cleaning System Pads by HTC. 2. Diamond Polishing Pads by Norton. 3. SpinFlex Diamond Polishing Pads by CPS. 4. Scotch-Brite Diamond Floor Pads Plus by 3M. 5. Optima pad system by VIC.
G. Natural Hair Pads: 1. Niagra Super Hogs Hair Floor Pad 3700N by 3M. 2. Ultra Grizzly Bear by Norton. 3. Consolideck Heat Pad by Prosoco.
H. Applicator pad:Minimum 24" Microfiber Wet Room Pad by Rubbermaid.
3.4 SURFACE BURNISHING AND DENSIFIER APPLICATION
A. Application shall be performed by certified applicator in accordance with manufacturers published instructions.
B. Employ methods to ensure concrete surface is not damaged during application, including discoloration.
C. Open slab surface by progressively grindingwith 40, 80, or 150-grit metal-bonded diamond heads. Start with initial grinding grit necessary to produce required gloss values in a surface free of pits and scratches. Do not expose coarse aggregate. 1. Use of more aggressive metal bonded diamond grits for removal of existing surface imperfections, sealers
or coatings shall be approved in writing by the Wal-Mart Construction Manager prior to use. 2. Sequential progression of diamond grinding shall be no more than double the grit value of the previous
diamonds used.
D. Clean slab with wet auto scrubber between grinding passes.
E. Progressively polish slab surface with 100, 200, 400 and 800-gritresin-bonded, phenolic diamond heads. Clean slab with wet auto scrubber between burnishing passes. Use of 100/200 combination diamond heads will be acceptable if required to produce less scratching in the slab surface.
F. Apply reactive surface densifier at 500 sq. ft. per gallon, one time after 100-grit resin diamond pass,according to manufacturer's instructions. Allow to dry 30 to 60 minutes.
G. Progressively diamond grind and polish edges along and around all vertical abutments, including walls, columns, cases, and racking systems as shown on Drawings. Use same progression of grinding/burnishing diamonds as noted above and include application of reactive surface densifier after initial grinding.
H. Apply second of densifier at the rate of 1000 SF per gallon to clean and dry slab surface.
I. Burnish at a slow movement pace using burnishing machine with 800 grit diamond impregnated or hogs hair burnishing pads.
03363-6
Wal-Mart Market #5986 – Frisco, TX (1007028) January 20, 2011
J. Continue burnishing operations until the specified gloss is attained.
3.5 FINAL BURNISHING PROCEDURE
A. Burnish at a slow movement pace using burnishing machine with 800 grit diamond impregnated or hogs hair burnishing pads two weeks prior to Owner Possession.
B. Achieve specified gloss not later than twoweeks prior to Owner Possession and maintain specified gloss levels until Owner Possession.
C. Provide final burnishing prior to Owner Possession to eliminate any scratches resulting from construction operations
3.6 FINISH REQUIREMENTS:
A. Gloss: Final surface gloss shall be a Specified Overall Gloss Value (SOGV) of not less than 50and Minimum Local Gloss Value (MLGV) of 40 as measured using a Horiba IG-320 Gloss Checker.
B. Slip Resistance: Measured static coefficient of friction (SCOF) shall be not less than 0.50 at time of Re-Grand Opening as measured using an American Slip Meter ASM 825 Digital Meter, Regan Scientific Instruments BOT-3000 Tribometer, or approved equal.
3.7 PROTECTION
A. Protect areas to receive polished concrete finish at all times during construction to prevent oils, dirt, metal, excessive water, paint and other potentially damaging materials from affecting the finished concrete surface. Protective measures listed below shall begin immediately after completion of grinding and burnishing. 1. Communicate to Store/Club Manager and subcontractors, vendors, and trades importance of maintaining
slab protection.Each day, inspect equipment used over completed slab surface, to insure: a. Equipment is without leaking hydraulic lines and is diapered to avoid staining. Remove equipment
with hydraulic fluid leaks from store site. b. Equipment is without tire embedment’s (rocks, nails, screws, etc.) that will scratch or pit slab sur
face. c. Operational HEPA vacuum filtration system is attached to grinding and polishing equipment.
2. Do not allow pipe cutting on the finished slab. 3. Do not place steel on the finished slab to avoid rust staining. 4. Prevent contact with acids and acidic detergents. 5. Use breathable surface protective materialsfor high traffic areas. 6. Use breathable drop cloths during all painting. Immediately wipe clean spilled paint.
3.8 FIELD QUALITY CONTROL BY OWNER
A. Testing will be performed by Wal-Mart Construction Testing Laboratory (CTL) at no expense to Contractor. A test report including plan and table of measurements taken shall be prepared by CTL for submittal by Contractor as required in Part 1.
B. Contractor shall notify CTL when slab is ready for testing.
C. CTL shall take gloss measurements once weekly. Gloss shall be considered as a quantitative value that expresses the degree of reflection when light hits the concrete floor surface. Gloss measurements will be taken independent of ambient lighting and within a sealed measurement window located beneath the testing equipment. Measurement and reporting of SOGV and MLGV by CTL shall be as follows: 1. Collect a minimum of five samples per each bay, in random, evenly distributed locations. Record
measurement locations on copy of Floor BurnishingPlan. Discard the high and low values measured in each bay.
2. The average of all samples collected in each bay shall meet SOGV.
03363-7
Wal-Mart Market #5986 – Frisco, TX (1007028) January 20, 2011
a. If the average of samples collected do not meet the SOGV, collect an additional 3 samples in each bay for each deficient result unless the individual samples fail to meet the MLGV or the average of all collected samples in each bay fail to meet the SOGV.
b. If samples fail to meet the SOGV, Contractor shall continue sweeping, scrubbing and burnishing until the SOGV is achieved.
3. No single measured value shall be less than MLGV. a. If one or more samples fall below the MLGV, Contractor shall continue sweeping, scrubbing and
burnishing until all samples comply with Specified MLGV and SOGV. 4. Collect and certify final gloss measurements.
D. Slip Resistance Measurements: 1. CTL shall take slip resistance measurements 2 weeks prior to Re-Grand Opening and at time of Re-Grand
Opening. Contractor shall notify CTL when floors are ready for testing. 2. Four slip resistance measurements will be required within the areas of the two highest and two lowest
SOGV measurements. 3. Correlate single re-measured gloss value at each location in floor slab where slip resistance is measured.
3.9 FIELD QUALITY CONTROL BY CONTRACTOR
A. At the request of the Wal-Mart Construction Manager or Concrete Consultant, Manufacturer’s Technical Representative shall be on Site to oversee the installation of the densifier system, joint filler, or surface defect repairs to verify proper installation of product.
B. A technically qualified manufacturer’s field representative of the densifier product shall be on Site during the initial application of the densifier and occasional observations during remainder of the applications.
C. The densifier representative shall ensure that the correct amount of densifier is onsite and in numbered containers prior to commencement of work.
3.10 CLEANING AND PROTECTION
A. Remove spilled, splashed, or splattered finish material from surfaces.
B. Prohibit traffic until floor has achieved full cure.
END OF SECTION
03363-8
Wal-Mart Market #5986 – Frisco, TX (1007028) January 20, 2011
UniSpec II - SPECIFICATIONS LIBRARY 12290
SECTION 03530 - CONCRETE TOPPING
PART 1 - GENERAL
1.1 SUMMARY
A. Section Includes: 1. Self-leveling concrete topping.
B. Related Sections: 1. Section 02023 - Selective Site Demolition. 2. Section 03300 - Cast-In-Place Concrete. 3. Section 03360 - Concrete Finishes.
1.2 QUALITY ASSURANCE
A. Installer’s Qualifications: Installation of self-leveling topping shall be by an applicator authorized by manufacturer using approved mixing and pumping equipment.
1.3 DELIVERY, STORAGE, AND HANDLING
A. Materials shall be delivered in original, unopened packages, and protected from exposure to the elements. Damaged or deteriorated materials shall be removed from the premises.
1.4 SITE CONDITIONS
A. Environmental Requirements: Before, during and after installation of self-leveling topping, building interior shall be enclosed and maintained at a temperature above 40 degrees F and below 100 degrees F until structure and sub-floor temperature are stabilized.
PART 2 - PRODUCTS
2.1 MATERIALS
A. Self-leveling concrete topping shall be ARDEX SD-T as manufactured by Ardex Inc., 1155 Stoops Ferry Road, Coraopolis (Pittsburgh), PA15108, (412) 604-1200; contact: Dallas, Texas Office, (972) 867-5616.
B. Compound shall be self-leveling, self-drying pumpable, Portland cement based mixture which will produce a water resistant and sealable wear surface.
C. Mix Water: Potable, free of impurities and debris.
D. Concrete primer and sealers shall be approved by manufacturer of topping.
2.2 MIX DESIGN
A. Mix in proportions and methods in strict accordance with product manufacturer’s instructions and recommendations.
PART 3 - EXECUTION
3.1 PREPARATION
03530-1
Wal-Mart Market #5986 – Frisco, TX (1007028) January 20, 2011
A. Steel troweled concrete, concrete sealed with curing compounds, or slick or smooth substrate surfaces shall be shotblast or scarified. Contractor shall clean subfloor to remove dirt, oil, grease and other contaminating factors before application of self-leveling concrete topping.
B. Fill cracks and voids with a quick-setting caulk or patching material.
C. Prime concrete subfloor using manufacturer approved primer. Priming with multiple coat as necessary as determined by the porosity of the concrete.
D. Building shall be enclosed and secured from moisture, dust, and debris prior to application of self-leveling topping.
3.2 APPLICATION
A. Place self-leveling concrete topping from 1/4" to 2" in one operation (without aggregate) or 5" (with aggregate). Spread and float to a smooth surface. Place as continuously as possible until application is complete so that no slurry is placed against self-leveling topping that has obtained its initial set.
B. Provide for continuous ventilation and adequate heat to remove moisture from area until the self-leveling topping is dry. Provide mechanical ventilation if necessary.
3.3 PROTECTION
A. Protect self-leveling topping from traffic until acceptance by Wal-Mart Construction manager.
END OF SECTION
03530-2
Wal-Mart Market #5986 – Frisco, TX (1007028) January 20, 2011
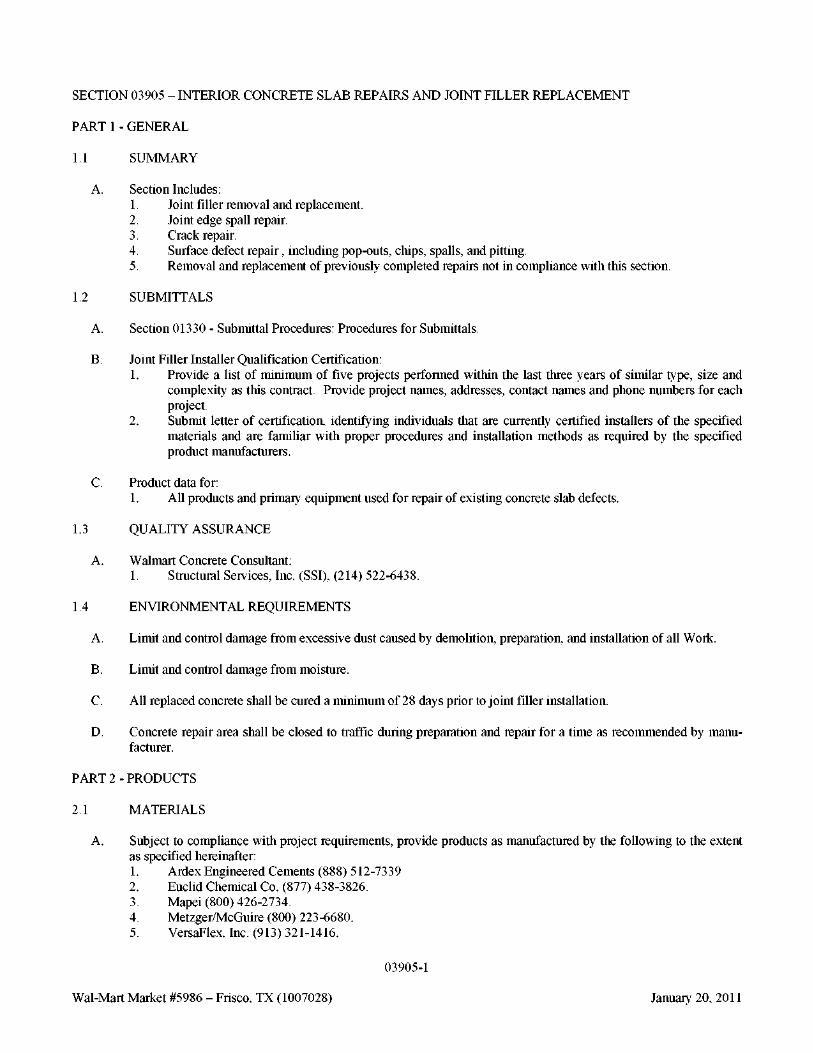
SECTION 03905 – INTERIOR CONCRETE SLAB REPAIRS AND JOINT FILLER REPLACEMENT
PART 1 - GENERAL
1.1 SUMMARY
A. Section Includes: 1. Joint filler removal and replacement. 2. Joint edge spall repair. 3. Crack repair. 4. Surface defect repair , including pop-outs, chips, spalls, and pitting. 5. Removal and replacement of previously completed repairs not in compliance with this section.
1.2 SUBMITTALS
A. Section 01330 - Submittal Procedures: Procedures for Submittals.
B. Joint Filler Installer Qualification Certification: 1. Provide a list of minimum of five projects performed within the last three years of similar type, size and
complexity as this contract. Provide project names, addresses, contact names and phone numbers for each project.
2. Submit letter of certification, identifying individuals that are currently certified installers of the specified materials and are familiar with proper procedures and installation methods as required by the specified product manufacturers.
C. Product data for: 1. All products and primary equipment used for repair of existing concrete slab defects.
1.3 QUALITY ASSURANCE
A. Walmart Concrete Consultant:
1. Structural Services, Inc. (SSI), (214) 522-6438.
1.4 ENVIRONMENTAL REQUIREMENTS
A. Limit and control damage from excessive dust caused by demolition, preparation, and installation of all Work.
B. Limit and control damage from moisture.
C. All replaced concrete shall be cured a minimum of 28 days prior to joint filler installation. D. Concrete repair area shall be closed to traffic during preparation and repair for a time as recommended by manu
facturer.
PART 2 - PRODUCTS
2.1 MATERIALS
A. Subject to compliance with project requirements, provide products as manufactured by the following to the extent as specified hereinafter: 1. Ardex Engineered Cements (888) 512-7339 2. Euclid Chemical Co. (877) 438-3826. 3. Mapei (800) 426-2734. 4. Metzger/McGuire (800) 223-6680. 5. VersaFlex, Inc. (913) 321-1416.
03905-1
Wal-Mart Market #5986 – Frisco, TX (1007028) January 20, 2011

B. Polyurea Joint Filler: Rapid setting, two-component polyurea polymer liquid of 100% solids content, Shore hardness 85-90, compatible with construction materials in contact. 1. Spal-Pro RS 88, by Metzger/McGuire. 2. Euco Quik Joint 200, by Euclid Chemical. 3. VersaFlex SL/85, by VersaFlex. 4. Match color of adjacent exposed concrete slab surface.
C. Joint Filler Stain Preventing Film: 1. SPF by Metzger/McGuire. 2. Euco CleanCut by Euclid Chemical.
D. Low Viscosity Rigid Urethane: 1. Rapid ReFloor, by Metzger/McGuire. 2. Quick Mender, by VersaFlex. 3. Match color of adjacent exposed concrete slab surface.
E. Structural Epoxy Mortar: 1. Armor Hard Extreme, by Metzger/McGuire. 2. Euco #456 Epoxy Mortar System, by Euclid Chemical.
F. Silica Sand 1. Dry 00 Sandblasting sand.
G. Polymerized Portland Cement Compound 1. Fast Top Supreme, by Euclid Chemical. 2. Planitop X, by Mapei. 3. Ardex CD, by Ardex.
2.2 EQUIPMENT
A. Subject to compliance with project requirements, provide equipment manufactured by the following: 1. HTC (877) 482-8700, www.htc-america.com 2. Joe Due Blades and Equipment, Mauston, WI, (877) 563-3833. 3. Pulman-Ermator (800) 232-2635, www.pullman-ermator.com 4. SASE Company, Inc, Kent, WA (800) 522-2606 5. U.S. Saws, Santa Ana, CA (866) 987-7297.
B. Dust extraction system for grinding/sawing: 1. HEPA filtration vacuum, designed for use with all hand tools when grinding or sawing concrete (minimum
125CFM air flow). 2. Provide one of the following:
a. 26D, by HTC. b. S2400, by Pullman-Ermator. c. Bull 50, by SASE Company, Inc. d. Approved equal.
C. Joint Filler Removal and Preparation 1. Humpback Cutter Complete, by Joe Due. 2. Dust Buggy, by U.S. Saws. 3. Approved equal.
D. Crack Repair: 1. 5” Dustmizer 007, by Joe Due. 2. 5” Crack Attacker, by Joe Due. 3. 7” Handheld Crack Chaser, by Joe Due. 4. SawTec 5” Tile Vac, by U.S. Saws.
03905-2
Wal-Mart Market #5986 – Frisco, TX (1007028) January 20, 2011
5. SawTec 7” Crac-Vac, by U.S.Saws. 6. Approved equal.
E. Surface Grinder: Handheld 5”-7” electric surface grinder with dustless shroud/housing. 1. Dust Avenger 5, by Joe Due. 2. Dust Avenger 7, by Joe Due. 3. SawTec 5” Grinder Vac, by U.S. Saws. 4. SawTec 7” Grinder Vac, by U.S. Saws. 5. Approved equal.
PART 3 - EXECUTION
3.1 EXAMINATION
A. An evaluation of the existing floor slab shall be conducted, identifying all defects. Scope of repairs shall be confirmed by the Wal-Mart Construction Manager, Architect of Record, or Walmart Concrete Consultant prior to commencement of work. Identify scope of work on Floor Polishing Plan specified in other section(s) of Division 3 – Concrete.
B. Repairs are not acceptable unless specifically approved on a case-by-case basis by the Wal-Mart Construction Manager, Architect of Record or Concrete Consultant.
3.2 PREPARATION
A. Protect surface of slab immediately adjacent to defect under repair.
3.3 JOINT MILLING AND CAP FILLER REPLACEMENT
A. If existing joint filler is sound and resting on top of saw cut shelf, mill top 1/2" of material and refill with specified polyurea joint filler:
B. Re-saw the joint to a minimum depth of 1/2” with a dry-cut, vacuum-equipped saw using a slightly oversized blade. The blade width should be sufficient to encapsulate the widest spall along a given contraction joint segment to produce a sharp corner on each side of the joint with a minimum of two passes through the joint.
C. Refill with polyurea joint filler material from the bottom up, taking care not to entrap large air bubbles per manufacturer’s recommendation. Slightly overfill and shave flush to the surface, prior to grinding process.
D. Ensure that after grinding, the joint is cut smooth and flush with the finish floor surface, without concave or intermittent, darkened profile.
V V
\1
V
Before V . . V
V V
V .̂ 1
V
^
V V
#
\1
V.
v . . v •• : v . V
V : V
V
V
After
V-
• \ l
V
V
Before
^-FTUrginal material „ „ O bearing on V V
v * v saw cut shelf
N ^-
v.
v
03905-3
N V
V
V •.
After
V
V
Saw cut shelf Wal-Mart Market #5986 – Frisco, TX (1007028)
V
V.
1/2" min. new filler
^
Fill to Bottom of Original
Saw Cut
3.4 F U L
\
January 20, 2011
Note: if shelf width at base of saw cut is less than 1/4" on either side of joint, minimum required filler depth is 2" placed over compressibel backer rod or bagged silica sand.
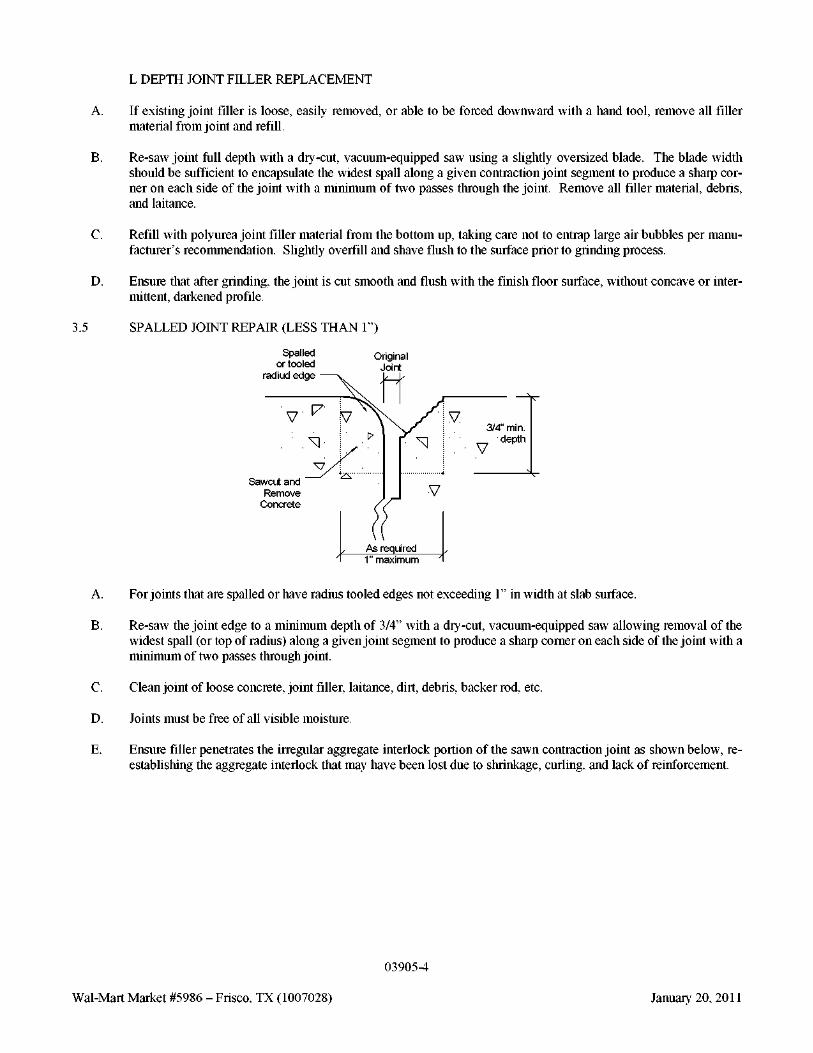
L DEPTH JOINT FILLER REPLACEMENT
A. If existing joint filler is loose, easily removed, or able to be forced downward with a hand tool, remove all filler material from joint and refill.
B. Re-saw joint full depth with a dry-cut, vacuum-equipped saw using a slightly oversized blade. The blade width should be sufficient to encapsulate the widest spall along a given contraction joint segment to produce a sharp corner on each side of the joint with a minimum of two passes through the joint. Remove all filler material, debris, and laitance.
C. Refill with polyurea joint filler material from the bottom up, taking care not to entrap large air bubbles per manufacturer’s recommendation. Slightly overfill and shave flush to the surface prior to grinding process.
D. Ensure that after grinding, the joint is cut smooth and flush with the finish floor surface, without concave or intermittent, darkened profile.
3.5 SPALLED JOINT REPAIR (LESS THAN 1”)
Spalled or tooled
radiud edge
Sawcut and Remove
Concrete
1" maximum
A. For joints that are spalled or have radius tooled edges not exceeding 1” in width at slab surface.
B. Re-saw the joint edge to a minimum depth of 3/4” with a dry-cut, vacuum-equipped saw allowing removal of the widest spall (or top of radius) along a given joint segment to produce a sharp corner on each side of the joint with a minimum of two passes through joint.
C. Clean joint of loose concrete, joint filler, laitance, dirt, debris, backer rod, etc.
D. Joints must be free of all visible moisture.
E. Ensure filler penetrates the irregular aggregate interlock portion of the sawn contraction joint as shown below, reestablishing the aggregate interlock that may have been lost due to shrinkage, curling, and lack of reinforcement.
03905-4
Wal-Mart Market #5986 – Frisco, TX (1007028) January 20, 2011
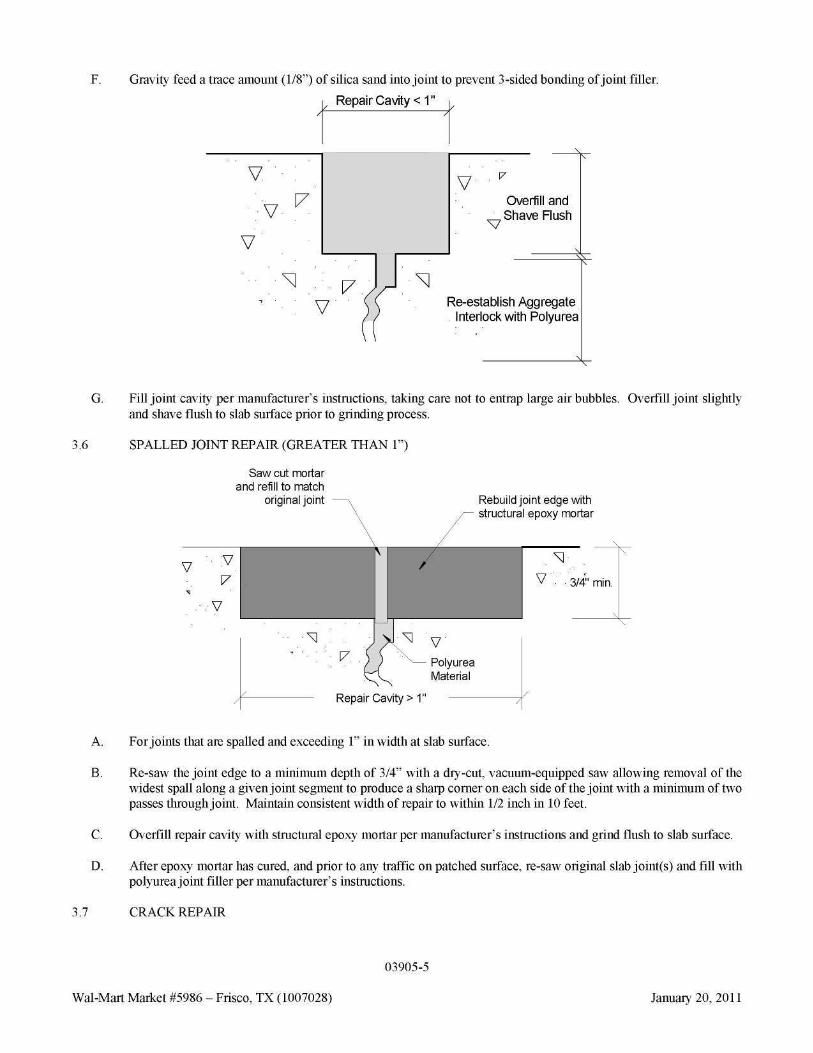
F. Gravity feed a trace amount (1/8”) of silica sand into joint to prevent 3-sided bonding of joint filler.
Repair Cavity < 1"
V
V
V
/- V
v V V
V
Overfill and Shave Flush
i
Re-establish Aggregate Interlock with Polyurea
G. Fill joint cavity per manufacturer’s instructions, taking care not to entrap large air bubbles. Overfill joint slightly and shave flush to slab surface prior to grinding process.
3.6 SPALLED JOINT REPAIR (GREATER THAN 1”)
Saw cut mortar and refill to match
original joint Rebuild joint edge with structural epoxy mortar
V 3/4" min.
A. For joints that are spalled and exceeding 1” in width at slab surface.
B. Re-saw the joint edge to a minimum depth of 3/4” with a dry-cut, vacuum-equipped saw allowing removal of the widest spall along a given joint segment to produce a sharp corner on each side of the joint with a minimum of two passes through joint. Maintain consistent width of repair to within 1/2 inch in 10 feet.
C. Overfill repair cavity with structural epoxy mortar per manufacturer’s instructions and grind flush to slab surface.
D. After epoxy mortar has cured, and prior to any traffic on patched surface, re-saw original slab joint(s) and fill with polyurea joint filler per manufacturer’s instructions.
3.7 CRACK REPAIR
03905-5
Wal-Mart Market #5986 – Frisco, TX (1007028) January 20, 2011
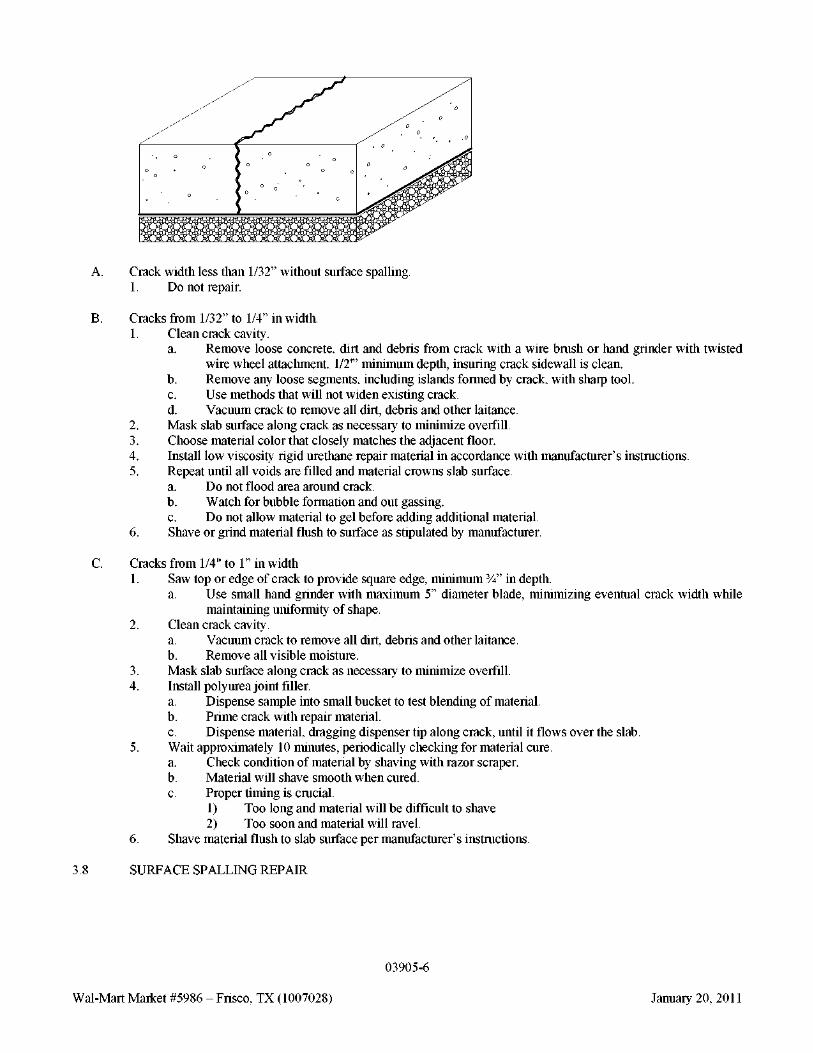
A. Crack width less than 1/32” without surface spalling. 1. Do not repair.
B. Cracks from 1/32” to 1/4” in width. 1.
2. 3. 4. 5.
6.
Clean crack cavity. a. Remove loose concrete, dirt and debris from crack with a wire brush or hand grinder with twisted
wire wheel attachment, 1/2'” minimum depth, insuring crack sidewall is clean. b. Remove any loose segments, including islands formed by crack, with sharp tool. c. Use methods that will not widen existing crack. d. Vacuum crack to remove all dirt, debris and other laitance. Mask slab surface along crack as necessary to minimize overfill. Choose material color that closely matches the adjacent floor. Install low viscosity rigid urethane repair material in accordance with manufacturer’s instructions. Repeat until all voids are filled and material crowns slab surface. a. Do not flood area around crack. b. Watch for bubble formation and out gassing. c. Do not allow material to gel before adding additional material. Shave or grind material flush to surface as stipulated by manufacturer.
C. Cracks from 1/4" to 1” in width 1.
2.
3. 4.
5.
Saw top or edge of crack to provide square edge, minimum ¾” in depth. a. Use small hand grinder with maximum 5” diameter blade, minimizing eventual crack width while
maintaining uniformity of shape. Clean crack cavity. a. Vacuum crack to remove all dirt, debris and other laitance. b. Remove all visible moisture. Mask slab surface along crack as necessary to minimize overfill. Install polyurea joint filler. a. Dispense sample into small bucket to test blending of material. b. Prime crack with repair material. c. Dispense material, dragging dispenser tip along crack, until it flows over the slab. Wait approximately 10 minutes, periodically checking for material cure. a. Check condition of material by shaving with razor scraper. b. Material will shave smooth when cured. c. Proper timing is crucial.
1) Too long and material will be difficult to shave 2) Too soon and material will ravel.
6. Shave material flush to slab surface per manufacturer’s instructions.
3.8 SURFACE SPALLING REPAIR
03905-6
Wal-Mart Market #5986 – Frisco, TX (1007028) January 20, 2011
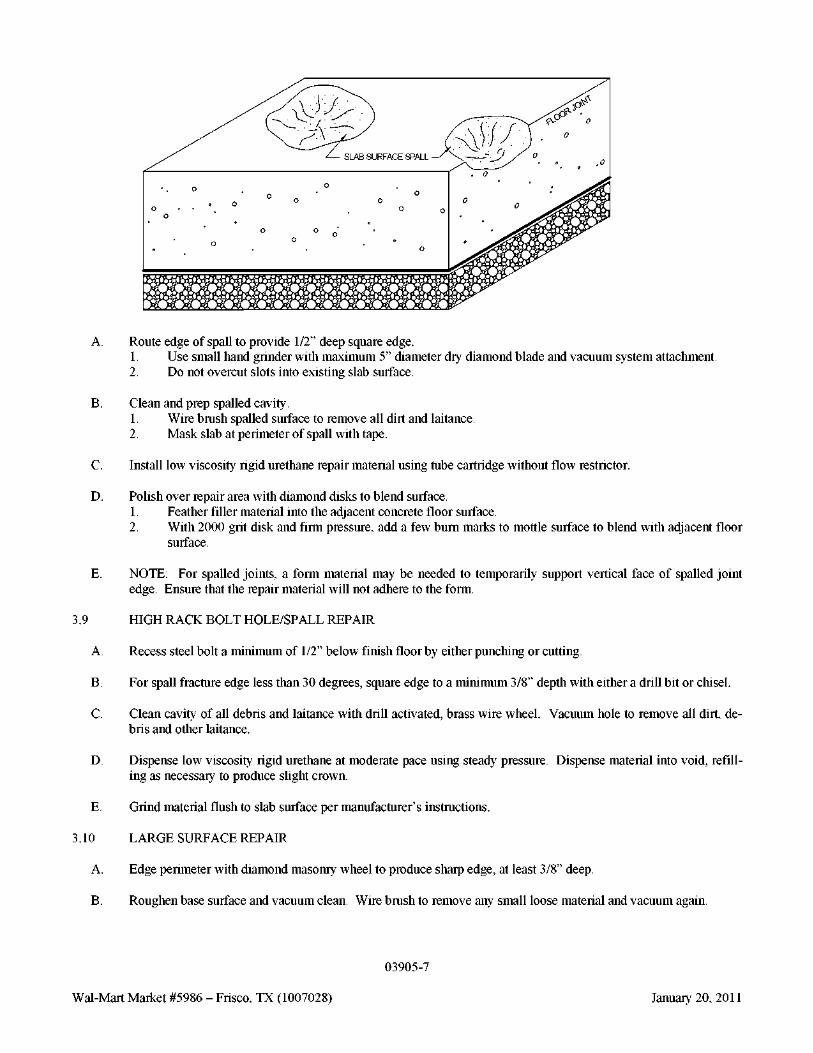
A. Route edge of spall to provide 1/2” deep square edge. 1. Use small hand grinder with maximum 5” diameter dry diamond blade and vacuum system attachment. 2. Do not overcut slots into existing slab surface.
B. Clean and prep spalled cavity. 1. Wire brush spalled surface to remove all dirt and laitance. 2. Mask slab at perimeter of spall with tape.
C. Install low viscosity rigid urethane repair material using tube cartridge without flow restrictor.
D. Polish over repair area with diamond disks to blend surface. 1. Feather filler material into the adjacent concrete floor surface. 2. With 2000 grit disk and firm pressure, add a few burn marks to mottle surface to blend with adjacent floor
surface.
E. NOTE: For spalled joints, a form material may be needed to temporarily support vertical face of spalled joint edge. Ensure that the repair material will not adhere to the form.
3.9 HIGH RACK BOLT HOLE/SPALL REPAIR
A. Recess steel bolt a minimum of 1/2” below finish floor by either punching or cutting.
B. For spall fracture edge less than 30 degrees, square edge to a minimum 3/8” depth with either a drill bit or chisel.
C. Clean cavity of all debris and laitance with drill activated, brass wire wheel. Vacuum hole to remove all dirt, debris and other laitance.
D. Dispense low viscosity rigid urethane at moderate pace using steady pressure. Dispense material into void, refilling as necessary to produce slight crown.
E. Grind material flush to slab surface per manufacturer’s instructions.
3.10 LARGE SURFACE REPAIR
A. Edge perimeter with diamond masonry wheel to produce sharp edge, at least 3/8” deep.
B. Roughen base surface and vacuum clean. Wire brush to remove any small loose material and vacuum again.
03905-7
Wal-Mart Market #5986 – Frisco, TX (1007028) January 20, 2011
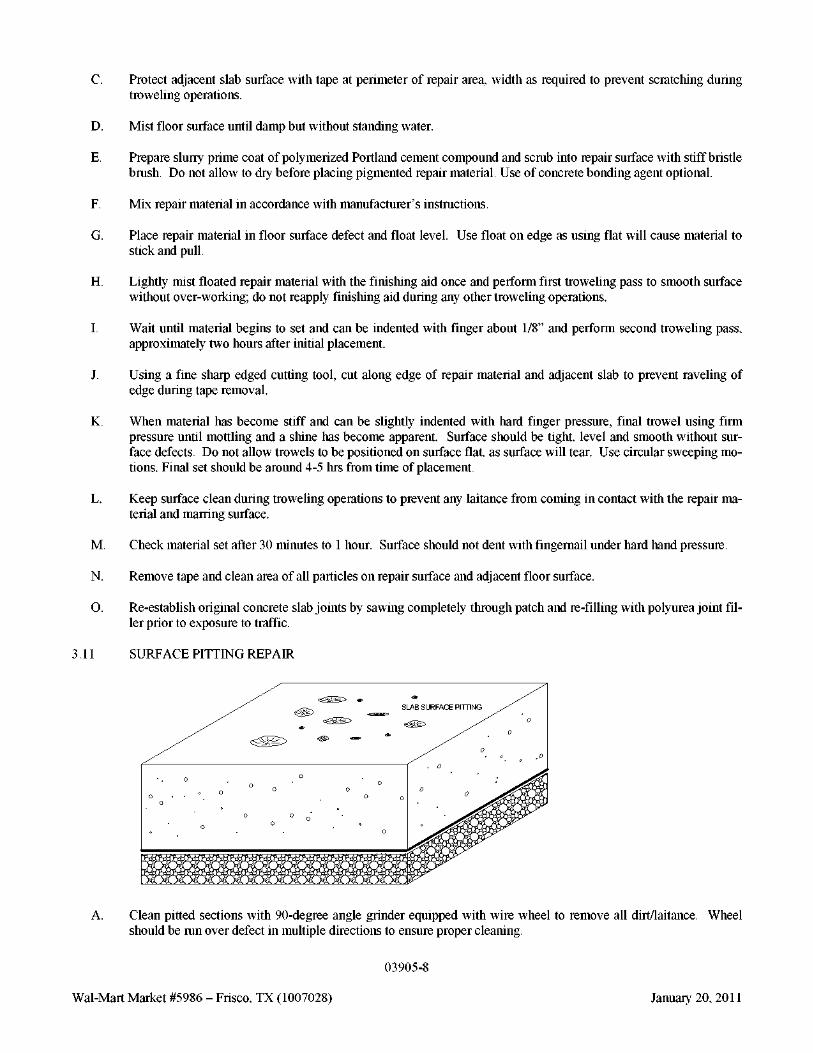
C. Protect adjacent slab surface with tape at perimeter of repair area, width as required to prevent scratching during troweling operations.
D. Mist floor surface until damp but without standing water.
E. Prepare slurry prime coat of polymerized Portland cement compound and scrub into repair surface with stiff bristle brush. Do not allow to dry before placing pigmented repair material. Use of concrete bonding agent optional.
F. Mix repair material in accordance with manufacturer’s instructions.
G. Place repair material in floor surface defect and float level. Use float on edge as using flat will cause material to stick and pull.
H. Lightly mist floated repair material with the finishing aid once and perform first troweling pass to smooth surface without over-working; do not reapply finishing aid during any other troweling operations.
I. Wait until material begins to set and can be indented with finger about 1/8” and perform second troweling pass, approximately two hours after initial placement.
J. Using a fine sharp edged cutting tool, cut along edge of repair material and adjacent slab to prevent raveling of edge during tape removal.
K. When material has become stiff and can be slightly indented with hard finger pressure, final trowel using firm pressure until mottling and a shine has become apparent. Surface should be tight, level and smooth without surface defects. Do not allow trowels to be positioned on surface flat, as surface will tear. Use circular sweeping motions. Final set should be around 4-5 hrs from time of placement.
L. Keep surface clean during troweling operations to prevent any laitance from coming in contact with the repair material and marring surface.
M. Check material set after 30 minutes to 1 hour. Surface should not dent with fingernail under hard hand pressure.
N. Remove tape and clean area of all particles on repair surface and adjacent floor surface.
O. Re-establish original concrete slab joints by sawing completely through patch and re-filling with polyurea joint filler prior to exposure to traffic.
3.11 SURFACE PITTING REPAIR
A. Clean pitted sections with 90-degree angle grinder equipped with wire wheel to remove all dirt/laitance. Wheel should be run over defect in multiple directions to ensure proper cleaning.
03905-8
Wal-Mart Market #5986 – Frisco, TX (1007028) January 20, 2011
B. Vacuum prepared pitted sections.
C. Dispense low viscosity rigid urethane repair material generously in and around pitted areas.
D. Immediately trowel repair material flush with slab surface and repeat troweling in opposite directions until material begins to thicken (approximately 2 minutes). If material sticks to trowel, wipe with denatured alcohol. 1. Ensure a thin, uniform layer of repair material covers the pitted areas. Refill any low spots as needed.
E. Allow repair material to fully cure (approximately 90-120 minutes for thin film).
F. Grind overfill with 80-grit metal-bond pads, ensuring repair material is flush with slab surface.
G. Repeat repairs in areas as required if repair material pulls out of defects. Allowing a longer curing time typically minimizes material pull out.
3.12 PROTECTION
A. Protect surfaces of finished floor.
B. Prohibit traffic until floor repairs have received final approval by Owner.
END OF SECTION
03905-9
Wal-Mart Market #5986 – Frisco, TX (1007028) January 20, 2011
UniSpec II 123010
SECTION 04200 (04 2000) - UNIT MASONRY ASSEMBLIES
PART 1 - GENERAL
1.1 SUMMARY
A. Section Includes: 1. Concrete masonry units. 2. Mortar and grout. 3. Reinforcement, anchorages, and accessories.
B. Related Requirements: 1. Section 01458 - Laboratory Testing Services. Procedures for inspection, testing, and documentation by
Owner furnished testing laboratory. 2. Section 05090 -Post-installed Concrete and Masonry Anchors. Mechanical and adhesive type anchor studs,
expansion bolts, sleeve anchors, adhesive anchors, and anchor bolts embedded in masonry for supporting structural members.
3. Section 05120 - Structural Steel: Support plates and angles. 4. Section 05500 - Metal Fabrications: Loose steel lintels and other metal components embedded in masonry. 5. Section 07900 - Joint Sealers: Filler, backer rod and sealant for control and expansion joints.
1.2 REFERENCES
A. The publications listed below form a part of this specification to the extent referenced. Publications are referenced within the text by the basic designation only.
B. American Concrete Institute (ACI): 1. ACI 315 - ACI Detailing Manual.
C. American Concrete Institute/American Society of Civil Engineers/The Masonry Society (ACI/ASCE/TMS) (Also known as Masonry Standards Joint Committee - MSJC standards): 1. ACI 530/ASCE 5/TMS 402 - Building Code Requirements for Masonry Structures. 2. ACI 530.1/ASCE6/TMS 602 - Specifications for Masonry Structures.
D. ASTM International (ASTM): 1. ASTM A 36 - Carbon Structural Steel 2. ASTM A 153 - Zinc Coating (Hot-Dip) on Iron and Steel Hardware. 3. ASTM A 615 - Deformed and Plain Billet-Steel Bars for Concrete Reinforcement. 4. ASTM C 34 - Structural Clay Load-Bearing Wall Tile. 5. ASTM C 39 - Compressive Strength Of Cylindrical Concrete Specimens 6. ASTM C 56 - Structural Clay Nonloadbearing Tile. 7. ASTM C 62 -Building Brick (Solid Masonry Units Made From Clay or Shale). 8. ASTM C 67 -Standard Test Methods for Sampling and Testing Brick and Structural Clay Tile. 9. ASTM C 90 - Hollow Load-Bearing Concrete Masonry Units. 10. ASTM C 94 - Ready-Mixed Concrete. 11. ASTM C 129 - Non-Load-Bearing Concrete Masonry Units. 12. ASTM C 140 - Methods For Sampling And Testing Concrete Masonry Units And Related Units. 13. ASTM C 143 - Slump of Hydraulic Cement Concrete. 14. ASTM C 144 - Aggregate for Masonry Mortar. 15. ASTM C 150 - Portland Cement. 16. ASTM C 207 - Hydrated Lime for Masonry Purposes. 17. ASTM C 216 - Facing Brick (Solid Masonry Units Made from Clay or Shale. 18. ASTM C 270 - Mortar for Unit Masonry. 19. ASTM C 331 - Lightweight Aggregates for Concrete Masonry Units. 20. ASTM C 387 - Packaged, Dry, Combined Materials for Mortar and Concrete.
04200-1
Wal-Mart Market #5986 – Frisco, TX (1007028) January 20, 2011
21. 22. 23. 24. 25. 26. 27.
28. 29. 30. 31. 32. 33. 34. 35.
ASTM C 404 -ASTM C 476 -ASTM C 516 -ASTM C 549 -ASTM C 618 -ASTM C 652 -ASTM C 780 Masonry. ASTM C 979 -ASTM C 1019 ASTM C 1142 ASTM C 1329 ASTM C 1611 ASTM E 119 -ASTM E 514 -ASTM F 1554
Aggregates for Masonry Grout. Grout for Masonry. Vermiculite Loose Fill Thermal Insulation. Perlite Loose Fill Insulation. Coal Fly Ash and Raw or Calcined Natural Pozzolan for Use in Concrete. Hollow Brick (Hollow Masonry Units Made From Clay or Shale) - Preconstruction and Construction Evaluation of Mortars for Plain and Reinforced Unit
Pigments for Integrally Colored Concrete. - Method of Sampling and Testing Grout. - Extended Life Mortar for Unit Masonry. - Mortar Cement. - Test Method for Slump Flow of Self-Consolidating Concrete. Fire Tests for Building Construction and Materials. Standard Test Method for Water Penetration and Leakage Through Masonry. - Anchor Bolts, Steel, 36, 55, and 105-ksi Yield Strength.
E. Mason Contractors Association of America (MCAA): 1. Standard Practice for Bracing Masonry Walls Under Construction.
1.3 ADMINISTRATIVE REQUIREMENTS
A. Pre-installation Conference: 1. Convene Pre-installation Conference at Site one week prior to commencing work of this Section. Require
attendance of parties directly affecting work of this Section, including, but not limited to, Wal-Mart Construction Manager, Contractor, Owner’s Construction Testing Laboratory (CTL), and masonry contractor and job foreman.
2. Notify all attendees at least two weeks prior to the conference. 3. Review preparation and installation procedures and coordinating and scheduling required with related
work. 4. Review foreseeable methods and procedures related to masonry work, including the following:
a. Tour, inspect, and discuss condition of preparatory work performed by other trades. b. View and discuss the masonry wall panel mock-up. c. Review masonry system requirements (drawings, specifications and other contract documents
including submittals). d. Review required submittals and submittals. e. Review and finalize construction schedule related to masonry work and verify availability of
materials, installer's personnel, equipment, and facilities needed to make progress and avoid delays. f. Review required inspections, testing, certifying, and material usage accounting procedures. g. Review weather and forecasted weather conditions, and procedures for coping with unfavorable
conditions. 5. Record discussions of conference and decisions and agreements reached, and furnish copy of record to each
party attending.
1.4 SUBMITTALS
A. Comply with the requirements of Section 01330.Unless otherwise specified, submit required submittals prior to Pre-installation Conference.
B. Shop Drawings: Do not use reproductions of Contract Documents as shop drawings. Prepare shop drawings in accordance with ACI 315 and submit within 5 working days of Contract Date. 1. Reinforcement:
a. Include masonry notes on shop drawings that relate to proper placing of reinforcing and submit shop drawings for use in the field.
b. Include vertical and horizontal wall reinforcement, dowels, bond beam reinforcement, embedded steel items and anchor bolts.
2. Placement Drawings:
04200-2
Wal-Mart Market #5986 – Frisco, TX (1007028) January 20, 2011
a. Include sides, front and rear elevations of building showing masonry walls full height and length; reinforcing size, quantity, spacing, location, length, and grade of steel; and control joint locations.
C. Product Data: Mortar and Grout.
D. Masonry Grout Mix Design: Complete and submit Masonry Grout Mix Design Form found at the end of this Section for each type of grout. Submit by fax to Structural Engineer of Record and Owner’s Construction Testing Laboratory (CTL) as specified in Section 01330 within 5 working days of Contract Date.
E. Masonry Mortar Mix Design: Submit Masonry Mortar Mix Design for each type of mortar. Includedescription of type, proportions of ingredients by dry weight, and statement of assurance that mix is free of admixtures other than those specified.Submit by fax to Structural Engineer of Record and Owner’sConstruction Testing Laboratoryas specified in Section 01330 within 5 working days of Contract Date.
F. Pre-construction Test Reports.
G. Work Plan for High-Lift Grouting Option: Provide work plan to Engineer of Record indicating how proper placement and positioning of reinforcement will be achieved and verified for high-lift grouting. Include information on how reinforcing lap splices are verified.
H. Statement of Compressive Strength of Masonry: For each combination of masonry unit type and mortar type, provide statement of average net area compressive strength of masonry units, mortar type, and resulting net area compressive strength of masonry.
1.5 QUALITY ASSURANCE
A. Mock-up: Construct masonry wall panel mock-up to represent the exterior masonry wall. 1. Locate, construct, clean, inspect, and remove in accordance with notes indicated on the Drawings. 2. Include each type of unit masonry assembly included in Project in mock-up. 3. When accepted, mockup will be used as standard of quality for masonry Work. 4. Approval of mock-up does not constitute approval of deviations from Contract Documents contained in
mock-up unless those deviations are specifically approved by Wal-Mart Construction Manager in writing.
B. Pre-construction Testing: Engage a qualified independent testing agency to perform testing indicated below at Contractor’s expense prior to beginning construction of masonry walls. 1. Grout Test (Compressive Strength): For each mix required, according to ASTM C 1019.
C. Installer Qualifications: Installer of foamed-in-place insulation shall be certified or approved by manufacturer of insulation.
D. Source Limitations: 1. Masonry Units: Obtain exposed masonry units of a uniform texture and color, or a uniform blend within
the ranges accepted for these characteristics, through one source from a single manufacturer for each product required.
2. Mortar Materials: Obtain mortar ingredients of uniform quality, including color for exposed masonry, from single manufacturer for each cementitious component and from one source or producer for each aggregate.
1.6 DELIVERY, STORAGE AND HANDLING
A. Transport, handle, store, and protect products in compliance with the requirements of Section 01600 and manufacturer's recommendations.
B. Store masonry units on elevated platforms in a dry location. If units are not stored in an enclosed location, cover tops and sides of stacks with waterproof sheeting, securely tied. If units become wet, do not install until they are dry.
C. Store cementitious materials on elevated platforms, under cover, and in a dry location. Do not use cementitious
04200-3
Wal-Mart Market #5986 – Frisco, TX (1007028) January 20, 2011
materials that have become damp.
D. Store aggregates where grading and other required characteristics can be maintained and contamination avoided.
E. Deliver preblended, dry mortar mix in moisture-resistant containers designed for use with dispensing silos. Store preblended, dry mortar mix in delivery containers on elevated platforms, under cover, and in a dry location or in covered weatherproof dispensing silos.
F. Store masonry accessories, including metal items, to prevent corrosion and accumulation of dirt and oil.
1.7 PROJECT CONDITIONS
A. Follow cold and hot weather procedures of ACI 530.1/ASCE6/TMS 602.
B. Protection of Masonry: During construction, cover tops of walls, projections, and sills with waterproof sheeting at end of each day's work. Cover partially completed masonry when construction is not in progress. 1. Extend cover a minimum of 24 inchesdown both sides of walls and hold cover securely in place. 2. Where one wythe of multiwythe masonry walls is completed in advance of other wythes, secure cover a
minimum of 24 inchesdown face next to unconstructed wythe and hold cover in place.
C. Do not apply uniform floor or roof loads for at least 12 hours and concentrated loads for at least three days after building masonry walls or columns.
D. Stain Prevention: Prevent grout, mortar, and soil from staining the face of masonry to be left exposed or painted. Immediately remove grout, mortar, and soil that come in contact with such masonry. 1. Protect base of walls from rain-splashed mud and from mortar splatter by spreading coverings on ground
and over wall surface. 2. Protect sills, ledges, and projections from mortar droppings. 3. Protect surfaces of window and door frames, as well as similar products with painted and integral finishes,
from mortar droppings. 4. Turn scaffold boards near the wall on edge at the end of each day to prevent rain from splashing mortar and
dirt onto completed masonry.
E. Cold Weather Construction:When ambient air temperature is below 40F, implement cold weather procedures and comply with the following: 1. Do not use frozen materials or materials mixed or coated with ice or frost. Do not build on frozen
substrates. Remove and replace unit masonry damaged by frost or by freezing conditions. 2. Preparation:Comply with the following requirements prior to conducting masonry work:
a. Do not lay masonry units having either a temperature below 20F or containing frozen moisture, visible ice, or snow on their surface.
b. Remove visible ice and snow from the top surface of existing foundations and masonry to receive new construction. Heat these surfaces above freezing using methods that do not result in damage.
3. Construction:These requirements apply to work in progress and are based on ambient air temperature. Do not heat water or aggregates used in mortar or grout above 140 F. Comply with the following requirements during construction during the following ambient air conditions: a. 40F to 32F: Heat sand or mixing water to produce mortar temperature between 40F and 120F at the
time of mixing. Grout does not require heated materials, unless the temperature of the materials is below 32F.
b. 32F to 25F: Heat sand and mixing water to produce mortar temperature between 40F and 120F at the time of mixing. Maintain mortar temperature above freezing until used in masonry. Heat grout aggregates and mixing water to produce grout temperature between 70F and 120F at the time of mixing. Maintain grout temperature above 70F at the time of grout placement.
c. 25F to 20F: Comply with requirements for 32 F to 25 F above and the following:Heat masonry surfaces under construction to 40F and use wind breaks or enclosures when the wind velocity exceeds 15 mph. Heat masonry to a minimum of 40F prior to grouting.
d. 20F and below: Comply with requirement for 35 F to 20 F above and the following: Provide an enclosure and auxiliary heat to maintain air temperature above 32F within the enclosure.
04200-4
Wal-Mart Market #5986 – Frisco, TX (1007028) January 20, 2011
4. Protection:These requirements apply after masonry is placed and are based on anticipated minimum daily temperature for grouted masonry and anticipated mean daily temperature for ungrouted masonry. Protect completed masonry in the following manner: a. 40F to 25F: Protect newly constructed masonry by covering with a weather-resistive membrane for
24 hr after being completed. b. 25F to 20F: Cover newly constructed masonry completely with weather-resistive insulating
blankets, or equal protection, for 24 hr after completion of work. Extend time period to 48 hr for grouted masonry unless the only cement in the grout is Type III portland cement.
c. 20F and below: Maintain newly constructed masonry temperature above 32F for at least 24 hr after being completed by using heated enclosures, electric heating blankets, infared lamps, or other acceptablemethods. Extend time period to 48 hr for grouted masonry unless the only cement in the grout is Type III Portland cement.
5. Cold-Weather Cleaning: Use liquid cleaning methods only when air temperature is 40 deg Fand higher and will remain so until masonry has dried, but not less than seven days after completing cleaning.
F. Hot Weather Construction:Comply with the followingprovisions: 1. Preparation: Prior to conducting masonry work:
a. When the ambient air temperature exceeds 100F or exceeds 90F with a wind velocity greater than 8 mph: 1) Maintain sand piles in a damp, loose condition. 2) Provide necessary conditions and equipment to produce mortar having a temperature below
120F. b. When the ambient temperature exceeds 115F or exceeds 105F with a wind velocity greater than 8
mph, implement the requirements above for ambient air temperature exceeding 100 F and shade materials and mixing equipment from direct sunlight.
2. Construction: While masonry work is in progress: a. When the ambient air temperature exceeds 100F, or exceeds 90F with a wind velocity greater than
8 mph: 1) Maintain temperature of mortar and grout below 120F. 2) Flush mixer, mortar transport container, and mortar boards with cool water before they come
into contact with mortar ingredients or mortar. 3) Maintain mortar consistency by retempering with cool water. 4) Use mortar within 2 hours of initial mixing.
b. When the ambient temperature exceeds 115F or exceeds 105F with a wind velocity greater than 8 mph, implement the construction requirements above for ambient air temperature exceeding 100 F and use cool mixing water for mortar and grout. Ice is permitted in the mixing water prior to use. Do not permit ice in the mixing water when added to the other mortar or grout materials.
3. Protection: When the mean daily temperature exceeds 100F or exceeds 90F with a wind velocity greater than 8 mph, fog spray newly constructed masonry until damp at least three times a day until the masonry is three days old.
PART 2 - PRODUCTS
2.1 PERFORMANCE REQUIREMENTS
A. Provide unit masonry, mortar, and grout that develops compressive strength (f’m) at 28 days as indicated on Drawings.
2.2 CONCRETE MASONRY UNITS
A. Unit Design: Modular two core units sized as indicated or scheduled. Provide special shapes necessary for bond beams, control and expansion joints, lintels, and special conditions. 1. Provide units as required for indicated construction including sill units and solid cap units. 2. Provide units with exposed faces which are uniform in appearance. 3. Provide units containing a minimum of 12% recycled content.
B. Hollow Load Bearing Units: ASTM C 90.
04200-5
Wal-Mart Market #5986 – Frisco, TX (1007028) January 20, 2011
1. Smooth CMU: Light weight or normal weight above finished floor; normal weight only below finished floor.
2. Split Face CMU: Light weight or normal weight above finished floor; normal weight only below finished floor.
C. Solid Load-bearing Units: ASTM C 90. 1. Smooth CMU: Light weight or normal weight above finished floor; normal weight only below finished
floor. 2. Split Face CMU: Light weight or normal weight above finished floor; normal weight only below finished
floor.
D. Non-load Bearing Units: ASTM C 129.
2.3 MORTAR AND GROUT MATERIALS
A. Portland Cement: ASTM C 150, Type I or Type II. Provide natural color or white cement as required to produce mortar color indicated.
B. Mortar Cement: ASTM C 1329.
C. Fly Ash for Grout: ASTM C 618, Type C or F maximum 4 percent loss in ignition shall be used as a replacement for Portland cement in grout. Fly ash shall be a minimum of 25 percent and a maximum of 30 percent of the total cementitious content. Use of fly ash in grout mix is mandatory.
D. Fly Ash for Mortar: Fly ash, slag and pozzolans not permitted as substitutes for Portland cement in mortar.
E. Masonry Cement: Not allowed.
F. Mortar Aggregate: ASTM C 144. 1. For mortar that is exposed to view, use washed aggregate consisting of natural sand or crushed stone. 2. For joints less than 1/4 inchthick, use aggregate graded with 100 percent passing the No. 16 sieve. 3. White-Mortar Aggregates: Natural white sand or crushed white stone. 4. Colored-Mortar Aggregates: Natural sand or crushed stone of color necessary to produce required mortar
color.
G. Mortar Pigments: Natural and synthetic iron oxides and chromium oxides, compounded for use in mortar mixesand complying with ASTM C 979. Use pigments with a record of satisfactory performance in masonry mortar.
H. Grout Aggregate: ASTM C 404; use of blast furnace slag is not permitted. Maximum coarse aggregate size, 3/8 inch.
I. Calcium chloride: Not permitted in mortar or grout. Chemicals containing thyocyanates, calcium chloride or more than 0.1 percent chloride ions shall not be used.
J. Hydrated Lime: ASTM C 207, Type S.
K. Water: Potable.
L. Admixtures: Not permitted in mortar or groutexcept as otherwise specifically allowed or required herein.
2.4 MIXES - MORTAR
A. Mortar: Type S, in accordance with the Proportion Specification of ASTM C 270 for site batched mortar and the Property Specification of ASTM C 270 for dry pre-blended mortar. 1. Mixing of components on-site is acceptable.
04200-6
Wal-Mart Market #5986 – Frisco, TX (1007028) January 20, 2011
2. Mixing on-site water and packaged dry blended mix for mortar (ASTM C 387 or C1329), that contains no masonry cement, is acceptable.
3. Use of ready mix mortar (ASTM C 1142) is prohibited. 4. Do not add admixtures of any kind to mortar mix except as otherwise specifically required herein.
B. Pointing Mortar: Duplicate original mortar proportions. Add aluminum tristearate, calcium stearate, or ammonium stearate equal to 2% of Portland cement weight.
2.5 MIXING – MORTAR
A. Thoroughly mix mortar ingredients in accordance with ASTM C 270, in quantities needed for immediate use. 1. Maintain sand uniformly damp immediately before the mixing process. 2. Provide uniformity of mix and coloration. 3. Do not use anti-freeze compounds. 4. If water is lost by evaporation, retemper only within 2 hours of mixing. Do not retemper mortar more than
2 hours after mixing.
2.6 MIXES - GROUT FILL
A. Grout fill for concrete masonry unit bond beams, lintels, and reinforced cells with reinforcing bars and embedded plates: Conform to ASTM C 476. 1. Compressive Strength: 2000 psi minimum at 28 days, as determined in accordance with the provisions of
ASTM C 1019. 2. Slump: 8 inches, minimum; 11 inches, maximum, taken in accordance with ASTM C 143. 3. Use coarse grout when grout space is equal to or greater than 4 inches in both directions. 4. Use fine grout when grout space is smaller than 4 inches in either direction. 5. Air entrainment shall not be used. 6. Do not add admixtures to grout.
2.7 MIXES – SELF-CONSOLIDATING GROUT FILL
A. At the option ofContractor, high lift grouting procedure for grout fill for concrete masonry unit bond beams, lintels, and reinforced cells with reinforcing bars and embedded plates may be used. Conform to ASTM C 476 compressive strength requirements with additional requirements for consistency, flow, and stability listed in MSJC standards. 1. Compressive Strength: 2000 psi minimum at 28 days, as determined in accordance with the provisions of
ASTM C 1019. 2. Slump Flow: 24 inches, minimum; 30 inches, maximum, taken in accordance with ASTM C 1611. 3. Visual Stability Index (VSI): Less than or equal to 1, taken in accordance with ASTM C1611, Appendix
X.1. 4. Use coarse grout when grout space is equal to or greater than 4 inches in both directions 5. Use fine grout when grout space is smaller than 4 inches in either direction. 6. Verify grout type with maximum grout pour height and minimum grout space dimensions in Table 7 of
ACI 530.1. 7. Self-consolidating grout may include admixtures preblended and certified by the manufacturer. Field
addition of admixtures will not be permitted for self-consolidating grout. 8. Air entrainment shall not be used.
2.8 MIXING – GROUT
A. Batch and mix grout in accordance with ASTM C 94 or ASTM C476 for site batched and mixed grout. Do not use anti-freeze compounds to lower the freezing point of grout.
B. Self-consolidating grout shall be mixed in the plant. Job proportioning of self-consolidating grout is not permitted. Do not add water at the site except in accordance with the self-consolidating grout manufacturer’s recommendations
04200-7
Wal-Mart Market #5986 – Frisco, TX (1007028) January 20, 2011
2.9 REINFORCEMENT
A. Horizontal Joint Reinforcement: Ladder design, minimum 9 gage welded steel wire, hot dipped galvanized to 1.5 oz, ASTM A 153, Class B2. Width 1-1/2 to 2 inches less than wall thickness.
B. Deformed Bars: ASTM A 615, Grade 60. Shop fabricate reinforcement which is shown bent or hooked. Field bending not allowed.
C. Anchor bolts and threaded rods as shown embedded in masonry on structural drawings: ASTM F 1554 for anchor bolts and ASTM A 36 for threaded rods.
D. Bar Positioners for Vertical Wall Bars: Wire units designed to fit into mortar bed joints spanning masonry unit cells and hold reinforcing bars in center of cells. Provide units formed from 0.148-inchsteel wire, hot-dip galvanized after fabrication and designed for number of bars indicated. 1. Dur-O-Wal (Dayton Superior),Dayton, OH (888) 977-9600.
2. Wire-Bond, Charlotte, NC (800) 849 6722.
2.10 ACCESSORIES
A. Grout Barrier: Provide one of the following: 1. DA1015-DA1018 Dur-O-Stop by Dur-O-Wal.
2. MGS Grout Screen by Hohmann & Barnard, Inc.
2.11 SUBSTITUTIONS
A. Comply with the requirements of Section 01600.
PART 3 - EXECUTION
3.1 EXAMINATION A. Examine conditions, with Installer present, for compliance with requirements for installation tolerances and other
conditions affecting performance of the Work. 1. Verify that foundations are within tolerances specified. 2. Verify that reinforcing dowels are properly placed. 3. Verify items specified under other Sections of work are properly sized and located.
3.2 PREPARATION
A. Establish lines, levels, and coursing. Protect from disturbance. Use non-corrosive materials in contact with masonry work.
B. Provide temporary bracing for walls, lintels, and other masonry work during erection. Maintain in place until roof and other structural elements are complete and provide permanent bracing.
C. Provide temporary bracing for walls, lintels, and other masonry work during erection. 1. Design bracing in accordance with MCAA Standard Practice for Bracing Masonry Walls Under
Construction. 2. Design bracing under supervision of an independent Professional Engineer hired by the contractor and
licensed in the state in which the project is located. 3. Maintain in place until roof and other structural elements are complete and provide permanent bracing.
D. Wetting of Brick: Wet brick before laying if initial rate of absorption exceeds 30 g/30 sq. in. per minute when tested in accordance with ASTM C 67. Allow units to absorb water until damp but not wet at time of laying.
3.3 INSTALLATION - GENERAL
04200-8
Wal-Mart Market #5986 – Frisco, TX (1007028) January 20, 2011
A. Construct masonry in accordance with ACI 530/ASCE 5/TMS 402 and ACI 530.1/ASCE6/TMS 602.
B. Thickness: Build cavity and composite walls and other masonry construction to full thickness shown. Build single-wythe walls to actual widths of masonry units, using units of widths indicated.
C. Build chases and recesses to accommodate items specified in this and other Sections.
D. Leave openings for equipment to be installed before completing masonry. After installing equipment, complete masonry to match the construction immediately adjacent to opening.
E. Use full-size units without cutting if possible. If cutting is required to provide a continuous pattern or to fit adjoining construction, cut units with motor-driven saws; provide clean, sharp, unchipped edges. Allow units to dry before laying unless wetting of units is specified. Install cut units with cut surfaces and, where possible, cut edges concealed.
F. Select and arrange units for exposed unit masonry to produce a uniform blend of colors and textures. Mix units from several pallets or cubes as they are placed.
3.4 COURSING
A. Place masonry to lines and levels indicated.
B. Maintain masonry courses to uniform width. Make vertical and horizontal joints equal and of uniform thickness.
C. Lay concrete masonry units in running bond unless otherwise noted. Course one block unit and one mortar joint to equal 8 inches (4 inches for half high units).
D. Tool head and bed joints concave when mortar is thumbprint hard regardless if below grade or above ceiling height. Use tool with large enough radius that joint is not raked free of mortar.
3.5 PLACING AND BONDING
A. Lay solid concrete masonry units with completely filled bed and head joints; butter ends with sufficient mortar to fill head joints and shove into place. Do not slush head joints. Remove excess mortar.
B. For hollow concrete masonry units, fill head and bed joints solidly with mortar for a distance in from the face of the unit not less than the thickness of the shell. Bed webs in mortar in starting course on footings and foundation walls and in courses of piers, columns and pilasters, and where adjacent to cells or cavities to be reinforced or filled with concrete or grout. For starting courses on footings, spread out full mortar bed, including areas under cells.
C. For high lift grouting method, provide cleanouts at the bottom course of grout lifts. Provide cleanouts at the bottom course of each vertical bar location in partially grouted masonry. Provide cleanouts at 32 inches on center along the bottom course of the grout lifts in fully grouted masonry. Use cleanouts to remove all mortar droppings and debris and ensure proper placement of reinforcement.
D. Allow masonry to cure a minimum of 4 hours prior to placing grout for high lift grout method. Increase curing time to a minimum of 8 hours in cold or dry weather conditions.
E. Solid grout hollow masonry cells as noted on Structural Drawings. Use low lift or high lift grout method of construction conforming to requirements of current ACI 530/ASCE 5/TMS 402 and ACI 530.1/ASCE 6/TMS 602. High lift grouting shall use self-consolidating grout. Grout space dimensions and maximum pour heights shall comply with Table 7 of the ACI 530.1/ASCE 6/TMS 602. High lift grout pour heights shall not exceed 24 feet.
F. High lift grouting with self-consolidating grout shall be a continuous procedure for each lift. Do not allow horizontal construction joint to form by discontinuing grouting
04200-9
Wal-Mart Market #5986 – Frisco, TX (1007028) January 20, 2011
G. Fully bond intersections, and external and internal corners.
H. Do not shift or tap masonry units after mortar has taken initial set. Where adjustment must be made, remove mortar and replace.
I. Perform jobsite cutting with proper tools to provide straight unchipped edges. Take care to prevent breaking masonry unit corners or edges. 1. Where required, match finish masonry work to adjacent surfaces. 2. For fire-rated walls, construct walls to finish against bottom of roof or floor deck and fill voids with
firestopping. 3. For other than fire-rated walls, cut units to match the slope of the roof deck and finish construction to
within 2 inches of and parallel to roof deck.
J. Isolate masonry partitions from vertical structural framing members with a control joint.
3.6 TOLERANCES
A. Construct masonry within the following tolerances: 1. Alignment of Pilasters: Maximum 1/4 inch from true line. 2. Variation from Plane of Wall: 1/4 inch in 10 feet; 3/8 inch in 20 feet; 1/2 inch maximum. 3. Variation from Plumb: 1/4 inch per story non-cumulative. 4. Variation from Level Coursing: 1/8 inch in 3 feet; 1/4 inch in 10 feet; 1/2 inch maximum. 5. Variation of Joint Thickness: 1/8 inch in 3 feet. 6. Variation from Unit to Adjacent Unit: 1/32 inch maximum.
B. Tolerances for the placement of reinforcing steel in walls and flexural elements: 1. ± 1/2 inch when the distance from the centerline of the steel to the opposite face of the masonry, "d", is
equal to 8 inches or less. 2. ± 1 inch for "d" equal to 24 inches or less but larger than 8 inches. 3. ± 1-1/4 inch for "d" greater than 24 inches.
3.7 REINFORCEMENT AND ANCHORAGES
A. Install horizontal joint reinforcement 16 inches on center, except space at 8 inches in parapet walls and below finished floor, or where otherwise indicated on Drawings. Place joint reinforcement continuous in first and second joint below top of walls. Lap joint reinforcement ends minimum 6 inches. Do not extend joint reinforcement through control joints.
B. Set vertical reinforcing bars supported and secured against displacement by means of bar positioners prior to placing grout. Set and support other bars, anchor bolts, and embedded items and tie to prevent displacement prior to placing grout.
C. Grout cells full that contain vertical reinforcing. Use low lift or high lift grout method of construction conforming to requirements of ACI 530/ASCE 5/TMS 402 and ACI 530.1/ASCE 6/TMS 602.
D. Place grout barrier below reinforced bond beams as required to prevent grout falling through cells while maintaining positive bond in mortar joint.
E. Verify that anchorages embedded in masonry are properly placed. 1. Proper placement of embed anchors shall be full depth penetration of scheduled anchorage without contact
of embed stud with interior surface of exterior shell face.
F. After reinforcing of masonry is securely tied in place, plug cleanout holes with masonry units. Brace against wet grout pressure.
3.8 LINTELS
04200-10
Wal-Mart Market #5986 – Frisco, TX (1007028) January 20, 2011
A. Install loose steel lintels as scheduled.
B. Install reinforced unit masonry lintels over openings where steel lintels are not scheduled. Construct lintels using grout fill and reinforcing. Maintain minimum 8 inch bearing on each side of opening, unless noted otherwise on Drawings.
C. Use reinforcing bars of one piece lengths only.
D. Place and consolidate grout fill without disturbing reinforcing. Allow lintels to reach strength before removing temporary supports.
E. For soap units covering steel lintels, provide 9 gage Z-ties at each vertical joint. Weld Z-ties to web of steel lintel.
3.9 CONTROL JOINTS
A. Do not continue bond beam reinforcing (except at floor and roof levels and top of walls) or joint reinforcing across control joints unless otherwise shown on Drawings.
B. Install preformed control joint filler at locations indicated on Drawings. Use proper size material to create sealant joint space.
C. Install backer rods and sealant at control joints as shown on Drawings and as specified in Section 07900.
3.10 EXPANSION JOINTS
A. Install expansion joints if shown on Drawings.
B. Do not continue bond beam reinforcing (except at floor and roof levels and top of walls) or joint reinforcing across expansion joints unless otherwise shown on Drawings.
C. Install expansion joint filler (compression seal), backer rods, and sealant at expansion joints as shown on Drawings and as specified in Section 07900.
3.11 BUILT-IN WORK
A. As work progresses, build in metal door frames, fabricated metal frames, window frames, anchor bolts, diaphragm anchors, embedded plates, and other items specified in other Sections.
B. Install items plumb and level.
C. Bed anchors of metal door and glazed frames in mortar joints. Fill frame voids solid with grout or mortar. Fill masonry cores with grout minimum 12 inches from framed openings.
D. Do not build in organic materials subject to deterioration.
3.12 CUTTING AND FITTING
A. Cut and fit for bearing plates, chases, pipes, conduit, sleeves, and grounds. Coordinate work specified in other Sections to provide correct size, shape, and location.
B. Obtain approval prior to cutting or fitting any area not indicated or where appearance or strength of masonry work may be impaired.
3.13 CLEANING
A. In-Progress Cleaning: Clean unit masonry as work progresses by dry brushing to remove mortar fins and smears before tooling joints.
04200-11
Wal-Mart Market #5986 – Frisco, TX (1007028) January 20, 2011
B. Final Cleaning: After mortar is thoroughly set and cured, clean exposed masonry as follows: 1. Remove large mortar particles by hand with wooden paddles and nonmetallic scrape hoes or chisels. 2. Test cleaning methods on mock-up as indicated on Drawings. 3. Protect nonmasonry surfaces from contact with cleaner by covering them with liquid strippable masking
agent, polyethylene film, or waterproof masking tape. 4. Clean non-colored CMU masonry with a proprietary acidic cleaner applied according to manufacturer's
written instructions. 5. Cleaned surfaces shall appear as represented by mockup wall panel.
C. Remove excess mortar and smears. Replace defective mortar. Match adjacent work.
D. Clean soiled surfaces with a non-acidic solution which will not harm masonry or adjacent materials. Consult masonry manufacturer for acceptable cleaners.
E. Use non-metallic tools in cleaning operations.
3.14 PROTECTION
A. Maintain protective boards at exposed external corners which may be damaged by construction activities.
B. Provide protection without damaging completed work.
C. Protect the base of walls from rain-splashed mud and mortar droppings.
D. At day's end, cover unfinished walls to prevent moisture infiltration. Weight cover down to prevent blow-off and maintain protection for fresh masonry work. Extend cover from top of wall a minimum of 2 feet down the wall on each side.
3.15 FIELD QUALITY CONTROL BY OWNER
A. Testing And Inspection Responsibility: Unless otherwise specified,field production quality control tests and inspection specified below will be conducted byOwner’s Construction Testing Laboratory (CTL) at no cost to Contractor in accordance with Section 01458. Contractor shall perform additional testing or inspection as considered necessary by Contractor for assurance of quality control.
B. Perform Tests and Inspections as specified herein and as indicated in Table A – Testing and Inspection Schedule at the end of this Section.
C. Work shall be performed by a Special Inspector – Technical II or Special Inspector – Structural I
D. Field Testing:Field testing, frequency, and methods may vary as determined by and between Owner and Owner’s Construction Testing Laboratory. 1. Masonry Units:
a. Compressive Strength of Masonry (f’m): Verify compressive strength of masonry by the unit strength method. Results of net-area unit strength tests shall meet the requirement of Table 2 in Part 1 of TMS 602/ACI 530.1/ASCE 6 based on the specified mortar type and the design f’m listed on the structural drawings
b. Three units for each type will be obtained and tested for every 5000 square feet of wall constructed. c. The net area compressive strength of the masonry units shall be determined in accordance with
ASTM C 140. The average of 3 units is considered one test. d. Strength of concrete masonry units will be considered satisfactory if each compressive strength test
passes. 2. Masonry Mortar:
a. Execute one mortar verification test for each 5,000 square feet of masonry wall constructed and a minimum of one mortar verification test for each day that masonry construction is performed. 1) Dry Pre-blended Mortars: Test in accordance with the mortar aggregate ratio test method of
ASTM C 780 Annex A4.
04200-12
Wal-Mart Market #5986 – Frisco, TX (1007028) January 20, 2011
2) Site-Batched Mortar: Visually determine batch proportions by bulk loose volume measures for compliance with Proportion Specification of ASTM C 270.
3. Grout: a. Verify that the delivered grout mix complies with the submitted mix design. b. Test self-consolidating grout mixes in accordance with ASTM C 1019 for grout mix required
complying with compressive strength requirement, and slump flow and visual stability index (VSI) as determined by ASTM C 1611.
c. Sample, cure, and test grout samples in accordance with ASTM C 1019. 1) Cast 4 grout specimen for each 5000 square feet of wall placed each day or fraction thereof. 2) Test 2 of the specimen at 7 days in accordance with ASTM C 39. 3) Test 2 of the specimens at 28 days in accordance with ASTM C 39.
E. Laboratory Testing: Test mortar in accordance with ASTM C270 verifying compliance with mortar specified from samples of pre-batched materials taken from the site.
F. Inspections: 1. General: Inspect masonry work for compliance with Construction Documents. Inspection of masonry shall
be performed during placing of masonry units, placement of structural reinforcement, cleanout of grout space immediately prior to closing of elements, and during all grouting operations.
2. Frequency of Inspection: a. "Continuous" Inspection of Masonry:
1) Grouting: 100% of structural grouting operations. b. "Periodic" Inspection of masonry:
1) Placing of Units: Not less than once/week nor less than once for every 2000 SF of surface 2) Reinforcement: Verification of compliance of grout spaces and of grades, sizes, and
locations of reinforcement. 3. Preparation and Placement
a. Base Conditions: Verify that masonry bearing surfaces are clean. b. Condition of Units: Verify that masonry units are clean and sound and dry. c. Mortar: Verify mortar is prepared in accordance with specification requirements. d. Placement: Inspect laying of masonry units for nominal unit widths, stack or running bond, proper
thickness and tooling of mortar joints, and depth of furrowing of bed joints. Note temperature at time of inspection.
e. Joints: Inspect construction, expansion, and contraction joints for location and continuity of steel. f. Verify hot and cold weather procedures are followed. g. Verify wall cavities are protected against entry of precipitation.
4. Bond Beams: Inspect and report on the following: a. Location. b. Size, placement, and lap of reinforcing bars. c. Placement and vibration of grout.
5. Openings: Inspect and report on the following: a. Types of concrete masonry units used to form lintels. b. Reinforcing bar size and placement at lintel. c. Stirrup size and spacing at lintel. d. Vertical reinforcing size and placement at door jambs. e. Placement and vibration of grout in lintels and jambs.
6. Pilasters: Inspect and report on the following: a. Vertical reinforcing size and placement. b. Tie size and placement. c. Placement and vibration of grout.
7. Masonry Reinforcement: a. Vertical Reinforcement: Inspect placement and alignment of vertical bars and dowels for size,
grade and spacing. Inspect length of lap splices, clearances between bars, clearances to masonry units and outside face of walls, and positioning of steel.
b. Horizontal Reinforcement: Inspect horizontal joint reinforcement steel and masonry reinforcement bars for size, length of lap splices, dowels, clearances between bars, clearance to masonry units and outside face of walls, and alignment.
04200-13
Wal-Mart Market #5986 – Frisco, TX (1007028) January 20, 2011
8.
c. Ties: Inspect ties in masonry for type, straightness, embedment, spacing and size. d. Dowels and Anchors: Inspect the installation of masonry anchor bolts, joist anchors, inserts, straps,
and dowels. Inspect spacing and grouting of embedded plates for joist bearing. Inspect spacing and grouting of embedded plates for continuous angle attachment at roof perimeter.
Prior to Masonry Grouting and Capping: Grout Spaces: Verify that grout spaces are correctly sized and clean, cleanouts are closed after inspection and grout barriers are in place before grouting. Dry Packing: Verify proper application of dry packing. Grouting: Verify proper grouting technique including consolidation to approved height of grout space, reconsolidation and vibration. If high lift grouting method is used, verify the use of self-consolidating grout. No consolidation or vibration is required with the use of self-consolidating grout.
a.
G.
H.
Mortar and Grout Mix Verification: Verify mixes conform to the design mix.
Reports: 1. Masonry: In addition to required information noted previously in this Section, record the following
information on concrete masonry unit test reports: a. Test sample number. b. Specific wall areas represented by test sample. c. Description of units used to form sample. d. Tested net area compressive strength to the nearest 10 psi separately for each specimen and as the
average of three specimens. 2. Masonry Mortar and Grout: In addition to required information in Section 01458, submit reports in
accordance with ASTM C780 annex A4for mortar mixes and ASTM C 1019 for grout mixes showing compliance with specified compressive strength and material requirements. a. Provide lab test reports in accordance with ASTM C 270 for dry pre-blended mortar and site-
batched mortar. b. For dry pre-blended mortar, include assumptions made in calculations and whether test results
indicate compliance with cementitious-material-to-aggregate ratio proportion requirement. c. For site batched mortar, provide documentation of observed mix proportions to determine
compliance with ASTM C 270 proportion specification. Document unit measure procedure used to determine conversion of mason’s method of sand measure (e.g. cubic foot box, calibrated bucket, etc.) to loose, damp, cubic feet.
d. If sand source does not meet gradation limits in ASTM C 144, provide test report in accordance with ASTM C 270 property specification.
3. Mix Design: Record verification of conformance of mortar and grout mixes to mix design.
END OF SECTION
04200-14
Wal-Mart Market #5986 – Frisco, TX (1007028) January 20, 2011

TABLE A TESTING AND INSPECTION SCHEDULE
Description of Verification and Inspection Work
Level 1 Special Inspection As masonry construction begins, the following shall be verified to ensure compliance:
1. Proportion of site-prepared mortar. 2. Construction of mortar joints. 3. Location of reinforcement, connectors,
and embedded anchorages.
The inspection program shall verify: 1. Size and location of structural
elements. 2. Type, size, and location of anchors,
including other details of anchorage to masonry to structural members, frame or other construction.
3. Specified size, grade, and type of reinforcement.
4. Protection of masonry during cold weather (temperature below 40°F) or hot weather (temperature above 90°F).
Prior to grouting, the following shall be verified to ensure compliance:
1. Grout space is clean. 2. Placement of reinforcement,
connectors, and embedded anchorages. 3. Proportions of site-prepared grout. 4. Construction of mortar joints.
Grout placement shall be verified to ensure compliance with code and construction document provisions.
Preparation of any required grout specimens, mortar specimens and/or prisms shall be observed. Compliance with required inspection provisions of the construction documents and the approved submittals shall be verified.
Inspection Frequency
Periodic
Periodic
Periodic
Continuous
Continuous
Periodic
Referenced Standards
ACI 530.1/ASCE 6/TMS 602 Art. 2.6A ACI 530.1/ASCE 6/TMS 602 Art. 3.3B ACI 530.1/ASCE 6/TMS 602 Art. 3.4 & 3.6A
ACI 530.1/ASCE 6/TMS 602 Art. 3.3G ACI 530/ASCE 5/TMS 402 Sec. 1.2.2(e), 2.1.4, 3.1.6 ACI 530/ASCE 5/TMS 402 Sec. 1.13 ACI 530.1/ASCE 6/TMS 602 Art. 2.4 & 3.4 ACI 530.1/ASCE 6/TMS 602 Art. 1.8C & 1.8D
ACI 530.1/ASCE 6/TMS 602 Art. 3.2D ACI 530/ASCE 5/TMS 402 Sec. 1.13 ACI 530.1/ASCE 6/TMS 602 Art. 3.4 ACI 530.1/ASCE 6/TMS 602 Art. 2.6B ACI 530.1/ASCE 6/TMS 602 Art. 3.3B
ACI 530.1/ASCE 6/TMS 602 Art. 3.5
ACI 530.1/ASCE 6/TMS 602 Art. 1.4
ACI 530.1/ASCE 6/TMS 602 Art. 1.5
04200-15
Wal-Mart Market #5986 – Frisco, TX (1007028) January 20, 2011

BLANK PAGE
04200-16
Wal-Mart Market #5986 – Frisco, TX (1007028) January 20, 2011
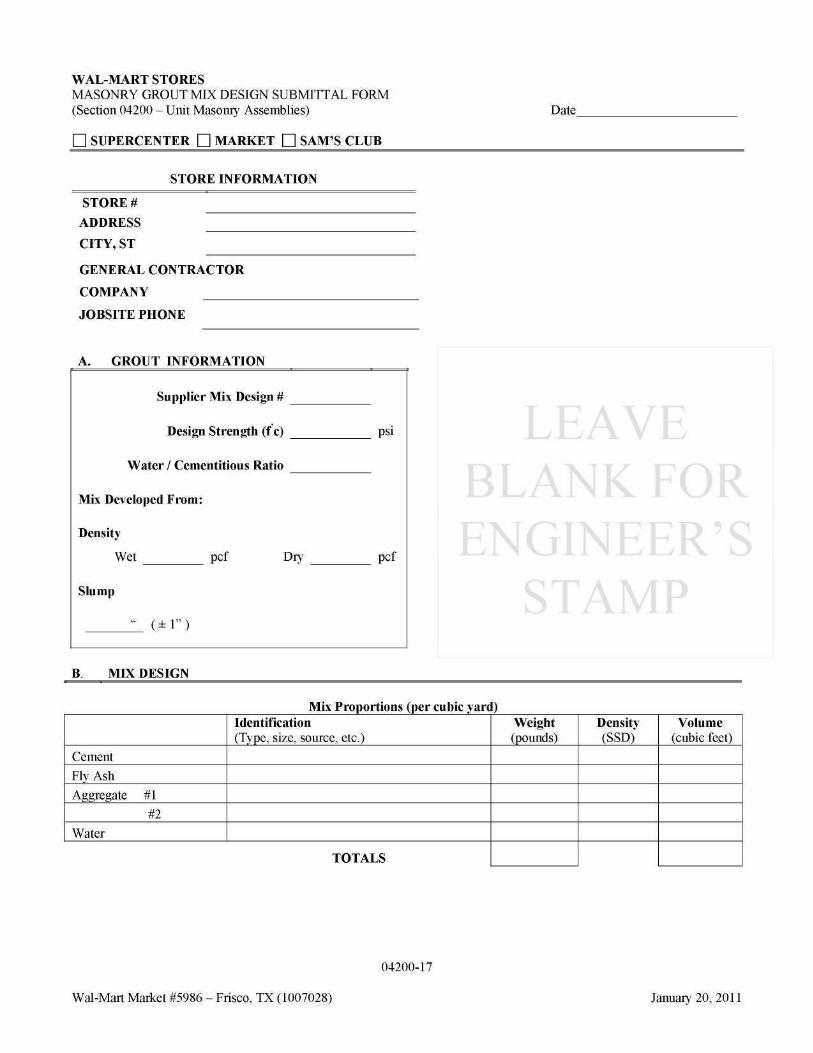
WAL-MART STORES MASONRY GROUT MIX DESIGN SUBMITTAL FORM (Section 04200 – Unit Masonry Assemblies) Date
SUPERCENTER MARKET SAM’S CLUB
STORE INFORMATION
STORE #
ADDRESS
CITY, ST
GENERAL CONTRACTOR
COMPANY
JOBSITE PHONE
A. GROUT INFORMATION
Supplier Mix Design #
Design Strength (f’c)
Water / Cementitious Ratio
Mix Developed From:
Density
Wet pcf Dry
Slump
( ± 1” )
B. MIX DESIGN
Mix Proportions (per cubic yard)
Cement
Fly Ash
Aggregate #1
#2
Water
Identification (Type, size, source, etc.)
TOTALS
Weight (pounds)
Density (SSD)
Volume (cubic feet)
04200-17
LE VE B R
EER STAMP
Wal-Mart Market #5986 – Frisco, TX (1007028)
Tel. # ( )
Cell # ( )
Cell # ( )
04200-18
C. MASONRY SUBCONTRACTOR INFORMATION
Company Name
Address
City, ST Zip
Technical Contact
Sales Contact
Wal-Mart Market #5986 – Frisco, TX (1007028) January 20, 2011
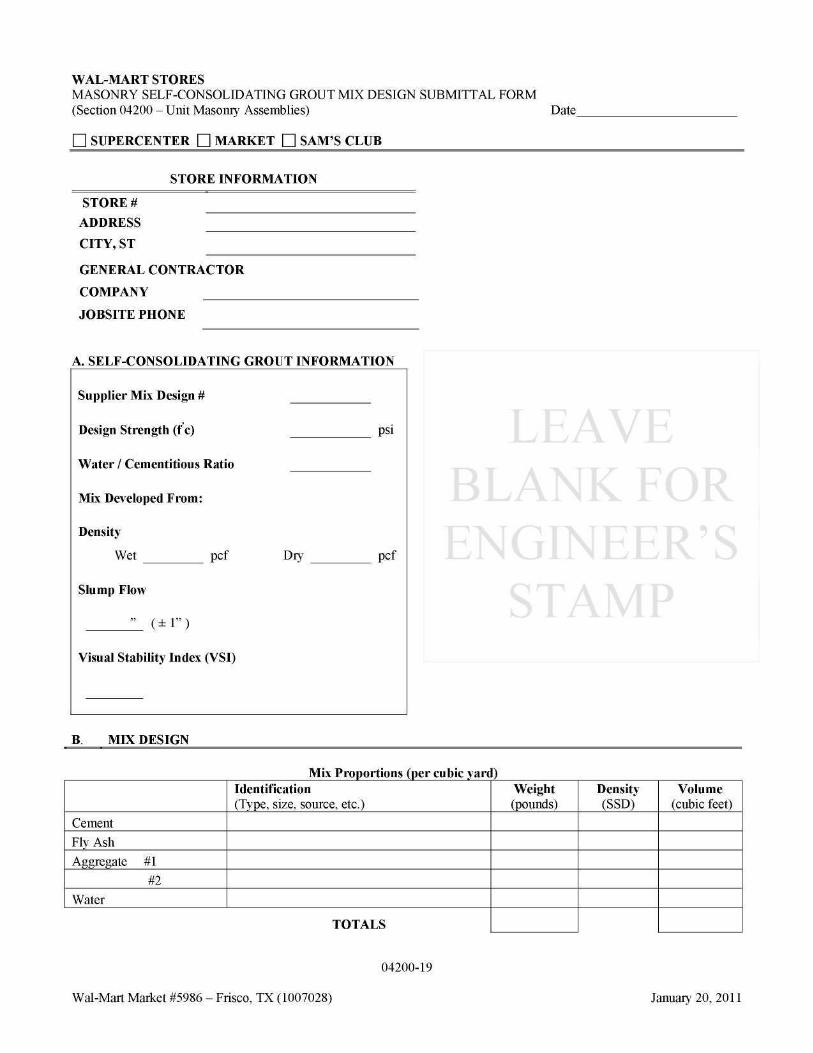
WAL-MART STORES MASONRY SELF-CONSOLIDATING GROUT MIX DESIGN SUBMITTAL FORM (Section 04200 – Unit Masonry Assemblies)
SUPERCENTER MARKET SAM’S CLUB
STORE INFORMATION
STORE #
ADDRESS
CITY, ST
GENERAL CONTRACTOR
COMPANY
JOBSITE PHONE
A. SELF-CONSOLIDATING GROUT INFORMATION
Supplier Mix Design #
Design Strength (f’c)
Water / Cementitious Ratio
Mix Developed From:
Density
Wet pcf
Slump Flow
” ( ± 1” )
Visual Stability Index (VSI)
Dry
psi
pcf
B. MIX DESIGN
Date
E B R
STAMP
Mix Proportions (per cubic yard)
Cement
Fly Ash
Aggregate #1
#2
Water
Identification (Type, size, source, etc.)
TOTALS
Weight (pounds)
Density (SSD)
Volume (cubic feet)
04200-19
Wal-Mart Market #5986 – Frisco, TX (1007028) January 20, 2011
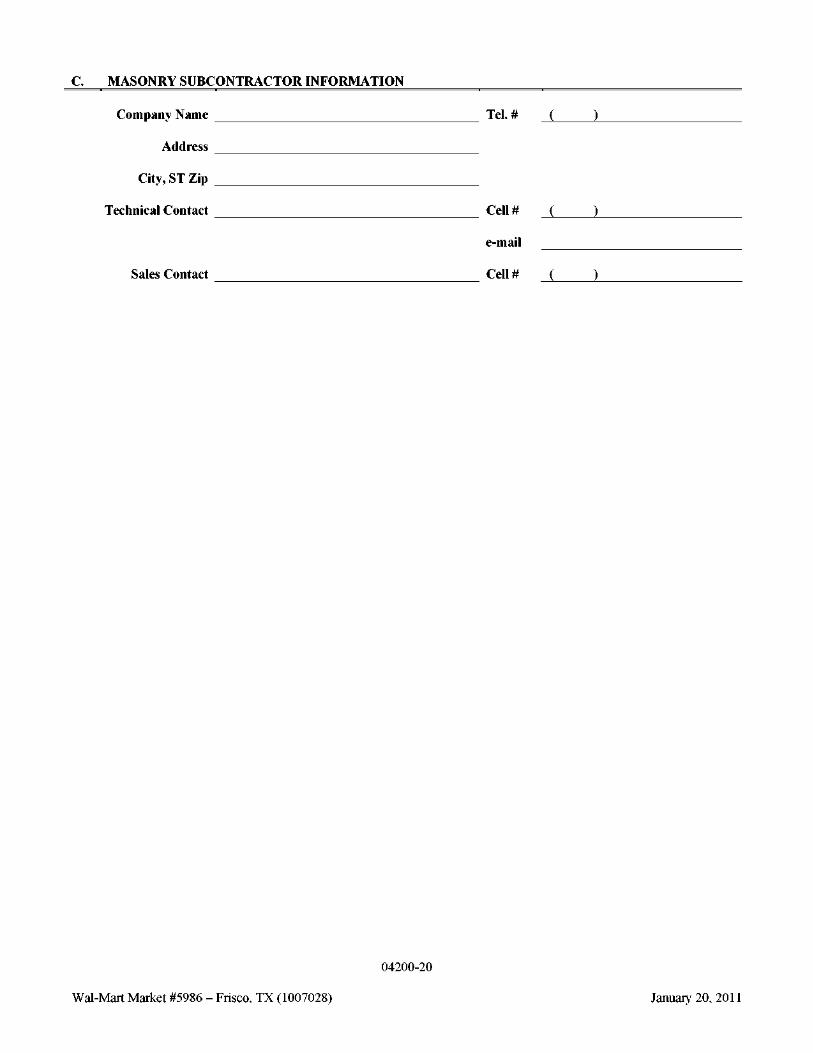
( )
( )
( )
04200-20
C. MASONRY SUBCONTRACTOR INFORMATION
Company Name Tel. #
Address
City, ST Zip
Technical Contact Cell #
Sales Contact Cell #
Wal-Mart Market #5986 – Frisco, TX (1007028) January 20, 2011

![SOS Rules revised 100710 - decisiongames.comdecisiongames.com/E-RULES/SOS_Rules_revised_100710.pdf · 1 storm of steel contents standard rules [1.0] introduction [2.0] general course](https://img.pdfslide.us/doc/110x75/6011ae3517ba0d349e03d049/sos-rules-revised-100710-1-storm-of-steel-contents-standard-rules-10-introduction.jpg)