Embed Size (px)
Citation preview
This Configuration Guide answers many of the most common questions regarding the uniCenta oPOS setup and configuration after installation. It is a “What Do I Do Next?” of key components.
Configuration GuideVersion 4.1
Jack Gerrard
March 2016
Foreward
Many of the settings and options are intuitive and self-explanatory, yet it’s still worthwhile providing a brief description of what they do, especially for newcomers to uniCenta oPOS
Configuring uniCenta oPOS for the first time? Take things step-by-step and try not to feel too intimidated. Follow this guide and you won’t go far wrong. If you’re upgrading it’s recommended you read the upgrade page.
There are a few things that need to be done if this is a new uniCenta oPOS installation.
• Decide if this is a single or multi-terminal installation • Install Java JRE 1.8 (minimum). • Install MySQL server 5.5 (minimum) or use the MAMP installer especially if you
know you will want to use the Web reporting. MySQL server installation is not covered in this guide and it is expected it is installed and functioning properly.
If an upgrade, you can use all your existing settings and only need to review, and possibly adjust, the new Configuration settings in uniCenta oPOS where necessary. Either way, fresh install or upgrade, it’s a good idea to be prepared before embarking on the set up.
The most essential application needed is MySQL server installed and without it you cannot run uniCenta oPOS. Support for installing or configuring a local or remote MySQL database is not included though a basic review is included at the end of this guide to help you.
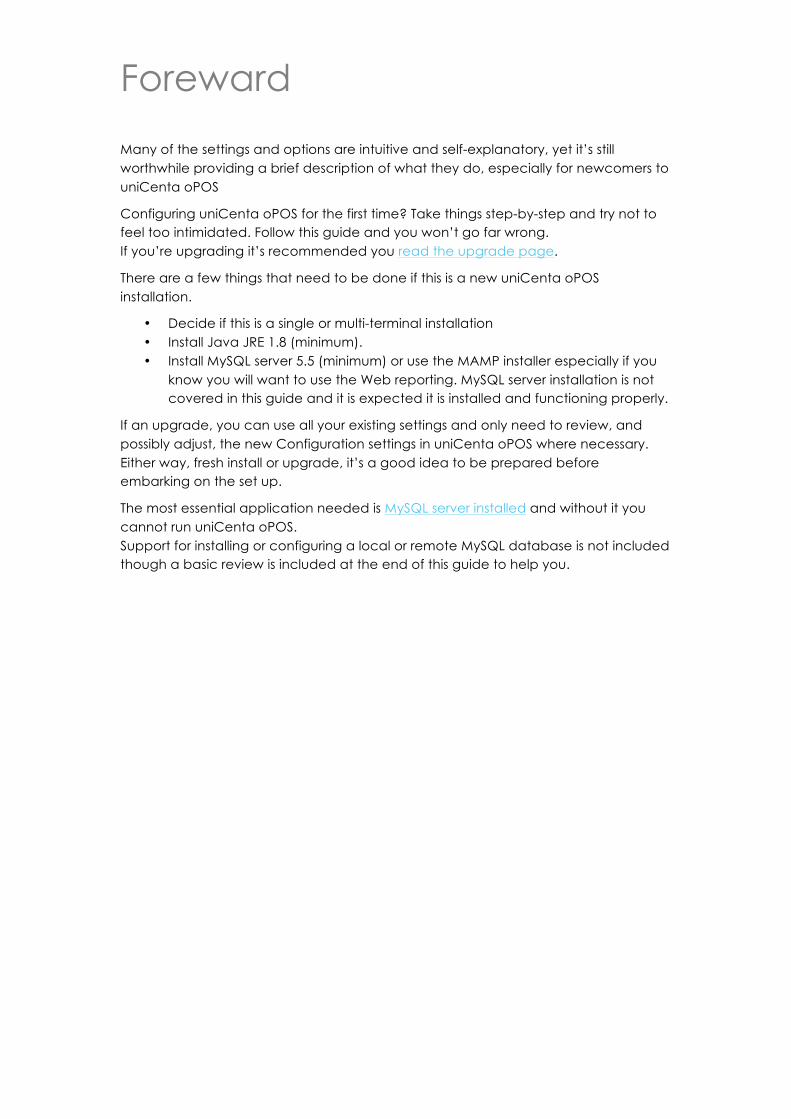
Date Version Author Comment January 2016 1.0 Jack Gerrard Drafting February 2016 1.1 Jack Gerrard Additional text March 2016 1.2 Jack Gerrard Database
GENERAL
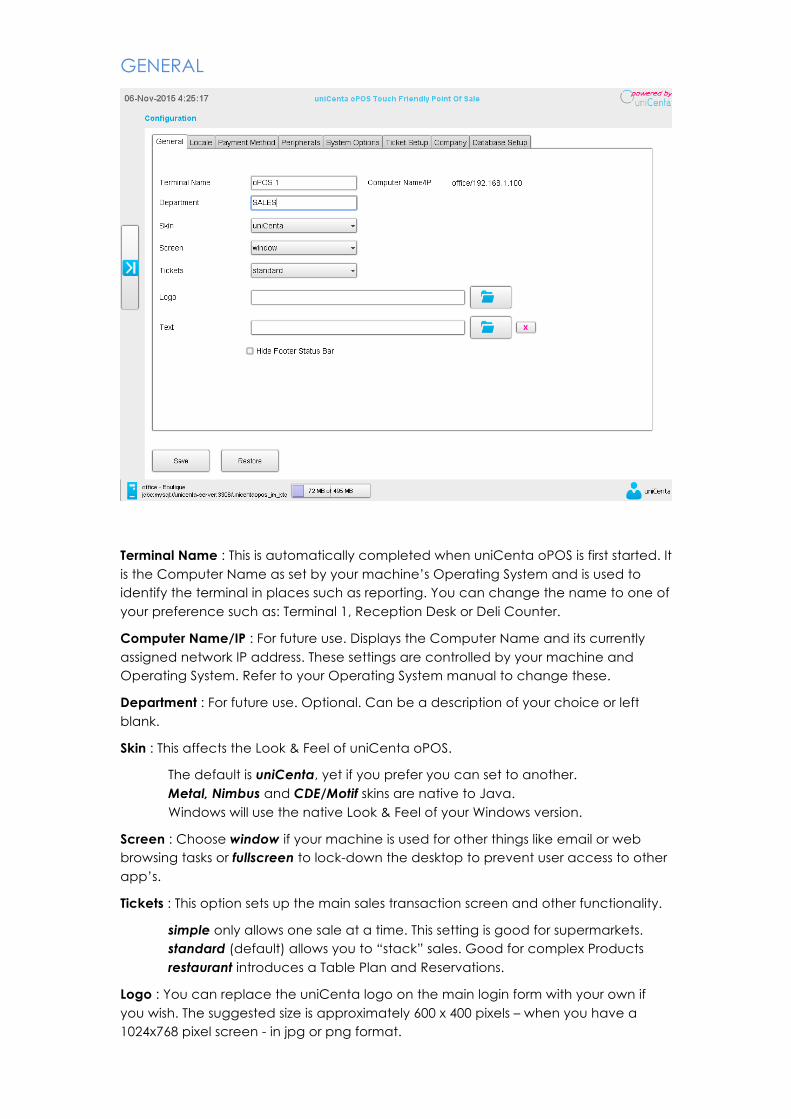
Terminal Name : This is automatically completed when uniCenta oPOS is first started. It is the Computer Name as set by your machine’s Operating System and is used to identify the terminal in places such as reporting. You can change the name to one of your preference such as: Terminal 1, Reception Desk or Deli Counter.
Computer Name/IP : For future use. Displays the Computer Name and its currently assigned network IP address. These settings are controlled by your machine and Operating System. Refer to your Operating System manual to change these.
Department : For future use. Optional. Can be a description of your choice or left blank.
Skin : This affects the Look & Feel of uniCenta oPOS.
The default is uniCenta, yet if you prefer you can set to another. Metal, Nimbus and CDE/Motif skins are native to Java. Windows will use the native Look & Feel of your Windows version.
Screen : Choose window if your machine is used for other things like email or web browsing tasks or fullscreen to lock-down the desktop to prevent user access to other app’s.
Tickets : This option sets up the main sales transaction screen and other functionality.
simple only allows one sale at a time. This setting is good for supermarkets. standard (default) allows you to “stack” sales. Good for complex Products restaurant introduces a Table Plan and Reservations.
Logo : You can replace the uniCenta logo on the main login form with your own if you wish. The suggested size is approximately 600 x 400 pixels – when you have a 1024x768 pixel screen - in jpg or png format.

Text : Replace the uniCenta oPOS GNU GPl3 license text with your own preferred content. Text can contain core <html> formatting tags such as <h1>Heading</h1>
Hide Footer Status Bar : This checkbox controls appearance of the footer section. If un-checked (default state) it appears on all uniCenta oPOS screens. It displays core configuration information such as the database in use, and the currently logged on user, as well as a Java JVM RAM used/available widget. The Status Bar is a useful reference when initially setting up uniCenta oPOS and can be switched off later.
When the option is checked; the footer is hidden from view.
LOCALE
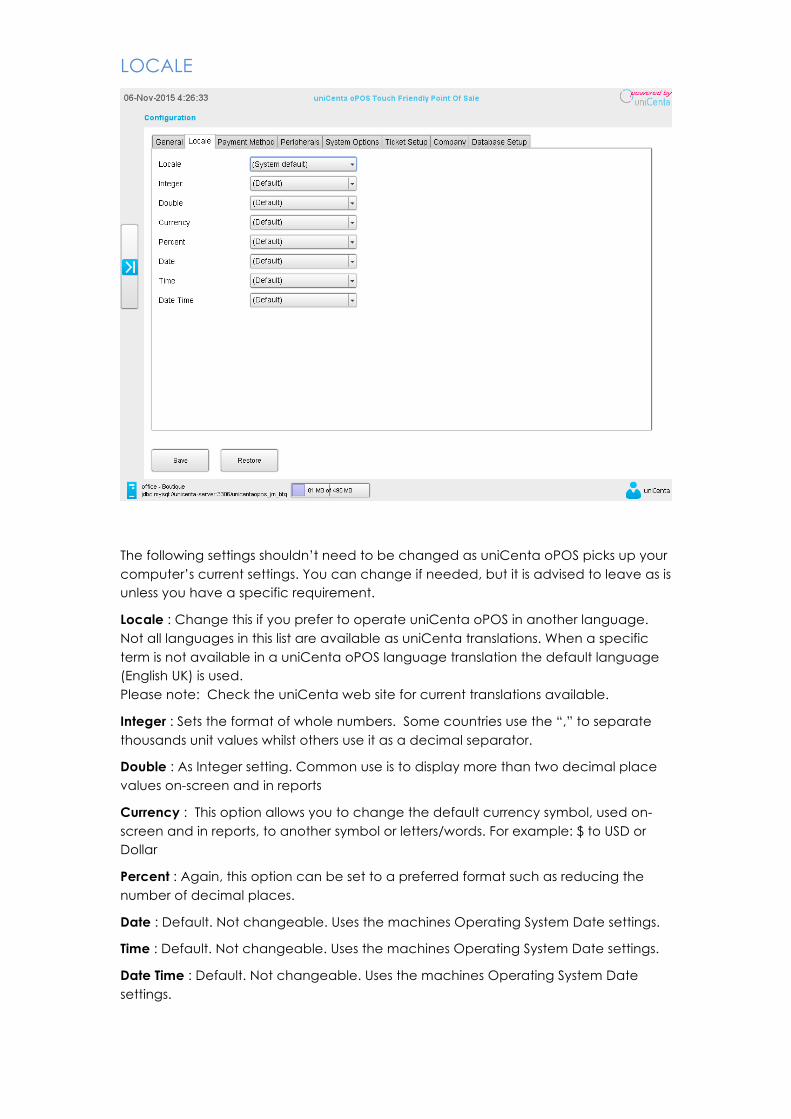
The following settings shouldn’t need to be changed as uniCenta oPOS picks up your computer’s current settings. You can change if needed, but it is advised to leave as is unless you have a specific requirement.
Locale : Change this if you prefer to operate uniCenta oPOS in another language. Not all languages in this list are available as uniCenta translations. When a specific term is not available in a uniCenta oPOS language translation the default language (English UK) is used. Please note: Check the uniCenta web site for current translations available.
Integer : Sets the format of whole numbers. Some countries use the “,” to separate thousands unit values whilst others use it as a decimal separator.
Double : As Integer setting. Common use is to display more than two decimal place values on-screen and in reports
Currency : This option allows you to change the default currency symbol, used on-screen and in reports, to another symbol or letters/words. For example: $ to USD or Dollar
Percent : Again, this option can be set to a preferred format such as reducing the number of decimal places.
Date : Default. Not changeable. Uses the machines Operating System Date settings.
Time : Default. Not changeable. Uses the machines Operating System Date settings.
Date Time : Default. Not changeable. Uses the machines Operating System Date settings.

PAYMENT METHOD
Credit Card Payment gateways have been removed from uniCenta oPOS due to the latest PCI Regulations. These will now be available as plug-ins.
Card Reader : For User, Customer and payment Card device readers.
• Not defined : Default. • Intelligent : Retained for specialist and legacy readers. Please check with your
card reader supplier. • Generic : Most commonly used and available. • Keyboard : Allows entry of cardholder, card number and expiration date
when making a settlement payment of a sales transaction when a magnetic card reader is not available.
• NCR/RFID : Reserved for future.
Payment Gateway : This will be populated when a specific uniCenta Card Payment gateway plug-in is used. Set to external if you have a separate card payment terminal and want to record card sales.
• Not defined • External
PERIPHERALS
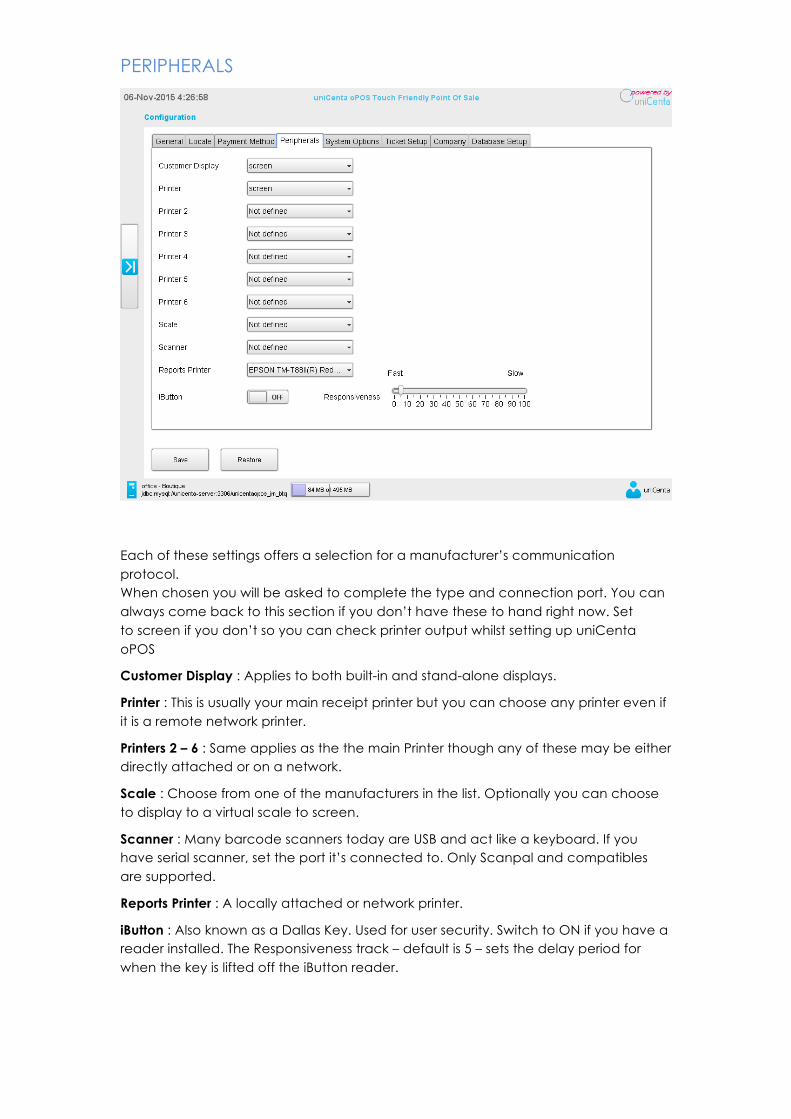
Each of these settings offers a selection for a manufacturer’s communication protocol. When chosen you will be asked to complete the type and connection port. You can always come back to this section if you don’t have these to hand right now. Set to screen if you don’t so you can check printer output whilst setting up uniCenta oPOS
Customer Display : Applies to both built-in and stand-alone displays.
Printer : This is usually your main receipt printer but you can choose any printer even if it is a remote network printer.
Printers 2 – 6 : Same applies as the the main Printer though any of these may be either directly attached or on a network.
Scale : Choose from one of the manufacturers in the list. Optionally you can choose to display to a virtual scale to screen.
Scanner : Many barcode scanners today are USB and act like a keyboard. If you have serial scanner, set the port it’s connected to. Only Scanpal and compatibles are supported.
Reports Printer : A locally attached or network printer.
iButton : Also known as a Dallas Key. Used for user security. Switch to ON if you have a reader installed. The Responsiveness track – default is 5 – sets the delay period for when the key is lifted off the iButton reader.

SYSTEM OPTIONS
Settings in this section affect the way certain components appear or function. uniCenta oPOS will work just fine if these are left as they are.
System Set Tax included on startup : Controls how tax is applied to variable price Products in the sales screen. Leave this un-checkedfor normal operation.
Single Instance : When checked prevents another copy of uniCenta oPOS running on the same computer.
Hide Payment panel text overlay : Switches off the text shown on the currency images when checked.
Keypad Use 00 keypad button : Replace the number pad’s single 0 with 00
Input box above keypad : Moves the number pad’s input area.
Move Close Cash buttons : Moves buttons from the form’s footer to the top.
Automatics Auto LogOff after Sale? : Returns to the login screen after a sale is closed or the sales screen is inactive after After ? seconds In Restaurant mode – return to table plan? : Check if it is preferred not to return to login screen.
Auto Refresh Table Map : Keeps the table status up to date opposed to doing a manual refresh. After ? seconds
Enable Service Charge :Used together with the special xxx988 Product to add (optional) fixed charge to a sales transaction.

Service Charge Rate ?% : The rate to charge. This value should be net of Tax. Restaurant mode only? : Will only be applied when Restaurant screen is used.
Restaurant Show Customer name on table plan : Check to show when a Customer is assigned to a ticket. Assign a colour using the colour picker.
Show User’s detail on table plan : Check to show the Server’s name assigned to a ticket. Assign a colour using the colour picker.
Table Name Text colour : Assign a colour using the colour picker.
TICKET SETUP
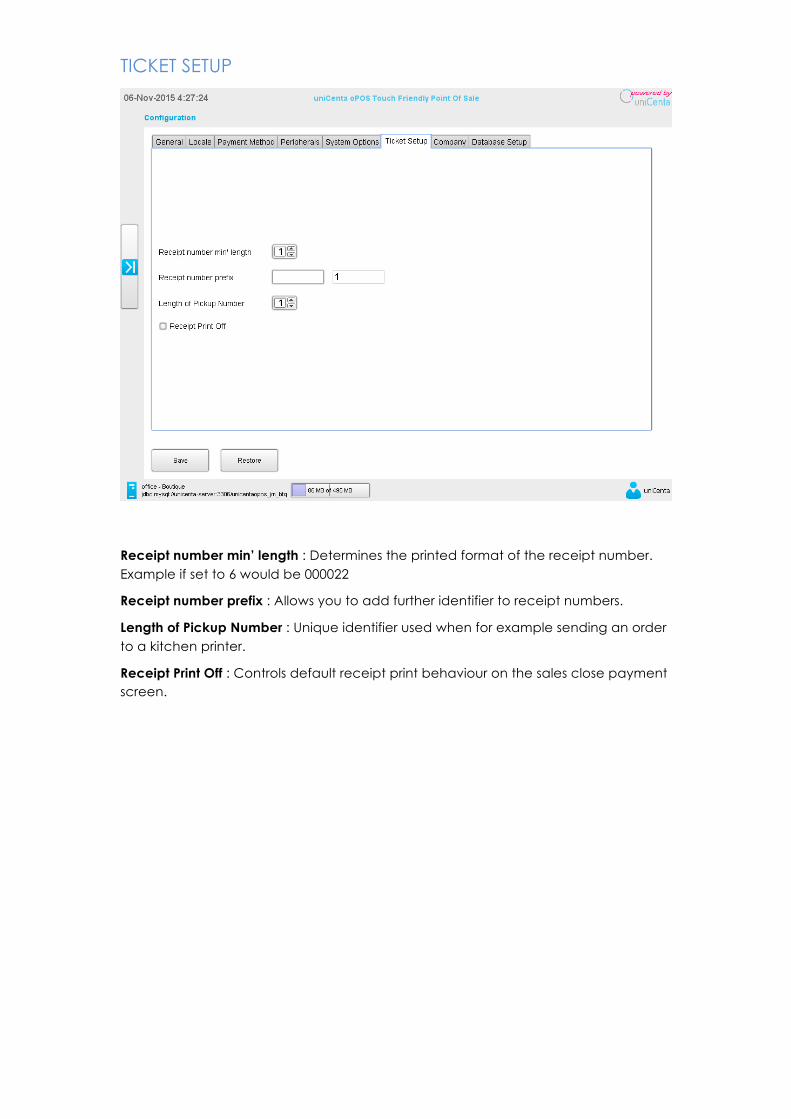
Receipt number min’ length : Determines the printed format of the receipt number. Example if set to 6 would be 000022
Receipt number prefix : Allows you to add further identifier to receipt numbers.
Length of Pickup Number : Unique identifier used when for example sending an order to a kitchen printer.
Receipt Print Off : Controls default receipt print behaviour on the sales close payment screen.

COMPANY
Header 1 – 6 : Complete the text to be used in your receipt’s header section.
Footer 1 – 6 : Complete the text to be used in your receipt’s footer section.
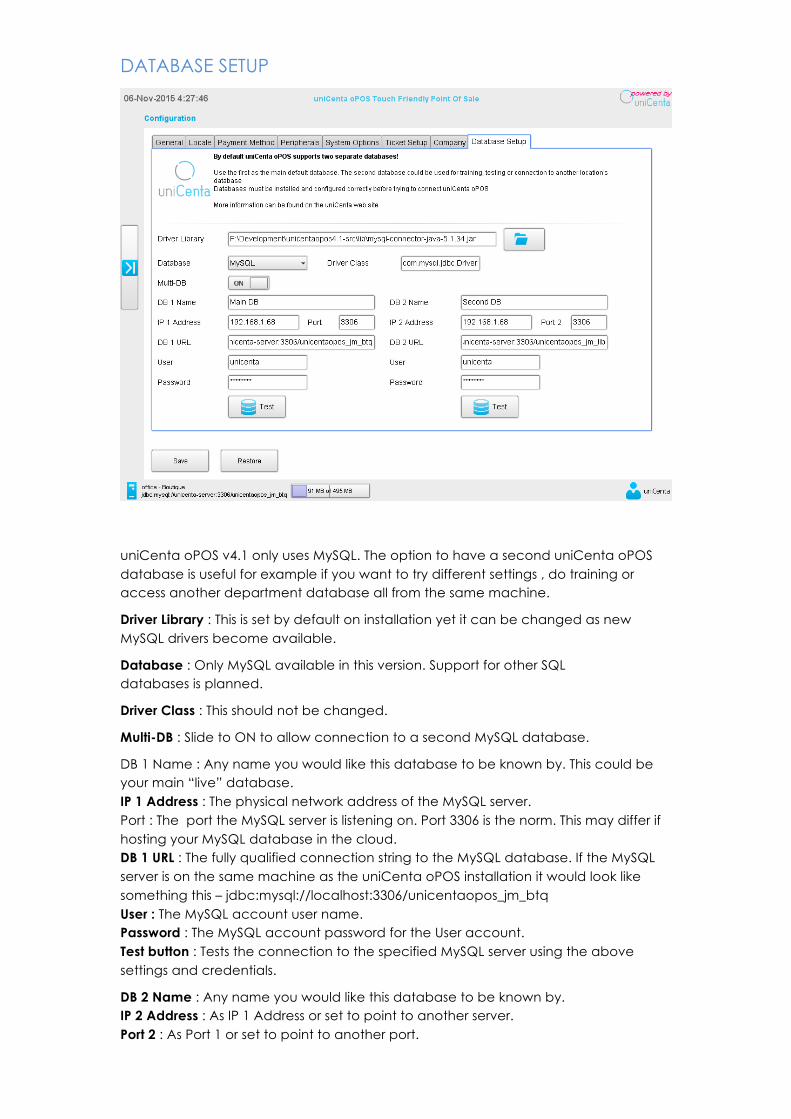
DATABASE SETUP
uniCenta oPOS v4.1 only uses MySQL. The option to have a second uniCenta oPOS database is useful for example if you want to try different settings , do training or access another department database all from the same machine.
Driver Library : This is set by default on installation yet it can be changed as new MySQL drivers become available.
Database : Only MySQL available in this version. Support for other SQL databases is planned.
Driver Class : This should not be changed.
Multi-DB : Slide to ON to allow connection to a second MySQL database.
DB 1 Name : Any name you would like this database to be known by. This could be your main “live” database. IP 1 Address : The physical network address of the MySQL server. Port : The port the MySQL server is listening on. Port 3306 is the norm. This may differ if hosting your MySQL database in the cloud. DB 1 URL : The fully qualified connection string to the MySQL database. If the MySQL server is on the same machine as the uniCenta oPOS installation it would look like something this – jdbc:mysql://localhost:3306/unicentaopos_jm_btq User : The MySQL account user name. Password : The MySQL account password for the User account. Test button : Tests the connection to the specified MySQL server using the above settings and credentials.
DB 2 Name : Any name you would like this database to be known by. IP 2 Address : As IP 1 Address or set to point to another server. Port 2 : As Port 1 or set to point to another port.
DB 2 URL : Same format as DB 1 URL except specify another MySQL database. Example – jdbc:mysql://localhost:3306/unicentaopos_jm_lib User : As User 1 or set to a different account user name. Password : The MySQL account password for the User account. Test button : Tests this connection’s settings and credentials.
Final thing you need to do is to Save your settings and restart uniCenta oPOS for them to take effect.
IMPORTANT
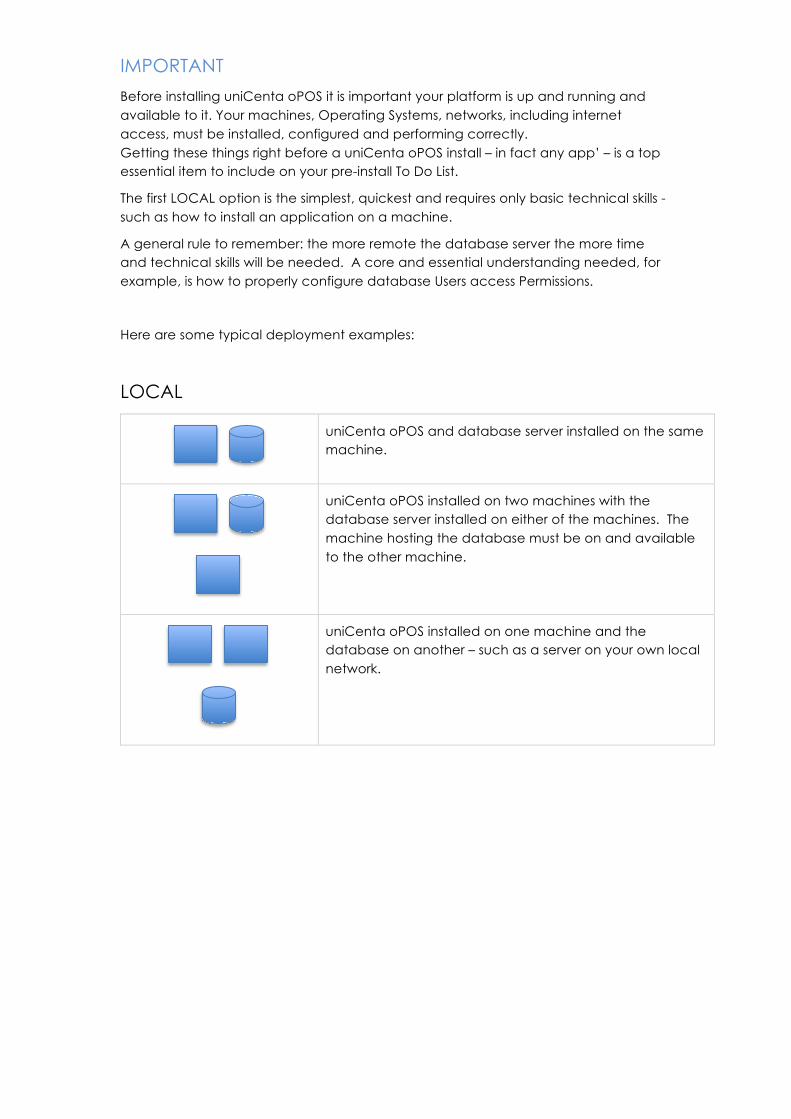
Before installing uniCenta oPOS it is important your platform is up and running and available to it. Your machines, Operating Systems, networks, including internet access, must be installed, configured and performing correctly. Getting these things right before a uniCenta oPOS install – in fact any app’ – is a top essential item to include on your pre-install To Do List.
The first LOCAL option is the simplest, quickest and requires only basic technical skills - such as how to install an application on a machine.
A general rule to remember: the more remote the database server the more time and technical skills will be needed. A core and essential understanding needed, for example, is how to properly configure database Users access Permissions.
Here are some typical deployment examples:
LOCAL
uniCenta oPOS and database server installed on the same machine.
uniCenta oPOS installed on two machines with the database server installed on either of the machines. The machine hosting the database must be on and available to the other machine.
uniCenta oPOS installed on one machine and the database on another – such as a server on your own local network.
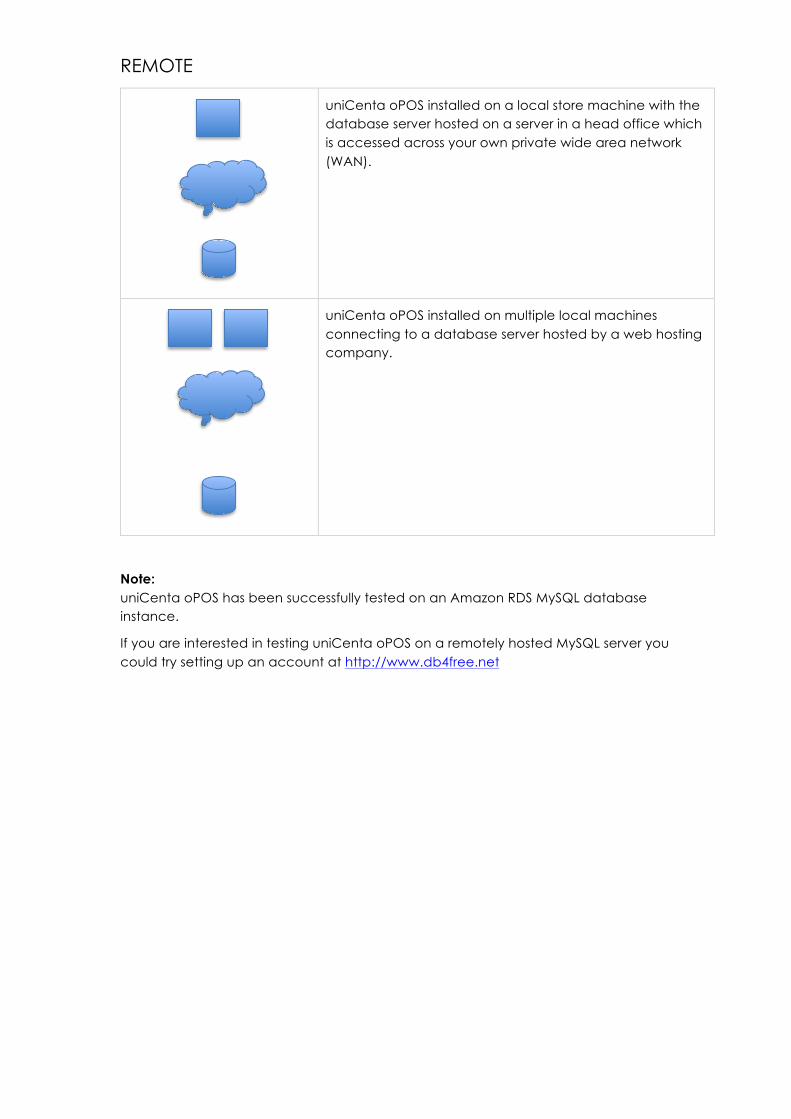
REMOTE
uniCenta oPOS installed on a local store machine with the database server hosted on a server in a head office which is accessed across your own private wide area network (WAN).
uniCenta oPOS installed on multiple local machines connecting to a database server hosted by a web hosting company.
Note: uniCenta oPOS has been successfully tested on an Amazon RDS MySQL database instance.
If you are interested in testing uniCenta oPOS on a remotely hosted MySQL server you could try setting up an account at http://www.db4free.net