Embed Size (px)
Citation preview
• Step by Step constructioninstruction.
• A complete bill of materials.
• Exploded view and elevationdrawings.
• How-to photos with instructivecaptions.
• Tips to help you complete theproject and become a betterwoodworker.
To download these plans,you will need Adobe Reader
installed on your computer. If you want to geta free copy, you can get it at: Adobe Reader.
Having trouble downloading the plans?• If you're using Microsoft Internet
Explorer, right click on the download linkand select "Save Target As" to downloadto your local drive.
• If you're using Netscape, right click onthe download link and select "Save LinkAs" to download to your local drive.
WJ077
“America’s leading woodworking authority”™
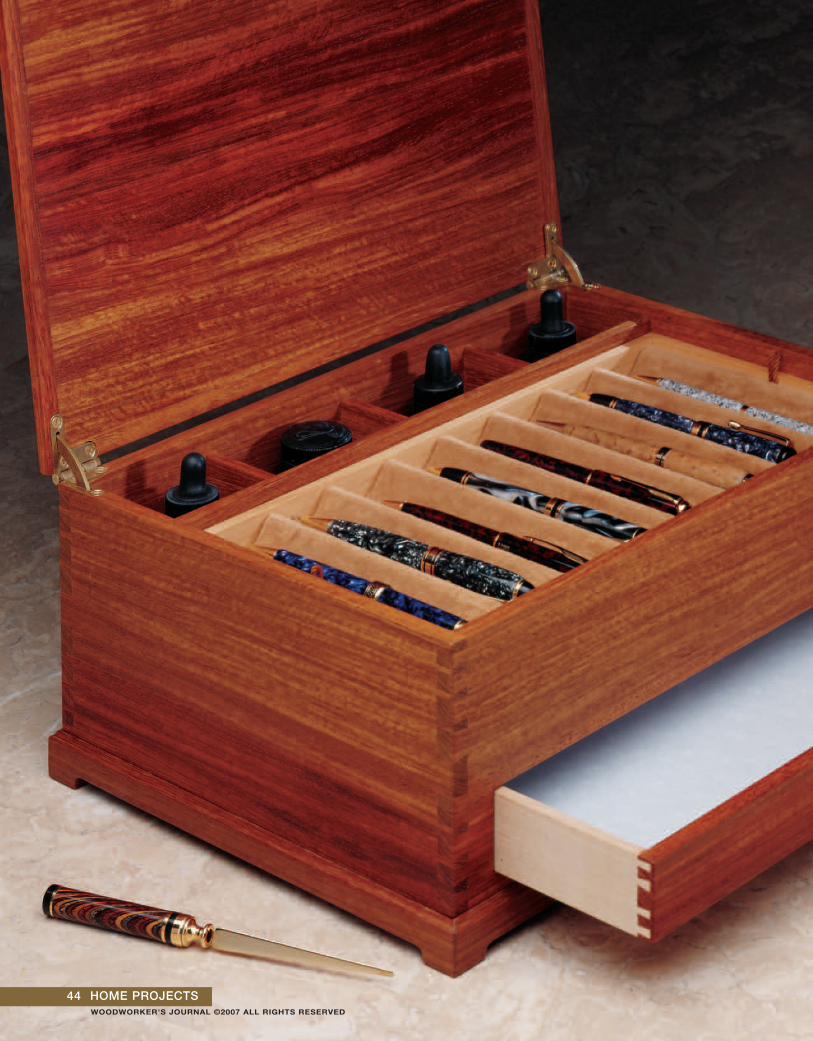
Undelivered Letter Box
Published in Woodworker’s Journal “Today’s Woodworker:Projects, Tips and Techniques for the Home Shop”
WOODWORKER'S JOURNAL ©2007 ALL RIGHTS RESERVED
44 HOME PROJECTS WOODWORKER'S JOURNAL ©2007 ALL RIGHTS RESERVED
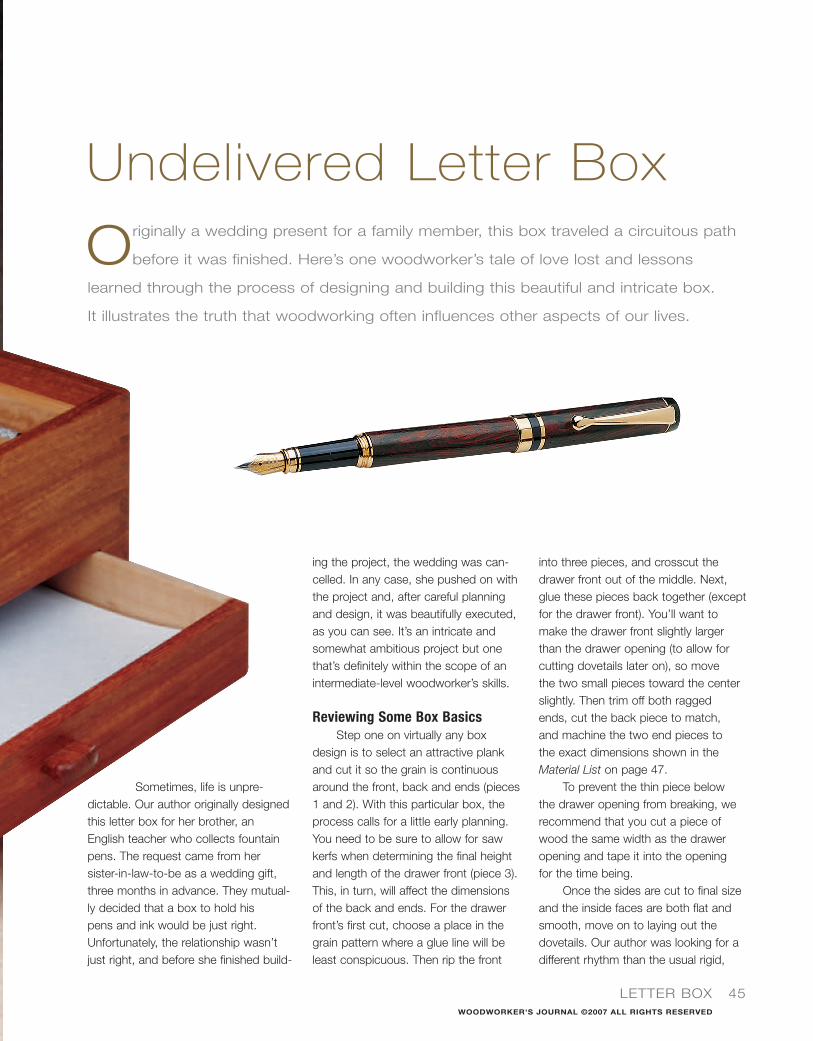
Sometimes, life is unpre-dictable. Our author originally designedthis letter box for her brother, anEnglish teacher who collects fountainpens. The request came from her sister-in-law-to-be as a wedding gift,three months in advance. They mutual-ly decided that a box to hold his pens and ink would be just right.Unfortunately, the relationship wasn’tjust right, and before she finished build-
LETTER BOX 45
Undelivered Letter Box
Originally a wedding present for a family member, this box traveled a circuitous path
before it was finished. Here’s one woodworker’s tale of love lost and lessons
learned through the process of designing and building this beautiful and intricate box.
It illustrates the truth that woodworking often influences other aspects of our lives.
ing the project, the wedding was can-celled. In any case, she pushed on withthe project and, after careful planningand design, it was beautifully executed,as you can see. It’s an intricate andsomewhat ambitious project but onethat’s definitely within the scope of anintermediate-level woodworker’s skills.
Reviewing Some Box BasicsStep one on virtually any box
design is to select an attractive plankand cut it so the grain is continuousaround the front, back and ends (pieces1 and 2). With this particular box, theprocess calls for a little early planning.You need to be sure to allow for sawkerfs when determining the final heightand length of the drawer front (piece 3).This, in turn, will affect the dimensionsof the back and ends. For the drawerfront’s first cut, choose a place in thegrain pattern where a glue line will beleast conspicuous. Then rip the front
into three pieces, and crosscut thedrawer front out of the middle. Next,glue these pieces back together (exceptfor the drawer front). You’ll want tomake the drawer front slightly largerthan the drawer opening (to allow forcutting dovetails later on), so move the two small pieces toward the centerslightly. Then trim off both ragged ends, cut the back piece to match, and machine the two end pieces to the exact dimensions shown in theMaterial List on page 47.
To prevent the thin piece below the drawer opening from breaking, werecommend that you cut a piece ofwood the same width as the draweropening and tape it into the opening for the time being.
Once the sides are cut to final sizeand the inside faces are both flat andsmooth, move on to laying out thedovetails. Our author was looking for adifferent rhythm than the usual rigid,
WOODWORKER'S JOURNAL ©2007 ALL RIGHTS RESERVED
Letter Box Exploded View
1
1
10
1010
22
2
4
4
5
6
7
8
8
9
911
12
46 HOME PROJECTS WOODWORKER'S JOURNAL ©2007 ALL RIGHTS RESERVED
LETTER BOX 47
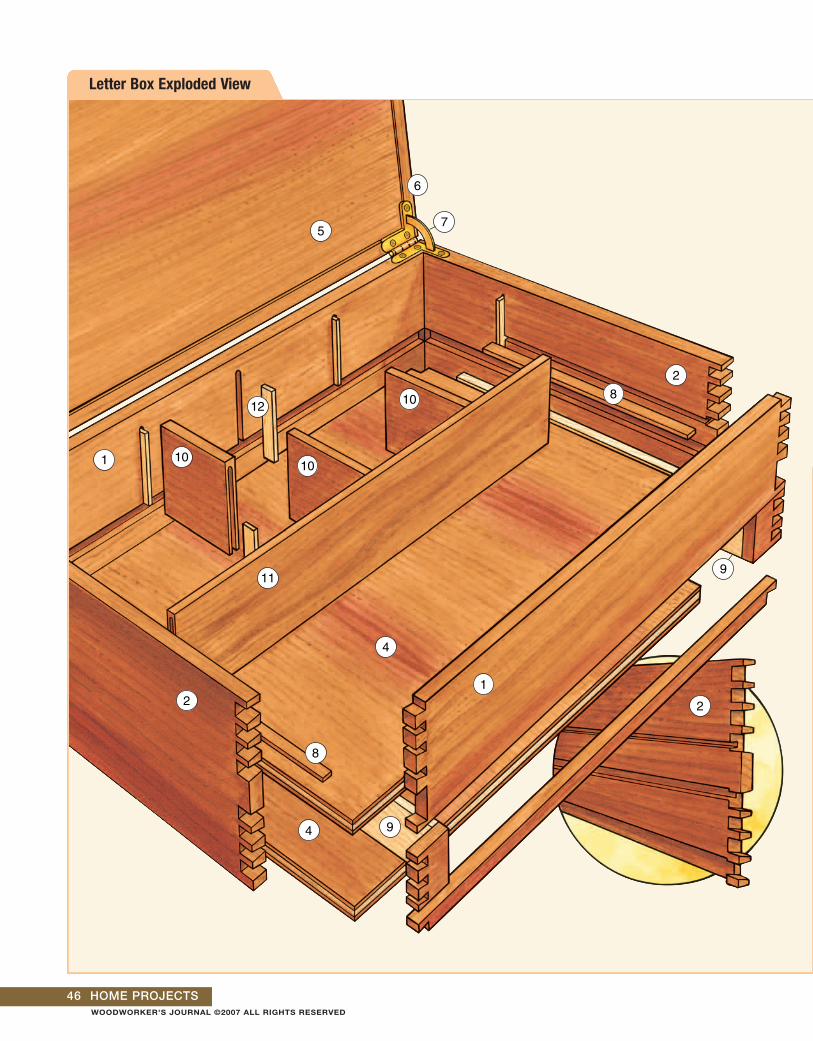
MATERIAL LIST – Carcass
T x W x L
1 Front and Back (2) 3/8" x 45⁄8" x 135⁄8"
2 Ends (2) 3/8" x 45⁄8" x 10"
3 Drawer Front (1) 3/8" x 13⁄8" x 115⁄8"
4 Horizontal Dividers (2) 9/32" x 131⁄4" x 97⁄16"
5 Lid (1) 9/32" x 93 ⁄8" x 131⁄16"
6 Edge Banding (1) 7/16" x 3/8" x 50"
7 Quadrant Hinges (2) Solid brass
8 Tray Supports (2) 1/8" x 7/16" x 67⁄8"
9 Drawer Pocket Sides (2) 3/8" x 17⁄16" x 91⁄4"
10 Small Dividers (3) 1/4" x 21⁄8" x 21⁄16"
11 Long Divider (1) 9/32" x 23⁄8" x 127⁄8"
12 Splines (8) 1/8" x 1/4" x 17⁄8"
uniform pattern of pins and tails, so shevaried the size and spacing. (Look topages 56 and 57 for more of theseconstruction details.)
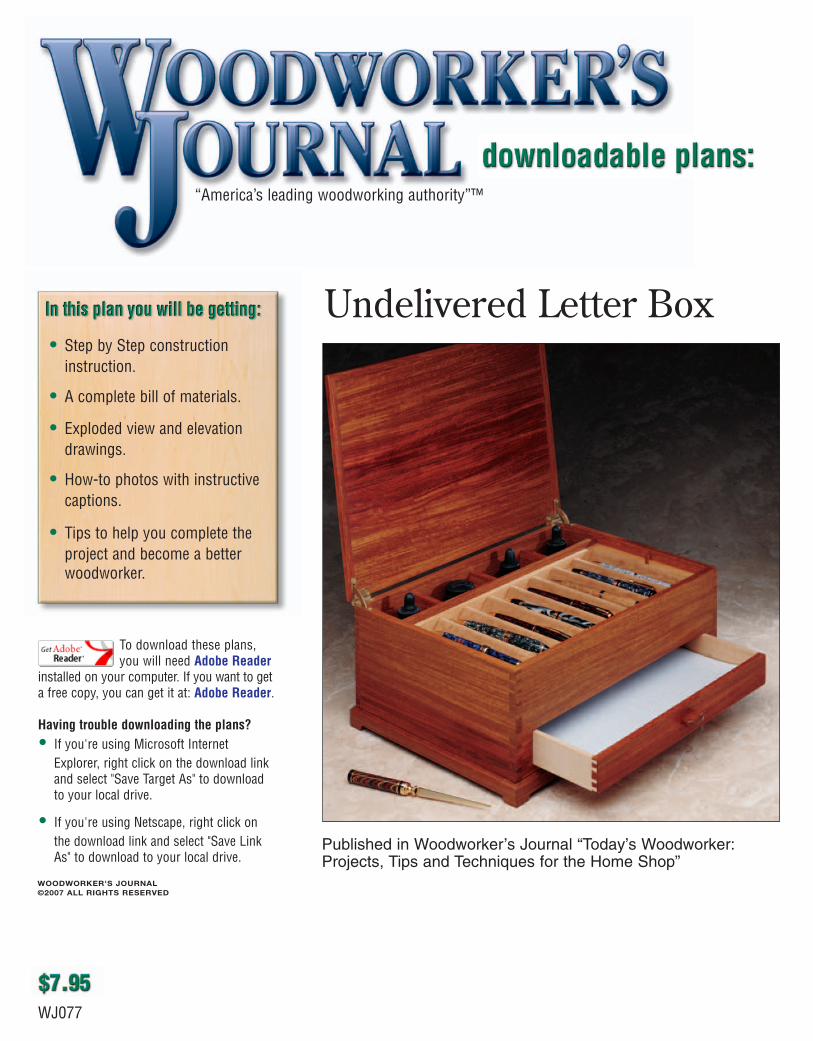
Making the Horizontal DividersThis box has two levels: the upper
for the ink and pen storage, and thelower for the paper drawer. Thisrequires two horizontal dividers (pieces4)—the lower one serves as the box’sbottom. Since these pieces will be fullycaptured by the walls of the box, theyneed to be made out of plywood. Itwouldn’t do to have them expandingand contracting with the seasons. Ourauthor made these panels from hand-made veneers and 1/8" plywood (seethe sidebar on page 49). She alsomade a third panel that would becomethe lid of the box (piece 5), with theapplication of thick, hand-made edgebanding (piece 6). The lid is eventuallyattached to the box with quadranthinges (pieces 7).
To capture the middle divider, rout grooves around the inside of thebox, stopping the cuts before the dove-tailed ends. Eventually, you’ll rout slotsfor the supports (pieces 8) that hold thetray. You’ll also install the drawer pocketsides (pieces 9) later. Next form a rab-bet along the bottom of the two endsand back to capture the bottom divider.This way, the piece serves double-dutyas the bottom of the drawer pocket.Don’t cut this rabbet in the box front:the bottom will be glued flush with thedrawer pocket opening.
Creating the Ink DividersYour next step is to go to the
Technical Drawings on pages 54 and56 in order to lay out the upper com-partment. Cut the dividers (pieces 10and 11) to size and mill the small slotsin the ends of each piece for the splines
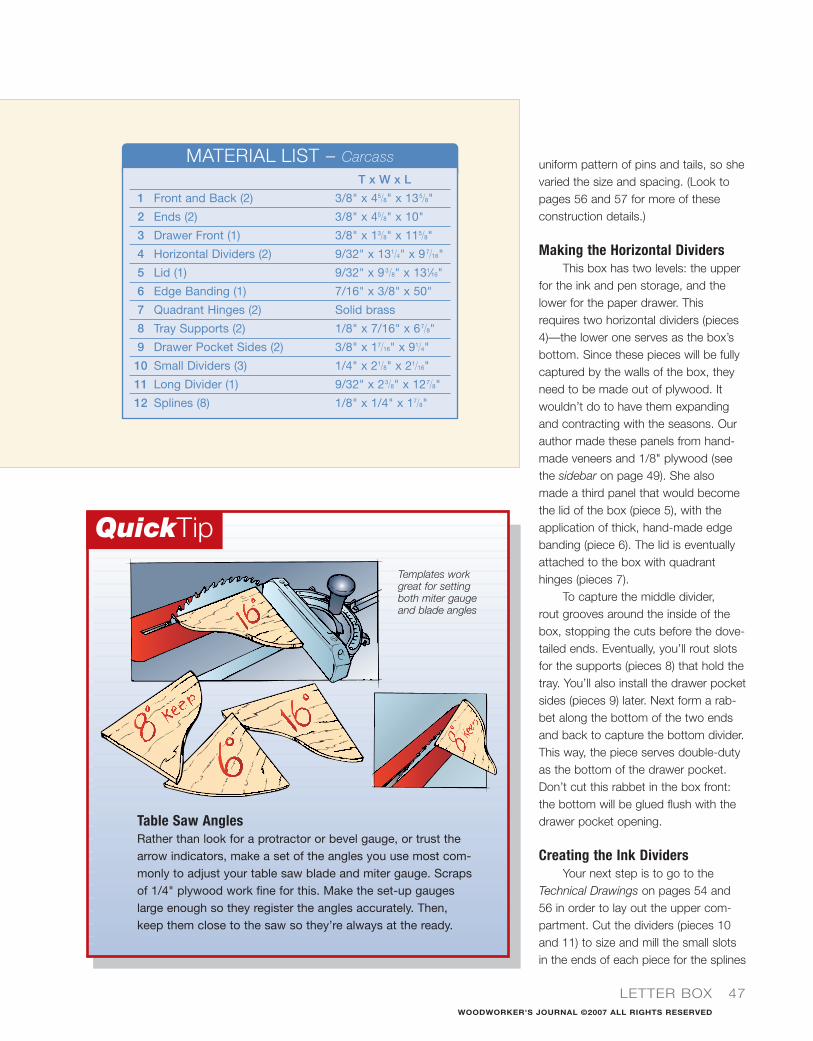
QuickTip
Table Saw AnglesRather than look for a protractor or bevel gauge, or trust thearrow indicators, make a set of the angles you use most com-monly to adjust your table saw blade and miter gauge. Scrapsof 1/4" plywood work fine for this. Make the set-up gaugeslarge enough so they register the angles accurately. Then,keep them close to the saw so they’re always at the ready.
Templates workgreat for settingboth miter gaugeand blade angles
WOODWORKER'S JOURNAL ©2007 ALL RIGHTS RESERVED
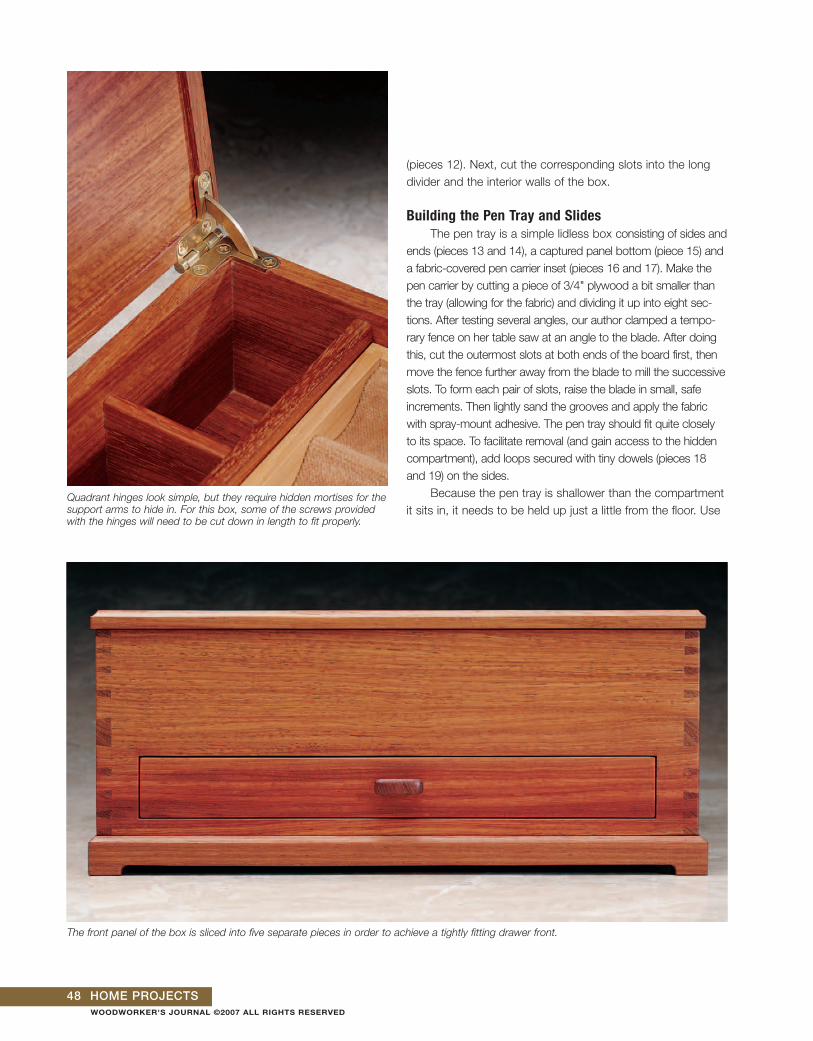
Quadrant hinges look simple, but they require hidden mortises for thesupport arms to hide in. For this box, some of the screws providedwith the hinges will need to be cut down in length to fit properly.
The front panel of the box is sliced into five separate pieces in order to achieve a tightly fitting drawer front.
48 HOME PROJECTS
(pieces 12). Next, cut the corresponding slots into the longdivider and the interior walls of the box.
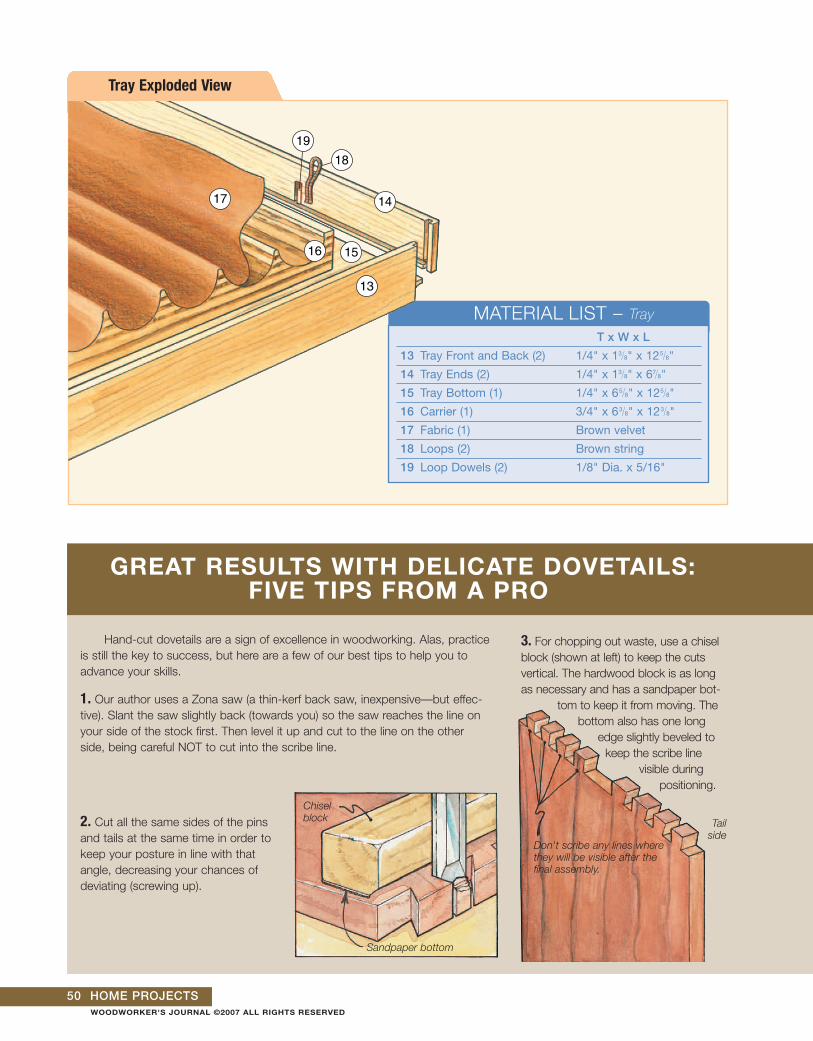
Building the Pen Tray and SlidesThe pen tray is a simple lidless box consisting of sides and
ends (pieces 13 and 14), a captured panel bottom (piece 15) anda fabric-covered pen carrier inset (pieces 16 and 17). Make thepen carrier by cutting a piece of 3/4" plywood a bit smaller thanthe tray (allowing for the fabric) and dividing it up into eight sec-tions. After testing several angles, our author clamped a tempo-rary fence on her table saw at an angle to the blade. After doingthis, cut the outermost slots at both ends of the board first, thenmove the fence further away from the blade to mill the successiveslots. To form each pair of slots, raise the blade in small, safeincrements. Then lightly sand the grooves and apply the fabricwith spray-mount adhesive. The pen tray should fit quite closelyto its space. To facilitate removal (and gain access to the hiddencompartment), add loops secured with tiny dowels (pieces 18and 19) on the sides.
Because the pen tray is shallower than the compartmentit sits in, it needs to be held up just a little from the floor. Use
WOODWORKER'S JOURNAL ©2007 ALL RIGHTS RESERVED

Making your ownplywood gives you totalcontrol of your project’sappearance. You’re notlimited to the commonlyavailable species of plywood, and you canmatch the color and figure of the wood usedon all aspects of yourpiece. As an example, our author book-matched the veneer sheused on the top andbottom layers of thisproject’s lid from suc-cessive flitches. Whenyou open the box, theplywood appears to bea solid piece of book-matched narra lumber.
To apply theseveneer pieces to the1/8" plywood core, use the same series of steps you would forany standard veneeringjob. For added strength,however, use white oryellow glue instead ofcontact cement.
To book-match the veneer, select successive flitchesand join two pieces with packing tape, glue and aheavy weight.
LETTER BOX 49
a 1/8" router bit and form groovesalong the sides of the box to receivenarrow supports.
Finishing the inside of the box willbe much more difficult to do after it isassembled, so tape off the exposedpins and tails and apply several coats ofyour favorite finish to the inside surfacesof the box. Our author chose shellac.
Carrying Out the First Glue-upYou are now ready for glue. In this
first stage, glue up the four sides of thebox, making sure to include the middlehorizontal divider. After the four cornerjoints cure, move on to the internaldividers. First, glue the splines into thesides of the box and then slide thedividers onto them. To aid in clampingthe small dividers to the bottom of thecompartment, make a clamp blockthick enough so the clamp will reacharound the sides of the box and putpressure on the underside of the hori-zontal divider. It’s also time to glue inthe supports for the pen tray. At thispoint all the interior work is done.
Making the Drawer The next step is to build the drawer
and its pocket. The drawer is sized tobe a little bigger than a standard sheetof paper, with room for a finger to liftthe paper out. You’ve already cut thedrawer front to size, so go ahead andslice the stock for the back, sides andbottom (pieces 20 through 22). Whencreating drawers, it’s a good practice toset the shoulders deeper than the thick-ness of the side material and file orplane off the excess after glue-up forperfect alignment. This time you needto be very careful because the front isso close to final size already. The frontjoints are half-blind dovetails, and theback corners are through dovetails.Make the drawer bottom a bit longer
Resawing fat 1/8" veneer is the first step in creatinghandmade plywood. A point fence and a properlytuned band saw are essential.
HANDMADE PLYWOOD
5
6
6
Use a slave board clamped in place to aid in planingyour veneer pieces smooth. They must all be uniform inthickness.
WOODWORKER'S JOURNAL ©2007 ALL RIGHTS RESERVED
Hand-cut dovetails are a sign of excellence in woodworking. Alas, practiceis still the key to success, but here are a few of our best tips to help you toadvance your skills.
1. Our author uses a Zona saw (a thin-kerf back saw, inexpensive—but effec-tive). Slant the saw slightly back (towards you) so the saw reaches the line onyour side of the stock first. Then level it up and cut to the line on the otherside, being careful NOT to cut into the scribe line.
2. Cut all the same sides of the pinsand tails at the same time in order tokeep your posture in line with thatangle, decreasing your chances ofdeviating (screwing up).
3. For chopping out waste, use a chiselblock (shown at left) to keep the cutsvertical. The hardwood block is as longas necessary and has a sandpaper bot-
tom to keep it from moving. Thebottom also has one long
edge slightly beveled tokeep the scribe line
visible duringpositioning.
Chiselblock
Sandpaper bottom
Don't scribe any lines wherethey will be visible after thefinal assembly.
50 HOME PROJECTS
MATERIAL LIST – Tray
Tailside
GREAT RESULTS WITH DELICATE DOVETAILS: FIVE TIPS FROM A PRO
Tray Exploded View
13
14
1516
17
18
19
19
T x W x L
13 Tray Front and Back (2) 1/4" x 13⁄8" x 125⁄8"
14 Tray Ends (2) 1/4" x 13⁄8" x 67⁄8"
15 Tray Bottom (1) 1/4" x 65⁄8" x 125⁄8"
16 Carrier (1) 3/4" x 63⁄8" x 123⁄8"
17 Fabric (1) Brown velvet
18 Loops (2) Brown string
19 Loop Dowels (2) 1/8" Dia. x 5/16"
WOODWORKER'S JOURNAL ©2007 ALL RIGHTS RESERVED
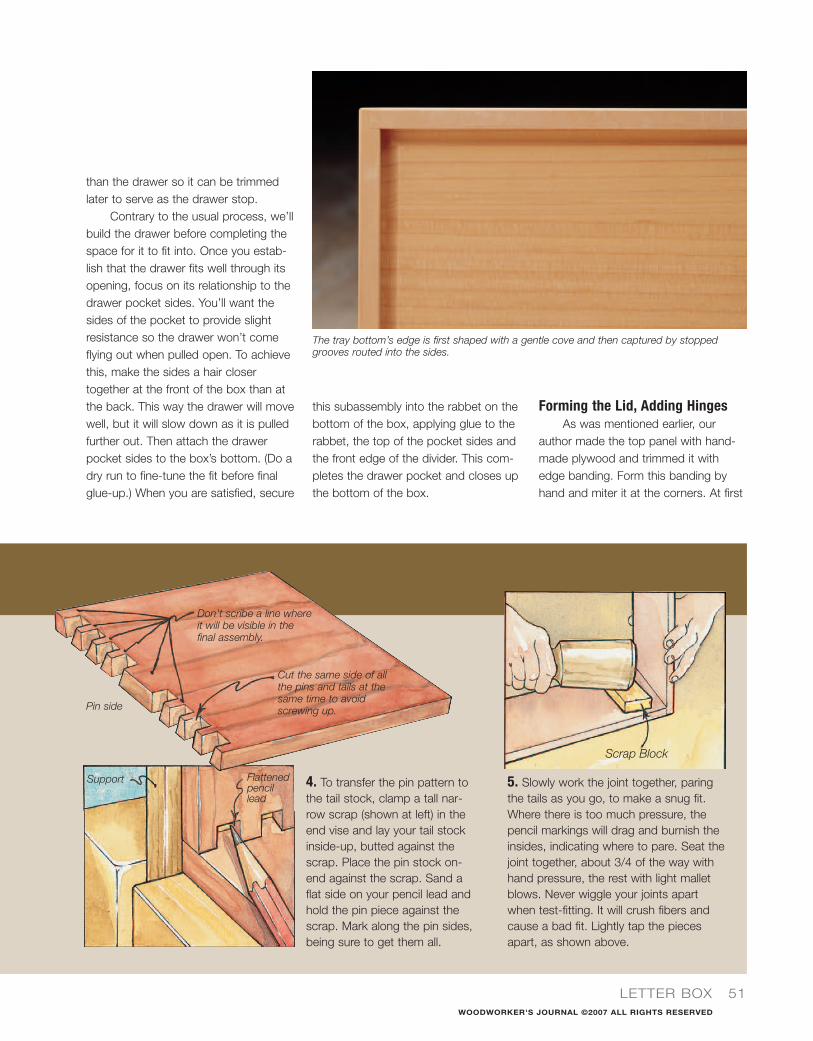
The tray bottom’s edge is first shaped with a gentle cove and then captured by stoppedgrooves routed into the sides.
LETTER BOX 51
4. To transfer the pin pattern tothe tail stock, clamp a tall nar-row scrap (shown at left) in theend vise and lay your tail stockinside-up, butted against thescrap. Place the pin stock on-end against the scrap. Sand aflat side on your pencil lead andhold the pin piece against thescrap. Mark along the pin sides,being sure to get them all.
Flattenedpencil lead
Support
Pin side
Don't scribe a line whereit will be visible in thefinal assembly.
Cut the same side of allthe pins and tails at thesame time to avoidscrewing up.
5. Slowly work the joint together, paringthe tails as you go, to make a snug fit.Where there is too much pressure, thepencil markings will drag and burnish theinsides, indicating where to pare. Seat thejoint together, about 3/4 of the way withhand pressure, the rest with light malletblows. Never wiggle your joints apartwhen test-fitting. It will crush fibers andcause a bad fit. Lightly tap the piecesapart, as shown above.
this subassembly into the rabbet on thebottom of the box, applying glue to therabbet, the top of the pocket sides andthe front edge of the divider. This com-pletes the drawer pocket and closes upthe bottom of the box.
Forming the Lid, Adding HingesAs was mentioned earlier, our
author made the top panel with hand-made plywood and trimmed it withedge banding. Form this banding byhand and miter it at the corners. At first
than the drawer so it can be trimmedlater to serve as the drawer stop.
Contrary to the usual process, we’llbuild the drawer before completing thespace for it to fit into. Once you estab-lish that the drawer fits well through itsopening, focus on its relationship to thedrawer pocket sides. You’ll want thesides of the pocket to provide slightresistance so the drawer won’t comeflying out when pulled open. To achievethis, make the sides a hair closertogether at the front of the box than atthe back. This way the drawer will movewell, but it will slow down as it is pulledfurther out. Then attach the drawerpocket sides to the box’s bottom. (Do adry run to fine-tune the fit before finalglue-up.) When you are satisfied, secure
Scrap Block
WOODWORKER'S JOURNAL ©2007 ALL RIGHTS RESERVED
Drawer Exploded View
26
25
24
24
MATERIAL LIST – Base
T x W x L
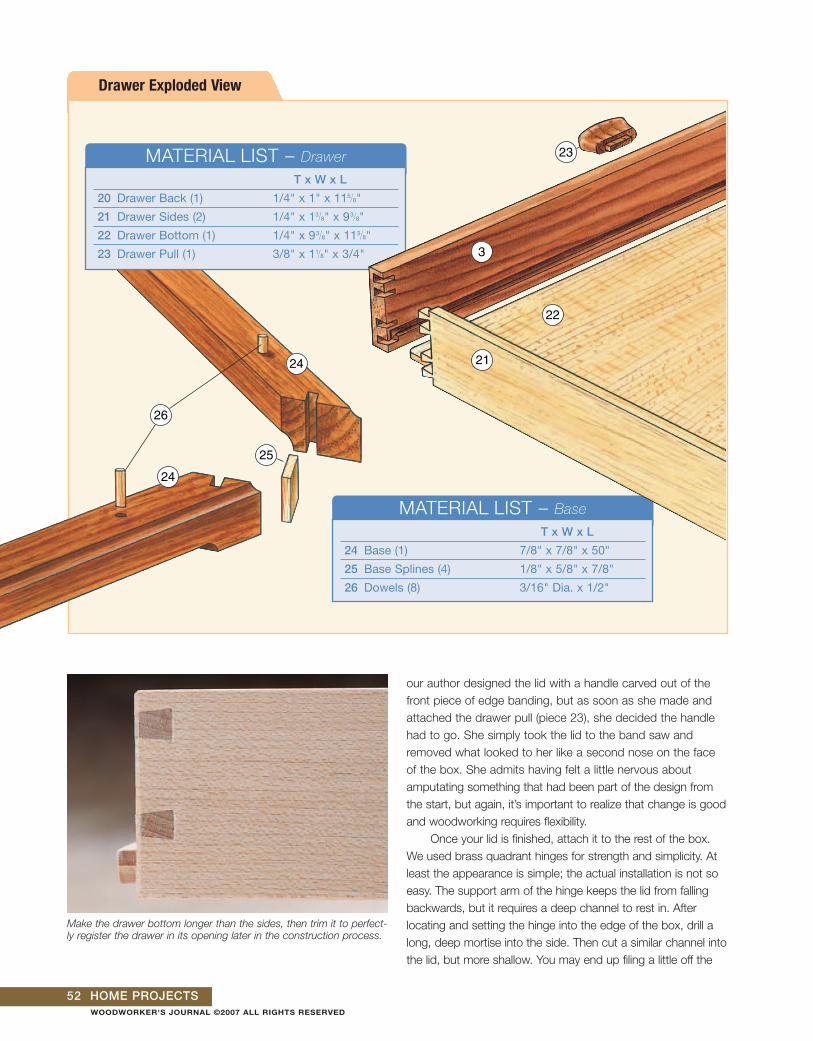
24 Base (1) 7/8" x 7/8" x 50"
25 Base Splines (4) 1/8" x 5/8" x 7/8"
26 Dowels (8) 3/16" Dia. x 1/2"
52 HOME PROJECTS
Make the drawer bottom longer than the sides, then trim it to perfect-ly register the drawer in its opening later in the construction process.
MATERIAL LIST – Drawer
T x W x L
20 Drawer Back (1) 1/4" x 1" x 115⁄8"
21 Drawer Sides (2) 1/4" x 13⁄8" x 93⁄8"
22 Drawer Bottom (1) 1/4" x 93⁄8" x 113⁄8"
23 Drawer Pull (1) 3/8" x 11⁄8" x 3/4" 3
21
22
23
our author designed the lid with a handle carved out of thefront piece of edge banding, but as soon as she made andattached the drawer pull (piece 23), she decided the handlehad to go. She simply took the lid to the band saw andremoved what looked to her like a second nose on the faceof the box. She admits having felt a little nervous aboutamputating something that had been part of the design fromthe start, but again, it’s important to realize that change is goodand woodworking requires flexibility.
Once your lid is finished, attach it to the rest of the box.We used brass quadrant hinges for strength and simplicity. Atleast the appearance is simple; the actual installation is not soeasy. The support arm of the hinge keeps the lid from fallingbackwards, but it requires a deep channel to rest in. Afterlocating and setting the hinge into the edge of the box, drill along, deep mortise into the side. Then cut a similar channel intothe lid, but more shallow. You may end up filing a little off the
WOODWORKER'S JOURNAL ©2007 ALL RIGHTS RESERVED
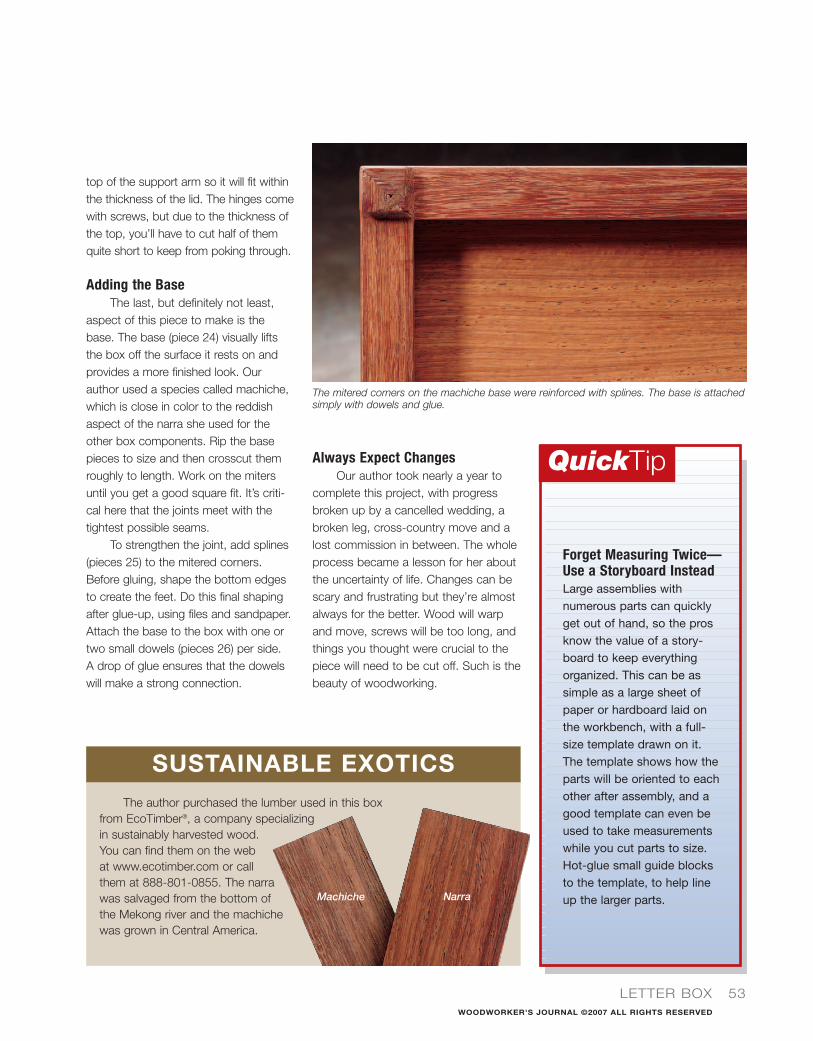
SUSTAINABLE EXOTICSThe author purchased the lumber used in this box
from EcoTimber®, a company specializingin sustainably harvested wood.You can find them on the webat www.ecotimber.com or callthem at 888-801-0855. The narrawas salvaged from the bottom ofthe Mekong river and the machichewas grown in Central America.
The mitered corners on the machiche base were reinforced with splines. The base is attachedsimply with dowels and glue.
LETTER BOX 53
top of the support arm so it will fit withinthe thickness of the lid. The hinges comewith screws, but due to the thickness ofthe top, you’ll have to cut half of themquite short to keep from poking through.
Adding the BaseThe last, but definitely not least,
aspect of this piece to make is thebase. The base (piece 24) visually liftsthe box off the surface it rests on andprovides a more finished look. Ourauthor used a species called machiche,which is close in color to the reddishaspect of the narra she used for theother box components. Rip the basepieces to size and then crosscut themroughly to length. Work on the mitersuntil you get a good square fit. It’s criti-cal here that the joints meet with thetightest possible seams.
To strengthen the joint, add splines(pieces 25) to the mitered corners.Before gluing, shape the bottom edgesto create the feet. Do this final shapingafter glue-up, using files and sandpaper.Attach the base to the box with one ortwo small dowels (pieces 26) per side. A drop of glue ensures that the dowelswill make a strong connection.
QuickTip
Forget Measuring Twice—Use a Storyboard InsteadLarge assemblies withnumerous parts can quicklyget out of hand, so the prosknow the value of a story-board to keep everythingorganized. This can be assimple as a large sheet ofpaper or hardboard laid onthe workbench, with a full-size template drawn on it.The template shows how theparts will be oriented to eachother after assembly, and agood template can even beused to take measurementswhile you cut parts to size.Hot-glue small guide blocksto the template, to help lineup the larger parts.
Always Expect ChangesOur author took nearly a year to
complete this project, with progressbroken up by a cancelled wedding, abroken leg, cross-country move and alost commission in between. The wholeprocess became a lesson for her aboutthe uncertainty of life. Changes can bescary and frustrating but they’re almostalways for the better. Wood will warpand move, screws will be too long, andthings you thought were crucial to thepiece will need to be cut off. Such is thebeauty of woodworking.
Machiche Narra
WOODWORKER'S JOURNAL ©2007 ALL RIGHTS RESERVED

54 HOME PROJECTS
Technical Drawings
Side Panel
?
Ends2
DrawerFront
3DrawerSide
21DrawerBack
20Drawer
Side
21
5/8"
15/8"
11
25
26
13
14
14
22
15
2323
24
24
24
24
16
15
3
4
9 9
2
5 6
115/8"13/8"
3/8"
1/4"1/8"
1/8"1/8"
5/16"
1/8"
1/8"
3/8"
9/32"
1/8" 1/8"
13/4"
3/8"
1/8"
9/32"
13/4" 221/32"
2"
35/16" 35/16"
219/32"
2"
1/4"
3/16"
5/32"
3/4"
2"
2"
3/4"1/4"
1/4" R.
1/8"
9/16"
15/32"1/16"
13/8"13/8"
5/32"5/32"
Drawer Pull(Side and End View)
Full size
Front (Front View)
Drawer Front (Front View)
Mortise for thedrawer pull.
The drawer front’s final dimensions aredetermined by the opening created inthe box front. The drawer pull is cen-tered vertical and horizontally
Tray and Drawer BottomCove Detail(Side View)
Edge Banding Detail(End View)
Full Size
Carrier (End View)
The carrier grooves are formed on the table saw withan angled fence. Once you’ve got your fence angleestablished, start on the outside and form twogrooves each time you move the fence.
WOODWORKER'S JOURNAL ©2007 ALL RIGHTS RESERVED
LETTER BOX 55
Side Panel
?
Ends2
DrawerFront
3DrawerSide
21DrawerBack
20Drawer
Side
21
5/8"
15/8"
11
25
26
13
14
14
22
15
2323
24
24
24
24
16
15
3
4
9 9
2
5 6
115/8"13/8"
3/8"
1/4"1/8"
1/8"1/8"
5/16"
1/8"
1/8"
3/8"
9/32"
1/8" 1/8"
13/4"
3/8"
1/8"
9/32"
13/4" 221/32"
2"
35/16" 35/16"
219/32"
2"
1/4"
3/16"
5/32"
3/4"
2"
2"
3/4"1/4"
1/4" R.
1/8"
9/16"
15/32"1/16"
13/8"13/8"
5/32"5/32"
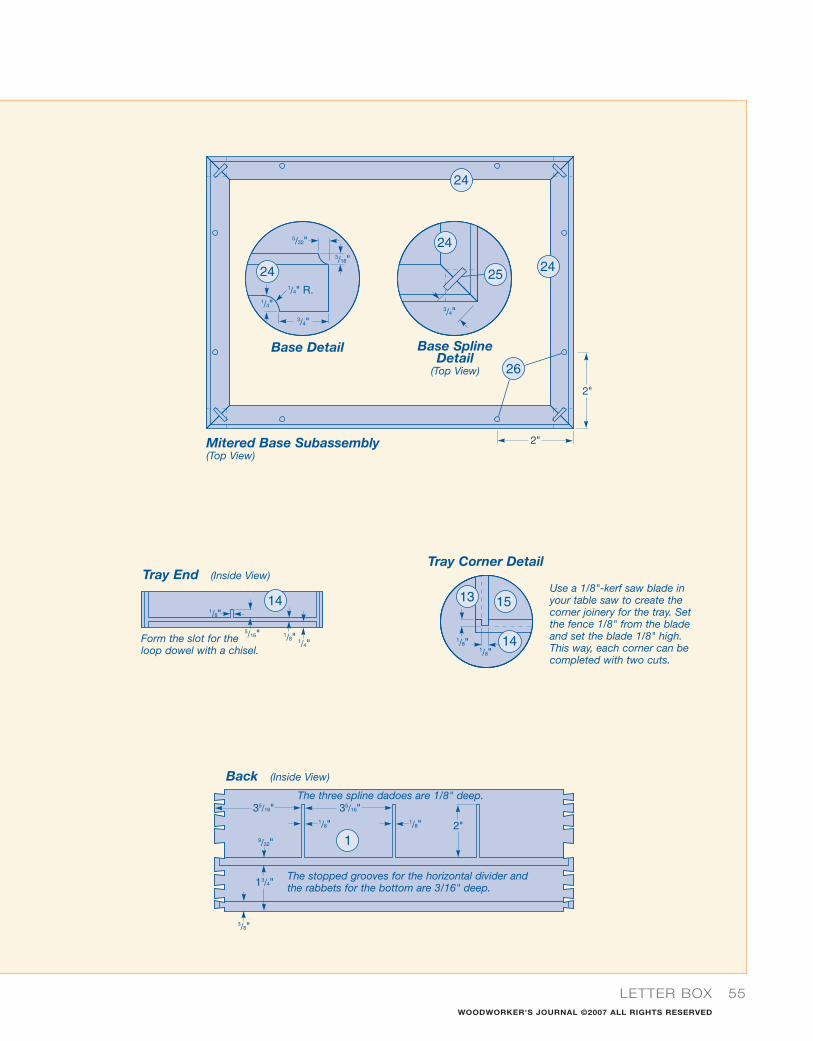
Base Detail
Tray Corner Detail
Back (Inside View)
The three spline dadoes are 1/8" deep.
The stopped grooves for the horizontal divider andthe rabbets for the bottom are 3/16" deep.
Base SplineDetail
(Top View)
Mitered Base Subassembly (Top View)
Tray End (Inside View)Use a 1/8"-kerf saw blade inyour table saw to create thecorner joinery for the tray. Setthe fence 1/8" from the bladeand set the blade 1/8" high.This way, each corner can becompleted with two cuts.
Form the slot for the loop dowel with a chisel.
WOODWORKER'S JOURNAL ©2007 ALL RIGHTS RESERVED
56 HOME PROJECTS
Technical Drawings
Side Panel
?
Ends2
DrawerFront
3
Frontand
Back
1
DrawerSide
21DrawerBack
20Drawer
Side
21
Ends, Front & Back
2 3
Letter Box
Side Panel
?
Ends2
DrawerFront
3DrawerSide
21DrawerBack
20Drawer
Side
21
5/8"
15/8"
11
25
26
13
14
14
22
15
2323
24
24
24
24
16
15
3
4
9 9
2
5 6
115/8"13/8"
3/8"
1/4"1/8"
1/8"1/8"
5/16"
1/8"
1/8"
3/8"
9/32"
1/8" 1/8"
13/4"
3/8"
1/8"
9/32"
13/4" 221/32"
2"
35/16" 35/16"
219/32"
2"
1/4"
3/16"
5/32"
3/4"
2"
2"
3/4"1/4"
1/4" R.
1/8"
9/16"
15/32"1/16"
13/8"13/8"
5/32"5/32"
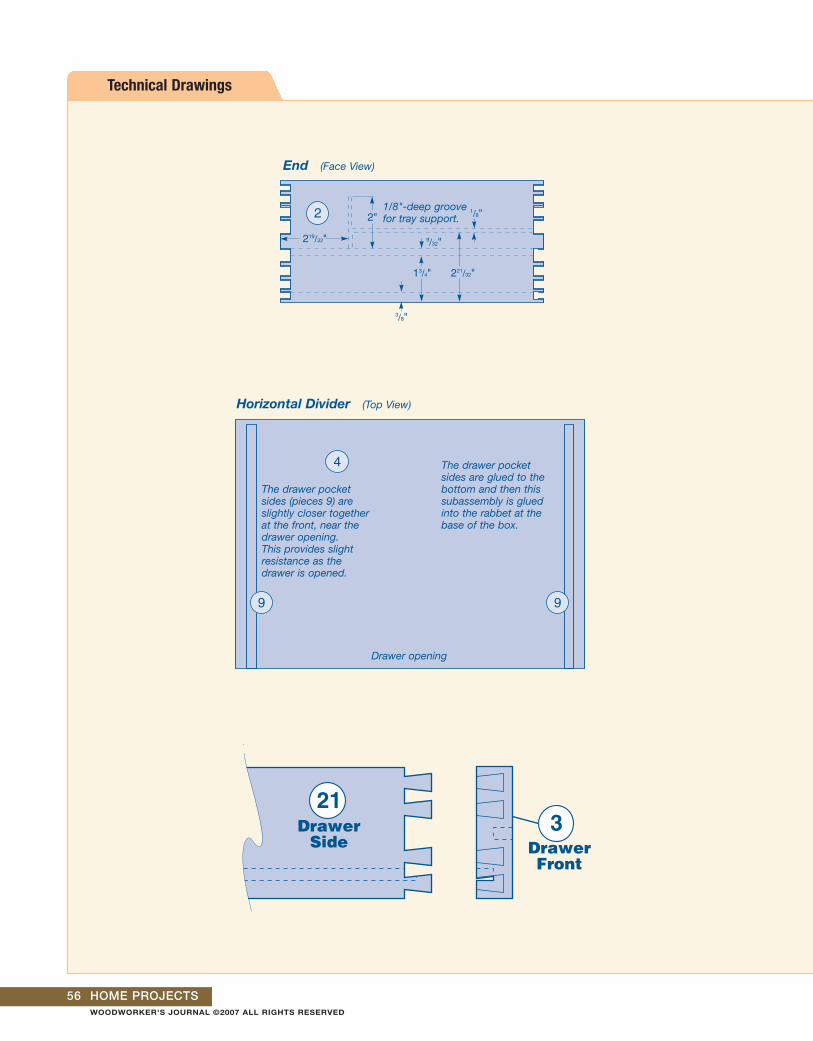
1/8"-deep groovefor tray support.
End (Face View)
Horizontal Divider (Top View)
The drawer pocketsides (pieces 9) areslightly closer togetherat the front, near thedrawer opening. This provides slightresistance as thedrawer is opened.
The drawer pocketsides are glued to thebottom and then thissubassembly is gluedinto the rabbet at thebase of the box.
Drawer opening
WOODWORKER'S JOURNAL ©2007 ALL RIGHTS RESERVED

LETTER BOX 57
Side Panel
?
Ends2
DrawerFront
3
Frontand
Back
1
DrawerSide
21DrawerBack
20Drawer
Side
21
Ends, Front & Back
2 3
Letter Box
Side Panel
?
Ends2
DrawerFront
3
Frontand
Back
1
DrawerSide
21DrawerBack
20Drawer
Side
21
Ends, Front & Back
2 3
Letter Box
These twogrooves areonly on theback.
Note: The full-sized dovetail layouts are shown below QuickTip
Routers versus ShapersIf, like most of us, your budg-et will only allow you to buyeither a shaper or a largerouter, the experts all say togo the latter route. Routersare more versatile and lessexpensive, plus they can doa lot of things a shaper can’t,like mortising and using adovetail jig. A shaper is defi-nitely the right tool in largeproduction jobs, but a bigrouter can do pretty mucheverything a shaper can, onlyslower. While an industrialshaper with a 11/4" spindlecan easily handle 4" stock inone pass, even a 3HP routerwill need to make severalpasses to do the same job.Buy a router that allows formicro-adjustment with provi-sions for above-the-table bitheight adjustment.
After investing in the router,the next logical purchase is a router table. A router tableprovides the second compo-nent to making a surrogateshaper. Choose a router tablethat has a sturdy base andthick worktop to support aheavy router. Router tableswith storage drawers or cabinet compartments arehandy, but what’s even moreimportant is that the tablehas a flat, rigid fence that’seasy to clamp in place.
WOODWORKER'S JOURNAL ©2007 ALL RIGHTS RESERVED