Embed Size (px)
Citation preview
1 Ultrasonic Scaling for Cement Removal Manual - © California Dental Association/D. Drury-Klein
ULTRASONIC SCALING FOR ORTHODONTIC CEMENT REMOVAL
CERTIFICATION COURSE MANUAL
Introduction:
An ultrasonic scaling instrument uses an alternating magnetic field to vibrate a water-cooled,
working tip at ultrasonic frequency. When contacted by this working tip, orthodontic cement is
disintegrated and washed away by the water. Compared to hand scaling, the advantages which
have been attributed to ultrasonic scaling for cement removal are:
The relative simplicity of use;
The effectiveness of use;
The expedience of the procedure by using an ultrasonic;
The lack of necessity to sharpen hand instruments;
Effectiveness of a tips ability to reach difficult or tight areas; and
The effectiveness of the water spray to debride the field quickly.
There are, however, disadvantages to using an ultrasonic tip for cement removal, to include:
Ultrasonic vibration may remove or loosen orthodontic bands and brackets if used
incorrectly;
Ultrasonic vibration may be annoying or intolerable to the patient;
The operator has continuous water spray to manage during the procedure;
Cost of the equipment may be prohibitive; and
The operator still must check for remaining cement with hand instruments following
ultrasonic scaling.
It is very important to remember that this procedure, and the certification for this procedure, is
currently for the Registered Dental Assistant only, and may not be performed for the purposes
of calculus or subgingival removal of deposits. The RDA performing ultrasonic scaling for
cement removal may not:
Perform any subgingival procedures with the ultrasonic device;
Perform supragingival calculus removal with the ultrasonic device;
Perform any procedure with the ultrasonic relating to a prophy; and
Perform this procedure without certification from a Board-approved provider and a
current RDA license.
Ultrasonic scaling for cement removal is limited to orthodontic cement only and may not be
used for cement removal of temporary or permanent cement relating to restorations.
2 Ultrasonic Scaling for Cement Removal Manual - © California Dental Association/D. Drury-Klein
Responsibilities of the Dentist 1. To prescribe only those scaling procedures that is necessary for treatment purposes.
2. To ensure all ultrasonic equipment is properly installed and maintained in a safe working
condition.
3. To provide appropriate personal protective equipment/attire to protect staff and patients
from the splash and splatter of the ultrasonic procedure.
4. To only allow this procedure to be performed by personnel who are properly trained,
credentialed, and appropriately supervised in keeping with the state regulations.
Responsibilities of the Dental Assistant
1. To be knowledgeable about the current licensing requirements, rules, and regulations of
California pertaining to all dental assisting duties.
2. To meet the certification and licensure requirements of California prior to the performance
of ultrasonic scaling for cement removal.
3. To participate in obtaining informed consent from the patient to include:
a. explaining the purpose of the procedure to the patient
b. helping the patient to understand the benefit of using an ultrasonic
c. what the consequences might be should the ultrasonic loosen or free a band
d. if the patient is a minor, the parent or guardian must give the consent
4. To review the health questionnaire; the assistant should call the dentist’s attention to any
information that might contradict or change the direction of the treatment by the dentist.
5. To use only those techniques that will maintain the safety and well-being of the patient at
all times.
Proper Use of Ultrasonic Equipment
A few studies have been made available regarding the impact of improper use of an ultrasonic
device against an orthodontic band. One study performed by dental faculty in Bergen, Norway,
suggested that the key to successful orthodontic cement removal is the technique used in
placing the ultrasonic tip next to the margins of the band rather than allow the tip to work on
the band itself. The study suggested that the palatal surface of the upper incisors where it is
often difficult to see the margins of the band is especially vulnerable to damage from the
ultrasonic tip.
3 Ultrasonic Scaling for Cement Removal Manual - © California Dental Association/D. Drury-Klein
The primary negative outcome from improper operator use is the cement cracking under the
band due to poor ultrasonic technique. It is likely that a rougher technique interferes with the
homogeneity of the cement layer and thus causes increased risks of decalcification and loose
bands.
Care of Ultrasonic Equipment
Today’s ultrasonic units are easier than ever to prepare for use, care, and disinfection. Many
offices provide one at each operatory for easy access. They are light and compact, minimizing
the amount of space required. Ultrasonic tips do not last forever and should periodically be
evaluated for wear. As the tip of the insert wears, scaling efficiency decreases. A good rule of
thumb to follow is one millimeter of tip wear results in approximately 25% loss of efficiency.
Two millimeters of wear results in approximately 50% loss of efficiency, and, at this point,
should be replaced.
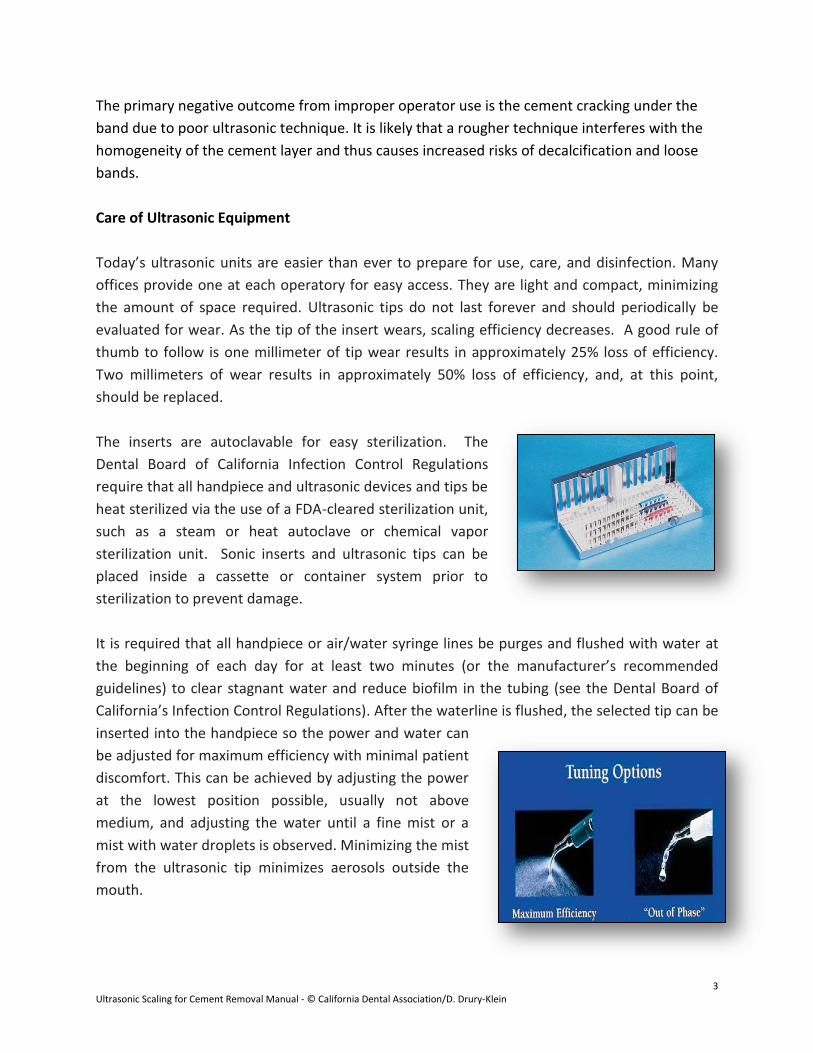
The inserts are autoclavable for easy sterilization. The
Dental Board of California Infection Control Regulations
require that all handpiece and ultrasonic devices and tips be
heat sterilized via the use of a FDA-cleared sterilization unit,
such as a steam or heat autoclave or chemical vapor
sterilization unit. Sonic inserts and ultrasonic tips can be
placed inside a cassette or container system prior to
sterilization to prevent damage.
It is required that all handpiece or air/water syringe lines be purges and flushed with water at
the beginning of each day for at least two minutes (or the manufacturer’s recommended
guidelines) to clear stagnant water and reduce biofilm in the tubing (see the Dental Board of
California’s Infection Control Regulations). After the waterline is flushed, the selected tip can be
inserted into the handpiece so the power and water can
be adjusted for maximum efficiency with minimal patient
discomfort. This can be achieved by adjusting the power
at the lowest position possible, usually not above
medium, and adjusting the water until a fine mist or a
mist with water droplets is observed. Minimizing the mist
from the ultrasonic tip minimizes aerosols outside the
mouth.
4 Ultrasonic Scaling for Cement Removal Manual - © California Dental Association/D. Drury-Klein
INFECTION CONTROL DURING ULTRASONIC SCALING FOR CEMENT REMOVAL
Sonic and ultrasonic procedures present special infection control challenges, primarily because
the operator contacts the patient’s saliva and then moves about and must touch many things
while performing the procedure. The mist from the ultrasonic tip can spread bacteria and
microorganisms out into the operatory and onto the clothing of the operator and the patient.
Sources of Disease Transmission and Contamination during Ultrasonic Scaling:
Instruments laying out on countertops carts and loosely arranged in the operatory.
Dental chair headrest and chair adjustment controls.
Operating light handle.
Counter tops and carts.
Floors, doorframes, light switches, and walls.
Patient records.
Any object the operator touches after the procedure has begun.
Protective Equipment
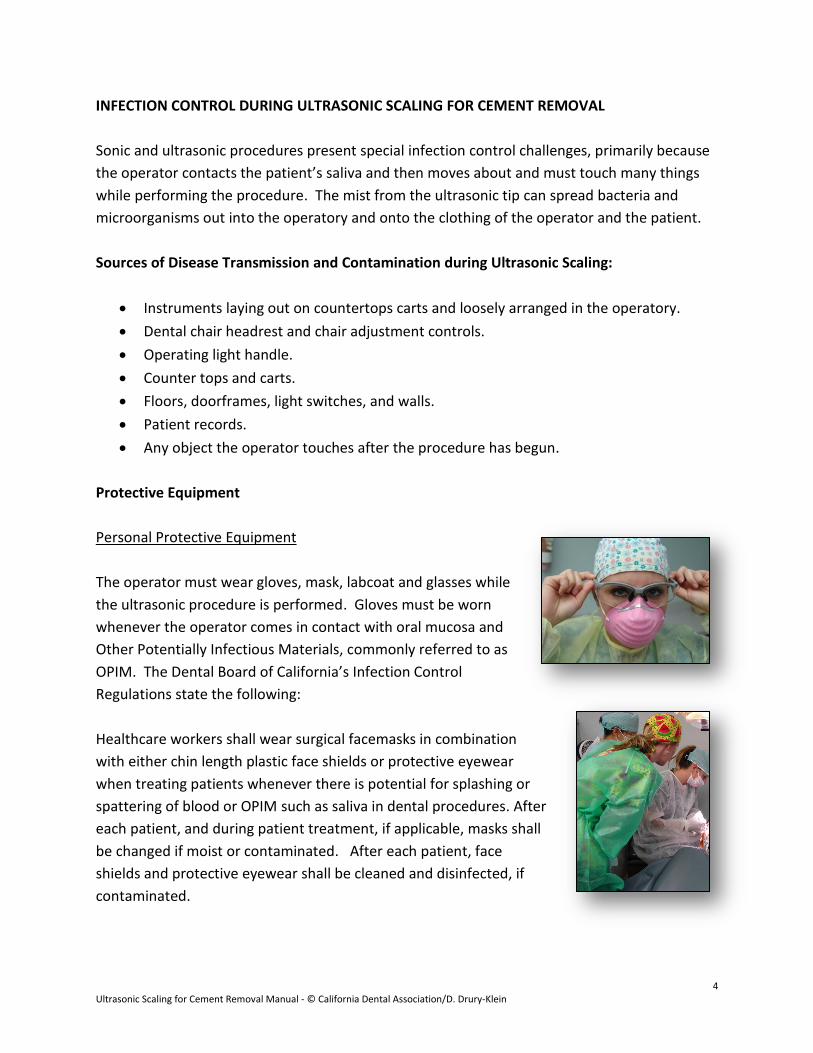
Personal Protective Equipment
The operator must wear gloves, mask, labcoat and glasses while
the ultrasonic procedure is performed. Gloves must be worn
whenever the operator comes in contact with oral mucosa and
Other Potentially Infectious Materials, commonly referred to as
OPIM. The Dental Board of California’s Infection Control
Regulations state the following:
Healthcare workers shall wear surgical facemasks in combination
with either chin length plastic face shields or protective eyewear
when treating patients whenever there is potential for splashing or
spattering of blood or OPIM such as saliva in dental procedures. After
each patient, and during patient treatment, if applicable, masks shall
be changed if moist or contaminated. After each patient, face
shields and protective eyewear shall be cleaned and disinfected, if
contaminated.
5 Ultrasonic Scaling for Cement Removal Manual - © California Dental Association/D. Drury-Klein
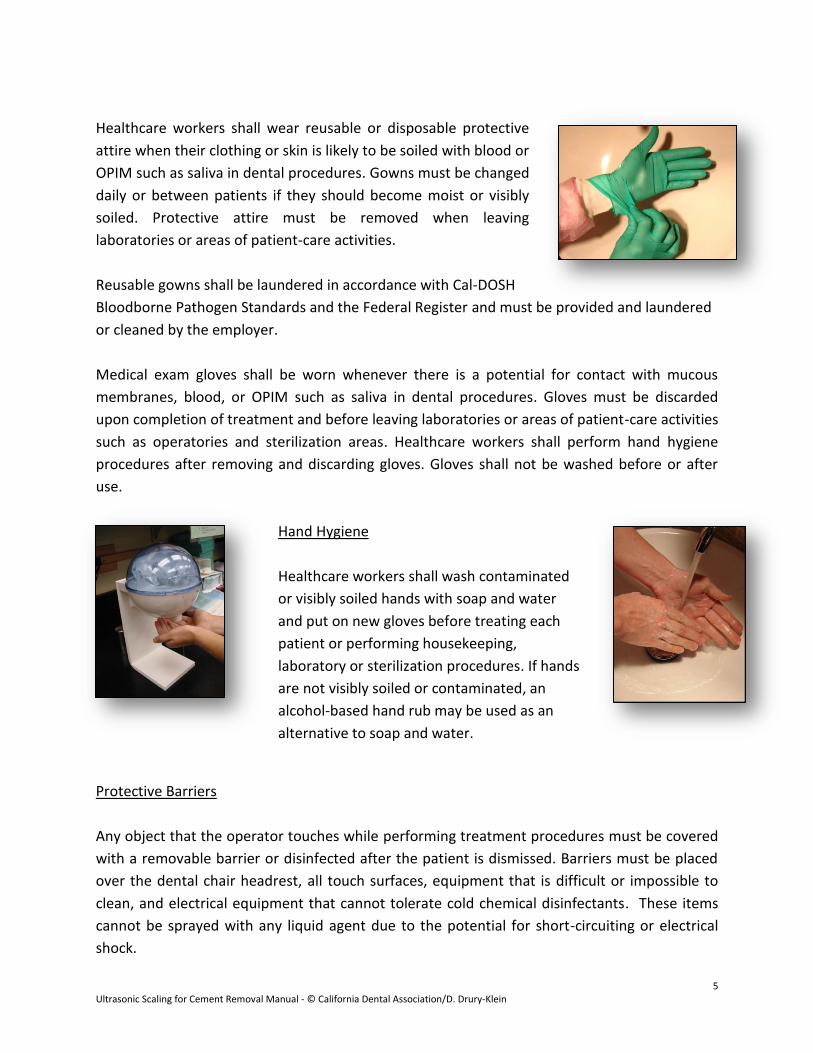
Healthcare workers shall wear reusable or disposable protective
attire when their clothing or skin is likely to be soiled with blood or
OPIM such as saliva in dental procedures. Gowns must be changed
daily or between patients if they should become moist or visibly
soiled. Protective attire must be removed when leaving
laboratories or areas of patient-care activities.
Reusable gowns shall be laundered in accordance with Cal-DOSH
Bloodborne Pathogen Standards and the Federal Register and must be provided and laundered
or cleaned by the employer.
Medical exam gloves shall be worn whenever there is a potential for contact with mucous
membranes, blood, or OPIM such as saliva in dental procedures. Gloves must be discarded
upon completion of treatment and before leaving laboratories or areas of patient-care activities
such as operatories and sterilization areas. Healthcare workers shall perform hand hygiene
procedures after removing and discarding gloves. Gloves shall not be washed before or after
use.
Hand Hygiene
Healthcare workers shall wash contaminated
or visibly soiled hands with soap and water
and put on new gloves before treating each
patient or performing housekeeping,
laboratory or sterilization procedures. If hands
are not visibly soiled or contaminated, an
alcohol-based hand rub may be used as an
alternative to soap and water.
Protective Barriers
Any object that the operator touches while performing treatment procedures must be covered
with a removable barrier or disinfected after the patient is dismissed. Barriers must be placed
over the dental chair headrest, all touch surfaces, equipment that is difficult or impossible to
clean, and electrical equipment that cannot tolerate cold chemical disinfectants. These items
cannot be sprayed with any liquid agent due to the potential for short-circuiting or electrical
shock.
6 Ultrasonic Scaling for Cement Removal Manual - © California Dental Association/D. Drury-Klein
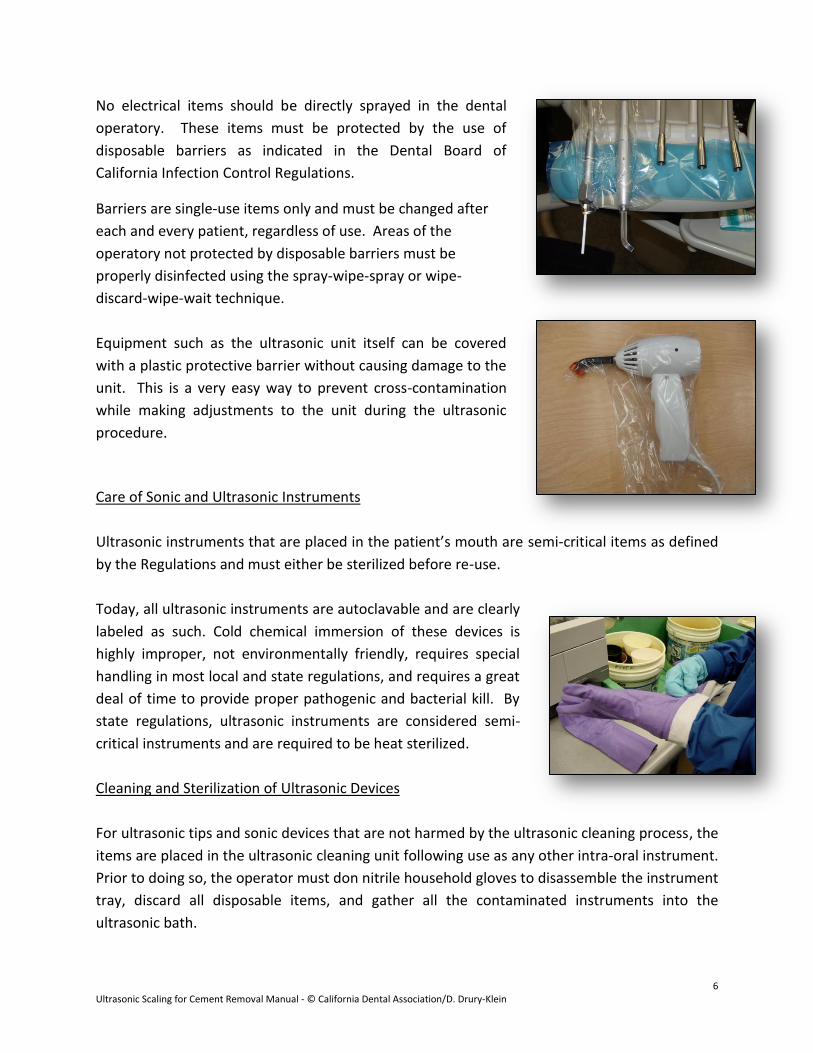
No electrical items should be directly sprayed in the dental
operatory. These items must be protected by the use of
disposable barriers as indicated in the Dental Board of
California Infection Control Regulations.
Barriers are single-use items only and must be changed after
each and every patient, regardless of use. Areas of the
operatory not protected by disposable barriers must be
properly disinfected using the spray-wipe-spray or wipe-
discard-wipe-wait technique.
Equipment such as the ultrasonic unit itself can be covered
with a plastic protective barrier without causing damage to the
unit. This is a very easy way to prevent cross-contamination
while making adjustments to the unit during the ultrasonic
procedure.
Care of Sonic and Ultrasonic Instruments
Ultrasonic instruments that are placed in the patient’s mouth are semi-critical items as defined
by the Regulations and must either be sterilized before re-use.
Today, all ultrasonic instruments are autoclavable and are clearly
labeled as such. Cold chemical immersion of these devices is
highly improper, not environmentally friendly, requires special
handling in most local and state regulations, and requires a great
deal of time to provide proper pathogenic and bacterial kill. By
state regulations, ultrasonic instruments are considered semi-
critical instruments and are required to be heat sterilized.
Cleaning and Sterilization of Ultrasonic Devices
For ultrasonic tips and sonic devices that are not harmed by the ultrasonic cleaning process, the
items are placed in the ultrasonic cleaning unit following use as any other intra-oral instrument.
Prior to doing so, the operator must don nitrile household gloves to disassemble the instrument
tray, discard all disposable items, and gather all the contaminated instruments into the
ultrasonic bath.

7 Ultrasonic Scaling for Cement Removal Manual - © California Dental Association/D. Drury-Klein
According to regulations:
All heat-stable critical and semi-critical instruments shall be
cleaned before sterilization by use of an ultrasonic device.
Instruments cleaned in an ultrasonic unit shall remain in the
unit for no less than 10 minutes.
Instrument cassette systems (or containers) have become
very popular in recent years. Dental washing machine units
(such as Miele washers) hold cassette of instruments,
including X-ray devices, and must run through an entire wash
and dry cycle prior to removal of the cassettes from the
washing unit and placed into a sterilization device. A
washing unit for cassettes does not eliminate the use of a
sterilization unit.
Following ultrasonic cleaning, the items are rinsed, patted
dry, and placed in sterilization/autoclave bags, sealed, and
placed into a steam or chemical autoclave.
An autoclave is the only device available to sterilize
instruments through the use of time, heat and pressure.
Sterilization only occurs when the proper amount of heat
and pressure is applied for the proper amount of time for
wrapped instruments. This is usually anywhere from 12 – 15
minutes, depending on the setting of the autoclave. ONLY
through the use of an autoclave can complete microbial kill
occur. Immersion into a liquid cold chemical will not produce
total microbial kill.
Refer to the Dental Board of California Infection Control Regulations for specific definitions of
critical and semi-critical instruments, their handling, and sterilization procedures required by
regulation.
8 Ultrasonic Scaling for Cement Removal Manual - © California Dental Association/D. Drury-Klein
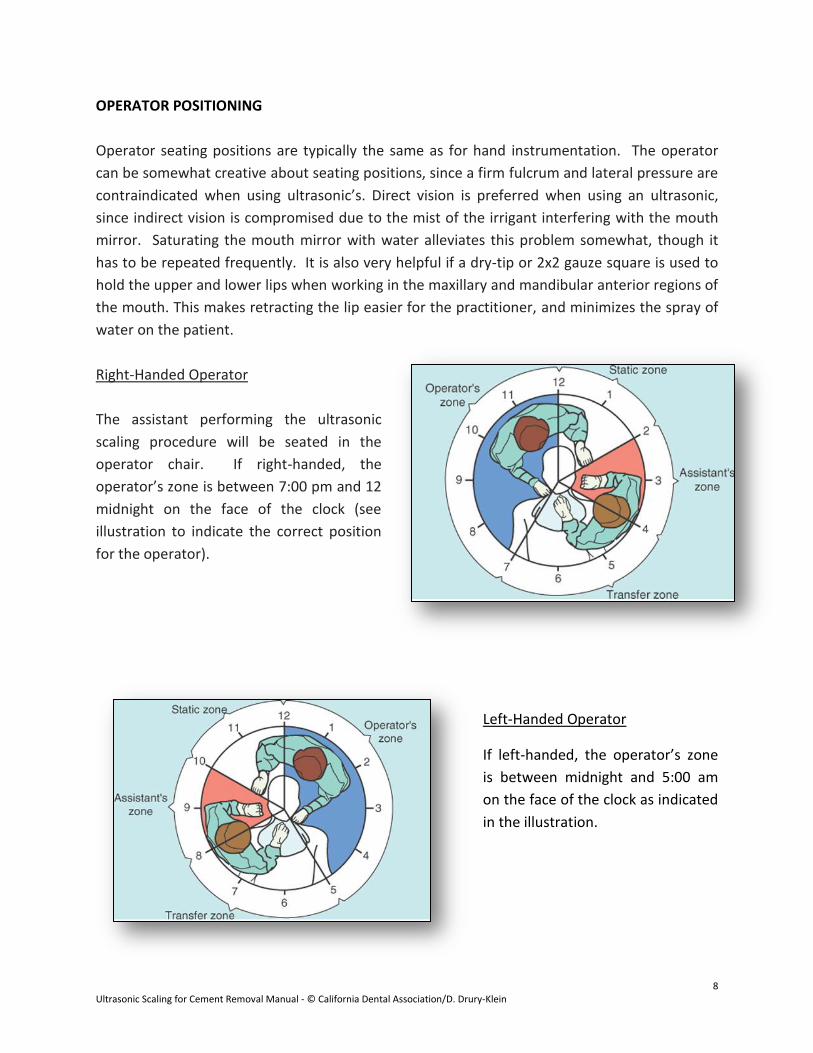
OPERATOR POSITIONING
Operator seating positions are typically the same as for hand instrumentation. The operator
can be somewhat creative about seating positions, since a firm fulcrum and lateral pressure are
contraindicated when using ultrasonic’s. Direct vision is preferred when using an ultrasonic,
since indirect vision is compromised due to the mist of the irrigant interfering with the mouth
mirror. Saturating the mouth mirror with water alleviates this problem somewhat, though it
has to be repeated frequently. It is also very helpful if a dry-tip or 2x2 gauze square is used to
hold the upper and lower lips when working in the maxillary and mandibular anterior regions of
the mouth. This makes retracting the lip easier for the practitioner, and minimizes the spray of
water on the patient.
Right-Handed Operator
The assistant performing the ultrasonic
scaling procedure will be seated in the
operator chair. If right-handed, the
operator’s zone is between 7:00 pm and 12
midnight on the face of the clock (see
illustration to indicate the correct position
for the operator).
Left-Handed Operator
If left-handed, the operator’s zone
is between midnight and 5:00 am
on the face of the clock as indicated
in the illustration.
9 Ultrasonic Scaling for Cement Removal Manual - © California Dental Association/D. Drury-Klein
ULTRASONIC SCALING TECHNIQUE
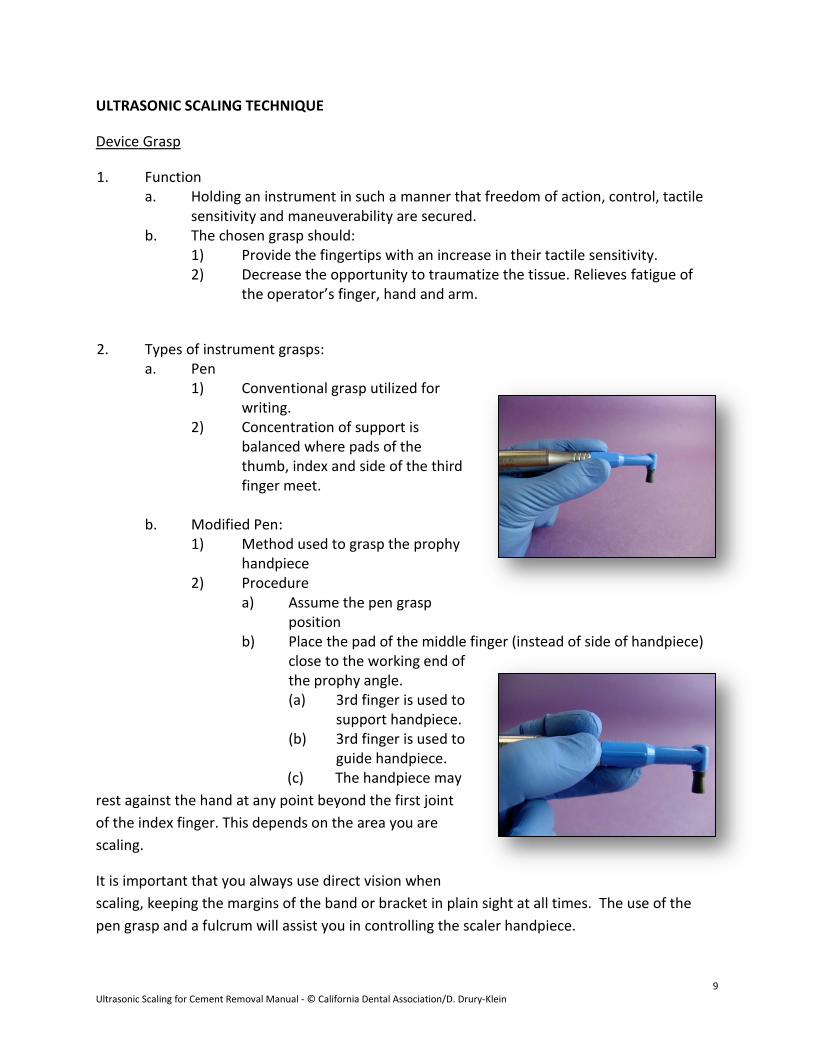
Device Grasp
1. Function a. Holding an instrument in such a manner that freedom of action, control, tactile
sensitivity and maneuverability are secured. b. The chosen grasp should:
1) Provide the fingertips with an increase in their tactile sensitivity. 2) Decrease the opportunity to traumatize the tissue. Relieves fatigue of
the operator’s finger, hand and arm.
2. Types of instrument grasps: a. Pen
1) Conventional grasp utilized for writing.
2) Concentration of support is balanced where pads of the thumb, index and side of the third finger meet.
b. Modified Pen: 1) Method used to grasp the prophy
handpiece 2) Procedure
a) Assume the pen grasp position
b) Place the pad of the middle finger (instead of side of handpiece) close to the working end of the prophy angle. (a) 3rd finger is used to
support handpiece. (b) 3rd finger is used to
guide handpiece. (c) The handpiece may
rest against the hand at any point beyond the first joint
of the index finger. This depends on the area you are
scaling.
It is important that you always use direct vision when
scaling, keeping the margins of the band or bracket in plain sight at all times. The use of the
pen grasp and a fulcrum will assist you in controlling the scaler handpiece.
10 Ultrasonic Scaling for Cement Removal Manual - © California Dental Association/D. Drury-Klein
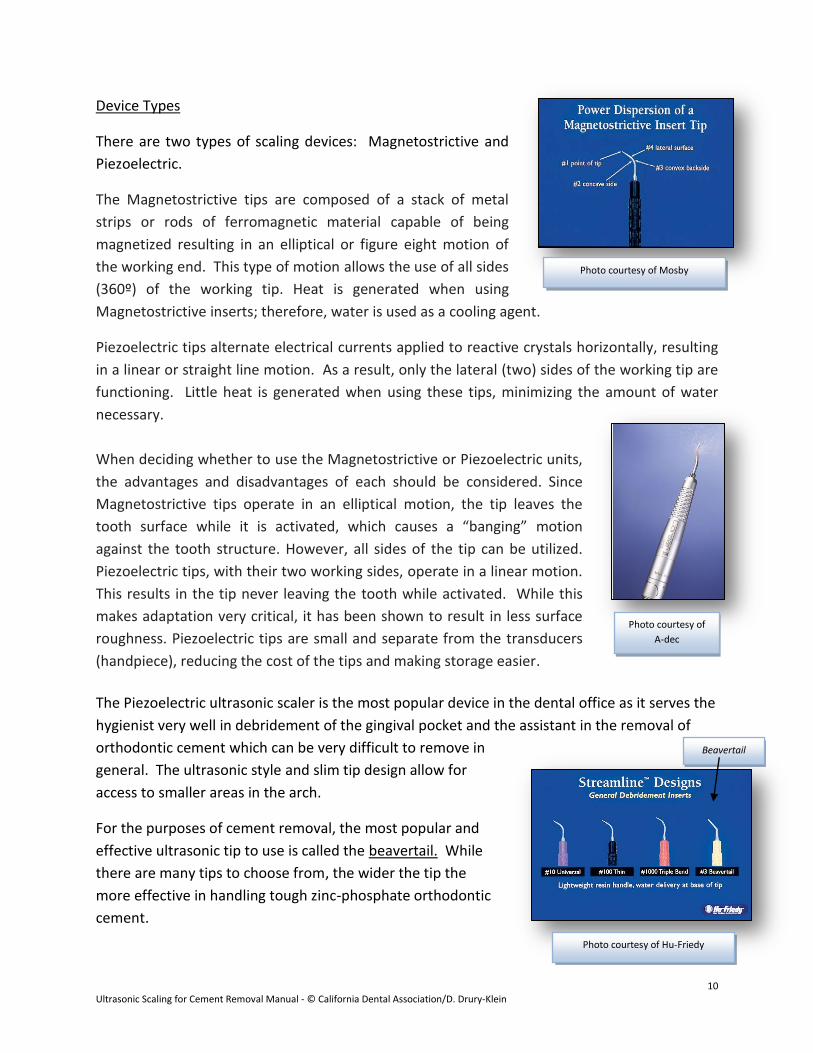
Device Types
There are two types of scaling devices: Magnetostrictive and
Piezoelectric.
The Magnetostrictive tips are composed of a stack of metal
strips or rods of ferromagnetic material capable of being
magnetized resulting in an elliptical or figure eight motion of
the working end. This type of motion allows the use of all sides
(360º) of the working tip. Heat is generated when using
Magnetostrictive inserts; therefore, water is used as a cooling agent.
Piezoelectric tips alternate electrical currents applied to reactive crystals horizontally, resulting
in a linear or straight line motion. As a result, only the lateral (two) sides of the working tip are
functioning. Little heat is generated when using these tips, minimizing the amount of water
necessary.
When deciding whether to use the Magnetostrictive or Piezoelectric units,
the advantages and disadvantages of each should be considered. Since
Magnetostrictive tips operate in an elliptical motion, the tip leaves the
tooth surface while it is activated, which causes a “banging” motion
against the tooth structure. However, all sides of the tip can be utilized.
Piezoelectric tips, with their two working sides, operate in a linear motion.
This results in the tip never leaving the tooth while activated. While this
makes adaptation very critical, it has been shown to result in less surface
roughness. Piezoelectric tips are small and separate from the transducers
(handpiece), reducing the cost of the tips and making storage easier.
The Piezoelectric ultrasonic scaler is the most popular device in the dental office as it serves the
hygienist very well in debridement of the gingival pocket and the assistant in the removal of
orthodontic cement which can be very difficult to remove in
general. The ultrasonic style and slim tip design allow for
access to smaller areas in the arch.
For the purposes of cement removal, the most popular and
effective ultrasonic tip to use is called the beavertail. While
there are many tips to choose from, the wider the tip the
more effective in handling tough zinc-phosphate orthodontic
cement.
Photo courtesy of
A-dec
Photo courtesy of Hu-Friedy
Photo courtesy of Mosby
Beavertail
11 Ultrasonic Scaling for Cement Removal Manual - © California Dental Association/D. Drury-Klein
Indications and Contraindications
Indications for using an ultrasonic scaler include:
Positive adaptability to the surface requiring cement removal without pressure
More timely removal of cement versus hand instrumentation
Operating field kept clean by use of water mist
Contraindications include:
Threat of communicable disease transmission due to contaminated aerosols
Potential for patient concern with cardiac pacemakers; newer models of ultrasonic units
contain protective measures to prevent a cardiac incident
Demineralized areas of the teeth may lose areas of remineralization due to vibration of
the ultrasonic
Tooth sensitivity may occur in areas of exposed dentin
Using a rougher technique may interfere with the homogeneity of the cement layer and
cause increased risk of decalcification and loose bands
The operator who uses the ultrasonic device too frequently may experience temporary
or permanent tendonitis
Due to the fact that many of the patients whose teeth are being orthodontically treated are
under the age of 18, it is important to work as sensitively as possible with the ultrasonic against
the enamel around the bands, as young teeth and young pulps are susceptible to over-heating
and may damage newly erupted teeth as well.
The health history is always considered before utilizing an ultrasonic device. In reviewing the
patient’s health history, the operator and dentist should consider the following additional
contraindications:
Prosthetic joints
Overall heart health
Lowered immune response
Diabetes
Hearing aide use
12 Ultrasonic Scaling for Cement Removal Manual - © California Dental Association/D. Drury-Klein
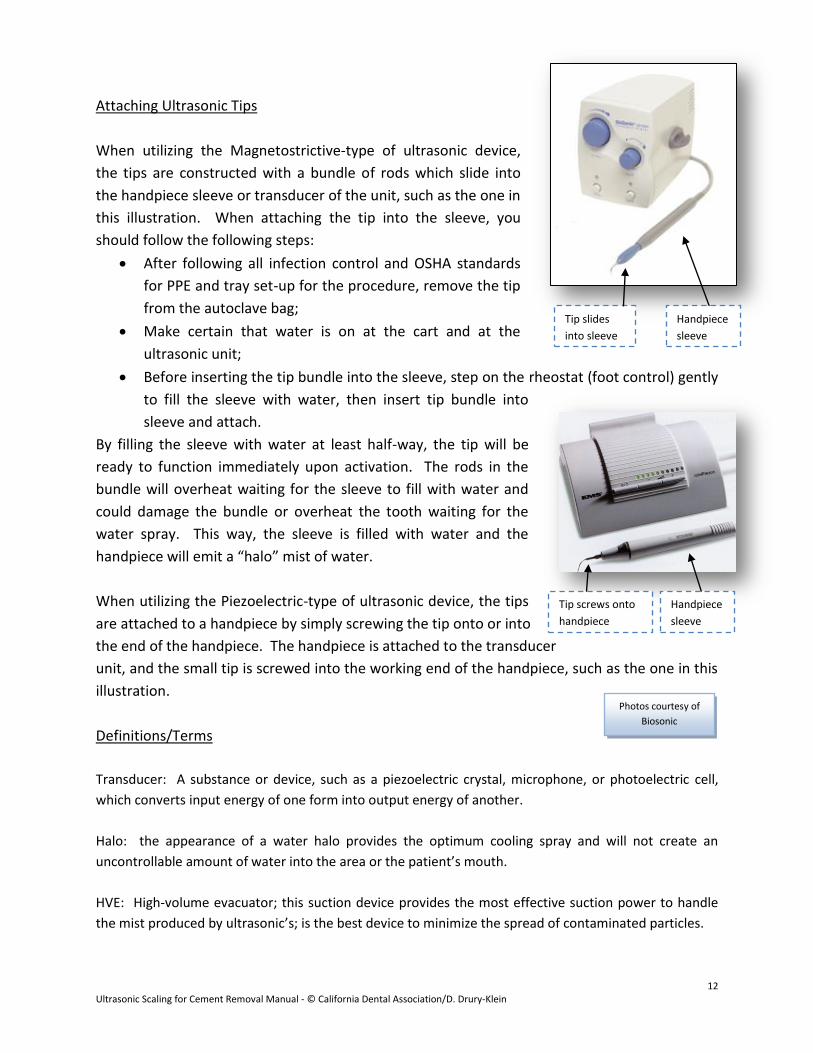
Attaching Ultrasonic Tips
When utilizing the Magnetostrictive-type of ultrasonic device,
the tips are constructed with a bundle of rods which slide into
the handpiece sleeve or transducer of the unit, such as the one in
this illustration. When attaching the tip into the sleeve, you
should follow the following steps:
After following all infection control and OSHA standards
for PPE and tray set-up for the procedure, remove the tip
from the autoclave bag;
Make certain that water is on at the cart and at the
ultrasonic unit;
Before inserting the tip bundle into the sleeve, step on the rheostat (foot control) gently
to fill the sleeve with water, then insert tip bundle into
sleeve and attach.
By filling the sleeve with water at least half-way, the tip will be
ready to function immediately upon activation. The rods in the
bundle will overheat waiting for the sleeve to fill with water and
could damage the bundle or overheat the tooth waiting for the
water spray. This way, the sleeve is filled with water and the
handpiece will emit a “halo” mist of water.
When utilizing the Piezoelectric-type of ultrasonic device, the tips
are attached to a handpiece by simply screwing the tip onto or into
the end of the handpiece. The handpiece is attached to the transducer
unit, and the small tip is screwed into the working end of the handpiece, such as the one in this
illustration.
Definitions/Terms
Transducer: A substance or device, such as a piezoelectric crystal, microphone, or photoelectric cell,
which converts input energy of one form into output energy of another.
Halo: the appearance of a water halo provides the optimum cooling spray and will not create an
uncontrollable amount of water into the area or the patient’s mouth.
HVE: High-volume evacuator; this suction device provides the most effective suction power to handle
the mist produced by ultrasonic’s; is the best device to minimize the spread of contaminated particles.
Photos courtesy of
Biosonic
Handpiece
sleeve
Tip slides
into sleeve
Handpiece
sleeve
Tip screws onto
handpiece
13 Ultrasonic Scaling for Cement Removal Manual - © California Dental Association/D. Drury-Klein
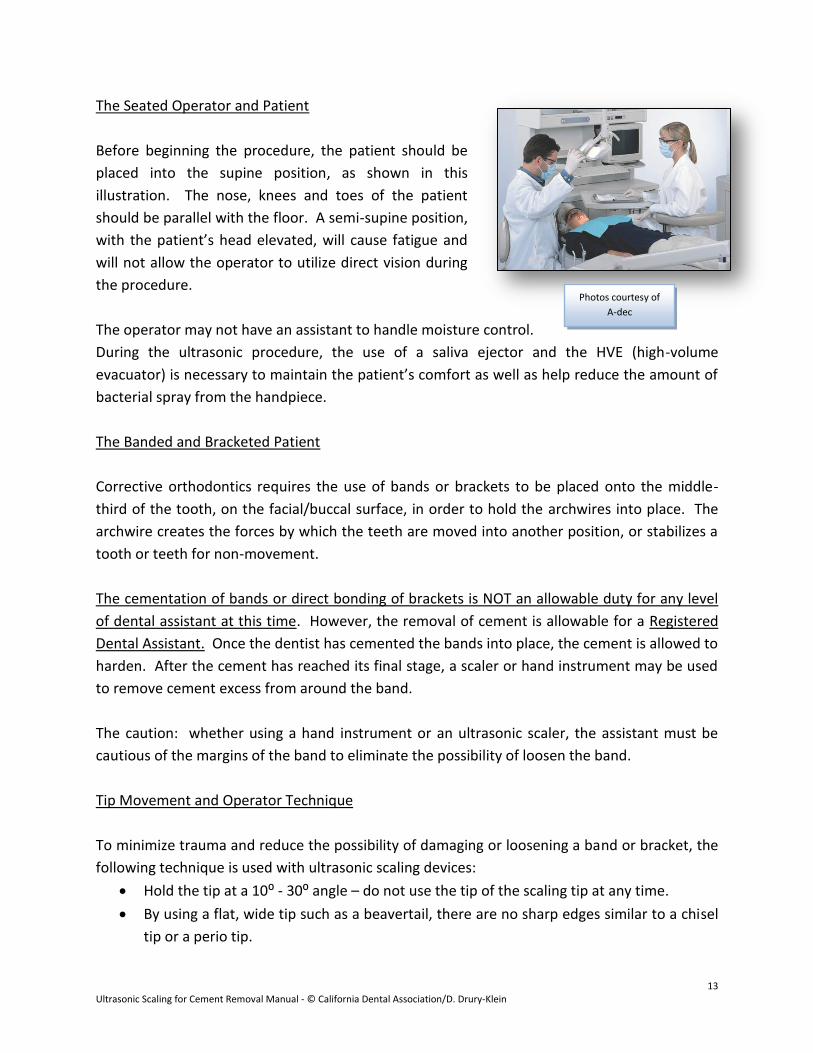
The Seated Operator and Patient
Before beginning the procedure, the patient should be
placed into the supine position, as shown in this
illustration. The nose, knees and toes of the patient
should be parallel with the floor. A semi-supine position,
with the patient’s head elevated, will cause fatigue and
will not allow the operator to utilize direct vision during
the procedure.
The operator may not have an assistant to handle moisture control.
During the ultrasonic procedure, the use of a saliva ejector and the HVE (high-volume
evacuator) is necessary to maintain the patient’s comfort as well as help reduce the amount of
bacterial spray from the handpiece.
The Banded and Bracketed Patient
Corrective orthodontics requires the use of bands or brackets to be placed onto the middle-
third of the tooth, on the facial/buccal surface, in order to hold the archwires into place. The
archwire creates the forces by which the teeth are moved into another position, or stabilizes a
tooth or teeth for non-movement.
The cementation of bands or direct bonding of brackets is NOT an allowable duty for any level
of dental assistant at this time. However, the removal of cement is allowable for a Registered
Dental Assistant. Once the dentist has cemented the bands into place, the cement is allowed to
harden. After the cement has reached its final stage, a scaler or hand instrument may be used
to remove cement excess from around the band.
The caution: whether using a hand instrument or an ultrasonic scaler, the assistant must be
cautious of the margins of the band to eliminate the possibility of loosen the band.
Tip Movement and Operator Technique
To minimize trauma and reduce the possibility of damaging or loosening a band or bracket, the
following technique is used with ultrasonic scaling devices:
Hold the tip at a 10⁰ - 30⁰ angle – do not use the tip of the scaling tip at any time.
By using a flat, wide tip such as a beavertail, there are no sharp edges similar to a chisel
tip or a perio tip.
Photos courtesy of
A-dec
14 Ultrasonic Scaling for Cement Removal Manual - © California Dental Association/D. Drury-Klein
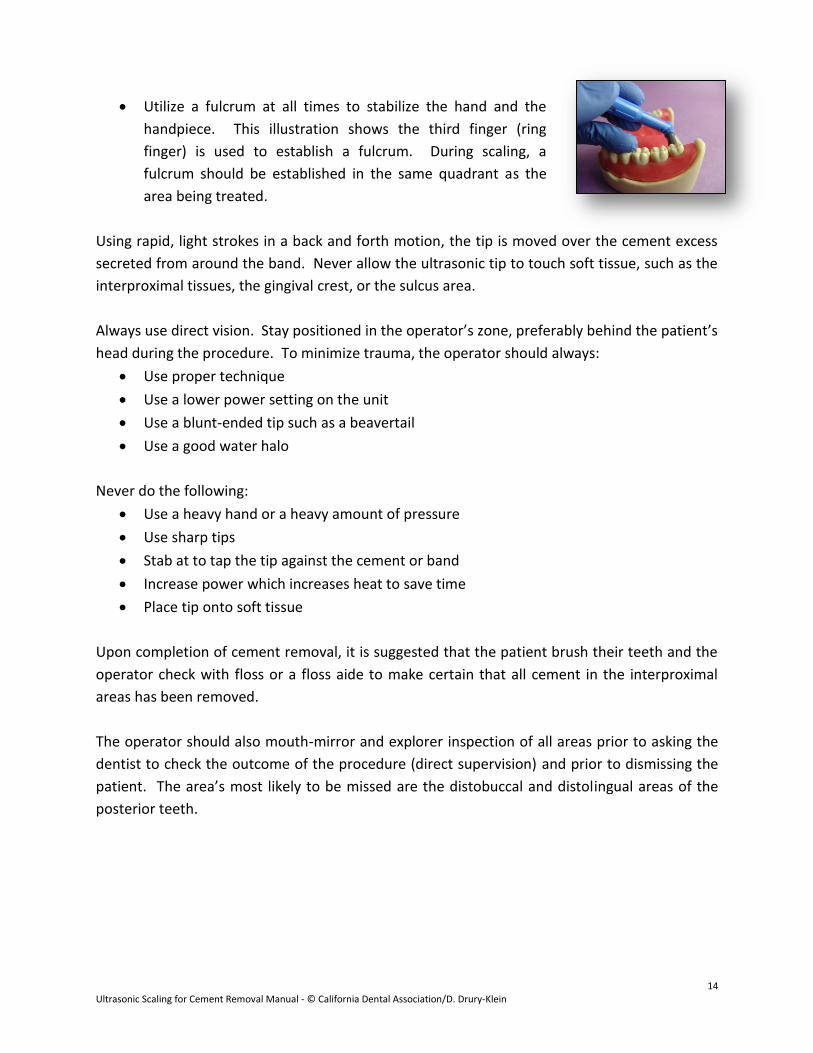
Utilize a fulcrum at all times to stabilize the hand and the
handpiece. This illustration shows the third finger (ring
finger) is used to establish a fulcrum. During scaling, a
fulcrum should be established in the same quadrant as the
area being treated.
Using rapid, light strokes in a back and forth motion, the tip is moved over the cement excess
secreted from around the band. Never allow the ultrasonic tip to touch soft tissue, such as the
interproximal tissues, the gingival crest, or the sulcus area.
Always use direct vision. Stay positioned in the operator’s zone, preferably behind the patient’s
head during the procedure. To minimize trauma, the operator should always:
Use proper technique
Use a lower power setting on the unit
Use a blunt-ended tip such as a beavertail
Use a good water halo
Never do the following:
Use a heavy hand or a heavy amount of pressure
Use sharp tips
Stab at to tap the tip against the cement or band
Increase power which increases heat to save time
Place tip onto soft tissue
Upon completion of cement removal, it is suggested that the patient brush their teeth and the
operator check with floss or a floss aide to make certain that all cement in the interproximal
areas has been removed.
The operator should also mouth-mirror and explorer inspection of all areas prior to asking the
dentist to check the outcome of the procedure (direct supervision) and prior to dismissing the
patient. The area’s most likely to be missed are the distobuccal and distolingual areas of the
posterior teeth.
15 Ultrasonic Scaling for Cement Removal Manual - © California Dental Association/D. Drury-Klein
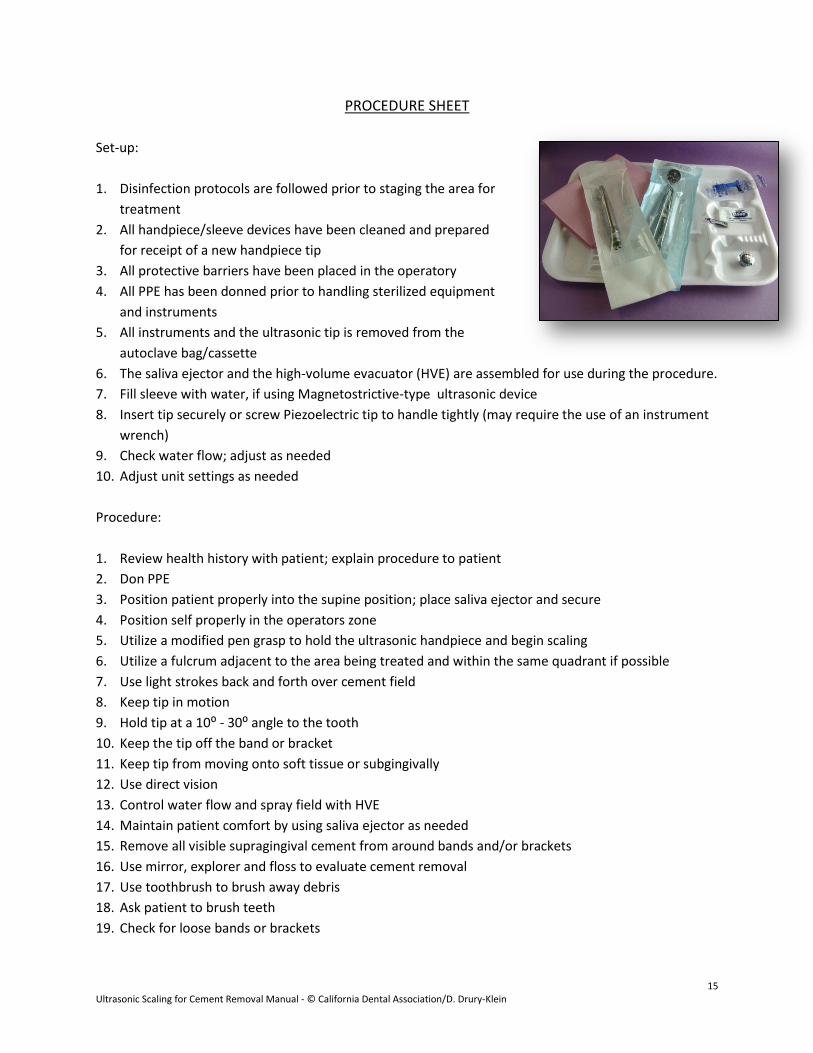
PROCEDURE SHEET
Set-up:
1. Disinfection protocols are followed prior to staging the area for
treatment
2. All handpiece/sleeve devices have been cleaned and prepared
for receipt of a new handpiece tip
3. All protective barriers have been placed in the operatory
4. All PPE has been donned prior to handling sterilized equipment
and instruments
5. All instruments and the ultrasonic tip is removed from the
autoclave bag/cassette
6. The saliva ejector and the high-volume evacuator (HVE) are assembled for use during the procedure.
7. Fill sleeve with water, if using Magnetostrictive-type ultrasonic device
8. Insert tip securely or screw Piezoelectric tip to handle tightly (may require the use of an instrument
wrench)
9. Check water flow; adjust as needed
10. Adjust unit settings as needed
Procedure:
1. Review health history with patient; explain procedure to patient
2. Don PPE
3. Position patient properly into the supine position; place saliva ejector and secure
4. Position self properly in the operators zone
5. Utilize a modified pen grasp to hold the ultrasonic handpiece and begin scaling
6. Utilize a fulcrum adjacent to the area being treated and within the same quadrant if possible
7. Use light strokes back and forth over cement field
8. Keep tip in motion
9. Hold tip at a 10⁰ - 30⁰ angle to the tooth
10. Keep the tip off the band or bracket
11. Keep tip from moving onto soft tissue or subgingivally
12. Use direct vision
13. Control water flow and spray field with HVE
14. Maintain patient comfort by using saliva ejector as needed
15. Remove all visible supragingival cement from around bands and/or brackets
16. Use mirror, explorer and floss to evaluate cement removal
17. Use toothbrush to brush away debris
18. Ask patient to brush teeth
19. Check for loose bands or brackets
16 Ultrasonic Scaling for Cement Removal Manual - © California Dental Association/D. Drury-Klein
Program Conclusion This Ultrasonic Scaling for Orthodontic Cement Removal Certification course and the materials provided herein are intended to provide the education necessary for the user to develop strong skills as a dental healthcare worker. The producers of this material would like to thank and gratefully acknowledge the California Dental Association for its commitment to developing quality educational materials for use within the profession of dentistry. Acknowledgements With great appreciation: Ms. Joan Greenfield, CDA, RDAEF, MS J. Productions Sacramento City College The faculty and staff of the dental assisting and dental hygiene programs of Sacramento City College Thomson Learning Elsevier Saunders (Mosby) Biosonic A-dec Hu-Friedy
REFERENCES
1. Primary Preventive Dentistry, Harris, Norman, DDS, MSD, FACD and Christen, Arden G., DDS, MSD, MA, FACD. Appleton & Lange, 1991.
2. Modern Dental Assisting, Torres, Hazel, CDA, RDA, MA, RDAEF and Erlich, Ann, CDA, MA. W. B. Saunders, Philadelphia, 1990, 2000, 2003.
3. Dental Assisting; A Comprehensive Approach, Phinney, Donna J., Halstead, Judy H., Delmar, 2000.
4. Clinical Periodontologv For The Dental Hygienist, Carranza, Fermin A. Jr. Dr. Odont. and Perry, Dorothy, RDH, PhD. W. B. Saunders, Philadelphia, 1986.
5. Infection Control Recommendations For The Dental Office And The Dental Laboratory. The American Dental Association, August 1992.
6. Comprehensive Dental Assisting: A Clinical Approach. Finkbeiner and Johnson. Mosby, 1998.
7. The Dental Board of California - Infection Control Regulations, 2005.
8. Ultrasonics, Carr, Michele, RDH, MA. ACCES Special Supplement Issue, 1999.