Embed Size (px)
Citation preview
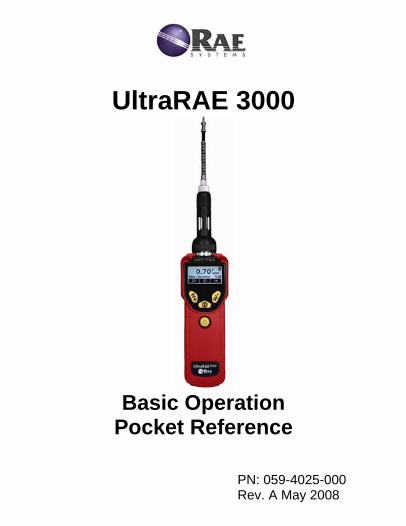
UltraRAE 3000
Basic Operation
Pocket Reference
PN: 059-4025-000 Rev. A May 2008
UltraRAE 3000 Pocket Reference
1
Read Before Operating This Pocket Reference is intended as a quick guide to basic use and calibration of your instrument. It does not cover advanced features. Information on advanced features and other operation modes is included in the User’s Guide. The User’s Guide must be carefully read by all individuals who have or will have the responsibility of using, maintaining, or servicing this product. The product will perform as designed only if it is used, maintained, and serviced in accordance with the manufacturer’s instructions. The user should understand how to set the correct parameters and interpret the obtained results.
CAUTION! To reduce the risk of electric shock, turn the power off before removing the instrument cover. Disconnect the battery before removing sensor module for service. Never operate the instrument when the cover is removed. Remove instrument cover and sensor module only in an area known to be non-hazardous.
UltraRAE 3000 Pocket Reference
WARNINGS STATIC HAZARD: Clean only with damp cloth. For safety reasons, this equipment must be operated and serviced by qualified personnel only. Read and understand the User’s Guide completely before operating or servicing. Use only RAE Systems battery packs, part numbers 059-3051-000 and 059-3052-000. This instrument has not been tested in an explosive gas/air atmosphere having an oxygen concentration greater than 21%. Substitution of components may impair intrinsic safety. Recharge batteries only in non-hazardous locations.
Do not mix old and new batteries or batteries from different manufacturers. The calibration of all newly purchased RAE Systems instruments should be tested by exposing the sensor(s) to known concentration calibration gas before the instrument is put into service.
2
UltraRAE 3000 Pocket Reference
For maximum safety, the accuracy of the instrument should be checked by exposing it to a known concentration calibration gas before each day’s use. Do not use USB/PC communication in hazardous locations.
The instrument is classified as to intrinsic safety for use in Class I, Division 1, groups A, B, C, D, and ATEX II 2G EEx ia IIC T4, or non-hazardous locations.
3
UltraRAE 3000 Pocket Reference
Special Notes When the instrument is taken out of the transport case and turned on for the first time, there may be some residual organic or inorganic vapor trapped inside the detector chamber. The initial PID sensor reading may indicate a few ppm. Enter an area known to be free of any organic vapor and turn on the instrument. After running for several minutes, the residual vapor in the detector chamber will be cleared and the reading should return to zero.
The battery of the instrument discharges slowly even if it is turned off. If the instrument has not been charged for 5 to 7 days, the battery voltage will be low. Therefore, it is a good practice to always charge the instrument before using it. It is also recommended to fully charge the instrument for at least 10 hours before first use. Refer to thr User Guide’s section on battery charging for more information on battery charging and replacement.
4
UltraRAE 3000 Pocket Reference
Contents Charging The Battery ......................................................... 7 Charging A Spare Rechargeable Battery ............................ 9 Low Voltage Warning ...................................................... 12 Pump Status ...................................................................... 12 Calibration Status.............................................................. 13 User Interface.................................................................... 14 Display.............................................................................. 17 Operating The Instrument................................................. 18 Turning The Instrument On........................................... 19 Turning The Instrument Off .......................................... 21 Operating The Built-In Flashlight ................................. 21 Compound-Specific Operation ......................................... 22 Performing A Measurement........................................... 22 Separation Tube Preparation.......................................... 25 Inserting The Separation Tube....................................... 27 Measuring ...................................................................... 28 VOC Operation................................................................. 33 Basic User Mode/Hygiene Mode ..................................... 33 Entering Calibration.......................................................... 36 Standard Two-Point Calibration (Zero & Span)............... 38 Zero (Fresh Air) Calibration.......................................... 39 Span Calibration............................................................ 42
5
UltraRAE 3000 Pocket Reference
Exiting Two-Point Calibration ...................................... 45 Alarm Signal Summary .................................................... 46 Preset Alarm Limits & Calibration................................... 48 Sampling Pump................................................................. 49 Ordering Replacement Parts ............................................. 50 Special Servicing Note ..................................................... 51 Troubleshooting................................................................ 51 Technical Support............................................... Back cover
6
UltraRAE 3000 Pocket Reference
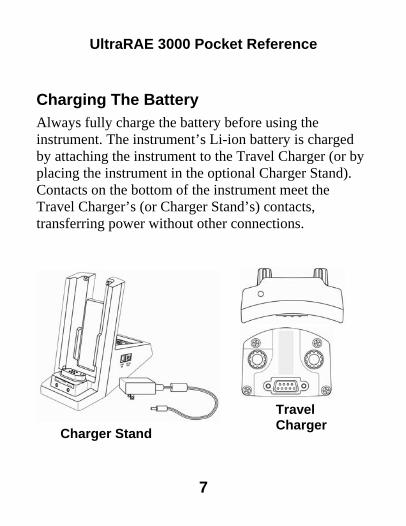
Charging The Battery Always fully charge the battery before using the instrument. The instrument’s Li-ion battery is charged by attaching the instrument to the Travel Charger (or by placing the instrument in the optional Charger Stand). Contacts on the bottom of the instrument meet the Travel Charger’s (or Charger Stand’s) contacts, transferring power without other connections. Charger Stand
Travel Charger
7
UltraRAE 3000 Pocket Reference
Note: Before setting the instrument into its charger, visually inspect the contacts to make sure they are clean. If they are not, wipe them with a soft cloth. Do not use solvents or cleaners. Follow this procedure to charge the instrument:
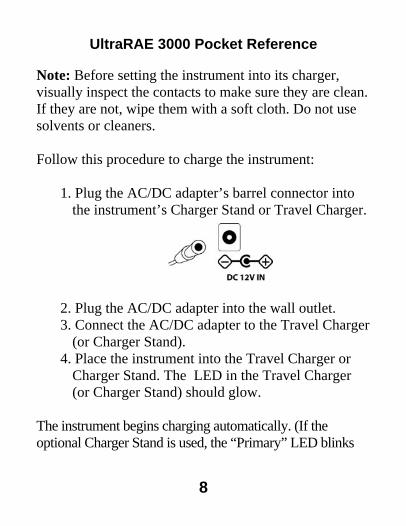
1. Plug the AC/DC adapter’s barrel connector into the instrument’s Charger Stand or Travel Charger.
2. Plug the AC/DC adapter into the wall outlet. 3. Connect the AC/DC adapter to the Travel Charger
(or Charger Stand). 4. Place the instrument into the Travel Charger or
Charger Stand. The LED in the Travel Charger (or Charger Stand) should glow.
The instrument begins charging automatically. (If the optional Charger Stand is used, the “Primary” LED blinks
8
UltraRAE 3000 Pocket Reference
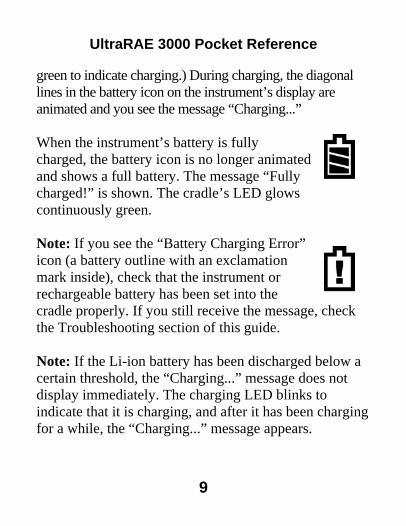
green to indicate charging.) During charging, the diagonal lines in the battery icon on the instrument’s display are animated and you see the message “Charging...” When the instrument’s battery is fully charged, the battery icon is no longer animated and shows a full battery. The message “Fully charged!” is shown. The cradle’s LED glows continuously green. Note: If you see the “Battery Charging Error” icon (a battery outline with an exclamation mark inside), check that the instrument or rechargeable battery has been set into the cradle properly. If you still receive the message, check the Troubleshooting section of this guide. Note: If the Li-ion battery has been discharged below a certain threshold, the “Charging...” message does not display immediately. The charging LED blinks to indicate that it is charging, and after it has been charging for a while, the “Charging...” message appears.
9
UltraRAE 3000 Pocket Reference
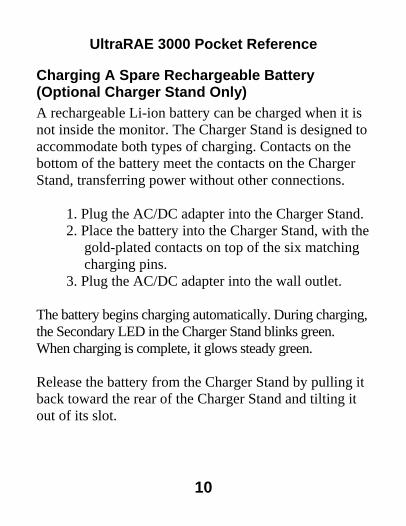
Charging A Spare Rechargeable Battery (Optional Charger Stand Only) A rechargeable Li-ion battery can be charged when it is not inside the monitor. The Charger Stand is designed to accommodate both types of charging. Contacts on the bottom of the battery meet the contacts on the Charger Stand, transferring power without other connections.
1. Plug the AC/DC adapter into the Charger Stand. 2. Place the battery into the Charger Stand, with the
gold-plated contacts on top of the six matching charging pins.
3. Plug the AC/DC adapter into the wall outlet. The battery begins charging automatically. During charging, the Secondary LED in the Charger Stand blinks green. When charging is complete, it glows steady green. Release the battery from the Charger Stand by pulling it back toward the rear of the Charger Stand and tilting it out of its slot.
10
UltraRAE 3000 Pocket Reference
Note: If you need to replace the Li-ion battery pack, replacements are available from RAE Systems. The part number is 059-3051-000. Note: An Alkaline Battery Adapter (part number 059-3052-000), which uses four AA alkaline batteries (Duracell MN1500 or Energizer E91), may be substituted for the Li-Ion battery.
IMPORTANT! Alkaline batteries cannot be recharged. If you try to charge an alkaline batteries installed in the instrument, the Charging Cradle or Travel Charger’s charging LED does not glow, indicating that it will not charge the alkaline batteries.
WARNING! To reduce the risk of ignition of hazardous atmospheres, recharge and replace batteries only in areas known to be non-hazardous. Remove and replace batteries only in areas known to be non-hazardous.
11
UltraRAE 3000 Pocket Reference
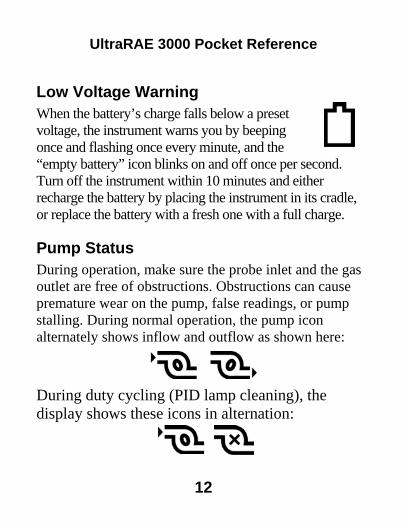
Low Voltage Warning When the battery’s charge falls below a preset voltage, the instrument warns you by beeping once and flashing once every minute, and the “empty battery” icon blinks on and off once per second. Turn off the instrument within 10 minutes and either recharge the battery by placing the instrument in its cradle, or replace the battery with a fresh one with a full charge.
Pump Status During operation, make sure the probe inlet and the gas outlet are free of obstructions. Obstructions can cause premature wear on the pump, false readings, or pump stalling. During normal operation, the pump icon alternately shows inflow and outflow as shown here:
During duty cycling (PID lamp cleaning), the display shows these icons in alternation:
12
UltraRAE 3000 Pocket Reference
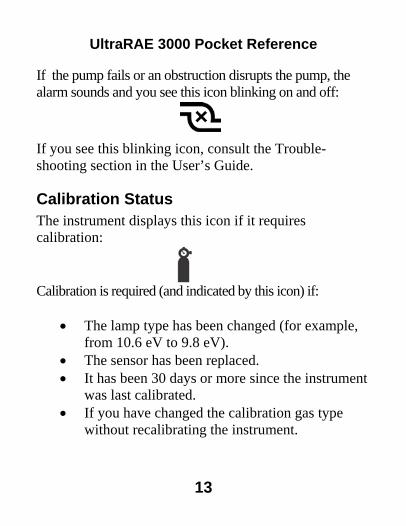
If the pump fails or an obstruc on disrupts the pump, the
If you see this he Trouble-
Calibration Status
alibration is required dicated by this icon) if:
• The lamp type has been changed (for example,
ced. ce the instrument
the calibration gas type
tialarm sounds and you see this icon blinking on and off:
blinking icon, consult t
shooting section in the User’s Guide.
The instrument displays this icon if it requires calibration: C (and in
from 10.6 eV to 9.8 eV). • The sensor has been repla• It has been 30 days or more sin
was last calibrated. • If you have changed
without recalibrating the instrument.
13
UltraRAE 3000 Pocket Reference
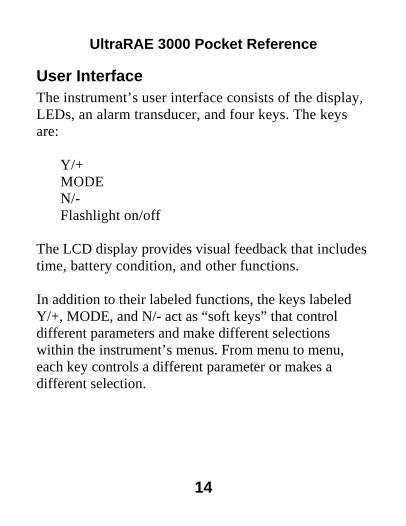
User Interface The instrument’s user interface consists of the display, LEDs, an alarm transducer, and four keys. The keys are:
Y/+ MODE N/- Flashlight on/off
The LCD display provides visual feedback that includes time, battery condition, and other functions. In addition to their labeled functions, the keys labeled Y/+, MODE, and N/- act as “soft keys” that control different parameters and make different selections within the instrument’s menus. From menu to menu, each key controls a different parameter or makes a different selection.
14
UltraRAE 3000 Pocket Reference
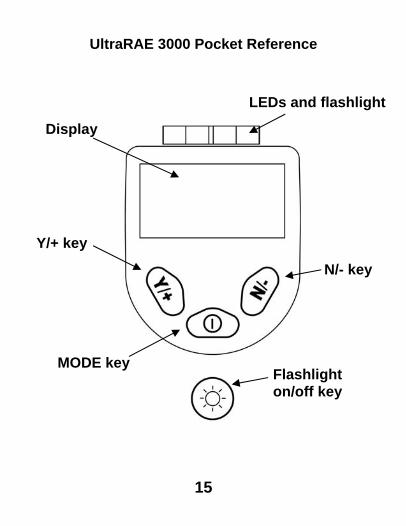
LEDs and flashlight
Display
Y/+ key
N/- key MODE key
Flashlight on/off key
15
UltraRAE 3000 Pocket Reference
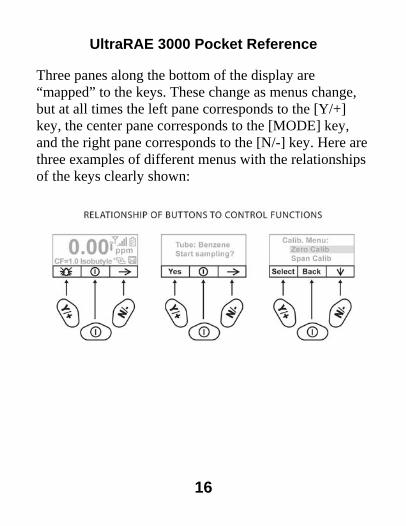
Three panes along the bottom of the display are “mapped” to the keys. These change as menus change, but at all times the left pane corresponds to the [Y/+] key, the center pane corresponds to the [MODE] key, and the right pane corresponds to the [N/-] key. Here are three examples of different menus with the relationships of the keys clearly shown:
16
UltraRAE 3000 Pocket Reference
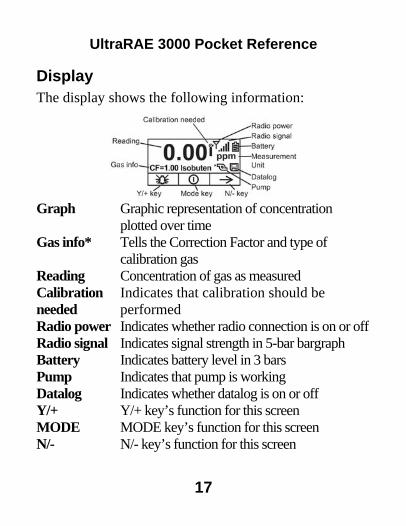
Display The display shows the following information:
Graph Graphic representation of concentration
plotted over time Gas info* Tells the Correction Factor and type of
calibration gas Reading Concentration of gas as measured Calibration Indicates that calibration should be needed performed Radio power Indicates whether radio connection is on or off Radio signal Indicates signal strength in 5-bar bargraph Battery Indicates battery level in 3 bars Pump Indicates that pump is working Datalog Indicates whether datalog is on or off Y/+ Y/+ key’s function for this screen MODE MODE key’s function for this screen N/- N/- key’s function for this screen
17
UltraRAE 3000 Pocket Reference
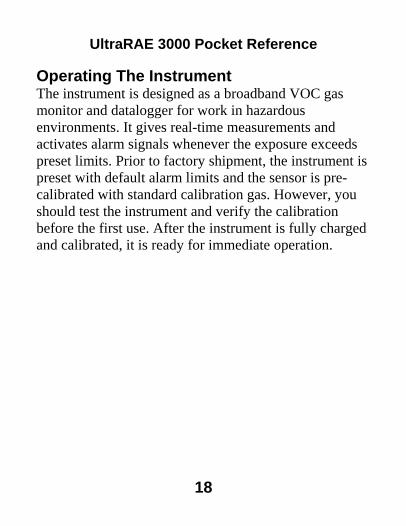
Operating The Instrument The instrument is designed as a broadband VOC gas monitor and datalogger for work in hazardous environments. It gives real-time measurements and activates alarm signals whenever the exposure exceeds preset limits. Prior to factory shipment, the instrument is preset with default alarm limits and the sensor is pre-calibrated with standard calibration gas. However, you should test the instrument and verify the calibration before the first use. After the instrument is fully charged and calibrated, it is ready for immediate operation.
18
UltraRAE 3000 Pocket Reference
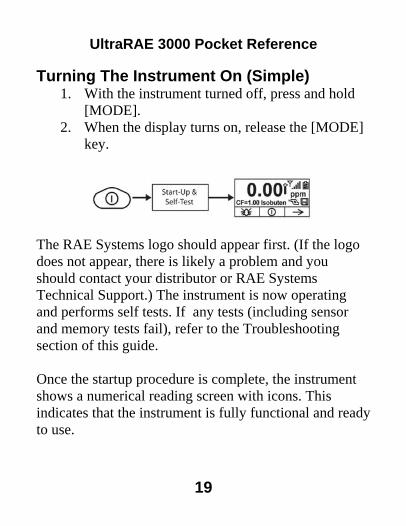
Turning The Instrument On (Simple) 1. With the instrument turned off, press and hold
[MODE]. 2. When the display turns on, release the [MODE]
key.
The RAE Systems logo should appear first. (If the logo does not appear, there is likely a problem and you should contact your distributor or RAE Systems Technical Support.) The instrument is now operating and performs self tests. If any tests (including sensor and memory tests fail), refer to the Troubleshooting section of this guide. Once the startup procedure is complete, the instrument shows a numerical reading screen with icons. This indicates that the instrument is fully functional and ready to use.
19
UltraRAE 3000 Pocket Reference
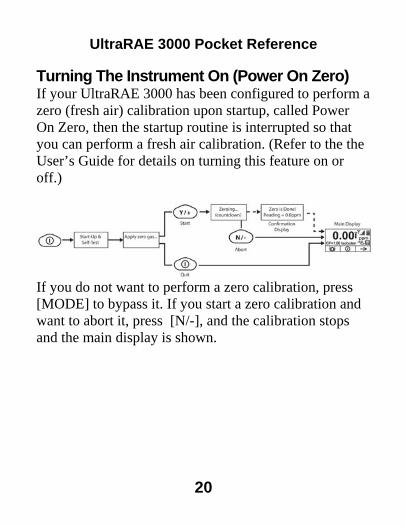
Turning The Instrument On (Power On Zero) If your UltraRAE 3000 has been configured to perform a zero (fresh air) calibration upon startup, called Power On Zero, then the startup routine is interrupted so that you can perform a fresh air calibration. (Refer to the the User’s Guide for details on turning this feature on or off.)
If you do not want to perform a zero calibration, press [MODE] to bypass it. If you start a zero calibration and want to abort it, press [N/-], and the calibration stops and the main display is shown.
20
UltraRAE 3000 Pocket Reference
Turning The Instrument Off 1. Press and hold the Mode key for 3 seconds. A 5-
second countdown to shutoff begins. 2. Once the countdown stops, the instrument is off.
Release the Mode key. 3. When you see “Unit off...” release your finger from
the [MODE] key. The instrument is now off. Note: You must hold your finger on the key for the entire shutoff process. If you remove your finger from the key during the countdown, the shutoff operation is canceled and the instrument continues normal operation. Operating The Built-In Flashlight The instrument has a built-in flashlight that helps you point the probe in dark places. Press the flashlight key to turn it on. Press it again to turn it off. Note: Using the flashlight for extended periods shortens the battery’s operating time before it needs recharging.
21
UltraRAE 3000 Pocket Reference
Compound-Specific Operation The UltraRAE 3000 can perform compound-specific measurement in addition to general VOC measurement. This requires using a RAE-Sep separation tube (butadiene or benzene) and having the UltraRAE 3000 in Tube Mode, operating with a 9.8eV lamp. To perform a compound-specific measurement, follow this order:
1. UltraRAE 3000 is ready for sampling. 2. Prepare the separation tube. 3. Insert the separation tube with its indicator
arrow pointing toward the instrument. 4. Start measurement. 5. UltraRAE 3000 displays and logs measurement. 6. Remove the separation tube.
Performing A Measurement Before performing a compound-specific measurement for Benzene or Butadiene using a RAE-Sep separation
22
UltraRAE 3000 Pocket Reference
tube, make sure the UltraRAE 3000 is in Tube Mode and that the appropriate tube type is selected. The UltraRAE 3000 only acts as a compound-specific measurement device when it is equipped with a 9.8eV lamp. The UltraRAE 3000 is designed to auto-sense the lamp type. It can also be manually set to default to a 9.8eV lamp type. Make sure the UltraRAE 3000 is set to operate with your selected tube:
1. Enter Programming Mode. 2. Select Measurement. 3. Select Tube Selection. 4. Make a choice of Benzene or Butadiene. 5. Save your choice.
23
UltraRAE 3000 Pocket Reference
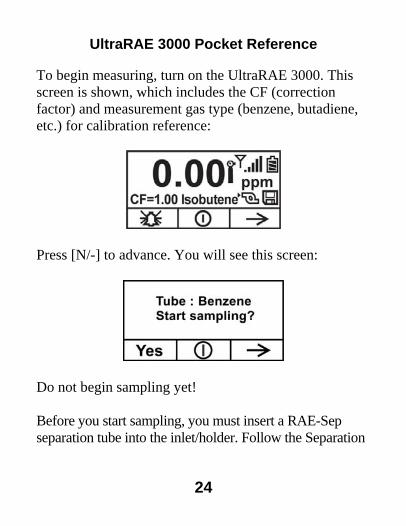
To begin measuring, turn on the UltraRAE 3000. This screen is shown, which includes the CF (correction factor) and measurement gas type (benzene, butadiene, etc.) for calibration reference:
Press [N/-] to advance. You will see this screen:
Do not begin sampling yet! Before you start sampling, you must insert a RAE-Sep separation tube into the inlet/holder. Follow the Separation
24
UltraRAE 3000 Pocket Reference
Tube Preparation and Placing A Tube Into The UltraRAE 3000 instructions before pressing any buttons on the UltraRAE 3000. Once the tube is in place, then proceed to measuring.
IMPORTANT! Once a tube’s ends are broken off, the material inside is exposed. Therefore, use the tube for sampling as soon as possible. Separation Tube Preparation
CAUTION! Wear hand and eye protection when breaking tube tips. Use caution in handling tubes with broken ends. Keep away from children. RAE-Sep tubes should be disposed of according to local regulations. See footnotes of data sheets for disposal information. 1. Open a package of RAE-Sep separation tubes and
remove one.
25
UltraRAE 3000 Pocket Reference
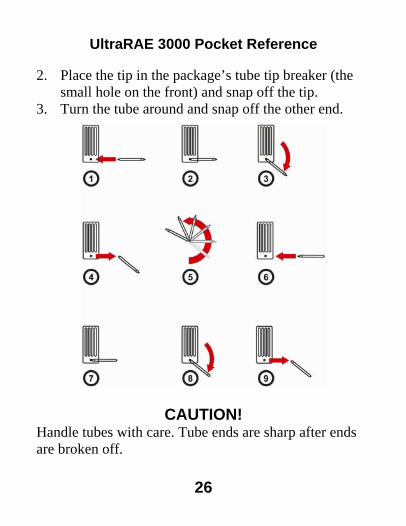
2. Place the tip in the package’s tube tip breaker (the small hole on the front) and snap off the tip.
3. Turn the tube around and snap off the other end.
CAUTION! Handle tubes with care. Tube ends are sharp after ends are broken off.
26
UltraRAE 3000 Pocket Reference
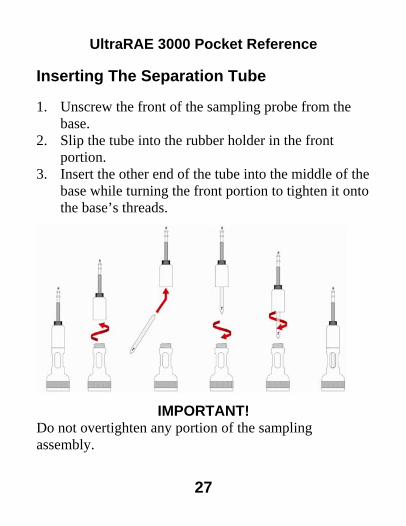
Inserting The Separation Tube
1. Unscrew the front of the sampling probe from the base.
2. Slip the tube into the rubber holder in the front portion.
3. Insert the other end of the tube into the middle of the base while turning the front portion to tighten it onto the base’s threads.
IMPORTANT! Do not overtighten any portion of the sampling assembly.
27
UltraRAE 3000 Pocket Reference
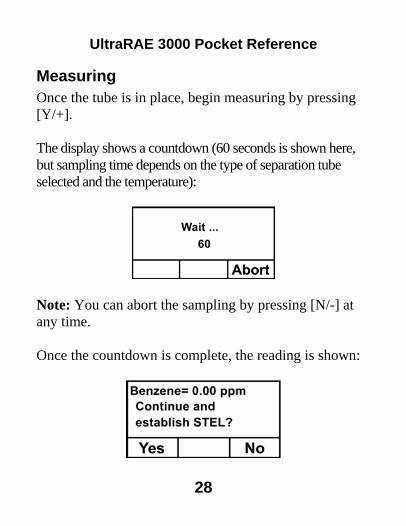
Measuring Once the tube is in place, begin measuring by pressing [Y/+]. The display shows a countdown (60 seconds is shown here, but sampling time depends on the type of separation tube selected and the temperature):
Note: You can abort the sampling by pressing [N/-] at any time. Once the countdown is complete, the reading is shown:
28

UltraRAE 3000 Pocket Reference
Press [Y/+] to continue sampling with the tube for 15 minutes to establish a STEL reading, or press [N/-] to return to the main menu.
WARNING! At least 1/4 of the tube should still be yellow-orange at the bottom. If not, the STEL value is not valid. Abort the measurement and change the tube. Then do a snapshot test instead of a STEL test. Note: If the STEL is exceeded, the UltraRAE 3000 goes into alarm. If you press [N/-] to return to the main menu, which shows the tube type instead of the CF (correction factor):
29
UltraRAE 3000 Pocket Reference
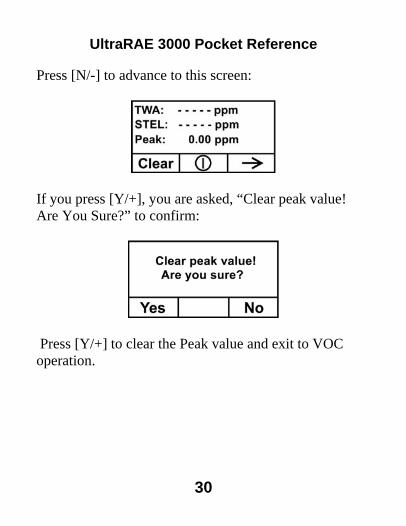
Press [N/-] to advance to this screen:
If you press [Y/+], you are asked, “Clear peak value! Are You Sure?” to confirm:
Press [Y/+] to clear the Peak value and exit to VOC operation.
30
UltraRAE 3000 Pocket Reference
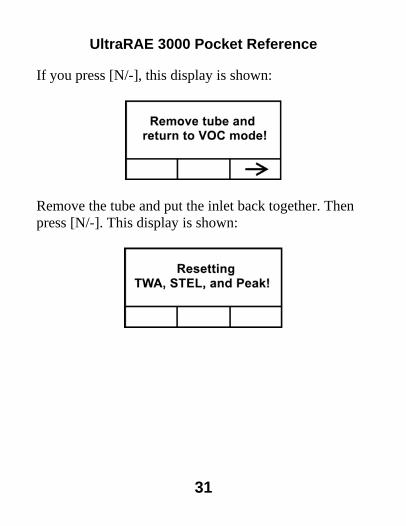
If you press [N/-], this display is shown:
Remove the tube and put the inlet back together. Then press [N/-]. This display is shown:
31
UltraRAE 3000 Pocket Reference
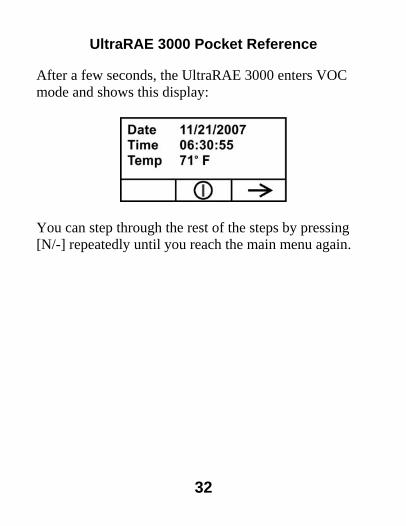
After a few seconds, the UltraRAE 3000 enters VOC mode and shows this display:
You can step through the rest of the steps by pressing [N/-] repeatedly until you reach the main menu again.
32
UltraRAE 3000 Pocket Reference
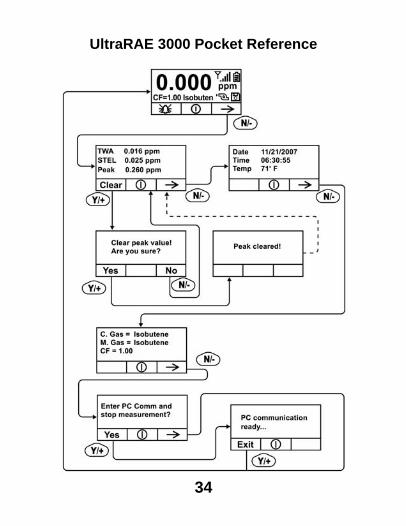
VOC Operation Basic User Mode/Hygiene Mode (Default Settings) The instrument is programmed to operate in Basic User Mode/Hygiene Mode as its default. This gives you the most commonly needed features while requiring the fewest parameter adjustments. Pressing [N/-] steps you from one screen to the next, and eventually return to the main display. If you do not press a key within 60 seconds after entering a display, the instrument reverts to its main display. Note: While viewing any of these screens, you can shut off your instrument by pressing [MODE]. Note: Whenever you see the alarm icon in the lower left pane, you can press [Y/+] to test the alarms.
33
UltraRAE 3000 Pocket Reference
34
UltraRAE 3000 Pocket Reference
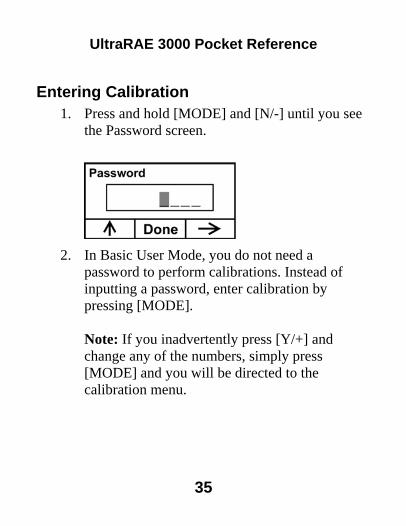
Entering Calibration 1. Press and hold [MODE] and [N/-] until you see
the Password screen.
2. In Basic User Mode, you do not need a
password to perform calibrations. Instead of inputting a password, enter calibration by pressing [MODE]. Note: If you inadvertently press [Y/+] and change any of the numbers, simply press [MODE] and you will be directed to the calibration menu.
35
UltraRAE 3000 Pocket Reference
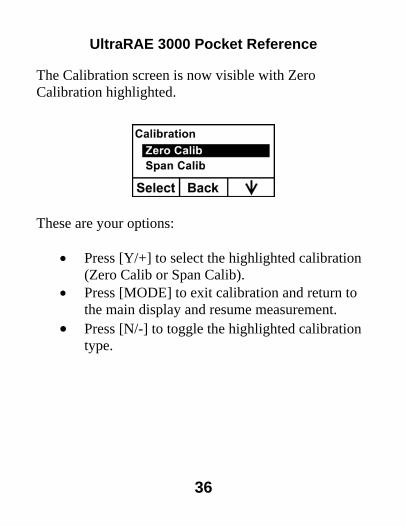
The Calibration screen is now visible with Zero Calibration highlighted.
These are your options:
• Press [Y/+] to select the highlighted calibration (Zero Calib or Span Calib).
• Press [MODE] to exit calibration and return to the main display and resume measurement.
• Press [N/-] to toggle the highlighted calibration type.
36
UltraRAE 3000 Pocket Reference
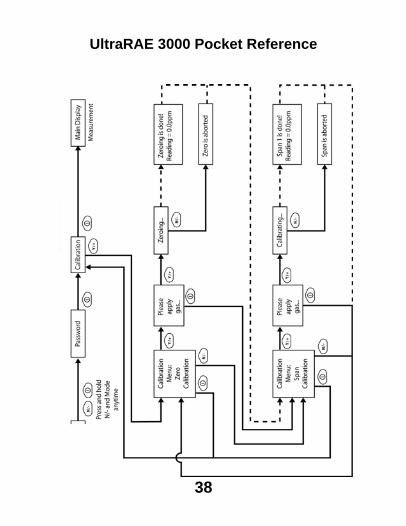
Standard Two-Point Calibration (Zero & Span) The following diagram shows the instrument’s calibrations in Basic/Hygiene mode. Note: In the diagram, a dashed line indicates automatic change to another screen.
37
UltraRAE 3000 Pocket Reference
38
UltraRAE 3000 Pocket Reference
Zero (Fresh Air) Calibration This procedure determines the zero point of the sensor calibration curve. To perform a fresh air calibration, use the calibration adapter to connect the instrument to a “fresh” air source such as from a cylinder or Tedlar bag (optional accessory). The “fresh” air is clean, dry air without organic impurities and an oxygen value of 20.9%. If such an air cylinder is not available, any clean ambient air without detectable contaminants or a charcoal filter can be used. At the Zero Calibration menu, you can proceed to perform a Zero calibration or bypass Zero calibration and perform a Span calibration. You may also go back to the initial Calibration menu if you want to exit calibration.
• Press [Y/+] to start calibration. • Press [MODE] to quit and return to the main
calibration display.
39
UltraRAE 3000 Pocket Reference
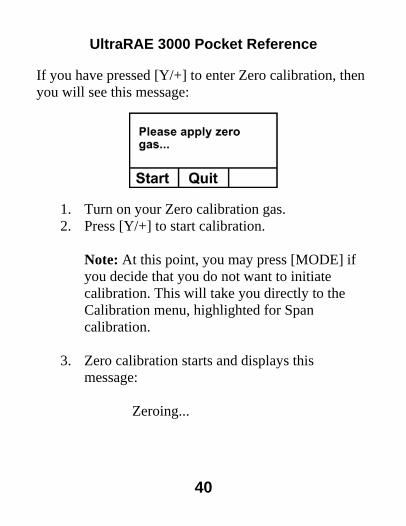
If you have pressed [Y/+] to enter Zero calibration, then you will see this message:
1. Turn on your Zero calibration gas. 2. Press [Y/+] to start calibration.
Note: At this point, you may press [MODE] if you decide that you do not want to initiate calibration. This will take you directly to the Calibration menu, highlighted for Span calibration.
3. Zero calibration starts and displays this message:
Zeroing...
40
UltraRAE 3000 Pocket Reference
During the zeroing process, the instrument performs the Zero calibration automatically and does not require any actions on your part. Note: To abort the zeroing process at any time and proceed to Span calibration, press [N/-] at any time while zeroing is being performed. You will see a confirmation message that says “Zero is aborted!” and then the Span calibration menu appears. When Zero calibration is complete, you see this message: Zeroing is done! Reading = 0.000 ppm The instrument will then show the Calibration menu on its display, with Span Calib hightlighted.
41
UltraRAE 3000 Pocket Reference
Span Calibration This procedure determines the second point of the sensor calibration curve for the sensor. A cylinder of standard reference gas (span gas) fitted with a 500 cc/min. flow-limiting regulator or a flow-matching regulator is the simplest way to perform this procedure. Choose the 500 cc/min. regulator only if the flow rate matches or slightly exceeds the flow rate of the instrument pump. Alternatively, the span gas can first be filled into a Tedlar bag or delivered through a demand-flow regulator. Connect the calibration adapter to the inlet port of the instrument, and connect the tubing to the regulator or Tedlar bag. Another alternative is to use a regulator with >500 cc/min flow but allow the excess flow to escape through a T or an open tube. In the latter method, the span gas flows out through an open tube slightly wider than the probe, and the probe is inserted into the calibration tube. At the Span Calibration menu, you perform a Span calibration. You may also go back to the Zero calibration menu or to the initial Calibration menu if you want to exit calibration.
42
UltraRAE 3000 Pocket Reference
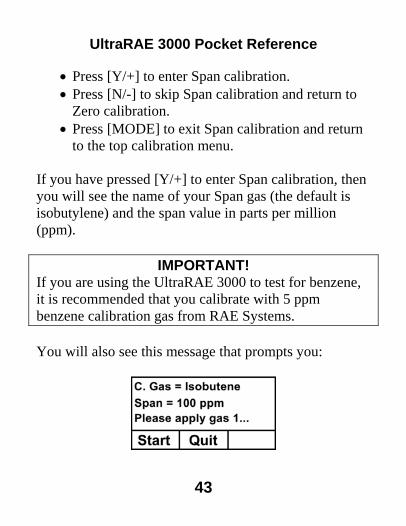
• Press [Y/+] to enter Span calibration. • Press [N/-] to skip Span calibration and return to
Zero calibration. • Press [MODE] to exit Span calibration and return
to the top calibration menu. If you have pressed [Y/+] to enter Span calibration, then you will see the name of your Span gas (the default is isobutylene) and the span value in parts per million (ppm).
IMPORTANT! If you are using the UltraRAE 3000 to test for benzene, it is recommended that you calibrate with 5 ppm benzene calibration gas from RAE Systems. You will also see this message that prompts you:
43
UltraRAE 3000 Pocket Reference
1. Turn on your span calibration gas. 2. Press [Y/+] to initiate calibration.
Note: You may press [MODE] if you decide that you do not want to initiate calibration. This will abort the span calibration and take you directly to the Calibration menu for Zero calibration.
3. Span calibration starts and displays this message:
Calibrating... During the Span calibration process, there is a 30-second countdown and the instrument performs the Span calibra-tion automatically. It requires no actions on your part. Note: If you want to abort the Span calibration process, press [N/-] at any time during the process. You will see a confirmation message that says “Span is aborted!” and then the Zero calibration menu appears. You can then
44
UltraRAE 3000 Pocket Reference
proceed to perform a Zero calibration, perform a Span calibration, or exit to the topmost Calibration menu. When Span calibration is complete, you see this message:
Span 1 is done! Reading = 100.0 ppm
The instrument then exits Span calibration and shows the Zero calibration menu on its display. Note: The reading should be very close to the span gas value. Exiting Two-Point Calibration When you are done performing calibrations, press [MODE], which corresponds with “Back” on the display. You will see the following message:
Updating settings… The instrument updates its settings and then returns to the main display. It begins or resumes monitoring.
45
UltraRAE 3000 Pocket Reference
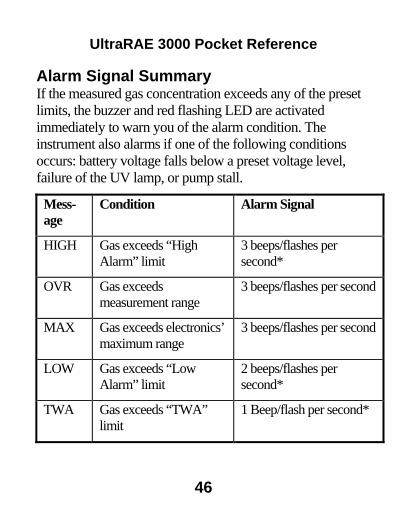
Alarm Signal Summary If the measured gas concentration exceeds any of the preset limits, the buzzer and red flashing LED are activated immediately to warn you of the alarm condition. The instrument also alarms if one of the following conditions occurs: battery voltage falls below a preset voltage level, failure of the UV lamp, or pump stall.
Mess-age
Condition Alarm Signal
HIGH Gas exceeds “High Alarm” limit
3 beeps/flashes per second*
OVR Gas exceeds measurement range
3 beeps/flashes per second
MAX Gas exceeds electronics’ maximum range
3 beeps/flashes per second
LOW Gas exceeds “Low Alarm” limit
2 beeps/flashes per second*
TWA Gas exceeds “TWA” limit
1 Beep/flash per second*
46
UltraRAE 3000 Pocket Reference
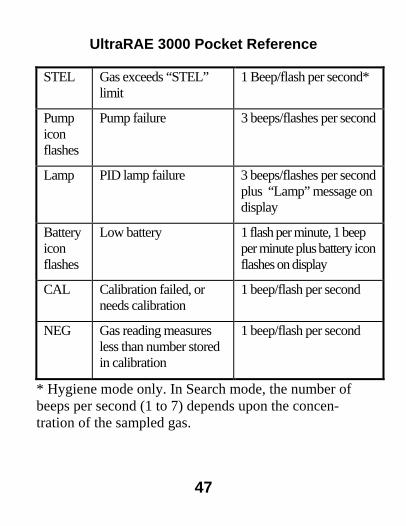
STEL Gas exceeds “STEL” limit
1 Beep/flash per second*
Pump icon flashes
Pump failure 3 beeps/flashes per second
Lamp PID lamp failure 3 beeps/flashes per second plus “Lamp” message on display
Battery icon flashes
Low battery 1 flash per minute, 1 beep per minute plus battery icon flashes on display
CAL Calibration failed, or needs calibration
1 beep/flash per second
NEG Gas reading measures less than number stored in calibration
1 beep/flash per second
* Hygiene mode only. In Search mode, the number of beeps per second (1 to 7) depends upon the concen-tration of the sampled gas.
47
UltraRAE 3000 Pocket Reference
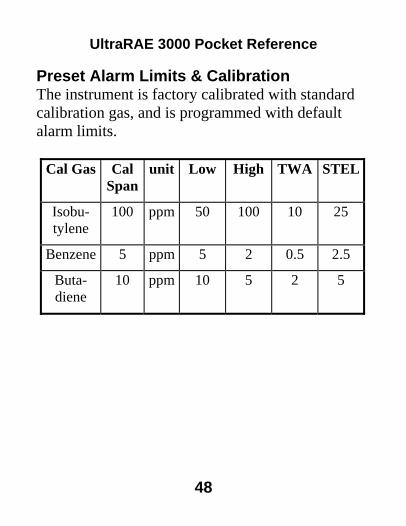
Preset Alarm Limits & Calibration The instrument is factory calibrated with standard calibration gas, and is programmed with default alarm limits.
Cal Gas Cal Span
unit Low High TWA STEL
Isobu-tylene
100 ppm 50 100 10 25
Benzene 5 ppm 5 2 0.5 2.5
Buta-diene
10 ppm 10 5 2 5
48
UltraRAE 3000 Pocket Reference
Sampling Pump When approaching the end of the specified lifetime of the pump, it will consume higher amount of energy and reduce its sample draw capability significantly. When this occurs, it is necessary to replace or rebuild the pump. When checking the pump flow, make sure that the inlet connector is tight and the inlet tubing is in good condition. Connect a flow meter to the gas inlet probe. The flow rate should be above 450 cc/min when there is no air leakage.
If the pump is not working properly, refer the instrument to qualified service personnel for further testing and, if necessary, pump repair or replacement.
Check the pump: With the UltraRAE 3000 running, place your finger over the end of the inlet probe. The alarm should sound and the pump-stall icon should flash on the display. This indicates that all seals are good. Stop the alarm by pressing [Y/+]. If the pump does not alarm or show the stalled-pump icon, then check that all inlet parts are tight and inspect the O-ring for damage (replace it if necessary). Also check the pump stall settings in Diagnostic Mode (refer to the User’s Guide).
49
UltraRAE 3000 Pocket Reference
Ordering Replacement Parts If you need replacement parts, contact your local RAE Systems distributor. A list is available online: http://www.raesystems.com In the U.S., you can order sensors, replacement batteries, and other accessories online at: http://istore.raesystems.com/
50
UltraRAE 3000 Pocket Reference
Special Servicing Note If the instrument needs to be serviced, contact either:
1. The RAE Systems distributor from whom the instrument was purchased; they will return the instrument on your behalf.
2. The RAE Systems Technical Service Department. Before returning the instrument for service or repair, obtain a Returned Material Authorization (RMA) number for proper tracking of your equipment. This number needs to be on all documentation and posted on the outside of the box in which the instrument is returned for service or upgrade. Packages without RMA Numbers will be refused at the factory.
Troubleshooting Refer to the User’s Guide for troubleshooting details.
51
RAE Systems Inc.
3775 N. First St. San Jose, CA 95134-1708 USA
Web: www.raesystems.com
Technical Support To contact RAE Systems Technical Support Team: Monday through Friday, 7:00AM to 5:00PM Pacific (US) Time Phone (toll-free): +1 888-723-4800 Phone: +1 408-952-8461 Email: [email protected] Life-critical after-hours support is available: +1 408-952-8200 select option 8
PN: 059-4025-000 Rev. A May 2008