Embed Size (px)
Citation preview
Ultimaker S5 Material Station
Installation and user manual
Ultimaker S5 Material Station user manual 1
Table of contents
1. Safety and compliance
1.1 Safety messages 41.2 General safety information 41.3 Hazards 41.4 Health and safety 5
2. Introduction
2.1 Main components 72.2 Specifications 8
3. Installation
3.1 Unboxing 103.2 What’s in the box 103.3 Hardware installation 103.4 Firmware installation 113.5 Welcome setup 113.6 Loading filament 123.7 Install Ultimaker Cura 12
4. Operation
4.1 Operation recommendations 144.2 Material compatibility 144.3 Changing materials 144.4 Humidity control 15
5. Maintenance
5.1 Clean the Material Station 175.2 Dehumidifier 17
6. Troubleshooting
6.1 Error messages 196.2 Material Station not recognised 196.3 Material stuck 196.4 Material greyed out 19
7. Warranty
7.1 General 227.2 Conditions 227.3 Notification 227.4 Exclusions 237.5 Applicable law and competent court 23
Ultimaker S5 Material Station user manual 2
Disclaimer
Please carefully read and understand the contents of this installation and user manual. Failure to read the manual may lead to personal injury, inferior results or damage to the Material Station, the Ultimaker S5 or its peripherals. Always make sure that anyone who uses this 3D printer knows and understands the contents of the manual to make the most out of the Ultimaker S5 Material Station.
The Ultimaker S5 Material Station, together with the Ultimaker S5 Air Manager and the Ultimaker S5, form the Ultimaker S5 Pro Bundle. This user manual specifically describes the intended workflow and operation for the Material Station. First-time Ultimaker S5 users are advised to consult the Ultimaker S5 manual first.
The conditions or methods used for assembling, handling, storage, use, or disposal of the device are beyond Ultimaker’s control and may be beyond its knowledge. For this and other reasons, Ultimaker does not assume responsibility and expressly disclaims liability for loss, injury, damage, or expense arising out of or in any way connected with the assembly, handling, storage, use, or disposal of the product.
The information in this document was obtained from sources which Ultimaker believes are reliable. However, the information is provided without any warranty, express or implied, regarding its accuracy.
Intended Use
The Ultimaker S5 Material Station is designed and built for use in combination with the Ultimaker S5.
The Ultimaker S5 Material Station delivers a more flexible, efficient, and reliable solution for material handling and storage on the Ultimaker S5. This is achieved by simplifying the 3D printing workflow, while improving the quality and success rate of single and dual extrusion 3D prints through humidity control and automatic material switching. Up to six spools can be loaded into the Ultimaker S5 Material Station. Both Ultimaker and third-party (composite) materials are compatible with the Material Station.
1. Safety and compliance
Ultimaker S5 Material Station user manual 4
1.1 Safety messages
This guide contains warnings and safety notices.
The information provided below is applicable to the combination of the Ultimaker S5 and the Material Station (“Ultimaker products”).
Provides additional information that is helpful to do a task or to avoid problems.
Warns of a situation that may cause material damage or injuries if the safety instructions are not followed.
1.2 General safety information
The Material Station is designed for use with the Ultimaker S5. The following safety information is applicable:
• The Ultimaker S5 generates high temperatures and has hot moving parts that can cause injury. Never reach inside of the Ultimaker S5 while it is in operation. Always control the printer with the touchscreen at the front or the power switch at the back. Allow the Ultimaker S5 to cool down for 5 minutes before reaching inside
• Do not change or adjust any parts of the Ultimaker products unless the change or adjustment is authorized by the manufacturer
• Do not store items inside Ultimaker products, except for compatible filament spools in the Material Station • Ultimaker products are not intended for use by persons with reduced physical and/or mental capabilities, or
lack of experience and knowledge, unless they are supervised or have been given instructions concerning the use of the appliance by a person responsible for their safety
• Children should be under constant supervision when using Ultimaker products
1.3 Hazards
Electromagnetic compatibility
This device may not cause harmful interference, and this device must accept any interference received, including interference that may cause undesired operation.
An electrostatic discharge in some metallic parts of the device may cause the interruption of the NFC communications, affecting the initial detection of the material spool. In these cases, a device restart should solve the problem.
Electrical safety
Ultimaker products have been tested according to the IEC 62368-1. All relevant products have undergone and passed Hi-pot testing before shipment. This test guarantees the right level of insulation against electrical shock. An earthed mains socket must be used. Be sure that the building installation has dedicated means for overcurrent and short-circuiting. For more information, please visit the Ultimaker website for the CB certificate. The printer is powered by mains voltage, which is hazardous when touched. This has been marked with a high-voltage symbol on the bottom cover. Only trained staff should remove the bottom cover.
Always unplug Ultimaker products before performing maintenance or modifications
Ultimaker S5 Material Station user manual 5
Risk of burns
There is a potential risk of burns: the print head of the Ultimaker S5 can reach temperatures up to 280 °C, while the heated bed can reach temperatures of 140 °C. Do not touch either of these parts with your bare hands.
Always allow Ultimaker products to cool down for 30 minutes before performing maintenance or modifications.
Mechanical safety
Ultimaker products are compliant with the Machine Directive 2006/42/EU. The EC declaration of conformity can be found on the Ultimaker website. The Ultimaker S5 contains moving parts. No damage to the user will be expected from the drive belts. The force of the build plate is large enough to cause damage, so stay out of the reach of the build plate during operation.
Always unplug Ultimaker products before performing maintenance or modifications.
1.4 Health and safety
3D printing thermoplastics may result in the release of Ultra Fine Particles (UFPs) and Volatile Organic Compounds (VOCs) depending on the thermoplastic used and settings of the 3D printer.
Ultimaker products are designed for use with Ultimaker materials and are open for use with materials from third-party suppliers.
Ultimaker materials
Ultimaker materials can be printed safely without any filtering using the recommended temperatures and settings in a well-ventilated area (minimum refresh rate of 1.8 for a room size of 30.6 m2). When multiple Ultimaker 3D printers are operated in a contained environment, emissions of UFPs and/or VOCs may vary. Please consider other safety measures, such as a filter, cabinet and/or dedicated ventilation system depending on your specific situation.
Third-party materials
Third-party material manufacturers can supply print profiles that contribute to reliable results with Ultimaker hardware (“The Ultimaker Material Alliance Program”).
The use of print profiles and materials from Ultimaker’s Material Alliances and/or other suppliers may require additional safety measures, such as a filter, for the safe usage of such materials. Please take the relevant information provided by the supplier of such filament/material into account at all times for safe operation. Please check the safety data sheet of each specific material for more information.
Ultimaker cannot be held responsible for any adverse effects from the use and/or performance of these materials.
2. Introduction
Ultimaker S5 Material Station user manual 7
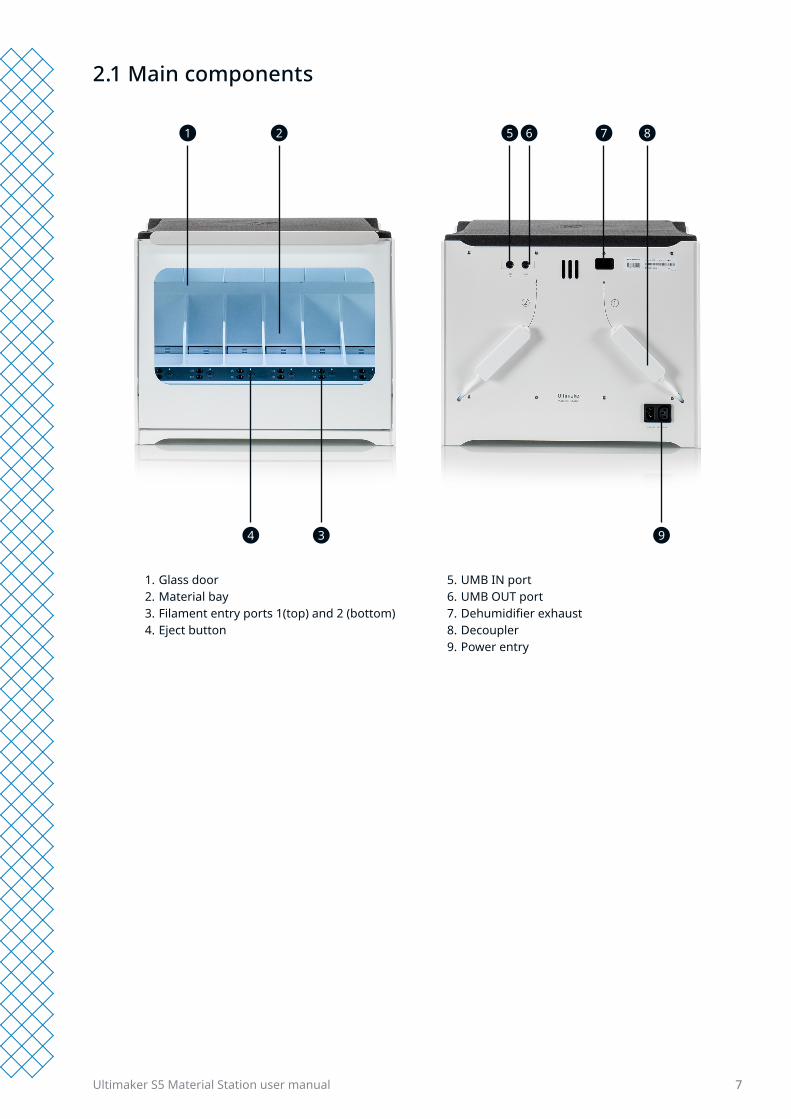
2.1 Main components
1. Glass door2. Material bay3. Filament entry ports 1(top) and 2 (bottom)4. Eject button
5. UMB IN port6. UMB OUT port7. Dehumidifier exhaust8. Decoupler9. Power entry
1 5 6 7 82
3 94
Ultimaker S5 Material Station user manual 8
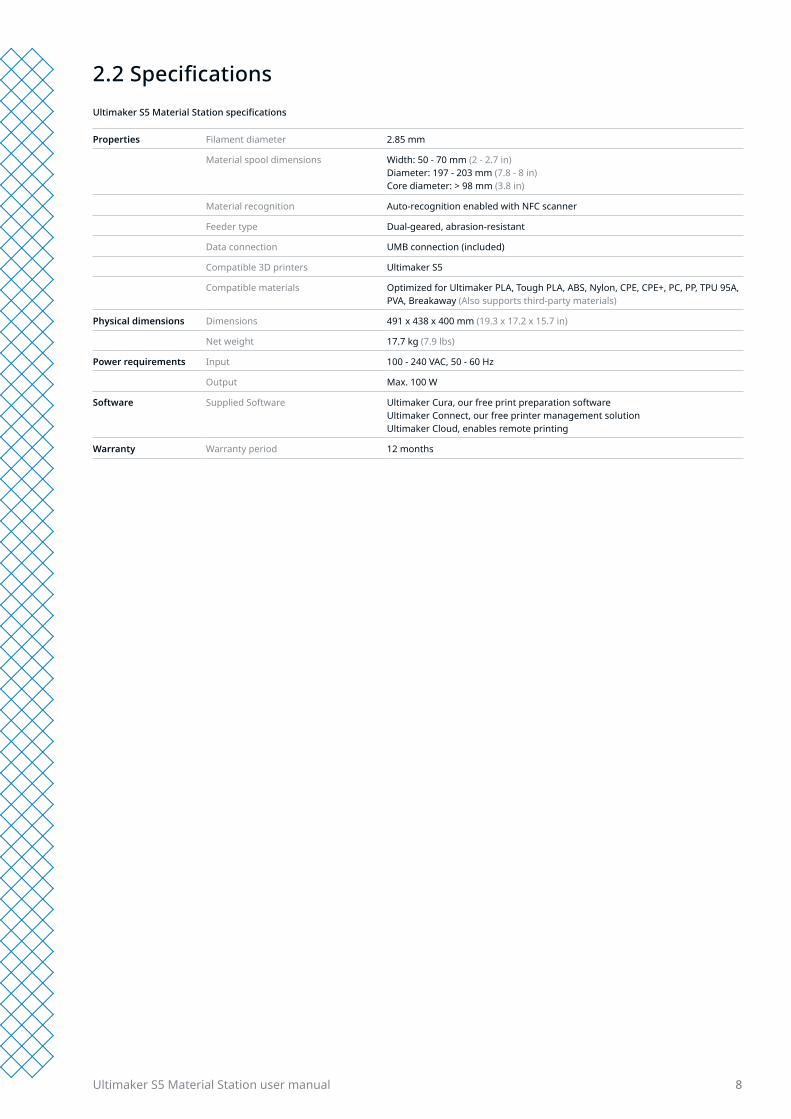
Ultimaker S5 Material Station specifications
Properties Filament diameter 2.85 mm
Material spool dimensions Width: 50 - 70 mm (2 - 2.7 in)Diameter: 197 - 203 mm (7.8 - 8 in)Core diameter: > 98 mm (3.8 in)
Material recognition Auto-recognition enabled with NFC scanner
Feeder type Dual-geared, abrasion-resistant
Data connection UMB connection (included)
Compatible 3D printers Ultimaker S5
Compatible materials Optimized for Ultimaker PLA, Tough PLA, ABS, Nylon, CPE, CPE+, PC, PP, TPU 95A, PVA, Breakaway (Also supports third-party materials)
Physical dimensions Dimensions 491 x 438 x 400 mm (19.3 x 17.2 x 15.7 in)
Net weight 17.7 kg (7.9 lbs)
Power requirements Input 100 - 240 VAC, 50 - 60 Hz
Output Max. 100 W
Software Supplied Software Ultimaker Cura, our free print preparation softwareUltimaker Connect, our free printer management solutionUltimaker Cloud, enables remote printing
Warranty Warranty period 12 months
2.2 Specifications
3. Installation
Ultimaker S5 Material Station user manual 10
3.1 Unboxing
The Material Station comes in reusable, durable packaging, specially designed to protect the device. Follow the steps below properly to unpack your Material Station.
Please retain all packaging for warranty purposes.
1. Remove the plastic locking clips from the lower section of the box2. Holding the handles, lift the upper section of the box3. Remove the quick start guide, the safety and warranty information booklet, and the bag with accessories4. Remove the two foam pieces from the top of the Material Station5. Lift the Material Station out of the bottom tray and place it on a flat surface
Choose a suitable location to place the Ultimaker S5 and Material Station. Install the products on a flat, stable surface that is capable of carrying the total weight of the system (~ 50 kg/110 lbs).
3.2 What’s in the box
The Ultimaker S5 Material Station is supplied with several hardware accessories:
• Tube coupling collet (2x)• Clamp clip (2x)• Spool holder cap• Material Station cable• Power extension cable• Wire cutters
3.3 Hardware installation
First, prepare your Ultimaker S5 for the Material Station. Unload any materials and power off the machine. Remove the power cable and spool holder. If you have an Air Manager, disconnect it from the UMB OUT port at the back of the Ultimaker S5.
The Ultimaker S5 and Material Station must be positioned out of direct sunlight when in use. Ensure there is at least 10 cm of free space at the back of the Material Station for unrestricted airflow.
Follow the steps below to connect your Ultimaker S5 and Material Station:
1. Carefully place the Ultimaker S5 on top of the Material Station
The Ultimaker S5 should be lifted by at least two people during installation.
2. Insert a tube coupling collet in the bottom of each feeder of the Ultimaker S5 3. Insert the left Bowden tube into the left feeder, and the right Bowden tube into the right feeder 4. Secure the Bowden tubes with the clamp clips5. Place the spool holder cap into the hole for the Ultimaker S5’s spool holder6. Connect the Material Station cable to the UMB IN port at the back of the Material Station7. Plug the other end of the cable into the UMB OUT port at the back of the Ultimaker S5
If you also have an Air Manager, connect the Air Manager cable to the UMB OUT port at the back of the Material Station.
Ultimaker S5 Material Station user manual 11
8. Connect the Material Station to the Ultimaker S5 with the power extension cable9. Connect the power cable to the Material Station and the other end to a power outlet
A power outlet with an earth connection must be used. Be sure that the building installation has dedicated means for over-current and short-circuiting.
The Material Station will automatically power on when power is supplied, allowing continuous control of humidity while the door is closed.
3.4 Firmware installation
The Material Station will only function correctly when your Ultimaker S5 is running firmware that supports it. Using an unsupported version may cause damage to your printer.
1. Turn on your Ultimaker S52. If the printer is connected, navigate to System → Maintenance → Update firmware in the Ultimaker S5 menu to
install the latest firmware that supports the Material Station3. Alternatively, visit the Ultimaker website for additional instructions and to update an Ultimaker S5 that is not
connected to the network
3.5 Welcome setup
The Ultimaker S5 will automatically detect the presence of the Material Station and guide you through the initial set-up of your Material Station. The relevant welcome setup dependent on your configuration will be displayed. Follow the on-screen instructions.
If the Material Station welcome setup does not run, manually install it by navigating to Settings → Peripherals → Material Station and select Add Material Station. The machine will restart.
If the Material Station is not recognized, it may not be correctly connected. Check the Material Station cable or consult the ‘Troubleshooting’ section (chapter 6).
3.6 Loading filament
Ensure the tip of the filament is good before inserting it into the machine. Use the wire cutters to cut the filament at an angle to ensure a short, sharp tip.
1. Place the material spool into any material bay with the NFC tag on the left side 2. Guide the filament end into either filament entry port 1 or 2. The Material Station will automatically grasp
the inserted filament3. The Material Station supports any combination of loaded filaments
The Material Station will automatically continue printing with a new spool of filament when end of filament occurs mid-print. We therefore recommend always having at least two spools of the same filament loaded at all times.
To unload a material, simply press the rewinder button next to the appropriate filament bay of the material to be removed.
Ultimaker S5 Material Station user manual 12
3.7 Ultimaker Cura
For best printing results with the Material Station, use the latest version of Ultimaker Cura. You can download the Ultimaker Cura by visiting the Ultimaker website.
All available material combinations in the Ultimaker S5 Material Station will be visible in Ultimaker Cura when the printer is connected to a network.
For more information about how Ultimaker Cura interacts with the Material Station, see the Ultimaker Cura user manual found on the Ultimaker website.
4. Operation
Ultimaker S5 Material Station user manual 14
4.1 Operation recommendations
Ensure the Ultimaker S5 and Material Station are placed in a suitable environment. These products perform best in an ambient operating temperature between 15 – 32 ºC (59 – 90 ºF).
The Ultimaker S5 and Material Station must be positioned out of direct sunlight when in use. Ensure there is at least 10 cm of free space at the back of the Material Station for unrestricted airflow.
The Ultimaker S5 Material Station continuously controls the humidity inside the chamber. Do not leave the door open for an extended period of time when materials are loaded. Always make sure the door is fully closed before starting a print.
Never put weight or place objects on the open door of the Material Station.
4.2 Material compatibility
The Ultimaker S5 Material Station is compatible with all Ultimaker materials, as well as a wide range of third-party filaments available from the Ultimaker Cura Marketplace. The Material Station contains abrasion-resistant feeder wheels in all material bays. Therefore, all material bays are compatible with composite materials.
Spools with the following dimensions are compatible with the Material Station:
• Width: 50 - 70 mm (2 - 2.7 in) • Diameter: 197 - 203 mm (7.8 - 8 in) • Core diameter: > 98 mm (3.8 in)
4.3 Changing materials
Changing materials in the Material Station is easy and intuitive. This is possible during printing as well as in an idle state:
1. Gently open the glass door of the Material Station2. Press the eject button of the corresponding material bay to unload the filament
The materials in use during a print are blocked from unloading. Pressing the eject button of an active material will not have any effect.
3. Remove the material spool from the material bay4. Take a new spool and use the wire cutters to ensure that the filament has a short, sharp tip before
loading the filament5. Place the spool of filament into the material bay of the Material Station with the NFC tag on the left side6. Insert the tip of the material into filament entry port 1 or 2 until the prefeeder grabs the material7. Wait for the Material Station to detect the material and select Confirm to continue
Alternatively, select the material type manually.
8. Close the glass door of the Material Station
Removing an empty spool does not require pressing the eject button. There will be a length of filament left at the end of an empty spool. This will rewind back into the Material Station. It is recommended to timely remove empty spools from the Material Station.
Ultimaker S5 Material Station user manual 15
4.4 Humidity control
The Material Station has a built-in dehumidifier. The dehumidifier controls the humidity inside the Material Station. Silica beads absorb the moisture in the chamber and maintain relative humidity under 40%. The dehumidifier will regenerate the silica beads when they are saturated.
The dehumidifier can only regenerate if power is supplied to the Material Station.
If the Material Station has been unplugged for a long period, the dehumidifier can take longer than usual to reach stable conditions.
It is not recommended to store (moisture sensitive) materials in the Material Station if the power cable is disconnected.
5. Maintenance
Ultimaker S5 Material Station user manual 17
5.1 Clean the Material Station
It is recommended to regularly clean the glass door of the Material Station to remove dust or fingerprints. All surfaces can be cleaned by using a damp microfiber cloth.
Only use water and mild detergent to clean the Material Station.
5.2 Dehumidifier
The dehumidifier controls the humidity inside the Material Station. It is self-regenerating, so it does not require maintenance.
It is not recommended to store (moisture sensitive) materials in the Material Station if the power cable is disconnected.
6. Troubleshooting
Ultimaker S5 Material Station user manual 19
6.1 Error messages
If you encounter an error in the range of ER50-ER79, there may be an issue within your Material Station. Go to the link shown on your display for steps on how to resolve your issue.
6.2 Material Station not recognized
If the Material Station is not recognized by the Ultimaker S5, first check if you have installed the latest firmware.
The Material Station will only function correctly when your Ultimaker S5 is running firmware that supports it. Using an unsupported version may cause damage to your printer.
Another possibility is that your system may not be properly connected. Check the Material Station and Ultimaker S5 cables:
1. Turn off the Ultimaker S5 and remove the power cable from the Material Station2. Ensure one side of the Material Station cable is firmly connected to the UMB IN port on the Material Station.
The connector and cable should face left3. Ensure the other side of the Material Station cable is firmly connected to the UMB OUT port on the Ultimaker
S5. The connector and cable should face left4. Plug in the power cable and turn on the Ultimaker S5 with the power switch
The UMB OUT port on the Material Station and the NFC port on the Ultimaker S5 should not be used to connect the Material Station.
If the Material Station is still not recognized, contact your local service provider for support.
6.3 Material stuck
Sometimes filament can become stuck within the Ultimaker S5 and/or the Material Station. An error code will be shown if this occurs. The error code can be used to troubleshoot where along the extrusion train the filament blockage has occurred. Please follow the link of the provided error code to get more troubleshooting information for the specific case.
Before removing stuck filament, power down machine and remove the power cable.
To remove stuck filament, it should be pushed out in a forward feeding motion.
If the broken filament is visible in the Bowden tube, you may try to carefully detach the Bowden tube and grab the broken filament, removing it from the decoupler end.
Carefully try to push the filament out from the same filament bay and entry point from which it was broken.
If you feel a blockage when feeding filament through the extrusion train, it may be that the pathway is blocked by a broken filament strand. Do not exert force as this may cause damage to the internal parts of the Material Station. Instead, try pushing the broken filament strand from another entry point.
Ultimaker S5 Material Station user manual 20
6.4 Grayed-out material
You may encounter grayed-out materials displayed in the materials list on the Ultimaker S5 display. A grayed-out material may not be usable because of either:
• Material and core incompatibility. Please check that the loaded material is compatible with the print core of the extruder. The Material Station will prevent materials from being extruded from an incompatible print core
• Material print profile not updated. All materials need to have their material print profiles updated to be compatible with the Material Station. All Ultimaker materials have been updated and are immediately compatible with the Material Station.
7. Warranty

Ultimaker S5 Material Station user manual 22
7.1 General
Ultimaker grants a standard warranty on the Ultimaker S5 Material Station (“Product”) in the country where the product was purchased.
From the date the product is sold and delivered to an end-customer for the first time, as evidenced by the original customer’s purchase invoice, Ultimaker warrants the product is free from defects in material, design and workmanship for a period of twelve (12) months. Only the original purchaser is entitled to claim warranty and the warranty period is limited to his/her lifetime.
For a warranty claim to be valid (i) notification must be made before the end of the warranty period, (ii) conform to any additional stipulations of the warranty, as defined below, (iii) must be substantiated with the original customer’s purchase invoice, (iv) the serial number sticker must still be on the product(s) and (v) the product must be returned in the original packaging. Since customers will only be entitled to make a warranty claim on submission of the original invoice and packaging, we advise that both the invoice and official packaging are kept in a safe place. If the original packaging is not available anymore, the customer can purchase such for an additional amount of EUR 25 or equivalent in applicable local currency.
The customer – provided that they are a natural person who is not acting in the course of their profession or business – may claim the rights to which they are entitled under the warranty without prejudice to their rights or claims in accordance with the law.
7.2 Conditions
The Ultimaker warranty is granted under the explicit condition that:
• The product was sold, delivered and assembled by a recognized Ultimaker reseller (see ultimaker.com for addresses of the recognized Ultimaker resellers)
• The product was newly manufactured on the date of purchase and not sold as used, refurbished or manufacturing seconds
• Ultimaker’s latest software was installed and used in and with the product • The Ultimaker’s installation and maintenance instructions as described in the manual for the product have been
observed. Unless the manual contains ‘do-it-yourself’ assembly instructions for the product or part thereof and these have been followed up meticulously, the warranty will become invalidated if the product was at any time disassembled or reassembled by any other person than a recognized Ultimaker reseller
Customers are welcome and we encourage them to use third-party materials, accessories, etc. That in itself, does not void the warranty. If, however, the use of third-party elements, causes damage to the product, the part(s) affected by this damage is excluded from warranty.
If a part of the product is repaired or replaced during the warranty period, the warranty period still remaining for the entire product will apply to this part. However, repair and/or replacement will not extend the warranty period.
Ultimaker S5 Material Station user manual 23
7.3 Notification
The Ultimaker resellers deal with this warranty on behalf of Ultimaker. Therefore, any notification on the basis of this warranty must be made to the Ultimaker reseller from whom the product was originally purchased, even if this is not in the customer’s present country of residence.
Any warranty claim must first be recognized as justified, either by Ultimaker’s reseller or by Ultimaker. If so, the reseller is obliged to rectify the defects free of charge according to this warranty. If the defect cannot be repaired, the reseller will, within the warranty period, replace the product free of charge by an identical product, or, if the product is no longer manufactured, by a similar replacement of the same value or offer an appropriate refund.
Depending on the country, the warranty may not automatically include costs incurred for shipping defective products for scrutiny and/or repair, nor for shipping costs of replacement or repaired product(s) back to claimant.
7.4 Exclusions
This warranty does not apply to and therefore does not cover:
• Any defect or damage caused by inappropriate, incorrect or improper use, installation, maintenance, operation and cleaning or normal wear and tear. For correct use, reference is made to the manual of the product
• Any other event, act, default or omission outside Ultimaker’s control • Failure of the product caused by an accident
In any event, Ultimaker is not liable for indirect or consequential damages, including but not limited to loss of use, loss of profit or revenue. Furthermore, Ultimaker’s liability is limited to the purchase value of the product.
7.5 Applicable law and competent court
This warranty is exclusively governed by Dutch law. Any dispute arising out of or in connection with this warranty will be exclusively submitted to the jurisdiction of the court (Rechtbank) of Midden-Nederland, location Utrecht.