Embed Size (px)
DESCRIPTION
UEye Camera Setup
Citation preview
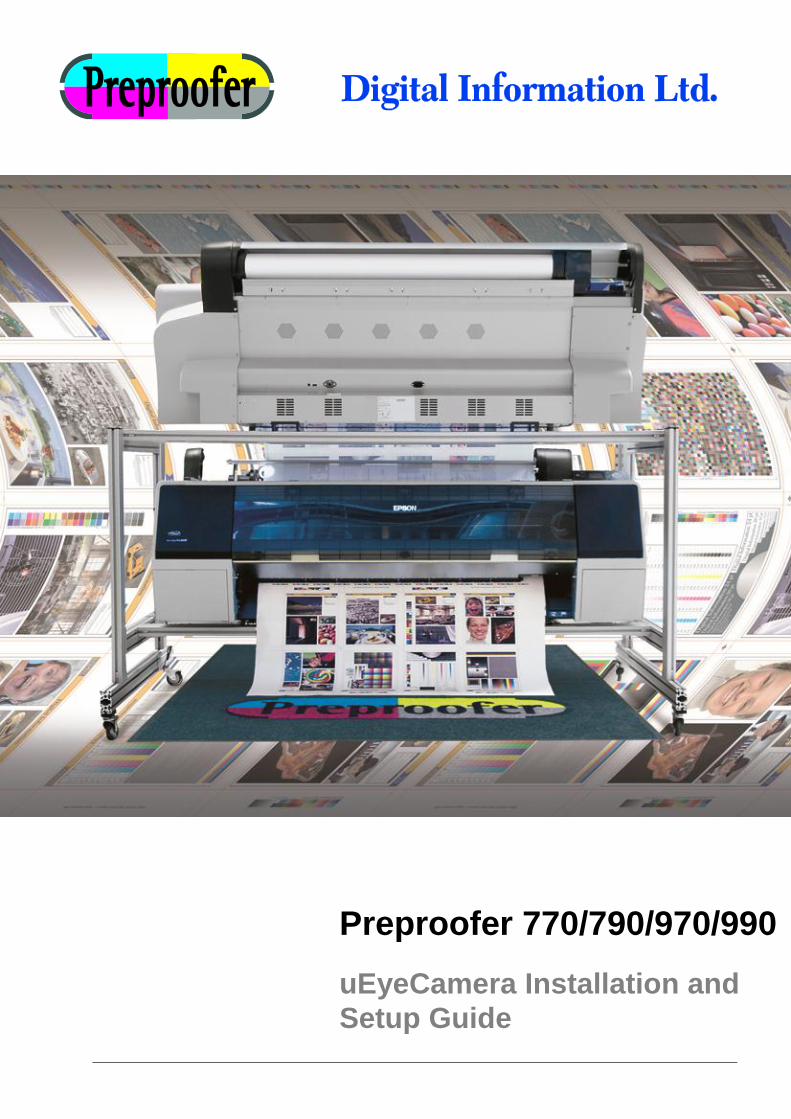
Preproofer 770/790/970/990
uEyeCamera Installation and
Setup Guide
Digital Information Ltd.
Technoparkstrasse 1
CH-8005 Zürich
© Copyright by Digital Information Ltd. 2010
This manual is proprietary in nature and the sole property of
Digital Information. It may not be reproduced, in whole or in part,
without the express written permission of Digital Information.
Digital Information reserves the right to modify and/or delete any
material and/or capabilities described herein.
All the documentation in this manual is instructional and for the
operation of Preproofer machine. Digital Information shall not be
responsible for any damage or claims resulting from any errors or
omissions in this manual.
Owning to our policy of continuous product development,
specifications, terms and description of Preproofer 940/980 are
subject to change without prior notice.
.
Identifier uEye Camera Setup and Installation Guide - EN
Target group Installation, Technician
Product Preproofer 770/790/970/990
Version V1.30
Date June 2011
Article code uEye Camera IM8498-021 EN
Table of contents
Preproofer – uEye Camera Installation and Setup Guide I
PP
x700/9
00 v
1.0
Table of contents
1 uEye Camera Setup ....................................................................................................................... 1-1
1.1 Basic................................................................................................................................................. 1-1
1.2 Set Camera IDs ................................................................................................................................ 1-1
2 Configure the DI-Camera Software .............................................................................................. 2-3
2.1 DI-Camera Access ........................................................................................................................... 2-3
2.2 Configuration DI-Camera ................................................................................................................. 2-3
3 uEye Cockpit .................................................................................................................................. 3-6
3.1 Basic................................................................................................................................................. 3-6
3.2 Create an Individual Camera Configuration File .............................................................................. 3-6

uEye Camera Setup 1
Preproofer – uEye Camera Installation and Setup Guide 1-1
PP
x700/9
00 v
1.0
1 uEye Camera Setup
1.1 Basic
Beginnings with the installer DI-Pilot 2.0 build196,
optimized camera configuration files are already
installed.
Therefore the described configuration steps in
chapter 1.3 are not necessary anymore.
To activate these configuration files, open the DI-
Camera application and select them. See chapter
2.2 “Configuration DI-Camera”.
1.2 Set Camera IDs
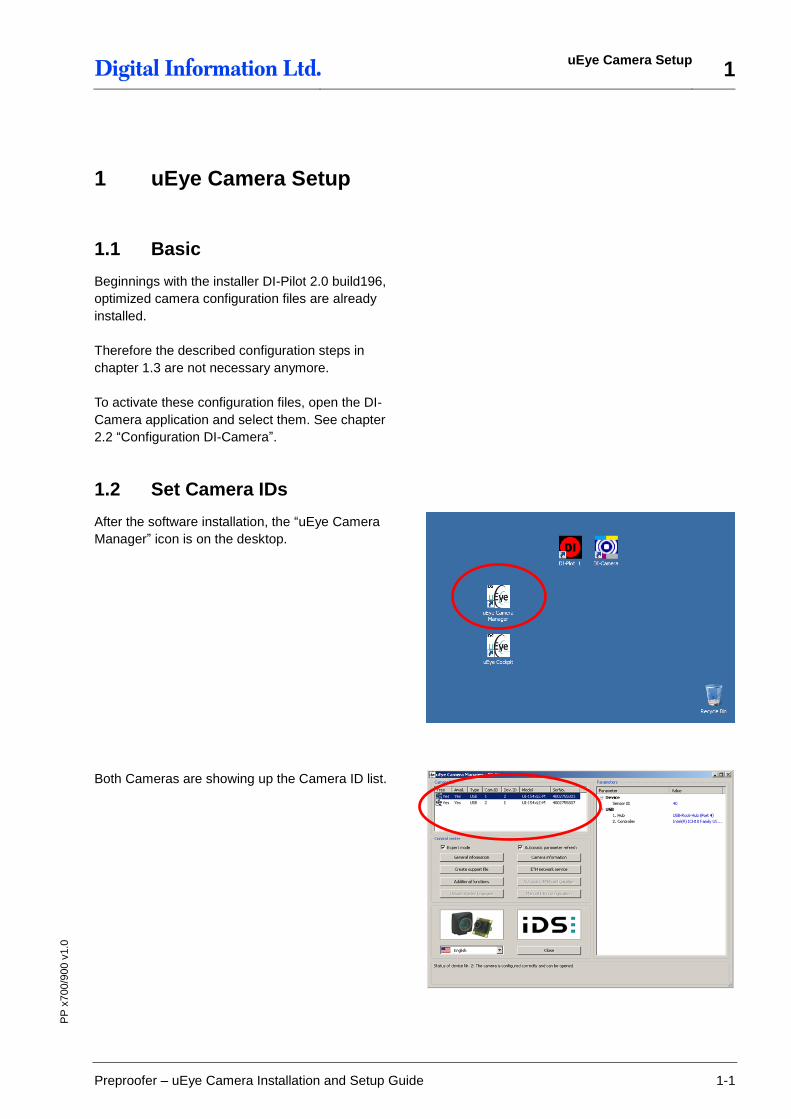
After the software installation, the “uEye Camera
Manager” icon is on the desktop.
Both Cameras are showing up the Camera ID list.
1 uEye Camera Setup Set Camera IDs
1-2 Preproofer – uEye Camera Installation and Setup Guide
PP
x700/9
00 v
1.0
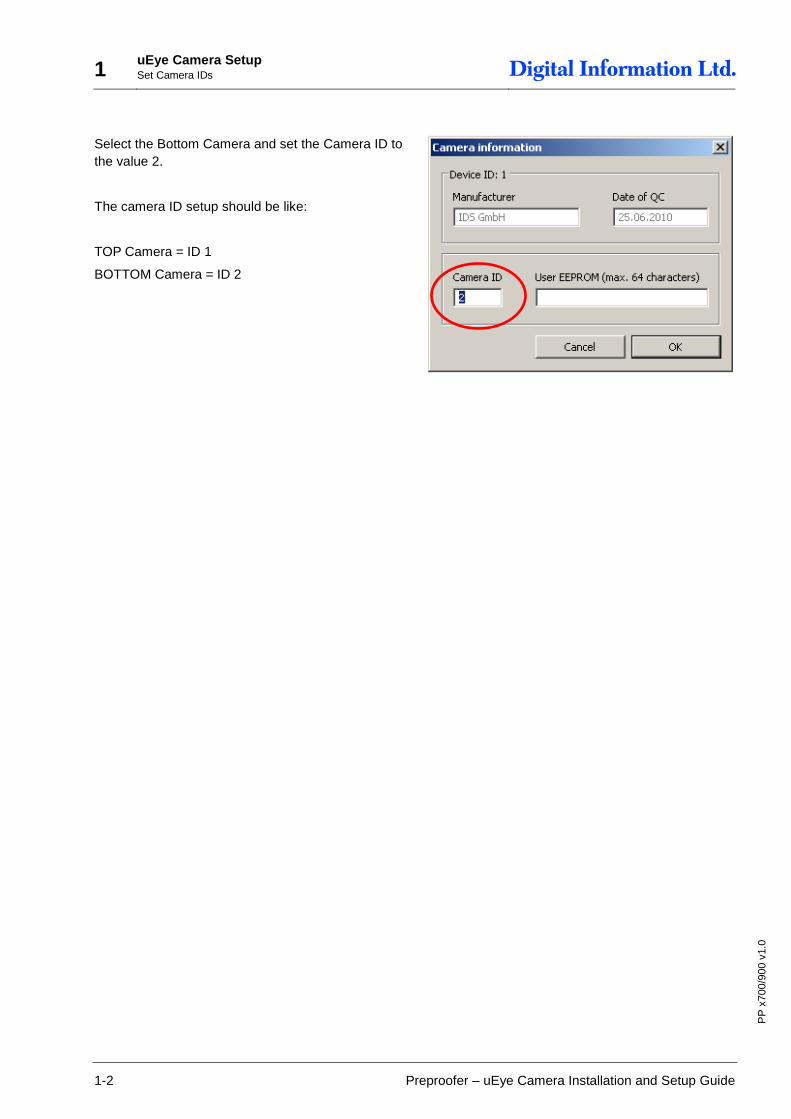
Select the Bottom Camera and set the Camera ID to
the value 2.
The camera ID setup should be like:
TOP Camera = ID 1
BOTTOM Camera = ID 2
Configure the DI-Camera Software DI-Camera Access 2
Preproofer – uEye Camera Installation and Setup Guide 2-3
PP
x700/9
00 v
1.0
2 Configure the DI-Camera Software
2.1 DI-Camera Access
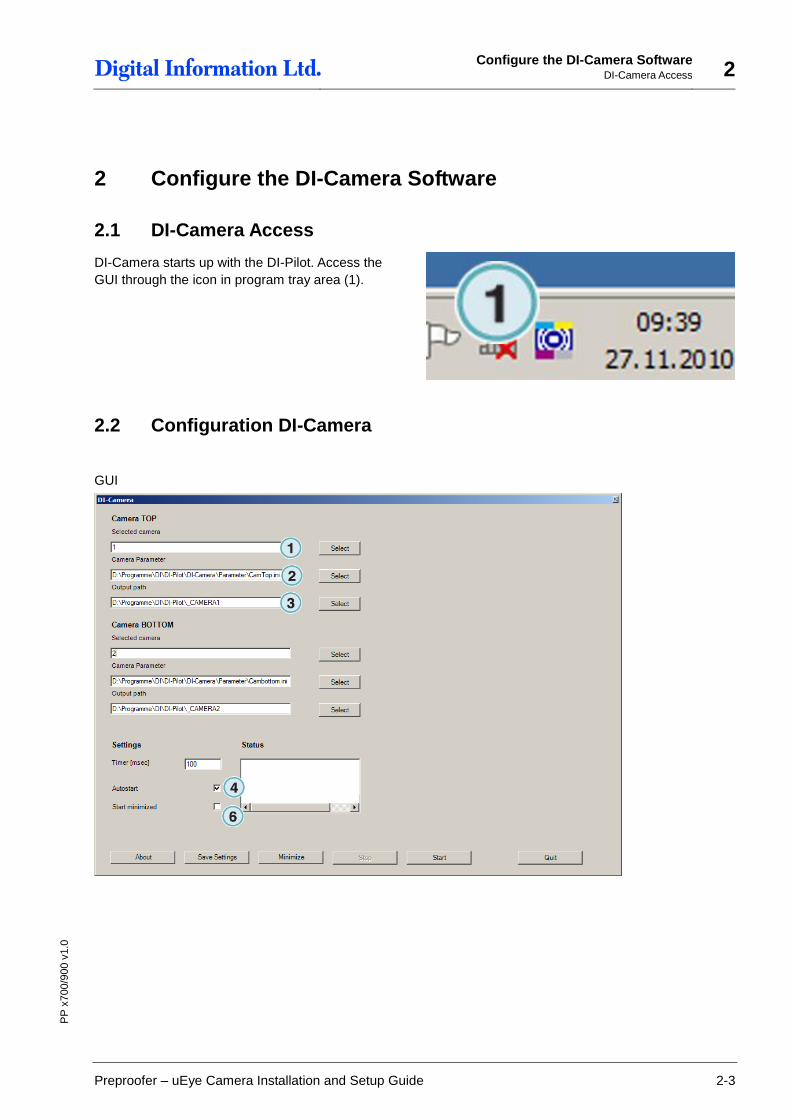
DI-Camera starts up with the DI-Pilot. Access the
GUI through the icon in program tray area (1).
2.2 Configuration DI-Camera
GUI
2 Configure the DI-Camera Software Configuration DI-Camera
2-4 Preproofer – uEye Camera Installation and Setup Guide
PP
x700/9
00 v
1.0
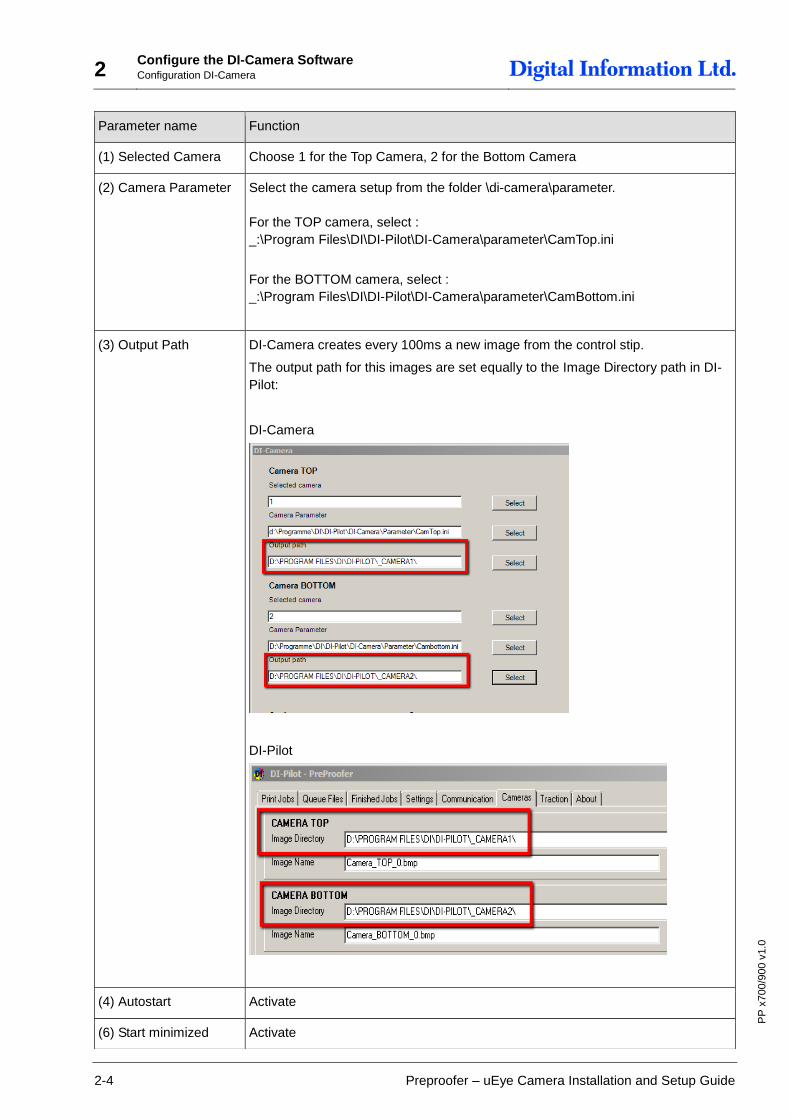
Parameter name Function
(1) Selected Camera Choose 1 for the Top Camera, 2 for the Bottom Camera
(2) Camera Parameter Select the camera setup from the folder \di-camera\parameter.
For the TOP camera, select :
_:\Program Files\DI\DI-Pilot\DI-Camera\parameter\CamTop.ini
For the BOTTOM camera, select :
_:\Program Files\DI\DI-Pilot\DI-Camera\parameter\CamBottom.ini
(3) Output Path DI-Camera creates every 100ms a new image from the control stip.
The output path for this images are set equally to the Image Directory path in DI-
Pilot:
DI-Camera
DI-Pilot
(4) Autostart Activate
(6) Start minimized Activate
Configure the DI-Camera Software Configuration DI-Camera 2
Preproofer – uEye Camera Installation and Setup Guide 2-5
PP
x700/9
00 v
1.0
3 uEye Cockpit Basic
3-6 Preproofer – uEye Camera Installation and Setup Guide
PP
x700/9
00 v
1.0
3 uEye Cockpit
3.1 Basic
Beginning with the installer DI-Pilot 2.0 build196, an
optimized camera configuration set is. Therefore the
steps mentioned under Chapter 3.2 are not
necessary to do anymore.
3.2 Create an Individual Camera Configuration File
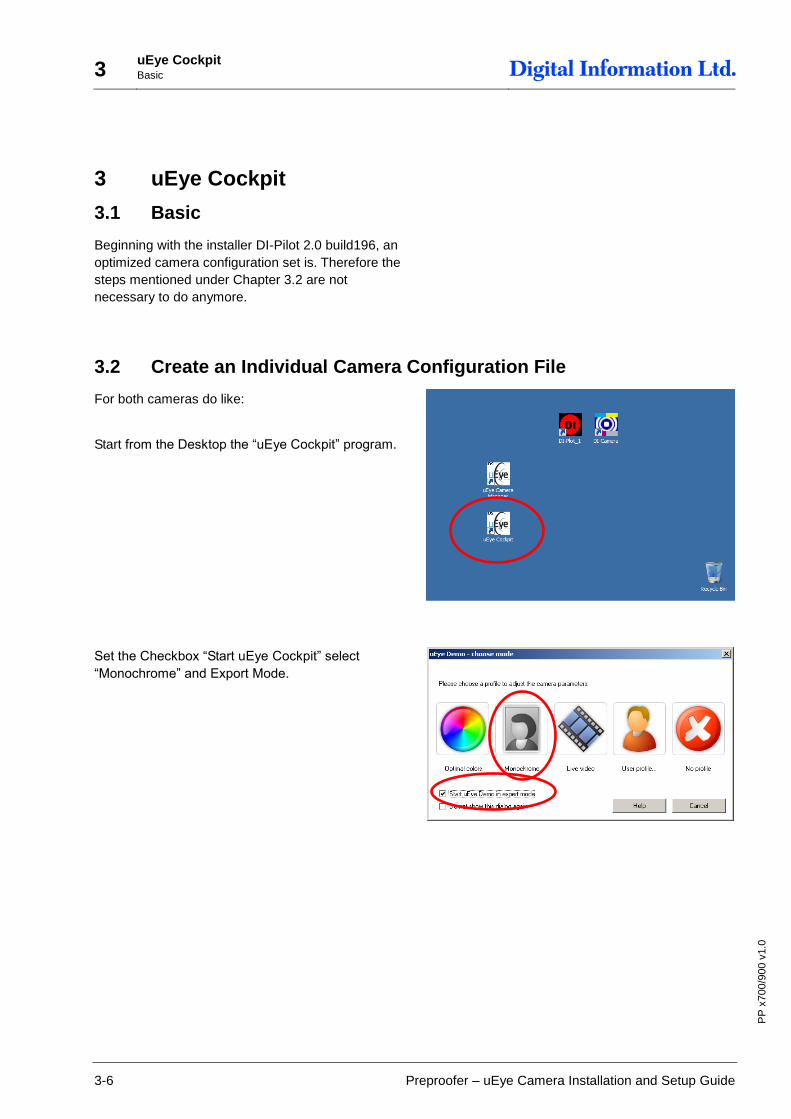
For both cameras do like:
Start from the Desktop the “uEye Cockpit” program.
Set the Checkbox “Start uEye Cockpit” select
“Monochrome” and Export Mode.
uEye Cockpit Create an Individual Camera Configuration File 3
Preproofer – uEye Camera Installation and Setup Guide 3-7
PP
x700/9
00 v
1.0
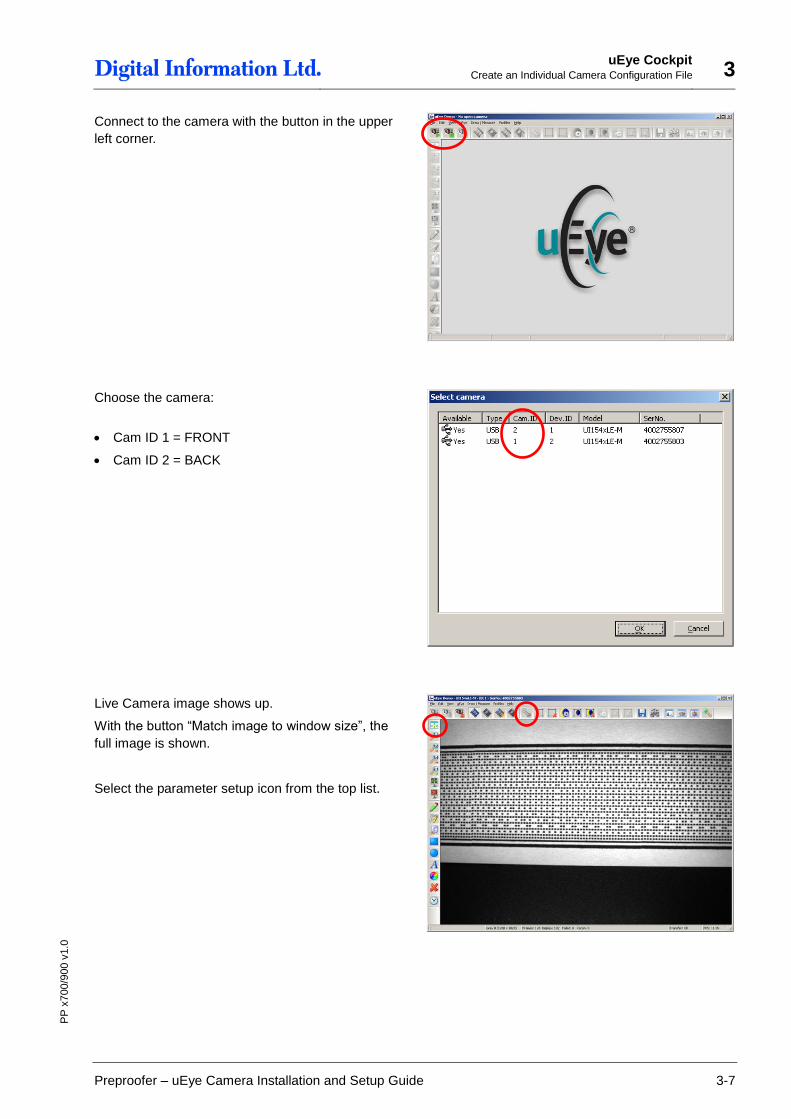
Connect to the camera with the button in the upper
left corner.
Choose the camera:
Cam ID 1 = FRONT
Cam ID 2 = BACK
Live Camera image shows up.
With the button “Match image to window size”, the
full image is shown.
Select the parameter setup icon from the top list.
3 uEye Cockpit Create an Individual Camera Configuration File
3-8 Preproofer – uEye Camera Installation and Setup Guide
PP
x700/9
00 v
1.0
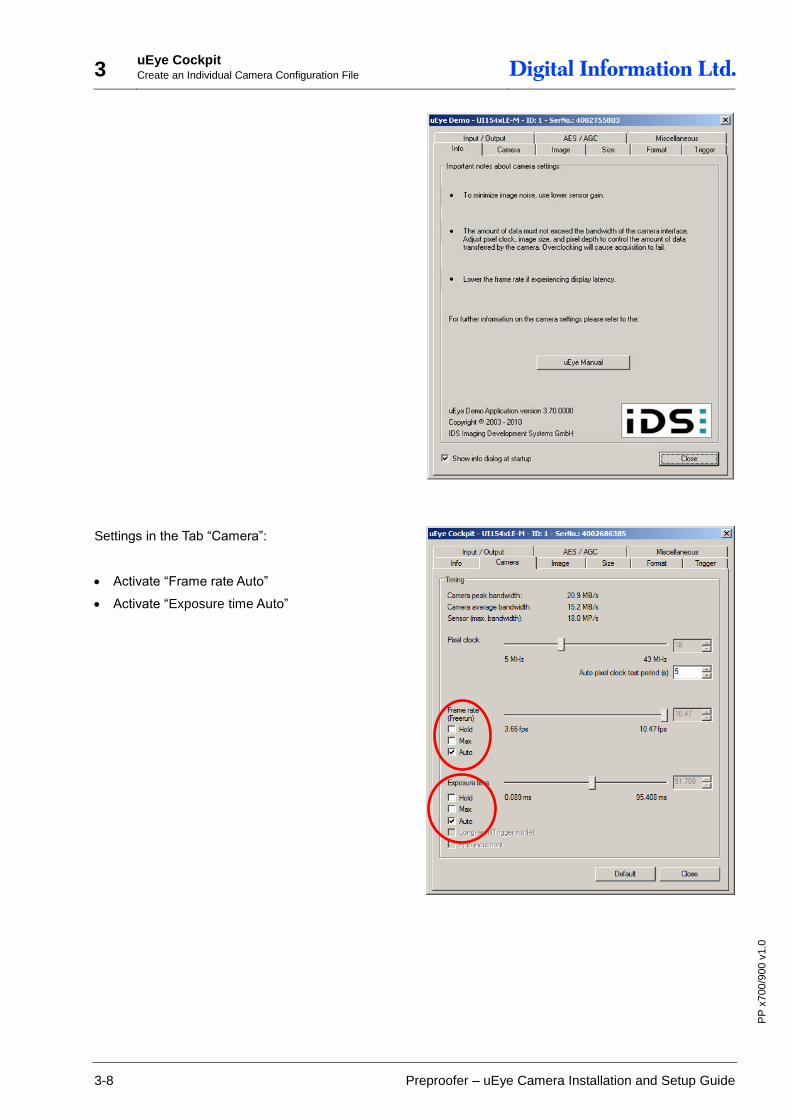
Settings in the Tab “Camera”:
Activate “Frame rate Auto”
Activate “Exposure time Auto”
uEye Cockpit Create an Individual Camera Configuration File 3
Preproofer – uEye Camera Installation and Setup Guide 3-9
PP
x700/9
00 v
1.0
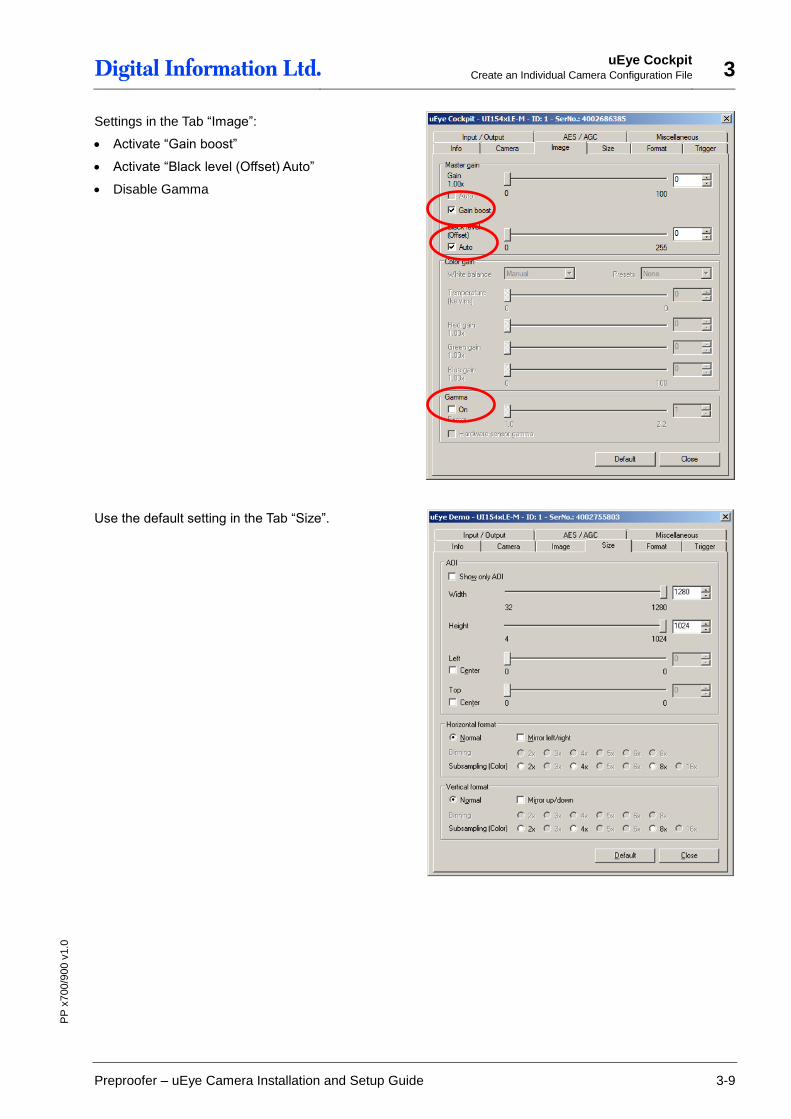
Settings in the Tab “Image”:
Activate “Gain boost”
Activate “Black level (Offset) Auto”
Disable Gamma
Use the default setting in the Tab “Size”.
3 uEye Cockpit Create an Individual Camera Configuration File
3-10 Preproofer – uEye Camera Installation and Setup Guide
PP
x700/9
00 v
1.0
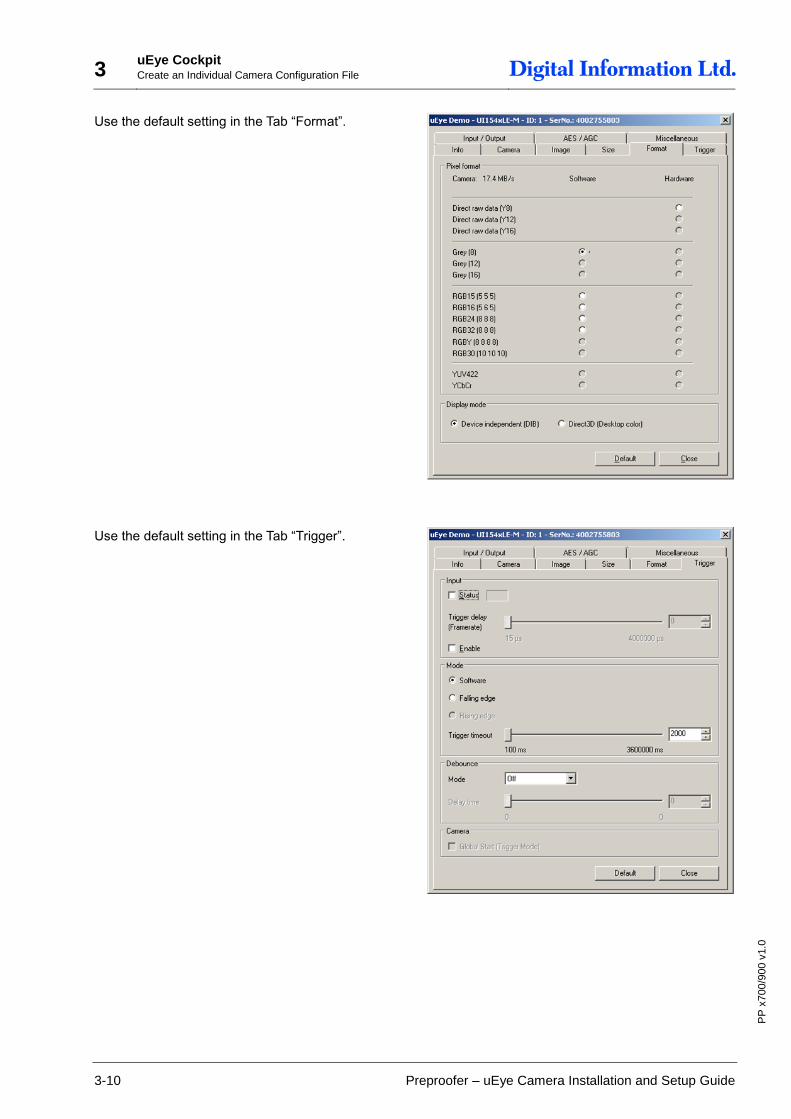
Use the default setting in the Tab “Format”.
Use the default setting in the Tab “Trigger”.
uEye Cockpit Create an Individual Camera Configuration File 3
Preproofer – uEye Camera Installation and Setup Guide 3-11
PP
x700/9
00 v
1.0
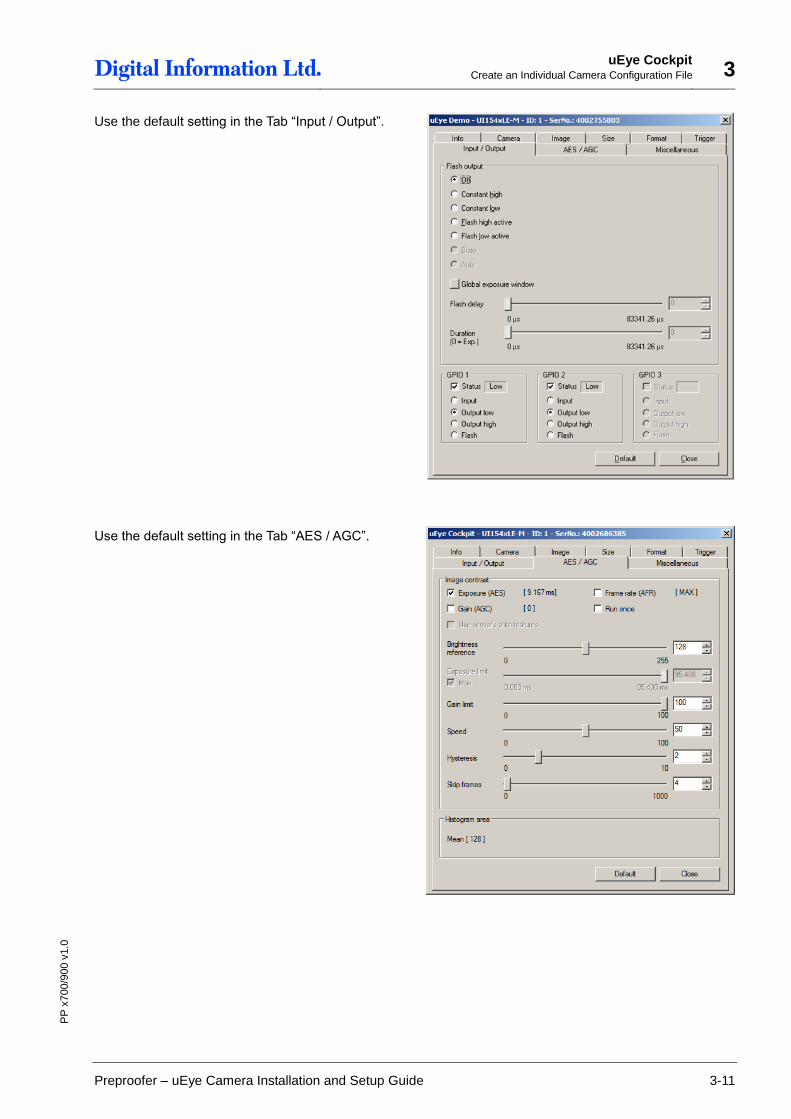
Use the default setting in the Tab “Input / Output”.
Use the default setting in the Tab “AES / AGC”.
3 uEye Cockpit Create an Individual Camera Configuration File
3-12 Preproofer – uEye Camera Installation and Setup Guide
PP
x700/9
00 v
1.0
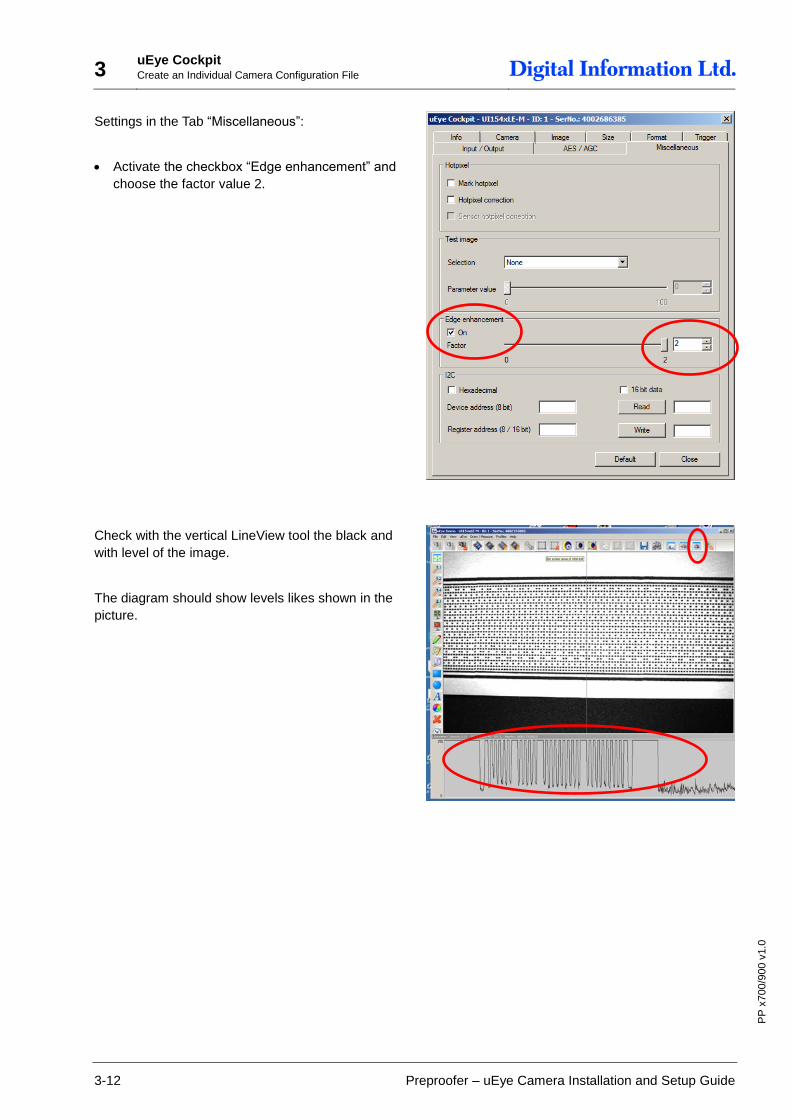
Settings in the Tab “Miscellaneous”:
Activate the checkbox “Edge enhancement” and
choose the factor value 2.
Check with the vertical LineView tool the black and
with level of the image.
The diagram should show levels likes shown in the
picture.
uEye Cockpit Create an Individual Camera Configuration File 3
Preproofer – uEye Camera Installation and Setup Guide 3-13
PP
x700/9
00 v
1.0
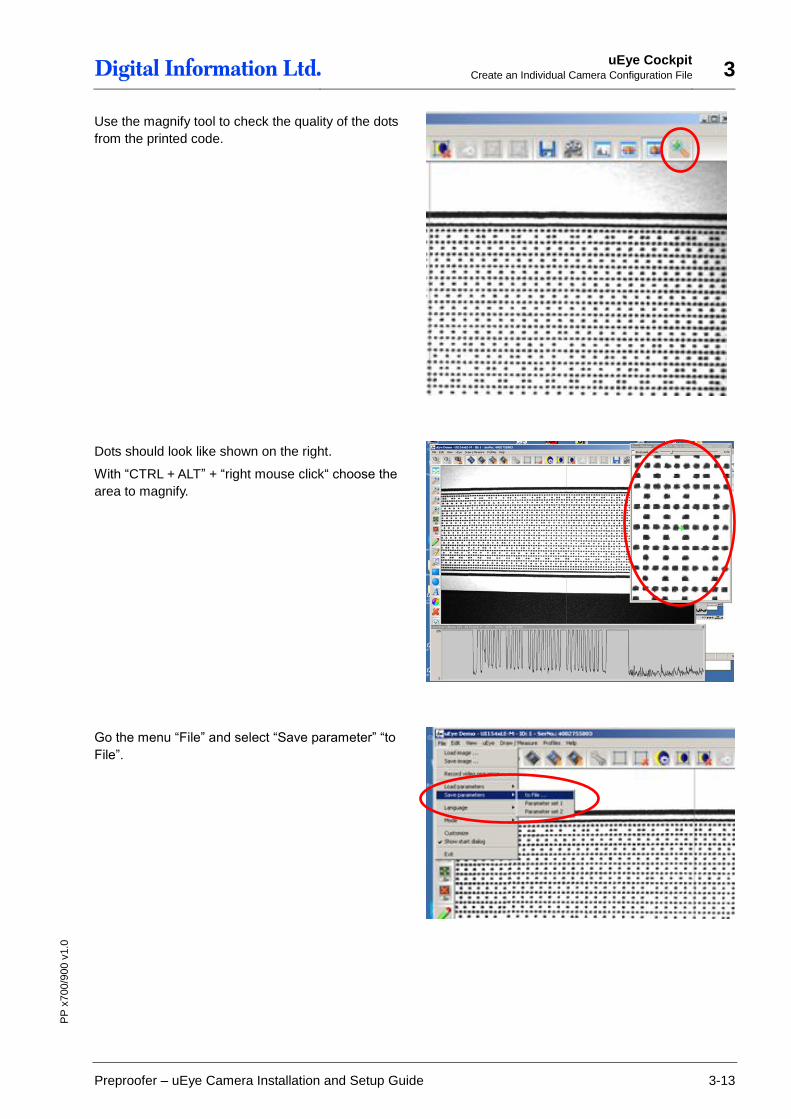
Use the magnify tool to check the quality of the dots
from the printed code.
Dots should look like shown on the right.
With “CTRL + ALT” + “right mouse click“ choose the
area to magnify.
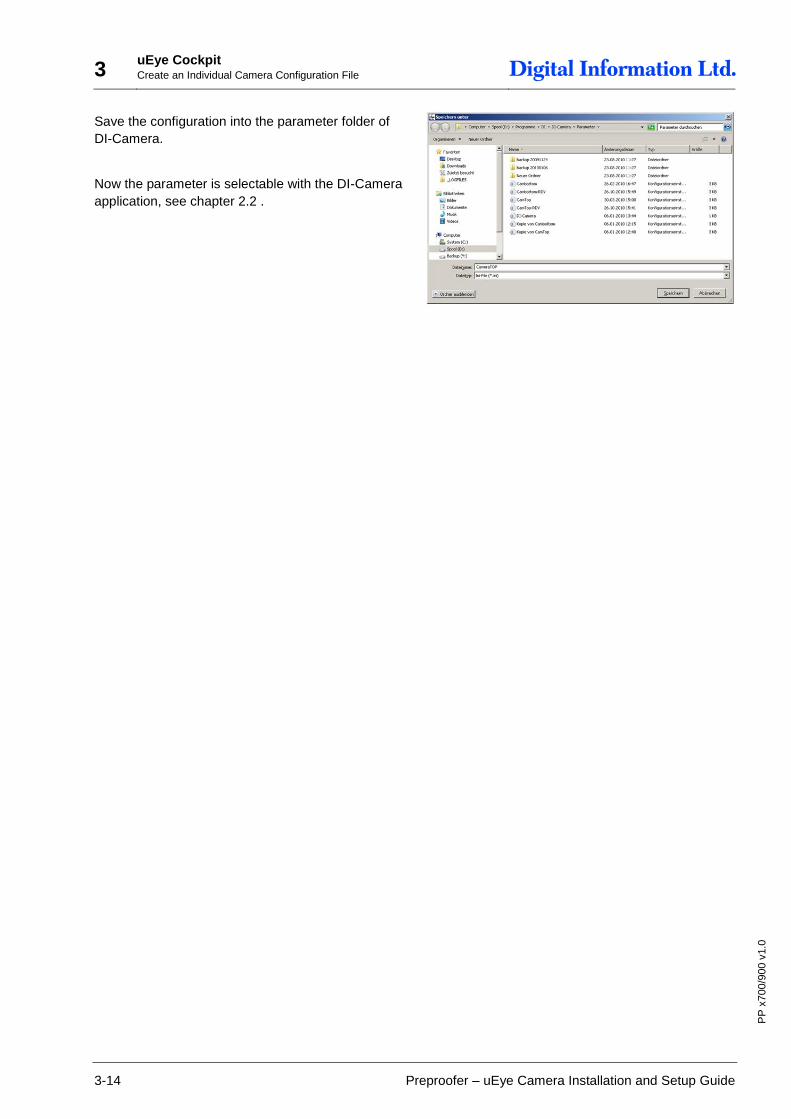
Go the menu “File” and select “Save parameter” “to
File”.
3 uEye Cockpit Create an Individual Camera Configuration File
3-14 Preproofer – uEye Camera Installation and Setup Guide
PP
x700/9
00 v
1.0
Save the configuration into the parameter folder of
DI-Camera.
Now the parameter is selectable with the DI-Camera
application, see chapter 2.2 .