Embed Size (px)
Citation preview
UBC Workspace 2.0 Using the Self-Service Portal
Using the Self-Service Portal to access and manage your work-related and personal content
Pilot Version 1.0, Mar 2015

Table of Contents
Introduction ......................................................................................................................................................................................................................... 1
Overview .............................................................................................................................................................................................................................. 1
User Types ..................................................................................................................................................................................................................... 1
Compliance and Appropriate Use ............................................................................................................................................................................. 1
Accessing the Self-Service Portal ............................................................................................................................................................................. 2
Managing Account Information and Password ...................................................................................................................................................... 3
Using the Self-Service Portal to Manage Personal Content................................................................................................................................. 4
My Content – the Personal Content Dashboard .................................................................................................................................................... 4
Using the My Content Menu ................................................................................................................................................................................... 5
Using the Actions Menu ........................................................................................................................................................................................... 6
Managing Content Details .......................................................................................................................................................................................... 7
Managing Shared Content ........................................................................................................................................................................................ 8
Configuring Shared Folders ................................................................................................................................................................................ 8
Managing Shared Folders................................................................................................................................................................................... 9
Configuring Shared Links .................................................................................................................................................................................. 10
Managing Shared Links ...................................................................................................................................................................................... 11
Managing Favorites ................................................................................................................................................................................................. 12
Managing Trash........................................................................................................................................................................................................ 13
Managing Activity .................................................................................................................................................................................................... 14
Managing My Repositories ...................................................................................................................................................................................... 15
Using the My Devices Page of the Self-Service Portal ........................................................................................................................................ 16
Need Additional Help? .................................................................................................................................................................................................... 16


Introduction This user guide describes how to use the UBC Workspace 2.0 Self-Service Web Portal. User guides for Content Locker Sync and the Mobile Clients, and further information about the Workspace 2.0 service can be found via the UBC IT Workspace 2.0 Project page located at https://it.ubc.ca/projects/workspace-20.
Overview Workspace 2.0 is an on-campus cloud based file sharing service. Workspace offers an easy and secure way for staff and faculty to share files via folders and links, both internally and externally with colleagues, partners and clients, from any supported device. It also enables UBC to centrally deliver, manage and secure data, while complying with Canadian, provincial and UBC security requirements.
Workspace 2.0 is delivered using a product called “AirWatch Secure Content Locker”. This product provides the following services to help you manage, share and access your content:
• Self-Service Portal – a web based portal that allows you to upload/download and manage sharing of content
• Content Locker Sync – a program that keeps all content in Workspace 2.0 synchronized with a personal folder on your workstation (Mac and Windows). The synchronization is bi-directional – changes made in Workspace 2.0 are synchronized to your personal folder, and changes in your personal folder on your workstation are synchronized into Workspace 2.0.
• Mobile Clients – mobile clients for Android, IOS, and Windows devices allow you to manage your content, and view specific types of content remotely.
User Types Organization – Accounts for UBC employees are automatically created and maintained by UBC’s identity management service. Username, password and account information are synchronized from UBC’s Enterprise Active Directory (EAD) Service. No changes to this information can be made through the Workspace 2.0 service.
A valid UBC email address must be associated with your EAD account in order for your Workspace 2.0 account to activate – Workspace 2.0 must be able to reach you via email in order to function properly.
External – External users are non-UBC employees whom you “invite” to use the service when you need to share the contents of a folder with them. An account will be automatically created the first time a user is invited and when you share content with them. They will receive an email message containing information about the shared content and new account.
External users can only access data via the Self-Service Portal. Only a subset of the Self-Service Portal features and actions are available - they will vary depending on the sharing permissions granted when a folder is shared to them.
Link – Link users are anyone with whom you’ve shared a download link to a file. No account is created in Workspace 2.0.
Compliance and Appropriate Use Only those components of the AirWatch suite required to provide a cloud based file sharing service have been deployed. Use of certain features may be restricted or enforced to ensure that content is managed in compliance with Canadian, Provincial, and UBC security requirements.
Use of the service by any party implies their agreement to abide by the Workspace 2.0 Service Terms of Use. The Terms of Use can be found at https://it.ubc.ca/projects/workspace-20
1
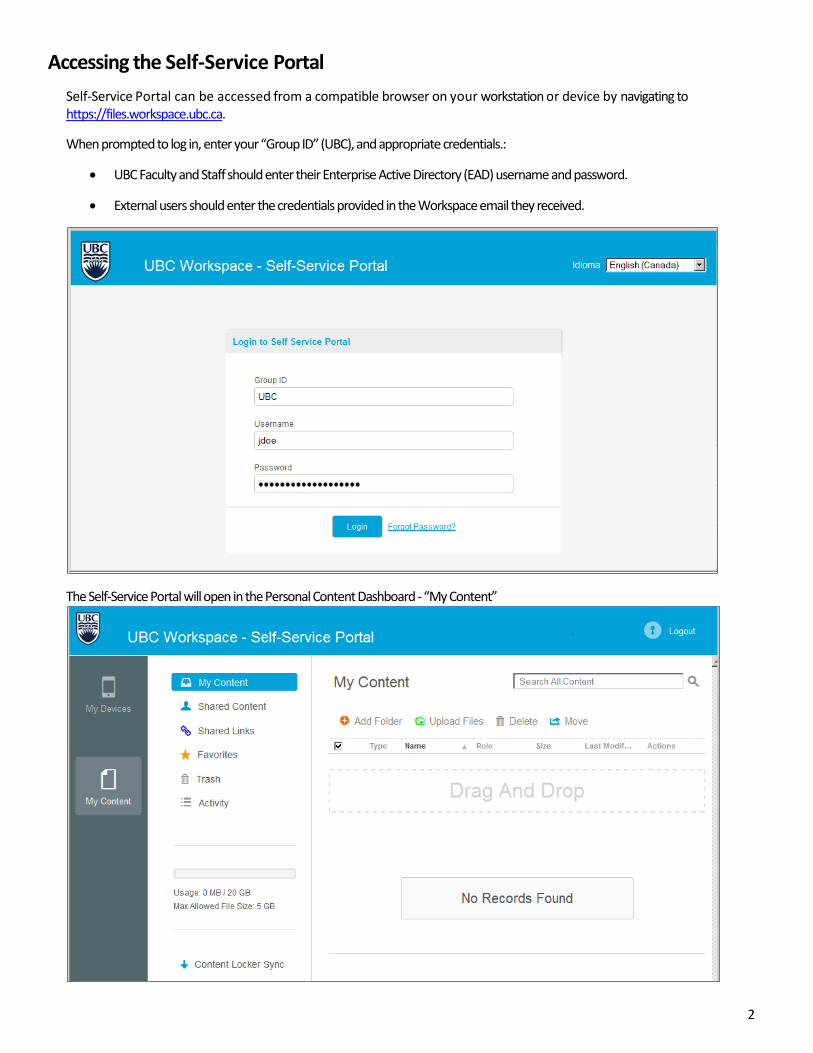
Accessing the Self-Service Portal Self-Service Portal can be accessed from a compatible browser on your workstation or device by navigating to https://files.workspace.ubc.ca.
When prompted to log in, enter your “Group ID” (UBC), and appropriate credentials.:
• UBC Faculty and Staff should enter their Enterprise Active Directory (EAD) username and password.
• External users should enter the credentials provided in the Workspace email they received.
The Self-Service Portal will open in the Personal Content Dashboard - “My Content”
2
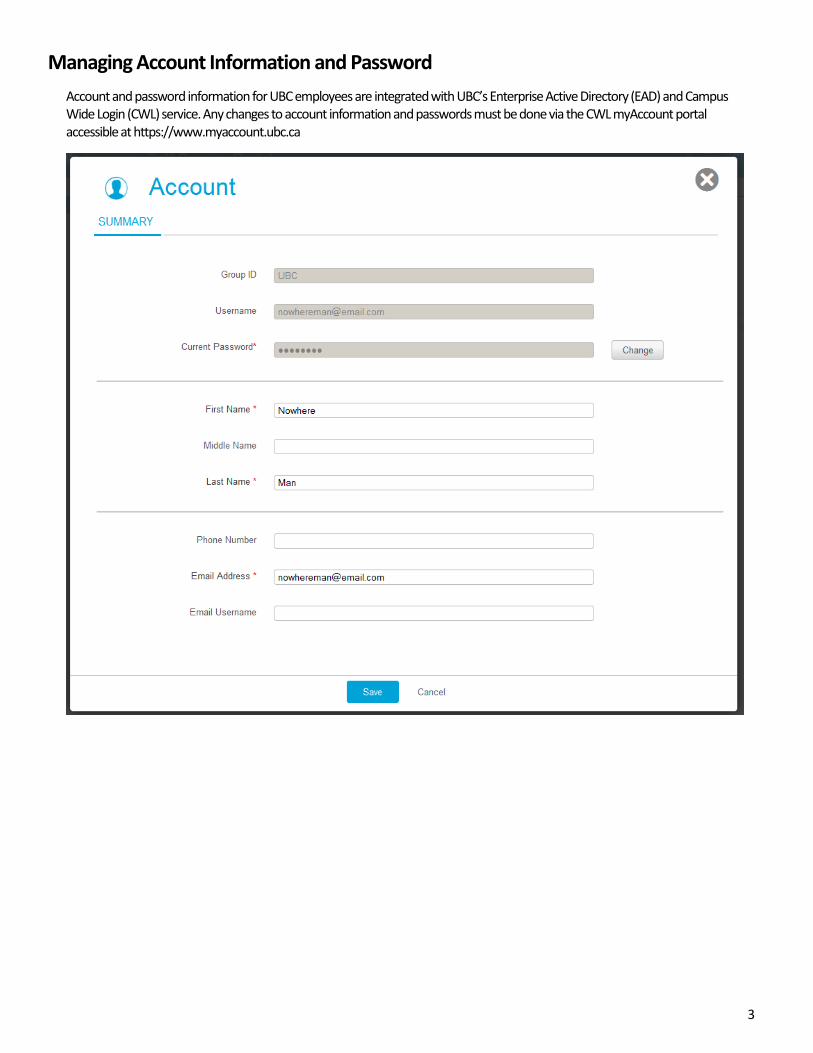
Managing Account Information and Password Account and password information for UBC employees are integrated with UBC’s Enterprise Active Directory (EAD) and Campus Wide Login (CWL) service. Any changes to account information and passwords must be done via the CWL myAccount portal accessible at https://www.myaccount.ubc.ca
3
Using the Self-Service Portal to Manage Personal Content In This Section
My Content – the Personal Content Dashboard – The dashboard that allows you to manage your Personal Content.
Using the Actions Menu – This section tells you about the actions you can perform on your files using the Actions Menu.
Managing Content Details – This section explains how to edit existing file details.
Managing Shared Content – This section teaches you how to manage shared folders, including who can see them and contribute.
Managing Shared Links – This section tells you how to configure share settings for your individual files.
Managing Favorites – This section explains how to view your favorite content.
Managing Trash – This section teaches you how to see what you have recently deleted and restore it, if necessary.
Managing Activity – This section tells you how to view recent activity of yourself and external users within the Self-Service Portal.
Managing My Repositories – This section explains how to access any shared repositories that have been configured for you.
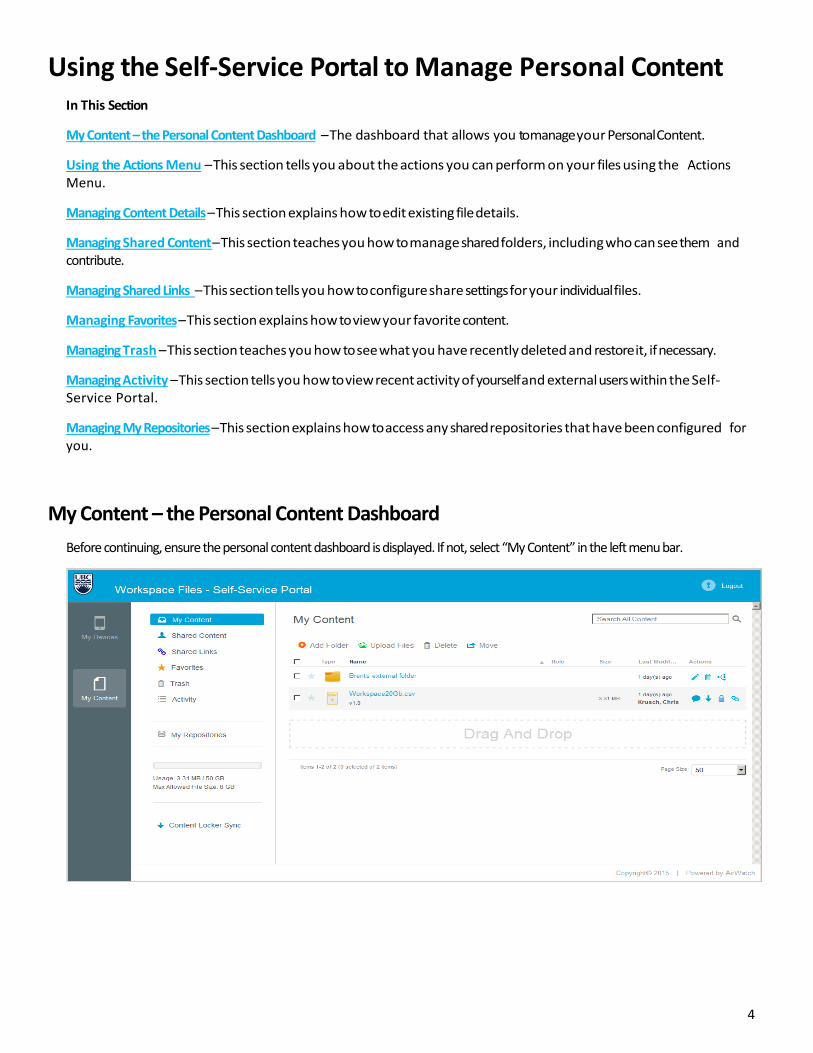
My Content – the Personal Content Dashboard Before continuing, ensure the personal content dashboard is displayed. If not, select “My Content” in the left menu bar.
4
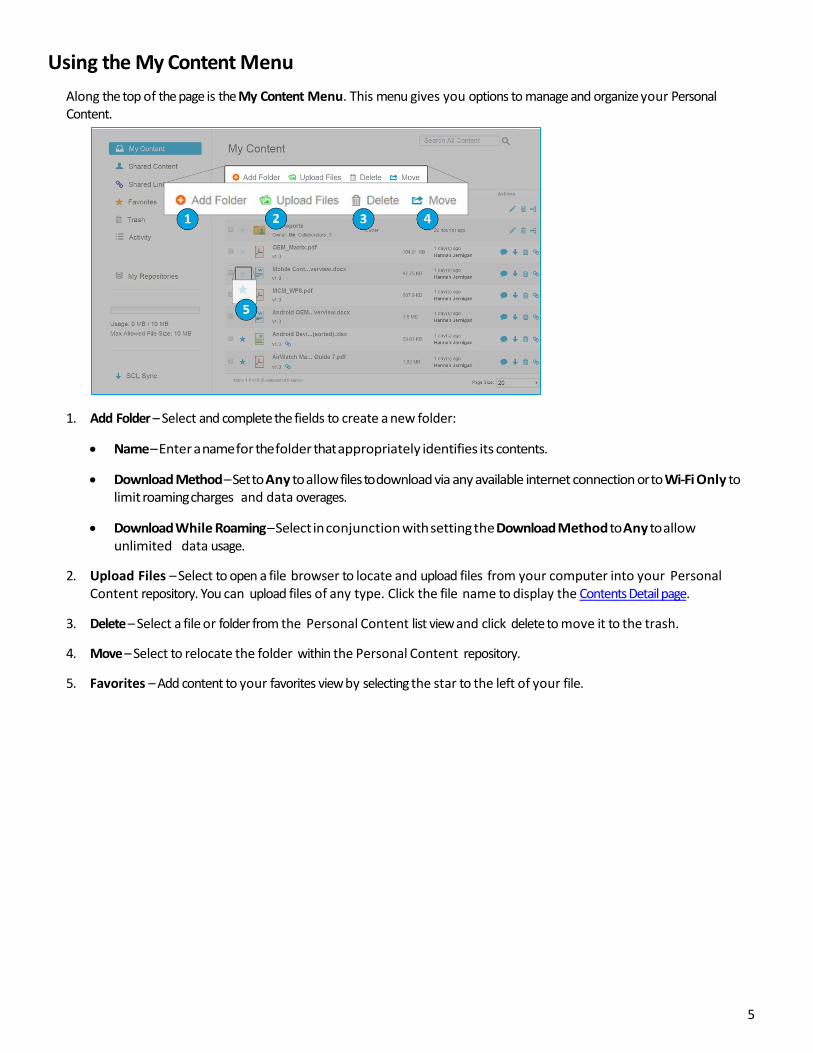
Using the My Content Menu Along the top of the page is the My Content Menu. This menu gives you options to manage and organize your Personal Content.
1. Add Folder – Select and complete the fields to create a new folder:
• Name – Enter a name for the folder that appropriately identifies its contents.
• Download Method – Set to Any to allow files to download via any available internet connection or to Wi-Fi Only to limit roaming charges and data overages.
• Download While Roaming – Select in conjunction with setting the Download Method to Any to allow unlimited data usage.
2. Upload Files – Select to open a file browser to locate and upload files from your computer into your Personal Content repository. You can upload files of any type. Click the file name to display the Contents Detail page.
3. Delete – Select a file or folder from the Personal Content list view and click delete to move it to the trash.
4. Move – Select to relocate the folder within the Personal Content repository.
5. Favorites – Add content to your favorites view by selecting the star to the left of your file.
5

Using the Actions Menu The Self-Service Portal displays an Actions Menu for each file and folder it contains. The available actions differ for files and folders.
Folder Actions
1. Edit – Select the edit icon beside the desired folder to open a field where you can:
• Change the Name of your folder.
• Set the Download Method to Any or Wi-Fi Only from a dropdown menu.
• Enable Download While Roaming.
• Enable Force Encryption to encrypt your folder.
2. Delete – Select delete to move content to the Trash.
From the Trash, you can view your deleted files in a simple list that is sortable by filename, delete date or size.
3. Share – Select share to display the Share Settings Screen.
File Actions
4. Comments – Click comments to add or view comments to the file. These comments are useful when you are collaborating with others.
5. Download – Click to download the file you wish to view.
6. Delete – Select delete to move content to Trash.
From Trash, you can view your deleted files in a simple list that is sortable by filename, delete date or size.
7. Share Link – Select share link to display the Share Link Screen.
Note: Restoring content previously located in a deleted folder places the file in the root directory.
Note: Restoring content previously located in a deleted folder places the file in the root directory.
6

Managing Content Details You can edit, delete or restore any content by using the Content Details Page. To access the Content Details page, click the name of the file you wish to edit.
1. Delete – Select to move your file to Trash.
2. Restore – Select to restore previous file versions. Previous versions are retained for a period of 30 days.
3. Edit – Select to change content details. Click the pen icon to save. The content details you can edit include:
• File Name
• Description
• Notes
• Subject
4. Download – Save the file to your laptop.
5. Close – Return to the Personal Content Dashboard.
7
Managing Shared Content Configuring Shared Folders
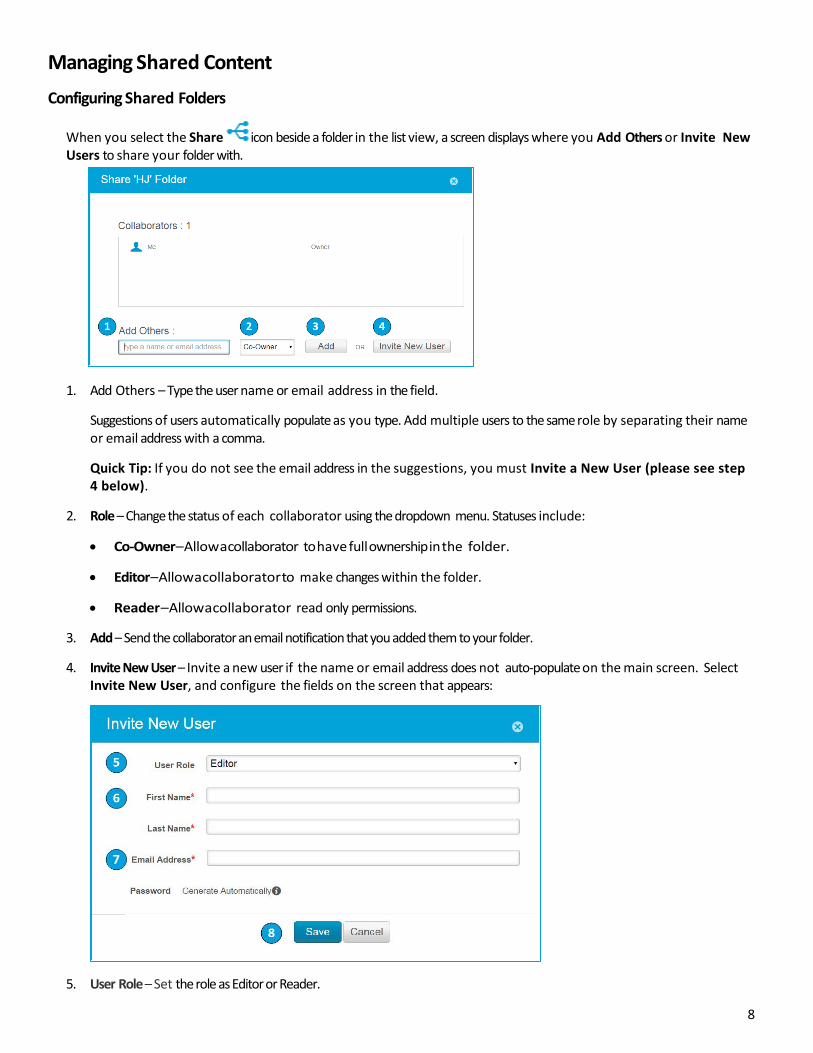
When you select the Share icon beside a folder in the list view, a screen displays where you Add Others or Invite New Users to share your folder with.
1. Add Others – Type the user name or email address in the field.
Suggestions of users automatically populate as you type. Add multiple users to the same role by separating their name or email address with a comma.
Quick Tip: If you do not see the email address in the suggestions, you must Invite a New User (please see step 4 below).
2. Role – Change the status of each collaborator using the dropdown menu. Statuses include:
• Co-Owner – Allow a collaborator to have full ownership in the folder.
• Editor – Allow a collaborator to make changes within the folder.
• Reader – Allow a collaborator read only permissions.
3. Add – Send the collaborator an email notification that you added them to your folder.
4. Invite New User – Invite a new user if the name or email address does not auto-populate on the main screen. Select Invite New User, and configure the fields on the screen that appears:
5. User Role – Set the role as Editor or Reader.
8
6. First/Last Name – Provide the name of the person you want to add.
7. Email Address – Provide the email address so that the new user can receive a notification and access information for the shared folder.
8. Password – AirWatch automatically generates a password that emails to the New User.
Managing Shared Folders
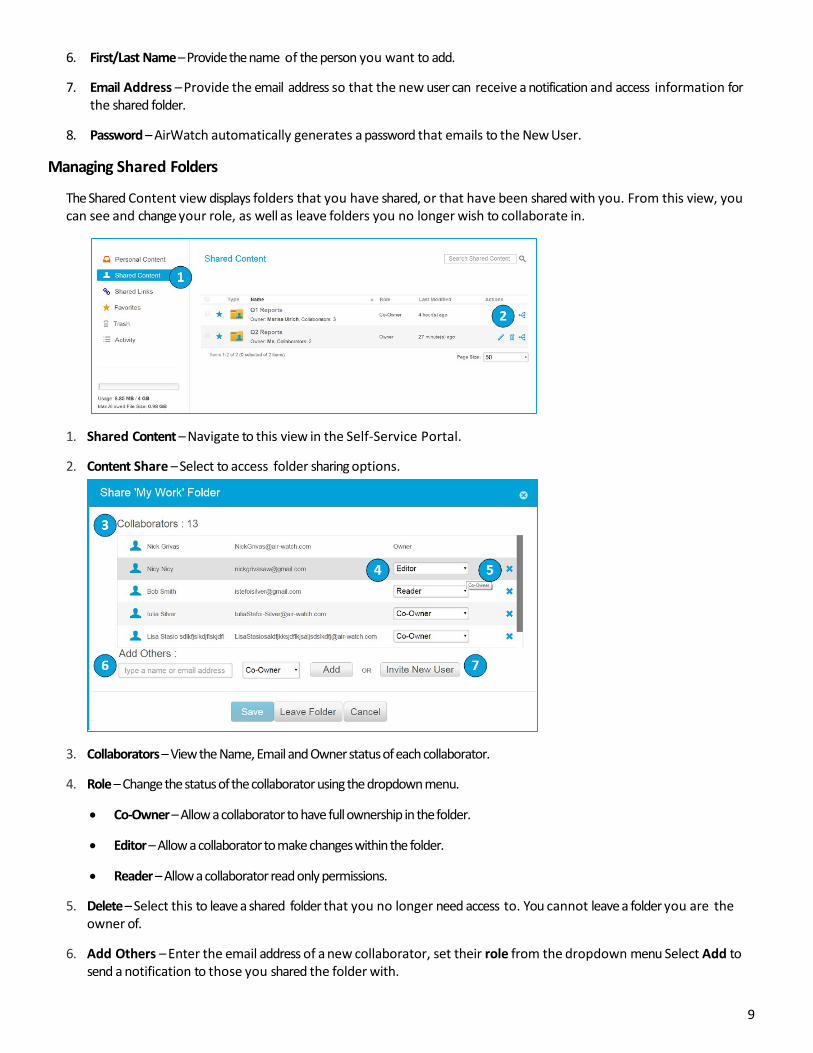
The Shared Content view displays folders that you have shared, or that have been shared with you. From this view, you can see and change your role, as well as leave folders you no longer wish to collaborate in.
1. Shared Content – Navigate to this view in the Self-Service Portal.
2. Content Share – Select to access folder sharing options.
3. Collaborators – View the Name, Email and Owner status of each collaborator.
4. Role – Change the status of the collaborator using the dropdown menu.
• Co-Owner – Allow a collaborator to have full ownership in the folder.
• Editor – Allow a collaborator to make changes within the folder.
• Reader – Allow a collaborator read only permissions.
5. Delete – Select this to leave a shared folder that you no longer need access to. You cannot leave a folder you are the owner of.
6. Add Others – Enter the email address of a new collaborator, set their role from the dropdown menu Select Add to send a notification to those you shared the folder with.
9
Suggestions of users automatically populate as you type. Add multiple users to the same role by separating their name or email address with a comma.
Quick Tip: If you do not see the email address in the suggestions, you must Invite a New User.
7. Invite New User – Invite a new user if the name or email address does not auto-populate on the main screen. Complete the fields in the screen that appears.
Configuring Shared Links
Note that UBC has place restrictions on the use of shared links to further enhance data security and align with UBC security policies. Links can only be valid up to a maximum of 30 days, and must have a password assigned to them. Both the link and password must be provided to the individuals that need to download the file.
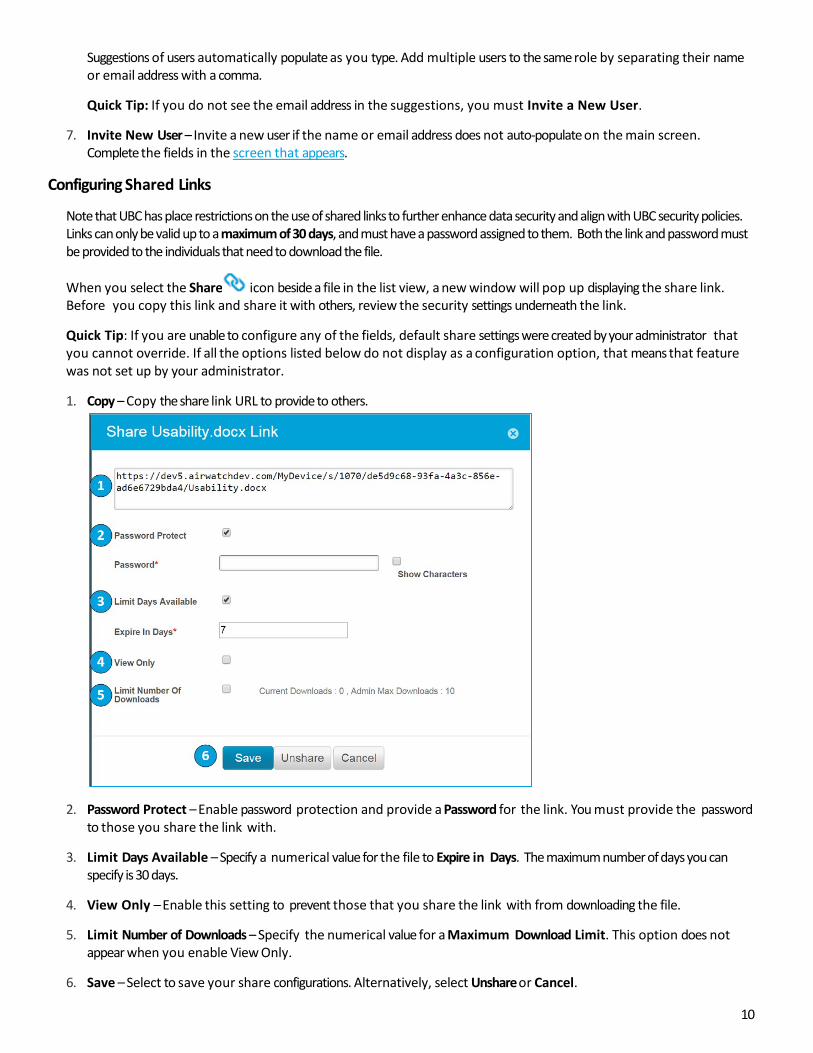
When you select the Share icon beside a file in the list view, a new window will pop up displaying the share link. Before you copy this link and share it with others, review the security settings underneath the link.
Quick Tip: If you are unable to configure any of the fields, default share settings were created by your administrator that you cannot override. If all the options listed below do not display as a configuration option, that means that feature was not set up by your administrator.
1. Copy – Copy the share link URL to provide to others.
2. Password Protect – Enable password protection and provide a Password for the link. You must provide the password to those you share the link with.
3. Limit Days Available – Specify a numerical value for the file to Expire in Days. The maximum number of days you can specify is 30 days.
4. View Only – Enable this setting to prevent those that you share the link with from downloading the file.
5. Limit Number of Downloads – Specify the numerical value for a Maximum Download Limit. This option does not appear when you enable View Only.
6. Save – Select to save your share configurations. Alternatively, select Unshare or Cancel.
10
Managing Shared Links
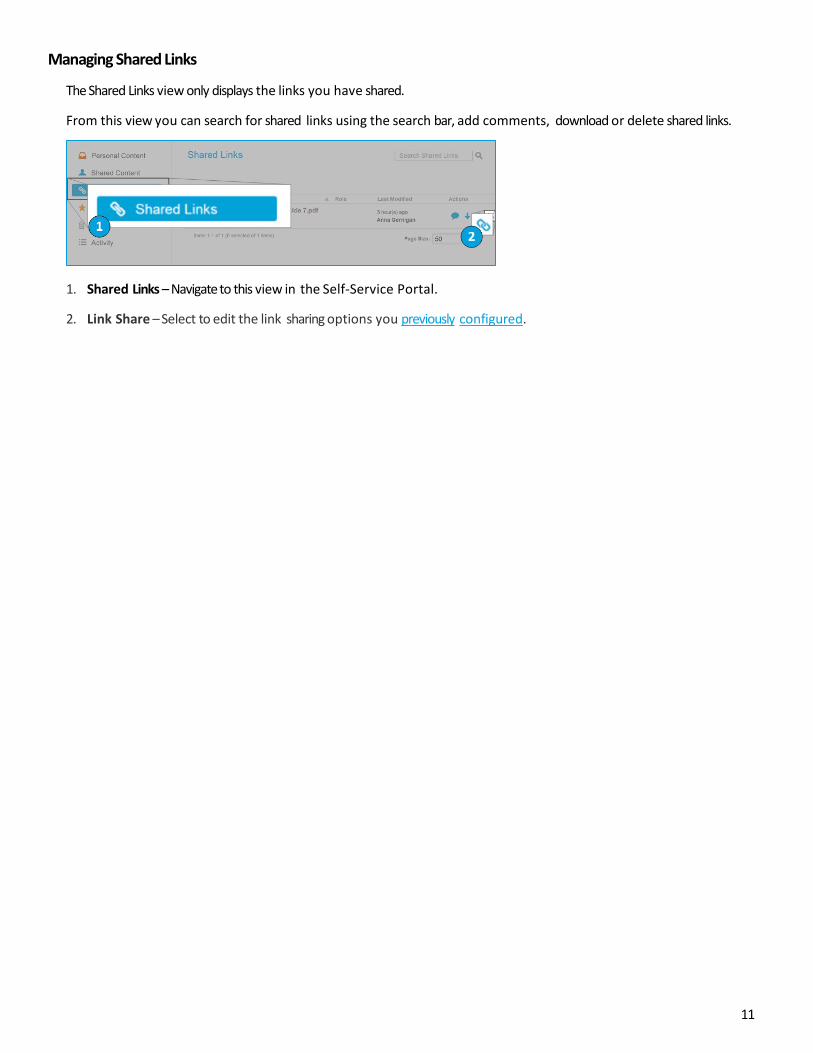
The Shared Links view only displays the links you have shared.
From this view you can search for shared links using the search bar, add comments, download or delete shared links.
1. Shared Links – Navigate to this view in the Self-Service Portal.
2. Link Share – Select to edit the link sharing options you previously configured.
11
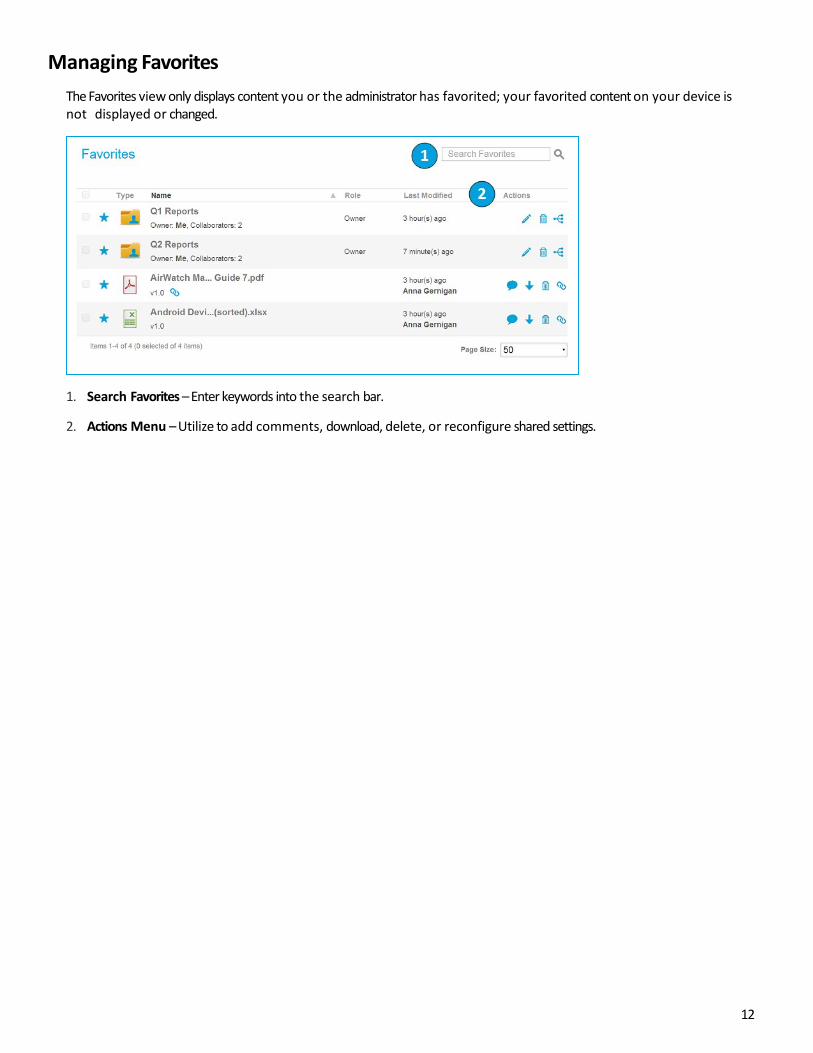
Managing Favorites The Favorites view only displays content you or the administrator has favorited; your favorited content on your device is not displayed or changed.
1. Search Favorites – Enter keywords into the search bar.
2. Actions Menu – Utilize to add comments, download, delete, or reconfigure shared settings.
12

Managing Trash When content and folders are deleted from the Self-Service Portal, they are moved to the Trash container.
1. Trash – Navigate to the view in the Self-Service Portal.
2. Restore – Click to return content from the trash queue to its original location.
3. Delete – Click to permanently remove a file from your Trash.
4. Sort – View your deleted files in a simple list that is sortable by filename, delete date or size.
5. Empty Trash – Click to permanently remove all content from Trash. This feature is helpful if you exceed your Self-Service Portal data storage limit, and wish to quickly create more storage.
Note: Restoring content previously located in a deleted folder places the file in the root directory.
13
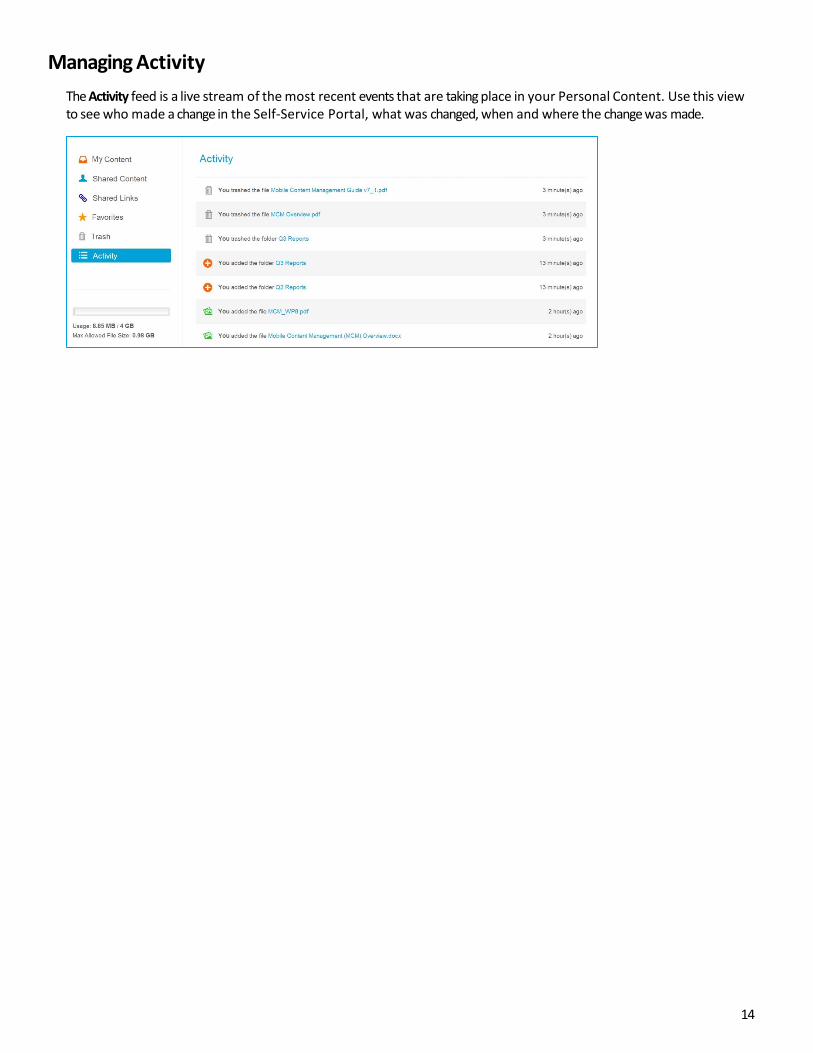
Managing Activity The Activity feed is a live stream of the most recent events that are taking place in your Personal Content. Use this view to see who made a change in the Self-Service Portal, what was changed, when and where the change was made.
14

Managing My Repositories Use the My Repositories view to see additional repositories that have been configured for you.
UBC employees will see a repository configured that automatically gives their mobile devices access to content stored on their Home drive (H: drive). The team share repository is also made available to portable devices, but is not visible as a shared repository within the Self-Service Portal
This home drive or team share repositories cannot be accessed via the Self-Service Portal – see the Home Drive and Team Share service documentation in the UBC IT service catalog at https://it.ubc.ca/services/web-servers-storage for more information on accessing those services.
You cannot add or remove repositories (actions 2 and 3 will not appear), but you can change the name displayed for your home drive by selecting the “edit” icon (action 4) and changing the display name.
If you delete the link to your home drive repository by selecting the delete action (5), it will automatically be re-created the next time you log into UBC Workspace 2.0.
15
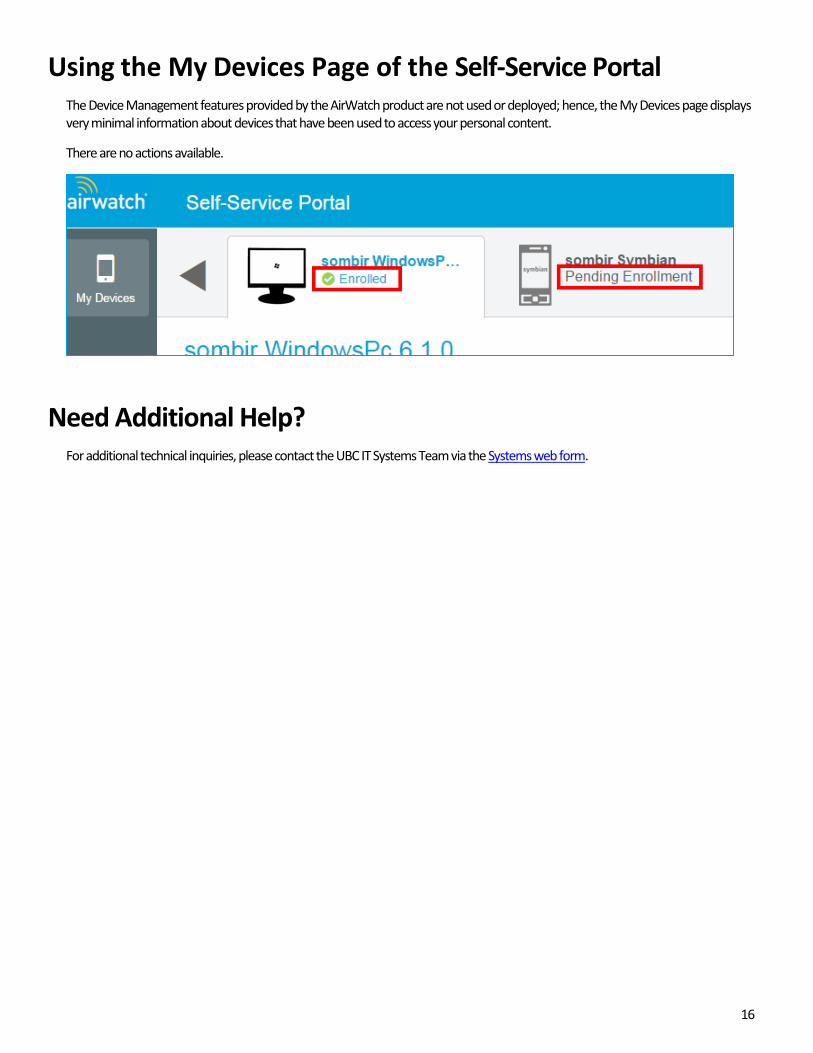
Using the My Devices Page of the Self-Service Portal The Device Management features provided by the AirWatch product are not used or deployed; hence, the My Devices page displays very minimal information about devices that have been used to access your personal content.
There are no actions available.
Need Additional Help? For additional technical inquiries, please contact the UBC IT Systems Team via the Systems web form.
16