Embed Size (px)
Citation preview
U2 Metadata Manager
User Guide
Version JAN2015
January 2015DBT-JAN2015-MDM-OH-01
2
NoticesEdition
Publication date: January 2015Book number: DBT-JAN2015-MDM-OH-01Product version: Version JAN2015
Copyright© Rocket Software, Inc. or its affiliates 2005-2015. All Rights Reserved.
Trademarks
Rocket is a registered trademark of Rocket Software, Inc. For a list of Rocket registered trademarks goto: www.rocketsoftware.com/about/legal. All other products or services mentioned in this documentmay be covered by the trademarks, service marks, or product names of their respective owners.
Examples
This information might contain examples of data and reports. The examples include the names ofindividuals, companies, brands, and products. All of these names are fictitious and any similarity tothe names and addresses used by an actual business enterprise is entirely coincidental.
License agreement
This software and the associated documentation are proprietary and confidential to Rocket Software,Inc. or its affiliates, are furnished under license, and may be used and copied only in accordance withthe terms of such license.
Note: This product may contain encryption technology. Many countries prohibit or restrict theuse, import, or export of encryption technologies, and current use, import, and export regulationsshould be followed when exporting this product.
3
Corporate informationRocket Software, Inc. develops enterprise infrastructure products in four key areas: storage, networks,and compliance; database servers and tools; business information and analytics; and applicationdevelopment, integration, and modernization.
Website: www.rocketsoftware.com
Rocket Global Headquarters77 4th Avenue, Suite 100Waltham, MA 02451-1468USA
To contact Rocket Software by telephone for any reason, including obtaining pre-sales informationand technical support, use one of the following telephone numbers.
Country Toll-free telephone number
United States 1-855-577-4323Australia 1-800-823-405Belgium 0800-266-65Canada 1-855-577-4323China 800-720-1170France 0800-180-0882Germany 08-05-08-05-62Italy 800-878-295Japan 0800-170-5464Netherlands 0-800-022-2961New Zealand 0800-003210South Africa 0-800-980-818United Kingdom 0800-520-0439
Contacting Technical Support
The Rocket Customer Portal is the primary method of obtaining support. If you have currentsupport and maintenance agreements with Rocket Software, you can access the Rocket CustomerPortal and report a problem, download an update, or find answers to in the U2 Knowledgebase.To log in to the Rocket Customer Portal or to request a Rocket Customer Portal account, go towww.rocketsoftware.com/support.
In addition to using the Rocket Customer Portal to obtain support, you can send an email [email protected] or use one of the following telephone numbers.
Country Telephone number
North America +1 800 729 3553United Kingdom/France +44 (0) 800 773 771 or +44 (0) 20 8867 3691Europe/Africa +44 (0) 20 8867 3692Australia +1 800 707 703 or +61 (0) 29412 5450New Zealand +0800 505 515
4
Contents
Notices................................................................................................................................................................................... 2
Corporate information......................................................................................................................................................... 3
Chapter 1: Welcome to the U2 Metadata Manager help....................................................................................................6U2 Metadata Manager overview.............................................................................................................................. 6New features in this release.................................................................................................................................... 6System requirements............................................................................................................................................... 7
Chapter 2: Getting started................................................................................................................................................... 8Installing U2 Metadata Manager............................................................................................................................. 8Installing and updating the DBTools using the Eclipse Update Manager.............................................................8
XTOOLSUB..................................................................................................................................................... 9Installing XTOOLSUB for UniData on Windows............................................................................ 10Installing XTOOLSUB for UniVerse on Windows........................................................................... 10Installing XTOOLSUB for UNIX/Linux for UniData........................................................................ 11Installing XTOOLSUB for UNIX/Linux on UniVerse........................................................................12Installing XTOOLSUB on Windows................................................................................................ 12
Starting U2 MDM..................................................................................................................................................... 13Establishing server connections............................................................................................................................ 14
U2 server definitions.................................................................................................................................. 14Creating U2 server definitions................................................................................................................... 14Editing U2 server definitions......................................................................................................................14Viewing or editing advanced settings of a U2 server definition.............................................................. 15Specifying a command to run on connection.......................................................................................... 16Connecting to U2 servers...........................................................................................................................16Disconnecting from U2 servers..................................................................................................................16Deleting U2 server definitions................................................................................................................... 17
U2 MDM perspective............................................................................................................................................... 17U2 Resource view....................................................................................................................................... 17
Database file options..................................................................................................................... 18Metadata Repository file options.................................................................................................. 18
U2 MDM editor............................................................................................................................................ 18U2 MDM editor views......................................................................................................................18Options available in the Metadata view....................................................................................... 19Options available in the 1NF Map view........................................................................................ 21
Chapter 3: Tutorial..............................................................................................................................................................24Creating the metadata file.....................................................................................................................................24Choosing virtual attributes.................................................................................................................................... 24Creating the 1NF file...............................................................................................................................................24Creating the schema.............................................................................................................................................. 25(Optional) Changing the data type enforcement................................................................................................. 25(Optional) Enabling data type enforcement.........................................................................................................26
Chapter 4: Generating metadata and 1NF maps in U2 MDM...........................................................................................27Generating the metadata file.................................................................................................................................27Adding virtual fields to metadata..........................................................................................................................27Generating a 1NF map........................................................................................................................................... 28
Chapter 5: Editing data in U2 MDM................................................................................................................................... 29Editing files in the graphical editor.......................................................................................................................29
Editing metadata table properties in the graphical view........................................................................ 29Editing 1NF table properties in the graphical view..................................................................................29Enabling data type enforcement in the graphical editor........................................................................ 30
Contents
5
Editing metadata files in the text editor...............................................................................................................31Editing 1NF files in the text editor............................................................................................................ 31Enabling UniData data type enforcement in the metadata text editor.................................................. 32
Chapter 6: Working with schemas.....................................................................................................................................34UniData schema rules............................................................................................................................................ 34UniVerse schema rules........................................................................................................................................... 34Generating a schema..............................................................................................................................................34Viewing the schema................................................................................................................................................35Testing the schema................................................................................................................................................ 35Making your non-compliant UniData file names accessible............................................................................... 37Creating a metadata repository for an existing schema......................................................................................37Creating metadata for the Metadata Repository wizard..................................................................................... 37Synchronizing the current dictionary with the metadata................................................................................... 38Synchronizing the data using the Metadata Synchronization wizard.................................................................38
Chapter 7: Data type enforcement for UniData............................................................................................................... 40Selecting an attribute for data type enforcement............................................................................................... 40Creating and deleting a metadata list.................................................................................................................. 40
CREATE.METADATA..................................................................................................................................... 41DELETE.METADATA..................................................................................................................................... 41LIST.METADATA........................................................................................................................................... 41
Data type enforcement (DTENF) commands........................................................................................................43ENABLE.DTENF............................................................................................................................................ 43DISABLE.DTENF........................................................................................................................................... 44LIST.METADATA........................................................................................................................................... 44VERIFY.DTENF..............................................................................................................................................46SET.DTELOG................................................................................................................................................ 46INMAT function........................................................................................................................................... 47
Chapter 8: Deployment for UniData..................................................................................................................................48UniData metadata repository................................................................................................................................ 48Deploying a metadata map................................................................................................................................... 48
Deploying the UniData metadata repository............................................................................................48Deploying a UniData metadata file........................................................................................................... 48
Deploying a relational schema.............................................................................................................................. 49Example: Deploying a single SQLDEF file................................................................................................. 50Example: Deploying all SQLDEF files.........................................................................................................50
Chapter 9: Deployment for UniVerse.................................................................................................................................52UniVerse metadata repository...............................................................................................................................52Deploying a relational schema for UniVerse........................................................................................................ 52
6
Chapter 1: Welcome to the U2 MetadataManager help
The help provides conceptual, task-based, and reference information about U2 Metadata Manager.
You can search for a word or phrase in these help topics by selecting the Search tab and entering yoursearch topic. To narrow the search results to an exact phrase, enclose the phrase within quotationmarks, for example, “dictionary files.”
The help topics cover the following areas:
▪ U2 MDM overview▪ System requirements▪ Installing U2 Metadata Manager▪ Getting started▪ Defining metadata and first normal form (1NF) maps▪ Enforcing data types▪ Deploying metadata maps and schemas
After you install the product, you can learn about the product interface and take a tutorial by readingthe topics in the Getting started section.
Additional resources
For additional information about U2 products, training, and technical resources go to http://www.rocketsoftware.com/brand/rocket-u2.
U2 Metadata Manager overviewThe U2 Metadata Manager (U2 MDM) client is an Eclipse-based tool that you can use to createmetadata files and 1NF maps, and to manage schema at an account level for both UniData andUniVerse. This is helpful when trying to create SQL-compliant files for JDBC and ODBC applications.
The U2 MDM perspective contains multiple panes, or views. From these views, you can view your U2dictionary, define metadata to describe the file's data, and create first normal form maps of yourmetadata files.
To begin, you can start U2 MDM and become familiar with the workspace in the standard interface.After that, you can connect to a U2 server, and then select a task to perform.
UniData users can also use the metadata files for data type enforcement (DTE). U2 MDM generatesmetadata based on existing U2 dictionaries and their relationship to the data files. U2 MDM allowsusers to create a base for generating account-level repositories for data type enforcement, andprovides an interface to the database’s DTE capabilities. UniData developers can use DTE to gobeyond the U2 dictionary by specifying the type of data expected for some or all data locations withina file. When writing data to the file, the database inspects the locations with data types specified. Ifany data violates the specified data type, the database logs the violation and can block the write of therecord, depending on the data type enforcement configuration for the file.
New features in this releaseThe following new features are available in the U2 Metadata Manager in this release.
System requirements
7
Metadata Repository wizard. This new wizard allows users to create a metadata repository using anexisting schema that does not have an associated metadata repository. This can occur if a schemawas created in VSG (UniData only) or if a schema was created in U2 MDM and then the correspondingmetadata repository was deleted. For more information, see Creating a metadata repository for anexisting schema, on page 37.
Metadata Synchronization wizard. When new fields are added, removed, or modified in a dictionaryafter the file has been loaded into the metadata repository, the information in the metadatarepository becomes out of sync with that in the dictionary. You need to refresh the information in themetadata to synchronize it with the dictionary. You can do this with the Metadata Synchronizationwizard. For more information, see Synchronizing the current dictionary with the metadata, on page38.
System requirementsBefore you install U2 Metadata Manager, make sure that the computer you are installing it on meetsthe requirements.
▪ You must install U2 MDM on a computer that is on the same network as the server running UniDataor UniVerse.
▪ The installation computer must be running Microsoft Windows with Windows XP, Vista, or later.▪ UniData or UniVerse services must be currently running on the server.▪ UniVerse 11.1.11 or later must be running on the server. If the account is UniVerse 11.1.10 or earlier,
you must run the updaccount command to upgrade the VOC file, or answer Yes to the prompt toupdate the VOC when logging in to the account for the first time.
▪ UniData 7.3 or later must be running on the server, with the QUOTED_IDENTIFIER=1 parameter thatis defined in the udtconfig file.
▪ You must run the MIGRATE.SQL command on the UniData files if you are using UniData VSGschema version 4000.00.01.
▪ You must run the MIGRATE.SQL command on the UniData account if it is not a new account andyou have never run this command on the account.
▪ If the account was created on UniData 7.2 or earlier, you must run the updatevoc command toupgrade the VOC file.
▪ A screen resolution of 1280x1024 or higher and a text setting of 100% is recommended for all U2Eclipse-based applications.
8
Chapter 2: Getting started
Installing U2 Metadata ManagerInstall U2 Metadata Manager on a Microsoft Windows computer that is on the same network as theserver that is running UniData or UniVerse.
Review the system requirements before you install U2 Metadata Manager.
1. From the U2 Database Tools Installation screen, select U2 Metadata Manager and click Next.2. After accepting the licensing agreement, click Next.3. Click Next to install U2 Metadata Manager in the default C:\U2\U2Tools\v3 folder, or click
Browse to select a different folder.4. By default, the installation process adds the Rocket U2 icon to the Program Folders list. Click
Next to accept this default, or select a different folder from the Existing Folders list and thenclick Next.
5. Review the information about the installation files listed in the Start Copying Files dialog box. Ifthe information is correct, click Next to begin copying files. If the information is not correct, clickBack to make changes.
6. Click Finish to complete the installation process.
Installing and updating the DBTools using the EclipseUpdate Manager
You can update and install any of the U2 DBTools using the Update Manager in Eclipse.
Find the latest information about updates for U2 DBTools at http://updates.rocketsoftware.com/u2.
Procedure
1. Launch any U2 DBTools or base Eclipse installations (beginning with Galileo) on your computer.2. From the Eclipse Help menu, select Help → Install New Software.3. Click Add, enter a name for the site, such as U2 Update Site, and in the Work with field enter
http://updates.rocketsoftware.com/u2. Click OK.4. Allow the repository to load and then expand the tree for U2 DBTools. Select the updates that you
want to apply. You can also choose to install any other U2 DBTools into your existing workspace.5. Click Next and follow the installation wizard to complete the installation of updates.6. Updates will take effect the next time an updated tool is launched.
Note: Only tools that are installed through separate InstallShield installations will appear onthe Start menu. Tools installed using the Eclipse Update Manager are installed as individualperspectives in a single Eclipse instance. You can access the different perspectives by selectingWindow → Open Perspective and then selecting the appropriate tool.

XTOOLSUB
9
Note: You can check for updates to the DBTools by selecting Help → Check for Updates. To usethis option, you must have previously defined the http://updates.rocketsoftware.com/u2 locationin the Install New Software dialog, as described in step 3.
XTOOLSUB
This topic describes the XTOOLSUB program and how to upgrade to the latest version of XTOOLSUBon various operating systems.
Updating the XTOOLSUB Program
The XTOOLSUB program is a U2 database server-side BASIC program used by various U2 Client Tools.This includes U2 DataVu, U2 Web DE, Basic Developer's Toolkit (BDT), Extensible Administration Tool(XAdmin), Web Services Developer, and more. It also includes any tool that uses the U2 Resource View.
XTOOLSUB updates itself automatically. However, if something happens to the XTOOLSUB programyou can download the latest version from the public Tech Note site at:
https://u2tc.rocketsoftware.com/documentation/1410028.asp
The XTOOLSUB program contains several zip and tar files, and includes three or four files, dependingon the environment. The XTOOLSUB program is used by all the tools, but the other files included areonly used for the Basic Developer's Toolkit (BDT).
The XTOOLSUB_EXECPRE/XTOOLSUB_XPRE programs are for pre-execution functionality andXTOOLSUB_EXECPOST/XTOOLSUB_XPST are for post-execution functionality. These programs arediscussed further in the related public Tech Note, BDT Extensibility Details. If you have added your owncode to the pre- and post-functionality, copy those modified programs to the older database versionsrather than the pre- and post- files located here.
The files included for UniData are:
▪ XTOOLSUB▪ XTOOLSUB_EXECPRE▪ XTOOLSUB_EXECPOST▪ EDAMAPSUB (UniData 6.1 and lower)
The files included for UniVerse are:
▪ XTOOLSUB▪ XTOOLSUB_XPRE▪ XTOOLSUB_XPST▪ EDAMAPSUB (UniVerse 10.3 and lower)
Do not catalog the EDAMAPSUB subroutine when using UDT 7.1 or UV 11.1 and higher. This programalready exists on those versions.
There is a difference between the databases because UniVerse's catalog environment is a type 1 fileand has a 14–character file name limit.
Only extract the file that is needed for the database server/version and OS type you are using.The ...UX.tar (Unix) files come from AIX. You will need to run fnuxi/convcode if you use other UNIX/Linux operating systems. Files are not included for all operating systems in order to avoid unnecessaryconfusion. The files in the zip/tar files are the object code for the given programs; do not open them ina text editor.
Chapter 2: Getting started
10
Note: Log in as a root or administrator user when doing these steps to avoid any permissionserrors. If an overwrite message occurs, select "yes" to overwrite the file in question.
Installing XTOOLSUB for UniData on Windows
The XTOOLSUB program is installed and updated automatically through the U2 DBTools updates.However, if your version of XTOOLSUB somehow becomes unusable, you can install a new version.
Procedure
1. Download the latest version of XTOOLSUB from the public Tech Note site at https://u2tc.rocketsoftware.com/documentation/1410028.asp.
2. Copy the XTOOLSUB_UDT_NT.zip or XTOOLSUB_UDT_61_NT.zip file to a temporary directory onyour server (for example, c:\temp).
3. Extract the file to the c:\u2\ud##\sys\SYS_BP (where ## refers to the UniData major version. Forexample, 61, 71, 72, etc.) directory using your preferred unzipping utility. If UniData is installed inanother location, change the path accordingly.
4. Log in to the sys account using telnet or execute a udt shell command in the sys directory on theserver.
5. Catalog the three XTOOLSUB programs, as follows:
▪ CATALOG SYS_BP XTOOLSUB FORCE▪ CATALOG SYS_BP XTOOLSUB_EXECPRE FORCE▪ CATALOG SYS_BP XTOOLSUB_EXECPOST FORCE
Note: If you are using UniData 6.1 or lower, also run the CATALOG SYS_BP EDAMAPSUBFORCE command.
6. Connect with your U2 client tool to the U2 database server.
Installing XTOOLSUB for UniVerse on Windows
The XTOOLSUB program is installed and updated automatically through the U2 DBTools updates.However, if your version of XTOOLSUB somehow becomes unusable, you can install a new version.
Procedure
1. Download the latest version of XTOOLSUB from the public Tech Note site at https://u2tc.rocketsoftware.com/documentation/1410028.asp
2. Copy the XTOOLSUB_UV_NT.zip or XTOOLSUB_UV_103_NT.zip file to a temporary directory onyour server. For example, c:\temp.
3. Extract the file to the c:\u2\uv\BP.O directory using your preferred unzipping utility. If UniVerse isinstalled in another location, change the path accordingly.
4. Log in to the UV home account via Telnet. The account name is UV or uv in the UV.ACCOUNT file.5. Catalog the three XTOOLSUB programs, as follows:
▪ CATALOG SYS_BP XTOOLSUB FORCE▪ CATALOG SYS_BP XTOOLSUB_EXECPRE FORCE▪ CATALOG SYS_BP XTOOLSUB_EXECPOST FORCE
Installing XTOOLSUB for UNIX/Linux for UniData
11
Note: You will receive a catalog error if you try to catalog all three programs on the samecommand line.
6. If you are using UniVerse 10.3 or later, also run CATALOG BP *EDAMAPSUB FORCE command.7. Connect with your U2 client tool to the U2 database server.
Installing XTOOLSUB for UNIX/Linux for UniData
The XTOOLSUB program is installed and updated automatically through the U2 DBTools updates.However, if your version of XTOOLSUB somehow becomes unusable, you can install a new version.
The $UDTBIN referenced below is an environment variable pointing to your UniData bin directory, forexample, /usr/ud##/bin (where ##, is 61,71,72, etc.). If this variable is not set, then reference the fullpath to the UniData bin directory in the commands.
Procedure
1. Download the latest version of XTOOLSUB from the public Tech Note site at https://u2tc.rocketsoftware.com/documentation/1410028.asp.
2. Copy the XTOOLSUB_UDT_UX.tar or XTOOLSUB_UDT_61_UX.tar file to a temporary directory onyour server (for example, /tmp). If transferring using ftp, remember to use binary format.
3. Extract the file to the $UDTHOME/sys/SYS_BP directory.
a. To install using UniData 6.1 or earlier, the commands will be:cd $UDTHOME/sys/SYS_BPtar -xvf /tmp/XTOOLSUB_UDT_61_UX.tar
b. To install UniData 7.1 or later, the commands will be:cd $UDTHOME/sys/SYS_BPtar -xvf /tmp/XTOOLSUB_UDT_UX.tar
4. If you are using a non-AIX operating system, run the convcode command, as shown: $UDTHOME/sys/SYS_BP: $UDTBIN/convcode .
Note: The convcode command includes a period at the end of the line. This will converteverything in the SYS_BP file to the current format. All files report that they were converted,but this is the default answer for convcode. The existing files should already be in the correctformat.
5. Change directories to the $UDTHOME/sys directory and then and execute the UDT command, asshown:
a. CD $UDTHOME/sysb. $UDTBIN/udt
6. Catalog the three XTOOLSUB programs, as follows:
▪ CATALOG SYS_BP XTOOLSUB FORCE▪ CATALOG SYS_BP XTOOLSUB_EXECPRE FORCE▪ CATALOG SYS_BP XTOOLSUB_EXECPOST FORCE
Note: If you are using UniData 6.1 or lower, also run the CATALOG SYS_BP EDAMAPSUBFORCE command.
7. Connect with your U2 client tool to the U2 database server.
Chapter 2: Getting started
12
Installing XTOOLSUB for UNIX/Linux on UniVerse
The XTOOLSUB program is installed and updated automatically through the U2 DBTools updates.However, if your version of XTOOLSUB somehow becomes unusable, you can install a new version.
Procedure
1. Download the latest version of XTOOLSUB from the public Tech Note site at https://u2tc.rocketsoftware.com/documentation/1410028.asp
2. Copy the XTOOLSUB_UV_UX.tar or XTOOLSUB_UDT_UV_103_UX.tar file to a temporary directoryon your server (for example, /tmp). If transferring files using FTP, remember to use binary fileformat.
3. Extract the file to the /usr/uv/BP.O directory. If UniVerse is installed in another location, changethe path accordingly. Use 'cat /.uvhome' to find the path if needed.
Note: `cat /.uvhome` references include single backward quotation marks. This commandretrieves the current value for the UniVerse home directory before running the command.
a. To install using UniVerse 10.3 or earlier, the commands to use are:cd `cat /.uvhome`/BP.Otar -xvf /tmp/XTOOLSUB_UV_103_UX.tar
b. To install using UniVerse 11.1 or later, the commands to use are:cd `cat /.uvhome`/BP.Otar -xvf /tmp/XTOOLSUB_UV_UX.tar
4. If you are using a non-AIX operating system, run the convcode command, as shown:`cat /.uvhome`/bin/fnuxi XTOOLSUB*
5. Change directories to the UniVerse home directory and then and run the UV command, as shown:
a. cd `cat /.uvhome`b. bin/uv
6. Click Escape to exit the menu.7. Catalog the three XTOOLSUB programs, as follows:
▪ CATALOG SYS_BP XTOOLSUB FORCE▪ CATALOG SYS_BP XTOOLSUB_EXECPRE FORCE▪ CATALOG SYS_BP XTOOLSUB_EXECPOST FORCE
Note: You will see a catalog error if you try to catalog all three programs on the samecommand line.
8. If you are using UniVerse 10.3 or earlier, also run the CATALOG BP *EDAMAPSUB FORCEcommand.
9. Connect with your U2 client tool to the U2 database server.
Installing XTOOLSUB on Windows
The XTOOLSUB program is installed and updated automatically through the U2 DBTools updates.However, if your version of XTOOLSUB somehow becomes unusable, you can install a new version.
Procedure
1. Download the latest version of XTOOLSUB from the public Tech Note site at https://u2tc.rocketsoftware.com/documentation/1410028.asp
Starting U2 MDM
13
2. Copy the XTOOLSUB_UDT_NT.zip or XTOOLSUB_UDT_61_NT.zip file to a temporary directory onyour server (for example, c:\temp).
3. Extract the file to the c:\u2\ud##\sys\SYS_BP (where ## refers to the UDT major version, i.e. 61, 71,72, etc.) directory using your preferred unzipping utility. If UniData is installed in another location,change the path accordingly.
4. Log into the sys account using telnet or execute a udt shell command in the sys directory on theserver.
5. Catalog the three XTOOLSUB programs, as follows:
▪ CATALOG SYS_BP XTOOLSUB FORCE▪ CATALOG SYS_BP XTOOLSUB_EXECPRE FORCE▪ CATALOG SYS_BP XTOOLSUB_EXECPOST FORCE
Note: If you are using UniData 6.1 or lower, also run the CATALOG SYS_BP EDAMAPSUBFORCE command.
6. Connect with your U2 client tool to the U2 database server.
Starting U2 MDMBefore you can create a metadata file or a 1NF map or schema, you must start the U2 MetadataManager (U2 MDM) tool. A schema, in U2 terms, is a set of catalog tables that contain names of 1NFviews that map U2 nested data into 1NF format and names and data types. Each U2 account is aseparate namespace and therefore, it fits the definition of one schema. In U2, the term schema meansthe metadata that describes the U2 data. In SQL, a schema is a collection of database objects, such astables, views, and indexes that share the same namespace.
Prerequisite▪ The installation computer must be running Microsoft Windows with Windows XP or later.▪ U2 MDM must be running on a Microsoft Windows computer that is on the same network as the
server computer running UniData or UniVerse.▪ Make sure that UniData or UniVerse services are currently running on the server computer.▪ You must run the MIGRATE.SQL command on your UniData files if you are using UniData VSG
schema version 4000.00.01.▪ You must run the MIGRATE.SQL command on your UniData account if it is not a new account and
you have never run this command on the account.▪ UniVerse 11.1.11 or higher.▪ UniData 7.3 or higher running with QUOTED_IDENTIFIER=1 in the udtconfig file.
Procedure
▪ On the task bar of the Windows computer on which U2 MDM is installed, choose Start > AllPrograms > Rocket U2 > U2 Metadata Manager.
Chapter 2: Getting started
14
Establishing server connections
U2 server definitions
To work with UniData or UniVerse accounts and data, you must enable your computer to connectto the server on which the accounts and data reside. Your computer (the client) requires a U2 serverdefinition to make a connection with the server.
A U2 server definition is stored on the client computer on which it was created, and is not sharedacross a network. One or several users can create multiple U2 server definitions on the same clientcomputer.
U2 server is the term for a defined connection to a server computer on which U2 accounts and dataare stored. All existing U2 servers on the client computer are listed in the U2 Resource view. You canconnect to any U2 server that is listed in the U2 Resource view.
Creating U2 server definitions
To administer UniData or UniVerse accounts and data, you must create a U2 server definition thatenables your computer to connect to the U2 data server on which the accounts and data are stored.
1. Start U2 MDM by clicking Start > All Programs > Rocket U2 > U2 Metadata Manager. 2. Right-click the U2 Servers node in the U2 Resource view, and click New U2 Server.3. In the Name field, enter a unique name to identify the U2 server definition.
The name cannot contain a slash (/) or backslash (\) character.4. In the Host field, enter the name or IP address of the computer on which UniData or UniVerse is
running.5. From the U2 data server options, select UniData or UniVerse.6. Optional: To view or edit the protocol, port number, and other advanced settings defining the
connection, click Advanced.For more information, see Viewing or editing advanced settings of a U2 server definition, on page15.
7. To save the U2 server definition, click Finish.U2 Metadata Manager creates a directory for the U2 server, registering the server definition sothe tool can find it in future sessions. The name of the new U2 server is added to the list in the U2Resource view.
Editing U2 server definitions
You can modify the details of an existing U2 server definition, except for the name of the U2 server.However, you can create the U2 server again using a new name.
1. Start U2 MDM by clicking Start > All Programs > Rocket U2 > U2 Metadata Manager. 2. Right-click the name of the U2 server definition in the U2 Resource view, and click Properties.3. In the Host field, enter the name or IP address of the computer on which UniData or UniVerse is
running.4. From the U2 data server options, select UniData or UniVerse.
Viewing or editing advanced settings of a U2 server definition
15
5. To view or edit the protocol, port number, and other advanced settings defining the connection,click Advanced.
Tip: The default values for advanced settings work best in most situations. Alter thesesettings only if necessary.
6. To save your changes to the U2 server definition, click Finish.
Viewing or editing advanced settings of a U2 server definition
On the Advanced Settings page of the server definition, you can view or edit the protocol, portnumber, and other advanced settings that define the connection. You can also specify commands torun when you connect to the U2 server. The default values for advanced settings work best in mostsituations. Alter these settings only if necessary.
1. Click Advanced on the U2 Server Definitions page.The Protocol Type field displays TCP/IP as the communications protocol used by the UniDataor UniVerse to access the Internet. At this time, the only supported protocol is TCP/IP, and thissetting cannot be changed.
2. In the RPC Port # field, enter the port number of the UniRPC server running on the host.The default port number is 31438.
3. In the RPC Service Name field, enter the name of the remote procedure call (RPC) service on yoursystem.For UniData, the name is normally udcs; for UniVerse, the name is normally uvcs.
4. In the Login Account field, enter the full path to the account folder on the server running UniDataor UniVerse.You can enter just the account name if the account is defined in the UD.ACCOUNT or UV.ACCOUNThash file.
5. If you run a RetrieVe command, a saved paragraph, or a globally cataloged program every timeyou connect to the U2 server, you can save time by entering the command in the U2 serverdefinition. To enter a command to run on connection, click Add in the Commands to Executegroup box.For more information, see Specifying a command to run on connection, on page 16.
6. In the Specify the session to run/debug your BASIC program on server side group box, enterdetails for connecting to the server in a debug session.
a. From the Protocol options, select the network protocol to use when you connect to the U2server in a debug session: Telnet or SSH (Secure Shell).
b. In the Port Number field, enter the port number on which the Telnet or SSH service runs onthe server. The default Telnet port number is 23; the default SSH port number is 22.
c. If device licensing is supported on the server, select the Use Device License check box toconserve license usage in your debug session.
While running or debugging BASIC programs, you can use multiple server connections to browsefiles, check data, update records, or perform other tasks. If device licensing is not enabled, yourdebug session consumes one U2 license for each connection. With device licensing enabled, yoursession consumes one U2 license and one device license for up to 10 connections from a singledevice.
Tip: If you cannot establish a Telnet or SSH connection with the Use Device License checkbox selected, clear the check box and try again.
Chapter 2: Getting started
16
7. To save any changes to advanced settings and return to the main page, click Finish.
Specifying a command to run on connection
You can save time when connecting to the U2 server by specifying a RetrieVe command, the name of asaved paragraph, or the name of a globally cataloged program in the U2 server definition.
1. While still on the Advanced Settings page, in the Specify a command field, enter a RetrieVecommand, the name of a saved paragraph, or the name of a globally cataloged program to runwhen you connect to the U2 server.
2. To save your changes and return to the details page, click OK.
Connecting to U2 servers
You must open a U2 server connection to work with the accounts stored on the associated U2 dataserver computer. You can connect to any U2 server that is listed in the U2 Resource view. If the U2server is not listed, you can create a server definition that adds a new server to the view.
1. Start U2 MDM by clicking Start > All Programs > Rocket U2 > U2 Metadata Manager. 2. Double-click the name of the U2 server in the U2 Resource view.3. In the User ID field, enter your administrator user name or the user name of a valid user on the
server computer running UniData or UniVerse.4. In the Password field, enter the password for the administrator or user on the server computer.5. To store the password for future connections, select the Remember me check box.
With this check box selected, Microsoft Windows stores the encrypted password on the clientcomputer.
6. If you are using a proxy server, select the Use Proxy Server check box.
a. In the Proxy Host field, enter the name or IP address of the computer on which the proxyserver is running.
b. In the Proxy Port field, enter the number of the port on which the proxy server listens forcommunication from UniData or UniVerse.
7. To connect to the U2 server, click Connect.When the connection is established, the U2 Resource view displays a tree view of the U2 accountsand catalog programs on the U2 data server to which you are connected.
Disconnecting from U2 servers
After completing tasks for a U2 account, you can disconnect from the U2 server. Disconnecting onlycloses your connection to the U2 server. It does not delete the U2 server definition or remove the U2server from the list in the U2 Resource view.
▪ In the U2 Resource view, right-click the name of the U2 server from which you want to disconnect,and click Disconnect.
Deleting U2 server definitions
17
Deleting U2 server definitions
If you no longer require access to the U2 accounts and catalog programs on a U2 server, you candelete the associated U2 server definition. It is not possible to change the name of an existing U2server. However, you can delete the U2 server definition and create it again using a new name.
▪ In the U2 Resource view, right-click the name of the U2 server definition that you want to delete,and click Delete.The name of the U2 server and folders for its U2 accounts and catalog programs are removed fromthe list in the U2 Resource view.
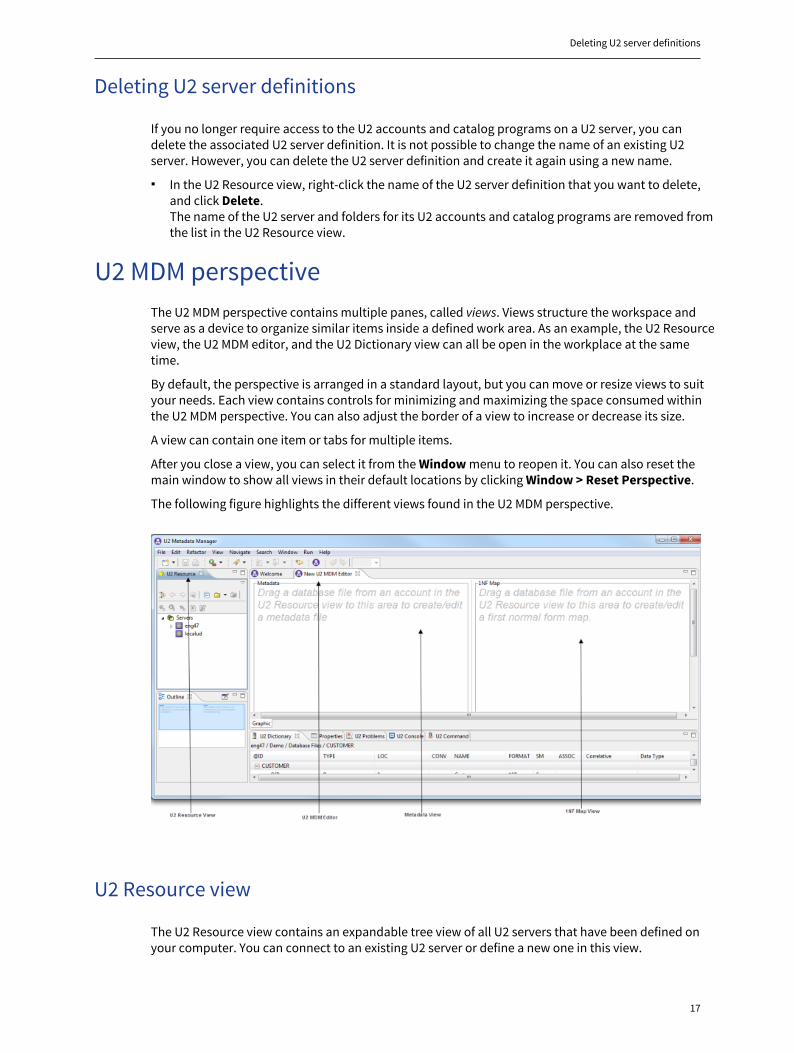
U2 MDM perspectiveThe U2 MDM perspective contains multiple panes, called views. Views structure the workspace andserve as a device to organize similar items inside a defined work area. As an example, the U2 Resourceview, the U2 MDM editor, and the U2 Dictionary view can all be open in the workplace at the sametime.
By default, the perspective is arranged in a standard layout, but you can move or resize views to suityour needs. Each view contains controls for minimizing and maximizing the space consumed withinthe U2 MDM perspective. You can also adjust the border of a view to increase or decrease its size.
A view can contain one item or tabs for multiple items.
After you close a view, you can select it from the Window menu to reopen it. You can also reset themain window to show all views in their default locations by clicking Window > Reset Perspective.
The following figure highlights the different views found in the U2 MDM perspective.
U2 Resource view
The U2 Resource view contains an expandable tree view of all U2 servers that have been defined onyour computer. You can connect to an existing U2 server or define a new one in this view.
Chapter 2: Getting started
18
When you expand the tree view for a U2 server, the associated U2 accounts and catalog programs areshown in the list. By default, this view is located in the upper left pane of the U2 MDM workspace.
Database file options
You can access all of the functionality of the U2 MDM tool from within the U2 Resource view.
When you right-click on a database file name in the U2 Resource view and select U2 MetadataManager, you are presented with a set of U2 MDM menu options:
▪ Create U2 MDM File - Creates a new metadata file if one does not already exist.▪ Open U2 MDM Editor - Opens the existing U2 MDM files in the U2 MDM editor.▪ Schema Tools - Creates a new schema from a 1NF map, or opens the existing schema for the file.
Metadata Repository file options
When you create metadata and 1NF maps in U2 MDM, the data is stored in a metadata repository. TheU2 Resource view displays these files in the Metadata Repository node.
When you right-click a file name in the Metadata Repository node and select U2 Metadata Manager,the following U2 MDM menu options are available:
▪ Open U2 MDM Editor - Opens the metadata file in the U2 MDM editor so that you can edit themetadata information.
▪ Create 1NF Mapping - Opens the U2 MDM 1NF editor, if a 1NF map does not already exist.▪ Schema Tools - Creates a new schema from a 1NF map, or opens the existing schema for the file.▪ Data Type Enforcement - (UniData only). Allows you to apply or remove data type enforcement
settings in the metadata file.
U2 MDM editor
Use the U2 MDM editor to define your metadata files and first normal form (1NF) maps. You can createmetadata files and 1NF maps in this view, as well as edit your existing metadata files and maps. Whenyou create a new metadata file, 1NF map, or schema, the results display in the U2 MDM editor.
The U2 MDM editor is made up of two views: Metadata and 1NF Map. Each view can be displayed ineither a graphical format or a text format.
1. Open the U2 MDM tool.2. Open the U2 MDM editor by selecting the Open the U2 Metadata Manager Editor icon at the top
of the Eclipse menu bar.It opens with two small editing panes visible: Metadata and 1NF Map.
U2 MDM editor views
Graphical view
The Graphics view displays both the metadata file and the 1NF map in a graphical representation ofthe files. The information is presented in two editable panes: Metadata and 1NF Map.
Options available in the Metadata view
19
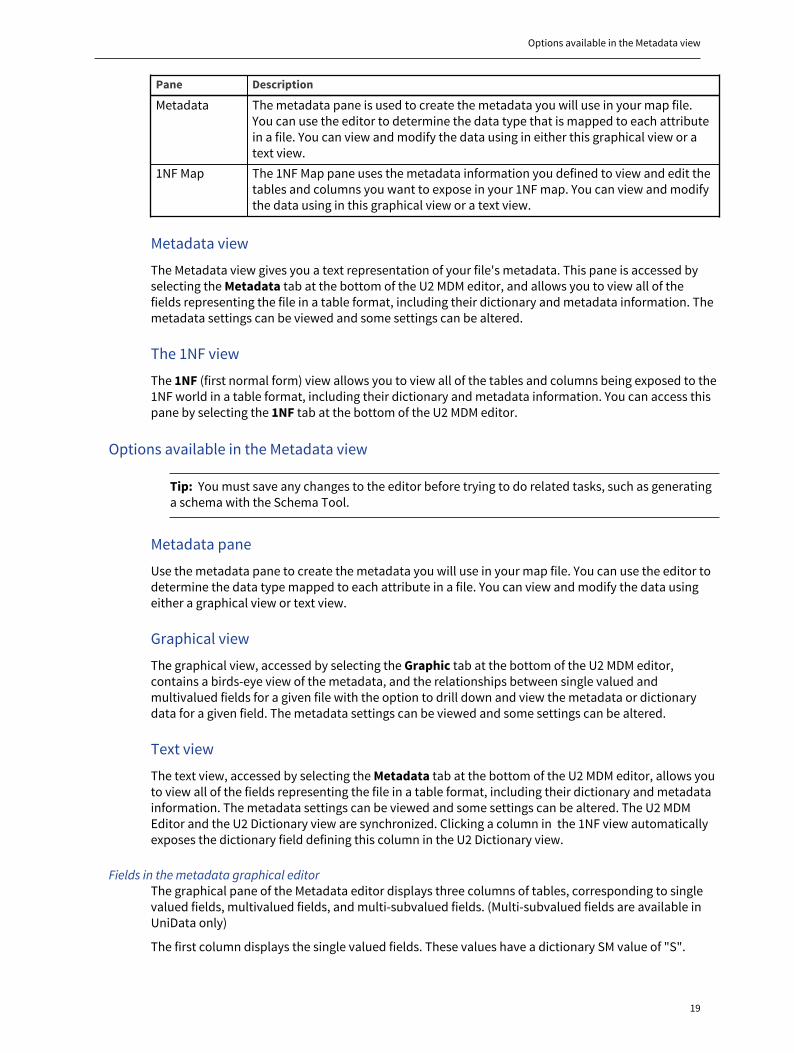
Pane Description
Metadata The metadata pane is used to create the metadata you will use in your map file.You can use the editor to determine the data type that is mapped to each attributein a file. You can view and modify the data using in either this graphical view or atext view.
1NF Map The 1NF Map pane uses the metadata information you defined to view and edit thetables and columns you want to expose in your 1NF map. You can view and modifythe data using in this graphical view or a text view.
Metadata view
The Metadata view gives you a text representation of your file's metadata. This pane is accessed byselecting the Metadata tab at the bottom of the U2 MDM editor, and allows you to view all of thefields representing the file in a table format, including their dictionary and metadata information. Themetadata settings can be viewed and some settings can be altered.
The 1NF view
The 1NF (first normal form) view allows you to view all of the tables and columns being exposed to the1NF world in a table format, including their dictionary and metadata information. You can access thispane by selecting the 1NF tab at the bottom of the U2 MDM editor.
Options available in the Metadata view
Tip: You must save any changes to the editor before trying to do related tasks, such as generatinga schema with the Schema Tool.
Metadata pane
Use the metadata pane to create the metadata you will use in your map file. You can use the editor todetermine the data type mapped to each attribute in a file. You can view and modify the data usingeither a graphical view or text view.
Graphical view
The graphical view, accessed by selecting the Graphic tab at the bottom of the U2 MDM editor,contains a birds-eye view of the metadata, and the relationships between single valued andmultivalued fields for a given file with the option to drill down and view the metadata or dictionarydata for a given field. The metadata settings can be viewed and some settings can be altered.
Text view
The text view, accessed by selecting the Metadata tab at the bottom of the U2 MDM editor, allows youto view all of the fields representing the file in a table format, including their dictionary and metadatainformation. The metadata settings can be viewed and some settings can be altered. The U2 MDMEditor and the U2 Dictionary view are synchronized. Clicking a column in the 1NF view automaticallyexposes the dictionary field defining this column in the U2 Dictionary view.
Fields in the metadata graphical editorThe graphical pane of the Metadata editor displays three columns of tables, corresponding to singlevalued fields, multivalued fields, and multi-subvalued fields. (Multi-subvalued fields are available inUniData only)
The first column displays the single valued fields. These values have a dictionary SM value of "S".
Chapter 2: Getting started
20
The second column displays the multivalued data. These fields have a dictionary SM value of"MV". The fields are grouped into boxes representing associations. This means that if a set ofmultivalued fields are related by an association, they are grouped together in a box with theassociation name as the title. If the named association is not present in the dictionary, or if the SMvalue for the field is MV and there is no ASSOC value set, the field displays in a box with the field namewhere the association title would normally be. This represents an unassociated multivalued data field,meaning that it is multivalued but not associated with any of the other multivalued data in the file.
The last column displays the multi-subvalued data from UniData. These fields have a dictionary SMvalue of "MS" or "M". The fields in the column are grouped into boxes representing associations. If themulti-subvalued field is unassociated, a multivalued association appears in the column to the left. Thismultivalued association contains no fields.
Each item in the graphical view contains a white arrow on the left side of the box. Clicking thearrow causes the box to expand or collapse, displaying more or less detail. The displayed detailscan be changed by right-clicking the title area and choosing either Show Metadata or Show DICTField. Some of the data in the expanded area may be editable. If editable, the background color for thedata cell is white. If not editable, the background color for the cell is gray. To edit, double-click any cellin an expanded box that has a white background.
Tip: You must save any changes that you make in the editor before trying to do a related task,such as generating a schema. When you make a change in the editor, the tab at the top will change,preceding the file name with an asterisk (*). This indicates the file's data has changed, but it hasnot yet been saved. To save the data, make sure that the editor has focus and click File > Save.
Fields in the metadata text editor
In the metadata view, you can view and edit several fields in your metadata file.
Field name Description
ID The dictionary field name representing this location for this file. This column cannotbe modified.
LOC The location (attribute) number in the file represented by this field. This columncannot be modified.
Data Type The 1NF data type derived from any output conversion (CONV in the U2 DictionaryView) defined in the dictionary for the field.
If the dictionary has no CONV value, the data type would be VARCHAR,representing a string of character data. If the CONV is MD0, the data type would beINT (integer), while MD2 would be FLOAT (a number containing a decimal point).
In UniVerse, the SQL-type listed in dictionary position 8 (if one is specified)determines the data type.
Enforced UniData only. Contains true and false values that indicate whether data typeenforcement is used. If true, the data type for this field is examined by the databasewhen new records are written to the file. Depending on the DTE settings on theserver, records that violate the data type may be rejected.
Only data types other than VARCHAR support the true setting for this column.
Clicking the column heading presents a dialog allowing you to set all the enforceable(non-VARCHAR) data types to true or false in one operation.
Nullable The true and false values that indicate whether or not a field can be set to the SQLNULL value. Location 0 (primary key field) can never have a value of true for nullable.
Null values
21
Field name Description
Description Optional. The text describing the data field and is optional. Comments are not addedto the dictionary field, but are added to the metadata repository about this field.
If the record from the dictionary contained a comment after the initial "D" characterin attribute 1 (for example, "D Warehouse identification number"), that commentwill appear here. This field can be updated or created whether or not a comment waspresent in the dictionary when imported to this tool.
Null values
Null values have the following characteristics in UniData SQL when null value handling is on:
▪ When used in any expression, the result of the expression is null.▪ When compared to any other value, including itself, the result is false. The only way to compare a
null value is to use the keywords IS [NOT] NULL.▪ The null value is the lowest value.
Options available in the 1NF Map view
1NF Map pane
The 1NF Map pane uses the metadata information you defined in the metadata editor to view and editthe tables and columns you want to expose in your 1NF map. You can edit the 1NF information eitherin a graphical view or a text view.
Graphical view
To access the graphical view, click the Graphic tab on the U2 MDM editor. This view contains a 1NFMap view that provides a birds-eye view of the relationships between single-valued and multivaluedtables and their columns for a given file. While in this view, you can view the column settings ordictionary data for a given column within the table. The 1NF settings can be viewed and some settingscan be altered.
Text view
Click the 1NF tab on the U2 MDM editor to view all of the tables and columns being exposed to the1NF world in a table format, including their dictionary and metadata information. Unlike the graphicalview, you cannot view the dictionary data from within the text view. To view the dictionary data, clickthe U2 Dictionary view. The U2 MDM Editor and the U2 Dictionary view are synchronized. Clickinga column in the 1NF view automatically exposes the dictionary field defining this column in the U2Dictionary view.
Fields in the 1NF graphic paneThe graphical pane of the 1NF map displays three columns of tables, corresponding to single valuedfields, multivalued fields, and multi-subvalued fields (multi-subvalued fields are available in UniDataonly).
The first column contains a single entry. It represents a table containing the single-valued fields youwant to make available to 1NF. This table and its columns derive from the metadata single-valuedfields.
The center column contains the tables representing multivalued data. These tables correspond to theassociations defined in the metadata.
The last column contains the multi-subvalued data from UniData. These fields have a dictionarySM value of "MS" or "M". The fields in the column are grouped into boxes representing a table ofassociated data. Each of these tables correspond to an association in the metadata view. If the multi-

Chapter 2: Getting started
22
subvalued field is unassociated, a multivalued association appears in the second column and containsno fields. A line between the columns connects the related MV and MS associations to give you a visualpicture of the associations.
Each item in the graphical view contains a white arrow on the left side of the box. Clicking the arrowcauses the box to expand or collapse, displaying more or less detail. The displayed details canbe changed by right-clicking on the title area and choosing either Show 1NF Map or Show DICTField. Some of the data in the expanded are may be editable. If editable, the background color for thedata cell is white. If not editable, the background color for the cell is gray. To edit, double-click any cellin an expanded box that has a white background.
Note: UniVerse only. When you create a schema, U2 MDM adds an @SELECT record in thedictionary that contains the fields included in the 1NF map. Field visibility in ODBC is determinedby the fields in the @SELECT clause. For this reason, this record is created by U2 MDM accordingto the selections made in the wizard. This record is maintained by U2 MDM and should not bemodified or deleted.
Tip: You must save any changes that you make in the editor before trying to do a related task,such as generating a schema. When you make a change in the editor, the tab at the top will change,preceding the file name with an asterisk (*). This indicates that the file's data has changed, but ithas not yet been saved. To save the data, make sure that the editor has focus select File > Save.
Fields in the 1NF text view
In the 1NF view, you can view and edit several fields in your 1NF map. Those fields are describedbelow.
Field name Description
Table/ColumnName
The name of the table or column as the 1NF world will see it.
In UniData, this column is editable and you can change the names to anycompliant name. Certain characters, such as "@" are not allowed. U2 databasereserved words are also not allowed. For example, "TIME" and "DESC" arereserved words. If you enter an illegal character or reserved word, the editorwill flag it with a warning icon. Hovering the mouse over the icon displaysdetails about the problem. You must fix any problem names before you cansuccessfully generate a schema.
Column Dict The name of the dictionary field used to establish the column. This field is forreference purposes only and is not editable.
Column Data Type The data type as a 1NF application sees the column. U2 assumes a defaultlength for VARCHAR data types of 254 characters. If a longer length is specifiedin the dictionary FORMAT field, for example, L500, then that value displays.
Generated Keys
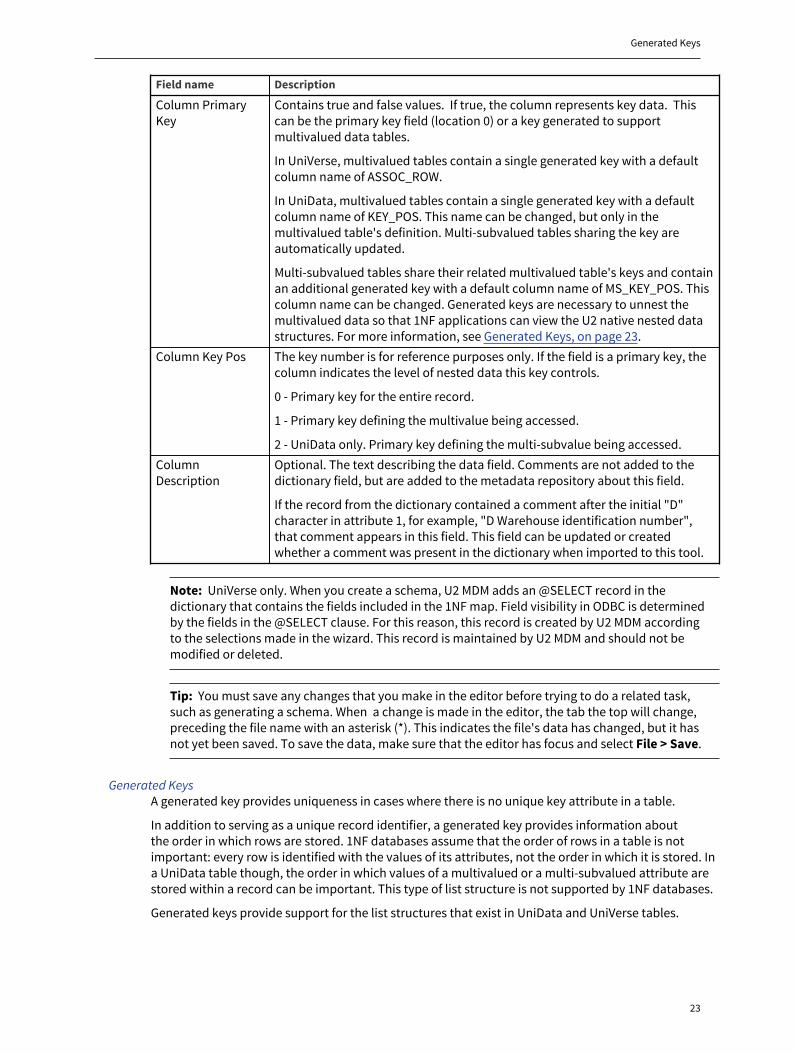
23
Field name Description
Column PrimaryKey
Contains true and false values. If true, the column represents key data. Thiscan be the primary key field (location 0) or a key generated to supportmultivalued data tables.
In UniVerse, multivalued tables contain a single generated key with a defaultcolumn name of ASSOC_ROW.
In UniData, multivalued tables contain a single generated key with a defaultcolumn name of KEY_POS. This name can be changed, but only in themultivalued table's definition. Multi-subvalued tables sharing the key areautomatically updated.
Multi-subvalued tables share their related multivalued table's keys and containan additional generated key with a default column name of MS_KEY_POS. Thiscolumn name can be changed. Generated keys are necessary to unnest themultivalued data so that 1NF applications can view the U2 native nested datastructures. For more information, see Generated Keys, on page 23.
Column Key Pos The key number is for reference purposes only. If the field is a primary key, thecolumn indicates the level of nested data this key controls.
0 - Primary key for the entire record.
1 - Primary key defining the multivalue being accessed.
2 - UniData only. Primary key defining the multi-subvalue being accessed.ColumnDescription
Optional. The text describing the data field. Comments are not added to thedictionary field, but are added to the metadata repository about this field.
If the record from the dictionary contained a comment after the initial "D"character in attribute 1, for example, "D Warehouse identification number",that comment appears in this field. This field can be updated or createdwhether a comment was present in the dictionary when imported to this tool.
Note: UniVerse only. When you create a schema, U2 MDM adds an @SELECT record in thedictionary that contains the fields included in the 1NF map. Field visibility in ODBC is determinedby the fields in the @SELECT clause. For this reason, this record is created by U2 MDM accordingto the selections made in the wizard. This record is maintained by U2 MDM and should not bemodified or deleted.
Tip: You must save any changes that you make in the editor before trying to do a related task,such as generating a schema. When a change is made in the editor, the tab the top will change,preceding the file name with an asterisk (*). This indicates the file's data has changed, but it hasnot yet been saved. To save the data, make sure that the editor has focus and select File > Save.
Generated KeysA generated key provides uniqueness in cases where there is no unique key attribute in a table.
In addition to serving as a unique record identifier, a generated key provides information aboutthe order in which rows are stored. 1NF databases assume that the order of rows in a table is notimportant: every row is identified with the values of its attributes, not the order in which it is stored. Ina UniData table though, the order in which values of a multivalued or a multi-subvalued attribute arestored within a record can be important. This type of list structure is not supported by 1NF databases.
Generated keys provide support for the list structures that exist in UniData and UniVerse tables.
24
Chapter 3: TutorialThis topic provides step-by-step instructions about how to create a metadata file, a first normal form(1NF) map, and a schema using the U2 Metadata Manager tool.
Before you create the metadata used to map your files, you must create and connect to a U2 serverfrom the U2 MDM tool. For more information, see Creating U2 server definitions, on page 14.
When your U2 data files are available in the U2 Resource view, click the white arrow symbol next toyour file name to expand the nodes and view your available data files.
Creating the metadata fileYou create a metadata file that contains an accurate description of your data files. The metadatafile is later used to map your file to first normal form (1NF) to determine which synonyms to use incases where multiple field aliases exist, and to map field conversions and format specifications to thecorresponding SQL data type.
1. Open U2 MDM and navigate to the U2 Resource view.2. Navigate to the UniData or UniVerse server to which the U2 MDM tool will connect. Right-click the
server and click Connect.3. Expand the Accounts node and then expand Database Files. Select the file that you want to work
with from the U2 Resource view.In this example, the Orders file is used.
4. Right-click the Orders file and select U2 Metadata Manager > Create New U2 MDM File.The Choose Dictionary Locations wizard opens.
5. Select the dictionary fields that you want to accurately represent each dictionary location in theselected file.For this example, accept the default selections.
6. Click Next.
Choosing virtual attributesThe virtual attributes defined in UniData or UniVerse can be included in the metadata file.
1. Select the virtual fields that will be included in the metadata file.2. Click Next.
Note: Virtual fields must be valid for the schema processing and for JDBC and ODBC access tosucceed.
The Choose 1NF Map Attributes page opens, listing all of the available files and associationsavailable.
Creating the 1NF fileU2 files must be presented to JDBC or ODBC applications as a set of related first normal form (1NF)tables. To do this, you must create a 1NF map of your UniData or UniVerse data that will contain the1NF tables.
Creating the schema
25
1. Select the fields and attributes that you want to include in your 1NF map. For this example,choose Select All.
2. Optional: (Available for UniData only). Select Automatically fix non-compliant table andcolumn names if you want the U2 MDM tool to generate ODBC-compliant names.
3. Optional: Select Create schema to create a schema automatically when the wizard finishes.4. Click Finish.
Both the metadata file and the 1NF map open in the U2 MDM editor.
In the metadata pane, each single valued, multivalued, and multi-subvalued (UniData only) field isgrouped together in a graphical representation of the locations that you made available to first normalform.
The 1NF pane displays the first normal form tables that you just created, along with the requiredprimary key.
If the Create Schema option was selected, then the schema tool will open behind the U2 MDM editor.
Tip: UniData only. In this example if the compliant name option is not selected, the @ID columnname is not SQL-compliant and a warning symbol is displayed next to the column name. Selectthe white arrow next to the column name to expand the table properties, click in the ColumnName text field, then enter ID. The name of the column changes to ID. All multivalued and multi-subvalued tables in the 1NF map reference this key field and now reflect the new column name. Click the Save icon to save your changes.
Creating the schemaAfter you define the 1NF map for your file, you can generate a deployable 1NF schema that you can useto access your JDBC or ODBC applications.
1. In the U2 Resource View, navigate to the Metadata Repository files and select the file that youwant to work with.
2. Right-click the file and select Schema Tools.A pop-up opens asking if you would like to generate a new schema.
3. Click Yes to generate a new schema.The Schema Data viewer opens, and displays the 1NF schema information comprising the schemaon the server.
Tip: If the Create Schema option was selected when you created the 1NF map, and therewere no errors during schema creation, the schema tool opens as a tab to the left of the U2MDM editor for the currently selected file.
(Optional) Changing the data type enforcementUniData only. After the wizard closes, your metadata files and 1NF map are visible in the U2 MDMeditor, in either the Metadata pane or the 1NF pane. At the bottom of the U2 MDM editor are threetabs: Graphic, Metadata, and 1NF.
1. If the ORDERS file is not already open, from the U2 Resource view, right-click the ORDERS file andselect U2 Metadata Manager > U2 Metadata Manager > Open U2 MDM Editor.
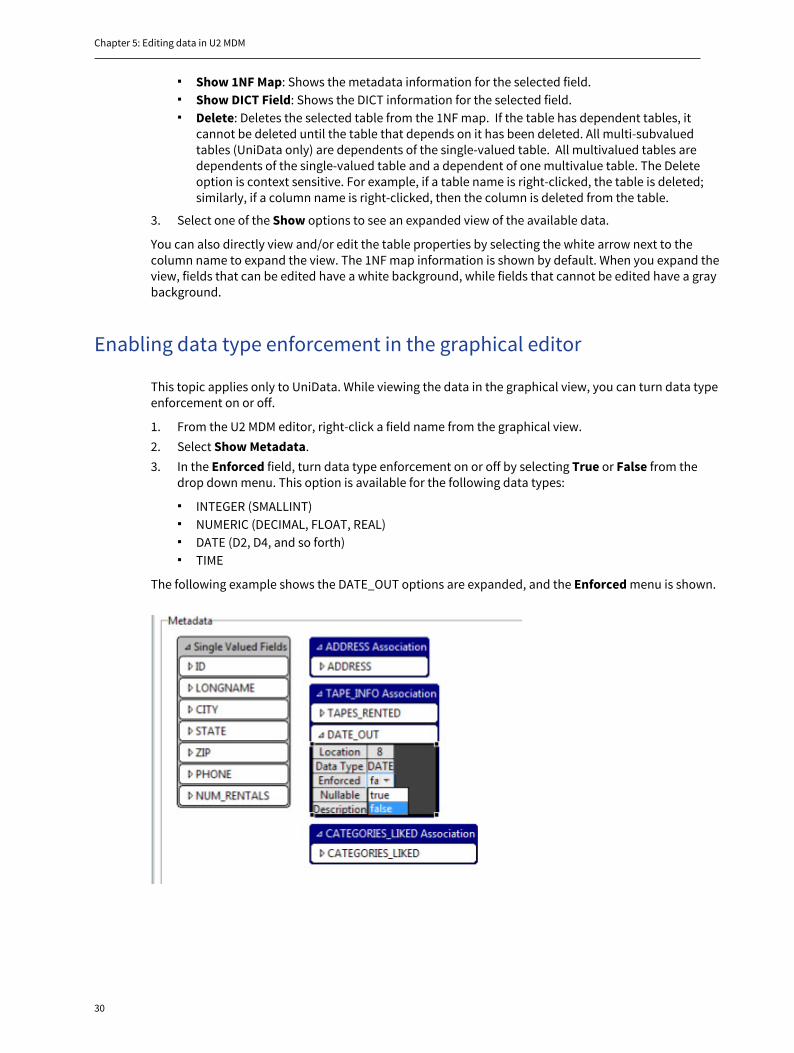
2. Select the Metadata tab from the bottom of the U2 MDM editor.3. Locate the ORD_DATE field. In the Enforced column, select true.
This enables data type enforcement on the file.
Chapter 3: Tutorial
26
4. Select File > Save from the Eclipse menu to save your changes.
(Optional) Enabling data type enforcementUniData only. After you have defined your data type enforcement changes in the Metadata editor, youneed to apply those changes.
1. In the U2 Resource view, navigate to the Metadata Repository files.2. Right-click the ORDERS file, then select U2 Metadata Manager > Data Type Enforcement >
Apply Metadata Settings.A pop-up window opens, telling you that your settings were applied.
3. Click OK to close the window.
27
Chapter 4: Generating metadata and 1NF mapsin U2 MDM
A metadata file is used to map this information to a 1NF file. For UniData users, this metadata can beused to establish data type enforcement on your U2 files. The metadata file is used to determine whichsynonym to use in cases where multiple field aliases exist and to map field conversions and formatspecifications to the corresponding SQL data type.
To use a UniData or UniVerse file with JDBC or ODBC, it must be presented to JDBC or ODBCapplications as a set of related 1NF tables. This is called 1NF mapping of your UniData or UniVersedata. Note that this set of 1NF tables is only a representation of the UniData or UniVerse data, and thedata itself still resides in the original files only. This mapping is performed automatically by U2 MDMafter you decide which data you want to expose to the JDBC or ODBC applications.
Generating the metadata fileThe U2 MDM tool provides a wizard for selecting the dictionary locations that you want to include inyour metadata file.
1. Right-click the file you want to work with from the U2 Resource View, and select U2 MetadataManager > Create U2 MDM file.
2. Select the dictionary fields that you want to accurately represent each dictionary location in theselected file.You must choose a field for each location in the file for which at least one D-type field exists in thedictionary representing that location. If a location has no dictionary field, that location will not beavailable for metadata settings or 1NF mapping.
Note: 1NF mapping is a mechanism that enables data stored in UniData and UniVerse files tobe viewed (read-only mapping) or updated (updatable mapping) by applications that operateon 1NF data. The applications assume that the data conforms to the 1NF model in which allattribute values are atomic.
3. Click Next to proceed to the next step, or select Finish to close the wizard.
Note: If you click Finish after this step and do not proceed with the rest of the wizard, you willnot be able to add any virtual fields to the metadata file or the 1NF map.
Creating metadata is done at an account level. When you generate metadata for the first time,a metadata repository file is created, which is the account level metafile. In UniData, this is the _METADATA_REPOSITORY_ file. In UniVerse, this is the &METADATA_REPOSITORY& file.
Adding virtual fields to metadataAfter selecting the fields that define the physical locations of your U2 file, you have the option toinclude important virtual fields. If you choose to create a 1NF map, you can select the virtual fieldsyou need to make available to 1NF applications. These virtual fields also provide a more accuraterepresentation of the metadata available for your U2 file. The tool generates a valid SQL data type forthese fields based on any conversion and format information in the field definition.
Chapter 4: Generating metadata and 1NF maps in U2 MDM
28
1. After you click Next in the Metadata wizard, the Choose Virtual Attributes page opens. Selectthe virtual fields you want to include in the metadata for this file. If you make selection at theassociation level, then everything in the association is selected.
2. Click Next to proceed to the next step. If you do not want to generate a 1NF map, click Finish toclose the wizard. Clicking Finish opens the U2 Metadata Manager editor containing only your metadata selections.
Virtual data is calculated during queries and does not physically reside in the U2 file, and so cannotsupport data type enforcement.
When you generate metadata in U2 MDM, an entry is created in the metadata repository filethat contains information describing the fields you previously selected. In UniData, this is the_METADATA_REPOSITORY_ file. In UniVerse, this is the &METADATA_REPOSITORY& file.
Generating a 1NF mapU2 files must be presented to JDBC or ODBC applications as a set of related first normal form (1NF)tables. To do this, you must create a 1NF map of your UniData or UniVerse data.
1. After you click Next in the Metadata wizard, the Choose 1NF Map Attributes page opens. Selectthe fields and associations that you want to include in the 1NF map.
2. Optional: (UniData only). By default, the U2 MDM tool verifies your table names and columnnames to ensure that they are SQL-compliant, and then fixes any names that are not SQL-compliant. If you do not want the tool to make these changes, clear the Automatically fix non-compliant table and client names check box. If you select this option, you must make the namesSQL-compliant before you can successfully generate schema and use the 1NF map with ODBC orJDBC.
3. Optional: Select the Create schema check box to automatically create a schema when thewizard finishes.
4. Click Finish.Both the metadata file and the 1NF map open in the U2 MDM editor.
In the metadata pane, each single-valued, multivalued, and multi-subvalued field is groupedtogether in a graphical representation of the locations that you made available in first normalform.
The 1NF pane displays the first normal form tables that you just created, along with the requiredprimary key.
Note: If there are any problems with the file names, a yellow warning icon appears. Hoveringover the icon will give a short description of the problem.
You can bypass the wizard and create a first normal form map based on the dictionary field choices.To do this, with the metadata file open in the Metadata graphical pane, select the fields and attributesthat you want to include in your 1NF map, and then drag those files onto the 1NF Mapping view.
After your metadata is generated, an entry is created in the metadata repository file containinginformation describing the fields that you previously selected. In UniData, this is theMETADATA_REPOSITORY_file. In UniVerse, this is the &METADATA&REPOSITORY& file.
29
Chapter 5: Editing data in U2 MDMAfter you have created your metadata and maps, you can view the files and edit your changes in theU2 MDM view. The default view is the Graphic view, which provides a graphical representation of yourmetadata files and your 1NF maps. This is a more review-oriented representation of the informationthan the text view.
You can also choose to view the metadata in a text editor. To view the metadata as text files, click theMetadata tab, located on the bottom of the U2 MDM editor. To view the 1NF maps as text files, clickthe 1NF tab. This is a more detail-oriented representation of the information than the Graphic view.
Editing files in the graphical editorAfter you have created a metadata file or a 1NF map, you can edit this metadata.
1. Open U2 MDM.2. From the U2 Resource view, right-click the database file and select U2 Metadata Manager >
Open U2 MDM Editor.The metadata pane displays the fields chosen to represent the data in the file. These fieldsdisplay in containers related fields at the single-valued, multivalued, and multi-subvalued(UniData only) level. The 1NF pane displays the fields selected for exposure to 1NF tools ascolumn names in table containers. Here again, each table contains related fields at the single-valued, multivalued, and multi-subvalued level, along with the related key information.
3. Make any changes you want and then select File > Save.
Editing metadata table properties in the graphical view
While viewing your data in the graphical view, you can view your dictionary fields, view and editmetadata fields, and change your metadata field locations.
1. From the U2 MDM editor, right-click a field name from the graphical view.2. Select one of the following options to view the data for the selected field:
▪ Choose field: Opens the Choose Dictionary Locations editor for that field. This option is onlyavailable when there are synonyms present for a given file's location.
▪ Show metadata: Shows the metadata information for the selected field.▪ Show DICT field: Shows the DICT information for the selected field.
3. Select one of the options to see an expanded view of the available data.
You can also directly view and/or edit the table properties by selecting the white arrow next to thecolumn name to expand the view. The metadata information is shown by default. When you expandthe view, fields that can be edited have a white background, while fields that cannot be edited have agray background.
Editing 1NF table properties in the graphical view
While viewing your 1NF data in the graphical view, you can rename your tables (UniData only), deleteyour tables, edit or delete fields in the current 1NF map, and view the DICT information for that field.
1. From the U2 MDM editor, right-click a field name from the graphical view.2. Select one of the following options to view the data for the selected field:
Chapter 5: Editing data in U2 MDM
30
▪ Show 1NF Map: Shows the metadata information for the selected field.▪ Show DICT Field: Shows the DICT information for the selected field.▪ Delete: Deletes the selected table from the 1NF map. If the table has dependent tables, it
cannot be deleted until the table that depends on it has been deleted. All multi-subvaluedtables (UniData only) are dependents of the single-valued table. All multivalued tables aredependents of the single-valued table and a dependent of one multivalue table. The Deleteoption is context sensitive. For example, if a table name is right-clicked, the table is deleted;similarly, if a column name is right-clicked, then the column is deleted from the table.
3. Select one of the Show options to see an expanded view of the available data.
You can also directly view and/or edit the table properties by selecting the white arrow next to thecolumn name to expand the view. The 1NF map information is shown by default. When you expand theview, fields that can be edited have a white background, while fields that cannot be edited have a graybackground.
Enabling data type enforcement in the graphical editor
This topic applies only to UniData. While viewing the data in the graphical view, you can turn data typeenforcement on or off.
1. From the U2 MDM editor, right-click a field name from the graphical view.2. Select Show Metadata.3. In the Enforced field, turn data type enforcement on or off by selecting True or False from the
drop down menu. This option is available for the following data types:
▪ INTEGER (SMALLINT)▪ NUMERIC (DECIMAL, FLOAT, REAL)▪ DATE (D2, D4, and so forth)▪ TIME
The following example shows the DATE_OUT options are expanded, and the Enforced menu is shown.
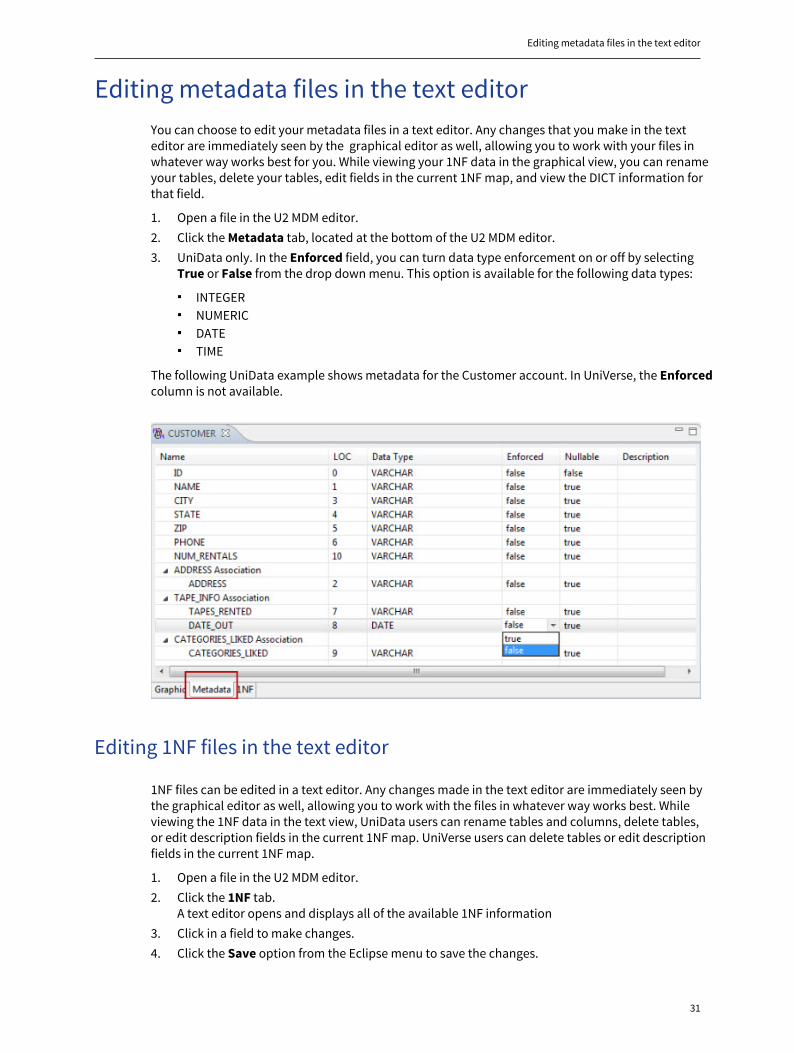
Editing metadata files in the text editor
31
Editing metadata files in the text editorYou can choose to edit your metadata files in a text editor. Any changes that you make in the texteditor are immediately seen by the graphical editor as well, allowing you to work with your files inwhatever way works best for you. While viewing your 1NF data in the graphical view, you can renameyour tables, delete your tables, edit fields in the current 1NF map, and view the DICT information forthat field.
1. Open a file in the U2 MDM editor.2. Click the Metadata tab, located at the bottom of the U2 MDM editor.3. UniData only. In the Enforced field, you can turn data type enforcement on or off by selecting
True or False from the drop down menu. This option is available for the following data types:
▪ INTEGER▪ NUMERIC▪ DATE▪ TIME
The following UniData example shows metadata for the Customer account. In UniVerse, the Enforcedcolumn is not available.
Editing 1NF files in the text editor
1NF files can be edited in a text editor. Any changes made in the text editor are immediately seen bythe graphical editor as well, allowing you to work with the files in whatever way works best. Whileviewing the 1NF data in the text view, UniData users can rename tables and columns, delete tables,or edit description fields in the current 1NF map. UniVerse users can delete tables or edit descriptionfields in the current 1NF map.
1. Open a file in the U2 MDM editor.2. Click the 1NF tab.
A text editor opens and displays all of the available 1NF information3. Click in a field to make changes.4. Click the Save option from the Eclipse menu to save the changes.

Chapter 5: Editing data in U2 MDM
32
Note: UniVerse users cannot change table names or column names.
The following example shows metadata for the Customer account.
Enabling UniData data type enforcement in the metadata text editor
UniData only. Data type enforcement can be turned on or off from within the metadata text editor.
1. Open a file in the U2 MDM editor.2. Select the Metadata tab.3. In the Enforced field, turn data type enforcement on or off by selecting True or False from the
drop down menu. This option is available for the following data types:
▪ INTEGER (SMALLINT)▪ NUMERIC (DECIMAL, FLOAT, REAL)▪ DATE (D2, D4, and so forth)▪ TIME
The following example shows the DATE_OUT options are expanded, and the Enforced menu is shown.
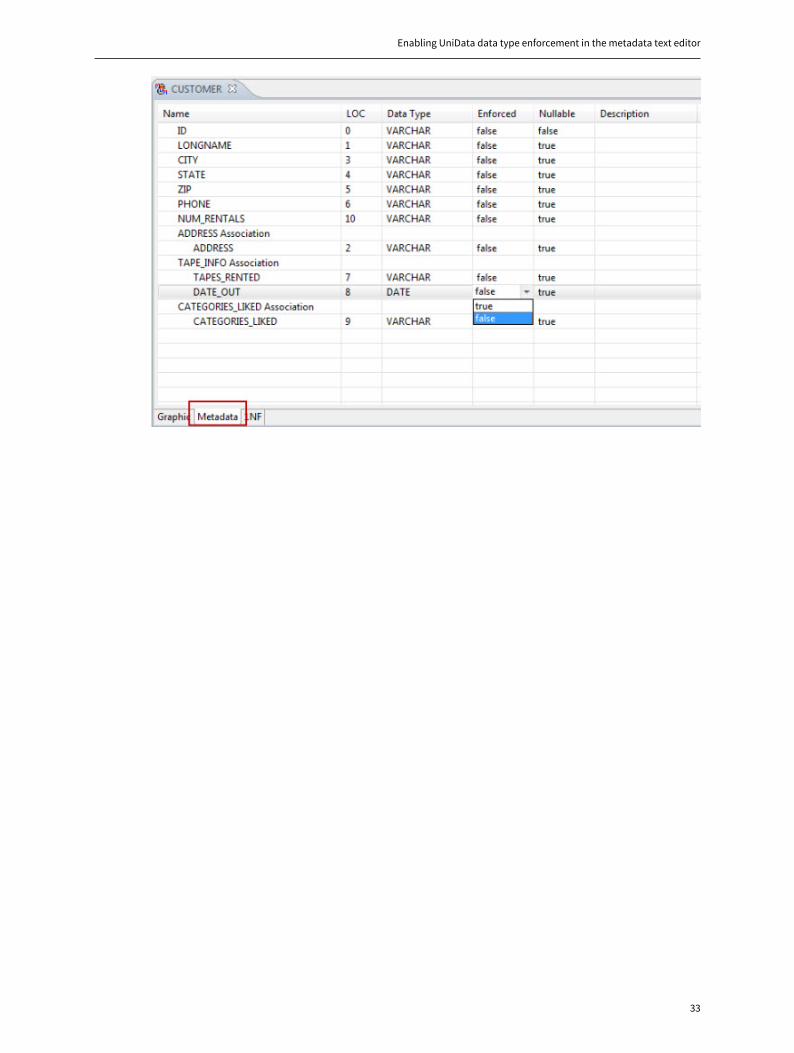
Enabling UniData data type enforcement in the metadata text editor
33

34
Chapter 6: Working with schemas
UniData schema rulesThe UniData schema rules follow a simple hierarchy of single values and multivalues. In general, singlevalued attributes will form one normalized ODBC table. Each association will form a separate childassociation table. Each non-associated field will form a separate child ODBC table. U2 MDM does notsupport schemas containing multiple single-valued attribute subtables.
Virtual fields are supported in U2 MDM, and the Metadata wizard contains a virtual attributessection where you can select the virtual fields that will be included in the metadata. Virtual data iscalculated during queries and does not physically reside in the U2 file, and so cannot support datatype enforcement. Virtual fields must be valid for the schema processing and ODBC access to proceed.
Note: At this time, U2 MDM does not support Views. If an existing schema (created outside of U2MDM) contains views, they will be dropped from any U2 MDM-generated schemas.
UniVerse schema rulesU2 MDM supports both PICK and IDEAL flavors of UniVerse files. The UniVerse schema hierarchy isdetermined by the rules that govern UniVerse SQL Dynamic Normalization.
In general, single valued attributes will form one normalized ODBC table. Each association will form aseparate child association table. Each non-associated field will form a separate child ODBC table. Allfields that contain either controlling or dependent attributes are mapped into a separate child tablewith a name that matches that of the controlling field name.
U2 MDM creates several account-level system tables to contain system information:
▪ LC_TABLES▪ LC_COLUMNS▪ LC_ASSOC▪ LC_FKEY
All mapping tables use UVACCT as the schema name in the LC_xxx tables. For mapped UniVerse files,the name of the schema is always set to UVACCT.
Virtual Fields are supported by U2 MDM, however, the virtual fields must be valid and must be able topass the compile dictionary (CD) command or the JDBC/ODBC queries will fail at runtime.
For more information about SQL Dynamic Normalization for UniVerse, refer to UniVerse SQL UserGuide.
Generating a schemaAfter you define a 1NF map for your file, you can generate a deployable 1NF schema that can be usedto access your UniData or UniVerse data from your JDBC or ODBC applications.
Prerequisite▪ You must be either the file administrator or the original owner of the file to create a schema file.
Viewing the schema
35
▪ Making your non-compliant UniData file names accessible, on page 37.▪ Generating a 1NF map, on page 28.
About this task
When you create a new schema, new _SQLDEF files are created. These are the 1NF representations ofthe newly created schema. After you create a schema, you cannot make changes to it. If you need tochange your schema information, you must generate a new schema.
Procedure
1. In the U2 Resource View, navigate to the Metadata Repository files and select the file with whichyou want to work.
2. Right-click the file and select U2 Metadata Manager > Schema Tools.3. From the schema tool, do one of the following actions:
▪ If there is no schema data present on the server, a pop-up opens asking if you want togenerate schema using the existing 1NF map. Click Yes to open the 1NF editor.
▪ If a 1NF file does not already exist, you must create it manually by dragging the fields you wantmapped from the metadata file onto the 1NF editor. Click Save from the Eclipse menu to savethe file.
▪ If there is already schema data present on the server, a pop-up opens asking if you want tooverwrite the existing server schema. Click Yes to overwrite the existing schema, or click No tocancel.
The Schema Data viewer opens, and displays the 1NF schema information comprising the schemaon the server.
After you generate the schema, your metadata and 1NF mapping choices are accessible through JDBCand ODBC applications.
Viewing the schemaAfter you create a schema, you may want to view the contents.
Note: You must be either the file administrator or the original owner of the file to create a schemafile.
1. In the U2 Resource view, right-click the file name of the schema that you want to view from eitherthe Database files or Metadata Repository files.
2. Select U2 Metadata Manager > Schema Tools.
If you did not overwrite the schema with the new 1NF map data, the schema tool will warn you that itis opening the existing schema that might not be based on your current 1NF map. This only occurs ifthe 1NF map data has changes since the schema was last created.
Testing the schemaYou can use the U2 MDM tool to verify that your schema files are SQL-compliant. It does this byrunning JDBC queries against the U2 database using the actual schema generated from the 1NF map.
1. Right-click the file of the schema that you want to test and select U2 Metadata Manager >Schema Tools.
2. Click the Verify tab at the bottom of the U2 MDM editor.

Chapter 6: Working with schemas
36
3. Create a test query in the SQL Statement text field by selecting the table name or column namesfrom the Table/Column Name menu. After selecting a column from a table, you may only selectadditional columns from the same table to add to the current select statement. If you select columns from a different table the select statement will reset using the new tablename. To start over when building a statement, click the table name in the panel on the left.Alternatively, you can create your own test query by typing a SQL statement directly into the textfield.
4. Optional: Choose the maximum number of records you want to return when you run the query.
a. Set the trace level for JDBC logging by selecting the appropriate level from the JDBC tracelevel menu. The following table describes the different trace level options:
Trace level Description
No logging No traceLog errors General error messageLog variable values Data variable dumpLog messages to/fromserver
Message passed to/from the server
Log data values Data shipped to/from the serverLog method entry/exit Method's entry/exit
The MDM_jdbc_unidata.trace file is created in the directory where the U2MDM.exe isrunning. In a default installation, this file is located in the C:\U2\U2Tools\v3 directory.
b. Click View Trace to view the trace file.5. Click Execute SQL Statement.
The tool runs the query against the server and displays the results in a table.
The following UniData example shows the results of a JDBC query that ran against theCLIENTS_PHONE_ITEMS_MV_SUB table.
Note: UniVerse only: Double quotes are added around all column and table names.
Making your non-compliant UniData file names accessible
37
Making your non-compliant UniData file namesaccessible
Beginning at UniData 7.3, UniData provides a QUOTED_IDENTIFIER configuration parameter. Theconfiguration parameters are located in the udtconfig file located in the udthome\includedirectory.
1. Open the udtconfig file, which is located in the udthome\include directory.2. Confirm that the QUOTED_IDENTIFIER parameter is set correctly for your needs:
▪ When the value of QUOTED_IDENTIFIER is 1, identifiers can be delimited by double quotationmarks, and literals must then be delimited by single quotation marks. This is the defaultsetting.
▪ When the value of QUOTED_IDENTIFIER is 0, identifiers cannot be quoted, and literals can bedelimited by either single or double quotation marks.
If the file or field name is not SQL-compliant, enclose the file name in double quotation marks andit will be read without causing an error.
Creating a metadata repository for an existing schemaSome users may find it necessary to create a metadata repository from an existing schema. This canoccur if a schema was created in VSG (UniData only) or if a schema was created in U2 MDM and thenthe corresponding metadata repository was deleted.
If a schema exists but does not have a corresponding metadata information, then a metadatarepository file must be created before the schema can be edited. The U2 MDM tool can take existingschema information and create a new metadata repository based on the information in the schema.To do this, U2 MDM provides a wizard that compares the information from the schema to that in thedictionary. When inconsistencies are found, the tool relies on the information in the dictionary file tocreate the metadata, as the metadata files must accurately reflect the dictionary definition contents.If a field exists in the schema and is not found in the dictionary, it will not be included in the metadata.Conversely, if a location exists in the dictionary but not in the schema, it must be represented inthe metadata repository. Creation of metadata for these locations does not require the location'sinclusion in the schema. If a virtual attribute exists in the dictionary, it can optionally be represented inthe metadata.
Attention: UniData only. U2 MDM does not currently support SQL views. Existing 1NF viewscreated by VSG will be lost when MDM generates a new schema.
Creating metadata for the Metadata Repository wizardUse the Metadata Repository wizard to create a metadata repository record from an existing schema.
Note: The wizard steps described in the procedure below contain examples of all possibleconflicts that might be encountered when creating a metadata repository from an existing schema.Depending on the schema used, some of these steps may not be visible.
1. In the U2 Resource view, select the file for which you want to create a metadata repository.2. Right-click the file and then select Schema Tools.
Chapter 6: Working with schemas
38
If a schema exists without any corresponding metadata, a dialog box opens and asks if youwant to proceed with the schema data. Click Yes. The Schema Data editor opens and the CreateMetadata Repository button appears in the Eclipse toolbar.
3. Click the Create Metadata Repository button to start the wizard.4. Select the Open the metadata editor when the wizard finishes check box if you want the
metadata editor to open when the wizard steps are complete. Click Next to proceed through thewizard steps.The Metadata/Dictionary Conflicts page opens and displays a list of any conflicts between theschema information and that in the dictionary. The information in the metadata must matchthat in the dictionary, so any differences between the two will be changed to match that in thedictionary.
5. After reviewing the conflicts, click Next.The Schema Fields Not Found in Dictionary page opens and displays a list of fields found in theschema that are not in the dictionary. These fields will not be included in the metadata.
6. After reviewing the information, click Next.The Choose Dictionary Locations for Metadata page opens, listing only the dictionary locationsthat are not found in the schema and for which there are one or more dictionary fields describingthat location.
7. Select a dictionary field to represent each location in the file and then click Next.The Choose Virtual Attributes page opens, listing any virtual fields in the dictionary that are notfound in the schema. Virtual fields in the dictionary that are not included in the metadata cannotbe exposed to 1NF tools.
8. Select the virtual fields that you want to include in the metadata and then click Finish.
After the wizard steps complete, the U2 MDM tool creates a metadata repository filebased on the selections made in the wizard. In UniData, the metadata repository iscalled _METADATA_REPOSITORY_. In UniVerse, the metadata repository is called&METADATA_REPOSITORY&.
Synchronizing the current dictionary with the metadataWhen new fields are added, changed, or removed in a dictionary after the file has been loaded into themetadata repository, the information in the metadata repository becomes out of sync with that in thedictionary. You need to refresh the information in the metadata to synchronize it with the dictionary.You can do this with the Metadata Synchronization wizard.
The Metadata Synchronization wizard compares the information in the metadata repository to thatin the dictionary. When inconsistencies are found, the tool relies on the information in the dictionaryfile to create the metadata, as the metadata files must accurately reflect the dictionary definitioncontents. If a field exists in the metadata repository and is not found in the dictionary, it will beremoved from the metadata. Conversely, if a location exists in the dictionary but not in the metadata,it must be represented in the metadata repository. If a virtual attribute exists in the dictionary, it canoptionally be represented in the metadata.
Attention: UniData only. U2 MDM does not currently support SQL views. Existing 1NF viewscreated by VSG will be lost when MDM generates a new schema.
Synchronizing the data using the MetadataSynchronization wizard
Use the Metadata Synchronization wizard to compare and update the metadata repository recordfrom the information found in the dictionary.
Synchronizing the data using the Metadata Synchronization wizard
39
Note: The wizard steps described in the procedure below contain examples of all possibleconflicts that might be encountered when synchronizing a metadata repository from an existingdictionary. Depending on the information in the dictionary, some of these steps may not be visible.
1. In the U2 Resource view, select the file for which you want to synchronize the metadatarepository with the dictionary.
2. Right-click the file and then select Sync metadata with dictionary.3. Select the Open the metadata editor when the wizard finishes check box if you want the
metadata editor to open when the wizard steps are complete. Click Next to proceed through thewizard steps.The Metadata/Dictionary Conflicts page opens and displays a list of any conflicts between theschema information and that in the dictionary. The information in the metadata must matchthat in the dictionary, so any differences between the two will be changed to match that in thedictionary.
4. After reviewing the conflicts, click Next.The Metadata Fields Not Found in Dictionary page opens and displays a list of fields found in themetadata that are not in the dictionary. These fields will be removed from the metadata
5. After reviewing the information, click Next.The Choose Dictionary Locations for Metadata page opens, listing dictionary locations that arenot found in the metadata and for which there are one or more dictionary fields describing thatlocation.
6. Select a dictionary field to represent each location in the metadata and then click Next.The Choose Virtual Attributes page opens, listing any virtual fields in the dictionary that are notfound in the metadata. Virtual fields in the dictionary that are not included in the metadatacannot be exposed to 1NF tools.
7. Select the virtual fields that you want to include in the metadata and then click Finish.
After the wizard steps complete, the U2 MDM tool updates the information in the metadatarepository file based on the selections made in the wizard. In UniData, the metadata repositoryis called _METADATA_REPOSITORY_. In UniVerse, the metadata repository is called&METADATA_REPOSITORY&.
40
Chapter 7: Data type enforcement for UniDataUniData only. Beginning with UniData 7.3, UniData provides a data type check on data that you writeto a file in an effort to avoid writing bad data to the database. This data type check is file-based.
You can define the fields that you want to check in the metadata file. UniData then checks these fieldsfor each record write. If a write fails, UniData reports the record ID and the data that failed the check.
Data type enforcement provides logging and blocking of specific data that does not match the defineddata type that had been previously defined through its metadata on a file-level basis. You can useECL-level data type enforcement commands to measure or limit this data access.
You can define the following data types to check:
▪ DATE (D2, D4, and so forth)▪ TIME▪ INTEGER (SMALLINT)▪ NUMERIC (DECIMAL, FLOAT, REAL)
The data type is determined by the conversion code in the dictionary record of the attribute, describedin the following table:
Conversion code Data type
Dn DATEMT TIMEMD0 INTEGER (SMALLINT)MD2, MR2 NUMERIC (DECIMAL, FLOAT, REAL)
Selecting an attribute for data type enforcementUniData only. To select an attribute on which to apply data type enforcement (DTE), use the U2 MDMtool.
1. Start U2 MDM by clicking Start > All Programs > Rocket U2 > U2 Metadata Manager. 2. From the U2 Resource View, expand Accounts, and then expand the account where the file for
which you want to define the DTE attributes resides. Drag the file name to the Metadata pane, orright-click the file name and select U2 Metadata Manager > U2 Metadata Manager > Open U2MDM Editor.
3. Click the Metadata tab, and then select the attribute for which you want to enforce the data type.In the Enforced column, select True.
4. In the U2 Resource view, navigate to the Metadata Repository files.5. Right-click the file that you want to apply the data type enforcement changes to, then select U2
Metadata Manager > Data Type Enforcement > Apply Metadata Settings. If you make changesin the Metadata editor and attempt to apply those changes before you have saved the Metadatafile, your changes will not be applied.
Creating and deleting a metadata listUniData only. Use the commands in this section to create, delete, and view the metadata information.
CREATE.METADATA
41
CREATE.METADATA
UniData only. The CREATE.METADATA command creates a metadata list for a UniData file fromthe account metadata repository file (_METADATA_REPOSITORY_) that contains all of the D-typeattributes for which you want to enforce the data type. You can define only one definition for eachlocation.
Before you can use the metadata that you have previously generated using the U2 MDM tool, you haveto make the metadata active for this account by using the CREATE.METADATA command.
Syntax
CREATE.METADATA filename USING RESPOSITORY
Parameters
The following table describes each parameter of the syntax.
Parameter Description
filename The UniData hash file for which you want to define metadata to checkUSING REPOSITORY The name of the core mapping file that is generated from the U2 Metadata
Manager
Example
The following example illustrates the CREATE.METADATA command:
:CREATE.METADATA INVENTORY USING REPOSITORYMetadata is created.
DELETE.METADATA
UniData only. The DELETE.METADATA command deletes the metadata list previously created for thefile. The command also deletes the DTENF record.
Syntax
DELETE.METADATA filename
Parameters
The following table describes each parameter of the syntax.
Parameter Description
filename The name of the file for which you created metadata.
LIST.METADATA
UniData only. The LIST.METADATA command lists all the D-type attributes and associationspreviously defined for the file name. It also lists all of the metadata information that has been definedfor this file.
Chapter 7: Data type enforcement for UniData
42
Syntax
LIST.METADATA filename
Parameters
The following table describes each parameter of the syntax.
Parameter Description
filename The name of the file for which you created metadata
Example
The following example illustrates the output from the LIST.METADATA command:
:LIST.METADATA INVENTORYData for Column @ID Position: 0 Data Type: VARCHAR Type Enf: 0 dict info: 'INVENTORY' 10R SData for Column INV_DATE Position: 1 Data Type: DATE Type Enf: 1 dict info: D4/ 'Inventory}Date' 10R SData for Column INV_TIME Position: 2 Data Type: TIME Type Enf: 1 dict info: MTH 'Inventory}Time' 5R SData for Column PROD_NAME Position: 3 Data Type: VARCHAR Type Enf: 0 dict info: 'Product}Name' 10T SData for Column FEATURES Position: 4 Data Type: VARCHAR Type Enf: 0 dict info: 'Features' 30T SData for Column COLOR Position: 5 Data Type: VARCHAR Type Enf: 0 dict info: 'Color' 10T MV LINE_ITEMSData for Column QTY Position: 6 Data Type: INT Type Enf: 0 dict info: MD0 'Quantity' 6R MV LINE_ITEMSData for Column PRICE Position: 7 Data Type: FLOAT Type Enf: 1 dict info: MD2,$ 'Price' 10R MV LINE_ITEMSData for Column REORDER Position: 8 Data Type: VARCHAR Type Enf: 0 dict info: 'Reorder}Point' 6R MV LINE_ITEMS
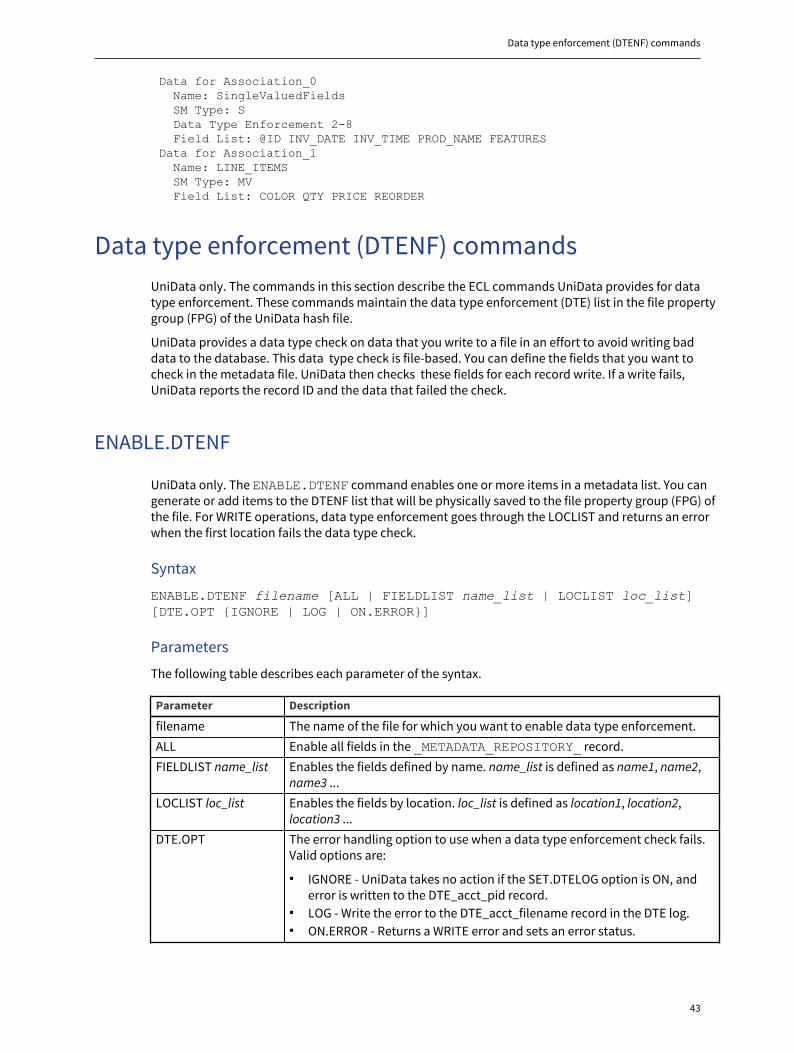
Data type enforcement (DTENF) commands
43
Data for Association_0 Name: SingleValuedFields SM Type: S Data Type Enforcement 2-8 Field List: @ID INV_DATE INV_TIME PROD_NAME FEATURESData for Association_1 Name: LINE_ITEMS SM Type: MV Field List: COLOR QTY PRICE REORDER
Data type enforcement (DTENF) commandsUniData only. The commands in this section describe the ECL commands UniData provides for datatype enforcement. These commands maintain the data type enforcement (DTE) list in the file propertygroup (FPG) of the UniData hash file.
UniData provides a data type check on data that you write to a file in an effort to avoid writing baddata to the database. This data type check is file-based. You can define the fields that you want tocheck in the metadata file. UniData then checks these fields for each record write. If a write fails,UniData reports the record ID and the data that failed the check.
ENABLE.DTENF
UniData only. The ENABLE.DTENF command enables one or more items in a metadata list. You cangenerate or add items to the DTENF list that will be physically saved to the file property group (FPG) ofthe file. For WRITE operations, data type enforcement goes through the LOCLIST and returns an errorwhen the first location fails the data type check.
Syntax
ENABLE.DTENF filename [ALL | FIELDLIST name_list | LOCLIST loc_list][DTE.OPT {IGNORE | LOG | ON.ERROR}]
Parameters
The following table describes each parameter of the syntax.
Parameter Description
filename The name of the file for which you want to enable data type enforcement.ALL Enable all fields in the _METADATA_REPOSITORY_ record.FIELDLIST name_list Enables the fields defined by name. name_list is defined as name1, name2,
name3 ...LOCLIST loc_list Enables the fields by location. loc_list is defined as location1, location2,
location3 ...DTE.OPT The error handling option to use when a data type enforcement check fails.
Valid options are:
▪ IGNORE - UniData takes no action if the SET.DTELOG option is ON, anderror is written to the DTE_acct_pid record.
▪ LOG - Write the error to the DTE_acct_filename record in the DTE log.▪ ON.ERROR - Returns a WRITE error and sets an error status.
Chapter 7: Data type enforcement for UniData
44
Use the ON.ERROR option in conjunction with the WRITE/ON ERROR statements in your BASICprogram to detect the attribute location with data that is incompatible with your metadata. If theON.ERROR statement executes, then use the INMAT() function to determine the attribute location ofthe incompatible data.
Example
The following example illustrates the ENABLE.DTENF command:
:ENABLE.DTENF CUSTOMER ALL DTE.OPT LOGDTE has not been added on file CUSTOMER
DISABLE.DTENF
UniData only. Use the DISABLE.DTENF command to delete items from the DTENF list. If the DTENFlist is empty, UniData removes the list.
Syntax
DISABLE.DTENF filename [ALL | FIELDLIST name_list | LOCLIST loc_list]
Parameters
The following table describes each parameter of the syntax.
Parameter Description
filename The name of the file for which you want to disable data type enforcement.ALL Disable all fields in the DTE list.FIELDLISTname_list Disables the fields defined by name. name_list is defined as name1,
name2,name3 ...LOCLISTloc_list Disables the fields by location. loc_list is defined as location1,
location2,location3 ...
LIST.METADATA
UniData only. The LIST.METADATA command lists all the D-type attributes and associationspreviously defined for the file name. It also lists all of the metadata information that has been definedfor this file.
Syntax
LIST.METADATA filename
Parameters
The following table describes each parameter of the syntax.
Parameter Description
filename The name of the file for which you created metadata
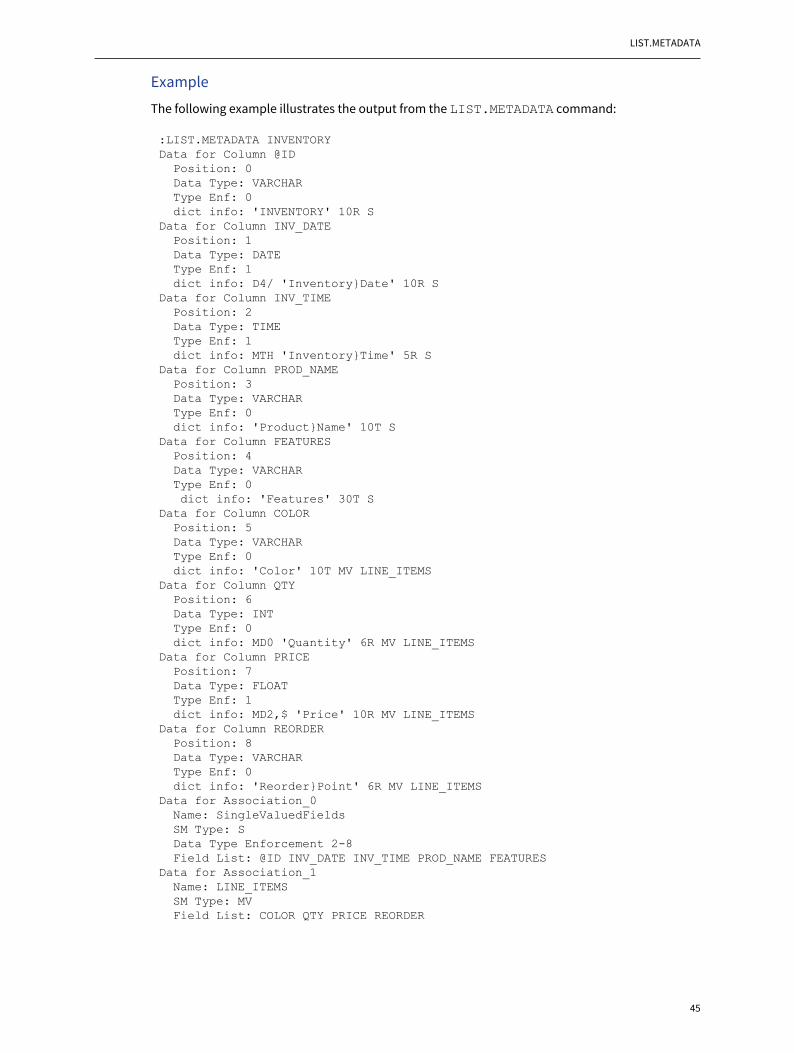
LIST.METADATA
45
Example
The following example illustrates the output from the LIST.METADATA command:
:LIST.METADATA INVENTORYData for Column @ID Position: 0 Data Type: VARCHAR Type Enf: 0 dict info: 'INVENTORY' 10R SData for Column INV_DATE Position: 1 Data Type: DATE Type Enf: 1 dict info: D4/ 'Inventory}Date' 10R SData for Column INV_TIME Position: 2 Data Type: TIME Type Enf: 1 dict info: MTH 'Inventory}Time' 5R SData for Column PROD_NAME Position: 3 Data Type: VARCHAR Type Enf: 0 dict info: 'Product}Name' 10T SData for Column FEATURES Position: 4 Data Type: VARCHAR Type Enf: 0 dict info: 'Features' 30T SData for Column COLOR Position: 5 Data Type: VARCHAR Type Enf: 0 dict info: 'Color' 10T MV LINE_ITEMSData for Column QTY Position: 6 Data Type: INT Type Enf: 0 dict info: MD0 'Quantity' 6R MV LINE_ITEMSData for Column PRICE Position: 7 Data Type: FLOAT Type Enf: 1 dict info: MD2,$ 'Price' 10R MV LINE_ITEMSData for Column REORDER Position: 8 Data Type: VARCHAR Type Enf: 0 dict info: 'Reorder}Point' 6R MV LINE_ITEMSData for Association_0 Name: SingleValuedFields SM Type: S Data Type Enforcement 2-8 Field List: @ID INV_DATE INV_TIME PROD_NAME FEATURESData for Association_1 Name: LINE_ITEMS SM Type: MV Field List: COLOR QTY PRICE REORDER
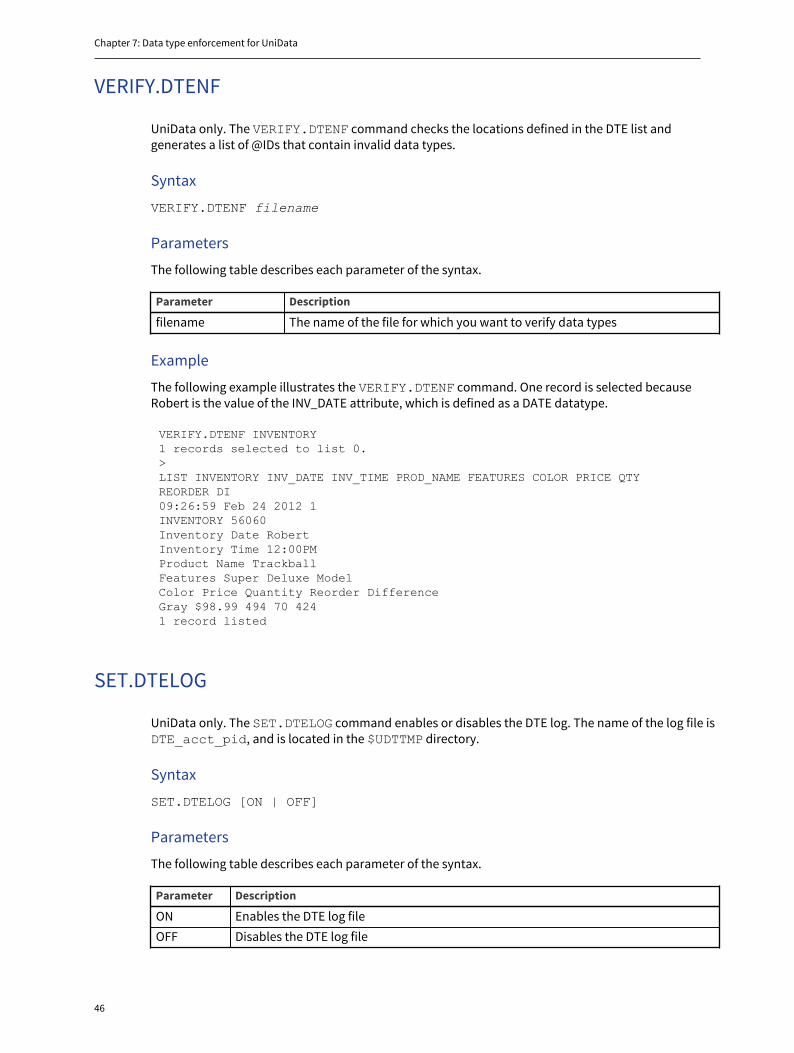
Chapter 7: Data type enforcement for UniData
46
VERIFY.DTENF
UniData only. The VERIFY.DTENF command checks the locations defined in the DTE list andgenerates a list of @IDs that contain invalid data types.
Syntax
VERIFY.DTENF filename
Parameters
The following table describes each parameter of the syntax.
Parameter Description
filename The name of the file for which you want to verify data types
Example
The following example illustrates the VERIFY.DTENF command. One record is selected becauseRobert is the value of the INV_DATE attribute, which is defined as a DATE datatype.
VERIFY.DTENF INVENTORY1 records selected to list 0.>LIST INVENTORY INV_DATE INV_TIME PROD_NAME FEATURES COLOR PRICE QTYREORDER DI09:26:59 Feb 24 2012 1INVENTORY 56060Inventory Date RobertInventory Time 12:00PMProduct Name TrackballFeatures Super Deluxe ModelColor Price Quantity Reorder DifferenceGray $98.99 494 70 4241 record listed
SET.DTELOG
UniData only. The SET.DTELOG command enables or disables the DTE log. The name of the log file isDTE_acct_pid, and is located in the $UDTTMP directory.
Syntax
SET.DTELOG [ON | OFF]
Parameters
The following table describes each parameter of the syntax.
Parameter Description
ON Enables the DTE log fileOFF Disables the DTE log file
INMAT function
47
INMAT function
UniData only. The INMAT function returns the following values for each the previously describedfunctions:
▪ 0 – The command completed successfully▪ Any positive integer– The command failed
48
Chapter 8: Deployment for UniData
UniData metadata repositoryThe _METADATA_REPOSITORY_ file is a UniData hash file that is on every account to which the U2MDM tool has successfully connected. The _METADATA_REPOSITORY_ is a system file containingthe U2 Metadata Manager's data regarding metadata and 1NF maps for an account's databasefiles. This file should not be modified by anything but the U2 MDM tool. Modification to the file or itscontents may corrupt the file and cause a loss of information needed by the U2 MDM tool.
Deploying a metadata map
Deploying the UniData metadata repository
The UniData _METADATA_REPOSITORY_ is the deployment mechanism for users to apply Data TypeEnforcement (DTE) settings for an account's database files.
Prerequisite
To deploy the DTE settings for an account, the destination account must be on a UniData serverrunning UniData 7.3.0 or later. The destination account's VOC should be up to date.
Procedure
1. Copy the _METADATA_REPOSITORY_ file to the destination account. 2. For each file that is contained in the _METADATA_REPOSITORY_ file and has DTE settings
established, run the following ECL commands:
▪ DELETE.METADATA filename▪ CREATE.METADATA filename USING REPOSITORY▪ ENABLE.DTENF filename ALL
You can retrieve the file names from the _METADATA_REPOSITORY_ by using standard UniQuerystatements such as LIST, SORT, SELECT, and SSELECT, and by providing the file names to a programor paragraph to automate this task. If you want to verify any of the above commands, the followingcommands are available:
▪ LIST.METADATA filename▪ LIST.DTENF filename
Deploying a UniData metadata file
If you use a test account to set up data type enforcement, you can copy the changes that madein the test account to the live account if the dictionary files in the live account are identical to thetest account using a paragraph similar to the following example. The following paragraph sets up apointer to the source file and executes another paragraph called DTE_SETUP to apply the Data TypeEnforcement settings you created and stored in the _METADATA_REPOSITORY_.
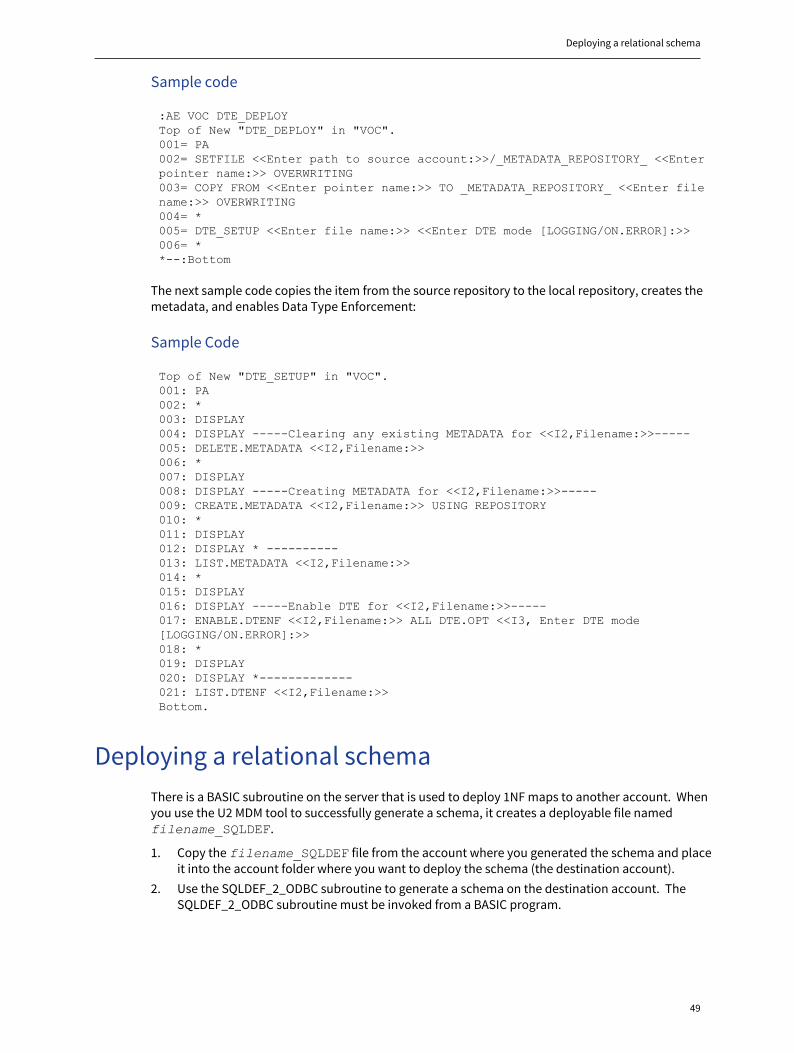
Deploying a relational schema
49
Sample code
:AE VOC DTE_DEPLOYTop of New "DTE_DEPLOY" in "VOC".001= PA002= SETFILE <<Enter path to source account:>>/_METADATA_REPOSITORY_ <<Enterpointer name:>> OVERWRITING003= COPY FROM <<Enter pointer name:>> TO _METADATA_REPOSITORY_ <<Enter filename:>> OVERWRITING004= *005= DTE_SETUP <<Enter file name:>> <<Enter DTE mode [LOGGING/ON.ERROR]:>>006= **--:Bottom
The next sample code copies the item from the source repository to the local repository, creates themetadata, and enables Data Type Enforcement:
Sample Code
Top of New "DTE_SETUP" in "VOC".001: PA002: *003: DISPLAY004: DISPLAY -----Clearing any existing METADATA for <<I2,Filename:>>-----005: DELETE.METADATA <<I2,Filename:>>006: *007: DISPLAY008: DISPLAY -----Creating METADATA for <<I2,Filename:>>-----009: CREATE.METADATA <<I2,Filename:>> USING REPOSITORY010: *011: DISPLAY012: DISPLAY * ----------013: LIST.METADATA <<I2,Filename:>>014: *015: DISPLAY016: DISPLAY -----Enable DTE for <<I2,Filename:>>-----017: ENABLE.DTENF <<I2,Filename:>> ALL DTE.OPT <<I3, Enter DTE mode[LOGGING/ON.ERROR]:>>018: *019: DISPLAY020: DISPLAY *-------------021: LIST.DTENF <<I2,Filename:>>Bottom.
Deploying a relational schemaThere is a BASIC subroutine on the server that is used to deploy 1NF maps to another account. Whenyou use the U2 MDM tool to successfully generate a schema, it creates a deployable file namedfilename_SQLDEF.
1. Copy the filename_SQLDEF file from the account where you generated the schema and placeit into the account folder where you want to deploy the schema (the destination account).
2. Use the SQLDEF_2_ODBC subroutine to generate a schema on the destination account. TheSQLDEF_2_ODBC subroutine must be invoked from a BASIC program.
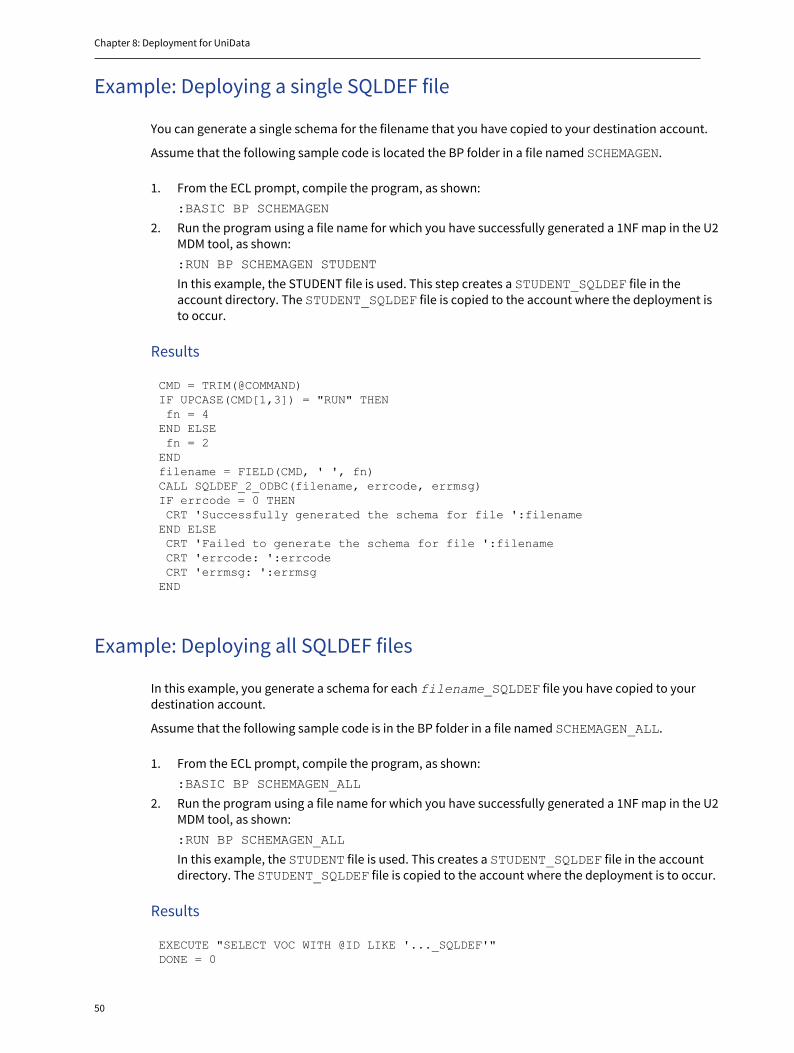
Chapter 8: Deployment for UniData
50
Example: Deploying a single SQLDEF file
You can generate a single schema for the filename that you have copied to your destination account.
Assume that the following sample code is located the BP folder in a file named SCHEMAGEN.
1. From the ECL prompt, compile the program, as shown::BASIC BP SCHEMAGEN
2. Run the program using a file name for which you have successfully generated a 1NF map in the U2MDM tool, as shown::RUN BP SCHEMAGEN STUDENT
In this example, the STUDENT file is used. This step creates a STUDENT_SQLDEF file in theaccount directory. The STUDENT_SQLDEF file is copied to the account where the deployment isto occur.
Results
CMD = TRIM(@COMMAND)IF UPCASE(CMD[1,3]) = "RUN" THEN fn = 4END ELSE fn = 2ENDfilename = FIELD(CMD, ' ', fn)CALL SQLDEF_2_ODBC(filename, errcode, errmsg)IF errcode = 0 THEN CRT 'Successfully generated the schema for file ':filenameEND ELSE CRT 'Failed to generate the schema for file ':filename CRT 'errcode: ':errcode CRT 'errmsg: ':errmsgEND
Example: Deploying all SQLDEF files
In this example, you generate a schema for each filename_SQLDEF file you have copied to yourdestination account.
Assume that the following sample code is in the BP folder in a file named SCHEMAGEN_ALL.
1. From the ECL prompt, compile the program, as shown::BASIC BP SCHEMAGEN_ALL
2. Run the program using a file name for which you have successfully generated a 1NF map in the U2MDM tool, as shown::RUN BP SCHEMAGEN_ALL
In this example, the STUDENT file is used. This creates a STUDENT_SQLDEF file in the accountdirectory. The STUDENT_SQLDEF file is copied to the account where the deployment is to occur.
Results
EXECUTE "SELECT VOC WITH @ID LIKE '..._SQLDEF'"DONE = 0
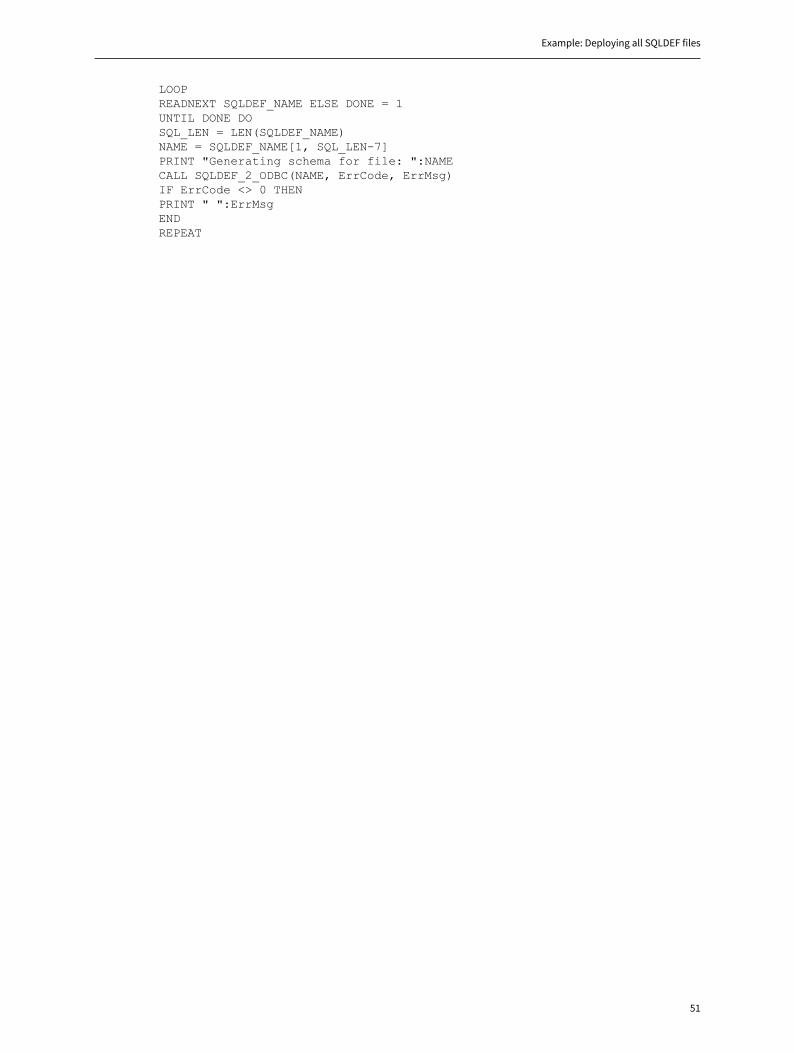
Example: Deploying all SQLDEF files
51
LOOPREADNEXT SQLDEF_NAME ELSE DONE = 1UNTIL DONE DOSQL_LEN = LEN(SQLDEF_NAME)NAME = SQLDEF_NAME[1, SQL_LEN-7]PRINT "Generating schema for file: ":NAMECALL SQLDEF_2_ODBC(NAME, ErrCode, ErrMsg)IF ErrCode <> 0 THENPRINT " ":ErrMsgENDREPEAT
52
Chapter 9: Deployment for UniVerse
UniVerse metadata repositoryThe UniVerse &METADATA_REPOSITORY& is a UniVerse hash file that is on every account to whichthe U2 MDM tool has successfully connected. The &METADATA_REPOSITORY& is a system filecontaining the U2 Metadata Manager's data regarding metadata and 1NF maps for an account'sdatabase files.
This file should not be modified by anything but the U2 MDM tool. Modification to the file or itscontents may corrupt the file and cause a loss of information needed by the U2 MDM tool.
Deploying a relational schema for UniVerseThere is a BASIC subroutine on the server that is used to deploy 1NF maps to another account. Whenyou use the U2 MDM tool to successfully generate a schema, it creates a deployable file namedfilename_SQLDEF.
1. Execute the LC.INIT program in the destination account.2. Copy the filename_SQLDEF file from the account where you generated the schema and place
it into the account folder where you want to deploy the schema (the destination account).3. Use the SQLDEF_2_ODBC subroutine to generate a schema on the destination account. The
SQLDEF_2_ODBC subroutine must be invoked from a BASIC program.4. On the destination machine, define the account in HS.SALES.5. Test the deployment using an ODBC client.