Embed Size (px)
Citation preview
Exploring InDesign CS4 • © 2009 Delmar, Cengage Learning Chapter 2 • Page 1
� Type FundamentalsAs printing technologies have changed, designers have also broadened their skill sets. Before desktop publishing, designers simply specified the type style, size, and leading and sent the order to a type house that produced beautiful galleys of copy which were later pasted up on an art board. The typesetter at the type house worried about all the picky details concerning how type is set on a page. Today, that responsibility has shifted to the designer—and designers need to be concerned with first, the aesthetic characteristics of the typeface; and then, the mechanics of how the type is set on a page. Knowing and applying the time-honored principles of setting type will set your work apart from that of amateurs.
� Chapter Goals• Distinguishbetweenserifandsansseriftypefaces• Readandinterpretprojectmarkup• Definetypefamily,typeface,font,pointsize,andleading• Definepicasandpoints• UseCharacterFormattingControlsintheControlpanel• UseParagraphFormattingControlsintheControlpanel• Modifytheattributesoftextframes• Applyfillsandstrokes• Insertglyphs
� TerminologyRoughlayout Facingpages MonospacedtypefaceProportionaltypeface Inport OutportCharacterformattingmode Font TypefaceSerif Sansserif TypefamilyTypestyle Leading PointBaseline Autoleading AbsoluteleadingPointsize Markup MeasureorlinelengthPica Oversettext TextframeoptionsInsetspacing Glyph
� Projects02A Typeface Personality02B Using Markup02C Using Text Frame Options02D Mastering Stroke and Fill02E Fall Sale02F Reedy Florist
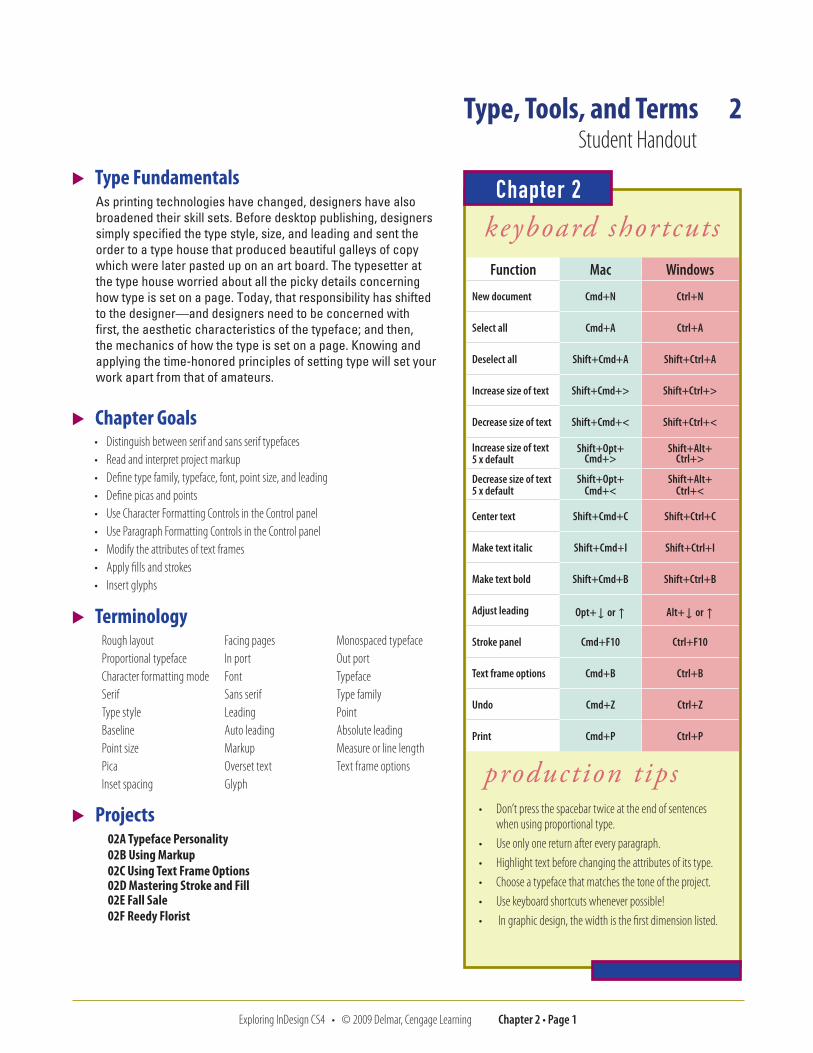
keyboard shortcutsFunction Mac Windows
New document Cmd+N Ctrl+N
Select all Cmd+A Ctrl+A
Deselect all Shift+Cmd+A Shift+Ctrl+A
Increase size of text Shift+Cmd+> Shift+Ctrl+>
Decrease size of text Shift+Cmd+< Shift+Ctrl+<
Increase size of text 5 x default
Shift+Opt+ Cmd+>
Shift+Alt+ Ctrl+>
Decrease size of text 5 x default
Shift+Opt+ Cmd+<
Shift+Alt+ Ctrl+<
Center text Shift+Cmd+C Shift+Ctrl+C
Make text italic Shift+Cmd+I Shift+Ctrl+I
Make text bold Shift+Cmd+B Shift+Ctrl+B
Adjust leading Opt+↓ or ↑ Alt+↓ or ↑
Stroke panel Cmd+F10 Ctrl+F10
Text frame options Cmd+B Ctrl+B
Undo Cmd+Z Ctrl+Z
Print Cmd+P Ctrl+P
production tips• Don’tpressthespacebartwiceattheendofsentences
whenusingproportionaltype.• Useonlyonereturnaftereveryparagraph.• Highlighttextbeforechangingtheattributesofitstype.• Chooseatypefacethatmatchesthetoneoftheproject.• Usekeyboardshortcutswheneverpossible!• Ingraphicdesign,thewidthisthefirstdimensionlisted.
Chapter 2
Type, Tools, and Terms 2StudentHandout
Exploring InDesign CS4 • © 2009 Delmar, Cengage Learning Chapter 2 • Page 2
Joe’s Bait and Tackleeverything for the fishing enthusiast
Brookfield Bay
Spa and Massage
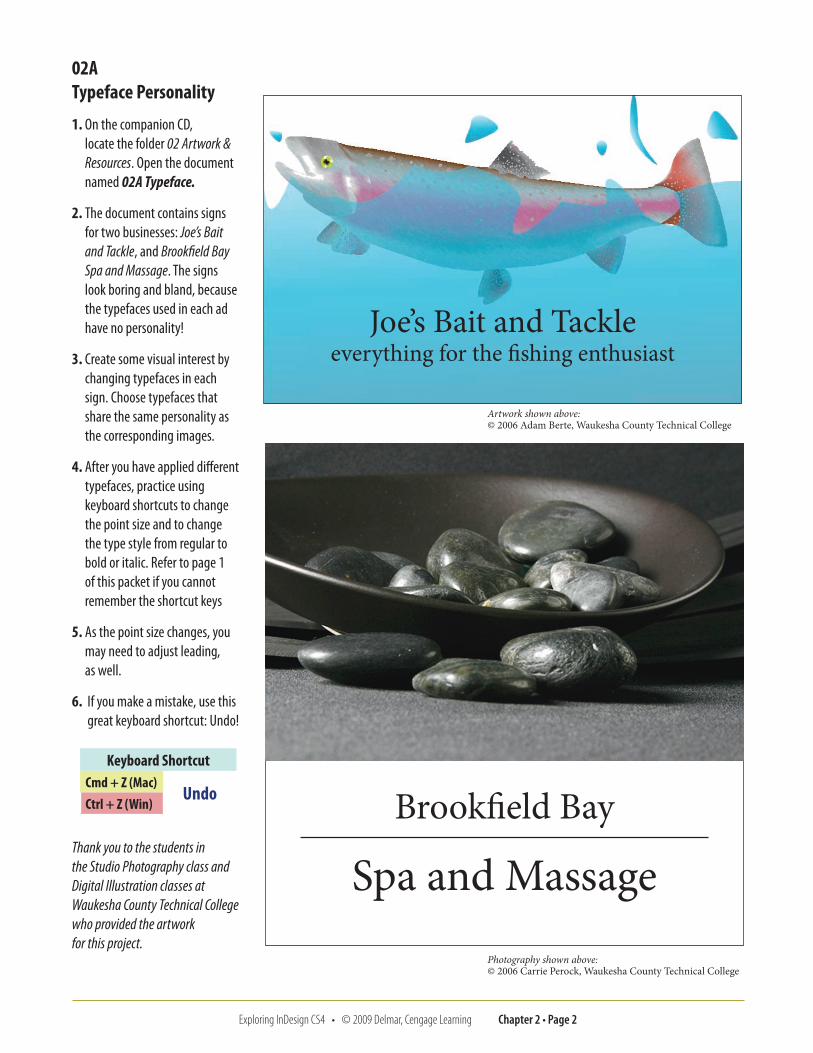
Artwork shown above: © 2006 Adam Berte, Waukesha County Technical College
02A Typeface Personality
1. On the companion CD, locate the folder 02 Artwork & Resources. Open the document named 02A Typeface.
2. The document contains signs for two businesses: Joe’s Bait and Tackle, and Brookfield Bay Spa and Massage. The signs look boring and bland, because the typefaces used in each ad have no personality!
3. Create some visual interest by changing typefaces in each sign. Choose typefaces that share the same personality as the corresponding images.
4. After you have applied different typefaces, practice using keyboard shortcuts to change the point size and to change the type style from regular to bold or italic. Refer to page 1 of this packet if you cannot remember the shortcut keys
5. As the point size changes, you may need to adjust leading, as well.
6. If you make a mistake, use this great keyboard shortcut: Undo!
Thank you to the students in the Studio Photography class and Digital Illustration classes at Waukesha County Technical College who provided the artwork for this project.
Photography shown above: © 2006 Carrie Perock, Waukesha County Technical College
Keyboard ShortcutCmd + Z (Mac)
UndoCtrl + Z (Win)

Exploring InDesign CS4 • © 2009 Delmar, Cengage Learning Chapter 2 • Page 3
Verona Billington CollectionPurses and bags–all styles.
Through Saturday 65% off
Stemware and FlatwareOpen stock and sets. Stainless and silverplate.
Friday only 75% offFree! Gift WrappingPurchase a wedding registry item and wrapping is free.
Up to $10.95 savings!
Photo Albums and FramesHuge assortment of sizes & styles.
Friday only 65% offBathroom LinensAll linens and accessories.
Through Saturday 65% off Open Tuesday – Saturday 10–6 • Closed Monday
Fine JewelrySterling silver, pearls, boutique.
Friday only 75% off
02B Using Markup
1. On the companion CD, locate the folder 02 Artwork and Resources. Open the document named 02B Markup.
2. This display ad is complete except for the type specifications. Follow the mark up (shown above) to format the display ad like this sample. The type specifications are the same for most of the copy blocks. Find the required fields in the Character Formatting Options panel. Highlight each line individually to change the attributes of the type.
3. Proof your ad and then print it.
Thank you to the students in the Studio Photography class at Waukesha County Technical College who provided the digital photography for this project.
©20
06
Jennif
erErd
man
© 20
06
Karen
Zale
©20
06
Jennif
erErd
man
©20
06
Eliza
beth
Krill
©20
06
Eliza
beth
Krill
©20
06
Jennif
erErd
man
MyriadProBoldCondensed12/10
MinionPro Regular9/10
MyriadProBoldCondensed8/19
MinionPro BoldItalic19/19
MinionPro BoldItalic19/10
MyriadProBoldCondensed12/10
MyriadProBoldCondensed8/9
MinionPro Regular9/10
Exploring InDesign CS4 • © 2009 Delmar, Cengage Learning Chapter 2 • Page 4
Holiday Greetings from both of us!Ipis essed tie magniam dolendrero con vel irit, quis augait wismod el ullam del irit num quiscipsummy nos nulputa tincilit nibh et, venibh et ea faccum num in ut Blum dolutat incillam do cor suscidunt inim zzrit praessi tatuer sit nosto consequat nonullan henit lore faci enit ullan utpat adit, quisit alit
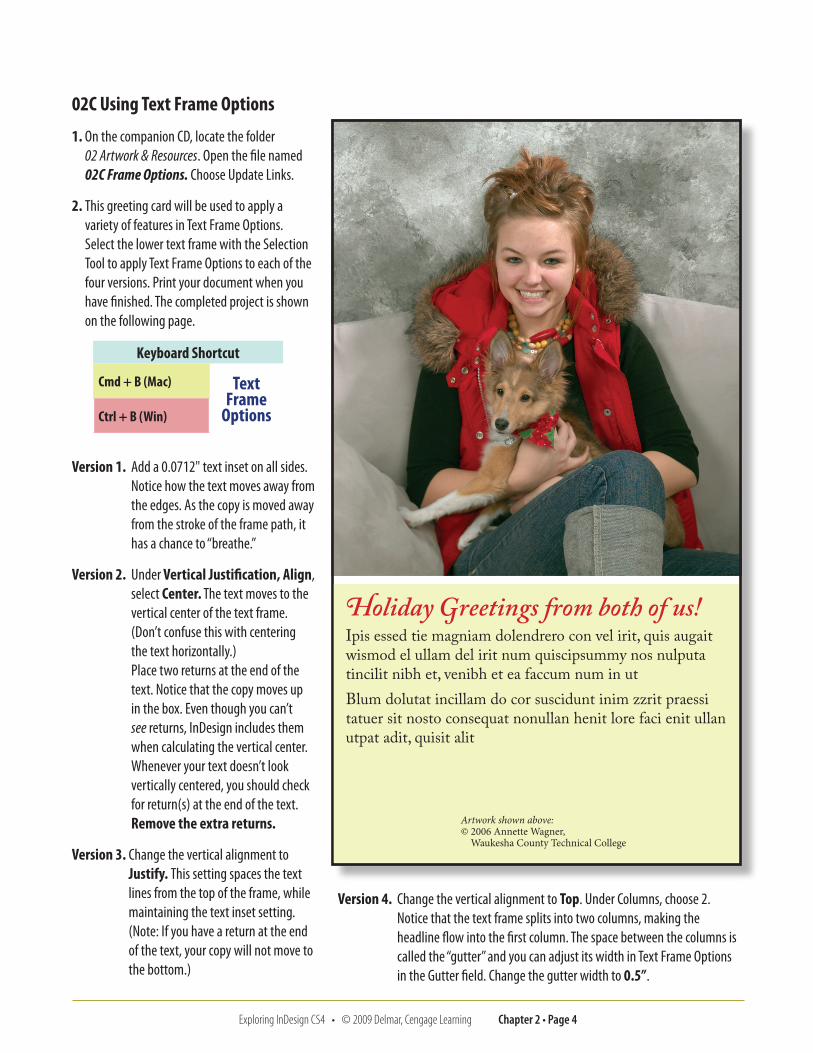
02C Using Text Frame Options
1. On the companion CD, locate the folder 02 Artwork & Resources. Open the file named 02C Frame Options. Choose Update Links.
2. This greeting card will be used to apply a variety of features in Text Frame Options. Select the lower text frame with the Selection Tool to apply Text Frame Options to each of the four versions. Print your document when you have finished. The completed project is shown on the following page.
Version 1. Add a 0.0712" text inset on all sides. Notice how the text moves away from the edges. As the copy is moved away from the stroke of the frame path, it has a chance to “breathe.”
Version 2. Under Vertical Justification, Align, select Center. The text moves to the vertical center of the text frame. (Don’t confuse this with centering the text horizontally.) Place two returns at the end of the text. Notice that the copy moves up in the box. Even though you can’t see returns, InDesign includes them when calculating the vertical center. Whenever your text doesn’t look vertically centered, you should check for return(s) at the end of the text. Remove the extra returns.
Version 3. Change the vertical alignment to Justify. This setting spaces the text lines from the top of the frame, while maintaining the text inset setting. (Note: If you have a return at the end of the text, your copy will not move to the bottom.)
Keyboard Shortcut
Cmd + B (Mac) Text Frame
OptionsCtrl + B (Win)
Version 4. Change the vertical alignment to Top. Under Columns, choose 2. Notice that the text frame splits into two columns, making the headline flow into the first column. The space between the columns is called the “gutter” and you can adjust its width in Text Frame Options in the Gutter field. Change the gutter width to 0.5”.
Artwork shown above: © 2006 Annette Wagner,
Waukesha County Technical College

Exploring InDesign CS4 • © 2009 Delmar, Cengage Learning Chapter 2 • Page 5
Holiday Greetings from both of us!Ipis essed tie magniam dolendrero con vel irit, quis augait wismod el ullam del irit num quiscipsummy nos nulputa tincilit nibh et, venibh et ea faccum num in ut Blum dolutat incillam do cor suscidunt inim zzrit praessi tatuer sit nosto consequat nonullan henit lore faci enit ullan utpat adit, quisit alit
Version 1
Version 3
Version 2
Version 4
Holiday Greetings from both of us!Ipis essed tie magniam dolendrero con vel irit, quis augait wismod el ullam del irit num quiscipsummy nos nulputa tincilit nibh et, venibh et ea faccum num in ut Blum dolutat incillam do cor suscidunt inim zzrit praessi tatuer sit nosto consequat nonullan henit lore faci enit ullan utpat adit, quisit alit
Holiday Greetings from both of us!Ipis essed tie magniam dolendrero con vel irit, quis augait
wismod el ullam del irit num quiscipsummy nos nulputa
tincilit nibh et, venibh et ea faccum num in ut
Blum dolutat incillam do cor suscidunt inim zzrit praessi
tatuer sit nosto consequat nonullan henit lore faci enit ullan
utpat adit, quisit alit
Holiday Greet-ings from both of us!Ipis essed tie magniam dolendrero con vel irit, quis augait wismod el ullam del irit num quis-cipsummy nos nulputa tincilit nibh et, venibh et ea faccum num in ut Blum dolutat incillam do
cor suscidunt inim zzrit praessi tatuer sit nosto consequat nonullan henit lore faci enit ullan utpat adit, quisit alit
Exploring InDesign CS4 • © 2009 Delmar, Cengage Learning Chapter 2 • Page 6
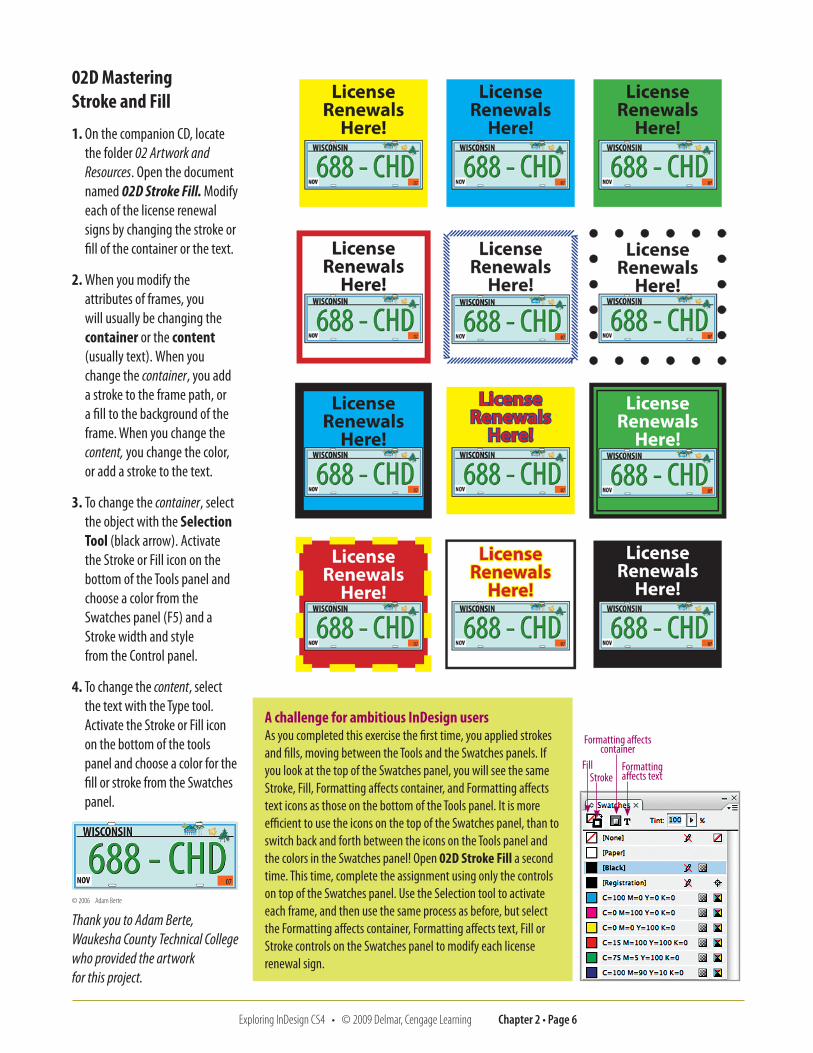
02D Mastering Stroke and Fill
1. On the companion CD, locate the folder 02 Artwork and Resources. Open the document named 02D Stroke Fill. Modify each of the license renewal signs by changing the stroke or fill of the container or the text.
2. When you modify the attributes of frames, you will usually be changing the container or the content (usually text). When you change the container, you add a stroke to the frame path, or a fill to the background of the frame. When you change the content, you change the color, or add a stroke to the text.
3. To change the container, select the object with the Selection Tool (black arrow). Activate the Stroke or Fill icon on the bottom of the Tools panel and choose a color from the Swatches panel (F5) and a Stroke width and style from the Control panel.
4. To change the content, select the text with the Type tool. Activate the Stroke or Fill icon on the bottom of the tools panel and choose a color for the fill or stroke from the Swatches panel.
©2006 AdamBerte
Thank you to Adam Berte, Waukesha County Technical College who provided the artwork for this project.
A challenge for ambitious InDesign users As you completed this exercise the first time, you applied strokes and fills, moving between the Tools and the Swatches panels. If you look at the top of the Swatches panel, you will see the same Stroke, Fill, Formatting affects container, and Formatting affects text icons as those on the bottom of the Tools panel. It is more efficient to use the icons on the top of the Swatches panel, than to switch back and forth between the icons on the Tools panel and the colors in the Swatches panel! Open 02D Stroke Fill a second time. This time, complete the assignment using only the controls on top of the Swatches panel. Use the Selection tool to activate each frame, and then use the same process as before, but select the Formatting affects container, Formatting affects text, Fill or Stroke controls on the Swatches panel to modify each license renewal sign.
FillStroke
Formatting affects container
Formatting affects text
Exploring InDesign CS4 • © 2009 Delmar, Cengage Learning Chapter 2 • Page 7
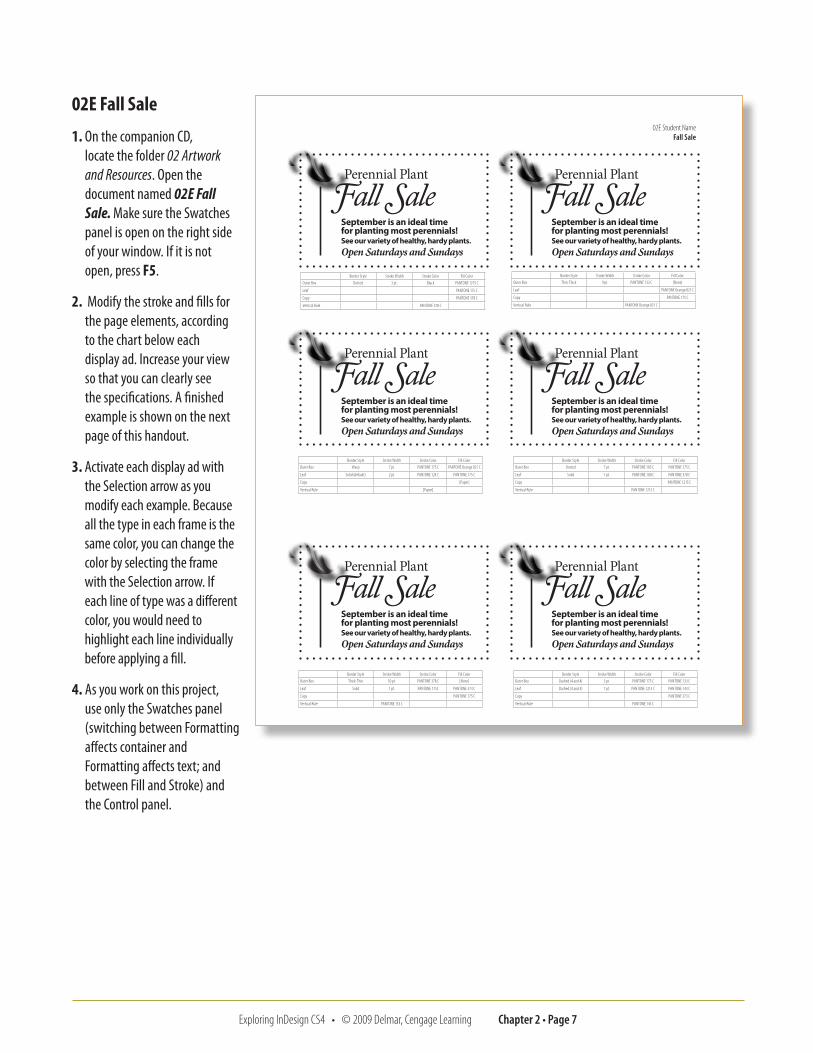
02E Fall Sale
1. On the companion CD, locate the folder 02 Artwork and Resources. Open the document named 02E Fall Sale. Make sure the Swatches panel is open on the right side of your window. If it is not open, press F5.
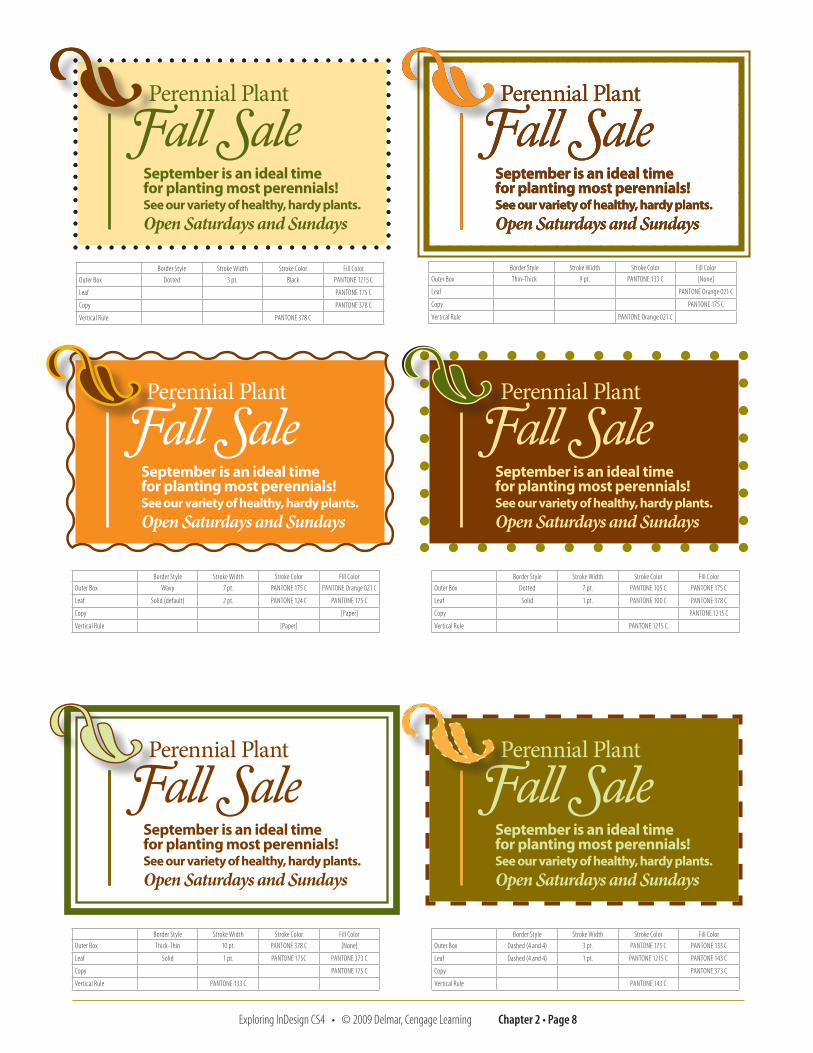
2. Modify the stroke and fills for the page elements, according to the chart below each display ad. Increase your view so that you can clearly see the specifications. A finished example is shown on the next page of this handout.
3. Activate each display ad with the Selection arrow as you modify each example. Because all the type in each frame is the same color, you can change the color by selecting the frame with the Selection arrow. If each line of type was a different color, you would need to highlight each line individually before applying a fill.
4. As you work on this project, use only the Swatches panel (switching between Formatting affects container and Formatting affects text; and between Fill and Stroke) and the Control panel.
BorderStyle StrokeWidth StrokeColor FillColorOuterBox Dotted 3pt. Black PANTONE1215C
Leaf PANTONE175C
Copy PANTONE378C
VerticalRule PANTONE378C
BorderStyle StrokeWidth StrokeColor FillColorOuterBox Thin-Thick 9pt. PANTONE133C [None]
Leaf PANTONEOrange021C
Copy PANTONE175C
VerticalRule PANTONEOrange021C
BorderStyle StrokeWidth StrokeColor FillColorOuterBox Dotted 7pt. PANTONE105C PANTONE175C
Leaf Solid 1pt. PANTONE100C PANTONE378C
Copy PANTONE1215C
VerticalRule PANTONE1215C
BorderStyle StrokeWidth StrokeColor FillColorOuterBox Wavy 7pt. PANTONE175C PANTONEOrange021C
Leaf Solid(default) 2pt. PANTONE124C PANTONE175C
Copy [Paper]
VerticalRule [Paper]
BorderStyle StrokeWidth StrokeColor FillColorOuterBox Thick-Thin 10pt. PANTONE378C [None]
Leaf Solid 1pt. PANTONE175C PANTONE373C
Copy PANTONE175C
VerticalRule PANTONE133C
BorderStyle StrokeWidth StrokeColor FillColorOuterBox Dashed(4and4) 3pt. PANTONE175C PANTONE133C
Leaf Dashed(4and4) 1pt. PANTONE1215C PANTONE143C
Copy PANTONE373C
VerticalRule PANTONE143C
02EStudentNameFall Sale
Perennial Plant
Fall SaleSeptember is an ideal timefor planting most perennials!See our variety of healthy, hardy plants. Open Saturdays and Sundays
Perennial Plant
Fall SaleSeptember is an ideal timefor planting most perennials!See our variety of healthy, hardy plants. Open Saturdays and Sundays
Perennial Plant
Fall SaleSeptember is an ideal timefor planting most perennials!See our variety of healthy, hardy plants. Open Saturdays and Sundays
Perennial Plant
Fall SaleSeptember is an ideal timefor planting most perennials!See our variety of healthy, hardy plants. Open Saturdays and Sundays
Perennial Plant
Fall SaleSeptember is an ideal timefor planting most perennials!See our variety of healthy, hardy plants. Open Saturdays and Sundays
Perennial Plant
Fall SaleSeptember is an ideal timefor planting most perennials!See our variety of healthy, hardy plants. Open Saturdays and Sundays
Exploring InDesign CS4 • © 2009 Delmar, Cengage Learning Chapter 2 • Page 8
Perennial Plant
Fall SaleSeptember is an ideal time for planting most perennials!See our variety of healthy, hardy plants. Open Saturdays and Sundays
Perennial Plant
Fall SaleSeptember is an ideal time for planting most perennials!See our variety of healthy, hardy plants. Open Saturdays and Sundays
Perennial Plant
Fall SaleSeptember is an ideal time for planting most perennials!See our variety of healthy, hardy plants. Open Saturdays and Sundays
Perennial Plant
Fall SaleSeptember is an ideal time for planting most perennials!See our variety of healthy, hardy plants. Open Saturdays and Sundays
Perennial Plant
Fall SaleSeptember is an ideal time for planting most perennials!See our variety of healthy, hardy plants. Open Saturdays and Sundays
Perennial Plant
Fall SaleSeptember is an ideal time for planting most perennials!See our variety of healthy, hardy plants. Open Saturdays and Sundays
Perennial Plant
Fall SaleSeptember is an ideal time for planting most perennials!See our variety of healthy, hardy plants. Open Saturdays and Sundays
Perennial Plant
Fall SaleSeptember is an ideal time for planting most perennials!See our variety of healthy, hardy plants. Open Saturdays and Sundays
BorderStyle StrokeWidth StrokeColor FillColorOuterBox Dotted 3pt. Black PANTONE1215C
Leaf PANTONE175C
Copy PANTONE378C
VerticalRule PANTONE378C
BorderStyle StrokeWidth StrokeColor FillColorOuterBox Thin-Thick 9pt. PANTONE133C [None]
Leaf PANTONEOrange021C
Copy PANTONE175C
VerticalRule PANTONEOrange021C
BorderStyle StrokeWidth StrokeColor FillColorOuterBox Dotted 7pt. PANTONE105C PANTONE175C
Leaf Solid 1pt. PANTONE100C PANTONE378C
Copy PANTONE1215C
VerticalRule PANTONE1215C
BorderStyle StrokeWidth StrokeColor FillColorOuterBox Wavy 7pt. PANTONE175C PANTONEOrange021C
Leaf Solid(default) 2pt. PANTONE124C PANTONE175C
Copy [Paper]
VerticalRule [Paper]
BorderStyle StrokeWidth StrokeColor FillColorOuterBox Thick-Thin 10pt. PANTONE378C [None]
Leaf Solid 1pt. PANTONE175C PANTONE373C
Copy PANTONE175C
VerticalRule PANTONE133C
BorderStyle StrokeWidth StrokeColor FillColorOuterBox Dashed(4and4) 3pt. PANTONE175C PANTONE133C
Leaf Dashed(4and4) 1pt. PANTONE1215C PANTONE143C
Copy PANTONE373C
VerticalRule PANTONE143C

Exploring InDesign CS4 • © 2009 Delmar, Cengage Learning Chapter 2 • Page 9
02F Reedy Florist
1. Create a letter-sized document.
2. Measure one of the three ads shown right. Select the Rectangle tool (M) and click in the center of your document. Enter the width and the height in the dialog box. Press D to apply a default 1-point, black stroke around the outside of the frame.
3. Press Cmd+F10 (Mac) or Ctrl+F10 (Windows) to open the Stroke panel. In the Weight field, choose 5 pt. In the Type pull down menu, select Japanese Dots. In the Align Stroke area, select the Align Stroke to Inside icon. (Use the Tool Tips to help identify the fields.) Convert the frame to a text frame by clicking on it with the Type tool. Use Cmd+B or Ctrl+B to open Text Frame Options. Enter a 0.125 inch text inset on all sides of the frame
4. Type first, format second. Use a hard return between each line. Type a “Z” to hold the spot for the ampersand. If the text becomes overset, select all the type, Cmd+A (Mac) or Ctrl+A (Windows), and reduce the point size until all the type is visible. All the type, except the ampersand, is from the Minion Pro family. Use keyboard shortcuts to change the point size and the style of type to bold or italic, as needed.
5. The bottom two lines of type use small caps. Type the lines, capitalizing the first letter of each word (except for the word “and”). To create small caps, highlight the two lines and press the icon in the Character or Paragraph Formatting Options, on the Control panel. Use keyboard shortcuts to adjust point size and leading.
6. Highlight all the text and press Shift+Cmd+C (Mac) or Shift+Ctrl+C (Windows) to center it horizontally.
7. Highlight the “Z” and change the font to Adobe Garamond Pro Bold Italic. Open the Glyphs panel and select the appropriate ampersand. Increase the point size until the ampersand is approximately the same size as the one in the example.
8. Finally, open Text Frame Options and set the Vertical Justification Alignment to Center. Proof and print.
Use this production sequence:Create the correct frame size. 1. Add stroke and align to inside. 2. Add appropriate text inset. 3. Do the typing without formatting. 4. Apply the character formatting.5. Apply the paragraph formatting. 6. Proof carefully, print and proof again!7.
Reedy Florist z GreenhousesAnnual FlowersVegetable BasketsHanging BasketsFamily Owned and Operated for 85 yearsOpen Year RoundCorner Concord and Park Street
1. Typing is completed.
ReedyFlorist z GreenhousesAnnual FlowersVegetable BasketsHanging BasketsFamily Owned and Operated for 85 yearsOpen Year RoundCorner Concord and Park Street
2. Type size and styles added.
ReedyFlorist & Greenhouses
Annual FlowersVegetable BasketsHanging Baskets
Family Owned and Operated for 85 yearsOpen Year Round
Corner Concord and Park Street
3. Finished project
Exploring InDesign CS4 • © 2009 Delmar, Cengage Learning Chapter 2 • Page 10
� Review Questions Exploring InDesign CS4
1. Howcanyoudifferentiateasansseriftypefacefromaseriftypeface?
2. Whyisitnotnecessarytoaddextraspacebetweensentencesbypressingthespacebartwice?
3. Howmanypointsareinaninch?
4. Whatisaglyph?
5. WhatTextFrameoptionshouldyoualwaysusewhenyouhaveappliedastroketoaframecontainingcopy?
6. Howdoyouchangetheunitsofmeasurementinadocument?
7. Whendescribingadocument’smeasurements,whichdimensionislistedfirst:thewidthortheheight?
8. Howcanyoucenteryour7"x5"documentonletter-sizepaperduringprinting?
9. Whatisthekeyboardshortcutforcreatingaboldtypestyle?
10. Listthesevenstepsintheproductionsequenceasdescribedinthechapter.
Chapter 2