Embed Size (px)
Citation preview

T E X A S C O M P U T E R C O O P E R A T I V E
D e v e l o p e d b y t h e
OVERVIEW
TxEIS Student

Copyright © 2016 by Texas Computer Cooperative All rights reserved
1314 Hines AvenueSan Antonio, TX 78208-1899

1
TxEIS Student Overview
Contents7BOverview .................................................................................................................................. 3
Release Notes & Known Issues ..................................................................................................................... 3System Requirements and Browser Settings .......................................................................................... 3TxEIS Software Terminology .......................................................................................................................... 3
Login ......................................................................................................................................... 5Login Page ........................................................................................................................................................... 5Change Password ............................................................................................................................................. 6Exit and Logout .................................................................................................................................................. 7
Navigation ................................................................................................................................ 9Application Directory ...................................................................................................................................... 9My Applications ...............................................................................................................................................10Menu ....................................................................................................................................................................11Software Version ..............................................................................................................................................12Change Application .......................................................................................................................................13
Linked Pages for Student Maintenance ...........................................................................................13Change School Year or Campus .................................................................................................................15Session Timer ....................................................................................................................................................15Online Help .......................................................................................................................................................17Printing ...............................................................................................................................................................18Back Button .......................................................................................................................................................18
Retrieve and Maintain Data ................................................................................................. 19Autosuggest ......................................................................................................................................................19Student Directory............................................................................................................................................20Student Photo ..................................................................................................................................................23
Change Student Photo ..........................................................................................................................23Student Information ......................................................................................................................................25Ellipsis Lookups and Directories ................................................................................................................27
Lookup .........................................................................................................................................................28Directory .....................................................................................................................................................29
Column Sorting ...............................................................................................................................................29Pagination ..........................................................................................................................................................30Adding Records ...............................................................................................................................................31
+Add Button ..............................................................................................................................................31Add Button .................................................................................................................................................32
Delete Records .................................................................................................................................................33Delete Button ............................................................................................................................................35
Spyglass Icon ....................................................................................................................................................36Save Button .......................................................................................................................................................39
Reports ................................................................................................................................... 43

2
TxEIS Student Overview
Report Parameters ..........................................................................................................................................44Ellipsis Button ............................................................................................................................................45Calendar Icon ............................................................................................................................................46
Report Preview .................................................................................................................................................47User Created Reports .....................................................................................................................................49
Templates ...................................................................................................................................................50Sorting and Filtering Reports .....................................................................................................................52
Sort ................................................................................................................................................................53Filter ..............................................................................................................................................................54
3
TxEIS Student Overview
7BoverviewThe TxEIS Student system is a group of web applications that allow you to interact with your database using a simple Internet Browser such as Internet Explorer, Firefox, Chrome, or Safari.
Release Notes & Known IssuesAs the TxEIS software programs are modified, release notes are posted on the TxEIS Resources page at txeis.net. An ESC consultant login is required to access the page. If known issues are identified for a particular release or update, a Known Issues document is also posted.
System Requirements and Browser SettingsPeriodically ensure that your system and browser settings meet the minimum requirements. For information about system requirements and recommended browser settings, see the System Requirements link found on the Contents tab of the TxEIS online Help system.
TxEIS Software TerminologySystem - The group of applications supporting a broad area of LEA or campus management, or specific group of applications (e.g., Business, Student, PEIMS, OCR, District Administration, System Administration).
Application - A particular application within a system (e.g., Attendance, Registration).
Page - Selected from a menu or submenu, a page may have multiple tabs, or it may stand alone. A page can have fields, buttons, grids, report parameters, and other features allowing you to accomplish one or more tasks.
Tab - Some pages have multiple tabs allowing you to accomplish tasks that can be logically grouped together.
Field - A mechanism for inputting data, such as a text entry box, drop-down list, check box, or radio button. Each field has a label, such as Grade Level. In TxEIS documentation, field names are displayed in bold font.
Report Parameters - Fields that allow you to specify criteria for running reports.
Grid - A group of records displayed in columns and rows, or empty columns and rows in which to add new records, such as a table maintenance page.
Free Form Area: A group of fields below a grid. Data is entered in the fields below the grid, rather than in the grid. Once the record is saved, the data is displayed in a grid.

4
TxEIS Student Overview

5
TxEIS Student Overview
Login
Login Page
BEFORE YOU BEGIN: Click What’s HOT in TxEIS to access the What’s Hot in TxEIS newsletter which is updated with each software release. Clicking the button opens the latest web-based newsletter on the txeis.net website.
1. In the User Name field, type the user ID or name provided by the district.
2. In the Password field, type your password. The text is displayed as black dots for privacy.
3. In the County/District Number field, type the six-digit county-district number.
4. The Version Build displays the current software version and build number.
5. Click Login. The Application Directory is displayed.

6
TxEIS Student Overview
Change Password From the Application Directory, in the top-right corner, click Change Password to access the Change Password page where you can update your password as needed.
The Change Password page opens. Your user ID is displayed in the User ID field and cannot be changed.
1. In the Old Password field, type the current password.
2. In the New Password and Confirm Password fields, type and re-type a new password that conforms to password requirements as specified by the LEA.
3. Click Save. Or, click Cancel to close the page without changing your password.
The Change Password page closes, and you return to the Application Directory.

7
TxEIS Student Overview
Exit and LogoutBefore you can log out of TxEIS, you must exit any applications you have opened. In the top-right corner of each application, click Exit Application.
Once you have exited all applications, the Application Directory page is displayed. From the top-right corner of the Application Directory, click Logout.
The Logout page is displayed. Click Back to Login to return to the Login page.
It is important to exit and logout properly to ensure that the software functions properly.

8
TxEIS Student Overview

9
TxEIS Student Overview
navigationOnce you successfully log on to TxEIS, the Application Directory is displayed, giving you access to TxEIS navigation tools and features.
Application DirectoryThe Application Directory displays links to all TxEIS applications. All applications are displayed, including applications you may not have access to. To access a Student application, click the application link under Student (e.g., Attendance).

10
TxEIS Student Overview
My ApplicationsUnder My Applications, on the left side of the page, only the applications to which you have rights are listed. You can access a Student application by clicking the application link under My Applications.
Access rights for each application must be set in the Security Administration system by a user with administrative access.
If you attempt to open an application you do not have rights to, the following page is displayed:
Click Exit to return to the Application Directory page.

11
TxEIS Student Overview
MenuWhen you click an application link from the Application Directory, the application landing page opens, which provides access to the application menu.
Click a menu to display the submenus.
If an arrow is displayed to the right of the submenu name, another submenu exists. The submenu appears when you hover over the submenu.
When the page you want to access is visible, click the page name to open the page.
The breadcrumb below the menu displays the menu path to the selected page.
Some pages have multiple tabs; other pages may have no tabs.

12
TxEIS Student Overview
Software VersionFrom the Application Directory, click Application Directory to view a list of the current versions and build numbers for each application you have access to. Click OK to close the list.
Additionally, in each application, the current version is displayed next to the application name.
13
TxEIS Student Overview
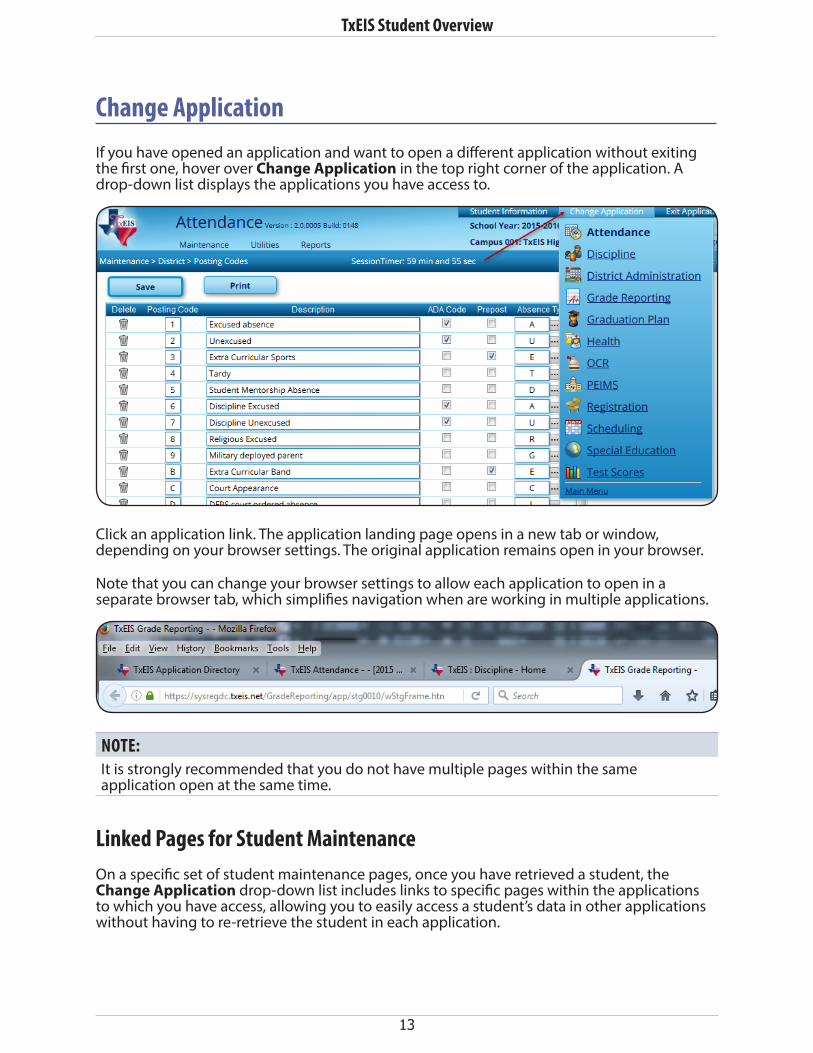
Change ApplicationIf you have opened an application and want to open a different application without exiting the first one, hover over Change Application in the top right corner of the application. A drop-down list displays the applications you have access to.
Click an application link. The application landing page opens in a new tab or window, depending on your browser settings. The original application remains open in your browser.
Note that you can change your browser settings to allow each application to open in a separate browser tab, which simplifies navigation when are working in multiple applications.
NOTE:It is strongly recommended that you do not have multiple pages within the same application open at the same time.
Linked Pages for Student MaintenanceOn a specific set of student maintenance pages, once you have retrieved a student, the Change Application drop-down list includes links to specific pages within the applications to which you have access, allowing you to easily access a student’s data in other applications without having to re-retrieve the student in each application.
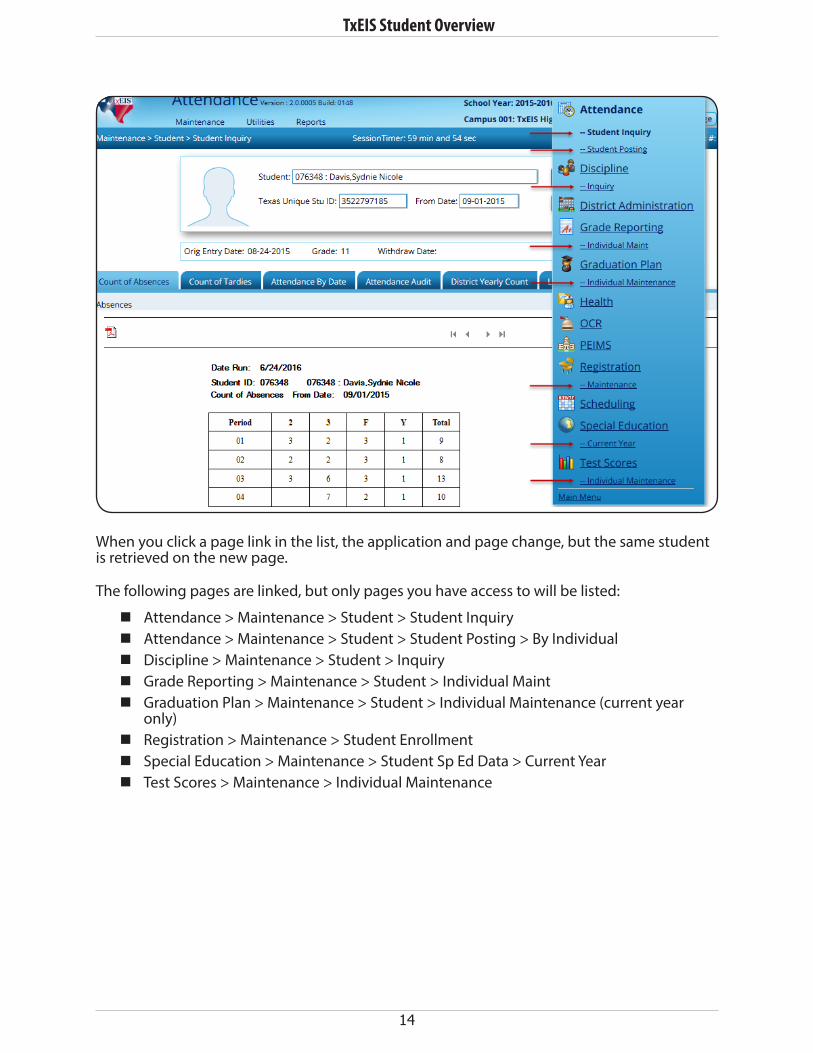
14
TxEIS Student Overview
When you click a page link in the list, the application and page change, but the same student is retrieved on the new page.
The following pages are linked, but only pages you have access to will be listed:
� Attendance > Maintenance > Student > Student Inquiry � Attendance > Maintenance > Student > Student Posting > By Individual � Discipline > Maintenance > Student > Inquiry � Grade Reporting > Maintenance > Student > Individual Maint � Graduation Plan > Maintenance > Student > Individual Maintenance (current year
only) � Registration > Maintenance > Student Enrollment � Special Education > Maintenance > Student Sp Ed Data > Current Year � Test Scores > Maintenance > Individual Maintenance
15
TxEIS Student Overview
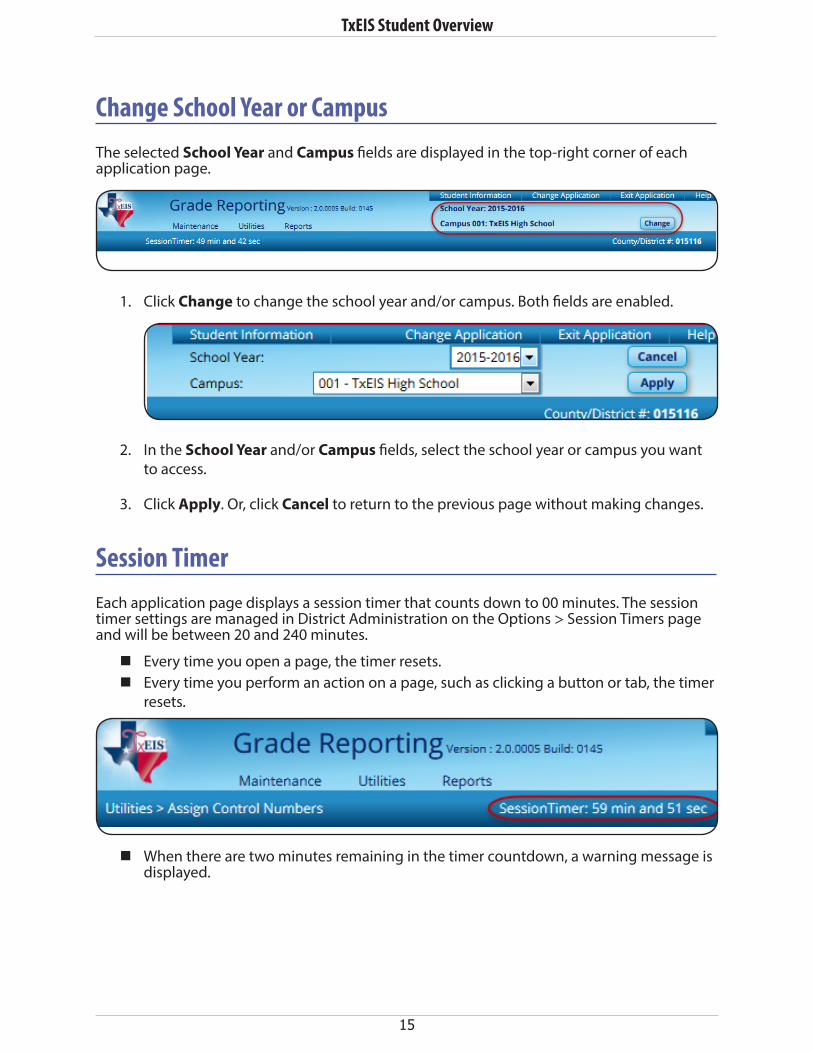
Change School Year or CampusThe selected School Year and Campus fields are displayed in the top-right corner of each application page.
1. Click Change to change the school year and/or campus. Both fields are enabled.
2. In the School Year and/or Campus fields, select the school year or campus you want to access.
3. Click Apply. Or, click Cancel to return to the previous page without making changes.
Session TimerEach application page displays a session timer that counts down to 00 minutes. The session timer settings are managed in District Administration on the Options > Session Timers page and will be between 20 and 240 minutes.
� Every time you open a page, the timer resets. � Every time you perform an action on a page, such as clicking a button or tab, the timer
resets.
� When there are two minutes remaining in the timer countdown, a warning message is displayed.

16
TxEIS Student Overview
Click OK to reset the session timer, or click Cancel to continue the existing session. If you do not click either, the existing session will continue counting down.
� After the two-minute warning, if you do not click OK or Cancel, the application session automatically times out two minutes later due to inactivity. To return to the application and start a new session, you can click Change Application or Exit Application.
NOTE:The session timers are separate for each application, so you may receive a session timeout message in one application while you are working in another application.
17
TxEIS Student Overview
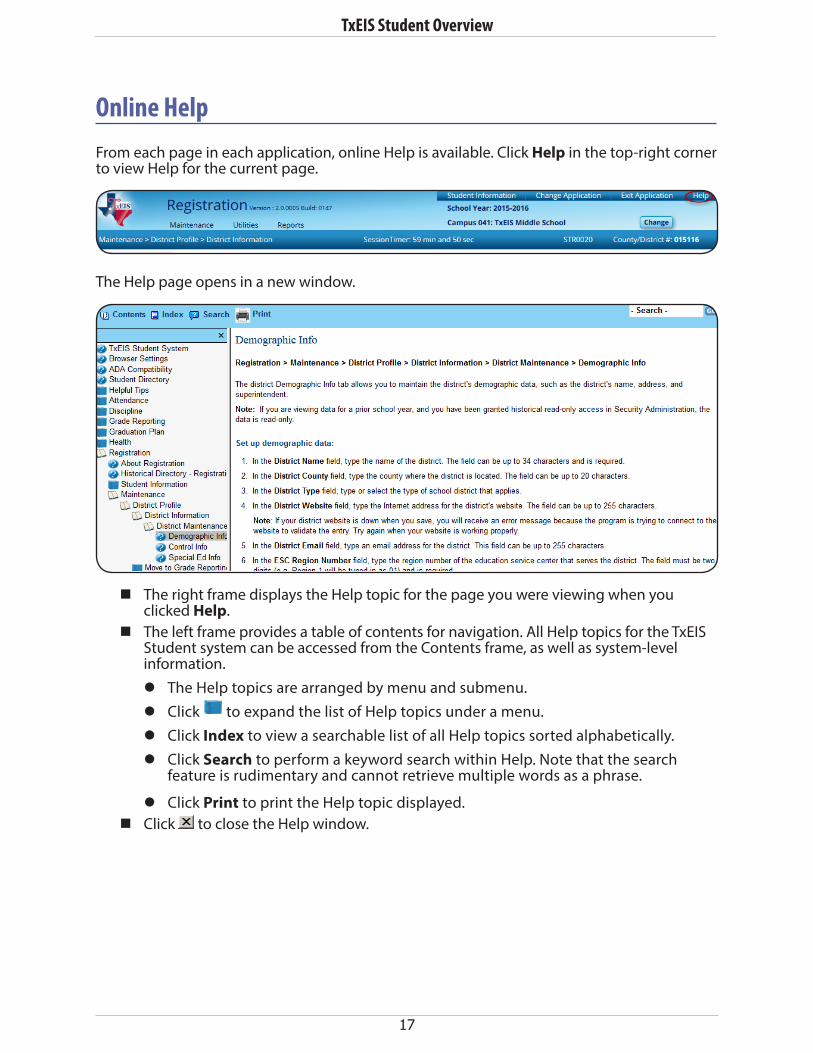
Online HelpFrom each page in each application, online Help is available. Click Help in the top-right corner to view Help for the current page.
The Help page opens in a new window.
� The right frame displays the Help topic for the page you were viewing when you clicked Help.
� The left frame provides a table of contents for navigation. All Help topics for the TxEIS Student system can be accessed from the Contents frame, as well as system-level information.
z The Help topics are arranged by menu and submenu. z Click to expand the list of Help topics under a menu. z Click Index to view a searchable list of all Help topics sorted alphabetically. z Click Search to perform a keyword search within Help. Note that the search
feature is rudimentary and cannot retrieve multiple words as a phrase.
z Click Print to print the Help topic displayed. � Click to close the Help window.

18
TxEIS Student Overview
PrintingIf you print data using an option in the browser menu or browser toolbar, only the page you are currently viewing will print, regardless of your settings in the Windows Print Options dialog box. Any TxEIS pages, tabs, and tables that are available in a printable format will have a Print button on the page allowing you to generate the data in a printable format.
Back ButtonNormally, when using an internet browser, you can click the browser ‘back’ button or arrow to return to the last page viewed. Since TxEIS is a secure system, the use of the “back” button or arrow is not allowed.
19
TxEIS Student Overview
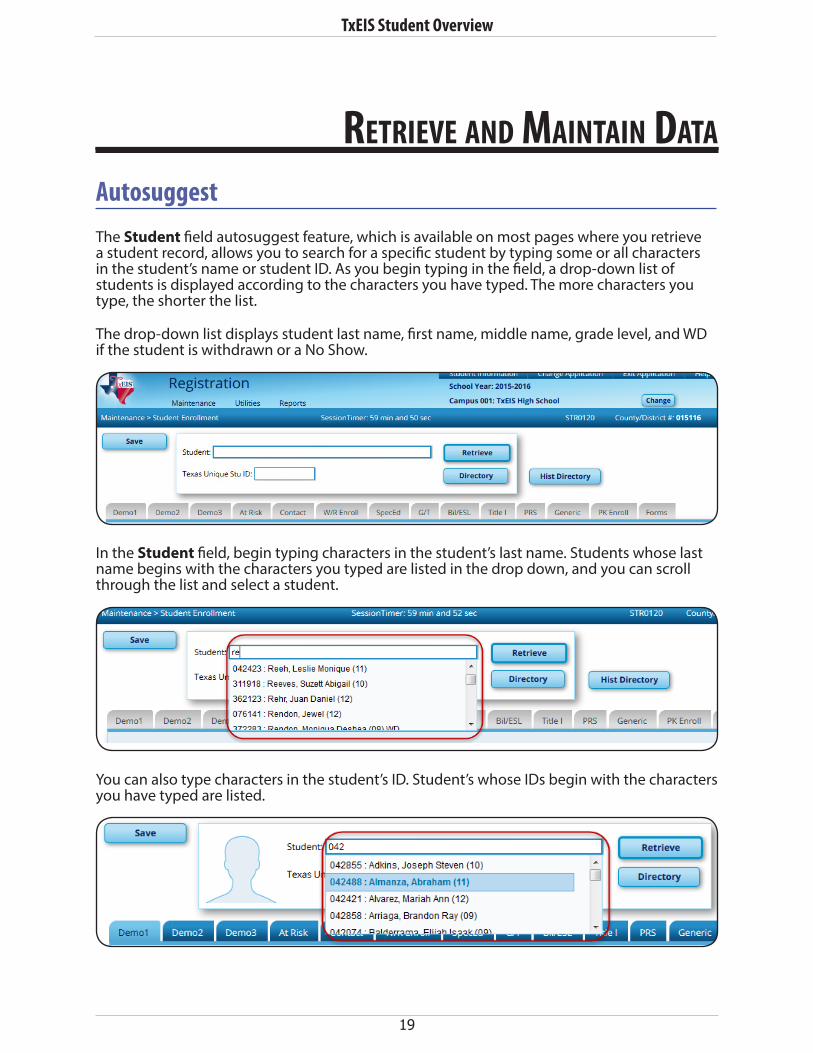
retrieve and Maintain data AutosuggestThe Student field autosuggest feature, which is available on most pages where you retrieve a student record, allows you to search for a specific student by typing some or all characters in the student’s name or student ID. As you begin typing in the field, a drop-down list of students is displayed according to the characters you have typed. The more characters you type, the shorter the list.
The drop-down list displays student last name, first name, middle name, grade level, and WD if the student is withdrawn or a No Show.
In the Student field, begin typing characters in the student’s last name. Students whose last name begins with the characters you typed are listed in the drop down, and you can scroll through the list and select a student.
You can also type characters in the student’s ID. Student’s whose IDs begin with the characters you have typed are listed.

20
TxEIS Student Overview
Additionally, you can type the first character of a student’s last name, comma, and the first character of the student’s first name.
The Texas Unique Stu ID field autosuggest feature is also available on pages where student data is retrieved. Begin typing characters in the student’s ten-digit state assigned ID number, and students are listed whose IDs start with the characters you have typed.
Student DirectoryThe Student Directory allows you to search for a student and retrieve the student’s record to the page from which you accessed the directory. You can search for a student by last and/or first name. Other options allow you to narrow the search further.
On pages where student data is retrieved, you can click Directory to open the Student Directory.
The Student Directory opens in a pop-up window.

21
TxEIS Student Overview
1. You can search for a student by last and/or first name. Other options allow you to narrow the search further. Enter data in any or all of the following fields:
z In the Last Name field, type all or part of the student’s last name. For example, you can type sm to find all students whose last name begins with Sm.
z In the First Name field, type all or part of the student’s first name. For example, you can type jo to find all students whose first name begins with Jo.
z In the Campus ID field, type the three-digit campus ID to filter the search results for a specific campus. Leave blank to search all campuses to which you have access.
z In the Texas Unique Stu ID field, type all or part of the student’s Texas Unique State ID. For example, you can type 55 to find all students whose ID contains 55.
z In the Grade Level field, type a grade level to narrow the search to one grade level. Leave blank to search all grade levels.
z In the Active Cd field, select Active, Inactive, or All to indicate if you want to limit the search results to active students only, inactive students only, or all students.
Depending on the application, there may be additional fields allowing you to filter the search results for specific students.
z For example, in Registration on the Maintenance > Student Maintenance tabs, the Next Year Students field allows you the option to retrieve students with record status 5 (i.e., not currently enrolled in this district, will attend next year) in the search results. When you select a record-status-code 5 student to be retrieved, a warning message is displayed to inform you that the student is not enrolled in the current year.
2. Click Search. The students who meet the criteria entered are displayed.

22
TxEIS Student Overview
If more students are retrieved than can be displayed on one page, you can page through the list, which is described later in this guide.
3. When you locate the student you want to retrieve, click the student ID. The directory closes, and the student’s information is displayed on the page from which you accessed the directory.
4. Click Cancel or Close to return to the previous page without selecting a student.

23
TxEIS Student Overview
Student PhotoIf set up by the LEA, student photos are displayed on all maintenance pages on which individual student records are retrieved. The photo is displayed once you click Retrieve.
If a photo is not available, a silhouette image is displayed in place of the student photo.
Change Student PhotoFrom the Registration > Maintenance > Student Enrollment page, you can upload a different photo for the student if an image file is available on your local PC.
1. Hover over the existing photo or silhouette, and the word “Change” appears on the image.
2. Click Change. The Change Student Photo window opens.

24
TxEIS Student Overview
3. Click Browse. Locate and select an alternate photo on your local PC. The new image is displayed.

25
TxEIS Student Overview
4. Click Save. The new image now appears on the student maintenance pages.
The initial student photo image files must be copied to a folder in a TxEIS directory. (Note that directory will vary by server.) Within the TxEIS directory, place files in a Pictures folder, and in a district folder (e.g., TxEIS Directory\Pictures\cccddd\007036.jpg). If a Pictures folder does not exist, or if the district folder does not exist, photos will not be enabled on any pages. See the TxEIS Getting Started guide for more information.
Student InformationThe Student Information report provides demographic information, contact information, discipline records, attendance records, special program enrollment information, schedules and health information (Medical Alert) from the Attendance, Discipline, Grade Reporting, Health, and Registration applications depending on your security rights.
From any of these applications, click Student Information in the top-right corner to view the report.
If a student was already retrieved, data for the selected student is displayed. Otherwise, the page is blank and you can use the fields at the top of the report page to retrieve a student.

26
TxEIS Student Overview
The School Year field displays the year for which you are logged on. You can select a different year.

27
TxEIS Student Overview
Ellipsis Lookups and DirectoriesThroughout TxEIS Student applications, some fields have a small square ellipsis icon allowing you to search for and retrieve a value for the corresponding field.
When you click the icon, a lookup or directory opens depending on the field.

28
TxEIS Student Overview
LookupA lookup (i.e., list) provides one data element, such as a code/description. A search field is provided.
1. To search for a specific value, begin typing the description, code, or ID in the Search field. The list is automatically filtered to display the records where the description, code, or ID contains the characters you have typed.
2. Click the link for the value you want to select. The lookup closes, and the field is populated with the selected value.

29
TxEIS Student Overview
DirectoryA directory returns multiple fields of information and usually has multiple search fields. See the Student Directory section of this guide for an explanation of directory usage.
Column SortingIn many grids, you can sort the displayed data in order to more easily locate a specific record. When a column heading is underlined, the data in the grid can be sorted by that column.
Click the column to sort the data in ascending order.
Click the column again to sort the data in descending order.

30
TxEIS Student Overview
PaginationSome grids and pages display a set number of rows of data. If the available data exceeds the number of rows that can be displayed on one page, pagination arrows will be available at the bottom of the grid or page allowing you to go to the previous or next page, or to the first or last page.
Pagination arrows are also displayed at the top of multi-page reports.
� Click to go to the first page. � Click to go back one page. � Click to go forward one page. � Click to go to the last page.
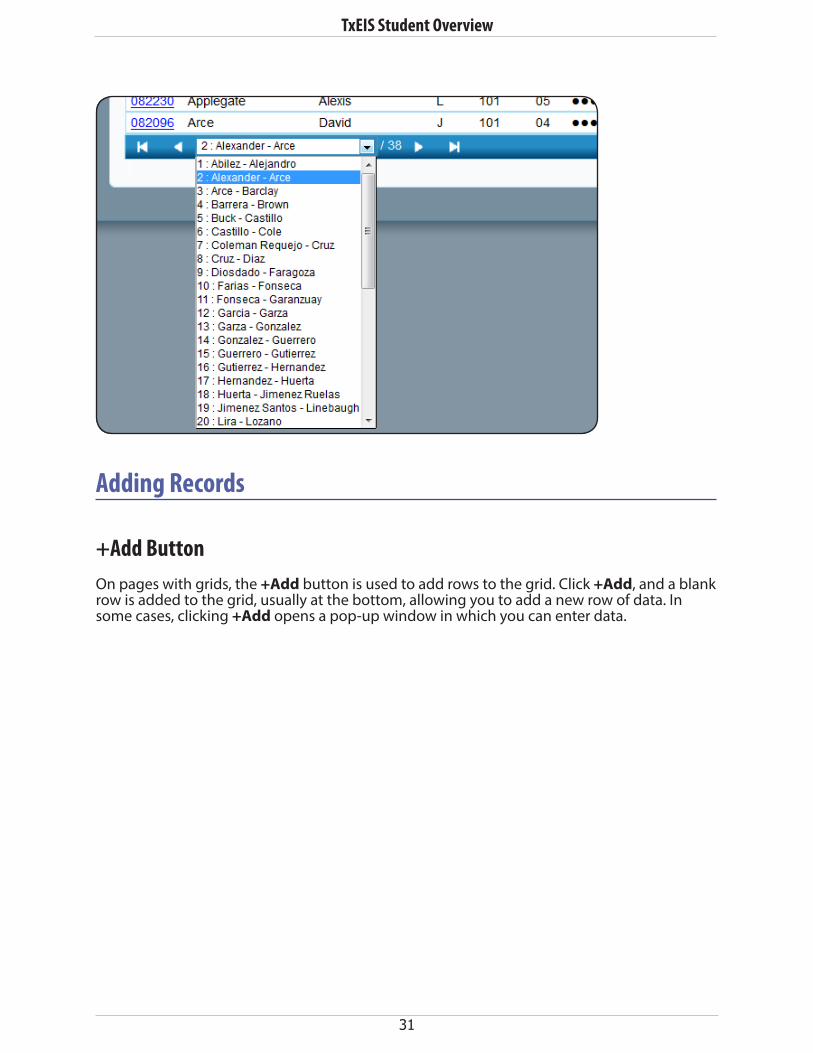
Some pages also provide a drop-down page list allowing you to jump to a specific page. For example, the Student Directory provides a drop-down list showing the student name ranges on each page.
31
TxEIS Student Overview
Adding Records
+Add ButtonOn pages with grids, the +Add button is used to add rows to the grid. Click +Add, and a blank row is added to the grid, usually at the bottom, allowing you to add a new row of data. In some cases, clicking +Add opens a pop-up window in which you can enter data.

32
TxEIS Student Overview
Add ButtonOn pages without a grid, an Add or New button (or similarly named button) is used to add a new record. Click Add, and the page is cleared of data allowing you to add and save a new record.
33
TxEIS Student Overview
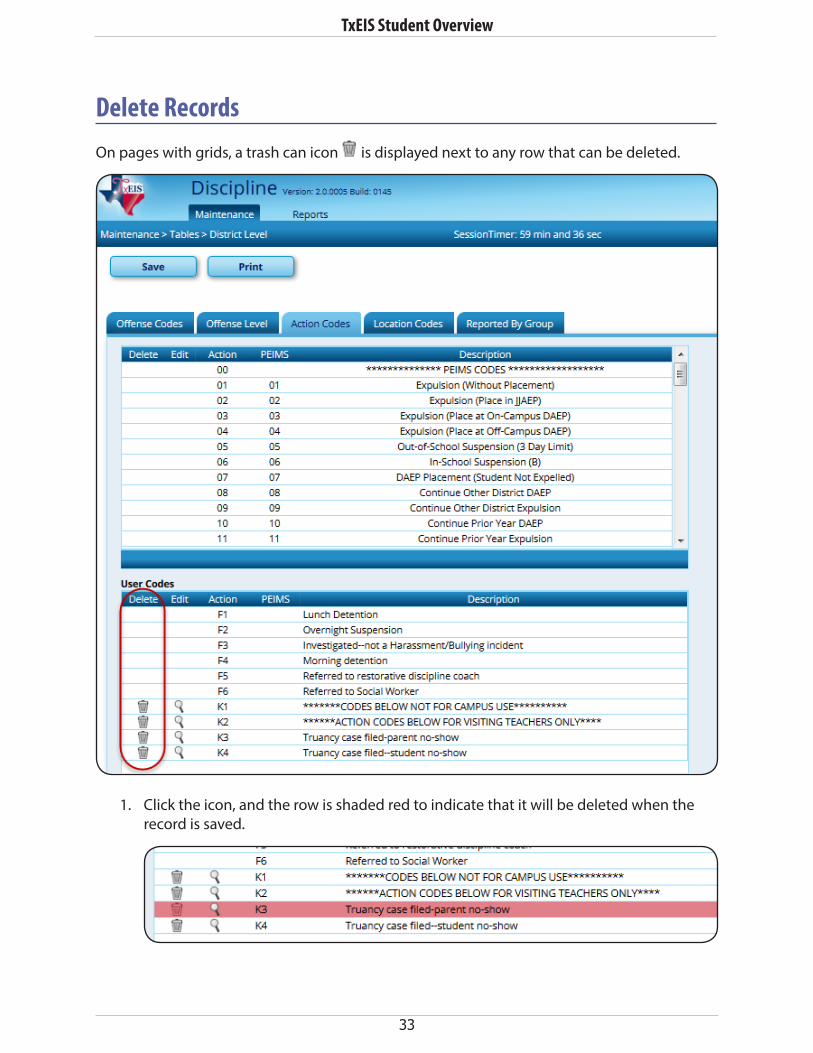
Delete RecordsOn pages with grids, a trash can icon is displayed next to any row that can be deleted.
1. Click the icon, and the row is shaded red to indicate that it will be deleted when the record is saved.

34
TxEIS Student Overview
You can select multiple rows to be deleted at the same time.
2. Click Save.
z On most pages, a message is displayed asking you to confirm that you want to delete the row.
Click Yes to continue. The selected rows are deleted. Or, click No to cancel the action.
z If restrictions exist, a message is displayed in red at the top of the page.
NOTE:On most pages, you can save edits and delete records in the same step (i.e., the changes are all committed when the record is saved).

35
TxEIS Student Overview
Delete ButtonOn pages without a grid, a Delete button (or similarly named button) is used to delete the displayed record.
On most pages, when you click Delete, a message is displayed asking you to confirm that you want to delete the record.
Click Yes to continue. The selected rows are deleted. Or, click No to cancel the action.

36
TxEIS Student Overview
Spyglass IconSpyglass icons are displayed throughout TxEIS Student when additional data exists, or when additional information can be added, for the record displayed. Click the spyglass icon to view or add data.
On some pages, clicking the icon opens a pop-up window that displays additional fields. On other pages, clicking the spyglass icon opens a new page. Elsewhere, the clicking the spyglass may display a new section of information on the same page.
Example 1:
Discipline > Maintenance > Student > Inquiry
Click the spyglass icon to go to Discipline > Maintenance > Student > Maintenance where you can add, modify, or delete the record.

37
TxEIS Student Overview
Example 2:
Grade Reporting > Maintenance > Master Schedule > District Schedule
To edit a course record, click the spyglass icon. The fields in the free-form area below the grid are enabled allowing you to make changes to the grid data. Click Save, and the changes are displayed in the grid.

38
TxEIS Student Overview
Example 3:
Discipline > Maintenance > Tables > District Level > Action Codes
Click spyglass icon to edit a user action code. A pop-up window opens allowing you to add or change data. Update the fields, click OK, and the window closes. Click Save, and the changes are displayed in the grid.

39
TxEIS Student Overview
Example 4:
Health > Maintenance > Student Health > Emergency
Click the spyglass icon to view the details for the student’s contacts. A read-only pop-up window opens displaying the contact information.
Other variations of the spyglass icon may exist. View the online Help for an explanation of the spyglass icon usage on the page you are viewing.
Save ButtonAll new and changed data must be saved in order to be retained in the database. Click Save any time you need to keep the changes you have made.
IMPORTANT!Save often. Unsaved data is lost when the page times out. If you get called away, or something unexpected happens, you may lose any work you have not saved.

40
TxEIS Student Overview
If the data was successfully saved, a “Save Successful” message is displayed below the Save button.
If any required data is missing, or the record cannot be saved for any reason, a red error message is displayed above the Save button. The field(s) with invalid data are highlighted.
All issues must be corrected before you can successfully save the data.
HERE’S A TIP!On maintenance pages, if the cursor is in a data field, and any data on the page has been changed, pressing ENTER saves the data or displays the appropriate error message.
If you attempt to leave a page or access another record before saving changes, a warning message is displayed prompting you to confirm the action.

41
TxEIS Student Overview
Click Cancel to return to the page and save any changes. Otherwise, click OK.
This message may also be displayed.
Click Stay on Page to return to the page and save any changes. Otherwise, click Leave Page.

42
TxEIS Student Overview
43
TxEIS Student Overview
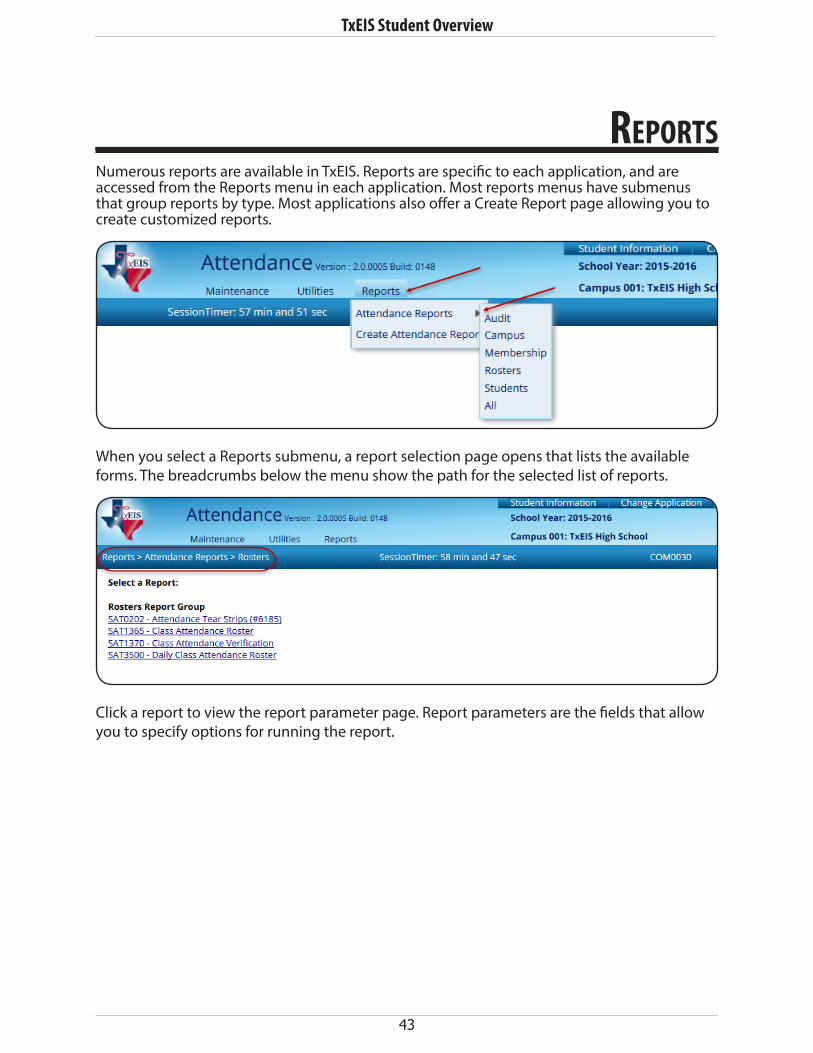
reportsNumerous reports are available in TxEIS. Reports are specific to each application, and are accessed from the Reports menu in each application. Most reports menus have submenus that group reports by type. Most applications also offer a Create Report page allowing you to create customized reports.
When you select a Reports submenu, a report selection page opens that lists the available forms. The breadcrumbs below the menu show the path for the selected list of reports.
Click a report to view the report parameter page. Report parameters are the fields that allow you to specify options for running the report.

44
TxEIS Student Overview
Report Parameters
� The Report ID field displays the unique ID for the report. The first three characters generally refer to the application. For example, SAT refers to Student Attendance, SGR refers to Grade Reporting, and so on.
� The User ID field displays the ID you used to log on to TxEIS. � Click Clear Options to clear all data in the Value fields if necessary.
� For each Parameter Description, enter data in the Value field as needed. Parameter Descriptions in bold are required.
� If the parameter has an ellipsis button , you can type data in the Value field, or you can click the button to select a value from a lookup or directory.
� If the parameter has an calendar icon , you can type a date in the Value field, or you can click the icon to select a date from a calendar.
� Click Run Preview to generate the report. � Click Return to Reports to return to the list of reports.
45
TxEIS Student Overview
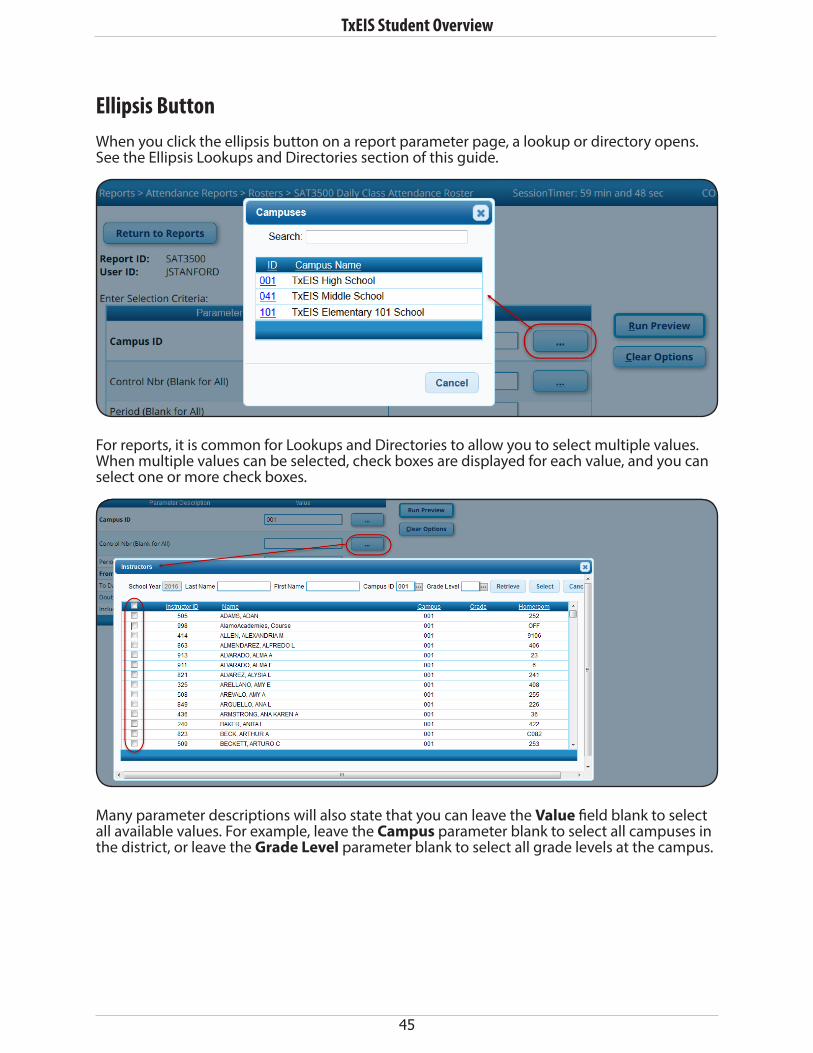
Ellipsis ButtonWhen you click the ellipsis button on a report parameter page, a lookup or directory opens. See the Ellipsis Lookups and Directories section of this guide.
For reports, it is common for Lookups and Directories to allow you to select multiple values. When multiple values can be selected, check boxes are displayed for each value, and you can select one or more check boxes.
Many parameter descriptions will also state that you can leave the Value field blank to select all available values. For example, leave the Campus parameter blank to select all campuses in the district, or leave the Grade Level parameter blank to select all grade levels at the campus.

46
TxEIS Student Overview
Calendar IconFor date parameters, you can type the date in the MMDDYYYY format, or you can click the calendar icon to select a date from a calendar.
� Arrows on either side of the month name allow you to view previous and future months.
� When you click a date on the calendar, the calendar closes, and the Value field is populated with the selected date.
� If you click outside the calendar, the calendar closes with no date selected.

47
TxEIS Student Overview
Report PreviewWhen parameter values are set, click Run Preview. The report preview opens allowing you to review the report.
All reports can be exported as PDF files, and you can save or print the PDF file. Many files can also be exported as CSV (spreadsheet) files.
Click the PDF or CSV icon to export the report in a PDF or spreadsheet format. Exported files are opened or saved according to your browser settings. The report data may be reformatted to accommodate the selected file type.
For example, when a report is exported to CSV format, data is displayed in columns and rows; header and footing data is not included. You can re-sort and reformat the data as needed using your spreadsheet program (e.g., Microsoft Excel).
When you click Run Preview, if you have entered invalid data, or if required data has not been entered, an error message is displayed at the top of the parameters page, and the affected parameters are highlighted. You must correct the issue before the report can be generated.

48
TxEIS Student Overview
Click Exit to close the report. You will return to the list of reports from which this report was selected.

49
TxEIS Student Overview
User Created ReportsMost TxEIS Student applications provide the ability to create a customized application-level report for students at one campus or all campuses. Student information is pulled from the most current student record for the selected school year.
Graduation Plan and Scheduling do not offer user created reports.
1. In the Report Title field, type a title for the report, up to 35 characters.
2. Under Campus Options, select Campus to print information for the campus to which you are logged on, or select All Campuses to print information for all campuses in the district to which you have access (according to your security settings).
3. The fields are grouped by student table. Select the fields for which you want to print information. You can select an entire group of fields by selecting the group name (e.g., Demographic Information).

50
TxEIS Student Overview
4. Click Create Report to generate the report. The report displays the selected data. Review, save, or print the report as described in the Report Preview section of this guide.
TemplatesTo save time and effort, you can create and reuse templates for reports that are run frequently. You can also create and use public reports, which are shared districtwide.
Create and save a new template:
1. In the Report Template field, type a name for the new report template.
z Special characters are not allowed.
z If you type a name that is already used, it will overwrite the previous template.
2. Select Public to make the report accessible to other users. All users in the district will see and be able to use the template.
3. In the Report Title field, type a name for the report, which may or may not be the same as the report template name.
4. Select the fields to be included. You can select individual fields, or you can select an entire group of fields by selecting the group name.
5. Click Save.

51
TxEIS Student Overview
Run a report from an existing template:
1. In the Report Template field, begin typing all or part of the name of an existing report template, or press the space bar to view all the templates. As you begin to type, a drop-down list displays report templates with titles that match the letters you have typed. From the drop-down list you can select the template. Only templates you created are listed in the drop-down list. Public templates created by other people are not listed.
2. If you do not know the name of the report template, or if you are looking for a public report template, click Directory to search for a template. From the directory, you can select templates you created as well as public templates.
z You can search for a template by the report title, report template or user ID. Type all or any part of the template name, report title, or ID.
z Select Public to include both private (i.e., your templates) and public (i.e., district-wide) reports in your search results.
z Click Search. Templates meeting the criteria entered are listed. z When you locate the report template you want to retrieve, click the report
template name. The directory closes.
3. IMPORTANT: Once the template is selected on the Create Report page, press ENTER to populate the selections.
4. Click Create Report to generate the report. The report opens in a new window.
5. Review, save, or print the report as described in the Report Preview section of this guide.
NOTE:You can save a public template as your own, or as a different public template, by saving the template with a different name. You cannot have two public templates with the same name.

52
TxEIS Student Overview
Sorting and Filtering ReportsSome reports can be sorted and/or filtered once they are generated. The Sort/Filter button is displayed at the top of the report if the feature is available for the report. A Reset button will be displayed next to the Sort/Filter button.
Some reports may only have a Sort button. Other reports may only have a Filter button.

53
TxEIS Student Overview
SortYou can sort data to make it easier to review or find records in the reports. Not all reports allow this option.
On the report window, click Sort/Filter. The Sort/Filter dialog box is displayed.
1. By default, the Sort Criteria section is expanded. If not, click Sort Criteria.
2. In the Columns Available for Sorting (left) list, click the field by which you want to sort, and then click . The field moves to the Sort Columns (right) list.
3. Continue moving fields to the right list as needed.
4. In the right grid, you can rearrange the fields to indicate the order in which you want the sort applied. Click a field name, and drag it up or down to a new location.

54
TxEIS Student Overview
5. In the right list, for each field, indicate if you want that data sorted in ascending (e.g., A-Z, 0-9) or descending (e.g., Z-A, 9-0) order.
6. To remove a field from the sort, select the field, and then click to move it back to the left list.
7. Click OK to apply the selected sort criteria to the report, or click Cancel to close the window without re-sorting.
8. To restore the report to the original view, click Reset on the report page.
FilterBy default, the Sort Criteria section is expanded. Click Filter Criteria to expand the Filter Criteria section.
1. Click Add Criterion to add new filter criteria. A blank row is displayed in the grid.

55
TxEIS Student Overview
2. In the Column field, select a field by which to filter the data. The drop down lists the columns that appear on the report.
3. In the Operator field, select an operator.
z = - Equalszz ≠ - Not equals z > - Greater than z ≥- Greater than or equal to z <- Less than z ≤- Less than or equal to
4. In the Value field, type the value by which you want to filter. For example, if you selected a date in the Column field, type a date to view only data for a specific date.
When filtering report data by date, you must use the following formats:
z If the date is displayed in the MM/DD/YYYY format, the filter value must be in the YYYYMMDD format.
z If the date is displayed in the MM/YYYY format, the filter value must be in the YYYYMM format.
z If the date is displayed in the MM/YY format, the filter value must be in the YYMM format.
5. To add another row, click Add, and then select the logical connector (AND or OR) in the Logical field. The Logical field does not appear until you click Add Criterion to add an additional row.
NOTE: » Using the AND operator limits search results, because the program looks only for
records that contain both criterion.
» Using the OR operator expands search results, because the program looks for records that contain either one criterion or the other, or both.
6. Continue adding rows as needed.

56
TxEIS Student Overview
7. To delete a row, select the row, and then click Delete Selected. The row is deleted from the filter criteria.
8. Click OK to apply the selected filter criteria to the report, or click Cancel to close the dialog box without applying a filter.
9. To restore the report to the original view, click Reset on the report page.