Embed Size (px)
Citation preview
48 Victorian Stucco
259 Nangle, Australian Building Practice, p 367.260 Richardson, Ramsay’s Catalogue [1931], § 25, pp 207, 210.261 Haddon, Australian Architecture, p 497.262 Richardson, Ramsay’s Catalogue [1931], § 25, p 202.263 Richardson, Ramsay’s Catalogue [1931], § 25, p 221.264 Green, ‘Cements and Concrete’, p 42.265 Sold by the Cement Marketing Co Ltd of Westminster: Faber & Childe, Concrete Year Book 1949, p 574. It was a waterproof cement paint supplied in
white, cream, pink and silver grey.
‘cement colour’, and the last was ‘slate’.260 The evolution of stucco paints is discussed above by Donald Ellsmore, but essentially they had already adapted in the later nineteenth century to deal with Portland cement, and the range now expanded, especially in terms of colour.
Robert Haddon advised that oil paint would not adhere well to new cement work, but it could be painted after a few years. He recommended a good priming coat to ‘stop the excessive suction and form a hard body’, preferably red lead and raw oil, after which ordinary paint was used.261 In 1931 Bergers specified the application of their ‘Dusseal’ cement sealer, and the Sherwin-Williams Company (Australia) required that fresh concrete be treated first with the company’s ‘Prymseal’, and linseed oil was under no circumstances to be added.262 However, Taubmans Limited had a ‘cement-proof paint’ which did not require priming:
It positively resists the chemical reaction of new cement, which during the process of setting, liberates lime. It remains unaffected by this free lime (alkaline), which quickly destroys ordinary Linseed Oil Paints.263
But the truth was that cement finishes were in decline, and the real market for stucco paints lay in the existing and now unfashionable nineteenth century building stock. Even ‘Benvenuta’, where such care had been taken in specifying the best cement finishes, acquired a white coating, of which only traces now remain. Jenny Dickens has found it to consist of lime, chalk, fine sand and casein, and it seems likely to be a twentieth century proprietary product, either a cement paint or another finishing material. Cement paints were reported in a British article of 1946 to be in increasing demand, and were characteristically supplied in shades of white or near-white.264 The British ‘Snowcem’265 was prominent, and the Taubmans cement-proof paint was one local example.
Twentieth century painting
The decline of the old stucco tradition is marked by Nangle’s dogmatic assertion in 1911:
All surfaces of the work should be finished quite smooth by a steel trowel; but on no account should the work be struck out in joints to imitate stone. In the first place the imitation is fraudulent, and in the second place this scratching of the cement surface generally means a crevice into which the weather penetrates.259
Consistent with this new attitude, stucco was no longer painted in colours specifically evoking stone: a much wider range was used, and white or near-white came to be especially favoured.
The paint manufacturers Lewis Berger & Sons (Aust.) offered a detailed rationale for painting stucco:
The architect appreciates the advisability of painting exterior concrete or stucco walls. This is advisable for two reasons: first, the control of the decorative effect in colour, as required by the type of building, which paint affords, and the ease in which the building can be cleaned up in appearance and the change of colour scheme effected. Second, painting a concrete wall renders it water-tight, and prevents the appearance of hairline cracks and chipping off caused by the penetration of moisture and frost.
Interestingly, though, Berger’s were by no means dismissive of cement stucco. They claimed that their paint did not ‘destroy the interesting texture of the stucco wall as does a gloss finish’. Of their four colours, one was ‘light stone’ and another, ‘ivory’, was within the traditional spectrum, while a third was a warmish grey actually called
Australian Stucco 49
266 Pittsburgh Plate Glass Company, Architectural Specifications (Milwaukee [Wisconsin] 1935), pp 25-6.267 One would assume that this was made or sold by the Cement Marketing Co, makers of Cullamix: Faber & Childe, Concrete Year Book 1949, p 307.
Hoeverthesaoheel out268 Faber & Childe, Concrete Year Book 1949, p 586.269 Sweet’s Architectural Catalogue (New York 1922), p 79. This formed ‘in and on the surface, a tough, flat pigment film, which does not flake,
blister or peel, and which is absolutely waterproof.’270 Richardson, Ramsay’s Catalogue [1931], § 21d, pp 191-2.
Other facing materials, such as Pittsburgh Cementhide,266 Cullacrete267 (referred to elsewhere by Donald Ellsmore), the British Stic B Semi-Stone Covering,268 and the American Minwax Brick and Cement Coating269 are of largely unknown composition.
So extensively was the ashlar tradition abandoned in new building work that by 1931 the Australian Cement Manufacturers’ Association was promoting the use of textures in Portland cement stucco—‘Spanish’, ‘Californian’, ‘Modern American’, ‘English Cottage’, ‘Italian’, and ‘Italian Travertine’.270 By a strange transposition these textures came to be widely understood as representing the definition of stucco.
Conclusion
Common stucco, like so much else in Australian building, is essentially British in character, but somewhat retardataire in British terms, for it was still on the rise in Australia at the time when Pugin was castigating it in Britain. Cement, however, presents a different picture. In the 1880s, when the Gothic Revival and Arts and Crafts movements had driven cemented surfaces into retreat in Britain, the Australian Portland cement industry was taking off, and the Boom style encouraged the cementitious elaboration of ‘Benvenuta’ and other less distinguished buildings. So, vulgar though it may have been thought by some critics, the Boom style was distinctive, and it was largely generated by Portland cement. In the twentieth century the creative use of stucco declined, but so much of it already existed that it could not be ignored. The moral guilt associated with the Boom and Bust, the unfashionableness of cement ornament, and the gloom of discoloured Portland cement all combined to demand cleansing, lightening and simplification. Only in recent years has there been much call to halt and reverse this puritanical destruction.
50 Victorian Stucco
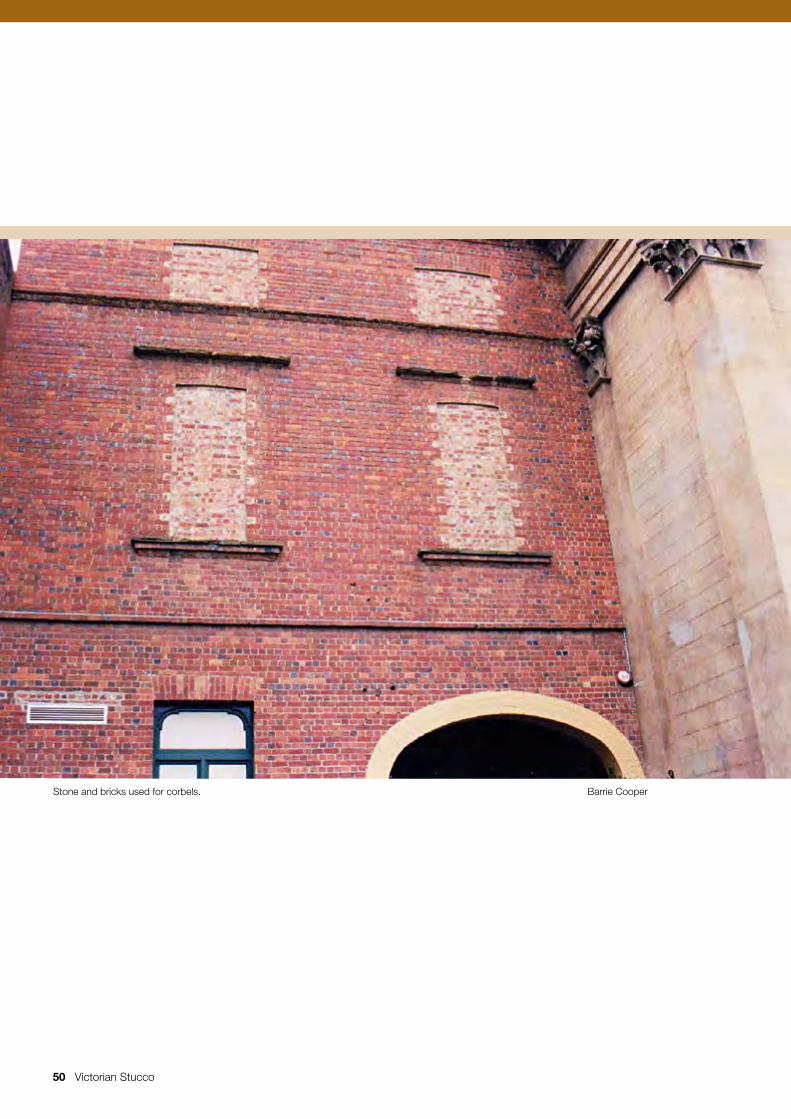
Stone and bricks used for corbels. Barrie Cooper
Victorian Stucco 51
Materials and Techniques of External StuccoBarrie Cooper
271 The normal sand and lime plastering would be carried out using a render and float coat of 3 parts sand to 1 part slaked lime. The set coat is a reverse mix and contained 3 parts lime to 1 part sand, which could vary slightly depending on the sand to a 5 parts lime to 2 parts sand mix. However, the lime being used would be the normal non hydraulic fat lime, and would rely on compression of the top coat created by working the surface with a wooden float several times to close the surface and to stop the cracking, before finishing with a steel trowel. On internal work, plastering with fat limes is fine but externally they fail very quickly—because it is just a 3 to 4 mm thick coating of sand and lime without any additives that is relying carbonation to achieve any real resistance to the weather.
272 Kemp The Practical Plasterer, p 25.
> abstract
> introduction
> materials
> setting out
> mouldings
> features and enrichments
> creating an original mould
> conclusion
Abstract
The main focus of this paper is external stucco as executed in Australia during the Victorian period (1837 –1901). Stucco is the term used by the Italians for a superior plaster finish originally intended for internal use, and introduced into England during the Renaissance. The introduction of external stucco to give a brick house the appearance of stone is often attributed to the Adam brothers, and in particular to Robert Adam. Although this is not strictly true, it was their use of it that made it a generally acceptable external finish.
Early stucco, which was not very durable, and commonly fell off in patches, was executed by using sand and lime at 3 parts sand to 1 part hydraulic lime, finished with a set coat of five parts lime and two parts sand.271 This coat contained an additive (such as casein, crushed brick dust, or sometimes silicate) to increase the resistance to weathering, thereby making the finish coat a stucco finish. If hydraulic lime was used, an additive was not essential. In another form of application a thick coat of lime and sand in a similar mix as used in the finish coat is applied by splashing on with a brush over roughcast finishes to provide protection against the weather. Roman cement was used with some success, and examples such as Lyndhurst House, Glebe, NSW, of about 1834, still exist. External stucco was further improved by the advent of Portland cement in the mid-nineteenth century.
Introduction
The art of plastering is one of the oldest trades known. From the various mixtures of mud and straw used over sticks and branches to form the walls and roofs of temporary dwellings (the precursor to wattle and daub) it has progressed to plasterwork on wooden laths, and thence to modern plastering techniques, and materials such as metal lathing. However, the materials and techniques of traditional plastering were basically the same throughout the world, because the conditions were essentially the same.
Although it is one of the oldest and most useful trades, very little technical literature has been written to inform the conservation architect or aspiring plasterer about the methods, technology and materials that can be used to replicate or restore traditional plastering work. Most books were written by plasterers who had a great knowledge and understanding of their craft, but tended to use technical terms without realising that the lay reader would fail to understand them. Meanwhile large multinational companies have promoted various methods and materials, which utilise less labour, and this has accelerated the decline of the plastering trade as once practised.
Materials
During the early Victorian period, sand and lime plasters were commonly used on very simple external stucco with simple cornice work, and marked with ashlar blocking. Several examples of Roman cement stuccoed buildings were also built in the period 1830–1850, probably using imported Roman cement. Roman cement was so named following the discovery and use of nodules of septaria (the petrified excreta of extinct animals) found in the London clay formation, and was patented in 1796272—the nodules were fired to vitrification and crushed to a fine powder ready for use. The name was used because of the similarity

52 Victorian Stucco
273 Kemp The Practical Plasterer, p 25.
of the material to original durable cements found in and around Rome.
Portland cement, which is in fact a form of hydraulic lime, superseded Roman cement for external stucco mainly due to the unreliability of the latter, of which the only real advantage is that it sets very rapidly. Portland cements are composed of clay and chalk or limestone, crushed and ground to a paste in water, allowed to deposit and then burned at high temperatures (1800ºC) again to the point of vitrification. The lime component was commonly unequally overburnt273—so great care was required in grinding and combining the materials of calcination to ensure regular setting properties (lime and natural cements fired at high temperatures are very difficult to slake, and need to be broken into small pieces or ground to a fine powder before use). Portland cement replaced Roman cement and the sand and lime mixes for external work when it became available in the mid-nineteenth century, and more elaborate decorations were possible. However, sand and lime internal plastering continued and many examples are found up to the 1950s, when internal cement render finishes started to gain favour, especially in Sydney.
The early types of cement were very different from those available in modern times, and the their hardness was far inferior to that of today’s Portland cement. Early cements were obtained from many sources and it is not possible to identify the origin of the cement used when carrying out repairs on cement stuccoed buildings. Therefore, the materials to be used are usually determined by the tradesman after visual examination for sand size, and mechanical testing to estimate the hardness. It is common for repairs performed on Victorian renders to be executed using a sand, lime and cement mix even though it is well known that when early cements were used they were not normally used with lime. The extreme hardness of modern cements makes them incompatible with early cements when they are used without lime, and usually results in excessive cracking at the joins between the old and new render.
The mixes used to simulate the various finishes range from 3 parts plastering sand to 1 part putty lime with
pozzolan added at the rate of 25% to the lime component by volume, to renders consisting of 6 parts plastering sand, 1 part lime putty and 1 part Portland cement. Cement mouldings are usually run with a mixture of 7 parts fine sand, 2 parts lime putty and 1 part cement so a sharp finish can be obtained. Early lime mixes used cow hair in the render and float coat to minimise cracking, but hair is not used in cement mixes.
Setting out
Setting out is the first stage of a successful project. The façade is normally the most important part of the building, and the architect’s design needs to be transferred from the drawing to the building and brought to life. Where cornices are to be run, the bricklayer or stonemason would provide corbelling to carry the cornices and further corbelling where enrichments are to be installed over and under windows.
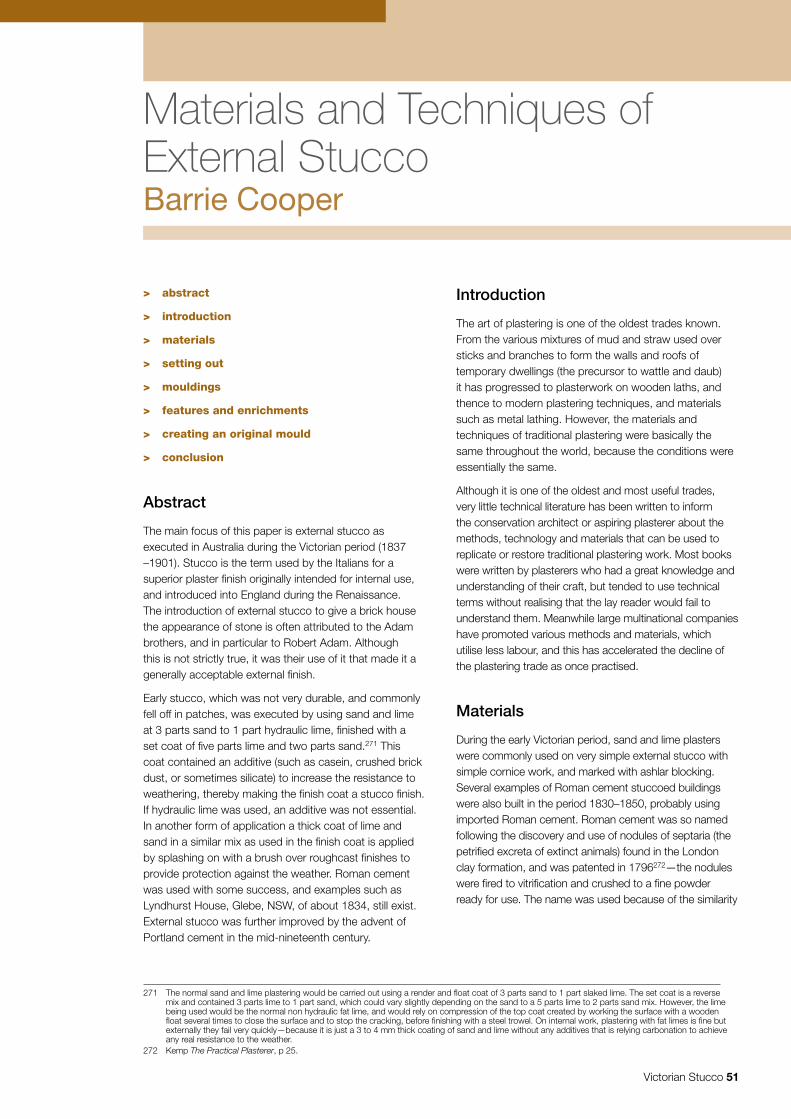
The first requirement for a perfect job is a plumb and flat wall. To this end, the façade is set out with dots using a plumb rule (in preference to a spirit level) to provide vertical and horizontal points for the screeds. The screeds are applied in a box format and then the area inside the box is filled in and the material ruled off flat to the screeds. Once the flat areas are completed, the mouldings can be run from the flat and plumb surface.
Plumb and dotted wall with box screeds. Barrie Cooper
Materials and Techniques of External Stucco 53
The dots are applied by placing a small dab of the mortar being used for the job at one end and a piece of lath or wood is bedded into the dab and tamped to the desired depth thus establishing the level of the finish. Other dots are then placed vertically taking a plumb line from the first dot. Dots are then applied to the other end of the wall in the same manner so the wall has two perfectly plumb sets of dots at each end of the wall. A string line is fixed horizontally to the corresponding dots at each end of the wall, and horizontal dots are installed across the wall at the depth indicated by the string line. After the dots have set or taken up, screeds are applied and ruled off the dots—to provide box screeds over the wall. Then, the inside of each box is filled in and ruled off the screeds. In some cases on large areas the mouldings are run off the screeds prior to the broad areas being filled in. After the mouldings are completed, the rendered surface is finished in the specified way. Some plasterers use nails for the dots instead of mortar.
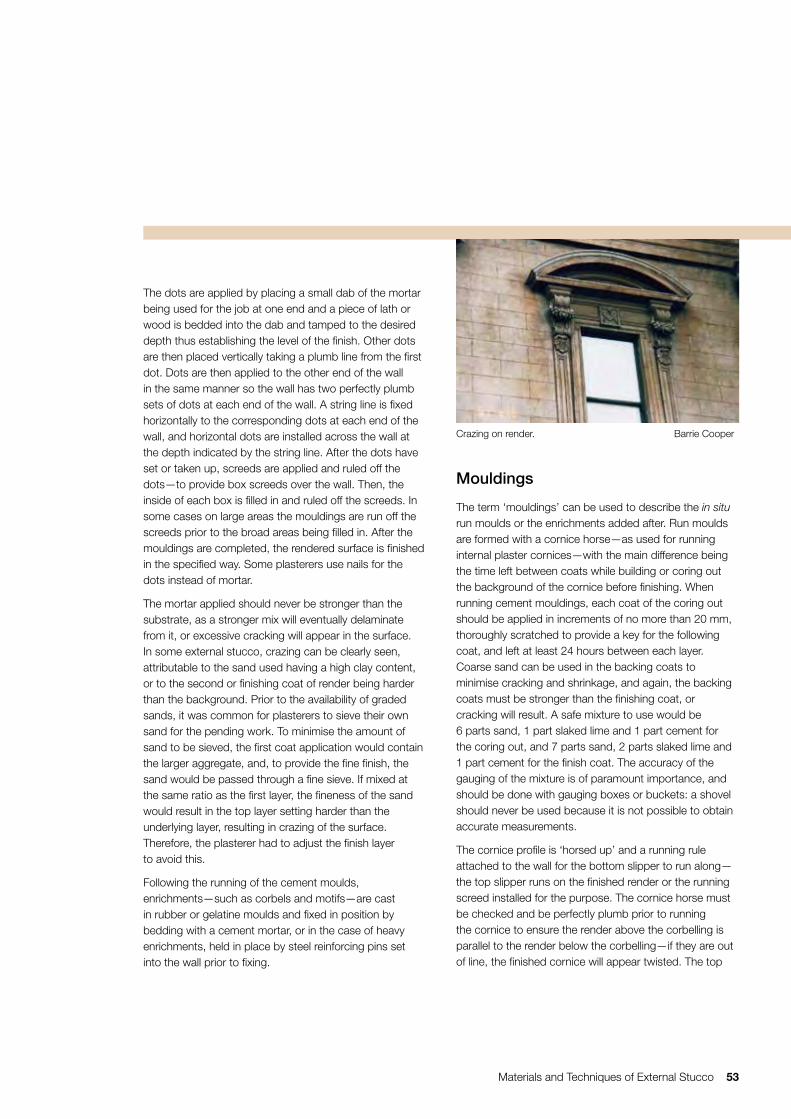
The mortar applied should never be stronger than the substrate, as a stronger mix will eventually delaminate from it, or excessive cracking will appear in the surface. In some external stucco, crazing can be clearly seen, attributable to the sand used having a high clay content, or to the second or finishing coat of render being harder than the background. Prior to the availability of graded sands, it was common for plasterers to sieve their own sand for the pending work. To minimise the amount of sand to be sieved, the first coat application would contain the larger aggregate, and, to provide the fine finish, the sand would be passed through a fine sieve. If mixed at the same ratio as the first layer, the fineness of the sand would result in the top layer setting harder than the underlying layer, resulting in crazing of the surface. Therefore, the plasterer had to adjust the finish layer to avoid this.
Following the running of the cement moulds, enrichments—such as corbels and motifs—are cast in rubber or gelatine moulds and fixed in position by bedding with a cement mortar, or in the case of heavy enrichments, held in place by steel reinforcing pins set into the wall prior to fixing.
Mouldings
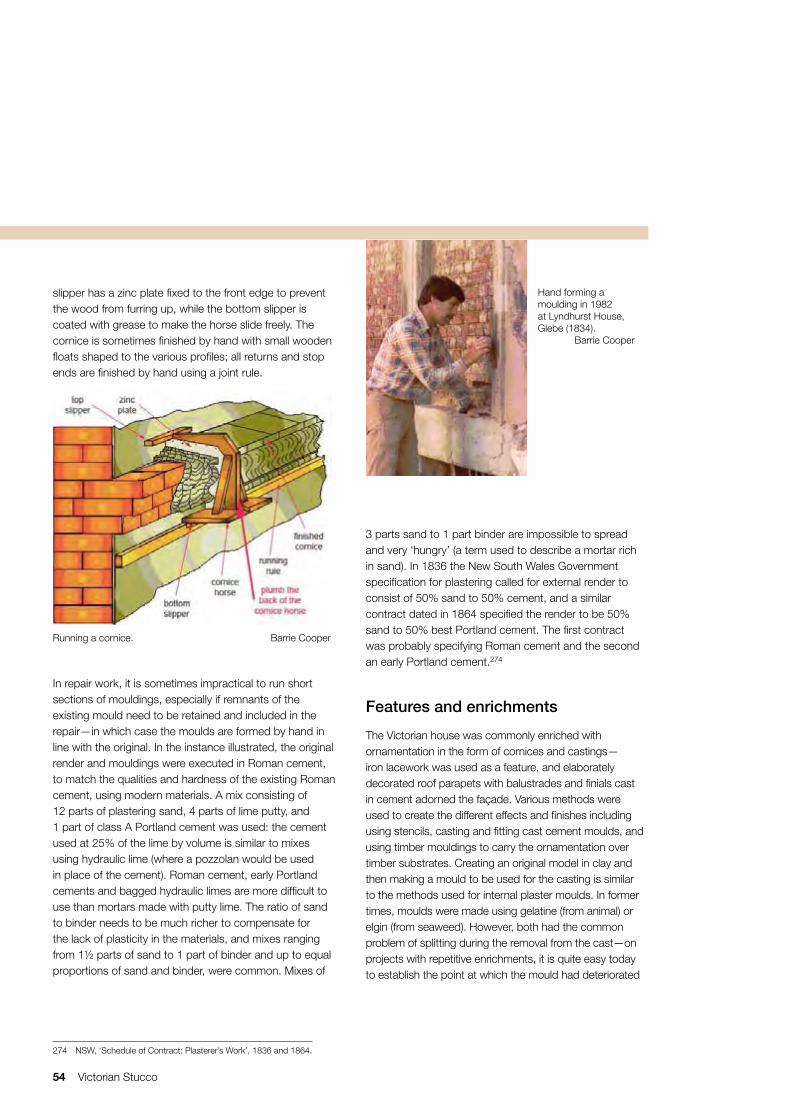
The term ‘mouldings’ can be used to describe the in situ run moulds or the enrichments added after. Run moulds are formed with a cornice horse—as used for running internal plaster cornices—with the main difference being the time left between coats while building or coring out the background of the cornice before finishing. When running cement mouldings, each coat of the coring out should be applied in increments of no more than 20 mm, thoroughly scratched to provide a key for the following coat, and left at least 24 hours between each layer. Coarse sand can be used in the backing coats to minimise cracking and shrinkage, and again, the backing coats must be stronger than the finishing coat, or cracking will result. A safe mixture to use would be 6 parts sand, 1 part slaked lime and 1 part cement for the coring out, and 7 parts sand, 2 parts slaked lime and 1 part cement for the finish coat. The accuracy of the gauging of the mixture is of paramount importance, and should be done with gauging boxes or buckets: a shovel should never be used because it is not possible to obtain accurate measurements.
The cornice profile is ‘horsed up’ and a running rule attached to the wall for the bottom slipper to run along—the top slipper runs on the finished render or the running screed installed for the purpose. The cornice horse must be checked and be perfectly plumb prior to running the cornice to ensure the render above the corbelling is parallel to the render below the corbelling—if they are out of line, the finished cornice will appear twisted. The top
Crazing on render. Barrie Cooper
54 Victorian Stucco
274 NSW, ‘Schedule of Contract: Plasterer’s Work’, 1836 and 1864.
slipper has a zinc plate fixed to the front edge to prevent the wood from furring up, while the bottom slipper is coated with grease to make the horse slide freely. The cornice is sometimes finished by hand with small wooden floats shaped to the various profiles; all returns and stop ends are finished by hand using a joint rule.
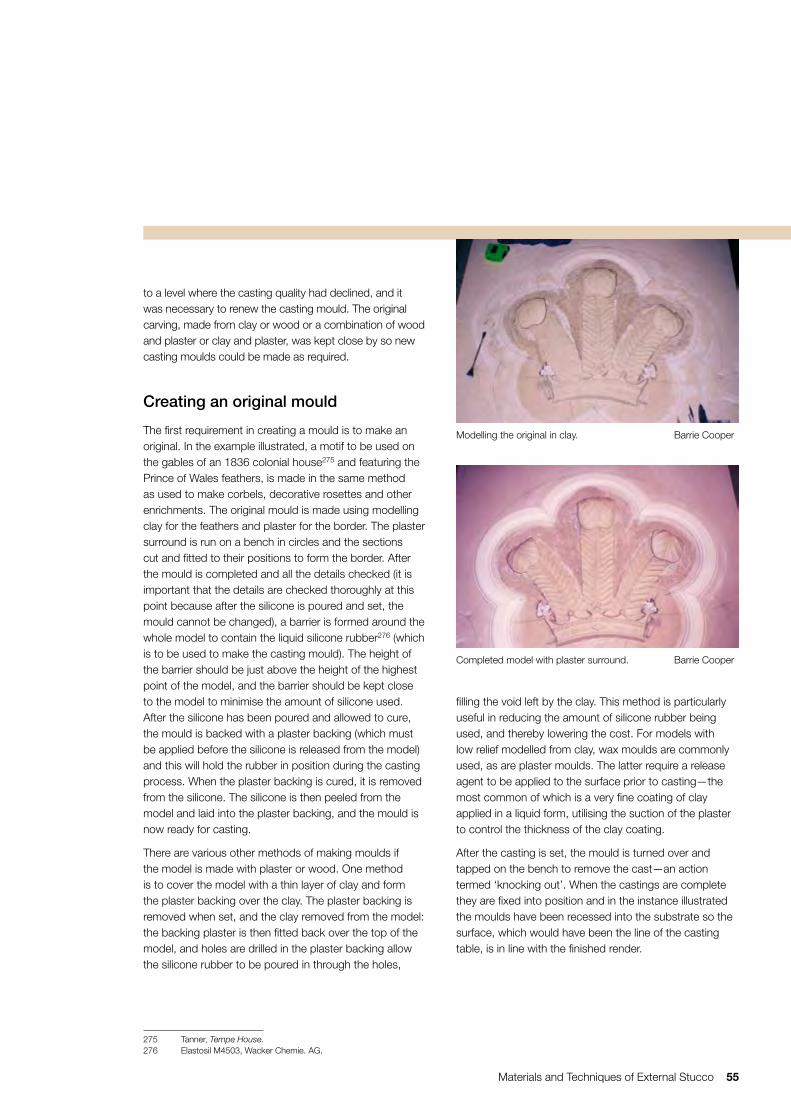
In repair work, it is sometimes impractical to run short sections of mouldings, especially if remnants of the existing mould need to be retained and included in the repair—in which case the moulds are formed by hand in line with the original. In the instance illustrated, the original render and mouldings were executed in Roman cement, to match the qualities and hardness of the existing Roman cement, using modern materials. A mix consisting of 12 parts of plastering sand, 4 parts of lime putty, and 1 part of class A Portland cement was used: the cement used at 25% of the lime by volume is similar to mixes using hydraulic lime (where a pozzolan would be used in place of the cement). Roman cement, early Portland cements and bagged hydraulic limes are more difficult to use than mortars made with putty lime. The ratio of sand to binder needs to be much richer to compensate for the lack of plasticity in the materials, and mixes ranging from 1½ parts of sand to 1 part of binder and up to equal proportions of sand and binder, were common. Mixes of
3 parts sand to 1 part binder are impossible to spread and very ‘hungry’ (a term used to describe a mortar rich in sand). In 1836 the New South Wales Government specification for plastering called for external render to consist of 50% sand to 50% cement, and a similar contract dated in 1864 specified the render to be 50% sand to 50% best Portland cement. The first contract was probably specifying Roman cement and the second an early Portland cement.274
Features and enrichments
The Victorian house was commonly enriched with ornamentation in the form of cornices and castings—iron lacework was used as a feature, and elaborately decorated roof parapets with balustrades and finials cast in cement adorned the façade. Various methods were used to create the different effects and finishes including using stencils, casting and fitting cast cement moulds, and using timber mouldings to carry the ornamentation over timber substrates. Creating an original model in clay and then making a mould to be used for the casting is similar to the methods used for internal plaster moulds. In former times, moulds were made using gelatine (from animal) or elgin (from seaweed). However, both had the common problem of splitting during the removal from the cast—on projects with repetitive enrichments, it is quite easy today to establish the point at which the mould had deteriorated
Running a cornice. Barrie Cooper
Hand forming a moulding in 1982 at Lyndhurst House, Glebe (1834).
Barrie Cooper
Materials and Techniques of External Stucco 55
275 Tanner, Tempe House.276 Elastosil M4503, Wacker Chemie. AG.
to a level where the casting quality had declined, and it was necessary to renew the casting mould. The original carving, made from clay or wood or a combination of wood and plaster or clay and plaster, was kept close by so new casting moulds could be made as required.
Creating an original mould
The first requirement in creating a mould is to make an original. In the example illustrated, a motif to be used on the gables of an 1836 colonial house275 and featuring the Prince of Wales feathers, is made in the same method as used to make corbels, decorative rosettes and other enrichments. The original mould is made using modelling clay for the feathers and plaster for the border. The plaster surround is run on a bench in circles and the sections cut and fitted to their positions to form the border. After the mould is completed and all the details checked (it is important that the details are checked thoroughly at this point because after the silicone is poured and set, the mould cannot be changed), a barrier is formed around the whole model to contain the liquid silicone rubber276 (which is to be used to make the casting mould). The height of the barrier should be just above the height of the highest point of the model, and the barrier should be kept close to the model to minimise the amount of silicone used. After the silicone has been poured and allowed to cure, the mould is backed with a plaster backing (which must be applied before the silicone is released from the model) and this will hold the rubber in position during the casting process. When the plaster backing is cured, it is removed from the silicone. The silicone is then peeled from the model and laid into the plaster backing, and the mould is now ready for casting.
There are various other methods of making moulds if the model is made with plaster or wood. One method is to cover the model with a thin layer of clay and form the plaster backing over the clay. The plaster backing is removed when set, and the clay removed from the model: the backing plaster is then fitted back over the top of the model, and holes are drilled in the plaster backing allow the silicone rubber to be poured in through the holes,
filling the void left by the clay. This method is particularly useful in reducing the amount of silicone rubber being used, and thereby lowering the cost. For models with low relief modelled from clay, wax moulds are commonly used, as are plaster moulds. The latter require a release agent to be applied to the surface prior to casting—the most common of which is a very fine coating of clay applied in a liquid form, utilising the suction of the plaster to control the thickness of the clay coating.
After the casting is set, the mould is turned over and tapped on the bench to remove the cast—an action termed ‘knocking out’. When the castings are complete they are fixed into position and in the instance illustrated the moulds have been recessed into the substrate so the surface, which would have been the line of the casting table, is in line with the finished render.
Modelling the original in clay. Barrie Cooper
Completed model with plaster surround. Barrie Cooper
56 Victorian Stucco
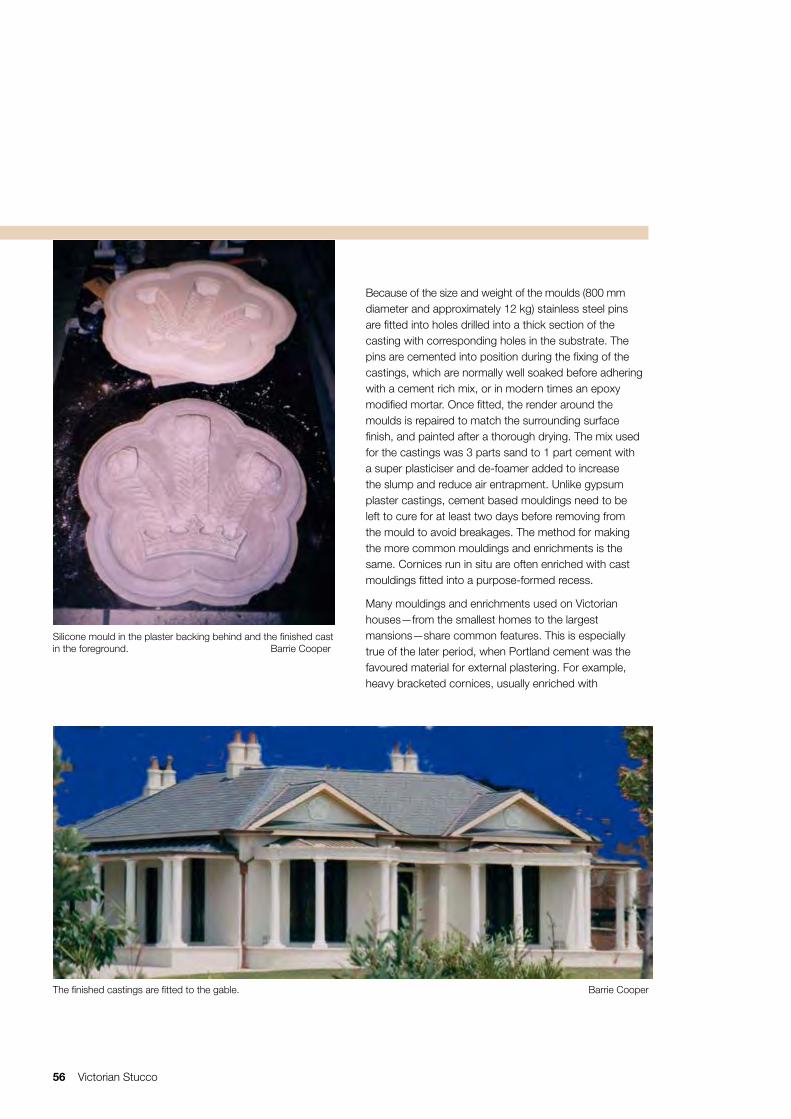
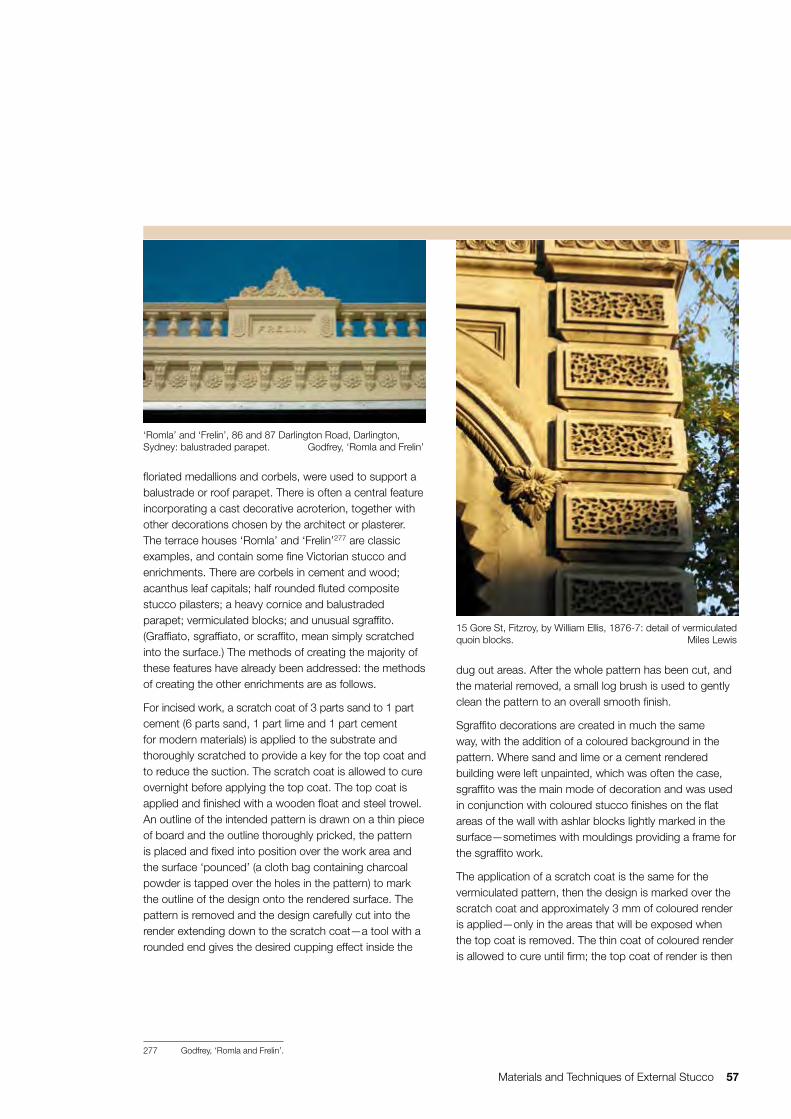
Because of the size and weight of the moulds (800 mm diameter and approximately 12 kg) stainless steel pins are fitted into holes drilled into a thick section of the casting with corresponding holes in the substrate. The pins are cemented into position during the fixing of the castings, which are normally well soaked before adhering with a cement rich mix, or in modern times an epoxy modified mortar. Once fitted, the render around the moulds is repaired to match the surrounding surface finish, and painted after a thorough drying. The mix used for the castings was 3 parts sand to 1 part cement with a super plasticiser and de-foamer added to increase the slump and reduce air entrapment. Unlike gypsum plaster castings, cement based mouldings need to be left to cure for at least two days before removing from the mould to avoid breakages. The method for making the more common mouldings and enrichments is the same. Cornices run in situ are often enriched with cast mouldings fitted into a purpose-formed recess.
Many mouldings and enrichments used on Victorian houses—from the smallest homes to the largest mansions—share common features. This is especially true of the later period, when Portland cement was the favoured material for external plastering. For example, heavy bracketed cornices, usually enriched with
Silicone mould in the plaster backing behind and the finished cast in the foreground. Barrie Cooper
The finished castings are fitted to the gable. Barrie Cooper
Materials and Techniques of External Stucco 57
277 Godfrey, ‘Romla and Frelin’.
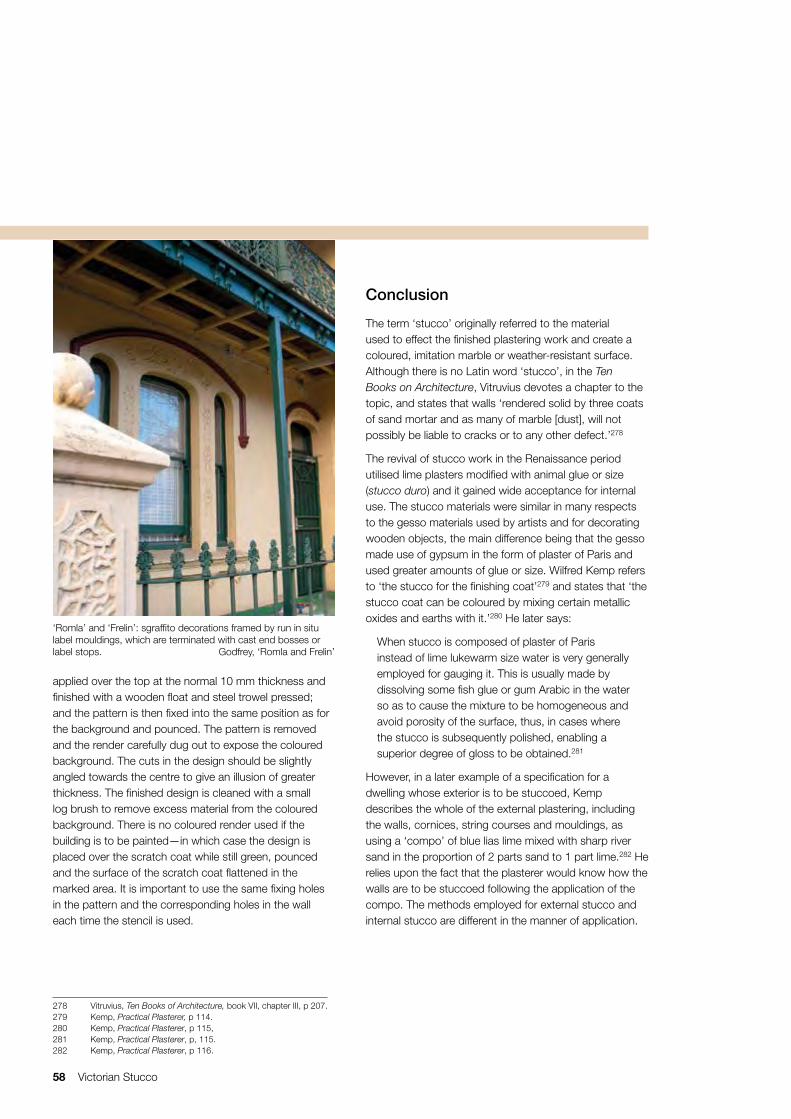
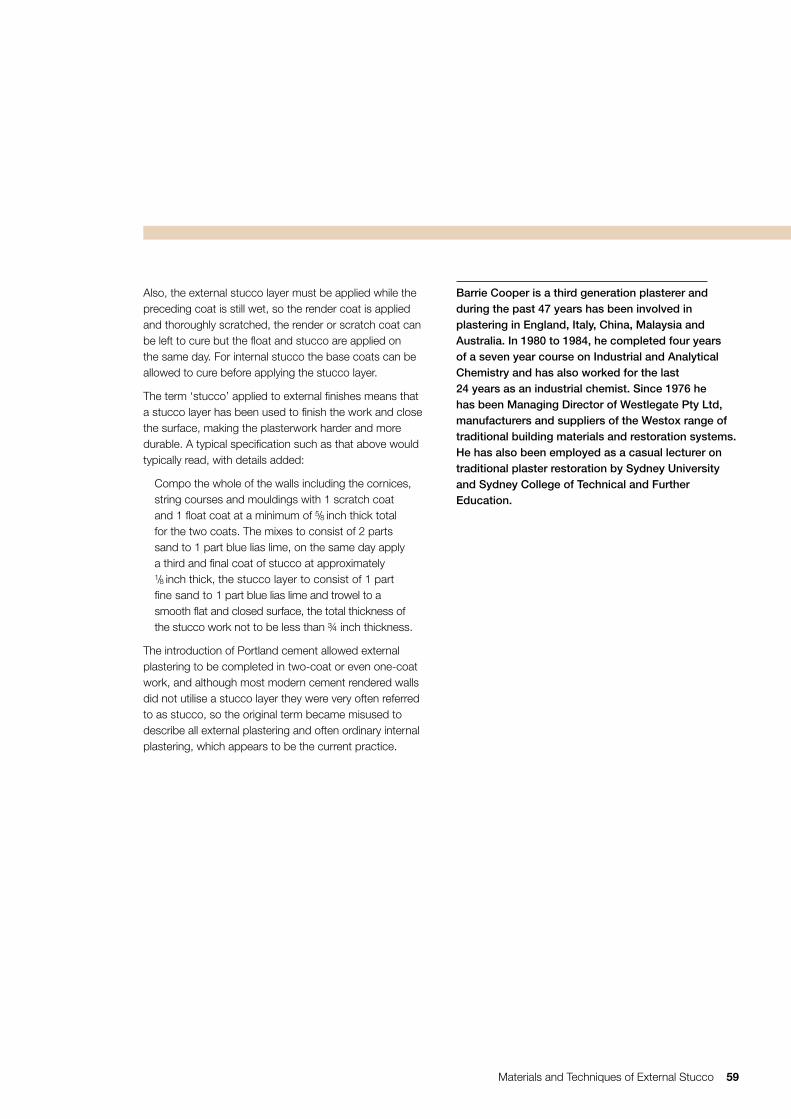
floriated medallions and corbels, were used to support a balustrade or roof parapet. There is often a central feature incorporating a cast decorative acroterion, together with other decorations chosen by the architect or plasterer. The terrace houses ‘Romla’ and ‘Frelin’277 are classic examples, and contain some fine Victorian stucco and enrichments. There are corbels in cement and wood; acanthus leaf capitals; half rounded fluted composite stucco pilasters; a heavy cornice and balustraded parapet; vermiculated blocks; and unusual sgraffito. (Graffiato, sgraffiato, or scraffito, mean simply scratched into the surface.) The methods of creating the majority of these features have already been addressed: the methods of creating the other enrichments are as follows.
For incised work, a scratch coat of 3 parts sand to 1 part cement (6 parts sand, 1 part lime and 1 part cement for modern materials) is applied to the substrate and thoroughly scratched to provide a key for the top coat and to reduce the suction. The scratch coat is allowed to cure overnight before applying the top coat. The top coat is applied and finished with a wooden float and steel trowel. An outline of the intended pattern is drawn on a thin piece of board and the outline thoroughly pricked, the pattern is placed and fixed into position over the work area and the surface ‘pounced’ (a cloth bag containing charcoal powder is tapped over the holes in the pattern) to mark the outline of the design onto the rendered surface. The pattern is removed and the design carefully cut into the render extending down to the scratch coat—a tool with a rounded end gives the desired cupping effect inside the
dug out areas. After the whole pattern has been cut, and the material removed, a small log brush is used to gently clean the pattern to an overall smooth finish.
Sgraffito decorations are created in much the same way, with the addition of a coloured background in the pattern. Where sand and lime or a cement rendered building were left unpainted, which was often the case, sgraffito was the main mode of decoration and was used in conjunction with coloured stucco finishes on the flat areas of the wall with ashlar blocks lightly marked in the surface—sometimes with mouldings providing a frame for the sgraffito work.
The application of a scratch coat is the same for the vermiculated pattern, then the design is marked over the scratch coat and approximately 3 mm of coloured render is applied—only in the areas that will be exposed when the top coat is removed. The thin coat of coloured render is allowed to cure until firm; the top coat of render is then
‘Romla’ and ‘Frelin’, 86 and 87 Darlington Road, Darlington, Sydney: balustraded parapet. Godfrey, ‘Romla and Frelin’
15 Gore St, Fitzroy, by William Ellis, 1876-7: detail of vermiculated quoin blocks. Miles Lewis
58 Victorian Stucco
278 Vitruvius, Ten Books of Architecture, book VII, chapter III, p 207.279 Kemp, Practical Plasterer, p 114. 280 Kemp, Practical Plasterer, p 115, 281 Kemp, Practical Plasterer, p, 115. 282 Kemp, Practical Plasterer, p 116.
applied over the top at the normal 10 mm thickness and finished with a wooden float and steel trowel pressed; and the pattern is then fixed into the same position as for the background and pounced. The pattern is removed and the render carefully dug out to expose the coloured background. The cuts in the design should be slightly angled towards the centre to give an illusion of greater thickness. The finished design is cleaned with a small log brush to remove excess material from the coloured background. There is no coloured render used if the building is to be painted—in which case the design is placed over the scratch coat while still green, pounced and the surface of the scratch coat flattened in the marked area. It is important to use the same fixing holes in the pattern and the corresponding holes in the wall each time the stencil is used.
Conclusion
The term ‘stucco’ originally referred to the material used to effect the finished plastering work and create a coloured, imitation marble or weather-resistant surface. Although there is no Latin word ‘stucco’, in the Ten Books on Architecture, Vitruvius devotes a chapter to the topic, and states that walls ‘rendered solid by three coats of sand mortar and as many of marble [dust], will not possibly be liable to cracks or to any other defect.’278
The revival of stucco work in the Renaissance period utilised lime plasters modified with animal glue or size (stucco duro) and it gained wide acceptance for internal use. The stucco materials were similar in many respects to the gesso materials used by artists and for decorating wooden objects, the main difference being that the gesso made use of gypsum in the form of plaster of Paris and used greater amounts of glue or size. Wilfred Kemp refers to ‘the stucco for the finishing coat’279 and states that ‘the stucco coat can be coloured by mixing certain metallic oxides and earths with it.’280 He later says:
When stucco is composed of plaster of Paris instead of lime lukewarm size water is very generally employed for gauging it. This is usually made by dissolving some fish glue or gum Arabic in the water so as to cause the mixture to be homogeneous and avoid porosity of the surface, thus, in cases where the stucco is subsequently polished, enabling a superior degree of gloss to be obtained.281
However, in a later example of a specification for a dwelling whose exterior is to be stuccoed, Kemp describes the whole of the external plastering, including the walls, cornices, string courses and mouldings, as using a ‘compo’ of blue lias lime mixed with sharp river sand in the proportion of 2 parts sand to 1 part lime.282 He relies upon the fact that the plasterer would know how the walls are to be stuccoed following the application of the compo. The methods employed for external stucco and internal stucco are different in the manner of application.
‘Romla’ and ‘Frelin’: sgraffito decorations framed by run in situ label mouldings, which are terminated with cast end bosses or label stops. Godfrey, ‘Romla and Frelin’
Materials and Techniques of External Stucco 59
Also, the external stucco layer must be applied while the preceding coat is still wet, so the render coat is applied and thoroughly scratched, the render or scratch coat can be left to cure but the float and stucco are applied on the same day. For internal stucco the base coats can be allowed to cure before applying the stucco layer.
The term ‘stucco’ applied to external finishes means that a stucco layer has been used to finish the work and close the surface, making the plasterwork harder and more durable. A typical specification such as that above would typically read, with details added:
Compo the whole of the walls including the cornices, string courses and mouldings with 1 scratch coat and 1 float coat at a minimum of 5/8 inch thick total for the two coats. The mixes to consist of 2 parts sand to 1 part blue lias lime, on the same day apply a third and final coat of stucco at approximately 1/8 inch thick, the stucco layer to consist of 1 part fine sand to 1 part blue lias lime and trowel to a smooth flat and closed surface, the total thickness of the stucco work not to be less than ¾ inch thickness.
The introduction of Portland cement allowed external plastering to be completed in two-coat or even one-coat work, and although most modern cement rendered walls did not utilise a stucco layer they were very often referred to as stucco, so the original term became misused to describe all external plastering and often ordinary internal plastering, which appears to be the current practice.
Barrie Cooper is a third generation plasterer and during the past 47 years has been involved in plastering in England, Italy, China, Malaysia and Australia. In 1980 to 1984, he completed four years of a seven year course on Industrial and Analytical Chemistry and has also worked for the last 24 years as an industrial chemist. Since 1976 he has been Managing Director of Westlegate Pty Ltd, manufacturers and suppliers of the Westox range of traditional building materials and restoration systems. He has also been employed as a casual lecturer on traditional plaster restoration by Sydney University and Sydney College of Technical and Further Education.
60 Victorian Stucco
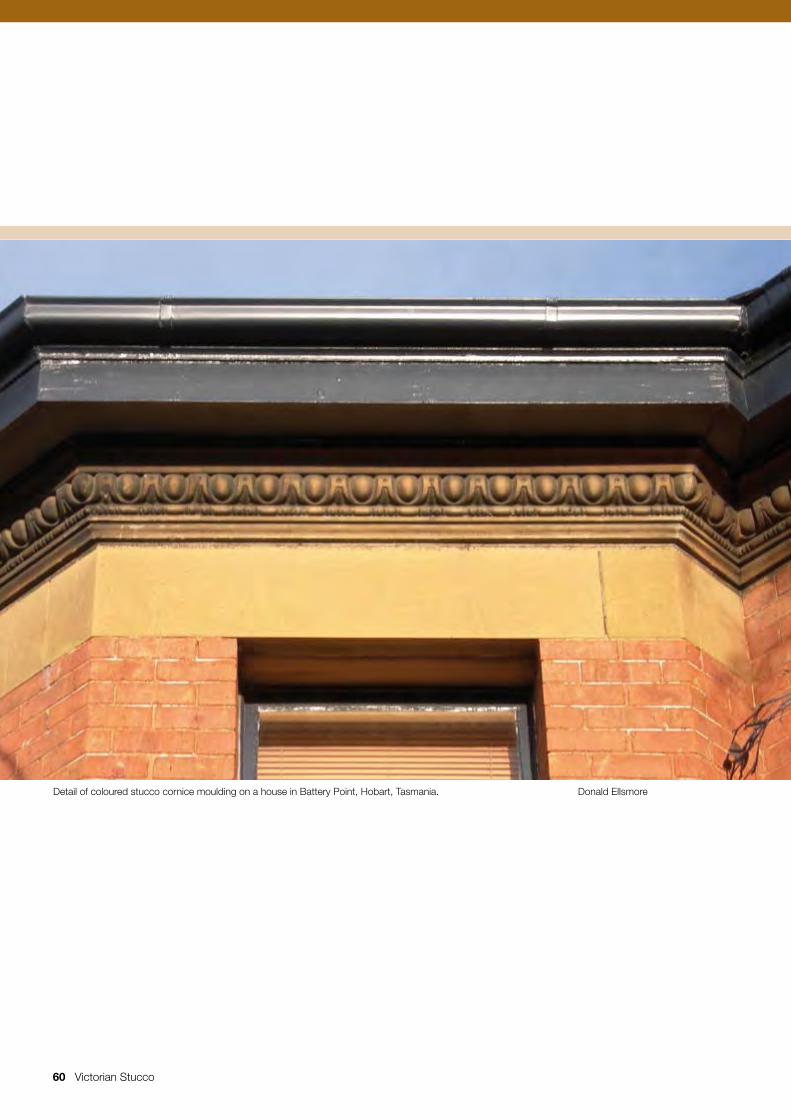
Detail of coloured stucco cornice moulding on a house in Battery Point, Hobart, Tasmania. Donald Ellsmore
Victorian Stucco 61
External Renders: Materials, Properties and Conservation Issues David Young
> Introduction
> limes
> non-hydraulic lime
> lime putty versus dry hydrated lime powder
> hydraulic limes
> cements
> comparison of lime, hydraulic lime and cement binders
> aggregate—sand
> mineralogy and colour
> impurities
> grain shape
> size grading
> clays and fine silts
> void ratio
> conservation issues
> significance
> compatibility
> application of significance and compatibility criteria
> conclusion
Introduction
External renders are made from the same materials commonly used for mortars: a binder, such as limes or cements, or a combination of these, and an aggregate, which is generally sand. Additives are sometimes used to modify the properties of the wet mix or the performance of the cured material. Like mortars, external renders are applied in a wet (plastic) state and allowed dry out and set, gaining strength on the wall. This paper is a brief review of the nature, production and properties of their materials. It concludes with a discussion of some of the issues that should be considered when conserving nineteenth and early twentieth century examples. The common term ‘render’ is used throughout this paper to distinguish external renders (and associated mouldings) from internal plasters.
Limes
Prior to the development and widespread use of Portland cements in the latter part of the nineteenth century (see Lewis, in this volume) the dominant binder was lime, a material, which has been used in building construction for thousands of years.
Lime binders come in several forms and it is important to be clear about the differences between them, and the sometimes confusing terminology. Limes may be ‘non-hydraulic’ or ‘hydraulic’.
Non-hydraulic lime
Non-hydraulic limes were the lime binders most commonly used in Australian building construction. They were used for bedding mortars in domestic construction until the major changes in industry and building that followed the Second World War. Generally described as just ‘lime’, the term non-hydraulic implies that they do not set by reacting with water, in contrast to hydraulic limes and cements, which do. Instead, non-hydraulic limes set by reacting with carbon dioxide in the air. The term ‘air-lime’ is sometimes used to describe these limes and to indicate the nature of the setting reaction.
62 Victorian Stucco
Non-hydraulic limes come in two distinct forms: as a wet putty, commonly described as ‘slaked lime putty’ or just ‘lime putty’; and as a dry powder, known as ‘dry hydrated lime’, or simply as ‘hydrated lime’. This latter material is the ‘builders lime’ that is sold in bags by hardware merchants. Do not confuse these materials with ‘agricultural limes’ (ag limes) which are used by gardeners and farmers for sweetening otherwise sour (acidic) soils. Agricultural limes are simply limestones that are ground to a powder; they have no binding power.
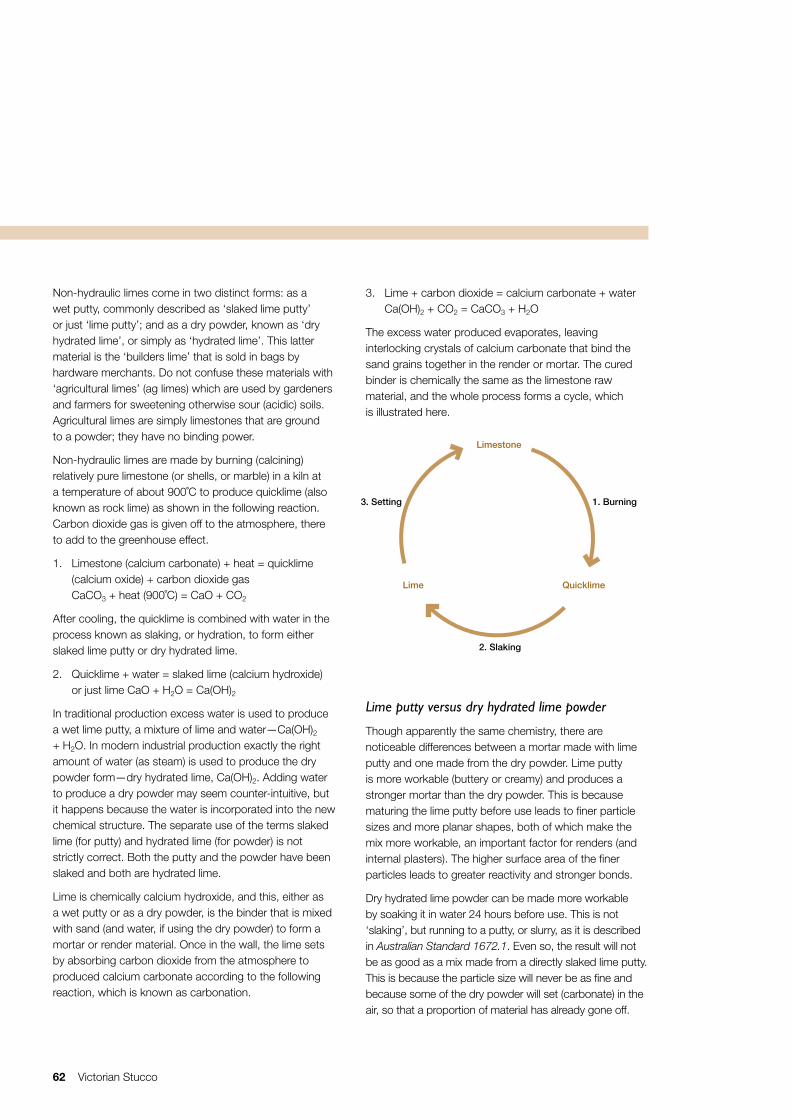
Non-hydraulic limes are made by burning (calcining) relatively pure limestone (or shells, or marble) in a kiln at a temperature of about 900˚C to produce quicklime (also known as rock lime) as shown in the following reaction. Carbon dioxide gas is given off to the atmosphere, there to add to the greenhouse effect.
1. Limestone (calcium carbonate) + heat = quicklime (calcium oxide) + carbon dioxide gas CaCO3 + heat (900˚C) = CaO + CO2
After cooling, the quicklime is combined with water in the process known as slaking, or hydration, to form either slaked lime putty or dry hydrated lime.
2. Quicklime + water = slaked lime (calcium hydroxide) or just lime CaO + H2O = Ca(OH)2
In traditional production excess water is used to produce a wet lime putty, a mixture of lime and water—Ca(OH)2 + H2O. In modern industrial production exactly the right amount of water (as steam) is used to produce the dry powder form—dry hydrated lime, Ca(OH)2. Adding water to produce a dry powder may seem counter-intuitive, but it happens because the water is incorporated into the new chemical structure. The separate use of the terms slaked lime (for putty) and hydrated lime (for powder) is not strictly correct. Both the putty and the powder have been slaked and both are hydrated lime.
Lime is chemically calcium hydroxide, and this, either as a wet putty or as a dry powder, is the binder that is mixed with sand (and water, if using the dry powder) to form a mortar or render material. Once in the wall, the lime sets by absorbing carbon dioxide from the atmosphere to produced calcium carbonate according to the following reaction, which is known as carbonation.
3. Lime + carbon dioxide = calcium carbonate + water Ca(OH)2 + CO2 = CaCO3 + H2O
The excess water produced evaporates, leaving interlocking crystals of calcium carbonate that bind the sand grains together in the render or mortar. The cured binder is chemically the same as the limestone raw material, and the whole process forms a cycle, which is illustrated here.
Lime putty versus dry hydrated lime powder
Though apparently the same chemistry, there are noticeable differences between a mortar made with lime putty and one made from the dry powder. Lime putty is more workable (buttery or creamy) and produces a stronger mortar than the dry powder. This is because maturing the lime putty before use leads to finer particle sizes and more planar shapes, both of which make the mix more workable, an important factor for renders (and internal plasters). The higher surface area of the finer particles leads to greater reactivity and stronger bonds.
Dry hydrated lime powder can be made more workable by soaking it in water 24 hours before use. This is not ‘slaking’, but running to a putty, or slurry, as it is described in Australian Standard 1672.1. Even so, the result will not be as good as a mix made from a directly slaked lime putty. This is because the particle size will never be as fine and because some of the dry powder will set (carbonate) in the air, so that a proportion of material has already gone off.
3. setting
Lime
Limestone
Quicklime
1. Burning
2. Slaking
3. Setting
External Renders: Materials, Properties and Conservation Issues 63
Hydraulic limes
Like cements, hydraulic limes (or rather, a part of them) set by reacting with water in a process known as hydration. They do this because of the presence of finely divided silica (either in the raw material, or added later). The material produced on setting, hydrated calcium silicate, is a very different binder from the calcium carbonate of non-hydraulic limes. Hydraulic limes can be ‘natural’ or ‘artificial’.
Natural hydraulic limes are so named because their limestone raw material naturally contains silica (as flint nodules or as silicate minerals in clays) in the correct proportions for the binder. Such limestones are described as argillaceous (for clay bearing) or siliceous (for silica bearing) limestones. They are burnt at temperatures of up to about 1000˚C, which produces a reaction between some of the quicklime and the silica to produce calcium silicates according to the following reaction.
4. Limestone + silica + heat = hydraulic lime (calcium silicate) + carbon dioxide CaCO3 + SiO2 + heat (~1000˚) = CaSiO3 + CO2 (formula not accurate)
The chemistry of calcium silicates is complex and the reactions shown here are not accurate but are included as a guide. The hydraulic component sets by reacting with water as follows.
5. Hydraulic lime (calcium silicate) + water = hydrated calcium silicate CaSiO3 + H2O = CaxSiOy(OH)z (formula not accurate)
Again, the formula is not accurate; x, y and z represent variables. There are also reactions between quicklime and alumina in clays, but these have been omitted for simplicity. As they set, the hydraulic components consume the mixing water and grow as tightly interlocking needle-like crystals, leading to greater strengths than are possible with non-hydraulic limes.
Like cement, natural hydraulic limes are available only in dry powder form. It is important to be clear that in a bag of hydraulic lime there are two types of material; some which is hydraulic (and sets by reacting with the mixing water) and some which is non-hydraulic (and sets by reacting with carbon dioxide in the air), the relative
proportions of each determining the degree of hydraulicity. Setting of hydraulic limes involves both hydration and carbonation reactions.
Natural hydraulic limes are not made in Australia, but are imported from Europe where there are a number of manufacturers. These products are commonly described as NHL2, NHL3.5 or NHL5, depending on the degree of hydraulicity (NHL stands for natural hydraulic lime, and should not to be confused with non-hydraulic lime).
Artificial hydraulic limes can be made by combining non-hydraulic lime with reactive siliceous materials known as pozzolans. The term ‘pozzolan’ is derived from the original source, Pozzuoli, near Naples in Italy, where there are large deposits of volcanic ash. Pozzolans have no binding power of their own but when mixed with non-hydraulic lime make a portion of it hydraulic and so increase the strength of the resulting binder. Pozzolanic materials include volcanic ash, such as the original from Pozzuoli, and a German ash known as trass, as well as a variety of manufactured materials such as crushed underfired bricks, fly ash from coal-fired power stations and activated kaolin (metakaolin) which is a calcined (heated) clay.
Although the pozzolan and the lime are mixed cold (and are not burnt together in a kiln) a reaction occurs between them because of the very fine particle size (and hence high surface area) of the pozzolan. The reaction produces a similar result to that of a natural hydraulic lime.
6. Lime (calcium hydroxide) + pozzolan (silica) + water = hydrated calcium silicate Ca(OH)2 + SiO2 + H20 = CaxSiOy(OH)z (formula not accurate)
Pozzolans can be added to lime putties or to dry hydrated limes. As before, better results will be achieved with putties because they are more reactive. Pozzolans can also be added to hydraulic limes to increase their hydraulicity.
The terms ‘natural’ and ‘artificial’ apply only to the source of the raw materials and are rather archaic. It is important not to be seduced by the feel-good connotations of the term ‘natural’; except for deep beneath the earth’s crust, there’s not a lot that is natural about being at temperatures around 1000˚C.
64 Victorian Stucco
Cements
Cements differ from hydraulic limes in consisting only of hydraulic materials. Like hydraulic limes, there are natural and artificial cements, and the terms relate to the source of the raw materials. Natural cements are made from argillaceous (clayey) limestones of just the right proportions so that on firing at moderate temperatures they produce a material that, after grinding to a fine powder, reacts with water to form complex hydrated calcium silicates and aluminates.
Artificial cements such as today’s ordinary Portland cement (OPC) (described as Type GP by Australian Standard 3972) are made by grinding together a mixture of about 80% limestone and 20% clay or shale (as sources of silica and alumina) together with other minor ingredients, and firing them at a temperature of around 1450˚C. The resulting partially-fused clinker is not reactive until it is finely ground, whereupon it becomes so reactive that a retardant in the form of gypsum is added to provide working time sufficient for normal use. Portland cements
have a complex chemistry and the following reactions are considerably simplified.
7. Limestone + shale (alumino-silicates) + heat = cement clinker (complex calcium alumino-silicates) CaCO3 + AlSiOn + heat (~1450˚) = CaxAlSiOy (formula not accurate)
Cement sets by reacting with the mixing water to form a hydrate.
8. Ground clinker + water = cement paste (complex hydrated calcium alumino-silicates) CaxAlSiOy + H20 = CaxAlSiOy(OH)z + Ca(OH)2 (formula not accurate)
Although the cement binder is entirely hydraulic, its setting produces free (non-hydraulic) lime, which makes up about 20% of hardened cement paste. This free lime is utilised in ‘blended cements’ (type GB, Australian Standard 3972) which contain about 20% of pozzolanic materials such as flyash. The result is a cement, which sets more slowly but ultimately reaches higher strengths than OPC.
Comparison of lime, hydraulic lime and cement binders
The following table compares the properties of limes and cements. It is a considerable simplification of a large amount of data across a wide range of materials. Although grouped into the three categories previously described (non-hydraulic limes, hydraulic limes and cements) there may be a wide range of results for each listed property and the variation within any one group can be high. Thus the setting rate of hydraulic limes, which is described here as intermediate, varies from relatively slow to moderately fast depending on the (increasing) hydraulicity of the lime. Similarly, the workability of non-hydraulic limes will vary with the ‘richness’ (purity) of the lime; a ‘lean’ (impure) lime will be less workable and require a stronger mix than a rich or ‘fat’ (pure) lime. And the strength of cements will vary depending on whether they are natural or artificial. Further, modern Portland cements are many times stronger than the Portland cements of the late nineteenth century.
Property Limes (non-hydraulic) Hydraulic limes Cements
Includes rich and lean limes, putty and dry hydrate
Includes natural and artificial hydraulic limes
Includes natural and artificial cements
workability good moderate poorpot life when mixed long intermediate shortsetting mechanism carbonation hydration + carbonation hydrationsetting rate slow intermediate faststrength low moderate highelasticity good moderate brittlepore structure of mortar open partially blocked mostly blockedsalt content negligible negligible to low low to moderate
External Renders: Materials, Properties and Conservation Issues 65
Aggregate—sand
The attention paid to sands is often slight compared with that devoted to binders. Yet sands make up the greater proportion of mortar and render mixes and their selection can be critical to achieving workable and durable results. While good sands will make good mixes, acceptable mixes can often be made from poor sands, provided care is taken in their formulation and mixing.
Sands are technically described as fine aggregate, and are distinguished from coarse aggregates (gravels) that are also used in construction. Sands are generally natural materials and are excavated from dunes, pits, river beds and river terraces. Though ‘natural’, sands are often highly processed, being passed through sieves of varying sizes (screening) to remove over and undersize particles and to adjust their grading. Materials from different sources are often blended to provide sands with particular properties. Washing of sands is commonly undertaken during screening to remove clays and other unwanted materials. As their name suggests, dry-screened sands are unwashed.
The relevant properties of sands include:
• the mineral type (mineralogy) and colour of the sand grains
• unwanted impurities, such as organic matter and salt
• the shape of the sand grains—‘sharp’ or ‘soft’
• the range of grain sizes—the size grading
• the undesirable presence of clays and fine silts
• the proportion of voids between grains—the void ratio.
Mineralogy and colour
The most common sand mineral is quartz, which is the principal component of many light-coloured beach sands and has a typical clear or light grey-colour. Quartz is chemically silica (SiO2) and is very strong and durable. Sands with darker coloured particles include silicate-based materials that can also be strong and durable.
Some beach and coastal dune sands consist of shell fragments, broken up and reduced by constant wave action. These sands are chemically calcium carbonate (CaCO3—the same as limestone) and are known as lime
sands. Being softer, their grains tend to be more rounded in shape and their whitish colours are more opaque. While they are not as strong as silica and silicate materials, they may make acceptable mortars.
Although pure quartz is clear, many quartz sands have yellow, pinkish and reddish colours due to very small amounts of various iron minerals dispersed through the quartz. Further, the colour of some quartz sands is due to thin clay and iron oxide coatings on the outside of otherwise clear grains. Where the coatings are weakly bonded to the grains, the sand will not make a strong mortar and washing alone may be sufficient to remove the coating, and with it, the colour. The overall colour of many sands, and mortars made from them, is largely due to the colour of the finer particles.
Impurities
Good sands are free of impurities, which commonly include organic matter, salts and clays. Organic matter may be leaf and tree litter and humic material from soils. These are avoided by careful selection during quarrying and by washing and screening the product. Salts are a problem, as they may lead to salt attack in the cured render. Sands may therefore need washing to remove salts, particularly if they were obtained from coastal locations. Sand excavated from ephemeral inland streams may also contain salt. Another source of contamination can be sand containing sulphide minerals, such as pyrite (iron sulphide), which oxidise on exposure to air to form sulphate salts, which can be very aggressive. Clays as impurities are discussed later.
Grain shape
Good sands are ‘sharp’—they feel sharp or abrasive when rubbed in the hand. Their angular shape leads to good interlocking of grains and good contact between sand grains and the substrate, which may be brick or stonework, or previous layers of render. In contrast, ‘soft’ sands are well-rounded, leading to weak mortars and renders, which do not key well to their substrates. Grain shape is technically described by the range: angular—sub-angular—sub-rounded—well-rounded. Good sands are sub-angular to angular in shape.
66 Victorian Stucco
Size grading
Size grading refers to the range of different grain sizes found in a sand and is perhaps the most critical property. Good sands have a wide range of grain sizes, so the gaps between the coarse grains are filled with medium size grains and progressively finer grains fill the smaller gaps. One result is a reduction in the void ratio, which is explained later. Another is improved workability. Although it may sound unlikely, a sand with a good range of grain sizes (including coarse grains) will be more workable than a sand made from a single or narrow range of grain sizes even though they may be fine or medium sizes. This is because the components of a ‘well-graded’ sand fit well together and fill up the gaps between grains (the void space) as described above.
Clays and fine silts
As the grain size becomes finer, we pass from fine sands into silts and then clays. While a small proportion of coarse silts may be acceptable, fine silts and clays are problematic because of their high surface areas, which must be coated to ensure good bonding. With fine silts and clays the particle size is more similar to that of the binder which leads to a stacking effect where the binder (in order to coat all surfaces) must force the aggregate grains apart, which in turn means more binder to fill the additional voids created.
Sands with high clay contents are often favoured for use in bricklaying because the clay improves the workability of otherwise harsh cement mortars. This is common, but bad practice; sands should be free of clay and workability should instead be sought through good size grading, choice of binder and appropriate use of additives.
Note that this discussion applies to renders made from sand and a binder, and not to those renders that were clay-based, such as may have been used on earth constructions like adobe and pisé de terre. In these the clay material is both the binder and the aggregate and
the use of clay for their repair or reproduction is entirely appropriate, whereas clays should be excluded from renders made from sand and lime and/or cement.
Void ratio
The void ratio of a sand is the proportion of voids (or air) in a dry sand and is expressed as a percentage. The void ratio of normal sands ranges from about 30% to about 40% of the volume of the sand. In a good, sharp, well-graded sand the void ratio will be about 33%, or one third of its volume. When making a mortar mix the aim is to fill this remaining space with a binder, and this leads to the traditional mix proportions of 1:3, one part binder to three parts of sand. Void ratios of up to about 40% can be found in some sands such as beach sands that are well-rounded and poorly-graded. Such sands require mix proportions of 1:2.5, one part binder to two and half parts sand (i.e. 40 to 100) simply to fill the voids. Very fine sands will require higher proportions of binder (often 1:2 and sometimes as rich as 1:1.5, or even 1:1) to allow for the poor size grading, the increasing surfacing area of the sand and the stacking effect noted above.
The void ratio may seem like an academic consideration, yet it is critical to determining the workability of a mortar (or render) mix. A sand with a 40% void ratio will not produce a workable mix if used in the standard proportions of 1:3 (one part binder to three parts sand). At these proportions the sand will be ‘hungry’ and the plasterer will want to add more water to make it workable. Better practice is to add more binder instead of adding water. Better practice still is to know the correct proportions from the beginning, by measuring the void ratio of the sand. Even then, some licence must be given to the tradesperson to adjust the mix slightly to suit the particular materials being used.
External Renders: Materials, Properties and Conservation Issues 67
283 Hughes & Válek, Mortars in historic Buildings, passim.284 Nangle, Australian Building Practice [1911], p 366.
Conservation issues
As well as treatment of the existing renders, their repair and conservation may involve patching small areas and reconstruction across larger areas. For patching and reconstruction work, decisions about the choice of materials and their mixes should be based on two criteria:
• significance of the building and the existing renders
• compatibility of the proposed replacements.
These criteria are explained below, followed by some examples of how they are applied.
Significance
Where the existing renders are of cultural significance, their conservation should be based on the principles of the Burra Charter, including, retention of as much significant material as possible, the preferred use of traditional materials and techniques, and like-for-like replacement where needed. These imply matching the original materials in nature, colour, texture, grain size and proportions. To do this well, the existing renders need to be researched and closely studied and analysed in order to determine their make up.
Significance cannot be the sole factor determining the choice of materials. Some traditional materials are simply not available, or are not available in the form they were in when used in the nineteenth or early twentieth centuries. This may force us to choose alternative materials and here the question of compatibility is critical.
Compatibility
New materials, and render mixes made from them, should be compatible with the existing render and with the substrate to which they are to be applied. This will commonly mean producing a mix with porosity and strength characteristics which are similar to the original. The key compatibility criterion is that the new materials and mix should not damage the original render or the substrate.283
In developing a replacement render mix we should begin with the original materials and mix (or as close to them as we can get) and then consider whether the compatibility criterion will be satisfied in the particular circumstances. We may need to modify the original mix to ensure that:
• it is weaker than the original (and so behaves sacrificially)
• it has appropriate porosity and permeability
• potential problems such as soluble salts can be managed
• there are no adverse side effects of the repairs.
Application of significance and compatibility criteria
The following examples illustrate how the significance and compatibility criteria are applied.
Replacing a lime-based render on a soft brick substrate with a hard cement-based render would not only fail the significance test (because it’s not the same as the original) but also the compatibility test, for the new render would be incompatible with the original render and with the substrate. It is important that a replacement render is weaker than the original, so that any failure will preferentially occur in the repair work, thus protecting the older fabric of heritage value.
Replacing a nineteenth century 1:2 or 1:3 cement:sand render, such as a recommended by Nangle,284 with a 1:2 or 1:3 render made with modern Portland cement would fail the compatibility test, because modern Portland cement is much stronger than that of the nineteenth century. A new render made this way would be too strong for the adjacent original, and possibly too strong for the substrate as well. The challenge in these circumstances is to design a cement-based render that is slightly weaker than the original, yet has similar porosity and permeability. One approach would be the use of masonry cements (Australian Standard 1316). These are cements, which have lime or inert fillers (such as powdered limestone) added to reduce the strength of the resulting mix. Another would be to obtain cements made to lower strength
68 Victorian Stucco
285 Young, Salt Attack and Rising Damp, passim.286 Hughes & Válek, Mortars in historic Buildings, passim.
standards than are used in contemporary reinforced concrete construction—but even here there may be the need to include an additive to reduce the strength of the resulting mix. In either case, the final proportion of cement to sand will be very much lower than 1:2 or 1:3. Strength is only one of the characteristics which need to be taken into account: thermal and moisture expansion, flexibility, durability, porosity and permeability all need to be considered and, depending on the particular circumstances, one or two of these characteristics may be more important than others.
Providing appropriate porosity and permeability characteristics may necessitate adjustment of the size grading of the sand (to remove clays or fine silts) or the judicious use of air entraining agents.
Managing salt problems will be necessary where failures in the render have allowed rain to carry soluble salts into the masonry over a long period, or where ineffective damp-proofing has allowed rising damp to carry salts up into the walls. Even after a desalination treatment, such as poulticing, some salt will remain in the masonry and the replacement render should be designed to allow the salt to migrate into the new material and so protect the original. 285 This will mean careful control of porosity and permeability and may require the use of air-entraining agents, porous particulates, or the replacement of some of the cement in the mix with lime, which has greater porosity.
Pre-wetting, the thorough wetting of the substrate to control suction and prevent rapid dehydration of the mix, is an important aspect of good practice. However, there may be an adverse side effect should too much water penetrate through the full thickness of the wall and lead to damage to valuable internal finishes. In such circumstances, the use of water-reducing agents in the mix may be appropriate.
Conclusion
Good conservation of external renders requires a thorough understanding of the mechanical, physical and chemical properties of the existing renders286 and of the reasons for their failure. Successful repairs will only be made where this knowledge is combined with similar understanding of the properties of the replacement materials. To this must be added the essential trades skills needed to carry out the work.
David Young, OAM, is a heritage consultant with a science and materials conservation background. He provides specialist advice on the repair of historic buildings and sites throughout Australia. He writes technical guides and runs heritage training programs, including summer schools in building conservation and heritage management at the University of Canberra.
Victorian Stucco 69
Testing of stuccoDavid West
287 APT Bulletin; The Journal of Preservation Technology, Association of Preservation Technology International, USA. See index at <www.apti.org>
> visual inspection
> general overview
> hands-on overview
> detailed survey
> tap testing for drumminess
> infra-red thermography
> sampling
> opening up
> finishes
> visual testing in the laboratory
> chemical testing
> physico-chemical testing
> physical properties
> samples
> Validating reproductions
These notes summarise my thoughts on the testing of stucco—from the general to the specific. They are intended to provide some basic pointers rather than to be a manual on the topic. Readers wishing to gain more detailed information about the methods described here will find several informed articles in APT Bulletin: the Journal of Preservation Technology.287
Visual inspection
I’m going to start with one of the most important tests for assessing stucco—visual inspection. Looking at the stucco can tell us many things about it. How do we look at it? I would do the following:
General overview
Start by walking around the outside of the building:
• as close as possible
• at least 30–50m away from it.
This is done in order to get perspective on the distribution of:
• the stucco itself and other materials on the building
• any discolouration or staining
• any cracking
• any loss or spalling.
Hands-on overview
Get close enough to the stucco to touch it and look at a range of things including:
• the texture of the surface
• the presence of any evidence of past surface finishes or treatments
• interfaces with other materials (for evidence of original finishes)
• hidden areas of original finishes
• each type of discolouration or staining—to identify what it is, and if possible, how it was caused
• each type of crack—to determine if it is active or old, whether there is associated delamination (drumminess) and if possible, what caused it
• each type of loss or spalling—to determine possible mechanisms of deterioration
• other evidence of deterioration.
This will provide the basis for a typology of deterioration and defects in the stucco in preparation for a detailed survey.
Detailed survey
The detailed survey is preferably done close up (hands-on survey) but could be done by binoculars or telescope (visual), and:
• involves mapping the distribution and quantity of each type of deterioration and defect
• probably includes drumminess survey
• might identify location for opening up or sampling of stucco
• might involve taking samples for lab analysis.

70 Victorian Stucco
Visual inspection is a necessary precursor to testing, because it allows you to define what you want to find out, and why—without this, testing is spending money to get data that may be of little use or meaning.
Tap testing for drumminess
This basically uses sound to map areas of delamination between stucco layer or layers and the substrate. There are many different methods, the most common are:
• hammer
• dragging.
Tuning (attuning) the ear is very important: one can often differentiate between delamination at different depths in wall coating system and different thicknesses of gap from the different sounds. This needs experience and careful attention, as well as later correlation.
Testing for drumminess involves:
• mapping the distribution of drumminess
• using a grid system, or relating sounds to cracks and architectural detail
• removing samples of drummy material to validate drumminess survey (often combined with a safety survey to remove pieces at risk of falling into public areas).
Infra-red thermography
This is undertaken away from the building, and needs a clear view of façade to be feasible. To be effective, it requires a temperature difference and active temperature gradient, as it is dependent on heat contrasts. The surface temperature of the stucco over an air-gap (delaminated region) is different from the temperature of stucco which is bonded to the substrate. The temperature gradient is most commonly achieved in early morning as façades warm up with sunlight, but it can also be achieved at night as the surfaces cool down. Interpretation requires care, as areas of dampness will also be represented by different
temperatures. The survey provides a tool to identify areas of differentiation, rather than absolute demarcation of the drumminess.
Infra-red thermography is generally used to identify:
• anomalies
• structural changes
• moisture
• intermediate layers.
If the materials are known, appropriate modelling can be used to quantify time and energy, but very sophisticated software is required, and it is usually not conclusive.
Sampling
Where stucco samples are to be removed for laboratory analysis, it is necessary to identify which tests are to be done, as this will determine the size, mass, and condition of the samples required. When samples are taken from areas of loss or spalling, it is important to know whether they are truly representative. All samples should be removed with care to minimise overall damage to the building. All must be labelled at the time of collection to avoid any future confusion, and stored in protective containers together with their labels.
Opening up
Stucco or other materials may need to be removed to reveal unseen conditions and to identify areas of original finish or unweathered material for the purposes of comparison. This might establish the number of layers of stucco, and the approximate thicknesses in different areas, and might also establish or confirm the nature of the substrate material.
Opening up may be done by means of drilled holes, core holes, saw cut slots or patches, or rough chiselled-off lumps. Sound areas (with no evidence of deterioration) and deteriorated areas should be compared.
Testing of stucco 71
288 See especially Stewart & Moore, ’Chemical Techniques of Historic Mortar Analysis’.
Finishes
To determine the true nature of finishes, paint scrapes may be done, samples taken, or original surfaces exposed by removing original fittings or early additions. The samples should ideally be examined under a microscope, either on site or in the laboratory. Comparative elemental analysis of samples of the surface and the body of the stucco can be done to determine whether a finish coat is of a composition significantly different from that of the body mix. Scanning electron microscopy with x-ray analysis might be useful to answer particular questions about the composition of finishes.
Visual testing in the laboratory
Using a hand specimen, stereo microscopy should reveal the surface texture, layering, deterioration and original finish.
Using a thin section under a petrographic microscope, it may be possible to determine the identity of the binder (whether lime, natural cement, hydraulic cement, or Portland cement). It is very difficult to distinguish between different pozzolans except by petrography, and even then, this is dependent upon the skill of the operator and the fineness of particles. The aggregate type and shape, the percentage of each component by point count, and the porosity can also be determined.
Scanning electron microscopy may be useful to establish the original finishes, the binder type and any alteration that has taken place in it.
A key consideration in commissioning testing is ensuring that the person or laboratory undertaking the work really has suitable experience, so that they can interpret the findings. A written report is rarely sufficient: discussions with the person doing the testing will often reveal far more information than a written test report.
Chemical testing288
Elemental analysis can be done using atomic absorption spectroscopy, ICP spectrometry, or x-ray fluorescence. This provides data on the key elements, enabling the percentage of each component to be calculated. It reports CaO and/or LOI, thus enabling the calculation of carbonate content, but makes no differentiation between lime, cement, or aggregate, which contains carbonates. It may be useful to identify trace elements to indicate additives or minor components, or to compare variability between samples.
Organic extraction and analysis by Fourier Transform Infra-Red (FTIR) spectroscopy can be useful to identify any organic additives in the original mix, though they are not always found. It is necessary to be aware of significant alterations that take place over time. With a carefully selected sample, it may be possible to identify organics present on the surface of the stucco.
Physico-chemical testing
Loss on ignition (differential thermal analysis or DTA) identifies calcium carbonate and magnesium carbonate not determinable through standard chemical analyses. It is important in determining the percentage of binder, but is not relevant if a carbonate aggregate such as limestone or marble has been used.
X-ray diffraction, for crystallographic phases and mineral identification is semi-quantitative, and is useful to identify binder and aggregate components, especially if carbonate aggregates have been used. It can also identify mineral phases of lesser components.
Soluble salts are identified for the analysis of salt attack. This is subject to the influence of original material, and may need to be correlated with other analyses.
Acid digestion and sieve analysis can be used to determine the size distribution of the aggregate, and may determine the percentage of non-carbonate minerals—the combination of aggregate and silica or impurities in cement and lime.
72 Victorian Stucco
289 See Jacob & Weiss, ‘Laboratory measurement of water Vapour Transmission Rates’.290 See Suter et al, ‘Mortar study of Mechanical Properties’.291 See Suter et al, ‘Mortar study of Mechanical Properties’.
Physical properties
Porosity and permeability are useful to give an indication of degree of weathering, and correlate with original composition, especially the binder type. This provides a baseline for comparison with patch and repair mixes.
Water vapour transmission testing using the ASTM E96 procedure289 is good as a comparative test, but not particularly useful for absolute measurement.
Strength testing (compressive, bending) is not particularly relevant in most situations.290
Thermal expansion can be important if there is extensive delamination, as there may be differential thermal expansion between stucco and substrate. This provides a baseline for comparison with patch and repair mixes.
Samples
The number of samples taken is important. Historic batching techniques mean that some variability is to be expected. An absolute minimum of three directly comparable specimens is required, but five to seven is preferable. More should be taken if a comparison between sound and deteriorated fabric is desired.
The sample size and shape must be sufficient for relevant test methods. More, rather than less, is usually good for the testing laboratory, but that is a problem when dealing with a significant building. It can be physically difficult to procure suitable samples if the stucco is in good condition.
Validating reproductions
Prototype materials for repair and restoration work should be tested for compatibility with the existing fabric.
Samples of the mix can be subjected to mortar analysis to confirm the composition and tested for cure, set, porosity and strength.291
Prototype samples should be applied to the wall to validate mixing, application, curing, and performance in situ. Pull-off tests can be used to verify adhesion, visual mapping for shrinkage cracking, and permeability testing to assess porosity.
Cleaning trials should also be carried out.
In all cases, comparative tests are by far the most useful. One-off tests of a single product or system tell us very little, because there are no absolute standards against which they can be measured. Instead, a test of the material prior to treatment compared with the treated material can provide some data for assessment of performance.
David West is a materials scientist with training in architecture, geology and materials testing. He has consulted on the conservation of historic building fabric throughout Australia, with a focus on stone, masonry and ceramics. He is the Executive Director of International Conservation Services, a multi-disciplinary conservation business based in Sydney.
Victorian Stucco 73
The Analysis and Conservation of Stucco Surface FinishesJenny Dickens with a contribution by David Tilbrooke
> introduction
> materials
> stucco materials
> stucco colourants
> stucco coatings
> maintenance coatings
> surface deposits
> materials identification
> methods of examination
> documentary research
> sampling
> visual examination
> visual microscopy
> technical analysis (with contributions by David Tilbrooke)
> semi-micro analysis in architectural conservation investigation
> instrumental techniques for micro sample analysis
> spectroscopy
> chromatography
> electron microscopy
> X-ray Fluorescence (XRF) and Particle Induced X-ray Emission (PIXE)
> X-ray Diffraction (XRD)
> philosophy of analysis and intervention
> determining the architect’s or builder’s intent
> approach to intervention
> applying the results
> conclusion
> case study: ‘Benvenuta’
> background
> project
> results
> summary
> conclusions
Introduction
Our understanding of the nature and true colour of Victorian stucco finishes has been challenged in recent research, which reveals a much greater degree of subtlety and sophistication than previously understood. This understanding can be extended with the aid of conservation science.
The colours and surface textures of buildings influence the way they are perceived by the general public. And perceptions can impact directly on conservation decision-making. For example, buildings with damaged or dirty surfaces can be perceived as structurally flawed leading to a lack of will to conserve them. Some will be demolished and replaced through a general lack of appreciation of their true significance. This applies equally to modest and grand buildings, including those with plaster or cement façade treatments, or stucco. The surfaces of stuccoed buildings are particularly important in understanding their significance, as they were generally intended to have the outward appearance of stone. It is therefore very important to have a good understanding of the precise nature, materials and appearance of stucco finishes and maintenance layers before any intervention.
Whichever technique is chosen to analyse a stuccoed building, it is critical to have a good understanding of the materials likely to be found on or in historic stuccoed surfaces. These layers can be thin and easily confused with each other. They are (from the interior outwards):
• rendered masonry
• stucco materials (including colourants) used to make and finish the stucco
• coatings (such as paint or limewash) applied to the stucco in the post-construction period
• maintenance coatings (such as paint or limewash) applied to the stucco as part of routine or occasional maintenance
• surface deposits—accretions and post-construction alterations which may be found between any of the above layers.
74 Victorian Stucco
292 Seeley, ‘Lead Paint for Historic Buildings’, pp 24–42.293 Krotzer, ‘Architectural finishes’, pp 1–6.294 Ellis, ‘The Analysis of Mortar’.
It is important that the person interpreting the results of technical analysis has sufficient understanding of the historical significance and the chemistry of materials, and of the history of building technology. A team of specialists, including at least an architectural historian and a conservator, is often better able to determine the significance or otherwise of a particular layer than a single individual, however expert.
Examination techniques commonly used to establish the original appearance of a stuccoed building are:
• documentary research
• visual examination and enhanced visual examination
• materials identification
- laboratory based identification techniques
- instrumental techniques.
Each technique focuses on a different aspect of the materials, and will have its own strengths and weaknesses. Usually a combination of one or more of these techniques would be the most successful. A clear understanding of scientific method is also essential for achieving accurate and meaningful analyses. This is to ensure that the evidence is collected accurately and evaluated carefully, that the research and testing is sound, and that there is no undue reliance on prior assumptions when developing the final conclusion.
The surfaces of buildings are constantly changing, whether intentionally, or due to ageing or damage—and it is erroneous to assume that the appearance of a building at a particular point early in its life is necessarily the original appearance. For example, it is not possible to apply resinous paints to a stuccoed building until after the stucco has completed carbonation, which may take up to three years.292 Ashurst reports that the use of oil paints on stucco became general in the United Kingdom in the 1840s. Research by the author has shown that ‘Benvenuta’ in Melbourne was white for much of its life due to applications of stucco, paint and whitewash. Should it be returned to its newly constructed grey appearance, or to the appearance it had for the majority of its life? Krotzer discusses an example where
a building’s exterior woodwork was originally painted to match the colour of the building’s stone dressings.293 If the stone has developed a darker colour over time (and this type of darkening often can’t be removed), should the woodwork be painted the original colour (which would not match the stone any more) or painted to match the new colour of the stone? These types of issues need to be considered in conjunction with the results of documentary research and technical analysis.
Materials
Stuccoes were applied to buildings as fine finishing layers over layers of coarse plaster, and were intentionally coloured using carefully selected materials. They were also coloured with various water-borne materials while they were still green (uncured) or very soon after. Conventional distempers and oil based house paints were applied, but a period of drying and carbonation of the stucco was required before application.
To start to identify the original appearance of a stucco surface it is necessary to attempt to identify the materials used to make the stucco and any coatings applied to it at the time of construction or soon after. Dirt and other additions must be identified and separated from the original and authentic surface finishes and any later maintenance coatings. Plasterers in the nineteenth century had access to a very wide variety of materials, and would have chosen them according to personal preference, price, availability and short- and long-term performance.
Stucco materials
Ellsmore’s review of stucco materials and finishes, above, lists the main materials found in Victorian stucco. The chemical constituents of these materials are complex due to the chemical interactions between the components during manufacture, use and ageing. Ellis lists the constituents expected in Portland cement [hydraulic lime, pozzolanic lime, lime putty (non-hydraulic) and dry hydrated lime (non-hydraulic)].294 These, as well
The Analysis and Conservation of Stucco Surface Finishes 75
295 Herm, ‘Kalkfarbetechniken’.296 Matero & Snodgrass, ‘Understanding Regional Painting Traditions’, pp 36–52.297 Burgio, ‘Dating Alhambra Stuccoes’.298 Istudor et al ‘An Alteration Phenomenon of Cinnabar Red Pigment in the Mural Paintings from Sucevita’, p 602.
as Roman cement and gypsum plaster, have many chemical similarities but with subtle differences caused by differences in source materials and processing. As time passes, many of these materials continue to carbonate and identification using their current chemical state may be quite inaccurate.
Organic binders were sometimes mixed into the final layer or layers of stucco in order to give a finer and smoother surface. Many of the same organic materials as those used in limewash (see below) would have been used, but with the addition of fine sand to give the mixture a bit more body. For example, the stucco layer at ‘Benvenuta’ (see case study below) was found to be a mixture of hydrated lime (calcium hydroxide), chalk (calcium carbonate or whiting), binder (probably casein) and fine sand. This was grey white in colour and rested on the masonry render. No dirt or pollutants were found between it and the render, which indicates that this layer was applied during construction or very soon after (within the first few years).
Stucco colourants
Again, Ellsmore lists the main colourants found in and on Victorian stucco. There is a very large variety of materials. The constituents of the most common are listed below.
• Limewash. The basic components of limewash are lime and water, usually with an organic binder. Herm lists a large range of materials used as limewash binders: ‘…1) oils, fats, soap, paraffin; 2) casein, milk, resin varnish; 3) salts; 4) cement, brick dust; 5) cellulose ether, glue, sugar, beer, glycerine; 6) polymer dispersions.’295 Polymer dispersions would normally be found in more modern coatings and may include synthetic resins such as polyvinyl acetate (PVA) or acrylic.
• Sealants. Organic materials such as those listed above, used alone form a clear coating. Transparent resinous coatings used on buildings would tend to be made from the cheaper resins such as rosin (pine resin). These would have been used to give a glossy coating; because these materials are visually saturated and thus temporarily disguise a dusty
surface; or in the mistaken belief that a clear coating would stop or prevent flaking of underlying layers. A layer of rosin (pine resin) was found at ‘Benvenuta’ (see case study).
• Pigments mixed with the stucco. Pigments may have an organic or inorganic origin. Most pigments have a historic name (e.g. raw sienna) and a chemical identity (e.g. iron oxide), and many have more than one name. Research by Matero and Snodgrass296 on 20 nineteenth century buildings in New Orleans identified a very large palette of colours on the exteriors of the buildings. These included Paris green (copper arsenate), chrome green (copper chromate), iron oxides (used raw and ‘burnt’ e.g. raw sienna and umber, burnt sienna and umber), Venetian red, Chinese white (lead carbonate), and various carbon blacks. All these pigments are inorganic—that is, they are minerals. Most mineral pigments are light-stable.
Organic pigments are generally made by precipitating a natural or synthetic dye (such as madder or indigo) onto a colourless powder (such as gypsum or alumina) thus forming a pigment known as a lake (madder lake being a popular example). It is likely that these materials have not often been used for colouring buildings given their greater propensity to fading. However, their presence cannot be completely discounted.
Pigments may have very similar compositions to each other, or change to a new chemical compound over time or on exposure to the lime in stucco. Both these will complicate visual examination and technical analysis. For example, the red pigment cinnabar or vermillion (mercury II sulphide) was sometimes used to give a pink colour to stucco297. On exposure to light, the pigment can recrystallise to black metacinnabar, which still has the same chemical composition although a different crystalline structure298.
Given the vast array of pigments and the chemical changes they may undergo over time, identifying pigments is a very complex process best done by a conservator or conservation chemist.
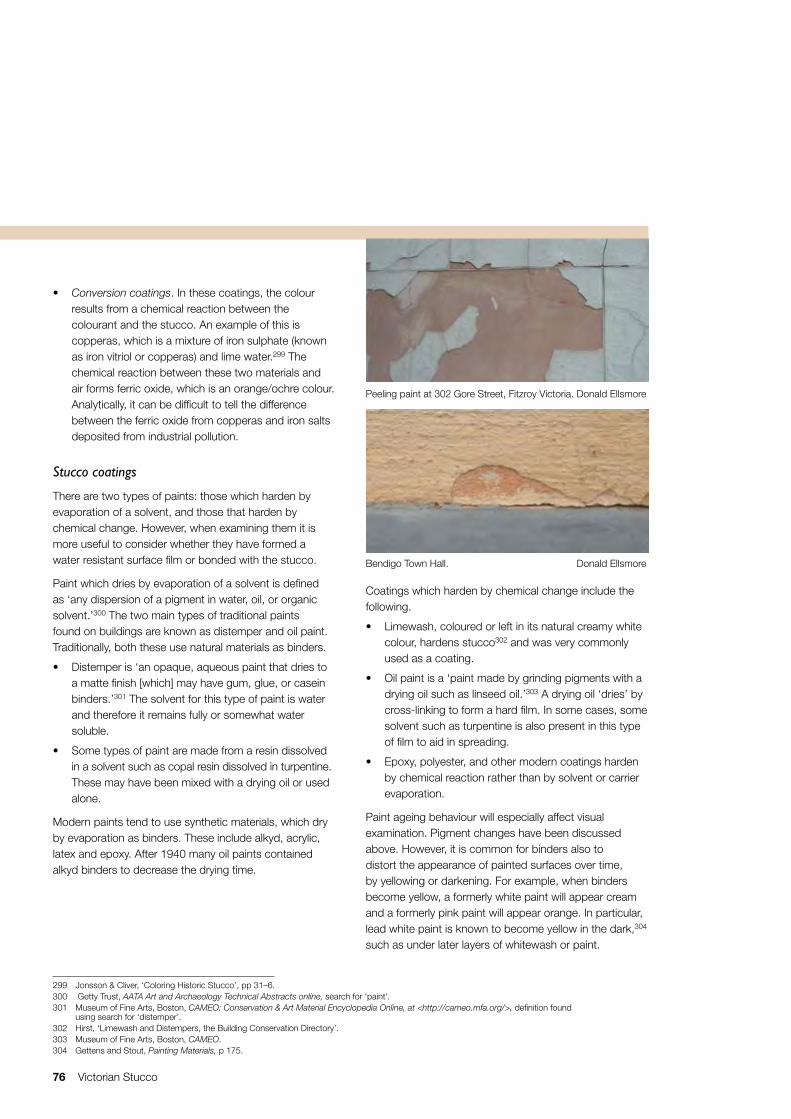
76 Victorian Stucco
299 Jonsson & Cliver, ‘Coloring Historic Stucco’, pp 31–6.300 Getty Trust, AATA Art and Archaeology Technical Abstracts online, search for ‘paint‘.301 Museum of Fine Arts, Boston, CAMEO: Conservation & Art Material Encyclopedia Online, at <http://cameo.mfa.org/>, definition found
using search for ‘distemper’.302 Hirst, ‘Limewash and Distempers, the Building Conservation Directory’.303 Museum of Fine Arts, Boston, CAMEO.304 Gettens and Stout, Painting Materials, p 175.
• Conversion coatings. In these coatings, the colour results from a chemical reaction between the colourant and the stucco. An example of this is copperas, which is a mixture of iron sulphate (known as iron vitriol or copperas) and lime water.299 The chemical reaction between these two materials and air forms ferric oxide, which is an orange/ochre colour. Analytically, it can be difficult to tell the difference between the ferric oxide from copperas and iron salts deposited from industrial pollution.
Stucco coatings
There are two types of paints: those which harden by evaporation of a solvent, and those that harden by chemical change. However, when examining them it is more useful to consider whether they have formed a water resistant surface film or bonded with the stucco.
Paint which dries by evaporation of a solvent is defined as ‘any dispersion of a pigment in water, oil, or organic solvent.’300 The two main types of traditional paints found on buildings are known as distemper and oil paint. Traditionally, both these use natural materials as binders.
• Distemper is ‘an opaque, aqueous paint that dries to a matte finish [which] may have gum, glue, or casein binders.’301 The solvent for this type of paint is water and therefore it remains fully or somewhat water soluble.
• Some types of paint are made from a resin dissolved in a solvent such as copal resin dissolved in turpentine. These may have been mixed with a drying oil or used alone.
Modern paints tend to use synthetic materials, which dry by evaporation as binders. These include alkyd, acrylic, latex and epoxy. After 1940 many oil paints contained alkyd binders to decrease the drying time.
Coatings which harden by chemical change include the following.
• Limewash, coloured or left in its natural creamy white colour, hardens stucco302 and was very commonly used as a coating.
• Oil paint is a ‘paint made by grinding pigments with a drying oil such as linseed oil.’303 A drying oil ‘dries’ by cross-linking to form a hard film. In some cases, some solvent such as turpentine is also present in this type of film to aid in spreading.
• Epoxy, polyester, and other modern coatings harden by chemical reaction rather than by solvent or carrier evaporation.
Paint ageing behaviour will especially affect visual examination. Pigment changes have been discussed above. However, it is common for binders also to distort the appearance of painted surfaces over time, by yellowing or darkening. For example, when binders become yellow, a formerly white paint will appear cream and a formerly pink paint will appear orange. In particular, lead white paint is known to become yellow in the dark,304 such as under later layers of whitewash or paint.
Peeling paint at 302 Gore Street, Fitzroy Victoria. Donald Ellsmore
Bendigo Town Hall. Donald Ellsmore
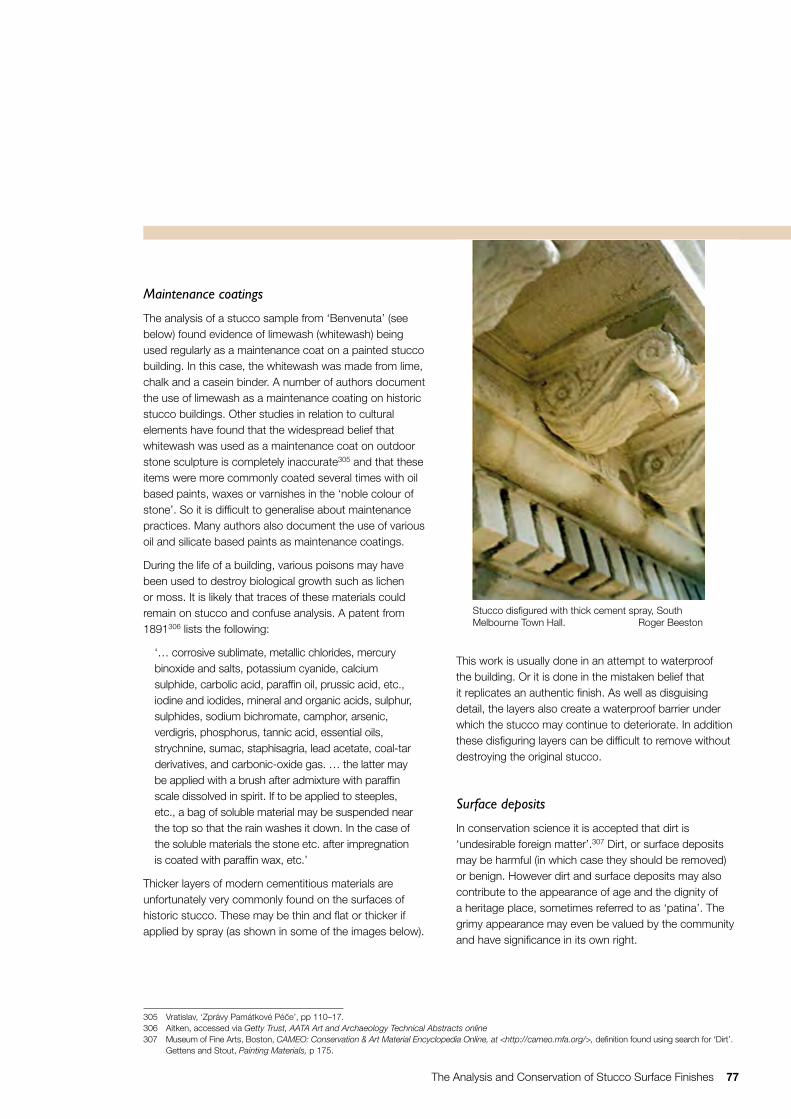
The Analysis and Conservation of Stucco Surface Finishes 77
305 Vratislav, ‘Zprávy Památkové Péc e’, pp 110–17.306 Aitken, accessed via Getty Trust, AATA Art and Archaeology Technical Abstracts online307 Museum of Fine Arts, Boston, CAMEO: Conservation & Art Material Encyclopedia Online, at <http://cameo.mfa.org/>, definition found using search for ‘Dirt’. Gettens and Stout, Painting Materials, p 175.
Maintenance coatings
The analysis of a stucco sample from ‘Benvenuta’ (see below) found evidence of limewash (whitewash) being used regularly as a maintenance coat on a painted stucco building. In this case, the whitewash was made from lime, chalk and a casein binder. A number of authors document the use of limewash as a maintenance coating on historic stucco buildings. Other studies in relation to cultural elements have found that the widespread belief that whitewash was used as a maintenance coat on outdoor stone sculpture is completely inaccurate305 and that these items were more commonly coated several times with oil based paints, waxes or varnishes in the ‘noble colour of stone’. So it is difficult to generalise about maintenance practices. Many authors also document the use of various oil and silicate based paints as maintenance coatings.
During the life of a building, various poisons may have been used to destroy biological growth such as lichen or moss. It is likely that traces of these materials could remain on stucco and confuse analysis. A patent from 1891306 lists the following:
‘… corrosive sublimate, metallic chlorides, mercury binoxide and salts, potassium cyanide, calcium sulphide, carbolic acid, paraffin oil, prussic acid, etc., iodine and iodides, mineral and organic acids, sulphur, sulphides, sodium bichromate, camphor, arsenic, verdigris, phosphorus, tannic acid, essential oils, strychnine, sumac, staphisagria, lead acetate, coal-tar derivatives, and carbonic-oxide gas. … the latter may be applied with a brush after admixture with paraffin scale dissolved in spirit. If to be applied to steeples, etc., a bag of soluble material may be suspended near the top so that the rain washes it down. In the case of the soluble materials the stone etc. after impregnation is coated with paraffin wax, etc.’
Thicker layers of modern cementitious materials are unfortunately very commonly found on the surfaces of historic stucco. These may be thin and flat or thicker if applied by spray (as shown in some of the images below).
This work is usually done in an attempt to waterproof the building. Or it is done in the mistaken belief that it replicates an authentic finish. As well as disguising detail, the layers also create a waterproof barrier under which the stucco may continue to deteriorate. In addition these disfiguring layers can be difficult to remove without destroying the original stucco.
Surface deposits
In conservation science it is accepted that dirt is ‘undesirable foreign matter’.307 Dirt, or surface deposits may be harmful (in which case they should be removed) or benign. However dirt and surface deposits may also contribute to the appearance of age and the dignity of a heritage place, sometimes referred to as ‘patina’. The grimy appearance may even be valued by the community and have significance in its own right.
Stucco disfigured with thick cement spray, South Melbourne Town Hall. Roger Beeston

78 Victorian Stucco
308 Holper & Noonan, ‘Air Pollution Information Sheet’. 309 As a result, the conversion of lime (calcium hydroxide) to more voluminous gypsum (calcium sulphate) by the action of acid rain (containing sulphur
dioxide and similar materials) is not common, but in theory could be found near industrial areas. Little research has been done on whether this form of deterioration is present on Australian historic buildings.
The dirt layer on buildings is usually a complex mixture of materials. In polluted city environments in Australia, deposits on buildings consist of organic carbon compounds, elemental carbon or soot, salt, sulphates, nitrates and dust.308 Dust may be made up of sea salt, particles of earth, fibres, hairs and other natural materials. This type of dirt is black (grey in thin layers) and can be hard, or greasy in nature due to the presence of organic compounds such as uncombusted fuel or tyre particles.
Hard black crusts or thinner grey layers are found on buildings in urban environments. These can consist of a mixture of soot, gypsum and organic materials. Anecdotal evidence suggests that iron vaporises from tram and train tracks and deposits on nearby buildings—an ongoing issue in cities like Melbourne with an extensive tramway network. All these deposits can provide nutrients for microscopic bacterial or fungal communities. The by-products of these communities are compounds such as oxalates or acetates. Where the dirt layer is thin, the building can have a greyish cast and it will be black when the dirt is thicker. The streaky appearance of buildings in polluted environments is caused by rain washing this dirt off exposed areas, which allows thicker and blacker dirt layers to build up in sheltered areas.
Salts generated by damp problems in the base levels of load bearing masonry structures, or cementitious repairs in other parts, may be found also on the surface of stucco. These salts may consist of gypsum or other sulphates, carbonates or chlorides. When buildings are located near the sea or made from improperly washed beach sand, sodium chlorides can be present. Acid rain does not appear to be the major problem in Australia that it is in Europe.309
It is common for buildings to have layers of some or all of these types of surface deposits and for the deposits to be interspersed with coatings. It can be difficult sometimes to distinguish between applied coatings (intended) and surface deposits (unintended) in heavy accumulations on old masonry structures.
Materials identification
Materials scientists routinely use a range of analyses to identify the organic and inorganic compounds found in building materials such as stuccoes and paints. They are summarised here to convey an understanding of their potential and their limitations in this area of research. There are a number of reasons why building materials such as stucco should be identified:
• documentation of the building
• dating/authentication
• evidence of use and users
• identification of deterioration
• identification of past conservation materials
• evidence of past environments
• designing interventions
• developing future preservation and maintenance activities.
Many analytical techniques are destructive—a sample must be removed from the building—so before starting any analysis project, the following should be considered carefully.
• What do you need to know and why?
• What information does the client, manager or owner need?
• Is the analysis necessary?
• What information is already available?
Stucco and layers of paint, South Melbourne Town Hall. Roger Beeston
The Analysis and Conservation of Stucco Surface Finishes 79
310 Del Cueto, ‘Manual on Conservation Methodology ‘, p A.4.4.
In order to get optimum results, it is critical to collate this data before approaching a scientist: most scientists are too busy to undertake basic documentary research. If they have to spend time doing this, they will either spend less time on the analysis or charge more for their services. For example, it is far more productive to give an analytical scientist a sample of stucco together with information on the materials it may be made from rather than just asking ‘What is this?’. Most scientists do not have training in historical materials technology, so you will save them time and yourself or your client money if you can provide this information.
Before starting any materials identification process:
• understand the characteristic appearance and composition of particular materials and manufacturing techniques
• understand the characteristic appearance and composition of deterioration specific to particular materials
• look for inconsistencies
• see if expected evidence of use is visible or identify its characteristics
• determine the physical and chemical characteristics of the previous use and environment or environments
• consider factors which may disguise any of the above
• develop assumptions and develop precise questions.
In the instrumental analysis:
• consider which analytical technique will be most suitable for the object and will best answer questions
• determine sampling opportunities and restrictions, and whether destructive testing is possible and if so to what extent
• identify an appropriate testing laboratory
• approach technical analysis experts with developed assumptions and clear questions and restrictions
• discuss the problem and questions with an expert to refine questions and determine if the proposed technique is suitable
• obtain costs and determine if these are fixed or will change, noting that any new questions or requests will incur additional costs.
During and after testing:
• document positive and negative test results
• do not hold fixed assumptions
• be prepared to change assumptions in the face of evidence from testing
• be prepared for results to disagree with the documentary evidence
• do not try to force or ignore facts that do not agree with prior assumptions
• discuss reasons for variations with analytical staff.
Methods of examination
Documentary research
Other authors in this publication have extensively covered the evidence from documentary research for stucco materials and methods, and this will not be repeated in detail here. It is important that all analytical techniques and their results are documented and included in any reports. Photographs of cross-sections should be made and copies of raw and manipulated test data should be included. Where possible, the samples should be retained as well.
Sampling
For enhanced visual, laboratory and instrumental analyses it is usually necessary to remove a sample of the material. To ensure accurate results all the procedures below should be followed.310
• Ensure that you collect a representative sample—in most cases, this will mean that more than one sample must be collected. For publication in scientific journals, it will be necessary to design the sampling program to ensure that a statistically valid number of samples are collected.
• For examination of cross-sections, the sample should contain all the existing layers including the substrate, i.e. masonry, in the case of stucco. For other sorts of testing it may only be necessary to sample the layer or layers of interest.

80 Victorian Stucco
311 Institution of Engineering and Technology, ‘Colour Vision Defects’, <www.theiet.org/factfiles/health/colourvisiondefects.cfm?type=pdf> accessed 9 May 2009.
• It is important to record which is the inner, and which is the outer surface of the sample.
• Do not allow the sample to become contaminated with surrounding materials.
• Ensure that collection of the sample does not damage the fabric of the building or stucco in any way. It is best to collect samples from the edges of pre-existing areas of damage. If this is not possible, it is essential that the samples are taken from inconspicuous areas; are as small as possible, while providing the required information; and that the sample areas are promptly and properly repaired with compatible material.
• For removing samples of stucco and render, usually a scalpel or sharp hobby knife is sufficient. If a chisel is used, this should be done with a great deal of care. It may be necessary to suspend a layer of plastic below vertical areas to catch samples. Use a new scalpel or knife blade for each building or area (if it differs considerably from the previous area).
• For most samples, a piece about 5 mm in diameter is sufficient.
• Use medical specimen jars or polyethylene zip-lock bags to hold the samples.
• Do not put more than one sample into each container.
• Label every container with the date, name of building, name of person collecting the sample, location of the sample, orientation of the sample, and sample number.
• Photograph the location of the sample close up, and indicate the sample collection position on a drawing of the building.
• Keep the samples in their containers for delivery to the laboratory.
• Ensure the samples are packed carefully for transport so that the container does not break.
Visual examination
This is the simplest and safest technique, since it is not necessary to touch or sample the building, but it is surprisingly easy to get inaccurate results. It is important to have good illumination, and to be aware of the effects of different types of illumination on colour perception and sharpness, e.g. the fact that interior incandescent bulbs give a very yellow light. Wear prescription lenses if required, but don’t wear sunglasses.
When undertaking visual examination to determine the colour of a painted or stuccoed finish, a number of important points must be considered.
• Approximately 1 in 12 men and 1 in 200 women have some form of defective colour vision311 and it is important that this possibility is excluded for personnel undertaking colour matching projects.
• For close examination, anecdotal evidence from conservators says that small hand lenses, dental magnifiers or other forms of magnification should be used by all those over 40 years of age.
• Thin or incomplete layers can be easily missed.
• Ageing of paint and stucco materials (as discussed above) may cause considerable visual distortion of the visual appearance of colours, to the extent that it should not be the only technique relied upon.
Visual microscopy
There are two types of microscopes that can be used for visual examination—stereo microscopes and compound microscopes.
Stereo microscopes:
• generally enable magnification from x10 to x60
• can be used to examine the thicker layers in samples
• have lower magnification, meaning it is often easy for thin layers to be missed—for example, the finish layers on ‘Benvenuta’ (see case study below) were only fractions of a millimetre thick.
The Analysis and Conservation of Stucco Surface Finishes 81
312 David Tilbrooke, is a conservation scientist with many years experience in the technical analysis of museum, art and architectural materials. He is the director of Museum Environment and Conservation Services, based in South Australia.
Compound microscopes:
• generally enable magnifications from x20 to x400+
• can be used to view all the layers of a mounted cross section
• allow pigment particles to be seen at higher magnification
• can also have UV lighting options as well as polarising filters, which further aid identification.
Note that the light sources in many microscopes are quite different from daylight and may make colours look quite different, often bluer. Sometimes stereo microscopes are used only with room lights; however, these are also different from daylight. Even when daylight is the light source, the optics of microscopes means that colours will not be rendered accurately. Therefore, microscopes should not be used to identify colours visually but rather to identify layers (stereo microscopes) and materials (compound microscopes).
To examine samples under a compound microscope, it is usually necessary to embed the samples in resin, which is then polished to make all the layers of the sample accessible. This will change the colours but this is irrelevant as this technique is not designed for visual colour identification. However, it is easy for layers to be missed if they are present on one part of a building and not another, so it is important that several samples are examined.
It is possible to examine samples using light sources outside the visible range such as ultra-violet and infra-red. The most commonly used alternative light examination techniques are ultraviolet light (UV) and Infrared light (IR).
Ultraviolet light:
• is commonly used to identify resinous binders as resins which look similar under daylight, and to fluoresce different colours
• has to be used in the dark, and so is most useful for samples rather than in situ
• can be harmful to vision and should be used with appropriate protective eyewear.
Infrared light:
• could be useful as it can sometimes ‘see’ through the outermost layer of dirt to identify original patterns and some materials, but not colours
• can be used to examine a building in situ using an IR vidicon (analogue or digital), a digital IR camera or a film SLR camera loaded with IR film.
Technical analysis (with contributions by David Tilbrooke312)
The main areas of chemical analysis, as defined by the requirement of sample size used, are: micro-, semi-micro- and macro-chemical analysis. Each area of analysis has its advantages and its drawbacks.
In micro-chemical analyses, the samples are usually in the range of 1 microgram [μg] to one milligram [mg] (a raisin or paperclip weighs about 1 gram [g]: 1 μg is 0.000001 of a gram [a millionth], while 1 mg is 000.1 of a gram [a thousandth]). Because the samples are so small and cross-contamination is easily possible, special precautions in terms of handling and quality of the laboratory environment must be observed. Such small samples often require using instrumental methods. A brief outline of these instrumental methods is given below.
Semi-micro chemical analyses usually work well with samples of about 10 mg upon which analyses for several elements or inorganic active groups (and some organic groups) may be undertaken. At this level of sample, estimates of the level of the elements and/or components present can be made. Semi-micro chemical analysis does not require special laboratory conditions, although some specialist equipment may be required. Such analysis can therefore be undertaken in any normal, analytical laboratory.
Macro-chemical analysis uses samples in the 10 mg to 1 g (or more) range and is more often than not applied to samples of known composition and where the quantitative composition is the most important aspect of the analysis.
82 Victorian Stucco
313 Vogel, Qualitative Chemical Analysis.314 Vogel, Qualitative Organic Analysis.315 Thompson, Semi-Micro Inorganic Qualitative Analysis.316 End of Tilbrooke contribution.
Semi-micro chemical analysis has advantages for the conservator as it allows analyses to be undertaken with mostly normal chemicals and equipment—the results of which can guide the conservator in his or her work, without demanding a large sample, taking an inordinate amount of time, or costing too much.
Semi-micro analysis in architectural conservation investigation
In an architectural conservation investigation, the sample is often much larger than that taken from a work of art. However, it is also very common in this field to find that the material to be analysed is present only as a thin layer (paint, distemper or varnish finish—of which several may be present, each needing to be analysed) or only available from a small piece of residual paint or plaster (and very little is available to the analyst). In addition, when samples also have to be used for other studies, then only small pieces of the material of interest may be available to the analyst.
The application of the semi-micro chemical method may be appropriate for the analysis of such architectural samples. This is particularly so when a polished cross-section of the sample is prepared and examined under the high power of the optical microscope. This can aid in the identification of multi-layered structures.
In many cases of architectural sample analysis, a polished cross-section of the sample is prepared.313 This aids the identification of sample layers and, in many cases, allows them to be isolated, by slitting and scrapping from the main sample and analysed—again using semi-micro chemical techniques.
Examination of a cross section of a sample can also allow identification of organic layers such as paint and varnish, and inclusions such as iron dust and other detritus.
If paint is found, it is possible to extract it and analyse its pigment by semi-micro chemistry and its binder by
Thin Layer Chromatography (TLC).314 The resin binder extracted can be saponified315 and the free fatty acids produced from this can be analysed also using TLC.
Many organic materials used in building construction, from ancient times into the early twentieth century, were derived from natural products and not highly refined. They are complex in nature and therefore require some pre-treatment before analysis can be undertaken.
There are a large number of chemical techniques used by chemists to undertake this type of analysis, and these will not be outlined here. It is important to note that many of these dissolve the sample in acids or solvents, or burn it (pyrolysis) thus destroying it. Once components of a sample have been extracted using chemical techniques, they can be subjected to the instrumental techniques outlined below to gain further information.316
Instrumental techniques for micro sample analysis
There are many complex techniques for analysing the exact composition of materials. Before embarking on this sort of work, it is important to consider what information is needed and determine which sort of technique may be most useful. If a number of layers are to be identified, it will be necessary to separate each one, as they will have to be analysed individually due to the extreme sensitivity of the techniques. It should be noted that these techniques are generally expensive and, because of their precision, may produce results that are not relevant to the practitioner asking the question, or appropriate to the problem. For example, it can be quite common for a technique to identify every single element on a surface, and these results can disguise the elements of interest. They also require a well-informed client and an experienced operator to interpret the results. A number of the more common techniques are listed below; however, there are many more available.
The Analysis and Conservation of Stucco Surface Finishes 83
Spectroscopy
Spectroscopy detects the intensity of emission or absorption of electromagnetic radiation or particles as a function of frequency or energy. It is particularly useful for identifying organic binders in paints and stuccos, but some techniques will also identify pigments and other inorganic compounds. There are many types:
• Spectrophotometry (visible light)
• FTIR - Fourier Transform Infra-Red Spectroscopy (portable equipment is available)
• FT-PL Fourier Transform photoluminescence spectroscopy
• Ramen Spectroscopy
• MS - Mass Spectroscopy
• Mössbauer Spectroscopy
• Electrochemical impedance spectroscopy.
Chromatography
Chromatography is a separation and identification technique that uses the different solubilities or sizes of materials in mobile and stationary phases (or solvents) to separate, and thus identify, components of a mixture. This is most useful for organic materials such as resins. There are many types, the most common being:
• Gas and Ion Chromatography
• GC-MS Gas Chromatography with Mass Spectroscopy.
Electron microscopy
This is a very high magnification microscopic technique using a beam of electrons rather than light.
• It may have XRF included—this is often known as EDAX and is advantageous as it is possible to do an elemental analysis of a selected area being viewed under the beam.
• In Scanning Electron Microscopy (SEM) a solid sample can be used but it may need to be coated in gold or carbon.
• In Transmission Electron Microscopy (TEM) a thin section of the sample must be used.
X-ray Fluorescence (XRF) and Particle Induced X-ray Emission (PIXE)
This technique identifies elements such as iron or calcium but not compounds such as iron oxide or calcium carbonate. This makes it less useful for many architectural analysis applications. Features include:
• surface sensitive technique.
• only tests top 1/10 of a mm
• difficult to measure below 0.1%
• portable equipment is available
• PIXE uses similar principles to XRF but is far more sensitive i.e. more trace elements can be identified.
• measurement can be done in air or in evacuated chamber allowing the use of a larger sample.
X-ray Diffraction (XRD)
This technique identifies crystalline compounds (phases) such as pigments and minerals, this makes it more useful for architectural analysis than XRF or PIXE. It is also known as powder diffraction. Features include:
• solid or powdered samples can be analysed
• graphs produced are compared with large databases
• portable equipment is available.
Philosophy of analysis and intervention
Determining the architect’s or builder’s intent
When a building was designed, there was usually a clear intention on the part of the designer to achieve a particular finished appearance—although this often changed in minor or major ways according to circumstances, especially depending upon supplies of materials and labour. Therefore, the designer’s intent may have changed, even during the construction process. With the passage of time, it can be even more difficult to identify this original intent due to factors such as changes in the surface caused by alteration, degradation of materials
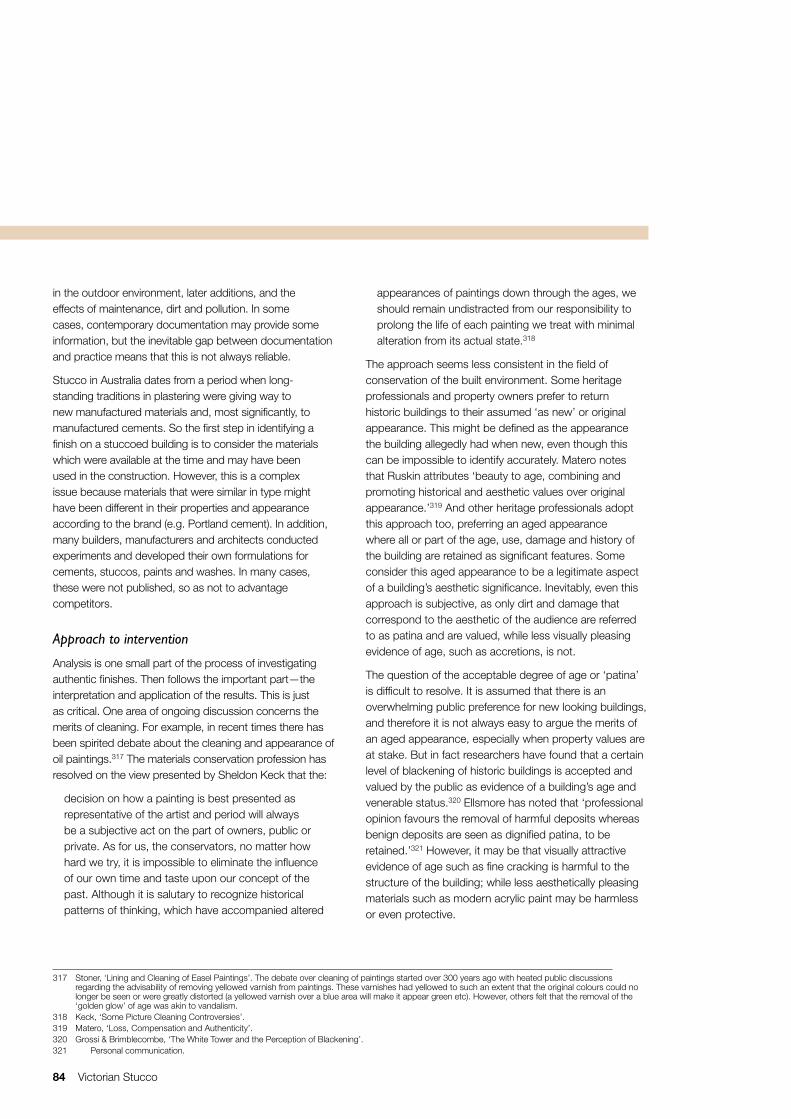
84 Victorian Stucco
317 Stoner, ‘Lining and Cleaning of Easel Paintings’. The debate over cleaning of paintings started over 300 years ago with heated public discussions regarding the advisability of removing yellowed varnish from paintings. These varnishes had yellowed to such an extent that the original colours could no longer be seen or were greatly distorted (a yellowed varnish over a blue area will make it appear green etc). However, others felt that the removal of the ‘golden glow’ of age was akin to vandalism.
318 Keck, ‘Some Picture Cleaning Controversies’.319 Matero, ‘Loss, Compensation and Authenticity’.320 Grossi & Brimblecombe, ‘The White Tower and the Perception of Blackening’.321 Personal communication.
in the outdoor environment, later additions, and the effects of maintenance, dirt and pollution. In some cases, contemporary documentation may provide some information, but the inevitable gap between documentation and practice means that this is not always reliable.
Stucco in Australia dates from a period when long-standing traditions in plastering were giving way to new manufactured materials and, most significantly, to manufactured cements. So the first step in identifying a finish on a stuccoed building is to consider the materials which were available at the time and may have been used in the construction. However, this is a complex issue because materials that were similar in type might have been different in their properties and appearance according to the brand (e.g. Portland cement). In addition, many builders, manufacturers and architects conducted experiments and developed their own formulations for cements, stuccos, paints and washes. In many cases, these were not published, so as not to advantage competitors.
Approach to intervention
Analysis is one small part of the process of investigating authentic finishes. Then follows the important part—the interpretation and application of the results. This is just as critical. One area of ongoing discussion concerns the merits of cleaning. For example, in recent times there has been spirited debate about the cleaning and appearance of oil paintings.317 The materials conservation profession has resolved on the view presented by Sheldon Keck that the:
decision on how a painting is best presented as representative of the artist and period will always be a subjective act on the part of owners, public or private. As for us, the conservators, no matter how hard we try, it is impossible to eliminate the influence of our own time and taste upon our concept of the past. Although it is salutary to recognize historical patterns of thinking, which have accompanied altered
appearances of paintings down through the ages, we should remain undistracted from our responsibility to prolong the life of each painting we treat with minimal alteration from its actual state.318
The approach seems less consistent in the field of conservation of the built environment. Some heritage professionals and property owners prefer to return historic buildings to their assumed ‘as new’ or original appearance. This might be defined as the appearance the building allegedly had when new, even though this can be impossible to identify accurately. Matero notes that Ruskin attributes ‘beauty to age, combining and promoting historical and aesthetic values over original appearance.’319 And other heritage professionals adopt this approach too, preferring an aged appearance where all or part of the age, use, damage and history of the building are retained as significant features. Some consider this aged appearance to be a legitimate aspect of a building’s aesthetic significance. Inevitably, even this approach is subjective, as only dirt and damage that correspond to the aesthetic of the audience are referred to as patina and are valued, while less visually pleasing evidence of age, such as accretions, is not.
The question of the acceptable degree of age or ‘patina’ is difficult to resolve. It is assumed that there is an overwhelming public preference for new looking buildings, and therefore it is not always easy to argue the merits of an aged appearance, especially when property values are at stake. But in fact researchers have found that a certain level of blackening of historic buildings is accepted and valued by the public as evidence of a building’s age and venerable status.320 Ellsmore has noted that ‘professional opinion favours the removal of harmful deposits whereas benign deposits are seen as dignified patina, to be retained.’321 However, it may be that visually attractive evidence of age such as fine cracking is harmful to the structure of the building; while less aesthetically pleasing materials such as modern acrylic paint may be harmless or even protective.
The Analysis and Conservation of Stucco Surface Finishes 85
322 Gettens & Stout, Painting Materials.
Layers of paints and limewashes interspersed with dirt and other deposits can be a valuable record of the maintenance of a building throughout its life and should not be removed without full consideration, especially if they are not contributing to a building’s deterioration or preventing interpretation. For example, long periods of neglect as evidenced by heavy dirt layers may correspond to periods of economic hardship for the owners. The abandonment of traditional maintenance practices in the 1960s illustrates the significant advances in materials technology and social change of the time, and the lack of value accorded to historic buildings. It should be noted that dirt layers contain a record of the pollutants to which the building, and therefore the city, have been exposed. They are accurate documents of the past. Aggressive washing and abrasive techniques used to ‘prepare’ building surfaces will remove most if not all historical layers, destroying the historical record and all chances of accurately identifying materials in the future. In many cases, a more careful treatment design can eliminate the need to do this.
Applying the results
There has been little research done on the long-term effects of the application of restoration materials to historic stucco, whitewash and paint. Because of this, and because of the ethical issues outlined above, it is difficult to find a completely satisfactory solution to the problem of protecting, conserving, repairing or restoring historic stucco surfaces, especially where dirt or maintenance layers are present. Ideally, a system should be chosen which allows the preservation of all historic evidence while ensuring that the building is interpreted correctly. Possible choices are:
• limewash/whitewash
• stucco colourants
• replicated original stuccos
• mineral paints and washes
• thicker cementitious coatings
• paint—modern or historic paint formulations.
There are three further issues which must be considered—colour, thickness and texture.
The choice of colour is complicated by the ubiquitous use of titanium dioxide as the base colour or filler in the modern forms of most of the above materials. Because it has a high refractive index it reflects visible and UV light very effectively, giving it a bright, almost bluish white appearance under normal light. This gives very bright white colours, which would never have existed in the past. When a paint or wash containing titanium dioxide as a base colour or filler has coloured pigments mixed with it, the resulting paint will also appear brighter in colour. Titanium dioxide was first used as a pigment in 1921,322 but before this time white in limewash was achieved with lime and chalk (calcium carbonate); and in paint with lead white (lead carbonate) or zinc white (zinc oxide). None of these materials has the same brilliant white and filling properties as titanium white. As a result, many modern coatings, whether white or coloured, produce a far brighter and more opaque appearance than would ever have been possible in the past. While it is sometimes possible to produce small amounts of coatings that do not contain titanium dioxide, the cost can be prohibitive for many projects. As a result, it is often not possible to re-create the exact colours of the past.
It may seem obvious to state that all aspects of the appearance of restoration materials need to be compatible with the original fabric. In practice, it is unfortunately very common for new coatings to have
Stucco overpainted with titanium white paint, Swan Street, Richmond. Jenny Dickens
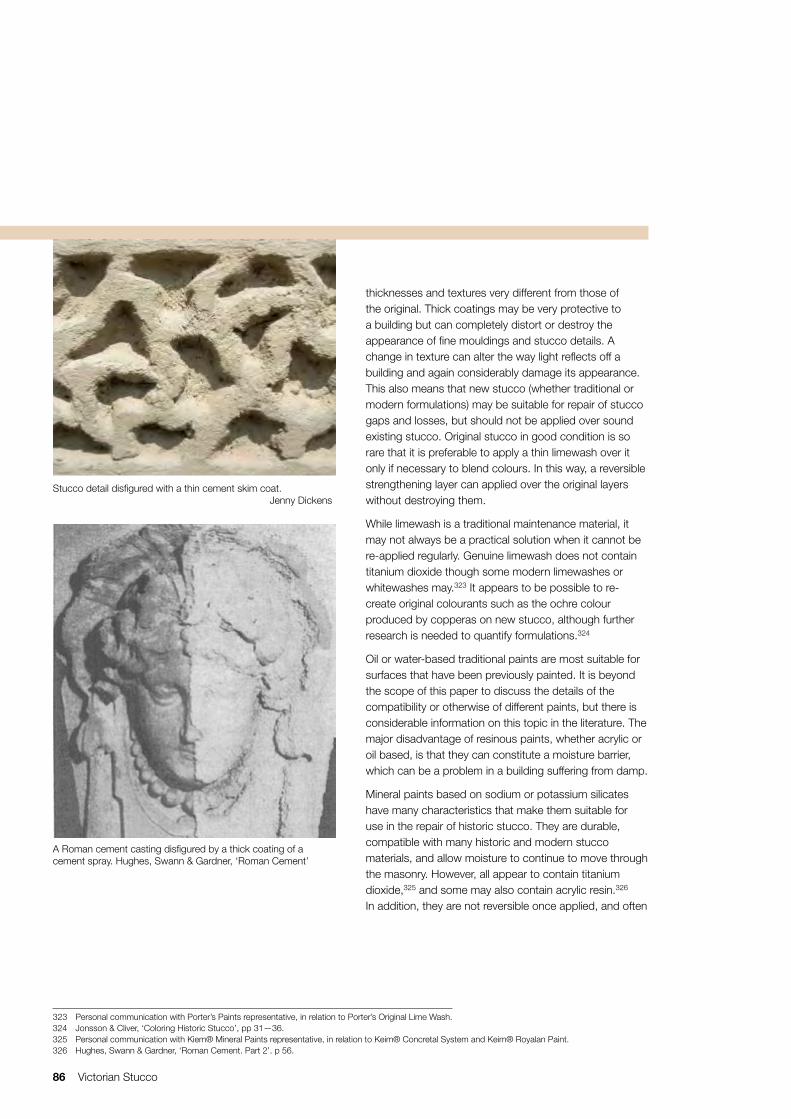
86 Victorian Stucco
323 Personal communication with Porter’s Paints representative, in relation to Porter’s Original Lime Wash. 324 Jonsson & Cliver, ‘Coloring Historic Stucco’, pp 31—36. 325 Personal communication with Kiem® Mineral Paints representative, in relation to Keim® Concretal System and Keim® Royalan Paint.326 Hughes, Swann & Gardner, ‘Roman Cement. Part 2’. p 56.
thicknesses and textures very different from those of the original. Thick coatings may be very protective to a building but can completely distort or destroy the appearance of fine mouldings and stucco details. A change in texture can alter the way light reflects off a building and again considerably damage its appearance. This also means that new stucco (whether traditional or modern formulations) may be suitable for repair of stucco gaps and losses, but should not be applied over sound existing stucco. Original stucco in good condition is so rare that it is preferable to apply a thin limewash over it only if necessary to blend colours. In this way, a reversible strengthening layer can applied over the original layers without destroying them.
While limewash is a traditional maintenance material, it may not always be a practical solution when it cannot be re-applied regularly. Genuine limewash does not contain titanium dioxide though some modern limewashes or whitewashes may.323 It appears to be possible to re-create original colourants such as the ochre colour produced by copperas on new stucco, although further research is needed to quantify formulations.324
Oil or water-based traditional paints are most suitable for surfaces that have been previously painted. It is beyond the scope of this paper to discuss the details of the compatibility or otherwise of different paints, but there is considerable information on this topic in the literature. The major disadvantage of resinous paints, whether acrylic or oil based, is that they can constitute a moisture barrier, which can be a problem in a building suffering from damp.
Mineral paints based on sodium or potassium silicates have many characteristics that make them suitable for use in the repair of historic stucco. They are durable, compatible with many historic and modern stucco materials, and allow moisture to continue to move through the masonry. However, all appear to contain titanium dioxide,325 and some may also contain acrylic resin.326 In addition, they are not reversible once applied, and often
Stucco detail disfigured with a thin cement skim coat. Jenny Dickens
A Roman cement casting disfigured by a thick coating of a cement spray. Hughes, Swann & Gardner, ‘Roman Cement’
The Analysis and Conservation of Stucco Surface Finishes 87
327 Hughes, Swann & Gardner, ‘Roman Cement. Part 2’, p 56.328 Matero, Loss, Compensation and Authenticity’.
all other underlying paints must be completely removed before they can be applied, thus destroying the history of previous maintenance and the early coatings. Hughes et al note that while silicates can strengthen weak stucco, if used frequently they can also over-consolidate surfaces, which can eventually lead to delamination. To avoid this problem, they suggest applying the silicate paint over a layer of recently applied limewash, although they note that this technique requires further research.327
The Burra Charter, article 22.2, requires that new work should be identifiable. However, this can be difficult to achieve when conserving stucco and coatings. This approach is problematic for stucco and coatings for many reasons, some of which are provided below.
• It is not possible to mark a new coating the way, for example, a new wooden component can be labelled, so it can be impossible to identify visually. Paper and computer-based documentation can assist, but are likely to be more difficult to access as time passes.
• To ensure that a new coating adheres to a substrate, it may be necessary to remove damaged or flaking layers of whitewash. This would destroy the history of maintenance of the building and may damage the original stucco.
• The use of materials that are chemically identical to the original materials might compromise future analysis because it will be impossible to tell if a coating is original or a later repair.
• Many modern coatings are far more durable than the underlying stucco and paint. As a result they are likely to damage original materials when they decay or are removed at a later date.
• Surfaces of buildings are particularly subject to changes over time. There is a case to be made for returning a building to the appearance it had for most of its life rather than a ‘new’ appearance that it would only have had for a short time.
Conclusion
We cannot hope to exactly re-create the original appearance of a stuccoed building, although with careful testing and selection of materials it is possible to get very close. In some situations, it is not possible even to identify precisely what the original appearance was. Scientific analysis and documentary research are often seen as providing definitive answers, when in many cases they can only give indications. While the preservation of the building and its materials may be of most importance, the perception and use of the building altered over time, and the preservation of these aspects is also significant and must not be ignored. Matero quotes Brandi saying that ‘all restoration is a product of its time and as such is an act of critical interpretation.’328
The materials chosen for the restoration of surfaces can influence the long-term survival of the building, and will almost certainly alter its appearance either permanently or temporarily. These issues must be considered when selecting replacement materials. In many cases, it appears that the lack of traditional maintenance practices means that very interventional measures are preferred by the industry, because the building may not get any other attention for many years. In fact, the public may be happy with a less than spic and span appearance and the preservation of the thin and fragile historic surface layers should be a prime consideration in the selection of a treatment methodology for a stuccoed surface.
Jenny Dickens is the Senior Conservator at Heritage Victoria and has qualifications in Materials Conservation and Materials Engineering. She works in archaeological, collections and architectural materials conservation and teaches in the Conservation of Cultural Materials program at the University of Melbourne

88 Victorian Stucco
Case study: ‘Benvenuta’
329 Heritage Victoria statement of significance.
Background
‘Benvenuta’ (now Medley Hall) was built in 1893 for Mrs Leah Abrahams by the builder Richard Stockdale, to the design of the architect W S Law, designer of many elaborate houses and terraces during the boom period of the 1880s. The profusion of fine stucco work and mouldings, both internally and externally, is unsurpassed and epitomises the period.329
‘Benvenuta’, c 1939. Donald Ellsmore
‘Benvenuta’, detail, November 2008 Jenny Dickens
‘Benvenuta’, detail. Donald Ellsmore
‘Benvenuta’, detail showing white areas, November 2008. Jenny Dickens
‘Benvenuta’, detail of white coating November 2008. Jenny Dickens
Project
Heritage Victoria staff wished to know what the original colour was, especially as evidence of a white under layer was visible. Image research showed that the building was white in the 1930s. Close examination also showed considerable traces of a white coating. Two cross section samples were removed and subjected to microscopic examination, and semi-micro chemical analysis by David Tilbrooke.
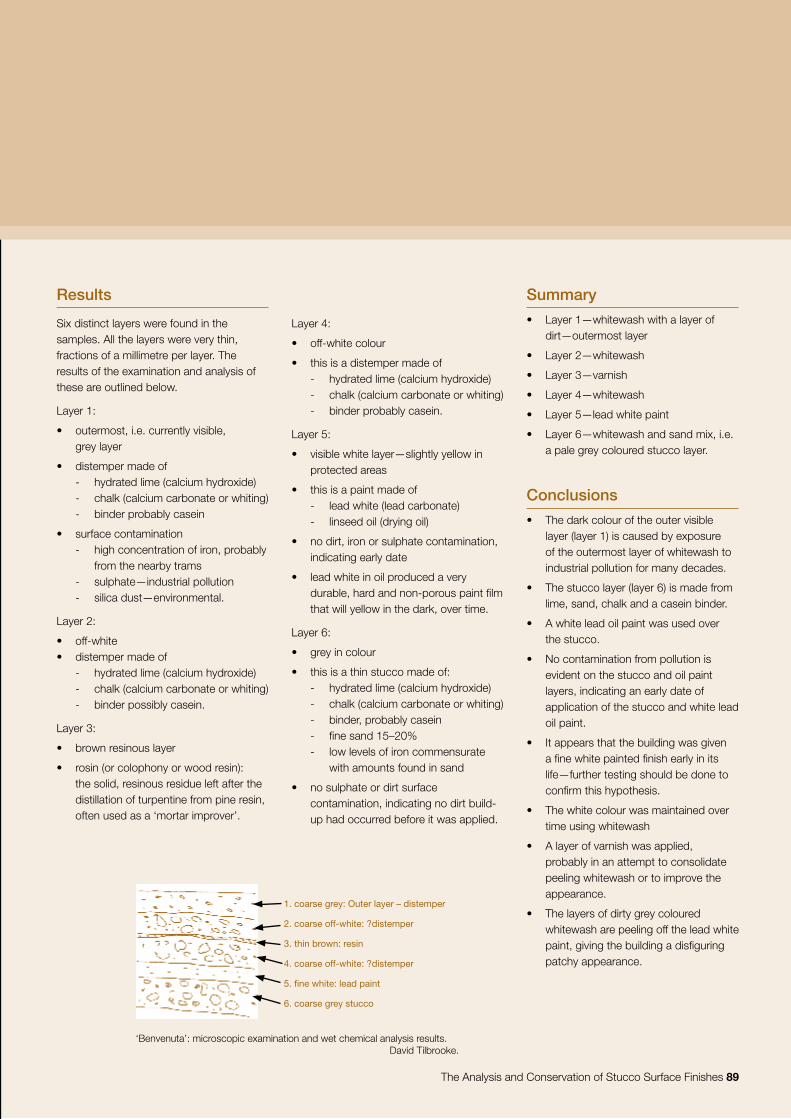
The Analysis and Conservation of Stucco Surface Finishes 89
Results
Six distinct layers were found in the samples. All the layers were very thin, fractions of a millimetre per layer. The results of the examination and analysis of these are outlined below.
Layer 1:
• outermost, i.e. currently visible, grey layer
• distemper made of - hydrated lime (calcium hydroxide) - chalk (calcium carbonate or whiting) - binder probably casein
• surface contamination - high concentration of iron, probably
from the nearby trams - sulphate—industrial pollution - silica dust—environmental.
Layer 2:
• off-white• distemper made of
- hydrated lime (calcium hydroxide) - chalk (calcium carbonate or whiting) - binder possibly casein.
Layer 3:
• brown resinous layer
• rosin (or colophony or wood resin): the solid, resinous residue left after the distillation of turpentine from pine resin, often used as a ‘mortar improver’.
Layer 4:
• off-white colour
• this is a distemper made of - hydrated lime (calcium hydroxide) - chalk (calcium carbonate or whiting) - binder probably casein.
Layer 5:
• visible white layer—slightly yellow in protected areas
• this is a paint made of - lead white (lead carbonate) - linseed oil (drying oil)
• no dirt, iron or sulphate contamination, indicating early date
• lead white in oil produced a very durable, hard and non-porous paint film that will yellow in the dark, over time.
Layer 6:
• grey in colour
• this is a thin stucco made of: - hydrated lime (calcium hydroxide) - chalk (calcium carbonate or whiting) - binder, probably casein - fine sand 15–20% - low levels of iron commensurate
with amounts found in sand
• no sulphate or dirt surface contamination, indicating no dirt build-up had occurred before it was applied.
‘Benvenuta’: microscopic examination and wet chemical analysis results.David Tilbrooke.
Summary
• Layer 1—whitewash with a layer of dirt—outermost layer
• Layer 2—whitewash
• Layer 3—varnish
• Layer 4—whitewash
• Layer 5—lead white paint
• Layer 6—whitewash and sand mix, i.e. a pale grey coloured stucco layer.
Conclusions
• The dark colour of the outer visible layer (layer 1) is caused by exposure of the outermost layer of whitewash to industrial pollution for many decades.
• The stucco layer (layer 6) is made from lime, sand, chalk and a casein binder.
• A white lead oil paint was used over the stucco.
• No contamination from pollution is evident on the stucco and oil paint layers, indicating an early date of application of the stucco and white lead oil paint.
• It appears that the building was given a fine white painted finish early in its life—further testing should be done to confirm this hypothesis.
• The white colour was maintained over time using whitewash
• A layer of varnish was applied, probably in an attempt to consolidate peeling whitewash or to improve the appearance.
• The layers of dirty grey coloured whitewash are peeling off the lead white paint, giving the building a disfiguring patchy appearance.
1. coarse grey: Outer layer – distemper
2. coarse off-white: ?distemper
3. thin brown: resin
4. coarse off-white: ?distemper
5. fine white: lead paint
6. coarse grey stucco
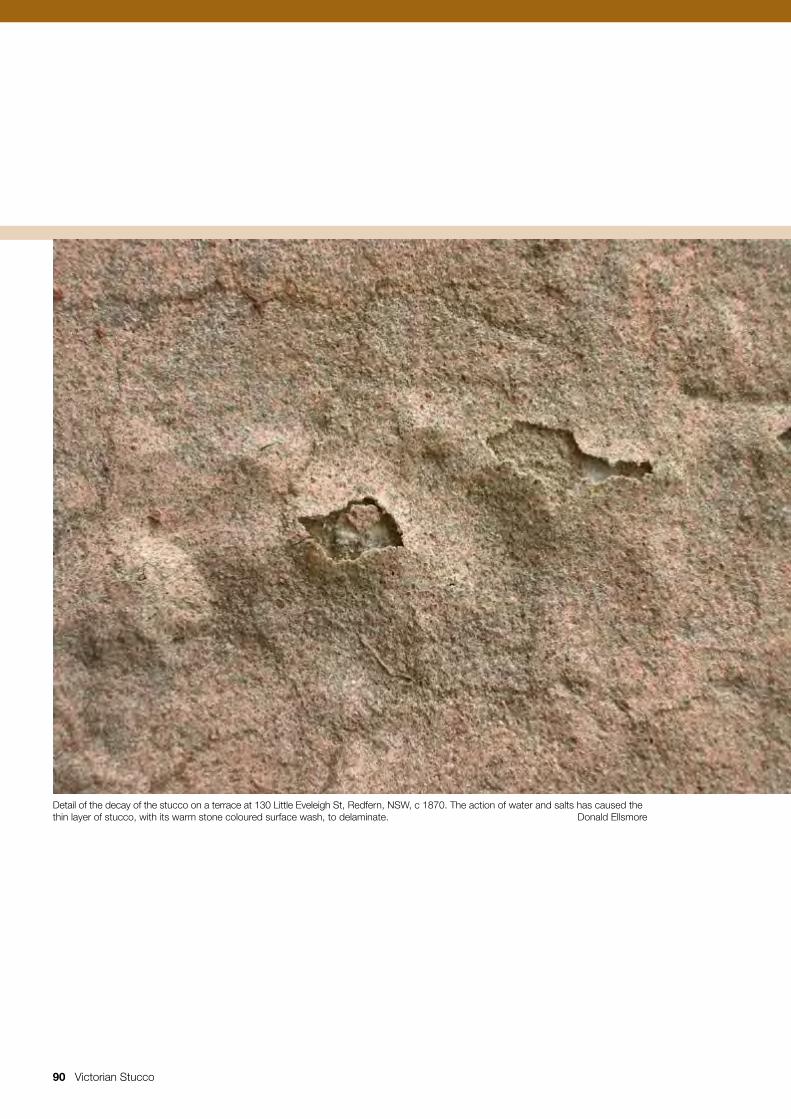
90 Victorian Stucco
Detail of the decay of the stucco on a terrace at 130 Little Eveleigh St, Redfern, NSW, c 1870. The action of water and salts has caused the thin layer of stucco, with its warm stone coloured surface wash, to delaminate. Donald Ellsmore
Victorian Stucco 91
Cleaning and Re-coating Victorian StuccoDonald Ellsmore
330 Millar, Plastering Plain and Decorative, p 104, describes trowelled stucco, which was ‘used for work that that has to be subsequently painted’. In addition, Schedules of Contract of Plasterer’s work for the service of the Honourable Board of Ordinance at Sydney (1836, 1838, and 1864) two types of stucco were scheduled. They were ‘Render, float and stucco on brick’ and ‘Render, float, and trowel, stucco on brick’.
> abstract
> introduction
> the natural appearance of stucco
> paints and applied finishes
> colour variations
> problems with heavy paint layering
> benefits and risks of cleaning and paint removal
> cleaning
> dealing with clear coatings
> paint removal
> today’s options for finishing stucco
> clear finishes
> limewashes
> distempers
> cement paints
> oil paints
> mineral silicate paints
> acrylic resin paints
> other paint types
> conclusion
Abstract
Victorian stucco is commonly found today in three conditions—unpainted, fully painted, or skimmed over with Portland cement. These conditions are not characteristic of the authentic finishes as originally intended. Usually, the unpainted examples are degraded by weathering, soiled by airborne deposits, and have lost much of their original surface colouring. Painted or cemented examples may have their original characteristics hidden beneath the coating. There is now a common trend to clean (at a minimum) and re-finish stucco and change its appearance—often involving the application modern paint finishes which are assumed to be the same
or similar to the original finishes. However, the cleaning and painting of stucco carries a high risk of distorting its correct intended appearance and cultural values. Therefore, cleaning, painting and re-finishing stucco surfaces should not proceed without due consideration of the short- and long-term effects of such interventions. This paper discusses the merits and risks of cleaning and re-coating external stucco finishes, assisting readers to assess the likely impacts and make informed decisions about the most suitable ways of meeting the legitimate needs of property owners without further adverse impacts to heritage values.
Introduction
The nature of Victorian stucco finishes is poorly understood today. Until recently, it was believed that the unpainted appearance of cement stuccoed building façades was false and inaccurate—an aberration, perhaps due to pecuniary constraints at the time of construction. What was not understood (or possibly overlooked) was that the apparently uniform grey finish of unpainted stucco is a product of years of weathering and urban soiling, and that beneath the layers of dirt—in places protected from wind, rain and sun—evidence of the authentic colouring of the stucco can be found. These authentic finishes were obtained at the time of construction by careful selection of the materials (sand and cement) or by the application of colouring agents in the finishing of the stucco, or were applied to it soon after. The aim was always to replicate the appearance of natural stone.
The application of paint to stucco was not common, but some stuccoed buildings were painted from the outset, presumably after using the trowelling method to finish the stucco and make it suitable for painting soon after curing. This process was explained by Millar and confirmed in Victorian works schedules.330 Other types of stucco, according to Millar and others, were finished by other methods to expose the coarse grain of the plaster and create a more convincing stone-like finish.331
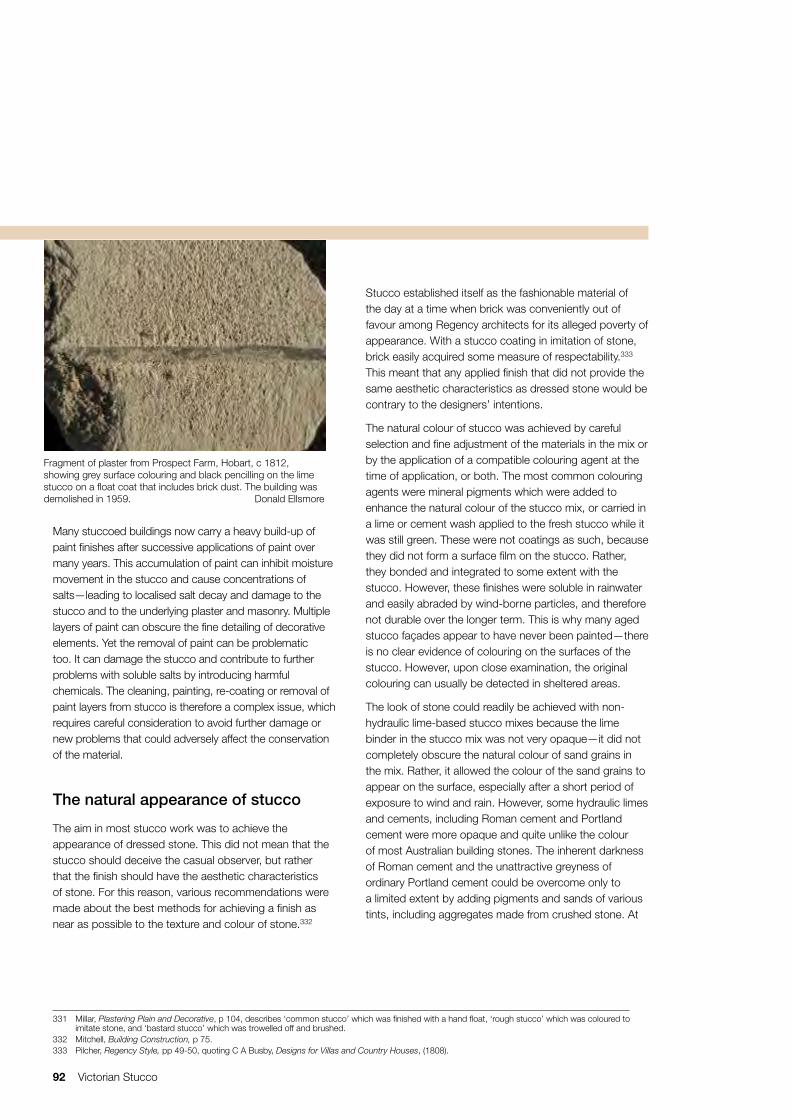
92 Victorian Stucco
331 Millar, Plastering Plain and Decorative, p 104, describes ‘common stucco’ which was finished with a hand float, ‘rough stucco’ which was coloured to imitate stone, and ‘bastard stucco’ which was trowelled off and brushed.
332 Mitchell, Building Construction, p 75.333 Pilcher, Regency Style, pp 49-50, quoting C A Busby, Designs for Villas and Country Houses, (1808).
Many stuccoed buildings now carry a heavy build-up of paint finishes after successive applications of paint over many years. This accumulation of paint can inhibit moisture movement in the stucco and cause concentrations of salts—leading to localised salt decay and damage to the stucco and to the underlying plaster and masonry. Multiple layers of paint can obscure the fine detailing of decorative elements. Yet the removal of paint can be problematic too. It can damage the stucco and contribute to further problems with soluble salts by introducing harmful chemicals. The cleaning, painting, re-coating or removal of paint layers from stucco is therefore a complex issue, which requires careful consideration to avoid further damage or new problems that could adversely affect the conservation of the material.
The natural appearance of stucco
The aim in most stucco work was to achieve the appearance of dressed stone. This did not mean that the stucco should deceive the casual observer, but rather that the finish should have the aesthetic characteristics of stone. For this reason, various recommendations were made about the best methods for achieving a finish as near as possible to the texture and colour of stone.332
Stucco established itself as the fashionable material of the day at a time when brick was conveniently out of favour among Regency architects for its alleged poverty of appearance. With a stucco coating in imitation of stone, brick easily acquired some measure of respectability.333 This meant that any applied finish that did not provide the same aesthetic characteristics as dressed stone would be contrary to the designers’ intentions.
The natural colour of stucco was achieved by careful selection and fine adjustment of the materials in the mix or by the application of a compatible colouring agent at the time of application, or both. The most common colouring agents were mineral pigments which were added to enhance the natural colour of the stucco mix, or carried in a lime or cement wash applied to the fresh stucco while it was still green. These were not coatings as such, because they did not form a surface film on the stucco. Rather, they bonded and integrated to some extent with the stucco. However, these finishes were soluble in rainwater and easily abraded by wind-borne particles, and therefore not durable over the longer term. This is why many aged stucco façades appear to have never been painted—there is no clear evidence of colouring on the surfaces of the stucco. However, upon close examination, the original colouring can usually be detected in sheltered areas.
The look of stone could readily be achieved with non-hydraulic lime-based stucco mixes because the lime binder in the stucco mix was not very opaque—it did not completely obscure the natural colour of sand grains in the mix. Rather, it allowed the colour of the sand grains to appear on the surface, especially after a short period of exposure to wind and rain. However, some hydraulic limes and cements, including Roman cement and Portland cement were more opaque and quite unlike the colour of most Australian building stones. The inherent darkness of Roman cement and the unattractive greyness of ordinary Portland cement could be overcome only to a limited extent by adding pigments and sands of various tints, including aggregates made from crushed stone. At
Fragment of plaster from Prospect Farm, Hobart, c 1812, showing grey surface colouring and black pencilling on the lime stucco on a float coat that includes brick dust. The building was demolished in 1959. Donald Ellsmore
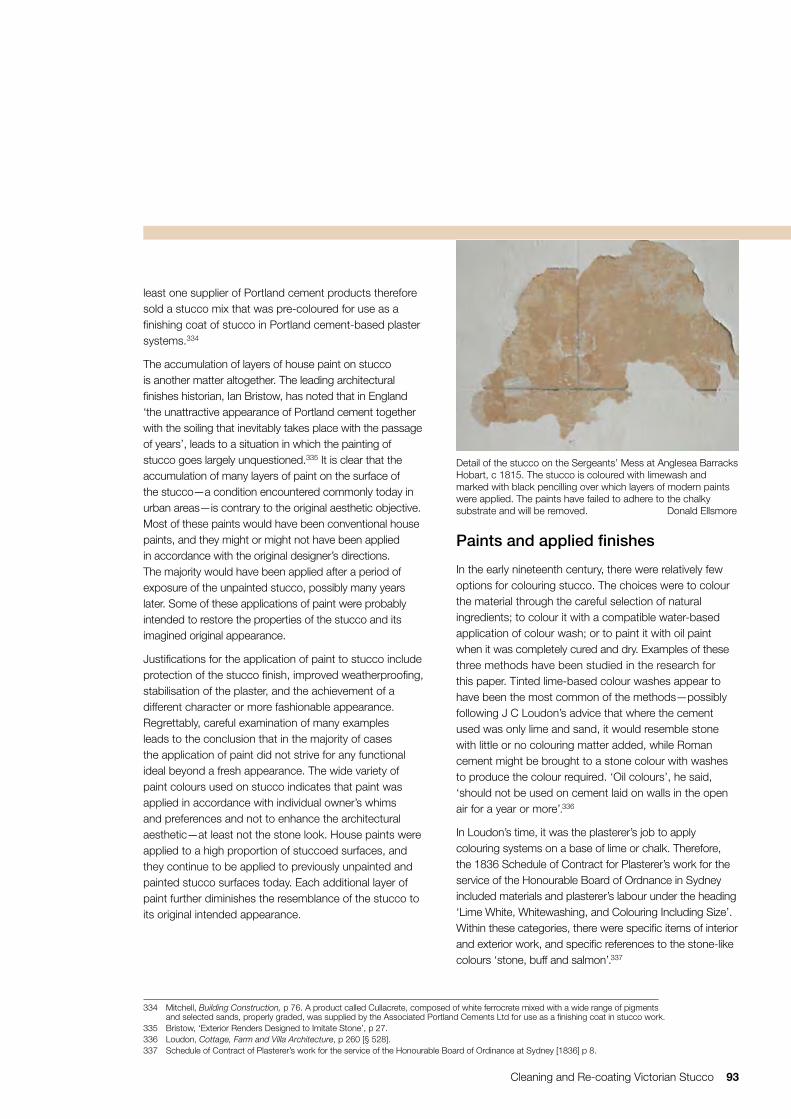
Cleaning and Re-coating Victorian Stucco 93
334 Mitchell, Building Construction, p 76. A product called Cullacrete, composed of white ferrocrete mixed with a wide range of pigments and selected sands, properly graded, was supplied by the Associated Portland Cements Ltd for use as a finishing coat in stucco work.
335 Bristow, ‘Exterior Renders Designed to Imitate Stone’, p 27.336 Loudon, Cottage, Farm and Villa Architecture, p 260 [§ 528].337 Schedule of Contract of Plasterer’s work for the service of the Honourable Board of Ordinance at Sydney [1836] p 8.
least one supplier of Portland cement products therefore sold a stucco mix that was pre-coloured for use as a finishing coat of stucco in Portland cement-based plaster systems.334
The accumulation of layers of house paint on stucco is another matter altogether. The leading architectural finishes historian, Ian Bristow, has noted that in England ‘the unattractive appearance of Portland cement together with the soiling that inevitably takes place with the passage of years’, leads to a situation in which the painting of stucco goes largely unquestioned.335 It is clear that the accumulation of many layers of paint on the surface of the stucco—a condition encountered commonly today in urban areas—is contrary to the original aesthetic objective. Most of these paints would have been conventional house paints, and they might or might not have been applied in accordance with the original designer’s directions. The majority would have been applied after a period of exposure of the unpainted stucco, possibly many years later. Some of these applications of paint were probably intended to restore the properties of the stucco and its imagined original appearance.
Justifications for the application of paint to stucco include protection of the stucco finish, improved weatherproofing, stabilisation of the plaster, and the achievement of a different character or more fashionable appearance. Regrettably, careful examination of many examples leads to the conclusion that in the majority of cases the application of paint did not strive for any functional ideal beyond a fresh appearance. The wide variety of paint colours used on stucco indicates that paint was applied in accordance with individual owner’s whims and preferences and not to enhance the architectural aesthetic—at least not the stone look. House paints were applied to a high proportion of stuccoed surfaces, and they continue to be applied to previously unpainted and painted stucco surfaces today. Each additional layer of paint further diminishes the resemblance of the stucco to its original intended appearance.
Paints and applied finishes
In the early nineteenth century, there were relatively few options for colouring stucco. The choices were to colour the material through the careful selection of natural ingredients; to colour it with a compatible water-based application of colour wash; or to paint it with oil paint when it was completely cured and dry. Examples of these three methods have been studied in the research for this paper. Tinted lime-based colour washes appear to have been the most common of the methods—possibly following J C Loudon’s advice that where the cement used was only lime and sand, it would resemble stone with little or no colouring matter added, while Roman cement might be brought to a stone colour with washes to produce the colour required. ‘Oil colours’, he said, ‘should not be used on cement laid on walls in the open air for a year or more’.336
In Loudon’s time, it was the plasterer’s job to apply colouring systems on a base of lime or chalk. Therefore, the 1836 Schedule of Contract for Plasterer’s work for the service of the Honourable Board of Ordnance in Sydney included materials and plasterer’s labour under the heading ‘Lime White, Whitewashing, and Colouring Including Size’. Within these categories, there were specific items of interior and exterior work, and specific references to the stone-like colours ‘stone, buff and salmon’.337
Detail of the stucco on the Sergeants’ Mess at Anglesea Barracks Hobart, c 1815. The stucco is coloured with limewash and marked with black pencilling over which layers of modern paints were applied. The paints have failed to adhere to the chalky substrate and will be removed. Donald Ellsmore
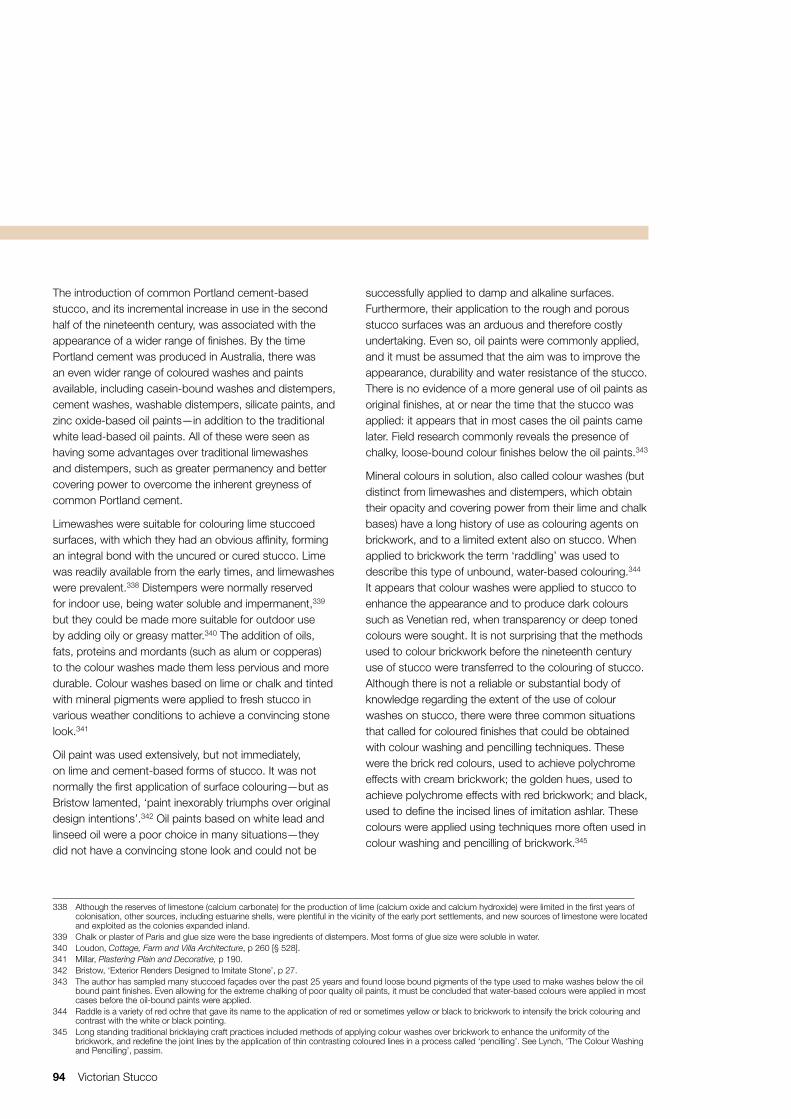
94 Victorian Stucco
338 Although the reserves of limestone (calcium carbonate) for the production of lime (calcium oxide and calcium hydroxide) were limited in the first years of colonisation, other sources, including estuarine shells, were plentiful in the vicinity of the early port settlements, and new sources of limestone were located and exploited as the colonies expanded inland.
339 Chalk or plaster of Paris and glue size were the base ingredients of distempers. Most forms of glue size were soluble in water. 340 Loudon, Cottage, Farm and Villa Architecture, p 260 [§ 528].341 Millar, Plastering Plain and Decorative, p 190.342 Bristow, ‘Exterior Renders Designed to Imitate Stone’, p 27.343 The author has sampled many stuccoed façades over the past 25 years and found loose bound pigments of the type used to make washes below the oil
bound paint finishes. Even allowing for the extreme chalking of poor quality oil paints, it must be concluded that water-based colours were applied in most cases before the oil-bound paints were applied.
344 Raddle is a variety of red ochre that gave its name to the application of red or sometimes yellow or black to brickwork to intensify the brick colouring and contrast with the white or black pointing.
345 Long standing traditional bricklaying craft practices included methods of applying colour washes over brickwork to enhance the uniformity of the brickwork, and redefine the joint lines by the application of thin contrasting coloured lines in a process called ‘pencilling’. See Lynch, ‘The Colour Washing and Pencilling’, passim.
The introduction of common Portland cement-based stucco, and its incremental increase in use in the second half of the nineteenth century, was associated with the appearance of a wider range of finishes. By the time Portland cement was produced in Australia, there was an even wider range of coloured washes and paints available, including casein-bound washes and distempers, cement washes, washable distempers, silicate paints, and zinc oxide-based oil paints—in addition to the traditional white lead-based oil paints. All of these were seen as having some advantages over traditional limewashes and distempers, such as greater permanency and better covering power to overcome the inherent greyness of common Portland cement.
Limewashes were suitable for colouring lime stuccoed surfaces, with which they had an obvious affinity, forming an integral bond with the uncured or cured stucco. Lime was readily available from the early times, and limewashes were prevalent.338 Distempers were normally reserved for indoor use, being water soluble and impermanent,339 but they could be made more suitable for outdoor use by adding oily or greasy matter.340 The addition of oils, fats, proteins and mordants (such as alum or copperas) to the colour washes made them less pervious and more durable. Colour washes based on lime or chalk and tinted with mineral pigments were applied to fresh stucco in various weather conditions to achieve a convincing stone look.341
Oil paint was used extensively, but not immediately, on lime and cement-based forms of stucco. It was not normally the first application of surface colouring—but as Bristow lamented, ‘paint inexorably triumphs over original design intentions’.342 Oil paints based on white lead and linseed oil were a poor choice in many situations—they did not have a convincing stone look and could not be
successfully applied to damp and alkaline surfaces. Furthermore, their application to the rough and porous stucco surfaces was an arduous and therefore costly undertaking. Even so, oil paints were commonly applied, and it must be assumed that the aim was to improve the appearance, durability and water resistance of the stucco. There is no evidence of a more general use of oil paints as original finishes, at or near the time that the stucco was applied: it appears that in most cases the oil paints came later. Field research commonly reveals the presence of chalky, loose-bound colour finishes below the oil paints.343
Mineral colours in solution, also called colour washes (but distinct from limewashes and distempers, which obtain their opacity and covering power from their lime and chalk bases) have a long history of use as colouring agents on brickwork, and to a limited extent also on stucco. When applied to brickwork the term ‘raddling’ was used to describe this type of unbound, water-based colouring.344 It appears that colour washes were applied to stucco to enhance the appearance and to produce dark colours such as Venetian red, when transparency or deep toned colours were sought. It is not surprising that the methods used to colour brickwork before the nineteenth century use of stucco were transferred to the colouring of stucco. Although there is not a reliable or substantial body of knowledge regarding the extent of the use of colour washes on stucco, there were three common situations that called for coloured finishes that could be obtained with colour washing and pencilling techniques. These were the brick red colours, used to achieve polychrome effects with cream brickwork; the golden hues, used to achieve polychrome effects with red brickwork; and black, used to define the incised lines of imitation ashlar. These colours were applied using techniques more often used in colour washing and pencilling of brickwork.345
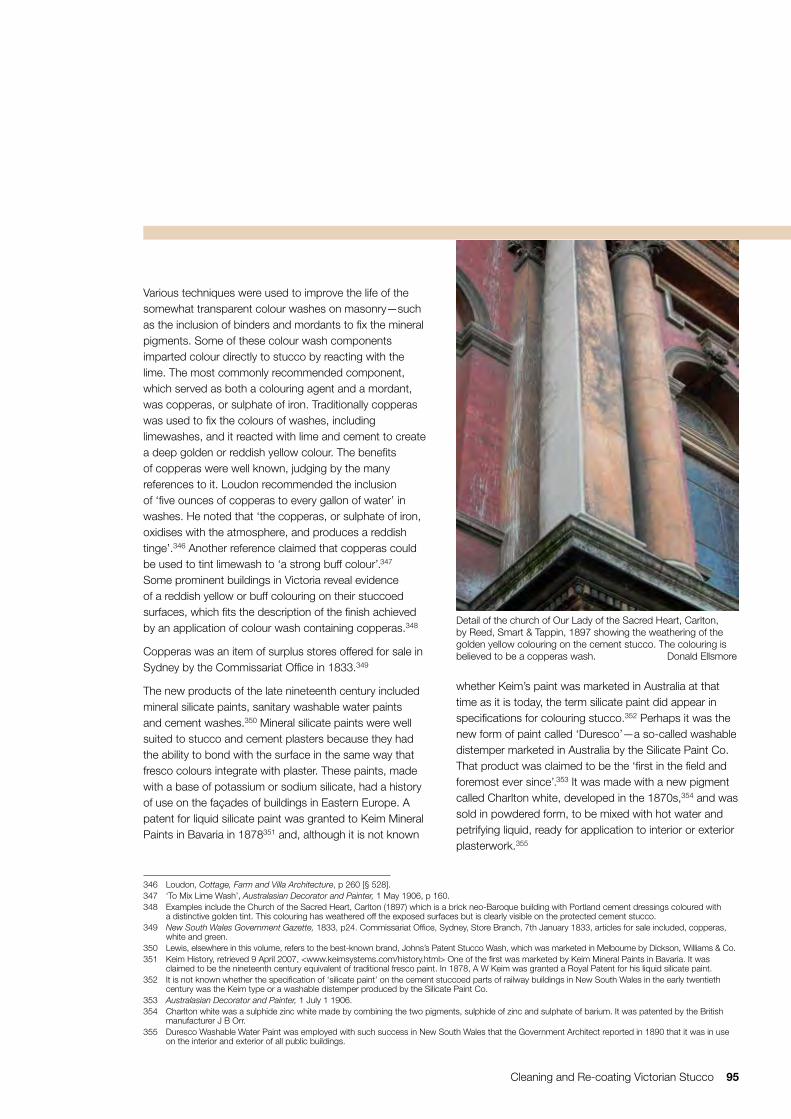
Cleaning and Re-coating Victorian Stucco 95
346 Loudon, Cottage, Farm and Villa Architecture, p 260 [§ 528].347 ‘To Mix Lime Wash’, Australasian Decorator and Painter, 1 May 1906, p 160.348 Examples include the Church of the Sacred Heart, Carlton (1897) which is a brick neo-Baroque building with Portland cement dressings coloured with
a distinctive golden tint. This colouring has weathered off the exposed surfaces but is clearly visible on the protected cement stucco. 349 New South Wales Government Gazette, 1833, p24. Commissariat Office, Sydney, Store Branch, 7th January 1833, articles for sale included, copperas,
white and green.350 Lewis, elsewhere in this volume, refers to the best-known brand, Johns’s Patent Stucco Wash, which was marketed in Melbourne by Dickson, Williams & Co.351 Keim History, retrieved 9 April 2007, <www.keimsystems.com/history.html> One of the first was marketed by Keim Mineral Paints in Bavaria. It was
claimed to be the nineteenth century equivalent of traditional fresco paint. In 1878, A W Keim was granted a Royal Patent for his liquid silicate paint.352 It is not known whether the specification of ‘silicate paint’ on the cement stuccoed parts of railway buildings in New South Wales in the early twentieth
century was the Keim type or a washable distemper produced by the Silicate Paint Co.353 Australasian Decorator and Painter, 1 July 1 1906. 354 Charlton white was a sulphide zinc white made by combining the two pigments, sulphide of zinc and sulphate of barium. It was patented by the British
manufacturer J B Orr. 355 Duresco Washable Water Paint was employed with such success in New South Wales that the Government Architect reported in 1890 that it was in use
on the interior and exterior of all public buildings.
Various techniques were used to improve the life of the somewhat transparent colour washes on masonry—such as the inclusion of binders and mordants to fix the mineral pigments. Some of these colour wash components imparted colour directly to stucco by reacting with the lime. The most commonly recommended component, which served as both a colouring agent and a mordant, was copperas, or sulphate of iron. Traditionally copperas was used to fix the colours of washes, including limewashes, and it reacted with lime and cement to create a deep golden or reddish yellow colour. The benefits of copperas were well known, judging by the many references to it. Loudon recommended the inclusion of ‘five ounces of copperas to every gallon of water’ in washes. He noted that ‘the copperas, or sulphate of iron, oxidises with the atmosphere, and produces a reddish tinge’.346 Another reference claimed that copperas could be used to tint limewash to ‘a strong buff colour’.347 Some prominent buildings in Victoria reveal evidence of a reddish yellow or buff colouring on their stuccoed surfaces, which fits the description of the finish achieved by an application of colour wash containing copperas.348
Copperas was an item of surplus stores offered for sale in Sydney by the Commissariat Office in 1833.349
The new products of the late nineteenth century included mineral silicate paints, sanitary washable water paints and cement washes.350 Mineral silicate paints were well suited to stucco and cement plasters because they had the ability to bond with the surface in the same way that fresco colours integrate with plaster. These paints, made with a base of potassium or sodium silicate, had a history of use on the façades of buildings in Eastern Europe. A patent for liquid silicate paint was granted to Keim Mineral Paints in Bavaria in 1878351 and, although it is not known
whether Keim’s paint was marketed in Australia at that time as it is today, the term silicate paint did appear in specifications for colouring stucco.352 Perhaps it was the new form of paint called ‘Duresco’—a so-called washable distemper marketed in Australia by the Silicate Paint Co. That product was claimed to be the ‘first in the field and foremost ever since’.353 It was made with a new pigment called Charlton white, developed in the 1870s,354 and was sold in powdered form, to be mixed with hot water and petrifying liquid, ready for application to interior or exterior plasterwork.355
Detail of the church of Our Lady of the Sacred Heart, Carlton, by Reed, Smart & Tappin, 1897 showing the weathering of the golden yellow colouring on the cement stucco. The colouring is believed to be a copperas wash. Donald Ellsmore
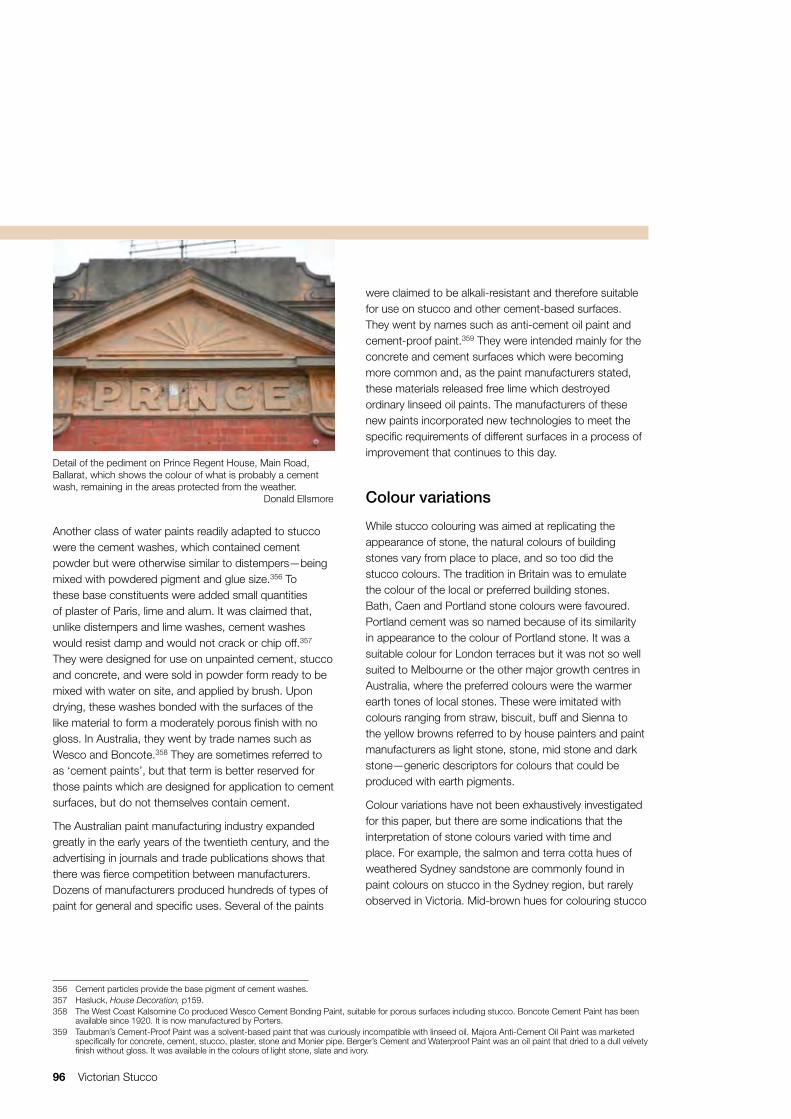
96 Victorian Stucco
356 Cement particles provide the base pigment of cement washes.357 Hasluck, House Decoration, p159.358 The West Coast Kalsomine Co produced Wesco Cement Bonding Paint, suitable for porous surfaces including stucco. Boncote Cement Paint has been
available since 1920. It is now manufactured by Porters. 359 Taubman’s Cement-Proof Paint was a solvent-based paint that was curiously incompatible with linseed oil. Majora Anti-Cement Oil Paint was marketed
specifically for concrete, cement, stucco, plaster, stone and Monier pipe. Berger’s Cement and Waterproof Paint was an oil paint that dried to a dull velvety finish without gloss. It was available in the colours of light stone, slate and ivory.
Another class of water paints readily adapted to stucco were the cement washes, which contained cement powder but were otherwise similar to distempers—being mixed with powdered pigment and glue size.356 To these base constituents were added small quantities of plaster of Paris, lime and alum. It was claimed that, unlike distempers and lime washes, cement washes would resist damp and would not crack or chip off.357 They were designed for use on unpainted cement, stucco and concrete, and were sold in powder form ready to be mixed with water on site, and applied by brush. Upon drying, these washes bonded with the surfaces of the like material to form a moderately porous finish with no gloss. In Australia, they went by trade names such as Wesco and Boncote.358 They are sometimes referred to as ‘cement paints’, but that term is better reserved for those paints which are designed for application to cement surfaces, but do not themselves contain cement.
The Australian paint manufacturing industry expanded greatly in the early years of the twentieth century, and the advertising in journals and trade publications shows that there was fierce competition between manufacturers. Dozens of manufacturers produced hundreds of types of paint for general and specific uses. Several of the paints
were claimed to be alkali-resistant and therefore suitable for use on stucco and other cement-based surfaces. They went by names such as anti-cement oil paint and cement-proof paint.359 They were intended mainly for the concrete and cement surfaces which were becoming more common and, as the paint manufacturers stated, these materials released free lime which destroyed ordinary linseed oil paints. The manufacturers of these new paints incorporated new technologies to meet the specific requirements of different surfaces in a process of improvement that continues to this day.
Colour variations
While stucco colouring was aimed at replicating the appearance of stone, the natural colours of building stones vary from place to place, and so too did the stucco colours. The tradition in Britain was to emulate the colour of the local or preferred building stones. Bath, Caen and Portland stone colours were favoured. Portland cement was so named because of its similarity in appearance to the colour of Portland stone. It was a suitable colour for London terraces but it was not so well suited to Melbourne or the other major growth centres in Australia, where the preferred colours were the warmer earth tones of local stones. These were imitated with colours ranging from straw, biscuit, buff and Sienna to the yellow browns referred to by house painters and paint manufacturers as light stone, stone, mid stone and dark stone—generic descriptors for colours that could be produced with earth pigments.
Colour variations have not been exhaustively investigated for this paper, but there are some indications that the interpretation of stone colours varied with time and place. For example, the salmon and terra cotta hues of weathered Sydney sandstone are commonly found in paint colours on stucco in the Sydney region, but rarely observed in Victoria. Mid-brown hues for colouring stucco
Detail of the pediment on Prince Regent House, Main Road, Ballarat, which shows the colour of what is probably a cement wash, remaining in the areas protected from the weather. Donald Ellsmore
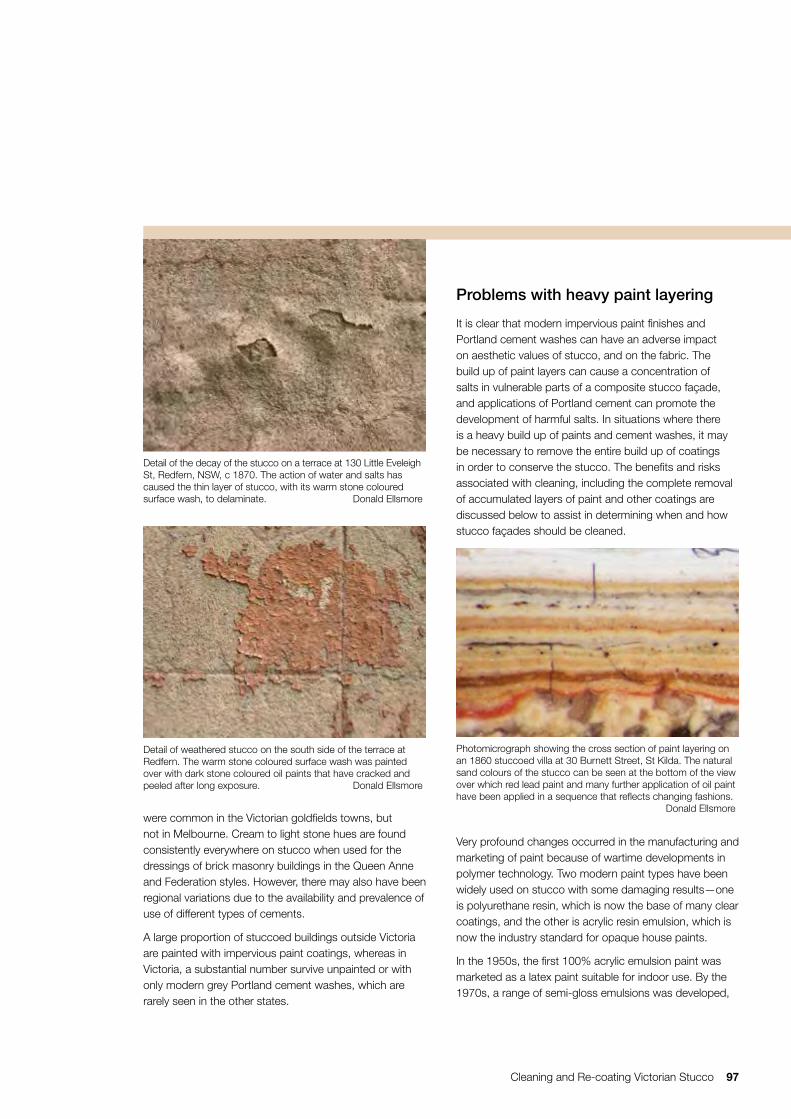
Cleaning and Re-coating Victorian Stucco 97
were common in the Victorian goldfields towns, but not in Melbourne. Cream to light stone hues are found consistently everywhere on stucco when used for the dressings of brick masonry buildings in the Queen Anne and Federation styles. However, there may also have been regional variations due to the availability and prevalence of use of different types of cements.
A large proportion of stuccoed buildings outside Victoria are painted with impervious paint coatings, whereas in Victoria, a substantial number survive unpainted or with only modern grey Portland cement washes, which are rarely seen in the other states.
Problems with heavy paint layering
It is clear that modern impervious paint finishes and Portland cement washes can have an adverse impact on aesthetic values of stucco, and on the fabric. The build up of paint layers can cause a concentration of salts in vulnerable parts of a composite stucco façade, and applications of Portland cement can promote the development of harmful salts. In situations where there is a heavy build up of paints and cement washes, it may be necessary to remove the entire build up of coatings in order to conserve the stucco. The benefits and risks associated with cleaning, including the complete removal of accumulated layers of paint and other coatings are discussed below to assist in determining when and how stucco façades should be cleaned.
Very profound changes occurred in the manufacturing and marketing of paint because of wartime developments in polymer technology. Two modern paint types have been widely used on stucco with some damaging results—one is polyurethane resin, which is now the base of many clear coatings, and the other is acrylic resin emulsion, which is now the industry standard for opaque house paints.
In the 1950s, the first 100% acrylic emulsion paint was marketed as a latex paint suitable for indoor use. By the 1970s, a range of semi-gloss emulsions was developed,
Detail of the decay of the stucco on a terrace at 130 Little Eveleigh St, Redfern, NSW, c 1870. The action of water and salts has caused the thin layer of stucco, with its warm stone coloured surface wash, to delaminate. Donald Ellsmore
Photomicrograph showing the cross section of paint layering on an 1860 stuccoed villa at 30 Burnett Street, St Kilda. The natural sand colours of the stucco can be seen at the bottom of the view over which red lead paint and many further application of oil paint have been applied in a sequence that reflects changing fashions. Donald Ellsmore
Detail of weathered stucco on the south side of the terrace at Redfern. The warm stone coloured surface wash was painted over with dark stone coloured oil paints that have cracked and peeled after long exposure. Donald Ellsmore
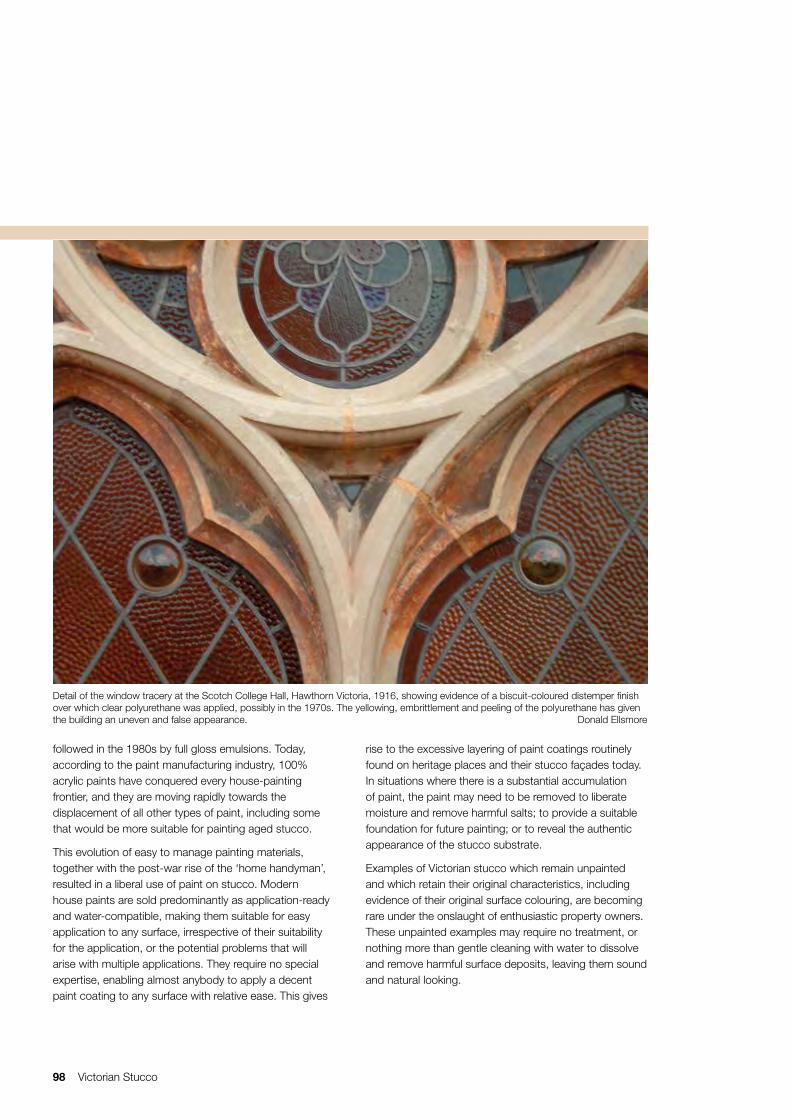
98 Victorian Stucco
followed in the 1980s by full gloss emulsions. Today, according to the paint manufacturing industry, 100% acrylic paints have conquered every house-painting frontier, and they are moving rapidly towards the displacement of all other types of paint, including some that would be more suitable for painting aged stucco.
This evolution of easy to manage painting materials, together with the post-war rise of the ‘home handyman’, resulted in a liberal use of paint on stucco. Modern house paints are sold predominantly as application-ready and water-compatible, making them suitable for easy application to any surface, irrespective of their suitability for the application, or the potential problems that will arise with multiple applications. They require no special expertise, enabling almost anybody to apply a decent paint coating to any surface with relative ease. This gives
rise to the excessive layering of paint coatings routinely found on heritage places and their stucco façades today. In situations where there is a substantial accumulation of paint, the paint may need to be removed to liberate moisture and remove harmful salts; to provide a suitable foundation for future painting; or to reveal the authentic appearance of the stucco substrate.
Examples of Victorian stucco which remain unpainted and which retain their original characteristics, including evidence of their original surface colouring, are becoming rare under the onslaught of enthusiastic property owners. These unpainted examples may require no treatment, or nothing more than gentle cleaning with water to dissolve and remove harmful surface deposits, leaving them sound and natural looking.
Detail of the window tracery at the Scotch College Hall, Hawthorn Victoria, 1916, showing evidence of a biscuit-coloured distemper finish over which clear polyurethane was applied, possibly in the 1970s. The yellowing, embrittlement and peeling of the polyurethane has given the building an uneven and false appearance. Donald Ellsmore
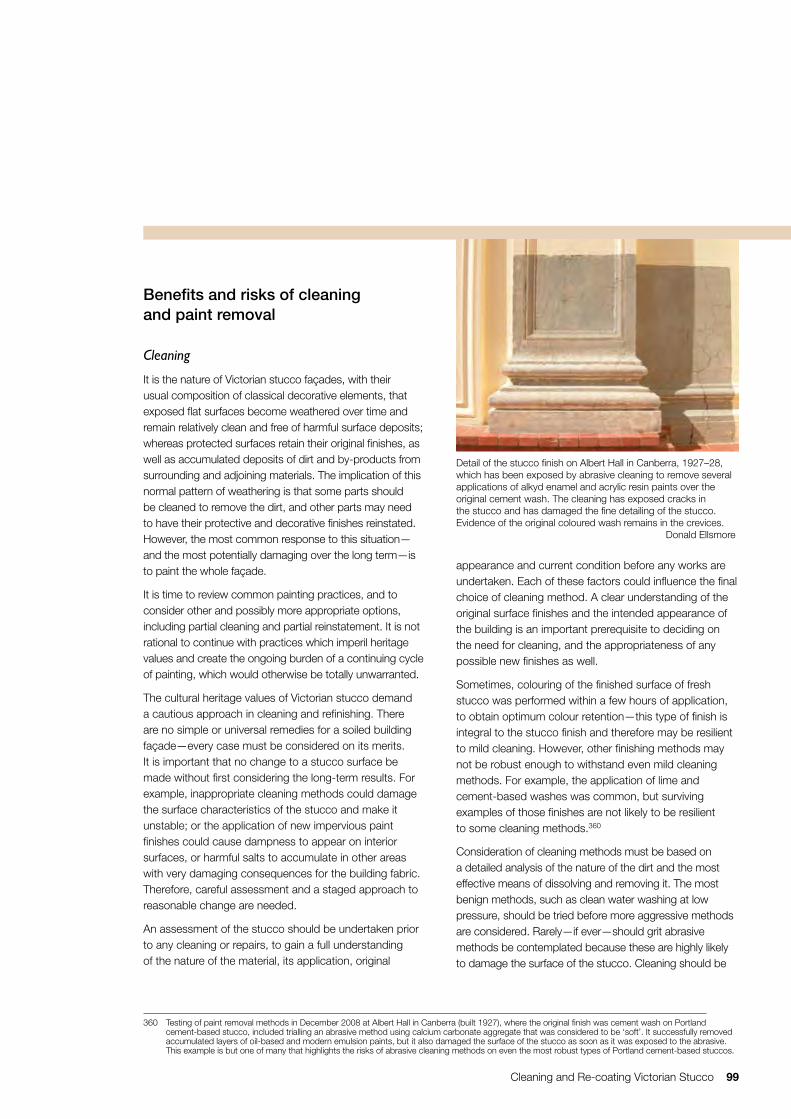
Cleaning and Re-coating Victorian Stucco 99
360 Testing of paint removal methods in December 2008 at Albert Hall in Canberra (built 1927), where the original finish was cement wash on Portland cement-based stucco, included trialling an abrasive method using calcium carbonate aggregate that was considered to be ‘soft’. It successfully removed accumulated layers of oil-based and modern emulsion paints, but it also damaged the surface of the stucco as soon as it was exposed to the abrasive. This example is but one of many that highlights the risks of abrasive cleaning methods on even the most robust types of Portland cement-based stuccos.
Benefits and risks of cleaning and paint removal
Cleaning
It is the nature of Victorian stucco façades, with their usual composition of classical decorative elements, that exposed flat surfaces become weathered over time and remain relatively clean and free of harmful surface deposits; whereas protected surfaces retain their original finishes, as well as accumulated deposits of dirt and by-products from surrounding and adjoining materials. The implication of this normal pattern of weathering is that some parts should be cleaned to remove the dirt, and other parts may need to have their protective and decorative finishes reinstated. However, the most common response to this situation—and the most potentially damaging over the long term—is to paint the whole façade.
It is time to review common painting practices, and to consider other and possibly more appropriate options, including partial cleaning and partial reinstatement. It is not rational to continue with practices which imperil heritage values and create the ongoing burden of a continuing cycle of painting, which would otherwise be totally unwarranted.
The cultural heritage values of Victorian stucco demand a cautious approach in cleaning and refinishing. There are no simple or universal remedies for a soiled building façade—every case must be considered on its merits. It is important that no change to a stucco surface be made without first considering the long-term results. For example, inappropriate cleaning methods could damage the surface characteristics of the stucco and make it unstable; or the application of new impervious paint finishes could cause dampness to appear on interior surfaces, or harmful salts to accumulate in other areas with very damaging consequences for the building fabric. Therefore, careful assessment and a staged approach to reasonable change are needed.
An assessment of the stucco should be undertaken prior to any cleaning or repairs, to gain a full understanding of the nature of the material, its application, original
appearance and current condition before any works are undertaken. Each of these factors could influence the final choice of cleaning method. A clear understanding of the original surface finishes and the intended appearance of the building is an important prerequisite to deciding on the need for cleaning, and the appropriateness of any possible new finishes as well.
Sometimes, colouring of the finished surface of fresh stucco was performed within a few hours of application, to obtain optimum colour retention—this type of finish is integral to the stucco finish and therefore may be resilient to mild cleaning. However, other finishing methods may not be robust enough to withstand even mild cleaning methods. For example, the application of lime and cement-based washes was common, but surviving examples of those finishes are not likely to be resilient to some cleaning methods.360
Consideration of cleaning methods must be based on a detailed analysis of the nature of the dirt and the most effective means of dissolving and removing it. The most benign methods, such as clean water washing at low pressure, should be tried before more aggressive methods are considered. Rarely—if ever—should grit abrasive methods be contemplated because these are highly likely to damage the surface of the stucco. Cleaning should be
Detail of the stucco finish on Albert Hall in Canberra, 1927–28, which has been exposed by abrasive cleaning to remove several applications of alkyd enamel and acrylic resin paints over the original cement wash. The cleaning has exposed cracks in the stucco and has damaged the fine detailing of the stucco. Evidence of the original coloured wash remains in the crevices. Donald Ellsmore
100 Victorian Stucco
directed at removing the harmful deposits without affecting the stucco or the residual evidence of its colouring. Chemical solvents and detergents, if used, should be completely removed by flushing with clean water—lest they remain in the porous substrate in sufficient concentrations to initiate a new cycle of deterioration.
Dealing with clear coatings
When clear polyurethane coatings were developed, they soon found many new applications in which traditional varnishes—because of their inherent colour and high gloss levels—could not be used. The polyurethanes could be made water-clear and non-glossy—very desirable characteristics for so-called invisible coatings. However, polyurethane coatings change over time under the effects of ultra violet light—commonly turning yellow and becoming opaque and brittle. The application of clear coatings to finishes such as weathered stucco has been calamitous in the past—with unanticipated results including unsightly milkiness across a façade, uneven weathering, darkening and yellowing, and a bleak prognosis.
The types of clear coatings which were marketed in the past for outdoor use, are not readily soluble in conventional solvents, and therefore cannot be removed economically. Neither can they be re-coated with another clear coating. The only way to deal with them is to remove them entirely and face the high probability of damaging the substrate in the process; or paint over them with an opaque finish which will very likely obliterate the natural characteristics of the stucco substrate.
Paint removal
The removal of paint can be problematic. Therefore, the first decision must be about the need to do so at all. If paint layers are present in sound condition and with reasonable vapour permeability, they are unlikely to affect the condition of the stucco adversely, and it may be appropriate to clean them but not to remove them. Any decision to remove such paintwork would be based purely on aesthetic considerations.
In some situations, the removal of accumulated layers of relatively modern, moisture entrapping alkyd and acrylic-bound paints would be desirable for other reasons, such as the need to reduce an already unstable accumulation of paint. It would be best achieved by using chemical solvents and super-heated water at low pressure, although some recent developments in cleaning technology have produced promising results with less environmentally damaging materials. Abrasive and high-pressure methods are, as noted above, very damaging to stucco and should be avoided. However, no matter what method is considered, it should not proceed without first testing the proposed method fully to determine its effectiveness and the likely impacts on the underlying stucco substrate.
When considering cleaning and paint removal techniques, a number of key questions need to be answered. Some of them have been raised already but they are repeated here again in their logical sequence as a checklist.
1 Is cleaning necessary for the conservation of the stucco?
2 Has the nature and extent of the original surface appearance been established?
3 How would the original finish withstand cleaning (based on field trials)?
4 How would the original finish appear or be reinstated following cleaning?
5 If water is to be used in the cleaning process, would structural cracks or hairline cracking admit water and cause the internal fabric to become damp or damaged?
6 If structural cracks or hairline cracking are present, what is the best way to deal with these and what is the most suitable finish treatment to apply after cleaning?
7 If paint removal is considered, what is the least damaging method of removal?
8 How would the paint residue be effectively and safely collected and disposed?
9 How would chemical solvents be removed entirely from the fabric following the paint removal?
10 What, if any, would be an appropriate new finish to apply?

Cleaning and Re-coating Victorian Stucco 101
361 Although the terms ‘paint’ and ‘painting’ are used throughout this discussion, strictly speaking the washes and distempers are not paints. In earlier times, washes were applied by plasterers (or bricklayers) and not by painters. But today they would be applied by painters.
362 Jackson, Botting & Striegel, ‘Durability of Traditional and Modified Limewashes’, pp 19-28.363 Porter’s Paints was lobbied by the NSW Heritage Branch Technical Advisory Group to remove the potentially harmful acrylic resin from its limewash.
The choice of casein as an alternative binder is based on traditional practice.
In the discussion below, a small range of commonly used finishes is considered for use on stucco today. And, as with the paint removal methods, it is wise to consider the most benign coatings, like water soluble washes before resorting to impervious coatings that would not only impact on the aesthetic values of the stucco, but also be costly to remove in the future should the need arise.
Today’s options for finishing stucco
When it is determined after careful analysis that a new finish should be applied, the correct choice will be a finish which will replicate the aesthetic and functional characteristics of the original finish. In addition, although the history of weathering and repair of the structure may militate against the success of a finish that matches the original finish, it should be always considered first: the original finish should be the starting point for selection of an appropriate new finish.
Clear finishes
The coatings industry has conducted a sufficiently exhaustive investigation of clear or invisible finishes (including anti-graffiti coatings) to conclude that there is no product or treatment on the market today that would satisfy the standards of sound conservation practice and reasonable durability for a clear coating on unpainted stucco. All the ‘invisible’ coatings have one or more unwanted features—imparting an unnatural milky or wet look; changing the appearance in some other way; or blocking pores, inhibiting moisture transfer (preventing breathability) and disrupting normal weathering. Accordingly, the application of clear coatings should be avoided: they are not suitable.
Limewashes
Limewash is a traditional finish that has been in continuous use for many years, although its use in recent times has been limited. It is now enjoying a revival in conservation work, and to some extent in commercial work, because of its inherent benefits and compatibility with porous
materials. It is an excellent option for painting or re-painting stucco.361
There are many recipes for traditional limewashes (usually containing animal fats, oils and other additives) and there are now several paint manufacturers who are producing limewash for new work and for conservation—sometimes with fail-safe additives to make it suitable for the home handyman. Some of these new limewashes are modified by adding acrylic emulsions to give them paint-like qualities. This improves their workability and durability but can also interfere with the natural behaviour of porous materials, especially when moisture and salts are present. The acrylic can block pores and reduce vapour permeability in a way that could be detrimental.
Limewash is not paint in the normal sense of the word. Limewash does not harden by the drying of the surface film. Rather, the slaked lime particles of calcium oxide combine with airborne carbon dioxide to form calcite crystals of calcium carbonate. This process requires suitable attendance to ensure that the surfaces remain damp long enough for the reaction to run its course. Some recipes for exterior limewashes indicated that the lime should be slaked and applied hot, which is all that is needed for it to perform satisfactorily—however, recent research indicates that it can perform satisfactorily in its natural form without heat.362 Some recipes call for the addition of various functional additives, with some regional peculiarities and more than a few ‘secret’ ingredients. The additives include salt and alum (to slow down drying and to fix pigments); linseed oil, tallow or milk (to reduce permeability); starch, glue or size (to improve workability and adhesion); and coloured mineral pigments (to improve opacity and colour).
Limewash can be mixed to a traditional recipe for local or site-specific conditions, or it can be obtained in a ready-mixed form with or without acrylic binders. One leading manufacturer has taken the decision to remove the acrylic resin from its product and replace it with a casein binder due to concerns about the pore-blocking effects of acrylic, and to address growing concerns about volatile organic compounds (VOCs) in all forms of paint. 363
102 Victorian Stucco
364 Hasluck, Cassell’s House Decoration, p 159.365 Wesco Bonding Cement Paint was first produced by the West Coast Kalsomine Co. (Australia) Ltd at Parramatta, NSW in 1920.366 Porters recommend a conditioner should be used in mixing Boncote—this conditioner is an acrylic resin emulsion. 367 It is sometimes recommended that cement paint should be applied with acrylic conditioner over lime-proof undercoats. The use of acrylic-based materials
on porous stucco may compound problems of damp and salts. 368 The difference between the use of sodium silicate and potassium silicate as a binder is mainly geographic. The western hemisphere mainly produces
sodium silicate, whereas Europe produces potassium silicate.
Distempers
The basic ingredients of the class of paints called distempers are powdered chalk or whiting (plaster of Paris) and glue size (cellulose or starch). The calcium carbonate in distempers exists as a powder, (and therefore differs from the calcium carbonate in limewashes, which forms in a reaction with air). As simple water-based finishes, distempers were inexpensive and easy to apply, but their durability was dependent upon the glue binders, and usually limited. Being water soluble they would not survive very long on exposed weather faces. The addition of stabilising substances, such as salicylic acid and cresylic acid (a coal tar by-product), was recommended to improve adhesion and retard decomposition.364 Distempers of greater or lesser durability were used on stucco façades, although it is unlikely that they would have been preferred to the more durable finishes used in the better classes of work. Modern ready-mixed distempers for interior use include small amounts of acrylic and PVA resins, which impart reasonable properties for interior use, but are not recommended for exterior use for the reasons mentioned above. Distempers for external use could be made with a casein binder, which would provide an improved but still modest performance. Their greatest advantage would be their suitability for use on the most significant stucco surfaces where compatibility is a more important consideration than durability.
Cement paints
Portland cement washes were commonly specified and used on Portland cement stucco surfaces. Early cement washes were based on the same basic constituents as distempers (plaster of Paris and glue size) with the addition of alum and hydrated lime. Better quality cement washes were based on Portland cement, which had the advantage of forming a durable surface by the chemical setting of the cement. Boncote cement paint is a Portland cement-based coating, which has been in use more
or less continuously since 1920.365 It was designed for use on unpainted cement, stucco, brick and concrete surfaces. It provided a convenient finish for asbestos cement sheeting when that material was introduced to domestic building, initially in 1915. Boncote is not suitable for use over existing impervious paint coatings, although manufacturer supports its use on previously painted surfaces with appropriate preparation and primers. It is supplied in powder form and once mixed with water366 can be applied to prepared absorbent concrete masonry and stucco surfaces to form a hard, durable, matt, coloured coating.367
Oil paints
Modern oil paints are based on the principal ingredients of alkyd resins and titanium dioxide base pigments in all the light tints. They do not possess anything like the hardness and durability of traditional white lead and linseed oil paints in the external environment. Alkyd enamels (as they are now called) are considered a good choice for use on sound timber, but not for all porous masonry surfaces. They form a surface film which degrades by chalking when the resins break down under the effect of ultra violet light. They are also susceptible to moisture when it is present in the stucco, and may blister and crack due to inadequate moisture permeability. Nevertheless, they provide a relatively compatible option in some situations.
Mineral silicate paints
Mineral silicate paints are mineral-based coatings formulated with potassium silicate or sodium silicate, otherwise known as waterglass, as the binder, combined with inorganic, alkaline resistant pigments.368 They are fully inorganic—containing no organic solvents. Mineral paints petrify, by binding to any silicates within the substrate, forming a micro-crystalline structure and a vapour-permeable finish. They are also alkaline and therefore inhibit microbiotic growth, and reduce carbonisation of

Cleaning and Re-coating Victorian Stucco 103
369 Silicate Mineral Paint, Wikipedia, retrieved 9 April 2007, <http://en.wikipedia.org/wiki/Silicate_mineral_paint>.370 History of Acrylic paint retrieved 10 April 2007, <www.watercolorpainting.com/acrylics.htm>. The first synthetic acrylic resin were made in 1901 by Dr Otto
Röhm and brought into American commercial production in the 1930s by Röhm & Haas. The acrylic resin was particularly useful for making cast plastic sheeting (Perspex) as well as polymerized emulsions for making paint. After World War II, the first acrylic paints were put onto the market. They were sold in solution form dissolved with turpentine and could be mixed with oil paints. By 1953, Röhm & Haas introduced the first true acrylic paints as interior wall paints.
371 Wikipedia, Acrylic paint, retrieved 10 April 2007, <http://en.wikipedia.org/Wiki/Acrylic.paint>. Water-based acrylic paints were subsequently sold as ‘latex’ house paints, although acrylic dispersion uses no latex derived from a rubber tree. Interior ‘latex’ house paints tend to be a combination of binder (sometimes acrylic, vinyl, or pva), filler, pigment and water. Exterior ‘latex’ house paints may also be a ‘co-polymer’ blend, but the very best exterior water-based paints are 100% acrylic. Soon after the water-based acrylic binders were introduced as house paints, artists (the first of whom were Mexican muralists) and manufacturers alike began to explore the potential of the new binders. Water soluble artist quality acrylic paints became commercially available in the early 1960s, offered by Liquitex.
cementitious materials.369 Modern silicate paints are matt and coarse grained and therefore similar in some respects to the traditional stucco surfaces in appearance. Some brands contain acrylic resin binders and form an impervious finish which may be undesirable in many situations. Silicate paints are understood to have a long service life.
Acrylic resin paints
Acrylic resin paints, known commercially as ‘acrylics’, now dominate the commercial and domestic market. They satisfy many environmental considerations and they have excellent performance properties on new structures—but not on heritage structures. Their main disadvantage is their poor vapour permeability. Paint manufacturers have developed and refined acrylic resin paints in an inexorable progression since World War II and production has probably reached a peak.370 They claim that the very best exterior water-based paints are 100% acrylic.371 Acrylic paints today are promoted in Australia as the most suitable paints for all external applications. Further, they are claimed to have sufficient vapour permeability for use on heritage building fabric—however, the evidence
indicates they are unsuitable in many commonly found situations at heritage places. They have the advantage of being readily available in a vast range of colours and finishes, and they are easy to apply. They have the disadvantage of being relatively impervious. They form a thick film with limited vapour permeability, which may trap moisture or, worse, cause salt-laden moisture to accumulate in areas with catastrophic consequences for vulnerable stucco decoration.
It can be concluded that the physical characteristics and performance characteristics of acrylic paints are inconsistent with traditional finishes, and that they should not be considered for applications where authenticity and traditional performance characteristics are sought.
Other paint types
The substantial array of further products on the market which could be suitable for use on stucco in some circumstances are too numerous to mention here. Furthermore, the relentless marketing of new products causes the range to be constantly changing. Paint manufacturers will advocate multi-layer paint systems where a high degree of waterproofing is required and will quote high rates of vapour permeability, which in reality are improbable and unlikely to be achieved. Others will advocate finishes containing fine aggregates (sand) to improve durability and surface texture. However, it should be noted that acrylic resins are a normal constituent of most modern, flexible paint finishes, and acrylic resins have been found in practice to inhibit the movement of moisture and salts, leading to alarming failures in some porous building fabric. For this reason, and for reasons of historical appropriateness, limewashes, cement washes, colour washes and, in some circumstances, silicate paints, are safer and more authentic finishes for use on Victorian stucco today.
Detail of the weathered and recently painted parts of Trades Hall, Carlton Victoria. Mineral silicate paint was applied to part of the cement stucco façade in 2006. Donald Ellsmore
104 Victorian Stucco
Conclusion
Recent examples of cleaning and re-coating of stucco façades demonstrate that insufficient attention is paid to the authentic nature of the finish and its conservation needs—far too often modern paint coatings are applied because they offer immediate and apparently economical solutions to perceived problems. In other cases, skim coatings of Portland cement-based mixtures are applied in the mistaken belief that they replicate original finishes. Skim coatings have not been covered in this discussion on conventional paint coatings and washes. The impact of the prevailing approach is that significant places have been and are being damaged by poorly considered work, and over the longer term the problems remain and often develop further.
The approach which should be adopted, and possibly even regulated, is to follow correct conservation procedures and make decisions based on the significance of the places and their real needs. Interventions, such as the removal of paint coatings, or the application of new paint coatings, should proceed only after careful consideration and trialling of the best options and with experienced professional input.
Victorian Stucco 105
372 Wardell, ‘the English Scottish & Australian Chartered Bank’, p 18.373 Wardell, ‘the English Scottish & Australian Chartered Bank’, p 19.374 Wardell, ‘the English Scottish & Australian Chartered Bank’, pp 21–2.375 Wardell, ‘the English Scottish & Australian Chartered Bank’, pp 28–9.376 Mayes, Australian Builders’ Price Book [1886], p 95.
W W Wardell, ‘English Scottish & Australian Chartered Bank Melbourne’ [specification] (Melbourne 1887)
Mason & Bricklayer
Lime and Lime Mortar
The lime used is to be the best duck ponds Roche Lime or other approved lime of equal quality, and the lime mortar is to be composed of one part in measured proportions of lime and two parts of well washed clean sharp grit coarse drift sand of approved quality free from salt loam dirt and other impurities and Yan Yean water, the proportions of the lime and sand to be measured in a box before mixing.372
Cement and Cement Mortar
All of the cement used is to be the best London made Portland Cement of approved quality in every respect, and any that may be brought upon the ground which may not be approved on examination shall be removed from the premises, and the Contractor shall provide any tests for the Cement that the Architect may require.373
Where work is specified to be lain in Cement, it is to be taken to mean (except where otherwise specified) a mortar composed of the measured proportions of one part of cement and three parts of sand similar to that described for lime mortar, and all well mixed and tempered together with water.
Wardell specifies lime mortar in the footing courses and cement mortar is limited in application to the piers to take the iron columns that support the main banking chamber. He includes two damp proof courses: one set at basement floor level using ‘No. 1 Claridges Asphalte’ and the second set just below the ground floor level using ‘Callender & Sons pure Bitumen Damp Course’.374
The freestone facades to Collins Street and Queen Street are specified with both the sandstone ashlar and brickwork behind to be laid in cement mortar. As an alternative option, he indicates that the contractor is also to include in his tender for the walls to be laid in solid sandstone ashlar laid in lime mortar and punched on the internal face to be take a plaster finish.375 The specification goes on to indicate that all arches, and all walls that are in brickwork less than 18 inches thick are to be laid in cement mortar. All other brickwork is to be in lime mortar.
All work above the roof level including parapets, chimneys and copings is specified to be in cement mortar.
PlastererMortar The mortar for the plastering is to be of equal parts of well burnt shell lime and clean sharp coarse sand free from salt and other impurities thoroughly mixed and tempered together with a sufficient quantity of good tough hair. The lime is to be run through a sieve and the mortar and fine stuff are to be made up at least three weeks before being used.
Charles Mayes, The Australian Builders’ Price-Book (Melbourne 1886)
Advertisements
The 1886 edition includes a number of advertisements including one for Best English Portland Cement; Castle Brand manufactured by Wm. Levett & Co., Ltd., London. The sole agents were MacDonnell & Busch of Bond Street Sydney. The advertisement states, ‘Likewise in Australia it is now the leading brand’, suggesting that it has an established presence in the market. Other cements advertised include those supplied by Petsch, Doehling & Co in Sydney, the Crown A1 Cement, ‘Stern’ or ‘Star’ Cement and ‘Faucus’ English Cement. In Melbourne, the Builders’ Lime and Cement Company advertises that it stocks ‘Portland Cement, ‘various brands’, and Alsen’s Portland Cement is advertised by the sole agents H Haege and Co. of Pitt Street, Sydney.
This edition of Mayes includes information on the tensile strength of various brands of Portland cement, indicating an increased interest in its overall strength and performance. In a more extensive article on Portland cement, Mayes notes that the strength of current cements is at least double the strength of those produced 40 years ago. This is said to be the result of ‘great competition among cement manufacturers.’376
> The following notes were gathered in the course of researching works to several Melbourne places.
CASE STUDIES
Documentation: Peter Lovell
106 Victorian Stucco
377 Terry & Oakden, What to Build and How to Build It, p 7.
In the section on plasterer’s work Mayes distinguishes between ‘stucco’ and lime plaster for external use and Portland Cement stucco. His pricing of cement renders is based on a one of cement to three of sand in a ¾ inch [19 mm] coat. He comments on the need to pre-wet surfaces and the use of a two-coat application. He also comments on the need for daily wetting to assist in curing for between three to 14 days dependant upon the weather.
In relation to lime plaster, he indicates that other than in Sydney the use of such plasters in external applications has been almost totally superseded by Portland Cement ‘compo’.
‘Callender’s’ pure bitumen damp proof course, the brand specified by Wardell for the E S & A Chartered Bank, is also advertised.
Reed & Barnes, ‘Melbourne Town Hall Contract & Specification, 1868’
Mason and Bricklayer
The specification distinguishes between work set in cement and work set in good lime mortar. The cement is specified to be the ‘very best Portland Cement’ mixed in a mortar comprising 1/3 cement and 2/3 sand. Lime mortar is specified to be in ‘fresh well burnt Geelong Roche Lime’ mixed in a mortar comprising 1/3 lime and 2/3 sand, all mixed in a pugmill. Work is generally specified to be in lime mortar, with cement being used in cornices and for dowels. Brickwork to arches is specified in cement mortar.
Plasterer
Generally all internal work is in a lime plaster finished in plaster of Paris and all external work is specified in cement plaster ‘to be comprised of two (2) parts of clean sharp sand and one (1) part of cement, well mixed’. The cement is specified as the ‘best Portland Cement’.
Robert Haddon, in Australian Architecture of 1908, addresses external plastering in a section titled ‘Outside Cementing’. He notes that while such work is sometimes referred to as ‘stucco’, it is more typically referred to as ‘cementing’. His mixes are 1:4 cement and sand for the first or floating coat, and 1:2.5 cement and sand for the finishing coat.
In James Nangle’s Australian Building Practice of 1911, external plasterwork is addressed in his chapter, Plastering. His terminology in this chapter is mixed. In his introductory comments on external plastering, he includes a statement that such work involves ‘the covering of the wall or exterior of the building, with the rendering of cement mortar, called stucco’. Two paragraphs later, he titles a paragraph ‘The proportions of sand and cement for rendering’. Within this paragraph, the words stucco and rendering are used interchangeably, and rendering is the action of applying the stucco and the material itself. His mixes are 1:3 Portland cement to Sand and 1:2 for arises and exposed angles. He comments that rendering is generally done in one coat, but sometimes two.
On the use of ‘lime water’ and lime in the mix, he comments that this sometimes occurs to make the mix fat, but comments that this practice is to be condemned as ‘lime and cement fail to make a satisfactory mix’.
In the 1925 third edition and the 1944 fourth edition prepared by his son, the text on external plastering is unaltered.
Terry & Oakden, What to Build and How to Build It (Melbourne 1885)
Brick cemented is too well known as a favourite building material amongst us to need much comment; while it has little to recommend it from an art point of view, it is cheap and convenient, and has also the advantage of keeping the walls free from damp. When used, a direct imitation of stone should be avoided, as being in bad taste; the greatest danger is that of over-crowding the ornament, as the material is so pliant there is a great temptation to fall into this, the most vulgar of all errors. The most appropriate system of decoration is surface ornament as opposed to those features more essentially suggestive of stone (in particular, as in many others, architects are subject to the wishes of their clients, and often imitate stone in cement under compulsion). The whole front may be painted in some pleasing tint; such a treatment is observable in many of the Italian towns.377
Peter Lovell is a Director of Lovell Chen. He is a graduate of Melbourne University and qualified with a Bachelor of Building Degree. Over the past 30 years he has established himself as a key participant in the building conservation field and has been involved in many aspects of conservation practice.
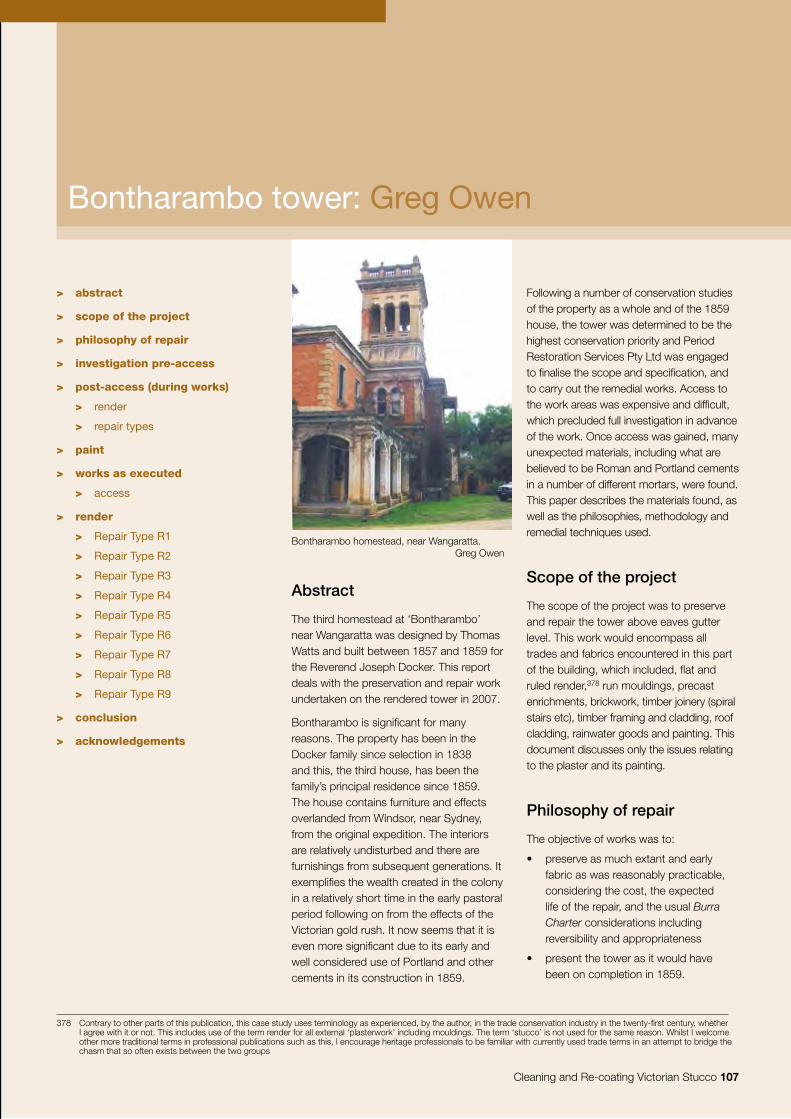
Cleaning and Re-coating Victorian Stucco 107
Following a number of conservation studies of the property as a whole and of the 1859 house, the tower was determined to be the highest conservation priority and Period Restoration Services Pty Ltd was engaged to finalise the scope and specification, and to carry out the remedial works. Access to the work areas was expensive and difficult, which precluded full investigation in advance of the work. Once access was gained, many unexpected materials, including what are believed to be Roman and Portland cements in a number of different mortars, were found. This paper describes the materials found, as well as the philosophies, methodology and remedial techniques used.
Scope of the project
The scope of the project was to preserve and repair the tower above eaves gutter level. This work would encompass all trades and fabrics encountered in this part of the building, which included, flat and ruled render,378 run mouldings, precast enrichments, brickwork, timber joinery (spiral stairs etc), timber framing and cladding, roof cladding, rainwater goods and painting. This document discusses only the issues relating to the plaster and its painting.
Philosophy of repair
The objective of works was to:
• preserve as much extant and early fabric as was reasonably practicable, considering the cost, the expected life of the repair, and the usual Burra Charter considerations including reversibility and appropriateness
• present the tower as it would have been on completion in 1859.
378 Contrary to other parts of this publication, this case study uses terminology as experienced, by the author, in the trade conservation industry in the twenty-first century, whether I agree with it or not. This includes use of the term render for all external ‘plasterwork’ including mouldings. The term ‘stucco’ is not used for the same reason. Whilst I welcome other more traditional terms in professional publications such as this, I encourage heritage professionals to be familiar with currently used trade terms in an attempt to bridge the chasm that so often exists between the two groups
> abstract
> scope of the project
> philosophy of repair
> investigation pre-access
> post-access (during works)
> render
> repair types
> paint
> works as executed
> access
> render
> Repair Type R1
> Repair Type R2
> Repair Type R3
> Repair Type R4
> Repair Type R5
> Repair Type R6
> Repair Type R7
> Repair Type R8
> Repair Type R9
> conclusion
> acknowledgements
Abstract
The third homestead at ‘Bontharambo’ near Wangaratta was designed by Thomas Watts and built between 1857 and 1859 for the Reverend Joseph Docker. This report deals with the preservation and repair work undertaken on the rendered tower in 2007.
Bontharambo is significant for many reasons. The property has been in the Docker family since selection in 1838 and this, the third house, has been the family’s principal residence since 1859. The house contains furniture and effects overlanded from Windsor, near Sydney, from the original expedition. The interiors are relatively undisturbed and there are furnishings from subsequent generations. It exemplifies the wealth created in the colony in a relatively short time in the early pastoral period following on from the effects of the Victorian gold rush. It now seems that it is even more significant due to its early and well considered use of Portland and other cements in its construction in 1859.
Bontharambo homestead, near Wangaratta. Greg Owen
Bontharambo tower: Greg Owen
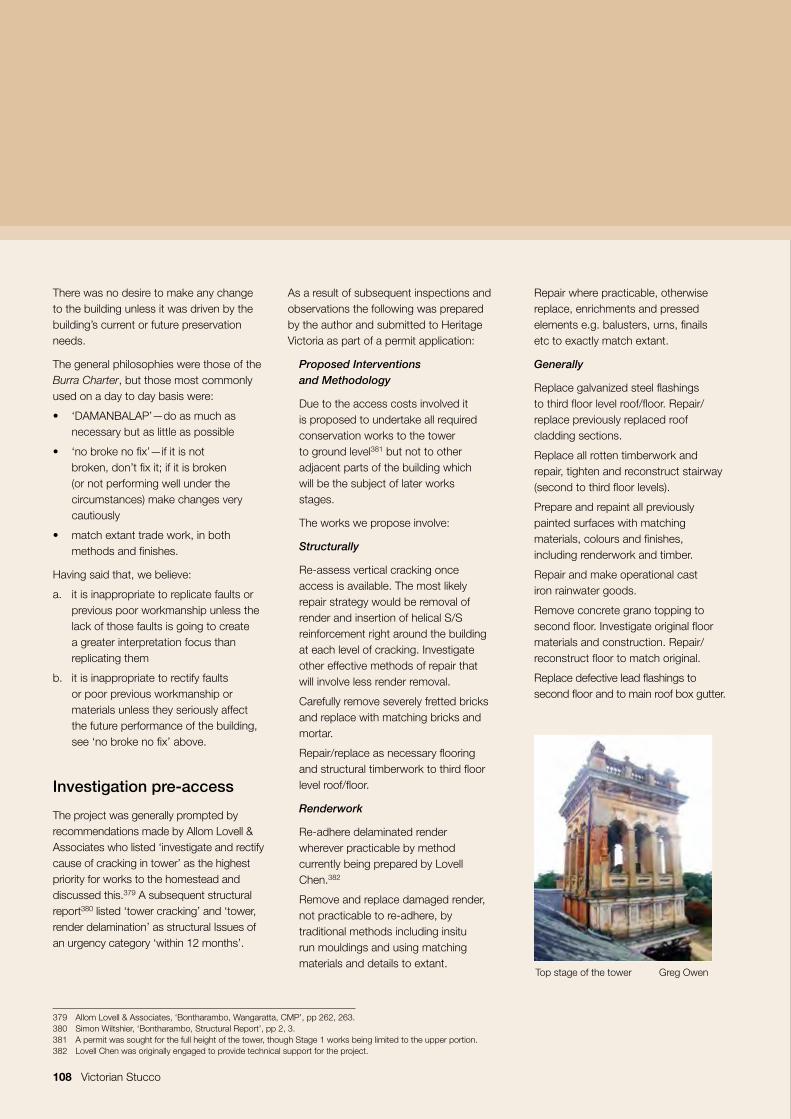
108 Victorian Stucco
379 Allom Lovell & Associates, ‘Bontharambo, Wangaratta, CMP’, pp 262, 263.380 Simon Wiltshier, ‘Bontharambo, Structural Report’, pp 2, 3.381 A permit was sought for the full height of the tower, though Stage 1 works being limited to the upper portion.382 Lovell Chen was originally engaged to provide technical support for the project.
There was no desire to make any change to the building unless it was driven by the building’s current or future preservation needs.
The general philosophies were those of the Burra Charter, but those most commonly used on a day to day basis were:
• ‘DAMANBALAP’—do as much as necessary but as little as possible
• ‘no broke no fix’—if it is not broken, don’t fix it; if it is broken (or not performing well under the circumstances) make changes very cautiously
• match extant trade work, in both methods and finishes.
Having said that, we believe:
a. it is inappropriate to replicate faults or previous poor workmanship unless the lack of those faults is going to create a greater interpretation focus than replicating them
b. it is inappropriate to rectify faults or poor previous workmanship or materials unless they seriously affect the future performance of the building, see ‘no broke no fix’ above.
Investigation pre-access
The project was generally prompted by recommendations made by Allom Lovell & Associates who listed ‘investigate and rectify cause of cracking in tower’ as the highest priority for works to the homestead and discussed this.379 A subsequent structural report380 listed ‘tower cracking’ and ‘tower, render delamination’ as structural Issues of an urgency category ‘within 12 months’.
As a result of subsequent inspections and observations the following was prepared by the author and submitted to Heritage Victoria as part of a permit application:
Proposed Interventions and Methodology
Due to the access costs involved it is proposed to undertake all required conservation works to the tower to ground level381 but not to other adjacent parts of the building which will be the subject of later works stages.
The works we propose involve:
Structurally
Re-assess vertical cracking once access is available. The most likely repair strategy would be removal of render and insertion of helical S/S reinforcement right around the building at each level of cracking. Investigate other effective methods of repair that will involve less render removal.
Carefully remove severely fretted bricks and replace with matching bricks and mortar.
Repair/replace as necessary flooring and structural timberwork to third floor level roof/floor.
Renderwork
Re-adhere delaminated render wherever practicable by method currently being prepared by Lovell Chen.382
Remove and replace damaged render, not practicable to re-adhere, by traditional methods including insitu run mouldings and using matching materials and details to extant.
Repair where practicable, otherwise replace, enrichments and pressed elements e.g. balusters, urns, finails etc to exactly match extant.
Generally
Replace galvanized steel flashings to third floor level roof/floor. Repair/replace previously replaced roof cladding sections.
Replace all rotten timberwork and repair, tighten and reconstruct stairway (second to third floor levels).
Prepare and repaint all previously painted surfaces with matching materials, colours and finishes, including renderwork and timber.
Repair and make operational cast iron rainwater goods.
Remove concrete grano topping to second floor. Investigate original floor materials and construction. Repair/reconstruct floor to match original.
Replace defective lead flashings to second floor and to main roof box gutter.
Top stage of the tower Greg Owen
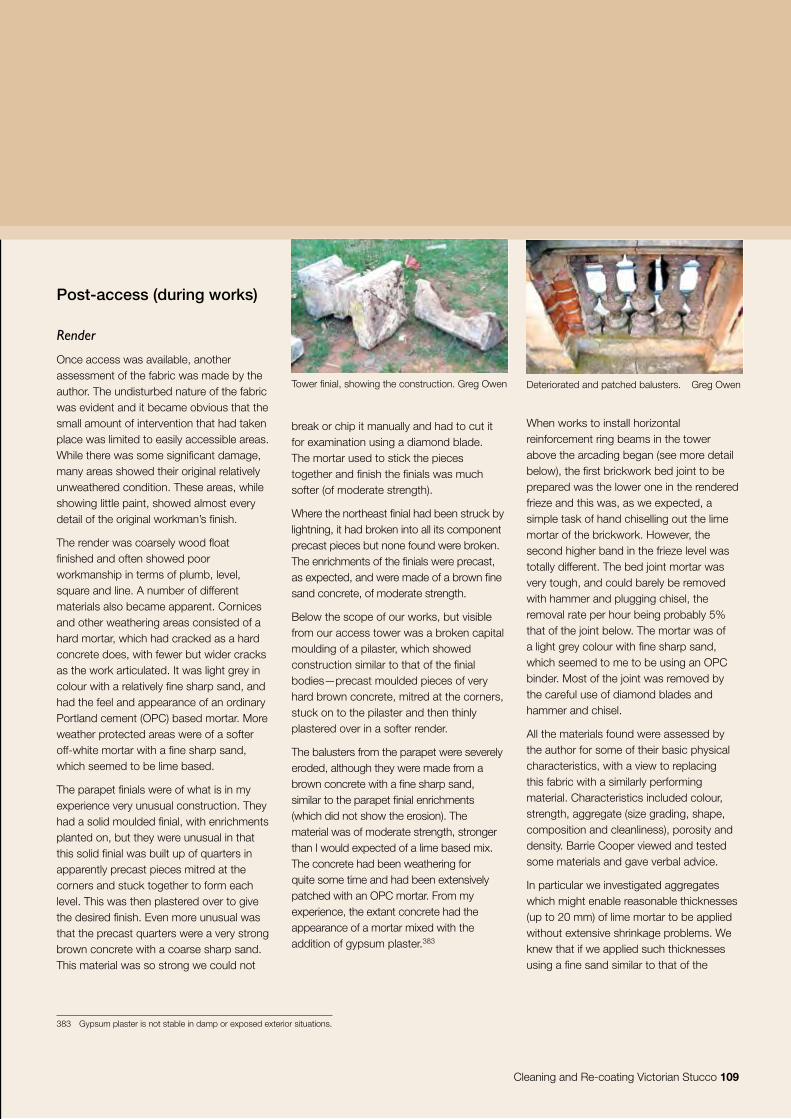
Cleaning and Re-coating Victorian Stucco 109
383 Gypsum plaster is not stable in damp or exposed exterior situations.
Post-access (during works)
Render
Once access was available, another assessment of the fabric was made by the author. The undisturbed nature of the fabric was evident and it became obvious that the small amount of intervention that had taken place was limited to easily accessible areas. While there was some significant damage, many areas showed their original relatively unweathered condition. These areas, while showing little paint, showed almost every detail of the original workman’s finish.
The render was coarsely wood float finished and often showed poor workmanship in terms of plumb, level, square and line. A number of different materials also became apparent. Cornices and other weathering areas consisted of a hard mortar, which had cracked as a hard concrete does, with fewer but wider cracks as the work articulated. It was light grey in colour with a relatively fine sharp sand, and had the feel and appearance of an ordinary Portland cement (OPC) based mortar. More weather protected areas were of a softer off-white mortar with a fine sharp sand, which seemed to be lime based.
The parapet finials were of what is in my experience very unusual construction. They had a solid moulded finial, with enrichments planted on, but they were unusual in that this solid finial was built up of quarters in apparently precast pieces mitred at the corners and stuck together to form each level. This was then plastered over to give the desired finish. Even more unusual was that the precast quarters were a very strong brown concrete with a coarse sharp sand. This material was so strong we could not
break or chip it manually and had to cut it for examination using a diamond blade. The mortar used to stick the pieces together and finish the finials was much softer (of moderate strength).
Where the northeast finial had been struck by lightning, it had broken into all its component precast pieces but none found were broken. The enrichments of the finials were precast, as expected, and were made of a brown fine sand concrete, of moderate strength.
Below the scope of our works, but visible from our access tower was a broken capital moulding of a pilaster, which showed construction similar to that of the finial bodies—precast moulded pieces of very hard brown concrete, mitred at the corners, stuck on to the pilaster and then thinly plastered over in a softer render.
The balusters from the parapet were severely eroded, although they were made from a brown concrete with a fine sharp sand, similar to the parapet finial enrichments (which did not show the erosion). The material was of moderate strength, stronger than I would expected of a lime based mix. The concrete had been weathering for quite some time and had been extensively patched with an OPC mortar. From my experience, the extant concrete had the appearance of a mortar mixed with the addition of gypsum plaster.383
When works to install horizontal reinforcement ring beams in the tower above the arcading began (see more detail below), the first brickwork bed joint to be prepared was the lower one in the rendered frieze and this was, as we expected, a simple task of hand chiselling out the lime mortar of the brickwork. However, the second higher band in the frieze level was totally different. The bed joint mortar was very tough, and could barely be removed with hammer and plugging chisel, the removal rate per hour being probably 5% that of the joint below. The mortar was of a light grey colour with fine sharp sand, which seemed to me to be using an OPC binder. Most of the joint was removed by the careful use of diamond blades and hammer and chisel.
All the materials found were assessed by the author for some of their basic physical characteristics, with a view to replacing this fabric with a similarly performing material. Characteristics included colour, strength, aggregate (size grading, shape, composition and cleanliness), porosity and density. Barrie Cooper viewed and tested some materials and gave verbal advice.
In particular we investigated aggregates which might enable reasonable thicknesses (up to 20 mm) of lime mortar to be applied without extensive shrinkage problems. We knew that if we applied such thicknesses using a fine sand similar to that of the
Tower finial, showing the construction. Greg Owen Deteriorated and patched balusters. Greg Owen
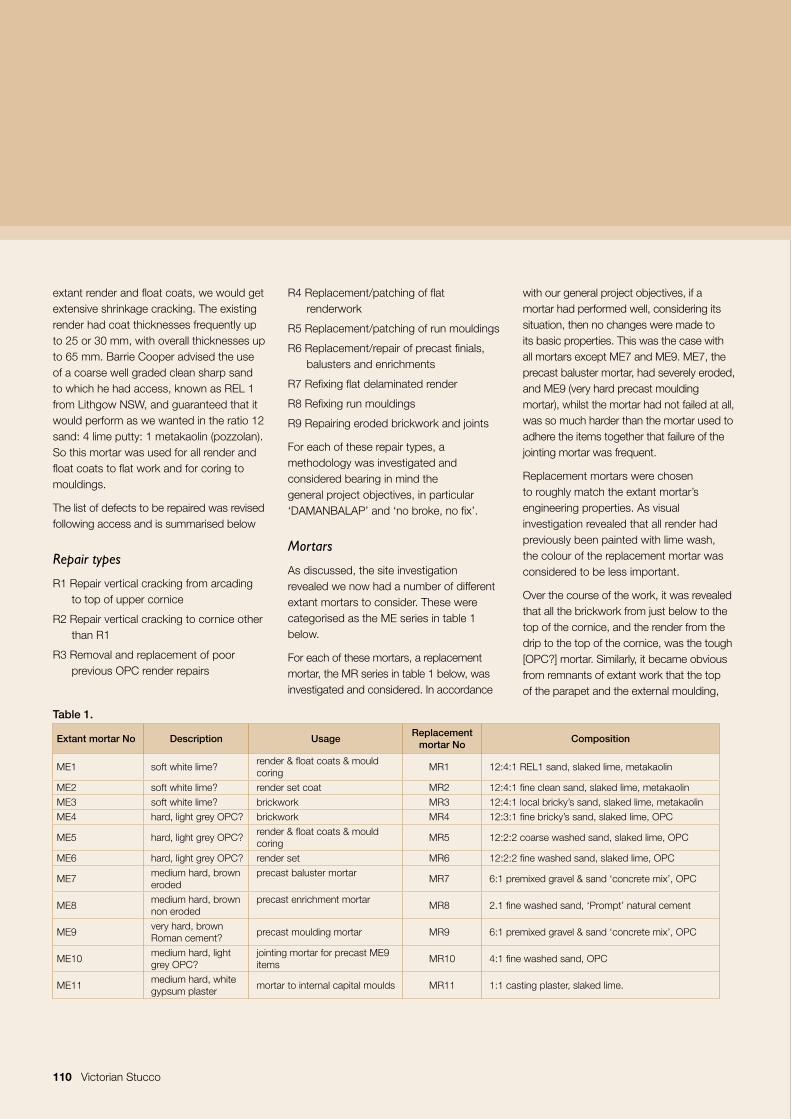
110 Victorian Stucco
extant render and float coats, we would get extensive shrinkage cracking. The existing render had coat thicknesses frequently up to 25 or 30 mm, with overall thicknesses up to 65 mm. Barrie Cooper advised the use of a coarse well graded clean sharp sand to which he had access, known as REL 1 from Lithgow NSW, and guaranteed that it would perform as we wanted in the ratio 12 sand: 4 lime putty: 1 metakaolin (pozzolan). So this mortar was used for all render and float coats to flat work and for coring to mouldings.
The list of defects to be repaired was revised following access and is summarised below
Repair types
R1 Repair vertical cracking from arcading to top of upper cornice
R2 Repair vertical cracking to cornice other than R1
R3 Removal and replacement of poor previous OPC render repairs
R4 Replacement/patching of flat renderwork
R5 Replacement/patching of run mouldings
R6 Replacement/repair of precast finials, balusters and enrichments
R7 Refixing flat delaminated render
R8 Refixing run mouldings
R9 Repairing eroded brickwork and joints
For each of these repair types, a methodology was investigated and considered bearing in mind the general project objectives, in particular ‘DAMANBALAP’ and ‘no broke, no fix’.
Mortars
As discussed, the site investigation revealed we now had a number of different extant mortars to consider. These were categorised as the ME series in table 1 below.
For each of these mortars, a replacement mortar, the MR series in table 1 below, was investigated and considered. In accordance
with our general project objectives, if a mortar had performed well, considering its situation, then no changes were made to its basic properties. This was the case with all mortars except ME7 and ME9. ME7, the precast baluster mortar, had severely eroded, and ME9 (very hard precast moulding mortar), whilst the mortar had not failed at all, was so much harder than the mortar used to adhere the items together that failure of the jointing mortar was frequent.
Replacement mortars were chosen to roughly match the extant mortar’s engineering properties. As visual investigation revealed that all render had previously been painted with lime wash, the colour of the replacement mortar was considered to be less important.
Over the course of the work, it was revealed that all the brickwork from just below to the top of the cornice, and the render from the drip to the top of the cornice, was the tough [OPC?] mortar. Similarly, it became obvious from remnants of extant work that the top of the parapet and the external moulding,
Table 1.
Extant mortar No Description UsageReplacement
mortar NoComposition
ME1 soft white lime?render & float coats & mould coring
MR1 12:4:1 REL1 sand, slaked lime, metakaolin
ME2 soft white lime? render set coat MR2 12:4:1 fine clean sand, slaked lime, metakaolinME3 soft white lime? brickwork MR3 12:4:1 local bricky’s sand, slaked lime, metakaolinME4 hard, light grey OPC? brickwork MR4 12:3:1 fine bricky’s sand, slaked lime, OPC
ME5 hard, light grey OPC?render & float coats & mould coring
MR5 12:2:2 coarse washed sand, slaked lime, OPC
ME6 hard, light grey OPC? render set MR6 12:2:2 fine washed sand, slaked lime, OPC
ME7medium hard, brown eroded
precast baluster mortarMR7 6:1 premixed gravel & sand ‘concrete mix’, OPC
ME8medium hard, brown non eroded
precast enrichment mortarMR8 2.1 fine washed sand, ‘Prompt’ natural cement
ME9very hard, brown Roman cement?
precast moulding mortar MR9 6:1 premixed gravel & sand ‘concrete mix’, OPC
ME10medium hard, light grey OPC?
jointing mortar for precast ME9 items
MR10 4:1 fine washed sand, OPC
ME11medium hard, white gypsum plaster
mortar to internal capital moulds MR11 1:1 casting plaster, slaked lime.
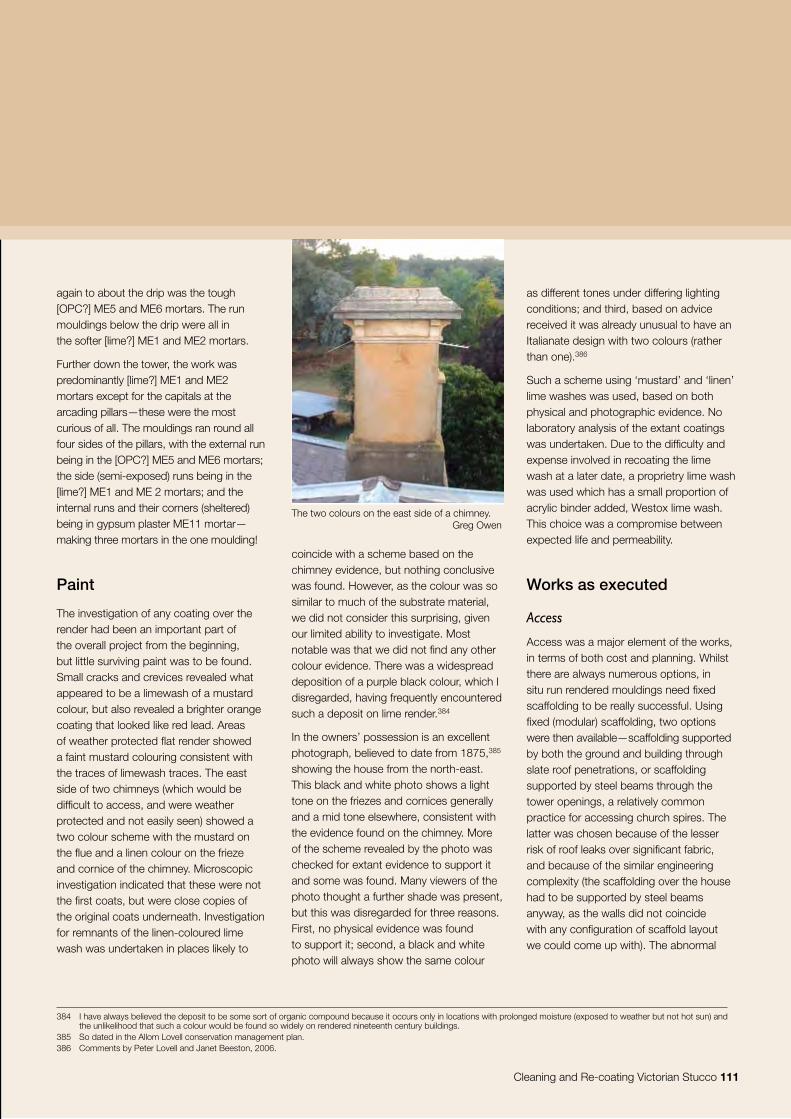
Cleaning and Re-coating Victorian Stucco 111
384 I have always believed the deposit to be some sort of organic compound because it occurs only in locations with prolonged moisture (exposed to weather but not hot sun) and the unlikelihood that such a colour would be found so widely on rendered nineteenth century buildings.
385 So dated in the Allom Lovell conservation management plan.386 Comments by Peter Lovell and Janet Beeston, 2006.
again to about the drip was the tough [OPC?] ME5 and ME6 mortars. The run mouldings below the drip were all in the softer [lime?] ME1 and ME2 mortars.
Further down the tower, the work was predominantly [lime?] ME1 and ME2 mortars except for the capitals at the arcading pillars—these were the most curious of all. The mouldings ran round all four sides of the pillars, with the external run being in the [OPC?] ME5 and ME6 mortars; the side (semi-exposed) runs being in the [lime?] ME1 and ME 2 mortars; and the internal runs and their corners (sheltered) being in gypsum plaster ME11 mortar—making three mortars in the one moulding!
Paint
The investigation of any coating over the render had been an important part of the overall project from the beginning, but little surviving paint was to be found. Small cracks and crevices revealed what appeared to be a limewash of a mustard colour, but also revealed a brighter orange coating that looked like red lead. Areas of weather protected flat render showed a faint mustard colouring consistent with the traces of limewash traces. The east side of two chimneys (which would be difficult to access, and were weather protected and not easily seen) showed a two colour scheme with the mustard on the flue and a linen colour on the frieze and cornice of the chimney. Microscopic investigation indicated that these were not the first coats, but were close copies of the original coats underneath. Investigation for remnants of the linen-coloured lime wash was undertaken in places likely to
coincide with a scheme based on the chimney evidence, but nothing conclusive was found. However, as the colour was so similar to much of the substrate material, we did not consider this surprising, given our limited ability to investigate. Most notable was that we did not find any other colour evidence. There was a widespread deposition of a purple black colour, which I disregarded, having frequently encountered such a deposit on lime render.384
In the owners’ possession is an excellent photograph, believed to date from 1875,385 showing the house from the north-east. This black and white photo shows a light tone on the friezes and cornices generally and a mid tone elsewhere, consistent with the evidence found on the chimney. More of the scheme revealed by the photo was checked for extant evidence to support it and some was found. Many viewers of the photo thought a further shade was present, but this was disregarded for three reasons. First, no physical evidence was found to support it; second, a black and white photo will always show the same colour
as different tones under differing lighting conditions; and third, based on advice received it was already unusual to have an Italianate design with two colours (rather than one).386
Such a scheme using ‘mustard’ and ‘linen’ lime washes was used, based on both physical and photographic evidence. No laboratory analysis of the extant coatings was undertaken. Due to the difficulty and expense involved in recoating the lime wash at a later date, a proprietry lime wash was used which has a small proportion of acrylic binder added, Westox lime wash. This choice was a compromise between expected life and permeability.
Works as executed
Access
Access was a major element of the works, in terms of both cost and planning. Whilst there are always numerous options, in situ run rendered mouldings need fixed scaffolding to be really successful. Using fixed (modular) scaffolding, two options were then available—scaffolding supported by both the ground and building through slate roof penetrations, or scaffolding supported by steel beams through the tower openings, a relatively common practice for accessing church spires. The latter was chosen because of the lesser risk of roof leaks over significant fabric, and because of the similar engineering complexity (the scaffolding over the house had to be supported by steel beams anyway, as the walls did not coincide with any configuration of scaffold layout we could come up with). The abnormal
The two colours on the east side of a chimney. Greg Owen
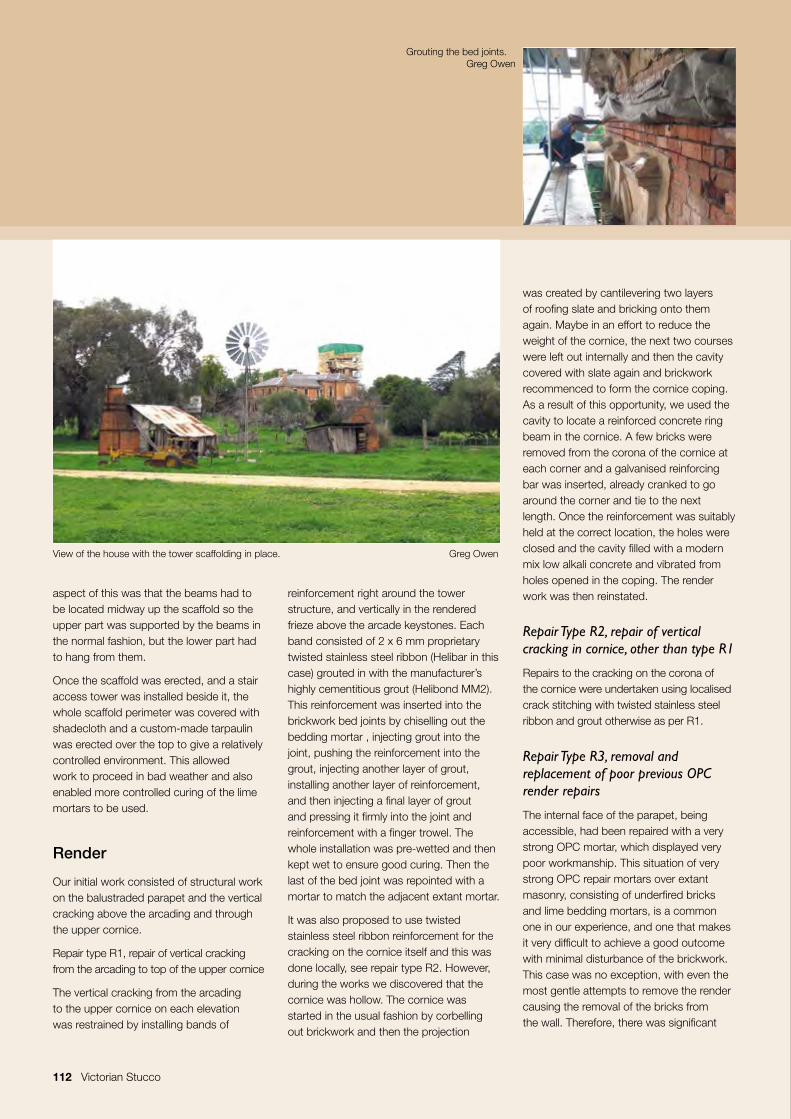
112 Victorian Stucco
aspect of this was that the beams had to be located midway up the scaffold so the upper part was supported by the beams in the normal fashion, but the lower part had to hang from them.
Once the scaffold was erected, and a stair access tower was installed beside it, the whole scaffold perimeter was covered with shadecloth and a custom-made tarpaulin was erected over the top to give a relatively controlled environment. This allowed work to proceed in bad weather and also enabled more controlled curing of the lime mortars to be used.
Render
Our initial work consisted of structural work on the balustraded parapet and the vertical cracking above the arcading and through the upper cornice.
Repair type R1, repair of vertical cracking from the arcading to top of the upper cornice
The vertical cracking from the arcading to the upper cornice on each elevation was restrained by installing bands of
reinforcement right around the tower structure, and vertically in the rendered frieze above the arcade keystones. Each band consisted of 2 x 6 mm proprietary twisted stainless steel ribbon (Helibar in this case) grouted in with the manufacturer’s highly cementitious grout (Helibond MM2). This reinforcement was inserted into the brickwork bed joints by chiselling out the bedding mortar , injecting grout into the joint, pushing the reinforcement into the grout, injecting another layer of grout, installing another layer of reinforcement, and then injecting a final layer of grout and pressing it firmly into the joint and reinforcement with a finger trowel. The whole installation was pre-wetted and then kept wet to ensure good curing. Then the last of the bed joint was repointed with a mortar to match the adjacent extant mortar.
It was also proposed to use twisted stainless steel ribbon reinforcement for the cracking on the cornice itself and this was done locally, see repair type R2. However, during the works we discovered that the cornice was hollow. The cornice was started in the usual fashion by corbelling out brickwork and then the projection
was created by cantilevering two layers of roofing slate and bricking onto them again. Maybe in an effort to reduce the weight of the cornice, the next two courses were left out internally and then the cavity covered with slate again and brickwork recommenced to form the cornice coping. As a result of this opportunity, we used the cavity to locate a reinforced concrete ring beam in the cornice. A few bricks were removed from the corona of the cornice at each corner and a galvanised reinforcing bar was inserted, already cranked to go around the corner and tie to the next length. Once the reinforcement was suitably held at the correct location, the holes were closed and the cavity filled with a modern mix low alkali concrete and vibrated from holes opened in the coping. The render work was then reinstated.
Repair Type R2, repair of vertical cracking in cornice, other than type R1
Repairs to the cracking on the corona of the cornice were undertaken using localised crack stitching with twisted stainless steel ribbon and grout otherwise as per R1.
Repair Type R3, removal and replacement of poor previous OPC render repairs
The internal face of the parapet, being accessible, had been repaired with a very strong OPC mortar, which displayed very poor workmanship. This situation of very strong OPC repair mortars over extant masonry, consisting of underfired bricks and lime bedding mortars, is a common one in our experience, and one that makes it very difficult to achieve a good outcome with minimal disturbance of the brickwork. This case was no exception, with even the most gentle attempts to remove the render causing the removal of the bricks from the wall. Therefore, there was significant
View of the house with the tower scaffolding in place. Greg Owen
Grouting the bed joints. Greg Owen
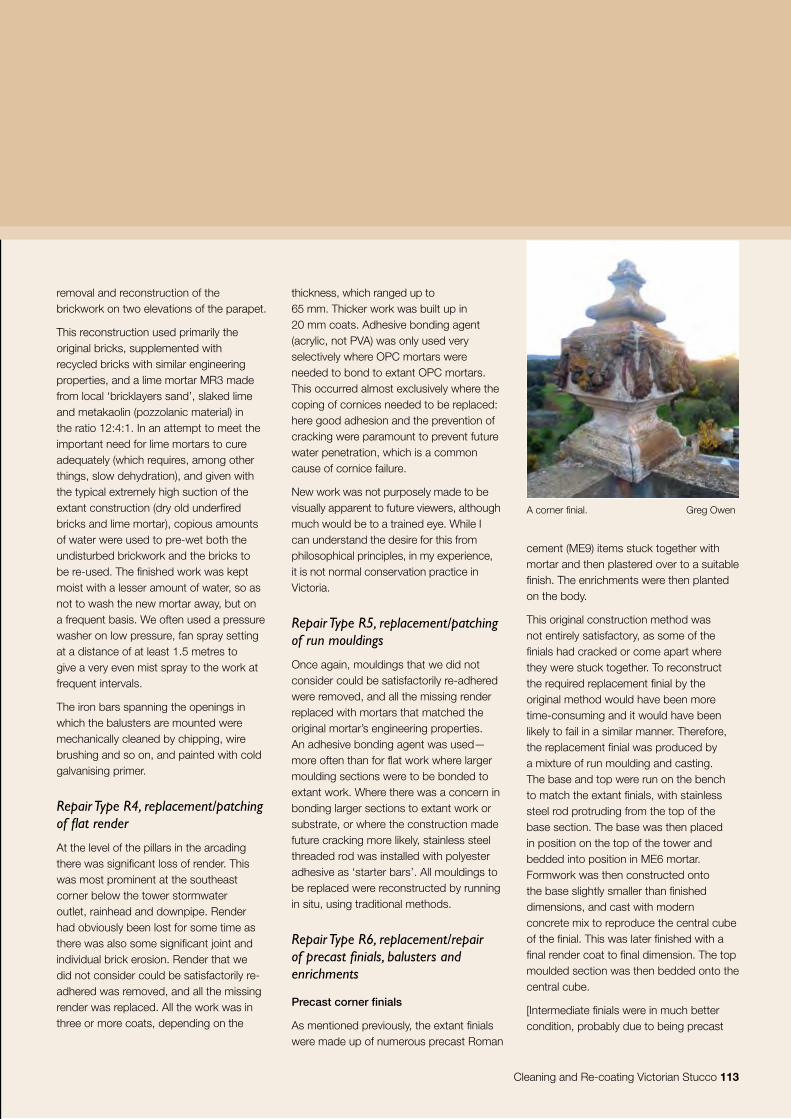
Cleaning and Re-coating Victorian Stucco 113
removal and reconstruction of the brickwork on two elevations of the parapet.
This reconstruction used primarily the original bricks, supplemented with recycled bricks with similar engineering properties, and a lime mortar MR3 made from local ‘bricklayers sand’, slaked lime and metakaolin (pozzolanic material) in the ratio 12:4:1. In an attempt to meet the important need for lime mortars to cure adequately (which requires, among other things, slow dehydration), and given with the typical extremely high suction of the extant construction (dry old underfired bricks and lime mortar), copious amounts of water were used to pre-wet both the undisturbed brickwork and the bricks to be re-used. The finished work was kept moist with a lesser amount of water, so as not to wash the new mortar away, but on a frequent basis. We often used a pressure washer on low pressure, fan spray setting at a distance of at least 1.5 metres to give a very even mist spray to the work at frequent intervals.
The iron bars spanning the openings in which the balusters are mounted were mechanically cleaned by chipping, wire brushing and so on, and painted with cold galvanising primer.
Repair Type R4, replacement/patching of flat render
At the level of the pillars in the arcading there was significant loss of render. This was most prominent at the southeast corner below the tower stormwater outlet, rainhead and downpipe. Render had obviously been lost for some time as there was also some significant joint and individual brick erosion. Render that we did not consider could be satisfactorily re-adhered was removed, and all the missing render was replaced. All the work was in three or more coats, depending on the
thickness, which ranged up to 65 mm. Thicker work was built up in 20 mm coats. Adhesive bonding agent (acrylic, not PVA) was only used very selectively where OPC mortars were needed to bond to extant OPC mortars. This occurred almost exclusively where the coping of cornices needed to be replaced: here good adhesion and the prevention of cracking were paramount to prevent future water penetration, which is a common cause of cornice failure.
New work was not purposely made to be visually apparent to future viewers, although much would be to a trained eye. While I can understand the desire for this from philosophical principles, in my experience, it is not normal conservation practice in Victoria.
Repair Type R5, replacement/patching of run mouldings
Once again, mouldings that we did not consider could be satisfactorily re-adhered were removed, and all the missing render replaced with mortars that matched the original mortar’s engineering properties. An adhesive bonding agent was used—more often than for flat work where larger moulding sections were to be bonded to extant work. Where there was a concern in bonding larger sections to extant work or substrate, or where the construction made future cracking more likely, stainless steel threaded rod was installed with polyester adhesive as ‘starter bars’. All mouldings to be replaced were reconstructed by running in situ, using traditional methods.
Repair Type R6, replacement/repair of precast finials, balusters and enrichments
Precast corner finials
As mentioned previously, the extant finials were made up of numerous precast Roman
cement (ME9) items stuck together with mortar and then plastered over to a suitable finish. The enrichments were then planted on the body.
This original construction method was not entirely satisfactory, as some of the finials had cracked or come apart where they were stuck together. To reconstruct the required replacement finial by the original method would have been more time-consuming and it would have been likely to fail in a similar manner. Therefore, the replacement finial was produced by a mixture of run moulding and casting. The base and top were run on the bench to match the extant finials, with stainless steel rod protruding from the top of the base section. The base was then placed in position on the top of the tower and bedded into position in ME6 mortar. Formwork was then constructed onto the base slightly smaller than finished dimensions, and cast with modern concrete mix to reproduce the central cube of the finial. This was later finished with a final render coat to final dimension. The top moulded section was then bedded onto the central cube.
[Intermediate finials were in much better condition, probably due to being precast
A corner finial. Greg Owen

114 Victorian Stucco
in fewer sections. Only one replacement top section was required, and this was reproduced by moulding on the bench.
Enrichments
As is often the case, the decoration on the finials was made up of many precast pieces planted onto the finial body. The originals were made of ME8 [Roman cement?] mortar. The enrichments were examined to locate the join between castings, and the best of each section of enrichment was identified, and if still in position, carefully removed. Each extant piece of enrichment was cleaned, repaired with gypsum plaster where necessary, and mounted on plywood. Thickened silicone moulding rubber was then applied to make a mould, and a plaster mould case was poured over to maintain the mould shape. The extant enrichment was removed and the silicone moulds used to cast numerous new items with a MR8 natural cement mortar. In total, 12 moulds were made, and a total of approximately 64 enrichments precast and planted onto the finials.
Balusters
The extant balusters were all very severely weather eroded. Each baluster that showed the original shape and detail in some section or another, was tagged and carefully removed. The baluster profile was reconstructed by measuring each intact section and drawing it in CAD. A full size replica was then reproduced in gypsum plaster by traditional plastering methods using a lathe. From that pattern, a full size silicone rubber mould was cast inside a timber mould case, again to retain its shape. The rubber was cut to allow removal of the pattern and then the mould reassembled. The mould was used to pour multiple castings using a MR7 modern OPC concrete mix. The full mould was propped horizontally and exactly half-filled with
casting (gypsum) plaster to form a pattern for a half baluster of which one is required at each end of each balustrade opening. This pattern was mounted on plywood and then covered with thickened moulding silicone, and a plaster mould case and reproduction half balusters recast as per the full items. In total 36 full and 24 half balusters were produced. The new balusters were installed into the preformed balustrade openings and secured by ME2 mortar top and bottom, and then the surrounds were weathered to shed water.
Repair Type R7, refixing flat delaminated render
Large areas of delaminated render were present in both the pillars and the internal flat work up inside the arcaded level. Most of these delaminated areas were around 30–40 mm thick with some up to 65 mm, so the render was quite strong in itself. We were familiar with the practice of re-glueing internal plaster ceilings back to laths from above using acrylic adhesives, so we investigated and experimented with using this method, eventually with good success. The products used were the Westox RAP adhesives, the only Australian-made products of this type known to me. Normally with these adhesives, the suction of the render is controlled, and the material locally stabilised, by the introduction of a very thin watery sealer, which penetrates and soaks deeply into the material. The adhesive is then introduced (poured, injected etc) into the space, and it penetrates and glues the render to the substrate. Without the sealant, the render suction is likely to be so great that the penetration of the glue will be very poor.
Where the delaminated render had moved away from the substrate leaving a gap (the very hollow drummy sections) this standard adhesive procedure was undertaken using
approx 10 mm holes drilled for access. Where the delaminated render was still quite tight against the substrate (drummy, but not hollow by the tap test) we could not get penetration by this method. With experimentation, we found that by pre-wetting the render and substrate with water through the access holes, and then dripping in the adhesive (with no sealant) we could get a fairly consistent minimum of about 50 mm penetration around the hole, giving a 100 mm dot of adhesion. Not all the injections were successful, but these were apparent the following day by the tap test. The result was large areas of render held to the substrate with a matrix of adhesive dots. As it is very important that masonry remains breathable, it is important that the entire surface is not sealed with the acrylic adhesive. The final method gave a compromise between adhesion and permeability.
Repair Type R8, refixing run mouldings
In a number of locations, the existing run mouldings had lost adhesion to their substrate, or the substrate had become unstable. In severe cases, these mouldings were completely separated from the substrate, while the substrate was rebuilt
Bedding the top section of a reconstructed finial.
Greg Owen
Lathe-forming a replica baluster; the completed baluster pattern. Greg Owen
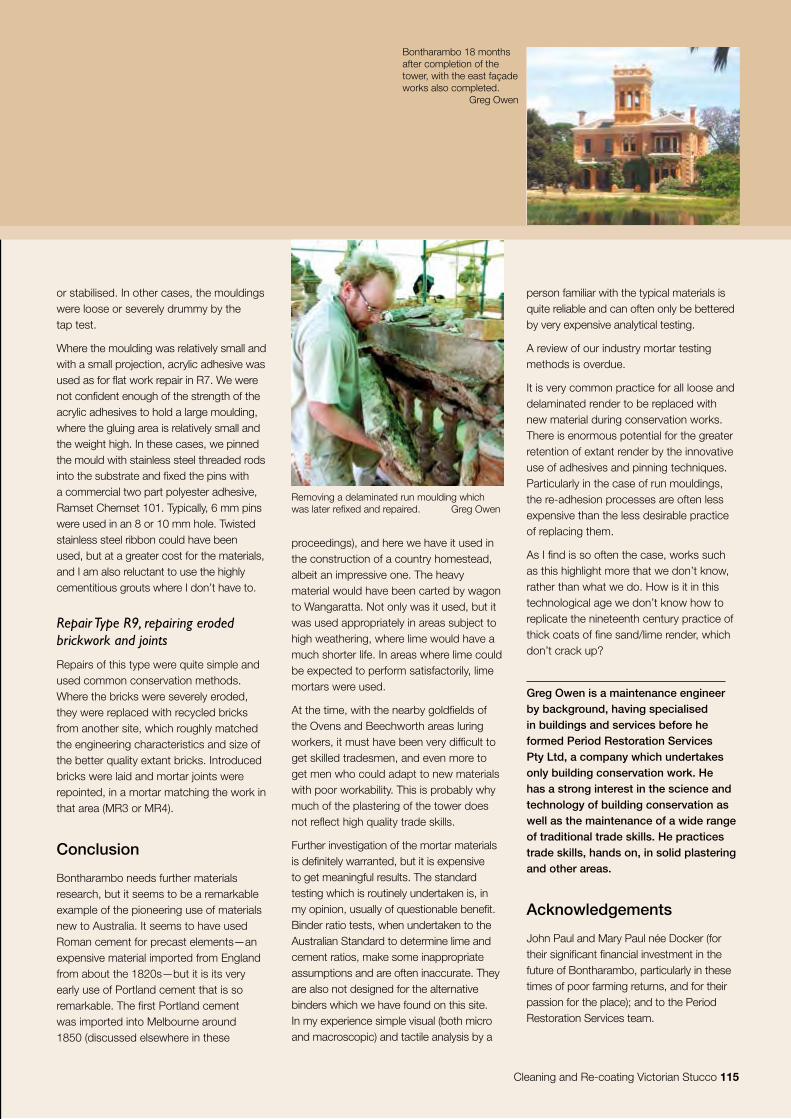
Cleaning and Re-coating Victorian Stucco 115
or stabilised. In other cases, the mouldings were loose or severely drummy by the tap test.
Where the moulding was relatively small and with a small projection, acrylic adhesive was used as for flat work repair in R7. We were not confident enough of the strength of the acrylic adhesives to hold a large moulding, where the gluing area is relatively small and the weight high. In these cases, we pinned the mould with stainless steel threaded rods into the substrate and fixed the pins with a commercial two part polyester adhesive, Ramset Chemset 101. Typically, 6 mm pins were used in an 8 or 10 mm hole. Twisted stainless steel ribbon could have been used, but at a greater cost for the materials, and I am also reluctant to use the highly cementitious grouts where I don’t have to.
Repair Type R9, repairing eroded brickwork and joints
Repairs of this type were quite simple and used common conservation methods. Where the bricks were severely eroded, they were replaced with recycled bricks from another site, which roughly matched the engineering characteristics and size of the better quality extant bricks. Introduced bricks were laid and mortar joints were repointed, in a mortar matching the work in that area (MR3 or MR4).
Conclusion
Bontharambo needs further materials research, but it seems to be a remarkable example of the pioneering use of materials new to Australia. It seems to have used Roman cement for precast elements—an expensive material imported from England from about the 1820s—but it is its very early use of Portland cement that is so remarkable. The first Portland cement was imported into Melbourne around 1850 (discussed elsewhere in these
proceedings), and here we have it used in the construction of a country homestead, albeit an impressive one. The heavy material would have been carted by wagon to Wangaratta. Not only was it used, but it was used appropriately in areas subject to high weathering, where lime would have a much shorter life. In areas where lime could be expected to perform satisfactorily, lime mortars were used.
At the time, with the nearby goldfields of the Ovens and Beechworth areas luring workers, it must have been very difficult to get skilled tradesmen, and even more to get men who could adapt to new materials with poor workability. This is probably why much of the plastering of the tower does not reflect high quality trade skills.
Further investigation of the mortar materials is definitely warranted, but it is expensive to get meaningful results. The standard testing which is routinely undertaken is, in my opinion, usually of questionable benefit. Binder ratio tests, when undertaken to the Australian Standard to determine lime and cement ratios, make some inappropriate assumptions and are often inaccurate. They are also not designed for the alternative binders which we have found on this site. In my experience simple visual (both micro and macroscopic) and tactile analysis by a
person familiar with the typical materials is quite reliable and can often only be bettered by very expensive analytical testing.
A review of our industry mortar testing methods is overdue.
It is very common practice for all loose and delaminated render to be replaced with new material during conservation works. There is enormous potential for the greater retention of extant render by the innovative use of adhesives and pinning techniques. Particularly in the case of run mouldings, the re-adhesion processes are often less expensive than the less desirable practice of replacing them.
As I find is so often the case, works such as this highlight more that we don’t know, rather than what we do. How is it in this technological age we don’t know how to replicate the nineteenth century practice of thick coats of fine sand/lime render, which don’t crack up?
Greg Owen is a maintenance engineer by background, having specialised in buildings and services before he formed Period Restoration Services Pty Ltd, a company which undertakes only building conservation work. He has a strong interest in the science and technology of building conservation as well as the maintenance of a wide range of traditional trade skills. He practices trade skills, hands on, in solid plastering and other areas.
Acknowledgements
John Paul and Mary Paul née Docker (for their significant financial investment in the future of Bontharambo, particularly in these times of poor farming returns, and for their passion for the place); and to the Period Restoration Services team.
Removing a delaminated run moulding which was later refixed and repaired. Greg Owen
Bontharambo 18 months after completion of the tower, with the east façade works also completed.
Greg Owen

116 Victorian Stucco
> abstract
> history
> applied finishes
> scope of the project
> aims and objectives
> methodology
> philosophy of repair
> works as executed
> methods
> conclusion
Abstract
A small project to conserve the exterior stucco of Malmsbury Town Hall had two elements—replacing the missing stucco with lime mortar, and stabilising areas of existing stucco with a range of adhesives. The missing sand and cement stucco was replaced with a 3:1 sand and lime putty with 25% pozzolan by volume to lime. This was done in view of the excessive moisture in these areas. Cracks and drummy areas were repaired using the Westox system of adhesives and additives. Neither of these processes was consistent with the materials and techniques of the original stucco, but they have been successful in retaining the original material whilst consolidating the structure and the intact evidence of its original construction.
Malmsbury Town Hall, current condition. Michael Dempsey
Malmsbury Town Hall, original façade. Mechanics Institute collection, Malmsbury
History
The Malmsbury Town Hall was built in 1868. It is a bluestone gable-roofed structure, with an impressive pedimented front façade complete with Doric pilasters. The walls are constructed in bluestone. They are divided into bays by grey stuccoed brick pilasters and there is stuccoed brick detailing around the windows. The original front façade, which was fully stuccoed, became unstable, and was demolished in 1947. It was rebuilt in red face brick but the stucco finish was not reinstated, for reasons that are not apparent.
Stucco – Malmsbury Town Hall: Michael Dempsey
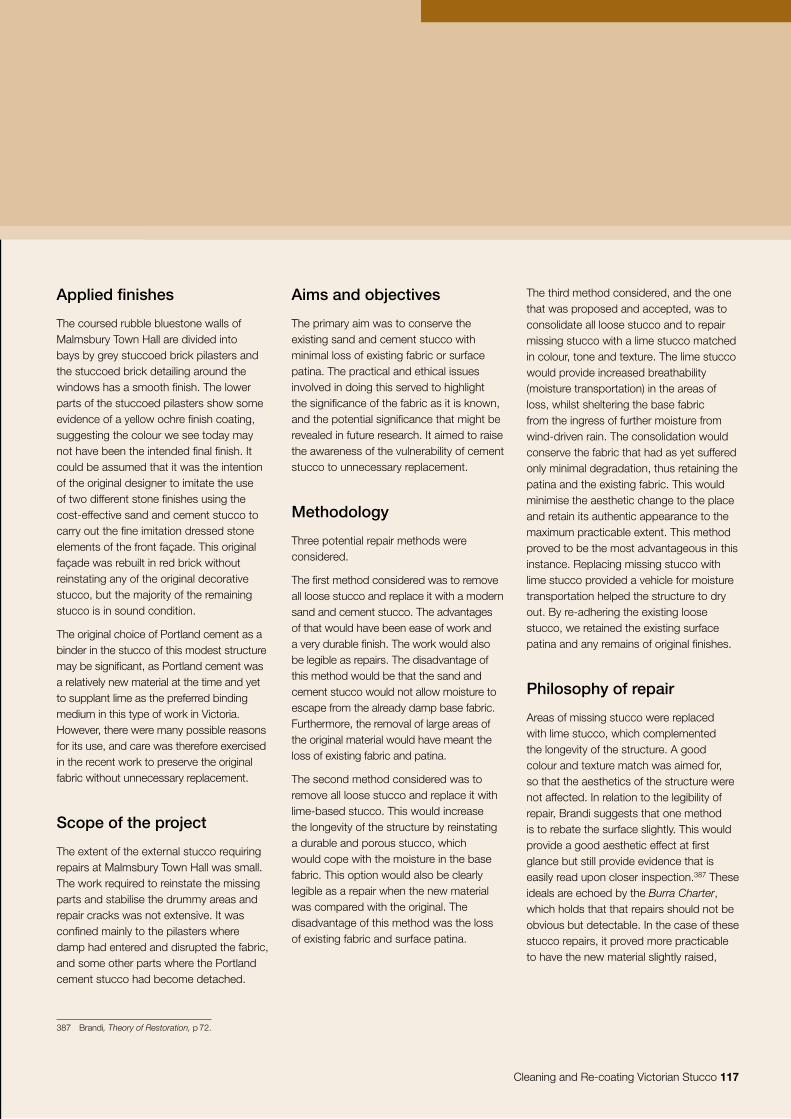
Cleaning and Re-coating Victorian Stucco 117
The third method considered, and the one that was proposed and accepted, was to consolidate all loose stucco and to repair missing stucco with a lime stucco matched in colour, tone and texture. The lime stucco would provide increased breathability (moisture transportation) in the areas of loss, whilst sheltering the base fabric from the ingress of further moisture from wind-driven rain. The consolidation would conserve the fabric that had as yet suffered only minimal degradation, thus retaining the patina and the existing fabric. This would minimise the aesthetic change to the place and retain its authentic appearance to the maximum practicable extent. This method proved to be the most advantageous in this instance. Replacing missing stucco with lime stucco provided a vehicle for moisture transportation helped the structure to dry out. By re-adhering the existing loose stucco, we retained the existing surface patina and any remains of original finishes.
Philosophy of repair
Areas of missing stucco were replaced with lime stucco, which complemented the longevity of the structure. A good colour and texture match was aimed for, so that the aesthetics of the structure were not affected. In relation to the legibility of repair, Brandi suggests that one method is to rebate the surface slightly. This would provide a good aesthetic effect at first glance but still provide evidence that is easily read upon closer inspection.387 These ideals are echoed by the Burra Charter, which holds that that repairs should not be obvious but detectable. In the case of these stucco repairs, it proved more practicable to have the new material slightly raised,
387 Brandi, Theory of Restoration, p 72.
Applied finishes
The coursed rubble bluestone walls of Malmsbury Town Hall are divided into bays by grey stuccoed brick pilasters and the stuccoed brick detailing around the windows has a smooth finish. The lower parts of the stuccoed pilasters show some evidence of a yellow ochre finish coating, suggesting the colour we see today may not have been the intended final finish. It could be assumed that it was the intention of the original designer to imitate the use of two different stone finishes using the cost-effective sand and cement stucco to carry out the fine imitation dressed stone elements of the front façade. This original façade was rebuilt in red brick without reinstating any of the original decorative stucco, but the majority of the remaining stucco is in sound condition.
The original choice of Portland cement as a binder in the stucco of this modest structure may be significant, as Portland cement was a relatively new material at the time and yet to supplant lime as the preferred binding medium in this type of work in Victoria. However, there were many possible reasons for its use, and care was therefore exercised in the recent work to preserve the original fabric without unnecessary replacement.
Scope of the project
The extent of the external stucco requiring repairs at Malmsbury Town Hall was small. The work required to reinstate the missing parts and stabilise the drummy areas and repair cracks was not extensive. It was confined mainly to the pilasters where damp had entered and disrupted the fabric, and some other parts where the Portland cement stucco had become detached.
Aims and objectives
The primary aim was to conserve the existing sand and cement stucco with minimal loss of existing fabric or surface patina. The practical and ethical issues involved in doing this served to highlight the significance of the fabric as it is known, and the potential significance that might be revealed in future research. It aimed to raise the awareness of the vulnerability of cement stucco to unnecessary replacement.
Methodology
Three potential repair methods were considered.
The first method considered was to remove all loose stucco and replace it with a modern sand and cement stucco. The advantages of that would have been ease of work and a very durable finish. The work would also be legible as repairs. The disadvantage of this method would be that the sand and cement stucco would not allow moisture to escape from the already damp base fabric. Furthermore, the removal of large areas of the original material would have meant the loss of existing fabric and patina.
The second method considered was to remove all loose stucco and replace it with lime-based stucco. This would increase the longevity of the structure by reinstating a durable and porous stucco, which would cope with the moisture in the base fabric. This option would also be clearly legible as a repair when the new material was compared with the original. The disadvantage of this method was the loss of existing fabric and surface patina.
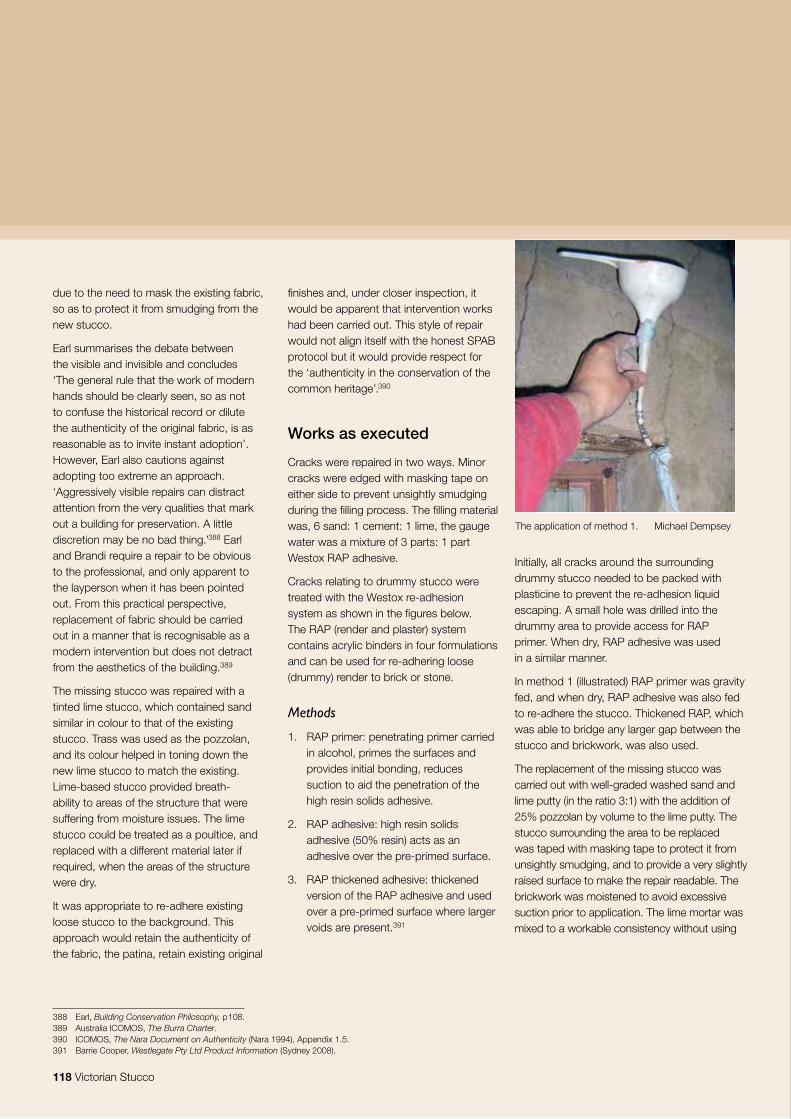
118 Victorian Stucco
388 Earl, Building Conservation Philosophy, p 108.389 Australia ICOMOS, The Burra Charter.390 ICOMOS, The Nara Document on Authenticity (Nara 1994), Appendix 1.5.391 Barrie Cooper, Westlegate Pty Ltd Product Information (Sydney 2008).
due to the need to mask the existing fabric, so as to protect it from smudging from the new stucco.
Earl summarises the debate between the visible and invisible and concludes ‘The general rule that the work of modern hands should be clearly seen, so as not to confuse the historical record or dilute the authenticity of the original fabric, is as reasonable as to invite instant adoption’. However, Earl also cautions against adopting too extreme an approach. ‘Aggressively visible repairs can distract attention from the very qualities that mark out a building for preservation. A little discretion may be no bad thing.’388 Earl and Brandi require a repair to be obvious to the professional, and only apparent to the layperson when it has been pointed out. From this practical perspective, replacement of fabric should be carried out in a manner that is recognisable as a modern intervention but does not detract from the aesthetics of the building.389
The missing stucco was repaired with a tinted lime stucco, which contained sand similar in colour to that of the existing stucco. Trass was used as the pozzolan, and its colour helped in toning down the new lime stucco to match the existing. Lime-based stucco provided breath-ability to areas of the structure that were suffering from moisture issues. The lime stucco could be treated as a poultice, and replaced with a different material later if required, when the areas of the structure were dry.
It was appropriate to re-adhere existing loose stucco to the background. This approach would retain the authenticity of the fabric, the patina, retain existing original
finishes and, under closer inspection, it would be apparent that intervention works had been carried out. This style of repair would not align itself with the honest SPAB protocol but it would provide respect for the ‘authenticity in the conservation of the common heritage’.390
Works as executed
Cracks were repaired in two ways. Minor cracks were edged with masking tape on either side to prevent unsightly smudging during the filling process. The filling material was, 6 sand: 1 cement: 1 lime, the gauge water was a mixture of 3 parts: 1 part Westox RAP adhesive.
Cracks relating to drummy stucco were treated with the Westox re-adhesion system as shown in the figures below. The RAP (render and plaster) system contains acrylic binders in four formulations and can be used for re-adhering loose (drummy) render to brick or stone.
Methods
1. RAP primer: penetrating primer carried in alcohol, primes the surfaces and provides initial bonding, reduces suction to aid the penetration of the high resin solids adhesive.
2. RAP adhesive: high resin solids adhesive (50% resin) acts as an adhesive over the pre-primed surface.
3. RAP thickened adhesive: thickened version of the RAP adhesive and used over a pre-primed surface where larger voids are present.391
Initially, all cracks around the surrounding drummy stucco needed to be packed with plasticine to prevent the re-adhesion liquid escaping. A small hole was drilled into the drummy area to provide access for RAP primer. When dry, RAP adhesive was used in a similar manner.
In method 1 (illustrated) RAP primer was gravity fed, and when dry, RAP adhesive was also fed to re-adhere the stucco. Thickened RAP, which was able to bridge any larger gap between the stucco and brickwork, was also used.
The replacement of the missing stucco was carried out with well-graded washed sand and lime putty (in the ratio 3:1) with the addition of 25% pozzolan by volume to the lime putty. The stucco surrounding the area to be replaced was taped with masking tape to protect it from unsightly smudging, and to provide a very slightly raised surface to make the repair readable. The brickwork was moistened to avoid excessive suction prior to application. The lime mortar was mixed to a workable consistency without using
The application of method 1. Michael Dempsey
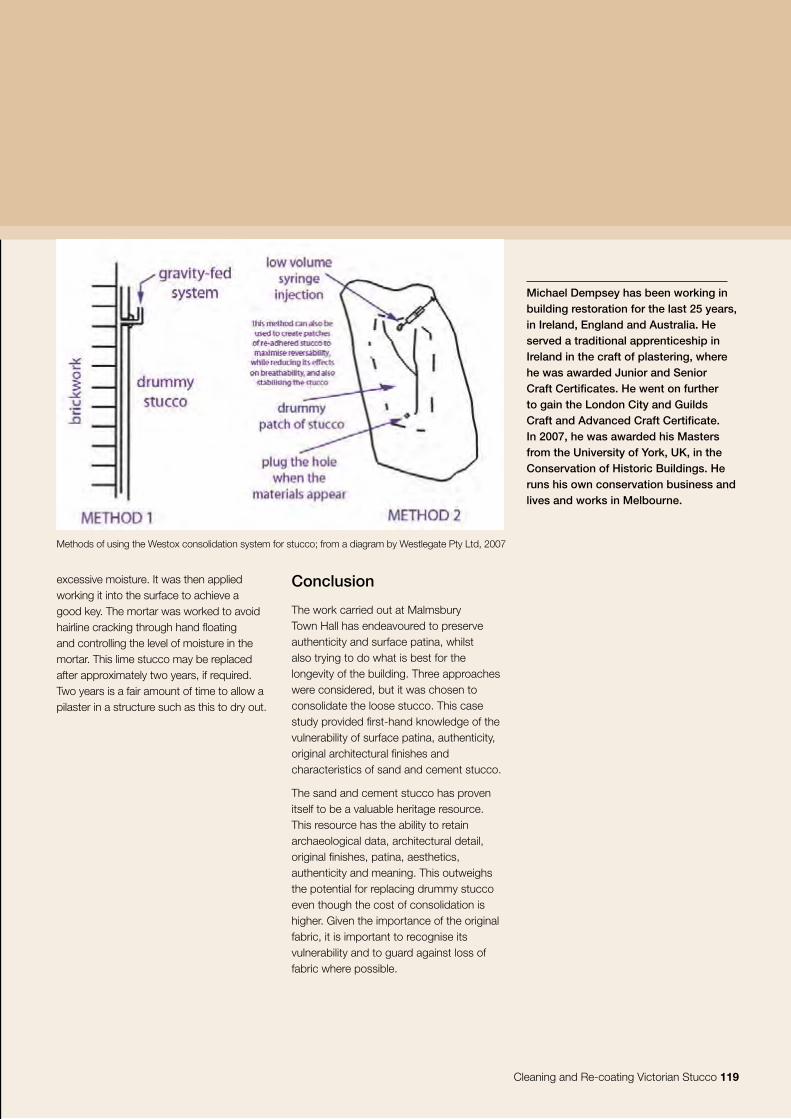
Cleaning and Re-coating Victorian Stucco 119
Michael Dempsey has been working in building restoration for the last 25 years, in Ireland, England and Australia. He served a traditional apprenticeship in Ireland in the craft of plastering, where he was awarded Junior and Senior Craft Certificates. He went on further to gain the London City and Guilds Craft and Advanced Craft Certificate. In 2007, he was awarded his Masters from the University of York, UK, in the Conservation of Historic Buildings. He runs his own conservation business and lives and works in Melbourne.
excessive moisture. It was then applied working it into the surface to achieve a good key. The mortar was worked to avoid hairline cracking through hand floating and controlling the level of moisture in the mortar. This lime stucco may be replaced after approximately two years, if required. Two years is a fair amount of time to allow a pilaster in a structure such as this to dry out.
Conclusion
The work carried out at Malmsbury Town Hall has endeavoured to preserve authenticity and surface patina, whilst also trying to do what is best for the longevity of the building. Three approaches were considered, but it was chosen to consolidate the loose stucco. This case study provided first-hand knowledge of the vulnerability of surface patina, authenticity, original architectural finishes and characteristics of sand and cement stucco.
The sand and cement stucco has proven itself to be a valuable heritage resource. This resource has the ability to retain archaeological data, architectural detail, original finishes, patina, aesthetics, authenticity and meaning. This outweighs the potential for replacing drummy stucco even though the cost of consolidation is higher. Given the importance of the original fabric, it is important to recognise its vulnerability and to guard against loss of fabric where possible.
Methods of using the Westox consolidation system for stucco; from a diagram by Westlegate Pty Ltd, 2007
120 Victorian Stucco
A sampling of terminology
Britain
Loudon, Cottage, Farm and Villa Architecture, pp 259–60 [§ 527]. ‘The cements for stuccoing are chiefly the Roman cement, of which there are two kinds common in Britain, Parker’s and Mulgrave’s; the Puzzolano; the tarras; the gypsum; the mastic; Frost’s cement; the metallic cement; and Bailey’s composition’.
Weale, Terms used in Architecture, p 472: ‘Stucco, in architecture, a composition of white marble pulverized and mixed with plaster or lime, but the ingredients vary; it is employed commonly for facing exterior and interior works…’
Donaldson, Handbook of Specifications, p 661, ‘Walls. — Finish with trowel stucco…’ [internal] as distinct from p 662, ‘Portland Cement Work externally’ [string courses, rusticated work, window dressings, cornices, enrichments and walls generally].
Farrow, Specifications for Building Works [no mention of stucco], p 96: ‘External plastering may be carried out in Portland cement, lime stucco, or in rough cast’.
Gwilt, Encyclopædia of Architecture [1881], p 675 [§ 2238], ‘When a wall is to be plastered, it is called rendering’ p 675 [2243-4]—description of bastard stucco and trowelled stucco [both lime-based].
Laxton’s Builder’s Price Book for 1863, p150, ‘Stucco: per yard’, as distinct from p153, ‘Portland Cement’ [refers to the appearance approximating Portland stone]. As distinct in turn from, p153, ‘Roman Cement’ and ‘Johns & Co’s Patent Stucco Cement’; p154 ‘Metallic Cement’, ‘Mastic’; and ‘Atkinson’s Cement’.
Leaning, Building Specifications, [no mention of stucco]; p 500 ‘All the work coloured grey on the elevations to be executed in Portland cement’.
Millar, Plastering Plain and Decorative, [1905], p107: ‘In England stucco is … used loosely for various plastic mixtures in whose composition lime, plaster, or cements enter. Hydraulic lime was formerly used for external stucco. Roman cement … Selenitic lime ... These materials are now entirely superseded by Portland cement.’ Pp109-110, ‘London stuccos’—describes
four types, all lime-based. Pp187 ff, ‘Portland cement façades’—at no point referred to as ‘stucco’. P 510: ‘Concrete Dressings. —Architectural works, especially large or plain parts, are generally cast in wood moulds’.
Rea, How to Estimate, [no mention of stucco]; p 331, ‘Rendering with Haired Mortar’ [using lime], as distinct from p 336 ‘Rendering with Portland Cement’.
Sutcliffe, Modern House Construction (new ed, 6 vols, London 1909): II, pp114, 124; VI, p 374: ‘Portland-cement stucco’.
Middleton, Modern Buildings, II (H Y Margary on Plastering): [no mention of stucco]; p 200 ‘Compo or cement rendering is the covering of large surfaces, such as the fronts of houses, with a mixture of Portland cement and sand’.
F W Macey, Specifications in Detail (3rd ed, London 1922), p 444: ‘Lime stucco, whether plain or roughcast, is suitable for external work, but seldom now used, Portland cement stucco having taken its place.’ Reference also to ‘Rough cast lime stucco’, and ‘Rough cast Portland cement stucco’.
W Verrall et al, The Modern Plasterer (2 vols, London, no date [c 1930]): II, p143, ‘By Portland cement stucco is meant something different from, and superior to, an ordinary mixture of cement and sand’.
Young, Spons’ Price Book 1935 [1935]: p186, ‘Bastard stucco, Trowelled Stucco’; as distinct from p187, ‘Rendering’; p 188, ‘Rendering in White Atlas Cement; Rough Cast’.
Australia
Mayes, Australian Builders Price-Book [1862], p 76, ‘Stucco or External Plastering’ gives prices for bastard or rough stucco, trowelled stucco, &c, very much in the Millar manner, but completely distinct from ‘Portland Cement’, p 77, which includes ‘rough render’, ‘plain faced, on brick, jointed’, &c. This in turn is distinct from ‘Composition enrichments’, p 81, which include capitals, pilasters, trusses, &c.
Victorian Stucco 121
Mayes, Australian Builders’ Price-Book [1877], p 85: ‘Stucco or lime plaster for external use is now superseded in Sydney and Melbourne by Portland cement compo…’
Australasian Builder and Contractors’ News
23 August 1890, p 123: New Buildings, Camberwell, for the Commercial Bank of Australia … Elevations are in brick with cement facings.
27 September 1890, p 227: We publish a number of designs of plaster and cement castings by G T Cross.
17 March 1894, p 127: Cottage at Harnleigh, New South Wales … ‘The walls are of brick, cemented externally …’.
14 April 1894, p 177: New Offices of the City Mutual Life Assurance Society, Limited, Sydney … ‘The elevations, which are finished in cement…’.
Haddon, Australian Architecture, p 91, ‘The term “stucco” is sometimes applied to cemented surfaces, but it is not of altogether general application, ordinary Portland cement and sand work being generally referred to as “cementing”’.
Nangle, Australian Building Practice (2nd ed, Sydney 1911), p 366, ‘the rendering of cement mortar, called stucco’, however, the diagrams, pp 366, 368, qualify it as ‘cement stucco’, and the text has no further reference to stucco but to ‘external plastering’, ‘rendering’ and ‘rough cast’.
Richardson, Ramsay’s Catalogue [1931], § 21d, Australian Cement Manufacturers’ Association: ‘Portland cement stucco’.
Sharp, Australian Methods of Building Construction no mention of the word ‘stucco’ but p 280 ‘A cement mortar is used for plastering the exterior of buildings’; p 281, diagram, ‘cement render’ appears within the drawing and ‘cement rendering’ in the caption.
Department of Labour and National Service, Plastering, p 42: ‘Rendering is the name given to a coating of Portland cement mortar’; p 160 ‘Stucco. An external rendering. The name given to a fine plaster composition’.
Mackey, Gregory’s Modern Building Practice, p 172, ‘Before the development of Portland cement various mixtures were employed for external work with more or less success and the name “stucco” was given to them. To-day the term is applied to all kinds of external rendering. Cement rendering externally is usually carried out …’
Virgo, Australasian Building Knowledge (Volume 2), [no mention of stucco]; p 151, ‘External Plaster Work … Portland cement is unquestionably the best material for external plastering.’
122 Victorian Stucco
Glossary
Accelerator
A substance which increases the speed of a chemical reaction, and in plastering, one used to speed up the setting time, such as common salt, alum, borax, Epsom salt (magnesium sulphate) or washing soda.
AcrylicA plastic material used as the basis for quick drying paints and other materials. Acrylic acid is the common name for 2-propenoic acid: CH2=CHCO2H, and other acrylic polymers are formed by polymerising an ester of this acid, such as methyl acrylate.
Acrylic paint, see Paint, acrylic
Albarium opus A term used by Vitruvius for pure white lime coat to the surface of which crushed marble was added to give a marble-like external finish, used especially in the Achaean temples of southern Italy.
Ashlar
Finely dressed squared stone laid in coursework with regular horizontal and vertical joints, usually thin. The finish is often imitated in plastering, externally by ruling a fine groove and/or marking the purported joint with a pencil or wax crayon; internally more often by marking only, a red line being often favoured.
Browning, see Floating.
CalcinationProlonged heating of a material at high temperatures to drive off water and/or carbon dioxide.
Cannabic workA nineteenth century term for plaster reinforced with hemp, based on the English patent taken out by Albano in 1843: essentially an early form of fibrous plaster.
Cement, artificialA cement manufactured by mixing the ingredients, mainly limestone and clay, in optimal proportions before calcining.
Cement, naturalA cement manufactured from a raw material containing calcium carbonate and clay in suitable proportions.
Cement, Portland
An artificial hydraulic cement, originally made by burning the limestone and clay at a higher temperature than previously, and grinding the product, including the clinker (or partly fused product). It was named from its resemblance to Portland stone when used in stucco or castings, and is referred to in Australia as general purpose Portland cement, Type GP.
Cement, Roman
A natural cement, misleadingly named Roman cement in order to promote it, and because of its superiority to existing commercial products. It was manufactured originally by Parker & Wyatt of London from septaria nodules found on the Isle of Sheppey, and tended to be distinctly brown in colour. The cement actually used by the Romans gained its special quality largely from the addition of pozzuolana to common or hydraulic lime.
Cement-based paint: see Paint, cement-based.
Cement renderHard-setting mortar covering, made from a mix of Portland cement and sand, with or without the addition of lime, for masonry wall surfaces. See also Stucco.
ChunamAn Indian fine plaster of shell lime, jaghery [sugar water], egg white and ghee [clarified butter] in various proportions. Versions of this were used for early flat roofs in Australia, but the term is oddly used in Australia by Mayes for a mixture of lime and ‘thin black oil’, and a similar material was subsequently used to waterproof the Sydney wharves.
Compo, see Mortar, compo [composition]
CopperasIron sulphate, commonly added to stucco as a colourant in the late nineteenth century.
CoreThe rough shape forming the heart of a mould such as a cornice, made by such means as corbelling bricks out from the wall surface.
Victorian Stucco 123
CoveA continuous concave moulding at the internal angle between two surfaces, typically within a cornice, but also used of a curved transition between a floor and a wall surface.
Controlled setting That in which over-rapid drying is prevented by applying a fine spray of water or draping the work in damp cloth.
Dash coatA lime or cement-based mix thrown against a wall surface, either as the intended finishing or as pricking-up for subsequent rendering. See also Roughcast, Pebbledash.
DistemperA cheap form of water soluble paint consisting of a white base pigment (usually crushed chalk) and an organic binder in solution (usually animal glue size in water). It was often heavily pigmented and used for internal walls and ceilings. But, distemper made of skimmed milk, quicklime, linseed oil, and a colouring agent such as whiting or ochre was recommended in Australia in 1861 as a means of colouring stucco.
Dots, see Screeds
Expanded metalA diamond grid of metal, made by creating a staggered pattern of slits in a sheet, and then pulling it apart laterally. It was invented by the American John F Golding in 1884 and used as lathing, and later used also in reinforced concrete. The Australasian rights were obtained by the Expanded Metal Lathing and Fencing Company Limited, which had a machine at work producing the material at the Centennial International Exhibition, Melbourne, of 1888–89.
Fibrous plaster, see Plaster, fibrous
Finish coat (plaster), see Plaster coat, finish
Finishing, see Setting
First coating, see Pricking up
FlankingFilling in plaster between screeds and ruling the work off straight and flush.
Float (verb)To straighten and level a plaster surface or to finish a fresh concrete surface by the use of a float.
Float (tool)A hand tool, usually a flat rectangular plate of steel or timber with a handle, used to finish a surface of concrete, plaster or render. A type with a wooden blade about 270 x 115 mm, is used as a general purpose float on large walls and ceilings. In plasterwork a hand float is used for truing-up and surfacing an undercoat or for providing a rough finish to a finishing coat (off-the-float finish).
Floating (and float coat)In three-coat plaster, the application of the second coat (or second coating) by means of a float to form a true surface for the finishing coat. In two-coat work, the first coat. In Scotland it is called straightening and in the USA browning: laying the second coat of coarse stuff over the first coat.
Gauge blocksWooden blocks fixed to the surface for guidance, so that the outer faces define the plane of the finished plaster surface.
GirthThe surface length of a moulding profile (which can be envisaged as the length of a piece string which would accommodate it) giving some indication of the amount of work and the cost involved in forming it.
GypsumHydrated calcium sulphate, CaS04·2H20, found as a soft rock in Australia and elsewhere. If calcined it gives off water and produces the hemihydrate, plaster of Paris: CaS04·2H20 + heat = CaS04·½H20 + 1½H20.If further calcined it gives off the remaining water to become anhydrous calcium sulphate:2CaS04·½H20 + heat = CaS04 + ½H20.
Gypsum plaster, see Plaster, gypsum
HairAnimal hair used to reinforce plasterwork, usually that of cattle, though texts often refer to horsehair.
Hard finish, see Setting
124 Victorian Stucco
HawkA square of aluminium, or traditionally wood, about 300 mm, with a handle at right angles from the back, and which is used to hold a limited quantity of plaster of mortar while applying it.
Hemihydrate plastersRetarded plasters such as plaster of Paris, which set hard quickly, and are used for casting. Retarding agents are commonly added to slow setting times for application to large areas.
HorseA running mould or a continuous member along which a running mould can be slid.
Howe’s Cement, see Keene’s Cement
Hydrated lime see Lime, hydrated
HydraulicUsed of lime or cement to indicate a capacity to set and cure under water, and to resist erosion by water when used externally.
Keating’s cementIn 1846 John Keating obtained a British patent for what later became known as Parian cement (from a purported similarity to Parian marble), which was made in much the same way as Keene’s cement but that borax [sodium borate] was substituted for alum. The material was used in some prominent Australian buildings in the 1850s.
Keene’s cementAnhydrous calcium sulphate plaster obtained by reburning hemihydrate plaster that has been soaked in a solution of alum. It was originally patented in England by J D Greenwood and R W Keene in about 1838. It was made by dissolving alum in water, and in this solution soaking gypsum in small lumps for three hours at 34oC, then letting these dry in the open for about eight days, calcining them at a dull red heat, and grinding and sifting them. If copperas [iron sulphate] was added to the alum solution the resultant plaster would have a fine cream or yellow colour. Keene’s cement sets rapidly and hard, and in Australia came to be much favoured for highly finished plasterwork—especially when it required a marble or other fine finish, or was used in arrises, skirtings or other areas
subject to damage. By the end of the twentieth century an improved version, Howe’s Improved Keene’s Cement (or just Howe’s Cement) was available.
Key (bond)The roughness of a surface which enables a subsequent layer to bond well to it, or the portion of the plaster which squeezes between laths and spreads slightly behind them, so that the surface plaster cannot fail unless the key is physically broken.
Keying, see scratching
Lath, lathingTradition lathing is an arrangement of parallel timber strips or laths [not ‘lathes’], typically about 7 x 32 mm, to provide a base for plastering, their spacing being about 10 mm or sufficient for the base coat to penetrate, spread behind, and form a key. Laths might be sawn or split, and in Australia split laths of local timber were often preferred as being stronger and providing a better bond than sawn laths, which were commonly of oregon and imported from North America.
Lath, metalMetal fabric made by weaving wire or perforating sheet metal (usually mild steel) to create a good key, and used as a base for plaster in place of traditional wooden laths. Wire netting had been used for the purpose, but from about 1890 expanded metal, became popular in place of timber lathing, and subsequently other products such as Hanley’s Patent Corrugated Woven-Wire Lathing, ‘Jhimil’ Patent Metal Lath, Bostwick Patent Fireproof Metal Lath Patent Metal Lathing Sheets, and Helical Metal Lathing were introduced.
Lath hammerA hand tool the head of which has a hammer head in one direction and an axe blade in the other, used for cutting and nailing laths as well as for general work such as cutting plugs and packing pieces.
LimeA word used both for calcium oxide or quicklime (CaO), and for calcium hydroxide or hydrated lime (CaOH2). Quicklime, or unslaked lime, is a white caustic solid prepared by calcining calcium carbonate (in the

Victorian Stucco 125
form of limestone, marble, seashells or coral) to drive off the carbon dioxide. Quicklime is usually slaked, by the addition of water, to produce hydrated lime for use.
Lime, hydrated Calcium hydroxide produced by slaking quicklime (calcium oxide) with water. The exact amount produces a dry powder, while an excess of water produces a putty. Dry hydrated lime is usually factory produced and sold in bags as ‘hydrated lime’.
Lime, hydraulicLime burnt from a limestone with a clay content sufficient to give the product hydraulic properties (or from a deliberate mixture of limestone and clay).
Lime puttySlaked lime that has been matured in water and sieved to remove coarse particles and achieve a smooth consistency. It is normally used for finishing work. Also called Lime paste and Plasterer’s putty.
Lime, quickThe form of lime or CaO produced directly by burning limestone &c, which is corrosive and difficult to handle.
Lime, rockQuicklime produced by calcining limestone.
Lime, slaked, see Lime, hydrated Calcium hydroxide, Ca(OH)2, produced by adding the required quantity of quicklime to water in a chemical reaction giving off heat: Ca0 + H2O Ca(OH)2.
Lime washA whitewash based upon lime (as opposed to materials such as pipeclay), made according to various recipes, the simplest of which is lime and water. One example consisted of four parts of pounded lime, three of sand, two of pounded wood ashes, and one of ‘scoria of lime’, mixed well and diluted to brushing consistency.
LoamNatural soil containing clay, which when mixed with water forms a plastic material for plastering. This was common in early Sydney mainly for internal work, and often a proportion of lime was added if available.
Martin’s cementOne Martin obtained a British patent in 1834 for the manufacture of an imitation marble or cement capable of receiving a high polish, and made by treating powdered chalk or gypsum first with a strong alkali, and then an acid, then in 1840 another patent for mixing the same materials in a solid state. The material was used similarly to Keene’s cement, but was not nearly so popular in Australia.
MasonryStone laid in courses with mortar joints: sometimes used also of brickwork.
Mortar, compo [composition]A mixture with water of Portland cement, lime and sand, in any one of the following proportions by volume: 1:½:4½; 1:1:6; 1:2:9; or 1:3:12. For floating, it is typically three parts of sand to one part of lime and cement mixture. It is used on internal and external surfaces, is easier to spread than Portland cement mortar, and holds water better.
Mortar, limeA mixture of lime, sand, and water, for floating, typically three parts of sand to one part of lime by volume. For pricking up laths, typically with a little more lime to increase the plasticity, and with cattle hair added.
Mortar, Portland cementA mixture of Portland cement, sand, and water, for floating, varying according to the work from one to four parts of sand to one part of cement.
One-coat methodThe application to a solid base (brick, concrete or terra cotta) of a single coat of Portland cement mortar or composition mortar, or of a sanded gypsum plaster. Used only where the background is sufficiently true and provides uniform suction.
Paint, acrylicCoating material manufactured with acrylic resins as the main binder.
Paint, cement-based.Paint base in dry powder form, containing Portland cement and other materials, which is mixed with water just before use. Also called Cement paint. Nowadays rarely used.
126 Victorian Stucco
Paint, oilA paint containing pigments to impart the required colour, white lead or a substitute material to provide body and to conceal the substrate, all of which is ground and mixed with a drying oil (usually linseed oil) as the basic medium, both binder and vehicle.
Paint, silicatePaint based upon water glass, or sodium silicate, introduced in mid nineteenth century Britain by Frederick Ransome and Nicolaus Charles Szerelmey.
Papier mâchéA material formed of mashed scrap paper, which is moulded into ornamental forms, then baked and finished, and is lighter and less fragile than cast plaster. It is applied to cornices &c in place of plaster ornament, and may be indistinguishable at a distance.
Parian cement, see Keating’s cement
PlasterA mixture of a binder such as lime (possibly combined with gypsum plaster or Portland cement) or Portland cement (but never gypsum plaster and Portland cement) with sand and water, in the form of a paste-like material which can be applied to the surfaces of walls and ceilings and which then sets to form a hard surface. When used externally usually lime-based and referred to as stucco.
Plaster, fibrous Pre-formed work made of plaster of Paris reinforced with fibrous material and sometimes wooden laths. Soluble cutting oils or specially made creams are applied to the mould or surface against which the casting is made, to ensure that it is easily released while preserving a sharp and true profile [or else a gelatin mould is used. The term ‘fibrous plaster’ was used in an English patent of 1856 by the French modeller Léonard Alexandre Desachy, to describe plaster of Paris reinforced with canvas or stiffened with wooden pieces. Until the turn of the twentieth century, most fibrous plaster was similarly based upon canvas or other fabric, but already other types of reinforcement, such as silicate cotton, were being used in some versions. In the twentieth century, loose fibre has been more common (such as jute, sisal, hemp, flax, coir, teased-out old rope, or fibreglass). While originally used mainly for ornamental purposes, in the twentieth century
it came to be widely used for plain sheets, and also as a finished surface in its own right rather than as the base for a setting coat. In purpose-made form, it may also include wood lath or metal angle reinforcement for additional stiffness. Also called Fibre-reinforced gypsum plaster.
Plaster, gypsumCalcium sulphate hemihydrate powder (plaster of Paris), made from gypsum, with the addition of water and, if necessary, suitable retarders. This was not used on any extensive scale in Australia until about the time of World War I. Subsequently, the Victor plaster brand dominated the local market, apparently connected in some way with the American Victor Plaster made by the Keystone Plaster Company of Philadelphia, but manufactured from South Australian raw material. Also the slower setting anhydrous calcium sulphate, generally with the addition of accelerators such as Keene’s cement.
Plaster coats, see dash, finishing, scratch, setting, skimming &c.
Plaster of ParisCalcium sulphate hemihydrate produced by calcining gypsum, and used in setting coats for internal surfaces, running mouldings, making moulds and casts, and the manufacture of fibrous plaster.
Plate, muffle, see running mould
Pressed cementA rather dry mixture of Portland cement and aggregate pressed or rammed into a mould, to create an architectural feature.
Pricking upThe London term for scratch coating or the application of a thin surface of mortar to lathing or other substrate material to provide a key for the first layer of plastering, otherwise first coating.
Putty coat, see setting
RenderOriginally the first coat laid onto a brick, stone or concrete wall, such as the first coat in a three-coat plastering system. In modern usage it includes the application of any external finish applied by trowel, including one-coat work in sand and Portland cement.
Victorian Stucco 127
RetarderA substance used to extend the setting time, such as glue, dextrin or cream of tartar.
Roche lime Rock lime in lump form after burning.
RoughcastAn external finish created by throwing onto a wall or other surface a mixture to creamy consistency of gravel, crushed stone toppings or pebbles, with sand and cement, used while in the plastic state. See also pebbledash.
Running mouldAn implement for forming mouldings by passing it along or over soft plaster, and usually consisting of three main parts, a slipper, a stock and a plate. The slipper is a flat timber plate forming the base of the mould, usually in a horizontal plane. In forming a cornice, one edge of the slipper slides along and is guided by a running rule fixed to wall surface. At right angles on top of the slipper is the wooden stock, of approximately the profile to be formed. Its role is to support the plate fixed on one side of it. The plate establishes the exact finished profile, and is made of zinc, copper, brass, muntz metal or galvanized iron. Commonly the core of the moulding will have been established first, about 5 mm behind the finished surface, by placing an appropriately sized muffle plate over the mould.
ScagliolaA form of artificial marble invented in Italy by Guido Sassi in about 1615, and first used in England at the Pantheon, Oxford Street, London, of 1772. Plaster of Paris was sieved and mixed with Flanders glue, isinglass and other materials, and then with the required colour. The various shades were mixed in separate batches, then combined together on the surface to create a marbled effect, and the finished work was smoothed off and highly polished. Later used fine gypsum plaster mixed with cement, pigments and marble or stone chips, and finished with a high polish after it had hardened. It was quite widely used in Australia until at least the 1930s.
Scoring, see Scratching
Scratch coatPreparatory layer of mortar or render applied to walls or floors to improve the bonding of a subsequent layer,
generally used where one layer of excessive thickness would provide insufficient bond. The surface is left ‘scratched’ to allow a key for the next coat. See also Pricking up.
ScratchingOr scoring or keying: scoring the partially hardened coat of plaster of the first coat with a toothed wood or iron scratcher to create a key for the next coat.
ScreedsOn a wall, dots of plastering material brought to the correct level, as guides for the subsequent flanking work. At the base of the wall, wood grounds provided for fixing skirtings may be used instead. On a floor, usually bands of mortar laid to establish the correct thickness and slope for the layer of mortar that is to be subsequently filled in, but occasionally timber strips for the same purpose.
ScrimOpen-meshed jute cloth (or other coarse open fabric, such as hessian, sisal or hemp) used for reinforcing fibrous plaster, and in the past to reinforce the mortar or to strengthen joints in plasterwork generally.
Second coating, see Floating
Setting, Setting coatSteel trowelled finishing coat in plastering, 2 to 3 mm thick, of lime putty and/or plaster of Paris. In Scotland, finishing; in the USA hard finish or putty coat: laying and finishing the final coat on the second or floating coat.
Shell limeLime manufactured by burning shells, which were obtainable in quantity along much of the Australian coastline, particularly in the form of Aboriginal middens. The material was extensively used in Sydney and other locations where limestone was not obtainable.
Skimming, skim coatThe application of fast-setting stuff with a trowel as thinly as possible over the floated surface to whiten it (and not designed to modify the existing profile). Fine white sand may be added, and it may be polished to a glazed finish with a sand trowel. Sometimes regarded as an inferior form of setting.

128 Victorian Stucco
Slipper, see running mould
Stock, see running mould
Stopping, Stopping-upThe filling of blemishes, joints and nail holes, commonly with neat plaster, or plaster and putty, to bring them to an even surface prior to painting. Straightening, see Floating
StuccoAn external lime or cement-based rendered surface, which is in nearly always implicitly or explicitly an imitation of stone. Today the word is occasionally used in Australia for cement surfaces, but ‘cement’ or if applicable ‘cement render’ are better for this. It is also misused for various textured finishes.The word stucco dates from the Italian Renaissance, for a material principally but not solely for internal modelling, referred to as stuccatura, or stucco duro, and commonly containing marble dust. It has also been used imprecisely by historical writers of any form of plastering in the ancient world (see albarium opus). The usage for exterior surfacing derives ultimately from Palladio, for whom it was still a smooth finish plaster of slaked lime, gypsum and pulverised white marble, used for decorative building parts such as cornices, mouldings or other ornamentation. This was modified by the introduction of so-called Roman cement in late eighteenth century Britain, and subsequently in Australia. This, and still more Portland cement, tends to be referred to as ‘cement’ or, in specific cases as ‘artificial stone’. In the nineteenth century the term ‘stucco’ was not commonly used of Portland cement surfaces or of any heavily moulded work.
Stucco washA proprietary material for surfacing and colouring stucco, usually containing colourants and one or more of cement, plaster of Paris, or size. Johns’s Patent Stucco Wash, basically stone-coloured, was available in Britain in the 1850s, and in Australia by 1859.
TallowRendered animal fat, sometimes added as a plasticiser to stucco.
Textured finishesFinishes other than the orthodox floated or trowelled types, usually executed in Portland cement.
Three-coat methodThe application of three coats, a bond coat, a floating (or flanking) coat, and a finishing coat. usually on laths or rough stonework. The first pricking-up coat is mortar with hair to hold it together, approximately straightened with a laying trowel, and subsequently finished as for the two-coat method.
Trowel, gaugingA tapered steel blade, with a handle at the end, used for gauging material and applying it to mouldings.
Trowel, layingA rectangular steel blade, with a handle at the back, used for applying and spreading plaster and for finishing some types of work.
Trowel, marginA small rectangular steel blade, with a handle at the end, used for trowelling in margins or panels.
Two-coat methodThe application of two coats, a bond coat and a flanking coat, to give a finer and more uniform finish than the one-coat method, using lime plaster, gypsum plaster, or Portland cement. The first coat is applied, usually from the bottom up, plumbed, brought to a straight face, and if necessary scratched. The second coat is generally applied from the top down and is very thin, perhaps 7 mm in the case of Portland cement mortar. Used where the background is not sufficiently true or does not provide uniform suction, or where a more highly finished surface free from grinning or crazing is required.
VermiculationA finish intended to suggest that is worm-eaten, used especially on quoins, keystones, &c. The surface is created true, then an irregular network of bands drawn onto it, then the surface between the bands is picked out with a small tool to leave the bands standing free, or, almost the reverse, shallow, irregular, and winding or wavy channels or markings resembling worm tracks are pressed or incised into the surface.
Wattle and daubA primitive building method consisting of loam or lime plaster laid on interlaced flexible twigs like basketwork: in Britain commonly hazel, but in Australia commonly acacia [hence called wattle].

Victorian Stucco 129
Bibliography
> overseas primary sources
> plastering texts
> overseas secondary sources
> materials science
> conservation principles
> Australian primary sources
> Australian specifications
> Australian secondary sources
> conservation studies
Overseas primary sources
——, Sweet’s Architectural Catalogue (New York 1922).
H Aitken, Stone, preserving; cements; plasters; mortars Patent 11,209 (London 1891).
Ashton & Green, Limited, Ashton & Green, Limited, Slate, Tile, Brick, Cement, Marble, and Iron Manufacturers and Merchants (London 1887).
William Atkinson, Views of Picturesque Cottages, with Plans: selected from a collection of drawings taken in different parts of England, and intended as hints for the improvement of village scenery (London 1805).
P B Butler, Portland Cement, its Manufacture, Testing and Use (London 1899).
A J Downing, The Architecture of Country Houses (New York 1850).
Oscar Faber & H L Childe [eds], The Concrete Year Book 1949 (London 1949)
F R Farrow, Specifications for Building Works (London 1898).
Q A Gillmore, A Practical Treatise on Limes Hydraulic Cements, and Mortars (8th ed, New York 1886).
Joseph Gwilt [ed Wyatt Papworth], An Encyclopaedia of Architecture: Historical, Theoretical and Practical (London 1881 [1842]); also (London 1912 [1842]).
P N Hasluck, Cassell’s House Decoration: A Practical Guide to Painters’ and Decorators’ Work (London 1910).
Bryan Higgins, Experiments and Observations [on] Calcareous Cements (London 1780).
C Kersten [translated N C Ricker], Der Eisonbetonbau (2 vols in 1, Urbana [Illinois] 1916 [from the 10th German edition, 1915, originally 1906] [typescript in the Ricker Library, University of Illinois at Urbana-Champaign].
F W Laxton, Laxton’s Builder’s Price Book for 1863 (43rd ed, London 1863).
John Leaning, Building Specifications (London 1901).
London, Great Exhibition of the Works of Industry of all Nations, 1851, Official Descriptive and Illustrated Catalogue (3 vols, London 1851).
J C Loudon, Encyclopædia of Cottage, Farm and Villa Architecture (London 1846 [1833]).
F W Macey, Specifications in Detail (3rd ed, London 1922).
G A T Middleton [ed], Modern Buildings (6 vols, London, no date [c 1910]).
G Mitchell, Building Construction (12th ed, London 1929).
Richard Neve, The City and Countrey Purchaser, and Builders’ Dictionary: or, Compleat Builders Guide (2nd ed, London1726 [1703])
Wyatt Papworth [ed], The Dictionary of Architecture (6 vols, London 1853–92).
N E Pelouze, Art de Fabriquer en Pierre Factice très-dure et susceptible de recevoir le poli, &c (Paris 1829).
C W Pasley, Observations on Limes, Calcareous Cements, &c (London 1838).
A W N Pugin, The True Principles of Pointed or Christian Architecture (London 1853 [1841]).
J T Rea, How to Estimate (London 1904).
J Singleton-Green, ‘Cements and Concrete’, in F E Drury et al [eds], Architects’, Builders’ and Civil Engineers’ Technical Catalogue (London 1946), pp 34–43.
G L Sutcliffe, The Principles and Practice of Modern House Construction (new ed, 6 vols, London 1909).
Andrew Ure, Dictionary of Arts, Manufactures and Mines (London 1839).
Giorgio Vasari [translated L S Maclehose & edited G B Brown], Vasari on Technique [being the first part of his Lives of the Artists] (New York 1960 [London 1907 (1550)]).
130 Victorian Stucco
W Verrall et al, The Modern Plasterer (2 vols, London, no date [c 1930]).
L J Vicat [translated J T Smith], A Practical and Scientific Treatise on Calcareous Mortars and Cements (London 1837).
Marcus Vitruvius Pollio [‘Vitruvius’] [translated M H Morgan], The Ten Books on Architecture (New York 1960 [1916]). Also Joseph Gwilt’s translation (London 1867).
John Weale, Rudimentary Dictionary of Terms used in Architecture, &c (London 1860).
John Wood, A Series of Plans for Cottages or Habitations of the Labourer (London 1806 [?1781]).
Clyde Young [ed], Spons’ Architects’ and Builders’ Pocket Price Book 1935 (62nd ed, London 1935).
Plastering texts
G P Bankart, The Art of the Plasterer (London 1908).
Wilfred Kemp, The Practical Plasterer (London 1893).
W S Lowndes & D K Boyd, Plastering and Stucco Work (2nd ed, Scranton [Pennsylvania] 1923 [1921]).
William Millar, Plastering Plain and Decorative (London 1897) [reprinted Shaftsbury, 2004] (also 3rd ed, London 1905).
J T Sawyer, Plastering,1951, [reprint Shaftsbury [Dorset] 2007).
W Verrall et al, The Modern Plasterer (2 vols, London, no date [c 1930]).
Overseas secondary sources
A C Davis, A Hundred Years of Portland Cement (London 1924).
Roger Dixon & Stefan Muthesius, Victorian Architecture (London 1978).
Donald Ellsmore, ‘Nineteenth-Century Painted Decorations’ (2 Volumes, D Phil, University of York, 1993).
Claire Gapper, ‘What is Stucco? English Interpretations of an Italian Term’, Architectural History, XL11 (1999), pp 333-334.
S B Hamilton, ‘Building and Civil Engineering’, in Charles Singer et al [eds], A History of Technology, Volume IV: the Industrial Revolution c 1750 to c 1850 (Oxford 1975).
Eileen Harris, British Architectural Books and Writers 1556-1785 (Cambridge 1990.
Hermione Hobhouse & Ann Saunders [eds], Good and Proper Materials; the Fabric of London Since the Great Fire (London 1989).
Lawrence Hurst, ‘The Properties and Uses of Roman Cement’, Construction History, XVIII (2002).
Sara Wermiel, ‘The Development of Fireproof Construction’, Construction History, IX (1993).
John Wilson, AA Book of New Zealand Historic Places (Auckland 1984).
Brian Kearney, Architecture in Natal (Cape Town1973).
R B Lewcock, Early Nineteenth Century Architecture in South Africa (Cape Town 1963).
G C L Lynch, ‘The Colour Washing and Pencilling of Historic English Brickwork’, Journal of Architectural Conservation, XII, 2 (July 2006).
Donald Pilcher, The Regency Style 1800 to 1830 (London 1947).
Thomas Ritchie, Canada Builds 1867-1967 (Toronto 1967). Russell, Watts & Pritchard, ‘Specifications for ... Dwelling houses ... at Elwood… for Joseph Docker’, 13 December 1854, Docker papers, State Library of Victoria.
Witold Rybczynski, The Perfect House (New York 2002).
A W Skempton, ‘Portland Cements, 1843-1887’, in Frank Newby [ed], Early Reinforced Concrete (Aldershot [Hampshire] 2001).
Samuel Smiles, Lives of the Engineers (3 vols, London 1862).
John Stacpoole, William Mason (Auckland 1971).
John Summerson, Georgian London (London 1945).
Geoffrey Thornton, Cast in Concrete (Auckland 1996).
G C Thornton, ‘Early Concrete Structures in New Zealand’, Fourth National Conference on Engineering
Victorian Stucco: Bibliography 131
Heritage 1988, Sydney 5-8 December 1988, Preprint of Papers (Barton [ACT] 1988).
G C Thornton, New Zealand’s Industrial Heritage (Wellington 1982).
John Weiler, ‘Colonial Connections: Royal Engineers and Building Technology Transfer in the Nineteenth Century’, Construction History, XII (1996).
Manfred Wundram & Thomas Pape, Andrea Palladio (Köln, no date).
Materials science
G Allen et al, Hydraulic Lime Mortar for Stone, Brick and Block Masonry (Shaftesbury [Dorset] 2003).
John Ashurst, Mortars, Plasters and Renders in Conservation (London 1983).
John Ashurst & Nicola Ashurst, Practical Building Conservation (5 vols Aldershot [Hampshire] 1988): vol 3, Mortars, Plasters and Renders.
Nicola Ashurst, Cleaning Historic Building, Vol 1 (London 1994).
L Burgio, ‘Dating Alhambra Stuccos’ V& A Conservation Journal Online, Spring 2005, 49, <www.vam.ac.uk/res_cons/conservation/journal/number_49/alhambra_stuccoes/index.html>, accessed 23 May 2009
E B Cliver, ‘Tests for the Analysis of Mortar Samples’, APT Bulletin, VI, 1 (1974) pp 68–73.
Beatriz del Cueto, ‘A Manual on Conservation Methodology for Historic Buildings and Structures. P Puerto Rico and the Virgin Islands’ (1997) [Caribbean Heritage Inc, Guaynabo, Puerto Rico: reproduction supplied by the US National Parks Service 1997].
Barrie Cooper, Westlegate Pty Ltd Product Information (Sydney 2008).
Peter Ellis, ‘The Analysis of Mortar: the Past 20 Years’, Historic Churches (2002), accessed via www.buildingconservation.com, 24 April 2009.
A M Forster, How Hydraulic Lime Binders Work: hydraulicity for beginners and the hydraulic lime family (Edinburgh 2004).
R J Gettens & G L Stout, Painting Materials: a Short Encyclopaedia (New York 1966).
C M Grossi & Peter Brimblecombe, ‘The White Tower and the Perception of Blackening’, Journal of Architectural Conservation, 11, 3 (November 2005).
C Herm, ‘Kalkfarbetechniken: eine Literaturstudie’ [Limewash techniques: a literature review] Arbeitsblätter für Restauratoren, 33, no 2, Gruppe 7 (2000), pp 153-168 [German with English summary]: abstract accessed 13 April 2009.
P C Hewlett, Lea’s Chemistry of Cement and Concrete (4th ed, Oxford 1988).
Elizabeth Hirst, ‘Limewash and Distempers’, The Building Conservation Directory 2002
<www.buildingconservation.com/articles/lwdistempers/lwdistempers.htm>, accessed 15 December 2008.
Getty Conservation Institute & International Institute for Conservation of Historic and Artistic Works, Art and Archaeology Technical Abstracts [AATA Online]: <http://aata.getty.edu/NPS/>
Historic Scotland, External Lime Coatings on Traditional Buildings [Technical Advice Note 15] (Edinburgh 2001).
Historic Scotland, Preparation and use of Lime Mortars [Technical Advice Note 1] Historic Scotland, (revised ed, Edinburgh 2003).
S Holmes & M Wingate, Building with Lime: a practical introduction (revised ed, London 2002).
Paul Holper & Julie Noonan, Urban and Regional Air Pollution Information Sheet (2000) [CSIRO Research]
<www.dar.csiro.au/information/urbanpollution.html> accessed 12 December 2008.
D Hughes, S Swann, & A Gardner, ‘Roman Cement, Part One’, Journal of Architectural Conservation, XIII, 1 (March 2007), & ‘Part Two’, XIII, 3 (November 2007), pp 41–58.
J Hughes & J Válek, Mortars in Historic Buildings: a review of the Conservation, Technical and Scientific Literature (Edinburgh 2003).
Institution of Engineering and Technology, ‘Colour Vision Defects’ (2007), <www.theiet.org/factfiles/health/colourvisiondefects.cfm?type=pdf>, accessed 9 May 2009
International Centre for the Study of the Preservation and Restoration of Cultural Property [ICCROM] Mortars, Cements and Grouts used in the Conservation of Historic

132 Victorian Stucco
Buildings. [proceedings of an ICCROM symposium, 3–6 November 1981] (Rome 1981).
Ioan Istudor, Anca Dina , Geanina Rosu, Doina Secla man and Gheorghe Niculescu, ‘An Alteration Phenomenon of Cinnabar Red Pigment in the Mural Paintings from Sucevita’, e-conservation, Issue 2 (2007), pp 602 <www.e-conservationline.com/content/view/587>, accessed 23 May 2009.
S M Jackson, Tye Botting & Mary Striegel, ‘Durability of Traditional and Modified Limewashes’, APT Bulletin, XXXVIII, 2-3 (2007), pp19-28.
J Jacob & N R Weiss, ‘Laboratory Measurement of Water Vapour Transmission rates of Masonry Mortars and Paints’, APT Bulletin, XXI, 3-4 (1989), pp 62–70.
M Jonsson & E B Cliver, ‘Coloring Historic Stucco: the Revival of a Past Technique in San Juan, Puerto Rico’, APT Bulletin, XXXIII, 4 (2002), pp 31–6.
Sheldon Keck, ‘Some Picture Cleaning Controversies: Past and present’, Journal of the American Institute for Conservation, 23, 2, (1984), article 1, pp 73 to 87, <http://aic.stanford.edu/jaic/articles/jaic23-02-001.html>, accessed 28 November 2008.
D S Krotzer, ‘Architectural finishes: Research and Analysis’ [Practice Points no 06]. APT Bulletin, XXIX, 2-3 (2008), pp 1–6.
D S Krotzer and J J Walsh, ‘Analyzing Mortars and Stuccos at the College of Charleston: A Comprehensive Approach’, APT Bulletin, XL, 1 (2009), pp 41–8.
M Lawrence, P Walker & D D’Ayala, ‘Non-Hydraulic Lime Mortars’, Journal of Architectural Conservation, XII, 1 (March 2006).
Frank Matero, ‘Loss, Compensation and Authenticity in Architectural Conservation’, Journal of Architectural Conservation,1,12 (March 2006).
F G Matero & J C Snodgrass, ‘Understanding Regional Painting Traditions: The New Orleans Exterior Finishes Study’, APT Bulletin, XXIV, 1/2 (1992), pp 36–52.
Museum of Fine Arts, Boston: Conservation and Art Material Encyclopedia Online [CAMEO]: <http://cameo.mfa.org/>.
Vratislav Nejedlý, [A couple of comments to the surface finish of the sculptural works of art installed in the exterior] Zprávy Památkové Péc e, 63, no 2 (2003), pp110–117
[Czech with English summary]: abstract accessed 17 March 2008.
Alan Phenix, ‘Solvent Abuse: some observations on the safe use of Solvents in the Cleaning of Painted and Decorated Surfaces’,
<www.buildingconservation.com/articles/solvent/solvent.htm>, accessed 15 December 2008.
Nigel Seeley, ‘The Use of Lead Paint for Historic Buildings’, Journal of Architectural Conservation, Vol 5, 2 (July 1999), pp 24–42.
Standards Association of Australia, Lime and Limestones, Part 1: Limes for building, AS:1672.10-1997 (Sydney 1997).
Standards Association of Australia, Portland and Blended Cements, AS:3972-1997 (Sydney 1997).
Standards Association of Australia, Masonry cement, AS:1316-2003 (Sydney 2003).
J Stewart & J Moore, ‘Chemical Techniques of Historic Mortar Analysis’, APT Bulletin, XIV,1(1982) pp11–16.
J H Stoner, ‘The Impact of Research on the Lining and Cleaning of Easel Paintings’, Journal of the American Institute for Conservation 1994, 33, 2 (1994), article 5, pp 131–140:
<http://aic.stanford.edu/jaic/articles/jaic33-02-005.html>, accessed 28 November 2008.
G T Suter, M L Thomson & L Fontaine, ‘Mortar Study of mechanical properties for the repointing of the Canadian Parliament buildings’, APT Bulletin, XXIX, 2 (1998) pp 51–8.
J M Teutonico et al, ‘The Smeaton Project: Factors Affecting the Properties of Lime-based Mortars’ APT Bulletin, XXV, 3-4 (1994), pp 32–49.
E T Thompson, A Laboratory Manual of Semi-Micro Inorganic Qualitative Analysis (London 1957).
G Torraca, Porous Building Materials: Materials Science for Architectural Conservation (3rd ed, Rome 1988).
A I Vogel, A Text Book of Qualitative Chemical Analysis (London 1957).
A I Vogel, Elementary Practical Organic Chemistry, 2. Qualitative Organic Analysis (London 1962).
David Young, Salt Attack and Rising Damp: a guide to salt damp in historic and older buildings (Sydney 2008).
Victorian Stucco: Bibliography 133
Conservation principles
Australia ICOMOS, The Burra Charter: the Australia ICOMOS Charter for Places of Cultural Significance, 1999 (Melbourne 1999).
Cesare Brandi, Theory of Restoration (Rome 2005 [1963])
I C Bristow, ‘Exterior Renders Designed to Imitate Stone: A Review’, Transactions of the Association for Studies in the Conservation of Historic Buildings, 22 (1977), p 27.
E Burden, Illustrated Dictionary of Architectural Preservation (New York 2003).
J Earl, Building Conservation Philosophy (3rd ed, Shaftsbury [Dorset] 2003 [c 1996]).
International Council on Monuments and Sites, The Nara Document on Authenticity (Nara 1994).
Australian primary sources
——, Australian Settler’s Handbook: being Practical Hints for the Unexperienced on the most simple and profitable method of cultivating their land: being the result of many years experience in the Colony (Sydney 1861).
——, To Architects, Contractors, &c [trade circular, apparently Melbourne c 1883], in John Beswicke papers, copy kindly supplied by Mr Ken Bethell.
——, ‘To Mix Lime Wash’, Australasian Decorator and Painter, 1 May 1906, p 160.
James Atkinson, An Account of the State of Agriculture and Grazing in New South Wales (London 1826).
Australia, Department of Labour and National Service, Industrial Training Division, Plastering [Technical Publication No 12] (Melbourne 1947 [1946]).
David Burn, A Picture of Van Diemen’s Land (Hobart 1973 [1840–41]).
Michael Cannon [ed], Historical Records of Victoria, III (Melbourne 1984).
David Collins [ed Maria Collins, James Collier], An Account of the English Colony in New South Wales (Christchurch 1910 [1798 & 1802; 1804]).
Peter Cunningham, Two Years in New South Wales (2nd ed, 2 vols, London 1827).
Harriet Daly, Digging, Squatting, and Pioneering Life in the Northern Territory of South Australia (London 1887).
Charles Griffith, The Present State and Prospects of the Port Phillip District of New South Wales (Dublin 1845).
Robert Haddon, Australian Architecture: a technical manual for all those engaged in architectural and building work (Melbourne, no date [c 1908]).
T H James, Six Months in South Australia (London 1838).
G F G Mackey, Gregory’s Modern Building Practice in Australia (Sydney, no date [late 1940s]).
James Moore & Sons Pty. Ltd., Price List 96 August 1913 (Melbourne 1913).
A W Johnson, ‘Goodlet and Smith Ltd. Brickworks, Roofing Tile Manufacturers, Cement Works & “Benedict Stone” Manufacturers. Granville, N.S.W. (1886-1982)’ (3 vols, major project for Historical Archaeology II [University of Sydney] 1982).
Charles Mayes, Victorian Contractors’ and Builders’ Price-Book (Melbourne 1859); also (2nd ed, Melbourne 1862; 3rd ed, Melbourne 1877; 4th ed, Melbourne 1883; and 5th ed, Melbourne 1886).
Melbourne, Intercolonial Exhibition of Australasia, Official Record (Melbourne 1867).
Melbourne International Exhibition, 1880-1881, Official Record (Melbourne 1882), pp 82–94.
[Janet] Millett, An Australian Parsonage (London 1872).
T L Mitchell, ‘Sir Thomas L Mitchell Memoranda Book, 1827-1829’, Mitchell Library, manuscript ML C38, reel CY 1992.
James Nangle, Australian Building Practice, Part 1 (Sydney 1900).
James Nangle, Australian Building Practice (2nd ed, Sydney 1911); also (4th ed, Sydney 1944).
New South Wales Government Gazette, 1833.
New South Wales, Public Works Department, Annual Report (Sydney 1890).
Arthur Phillip, The Voyage of Governor Phillip to Botany Bay (London 1789).
Pittsburgh Plate Glass Company, Architectural Specifications (Milwaukee [Wisconsin] 1935).
134 Victorian Stucco
W L Richardson [ed], Ramsay’s Architectural Catalogue (Melbourne 1931).
Watson Sharp, Australian Methods of Building Construction (Sydney 1946).
E G Stone, Reinforced Concrete in Australia (no place, 1920).
Sydney, International Exhibition 1879, Official Catalogue of the British Section (London 1879).
Terry & Oakden, What to Build and How to Build It (Melbourne 1885).
[James Tucker] ‘Giacomo de Rosenberg’ [ed Colin Roderick], Ralph Rashleigh, or the Life of an Exile (Sydney 1952 [1929]).
C J Virgo, Australasian Building Knowledge (Volume 2) (Brisbane 1955).
F W Ware & W L Richardson [eds], Ramsay’s Architectural and Engineering Catalogue (Melbourne 1949); also ((Melbourne 1954).
W C Wentworth, Statistical, Historical and Political Description of the Colony of New South Wales (London 1819).
John White, Journal of a Voyage to New South Wales (London 1790).
Australian specifications
Beswicke & Hutchins, ‘Specification of Works to be done in painting “Altyre” Barkers Road Kew for James E Cumming Esq.’ (Melbourne 1889) [single page], Ken Bethell collection.
L J Flannagan, ‘Specification… for Shop Additions in Heidelberg Road, Ivanhoe’, July 1907, p 18, Melbourne University Architectural Collection, State Library of Victoria.
Hyndman & Bates, ‘Specification, &c, Villa Residence Tank +c / Camberwell / Arthur J Fuller Esq / Normanby Chambers Chancery Lane’ (Melbourne 1990).
W S Law, ‘Specifications of Residence Drummond St. Carlton for Mrs. L. Abrahams’ (Melbourne 1891).
New South Wales, ‘Schedule of Contract. Plasterer’s Work’. (Sydney 1836). Mitchell Library.
New South Wales, ‘Schedule of Contract. Plasterer’s Work’. (Sydney 1864). Mitchell Library.
Reed & Barnes, ‘Melbourne Town Hall Specification, 1868’. City of Melbourne Archives.
Reed & Barnes, ‘Specification of Work to be done and Materials to be used in the Erection of Banking Premises at “Kooringa S.A.” for the Bank of Australasia’ (Melbourne 1878), State Library of Victoria.
Reed, Henderson & Smart, ‘Specification of Work to be done ... New Premises for the Metropolitan Gas Coy.’ (Melbourne 1890), State Library of Victoria.
W W Wardell, ‘English Scottish & Australian Chartered Bank Melbourne / W.W. Wardell Aust’ [specification] (Melbourne [1883]). ANZ Bank Archives.
Australian secondary sources
James Broadbent, The Australian Colonial House (Sydney 1997).
Philip Cox, Building Norfolk Island (Melbourne 1971).
Peter Cuffley, Australian Houses of the ‘20’s and ‘30’s (Fitzroy [Victoria] 1989)
D A Cumming & G C Moxham, They Built South Australia: Engineers, Technicians, Manufacturers, Contractors and their Work (Adelaide 1986).
Hanut Dodd, ‘Lime and Victorian Buildings’ (MPD, University of Melbourne, 1997).
Barrie Dyster, Servant and Master (Kensington [NSW] 1989).
Ian Evans, The Australian Home (Sydney 1983).
R J Fergusson, Rottnest Island: History and Architecture (Nedlands [Western Australia] 1979).
Warwick Gemmell, And So We Graft from Six to Six (North Ryde [New South Wales] 1986.
Jane Harrington, An Archaeological and Historical Overview of Limeburning in Victoria (Melbourne 2000).
Morton Herman, The Early Australian Architects and their Work (Sydney 1954).
Robert Irving, ‘The First Australian Architecture’ (March, University of New South Wales 1975).
Dennis Jeans, ‘The Building Industry: Materials and Styles’, in Judy Birmingham, Dennis Jeans & Ian Jack, Industrial Archaeology in Australia: Rural Industry (Richmond [Victoria])1983.
Victorian Stucco: Bibliography 135
E & R Jensen, Colonial Architecture in South Australia (Adelaide 1980).
Sarah Johnstone, ‘Australian Cement Industry’ (typescript article for what was said to be a forthcoming publication of the Institution of Engineers, Sydney 1987).
Clem Lack, Newstead House (Brisbane, no date).
Miles Lewis, ‘Tradition and Innovation in Victorian Building 1801 - 1865’ (3 vols, PhD, University of Melbourne, 1972).
Philip McKay, ‘The History of the Cement Industry to 1939; an essay’ (mimeographed report for the Cement & Concrete Association of Australia, no place, 1977).
D C Markey, ‘Pioneer Perth’, in J Gentilli [ed] Western Landscapes (Nedlands [Western Australia]1872).
C J Mitchell, Hunter’s River (Sydney 1973).
Michael Pearson, ‘Archaeological Interpretation and Ethnographic Analogy: the lime industry in Western Australia’, Archaeology in Oceania, XXI, 1 (April 1986).
D W Penn, How Firm the Foundation: a Historical Survey of an Independent Venture that Founded the Portland Cement Industry in Australia (Sydney 1977).
E G Robertson, Early Buildings of Southern Tasmania (2 vols, Melbourne 1970).
J G Steel, Brisbane Town in Convict Days 1824–1842 (St Lucia [Queensland] 1975).
C R Stone & Pamela Tyson, Old Hobart Town (Lilydale [Victoria] 1978).
Donald Watson & Judith McKay, Queensland Architects of the 19th Century (Brisbane 1994).
H P Wellings, Benjamin Boyd in Australia (1842–1849) (Bega [New South Wales], no date).
conservation studies
Allom Lovell & Associates, ‘Bontharambo Wangaratta, Conservation Management Plan’ [prepared for Heritage Victoria] (Melbourne 2001).
Allom Lovell Marquis-Kyle, ‘St. Helena Island Measurement and Assessment of Structures Component Reports’ (Brisbane 1989).
P J F Coutts, Corinella: a Forgotten Episode in Victorian History [Records of the Victorian Archaeological Survey No. 15] (Melbourne 1983).
Heather Godfrey et al, ‘Conservation Management Plan: “Romla and Frelin”. 86 and 87 Darlington Road, Darlington, Sydney’ (Sydney 2008).
Howard Tanner and Associates, Architects, ‘Tempe House Restoration and Conservation (Sydney 2004).
Hughes Trueman Pty Ltd [Simon Wiltshier], ‘Bontharambo at Wangaratta, Structural Condition Report’ (Sydney 2004).
Hughes Trueman Ludlow, Evans Shire Council Heritage Study (2 vols, no place, 1987).
Lindy Scripps et al, Willow Court Conservation Management Plan Stage C(i) The Barracks and Bronte [for Derwent Valley Council] (Hobart 2006).

136 Victorian Stucco
Victorian Stucco 137
Index
IndexAacid rain 78
acrylic 25, 75, 76, 84, 86, 91, 97, 99, 100, 101, 102, 103, 113, 114, 115, 118, 122, 125
ACTCanberra, Albert Hall 99
albarium opus 3, 128
analysischemical 81, 82, 88, 89technical 73, 74, 75, 79, 81
ashlar 4, 6, 22, 30, 37, 39, 40, 49, 94, 105
Australian standards 62, 64, 67, 115
Bbinder (see also casein, glue size) 16, 18, 26, 63, 64, 66, 71,
72, 75, 77, 82, 89, 92, 101, 102, 103, 109, 117, 123, 125, 126
Boom Style 47
brands (of lime, cement) 8, 34, 35, 36, 103, 105
Burra Charter 67, 87, 107, 108, 117, 118, 133
Ccarbonation 16, 51, 62, 63, 64, 74
casein 48, 51, 75, 76, 77, 89, 94, 101, 102
casting (see also moulds, ornamentation, enrichments) 17, 29, 36, 38, 44, 46, 47, 55, 56, 86, 114, 124, 126
cement render (see also stucco, roughcast, pebbledash) 1, 11, 21, 106, 120, 121, 128
cement spray 77, 86
cement (types)hydraulic 1, 5, 8, 9, 34, 35, 36, 71, 122natural 3, 7, 8, 11, 13, 16, 17, 30, 34, 46, 71, 122Parian 124, 126Portland (see also mortar, stucco, casting) 1, 6, 7, 8, 9,
10, 11, 14, 16, 17, 18, 19, 20, 22, 23, 24, 25, 26, 30, 34, 35, 36, 39, 40, 44, 46, 47, 48, 49, 51, 64, 67, 71, 74, 84, 91, 92, 93, 94, 95, 96, 97, 99, 102, 104, 105, 106, 107, 115, 117, 120, 121, 122, 125, 126, 128
Roman 1, 7, 8, 9, 17, 18, 19, 23, 29, 32, 33, 34, 38, 39, 51, 75, 86, 92, 93, 113, 114, 115, 120, 122, 128
cement wash 25, 92, 94, 95, 96, 97, 99, 102, 103
chalk (calcium carbonate - see also whiting) 3, 8, 9, 10, 19, 22, 30, 48, 75, 77, 85, 89, 93, 94, 102, 123, 125
chromatography 73, 83
chunam 39
cleaning 84, 91, 92, 97, 98, 99, 100, 104
coatings 13, 25, 26, 43, 65, 73, 74, 75, 76, 78, 85, 87, 92, 97, 98, 100, 101, 102, 104, 111clear 91, 97, 100, 101maintenance 73, 74, 77
colourants (see also stucco wash, copperas, pigments, ochres) 73, 75, 85, 86, 128
colour washes (see also limewash, colourants) 25, 26, 93, 94, 95, 103
compatibility (of repair materials) 67, 72, 86, 101, 102
compo (see also composition mortar) 1, 38, 39, 106, 121, 122, 125
consolidation 117, 119
copperas (iron sulphate - see also colourants) 23, 42, 76, 86, 94, 95, 124
Ddelamination 69, 70, 72, 87, 108
differential thermal analysis (DTA) 71
distemper 26, 42, 76, 82, 89, 95, 98, 123
drumminess 69, 70
Eelectron microscopy 71, 73, 83
enrichments (see also ornamentation) 46, 47, 51, 55, 56, 107, 108, 109, 113, 114, 120
expanded metal 124
FFederation style (see also roughcast, pebbledash) 16, 26, 97
finishes (see also paint, distemper, limewash, stucco wash, cement wash, whitewash, varnish, pigments, colourants, colour wash) 1, 13, 14, 15, 19, 20, 21, 22, 25, 26, 27, 29, 40, 47, 48, 51, 68, 69, 71, 73, 74, 84, 91, 92, 93, 94, 97, 99, 100, 101, 102, 103, 104, 108, 116, 117, 118, 119, 128, 132clear 91, 101
Gglue size 94, 96, 102, 123
HHaddon, Robert 29, 30, 40, 42, 44, 46, 48, 106, 121, 133
hair 6, 18, 22, 37, 48, 100, 105, 119, 123, 125, 128
hydration 63, 64
Iimportation (of cement) 33, 36
138 Victorian Stucco
incised decoration 3, 4, 44, 45, 94, 128
infra-red thermography 69, 70
intervention 73, 83, 84, 109, 118
Italianate style 14, 19, 20, 111
Italian Renaissance 1, 3, 19, 47, 51, 128
ItalyPoiana Maggiore, Villa Poiana 4Rome, Porta Maggiore 2, 3
Llath 14, 21, 38, 126
lathing 123, 124, 126
lead white (lead carbonate) 76, 85, 89
lime burning 3, 8, 10, 30, 31, 32, 36, 38, 39, 63, 75, 105, 106, 125
lime mortar 105, 106, 109, 112, 113, 115, 116, 118
lime (types - see also limewash, stucco)hydrated (calcium hydroxide) 11, 62, 63, 74, 75, 89, 102,
124, 125hydraulic 1, 6, 7, 9, 11, 17, 20, 22, 32, 33, 38, 51, 63, 64,
74, 92, 122, 131lias 7lime (types - see also limewash, stucco) non-hydraulic 63,
64, 92lime (types - see also limewash, stucco) pozzolanic 74lime (types - see also limewash, stucco) putty 6, 14, 19,
22, 23, 62, 74, 116, 118, 127lime (types - see also limewash, stucco) quicklime (calcium
oxide) 6, 7, 42, 63, 123, 124, 125lime (types - see also limewash, stucco) roche 19, 33lime (types - see also limewash, stucco) rock (calcium
oxide - see also quicklime) 7, 23, 29, 30, 31, 32lime (types - see also limewash, stucco) shell 18, 30, 31,
32, 35, 39, 105, 122lime (types - see also limewash, stucco) slaked 4, 6, 7, 23,
51, 62, 101, 128magnesian 29, 34
limewash (see also whitewash, colour washes) 73, 75, 77, 85, 86, 87, 93, 95, 101
linseed oil 25, 42, 48, 76, 89, 94, 96, 101, 102, 123, 126
loam 30, 31, 38, 105, 128
Loudon, J C 18, 19, 23, 38, 39, 93, 94, 95, 120, 129
Mmaterials identification 73, 74, 78, 79
moisture barrier 86
mortar 6, 14, 28, 30, 31, 32, 46, 56, 62, 64, 65, 66, 72, 89, 105, 106, 108, 109, 110, 111, 113, 114, 115, 119, 121, 122, 124, 125, 126, 127, 128composition 110, 113, 125
Portland cement 109, 121, 125, 128
mouldings (see also running mould) 14, 16, 17, 39, 40, 43, 46, 47, 51, 56, 86, 88, 107, 108, 110, 111, 114, 115, 127, 128
mouldsplaster 55silicone rubber 114timber 114wax 55
NNSW
Ashfield, Vine Street 37, 38Darlington, Romla and Frelin 135Glebe, Lyndhurst House 51NSW Goulburn, Noorilim 42, 43NSW Hill End, cottage 18, 37NSW Paramatta, Old Government House 40, 41NSW Redfern, 130 Little Eveleigh Street 90, 97NSW Windsor, 33 North Street 28
Oochres 22, 25
ornamentation (see also enrichments) 128
Ppaint 21, 22, 25, 26, 40, 41, 43, 48, 71, 73, 74, 76, 78, 80,
82, 85, 87, 89, 91, 92, 93, 94, 95, 96, 97, 98, 99, 100, 101, 102, 103, 104, 107, 109, 111, 122, 123, 125, 126acrylic 84, 98, 103cement 48, 91, 96, 102mineral 85oil 25, 26, 48, 74, 76, 84, 89, 91, 93, 94, 96, 97, 102, 103silicate 25, 26, 87, 91, 94, 95, 102, 103water-based 26, 103
paint removal 91, 99, 100, 101
Pasley, Charles 9, 10, 34, 129
patina 77, 84, 117, 118, 119
pebbledash (see also roughcast) 127
pigments (see also colourants, whiting, lead white, zinc white, titanium dioxide, ochres) 23, 26, 38, 75, 76, 83, 85, 92, 93, 94, 95, 96, 101, 102, 126, 127mineral 23, 25, 75, 92, 94, 95, 101
plastering (see also rendering) 1, 3, 5, 6, 13, 14, 16, 17, 19, 20, 21, 22, 25, 29, 30, 31, 37, 38, 39, 51, 84, 105, 106, 115, 119, 120, 121, 122, 124, 125, 126, 127, 128, 129, 130dash coat 6finish coat 51, 71, 117flanking 127, 128floating 14, 21, 40, 106, 119, 125, 127, 128gauging 46, 128

Victorian Stucco: Index 139
one-coat method 128pricking up 125scratch coat 21, 126setting coat 14, 18, 19, 22, 36, 126skim coat 86, 104, 127three-coat method 21two-coat method 128
plaster of Paris (see also gypsum plaster) 25, 43, 46, 94, 96, 102, 106, 114, 123, 124, 126, 127, 128
plaster (see also stucco, cement render)fibrous 122, 126, 127gypsum (calcium sulphate) 38, 56, 75, 109, 125, 126,
127, 128hard 43lime 6, 25, 39, 51, 106, 121, 128
poisons (used to destroy biological growth) 77
pozzolan (pozzuolan, pozzuolana) 63, 110, 116, 118
pressed cement 46
Pugin, A W N (British architect & writer), illustration of church with pagan symbols 8
QQueen Anne style (see also roughcast, pebbledash) 26, 97
Rrefixing (mouldings etc) 114
Regency style 8, 14, 17
rendering 3, 14, 19, 21, 22, 40, 106, 120, 121, 123
render (see also plaster, stucco) 5, 11, 14, 20, 21, 25, 35, 39, 44, 51, 55, 56, 65, 66, 67, 68, 75, 80, 107, 108, 109, 110, 111, 112, 113, 114, 120, 122, 123, 127
repair method 117
resin 75, 76, 81, 82, 86, 89, 91, 97, 99, 101, 102, 103, 118
rosin (pine resin) 75, 89
roughcast (see also pebbledash) 51, 120
running mould 15, 113, 124, 126, 128
Ssample 71, 72, 73, 77, 78, 79, 80, 81, 82, 83
sampling 20, 69, 70, 73, 79
sands 18, 23, 24, 39, 65, 66, 92, 93impurities 65, 71, 105lime 65mineralogy 65quartz 65void ratio 65, 66
screeds 123
septaria 8, 17, 122
sgraffito 22
significance 67, 73, 74, 77, 84, 88, 104, 117
slipper 127
SPAB (Society for the Preservation of Ancient Buildings) 118
specifications/instructions, original byCharles Mayes 34, 105, 133Reed & Barnes 36, 106, 134Terry & Oakden 46, 106, 134W W Wardell 105, 134
spectroscopy 71, 73, 83
stucco terminology 1, 35, 106
stucco (types - see also plaster, cement render)cement 1, 14, 26, 29, 30, 48, 91, 95, 103, 116, 117, 119,
120, 121common 22, 92lime 6, 18, 22, 29, 38, 92, 94, 117, 118, 119, 120local 29, 37modern 3, 6, 86Portland cement 1, 6, 24, 49, 102, 117, 120, 121
surface deposits 73, 77, 78, 98, 99
Syria, tomb at Palmyra 3
Ttallow 23, 42, 101
TasmaniaHobart, Anglesea Barracks 93Hobart, Prospect Farm 92Launceston, Wesleyan Chapel 39Mountford 40, 41New Norfolk, Willow Court 40, 42, 135
testingchemical 69, 71visual 69, 71
textured finishes (see also roughcast, pebbledash) 1, 22, 128
titanium dioxide 85, 86, 102
UUK
Isle of Wight, Osborne House 19, 20Kent, Mereworth Castle 5London, Park Crescent 7
Vvarnish 75, 82, 84, 89
vermiculation 46
VictoriaBallarat, Prince Regent House 96Bendigo Law Courts 21, 26, 27Bendigo, Shamrock Hotel 15Carlton, Benvenuta (Medley Hall) 39, 43, 47, 48, 49, 73,
74, 75, 77, 80, 88, 89

140 Victorian Stucco
Carlton, Church of Our Lady of the Sacred Heart 95Carlton, Trades Hall 103Carlton, �Walkham House� 46, 47Castlemaine, former church 13Clunes Free Library (former) 12Clunes, National Bank 24Doncaster, �Pontville� 40, 41East Melbourne, Greek Orthodox Church 44Fitzroy, Gore Street 35, 40, 45, 134Hawthorn, Scotch College Hall 98Inverleigh, �Lullote� 33Malmsbury Town Hall 116, 117Melbourne, Duke of Wellington Hotel 21Port Albert, �Hawthorn Bank� 37Port Fairy, Volunteer Arms Hotel 40, 41Richmond, Swan Street 85South Melbourne Town Hall 1, 21, 77, 78Victoria St Kilda, 30 Burnett Street 39, 46, 97Wangaratta district, �Bontharambo� 17, 20, 107, 108,
115, 135
visual inspection 69
WWA
Fremantle, �Kyneton� 47
Waschatz, Otto 47
wattle and daub 37
Westox system of adhesives and additives 114, 116, 118, 119
whitewash (see also limewash) 74, 76, 77, 85, 87, 89, 125
whiting (calcium carbonate - see also chalk) 7, 42, 75, 89, 102, 123
Zzinc white (zinc carbonate) 85, 95


Editor: Miles Lewis
Victorian Stucco
V
icto
rian
Suc
co


![Nurse Stucco Inc.nursestucco.com/wp-content/uploads/2017/02/Nurse-Stucco-IIPP-Manual.pdfNurse Stucco Inc. Injury and Illness Prevention Program [High Hazard] Prepared by: Nurse Stucco](https://img.pdfslide.us/doc/110x75/5e7cb411957c795622453e76/nurse-stucco-inc-nurse-stucco-inc-injury-and-illness-prevention-program-high.jpg)