Embed Size (px)
Citation preview

TV Lift Cabinet Owner's Manual
www.touchstonehomeproducts.com 800.215.1990
Flat Screen TV Lift
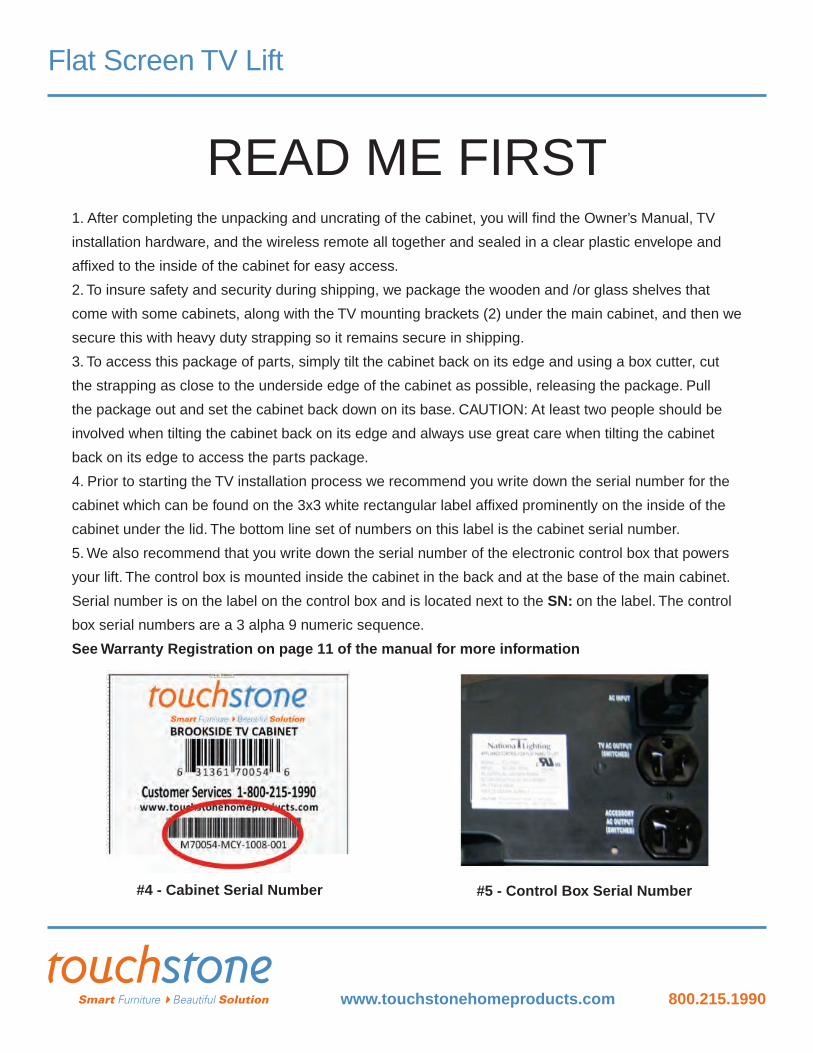
READ ME FIRST1. After completing the unpacking and uncrating of the cabinet, you will fi nd the Owner’s Manual, TV
installation hardware, and the wireless remote all together and sealed in a clear plastic envelope and
affi xed to the inside of the cabinet for easy access.
2. To insure safety and security during shipping, we package the wooden and /or glass shelves that
come with some cabinets, along with the TV mounting brackets (2) under the main cabinet, and then we
secure this with heavy duty strapping so it remains secure in shipping.
3. To access this package of parts, simply tilt the cabinet back on its edge and using a box cutter, cut
the strapping as close to the underside edge of the cabinet as possible, releasing the package. Pull
the package out and set the cabinet back down on its base. CAUTION: At least two people should be
involved when tilting the cabinet back on its edge and always use great care when tilting the cabinet
back on its edge to access the parts package.
4. Prior to starting the TV installation process we recommend you write down the serial number for the
cabinet which can be found on the 3x3 white rectangular label affi xed prominently on the inside of the
cabinet under the lid. The bottom line set of numbers on this label is the cabinet serial number.
5. We also recommend that you write down the serial number of the electronic control box that powers
your lift. The control box is mounted inside the cabinet in the back and at the base of the main cabinet.
Serial number is on the label on the control box and is located next to the SN: on the label. The control
box serial numbers are a 3 alpha 9 numeric sequence.
See Warranty Registration on page 11 of the manual for more information
#4 - Cabinet Serial Number #5 - Control Box Serial Number
www.touchstonehomeproducts.com 800.215.1990
Flat Screen TV Lift
Table of Contents
ABOUT YOUR TOUCHSTONE TV LIFT CABINET ................................................................................ 1
SAFETY ................................................................................................................................................... 3
ADDITIONAL INSTRUCTIONS FOR THE 73000 BEDROOM SERIES ................................................. 4
LIFT COMPONENTS & TV INSTALLATION HARDWARE ..................................................................... 5
MOUNTING AND INSTALLING THE TV .................................................................................................. 6
ADDITIONAL COMPONENT INTEGRATION FEATURES ...................................................................... 8
OPERATING THE LIFT TV ..................................................................................................................... 9
SETTING THE SECURITY/CHILD SAFETY FEATURE ........................................................................ 10
REMOTE CONTROL INFORMATION ................................................................................................... 11
TROUBLESHOOTING .......................................................................................................................... 12
TOUCHSTONE HOME PRODUCTS LIMITED WARRANTY .............................................................. 13
IR REPEATER ...................................................................................................................................... 14
SPECIFICATIONS ................................................................................................................................. 15
www.touchstonehomeproducts.com 800.215.1990
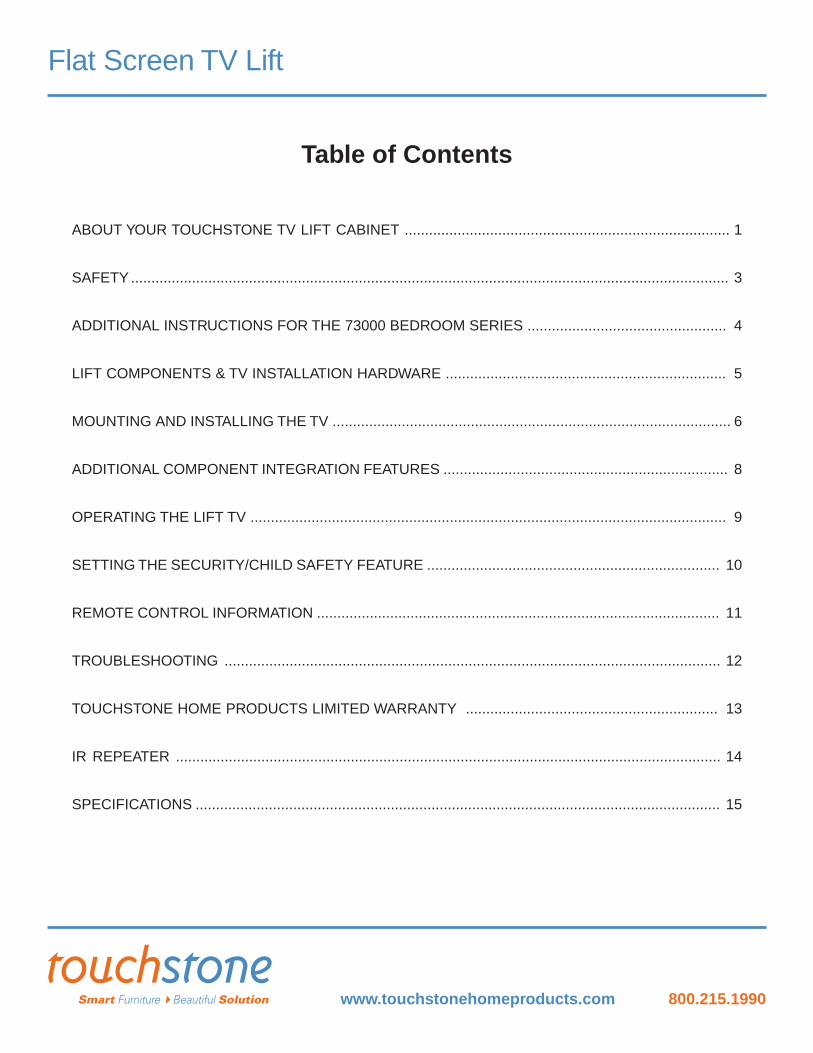
Flat Screen TV Lift 1
73000 End of Bed Series Component Shelf
Full & Mid Size Main Cabinet Interior
About Your TouchStone TV Lift Cabinet
www.touchstonehomeproducts.com 800.215.1990
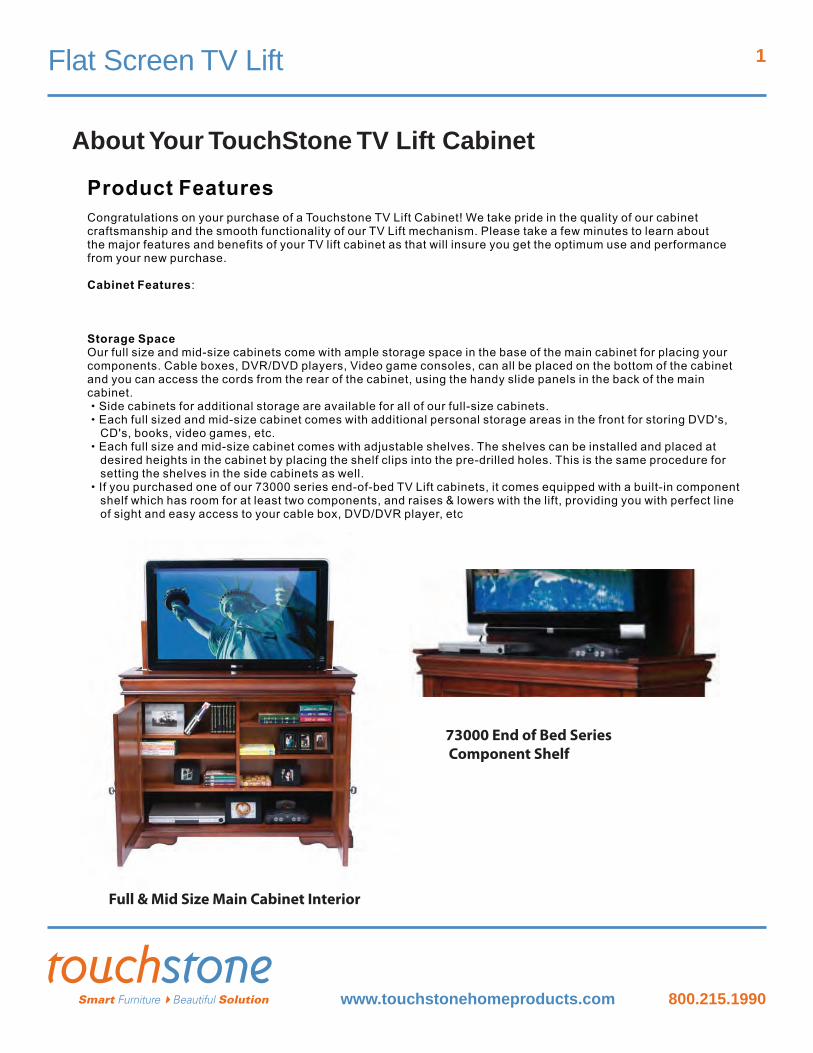
Flat Screen TV Lift 2
70052 Adonzo Pull Down Media CompartmentCable Management System
About Your TouchStone TV Lift Cabinet

www.touchstonehomeproducts.com 800.215.1990
Flat Screen TV Lift 3
Safety
Installing your Flat Screen TV in your Touchstone TV lift cabinet is fast and easy. Operating your lift isvery straightforward. However, to avoid the risk of personal injury and to insure optimum performanceof your TV lift mechanism, please pay particular attention to the warnings and safety notices throughoutthis manual.
IMPORTANT SAFETY and PRE-INSTALLATION INSTRUCTIONS
1. Please adhere to the proper installation procedure as detailed in the installation instructions.2. Safety precaution measures must be practiced at all times during the installation of this product.3. The entire installation instructions should be fully read and understood before beginning installation.4. At least two qualifi ed people should always perform the installation work. Please take care when handling your fl at screen TV as injury and damage can result from dropping or mishandling of the TV.5. Plasma screen TV’s should remain upright at all times. Never place screen face down on the fl oor. This could cause damage to the TV.6. The stand on your fl at screen TV is removable! Please remove prior to installing the TV on the lift.7. Carefully measure all dimensions on your LCD, PLASMA, or OLED TV before proceeding. Then consult our handy Dimensions Chart in the back of the Owners Manual for maximum TV size guidelines for each of our TV Lift Cabinets. IMPORTANT! : After installing your TV on the lift, check to see if there is enough room for accessory components in the bottom area of the cabinet before placing them inside.8. All cords connecting components to the TV and/or the Control Box should be a minimum of at least 60” (5 feet) in length.9. Keep hands, arms, and fi ngers away from the lift and the cabinet lid opening when the lift is in motion.10. Clean lift mechanism unit with a dry cloth only. Never use water or liquids on the lift mechanism.
Please see Setting the Security/Child Safety Feature Section on Page 9 of the Manual.
Contact Touchstone Customer Service at 1-800-215-1990 for any questions regardingthe operation of your TV lift cabinet.Or consult our web site at www.touchstonehomeproducts.com/serviceandsupport.
www.touchstonehomeproducts.com 800.215.1990
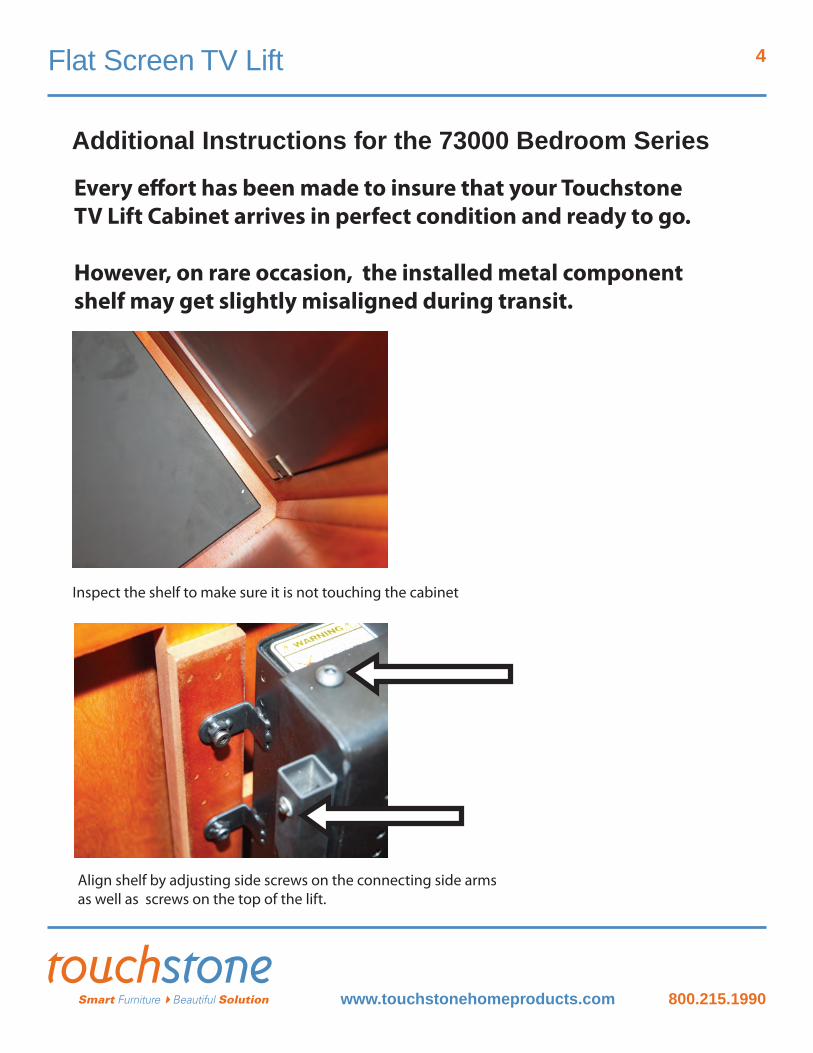
Flat Screen TV Lift 4
Every effort has been made to insure that your TouchstoneTV Lift Cabinet arrives in perfect condition and ready to go.
However, on rare occasion, the installed metal component shelf may get slightly misaligned during transit.
Inspect the shelf to make sure it is not touching the cabinet
Align shelf by adjusting side screws on the connecting side armsas well as screws on the top of the lift.
Additional Instructions for the 73000 Bedroom Series
www.touchstonehomeproducts.com 800.215.1990
Flat Screen TV Lift 5
Wireless Remote Control
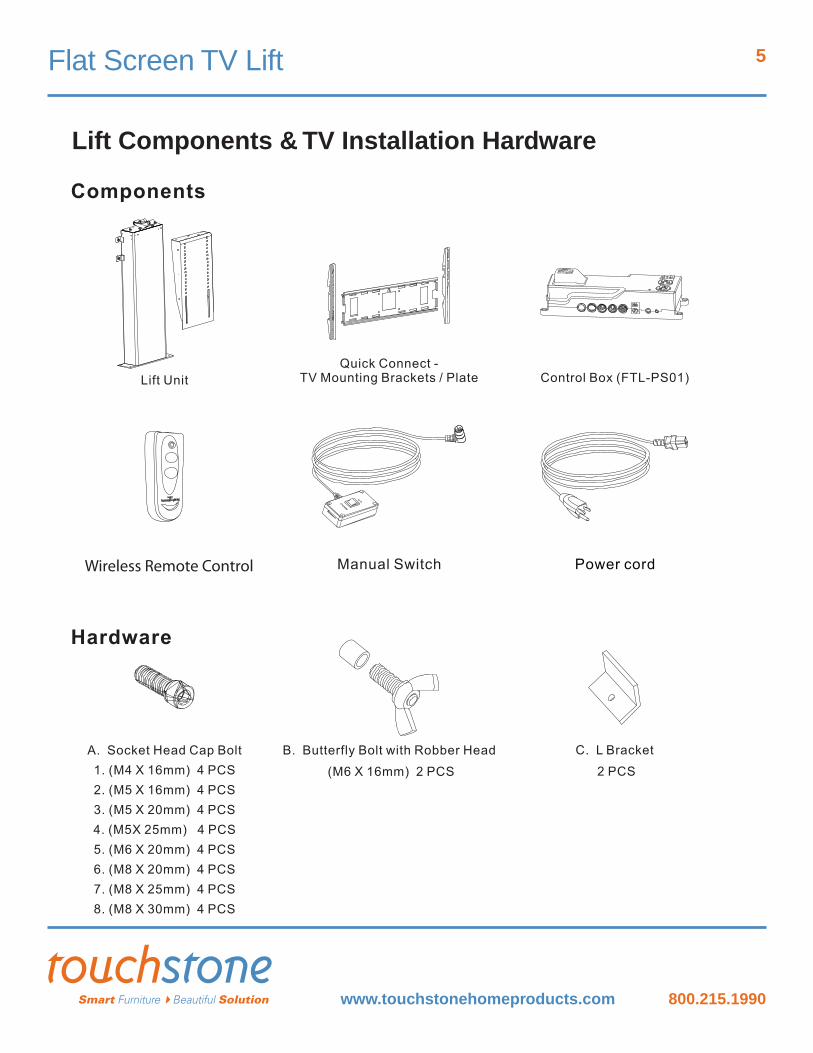
Lift Components & TV Installation Hardware
www.touchstonehomeproducts.com 800.215.1990
Flat Screen TV Lift 6
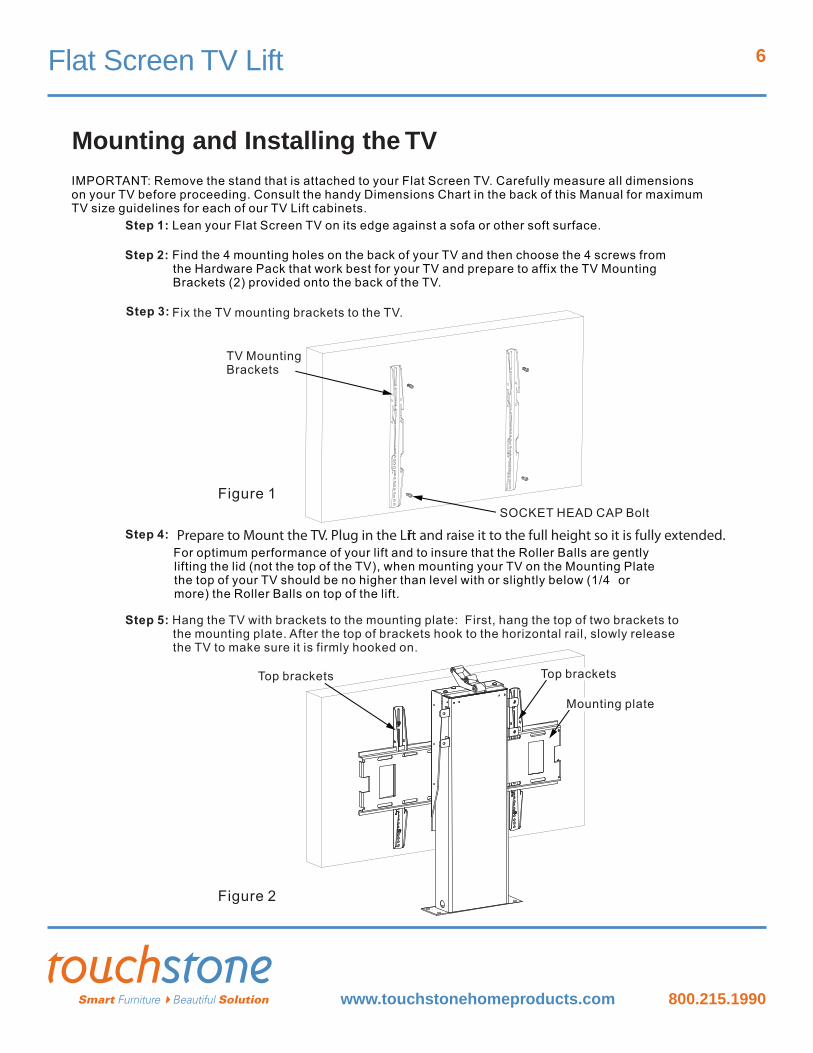
Prepare to Mount the TV. Plug in the Li and raise it to the full height so it is fully extended.
Mounting and Installing the TV
www.touchstonehomeproducts.com 800.215.1990
Flat Screen TV Lift 7
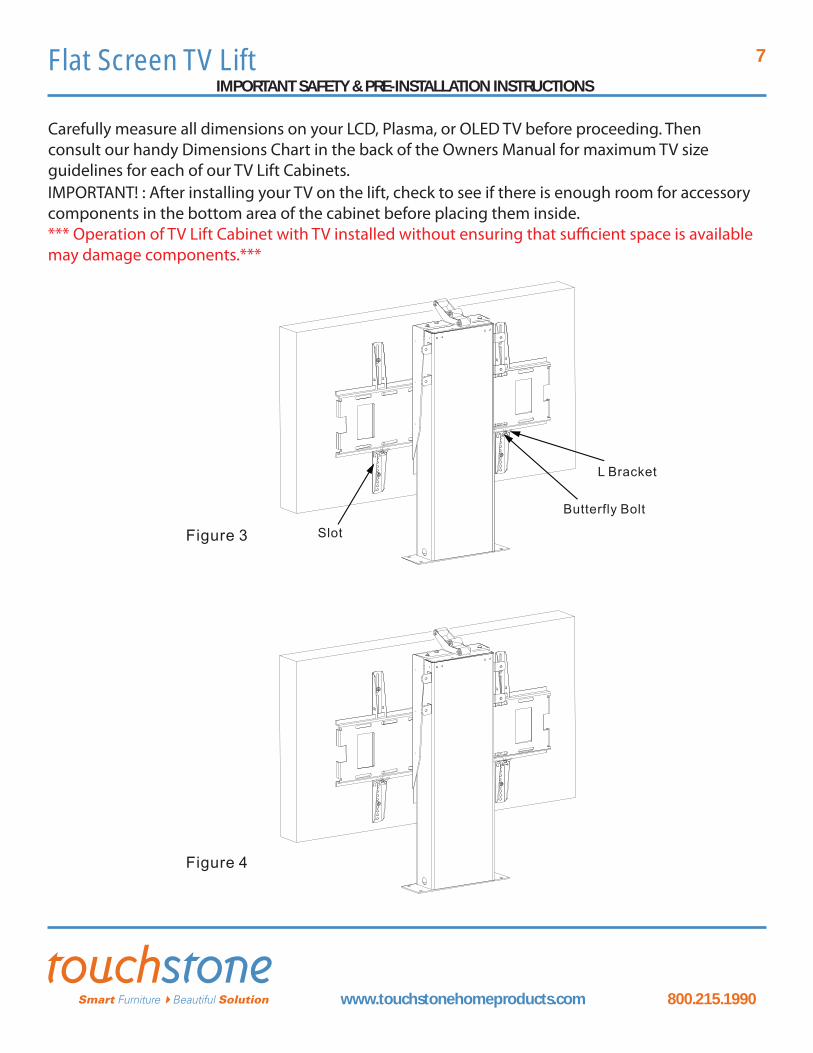
IMPORTANT SAFETY & PRE-INSTALLATION INSTRUCTIONS
Carefully measure all dimensions on your LCD, Plasma, or OLED TV before proceeding. Then consult our handy Dimensions Chart in the back of the Owners Manual for maximum TV size guidelines for each of our TV Lift Cabinets.IMPORTANT! : After installing your TV on the lift, check to see if there is enough room for accessory components in the bottom area of the cabinet before placing them inside.*** Operation of TV Lift Cabinet with TV installed without ensuring that su�cient space is available may damage components.***
www.touchstonehomeproducts.com 800.215.1990
Flat Screen TV Lift 8
o
o
The Touchstone control box comes equipped with additional input/output features that allow you to connect external devices such as high-end amplifi ers, automated systems such as Crestron, and other devices that you can operate using your Universal remote.
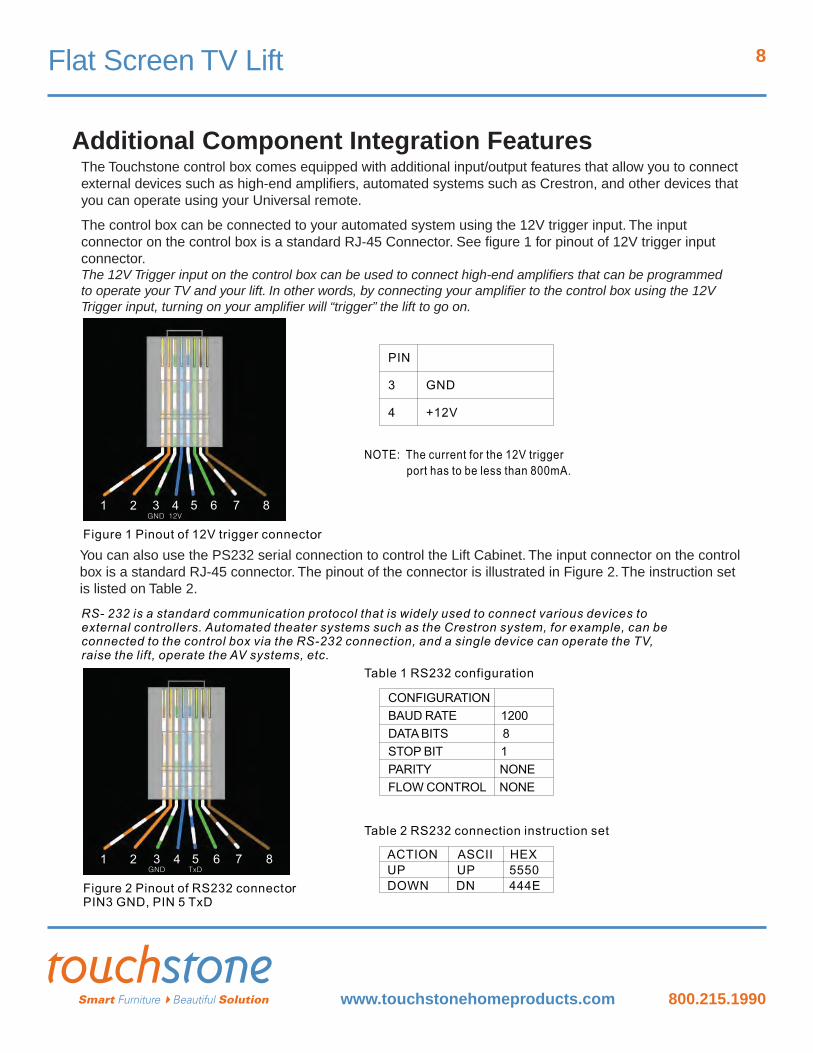
The control box can be connected to your automated system using the 12V trigger input. The input connector on the control box is a standard RJ-45 Connector. See fi gure 1 for pinout of 12V trigger inputconnector.The 12V Trigger input on the control box can be used to connect high-end amplifi ers that can be programmed to operate your TV and your lift. In other words, by connecting your amplifi er to the control box using the 12V Trigger input, turning on your amplifi er will “trigger” the lift to go on.
You can also use the PS232 serial connection to control the Lift Cabinet. The input connector on the control box is a standard RJ-45 connector. The pinout of the connector is illustrated in Figure 2. The instruction set is listed on Table 2.
Additional Component Integration Features
www.touchstonehomeproducts.com 800.215.1990
Flat Screen TV Lift 9
1. Make sure the li is at the lowest position, fully down.
2. Locate the manual switch inside the cabinet.
3. Press the “UP” bu on on the manual switch
4. When the li reaches the desired height for optimum viewing and comfort for you, press either the “UP” or “DOWN” button on the manual switch and the control bo x will memorize and store that height.
Connecting Components
Setting the Lift Height
The control box comes equipped with 2 switched AC receptacles that you can plug components into.
If you choose to use the outlets, please note that each time you raise or lower the lift,
For certain components that may have long reboot/restart times such as Cable Boxes,
Operating the TV Lift

www.touchstonehomeproducts.com 800.215.1990
Flat Screen TV Lift 10
Note: All security settings must be set by the handset (manual switch) located inside the cabinet.Handsets are located in the back of the 73000 Bedroom Series and in the front of the cabinetin the Mid and Full Size Cabinet Lines.
Security / Child Safety Feature (Lock Mode) : To enable this feature the lift must be lowered to itslowest position. Press the DOWN button on the handset and hold for approximately 5 seconds toenable the Security / Child Safety Feature (Lock Mode). The LED indicator on the control box will fl ashquickly in orange and you will hear a single beep indicating the Lock Mode is enabled. All the liftcontrols (handset, remote controls, 12V trigger and RS-232 port) are disabled. The orange light willcontinue to blink quickly as long as the lift remains in Lock Mode.
Note: Release the DOWN button on the handset once you hear the fi rst beep. If you continue to hold the DOWN button and hear a second beep then you have preformed a different function (Pairing New RF Remote to Control Box) and the Security/Child Safety Feature will not have been activated.
Active Mode: The lift controls can be enabled temporarily for 5 minutes when the lift is in Lock Mode.Press the DOWN key once and the UP key twice to enable the Active Mode temporarily. The LEDindicator on the control box will fl ash slowly in orange and you will hear a short beep indicating theActive Mode is enabled. All the lift controls (handset, remote controls, 12V trigger and RS-232 port) will be enabled for 5 minutes; after this period of time the lift will automatically switch back to Lock Mode. While in Active Mode the orange indicator LED will fl ash slower than when the lift is in Lock Mode.
Disabling the Security / Child Safety Feature (Lock Mode): Press the UP button once and the DOWN button twice on the handset while the lift is in Lock Mode to disable the Security / Child Safety Feature (Lock Mode). The LED indicator on the control box will turn solid green and you will hear two beeps indicating the Lock Mode has successfully been disabled. All the lift controls (handset, remote controls, 12V trigger and RS-232 port) will be enabled.
Setting the Security/Child Safety Feature
www.touchstonehomeproducts.com 800.215.1990
Flat Screen TV Lift 11
Remote Control Information
www.touchstonehomeproducts.com 800.215.1990
Flat Screen TV Lift 12
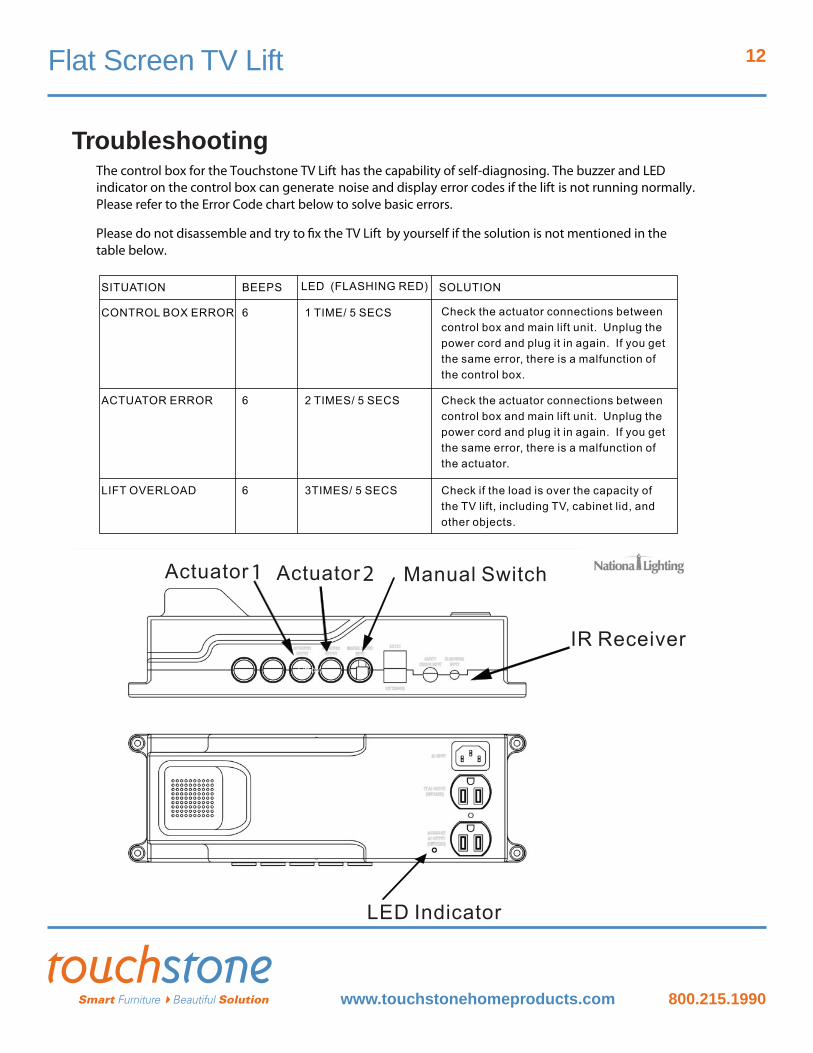
The control box for the Touchstone TV Lift has the capability of self-diagnosing. The buzzer and LED indicator on the control box can generate noise and display error codes if the lift is not running normally.Please refer to the Error Code chart below to solve basic errors.
Please do not disassemble and try to fix the TV Lift by yourself if the solution is not mentioned in the table below.
1 2
Troubleshooting
www.touchstonehomeproducts.com 800.215.1990
Flat Screen TV Lift 13
Warranty Registration :
To register your Touchstone TV Lift Cabinet, please go to our websiteat www.touchstonehomeproducts.com/serviceandsupport.
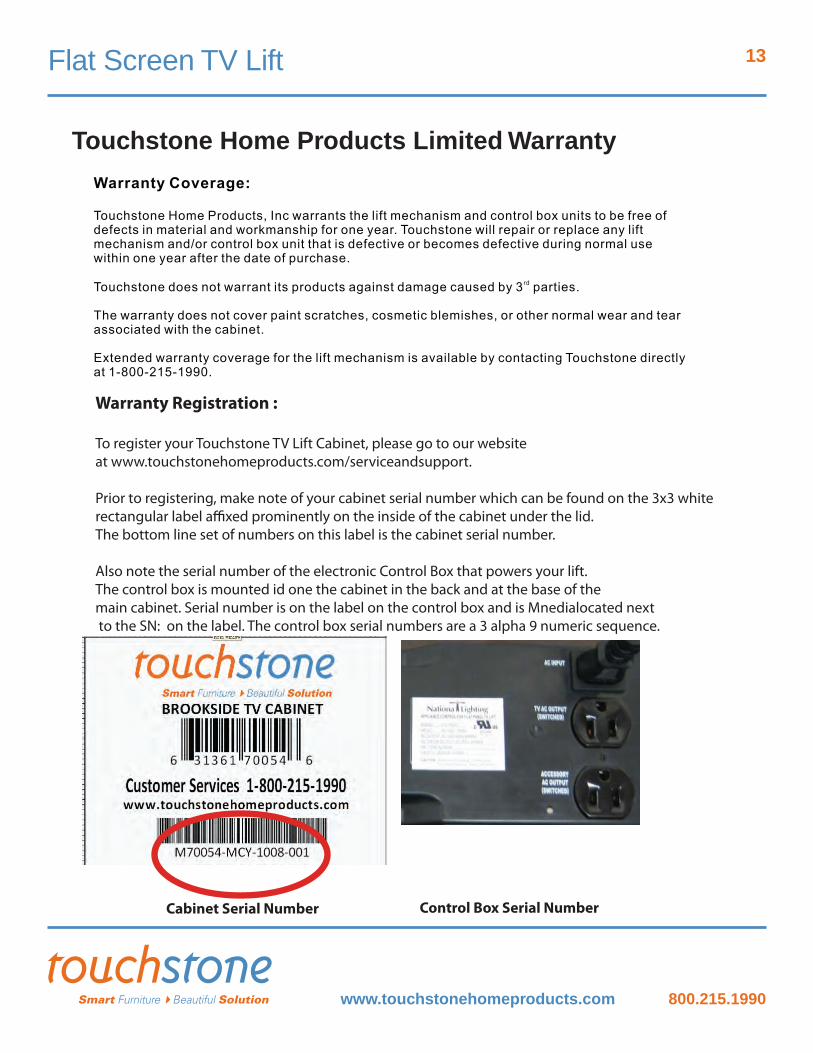
Prior to registering, make note of your cabinet serial number which can be found on the 3x3 white
The bottom line set of numbers on this label is the cabinet serial number.
Also note the serial number of the electronic Control Box that powers your lift. The control box is mounted id one the cabinet in the back and at the base of the main cabinet. Serial number is on the label on the control box and is Mnedialocated next to the SN: on the label. The control box serial numbers are a 3 alpha 9 numeric sequence.
Cabinet Serial Number Control Box Serial Number
Touchstone Home Products Limited Warranty
www.touchstonehomeproducts.com 800.215.1990
Flat Screen TV Lift 14
IR REPEATER
All of our full size and mid-size line of TV Lift cabinets manufactured after 9/1/09 come “IR-ready”,with a built in IR eye, so that you can hide your components behind closed doors, yet be able tooperate them via remote simply by pointing your component’s remote toward the built-in eye.
To make your “IR ready” Touchstone TV Lift cabinet IR operational, you will need the TouchstoneIR Repeater Kit, P/N# 70012, which is available from your retailer/dealer or atwww.touchstonehomeproducts.com.
The IR repeater kit comes with 3 emitters, an emitter control box, and an extra IR eye. TheTouchstone IR Repeater Kit is all you need to be able to operate all of your components fromone central “IR-ready” eye, which has been pre-installed and is conveniently located in the upperright corner of our full and mid-size main cabinets. If you plan on placing components in yourside cabinets as many people do, the 3 emitters in the kit can handle that type of confi guration.
www.touchstonehomeproducts.com 800.215.1990
Flat Screen TV Lift 15
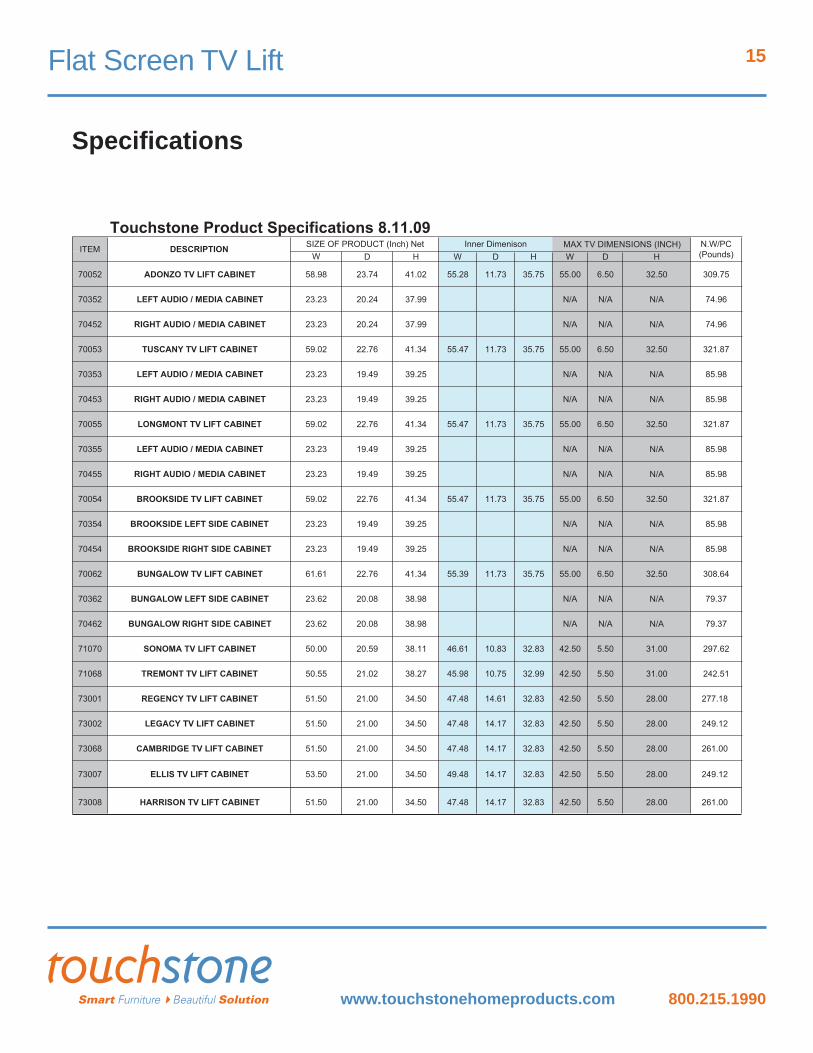
Specifi cations