Embed Size (px)
Citation preview

sfml-dev.org http://www.sfml-dev.org/tutorials/2.2/
Tutorials for SFML 2.2
Getting started
SFML and Visual Studio
SFML and Code::Blocks (MinGW)
SFML and Linux
SFML and Xcode (Mac OS X)
Compiling SFML with CMake
System module
Handling time
Threads
User data streams
Window module
Opening and managing an SFML window
Events explained
Keyboard, mouse and joysticks
Using OpenGL in a SFML window
Graphics module
Drawing 2D stuff
Sprites and textures
Text and fonts
Shapes
Designing your own entities with vertex arrays
Position, rotation, scale: transforming entities
Adding special effects with shaders
Controlling the 2D camera with views
Audio module
Playing sounds and music
Recording audio
Custom audio streams
Spatialization: Sounds in 3D
Network module
Communication using sockets

Using and extending packets
Web requests with HTTP
File transfers with FTP
SFML is licensed under the terms and conditions of the zlib/png license.Copyright © Laurent Gomila

sfml-dev.org http://www.sfml-dev.org/tutorials/2.2/start-vc.php
SFML and Visual studio
Introduction
This tutorial is the first one you should read if you're using SFML withthe Visual Studio IDE (Visual C++ compiler). It will explain how toconfigure your SFML projects.
Installing SFML
First, you must download the SFML SDK from the download page.
You must download the package that matches your version of Visual C++. Indeed, a library compiled with VC++9 (Visual Studio 2008) won't be compatible with VC++ 10 (Visual Studio 2010) for example. If there's no SFMLpackage compiled for your version of Visual C++, you will have to build SFML yourself .
You can then unpack the SFML archive wherever you like. Copying headers and libraries to your installation ofVisual Studio is not recommended, it's better to keep libraries in their own separate location, especially if youintend to use several versions of the same library, or several compilers.
Creating and configuring a SFML project
The first thing to do is choose what kind of project to create: you must select "Win32 application". The wizardoffers a few options to customize the project: select "Console application" if you need the console, or "Windowsapplication" if you don't want it. Check the "Empty project" box if you don't want to be annoyed with auto-generated code.For the purpose of this tutorial, you should create a main.cpp file and add it to the project, so that we have accessto the C++ settings (otherwise Visual Studio doesn't know which language you're going to use for this project).We'll explain what to put inside later.
Now we need to tell the compiler where to find the SFML headers (.hpp files), and the linker where to find theSFML libraries (.lib files).
In the project's properties, add:
The path to the SFML headers ( /include) to C/C++ » General » Additional Include Directories
The path to the SFML libraries ( /lib) to Linker » General » Additional Library Directories
These paths are the same in both Debug and Release configuration, so you can set them globally for your project("All configurations").

The next step is to link your application to the SFML libraries (.lib files) that your code will need. SFML is made of5 modules (system, window, graphics, network and audio), and there's one library for each of them.Libraries must be added in the project's properties, in Linker » Input » Additional Dependencies. Add all the SFMLlibraries that you need, for example "sfml-graphics.lib", "sfml-window.lib" and "sfml-system.lib".
It is important to link to the libraries that match the configuration: "sfml-xxx-d.lib" for Debug, and "sfml-xxx.lib" forRelease. A bad mix may result in crashes.
The settings shown here will result in your application being linked to the dynamic version of SFML, the one thatneeds the DLL files. If you want to get rid of these DLLs and have SFML directly integrated into your executable,you must link to the static version. Static SFML libraries have the "-s" suffix: "sfml-xxx-s-d.lib" for Debug, and"sfml-xxx-s.lib" for Release.In this case, you'll also need to define the SFML_STATIC macro in the preprocessor options of your project.

Starting from SFML 2.2, when static linking, you will have to link all of SFML's dependencies to your project aswell. This means that if you are linking sfml-window-s.lib or sfml-window-s-d.lib for example, you will also have tolink opengl32.lib, winmm.lib and gdi32.lib. Some of these dependency libraries might already be listed under"Inherited values", but adding them again yourself shouldn't cause any problems.
Here are the dependencies of each module, append the -d as described above if you want to link the SFMLdebug libraries:
Module Dependencies
sfml-system-s.libwinmm.lib
sfml-network-s.libsfml-system-s.libws2_32.lib
sfml-audio-s.libsfml-system-s.libsndfile.libopenal32.lib

sfml-window-s.libsfml-system-s.libopengl32.libgdi32.libwinmm.lib
sfml-graphics-s.libsfml-window-s.libsfml-system-s.libglew.libfreetype.libjpeg.libopengl32.lib
Module Dependencies
You might have noticed from the table that SFML modules can also depend on one another, e.g. sfml-graphics-s.lib depends both on sfml-window-s.lib and sfml-system-s.lib. If you static link to an SFML library, make sure tolink to the dependencies of the library in question, as well as the dependencies of the dependencies and so on. Ifanything along the dependency chain is missing, you will get linker errors.
If you are slightly confused, don't worry, it is perfectly normal for beginners to be overwhelmed by all thisinformation regarding static linking. If something doesn't work for you the first time around, you can simply keeptrying always bearing in mind what has been said above. If you still can't get static linking to work, you can checkthe FAQ and the forum for threads about static linking.
If you don't know the differences between dynamic (also called shared) and static libraries, and don't know whichone to use, you can search for more information on the internet. There are many good articles/blogs/posts aboutthem.
Your project is ready, let's write some code now to make sure that it works. Put the following code inside themain.cpp file:
#include <SFML/Graphics.hpp>
int main(){ sf::RenderWindow window(sf::VideoMode(200, 200), "SFML works!"); sf::CircleShape shape(100.f); shape.setFillColor(sf::Color::Green);
while (window.isOpen()) { sf::Event event; while (window.pollEvent(event)) { if (event.type == sf::Event::Closed) window.close(); }
window.clear(); window.draw(shape);

window.display(); }
return 0;}
If you chose to create a "Windows application" project, the entry point of your code has to be set to "WinMain"instead of "main". Since it's Windows specific, and your code would therefore not compile on Linux or Mac OS X,SFML provides a way to keep a standard "main" entry point in this case: link your project to the sfml-main module("sfml-main-d.lib" in Debug, "sfml-main.lib" in Release), the same way you linked sfml-graphics, sfml-window andsfml-system.
Now compile the project, and if you linked to the dynamic version of SFML, don't forget to copy the SFML DLLs(they are in ) to the directory where your compiled executable is. Run it, and if everything works you should seethis:
If you are using the sfml-audio module (regardless whether statically ordynamically), you must also copy the DLLs of the external libraries neededby it, which are libsndfile-1.dll and OpenAL32.dll.These files can be found in too.

sfml-dev.org http://www.sfml-dev.org/tutorials/2.2/start-cb.php
SFML and Code::Blocks (MinGW)
Introduction
This tutorial is the first one you should read if you're using SFML withthe Code::Blocks IDE, and the GCC compiler (this is the default one).It will explain how to configure your SFML projects.
Installing SFML
First, you must download the SFML SDK from the download page.
There are multiple variants of GCC for Windows, which are incompatible with each other (different exceptionmanagement, threading model, etc.). Make sure you select the package which corresponds to the version thatyou use. If you are unsure, check which of the libgcc_s_sjlj-1.dll or libgcc_s_dw2-1.dll files is present in yourMinGW/bin folder. If MinGW was installed along with Code::Blocks, you probably have an SJLJ version. If you feel like your version of GCC can't work with the precompiled SFML libraries, don't hesitate to build SFMLyourself, it's not complicated.
You can then unpack the SFML archive wherever you like. Copying headers and libraries to your installation ofMinGW is not recommended, it's better to keep libraries in their own separate location, especially if you intend touse several versions of the same library, or several compilers.
Creating and configuring a SFML project
The first thing to do is choose what kind of project to create. Code::Blocks offers a wide variety of project types,including an "SFML project". Don't use it! It hasn't been updated in a long time and is likely incompatible withrecent versions of SFML. Instead, create an Empty project. If you want to get rid of the console, in the projectproperties, go to the "Build targets" tab and select "GUI application" in the combo box instead of "Consoleapplication".
Now we need to tell the compiler where to find the SFML headers (.hpp files), and the linker where to find theSFML libraries (.a files).
In the project's "Build options", "Search directories" tab, add:
The path to the SFML headers ( /include) to the Compiler search directories
The path to the SFML libraries ( /lib) to the Linker search directories
These paths are the same in both Debug and Release configuration, so you can set them globally for yourproject.

The next step is to link your application to the SFML libraries (.a files) that your code will need. SFML is made of 5modules (system, window, graphics, network and audio), and there's one library for each of them.Libraries must be added to the "Link libraries" list in the project's build options, under the "Linker settings" tab.Add all the SFML libraries that you need, for example "sfml-graphics", "sfml-window" and "sfml-system" (the "lib"prefix and the ".a" extension must be omitted).

It is important to link to the libraries that match the configuration: "sfml-xxx-d" for Debug, and "sfml-xxx" forRelease. A bad mix may result in crashes.
When linking to multiple SFML libraries, make sure that you link them in the right order, it is very important forGCC. The rule is that libraries that depend on other libraries must be put first in the list. Every SFML librarydepends on sfml-system, and sfml-graphics also depends on sfml-window. So, the correct order for these threelibraries would be: sfml-graphics, sfml-window, sfml-system -- as shown in the screen capture above.
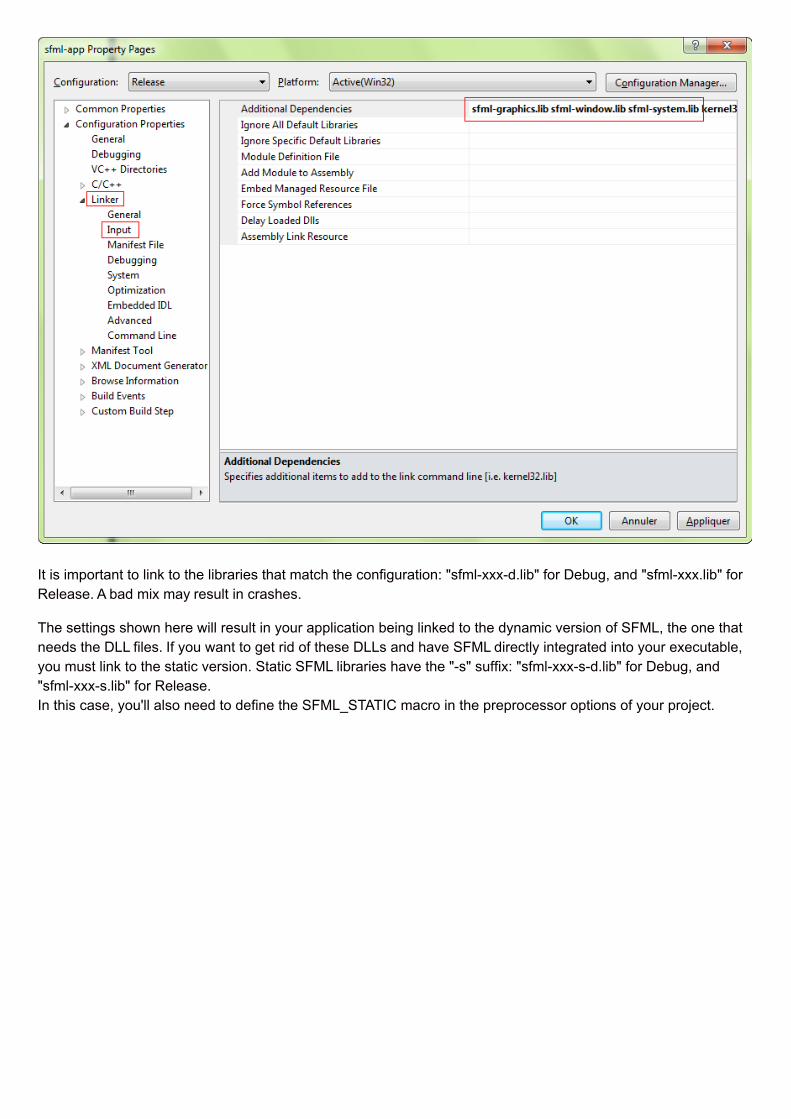
The settings shown here will result in your application being linked to the dynamic version of SFML, the one thatneeds the DLL files. If you want to get rid of these DLLs and have SFML directly integrated into your executable,you must link to the static version. Static SFML libraries have the "-s" suffix: "sfml-xxx-s-d" for Debug, and "sfml-xxx-s" for Release.In this case, you'll also need to define the SFML_STATIC macro in the preprocessor options of your project.
Starting from SFML 2.2, when static linking, you will have to link all of SFML's dependencies to your project aswell. This means that if you are linking sfml-window-s or sfml-window-s-d for example, you will also have to linkopengl32, winmm and gdi32. Some of these dependency libraries might already be listed under "Inheritedvalues", but adding them again yourself shouldn't cause any problems.
Here are the dependencies of each module, append the -d as described above if you want to link the SFMLdebug libraries:
Module Dependencies
sfml-system-swinmm
sfml-network-ssfml-system-sws2_32
sfml-audio-ssfml-system-ssndfileopenal32

sfml-window-ssfml-system-sopengl32gdi32winmm
sfml-graphics-ssfml-window-ssfml-system-sglewfreetypejpegopengl32
Module Dependencies
You might have noticed from the table that SFML modules can also depend on one another, e.g. sfml-graphics-sdepends both on sfml-window-s and sfml-system-s. If you static link to an SFML library, make sure to link to thedependencies of the library in question, as well as the dependencies of the dependencies and so on. If anythingalong the dependency chain is missing, you will get linker errors.
Additionally, because Code::Blocks makes use of GCC, the linking order does matter. This means that librariesthat depend on other libraries have to be added to the library list before the libraries they depend on. If you don'tfollow this rule, you will get linker errors.
If you are slightly confused, don't worry, it is perfectly normal for beginners to be overwhelmed by all thisinformation regarding static linking. If something doesn't work for you the first time around, you can simply keeptrying always bearing in mind what has been said above. If you still can't get static linking to work, you can checkthe FAQ and the forum for threads about static linking.
If you don't know the differences between dynamic (also called shared) and static libraries, and don't know whichone to use, you can search for more information on the internet. There are many good articles/blogs/posts aboutthem.
Your project is ready, let's write some code now to make sure that it works. Add a "main.cpp" file to your project,with the following code inside:
#include <SFML/Graphics.hpp>
int main(){ sf::RenderWindow window(sf::VideoMode(200, 200), "SFML works!"); sf::CircleShape shape(100.f); shape.setFillColor(sf::Color::Green);
while (window.isOpen()) { sf::Event event; while (window.pollEvent(event)) { if (event.type == sf::Event::Closed) window.close(); }

window.clear(); window.draw(shape); window.display(); }
return 0;}
Compile it, and if you linked to the dynamic version of SFML, don't forget to copy the SFML DLLs (they are in ) tothe directory where your compiled executable is. Run it, and if everything works you should see this:
If you are using the sfml-audio module (regardless whether statically ordynamically), you must also copy the DLLs of the external libraries neededby it, which are libsndfile-1.dll and OpenAL32.dll.These files can be found in too.

sfml-dev.org http://www.sfml-dev.org/tutorials/2.2/start-linux.php
SFML and Linux
Introduction
This tutorial is the first one you should read if you're using SFML onLinux. It will explain how to install SFML, and compile projects thatuse it.
Installing SFML
There are different approaches to the installation of SFML on Linux:
Install it directly from your distribution's package repository
Download the precompiled SDK and manually copy the files
Get the source code, build it and install it
Option 1 is the preferred one; if the version of SFML that you want to install is available in the official repository,then install it using your package manager. For example, on Debian you would do:
sudo apt-get install libsfml-dev
Option 3 requires more work: you need to ensure all of SFML's dependencies including their developmentheaders are available, make sure CMake is installed, and manually execute some commands. This will result in apackage which is tailored to your system.If you want to go this way, there's a dedicated tutorial on building SFML yourself.
Finally, option 2 is a good choice for quick installation if SFML is not available as an official package. Downloadthe SDK from the download page, unpack it and copy the files to your preferred location: either a separate path inyour personal folder (like /home/me/sfml), or a standard path (like /usr/local).
If you already had an older version of SFML installed, make sure that it won't conflict with the new version!
Compiling a SFML program
In this tutorial we're not going to talk about IDEs such as Code::Blocks or Eclipse. We'll focus on the commandsrequired to compile and link an SFML executable. Writing a complete makefile or configuring a project in an IDE isbeyond the scope of this tutorial -- there are better dedicated tutorials for this.If you're using Code::Blocks, you may refer to the Code::Blocks tutorial for Windows; many things should besimilar. You won't have to set the compiler and linker search paths if you installed SFML to one of your system'sstandard paths.
First, create a source file. For this tutorial we'll name it "main.cpp". Put the following code inside the main.cpp file:
#include <SFML/Graphics.hpp>
int main(){ sf::RenderWindow window(sf::VideoMode(200, 200), "SFML works!"); sf::CircleShape shape(100.f); shape.setFillColor(sf::Color::Green);
while (window.isOpen())

{ sf::Event event; while (window.pollEvent(event)) { if (event.type == sf::Event::Closed) window.close(); }
window.clear(); window.draw(shape); window.display(); }
return 0;}
Now let's compile it:
g++ -c main.cpp
In case you installed SFML to a non-standard path, you'll need to tell the compiler where to find the SFML headers(.hpp files):
g++ -c main.cpp -I<sfml-install-path>/include
Here, is the directory where you copied SFML, for example /home/me/sfml.
You must then link the compiled file to the SFML libraries in order to get the final executable. SFML is made of 5modules (system, window, graphics, network and audio), and there's one library for each of them.To link an SFML library, you must add "-lsfml-xxx" to your command line, for example "-lsfml-graphics" for thegraphics module (the "lib" prefix and the ".so" extension of the library file name must be omitted).
g++ main.o -o sfml-app -lsfml-graphics -lsfml-window -lsfml-system
If you installed SFML to a non-standard path, you'll need to tell the linker where to find the SFML libraries (.sofiles):
g++ main.o -o sfml-app -L<sfml-install-path>/lib -lsfml-graphics -lsfml-window -lsfml-system
We are now ready to execute the compiled program:
./sfml-app
If SFML is not installed in a standard path, you need to tell the dynamic linker where to find the SFML libraries firstby specifying LD_LIBRARY_PATH:
export LD_LIBRARY_PATH=<sfml-install-path>/lib && ./sfml-app
If everything works, you should see this in a new window:


sfml-dev.org http://www.sfml-dev.org/tutorials/2.2/start-osx.php
SFML and Xcode (Mac OS X)
Introduction
This is the first tutorial you should read if you're using SFML withXcode -- and more generally if you are developing applications forMac OS X. It will show you how to install SFML, set up your IDE andcompile a basic SFML program. More importantly, it will also showyou how to make your applications ready "out of the box" for the end users.
You will see several external links in this document. They are meant for further reading on specific topics forthose who are curious; reading them isn't necessary to follow this tutorial.
System requirements
All you need to create an SFML application is:
An Intel Mac with Lion or later (10.7+)
Xcode (preferably version 4 or later of the IDE which is available on the App Store) and clang.
With recent versions of Xcode you also need to install the Command Line Tools from Xcode >Preferences > Downloads > Components. If you can't find the CLT there use xcode-select --install in a Terminal and follow onscreen instructions.
Binaries: dylib vs framework
SFML is available in two formats on Mac OS X. You have the dylib libraries on the one hand and the frameworkbundles on the other. Both of them are provided as universal binaries so they can be used on 32-bit or 64-bit Intelsystems without any special consideration.
Dylib stands for dynamic library; this format is like .so libraries on Linux. You can find more details in thisdocument. Frameworks are fundamentally the same as dylibs, except that they can encapsulate externalresources. Here is the in-depth documentation.
There is only one slight difference between these two kinds of libraries that you should be aware of whiledeveloping SFML applications: if you build SFML yourself, you can get dylib in both release and debugconfigurations. However, frameworks are only available in the release configuration. In either case, it wouldn't bean issue since you would use the release version of SFML when you release your application anyway. That's whythe OS X binaries on the download page are only available in the release configuration.
Xcode templates
SFML is provided with two templates for Xcode 4 and later which allow you to create new application projectsvery quickly and easily. These templates can create custom projects: you can select which modules yourapplication requires, whether you want to use SFML as dylib or as frameworks and whether to create anapplication bundle containing all its resources (making the installation process of your applications as easy as asimple drag-and-drop) or a classic binary. See below for more details.
Be aware that these templates are not compatible with Xcode 3. If you are still using this version of the IDE andyou don't consider updating it, you can still create SFML applications. A guide on doing that is beyond the scopeof this tutorial. Please refer to Apple's documentation about Xcode 3 and how to add a library to your project.

C++11, libc++ and libstdc++
Apple ships a custom version of clang and libc++ with Xcode that partially supports C++11 (i.e. some newfeatures are not yet implemented). If you plan to use C++11's new features, you need to configure your project touse clang and libc++.
However, if your project depends on libstdc++ (directly or indirectly), you need to build SFML yourself andconfigure your project accordingly.
Installing SFML
First of all you need to download the SFML SDK which is available on the download page. Then, in order to startdeveloping SFML applications, you have to install the following items:
Header files and librariesSFML is available either as dylibs or as frameworks. Only one type of binary is required although both canbe installed simultaneously on the same system. We recommend using the frameworks.
dylibCopy the content of lib to /usr/local/lib and copy the content of include to/usr/local/include.
frameworksCopy the content of Frameworks to /Library/Frameworks.
SFML dependenciesSFML only depends on two external libraries on Mac OS X. Copy sndfile.framework andfreetype.framework from extlibs to /Library/Frameworks.
Xcode templatesThis feature is optional but we strongly recommend that you install it. Copy the SFML directory fromtemplates to /Library/Developer/Xcode/Templates (create the folders if they don't exist yet).
Create your first SFML program
We provide two templates for Xcode. SFML CLT generates a project for a classic terminal program whereasSFML App creates a project for an application bundle. We will use the latter here but they both work similarly.
First select File > New Project... then choose SFML in the left column and double-click on SFML App.

Now you can fill in the required fields as shown in the following screenshot. When you are done click next.

Your new project is now set to create an application bundle ".app".
A few words about the templates settings. If you choose an incompatible option for C++ Compiler andStandard Library you will end up with linker errors. Make sure you follow this guideline:
If you downloaded the "Clang" version from the download page, you should select C++11 with Clangand libc++.
If you compiled SFML yourself, you should be able to figure out which option you should use. ;-)
Now that your project is ready, let's see what is inside:
As you can see, there are already a few files in the project. There are three important kinds:
1. Header & source files: the project comes with a basic example in main.cpp and the helper functionstd::string resourcePath(void); in ResourcePath.hpp and ResourcePath.mm. The purposeof this function, as illustrated in the provided example, is to provide a convenient way to access theResources folder of your application bundle.Please note that this function only works on Mac OS X. If you are planning to make your application workon other operating systems, you should implement your own version of this function on the operatingsystems in question.
2. Resource files: the resources of the basic example are put in this folder and are automatically copied toyour application bundle when you compile it.To add new resources to your project, simply drag and drop them into this folder and make sure that theyare a member of your application target; i.e. the box under Target Membership in the utility area(cmd+alt+1) should be checked.
3. Products: your application. Simply press the Run button to test it.
The other files in the project are not very relevant for us here. Note that the SFML dependencies of your projectare added to your application bundle in a similar in which the resources are added. This is done so that yourapplication will run out of the box on another Mac without any prior installation of SFML or its dependencies.

sfml-dev.org http://www.sfml-dev.org/tutorials/2.2/compile-with-cmake.php
Compiling SFML with CMake
Introduction
Admittedly, the title of this tutorial is a bit misleading. You will notcompile SFML with CMake, because CMake is not a compiler. So...what is CMake?
CMake is an open-source meta build system. Instead of building SFML, it builds what builds SFML: Visual Studiosolutions, Code::Blocks projects, Linux makefiles, XCode projects, etc. In fact it can generate the makefiles orprojects for any operating system and compiler of your choice. It is similar to autoconf/automake or premake forthose who are already familiar with these tools.
CMake is used by many projects including well-known ones such as Blender, Boost, KDE, and Ogre. You canread more about CMake on its official website or in its Wikipedia article.
As you might expect, this tutorial is divided into two main sections: Generating the build configuration with CMake,and building SFML with your toolchain using that build configuration.
Installing dependencies
SFML depends on a few other libraries, so before starting to configure you must have their development filesinstalled.
On Windows and Mac OS X, all the required dependencies are provided alongside SFML so you won't have todownload/install anything else. Building will work out of the box.
On Linux however, nothing is provided. SFML relies on you to install all of its dependencies on your own. Here is alist of what you need to install before building SFML:
pthread
opengl
xlib
xrandr
udev
freetype
glew
jpeg
sndfile
openal
The exact name of the packages may vary from distribution to distribution. Once those packages are installed,don't forget to install their development headers as well.
Configuring your SFML build
This step consists of creating the projects/makefiles that will finally compile SFML. Basically it consists of choosingwhat to build, how to build it and where to build it. There are several other options as well which allow you tocreate a build configuration that suits your needs. We'll see that in detail later.
The first thing to choose is where the projects/makefiles and object files (files resulting from the compilationprocess) will be created. You can generate them directly in the source tree (i.e. the SFML root directory), but it willthen be polluted with a lot of garbage: a complete hierarchy of build files, object files, etc. The cleanest solution isto generate them in a completely separate folder so that you can keep your SFML directory clean. Using separatefolders will also make it easier to have multiple different builds (static, dynamic, debug, release, ...).
Now that you've chosen the build directory, there's one more thing to do before you can run CMake. When CMakeconfigures your project, it tests the availability of the compiler (and checks its version as well). As a consequence,the compiler executable must be available when CMake is run. This is not a problem for Linux and Mac OS Xusers, since the compilers are installed in a standard path and are always globally available, but on Windows youmay have to add the directory of your compiler in the PATH environment variable, so that CMake can find itautomatically. This is especially important when you have several compilers installed, or multiple versions of thesame compiler.
On Windows, if you want to use GCC (MinGW), you can temporarily add the MinGW\bin directory to the PATH andthen run CMake from the command shell:
> set PATH=%PATH%;your_mingw_folder\bin> cmake
With Visual C++, you can either run CMake from the "Visual Studio command prompt" available from the startmenu, or run the vcvars32.bat batch file of your Visual Studio installation in the console you have open. The batchfile will set all the necessary environment variables in that console window for you.
> your_visual_studio_folder\VC\bin\vcvars32.bat> cmake
Now you are ready to run CMake. In fact there are three different ways to run it:
cmake-guiThis is CMake's graphical interface which allows you to configure everything with buttons and text fields. It'svery convenient to see and edit the build options and is probably the easiest solution for beginners andpeople who don't want to deal with the command line.
cmake -iThis is CMake's interactive command line wizard which guides you through filling build options one at atime. It is a good option if you want to start by using the command line since you are probably not able toremember all the different options that are available and which of them are important.
cmakeThis is the direct call to CMake. If you use this, you must specify all the option names and their values ascommand line parameters. To print out a list of all options, run cmake -L.
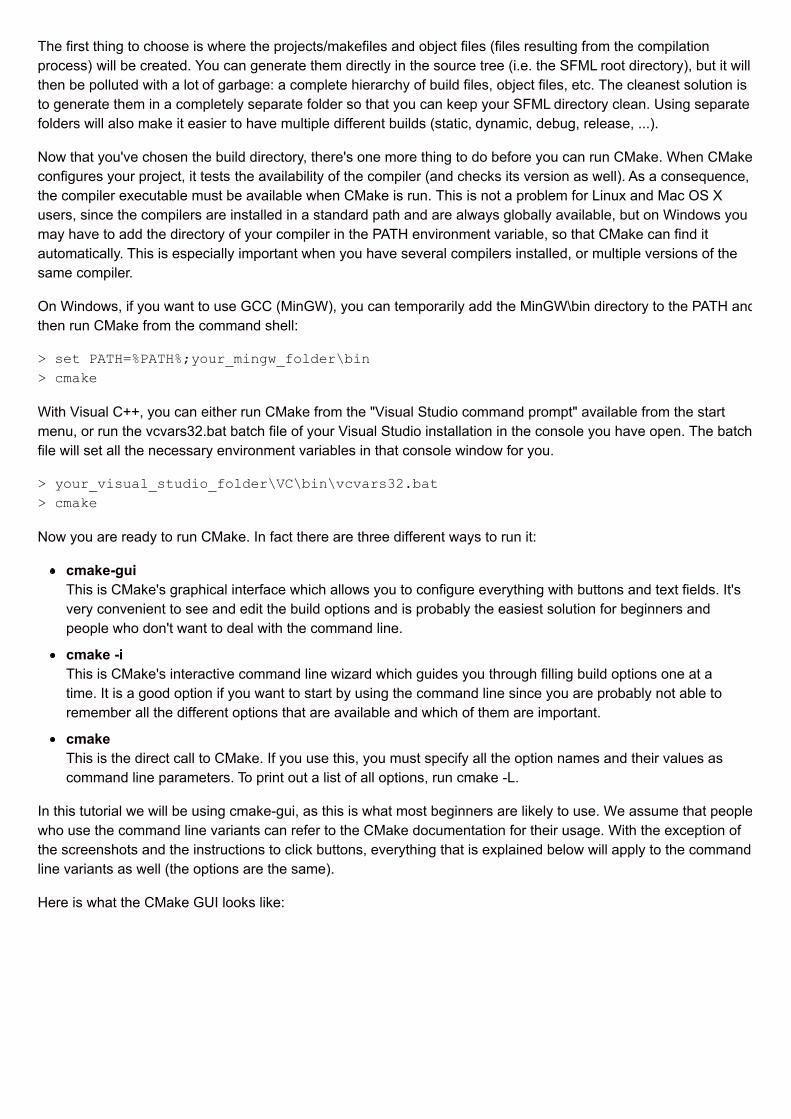
In this tutorial we will be using cmake-gui, as this is what most beginners are likely to use. We assume that peoplewho use the command line variants can refer to the CMake documentation for their usage. With the exception ofthe screenshots and the instructions to click buttons, everything that is explained below will apply to the commandline variants as well (the options are the same).
Here is what the CMake GUI looks like:

The first steps that need to be done are as follows (perform them in order):
1. Tell CMake where the source code of SFML is (this must be the root folder of the SFML folder hierarchy,basically where the top level CMakeLists.txt file is).
2. Choose where you want the projects/makefiles to be generated (if the directory doesn't exist, CMake willcreate it).
3. Click the "Configure" button.
If this is the first time CMake is run in this directory (or if you cleared the cache), the CMake GUI will prompt you toselect a generator. In other words, this is where you select your compiler/IDE.
For example, if you are using Visual Studio 2010,you should select "Visual Studio 10 2010" from thedrop-down list. To generate makefiles usable withNMake on the Visual Studio command line, select"NMake makefiles". To create makefiles usablewith MinGW (GCC), select "MinGW makefiles". Itis generally easier to build SFML using makefilesrather than IDE projects: you can build the entirelibrary with a single command, or even batchtogether multiple builds in a single script. Sinceyou only plan to build SFML and not edit its sourcefiles, IDE projects aren't as useful.More importantly, the installation process(described further down) may not work with the"Xcode" generator. It is therefore highlyrecommended to use the "Makefile" generatorwhen building on Mac OS X.
Always keep the "Use default native compilers" option enabled. The other three fields can be left alone.
After selecting the generator, CMake will run a series of tests to gather information about your toolchain

environment: compiler path, standard headers, SFML dependencies, etc. If the tests succeed, it should finish withthe "Configuring done" message. If something goes wrong, read the error(s) printed to the output log carefully. Itmight be the case that your compiler is not accessible (see above) or configured properly, or that one of SFML'sexternal dependencies is missing.
After configuring is done, the build options appear in the center of the window. CMake itself has many options, butmost of them are already set to the right value by default. Some of them are cache variables and better leftunchanged, they simply provide feedback about what CMake automatically found.Here are the few options that you may want to have a look at when configuring your SFML build:
Variable Meaning
CMAKE_BUILD_TYPE This option selects the build configuration type. Valid values are"Debug" and "Release" (there are other types such as"RelWithDebInfo" or "MinSizeRel", but they are meant for moreadvanced builds). Note that if you generate a workspace for an IDEthat supports multiple configurations, such as Visual Studio, thisoption is ignored since the workspace can contain multipleconfigurations simultaneously.
CMAKE_INSTALL_PREFIX This is the install path. By default, it is set to the installation path thatis most typical on the operating system ("/usr/local" for Linux andMac OS X, "C:\Program Files" for Windows, etc.). Installing SFMLafter building it is not mandatory since you can use the binariesdirectly from where they were built. It may be a better solution,however, to install them properly so you can remove all thetemporary files produced during the build process.

CMAKE_INSTALL_FRAMEWORK_PREFIX(Mac OS X only)
This is the install path for frameworks. By default, it is set to the rootlibrary folder i.e. /Library/Frameworks. As stated explained above forCMAKE_INSTALL_PREFIX, it is not mandatory to install SFML afterbuilding it, but it is definitely cleaner to do so.This path is also used to install the sndfile framework on your system(a required dependency not provided by Apple) and SFML asframeworks if BUILD_FRAMEWORKS is selected.
BUILD_SHARED_LIBS This boolean option controls whether you build SFML as dynamic(shared) libraries, or as static ones. This option should not be enabled simultaneously withSFML_USE_STATIC_STD_LIBS, they are mutually exclusive.
SFML_BUILD_FRAMEWORKS(Mac OS X only)
This boolean option controls whether you build SFML as frameworkbundles or as dylib binaries. Building frameworks requiresBUILD_SHARED_LIBS to be selected.It is recommended to use SFML as frameworks when publishingyour applications. Note however, that SFML cannot be built in thedebug configuration as frameworks. In that case, use dylibs instead.
SFML_BUILD_EXAMPLES This boolean option controls whether the SFML examples are builtalongside the library or not.
SFML_BUILD_DOC This boolean option controls whether you generate the SFMLdocumentation or not. Note that the Doxygen tool must be installedand accessible, otherwise enabling this option will produce an error.On Mac OS X you can either install the classic-Unix doxygen binaryinto /usr/bin or any similar directory, or install Doxygen.app into any"Applications" folder, e.g. ~/Applications.
SFML_USE_STATIC_STD_LIBS(Windows only)
This boolean option selects the type of the C/C++ runtime librarywhich is linked to SFML. TRUE statically links the standard libraries, which means that SFMLis self-contained and doesn't depend on the compiler's specificDLLs. FALSE (the default) dynamically links the standard libraries, whichmeans that SFML depends on the compiler's DLLs(msvcrxx.dll/msvcpxx.dll for Visual C++, libgcc_s_xxx-1.dll/libstdc++-6.dll for GCC). Be careful when setting this. The setting must matchyour own project's setting or else your application may fail to run. This option should not be enabled simultaneously withBUILD_SHARED_LIBS, they are mutually exclusive.
CMAKE_OSX_ARCHITECTURES(Mac OS X only)
This setting specifies for which architectures SFML should be built.The recommended value is "i386;x86_64" to generate universalbinaries for both 32 and 64-bit systems.
SFML_INSTALL_XCODE_TEMPLATES(Mac OS X only)
This boolean option controls whether CMake will install the Xcodetemplates on your system or not. Please make sure that/Library/Developer/Xcode/Templates/SFML exists and is writable.More information about these templates is given in the "Gettingstarted" tutorial for Mac OS X.
SFML_INSTALL_PKGCONFIG_FILES(Linux shared libraries only)
This boolean option controls whether CMake will install the pkg-config files on your system or not. pkg-config is a tool that provides aunified interface for querying installed libraries.
Variable Meaning
After everything is configured, click the "Configure" button once again. There should no longer be any optionshighlighted in red, and the "Generate" button should be enabled. Click it to finally generate the chosenmakefiles/projects.

CMake creates a variable cache for every project. Therefore, if you decide to reconfigure something at a latertime, you'll find that your settings have been saved from the previous configuration. Make the necessary changes,reconfigure and generate the updated makefiles/projects.
C++11 and Mac OS X
If you want to use C++11 features in your application on Mac OS X, you have to use clang (Apple's officialcompiler) and libc++. Moreover, you will need to build SFML with these tools to work around any incompatibilitybetween the standard libraries and compilers.
Here are the settings to use to build SFML with clang and libc++:
Choose "Specify native compilers" rather than "Use default native compilers" when you select thegenerator.
Set CMAKE_CXX_COMPILER to /usr/bin/clang++ (see screenshot).
Set CMAKE_C_COMPILER to /usr/bin/clang (see screenshot).
Set CMAKE_CXX_FLAGS and CMAKE_C_FLAGS to "-stdlib=libc++".

Building SFML
Let's begin this section with some good news: you won't have to go through the configuration step any more, evenif you update your working copy of SFML. CMake is smart: It adds a custom step to the generatedmakefiles/projects, that automatically regenerates the build files whenever something changes.
You're now ready to build SFML. Of course, how to do it depends on what makefiles/projects you've generated. Ifyou created a project/solution/workspace, open it with your IDE and build SFML like you would any other project.We won't go into the details here, there are simply too many different IDEs and we have to assume that you knowhow to use yours well enough to perform this simple task on your own.
If you generated a makefile, open a command shell and execute the make command corresponding to yourenvironment. For example, run "nmake" if you generated an NMake (Visual Studio) makefile, "mingw32-make" ifyou generated a MinGW (GCC) makefile, or simply "make" if you generated a Linux makefile.Note: On Windows, the make program (nmake or mingw32-make) may not be accessible. If this is the case, don'tforget to add its location to your PATH environment variable. See the explanations at the beginning of the"Configuring your SFML build" section for more details.
By default, building the project will build everything (all the SFML libraries, as well as all the examples if youenabled the SFML_BUILD_EXAMPLES option). If you just want to build a specific SFML library or example, youcan select a different target. You can also choose to clean or install the built files, with the corresponding targets.Here are all the targets that are available, depending on the configure options that you chose:
Target Meaning
all This is the default target, it is used if no target is explicitly specified. It builds all the targetsthat produce a binary (SFML libraries and examples).
sfml‑systemsfml‑windowsfml‑networksfml‑graphicssfml‑audiosfml‑main
Builds the corresponding SFML library. The "sfml-main" target is available only whenbuilding for Windows.

cocoaftpopenglpongshadersocketssoundsound‑capturevoipwindowwin32X11
Builds the corresponding SFML example. These targets are available only if theSFML_BUILD_EXAMPLES option is enabled. Note that some of the targets are available onlyon certain operating systems ("cocoa" is available on Mac OS X, "win32" on Windows,"X11" on Linux, etc.).
doc Generates the API documentation. This target is available only if SFML_BUILD_DOC isenabled.
clean Removes all the object files, libraries and example binaries produced by a previous build.You generally don't need to invoke this target, the exception being when you want tocompletely rebuild SFML (some source updates may be incompatible with existing objectfiles and cleaning everything is the only solution).
install Installs SFML to the path given by CMAKE_INSTALL_PREFIX andCMAKE_INSTALL_FRAMEWORK_PREFIX. It copies over the SFML libraries and headers, aswell as examples and documentation if SFML_BUILD_EXAMPLES and SFML_BUILD_DOCare enabled. After installing, you get a clean distribution of SFML, just as if you haddownloaded the SDK or installed it from your distribution's package repository.
Target Meaning
If you use an IDE, a target is simply a project. To build a target, select the corresponding project and compile it(even "clean" and "install" must be built to be executed -- don't be confused by the fact that no source code isactually compiled).If you use a makefile, pass the name of the target to the make command to build the target. Examples: "nmakedoc", "mingw32-make install", "make sfml-network".
At this point you should have successfully built SFML. Congratulations!

sfml-dev.org http://www.sfml-dev.org/tutorials/2.2/system-time.php
Handling time
Time in SFML
Unlike many other libraries where time is a uint32 number ofmilliseconds, or a float number of seconds, SFML doesn't impose anyspecific unit or type for time values. Instead it leaves this choice tothe user through a flexible class: sf::Time. All SFML classes andfunctions that manipulate time values use this class.
sf::Time represents a time period (in other words, the time that elapses between two events). It is not a date-time class which would represent the current year/month/day/hour/minute/second as a timestamp, it's just a valuethat represents a certain amount of time, and how to interpret it depends on the context where it is used.
Converting time
A sf::Time value can be constructed from different source units: seconds, milliseconds and microseconds.There is a (non-member) function to turn each of them into a sf::Time:
sf::Time t1 = sf::microseconds(10000);sf::Time t2 = sf::milliseconds(10);sf::Time t3 = sf::seconds(0.01f);
Note that these three times are all equal.
Similarly, a sf::Time can be converted back to either seconds, milliseconds or microseconds:
sf::Time time = ...;
sf::Int64 usec = time.asMicroseconds();sf::Int32 msec = time.asMilliseconds();float sec = time.asSeconds();
Playing with time values
sf::Time is just an amount of time, so it supports arithmetic operations such as addition, subtraction,comparison, etc. Times can also be negative.
sf::Time t1 = ...;sf::Time t2 = t1 * 2;sf::Time t3 = t1 + t2;sf::Time t4 = -t3;
bool b1 = (t1 == t2);bool b2 = (t3 > t4);
Measuring time
Now that we've seen how to manipulate time values with SFML, let's see how to do something that almost everyprogram needs: measuring the time elapsed.
SFML has a very simple class for measuring time: sf::Clock. It only has two functions: getElapsedTime, to

retrieve the time elapsed since the clock started, and restart, to restart the clock.
sf::Clock clock; ...sf::Time elapsed1 = clock.getElapsedTime();std::cout << elapsed1.asSeconds() << std::endl;clock.restart();...sf::Time elapsed2 = clock.getElapsedTime();std::cout << elapsed2.asSeconds() << std::endl;
Note that restart also returns the elapsed time, so that you can avoid the slight gap that would exist if you hadto call getElapsedTime explicitly before restart.Here is an example that uses the time elapsed at each iteration of the game loop to update the game logic:
sf::Clock clock;while (window.isOpen()){ sf::Time elapsed = clock.restart(); updateGame(elapsed); ...}

sfml-dev.org http://www.sfml-dev.org/tutorials/2.2/system-thread.php
Threads
What is a thread?
Most of you should already know what a thread is, however here is alittle explanation for those who are really new to this concept.
A thread is basically a sequence of instructions that run in parallel toother threads. Every program is made of at least one thread: the main one, which runs your main() function.Programs that only use the main thread are single-threaded, if you add one or more threads they become multi-threaded.
So, in short, threads are a way to do multiple things at the same time. This can be useful, for example, to displayan animation and reacting to user input while loading images or sounds. Threads are also widely used in networkprogramming, to wait for data to be received while continuing to update and draw the application.
SFML threads or std::thread?
In its newest version (2011), the C++ standard library provides a set of classes for threading. At the time SFMLwas written, the C++11 standard was not written and there was no standard way of creating threads. When SFML2.0 was released, there were still a lot of compilers that didn't support this new standard.
If you work with compilers that support the new standard and its <thread> header, forget about the SFML threadclasses and use it instead -- it will be much better. But if you work with a pre-2011 compiler, or plan to distributeyour code and want it to be fully portable, the SFML threading classes are a good solution.
Creating a thread with SFML
Enough talk, let's see some code. The class that makes it possible to create threads in SFML is sf::Thread,and here is what it looks like in action:
#include <SFML/System.hpp>#include <iostream>
void func(){
for (int i = 0; i < 10; ++i) std::cout << "I'm thread number one" << std::endl;}
int main(){ sf::Thread thread(&func);
thread.launch();

for (int i = 0; i < 10; ++i) std::cout << "I'm the main thread" << std::endl;
return 0;}
In this code, both main and func run in parallel after thread.launch() has been called. The result is that textfrom both functions should be mixed in the console.
The entry point of the thread, ie. the function that will be run when the thread is started, must be passed to theconstructor of sf::Thread. sf::Thread tries to be flexible and accept a wide variety of entry points: non-member or member functions, with or without arguments, functors, etc. The example above shows how to use anon-member function, here are a few other examples.
- Non-member function with one argument:
void func(int x){}
sf::Thread thread(&func, 5);
- Member function:
class MyClass{public:
void func() { }};
MyClass object;sf::Thread thread(&MyClass::func, &object);

- Functor (function-object):
struct MyFunctor{ void operator()() { }};
sf::Thread thread(MyFunctor());
The last example, which uses functors, is the most powerful one since it can accept any type of functor andtherefore makes sf::Thread compatible with many types of functions that are not directly supported. Thisfeature is especially interesting with C++11 lambdas or std::bind.
sf::Thread thread([](){ std::cout << "I am in thread!" << std::endl;});
void func(std::string, int, double){}
sf::Thread thread(std::bind(&func, "hello", 24, 0.5));
If you want to use a sf::Thread inside a class, don't forget that it doesn't have a default constructor. Therefore,you have to initialize it directly in the constructor's initialization list:
class ClassWithThread{public:
ClassWithThread() : m_thread(&ClassWithThread::f, this) { }
private:
void f() { ... }
sf::Thread m_thread;};
If you really need to construct your sf::Thread instance after the construction of the owner object, you can alsodelay its construction by dynamically allocating it on the heap.
Starting threads
Once you've created a sf::Thread instance, you must start it with the launch function.

sf::Thread thread(&func);thread.launch();
launch calls the function that you passed to the constructor in a new thread, and returns immediately so that thecalling thread can continue to run.
Stopping threads
A thread automatically stops when its entry point function returns. If you want to wait for a thread to finish fromanother thread, you can call its wait function.
sf::Thread thread(&func);
thread.launch();
...
thread.wait();
The wait function is also implicitly called by the destructor of sf::Thread, so that a thread cannot remain alive(and out of control) after its owner sf::Thread instance is destroyed. Keep this in mind when you manage yourthreads (see the last section of this tutorial).
Pausing threads
There's no function in sf::Thread that allows another thread to pause it, the only way to pause a thread is to doit from the code that it runs. In other words, you can only pause the current thread. To do so, you can call thesf::sleep function:
void func(){ ... sf::sleep(sf::milliseconds(10)); ...}
sf::sleep has one argument, which is the time to sleep. This duration can be given with any unit/precision, asseen in the time tutorial.Note that you can make any thread sleep with this function, even the main one.
sf::sleep is the most efficient way to pause a thread: as long as the thread sleeps, it requires zero CPU.Pauses based on active waiting, like empty while loops, would consume 100% CPU just to do... nothing.However, keep in mind that the sleep duration is just a hint, depending on the OS it will be more or less accurate.So don't rely on it for very precise timing.
Protecting shared data
All the threads in a program share the same memory, they have access to all variables in the scope they are in. Itis very convenient but also dangerous: since threads run in parallel, it means that a variable or function might beused concurrently from several threads at the same time. If the operation is not thread-safe, it can lead toundefined behavior (ie. it might crash or corrupt data).
Several programming tools exist to help you protect shared data and make your code thread-safe, these are
called synchronization primitives. Common ones are mutexes, semaphores, condition variables and spin locks.They are all variants of the same concept: they protect a piece of code by allowing only certain threads to accessit while blocking the others.
The most basic (and used) primitive is the mutex. Mutex stands for "MUTual EXclusion": it ensures that only asingle thread is able to run the code that it guards. Let's see how they can bring some order to the example above:
#include <SFML/System.hpp>#include <iostream>
sf::Mutex mutex;
void func(){ mutex.lock();
for (int i = 0; i < 10; ++i) std::cout << "I'm thread number one" << std::endl;
mutex.unlock();}
int main(){ sf::Thread thread(&func); thread.launch();
mutex.lock();
for (int i = 0; i < 10; ++i) std::cout << "I'm the main thread" << std::endl;
mutex.unlock();
return 0;}
This code uses a shared resource (std::cout), and as we've seen it produces unwanted results -- everything ismixed in the console. To make sure that complete lines are properly printed instead of being randomly mixed, weprotect the corresponding region of the code with a mutex.
The first thread that reaches its mutex.lock() line succeeds to lock the mutex, directly gains access to thecode that follows and prints its text. When the other thread reaches its mutex.lock() line, the mutex is alreadylocked and thus the thread is put to sleep (like sf::sleep, no CPU time is consumed by the sleeping thread).When the first thread finally unlocks the mutex, the second thread is awoken and is allowed to lock the mutex andprint its text block as well. This leads to the lines of text appearing sequentially in the console instead of beingmixed.

Mutexes are not the only primitive that you can use to protect your shared variables, but it should be enough formost cases. However, if your application does complicated things with threads, and you feel like it is not enough,don't hesitate to look for a true threading library, with more features.
Protecting mutexes
Don't worry: mutexes are already thread-safe, there's no need to protect them. But they are not exception-safe!What happens if an exception is thrown while a mutex is locked? It never gets a chance to be unlocked andremains locked forever. All threads that try to lock it in the future will block forever, and in some cases, your wholeapplication could freeze. Pretty bad result.
To make sure that mutexes are always unlocked in an environment where exceptions can be thrown, SFMLprovides an RAII class to wrap them: sf::Lock. It locks a mutex in its constructor, and unlocks it in itsdestructor. Simple and efficient.
sf::Mutex mutex;
void func(){ sf::Lock lock(mutex);
functionThatMightThrowAnException();
}
Note that sf::Lock can also be useful in a function that has multiple return statements.
sf::Mutex mutex;
bool func(){ sf::Lock lock(mutex);
if (!image1.loadFromFile("...")) return false;
if (!image2.loadFromFile("...")) return false;
if (!image3.loadFromFile("...")) return false;
return true;}
Common mistakes
One thing that is often overlooked by programmers is that a thread cannot live without its correspondingsf::Thread instance.The following code is often seen on the forums:
void startThread(){ sf::Thread thread(&funcToRunInThread); thread.launch();}
int main(){ startThread(); return 0;}
Programers who write this kind of code expect the startThread() function to start a thread that will live on itsown and be destroyed when the threaded function ends. This is not what happens. The threaded function appearsto block the main thread, as if the thread wasn't working.
What is the cause of this? The sf::Thread instance is local to the startThread() function and is thereforeimmediately destroyed, when the function returns. The destructor of sf::Thread is invoked, which calls wait()as we've learned above, and the result is that the main thread blocks and waits for the threaded function to befinished instead of continuing to run in parallel.
So don't forget: You must manage your sf::Thread instance so that it lives as long as the threaded function issupposed to run.

sfml-dev.org http://www.sfml-dev.org/tutorials/2.2/system-stream.php
User data streams
Introduction
SFML has several resource classes: images, fonts, sounds, etc. Inmost programs, these resources will be loaded from files, with thehelp of their loadFromFile function. In a few other situations,resources will be packed directly into the executable or in a big datafile, and loaded from memory with loadFromMemory. These functions cover almost all the possible use cases --but not all.
Sometimes you want to load files from unusual places, such as a compressed/encrypted archive, or a remotenetwork location for example. For these special situations, SFML provides a third loading function:loadFromStream. This function reads data using an abstract sf::InputStream interface, which allows you toprovide your own implementation of a stream class that works with SFML.
In this tutorial you'll learn how to write and use your own derived input stream.
And standard streams?
Like many other languages, C++ already has a class for input data streams: std::istream. In fact it has two:std::istream is only the front-end, the abstract interface to the custom data is std::streambuf.
Unfortunately, these classes are not very user friendly, and can become very complicated if you want toimplement non-trivial stuff. The Boost.Iostreams library tries to provide a simpler interface to standard streams,but Boost is a big dependency and SFML cannot depend on it.
That's why SFML provides its own stream interface, which is hopefully a lot more simple and fast.
InputStream
The sf::InputStream class declares four virtual functions:
class InputStream{public :
virtual ~InputStream() {}
virtual Int64 read(void* data, Int64 size) = 0;
virtual Int64 seek(Int64 position) = 0;
virtual Int64 tell() = 0;
virtual Int64 getSize() = 0;};
read must extract size bytes of data from the stream, and copy them to the supplied data address. It returns thenumber of bytes read, or -1 on error.
seek must change the current reading position in the stream. Its position argument is the absolute byte offset to

jump to (so it is relative to the beginning of the data, not to the current position). It returns the new position, or -1on error.
tell must return the current reading position (in bytes) in the stream, or -1 on error.
getSize must return the total size (in bytes) of the data which is contained in the stream, or -1 on error.
To create your own working stream, you must implement every one of these four functions according to theirrequirements.
An example
Here is a complete and working implementation of a custom input stream. It's not very useful: It is simply astream that reads data from a file, FileStream. It serves as a demonstration that helps you focus on how thecode works, and not get lost in implementation details.
First, let's see its declaration:
#include <SFML/System.hpp>#include <string>#include <cstdio>
class FileStream : public sf::InputStream{public :
FileStream();
~FileStream();
bool open(const std::string& filename);
virtual sf::Int64 read(void* data, sf::Int64 size);
virtual sf::Int64 seek(sf::Int64 position);
virtual sf::Int64 tell();
virtual sf::Int64 getSize();
private :
std::FILE* m_file;};
In this example we'll use the good old C file API, so we have a std::FILE* member. We also add a defaultconstructor, a destructor, and a function to open the file.
Here is the implementation:
FileStream::FileStream() :m_file(NULL){}
FileStream::~FileStream()

{ if (m_file) std::fclose(m_file);}
bool FileStream::open(const std::string& filename){ if (m_file) std::fclose(m_file);
m_file = std::fopen(filename.c_str(), "rb");
return m_file != NULL;}
sf::Int64 FileStream::read(void* data, sf::Int64 size){ if (m_file) return std::fread(data, 1, static_cast<std::size_t>(size), m_file); else return -1;}
sf::Int64 FileStream::seek(sf::Int64 position){ if (m_file) { std::fseek(m_file, static_cast<std::size_t>(position), SEEK_SET); return tell(); } else { return -1; }}
sf::Int64 FileStream::tell(){ if (m_file) return std::ftell(m_file); else return -1;}
sf::Int64 FileStream::getSize(){ if (m_file) { sf::Int64 position = tell(); std::fseek(m_file, 0, SEEK_END); sf::Int64 size = tell(); seek(position); return size;

} else { return -1; }}
Note that, as explained above, all functions return -1 on error.
Don't forget to check the forum and wiki. Chances are that another user already wrote a sf::InputStreamclass that suits your needs. And if you write a new one and feel like it could be useful to other people as well,don't hesitate to share!
Using your stream
Using a custom stream class is straight-forward: instantiate it, and pass it to the loadFromStream (oropenFromStream) function of the object that you want to load.
FileStream stream;stream.open("image.png");
sf::Texture texture;texture.loadFromStream(stream);
Common mistakes
Some resource classes are not loaded completely after loadFromStream has been called. Instead, theycontinue to read from their data source as long as they are used. This is the case for sf::Music, which streamsaudio samples as they are played, and for sf::Font, which loads glyphs on the fly depending on the text that isdisplayed.
As a consequence, the stream instance that you used to load a music or a font, as well as its data source, mustremain alive as long as the resource uses it. If it is destroyed while still being used, it results in undefinedbehavior (can be a crash, corrupt data, or nothing visible).
Another common mistake is to return whatever the internal functions return directly, but sometimes it doesn'tmatch what SFML expects. For example, in the FileStream example above, one might be tempted to write theseek function as follows:
sf::Int64 FileStream::seek(sf::Int64 position){ return std::fseek(m_file, position, SEEK_SET);}
This code is wrong, because std::fseek returns zero on success, whereas SFML expects the new position tobe returned.

sfml-dev.org http://www.sfml-dev.org/tutorials/2.2/window-window.php
Opening and managing a SFML window
Introduction
This tutorial only explains how to open and manage a window.Drawing stuff is beyond the scope of the sfml-window module: it ishandled by the sfml-graphics module. However, the windowmanagement remains exactly the same so reading this tutorial isimportant in any case.
Opening a window
Windows in SFML are defined by the sf::Window class. A window can be created and opened directly uponconstruction:
#include <SFML/Window.hpp>
int main(){ sf::Window window(sf::VideoMode(800, 600), "My window");
...
return 0;}
The first argument, the video mode, defines the size of the window (the inner size, without the title bar andborders). Here, we create a window with a size of 800x600 pixels.The sf::VideoMode class has some interesting static functions to get the desktop resolution, or the list of validvideo modes for fullscreen mode. Don't hesitate to have a look at its documentation.
The second argument is simply the title of the window.
This constructor accepts a third optional argument: a style, which allows you to choose which decorations andfeatures you want. You can use any combination of the following styles:
sf::Style::None No decoration at all (useful for splash screens, for example); this style cannot becombined with others
sf::Style::Titlebar The window has a titlebar
sf::Style::Resize The window can be resized and has a maximize button
sf::Style::Close The window has a close button
sf::Style::Fullscreen The window is shown in fullscreen mode; this style cannot be combined withothers, and requires a valid video mode
sf::Style::Default The default style, which is a shortcut for Titlebar | Resize | Close
There's also a fourth optional argument, which defines OpenGL specific options which are explained in thededicated OpenGL tutorial .

If you want to create the window after the construction of the sf::Window instance, or re-create it with a differentvideo mode or title, you can use the create function instead. It takes the exact same arguments as theconstructor.
#include <SFML/Window.hpp>
int main(){ sf::Window window; window.create(sf::VideoMode(800, 600), "My window");
...
return 0;}
Bringing the window to life
If you try to execute the code above with nothing in place of the "...", you will hardly see something. First, becausethe program ends immediately. Second, because there's no event handling -- so even if you added an endlessloop to this code, you would see a dead window, unable to be moved, resized, or closed.
Let's add some code to make this program a bit more interesting:
#include <SFML/Window.hpp>
int main(){ sf::Window window(sf::VideoMode(800, 600), "My window");
while (window.isOpen()) { sf::Event event; while (window.pollEvent(event)) { if (event.type == sf::Event::Closed) window.close(); } }
return 0;}
The above code will open a window, and terminate when the user closes it. Let's see how it works in detail.
First, we added a loop that ensures that the application will be refreshed/updated until the window is closed. Most(if not all) SFML programs will have this kind of loop, sometimes called the main loop or game loop.
Then, the first thing that we want to do inside our game loop is check for any events that occurred. Note that weuse a while loop so that all pending events are processed in case there were several. The pollEvent functionreturns true if an event was pending, or false if there was none.

Whenever we get an event, we must check its type (window closed? key pressed? mouse moved? joystickconnected? ...), and react accordingly if we are interested in it. In this case, we only care about theEvent::Closed event, which is triggered when the user wants to close the window. At this point, the window isstill open and we have to close it explicitly with the close function. This enables you to do something before thewindow is closed, such as saving the current state of the application, or displaying a message.
A mistake that people often make is forget the event loop, simply because they don't yet care about handlingevents (they use real-time inputs instead). Without an event loop, the window will become unresponsive. It isimportant to note that the event loop has two roles: in addition to providing events to the user, it gives the windowa chance to process its internal events too, which is required so that it can react to move or resize user actions.
After the window has been closed, the main loop exits and the program terminates.
At this point, you probably noticed that we haven't talked about drawing something to the window yet. As stated inthe introduction, this is not the job of the sfml-window module, and you'll have to jump to the sfml-graphics tutorialsif you want to draw things such as sprites, text or shapes.
To draw stuff, you can also use OpenGL directly and totally ignore the sfml-graphics module. sf::Windowinternally creates an OpenGL context and is ready to accept your OpenGL calls. You can learn more about that inthe corresponding tutorial.
Don't expect to see something interesting in this window: you may see a uniform color (black or white), or the lastcontents of the previous application that used OpenGL, or... something else.
Playing with the window
Of course, SFML allows you to play with your windows a bit. Basic window operations such as changing the size,position, title or icon are supported, but unlike dedicated GUI libraries (Qt, wxWidgets), SFML doesn't provideadvanced features. SFML windows are only meant to provide an environment for OpenGL or SFML drawing.
window.setPosition(sf::Vector2i(10, 50));
window.setSize(sf::Vector2u(640, 480));
window.setTitle("SFML window");
sf::Vector2u size = window.getSize();unsigned int width = size.x;unsigned int height = size.y;
...
You can refer to the API documentation for a complete list of sf::Window's functions.
In case you really need advanced features for your window, you can create one (or even a full GUI) with anotherlibrary, and embed SFML into it. To do so, you can use the other constructor, or create function, of sf::Windowwhich takes the OS-specific handle of an existing window. In this case, SFML will create a drawing context insidethe given window and catch all its events without interfering with the parent window management.
sf::WindowHandle handle = ;sf::Window window(handle);

If you just want an additional, very specific feature, you can also do it the other way round: create an SFMLwindow and get its OS-specific handle to implement things that SFML itself doesn't support.
sf::Window window(sf::VideoMode(800, 600), "SFML window");sf::WindowHandle handle = window.getSystemHandle();
Integrating SFML with other libraries requires some work and won't be described here, but you can refer to thededicated tutorials, examples or forum posts.
Controlling the framerate
Sometimes, when your application runs fast, you may notice visual artifacts such as tearing. The reason is thatyour application's refresh rate is not synchronized with the vertical frequency of the monitor, and as a result, thebottom of the previous frame is mixed with the top of the next one.The solution to this problem is to activate vertical synchronization. It is automatically handled by the graphicscard, and can easily be switched on and off with the setVerticalSyncEnabled function:
window.setVerticalSyncEnabled(true);
After this call, your application will run at the same frequency as the monitor's refresh rate.
Sometimes setVerticalSyncEnabled will have no effect: this is most likely because vertical synchronizationis forced to "off" in your graphics driver's settings. It should be set to "controlled by application" instead.
In other situations, you may also want your application to run at a given framerate, instead of the monitor'sfrequency. This can be done by calling setFramerateLimit:
window.setFramerateLimit(60);
Unlike setVerticalSyncEnabled, this feature is implemented by SFML itself, using a combination ofsf::Clock and sf::sleep. An important consequence is that it is not 100% reliable, especially for highframerates: sf::sleep's resolution depends on the underlying operating system and hardware, and can be ashigh as 10 or 15 milliseconds. Don't rely on this feature to implement precise timing.
Never use both setVerticalSyncEnabled and setFramerateLimit at the same time! They would badlymix and make things worse.
Things to know about windows
Here is a brief list of what you can and cannot do with SFML windows.
You can create multiple windows
SFML allows you to create multiple windows, and to handle them either all in the main thread, or each one in itsown thread (but... see below). In this case, don't forget to have an event loop for each window.
Multiple monitors are not correctly supported yet
SFML doesn't explicitly manage multiple monitors. As a consequence, you won't be able to choose which monitora window appears on, and you won't be able to create more than one fullscreen window. This should be improvedin a future version.
Events must be polled in the window's thread

This is an important limitation of most operating systems: the event loop (more precisely, the pollEvent orwaitEvent function) must be called in the same thread that created the window. This means that if you want tocreate a dedicated thread for event handling, you'll have to make sure that the window is created in this threadtoo. If you really want to split things between threads, it is more convenient to keep event handling in the mainthread and move the rest (rendering, physics, logic, ...) to a separate thread instead. This configuration will also becompatible with the other limitation described below.
On OS X, windows and events must be managed in the main thread
Yep, that's true. Mac OS X just won't agree if you try to create a window or handle events in a thread other thanthe main one.
On Windows, a window which is bigger than the desktop will not behave correctly
For some reason, Windows doesn't like windows that are bigger than the desktop. This includes windows createdwith VideoMode::getDesktopMode(): with the window decorations (borders and titlebar) added, you end upwith a window which is slightly bigger than the desktop.

sfml-dev.org http://www.sfml-dev.org/tutorials/2.2/window-events.php
Events explained
Introduction
This tutorial is a detailed list of window events. It describes them, andshows how to (and how not to) use them.
The sf::Event type
Before dealing with events, it is important to understand what the sf::Event type is, and how to correctly use it.sf::Event is a union, which means that only one of its members is valid at a time (remember your C++ lesson:all the members of a union share the same memory space). The valid member is the one that matches the eventtype, for example event.key for a KeyPressed event. Trying to read any other member will result in anundefined behavior (most likely: random or invalid values). It it important to never try to use an event member thatdoesn't match its type.
sf::Event instances are filled by the pollEvent (or waitEvent) function of the sf::Window class. Onlythese two functions can produce valid events, any attempt to use an sf::Event which was not returned bysuccessful call to pollEvent (or waitEvent) will result in the same undefined behavior that was mentionedabove.
To be clear, here is what a typical event loop looks like:
sf::Event event;
while (window.pollEvent(event)){ switch (event.type) { case sf::Event::Closed: window.close(); break;
case sf::Event::KeyPressed: ... break;
default: break; }}
Read the above paragraph once again and make sure that you fully understand it, the sf::Event union is thecause of many problems for inexperienced programmers.
Alright, now we can see what events SFML supports, what they mean and how to use them properly.

The Closed event
The sf::Event::Closed event is triggered when the user wants to close the window, through any of thepossible methods the window manager provides ("close" button, keyboard shortcut, etc.). This event onlyrepresents a close request, the window is not yet closed when the event is received.
Typical code will just call window.close() in reaction to this event, to actually close the window. However, youmay also want to do something else first, like saving the current application state or asking the user what to do. Ifyou don't do anything, the window remains open.
There's no member associated with this event in the sf::Event union.
if (event.type == sf::Event::Closed) window.close();
The Resized event
The sf::Event::Resized event is triggered when the window is resized, either through user action orprogrammatically by calling window.setSize.
You can use this event to adjust the rendering settings: the viewport if you use OpenGL directly, or the currentview if you use sfml-graphics.
The member associated with this event is event.size, it contains the new size of the window.
if (event.type == sf::Event::Resized){ std::cout << "new width: " << event.size.width << std::endl; std::cout << "new height: " << event.size.height << std::endl;}
The LostFocus and GainedFocus events
The sf::Event::LostFocus and sf::Event::GainedFocus events are triggered when the windowloses/gains focus, which happens when the user switches the currently active window. When the window is out offocus, it doesn't receive keyboard events.
This event can be used e.g. if you want to pause your game when the window is inactive.
There's no member associated with these events in the sf::Event union.
if (event.type == sf::Event::LostFocus) myGame.pause();
if (event.type == sf::Event::GainedFocus) myGame.resume();
The TextEntered event
The sf::Event::TextEntered event is triggered when a character is typed. This must not be confused withthe KeyPressed event: TextEntered interprets the user input and produces the appropriate printable character.For example, pressing '^' then 'e' on a French keyboard will produce two KeyPressed events, but a singleTextEntered event containing the 'ê' character. It works with all the input methods provided by the operatingsystem, even the most specific or complex ones.
This event is typically used to catch user input in a text field.

The member associated with this event is event.text, it contains the Unicode value of the entered character.You can either put it directly in a sf::String, or cast it to a char after making sure that it is in the ASCII range(0 - 127).
if (event.type == sf::Event::TextEntered){ if (event.text.unicode < 128) std::cout << "ASCII character typed: " << static_cast<char>(event.text.unicode) << std::endl;}
Note that, since they are part of the Unicode standard, some non-printable characters such as backspace aregenerated by this event. In most cases you'll need to filter them out.
Many programmers use the KeyPressed event to get user input, and start to implement crazy algorithms that tryto interpret all the possible key combinations to produce correct characters. Don't do that!
The KeyPressed and KeyReleased events
The sf::Event::KeyPressed and sf::Event::KeyReleased events are triggered when a keyboard key ispressed/released.
If a key is held, multiple KeyPressed events will be generated, at the default operating system delay (ie. thesame delay that applies when you hold a letter in a text editor). To disable repeated KeyPressed events, you cancall window.setKeyRepeatEnabled(false). On the flip side, it is obvious that KeyReleased events cannever be repeated.
This event is the one to use if you want to trigger an action exactly once when a key is pressed or released, likemaking a character jump with space, or exiting something with escape.
Sometimes, people try to react to KeyPressed events directly to implement smooth movement. Doing so will notproduce the expected effect, because when you hold a key you only get a few events (remember, the repeatdelay). To achieve smooth movement with events, you must use a boolean that you set on KeyPressed andclear on KeyReleased; you can then move (independently of events) as long as the boolean is set.The other (easier) solution to produce smooth movement is to use real-time keyboard input with sf::Keyboard(see the dedicated tutorial).
The member associated with these events is event.key, it contains the code of the pressed/released key, aswell as the current state of the modifier keys (alt, control, shift, system).
if (event.type == sf::Event::KeyPressed){ if (event.key.code == sf::Keyboard::Escape) { std::cout << "the escape key was pressed" << std::endl; std::cout << "control:" << event.key.control << std::endl; std::cout << "alt:" << event.key.alt << std::endl; std::cout << "shift:" << event.key.shift << std::endl; std::cout << "system:" << event.key.system << std::endl; }}
Note that some keys have a special meaning for the operating system, and will lead to unexpected behavior. Anexample is the F10 key on Windows, which "steals" the focus, or the F12 key which starts the debugger whenusing Visual Studio. This will probably be solved in a future version of SFML.

The MouseWheelMoved event
The sf::Event::MouseWheelMoved event is triggered when the mouse wheel moves up or down.
The member associated with this event is event.mouseWheel, it contains the number of ticks the wheel hasmoved, as well as the current position of the mouse cursor.
if (event.type == sf::Event::MouseWheelMoved){ std::cout << "wheel movement: " << event.mouseWheel.delta << std::endl; std::cout << "mouse x: " << event.mouseWheel.x << std::endl; std::cout << "mouse y: " << event.mouseWheel.y << std::endl;}
The MouseButtonPressed and MouseButtonReleased events
The sf::Event::MouseButtonPressed and sf::Event::MouseButtonReleased events are triggeredwhen a mouse button is pressed/released.
SFML supports 5 mouse buttons: left, right, middle (wheel), extra #1 and extra #2 (side buttons).
The member associated with these events is event.mouseButton, it contains the code of the pressed/releasedbutton, as well as the current position of the mouse cursor.
if (event.type == sf::Event::MouseButtonPressed){ if (event.mouseButton.button == sf::Mouse::Right) { std::cout << "the right button was pressed" << std::endl; std::cout << "mouse x: " << event.mouseButton.x << std::endl; std::cout << "mouse y: " << event.mouseButton.y << std::endl; }}
The MouseMoved event
The sf::Event::MouseMoved event is triggered when the mouse moves within the window.
This event is triggered even if the window isn't focused. However, it is triggered only when the mouse moveswithin the inner area of the window, not when it moves over the title bar or borders.
The member associated with this event is event.mouseMove, it contains the current position of the mousecursor relative to the window.
if (event.type == sf::Event::MouseMoved){ std::cout << "new mouse x: " << event.mouseMove.x << std::endl; std::cout << "new mouse y: " << event.mouseMove.y << std::endl;}
The MouseEntered and MouseLeft event
The sf::Event::MouseEntered and sf::Event::MouseLeft events are triggered when the mouse cursorenters/leaves the window.
There's no member associated with these events in the sf::Event union.

if (event.type == sf::Event::MouseEntered) std::cout << "the mouse cursor has entered the window" << std::endl;
if (event.type == sf::Event::MouseLeft) std::cout << "the mouse cursor has left the window" << std::endl;
The JoystickButtonPressed and JoystickButtonReleased events
The sf::Event::JoystickButtonPressed and sf::Event::JoystickButtonReleased events aretriggered when a joystick button is pressed/released.
SFML supports up to 8 joysticks and 32 buttons.
The member associated with these events is event.joystickButton, it contains the identifier of the joystickand the index of the pressed/released button.
if (event.type == sf::Event::JoystickButtonPressed){ std::cout << "joystick button pressed!" << std::endl; std::cout << "joystick id: " << event.joystickButton.joystickId << std::endl; std::cout << "button: " << event.joystickButton.button << std::endl;}
The JoystickMoved event
The sf::Event::JoystickMoved event is triggered when a joystick axis moves.
Joystick axes are typically very sensitive, that's why SFML uses a detection threshold to avoid spamming yourevent loop with tons of JoystickMoved events. This threshold can be changed with theWindow::setJoystickThreshold function, in case you want to receive more or less joystick move events.
SFML supports 8 joystick axes: X, Y, Z, R, U, V, POV X and POV Y. How they map to your joystick depends on itsdriver.
The member associated with this event is event.joystickMove, it contains the identifier of the joystick, thename of the axis, and its current position (in the range [-100, 100]).
if (event.type == sf::Event::JoystickMoved){ if (event.joystickMove.axis == sf::Joystick::X) { std::cout << "X axis moved!" << std::endl; std::cout << "joystick id: " << event.joystickMove.joystickId << std::endl; std::cout << "new position: " << event.joystickMove.position << std::endl; }}
The JoystickConnected and JoystickDisconnected events
The sf::Event::JoystickConnected and sf::Event::JoystickDisconnected events are triggeredwhen a joystick is connected/disconnected.
The member associated with this event is event.joystickConnect, it contains the identifier of theconnected/disconnected joystick.

if (event.type == sf::Event::JoystickConnected) std::cout << "joystick connected: " << event.joystickConnect.joystickId << std::endl;
if (event.type == sf::Event::JoystickDisconnected) std::cout << "joystick disconnected: " << event.joystickConnect.joystickId << std::endl;

sfml-dev.org http://www.sfml-dev.org/tutorials/2.2/window-inputs.php
Keyboard, mouse and joystick
Introduction
This tutorial explains how to access global input devices: keyboard,mouse and joysticks. This must not be confused with events. Real-time input allows you to query the global state of keyboard, mouseand joysticks at any time ("is this button currently pressed? ", "whereis the mouse currently?") while events notify you when something happens (" this button was pressed", "themouse has moved").
Keyboard
The class that provides access to the keyboard state is sf::Keyboard. It only contains one function,isKeyPressed, which checks the current state of a key (pressed or released). It is a static function, so you don'tneed to instantiate sf::Keyboard to use it.
This function directly reads the keyboard state, ignoring the focus state of your window. This means thatisKeyPressed may return true even if your window is inactive.
if (sf::Keyboard::isKeyPressed(sf::Keyboard::Left)){ character.move(1, 0);}
Key codes are defined in the sf::Keyboard::Key enum.
Depending on your operating system and keyboard layout, some key codes might be missing or interpretedincorrectly. This is something that will be improved in a future version of SFML.
Mouse
The class that provides access to the mouse state is sf::Mouse. Like its friend sf::Keyboard, sf::Mouseonly contains static functions and is not meant to be instantiated (SFML only handles a single mouse for the timebeing).
You can check if buttons are pressed:
if (sf::Mouse::isButtonPressed(sf::Mouse::Left)){ gun.fire();}
Mouse button codes are defined in the sf::Mouse::Button enum. SFML supports up to 5 buttons: left, right,middle (wheel), and two additional buttons whatever they may be.
You can also get and set the current position of the mouse, either relative to the desktop or to a window:
sf::Vector2i globalPosition = sf::Mouse::getPosition();

sf::Vector2i localPosition = sf::Mouse::getPosition(window);
sf::Mouse::setPosition(sf::Vector2i(10, 50));
sf::Mouse::setPosition(sf::Vector2i(10, 50), window);
There is no function for reading the current state of the mouse wheel. Since the wheel can only be movedrelatively, it has no absolute state that can be queried. By looking at a key you can tell whether it's pressed orreleased. By looking at the mouse cursor you can tell where it is located on the screen. However, looking at themouse wheel doesn't tell you which "tick" it is on. You can only be notified when it moves (MouseWheelMovedevent).
Joystick
The class that provides access to the joysticks' states is sf::Joystick. Like the other classes in this tutorial, itonly contains static functions.
Joysticks are identified by their index (0 to 7, since SFML supports up to 8 joysticks). Therefore, the first argumentof every function of sf::Joystick is the index of the joystick that you want to query.
You can check whether a joystick is connected or not:
if (sf::Joystick::isConnected(0)){ ...}
You can also get the capabilities of a connected joystick:
unsigned int buttonCount = sf::Joystick::getButtonCount(0);
bool hasZ = sf::Joystick::hasAxis(0, sf::Joystick::Z);
Joystick axes are defined in the sf::Joystick::Axis enum. Since buttons have no special meaning, they aresimply numbered from 0 to 31.
Finally, you can query the state of a joystick's axes and buttons as well:
if (sf::Joystick::isButtonPressed(0, 1)){ gun.fire();}
float x = sf::Joystick::getAxisPosition(0, sf::Joystick::X);float y = sf::Joystick::getAxisPosition(0, sf::Joystick::Y);character.move(x, y);

Joystick states are automatically updated when you check for events. If you don't check for events, or need toquery a joystick state (for example, checking which joysticks are connected) before starting your game loop, you'llhave to manually call the sf::Joystick::update() function yourself to make sure that the joystick states areup to date.

sfml-dev.org http://www.sfml-dev.org/tutorials/2.2/window-opengl.php
Using OpenGL in a SFML window
Introduction
This tutorial is not about OpenGL itself, but rather how to use SFMLas an environment for OpenGL, and how to mix them together.
As you know, one of the most important features of OpenGL isportability. But OpenGL alone won't be enough to create complete programs: you need a window, a renderingcontext, user input, etc. You would have no choice but to write OS-specific code to handle this stuff on your own.That's where the sfml-window module comes into play. Let's see how it allows you to play with OpenGL.
Including and linking OpenGL to your application
OpenGL headers are not the same on every OS. Therefore, SFML provides an "abstract" header that takes careof including the right file for you.
#include <SFML/OpenGL.hpp>
This header includes OpenGL and GLU functions, and nothing else. People sometimes think that SFMLautomatically includes GLEW (a library which manages OpenGL extensions) because SFML uses GLEWinternally, but it's only an implementation detail. From the user's point of view, GLEW must be handled like anyother external library.
You will then need to link your program to the OpenGL library. Unlike what it does with the headers, SFML can'tprovide a unified way of linking OpenGL. Therefore, you need to know which library to link to according to whatoperating system you're using ("opengl32" on Windows, "GL" on Linux, etc.). The same applies for GLU as well incase you plan on using it too: "glu32" on Windows, "GLU" on Linux, etc.
OpenGL functions start with the "gl" prefix, GLU functions start with the "glu" prefix. Remember this when you getlinker errors, this will help you find which library you forgot to link.
Creating an OpenGL window
Since SFML is based on OpenGL, its windows are ready for OpenGL calls without any extra effort.
sf::Window window(sf::VideoMode(800, 600), "OpenGL");
glEnable(GL_TEXTURE_2D);...
In case you think it is too automatic, sf::Window's constructor has an extra argument that allows you to changethe settings of the underlying OpenGL context. This argument is an instance of the sf::ContextSettingsstructure, it provides access to the following settings:
depthBits is the number of bits per pixel to use for the depth buffer (0 to disable it)
stencilBits is the number of bits per pixel to use for the stencil buffer (0 to disable it)
antialiasingLevel is the multisampling level
majorVersion and minorVersion comprise the requested version of OpenGL

sf::ContextSettings settings;settings.depthBits = 24;settings.stencilBits = 8;settings.antialiasingLevel = 4;settings.majorVersion = 3;settings.minorVersion = 0;
sf::Window window(sf::VideoMode(800, 600), "OpenGL", sf::Style::Default, settings);
If any of these settings is not supported by the graphics card, SFML tries to find the closest valid match. Forexample, if 4x anti-aliasing is too high, it tries 2x and then falls back to 0.In any case, you can check what settings SFML actually used with the getSettings function:
sf::ContextSettings settings = window.getSettings();
std::cout << "depth bits:" << settings.depthBits << std::endl;std::cout << "stencil bits:" << settings.stencilBits << std::endl;std::cout << "antialiasing level:" << settings.antialiasingLevel << std::endl;std::cout << "version:" << settings.majorVersion << "." << settings.minorVersion << std::endl;
OpenGL versions above 3.0 are supported by SFML (as long as your graphics driver can handle them), but youcan't set flags for now. This means that you can't create debug or forward compatible contexts; in fact SFMLautomatically creates contexts with the "compatibility" flag, because it uses deprecated functions internally. Thisshould be improved soon, and flags will then be exposed in the public API.
On OS X SFML supports creating OpenGL 3.2 contexts using the core profile. However, keep in mind that thosecontexts are not compatible with the graphics module of SFML. If you want to use the graphics module you haveto keep using the default context version which is 2.1.
A typical OpenGL-with-SFML program
Here is what a complete OpenGL program would look like with SFML:
#include <SFML/Window.hpp>#include <SFML/OpenGL.hpp>
int main(){ sf::Window window(sf::VideoMode(800, 600), "OpenGL", sf::Style::Default, sf::ContextSettings(32)); window.setVerticalSyncEnabled(true);
bool running = true; while (running) { sf::Event event; while (window.pollEvent(event)) { if (event.type == sf::Event::Closed)
{ running = false; } else if (event.type == sf::Event::Resized) { glViewport(0, 0, event.size.width, event.size.height); } }
glClear(GL_COLOR_BUFFER_BIT | GL_DEPTH_BUFFER_BIT);
window.display(); }
return 0;}
Here we don't use window.isOpen() as the condition of the main loop, because we need the window to remainopen until the program ends, so that we still have a valid OpenGL context for the last iteration of the loop and thecleanup code.
Don't hesitate to have a look at the "OpenGL" and "Window" examples in the SFML SDK if you have furtherproblems, they are more complete and most likely contain solutions to your problems.
Managing multiple OpenGL windows
Managing multiple OpenGL windows is not more complicated than managing one, there are just a few things tokeep in mind.
OpenGL calls are made on the active context (thus the active window). Therefore if you want to draw to twodifferent windows within the same program, you have to select which window is active before drawing something.This can be done with the setActive function:
window1.setActive(true);
window2.setActive(true);
Only one context (window) can be active in a thread, so you don't need to deactivate a window before activatinganother one, it is deactivated automatically. This is how OpenGL works.
Another thing to know is that all the OpenGL contexts created by SFML share their resources. This means that

you can create a texture or vertex buffer with any context active, and use it with any other. This also means thatyou don't have to reload all your OpenGL resources when you recreate your window. Only shareable OpenGLresources can be shared among contexts. An example of an unshareable resource is a vertex array object.
OpenGL without a window
Sometimes it might be necessary to call OpenGL functions without an active window, and thus no OpenGLcontext. For example, when you load textures from a separate thread, or before the first window is created. SFMLallows you to create window-less contexts with the sf::Context class. All you have to do is instantiate it to get avalid context.
int main(){ sf::Context context;
sf::Window window(sf::VideoMode(800, 600), "OpenGL");
...
return 0;}
Rendering from threads
A typical configuration for a multi-threaded program is to handle the window and its events in one thread (the mainone), and rendering in another one. If you do so, there's an important rule to keep in mind: you can't activate acontext (window) if it's active in another thread. This means that you have to deactivate your window beforelaunching the rendering thread.
void renderingThread(sf::Window* window){ window->setActive(true);
while (window->isOpen()) {
window->display(); }}
int main(){ sf::Window window(sf::VideoMode(800, 600), "OpenGL");
window.setActive(false);

sf::Thread thread(&renderingThread, &window); thread.Launch();
while (window.isOpen()) { ... }
return 0;}
Using OpenGL together with the graphics module
This tutorial was about mixing OpenGL with sfml-window, which is fairly easy since it's the only purpose of thismodule. Mixing with the graphics module is a little more complicated: sfml-graphics uses OpenGL too, so extracare must be taken so that SFML and user states don't conflict with each other.
If you don't know the graphics module yet, all you have to know is that the sf::Window class is replaced withsf::RenderWindow, which inherits all its functions and adds features to draw SFML specific entities.
The only way to avoid conflicts between SFML and your own OpenGL states, is to save/restore them every timeyou switch from OpenGL to SFML.
- draw with OpenGL
- save OpenGL states
- draw with SFML
- restore OpenGL states
- draw with OpenGL
...
The easiest solution is to let SFML do it for you, with the pushGLStates/popGLStates functions :
glDraw...
window.pushGLStates();
window.draw(...);
window.popGLStates();
glDraw...
Since it has no knowledge about your OpenGL code, SFML can't optimize these steps and as a result itsaves/restores all available OpenGL states and matrices. This may be acceptable for small projects, but it mightalso be too slow for bigger programs that require maximum performance. In this case, you can handle saving andrestoring the OpenGL states yourself, with glPushAttrib/glPopAttrib, glPushMatrix/glPopMatrix, etc.If you do this, you'll still need to restore SFML's own states before drawing. This is done with theresetGLStates function.

glDraw...
glPush...window.resetGLStates();
window.draw(...);
glPop...
glDraw...
By saving and restoring OpenGL states yourself, you can manage only the ones that you really need which leadsto reducing the number of unnecessary driver calls.

sfml-dev.org http://www.sfml-dev.org/tutorials/2.2/graphics-draw.php
Drawing 2D stuff
Introduction
As you learnt in the previous tutorials, SFML's window moduleprovides an easy way to open an OpenGL window and handle itsevents, but it doesn't help when it comes to drawing something. Theonly option which is left to you is to use the powerful, yet complexand low level OpenGL API.
Fortunately, SFML provides a graphics module which will help you draw 2D entities in a much simpler way thanwith OpenGL.
The drawing window
To draw the entities provided by the graphics module, you must use a specialized window class:sf::RenderWindow. This class is derived from sf::Window, and inherits all its functions. Everything thatyou've learnt about sf::Window (creation, event handling, controlling the framerate, mixing with OpenGL, etc.)is applicable to sf::RenderWindow as well.
On top of that, sf::RenderWindow adds high-level functions to help you draw things easily. In this tutorial we'llfocus on two of these functions: clear and draw. They are as simple as their name implies: clear clears thewhole window with the chosen color, and draw draws whatever object you pass to it.
Here is what a typical main loop looks like with a render window:
#include <SFML/Graphics.hpp>
int main(){ sf::RenderWindow window(sf::VideoMode(800, 600), "My window");
while (window.isOpen()) { sf::Event event; while (window.pollEvent(event)) { if (event.type == sf::Event::Closed) window.close(); }
window.clear(sf::Color::Black);

window.display(); }
return 0;}
Calling clear before drawing anything is mandatory, otherwise the contents from previous frames will be presentbehind anything you draw. The only exception is when you cover the entire window with what you draw, so that nopixel is not drawn to. In this case you can avoid calling clear (although it won't have a noticeable impact onperformance).
Calling display is also mandatory, it takes what was drawn since the last call to display and displays it on thewindow. Indeed, things are not drawn directly to the window, but to a hidden buffer. This buffer is then copied tothe window when you call display -- this is called double-buffering.
This clear/draw/display cycle is the only good way to draw things. Don't try other strategies, such as keepingpixels from the previous frame, "erasing" pixels, or drawing once and calling display multiple times. You'll getstrange results due to double-buffering.Modern graphics hardware and APIs are really made for repeated clear/draw/display cycles where everything iscompletely refreshed at each iteration of the main loop. Don't be scared to draw 1000 sprites 60 times persecond, you're far below the millions of triangles that your computer can handle.
What can I draw now?
Now that you have a main loop which is ready to draw, let's see what, and how, you can actually draw there.
SFML provides four kinds of drawable entities: three of them are ready to be used (sprites, text and shapes), thelast one is the building block that will help you create your own drawable entities (vertex arrays).
Although they share some common properties, each of these entities come with their own nuances and aretherefore explained in dedicated tutorials:
Off-screen drawing
SFML also provides a way to draw to a texture instead of directly to a window. To do so, use asf::RenderTexture instead of a sf::RenderWindow. It has the same functions for drawing, inherited fromtheir common base: sf::RenderTarget.
sf::RenderTexture renderTexture;if (!renderTexture.create(500, 500)){ }
renderTexture.clear();renderTexture.draw(sprite); renderTexture.display();
const sf::Texture& texture = renderTexture.getTexture();

sf::Sprite sprite(texture);window.draw(sprite);
The getTexture function returns a read-only texture, which means that you can only use it, not modify it. If youneed to modify it before using it, you can copy it to your own sf::Texture instance and modify that instead.
sf::RenderTexture also has the same functions as sf::RenderWindow for handling views and OpenGL(see the corresponding tutorials for more details). If you use OpenGL to draw to the render-texture, you canrequest creation of a depth buffer by using the third optional argument of the create function.
renderTexture.create(500, 500, true);
Drawing from threads
SFML supports multi-threaded drawing, and you don't even have to do anything to make it work. The only thing toremember is to deactivate a window before using it in another thread. That's because a window (more preciselyits OpenGL context) cannot be active in more than one thread at the same time.
void renderingThread(sf::RenderWindow* window){ while (window->isOpen()) {
window->display(); }}
int main(){ sf::RenderWindow window(sf::VideoMode(800, 600), "OpenGL");
window.setActive(false);
sf::Thread thread(&renderingThread, &window); thread.launch();
while (window.isOpen()) { ... }
return 0;}
As you can see, you don't even need to bother with the activation of the window in the rendering thread, SFMLdoes it automatically for you whenever it needs to be done.
Remember to always create the window and handle its events in the main thread for maximum portability. This is

sfml-dev.org http://www.sfml-dev.org/tutorials/2.2/graphics-sprite.php
Sprites and textures
Vocabulary
Most (if not all) of you are already familiar with these two verycommon objects, so let's define them very briefly.
A texture is an image. But we call it "texture" because it has a veryspecific role: being mapped to a 2D entity.
A sprite is nothing more than a textured rectangle.
Ok, that was short but if you really don't understand what sprites and textures are, then you'll find a much betterdescription on Wikipedia.
Loading a texture
Before creating any sprite, we need a valid texture. The class that encapsulates textures in SFML is, surprisingly,sf::Texture. Since the only role of a texture is to be loaded and mapped to graphical entities, almost all itsfunctions are about loading and updating it.
The most common way of loading a texture is from an image file on disk, which is done with the loadFromFilefunction.
sf::Texture texture;if (!texture.loadFromFile("image.png")){ }
The loadFromFile function can sometimes fail with no obvious reason. First, check the error message thatSFML prints to the standard output (check the console). If the message is "unable to open file", make sure thatthe working directory (which is the directory that any file path will be interpreted relative to) is what you think it is:When you run the application from your desktop environment, the working directory is the executable folder.However, when you launch your program from your IDE (Visual Studio, Code::Blocks, ...) the working directorymight sometimes be set to the project directory instead. This can usually be changed quite easily in the projectsettings.
You can also load an image file from memory (loadFromMemory), from a custom input stream(loadFromStream), or from an image that has already been loaded (loadFromImage). The latter loads thetexture from an sf::Image, which is a utility class that helps store and manipulate image data (modify pixels,

create transparency channel, etc.). The pixels of an sf::Image stay in system memory, which ensures thatoperations on them will be as fast as possible, in contrast to the pixels of a texture which reside in video memoryand are therefore slow to retrieve or update but very fast to draw.
SFML supports most common image file formats. The full list is available in the API documentation.
All these loading functions have an optional argument, which can be used if you want to load a smaller part of theimage.
if (!texture.loadFromFile("image.png", sf::IntRect(10, 10, 32, 32))){ }
The sf::IntRect class is a simple utility type that represents a rectangle. Its constructor takes the coordinatesof the top-left corner, and the size of the rectangle.
If you don't want to load a texture from an image, but instead want to update it directly from an array of pixels, youcan create it empty and update it later:
if (!texture.create(200, 200)){ }
Note that the contents of the texture are undefined at this point.
To update the pixels of an existing texture, you have to use the update function. It has overloads for many kindsof data sources:
sf::Uint8* pixels = new sf::Uint8[width * height * 4]; ...texture.update(pixels);
sf::Image image;...texture.update(image);
sf::RenderWindow window;...texture.update(window);
These examples all assume that the source is of the same size as the texture. If this is not the case, i.e. if youwant to update only a part of the texture, you can specify the coordinates of the sub-rectangle that you want toupdate. You can refer to the documentation for further details.
Additionally, a texture has two properties that change how it is rendered.
The first property allows one to smooth the texture. Smoothing a texture makes pixel boundaries less visible (butthe image a little more blurry), which can be desirable if it is up-scaled.
texture.setSmooth(true);

Since smoothing samples from adjacent pixels in the texture as well, it can lead to the unwanted side effect offactoring in pixels outside the selected texture area. This can happen when your sprite is located at non-integercoordinates.
The second property allows a texture to be repeatedly tiled within a single sprite.
texture.setRepeated(true);
This only works if your sprite is configured to show a rectangle which is larger than the texture, otherwise this

property has no effect.
Ok, can I have my sprite now?
Yes, you can now create your sprite.
sf::Sprite sprite;sprite.setTexture(texture);
... and finally draw it.
window.draw(sprite);
If you don't want your sprite to use the entire texture, you can set its texture rectangle.
sprite.setTextureRect(sf::IntRect(10, 10, 32, 32));
You can also change the color of a sprite. The color that you set is modulated (multiplied) with the texture of thesprite. This can also be used to change the global transparency (alpha) of the sprite.
sprite.setColor(sf::Color(0, 255, 0)); sprite.setColor(sf::Color(255, 255, 255, 128));
These sprites all use the same texture, but have a different color:
Sprites can also be transformed: They have a position, an orientation and a scale.
sprite.setPosition(sf::Vector2f(10, 50)); sprite.move(sf::Vector2f(5, 10));
sprite.setRotation(90); sprite.rotate(15);
sprite.setScale(sf::Vector2f(0.5f, 2.f)); sprite.scale(sf::Vector2f(1.5f, 3.f));
By default, the origin for these three transformations is the top-left corner of the sprite. If you want to set the originto a different point (for example the center of the sprite, or another corner), you can use the setOrigin function.
sprite.setOrigin(sf::Vector2f(25, 25));
Since transformation functions are common to all SFML entities, they are explained in a separate tutorial:Transforming entities.

The white square problem
You successfully loaded a texture, constructed a sprite correctly, and... all you see on your screen now is a whitesquare. What happened?
This is a common mistake. When you set the texture of a sprite, all it does internally is store a pointer to thetexture instance. Therefore, if the texture is destroyed or moves elsewhere in memory, the sprite ends up with aninvalid texture pointer.
This problem occurs when you write this kind of function:
sf::Sprite loadSprite(std::string filename){ sf::Texture texture; texture.loadFromFile(filename);
return sf::Sprite(texture);}
You must correctly manage the lifetime of your textures and make sure that they live as long as they are used byany sprite.
The importance of using as few textures as possible
Using as few textures as possible is a good strategy, and the reason is simple: Changing the current texture is anexpensive operation for the graphics card. Drawing many sprites that use the same texture will yield the bestperformance.
Additionally, using a single texture allows you to group static geometry into a single entity (you can only use onetexture per draw call), which will be much faster to draw than a set of many entities. Batching static geometryinvolves other classes and is therefore beyond the scope of this tutorial, for further details see the vertex arraytutorial.
Try to keep this in mind when you create your animation sheets or your tilesets: Use as little textures as possible.
Using sf::Texture with OpenGL code
If you're using OpenGL rather than the graphics entities of SFML, you can still use sf::Texture as a wrapperaround an OpenGL texture object and use it along with the rest if your OpenGL code.
To bind a sf::Texture for drawing (basically glBindTexture), you call the bind static function:
sf::Texture texture;...
sf::Texture::bind(&texture);
sf::Texture::bind(NULL);

sfml-dev.org http://www.sfml-dev.org/tutorials/2.2/graphics-text.php
Text and fonts
Loading a font
Before drawing any text, you need to have an available font, just likeany other program that prints text. Fonts are encapsulated in thesf::Font class, which provides three main features: loading a font,getting glyphs (i.e. visual characters) from it, and reading itsattributes. In a typical program, you'll only have to make use of the first feature, loading the font, so let's focus onthat first.
The most common way of loading a font is from a file on disk, which is done with the loadFromFile function.
sf::Font font;if (!font.loadFromFile("arial.ttf")){ }
Note that SFML won't load your system fonts automatically, i.e. font.loadFromFile("Courier New") won'twork. Firstly, because SFML requires file names, not font names, and secondly because SFML doesn't havemagical access to your system's font folder. If you want to load a font, you will need to include the font file withyour application, just like every other resource (images, sounds, ...).
The loadFromFile function can sometimes fail with no obvious reason. First, check the error message thatSFML prints to the standard output (check the console). If the message is "unable to open file", make sure thatthe working directory (which is the directory that any file path will be interpreted relative to) is what you think it is:When you run the application from your desktop environment, the working directory is the executable folder.However, when you launch your program from your IDE (Visual Studio, Code::Blocks, ...) the working directorymight sometimes be set to the project directory instead. This can usually be changed quite easily in the projectsettings.
You can also load a font file from memory (loadFromMemory), or from a custom input stream(loadFromStream).
SFML supports most common font formats. The full list is available in the API documentation.
That's all you need to do. Once your font is loaded, you can start drawing text.
Drawing text
To draw text, you will be using the sf::Text class. It's very simple to use:
sf::Text text;
text.setFont(font);
text.setString("Hello world");

text.setCharacterSize(24);
text.setColor(sf::Color::Red);
text.setStyle(sf::Text::Bold | sf::Text::Underlined);
...
window.draw(text);
Text can also be transformed: They have a position, anorientation and a scale. The functions involved are thesame as for the sf::Sprite class and other SFMLentities. They are explained in the Transforming entitiestutorial.
How to avoid problems with non-ASCIIcharacters?
Handling non-ASCII characters (such as accented European, Arabic, or Chinese characters) correctly can betricky. It requires a good understanding of the various encodings involved in the process of interpreting anddrawing your text. To avoid having to bother with these encodings, there's a simple solution: Use wide literalstrings.
text.setString(L" חאטי ");
It is this simple "L" prefix in front of the string that makes it work by telling the compiler to produce a wide string.Wide strings are a strange beast in C++: the standard doesn't say anything about their size (16-bit? 32-bit?), norabout the encoding that they use (UTF-16? UTF-32?). However we know that on most platforms, if not all, they'llproduce Unicode strings, and SFML knows how to handle them correctly.
Note that the C++11 standard supports new character types and prefixes to build UTF-8, UTF-16 and UTF-32string literals, but SFML doesn't support them yet.
It may seem obvious, but you also have to make sure that the font that you use contains the characters that youwant to draw. Indeed, fonts don't contain glyphs for all possible characters (there are more than 100000 in theUnicode standard!), and an Arabic font won't be able to display Japanese text, for example.
Making your own text class
If sf::Text is too limited, or if you want to do something else with pre-rendered glyphs, sf::Font provideseverything that you need.
You can retrieve the texture which contains all the pre-rendered glyphs of a certain size:
const sf::Texture& texture = font.getTexture(characterSize);
It is important to note that glyphs are added to the texture when they are requested. There are so manycharacters (remember, more than 100000) that they can't all be generated when you load the font. Instead, theyare rendered on the fly when you call the getGlyph function (see below).
To do something meaningful with the font texture, you must get the texture coordinates of glyphs that arecontained in it:

sf::Glyph glyph = font.getGlyph(character, characterSize, bold);
character is the UTF-32 code of the character whose glyph that you want to get. You must also specify thecharacter size, and whether you want the bold or the regular version of the glyph.
The sf::Glyph structure contains three members:
textureRect contains the texture coordinates of the glyph within the texture
bounds contains the bounding rectangle of the glyph, which helps position it relative to the baseline of thetext
advance is the horizontal offset to apply to get the starting position of the next glyph in the text
You can also get some of the font's other metrics, such as the kerning between two characters or the line spacing(always for a certain character size):
int lineSpacing = font.getLineSpacing(characterSize);
int kerning = font.getKerning(character1, character2, characterSize);

sfml-dev.org http://www.sfml-dev.org/tutorials/2.2/graphics-shape.php
Shapes
Introduction
SFML provides a set of classes that represent simple shape entities.Each type of shape is a separate class, but they all derive from thesame base class so that they have access to the same subset ofcommon features. Each class then adds its own specifics: a radiusproperty for the circle class, a size for the rectangle class, points for the polygon class, etc.
Common shape properties
Transformation (position, rotation, scale)
These properties are common to all the SFML graphical classes, so they are explained in a separate tutorial:Transforming entities.
Color
One of the basic properties of a shape is its color. You can change with the setFillColor function.
sf::CircleShape shape(50);
shape.setFillColor(sf::Color(100, 250, 50));
Outline
Shapes can have an outline. You can set the thicknessand color of the outline with thesetOutlineThickness and setOutlineColorfunctions.
sf::CircleShape shape(50);shape.setFillColor(sf::Color(150, 50, 250));
shape.setOutlineThickness(10);shape.setOutlineColor(sf::Color(250, 150, 100));
By default, the outline is extruded outwards from the shape (e.g. if you have a circle with a radius of 10 and anoutline thickness of 5, the total radius of the circle will be 15). You can make it extrude towards the center of theshape instead, by setting a negative thickness.
To disable the outline, set its thickness to 0. If you only want the outline, you can set the fill color tosf::Color::Transparent.
Texture
Shapes can also be textured, just like sprites. To specify a part of the texture to be mapped to the shape, you

must use the setTextureRect function. It takes the texture rectangle to map to the bounding rectangle of theshape. This method doesn't offer maximum flexibility,but it is much easier to use than individually setting thetexture coordinates of each point of the shape.
sf::CircleShape shape(50);
shape.setTexture(&texture); shape.setTextureRect(sf::IntRect(10, 10, 100, 100));
Note that the outline is not textured.It is important to know that the texture is modulated(multiplied) with the shape's fill color. If its fill color issf::Color::White, the texture will appear unmodified.To disable texturing, call setTexture(NULL).
Drawing a shape
Drawing a shape is as simple as drawing any otherSFML entity:
window.draw(shape);
Built-in shape types
Rectangles
To draw rectangles, you can use the sf::RectangleShape class. It has a single attribute: The size of therectangle.
sf::RectangleShape rectangle(sf::Vector2f(120, 50));
rectangle.setSize(sf::Vector2f(100, 100));
Circles
Circles are represented by the sf::CircleShapeclass. It has two attributes: The radius and the numberof sides. The number of sides is an optional attribute, itallows you to adjust the "quality" of the circle: Circleshave to be approximated by polygons with many sides(the graphics card is unable to draw a perfect circledirectly), and this attribute defines how many sides yourcircle approximation will have. If you draw small circles,you'll probably only need a few sides. If you draw bigcircles, or zoom on regular circles, you'll most likelyneed more sides.
sf::CircleShape circle(200);

circle.setRadius(40);
circle.setPointCount(100);
Regular polygons
There's no dedicated class for regular polygons, in factyou can represent a regular polygon with any numberof sides using the sf::CircleShape class: Sincecircles are approximated by polygons with many sides,you just have to play with the number of sides to get thedesired polygons. A sf::CircleShape with 3 pointsis a triangle, with 4 points it's a square, etc.
sf::CircleShape triangle(80, 3);
sf::CircleShape square(80, 4);
sf::CircleShape octagon(80, 8);
Convex shapes
The sf::ConvexShape class is the ultimate shapeclass: It allows you to define any convex shape. SFMLis unable to draw concave shapes. If you need to drawa concave shape, you'll have to split it into multipleconvex polygons.
To construct a convex shape, you must first set thenumber of points it should have and then define thepoints.
sf::ConvexShape convex;
convex.setPointCount(5);
convex.setPoint(0, sf::Vector2f(0, 0));convex.setPoint(1, sf::Vector2f(150, 10));convex.setPoint(2, sf::Vector2f(120, 90));convex.setPoint(3, sf::Vector2f(30, 100));convex.setPoint(4, sf::Vector2f(0, 50));
The order in which you define the points is very important. They must all be defined either in clockwise orcounter-clockwise order. If you define them in an inconsistent order, the shape will be constructed incorrectly.
Although the name of sf::ConvexShape implies that it should only be used to represent convex shapes, itsrequirements are a little more relaxed. In fact, the only requirement that your shape must meet is that if you went
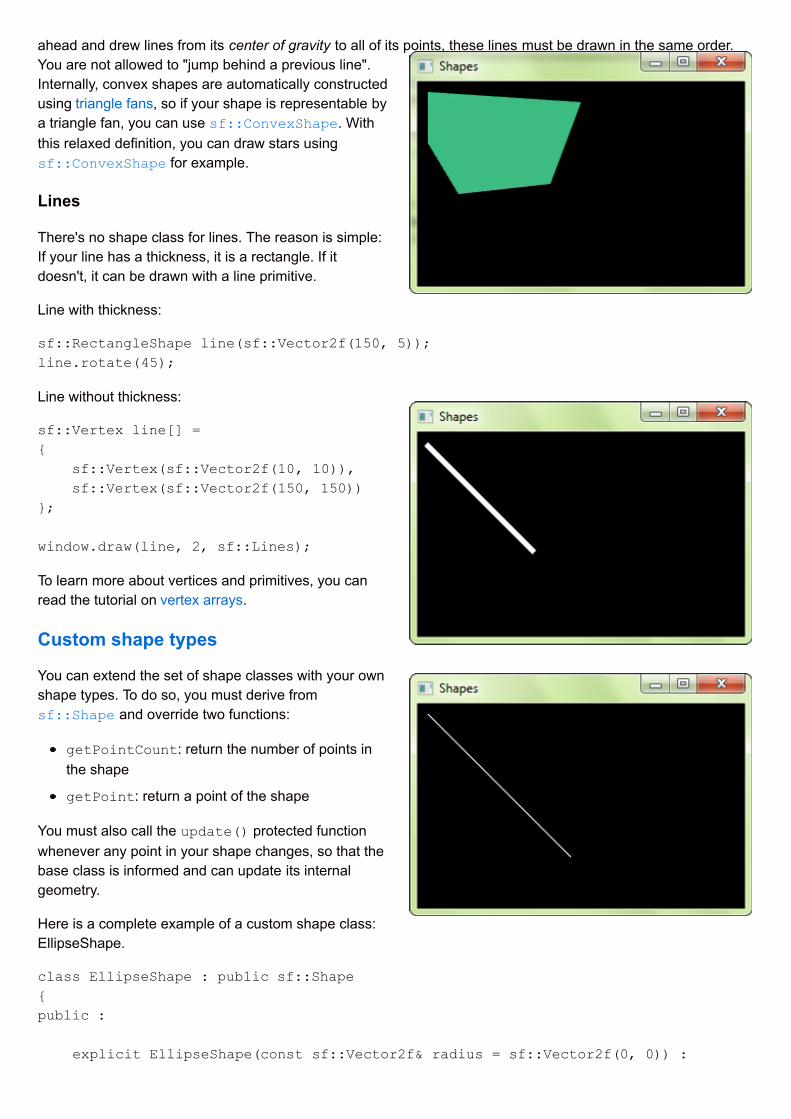
ahead and drew lines from its center of gravity to all of its points, these lines must be drawn in the same order.You are not allowed to "jump behind a previous line".Internally, convex shapes are automatically constructedusing triangle fans, so if your shape is representable bya triangle fan, you can use sf::ConvexShape. Withthis relaxed definition, you can draw stars usingsf::ConvexShape for example.
Lines
There's no shape class for lines. The reason is simple:If your line has a thickness, it is a rectangle. If itdoesn't, it can be drawn with a line primitive.
Line with thickness:
sf::RectangleShape line(sf::Vector2f(150, 5));line.rotate(45);
Line without thickness:
sf::Vertex line[] ={ sf::Vertex(sf::Vector2f(10, 10)), sf::Vertex(sf::Vector2f(150, 150))};
window.draw(line, 2, sf::Lines);
To learn more about vertices and primitives, you canread the tutorial on vertex arrays.
Custom shape types
You can extend the set of shape classes with your ownshape types. To do so, you must derive fromsf::Shape and override two functions:
getPointCount: return the number of points inthe shape
getPoint: return a point of the shape
You must also call the update() protected functionwhenever any point in your shape changes, so that thebase class is informed and can update its internalgeometry.
Here is a complete example of a custom shape class:EllipseShape.
class EllipseShape : public sf::Shape{public :
explicit EllipseShape(const sf::Vector2f& radius = sf::Vector2f(0, 0)) :

m_radius(radius) { update(); }
void setRadius(const sf::Vector2f& radius) { m_radius = radius; update(); }
const sf::Vector2f& getRadius() const { return m_radius; }
virtual unsigned int getPointCount() const { return 30; }
virtual sf::Vector2f getPoint(unsigned int index) const { static const float pi = 3.141592654f;
float angle = index * 2 * pi / getPointCount() - pi / 2; float x = std::cos(angle) * m_radius.x; float y = std::sin(angle) * m_radius.y;
return sf::Vector2f(m_radius.x + x, m_radius.y + y); }
private :
sf::Vector2f m_radius;};
Antialiased shapes
There's no option to anti-alias a single shape. To getanti-aliased shapes (i.e. shapes with smoothed edges),you have to enable anti-aliasing globally when youcreate the window, with the corresponding attribute ofthe sf::ContextSettings structure.
sf::ContextSettings settings;settings.antialiasingLevel = 8;
sf::RenderWindow window(sf::VideoMode(800, 600), "SFML shapes", sf::Style::Default, settings);

Remember that anti-aliasing availability depends on the graphics card: It might not support it, or have it forced todisabled in the driver settings.

sfml-dev.org http://www.sfml-dev.org/tutorials/2.2/graphics-vertex-array.php
Designing your own entities with vertex arrays
Introduction
SFML provides simple classes for the most common 2D entities. Andwhile more complex entities can easily be created from thesebuilding blocks, it isn't always the most efficient solution. Forexample, you'll reach the limits of your graphics card very quickly ifyou draw a large number of sprites. The reason is that performance depends in large part on the number of callsto the draw function. Indeed, each call involves setting a set of OpenGL states, resetting matrices, changingtextures, etc. All of this is required even when simply drawing two triangles (a sprite). This is far from optimal foryour graphics card: Today's GPUs are designed to process large batches of triangles, typically several thousandto millions.
To fill this gap, SFML provides a lower-level mechanism to draw things: Vertex arrays. As a matter of fact, vertexarrays are used internally by all other SFML classes. They allow for a more flexible definition of 2D entities,containing as many triangles as you need. They even allow drawing points or lines.
What is a vertex, and why are they always in arrays?
A vertex is the smallest graphical entity that you can manipulate. In short, it is a graphical point: Naturally, it has a2D position (x, y), but also a color, and a pair of texture coordinates. We'll go into the roles of these attributeslater.
Vertices (plural of vertex) alone don't do much. They are always grouped into primitives: Points (1 vertex), lines (2vertices), triangles (3 vertices) or quads (4 vertices). You can then combine multiple primitives together to createthe final geometry of the entity.
Now you understand why we always talk about vertex arrays, and not vertices alone.
A simple vertex array
Let's have a look at the sf::Vertex class now. It's simply a container which contains three public members andno functions besides its constructors. These constructors allow you to construct vertices from the set of attributesyou care about -- you don't always need to color or texture your entity.
sf::Vertex vertex;
vertex.position = sf::Vector2f(10, 50);
vertex.color = sf::Color::Red;
vertex.texCoords = sf::Vector2f(100, 100);
... or, using the correct constructor:
sf::Vertex vertex(sf::Vector2f(10, 50), sf::Color::Red, sf::Vector2f(100, 100));

Now, let's define a primitive. Remember, a primitive consists of several vertices, therefore we need a vertexarray. SFML provides a simple wrapper for this: sf::VertexArray. It provides the semantics of an array(similar to std::vector), and also stores the type of primitive its vertices define.
sf::VertexArray triangle(sf::Triangles, 3);
triangle[0].position = sf::Vector2f(10, 10);triangle[1].position = sf::Vector2f(100, 10);triangle[2].position = sf::Vector2f(100, 100);
triangle[0].color = sf::Color::Red;triangle[1].color = sf::Color::Blue;triangle[2].color = sf::Color::Green;
Your triangle is ready and you can now draw it. Drawing a vertex array can be done similar to drawing any otherSFML entity, by using the draw function:
window.draw(triangle);
You can see that the vertices' color is interpolated to fillthe primitive. This is a nice way of creating gradients.
Note that you don't have to use thesf::VertexArray class. It's just defined forconvenience, it's nothing more than astd::vector<sf::Vertex> along with asf::PrimitiveType. If you need more flexibility, or astatic array, you can use your own storage. You mustthen use the overload of the draw function which takesa pointer to the vertices, the vertex count and theprimitive type.
std::vector<sf::Vertex> vertices;vertices.push_back(sf::Vertex(...));...
window.draw(&vertices[0], vertices.size(), sf::Triangles);
sf::Vertex vertices[2] ={ sf::Vertex(...), sf::Vertex(...)};
window.draw(vertices, 2, sf::Lines);
Primitive types
Let's pause for a while and see what kind of primitives you can create. As explained above, you can define themost basic 2D primitives: Point, line, triangle and quad (quad exists merely as a convenience, internally the

graphics card breaks it into two triangles). There are also "chained" variants of these primitive types which allowfor sharing of vertices among two consecutive primitives. This can be useful because consecutive primitives areoften connected in some way.
Let's have a look at the full list:
Primitive type Description Example
sf::Points A set of unconnected points. These points have no thickness:They will always occupy a single pixel, regardless of thecurrent transform and view.
sf::Lines A set of unconnected lines. These lines have no thickness:They will always be one pixel wide, regardless of the currenttransform and view.
sf::LinesStrip A set of connected lines. The end vertex of one line is used asthe start vertex of the next one.
sf::Triangles A set of unconnected triangles.
sf::TrianglesStrip A set of connected triangles. Each triangle shares its two lastvertices with the next one.
sf::TrianglesFan A set of triangles connected to a central point. The first vertexis the center, then each new vertex defines a new triangle,using the center and the previous vertex.
sf::Quads A set of unconnected quads. The 4 points of each quad mustbe defined consistently, either in clockwise or counter-clockwise order.
Texturing
Like other SFML entities, vertex arrays can also be textured. To do so, you'll need to manipulate the texCoordsattribute of the vertices. This attribute defines which pixel of the texture is mapped to the vertex.
sf::VertexArray quad(sf::Quads, 4);

quad[0].position = sf::Vector2f(10, 10);quad[1].position = sf::Vector2f(110, 10);quad[2].position = sf::Vector2f(110, 110);quad[3].position = sf::Vector2f(10, 110);
quad[0].texCoords = sf::Vector2f(0, 0);quad[1].texCoords = sf::Vector2f(25, 0);quad[2].texCoords = sf::Vector2f(25, 50);quad[3].texCoords = sf::Vector2f(0, 50);
Texture coordinates are defined in pixels (just like the textureRect of sprites and shapes). They are notnormalized (between 0 and 1), as people who are used to OpenGL programming might expect.
Vertex arrays are low-level entities, they only deal with geometry and do not store additional attributes like atexture. To draw a vertex array with a texture, you must pass it directly to the draw function:
sf::VertexArray vertices;sf::Texture texture;
...
window.draw(vertices, &texture);
This is the short version, if you need to pass other render states (like a blend mode or a transform), you can usethe explicit version which takes a sf::RenderStates object:
sf::VertexArray vertices;sf::Texture texture;
...
sf::RenderStates states;states.texture = &texture;
window.draw(vertices, states);
Transforming a vertex array
Transforming is similar to texturing. The transform is not stored in the vertex array, you must pass it to the drawfunction.
sf::VertexArray vertices;sf::Transform transform;
...
window.draw(vertices, transform);
Or, if you need to pass other render states:
sf::VertexArray vertices;sf::Transform transform;

...
sf::RenderStates states;states.transform = transform;
window.draw(vertices, states);
To know more about transformations and the sf::Transform class, you can read the tutorial on transformingentities.
Creating an SFML-like entity
Now that you know how to define your own textured/colored/transformed entity, wouldn't it be nice to wrap it in anSFML-style class? Fortunately, SFML makes this easy for you by providing the sf::Drawable andsf::Transformable base classes. These two classes are the base of the built-in SFML entities sf::Sprite,sf::Text and sf::Shape.
sf::Drawable is an interface: It declares a single pure virtual function and has no members nor concretefunctions. Inheriting from sf::Drawable allows you to draw instances of your class the same way as SFMLclasses:
class MyEntity : public sf::Drawable{private:
virtual void draw(sf::RenderTarget& target, sf::RenderStates states) const;};
MyEntity entity;window.draw(entity);
Note that doing this is not mandatory, you could also just have a similar draw function in your class and simplycall it with entity.draw(window). But the other way, with sf::Drawable as a base class, is nicer and moreconsistent. This also means that if you plan on storing an array of drawable objects, you can do it without anyadditional effort since all drawable objects (SFML's and yours) derive from the same class.
The other base class, sf::Transformable, has no virtual function. Inheriting from it automatically adds thesame transformation functions to your class as other SFML classes (setPosition, setRotation, move,scale, ...). You can learn more about this class in the tutorial on transforming entities.
Using these two base classes and a vertex array (in this example we'll also add a texture), here is what a typicalSFML-like graphical class would look like:
class MyEntity : public sf::Drawable, public sf::Transformable{public:
private:
virtual void draw(sf::RenderTarget& target, sf::RenderStates states) const { states.transform *= getTransform();

states.texture = &m_texture;
target.draw(m_vertices, states); }
sf::VertexArray m_vertices; sf::Texture m_texture;};
You can then use this class as if it were a built-in SFML class:
MyEntity entity;
entity.setPosition(10, 50);entity.setRotation(45);
window.draw(entity);
Example: tile map
With what we've seen above, let's create a class that encapsulates a tile map. The whole map will be containedin a single vertex array, therefore it will be super fast to draw. Note that we can apply this strategy only if thewhole tile set can fit into a single texture. Otherwise, we would have to use at least one vertex array per texture.
class TileMap : public sf::Drawable, public sf::Transformable{public:
bool load(const std::string& tileset, sf::Vector2u tileSize, const int* tiles, unsigned int width, unsigned int height) { if (!m_tileset.loadFromFile(tileset)) return false;
m_vertices.setPrimitiveType(sf::Quads); m_vertices.resize(width * height * 4);
for (unsigned int i = 0; i < width; ++i) for (unsigned int j = 0; j < height; ++j) { int tileNumber = tiles[i + j * width];
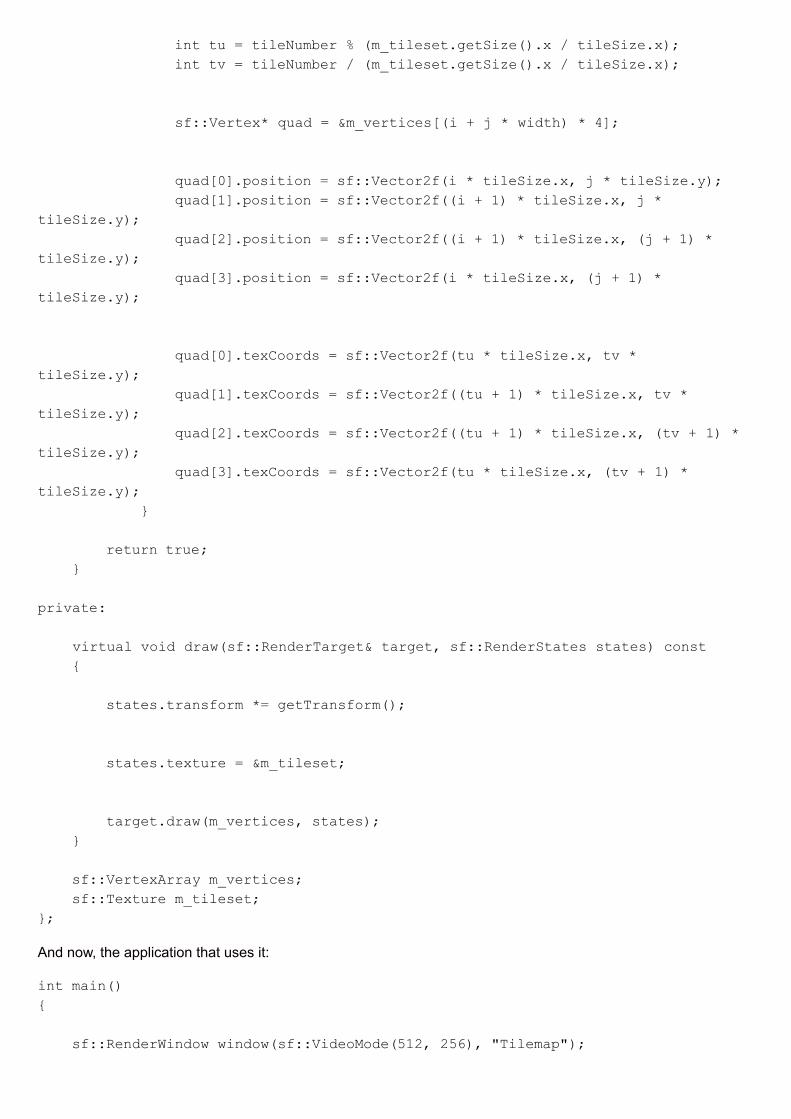
int tu = tileNumber % (m_tileset.getSize().x / tileSize.x); int tv = tileNumber / (m_tileset.getSize().x / tileSize.x);
sf::Vertex* quad = &m_vertices[(i + j * width) * 4];
quad[0].position = sf::Vector2f(i * tileSize.x, j * tileSize.y); quad[1].position = sf::Vector2f((i + 1) * tileSize.x, j * tileSize.y); quad[2].position = sf::Vector2f((i + 1) * tileSize.x, (j + 1) * tileSize.y); quad[3].position = sf::Vector2f(i * tileSize.x, (j + 1) * tileSize.y);
quad[0].texCoords = sf::Vector2f(tu * tileSize.x, tv * tileSize.y); quad[1].texCoords = sf::Vector2f((tu + 1) * tileSize.x, tv * tileSize.y); quad[2].texCoords = sf::Vector2f((tu + 1) * tileSize.x, (tv + 1) * tileSize.y); quad[3].texCoords = sf::Vector2f(tu * tileSize.x, (tv + 1) * tileSize.y); }
return true; }
private:
virtual void draw(sf::RenderTarget& target, sf::RenderStates states) const { states.transform *= getTransform();
states.texture = &m_tileset;
target.draw(m_vertices, states); }
sf::VertexArray m_vertices; sf::Texture m_tileset;};
And now, the application that uses it:
int main(){ sf::RenderWindow window(sf::VideoMode(512, 256), "Tilemap");

const int level[] = { 0, 0, 0, 0, 0, 0, 1, 1, 1, 1, 1, 1, 1, 1, 1, 1, 0, 1, 1, 1, 1, 1, 1, 0, 0, 0, 0, 2, 0, 0, 0, 0, 1, 1, 0, 0, 0, 0, 0, 0, 3, 3, 3, 3, 3, 3, 3, 3, 0, 1, 0, 0, 2, 0, 3, 3, 3, 0, 1, 1, 1, 0, 0, 0, 0, 1, 1, 0, 3, 3, 3, 0, 0, 0, 1, 1, 1, 2, 0, 0, 0, 0, 1, 0, 3, 0, 2, 2, 0, 0, 1, 1, 1, 1, 2, 0, 2, 0, 1, 0, 3, 0, 2, 2, 2, 0, 1, 1, 1, 1, 1, 1, 0, 0, 1, 0, 3, 2, 2, 2, 0, 0, 0, 0, 1, 1, 1, 1, };
TileMap map; if (!map.load("tileset.png", sf::Vector2u(32, 32), level, 16, 8)) return -1;
while (window.isOpen()) { sf::Event event; while (window.pollEvent(event)) { if(event.type == sf::Event::Closed) window.close(); }
window.clear(); window.draw(map); window.display(); }
return 0;}

Example: particle system
This second example implements another common entity: The particle system. This one is very simple, with notexture and as few parameters as possible. It demonstrates the use of the sf::Points primitive type with adynamic vertex array which changes every frame.
class ParticleSystem : public sf::Drawable, public sf::Transformable{public:
ParticleSystem(unsigned int count) : m_particles(count), m_vertices(sf::Points, count), m_lifetime(sf::seconds(3)), m_emitter(0, 0) { }
void setEmitter(sf::Vector2f position) { m_emitter = position; }
void update(sf::Time elapsed) { for (std::size_t i = 0; i < m_particles.size(); ++i) { Particle& p = m_particles[i]; p.lifetime -= elapsed;
if (p.lifetime <= sf::Time::Zero) resetParticle(i);
m_vertices[i].position += p.velocity * elapsed.asSeconds();
float ratio = p.lifetime.asSeconds() / m_lifetime.asSeconds(); m_vertices[i].color.a = static_cast<sf::Uint8>(ratio * 255); } }
private:
virtual void draw(sf::RenderTarget& target, sf::RenderStates states) const { states.transform *= getTransform();
states.texture = NULL;

target.draw(m_vertices, states); }
private:
struct Particle { sf::Vector2f velocity; sf::Time lifetime; };
void resetParticle(std::size_t index) { float angle = (std::rand() % 360) * 3.14f / 180.f; float speed = (std::rand() % 50) + 50.f; m_particles[index].velocity = sf::Vector2f(std::cos(angle) * speed, std::sin(angle) * speed); m_particles[index].lifetime = sf::milliseconds((std::rand() % 2000) + 1000);
m_vertices[index].position = m_emitter; }
std::vector<Particle> m_particles; sf::VertexArray m_vertices; sf::Time m_lifetime; sf::Vector2f m_emitter;};
And a little demo that uses it:
int main(){ sf::RenderWindow window(sf::VideoMode(512, 256), "Particles");
ParticleSystem particles(1000);
sf::Clock clock;
while (window.isOpen()) { sf::Event event; while (window.pollEvent(event)) { if(event.type == sf::Event::Closed) window.close();

}
sf::Vector2i mouse = sf::Mouse::getPosition(window); particles.setEmitter(window.mapPixelToCoords(mouse));
sf::Time elapsed = clock.restart(); particles.update(elapsed);
window.clear(); window.draw(particles); window.display(); }
return 0;}

sfml-dev.org http://www.sfml-dev.org/tutorials/2.2/graphics-transform.php
Position, rotation, scale: Transforming entities
Transforming SFML entities
All SFML classes (sprites, text, shapes) use the same interface fortransformations: sf::Transformable. This base class provides asimple API to move, rotate and scale your entities. It doesn't providemaximum flexibility, but instead defines an interface which is easy tounderstand and to use, and which covers 99% of all use cases -- for the remaining 1%, see the last chapters.
sf::Transformable (and all its derived classes) defines four properties: position, rotation, scale and origin.They all have their respective getters and setters. These transformation components are all independent of oneanother: If you want to change the orientation of the entity, you just have to set its rotation property, you don't haveto care about the current position and scale.
Position
The position is the... position of the entity in the 2D world. I don't think it needs more explanation :).
entity.setPosition(10, 50);
entity.move(5, 5);
sf::Vector2f position = entity.getPosition();
By default, entities are positioned relative to their top-leftcorner. We'll see how to change that with the 'origin'property later.
Rotation
The rotation is the orientation of the entity in the 2Dworld. It is defined in degrees, in clockwise order(because the Y axis is pointing down in SFML).
entity.setRotation(45);
entity.rotate(10);
float rotation = entity.getRotation();
Note that SFML always returns an angle in range [0, 360) when you call getRotation.

As with the position, the rotation is performed aroundthe top-left corner by default, but this can be changed bysetting the origin.
Scale
The scale factor allows the entity to be resized. Thedefault scale is 1. Setting it to a value less than 1 makesthe entity smaller, greater than 1 makes it bigger.Negative scale values are also allowed, so that you canmirror the entity.
entity.setScale(4.0f, 1.6f);
entity.scale(0.5f, 0.5f);
sf::Vector2f scale = entity.getScale();
Origin
The origin is the center point of the three othertransformations. The entity's position is the position ofits origin, its rotation is performed around the origin, andthe scale is applied relative to the origin as well. Bydefault, it is the top-left corner of the entity (point (0, 0)),but you can set it to the center of the entity, or any othercorner of the entity for example.
To keep things simple, there's only a single origin for allthree transformation components. This means that youcan't position an entity relative to its top-left corner whilerotating it around its center for example. If you need todo such things, have a look at the next chapters.
entity.setOrigin(10, 20);
sf::Vector2f origin = entity.getOrigin();
Note that changing the origin also changes where the entity is drawn on screen, even though its position propertyhasn't changed. If you don't understand why, read this tutorial one more time!
Transforming your own classes
sf::Transformable is not only made for SFML classes, it can also be a base (or member) of your own classes.
class MyGraphicalEntity : public sf::Transformable{

};
MyGraphicalEntity entity;entity.setPosition(10, 30);entity.setRotation(110);entity.setScale(0.5f, 0.2f);
To retrieve the final transform of the entity (commonly needed when drawing it), call the getTransform function.This function returns a sf::Transform object. See below for an explanation about it, and how to use it totransform an SFML entity.
If you don't need/want the complete set of functions provided by the sf::Transformable interface, don'thesitate to simply use it as a member instead and provide your own functions on top of it. It is not abstract, so it ispossible to instantiate it instead of only being able to use it as a base class.
Custom transforms
The sf::Transformable class is easy to use, but it is also limited. Some users might need more flexibility. Theymight need to specify a final transformation as a custom combination of individual transformations. For theseusers, a lower-level class is available: sf::Transform. It is nothing more than a 3x3 matrix, so it can representany transformation in 2D space.
There are many ways to construct a sf::Transform:
by using the predefined functions for the most common transformations (translation, rotation, scale)
by combining two transforms
by specifying its 9 elements directly
Here are a few examples:
sf::Transform t1 = sf::Transform::Identity;
sf::Transform t2;t2.rotate(45);
sf::Transform t3(2, 0, 20, 0, 1, 50, 0, 0, 1);
sf::Transform t4 = t1 * t2 * t3;
You can apply several predefined transformations to the same transform as well. They will all be combinedsequentially:
sf::Transform t;t.translate(10, 100);t.rotate(90);t.translate(-10, 50);t.scale(0.5f, 0.75f);

Back to the point: How can a custom transform be applied to a graphical entity? Simple: Pass it to the drawfunction.
window.draw(entity, transform);
... which is in fact a short-cut for:
sf::RenderStates states;states.transform = transform;window.draw(entity, states);
If your entity is a sf::Transformable (sprite, text, shape), which contains its own internal transform, both theinternal and the passed transform are combined to produce the final transform.
Bounding boxes
After transforming entities and drawing them, you might want to perform some computations using them e.g.checking for collisions.
SFML entities can give you their bounding box. The bounding box is the minimal rectangle that contains all pointsbelonging to the entity, with sides aligned to the X and Y axes.
The bounding box is very useful when implementingcollision detection: Checks against a point or anotheraxis-aligned rectangle can be done very quickly, and itsarea is close enough to that of the real entity to providea good approximation.
sf::FloatRect boundingBox = entity.getGlobalBounds();
sf::Vector2f point = ...;if (boundingBox.contains(point)){ }
sf::FloatRect otherBox = ...;if (boundingBox.intersects(otherBox)){ }
The function is named getGlobalBounds because it returns the bounding box of the entity in the globalcoordinate system, i.e. after all of its transformations (position, rotation, scale) have been applied.
There's another function that returns the bounding box of the entity in its local coordinate system (before itstransformations are applied): getLocalBounds. This function can be used to get the initial size of an entity, forexample, or to perform more specific calculations.
Object hierarchies (scene graph)
With the custom transforms seen previously, it becomes easy to implement a hierarchy of objects in which

children are transformed relative to their parent. All you have to do is pass the combined transform from parent tochildren when you draw them, all the way until you reach the final drawable entities (sprites, text, shapes, vertexarrays or your own drawables).
class Node{public:
void draw(sf::RenderTarget& target, const sf::Transform& parentTransform) const { sf::Transform combinedTransform = parentTransform * m_transform;
onDraw(target, combinedTransform)
for (std::size_t i = 0; i < m_children.size(); ++i) m_children[i]->draw(target, combinedTransform); }
private:
virtual void onDraw(sf::RenderTarget& target, const sf::Transform& transform) const = 0;
sf::Transform m_transform; std::vector<Node*> m_children;};
class SpriteNode : public Node{public:
private:
virtual void onDraw(sf::RenderTarget& target, const sf::Transform& transform) const { target.draw(m_sprite, transform); }
sf::Sprite m_sprite;};

sfml-dev.org http://www.sfml-dev.org/tutorials/2.2/graphics-shader.php
Adding special effects with shaders
Introduction
A shader is a small program that is executed on the graphics card. Itprovides the programmer with more control over the drawing processand in a more flexible and simple way than using the fixed set ofstates and operations provided by OpenGL. With this additionalflexibility, shaders are used to create effects that would be too complicated, if not impossible, to describe withregular OpenGL functions: Per-pixel lighting, shadows, etc. Today's graphics cards and newer versions ofOpenGL are already entirely shader-based, and the fixed set of states and functions (which is called the "fixedpipeline") that you might know of has been deprecated and will likely be removed in the future.
Shaders are written in GLSL (OpenGL Shading Language), which is very similar to the C programming language.
There are two types of shaders: vertex shaders and fragment (or pixel) shaders. Vertex shaders are run for eachvertex, while fragment shaders are run for every generated fragment (pixel). Depending on what kind of effect youwant to achieve, you can provide a vertex shader, a fragment shader, or both.
To understand what shaders do and how to use them efficiently, it is important to understand the basics of therendering pipeline. You must also learn how to write GLSL programs and find good tutorials and examples to getstarted. You can also have a look at the "Shader" example that comes with the SFML SDK.
This tutorial will only focus on the SFML specific part: Loading and applying your shaders -- not writing them.
Loading shaders
In SFML, shaders are represented by the sf::Shader class. It handles both the vertex and fragment shaders: Asf::Shader object is a combination of both (or only one, if the other is not provided).
Even though shaders have become commonplace, there are still old graphics cards that might not support them.The first thing you should do in your program is check if shaders are available on the system:
if (!sf::Shader::isAvailable()){ }
Any attempt to use the sf::Shader class will fail if sf::Shader::isAvailable() returns false.
The most common way of loading a shader is from a file on disk, which is done with the loadFromFile function.
sf::Shader shader;
if (!shader.loadFromFile("vertex_shader.vert", sf::Shader::Vertex)){ }
if (!shader.loadFromFile("fragment_shader.frag", sf::Shader::Fragment)){

}
if (!shader.loadFromFile("vertex_shader.vert", "fragment_shader.frag")){ }
Shader source is contained in simple text files (like your C++ code). Their extension doesn't really matter, it can beanything you want, you can even omit it. ".vert" and ".frag" are just examples of possible extensions.
The loadFromFile function can sometimes fail with no obvious reason. First, check the error message thatSFML prints to the standard output (check the console). If the message is "unable to open file", make sure that theworking directory (which is the directory that any file path will be interpreted relative to) is what you think it is:When you run the application from your desktop environment, the working directory is the executable folder.However, when you launch your program from your IDE (Visual Studio, Code::Blocks, ...) the working directorymight sometimes be set to the project directory instead. This can usually be changed quite easily in the projectsettings.
Shaders can also be loaded directly from strings, with the loadFromMemory function. This can be useful if youwant to embed the shader source directly into your program.
const std::string vertexShader = \ "void main()" \ "{" \ " ..." \ "}";
const std::string fragmentShader = \ "void main()" \ "{" \ " ..." \ "}";
if (!shader.loadFromMemory(vertexShader, sf::Shader::Vertex)){ }
if (!shader.loadFromMemory(fragmentShader, sf::Shader::Fragment)){ }
if (!shader.loadFromMemory(vertexShader, fragmentShader)){ }
And finally, like all other SFML resources, shaders can also be loaded from a custom input stream with theloadFromStream function.
If loading fails, don't forget to check the standard error output (the console) to see a detailed report from the GLSLcompiler.
Using a shader
Using a shader is simple, just pass it as an additional argument to the draw function.
window.draw(whatever, &shader);
Passing variables to a shader
Like any other program, a shader can take parameters so that it is able to behave differently from one draw toanother. These parameters are declared as global variables known as uniforms in the shader.
uniform float myvar;
void main(){ }
Uniforms can be set by the C++ program, using the various overloads of the setParameter function in thesf::Shader class.
shader.setParameter("myvar", 5.f);
setParameter's overloads support all the types provided by SFML:
float (GLSL type float)
2 floats, sf::Vector2f (GLSL type vec2)
3 floats, sf::Vector3f (GLSL type vec3)
4 floats (GLSL type vec4)
sf::Color (GLSL type vec4)
sf::Transform (GLSL type mat4)
sf::Texture (GLSL type sampler2D)
The GLSL compiler optimizes out unused variables (here, "unused" means "not involved in the calculation of thefinal vertex/pixel"). So don't be surprised if you get error messages such as "Failed to find variable "xxx" inshader" when you call setParameter during your tests.
Minimal shaders
You won't learn how to write GLSL shaders here, but it is essential that you know what input SFML provides to theshaders and what it expects you to do with it.
Vertex shader
SFML has a fixed vertex format which is described by the sf::Vertex structure. An SFML vertex contains a 2Dposition, a color, and 2D texture coordinates. This is the exact input that you will get in the vertex shader, stored inthe built-in gl_Vertex, gl_MultiTexCoord0 and gl_Color variables (you don't need to declare them).
void main(){

gl_Position = gl_ModelViewProjectionMatrix * gl_Vertex;
gl_TexCoord[0] = gl_TextureMatrix[0] * gl_MultiTexCoord0;
gl_FrontColor = gl_Color;}
The position usually needs to be transformed by the model-view and projection matrices, which contain the entitytransform combined with the current view. The texture coordinates need to be transformed by the texture matrix(this matrix likely doesn't mean anything to you, it is just an SFML implementation detail). And finally, the color justneeds to be forwarded. Of course, you can ignore the texture coordinates and/or the color if you don't make use ofthem. All these variables will then be interpolated over the primitive by the graphics card, and passed to the fragmentshader.
Fragment shader
The fragment shader functions quite similarly: It receives the texture coordinates and the color of a generatedfragment. There's no position any more, at this point the graphics card has already computed the final rasterposition of the fragment. However if you deal with textured entities, you'll also need the current texture.
uniform sampler2D texture;
void main(){ vec4 pixel = texture2D(texture, gl_TexCoord[0].xy);
gl_FragColor = gl_Color * pixel;}
The current texture is not automatic, you need to treat it like you do the other input variables, and explicitly set itfrom your C++ program. Since each entity can have a different texture, and worse, there might be no way for youto get it and pass it to the shader, SFML provides a special overload of the setParameter function that does thisjob for you.
shader.setParameter("texture", sf::Shader::CurrentTexture);
This special parameter automatically sets the texture of the entity being drawn to the shader variable with thegiven name. Every time you draw a new entity, SFML will update the shader texture variable accordingly.
If you want to see nice examples of shaders in action, you can have a look at the Shader example in the SFMLSDK.
Using a sf::Shader with OpenGL code
If you're using OpenGL rather than the graphics entities of SFML, you can still use sf::Shader as a wrapperaround an OpenGL program object and use it within your OpenGL code.
To activate a sf::Shader for drawing (the equivalent of glUseProgram), you have to call the bind staticfunction:

sf::Shader shader;...
sf::Shader::bind(&shader);
sf::Shader::bind(NULL);

sfml-dev.org http://www.sfml-dev.org/tutorials/2.2/graphics-view.php
Controlling the 2D camera with views
What is a view?
In games, it is not uncommon to have levels which are much biggerthan the window itself. You only see is a small part of them. This istypically the case in RPGs, platform games, and many other genres.What developers might tend to forget is that they define entities in a2D world, not directly in the window. The window is just a view, it shows a specific area of the whole world. It isperfectly fine to draw several views of the same world in parallel, or draw the world to a texture rather than to awindow. The world itself remains unchanged, what changes is just the way it is seen.
Since what is seen in the window is just a small part of the entire 2D world, you need a way to specify which partof the world is shown in the window. Additionally, you may also want to define where/how this area will be shownwithin the window. These are the two main features of SFML views.
To summarize, views are what you need if you want to scroll, rotate or zoom your world. They are also the key tocreating split screens and mini-maps.
Defining what the view views
The class which encapsulates views in SFML is sf::View. It can be constructed directly with a definition of thearea to view:
sf::View view1(sf::FloatRect(200, 200, 300, 200));
sf::View view2(sf::Vector2f(350, 300), sf::Vector2f(300, 200));
These two definitions are equivalent: Both views will show the same area of the 2D world, a 300x200 rectanglecentered on the point (350, 300).
If you don't want to define the view upon construction orwant to modify it later, you can use the equivalent setters:
sf::View view1;view1.reset(sf::FloatRect(200, 200, 300, 200));
sf::View view2;view2.setCenter(sf::Vector2f(350, 300));view2.setSize(sf::Vector2f(200, 200));
Once your view is defined, you can transform it to make itshow a translated/rotated/scaled version of your 2D world.
Moving (scrolling) the view
Unlike drawable entities, such as sprites or shapes whose positions are defined by their top-left corner (and canbe changed to any other point), views are always manipulated by their center -- this is simply more convenient.That's why the function to change the position of a view is named setCenter, and not setPosition.
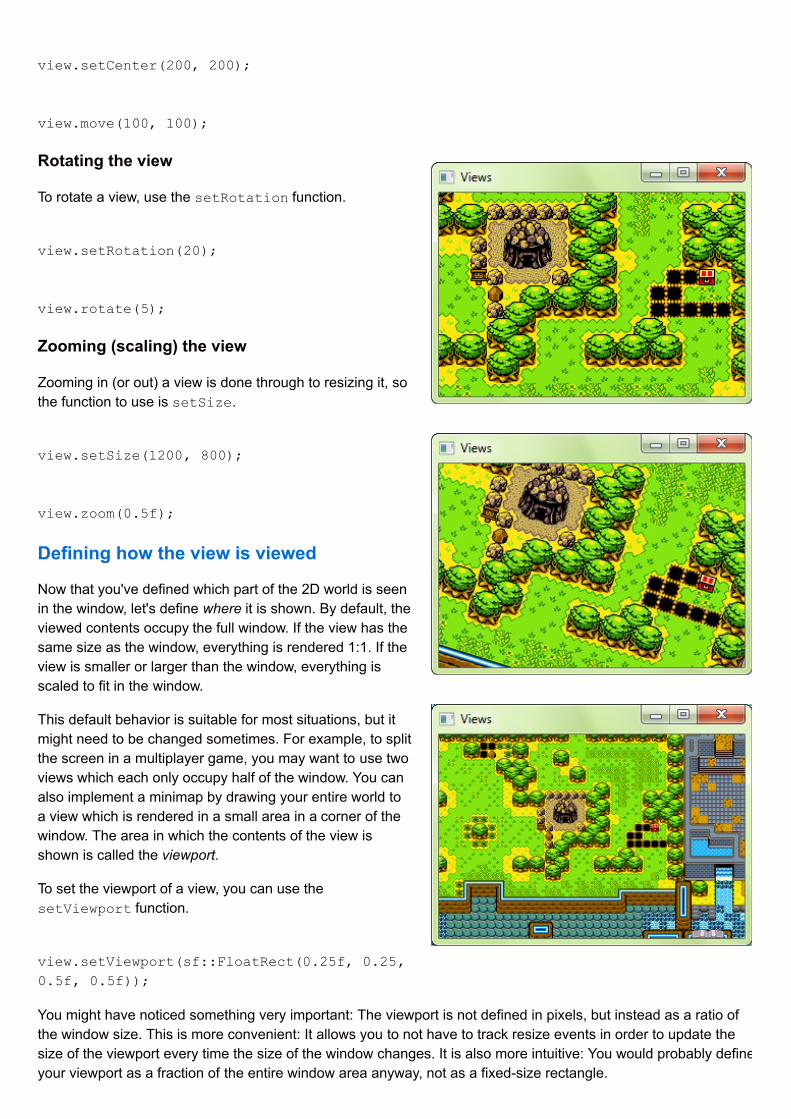
view.setCenter(200, 200);
view.move(100, 100);
Rotating the view
To rotate a view, use the setRotation function.
view.setRotation(20);
view.rotate(5);
Zooming (scaling) the view
Zooming in (or out) a view is done through to resizing it, sothe function to use is setSize.
view.setSize(1200, 800);
view.zoom(0.5f);
Defining how the view is viewed
Now that you've defined which part of the 2D world is seenin the window, let's define where it is shown. By default, theviewed contents occupy the full window. If the view has thesame size as the window, everything is rendered 1:1. If theview is smaller or larger than the window, everything isscaled to fit in the window.
This default behavior is suitable for most situations, but itmight need to be changed sometimes. For example, to splitthe screen in a multiplayer game, you may want to use twoviews which each only occupy half of the window. You canalso implement a minimap by drawing your entire world toa view which is rendered in a small area in a corner of thewindow. The area in which the contents of the view isshown is called the viewport.
To set the viewport of a view, you can use thesetViewport function.
view.setViewport(sf::FloatRect(0.25f, 0.25, 0.5f, 0.5f));
You might have noticed something very important: The viewport is not defined in pixels, but instead as a ratio ofthe window size. This is more convenient: It allows you to not have to track resize events in order to update thesize of the viewport every time the size of the window changes. It is also more intuitive: You would probably defineyour viewport as a fraction of the entire window area anyway, not as a fixed-size rectangle.

Using a viewport, it is straightforward to split the screen formultiplayer games:
player1View.setViewport(sf::FloatRect(0, 0, 0.5f, 1));
player2View.setViewport(sf::FloatRect(0.5f,0, 0.5f, 1));
... or a mini-map:
gameView.setViewport(sf::FloatRect(0, 0, 1, 1));
minimapView.setViewport(sf::FloatRect(0.75f, 0, 0.25f, 0.25f));
Using a view
To draw something using a view, you must draw it aftercalling the setView function of the target to which you aredrawing (sf::RenderWindow or sf::RenderTexture).
sf::View view(sf::FloatRect(0, 0, 1000, 600));
window.setView(view);
window.draw(some_sprite);
sf::View currentView = window.getView();...
The view remains active until you set another one. This means that there is always a view which defines whatappears in the target, and where it is drawn. If you don't explicitly set any view, the render-target uses its owndefault view, which matches its size 1:1. You can get the default view of a render-target with thegetDefaultView function. This can be useful if you want to define your own view based on it, or restore it to

draw fixed entities (like a GUI) on top of your scene.
sf::View view = window.getDefaultView();view.zoom(0.5f);window.setView(view);
window.setView(window.getDefaultView());
When you call setView, the render-target makes a copy of the view, and doesn't store a pointer to the one that ispassed. This means that whenever you update your view, you need to call setView again to apply themodifications.Don't be afraid to copy views or create them on the fly, they aren't expensive objects (they just hold a few floats).
Showing more when the window is resized
Since the default view never changes after the window is created, the viewed contents are always the same. Sowhen the window is resized, everything is squeezed/stretched to the new size.
If, instead of this default behavior, you'd like to show more/less stuff depending on the new size of the window, allyou have to do is update the size of the view with the size of the window.
sf::Event event;while (window.pollEvent(event)){ ...
if (event.type == sf::Event::Resized) { sf::FloatRect visibleArea(0, 0, event.size.width, event.size.height); window.setView(sf::View(visibleArea)); }}
Coordinates conversions
When you use a custom view, or when you resize the window without using the code above, pixels displayed onthe target no longer match units in the 2D world. For example, clicking on pixel (10, 50) may hit the point (26.5, -84) of your world. You end up having to use a conversion function to map your pixel coordinates to worldcoordinates: mapPixelToCoords.
sf::Vector2i pixelPos = sf::Mouse::getPosition(window);
sf::Vector2f worldPos = window.mapPixelToCoords(pixelPos);
By default, mapPixelToCoords uses the current view. If you want to convert the coordinates using view which isnot the active one, you can pass it as an additional argument to the function.
The opposite, converting world coordinates to pixel coordinates, is also possible with the mapCoordsToPixel

function.

sfml-dev.org http://www.sfml-dev.org/tutorials/2.2/audio-sounds.php
Playing sounds and music
Sound or music?
SFML provides two classes for playing audio: sf::Sound andsf::Music. They both provide more or less the same features, themain difference is how they work.
sf::Sound is a lightweight object that plays loaded audio data from a sf::SoundBuffer. It should be used forsmall sounds that can fit in memory and should suffer no lag when they are played. Examples are gun shots, footsteps, etc.
sf::Music doesn't load all the audio data into memory, instead it streams it on the fly from the source file. It istypically used to play compressed music that lasts several minutes, and would otherwise take many seconds toload and eat hundreds of MB in memory.
Loading and playing a sound
As mentioned above, the sound data is not stored directly in sf::Sound but in a separate class namedsf::SoundBuffer. This class encapsulates the audio data, which is basically an array of 16-bit signed integers(called "audio samples"). A sample is the amplitude of the sound signal at a given point in time, and an array ofsamples therefore represents a full sound.
In fact, the sf::Sound/sf::SoundBuffer classes work the same way as sf::Sprite/sf::Texture fromthe graphics module. So if you understand how sprites and textures work together, you can apply the sameconcept to sounds and sound buffers.
You can load a sound buffer from a file on disk with its loadFromFile function:
#include <SFML/Audio.hpp>
int main(){ sf::SoundBuffer buffer; if (!buffer.loadFromFile("sound.wav")) return -1;
...
return 0;}
As with everything else, you can also load an audio file from memory (loadFromMemory) or from a custom inputstream (loadFromStream).
SFML supports most common audio file formats. The full list is available in the API documentation.
You can also load a sound buffer directly from an array of samples, in the case they originate from another source:
std::vector<sf::Int16> samples = ...;buffer.loadFromSamples(&samples[0], samples.size(), 2, 44100);
Since loadFromSamples loads a raw array of samples rather than an audio file, it requires additional arguments

in order to have a complete description of the sound. The first one (third argument) is the number of channels; 1channel defines a mono sound, 2 channels define a stereo sound, etc. The second additional attribute (fourthargument) is the sample rate; it defines how many samples must be played per second in order to reconstruct theoriginal sound.
Now that the audio data is loaded, we can play it with a sf::Sound instance.
sf::SoundBuffer buffer;
sf::Sound sound;sound.setBuffer(buffer);sound.play();
The cool thing is that you can assign the same sound buffer to multiple sounds if you want. You can even playthem together without any issues.
Sounds (and music) are played in a separate thread. This means that you are free to do whatever you want aftercalling play() (except destroying the sound or its data, of course), the sound will continue to play until it'sfinished or explicitly stopped.
Playing a music
Unlike sf::Sound, sf::Music doesn't pre-load the audio data, instead it streams the data directly from thesource. The initialization of music is thus more direct:
sf::Music music;if (!music.openFromFile("music.ogg")) return -1; music.play();
It is important to note that, unlike all other SFML resources, the loading function is named openFromFile insteadof loadFromFile. This is because the music is not really loaded, this function merely opens it. The data is onlyloaded later, when the music is played. It also helps to keep in mind that the audio file has to remain available aslong as it is played.The other loading functions of sf::Music follow the same convention: openFromMemory, openFromStream.
What's next?
Now that you are able to load and play a sound or music, let's see what you can do with it.
To control playback, the following functions are available:
play starts or resumes playback
pause pauses playback
stop stops playback and rewind
setPlayingOffset changes the current playing position
Example:
sound.play();
sound.setPlayingOffset(sf::seconds(2));
sound.pause();
sound.play();
sound.stop();
The getStatus function returns the current status of a sound or music, you can use it to know whether it isstopped, playing or paused.
Sound and music playback is also controlled by a few attributes which can be changed at any moment.
The pitch is a factor that changes the perceived frequency of the sound: greater than 1 plays the sound at ahigher pitch, less than 1 plays the sound at a lower pitch, and 1 leaves it unchanged. Changing the pitch has aside effect: it impacts the playing speed.
sound.setPitch(1.2);
The volume is... the volume. The value ranges from 0 (mute) to 100 (full volume). The default value is 100, whichmeans that you can't make a sound louder than its initial volume.
sound.setVolume(50);
The loop attribute controls whether the sound/music automatically loops or not. If it loops, it will restart playingfrom the beginning when it's finished, again and again until you explicitly call stop. If not set to loop, it will stopautomatically when it's finished.
sound.setLoop(true);
More attributes are available, but they are related to spatialization and are explained in the corresponding tutorial.
Common mistakes
Destroyed sound buffer
The most common mistake is to let a sound buffer go out of scope (and therefore be destroyed) while a sound stilluses it.
sf::Sound loadSound(std::string filename){ sf::SoundBuffer buffer; buffer.loadFromFile(filename); return sf::Sound(buffer);}
sf::Sound sound = loadSound("s.wav");sound.play();
Remember that a sound only keeps a pointer to the sound buffer that you give to it, it doesn't contain its own copy.You have to correctly manage the lifetime of your sound buffers so that they remain alive as long as they are usedby sounds.
Too many sounds

Another source of error is when you try to create a huge number of sounds. SFML internally has a limit; it can varydepending on the OS, but you should never exceed 256. This limit is the number of sf::Sound and sf::Musicinstances that can exist simultaneously. A good way to stay below the limit is to destroy (or recycle) unusedsounds when they are no longer needed. This only applies if you have to manage a really large amount of soundsand music, of course.
Destroying the music source while it plays
Remember that a music needs its source as long as it is played. A music file on your disk probably won't bedeleted or moved while your application plays it, however things get more complicated when you play a musicfrom a file in memory, or from a custom input stream:
std::vector<char> fileData = ...;
sf::Music music;music.openFromMemory(&fileData[0], fileData.size());music.play();
fileData.clear();
sf::Music is not copyable
The final "mistake" is a reminder: the sf::Music class is not copyable, so you won't be allowed to do that:
sf::Music music;sf::Music anotherMusic = music;
void doSomething(sf::Music music){ ...}sf::Music music;doSomething(music);
sfml-dev.org http://www.sfml-dev.org/tutorials/2.2/audio-recording.php
Recording audio
Recording to a sound buffer
The most common use for captured audio data is for it to be saved toa sound buffer (sf::SoundBuffer) so that it can either be playedor saved to a file.
This can be achieved with the very simple interface of the sf::SoundBufferRecorder class:
if (!SoundBufferRecorder::isAvailable()){ ...}
SoundBufferRecorder recorder;
recorder.start();
recorder.stop();
const sf::SoundBuffer& buffer = recorder.getBuffer();
The SoundBufferRecorder::isAvailable static function checks if audio recording is supported by thesystem. It if returns false, you won't be able to use the sf::SoundBufferRecorder class at all.
The start and stop functions are self-explanatory. The capture runs in its own thread, which means that youcan do whatever you want between start and stop. After the end of the capture, the recorded audio data isavailable in a sound buffer that you can get with the getBuffer function.
With the recorded data, you can then:
Save it to a file
buffer.saveToFile("my_record.ogg");
Play it directly
sf::Sound sound(buffer);sound.play();

Access the raw audio data and analyze it, transform it, etc.
const sf::Int16* samples = buffer.getSamples();std::size_t count = buffer.getSampleCount();doSomething(samples, count);
If you want to use the captured audio data after the recorder is destroyed or restarted, don't forget to make a copyof the buffer.
Custom recording
If storing the captured data in a sound buffer is not what you want, you can write your own recorder. Doing so willallow you to process the audio data while it is captured, (almost) directly from the recording device. This way youcan, for example, stream the captured audio over the network, perform real-time analysis on it, etc.
To write your own recorder, you must inherit from the sf::SoundRecorder abstract base class. In fact,sf::SoundBufferRecorder is just a built-in specialization of this class.
You only have a single virtual function to override in your derived class: onProcessSamples. It is called everytime a new chunk of audio samples is captured, so this is where you implement your specific stuff.
Audio samples are provided to the onProcessSamples function every 100 ms. This is currently hard-coded intoSFML and you can't change that (unless you modify SFML itself). This may change in the future.
There are also two additional virtual functions that you can optionally override: onStart and onStop. They arecalled when the capture starts/stops respectively. They are useful for initialization/cleanup tasks.
Here is the skeleton of a complete derived class:
class MyRecorder : public sf::SoundRecorder{ virtual bool onStart() { ...
return true; }
virtual bool onProcessSamples(const Int16* samples, std::size_t sampleCount) { ...
return true; }
virtual void onStop() { ... }}

The isAvailable/start/stop functions are defined in the sf::SoundRecorder base, and thus inherited inevery derived classes. This means that you can use any recorder class exactly the same way as thesf::SoundBufferRecorder class above.
if (!MyRecorder::isAvailable()){ }
MyRecorder recorder;recorder.start();...recorder.stop();
Threading issues
Since recording is done in a separate thread, it is important to know what exactly happens, and where.
onStart will be called directly by the start function, so it is executed in the same thread that called it. However,onProcessSample and onStop will always be called from the internal recording thread that SFML creates.
If your recorder uses data that may be accessed concurrently in both the caller thread and in the recording thread,you have to protect it (with a mutex for example) in order to avoid concurrent access, which may cause undefinedbehavior -- corrupt data being recorded, crashes, etc.
If you're not familiar enough with threading, you can refer to the corresponding tutorial for more information.

sfml-dev.org http://www.sfml-dev.org/tutorials/2.2/audio-streams.php
Custom audio streams
Audio stream? What's that?
An audio stream is similar to music (remember the sf::Musicclass?). It has almost the same functions and behaves the same.The only difference is that an audio stream doesn't play an audio file:Instead, it plays a custom audio source that you directly provide. Inother words, defining your own audio stream allows you to play from more than just a file: A sound streamed overthe network, music generated by your program, an audio format that SFML doesn't support, etc.
In fact, the sf::Music class is just a specialized audio stream that gets its audio samples from a file.
Since we're talking about streaming, we'll deal with audio data that cannot be loaded entirely in memory, and willinstead be loaded in small chunks while it is being played. If your sound can be loaded completely and can fit inmemory, then audio streams won't help you: Just load the audio data into a sf::SoundBuffer and use aregular sf::Sound to play it.
sf::SoundStream
In order to define your own audio stream, you need to inherit from the sf::SoundStream abstract base class.There are two virtual functions to override in your derived class: onGetData and onSeek.
class MyAudioStream : public sf::SoundStream{ virtual bool onGetData(Chunk& data);
virtual void onSeek(sf::Time timeOffset);};
onGetData is called by the base class whenever it runs out of audio samples and needs more of them. You mustprovide new audio samples by filling the data argument:
bool MyAudioStream::onGetData(Chunk& data){ data.samples = ; data.sampleCount = ; return true;}
You must return true when everything is all right, or false if playback must be stopped, either because an errorhas occurred or because there's simply no more audio data to play.
SFML makes an internal copy of the audio samples as soon as onGetData returns, so you don't have to keepthe original data alive if you don't want to.
The onSeek function is called when the setPlayingOffset public function is called. Its purpose is to changethe current playing position in the source data. The parameter is a time value representing the new position, fromthe beginning of the sound (not from the current position). This function is sometimes impossible to implement. Inthose cases leave it empty, and tell the users of your class that changing the playing position is not supported.
Now your class is almost ready to work. The only thing that sf::SoundStream needs to know now is the

channel count and sample rate of your stream, so that it can be played as expected. To let the base class knowabout these parameters, you must call the initialize protected function as soon as they are known in yourstream class (which is most likely when the stream is loaded/initialized).
unsigned int channelCount = ...;unsigned int sampleRate = ...;initialize(channelCount, sampleRate);
Threading issues
Audio streams are always played in a separate thread, therefore it is important to know what happens exactly,and where.
onSeek is called directly by the setPlayingOffset function, so it is always executed in the caller thread.However, the onGetData function will be called repeatedly as long as the stream is being played, in a separatethread created by SFML. If your stream uses data that may be accessed concurrently in both the caller threadand in the playing thread, you have to protect it (with a mutex for example) in order to avoid concurrent access,which may cause undefined behavior -- corrupt data being played, crashes, etc.
If you're not familiar enough with threading, you can refer to the corresponding tutorial for more information.
Using your audio stream
Now that you have defined your own audio stream class, let's see how to use it. In fact, things are very similar towhat's shown in the tutorial about sf::Music. You can control playback with the play, pause, stop andsetPlayingOffset functions. You can also play with the sound's properties, such as the volume or the pitch.You can refer to the API documentation or to the other audio tutorials for more details.
A simple example
Here is a very simple example of a custom audio stream class which plays the data of a sound buffer. Such aclass might seem totally useless, but the point here is to focus on how the data is streamed by the class,regardless of where it comes from.
#include <SFML/Audio.hpp>#include <vector>
class MyStream : public sf::SoundStream{public:
void load(const sf::SoundBuffer& buffer) { m_samples.assign(buffer.getSamples(), buffer.getSamples() + buffer.getSampleCount());
m_currentSample = 0;
initialize(buffer.getChannelCount(), buffer.getSampleRate()); }

private:
virtual bool onGetData(Chunk& data) { const int samplesToStream = 50000;
data.samples = &m_samples[m_currentSample];
if (m_currentSample + samplesToStream <= m_samples.size()) { data.sampleCount = samplesToStream; m_currentSample += samplesToStream; return true; } else { data.sampleCount = m_samples.size() - m_currentSample; m_currentSample = m_samples.size(); return false; } }
virtual void onSeek(sf::Time timeOffset) { m_currentSample = static_cast<std::size_t>(timeOffset.asSeconds() * getSampleRate() * getChannelCount()); }
std::vector<sf::Int16> m_samples; std::size_t m_currentSample;};
int main(){ sf::SoundBuffer buffer; buffer.loadFromFile("sound.wav");
MyStream stream; stream.load(buffer); stream.play();

while (stream.getStatus() == MyStream::Playing) sf::sleep(sf::seconds(0.1f));
return 0;}
sfml-dev.org http://www.sfml-dev.org/tutorials/2.2/audio-spatialization.php
Spatialization: Sounds in 3D
Introduction
By default, sounds and music are played at full volume in eachspeaker; they are not spatialized.
If a sound is emitted by an entity which is to the right of the screen,you would probably want to hear it from the right speaker. If a music is being played behind the player, you wouldwant to hear it from the rear speakers of your Dolby 5.1 sound system.
How can this be achieved?
Spatialized sounds are mono
A sound can be spatialized only if it has a single channel, i.e. if it's a mono sound.Spatialization is disabled for sounds with more channels, since they already explicitly decide how to use thespeakers. This is very important to keep in mind.
The listener
All the sounds and music in your audio environment will be heard by a single actor: the listener. What is outputfrom your speakers is determined by what the listener hears.
The class which defines the listener's properties is sf::Listener. Since the listener is unique in theenvironment, this class only contains static functions and is not meant to be instantiated.
First, you can set the listener's position in the scene:
sf::Listener::setPosition(10.f, 0.f, 5.f);
If you have a 2D world you can just use the same Y value everywhere, usually 0.
In addition to its position, you can define the listener's orientation:
sf::Listener::setDirection(1.f, 0.f, 0.f);
Here, the listener is oriented along the +X axis. This means that, for example, a sound emitted at (15, 0, 5) will beheard from the right speaker.
The "up" vector of the listener is set to (0, 1, 0) by default, in other words, the top of the listener's head is pointingtowards +Y. You can change the "up" vector if you want. It is rarely necessary though.
sf::Listener::setUpVector(1.f, 1.f, 0.f);
This corresponds to the listener tilting their head towards the right (+X).
Finally, the listener can adjust the global volume of the scene:
sf::Listener::setGlobalVolume(50.f);
The value of the volume is in the range [0 .. 100], so setting it to 50 reduces it to half of the original volume.
Of course, all these properties can be read with the corresponding get functions.

Audio sources
Every audio source provided by SFML (sounds, music, streams) defines the same properties for spatialization.
The main property is the position of the audio source.
sound.setPosition(2.f, 0.f, -5.f);
This position is absolute by default, but it can be relative to the listener if needed.
sound.setRelativeToListener(true);
This can be useful for sounds emitted by the listener itself (like a gun shot, or foot steps). It also has theinteresting side-effect of disabling spatialization if you set the position of the audio source to (0, 0, 0). Non-spatialized sounds can be required in various situations: GUI sounds (clicks), ambient music, etc.
You can also set the factor by which audio sources will be attenuated depending on their distance to the listener.
sound.setMinDistance(5.f);sound.setAttenuation(10.f);
The minimum distance is the distance under which the sound will be heard at its maximum volume. As anexample, louder sounds such as explosions should have a higher minimum distance to ensure that they will beheard from far away. Please note that a minimum distance of 0 (the sound is inside the head of the listener!)would lead to an incorrect spatialization and result in a non-attenuated sound. 0 is an invalid value, never use it.
The attenuation is a multiplicative factor. The greater the attenuation, the less it will be heard when the soundmoves away from the listener. To get a non-attenuated sound, you can use 0. On the other hand, using a valuelike 100 will highly attenuate the sound, which means that it will be heard only if very close to the listener.
Here is the exact attenuation formula, in case you need accurate values:
MinDistance is the sound's minimum distance, set with setMinDistanceAttenuation is the sound's attenuation, set with setAttenuationDistance is the distance between the sound and the listenerVolume factor is the calculated factor, in range [0 .. 1], that will be applied to the sound's volume
Volume factor = MinDistance / (MinDistance + Attenuation * (max(Distance, MinDistance) - MinDistance))
sfml-dev.org http://www.sfml-dev.org/tutorials/2.2/network-socket.php
Communicating with sockets
Sockets
A socket is the interface between your application and the outsideworld: through a socket, you can send and receive data. Therefore,any network program will most likely have to deal with sockets, theyare the central element of network communication.
There are several kinds of sockets, each providing specific features. SFML implements the most common ones:TCP sockets and UDP sockets.
TCP vs UDP
It is important to know what TCP and UDP sockets can do, and what they can't do, so that you can choose thebest socket type according to the requirements of your application.
The main difference is that TCP sockets are connection-based. You can't send or receive anything until you areconnected to another TCP socket on the remote machine. Once connected, a TCP socket can only send andreceive to/from the remote machine. This means that you'll need one TCP socket for each client in yourapplication.UDP is not connection-based, you can send and receive to/from anyone at any time with the same socket.
The second difference is that TCP is reliable unlike UDP. It ensures that what you send is always received,without corruption and in the same order. UDP performs less checks, and doesn't provide any reliability: what yousend might be received multiple times (duplication), or in a different order, or be lost and never reach the remotecomputer. However, UDP does guarantee that data which is received is always valid (not corrupted).UDP may seem scary, but keep in mind that almost all the time, data arrives correctly and in the right order.
The third difference is a direct consequence of the second one: UDP is faster and more lightweight than TCP.Because it has less requirements, thus less overhead.
The last difference is about the way data is transported. TCP is a stream protocol: there's no message boundary,if you send "Hello" and then "SFML", the remote machine might receive "HelloSFML", "Hel" + "loSFML", or even"He" + "loS" + "FML".UDP is a datagram protocol. Datagrams are packets that can't be mixed with each other. If you receive adatagram with UDP, it is guaranteed to be exactly the same as it was sent.
Oh, and one last thing: since UDP is not connection-based, it allows broadcasting messages to multiplerecipients, or even to an entire network. The one-to-one communication of TCP sockets doesn't allow that.
Connecting a TCP socket
As you can guess, this part is specific to TCP sockets. There are two sides to a connection: the one that waits forthe incoming connection (let's call it the server), and the one that triggers it (let's call it the client).
On client side, things are simple: the user just needs to have a sf::TcpSocket and call its connect function tostart the connection attempt.
#include <SFML/Network.hpp>
sf::TcpSocket socket;sf::Socket::Status status = socket.connect("192.168.0.5", 53000);

if (status != sf::Socket::Done){ }
The first argument is the address of the host to connect to. It is an sf::IpAddress, which can represent anyvalid address: a URL, an IP address, or a network host name. See its documentation for more details.
The second argument is the port to connect to on the remote machine. The connection will succeed only if theserver is accepting connections on that port.
There's an optional third argument, a time out value. If set, and the connection attempt doesn't succeed before thetime out is over, the function returns an error. If not specified, the default operating system time out is used.
Once connected, you can retrieve the address and port of the remote computer if needed, with thegetRemoteAddress() and getRemotePort() functions.
All functions of socket classes are blocking by default. This means that your program (more specifically the threadthat contains the function call) will be stuck until the operation is complete. This is important because somefunctions may take very long: For example, trying to connect to an unreachable host will only return after a fewseconds, receiving will wait until there's data available, etc.You can change this behavior and make all functions non-blocking by using the setBlocking function of thesocket. See the next chapters for more details.
On the server side, a few more things have to be done. Multiple sockets are required: One that listens forincoming connections, and one for each connected client.
To listen for connections, you must use the special sf::TcpListener class. Its only role is to wait for incomingconnection attempts on a given port, it can't send or receive data.
sf::TcpListener listener;
if (listener.listen(53000) != sf::Socket::Done){ }
sf::TcpSocket client;if (listener.accept(client) != sf::Socket::Done){ }
The accept function blocks until a connection attempt arrives (unless the socket is configured as non-blocking).When it happens, it initializes the given socket and returns. The socket can now be used to communicate with thenew client, and the listener can go back to waiting for another connection attempt.
After a successful call to connect (on client side) and accept (on server side), the communication is establishedand both sockets are ready to exchange data.
Binding a UDP socket

UDP sockets need not be connected, however you need to bind them to a specific port if you want to be able toreceive data on that port. A UDP socket cannot receive on multiple ports simultaneously.
sf::UdpSocket socket;
if (socket.bind(54000) != sf::Socket::Done){ }
After binding the socket to a port, it's ready to receive data on that port. If you want the operating system to bindthe socket to a free port automatically, you can pass sf::Socket::AnyPort, and then retrieve the chosen portwith socket.getLocalPort().
UDP sockets that send data don't need to do anything before sending.
Sending and receiving data
Sending and receiving data is done in the same way for both types of sockets. The only difference is that UDP hastwo extra arguments: the address and port of the sender/recipient. There are two different functions for eachoperation: the low-level one, that sends/receives a raw array of bytes, and the higher-level one, which uses thesf::Packet class. See the tutorial on packets for more details about this class. In this tutorial, we'll only explainthe low-level functions.
To send data, you must call the send function with a pointer to the data that you want to send, and the number ofbytes to send.
char data[100] = ...;
if (socket.send(data, 100) != sf::Socket::Done){ }
sf::IpAddress recipient = "192.168.0.5";unsigned short port = 54000;if (socket.send(data, 100, recipient, port) != sf::Socket::Done){ }
The send functions take a void* pointer, so you can pass the address of anything. However, it is generally a badidea to send something other than an array of bytes because native types with a size larger than 1 byte are notguaranteed to be the same on every machine: Types such as int or long may have a different size, and/or adifferent endianness. Therefore, such types cannot be exchanged reliably across different systems. This problemis explained (and solved) in the tutorial on packets.
With UDP you can broadcast a message to an entire sub-network in a single call: to do so you can use the specialaddress sf::IpAddress::Broadcast.
There's another thing to keep in mind with UDP: Since data is sent in datagrams and the size of these datagramshas a limit, you are not allowed to exceed it. Every call to send must send less that

sf::UdpSocket::MaxDatagramSize bytes -- which is a little less than 2^16 (65536) bytes.
To receive data, you must call the receive function:
char data[100];std::size_t received;
if (socket.receive(data, 100, received) != sf::Socket::Done){ }std::cout << "Received " << received << " bytes" << std::endl;
sf::IpAddress sender;unsigned short port;if (socket.receive(data, 100, received, sender, port) != sf::Socket::Done){ }std::cout << "Received " << received << " bytes from " << sender << " on port " << port << std::endl;
It is important to keep in mind that if the socket is in blocking mode, receive will wait until something is received,blocking the thread that called it (and thus possibly the whole program).
The first two arguments specify the buffer to which the received bytes are to be copied, along with its maximumsize. The third argument is a variable that will contain the actual number of bytes received after the functionreturns.With UDP sockets, the last two arguments will contain the address and port of the sender after the functionreturns. They can be used later if you want to send a response.
These functions are low-level, and you should use them only if you have a very good reason to do so. A morerobust and flexible approach involves using packets.
Blocking on a group of sockets
Blocking on a single socket can quickly become annoying, because you will most likely have to handle more thanone client. You most likely don't want socket A to block your program while socket B has received something thatcould be processed. What you would like is to block on multiple sockets at once, i.e. waiting until any of them hasreceived something. This is possible with socket selectors, represented by the sf::SocketSelector class.
A selector can monitor all types of sockets: sf::TcpSocket, sf::UdpSocket, and sf::TcpListener. To adda socket to a selector, use its add function:
sf::TcpSocket socket;
sf::SocketSelector selector;selector.add(socket);
A selector is not a socket container. It only references (points to) the sockets that you add, it doesn't store them.There is no way to retrieve or count the sockets that you put inside. Instead, it is up to you to have your ownseparate socket storage (like a std::vector or a std::list).
Once you have filled the selector with all the sockets that you want to monitor, you must call its wait function to

wait until any one of them has received something (or has triggered an error). You can also pass an optional timeout value, so that the function will fail if nothing has been received after a certain period of time -- this avoidsstaying stuck forever if nothing happens.
if (selector.wait(sf::seconds(10))){ }else{ }
If the wait function returns true, it means that one or more socket(s) have received something, and you cansafely call receive on the socket(s) with pending data without having them block. If the socket is asf::TcpListener, it means that an incoming connection is ready to be accepted and that you can call itsaccept function without having it block.
Since the selector is not a socket container, it cannot return the sockets that are ready to receive. Instead, youmust test each candidate socket with the isReady function:
if (selector.wait(sf::seconds(10))){ { if (selector.isReady(socket)) { socket.receive(...); } }}
You can have a look at the API documentation of the sf::SocketSelector class for a working example of howto use a selector to handle connections and messages from multiple clients.
As a bonus, the time out capability of Selector::wait allows you to implement a receive-with-timeout function,which is not directly available in the socket classes, very easily:
sf::Socket::Status receiveWithTimeout(sf::TcpSocket& socket, sf::Packet& packet, sf::Time timeout){ sf::SocketSelector selector; selector.add(socket); if (selector.wait(timeout)) return socket.receive(packet); else return sf::Socket::NotReady;}
Non-blocking sockets
All sockets are blocking by default, but you can change this behaviour at any time with the setBlockingfunction.

sf::TcpSocket tcpSocket;tcpSocket.setBlocking(false);
sf::TcpListener listenerSocket;listenerSocket.setBlocking(false);
sf::UdpSocket udpSocket;udpSocket.setBlocking(false);
Once a socket is set as non-blocking, all of its functions always return immediately. For example, receive willreturn with status sf::Socket::NotReady if there's no data available. Or, accept will return immediately, withthe same status, if there's no pending connection.
Non-blocking sockets are the easiest solution if you already have a main loop that runs at a constant rate. Youcan simply check if something happened on your sockets in every iteration, without having to block programexecution.

sfml-dev.org http://www.sfml-dev.org/tutorials/2.2/network-packet.php
Using and extending packets
Problems that need to be solved
Exchanging data on a network is more tricky than it seems. Thereason is that different machines, with different operating systemsand processors, can be involved. Several problems arise if you wantto exchange data reliably between these different machines.
The first problem is the endianness. The endianness is the order in which a particular processor interprets thebytes of primitive types that occupy more than a single byte (integers and floating point numbers). There are twomain families: "big endian" processors, which store the most significant byte first, and "little endian" processors,which store the least significant byte first. There are other, more exotic byte orders, but you'll probably never haveto deal with them.The problem is obvious: If you send a variable between two computers whose endianness doesn't match, theywon't see the same value. For example, the 16-bit integer "42" in big endian notation is 00000000 00101010, butif you send this to a little endian machine, it will be interpreted as "10752".
The second problem is the size of primitive types. The C++ standard doesn't set the size of primitive types (char,short, int, long, float, double), so, again, there can be differences between processors -- and there are. Forexample, the long int type can be a 32-bit type on some platforms, and a 64-bit type on others.
The third problem is specific to how the TCP protocol works. Because it doesn't preserve message boundaries,and can split or combine chunks of data, receivers must properly reconstruct incoming messages beforeinterpreting them. Otherwise bad things might happen, like reading incomplete variables, or ignoring useful bytes.
You may of course face other problems with network programming, but these are the lowest-level ones, thatalmost everybody will have to solve. This is the reason why SFML provides some simple tools to avoid them.
Fixed-size primitive types
Since primitive types cannot be exchanged reliably on a network, the solution is simple: don't use them. SFMLprovides fixed-size types for data exchange: sf::Int8, sf::Uint16, sf::Int32, etc. These types are justtypedefs to primitive types, but they are mapped to the type which has the expected size according to theplatform. So they can (and must!) be used safely when you want to exchange data between two computers.
SFML only provides fixed-size integer types. Floating-point types should normally have their fixed-size equivalenttoo, but in practice this is not needed (at least on platforms where SFML runs), float and double types alwayshave the same size, 32 bits and 64 bits respectively.
Packets
The two other problems (endianness and message boundaries) are solved by using a specific class to pack yourdata: sf::Packet. As a bonus, it provides a much nicer interface than plain old byte arrays.
Packets have a programming interface similar to standard streams: you can insert data with the << operator, andextract data with the >> operator.
sf::Uint16 x = 10;std::string s = "hello";double d = 0.6;

sf::Packet packet;packet << x << s << d;
sf::Uint16 x;std::string s;double d;
packet >> x >> s >> d;
Unlike writing, reading from a packet can fail if you try to extract more bytes than the packet contains. If a readingoperation fails, the packet error flag is set. To check the error flag of a packet, you can test it like a boolean (thesame way you do with standard streams):
if (packet >> x){ }else{ }
Sending and receiving packets is as easy as sending/receiving an array of bytes: sockets have an overload ofsend and receive that directly accept a sf::Packet.
tcpSocket.send(packet);tcpSocket.receive(packet);
udpSocket.send(packet, recipientAddress, recipientPort);udpSocket.receive(packet, senderAddress, senderPort);
Packets solve the "message boundaries" problem, which means that when you send a packet on a TCP socket,you receive the exact same packet on the other end, it cannot contain less bytes, or bytes from the next packetthat you send. However, it has a slight drawback: To preserve message boundaries, sf::Packet has to sendsome extra bytes along with your data, which implies that you can only receive them with a sf::Packet if youwant them to be properly decoded. Simply put, you can't send an SFML packet to a non-SFML packet recipient, ithas to use an SFML packet for receiving too. Note that this applies to TCP only, UDP is fine since the protocolitself preserves message boundaries.
Extending packets to handle user types
Packets have overloads of their operators for all the primitive types and the most common standard types, butwhat about your own classes? As with standard streams, you can make a type "compatible" with sf::Packet byproviding an overload of the << and >> operators.
struct Character{ sf::Uint8 age; std::string name; float weight;};

sf::Packet& operator <<(sf::Packet& packet, const Character& character){ return packet << character.age << character.name << character.weight;}
sf::Packet& operator >>(sf::Packet& packet, Character& character){ return packet >> character.age >> character.name >> character.weight;}
Both operators return a reference to the packet: This allows chaining insertion and extraction of data.
Now that these operators are defined, you can insert/extract a Character instance to/from a packet like anyother primitive type:
Character bob;
packet << bob;packet >> bob;
Custom packets
Packets provide nice features on top of your raw data, but what if you want to add your own features such asautomatically compressing or encrypting the data? This can easily be done by deriving from sf::Packet andoverriding the following functions:
onSend: called before the data is sent by the socket
onReceive: called after the data has been received by the socket
These functions provide direct access to the data, so that you can transform them according to your needs.
Here is a mock-up of a packet that performs automatic compression/decompression:
class ZipPacket : public sf::Packet{ virtual const void* onSend(std::size_t& size) { const void* srcData = getData(); std::size_t srcSize = getDataSize(); return compressTheData(srcData, srcSize, &size); } virtual void onReceive(const void* data, std::size_t size) { std::size_t dstSize; const void* dstData = uncompressTheData(data, size, &dstSize); append(dstData, dstSize); }};
Such a packet class can be used exactly like sf::Packet. All your operator overloads will apply to them as well.
ZipPacket packet;packet << x << bob;socket.send(packet);


sfml-dev.org http://www.sfml-dev.org/tutorials/2.2/network-http.php
Web requests with HTTP
Introduction
SFML provides a simple HTTP client class which you can use tocommunicate with HTTP servers. "Simple" means that it supports themost basic features of HTTP: POST, GET and HEAD request types,accessing HTTP header fields, and reading/writing the pages body.
If you need more advanced features, such as secured HTTP (HTTPS) for example, you're better off using a trueHTTP library, like libcurl or cpp-netlib.
For basic interaction between your program and an HTTP server, it should be enough.
sf::Http
To communicate with an HTTP server you must use the sf::Http class.
#include <SFML/Network.hpp>
sf::Http http;http.setHost("http://www.some-server.org/");
sf::Http http("http://www.some-server.org/");
Note that setting the host doesn't trigger any connection. A temporary connection is created for each request.
The only other function in sf::Http, sends requests. This is basically all that the class does.
sf::Http::Request request;
sf::Http::Response response = http.sendRequest(request);
Requests
An HTTP request, represented by the sf::Http::Request class, contains the following information:
The method: POST (send content), GET (retrieve a resource), HEAD (retrieve a resource header, withoutits body)
The URI: the address of the resource (page, image, ...) to get/post, relative to the root directory
The HTTP version (it is 1.0 by default but you can choose a different version if you use specific features)
The header: a set of fields with key and value
The body of the page (used only with the POST method)
sf::Http::Request request;request.setMethod(sf::Http::Request::Post);request.setUri("/page.html");request.setHttpVersion(1, 1); request.setField("From", "me");request.setField("Content-Type", "application/x-www-form-urlencoded");

request.setBody("para1=value1¶m2=value2");
sf::Http::Response response = http.sendRequest(request);
SFML automatically fills mandatory header fields, such as "Host", "Content-Length", etc. You can send yourrequests without worrying about them. SFML will do its best to make sure they are valid.
Responses
If the sf::Http class could successfully connect to the host and send the request, a response is sent back andreturned to the user, encapsulated in an instance of the sf::Http::Response class. Responses contain thefollowing members:
A status code which precisely indicates how the server processed the request (OK, redirected, not found,etc.)
The HTTP version of the server
The header: a set of fields with key and value
The body of the response
sf::Http::Response response = http.sendRequest(request);std::cout << "status: " << response.getStatus() << std::endl;std::cout << "HTTP version: " << response.getMajorHttpVersion() << "." << response.getMinorHttpVersion() << std::endl;std::cout << "Content-Type header:" << response.getField("Content-Type") << std::endl;std::cout << "body: " << response.getStatus() << std::endl;
The status code can be used to check whether the request was successfully processed or not: codes 2xxrepresent success, codes 3xx represent a redirection, codes 4xx represent client errors, codes 5xx representserver errors, and codes 10xx represent SFML specific errors which are not part of the HTTP standard.
Example: sending scores to an online server
Here is a short example that demonstrates how to perform a simple task: Sending a score to an online database.
#include <SFML/Network.hpp>#include <sstream>
void sendScore(int score, const std::string& name){ sf::Http::Request request("/send-score.php", sf::Http::Request::Post);
std::ostringstream stream; stream << "name=" << name << "&score=" << score; request.setBody(stream.str());
sf::Http http("http://www.myserver.com/"); sf::Http::Response response = http.sendRequest(request);
if (response.getStatus() == sf::Http::Response::Ok)
{ std::cout << response.getBody() << std::endl; } else { std::cout << "request failed" << std::endl; }}
Of course, this is a very simple way to handle online scores. There's no protection: Anybody could easily send afalse score. A more robust approach would probably involve an extra parameter, like a hash code that ensuresthat the request was sent by the program. That is beyond the scope of this tutorial.
And finally, here is a very simple example of what the PHP page on server might look like.
<?php $name = $_POST['name']; $score = $_POST['score']; if (write_to_database($name, $score)) { echo "name and score added!"; } else { echo "failed to write name and score to database..."; }?>

sfml-dev.org http://www.sfml-dev.org/tutorials/2.2/network-ftp.php
File transfers with FTP
FTP for dummies
If you know what FTP is, and just want to know how to use the FTPclass that SFML provides, you can skip this section.
FTP (File Transfer Protocol) is a simple protocol that allowsmanipulation of files and directories on a remote server. The protocol consists of commands such as "createdirectory", "delete file", "download file", etc. You can't send FTP commands to any remote computer, it needs tohave an FTP server running which can understand and execute the commands that clients send.
So what can you do with FTP, and how can it be helpful to your program? Basically, with FTP you can accessexisting remote file systems, or even create your own. This can be useful if you want your network game todownload resources (maps, images, ...) from a server, or your program to update itself automatically when it'sconnected to the internet.
If you want to know more about the FTP protocol, the Wikipedia article provides more detailed information thanthis short introduction.
The FTP client class
The class provided by SFML is sf::Ftp (surprising, isn't it?). It's a client, which means that it can connect to anFTP server, send commands to it and upload or download files.
Every function of the sf::Ftp class wraps an FTP command, and returns a standard FTP response. An FTPresponse contains a status code (similar to HTTP status codes but not identical), and a message that informs theuser of what happened. FTP responses are encapsulated in the sf::Ftp::Response class.
#include <SFML/Network.hpp>
sf::Ftp ftp;...sf::Ftp::Response response = ftp.login();
std::cout << "Response status: " << response.getStatus() << std::endl;std::cout << "Response message: " << response.getMessage() << std::endl;
The status code can be used to check whether the command was successful or failed: Codes lower than 400represent success, all others represent errors. You can use the isOk() function as a shortcut to test a statuscode for success.
sf::Ftp::Response response = ftp.login();if (response.isOk()){ }else{ }
If you don't care about the details of the response, you can check for success with even less code:
if (ftp.login().isOk()){ }else{ }
For readability, these checks won't be performed in the following examples in this tutorial. Don't forget to performthem in your code!
Now that you understand how the class works, let's have a look at what it can do.
Connecting to the FTP server
The first thing to do is connect to an FTP server.
sf::Ftp ftp;ftp.connect("ftp.myserver.org");
The server address can be any valid sf::IpAddress: A URL, an IP address, a network name, ...
The standard port for FTP is 21. If, for some reason, your server uses a different port, you can specify it as anadditional argument:
sf::Ftp ftp;ftp.connect("ftp.myserver.org", 45000);
You can also pass a third parameter, which is a time out value. This prevents you from having to wait forever (orat least a very long time) if the server doesn't respond.
sf::Ftp ftp;ftp.connect("ftp.myserver.org", 21, sf::seconds(5));
Once you're connected to the server, the next step is to authenticate yourself:
ftp.login("username", "password");
ftp.login();
FTP commands
Here is a short description of all the commands available in the sf::Ftp class. Remember one thing: All thesecommands are performed relative to the current working directory, exactly as if you were executing file ordirectory commands in a console on your operating system.
Getting the current working directory:
sf::Ftp::DirectoryResponse response = ftp.getWorkingDirectory();if (response.isOk()) std::cout << "Current directory: " << response.getDirectory() << std::endl;

sf::Ftp::DirectoryResponse is a specialized sf::Ftp::Response that also contains the requesteddirectory.
Getting the list of directories and files contained in the current directory:
sf::Ftp::ListingResponse response = ftp.getDirectoryListing();if (response.isOk()){ const std::vector<std::string>& listing = response.getListing(); for (std::vector<std::string>::const_iterator it = listing.begin(); it != listing.end(); ++it) std::cout << "- " << *it << std::endl;}
response = ftp.getDirectoryListing("subfolder");
sf::Ftp::ListingResponse is a specialized sf::Ftp::Response that also contains the requesteddirectory/file names.
Changing the current directory:
ftp.changeDirectory("path/to/new_directory");
Going to the parent directory of the current one:
ftp.parentDirectory();
Creating a new directory (as a child of the current one):
ftp.createDirectory("name_of_new_directory");
Deleting an existing directory:
ftp.deleteDirectory("name_of_directory_to_delete");
Renaming an existing file:
ftp.renameFile("old_name.txt", "new_name.txt");
Deleting an existing file:
ftp.deleteFile("file_name.txt");
Downloading (receiving from the server) a file:
ftp.download("remote_file_name.txt", "local/destination/path", sf::Ftp::Ascii);
The last argument is the transfer mode. It can be either Ascii (for text files), Ebcdic (for text files using theEBCDIC character set) or Binary (for non-text files). The Ascii and Ebcdic modes can transform the file (lineendings, encoding) during the transfer to match the client environment. The Binary mode is a direct byte-for-bytetransfer.
Uploading (sending to the server) a file:
ftp.upload("local_file_name.pdf", "remote/destination/path", sf::Ftp::Binary);
FTP servers usually close connections that are inactive for a while. If you want to avoid being disconnected, youcan send a no-op command periodically:

ftp.keepAlive();
Disconnecting from the FTP server
You can close the connection with the server at any moment with the disconnect function.
ftp.disconnect();

![I-IEYI YOU'RE AWESOME [JUST LIKE ME] HAPPY VALENTINE'S TO YOU'RE AWESOME [JUST LIKE ME … · 2015. 1. 18. · you're awesome [just like me] happy valentine's to you're awesome [just](https://img.pdfslide.us/doc/110x75/60cb46e678245f68594f9a11/i-ieyi-youre-awesome-just-like-me-happy-valentines-to-youre-awesome-just-like.jpg)