Embed Size (px)
Citation preview

Setting up AircastDB with PostgreSQLThis article explains how to use PostgreSQL as a backend storage for Aircast.
PostgreSQL is an open source database management system, available for Windows, Linux and other operatingsystems. Being free of charge, fast and networking-enabled, we recommend to use PostgreSQL as the backendfor any networked AircastDB installation (where two or more Aircast computers or processes will share the samedatabase).
PostgreSQL server setup
Windows
Binary packages/installers for Windows are available here: http://www.postgresql.org/download/windows/ (forthe actual download, you will be taken to a site called EnterpriseDB)
Aircast needs at least PostgreSQL 8.3 but will work fine with newer versions. You should pick the latest stableversion available. As of October 2014, this is PostgreSQL 9.3.5.
The Windows installer includes the graphical administration frontend, pgAdmin III.
Installation
Download the appropriate setup file for your system (in this example postgresql-9.3.5-1-windows-x64.exe)and run it.
The installer will ask you for a couple of things - most can be left untouched:
Installation directory: Where the program files go - leave untouched. Data directory: This is where PostgreSQL will store all SQL data. Usually inside the program directory, but it
is possible to use a different location, e.g. a larger partition or hard drive. Password: This is the password for the superuser postgres. Choose a password and write it down. You will
need it later to access the database with pgAdmin III. Port number: use default 5432 Locale: leave untouched Stack Builder: We don't need that, uncheck this option.At the end of the installation, you will find pgAdmin III in the Windows Start Menu.

Create user and database
The next step is to create an SQL user and an empty database for Aircast.
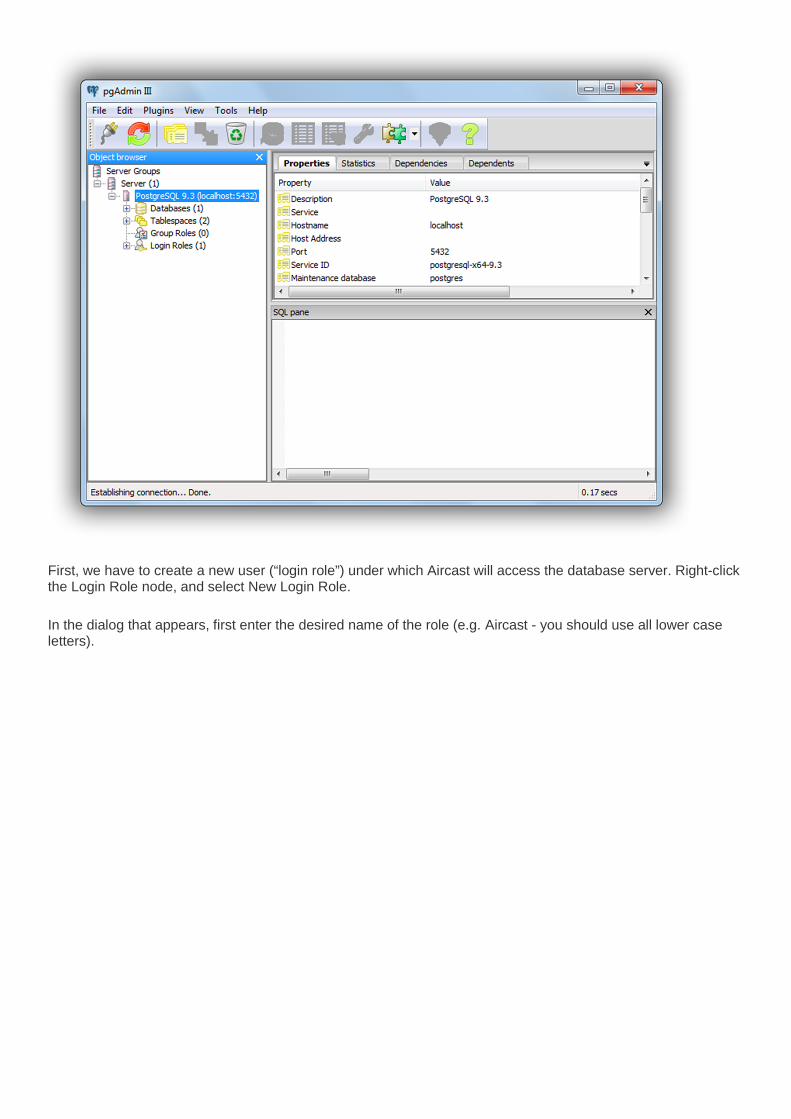
Open pgAdmin III, the main window will show:
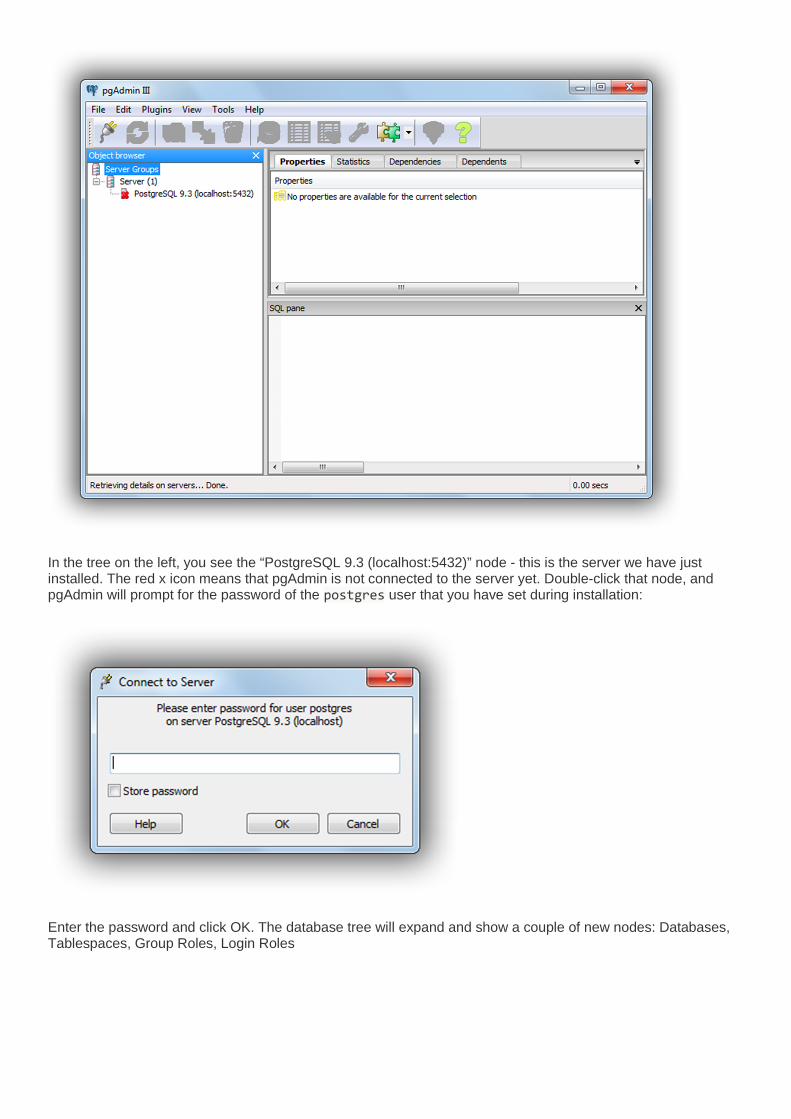
In the tree on the left, you see the “PostgreSQL 9.3 (localhost:5432)” node - this is the server we have justinstalled. The red x icon means that pgAdmin is not connected to the server yet. Double-click that node, andpgAdmin will prompt for the password of the postgres user that you have set during installation:
Enter the password and click OK. The database tree will expand and show a couple of new nodes: Databases,Tablespaces, Group Roles, Login Roles
First, we have to create a new user (“login role”) under which Aircast will access the database server. Right-clickthe Login Role node, and select New Login Role.
In the dialog that appears, first enter the desired name of the role (e.g. Aircast - you should use all lower caseletters).
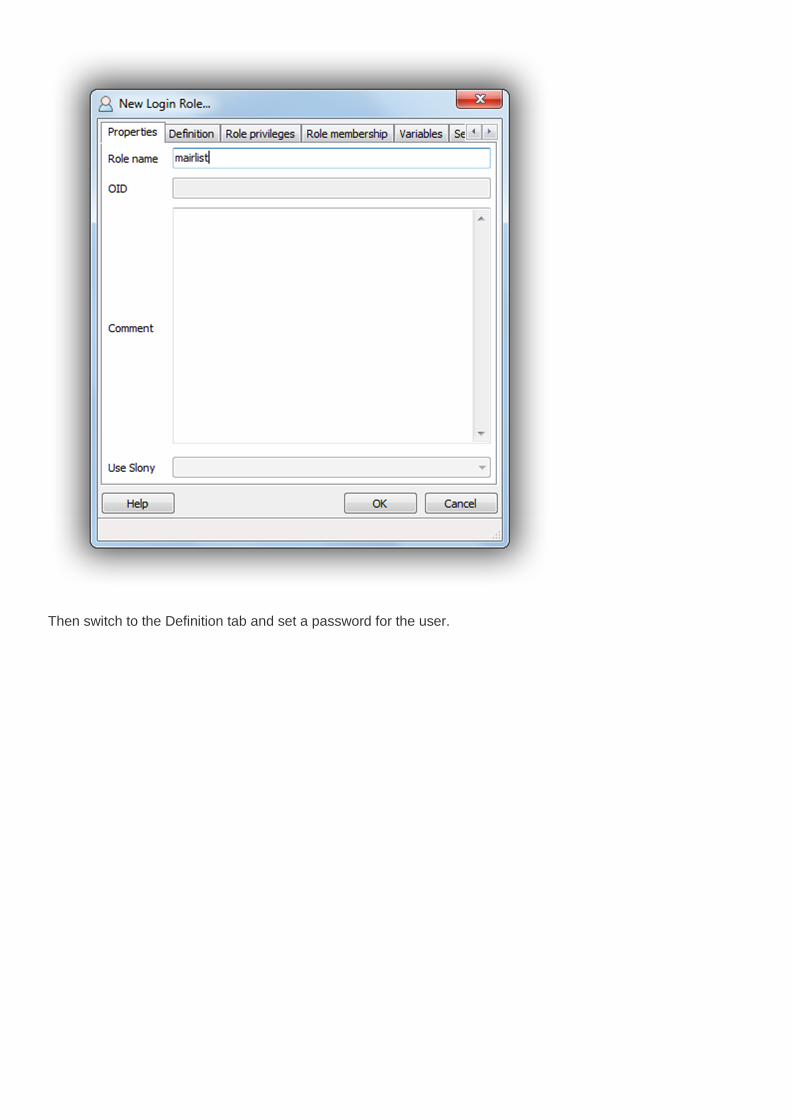
Then switch to the Definition tab and set a password for the user.
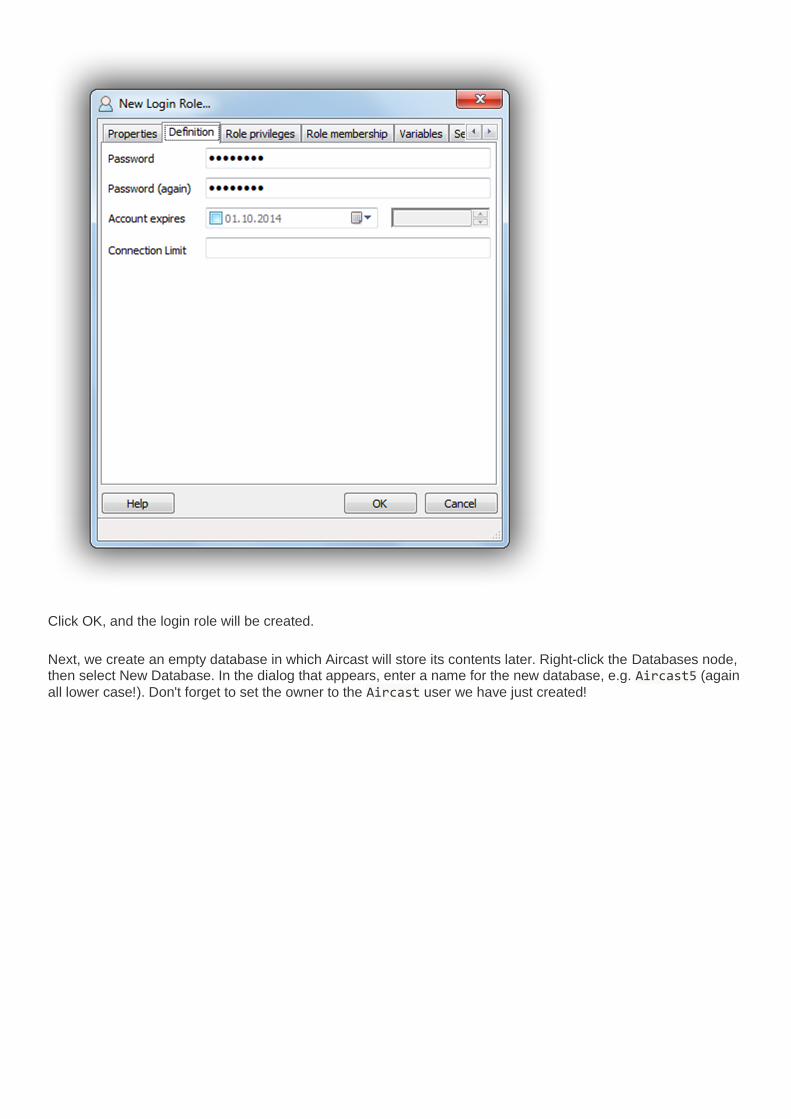
Click OK, and the login role will be created.
Next, we create an empty database in which Aircast will store its contents later. Right-click the Databases node,then select New Database. In the dialog that appears, enter a name for the new database, e.g. Aircast5 (againall lower case!). Don't forget to set the owner to the Aircast user we have just created!
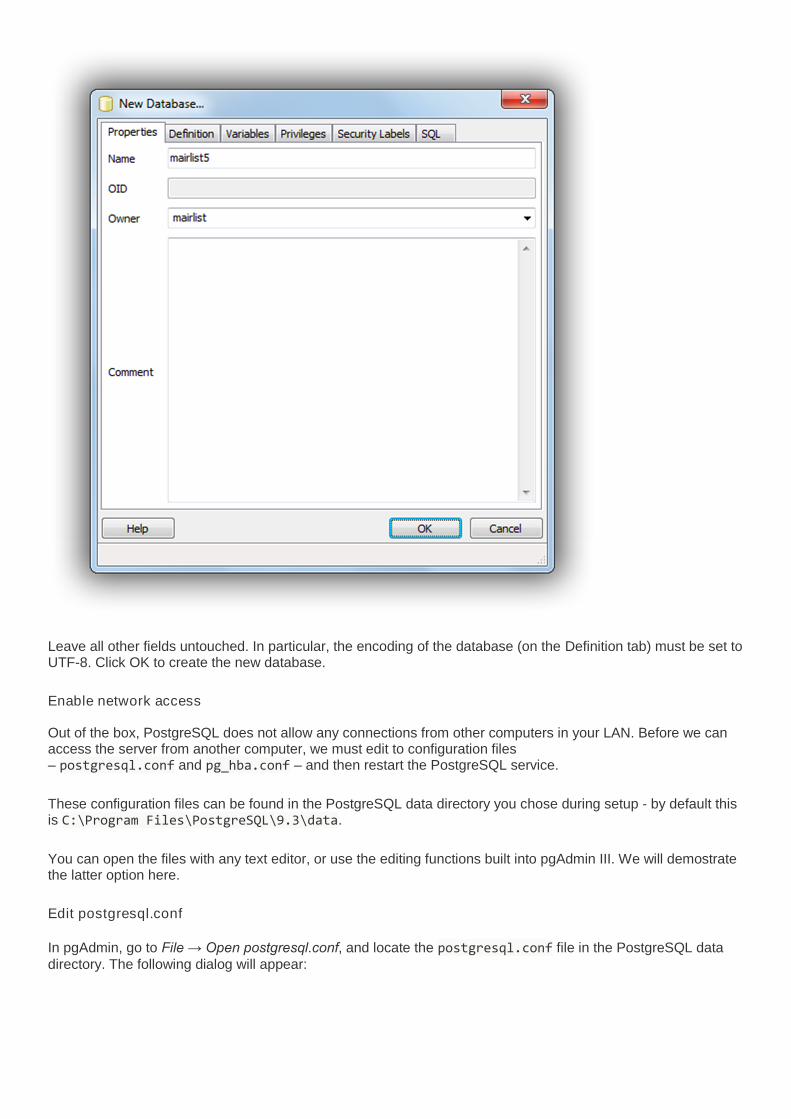
Leave all other fields untouched. In particular, the encoding of the database (on the Definition tab) must be set toUTF-8. Click OK to create the new database.
Enable network access
Out of the box, PostgreSQL does not allow any connections from other computers in your LAN. Before we canaccess the server from another computer, we must edit to configuration files– postgresql.conf and pg_hba.conf – and then restart the PostgreSQL service.
These configuration files can be found in the PostgreSQL data directory you chose during setup - by default thisis C:\Program Files\PostgreSQL\9.3\data.
You can open the files with any text editor, or use the editing functions built into pgAdmin III. We will demostratethe latter option here.
Edit postgresql.conf
In pgAdmin, go to File → Open postgresql.conf, and locate the postgresql.conf file in the PostgreSQL datadirectory. The following dialog will appear:
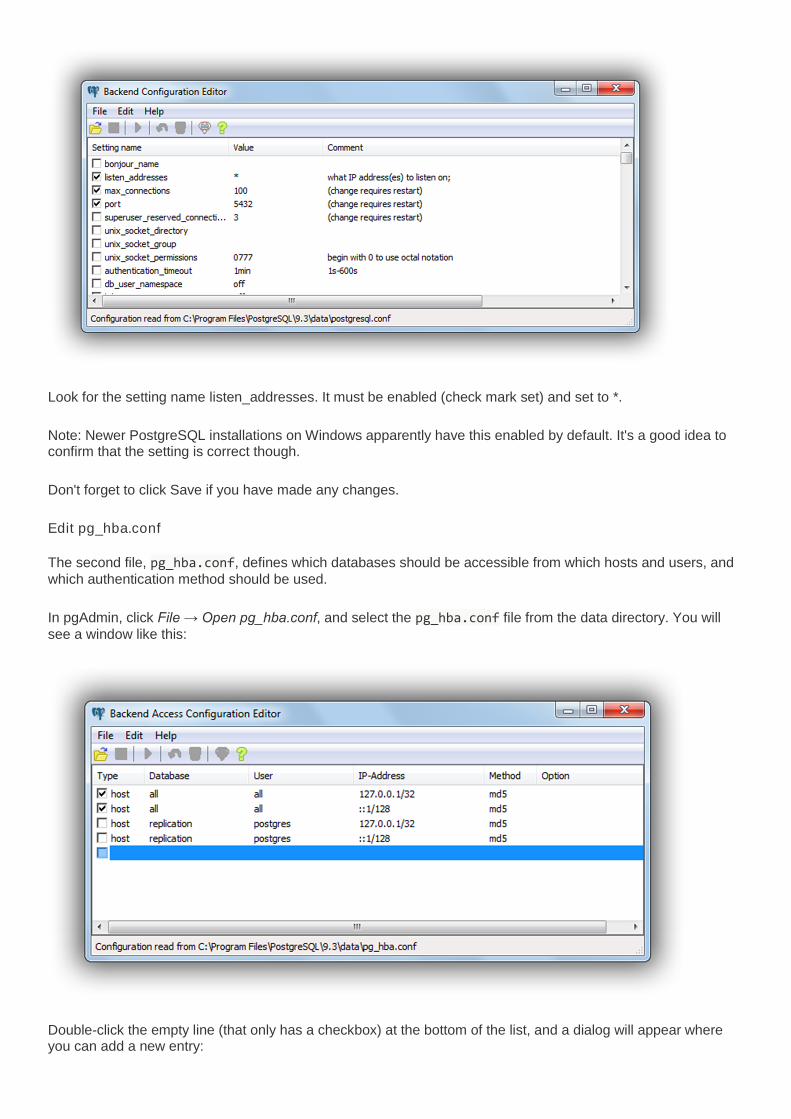
Look for the setting name listen_addresses. It must be enabled (check mark set) and set to *.
Note: Newer PostgreSQL installations on Windows apparently have this enabled by default. It's a good idea toconfirm that the setting is correct though.
Don't forget to click Save if you have made any changes.
Edit pg_hba.conf
The second file, pg_hba.conf, defines which databases should be accessible from which hosts and users, andwhich authentication method should be used.
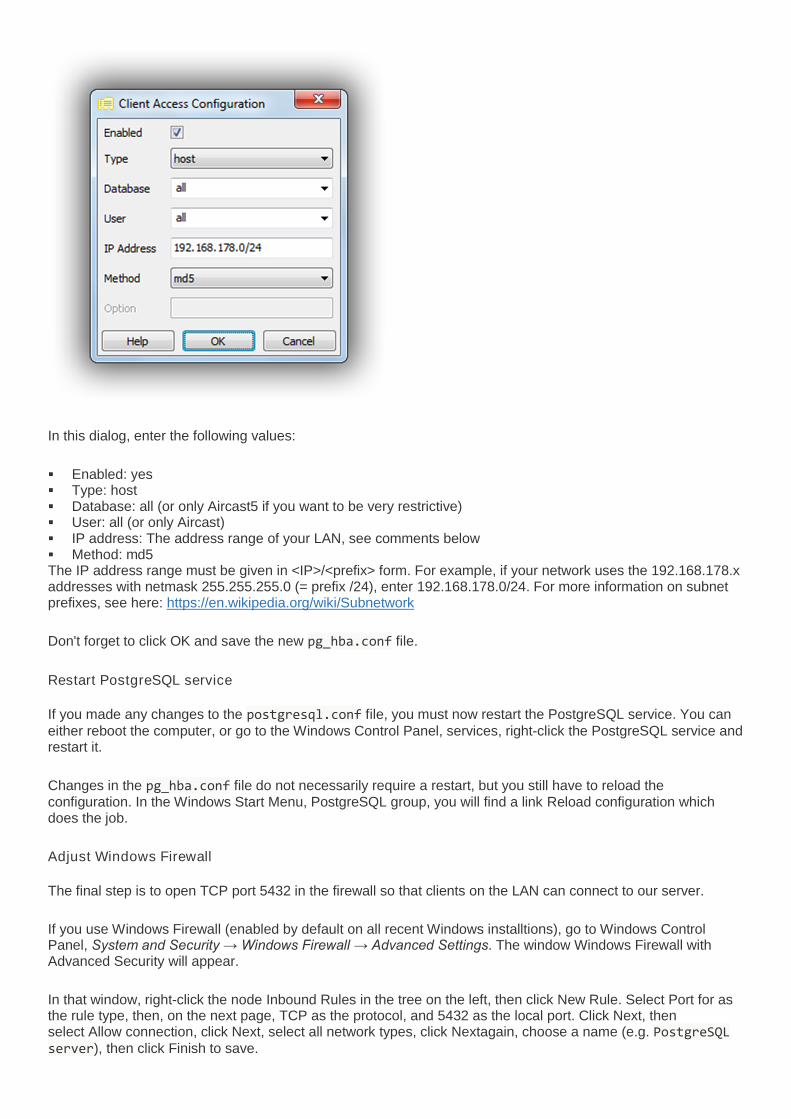
In pgAdmin, click File → Open pg_hba.conf, and select the pg_hba.conf file from the data directory. You willsee a window like this:
Double-click the empty line (that only has a checkbox) at the bottom of the list, and a dialog will appear whereyou can add a new entry:
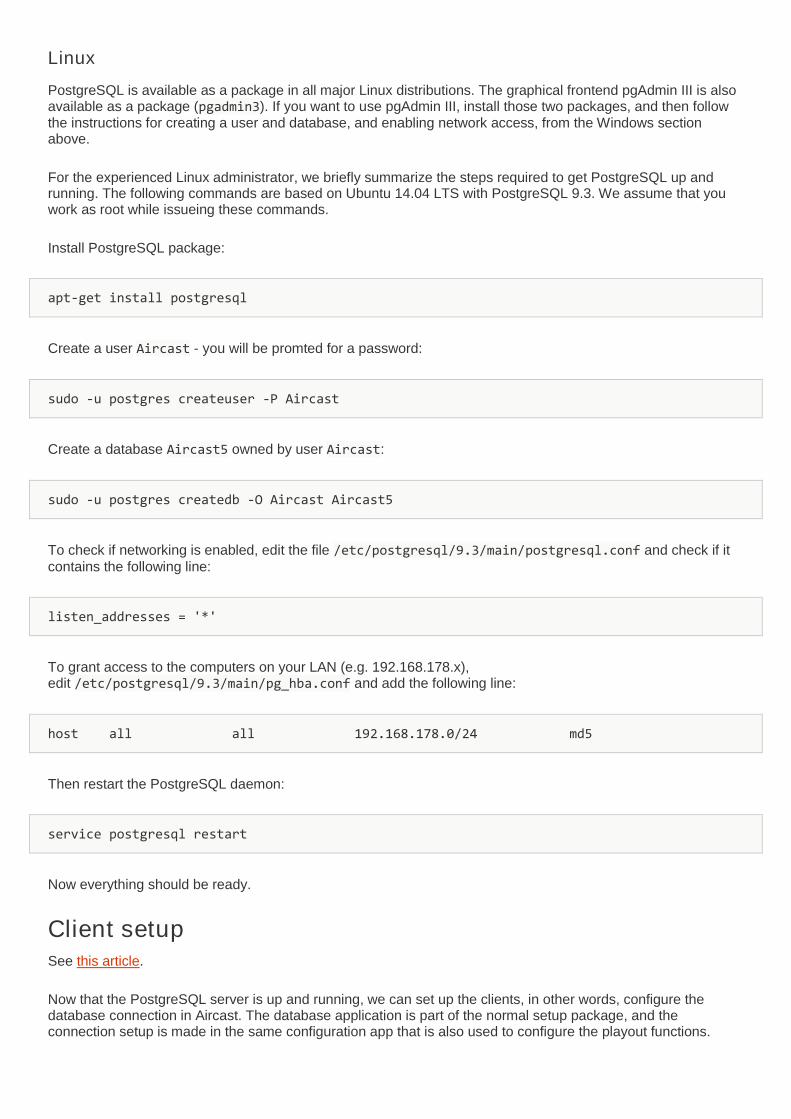
In this dialog, enter the following values:
Enabled: yes Type: host Database: all (or only Aircast5 if you want to be very restrictive) User: all (or only Aircast) IP address: The address range of your LAN, see comments below Method: md5The IP address range must be given in <IP>/<prefix> form. For example, if your network uses the 192.168.178.xaddresses with netmask 255.255.255.0 (= prefix /24), enter 192.168.178.0/24. For more information on subnetprefixes, see here: https://en.wikipedia.org/wiki/Subnetwork
Don't forget to click OK and save the new pg_hba.conf file.
Restart PostgreSQL service
If you made any changes to the postgresql.conf file, you must now restart the PostgreSQL service. You caneither reboot the computer, or go to the Windows Control Panel, services, right-click the PostgreSQL service andrestart it.
Changes in the pg_hba.conf file do not necessarily require a restart, but you still have to reload theconfiguration. In the Windows Start Menu, PostgreSQL group, you will find a link Reload configuration whichdoes the job.
Adjust Windows Firewall
The final step is to open TCP port 5432 in the firewall so that clients on the LAN can connect to our server.
If you use Windows Firewall (enabled by default on all recent Windows installtions), go to Windows ControlPanel, System and Security → Windows Firewall → Advanced Settings. The window Windows Firewall withAdvanced Security will appear.
In that window, right-click the node Inbound Rules in the tree on the left, then click New Rule. Select Port for asthe rule type, then, on the next page, TCP as the protocol, and 5432 as the local port. Click Next, thenselect Allow connection, click Next, select all network types, click Nextagain, choose a name (e.g. PostgreSQLserver), then click Finish to save.
Linux
PostgreSQL is available as a package in all major Linux distributions. The graphical frontend pgAdmin III is alsoavailable as a package (pgadmin3). If you want to use pgAdmin III, install those two packages, and then followthe instructions for creating a user and database, and enabling network access, from the Windows sectionabove.
For the experienced Linux administrator, we briefly summarize the steps required to get PostgreSQL up andrunning. The following commands are based on Ubuntu 14.04 LTS with PostgreSQL 9.3. We assume that youwork as root while issueing these commands.
Install PostgreSQL package:
apt-get install postgresql
Create a user Aircast - you will be promted for a password:
sudo -u postgres createuser -P Aircast
Create a database Aircast5 owned by user Aircast:
sudo -u postgres createdb -O Aircast Aircast5
To check if networking is enabled, edit the file /etc/postgresql/9.3/main/postgresql.conf and check if itcontains the following line:
listen_addresses = '*'
To grant access to the computers on your LAN (e.g. 192.168.178.x),edit /etc/postgresql/9.3/main/pg_hba.conf and add the following line:
host all all 192.168.178.0/24 md5
Then restart the PostgreSQL daemon:
service postgresql restart
Now everything should be ready.
Client setupSee this article.
Now that the PostgreSQL server is up and running, we can set up the clients, in other words, configure thedatabase connection in Aircast. The database application is part of the normal setup package, and theconnection setup is made in the same configuration app that is also used to configure the playout functions.
If you are getting an error about “unable to load libpq.dll” during client setup, you must install Microsoft VisualC++ 2010 Redistributable first: http://www.microsoft.com/en-us/download/details.aspx?id=8328
First client computer
Connection setup
On all client/Aircast computers that you want to access the AircastDB, a database connection must be set up inthe config.
Install Aircast, then open Windows Start Menu → All Programs → Aircast → Configuration. Go tothe Databases page, then click Add and add a new connection of type AircastDB (networked, PostgreSQLbackend).
The AircastDB connection properties dialog will appear:
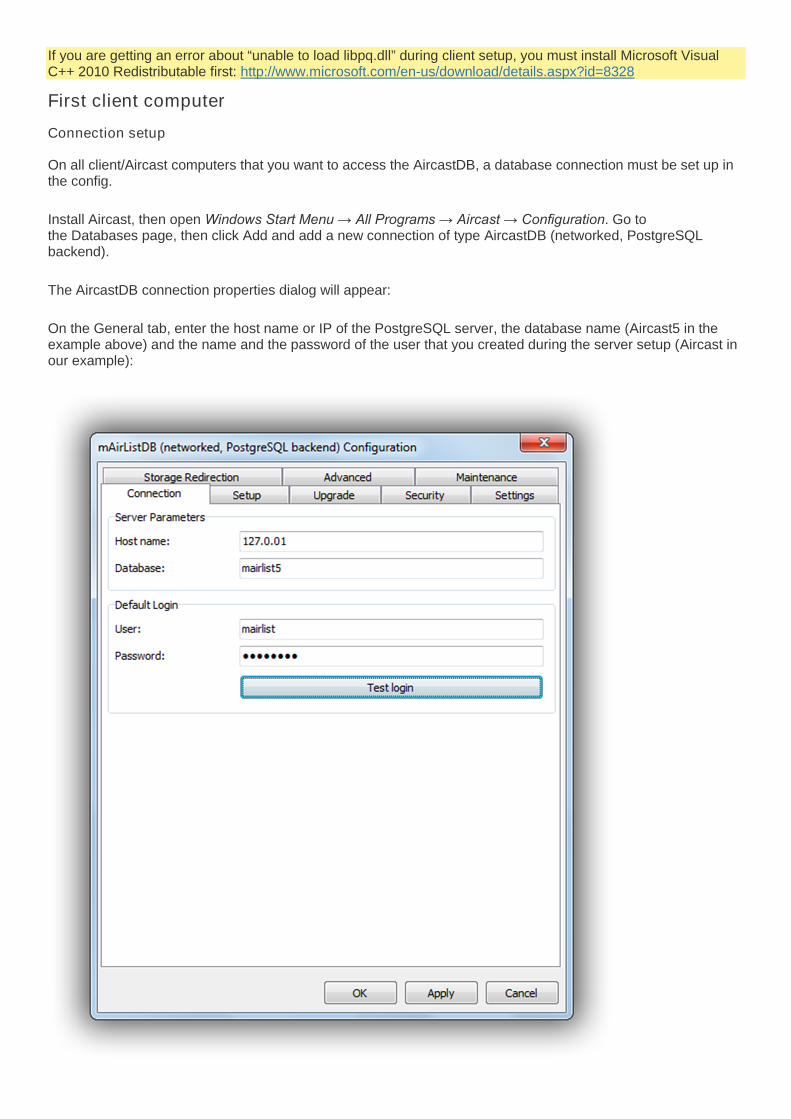
On the General tab, enter the host name or IP of the PostgreSQL server, the database name (Aircast5 in theexample above) and the name and the password of the user that you created during the server setup (Aircast inour example):
When you click Test login, an error message will appear, saying that the “relation config does not exist”. This isOK at this point, as we haven't set up the tables yet (see next section). Any other message, like “connetiontimeout”, “missing pg_hba.conf entry” etc. means that something is wrong with the connection config, server orfirewall.
Before you close the dialog and repeat the steps on the other client computers, go to the Setup tab to performthe initial setup tasks.
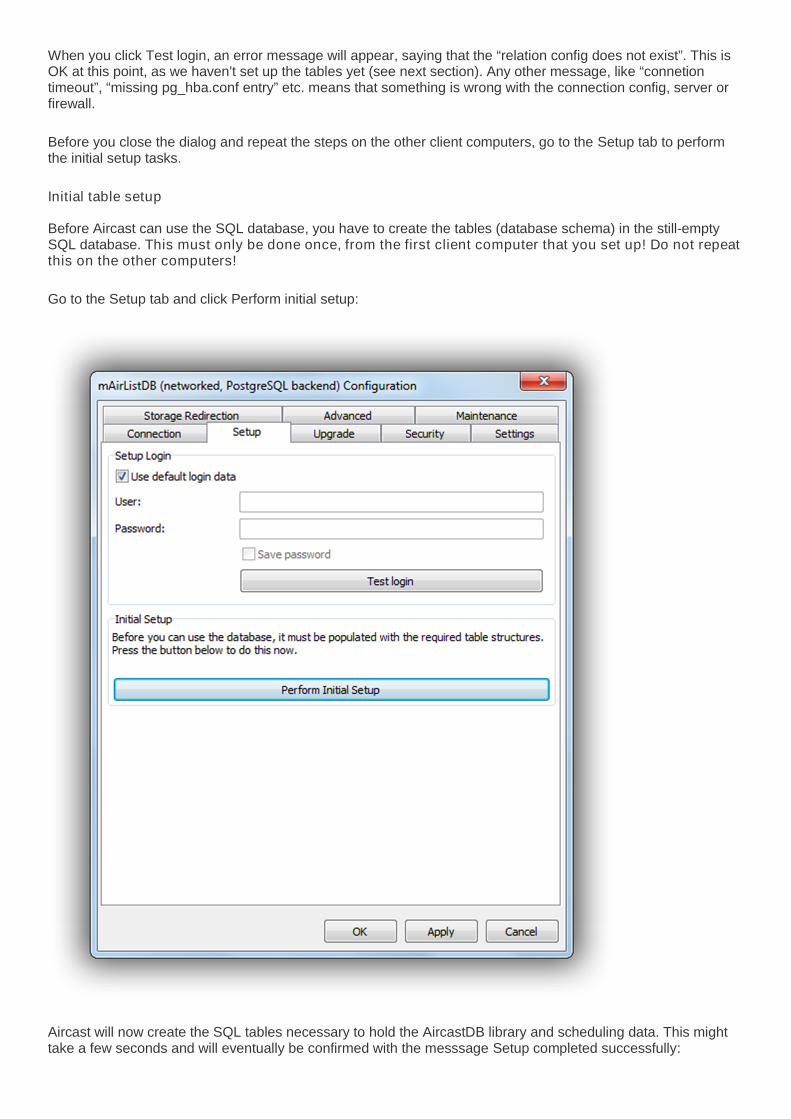
Initial table setup
Before Aircast can use the SQL database, you have to create the tables (database schema) in the still-emptySQL database. This must only be done once, from the first client computer that you set up! Do not repeatthis on the other computers!
Go to the Setup tab and click Perform initial setup:
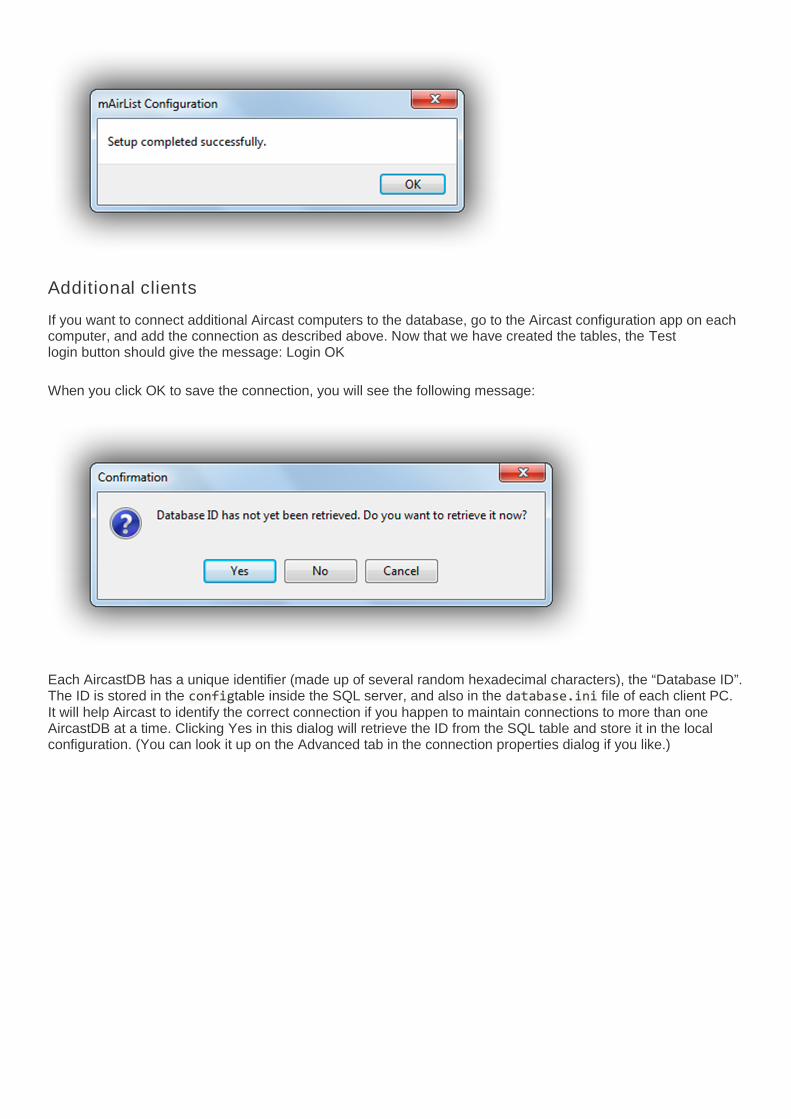
Aircast will now create the SQL tables necessary to hold the AircastDB library and scheduling data. This mighttake a few seconds and will eventually be confirmed with the messsage Setup completed successfully:
Additional clients
If you want to connect additional Aircast computers to the database, go to the Aircast configuration app on eachcomputer, and add the connection as described above. Now that we have created the tables, the Testlogin button should give the message: Login OK
When you click OK to save the connection, you will see the following message:
Each AircastDB has a unique identifier (made up of several random hexadecimal characters), the “Database ID”.The ID is stored in the configtable inside the SQL server, and also in the database.ini file of each client PC.It will help Aircast to identify the correct connection if you happen to maintain connections to more than oneAircastDB at a time. Clicking Yes in this dialog will retrieve the ID from the SQL table and store it in the localconfiguration. (You can look it up on the Advanced tab in the connection properties dialog if you like.)