Embed Size (px)
Citation preview

Zippers can be daunting even for experienced sewers. The reason? Zippers are often installed thewrong way. Lots of seam ripping and swearing ensues, especially when it’s a simple mistake. There’s noneed to be scared of zippers anymore! We’re here to help. With a little bit of practice you’ll get it.Remember that it takes time to master something new and even then, it’s easy to make mistakes. Giveyourself a break if you feel overwhelmed and come back to it later.
With this tutorial we cover how to install an invisible zipper. Invisible zippers are one of the nicestlooking zippers because they are, like the name says, invisible. They look clean and professional, thatis, if you can see it! We love to use this zipper in the garments we make for ourselves and especially inour patterns. They look good, and (even better), they are perhaps the easiest to install!
Items Needed:
invisible zipper
thread
scissors
64Tutorial: Installing an Invisible ZipperPosted by Caitlin | Leave a Comment
12Meet the Writers
Sarai MitnickColette PatternsOwner and Designer
Sarai is the designerbehind ColettePatterns and the
author of The Colette SewingHandbook. She loves sewing as a meansto bring creativity and personalexpression into daily life. She’s also aCrazy Cat Lady, vegetable grower, gindrinker, traveler, knitter, andbookworm.
Caitlin ClarkDesign Assistant
Caitlin is our stitcherextraordinaire,putting togethersamples, helping
with design, and coming up with funprojects for the website. She helps withphotoshoots and is also our residentredhead and deputy Crazy Cat Lady.
Search... GO
SHOP OUR PATTERNS | COMMUNITYFORUM |
Apr
AND

Be Our Friend Follow Us
© 2008–2012 Colette Media, LLC | Portland, Oregon | Contact
invisible zipper foot
zipper foot
garment
Before we start, take a look at the back of your invisible zipper. Do you notice how the coils of thezipper curl toward the back? This is what makes the zipper less visible than a normal zipper. But forsewing it in, it’s helpful to uncurl those coils and press the zipper flat first. This lets you stitch a bitcloser to the coils.
1. Lay your zipper wrong side up, with the zipper open. Set your iron on warm (or the syntheticsetting). Use your fingers to uncurl the teeth of the zipper while pressing it flat with the tip of your iron.Do this on both sides.
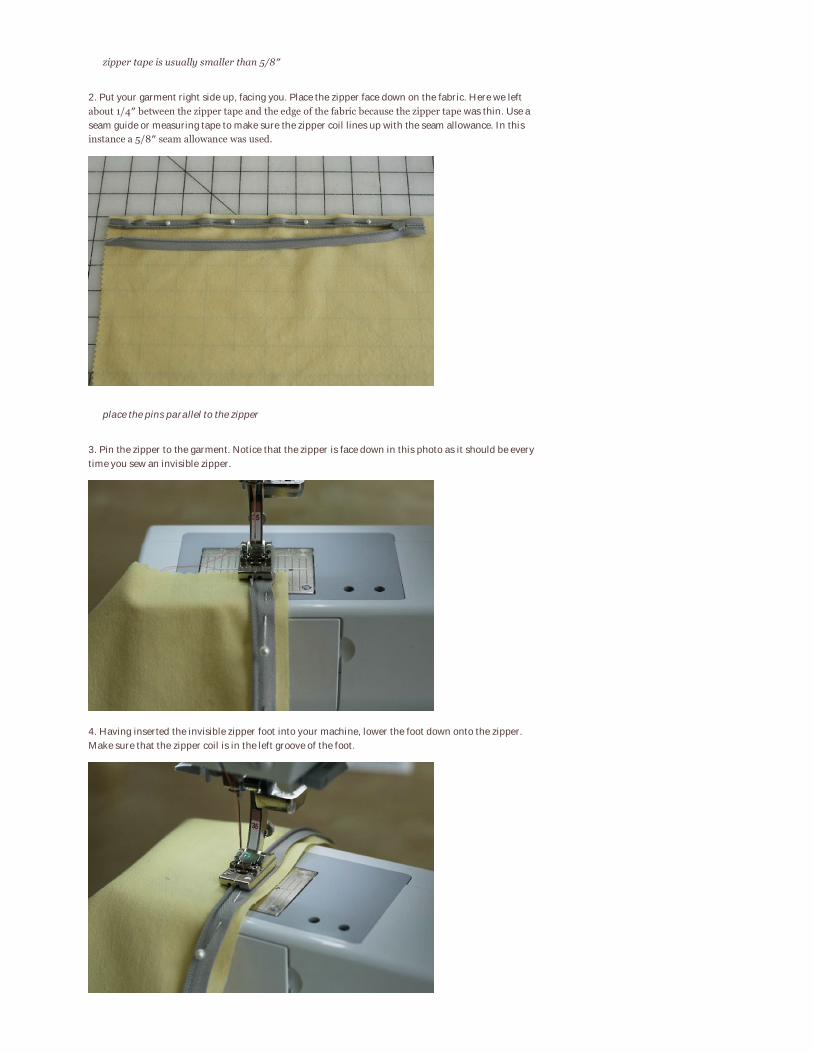
zipper tape is usually smaller than 5/8″
2. Put your garment right side up, facing you. Place the zipper face down on the fabric. Here we leftabout 1/4″ between the zipper tape and the edge of the fabric because the zipper tape was thin. Use aseam guide or measuring tape to make sure the zipper coil lines up with the seam allowance. In thisinstance a 5/8″ seam allowance was used.
place the pins parallel to the zipper
3. Pin the zipper to the garment. Notice that the zipper is face down in this photo as it should be everytime you sew an invisible zipper.
4. Having inserted the invisible zipper foot into your machine, lower the foot down onto the zipper.Make sure that the zipper coil is in the left groove of the foot.

sewing slowly helps prevent the fabric from puckering
5. Stitch the pinned zipper. Sew slowly, removing the pins before they reach the foot. Stop when youreach the end of the zipper, or the mark on your garment where the zipper should end. Backstitchabout 1/2 inch.
6. For the opposite side, pin the zipper to the garment so that it resembles the above photo. Again,make sure that the right side of the fabric is facing up. So you are pinning the zipper to the right side ofthe fabric.
double check your zipper before sewing
7. Close the zipper to make sure that you’ve pinned it correctly. This part can easily get twisted, so it’sbest to double check before you do any sewing. Once you’ve checked, unzip it before sewing.

remember to back stitch at the end of the zipper
8. Sew the zipper as you did the other side. However, this time make sure that the zipper coil is in theright side groove of the foot.
9. The zipper is now firmly in your garment, you did it! Just a few more steps to go. Pull the zipperclosed and lightly press before continuing.
make sure the seam allowances line up
10. Sandwich the zipper in the seam allowance and pin carefully down the rest of the seam. The zippertail should be out of the way, otherwise it’ll get caught in the stitches you’re about to make.

keep your seam line even to avoid puckering
11. Remove the invisible zipper foot and replace with a standard zipper foot. Put the foot to the left ofthe zipper. Starting about 1/4″ or so above the end of the zipper, slowly stitch forward then do a smallback stitch. The zipper adds bulk right here and will try to pull away from the needle. Instead of forcingthe needle to be right next to the zipper, just stitch slowly as close to the zipper as you can. Sew downthe remainder of your garment.
12. You can see that the stitching lines have about 1/8″ of space between them. It’s okay that they don’tmatch up! If you are able to match them up perfectly, then do so. Even with that small bit of space yourzipper will still look good.

← Older: Tutorial: Understitching Newer: Norman Norell →
And there you have it! Let us know in the invisible zipper post in our forum if you have any questionsabout the process. We’re happy to help if we can!
Thanks for reading! If this is your first time visiting, you may want tosubscribe to our RSS feed and follow @ColettePatterns on Twitter.
File Under: Tutorials, Tips, & Tricks
On Apr 12th, Marie Roche said:
Is it correct that an invisible zipper foot cannot be used on all fabrics? I heard a sewing
instructor say this, that invisible zippers should only be used if the fabric has a bit of loft. Isthis true?
Thank you for this tutorial it was clear and very helpful.
Marie Roche
On Apr 12th, Brittan said: | brittansalisbury.wordpress.com
Its true, Invisible zippers are HARD, I think step 11 can be the toughest .
I was shocked when I finally started to get zippers right right! haha.
Another great tutorial, I love the little tips pointed to by arrows. Good job! xo
On Apr 12th, Caroline said: | l-p.cc
This tutorial assumes its readers have an “invisible zipper foot.” So many of us are sewing on
ancient machines. It’s possible to make do. Even new machines sometimes don’t have zipper
feet. Husqvarna Viking owners will be using their buttonhole (C) foot. No joke. The Juki
F-series doesn’t come with an invisible zipper foot so I have made do other feet (instead ofspecial-ordering a foot), sometimes with even better results. As long as the foot isn’t sliding over the coils
and one is able to sew in a straight line, finding a target line on the zipper (usually a margin with a visibly
different weave closest to the coil) and sewing along it works well.
On Apr 12th, Sarai said: | colettepatterns.com | @saraicat
We should point out that most fabric stores carry very cheap (I think I’ve bought one for
$3) plastic snap on invisible zipper feet. Of course, they don’t fit on all machines, but if youhave one that it will work with, it’s a really cheap option.
On Apr 12th, Caroline said: | l-p.cc
Hmmmm. That might be an option for me for the Juki! Thanks Serai.
On Apr 12th, Reana Louise said: | curvespatternsandpins.blogspot.com
I’ve purchased a generic cheap plastic foot for invisible zippers and whilst it was a bit ofan effort getting it on, it still worked perfectly fine once it was (finally!) on there.
Since then my boyfriend spoilt me with the proper metal foot (probably sick of my
whinging! ha!) and working with it is a total breeze- but the plastic ones still work fine if it’s your only
option.

On Apr 13th, Sarai said: | colettepatterns.com | @saraicat
This is basically my experience. The real metal feet are indeed nicer, but I’ve sewnzippers with cheap feet in the past and it worked fine. I don’t see much harm in
experimenting with it if the more expensive feet are inaccessible.
On Apr 13th, Gordana Radovanovic said: | MyFimoKitchen
Hi Caroline,I’ve just discovered your blog seeing the zipper tut.Unexpectably for me,you
had a great advice for the Husky mashine which I own,thanks a lot!Also,I think your tip is
great,since the invisible zippers are lovely looking but a real nightmare forsewing…greetings from Serbia
On Apr 13th, Caroline said: | l-p.cc
Hi Gordana,
Happy that you found what you needed. Here is a more specific tutorial for the
Husqvarna Viking machines which lack a dedicated zipper foot:
http://www.geocities.com/fashionavenue/3824/invszipper.html
On Apr 12th, Katrina said: | katriniella.wordpress.com
I’ve done invisibible zippers so many times, and I STILL can’t get it to look good! Thanks forthe tutorial–time to practice, I think.
On Apr 12th, sewer said:
Caroline:
It is possible to install an invisible zipper without the special foot, but it is harder. I’ve sewn onan industrial Juki; it’s a very common, cheap, and easily available foot. I had to buy one for my
home sewing machine, again, it was easy to find and was inexpensive.
The traditional method of installing an invisible zipper has been illustrated, in which the zipper is installed
before the seam is sewn. I once took a class in which we installed the zipper into a closed seam, but thatinvolved basting part of the seam first. It was truly fool-proof and avoided the bubble at the bottom of the
zipper. I don’t recall all the steps, otherwise I would post the method.
On Apr 12th, Caroline said: | l-p.cc
Thanks – I know it’s possible and I mentioned how. I’m not sure you read my comment.
The invisible zipper foot for my machine is not available at any stores in Portland. There is
only one official Juki dealer and according to him it needs to be special-ordered. Which iswhy I was thankful for Serai’s comment. $3 is a nice price.
On Oct 1st, Christina Draper said:
I absolutely love this method. It truly is foolproof. Just be sure to measure and mark where
the closed end of the zipper hits in the seam and backstitch over that spot. Once the zipper
is on, you can then take a seam ripper to let it out, not going past your backstitched spot.
On Apr 12th, Heather said: | sewingonpins.blogspot.com
Thank you for the great tutorial! There were a couple tricks in here that I’d never done before.I think I have a couple invisible zippers around – time to practice! :)

On Apr 12th, Steph said: | 3hourspast.blogspot.com
If you have the right foot for the job, you should never NEVER need to press open a zippertape. They aren’t designed to be pressed, in fact they are specifically designed to roll. Don’t do
your zips this way, you’re setting yourself up for failure.
On Apr 12th, Caroline said: | l-p.cc
Is it possible to disagree and agree at the same time? I press them when I don’t have the
correct foot so I can see what I’m doing. I don’t see a difference in the end result. I get a nice
flat-lying super-hidden zipper. Please elaborate.
And thanks for the tip on the plastic foot. I assume you’ve tried them?
On Apr 12th, Sarai said: | colettepatterns.com | @saraicat
Steph, I respectfully disagree with your experience. I always press my coils, even with my
fancy Bernina foot, and get better results that way.
Yes, they are designed to roll, and will continue to do so once you zip them up again. I
believe even the Coats and Clark Sewing book (manufacturers of invisible zippers) says to press them
lightly (see this reference on Sewing.org). I also have some manufacturer instructions right here that sayto press lightly “for easier application.”
Anyway, I know some people prefer not to press them and I respect that, but your comment seems a bit
extreme. I’ve yet to have a “failure” because of pressing per manufacturer’s instructions.
On Apr 12th, Caroline said: | l-p.cc
I also thought the word NEVER was extreme, since everything I’ve read says to pressthem. Though if you have a good zipper foot (and some I’ve used have crummygrooves) it kind of takes the need to press the zipper out of the equation, which issometimes nice.
On Apr 12th, Steph said: | 3hourspast.blogspot.com
Also, make sure it’s the metal foot designed for your machine. The plastic snap on feet are
basically worthless.
On Apr 12th, Leah said: | strugglesewsastraightseam.wordpress.com
Is there a way to do this by hand? I know it’s weird but I prefer doing zippers by hand, I feel
like I have more control.
On Apr 13th, Susan – Knitters Delight said: | knitters-delight.blogspot.com
I really appreciate this tutorial. I have a Bernina including the correct feet, but still have had a
hit or miss result on my construction. Low and behold, I realize now that I have been sewingthe zipper right side up with the fabric wrong side up. I am happy to now do the reverse.
One question that another commenter also asked – isn’t the bottom portion of the seam suppose to be
sewed first to avoid bubbles below the zipper? I vaguely remember hearing that somewhere.
On Apr 13th, Sarai said: | colettepatterns.com | @saraicat
Hi Susan… is it possible you are thinking of a standard (non-invisible) zipper? If you were
doing a standard centered zipper, you would sew the seam at the bottom first. With
invisibles, you leave it open. If you look at the photos for steps 6 and 7 above, you canprobably see that it would be much harder to sew the zipper at the bottom in if the seam
was stitched.
On Apr 13th, Lola said:
Great tutorial! However, I would like to make a wish for a following one – how to finish an
invisible zipper with the facing or lining… I just never get really clean results there!
On Apr 13th, Caitlin said: | @thestorycat
Patricia’s comment is great! I also found a tutorial and posted about it in the invisible
zipper thread in our forum.
On Apr 13th, Patricia Austin said:
Veronica Shaeffer from http://www.vsgowns.com/ just gave me this extremely helpful tip
when dealing with lining AND invisible zippers. I had just posted this very question only
moments ago. Kismet! Thanks Veronica!
“Btw, you can machine stitch the lining to an invisible zipper by turning the dress inside out and then laying
the lining over it. Match the lining edge to the zipper/fabric edge and then stitch with your invisible presserfoot. The zipper will be between the self fabric and lining, if that makes sense. Actually very easy once you
give it a try!”
On Apr 13th, Steph said: | 3hourspast.blogspot.com
I appreciate the respectful disagreement, which is why I never say much when I see similar
tutorials. I assume I’d be tarred and feathered for disagreeing. Please know that I teachsewing, I have taught hundreds of women (not many men come to classes) to sew invisible
zippers, and I can boast a 100% success rate. I take great personal pride in the success of my
students.
I see a big problem with plastic feet. They don’t function as they ought to. I have never seen one perform thefunction they should. Metal invisible zipper feet usually range in the $18-42 price range here in Australia
depending on the model, and the plastic foot retails for $3. The metal foot may need to be specially ordered
even though the shop where I works carries plastic feet. If someone wants to try the plastic foot first for
whatever reason, I warn them and then do my very best to teach them to put in a good invisible zip.
I define “good” as they shouldn’t have to break their brains and offer their firstborn to the sewing gods inorder to get a good result. Good results with plastic feet in my experience=nil. Never. I can stand by that.
Further, I find if I let someone buy a plastic foot and try to put in a zip that several things may happen:
–Melting the zipper as they press it. Unless I press it myself, there’s a high likelihood of someone
over-pressing and the zipper teeth stick together. In such a case, I humbly suggest it may be a faulty zipperand give them a new one.
–Bad zipper. A plastic foot simply does not (as far as I’ve seen it) roll the zipper coil effectively, and
generally leads to sewing too far from the zipper coils or the sewist mistakenly sews over the coils. Either
way is not a good invisible zip.
I’m not saying that with a great deal of patience and perserverance a beginner or intermediate sewist canachieve a good invisible zip. I just say that these kinds of tutorials actually make my blood boil because I
know it doesn’t have to be that difficult or mysterious. A good invisible zipper foot engineered specifically
for the machine and the task will present perfect results every time.
Sometimes I offer the alternative of the right metal foot to someone who insisted on using a plastic foot.Some people need to make mistakes before they will listen. That’s fine. I’ll get the right metal foot, let them
try it, and they immediately buy it, even at $42. With the right technique and the right foot, an invisible
zipper takes about the same amount of thought as fusing interfacing properly. I don’t think we as sewists
should celebrate making life harder on beginners and intermediates. I know that’s not what you’re sayinghere and I appreciate that you regularly post new and interesting tips and techniques, but this tutorial leaves
me cold.
On Apr 13th, Caitlin said: | @thestorycat
Hi Steph,

Thank you very much for offering your view on the tutorial. I can understand your
frustration with seeing advice contrary to your own, especially when you feel that it is
impeding learners. While you disagree with the pressing of the zipper and the plastic foot, Iwasn’t sure what upset you about the tutorial. I have created a post in the forum about invisible zippers
and welcome your input.
While we try hard to help all sewers learn the best ways to do things, we do make mistakes. In this case, I
think that it is a difference of opinion. Sarai and I both see sewing as something that suits each person
differently. In this case, you have had no positive experience with ironing zippers or plastic feet. However,Sarai and as others have had success. I think that this is a good example of how two methods work
differently for others.
I would like to stress that beginners will make mistakes and we would love to help them avoid them! If we
felt that our advice was a hinderance, we wouldn’t offer it. As with all tutorials and methods, each sewistshould test it out to see what works best for themselves.
Thanks again for your input and please feel free to continue the discussion in the forum.
-Caitlin
On Apr 13th, Steph said: | 3hourspast.blogspot.com
I’ll add, respectfully, I have never seen instructions to iron the coils included on a zipper, but I
know I haven’t seen every brand of zipper out there.
On Apr 14th, Amanda said:
Thank you! I love this tutorial. It’s really easy to follow.
I have inserted an invisible zip in the past with some success (and a few mistakes!) but now I
see where I have gone wrong.
So well timed too – I’m nearly ready to put the zip into my parfait dress.
On Apr 17th, Faye Lewis said: | fayessewingadventure.blogspot.com
THANK YOU, THANK YOU, THANK YOU. My problem was knowing just how far to place the
zipper tape away from the edge of the fabric. This clear tells and shows me. Thank you again!
On Apr 18th, Layla said:
While a good specialized foot may save time, and help you achieve great results without the
learning curve, I’d like to mention that I have used my regular zipper foot to install invisible
zips using the same instructions illustrated so clearly in this well-photographed tutorial. I’ve
never melted a zipper, and ironing (mentioned on sewing.org which my zipper manufacturercoats and clark references on their invisible zip blog post) is a crucial step for me, using the regular zipper
foot.
I appreciate Steph’s frustration and the fact that her long experience with her method is highly successful.
But I also agree that this is a case where this common method works for many people, is not technicallyinferior (as long as you watch the temp of your iron, probably the best take home point of this particular
sidebar), and for people like me means you don’t spend the money on another foot and can instead buy
more zippers and fabric ;)
I continue to appreciate these clear tips from Colette Patterms – and I also enjoy the discussions theyinspire.
On Apr 24th, Heather said:
So, what if someone was just now at the point of inserting an invisible zipper, and, never
having done one before and having seen nothing in the pattern or pattern instructions
indicating that a 5/8 seam allowance was required, is now left with a 1/4 seam allowance to
work with? Is there anything wrong with using a smaller seam allowance?

On May 25th, this post was linked from:Inserting an Invisible Zipper
[...] Colette Patterns – Installing an Invisible Zipper [...]
On May 25th, this post was linked from:Muslin is Actually Calico « VickikateMakes
[...] by me, it’s an invisible one and it ain’t bad if I do say so myself! I followed this tutorial from Colette as it
was straight forward and I got it, Sunni’s method didn’t suit me, [...]
On Jun 9th, this post was linked from:Secrets of the Invisible Zipper
[...] I prefer to put the zipper in before the seam is stitched, I do love Caitlin’s tutorial as well. I think her
little helpful hints in the pink boxes is just the cat’s pajamas! [...]
On Jun 14th, this post was linked from:Colette Patterns’ Sewing Tutorials : Craft Stew
[...] Craft Link : Colette Patterns’ Sewing Tutorials [...]
Thanks for the great, and very timely, tutorial.
On May 16th, Christine said:
You’ve probably already figured out by now that you *can* use a smaller seam allowance,
though it can make lining up the edges of the zipper tape and fabric more difficult (since
you can’t see through the zipper tape to the fabric below). If it’s all you have to work with,
then that’s what you’ve got to use. I would suggest finishing the seam allowance with atriple zigzag stitch to minimize any fraying which might cause the zipper application to fail further down
the road, and marking the seamline so you have a guide to line up the zipper coil against.
My preferred method for any type of zipper application, though, is to cut my seam allowances to match
my zipper tape width (measured from outer edge to center of the coil). For example, if I am doing acentered or invisible zipper application, I cut my fabric out so there is a 1/2″ SA the length of the zipper
insertion (because my zipper tape width is slightly less than 1/2″, and the rest is taken up with the turn of
cloth). If I am using a commercial pattern, this usually means trimming 1/8″ away from the SA. I find
that it’s so much easier to sew edges that match each other (an added bonus – I don’t need to use pins!).
I learned this from the Fashion-Incubator.com website (which Caitlin referenced above). The methods
described on that website are the *only* ones I use to apply zippers anymore.
On Jun 28th, Kelli said: | smalltownstitcher.blogspot.com
Just wanted to say thanks for the great tutorial. I haven’t put in an invisible zipper since I was
about 10 learning how to sew in 4-H and that was with help from my sewing leader, so I reallycouldn’t remember how to do it. I followed your tutorial exactly except that I don’t have an
invisible zipper foot. I’ve got a Viking and didn’t think to use my buttonhole foot, I used my
blind hem foot. It’s got the perfect ridge for the coil to sit in. I am bookmarking this for future reference.
Y’all are great, keep it up!
On Jul 5th, Lizzy said:
I’m doing a decent job with the invisible zippers now but cannot for the life of me make a cleanfinish at the top with a hook and eye. Any tips for that?
On Oct 1st, Christina Draper said:

On Aug 15th, this post was linked from:Pretty Little Plaid Skirt Tutorial | Sweet Little Chickadee
[...] Sew up one side of the skirt, then tackle the zipper. Colette Patterns has a good invisible zipper tutorial
here. [...]
On Aug 16th, this post was linked from:DIY: Sewing Up A Sea of Turquoise « Sheila Zeller Interiors
[...] on how to install an invisible zipper… 3 different sets of instructions! In the end I used this tutorial by
Colette Patterns along with a few extra tips from my trusty old Reader’s Digest Guide to [...]
On Sep 4th, this post was linked from:Cartoon-esque Rooibos | | Scruffy Badger TimeScruffy Badger Time
You need to make sure the hook and eye are set with the top of the hook and the top of the
eye even to the edge (fold) of your fabric. The edges of your fabric will meet and thereshould not be a gap between them. If this isn’t your problem, then your zipper may not be
stitched on properly. A lot of people make the mistake of leaving the zipper zipped up when
they stitch it on. You should have the zipper unzipped when you are stitching the top part on. If it is leftzipped up, the zip part of the zipper will get in the way of your sewing and create a little wave in your
stitch line. Sometimes this will force the two top ends of the zipper out, rather than in.
On Jul 5th, Amber said: | amber-elayne.blogspot.com
Thank you so much! I’ve never actually seen this so easily done!
On Jul 6th, Claudia said: | customwearsbyclaudia.com
Thank you for another great tutorial! I recommend this blog to all of my sewing students and
look forward to each new post. I guess I am with the few who do not use the plastic zipper foot.
I roll the teeth of the zipper as ‘open’ as possible, press and use my sewing machine’s regularzipper foot. I always have great results and have never damaged a zipper with the iron.
On Jul 17th, Duckie said:
Huzzah! Just used this tutorial to put the (non-invisible) zipper into my nearly-finished
Ginger skirt and after 5 years of sewing, it’s the neatest gosh-darned zipper I’ve ever inserted.
Glorious.
On Aug 16th, Lisa said: | GracieLouDesigns.Etsy.com
Thank you, THANK YOU! In my 15 plus years of sewing, I’ve lost track of the number of times
I’ve been aggravated from installing invisible zippers, and I’ve never been happy with the
results….until I read your instructions! There are so many helpful tips that I had just never
come across in any other instructions before. I just finished installing the zipper on my Gingerskirt, and I am pleased and satisfied beyond words! You are never too old to learn a better way of doing
something!
On Aug 18th, Lyne said:
Yay ! my first ever invisible zip ! thanks now feel confident to finish my parfait

[...] been.Now, invisible zip sewing is a new one for me, & I also followed Colette Patterns online tutorial. It
was very clear, but didn’t stop me messing it up first time. Never mind. I am [...]
On Sep 7th, this post was linked from:FO: Simplicity 2452 « The No-Method Method to Happy, Healthy Children
[...] I used this tutorial to insert the zipper, although this one at Colette also looks good. I’m pretty happywith it. There’s a slight bulge at the bottom left, [...]
On Sep 15th, this post was linked from:Invisible Zipper Foot to the Rescue « Sew Well
[...] with this magical foot. I do have to give due credit to both Sunni’s tutorial and the Colette Pattern’s
tutorial for why everything finally went so [...]
On Sep 27th, this post was linked from:Ginger Skirt in Candy Trees « Night Knitter
[...] I also like the thorough tutorials on the Colette blog. I used the tutorial on how to insert an invisiblezipper to make the Ginger skirt (Colette 1016). I’ve sewn in my fair share of zippers, but I need [...]
On Sep 9th, Gayle said:
This is a great tutorial. It’s wonderful that all of these things are available online, and I mustsay that the Coletterie, as it’s now named, is the first spot I check for tutorials, as the pictures
and writing are crystal clear.
I teach private and semi-private sewing classes, and was looking for an invisible zipper tute to
send to a friend in another country, as I’m lazy and knew I could find it online rather than have to takepictures myself! I bring up the classes, as I teach basic zipper installation in the first two hour class. Once
you can sew a straight line, you can install a zipper, so far as I’m concerned, and I think that so many of
(myself included!) scare ourselves with the perceived difficulty of sewing tasks, psyching ourselves out. Ispent years of my sewing doing anything and everything to avoid installing zippers, and could have kicked
myself once I finally “manned up” and did it, as it was so easy, not the monster I’d considered it to be.
Which I guess is a long and round about way of thanking you for demystifying sewing for so many people.
On Sep 23rd, PDX Gretchen said:
Thanks to your wonderful tutorial, I’ve just installed the nicest invisible zipper I’ve ever done.
On a Ginger, to boot. Thank you for such clear instruction, in your tutorials and your patterns.
On Oct 1st, Christina Draper said:
I’ve always just used regular zipper feet to install invisible zippers. Really, the most importantpart of it all is pinning everything EXACTLY. Then get as close as possible to the teeth of the
zipper.
On Oct 9th, Faye Lewis said: | fayessewingadventure.blogspot.com
Thank you very much for this tutorial. My application is still not as easy as eating cake, but I’ll
keep practicing and maybe one day it will be.
On Oct 16th, Marie said: | asewingodyssey.blogspot.com | @MarieK83
Just wanted to say that I used to hate and mess up zips every time I attempted them, until I
found this brilliant tutorial…many thanks!

On Dec 8th, this post was linked from:Colocando um ziper invísivel « Falando com os meus botoes
[...] Achei esse post num tutorial de blog, e colocar zipers é sempre chato, e complicado para quem não tem
experiencia. Se for invisível é ainda mais chato o endereço é este aqui: http://www.coletterie.com/tutorials-tips-tricks/tutorial-installing-an-invisible-zipper [...]
On Dec 23rd, this post was linked from:almost finished dress! « Look, I made A Dress!
[...] I finally have a decent dress! I followed grosgrain tutorial here to make the dress and used
this awesome zipper [...]
On Jan 12th, this post was linked from:Pretty Quirky Pants | 50's Skirt Adventure #1 - DIY Pleated Skirt
[...] essential. The series of photos below demonstrate how I attached it and the following links show
a pictorial tutorial on how it is done and a very informative video explaining the different types of zipper
foots along [...]
On Jan 27th, this post was linked from:Colette Sewing Handbook: Meringue Skirt | Right Side Wrong Side
[...] You have to switch to a regular zipper foot to complete the invisible zipper. I found the Coletterie
invisible zipper tutorial to be helpful. The instructions in the Sew Everything Workshop were also good, aswas this [...]
On Oct 30th, donna said:
thank you for this great tutorial. i made a soft wool ginger skirt and the zipper looks
professional! i have never had a zipper to come out so perfectly. i don’t have an invisible foot
so I used my clear plastic foot that i use when making small tucks/cording. it worked fine.
On Nov 27th, Faye Lewis said: | fayessewingadventure.blogspot.com
I really need to thank you each and every time I insert an invisible zipper. Just did another one– THANKS!
On Dec 8th, Mary said:
Have yet to try your advice, which is more thorough than what I had been given elsewhere.However, nowhere do you (or my other source) state whether one is starting to install the
zipper on the left or right half of the garment. Considering you start with the zipper upside
down and then flip it over, there is an inherent possibility of confusion, and some of us
manage to sew despite of a severe lack of spatial relations
On Jan 23rd, Jo said:
I have just made a skirt tonight and followed this tutorial to install the zip. It worked! The only
thing was that I could have got closer to the teeth so the zip was more hidden, but I am
absolutely stoked with my first go!!

Your Name... * Your Email... *
Your Web Site URL... Your Twitter Name...
POST COMMENT
What do you have to say?
Your Comment... *
Notify me of followup comments via e-mail.