Embed Size (px)
Citation preview
Page | 1
INSTALLATIO
N I
NSTRU
CTIO
NS A
ND
IN
FO
RM
ATIO
N
Tusk Pannier Racks: Suzuki DRZ 400
Thanks for your purchase of the Tusk Pannier Racks.
These racks are made to handle extreme adventure riding, but work
great for the commuter as well. Please take note of the information and
instructions below to get the most out of your Tusk racks and panniers.
Assembly: Before you throw any packaging away, make sure you received all the necessary hardware:
Rack Installation
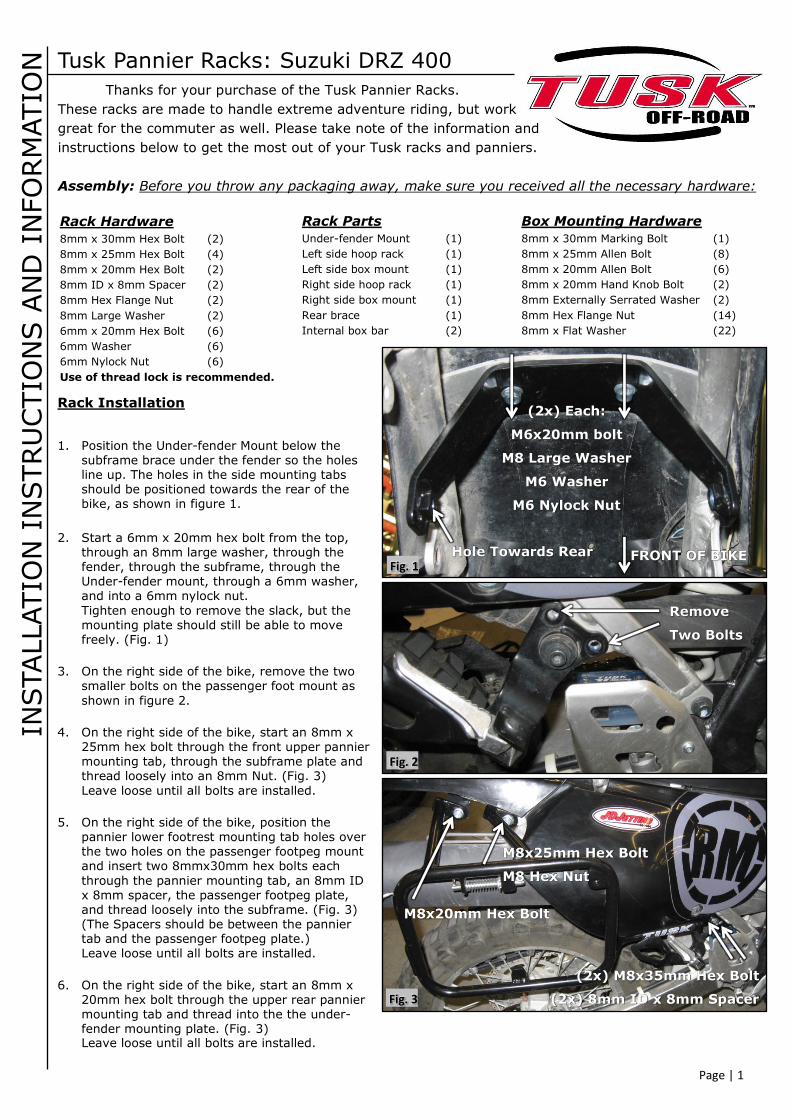
1. Position the Under-fender Mount below the subframe brace under the fender so the holes line up. The holes in the side mounting tabs should be positioned towards the rear of the bike, as shown in figure 1.
2. Start a 6mm x 20mm hex bolt from the top,
through an 8mm large washer, through the fender, through the subframe, through the Under-fender mount, through a 6mm washer, and into a 6mm nylock nut.
Tighten enough to remove the slack, but the mounting plate should still be able to move freely. (Fig. 1)
3. On the right side of the bike, remove the two smaller bolts on the passenger foot mount as
shown in figure 2.
4. On the right side of the bike, start an 8mm x 25mm hex bolt through the front upper pannier
mounting tab, through the subframe plate and thread loosely into an 8mm Nut. (Fig. 3)
Leave loose until all bolts are installed.
5. On the right side of the bike, position the pannier lower footrest mounting tab holes over the two holes on the passenger footpeg mount and insert two 8mmx30mm hex bolts each
through the pannier mounting tab, an 8mm ID x 8mm spacer, the passenger footpeg plate, and thread loosely into the subframe. (Fig. 3) (The Spacers should be between the pannier tab and the passenger footpeg plate.) Leave loose until all bolts are installed.
6. On the right side of the bike, start an 8mm x 20mm hex bolt through the upper rear pannier mounting tab and thread into the the under-fender mounting plate. (Fig. 3) Leave loose until all bolts are installed.
Rack Hardware
8mm x 30mm Hex Bolt (2)
8mm x 25mm Hex Bolt (4)
8mm x 20mm Hex Bolt (2)
8mm ID x 8mm Spacer (2)
8mm Hex Flange Nut (2)
8mm Large Washer (2)
6mm x 20mm Hex Bolt (6)
6mm Washer (6)
6mm Nylock Nut (6)
Use of thread lock is recommended.
Rack Parts
Under-fender Mount (1)
Left side hoop rack (1)
Left side box mount (1)
Right side hoop rack (1)
Right side box mount (1)
Rear brace (1)
Internal box bar (2)
Box Mounting Hardware
8mm x 30mm Marking Bolt (1)
8mm x 25mm Allen Bolt (8)
8mm x 20mm Allen Bolt (6)
8mm x 20mm Hand Knob Bolt (2)
8mm Externally Serrated Washer (2)
8mm Hex Flange Nut (14)
8mm x Flat Washer (22)
Fig. 1
Fig. 2
Fig. 3
FRONT OF BIKE
(2x) Each:
M6x20mm bolt
M8 Large Washer
M6 Washer
M6 Nylock Nut
Hole Towards Rear
Remove
Two Bolts
M8x25mm Hex Bolt
M8 Hex Nut
(2x) M8x35mm Hex Bolt
(2x) 8mm ID x 8mm Spacer
M8x20mm Hex Bolt
Page | 2
INSTALLATIO
N I
NSTRU
CTIO
NS A
ND
IN
FO
RM
ATIO
N
Rack Installation (continued)
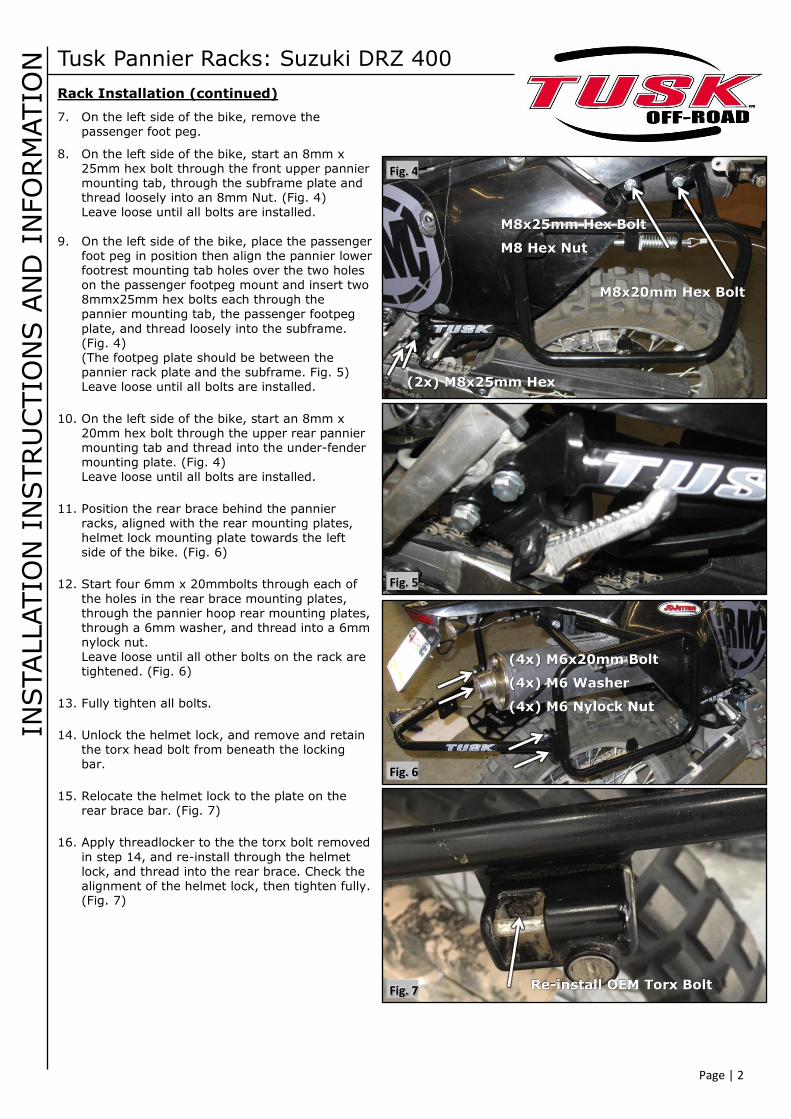
7. On the left side of the bike, remove the passenger foot peg.
8. On the left side of the bike, start an 8mm x 25mm hex bolt through the front upper pannier mounting tab, through the subframe plate and thread loosely into an 8mm Nut. (Fig. 4) Leave loose until all bolts are installed.
9. On the left side of the bike, place the passenger
foot peg in position then align the pannier lower footrest mounting tab holes over the two holes on the passenger footpeg mount and insert two 8mmx25mm hex bolts each through the pannier mounting tab, the passenger footpeg
plate, and thread loosely into the subframe. (Fig. 4) (The footpeg plate should be between the pannier rack plate and the subframe. Fig. 5) Leave loose until all bolts are installed.
10. On the left side of the bike, start an 8mm x 20mm hex bolt through the upper rear pannier mounting tab and thread into the under-fender mounting plate. (Fig. 4) Leave loose until all bolts are installed.
11. Position the rear brace behind the pannier racks, aligned with the rear mounting plates,
helmet lock mounting plate towards the left side of the bike. (Fig. 6)
12. Start four 6mm x 20mmbolts through each of
the holes in the rear brace mounting plates, through the pannier hoop rear mounting plates, through a 6mm washer, and thread into a 6mm nylock nut. Leave loose until all other bolts on the rack are tightened. (Fig. 6)
13. Fully tighten all bolts.
14. Unlock the helmet lock, and remove and retain the torx head bolt from beneath the locking
bar.
15. Relocate the helmet lock to the plate on the rear brace bar. (Fig. 7)
16. Apply threadlocker to the the torx bolt removed
in step 14, and re-install through the helmet lock, and thread into the rear brace. Check the alignment of the helmet lock, then tighten fully. (Fig. 7)
Tusk Pannier Racks: Suzuki DRZ 400
Fig. 4
Fig. 5
Fig. 6
M8x25mm Hex Bolt
M8 Hex Nut
M8x20mm Hex Bolt
(2x) M8x25mm Hex
(4x) M6x20mm Bolt
(4x) M6 Washer
(4x) M6 Nylock Nut
Fig. 7 Re-install OEM Torx Bolt
Page | 3
Tusk Aluminum Pannier Boxes
INST
ALL
ATI
ON
IN
STR
UC
TIO
NS
AN
D I
NFO
RM
ATI
ON
Pannier Mounting
Note: Most universal type pannier boxes can be mounted
to the tusk pannier racks. Always refer to the instructions
included with the boxes you are mounting.
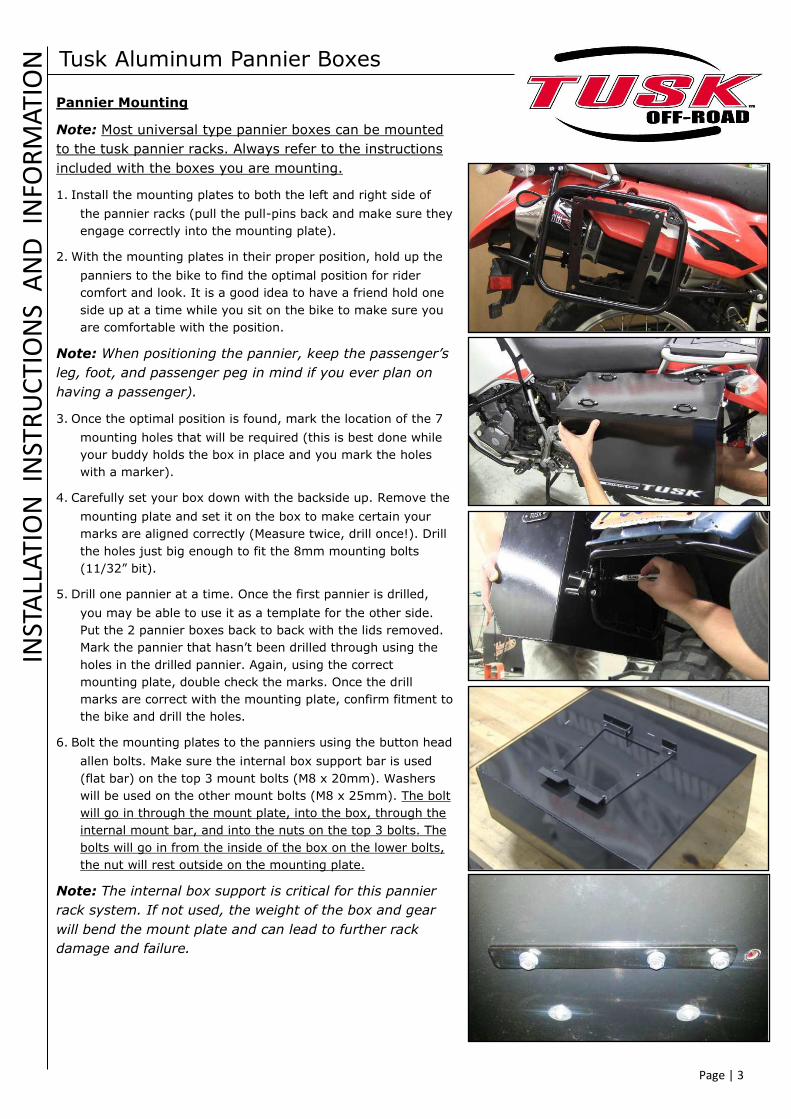
1. Install the mounting plates to both the left and right side of
the pannier racks (pull the pull-pins back and make sure they
engage correctly into the mounting plate).
2. With the mounting plates in their proper position, hold up the
panniers to the bike to find the optimal position for rider
comfort and look. It is a good idea to have a friend hold one
side up at a time while you sit on the bike to make sure you
are comfortable with the position.
Note: When positioning the pannier, keep the passenger’s
leg, foot, and passenger peg in mind if you ever plan on
having a passenger).
3. Once the optimal position is found, mark the location of the 7
mounting holes that will be required (this is best done while
your buddy holds the box in place and you mark the holes
with a marker).
4. Carefully set your box down with the backside up. Remove the
mounting plate and set it on the box to make certain your
marks are aligned correctly (Measure twice, drill once!). Drill
the holes just big enough to fit the 8mm mounting bolts
(11/32” bit).
5. Drill one pannier at a time. Once the first pannier is drilled,
you may be able to use it as a template for the other side.
Put the 2 pannier boxes back to back with the lids removed.
Mark the pannier that hasn’t been drilled through using the
holes in the drilled pannier. Again, using the correct
mounting plate, double check the marks. Once the drill
marks are correct with the mounting plate, confirm fitment to
the bike and drill the holes.
6. Bolt the mounting plates to the panniers using the button head
allen bolts. Make sure the internal box support bar is used
(flat bar) on the top 3 mount bolts (M8 x 20mm). Washers
will be used on the other mount bolts (M8 x 25mm). The bolt
will go in through the mount plate, into the box, through the
internal mount bar, and into the nuts on the top 3 bolts. The
bolts will go in from the inside of the box on the lower bolts,
the nut will rest outside on the mounting plate.
Note: The internal box support is critical for this pannier
rack system. If not used, the weight of the box and gear
will bend the mount plate and can lead to further rack
damage and failure.
Page | 4
Tusk Aluminum Pannier Boxes
INST
ALL
ATI
ON
IN
STR
UC
TIO
NS
AN
D I
NFO
RM
ATI
ON
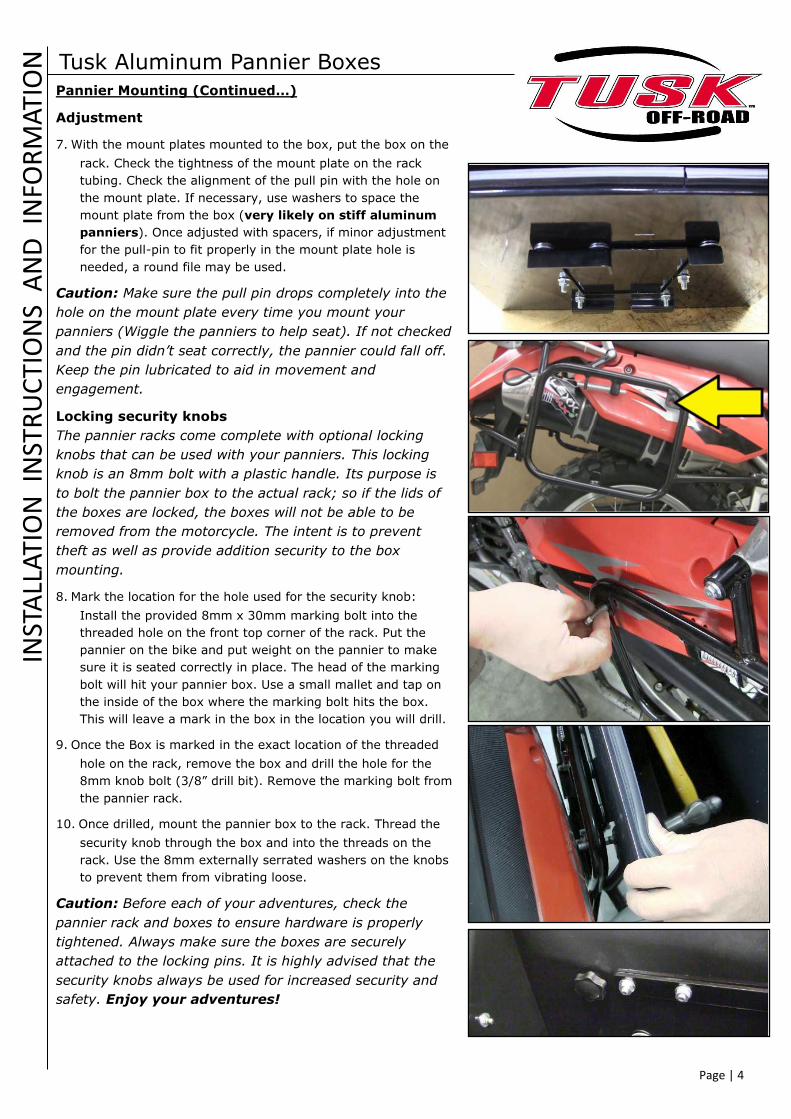
Pannier Mounting (Continued…)
Adjustment
7. With the mount plates mounted to the box, put the box on the
rack. Check the tightness of the mount plate on the rack
tubing. Check the alignment of the pull pin with the hole on
the mount plate. If necessary, use washers to space the
mount plate from the box (very likely on stiff aluminum
panniers). Once adjusted with spacers, if minor adjustment
for the pull-pin to fit properly in the mount plate hole is
needed, a round file may be used.
Caution: Make sure the pull pin drops completely into the
hole on the mount plate every time you mount your
panniers (Wiggle the panniers to help seat). If not checked
and the pin didn’t seat correctly, the pannier could fall off.
Keep the pin lubricated to aid in movement and
engagement.
Locking security knobs
The pannier racks come complete with optional locking
knobs that can be used with your panniers. This locking
knob is an 8mm bolt with a plastic handle. Its purpose is
to bolt the pannier box to the actual rack; so if the lids of
the boxes are locked, the boxes will not be able to be
removed from the motorcycle. The intent is to prevent
theft as well as provide addition security to the box
mounting.
8. Mark the location for the hole used for the security knob:
Install the provided 8mm x 30mm marking bolt into the
threaded hole on the front top corner of the rack. Put the
pannier on the bike and put weight on the pannier to make
sure it is seated correctly in place. The head of the marking
bolt will hit your pannier box. Use a small mallet and tap on
the inside of the box where the marking bolt hits the box.
This will leave a mark in the box in the location you will drill.
9. Once the Box is marked in the exact location of the threaded
hole on the rack, remove the box and drill the hole for the
8mm knob bolt (3/8” drill bit). Remove the marking bolt from
the pannier rack.
10. Once drilled, mount the pannier box to the rack. Thread the
security knob through the box and into the threads on the
rack. Use the 8mm externally serrated washers on the knobs
to prevent them from vibrating loose.
Caution: Before each of your adventures, check the
pannier rack and boxes to ensure hardware is properly
tightened. Always make sure the boxes are securely
attached to the locking pins. It is highly advised that the
security knobs always be used for increased security and
safety. Enjoy your adventures!