Embed Size (px)
Citation preview

www.pnas.org/cgi/doi/10.1073/pnas.
Total RNA isolation from urine, serum, citrate-, EDTA- and heparin-plasma samples; Full protocol for barcoded cDNA library preparation for small RNA sequencing; Expression, purification, and quality control of RNA ligases; Klaas E. A. Max*, Karl Bertram, Kemal Marc Akat, Kimberly A. Bogardus, Anuoluwapo Sopeyin, Jenny Li, Michael S. Chang, Victoria Wang, Jonathan J. Liau, and Thomas Tuschl* Howard Hughes Medical Institute and Laboratory for RNA Molecular Biology, The Rockefeller University, 1230 York Ave, Box 186, New York, NY 10065. *corresponding author Document version: 5.3
Abstract and Preamble This document contains a collection of protocols optimized for the characterization of extracellular nucleic acids from cell-free biological fluids (biofluids) using sequencing, amplification or hybridization techniques, including but not limited to RNAseq, RT-PCR and microarray analyses. Chapter 1 covers exRNA and exDNA isolation methods from small-volume (approx. 450 microliters) low-input biofluid samples with low-exRNA content and high RNase activity, including but not limited to human urine, serum, citrate-, EDTA- and heparin-plasma. The protocol combines novel combinations of denaturants, reducing agents, proteolysis, revised organic extractions, and column-based RNA purification and allows consecutive isolation of exRNAs and extracellular DNA (exDNA) from the same biofluid sample. Depending on sample numbers and available equipment, three different processing modes are described, including high throughput processing using automated liquid handling equipment, which allows exRNA isolation from 96 biofluid samples in less than 4 hours. Chapter 2 covers multiplexed exRNA-derived cDNA library preparation methods for 5’phopshorylated, 3’OH RNAs (e.g., microRNAs and Y-RNAs) from biofluid samples. Based on methods published earlier (1, 2), this protocol utilizes RNA ligation, barcoded adapters, and reverse transcription typically followed by Illumina HiSeq sequencing. Compared to the earlier protocol versions, the level of multiplexing scale has been
1714397115

2
increased to 24 samples per sequencing lane, and the setup is now fully automatable using liquid handling equipment. To address RNA contaminations in commercial enzymes, protocols for the production and purification of RNA ligases I and II have been included as a separate chapter (Chapter 3). In the reagents subsection of each protocol, formulations of all buffers and solutions are listed, along with required consumables, chemicals and directions for formulation and storage of reagents. To avoid reduced efficiencies and unfavorable results, protocols and formulations should be closely followed and any deviation from the experimental procedures should be thoroughly tested. Furthermore, monitoring of exRNA/exDNA isolation and cDNA library preparation by addition of 32P-radiolabeled riboprobes to one or more control sample per processing batch is strongly encouraged for quality control assessment. This addition needs to comply with all requirements for radioisotope handling. 1. Bioinformatic analysis of barcoded cDNA libraries for small RNA profiling by next-
generation sequencing (2012) Bioinformatic analysis of barcoded cDNA libraries for small RNA profiling by next-generation sequencing. Methods 58(2):171–187.
2. Hafner M, et al. (2011) RNA-ligase-dependent biases in miRNA representation in deep-sequenced small RNA cDNA libraries. RNA 17(9):1697–1712.
Distribution of this work The entire protocol collection can be distributed according to creative commons 4.0 license CC BY-NC. For academic purposes, the use of this material should be acknowledged by citing as described in “Referencing of this work”. Anyone can share this material, provided it remains unaltered in any way, sharing is not done for commercial purposes, and the original authors and work are cited as described in “Referencing of this work”. Aspects of this work are encompassed in patent application US 15/540,528. For commercial inquiries, please visit https://www.rockefeller.edu/technology-transfer/. Referencing of this work: This document was generated is a supplement to:
Max, K. E. A., Bertram K., Akat K. M., Bogardus K. A., Li J., Morozov P., Ben-Dov I. Z., Li X., Weiss Z. R., Azizian A., Sopeyin A., Diacovo T. G., Adamidi C., Williams Z., Tuschl T. (2018) Human plasma and serum extracellular small RNA reference profiles for clinical applications. Proc. Natl. Acad. Sci. U S A, doc. number 2017-14397R, in press.

3
Table of Contents
1 TOTAL RNA ISOLATION FROM URINE, SERUM, CITRATE-, EDTA- AND HEPARIN-PLASMA SAMPLES 5
1.1 PROCEDURAL CONSIDERATIONS REGARDING NUMBER OF SAMPLES AND MANUAL, SEMI-AUTOMATED OR AUTOMATED PROCESSES 5
1.2 CHEMICALS 5 1.3 ENZYMES 6 1.4 OLIGONUCLEOTIDES 7 1.5 EQUIPMENT 8 1.6 REQUIRED EQUIPMENT, CONSUMABLES AND SOLUTIONS 9 1.6.1 RNA EXTRACTIONS FROM BIOFLUIDS 9 1.6.2 QUBIT ASSAY 10 1.6.3 QUANT-IT™ RIBOGREEN® RNA ASSAY 10 1.6.4 BUFFERS, REAGENTS AND ENZYME SOLUTIONS 10 1.6.5 BUFFERS FOR SAMPLE PROTEIN DEGRADATION 13 1.6.6 BUFFERS FOR PROTEIN AND DETERGENT REMOVAL BY ORGANIC EXTRACTION 15 1.6.7 BUFFERS FOR RNA PURIFICATION USING ZYMO-RESEARCH COLUMNS AND THE VACUUM
MANIFOLD OR THE ZYMO-SPIN TM 1-96 PLATE 16 1.6.8 BUFFERS FOR DNA RE-EXTRACTION FROM ORGANIC PHASE 17 1.6.9 PROTEINASE K SOLUTIONS AND QUALITY CONTROL ASSAY 18 1.6.10 GEL LOADING BUFFER 19 1.7 PROCEDURES 19 1.7.1 INTRODUCTION 19 1.7.2 ORGANIZATION OF SAMPLES AND WORKFLOW 20 1.7.3 MANUAL RNA EXTRACTION OF UP TO 24 SAMPLES 21 1.7.4 SEMI-AUTOMATED RNA EXTRACTION OF UP TO 96 SAMPLES 27 1.7.5 FULLY AUTOMATED RNA EXTRACTION OF UP TO 96 SAMPLES 34 1.7.6 ALTERNATIVE DENATURATION PROCEDURE 39 1.8 APPENDIX A: EFFECTIVE CONCENTRATIONS DURING PURIFICATION AND
PARAMETERS INFLUENCING PURIFICATION EFFICIENCY 40 1.9 APPENDIX B: PROTEINASE K QUALITY CONTROL ASSAY 41 1.9.1 INTRODUCTION 41 1.9.2 SETUP 42 1.9.3 QUALITY CONTROL ASSAY 42 1.9.4 EXEMPLARY RESULTS 43 1.10 APPENDIX C: RNA CONCENTRATION DETERMINATION 45 1.10.1 NANODROP (THERMOSCIENTIFIC) 45 1.10.2 RIBOGREEN ASSAY (INVITROGEN) 45
2 BARCODED CDNA LIBRARIES FOR MIRNA PROFILING BY NEXT-GENERATION SEQUENCING 48
2.1 MATERIALS 48 2.1.1 OLIGONUCLEOTIDES 48 2.1.2 ADAPTERS FOR ILLUMINA SEQUENCING 50 2.1.3 ENZYMES 51

4
2.1.4 BUFFERS AND SOLUTIONS 52 2.1.5 OTHER MATERIALS 55 2.2 PROCEDURES 55 2.2.1 SYNTHESIS OF ADENOSINE-5'-PHOSPHOIMIDAZOLIDE (IMPA) 55 2.2.2 ADENYLATION OF 3' ADAPTER OLIGODEOXYNUCLEOTIDES 58 2.2.3 PREPARATION OF CALIBRATOR OLIGORIBONUCLEOTIDE COCKTAIL 59 2.2.4 PREPARATION OF RADIOACTIVE LENGTH MARKERS 60 2.2.5 3'-ADAPTER LIGATION 61 2.2.6 5' ADAPTER LIGATION 65 2.2.7 REVERSE TRANSCRIPTION (RT) 66 2.2.8 PCR AMPLIFICATION 67 2.2.9 PMEI DIGESTION 69 2.3 APPENDIX 72 2.3.1 ORDERING OF CALIBRATOR OLIGONUCLEOTIDES 72 2.3.2 ORDERING AND QUALITY CONTROL OF 3’ ADAPTER OLIGONUCLEOTIDES 73
3 EXPRESSION, PURIFICATION, AND QUALITY CONTROL OF RNA LIGASE 1 AND RNA LIGASE 2 76
3.1 MATERIALS 76 3.1.1 SOLUTIONS REQUIRED FOR BACTERIAL PROTEIN PRODUCTION 76 3.1.2 BUFFERS FOR RNL1/RNL2 PURIFICATION 76 3.2 PROCEDURES 79 3.2.1 BACTERIAL CELL CULTURE FOR PROTEIN PRODUCTION 79 3.2.2 BACTERIAL CELL HARVESTING 80 3.2.3 BACTERIAL CELL LYSIS 80 3.2.4 CENTRIFUGATION AND CLARIFICATION OF THE BACTERIAL LYSATE 81 3.3 PROTEIN PURIFICATION 82 3.3.1 IMMOBILIZED METAL AFFINITY CHROMATOGRAPHY (IMAC) 82 3.3.2 HYDROPHOBIC INTERACTION CHROMATOGRAPHY (HIC) 84 3.3.3 ION EXCHANGE CHROMATOGRAPHY (IEC) 87 3.3.4 CHROMATOGRAPHY COLUMN REGENERATION 89 3.4 PROTEIN DIALYSIS 89 3.5 DETERMINING CONCENTRATION OF RNL1 IN ELUTION FRACTIONS 90 3.6 SCANNING SDS-PAGE AND QUANTIFICATION OF PROTEIN CONCENTRATION BY BSA
CURVE 92 3.7 QUALITY CONTROL OF RNA LIGASE 1 94 3.7.1 NUCLEIC ACID CONTAMINATION ASSAY 94 3.7.2 DNASE AND RNASE CONTAMINATION ASSAY 96 3.7.3 RNL1 LIGATION ASSAY 98 3.7.4 DETERMINING CONCENTRATION OF RNA LIGASE 2 IN ELUTION FRACTIONS 102 3.8 QUALITY CONTROL OF RNA LIGASE 2 103 3.8.1 NUCLEIC ACID CONTAMINATION ASSAY 103 3.8.2 DNASE AND RNASE CONTAMINATION ASSAY 106 3.8.3 RNA LIGASE 2 LIGATION ACTIVITY ASSAY 108

5
1 Total RNA isolation from urine, serum, citrate-, EDTA- and heparin-plasma samples
1.1 Procedural considerations regarding number of samples and manual, semi-automated or automated processes
This protocol allows the isolation of exRNA exDNA from 550 µl biofluid samples. The volumes and amounts of all solutions and consumables were chosen for parallel processing of 24 biofluid samples unless stated otherwise. We typically process 24 samples in a single multiplexed library preparation and sequencing reaction using 24 different barcoded 3’ DNA adapters. The RNA purification procedure consists of (1) an initial denaturation step with detergent at an elevated temperature, followed by (2) an enzymatic digestion of protein, (3) an organic extraction step to remove hydrophobic peptides and other hydrophobic substances, and (4) a column purification step. There are three protocols using different degrees of automation: A. Manual purification using either a vacuum manifold or centrifugation in order to pass solutions through columns. B. Semi-automated purification where the lysis step and the organic extraction step are carried out manually while the column purification is performed using an automated liquid handling system. C. Fully automated purification where all steps are performed using the fully equipped liquid epMotion 5075 liquid handling system (see section 1.4 for equipment). We provide formulations of buffers and solutions for 8, 24, and 96 extractions at a time. For manual RNA isolations we recommend any number of samples up to a total of 24 samples at a time. For semi-automated sample processing we recommend to perform denaturation, digestion, and organic extraction in batches of up to 24 samples, one batch at a time. After organic extraction, samples can be stored in binding buffer for an intermitted period of up to three hours until all batches (of up to 4) are denatured and extracted. Multiple batches are then subjected to automated column purification. For semi-automated or fully automated setups we recommend purifying multiples of 8 samples at a time, since microtiter plates and filter plates of manifolds are typically organized in a 12 x 8 well format. Using a total of 96 samples (4 x 24 samples) takes full advantage of this form factor.
1.2 Chemicals
- 2-Propanol (also named: isopropanol, Fisher Sci, Cat# 314, Mr 60.1 g/mol) - Acetic acid, glacial (Fisher Sci, Cat# A38-212, Mr 60.05 g/mol)

6
- 2-Mercapthoethanol (also named: β-mercaptoethanol, Sigma, Cat# M3148, Mr 78.13 g/mol)
- Brilliant Blue R, powder (Sigma, Cat# B0149, Mr 825.99 g/mol) - Bromophenol blue, technical grade (Sigma, Cat# B6131, Mr 691.94 g/mol) - Calcium dichloride dihydrate (CaCl2·2H2O, Applichem, Cat# A1873, Mr 147.02
g/mol) - Citric acid monohydrate, crystalline (Fisher Sci, Cat# A1112-12, Mr 210.14
g/mol) - Disodium ethylenediaminetetraacetic acid dihydrate (Na2EDTA · 2H2O, Sigma,
Cat# E6635, Mr 372.24 g/mol) - Glycerol (Fisher Sci, Cat# G31-1, Mr 92.09 g/mol) - Guanidium thiocyanate (GITC, Sigma, Cat# 50981, Mr 118.16 g/mol) - Magnesium dichloride hexahydrate (MgCl2 · 6H2O, Applichem, Cat# A1036,
Mr 203.3 g/mol) - Mini-PROTEAN TGX 4-20% SDS PAGE gel, 15-well, 15 µl (Bio-Rad, Cat#
456-1096) - Phenol solution, saturated with 0.1 M citrate buffer, pH 4.3 ± 0.2 (Sigma,
Cat# P4682, Mr 94.11 g/mol) or phenol, water saturated, stabilized, pH 4.0 (Applichem, Cat# A1624, Mr 94.11 g/mol)
- Phenylmethylsulfonyl fluoride (PMSF, Sigma, Cat# P7626, Mr 174.19 g/mol) - Sarcosyl (Fisher Sci, Cat# BP234, Mr 293.38 g/mol) - Sodium chloride (NaCl, Fisher Sci, Cat# S271500, Mr 58.44 g/mol) - Sodium dodecyl sulfate (SDS, Fisher Sci, Cat# BP166-500, Mr 288.38 g/mol) - Sodium hydroxide, pellets (NaOH, Fisher Sci, Cat# S318-1, Mr 40.00 g/mol) - Tri(2-carboxyethyl)phosphine hydro-chloride, 10 g (TCEP · HCl, Hampton
Research, Cat# HR2-801, Mr 286.65 g/mol) - Tris base (Fisher Sci, Cat# BP152, Stock# 336,000, Mr 121.14 g/mol) - Tris-HCl (Sigma, Cat# T3253, Mr 157.60 g/mol) - Tris/glycine buffer (10x) (Bio-rad, Cat# 161-0734)
1.3 Enzymes
- Proteinase K (recombinant, Storeroom, 100 mg, from Roche Ref # 03 115 879 001, Cat# 301104)

7
1.4 Oligonucleotides
Calibrator pool 1 consists of 10 equimolar concentrated 5’ phosphorylated 3’ hydroxyl 22-nt RNA oligonucleotides, which were ordered from Dharmacon at a 0.05 µmol scale. They have no match to the human or mouse genome.
Calibrator (synthesis no.) Sequence Extinction coefficient
(L·mol-1·cm-1)
01 (cali_01_rc) pUCCACGACGUCUCAUGUAUUUC 191700
02 (cali_04_rc) pGGGUACCAUACCGGUUGUCUUA 201900 03 (cali_17_rc) pUCAUGAGUCCGUACCUUGAUUG 201900
04 (cali_18_rc) pAUCAUUUACGAUUCGGAGCUGU 203100
05 (cali_20_rc) pGAUAGUUCGGGAUCGCUGUAAC 208400
06 (cali_24_rc) pUGCUACUCCGAUCUUUAGCCUC 182900
07 (cali_25_rc) pAGGGCCCUUUAGGCACUAAUAG 209500 08 (cali_27_rc) pGUAGCUGUCAGUACGUUCGUGC 198000
09 (cali_43_rc) pUCUAGUUGCGUGAUGGAGAGAA 218000
10 (cali_44_rc) pAGCCGCAUUUCGUAGUGAUAUU 204300
p: 5’ phosphate
- Measure the concentrations of each calibrator using a spectrophotometer. - The preparation of diluted solutions of the calibrator pools requires the use of a
carrier oligonucleotide to prevent surface adsorption during preparation of the dilution series in the nanomolar concentration range. We use an 11-nt oligodeoxynucleotide, 5’-TCGAAGTATTC, at a final concentration of 500 nM.
- Prepare 50 µl of a concentrated “each stock” containing 1 µM of “each calibrator” RNA, which does not require addition of carrier DNA.
- Dilute the 1 µM calibrator “each stock” 1:10 into 500 nM TCGAAGTATTC resulting in a concentration of 0.1 µM each calibrator (10 µl calibrator stock plus 90 µl 500 nM 11-nt carrier DNA).
- Further dilute the 0.1 µM calibrator pool 1:10 in 500 nM TCGAAGTATTC resulting in a calibrator concentration of 10 nM each calibrator (50 µl calibrator dilution plus 450 µl 500 nM 11-nt carrier DNA).
- Further dilute the 10 nM calibrator pool 1:10 in 500 nM TCGAAGTATTC resulting in a calibrator concentration of 1 nM each (50 µl calibrator dilution plus 450 µl 500 nM 11-nt carrier DNA).

8
- Further dilute the 1 nM calibrator pool 1:10 in 500 nM TCGAAGTATTC resulting in a calibrator concentration of 100 pM each (50 µl calibrator dilution plus 450 µl 500 nM 11-nt carrier DNA).
- Further dilute the 100 pM calibrator pool 1:10 in 500 nM TCGAAGTATTC resulting in a calibrator concentration of 10 pM each (50 µl calibrator dilution plus 450 µl 500 nM 11-nt carrier DNA). This dilution will be used for plasma and serum samples.
- Dilute the 10 pM calibrator pool one last time 1:10 to reach a calibrator concentration of 1 pM each (50 µl calibrator solution plus 450 µl 500 nM 11-nt carrier DNA). This dilution will be used for urine samples.
Example for using calibrator pool 1: The suggested final amount of calibrator per sample is 0.2 attomole each oligoribonucleotide for urine and 2 attomol each oligoribonucleotide for serum or plasma per 450 µl of input biofluid. For urine add 2.8 µl 1 pM each oligoribonucleotide of “Calibrator pool 1” to 1.467 ml of Buffer P (with 2-mercaptoethanol and methylene blue added) to obtain 14 aliquots of 105 µl of denaturing buffer with 0.2 attomol of each RNA per aliquot:
2.8 µl x 1 pM of each “calibrator pool 1” RNA / 14 aliquots
= 2.8 x 10-6 l x 10-12 M of each “calibrator pool 1” RNA / 14 aliquots = 2.8 x 10⁻¹⁸ mol of each “calibrator pool 1” RNA / 14 aliquots = 2.8 attomol of each “calibrator pool 1” RNA / 14 aliquots = 0.2 attomol of each “calibrator pool 1” RNA / aliquot.
1.5 Equipment
- Qubit 2.0 Fluorometer (Invitrogen) - A set of pipettes (20 µl, 200 µl, 1000 µl), (e.g. Gilson) - Repeater pipette (e.g. eppendorf M4) - Spectrofluorometer or fluorescence microplate reader
A. For manual processing/semi-automated processing - Vacuum manifold 24x, (e.g. QIAGEN, QIAval 24 Plus Vacuum Manifold,
Cat# 19413) - Table top centrifuge (e.g. SORVALL Legend Micro 21R centrifuge), set to 4°C - Table top centrifuge (e.g. SORVALL Biofuge pico) or eppendorf centrifuge, at
room temperature - eppendorf thermomixer set to 10°C - eppendorf thermomixer set to 60°C
9
B. For semi-automated and automated processing - epMotion 5075 or similar liquid handling system with vacuum manifold option,
for fully automated processing also equipped with one thermoplate heater/cooler and the thermomixer option
- Single-channel dispensing tool TS 50 (Cat# 960001010) - Single-channel dispensing tool TS 300 (Cat# 960001028) - Single-channel dispensing tool TS 1000 (Cat# 960001036) - Eight-channel-dispensing tool TM 50-8 (Cat# 960001044) - Eight-channel-dispensing tool TM 300-8 (Cat# 960001052) - Eight-channel-dispensing tool TM 1000-8 (Cat# 960001061) - Gripper (Cat# 960002270) - Gripper holder (Cat# 960002211) - Thermoblock for PCR 96 wells (Cat# 960002083) - Thermorack for 24 Safe Lock tubes (Cat# 960002067) - Deep well plate 96/2000 µl (Cat# 951033561) - Eppendorf heat sealer (5390 000.024, from Sigma Aldrich) - Eppendorf heat sealing foil (Cat# 0030127.845, from Sigma Aldrich) - Centrifuge with holder for 96-well plates (e.g. SORVALL Legend RT), set to 4°C
1.6 Required consumables and solutions
1.6.1 RNA extractions from biofluids Items listed for processing of 24 samples. For manual, semi-automated or automated processing of 48, 72 or 96 samples, multiply by two, three or four, respectively. When performing semi-automated or automated purification only one Zymo-spin TM I 96 filter plate is needed for up to 96 samples. A. For manual processing
- Filter pipet tips (10 µl, 200 µl, 1000 µl) - 48 x 2 ml eppendorf Lo-Bind tubes (VWR, DNA LoBind Tube 2.0 ml, PCR clean,
CS/250 (5x PK/50); 22431048, Cat# 470202-584) - 24 x 1.5 ml siliconized tubes (VWR, G-Tube® Snap Cap Siliconized
Microcentrifuge Tubes, Cat# 22179-004) - 24 x Zymo-Research Zymo-Spin™ I columns (Zymo-Research, Zymo-Spin™ I
columns, 50, Cat# C1003-50),

10
B. For semi-automated and automated processing - 1x Zymo-Research Zymo-Spin TM I-96 filter plate, Cat# C2004 - 26 x 2 ml microcentrifuge tube - 380 µl RNase free water - 1 ml deep well plate 96 well, green border (Eppendorf, Cat# 0030 502.230, Cat#
951032760 - 2 ml deep well plate 96 well, green border (Eppendorf, Cat# 0030 502.337, Cat#
951033561) - 250 µl twin.tec 96 well, semi-skirted, colorless pcr plate (Eppendorf, Cat# 0030
128.575, Cat# 951020303) - epMotion® PCR clean reservoir 100 ml (Eppendorf, Cat# 960051017)
C. Optional. For automated initial sample addition using width adjustable multichannel pipette
- Rainin EA8 1200XLS multichannel and adjustable spacer electronic pipette (Cat# 17012331)
- Rainin LTS 1 ml Filter RT-L1000FLR Low Retention Tips (Cat# 17007954)
1.6.2 Qubit assay - Qubit RNA HS assay kit (Invitrogen, Cat# Q32852), including Qubit RNA HS
assay dilution buffer and Qubit RNA HS assay dye
- 2’-OMe-let-7a oligoribonucleotide standard (A260 = 0.5) - 1.5 ml siliconized tubes - 0.5 ml Qubit assay tubes (500 tubes, Invitrogen, Cat# Q32856) or Axygen PCR-
05-C tubes (VWR, part number 10011-830).
1.6.3 Quant-iT™ RiboGreen® RNA assay - Quant-iT™ RiboGreen® RNA Assay Kit (Life Technologies, Cat# R11490)
- Quant-iT™ RiboGreen® RNA Reagent - 20X TE Buffer, RNase-free - Ribosomal RNA standard, 16S and 23S rRNA from E. coli (100 µg/ml)
- Costar™96-well clear-bottom plates (Fisher Scientific, Cat# 07-200-565)
1.6.4 Buffers, reagents and enzyme solutions All buffers should be prepared in advance and stored under the recommended conditions to minimize degradation and microbial growth. All buffers are made using MilliQ deionized and sterile filtered water, from now on referred to as ‘water’. The following

11
stock solutions will be required to prepare working solutions used during the isolation procedure.
1.6.4.1 1 M Tris-HCl, 1000 ml
In a 1000 ml glass bottle equipped with a magnetic stir bar, weigh out 157.6 g of Tris-HCl (Mr 157.60 g/mol). Add approx. 800 ml water and dissolve powder. Transfer solution to 1000 ml graduated cylinder, fill up to 1000 ml with water and return solution to 1000 ml bottle. Store at room temperature.
1.6.4.2 1 M Tris base, 1000 ml
In a 1000 ml glass bottle equipped with a magnetic stir bar, weigh out 121.1 g of Tris base (Mr 121.14 g/mol). Add approx. 800 ml water and dissolve powder. Transfer solution to 1000 ml graduated cylinder, fill up to 1000 ml with water and return solution to 1000 ml bottle. Store at room temperature.
1.6.4.3 1 M Buffer Tris-HCl (pH 6.8), 50 ml
Combine 47.4 ml of 1 M Tris-HCl and 2.6 ml of 1 M Tris base in a 50 ml FALCON tube.
Volume (Tris base) = (10^(pH-pKa)/(1+10^(pH-pKa))) × 1000 ml; pKa = 8.06 at 25 ºC. Dispense into aliquots. Store at room temperature.
1.6.4.4 1 M Buffer Tris-HCl (pH 7.5), 50 ml
Combine 39.2 ml of 1 M Tris-HCl and 10.8 ml of 1 M Tris base in a 1000 ml glass bottle.
Volume (Tris base) = (10^(pH-pKa)/(1+10^(pH-pKa))) × 1000 ml; pKa = 8.06 at 25 ºC. Dispense into aliquots. Store at room temperature.
1.6.4.5 1 M Buffer Tris-HCl (pH 8.0), 50 ml
Combine 26.7 ml of 1 M Tris-HCl and 23.3 ml of 1 M Tris base in a 1000 ml glass bottle.
Volume (Tris base) = (10^(pH-pKa)/(1+10^(pH-pKa))) × 1000 ml; pKa = 8.06 at 25 ºC. Dispense into aliquots. Store at room temperature.
12
1.6.4.6 0.5 M EDTA (pH 8.0), 1000 ml
In a 1 l graduated cylinder, add 186.1 g of Na2EDTA·2H2O (Mr 372.24 g/mol) to 800 ml water. Stir vigorously on a magnetic stirrer. Adjust pH to 8.0 with NaOH pellets (~20 g). Add pellets slowly and wait for pH to stabilize. Expect EDTA to dissolve fully before pH can reach 8.0. Adjust volume to 1 liter. Store at room temperature. Note: The disodium salt of EDTA will not go into solution until the pH of the solution is adjusted to pH 8.0 by adding NaOH.
1.6.4.7 4 M NaOH, 50 ml
Place an appropriately sized tube holder on a scale and tare with a 50 ml FALCON tube. Add 8.00 g NaOH pellets (Mr 40.00 g/mol) to this tube. Add water to reach a final weight of 56.3 g. Close lid and vortex until a clear solution has formed. Store at room temperature.
1.6.4.8 4 M Citric acid, 50 ml
Place an appropriately sized tube holder on a scale and tare with a 50 ml FALCON tube. Add 42.03 g citric acid monohydrate (Mr 210.14 g/mol) to this tube. Add water to reach a final weight of 64.1 g. Close lid and vortex until a clear solution has formed. Store at room temperature.
1.6.4.9 1 M MgCl2, 50 ml
Place an appropriately sized tube holder on a scale and tare with a 50 ml FALCON tube. Add 10.17 g of MgCl2·6H2O (Mr 203.30 g/mol) to this tube. Add water to reach a final weight of 53.1 g. Close lid and vortex until a clear solution has formed. Store at room temperature.
1.6.4.10 1 M CaCl2, 50 ml
Place an appropriately sized tube holder on a scale and tare with a 50 ml FALCON tube. Add 10.95 g of CaCl2 · 6H2O (Mr 219.08 g/mol) to this tube. Make sure to return the CaCl2·6H2O powder to its recommended storage temperature of 4°C immediately after use. Add water to reach a final weight of 53.7 g. Close lid and vortex until a clear solution has formed. Store at room temperature.

13
1.6.4.11 5 M NaCl, 50 ml
Dissolve 14.61 g NaCl (Mr 58.44 g/mol) in 45 ml water in a 50 ml FALCON tube. Adjust the volume to 50 ml with water and vortex. Store at room temperature.
1.6.4.12 0.5 M TCEP, 5 ml
Dissolve 0.72 g TCEP·HCl in 4 ml water in a 15 ml FALCON tube. Adjust the volume to 5 ml with water and vortex. Wrap the labeled tube with aluminum foil in order to protect the solution from light. TCEP is light sensitive. Store at 4 °C for up to one week.
1.6.4.13 0.63 M SDS solution (20%), 10 ml
Dissolve 2.00 g SDS (Mr 288.37 g/mol) in 8 ml water in a 15 ml FALCON tube. To dissolve the SDS, remove the cap of the 15 ml FALCON and place upright (using a FALCON tube stand) inside the microwave (Fig. 1). Heat with 4 x 5 s pulses at 1250 W. The temperature of the solution must not rise above lukewarm; close tube, check and invert after every pulses. Since the volume will decrease as the powdered SDS dissolves, readjust volume to exactly 10 ml with water. Heat the solution again with 1-3 x 5 s pulses at 1250 W inside the microwave using the above procedure and precautions. Do not vortex as the solution will easily foam. Store at room temperature.
1.6.4.14 Coomassie brilliant blue protein gel staining solution, 1000 ml
In a 1 L flask, weigh 500 mg of brilliant blue powder. Then, add 400 ml ethanol, 100 ml acetic acid and fill up to 1 L with water. Close lid and mix by inverting the bottle. Store at room temperature.
1.6.4.15 Coomassie gel de-staining solution, 1000 ml
In a 1 L flask, add 200 ml methanol to 100 ml acetic acid and fill up to 1 L with water. Close lid and mix by inverting the bottle. Store at room temperature.
1.6.5 Buffers for sample protein degradation
1.6.5.1 Buffer P (Proteolysis), 50 ml
Never vortex this buffer as it will foam! Only gently invert tubes. For 380 samples. Buffer can be stored at room temperature.

14
In a 50 ml FALCON tube combine:
Reagent or solution Amount Buffer concentration Sodium dodecyl sulfate (SDS) 15 g 30% (w/v) 1 M Buffer Tris-HCl (pH 7.5) 3.3 ml 66 mM
0.5 M EDTA (pH 8.0) 1.98 ml 19.8 mM
Add Buffer Tris-HCl, EDTA solution and 15 ml water in a 50 ml FALCON tube. Weigh out finely powdered SDS powder and add to the previously added solutions. Adjust volume to roughly 50 ml with water. Mix by gently inverting the tube multiple times. Adjust volume again to approximately 50 ml with water. Close the tube tightly and invert for 6 hours at room temperature until a clear solution has formed. Adjust volume again to exactly 50 ml with water and invert multiple times to prepare a homogenous solution. Be prepared to add 2-mercapthoethanol to a Buffer P aliquot just before use. Store at room temperature. Do not autoclave. Refrigeration will cause SDS to precipitate. DO NOT refrigerate. If precipitate forms at room temperature, use 1-3 x 10 s pulses at 1250 W in the microwave (Fig. 1) and invert repeatedly until all precipitates are dissolved. When formulating buffer P from the ingredients: - MAKE SURE the SDS you use is indeed finely powdered. If necessary, filter the SDS trough a sieve or mesh to remove any lumps before adding it to the solution. SDS lumps in solution will likely prevail even after 24h of mixing and significantly delay the formulation of this buffer, - DO NOT put the powder on the bottom of a dry tube and add liquid on top of it. This will only promote lump formation and delay the formulation of this buffer, DO NOT try to speed up the process by heating the partially dissolved solution using a microwave or water bath. Melting of SDS granulate will promote formation of insoluble lumps and delay the formulation of this buffer.

15
Fig. 1 50 ml FALCON tube in microwave, using a tube stand. Unscrew lid and loosely place on top of the tube before starting the microwave. Do not walk away during the procedure.
1.6.6 Buffers for protein and detergent removal by organic extraction
1.6.6.1 Buffer ED2, 24.5 ml
Buffer ED2 replaces the previously used Buffer ED. This buffer is less acidic and approaches pH 4.5. For 8, 24 and 48 extractions prepare given amount in a 50 ml FALCON tube. For 96 samples prepare 2x the amount for 48 extractions in two separate 50 ml FALCON tubes. Use filter pipet tips to avoid contamination. Be prepared to add 2-mercapthoethanol to Buffer ED2 just before usage (see section 3.1.2, step 9). In a 50 ml FALCON tube combine: Reagent or solution 8 extr. 24 extr. 2x 48 extr.
= 96 extr. Buffer conc.
4 M Citric acid 74 µl 222 µl 2x 444 µl 37.4 mM
4 M Sodium hydroxide solution (NaOH)
92 µl 275 µl 2x 550 µl
Sarcosyl 33 mg 100 mg 2x 200 mg 0.4% (w/v)
Guanidium thiocyanate (GITC) 1.5 g 4.51 g 2x 9.02 g 1.6 M
Phenol solution, saturated with 0.1 M citrate buffer (pH 4.3)
6.4 ml 19.1 ml 2x 38.2 ml 80% (v/v)
Add citric acid and NaOH solutions to a 50 ml FALCON tube, and then add GITC and sarcosyl powder. Dissolve all components by adding 19.1 ml buffer equilibrated phenol,

16
close tube and mix by inverting until a clear, colorless liquid is formed. Do not adjust pH or volume, the expected final volume is about 47.5 ml. Short-term storage at 4ºC, long-term storage at -20ºC. Remark: Although in earlier versions of this protocol buffer ED contained 0.15 M NaCl, in the present versions, NaCl is added either before the lysis step or during the addition of the protease since protease activity appears to be higher in the presence of 0.2-0.35 M NaCl.
1.6.7 Buffers for RNA purification using Zymo-Research columns and the vacuum manifold or the Zymo-Spin TM 1-96 plate
VB2G replaces previously used Buffers VB1, VB2 and VB3. This buffer minimizes precipitation of peptides and clogging of columns, which was observed when aqueous supernatants from organic extractions were applied using older version of the buffer. VB2G appears to work well for all sample types thereby eliminating the need to specifically adjust divalent cation concentrations.
1.6.7.1 Buffer VB2G (Vacuum-manifold Binding) – for serum, plasma (EDTA and citrate) and urine
For 8 and 24, and 32 extractions prepare given amount in a 50-ml FALCON tube. For 96 samples prepare 3x the amount for 32 extractions in three separate 50-ml FALCON tubes (8 extr. = 15 ml, otherwise 50 ml).
Reagent or solution 8 extr. 24 extr. 3x 32 extr. = 96 extr.
Buffer conc.
Isopropanol (100%) 12.2 ml 36.8 ml 3x 49.1 ml 98.2% (v/v)
1 M MgCl2 84.5 µl 271.5 µl 3x 362 µl 7.2 mM 1 M CaCl2 28.2 µl 84.5 µl 3x 121 µl 2.4 mM
GITC 1.5 g 4.4 g 5.9 g 1 M
Add before use: 0.5 M TCEP 123 µl 367 µl 500 µl 5.0 mM
Do not adjust volume. Combine isopropanol, MgCl2 and CaCl2 solutions and GITC. Mix well and store solution at room temperature. Before use, add 1% 0.5 M TCEP. Upon storage, precipitate may form. Shake well before use. It has not been tested how long TCEP will remain stable; according to the literature it should be stable for at least a week.
1.6.7.2 Buffer EWL wash buffer for silica columns during RNA or DNA purification

17
EWL aqueous concentrate, 50 ml:
Reagent or solution
5 M NaCl 600 µl 1 M MgCl2 450 µl
1 M CaCl2 150 µl
Triton X-100 750 µl
GITC 7.08 g
Dissolve GITC in 20 ml of Water, add NaCl, MgCl2, CaCl2 solution, add Triton X-100. Fill up to a final volume 50 ml with water. EWL Stock solution:
Reagent or solution 8 extr.
24 extr.
96 extr. = 2x 50 ex
Buffer conc.
EWL aqueous concentrate 5 ml 15 ml 4x 15 ml 1x
Isopropanol 11.7 ml 35 ml 4x 35 ml
Add before use: 0.5 M TCEP 150 µl 0.5 ml 4x 0.5 ml 5 mM
Do not adjust volume. Combine EWL aqueous concentrate and isopropanol. Mix well and store solution at room temperature. Before use, add TCEP. Shake well before use. It has not been tested how long TCEP will remain stable; according to the literature it should be stable for at least a week.
1.6.8 Buffers for DNA re-extraction from organic phase
1.6.8.1 Buffers EA3, 24.5 ml
For 8, 24 and 48 extractions prepare given amount in a 50-ml FALCON tube. For 96 samples prepare 2x the amount for 48 extractions in two separate 50-ml FALCON tubes. Use filter pipet tips to avoid contamination. In a 50 ml FALCON tube, combine: Reagent or solution 8 extr. 24 extr. 96 extr. Buffer
concentration
4 M Citric acid 74 µl 222 µl 2x444 µl 35.5 mM sodium citrate 4 M Sodium hydroxide (NaOH) 110 µl 330 µl 2x660 µl
Guanidium thiocyanate (GITC) 3.55 g 10.64 g 2x21.27g 4.00 M
H2O 7.5 ml 22.5 ml 45 ml

18
Add citric acid and NaOH solutions first, then add GITC. Dissolve all components by adding H2O, close tube and mix by inverting until a clear, colorless liquid is formed. Do not adjust pH or volume. The final volume is approximately 50 ml. For short-term storage keep a convenient volume of a working stock at 4 ºC.
1.6.9 Proteinase K solutions and quality control assay
1.6.9.1 PK (Proteinase K) stock solution (20 mg/ml), 1 ml
Use filter pipet tips to avoid contamination. First, prepare proteinase K storage buffer, which is then used to dissolve the crystalline enzyme. In a 50 ml FALCON tube, combine:
Reagent or solution Amount (ml) Buffer concentration Glycerol (100%) 25 50% (v/v)
1 M CaCl2 1.5 30 mM
1 M Buffer Tris-HCl (pH 8.0) 2.5 50 mM
Start by adding 25 ml 100% glycerol (reading from the graded 50 ml tube), and then add water to 40 ml followed by all other stock solutions. Mix gently and thoroughly by inverting the tube many times. Adjust volume to 50 ml. Mix again and readjust volume if necessary. Prepare 1 ml aliquots in 1.5 ml eppendorf tubes, and store at -20 ºC. To prepare PK stock solution, pre-chill the above proteinase K storage buffer on ice. Weigh 20 mg of proteinase K (Roche Diagnostics, recombinant) in one 1.5 ml eppendorf tube, then add 1 ml pre-chilled proteinase K storage buffer and immediately transfer to a thermal pack pre-cooled to -20 °C. Prepare 80 µl aliquots in pre-chilled 1.5 ml tubes (enough for 24 extractions) and store at -20 ºC Important note: We observed that PK stock solution loses activity within 1 min should it ever reach room temperature. Always prepare and keep PK stock solution in a thermal pack or other suitable container pre-chilled to -20 ºC.
1.6.9.2 Buffer PKQC (Proteinase K Quality Control), 10 ml
In a 15 ml FALCON tube, combine:
Reagent or solution Amount (ml) Buffer concentration 1 M Buffer Tris-HCl (pH 7.5) 1 100 mM
0.5 M EDTA (pH 8.0) 0.25 12.5 mM
5 M NaCl 0.3 150 mM SDS solution (20%) 0.5 1% (v/v)
Add all solutions and adjust volume to 10 ml with water. Mix by inverting the tube.

19
Store at room temperature.
1.6.9.3 1 M Phenylmethylsulfonyl fluoride (PMSF) solution, 1 ml
Dissolve 0.17 g of PMSF powder in 1 ml of 100% DMSO by vortexing. Store at -20 °C.
1.6.9.4 Stop mix solution, 10 x 10 µl
SDS gel loading buffer with PMSF. In a 1.5 ml eppendorf tube, add 8 µl of 1 M PMSF solution to 100 µl of 4x SDS loading buffer. Mix well by vortexing. Store at room temperature.
1.6.10 Gel loading buffer
1.6.10.1 SDS gel loading buffer (4x), 20 ml
In a 50 ml FALCON tube, combine:
Reagent or solution Amount Buffer concentration 1 M Buffer Tris-HCl (pH 6.8) 4 ml 200 mM SDS powder 1.6 g 8%
Glycerol (100%) 8 ml 40%
Bromophenol blue 8 mg 0.4 mg/ml
2-mercaptoethanol 4 ml 2.6 M
Start by adding 8 ml 100% glycerol, then add water to 11 ml followed by all other stock solutions. Mix gently and thoroughly by inverting the tube many times. Adjust volume to 20 ml. Mix again and readjust volume if necessary. Store at room temperature.
1.7 Procedures
1.7.1 Introduction The following RNA extraction protocol was developed to isolate RNA from human urine, serum or citrate-, heparin- and EDTA-plasma samples. The presence of endogenous ribonucleases in these body fluids requires protective steps to recover intact RNA from otherwise protein-bound and thereby protected extracellular RNA. Be aware that biofluids are rich in RNases and DNases and that any spills or contamination of pipettes, centrifuges or tube holder carry the risk of contaminating and degrading recovered RNA or DNA otherwise free of nucleases.

20
Using a vacuum manifold, the column-based RNA isolation procedure is at least 2-times faster compared to the usual centrifuge spin protocols. For sample processing, the specimen is initially mixed with Buffer P (Proteolysis) and heated in order to denature ribonucleoprotein complexes, vesicle-enclosed RNA and RNases. Subsequent proteinase K digestion at 60 °C efficiently degrades protein including RNases, eliminating any possibility for RNA degradation due to renaturation of RNases. A subsequent organic extraction, using custom-made buffers containing guanidinium isothiocyanate (GITC) and phenol/chloroform, allows the transfer of the majority of DNA and hydrophobic peptide fragments into the organic phase while retaining RNA within the aqueous phase. The solubility of the RNA is subsequently lowered by the addition of isopropanol and divalent cations to the aqueous phase. This solution is applied to a Zymo-Spin™ I column and handled on the vacuum manifold. Several wash steps ensure the removal of residual DNA, peptides and salts while RNA of 19-nt or longer is retained on the column matrix. The bound RNA is eluted from the columns in volumes as small as 15 µl, thereby yielding a maximum final RNA concentration for subsequent procedures.
1.7.2 Organization of samples and workflow The following recommendations (especially points 1-3) are intended for the organization of large sample collections into batches of 24 samples, which are subsequently used for small RNA-based multiplexed cDNA library preparation and high-throughput sequencing. They may however also be relevant for other types of RNA characterization. 1. Avoid combining different biofluid type samples (serum/plasma with urine) into one
batch of 24 samples. 2. Include “standardized” samples, which are present at least once in each batch in order
to assess the level of reproducibility between batches. 3. If necessary, randomize your samples to avoid introducing biases in ligation,
amplification or sequencing caused by adapters or sample categories (healthy or diseased), e.g. avoid assigning samples from one category to the same slot of 24 across different batches, therefore barcoding them with the same 3’ adapter.
4. Avoid having sample categories coincide with individual batches, e.g. avoid having one sample category (healthy) that is only present in one batch and another (diseased) that is present only in the other batch.
5. Make sure that all samples contain enough input material (we recommend at least 450 µl, although we prefer 500 µl).
6. Organize the samples you want to use for extraction, make sample lists and print stickers to label the sample tubes.
7. Assess the amount of reagents needed for your purification scale. Make sure you have all the solutions and additives that are required. An overview is given in Table 1.

21
Table 1: Overview of reagent solutions needed for RNA isolation of 8, 24 or 96 samples.
1.7.3 Manual RNA extraction of up to 24 samples DO NOT cool, heat or centrifuge samples unless instructed by the protocol. If not specified, carry out steps at room temperature. Use thermomixers for both heating and mixing. The term ‘tube holder’ refers to a piece of equipment of the eppendorf thermomixer and thermomixer R series that allows the transfer of 24 tubes at a time between two mixers. Use filter pipet tips at all times to minimize contamination of pipette shafts with ribonucleases from the sample. Clean your workplace and all technical equipment with 70% ethanol and RNaseZAPTM prior to starting to reduce possible contamination by particles carrying RNases. Change gloves frequently or wash gloved hands and dry them using a paper towel, especially after handling nuclease active sample material. Keep centrifuges and pipets clean. Mix working solutions by vortexing unless otherwise instructed when adding additives such as methylene blue, 2-mercaptoethanol, and TCEP. Before choosing the sample denaturation option in this protocol (see 1.7.3.2 step 5), please also consider looking into the alternative sample denaturation protocol (section 1.7.6), which combines sample aspiration, which combines sample aspiration, addition of Proteinase K working solution, and mixing with buffer P into a single work step using a programmable multichannel (Rainin) pipette. We routinely use this approach in automated sample processing. When using the repeater pipette be careful not to aspirate air bubbles. Also test the dispense function at least once before applying aspirated solutions to samples since every first dispense tends to not contain the entire adjusted volume.
15.0 50.0 10.0 30.0 100.0
118.8 396.0
100% ethanol 9.8 24.4 98.0 19.6 48.8 196.0
16.5 10.5
VB2G + TCEP 12.1 36.0 133.2 24.2 72.0 266.4
3.1
Buffer ED2 working solution
5.2 15.6 52.2 5.2 15.6 52.2
- - -
19.8 59.4 198.0
5.0
1.0 3.0 11.3
0.3 0.9 3.1
1.0
0.3
5.5
39.6
Number of Samples (Multiples of 8)
96248
RNA isolation only RNA and DNA isolation combined
96
11.3
8 24
3.0
0.9
Reagent (ml)
Proteinase K working solution
Buffer P working solution
EA3
EW + TCEP
80% ethanol

22
Once started, the procedure should be carried out continuously. Try to avoid pauses during the preparation procedure. Do not process more than 24 samples at a time. Duration: Initial preparation: 30 min. Extraction: 30 min per batch of 24 samples. Column purification: 60 min per batch of 24. Optional DNA purification and column purification: 90 min per batch of 24.
1.7.3.1 Preparation of reagents and consumables (manual processing)
1. Organize your samples (see section 1.7.2) but keep them frozen at this time. 2. Preheat one heatblock to 60 °C and a second heatblock to 10 °C. Make sure these
temperatures are reached. 3. Label a first set of 8x or 24x 2 ml eppendorf Lo-Bind tubes, e.g. 1.1-1.24 (set 1). 4. Label a second set of 8x or 24x 2 ml eppendorf Lo-Bind tubes, e.g. 2.1-2.24 (set 2).
Optional: If DNA isolation is intended label a third set of 8x or 24x 2 ml eppendorf Lo-Bind tubes, e.g. 3.1-3.24 (set 3).
5. Prepare Buffer P working solution: For 8 samples, aliquot 1 ml of Buffer P with 5 µl methylene blue stock into one 2 ml tube and add 19 µl β-mercaptoethanol and 1.9 µl “calibrator pool 1”, either c = 1 pM each oligonucleotide (urine) or c = 10 pM each oligonucleotide (serum or plasma). For 24 samples, aliquot two aliquots of 1.47 ml of Buffer P with 7.4 µl methylene blue stock into two separate 2 ml tubes and to each aliquot add 28.0 µl β-mercaptoethanol and 2.8 µl “calibrator pool 1”, c = 1 pM each oligonucleotide (urine) or c = 10 pM each oligonucleotide (serum or plasma). Make sure that Buffer P working solution is properly mixed by tumbling or vortexing and is free of bubbles. Buffer P solution may get discolored if kept too long and the level of reducing agent may have dropped due to oxidation. We generally dispose “faded” buffer P solutions. Centrifuge buffer P at room temperature.
6. Aliquot 8x or 24x 105 µl of Buffer P working solution (prepared in step 5) into set 1 tubes.
7. Aliquot 8x, or 24x, or 96x 1200 µl (twice 600 µl) of Buffer VB2G with TCEP added (1.6.7.1) into each tube set. Optional: if DNA re-extraction from the organic phase is intended, prepare & fill third set of tubes (set 3) accordingly.
8. Label 8x or 24x 1.5 ml siliconized tubes with sample identification number (e.g. 1.1 to 1.24, 2.1 to 2.24, etc.). Keep lids closed. The eluted RNA will be collected in these tubes at the end of the purification process. Optional: For DNA re-extraction from organic phase: prepare another set of tubes.
9. Prepare Buffer ED working solution: For 8 samples, aliquot 6.75 ml Buffer ED2 (9x master mix) in a 15 ml FALCON tube. Before continuing with RNA extraction, add 23.6 µl 2-mercaptoethanol to Buffer ED. For 24 samples, aliquot 18.75 ml Buffer ED2 (25x master mix) in a 50 ml FALCON tube. Before continuing with RNA extraction, add 65.5 µl 2-mercaptoethanol to Buffer ED.
23
10. Prepare EWL working solution For 8 samples, aliquot 17 ml EWL stock solution and add 170 µl of 0.5M TCEP (section 1.6.7.2) into 50 ml FALCON tube. For 24 samples, aliquot 50 ml EWL stock solution and add 500 µl of 0.5M TCEP added (section 1.6.7.2) into 50 ml FALCON tube. Optional: if DNA re-extraction from the organic phase is intended, prepare twice the amounts listed before.
11. Prepare 100% and 80% ethanol For 8 samples, prepare 10 ml 80% ethanol and 10 ml 100% ethanol in 15 ml FALCON tubes. For 24 samples, prepare 30 ml 80% ethanol and 30 ml 100% ethanol in 50 ml FALCON tubes. Optional: if DNA re-extraction from the organic phase is intended, prepare twice the amounts listed before.
12. Prepare Proteinase K working solution: For 8 samples, aliquot 250 µl 5 M NaCl and 30 µl proteinase K stock (20 mg/ml) into a 1.5 ml reaction tube, mix gently by pipetting. For 24 samples, aliquot 750 µl 5 M NaCl and 90 µl proteinase K stock (20 mg/ml) into a 1.5 ml reaction tube, mix gently by pipetting. If a multichannel pipette is to be used for sample aspiration/mixing/proteinase K addition, aliquot PK/NaCl solution as 105 µl fractions into 8 tubes. Remark: Dispose Proteinase K working solution, and prepare a fresh working solution for the next isolation. The 20 mg/ml proteinase K stock should always be kept at -20°C using suitable equipment (cooling containers, etc.). At this concentration the enzyme quickly looses activity at all other temperatures. Aliquots of proteinase K solution that reached room temperature should be disposed.
13. Optional: For DNA re-extraction from organic phase: For 8 samples, prepare 6.75 ml buffer EA3 in a 15 ml FALCON tube. For 24 samples, prepare 18.75 ml buffer EA3 in a 50 ml FALCON tube. Also: prepare a third set of tubes (step 4), double the amount of VB2G (step 7), EWL working solution (step 10), 80% ethanol & 100% ethanol (step 11).
1.7.3.2 Denaturation and proteolytic digestion of samples to inactivate ribonucleases
1. Organize your workspace: Have all three tube sets ready in individual tube holders. Tube set 1 containing buffer P working solution, tube set 2 and (optional for DNA isolation) tube set 3 filled with TCEP-added VB2G. Have all required pipettes and tips in place. If you want to use a repeater pipette for applying Proteinase K working solution (step 6), wrap a 1 ml repeater pipette tip in aluminum foil inside a zip lock bag and pre-chill in -20°C freezer for each batch of samples that you want to process.
2. Preheat one eppendorf thermomixer to 60°C and a second eppendorf thermomixer to 10°C. Make sure these temperatures are reached.
3. Thaw biofluid samples. For samples in 1.5 ml microcentrifuge tubes we recommend thawing with warm air, e.g. by placing sample tubes in tube holders that allow airflow

24
to pass through inside a incubator/shaker pre-heated to 37°C shaking at 130 rpm for 5-10 min. Watch samples during thawing procedure, remove from incubator when thawed and store at room temperature. Homogenize samples by inverting tube racks with sample tubes several times to allow precipitates to dissolve and liquid fractions to mix. We recommend keeping thawed samples at room temperature. DO NOT put thawed urine samples on ice, since this will cause precipitation of salts and other compounds in some samples. If the provided sample volume is very low, spin tubes at 50xg for 10 s to minimize losses due to adhesion of sample to the lids. Organize sample tubes in a separate tube rack and check sample order.
4. Preheat all 8 or 24 2-ml tubes (tube set 1) containing 105 µl of Buffer P working solution (prepared in section 1.7.3.1, step 4 & 5) to 60°C in eppendorf thermomixer for 2 min. Keep tubes at 60°C in eppendorf thermomixer at until instructed to remove them. At the end of the incubation period open all lids of tube set 1 and of your sample tubes.
5. Addition of biofluid samples: Alternative 1: Switch eppendorf thermomixer to interval mixing mode at 60°C featuring a 3 s mixing phase at 1200 rpm followed by a 3 s pause. During the mixing pause phase, add 450 µl of sample (plasma, serum or urine) to a “set 1” tube containing Buffer P working solution. Aspirate the next sample and position pipette tip with next sample into the next “set 1” tube during mixing pause. You may need to adjust the pause time according to your work speed. Alternative 2: Switch eppendorf thermomixer to continuous mixing mode at 60°C but do not turn on mixing. Add 450 µl biofluid sample to “set 1” tube and immediately after addition of each sample, press quick mixing button for 3 s. Repeat by adding the next biofluid sample into the next “set 1” tube. Upon each sample addition, press the quick mixing button to allow rapid mixing. Partially mixed solutions may expose RNA released from proteins to more stable, partially denatured ribonucleases followed by its degradation. Alternative 3: Do not switch on mixing function of eppendorf thermomixer. Add 450 µl biofluid sample to “set 1” tube and mix by pipetting up and down at least five times. This can be done reproducibly using automated single channel or multi channel pipettes. If using mixing by eppendorf thermomixer shaking DO NOT EXCEED the recommended mixing speed or time to prevent spillage of the sample. It may be necessary to determine the optimal speed for mixing when using different equipment. Make sure the sample is properly mixed and does not spill out during mixing with open lids!
6. Proteolytic digestion: Alternative 1: Adjust eppendorf thermomixer to 1200 rpm but do not turn on. Add 28 µl Proteinase K working solution (prepared 1.7.3.1, step 12) to each sample. Without closing the tube, mix by activating the thermomixer for a 2 s pulse at 1200 rpm after each addition. Alternative 2: For faster addition of proteinase K allowing for higher throughput use a repeater pipette and a pre-chilled 1.0-ml repeater tip (from step 1) to dispense

25
Proteinase K working solution (prepared 1.7.3.1, step 12). Avoid formation of air-bubbles when loading solution. Set dispense volume to 30 µl. Switch eppendorf thermomixer to interval mixing mode at 60°C featuring a 2 s mixing phase at 1200 rpm followed by a 2 s pause and position repeater pipette above the tube during pause time while ejecting before or during mixing phase. Strictly aim for the liquid to be ejected to the center of the tube, not the tube wall. The viscous PK stock solution sticking to the tube wall at high temperatures will be rendered inactive otherwise. DO NOT EXCEED suggested mixing speed or time to prevent spillage of the sample. It may be necessary to determine the optimal speed for mixing when using different equipment. Make sure the sample is properly mixed and does not spill out during mixing with open lids!
7. Close all lids, perform protease digestion for 10 min at 60°C, during this period shake gently at 550 rpm. Then stop eppendorf thermomixer mixing but do not turn off heating.
8. Organic extraction Alternative 1: Open tubes and add 513 µl of Buffer ED2 working solution containing 2-mercaptoethanol (from 1.7.3.1 step 9). Close tubes after addition, mix vigorously at 1400 rpm for 30 s. Alternative 2: Use repeater pipette to dispense Buffer ED2 working solution containing 2-mercaptoethanol (from 1.7.3.1 step 9). Set dispensing volume to 550 µl and aim for the liquid to be ejected against the lower half of the tube wall, not the liquid interface. Aiming directly at the center of the tube will result in spilling of tube contents. Close tubes after addition, mix vigorously at 1400 rpm for 30 s.
9. Transfer entire tube holder (with 24 samples) to second eppendorf thermomixer previously set to 10°C. Cool down sample by mixing vigorously at 1400 rpm for 1 minute.
10. Centrifuge samples in tube holder for 30 s at 50xg to prevent contamination when opening tubes for next step.
11. Add 103 µl chloroform to each tube. Close tubes, mix vigorously at 1400 rpm for 30 s at 10°C. [or: Close tubes, vortex tubes by hand for 30 s at full speed before proceeding. If previously 550 µl of Buffer ED2 working solution had been added using a repeater pipette use 110 µl chloroform instead, the chloroform: ED2 ratio should be 1:5. We do not recommend using an eppendorf repeater pipette for this step due to a high risk of spilling the sample.
12. Centrifuge all tubes at full speed in a microcentrifuge at 4°C for 5 min. 13. Remove all tubes from the centrifuge, keep at room temperature from now on. 14. Transfer 650 µl from the upper aqueous phase to numbered tubes containing Buffer
VB2G (containing TCEP as prepared in section 1.7.3.1 step 7). Try to avoid carrying over any white interphase material if present. Optional: Keep the organic phase if DNA re-extraction is intended.
15. Vortex. A precipitate may form. DO NOT centrifuge at high speed as an RNA pellet may form that remains behind in the tube.

26
1.7.3.3 Optional: Manual DNA re-extraction from organic phases
1. Add 500 µl of Buffer EA3 to each organic phase (from section 1.7.3.2, step 14). Close tubes after addition, mix vigorously at 1400 rpm for 30 s. When using the repeater pipette to dispense Buffer EA3, aim for the liquid to be ejected against the lower half of the tube wall, not the liquid interface. Aiming directly at the center of the tube will result in spilling of tube contents.
2. Centrifuge all tubes at full speed in a microcentrifuge at 4°C for 5 min. 3. Remove all tubes from the centrifuge, keep at room temperature from now on. 4. Transfer 600 µl from the upper aqueous phase to numbered tubes containing buffer
VB2G, prepared in section 1.7.3.1 step 7. DO NOT forget to add TCEP in advance. Try to avoid carrying over any white interphase material if present.
5. Vortex. A precipitate may form. DO NOT centrifuge at high speed as an RNA pellet may form that remains behind in the tube.
1.7.3.4 Column purification of nucleic acids (for both DNA and RNA isolation)
1. Load the vacuum manifold with 8 or 24 Zymo-Spin™ I columns for parallel processing of all samples.
2. Connect the vacuum manifold to a vacuum source (in-house lab vacuum valve is sufficient). Turn on vacuum, leave on at all times until prompted to turn off.
3. Carefully pour the isopropanol-containing solution/suspension of each tube (from section 1.7.3.2, step 15) onto the respective column mounted on the manifold.
4. Wash spin columns with 900 µl EWL working solution (from section 1.7.3.1 step 10), dispense quickly to remove remaining liquid drops on column walls.
5. Wash spin columns for a second time with 900 µl EWL working solution with (from section 1.7.3.1 step 10), using previous conditions.
6. Wash spin columns with 900 µl 100% ethanol (from section 1.7.3.2, step 11) using previous conditions. Omitting this step will decrease sample yield at molecular ranges smaller than 45 nt.
7. Wash spin columns with 500 µl 80% ethanol using previous conditions (from section 1.7.3.2, step 11).
8. Turn off vacuum. Carefully remove the first column to release the vacuum. 9. Transfer all Zymo-Spin™ I columns into fresh 2-ml collection tubes (use any 2-ml
microcentrifuge tube) and place into a microcentrifuge at room temperature. 10. Spin at full speed (≥13,000 rpm) for 5 min to dry silica matrix. 11. Carefully transfer columns into earlier pre-numbered, siliconized 1.5 ml collection
tubes (prepared in section 1.7.3.2, step 8). Discard the 2 ml collection tubes with any liquid inside.
12. To elute, apply 20 µl 10 mM TRIS-HCl, pH 7.4 directly onto the filter matrix. 13. Place all Zymo-Spin™ I column-collection tube assemblies into a microcentrifuge.

27
14. Incubate for 1 min. 15. To collect eluates, spin at full speed (≥13,000 rpm) for 1 min. 16. Approximately 18 µl of liquid are collected in each siliconized tube (step 11), which
is stored at -20°C. Discard Zymo-Spin™ I columns after elution. 17. Store eluates at -20°C.
1.7.4 Semi-automated RNA extraction of up to 96 samples DO NOT cool, heat or centrifuge samples unless instructed by the protocol. If not specified, carry out steps at room temperature. Use thermomixers for both heating and mixing. Tube holder refers to a piece of equipment of the eppendorf thermomixer and thermomixer R series that allows the transfer of 24 tubes at a time between two mixers. Use filter pipet tips at all times. Clean your workplace and all technical equipment with 70% ethanol prior to starting to reduce possible contamination by particles carrying RNases. Change gloves frequently or wash gloved hands and dry them using a paper towel, especially after handling nuclease active sample material. Keep centrifuges and pipets clean. Mix working solutions by vortexing unless otherwise instructed when adding additives such as methylene blue, 2-mercaptoethanol, and TCEP. Before choosing the sample denaturation option in this protocol (see 1.7.3.2 step 5), please also consider looking into the alternative sample denaturation protocol (section 1.7.6), which combines sample aspiration, addition of Proteinase K working solution, and mixing with buffer P into a single work step using a programmable Rainin multichannel pipette. We routinely use this approach in automated sample processing. When choosing to use the repeater pipette be careful not to aspirate air bubbles when aspirating solutions. Also test the dispense function at least once before applying aspirated solutions to samples since every first dispense tends to not contain the entire adjusted volume. Once started, the procedure should be carried out continuously. Try to avoid pauses during the preparation procedure. Organize your samples in batches of 24 samples (if applicable). For sample denaturation, RNA extraction and optional DNA extraction do not process more than 24 samples at a time (manual part). For column purification do not process more than 96 samples at a time (automated part). Duration: Initial preparation: 30 min for 96 samples. Extraction: 30 min per batch of 24 samples. Automated column purification: 90 min. Optional DNA purification and automated column purification: 120 min.
1.7.4.1 Preparation of reagents and consumables (semi-automated processing)
1. Preheat one heatblock to 60°C and a second heatblock to 10°C. Make sure these temperatures are reached.
2. Label one set of 8x or 24x or 96x 2 ml eppendorf Lo-Bind tubes, e.g. 1-24, set 1. 3. When running in low or intermediate throughput (8 to 24 samples), label another set
of 8x or 24x 2ml eppendorf Lo-Bind tubes, e.g. 1-24, set 2, and place into epMotion

28
5075 tube holder. For higher throughput use a 2 ml 96x deep well plate, labeled as set 2. Optional : If DNA isolation is intended, label a third set or prepare another 2 ml 96x deep well plate accordingly (set 3). When processing up to 48 samples, you may use the second half of the 2 ml 96x deep well plate.
4. Prepare Buffer P working solution: For 8 samples, aliquot 1 ml of Buffer P with 5 µl methylene blue into one 2 ml tube and add 19 µl 2-mercapthoethanol and 1.9 µl “calibrator pool 1 ”, either c = 1 pM each oligonucleotide (urine) or c = 10 pM each oligonucleotide (serum or plasma). For 24 samples, prepare two aliquots of 1.47 ml of Buffer P with 7.4 methylene blue stock in two separate 2 ml tubes and to each aliquot add 28.0 µl β-mercaptoethanol and 2.8 µl “calibrator pool 1”, c = 1 pM each oligonucleotide (urine) or c = 10 pM each oligonucleotide (serum or plasma). For 96 samples, aliquot 11 ml buffer P with 55 µl methylene blue into a 15 ml tube and add 209 µl 2-mercaptoethanol and 20.9 µl “calibrator pool 1”, c = 1 pM each oligonucleotide (urine) or c = 10 pM each oligonucleotide (serum or plasma). Make sure that buffer P is properly mixed by tumbling or vortexing and is free of bubbles. Buffer P solution may get discolored if kept too long and the level of reducing agent may have dropped due to oxidation. We generally dispose “faded” buffer P solutions. Centrifuge buffer P at room temperature.
5. Use epMotion 5075 script “Xx_BufferP_aliq “ to dispense 8x or 24x or 96x 105 µl of Buffer P with additives from step 4 into tube set 1 where X=8, 24, or 96.
6. Use epMotion 5075 to aliquot 1200 µl (twice 600 µl) of TCEP-added buffer VB2G (1.6.7.1) into a 2-ml 96x deep well plate (set 2) using the script “S1VBadd only 96s1” for 96 samples. For 48 or 24 samples use the S1 file ending in 48samp or 24samp, respectively). Optional: if DNA re-extraction from the organic phase is intended, prepare and fill a third set of tubes (set 3) accordingly.
After dilution in the experimental setup by addition of 650 µl aqueous RNA sample, as obtained after organic extraction, Buffer concentrations correspond to: VB2G: 15 mM MgCl2 and 5 mM CaCl2, approx. 1 M GITC.
7. Label 96 well PCR plate “elution plate” with sample identification information. Seal plate with adhesive plastic film. The eluted RNA will be collected in this plate at the end of the purification process. Optional: For DNA re-extraction from organic phase: prepare another PCR plate OR use the second half of the PCR plate (for up to 48 samples).
8. Prepare Buffer ED2 working solution: For 8 samples aliquot 6.75 ml Buffer ED2 (9 x master mix), add 23.6 µl 2-mercaptoethanol and fill into 100 ml tub reservoir. For 24 samples aliquot 18.75 ml Buffer ED2 (25 x master mix), add 65.5 µl 2-mercaptoethanol and fill into 100 ml tub reservoir. For 96 samples aliquot 75 ml Buffer ED2 (100 x master mix), add 262 µl 2-mercaptoethanol and fill into 100 ml tub reservoir.
9. Prepare EWL working solution For 8 samples, aliquot 17 ml EWL stock solution, add 170 µl TCEP and fill into a

29
100 ml tub reservoir. For 24 samples, aliquot 50 ml EWL stock solution, add 500 µl TCEP and fill into a 100 ml tub reservoir. For 96 samples, aliquot 2x 100 ml EWL stock solution, add 2x 1000 µl TCEP, and fill each aliquot into 100 ml tub reservoir. Optional: if DNA re-extraction from the organic phase is intended, prepare twice the amounts listed before.
10. For 8 samples, prepare 10 ml 80% ethanol and 100% ethanol, fill solutions into 100 ml tub reservoirs. For 24 samples, prepare 30 ml 80% ethanol and 100% ethanol, fill solutions into 100 ml tub reservoirs. For 96 samples, prepare 100 ml 80% ethanol and 100% ethanol, fill solutions into 100 ml tub reservoirs. Optional: if DNA re-extraction from the organic phase is intended, prepare twice the amounts listed before.
11. Prepare Proteinase K working solution: For 8 samples, aliquot 250 µl 5 M NaCl and 30 µl proteinase K stock (20 mg/ml) into a 1.5 ml reaction tube, mix gently by pipetting. For 24 samples, aliquot 750 µl 5 M NaCl and 90 µl proteinase K stock (20 mg/ml) into a 1.5 ml reaction tube, mix gently by pipetting. If a multichannel pipette is to be used for proteinase K addition, aliquot PK/NaCl solution as 105 µl fractions into 8 separate 1.5 ml tubes. For 96 samples, aliquot 2750 µl 5 M NaCl and 330 µl proteinase K stock (20 mg/ml) into a 5 ml reaction tube, mix gently by pipetting. If a multichannel pipette is to be used for sample proteinase K addition, aliquot PK/NaCl solution as 385 µl fractions into 8 separate 1.5 ml tubes. Remark: Dispose Proteinase K working solution, and prepare a fresh working solution for the next isolation. The 20 mg/ml proteinase K stock should always be kept at -20°C using suitable equipment (cooling containers, etc.). At this concentration the enzyme quickly looses activity at all other temperatures. Aliquots that reach room temperature should be disposed of right away.
12. Optional: For DNA re-extraction from organic phase: For 8 samples, prepare 6.75 ml buffer EA3 in a 100 ml tub reservoir. For 24 samples, prepare 18.75 ml buffer EA3 in a 100 ml tub reservoir. For 96 samples, prepare 75 ml EA3 in a 100 ml tub reservoir. Also: prepare, double the amount of VB2G (step 6), EWL (step 9), 80% & 100% ethanol (step 10) and prepare a third set of tubes or another 96-well plate filled with VB2G (step 6)
1.7.4.2 Initial denaturation and proteolytic digestion of sample to inactivate ribonucleases - manual part
1. Organize your workspace: Have all three tube sets ready in individual tube holders. Tube set 1 containing buffer P working solution, tube set 2 and (optional for DNA isolation) tube set 3 filled with buffer VB2G with TCEP added. Have all required

30
pipettes and tips in place. If you want to use a repeater pipette for applying Proteinase K working solution (see 1.7.4.2 step 6), wrap a 1-ml repeater pipette tip in aluminum foil inside a zip lock bag and pre-chill in -20°C freezer for each batch of samples that you want to process.
2. Preheat one heatblock to 60°C and a second heatblock to 10°C. Make sure these temperatures are reached.
3. Thaw biofluid samples. For samples in 1.5 ml microcentrifuge tubes we recommend thawing with warm air, e.g. by placing sample tubes in tube holders that allow airflow to pass through inside a incubator/shaker pre-heated to 37°C shaking at 130 rpm for 5-10 min. Watch samples during thawing procedure, remove from incubator when thawed and store at room temperature. Homogenize samples by inverting tube racks with sample tubes several times to allow precipitates to dissolve and liquid fractions to mix. We recommend keeping thawed samples at room temperature. DO NOT put thawed urine samples on ice, since this will cause precipitation of salts and other compounds in some samples. If the provided sample volume is very low, spin tubes at 50xg for 10 s to minimize losses due to adhesion of sample to the lids. Organize sample tubes in a separate tube rack and check sample order.
4. Preheat all 8 or 24 2-ml tubes (tube set 1) from one batch containing 105 µl of Buffer P working solution (prepared in section 1.7.4.1 step 4 & 5) to 60°C in eppendorf thermomixer for 2 min. Keep tubes at 60°C in eppendorf thermomixer at all times until instructed to remove them. At the end of the incubation period open all lids of “set 1” tubes and the biofluid samples.
5. Addition of biofluid samples: Alternative 1: Switch eppendorf thermomixer to interval mixing mode at 60°C featuring a 3 s mixing phase at 1200 rpm followed by a 3 s pause. During the mixing phase add 450 µl of sample (plasma, serum or urine) to a “set 1” tube containing Buffer P working solution. Aspirate the next sample and position the pipette tip with next sample into the next “set 1” tube during mixing pause. You may need to adjust the pause time according to your work speed. Alternative 2: Switch eppendorf thermomixer to continuous mixing mode at 60°C but do not turn on mixing. Add 450 µl biofluid sample to “set 1” tube and immediately after addition of each sample, press quick mixing button for 3 s. Repeat by adding the next biofluid sample into the next “set 1” tube. Upon each sample addition, press the quick mixing button to allow rapid mixing. Partially mixed solutions may expose RNA released from proteins to more stable, partially denatured ribonucleases followed by its degradation. Alternative 3: Do not switch on mixing function of eppendorf thermomixer. Add 450 µl biofluid sample to “set 1” tube and mix by pipetting up and down at least five times. This can be done reproducibly using automated single channel or multi channel pipettes. If mixing by eppendorf thermomixer DO NOT EXCEED the recommended mixing speed or time to prevent spillage of the sample. It may be necessary to determine the optimal speed for mixing when using different equipment. Make sure the sample is properly mixed and does not spill out during mixing with open lids!
31
6. Proteolytic digestion: Alternative 1: Adjust eppendorf thermomixer to 1200 rpm but do not turn on. Add 28 µl Proteinase K working (prepared 1.7.3.1, step 12) to each sample. Without closing the tube, mix by activating the thermomixer for a 2 s pulse at 1200 rpm after each addition. Alternative 2: For faster addition of proteinase K allowing for higher throughput use a repeater pipette and a pre-chilled 1-ml repeater tip (from step 1) to dispense Proteinase K working solution (prepared 1.7.3.1, step 12). Avoid formation of air-bubbles when loading solution. Set dispense volume to 30 µl. Switch eppendorf thermomixer to interval mixing mode at 60°C featuring a 2 s mixing phase at 1200 rpm followed by a 2 s pause and position repeater pipette above the tube during pause time while ejecting before or during mixing phase. Strictly aim for the liquid to be ejected to the center of the tube, not the tube wall. The viscous PK stock solution sticking to the tube wall at high temperatures will be rendered inactive otherwise. DO NOT EXCEED suggested mixing speed or time to prevent spillage of the sample. It may be necessary to determine the optimal speed for mixing when using different equipment. Make sure the sample is properly mixed and does not spill out during mixing with open lids!
7. Close all lids, perform protease digestion for 10 min at 60°C, during this period shake gently at 550 rpm. Then stop eppendorf thermomixer mixing but do not turn off heating.
8. Organic extraction: Alternative 1: Open tubes and add 513 µl of Buffer ED2 working solution containing 2-mercaptoethanol (from 1.7.3.1 step 9). Close tubes after addition, mix vigorously at 1400 rpm for 30 s. Alternative 2: Use repeater pipette to dispense Buffer ED2 containing 2-mercaptoethanol (from 1.7.3.1 step 9). Set dispensing volume to 550 µl and aim for the liquid to be ejected against the lower half of the tube wall, not the liquid interface. Aiming directly at the center of the tube will result in spilling of tube contents. Close tubes after addition, mix vigorously at 1400 rpm for 30 s.
9. Transfer entire tube holder (with 24 samples) to second eppendorf thermomixer previously set to 10°C. Cool down sample by mixing vigorously at 1400 rpm for 1 min.
10. Centrifuge samples in tube holder for 30 s at 50xg to prevent contamination when opening tubes for next step.
11. Add 103 µl chloroform to each tube. Close tubes, mix vigorously at 1400 rpm for 30 s at 10°C. [or: Close tubes, vortex tubes by hand for 30 s at full speed before proceeding. If previously 550 µl of Buffer ED2 working solution had been added using a repeater pipette use 110 µl chloroform instead, the chloroform: ED2 ratio should be 1:5. We do not recommend using an eppendorf repeater pipette for this step due to a high risk of spilling the sample.
12. Centrifuge all tubes at full speed in a microcentrifuge at 4°C for 5 min. 13. Remove all tubes from the centrifuge, keep at room temperature from now on.

32
14. Transfer 650 µl from the upper aqueous phase to numbered tubes or 2-ml deep well plate containing buffer VB2G with TCEP added 1.7.4.1, step 6. Try to avoid carrying over any white interphase material if present. Optional: Keep the organic phase if DNA re-extraction is intend
15. Vortex the tubes, or heat-seal the plate and mix by inverting 10 times. A precipitate may form. DO NOT centrifuge at high speed as an RNA pellet may form that remains behind in the tube.
1.7.4.3 Optional: Manual DNA re-extraction from organic phase, manual part
1. Add 500 µl of Buffer EA3 to each tube (from section 1.7.4.2, step 14). Close tubes
after addition, mix vigorously at 1400 rpm for 30 s. When using the repeater pipette to dispense Buffer EA3, aim for the liquid to be ejected against the lower half of the tube wall, not the liquid interface. Aiming directly at the center of the tube will result in spilling of tube contents.
2. Centrifuge all tubes at full speed in a microcentrifuge at 4°C for 5 min. 3. Remove all tubes from the centrifuge, keep at room temperature from now on. 4. Transfer 600 µl from the upper aqueous phase to deep well plate containing buffer
VB2G with TCEP added (see 1.7.4.1 step 6). Try to avoid carrying over any white interphase material if present.
5. Vortex. A precipitate may form. DO NOT centrifuge at high speed as an RNA pellet may form that remains behind in the tube.
1.7.4.4 Column purification of nucleic acids, automated part (both RNA and DNA isolation)
1. Load the vacuum manifold with an unused Zymo-I filter plate for parallel processing of all samples. Make sure that “set 2” or “set 3” plate is placed into epMotion 5075. “Set 2“ and “set 3” plate refer to VB2G-plate mixed with aqueous phase from organic extraction (section 1.7.4.2 step 15) or organic re-extraction (section 1.7.4.3, step 5), respectively.
2. Start epMotion 5075 automated exRNA isolation script “S6-ldfill1+2 96sl” in the folder labeled “RNA only 96sl”. From here on out, the script names given will be for 96 samples in this folder. For 24 or 48 samples, find the corresponding script in the folders “DNA + RNA 24 samples” or “RNA 48 samples”, respectively.
3. epMotion 5075 loads first portion (1 ml) of isopropanolic aqueous phase (from section 1.7.4.2, step 15) onto Zymo-I filter plate followed by application of 600 mPa vacuum for 6 min. Confirm that all liquid was applied to the filter plate or apply vacuum for a longer time.
4. epMotion 5075 loads first portion (1 ml) of isopropanolic aqueous phase (from section 1.7.4.2, step 15) onto Zymo-I filter plate followed by application of 600 mPa

33
vacuum for 7 min and 900 mPa vacuum for 1 min. Confirm that all liquid was applied to the filter plate or apply vacuum for a longer time.
5. Start epMotion 5075 automated exRNA isolation script “S10-Wash pt1 96s1” to apply 970 µl Buffer EWL working solution (from section 1.7.4.1, step 9) to sample-loaded columns (step 3), followed by application of 800 mPa vacuum for 7 min and high-vacuum for 1 min.
6. epMotion 5075 loads columns with 970 µl Buffer EWL working solution (from 1.7.4.1, step 9), and applies 600 mPa vacuum for 7 min, followed 900 mPa vacuum for 1 min. Confirm that all liquid was applied to the filter plate or apply vacuum for a longer time.
7. Start epMotion 5075 automated exRNA isolation script “S11-Wash pt2 elute 96s1” to load columns in filter plate with 970 µl 100% ethanol (section 1.7.4.1, step 10), followed by vacuum for 7 min and high-vacuum for 1 min. Omitting this step will result in sample loss, especially at molecular ranges smaller than 45 nucleotides.
8. epMotion 5075 loads columns with 500 µl 80% ethanol (section 1.7.4.1, step 10), followed by vacuum for 5 min and high-vacuum for 1 min.
9. epMotion 5075 loads columns with 500 µl 80% ethanol (section 1.7.4.1, step 10), followed by vacuum for 5 min and high-vacuum for 1 min.
10. Remove Zymo-I filter plate from vacuum manifold, seal it with adhesive foil (no heat seal) and place it above 96 well PCR plate. Place this assembly into centrifuge basket for 96 well plates and place into a centrifuge. Insert an appropriate counterweight to balance weight inside centrifuge rotor.
11. Spin at full speed (e.g. 3700xg) for 5 min to dry silica matrix. 12. Remove seal and place Zymo-I filter plate back into epMotion 5075 vacuum manifold.
Discard the liquid in 96 well PCR plate used for collection. If sealed and stored clean, this 96 PCR plate can be reused for step 8 & 9 in another purification.
13. To elute RNA, have epMotion 5075 apply 21 µl 10 mM TRIS, pH 7.4 directly onto the filter matrix.
14. Remove Zymo-I filter plate from vacuum manifold, seal it with an adhesive seal (no heat seal) and place it above 96 PCR plate. Place this assembly into centrifuge basket for 96 well plates and place into a centrifuge. Insert an appropriate counterweight to balance weight inside centrifuge rotor.
15. Incubate for 1 min. 16. To collect eluates, spin Zymo-I at full speed (3700xg) for 5 min. 17. Approximately 18 µl of liquid are collected in each siliconized tube, which is stored
at -20°C. Discard Zymo-I filter plate or label the used sections of the plate for later purifications.
18. Seal PCR plate and store eluates at -20°C.

34
1.7.5 Fully automated RNA extraction of up to 96 samples DO NOT cool, heat or centrifuge samples unless instructed by the protocol. If not specified, carry out steps at room temperature. Clean your workplace, the epMotion 5075 and all technical equipment with 70% ethanol prior to starting to reduce possible contamination by particles carrying RNases. Change gloves frequently or wash gloved hands and dry them using a paper towel, especially after handling nuclease active sample material. Keep centrifuges and pipets clean. Before choosing the sample denaturation option in this protocol (see 1.7.5.2 step 5), please also consider looking into the alternative sample denaturation protocol (section 1.7.6), which combines sample aspiration/ addition of Proteinase K working solution and mixing with buffer P into a single work step using a programmable Rainin multichannel pipette. We routinely use this approach in automated sample processing. When choosing to use the repeater pipette be careful not to aspirate air bubbles when aspirating solutions. Also test the dispense function at least once before applying aspirated solutions to samples since every first dispense tends to not contain the entire adjusted volume. Once started, the procedure should be carried out continuously. Try to avoid pauses during the preparation procedure. Organize your samples in batches of 24 samples (if applicable). Do not process more than 96 at a time. Duration: Initial preparation: 30 min. for 96 samples. Extraction: 60 min for 96 samples. Automated column purification: 90 min. Optional DNA purification: 120 min for 96 samples.
1.7.5.1 Preparation of reagents and consumables (fully automated processing)
1. Organize your samples (see section 1.7.2) but keep them frozen at this time. 2. Preheat one heatblock to 60°C and a second heatblock to 10°C. Make sure these
temperatures are reached. 3. Preparation of Buffer P working solution:
For 8 samples, aliquot 1 ml of Buffer P with 5 µl methylene blue stock into one 2 ml tube and add 19 µl β-mercaptoethanol and 1.9 µl “calibrator pool 1 ”, either c = 1 pM each oligonucleotide (urine) or c = 10 pM each oligonucleotide (serum or plasma). For 24 samples, prepare two aliquots of 1.47 ml of Buffer P with 7.4 methylene blue stock in two separate 2 ml tubes and to each aliquot add 28.0 µl β-mercaptoethanol and 2.8 µl “calibrator pool 1”, c = 1 pM each oligonucleotide (urine) or c = 10 pM each oligonucleotide (serum or plasma). For 96 samples, aliquot 11 ml buffer P with 55 µl methylene blue stock into a 15 ml tube and add 209 µl 2-mercaptoethanol and 20.9 µl “calibrator pool 1”, c = 1 pM each oligonucleotide (urine) or c = 10 pM each oligonucleotide (serum or plasma). Make sure that buffer P working solution is properly mixed by tumbling or vortexing and is free of bubbles. Buffer P working solution may get discolored if kept too long and the level of reducing agent may have dropped due to oxidation. We generally dispose “faded” buffer P solutions. Centrifuge buffer P at room temperature.

35
Label a 1-ml deep well plate “set 1”. Use epMotion 5075 script “S1-P+VBadd96s1” to aliquot 105 µl buffer P with additives from step 1 into a 1-ml deep well plate.
4. Label 2-ml 96x deep well plate “set 2”. Use epMotion 5075 script “S1-P+VBadd96s1” to aliquot 1200 µl (twice 600 µl) of TCEP-added buffer VB2G into a 2-ml 96x deep well plate (set 2). Optional: if DNA re-extraction from the organic phase is intended, prepare and fill a third plate (“set 3”) accordingly using epMotion script “S1-VBadd only 96s1” in the folder “DNA 2ndext 96s1”.
5. Label 96 well PCR plate “elution plate” with sample identification information. Seal plate with adhesive plastic film. The eluted RNA will be collected in this plate at the end of the purification process. Optional: For DNA re-extraction from organic phase: prepare another PCR plate OR use the second half of the PCR plate (for up to 48 samples).
6. Prepare Buffer ED working solution: For 8 samples aliquot 6.75 ml Buffer ED2 (9 x master mix), add 23.6 µl 2-mercaptoethanol and fill into 100 ml tub reservoir. For 24 samples aliquot 18.75 ml Buffer ED2 (25 x master mix), add 65.5 µl 2-mercaptoethanol and fill into 100 ml tub reservoir. For 96 samples aliquot 75 ml Buffer ED2 (100 x master mix), add 262 µl 2-mercaptoethanol and fill into 100 ml tub reservoir.
7. Prepare EWL working solution: For 8 samples, aliquot 17 ml EWL stock solution, add 170 µl TCEP and fill into a 100 ml tub reservoir. For 24 samples, aliquot 50 ml EWL stock solution, add 500 µl TCEP and fill into a 100 ml tub reservoir. For 96 samples, aliquot 2x 100 ml EWL stock solution, add 1000 µl TCEP, and fill each aliquot into 100 ml tub reservoir. Optional: if DNA re-extraction from the organic phase is intended, prepare twice the amounts listed before.
8. For 8 samples, prepare 10 ml 80% ethanol and 100% ethanol, fill solutions into 100 ml tub reservoirs. For 24 samples, prepare 30 ml 80% ethanol and 100% ethanol, fill solutions into 100 ml tub reservoirs. For 96 samples, prepare 100 ml 80% ethanol and 100% ethanol, fill solutions into 100 ml tub reservoirs. Optional: if DNA re-extraction from the organic phase is intended, prepare twice the amounts listed before.
9. Prepare Proteinase K working solution: For 8 samples, aliquot 250 µl 5 M NaCl and 30 µl proteinase K stock (20 mg/ml) into a 1.5 ml reaction tube, mix gently by pipetting. For 24 samples, aliquot 750 µl 5 M NaCl and 90 µl proteinase K stock (20 mg/ml) into a 1.5 ml reaction tube, mix gently by pipetting. If a multichannel pipette is to be used for sample proteinase K addition , aliquot PK/NaCl solution as 105 µl fractions into 8 tubes. For 96 samples, aliquot 2750 µl 5 M NaCl and 330 µl proteinase K stock (20 mg/ml) into a 5 ml reaction tube, mix genty by pipetting. If a multichannel pipette is to be

36
used for sample proteinase K addition, aliquot PK/NaCl solution as 385 µl fractions into 8 tubes. Remark: Dispose Proteinase K working solution, and prepare a fresh working solution for the next isolation. The 20 mg/ml proteinase K stock should always be kept at -20°C using suitable equipment (cooling containers, etc). At this concentration the enzyme quickly looses activity at all other temperatures. Aliquots of proteinase K that reach room temperature should be disposed.
10. Optional: For DNA extraction from organic phase: For 8 samples, prepare 6.75 ml buffer EA3 in a 100 ml tub reservoir. For 24 samples, prepare 18.75 ml buffer EA3 in a 100 ml tub reservoir. For 96 samples, prepare 75 ml EA3 in a 100 ml tub reservoir. Also: double the amount of EWL working solution (step 9), 80% & 100% ethanol (step 10), VB2G and prepare another 96-well plate filled with VB2G (step 4).
1.7.5.2 Denaturation and proteolytic digestion of samples to inactivate ribonucleases
1. Organize your workspace: Have all deep well plate sets ready. Plate “set 1” is filled with Buffer P working solution, “set 2” and (optional for DNA isolation) “set 3” is filled with buffer TCEP-added VB2G. Have all required filled reservoir tubs: 2-mercaptoethanol-added ED2 working solution, chloroform, TCEP-added EWL working solution, 80% ethanol, 100% ethanol (and EA3 if doing DNA extractions) and place them into epMotion 5075. Make sure pipette tools and tips are in in place. Check that epMotion’s liquid and consumable waste containers are empty.
2. Start epMotion 5075 automated exRNA isolation script “S2-ED2+chloEx 96s1” in the folder labeled “RNA only 96sl”. From here on out, the script names given will be for 96 samples in this folder. For 24 or 48 samples, find the corresponding script in the folders “DNA + RNA 24 samples” or “RNA 48 samples”, respectively. It will take about 10 min for the heat blocks to reach their assigned temperatures 65°C and 10°C. During this time you can proceed with the next step.
3. Thaw your samples. For biofluid samples in 1.5 ml microcentrifuge tubes we recommend thawing with warm air, e.g. by placing sample tubes in tube holders that allow airflow to pass through inside a incubator/shaker pre-heated to 37°C shaking at 130 rpm for 5 to 10 min. Watch thawing process, remove samples from incubator once thawed. Homogenize samples by inverting tube racks with sample tubes several times to allow precipitates to dissolve and liquid fractions to mix. We recommend keeping thawed samples at room temperature. DO NOT put thawed urine samples on ice, since this will cause precipitation of salts and other compounds in some samples. Manually fill samples into a 0.5 ml deep well plate (input plate) with at least 475 µl of sample per well. If the provided sample volume is very low, spin tubes at 50xg for 10 s to minimize losses due to adhesion of sample to the lids.
4. Before proceeding, make sure that the epMotion heatblocks have reached their temperatures 65°C and 10°C. Use epMotion 5075 to preheat 1-ml lysis plate

37
containing 105 µl of Buffer P working solution (prepared in section 1.7.5.1 step 3, 4) to 65°C in eppendorf thermomixer for 2 min.
5. Place 0.5 ml input plate filled with biofluid samples into epMotion 5075. Press “Continue” to continue script “S1.5-Sampleadd_BufferP” 450 µl of biofluid sample will be transferred into set 1 deep well plate (sample denaturation), followed by quick mixing at 1200 rpm for 10 s. Note: DO NOT EXCEED this speed to prevent spillage of the sample. It may be necessary to determine the optimal speed for mixing when using different equipment. Make sure the sample is properly mixed!
6. epMotion 5075 adds 28 µl Proteinase K working solution to each lysis reaction, followed by mixing at 1200 rpm for 1 min.
7. epmotion 5075 mixes samples for 8 min at 65°C at 450 rpm. 8. epMotion 5075 adds 517 µl of Buffer ED2 working solution with 2-mercaptoethanol
added (from section 1.7.5.1, step 5) to each sample position, followed by mixing at 800 rpm for two min.
9. epMotion 5075 transfers set 1 plate (denaturation plate) to thermoblock at 10°C and cools plate and sample for 8 min.
10. epMotion 5075 adds 103 µl chloroform to each “set 1” sample position, followed by 5 mixing tasks by up and down pipetting.
11. Remove denaturation plate (“set 1” ) from epMotion 5075 and check lysis plate for spillage/splashing. Remove any splashed liquid by carefully patting the top of the plate with a Kim wipe. Seal plate with adhesive seal made of aluminum foil.
12. Centrifuge “set 1” plate at 3700xg for 5 min at 4°C. Check that two phases well separated phases formed: The lower (organic) phase should be blue, there should be no interphase, and the top (aqueous) phase should be colorless.
13. Carefully remove sealing foil and place the plate back into epMotion 5075. Start epMotion 5075 automated exRNA isolation script “S3-aquaasp1 96s1”.
14. epMotion 5075 transfers 645 µl from aqueous phase (top) of the lysis plate (including some air) to “set 2“ deep well plate (RNA binding plate) containing buffer VB2G, (prepared in section 1.7.5.1, step 4). When done we recommend to proceed with 3.5.4 for RNA purification prior to re-extraction DNA (1.7.5.3).
1.7.5.3 Optional: automated DNA re-extraction from organic phase
The following steps should be carried out continuously, try to avoid pauses during the preparation procedure.
1. Run epMotion 5075 automated exRNA isolation script “S4-2ndorgex 96s1”. 2. epMotion 5075 adds 500 µl of Buffer EA3 to each tube (from section 1.7.5.2, step
14). 3. Heat seal the multiwell plate by pressing down on the foil with the sealer for at
least 2 s. Mix by inverting 10 times.

38
4. Centrifuge multiwall plate at full speed in a microcentrifuge at 4°C for 5 min. 5. Remove multiwell plate from the centrifuge, keep at room temperature from now
on. 6. Use epMotion 5075 script “S5-aquaasp2 96s1” to transfer 600 µl from the upper
(aqueous) phase to “set 3” deep well plate containing Buffer VB2G with TCEP added, prepared in section 1.7.5.1 step 4, followed by five-fold mixing by pipetting up and down.
1.7.5.4 Column purification of nucleic acids – automated part
1. Load the vacuum manifold with an unused Zymo-I filter plate for parallel processing of all samples. Make sure that “set 2” or “set 3” plate is placed into epMotion 5075. “Set 2“ and “set 3” plate refer to VB2G-plate mixed with aqueous phase from organic extraction (section 1.7.5.2 step 14) or organic re-extraction (section 1.7.5.3, step 6), respectively.
2. Start epMotion 5075 automated exRNA isolation script “S6-ldfill1+2 96s1”. 3. epMotion 5075 loads first portion (1 ml) of isopropanolic aqueous phase (from
section 1.7.5.2, step 14, or 1.7.5.3, step 6) onto Zymo-I filter plate, followed by application of 600 mPa vacuum for 6 min. Confirm that all liquid was applied to the filter plate or apply vacuum for a longer time.
4. epMotion 5075 loads second portion (1 ml) of isopropanolic aqueous phase, followed by application of 600 mPa vacuum for 7 min and 900 mPa vacuum for 1 min. Confirm that all liquid was applied to the filter plate or apply vacuum for a longer time.
5. Start epMotion 5075 automated exRNA isolation script “S10-Wash pt1 96s1” to load columns with 970 µl Buffer EWL with TCEP added (from section 1.7.5.1, step 7), and applies vacuum for 7 min, followed by high-vacuum for 1 min. Confirm that all liquid was applied to the filter plate or apply vacuum for a longer time.
6. epMotion 5075 loads columns with 970 µl Buffer EWL with TCEP added (from section 1.7.5.1, step 7), and applies 600 mPa vacuum for 7 min, followed 900 mPa vacuum for 1 min. Confirm that all liquid was applied to the filter plate or apply vacuum for a longer time.
7. Start epMotion 5075 automated exRNA isolation script “S11-Wash pt2 elute 96s1” to load columns with 970 µl 100% ethanol (section 1.7.5.1, step 8), followed by vacuum for 7 min and high-vacuum for 1 min. Omitting this step will result in sample loss, especially at molecular ranges smaller than 45 nucleotides.
8. epMotion 5075 loads columns columns with 500 µl 80% ethanol (section 1.7.5.1, step 8), followed by vacuum for 7 min and high-vacuum for 1 min.
9. epMotion 5075 loads columns columns with 500 µl 80% ethanol (section 1.7.5.1, step 8), followed by vacuum for 7 min and high-vacuum for 1 min.
10. Remove Zymo-I filter plate from vacuum manifold, seal it with adhesive foil (no heat seal) and place it above 96 well PCR plate. Place this assembly into centrifuge basket
39
for 96 well plates and place into a centrifuge. Insert an appropriate counterweight to balance weight inside centrifuge rotor.
11. Spin at full speed (e.g. 3700xg) for 5 min to dry silica matrix. 12. Remove seal and place Zymo-I filter plate back into epMotion 5075 vacuum manifold.
Discard the liquid in 96 well PCR plate used for collection. If sealed and stored clean, this 96 PCR plate can be reused for step 8 & 9 in another purification.
13. To elute RNA, have epMotion 5075 apply 21 µl 10 mM TRIS, pH 7.4 directly onto the filter matrix.
14. Remove Zymo-I filter plate from vacuum manifold, seal it with an adhesive seal (no heat seal) and place it above 96 PCR plate. Place this assembly into centrifuge basket for 96 well plates and place into a centrifuge. Insert an appropriate counterweight to balance weight inside centrifuge rotor.
15. Incubate for 1 min. 16. To collect eluates, spin at full speed e.g. 3700xg) for 5 min. 17. Approximately 18 µl of liquid are collected in each siliconized tube, which is stored
at -20°C. Discard Zymo-I filter plate. Or label which part has been used and save unused columns for additional purifications.
18. Seal PCR plate and store eluates at -20°C.
1.7.6 Alternative denaturation procedure A 96-deep well lysis plate filled with 105 µl aliquots of buffer P (section 1.7.5.1, step 3) is preincubated at 65°C for 2 min. Using a Rainin multichannel electronic pipette with adjustable spacing, aspirate 28 µl of Proteinase K working solution (section 1.7.5.1, step 9) from 8 1.5 ml microcentrifuge tubes, followed by a brief rinse of the pipette tips with water. Next, 100 µl of air are aspirated followed by 450 µl of biofluid sample from 8 1.5 or 2 ml microcentrifuge tubes. During this step the PK/NaCl and biofluid are aspirated into the same tip, but the two liquids do not mix. The spacing of the pipette is then adjusted such that the tips fit into the 2-ml deep well plate filled with buffer P working solution. The contents of the tips are added to the first column and mixed with the buffer P working solution by pipetting up and down 5 times. This is repeated twelve times until all 96 samples have been added. The deep well plate containing the denaturation samples/proteolytic digestions is then inserted into epMotion 5075, and the RNA isolation is continued at step 7 (section 1.7.5.2).

40
1.8 APPENDIX A: Effective concentrations during purification and parameters influencing purification efficiency
Denaturation step: To each sample of 450 µl biofluid, 105 µl Buffer P, 25 µl 5 M NaCl, and 3 µl proteinase K were added to obtain a final volume of 583 µl and a final working concentration of approx. 12 mM Buffer Tris-HCl (pH 7.5), 215 mM NaCl, 2 mM EDTA, 50 mM 2-mercapthoethanol and 5.4% SDS during extraction. We observed a lower Proteinase K activity at a lower NaCl concentration of 50 mM. - It is not recommended to add the NaCl solution to Buffer P before the biofluid sample is added because the resulting high NaCl and SDS concentrations would lead to precipitation of Na SDS. Proteolysis step: Proteinase K stock loses activity within minutes if not at cold temperatures. It is necessary to store it at -20 °C. However, when diluted to approximately 2.1 mg/ml in 5 M NaCl, it appears to tolerate higher temperatures. Thus, it is acceptable to keep this stock on ice at the time of preparation or at room temperature when it is added to the samples. - To accelerate proteolysis and obtain a more complete denaturation of ribonucleases, we recommend to digestion at 60 °C. An incubation temperature of 65 °C was chosen for the automated setup to compensate for the fact that the heat transfer is less optimal when using the epMotion thermomixer 5075. Organic extraction step: After denaturation and proteolysis, addition of 513 µl buffer ED2 working solution containing 37.4 mM Na Citrate, 0.4% sarcosyl, 1.6 M GITC and 80.4% Phenol, brought the effective concentrations to approximately 3.0% SDS, 6.6 mM TRIS, 1.0 mM EDTA, 120 mM NaCl, 18.5 mM Na Citrate, 0.2% sarcosyl, 0.8 M GITC, 30 mM 2-ME and 40% phenol at total volume of 1040 µl. Phase separation is induced by adding 103 µl of chloroform, followed by centrifugation. After phase separation, the effective concentrations in the aqueous phase are approximately 12.5 mM TRIS, 1.9 mM EDTA, 225 mM NaCl, 35 mM Na Citrate and 1.5 M GITC. - Chloroform must be added at a ratio of 1:5 with regards to ED2 working solution to partition DNA into the organic phase while retaining RNA in the aqueous phase. - Noticeable interphase after organic extraction likely indicates incomplete proteolytic digestion. Prepare a fresh Proteinase K stock and working solution. If a more stringent organic extraction is required, e.g. to address remaining RNase activity observed during purification, 750 µl of ED2 working solution can be added and phase separation can be induced by addition of 150 µl chloroform. We have successfully used this ratio in manual RNA purification but do not routinely use it for automated purification due to volume limitations. If this variant is used, make sure to maintain the
41
same ratio of aqueous phase to VB2G working solutions, e.g. mix 650 µl of aqueous phase obtained after aqueous phase with 1600 µl of VB2G. Binding to silicate columns After mixing 525 µl of aqueous phases from organic extractions with buffer VB2G working solution resulting effective concentrations are approximately 10.5 mM sodium citrate, 0.3 mM EDTA, 68.5 mM NaCl, 5.0 mM MgCl2, 2.1 mM CaCl2, 0.9 M GITC, 68.3% isopropanol. Ensure that the isopropanol concentration is at least 66% to avoid losses of RNAs shorter than 25 nt due to incomplete column binding. Ensure that the GITC concentration is at least 0.9 M to avoid precipitation of peptides in the aqueous phase upon addition of isopropanol. Organic re-extraction The concentrations of the aqueous phase after re-extraction of the organic phase with solution EA3 are expected to resemble those of solution EA3, which contains 4 M GITC. Ensure that an aqueous solution containing at least 3 M GITC is used to partition DNA from the organic phase into the aqueous phase.
1.9 APPENDIX B: Proteinase K quality control assay
1.9.1 Introduction This assay evaluates the proteolytic activity of a batch of proteinase K (PK) stock solution (prepared in section 1.6.9.1) using fetal bovine serum (FBS) as protein substrate for degradation. It compares proteolytic activity of fresh PK stock solution (prepared in section 1.6.9.1) stored at -20 °C and PK stock solutions incubated at room temperature for 2 and 5 min, respectively. To compare proteolytic potency, all three PK stock solutions will be incubated with substrate (FBS) for 3, 10 and 30 min, respectively. To stop the reaction at a precise time point, a stop mix solution containing PMSF protease inhibitor and SDS is used. We recommend assessing PK activity for every new commercial PK powder batch verifying it has the desired activity for follow-up applications. We experienced that PK solutions lost activity even when incubated shortly at room temperature or above. We recommend preparing and storing PK stock solutions at -20°C at all times and using pre-chilled thermal packs while PK stock solutions are handled.

42
1.9.2 Setup Always keep PK stock solution at -20 °C in a thermal pack if not deliberately instructed to do otherwise.
1. Preheat eppendorf thermomixer to 50 °C. 2. In a 1.5 ml eppendorf tube, prepare a 4x master mix as proposed in the table
below and mix by vortexing. Aliquot 148.5 µl of this master mix into three 1.5 ml eppendorf tubes labeled with ‘a’, ‘b’ and ‘c’. Keep tubes at room temperature.
Reagent or solution Per sample, 1x (µl) Master mix, 4x (µl) FBS 120 420
Buffer PKQC 28.5 114
3. To prepare a negative control, transfer 30 µl of the master mix prepared in step 2
into one 10 µl aliquot of stop mix solution (prepared in section 1.6.9.4). 4. Label two 1.5 ml eppendorf tubes with 2 and 5 min, respectively. Place them into
an appropriate tube rack at room temperature.
1.9.3 Quality control assay
5. Start a timer and swiftly transfer 5 µl PK stock solution in one 1.5 ml eppendorf tube labeled in step 4 and kept at room temperature. Incubate 5 min at room temperature.
6. 3 min after completing step 5, swiftly transfer 5 µl PK stock solution in one 1.5 ml eppendorf tube labeled in step 4 and kept at room temperature. Incubate 2 min at room temperature.
7. Start the assay reaction by adding 1.5 µl PK stock solution (chilled at -20°C) to tube ‘a’ (prepared in step 2), 1.5 µl 2 min pre-incubated PK stock solution (from step 6) to tube ‘b’ (prepared in step 2), and 1.5 µl 5 min pre-incubated PK stock solution (from step 5) to tube ‘c’ (prepared in step 2). Briefly mix by vortexing and immediately transfer all three tubes to the 50°C eppendorf thermomixer.
8. After 3 min, 10 min and 30 min, transfer 30-µl aliquots of each tube (a, b, c) into the according 10 µl stop mix tube (prepared and labeled in section 1.6.9.4).

43
9. Denature all sample tubes (from step 8) at 90 °C for 3 min. 10. Prepare a mini-PROTEAN TGX 4-20% gradient gel for SDS PAGE in the
appropriate running chamber using a 1x dilution of the 10x Tris/glycine buffer (BioRad).
11. Load 2 µl of each denatured sample on this gel. 12. Run the gel at 150 V for 50 min or until the blue dye reaches to the bottom edge
of the gel. 13. To stain the gel, disassemble the plastic scaffold and place gel in a plastic tray.
Add 50 ml Coomassie brilliant blue protein gel staining solution and keep on shaker at room temperature and shake gently for one hour. Make sure the entire gel is covered in staining solution. To de-stain, remove the staining solution and add 50 ml of Coomassie gel de-staining solution. Keep on shaker at room temperature, shake gently and make sure that the gel is covered completely in solution at all times. De-stain for 1-3 h, change de-staining solution once in-between.
1.9.4 Exemplary results On a 4-20% PAGE gel, running FBS should only show two major bands at 68 and 60 kDa, respectively (Fig. 2). Using a correctly stored PK stock solution, a 30 min incubation time is sufficient to completely degrade the most prominent 68 kDa FBS band (Fig. 2; tube a, 30 min). Decreasing this incubation time generally results in less FBS degradation, hence the increase protein band strengths (Fig. 2; tube a, b & c, 3-10 min). Pre-incubation of PK stock solutions at room temperature for 2 or 5 min impairs the expected degradation process of the 68 kDa band (Fig. 2; tube b & c).
PK stock
solution, time at RT (min)
incubation at 50°C (min)
stop mix tube label
tube a 3
a3
(prepared in step 2) 0 è 10 è a10
30 a30 tube b 3
b3
(prepared in step 2) 2 è 10 è b10
30 b30
tube c 3
c3
(prepared in step 2) 5 è 10 è c10
30 c30
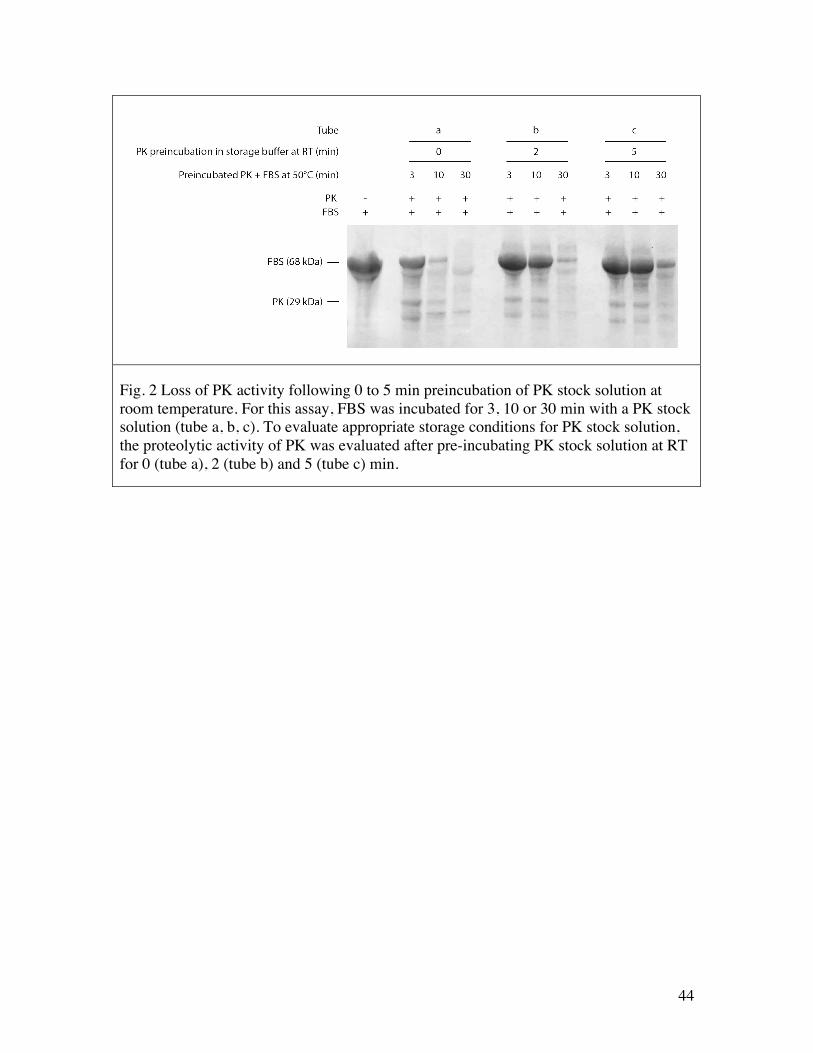
44
Fig. 2 Loss of PK activity following 0 to 5 min preincubation of PK stock solution at room temperature. For this assay, FBS was incubated for 3, 10 or 30 min with a PK stock solution (tube a, b, c). To evaluate appropriate storage conditions for PK stock solution, the proteolytic activity of PK was evaluated after pre-incubating PK stock solution at RT for 0 (tube a), 2 (tube b) and 5 (tube c) min.

45
1.10 APPENDIX C: RNA concentration determination
1.10.1 Nanodrop (ThermoScientific) The Nanodrop photometer allows for the determination of RNA concentrations in sample volumes of 0.5 – 2 µl. Typically 1 µl is used to avoid variability in the reading. The reported upper and lower concentration limits for accurate detection are 4 ng/µl and 14 µg/µl, respectively, according to the manufacturer’s specifications. We suggest here, that only samples in an expected concentration range greater than 10 ng/µl should be photometrically evaluated whereas samples with suspected lower concentrations (0.1-4 ng/µl), or samples containing possible UV-absorbent contaminants (e.g. protein, phenol) should be processed using the Qubit RNA HS assay.
1.10.2 Ribogreen assay (Invitrogen) The Quant-iT Ribogreen assay from Invitrogen offers a similar sensitivity of 1 ng/ml at the lower limit as the Qubit HS RNA assay from Invitrogen. The Ribogreen has a higher range (upper limit according to the manufacturer 1 µg/ml) and, more importantly for our purposes, can be scaled up more easily for a large number of samples. Materials
• Quant-iT™ RiboGreen® RNA Assay Kit (Life Technologies, Cat# R11490) • Quant-iT™ RiboGreen® RNA Reagent • 20x TE Buffer, RNase-free • Ribosomal RNA standard, 16S and 23S rRNA from E. coli (100 µg/ml)
Costar™ 96-Well Clear-Bottom Plates (Fisher Scientific, Cat#07-200-565) Procedure Preparing the RNA Standards
1. Prepare 125 µl of 2 µg/ml ribosomal RNA standard by adding 2.5 µl of the included RNA Standard (100 µg/ml) to 122.5 µl 1X TE Buffer.
2. Prepare the dilution series shown in Table 1, starting with the 2 µg/ml RNA standard, in an 8-well PCR strip.
Table 1. Dilution series for quantifying RNA isolated from biofluids.
46
Dilution Number
Volume of 1X TE (µl)
Volume transferred from previous dilution (µl)
Dilution concentration (µg/ml)
Final concentration in plate(ng/ml)
1 - 122 (2 µg/ml stock) 2.00 50.00 2 48 72 (from dilution #1) 1.20 30.00 3 35 70 (from dilution #2) 0.80 20.00 4 33 55 (from dilution #3) 0.50 12.50 5 48 32 (from dilution #4) 0.20 5.00 6 45 30 (from dilution #5) 0.08 2.00 7 25 25 (from dilution #6) 0.04 1.00 8 (blank) 50 0 0.00 0.00
Sample RNA Quantification
The assay plate setup is performed using the epMotion 5075 liquid handling system.
3. Prepare a 1:2000 dilution of the Quant-iT™ RiboGreen® RNA Reagent in 1X TE Buffer. Make sure that the RiboGreen has fully thawed before making the dilution. The dye is light-sensitive, so wrap the tube in foil and use within a few hours of preparation.
4. The first column of the 96-well assay plate will contain the 8 RNA dilutions prepared in step 2. The standards are diluted 20-fold from their starting concentrations to their final concentrations in the plate, as shown in Table 1. The final volume in each well will be 200 µl, so use the EpMotion 5075 to transfer 10 µl of each standard to the first column. Add 90 µl of 1X TE Buffer for a total volume of 100 µl.
5. The isolated RNA of unknown concentration will be added to the subsequent columns. First use the EpMotion 5075 to transfer 97 µl of 1X TE Buffer to the appropriate number of wells in the assay plate. Next, transfer 3 µl of the isolate to each well for a total volume of 100 µl.
6. Add 100 µl of the 1:2000 RiboGreen® RNA Reagent prepared in step 3 to all wells, for a final volume of 200 µl.
7. Mix thoroughly by shaking the plate for 1 minute at 1200 rpm. 8. Cover the plate from light by wrapping it in foil and incubate for 2 min at room
temperature. 9. Measure the fluorescence of the samples using a fluorescence microplate reader
(excitation: 480 nm, emission: 530 nm). Generate a standard curve using the concentrations of the standards in the plate (Table 1) and their measured absorbances. The curve should be linear in this concentration range (Figure 1).
10. Calculate the RNA concentration of each sample from the standard curve. The amount of RNA from each sample used for cDNA library generation should be equal as to not limit sequencing depth of individual samples. If there is significant variance in the RNA content of each sample to be used in library preparation, adjust the concentration accordingly.

47
Figure 16. Representative standard curve used to calculate RNA concentration using the Quant-iT™ RiboGreen® RNA Reagent.
R²=0.99238
0
5000
10000
15000
20000
25000
30000
35000
0 10 20 30 40
FluorescenceIntensity
Concentration (ng/ml)

48
2 Barcoded cDNA libraries for miRNA profiling by next-generation sequencing
2.1 Materials
All reagents need to be RNase free. RNA samples should be stored at -20 ºC or below and kept on ice while the reactions are being set up to minimize hydrolysis. Importantly, use siliconized tubes for all manipulations of small RNAs after the recovery of the 3’ adapter ligation products, because oligonucleotides in the nanomolar concentration range readily adsorb to surfaces of non-siliconized tubes and pipette tips. For the same reason, mix reaction solutions by tapping the tube rather than pipetting up and down.
2.1.1 Oligonucleotides
2.1.1.1 Size marker oligoribonucleotides
We add a trace amount of 32P-end-labeled size markers to the samples of total RNA to monitor the yield of adapter ligation and to guide the recovery of the expected length fraction of RNA ligation products. Use the 19-nt and 24-nt size markers for recovering miRNAs and the 19-nt and 35-nt size markers for recovery of piRNAs.
Size marker (nt)
Sequence 5’ to 3’ Synthesis number
19 CGUACGCGGGUUUAAACGA 19.39
24 CGUACGCGGAAUAGUUUAAACUGU 24.60
30 CUUGGUCGUACGCGGAAUAGUUUAAACUGU 30.125
35 CUCAUCUUGGUCGUACGCGGAAUAGUUUAAACUGU 35.131
45 CUCAUCUUGGUCGUCUCGAUGGGUACGCGGAAUAGUUUAAACUGU
45.54
The RNA size markers contain a PmeI restriction endonuclease recognition site (underlined). After PCR-amplification the cDNA libraries are digested with PmeI to avoid sequencing of the size markers.
2.1.1.2 Calibrator oligoribonucleotide sequences
Set 1 (used for monitoring RNA isolation from biofluid)

49
The calibrator oligoribonucleotides have no match to the human or mouse genome. We recommend the addition of 0.5 fmol each of the set 2 calibrator oligoribonucleotides to 2 µg of total RNA (the set 1 calibrators are typically spiked in prior to RNA isolation). The preparation of the calibrator cocktails require the use of carrier oligonucleotide to prevent surface adsorption during preparation of the dilution series in the nanomolar concentration range (we use 500 nM 11-nt oligodeoxynucleotide 5’-TCGAAGTATTC, synthesis number 11.6) The 2’O-methylated calibrators (set 3) can be used when processing piRNAs.
Calibrator Sequence cali_01_rc pUCCACGACGUCUCAUGUAUUUC cali_04_rc pGGGUACCAUACCGGUUGUCUUA cali_17_rc pUCAUGAGUCCGUACCUUGAUUG cali_18_rc pAUCAUUUACGAUUCGGAGCUGU cali_20_rc pGAUAGUUCGGGAUCGCUGUAAC cali_24_rc pUGCUACUCCGAUCUUUAGCCUC cali_25_rc pAGGGCCCUUUAGGCACUAAUAG cali_27_rc pGUAGCUGUCAGUACGUUCGUGC cali_43_rc pUCUAGUUGCGUGAUGGAGAGAA cali_44_rc pAGCCGCAUUUCGUAGUGAUAUU Set 2 (used to monitor cDNA library preparation)
Set 3 (2’O-methylated) (used for study of piRNAs)
Calibrator Sequence cali_07_rc pGUCCCACUCCGUAGAUCUGUUC cali_11_rc pGAUGUAACGAGUUGGAAUGCAA cali_12_rc pUAGCAUAUCGAGCCUGAGAACA cali_14_rc pCAUCGGUCGAACUUAUGUGAAA cali_15_rc pGAAGCACAUUCGCACAUCAUAU cali_16_rc pUCUUAACCCGGACCAGAAACUA cali_26_rc pAGGUUCCGGAUAAGUAAGAGCC cali_28_rc pUAACUCCUUAAGCGAAUCUCGC cali_31_rc pAAAGUAGCAUCCGAAAUACGGA cali_35_rc pUGAUACGGAUGUUAUACGCAGC
Calibrator Sequence cali_05_rc pCAUGGUUGUAAGUCCCGGUAAU cali_08_rc pGGAUUACUCGGGUUUGAGACAG cali_19_rc pAUGAUUCUCUAACGUCGGCAUU cali_23_rc pCUCGUCUCCGGCUGUAUAUACC cali_29_rc pCGUCGAUUUAGACCGUAUAGCC cali_37_rc pUUCCGCUUUACGGGUUAAUAGA cali_38_rc pGGAGGAUACUUAAUCCGCUGUG cali_39_rc pGGUAAUCCAACGUUGAUGGUUU cali_40_rc pGGAGCCGUGAAUACAAUCCUAG cali_41_rc pUGCUAGUCCACGGGAGAAAUAU

50
Sample Type Amount of set 1 calibrator pool Amount of set 2 calibrator pool
Urine 2 attomoles total (0.2 attomoles each cali)
2 attomoles total (0.2 attomoles each cali)
Serum, Plasma 20 attomoles total (2 attomoles each cali)
10 attomoles total (1 attomole each cali)
Tissue, cells Not tested 2.5 fmol per 1 µg of total RNA. Maintain this ratio for samples with >50 ng total RNA
2.1.2 Adapters for Illumina sequencing 3’ adaptor barcode deoxyoligonucleotides (ssDNA) that are 3’ aminomodified and 5’ phosphorylated are purchased from IDT DNA at 1 µmol scale. However, this scale synthesis from IDT typically only produces ~300 nmol of the oligonucleotide. Note: Adapters previously ordered from IDT in poor quality are marked by a yellow discoloring. Thus, prior to adenylation of adapters their quality should be controlled by running 0.3 OD260u of each DNA on a 20% polyacrylamide urea gel. If the DNA is less than ~80% full length, document quality and request resynthesis from IDT.
2.1.2.1 Pre-adenylated 3' adapters for Illumina sequencing
There are 24 pre-adenylated 3’ adapter oligodeoxynucleotides, each containing a unique pentamer barcode sequence at the 5’ end (bold and underlined).
3’ Adapter Sequence Synthesis number
01 rAppTCACTTCGTATGCCGTCTTCTGCTTG-L 26.75
02 rAppTCATCTCGTATGCCGTCTTCTGCTTG-L 26.76
03 rAppTCCACTCGTATGCCGTCTTCTGCTTG-L 26.77
04 rAppTCCGTTCGTATGCCGTCTTCTGCTTG-L 26.78
05 rAppTCCTATCGTATGCCGTCTTCTGCTTG-L 26.79
06 rAppTCGATTCGTATGCCGTCTTCTGCTTG-L 26.80
07 rAppTCGCGTCGTATGCCGTCTTCTGCTTG-L 26.81
08 rAppTCTAGTCGTATGCCGTCTTCTGCTTG-L 26.82
09 rAppTCTCCTCGTATGCCGTCTTCTGCTTG-L 26.83
10 rAppTTAAGTCGTATGCCGTCTTCTGCTTG-L 26.85
11 rAppTAACGTCGTATGCCGTCTTCTGCTTG-L 26.89
12 rAppTAATATCGTATGCCGTCTTCTGCTTG-L 26.90

51
13 rAppTAGAGTCGTATGCCGTCTTCTGCTTG-L 26.91
14 rAppTATCATCGTATGCCGTCTTCTGCTTG-L 26.93
15 rAppTGATGTCGTATGCCGTCTTCTGCTTG-L 26.94
16 rAppTTACATCGTATGCCGTCTTCTGCTTG-L 26.96
17 rAppTACTCTCGTATGCCGTCTTCTGCTTG-L 26.122
18 rAppTAGCCTCGTATGCCGTCTTCTGCTTG-L 26.123
19 rAppTTATTTCGTATGCCGTCTTCTGCTTG-L 26.124
20 rAppTTCATTCGTATGCCGTCTTCTGCTTG-L 26.125
21 rAppTTGACTCGTATGCCGTCTTCTGCTTG-L 26.126
22 rAppTTGTATCGTATGCCGTCTTCTGCTTG-L 26.127
23 rAppTGTTATCGTATGCCGTCTTCTGCTTG-L 26.129
24 rAppTGCCATCGTATGCCGTCTTCTGCTTG-L 26.130 L, 3' aminolinker blocking group; rApp, 5’ terminal adenosine residue connected via a 5’,5’-diphosphate bridge to the 5’OH of the 5’ nucleotide, which allows the DNA 3’ adapter for ligation using RNA ligase 2.
2.1.2.2 Oligoribonucleotide 5'-adapter compatible with Solexa sequencing
5' adapter: 5’-GUUCAGAGUUCUACAGUCCGACGAUC (synthesis number 26.68)
2.1.2.3 Primers for amplification of the barcoded cDNA library
Primer Sequence Synthesis number
5’-primer for HiSeq
AATGATACGGCGACCACCGACAGGTTCAGAGTTCTACAGTCCGA
44.32
5’-primer for NextSeq
AATGATACGGCGACCACCGAGATCTACACGTTCAGAGTTCTACAGTCCGA
50.45
3’-primer CAAGCAGAAGACGGCATACGA 21.929
2.1.3 Enzymes Enzymes related to small RNA sequencing should be found in the small RNA sequencing box unless otherwise noted.
• T4 polynucleotide kinase (PNK; NEB) – available in small -20 ºC

52
• T4 Rnl2(1-249)K227Q (NEB). The plasmid for expression of recombinant, His-tagged T4 Rnl2(1-249)K227Q can also be obtained from www.addgene.org.
• T4 Rnl1 (Fermentas or NEB). • SuperScript III reverse transcriptase (Invitrogen, 18080-051) -20 ºC #2, shelf 4 • Taq polymerase, available in -20 ºC #2, shelf 2 in pink box • PmeI (NEB, catalog #R0560S) – available in small -20 ºC
2.1.4 Buffers and solutions
2.1.4.1 10x RNA Ligation buffer without ATP
In a 15 ml Falcon tube combine:
Reagent or solution Final concentration Volume (ml)
1 M Tris-HCl, pH 7.6 0.5 M 5
1 M MgCl2 0.1 M 1
2-Mercaptoethanol 0.1 M 0.07
20 mg/ml acetylated BSA (Sigma , B-8894)
1 mg/ml 1
MilliQ water N/A 2.93
Store at -20°C.
2.1.4.2 10x RNA Ligation buffer with ATP
In a 15 ml Falcon tube combine:
Reagent or solution Final concentration Volume (ml)
1 M Tris-HCl, pH 7.6 0.5 M 5
1 M MgCl2 0.1 M 1
2-Mercaptoethanol 0.1 M 0.07
20 mg/ml acetylated BSA (Sigma , B-8894)
1 mg/ml 1
100 mM ATP 2 mM 0.2
MilliQ water N/A 2.73
Store at -20°C.

53
2.1.4.3 Denaturing PAA gel loading solution
In a 15 ml Falcon tube combine:
Reagent or solution Final concentration Volume (ml) Mass(mg)
Deionized Formamide 98.8% 14.25 N/A
0.5 M EDTA, pH 8.0 5 mM 0.15 N/A
Bromophenol Blue 0.2% N/A 15
MilliQ water N/A 0.60 N/A
2.1.4.4 5x TBE buffer
In an 8 L plastic bottle (carboy), combine:
Reagent or solution Final concentration (M) Mass (g)
Tris Base 0.45 377.3
Boric Acid 0.45 192.6
Na2EDTA.2H2O 0.01 26.1
Fill up to 7 L mark with MilliQ water and shake vigorously. Store at 25 ºC. Note: Using the above protocol, a dilution to 0.5X TBE may in other protocols be referred to as 1X TBE. We use 5X and 0.5X rather than 10X and 1X because 10X TBE precipitates at room temperature.
2.1.4.5 10x dNTP mix
In a 15 ml Falcon tube combine
Store at -20°C. Note: A set of the four separate 100 mM dNTPs is available from GE Healthcare, product number 28-4065-52.
Reagent Final concentration (mM) Volume (µl)
100 mM dATP 2 280
100 mM dCTP 2 280
100 mM dGTP 2 280
100 mM dTTP 2 280
MilliQ water N/A 12.88 ml

54
2.1.4.6 10x PCR buffer
In an autoclaved glass bottle combine:
Reagent Final concentration Volume (ml)
1 M Tris-HCl, pH 8.0 100 mM 10
2 M KCl 500 mM 25
Triton-X-100 1% 1
1 M MgCl2 20 mM 2
ß-Mercaptoethanol 10 mM 70 µl
MilliQ water N/A 61.98
Store at -20°C.
2.1.4.7 5x Agarose gel loading solution
In a 15 ml Falcon tube combine:
Reagent or solution Final concentration Volume (ml) Mass(g)
Bromophenol blue 0.2% N/A 0.02
Xylene cyanol FF 0.2% N/A 0.02
0.5 M EDTA, pH 8.0 100 mM 2 N/A
Ficoll type 400 20% N/A 2
MilliQ water N/A To 10 ml N/A
2.1.4.8 25 bp ladder
In a 1.5 ml Eppendorf tube combine the following:
Reagent Final concentration Volume (µl)
25 bp ladder (Invitrogen catalog number 10597011)
0.1 µg/µl 50
5 M NaCl 2 mM 1
1X TE buffer, pH 8 0.7X 350
5X loading dye 1X 100
55
2.1.5 Other Materials • Siliconized 1.5 ml reaction tubes (BioPlas cat. # 4165SL) • PCR Tube; 0.2 ml; Natural; w/Dome caps (Fisher cat. # 3414) • EDTA-coated Eppendorf tubes (Fisher cat. # 05-407-34) • QiaQuick gel extraction kit (Qiagen cat. # 28704) • TRIzol reagent (Invitrogen cat #15596-018) • miRNEasy kit (Qiagen cat. #217004)
2.2 Procedures
2.2.1 Synthesis of adenosine-5'-phosphoimidazolide (ImpA)
2.2.1.1 Reagents
• 5' AMP free acid (Sigma cat. # A2252) • Triphenylphosphine (Aldrich cat. # T84409) • 2,2'-Dipyridyldisulfide (aldrithiol-2) (Aldrich cat. # 143049) • Imidazole (molecular biology grade) (Sigma cat. # I5513) • Sodium perchlorate (Sigma cat. # 410241) • Dimethylformamide anhydrous (Sigma cat. # 227056) • Triethylamine anhydrous (Fisher cat. # 04885-1) • Acetone (Fisher cat. # A18S-4) • Diethyl ether anhydrous (Sigma cat. # 346136)
2.2.1.2 ImpA synthesis procedure
Perform all experiments under a fume hood 1. Prepare two dry 50 ml round-bottom glass flasks. Flasks are dried overnight in a drying oven at 140 ºC under vacuum. While the vacuum pump is still running, the oven is allowed to cool to room temperature and the vacuum is then released by shutting off the pump and venting the drying oven with argon from an argon tank. The flasks are then immediately sealed with rubber septa. Instead of a drying oven, one can also flame dry the flask using a Bunsen burner and chasing the hot humid air out by a constant argon flow from an argon-filled balloon connected to the flask by a needle through a rubber septum; a second needle is plucked into the septum to release the humid air and incoming argon. Once the humid air has been replaced by dry argon, the second needle is removed while the argon filled balloon remains connected while the flask is allowed to cool to room temperature. 2. Suspend 174 mg (0.5 mmol) of 5' AMP free acid in 15 ml of anhydrous dimethylformamide in one of the dried round-bottom flasks. The AMP will not dissolve

56
entirely. Retain a 20 µl aliquot of the AMP solution from the flask for subsequent thin layer chromatography (TLC) analysis (labeled as sample A). Gently flush the flask with argon and keep the flask closed with a rubber septum. 3. In the other flask, dissolve 262 mg (1 mmol) of triphenylphosphine, 220 mg (1 mmol) of 2,2'-dipyridyldisulfide, and 170 mg (2.5 mmol) of imidazole in 15 ml of dimethylformamide and 0.9 ml (2.5 mmol) of triethylamine. Remove a 20 µl aliquot and label as sample B. Gently flush the flask with argon and keep it covered with a septum. 4. Loosen the septums on both flasks and with a glass pipette add the AMP solution/suspension to the vigorously stirred triphenylphosphine-containing solution. Aspirate sample A to make sure you are able to transfer the un-dissolved AMP. Stir the reaction mixture for another 2.5 h at room temperature; keep the flask closed with the rubber septum. The 5'AMP from the DMF solution/suspension will dissolve completely and should turn to a clear yellow-green color. When the reaction is done, make sure to remove a 20 µl aliquot and label as sample C before proceeding to the next step. 5. Precipitate the ImpA by adding the reaction mixture dropwise into a thin and tall 500 ml beaker containing a vigorously stirred solution of 1.1 g (9 mmol) of sodium perchlorate, 110 ml acetone and 55 ml anhydrous diethyl ether. Precipitation will begin immediately and the solution will turn progressively cloudier as the entire reaction mixture is added. 6. Turn off the stirrer to allow the precipitate to settle to the bottom of the beaker. After approximately 1 h, decant as much as possible of the supernatant without perturbing the precipitate or use a large glass pipette connected to a pipetting aid to aspirate the clear supernatant. 7. Once the volume has been reduced to about 40 ml, resuspend the precipitate in the residual supernatant and transfer to two 30 ml Corex glass centrifugation tubes. Rinse the beaker with small volumes (5 ml) of acetone and combine the wash solutions with the suspension already transferred to Corex tubes. Collect the precipitate by centrifugation at 5000 rpm (3000xg) for 10 min. 8. Pour off the supernatant and wash the pellet twice by resuspending it with 20 ml acetone in the Corex tubes followed by 5 min centrifugation at 10, 000 rpm. The pellet should be white and the supernatant should be clear. 9. Resuspend the pellet in 10 ml diethylether and collect it again at 10,000 rpm for 10 min. Pour off the ether supernatant. Seal the centrifugation tubes with a septum or parafilm and place 2 needles or poke small holes, so that the pellet in the tubes can be dried overnight under reduced pressure at 40 ºC. After releasing the pressure by flushing the oven with argon, remove the needles so that the dry powder is protected from exposure to the air.

57
10. The dried powder may be stored in a sealed bottle for up to one week at -80 ºC protected from humidity. The yield of ImpA is approximately 160 mg. The molecular weight of ImpA is 396.3 g/mol.
2.2.1.3 Quality control of synthesized ImpA
11. For quality control, spot 1 µl AMP (sample A), unreacted mixture (sample B), and the mixture after 2.5 h reaction (sample C) on fluorescence-indicator coated Silica gel 60 pre-coated (TLC) plates (EMD, 5719-2). 12. Dry the plate with a hair dryer and develop the TLC in a chromatography chamber using isopropanol/water/25% ammonia (7/2/1) as solvent system. Develop the TLC until the solvent front is about 1 cm away from the top of the plate. Mark the solvent front with a pencil. Dry the plate with the hair dryer. 13. Visualize the spots at 254 nm with a UV hand lamp. The starting material should be completely consumed. With these conditions, the retention factors are 0.14 for AMP and 0.58 for ImpA (Figure 3).
Fig. 3 Quality control TLC plate

58
2.2.2 Adenylation of 3' adapter oligodeoxynucleotides
2.2.2.1 Reagents
• Freshly prepared adenosine-5'-phosphoimidazolide (ImpA) • 1 M MgCl2 • 5' phosphorylated 3' aminolinker-modified 3' adapter oligodeoxynucleotides,
commercially available from oligonucleotide custom synthesis companies.
2.2.2.2 Adenylation procedure
14. The protocol is given for a conversion of 50 nmol adapters. For each adapter, dry down the equivalent of 50 nmol in 1.5 ml Eppendorf tubes in a Speedvac. A 100 µl aliquot will take approximately 4 hours at 30ºC to Speedvac. We will need 150 µl of a solution containing 100 mM ImpA (MW 396.3 g/mol) and 50 mM MgCl2 for each adapter – make the appropriate sized master mix. Add 100 µl of the ImpA/MgCl2 solution to the each of the dried down oligonucleotides (the remaining ImpA/MgCl2 solution can be stored temporarily at room temperature). Incubate the adenylation reaction at 50ºC for 1.5 h with shaking. Add the remaining 50 µl of the ImpA/MgCl2 solution to each oligonucleotide and incubate for another 1.5 h at 50ºC with shaking. Proceed to the next step or store the solution at -20 ºC.
15. We recommend the use of sequencing size, preparative gels (40 cm x 25 cm x 1.5 mm, gel volume of 200 ml), to properly resolve the adenylated product from the non-adenylated adapter starting material. Pre-run the gel at 30 W for 1 h. Add 150 µl of 2x FA loading buffer with bromophenol blue to each tube, incubate them at 90ºC for 1 min, keep at room temperature for 1 min, then load the material in two wells (150 µl in each well) of an 8-well 18% polyacrylamide gel and run the gel for 15 h at 20 W until the bromophenol blue dye exits the bottom of the gel.
16. Dismantle the gel and wrap it in plastic film (i.e. Saran wrap). Place it onto a 254 nm fluorescence-indicator coated silica gel plate and visualize the oligodeoxynucleotides by shadowing with a 254 nm UV lamp (Figure 4).

59
Fig. 4 Adenylation reaction run on a 20% polyacrylamide gel
17. Mark the UV-absorbing dark bands using a Sharpie marker and draw on the Saran wrap. Make sure to look from directly above the gel when marking the lanes to precisely outline the band without visual distortions. Excise the product band and transfer gel pieces to a 13 ml tube. Elute the adenylated oligodeoxynucleotide from the gel slices overnight at 4ºC in at least 3 volumes of 0.3 M NaCl. The intensity of the band corresponding to the adenylated product (top band) is similar to the intensity of the non-adenylated material (bottom band).
18. Transfer the supernatant to a clean 13 ml tube and precipitate the adenylated oligodeoxynucleotide by adding of 3 volumes of absolute ethanol and incubating for at least 1 h at 0ºC or overnight at -20 ºC.
19. Collect the pellet by centrifugation for 30 min at 4 ºC (10,000xg) (Sorvall rotor code SS-34). Discard the supernatant and spin the samples for another 10 seconds. Remove any residual supernatant and allow the pellet to air-dry for 5 minutes.
20. Add 30 µl of water to the pellet, gently vortex and wait 10 minutes for the pellet to fully dissolve. Transfer the solution to a clean 1.5 ml microcentrifuge tube.
21. Determine the concentration by UV absorbance. The overall yield of the adenylation reaction is approximately 20%.
22. Adjust the concentration of the adenylated adapters to 50 µM, as this is the concentration required for the miRNA profiling. See appendix for concentration measurement and dilution of adenylated product.
2.2.3 Preparation of calibrator oligoribonucleotide cocktail 1. Prepare 7 ml of Carrier solution containing 500 nM 11-nt carrier of DNA oligonucleotide 11.6 in water. The carrier is necessary to prevent surface adsorption during dilution and storage of low concentrations of calibrator RNA oligonucleotides.

60
2. Prepare 50 µl of a calibrator cocktail containing 1 µM of each calibrator RNA oligo. 3. Dilute the calibrator cocktail 1:10 in Carrier solution resulting in a RNA calibrator concentration of 0.1 µM each (50 µl calibrator solution plus 450 µl of 500 nM 11-nt carrier DNA). 4. Further dilute the calibrator cocktail from step 3 1:10 in Carrier solution resulting in a calibrator concentration of 10 nM each (50 µl calibrator solution plus 450 µl of 500 nM 11-nt carrier DNA). 5. Then dilute the calibrator cocktail dilution from step 4 1:10 in carrier solution resulting in a calibrator concentration of 1 nM each (50 µl calibrator solution plus 450 µl of carrier). Continue to dilute the calibrators in this manner until the desired concentration is reached (Figure 5).
Fig. 5 Serial dilutions of calibrator cocktail
2.2.4 Preparation of radioactive length markers 1. Radiolabel the size markers individually in a 10 µl reaction by combining 1 µL of 10 µM oligo, 1 µL of 10X PNK Buffer, 1 µL of 50 µCi [gamma-32P]ATP (6,000 Ci/mmol) and 6 µL of water in a siliconized microcentrifuge tube. 2. Incubate sample at 90 ºC for 1 min. 3. Incubate sample on ice for 2 min. 4. Add 1 µl of T4 PNK enzyme (10 U/µl). 5. Incubate sample for 15 minutes at 37 ºC. 6. Quench the reaction by addition of 10 µl of denaturing PAA gel loading solution. 7. Incubate sample at 90 ºC for 1 min.
61
8. Load 20 µl samples in a single well on a 15% denaturing acrylamide (PAA) gel (15 cm wide, 17 cm long, 0.5 mm thick, 30 ml gel volume). Run the gel approx. 45 min at 30 W using 0.5x TBE buffer until the bromophenol blue dye is close to the bottom of the gel. 9. Dismantle the gel, leaving it mounted on one glass plate. To orient the alignment of the gel to the phosphorimager paper printout, excise small triangles (approx. 5 mm size) at three of the four corners of the gel and implant tiny radioactive gel pieces. Wrap the gel in plastic film (i.e. Saran wrap), place it in a cassette and against one corner of the glass plate to a corner of the cassette, align an X-ray film against the same corner and expose for 1 min; develop the film. 10. Align the gel on glass plate over X-ray film. Cut out the radioactive bands corresponding to the length marker and transfer the gel slices into pre-weighed 1.5 ml siliconized tubes (one for each marker). Also collect some weakly radioactive gel pieces from the gel running front and store in radioactive storage container. These pieces will be implanted later to facilitate alignment of gels with phosphorimager printouts. 11. Add at least 3 volumes of the gel slices of 0.3 M NaCl, but no more than 400 µl, and elute the RNA from the gel by incubating the tube overnight at 4 ºC under constant agitation (on the thermomixer shaking at 1000 rpm). 12. Collect the supernatant and add 3.5 volumes of absolute ethanol (volume of ethanol is calculated based on the volume of 0.3 M NaCl used in step 11). Keep sample on ice for 1 h or overnight at -20 ºC. 13. Collect the RNA as pellet by centrifugation in tabletop centrifuge at 4 ºC at maximum speed (approx. 14000xg) for 30 min. 14. Discard the supernatant. Collect residual ethanol by centrifugation at 14,000xg for 10 s. Air-dry the RNA pellet for 5 min. 15. Dissolve pellets in 10 µl of water. Combine 19-nt and 24-nt length marker solutions by diluting them 1:100 in water.
2.2.5 3'-Adapter ligation Note: RNA secondary structure and sequence of RNA and adapters affect ligation efficiency. It is therefore important to follow precisely the temperatures and incubation times given during 3’ and 5’ adapter ligations and RT. Make sure, using a thermometer, that your heat blocks are at the correct temperature, do not trust displays or marked settings, and keep a thermometer in your block during these steps. Heat shocks should be at 90 ºC and for 1 min. Once the reactions are complete and reactions are stopped, the temperature is no longer critical, i.e. heat-shocking a sample prior for loading is not as critical anymore.

62
1. For total RNA isolated from cells or tissue, provide 2 µg of total RNA in 8.5 µl of water in a siliconized reaction tube. (When using periodate treated samples for piRNA cloning, you may increase the amount of total RNA to 20 µg per sample. When barcoding is performed, note that the total amount of RNA loaded on the separation gel may exceed its separation capacity, requiring the use of either more lanes or increasing the gel spacer size. After recovery of ligation products and 5’ adapter ligation, the regular size gels can be used for separating the 5’ adapter ligation product since the majority of RNA was removed on the first gel.) For RNA isolated from serum or plasma, provide 5-20 ng of RNA in 8.5 µl of water in a siliconized reaction tube. 2. Premix the following components. Multiply each volume by the number of samples being processed (up to 24 samples plus one control for combined 19-nt and 24-nt length marker). Prepare 10% extra of the required mastermix to allow for dispensing errors. Each 3'-adapter ligation reaction requires 2 µl of 10x RNA ligase buffer without ATP, 6 µl 50% aqueous DMSO, 0.5 µl of 1 nM “each” set 2 calibrator cocktail and 0.1 µl of 1:100 dilution of the 5'-32P-labeled length marker oligoribonucleotide mix. Make certain the calibrator cocktail is at the proper concentration; should the concentration be too high, the calibrator marker becomes dominant in sequencing reads. Note: When preparing a library of RNA from serum, plasma, or urine, do not add radiolabeled size-marker to the cocktail as one does not want the size-marker to dominate in adapter ligation steps. Run size-markers flanking the sample of interest on subsequent polyacrylamide gels and use the radiolabeled size-marker location on the gel to approximate the sample of interest’s location for gel excision and elution purposes. Additionally, the calibrator concentration must be further proportionately diluted depending upon lower input amounts from serum or plasma. For example, further dilute the calibrator 1:100 to 0.01 nM each calibrator for 20 ng of RNA input from plasma. 3. Add 8.6 µl of the mastermix to each sample (for the length marker control reaction add mastermix to 8.5 µl that contains 6.5 µl of water and 2 µl of the 1:100 diluted length marker oligoribonucleotide mix). 4. Add 2 µl of 50 µM adenylated 3'-adapter with a unique barcode to each sample including the tube containing the 19- and 24-nt size markers, for which you may use again any of the adenylated adapters before, since this sample won’t be pooled. 5. Incubate the tube for 1 min at 90 ºC to denature RNA and immediately place on ice for 2 min. 6. Add 1 µl Rnl2(1-249)K227Q (1 µg/µl), mix gently, and incubate overnight on ice in the cold room. 7. Add 3-4 times the total volume of the combined 3'-adapter ligation reactions of absolute ethanol (i.e. 1.32 ml ethanol for 24 samples) to the samples. In order to do this add 660 µl of the 100% ethanol to one of the samples and 660 µl to the other sample then

63
combine the rest of the samples by adding 11 of them, one after another, to the tube containing the first sample and ethanol and other 11 by adding them to second tube that contains sample and ethanol. It is important not to mix samples together before the ethanol is added because ligase has to be inactivated in each sample, and that is achieved with ethanol. In this instance, it is imperative ethanol be added before NaCl in order to inactivate the enzyme and stop the reaction. 8. Add 24 µl of 3 M NaCl to each tube that contains 12 samples and ethanol to achieve a final concentration of 0.3 M NaCl. Note that NaCl concentration is calculated solely based on the aqueous volume and excludes the volume of ethanol. 9. Precipitate the ligation products by incubation on ice for 1 h and collect the pellet by centrifugation in a tabletop centrifuge at 4 ºC at maximum speed (approx. 21,000xg) for 30 min. 10. Discard the supernatant. Collect residual ethanol by centrifugation at 21,000xg for 10 s. Air-dry the RNA pellet for 5 min. 11. Use 10 µl of water to dissolve each of the two RNA pellets representing 12 pooled RNA samples. Tap to mix, spin down. Combine the two 10 µl samples into one tube for a final volume of 20 µl representing a pool of all 24 RNA samples. 12. Before loading the samples, pre-run a 20-well 15% denaturing PAA urea gel (15 cm x 17 cm x 0.5 mm, 30 ml gel volume; if the amount of total RNA is larger, consider using 1.5 mm spacers and 70 ml of gel solution or spreading the sample across more lanes) for 30 min at 30 W. Add 20 µl of denaturing PAA gel loading solution (5x FA) to the samples, incubate for 1 min at 90 ºC and immediately load the samples in two adjacent wells (20 µl of the sample in each well) in the center of the gel. Also load a negative control containing 0.5 µl of the 1:100 diluted length marker oligoribonucleotide mix, 9 µl of water and 10 µl of PAA gel loading solution into one lane. When processing more than one barcoded library (i.e. more than 24 individual small RNA samples at once), space samples by a two-well distance to avoid cross contamination. Load the length marker ligation reaction separated by one blank lane into the lanes flanking the leftmost and the rightmost of the samples loaded in the center of the gel. 13. Run the gel at 30 W for approximately 45 min in 0.5x TBE buffer until the bromophenol blue dye reaches the lower third of the gel (For size selection with ranges greater than 20nt, run gel for 35 min to reduce the gel volume, thus preventing excessive splitting of samples). Do not run the gel much further in order to contain the ligation products within a gel area as small as possible for efficient elution. 14. Dismantle the gel, leaving it mounted on one glass plate. 15. To facilitate the alignment of the gel to the phosphorimager paper printout, excise small triangles (approx. 5 mm size) at three of the four corners of the gel and implant into

64
each tiny radioactive gel pieces collected in step 10 of the radiolabeling procedure. 16. Wrap the gel in plastic film (i.e. Saran wrap) to avoid contamination and expose it to a phosphorimaging screen for 1 hour (Figure 6).
Fig. 6 15% polyacrylamide gel after 3’ adapter ligation. Sample GA1 is a representative RNA sample that has undergone 3’ adapter ligation The boxed fragment of GA1 has 3’ adapter ligated and will be excised from the gel and the RNA will be extracted. This will be used in 5’ adapter ligation. At size 19 and 24 nt, sample GA1 has some unligated product resulting from a non-100% efficient 3’ ligation reaction. Smaller products may be the result of a circularization of small RNAs by the T4 ligase.
17. Print out a 100%-scaled image of the phosphorimaged gel, align the gel on top of the printout according to the positions of the three radioactive gel pieces. For gel excision in sample lanes, use the positions of the 19-nt/3’ adapter and 24-nt/3’ adapter (35-nt/3’adapter, when sequencing piRNAs) ligation products as margins. Transfer the gel piece(s) into a pre-weighed siliconized 1.5 ml tube. Also excise the ligation products for the length marker control and place into a separate tube. 18. Add 3 gel-piece volume of 0.3 M NaCl and elute the RNA from the gel by incubating the tube overnight at 4 ºC under constant agitation (on the thermomixer shaking at 1000 rpm). 19. Collect the supernatant and precipitate the small RNAs by adding 3.5 volumes of ethanol to the collected supernatant (volume of ethanol is calculated based on the volume of 0.3 M NaCl used in step 18). 20. Precipitate the ligation products by incubation on ice for 1 h and collect the pellet by centrifugation in a tabletop centrifuge at 4 ºC at maximum speed (approx. 21,000xg) for 30 min. 21. Discard the supernatant. Collect residual ethanol by centrifugation at 21,000xg for 10 s and discard the supernatant. Air-dry the RNA pellet for 5 min and cover the samples with a clean Kimwipe to prevent contamination.

65
2.2.6 5' Adapter ligation 1. Dissolve the pellets in 9 µl water. Carry forward also the control length marker ligation product. 2. Prepare a mastermix containing the following components per reaction: 1 µl of 100 µM 5'-adapter (26.68), 2 µl of 10x RNA ligase buffer with ATP and 6 µl 50% aqueous DMSO. Prepare 10% extra of the required cocktail to allow for dispensing errors. Add 9 µl of this mixture to each sample. 3. Incubate the tube for 1 min at 90 ºC to denature RNA and immediately place on ice for 2 min. 4. Add 2 µl of T4 RNA ligase 1 (Rnl1) (1 µg/µl), mix gently, and incubate for 1 h at 37 ºC. 5. Before loading the samples, pre-run a 20-well 15% denaturing PAA urea gel (15 cm x 17 cm x 0.5 mm, 30 ml gel volume) for 30 min at 30 W. Add 20 µl of denaturing PAA gel loading solution to the samples, incubate for 1 min at 90 ºC and immediately load the samples in two adjacent wells (20 µl of the sample in each well). When processing more than one barcoded library (i.e. more than 20 individual small RNA samples at once), space samples by a two-well distance to avoid cross contamination. Load the length marker ligation reaction separated by one blank lane into the lanes flanking the leftmost and the rightmost of the samples loaded in the center of the gel. Also load a negative control containing 0.5 µl of the 1:100 diluted length marker oligoribonucleotide mix, 9 µl of water and 10 µl of PAA gel loading solution into one lane. Run the gel for 40 min at 30 W using 0.5x TBE buffer until the bromophenol blue dye is close to the bottom of the gel (For size selection with ranges greater than 20nt, run gel for 30 min to reduce the gel volume, thus preventing excessive splitting of samples). Image the gel as described for the 3’ adapter ligation (Figure 7).

66
Fig. 7 12% polyacrylamide gel after 5’ adapter ligation. Sample GA1 is a representative RNA sample that has undergone 3’ and 5’ adapter ligation. The boxed fragments are RNA samples with both 3’ and 5’ adapter ligate. These will be excised from the gel and the RNA will be extracted. The bands at 45 and 50 bp represent RNA without 5’ adapter ligate.
6. Add 3 gel-piece volumes of 0.3 M NaCl and 1 µl of 100 µM 3'-primer (21.929) as carrier and elute the ligated RNAs from the gel by incubating the tube overnight at 4 ºC under constant agitation (on the thermomixer shaking at 1000 rpm). The 3'-primer facilitates the recovery of the ligation product and will be precipitated together with RNA and used in the reverse transcription reaction. 7. Collect the supernatant and precipitate the small RNAs by adding 3.5 volumes of ethanol relative to the collected supernatant. Store 3’ ligation product gel pieces in -20 ºC in case subsequent experiments fail and need to be repeated. 8. Precipitate the ligation products by incubation on ice for 1 h and collect the pellet by centrifugation in a tabletop centrifuge at 4 ºC at maximum speed (approx. 21,000xg) for 30 min. 9. Discard the supernatant. Collect residual ethanol by centrifugation at 21,000xg for 10 s and discard the supernatant. Air-dry the RNA pellet for 5 min.
2.2.7 Reverse transcription (RT) 1. Dissolve pellets in 5.6 µl water. Carry forward also the control length marker ligation product. 2. Prepare an RT mastermix containing the following components per reaction: 1.5 µl 0.1 M DTT, 3 µl 5x first-strand buffer (provided by the manufacturer, but verify 5X vs 10X) and 4.2 µl 10 mM each dNTPs. Prepare 10% extra of the required cocktail to allow for

67
A1101 New Taq 1:50 New Taq 1:60
New Taq 1:100
8 10 12 14 18 8 10 12 14 18 8 10 12 14 18
8 10 12 14 18 cycles
cycles
125100
125100
dispensing errors. 3. Denature the RNA by incubating the tube for 1 min at 90 ºC and transfer the tube to a 50 ºC incubator. 4. Add 8.7 µl of the RT cocktail to each sample and incubate for 3 min at 50 ºC. Add 0.75 µl of Superscript III reverse transcriptase and incubate for 30 min at 42 ºC. 5. To hydrolyze the RNA template, add 48 µl of 150 mM KOH/20 mM Tris base and incubate for 10 min at 90 ºC. 6. Neutralize the solution by addition of 40 µl of 150 mM HCl and adjust the pH value to a range of 7.5 and 9.0. Monitor the pH change by spotting 1 µl of cDNA solution on pH paper. The pH of the solution should be slightly alkaline to not inhibit the subsequent PCR.
2.2.8 PCR amplification 7. Prepare a PCR mix containing the following components per reaction: 10 µl of the cDNA solution, 0.5 µl of 100 µM 3’primer 21.929, 0.5 µl of the appropriate 100 µM 5’primer (44.32 for HiSeq or 50.45 for NextSeq), 2 µl of 10 mM each dNTPs, 10 µl of 10x PCR buffer, 76 µl of water and 1 µl of Taq DNA polymerase (5 U/µl) to perform a standard 100 µl PCR with Taq polymerase. Also perform a no-template control PCR reaction (H2O instead of cDNA) to check for DNA contamination in the reaction mixture. Prepare enough mastermix to have four 100 µl PCR reactions per sample. One PCR reaction will be a pilot PCR to determine how many cycles should be used to amplify the cDNA library. Once you determine the number of cycles needed per cDNA library, perform the large-scale amplification, which will contain three 100 µl PCR reactions per cDNA library.
Fig. 8 Pilot PCR on 2.5% agarose gel For representative sample A1101, 8 PCR cycles would be used for the final amplification. Desired PCR product runs around 90-101 nt on gel. 70 bp band is unwanted 3’-adapter-to-5’adapter ligation.

68
8. Program the following cycle conditions: 45 s at 94 ºC, 85 s at 50 ºC, 60 s at 72 ºC. Remove 12 µl aliquots every other cycle following cycle number 18 by temporarily putting the PCR cycler on hold at the end of the 72 ºC step. This is done to determine the necessary number of cycles for amplifying the cDNA library. Do not amplify more than 22 cycles. 9. Add 3 µl of agarose loading dye solution to each aliquot and load onto a 2.5% agarose gel. Load the 25-bp DNA ladder in a separate well. Run the gel for 45 min, 150 V until the ladder is sufficiently resolved (Fig. 8). Also load the 25-bp DNA ladder in a separate well. The products might appear as a double band with a higher band running at the expected length of about 90-95 bp (90-106 bp when generating piRNA libraries) and a 70 bp band corresponding to 3’-adapter-to-5’-adapter ligation side products without insert. Carry over from unligated 3’ adapter into the 5’ adapter ligation reaction is responsible for this byproduct. Only the negative control from the final PCR cycle needs to be run on agarose gel. 10. Define the optimal cycle number for cDNA amplification, which has to be within the exponential amplification phase of the PCR, i.e. approx. 5 cycles away from reaching the saturation level of PCR amplification. It is important to limit the PCR to the exponential phase, otherwise sequence-specific distortions will be introduced into the small RNA profiles, a process commonly referred to as clonal amplification. 11. Perform a 300 µl PCR with the determined cycle number by distributing the volume over 3 PCR tubes. After the reaction, remove 5 µl of PCR reaction, add 1.25 µl agarose loading dye solution and verify the product formation by running a 2.5% agarose gel for 45 min, 150 V. Run the 25-bp DNA ladder in a separate well. If the PCR product is visible, proceed to the next step, otherwise add a few cycles of PCR or repeat the pilot study and larger scale PCR. 12. Combine the aliquoted PCR products in a 1.5 ml tube, add 30 µl of 3 M NaCl and extract with 330 µl of basic (pH 7.9) phenol/chloroform/isoamyl alcohol (25:24:1) and vortex for 20 s. 13. Separate phases by centrifugation at 21,100xg in a tabletop centrifuge for 2 min. 14. Take off the upper, aqueous phase and transfer to a new tube. Make sure not to take off the interphase where denatured proteins accumulate. 15. Re-extract the aqueous phase with 330 µl of chloroform to remove residual phenol and vortex for 20 s, then separate phases by centrifugation at 21,100xg in a tabletop centrifuge for 2 min. 16. Take off the upper, aqueous phase and transfer to a new tube. 17. Add 1 ml of absolute ethanol and incubate on ice for 1 h or overnight at -20 ºC.

69
18. Collect the pellet by centrifugation in a tabletop centrifuge at 4 ºC at maximum speed (approx. 21,100xg) for 15 min. 19. Discard the supernatant. Collect residual ethanol by centrifugation at 21,100xg for 1 min. Remove all of the supernatant but do not dry the pellet as this will cause the DNA to denature. Immediately proceed to the next step.
2.2.9 PmeI digestion This step cleaves PCR products originating from the radiolabeled length markers used during small RNA cDNA library preparation. Be careful not to denature the double-stranded PCR product before or during the PmeI digestion. Denaturation and subsequent re-annealing of a complex sequence pool will result in imperfect rehybridization and formation of DNA duplexes with internal bulges that might compromise PmeI digestion. As control, the PCR product obtained from the ligation of adapters to the marker oligonucleotides alone (marker control sample) must be digested completely. Note: This is not necessary for samples that do not have radiolabeled size markers. Resuspend pellets in 20 µl water and proceed to step 3 for size selection. 1. Prepare a PmeI digestion cocktail containing the following components per reaction: 2 µl 10x PmeI buffer (with BSA), 17.3 µl of water and 0.5 µl (5 U) of PmeI (NEB). 2. Dissolve the DNA pellet in 20 µl of the PmeI digestion mixture and incubate for at least 2 h at 37 ºC. Do not vortex reaction vigorously or the enzyme will denature. 3. Next, to separate small RNA insert-containing adapter ligation products from shorter 5'-adapter-to-3'-adapter ligation side products, prepare a 2.5% agarose gel containing 0.4 µg/ml of ethidium bromide. Add 5 µl of agarose gel loading solution and load all of the restriction digest into two wells of the agarose gel, as well as the 25-bp DNA ladder in a separate well. Run the gel in 0.5 x TBE buffer for approximately 1.5 h at 180 V until the 25-bp ladder is sufficiently resolved. 4. Visualize the DNA in the gel using a 360 nm UV transilluminator and excise the upper band of approximately 90 to 95 bp (90-106 bp for piRNA libraries) in size. Avoid excising below 90 bp to make sure the 5’-to-3’-adapter ligation product is not recovered. 5. Transfer the gel slice to a pre-weighed 1.5 ml reaction tube and weigh it again. Elute the DNA from the gel using the QiaQuick gel extraction kit according to the manufacturer's instructions. Recover the DNA in 30 µl of Qiagen elution buffer (EB). 6. After the elution, remove 5 µl of the eluted product, add 1.25 µl agarose loading dye solution and verify the product elution and removal of the 5’-to-3’-adapter ligation product on a 2.5% agarose gel. Load the 25 bp DNA ladder in a separate well. Run the
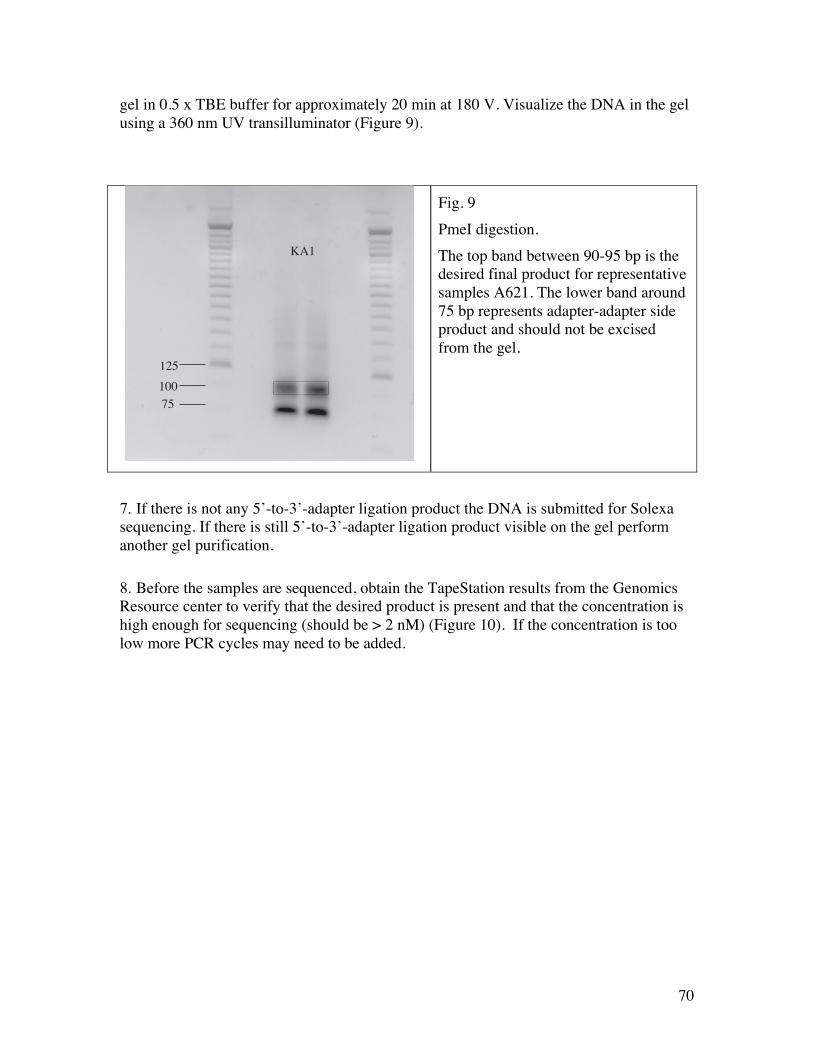
70
gel in 0.5 x TBE buffer for approximately 20 min at 180 V. Visualize the DNA in the gel using a 360 nm UV transilluminator (Figure 9).
Fig. 9 PmeI digestion. The top band between 90-95 bp is the desired final product for representative samples A621. The lower band around 75 bp represents adapter-adapter side product and should not be excised from the gel.
7. If there is not any 5’-to-3’-adapter ligation product the DNA is submitted for Solexa sequencing. If there is still 5’-to-3’-adapter ligation product visible on the gel perform another gel purification. 8. Before the samples are sequenced, obtain the TapeStation results from the Genomics Resource center to verify that the desired product is present and that the concentration is high enough for sequencing (should be > 2 nM) (Figure 10). If the concentration is too low more PCR cycles may need to be added.
12510075
KA1

71
Fig. 10 Tape Station Results. The desired product should appear as a peak between 90-100 bp. The region molarity should be >2000 pmol/l to obtain sufficient reads.
Troubleshooting: No PCR product: A) Adapter ligation failed. Take care to cool the reaction mixture after heat-shock and before addition of ligase. Rnl2(1-249)K227Q in particular is inactive at temperatures above 37 ºC and may be irreversibly inactivated at higher temperatures. B) After precipitation, take care that residual ethanol is evaporated before addition of reaction mix, as residual ethanol will inhibit ligases and reverse transcriptases. C) Revisit reverse transcription. D) Periodate treatment to enrich for piRNAs dramatically reduces the amount of RNA able to ligate to adapters. More rounds of PCR may be needed in this case though it may appear as if RT failed. No full-length, but only 5’-to-3’-adapter ligation products of 70 bp are visible after PCR: A) Make sure adapter concentrations in the ligation reactions are correct. B) Make sure to only excise ligation products between 19 and 24 nt (or 35 nt) length. Never cut below the 19 nt marker. C) If the starting concentration of input RNA was low and you cannot visualize the full-length product, try running the full-scale PCR for 10 cycles, do the phenol/chloroform extraction, ethanol precipitation, and then run the sample on a full-length 2.5% agarose gel (180 V, 1.5 h). Excise the product at 90-95 bp, elute from the gel using the QiaQuick gel extraction kit then redo the pilot PCR.
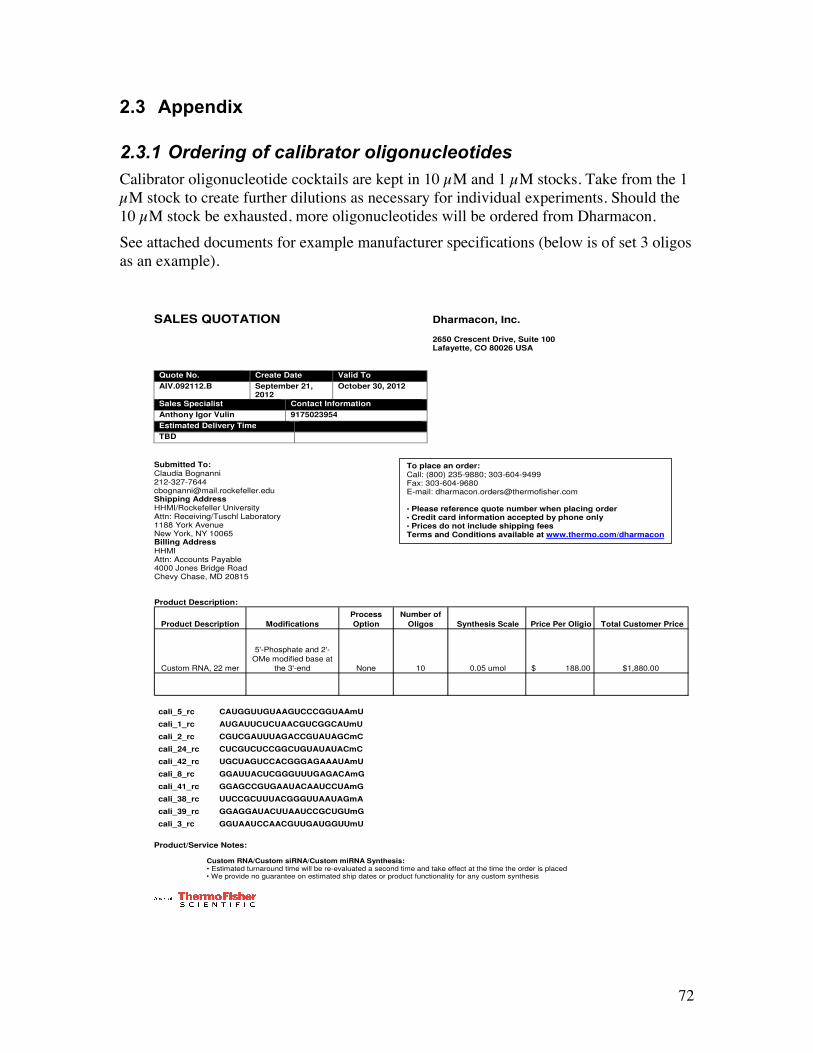
72
2.3 Appendix
2.3.1 Ordering of calibrator oligonucleotides Calibrator oligonucleotide cocktails are kept in 10 µM and 1 µM stocks. Take from the 1 µM stock to create further dilutions as necessary for individual experiments. Should the 10 µM stock be exhausted, more oligonucleotides will be ordered from Dharmacon. See attached documents for example manufacturer specifications (below is of set 3 oligos as an example).
SALES QUOTATION Dharmacon, Inc. 2650 Crescent Drive, Suite 100 Lafayette, CO 80026 USA
Quote No. Create Date Valid To AIV.092112.B September 21,
2012 October 30, 2012
Sales Specialist Contact Information Anthony Igor Vulin 9175023954 Estimated Delivery Time TBD
Submitted To: Claudia Bognanni 212-327-7644 [email protected] Shipping Address HHMI/Rockefeller University Attn: Receiving/Tuschl Laboratory 1188 York Avenue New York, NY 10065 Billing Address HHMI Attn: Accounts Payable 4000 Jones Bridge Road Chevy Chase, MD 20815 Product Description:
Product Description ModificationsProcess Option
Number of Oligos Synthesis Scale Price Per Oligio Total Customer Price
Custom RNA, 22 mer
5'-Phosphate and 2'-OMe modified base at
the 3'-end None 10 0.05 umol $ 188.00 $1,880.00
Product/Service Notes:
Custom RNA/Custom siRNA/Custom miRNA Synthesis: • Estimated turnaround time will be re-evaluated a second time and take effect at the time the order is placed • We provide no guarantee on estimated ship dates or product functionality for any custom synthesis
cali_5_rc CAUGGUUGUAAGUCCCGGUAAmU
cali_1_rc AUGAUUCUCUAACGUCGGCAUmU
cali_2_rc CGUCGAUUUAGACCGUAUAGCmC
cali_24_rc CUCGUCUCCGGCUGUAUAUACmC
cali_42_rc UGCUAGUCCACGGGAGAAAUAmU
cali_8_rc GGAUUACUCGGGUUUGAGACAmG
cali_41_rc GGAGCCGUGAAUACAAUCCUAmG
cali_38_rc UUCCGCUUUACGGGUUAAUAGmA
cali_39_rc GGAGGAUACUUAAUCCGCUGUmG
cali_3_rc GGUAAUCCAACGUUGAUGGUUmU
To place an order: Call: (800) 235-9880; 303-604-9499 Fax: 303-604-9680 E-mail: [email protected] • Please reference quote number when placing order • Credit card information accepted by phone only • Prices do not include shipping fees Terms and Conditions available at www.thermo.com/dharmacon
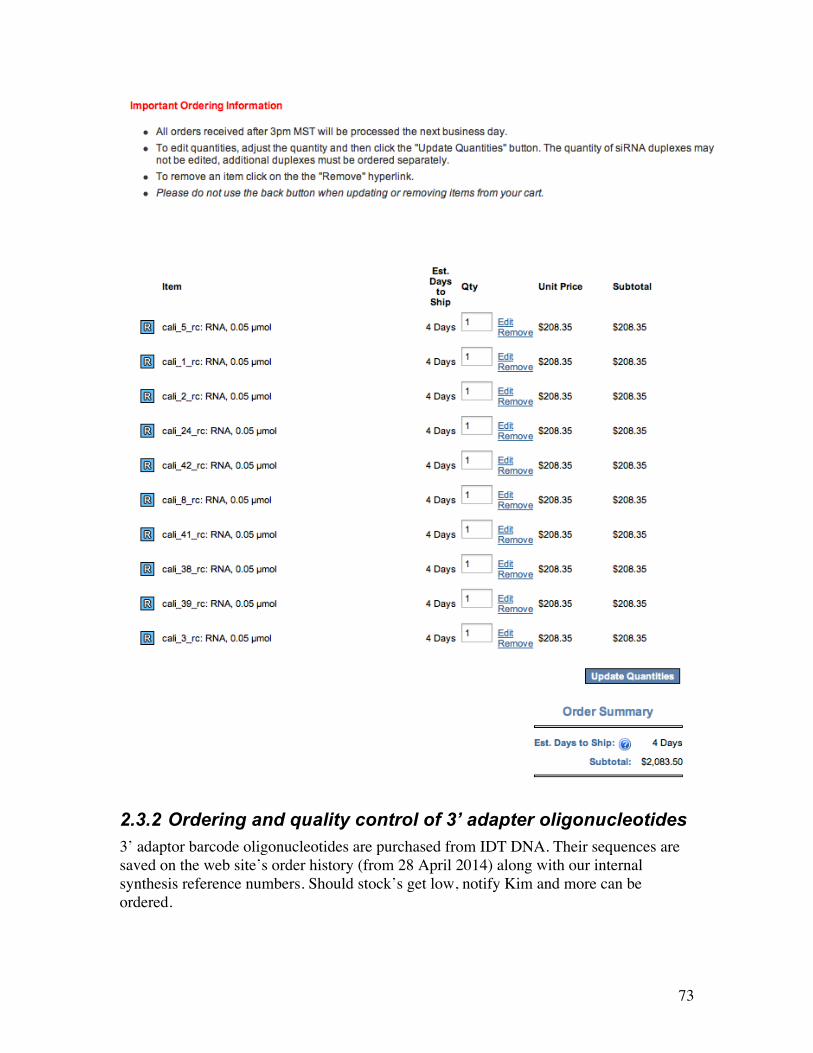
73
2.3.2 Ordering and quality control of 3’ adapter oligonucleotides 3’ adaptor barcode oligonucleotides are purchased from IDT DNA. Their sequences are saved on the web site’s order history (from 28 April 2014) along with our internal synthesis reference numbers. Should stock’s get low, notify Kim and more can be ordered.

74
Pricing Breakdown
Quotation SummaryPricing Quote # 10162 applied.
Item # Sequence Name Sequence Product Name PurificationYield
GuaranteeOligo Price
1 26.75 /5Phos/TCACTTCGTATGCCGTCTTCTGCTTG/3AmMO/ 1 umole DNA oligo Standard Desalting 20 ODs $ 106.75
2 26.76 /5Phos/TCATCTCGTATGCCGTCTTCTGCTTG/3AmMO/ 1 umole DNA oligo Standard Desalting 20 ODs $ 106.75
3 26.77 /5Phos/TCCACTCGTATGCCGTCTTCTGCTTG/3AmMO/ 1 umole DNA oligo Standard Desalting 20 ODs $ 106.75
4 26.78 /5Phos/TCCGTTCGTATGCCGTCTTCTGCTTG/3AmMO/ 1 umole DNA oligo Standard Desalting 20 ODs $ 106.75
5 26.79 /5Phos/TCCTATCGTATGCCGTCTTCTGCTTG/3AmMO/ 1 umole DNA oligo Standard Desalting 20 ODs $ 106.75
6 26.8 /5Phos/TCGATTCGTATGCCGTCTTCTGCTTG/3AmMO/ 1 umole DNA oligo Standard Desalting 20 ODs $ 106.75
7 26.81 /5Phos/TCGCGTCGTATGCCGTCTTCTGCTTG/3AmMO/ 1 umole DNA oligo Standard Desalting 20 ODs $ 106.75
8 26.82 /5Phos/TCTAGTCGTATGCCGTCTTCTGCTTG/3AmMO/ 1 umole DNA oligo Standard Desalting 20 ODs $ 106.75
9 26.83 /5Phos/TCTCCTCGTATGCCGTCTTCTGCTTG/3AmMO/ 1 umole DNA oligo Standard Desalting 20 ODs $ 106.75
10 26.84 /5Phos/TCTGATCGTATGCCGTCTTCTGCTTG/3AmMO/ 1 umole DNA oligo Standard Desalting 20 ODs $ 106.75
11 26.85 /5Phos/TTAAGTCGTATGCCGTCTTCTGCTTG/3AmMO/ 1 umole DNA oligo Standard Desalting 20 ODs $ 106.75
12 26.89 /5Phos/TAACGTCGTATGCCGTCTTCTGCTTG/3AmMO/ 1 umole DNA oligo Standard Desalting 20 ODs $ 106.75
13 26.9 /5Phos/TAATATCGTATGCCGTCTTCTGCTTG/3AmMO/ 1 umole DNA oligo Standard Desalting 20 ODs $ 106.75
14 26.91 /5Phos/TAGAGTCGTATGCCGTCTTCTGCTTG/3AmMO/ 1 umole DNA oligo Standard Desalting 20 ODs $ 106.75
15 26.92 /5Phos/TAGGATCGTATGCCGTCTTCTGCTTG/3AmMO/ 1 umole DNA oligo Standard Desalting 20 ODs $ 106.75
16 26.93 /5Phos/TATCATCGTATGCCGTCTTCTGCTTG/3AmMO/ 1 umole DNA oligo Standard Desalting 20 ODs $ 106.75
17 26.94 /5Phos/TGATGTCGTATGCCGTCTTCTGCTTG/3AmMO/ 1 umole DNA oligo Standard Desalting 20 ODs $ 106.75
18 26.95 /5Phos/TGTGTTCGTATGCCGTCTTCTGCTTG/3AmMO/ 1 umole DNA oligo Standard Desalting 20 ODs $ 106.75
19 26.96 /5Phos/TTACATCGTATGCCGTCTTCTGCTTG/3AmMO/ 1 umole DNA oligo Standard Desalting 20 ODs $ 106.75
20 26.98 /5Phos/TTGGTTCGTATGCCGTCTTCTGCTTG/3AmMO/ 1 umole DNA oligo Standard Desalting 20 ODs $ 106.75
Invoice Subtotal: $ 2,135.00
Shipping Charge: $ 0.00
Credit: $ 0.00
Invoice Total (not including applicable sales tax): $ 2,135.00
Integrated DNA Technologies, Inc. - Custom Quote Quote Reference Number - Page 2
Custom Quote
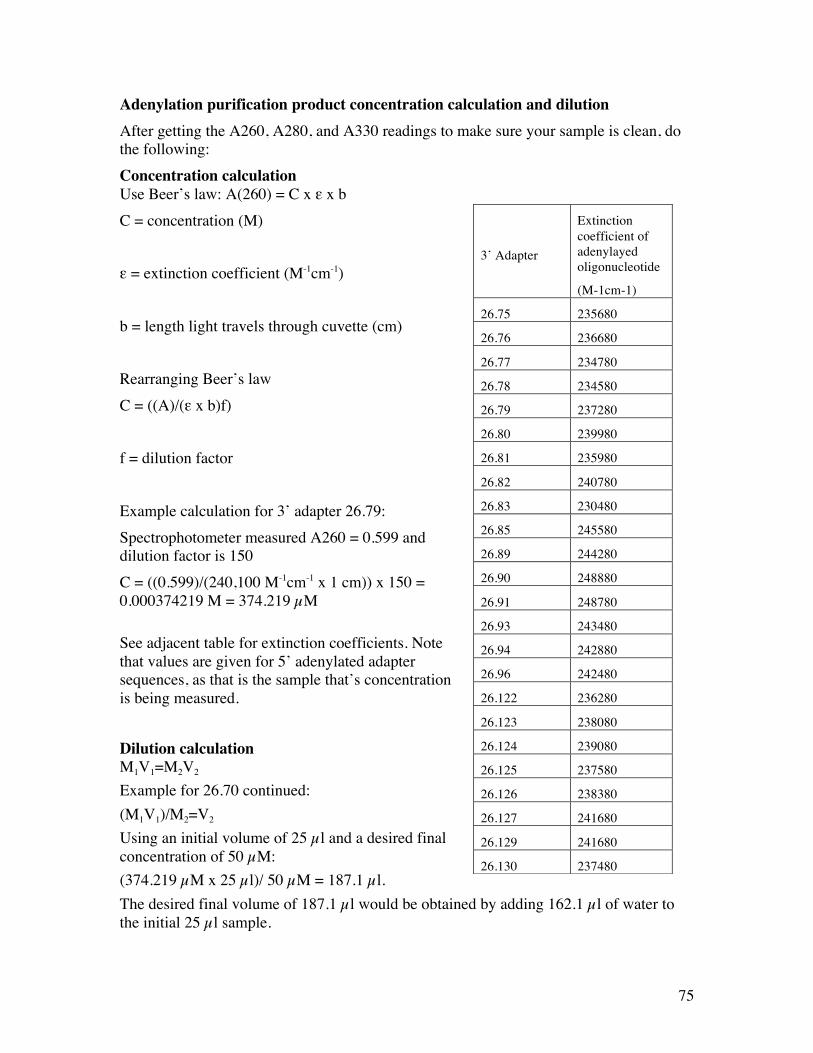
75
Adenylation purification product concentration calculation and dilution After getting the A260, A280, and A330 readings to make sure your sample is clean, do the following: Concentration calculation Use Beer’s law: A(260) = C x ε x b C = concentration (M) ε = extinction coefficient (M-1cm-1) b = length light travels through cuvette (cm) Rearranging Beer’s law C = ((A)/(ε x b)f) f = dilution factor Example calculation for 3’ adapter 26.79: Spectrophotometer measured A260 = 0.599 and dilution factor is 150 C = ((0.599)/(240,100 M-1cm-1 x 1 cm)) x 150 = 0.000374219 M = 374.219 µM See adjacent table for extinction coefficients. Note that values are given for 5’ adenylated adapter sequences, as that is the sample that’s concentration is being measured. Dilution calculation M1V1=M2V2 Example for 26.70 continued: (M1V1)/M2=V2 Using an initial volume of 25 µl and a desired final concentration of 50 µM: (374.219 µM x 25 µl)/ 50 µM = 187.1 µl. The desired final volume of 187.1 µl would be obtained by adding 162.1 µl of water to the initial 25 µl sample.
3’ Adapter
Extinction coefficient of adenylayed oligonucleotide
(M-1cm-1)
26.75 235680
26.76 236680
26.77 234780
26.78 234580
26.79 237280
26.80 239980
26.81 235980
26.82 240780
26.83 230480
26.85 245580
26.89 244280
26.90 248880
26.91 248780
26.93 243480
26.94 242880
26.96 242480
26.122 236280
26.123 238080
26.124 239080
26.125 237580
26.126 238380
26.127 241680
26.129 241680
26.130 237480

76
3 Expression, purification, and quality control of RNA ligase 1 and RNA ligase 2
3.1 Materials
3.1.1 Solutions required for bacterial protein production All buffers should be filtered through a 0.22 µm Millipore filter and degassed under vacuum chamber conditions prior to use.
3.1.1.1 50 mM AEBSF
Applichem, Cat. No. A1421,0500 Dissolve 0.1198 g (119.8 mg) of AEBSF in 10 ml MilliQ H2O. Do not pH. Store at -20 ºC.
3.1.1.2 1M IPTG
IPTG ≥ 99% (TLC), ≤ 0.1% Dioxane, Sigma-Aldrich, Cat. No. I6758-10G Dissolve 2.38 g of IPTG in 10 ml MilliQ H2O. Do not pH. Store at -20 ºC.
3.1.1.3 Ampicillin (50 mg/ml)
Dissolve 1 g of ampicillin in 20 ml of MilliQ Do not pH. Store at -20 ºC. Dispense into 1 ml aliquots. Store at -20 ºC.
3.1.2 Buffers for Rnl1/Rnl2 Purification
3.1.2.1 Buffer A (Lysis/Wash – 500 ml)
Reagent or solution Final concentration Volume (ml)
1 M Tris-HCl, pH 8.0 (+25 ºC) 0.05 M 25
5 M NaCl 0.5 M 2.5
100% Glycerol 10% 50
MilliQ H2O N/A 422.5

77
To make lysis buffer, add 48 ml of Buffer A, 50 µl of 1 mg/ml DNase I, 50 mg lysozyme, 0.344 g sodium pyrophosphate decahydrate, and 2 ml of 50 mM AEBSF. Make an amount of lysis buffer proportional to the size of the pellet (See 12.3 Lysis). Keep lysis buffer on ice.
3.1.2.2 Buffer B (IMAC Elution – 250 ml)
Reagent or solution Final concentration Volume (ml)
1 M Tris-HCl, pH 8.0 (+25 ºC) 0.05 M 12.5
5 M NaCl 0.025 M 1.25
1 M Imidazole 0.5 M 125
100% Glycerol 10% 25
MilliQ H2O N/A 86.25
Add the Tris-HCl, NaCl, imidazole, glycerol and 80 ml of MilliQ H2O. Adjust the pH to 8.0 using ~2 ml of 12 N HCl. Fill up to 250 ml with MilliQ H2O.
3.1.2.3 Buffer C (HIC Wash – 1 L)
Reagent or solution Final concentration Volume (ml)
1 M Tris-HCl, pH 7.5 (+25 ºC) 0.025 M 25
5 M NaCl 0.025 M 5
1M DTT 1 mM 1
MilliQ H2O N/A 869
Also prepare 1 L of Buffer C saturated with 80% ammonium sulfate (Use Encorbio’s online calculator; add 567.01 g of ammonium sulfate to 1 L of Buffer C).
3.1.2.4 Buffer D (DEAE Wash – 1 L)

78
Reagent or solution Final concentration Volume (ml)
1 M Tris-HCl, pH 7.0 (+25 ºC) 0.02 M 20
5 M NaCl 0.025 M 5
0.5 M EDTA 1 mM 2
100% Glycerol 10% 100
1 M DTT 1 mM DTT 1
MilliQ H2O N/A 872
3.1.2.5 Buffer E (DEAE Elution – 1 L)
Reagent or solution Final concentration Volume (ml)
1 M Tris-HCl, pH 7.0 (+25 ºC) 0.02 M 20
5 M NaCl 1.0 M 200
0.5 M EDTA 1 mM 2
100% Glycerol 10% 100
1 M DTT 1 mM DTT 1
MilliQ H2O N/A 677
3.1.2.6 Buffer F (Dialysis – 2 L)
Reagent or solution Final concentration Volume (ml)
1 M Tris-HCl, pH 7.0 (+25 ºC) 0.05 M 100
1 M KCl 0.05 M 100
0.5 M EDTA 0.1 mM 0.4
79
1 M DTT 1 mM 2
100% Glycerol 50% 1000
MilliQ H2O N/A 795.6
3.2 Procedures
3.2.1 Bacterial cell culture for protein production Prior to cell culture, 5X Super Broth (SB) should be prepared to standard protocol, autoclaved, and stored in 500 ml bottles. When culturing the bacteria, maintain a 1:10 ratio of media to flask volume, and use beveled flasks to provide sufficient oxygen for bacterial growth. Make sure that the bacteria receive enough oxygen and that the flasks are properly aerated.
1) Inoculate 100 ml of LB-Ampicillin (50 µg/ml) media or SB-Ampicillin (50 µg/ml) media with glycerol stock (scrape off a few pieces of the frozen cells) of BL21(DE3)-pET16b–Rnl1 for RNL1 purification or BL21(DE3)-pET16b-Rnl2 (1-249) K227Q for RNL2 purification and incubate at 37 ºC and 250 rpm. Add 100 µl of 50 mg/ml ampicillin to this starter culture. Grow overnight for 12-16 h.
2) After 12-16 h of growth, inoculate 2 L of LB-Ampicillin (50 µg/ml) medium (or
SB-Ampicillin) with overnight culture (4 ml of overnight culture per 100 ml of expansion culture, for 2 L you should add a total of 80 ml). The most convenient flask combination, which will fit in the middle Multitron incubator, is five 2 L flasks (400 ml of medium each). Add 75 µl of Antifoam A to stop foam from forming. Microwave the media to 37 ºC before adding 1:1000 ampicillin and inoculating. Do not overheat.
3) Grow the expansion cultures at 37 ºC and 210 rpm until the OD600 is 0.6-0.8 for
cultures growing in LB or 1.0-1.2 for cultures growing in SB.
4) When the OD600 reaches the appropriate value for the type of media, remove an aliquot to run on a mini-PROTEAN gel (aliquot size (ml) = 0.5/OD600). Spin the aliquot in a table-top centrifuge for 1 min at full speed, discard the supernatant, then resuspend the pellet in 50 µl 4X SDS loading dye and boil for 1 min at 90 ºC.

80
5) To induce protein expression, add 440 µl (1:1000) of 1 M IPTG for a final concentration of 1 mM IPTG and incubate the culture for another 4 h.
6) After 4 hours, take a post-induction aliquot (aliquot size (ml) = 0.5/OD600) and
prepare as described in step 4. After removing the flasks, turn off the shaker in the incubator if there are no other culture flasks or tubes.
7) Run the pre-induction and post-induction samples on a gel for 45 in at 150 V to
ensure proper induction.
3.2.2 Bacterial cell harvesting 1) Collect the cells by spinning them down in 2-4 1 L polypropylene flasks using an
SLC-4000 rotor at 4,000 rpm (3,010xg) for 20 min with the Sorvall RC 5C Plus centrifuge. If this rotor is not available, use the SLA-3000 and set it to the same RCF value. The flasks must be full before spinning to prevent the flasks from collapsing.
2) Discard the media and resuspend each pellet in 5-10 ml 1X PBS.
3) Combine the suspensions in a 50 ml Falcon tube and centrifuge at 3,716 x g for 5
min. Suspensions may have to be centrifuged for up to 15 min depending on the size of the pellet.
4) Decant media supernatant, flash freeze in liquid nitrogen, and leave pellet in -80
ºC freezer or proceed with purification. Be sure to weigh and record bacterial cell pellets prior to storage.
5) Use a 3% bleach solution to clean bacteria from flasks, spatulas, etc.
3.2.3 Bacterial cell lysis 1) Before starting, ensure the FPLCs are clean (See 12.5 Protein Purification) and
there is enough of the necessary buffers (See 11.1.2 Buffers for Rnl1/Rnl2 Purification). Thaw the pellet in a warm 30 ºC water bath, stirring the pellet occasionally with a spatula until melted. Do not heat cells to 30 ºC completely.
2) Add 3-5 volumes of lysis buffer, which should include DNase I, sodium
pyrophosphate decahydrate (for deadenylation) and lysozyme, to the pellet, to resuspend the cells (See “Buffers” in the section above). Use a metal spatula to smooth any clumps in the lysate. Attach a 60 ml syringe to a Nylon Mesh 16U

81
Micron filter. Take out the plunger and pour the lysate into the barrel. Reattach the plunger and push the lysate through the filter into a new beaker. If the lysate is still thick, double the amount of DNase I.
3) Emulsify the lysate using the EmulsiFlex-C5. Switch out the connected nitrogen
tank if the pressure is under the 500 psi.
4) Load MilliQ H2O into the reservoir. Open the nitrogen tank and open the small valve on the right side of the EmulsiFlex-C5 to allow the nitrogen gas into the system. Turn the green switch on the center of the device perpendicular to the floor to start emulsifying. Do not let the reservoir run empty.
5) After cleaning with water, pump lysis buffer or Buffer A through the EmulsiFlex-
C5 before loading the sample lysate. Load the sample lysate through at least three times or until the consistency is less viscous. For larger samples, the lysate may have to be passed through the emulsifier up to five times. If the lysate is too viscous, add more DNase I. The meter in the center of the machine should be hitting 10,000-15,000 psi when emulsifying the sample.
6) Once the sample is emulsified, load lysis buffer or Buffer A through the
emulsifier and collect the residual lysate. Clean the emulsifier with water followed by 70% EtOH.
3.2.4 Centrifugation and clarification of the bacterial lysate 1) Based on the amount collected, pour the lysate into 2, 4, or 6 purple-capped 50 ml
centrifuge tubes. Centrifuge sample with Sorvall SS-34 rotor at 17,000 rpm for 10 min. While the centrifuge is spinning, equilibrate your IMAC column (See 12.5.1 Immobilized metal affinity chromatography).
2) Decant the supernatant into new tubes and centrifuge the supernatant at 17,000
rpm for 10 min. Repeat for a second centrifugation.
3) Ultracentrifuge the samples at 24,000 rpm for 20 min in the Sorvall Discovery SE centrifuge.
4) Filter the supernatant through a PALL Acrodisc 32 mm Syringe Filter with 5 µm
Supor Membrane into a new beaker before loading onto the column.

82
3.3 Protein purification
3.3.1 Immobilized metal affinity chromatography (IMAC)
1) The ÄKTAprime is used for the purification of the crude lysate. Subsequent purifications are done on the ÄKTAexplorer. Clean ÄKTAprime in the 4 ºC room using the SystemWash program with warm water, 1% NaOH, water, 1% HCl, water, and 70% EtOH. ÄKTAprime can be left in water or 70% EtOH, but should be washed with water and then the binding buffer (Buffer A) before use. All solutions should be filtered and degassed. Cleaning can be done the day prior to purification to save time.
2) Column used is the 5 ml TALON Superflow Co2+ agarose resin packed in an
XK16 FPLC column (GE) (Provides superior separation compared to Ni-NTA Superflow resin from Qiagen). If the column has never been used or is stored in EtOH, wash the column with 20 column volumes (100 ml) of warm water using a peristaltic pump at 3 ml/min. Then, wash the column with 5 column volumes (25 ml) of the binding buffer (Buffer A) at 3 ml/min. The binding buffer (Buffer A) for this column should not contain any imidazole. If there is a lot of lysate, prepare two columns and split the lysate in half. Load the second portion while the first portion is eluting.
3) Load lysate onto the column using the peristaltic pump at 1 ml/min.
4) Wash the column with 100 ml of Buffer A with a flow rate of 3 ml/min. Part of
this wash can also be done on the FPLC to establish a baseline.
5) After the baseline level is established on the FPLC, set a gradient to 100% B for 10 column volumes (50 min). Elute in fractions of 1.0 ml at 1 ml/min.
6) Mix 18 µl of the relevant fractions and 6 µl of the 4X SDS dye. Controls should
include the lysate, column loading, and the wash. Incubate for 1 min at 90 ºC. Load 5 µl onto an SDS gel and also 5 µl of the ladder. Run gel at 150 V for 45 min. If there are two gels in the gel box, run the program at 150 V until the samples are in the gel, and then switch to 180 V for 30-40 min.
7) Add DTT to the relevant elution fractions to a final concentration of 1 mM using
1 M DTT (e.g. 1.0 µl to each 1.0 ml fraction). Store at 4 ºC overnight.

83
8) To stain the gel, microwave the gel in Coomassie stain (40% EtOH, 10% acetic acid, 0.05% Brilliant Blue) for 30 s and leave rocking for 15 min. Pour the Coomassie stain back into the container, wash the gel with MilliQ H2O, and add destainer (40% EtOH, 10% acetic acid) and microwave for 30 s. Leave the gel in destainer and place wicks on the sides to remove the dye for 15 min. Finally, leave in MilliQ H2O overnight. Alternatively, simply put the gel in MilliQ H2O, add 0.5 ml of Coomassie stain and leave overnight (Figure 11A, B).
Example of an elution peak on the ÄKTAprime
Fig. 11A Rnl1 IMAC. The size of Rnl1 is between 50 and 37 kDa. Note the extra protein bands that are from protein degradation.

84
Fig. 11B Rnl2 IMAC. The size of Rnl2 is between 37 and 25 kDa. The purification of Rnl2 at this stage has many more other proteins that need to be eluted out than that of Rnl1 at this stage.
3.3.2 Hydrophobic interaction chromatography (HIC) 1) The following steps will be done on the ÄKTAexplorer. The ÄKTAexplorer
should be washed with the same solutions as the ÄKTAprime. The following steps should be completed: SystemWash (40 ml), PumpWashExplorer with the A11 and B1 inlets, using Sample_960 to clean S1 and S8 and the column positions, and the fractionator outlet F2. Inlet A11 should be in Buffer C and inlet B1 should be in Buffer C with 80% ammonium sulfate. The S1 and S8 leads for the Sample_960 sample loading pump should be in Buffer C with 22.5% ammonium sulfate for Rnl1 purification and Buffer C with 45% ammonium sulfate for Rnl2 purification. Make sure that liquid is actually coming out of the outlet (WasteF1 or F2). If not, use a syringe to remove air from the inside the ÄKTAexplorer.
2) Install a 5 ml octyl (or phenyl) sepharose column onto the FPLC. Equilibrate the
column in 5-10 column volumes of Buffer C with 22.5% ammonium sulfate for Rnl1 purification and Buffer C with 45% ammonium sulfate for Rnl2 purification.
3) Pool relevant fractions from 12.5.1 Immobilized metal affinity chromatography.
Adjust volume to 20 ml using Buffer A.

85
4) Add ammonium sulfate to the pooled samples at 22.5% saturation for Rnl1 or 45% for Rnl2 (use Encorbio’s online calculator) with a stir bar to not create foam.
5) Centrifuge at 3,716xg for 10 min. Transfer the supernatant to a new beaker but do
not discard the pellet. Dissolve the pellet in 20 ml of Buffer C w/o ammonium sulfate to run on a gel as a control later.
6) Perform a Bradford Assay using the Pierce BCA Protein Assay Kit. Prepare a
working solution of 50 parts BCA Reagent A to 1 part BCA Reagent B. In a test tube, add 2 ml of the working solution and 100 µl of the sample. Compare with the stock dilutions and the pellet. Heat for 30 minutes at 37 ºC. If there is protein present, continue with HIC.
7) AutoZeroUV and make sure the UV lamps for 280 nm and 254 nm are on. Place
the S1 lead into the sample and the S8 lead into Buffer C with ammonium sulfate (22.5% for Rnl1 and 45% for Rnl2).
8) At all times, run the system pump at the same flow rate as the sample loading pump, in order for the UV to be recorded properly. Collect a bypass sample and also establish a baseline reading for the sample. For the bypass sample, run both the system pump and the sample loading pump at 1 ml/min. Set fractionation to 30 mm tubes with a volume of 50 ml. Set the ColumnPosition to 1Bypass, OutletValve to the fractionator F2. When the sample appears (UV reading increases), FeedTube to switch to the next Falcon tube.
9) To load the pooled fractions onto the column, switch the flowpath to the correct
column position. FeedTube to switch to the next Falcon tube. Pour the Bypass back into the sample once it has begun to run through the column. If the column loading reading looks too similar to that of the bypass reading, the sample is not binding to the column and needs to be troubleshooted. (Try diluting the sample 1:10, or dialyze.) Switch the sample loading pump from S1 to S8 immediately when the sample is done loading to wash the sample loading pump of the material and so that no air gets into the system.
10) When the absorbance reading decreases, select FeedTube. Collect the wash sample as a control. After obtaining a stable wash baseline, turn off the sample loading pump and use the system to clean the column by switching from Inject to Load. Make sure the %B value is correct before switching.
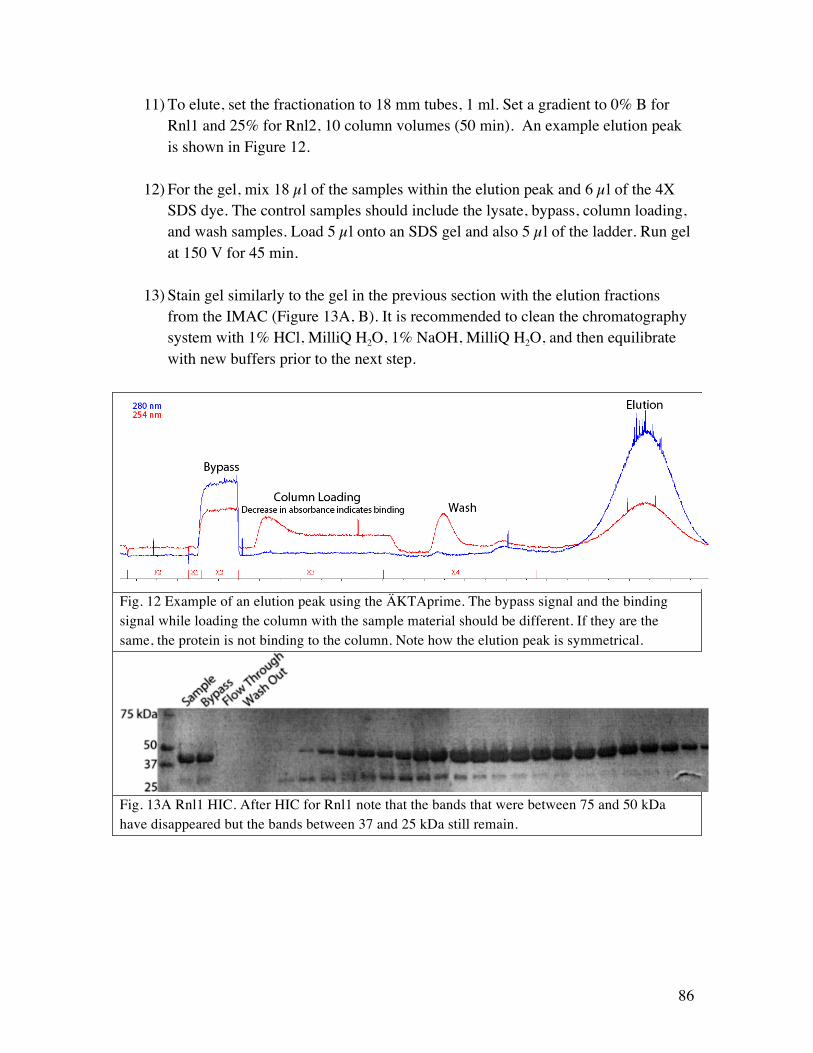
86
11) To elute, set the fractionation to 18 mm tubes, 1 ml. Set a gradient to 0% B for Rnl1 and 25% for Rnl2, 10 column volumes (50 min). An example elution peak is shown in Figure 12.
12) For the gel, mix 18 µl of the samples within the elution peak and 6 µl of the 4X SDS dye. The control samples should include the lysate, bypass, column loading, and wash samples. Load 5 µl onto an SDS gel and also 5 µl of the ladder. Run gel at 150 V for 45 min.
13) Stain gel similarly to the gel in the previous section with the elution fractions
from the IMAC (Figure 13A, B). It is recommended to clean the chromatography system with 1% HCl, MilliQ H2O, 1% NaOH, MilliQ H2O, and then equilibrate with new buffers prior to the next step.
Fig. 12 Example of an elution peak using the ÄKTAprime. The bypass signal and the binding signal while loading the column with the sample material should be different. If they are the same, the protein is not binding to the column. Note how the elution peak is symmetrical.
Fig. 13A Rnl1 HIC. After HIC for Rnl1 note that the bands that were between 75 and 50 kDa have disappeared but the bands between 37 and 25 kDa still remain.

87
Fig. 13B Rnl2 HIC. Most of the extra protein bands have been removed after the HIC step.
3.3.3 Ion exchange chromatography (IEC)
1) Install a 5 ml diethylaminoethyl (DEAE) positively charged column onto the ÄKTAexplorer.
2) Put Inlet A11 in Buffer D and inlet B1 in Buffer E. Run the SystemWash to
equilibrate the pumps.
3) Clean S1 and S8 with Buffer D. Set the ColumnPosition to Bypass 1.
4) Pool samples in a similar fashion to the 12.5.2 HIC protocol. Dilute the sample 1:5. If this does not bind, dilute the samples 1:10. If this still does not bind, concentrate the samples using Millipore Amicon Centrifugal Filter Units and then dialyze the protein overnight in Buffer C.
5) Turn on the sample loading pump at a flow rate of 1 ml/min and change the
InjectionValve value to Inject. Collect the Bypass sample as a control.
6) Make sure the inlet valve is set to S1 and that the manual fractionation is specified for 30 mm tubes with a collection of 50 ml fractions.
7) Then, when the sample appears based off increased absorbance at 260/280, select
FeedTube to switch to the next tube for fractionation.
8) To switch to loading the column, change the flowpath to the appropriate column position.

88
9) Select FeedTube to switch to the next collection tube and then pour the bypass back into the container with the sample because the previous actions were intended to just run the sample through the system. Collect some of the original sample as a control.
10) When the sample loading is complete, switch to S8 to wash the column. Collect
column sample as a control.
11) Once the absorbance goes down, select FeedTube to switch the fraction. Collect a wash fraction. Wait for the baseline to stabilize before eluting.
12) For elution, change InjectValve to Load, turn off the sample loading pump, and
change fractionation settings to 18 mm tubes and 1.0 ml fractions.
13) Using 5-10 column volumes, run a gradient of Buffer E from 5% to 25% to elute the protein.
14) Once peak is visualized, wash the column and regenerate it for future use by using
syringe and adapter (see 12.5.4 Chromatography column regeneration). Run aliquots of input and eluate fractions on an SDS PAGE (conditions for PAGE: see Hydrophibic interaction chromatography (HIC). Fig. 14A, B).
Fig. 14A Rnl1 IEC. Most of the extra protein bands have been removed.
Fig. 14B Rnl2 IEC. Most of the extra protein bands have been removed.
89
3.3.4 Chromatography column regeneration 1. For TALON columns (IMAC)
1) Routinely regenerate TALON columns using 5-10 column volumes the pH 5.0 MES buffer, check if the column looks faded afterwards/compare to a fresh column.
2) If a regenerated column shows a faded red color, unchelate the metal ions with EDTA, then recharge and wash using water, cobalt chloride solution, sodium chloride and water and store in 20% EtOH, following the protocol in the manual.
3) If a TALON column appears to be clogged (high back pressure), etc. wash with 5-10 column volumes of 1% NaOH, water, 1% HCl, water for a few rounds. Then wash with 70% Ethanol, unchelate and recharge using step 2, follow guidelines in the manual.
2. For octyl sepharose columns (HIC)
1) Routinely elute & wash with 5-10 column volumes of water and store in 20% EtOH.
2) For extremely stringent operation (RNL1 and RNL2 purification) or when the column appears to be clogged (high back pressure), treat the column with 5-10 column volumes of water, 0.5 to 1.0 M NaOH, water, 70% EtOH, and water to clean. Store in 20% EtOH.
3. For DEAE sepharose columns (IEC)
1) Routinely elute/recharge with 1M NaCl, wash with water and store in 20% EtOH. 2) For extremely stringent operation (RNL1 and RNL2 purification) or when the
column appears to be clogged (high back pressure), treat the column with 5-10 column volumes water, 1% NaOH, water, 1% NaCl, water, 70% EtOH, water to clean it. Store it in 20% EtOH. Follow the guidelines in the manual.
Washing and regeneration steps can be performed with syringes using appropriate adapters.
3.4 Protein dialysis
1) Wash snakeskin dialysis tubing in 50 mM boiling EDTA and rinse thoroughly with MilliQ.
2) Pool samples into the dialysis tubing.

90
3) Submerge dialysis tube with the sample in Buffer G for 2-4 hrs, stirring in the cold room with a magnetic stir bar. Change to fresh Buffer G before leaving overnight. Cover the top of the beaker with aluminum foil to prevent contamination.
4) The next morning, measure the concentration fraction using a NanoDrop 2000.
Use the extinction coefficient to calculate the concentration of the fractions by dividing the concentration of the fraction by the extinction coefficient. Use ExPASy ProtParam to estimate the extinction coefficient value (Rnl1: 1.235; Rnl2: 1.139 if the assumption is made that all Cys residues are reduced).
5) Keep different purified protein fractions separate in case of contamination.
Prepare aliquots diluted to 1 mg/ml, but if the concentration of protein is lower than 1 mg/ml, leave the fraction undiluted. Aliquot the dialyzed ligase into 120 µl portions, flash freeze, and store at -80 ºC.
6) Save 50 µl of each fraction group for subsequent quality control testing at -20 ºC.
Follow the quality control assays in the previous Rnl1/Rnl2 purification protocol.
3.5 Determining concentration of RNL1 in elution fractions
1) The concentration of the purified ligase can be gauged using two SDS-PAGE gels (5% stacking, 10% separating) as shown below (Fig. 15 and 16).
2) Fractions A, B, and C were serially diluted and run side-by-side with BSA standards
(Fig. 15). 3) Bands were quantified using ImageGauge and the approximate concentrations of
RNL1 in each fraction were calculated. 4) Each fraction was also loaded and compared to previously purified fractions of RNL1
that were stored at two different concentrations (2 mg/ml and 0.6 mg/ml); both diluted accordingly to match BSA standard and all three fractions (Fig. 16). Concentration was determined by protocol in following section.

91
Calculated concentrations of RNL1 in each of the purified fractions
Fraction RNL1 Concentration (mg/ml)
Approximate Volume (µl) Total RNL1 (mg)
A 0.4 1600 0.6517
B 2.3 1700 3.988
C 0.4 2700 1.105
Fig. 15 Determining RNL1 concentrations by BSA standard. File name: 06_12_12_RNL1Conc_AS_Gel1_001_Mod_8bit.jpg

92
Fig. 16 Comparing concentrations of newly purified RNL1 to older RNL1. File name: 06_12_12_RNL1Conc_AS_Gel2_001_Mod_8bit.jpg
3.6 Scanning SDS-PAGE and quantification of protein concentration by BSA curve
1) Load gel with BSA (five samples between 25 ng and 100 ng). Load three or more protein samples diluted serially. 2) Scanning SDS-PAGE gels for determination of protein concentration by comparison to BSA standard utilizing Fiji (NIH) software. Scan gel at 16 bit grayscale, 300 bit, reflective, photo. Save as .tif files. 3) Do not alter file in photoshop prior to quantification of bands; only adjust levels once in Fiji. 4) To create boxes for quantification of bands, go to Analyze > Tools > ROI Manager. Check on “Show All” and “Labels”. 5) Draw one box around a band, then when finished, press “t” on keyboard. This command creates a labeled box around the designated band.

93
6) Move original box using the mouse cursor to next band and press “t” again. 7) For bands correlating to BSA standard, create a quantification box that fits the largest band and use that box for all bands that make up the BSA standard. Use similar method for protein bands to the best extent possible (adjust quant boxes accordingly if you have to). 8) After creating quant boxes for all bands, prepare boxes of the exact sizes (manually by changing box size accordingly) and move them below/above their respective bands to receive background measurements for all bands (try to avoid speckles on gel) (Fig. 17).
Fig. 17 Example of gel with quantification boxes around protein bands and under bands for background readings. File name: Quant_BSA_RNL2.jpg
9) Press “Measure” when finished creating boxes. 10) The raw data may be copied and pasted into an excel spreadsheet for simpler processing. Select the Raw Integrated Density values (or just IntDen values) for each band and subtract with background. If resulting value is negative, multiply by -1. 11) Plot BSA standard using “scatterplots” with “ng loaded” on X-axis, and RawIntDen values on Y-axis. The best fit line should be within an R2 ≥ 0.95.

94
12) Right click on best fit line and “show equations”. Use equation to back-calculate the ng loaded per protein band. To ensure accuracy, prepare new dilutions of protein that should match the BSA bands in terms of ng loaded.
3.7 Quality control of RNA ligase 1
3.7.1 Nucleic acid contamination assay 1) Keep all three purified RNL1 fractions separate and prepare aliquots diluted to 1000 ng/µl. If the concentration of protein is lower than 1000 ng/µl, then leave the fraction undiluted. 2) Prepare Proteinase K reactions for all three aforementioned fractions, a previous stock of RNL1, and one for RNA 21.593 (5 reactions total) (21.593 serves as a positive control for radiolabelling). Use at least 1000 ng of protein from each fraction (could use 10x more). Reaction set-up:
Reagents Volume (µl) (per reaction) Mastermix (6x)
1x Proteinase K Buffer 118 708
RNL1 fractions Or 21.593 (20 µM)
1000 ng of RNL1 (1 µl) 200 pmoles of RNA (10 µl)
Not included
Proteinase K (20 mg/ml) 1 6
Note: Final reaction volume for RNA will be greater than for RNL1 fractions, which does not affect the reaction itself. 3) Incubate 5 reactions at 60 ºC for 15 min, 400 rpm shaking. 4) Perform phenol-chloroform extraction on each reaction mixture. Add 1 volume (120 µl) of acidic pH 4.3 Phenol:Chloroform:IAA (25:24:1) (from bottom of mixture avoiding upper aqueous layer) to each reaction. 5) Vortex for 30 s and centrifuge at max rpm for 2 min. 6) Pipette aqueous phase (upper phase) to new tube.

95
7) Add 1 volume of chloroform (120 µl). 8) Vortex for 30 s and centrifuge at max rpm for 2 min. 9) Pipette aqueous phase (upper phase) to new tube. 10) Add 3 volumes of 100% Ethanol. 11) Incubate at -20 ºC for 1 h or longer. 12) Centrifuge tubes at max rpm at 4 ºC for 45 min. 13) Remove supernatant and air-dry pellets (will not be visible, but will be there) for 10 min. When air-drying, cover tubes with a clean Kimwipe to prevent contamination. 14) Prepare Antarctic Phosphatase Reaction mastermix Reaction set-up:
Reagents Volume (µl) (per reaction) Mastermix (6.5x)
10x AP Buffer 1 6.5
Water 8 52
Antarctic Phosphatase 1 6.5
15) Resuspend pellets in 10 µl of AP reaction mix (5 reactions), plus prepare a 6th reaction tube with 10 µl of fresh 21.593 (additional control for radiolabelling) (add 1 µl of 10x AP Buffer and 1 µl of AP for a final volume of 12 µl). 16) Incubate reactions at 37 ºC for 15 min. 17) Incubate at 70 ºC for 20 min to heat inactivate AP. 18) Prepare mastermix for radiolabelling nucleic acids that remain in reaction tubes:
Reagents Volume (µl) (per reaction) Mastermix (6.5x)
10x PNK Buffer 1 6.5

96
γ-32-ATP 1 6.5
Reaction mixture 10 Not included
T4 PNK (added later) 1 Not included
19) Incubate mixture for 1 min at 95 ºC prior addition of T4 PNK. 20) Incubate reactions at 37 ºC for 15 min. Add 1 µl of cold ATP (1 mM) and incubate each reaction at 37 ºC for another 15 min.
21) Stop reactions with 13 µl of 2x FA stop mix. 22) Separate samples on 15% Urea PAGE (Fig. 17) for 45 min at 30 W.
3.7.2 DNAse and RNase contamination assay 1) Prepare RNA oligo 21.593 and DNA oligo 23.14 at concentrations of 20 µM (pmoles/µl). Radiolabel at least 1000 pmoles of each oligo with T4 PNK (will need 200 pmoles of each oligo per assay). Gel purify both oligos prior to use in assay (There will be a loss of ~50% oligo during gel extraction, so radiolabel more in case repetition of experiment is required). 2) Set-up for radiolabelling oligos:
Reagents Volume (µl) (per reaction) Mastermix (2.25x)
10x PNK Buffer 8 18
γ-32-ATP 15 34
Oligo (20 µM) 40 Not included
Water 13 29.25
T4 PNK (added later) 4 Not included
3) Incubate mixture at 95 ºC prior to addition of T4 PNK 4) Incubate reactions at 37 ºC for 15 min. Add 1 µl of cold ATP (1 mM) and incubate each reaction at 37 ºC for another 5 min. 5) Stop reaction with 2x FA stop mix (1:1) and gel purify oligos. Gel purification and extraction yields approximately 400 pmoles of each oligo.

97
6) Set up 8 reaction tubes: 2 tubes with 2 µl of each RNL1 fraction (from aliquots of 400 pmoles/µl) and 2 blank tube with 2 µl of PBS. 7) Add 2 µl of each radiolabelled oligo to each reaction tube. 8) Incubate reactions at 37 ºC for 3 h (normal reaction lasts 60 min). 9) Stop reactions with 22 µl of 1x FA stop mix and incubate for 1 min at 95 ºC. 10) Separate samples on 15% Urea PAGE (Fig. 18) for 45 min at 30 W.
Fig. 18 Nucleic acid contamination assay on left panel, DNAse/RNAse contamination assay in on right panel (Same gel despite being split into 2 parts). File name: 06_19-20_12_RNL1_QC.jpg
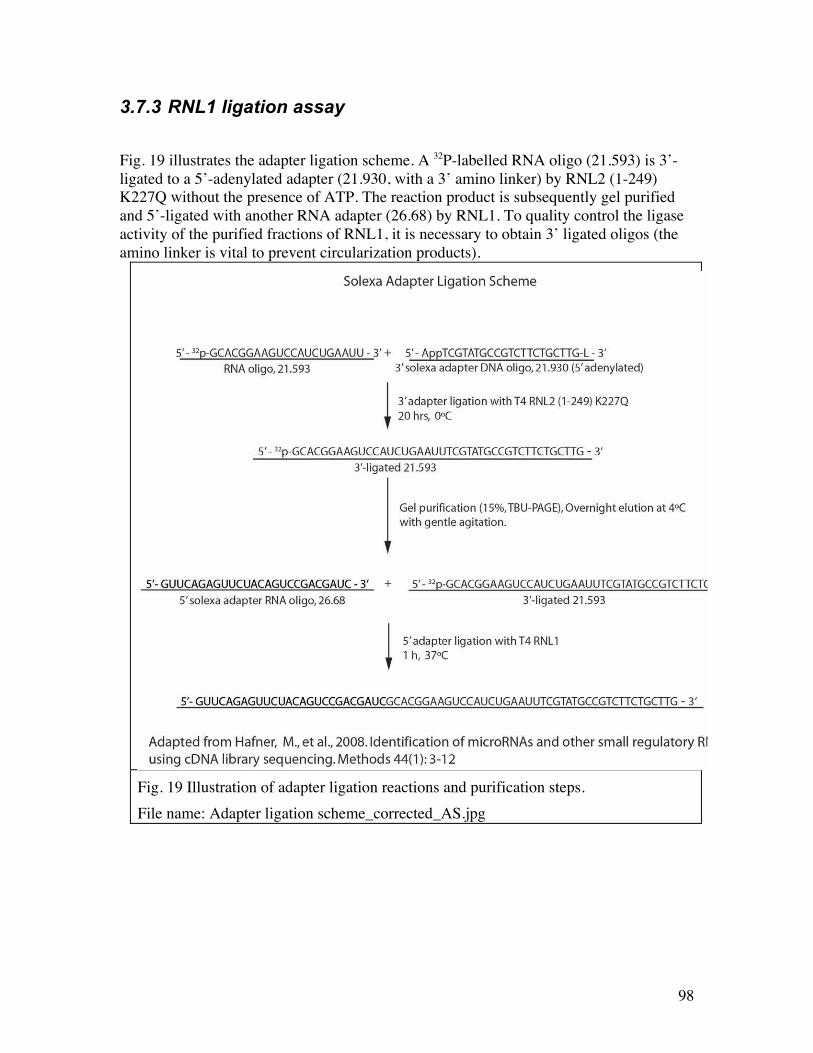
98
3.7.3 RNL1 ligation assay
Fig. 19 illustrates the adapter ligation scheme. A 32P-labelled RNA oligo (21.593) is 3’-ligated to a 5’-adenylated adapter (21.930, with a 3’ amino linker) by RNL2 (1-249) K227Q without the presence of ATP. The reaction product is subsequently gel purified and 5’-ligated with another RNA adapter (26.68) by RNL1. To quality control the ligase activity of the purified fractions of RNL1, it is necessary to obtain 3’ ligated oligos (the amino linker is vital to prevent circularization products).
Fig. 19 Illustration of adapter ligation reactions and purification steps. File name: Adapter ligation scheme_corrected_AS.jpg
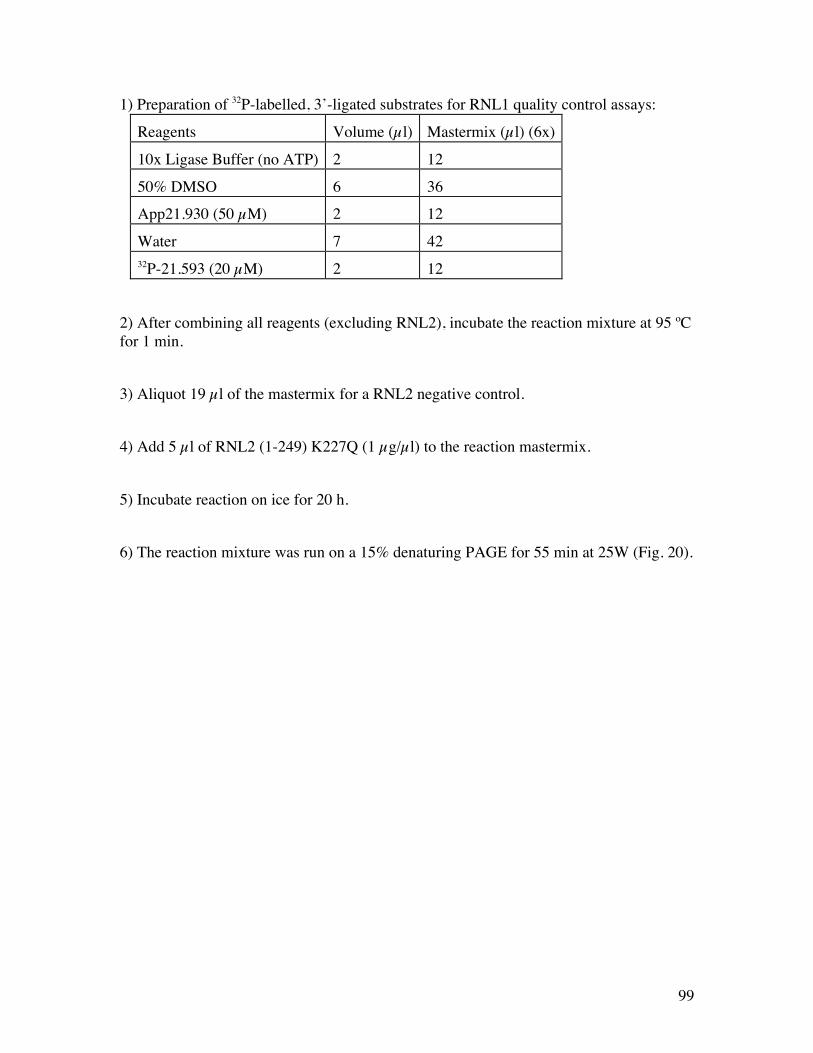
99
1) Preparation of 32P-labelled, 3’-ligated substrates for RNL1 quality control assays:
Reagents Volume (µl) Mastermix (µl) (6x)
10x Ligase Buffer (no ATP) 2 12
50% DMSO 6 36
App21.930 (50 µM) 2 12
Water 7 42 32P-21.593 (20 µM) 2 12
2) After combining all reagents (excluding RNL2), incubate the reaction mixture at 95 ºC for 1 min. 3) Aliquot 19 µl of the mastermix for a RNL2 negative control. 4) Add 5 µl of RNL2 (1-249) K227Q (1 µg/µl) to the reaction mastermix. 5) Incubate reaction on ice for 20 h. 6) The reaction mixture was run on a 15% denaturing PAGE for 55 min at 25W (Fig. 20).

100
Fig. 20 Gel purification of 32P-labelled, 3’-ligated oligos for RNL1 quality control assays. File name: 21.593_ligated_3adapter.jpg
Fig. 21 RNL1 quality control assay. 21.593 unligated sample shows the original RNA in comparison to the 3’-ligated product and the 5’ ligated products. File name: RNL1_activity_QC.jpg
7) Bands corresponding to the 3’-ligated products were cut out of gel and extracted overnight in 350 µl of 0.4 M NaCl at 4 ºC (800 rpm). 8) Ethanol precipitation: The extract was combined with 1 ml of 100% ethanol, stored at -20 ºC for 2 h (at least), and the samples were centrifuged at max rpm for 45 min. 9) Samples were resuspended in 55 µl of water (enough volume for 1 round of RNL1 reactions, 10 µl of 3’-ligated product per RNL1 ligation reaction). 10) RNL1 ligation assay set-up:
Reagents Volume (µl) Mastermix (µl) (5x)
10x Ligase Buffer (with ATP) 2 10
50% DMSO 6 30
3’-ligated oligos 10 50
26.68 (100 µM) 1 5
RNL1 (2 µg/µl) 1 Added later
101
11) Aliquot 19 µl of the mastermix to five reaction tubes. Incubate at 95 ºC for 1 min. 12) Do not add RNL1 to the RNL1 negative control tube, and add 2 µg of RNL1 to the other 4 reaction tubes (currently used stock and fractions A-C). 13) Incubate reactions at 37 ºC for 60 min. 14) Stop reactions by adding 1 to 1 volume of 2x FA stop mix. 15) Separate reaction products on 15% denaturing PAGE (Fig. 21). All three fractions of RNL1 have comparable ligation activities (Fig. 21) and lack nucleic acid and DNase/RNase contaminants (Fig. 18). All three fractions were combined and aliquoted for future use (after old stocks are exhausted).

102
3.7.4 Determining concentration of RNA Ligase 2 in elution fractions
1) The concentration of the purified ligases can be gauged using two SDS-PAGE gels (5% stacking, 10% separating) as shown below (Fig. 22 and 23). 2) Fractions B-D for RNL2 (1-249) K227Q and Fractions C and D for RNL2 (1-249) K227Q R55K were serially diluted and run side-by-side with BSA standards (Fig. 22 and 23). 3) Bands were quantified using ImageGauge (Fiji is useable as well) and the approximate concentration of RNL2 in each fraction was calculated. 4) Each fraction was also loaded and compared to previously purified RNL2, which was diluted accordingly for comparison to the BSA standard and elution fractions (Fig. 22 and 23). Calculated concentrations of RNL2 (1-249) K227Q in the purified fractions
Fraction RNL2 Concentration (mg/ml)
Approximate Volume (µl)
Total RNL2 (mg)
B 2.46 400 0.9855
C 9.46 900 8.5135
D 6.52 1400 9.1210
Calculated concentrations of RNL2 (1-249) K227Q R55K in the purified fractions
Fraction RNL2 Concentration (mg/ml)
Approximate Volume (µl)
Total RNL2 (mg)
C 5.07 900 4.5667
D 9.73 900 8.7528

103
Fig. 22 Determining RNL1 concentrations by BSA standard. File name: RNL2_JM_Conc_Gel_1_mod.jpg
Fig. 23 Comparing concentrations of newly purified RNL1 to older RNL1. File name: RNL2_JM_Conc_Gel_2_mod.jpg
3.8 Quality control of RNA ligase 2
3.8.1 Nucleic acid contamination assay 1) Keep all purified RNL2 fractions (RNL2 (1-249) K227Q fractions B-D, RNL2 (1-249) K227Q R55K fractions C and D) separate and prepare aliquots diluted to 1 µg/µl.
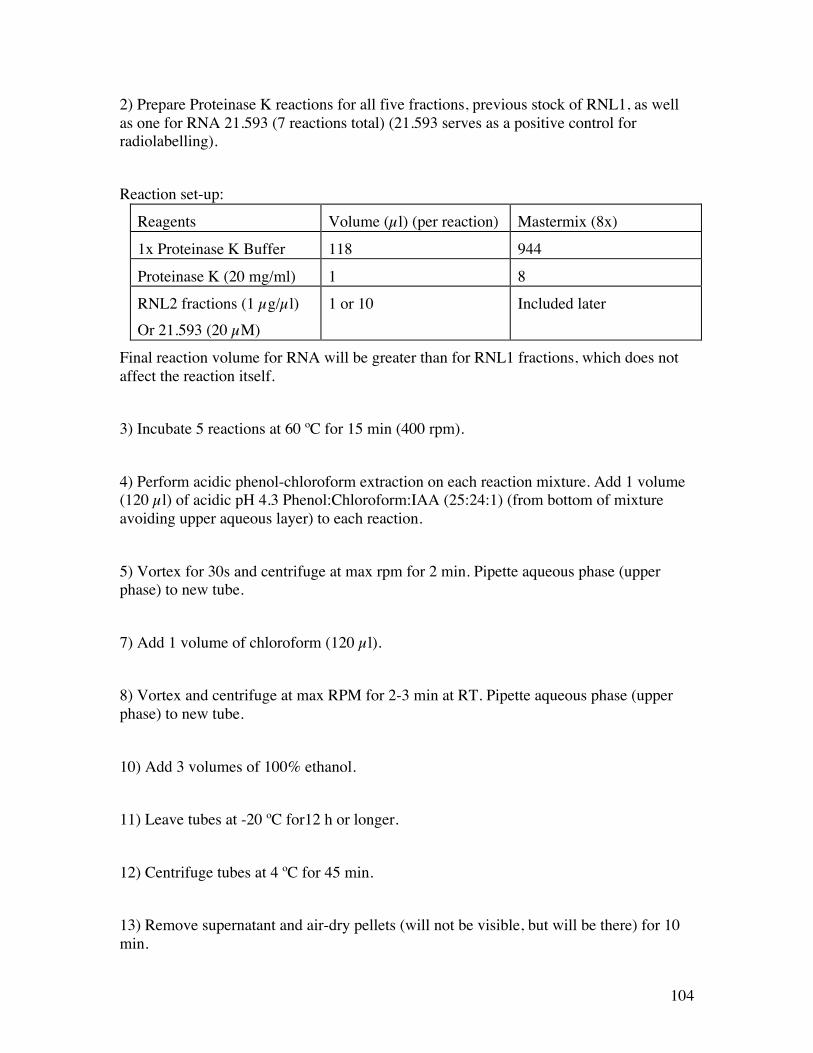
104
2) Prepare Proteinase K reactions for all five fractions, previous stock of RNL1, as well as one for RNA 21.593 (7 reactions total) (21.593 serves as a positive control for radiolabelling). Reaction set-up:
Reagents Volume (µl) (per reaction) Mastermix (8x)
1x Proteinase K Buffer 118 944
Proteinase K (20 mg/ml) 1 8
RNL2 fractions (1 µg/µl) Or 21.593 (20 µM)
1 or 10 Included later
Final reaction volume for RNA will be greater than for RNL1 fractions, which does not affect the reaction itself. 3) Incubate 5 reactions at 60 ºC for 15 min (400 rpm). 4) Perform acidic phenol-chloroform extraction on each reaction mixture. Add 1 volume (120 µl) of acidic pH 4.3 Phenol:Chloroform:IAA (25:24:1) (from bottom of mixture avoiding upper aqueous layer) to each reaction.
5) Vortex for 30s and centrifuge at max rpm for 2 min. Pipette aqueous phase (upper phase) to new tube. 7) Add 1 volume of chloroform (120 µl). 8) Vortex and centrifuge at max RPM for 2-3 min at RT. Pipette aqueous phase (upper phase) to new tube. 10) Add 3 volumes of 100% ethanol. 11) Leave tubes at -20 ºC for12 h or longer. 12) Centrifuge tubes at 4 ºC for 45 min. 13) Remove supernatant and air-dry pellets (will not be visible, but will be there) for 10 min.

105
14) Prepare Antarctic Phosphatase Reaction mastermix Reaction set-up:
Reagents Volume (µl) (per reaction) Mastermix (8x)
10x AP Buffer 1 8
Water 8 64
Antarctic Phosphatase 1 8
15) Resuspend pellets in 10 µl of AP reaction mix (5 reactions). 16) Incubate reactions at 37 ºC for 15 min. 17) Heat inactivate AP at 70 ºC for 20 min. 18) Prepare mastermix for radiolabelling nucleic acids that remain in reaction tubes:
Reagents Volume (µl) (per reaction) Mastermix (8x)
10x PNK Buffer 1 8
γ-32-ATP 1 8
Reaction mixture 10 Not included
T4 PNK (added later) 1 Not included
19) Incubate mixture at +95 ºC for 1 min prior addition of T4 PNK.

106
20) Incubate reactions at 37 ºC for 15 min. Add 1 µl of cold 1 mM ATP and incubate each reaction at 37 ºC for another 15 min. 21) Stop reactions with 13 µl of 2x FA stop mix. 22) Separate samples on 15% Urea PAGE for 45 min at 30 W (Fig. 24). Fraction B has more nucleic acid contamination than other elution fractions. Elution fractions in general have less nucleic acid contamination than the older stock of RNL2 (1-249) K227Q.
3.8.2 DNase and RNase contamination assay 1) Prepare RNA oligo 21.593 and DNA oligo 23.14 at concentrations of 20 µM (pmoles/µl). Radiolabel at least 800 pmoles of each oligo with T4 PNK (will need 200 pmoles of each oligo per assay). Gel purify both oligos prior to use in assay. 2) Set-up for radiolabelling oligos:
Reagents Volume (µl) (per reaction) Mastermix (2.25x)
10x PNK Buffer 8 18
γ-32-ATP 1 2.25
Oligo (20 µM) 40 Not included
Water 7 16
Fig. 24 RNL2 nucleic acid contamination assay. ‘No RNL2’ sample is processed 21.593. File name: RNL2_JM_nucleic_acid_QC_mod.jpg

107
T4 PNK (added later) 10 Not included
3) Incubate at 95 ºC mixture prior addition of T4 PNK 4) Incubate reactions at 37 ºC for 15 min. Add 1 µl of cold 1 mM ATP and incubate each reaction at 37 ºC for another 15 min. 5) Stop reaction with 2x FA stop mix (1:1) and gel purify oligos. This results in approximately 400 pmoles of each oligo. 6) Prepare 1 µg/µl aliquots of each elution fraction (dilute enzymes with PBS). 7) Set up 14 reaction tubes: 2 tubes with 1 µl of each RNL2 fraction (from aliquots of 1,000 pmoles/µl) (10 tubes total), 2 blank tubes with 1 µl of PBS, and 2 tubes with 1 µl of older stock of RNL2 (1-249) K227Q. (In the future, utilize 10x more enzyme to increase the potential for DNase/RNase contaminations to be observed). Prepare a 16x mastermix for incubation of RNL2
Reagents Volume (µl) Mastermix (µl) (16x)
10x Ligase Buffer (no ATP) 2 32
DMSO 6 96
Water 10 160 32P-Oligo (20 µM) 2 N/A
8) Split 16x Mastermix into 8x mastermixes (144 µl each). 9) Add 16 µl of each radiolabelled oligo to each 8x mastermix. 10) Add 19 µl of resulting mastermixes to corresponding reaction tubes with RNL2. 11) Incubate reactions at 0 ºC for 20 h (normal reaction lasts 20 h). 12) Stop reactions with 20 µl of 2x FA stop mix.

108
13) Separate samples on 15% Urea PAGE for 55 min at 25W (Fig. 25). DNase/RNase contamination assay revealed no degradation of incubated DNA and RNA.
Fig. 25 Nucleic acid contamination assay on left panel, DNase/RNase contamination assay in on right panel (Same gel despite being split into 2 parts). Possible enzyme adenylation is also observed for the RNA incubated samples. File name: RNL2_JM_RNaseDNase_QC_Gel.jpg
3.8.3 RNA Ligase 2 ligation activity assay Fig. 19 illustrates the adapter ligation scheme. A 32P-labelled RNA oligo (21.593) is 3’-ligated to a 5’-adenylated adapter (21.930, with a 3’ amino linker) by RNL2 (1-249) K227Q without presence of ATP. The ligase activity of purified RNL2 needs to be quality controlled before combining fractions and utilizing the enzymes. Furthermore, it is necessary to compare activity levels of both mutants RNL2 (1-249) K227Q/R55K.

109
1) Prepare an 8x mastermix for RNL2 reactions
Reagents Volume (µl) Mastermix (µl) (8x)
10x Ligase Buffer (no ATP) 2 16
DMSO 6 48
Water 8 64
App21.930 (50 µM) 2 16 32P-21.593 (20 µM) 2 16
2) Incubate at 95 ºC 8x mastermix for at +95 ºC for 1 min and cool it on ice. 3) Aliquot 19 µl of mastermix into 7 reaction tubes.
4) Leave 1 tube without RNL2, and added 1 µg of RNL2 (1-249) K227Q (old stock and elution fractions B-D) (4 different reactions) and RNL2 (1-249) K227Q/R55K (elution fractions C and D) (2 different reactions). 5) Incubate reactions at 0 ºC for 20 h. 6) Stop reactions with 20 µl of 2x FA stop mix. 7) Separate samples on 15% Urea PAGE for 55 min at 25W (Fig. 26).
Elution fractions B-D for RNL2 (1-249) K227Q and fractions C and D for RNL2 (1-249) K227Q/R55K seem to ligate as effectively as the older stock of RNL2 (1-249) K227Q.
Fig. 26 RNL2 ligation quality control assay. ‘No RNL2’ sample is 32P-21.593 incubated without RNL2. File name: RNL2_JM_activity_assay.jpg