Embed Size (px)
Citation preview

Turbo STS Instruction Manual3 Burner Standard 720-0057-3B4 Burner Standard 720-0057-4B4 Burner (2Mn+2SR)+RB 750-0057-4BRB3 Burner Cart 780-02224 Burner Cart 780-0228
Note: We highly recommend you always cover this barbecue when it is not in use which will prolong the life ofthe barbecue and protect it from the elements.
Design CertifiedUnit approved by
CSA Laboratories under standardANSI Z21-58b-2002/CGA 1.6b-2002
America's Largest Chain of Barbecue Stores
Customer Service Helpline: If you have questions about assembly or grill operation, or if there are damaged or missingparts when you unpack this unit from the shipping box, call us Monday through Friday at 1-800-752-3085
REV 030306
®
WARNING:All barbecues and carts are designed for outdoor use only!All barbecues are not intended for commercial use.
Read this Owner’s Manual carefully andbe sure your gas grill is properly assem-bled, installed and maintained. Failure tofollow these instructions could result inserious bodily injury and/or property dam-age. This gas grill is intended for outdooruse only and is not intended to be installedin or on recreational vehicles or boats.
Note to Installer: Leave this Owner’sManual with the consumer after deliveryand/or installation.
Note to Consumer: Leave this Owner’sManual in a convenient place for futurereference.
FOR YOUR SAFETY, IF YOU SMELL GAS :
1. Shut off gas to the appliance.2. Extinguish any open flame.3. Open lid.4. If odor continues, immediately call your gas
supplier.
5. Do not store or use gasoline or other flammablevapors and liquids in the vicinity of this or anyother appliance.
6. An LP cylinder not connected for use should notbe stored in the vicinity of this or any otherappliance.


WARNINGFuels used in gas or oil-fired appliances and the products ofcombustion of such fuels, contain chemicals known to theState of California to cause cancer, birth defects and/ or otherreproductive harm.
This warning is issued pursuant to California Health &Safety Code Sec. 25249.6.
WARNINGFailure to comply with these instructions could result in a fireor explosion that could cause serious bodily injury, death, orproperty damage.
WARNINGYour grill will get very hot. Never lean over the cooking areawhile using your grill. Do not touch cooking surfaces, grill hous-ing, grill lid or any other grill parts while the grill is in operation,or until the grill has cooled down after use.Failure to comply with these instructions may result inserious bodily injury.
You have bought a quality gas product from BarbequesGalore. All gas products require careful installation and orassembly and pre-operational testing. We recommend that ourtrained staff assemble, test and if necessary install your newpurchase for you.
Barbeques Galore cannot be held responsible for anydamages to persons or property resulting from improperassembly or installation.
If you chose to assemble, test and install your own unit,please follow the manufacturer’s instructions explicitly.
This Outdoor Cooking Gas Appliance is not intended to beinstalled in or on recreational vehicles and/or boats.
LOCATION: FOR OUTDOOR USE ONLY.
When choosing a location for your Gas grill, keep in mindthat it should not be located under any overhead unprotectedcombustible construction. The sides and bottom of the grillshould not be any closer than 14 inches to combustible con-struction and back of the grill should not be any closer than 16inches to combustible construction.
GAS PRESSURE
The Propane Gas Grills are designed to operate onpropane at a gas pressure regulated at 11" water column(W.C.) when equipped with the correct Propane Orifices on thevalves and a Propane Regulator on the supply line.
The Natural Gas Grills are designed to operate on NaturalGas at a gas pressure regulated at 4" water column (W.C.)when equipped with the correct Natural Gas Orifice on thevalves and a Natural Gas Regulator on the supply line.
GENERAL INFORMATION
The installation of your Gas grill must meet all local codesand/or gas utility requirements or, in the absence of localcodes, with the National Fuel Gas Code, ANSI Z223.1.
CAUTION: LEAK CHECKING
Check all gas connections with a soap solution to be surethey are tight and leakproof. To make soap solution, mix onepart water with one part liquid detergent. With heat controlknobs at "OFF position, turn gas supply on. Apply the mixtureto all gas pipe connections. Soap bubbles will appear if con-nections are not properly sealed; repair as necessary. Nevertest for gas leaks with a lighted match or open flame.
PROPANE MODELS:
Correct LP Gas Tank UseLP gas grill models are designed for use with a standard
20 lb. Liquid Propane Gas (LP gas) tank, not included with grillbox. Never connect your gas grill to an LP gas tank thatexceeds this capacity. A tank of approximately 12 inches indiameter by 18-1/2 inches high is the maximum size LP gastank to use. A Propane tank with an OPD (Overfill PreventionDevice) must be used. This safety feature prevents the tankfrom being over-filled which can cause malfunction of the LPgas tank, regulator and/or grill.
The LP gas tank must be constructed and marked inaccordance with specifications of the U.S. Dpt. ofTransportation (DOT). In Canada, the LP gas tank must meetthe Canadian Transportation and Communications (CTC)specifications. Also be sure to read and follow all LP instruc-tions on the following page.
If the outdoor cooking gas appliance is not in use, thegas must be turned off at the supply cylinder.
(a) Do not store a spare LP-gas cylinder under or nearthis appliance;
(b) Never fill the cylinder beyond 80 percent full; and
(c) If the information in (a) and (b) is not followed exact-ly, a fire causing death or serious injury may occur.
1. The LP gas tank has a shutoff valve, terminating in an LPgas supply tank valve outlet, that is compatible with aType 1 tank connection device. The LP gas tank mustalso have a safety relief device that has a direct commu-nication with the vapor space of the tank.
2. The tank supply system must be arranged for vapor with-drawal.
3. The LP gas tank used must have a collar to protect thetank valve.
! Never connect an unregulated LP gas tank to your gasgrill. The gas regulator assembly supplied with your gasgrill is adjusted to have an outlet pressure of 11" water col-umn (W.C.) for connection to an LP gas tank.
- 1 -
Safety Information

! Only use the regulator and hose assembly supplied withyour gas grill. Replacement regulators and hose assem-blies must be those specified by manufacture.
! Have your LP gas tank filled by a reputable propane gasdealer and visually inspected and re-qualified at each fill-ing.
! Never fill the gas tank beyond 80% full. Have yourpropane gas dealer check the release valve after every fill-ing to ensure that it remains free of defects.
! Always keep LP gas tanks in an upright position.! Do not store (or use) gasoline or other flammable vapors
and liquids in the vicinity of this gas grill.! An LP gas tank that is not connected for use must NOT be
stored on bottom shelf or in the vicinity of this or any othergas grill.
! Do not subject the LP gas tank to excessive heat.! Never store an LP gas tank indoors. If you store your gas
grill in the garage or other indoor location, always discon-nect the LP gas tank first and store it safely outside andout of reach of children.
! LP gas tanks must be stored outdoors in a well-ventilatedarea. Disconnected LP gas tanks must not be stored in abuilding, garage or any other enclosed area.
! When your gas grill is not in use the gas must be turnedoff at the LP gas tank.
! The regulator and hose assembly must be inspectedbefore each use of the grill. If there is excessive abrasionor wear or if the hose is cut, it must be replaced prior tothe grill being used again.
! Keep the gas regulator hose away from hot grill surfacesand dripping grease. Avoid unnecessary twisting of hose.Visually inspect hose prior to each use for cuts, cracks,excessive wear or other damage. If the hose appearsdamaged do not use the gas grill. Call our service centerat 1-800-752-3085.
! Never light your gas grill with the lid closed or beforechecking to insure the burner tubes are fully seated overthe gas valve orifices.
! Never allow children to operate your grill. Do not allowchildren to play near your grill.
WARNINGA strong gas smell, or the hissing sound of gas indicates aserious problem with your gas grill or the LP gas tank. Failureto immediately follow the steps listed below could result in afire or explosion that could cause serious bodily injury, death,or property damage.
! Shut off gas supply to the grill.! Turn the Control Knobs to the OFF position.! Open grill lid.! Get away from the LP gas tank.! Do not try to fix the problem yourself..! If odor continues or you have a fire you cannot extinguish,
call your fire department.Do not call near the LP gas tank because your telephone isan electrical device and could create a spark resulting in fireand/or explosion.
NOTE: The normal flow of gas through the regulator andhose assembly can create a humming noise. A low volume ofnoise is perfectly normal and will not interfere with operationof the grill. If humming noise is loud and excessive you mayneed to purge air from the gas line or reset the regulatorexcess gas flow device. This purging procedure should bedone every time a new LP gas tank is connected to your grill.For help call the Customer Service Helpline for assistance.
The barbecue must be isolated from the gas supply pip-ing system by closing its individual manual shut-off valve dur-ing any pressure testing of the gas supply piping system attest pressures equal to or less than ½ psi (3.5 kPa)
The units are supplied from the factory equipped for usewith natural gas and includes a natural gas regulator. If oper-ation with propane gas is desired, simply follow the instruc-tions found on page 4 of this manual. In addition, a propanegas regulator MUST be installed in the gas supply line fromthe propane gas tank.
Please remember to check all gas connections for leaksafter the piping is completed. Follow the procedure found onpage 1, under the heading "CAUTION: LEAK CHECKING."
CAUTION: ELECTRICAL WARNING
If your grill incorporates electrical components they mustbe installed in accordance with local codes or in the absenceof local codes, with the National Electrical Code,ANSI/NFPA No.70-1987.
The electric cord for the optional rotisserie motor isequipped with a three-prong 115v plug, and must be usedwith a grounded outlet. If it is not designed for a three wireplug, you must obtain an adapter and properly ground itbefore using the rotisserie. Do not cut or remove the ground-ing prong from the plug.
KEEP ANY ELECTRICAL SUPPLY CORD AND THE FUELSUPPLY HOSE AWAY FROM ANY HEATED SURFACE.
Failure to comply with these instructions may result inserious bodily injury.
The LP gas pressure regulator and hose assembly sup-plied with this unit must be used without alteration. If thisassembly needs to be replaced, use only the type specified byBarbeques Galore for this appliance.
When connecting the LP gas regulator to the supply cylin-der, please remember that the threaded fittings on the QCC-1valve tightens clockwise (Figure 1). This connection must betightened fully to prevent leakage.
I) If your Propane tank should ever require repainting use alight colored paint to allow heat reflection. Never use adark color to repaint the Propane tank.
- 2 -

- 3 -
Barbeques Galore Limited Warranty
Barbeques Galore hereby warrants to the ORIGINAL PURCHASER of this Barbeques Galore Gas Barbecue that it will be free of defectsin material and workmanship from the date of purchase as follows:
Solid Cast Stainless Steel Burners ....................................................................................................................................Lifetime of GrillAll Stainless Steel exterior parts ........................................................................................................................................Lifetime of Grill Painted BBQ Frames, Igniter Assemblies and All Remaining Parts..................................................................................2 years
...when assembled and operated in accordance with the printed instructions that accompany it.
High cooking temperatures, excessive humidity, chlorine, fertilizers, lawn pesticides and salt can affect the Stainless Steel compo-nents and for these reasons, the limited warranties DO NOT COVER DISCOLORATION OR RUST, unless there is a loss of structuralintegrity on the grill component.
Barbeques Galore shall not be liable under this or any implied warranty for incidental or consequential damages and BarbequesGalore’s liability is limited to the purchase price of this barbecue. This warranty gives you specific legal rights, and you may also haveother rights which vary from state to state. This warranty is applicable in the United States and Canada. No one else is authorized to per-form any obligations under this warranty.
Barbeques Galore requires reasonable proof of your date of purchase. THEREFORE YOU SHOULD RETAIN YOUR SALES SLIPOR INVOICE AND RETURN THE BARBEQUES GALORE PRODUCT REGISTRATION CARD IMMEDIATELY.
This limited warranty shall be limited to the repair or replacement of parts which prove defective under normal use and service and which on exam-ination shall indicate to Barbeques Galore’s satisfaction they are defective. Before returning any parts to Barbeques Galore, contact our CustomerService Center at (800) 752-3085 or email us at [email protected]
If Barbeques Galore confirms the defect and approves the claim, Barbeques Galore will elect to repair or replace such part without charge. Partsreturned to Barbeques Galore must be sent freight prepaid to Barbeques Galore, Inc. Customer service center 3355 East Cedar, Suite B, Ontario, CA91761 or to the nearest Barbeques Galore Store. Barbeques Galore will return parts to the purchaser freight or postage prepaid.
The LP tank manufacturer is solely responsible for the materials, workmanship and performance of the tank. If the tank has a defect, malfunctions,or you have questions regarding the tank, call the tank manufacturer’s customer service center. The phone number is on the warning decal which ispermanently attached to the tank. If the tank manufacturer has not resolved the issue to your satisfaction, then call the Barbeques Galore store near-est you.
Model Number _____________________________ Serial Number ________________________________
Date of Purchase ___________________________Purchase From ________________________________
Warranty Restrictions
Converting these barbecues to Propane can be done provided the appropriate Propane Conversion Kit is used and itis done by a Barbeques Galore Technician or a licensed plumber. Failure to follow these instructions will void the war-ranty and is also extremely dangerous and could cause a fire or injury.This warranty is void if grill is used for commercial or rental purposes.This warranty applies only when the grill is used in the United States, Canada & Australia.This warranty gives you specific legal rights, and you may also have other rights which vary from state to state.
This appliance is for outdoor use in a well-ventilated areaonly. This unit must not be used in a building, garage or anyother enclosed area.
BUILT-IN UNITS UTILIZING NATURAL GAS
When connecting a built-in unit to the natural gas supplyin your home, please ensure the pipe joint compound isresistant to the action of natural gas. In addition, pleaseobserve the following:
The barbecue and its individual shut-off valve must bedisconnected from the gas supply piping system during anypressure testing of that system at test pressures in excess of½ psi (3.5 kPa).

ALL NEW CYLINDERS MUST BE PURGEDBEFORE THE FIRST FILLING.
A) Turn heat control knobs and Gas Cylinder valve to"OFF" position.
B) Propane cylinder equipped with QCC-1 valve (Figure 1)is equipped with a right-handed thread. Turn blackplastic nut counter-clockwise to loosen.
C) Remove cylinder from Grill. Have cylinder filled by yourlocal Propane gas dealer.
D) Some Propane Cylinders have a bleed-off valve (Fig. 1).This bleed-off valve should be inspected for leaks aftereach refilling of the tank. Turn clockwise to reseal.
E) Fasten full Propane tank to Grill and connect QCC-1 fit-ting to tank valve (Figure 1) by turning clockwise.
F) With heat control knobs still at "OFF" position, turn onCylinder valve.
USING SOAP SOLUTION, TEST THE GAS CONNECTIONFOR LEAKS. (See Page 1 for information on mixing andapplying soap solution.) If bubbles appear, there is a leak;tighten or correct gas connections as necessary. After check-ing for leaks, turn valve off.
Gas Barbecue Assembly Instructions1. Remove unit from carton carefully, ensuring drip tray
does not fall out.
2. Check barbecue for damage.
3. Check that proper orifices are installed in the valves.
IMPORTANT: The Turbo STS Barbecue is supplied from thefactory setup for Natural Gas and fitted with Natural GasOrifices (see Figure 2).
If you are going to use this barbecue with Propane, itMUST be converted to operate on Propane gas by aBarbeques Galore Technician or a qualified gas plumber.
A company supplied Propane Conversion Kit must be usedto convert the barbecue to the correct gas.
Conversion Procedure:
3a. Remove all the existing NaturalGas Orifices.
3b. Locate the Propane GasOrifices and install them intothe barbecue as shown inFigure 3a.
3c. Place the new Propane Rating Label over the existinglabel on the right hand side of the barbecue frame.
3d. Connect the barbecue to an appropriate regulatedPropane Gas supply.
The Natural Gas orifice has a substantially larger holesize than the Propane orifice and is easily distinguishable. Ifyou have to change them, use a wrench to undo the orificefrom the valve (see Figure 3a) and install the correct orificemaking sure they are wrench tight. Do not over-tighten.Repeat for the other orifices.
NOTE: Ensure barbecue is connected to the appropriateregulated gas supply determined by the orifices. Failureto use the appropriate gas regulator voids all warranties.
Conversion Procedurefor Rotis Burner:(Rotis models only)Remove Access Panel andreplace existing Natural GasOrifices #52 with the PropaneGas Orifices #62.
This Gas Grill must be connected to anappropriate REGULATED gas supply - refer toSafety Information.
FILLING OR REFILLING THE PROPANE GAS CYLINDER
This barbecue is intended for use with LP cylinders equipped with a QCC-1 / OPD valve (QuickConnect Coupling Type 1 with Overfill Prevention Device) .IMPORTANT:
Purging and filling of LP-Gas cylinders must be performed by personnel who have been thor-oughly trained in accepted LP-Gas industry procedures. Failure to follow this instruction mayresult in explosion, fire, severe personal injury, or death.
WARNING
Figure 1
BLACK COUPLING NUTTurn Clockwise to connect
PRESSURERELIEF VALVE
Turn Clockwiseto Reseal
New Style QCC-1 OPD Connection
BLEED-OFFVALVE
REGULATOR
QCC-1 CYLINDER VALVE
Figure 3aValve
Orifice
PROPANE: NATURAL:
Main Burners
#57 #50Figure 2
- 4 -
Figure 3b
Rotis Burner
Orifice

Installing Stainless Burners4. Remove Drip Tray from packaging carefully. We recom-
mend that you fill the drip tray with Ultrasorb or sand,approximately ¼” deep, prior to using the grill initially, asthis will help absorb any grease or residues from the bar-becuing process. Change the Ultrasorb on a regular basis.
TIP:- For easier clean up, line the grease tray with heavy dutyfoil (shiny side down) and cover with Ultrasorb or 1/4” of sand.
NOTE: You must NEVER use just foil, as the reflected heat willbe excessive and could damage the barbecue - foil must becovered with Ultrasorb or 1/4” of sand.
5. Your barbecue has been supplied with a pair of Side Trims(Figure 4) which are used for built-in installations. If youplan to install your barbecue on a Turbo STS Cart, the SideTrims are not required.
6. Prior to installing barbecue, make sure Baffle is properlyinstalled inside barbecue since it may have been dislodgedduring shipping. The tabs at the ends must be inserted intothe slots on the four corners of the barbecue frame (seeFigure 4).
7. Note: Prior to installing burners, check to make sureAir Adjustment Bolt on the side of each burner isscrewed all the way in and secured with locking nut.Place burners into barbecue as shown in Figure 5..Theopen end of the burner has to be installed over stem ofvalve and then the rear of the burner is then lowereddown onto the back bracket locating the cast peg into theappropriate hole (Figure 6).
6. Install Stainless Flame Tamer Assemblies into the barbe-cue above the Burners, ensuring tabs fit into locatingholes (Figure 6).
7. The Sear Burners do not require Flame Tamers abovethem (Figure 7).
8. Place the Cooking Grills in position (see Figure 11).
Tip: - A light coating of vegetable oil will prevent food fromsticking to the grills.
Figure 6
Tabsat rearfit intoholes
Cast Peg on burnerrests in hole
Baffle
Figure 5 Cast peg on burnerrests in hole
Figure 7
- 5 -
Burner fits intobrass stem on valve
Baffle sits abovedrip tray
Figure 4
Make sure Baffle tabsare inserted into slots.
Side Trims are for built-in installations. Discard ifplacing BBQ on cart.
Stainless FlameTamer Assemblies
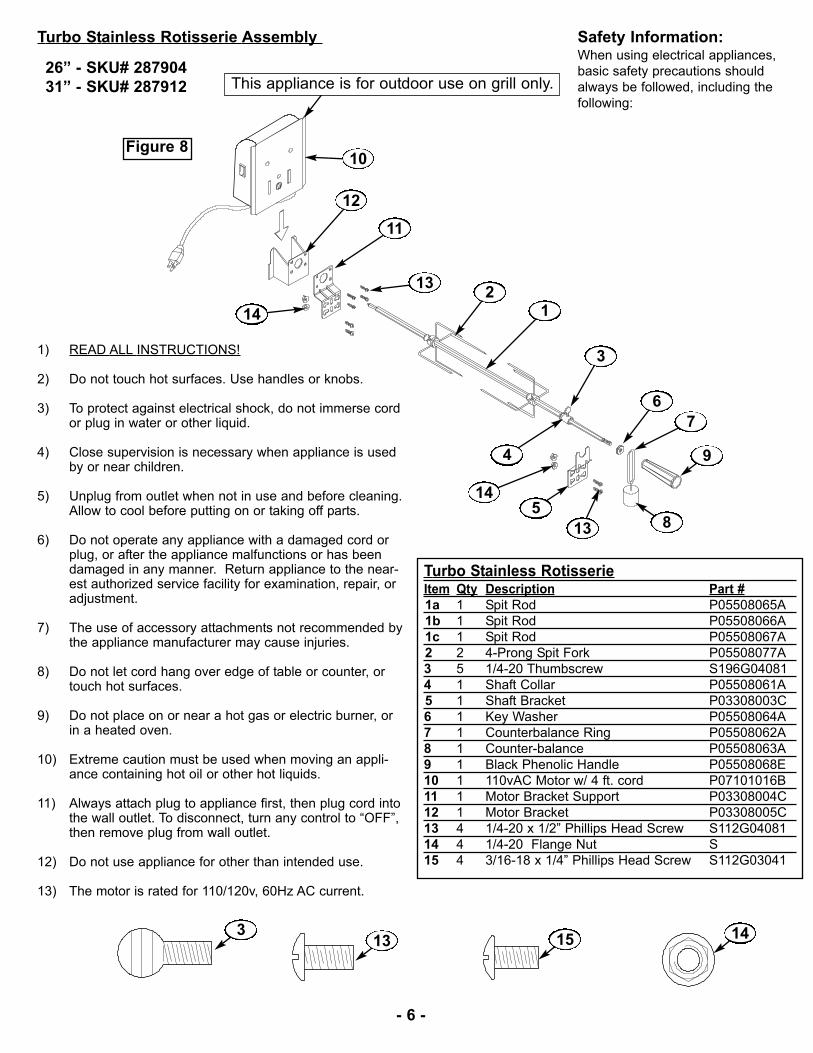
Turbo Stainless Rotisserie Assembly
Turbo Stainless RotisserieItem Qty Description Part #1a 1 Spit Rod P05508065A1b 1 Spit Rod P05508066A1c 1 Spit Rod P05508067A2 2 4-Prong Spit Fork P05508077A3 5 1/4-20 Thumbscrew S196G040814 1 Shaft Collar P05508061A5 1 Shaft Bracket P03308003C6 1 Key Washer P05508064A7 1 Counterbalance Ring P05508062A8 1 Counter-balance P05508063A9 1 Black Phenolic Handle P05508068E10 1 110vAC Motor w/ 4 ft. cord P07101016B11 1 Motor Bracket Support P03308004C12 1 Motor Bracket P03308005C13 4 1/4-20 x 1/2” Phillips Head Screw S112G0408114 4 1/4-20 Flange Nut S15 4 3/16-18 x 1/4” Phillips Head Screw S112G03041
Figure 8
9
10
6
4
142
3
1
13
11
14
135
12
8
7
This appliance is for outdoor use on grill only.26” - SKU# 28790431” - SKU# 287912
Safety Information:When using electrical appliances,basic safety precautions shouldalways be followed, including thefollowing:
1) READ ALL INSTRUCTIONS!
2) Do not touch hot surfaces. Use handles or knobs.
3) To protect against electrical shock, do not immerse cordor plug in water or other liquid.
4) Close supervision is necessary when appliance is usedby or near children.
5) Unplug from outlet when not in use and before cleaning.Allow to cool before putting on or taking off parts.
6) Do not operate any appliance with a damaged cord orplug, or after the appliance malfunctions or has beendamaged in any manner. Return appliance to the near-est authorized service facility for examination, repair, oradjustment.
7) The use of accessory attachments not recommended bythe appliance manufacturer may cause injuries.
8) Do not let cord hang over edge of table or counter, ortouch hot surfaces.
9) Do not place on or near a hot gas or electric burner, orin a heated oven.
10) Extreme caution must be used when moving an appli-ance containing hot oil or other hot liquids.
11) Always attach plug to appliance first, then plug cord intothe wall outlet. To disconnect, turn any control to “OFF”,then remove plug from wall outlet.
12) Do not use appliance for other than intended use.
13) The motor is rated for 110/120v, 60Hz AC current.
313 15 14
- 6 -

- 7 -
Rotisserie Assembly to Barbecue:1. Assemble Motor Support Bracket (11) and Motor Shield
(12) using four screws (15) as shown in Figure 9.
2. Attach Motor Bracket Assembly to side of barbecue frame(can be mounted on either the left or right side of the frame)using two screws (13), and two nuts (14) (Fig. 9).
3. Assemble Key Washer (10), Counterbalance (11) andHandle (12) to Spit Rod (6) as shown in Figure 10. SlideShaft Collar (8) onto Spit Rod with long end towards han-dle.
4. Slide Spit Forks (7) into position (Figure 8). Center meat onspit, then secure in place with the Spit Forks. Test theloaded spit for proper balance by supporting both ends inyour palms. Roll Spit Rod and allow heaviest load to rolldownward.
5. Attach Shaft Support Bracket (5) to opposite side andsecure with two screws (13) and Kep Nuts (14) (Fig.10).
6. Place assembly into barbecue making sure Spit Rod isinserted into Motor and groove on Shaft Collar (8) rests inslot on Support Bracket (5) (Figure 10). Make sure longend of collar sticks out of the barbecue. Secure positionand tighten Thumbscrew (9).
7. Position counterbalance weight upwards so as to counter-act opposing weight. Tighten Counterbalance by tighten-ing Handle and Key Washer.
8. Ensure that all Bolts are tightened securely.
NOTE: Cooking Grates are removed from Barbecue for allRotisserie Cooking. (Drip Trays are recommended for usein all Rotisserie Cooking), see Figures 12 & 13.
Getting To Know Your Gas Grill & Smoker Lid
1. Lid Handle: Mounted on front to make opening and clos-ing the lid easier.
2. Heat Indicator: Indicates the temperature inside the lid.Invaluable when cooking by indirect heat and smoking.
3. Smoker Lid: Converts your gas grill into a smoker oven bykeeping the smoke and heat in. Try to keep it closed at alltimes when grilling too, as it conserves energy, savesmoney, minimizes flare-ups and improves flavor.
Figure 9
15
14
13
11
12
long end of Shaft Collartowards exterior
9
87
63
51314
4 Figure 10
Figure 11
9
10
11
12
14 2
1
3
5
76
8
Figure 12 15
4
713

4. Rotisserie Kit: The Rotisserie is equipped with a heavyduty stainless steel motor to turn the solid rotisserie. Thiskit comes standard with all rear burner models.
5. Battery holder for Rear Rotisserie Burner model only –Uses AA battery.
6. Heat Control Knob: Each heat control knob has infinitesettings for complete cooking flexibility. As a safety pre-caution, knob has been designed so that it must bePUSHED IN AND TURNED COUNTERCLOCKWISE TOHIGH in order to turn the gas on.
7. Rear Rotisserie Control Knob - Push in and turn to highand HOLD in for 10 seconds to ignite the burner. This alsoallows the required amount of time for the thermocouple toheat up.
8. Drip Tray: This full width tray is designed to catch all thefat, etc., which is not burnt off. It is advisable to fill it withsand, approximately 1/4" deep, prior to using the grill ini-tially as this will assist cleaning it out when required. Foreasier clean up, line the grease tray with Heavy Duty foil(shiny side down) - then you MUST cover the foil with1/4" sand. DO NOT USE FOIL ONLY - IT MUST BECOVERED WITH SAND.
9. Ceramic Briquettes: The long life Ceramic Briquettesradiate the heat from the burners evenly throughout thegrill. Briquettes should be spaced evenly, one layer deep,on top of the Stainless Flame Tamer trays.
10. Stainless Steel Burners: The specially designedStainless Steel burners are designed to give an evenspread of heat throughout the entire length to give perfectcooking results every time.
11. Stainless Steel Cooking Grills: These stainless steelGrills provide a uniform heated cooking surface to searyour steak to perfection. It may be necessary to removegrills if the rotisserie is used to gain greater depth(Figure 11).
12. Sear Burner: (C4BSSTR models only) The direct heatof these burners sear the juices of the food. Greasedrippings vaporize back into the food keeping it moist.These burners do not require ceramic flame tamerassemblies, just the Cooking Grids directly above theSear Burner.
13. Counterbalance: The optional Deluxe Stainless TurboRotisserie includes a Counterbalance. This feature pro-vides perfect balance for Rotisserie cooking.
14. Warming Rack: Designed to keep your food warm whileyou finish cooking.NOTE: Warming Rack must be removed when aRotisserie is used ( Figures 12 & 13).
15. Rotisserie Burner (only available on Rear Burner mod-els): The Stainless Turbo Rotisserie models are equippedwith a rear rotisserie infrared burner (Figure 13) whichallows for slow rotisserie cooking of meats and poultry.Infrared burners radiate heat onto to the outer surface ofthe food. This allows cooking without the grease drip-pings burning on the main burner radiants.
LOCATIONTHE GAS GRILL IS DESIGNED FOR OUTDOORINSTALLATION ONLY.
It may be installed on a covered or open patio provided thesides and bottom are at least 14" away and the back at least16" away from any combustible construction. The grill mustnot be located under any overhead unprotected combustibleconstruction.
Before each use, carefully and thoroughly check regu-lator hose. If it is evident there is excessive abrasion or wear, orthe hose is cut, it must be replaced prior to the appliance being putinto operation. Contact your BBQ Galore retailer or by callingBBQ’s Galore at (800) 752-3085.
- 8 -
Figure 13
Notch in front ofstainless CookingGrid is allows easyremoval.
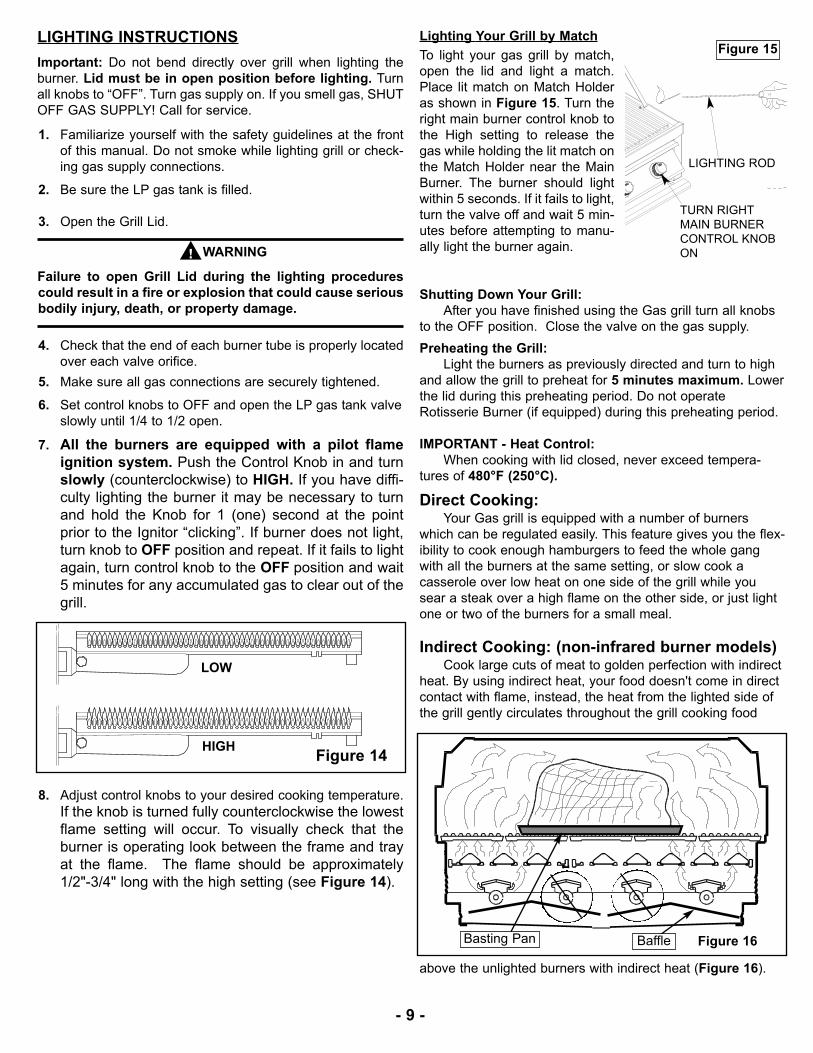
LIGHTING INSTRUCTIONSImportant: Do not bend directly over grill when lighting theburner. Lid must be in open position before lighting. Turnall knobs to “OFF”. Turn gas supply on. If you smell gas, SHUTOFF GAS SUPPLY! Call for service.
1. Familiarize yourself with the safety guidelines at the frontof this manual. Do not smoke while lighting grill or check-ing gas supply connections.
2. Be sure the LP gas tank is filled.
3. Open the Grill Lid.
WARNING
Failure to open Grill Lid during the lighting procedurescould result in a fire or explosion that could cause seriousbodily injury, death, or property damage.
4. Check that the end of each burner tube is properly locatedover each valve orifice.
5. Make sure all gas connections are securely tightened.
6. Set control knobs to OFF and open the LP gas tank valveslowly until 1/4 to 1/2 open.
7. All the burners are equipped with a pilot flameignition system. Push the Control Knob in and turnslowly (counterclockwise) to HIGH. If you have diffi-culty lighting the burner it may be necessary to turnand hold the Knob for 1 (one) second at the pointprior to the Ignitor “clicking”. If burner does not light,turn knob to OFF position and repeat. If it fails to lightagain, turn control knob to the OFF position and wait5 minutes for any accumulated gas to clear out of thegrill.
8. Adjust control knobs to your desired cooking temperature.If the knob is turned fully counterclockwise the lowestflame setting will occur. To visually check that theburner is operating look between the frame and trayat the flame. The flame should be approximately1/2"-3/4" long with the high setting (see Figure 14).
Lighting Your Grill by MatchTo light your gas grill by match,open the lid and light a match.Place lit match on Match Holderas shown in Figure 15. Turn theright main burner control knob tothe High setting to release thegas while holding the lit match onthe Match Holder near the MainBurner. The burner should lightwithin 5 seconds. If it fails to light,turn the valve off and wait 5 min-utes before attempting to manu-ally light the burner again.
Shutting Down Your Grill:After you have finished using the Gas grill turn all knobs
to the OFF position. Close the valve on the gas supply.Preheating the Grill:
Light the burners as previously directed and turn to highand allow the grill to preheat for 5 minutes maximum. Lowerthe lid during this preheating period. Do not operateRotisserie Burner (if equipped) during this preheating period.
IMPORTANT - Heat Control:When cooking with lid closed, never exceed tempera-
tures of 480°F (250°C).
Direct Cooking:Your Gas grill is equipped with a number of burners
which can be regulated easily. This feature gives you the flex-ibility to cook enough hamburgers to feed the whole gangwith all the burners at the same setting, or slow cook acasserole over low heat on one side of the grill while yousear a steak over a high flame on the other side, or just lightone or two of the burners for a small meal.
Indirect Cooking: (non-infrared burner models)Cook large cuts of meat to golden perfection with indirect
heat. By using indirect heat, your food doesn't come in directcontact with flame, instead, the heat from the lighted side ofthe grill gently circulates throughout the grill cooking food
above the unlighted burners with indirect heat (Figure 16).
- 9 -
Figure 14HIGH
LOW
Figure 16Basting Pan Baffle
TURN RIGHTMAIN BURNERCONTROL KNOBON
LIGHTING ROD
Figure 15

Closed Lid Saves Money:When the smoker lid is closed you have a more constant
temperature. Your food will cook faster, with fewer flare-upsand you will use less energy. Always use a drip tray whencooking roasts, whole fish, chickens and ALL rotisserie cook-ing. Use of a drip tray eliminates basting, since the juicesdrop into the drip pan, vaporize, rise and self-baste. Water,beer, wine, fruit juices or herbs in the drip pan adds flavor.Gravy or sauce can be made from the drippings. Disposable drippans prevent flare-ups.
Flare-up Control:Anytime you cook meat above an open flame you will have
flare-ups since flare-ups are caused when the natural juicesfrom the meat fall on the hot lava rock.
Flare-ups, and the resulting smoke, are what give meatcooked over an open flame the delicious outdoor flavor, soexpect and encourage some flare-up. However, excessiveflare-ups can be caused by cooking extra fatty foods directly onthe grill, or by cooking with too high a temperature. Thesetypes of flare-ups should be controlled or your food will burn.
To prevent excessive flare-ups, trim off excess fat frommeat and poultry before putting it on the grill, or cook particu-larly fatty meat such as duck, in a foil tray (or put the foil trayon the lava rocks directly under the meat). To control excessiveflare-ups caused by too high a heat setting, turn the heat con-trol knob to a lower setting.
Rotisserie Cooking:A rotisserie is mostly used to cook large pieces of meat
and poultry to assure slow, even cooking. The constant turn-ing provides a self-basting action, making food cooked on arotisserie exceptionally moist and juicy. Rotisserie cookinggenerally requires 1½ to 4½ hrs. to cook depending on thesize and type of meat being cooked.
For successful rotisseriing, the meat should be centeredand balanced as evenly as possible on the spit rod to avoidoverworking the rotisserie motor (see Rotisserie AssemblyInstructions on page 5).
Since indirect heat is often used in cooking on a rotisserie,a foil or aluminum drip pan is advisable to prevent excessiveflare-ups. Generally, the cooking grills are removed to allow forthe swing of the rotisserie. A basting pan is placed under therotis area on top of the radiants to catch the drippings.
Prior to lighting barbecue, remove the Ceramic Briquetteson the Flame Tamer Trays that lie directly underneath the meatso that the drip pan rests directly on the empty Flame TamerTrays (Figure 17). Pan can be emptied with a bulb baster.
To mount the meat of poultry on the rotisserie, one fork ofthe rod is removed. The spit rod is pushed through the foodand secured with the fork and the remaining fork is replacedback in position to secure the other end of the meat.
It is important to secure any loose pieces so that whenthe rotisserie rotates, a part does not become dislodgedand catch on the basting pan!
Tooth picks, pins, or skewers are a few methods of secur-ing. With meats, having them rolled and tied is the bestmethod.
Using Your Rotisserie Burner (if equipped):
The Turbo Rotisserie models are equipped with the rearinfrared rotis burner which allows for slow rotis cooking ofmeats and poultry. Infrared burners radiate heat onto to theouter surface of the food. This allows cooking without thegrease drippings burning on the main burner radiants.
Rotisserie Burner Lighting Instructions
Note: The location of the Rotisserie burner makes it more sus-ceptible to winds that will decrease the performance of yourrotisserie cooking. For this reason you should not operate theback burner during windy weather conditions.
1. Familiarize yourself with the safety guidelines at thefront of this manual. Do not smoke while lighting grill orchecking gas supply connections.
2. Be sure the LP gas tank is filled.
3. Check that the end of each burner tube is properly locat-ed over each valve orifice.
4. Make sure all gas connections are securely tightened.
5. Open the Grill Lid. Failure to do so can result in fire orexplosion.
6. Set Rotisserie Burner control knob to OFF and open gassupply.
7. Push and turn the Rotisserie Burner Control Knob (locat-ed between the two burner control knobs at the rightside of the control panel, see Figure 18) to HIGH andthen HOLD the knob in for 10 seconds until the thermo-couple heats up.
- 10 -
Figure 17
Basting Pan
Rear Infrared Burner
Rear Rotisserie BurnerControl Knob
Rear Rotis BurnerBattery HolderFigure 18
8. If the rear burner does not light, turn the control knobOFF, wait 5 minutes for the gas to clear, then retry.
9. Once lit, the Rotisserie Burner will reach cooking tem-perature quickly. The orange/red glow will even out inabout 5 minutes.
10. For best results, always rotisserie cook with the grill liddown and the Rotisserie Burner control knob set toHIGH. Do NOT use the main grill burners when theRotisserie Burner is in operation.
Do not attempt to regulate the rotisserie burner by usingthe control knob. This control has a fixed setting and is notadjustable.
NOTE: Initially, the Ceramic Panel will have a blue flame that,after some time, will change to an orange flame and theCeramic Panel will glow an orange color. This may not be evi-dent in bright daylight.
Cleaning Up After Using Your Grill:To keep your grill ready for the next time you want to use
it, turn the grill off, then take a long handled soft brass bristlebrush and brush off the cooking grills. Be careful, they're hot!Protect your hand from the heat by using an oven mitten tohold the brush.
Cooking Tips
Food Preparation:Preparing food to be cooked on your gas grill requires no moreeffort than if you were preparing it to be cooked on your indoorrange. The following tips will help you get the best results rightfrom the start.
1. Trim off excess fat from meat, leaving a thin strip roundthe edges. To prevent meat from curling up while itcooks, slash the remaining fat at two-inch intervals, takingcare not to cut into the meat. Trim off all excess fat frompoultry before cooking
2. Use tongs instead of a fork when turning meat or poultry.The prongs of a fork pierce the meat or poultry, causing itto lose it's natural juices.
3. If you use a tomato or sugar base sauce for basting, donot apply until the last five or ten minutes of cooking peri-od. Use over a longer period of time will result in over-browning or charring.
4. Poultry, fish and natural lean meats should be brushedwith cooking oil, butter, or margarine several times duringthe cooking period to avoid their drying out.
5. Meats and poultry should be brought to room temperaturebefore cooking. Frozen foods such as fish and vegetablesshould be put on the grill without thawing.
6. Salt meat, fish or poultry after cooking not before or dur-ing cooking periods. Salt tends to draw the natural mois-ture out of food, causing it to dry out. Other spicesincluding pepper and garlic may be freely applied.
Smoke Cooking:Smoke cooking is an exceptionally slow method of cooking inwhich a flavoring source is added to the Ceramic Briquettes inorder to impart its own delectable flavor to the meal for a deepsmoke flavor.
Soak a flavoring source such as hickory chips, green twigs ofapple-wood or wild cherry, garlic cloves or bay leaves in waterfor 30 minutes prior to use.
Loosely wrap in a single layer of aluminum foil, leaving oneend slightly open or place on the Ceramic Briquettes at thebeginning of the cooking period. For a lighter smoke flavor, addthe pre-moistened wrapped flavor source to the CeramicBriquettes during the last half hour of the cooking period.
Remember smoke cooking is slow cooking. You can't hurry italong without unsatisfactory results. Keep the heat controlknobs set at LOW and the lid closed.
Wood Chips In A Gas Grill:Wood chips should be soaked for a minimum of 30 minutes.Presoaked chips or chunks may be thrown directly onto fire,but they must be in a container or wrapped in foil, log fashion,for use in gas grills.
If smoking is expected to last for a long period of time, youshould keep chips soaking in the event you need to throw moreon the fire or to add to the container or make another foil log.
Maintenance Guide
On at least a monthly basis during times when the BARBE-CUE is in use, and at least every other week during highusage periods, the following items must be inspected:
1. Clear the area surrounding the BARBECUE of ALL com-bustible materials, gasoline and other flammable vaporsand liquids.
2. Insure that the free flow of combustion and ventilating air isnot obstructed.
3. Stainless Steel burners should be wire brushed every 3months.
Cleaning:The barbecue has been designed and manufactured fromStainless Steel for long life. If cleaning is necessary, please use asoft damp cloth and some household detergent.
Lid:There are many different stainless steel cleaners available.Always use the mildest cleaning procedure first, scrubbing inthe direction of the grain. To touch-up noticeable scratches,sand very lightly with 400 grit sand paper in the direction of thegrain. Specks of grease which gather on the surfaces of thegrill may give the appearance of rust, these may be removedby lightly using a “Scotch-Brite” pad in conjunction with a goodstainless cleaner. Remember to rub in the direction of thegrain.
- 11 -
Maintaining Your Grills’ Appearance:One of the best features of your new stainless steel grill is it'sshiny exterior. To maintain this appearance over many years,follow two simple rules;1) Keep it covered. Backyard environments are harsh on
your grills’ finish. Long days of exposure to sun, water,yard chemicals and the elements will reduce the shine ofstainless steel. We strongly recommend that you coveryour Barbecue with a custom “Turbo” Cover fromBarbeques Galore.
2) Do not overheat your grill. If you do not follow the operat-ing instructions and leave the grill on high with the lidclosed or allow an unattended grease fire to burn, yourgrills’ finish will turn a dull brown. This happens to all stain-less steel when it reaches a temperature of 575°F orgreater. Refer to section on “..Heat Control” on page 8.If this should happen, don't panic because with some effortyour grill can still be polished back to a nice shine.
Cooking Grills:
The Stainless Cooking Grills should be cleaned regularly.Use a brass bristle brush to lightly clean off the excess build-up on both sides of the grill.Use care not to scratch or chip the porcelain finish onPorcelain Grills. Do not use abrasives!
To Thoroughly Clean The Grills:
Step 1. Lightly brush off excess build-up with brass brush onboth sides.
Step 2. Remove grills from barbecue.
Step 3. Wash grills in warm water.
Step 4. With grills still wet, sprinkle baking soda very liberallyover surfaces on both sides.
Step 5. Take a wet sponge and vigorously rub and clean offsurfaces.
NOTE: Tough spots may need second application of bakingsoda and rubbing.
Step 6: Rinse well and dry. Oil lightly.
Stainless Steel Burners:
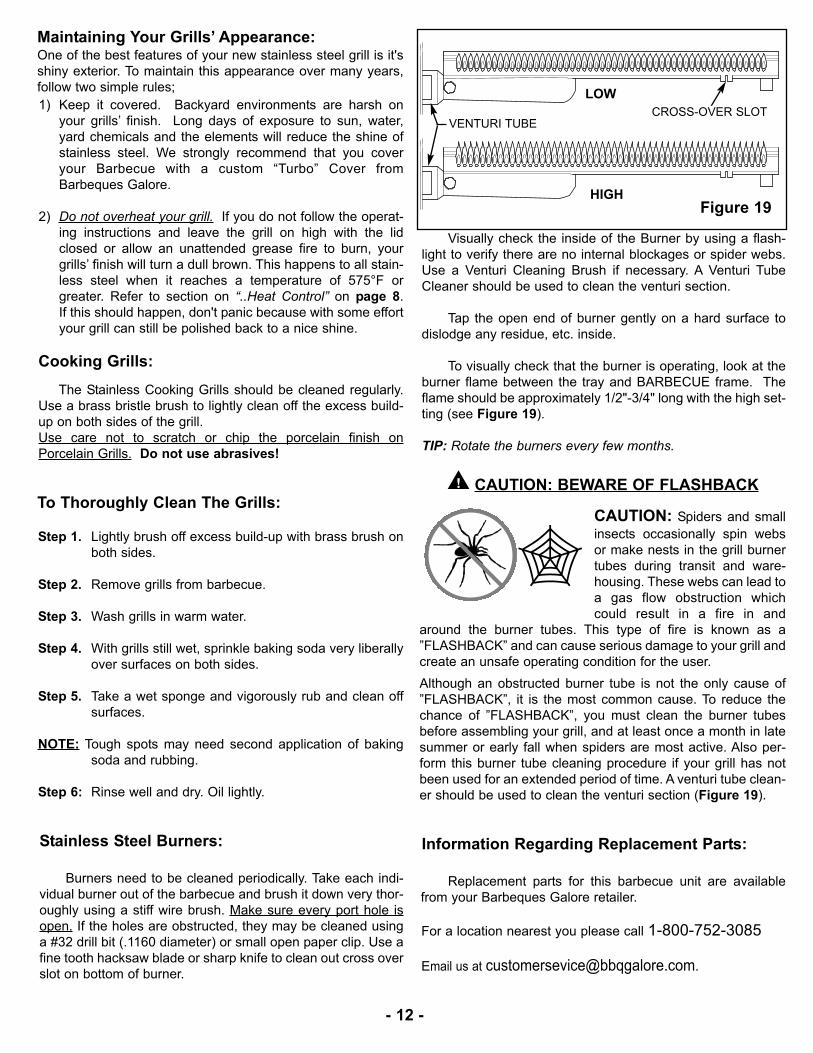
Burners need to be cleaned periodically. Take each indi-vidual burner out of the barbecue and brush it down very thor-oughly using a stiff wire brush. Make sure every port hole isopen. If the holes are obstructed, they may be cleaned usinga #32 drill bit (.1160 diameter) or small open paper clip. Use afine tooth hacksaw blade or sharp knife to clean out cross overslot on bottom of burner.
Visually check the inside of the Burner by using a flash-light to verify there are no internal blockages or spider webs.Use a Venturi Cleaning Brush if necessary. A Venturi TubeCleaner should be used to clean the venturi section.
Tap the open end of burner gently on a hard surface todislodge any residue, etc. inside.
To visually check that the burner is operating, look at theburner flame between the tray and BARBECUE frame. Theflame should be approximately 1/2"-3/4" long with the high set-ting (see Figure 19).
TIP: Rotate the burners every few months.
CAUTION: BEWARE OF FLASHBACK
CAUTION: Spiders and smallinsects occasionally spin websor make nests in the grill burnertubes during transit and ware-housing. These webs can lead toa gas flow obstruction whichcould result in a fire in and
around the burner tubes. This type of fire is known as a”FLASHBACK” and can cause serious damage to your grill andcreate an unsafe operating condition for the user.Although an obstructed burner tube is not the only cause of”FLASHBACK”, it is the most common cause. To reduce thechance of ”FLASHBACK”, you must clean the burner tubesbefore assembling your grill, and at least once a month in latesummer or early fall when spiders are most active. Also per-form this burner tube cleaning procedure if your grill has notbeen used for an extended period of time. A venturi tube clean-er should be used to clean the venturi section (Figure 19).
Information Regarding Replacement Parts:
Replacement parts for this barbecue unit are availablefrom your Barbeques Galore retailer.
For a location nearest you please call 1-800-752-3085
Email us at [email protected].
Figure 19HIGH
LOW
VENTURI TUBECROSS-OVER SLOT
- 12 -

DO’S & DON’TS
- 13 -
DO..Have propane cylinder (LP units) filled byauthorized LP supplier.Record your grill model number on yourinstructions and keep the instructions and partslist in a convenient place.Check all gas line connections for leaks withsoapy solution prior to lighting, tighten until bub-bles disappear.Raise the hood before lighting the burner.Preheat the grill 5 minutes maximum beforecooking.After cooking, turn the grill off, then take a longhandled soft brass bristle brush and brush off thecooking grills. Then turn off gas at the Propanetank or main valve.Use a mitt to turn off tank valve, it can get hot.Cook with hood down when possible. It is gen-erally faster and more efficient. Trapped smokeadds to the flavor.Turn the gas off promptly should you be unableto light the grill immediately. Wait a full 5 minutesbefore attempting to light grill again.Have proper tools, tongs, mittens and hot padsready prior to removing foods.Trim excess fats from meats to minimize flare-ups.Let the grill cool before removing any parts forcleaning.Be careful of the control valve setting. LP gas ishotter and the lower setting may be generallypreferred.Cover the barbecue when not in use.Use a mitt or glove when opening BBQ lid orturning off Propane tank valve after use.
DON’T..Install grill closer than 14" on the sides or 16" onthe back to any combustible construction.Attempt any adjustment of the regulator, it hasbeen preset and tested.Allow the LP tank to lie on its side. Keep in anupright position.Turn a control knob on until a lighted match isinserted in the lighting hole.Use plastics or untempered glass utensils on thegrill.Attempt to move an aluminum foil pan while it ishot. Let it cool first before moving it.Cover or block any air openings in the bottom ofthe grill with foil.Wear long, loose flowing clothing around thegrill. Long flowing hair is also easily ignited espe-cially by unexpected flare-ups. Tie hair back orwear a hat or a scarf.Put food on the grill and leave it unattended orunwatched for long periods. Most fats can catchfire even on the lower setting.Clean Flame Tamers in any solution other than aboiling detergent water. Then rinse well, dry andreuse.Use caustic materials, i.e., lye , to clean grillparts.Store any additional Propane gas tanks underbarbecue.
When cooking with lid closed NEVER exceedtemperatures of 480°F (250°C).

BARBECUE SIDEFRAME DIMS ANDLID CLEARANCE
3 Burner Standard
4 Burner Standard
Figure 23
Figure 20
Figure 21
Figure 24
Figure 25
1/2” NPTFemaleGas Inlet
Rear of BBQ
Deluxe Stainless Steel Turbo Overall Dimensions & Specs
Install adapter betweenelbow fitting and manifoldto ensure elbow faces 90°downwards once installed.4 Burner RotisFigure 22
- 14 -
27 3/4”
24 3/16”
2-3/4”
33 3/4”
30 3/16”
21 3/4”
8 3/4”
33 5/16”
21 3/4”
19 3/4”
30-3/16”
33-3/4”
21-3/4”

NOTE: When choosing a location for your Gasgrill, keep in mind that it should not be locatedunder any overhead combustible construction. Theside of the grill should not be any closer than 14inches to combustible construction, and the back ofthe grill should not be any closer than 16 inches tocombustible construction.
BARBECUES MUST BE INSTALLED IN ACCORDANCE WITHAGA SPECIFICATION AND ALL LOCAL BUILDING CODES
DIM "A"
20”
DIM. "A" MODEL24 1/2" 3 BURNER30 1/2" 4 BURNER
NON-COMBUSTIBLECONSTRUCTION
Figure 26
Outdoor Barbecue Installation Instructions
- 15 -
9” MIN.
UNIT SETS INAND RESTS ONLIP. 3 SIDESSecure Stainless Flexline
with Plumber’s Tape to pre-vent shifting during tankinstallation. An approvedrubber gas hose is then con-nected to the LPG tank.
CSA ApprovedPropane Regulator
(not supplied)
PropaneInstallation
QCC-1 (Quick Connect Coupling)& OPD (Overfill ProtectionDevice) required (not included).
WARNINGVapors from products containing Chlorine and other caustic chemicals cancause Stainless Steel flexible connectors to corrode. THESE PRODUCTSSHOULD NOT BE STORED IN AN ISLAND OR NEAR THE connector.Cleaning solutions, Household Chemicals and Solder fluxes can also causepinholes if they come in contact with these connectors and MUST bewashed off immediately with water.
NOTE : Upper & lowerground-level vents (20 sq. in.minimum each) MUST BEPROVIDED for combustion airon both sides of built-in con-struction. Please ask aBarbeques Galore associatefor full details.
Secure LP Tank to floor witha Tank Retainer Bracket

Outdoor Natural Gas Barbecue Built-in Installation Specifications
Shut-Off Valve1/2”-1/2” NPT
Access must be providedto Shut-Off Valve.
NOTE: When choosing a location for your Gas grill, keep in mind that it should not be located underany overhead combustible construction. The side and bottom of the grill should not be any closer than14 inches to combustible construction, and the back of the grill should not be any closer than 16 inchesto combustible construction.
Barbecues must be installed in accordance with AGA specifications and all local building codes.
Upper Vent
Lower Vent
NOTE : Upper & lower ground-level vents (20 sq. in. minimum each)MUST BE PROVIDED for combustion air on both sides of built-in con-struction. Please ask a Barbeques Galore associate for full details.
Figure 27
Louvers on BARBECUE must remainunobstructed to allow for combustion air.
AGA Approved NaturalGas Regulator
Gas Supply
1/2” StainlessFlexline
Close Nipple
Outer lips of barbe-cue rests on edges.
Non-combustibleConstruction
- 16 -
WARNINGVapors from products containing Chlorine and other caustic chemicals cancause Stainless Steel flexible connectors to corrode. THESE PRODUCTSSHOULD NOT BE STORED IN AN ISLAND OR NEAR THE connector.Cleaning solutions, Household Chemicals and Solder fluxes can also causepinholes if they come in contact with these connectors and MUST bewashed off immediately with water.

TURBO STS BARBECUE
ITEM DESCRIPTION SKU# QTY SKU# QTY SKU# QTY1 Lid 313783 1 315465 1 315465 12 Lid Handle 313791 1 315473 1 315473 13 Temp Gauge 313270 1 313270 1 313270 14 Warming Rack 313809 1 315481 1 315481 15 Lid Support Assembly 313841 1 315499 1 315507 16 Barbecue Chassis 313858 1 315515 1 315515 17 Manifold 313866 1 315523 1 330498 18 LP Hose & Regulator 144655 1 144655 1 144655 19 Flame Thrower Valve 450 315333 3 315333 4 315333 410 Rotisserie Burner Control Valve 315358 111 Rear Burner Gas Line 315630 112 Drip Tray 315341 1 315549 1 315549 113 Chrome Knob 329581 3 329581 4 329581 514 Cooking Grate 8" 210153 4 210153 415 Cooking Grate 13" 210161 2
Stainless Burners(3 Pak) 259895 1 Stainless Burners(2 Pak) 259887 2 259887 1
17 Briquette Tray Assembly 244475 3 244475 4 244475 218 Sear Main Burner 330514 219 Battery Holder-Rear Igniter 315556 120 Rear Rotisserie Burner 315564 121 Rotis Burner Cover 315572 122 Safety Device Thermocouple 315580 123 Safety Device Cover 315598 124 Electrode Assembly 315606 125 Front Baffle 329821 1 329862 1 329870 126 Control Panel 315374 1 315614 1 315622 127 Baffle 315382 1 315648 1 315648 128 Side Trim Piece Set (1 RH & 1 LH) 315390 1 315390 1 315390 129 Handle Bracket Set (1 RH & 1 LH) 315408 1 315408 1 315408 130 Elbow Fitting 315457 1 315457 1 315457 131 Rear Baffle,Rear Burner 315671 132 Name Plate 330522 1 330522 1 330522 133 Hood Buffer 162772 2 162772 2 162772 2
Orifice for Main Burner--NG 315697 3 315697 4 315697 4Orifice for Main Burner--LP 299503 3 299503 4 299503 4Orifice for Rear Burner--NG 315705 1Orifice for Rear Burner--LP 288167 1
36 Gas Valve - Sear Main Burner 330561 2Orifice for Sear Main Burner-NG 330530 2Orifice for Sear Main Burner-LP 330548 2
37A Sear Burner Electrode 330654 2
TURBO STS CARTITEM DESCRIPTION SKU# QTY SKU# QTY
38 Left Side Panel 315739 1 315739 139 Right Side Panel 315754 1 315754 140 Bottom Panel 315762 1 315770 141 Front Trim Piece 315788 1 315796 142 Rear Trim Piece 315804 1 315812 143 Heat Shield 315820 1 315838 144 RH Side Shelf Assembly 315846 1 315846 145 LH Side Shelf Assembly 315853 1 315853 146 Side Shelf Bracket Left 315861 2 315861 247 Side Shelf Bracket Right 315879 2 315879 248 Cart Hardware Pack 315887 1 315887 149 RH Door 315895 1 315903 150 LH Door 315911 1 315929 151 Slider Set(LH&RH) 315937 1 315937 152 Tank Slider Set Assembly 315945 1 315945 153 Back Panel 315952 1 315960 154 Wheel w/S/Steel Hub caps 330563 2 330563 255 Swivel Castors 315986 2 315986 256 H/D Towel Bars 330639 2 330639 257 H/D Door Handles 330647 2 330647 258 Magnet Catch 316026 2 316026 259 Towel Rack 316034 1 316034 160 Condiment Tray 330571 1 330571 161 Foot Brake 330589 1 330589 162 Wheel Axle 330597 1 330597 163 Support Bearing Assembly 330605 1 330605 164 Lighting Rod & Chain assy 330613 1 330613 165 Bar Barrier Support 330621 1 330621 166 Natural Gas Regulator 110267 1 110267 1
37
16
34
35
720-0057-3B 720-0057-4B 750-0057-4BRB
780-0222 780-0228
- 17 -

Figure 28
Exploded Parts Diagram3 Burner Standard
C3BSST
- 18 -
913
1
32
33
29
2
3
4
15
5
1716
2528
28
7
13
26
9
30
6
27
12
34
66

- 19 -
Figure 29
Exploded Parts Diagram4 Burner Standard
C4BSST
332
292
1
4
7
17
16
13
5
6
26
14
12
30
9
13
34
9
66
28 25
27

Exploded Parts Diagram4 Burner w/ Rear Rotisserie Burner
C4BSSTRP/N
- 20 -
Figure 30
332
29
2
1
4
7
19
17
16
66
13
5
2120
31
2322
6
26
14
12
30
27
11
109 18
2528
36
13
3437
37A
11
10
936
3524
Rotisserie BurnerControl Valve
Main BurnerControl Valve
Sear BurnerControl Valve

Figure 31
5343
4546
47
59
60
6162
63
64
65
56
48
58
41
4238
44
39
55
8
5152
54
57
49
50 40
- 21 -
Exploded Parts Diagram3 Burner Cart C3BSSTC4 Burner Cart C4BSSTC

Barbeques Galore (949) 597-2400 10 Orchard Road, Suite 200 Lake Forest, CA. 92630