Embed Size (px)
Citation preview
Turbo-BASIC XL 1.5
© 1985 Frank Ostrowski
Expanded
Turbo-BASIC XL
Documentation
by Ron Fetzer
Introduction: This expanded documentation is based on the pioneering work of Dave and Laura Yearke of the Western New York Atari Users Group. The superb Turbo-BASIC XL by Frank Ostrowski from Germany works only on the Atari XL and Atari XE computers. It is completely compatible with Atari BASIC. In addition to the regular Atari BASIC commands you get 42 more commands and 22 more functions. You have a useable RAM of 34,021 bytes. This is 1,747 more bytes than Atari BASIC. It runs 3 times faster than Atari BASIC and you have a BASIC COMPILER that increases the speed 10 to 15 times more. The DOS commands are accessed in the direct mode or the programmed mode. There is no Turbo-BASIC XL DOS. You have new graphics commands not available before. Turbo-BASIC XL is insensitive to upper or lower or inverse characters for most of its commands. You can have 256 variable names. This documentation tries to provide programming examples for the new commands. There is an index at the end of this documentation for easy finding of commands. Loading Turbo-BASIC XL: Turbo-BASIC XL gets loaded without a cartridge. 1. Turn on your disk drive. 2. Insert the Turbo-BASIC XL disk. 3. On the XE hold down the OPTION key and turn on the computer. Disk Commands: The DOS functions are accessed in the direct or the programmed mode. There is no Turbo-DOS. If you type DOS you are directed to DOS 2.5. You are now out of Turbo-BASIC XL. It is suggested that you save your program first otherwise it is lost. You can get back into Turbo-BASIC XL by using OPTION L on the DOS and typing AUTORUN.SYS for the file name. BLOAD FORMAT: BLOAD "D:name" EXAMPLE: BLOAD "D:TEST.BIN" This command is used to load binary files. The file will automatically load without having to give a memory address. It is just like Option L with /N on DOS 2.0. _________________________________________ BRUN FORMAT: BRUN "D:name" EXAMPLE: BRUN "D:COMPILER.COM" This is used to load and RUN a machine language (Binary) file. The file will run automatically without having to give a memory address. It is the same as Option L and Option M on DOS 2.0. _________________________________________ DELETE FORMAT: DELETE "D:name" (Wild cards are O.K.) EXAMPLE: DELETE "D:TEST.BAS" DELETE "D8:test.bas" delete "D2:*.*" Delete "D2:TEST.???" 90 DELETE "D:*.*" This command erases from the disk a file specified. The wild card symbols (*.* and ???) are permitted. The device name (D:) has to be in capital letters. Inverse file names are not permitted. In the programmed mode it has to be the last item on the line. This is the same as Option D on DOS 2.0.

Disk Commands (Cont.): DIR FORMAT: DIR (Wild cards O.K.) EXAMPLE: DIR DIR "D:*.*" DIR "D2:*.BAS" DIR "D:???.*" DIR "D8:*.*" 90 DIR "D8:*.*" This command gives you the disk directory. Wild cards are permitted. In the programmed mode it has to be the last item on the line. This is the same as Option A on DOS 2.0. _________________________________________ RENAME FORMAT: RENAME "D:old name,new name" EXAMPLE: RENAME "D:FILE.OLD,FILE.NEW" RENAME "D8:*.TXT,*.BAS" This command renames a file. The first name is the OLD name, the second name is the NEW name. The comma between them is important. Wild cards are permitted. This is the same as Option E on DOS 2.0. _________________________________________ LOCK FORMAT: LOCK "D:name" EXAMPLE: LOCK "D:TEST.BAS" LOCK "D2:SCREEN.???" LOCK "D8:*.*" 90 LOCK "D:*.*" This command locks a file so you cannot change it or erase it until you unlock it. Wild cards are permitted. In the programmed mode it has to be the last item on the line. This is the same as Option F on DOS 2.0. _________________________________________ UNLOCK FORMAT: UNLOCK "D:name" EXAMPLE: UNLOCK "D:TEST.BAS" UNLOCK "D2:SCREEN.???" UNLOCK "D8:*.*" 10 UNLOCK "D:*.*" This command is the opposite of LOCK. It opens a file so it can be changed. Wild cards are permitted. In the programmed mode it has to be the last item on the line. This is the same as Option G on DOS 2.0.

Memory: DPOKE FORMAT: DPOKE m,v EXAMPLE: DPOKE 88,32750 90 DPOKE 88,32750 This command puts 2 bytes of data into 2 consecutive memory locations. In the example above at POKE 88 and POKE 89 integer 32750 is stored. _________________________________________ DPEEK FORMAT: DPEEK(m) EXAMPLE: ? DPEEK(88) 90 ? DPEEK(88) This is the opposite of DPOKE. It retrieves a 2 byte integer from 2 consecutive locations. In the example above at PEEK (88) and PEEK (89). _________________________________________ MOVE FORMAT: MOVE m,m1,m2 EXAMPLE: MOVE 53248,32768,1024 MOVE $D000,$8000,$400 This moves a whole block of data. The 'm' is the old address, the 'm1' is the new address and the 'm2' is the length of the data in bytes. _________________________________________ -MOVE FORMAT: -MOVE m,m1,m2 EXAMPLE: -MOVE 53248,32768,1024 -MOVE $D000,$8000,$400 This is the same as above except it copies starting with the last byte of the block. _________________________________________ BPUT FORMAT: BPUT #n,adr,len EXAMPLE: BPUT #3,ADR(B$),LEN(B$) EXAMPLE #2 100 CLS 110 GRAPHICS 5:ADDR=DPEEK(88) 120 PRINT " FILL THE SCREEN" 130 FOR X = 1 TO (20*40) 140 POKE ADDR+X,RAND(125) 150 NEXT X 160 ? "Now BPUT data onto RAMDISK D8:SCREEN" 170 CLOSE:OPEN #1,8,0,"D8:SCREEN" 180 BPUT #1,ADDR,20*40 190 CLOSE 200 ? "IT IS DONE!" 210 FOR Y= 1 TO 6000:NEXT Y 220 GRAPHICS 0 This outputs a block of data to a device specified by the channel number (1-7). The block starts at 'adr' and ends at 'len'. In the example above we wrote to the RAM DISK the screen data under the file name "SCREEN". It can be recovered with BGET. See the next command.

Memory (Cont.): BGET FORMAT: BGET #n,adr,len EXAMPLE: BGET #3,ADR(B$),LEN(B$) EXAMPLE #2 100 CLS 110 GRAPHICS 5:ADDR=DPEEK(88) 120 CLOSE:OPEN #1,4,0,"D8:SCREEN" 130 ? "BGET data from RAM DISK D8:'SCREEN'" 140 BGET #1,ADDR,20*40 150 CLOSE 160 FOR Y=1 TO 6000:NEXT Y 170 GRAPHICS 0 BGET recovers a block of data saved with BPUT. The '#n' is the channel number (1-7), 'adr' is the memory address and 'len' is the length of the data. _________________________________________ %PUT FORMAT: %PUT #n,a EXAMPLE: %PUT #1,A EXAMPLE #2 10 CLS 20 CLOSE:OPEN #1,8,0,"D8:TEST" 30 FOR X = 1 TO 5 40 INPUT "GIVE ME A NUMBER>",A 50 %PUT #1;A 60 NEXT X:CLOSE 70 ?:? "I have saved the numbers with %PUT to the RAM DISK under 'TEST'" 80 ?:?:DIR "D8:*.*" This is the same as 'PRINT #1;A' except it is much faster and uses less memory. You must open a channel for %PUT. See the demonstration program on the front of this disk. Use RUN "D:PUTGET.TUR". If you have a XL computer list the program and change all references from D8: to D1: and then run it. You can retrieve the numbers in EXAMPLE #2 by using the %GET program that follows. It is used with NUMBERS only. _________________________________________ %GET FORMAT: %GET #n,a EXAMPLE: %GET #1,A EXAMPLE #2 10 CLS 20 CLOSE:OPEN #1,4,0,"D8:TEST" 30 FOR Y = 1 TO 5 40 %GET #1;A 50 ? A 60 NEXT Y:CLOSE 70 ?:? "I have retrieved the numbers saved with %PUT by using %GET" 80 LIST It retrieves the numbers saved with %PUT. You must have a channel open. It is the same as 'INPUT #1;A' except it is much faster.

General Programming: CLS FORMAT: CLS EXAMPLE: CLS 10 CLS EXAMPLE #2 10 CLS 20 FOR X=1 TO 50 30 ? " CLEAR SCREEN "; 40 NEXT X 50 GOTO 10 This command clears the screen. It is the same as pressing CNTRL+CLEAR or ? CHR$ (125). _________________________________________ CLS # FORMAT: CLS #n(channels 1-7) EXAMPLE: CLS #3 90 CLS #3 EXAMPLE #2 10 CLS 20 ?:?:?:?:?:?:? "THIS WILL NOT BE ERASED - IT IS BEFORE LINE 30(OPEN). TO STOP-->'BREAK'" 30 CLOSE:OPEN #3,4,0,"K:" 40 CLS #3 50 ? "PRESS ANY KEY"; 60 GET #3,L 70 ?:? "YOU PRESSED THE ";CHR$(L);" KEY":? 80 CLS #3 90 GOTO 40 This command clears the screen of any information that was there because of the opened channel. This is different from CLS which clears the whole screen. _________________________________________ PAUSE FORMAT: PAUSE n EXAMPLE: PAUSE 50 90 PAUSE 100 EXAMPLE #2 10 CLS 20 REPEAT:A=A+1 30 ? A;", "; 40 PAUSE 100 50 UNTIL A=20 EXAMPLE #3 10 CLS 20 X=10 30 REPEAT:A=A+1 40 ? A;", "; 50 PAUSE 10*X 60 UNTIL A=20 This command puts a time delay of about 1/60 of a second into your program for each number. PAUSE 60 = about 60/60 or 1 second delay. It is the similar to 'FOR X = 1 TO 60:NEXT X'. Computed values are allowed. Negative values are not allowed.

General Programming (Cont.): RENUM FORMAT: RENUM n,i,j EXAMPLE: RENUM 10,100,10 90 RENUM 100,10,10 EXAMPLE #2 10 CLS 20 ? "RENUMBER PLEASE!" 30 PAUSE 100 40 LIST 50 RENUM 10,100,20 60 LIST EXAMPLE #3 10 CLS 20 X=3 30 ? " HELLO "; 40 GOTO X*10 50 REM X*10 WILL NOT BE RENUMBERED 60 RENUM 10,100,20 70 LIST This command renumbers your program. The 'n' is the program line number that you want to start renumbering with. The 'i' is the first NEW number. The 'j' is the increment. It will not renumber line references which involve variables or computed values. See example #3. _________________________________________ DEL FORMAT: DEL n,i EXAMPLE: DEL 60,100 90 DEL 50,80 EXAMPLE #2 10 CLS 20 ? "THIS LINE STAYS" 30 ? "30 GOES" 40 ? "40 GOES" 50 ? "50 GOES" 60 DEL 30,50 70 LIST This command deletes lines out of your program. 'n' = the starting number and 'i'= the ending number. It can be used in the direct or programmed mode.
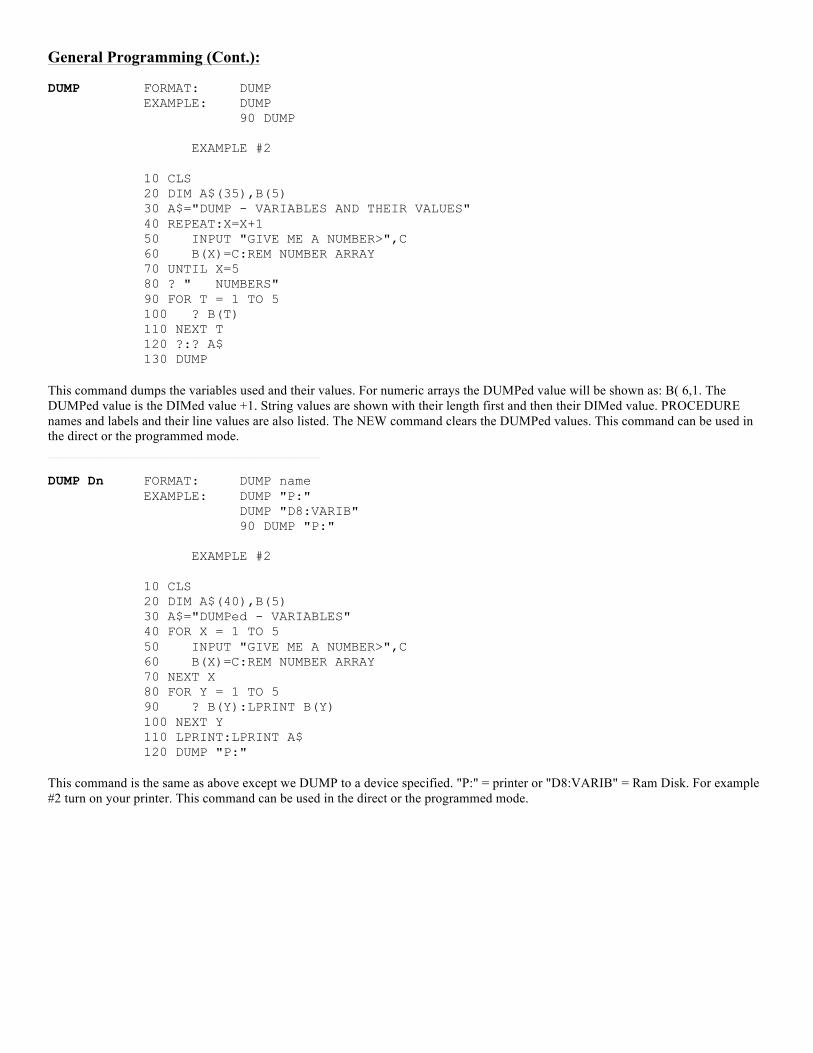
General Programming (Cont.): DUMP FORMAT: DUMP EXAMPLE: DUMP 90 DUMP EXAMPLE #2 10 CLS 20 DIM A$(35),B(5) 30 A$="DUMP - VARIABLES AND THEIR VALUES" 40 REPEAT:X=X+1 50 INPUT "GIVE ME A NUMBER>",C 60 B(X)=C:REM NUMBER ARRAY 70 UNTIL X=5 80 ? " NUMBERS" 90 FOR T = 1 TO 5 100 ? B(T) 110 NEXT T 120 ?:? A$ 130 DUMP This command dumps the variables used and their values. For numeric arrays the DUMPed value will be shown as: B( 6,1. The DUMPed value is the DIMed value +1. String values are shown with their length first and then their DIMed value. PROCEDURE names and labels and their line values are also listed. The NEW command clears the DUMPed values. This command can be used in the direct or the programmed mode. _________________________________________ DUMP Dn FORMAT: DUMP name EXAMPLE: DUMP "P:" DUMP "D8:VARIB" 90 DUMP "P:" EXAMPLE #2 10 CLS 20 DIM A$(40),B(5) 30 A$="DUMPed - VARIABLES" 40 FOR X = 1 TO 5 50 INPUT "GIVE ME A NUMBER>",C 60 B(X)=C:REM NUMBER ARRAY 70 NEXT X 80 FOR Y = 1 TO 5 90 ? B(Y):LPRINT B(Y) 100 NEXT Y 110 LPRINT:LPRINT A$ 120 DUMP "P:" This command is the same as above except we DUMP to a device specified. "P:" = printer or "D8:VARIB" = Ram Disk. For example #2 turn on your printer. This command can be used in the direct or the programmed mode.
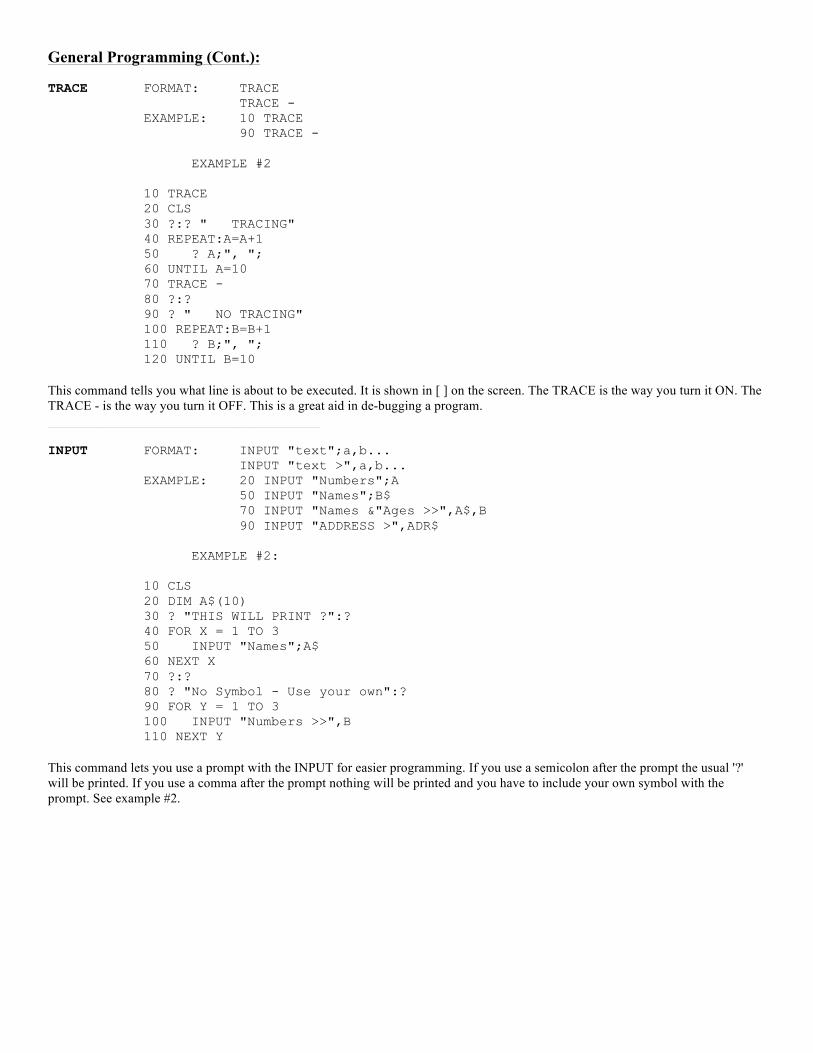
General Programming (Cont.): TRACE FORMAT: TRACE TRACE - EXAMPLE: 10 TRACE 90 TRACE - EXAMPLE #2 10 TRACE 20 CLS 30 ?:? " TRACING" 40 REPEAT:A=A+1 50 ? A;", "; 60 UNTIL A=10 70 TRACE - 80 ?:? 90 ? " NO TRACING" 100 REPEAT:B=B+1 110 ? B;", "; 120 UNTIL B=10 This command tells you what line is about to be executed. It is shown in [ ] on the screen. The TRACE is the way you turn it ON. The TRACE - is the way you turn it OFF. This is a great aid in de-bugging a program. _________________________________________ INPUT FORMAT: INPUT "text";a,b... INPUT "text >",a,b... EXAMPLE: 20 INPUT "Numbers";A 50 INPUT "Names";B$ 70 INPUT "Names &"Ages >>",A$,B 90 INPUT "ADDRESS >",ADR$ EXAMPLE #2: 10 CLS 20 DIM A$(10) 30 ? "THIS WILL PRINT ?":? 40 FOR X = 1 TO 3 50 INPUT "Names";A$ 60 NEXT X 70 ?:? 80 ? "No Symbol - Use your own":? 90 FOR Y = 1 TO 3 100 INPUT "Numbers >>",B 110 NEXT Y This command lets you use a prompt with the INPUT for easier programming. If you use a semicolon after the prompt the usual '?' will be printed. If you use a comma after the prompt nothing will be printed and you have to include your own symbol with the prompt. See example #2.

General Programming (Cont.): GO TO FORMAT: GO TO EXAMPLE: 50 GO TO 20 GO TO 100 EXAMPLE #2 10 CLS 20 ? " HELLO "; 30 GO TO 20 This command is the same as the usual GOTO. _________________________________________ *L FORMAT: *L (DEFAULT) *L - EXAMPLE: 30 *L 90 *L - EXAMPLE #2 10 CLS:? 20 *L 30 ? "LINE # 50-70 INDENT ON" 40 FOR X = 1 TO 5 50 ? " "; 60 ? " "; 70 ? " "; 80 NEXT X 90 LIST 100 PAUSE 300 110 CLS:? 120 *L - 130 ? "LINE # 50-70 INDENT OFF" 140 LIST When listing a program with loops this command either turns on the indent on the loops or turns them off. The *L turns it ON. This is the normal default condition. The *L - turns the indent OFF. This works not only on the screen but also on the printer.

General Programming (Cont.): *F FORMAT: *F (or *F+) *F - EXAMPLE: 70 *F 90 *F - EXAMPLE #2 10 CLS 20 ? "ILLEGAL REVERSE LOOP":? 30 FOR X = 2 TO 1 40 ? X 50 NEXT X 60 PAUSE 200 70 *F 80 ?:? "ILLEGAL LOOP - NO EXECUTION - '*F'" 90 FOR X = 2 TO 1 100 ? X 110 NEXT X 120 PAUSE 200 130 LIST Atari BASIC has a bug. It allows execution of an illegal reverse loop. (FOR X=2 TO 1:? X:NEXT X). This command allows you to turn this feature off or on. *F or *F + turns it OFF. *F - turns the bug ON if you want it. _________________________________________ *B FORMAT: *B (or B+) *B - EXAMPLE: 90 *B 200 *B - EXAMPLE #2 10 CLS:? 20 CLOSE:OPEN #1,8,0,"D8:TEST" 30 FOR X=1 TO 3 40 INPUT "GIVE ME A NUMBER";A 50 %PUT #1;A 60 NEXT X:CLOSE 70 PAUSE 100:?:? 80 ? " I AM TRAPPING 'BREAK' KEY" 90 *B 100 CLOSE:TRAP 180:OPEN #1,4,0,"D8:TEST" 110 ?:? 120 FOR Y = 1 TO 3 130 PAUSE 100 140 %GET #1;A 150 ? A;" TRY BREAK KEY" 160 NEXT Y:CLOSE 170 END 180 REM TRAP 190 ?:? "BREAK KEY TRAPPED!" 200 GOTO 90 This command lets you trap the break key so your program cannot accidentally be stopped by hitting the BREAK key. This command works with the TRAP command. The *B turns it ON. The *B - turns it OFF.

General Programming (Cont.): -- FORMAT: -- EXAMPLE: 10 -- 90 -- EXAMPLE #2 10 -- 20 CLS 30 ? " 30 DASHES " 40 ? " HELLO " 50 -- 60 LIST This command prints 30 dashes across the screen or the page when you LIST your program. It can be used to make your program listing clearer. _________________________________________ DSOUND FORMAT: DSOUND n,f,d,v DSOUND EXAMPLE: 10 DSOUND 1,72,12,8 90 DSOUND EXAMPLE #2 10 CLS 20 ?:? "PRESS 'RESET' TO STOP" 30 X = RAND(255) 40 ? X;", "; 50 DSOUND 1,X,12,8 60 PAUSE 25 70 DSOUND 80 DSOUND 0,X,12,8 90 GOTO 30 This command pairs channels for increased frequency range. n=channels (0-3). f=frequency range (0-255). d=distortion (0-15) 10 and 14 produce pure tones. v=volume (0-15). 0 is silent 15 is the loudest. DSOUND turns all sound OFF.

Line Labels: # FORMAT: # name EXAMPLE: 120 # END 120 # END_OF_FILE EXAMPLE #2 10 CLS 20 CLOSE:OPEN #1,8,0,"D8:TEST" 30 REPEAT:X=X+%1 40 INPUT "GIVE ME A NUMBER";A 50 %PUT #1,A 60 UNTIL X=%3 70 CLOSE 80 CLOSE:OPEN #1,4,0,"D8:TEST" 90 TRAP # END:%GET #1,A 100 ? A 110 GOTO 90 120 # END:IF ERR=136 THEN CLOSE This command gives the line number that has the '#' the VARIABLE LABEL that follows the '#'. For example: '120 # END' will now become a VARIABLE LABEL and it will be in the variable name table listed as such (Use DUMP to see it). In example #2 see line #90 '90 TRAP # END...". It will go to line 120. This is the same as if we wrote '90 TRAP 120...' except it is clearer the first way. When there is an EOL error (136) channel #1 will be closed so no error is printed. A better way would have been '120 # END_OF_FILE...' The underscore (_) is allowed in variables and labels and makes for clearer listings. We would have a better description of WHERE and WHAT the program does if we had used it. If you use line labels they can be renumbered. %1 and %3 in line 30 and 60 are used because they save us 6 bytes each and stand for the number 1 and 3. See discussion on constants. _________________________________________ GO# FORMAT: GO# name EXAMPLE: 60 GO# GET_KEY 100 GO# ERROR EXAMPLE #2 10 CLS 20 ?:? "PRESS ANY KEY" 30 CLOSE:OPEN #1,4,0,"K:" 40 # GET_KEY:GET #1,A 50 ? CHR$(A);", "; 60 GO# GET_KEY This is the same as GOTO except the GO# looks for a label. You cannot have a space between the GO and #. For the (_) in line 40 see '# name' above. Line 40 has the variable label of '# GET_KEY'. Line 60 looks for this label and it works just like a GOTO except the listing is clearer.

Modification of Atari Commands: CLOSE FORMAT: CLOSE EXAMPLE: 90 CLOSE 120 CLOSE:OPEN #1,4,0,"D8:TEST" This command closes ALL opened channels. It is a good practice to close a channel first before opening it. This command is the same as 'FOR X=1 TO 7:CLOSE X:NEXT X'. _________________________________________ DIM FORMAT: DIM a(n) EXAMPLE: 10 DIM A(6) 30 DIM B$(20) This command automatically assigns a value of 0 to all elements in a numeric array and null characters to all elements of a string. The LEN function is still variable and initially 0. _________________________________________ GET FORMAT: GET name EXAMPLE: 20 GET A 90 GET K EXAMPLE #2 10 CLS:?:? 20 GET A 30 ? "The key is ";CHR$(A); 40 ? " the ATASCII = ";A 50 GOTO 20 This command returns the ATASCII value of the key pressed. It is the same as 'OPEN #1,4,0,"K:":GET #1;A:CLOSE #1'. The command waits for a key press and assigns the ATASCII value to the variable. _________________________________________ LIST FORMAT: LIST n, EXAMPLE: LIST 90, This command lists the program from the line specified to its end provided the comma is used. _________________________________________ ON/EXEC FORMAT: ON a EXEC n1,n2,... EXAMPLE: 30 ON X EXEC START,MAIN_PROG,ENDING This command is the same as 'ON...GOSUB' except it is used with PROCEDURE. The command executes the PROCEDURES named. Instead of 'ON X GOSUB 200,300,400' we use variable label names of the PROCEDURES. See PROCEDURES.

Modification of Atari Commands (Cont.): ON/GO# FORMAT: ON a GO# n1,n2,... EXAMPLE: 70 ON X GO# NORMAL,UPSIDE_DOWN EXAMPLE #2 10 CLS:DIM A$(1) 20 ?:? 30 INPUT "Normal or Upside down";A$ 40 IF A$(1,1)="N" THEN X=1 50 IF A$(1,1)<>"N" THEN X=2 60 ?:? 70 ON X GO# NORMAL,UPSIDE_DOWN 80 # NORMAL 90 POKE 755,2 100 ? "THIS IS PRINTED NORMALLY" 110 GOTO 20 120 # UPSIDE_DOWN:CLS 130 POKE 755,7:?:? 140 ? "THIS IS PRINTED UPSIDE DOWN" 150 PAUSE 200:POKE 755,2 160 GOTO 20 This command is the same as ON...GOTO except we use variable label names instead of line numbers. In example #2 see line 70. _________________________________________ POP FORMAT: POP EXAMPLE: 100 POP EXAMPLE #2 10 CLS:?:? 20 GOSUB 50 30 ? "I am the next line" 40 END 50 REM SUBROUTINE 60 POP 70 GOTO 90 80 RETURN 90 ? "I POPPED the RETURN line 30" 100 LIST The POP command will work with all 4 loops, the DO-LOOP, WHILE-WEND, FOR-NEXT and GOSUB. When Turbo-BASIC XL sees a DO, WHILE, FOR or GOSUB it saves its RETURN address on the runtime stack so it knows to what line to return to. If you want BASIC to 'FORGET' this return line use POP. Too many POPs can lead to errors and make for poor programming.

Modification of Atari Commands (Cont.): PUT FORMAT: PUT n EXAMPLE: 60 PUT 90 20 PUT 89,69,83 EXAMPLE #2 10 REM SIMPLE WORDPROCESSOR 20 CLS:? 30 OPEN #1,4,0,"K:" 40 GET #1;A:R=R+1 50 IF R=37 THEN ? CHR$(155):R=0 60 PUT A 70 GOTO 40 This command is the same as 'PRINT CHR$ (A)'. It takes the ATASCII number and converts it into a character. _________________________________________ RESTORE # FORMAT: RESTORE #name EXAMPLE: 120 RESTORE #AGAIN 160 RESTORE #NUM_AGAIN EXAMPLE #2 10 CLS:? 20 DATA 1,2,3,4,5 30 # AGAIN 40 DATA 6,7,8,9,0 50 READ A 60 IF A=0 THEN 100 70 ? A;", "; 80 PAUSE 10 90 GOTO 50 100 ?:? "NOW DOING LN 40 DATA AGAIN" 110 PAUSE 120 RESTORE #AGAIN 130 READ A 140 IF A=0 THEN 170 150 ? A;", "; 160 GOTO 130 170 ?:LIST This command moves the data pointer back to the variable label in the DATA chain. In example #2 the RESTORE printed only the numbers in DATA ln. 40 because it came after '30 #AGAIN'. It did not start with ln. #20. It is the same as RESTORE 40 except we use a variable label for clearer programming. The 0 was the flag. When the READ saw a 0 then the IF-THEN came in and directed it to some other line.

Modification of Atari Commands (Cont.): RND FORMAT: RND EXAMPLE: 20 RND 40 X=RND 90 X=INT(RND*10) 100 X=INT(RND*10)+1 200 X=INT(RND*100) EXAMPLE #2 10 X=RND 20 ? X;", "; 30 GOTO 10 EXAMPLE #3 10 CLS:? 20 X=INT(RND*10) 30 PAUSE 25:? X;", "; 40 GOTO 20 In this command the dummy variable (0) has been eliminated. You can still use the Atari way RND (0) if you want to. In the example ln. 90 you get random numbers from 0-9. In ln. 100 you get random numbers from 1-10. In ln. 200 you get random numbers from 0-99. _________________________________________ RAND(n) FORMAT: RAND(n) EXAMPLE: 10 X = RAND(10) 90 X = RAND(100) EXAMPLE #2 10 CLS 20 X = RAND(100) 30 ? X;", "; 40 PAUSE 25 50 GOTO 20 In this command the random numbers are printed as integers. They start with 0 and end with the number-1 in the parentheses. _________________________________________ SOUND FORMAT: SOUND EXAMPLE: 90 SOUND EXAMPLE #2 10 R=R+1 20 Y = RAND(255) 30 SOUND 0,Y,10,8 40 PAUSE 100 50 SOUND 60 X = RAND(255) 70 SOUND 1,X,12,8 80 PAUSE 50 90 SOUND 100 IF R=8 THEN SOUND:R=0:GOTO 120 110 GOTO 10 120 END This command turns all sounds off. It is the same as 'SOUND 0,0,0,0.

Modification of Atari Commands (Cont.): TRAP # FORMAT: TRAP #name EXAMPLE: 90 TRAP #END 95 TRAP #END_OF_FILE This command is the same as '90 TRAP 150' except it uses variable label names. For an application see example #2 on the command '#name'.

Strings and Errors: TIME FORMAT: TIME EXAMPLE: 95 ? TIME/60 EXAMPLE #2 10 CLS:?:? 20 ? "TIMING A LOOP":?:? 30 S=TIME:REM STARTING TIME 40 FOR X=1 TO 120:? X;", ";:NEXT X 50 E=(TIME-S)/60:REM E=ELAPSED TIME-S, STARTING TIME 60 ?:?:? INT(E*100)/100;" SECONDS" The TIME counter is active as soon as you turn on your computer. It counts 60 numbers per second. To get a readout in seconds use TIME/60. To get a readout in minutes use TIME/3600. To get a readout in hours use TIME/216000. The TIME counter will continue as long as your computer is turned on. If you want to start the time counter from the beginning then press the RESET button. _________________________________________ TIME$ FORMAT: TIME$ EXAMPLE: 30 ? TIME$ EXAMPLE #2 10 CLS:?:? 20 DIM T$(6) 30 INPUT "SET TIME - HHMMSS";T$ 40 INPUT "WHEN TO STOP - HHMMSS";S 50 CLS 60 TIME$=T$ 70 REPEAT 80 POKE 755,0:REM NO CURSOR 90 POSITION 10,10:? "HOURS,MIN,SEC:";:? TIME$ 100 X=VAL(TIME$) 110 UNTIL X=S 120 POSITION 10,12:? "RING! RING! RING!" 130 POKE 755,3:REM CURSOR This command prints the time of day in the form of HOUR MINUTE SECOND (HHMMSS). In Europe they use 50 cycle current and European ATARI's run on this current as against 60 cycle in the USA. As a result of this the TIME$ function is not accurate and gains 10 minutes each hour.

Strings and Errors (Cont.): INKEY$ FORMAT: INKEY$ EXAMPLE: 70 ? INKEY$ 90 A$=INKEY$ EXAMPLE #2 10 REM SCREEN WRITER 20 ? INKEY$; 30 GOTO 20 EXAMPLE #3 10 CLS:DIM A$(1):?:?:REM GAME 20 ? "HIT THE KEY OF THE LETTER ON THE SCREEN!" 30 PAUSE 150 40 R=RAND(90):IF R<65 THEN 40 50 CLS:POSITION 19,12:? CHR$(R) 60 PAUSE 55 70 A$=INKEY$ 80 IF A$=CHR$(R):GOTO 90:ELSE:GOTO 100:ENDIF 90 ?:? "YOU GOT IT!":PAUSE 90:GOTO 40 100 ?:? "YOU MISSED IT!":PAUSE 90:GOTO 40 This command returns the character of the last key hat was pressed. In example #3 please note line 70. Line 80 uses and IF-ELSE-ENDIF command. _________________________________________ INSTR FORMAT: INSTR(x$,a$,i) EXAMPLE: 50 ? INSTR(X$,A$,1) EXAMPLE #2 10 DIM X$(30),A$(5) 20 X$="MY HEART BELONGS TO DADDY" 30 A$="DADDY" 40 ? "DADDY IS AT POSIT. "; 50 ? INSTR(X$,A$,1) This command returns the beginning of a sub string. The x$ = the original string. The a$ = the sub string you want to find. The i = the position in numeric form that you want to search the original string. This command will return the position number where the sub string starts. Spaces are also counted.

Strings and Errors (Cont.): UINSTR FORMAT: UINSTR(x$,a$) UINSTR(x$,a$,i) EXAMPLE: 50 ? UINSTR(X$,A$) 20 ? UNISTR(X$,A$,5) EXAMPLE #2 10 DIM X$(40),A$(8) 20 X$="WHERE HAVE ALL THE SOLDIERS GONE" 30 A$="soldiers" 40 ? "soldiers IS AT POSIT"; 50 ? UINSTR(X$,A$) EXAMPLE #3 10 DIM X$(40),A$(8) 20 X$="ICH BIN EIN BERLINER" 30 A$="berliner" 40 ? "berliner IS AT POSIT."; 50 ? UINSTR(X$,A$,5) This command is the same as INSTR above. It searches for the beginning of a sub string. x$=original string. a$=sub string. i=starting position of the search. With UINSTR you can have lower case, upper case or inverse as the substring. It does not distinguish between case. You can include or eliminate the starting position of the search. See example #2 and #3. _________________________________________ ERR FORMAT: ERR EXAMPLE: 20 ? ERR 90 ? "ERROR # ";ERR;" AT LINE ";ERL EXAMMPLE #3 10 CLS:DIM A$(15):?:? 20 TRAP 90:READ A$ 30 ? A$ 40 GOTO 20 50 DATA MONDAY,TUESDAY,WEDNESDAY 60 DATA THURSDAY,FRIDAY 70 DATA SATRUDAY,SUNDAY 90 REM ERROR TRAP ROUTINE 100 ?:? "ERROR # ";ERR;" AT LINE ";ERL 110 LIST DPEEK(186):REM LIST ERROR LINE This command lists the last error number. _________________________________________ ERL FORMAT: ERL EXAMPLE: 20 ? ERL 90 ? "ERROR # ";ERR;" AT LINE ";ERL This command prints the line number where the last error occurred. See example #3 at 'ERR".

Loops and Subroutines: In Turbo-BASIC XL you call a subroutine in 3 ways: 1) GOSUB - by line number. 2) PROCEDURE - by name. 3) USR - by address. REPEAT/UNTIL FORMAT: REPEAT - UNTIL - EXIT EXAMPLE: 10 REPEAT:A=A+1 20 ? A 30 UNTIL A=6 EXAMPLE #2 10 CLS 20 A=64 30 ?:?:?:? 40 REPEAT:A=A+1 50 ? CHR$(A);", "; 60 UNTIL A=90 This command is a loop. It will repeat itself till the end condition is met. The end condition must be included with the UNTIL statement. EXIT gets you out of the loop. See DO-LOOP. _________________________________________ WHILE/WEND FORMAT: WHILE - WEND - EXIT EXAMPLE: 10 A=10:WHILE A 20 ? A 30 A=A-1:WEND EXAMPLE #2 10 CLS:? 20 A=90:WHILE A:? CHR$(A);", "; 30 IF A=65 THEN A=1 40 A=A-1:WEND This command is a loop. As long as the WHILE remains NON-ZERO the loop will execute. All statements between WHILE and WEND will be executed. In example #2, A=A-1 is the reverse counter. We terminate the loop before it becomes zero with the IF-THEN. If you go out of this loop with GOTO use the POP to clear the stack. Example #2 is the same as 'FOR X=90 TO 64 STEP-1'. EXIT gets you out of the loop. See DO-LOOP. _________________________________________ DO/LOOP FORMAT: DO - LOOP - EXIT EXAMPLE: 10 DO:A=A+1 20 ? A;", "; 30 IF A=15O THEN EXIT 40 LOOP The DO-LOOP is an infinite loop unless you use the EXIT command to get out of it. The DO and the LOOP are the 2 parts needed for this loop. Anything between them will be printed.

Loops and Subroutines (Cont.): IF/ELSE/ENDIF FORMAT: IF - ELSE - ENDIF IF - ENDIF EXAMPLE: 90 IF X>3:? "TOO LARGE:ELSE:? "OK":ENDIF 10 IF A<7 ? "YES":ENDIF EXAMPLE #2 10 CLS:?:? 20 INPUT "GIVE ME A NUMBER";A 30 IF A>5 40 PRINT A 50 GO# TOO_BIG 60 ELSE 70 PRINT A 80 GO# A_IS_OK 90 ENDIF 100 # TO_BIG:? "THIS NUMBER IS TOO LARGE":?:GO TO 20 110 # A_IS_OK:? "THIS NUMBER IS JUST RIGHT" 120 END EXAMPLE #3 10 CLS:?:?:DIM A$(1) 20 INPUT "IS THIS PORRIDGE OK(Y/N)";A$ 30 IF A$(1,1)="N":GO# TOO_HOT:ELSE:GO# JUST_RIGHT:ENDIF 40 # TOO_HOT:?:? "THIS PORRIDGE IS TOO HOT SAID GOLDILOCKS":END 50 # JUST_RIGHT:?:? "THIS IS JUST RIGHT SAID GOLDILOCKS" This command as NO THEN in it. It can be used with an ELSE or not. If you use it on one line be sure to have a colon before and after the ELSE (:ELSE:). This command must be terminated with an :ENDIF. The ENDIF has a colon in front of it if it is used on one line. See example #3 line 30.

Loops and Subroutines (Cont.): PROC/ENDPROC FORMAT: PROC - ENDPROC -(EXEC) EXAMPLE: 10 EXEC START_PROG 20 END 30 PROC START_PROG 40 ? "HELLO" 50 ENDPROC EXAMPLE #2 10 CLS:?:? 20 EXEC TOO_HARD 30 EXEC TOO_SOFT 40 EXEC JUST_RIGHT 50 END 60 -- 70 PROC TOO_HARD 80 ? "GOLDILOCKS SAID THIS BED IS TOO HARD!":? 90 ENDPROC 100 -- 110 PROC TOO_SOFT 120 ? "GOLDILOCKS SAID THIS BED IS TOO SOFT!":? 130 ENDPROC 140 -- 150 PROC JUST_RIGHT 160 ? "GOLDILOCKS SAID THIS IS JUST RIGHT!" 170 ENDPROC This command is used like GOSUB except we use a variable label name. Just like GOSUB you should have an END statement somewhere in your program. The PROC stand for procedure and is called by the EXEC (execute) command. The EXEC looks for the PROC name and then executes it. The command is terminated with ENDPROC. Anything between PROC and ENDPROC will be executed.

Graphics: To get a clear understanding of the various graphics modes, colors, screen positions and text windows etc. See the book "YOUR ATARI COMPUTER" by Lon Poole et al. published by Osborne / McGraw-Hill. CIRCLE FORMAT: CIRCLE x,y,r EXAMPLE: 40 CIRCLE 160,96,20 EXAMPLE #2 10 GRAPHICS 8+16 20 COLOR 1 30 FOR X = 1 TO 90 STEP 3 40 CIRCLE 160,96,X 50 NEXT X 60 GOTO 20 EXAMPLE #3 10 GRAPHICS 8+16 20 COLOR 1 30 FOR X=20 TO 300 STEP 20 40 CIRCLE X,96,80 50 NEXT X 60 GOTO 20 This command draws a circle. The graphic mode has to be stated in the program. x and y are the center position of the circle. r is the radius of the circle. _________________________________________ CIRCLE (Oblique) FORMAT: CIRCLE x,y,r,r2 EXAMPLE: 30 CIRCLE 160,96,50,70 EXAMPLE #2 10 GRAPHICS 8+16 20 COLOR 1 30 FOR X=1 TO 75 STEP 3 40 CIRCLE 160,96,X,X+25 50 NEXT X 60 GOTO 20 This command is the same as above except we have a vertical radius r2 so we can draw true circles or ellipses. x,y is the center of the circle, r is the radius and r2 is the vertical radius.

Graphics (Cont.): FCOLOR FORMAT: FCOLOR n EXAMPLE: 30 FCOLOR 3 EXAMPLE #2 10 GRAPHICS 7+16 20 COLOR 1 30 CIRCLE 80,48,45 40 FCOLOR 3 50 FILLTO 80,48 60 FCOLOR 1 70 FILLTO 80,93 80 GOTO 20 FCOLOR is usually used in conjunction with the FILLTO command. FCOLOR selects the fill in color. The number of fill in colors depend on the graphics mode. _________________________________________ FILLTO FORMAT: FILLTO x,y EXAMPLE: 70 FILLTO 80,93 This command fills in a shape with the color selected by the FCOLOR command. It is the same as XIO 18,#6,0,0,"S:". The x and y are the starting position INSIDE the shape. See example #2 under FCOLOR. _________________________________________ PAINT FORMAT: PAINT x,y EXAMPLE: 40 PAINT 80,48 EXAMPLE #2 10 GRAPHICS 7+16 20 COLOR 1 30 CIRCLE 80,48,45 40 PAINT 80,48 50 GOTO 20 This is also a type of fill in command. This is a recursive routine that will fill any closed shape. The x and y have to be the position inside the shape to be filled. _________________________________________ TEXT FORMAT: TEXT x,y,a$ EXAMPLE: 40 TEXT 3,8,A$ EXAMPLE #2 10 CLS 20 DIM A$(4) 30 A$="WIND" 40 TEXT 3,8,A$ This command bit-blocks the text in A$ at position x,y.

Arithmetic and Logic: HEX$ FORMAT: HEX$(n) EXAMPLE: 20 ? HEX$(32) EXAMPLE #2 10 CLS:?:? 20 INPUT "GIVE ME A DECIMAL NUMBER";A 30 ? "DECIMAL ";A;" = HEX ";HEX$(A) 40 ?:GOTO 20 This command takes a decimal number and converts it into a HEXIDECIMAL number. _________________________________________ DEC FORMAT: DEC(a$) EXAMPLE: 20 A$="FF":? DEC(A$) EXAMPLE #2 10 CLS:?:?: DIM A$(8) 20 INPUT "GIVE ME THE HEX NUMBER";A$ 30 ? "HEX ";A$;" = DECIMAL ";DEC(A$) 40 ?:GOTO 20 This command changes a HEXIDECIMAL number to a decimal number. The HEX number must first be put into a string. [Note: The HEXIDECIMAL string must be in upper-case in order to be properly converted.] _________________________________________ DIV FORMAT: n DIV i EXAMPLE: 20 A=9:B=4:? A DIV B EXAMPLE #2 10 CLS:?:? 20 INPUT "GIVE ME A NUMBER";A 30 INPUT "GIVE ME A SMALLER NUMBER";B 40 Q=A DIV B:R=A MOD B 50 ? A;"/";B;" = "; 60 ? Q;" REMAINDER ";R This command gives you the whole number part of a division or fraction. Example 9/4=2 R 1. This command prints the 2. _________________________________________ MOD FORMAT: n MOD i EXAMPLE: 20 A=9:B=4:? A MOD B This command returns the remainder of a division as a whole number. Example 9/4=2 R 1 This command will print 1. See example #2 above.

Arithmetic and Logic (Cont.): FRAC FORMAT: FRAC(a) EXAMPLE: A=22/7:? FRAC(A) EXAMPLE #2 10 CLS:?:? 20 A=22/7 30 ? "THE FRACTION 22/7 = ";A 40 ? "THE DECIMAL PART OF 22/7 = ";FRAC(A) This command prints the decimal part of a fraction ONLY. Example 22/7=3.142857... This command prints 142857... _________________________________________ TRUNC FORMAT: TRUNC(a) EXAMPLE: A=22/7:? TRUNC(A) EXAMPLE #2 10 CLS:?:? 20 A=22/7 30 ? "THE FRACTION 22/7 =";A 40 ? "THE INTEGER PART =";TRUNC(A) This command prints the Integer part of a fraction ONLY. Example 22/7=3.142857 it will print only 3. _________________________________________ $nnnn FORMAT: $nnnn EXAMPLE: 20 POKE $8000 EXAMPLE #2 10 CLS:?:? 20 FOR T = $0F TO $FF 30 ? T;", "; 40 NEXT T This command allows you to use hexadecimal numbers but they are converted to decimal numbers. In example #2 line 20 is converted to 'FOR T = 15 TO 255'.

Boolean Logic: The &, !, EXOR, are used in BOOLEAN logic. They are usually used to compare 2 bits. The bits have to be positive. Negative numbers will give you an error. Each program will print out a table for you of the result of comparing 2 bits. & FORMAT: n & i EXAMPLE: 10 CLS:?:? 20 ?,"BOOLEAN 'AND' (&)" 30 ? 40 ? "BIT ONE","BIT TWO","RESULT" 50 ? "1 &","1 =",1&1 60 ? "0 &","1 =",0&1 70 ? "1 &";"0 =",1&0 80 ? "0 &";"0 =",0&0 This command is the BOOLEAN 'AND'. _________________________________________ ! FORMAT: n ! i EXAMPLE: 10 CLS:?:? 20 ? ,"BOOLEAN 'OR' (!)" 30 ? 40 ? "BIT ONE","BIT TWO","RESULT" 50 ? "1 !","1 =",1!1 60 ? "0 !","1 =",0!1 70 ? "1 !","0 =",1!0 80 ? "0 !","0 =",0!0 This command is the BOOLEAN 'OR'. _________________________________________ EXOR FORMAT: n EXOR I EXAMPLE: 10 CLS:?:? 20 ? " BOOLEAN 'EXCULSIVE OR' (EXOR)" 30 ? 40 ? "BIT ONE","BIT TWO","RESULT" 50 ? "1 EXOR";"1 =",1 EXOR 1 60 ? "0 EXOR";"1 =",0 EXOR 1 70 ? "1 EXOR","0 =",1 EXOR 0 80 ? "0 EXOR","0 =",0 EXOR 0 This command is the BOOLEAN "Exclusive Or'. Constants: %0 - %3 FORMAT: %0 %1 %2 %3 EXAMPLE: 20 X=%1 50 FOR T = %1 TO %3:? T:NEXT T These 4 constants stand for the numbers 0 to 3. They are used like regular numbers. "X=1" uses 10 bytes while "X=%1" uses 4 bytes. When you use these numbers you save on each number 6 bytes. It is good programming to make variables of numbers that are used more than 3 times.

New Error Codes: Turbo-BASIC XL prints out in English all errors. You do not have to look up the error code numbers anymore. Turbo-BASIC XL has 8 new error codes not in ATARI-BASIC. The new error codes are form 22 to 30. FORMAT: Error - 22 ?NEST The loops are not properly nested _________________________________________ FORMAT: Error - 23 ?WHILE A WHILE-WEND loop with no corresponding WHILE _________________________________________ FORMAT: Error - 24 ?REPEAT An UNTIL with no corresponding REPEAT _________________________________________ FORMAT: Error - 25 ?DO A DO-LOOP with no corresponding DO _________________________________________ FORMAT: Error - 26 ?EXIT EXIT is outside a loop _________________________________________ FORMAT: Error - 27 ?XPROC Error in executing a procedure (There is no END line in your program etc.) _________________________________________ FORMAT: Error - 28 ?EXEC ENDPROC with no corresponding EXEC. _________________________________________ FORMAT: Error - 29 ?PROC PROC does not exist. _________________________________________ FORMAT: Error - 30 ?# Variable name label does not exist. _________________________________________ FORMAT: Error - 15 Error 15 has been expanded to include an UNTIL, which is in a REPEAT-UNTIL loop and which has been deleted by mistake. Self Booting Programs: If you want to have a program that runs itself upon booting up the disk name it 'AUTORUN.BAS'. Turbo-BASIC XL looks for a BASIC file by this name when the boot process is in operation.

Notes: Variables, Procedure Names and labels may contain the underscore (_). Now you can combine several words into a name that tells you WHAT and WHERE it goes. This is a powerful feature to make your programs more legible. EXAMPLES: 10 TRAP 200 10 TRAP #END_OF_FILE 60 X = 65 60 # LAST_CHAR = 65 90 IF A$(1,1) = "Y" THEN 60 90 IF A$(1,1) = "Y" THEN # FETCH_LABEL Double Quotes Double quotes are allowed in print statements. Whenever you want a quote in a print statement put in double quotes. EXAMPLE: 30 ? "SHE SAID ""GOODBYE"" AND SLAMMED THE DOOR" Multiple Line IF-ELSE-ENDIF You can use several lines between IF and ELSE and ENDIF. See example #2 of IF-ELSE-ENDIF on page 24. Arrays You can have only NUMBER arrays. Just like ATARI BASIC, Turbo-BASIC XL does not allow string arrays. Number arrays can be one or two dimensional. You must DIM each array. One dimensional array 'DIM A (5)'. Two dimensional arrays 'DIM A (5,8)'. For a tutorial on arrays and sorting see the back of this disk. Sorting For a tutorial on sorting of numbers and strings see the back of this disk. Public Domain I am collecting Turbo-BASIC XL utilities to be put into the Public Domain. Your help is appreciated. If you have a utility to share please send it to the author (I prefer it on a disk if possible). This documentation is in the Public Domain and may be copied by anyone! The author of this documentation apologizes for any omission or mistakes - they were accidental. If you cannot get this disk through any Public Domain source please send $5.00 to the author to cover the expense of the disk, the mailer and postage. If you have any comments or suggestion about this documentation - they are welcome. Please write to: Ron Fetzer 22 Monaco Ave. Elmont, NY 11003

Turbo-BASIC XL Memory Map
The Turbo-BASIC XL Compiler: Documentation and Operating Instructions by Dave Arlington Original Program by Frank Ostrowski This documentation is provided by the Western New York Atari Users Group and may be reprinted freely provided this credit is included. I know everyone is still rubbing their hands in glee over Turbo-BASIC XL, the new public domain Basic interpreter imported from Holland and Germany. This month we are proud to present a new treat from our international friends overseas, the Turbo-BASIC XL Compiler. The Turbo-BASIC XL Compiler will increase the speed of your TURBO-BASIC XL programs 3-5 times and regular Atari BASIC programs can be speeded up to 10-15 times faster. Unfortunately, like Turbo-BASIC XL, the Turbo-BASIC XL Compiler will only run on the XL/XE series of computers. In addition, the finished compiled programs will also only run on the XL/XE series. The Turbo-BASIC XL Compiler is very easy to operate. It can be used with more than one disk drive, even Drive 8, the 130XE ramdisk. On the Turbo-BASIC XL Compiler disk, you will find several files. The important ones for the operation of the Turbo-BASIC XL Compiler are COMPILER.COM and RUNTIME.COM. Before you begin, you should prepare two disks. The first one should be a blank formatted disk with DOS.SYS and DUP.SYS written on it. Your second disk should contain your BASIC program (TURBO or ATARI BASIC). To begin, insert the Turbo-BASIC XL Compiler disk into your drive and turn your computer on. When it has finished loading you will be in Turbo-BASIC XL. Type DOS to get to the DOS 2.5 menu. Choose DOS Option 'L', Load Binary File and load the file COMPILER.COM. After a short while, you will see a screen full of German. If you do not read German, do not worry, that is what this article is for! At any time that you are on this screen, you may reboot your system by hitting Control-R or you may return to DOS by hitting Control-D. You will be asked if you really want to do this. If you do, don't forget to 'J' for Ja and not 'Y' for Yes!! To compile your programs, remove the Turbo-BASIC XL Compiler disk from the drive and insert the disk with the program you want to compile. (If you have two drives, insert your disk with the program to compile in Drive 2 and the blank DOS disk in Drive 1.) Press the number 1 key (Number 2 if you have two drives). A complete listing of all the files on that drive will appear on the screen with one highlighted in inverse video. Using the arrow keys, highlight the file you want to compile and hit Return. That's all there is to it! At the top of the screen, you will see the line numbers fly by as the program is compiled. When it is finished, you will be prompted for a file name to save your compiled program under. It has to have an extender of CTB (for Compiled Turbo Basic). The program will not let you use any other extender. At this time, if you have one drive, you should remove your disk with your original program on it and replace it with your blank DOS disk. If you want your compiled program to be an AUTORUN file, you should name it AUTORUN.CTB. Then the file will automatically load and run at bootup time. There is one more step that you must do to get a completely runnable compiled program. Go back to DOS and copy the file RUNTIME.COM from the Turbo-BASIC XL Compiler disk to the disk with your compiled program on it. Rename the RUNTIME.COM file to the name AUTORUN.SYS. Your disk is now ready to go. The Turbo-BASIC XL Compiler does not compile to runnable code, you must run the RUNTIME.COM file to run your compiled program. One technical note on the Turbo-BASIC XL Compiler: If you're not familiar with other compilers for the ATARI computers, you should know that many have trouble compiling certain types of statements or insist that you organize your program structure in a certain way. So far none of these problems have occurred on any programs we have tested with the Turbo-BASIC XL Compiler. The only statement that wouldn't compile so far is the END statement. The only program structure that we have had trouble with is a FOR-NEXT loop that has two or more NEXTs for one FOR. For example: 10 FOR X=1 TO 5 20 IF X=3 THEN NEXT X 30 NEXT X Other than those two examples, we have had no problems compiling any type of program, either TURBO or ATARI BASIC. Please let us know of any problems you run into compiling any types of statements or programs. Whether you program in Turbo-BASIC XL or just want to turbo-charge your old Atari BASIC programs to super speed, I'm sure you will find the Turbo-BASIC XL Compiler will fit all your speed needs.

Turbo-BASIC XL Commands: Quick Reference !
Disk Commands:
BLOAD "Dn:FileSpec" BRUN "Dn:FileSpec" DELETE "Dn:FileSpec" DIR [optional "Dn:FileSpec"] LOCK "Dn:FileSpec" RENAME "Dn:OldFilename.ext, NewFilename.ext" UNLOCK "Dn:FileSpec" !
Memory:
DPEEK (Memory Location) DPOKE Memory Location, Value MOVE Source MemLoc, Destination MemLoc, NumBytes -MOVE Source MemLoc, Destination MemLoc, NumBytes [note: starts with last byte] BGET #Channel, Destination MemLoc, NumBytes BPUT #Channel, Source MemLoc, NumBytes %GET #Channel, Floating Point Value %PUT #Channel, Floating Point Value !Structured Programming:
REPEAT (Program Code) UNTIL WHILE (Program Code) WEND IF (Program Code) ELSE (Program Code) ENDIF DO (Program Code) LOOP EXIT (exit from a structured loop) PROC Procedure Name (Program Code) ENDPROC EXEC Procedure Name (execute a procedure) !
Programming Utilities:
PAUSE Value (in jiffies) RENUM Starting Line, Starting Number, Increment DEL First Line, Last Line DUMP [optional Device] TRACE (turn program tracing ON) TRACE- (turn program tracing OFF) DSOUND Note, Frequency, Distortion, Volume (pairs audio registers together for extended range) DSOUND (turns Off sounds) *L (turns ON line indent) *L- (turns OFF line indent) *F (Turbo-BASIC FOR/NEXT) *F- (Atari BASIC FOR/NEXT) *B (traps the <Break> key) *B- (untraps the <Break> key) -- (special REM displaying 30 dashes) # Label Name (line label) GO# Label Name (go to a line label)!!
Graphics:
CIRCLE X, Y, R, [optional R2 (vertical radius)] FCOLOR Color# (fill color) FILLTO X, Y (same as XIO #6) PAINT X, Y (fills an enclosed shape) TEXT X, Y, A$ (bit-blocks text)
Modifications of Atari Commands:
CLOSE (closes channels #1 - #7) DIM (zeroes arrays with null strings) GET Variable Name (gets value from "K:") INPUT "Prompt"; VarName or "Prompt", VarName [note: semi-colon uses "?" prompt, comma uses no prompt] INPUT Variable Name [note: uses "?" prompt] LIST Start Line, [optional End Line] [note: lists to program end when optional end line is not present] ON Value EXEC Proc1, Proc2, etc... PUT ATASCII Value (same as ? CHR$(ATASCII Value)) RESTORE #Label Name RND [note: (0) is now optional] SOUND [note: turns off all sounds] TRAP #Label Name
Arithmetic & Logic:
HEX$ (Value) (converts decimal Value to hexidecimal) DEC (HexString$) (converts hexidecimal string to decimal) [note: string must be in all upper-case] DIV Value1 DIV Value2 (integer quotient) MOD Value1 MOD Value2 (remainder of Value1/Value2) FRAC (Value) (gives fractional part of Value) TRUNC (Value) (truncates Value) RAND (Value) (random integer from zero to Value) $ Value (allows hex entry from $0 - $FFFF) & Value1 & Value2 (bitwise "AND") ! Value1 ! Value2 (bitwise "OR") EXOR Value1 EXOR Value2 (bitwise "Exclusive OR") !Strings, Errors, & Constants:
TIME (elapsed time in jiffies since computer was turned on, or last time <RESET> was pressed) TIME$ (returns time in the form: "HHMMSS") INKEY$ (returns the last key pressed) INSTR (String$, SubString$, [optional Start Position]) UINSTR (String$, SubString$, [optional Start Position]) [note: not case-sensitive] ERR (returns the last error number) ERL (returns the last error line) [note: TBXL doesn't automatically clear either ERR or ERL] %0 - %3 (constants, saving 6 bytes each time used in variable assignment compared to using numerical values) !
General Notes:
• Use ""Text"" (double-quotes) in PRINT statements to render as single quotes.
• Turbo-BASIC XL looks for "AUTORUN.BAS" at boot-up. • Variables, Procedure Names, and Labels may use the underscore "_" character.
• Patched U.S. version of Turbo-BASIC XL has the prompt "TURBO" instead of "READY".
• New Turbo-BASIC XL error Messages are #23 - #30, most of which are related to loops, nesting, and procedures.