Embed Size (px)
DESCRIPTION
Prepare for your Class 7 (novice) road test or brush up on your driving skills with Tuning Up for Drivers.
Citation preview
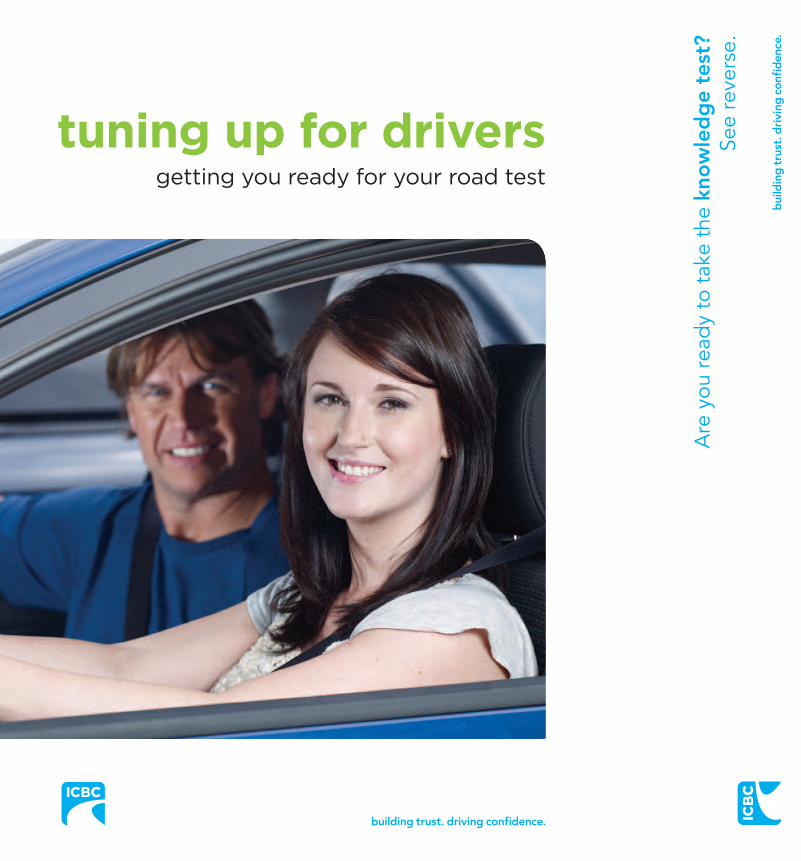
tuning up for driversgetting you ready for your road test
Are
you
rea
dy
to t
ake
the
kno
wle
dg
e te
st?
See
reve
rse.
Driving skills
A driver with smart-driving skills uses:
Observation
• looks well ahead in the direction of intended travel
• scans at intersections
• shoulder checks and mirror checks
• does a 360º vision check when backing up.
Hazard perception
• identifi es hazards in the driving environment.
Speed control
• uses the gas, brakes and gears smoothly
• chooses and maintains a consistent and appropriate speed.
Steering
• steers smoothly and accurately
• keeps both hands on the steering wheel.
Space margins
• keeps appropriate space margins
• chooses safe lane positions
• stops accurately.
Communication
• correctly uses turn signals, hand signals, eye contact, brake light and horn.
Vie
w d
rivin
g t
ips
on ic
bc.
com
Mak
e su
re t
o b
ring
w
ith
you
Prim
ary
and
Sec
ond
ary
ID
(see
bac
k co
ver)
Use
Tun
ing
Up
to
help
you
pre
par
e.
Don
’t st
ress
... g
et
lots
of p
ract
ice
and
yo
u’ll
be
confi
den
t.
Ask
us
que
stio
ns if
it’s
not
cl
ear.
We
wan
t yo
u to
suc
ceed
!

tuning up for driversgetting you ready for your road test

© 2012, 1998 Insurance Corporation of British Columbia.
All rights reserved. No part of this publication may be reproduced, stored or transmitted in any form, whether electronic, mechanical, photocopied or otherwise, without the prior written consent of the Insurance Corporation of British Columbia (ICBC). Applications for ICBC’s written consent should be made to ICBC, 151 West Esplanade, North Vancouver, B.C., V7M 3H9.
Statement of Limitation
ICBC has prepared Tuning up for drivers to present some simple and practical suggestions for dealing with some of the most common situations encountered by new drivers and their supervisors when studying for a Class 7 and 5 British Columbia driving licence. Tuning up is not intended to take the place of professional training and ICBC does not make any representation or warranty that any individual who studies Tuning up will be successful in obtaining the desired licence. Suggestions in Tuning up may need to be adapted to specifi c situations and circumstances. ICBC is not responsible for any consequences that may result from the use of Tuning up.
Throughout this guide, references are made to acts and regulations that govern driving in British Columbia. This guide refl ects the law in British Columbia as set out in these acts and regulations as of June 1, 2012. These references are written in plain language to help you understand their impact on individual drivers and the commercial driving industry. In the event of a difference between the material included in Tuning up and any of these acts or regulations, the acts and regulations shall apply.
i
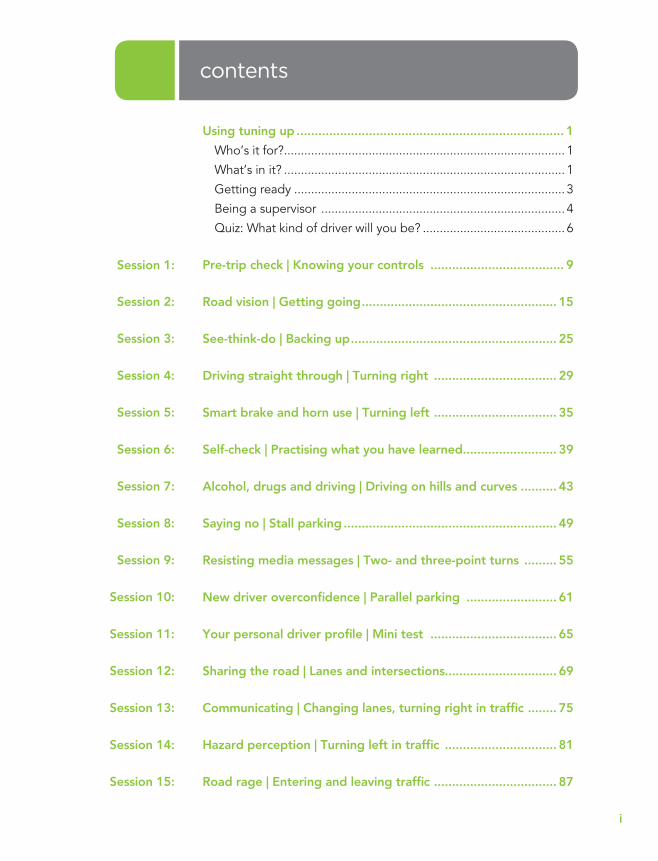
Using tuning up .......................................................................... 1
Who’s it for? ................................................................................... 1
What’s in it? ................................................................................... 1
Getting ready ................................................................................ 3
Being a supervisor ........................................................................ 4
Quiz: What kind of driver will you be? .......................................... 6
Pre-trip check | Knowing your controls ..................................... 9
Road vision | Getting going ...................................................... 15
See-think-do | Backing up ......................................................... 25
Driving straight through | Turning right .................................. 29
Smart brake and horn use | Turning left .................................. 35
Self-check | Practising what you have learned .......................... 39
Alcohol, drugs and driving | Driving on hills and curves .......... 43
Saying no | Stall parking ........................................................... 49
Resisting media messages | Two- and three-point turns ......... 55
New driver overconfi dence | Parallel parking ......................... 61
Your personal driver profi le | Mini test ................................... 65
Sharing the road | Lanes and intersections............................... 69
Communicating | Changing lanes, turning right in traffi c ........ 75
Hazard perception | Turning left in traffi c ............................... 81
Road rage | Entering and leaving traffi c .................................. 87
Session 1:
Session 2:
Session 3:
Session 4:
Session 5:
Session 6:
Session 7:
Session 8:
Session 9:
Session 10:
contents
Session 11:
Session 12:
Session 13:
Session 14:
Session 15:
ii
Choosing a safe speed | Practising in moderate traffi c ............ 91
Time and space | Entering and leaving the highway/freeway .... 97
Keeping alert | Passing .......................................................... 101
Driver personality | Becoming a skilled highway/freeway driver ..................................................................................... 105
Driving guidelines | Preparing for the road test .................... 111
Need to know more? ............................................................. 120
Licensing information ................................................................120
Booking road tests ....................................................................120
Other helpful phone numbers ..................................................120
Website addresses ....................................................................120
About your road test .................................................................121
Examiners’ tips for passing the Class 5 and 7 road tests ..........122
Session 16:
Session 17:
Session 18:
Session 19:
Session 20:
11
9
pre-trip check knowing your controls1
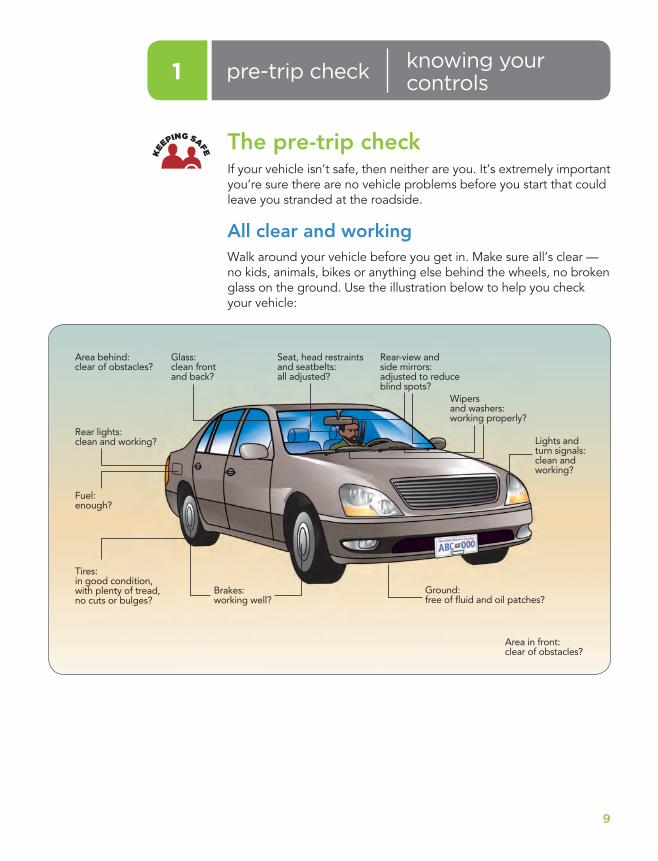
The pre-trip checkIf your vehicle isn’t safe, then neither are you. It’s ex treme ly important you’re sure there are no vehicle problems before you start that could leave you stranded at the roadside.
All clear and workingWalk around your vehicle before you get in. Make sure all’s clear — no kids, animals, bikes or anything else behind the wheels, no broken glass on the ground. Use the illustration below to help you check your vehicle:
KEEPING SAFE
Area in front:clear of obstacles?
Ground:free of fluid and oil patches?
Lights andturn signals:clean and working?
Rear-view andside mirrors:adjusted to reduceblind spots?
Seat, head restraintsand seatbelts:all adjusted?
Glass:clean frontand back?
Area behind:clear of obstacles?
Rear lights:clean and working?
Fuel:enough?
Tires:in good condition,with plenty of tread,no cuts or bulges?
Brakes:working well?
Wipers and washers: working properly?
Who’s it for?Tuning up for drivers is designed for:
• beginning drivers who want to learn to drive and get a driver’s licence
• experienced, fully licensed drivers who are helping beginning driv ers learn to drive
• licensed drivers who are new to B.C., or who are preparing for a re-examination, or who just want to review their skills.
What’s in it?The 20 sessions in Tuning up for drivers lead you through exercises to help you prepare for the Class 7 road test. These sessions are also helpful in preparing for a Class 5 road test. Although these sessions don't take the place of training, you can use them along with a professional driver education program to guide you as you practise.
Different kinds of information appear in different locations in this guide. Here are sug ges tions for using the information.
using Tuning up
Sidebar Main column
26
session 3
Putting it all togetherNow that you can go forward and backward, practise all the skills you’ve learned so far.
Pull up and park within 30 cm of the curb.
Pull away from the curb.
Back up slowly in a straight line.
Practise using vision skills.
Practise seeing-thinking-doing.
Repeat until you feel comfortable and confi dent.
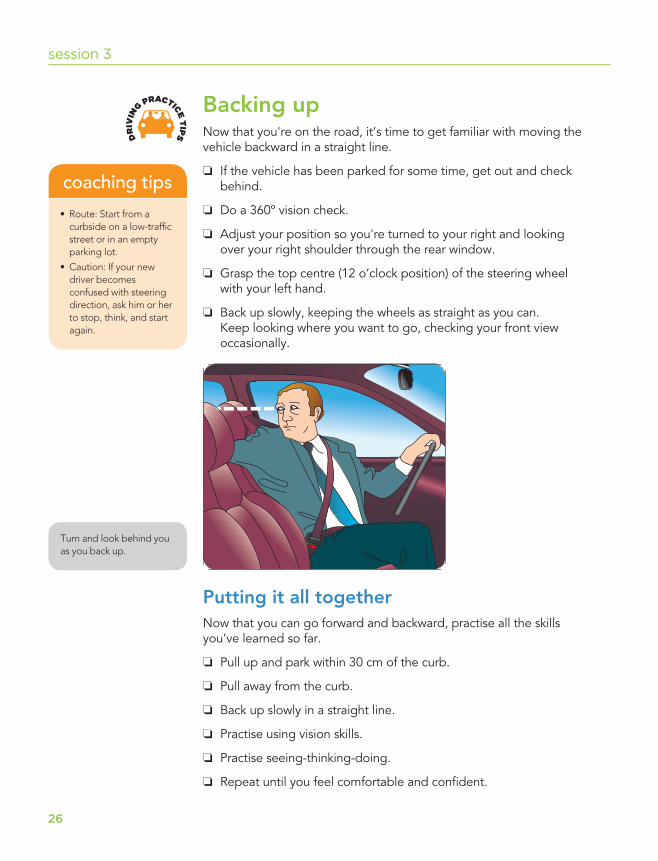
Backing upNow that you're on the road, it’s time to get familiar with moving the vehicle backward in a straight line.
If the vehicle has been parked for some time, get out and check behind.
Do a 360º vision check.
Adjust your position so you're turned to your right and looking over your right shoulder through the rear window.
Grasp the top centre (12 o’clock position) of the steering wheel with your left hand.
Back up slowly, keeping the wheels as straight as you can. Keep looking where you want to go, checking your front view occasionally.
DR
IVIN
G PRACTICE T
IPS
• Route: Start from a curbside on a low-traffi c street or in an empty parking lot.
• Caution: If your new driver becomes confused with steering direction, ask him or her to stop, think, and start again.
coaching tips
Turn and look behind you as you back up.
2
Main columnMost of the information for each chapter is located in the main column on the right. This main column also includes:
• Illustrations — To display certain points or to give direction.
• Keeping safe — These sections help you learn how to avoid crashes. They also challenge you to examine your attitudes and motives.
• Driving practice tips — These sections give you pointers on what to practise.
• How are you doing? — Rate your progress and invite your supervisor to rate you as well.
• Sign off — When you and your supervisor feel confi dent that you're ready to move on.
SidebarYou'll fi nd the following information on the left of the page:
• Learn to drive smart — Review your driving knowledge, and check the Learn to drive smart guide for valuable background information.
• warning — Important information to keep you safe.
• crash fact — Facts and statistics to think about while you're driving.
• reminder — Pay special attention to these while you do the exercises. They'll help you increase your skill.
• review — Review these driving skills before starting the session.
• coaching tips — These notes will help your supervisor teach you the driving manoeuvres.
Learn to drive smart review
crash fact
reminder
review
coaching tips
KEEPING SAFE
DR
IVIN
G PRACTICE T
IPS
RA
TE YOURSELF
SIG
N OFF
warning!
3
Getting ready You probably can't wait to get behind the wheel and start learning to drive. But you need to get these things in place fi rst.
Do you have a suitable vehicle?If you have a choice, it's easier to learn to drive in a small car than a big one. It's also easier to learn with an automatic trans mis sion than a manual.
Is your licence in order?You cannot drive a car without a valid learner’s licence. You were issued this licence after you passed the knowledge test. Carry it whenever you drive.
Do you have a supervisor?You need to choose a supervisor, or supervisors, who will be serious about helping you become a skilled, safe driver. Whenever you're driving, you're responsible — not your supervisor — for following the rules of the road.
Here are some suggestions for choosing your supervisor:
❏ TimeIs this person ready to commit the time needed to practise?
❏ Driving ability Is this person a skilled, confi dent driver? Your supervisor must have a valid Class 5 licence and meet supervisor age requirements.
❏ SafetyWill this person provide a good example of safe driving? Can he or she be relied on not to drive while impaired by alcohol or drugs, speed or take other risks on the road?
❏ Communication skills Is this person able to get information and ideas across clearly?
❏ PatienceDoes he or she have the patience to guide you effectively?
Professional trainingProfessional training is extremely valuable. It will help you learn faster and avoid developing bad driving habits.
Make sure the vehicle insurance covers you to drive the vehicle.
For example, some insurance categories limit vehicle use to drivers with more than 10 years driving experience.
It's your responsibility to ensure that your vehicle is properly insured for use on your road test. We accept no liability whatsoever for ensuring that your vehicle is properly insured and expressly reserve the right to make determinations with respect to coverage in the event of a claim.Check with your local ICBC Autoplan broker if you have any questions about your coverage. If you're planning to rent a vehicle, check with the rental agency to fi nd out if it's okay to drive their vehicle and use it for your road test.
warning!
For more information on the advantages of taking driver training, go to the Driver Training & Assessment Standards website at www.dtcbc.com. Also take a look at their list of licensed driving schools and locations.
4
Check chapter 9 in Learn to drive smart for information to help you choose a driving school and in for ma tion on approved driver education courses. Use Tuning up for drivers to reinforce what you learn in a course.
Being a supervisor Being a supervisor is a big commitment. It means demonstrating driving skills and coaching the driver through diffi cult manoeuvres. Before you commit to be a supervisor, ask yourself these questions:
❏ Do I have the time? A new driver needs a lot of practice to gain skills and confi dence. You should plan to spend about 60 hours helping the new driver prepare for the Class 7 road test.
❏ Am I qualifi ed?To be a supervisor, you must have a valid Class 5 licence and meet supervisor age requirements. You also need to be an ex cel lent driver with a good safety record.
❏ Do I have a good relationship with the driver?Supervising a new driver can be stressful. Can your relationship survive the frustrations of driving practice?
❏ Am I a good communicator?Your main teaching tool will be your communication with the driver. Are you a good listener? Can you explain complex ideas in simple terms?
❏ Do I have a lot of patience?At times, helping a new driver can challenge your ability to stay calm and collected.
Coaching tipsSupervising a new driver can be rewarding. It can also be challenging. Here are some sug ges tions for a better experience for you and the new driver:
• Use the see-think-do strategy. Take time to help the driver develop a systematic way to see the driving environment, think about it and take appropriate driving actions.
• Use a learning cycle. The following cycle is one way to help the new driver develop skills:
– discuss the exercise with the new driver
– demonstrate it
If you're in B.C.’sGraduated Licensing Program (GLP) and have a Class 7L learner’s licence, you have to display an L sign on the rear of the car when you drive.
reminder
Read Learn to drive smart, chapter 5 for background on the see-think-do strategy.
Learn to drive smart review
5
– let the new driver do the exercise while you watch
– give feedback
– allow time for the driver to practise
– if the driver's not successful, go through the cycle again.
• Review. Build in plenty of review time at the beginning and during.
• Assess accurately. Use the rating scales in this manual to assess the driver’s skills and make clear suggestions to improve. You'll need to judge whether the driver is overconfi dent and rates their own driving skills too highly, or whether the driver is under-confi dent and maybe overcritical and overcautious. These factors may infl uence how you communicate your assessment of each manoeuvre.
• Use the coaching tips. You'll fi nd helpful tips in this guide on how to teach specifi c exercises and descriptions of the kinds of behaviours you should encourage in the new driver.
• Plan. Always plan routes ahead. Consider safety and diffi culty.
• Model a good attitude. Because you'll be an infl uential model, the new driver may adopt your driving attitude. Make sure you pass on an attitude that supports good judgment and responsibility, such as not coaching or supervising while impaired by alcohol or drugs.
• Control the situation. New drivers can want to move on and be overconfi dent. To help control the situation, always choose a safe driving environment. Never let a new driver attempt a manoeuvre unless you're sure they can do it safely.
• Illustrate. Drawing diagrams of manoeuvres can help to clarify teaching points. Tuning up for drivers includes some blank intersection diagrams for your use. You may also want to keep a notebook handy.
• Communicate with a driver training school. If the driver's taking professional training, it's probably a good idea to talk to the instructors and coordinate your practice sessions with their training program.
• The driver experience log. A driver experience log is available in the learner passenger vehicle toolkit you receive when you get your learner’s licence. It's also available from our driver licensing offi ces and on icbc.com. Use this log to keep track of your practice hours. You should get at least 60 hours of practice. The more you practise, the better and safer a driver you'll be. By recording your practice hours in the log, you’ll see exactly how many hours you’ve spent on the road learning to become a safe and skillful driver.
6
Quiz: What kind of driver will you be?Before beginning, quiz yourself. Imagine that you've passed your road test and have been driving for a few months. What kind of driver do you think you'll be? Circle one choice. (Suggestion: Your supervisor might like to take this quiz too.)
1. You have just bought your fi rst car and you're taking your friend out on the highway. Would you:
a) keep a safe, controlled speed, paying close attention to traffi c?
b) speed up a little to keep up with the traffi c fl ow, but still keep good control?
c) pass a few slower vehicles, just to show your friend how well your car handles?
d) press right down on the accelerator, to show your friend how fast your car can go?
2. You're trying to turn right on a red light and there's a cyclist ahead and to your right. Would you:
a) wait patiently until the light turns green so that the cyclist can go?
b) tap on your window, smile and use eye contact and gestures to ask if he could pull back to let you by?
c) honk your horn lightly?
d) roll down the window and yell at him to move?
3. You're in a busy parking lot. It's taken you fi ve minutes to get three rows ahead. As you turn down a lane, you notice an elderly woman backing out. But there's someone approaching from the other end of the lane. Would you:
a) slow down to let the woman back out and the other person drive in?
b) keep approaching the parking stall slowly and hope that you make it in time?
c) speed up a bit, hoping that you might beat the other driver to the spot?
d) press the accelerator and try to beat the other driver?
7
4. You're planning to go to an event that night but before you leave, your friend phones you at home to tell you that the roads are icy and treacherous. Would you:
a) cancel?
b) ask some other experienced driver to go with you?
c) put an extra blanket in the car and drive slowly?
d) feel confi dent that you know how to drive in those conditions?
5. If you see someone who's probably going to step into the crosswalk, would you:
a) slow down and check mirrors before coming to a stop?
b) stop immediately?
c) continue on, but lean on the horn to warn him?
d) speed up and get past before he can step into the street?
6. The speed limit's 50 km/h, but most of the cars around you seem to be going faster. Would you:
a) pull over to let the others go by?
b) keep to the speed limit, even if everyone is trying to pass you?
c) speed up to follow the fl ow if it feels comfortable?
d) speed up to keep up with the rest, even if you feel a bit out of control?
7. Driving past a cyclist on a busy, narrow road, would you:
a) follow her, as you would another vehicle, until you get a chance to pass?
b) beep lightly to let her know you're approaching?
c) try to squeeze past?
d) pass her at your regular speed?
8
8. The car in front of you is moving quite slowly and you're on a narrow, winding road. Would you:
a) keep going slowly, keeping your distance?
b) honk the horn to try to get the driver to speed up?
c) follow very closely to get the driver moving?
d) pass?
9. You pull in front of another car and the driver honks at you. Would you:
a) decide that you’d better be more careful next time?
b) check your mirrors and signals to see if you made a mistake?
c) honk back?
d) become annoyed?
10. You’re ready to leave the party, and you realize that you shouldn’t have had those two beers. Would you:
a) call someone for a ride?
b) go home with your friend who's only had a little bit to drink?
c) drive home very slowly?
d) drive home at your usual speed?
Look over your resultsLook over the answers you've circled. The more your answers are around the “a” end of the scale, the more likely you'll be a driver who doesn’t take risks.
Discuss with your supervisor:
• How do you feel about the results of the quiz?
• What is it in your personality that might get in the way of making smart driving choices?
• In what ways can you see yourself changing if it would mean avoiding a crash?
9
pre-trip check knowing your controls1
The pre-trip checkIf your vehicle isn’t safe, then neither are you. It’s ex treme ly important you’re sure there are no vehicle problems before you start that could leave you stranded at the roadside.
All clear and workingWalk around your vehicle before you get in. Make sure all’s clear — no kids, animals, bikes or anything else behind the wheels, no broken glass on the ground. Use the illustration below to help you check your vehicle:
KEEPING SAFE
Area in front:clear of obstacles?
Ground:free of fluid and oil patches?
Lights andturn signals:clean and working?
Rear-view andside mirrors:adjusted to reduceblind spots?
Seat, head restraintsand seatbelts:all adjusted?
Glass:clean frontand back?
Area behind:clear of obstacles?
Rear lights:clean and working?
Fuel:enough?
Tires:in good condition,with plenty of tread,no cuts or bulges?
Brakes:working well?
Wipers and washers: working properly?
10
session 1
All adjustedMake sure everything’s adjusted for the best fi t and visibility.
Seat
Adjust the angle of the seat back to an upright position, and move the seat to a position that suits you. You should be able to:
• push the small of your back into the seat
• sit upright, never with a reclined seat
• with your right foot, reach the fl oor behind the brake pedal and still have a slight bend in your leg
• turn the steering wheel and keep your arms slightly bent
• reach all the controls
• keep your left foot comfortably on the space to the left of the brake pedal or clutch pedal.
Seatbelt
• The lap belt should be across your hips as low as possible. There should be no slack.
• The shoulder belt should be over the shoulder and snug across your chest. Never wear it under your arm, behind your back, or with a reclined seat.
• There are special precautions regarding safety restraints for children. Check the section on safety restraints for children in Learn to drive smart.
Airbags
• If your vehicle’s equipped with airbags, you should adjust your seat so you can reach the controls, but be at least 25 cm (10 in) from the steering wheel. This allows room for the airbag to infl ate and protects you from further injury.
• Consult your owner’s manual for safety precautions.
Head restraint
It’s not just a place to rest your head. A head restraint can help prevent neck injuries. Simply make sure:
• the top of your head restraint is at least as high as the top of your head
• it’s less than 10 cm from the back of your head.
The impact on your body in a 50 km/h crash is about the same as falling from a three-storey building. By wearing your seatbelt, you decrease the chance of severe injury by up to 67 per cent.
National Highway Traffi cSafety Administration
crash fact
11
pre-trip check | knowing your controls
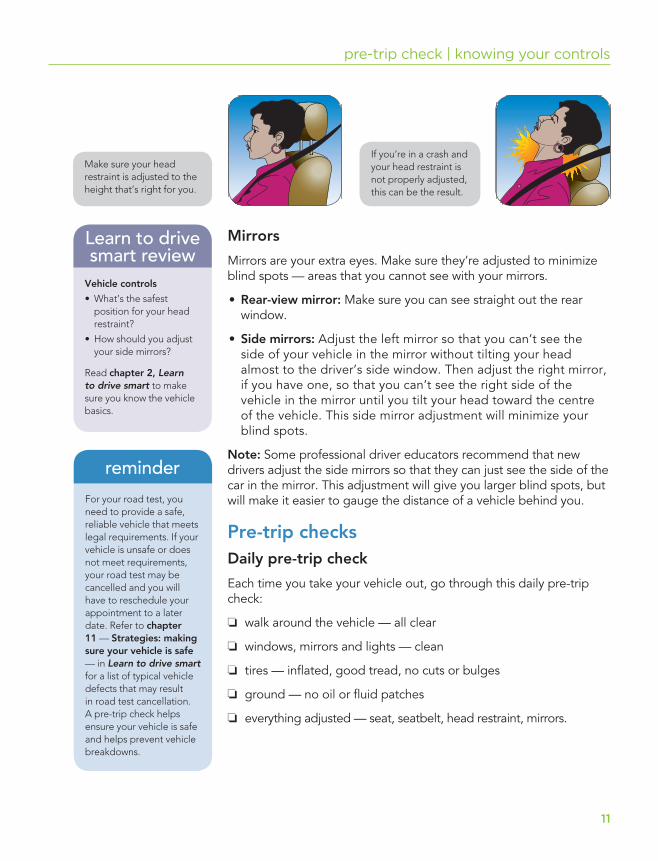
Mirrors
Mirrors are your extra eyes. Make sure they’re adjusted to minimize blind spots — areas that you cannot see with your mirrors.
• Rear-view mirror: Make sure you can see straight out the rear window.
• Side mirrors: Adjust the left mirror so that you can’t see the side of your vehicle in the mirror without tilting your head almost to the driver’s side window. Then adjust the right mirror, if you have one, so that you can’t see the right side of the vehicle in the mirror until you tilt your head toward the centre of the vehicle. This side mirror adjustment will minimize your blind spots.
Note: Some professional driver educators recommend that new drivers adjust the side mirrors so that they can just see the side of the car in the mirror. This adjustment will give you larger blind spots, but will make it easier to gauge the distance of a vehicle behind you.
Pre-trip checksDaily pre-trip check
Each time you take your vehicle out, go through this daily pre-trip check:
❏ walk around the vehicle — all clear
❏ windows, mirrors and lights — clean
❏ tires — infl ated, good tread, no cuts or bulges
❏ ground — no oil or fl uid patches
❏ everything adjusted — seat, seatbelt, head restraint, mirrors.
Make sure your head restraint is adjusted to the height that’s right for you.
If you’re in a crash and your head restraint is not properly adjusted, this can be the result.
Vehicle controls
• What’s the safest position for your head restraint?
• How should you adjust your side mir rors?
Read chapter 2, Learn to drive smart to make sure you know the vehicle basics.
Learn to drive smart review
For your road test, you need to provide a safe, reliable vehicle that meets legal requirements. If your vehicle is unsafe or does not meet requirements, your road test may be cancelled and you will have to reschedule your appointment to a later date. Refer to chapter 11 — Strategies: making sure your vehicle is safe — in Learn to drive smart for a list of typical vehicle defects that may result in road test cancellation. A pre-trip check helps ensure your vehicle is safe and helps prevent vehicle breakdowns.
reminder
12
session 1
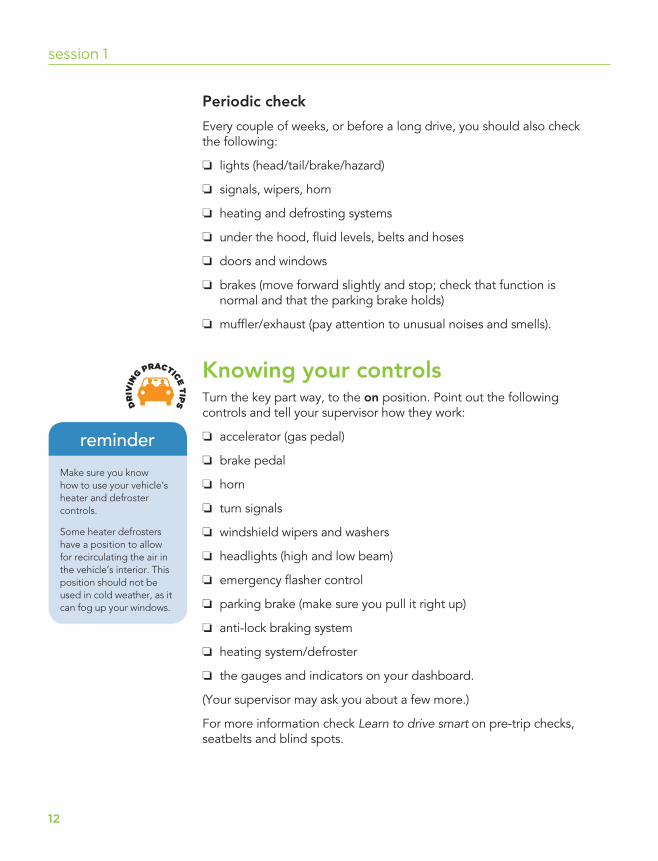
Periodic check
Every couple of weeks, or before a long drive, you should also check the following:
❏ lights (head/tail/brake/hazard)
❏ signals, wipers, horn
❏ heating and defrosting systems
❏ under the hood, fl uid levels, belts and hoses
❏ doors and windows
❏ brakes (move forward slightly and stop; check that function is normal and that the parking brake holds)
❏ muffl er/exhaust (pay attention to unusual noises and smells).
Knowing your controlsTurn the key part way, to the on position. Point out the following controls and tell your supervisor how they work:
❏ accelerator (gas pedal)
❏ brake pedal
❏ horn
❏ turn signals
❏ windshield wipers and washers
❏ headlights (high and low beam)
❏ emergency fl asher control
❏ parking brake (make sure you pull it right up)
❏ anti-lock braking system
❏ heating system/defroster
❏ the gauges and indicators on your dashboard.
(Your supervisor may ask you about a few more.)
For more information check Learn to drive smart on pre-trip checks, seatbelts and blind spots.
DR
IVIN
G PRACTICE T
IPS
Make sure you know how to use your vehicle’s heater and defroster controls.
Some heater defrosters have a position to allow for recirculating the air in the vehicle’s interior. This position should not be used in cold weather, as it can fog up your windows.
reminder
13
pre-trip check | knowing your controls
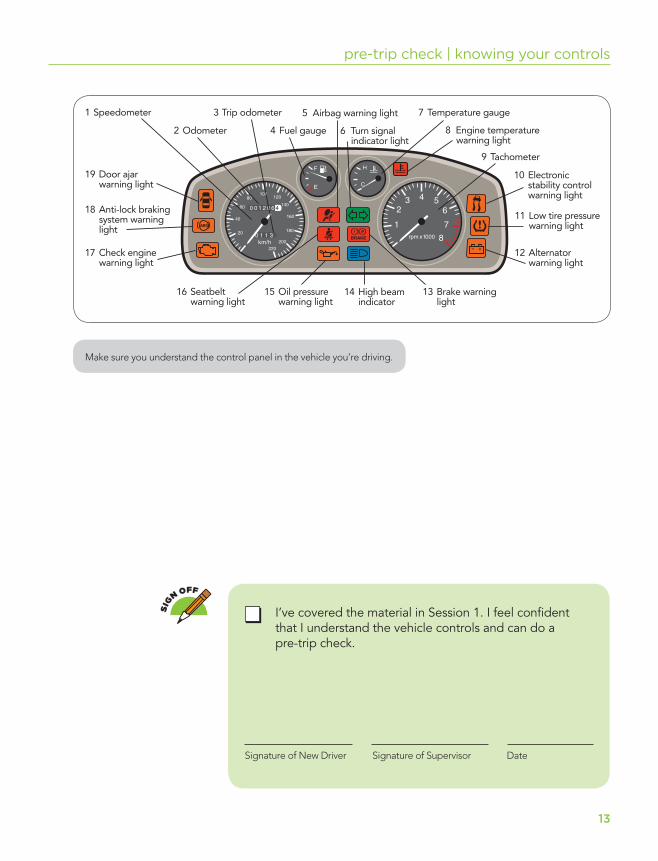
1 Speedometer
2 Odometer
3 Trip odometer
11 Low tire pressure warning light
7 Temperature gauge
4 Fuel gauge
5 Airbag warning light
6 Turn signal indicator light
9 Tachometer
10 Electronic stability control warning light
12 Alternator warning light
13 Brake warning light
14 High beam indicator
16 Seatbelt warning light
15 Oil pressure warning light
17 Check engine warning light
18 Anti-lock braking system warning light
19 Door ajar warning light
8 Engine temperature warning light
Make sure you understand the control panel in the vehicle you’re driving.
I’ve covered the material in Session 1. I feel confi dent that I understand the vehicle controls and can do a pre-trip check.
Signature of New Driver Signature of Supervisor Date
SIG
N OFF

14
notes
15
road vision getting going2
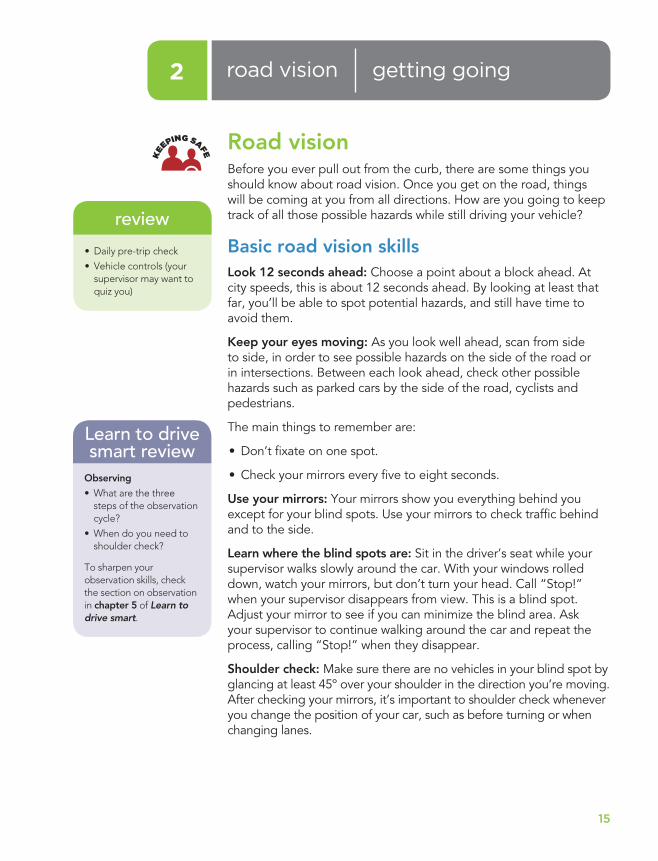
Road visionBefore you ever pull out from the curb, there are some things you should know about road vision. Once you get on the road, things will be coming at you from all directions. How are you going to keep track of all those possible hazards while still driving your vehicle?
Basic road vision skillsLook 12 seconds ahead: Choose a point about a block ahead. At city speeds, this is about 12 seconds ahead. By looking at least that far, you’ll be able to spot potential hazards, and still have time to avoid them.
Keep your eyes moving: As you look well ahead, scan from side to side, in order to see possible hazards on the side of the road or in intersections. Between each look ahead, check other possible hazards such as parked cars by the side of the road, cyclists and pedestrians.
The main things to remember are:
• Don’t fi xate on one spot.
• Check your mirrors every fi ve to eight seconds.
Use your mirrors: Your mirrors show you everything behind you except for your blind spots. Use your mirrors to check traffi c behind and to the side.
Learn where the blind spots are: Sit in the driver’s seat while your supervisor walks slowly around the car. With your windows rolled down, watch your mirrors, but don’t turn your head. Call “Stop!” when your supervisor disappears from view. This is a blind spot. Adjust your mirror to see if you can minimize the blind area. Ask your supervisor to continue walking around the car and repeat the process, calling “Stop!” when they disappear.
Shoulder check: Make sure there are no vehicles in your blind spot by glancing at least 45º over your shoulder in the direction you’re moving. After checking your mirrors, it’s important to shoulder check whenever you change the position of your car, such as before turning or when changing lanes.
• Daily pre-trip check
• Vehicle controls (your supervisor may want to quiz you)
review
Observing
• What are the three steps of the observation cycle?
• When do you need to shoulder check?
To sharpen your ob ser va tion skills, check the section on observation in chapter 5 of Learn to drive smart.
Learn to drive smart review
KEEPING SAFE
16
session 2
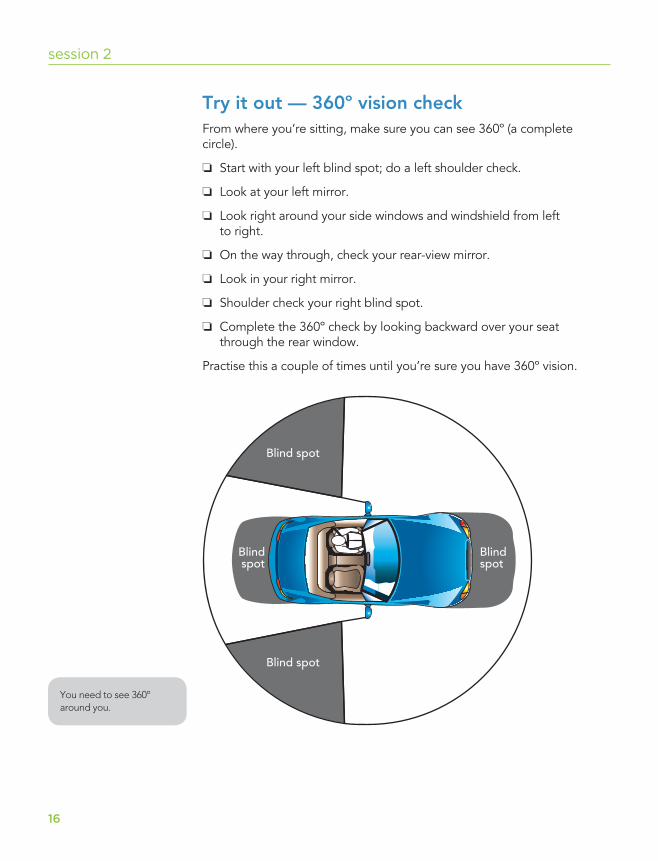
Try it out — 360º vision checkFrom where you’re sitting, make sure you can see 360º (a complete circle).
❏ Start with your left blind spot; do a left shoulder check.
❏ Look at your left mirror.
❏ Look right around your side windows and windshield from left to right.
❏ On the way through, check your rear-view mirror.
❏ Look in your right mirror.
❏ Shoulder check your right blind spot.
❏ Complete the 360º check by looking backward over your seat through the rear window.
Practise this a couple of times until you’re sure you have 360º vision.
You need to see 360º around you.
17
road vision | getting going
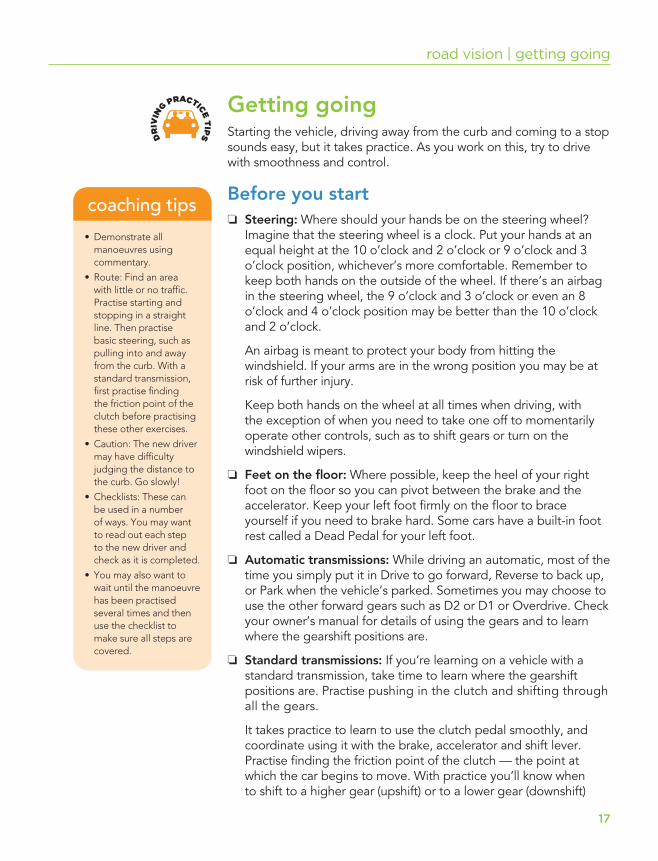
Getting goingStarting the vehicle, driving away from the curb and coming to a stop sounds easy, but it takes practice. As you work on this, try to drive with smoothness and control.
Before you start ❏ Steering: Where should your hands be on the steering wheel?
Imagine that the steering wheel is a clock. Put your hands at an equal height at the 10 o’clock and 2 o’clock or 9 o’clock and 3 o’clock position, whichever’s more comfortable. Remember to keep both hands on the outside of the wheel. If there’s an airbag in the steering wheel, the 9 o’clock and 3 o’clock or even an 8 o’clock and 4 o’clock position may be better than the 10 o’clock and 2 o’clock.
An airbag is meant to protect your body from hitting the windshield. If your arms are in the wrong position you may be at risk of further injury.
Keep both hands on the wheel at all times when driving, with the exception of when you need to take one off to momentarily operate other controls, such as to shift gears or turn on the windshield wipers.
❏ Feet on the fl oor: Where possible, keep the heel of your right foot on the fl oor so you can pivot between the brake and the accelerator. Keep your left foot fi rmly on the fl oor to brace yourself if you need to brake hard. Some cars have a built-in foot rest called a Dead Pedal for your left foot.
❏ Automatic transmissions: While driving an automatic, most of the time you simply put it in Drive to go forward, Reverse to back up, or Park when the vehicle’s parked. Sometimes you may choose to use the other forward gears such as D2 or D1 or Overdrive. Check your owner’s manual for details of using the gears and to learn where the gearshift positions are.
❏ Standard transmissions: If you’re learning on a vehicle with a standard transmission, take time to learn where the gearshift positions are. Practise pushing in the clutch and shifting through all the gears.
It takes practice to learn to use the clutch pedal smoothly, and co or di nate using it with the brake, accelerator and shift lever. Practise fi nding the friction point of the clutch — the point at which the car begins to move. With practice you’ll know when to shift to a higher gear (upshift) or to a lower gear (downshift)
DR
IVIN
G PRACTICE T
IPS
• Demonstrate all manoeuvres using commentary.
• Route: Find an area with little or no traffi c. Practise starting and stop ping in a straight line. Then practise basic steering, such as pulling into and away from the curb. With a standard trans mis sion, fi rst practise fi nding the friction point of the clutch before practising these other ex er cis es.
• Caution: The new driver may have diffi culty judging the distance to the curb. Go slowly!
• Checklists: These can be used in a number of ways. You may want to read out each step to the new driver and check as it is completed.
• You may also want to wait until the manoeuvre has been practised several times and then use the checklist to make sure all steps are covered.
coaching tips
18
session 2
by listening to the sound of the engine or by glancing at the tachometer (if your vehicle has one).
Keep your eyes on the road — don’t look down at your feet or at the gearshift lever when you’re shifting gears.
Don’t shift gears while turning — choose the correct gear, then use both hands to steer through the turn, then change gears as needed.
Starting up ❏ Check that the parking brake is properly set. Put your right foot on
the brake.
❏ Automatic: Check that the transmission is in Park.Standard: Depress the clutch, place the gear shift in neutral
and keep the clutch pedal fully depressed.
❏ Turn the key to the on position. Check that all the gauges and indicator lights are working.
❏ Turn the key to the start position.
❏ Listen to the sound of the engine. The moment the noise chang es, release the switch. Never engage the starter for longer than 10 seconds. If the engine doesn’t start, release the switch, wait a few seconds and then try again.
Pulling away from the curbAutomatic transmission:
❏ Put your right foot on the brake.
❏ Put the gear into Drive.
❏ Release the parking brake.
❏ Check your mirrors (the rear-view and side mir rors).
❏ Put on your turn signal.
❏ Shoulder check.
❏ Move your foot from the brake to the accelerator, and press the accelerator just enough to get go ing.
❏ Move smoothly away from the curb, looking ahead.
❏ Turn off your turn signal.
❏ Check your rear-view mirror to make sure nothing unexpected is coming up behind.
An easy way to remember the checking/signalling order is to think: mirror – signal – glance – go.
Translation: Check your mirrors, turn on your signal, do a shoul der check and then move when it’s clear.
reminder
In order to learn to start without stalling, have the new driver practise fi nding the friction point of the clutch.
Remind the new driver that the clutch pedal must be moved slowly in order to move ahead without stalling.
coaching tips
19
road vision | getting going
Standard transmission:
❏ Put your right foot on the brake.
❏ Put your left foot on the clutch and press it in all the way.
❏ Shift to fi rst gear.
❏ Release the parking brake.
❏ Check your mirrors (the rear-view and side mir rors).
❏ Put on your turn signal.
❏ Shoulder check.
❏ Move your foot from the brake to the accelerator.
❏ Raise the clutch pedal (let the clutch out) to where you feel the engine speed changing or the engine start to grab or pull (this is the friction point).
❏ Press the accelerator just enough to get going as you slowly let the clutch out the rest of the way.
❏ Move smoothly away from the curb, looking ahead.
❏ Turn off your turn signal.
❏ Check your rear-view mirror to make sure nothing un ex pect ed is coming up behind.
BrakingAutomatic transmission:
❏ Move your right foot from the accelerator pedal to the brake ped al. Where possible, rest your right heel on the fl oor just in front of the brake pedal.
❏ Apply pressure fi rmly and evenly on the brake pedal, not suddenly or hard.
❏ Look ahead and choose a spot to stop ahead, such as a tree or mailbox. Practise stopping smooth ly at the chosen spot.
Standard transmission:
❏ Move your right foot from the accelerator pedal to the brake. Rest your right heel on the fl oor just in front of the brake pedal.
❏ Apply pressure fi rmly and evenly on the brake pedal, not suddenly or hard.
To avoid wear on the clutch, if you will be stopped for a while, such as for a red traffi c light, shift to neutral.
reminder
Don’t use your left foot to brake.
reminder
Don’t press the clutch in too soon, otherwise, the engine won’t help slow the vehicle down and you’ll be relying only on the brakes.
warning!
Don’t “ride the clutch” (leave your foot on the clutch pedal after you have com plet ed shifting gears). This can cause the clutch to wear out rapidly.
warning!
20
session 2
❏ Look ahead and choose a spot to stop ahead, such as a tree or mailbox.
❏ If you’re in third gear or higher, you may choose to downshift to second gear to help slow you down. Or, you may choose to leave it in the higher gear. Either way, don’t downshift to fi rst gear until you’ve stopped.
❏ Just before you stop, press the clutch in all the way.
❏ Practise stopping smoothly at the chosen spot.
Accelerating (Upshifting)Automatic transmission:
In most cars, you simply need to leave the gear in Drive and press the accelerator farther down to go faster. The transmission au to mat i cal ly shifts gear.
Standard transmission:
As you gently press down on the accelerator and the car goes faster, you’ll need to shift to a higher gear:
❏ Press the clutch in all the way and at the same time, release the pressure on the accelerator.
❏ Shift to the higher gear.
❏ Smoothly release the clutch and adjust your pres sure on the accelerator to set your speed.
Slowing down (Downshifting)Automatic transmission:
❏ To go slower, let up on the accelerator. You may also need to apply the brake. The trans mis sion will automatically shift to a lower gear as the speed decreases.
❏ When going down a long hill, you may wish to shift to a lower gear like D3 or D2. Check your owner’s manual for recommended use of these gears. You may also need to apply the brake.
Standard transmission:
Depending on your speed and the gear you’re in, you maybe able to go slower simply by letting up on the accelerator or by applying the brake.
With practice, a new driver should be able to shift in less time than it takes to read this sentence.
coaching tips
Just like upshifting, with practice a new driver should be able to downshift in less time than it takes to read this sentence.
coaching tips
21
road vision | getting going
In some cases you may need to shift to a lower gear:
❏ Press the clutch in all the way and release the pressure on the accelerator.
❏ Shift to the lower gear.
❏ Release the clutch and adjust your pressure on the accelerator to reset your speed.
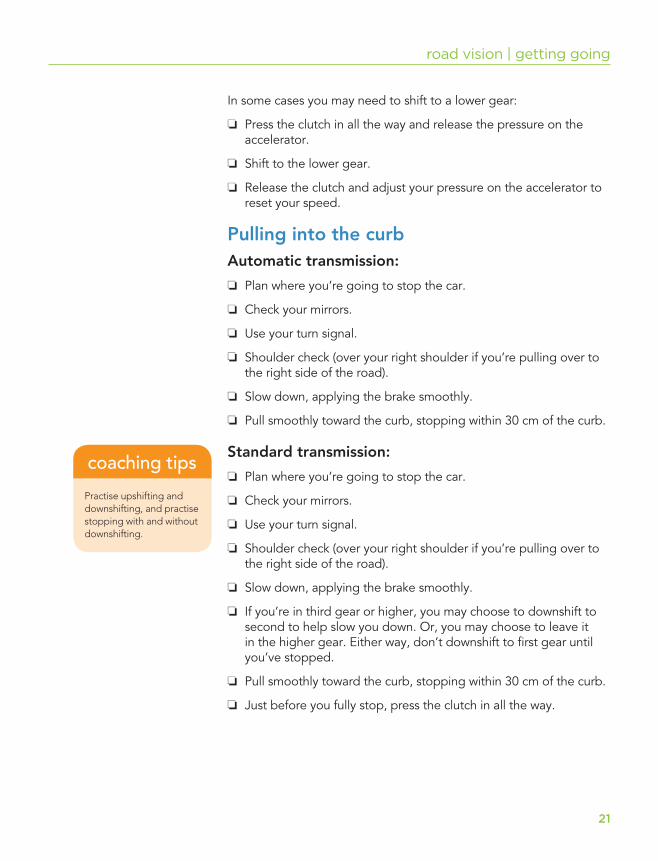
Pulling into the curbAutomatic transmission:
❏ Plan where you’re going to stop the car.
❏ Check your mirrors.
❏ Use your turn signal.
❏ Shoulder check (over your right shoulder if you’re pulling over to the right side of the road).
❏ Slow down, applying the brake smoothly.
❏ Pull smoothly toward the curb, stopping within 30 cm of the curb.
Standard transmission:
❏ Plan where you’re going to stop the car.
❏ Check your mirrors.
❏ Use your turn signal.
❏ Shoulder check (over your right shoulder if you’re pulling over to the right side of the road).
❏ Slow down, applying the brake smoothly.
❏ If you’re in third gear or higher, you may choose to downshift to second to help slow you down. Or, you may choose to leave it in the higher gear. Either way, don’t downshift to fi rst gear until you’ve stopped.
❏ Pull smoothly toward the curb, stopping within 30 cm of the curb.
❏ Just before you fully stop, press the clutch in all the way.
Practise upshifting and downshifting, and practise stopping with and without downshifting.
coaching tips
22
session 2
Stopping your vehicleAutomatic transmission:
❏ While keeping your foot on the brake, put the transmission into Park.
❏ Apply the parking brake.
❏ Make sure your lights, signals, wipers and radio are off.
❏ Shut off the engine.
Standard transmission:
❏ While keeping your foot on the brake and the clutch pushed in to the fl oor, put the trans mis sion into fi rst gear if facing up a hill or on a level surface, or reverse if facing down a hill.
❏ Apply the parking brake.
❏ Make sure your lights, signals, wipers and radio are off.
❏ Shut off the engine.
❏ Release the clutch.
Getting out ❏ Mirror and shoulder check for bikes and vehicles before opening
the door.
❏ Get out.
❏ Lock your doors.
23
road vision | getting going
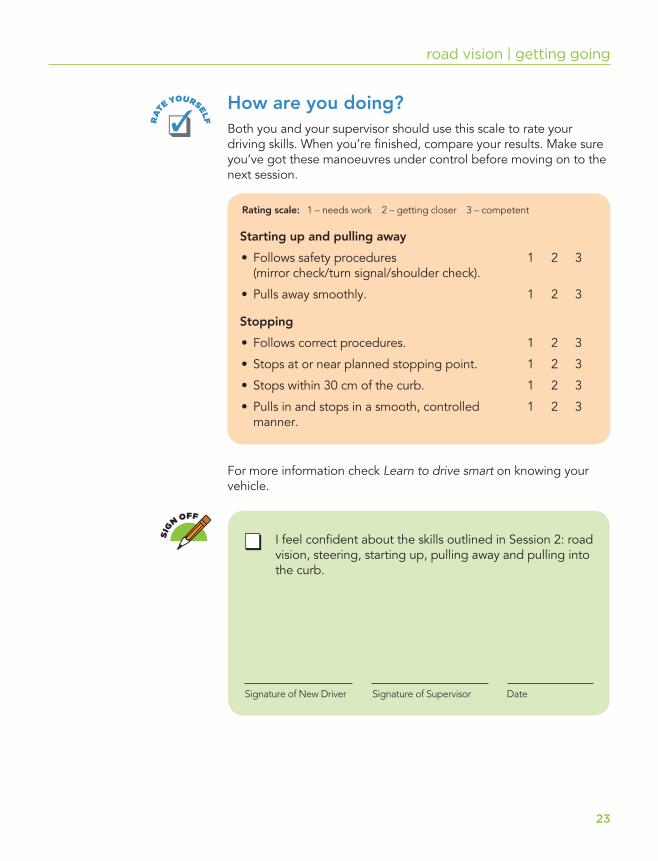
How are you doing?Both you and your supervisor should use this scale to rate your driving skills. When you’re fi nished, compare your results. Make sure you’ve got these manoeuvres under control before moving on to the next session.
For more information check Learn to drive smart on knowing your vehicle.
I feel confi dent about the skills outlined in Session 2: road vision, steering, starting up, pulling away and pulling into the curb.
Rating scale: 1 – needs work 2 – getting closer 3 – competent
Starting up and pulling away
• Follows safety procedures 1 2 3(mirror check/turn signal/shoulder check).
• Pulls away smoothly. 1 2 3
Stopping
• Follows correct procedures. 1 2 3
• Stops at or near planned stopping point. 1 2 3
• Stops within 30 cm of the curb. 1 2 3
• Pulls in and stops in a smooth, controlled 1 2 3manner.
Signature of New Driver Signature of Supervisor Date
RA
TE YOURSELF
SIG
N OFF

24
notes
2525
see-think-do backing up3
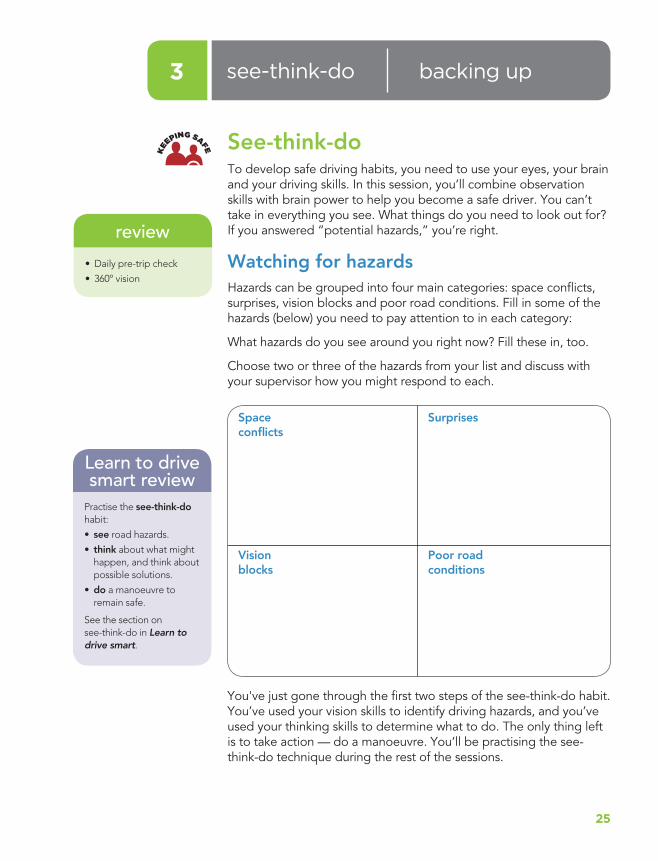
See-think-doTo develop safe driving habits, you need to use your eyes, your brain and your driving skills. In this session, you’ll combine observation skills with brain power to help you become a safe driver. You can’t take in everything you see. What things do you need to look out for? If you answered “potential hazards,” you’re right.
Watching for hazardsHazards can be grouped into four main categories: space confl icts, surprises, vision blocks and poor road conditions. Fill in some of the hazards (below) you need to pay attention to in each category:
What hazards do you see around you right now? Fill these in, too.
Choose two or three of the hazards from your list and discuss with your supervisor how you might respond to each.
Space confl icts
Surprises
Visionblocks
Poor road con di tions
Practise the see-think-do habit:
• see road hazards.
• think about what might happen, and think about possible so lu tions.
• do a manoeuvre toremain safe.
See the section onsee-think-do in Learn to drive smart.
Learn to drive smart review
• Daily pre-trip check
• 360º vision
review
You've just gone through the fi rst two steps of the see-think-do habit. You’ve used your vision skills to identify driving hazards, and you’ve used your thinking skills to determine what to do. The only thing left is to take action — do a manoeuvre. You’ll be practising the see-think-do technique during the rest of the sessions.
KEEPING SAFE
26
session 3
Putting it all togetherNow that you can go forward and backward, practise all the skills you’ve learned so far.
❏ Pull up and park within 30 cm of the curb.
❏ Pull away from the curb.
❏ Back up slowly in a straight line.
❏ Practise using vision skills.
❏ Practise seeing-thinking-doing.
❏ Repeat until you feel comfortable and confi dent.
Backing upNow that you're on the road, it’s time to get familiar with moving the vehicle backward in a straight line.
❏ If the vehicle has been parked for some time, get out and check behind.
❏ Do a 360º vision check.
❏ Adjust your position so you're turned to your right and looking over your right shoulder through the rear window.
❏ Grasp the top centre (12 o’clock position) of the steering wheel with your left hand.
❏ Back up slowly, keeping the wheels as straight as you can. Keep looking where you want to go, checking your front view occasionally.
DR
IVIN
G PRACTICE T
IPS
• Route: Start from a curbside on a low-traffi c street or in an empty parking lot.
• Caution: If your new driver becomes confused with steering direction, ask him or her to stop, think, and start again.
coaching tips
Turn and look behind you as you back up.
27
see-think-do | backing up
How are you doing?Both you and your supervisor should use this scale to rate your skill at backing up. When you’re fi nished, compare your results. Make sure you’ve got backing up under control before moving on to the next session.
Rating scale: 1 – needs work 2 – getting closer 3 – competent
Backing up
• Positions body for maximum vision. 1 2 3
• Maintains straight back-up steering. 1 2 3
• Backs up smoothly, with control. 1 2 3
I'm familiar with road vision skills and the see-think-do technique.
I can back up with smoothness and control.
Signature of New Driver Signature of Supervisor Date
RA
TE YOURSELF
SIG
N OFF

28
notes
2929
driving straight through turning right4
Space marginsWhenever you drive, you need to keep areas of space — sometimes called space margins — around your vehicle. Space margins will give you time and space to react if something happens ahead, or if a hazard comes toward you from the side or from behind.
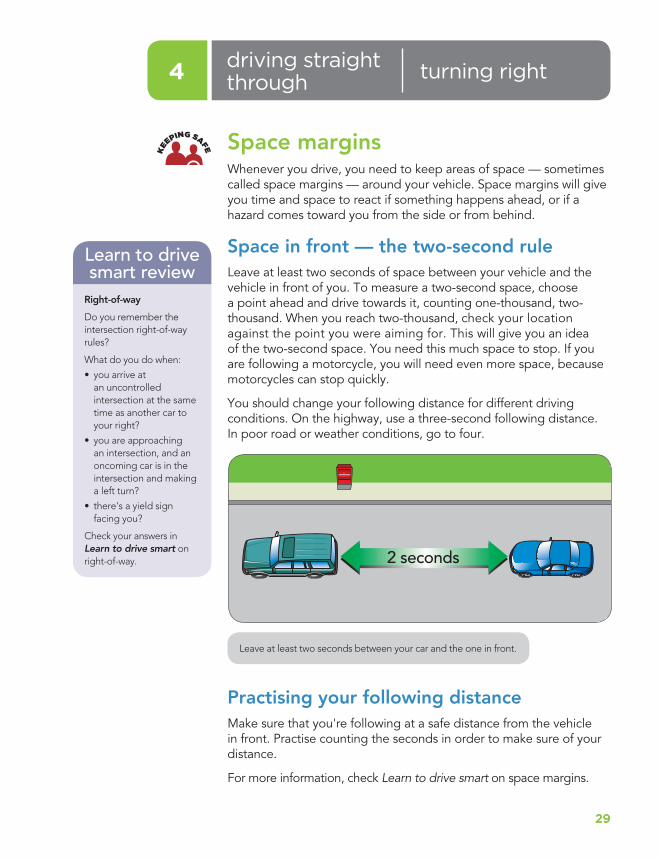
Space in front — the two-second ruleLeave at least two seconds of space between your vehicle and the vehicle in front of you. To measure a two-second space, choose a point ahead and drive towards it, counting one-thousand, two-thousand. When you reach two-thousand, check your location against the point you were aiming for. This will give you an idea of the two-second space. You need this much space to stop. If you are following a motorcycle, you will need even more space, because motorcycles can stop quickly.
You should change your following distance for different driving conditions. On the highway, use a three-second following distance. In poor road or weather conditions, go to four.
Right-of-way
Do you remember the intersection right-of-way rules?
What do you do when:
• you arrive at an un con trolled intersection at the same time as another car to your right?
• you are approaching an intersection, and an oncoming car is in the intersection and making a left turn?
• there's a yield sign facing you?
Check your answers in Learn to drive smart on right-of-way.
Learn to drive smart review
Leave at least two seconds between your car and the one in front.
Practising your following distanceMake sure that you're following at a safe distance from the vehicle in front. Practise counting the seconds in order to make sure of your distance.
For more information, check Learn to drive smart on space margins.
KEEPING SAFE
30
session 4
Space behindIf someone's following too close behind you, increase your following distance by gradually slowing down slightly. Having more space in front means that, if you have to stop you can stop more gradually and there will be less chance of the person behind crashing into you.
Space besideAs you drive, keep at least one metre of clear space on each side of your vehicle. When passing pe des tri ans, cyclists, or other vehicles, allow as much room as possible — at least one metre and more if you're going at a faster speed. Increase your side space margins even more when visibility or road conditions are poor.
Driving straight through ❏ Look well ahead for signs, signals, and other road users.
❏ Check your mirrors.
❏ If you are not required to stop, scan the in ter sec tion — left, centre, right, and left again — to make sure it's clear.
❏ If you are required to stop, scan left, centre, right and left once more before you move.
❏ Drive through the intersection.
Making right turnsIn this session, you'll learn about intersections and turns. Before you start, think about the other road users who share the intersections: pedestrians, other drivers and cyclists. Watch closely for them as you approach the intersection.
❏ Check your mirrors.
❏ Signal well in advance, being careful that you don’t confuse other drivers if there are side roads or driveways between your present position and the intersection.
❏ Reduce your speed, so that you won’t need to brake during the turn. With a standard transmission vehicle, if you need to downshift, do it before the turn.
❏ Check ahead for traffi c and other road users in or around the intersection as you approach it. (If there's a stop sign or red light, stop.)
DR
IVIN
G PRACTICE T
IPS
31
driving straight through | turning right
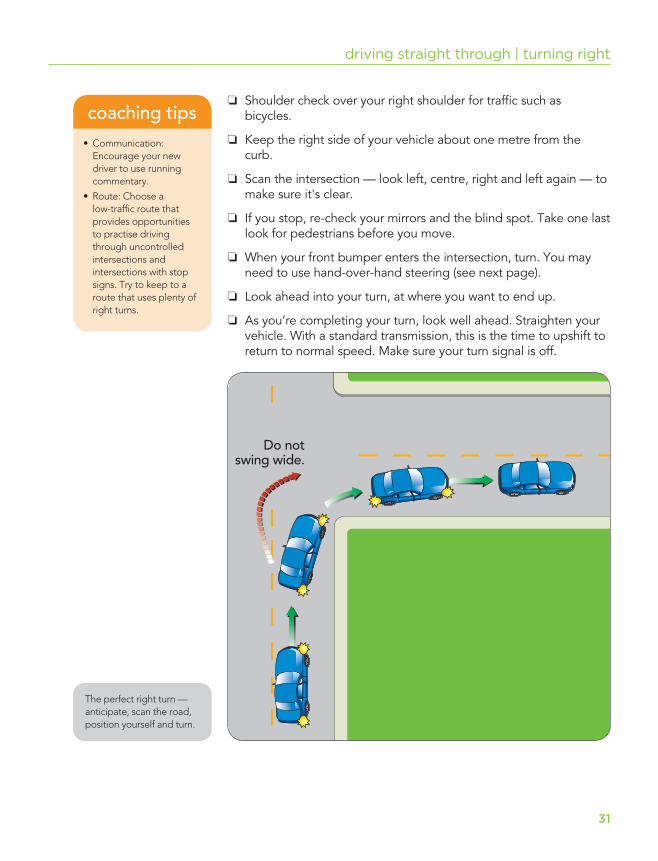
❏ Shoulder check over your right shoulder for traffi c such as bicycles.
❏ Keep the right side of your vehicle about one metre from the curb.
❏ Scan the intersection — look left, centre, right and left again — to make sure it's clear.
❏ If you stop, re-check your mirrors and the blind spot. Take one last look for pedestrians before you move.
❏ When your front bumper enters the intersection, turn. You may need to use hand-over-hand steering (see next page).
❏ Look ahead into your turn, at where you want to end up.
❏ As you’re completing your turn, look well ahead. Straighten your vehicle. With a standard transmission, this is the time to upshift to return to normal speed. Make sure your turn signal is off.
• Communication:Encourage your new driver to use running com men tary.
• Route: Choose a low-traffi c route that provides opportunities to practise driving through uncontrolled in ter sec tions and in ter sec tions with stop signs. Try to keep to a route that uses plenty of right turns.
coaching tips
The perfect right turn — anticipate, scan the road, position yourself and turn.
32
session 4
Hand-over-hand steeringFor sharp right turns, use hand-over-hand steering:
• Push the wheel around with your left hand.
• Cross your right hand over your left and grasp the top of the wheel to keep turning.
• To straighten up, reverse the procedure.
Caution!• Don’t cut the corner. Pull out far enough before you start to turn.
• Don’t steer wide. This happens when you:
– pull out too much before beginning your turn
– don’t move over far enough to the right
– don’t look into your turn.
• Don’t shift while turning. With a standard transmission, downshift to the appropriate gear before the turn, then upshift after completing the turn.
Putting it all togetherYou can now go in three directions: forwards, backwards, and right. Don’t forget to practise stopping, starting and backing up.
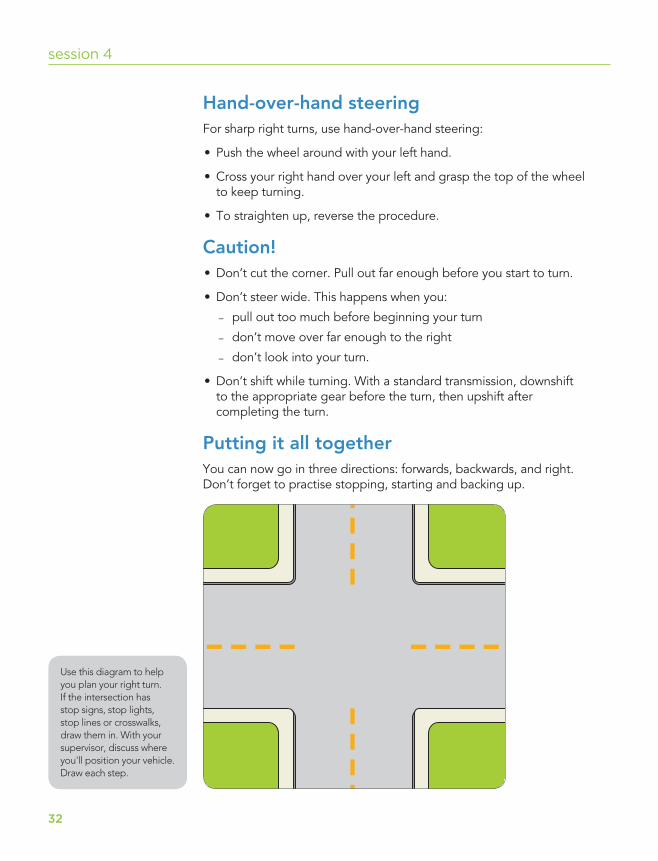
Use this diagram to help you plan your right turn. If the intersection has stop signs, stop lights, stop lines or crosswalks, draw them in. With your supervisor, discuss where you'll position your vehicle. Draw each step.
33
driving straight through | turning right
How are you doing?Rate your right turn and then compare your results with your supervisor’s.
RA
TE YOURSELF
Rating scale: 1 – needs work 2 – getting closer 3 – competent
Driving straight through
• Check mirrors. 1 2 3
• Scans intersection — left, centre, right, 1 2 3and left again.
• Stops if required, in correct stopping position. 1 2 3
• Moves smoothly through the intersection. 1 2 3
Turning right
• Slows down when approaching intersection. 1 2 3
• Checks mirrors. 1 2 3
• Uses signals correctly. 1 2 3
• Shoulder checks before moving to the right 1 2 3or turning.
• Scans intersection — left, centre, right, 1 2 3and left again.
• Turns smoothly without cutting corners or 1 2 3swinging wide.
• Doesn’t brake when turning. 1 2 3
• Keeps correct lane position. 1 2 3
I understand the importance of keeping a safe following distance.
I can safely and smoothly drive straight through an intersection.
I can turn right with smoothness and control.
Signature of New Driver Signature of Supervisor Date
SIG
N OFF

34
notes

3535
smart brake and horn use turning right5
Smart brake and horn useBrake aheadAbout one-quarter of all collisions involve one car hitting another from behind. Make sure you don’t become one of these “rear-ender” statistics. Slow down well ahead of the in ter sec tion, so that the driver behind you isn’t in danger of hitting you. If you tap lightly on your brake, the driver be hind will see your brake lights and know that you're about to stop.
Cover the brake and hornWhen you see a possible haz ard ahead, you need to be pre pared for emergencies. Here are two useful tech niques:
• Cover the brake: Put the heel of your right foot on the fl oor right in front of the brake with your toes lightly touching the brake pedal, but without activating the brake.
• Cover the horn: Keep your hand positioned, ready to use the horn.
Take a few minutes to practise your foot position for cov er ing the brake, and your hand position for covering the horn.
Making left turnsNow that you’ve practised right turns, you’re ready for left turns.
❏ Check mirrors.
❏ Signal well in advance, being careful that you don’t confuse other drivers if there are side roads or driveways between you and the intersection.
❏ Reduce speed, so that you won’t have to brake during the turn. With a standard transmission vehicle, if you need to downshift, do it before the turn.
❏ Check ahead for traffi c and other road users in or around the intersection as you approach it. (If there's a stop sign or red light, stop.)
❏ Shoulder check over your left shoul der.
❏ Keep the vehicle in the left part of the lane.
Where should you stop?
If you need to stop at an in ter sec tion, where should you stop if:
• there's a marked stop line?
• there's a crosswalk, but no marked stop line?
• there's no marked stop line or crosswalk?
If you’re not sure, review Learn to drive smart on stopping.
Learn to drive smart review
DR
IVIN
G PRACTICE T
IPS
• Route: Your practice route should be similar to the one you used in Session 4, but this time you can make left turns.
coaching tips
KEEPING SAFE
36
session 5
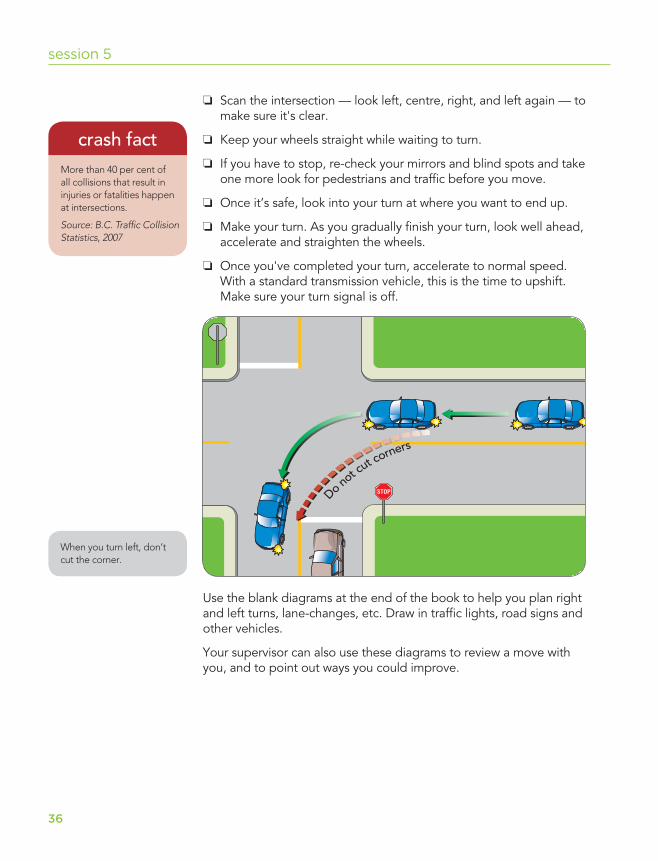
❏ Scan the intersection — look left, centre, right, and left again — to make sure it's clear.
❏ Keep your wheels straight while waiting to turn.
❏ If you have to stop, re-check your mirrors and blind spots and take one more look for pedestrians and traffi c before you move.
❏ Once it’s safe, look into your turn at where you want to end up.
❏ Make your turn. As you gradually fi nish your turn, look well ahead, accelerate and straighten the wheels.
❏ Once you've completed your turn, accelerate to normal speed. With a standard transmission vehicle, this is the time to upshift. Make sure your turn signal is off.
More than 40 per cent of all collisions that result in injuries or fatalities happen at intersections.
Source: B.C. Traffi c Collision Statistics, 2007
crash fact
When you turn left, don’t cut the corner.
Use the blank diagrams at the end of the book to help you plan right and left turns, lane-changes, etc. Draw in traffi c lights, road signs and other vehicles.
Your supervisor can also use these diagrams to review a move with you, and to point out ways you could improve.
37
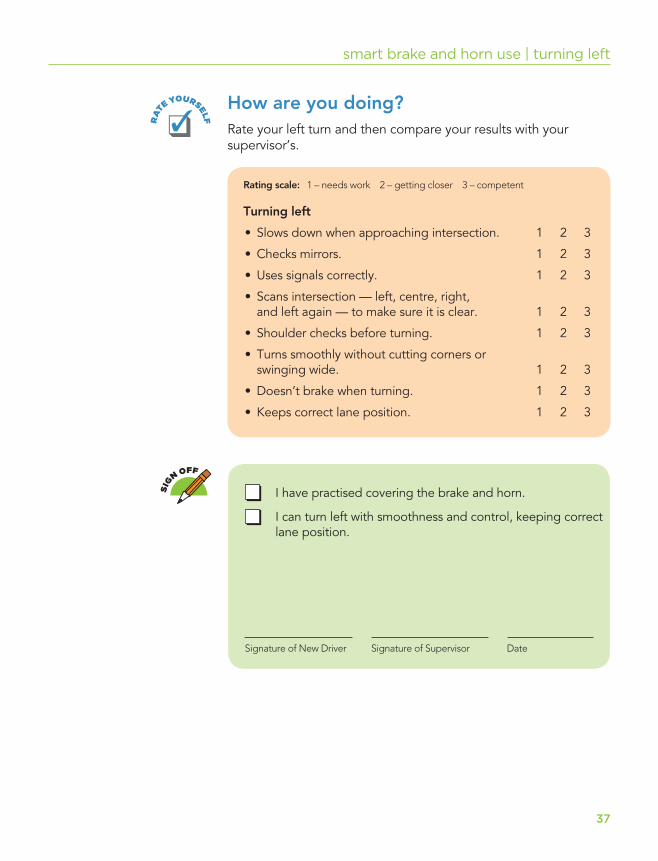
smart brake and horn use | turning left
Rating scale: 1 – needs work 2 – getting closer 3 – competent
Turning left
• Slows down when approaching intersection. 1 2 3
• Checks mirrors. 1 2 3
• Uses signals correctly. 1 2 3
• Scans intersection — left, centre, right, and left again — to make sure it is clear. 1 2 3
• Shoulder checks before turning. 1 2 3
• Turns smoothly without cutting corners or swinging wide. 1 2 3
• Doesn’t brake when turning. 1 2 3
• Keeps correct lane position. 1 2 3
How are you doing?Rate your left turn and then compare your results with your supervisor’s.
RA
TE YOURSELF
I have practised covering the brake and horn.
I can turn left with smoothness and control, keeping correct lane position.
Signature of New Driver Signature of Supervisor Date
SIG
N OFF

38
notes
39
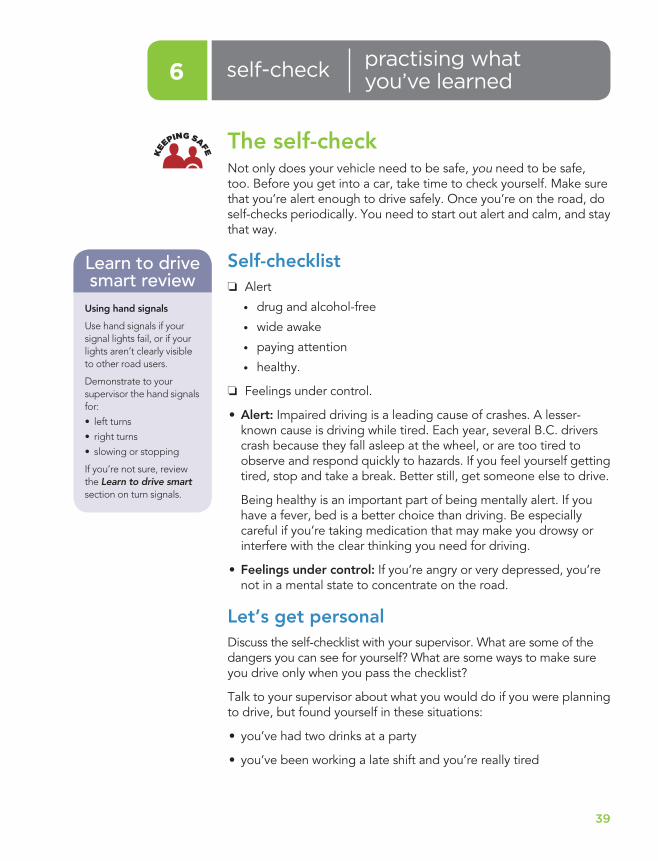
The self-checkNot only does your vehicle need to be safe, you need to be safe, too. Before you get into a car, take time to check yourself. Make sure that you’re alert enough to drive safely. Once you’re on the road, do self-checks periodically. You need to start out alert and calm, and stay that way.
Self-checklist ❏ Alert
• drug and alcohol-free
• wide awake
• paying attention
• healthy.
❏ Feelings under control.
• Alert: Impaired driving is a leading cause of crashes. A lesser-known cause is driving while tired. Each year, several B.C. drivers crash because they fall asleep at the wheel, or are too tired to observe and respond quickly to hazards. If you feel yourself getting tired, stop and take a break. Better still, get someone else to drive.
Being healthy is an important part of being mentally alert. If you have a fever, bed is a better choice than driving. Be especially careful if you’re taking medication that may make you drowsy or interfere with the clear thinking you need for driving.
• Feelings under control: If you’re angry or very depressed, you’re not in a mental state to concentrate on the road.
Let’s get personalDiscuss the self-checklist with your supervisor. What are some of the dangers you can see for yourself? What are some ways to make sure you drive only when you pass the checklist?
Talk to your supervisor about what you would do if you were planning to drive, but found yourself in these situations:
• you’ve had two drinks at a party
• you’ve been working a late shift and you’re really tired
self-check practising what you’ve learned6
Using hand signals
Use hand signals if your signal lights fail, or if your lights aren’t clearly visible to other road users.
Demonstrate to your supervisor the hand signals for:
• left turns
• right turns
• slowing or stopping
If you’re not sure, review the Learn to drive smart section on turn signals.
Learn to drive smart review
KEEPING SAFE
40
session 6
• you’ve just had a fi ght with a friend and you’re so angry that you can’t think clearly
• you have the fl u and a fever.
Self-check safety planList two things you could do to avoid driving if you don’t pass the self-check.
1. ___________________________________________
2. ___________________________________________
Practising what you have learnedYou can now drive forward, backward, and turn right and left. Before you move on to the next step, get more practice in a quiet, low-traffi c area. As you drive, remember to practise see-think-do techniques and keep a safe following distance.
Mini-evaluationYou and your supervisor should both complete the mini-evaluation separately. When assessing each manoeuvre, there are three things you should think about:
Safety
• mirror checks, signals and shoulder checks
• drives at a safe speed
• maintains correct lane position
• demonstrates knowledge of rules.
Control
• keeps the vehicle under control.
Smoothness
• steers steadily
• changes gears smoothly
• has good pedal control.
DR
IVIN
G PRACTICE T
IPS
41
self-check | practising what you’ve learned
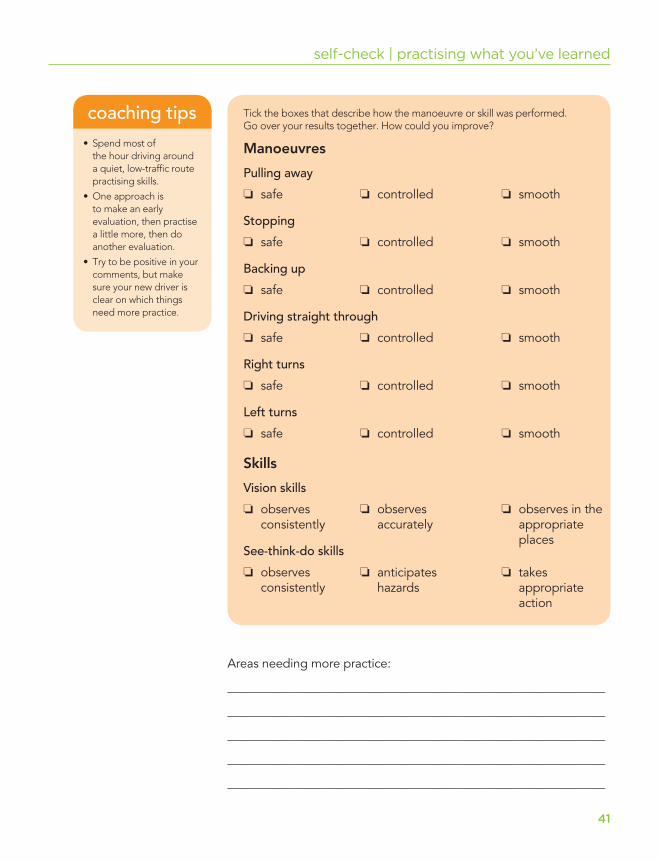
• Spend most of the hour driving around a quiet, low-traffi c route prac tis ing skills.
• One approach is to make an early eval u a tion, then practise a little more, then do another evaluation.
• Try to be positive in your comments, but make sure your new driver is clear on which things need more practice.
coaching tips Tick the boxes that describe how the manoeuvre or skill was performed. Go over your results together. How could you improve?
Manoeuvres
Pulling away
❏ safe
Stopping
❏ safe
Backing up
❏ safe
Driving straight through
❏ safe
Right turns
❏ safe
Left turns
❏ safe
Skills
Vision skills
❏ observesconsistently
See-think-do skills
❏ observesconsistently
❏ controlled
❏ controlled
❏ controlled
❏ controlled
❏ controlled
❏ controlled
❏ observesaccurately
❏ anticipateshazards
❏ smooth
❏ smooth
❏ smooth
❏ smooth
❏ smooth
❏ smooth
❏ observes in the appropriate places
❏ takes appropriateaction
Areas needing more practice:
_____________________________________________________________
_____________________________________________________________
_____________________________________________________________
_____________________________________________________________
_____________________________________________________________
42
session 6
I can perform these vehicle manoeuvres with safety, control and smoothness:
Pulling away
Stopping
Backing up
Driving straight through
Making right turns
Making left turns
Signature of New Driver Signature of Supervisor Date
SIG
N OFF
43
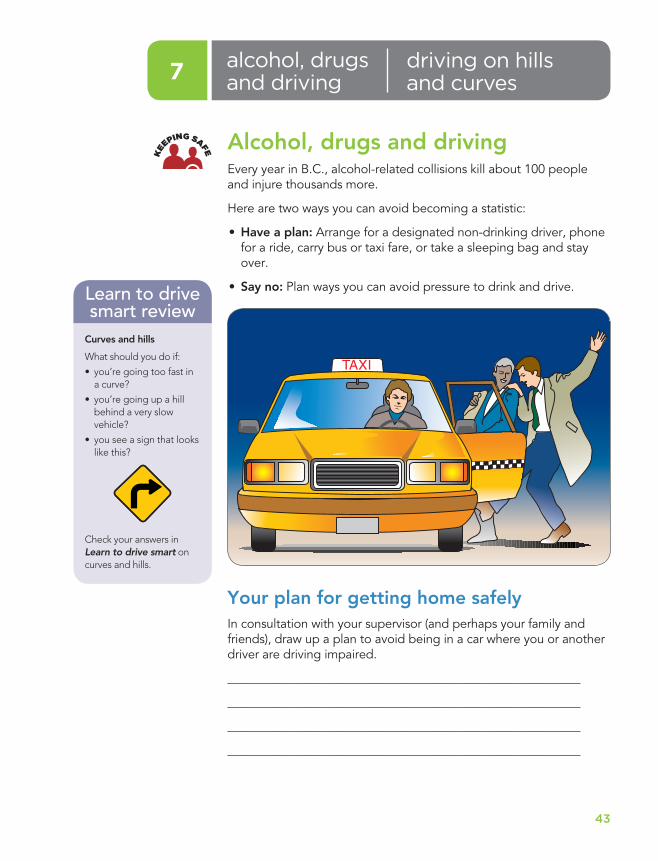
Alcohol, drugs and drivingEvery year in B.C., alcohol-related collisions kill about 100 people and injure thousands more.
Here are two ways you can avoid becoming a statistic:
• Have a plan: Arrange for a designated non-drinking driver, phone for a ride, carry bus or taxi fare, or take a sleeping bag and stay over.
• Say no: Plan ways you can avoid pressure to drink and drive.
Your plan for getting home safelyIn consultation with your supervisor (and perhaps your family and friends), draw up a plan to avoid being in a car where you or another driver are driving impaired.
_________________________________________________________
_________________________________________________________
_________________________________________________________
_________________________________________________________
alcohol, drugs and driving
driving on hills and curves7
Curves and hills
What should you do if:
• you’re going too fast in a curve?
• you’re going up a hill behind a very slow vehicle?
• you see a sign that looks like this?
Check your answers in Learn to drive smart on curves and hills.
Learn to drive smart review
KEEPING SAFE
44
HillsThere are two challenging things about driving on hills: starting up on them (especially if you’re driving a vehicle with standard transmission) and parking on them. In this session, you’ll practise both.
The main thing to remember about parking on a hill is that the front wheels need to be in a position to prevent your vehicle from rolling down the hill.
Note: The parking checklists are written with a two-way street in mind. If you’re parking on the left side of a one-way street, reverse the words right and left.
Parking downhill with a curb ❏ Check mirrors.
❏ Signal for a right turn.
❏ Right shoulder check.
❏ Bring the vehicle parallel to the curb, within 30 cm.
❏ Turn the wheels right as you continue moving forward slowly toward the curb.
❏ When the right front wheel touches the curb, stop, choosing reverse gear (standard) or park (automatic).
❏ Make sure the parking brake is fully on.
Parking uphill with a curb ❏ Check mirrors.
❏ Signal for a right turn.
❏ Right shoulder check.
❏ Bring the vehicle parallel to the curb, within 30 cm.
❏ Let the vehicle roll back slowly with the wheels turned left until the tire touches the curb.
❏ Stop, choosing fi rst gear (standard) or park (automatic).
❏ Make sure the parking brake is fully on.
session 7
• Route: Continue to practise in low-traffi c areas. After you’ve done some hill parking practice, spend some time following a route on which there are hills. Practise starting from a stopped position on a hill.
• Try to fi nd some curves to practise on.
coaching tips
DR
IVIN
G PRACTICE T
IPS
45
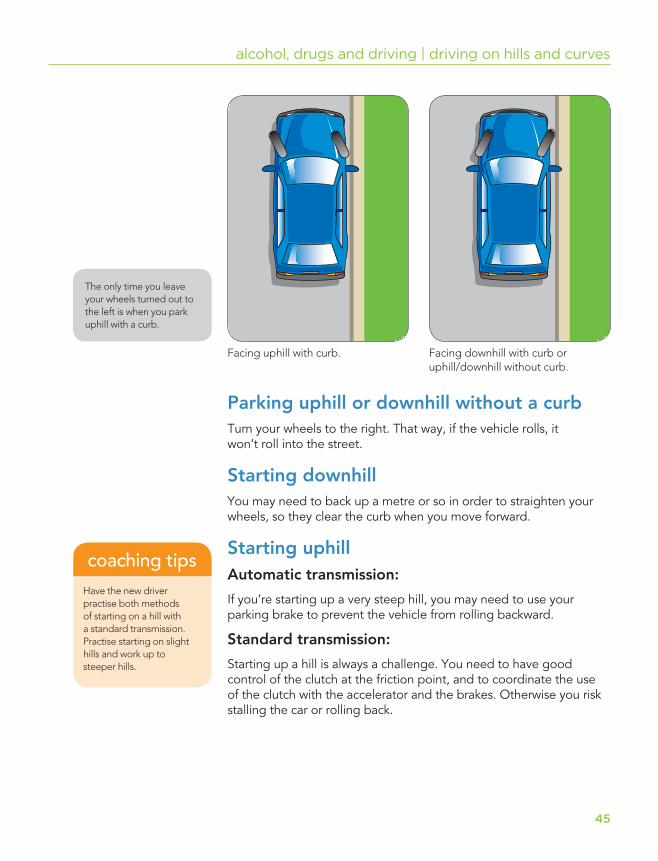
Parking uphill or downhill without a curbTurn your wheels to the right. That way, if the vehicle rolls, itwon’t roll into the street.
Starting downhillYou may need to back up a metre or so in order to straighten your wheels, so they clear the curb when you move forward.
Starting uphillAutomatic transmission:
If you’re starting up a very steep hill, you may need to use your parking brake to prevent the vehicle from rolling backward.
Standard transmission:
Starting up a hill is always a challenge. You need to have good control of the clutch at the friction point, and to coordinate the use of the clutch with the ac cel er a tor and the brakes. Otherwise you risk stalling the car or rolling back.
alcohol, drugs and driving | driving on hills and curves
Facing uphill with curb. Facing downhill with curb or uphill/downhill without curb.
The only time you leave your wheels turned out to the left is when you park uphill with a curb.
Have the new driver practise both methods of starting on a hill with a standard transmission. Practise starting on slight hills and work up to steep er hills.
coaching tips
46
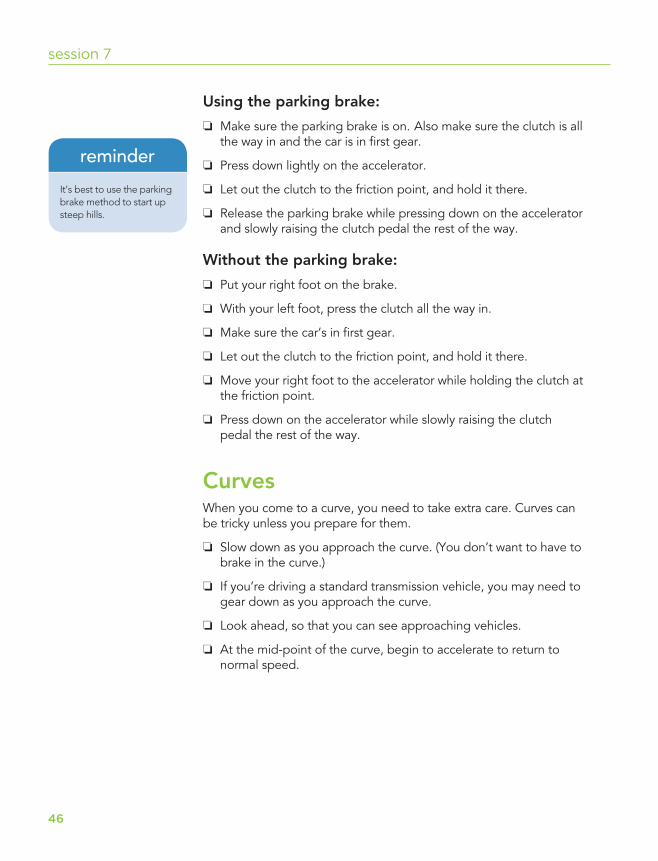
Using the parking brake:
❏ Make sure the parking brake is on. Also make sure the clutch is all the way in and the car is in fi rst gear.
❏ Press down lightly on the accelerator.
❏ Let out the clutch to the friction point, and hold it there.
❏ Release the parking brake while pressing down on the accelerator and slowly raising the clutch pedal the rest of the way.
Without the parking brake:
❏ Put your right foot on the brake.
❏ With your left foot, press the clutch all the way in.
❏ Make sure the car’s in fi rst gear.
❏ Let out the clutch to the friction point, and hold it there.
❏ Move your right foot to the accelerator while hold ing the clutch at the friction point.
❏ Press down on the accelerator while slowly raising the clutch pedal the rest of the way.
CurvesWhen you come to a curve, you need to take extra care. Curves can be tricky unless you prepare for them.
❏ Slow down as you approach the curve. (You don’t want to have to brake in the curve.)
❏ If you’re driving a standard transmission vehicle, you may need to gear down as you approach the curve.
❏ Look ahead, so that you can see approaching vehicles.
❏ At the mid-point of the curve, begin to accelerate to return to normal speed.
session 7
It’s best to use the parking brake method to start up steep hills.
reminder
47
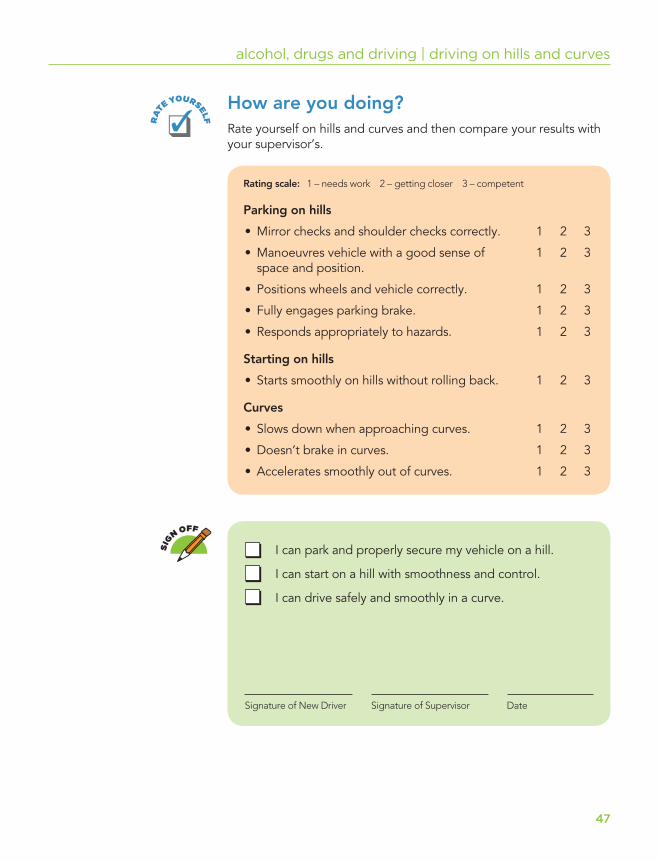
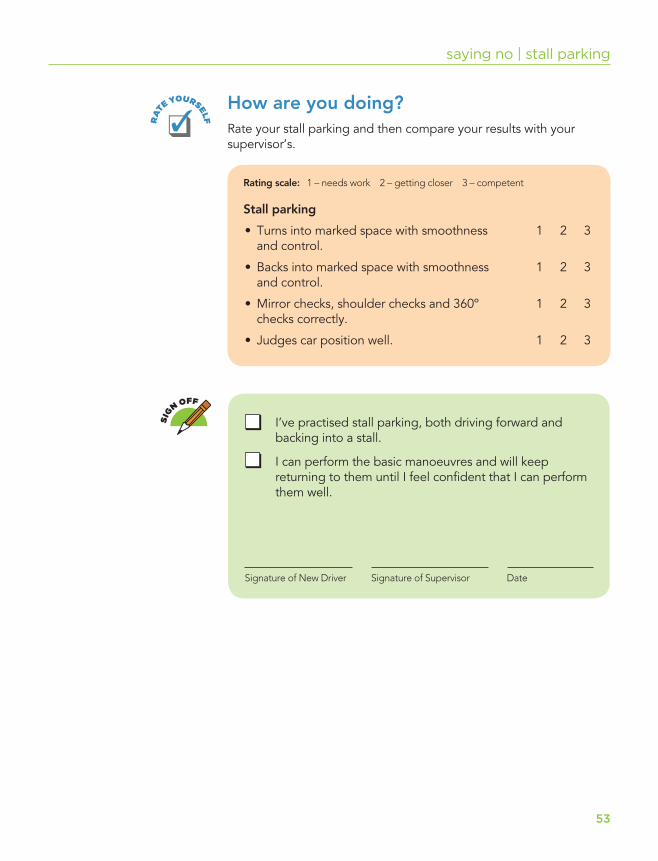
How are you doing?Rate yourself on hills and curves and then compare your results with your supervisor’s.
alcohol, drugs and driving | driving on hills and curves
RA
TE YOURSELF
Rating scale: 1 – needs work 2 – getting closer 3 – competent
Parking on hills
• Mirror checks and shoulder checks correctly. 1 2 3
• Manoeuvres vehicle with a good sense of 1 2 3space and position.
• Positions wheels and vehicle correctly. 1 2 3
• Fully engages parking brake. 1 2 3
• Responds appropriately to hazards. 1 2 3
Starting on hills
• Starts smoothly on hills without rolling back. 1 2 3
Curves
• Slows down when approaching curves. 1 2 3
• Doesn’t brake in curves. 1 2 3
• Accelerates smoothly out of curves. 1 2 3
I can park and properly secure my vehicle on a hill.
I can start on a hill with smoothness and control.
I can drive safely and smoothly in a curve.
Signature of New Driver Signature of Supervisor Date
SIG
N OFF

48
notes
49
Saying noWhy do some new drivers fi nd themselves speeding, driving while impaired and taking risks? Sometimes it’s because of peer pressure. One way you can deal with this is to decide ahead on refusal tactics — ways that’ll make it easier for you to say no.
Refusal tacticsRead through this list, and check the three tactics that you think would work best for you.
❏ Say “no” and state your reasons.
❏ Find a buddy and support each other in not giving in to negative peer pressure. (“Sam and I have a bet that we’re not going to drink tonight.”)
❏ Use someone else as an excuse. (“I promised my husband that I wouldn’t speed.”)
❏ Use humour. (“Listen, one drink and you’ll have to carry me home!”)
❏ Get out of the situation. (“Why don’t we go to a movie?”)
❏ Use avoidance. (Say, “Maybe later,” then try to change the subject.)
Discuss with your supervisor what you might say and do in these situations:
• A group of your friends, all impaired, are planning to leave one party and drive to another. They want you to come with them.
• You’re driving behind a slow vehicle, and your friends are urging you to pass. The road is winding, and you just can’t seem to fi nd a safe place to pass. “Come on, just do it!” they yell.
• You’re a passenger in a car driving home from a party. Your friend is the designated non-drinking driver. She’s swerving on the road, and you realize that she’s impaired.
• You’re driving your friend home from a movie, and someone you know pulls up beside you at a light. “Hey!” he yells. “See if you can beat me to the next light.” Your friend urges you on.
saying no stall parking8
Backing up, Session 3.
review
KEEPING SAFE
50
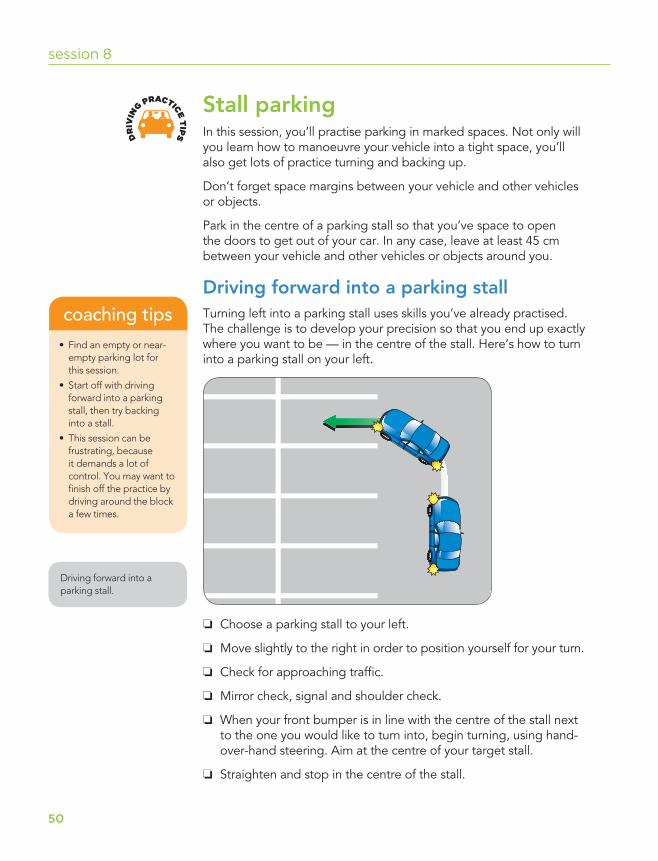
Stall parkingIn this session, you’ll practise parking in marked spaces. Not only will you learn how to manoeuvre your vehicle into a tight space, you’ll also get lots of practice turning and backing up.
Don’t forget space margins between your vehicle and other vehicles or objects.
Park in the centre of a parking stall so that you’ve space to open the doors to get out of your car. In any case, leave at least 45 cm between your vehicle and other vehicles or objects around you.
Driving forward into a parking stall Turning left into a parking stall uses skills you’ve already practised. The challenge is to develop your precision so that you end up exactly where you want to be — in the centre of the stall. Here’s how to turn into a parking stall on your left.
session 8
DR
IVIN
G PRACTICE T
IPS
• Find an empty or near-empty parking lot for this session.
• Start off with driving forward into a parking stall, then try backing into a stall.
• This session can be frustrating, because it demands a lot of control. You may want to fi nish off the practice by driving around the block a few times.
coaching tips
Driving forward into a parking stall.
❏ Choose a parking stall to your left.
❏ Move slightly to the right in order to position yourself for your turn.
❏ Check for approaching traffi c.
❏ Mirror check, signal and shoulder check.
❏ When your front bumper is in line with the centre of the stall next to the one you would like to turn into, begin turning, using hand-over-hand steering. Aim at the centre of your target stall.
❏ Straighten and stop in the centre of the stall.
51
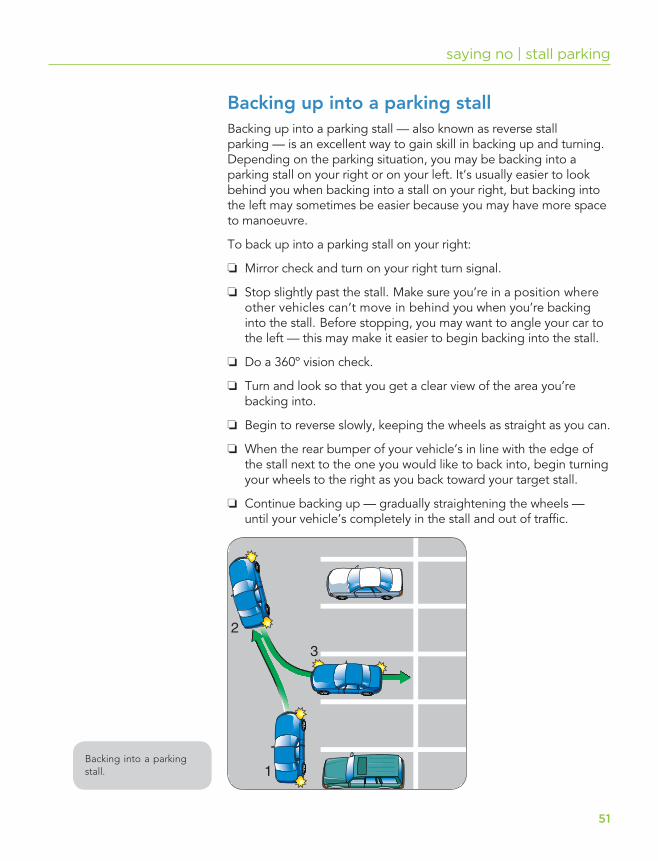
Backing up into a parking stall Backing up into a parking stall — also known as reverse stall parking — is an excellent way to gain skill in backing up and turning. Depending on the parking situation, you may be backing into a parking stall on your right or on your left. It’s usually easier to look behind you when backing into a stall on your right, but backing into the left may sometimes be easier because you may have more space to manoeuvre.
To back up into a parking stall on your right:
❏ Mirror check and turn on your right turn signal.
❏ Stop slightly past the stall. Make sure you’re in a position where other vehicles can’t move in behind you when you’re backing into the stall. Before stopping, you may want to angle your car to the left — this may make it easier to begin backing into the stall.
❏ Do a 360º vision check.
❏ Turn and look so that you get a clear view of the area you’re backing into.
❏ Begin to reverse slowly, keeping the wheels as straight as you can.
❏ When the rear bumper of your vehicle’s in line with the edge of the stall next to the one you would like to back into, begin turning your wheels to the right as you back toward your target stall.
❏ Continue backing up — gradually straightening the wheels — until your vehicle’s completely in the stall and out of traffi c.
saying no | stall parking
Backing into a parking stall.
52
Moving out of a parking stallMake sure it‘s clear before you move, then signal which way you want to go, and move out slowly. Steer carefully — fi rst move straight ahead, then begin to turn. If you start turning too soon, you could hit a car or object beside you.
You’ll fi nd that it’s easier to move out if you’ve backed into the parking stall. If you drove forward into the parking stall, you’ll have diffi culty seeing behind you when you back up to leave.
Practise what you’ve learnedNow that you can back up and turn, you’re ready to move through the parking lot in all kinds of different ways.
❏ Practise turning into a marked space. Pretend there’s a car parked in the next space. Keep as centred as you can between the lines.
❏ Once you’ve practised turning left into a stall, try turning right.
❏ Practise backing out of the stall, turning to the right and also turning to the left.
❏ Practise backing into a marked space, keeping as centred as you can.
❏ Repeat these manoeuvres until you feel your driving’s smooth and controlled.
Note: Backing into a marked parking space isn’t an easy skill. You may need to repeat it throughout your practice sessions before you feel skilled and confi dent.
session 8
53
saying no | stall parking
How are you doing?Rate your stall parking and then compare your results with your supervisor’s.
RA
TE YOURSELF
Rating scale: 1 – needs work 2 – getting closer 3 – competent
Stall parking
• Turns into marked space with smoothness 1 2 3and control.
• Backs into marked space with smoothness 1 2 3and control.
• Mirror checks, shoulder checks and 360º 1 2 3checks correctly.
• Judges car position well. 1 2 3
I’ve practised stall parking, both driving forward and backing into a stall.
I can perform the basic manoeuvres and will keep returning to them until I feel confi dent that I can perform them well.
Signature of New Driver Signature of Supervisor Date
SIG
N OFF

54
notes
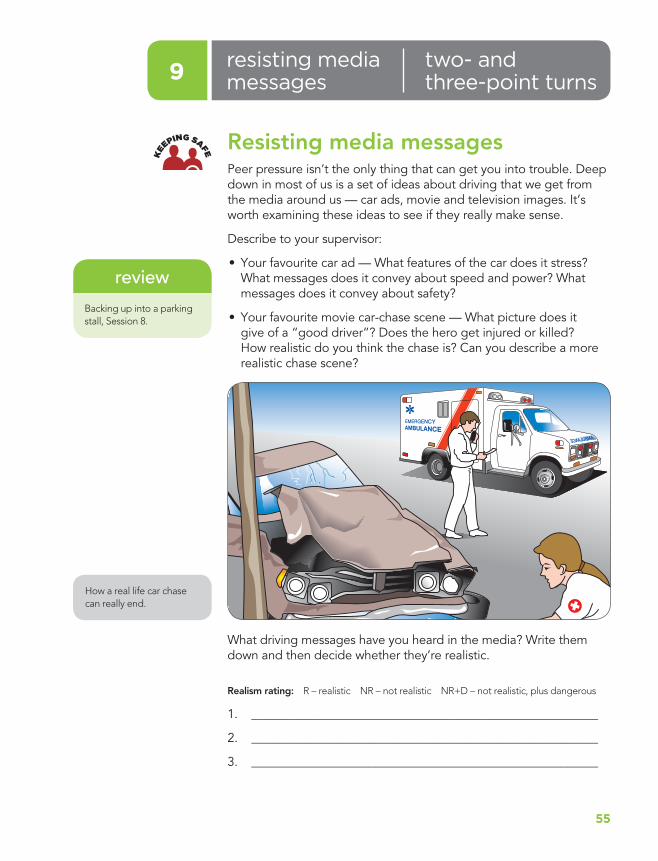
5555
two- and three-point turns
resisting media messages9
Resisting media messagesPeer pressure isn’t the only thing that can get you into trouble. Deep down in most of us is a set of ideas about driving that we get from the media around us — car ads, movie and television images. It’s worth examining these ideas to see if they really make sense.
Describe to your supervisor:
• Your favourite car ad — What features of the car does it stress? What messages does it convey about speed and power? What messages does it convey about safety?
• Your favourite movie car-chase scene — What picture does it give of a “good driver”? Does the hero get injured or killed? How realistic do you think the chase is? Can you describe a more realistic chase scene?
How a real life car chase can really end.
Backing up into a parking stall, Session 8.
review
What driving messages have you heard in the media? Write them down and then decide whether they’re realistic.
Realism rating: R – realistic NR – not realistic NR+D – not realistic, plus dangerous
1. ________________________________________________________
2. ________________________________________________________
3. ________________________________________________________
KEEPING SAFE
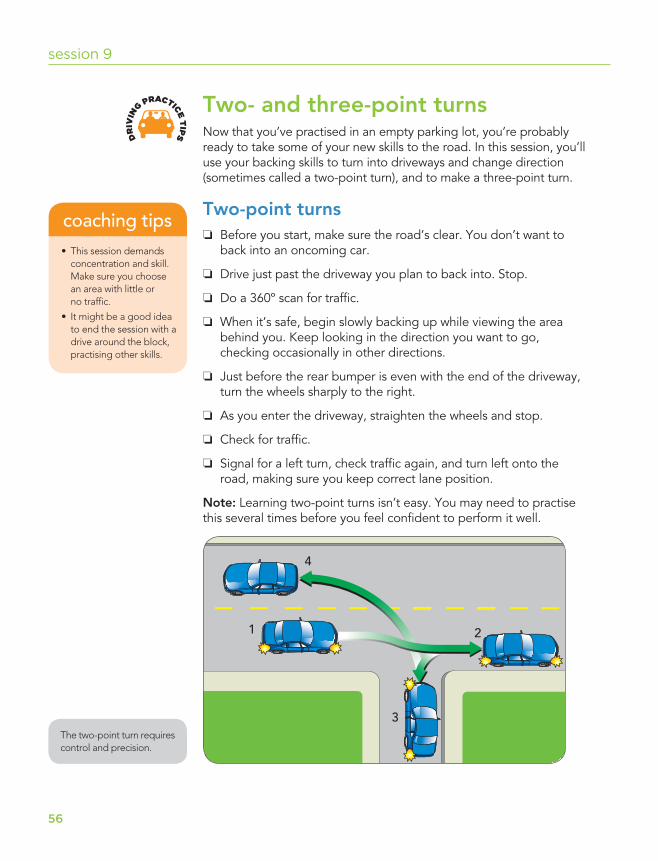
56
session 9
Two- and three-point turnsNow that you’ve practised in an empty parking lot, you’re probably ready to take some of your new skills to the road. In this session, you’ll use your backing skills to turn into driveways and change direction (sometimes called a two-point turn), and to make a three-point turn.
Two-point turns ❏ Before you start, make sure the road’s clear. You don’t want to
back into an oncoming car.
❏ Drive just past the driveway you plan to back into. Stop.
❏ Do a 360º scan for traffi c.
❏ When it’s safe, begin slowly backing up while viewing the area behind you. Keep looking in the direction you want to go, checking occasionally in other directions.
❏ Just before the rear bumper is even with the end of the driveway, turn the wheels sharply to the right.
❏ As you enter the driveway, straighten the wheels and stop.
❏ Check for traffi c.
❏ Signal for a left turn, check traffi c again, and turn left onto the road, making sure you keep correct lane position.
Note: Learning two-point turns isn’t easy. You may need to practise this several times before you feel confi dent to perform it well.
DR
IVIN
G PRACTICE T
IPS
• This session demands con cen tra tion and skill. Make sure you choose an area with little or no traffi c.
• It might be a good idea to end the session with a drive around the block, practising other skills.
coaching tips
The two-point turn requires control and precision.
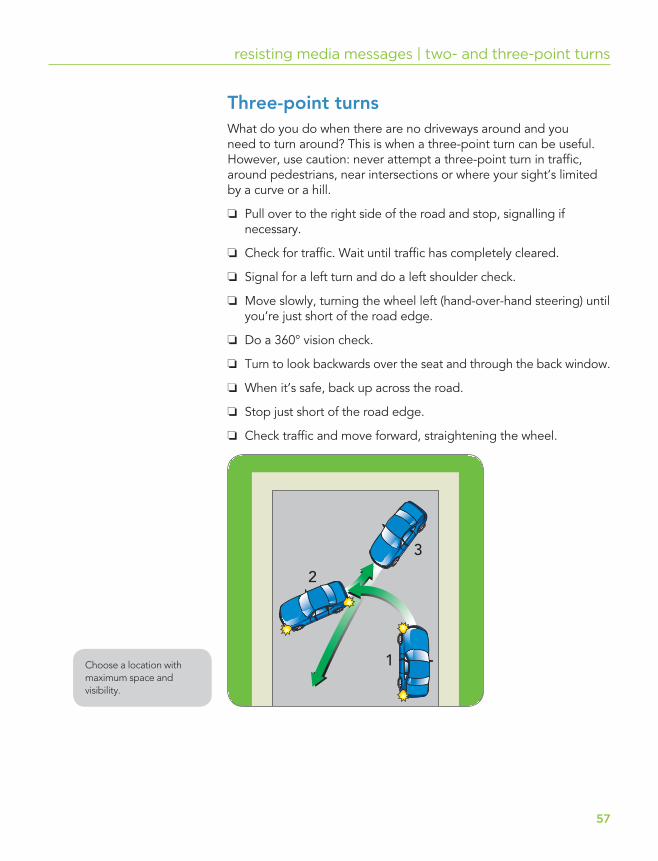
57
resisting media messages | two- and three-point turns
Three-point turns What do you do when there are no driveways around and you need to turn around? This is when a three-point turn can be useful. However, use caution: never attempt a three-point turn in traffi c, around pedestrians, near intersections or where your sight’s limited by a curve or a hill.
❏ Pull over to the right side of the road and stop, signalling if necessary.
❏ Check for traffi c. Wait until traffi c has completely cleared.
❏ Signal for a left turn and do a left shoulder check.
❏ Move slowly, turning the wheel left (hand-over-hand steering) until you’re just short of the road edge.
❏ Do a 360° vision check.
❏ Turn to look backwards over the seat and through the back window.
❏ When it’s safe, back up across the road.
❏ Stop just short of the road edge.
❏ Check traffi c and move forward, straightening the wheel.
Choose a location with maximum space and visibility.
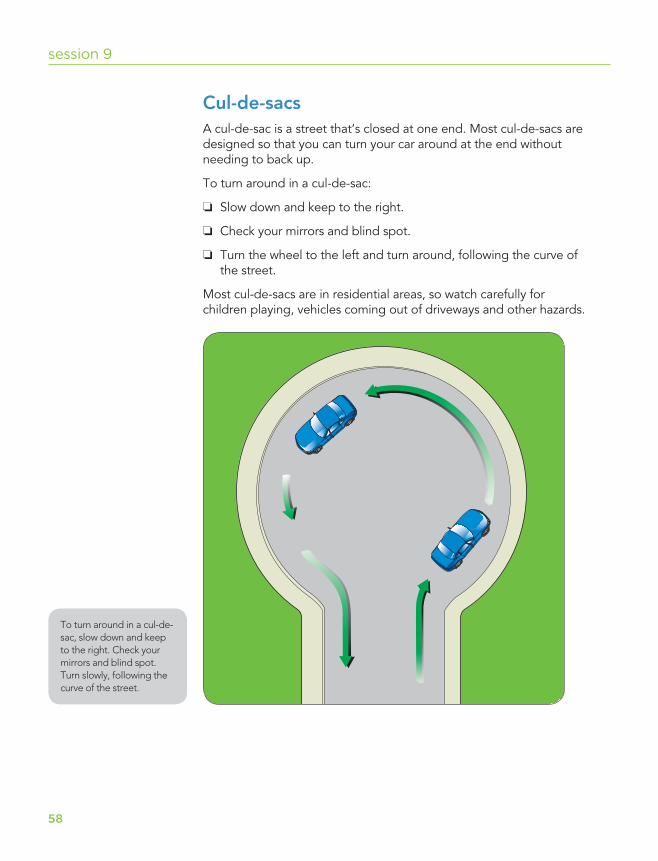
58
session 9
Cul-de-sacsA cul-de-sac is a street that’s closed at one end. Most cul-de-sacs are designed so that you can turn your car around at the end without needing to back up.
To turn around in a cul-de-sac:
❏ Slow down and keep to the right.
❏ Check your mirrors and blind spot.
❏ Turn the wheel to the left and turn around, following the curve of the street.
Most cul-de-sacs are in residential areas, so watch carefully for children playing, vehicles coming out of driveways and other hazards.
To turn around in a cul-de-sac, slow down and keep to the right. Check your mirrors and blind spot. Turn slowly, following the curve of the street.
59
I have practised two- and three-point turns and turning around in a cul-de-sac.
I can perform the basic manoeuvres and will keep returning to them until I feel confi dent that I can perform them well.
Signature of New Driver Signature of Supervisor Date
resisting media messages | two- and three-point turns
How are you doing?Rate your two- and three-point turns, and turning around in a cul-de-sac, and compare your results with those of your supervisor’s.
Rating scale: 1 – needs work 2 – getting closer 3 – competent
Two-point turns
• Vision checks (mirror/shoulder checks/360º) 1 2 3correctly.
• Backs up and pulls out with smoothness 1 2 3and control.
• Steers accurately. 1 2 3
Three-point turns
• Performs manoeuvre only when safe. 1 2 3
• Vision checks (mirror/shoulder checks/360º) 1 2 3correctly.
• Performs the manoeuvre with smoothness 1 2 3and control.
Cul-de-sacs
• Vision checks (mirror/shoulder checks/360º) 1 2 3correctly.
• Performs the manoeuvre with smoothness 1 2 3and control.
RA
TE YOURSELF
SIG
N OFF

60
notes
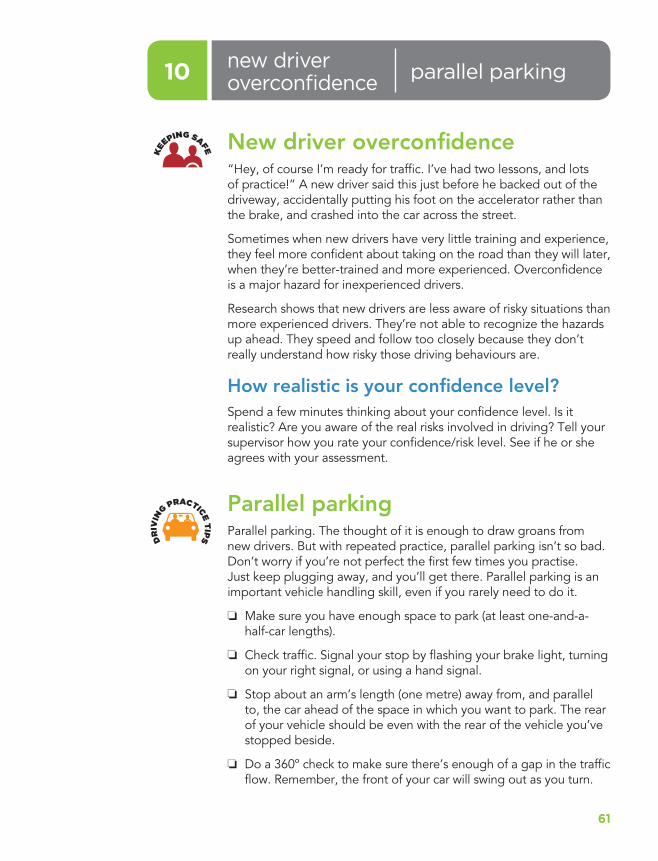
6161
parallel parkingnew driveroverconfi dence10
New driver overconfi dence“Hey, of course I’m ready for traffi c. I’ve had two lessons, and lots of practice!” A new driver said this just before he backed out of the driveway, accidentally putting his foot on the accelerator rather than the brake, and crashed into the car across the street.
Sometimes when new drivers have very little training and experience, they feel more confi dent about taking on the road than they will later, when they’re better-trained and more experienced. Overconfi dence is a major hazard for inexperienced drivers.
Research shows that new drivers are less aware of risky situations than more experienced drivers. They’re not able to recognize the hazards up ahead. They speed and follow too closely because they don’t really understand how risky those driving behaviours are.
How realistic is your confi dence level?Spend a few minutes thinking about your confi dence level. Is it realistic? Are you aware of the real risks involved in driving? Tell your supervisor how you rate your confi dence/risk level. See if he or she agrees with your assessment.
Parallel parkingParallel parking. The thought of it is enough to draw groans from new drivers. But with repeated practice, parallel parking isn’t so bad. Don’t worry if you’re not perfect the fi rst few times you practise. Just keep plugging away, and you’ll get there. Parallel parking is an important vehicle handling skill, even if you rarely need to do it.
❏ Make sure you have enough space to park (at least one-and-a-half-car lengths).
❏ Check traffi c. Signal your stop by fl ashing your brake light, turning on your right signal, or using a hand signal.
❏ Stop about an arm’s length (one metre) away from, and parallel to, the car ahead of the space in which you want to park. The rear of your vehicle should be even with the rear of the vehicle you’ve stopped beside.
❏ Do a 360º check to make sure there’s enough of a gap in the traffi c fl ow. Remember, the front of your car will swing out as you turn.
DR
IVIN
G PRACTICE T
IPS
KEEPING SAFE

62
session 10
❏ Back up, turning the wheel sharply to the right until the car is at approximately a 45º angle to the curb.
❏ As your front door passes the back bumper of the car ahead, straighten the wheels and continue to back up.
❏ When you’re clear of the car ahead, turn the wheels sharply to the left and back slowly toward the car behind you. As you do this, glance forward to make sure you’re not going to hit the car in front, then look back again.
❏ Stop before you make contact with the bumper of the car behind.
❏ Move forward slowly, straightening the wheels. Stop when your car is positioned between the car in front and the car behind.
When you parallel park, turn your wheel sharply to the right, and back in at a 45º angle to the curb. As your front door passes the back bumper of the car ahead, straighten the wheels and keep backing up.
• Try starting out with traffi c cones, garbage cans or cardboard boxes marking the position of the front and back car. This beats scraping the paint job off your neigh bour’s car! Next, practise parking in a big space (three to fi ve car-lengths), before your driver tries to park in a regular-sized space.
• Don’t expect them to be perfect right away. Most new drivers have to parallel park several times before they get it.
• Finish off the prac tice with a tour around the neigh bour hood, prac tis ing the other skills learned so far.
coaching tips
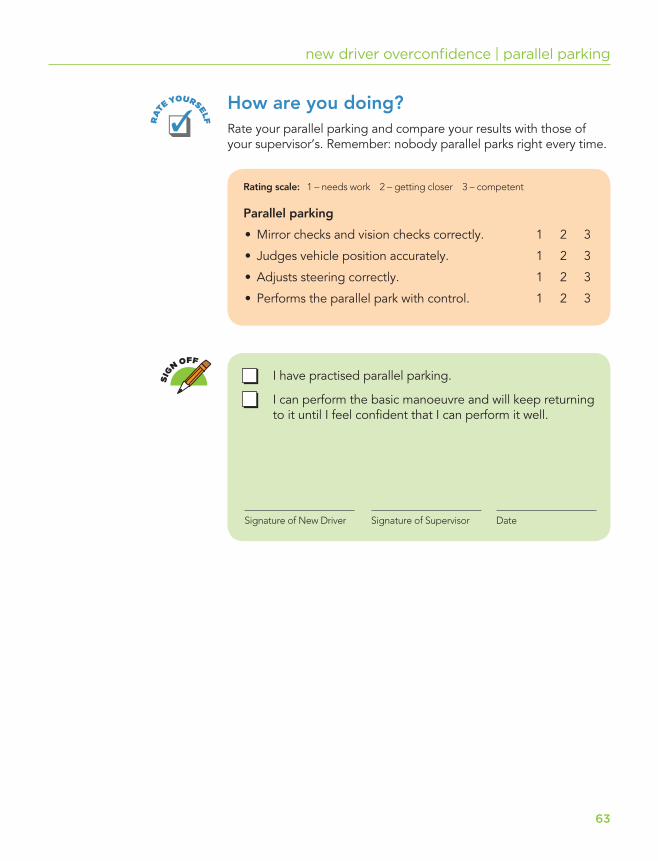
63
new driver overconfi dence | parallel parking
How are you doing?Rate your parallel parking and compare your results with those of your supervisor’s. Remember: nobody parallel parks right every time.
Rating scale: 1 – needs work 2 – getting closer 3 – competent
Parallel parking
• Mirror checks and vision checks correctly. 1 2 3
• Judges vehicle position accurately. 1 2 3
• Adjusts steering correctly. 1 2 3
• Performs the parallel park with control. 1 2 3
I have practised parallel parking.
I can perform the basic manoeuvre and will keep returning to it until I feel confi dent that I can perform it well.
Signature of New Driver Signature of Supervisor Date
RA
TE YOURSELF
SIG
N OFF

64
notes
6565
mini testyour personaldriver profi le11
Rating scale: 1 – never 2 – sometimes 3 – always
Do you:
• avoid impaired driving? 1 2 3
• say “no” to risky driving? 1 2 3
• resist media messages that encourage speeding? 1 2 3
• maintain a realistic confi dence level? 1 2 3
Your personal driver profi leIn Sessions 6 to 10, you’ve examined some of the at ti tudes that lead to safe or unsafe driving. Try putting this information together to get a personal profi le of your inner strengths and weaknesses relating to safe driving.
Adding upThe higher your score, the more likely you’ll be a safe, crash-free driver. If your score is very low, you may need to work on aspects of risk avoidance.
Round out your profi le by going back to the What Kind of Driver Will You Be? quiz. Do it again. Notice whether your answers have changed. Do your answers tell you anything about your driver profi le?
Discuss your driver profi le with your supervisor. Are there things you need to work on to become a safer driver?
Mini-testYou’ve now practised most of the basic skills of driving. You’ll soon be able to head into traffi c. But before you do, take as much time as you need to feel secure with what you’ve learned. Before you get into multiple lanes and traffi c lights, you need to be so familiar with your basic driving skills that they feel automatic. This mini-test will help you to decide whether you’re ready to move on right now, or whether you need a session or two of further practice.
Pedestrians
What does this sign mean?
Check out the sign section in Learn to drive smart.
Learn to drive smart review
DR
IVIN
G PRACTICE T
IPS
KEEPING SAFE
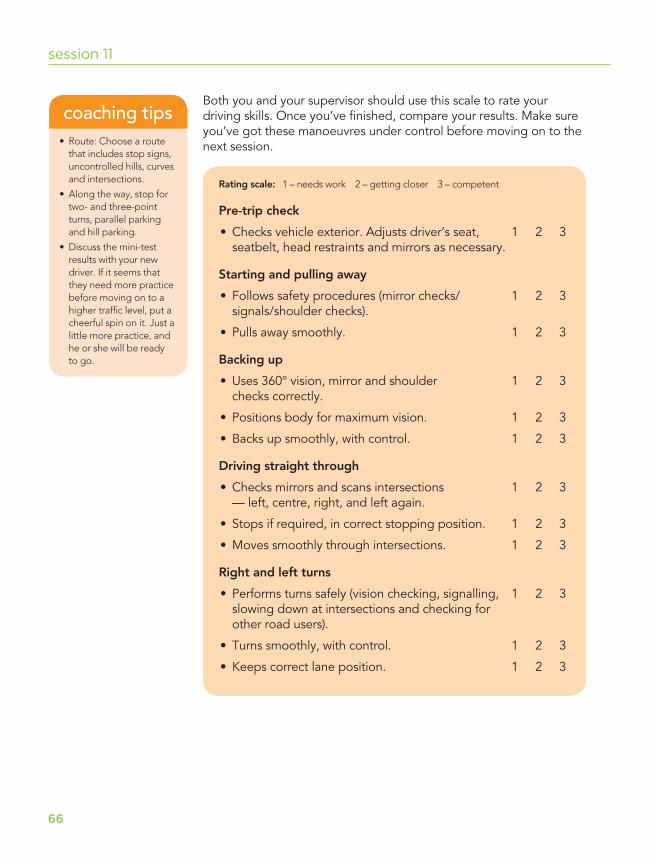
66
session 11
Both you and your supervisor should use this scale to rate your driving skills. Once you’ve fi nished, compare your results. Make sure you’ve got these manoeuvres under control before moving on to the next session.
Rating scale: 1 – needs work 2 – getting closer 3 – competent
Pre-trip check
• Checks vehicle exterior. Adjusts driver’s seat, 1 2 3seatbelt, head restraints and mirrors as necessary.
Starting and pulling away
• Follows safety procedures (mirror checks/ 1 2 3signals/shoulder checks).
• Pulls away smoothly. 1 2 3
Backing up
• Uses 360° vision, mirror and shoulder 1 2 3checks correctly.
• Positions body for maximum vision. 1 2 3
• Backs up smoothly, with control. 1 2 3
Driving straight through
• Checks mirrors and scans intersections 1 2 3— left, centre, right, and left again.
• Stops if required, in correct stopping position. 1 2 3
• Moves smoothly through intersections. 1 2 3
Right and left turns
• Performs turns safely (vision checking, signalling, 1 2 3slowing down at intersections and checking for other road users).
• Turns smoothly, with control. 1 2 3
• Keeps correct lane position. 1 2 3
• Route: Choose a route that includes stop signs, uncontrolled hills, curves and intersections.
• Along the way, stop for two- and three-point turns, parallel parking and hill parking.
• Discuss the mini-test results with your new driver. If it seems that they need more practice before moving on to a higher traffi c level, put a cheerful spin on it. Just a little more practice, and he or she will be ready to go.
coaching tips
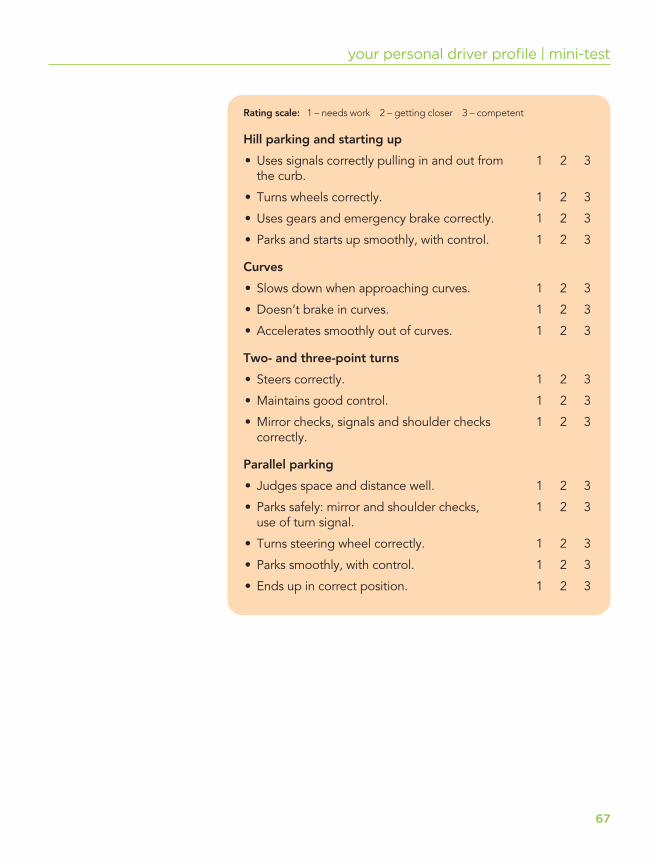
67
your personal driver profi le | mini-test
Rating scale: 1 – needs work 2 – getting closer 3 – competent
Hill parking and starting up
• Uses signals correctly pulling in and out from 1 2 3the curb.
• Turns wheels correctly. 1 2 3
• Uses gears and emergency brake correctly. 1 2 3
• Parks and starts up smoothly, with control. 1 2 3
Curves
• Slows down when approaching curves. 1 2 3
• Doesn’t brake in curves. 1 2 3
• Accelerates smoothly out of curves. 1 2 3
Two- and three-point turns
• Steers correctly. 1 2 3
• Maintains good control. 1 2 3
• Mirror checks, signals and shoulder checks 1 2 3correctly.
Parallel parking
• Judges space and distance well. 1 2 3
• Parks safely: mirror and shoulder checks, 1 2 3use of turn signal.
• Turns steering wheel correctly. 1 2 3
• Parks smoothly, with control. 1 2 3
• Ends up in correct position. 1 2 3
68
session 11
Note: Two- and three-point turns and parallel parking don’t have to be perfect in order to move on. Keep coming back to quiet, low-traffi c areas for more practice.
Areas needing more practice:
I feel confi dent that I can perform the basic driving skills reviewed in this session and am ready to move into moderate traffi c.
Signature of New Driver Signature of Supervisor Date
SIG
N OFF
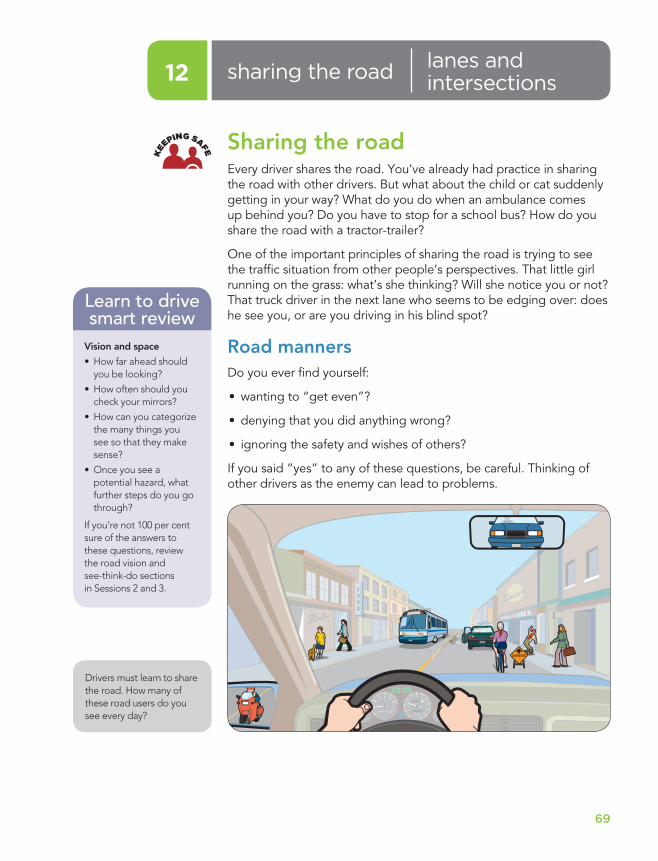
69
lanes andintersectionssharing the road12
Sharing the roadEvery driver shares the road. You’ve already had prac tice in sharing the road with other drivers. But what about the child or cat suddenly getting in your way? What do you do when an ambulance comes up behind you? Do you have to stop for a school bus? How do you share the road with a tractor-trailer?
One of the important principles of sharing the road is trying to see the traffi c situation from other people’s perspectives. That little girl running on the grass: what’s she thinking? Will she notice you or not? That truck driver in the next lane who seems to be edging over: does he see you, or are you driving in his blind spot?
Road mannersDo you ever fi nd yourself:
• wanting to “get even”?
• denying that you did anything wrong?
• ignoring the safety and wishes of others?
If you said “yes” to any of these questions, be careful. Thinking of other drivers as the enemy can lead to problems.
Vision and space
• How far ahead should you be looking?
• How often should you check your mirrors?
• How can you categorize the many things you see so that they make sense?
• Once you see a potential hazard, what further steps do you go through?
If you’re not 100 per cent sure of the answers to these questions, review the road vision and see-think-do sections in Ses sions 2 and 3.
Learn to drive smart review
Drivers must learn to share the road. How many of these road users do you see every day?
KEEPING SAFE
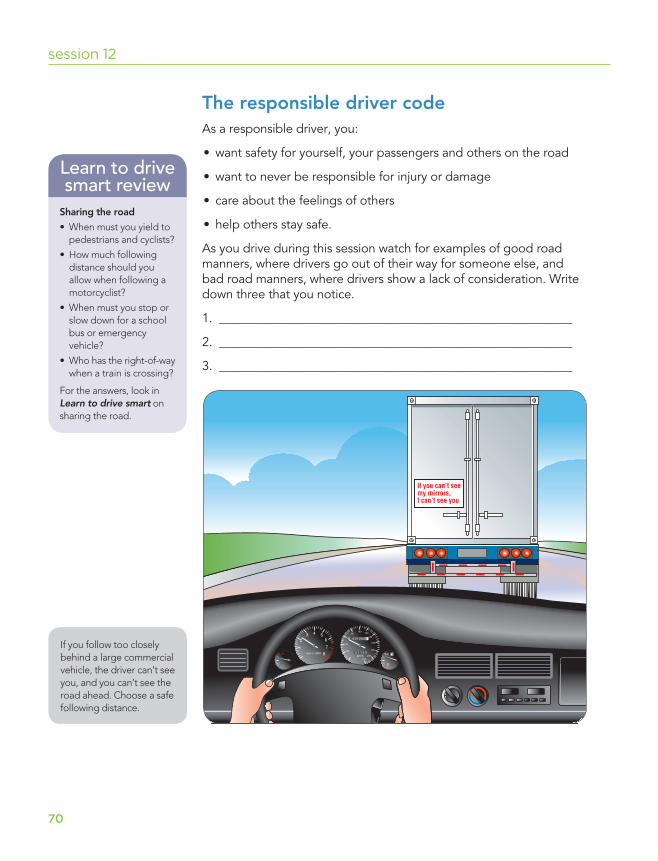
70
session 12
The responsible driver codeAs a responsible driver, you:
• want safety for yourself, your passengers and others on the road
• want to never be responsible for injury or damage
• care about the feelings of others
• help others stay safe.
As you drive during this session watch for examples of good road manners, where drivers go out of their way for someone else, and bad road manners, where drivers show a lack of consideration. Write down three that you notice.
1. _________________________________________________________
2. _________________________________________________________
3. _________________________________________________________
Sharing the road
• When must you yield to pe des tri ans and cyclists?
• How much following distance should you allow when following a motorcyclist?
• When must you stop or slow down for a school bus or emer gen cy ve hi cle?
• Who has the right-of-way when a train is crossing?
For the answers, look in Learn to drive smart on sharing the road.
Learn to drive smart review
If you follow too closely behind a large commercial vehicle, the driver can’t see you, and you can’t see the road ahead. Choose a safe following distance.
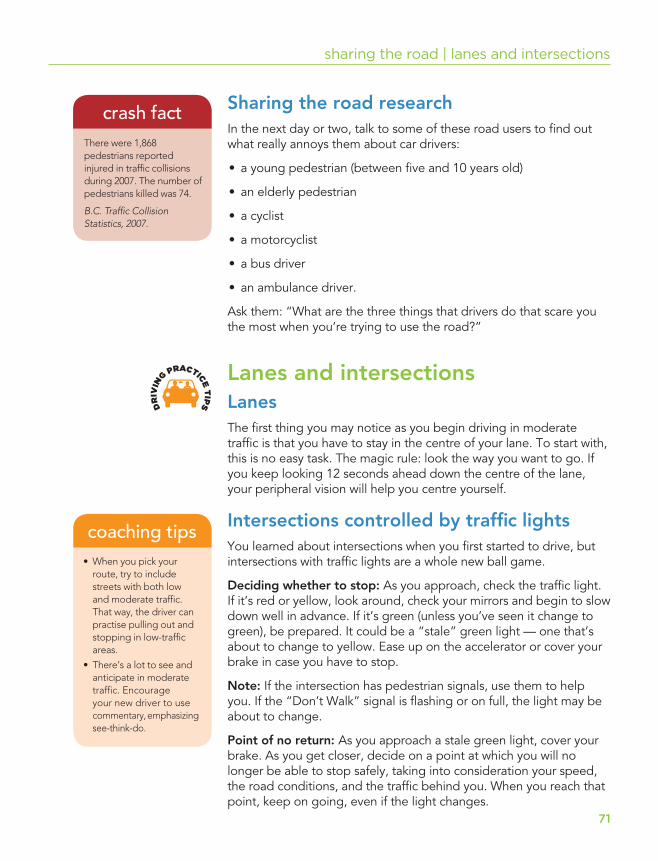
71
sharing the road | lanes and intersections
Sharing the road researchIn the next day or two, talk to some of these road users to fi nd out what really annoys them about car drivers:
• a young pedestrian (between fi ve and 10 years old)
• an elderly pedestrian
• a cyclist
• a motorcyclist
• a bus driver
• an ambulance driver.
Ask them: “What are the three things that drivers do that scare you the most when you’re trying to use the road?”
Lanes and intersectionsLanesThe fi rst thing you may notice as you begin driving in moderate traffi c is that you have to stay in the centre of your lane. To start with, this is no easy task. The magic rule: look the way you want to go. If you keep looking 12 seconds ahead down the centre of the lane, your peripheral vision will help you centre yourself.
Intersections controlled by traffi c lightsYou learned about intersections when you fi rst started to drive, but intersections with traffi c lights are a whole new ball game.
Deciding whether to stop: As you approach, check the traffi c light. If it’s red or yellow, look around, check your mirrors and begin to slow down well in advance. If it’s green (unless you’ve seen it change to green), be prepared. It could be a “stale” green light — one that’s about to change to yellow. Ease up on the accelerator or cover your brake in case you have to stop.
Note: If the intersection has pedestrian signals, use them to help you. If the “Don’t Walk” signal is fl ashing or on full, the light may be about to change.
Point of no return: As you approach a stale green light, cover your brake. As you get closer, decide on a point at which you will no longer be able to stop safely, taking into consideration your speed, the road conditions, and the traffi c behind you. When you reach that point, keep on going, even if the light changes.
DR
IVIN
G PRACTICE T
IPS
There were 1,868 pedestrians reported injured in traffi c collisions during 2007. The number of pedestrians killed was 74.
B.C. Traffi c Collision Statistics, 2007.
crash fact
• When you pick your route, try to include streets with both low and moderate traffi c. That way, the driver can practise pulling out and stop ping in low-traffi c areas.
• There’s a lot to see and anticipate in moderate traffi c. Encourage your new driver to use com men tary, em pha siz ing see-think-do.
coaching tips
72
session 12
If you stop …
❏ Slow down early, keeping a two- to three-second distance behind the vehicle in front.
❏ If you’re the fi rst car to stop, stop behind the line or the crosswalk. If you stop behind another vehicle, leave at least enough space so that you could steer around the vehicle if it were to stall.
❏ Keep your wheels straight.
When the light turns green …
❏ Scan the intersection — left, centre, right, and left again before you move forward.
❏ Don’t enter if traffi c is backed up on the other side of the intersection. Otherwise, you might not be able to clear the intersection before the light changes.
❏ If you’re stopped behind another vehicle, wait and count to three before you start. This gives you visibility and a good following distance.
❏ Accelerate moderately to fi t in with traffi c fl ow.
Note: Here are three advantages to leaving a car-length be tween you and the next vehicle when stopped at an in ter sec tion:
• if the front vehicle stalls, you can pull out and pass
• if you’re rear-ended, you won’t be pushed into the vehicle in front
• if the vehicle in front rolls backwards, you’re out of the way.
Railway crossingsTrains always have the right-of-way. Slow down when you see the railway crossing ahead sign and be prepared to stop. Check Learn to drive smart if you’re not sure what this sign looks like.
73
sharing the road | lanes and intersections
How are you doing?Rate yourself on maintaining position in lanes and on going through intersections. Once you’re fi nished, compare your results with your supervisor’s.
RA
TE YOURSELF
Rating scale: 1 – needs work 2 – getting closer 3 – competent
Lanes
• Maintains good lane position. 1 2 3
Intersections
• Scans when approaching intersections. 1 2 3
• Makes safe decisions about whether to proceed 1 2 3through intersections.
• Stops in correct position. 1 2 3
• Goes through intersections in a safe and 1 2 3controlled manner.
I’m able to stay centred in the lane.
I can stop and go through intersections with safety and control.
Signature of New Driver Signature of Supervisor Date
SIG
N OFF

74
notes
75
changing lanesturning right in traffi ccommunicating13
Communicating Communicating is a two-way process. We talk and we listen, or we send messages and we receive them. Communicating with other road users is no different. We need to give information to other road users and we need to receive information back.
Why do road users communicate with each other?• to give warnings
• to communicate intentions
• to give responses
• to communicate their presence or say “I’m here.”
How do road users communicate?• signals (automatic and hand)
• horn
• lights (hazard, fl ashing headlights, back-up, brake)
• eye contact
• body language
• vehicle position.
Intersection researchEach time you come to an intersection during today’s practice session, look around and notice the communications between road users. At the end of the session, list fi ve communications that you saw, what was communicated, and how it was communicated. Five communications I observed:
1.
2.
3.
4.
5.
Signs and signals
What do these mean?
If you’re not sure about traffi c signs and signals, check them in the Learn to drive smart section on signs, signals and road markings.
Learn to drive smart review
KEEPING SAFE
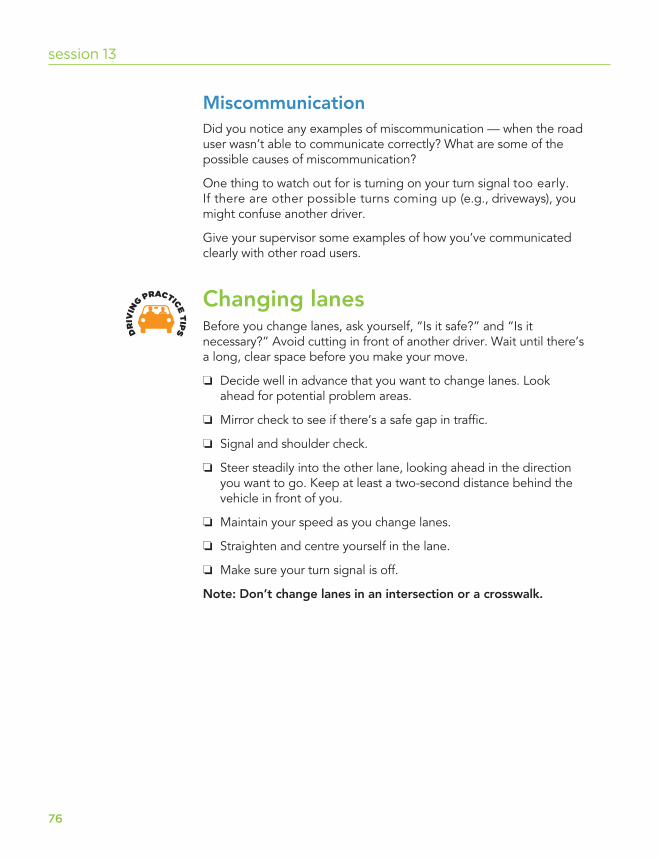
76
session 13
MiscommunicationDid you notice any examples of miscommunication — when the road user wasn’t able to communicate correctly? What are some of the possible causes of miscommunication?
One thing to watch out for is turning on your turn signal too early. If there are other possible turns coming up (e.g., driveways), you might confuse another driver.
Give your supervisor some examples of how you’ve communicated clearly with other road users.
Changing lanesBefore you change lanes, ask yourself, “Is it safe?” and “Is it necessary?” Avoid cutting in front of another driver. Wait until there’s a long, clear space before you make your move.
❏ Decide well in advance that you want to change lanes. Look ahead for potential problem areas.
❏ Mirror check to see if there’s a safe gap in traffi c.
❏ Signal and shoulder check.
❏ Steer steadily into the other lane, looking ahead in the direction you want to go. Keep at least a two-second distance behind the vehicle in front of you.
❏ Maintain your speed as you change lanes.
❏ Straighten and centre yourself in the lane.
❏ Make sure your turn signal is off.
Note: Don’t change lanes in an intersection or a crosswalk.
DR
IVIN
G PRACTICE T
IPS
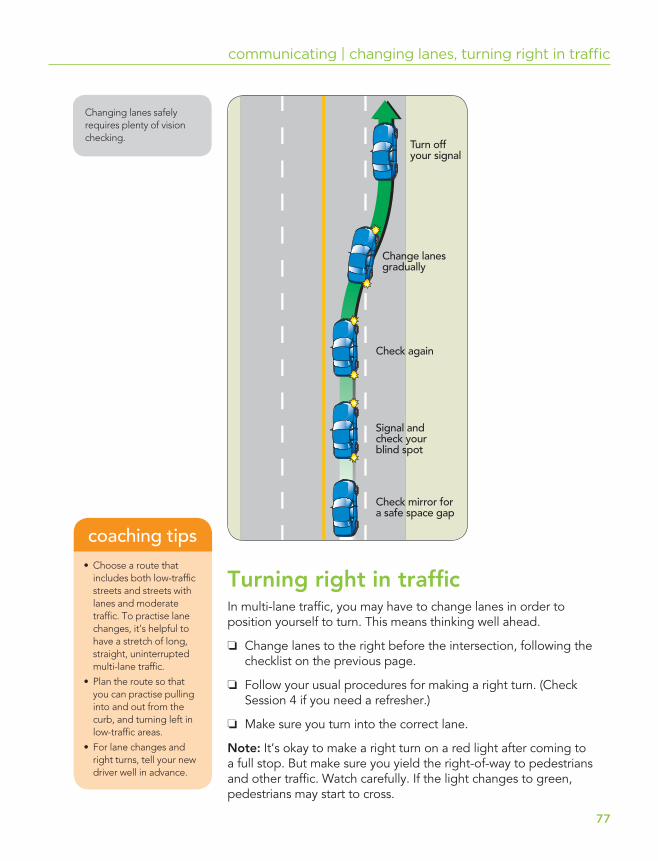
77
communicating | changing lanes, turning right in traffi c
Turning right in traffi cIn multi-lane traffi c, you may have to change lanes in order to position yourself to turn. This means thinking well ahead.
❏ Change lanes to the right before the intersection, following the checklist on the previous page.
❏ Follow your usual procedures for making a right turn. (Check Session 4 if you need a refresher.)
❏ Make sure you turn into the correct lane.
Note: It’s okay to make a right turn on a red light after coming to a full stop. But make sure you yield the right-of-way to pedestrians and other traffi c. Watch carefully. If the light changes to green, pedestrians may start to cross.
Changing lanes safely requires plenty of vision checking.
• Choose a route that includes both low-traffi c streets and streets with lanes and moderate traffi c. To practise lane changes, it’s helpful to have a stretch of long, straight, uninterrupted multi-lane traffi c.
• Plan the route so that you can practise pulling into and out from the curb, and turning left in low-traffi c areas.
• For lane changes and right turns, tell your new driver well in advance.
coaching tips

78
session 13
YieldingA yield sign tells you that you need to slow down and give the right-of-way to the traffi c on the crossing street. Usually a yield involves a right turn, but you don’t have a traffi c light to help you. Instead, you need to wait for a long enough gap to allow you to turn into the lane and accelerate to traffi c speed.
❏ Slow down.
❏ Check for traffi c.
❏ If necessary, stop.
❏ Wait for a long, safe break in traffi c.
❏ Turn into the nearest lane.
❏ Look ahead and adjust your speed.
Use this diagram to plan your right turn. Or, you can use it after you’ve made the turn, to illustrate what happened and what could be improved.
79
communicating | changing lanes, turning right in traffi c
How are you doing?Rate yourself for lane changes, right turns and yielding. Once you’ve fi nished, compare your results with your supervisor’s.
RA
TE YOURSELF
Rating scale: 1 – needs work 2 – getting closer 3 – competent
Lane changes
• Changes lanes only when a safe space 1 2 3is available.
• Mirror checks, signals and shoulder 1 2 3checks correctly.
• Steers into the new lane with smoothness 1 2 3and control.
• Maintains good lane position, speed and space 1 2 3around the vehicle.
Right turns
• Checks the intersection well ahead for other 1 2 3road users.
• Shows good sense of timing in deciding when 1 2 3to turn.
• Keeps correct lane position. 1 2 3
Yielding
• Checks traffi c and waits for an appropriate gap. 1 2 3
• Moves into traffi c and accelerates smoothly. 1 2 3
I’m able to make lane changes smoothly and safely.
I can make right turns in a multi-lane situation with smoothness and control.
I can yield and move into traffi c smoothly.
Signature of New Driver Signature of Supervisor Date
SIG
N OFF

80
notes

81
turning left in traffi chazard perception14
Practising hazard perceptionWhile practising your driving skills, you’ve been using see skills to identify potential hazards, think skills to decide on the best solution, and do skills to respond safely.
Now that you’re becoming more skilled, try practising identifying the hazards out loud. As you drive, name all the potential hazards you see ahead, beside or behind you. Ask your supervisor to write down the words you say and put a ✓ beside the word if they agree or an ✕
if they disagree. Ask them to write down any hazards you miss, using the chart below. After a few blocks, pull over to the side of the road and talk about your answers.
To check your answers, ask yourself:
• Which of these are real hazards?
• Which aren’t?
Decide if the thing you named was a space confl ict, a surprise, a vision blocker or a poor road condition.
Hazard perception chart
HazardAgree?✓ or ✕ Hazard
Agree?✓ or ✕
Hazard perception
Give an example of a:
• space confl ict
• surprise
• vision block
• poor road condition.
If you see a potential haz ard ahead, what should you do?
To brush up, reviewhazard perception in Learn to drive smart.
Learn to drive smart review
KEEPING SAFE
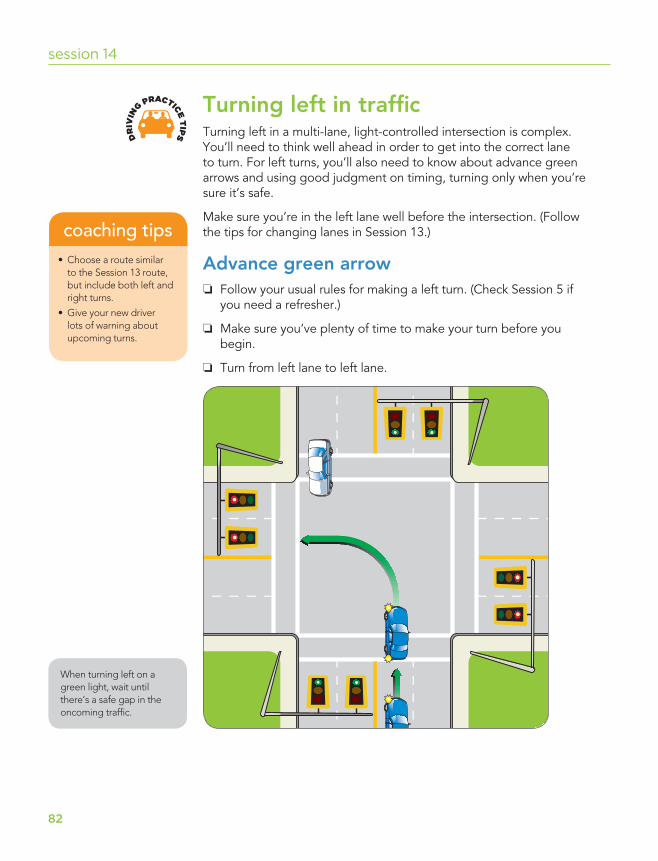
82
session 14
Turning left in traffi cTurning left in a multi-lane, light-controlled intersection is complex. You’ll need to think well ahead in order to get into the correct lane to turn. For left turns, you’ll also need to know about advance green arrows and using good judgment on timing, turning only when you’re sure it’s safe.
Make sure you’re in the left lane well before the intersection. (Follow the tips for changing lanes in Session 13.)
Advance green arrow ❏ Follow your usual rules for making a left turn. (Check Session 5 if
you need a refresher.)
❏ Make sure you’ve plenty of time to make your turn before you begin.
❏ Turn from left lane to left lane.
DR
IVIN
G PRACTICE T
IPS
• Choose a route similar to the Session 13 route, but include both left and right turns.
• Give your new driver lots of warning about upcoming turns.
coaching tips
When turn ing left on a green light, wait until there’s a safe gap in the oncoming traffi c.
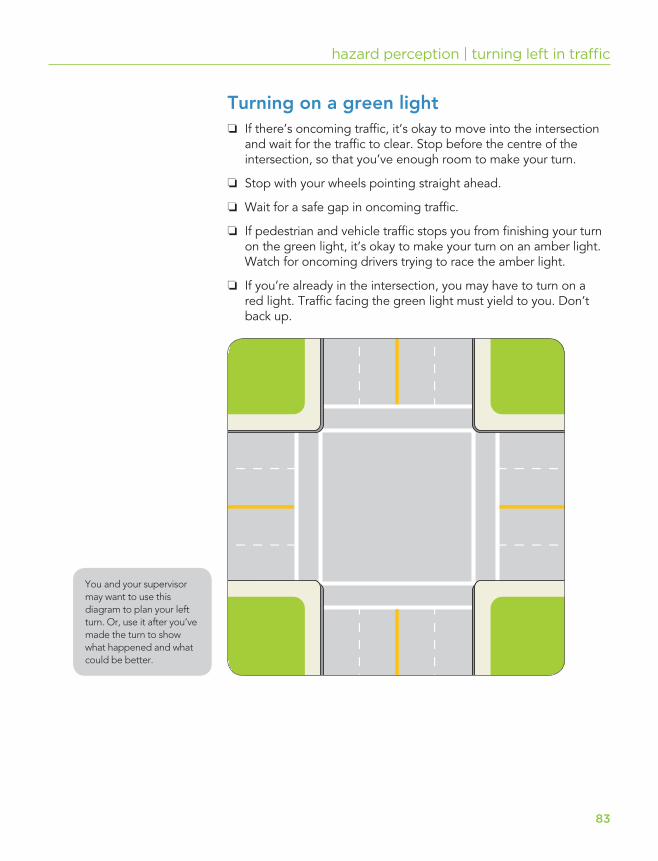
83
hazard perception | turning left in traffi c
Turning on a green light ❏ If there’s oncoming traffi c, it’s okay to move into the intersection
and wait for the traffi c to clear. Stop before the centre of the intersection, so that you’ve enough room to make your turn.
❏ Stop with your wheels pointing straight ahead.
❏ Wait for a safe gap in oncoming traffi c.
❏ If pedestrian and vehicle traffi c stops you from fi nishing your turn on the green light, it’s okay to make your turn on an amber light. Watch for oncoming drivers trying to race the amber light.
❏ If you’re already in the intersection, you may have to turn on a red light. Traffi c facing the green light must yield to you. Don’t back up.
You and your supervisor may want to use this diagram to plan your left turn. Or, use it after you’ve made the turn to show what happened and what could be better.
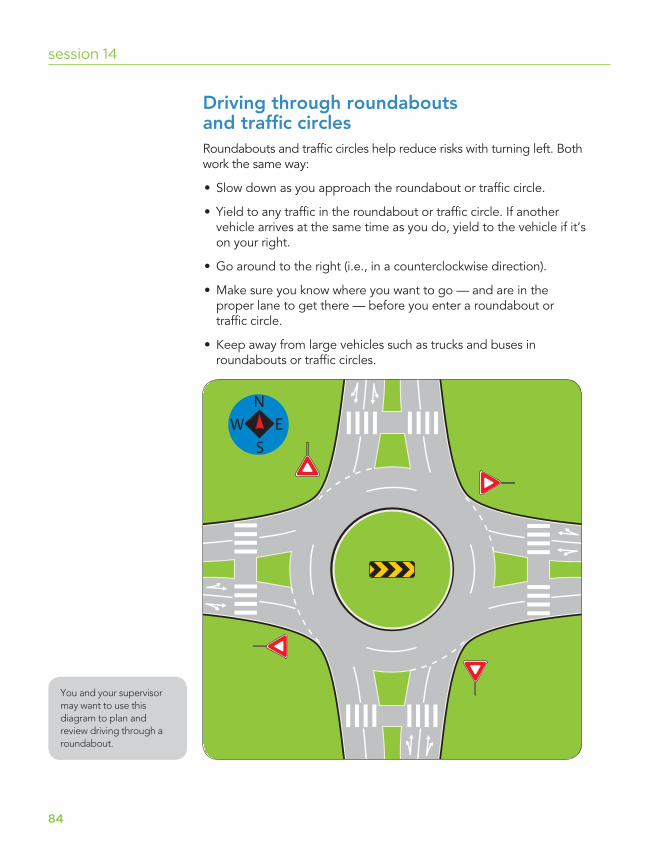
84
Driving through roundabouts and traffi c circlesRoundabouts and traffi c circles help reduce risks with turning left. Both work the same way:
• Slow down as you approach the roundabout or traffi c circle.
• Yield to any traffi c in the roundabout or traffi c circle. If another vehicle arrives at the same time as you do, yield to the vehicle if it’s on your right.
• Go around to the right (i.e., in a counterclockwise direction).
• Make sure you know where you want to go — and are in the proper lane to get there — before you enter a roundabout or traffi c circle.
• Keep away from large vehicles such as trucks and buses in roundabouts or traffi c circles.
session 14
You and your supervisor may want to use this diagram to plan and review driving through a roundabout.
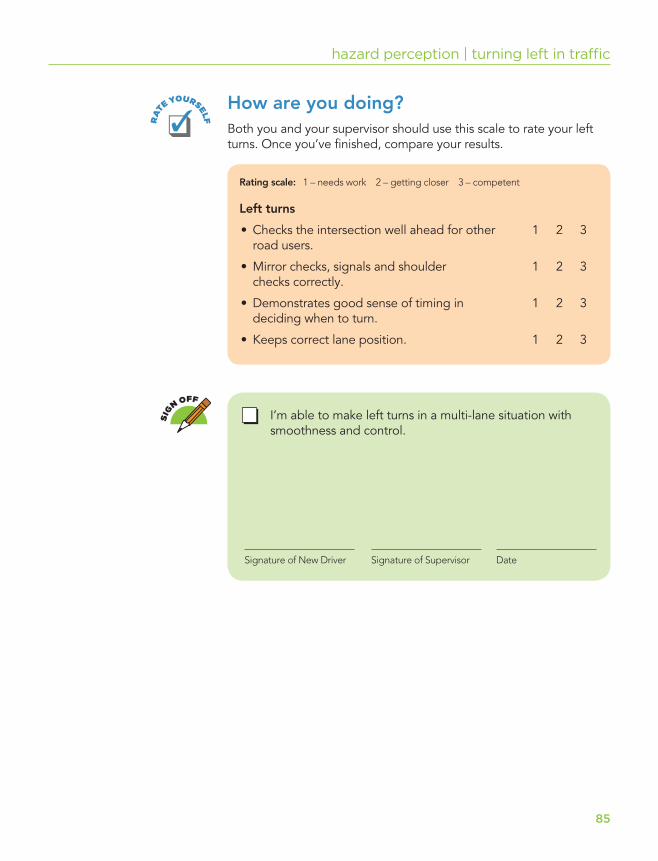
85
How are you doing?Both you and your supervisor should use this scale to rate your left turns. Once you’ve fi nished, compare your results.
hazard perception | turning left in traffi c
RA
TE YOURSELF
Rating scale: 1 – needs work 2 – getting closer 3 – competent
Left turns
• Checks the intersection well ahead for other 1 2 3road users.
• Mirror checks, signals and shoulder 1 2 3checks correctly.
• Demonstrates good sense of timing in 1 2 3deciding when to turn.
• Keeps correct lane position. 1 2 3
I’m able to make left turns in a multi-lane situation with smoothness and control.
Signature of New Driver Signature of Supervisor Date
SIG
N OFF

86
notes
87
entering and leaving traffi croad rage15
Road rageIn today’s fast-paced world, driving can sometimes be frustrating. Some drivers become very angry. Why does this happen?
• Roads are more congested than they’ve ever been.
• People have more stress in their lives.
• People are always rushing to get somewhere.
• We see other drivers acting aggressively and we pick up their behaviour.
• Car ads encourage us to think our cars give us power.
• We think of our car as part of our own self-image.
The best way to prevent road rage is not to respond. Remember: It takes two to tangle. Don’t think of the driv er as your enemy.
How can you change your road rage into road responsibility? Here are three steps to help you conquer road rage:
• Acknowledge that you can feel anger and frustration toward other drivers.
• Pay attention to your thoughts and feelings about anger and frustration while you’re driving.
• Change the way you feel. You don’t have to do this all at once; change one step at a time.
Let’s get personalAs you go through this practice session, tell your supervisor about the feelings you’re having about other road users. Ask your supervisor to take notes. At the end of the session, discuss why you were feeling the way you were and whether the feelings could be dangerous for you.
Pavement markings
What do these pavement markings mean?
Find out in Learn to drive smart.
Learn to drive smart review
KEEPING SAFE
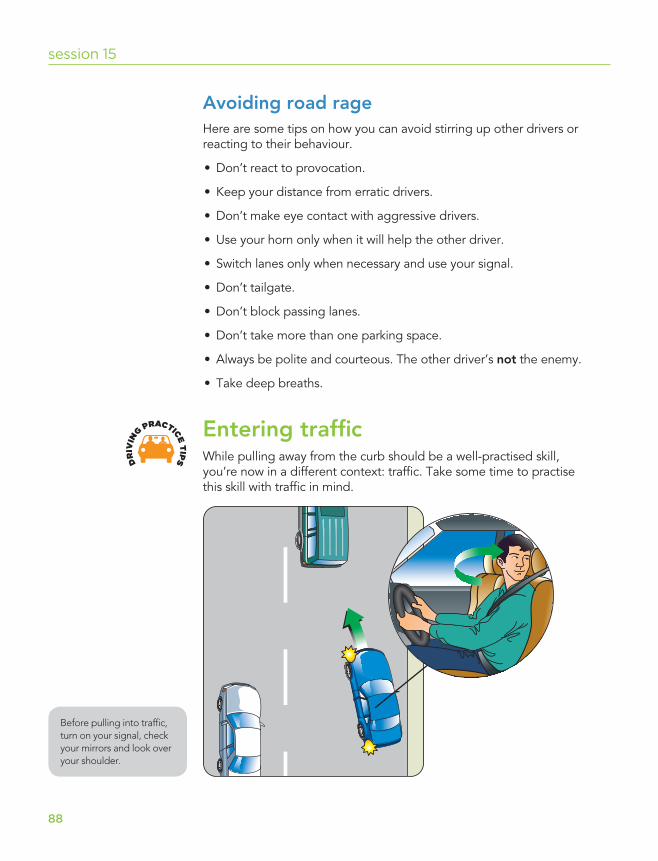
88
session 15
Avoiding road rageHere are some tips on how you can avoid stirring up other drivers or reacting to their behaviour.
• Don’t react to provocation.
• Keep your distance from erratic drivers.
• Don’t make eye contact with aggressive drivers.
• Use your horn only when it will help the other driver.
• Switch lanes only when necessary and use your signal.
• Don’t tailgate.
• Don’t block passing lanes.
• Don’t take more than one parking space.
• Always be polite and courteous. The other driver’s not the enemy.
• Take deep breaths.
Entering traffi cWhile pulling away from the curb should be a well-practised skill, you’re now in a different context: traffi c. Take some time to practise this skill with traffi c in mind.
DR
IVIN
G PRACTICE T
IPS
Before pulling into traffi c, turn on your signal, check your mirrors and look over your shoulder.
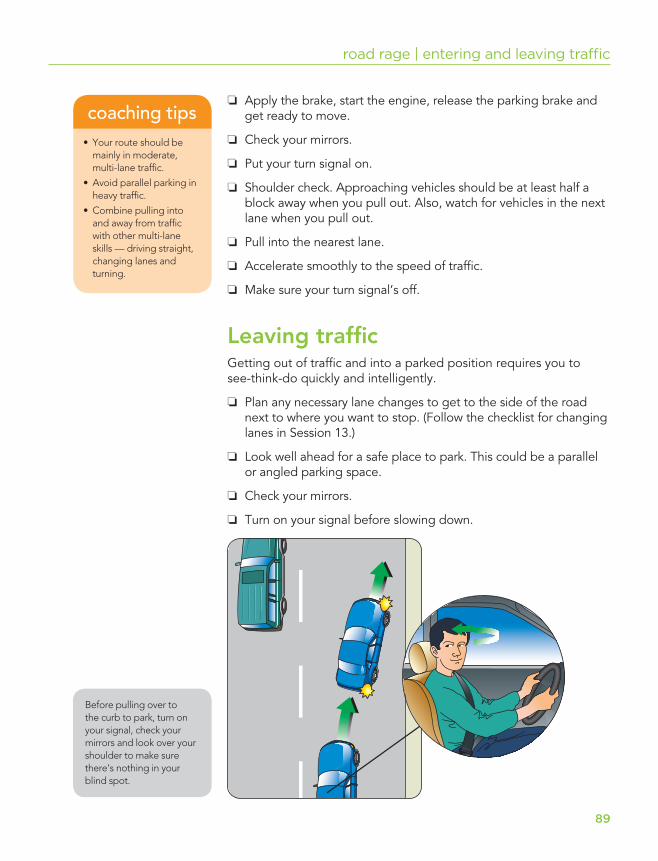
89
road rage | entering and leaving traffi c
❏ Apply the brake, start the engine, release the parking brake and get ready to move.
❏ Check your mirrors.
❏ Put your turn signal on.
❏ Shoulder check. Approaching vehicles should be at least half a block away when you pull out. Also, watch for vehicles in the next lane when you pull out.
❏ Pull into the nearest lane.
❏ Accelerate smoothly to the speed of traffi c.
❏ Make sure your turn signal’s off.
Leaving traffi cGetting out of traffi c and into a parked position requires you to see-think-do quickly and intelligently.
❏ Plan any necessary lane changes to get to the side of the road next to where you want to stop. (Follow the checklist for changing lanes in Session 13.)
❏ Look well ahead for a safe place to park. This could be a parallel or angled parking space.
❏ Check your mirrors.
❏ Turn on your signal before slowing down.
Before pulling over to the curb to park, turn on your signal, check your mirrors and look over your shoulder to make sure there’s nothing in your blind spot.
• Your route should be mainly in moderate, multi-lane traffi c.
• Avoid parallel parking in heavy traffi c.
• Combine pulling into and away from traffi c with other multi-lane skills — driving straight, changing lanes and turning.
coaching tips
90
❏ Steadily reduce your speed as you approach the stop.
❏ If you’re driving a vehicle with a manual transmission, gear down. Don’t coast with your clutch in.
❏ Shoulder check. Watch out for cyclists coming up beside you.
❏ Depending on the space you’ve chosen, either turn into the spot or parallel park. If you’re parallel parking, watch closely for vehicles passing you.
How are you doing?Both you and your supervisor should use this scale to rate your traffi c entrances and exits. Then compare your results.
session 15
RA
TE YOURSELF
Rating scale: 1 – needs work 2 – getting closer 3 – competent
Entering traffi c
• Mirror checks, signals and shoulder checks 1 2 3correctly.
• Turns smoothly into the nearest lane and 1 2 3adjusts speed.
Leaving traffi c
• Mirror checks, signals and shoulder 1 2 3checks correctly.
• Chooses an appropriate parking space. 1 2 3
• Reduces speed and pulls in smoothly. 1 2 3
I’m able to enter and leave multi-lane traffi c smoothly and safely.
Signature of New Driver Signature of Supervisor Date
SIG
N OFF

91
practising in moderate traffi c
choosing a safe speed16
Choosing a safe speedTo keep yourself safe, here are a few things you need to know about speed.
The faster you go, the longer it takes youto stop.Total stopping distance is longer than most drivers realize. It takes you three-quarters of a second to see the hazard and make a decision. Then it takes you another three-quarters of a second to react — to get your foot off the accelerator and onto the brake. Actual braking — the time it takes your brakes to bring your vehicle to a stop — depends on a number of things: the road condition, the condition of your brakes and tires, the speed at which you’re travelling. When you’re choosing a speed, keep in mind — whenever you double your speed, your braking distance is multiplied by four. In wet or icy road conditions, it’s even more.
Safety tips:
• Stay a safe distance behind other vehicles and never closer than your stopping distance. (At 90 km/h, you need at least 20 car lengths to stop, which will take about four seconds.)
• On wet roads, slow down.
The faster you drive, the harder you hit.Force of impact, like braking distance, increases as you go faster. If you double your speed, you hit four times as hard.
Safety tips:
• Keep to a speed where you feel well in control.
• Buckle up. This is the law for a good reason. Seatbelts will reduce your chances of being injured in a collision.
Note: Make sure you know the current regulations on approved safety restraints for children.
• Keep a safe following distance.
• If a collision seems unavoidable, steer to the right. Head towards the least harmful option, preferably an object that will give way on impact, such as a bush. The worst option is a head-on crash, where the force of impact is doubled.
Watch your speed
• Unless posted otherwise, what is our speed limit in cities and towns in B.C.?
• Unless posted otherwise, what is our speed limit outside cities and towns in B.C.?
• How should you change your speed as you ap proach and drive through a curve?
Check your answers in Learn to drive smart on speed control.
Learn to drive smart review
In B.C. in 2007:
• Speed was a factor in about 38 per cent of all reported fatal collisions.
• 4,942 people were injured and 167 died in collisions involving speed.
Source: B.C. Traffi c Collision Statistics, 2007
crash fact
KEEPING SAFE
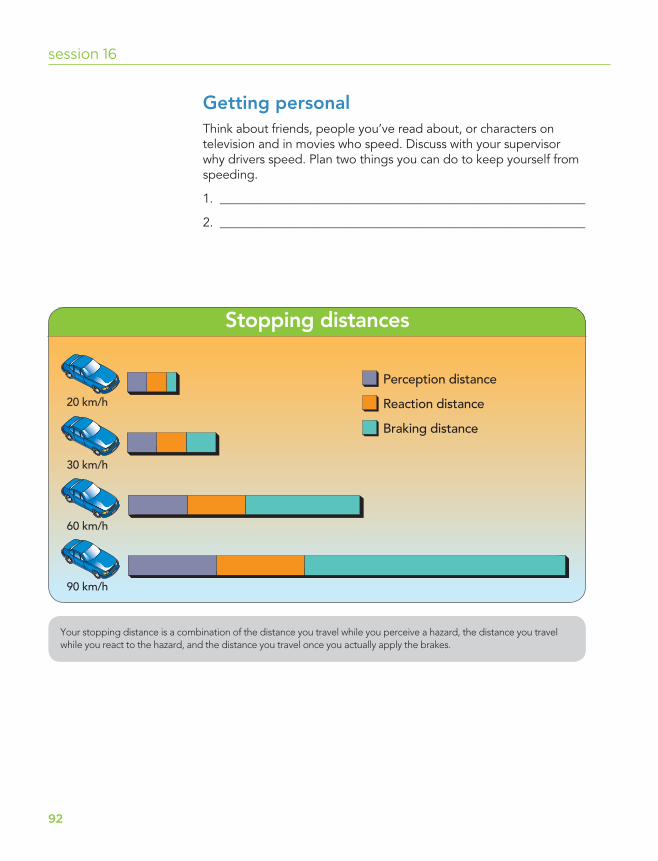
92
session 16
Getting personalThink about friends, people you’ve read about, or characters on television and in movies who speed. Discuss with your supervisor why drivers speed. Plan two things you can do to keep yourself from speeding.
1. ___________________________________________________________
2. ___________________________________________________________
Your stopping distance is a combination of the distance you travel while you perceive a hazard, the distance you travel while you react to the hazard, and the distance you travel once you actually apply the brakes.
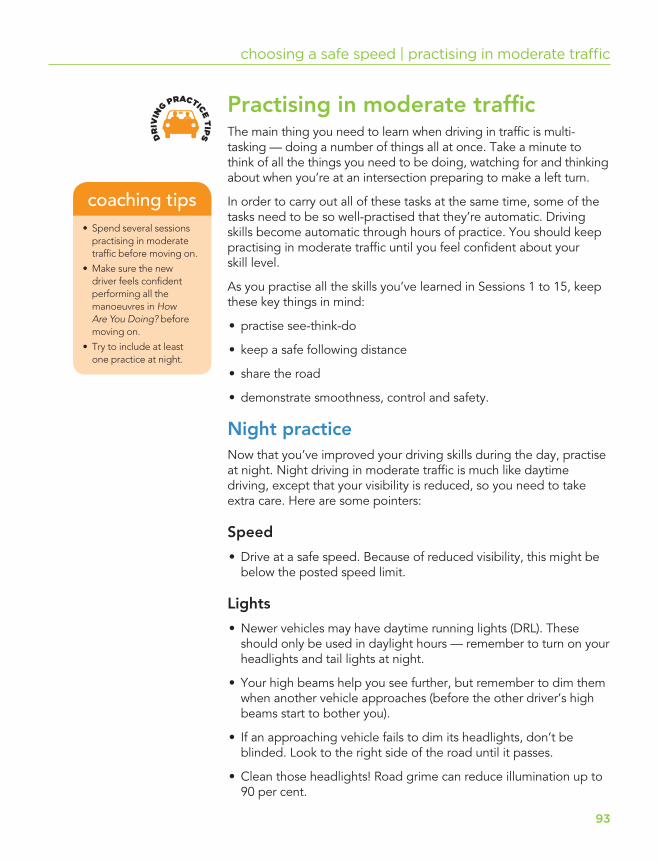
93
choosing a safe speed | practising in moderate traffi c
Practising in moderate traffi cThe main thing you need to learn when driving in traffi c is multi-tasking — doing a number of things all at once. Take a minute to think of all the things you need to be doing, watching for and thinking about when you’re at an intersection preparing to make a left turn.
In order to carry out all of these tasks at the same time, some of the tasks need to be so well-practised that they’re automatic. Driving skills become automatic through hours of practice. You should keep practising in moderate traffi c until you feel confi dent about your skill level.
As you practise all the skills you’ve learned in Sessions 1 to 15, keep these key things in mind:
• practise see-think-do
• keep a safe following distance
• share the road
• demonstrate smoothness, control and safety.
Night practiceNow that you’ve improved your driving skills during the day, practise at night. Night driving in moderate traffi c is much like daytime driving, except that your visibility is reduced, so you need to take extra care. Here are some pointers:
Speed
• Drive at a safe speed. Because of reduced visibility, this might be below the posted speed limit.
Lights
• Newer vehicles may have daytime running lights (DRL). These should only be used in daylight hours — remember to turn on your headlights and tail lights at night.
• Your high beams help you see further, but remember to dim them when another vehicle approaches (before the other driver’s high beams start to bother you).
• If an approaching vehicle fails to dim its headlights, don’t be blinded. Look to the right side of the road until it passes.
• Clean those headlights! Road grime can reduce illumination up to 90 per cent.
DR
IVIN
G PRACTICE T
IPS
• Spend several sessions prac tis ing in moderate traffi c before moving on.
• Make sure the new driver feels confi dent performing all the manoeuvres in How Are You Doing? before moving on.
• Try to include at least one practice at night.
coaching tips
94
• If you’ve got fog lights or driving lights, make sure they’re properly aimed. Remember, fog lights are only useful if it’s foggy.
• Clean your windshield inside and out. The glare of oncoming headlights on a dirty window can make it diffi cult to see.
• Before driving at night, practise switching the headlights from low to high beam without looking at the controls. Practise this away from traffi c.
• Having your headlights and tail lights on both day and night will help you see and help others drivers see you.
Sharing the road
• Pedestrians, cyclists and animals can be diffi cult to see at night. Watch for them.
How are you doing?Both you and your supervisor can use this scale to rate your driving skills in moderate traffi c. Then compare your results. Make sure you can perform these manoeuvres with smoothness and control before moving on to the next stage — highway and freeway driving.
session 16
RA
TE YOURSELF
Rating scale: 1 – needs work 2 – getting closer 3 – competent
Entering and leaving traffi c
• Mirror checks, signals and shoulder checks 1 2 3before entering or leaving traffi c.
• Plans well ahead before pulling over. 1 2 3
• Communicates with other road users. 1 2 3
Lanes and lane changes
• Maintains correct lane position. 1 2 3
• Mirror checks, signals and shoulder 1 2 3 shoulder checks correctly.
• Changes lanes safely and smoothly. 1 2 3
Driving straight through
• Checks mirrors and scans intersections. 1 2 3
• Uses good judgment when deciding whether 1 2 3 to stop or proceed through intersections.
• Communicates with other road users. 1 2 3
95
choosing a safe speed | practising in moderate traffi c
Rating scale: 1 – needs work 2 – getting closer 3 – competent
Right and left turns
• Positions vehicle for turn. 1 2 3
• Mirror checks, signals and shoulder 1 2 3checks correctly.
• Shows good sense of timing in deciding when 1 2 3to turn.
• Executes turns smoothly. 1 2 3
• Maintains correct lane position. 1 2 3
Two- and three-point turns
• Executes turns only when safe. 1 2 3
• Steers accurately. 1 2 3
• Maintains good control. 1 2 3
• Vision checks (mirror/shoulder checks/360°) 1 2 3correctly.
Parallel parking
• Judges space and distance well. 1 2 3
• Mirror checks, signals and shoul der checks. 1 2 3
• Turns steering wheel correctly. 1 2 3
• Parks smoothly, with control. 1 2 3
• Ends up in correct position. 1 2 3
Areas needing more practice:
96
session 16
I can perform the driving manoeuvres listed above with safety, smoothness and control, and feel ready to move into highway traffi c.
Signature of New Driver Signature of Supervisor Date
SIG
N OFF
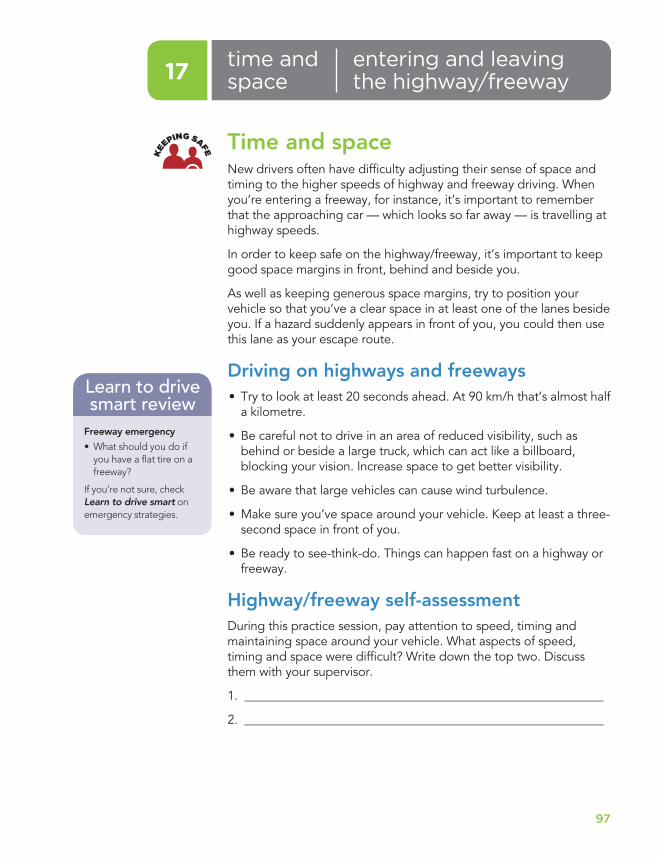
97
entering and leaving the highway/freeway
time and space17
Time and space New drivers often have diffi culty adjusting their sense of space and timing to the higher speeds of highway and freeway driving. When you’re entering a freeway, for instance, it’s important to remember that the approaching car — which looks so far away — is travelling at highway speeds.
In order to keep safe on the highway/freeway, it’s important to keep good space margins in front, behind and beside you.
As well as keeping generous space margins, try to position your vehicle so that you’ve a clear space in at least one of the lanes beside you. If a hazard suddenly appears in front of you, you could then use this lane as your escape route.
Driving on highways and freeways• Try to look at least 20 seconds ahead. At 90 km/h that’s almost half
a kilometre.
• Be careful not to drive in an area of reduced visibility, such as behind or beside a large truck, which can act like a billboard, blocking your vision. Increase space to get better visibility.
• Be aware that large vehicles can cause wind turbulence.
• Make sure you’ve space around your vehicle. Keep at least a three-second space in front of you.
• Be ready to see-think-do. Things can happen fast on a highway or freeway.
Highway/freeway self-assessmentDuring this practice session, pay attention to speed, timing and maintaining space around your vehicle. What aspects of speed, timing and space were diffi cult? Write down the top two. Discuss them with your supervisor.
1. __________________________________________________________
2. __________________________________________________________
Freeway emergency
• What should you do if you have a fl at tire on a freeway?
If you’re not sure, check Learn to drive smart on emergency strategies.
Learn to drive smart review
KEEPING SAFE
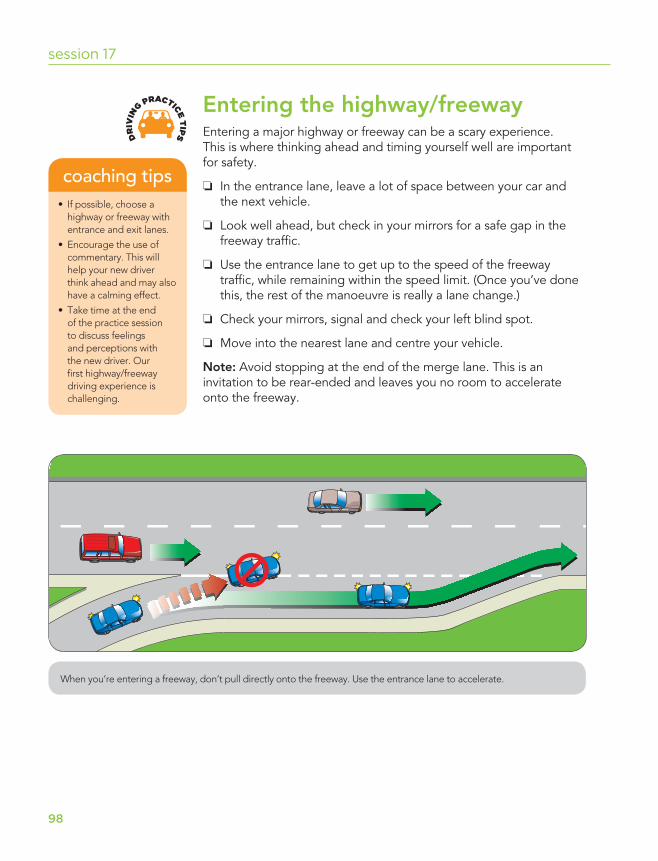
98
session 17
Entering the highway/freewayEntering a major highway or freeway can be a scary experience. This is where thinking ahead and timing yourself well are important for safety.
❏ In the entrance lane, leave a lot of space between your car and the next vehicle.
❏ Look well ahead, but check in your mirrors for a safe gap in the freeway traffi c.
❏ Use the entrance lane to get up to the speed of the freeway traffi c, while remaining within the speed limit. (Once you’ve done this, the rest of the manoeuvre is really a lane change.)
❏ Check your mirrors, signal and check your left blind spot.
❏ Move into the nearest lane and centre your vehicle.
Note: Avoid stopping at the end of the merge lane. This is an invitation to be rear-ended and leaves you no room to accelerate onto the freeway.
DR
IVIN
G PRACTICE T
IPS
• If possible, choose a highway or freeway with entrance and exit lanes.
• Encourage the use of commentary. This will help your new driver think ahead and may also have a calming effect.
• Take time at the end of the practice session to discuss feelings and perceptions with the new driver. Our fi rst highway/freeway driving experience is challenging.
coaching tips
When you’re entering a freeway, don’t pull directly onto the freeway. Use the entrance lane to accelerate.
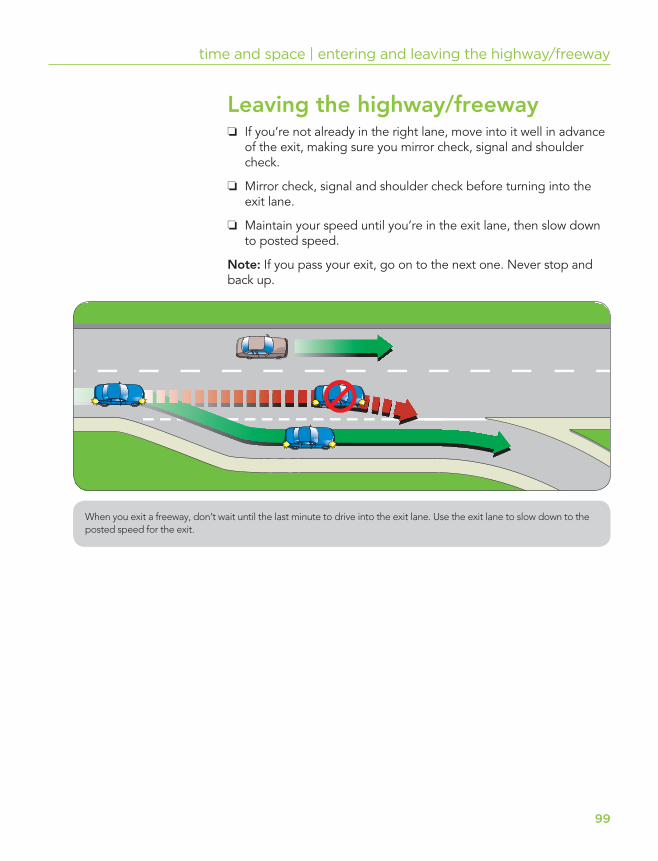
99
time and space | entering and leaving the highway/freeway
When you exit a freeway, don’t wait until the last minute to drive into the exit lane. Use the exit lane to slow down to the posted speed for the exit.
Leaving the highway/freeway ❏ If you’re not already in the right lane, move into it well in advance
of the exit, making sure you mirror check, signal and shoulder check.
❏ Mirror check, signal and shoulder check before turning into the exit lane.
❏ Maintain your speed until you’re in the exit lane, then slow down to posted speed.
Note: If you pass your exit, go on to the next one. Never stop and back up.
100
How are you doing?Both you and your supervisor should use this scale to rate your highway/freeway entrances and exits. Then compare your results.
session 17
RA
TE YOURSELF
Rating scale: 1 – needs work 2 – getting closer 3 – competent
Entering the highway/freeway
• Uses good vision scanning. 1 2 3
• Accelerates in the entrance lane. 1 2 3
• Enters the freeway smoothly and adjusts speed. 1 2 3
Leaving the highway/freeway
• Changes lanes well in advance of exit lane. 1 2 3
• Maintains speed until exit lane. 1 2 3
• Reduces speed in exit lane. 1 2 3
I’m able to enter and leave highway or freeway traffi c safely, with smoothness and control.
Signature of New Driver Signature of Supervisor Date
SIG
N OFF
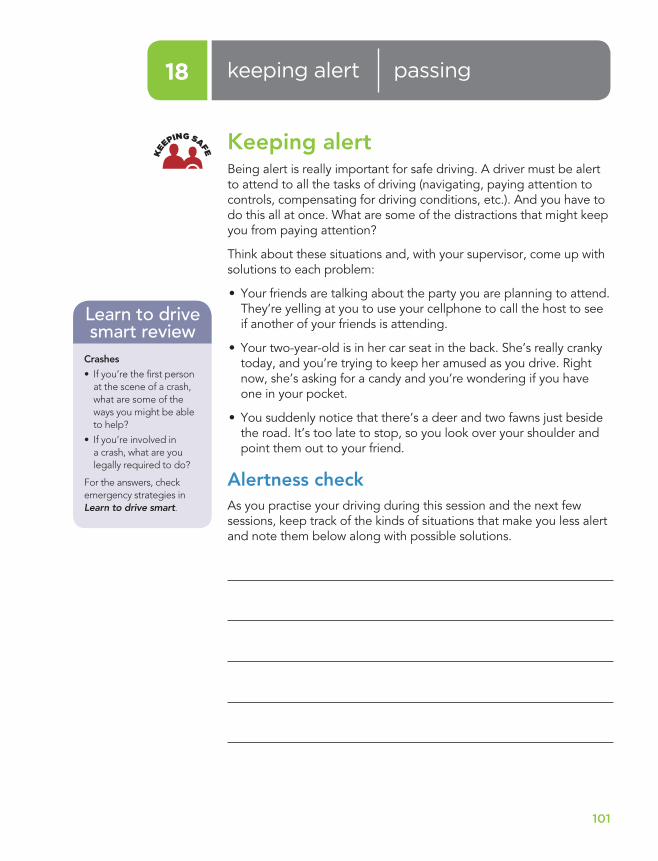
101
passingkeeping alert18
Keeping alertBeing alert is really important for safe driving. A driver must be alert to attend to all the tasks of driving (navigating, paying attention to controls, compensating for driving conditions, etc.). And you have to do this all at once. What are some of the distractions that might keep you from paying attention?
Think about these situations and, with your supervisor, come up with solutions to each problem:
• Your friends are talking about the party you are planning to attend. They’re yelling at you to use your cellphone to call the host to see if another of your friends is attending.
• Your two-year-old is in her car seat in the back. She’s really cranky today, and you’re trying to keep her amused as you drive. Right now, she’s asking for a candy and you’re wondering if you have one in your pocket.
• You suddenly notice that there’s a deer and two fawns just beside the road. It’s too late to stop, so you look over your shoulder and point them out to your friend.
Alertness checkAs you practise your driving during this session and the next few sessions, keep track of the kinds of situations that make you less alert and note them below along with possible solutions.
Crashes
• If you’re the fi rst person at the scene of a crash, what are some of the ways you might be able to help?
• If you’re involved in a crash, what are you legally required to do?
For the answers, check emergency strategies in Learn to drive smart.
Learn to drive smart review
KEEPING SAFE
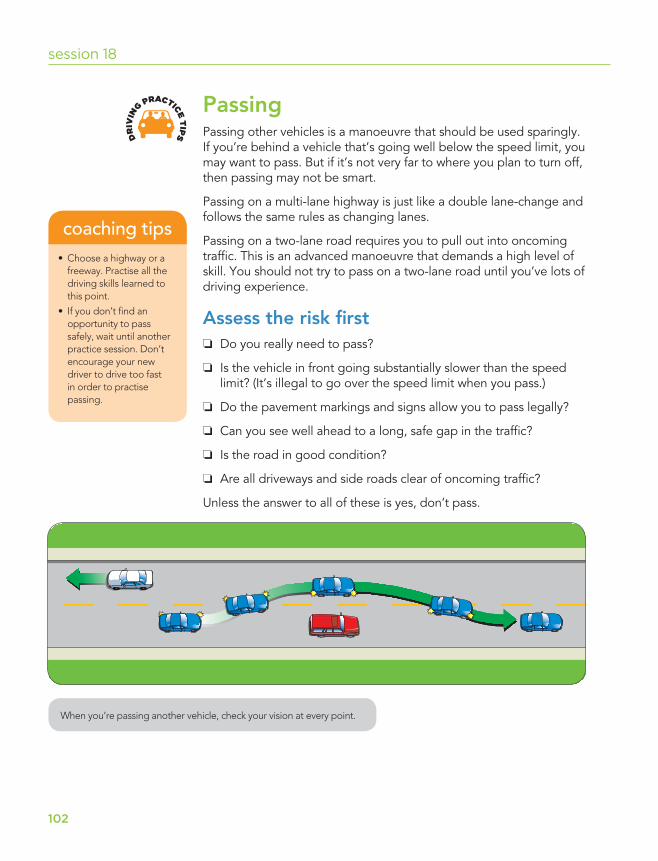
102
session 18
PassingPassing other vehicles is a manoeuvre that should be used sparingly. If you’re behind a vehicle that’s going well below the speed limit, you may want to pass. But if it’s not very far to where you plan to turn off, then passing may not be smart.
Passing on a multi-lane highway is just like a double lane-change and follows the same rules as changing lanes.
Passing on a two-lane road requires you to pull out into oncoming traffi c. This is an advanced manoeuvre that demands a high level of skill. You should not try to pass on a two-lane road until you’ve lots of driving experience.
Assess the risk fi rst ❏ Do you really need to pass?
❏ Is the vehicle in front going substantially slower than the speed limit? (It’s illegal to go over the speed limit when you pass.)
❏ Do the pavement markings and signs allow you to pass legally?
❏ Can you see well ahead to a long, safe gap in the traffi c?
❏ Is the road in good condition?
❏ Are all driveways and side roads clear of oncoming traffi c?
Unless the answer to all of these is yes, don’t pass.
DR
IVIN
G PRACTICE T
IPS
• Choose a highway or a freeway. Practise all the driving skills learned to this point.
• If you don’t fi nd an opportunity to pass safely, wait until another practice session. Don’t encourage your new driver to drive too fast in order to practise passing.
coaching tips
When you’re passing another vehicle, check your vision at every point.
103
keeping alert | passing
Do the manoeuvre ❏ Mirror check, signal left, and shoulder check to the left to make
sure another vehicle is not trying to pass you.
❏ Steer smoothly into the left lane, and accelerate to overtake the vehicle.
❏ Keep looking ahead for hazards as you pass. If conditions change — if the vehicle you’re passing speeds up, or if a vehicle appears in the oncoming lane — you’ll need to use your judgment to decide on the best action to take.
❏ Check your rear-view mirror and right mirror. When you can see the front of the vehicle you’re passing, signal right, and shoulder check to make sure you’ve enough space to pull in.
❏ Return to the original lane.
❏ Cancel the turn signal and adjust your speed to the speed of the traffi c fl ow.
Note: Don’t pass:
• any place where your vision is obstructed
• on hills
• in curves
• at intersections or railway crossings
• on bridges or underpasses or near tunnels.
You’re allowed to pass if there’s a single solid or single broken yellow line on your left, or where there are two yellow lines — a broken line and a solid line — and the broken line is on your side.
reminder
104
How are you doing?Both you and your supervisor should use this scale to rate your highway/freeway entrances and exits. Then compare your results.
RA
TE YOURSELF
I feel confi dent that I can pass with safety, smoothness and control.
Signature of New Driver Signature of Supervisor Date
Rating scale: 1 – needs work 2 – getting closer 3 – competent
Passing
• Passes only when there is a safe gap. 1 2 3
• Mirror checks, signals and shoulder 1 2 3checks correctly.
• Steers into the passing lane with 1 2 3smoothness and control.
• Is well past the vehicle being passed before 1 2 3returning to the original lane.
session 18
SIG
N OFF
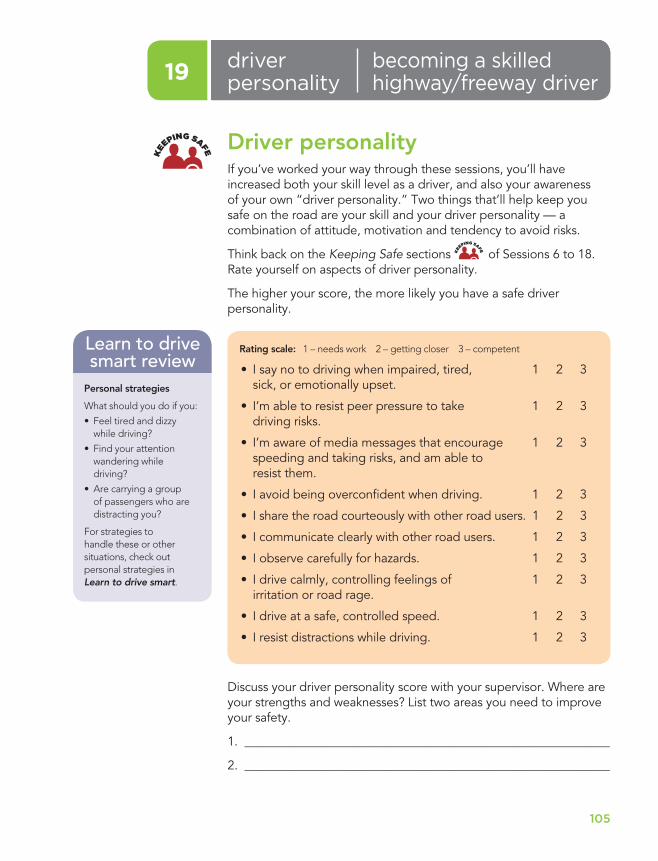
105
becoming a skilled highway/freeway driver
driver personality19
Driver personalityIf you’ve worked your way through these sessions, you’ll have increased both your skill level as a driver, and also your awareness of your own “driver personality.” Two things that’ll help keep you safe on the road are your skill and your driver personality — a combination of attitude, motivation and tendency to avoid risks.
Think back on the Keeping Safe sections KEEPING SAFE
of Sessions 6 to 18. Rate yourself on aspects of driver personality.
The higher your score, the more likely you have a safe driver personality.
Personal strategies
What should you do if you:
• Feel tired and dizzy while driving?
• Find your attention wandering whiledriving?
• Are carrying a group of passengers who are distracting you?
For strategies to handle these or other situations, check out personal strategies in Learn to drive smart.
Learn to drive smart review
Rating scale: 1 – needs work 2 – getting closer 3 – competent
• I say no to driving when impaired, tired, 1 2 3sick, or emotionally upset.
• I’m able to resist peer pressure to take 1 2 3driving risks.
• I’m aware of media messages that encourage 1 2 3speeding and taking risks, and am able to resist them.
• I avoid being overconfi dent when driving. 1 2 3
• I share the road courteously with other road users. 1 2 3
• I communicate clearly with other road users. 1 2 3
• I observe carefully for hazards. 1 2 3
• I drive calmly, controlling feelings of 1 2 3irritation or road rage.
• I drive at a safe, controlled speed. 1 2 3
• I resist distractions while driving. 1 2 3
Discuss your driver personality score with your supervisor. Where are your strengths and weaknesses? List two areas you need to improve your safety.
1. ___________________________________________________________
2. ___________________________________________________________
KEEPING SAFE
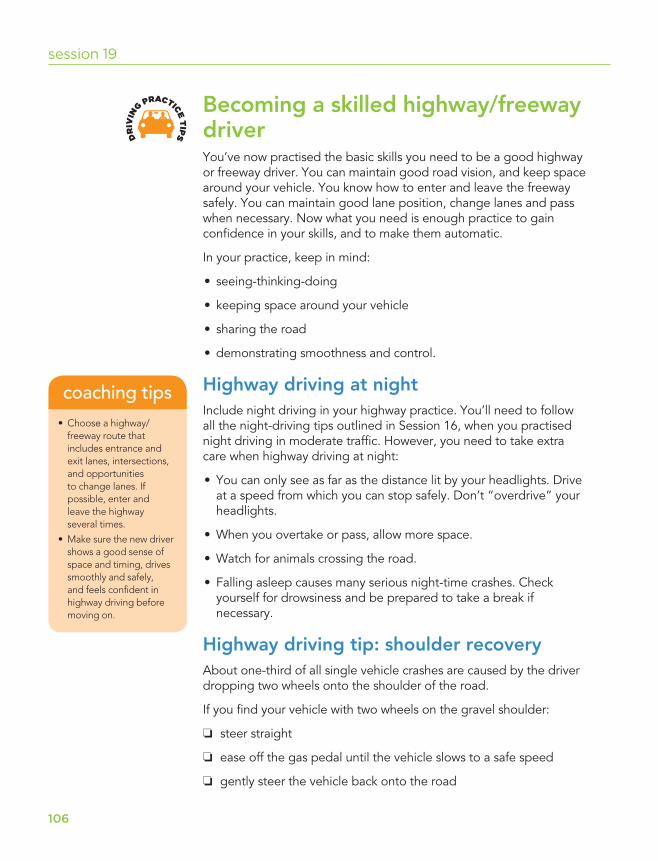
106
session 19
Becoming a skilled highway/freeway driverYou’ve now practised the basic skills you need to be a good highway or freeway driver. You can maintain good road vision, and keep space around your vehicle. You know how to enter and leave the freeway safely. You can maintain good lane position, change lanes and pass when necessary. Now what you need is enough practice to gain confi dence in your skills, and to make them automatic.
In your practice, keep in mind:
• seeing-thinking-doing
• keeping space around your vehicle
• sharing the road
• demonstrating smoothness and control.
Highway driving at nightInclude night driving in your highway practice. You’ll need to follow all the night-driving tips outlined in Session 16, when you practised night driving in moderate traffi c. However, you need to take extra care when highway driving at night:
• You can only see as far as the distance lit by your headlights. Drive at a speed from which you can stop safely. Don’t “overdrive” your headlights.
• When you overtake or pass, allow more space.
• Watch for animals crossing the road.
• Falling asleep causes many serious night-time crashes. Check yourself for drowsiness and be prepared to take a break if necessary.
Highway driving tip: shoulder recoveryAbout one-third of all single vehicle crashes are caused by the driver dropping two wheels onto the shoulder of the road.
If you fi nd your vehicle with two wheels on the gravel shoulder:
❏ steer straight
❏ ease off the gas pedal until the vehicle slows to a safe speed
❏ gently steer the vehicle back onto the road
• Choose a highway/freeway route that includes entrance and exit lanes, intersections, and opportunities to change lanes. If possible, enter and leave the highway several times.
• Make sure the new driver shows a good sense of space and timing, drives smoothly and safely, and feels confi dent in highway driving before moving on.
coaching tips
DR
IVIN
G PRACTICE T
IPS
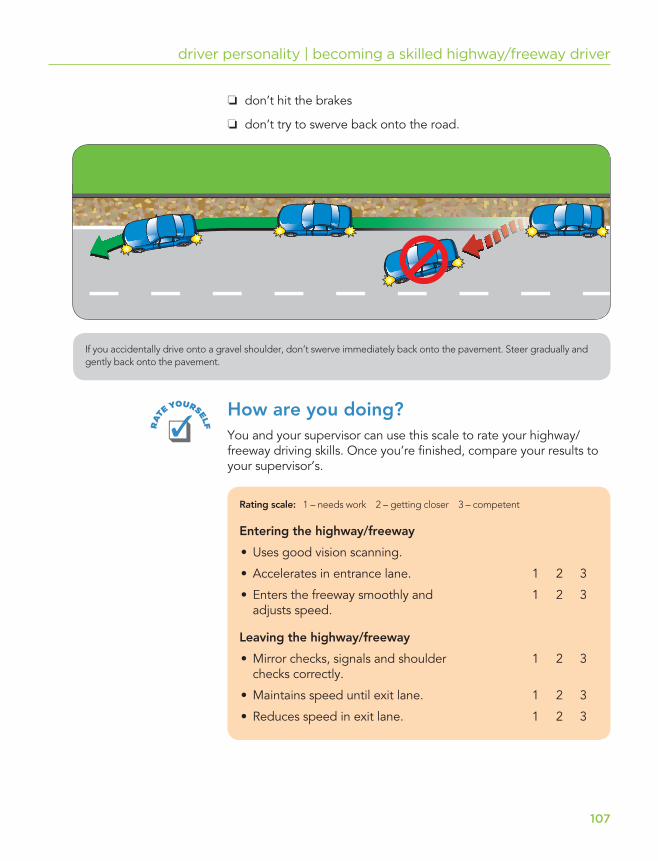
107
driver personality | becoming a skilled highway/freeway driver
❏ don’t hit the brakes
❏ don’t try to swerve back onto the road.
If you accidentally drive onto a gravel shoulder, don’t swerve immediately back onto the pavement. Steer gradually and gently back onto the pavement.
How are you doing?You and your supervisor can use this scale to rate your highway/freeway driving skills. Once you’re fi nished, compare your results to your supervisor’s.
Rating scale: 1 – needs work 2 – getting closer 3 – competent
Entering the highway/freeway
• Uses good vision scanning.
• Accelerates in entrance lane. 1 2 3
• Enters the freeway smoothly and 1 2 3adjusts speed.
Leaving the highway/freeway
• Mirror checks, signals and shoulder 1 2 3checks correctly.
• Maintains speed until exit lane. 1 2 3
• Reduces speed in exit lane. 1 2 3
RA
TE YOURSELF
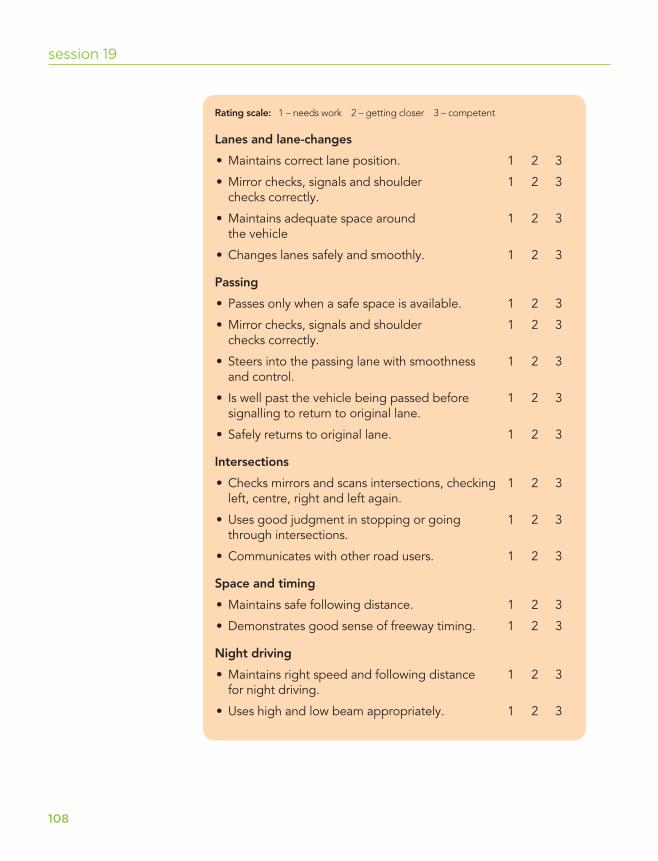
108
session 19
Rating scale: 1 – needs work 2 – getting closer 3 – competent
Lanes and lane-changes
• Maintains correct lane position. 1 2 3
• Mirror checks, signals and shoulder 1 2 3checks correctly.
• Maintains adequate space around 1 2 3the vehicle
• Changes lanes safely and smoothly. 1 2 3
Passing
• Passes only when a safe space is available. 1 2 3
• Mirror checks, signals and shoulder 1 2 3checks correctly.
• Steers into the passing lane with smoothness 1 2 3and control.
• Is well past the vehicle being passed before 1 2 3signalling to return to original lane.
• Safely returns to original lane. 1 2 3
Intersections
• Checks mirrors and scans intersections, checking 1 2 3left, centre, right and left again.
• Uses good judgment in stopping or going 1 2 3through intersections.
• Communicates with other road users. 1 2 3
Space and timing
• Maintains safe following distance. 1 2 3
• Demonstrates good sense of freeway timing. 1 2 3
Night driving
• Maintains right speed and following distance 1 2 3for night driving.
• Uses high and low beam appropriately. 1 2 3
109
driver personality | becoming a skilled highway/freeway driver
Areas needing more practice:
I have practised the driving skills listed above, and feel confi dent that I can drive safely in highway/freeway conditions.
Signature of New Driver Signature of Supervisor Date
SIG
N OFF

110
notes
111
preparing for the road test
driving guidelines20
Driving guidelinesYou should now have the basic skills and driving behaviours you need to be a safe, controlled driver. Make sure you practise in all conditions — including challenging conditions such as bad weather and heavy traffi c (see the practice suggestions at the end of this session). Once you’ve practised your skills in all conditions, you can feel confi dent that you’re ready to drive on your own.
Before you take your road test, you may want to think about a set of guidelines to follow when you drive. These will help you to resist pressures to drive unsafely.
Use the box on the next page to come up with guidelines that fi t you and your driving situation. Keep in mind your driver personality. What do you need to watch out for? In what areas do you need to work on? Talk this over with your supervisor. He or she has watched you learn to drive, and probably has a good idea of the areas you need to pay attention to.
Here are some categories to consider when drawing up your driving guidelines:
• Fitness to drive: Are there some conditions when you’ll refuse to drive, such as when tired, impaired, ill, emotionally upset?
• Passengers: Should you take passengers in your vehicle, especially during the fi rst few months, and knowing that your novice driver’s licence includes a passenger restriction?
• Driving hours: Should you gradually increase the hours of driving as you gain experience?
• Risk avoidance: What risks do you particularly need to look out for, such as speeding, passing, following too closely?
• Do you need to make an appointment for your road test?
• What do you need to bring to a road test?
Look in chapter 9, Learn to drive smart for this information.
Learn to drive smart review
KEEPING SAFE
112
session 20
Driving guidelines
I will keep in mind the following guidelines:
Signature of New Driver Signature of Supervisor Date
113
driving guidelines | preparing for the road test
Preparing for the road testThe more hours new drivers are able to practise, the more skilled, confi dent and competent they’ll be. Don’t move on to the road test until both of you — new driver and supervisor — are satisfi ed that the skills have been well learned and practised.
What to practiseSkills — Both the Class 7 and the Class 5 road tests will test your driving skills: observation, maintaining space margins, speed control, steering and communication. The examiner will rate your skills as you drive through a route and perform a series of driving manoeuvres.
Hazard perception — Both tests will assess your hazard perception. In the Class 7 test, the examiner will ask you to pull over, look ahead, and explain what hazards you would look out for in the driving environment. In the Class 5 test, you’ll be asked at certain times during the test to say the names of the hazards you see as you drive. Turn back to Session 14 for suggestions on how to practise hazard perception. If English is not your fi rst language, and you don’t know the name of a hazard, you may point and say “hazard.”
Manoeuvres — Whether you’re taking the Class 7 or the Class 5 test, you may be tested on these manoeuvres:
• Intersection manoeuvres (driving straight through, turning right, turning left)
• Entering and exiting a highway or freeway
• Backing up
• Changing lanes
• Parking at the side of the road
• Parking on a hill
• Reverse stall parking
• Parallel parking
• Two- and three-point turns
• General driving, such as straight driving, driving on hills and curves.
DR
IVIN
G PRACTICE T
IPS
Use a variety of routes to practise with your new driver.
coaching tips
During the road test, the new driver will be asked to verbally identify the hazards he or she sees while driving. See the section on hazard perception in Learn to drive smart for more information.
coaching tips
114
Making sure you’re readyUse what you’ve previously learned in Tuning up for drivers to help you practise these manoeuvres correctly. The following checklist will help you be sure you’re ready for the test. As you practise each of the manoeuvres, make sure you show how well you observe, use good speed control, steer, maintain space margins, and communicate with other road users.
Pre-trip check
❏ Checks exterior of vehicle.
❏ Checks that essentials are working.
❏ Adjusts seats, seatbelts, head restraints and mirrors correctly.
Entering traffi c and parking at the side of the road
❏ Mirror checks/signals/shoulder checks correctly.
❏ Pulls into traffi c and out of traffi c smoothly.
❏ Keeps safe space margins around the vehicle.
❏ Brakes smoothly.
❏ Doesn’t coast with clutch in (if driving a vehicle with standard transmission).
❏ Stops at correct distance from the curb.
❏ Applies parking brake correctly.
❏ Shoulder checks before opening the door.
Backing up
❏ Turns around to look behind, glancing forward occasionally when necessary.
❏ Maintains good control and steering.
Intersections — driving straight through
❏ Slows down when approaching intersections.
❏ Scans intersection — left, centre, right, and left again.
❏ Comes to a complete stop for stop sign or amber/red light.
❏ Stops in correct position.
❏ Responds safely to traffi c lights.
❏ Leaves space before car in front.
session 20
If you live in the Lower Mainland, Kelowna or Prince George, you can book your road test online at icbc.com.
reminder
115
Turning right
❏ Slows down when approaching intersections.
❏ Signals well ahead.
❏ Positions vehicle for turn.
❏ Scans the intersection — left, centre, right and left again.
❏ Shows good sense of timing in deciding when to turn.
❏ Turns smoothly, without braking during turn.
❏ Keeps correct position — doesn’t cut corners or steer wide.
Turning left
❏ Slows down when approaching intersections.
❏ Signals well in advance.
❏ Positions vehicle for turn.
❏ Scans the intersection — left, centre, right and left again.
❏ Shows good sense of timing in deciding when to turn.
❏ Turns smoothly, without braking during turn.
❏ Keeps correct lane position.
Intersections
❏ Slows down when approaching intersections.
❏ Vision checks at intersection.
❏ Comes to a complete stop for stop sign or amber/red light.
❏ Stops in correct position.
❏ Responds safely to traffi c lights.
❏ Leaves space before car in front.
Turning around: two- and three-point turns
❏ Performs these manoeuvres only when safe.
❏ Mirror checks, signals and shoulder checks correctly.
❏ Performs these manoeuvres with smoothness, safety and control.
❏ Keeps safe space margins.
driving guidelines | preparing for the road test
116
Parallel parking
❏ Chooses right space.
❏ Mirror checks, signals and shoulder checks correctly.
❏ Performs manoeuvre smoothly.
❏ Stops at correct distance from curb, and right distance from other vehicles.
Parking on a hill
❏ Stops at correct distance from curb.
❏ Turns wheels correctly.
❏ Secures vehicle correctly.
❏ Pulls away smoothly, maintaining control.
Reverse stall parking
❏ Signals correctly.
❏ Mirror checks, shoulder checks and 360º vision checks.
❏ Backs into space with smoothness and control.
❏ Judges vehicle position accurately.
Changing lanes
❏ Changes lanes only when a safe gap is available.
❏ Mirror checks, signals and shoulder checks correctly.
❏ Maintains good lane position, speed and space margins.
❏ Checks rear-view mirror and uses turn signal before returning to original lane.
❏ Centres vehicle correctly in new lane.
Entering and exiting the highway/freeway
❏ Scans the highway/freeway well ahead.
❏ Chooses a safe gap.
❏ Keeps right speeds — speeds up in the acceleration lane and slows down in the exit lane.
session 20
117
Practising in all conditionsTo be ready to drive on your own, put yourself through challenging conditions such as night-time driving, rain, snow and congested traffi c. This kind of practising with supervisor guidance will get you ready to drive safely when you’re on your own.
Spend a few practice sessions driving in diffi cult weather and in heavy traffi c. Keep in mind these tips:
Driving in heavy traffi cIn heavy traffi c and busy parking lots, you’ll need to use all the vision and communication skills you’ve practised, such as:
• keep good road vision and space margins
• look out for other road users and try to see things from their perspective
• be constantly alert, ready to use your brake and horn
• communicate — let other road users know what you’re doing.
Driving in bad weather• visibility and road traction are reduced — reduce your speed and
leave more space in front
• make sure your headlights are on
• clean your windows and keep them clear
• make sure your windshield wipers are working well and that you have plenty of windshield fl uid
• check your tires for good tread and correct air pressure.
Note: Avoid driving when roads are icy or when there’s heavy fog.
Hydroplaning
If you’re travelling too fast on wet roads, your car may start to hydroplane — ride on a fi lm of water and lose traction. To avoid hydroplaning, drive slowly and follow the tread marks of the vehicle in front. If you do hydroplane and your car has a normal braking system, ease off on the gas pedal and make sure your vehicle is pointing straight ahead. Don’t brake or turn. If your car’s equipped with an anti-lock braking system, follow the instructions in your owner’s manual.
driving guidelines | preparing for the road test
118
Skidding
Most skids are caused by driving too fast for the conditions, or by driving too “stop-and-start.” If you do start to skid, look and steer where you want to go. This is sometimes called “steering into a skid.”
Slippery road surfaces
When roads are wet the distance you need to stop is much longer than the distance required on a dry surface, drive slowly.
Be really careful after driving through a large puddle or section of road covered with water. If your brakes get wet, your vehicle may not stop as quickly as normal.
Watch for changes in the appearance of the road surface. Is it shiny? Darker or lighter? That could mean ice. Avoid these sections if possible.
Braking
Don’t slam on your brakes. Slamming could lock your wheels and cause you to skid. Instead, squeeze down on the brakes fi rmly, then ease up slightly on the pedal. Then squeeze the brakes again.
Anti-lock braking systems
Despite what many people believe, your anti-lock braking system (ABS) won’t let you drive faster and stop sooner. In fact, on some surfaces, such as gravel, braking distance with ABS may be longer.
What your ABS can do is prevent wheel lock-up on surfaces where conventional brakes will usually lock up — surfaces such as wet roads and ice. This means you can brake hard, without skidding and losing steering control.
ABS is only as good as the driver. Learn the correct technique and practise it, so that you’re ready in an emergency.
A few tips:
• Apply fi rm, hard, continuous pressure to the brake pedal until the vehicle stops.
• Don’t pump the brakes. This turns the system on and off.
• Don’t be alarmed by brake noise, pedal movement or shudder. This is normal. Keep applying fi rm pressure.
• Use the vehicle’s steering ability to go around obstacles.
session 20
119
driving guidelines | preparing for the road test
I’ve practised my driving skills in different conditions and feel ready to take my road test.
Signature of New Driver Signature of Supervisor Date
SIG
N OFF
120
Licensing informationContact our nearest driver licensing offi ce to get information on licensing classifi cations and requirements.
For general information call:
• Greater Victoria: 250-978-8300
• Toll-free in B.C.: 1-800-950-1498
Booking road tests• Metro Vancouver: 604-661-2255 or online at icbc.com
• Abbotsford, Chilliwack, Kelowna, Mission and Prince George: 1-888-715-7775 or online at icbc.com
• In other areas, contact our nearest driver licensing offi ce.
Other helpful phone numbers• General enquiries: 1-800-663-3051
• Dial-a-Claim (24/7):
– in Metro Vancouver: 604-520-8222
– outside Metro Vancouver: 1-800-910-4222
• Used vehicle information:
– Visit icbc.com for information on buying a used vehicle and to get a Vehicle Claims History Report.
– Or call 1-800-464-5050
Website addresses• ICBC: icbc.com
• Ministry of Transportation and Infrastructure: www.gov.bc.ca/tran
• Ministry of Public Safety and Solicitor General: www.gov.bc.ca/pssg
• Offi ce of the Superintendent of Motor Vehicles: www.pssg.gov.bc.ca/osmv
Check out driving tips on icbc.com — video tips by driver examiners that show you how to drive safely, and help you prepare for your road test.
need to know more?
121
About your road testWe’ve designed the Class 5 and 7 road tests to ensure drivers know and understand the rules of the road and can drive safely on our roads.
Before the road test, our driver examiner will introduce themselves to you and say a few friendly words. He or she will then explain what will happen during the road test including manoeuvres that you’ll be asked to complete. You’ll then be given an opportunity to ask any questions.
During the road test, our driver examiner will remain quiet except to give you directions or notify you of a situation that requires your attention. Ongoing discussion during a road test may distract you. Our driver examiner will not try to trick you or ask you to do anything illegal. If you’re not clear about directions, be sure to ask the driver examiner for clarifi cation.
Keep in mind that our driver examiner is not there to teach you or coach you through the road test. They are there to evaluate your driving against criteria based on safe driving practices and the rules of the road.
At the end of the test, our driver examiner will advise you of your road test results and give suggestions to further improve your driving. You may also ask our driver examiner to advise your supervisor of these results and suggestions.
Do you hold an Enhanced Driver’s Licence?
If you hold an Enhanced Driver’s Licence (EDL), you must complete the EDL application process again if you want to keep your EDL after passing your road test. If there’s an EDL appointment time available after the test, you can reapply then. If you can’t complete the application that day, you’ll be issued a regular interim licence and will need to make an appointment for your EDL application. If your application is approved, you’ll be issued a free replacement driver’s licence and will only pay the enhanced fee if you re-qualify within 60 days of your road test. Remember the identifi cation requirements are slightly different than a regular driver’s licence. Please review the EDL guide at icbc.com for a complete list of requirements.
reminder
When you come for your road test, make sure you arrive 15 minutes early and remember:
• your identifi cation
• your vehicle licence plate number
• proof of vehicle insurance and registration
• enough money to cover the test, licence fees and any outstanding debts.
Your vehicle must meet all safety standards.
Note: If you can’t make it to your road test appointment, please let us know at least 48 hours before or have a valid reason we’ll fi nd acceptable, or we’ll have to add $25 to your next road test.
need to know more?
122
Examiners’ tips for passing the Class 5 and 7 road tests Here are some tips from driver examiners on how to prepare to pass these tests:
• Keep to the posted speed limits. Don’t try to keep up with speeding traffi c.
• Watch for school and playground zones. Speeding through school and playground zones is a common reason why drivers fail their test.
• Make full stops at stop signs, and make sure you stop in the correct position. When it’s safe to move out, pull out slowly, scanning the intersection.
• When turning right, shoulder check to the right to ensure there are no cyclists, pedestrians or other road users heading straight through the intersection — and into your path.
• Mirror check, signal and shoulder check whenever you change lanes or direction.
• Keep a safe distance from other vehicles.
• Scan intersections before driving through, even if the light’s green when you approach.
• Practise all the manoeuvres you may be asked to do as part of your road test, including parallel parking, parking on a hill, and two- and three-point turns.
• When merging onto a highway, use the acceleration lane to get up to the speed of the highway traffi c, while remaining within the speed limit. The rest of the manoeuvre is a lane change.
If you have any questions, don’t hesitate to ask! We’ll be happy to answer them before you start your road test.
need to know more?
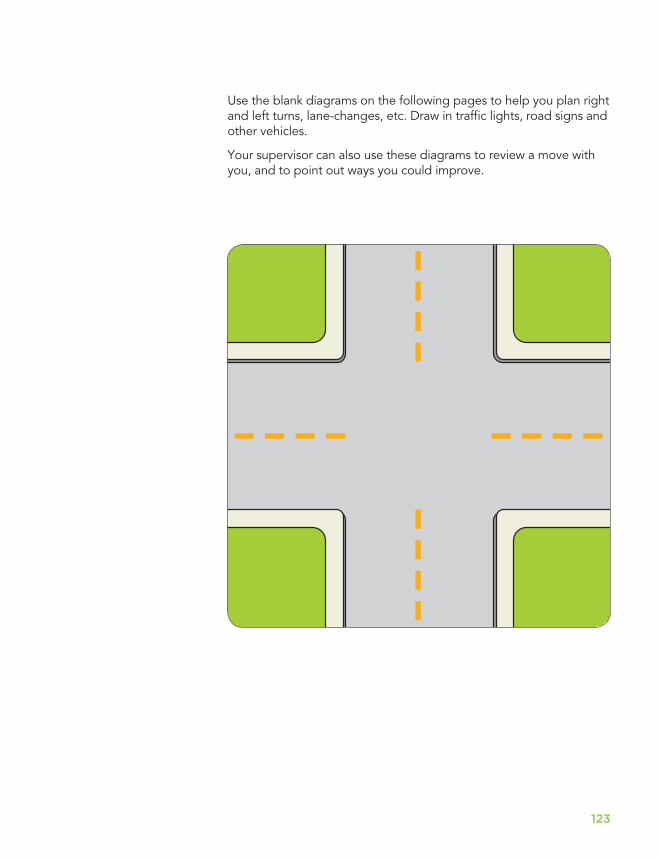
123
Use the blank diagrams on the following pages to help you plan right and left turns, lane-changes, etc. Draw in traffi c lights, road signs and other vehicles.
Your supervisor can also use these diagrams to review a move with you, and to point out ways you could improve.

124
125

126

127
128
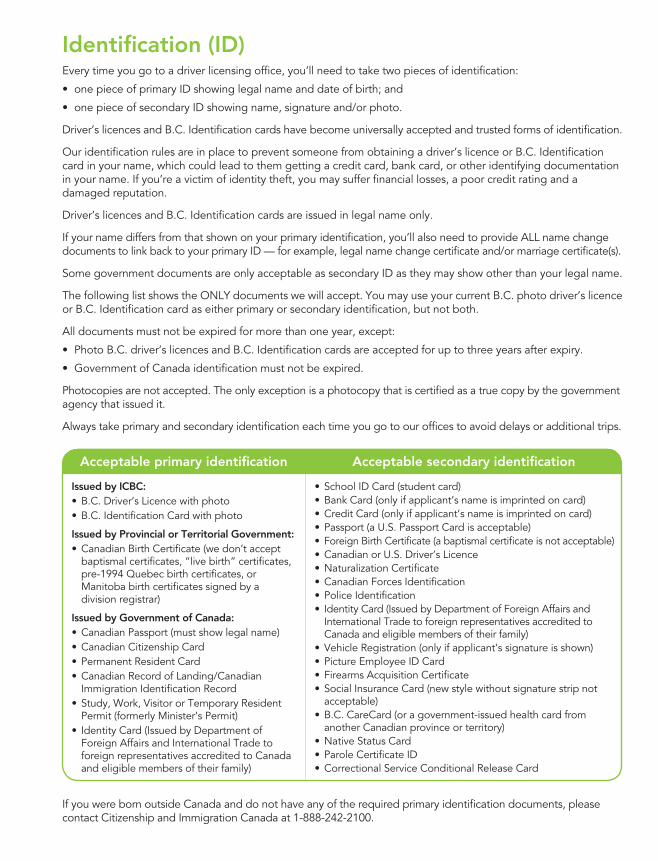
Identifi cation (ID)Every time you go to a driver licensing offi ce, you’ll need to take two pieces of identifi cation:
• one piece of primary ID showing legal name and date of birth; and
• one piece of secondary ID showing name, signature and/or photo.
Driver’s licences and B.C. Identifi cation cards have become universally accepted and trusted forms of identifi cation.
Our identifi cation rules are in place to prevent someone from obtaining a driver’s licence or B.C. Identifi cation card in your name, which could lead to them getting a credit card, bank card, or other identifying documentation in your name. If you’re a victim of identity theft, you may suffer fi nancial losses, a poor credit rating and a damaged reputation.
Driver’s licences and B.C. Identifi cation cards are issued in legal name only.
If your name differs from that shown on your primary identifi cation, you’ll also need to provide ALL name change documents to link back to your primary ID — for example, legal name change certifi cate and/or marriage certifi cate(s).
Some government documents are only acceptable as secondary ID as they may show other than your legal name.
The following list shows the ONLY documents we will accept. You may use your current B.C. photo driver’s licence or B.C. Identifi cation card as either primary or secondary identifi cation, but not both.
All documents must not be expired for more than one year, except:
• Photo B.C. driver’s licences and B.C. Identifi cation cards are accepted for up to three years after expiry.
• Government of Canada identifi cation must not be expired.
Photocopies are not accepted. The only exception is a photocopy that is certifi ed as a true copy by the government agency that issued it.
Always take primary and secondary identifi cation each time you go to our offi ces to avoid delays or additional trips.
If you were born outside Canada and do not have any of the required primary identifi cation documents, please contact Citizenship and Immigration Canada at 1-888-242-2100.
Acceptable primary identifi cation Acceptable secondary identifi cation
Issued by ICBC:• B.C. Driver’s Licence with photo• B.C. Identifi cation Card with photo
Issued by Provincial or Territorial Government:• Canadian Birth Certifi cate (we don’t accept
baptismal certifi cates, “live birth” certifi cates, pre-1994 Quebec birth certifi cates, or Manitoba birth certifi cates signed by a division registrar)
Issued by Government of Canada:• Canadian Passport (must show legal name)• Canadian Citizenship Card• Permanent Resident Card• Canadian Record of Landing/Canadian
Immigration Identifi cation Record• Study, Work, Visitor or Temporary Resident
Permit (formerly Minister’s Permit)• Identity Card (Issued by Department of
Foreign Affairs and International Trade to foreign representatives accredited to Canada and eligible members of their family)
• School ID Card (student card)• Bank Card (only if applicant’s name is imprinted on card)• Credit Card (only if applicant’s name is imprinted on card) • Passport (a U.S. Passport Card is acceptable)• Foreign Birth Certifi cate (a baptismal certifi cate is not acceptable)• Canadian or U.S. Driver’s Licence• Naturalization Certifi cate• Canadian Forces Identifi cation• Police Identifi cation• Identity Card (Issued by Department of Foreign Affairs and
International Trade to foreign representatives accredited to Canada and eligible members of their family)
• Vehicle Registration (only if applicant’s signature is shown)• Picture Employee ID Card• Firearms Acquisition Certifi cate• Social Insurance Card (new style without signature strip not
acceptable)• B.C. CareCard (or a government-issued health card from
another Canadian province or territory)• Native Status Card• Parole Certifi cate ID• Correctional Service Conditional Release Card
MV2902 (062012)
replacement cost: $5.00
Visit icbc.com to:
• view and download this and other driver licensing guides and manuals
• take the online practice knowledge test
• view online driving tips — video tips by driver examiners will show you how to drive safely, and help you prepare for your road test
• learn more about driver and vehicle licensing in B.C.
• get information on our products, services and news