Embed Size (px)
Citation preview
Tungsten Replicator 2.2 ManualContinuent
Tungsten Replicator 2.2 ManualContinuentCopyright © 2013 and beyond Continuent, Inc.
Abstract
This manual documents Tungsten Replicator 2.2.
Build date: 2015-04-13, Revision: 1279
Up to date builds of this document: Tungsten Replicator 2.2 Manual (Online), Tungsten Replicator 2.2 Manual (PDF)
iii
Table of ContentsPreface . . . . . . . . . . . . . . . . . . . . . . . . . . . . . . . . . . . . . . . . . . . . . . . . . . . . . . . . . . . . . . . . . . . . . . . . . . . . . . . . . . . . . . . . . . . . . . . . . . . . . . . . . . . . . . . . . . . . . . . . . . . . . . . . . . . . . . . . . . . . . . . . . . . . . xiii
1. Legal Notice . . . . . . . . . . . . . . . . . . . . . . . . . . . . . . . . . . . . . . . . . . . . . . . . . . . . . . . . . . . . . . . . . . . . . . . . . . . . . . . . . . . . . . . . . . . . . . . . . . . . . . . . . . . . . . . . . . . . . . . . . . . . . . . . . . . . xiii2. Conventions . . . . . . . . . . . . . . . . . . . . . . . . . . . . . . . . . . . . . . . . . . . . . . . . . . . . . . . . . . . . . . . . . . . . . . . . . . . . . . . . . . . . . . . . . . . . . . . . . . . . . . . . . . . . . . . . . . . . . . . . . . . . . . . . . . . . . xiii3. Quickstart Guide . . . . . . . . . . . . . . . . . . . . . . . . . . . . . . . . . . . . . . . . . . . . . . . . . . . . . . . . . . . . . . . . . . . . . . . . . . . . . . . . . . . . . . . . . . . . . . . . . . . . . . . . . . . . . . . . . . . . . . . . . . . . . . . xiv
1. Introduction . . . . . . . . . . . . . . . . . . . . . . . . . . . . . . . . . . . . . . . . . . . . . . . . . . . . . . . . . . . . . . . . . . . . . . . . . . . . . . . . . . . . . . . . . . . . . . . . . . . . . . . . . . . . . . . . . . . . . . . . . . . . . . . . . . . . . . . . . . . . . 151.1. Tungsten Replicator . . . . . . . . . . . . . . . . . . . . . . . . . . . . . . . . . . . . . . . . . . . . . . . . . . . . . . . . . . . . . . . . . . . . . . . . . . . . . . . . . . . . . . . . . . . . . . . . . . . . . . . . . . . . . . . . . . . . . . . . . 15
1.1.1. Extractor . . . . . . . . . . . . . . . . . . . . . . . . . . . . . . . . . . . . . . . . . . . . . . . . . . . . . . . . . . . . . . . . . . . . . . . . . . . . . . . . . . . . . . . . . . . . . . . . . . . . . . . . . . . . . . . . . . . . . . . . . . . . 161.1.2. Appliers . . . . . . . . . . . . . . . . . . . . . . . . . . . . . . . . . . . . . . . . . . . . . . . . . . . . . . . . . . . . . . . . . . . . . . . . . . . . . . . . . . . . . . . . . . . . . . . . . . . . . . . . . . . . . . . . . . . . . . . . . . . . . . 161.1.3. Transaction History Log (THL) . . . . . . . . . . . . . . . . . . . . . . . . . . . . . . . . . . . . . . . . . . . . . . . . . . . . . . . . . . . . . . . . . . . . . . . . . . . . . . . . . . . . . . . . . . . . . . . . . . . . 161.1.4. Filtering . . . . . . . . . . . . . . . . . . . . . . . . . . . . . . . . . . . . . . . . . . . . . . . . . . . . . . . . . . . . . . . . . . . . . . . . . . . . . . . . . . . . . . . . . . . . . . . . . . . . . . . . . . . . . . . . . . . . . . . . . . . . . . 17
2. Deployment . . . . . . . . . . . . . . . . . . . . . . . . . . . . . . . . . . . . . . . . . . . . . . . . . . . . . . . . . . . . . . . . . . . . . . . . . . . . . . . . . . . . . . . . . . . . . . . . . . . . . . . . . . . . . . . . . . . . . . . . . . . . . . . . . . . . . . . . . . . . . 182.1. Requirements . . . . . . . . . . . . . . . . . . . . . . . . . . . . . . . . . . . . . . . . . . . . . . . . . . . . . . . . . . . . . . . . . . . . . . . . . . . . . . . . . . . . . . . . . . . . . . . . . . . . . . . . . . . . . . . . . . . . . . . . . . . . . . . . . 20
2.1.1. Operating Systems Support . . . . . . . . . . . . . . . . . . . . . . . . . . . . . . . . . . . . . . . . . . . . . . . . . . . . . . . . . . . . . . . . . . . . . . . . . . . . . . . . . . . . . . . . . . . . . . . . . . . . . . 202.1.2. Database Support . . . . . . . . . . . . . . . . . . . . . . . . . . . . . . . . . . . . . . . . . . . . . . . . . . . . . . . . . . . . . . . . . . . . . . . . . . . . . . . . . . . . . . . . . . . . . . . . . . . . . . . . . . . . . . . . . . 202.1.3. RAM Requirements . . . . . . . . . . . . . . . . . . . . . . . . . . . . . . . . . . . . . . . . . . . . . . . . . . . . . . . . . . . . . . . . . . . . . . . . . . . . . . . . . . . . . . . . . . . . . . . . . . . . . . . . . . . . . . . . 202.1.4. Disk Requirements . . . . . . . . . . . . . . . . . . . . . . . . . . . . . . . . . . . . . . . . . . . . . . . . . . . . . . . . . . . . . . . . . . . . . . . . . . . . . . . . . . . . . . . . . . . . . . . . . . . . . . . . . . . . . . . . . 202.1.5. Java Requirements . . . . . . . . . . . . . . . . . . . . . . . . . . . . . . . . . . . . . . . . . . . . . . . . . . . . . . . . . . . . . . . . . . . . . . . . . . . . . . . . . . . . . . . . . . . . . . . . . . . . . . . . . . . . . . . . . 212.1.6. Cloud Deployment Requirements . . . . . . . . . . . . . . . . . . . . . . . . . . . . . . . . . . . . . . . . . . . . . . . . . . . . . . . . . . . . . . . . . . . . . . . . . . . . . . . . . . . . . . . . . . . . . . . . 21
2.2. Deployment Sources . . . . . . . . . . . . . . . . . . . . . . . . . . . . . . . . . . . . . . . . . . . . . . . . . . . . . . . . . . . . . . . . . . . . . . . . . . . . . . . . . . . . . . . . . . . . . . . . . . . . . . . . . . . . . . . . . . . . . . . . . 222.2.1. Using the TAR/GZipped files . . . . . . . . . . . . . . . . . . . . . . . . . . . . . . . . . . . . . . . . . . . . . . . . . . . . . . . . . . . . . . . . . . . . . . . . . . . . . . . . . . . . . . . . . . . . . . . . . . . . . . 222.2.2. Using the RPM and DEB package files . . . . . . . . . . . . . . . . . . . . . . . . . . . . . . . . . . . . . . . . . . . . . . . . . . . . . . . . . . . . . . . . . . . . . . . . . . . . . . . . . . . . . . . . . . 22
2.3. Deploying a Master/Slave Topology . . . . . . . . . . . . . . . . . . . . . . . . . . . . . . . . . . . . . . . . . . . . . . . . . . . . . . . . . . . . . . . . . . . . . . . . . . . . . . . . . . . . . . . . . . . . . . . . . . . . . . . 232.3.1. Monitoring a Master/Slave Dataservice . . . . . . . . . . . . . . . . . . . . . . . . . . . . . . . . . . . . . . . . . . . . . . . . . . . . . . . . . . . . . . . . . . . . . . . . . . . . . . . . . . . . . . . . . 25
2.4. Deploying a Multi-master Topology . . . . . . . . . . . . . . . . . . . . . . . . . . . . . . . . . . . . . . . . . . . . . . . . . . . . . . . . . . . . . . . . . . . . . . . . . . . . . . . . . . . . . . . . . . . . . . . . . . . . . . . . 262.4.1. Preparing Hosts for Multimaster . . . . . . . . . . . . . . . . . . . . . . . . . . . . . . . . . . . . . . . . . . . . . . . . . . . . . . . . . . . . . . . . . . . . . . . . . . . . . . . . . . . . . . . . . . . . . . . . . 272.4.2. Installing Multimaster Deployments . . . . . . . . . . . . . . . . . . . . . . . . . . . . . . . . . . . . . . . . . . . . . . . . . . . . . . . . . . . . . . . . . . . . . . . . . . . . . . . . . . . . . . . . . . . . . 282.4.3. Management and Monitoring of Multimaster Deployments . . . . . . . . . . . . . . . . . . . . . . . . . . . . . . . . . . . . . . . . . . . . . . . . . . . . . . . . . . . . . . . . . . 292.4.4. Alternative Multimaster Deployments . . . . . . . . . . . . . . . . . . . . . . . . . . . . . . . . . . . . . . . . . . . . . . . . . . . . . . . . . . . . . . . . . . . . . . . . . . . . . . . . . . . . . . . . . . . 31
2.5. Deploying a Fan-In Topology . . . . . . . . . . . . . . . . . . . . . . . . . . . . . . . . . . . . . . . . . . . . . . . . . . . . . . . . . . . . . . . . . . . . . . . . . . . . . . . . . . . . . . . . . . . . . . . . . . . . . . . . . . . . . . . . 312.5.1. Management and Monitoring Fan-in Deployments . . . . . . . . . . . . . . . . . . . . . . . . . . . . . . . . . . . . . . . . . . . . . . . . . . . . . . . . . . . . . . . . . . . . . . . . . . . . 33
2.6. Deploying a Star Topology . . . . . . . . . . . . . . . . . . . . . . . . . . . . . . . . . . . . . . . . . . . . . . . . . . . . . . . . . . . . . . . . . . . . . . . . . . . . . . . . . . . . . . . . . . . . . . . . . . . . . . . . . . . . . . . . . . 342.6.1. Management and Monitoring of Star Topology Deployments . . . . . . . . . . . . . . . . . . . . . . . . . . . . . . . . . . . . . . . . . . . . . . . . . . . . . . . . . . . . . . . . 36
2.7. Additional Configuration and Deployment Options . . . . . . . . . . . . . . . . . . . . . . . . . . . . . . . . . . . . . . . . . . . . . . . . . . . . . . . . . . . . . . . . . . . . . . . . . . . . . . . . . . . . . 392.7.1. Deploying Multiple Replicators on a Single Host . . . . . . . . . . . . . . . . . . . . . . . . . . . . . . . . . . . . . . . . . . . . . . . . . . . . . . . . . . . . . . . . . . . . . . . . . . . . . . . 39
2.8. Replicating Data Into an Existing Dataservice . . . . . . . . . . . . . . . . . . . . . . . . . . . . . . . . . . . . . . . . . . . . . . . . . . . . . . . . . . . . . . . . . . . . . . . . . . . . . . . . . . . . . . . . . . . . 402.9. Removing Datasources from a Deployment . . . . . . . . . . . . . . . . . . . . . . . . . . . . . . . . . . . . . . . . . . . . . . . . . . . . . . . . . . . . . . . . . . . . . . . . . . . . . . . . . . . . . . . . . . . . . . 43
2.9.1. Removing a Datasource from an Existing Deployment . . . . . . . . . . . . . . . . . . . . . . . . . . . . . . . . . . . . . . . . . . . . . . . . . . . . . . . . . . . . . . . . . . . . . . . . 432.10. Starting and Stopping Tungsten Replicator . . . . . . . . . . . . . . . . . . . . . . . . . . . . . . . . . . . . . . . . . . . . . . . . . . . . . . . . . . . . . . . . . . . . . . . . . . . . . . . . . . . . . . . . . . . . . 432.11. Configuring Startup on Boot . . . . . . . . . . . . . . . . . . . . . . . . . . . . . . . . . . . . . . . . . . . . . . . . . . . . . . . . . . . . . . . . . . . . . . . . . . . . . . . . . . . . . . . . . . . . . . . . . . . . . . . . . . . . . . 442.12. Upgrading Tungsten Replicator . . . . . . . . . . . . . . . . . . . . . . . . . . . . . . . . . . . . . . . . . . . . . . . . . . . . . . . . . . . . . . . . . . . . . . . . . . . . . . . . . . . . . . . . . . . . . . . . . . . . . . . . . . . 44
2.12.1. Upgrading Installations using update . . . . . . . . . . . . . . . . . . . . . . . . . . . . . . . . . . . . . . . . . . . . . . . . . . . . . . . . . . . . . . . . . . . . . . . . . . . . . . . . . . . . . . . . . . 442.12.2. Upgrading Tungsten Replicator to use tpm . . . . . . . . . . . . . . . . . . . . . . . . . . . . . . . . . . . . . . . . . . . . . . . . . . . . . . . . . . . . . . . . . . . . . . . . . . . . . . . . . . . 452.12.3. Upgrading Tungsten Replicator using tpm . . . . . . . . . . . . . . . . . . . . . . . . . . . . . . . . . . . . . . . . . . . . . . . . . . . . . . . . . . . . . . . . . . . . . . . . . . . . . . . . . . . . 462.12.4. Installing an Upgraded JAR Patch . . . . . . . . . . . . . . . . . . . . . . . . . . . . . . . . . . . . . . . . . . . . . . . . . . . . . . . . . . . . . . . . . . . . . . . . . . . . . . . . . . . . . . . . . . . . . . 48
3. Heterogenous Deployments . . . . . . . . . . . . . . . . . . . . . . . . . . . . . . . . . . . . . . . . . . . . . . . . . . . . . . . . . . . . . . . . . . . . . . . . . . . . . . . . . . . . . . . . . . . . . . . . . . . . . . . . . . . . . . . . . . . . . . . . . . 503.1. How Heterogeneous Replication Works . . . . . . . . . . . . . . . . . . . . . . . . . . . . . . . . . . . . . . . . . . . . . . . . . . . . . . . . . . . . . . . . . . . . . . . . . . . . . . . . . . . . . . . . . . . . . . . . . . . 503.2. Deploying Oracle Replication . . . . . . . . . . . . . . . . . . . . . . . . . . . . . . . . . . . . . . . . . . . . . . . . . . . . . . . . . . . . . . . . . . . . . . . . . . . . . . . . . . . . . . . . . . . . . . . . . . . . . . . . . . . . . . . 52
3.2.1. How Oracle Extraction Works . . . . . . . . . . . . . . . . . . . . . . . . . . . . . . . . . . . . . . . . . . . . . . . . . . . . . . . . . . . . . . . . . . . . . . . . . . . . . . . . . . . . . . . . . . . . . . . . . . . . 533.2.2. Data Type Differences and Limitations . . . . . . . . . . . . . . . . . . . . . . . . . . . . . . . . . . . . . . . . . . . . . . . . . . . . . . . . . . . . . . . . . . . . . . . . . . . . . . . . . . . . . . . . . . 553.2.3. Creating a MySQL to Oracle Deployment . . . . . . . . . . . . . . . . . . . . . . . . . . . . . . . . . . . . . . . . . . . . . . . . . . . . . . . . . . . . . . . . . . . . . . . . . . . . . . . . . . . . . . . 57
3.2.3.1. Configure the MySQL database . . . . . . . . . . . . . . . . . . . . . . . . . . . . . . . . . . . . . . . . . . . . . . . . . . . . . . . . . . . . . . . . . . . . . . . . . . . . . . . . . . . . . . . . 573.2.3.2. Configure the Oracle database . . . . . . . . . . . . . . . . . . . . . . . . . . . . . . . . . . . . . . . . . . . . . . . . . . . . . . . . . . . . . . . . . . . . . . . . . . . . . . . . . . . . . . . . . 573.2.3.3. Create the Destination Schema . . . . . . . . . . . . . . . . . . . . . . . . . . . . . . . . . . . . . . . . . . . . . . . . . . . . . . . . . . . . . . . . . . . . . . . . . . . . . . . . . . . . . . . . 583.2.3.4. Install the Master Replicator Service . . . . . . . . . . . . . . . . . . . . . . . . . . . . . . . . . . . . . . . . . . . . . . . . . . . . . . . . . . . . . . . . . . . . . . . . . . . . . . . . . . 583.2.3.5. Install Slave Replicator . . . . . . . . . . . . . . . . . . . . . . . . . . . . . . . . . . . . . . . . . . . . . . . . . . . . . . . . . . . . . . . . . . . . . . . . . . . . . . . . . . . . . . . . . . . . . . . . . . 59
3.2.4. Creating an Oracle to MySQL Deployment . . . . . . . . . . . . . . . . . . . . . . . . . . . . . . . . . . . . . . . . . . . . . . . . . . . . . . . . . . . . . . . . . . . . . . . . . . . . . . . . . . . . . 603.2.4.1. Configuring the Oracle Environment . . . . . . . . . . . . . . . . . . . . . . . . . . . . . . . . . . . . . . . . . . . . . . . . . . . . . . . . . . . . . . . . . . . . . . . . . . . . . . . . . . 613.2.4.2. Creating the MySQL Environment . . . . . . . . . . . . . . . . . . . . . . . . . . . . . . . . . . . . . . . . . . . . . . . . . . . . . . . . . . . . . . . . . . . . . . . . . . . . . . . . . . . . . 633.2.4.3. Creating the Destination Schema . . . . . . . . . . . . . . . . . . . . . . . . . . . . . . . . . . . . . . . . . . . . . . . . . . . . . . . . . . . . . . . . . . . . . . . . . . . . . . . . . . . . . . 633.2.4.4. Creating the Master Replicator . . . . . . . . . . . . . . . . . . . . . . . . . . . . . . . . . . . . . . . . . . . . . . . . . . . . . . . . . . . . . . . . . . . . . . . . . . . . . . . . . . . . . . . . 643.2.4.5. Creating the Slave Replicator . . . . . . . . . . . . . . . . . . . . . . . . . . . . . . . . . . . . . . . . . . . . . . . . . . . . . . . . . . . . . . . . . . . . . . . . . . . . . . . . . . . . . . . . . . . 66
3.2.5. Creating an Oracle to Oracle Deployment . . . . . . . . . . . . . . . . . . . . . . . . . . . . . . . . . . . . . . . . . . . . . . . . . . . . . . . . . . . . . . . . . . . . . . . . . . . . . . . . . . . . . . 683.2.5.1. Setting up the Source Oracle Environment . . . . . . . . . . . . . . . . . . . . . . . . . . . . . . . . . . . . . . . . . . . . . . . . . . . . . . . . . . . . . . . . . . . . . . . . . . . 683.2.5.2. Setting up the Target Oracle Environment . . . . . . . . . . . . . . . . . . . . . . . . . . . . . . . . . . . . . . . . . . . . . . . . . . . . . . . . . . . . . . . . . . . . . . . . . . . 70
Tungsten Replicator 2.2 Manual
iv
3.2.5.3. Creating the Destination Schema . . . . . . . . . . . . . . . . . . . . . . . . . . . . . . . . . . . . . . . . . . . . . . . . . . . . . . . . . . . . . . . . . . . . . . . . . . . . . . . . . . . . . . 713.2.5.4. Installing the Master Replicator . . . . . . . . . . . . . . . . . . . . . . . . . . . . . . . . . . . . . . . . . . . . . . . . . . . . . . . . . . . . . . . . . . . . . . . . . . . . . . . . . . . . . . . . 713.2.5.5. Installing the Slave Replicator . . . . . . . . . . . . . . . . . . . . . . . . . . . . . . . . . . . . . . . . . . . . . . . . . . . . . . . . . . . . . . . . . . . . . . . . . . . . . . . . . . . . . . . . . . 73
3.2.6. Deployment with Provisioning . . . . . . . . . . . . . . . . . . . . . . . . . . . . . . . . . . . . . . . . . . . . . . . . . . . . . . . . . . . . . . . . . . . . . . . . . . . . . . . . . . . . . . . . . . . . . . . . . . . 753.2.7. Updating CDC after Schema Changes . . . . . . . . . . . . . . . . . . . . . . . . . . . . . . . . . . . . . . . . . . . . . . . . . . . . . . . . . . . . . . . . . . . . . . . . . . . . . . . . . . . . . . . . . . . 763.2.8. CDC Cleanup and Correction . . . . . . . . . . . . . . . . . . . . . . . . . . . . . . . . . . . . . . . . . . . . . . . . . . . . . . . . . . . . . . . . . . . . . . . . . . . . . . . . . . . . . . . . . . . . . . . . . . . . . 763.2.9. Tuning CDC Extraction . . . . . . . . . . . . . . . . . . . . . . . . . . . . . . . . . . . . . . . . . . . . . . . . . . . . . . . . . . . . . . . . . . . . . . . . . . . . . . . . . . . . . . . . . . . . . . . . . . . . . . . . . . . . 773.2.10. Troubleshooting Oracle Deployments . . . . . . . . . . . . . . . . . . . . . . . . . . . . . . . . . . . . . . . . . . . . . . . . . . . . . . . . . . . . . . . . . . . . . . . . . . . . . . . . . . . . . . . . . 77
3.2.10.1. 'subscription exists' when setting up CDC on Oracle . . . . . . . . . . . . . . . . . . . . . . . . . . . . . . . . . . . . . . . . . . . . . . . . . . . . . . . . . . . . . 773.3. Deploying MySQL to MongoDB Replication . . . . . . . . . . . . . . . . . . . . . . . . . . . . . . . . . . . . . . . . . . . . . . . . . . . . . . . . . . . . . . . . . . . . . . . . . . . . . . . . . . . . . . . . . . . . . . 77
3.3.1. Preparing Hosts for MongoDB Replication . . . . . . . . . . . . . . . . . . . . . . . . . . . . . . . . . . . . . . . . . . . . . . . . . . . . . . . . . . . . . . . . . . . . . . . . . . . . . . . . . . . . . 783.3.2. Installing MongoDB Replication . . . . . . . . . . . . . . . . . . . . . . . . . . . . . . . . . . . . . . . . . . . . . . . . . . . . . . . . . . . . . . . . . . . . . . . . . . . . . . . . . . . . . . . . . . . . . . . . . . 803.3.3. Management and Monitoring of MongoDB Deployments . . . . . . . . . . . . . . . . . . . . . . . . . . . . . . . . . . . . . . . . . . . . . . . . . . . . . . . . . . . . . . . . . . . . 80
3.4. Deploying MySQL to Amazon RDS Replication . . . . . . . . . . . . . . . . . . . . . . . . . . . . . . . . . . . . . . . . . . . . . . . . . . . . . . . . . . . . . . . . . . . . . . . . . . . . . . . . . . . . . . . . . . . 833.4.1. Preparing Hosts for Amazon RDS Replication . . . . . . . . . . . . . . . . . . . . . . . . . . . . . . . . . . . . . . . . . . . . . . . . . . . . . . . . . . . . . . . . . . . . . . . . . . . . . . . . . . 843.4.2. Installing MySQL to Amazon RDS Replication . . . . . . . . . . . . . . . . . . . . . . . . . . . . . . . . . . . . . . . . . . . . . . . . . . . . . . . . . . . . . . . . . . . . . . . . . . . . . . . . . . 843.4.3. Management and Monitoring of Amazon RDS Deployments . . . . . . . . . . . . . . . . . . . . . . . . . . . . . . . . . . . . . . . . . . . . . . . . . . . . . . . . . . . . . . . . . 863.4.4. Changing Amazon RDS Instance Configurations . . . . . . . . . . . . . . . . . . . . . . . . . . . . . . . . . . . . . . . . . . . . . . . . . . . . . . . . . . . . . . . . . . . . . . . . . . . . . . . 87
3.5. Deploying MySQL to Vertica Replication . . . . . . . . . . . . . . . . . . . . . . . . . . . . . . . . . . . . . . . . . . . . . . . . . . . . . . . . . . . . . . . . . . . . . . . . . . . . . . . . . . . . . . . . . . . . . . . . . . 883.5.1. Preparing Hosts for Vertica Deployments . . . . . . . . . . . . . . . . . . . . . . . . . . . . . . . . . . . . . . . . . . . . . . . . . . . . . . . . . . . . . . . . . . . . . . . . . . . . . . . . . . . . . . 883.5.2. Installing Vertica Replication . . . . . . . . . . . . . . . . . . . . . . . . . . . . . . . . . . . . . . . . . . . . . . . . . . . . . . . . . . . . . . . . . . . . . . . . . . . . . . . . . . . . . . . . . . . . . . . . . . . . . . 903.5.3. Management and Monitoring of Vertica Deployments . . . . . . . . . . . . . . . . . . . . . . . . . . . . . . . . . . . . . . . . . . . . . . . . . . . . . . . . . . . . . . . . . . . . . . . . 923.5.4. Troubleshooting Vertica Installations . . . . . . . . . . . . . . . . . . . . . . . . . . . . . . . . . . . . . . . . . . . . . . . . . . . . . . . . . . . . . . . . . . . . . . . . . . . . . . . . . . . . . . . . . . . . 94
4. Advanced Deployments . . . . . . . . . . . . . . . . . . . . . . . . . . . . . . . . . . . . . . . . . . . . . . . . . . . . . . . . . . . . . . . . . . . . . . . . . . . . . . . . . . . . . . . . . . . . . . . . . . . . . . . . . . . . . . . . . . . . . . . . . . . . . . . 954.1. Migrating and Seeding Data . . . . . . . . . . . . . . . . . . . . . . . . . . . . . . . . . . . . . . . . . . . . . . . . . . . . . . . . . . . . . . . . . . . . . . . . . . . . . . . . . . . . . . . . . . . . . . . . . . . . . . . . . . . . . . . . 95
4.1.1. Migrating from MySQL Native Replication 'In-Place' . . . . . . . . . . . . . . . . . . . . . . . . . . . . . . . . . . . . . . . . . . . . . . . . . . . . . . . . . . . . . . . . . . . . . . . . . . . 954.1.2. Migrating from MySQL Native Replication Using a New Service . . . . . . . . . . . . . . . . . . . . . . . . . . . . . . . . . . . . . . . . . . . . . . . . . . . . . . . . . . . . . 964.1.3. Seeding Data through MySQL . . . . . . . . . . . . . . . . . . . . . . . . . . . . . . . . . . . . . . . . . . . . . . . . . . . . . . . . . . . . . . . . . . . . . . . . . . . . . . . . . . . . . . . . . . . . . . . . . . . . 97
4.2. Deploying Parallel Replication . . . . . . . . . . . . . . . . . . . . . . . . . . . . . . . . . . . . . . . . . . . . . . . . . . . . . . . . . . . . . . . . . . . . . . . . . . . . . . . . . . . . . . . . . . . . . . . . . . . . . . . . . . . . . . 984.2.1. Application Prerequisites for Parallel Replication . . . . . . . . . . . . . . . . . . . . . . . . . . . . . . . . . . . . . . . . . . . . . . . . . . . . . . . . . . . . . . . . . . . . . . . . . . . . . . 984.2.2. Enabling Parallel Apply . . . . . . . . . . . . . . . . . . . . . . . . . . . . . . . . . . . . . . . . . . . . . . . . . . . . . . . . . . . . . . . . . . . . . . . . . . . . . . . . . . . . . . . . . . . . . . . . . . . . . . . . . . . . 984.2.3. Channels . . . . . . . . . . . . . . . . . . . . . . . . . . . . . . . . . . . . . . . . . . . . . . . . . . . . . . . . . . . . . . . . . . . . . . . . . . . . . . . . . . . . . . . . . . . . . . . . . . . . . . . . . . . . . . . . . . . . . . . . . . . . . 994.2.4. Disk vs. Memory Parallel Queues . . . . . . . . . . . . . . . . . . . . . . . . . . . . . . . . . . . . . . . . . . . . . . . . . . . . . . . . . . . . . . . . . . . . . . . . . . . . . . . . . . . . . . . . . . . . . . . . 994.2.5. Parallel Replication and Offline Operation . . . . . . . . . . . . . . . . . . . . . . . . . . . . . . . . . . . . . . . . . . . . . . . . . . . . . . . . . . . . . . . . . . . . . . . . . . . . . . . . . . . . 100
4.2.5.1. Clean Offline Operation . . . . . . . . . . . . . . . . . . . . . . . . . . . . . . . . . . . . . . . . . . . . . . . . . . . . . . . . . . . . . . . . . . . . . . . . . . . . . . . . . . . . . . . . . . . . . . . 1004.2.5.2. Tuning the Time to Go Offline Cleanly . . . . . . . . . . . . . . . . . . . . . . . . . . . . . . . . . . . . . . . . . . . . . . . . . . . . . . . . . . . . . . . . . . . . . . . . . . . . . . 1004.2.5.3. Unclean Offline . . . . . . . . . . . . . . . . . . . . . . . . . . . . . . . . . . . . . . . . . . . . . . . . . . . . . . . . . . . . . . . . . . . . . . . . . . . . . . . . . . . . . . . . . . . . . . . . . . . . . . . . . 100
4.2.6. Adjusting Parallel Replication After Installation . . . . . . . . . . . . . . . . . . . . . . . . . . . . . . . . . . . . . . . . . . . . . . . . . . . . . . . . . . . . . . . . . . . . . . . . . . . . . . 1004.2.6.1. How to Change Channels Safely . . . . . . . . . . . . . . . . . . . . . . . . . . . . . . . . . . . . . . . . . . . . . . . . . . . . . . . . . . . . . . . . . . . . . . . . . . . . . . . . . . . . . . 1004.2.6.2. How to Switch Parallel Queue Types Safely . . . . . . . . . . . . . . . . . . . . . . . . . . . . . . . . . . . . . . . . . . . . . . . . . . . . . . . . . . . . . . . . . . . . . . . . . 101
4.2.7. Monitoring Parallel Replication . . . . . . . . . . . . . . . . . . . . . . . . . . . . . . . . . . . . . . . . . . . . . . . . . . . . . . . . . . . . . . . . . . . . . . . . . . . . . . . . . . . . . . . . . . . . . . . . . 1014.2.7.1. Useful Commands for Parallel Monitoring Replication . . . . . . . . . . . . . . . . . . . . . . . . . . . . . . . . . . . . . . . . . . . . . . . . . . . . . . . . . . . . . 1014.2.7.2. Parallel Replication and Applied Latency On Slaves . . . . . . . . . . . . . . . . . . . . . . . . . . . . . . . . . . . . . . . . . . . . . . . . . . . . . . . . . . . . . . . . 1014.2.7.3. Relative Latency . . . . . . . . . . . . . . . . . . . . . . . . . . . . . . . . . . . . . . . . . . . . . . . . . . . . . . . . . . . . . . . . . . . . . . . . . . . . . . . . . . . . . . . . . . . . . . . . . . . . . . . . 1024.2.7.4. Serialization Count . . . . . . . . . . . . . . . . . . . . . . . . . . . . . . . . . . . . . . . . . . . . . . . . . . . . . . . . . . . . . . . . . . . . . . . . . . . . . . . . . . . . . . . . . . . . . . . . . . . . . 1024.2.7.5. Maximum Offline Interval . . . . . . . . . . . . . . . . . . . . . . . . . . . . . . . . . . . . . . . . . . . . . . . . . . . . . . . . . . . . . . . . . . . . . . . . . . . . . . . . . . . . . . . . . . . . . 1034.2.7.6. Workload Distribution . . . . . . . . . . . . . . . . . . . . . . . . . . . . . . . . . . . . . . . . . . . . . . . . . . . . . . . . . . . . . . . . . . . . . . . . . . . . . . . . . . . . . . . . . . . . . . . . . 103
4.2.8. Controlling Assignment of Shards to Channels . . . . . . . . . . . . . . . . . . . . . . . . . . . . . . . . . . . . . . . . . . . . . . . . . . . . . . . . . . . . . . . . . . . . . . . . . . . . . . . 1044.3. Batch Loading for Data Warehouses . . . . . . . . . . . . . . . . . . . . . . . . . . . . . . . . . . . . . . . . . . . . . . . . . . . . . . . . . . . . . . . . . . . . . . . . . . . . . . . . . . . . . . . . . . . . . . . . . . . . . 105
4.3.1. How It Works . . . . . . . . . . . . . . . . . . . . . . . . . . . . . . . . . . . . . . . . . . . . . . . . . . . . . . . . . . . . . . . . . . . . . . . . . . . . . . . . . . . . . . . . . . . . . . . . . . . . . . . . . . . . . . . . . . . . . . 1054.3.2. Important Limitations . . . . . . . . . . . . . . . . . . . . . . . . . . . . . . . . . . . . . . . . . . . . . . . . . . . . . . . . . . . . . . . . . . . . . . . . . . . . . . . . . . . . . . . . . . . . . . . . . . . . . . . . . . . . 1064.3.3. Batch Applier Setup . . . . . . . . . . . . . . . . . . . . . . . . . . . . . . . . . . . . . . . . . . . . . . . . . . . . . . . . . . . . . . . . . . . . . . . . . . . . . . . . . . . . . . . . . . . . . . . . . . . . . . . . . . . . . . 1064.3.4. Connect and Merge Scripts . . . . . . . . . . . . . . . . . . . . . . . . . . . . . . . . . . . . . . . . . . . . . . . . . . . . . . . . . . . . . . . . . . . . . . . . . . . . . . . . . . . . . . . . . . . . . . . . . . . . . 1074.3.5. Staging Tables . . . . . . . . . . . . . . . . . . . . . . . . . . . . . . . . . . . . . . . . . . . . . . . . . . . . . . . . . . . . . . . . . . . . . . . . . . . . . . . . . . . . . . . . . . . . . . . . . . . . . . . . . . . . . . . . . . . . . 108
4.3.5.1. Staging Table Names . . . . . . . . . . . . . . . . . . . . . . . . . . . . . . . . . . . . . . . . . . . . . . . . . . . . . . . . . . . . . . . . . . . . . . . . . . . . . . . . . . . . . . . . . . . . . . . . . . . 1084.3.5.2. Whole Record Staging . . . . . . . . . . . . . . . . . . . . . . . . . . . . . . . . . . . . . . . . . . . . . . . . . . . . . . . . . . . . . . . . . . . . . . . . . . . . . . . . . . . . . . . . . . . . . . . . . 1084.3.5.3. Delete Key Staging . . . . . . . . . . . . . . . . . . . . . . . . . . . . . . . . . . . . . . . . . . . . . . . . . . . . . . . . . . . . . . . . . . . . . . . . . . . . . . . . . . . . . . . . . . . . . . . . . . . . . 1094.3.5.4. Staging Table Generation . . . . . . . . . . . . . . . . . . . . . . . . . . . . . . . . . . . . . . . . . . . . . . . . . . . . . . . . . . . . . . . . . . . . . . . . . . . . . . . . . . . . . . . . . . . . . . 109
4.3.6. Character Sets . . . . . . . . . . . . . . . . . . . . . . . . . . . . . . . . . . . . . . . . . . . . . . . . . . . . . . . . . . . . . . . . . . . . . . . . . . . . . . . . . . . . . . . . . . . . . . . . . . . . . . . . . . . . . . . . . . . . 1094.3.7. Time Zones . . . . . . . . . . . . . . . . . . . . . . . . . . . . . . . . . . . . . . . . . . . . . . . . . . . . . . . . . . . . . . . . . . . . . . . . . . . . . . . . . . . . . . . . . . . . . . . . . . . . . . . . . . . . . . . . . . . . . . . . 109
4.4. Using the Parallel Extractor . . . . . . . . . . . . . . . . . . . . . . . . . . . . . . . . . . . . . . . . . . . . . . . . . . . . . . . . . . . . . . . . . . . . . . . . . . . . . . . . . . . . . . . . . . . . . . . . . . . . . . . . . . . . . . . 1094.4.1. Advanced Configuration Parameters . . . . . . . . . . . . . . . . . . . . . . . . . . . . . . . . . . . . . . . . . . . . . . . . . . . . . . . . . . . . . . . . . . . . . . . . . . . . . . . . . . . . . . . . . . . 111
4.5. Deploying SSL Secured Replication and Administration . . . . . . . . . . . . . . . . . . . . . . . . . . . . . . . . . . . . . . . . . . . . . . . . . . . . . . . . . . . . . . . . . . . . . . . . . . . . . . . 1124.5.1. Creating the Truststore and Keystore . . . . . . . . . . . . . . . . . . . . . . . . . . . . . . . . . . . . . . . . . . . . . . . . . . . . . . . . . . . . . . . . . . . . . . . . . . . . . . . . . . . . . . . . . . 112
4.5.1.1. Creating Your Own Client and Server Certificates . . . . . . . . . . . . . . . . . . . . . . . . . . . . . . . . . . . . . . . . . . . . . . . . . . . . . . . . . . . . . . . . . . 1124.5.1.2. Creating a Custom Certificate and Getting it Signed . . . . . . . . . . . . . . . . . . . . . . . . . . . . . . . . . . . . . . . . . . . . . . . . . . . . . . . . . . . . . . . 1144.5.1.3. Using an existing Certificate . . . . . . . . . . . . . . . . . . . . . . . . . . . . . . . . . . . . . . . . . . . . . . . . . . . . . . . . . . . . . . . . . . . . . . . . . . . . . . . . . . . . . . . . . . 115

Tungsten Replicator 2.2 Manual
v
4.5.1.4. Converting SSL Certificates for keytool . . . . . . . . . . . . . . . . . . . . . . . . . . . . . . . . . . . . . . . . . . . . . . . . . . . . . . . . . . . . . . . . . . . . . . . . . . . . . 1164.5.2. SSL and Administration Authentication . . . . . . . . . . . . . . . . . . . . . . . . . . . . . . . . . . . . . . . . . . . . . . . . . . . . . . . . . . . . . . . . . . . . . . . . . . . . . . . . . . . . . . . . 1164.5.3. Configuring the Secure Service through tpm . . . . . . . . . . . . . . . . . . . . . . . . . . . . . . . . . . . . . . . . . . . . . . . . . . . . . . . . . . . . . . . . . . . . . . . . . . . . . . . . . 1174.5.4. Connector SSL Example Procedure . . . . . . . . . . . . . . . . . . . . . . . . . . . . . . . . . . . . . . . . . . . . . . . . . . . . . . . . . . . . . . . . . . . . . . . . . . . . . . . . . . . . . . . . . . . . . 119
4.5.4.1. Setup Environment and Paths . . . . . . . . . . . . . . . . . . . . . . . . . . . . . . . . . . . . . . . . . . . . . . . . . . . . . . . . . . . . . . . . . . . . . . . . . . . . . . . . . . . . . . . . 1194.5.4.2. Configuring SSL for MySQL Server . . . . . . . . . . . . . . . . . . . . . . . . . . . . . . . . . . . . . . . . . . . . . . . . . . . . . . . . . . . . . . . . . . . . . . . . . . . . . . . . . . . 1204.5.4.3. Enable and Test SSL encryption from the Connector to the Database . . . . . . . . . . . . . . . . . . . . . . . . . . . . . . . . . . . . . . . . . . . 1214.5.4.4. Test SSL encryption from the Application to the Database . . . . . . . . . . . . . . . . . . . . . . . . . . . . . . . . . . . . . . . . . . . . . . . . . . . . . . . 123
5. Operations Guide . . . . . . . . . . . . . . . . . . . . . . . . . . . . . . . . . . . . . . . . . . . . . . . . . . . . . . . . . . . . . . . . . . . . . . . . . . . . . . . . . . . . . . . . . . . . . . . . . . . . . . . . . . . . . . . . . . . . . . . . . . . . . . . . . . . . . 1255.1. Checking Replication Status . . . . . . . . . . . . . . . . . . . . . . . . . . . . . . . . . . . . . . . . . . . . . . . . . . . . . . . . . . . . . . . . . . . . . . . . . . . . . . . . . . . . . . . . . . . . . . . . . . . . . . . . . . . . . . . 125
5.1.1. Understanding Replicator States . . . . . . . . . . . . . . . . . . . . . . . . . . . . . . . . . . . . . . . . . . . . . . . . . . . . . . . . . . . . . . . . . . . . . . . . . . . . . . . . . . . . . . . . . . . . . . . 1275.1.2. Replicator States During Operations . . . . . . . . . . . . . . . . . . . . . . . . . . . . . . . . . . . . . . . . . . . . . . . . . . . . . . . . . . . . . . . . . . . . . . . . . . . . . . . . . . . . . . . . . . . 1285.1.3. Changing Replicator States . . . . . . . . . . . . . . . . . . . . . . . . . . . . . . . . . . . . . . . . . . . . . . . . . . . . . . . . . . . . . . . . . . . . . . . . . . . . . . . . . . . . . . . . . . . . . . . . . . . . . . 128
5.2. Managing Transaction Failures . . . . . . . . . . . . . . . . . . . . . . . . . . . . . . . . . . . . . . . . . . . . . . . . . . . . . . . . . . . . . . . . . . . . . . . . . . . . . . . . . . . . . . . . . . . . . . . . . . . . . . . . . . . . 1295.2.1. Identifying a Transaction Mismatch . . . . . . . . . . . . . . . . . . . . . . . . . . . . . . . . . . . . . . . . . . . . . . . . . . . . . . . . . . . . . . . . . . . . . . . . . . . . . . . . . . . . . . . . . . . . 1295.2.2. Skipping Transactions . . . . . . . . . . . . . . . . . . . . . . . . . . . . . . . . . . . . . . . . . . . . . . . . . . . . . . . . . . . . . . . . . . . . . . . . . . . . . . . . . . . . . . . . . . . . . . . . . . . . . . . . . . . . 131
5.3. Deploying Automatic Replicator Recovery . . . . . . . . . . . . . . . . . . . . . . . . . . . . . . . . . . . . . . . . . . . . . . . . . . . . . . . . . . . . . . . . . . . . . . . . . . . . . . . . . . . . . . . . . . . . . . 1325.4. Provision or Reprovision a Slave . . . . . . . . . . . . . . . . . . . . . . . . . . . . . . . . . . . . . . . . . . . . . . . . . . . . . . . . . . . . . . . . . . . . . . . . . . . . . . . . . . . . . . . . . . . . . . . . . . . . . . . . . . 1335.5. Creating a Backup . . . . . . . . . . . . . . . . . . . . . . . . . . . . . . . . . . . . . . . . . . . . . . . . . . . . . . . . . . . . . . . . . . . . . . . . . . . . . . . . . . . . . . . . . . . . . . . . . . . . . . . . . . . . . . . . . . . . . . . . . . 133
5.5.1. Using a Different Backup Tool . . . . . . . . . . . . . . . . . . . . . . . . . . . . . . . . . . . . . . . . . . . . . . . . . . . . . . . . . . . . . . . . . . . . . . . . . . . . . . . . . . . . . . . . . . . . . . . . . . 1345.5.2. Using a Different Directory Location . . . . . . . . . . . . . . . . . . . . . . . . . . . . . . . . . . . . . . . . . . . . . . . . . . . . . . . . . . . . . . . . . . . . . . . . . . . . . . . . . . . . . . . . . . . 1345.5.3. Creating an External Backup . . . . . . . . . . . . . . . . . . . . . . . . . . . . . . . . . . . . . . . . . . . . . . . . . . . . . . . . . . . . . . . . . . . . . . . . . . . . . . . . . . . . . . . . . . . . . . . . . . . . 134
5.6. Restoring a Backup . . . . . . . . . . . . . . . . . . . . . . . . . . . . . . . . . . . . . . . . . . . . . . . . . . . . . . . . . . . . . . . . . . . . . . . . . . . . . . . . . . . . . . . . . . . . . . . . . . . . . . . . . . . . . . . . . . . . . . . . . 1355.6.1. Restoring a Specific Backup . . . . . . . . . . . . . . . . . . . . . . . . . . . . . . . . . . . . . . . . . . . . . . . . . . . . . . . . . . . . . . . . . . . . . . . . . . . . . . . . . . . . . . . . . . . . . . . . . . . . . 1355.6.2. Restoring an External Backup . . . . . . . . . . . . . . . . . . . . . . . . . . . . . . . . . . . . . . . . . . . . . . . . . . . . . . . . . . . . . . . . . . . . . . . . . . . . . . . . . . . . . . . . . . . . . . . . . . . 1355.6.3. Restoring from Another Slave . . . . . . . . . . . . . . . . . . . . . . . . . . . . . . . . . . . . . . . . . . . . . . . . . . . . . . . . . . . . . . . . . . . . . . . . . . . . . . . . . . . . . . . . . . . . . . . . . . 1365.6.4. Manually Recovering from Another Slave . . . . . . . . . . . . . . . . . . . . . . . . . . . . . . . . . . . . . . . . . . . . . . . . . . . . . . . . . . . . . . . . . . . . . . . . . . . . . . . . . . . . . 136
5.7. Switching Master Hosts . . . . . . . . . . . . . . . . . . . . . . . . . . . . . . . . . . . . . . . . . . . . . . . . . . . . . . . . . . . . . . . . . . . . . . . . . . . . . . . . . . . . . . . . . . . . . . . . . . . . . . . . . . . . . . . . . . . . 1375.8. Configuring Parallel Replication . . . . . . . . . . . . . . . . . . . . . . . . . . . . . . . . . . . . . . . . . . . . . . . . . . . . . . . . . . . . . . . . . . . . . . . . . . . . . . . . . . . . . . . . . . . . . . . . . . . . . . . . . . 1395.9. Performing Database or OS Maintenance . . . . . . . . . . . . . . . . . . . . . . . . . . . . . . . . . . . . . . . . . . . . . . . . . . . . . . . . . . . . . . . . . . . . . . . . . . . . . . . . . . . . . . . . . . . . . . . 140
5.9.1. Performing Maintenance on a Single Slave . . . . . . . . . . . . . . . . . . . . . . . . . . . . . . . . . . . . . . . . . . . . . . . . . . . . . . . . . . . . . . . . . . . . . . . . . . . . . . . . . . . . 1405.9.2. Performing Maintenance on a Master . . . . . . . . . . . . . . . . . . . . . . . . . . . . . . . . . . . . . . . . . . . . . . . . . . . . . . . . . . . . . . . . . . . . . . . . . . . . . . . . . . . . . . . . . 1415.9.3. Performing Maintenance on an Entire Dataservice . . . . . . . . . . . . . . . . . . . . . . . . . . . . . . . . . . . . . . . . . . . . . . . . . . . . . . . . . . . . . . . . . . . . . . . . . . . 1415.9.4. Upgrading or Updating your JVM . . . . . . . . . . . . . . . . . . . . . . . . . . . . . . . . . . . . . . . . . . . . . . . . . . . . . . . . . . . . . . . . . . . . . . . . . . . . . . . . . . . . . . . . . . . . . . 142
5.10. Making Online Schema Changes . . . . . . . . . . . . . . . . . . . . . . . . . . . . . . . . . . . . . . . . . . . . . . . . . . . . . . . . . . . . . . . . . . . . . . . . . . . . . . . . . . . . . . . . . . . . . . . . . . . . . . . . 1426. Command-line Tools . . . . . . . . . . . . . . . . . . . . . . . . . . . . . . . . . . . . . . . . . . . . . . . . . . . . . . . . . . . . . . . . . . . . . . . . . . . . . . . . . . . . . . . . . . . . . . . . . . . . . . . . . . . . . . . . . . . . . . . . . . . . . . . . . . 144
6.1. The check_tungsten_services Command . . . . . . . . . . . . . . . . . . . . . . . . . . . . . . . . . . . . . . . . . . . . . . . . . . . . . . . . . . . . . . . . . . . . . . . . . . . . . . . . . . . . . . . . . . . . . . . . 1446.2. The check_tungsten_online Command . . . . . . . . . . . . . . . . . . . . . . . . . . . . . . . . . . . . . . . . . . . . . . . . . . . . . . . . . . . . . . . . . . . . . . . . . . . . . . . . . . . . . . . . . . . . . . . . . . 1456.3. The check_tungsten_latency Command . . . . . . . . . . . . . . . . . . . . . . . . . . . . . . . . . . . . . . . . . . . . . . . . . . . . . . . . . . . . . . . . . . . . . . . . . . . . . . . . . . . . . . . . . . . . . . . . . 1456.4. The ddlscan Command . . . . . . . . . . . . . . . . . . . . . . . . . . . . . . . . . . . . . . . . . . . . . . . . . . . . . . . . . . . . . . . . . . . . . . . . . . . . . . . . . . . . . . . . . . . . . . . . . . . . . . . . . . . . . . . . . . . . . 146
6.4.1. Optional Arguments . . . . . . . . . . . . . . . . . . . . . . . . . . . . . . . . . . . . . . . . . . . . . . . . . . . . . . . . . . . . . . . . . . . . . . . . . . . . . . . . . . . . . . . . . . . . . . . . . . . . . . . . . . . . . . 1476.4.2. Supported Templates and Usage . . . . . . . . . . . . . . . . . . . . . . . . . . . . . . . . . . . . . . . . . . . . . . . . . . . . . . . . . . . . . . . . . . . . . . . . . . . . . . . . . . . . . . . . . . . . . . . 148
6.4.2.1. ddl-check-pkeys.vm . . . . . . . . . . . . . . . . . . . . . . . . . . . . . . . . . . . . . . . . . . . . . . . . . . . . . . . . . . . . . . . . . . . . . . . . . . . . . . . . . . . . . . . . . . . . . . . . . . . . . 1486.4.2.2. ddl-mysql-oracle.vm . . . . . . . . . . . . . . . . . . . . . . . . . . . . . . . . . . . . . . . . . . . . . . . . . . . . . . . . . . . . . . . . . . . . . . . . . . . . . . . . . . . . . . . . . . . . . . . . . . . . 1486.4.2.3. ddl-mysql-oracle-cdc.vm . . . . . . . . . . . . . . . . . . . . . . . . . . . . . . . . . . . . . . . . . . . . . . . . . . . . . . . . . . . . . . . . . . . . . . . . . . . . . . . . . . . . . . . . . . . . . . 1496.4.2.4. ddl-mysql-vertica.vm . . . . . . . . . . . . . . . . . . . . . . . . . . . . . . . . . . . . . . . . . . . . . . . . . . . . . . . . . . . . . . . . . . . . . . . . . . . . . . . . . . . . . . . . . . . . . . . . . . 1506.4.2.5. ddl-mysql-vertica-staging.vm . . . . . . . . . . . . . . . . . . . . . . . . . . . . . . . . . . . . . . . . . . . . . . . . . . . . . . . . . . . . . . . . . . . . . . . . . . . . . . . . . . . . . . . . 1516.4.2.6. ddl-oracle-mysql.vm . . . . . . . . . . . . . . . . . . . . . . . . . . . . . . . . . . . . . . . . . . . . . . . . . . . . . . . . . . . . . . . . . . . . . . . . . . . . . . . . . . . . . . . . . . . . . . . . . . . . 1516.4.2.7. ddl-oracle-mysql-pk-only.vm . . . . . . . . . . . . . . . . . . . . . . . . . . . . . . . . . . . . . . . . . . . . . . . . . . . . . . . . . . . . . . . . . . . . . . . . . . . . . . . . . . . . . . . . . 152
6.5. The multi_trepctl Command . . . . . . . . . . . . . . . . . . . . . . . . . . . . . . . . . . . . . . . . . . . . . . . . . . . . . . . . . . . . . . . . . . . . . . . . . . . . . . . . . . . . . . . . . . . . . . . . . . . . . . . . . . . . . . 1526.5.1. multi_trepctl Options . . . . . . . . . . . . . . . . . . . . . . . . . . . . . . . . . . . . . . . . . . . . . . . . . . . . . . . . . . . . . . . . . . . . . . . . . . . . . . . . . . . . . . . . . . . . . . . . . . . . . . . . . . . . 1536.5.2. multi_trepctl Commands . . . . . . . . . . . . . . . . . . . . . . . . . . . . . . . . . . . . . . . . . . . . . . . . . . . . . . . . . . . . . . . . . . . . . . . . . . . . . . . . . . . . . . . . . . . . . . . . . . . . . . . . 155
6.5.2.1. multi_trepctl list Command . . . . . . . . . . . . . . . . . . . . . . . . . . . . . . . . . . . . . . . . . . . . . . . . . . . . . . . . . . . . . . . . . . . . . . . . . . . . . . . . . . . . . . . . . 1556.5.2.2. multi_trepctl run Command . . . . . . . . . . . . . . . . . . . . . . . . . . . . . . . . . . . . . . . . . . . . . . . . . . . . . . . . . . . . . . . . . . . . . . . . . . . . . . . . . . . . . . . . . . 155
6.6. The setupCDC.sh Command . . . . . . . . . . . . . . . . . . . . . . . . . . . . . . . . . . . . . . . . . . . . . . . . . . . . . . . . . . . . . . . . . . . . . . . . . . . . . . . . . . . . . . . . . . . . . . . . . . . . . . . . . . . . . . 1566.7. The thl Command . . . . . . . . . . . . . . . . . . . . . . . . . . . . . . . . . . . . . . . . . . . . . . . . . . . . . . . . . . . . . . . . . . . . . . . . . . . . . . . . . . . . . . . . . . . . . . . . . . . . . . . . . . . . . . . . . . . . . . . . . . 159
6.7.1. thl list Command . . . . . . . . . . . . . . . . . . . . . . . . . . . . . . . . . . . . . . . . . . . . . . . . . . . . . . . . . . . . . . . . . . . . . . . . . . . . . . . . . . . . . . . . . . . . . . . . . . . . . . . . . . . . . . . . 1596.7.2. thl index Command . . . . . . . . . . . . . . . . . . . . . . . . . . . . . . . . . . . . . . . . . . . . . . . . . . . . . . . . . . . . . . . . . . . . . . . . . . . . . . . . . . . . . . . . . . . . . . . . . . . . . . . . . . . . . . 1626.7.3. thl purge Command . . . . . . . . . . . . . . . . . . . . . . . . . . . . . . . . . . . . . . . . . . . . . . . . . . . . . . . . . . . . . . . . . . . . . . . . . . . . . . . . . . . . . . . . . . . . . . . . . . . . . . . . . . . . . . 1626.7.4. thl info Command . . . . . . . . . . . . . . . . . . . . . . . . . . . . . . . . . . . . . . . . . . . . . . . . . . . . . . . . . . . . . . . . . . . . . . . . . . . . . . . . . . . . . . . . . . . . . . . . . . . . . . . . . . . . . . . . 1636.7.5. thl help Command . . . . . . . . . . . . . . . . . . . . . . . . . . . . . . . . . . . . . . . . . . . . . . . . . . . . . . . . . . . . . . . . . . . . . . . . . . . . . . . . . . . . . . . . . . . . . . . . . . . . . . . . . . . . . . . . 163
6.8. The tpm Command . . . . . . . . . . . . . . . . . . . . . . . . . . . . . . . . . . . . . . . . . . . . . . . . . . . . . . . . . . . . . . . . . . . . . . . . . . . . . . . . . . . . . . . . . . . . . . . . . . . . . . . . . . . . . . . . . . . . . . . . . 1636.8.1. Comparing Staging and INI tpm Methods . . . . . . . . . . . . . . . . . . . . . . . . . . . . . . . . . . . . . . . . . . . . . . . . . . . . . . . . . . . . . . . . . . . . . . . . . . . . . . . . . . . . 1646.8.2. Processing Installs and Upgrades . . . . . . . . . . . . . . . . . . . . . . . . . . . . . . . . . . . . . . . . . . . . . . . . . . . . . . . . . . . . . . . . . . . . . . . . . . . . . . . . . . . . . . . . . . . . . . . 1666.8.3. tpm Staging Configuration . . . . . . . . . . . . . . . . . . . . . . . . . . . . . . . . . . . . . . . . . . . . . . . . . . . . . . . . . . . . . . . . . . . . . . . . . . . . . . . . . . . . . . . . . . . . . . . . . . . . . . 167
6.8.3.1. Configuring default options for all services . . . . . . . . . . . . . . . . . . . . . . . . . . . . . . . . . . . . . . . . . . . . . . . . . . . . . . . . . . . . . . . . . . . . . . . . . 1686.8.3.2. Configuring a single service . . . . . . . . . . . . . . . . . . . . . . . . . . . . . . . . . . . . . . . . . . . . . . . . . . . . . . . . . . . . . . . . . . . . . . . . . . . . . . . . . . . . . . . . . . . 168
Tungsten Replicator 2.2 Manual
vi
6.8.3.3. Configuring a single host . . . . . . . . . . . . . . . . . . . . . . . . . . . . . . . . . . . . . . . . . . . . . . . . . . . . . . . . . . . . . . . . . . . . . . . . . . . . . . . . . . . . . . . . . . . . . . 1686.8.3.4. Reviewing the current configuration . . . . . . . . . . . . . . . . . . . . . . . . . . . . . . . . . . . . . . . . . . . . . . . . . . . . . . . . . . . . . . . . . . . . . . . . . . . . . . . . . 1686.8.3.5. Installation . . . . . . . . . . . . . . . . . . . . . . . . . . . . . . . . . . . . . . . . . . . . . . . . . . . . . . . . . . . . . . . . . . . . . . . . . . . . . . . . . . . . . . . . . . . . . . . . . . . . . . . . . . . . . . . 1686.8.3.6. Upgrades from a Staging Directory . . . . . . . . . . . . . . . . . . . . . . . . . . . . . . . . . . . . . . . . . . . . . . . . . . . . . . . . . . . . . . . . . . . . . . . . . . . . . . . . . . 1696.8.3.7. Configuration Changes from a Staging Directory . . . . . . . . . . . . . . . . . . . . . . . . . . . . . . . . . . . . . . . . . . . . . . . . . . . . . . . . . . . . . . . . . . 169
6.8.4. tpm INI File Configuration . . . . . . . . . . . . . . . . . . . . . . . . . . . . . . . . . . . . . . . . . . . . . . . . . . . . . . . . . . . . . . . . . . . . . . . . . . . . . . . . . . . . . . . . . . . . . . . . . . . . . . . 1706.8.4.1. Creating an INI file . . . . . . . . . . . . . . . . . . . . . . . . . . . . . . . . . . . . . . . . . . . . . . . . . . . . . . . . . . . . . . . . . . . . . . . . . . . . . . . . . . . . . . . . . . . . . . . . . . . . . 1706.8.4.2. Installation with INI File . . . . . . . . . . . . . . . . . . . . . . . . . . . . . . . . . . . . . . . . . . . . . . . . . . . . . . . . . . . . . . . . . . . . . . . . . . . . . . . . . . . . . . . . . . . . . . . . 1706.8.4.3. Upgrades with an INI File . . . . . . . . . . . . . . . . . . . . . . . . . . . . . . . . . . . . . . . . . . . . . . . . . . . . . . . . . . . . . . . . . . . . . . . . . . . . . . . . . . . . . . . . . . . . . . 1706.8.4.4. Configuration Changes with an INI file . . . . . . . . . . . . . . . . . . . . . . . . . . . . . . . . . . . . . . . . . . . . . . . . . . . . . . . . . . . . . . . . . . . . . . . . . . . . . . 171
6.8.5. tpm Commands . . . . . . . . . . . . . . . . . . . . . . . . . . . . . . . . . . . . . . . . . . . . . . . . . . . . . . . . . . . . . . . . . . . . . . . . . . . . . . . . . . . . . . . . . . . . . . . . . . . . . . . . . . . . . . . . . . . 1716.8.5.1. tpm configure Command . . . . . . . . . . . . . . . . . . . . . . . . . . . . . . . . . . . . . . . . . . . . . . . . . . . . . . . . . . . . . . . . . . . . . . . . . . . . . . . . . . . . . . . . . . . . . . 1726.8.5.2. tpm diag Command . . . . . . . . . . . . . . . . . . . . . . . . . . . . . . . . . . . . . . . . . . . . . . . . . . . . . . . . . . . . . . . . . . . . . . . . . . . . . . . . . . . . . . . . . . . . . . . . . . . . 1726.8.5.3. tpm fetch Command . . . . . . . . . . . . . . . . . . . . . . . . . . . . . . . . . . . . . . . . . . . . . . . . . . . . . . . . . . . . . . . . . . . . . . . . . . . . . . . . . . . . . . . . . . . . . . . . . . . 1726.8.5.4. tpm firewall Command . . . . . . . . . . . . . . . . . . . . . . . . . . . . . . . . . . . . . . . . . . . . . . . . . . . . . . . . . . . . . . . . . . . . . . . . . . . . . . . . . . . . . . . . . . . . . . . 1736.8.5.5. tpm help Command . . . . . . . . . . . . . . . . . . . . . . . . . . . . . . . . . . . . . . . . . . . . . . . . . . . . . . . . . . . . . . . . . . . . . . . . . . . . . . . . . . . . . . . . . . . . . . . . . . . . 1736.8.5.6. tpm install Command . . . . . . . . . . . . . . . . . . . . . . . . . . . . . . . . . . . . . . . . . . . . . . . . . . . . . . . . . . . . . . . . . . . . . . . . . . . . . . . . . . . . . . . . . . . . . . . . 1736.8.5.7. tpm mysql Command . . . . . . . . . . . . . . . . . . . . . . . . . . . . . . . . . . . . . . . . . . . . . . . . . . . . . . . . . . . . . . . . . . . . . . . . . . . . . . . . . . . . . . . . . . . . . . . . . . . 1746.8.5.8. tpm query Command . . . . . . . . . . . . . . . . . . . . . . . . . . . . . . . . . . . . . . . . . . . . . . . . . . . . . . . . . . . . . . . . . . . . . . . . . . . . . . . . . . . . . . . . . . . . . . . . . . . 1746.8.5.9. tpm reset Command . . . . . . . . . . . . . . . . . . . . . . . . . . . . . . . . . . . . . . . . . . . . . . . . . . . . . . . . . . . . . . . . . . . . . . . . . . . . . . . . . . . . . . . . . . . . . . . . . . . 1756.8.5.10. tpm reset-thl Command . . . . . . . . . . . . . . . . . . . . . . . . . . . . . . . . . . . . . . . . . . . . . . . . . . . . . . . . . . . . . . . . . . . . . . . . . . . . . . . . . . . . . . . . . . . . 1766.8.5.11. tpm restart Command . . . . . . . . . . . . . . . . . . . . . . . . . . . . . . . . . . . . . . . . . . . . . . . . . . . . . . . . . . . . . . . . . . . . . . . . . . . . . . . . . . . . . . . . . . . . . . . 1766.8.5.12. tpm reverse Command . . . . . . . . . . . . . . . . . . . . . . . . . . . . . . . . . . . . . . . . . . . . . . . . . . . . . . . . . . . . . . . . . . . . . . . . . . . . . . . . . . . . . . . . . . . . . . . 1766.8.5.13. tpm start Command . . . . . . . . . . . . . . . . . . . . . . . . . . . . . . . . . . . . . . . . . . . . . . . . . . . . . . . . . . . . . . . . . . . . . . . . . . . . . . . . . . . . . . . . . . . . . . . . . 1766.8.5.14. tpm stop Command . . . . . . . . . . . . . . . . . . . . . . . . . . . . . . . . . . . . . . . . . . . . . . . . . . . . . . . . . . . . . . . . . . . . . . . . . . . . . . . . . . . . . . . . . . . . . . . . . . 1776.8.5.15. tpm update Command . . . . . . . . . . . . . . . . . . . . . . . . . . . . . . . . . . . . . . . . . . . . . . . . . . . . . . . . . . . . . . . . . . . . . . . . . . . . . . . . . . . . . . . . . . . . . . . . 1776.8.5.16. tpm validate Command . . . . . . . . . . . . . . . . . . . . . . . . . . . . . . . . . . . . . . . . . . . . . . . . . . . . . . . . . . . . . . . . . . . . . . . . . . . . . . . . . . . . . . . . . . . . . 1776.8.5.17. tpm validate-update Command . . . . . . . . . . . . . . . . . . . . . . . . . . . . . . . . . . . . . . . . . . . . . . . . . . . . . . . . . . . . . . . . . . . . . . . . . . . . . . . . . . . . 177
6.8.6. tpm Configuration Options . . . . . . . . . . . . . . . . . . . . . . . . . . . . . . . . . . . . . . . . . . . . . . . . . . . . . . . . . . . . . . . . . . . . . . . . . . . . . . . . . . . . . . . . . . . . . . . . . . . . . 1786.8.7. Troubleshooting . . . . . . . . . . . . . . . . . . . . . . . . . . . . . . . . . . . . . . . . . . . . . . . . . . . . . . . . . . . . . . . . . . . . . . . . . . . . . . . . . . . . . . . . . . . . . . . . . . . . . . . . . . . . . . . . . . 212
6.9. The trepctl Command . . . . . . . . . . . . . . . . . . . . . . . . . . . . . . . . . . . . . . . . . . . . . . . . . . . . . . . . . . . . . . . . . . . . . . . . . . . . . . . . . . . . . . . . . . . . . . . . . . . . . . . . . . . . . . . . . . . . . . 2126.9.1. trepctl Options . . . . . . . . . . . . . . . . . . . . . . . . . . . . . . . . . . . . . . . . . . . . . . . . . . . . . . . . . . . . . . . . . . . . . . . . . . . . . . . . . . . . . . . . . . . . . . . . . . . . . . . . . . . . . . . . . . . 2136.9.2. trepctl Global Commands . . . . . . . . . . . . . . . . . . . . . . . . . . . . . . . . . . . . . . . . . . . . . . . . . . . . . . . . . . . . . . . . . . . . . . . . . . . . . . . . . . . . . . . . . . . . . . . . . . . . . . . 214
6.9.2.1. trepctl kill Command . . . . . . . . . . . . . . . . . . . . . . . . . . . . . . . . . . . . . . . . . . . . . . . . . . . . . . . . . . . . . . . . . . . . . . . . . . . . . . . . . . . . . . . . . . . . . . . . . . 2146.9.2.2. trepctl services Command . . . . . . . . . . . . . . . . . . . . . . . . . . . . . . . . . . . . . . . . . . . . . . . . . . . . . . . . . . . . . . . . . . . . . . . . . . . . . . . . . . . . . . . . . . . . 2146.9.2.3. trepctl shutdown Command . . . . . . . . . . . . . . . . . . . . . . . . . . . . . . . . . . . . . . . . . . . . . . . . . . . . . . . . . . . . . . . . . . . . . . . . . . . . . . . . . . . . . . . . . . 2166.9.2.4. trepctl version Command . . . . . . . . . . . . . . . . . . . . . . . . . . . . . . . . . . . . . . . . . . . . . . . . . . . . . . . . . . . . . . . . . . . . . . . . . . . . . . . . . . . . . . . . . . . . . 216
6.9.3. trepctl Service Commands . . . . . . . . . . . . . . . . . . . . . . . . . . . . . . . . . . . . . . . . . . . . . . . . . . . . . . . . . . . . . . . . . . . . . . . . . . . . . . . . . . . . . . . . . . . . . . . . . . . . . . 2166.9.3.1. trepctl backup Command . . . . . . . . . . . . . . . . . . . . . . . . . . . . . . . . . . . . . . . . . . . . . . . . . . . . . . . . . . . . . . . . . . . . . . . . . . . . . . . . . . . . . . . . . . . . . 2176.9.3.2. trepctl capabilities Command . . . . . . . . . . . . . . . . . . . . . . . . . . . . . . . . . . . . . . . . . . . . . . . . . . . . . . . . . . . . . . . . . . . . . . . . . . . . . . . . . . . . . . . . 2186.9.3.3. trepctl check Command . . . . . . . . . . . . . . . . . . . . . . . . . . . . . . . . . . . . . . . . . . . . . . . . . . . . . . . . . . . . . . . . . . . . . . . . . . . . . . . . . . . . . . . . . . . . . . . 2196.9.3.4. trepctl clear Command . . . . . . . . . . . . . . . . . . . . . . . . . . . . . . . . . . . . . . . . . . . . . . . . . . . . . . . . . . . . . . . . . . . . . . . . . . . . . . . . . . . . . . . . . . . . . . . . 2196.9.3.5. trepctl clients Command . . . . . . . . . . . . . . . . . . . . . . . . . . . . . . . . . . . . . . . . . . . . . . . . . . . . . . . . . . . . . . . . . . . . . . . . . . . . . . . . . . . . . . . . . . . . . . 2196.9.3.6. trepctl flush Command . . . . . . . . . . . . . . . . . . . . . . . . . . . . . . . . . . . . . . . . . . . . . . . . . . . . . . . . . . . . . . . . . . . . . . . . . . . . . . . . . . . . . . . . . . . . . . . . 2206.9.3.7. trepctl heartbeat Command . . . . . . . . . . . . . . . . . . . . . . . . . . . . . . . . . . . . . . . . . . . . . . . . . . . . . . . . . . . . . . . . . . . . . . . . . . . . . . . . . . . . . . . . . . 2206.9.3.8. trepctl load Command . . . . . . . . . . . . . . . . . . . . . . . . . . . . . . . . . . . . . . . . . . . . . . . . . . . . . . . . . . . . . . . . . . . . . . . . . . . . . . . . . . . . . . . . . . . . . . . . . 2216.9.3.9. trepctl offline Command . . . . . . . . . . . . . . . . . . . . . . . . . . . . . . . . . . . . . . . . . . . . . . . . . . . . . . . . . . . . . . . . . . . . . . . . . . . . . . . . . . . . . . . . . . . . . . 2226.9.3.10. trepctl offline-deferred Command . . . . . . . . . . . . . . . . . . . . . . . . . . . . . . . . . . . . . . . . . . . . . . . . . . . . . . . . . . . . . . . . . . . . . . . . . . . . . . . . . 2226.9.3.11. trepctl online Command . . . . . . . . . . . . . . . . . . . . . . . . . . . . . . . . . . . . . . . . . . . . . . . . . . . . . . . . . . . . . . . . . . . . . . . . . . . . . . . . . . . . . . . . . . . . . 2236.9.3.12. trepctl properties Command . . . . . . . . . . . . . . . . . . . . . . . . . . . . . . . . . . . . . . . . . . . . . . . . . . . . . . . . . . . . . . . . . . . . . . . . . . . . . . . . . . . . . . . . 2256.9.3.13. trepctl purge Command . . . . . . . . . . . . . . . . . . . . . . . . . . . . . . . . . . . . . . . . . . . . . . . . . . . . . . . . . . . . . . . . . . . . . . . . . . . . . . . . . . . . . . . . . . . . . 2266.9.3.14. trepctl reset Command . . . . . . . . . . . . . . . . . . . . . . . . . . . . . . . . . . . . . . . . . . . . . . . . . . . . . . . . . . . . . . . . . . . . . . . . . . . . . . . . . . . . . . . . . . . . . . 2276.9.3.15. trepctl restore Command . . . . . . . . . . . . . . . . . . . . . . . . . . . . . . . . . . . . . . . . . . . . . . . . . . . . . . . . . . . . . . . . . . . . . . . . . . . . . . . . . . . . . . . . . . . 2276.9.3.16. trepctl setrole Command . . . . . . . . . . . . . . . . . . . . . . . . . . . . . . . . . . . . . . . . . . . . . . . . . . . . . . . . . . . . . . . . . . . . . . . . . . . . . . . . . . . . . . . . . . . . 2276.9.3.17. trepctl shard Command . . . . . . . . . . . . . . . . . . . . . . . . . . . . . . . . . . . . . . . . . . . . . . . . . . . . . . . . . . . . . . . . . . . . . . . . . . . . . . . . . . . . . . . . . . . . . . 2286.9.3.18. trepctl start Command . . . . . . . . . . . . . . . . . . . . . . . . . . . . . . . . . . . . . . . . . . . . . . . . . . . . . . . . . . . . . . . . . . . . . . . . . . . . . . . . . . . . . . . . . . . . . . . 2296.9.3.19. trepctl status Command . . . . . . . . . . . . . . . . . . . . . . . . . . . . . . . . . . . . . . . . . . . . . . . . . . . . . . . . . . . . . . . . . . . . . . . . . . . . . . . . . . . . . . . . . . . . . 2296.9.3.20. trepctl stop Command . . . . . . . . . . . . . . . . . . . . . . . . . . . . . . . . . . . . . . . . . . . . . . . . . . . . . . . . . . . . . . . . . . . . . . . . . . . . . . . . . . . . . . . . . . . . . . . 2356.9.3.21. trepctl unload Command . . . . . . . . . . . . . . . . . . . . . . . . . . . . . . . . . . . . . . . . . . . . . . . . . . . . . . . . . . . . . . . . . . . . . . . . . . . . . . . . . . . . . . . . . . . . 2366.9.3.22. trepctl wait Command . . . . . . . . . . . . . . . . . . . . . . . . . . . . . . . . . . . . . . . . . . . . . . . . . . . . . . . . . . . . . . . . . . . . . . . . . . . . . . . . . . . . . . . . . . . . . . . 236
6.10. The tungsten_provision_slave Script . . . . . . . . . . . . . . . . . . . . . . . . . . . . . . . . . . . . . . . . . . . . . . . . . . . . . . . . . . . . . . . . . . . . . . . . . . . . . . . . . . . . . . . . . . . . . . . . . . . 2376.11. The tungsten_read_master_events Script . . . . . . . . . . . . . . . . . . . . . . . . . . . . . . . . . . . . . . . . . . . . . . . . . . . . . . . . . . . . . . . . . . . . . . . . . . . . . . . . . . . . . . . . . . . . . 2386.12. The tungsten_set_position Script . . . . . . . . . . . . . . . . . . . . . . . . . . . . . . . . . . . . . . . . . . . . . . . . . . . . . . . . . . . . . . . . . . . . . . . . . . . . . . . . . . . . . . . . . . . . . . . . . . . . . . . 2386.13. The updateCDC.sh Command . . . . . . . . . . . . . . . . . . . . . . . . . . . . . . . . . . . . . . . . . . . . . . . . . . . . . . . . . . . . . . . . . . . . . . . . . . . . . . . . . . . . . . . . . . . . . . . . . . . . . . . . . . . 239
7. Using the Cookbook . . . . . . . . . . . . . . . . . . . . . . . . . . . . . . . . . . . . . . . . . . . . . . . . . . . . . . . . . . . . . . . . . . . . . . . . . . . . . . . . . . . . . . . . . . . . . . . . . . . . . . . . . . . . . . . . . . . . . . . . . . . . . . . . . . 2418. Replication Filters . . . . . . . . . . . . . . . . . . . . . . . . . . . . . . . . . . . . . . . . . . . . . . . . . . . . . . . . . . . . . . . . . . . . . . . . . . . . . . . . . . . . . . . . . . . . . . . . . . . . . . . . . . . . . . . . . . . . . . . . . . . . . . . . . . . . . 242
8.1. Enabling/Disabling Filters . . . . . . . . . . . . . . . . . . . . . . . . . . . . . . . . . . . . . . . . . . . . . . . . . . . . . . . . . . . . . . . . . . . . . . . . . . . . . . . . . . . . . . . . . . . . . . . . . . . . . . . . . . . . . . . . . . 243
Tungsten Replicator 2.2 Manual
vii
8.2. Enabling Additional Filters . . . . . . . . . . . . . . . . . . . . . . . . . . . . . . . . . . . . . . . . . . . . . . . . . . . . . . . . . . . . . . . . . . . . . . . . . . . . . . . . . . . . . . . . . . . . . . . . . . . . . . . . . . . . . . . . . 2448.3. Filter Status . . . . . . . . . . . . . . . . . . . . . . . . . . . . . . . . . . . . . . . . . . . . . . . . . . . . . . . . . . . . . . . . . . . . . . . . . . . . . . . . . . . . . . . . . . . . . . . . . . . . . . . . . . . . . . . . . . . . . . . . . . . . . . . . . . 2458.4. Filter Reference . . . . . . . . . . . . . . . . . . . . . . . . . . . . . . . . . . . . . . . . . . . . . . . . . . . . . . . . . . . . . . . . . . . . . . . . . . . . . . . . . . . . . . . . . . . . . . . . . . . . . . . . . . . . . . . . . . . . . . . . . . . . . 245
8.4.1. BidiRemoteSlave Filter . . . . . . . . . . . . . . . . . . . . . . . . . . . . . . . . . . . . . . . . . . . . . . . . . . . . . . . . . . . . . . . . . . . . . . . . . . . . . . . . . . . . . . . . . . . . . . . . . . . . . . . . . . . 2478.4.2. BuildAuditTable Filter . . . . . . . . . . . . . . . . . . . . . . . . . . . . . . . . . . . . . . . . . . . . . . . . . . . . . . . . . . . . . . . . . . . . . . . . . . . . . . . . . . . . . . . . . . . . . . . . . . . . . . . . . . . . 2478.4.3. BuildIndexTable Filter . . . . . . . . . . . . . . . . . . . . . . . . . . . . . . . . . . . . . . . . . . . . . . . . . . . . . . . . . . . . . . . . . . . . . . . . . . . . . . . . . . . . . . . . . . . . . . . . . . . . . . . . . . . . 2488.4.4. CaseMapping Filter . . . . . . . . . . . . . . . . . . . . . . . . . . . . . . . . . . . . . . . . . . . . . . . . . . . . . . . . . . . . . . . . . . . . . . . . . . . . . . . . . . . . . . . . . . . . . . . . . . . . . . . . . . . . . . . 2488.4.5. CDCMetadata Filter . . . . . . . . . . . . . . . . . . . . . . . . . . . . . . . . . . . . . . . . . . . . . . . . . . . . . . . . . . . . . . . . . . . . . . . . . . . . . . . . . . . . . . . . . . . . . . . . . . . . . . . . . . . . . . 2488.4.6. ColumnName Filter . . . . . . . . . . . . . . . . . . . . . . . . . . . . . . . . . . . . . . . . . . . . . . . . . . . . . . . . . . . . . . . . . . . . . . . . . . . . . . . . . . . . . . . . . . . . . . . . . . . . . . . . . . . . . . . 2498.4.7. ConsistencyCheck Filter . . . . . . . . . . . . . . . . . . . . . . . . . . . . . . . . . . . . . . . . . . . . . . . . . . . . . . . . . . . . . . . . . . . . . . . . . . . . . . . . . . . . . . . . . . . . . . . . . . . . . . . . . . 2508.4.8. DatabaseTransform Filter . . . . . . . . . . . . . . . . . . . . . . . . . . . . . . . . . . . . . . . . . . . . . . . . . . . . . . . . . . . . . . . . . . . . . . . . . . . . . . . . . . . . . . . . . . . . . . . . . . . . . . . . 2508.4.9. Dummy Filter . . . . . . . . . . . . . . . . . . . . . . . . . . . . . . . . . . . . . . . . . . . . . . . . . . . . . . . . . . . . . . . . . . . . . . . . . . . . . . . . . . . . . . . . . . . . . . . . . . . . . . . . . . . . . . . . . . . . . . 2518.4.10. EnumToString Filter . . . . . . . . . . . . . . . . . . . . . . . . . . . . . . . . . . . . . . . . . . . . . . . . . . . . . . . . . . . . . . . . . . . . . . . . . . . . . . . . . . . . . . . . . . . . . . . . . . . . . . . . . . . . . 2518.4.11. EventMetadata Filter . . . . . . . . . . . . . . . . . . . . . . . . . . . . . . . . . . . . . . . . . . . . . . . . . . . . . . . . . . . . . . . . . . . . . . . . . . . . . . . . . . . . . . . . . . . . . . . . . . . . . . . . . . . 2528.4.12. Heartbeat Filter . . . . . . . . . . . . . . . . . . . . . . . . . . . . . . . . . . . . . . . . . . . . . . . . . . . . . . . . . . . . . . . . . . . . . . . . . . . . . . . . . . . . . . . . . . . . . . . . . . . . . . . . . . . . . . . . . 2528.4.13. Logging Filter . . . . . . . . . . . . . . . . . . . . . . . . . . . . . . . . . . . . . . . . . . . . . . . . . . . . . . . . . . . . . . . . . . . . . . . . . . . . . . . . . . . . . . . . . . . . . . . . . . . . . . . . . . . . . . . . . . . . 2538.4.14. MySQLSessionSupport Filter . . . . . . . . . . . . . . . . . . . . . . . . . . . . . . . . . . . . . . . . . . . . . . . . . . . . . . . . . . . . . . . . . . . . . . . . . . . . . . . . . . . . . . . . . . . . . . . . . . . 2538.4.15. NetworkClient Filter . . . . . . . . . . . . . . . . . . . . . . . . . . . . . . . . . . . . . . . . . . . . . . . . . . . . . . . . . . . . . . . . . . . . . . . . . . . . . . . . . . . . . . . . . . . . . . . . . . . . . . . . . . . . 253
8.4.15.1. Network Client Configuration . . . . . . . . . . . . . . . . . . . . . . . . . . . . . . . . . . . . . . . . . . . . . . . . . . . . . . . . . . . . . . . . . . . . . . . . . . . . . . . . . . . . . . . 2548.4.15.2. Network Filter Protocol . . . . . . . . . . . . . . . . . . . . . . . . . . . . . . . . . . . . . . . . . . . . . . . . . . . . . . . . . . . . . . . . . . . . . . . . . . . . . . . . . . . . . . . . . . . . . . 2558.4.15.3. Sample Network Client . . . . . . . . . . . . . . . . . . . . . . . . . . . . . . . . . . . . . . . . . . . . . . . . . . . . . . . . . . . . . . . . . . . . . . . . . . . . . . . . . . . . . . . . . . . . . . . 257
8.4.16. OptimizeUpdates Filter . . . . . . . . . . . . . . . . . . . . . . . . . . . . . . . . . . . . . . . . . . . . . . . . . . . . . . . . . . . . . . . . . . . . . . . . . . . . . . . . . . . . . . . . . . . . . . . . . . . . . . . . . 2588.4.17. PrimaryKey Filter . . . . . . . . . . . . . . . . . . . . . . . . . . . . . . . . . . . . . . . . . . . . . . . . . . . . . . . . . . . . . . . . . . . . . . . . . . . . . . . . . . . . . . . . . . . . . . . . . . . . . . . . . . . . . . . . 2598.4.18. PrintEvent Filter . . . . . . . . . . . . . . . . . . . . . . . . . . . . . . . . . . . . . . . . . . . . . . . . . . . . . . . . . . . . . . . . . . . . . . . . . . . . . . . . . . . . . . . . . . . . . . . . . . . . . . . . . . . . . . . . . 2608.4.19. Rename Filter . . . . . . . . . . . . . . . . . . . . . . . . . . . . . . . . . . . . . . . . . . . . . . . . . . . . . . . . . . . . . . . . . . . . . . . . . . . . . . . . . . . . . . . . . . . . . . . . . . . . . . . . . . . . . . . . . . . . 261
8.4.19.1. Rename Filter Examples . . . . . . . . . . . . . . . . . . . . . . . . . . . . . . . . . . . . . . . . . . . . . . . . . . . . . . . . . . . . . . . . . . . . . . . . . . . . . . . . . . . . . . . . . . . . . 2628.4.20. ReplicateColumns Filter . . . . . . . . . . . . . . . . . . . . . . . . . . . . . . . . . . . . . . . . . . . . . . . . . . . . . . . . . . . . . . . . . . . . . . . . . . . . . . . . . . . . . . . . . . . . . . . . . . . . . . . . 2638.4.21. Replicate Filter . . . . . . . . . . . . . . . . . . . . . . . . . . . . . . . . . . . . . . . . . . . . . . . . . . . . . . . . . . . . . . . . . . . . . . . . . . . . . . . . . . . . . . . . . . . . . . . . . . . . . . . . . . . . . . . . . . 2638.4.22. SetToString Filter . . . . . . . . . . . . . . . . . . . . . . . . . . . . . . . . . . . . . . . . . . . . . . . . . . . . . . . . . . . . . . . . . . . . . . . . . . . . . . . . . . . . . . . . . . . . . . . . . . . . . . . . . . . . . . . . 2648.4.23. Shard Filter . . . . . . . . . . . . . . . . . . . . . . . . . . . . . . . . . . . . . . . . . . . . . . . . . . . . . . . . . . . . . . . . . . . . . . . . . . . . . . . . . . . . . . . . . . . . . . . . . . . . . . . . . . . . . . . . . . . . . . . 2658.4.24. TimeDelay Filter . . . . . . . . . . . . . . . . . . . . . . . . . . . . . . . . . . . . . . . . . . . . . . . . . . . . . . . . . . . . . . . . . . . . . . . . . . . . . . . . . . . . . . . . . . . . . . . . . . . . . . . . . . . . . . . . . 266
8.5. JavaScript Filters . . . . . . . . . . . . . . . . . . . . . . . . . . . . . . . . . . . . . . . . . . . . . . . . . . . . . . . . . . . . . . . . . . . . . . . . . . . . . . . . . . . . . . . . . . . . . . . . . . . . . . . . . . . . . . . . . . . . . . . . . . . . 2668.5.1. Writing JavaScript Filters . . . . . . . . . . . . . . . . . . . . . . . . . . . . . . . . . . . . . . . . . . . . . . . . . . . . . . . . . . . . . . . . . . . . . . . . . . . . . . . . . . . . . . . . . . . . . . . . . . . . . . . . 267
8.5.1.1. Implementable Functions . . . . . . . . . . . . . . . . . . . . . . . . . . . . . . . . . . . . . . . . . . . . . . . . . . . . . . . . . . . . . . . . . . . . . . . . . . . . . . . . . . . . . . . . . . . . . . 2688.5.1.2. Getting Configuration Parameters . . . . . . . . . . . . . . . . . . . . . . . . . . . . . . . . . . . . . . . . . . . . . . . . . . . . . . . . . . . . . . . . . . . . . . . . . . . . . . . . . . . 2688.5.1.3. Logging Information and Exceptions . . . . . . . . . . . . . . . . . . . . . . . . . . . . . . . . . . . . . . . . . . . . . . . . . . . . . . . . . . . . . . . . . . . . . . . . . . . . . . . . . 2688.5.1.4. Exposed Data Structures . . . . . . . . . . . . . . . . . . . . . . . . . . . . . . . . . . . . . . . . . . . . . . . . . . . . . . . . . . . . . . . . . . . . . . . . . . . . . . . . . . . . . . . . . . . . . . 269
8.5.2. JavaScript Filter Reference . . . . . . . . . . . . . . . . . . . . . . . . . . . . . . . . . . . . . . . . . . . . . . . . . . . . . . . . . . . . . . . . . . . . . . . . . . . . . . . . . . . . . . . . . . . . . . . . . . . . . . 2748.5.2.1. ansiquotes.js Filter . . . . . . . . . . . . . . . . . . . . . . . . . . . . . . . . . . . . . . . . . . . . . . . . . . . . . . . . . . . . . . . . . . . . . . . . . . . . . . . . . . . . . . . . . . . . . . . . . . . . 2748.5.2.2. breadcrumbs.js Filter . . . . . . . . . . . . . . . . . . . . . . . . . . . . . . . . . . . . . . . . . . . . . . . . . . . . . . . . . . . . . . . . . . . . . . . . . . . . . . . . . . . . . . . . . . . . . . . . . . . 2758.5.2.3. dbrename.js Filter . . . . . . . . . . . . . . . . . . . . . . . . . . . . . . . . . . . . . . . . . . . . . . . . . . . . . . . . . . . . . . . . . . . . . . . . . . . . . . . . . . . . . . . . . . . . . . . . . . . . . . . 2768.5.2.4. dbselector.js Filter . . . . . . . . . . . . . . . . . . . . . . . . . . . . . . . . . . . . . . . . . . . . . . . . . . . . . . . . . . . . . . . . . . . . . . . . . . . . . . . . . . . . . . . . . . . . . . . . . . . . 2778.5.2.5. dbupper.js Filter . . . . . . . . . . . . . . . . . . . . . . . . . . . . . . . . . . . . . . . . . . . . . . . . . . . . . . . . . . . . . . . . . . . . . . . . . . . . . . . . . . . . . . . . . . . . . . . . . . . . . . . . 2788.5.2.6. dropcolumn.js Filter . . . . . . . . . . . . . . . . . . . . . . . . . . . . . . . . . . . . . . . . . . . . . . . . . . . . . . . . . . . . . . . . . . . . . . . . . . . . . . . . . . . . . . . . . . . . . . . . . . . . 2788.5.2.7. dropcomments.js Filter . . . . . . . . . . . . . . . . . . . . . . . . . . . . . . . . . . . . . . . . . . . . . . . . . . . . . . . . . . . . . . . . . . . . . . . . . . . . . . . . . . . . . . . . . . . . . . . . . . 2798.5.2.8. dropmetadata.js Filter . . . . . . . . . . . . . . . . . . . . . . . . . . . . . . . . . . . . . . . . . . . . . . . . . . . . . . . . . . . . . . . . . . . . . . . . . . . . . . . . . . . . . . . . . . . . . . . . . . 2808.5.2.9. dropstatementdata.js Filter . . . . . . . . . . . . . . . . . . . . . . . . . . . . . . . . . . . . . . . . . . . . . . . . . . . . . . . . . . . . . . . . . . . . . . . . . . . . . . . . . . . . . . . . . . . 2808.5.2.10. foreignkeychecks.js Filter . . . . . . . . . . . . . . . . . . . . . . . . . . . . . . . . . . . . . . . . . . . . . . . . . . . . . . . . . . . . . . . . . . . . . . . . . . . . . . . . . . . . . . . . . . . 2818.5.2.11. insertsonly.js Filter . . . . . . . . . . . . . . . . . . . . . . . . . . . . . . . . . . . . . . . . . . . . . . . . . . . . . . . . . . . . . . . . . . . . . . . . . . . . . . . . . . . . . . . . . . . . . . . . . 2818.5.2.12. nocreatedbifnotexists.js Filter . . . . . . . . . . . . . . . . . . . . . . . . . . . . . . . . . . . . . . . . . . . . . . . . . . . . . . . . . . . . . . . . . . . . . . . . . . . . . . . . . . . . . 2828.5.2.13. noonlykeywords.js Filter . . . . . . . . . . . . . . . . . . . . . . . . . . . . . . . . . . . . . . . . . . . . . . . . . . . . . . . . . . . . . . . . . . . . . . . . . . . . . . . . . . . . . . . . . . . . . . 2828.5.2.14. pgddl.js Filter . . . . . . . . . . . . . . . . . . . . . . . . . . . . . . . . . . . . . . . . . . . . . . . . . . . . . . . . . . . . . . . . . . . . . . . . . . . . . . . . . . . . . . . . . . . . . . . . . . . . . . . . . 2838.5.2.15. shardbyseqno.js Filter . . . . . . . . . . . . . . . . . . . . . . . . . . . . . . . . . . . . . . . . . . . . . . . . . . . . . . . . . . . . . . . . . . . . . . . . . . . . . . . . . . . . . . . . . . . . . . . . 2838.5.2.16. shardbytable.js Filter . . . . . . . . . . . . . . . . . . . . . . . . . . . . . . . . . . . . . . . . . . . . . . . . . . . . . . . . . . . . . . . . . . . . . . . . . . . . . . . . . . . . . . . . . . . . . . . . 2848.5.2.17. tosingledb.js Filter . . . . . . . . . . . . . . . . . . . . . . . . . . . . . . . . . . . . . . . . . . . . . . . . . . . . . . . . . . . . . . . . . . . . . . . . . . . . . . . . . . . . . . . . . . . . . . . . . . . 2848.5.2.18. truncatetext.js Filter . . . . . . . . . . . . . . . . . . . . . . . . . . . . . . . . . . . . . . . . . . . . . . . . . . . . . . . . . . . . . . . . . . . . . . . . . . . . . . . . . . . . . . . . . . . . . . . . 2848.5.2.19. zerodate2null.js Filter . . . . . . . . . . . . . . . . . . . . . . . . . . . . . . . . . . . . . . . . . . . . . . . . . . . . . . . . . . . . . . . . . . . . . . . . . . . . . . . . . . . . . . . . . . . . . . . 285
9. Performance and Tuning . . . . . . . . . . . . . . . . . . . . . . . . . . . . . . . . . . . . . . . . . . . . . . . . . . . . . . . . . . . . . . . . . . . . . . . . . . . . . . . . . . . . . . . . . . . . . . . . . . . . . . . . . . . . . . . . . . . . . . . . . . . . . 2879.1. Block Commit . . . . . . . . . . . . . . . . . . . . . . . . . . . . . . . . . . . . . . . . . . . . . . . . . . . . . . . . . . . . . . . . . . . . . . . . . . . . . . . . . . . . . . . . . . . . . . . . . . . . . . . . . . . . . . . . . . . . . . . . . . . . . . . 287
9.1.1. Monitoring Block Commit Status . . . . . . . . . . . . . . . . . . . . . . . . . . . . . . . . . . . . . . . . . . . . . . . . . . . . . . . . . . . . . . . . . . . . . . . . . . . . . . . . . . . . . . . . . . . . . . . 2889.2. Improving Network Performance . . . . . . . . . . . . . . . . . . . . . . . . . . . . . . . . . . . . . . . . . . . . . . . . . . . . . . . . . . . . . . . . . . . . . . . . . . . . . . . . . . . . . . . . . . . . . . . . . . . . . . . . . 288
10. Configuration Files and Format . . . . . . . . . . . . . . . . . . . . . . . . . . . . . . . . . . . . . . . . . . . . . . . . . . . . . . . . . . . . . . . . . . . . . . . . . . . . . . . . . . . . . . . . . . . . . . . . . . . . . . . . . . . . . . . . . . . . 29010.1. Replicator Configuration Properties . . . . . . . . . . . . . . . . . . . . . . . . . . . . . . . . . . . . . . . . . . . . . . . . . . . . . . . . . . . . . . . . . . . . . . . . . . . . . . . . . . . . . . . . . . . . . . . . . . . . 290
A. Troubleshooting . . . . . . . . . . . . . . . . . . . . . . . . . . . . . . . . . . . . . . . . . . . . . . . . . . . . . . . . . . . . . . . . . . . . . . . . . . . . . . . . . . . . . . . . . . . . . . . . . . . . . . . . . . . . . . . . . . . . . . . . . . . . . . . . . . . . . . 291A.1. Contacting Support . . . . . . . . . . . . . . . . . . . . . . . . . . . . . . . . . . . . . . . . . . . . . . . . . . . . . . . . . . . . . . . . . . . . . . . . . . . . . . . . . . . . . . . . . . . . . . . . . . . . . . . . . . . . . . . . . . . . . . . . 291A.2. Error/Cause/Solution . . . . . . . . . . . . . . . . . . . . . . . . . . . . . . . . . . . . . . . . . . . . . . . . . . . . . . . . . . . . . . . . . . . . . . . . . . . . . . . . . . . . . . . . . . . . . . . . . . . . . . . . . . . . . . . . . . . . . . . 292
A.2.1. Too many open processes or files . . . . . . . . . . . . . . . . . . . . . . . . . . . . . . . . . . . . . . . . . . . . . . . . . . . . . . . . . . . . . . . . . . . . . . . . . . . . . . . . . . . . . . . . . . . . . 292
Tungsten Replicator 2.2 Manual
viii
A.2.2. OptimizeUpdatesFilter cannot filter, because column and key count is different. Make sure that it is definedbefore filters which remove keys (eg. PrimaryKeyFilter). . . . . . . . . . . . . . . . . . . . . . . . . . . . . . . . . . . . . . . . . . . . . . . . . . . . . . . . . . . . . . . . . . . . . . . . . . . 292A.2.3. Unable to update the configuration of an installed directory . . . . . . . . . . . . . . . . . . . . . . . . . . . . . . . . . . . . . . . . . . . . . . . . . . . . . . . . . . . 293A.2.4. 'subscription exists' when setting up CDC on Oracle . . . . . . . . . . . . . . . . . . . . . . . . . . . . . . . . . . . . . . . . . . . . . . . . . . . . . . . . . . . . . . . . . . . . . . . 293A.2.5. MySQLExtractException: unknown data type 0 . . . . . . . . . . . . . . . . . . . . . . . . . . . . . . . . . . . . . . . . . . . . . . . . . . . . . . . . . . . . . . . . . . . . . . . . . . . . 293A.2.6. The session variable SQL_MODE when set to include ALLOW_INVALID_DATES does not apply statementscorrectly on the slave. . . . . . . . . . . . . . . . . . . . . . . . . . . . . . . . . . . . . . . . . . . . . . . . . . . . . . . . . . . . . . . . . . . . . . . . . . . . . . . . . . . . . . . . . . . . . . . . . . . . . . . . . . . . . . . . . . 294
A.3. Known Issues . . . . . . . . . . . . . . . . . . . . . . . . . . . . . . . . . . . . . . . . . . . . . . . . . . . . . . . . . . . . . . . . . . . . . . . . . . . . . . . . . . . . . . . . . . . . . . . . . . . . . . . . . . . . . . . . . . . . . . . . . . . . . . . . 294A.3.1. Triggers . . . . . . . . . . . . . . . . . . . . . . . . . . . . . . . . . . . . . . . . . . . . . . . . . . . . . . . . . . . . . . . . . . . . . . . . . . . . . . . . . . . . . . . . . . . . . . . . . . . . . . . . . . . . . . . . . . . . . . . . . . . . 294
A.4. Troubleshooting Timeouts . . . . . . . . . . . . . . . . . . . . . . . . . . . . . . . . . . . . . . . . . . . . . . . . . . . . . . . . . . . . . . . . . . . . . . . . . . . . . . . . . . . . . . . . . . . . . . . . . . . . . . . . . . . . . . . . 294A.5. Troubleshooting Backups . . . . . . . . . . . . . . . . . . . . . . . . . . . . . . . . . . . . . . . . . . . . . . . . . . . . . . . . . . . . . . . . . . . . . . . . . . . . . . . . . . . . . . . . . . . . . . . . . . . . . . . . . . . . . . . . . . 294A.6. Running Out of Diskspace . . . . . . . . . . . . . . . . . . . . . . . . . . . . . . . . . . . . . . . . . . . . . . . . . . . . . . . . . . . . . . . . . . . . . . . . . . . . . . . . . . . . . . . . . . . . . . . . . . . . . . . . . . . . . . . . . 295A.7. Troubleshooting SSH and tpm . . . . . . . . . . . . . . . . . . . . . . . . . . . . . . . . . . . . . . . . . . . . . . . . . . . . . . . . . . . . . . . . . . . . . . . . . . . . . . . . . . . . . . . . . . . . . . . . . . . . . . . . . . . . 295A.8. Troubleshooting Data Differences . . . . . . . . . . . . . . . . . . . . . . . . . . . . . . . . . . . . . . . . . . . . . . . . . . . . . . . . . . . . . . . . . . . . . . . . . . . . . . . . . . . . . . . . . . . . . . . . . . . . . . . 295A.9. Comparing Table Data . . . . . . . . . . . . . . . . . . . . . . . . . . . . . . . . . . . . . . . . . . . . . . . . . . . . . . . . . . . . . . . . . . . . . . . . . . . . . . . . . . . . . . . . . . . . . . . . . . . . . . . . . . . . . . . . . . . . . 295A.10. Troubleshooting Memory Usage . . . . . . . . . . . . . . . . . . . . . . . . . . . . . . . . . . . . . . . . . . . . . . . . . . . . . . . . . . . . . . . . . . . . . . . . . . . . . . . . . . . . . . . . . . . . . . . . . . . . . . . . 296
B. Release Notes . . . . . . . . . . . . . . . . . . . . . . . . . . . . . . . . . . . . . . . . . . . . . . . . . . . . . . . . . . . . . . . . . . . . . . . . . . . . . . . . . . . . . . . . . . . . . . . . . . . . . . . . . . . . . . . . . . . . . . . . . . . . . . . . . . . . . . . . . 297B.1. Tungsten Replicator 2.2.1 GA (13 May 2014) . . . . . . . . . . . . . . . . . . . . . . . . . . . . . . . . . . . . . . . . . . . . . . . . . . . . . . . . . . . . . . . . . . . . . . . . . . . . . . . . . . . . . . . . . . . 297B.2. Tungsten Replicator 2.2.0 GA (23 December 2013) . . . . . . . . . . . . . . . . . . . . . . . . . . . . . . . . . . . . . . . . . . . . . . . . . . . . . . . . . . . . . . . . . . . . . . . . . . . . . . . . . . . . 299
C. Prerequisites . . . . . . . . . . . . . . . . . . . . . . . . . . . . . . . . . . . . . . . . . . . . . . . . . . . . . . . . . . . . . . . . . . . . . . . . . . . . . . . . . . . . . . . . . . . . . . . . . . . . . . . . . . . . . . . . . . . . . . . . . . . . . . . . . . . . . . . . . . 304C.1. Staging Host Configuration . . . . . . . . . . . . . . . . . . . . . . . . . . . . . . . . . . . . . . . . . . . . . . . . . . . . . . . . . . . . . . . . . . . . . . . . . . . . . . . . . . . . . . . . . . . . . . . . . . . . . . . . . . . . . . . 304C.2. Host Configuration . . . . . . . . . . . . . . . . . . . . . . . . . . . . . . . . . . . . . . . . . . . . . . . . . . . . . . . . . . . . . . . . . . . . . . . . . . . . . . . . . . . . . . . . . . . . . . . . . . . . . . . . . . . . . . . . . . . . . . . . . 305
C.2.1. Creating the User Environment . . . . . . . . . . . . . . . . . . . . . . . . . . . . . . . . . . . . . . . . . . . . . . . . . . . . . . . . . . . . . . . . . . . . . . . . . . . . . . . . . . . . . . . . . . . . . . . . . 305C.2.2. Configuring Network and SSH Environment . . . . . . . . . . . . . . . . . . . . . . . . . . . . . . . . . . . . . . . . . . . . . . . . . . . . . . . . . . . . . . . . . . . . . . . . . . . . . . . . . . 306
C.2.2.1. Network Ports . . . . . . . . . . . . . . . . . . . . . . . . . . . . . . . . . . . . . . . . . . . . . . . . . . . . . . . . . . . . . . . . . . . . . . . . . . . . . . . . . . . . . . . . . . . . . . . . . . . . . . . . . . 307C.2.2.2. SSH Configuration . . . . . . . . . . . . . . . . . . . . . . . . . . . . . . . . . . . . . . . . . . . . . . . . . . . . . . . . . . . . . . . . . . . . . . . . . . . . . . . . . . . . . . . . . . . . . . . . . . . . . . 307
C.2.3. Directory Locations and Configuration . . . . . . . . . . . . . . . . . . . . . . . . . . . . . . . . . . . . . . . . . . . . . . . . . . . . . . . . . . . . . . . . . . . . . . . . . . . . . . . . . . . . . . . . 308C.2.4. Configure Software . . . . . . . . . . . . . . . . . . . . . . . . . . . . . . . . . . . . . . . . . . . . . . . . . . . . . . . . . . . . . . . . . . . . . . . . . . . . . . . . . . . . . . . . . . . . . . . . . . . . . . . . . . . . . . 308C.2.5. sudo Configuration . . . . . . . . . . . . . . . . . . . . . . . . . . . . . . . . . . . . . . . . . . . . . . . . . . . . . . . . . . . . . . . . . . . . . . . . . . . . . . . . . . . . . . . . . . . . . . . . . . . . . . . . . . . . . . . 309
C.3. MySQL Database Setup . . . . . . . . . . . . . . . . . . . . . . . . . . . . . . . . . . . . . . . . . . . . . . . . . . . . . . . . . . . . . . . . . . . . . . . . . . . . . . . . . . . . . . . . . . . . . . . . . . . . . . . . . . . . . . . . . . . . 309C.3.1. MySQL Configuration . . . . . . . . . . . . . . . . . . . . . . . . . . . . . . . . . . . . . . . . . . . . . . . . . . . . . . . . . . . . . . . . . . . . . . . . . . . . . . . . . . . . . . . . . . . . . . . . . . . . . . . . . . . . 309C.3.2. MySQL User Configuration . . . . . . . . . . . . . . . . . . . . . . . . . . . . . . . . . . . . . . . . . . . . . . . . . . . . . . . . . . . . . . . . . . . . . . . . . . . . . . . . . . . . . . . . . . . . . . . . . . . . . . 312
C.4. Oracle Database Setup . . . . . . . . . . . . . . . . . . . . . . . . . . . . . . . . . . . . . . . . . . . . . . . . . . . . . . . . . . . . . . . . . . . . . . . . . . . . . . . . . . . . . . . . . . . . . . . . . . . . . . . . . . . . . . . . . . . . 312C.4.1. Oracle Environment Variables . . . . . . . . . . . . . . . . . . . . . . . . . . . . . . . . . . . . . . . . . . . . . . . . . . . . . . . . . . . . . . . . . . . . . . . . . . . . . . . . . . . . . . . . . . . . . . . . . . 312
C.5. PostgreSQL Database Setup . . . . . . . . . . . . . . . . . . . . . . . . . . . . . . . . . . . . . . . . . . . . . . . . . . . . . . . . . . . . . . . . . . . . . . . . . . . . . . . . . . . . . . . . . . . . . . . . . . . . . . . . . . . . . . 313D. Terminology Reference . . . . . . . . . . . . . . . . . . . . . . . . . . . . . . . . . . . . . . . . . . . . . . . . . . . . . . . . . . . . . . . . . . . . . . . . . . . . . . . . . . . . . . . . . . . . . . . . . . . . . . . . . . . . . . . . . . . . . . . . . . . . . . 314
D.1. Transaction History Log (THL) . . . . . . . . . . . . . . . . . . . . . . . . . . . . . . . . . . . . . . . . . . . . . . . . . . . . . . . . . . . . . . . . . . . . . . . . . . . . . . . . . . . . . . . . . . . . . . . . . . . . . . . . . . . . 314D.1.1. THL Format . . . . . . . . . . . . . . . . . . . . . . . . . . . . . . . . . . . . . . . . . . . . . . . . . . . . . . . . . . . . . . . . . . . . . . . . . . . . . . . . . . . . . . . . . . . . . . . . . . . . . . . . . . . . . . . . . . . . . . . 314
D.2. Generated Field Reference . . . . . . . . . . . . . . . . . . . . . . . . . . . . . . . . . . . . . . . . . . . . . . . . . . . . . . . . . . . . . . . . . . . . . . . . . . . . . . . . . . . . . . . . . . . . . . . . . . . . . . . . . . . . . . . . 317D.2.1. Terminology: Fields accessFailures . . . . . . . . . . . . . . . . . . . . . . . . . . . . . . . . . . . . . . . . . . . . . . . . . . . . . . . . . . . . . . . . . . . . . . . . . . . . . . . . . . . . . . . . . . . . 317D.2.2. Terminology: Fields active . . . . . . . . . . . . . . . . . . . . . . . . . . . . . . . . . . . . . . . . . . . . . . . . . . . . . . . . . . . . . . . . . . . . . . . . . . . . . . . . . . . . . . . . . . . . . . . . . . . . . . 317D.2.3. Terminology: Fields activeSeqno . . . . . . . . . . . . . . . . . . . . . . . . . . . . . . . . . . . . . . . . . . . . . . . . . . . . . . . . . . . . . . . . . . . . . . . . . . . . . . . . . . . . . . . . . . . . . . . . 318D.2.4. Terminology: Fields appliedLastEventId . . . . . . . . . . . . . . . . . . . . . . . . . . . . . . . . . . . . . . . . . . . . . . . . . . . . . . . . . . . . . . . . . . . . . . . . . . . . . . . . . . . . . . . 318D.2.5. Terminology: Fields appliedLastSeqno . . . . . . . . . . . . . . . . . . . . . . . . . . . . . . . . . . . . . . . . . . . . . . . . . . . . . . . . . . . . . . . . . . . . . . . . . . . . . . . . . . . . . . . . . 318D.2.6. Terminology: Fields appliedLatency . . . . . . . . . . . . . . . . . . . . . . . . . . . . . . . . . . . . . . . . . . . . . . . . . . . . . . . . . . . . . . . . . . . . . . . . . . . . . . . . . . . . . . . . . . . . 318D.2.7. Terminology: Fields applier.class . . . . . . . . . . . . . . . . . . . . . . . . . . . . . . . . . . . . . . . . . . . . . . . . . . . . . . . . . . . . . . . . . . . . . . . . . . . . . . . . . . . . . . . . . . . . . 318D.2.8. Terminology: Fields applier.name . . . . . . . . . . . . . . . . . . . . . . . . . . . . . . . . . . . . . . . . . . . . . . . . . . . . . . . . . . . . . . . . . . . . . . . . . . . . . . . . . . . . . . . . . . . . . . 318D.2.9. Terminology: Fields applyTime . . . . . . . . . . . . . . . . . . . . . . . . . . . . . . . . . . . . . . . . . . . . . . . . . . . . . . . . . . . . . . . . . . . . . . . . . . . . . . . . . . . . . . . . . . . . . . . . . . 318D.2.10. Terminology: Fields autoRecoveryEnabled . . . . . . . . . . . . . . . . . . . . . . . . . . . . . . . . . . . . . . . . . . . . . . . . . . . . . . . . . . . . . . . . . . . . . . . . . . . . . . . . . . . . 318D.2.11. Terminology: Fields autoRecoveryTotal . . . . . . . . . . . . . . . . . . . . . . . . . . . . . . . . . . . . . . . . . . . . . . . . . . . . . . . . . . . . . . . . . . . . . . . . . . . . . . . . . . . . . . . 318D.2.12. Terminology: Fields averageBlockSize . . . . . . . . . . . . . . . . . . . . . . . . . . . . . . . . . . . . . . . . . . . . . . . . . . . . . . . . . . . . . . . . . . . . . . . . . . . . . . . . . . . . . . . . 318D.2.13. Terminology: Fields blockCommitRowCount . . . . . . . . . . . . . . . . . . . . . . . . . . . . . . . . . . . . . . . . . . . . . . . . . . . . . . . . . . . . . . . . . . . . . . . . . . . . . . . . . . . . 319D.2.14. Terminology: Fields cancelled . . . . . . . . . . . . . . . . . . . . . . . . . . . . . . . . . . . . . . . . . . . . . . . . . . . . . . . . . . . . . . . . . . . . . . . . . . . . . . . . . . . . . . . . . . . . . . . . . 319D.2.15. Terminology: Fields channel . . . . . . . . . . . . . . . . . . . . . . . . . . . . . . . . . . . . . . . . . . . . . . . . . . . . . . . . . . . . . . . . . . . . . . . . . . . . . . . . . . . . . . . . . . . . . . . . . . . 319D.2.16. Terminology: Fields channels . . . . . . . . . . . . . . . . . . . . . . . . . . . . . . . . . . . . . . . . . . . . . . . . . . . . . . . . . . . . . . . . . . . . . . . . . . . . . . . . . . . . . . . . . . . . . . . . . . 319D.2.17. Terminology: Fields clusterName . . . . . . . . . . . . . . . . . . . . . . . . . . . . . . . . . . . . . . . . . . . . . . . . . . . . . . . . . . . . . . . . . . . . . . . . . . . . . . . . . . . . . . . . . . . . . . 319D.2.18. Terminology: Fields commits . . . . . . . . . . . . . . . . . . . . . . . . . . . . . . . . . . . . . . . . . . . . . . . . . . . . . . . . . . . . . . . . . . . . . . . . . . . . . . . . . . . . . . . . . . . . . . . . . . . 319D.2.19. Terminology: Fields committedMinSeqno . . . . . . . . . . . . . . . . . . . . . . . . . . . . . . . . . . . . . . . . . . . . . . . . . . . . . . . . . . . . . . . . . . . . . . . . . . . . . . . . . . . . . . . 319D.2.20. Terminology: Fields criticalPartition . . . . . . . . . . . . . . . . . . . . . . . . . . . . . . . . . . . . . . . . . . . . . . . . . . . . . . . . . . . . . . . . . . . . . . . . . . . . . . . . . . . . . . . 319D.2.21. Terminology: Fields currentBlockSize . . . . . . . . . . . . . . . . . . . . . . . . . . . . . . . . . . . . . . . . . . . . . . . . . . . . . . . . . . . . . . . . . . . . . . . . . . . . . . . . . . . . . . . . 319D.2.22. Terminology: Fields currentEventId . . . . . . . . . . . . . . . . . . . . . . . . . . . . . . . . . . . . . . . . . . . . . . . . . . . . . . . . . . . . . . . . . . . . . . . . . . . . . . . . . . . . . . . . . . 319D.2.23. Terminology: Fields currentLastEventId . . . . . . . . . . . . . . . . . . . . . . . . . . . . . . . . . . . . . . . . . . . . . . . . . . . . . . . . . . . . . . . . . . . . . . . . . . . . . . . . . . . . . 319D.2.24. Terminology: Fields currentLastFragno . . . . . . . . . . . . . . . . . . . . . . . . . . . . . . . . . . . . . . . . . . . . . . . . . . . . . . . . . . . . . . . . . . . . . . . . . . . . . . . . . . . . . . . 319D.2.25. Terminology: Fields currentLastSeqno . . . . . . . . . . . . . . . . . . . . . . . . . . . . . . . . . . . . . . . . . . . . . . . . . . . . . . . . . . . . . . . . . . . . . . . . . . . . . . . . . . . . . . . . 319D.2.26. Terminology: Fields currentTimeMillis . . . . . . . . . . . . . . . . . . . . . . . . . . . . . . . . . . . . . . . . . . . . . . . . . . . . . . . . . . . . . . . . . . . . . . . . . . . . . . . . . . . . . . . 319D.2.27. Terminology: Fields dataServerHost . . . . . . . . . . . . . . . . . . . . . . . . . . . . . . . . . . . . . . . . . . . . . . . . . . . . . . . . . . . . . . . . . . . . . . . . . . . . . . . . . . . . . . . . . . 319D.2.28. Terminology: Fields discardCount . . . . . . . . . . . . . . . . . . . . . . . . . . . . . . . . . . . . . . . . . . . . . . . . . . . . . . . . . . . . . . . . . . . . . . . . . . . . . . . . . . . . . . . . . . . . . 319

Tungsten Replicator 2.2 Manual
ix
D.2.29. Terminology: Fields doChecksum . . . . . . . . . . . . . . . . . . . . . . . . . . . . . . . . . . . . . . . . . . . . . . . . . . . . . . . . . . . . . . . . . . . . . . . . . . . . . . . . . . . . . . . . . . . . . . . 319D.2.30. Terminology: Fields estimatedOfflineInterval . . . . . . . . . . . . . . . . . . . . . . . . . . . . . . . . . . . . . . . . . . . . . . . . . . . . . . . . . . . . . . . . . . . . . . . . . . . . . . 320D.2.31. Terminology: Fields eventCount . . . . . . . . . . . . . . . . . . . . . . . . . . . . . . . . . . . . . . . . . . . . . . . . . . . . . . . . . . . . . . . . . . . . . . . . . . . . . . . . . . . . . . . . . . . . . . . 320D.2.32. Terminology: Fields extensions . . . . . . . . . . . . . . . . . . . . . . . . . . . . . . . . . . . . . . . . . . . . . . . . . . . . . . . . . . . . . . . . . . . . . . . . . . . . . . . . . . . . . . . . . . . . . . . 320D.2.33. Terminology: Fields extractTime . . . . . . . . . . . . . . . . . . . . . . . . . . . . . . . . . . . . . . . . . . . . . . . . . . . . . . . . . . . . . . . . . . . . . . . . . . . . . . . . . . . . . . . . . . . . . . 320D.2.34. Terminology: Fields extractor.class . . . . . . . . . . . . . . . . . . . . . . . . . . . . . . . . . . . . . . . . . . . . . . . . . . . . . . . . . . . . . . . . . . . . . . . . . . . . . . . . . . . . . . . . . 320D.2.35. Terminology: Fields extractor.name . . . . . . . . . . . . . . . . . . . . . . . . . . . . . . . . . . . . . . . . . . . . . . . . . . . . . . . . . . . . . . . . . . . . . . . . . . . . . . . . . . . . . . . . . . 320D.2.36. Terminology: Fields filter.#.class . . . . . . . . . . . . . . . . . . . . . . . . . . . . . . . . . . . . . . . . . . . . . . . . . . . . . . . . . . . . . . . . . . . . . . . . . . . . . . . . . . . . . . . . . . 320D.2.37. Terminology: Fields filter.#.name . . . . . . . . . . . . . . . . . . . . . . . . . . . . . . . . . . . . . . . . . . . . . . . . . . . . . . . . . . . . . . . . . . . . . . . . . . . . . . . . . . . . . . . . . . . . 320D.2.38. Terminology: Fields filterTime . . . . . . . . . . . . . . . . . . . . . . . . . . . . . . . . . . . . . . . . . . . . . . . . . . . . . . . . . . . . . . . . . . . . . . . . . . . . . . . . . . . . . . . . . . . . . . . 320D.2.39. Terminology: Fields flushIntervalMillis . . . . . . . . . . . . . . . . . . . . . . . . . . . . . . . . . . . . . . . . . . . . . . . . . . . . . . . . . . . . . . . . . . . . . . . . . . . . . . . . . . . . 320D.2.40. Terminology: Fields fsyncOnFlush . . . . . . . . . . . . . . . . . . . . . . . . . . . . . . . . . . . . . . . . . . . . . . . . . . . . . . . . . . . . . . . . . . . . . . . . . . . . . . . . . . . . . . . . . . . . . 320D.2.41. Terminology: Fields headSeqno . . . . . . . . . . . . . . . . . . . . . . . . . . . . . . . . . . . . . . . . . . . . . . . . . . . . . . . . . . . . . . . . . . . . . . . . . . . . . . . . . . . . . . . . . . . . . . . . . 320D.2.42. Terminology: Fields intervalGuard . . . . . . . . . . . . . . . . . . . . . . . . . . . . . . . . . . . . . . . . . . . . . . . . . . . . . . . . . . . . . . . . . . . . . . . . . . . . . . . . . . . . . . . . . . . . 320D.2.43. Terminology: Fields lastCommittedBlockSize . . . . . . . . . . . . . . . . . . . . . . . . . . . . . . . . . . . . . . . . . . . . . . . . . . . . . . . . . . . . . . . . . . . . . . . . . . . . . . . . 320D.2.44. Terminology: Fields lastCommittedBlockTime . . . . . . . . . . . . . . . . . . . . . . . . . . . . . . . . . . . . . . . . . . . . . . . . . . . . . . . . . . . . . . . . . . . . . . . . . . . . . . . . 320D.2.45. Terminology: Fields latestEpochNumber . . . . . . . . . . . . . . . . . . . . . . . . . . . . . . . . . . . . . . . . . . . . . . . . . . . . . . . . . . . . . . . . . . . . . . . . . . . . . . . . . . . . . . . 320D.2.46. Terminology: Fields logConnectionTimeout . . . . . . . . . . . . . . . . . . . . . . . . . . . . . . . . . . . . . . . . . . . . . . . . . . . . . . . . . . . . . . . . . . . . . . . . . . . . . . . . . . . 320D.2.47. Terminology: Fields logDir . . . . . . . . . . . . . . . . . . . . . . . . . . . . . . . . . . . . . . . . . . . . . . . . . . . . . . . . . . . . . . . . . . . . . . . . . . . . . . . . . . . . . . . . . . . . . . . . . . . . . 321D.2.48. Terminology: Fields logFileRetainMillis . . . . . . . . . . . . . . . . . . . . . . . . . . . . . . . . . . . . . . . . . . . . . . . . . . . . . . . . . . . . . . . . . . . . . . . . . . . . . . . . . . . . 321D.2.49. Terminology: Fields logFileSize . . . . . . . . . . . . . . . . . . . . . . . . . . . . . . . . . . . . . . . . . . . . . . . . . . . . . . . . . . . . . . . . . . . . . . . . . . . . . . . . . . . . . . . . . . . . . . 321D.2.50. Terminology: Fields masterConnectUri . . . . . . . . . . . . . . . . . . . . . . . . . . . . . . . . . . . . . . . . . . . . . . . . . . . . . . . . . . . . . . . . . . . . . . . . . . . . . . . . . . . . . . . . 321D.2.51. Terminology: Fields masterListenUri . . . . . . . . . . . . . . . . . . . . . . . . . . . . . . . . . . . . . . . . . . . . . . . . . . . . . . . . . . . . . . . . . . . . . . . . . . . . . . . . . . . . . . . . . 321D.2.52. Terminology: Fields maxChannel . . . . . . . . . . . . . . . . . . . . . . . . . . . . . . . . . . . . . . . . . . . . . . . . . . . . . . . . . . . . . . . . . . . . . . . . . . . . . . . . . . . . . . . . . . . . . . . 321D.2.53. Terminology: Fields maxDelayInterval . . . . . . . . . . . . . . . . . . . . . . . . . . . . . . . . . . . . . . . . . . . . . . . . . . . . . . . . . . . . . . . . . . . . . . . . . . . . . . . . . . . . . . . . 321D.2.54. Terminology: Fields maxOfflineInterval . . . . . . . . . . . . . . . . . . . . . . . . . . . . . . . . . . . . . . . . . . . . . . . . . . . . . . . . . . . . . . . . . . . . . . . . . . . . . . . . . . . . . 321D.2.55. Terminology: Fields maxSize . . . . . . . . . . . . . . . . . . . . . . . . . . . . . . . . . . . . . . . . . . . . . . . . . . . . . . . . . . . . . . . . . . . . . . . . . . . . . . . . . . . . . . . . . . . . . . . . . . . 321D.2.56. Terminology: Fields maximumStoredSeqNo . . . . . . . . . . . . . . . . . . . . . . . . . . . . . . . . . . . . . . . . . . . . . . . . . . . . . . . . . . . . . . . . . . . . . . . . . . . . . . . . . . . . . 321D.2.57. Terminology: Fields minimumStoredSeqNo . . . . . . . . . . . . . . . . . . . . . . . . . . . . . . . . . . . . . . . . . . . . . . . . . . . . . . . . . . . . . . . . . . . . . . . . . . . . . . . . . . . . . 321D.2.58. Terminology: Fields name . . . . . . . . . . . . . . . . . . . . . . . . . . . . . . . . . . . . . . . . . . . . . . . . . . . . . . . . . . . . . . . . . . . . . . . . . . . . . . . . . . . . . . . . . . . . . . . . . . . . . . . 321D.2.59. Terminology: Fields offlineRequests . . . . . . . . . . . . . . . . . . . . . . . . . . . . . . . . . . . . . . . . . . . . . . . . . . . . . . . . . . . . . . . . . . . . . . . . . . . . . . . . . . . . . . . . . 321D.2.60. Terminology: Fields otherTime . . . . . . . . . . . . . . . . . . . . . . . . . . . . . . . . . . . . . . . . . . . . . . . . . . . . . . . . . . . . . . . . . . . . . . . . . . . . . . . . . . . . . . . . . . . . . . . . . 322D.2.61. Terminology: Fields pendingError . . . . . . . . . . . . . . . . . . . . . . . . . . . . . . . . . . . . . . . . . . . . . . . . . . . . . . . . . . . . . . . . . . . . . . . . . . . . . . . . . . . . . . . . . . . . . 322D.2.62. Terminology: Fields pendingErrorCode . . . . . . . . . . . . . . . . . . . . . . . . . . . . . . . . . . . . . . . . . . . . . . . . . . . . . . . . . . . . . . . . . . . . . . . . . . . . . . . . . . . . . . . . 322D.2.63. Terminology: Fields pendingErrorEventId . . . . . . . . . . . . . . . . . . . . . . . . . . . . . . . . . . . . . . . . . . . . . . . . . . . . . . . . . . . . . . . . . . . . . . . . . . . . . . . . . . . . 322D.2.64. Terminology: Fields pendingErrorSeqno . . . . . . . . . . . . . . . . . . . . . . . . . . . . . . . . . . . . . . . . . . . . . . . . . . . . . . . . . . . . . . . . . . . . . . . . . . . . . . . . . . . . . . . 322D.2.65. Terminology: Fields pendingExceptionMessage . . . . . . . . . . . . . . . . . . . . . . . . . . . . . . . . . . . . . . . . . . . . . . . . . . . . . . . . . . . . . . . . . . . . . . . . . . . . . . . 322D.2.66. Terminology: Fields pipelineSource . . . . . . . . . . . . . . . . . . . . . . . . . . . . . . . . . . . . . . . . . . . . . . . . . . . . . . . . . . . . . . . . . . . . . . . . . . . . . . . . . . . . . . . . . . 322D.2.67. Terminology: Fields processedMinSeqno . . . . . . . . . . . . . . . . . . . . . . . . . . . . . . . . . . . . . . . . . . . . . . . . . . . . . . . . . . . . . . . . . . . . . . . . . . . . . . . . . . . . . . . 322D.2.68. Terminology: Fields queues . . . . . . . . . . . . . . . . . . . . . . . . . . . . . . . . . . . . . . . . . . . . . . . . . . . . . . . . . . . . . . . . . . . . . . . . . . . . . . . . . . . . . . . . . . . . . . . . . . . . . 322D.2.69. Terminology: Fields readOnly . . . . . . . . . . . . . . . . . . . . . . . . . . . . . . . . . . . . . . . . . . . . . . . . . . . . . . . . . . . . . . . . . . . . . . . . . . . . . . . . . . . . . . . . . . . . . . . . . . 322D.2.70. Terminology: Fields relativeLatency . . . . . . . . . . . . . . . . . . . . . . . . . . . . . . . . . . . . . . . . . . . . . . . . . . . . . . . . . . . . . . . . . . . . . . . . . . . . . . . . . . . . . . . . . 322D.2.71. Terminology: Fields resourcePrecedence . . . . . . . . . . . . . . . . . . . . . . . . . . . . . . . . . . . . . . . . . . . . . . . . . . . . . . . . . . . . . . . . . . . . . . . . . . . . . . . . . . . . . 322D.2.72. Terminology: Fields rmiPort . . . . . . . . . . . . . . . . . . . . . . . . . . . . . . . . . . . . . . . . . . . . . . . . . . . . . . . . . . . . . . . . . . . . . . . . . . . . . . . . . . . . . . . . . . . . . . . . . . . 322D.2.73. Terminology: Fields role . . . . . . . . . . . . . . . . . . . . . . . . . . . . . . . . . . . . . . . . . . . . . . . . . . . . . . . . . . . . . . . . . . . . . . . . . . . . . . . . . . . . . . . . . . . . . . . . . . . . . . . 322D.2.74. Terminology: Fields seqnoType . . . . . . . . . . . . . . . . . . . . . . . . . . . . . . . . . . . . . . . . . . . . . . . . . . . . . . . . . . . . . . . . . . . . . . . . . . . . . . . . . . . . . . . . . . . . . . . . . 323D.2.75. Terminology: Fields serializationCount . . . . . . . . . . . . . . . . . . . . . . . . . . . . . . . . . . . . . . . . . . . . . . . . . . . . . . . . . . . . . . . . . . . . . . . . . . . . . . . . . . . . . 323D.2.76. Terminology: Fields serialized . . . . . . . . . . . . . . . . . . . . . . . . . . . . . . . . . . . . . . . . . . . . . . . . . . . . . . . . . . . . . . . . . . . . . . . . . . . . . . . . . . . . . . . . . . . . . . . 323D.2.77. Terminology: Fields serviceName . . . . . . . . . . . . . . . . . . . . . . . . . . . . . . . . . . . . . . . . . . . . . . . . . . . . . . . . . . . . . . . . . . . . . . . . . . . . . . . . . . . . . . . . . . . . . . 323D.2.78. Terminology: Fields serviceType . . . . . . . . . . . . . . . . . . . . . . . . . . . . . . . . . . . . . . . . . . . . . . . . . . . . . . . . . . . . . . . . . . . . . . . . . . . . . . . . . . . . . . . . . . . . . . 323D.2.79. Terminology: Fields shard_id . . . . . . . . . . . . . . . . . . . . . . . . . . . . . . . . . . . . . . . . . . . . . . . . . . . . . . . . . . . . . . . . . . . . . . . . . . . . . . . . . . . . . . . . . . . . . . . . . . 323D.2.80. Terminology: Fields simpleServiceName . . . . . . . . . . . . . . . . . . . . . . . . . . . . . . . . . . . . . . . . . . . . . . . . . . . . . . . . . . . . . . . . . . . . . . . . . . . . . . . . . . . . . . . 323D.2.81. Terminology: Fields siteName . . . . . . . . . . . . . . . . . . . . . . . . . . . . . . . . . . . . . . . . . . . . . . . . . . . . . . . . . . . . . . . . . . . . . . . . . . . . . . . . . . . . . . . . . . . . . . . . . . 323D.2.82. Terminology: Fields sourceId . . . . . . . . . . . . . . . . . . . . . . . . . . . . . . . . . . . . . . . . . . . . . . . . . . . . . . . . . . . . . . . . . . . . . . . . . . . . . . . . . . . . . . . . . . . . . . . . . . 323D.2.83. Terminology: Fields stage . . . . . . . . . . . . . . . . . . . . . . . . . . . . . . . . . . . . . . . . . . . . . . . . . . . . . . . . . . . . . . . . . . . . . . . . . . . . . . . . . . . . . . . . . . . . . . . . . . . . . . 323D.2.84. Terminology: Fields started . . . . . . . . . . . . . . . . . . . . . . . . . . . . . . . . . . . . . . . . . . . . . . . . . . . . . . . . . . . . . . . . . . . . . . . . . . . . . . . . . . . . . . . . . . . . . . . . . . . 323D.2.85. Terminology: Fields state . . . . . . . . . . . . . . . . . . . . . . . . . . . . . . . . . . . . . . . . . . . . . . . . . . . . . . . . . . . . . . . . . . . . . . . . . . . . . . . . . . . . . . . . . . . . . . . . . . . . . . 323D.2.86. Terminology: Fields stopRequested . . . . . . . . . . . . . . . . . . . . . . . . . . . . . . . . . . . . . . . . . . . . . . . . . . . . . . . . . . . . . . . . . . . . . . . . . . . . . . . . . . . . . . . . . . . . 323D.2.87. Terminology: Fields store.# . . . . . . . . . . . . . . . . . . . . . . . . . . . . . . . . . . . . . . . . . . . . . . . . . . . . . . . . . . . . . . . . . . . . . . . . . . . . . . . . . . . . . . . . . . . . . . . . . . . 323D.2.88. Terminology: Fields storeClass . . . . . . . . . . . . . . . . . . . . . . . . . . . . . . . . . . . . . . . . . . . . . . . . . . . . . . . . . . . . . . . . . . . . . . . . . . . . . . . . . . . . . . . . . . . . . . . 323D.2.89. Terminology: Fields syncInterval . . . . . . . . . . . . . . . . . . . . . . . . . . . . . . . . . . . . . . . . . . . . . . . . . . . . . . . . . . . . . . . . . . . . . . . . . . . . . . . . . . . . . . . . . . . . . 323D.2.90. Terminology: Fields taskCount . . . . . . . . . . . . . . . . . . . . . . . . . . . . . . . . . . . . . . . . . . . . . . . . . . . . . . . . . . . . . . . . . . . . . . . . . . . . . . . . . . . . . . . . . . . . . . . . . 323D.2.91. Terminology: Fields taskId . . . . . . . . . . . . . . . . . . . . . . . . . . . . . . . . . . . . . . . . . . . . . . . . . . . . . . . . . . . . . . . . . . . . . . . . . . . . . . . . . . . . . . . . . . . . . . . . . . . . . 324D.2.92. Terminology: Fields timeInStateSeconds . . . . . . . . . . . . . . . . . . . . . . . . . . . . . . . . . . . . . . . . . . . . . . . . . . . . . . . . . . . . . . . . . . . . . . . . . . . . . . . . . . . . . 324D.2.93. Terminology: Fields timeoutMillis . . . . . . . . . . . . . . . . . . . . . . . . . . . . . . . . . . . . . . . . . . . . . . . . . . . . . . . . . . . . . . . . . . . . . . . . . . . . . . . . . . . . . . . . . . . . 324D.2.94. Terminology: Fields totalAssignments . . . . . . . . . . . . . . . . . . . . . . . . . . . . . . . . . . . . . . . . . . . . . . . . . . . . . . . . . . . . . . . . . . . . . . . . . . . . . . . . . . . . . . . . 324D.2.95. Terminology: Fields transitioningTo . . . . . . . . . . . . . . . . . . . . . . . . . . . . . . . . . . . . . . . . . . . . . . . . . . . . . . . . . . . . . . . . . . . . . . . . . . . . . . . . . . . . . . . . . 324
Tungsten Replicator 2.2 Manual
x
D.2.96. Terminology: Fields uptimeSeconds . . . . . . . . . . . . . . . . . . . . . . . . . . . . . . . . . . . . . . . . . . . . . . . . . . . . . . . . . . . . . . . . . . . . . . . . . . . . . . . . . . . . . . . . . . . . 324D.2.97. Terminology: Fields version . . . . . . . . . . . . . . . . . . . . . . . . . . . . . . . . . . . . . . . . . . . . . . . . . . . . . . . . . . . . . . . . . . . . . . . . . . . . . . . . . . . . . . . . . . . . . . . . . . . 324
E. Files, Directories, and Environment . . . . . . . . . . . . . . . . . . . . . . . . . . . . . . . . . . . . . . . . . . . . . . . . . . . . . . . . . . . . . . . . . . . . . . . . . . . . . . . . . . . . . . . . . . . . . . . . . . . . . . . . . . . . . . . . . 325E.1. The Tungsten Replicator Install Directory . . . . . . . . . . . . . . . . . . . . . . . . . . . . . . . . . . . . . . . . . . . . . . . . . . . . . . . . . . . . . . . . . . . . . . . . . . . . . . . . . . . . . . . . . . . . . . . 325
E.1.1. The backups Directory . . . . . . . . . . . . . . . . . . . . . . . . . . . . . . . . . . . . . . . . . . . . . . . . . . . . . . . . . . . . . . . . . . . . . . . . . . . . . . . . . . . . . . . . . . . . . . . . . . . . . . . . . . . . 325E.1.1.1. Automatically Deleting Backup Files . . . . . . . . . . . . . . . . . . . . . . . . . . . . . . . . . . . . . . . . . . . . . . . . . . . . . . . . . . . . . . . . . . . . . . . . . . . . . . . . . 325E.1.1.2. Manually Deleting Backup Files . . . . . . . . . . . . . . . . . . . . . . . . . . . . . . . . . . . . . . . . . . . . . . . . . . . . . . . . . . . . . . . . . . . . . . . . . . . . . . . . . . . . . . . 326E.1.1.3. Copying Backup Files . . . . . . . . . . . . . . . . . . . . . . . . . . . . . . . . . . . . . . . . . . . . . . . . . . . . . . . . . . . . . . . . . . . . . . . . . . . . . . . . . . . . . . . . . . . . . . . . . . . 326E.1.1.4. Relocating Backup Storage . . . . . . . . . . . . . . . . . . . . . . . . . . . . . . . . . . . . . . . . . . . . . . . . . . . . . . . . . . . . . . . . . . . . . . . . . . . . . . . . . . . . . . . . . . . . 327
E.1.2. The releases Directory . . . . . . . . . . . . . . . . . . . . . . . . . . . . . . . . . . . . . . . . . . . . . . . . . . . . . . . . . . . . . . . . . . . . . . . . . . . . . . . . . . . . . . . . . . . . . . . . . . . . . . . . . . . 328E.1.3. The service_logs Directory . . . . . . . . . . . . . . . . . . . . . . . . . . . . . . . . . . . . . . . . . . . . . . . . . . . . . . . . . . . . . . . . . . . . . . . . . . . . . . . . . . . . . . . . . . . . . . . . . . . . . 328E.1.4. The thl Directory . . . . . . . . . . . . . . . . . . . . . . . . . . . . . . . . . . . . . . . . . . . . . . . . . . . . . . . . . . . . . . . . . . . . . . . . . . . . . . . . . . . . . . . . . . . . . . . . . . . . . . . . . . . . . . . . . 328
E.1.4.1. Purging THL Log Information . . . . . . . . . . . . . . . . . . . . . . . . . . . . . . . . . . . . . . . . . . . . . . . . . . . . . . . . . . . . . . . . . . . . . . . . . . . . . . . . . . . . . . . . . 329E.1.4.2. Moving the THL File Location . . . . . . . . . . . . . . . . . . . . . . . . . . . . . . . . . . . . . . . . . . . . . . . . . . . . . . . . . . . . . . . . . . . . . . . . . . . . . . . . . . . . . . . . . 330E.1.4.3. Changing the THL Retention Times . . . . . . . . . . . . . . . . . . . . . . . . . . . . . . . . . . . . . . . . . . . . . . . . . . . . . . . . . . . . . . . . . . . . . . . . . . . . . . . . . . 331
E.1.5. The tungsten Directory . . . . . . . . . . . . . . . . . . . . . . . . . . . . . . . . . . . . . . . . . . . . . . . . . . . . . . . . . . . . . . . . . . . . . . . . . . . . . . . . . . . . . . . . . . . . . . . . . . . . . . . . . . . 331E.2. Environment Variables . . . . . . . . . . . . . . . . . . . . . . . . . . . . . . . . . . . . . . . . . . . . . . . . . . . . . . . . . . . . . . . . . . . . . . . . . . . . . . . . . . . . . . . . . . . . . . . . . . . . . . . . . . . . . . . . . . . . . 332
F. Internals . . . . . . . . . . . . . . . . . . . . . . . . . . . . . . . . . . . . . . . . . . . . . . . . . . . . . . . . . . . . . . . . . . . . . . . . . . . . . . . . . . . . . . . . . . . . . . . . . . . . . . . . . . . . . . . . . . . . . . . . . . . . . . . . . . . . . . . . . . . . . . . . 333F.1. Extending Backup and Restore Behavior . . . . . . . . . . . . . . . . . . . . . . . . . . . . . . . . . . . . . . . . . . . . . . . . . . . . . . . . . . . . . . . . . . . . . . . . . . . . . . . . . . . . . . . . . . . . . . . . 333
F.1.1. Backup Behavior . . . . . . . . . . . . . . . . . . . . . . . . . . . . . . . . . . . . . . . . . . . . . . . . . . . . . . . . . . . . . . . . . . . . . . . . . . . . . . . . . . . . . . . . . . . . . . . . . . . . . . . . . . . . . . . . . . 333F.1.2. Restore Behavior . . . . . . . . . . . . . . . . . . . . . . . . . . . . . . . . . . . . . . . . . . . . . . . . . . . . . . . . . . . . . . . . . . . . . . . . . . . . . . . . . . . . . . . . . . . . . . . . . . . . . . . . . . . . . . . . . . 333F.1.3. Writing a Custom Backup/Restore Script . . . . . . . . . . . . . . . . . . . . . . . . . . . . . . . . . . . . . . . . . . . . . . . . . . . . . . . . . . . . . . . . . . . . . . . . . . . . . . . . . . . . . . 334F.1.4. Enabling a Custom Backup Script . . . . . . . . . . . . . . . . . . . . . . . . . . . . . . . . . . . . . . . . . . . . . . . . . . . . . . . . . . . . . . . . . . . . . . . . . . . . . . . . . . . . . . . . . . . . . . . 335
F.2. Character Sets in Database and Tungsten Replicator . . . . . . . . . . . . . . . . . . . . . . . . . . . . . . . . . . . . . . . . . . . . . . . . . . . . . . . . . . . . . . . . . . . . . . . . . . . . . . . . . . 336F.3. Memory Tuning and Performance . . . . . . . . . . . . . . . . . . . . . . . . . . . . . . . . . . . . . . . . . . . . . . . . . . . . . . . . . . . . . . . . . . . . . . . . . . . . . . . . . . . . . . . . . . . . . . . . . . . . . . . . 336
F.3.1. Understanding Tungsten Replicator Memory Tuning . . . . . . . . . . . . . . . . . . . . . . . . . . . . . . . . . . . . . . . . . . . . . . . . . . . . . . . . . . . . . . . . . . . . . . . . . 336G. Frequently Asked Questions (FAQ) . . . . . . . . . . . . . . . . . . . . . . . . . . . . . . . . . . . . . . . . . . . . . . . . . . . . . . . . . . . . . . . . . . . . . . . . . . . . . . . . . . . . . . . . . . . . . . . . . . . . . . . . . . . . . . . . . 338H. Ecosystem Support . . . . . . . . . . . . . . . . . . . . . . . . . . . . . . . . . . . . . . . . . . . . . . . . . . . . . . . . . . . . . . . . . . . . . . . . . . . . . . . . . . . . . . . . . . . . . . . . . . . . . . . . . . . . . . . . . . . . . . . . . . . . . . . . . . . 340
H.1. Managing Log Files with logrotate . . . . . . . . . . . . . . . . . . . . . . . . . . . . . . . . . . . . . . . . . . . . . . . . . . . . . . . . . . . . . . . . . . . . . . . . . . . . . . . . . . . . . . . . . . . . . . . . . . . . . . 340H.2. Monitoring Status Using cacti . . . . . . . . . . . . . . . . . . . . . . . . . . . . . . . . . . . . . . . . . . . . . . . . . . . . . . . . . . . . . . . . . . . . . . . . . . . . . . . . . . . . . . . . . . . . . . . . . . . . . . . . . . . . . 340H.3. Monitoring Status Using nagios . . . . . . . . . . . . . . . . . . . . . . . . . . . . . . . . . . . . . . . . . . . . . . . . . . . . . . . . . . . . . . . . . . . . . . . . . . . . . . . . . . . . . . . . . . . . . . . . . . . . . . . . . . 342
xi
List of Figures2.1. Topologies: Component Architecture . . . . . . . . . . . . . . . . . . . . . . . . . . . . . . . . . . . . . . . . . . . . . . . . . . . . . . . . . . . . . . . . . . . . . . . . . . . . . . . . . . . . . . . . . . . . . . . . . . . . . . . . . . . . . 182.2. Topologies: Master/Slave . . . . . . . . . . . . . . . . . . . . . . . . . . . . . . . . . . . . . . . . . . . . . . . . . . . . . . . . . . . . . . . . . . . . . . . . . . . . . . . . . . . . . . . . . . . . . . . . . . . . . . . . . . . . . . . . . . . . . . . . . . . . 242.3. Topologies: Multiple-masters . . . . . . . . . . . . . . . . . . . . . . . . . . . . . . . . . . . . . . . . . . . . . . . . . . . . . . . . . . . . . . . . . . . . . . . . . . . . . . . . . . . . . . . . . . . . . . . . . . . . . . . . . . . . . . . . . . . . . . . 272.4. Topologies: Fan-in . . . . . . . . . . . . . . . . . . . . . . . . . . . . . . . . . . . . . . . . . . . . . . . . . . . . . . . . . . . . . . . . . . . . . . . . . . . . . . . . . . . . . . . . . . . . . . . . . . . . . . . . . . . . . . . . . . . . . . . . . . . . . . . . . . . . 322.5. Topologies: Star . . . . . . . . . . . . . . . . . . . . . . . . . . . . . . . . . . . . . . . . . . . . . . . . . . . . . . . . . . . . . . . . . . . . . . . . . . . . . . . . . . . . . . . . . . . . . . . . . . . . . . . . . . . . . . . . . . . . . . . . . . . . . . . . . . . . . . 352.6. Topologies: Replicating into a Dataservice . . . . . . . . . . . . . . . . . . . . . . . . . . . . . . . . . . . . . . . . . . . . . . . . . . . . . . . . . . . . . . . . . . . . . . . . . . . . . . . . . . . . . . . . . . . . . . . . . . . . . . . . 413.1. Topologies: Heterogeneous Operation . . . . . . . . . . . . . . . . . . . . . . . . . . . . . . . . . . . . . . . . . . . . . . . . . . . . . . . . . . . . . . . . . . . . . . . . . . . . . . . . . . . . . . . . . . . . . . . . . . . . . . . . . . . . 503.2. Topologies: MySQL to Oracle . . . . . . . . . . . . . . . . . . . . . . . . . . . . . . . . . . . . . . . . . . . . . . . . . . . . . . . . . . . . . . . . . . . . . . . . . . . . . . . . . . . . . . . . . . . . . . . . . . . . . . . . . . . . . . . . . . . . . . . 523.3. Topologies: Oracle to MySQL . . . . . . . . . . . . . . . . . . . . . . . . . . . . . . . . . . . . . . . . . . . . . . . . . . . . . . . . . . . . . . . . . . . . . . . . . . . . . . . . . . . . . . . . . . . . . . . . . . . . . . . . . . . . . . . . . . . . . . . 523.4. Topologies: Oracle to Oracle . . . . . . . . . . . . . . . . . . . . . . . . . . . . . . . . . . . . . . . . . . . . . . . . . . . . . . . . . . . . . . . . . . . . . . . . . . . . . . . . . . . . . . . . . . . . . . . . . . . . . . . . . . . . . . . . . . . . . . . 533.5. Oracle Extraction with Synchronous CDC . . . . . . . . . . . . . . . . . . . . . . . . . . . . . . . . . . . . . . . . . . . . . . . . . . . . . . . . . . . . . . . . . . . . . . . . . . . . . . . . . . . . . . . . . . . . . . . . . . . . . . . . . 543.6. Oracle Extraction with Asynchronous CDC . . . . . . . . . . . . . . . . . . . . . . . . . . . . . . . . . . . . . . . . . . . . . . . . . . . . . . . . . . . . . . . . . . . . . . . . . . . . . . . . . . . . . . . . . . . . . . . . . . . . . . . 553.7. Topologies: MySQL to MongoDB . . . . . . . . . . . . . . . . . . . . . . . . . . . . . . . . . . . . . . . . . . . . . . . . . . . . . . . . . . . . . . . . . . . . . . . . . . . . . . . . . . . . . . . . . . . . . . . . . . . . . . . . . . . . . . . . . . . 783.8. Topologies: MySQL to Amazon RDS . . . . . . . . . . . . . . . . . . . . . . . . . . . . . . . . . . . . . . . . . . . . . . . . . . . . . . . . . . . . . . . . . . . . . . . . . . . . . . . . . . . . . . . . . . . . . . . . . . . . . . . . . . . . . . . 833.9. Topologies: MySQL to Vertica . . . . . . . . . . . . . . . . . . . . . . . . . . . . . . . . . . . . . . . . . . . . . . . . . . . . . . . . . . . . . . . . . . . . . . . . . . . . . . . . . . . . . . . . . . . . . . . . . . . . . . . . . . . . . . . . . . . . . . 884.1. Migration: Migrating Native Replication using a New Service . . . . . . . . . . . . . . . . . . . . . . . . . . . . . . . . . . . . . . . . . . . . . . . . . . . . . . . . . . . . . . . . . . . . . . . . . . . . . . . . . . 964.2. Parallel Extractor: Extraction Sequence . . . . . . . . . . . . . . . . . . . . . . . . . . . . . . . . . . . . . . . . . . . . . . . . . . . . . . . . . . . . . . . . . . . . . . . . . . . . . . . . . . . . . . . . . . . . . . . . . . . . . . . . . . 1104.3. Parallel Extractor: Extraction Operation . . . . . . . . . . . . . . . . . . . . . . . . . . . . . . . . . . . . . . . . . . . . . . . . . . . . . . . . . . . . . . . . . . . . . . . . . . . . . . . . . . . . . . . . . . . . . . . . . . . . . . . . . 1106.1. tpm Staging Based Deployment . . . . . . . . . . . . . . . . . . . . . . . . . . . . . . . . . . . . . . . . . . . . . . . . . . . . . . . . . . . . . . . . . . . . . . . . . . . . . . . . . . . . . . . . . . . . . . . . . . . . . . . . . . . . . . . . . . 1646.2. tpm INI Based Deployment . . . . . . . . . . . . . . . . . . . . . . . . . . . . . . . . . . . . . . . . . . . . . . . . . . . . . . . . . . . . . . . . . . . . . . . . . . . . . . . . . . . . . . . . . . . . . . . . . . . . . . . . . . . . . . . . . . . . . . . . 1658.1. Filters: Pipeline Stages on Masters . . . . . . . . . . . . . . . . . . . . . . . . . . . . . . . . . . . . . . . . . . . . . . . . . . . . . . . . . . . . . . . . . . . . . . . . . . . . . . . . . . . . . . . . . . . . . . . . . . . . . . . . . . . . . . . 2428.2. Filters: Pipeline Stages on Slaves . . . . . . . . . . . . . . . . . . . . . . . . . . . . . . . . . . . . . . . . . . . . . . . . . . . . . . . . . . . . . . . . . . . . . . . . . . . . . . . . . . . . . . . . . . . . . . . . . . . . . . . . . . . . . . . . . 243C.1. Tungsten Deployment . . . . . . . . . . . . . . . . . . . . . . . . . . . . . . . . . . . . . . . . . . . . . . . . . . . . . . . . . . . . . . . . . . . . . . . . . . . . . . . . . . . . . . . . . . . . . . . . . . . . . . . . . . . . . . . . . . . . . . . . . . . . . 304H.1. Cacti Monitoring: Example Graphs . . . . . . . . . . . . . . . . . . . . . . . . . . . . . . . . . . . . . . . . . . . . . . . . . . . . . . . . . . . . . . . . . . . . . . . . . . . . . . . . . . . . . . . . . . . . . . . . . . . . . . . . . . . . . . . 341
xii
List of Tables2.1. Key Terminology . . . . . . . . . . . . . . . . . . . . . . . . . . . . . . . . . . . . . . . . . . . . . . . . . . . . . . . . . . . . . . . . . . . . . . . . . . . . . . . . . . . . . . . . . . . . . . . . . . . . . . . . . . . . . . . . . . . . . . . . . . . . . . . . . . . . . . 193.1. Data Type differences when replicating data from MySQL to Oracle . . . . . . . . . . . . . . . . . . . . . . . . . . . . . . . . . . . . . . . . . . . . . . . . . . . . . . . . . . . . . . . . . . . . . . . . . 553.2. Data Type Differences when Replicating from Oracle to MySQL or Oracle . . . . . . . . . . . . . . . . . . . . . . . . . . . . . . . . . . . . . . . . . . . . . . . . . . . . . . . . . . . . . . . . . . . 563.3. setupCDC.conf Configuration File Parameters . . . . . . . . . . . . . . . . . . . . . . . . . . . . . . . . . . . . . . . . . . . . . . . . . . . . . . . . . . . . . . . . . . . . . . . . . . . . . . . . . . . . . . . . . . . . . . . . . . . . 613.4. setupCDC.conf Configuration File Parameters . . . . . . . . . . . . . . . . . . . . . . . . . . . . . . . . . . . . . . . . . . . . . . . . . . . . . . . . . . . . . . . . . . . . . . . . . . . . . . . . . . . . . . . . . . . . . . . . . . . . 696.1. check_tungsten_services Options . . . . . . . . . . . . . . . . . . . . . . . . . . . . . . . . . . . . . . . . . . . . . . . . . . . . . . . . . . . . . . . . . . . . . . . . . . . . . . . . . . . . . . . . . . . . . . . . . . . . . . . . . . . . . . . . 1446.2. check_tungsten_online Options . . . . . . . . . . . . . . . . . . . . . . . . . . . . . . . . . . . . . . . . . . . . . . . . . . . . . . . . . . . . . . . . . . . . . . . . . . . . . . . . . . . . . . . . . . . . . . . . . . . . . . . . . . . . . . . . . . 1456.3. check_tungsten_latency Options . . . . . . . . . . . . . . . . . . . . . . . . . . . . . . . . . . . . . . . . . . . . . . . . . . . . . . . . . . . . . . . . . . . . . . . . . . . . . . . . . . . . . . . . . . . . . . . . . . . . . . . . . . . . . . . . . 1456.4. ddlscan Supported Templates . . . . . . . . . . . . . . . . . . . . . . . . . . . . . . . . . . . . . . . . . . . . . . . . . . . . . . . . . . . . . . . . . . . . . . . . . . . . . . . . . . . . . . . . . . . . . . . . . . . . . . . . . . . . . . . . . . . . 1486.5. multi_trepctl Command-line Options . . . . . . . . . . . . . . . . . . . . . . . . . . . . . . . . . . . . . . . . . . . . . . . . . . . . . . . . . . . . . . . . . . . . . . . . . . . . . . . . . . . . . . . . . . . . . . . . . . . . . . . . . . . . 1536.6. multi_trepctl--output Option . . . . . . . . . . . . . . . . . . . . . . . . . . . . . . . . . . . . . . . . . . . . . . . . . . . . . . . . . . . . . . . . . . . . . . . . . . . . . . . . . . . . . . . . . . . . . . . . . . . . . . . . . . . . . . . . . . . . . 1546.7. multi_trepctl Commands . . . . . . . . . . . . . . . . . . . . . . . . . . . . . . . . . . . . . . . . . . . . . . . . . . . . . . . . . . . . . . . . . . . . . . . . . . . . . . . . . . . . . . . . . . . . . . . . . . . . . . . . . . . . . . . . . . . . . . . . . . 1556.8. setupCDC.sh Configuration Options . . . . . . . . . . . . . . . . . . . . . . . . . . . . . . . . . . . . . . . . . . . . . . . . . . . . . . . . . . . . . . . . . . . . . . . . . . . . . . . . . . . . . . . . . . . . . . . . . . . . . . . . . . . . . 1566.9. thl Options . . . . . . . . . . . . . . . . . . . . . . . . . . . . . . . . . . . . . . . . . . . . . . . . . . . . . . . . . . . . . . . . . . . . . . . . . . . . . . . . . . . . . . . . . . . . . . . . . . . . . . . . . . . . . . . . . . . . . . . . . . . . . . . . . . . . . . . . . . 1596.10. TPM Deployment Methods . . . . . . . . . . . . . . . . . . . . . . . . . . . . . . . . . . . . . . . . . . . . . . . . . . . . . . . . . . . . . . . . . . . . . . . . . . . . . . . . . . . . . . . . . . . . . . . . . . . . . . . . . . . . . . . . . . . . . . 1656.11. tpm Common Options . . . . . . . . . . . . . . . . . . . . . . . . . . . . . . . . . . . . . . . . . . . . . . . . . . . . . . . . . . . . . . . . . . . . . . . . . . . . . . . . . . . . . . . . . . . . . . . . . . . . . . . . . . . . . . . . . . . . . . . . . . . . 1676.12. tpm Core Options . . . . . . . . . . . . . . . . . . . . . . . . . . . . . . . . . . . . . . . . . . . . . . . . . . . . . . . . . . . . . . . . . . . . . . . . . . . . . . . . . . . . . . . . . . . . . . . . . . . . . . . . . . . . . . . . . . . . . . . . . . . . . . . . . 1716.13. tpm Commands . . . . . . . . . . . . . . . . . . . . . . . . . . . . . . . . . . . . . . . . . . . . . . . . . . . . . . . . . . . . . . . . . . . . . . . . . . . . . . . . . . . . . . . . . . . . . . . . . . . . . . . . . . . . . . . . . . . . . . . . . . . . . . . . . . . 1716.14. tpm Configuration Options . . . . . . . . . . . . . . . . . . . . . . . . . . . . . . . . . . . . . . . . . . . . . . . . . . . . . . . . . . . . . . . . . . . . . . . . . . . . . . . . . . . . . . . . . . . . . . . . . . . . . . . . . . . . . . . . . . . . . . 1786.15. trepctl Command-line Options . . . . . . . . . . . . . . . . . . . . . . . . . . . . . . . . . . . . . . . . . . . . . . . . . . . . . . . . . . . . . . . . . . . . . . . . . . . . . . . . . . . . . . . . . . . . . . . . . . . . . . . . . . . . . . . . . . 2136.16. trepctl Replicator Wide Commands . . . . . . . . . . . . . . . . . . . . . . . . . . . . . . . . . . . . . . . . . . . . . . . . . . . . . . . . . . . . . . . . . . . . . . . . . . . . . . . . . . . . . . . . . . . . . . . . . . . . . . . . . . . . 2146.17. trepctl Service Commands . . . . . . . . . . . . . . . . . . . . . . . . . . . . . . . . . . . . . . . . . . . . . . . . . . . . . . . . . . . . . . . . . . . . . . . . . . . . . . . . . . . . . . . . . . . . . . . . . . . . . . . . . . . . . . . . . . . . . . . 2176.18. trepctl backup Command Options . . . . . . . . . . . . . . . . . . . . . . . . . . . . . . . . . . . . . . . . . . . . . . . . . . . . . . . . . . . . . . . . . . . . . . . . . . . . . . . . . . . . . . . . . . . . . . . . . . . . . . . . . . . . . . 2176.19. trepctl clients Command Options . . . . . . . . . . . . . . . . . . . . . . . . . . . . . . . . . . . . . . . . . . . . . . . . . . . . . . . . . . . . . . . . . . . . . . . . . . . . . . . . . . . . . . . . . . . . . . . . . . . . . . . . . . . . . . 2196.20. trepctl offline-deferred Command Options . . . . . . . . . . . . . . . . . . . . . . . . . . . . . . . . . . . . . . . . . . . . . . . . . . . . . . . . . . . . . . . . . . . . . . . . . . . . . . . . . . . . . . . . . . . . . . . . . . . 2226.21. trepctl online Command Options . . . . . . . . . . . . . . . . . . . . . . . . . . . . . . . . . . . . . . . . . . . . . . . . . . . . . . . . . . . . . . . . . . . . . . . . . . . . . . . . . . . . . . . . . . . . . . . . . . . . . . . . . . . . . . . 2236.22. trepctl purge Command Options . . . . . . . . . . . . . . . . . . . . . . . . . . . . . . . . . . . . . . . . . . . . . . . . . . . . . . . . . . . . . . . . . . . . . . . . . . . . . . . . . . . . . . . . . . . . . . . . . . . . . . . . . . . . . . . 2266.23. trepctl reset Command Options . . . . . . . . . . . . . . . . . . . . . . . . . . . . . . . . . . . . . . . . . . . . . . . . . . . . . . . . . . . . . . . . . . . . . . . . . . . . . . . . . . . . . . . . . . . . . . . . . . . . . . . . . . . . . . . . 2276.24. trepctl setrole Command Options . . . . . . . . . . . . . . . . . . . . . . . . . . . . . . . . . . . . . . . . . . . . . . . . . . . . . . . . . . . . . . . . . . . . . . . . . . . . . . . . . . . . . . . . . . . . . . . . . . . . . . . . . . . . . . 2286.25. trepctl shard Command Options . . . . . . . . . . . . . . . . . . . . . . . . . . . . . . . . . . . . . . . . . . . . . . . . . . . . . . . . . . . . . . . . . . . . . . . . . . . . . . . . . . . . . . . . . . . . . . . . . . . . . . . . . . . . . . . . 2286.26. trepctl status Command Options . . . . . . . . . . . . . . . . . . . . . . . . . . . . . . . . . . . . . . . . . . . . . . . . . . . . . . . . . . . . . . . . . . . . . . . . . . . . . . . . . . . . . . . . . . . . . . . . . . . . . . . . . . . . . . . 2296.27. trepctl wait Command Options . . . . . . . . . . . . . . . . . . . . . . . . . . . . . . . . . . . . . . . . . . . . . . . . . . . . . . . . . . . . . . . . . . . . . . . . . . . . . . . . . . . . . . . . . . . . . . . . . . . . . . . . . . . . . . . . . 2366.28. tungsten_provision_slave Command-line Options . . . . . . . . . . . . . . . . . . . . . . . . . . . . . . . . . . . . . . . . . . . . . . . . . . . . . . . . . . . . . . . . . . . . . . . . . . . . . . . . . . . . . . . . . . . . 2376.29. tungsten_read_master_events Command-line Options . . . . . . . . . . . . . . . . . . . . . . . . . . . . . . . . . . . . . . . . . . . . . . . . . . . . . . . . . . . . . . . . . . . . . . . . . . . . . . . . . . . . . . 2386.30. tungsten_set_position Command-line Options . . . . . . . . . . . . . . . . . . . . . . . . . . . . . . . . . . . . . . . . . . . . . . . . . . . . . . . . . . . . . . . . . . . . . . . . . . . . . . . . . . . . . . . . . . . . . . . 239D.1. THL Event Format . . . . . . . . . . . . . . . . . . . . . . . . . . . . . . . . . . . . . . . . . . . . . . . . . . . . . . . . . . . . . . . . . . . . . . . . . . . . . . . . . . . . . . . . . . . . . . . . . . . . . . . . . . . . . . . . . . . . . . . . . . . . . . . . . . 315E.1. Continuent Tungsten Directory Structure . . . . . . . . . . . . . . . . . . . . . . . . . . . . . . . . . . . . . . . . . . . . . . . . . . . . . . . . . . . . . . . . . . . . . . . . . . . . . . . . . . . . . . . . . . . . . . . . . . . . . . . 325E.2. Continuent Tungsten tungsten Sub-Directory Structure . . . . . . . . . . . . . . . . . . . . . . . . . . . . . . . . . . . . . . . . . . . . . . . . . . . . . . . . . . . . . . . . . . . . . . . . . . . . . . . . . . . . . . . 331
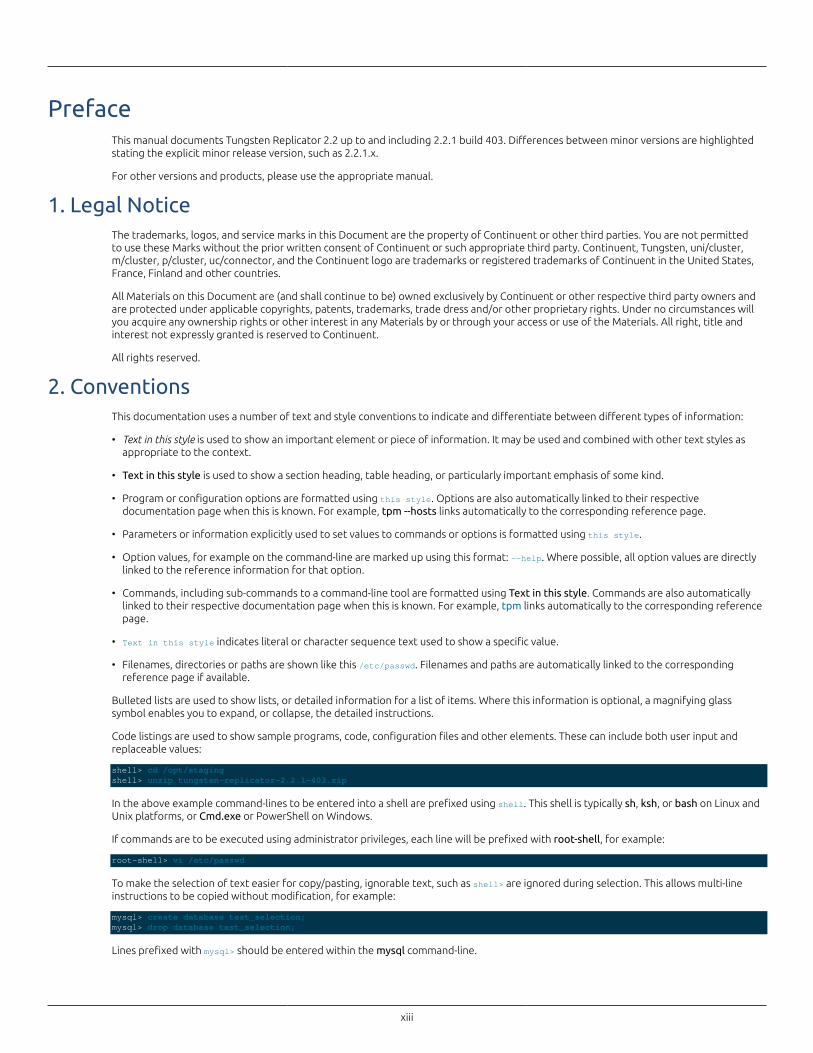
xiii
PrefaceThis manual documents Tungsten Replicator 2.2 up to and including 2.2.1 build 403. Differences between minor versions are highlightedstating the explicit minor release version, such as 2.2.1.x.
For other versions and products, please use the appropriate manual.
1. Legal NoticeThe trademarks, logos, and service marks in this Document are the property of Continuent or other third parties. You are not permittedto use these Marks without the prior written consent of Continuent or such appropriate third party. Continuent, Tungsten, uni/cluster,m/cluster, p/cluster, uc/connector, and the Continuent logo are trademarks or registered trademarks of Continuent in the United States,France, Finland and other countries.
All Materials on this Document are (and shall continue to be) owned exclusively by Continuent or other respective third party owners andare protected under applicable copyrights, patents, trademarks, trade dress and/or other proprietary rights. Under no circumstances willyou acquire any ownership rights or other interest in any Materials by or through your access or use of the Materials. All right, title andinterest not expressly granted is reserved to Continuent.
All rights reserved.
2. ConventionsThis documentation uses a number of text and style conventions to indicate and differentiate between different types of information:
• Text in this style is used to show an important element or piece of information. It may be used and combined with other text styles asappropriate to the context.
• Text in this style is used to show a section heading, table heading, or particularly important emphasis of some kind.
• Program or configuration options are formatted using this style. Options are also automatically linked to their respectivedocumentation page when this is known. For example, tpm --hosts links automatically to the corresponding reference page.
• Parameters or information explicitly used to set values to commands or options is formatted using this style.
• Option values, for example on the command-line are marked up using this format: --help. Where possible, all option values are directlylinked to the reference information for that option.
• Commands, including sub-commands to a command-line tool are formatted using Text in this style. Commands are also automaticallylinked to their respective documentation page when this is known. For example, tpm links automatically to the corresponding referencepage.
• Text in this style indicates literal or character sequence text used to show a specific value.
• Filenames, directories or paths are shown like this /etc/passwd. Filenames and paths are automatically linked to the correspondingreference page if available.
Bulleted lists are used to show lists, or detailed information for a list of items. Where this information is optional, a magnifying glasssymbol enables you to expand, or collapse, the detailed instructions.
Code listings are used to show sample programs, code, configuration files and other elements. These can include both user input andreplaceable values:
shell> cd /opt/stagingshell> unzip tungsten-replicator-2.2.1-403.zip
In the above example command-lines to be entered into a shell are prefixed using shell. This shell is typically sh, ksh, or bash on Linux andUnix platforms, or Cmd.exe or PowerShell on Windows.
If commands are to be executed using administrator privileges, each line will be prefixed with root-shell, for example:
root-shell> vi /etc/passwd
To make the selection of text easier for copy/pasting, ignorable text, such as shell> are ignored during selection. This allows multi-lineinstructions to be copied without modification, for example:
mysql> create database test_selection;mysql> drop database test_selection;
Lines prefixed with mysql> should be entered within the mysql command-line.
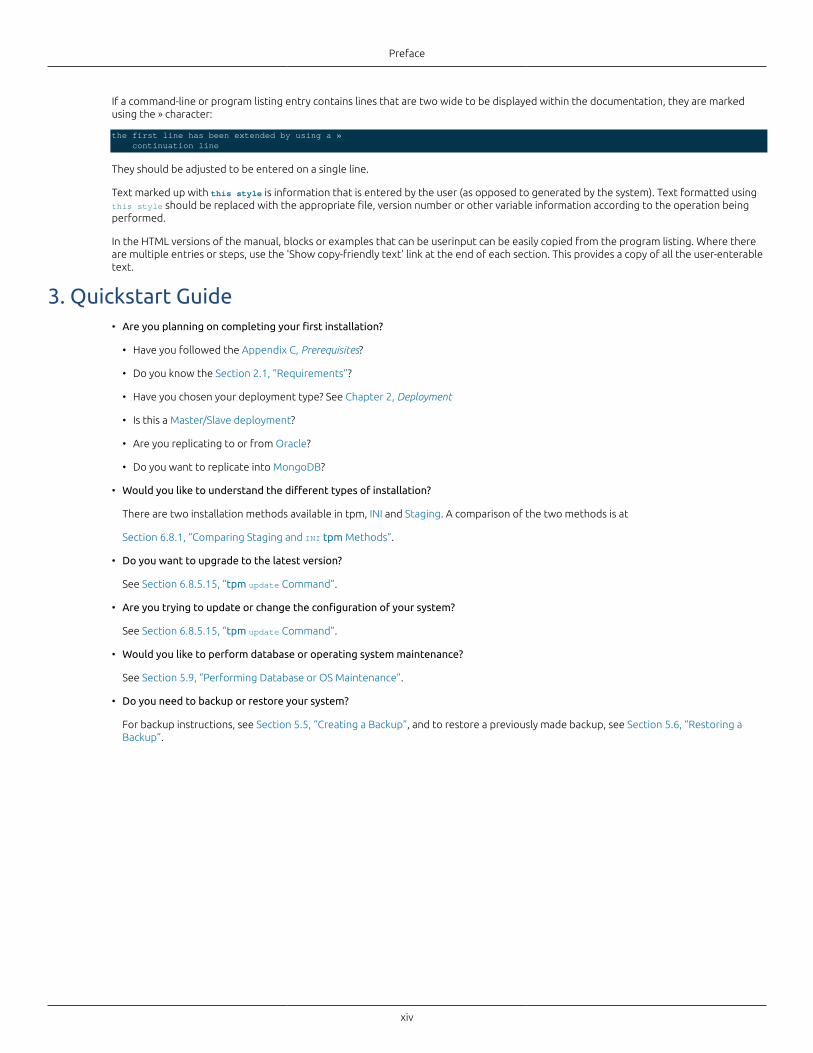
Preface
xiv
If a command-line or program listing entry contains lines that are two wide to be displayed within the documentation, they are markedusing the » character:
the first line has been extended by using a » continuation line
They should be adjusted to be entered on a single line.
Text marked up with this style is information that is entered by the user (as opposed to generated by the system). Text formatted usingthis style should be replaced with the appropriate file, version number or other variable information according to the operation beingperformed.
In the HTML versions of the manual, blocks or examples that can be userinput can be easily copied from the program listing. Where thereare multiple entries or steps, use the 'Show copy-friendly text' link at the end of each section. This provides a copy of all the user-enterabletext.
3. Quickstart Guide• Are you planning on completing your first installation?
• Have you followed the Appendix C, Prerequisites?
• Do you know the Section 2.1, “Requirements”?
• Have you chosen your deployment type? See Chapter 2, Deployment
• Is this a Master/Slave deployment?
• Are you replicating to or from Oracle?
• Do you want to replicate into MongoDB?
• Would you like to understand the different types of installation?
There are two installation methods available in tpm, INI and Staging. A comparison of the two methods is at
Section 6.8.1, “Comparing Staging and INI tpm Methods”.
• Do you want to upgrade to the latest version?
See Section 6.8.5.15, “tpm update Command”.
• Are you trying to update or change the configuration of your system?
See Section 6.8.5.15, “tpm update Command”.
• Would you like to perform database or operating system maintenance?
See Section 5.9, “Performing Database or OS Maintenance”.
• Do you need to backup or restore your system?
For backup instructions, see Section 5.5, “Creating a Backup”, and to restore a previously made backup, see Section 5.6, “Restoring aBackup”.
15
Chapter 1. IntroductionTungsten Replicator™ is an open source replication engine supporting a variety of different extractor and applier modules. Data can beextracted from MySQL, Oracle and Amazon RDS, and applied to transactional stores, including MySQL, Oracle, and Amazon RDS; NoSQLstores such as MongoDB, and datawarehouse stores such as Vertica, InfiniDB.
During replication, Tungsten Replication assigns data a unique global transaction ID, and enables flexible statement and/or row-basedreplication of data. This enables data to be exchanged between different databases and different database versions. During replication,information can be filtered and modified, and deployment can be between on-premise or cloud-based databases. For performance,Tungsten Replicator includes support for parallel replication, and advanced topologies such as fan-in, star and multi-master, and can beused efficiently in cross-site deployments.
Tungsten Replicator is the core foundation for Continuent Tungsten clustering solution for HA, DR and geographically distributedsolutions.
Features in Tungsten Replicator 2.2
• Replication from Oracle and MySQL, to MySQL, Oracle, MongoDB, Vertica, InfiniDB
• New installation tool, tpm, providing easier installation from the command-line, and heterogenous replication easier to deploy
• New INI file configuration, making complex deployments easier
• Additional command-line tools to make deploying and running replicator easier
• New multi_trepctl tool to make running multi host and service deployments easier
• Parallel Extractor for Oracle-based data provisioning
1.1. Tungsten ReplicatorTungsten Replicator is an open source high performance replication engine that works with a number of different source and targetdatabases to provide high-performance and improved replication functionality over the native solution. With MySQL replication, forexample, the enhanced functionality and information provided by Tungsten Replicator allows for global transaction IDs, advancedtopology support such as multi-master, star, and fan-in, and enhanced latency identification.
In addition to providing enhanced functionality Tungsten Replicator is also capable of heterogeneous replication by enabling thereplicated information to be transformed after it has been read from the data server to match the functionality or structure in the targetserver. This functionality allows for replication between MySQL, Oracle, PostgreSQL, MongoDB and Vertica, among others.
Understanding the Tungsten Replicator works requires looking at the overall replicator structure. In the diagram below is the top-leveloverview of the structure of a replication service.
At this level, there are three major components in the system that provide the core of the replication functionality:
• Extractor
The extractor component reads data from a data server, such as MySQL or Oracle, and writes that information into the TransactionHistory Log (THL). The role of the extractor is to read the information from a suitable source of change information and write it into theTHL in the native ro devined format, either as SQL statements or row-based information.
For example, within MySQL, information is read directly from the binary log that MySQL produces for native replication; in Oracle, theChange Data Capture (CDC) information is used as the information source.
• Applier
Appliers within Tungsten Replicator convert the THL information and apply it to a destination data server. The role of the applier is toread the THL information and apply that to the data server.
The applier works a number of different target databases, and is responsible for writing the information to the database. Because thetransactional data in the THL is stored either as SQL statements or row-based information, the applier has the flexibility to reformat theinformation to match the target data server. Row-based data can be reconstructed to match different database formats, for example,converting row-based information into an Oracle-specific table row, or a MongoDB document.
• Transaction History Log (THL)
The THL contains the information extracted from a data server. Information within the THL is divided up by transactions, either impliedor explicit, based on the data extracted from the data server. The THL structure, format, and content provides a significant proportion ofthe functionality and operational flexibility within Tungsten Replicator.
Introduction
16
As the THL data is stored additional information, such as the metadata and options in place when the statement or row data wasextracted are recorded. Each transaction is also recorded with an incremental global transaction ID. This ID enables individualtransactions within the THL to be identified, for example to retrieve their content, or to determine whether different appliers within areplication topology have written a specific transaction to a data server.
These components will be examined in more detail as different aspects of the system are described with respect to the different systems,features, and functionality that each system provides.
From this basic overview and structure of Tungsten Replicator, the replicator allows for a number of different topologies and solutionsthat replicate information between different services. Straightforward replication topologies, such as master/slave are easy to understandwith the basic concepts described above. More complex topologies use the same core components. For example, multi-master topologiesmake use of the global transaction ID to prevent the same statement or row data being applied to a data server multiple times. Fan-intopologies allow the data from multiple data servers to be combined into one data server.
1.1.1. Extractor
Extractors exist for reading information from the following sources:
• MySQL
• Oracle
• PostgreSQL
1.1.2. AppliersThe replicator commits transactions using block commit meaning it only commits on x transactions. This imporves performancebut when using a non-transactional engine it can cause the problems you have seen. By default this is set to 10 (The value isreplicator.global.buffer.size in replicator.properties). It is possible to set this to 1 which will remove the problem with MyISAM tables but itwill impact the performance of the replicators
Available appliers include:
• MongoDB
• MySQL
• Oracle
• PostgreSQL
• Vertica
For more information on how the replicator for heterogeneous works, see Section 3.1, “How Heterogeneous Replication Works”. For moreinformation on the batch applier, which works with datawarehouse targets, see Section 4.3, “Batch Loading for Data Warehouses”.
1.1.3. Transaction History Log (THL)Tungsten Replicator operates by reading information from the source database (MySQL, PostgreSQL, Oracle) and transferring thatinformation to the Tungsten History Log (THL).
Each transaction within the THL includes the SQL statement or the row-based data written to the database. The information also includeswhere possible transaction specific option and metadata, such as character set data, SQL modes and other information that may affecthow the information is written when the data is applied. The combination of the metadata and the global transaction ID also enable morecomplex data replication scenarios to be supported, such as multi-master, without fear of duplicating statement or row data applicationbecuase the source and global transaction ID can be compared.
In addition to all this information, the THL also includes a timestamp and a record of when the information was written into the databasebefore the change was extracted. Using a combination of the global transaction ID and this timing information provides information on thelatency and how up to date an a dataserver is compared to the original datasource.
Depending on the underlying storage of the data, the information can be reformatted and applied to different data servers. When dealingwith row-based data, this can be applied to a different type of data server, or completely reformatted and applied to non-table basedservices such as MongoDB.
THL information is stored for each replicator service, and can also be exchanged over the network between different replicator instances.This enables transaction data to be exchanged between different hosts within the same network or across wide-area-networks.

Introduction
17
1.1.4. FilteringFor more information on the filters available, and how to use them, see Chapter 8, Replication Filters.
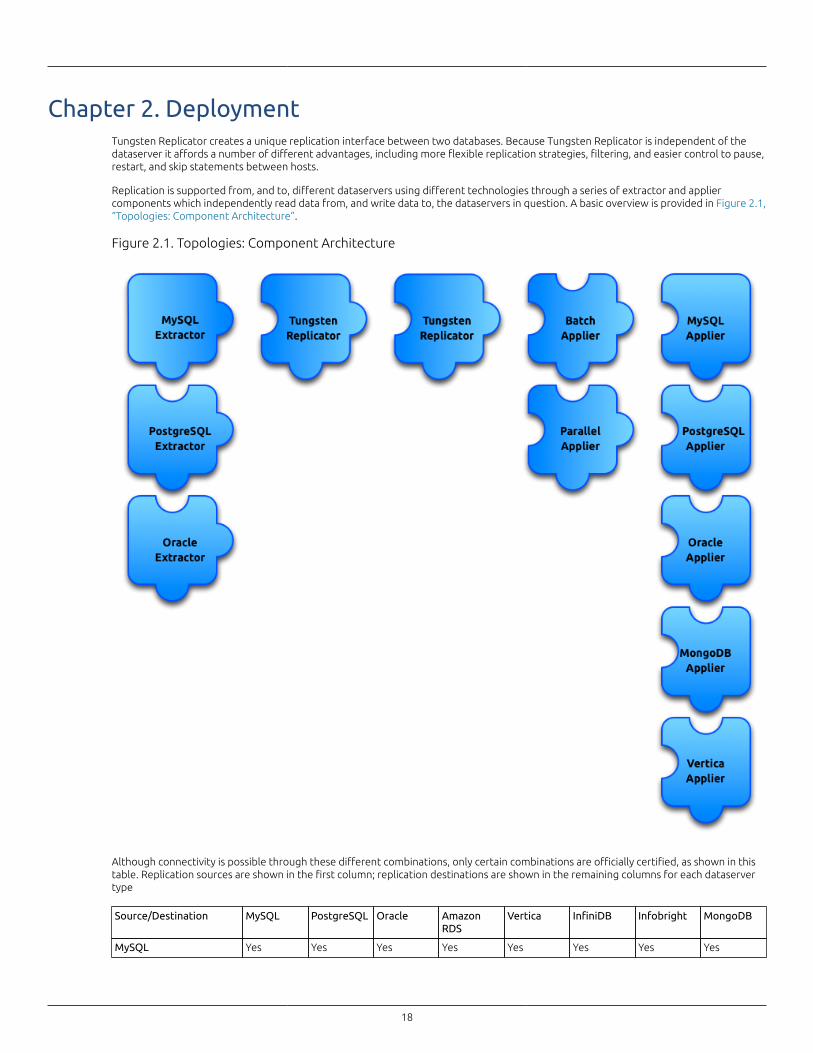
18
Chapter 2. DeploymentTungsten Replicator creates a unique replication interface between two databases. Because Tungsten Replicator is independent of thedataserver it affords a number of different advantages, including more flexible replication strategies, filtering, and easier control to pause,restart, and skip statements between hosts.
Replication is supported from, and to, different dataservers using different technologies through a series of extractor and appliercomponents which independently read data from, and write data to, the dataservers in question. A basic overview is provided in Figure 2.1,“Topologies: Component Architecture”.
Figure 2.1. Topologies: Component Architecture
Although connectivity is possible through these different combinations, only certain combinations are officially certified, as shown in thistable. Replication sources are shown in the first column; replication destinations are shown in the remaining columns for each dataservertype
Source/Destination MySQL PostgreSQL Oracle AmazonRDS
Vertica InfiniDB Infobright MongoDB
MySQL Yes Yes Yes Yes Yes Yes Yes Yes
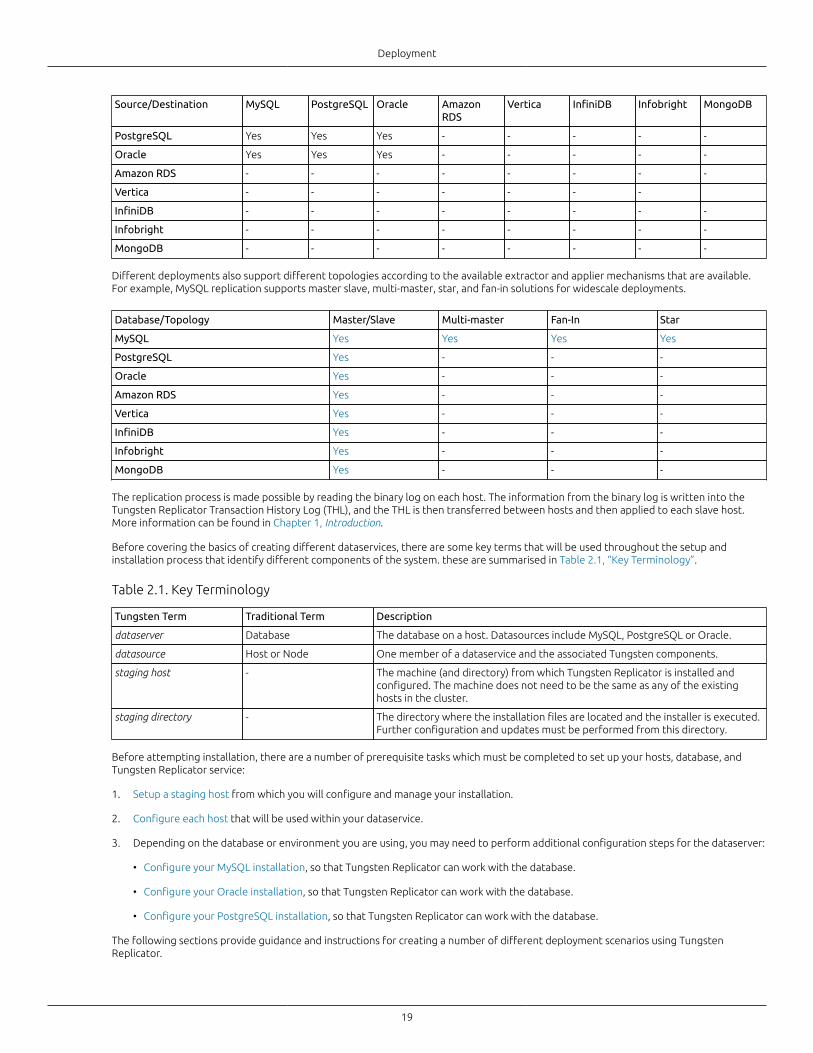
Deployment
19
Source/Destination MySQL PostgreSQL Oracle AmazonRDS
Vertica InfiniDB Infobright MongoDB
PostgreSQL Yes Yes Yes - - - - -
Oracle Yes Yes Yes - - - - -
Amazon RDS - - - - - - - -
Vertica - - - - - - -
InfiniDB - - - - - - - -
Infobright - - - - - - - -
MongoDB - - - - - - - -
Different deployments also support different topologies according to the available extractor and applier mechanisms that are available.For example, MySQL replication supports master slave, multi-master, star, and fan-in solutions for widescale deployments.
Database/Topology Master/Slave Multi-master Fan-In Star
MySQL Yes Yes Yes Yes
PostgreSQL Yes - - -
Oracle Yes - - -
Amazon RDS Yes - - -
Vertica Yes - - -
InfiniDB Yes - - -
Infobright Yes - - -
MongoDB Yes - - -
The replication process is made possible by reading the binary log on each host. The information from the binary log is written into theTungsten Replicator Transaction History Log (THL), and the THL is then transferred between hosts and then applied to each slave host.More information can be found in Chapter 1, Introduction.
Before covering the basics of creating different dataservices, there are some key terms that will be used throughout the setup andinstallation process that identify different components of the system. these are summarised in Table 2.1, “Key Terminology”.
Table 2.1. Key Terminology
Tungsten Term Traditional Term Description
dataserver Database The database on a host. Datasources include MySQL, PostgreSQL or Oracle.
datasource Host or Node One member of a dataservice and the associated Tungsten components.
staging host - The machine (and directory) from which Tungsten Replicator is installed andconfigured. The machine does not need to be the same as any of the existinghosts in the cluster.
staging directory - The directory where the installation files are located and the installer is executed.Further configuration and updates must be performed from this directory.
Before attempting installation, there are a number of prerequisite tasks which must be completed to set up your hosts, database, andTungsten Replicator service:
1. Setup a staging host from which you will configure and manage your installation.
2. Configure each host that will be used within your dataservice.
3. Depending on the database or environment you are using, you may need to perform additional configuration steps for the dataserver:
• Configure your MySQL installation, so that Tungsten Replicator can work with the database.
• Configure your Oracle installation, so that Tungsten Replicator can work with the database.
• Configure your PostgreSQL installation, so that Tungsten Replicator can work with the database.
The following sections provide guidance and instructions for creating a number of different deployment scenarios using TungstenReplicator.
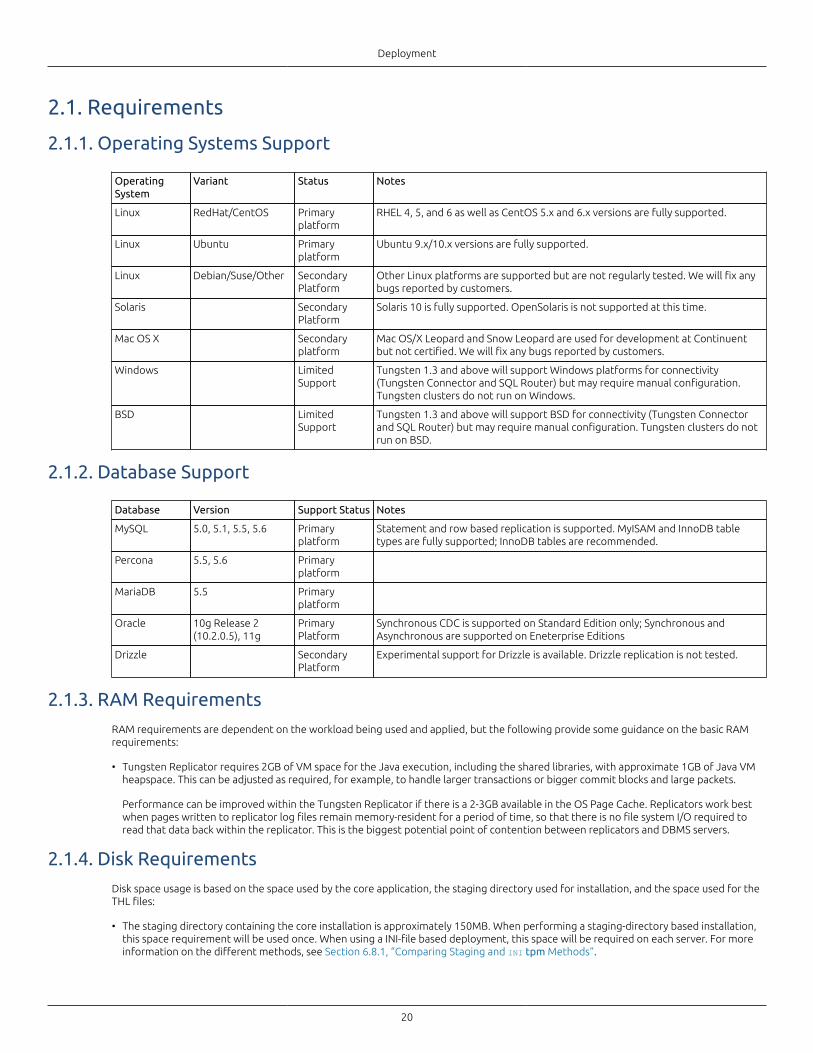
Deployment
20
2.1. Requirements
2.1.1. Operating Systems Support
OperatingSystem
Variant Status Notes
Linux RedHat/CentOS Primaryplatform
RHEL 4, 5, and 6 as well as CentOS 5.x and 6.x versions are fully supported.
Linux Ubuntu Primaryplatform
Ubuntu 9.x/10.x versions are fully supported.
Linux Debian/Suse/Other SecondaryPlatform
Other Linux platforms are supported but are not regularly tested. We will fix anybugs reported by customers.
Solaris SecondaryPlatform
Solaris 10 is fully supported. OpenSolaris is not supported at this time.
Mac OS X Secondaryplatform
Mac OS/X Leopard and Snow Leopard are used for development at Continuentbut not certified. We will fix any bugs reported by customers.
Windows LimitedSupport
Tungsten 1.3 and above will support Windows platforms for connectivity(Tungsten Connector and SQL Router) but may require manual configuration.Tungsten clusters do not run on Windows.
BSD LimitedSupport
Tungsten 1.3 and above will support BSD for connectivity (Tungsten Connectorand SQL Router) but may require manual configuration. Tungsten clusters do notrun on BSD.
2.1.2. Database Support
Database Version Support Status Notes
MySQL 5.0, 5.1, 5.5, 5.6 Primaryplatform
Statement and row based replication is supported. MyISAM and InnoDB tabletypes are fully supported; InnoDB tables are recommended.
Percona 5.5, 5.6 Primaryplatform
MariaDB 5.5 Primaryplatform
Oracle 10g Release 2(10.2.0.5), 11g
PrimaryPlatform
Synchronous CDC is supported on Standard Edition only; Synchronous andAsynchronous are supported on Eneterprise Editions
Drizzle SecondaryPlatform
Experimental support for Drizzle is available. Drizzle replication is not tested.
2.1.3. RAM Requirements
RAM requirements are dependent on the workload being used and applied, but the following provide some guidance on the basic RAMrequirements:
• Tungsten Replicator requires 2GB of VM space for the Java execution, including the shared libraries, with approximate 1GB of Java VMheapspace. This can be adjusted as required, for example, to handle larger transactions or bigger commit blocks and large packets.
Performance can be improved within the Tungsten Replicator if there is a 2-3GB available in the OS Page Cache. Replicators work bestwhen pages written to replicator log files remain memory-resident for a period of time, so that there is no file system I/O required toread that data back within the replicator. This is the biggest potential point of contention between replicators and DBMS servers.
2.1.4. Disk Requirements
Disk space usage is based on the space used by the core application, the staging directory used for installation, and the space used for theTHL files:
• The staging directory containing the core installation is approximately 150MB. When performing a staging-directory based installation,this space requirement will be used once. When using a INI-file based deployment, this space will be required on each server. For moreinformation on the different methods, see Section 6.8.1, “Comparing Staging and INI tpm Methods”.
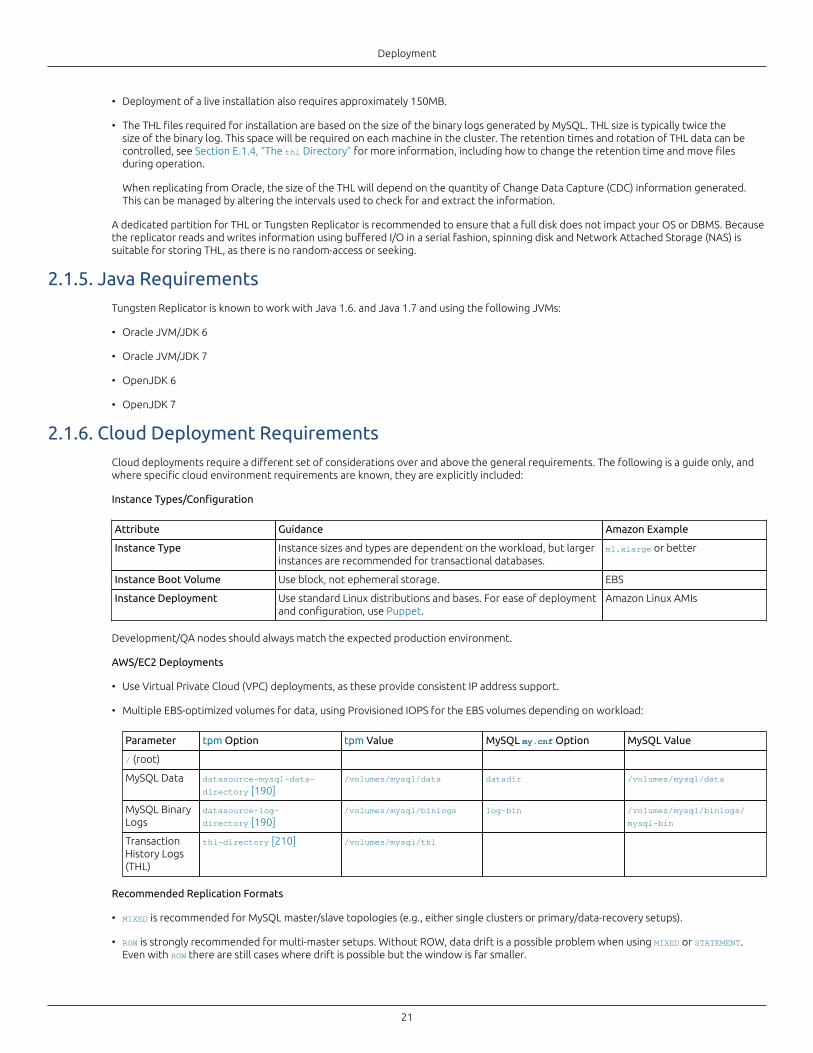
Deployment
21
• Deployment of a live installation also requires approximately 150MB.
• The THL files required for installation are based on the size of the binary logs generated by MySQL. THL size is typically twice thesize of the binary log. This space will be required on each machine in the cluster. The retention times and rotation of THL data can becontrolled, see Section E.1.4, “The thl Directory” for more information, including how to change the retention time and move filesduring operation.
When replicating from Oracle, the size of the THL will depend on the quantity of Change Data Capture (CDC) information generated.This can be managed by altering the intervals used to check for and extract the information.
A dedicated partition for THL or Tungsten Replicator is recommended to ensure that a full disk does not impact your OS or DBMS. Becausethe replicator reads and writes information using buffered I/O in a serial fashion, spinning disk and Network Attached Storage (NAS) issuitable for storing THL, as there is no random-access or seeking.
2.1.5. Java RequirementsTungsten Replicator is known to work with Java 1.6. and Java 1.7 and using the following JVMs:
• Oracle JVM/JDK 6
• Oracle JVM/JDK 7
• OpenJDK 6
• OpenJDK 7
2.1.6. Cloud Deployment RequirementsCloud deployments require a different set of considerations over and above the general requirements. The following is a guide only, andwhere specific cloud environment requirements are known, they are explicitly included:
Instance Types/Configuration
Attribute Guidance Amazon Example
Instance Type Instance sizes and types are dependent on the workload, but largerinstances are recommended for transactional databases.
m1.xlarge or better
Instance Boot Volume Use block, not ephemeral storage. EBS
Instance Deployment Use standard Linux distributions and bases. For ease of deploymentand configuration, use Puppet.
Amazon Linux AMIs
Development/QA nodes should always match the expected production environment.
AWS/EC2 Deployments
• Use Virtual Private Cloud (VPC) deployments, as these provide consistent IP address support.
• Multiple EBS-optimized volumes for data, using Provisioned IOPS for the EBS volumes depending on workload:
Parameter tpm Option tpm Value MySQL my.cnf Option MySQL Value
/ (root)
MySQL Data datasource-mysql-data-
directory [190]/volumes/mysql/data datadir /volumes/mysql/data
MySQL BinaryLogs
datasource-log-
directory [190]/volumes/mysql/binlogs log-bin /volumes/mysql/binlogs/
mysql-bin
TransactionHistory Logs(THL)
thl-directory [210] /volumes/mysql/thl
Recommended Replication Formats
• MIXED is recommended for MySQL master/slave topologies (e.g., either single clusters or primary/data-recovery setups).
• ROW is strongly recommended for multi-master setups. Without ROW, data drift is a possible problem when using MIXED or STATEMENT.Even with ROW there are still cases where drift is possible but the window is far smaller.
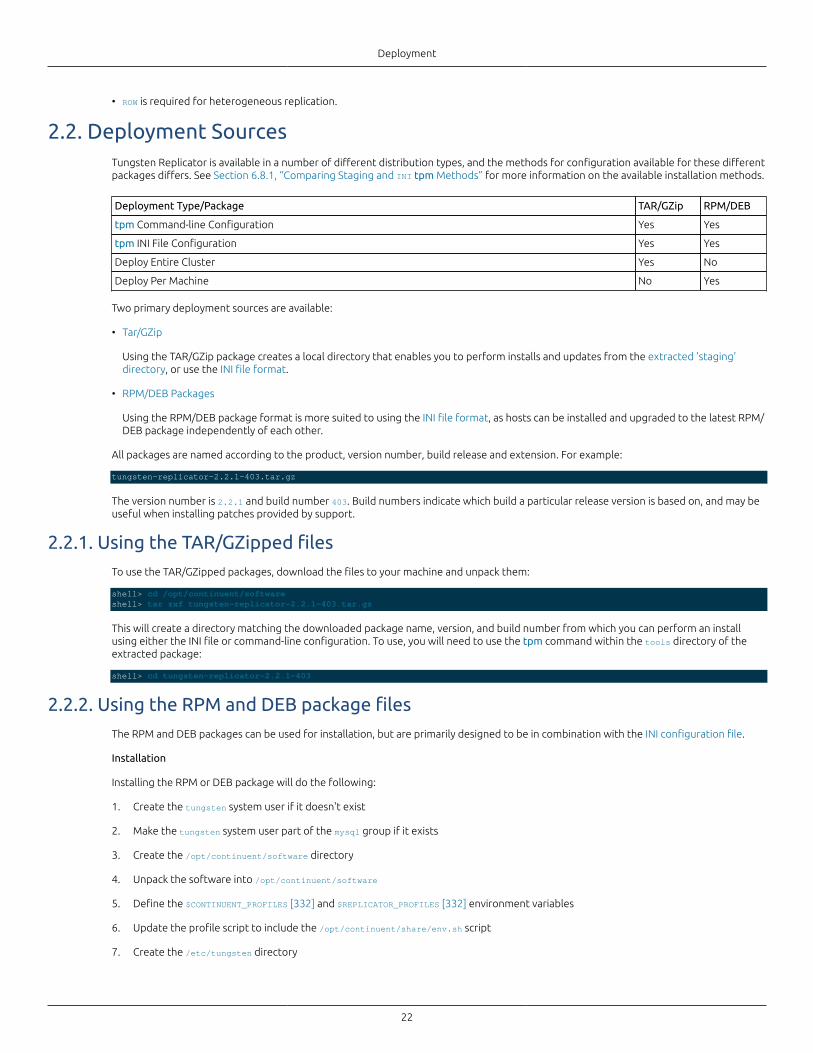
Deployment
22
• ROW is required for heterogeneous replication.
2.2. Deployment SourcesTungsten Replicator is available in a number of different distribution types, and the methods for configuration available for these differentpackages differs. See Section 6.8.1, “Comparing Staging and INI tpm Methods” for more information on the available installation methods.
Deployment Type/Package TAR/GZip RPM/DEB
tpm Command-line Configuration Yes Yes
tpm INI File Configuration Yes Yes
Deploy Entire Cluster Yes No
Deploy Per Machine No Yes
Two primary deployment sources are available:
• Tar/GZip
Using the TAR/GZip package creates a local directory that enables you to perform installs and updates from the extracted 'staging'directory, or use the INI file format.
• RPM/DEB Packages
Using the RPM/DEB package format is more suited to using the INI file format, as hosts can be installed and upgraded to the latest RPM/DEB package independently of each other.
All packages are named according to the product, version number, build release and extension. For example:
tungsten-replicator-2.2.1-403.tar.gz
The version number is 2.2.1 and build number 403. Build numbers indicate which build a particular release version is based on, and may beuseful when installing patches provided by support.
2.2.1. Using the TAR/GZipped filesTo use the TAR/GZipped packages, download the files to your machine and unpack them:
shell> cd /opt/continuent/softwareshell> tar zxf tungsten-replicator-2.2.1-403.tar.gz
This will create a directory matching the downloaded package name, version, and build number from which you can perform an installusing either the INI file or command-line configuration. To use, you will need to use the tpm command within the tools directory of theextracted package:
shell> cd tungsten-replicator-2.2.1-403
2.2.2. Using the RPM and DEB package filesThe RPM and DEB packages can be used for installation, but are primarily designed to be in combination with the INI configuration file.
Installation
Installing the RPM or DEB package will do the following:
1. Create the tungsten system user if it doesn't exist
2. Make the tungsten system user part of the mysql group if it exists
3. Create the /opt/continuent/software directory
4. Unpack the software into /opt/continuent/software
5. Define the $CONTINUENT_PROFILES [332] and $REPLICATOR_PROFILES [332] environment variables
6. Update the profile script to include the /opt/continuent/share/env.sh script
7. Create the /etc/tungsten directory
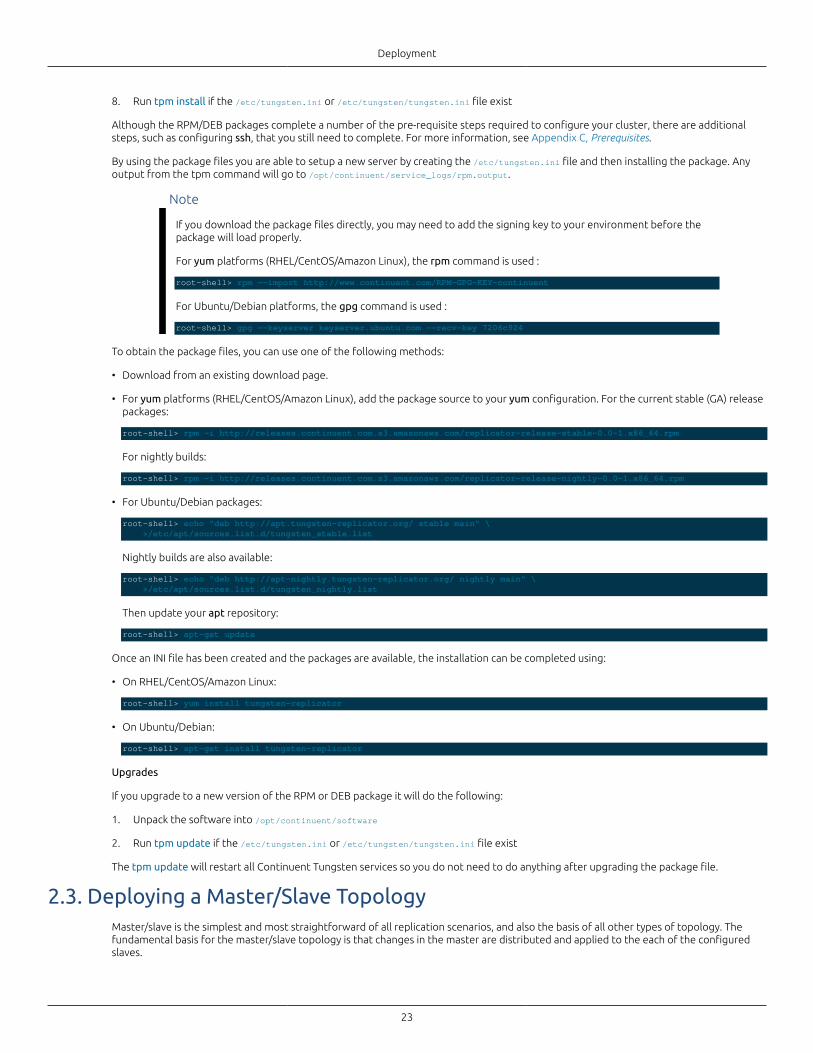
Deployment
23
8. Run tpm install if the /etc/tungsten.ini or /etc/tungsten/tungsten.ini file exist
Although the RPM/DEB packages complete a number of the pre-requisite steps required to configure your cluster, there are additionalsteps, such as configuring ssh, that you still need to complete. For more information, see Appendix C, Prerequisites.
By using the package files you are able to setup a new server by creating the /etc/tungsten.ini file and then installing the package. Anyoutput from the tpm command will go to /opt/continuent/service_logs/rpm.output.
Note
If you download the package files directly, you may need to add the signing key to your environment before thepackage will load properly.
For yum platforms (RHEL/CentOS/Amazon Linux), the rpm command is used :
root-shell> rpm --import http://www.continuent.com/RPM-GPG-KEY-continuent
For Ubuntu/Debian platforms, the gpg command is used :
root-shell> gpg --keyserver keyserver.ubuntu.com --recv-key 7206c924
To obtain the package files, you can use one of the following methods:
• Download from an existing download page.
• For yum platforms (RHEL/CentOS/Amazon Linux), add the package source to your yum configuration. For the current stable (GA) releasepackages:
root-shell> rpm -i http://releases.continuent.com.s3.amazonaws.com/replicator-release-stable-0.0-1.x86_64.rpm
For nightly builds:
root-shell> rpm -i http://releases.continuent.com.s3.amazonaws.com/replicator-release-nightly-0.0-1.x86_64.rpm
• For Ubuntu/Debian packages:
root-shell> echo "deb http://apt.tungsten-replicator.org/ stable main" \ >/etc/apt/sources.list.d/tungsten_stable.list
Nightly builds are also available:
root-shell> echo "deb http://apt-nightly.tungsten-replicator.org/ nightly main" \ >/etc/apt/sources.list.d/tungsten_nightly.list
Then update your apt repository:
root-shell> apt-get update
Once an INI file has been created and the packages are available, the installation can be completed using:
• On RHEL/CentOS/Amazon Linux:
root-shell> yum install tungsten-replicator
• On Ubuntu/Debian:
root-shell> apt-get install tungsten-replicator
Upgrades
If you upgrade to a new version of the RPM or DEB package it will do the following:
1. Unpack the software into /opt/continuent/software
2. Run tpm update if the /etc/tungsten.ini or /etc/tungsten/tungsten.ini file exist
The tpm update will restart all Continuent Tungsten services so you do not need to do anything after upgrading the package file.
2.3. Deploying a Master/Slave TopologyMaster/slave is the simplest and most straightforward of all replication scenarios, and also the basis of all other types of topology. Thefundamental basis for the master/slave topology is that changes in the master are distributed and applied to the each of the configuredslaves.
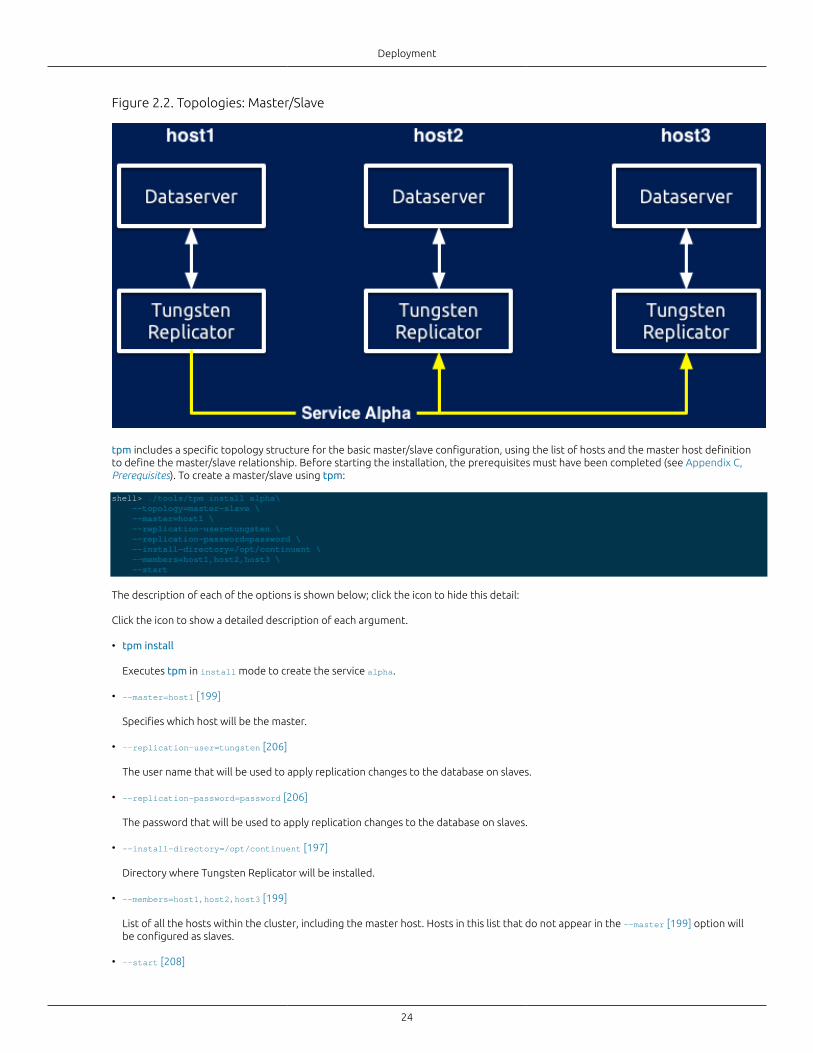
Deployment
24
Figure 2.2. Topologies: Master/Slave
tpm includes a specific topology structure for the basic master/slave configuration, using the list of hosts and the master host definitionto define the master/slave relationship. Before starting the installation, the prerequisites must have been completed (see Appendix C,Prerequisites). To create a master/slave using tpm:
shell> ./tools/tpm install alpha\ --topology=master-slave \ --master=host1 \ --replication-user=tungsten \ --replication-password=password \ --install-directory=/opt/continuent \ --members=host1,host2,host3 \ --start
The description of each of the options is shown below; click the icon to hide this detail:
Click the icon to show a detailed description of each argument.
• tpm install
Executes tpm in install mode to create the service alpha.
• --master=host1 [199]
Specifies which host will be the master.
• --replication-user=tungsten [206]
The user name that will be used to apply replication changes to the database on slaves.
• --replication-password=password [206]
The password that will be used to apply replication changes to the database on slaves.
• --install-directory=/opt/continuent [197]
Directory where Tungsten Replicator will be installed.
• --members=host1,host2,host3 [199]
List of all the hosts within the cluster, including the master host. Hosts in this list that do not appear in the --master [199] option willbe configured as slaves.
• --start [208]
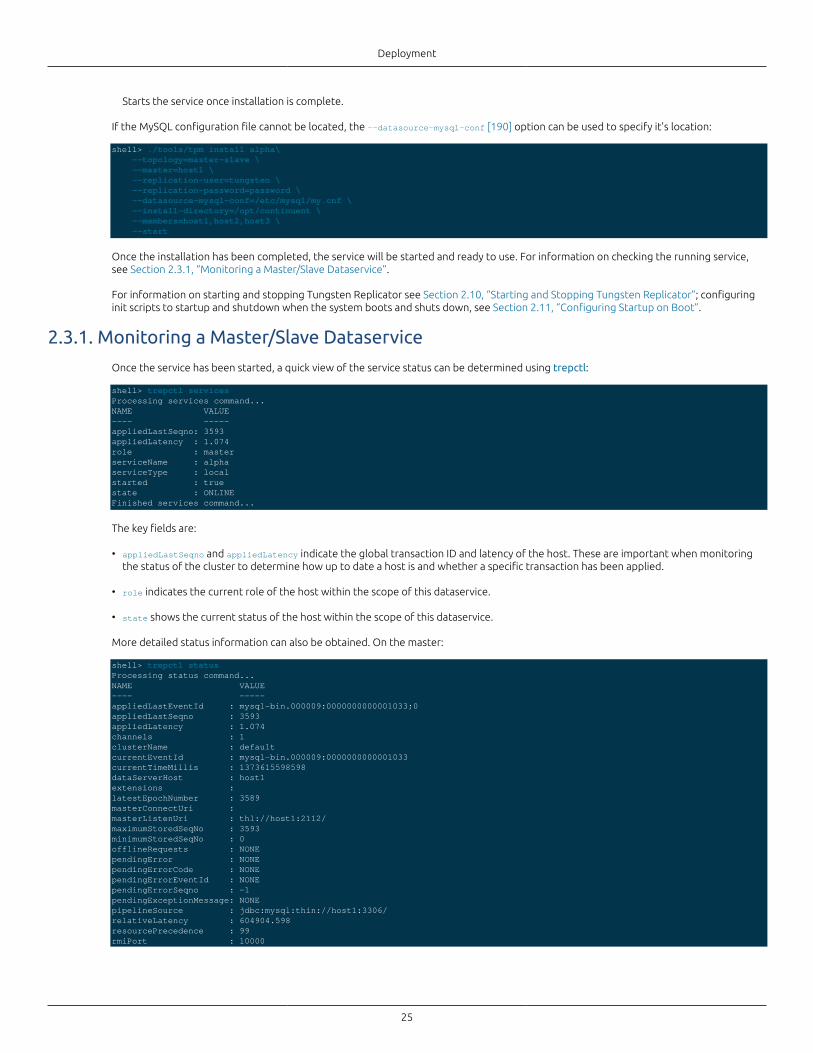
Deployment
25
Starts the service once installation is complete.
If the MySQL configuration file cannot be located, the --datasource-mysql-conf [190] option can be used to specify it's location:
shell> ./tools/tpm install alpha\ --topology=master-slave \ --master=host1 \ --replication-user=tungsten \ --replication-password=password \ --datasource-mysql-conf=/etc/mysql/my.cnf \ --install-directory=/opt/continuent \ --members=host1,host2,host3 \ --start
Once the installation has been completed, the service will be started and ready to use. For information on checking the running service,see Section 2.3.1, “Monitoring a Master/Slave Dataservice”.
For information on starting and stopping Tungsten Replicator see Section 2.10, “Starting and Stopping Tungsten Replicator”; configuringinit scripts to startup and shutdown when the system boots and shuts down, see Section 2.11, “Configuring Startup on Boot”.
2.3.1. Monitoring a Master/Slave Dataservice
Once the service has been started, a quick view of the service status can be determined using trepctl:
shell> trepctl servicesProcessing services command...NAME VALUE---- -----appliedLastSeqno: 3593appliedLatency : 1.074role : masterserviceName : alphaserviceType : localstarted : truestate : ONLINEFinished services command...
The key fields are:
• appliedLastSeqno and appliedLatency indicate the global transaction ID and latency of the host. These are important when monitoringthe status of the cluster to determine how up to date a host is and whether a specific transaction has been applied.
• role indicates the current role of the host within the scope of this dataservice.
• state shows the current status of the host within the scope of this dataservice.
More detailed status information can also be obtained. On the master:
shell> trepctl statusProcessing status command...NAME VALUE---- -----appliedLastEventId : mysql-bin.000009:0000000000001033;0appliedLastSeqno : 3593appliedLatency : 1.074channels : 1clusterName : defaultcurrentEventId : mysql-bin.000009:0000000000001033currentTimeMillis : 1373615598598dataServerHost : host1extensions : latestEpochNumber : 3589masterConnectUri : masterListenUri : thl://host1:2112/maximumStoredSeqNo : 3593minimumStoredSeqNo : 0offlineRequests : NONEpendingError : NONEpendingErrorCode : NONEpendingErrorEventId : NONEpendingErrorSeqno : -1pendingExceptionMessage: NONEpipelineSource : jdbc:mysql:thin://host1:3306/relativeLatency : 604904.598resourcePrecedence : 99rmiPort : 10000
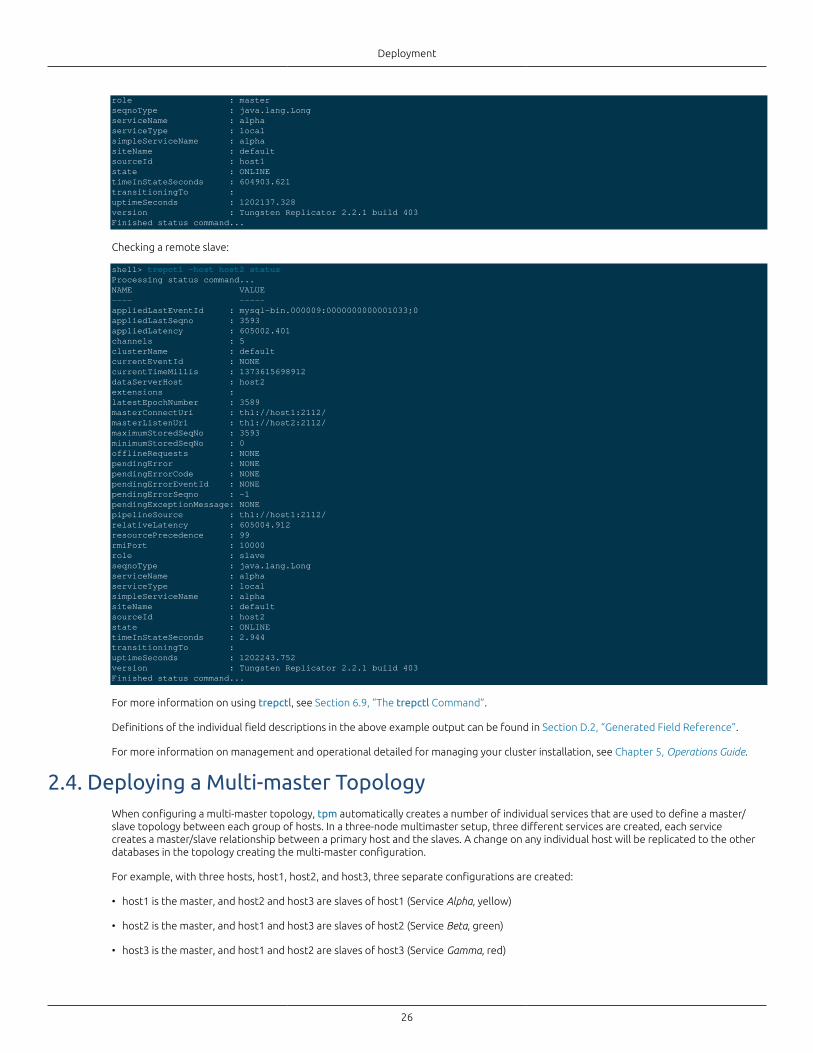
Deployment
26
role : masterseqnoType : java.lang.LongserviceName : alphaserviceType : localsimpleServiceName : alphasiteName : defaultsourceId : host1state : ONLINEtimeInStateSeconds : 604903.621transitioningTo : uptimeSeconds : 1202137.328version : Tungsten Replicator 2.2.1 build 403Finished status command...
Checking a remote slave:
shell> trepctl -host host2 statusProcessing status command...NAME VALUE---- -----appliedLastEventId : mysql-bin.000009:0000000000001033;0appliedLastSeqno : 3593appliedLatency : 605002.401channels : 5clusterName : defaultcurrentEventId : NONEcurrentTimeMillis : 1373615698912dataServerHost : host2extensions : latestEpochNumber : 3589masterConnectUri : thl://host1:2112/masterListenUri : thl://host2:2112/maximumStoredSeqNo : 3593minimumStoredSeqNo : 0offlineRequests : NONEpendingError : NONEpendingErrorCode : NONEpendingErrorEventId : NONEpendingErrorSeqno : -1pendingExceptionMessage: NONEpipelineSource : thl://host1:2112/relativeLatency : 605004.912resourcePrecedence : 99rmiPort : 10000role : slaveseqnoType : java.lang.LongserviceName : alphaserviceType : localsimpleServiceName : alphasiteName : defaultsourceId : host2state : ONLINEtimeInStateSeconds : 2.944transitioningTo : uptimeSeconds : 1202243.752version : Tungsten Replicator 2.2.1 build 403Finished status command...
For more information on using trepctl, see Section 6.9, “The trepctl Command”.
Definitions of the individual field descriptions in the above example output can be found in Section D.2, “Generated Field Reference”.
For more information on management and operational detailed for managing your cluster installation, see Chapter 5, Operations Guide.
2.4. Deploying a Multi-master TopologyWhen configuring a multi-master topology, tpm automatically creates a number of individual services that are used to define a master/slave topology between each group of hosts. In a three-node multimaster setup, three different services are created, each servicecreates a master/slave relationship between a primary host and the slaves. A change on any individual host will be replicated to the otherdatabases in the topology creating the multi-master configuration.
For example, with three hosts, host1, host2, and host3, three separate configurations are created:
• host1 is the master, and host2 and host3 are slaves of host1 (Service Alpha, yellow)
• host2 is the master, and host1 and host3 are slaves of host2 (Service Beta, green)
• host3 is the master, and host1 and host2 are slaves of host3 (Service Gamma, red)
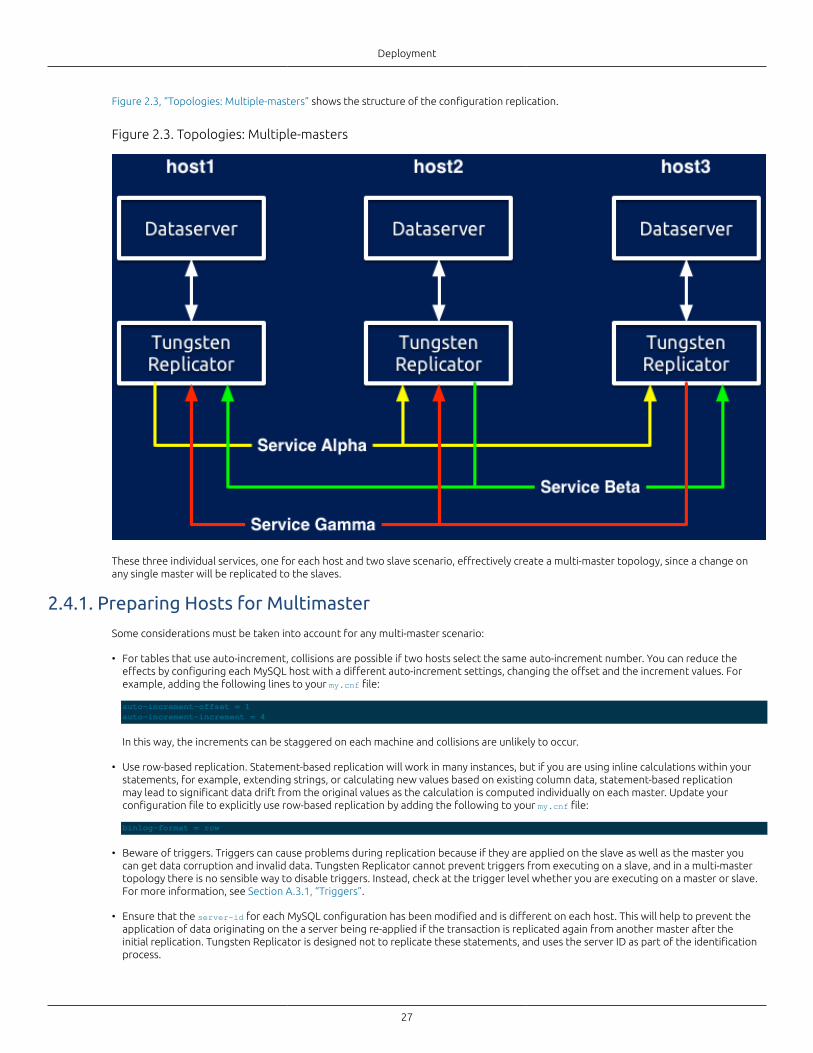
Deployment
27
Figure 2.3, “Topologies: Multiple-masters” shows the structure of the configuration replication.
Figure 2.3. Topologies: Multiple-masters
These three individual services, one for each host and two slave scenario, effrectively create a multi-master topology, since a change onany single master will be replicated to the slaves.
2.4.1. Preparing Hosts for Multimaster
Some considerations must be taken into account for any multi-master scenario:
• For tables that use auto-increment, collisions are possible if two hosts select the same auto-increment number. You can reduce theeffects by configuring each MySQL host with a different auto-increment settings, changing the offset and the increment values. Forexample, adding the following lines to your my.cnf file:
auto-increment-offset = 1auto-increment-increment = 4
In this way, the increments can be staggered on each machine and collisions are unlikely to occur.
• Use row-based replication. Statement-based replication will work in many instances, but if you are using inline calculations within yourstatements, for example, extending strings, or calculating new values based on existing column data, statement-based replicationmay lead to significant data drift from the original values as the calculation is computed individually on each master. Update yourconfiguration file to explicitly use row-based replication by adding the following to your my.cnf file:
binlog-format = row
• Beware of triggers. Triggers can cause problems during replication because if they are applied on the slave as well as the master youcan get data corruption and invalid data. Tungsten Replicator cannot prevent triggers from executing on a slave, and in a multi-mastertopology there is no sensible way to disable triggers. Instead, check at the trigger level whether you are executing on a master or slave.For more information, see Section A.3.1, “Triggers”.
• Ensure that the server-id for each MySQL configuration has been modified and is different on each host. This will help to prevent theapplication of data originating on the a server being re-applied if the transaction is replicated again from another master after theinitial replication. Tungsten Replicator is designed not to replicate these statements, and uses the server ID as part of the identificationprocess.
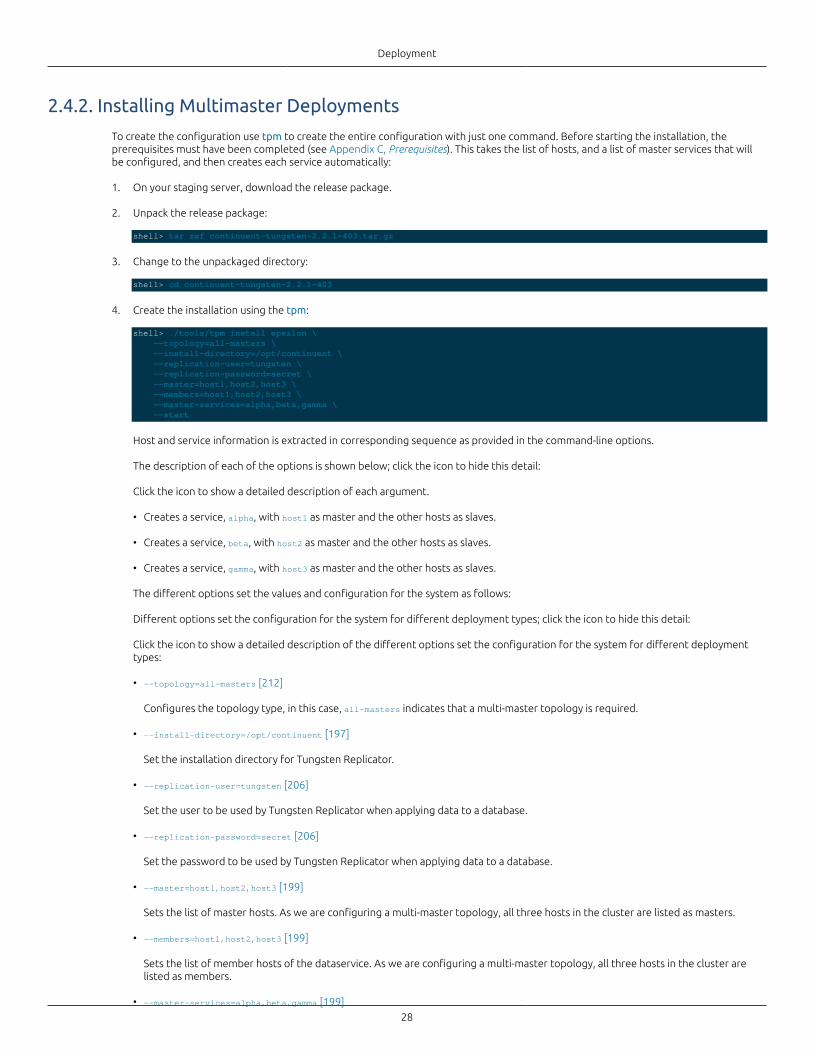
Deployment
28
2.4.2. Installing Multimaster Deployments
To create the configuration use tpm to create the entire configuration with just one command. Before starting the installation, theprerequisites must have been completed (see Appendix C, Prerequisites). This takes the list of hosts, and a list of master services that willbe configured, and then creates each service automatically:
1. On your staging server, download the release package.
2. Unpack the release package:
shell> tar zxf continuent-tungsten-2.2.1-403.tar.gz
3. Change to the unpackaged directory:
shell> cd continuent-tungsten-2.2.1-403
4. Create the installation using the tpm:
shell> ./tools/tpm install epsilon \ --topology=all-masters \ --install-directory=/opt/continuent \ --replication-user=tungsten \ --replication-password=secret \ --master=host1,host2,host3 \ --members=host1,host2,host3 \ --master-services=alpha,beta,gamma \ --start
Host and service information is extracted in corresponding sequence as provided in the command-line options.
The description of each of the options is shown below; click the icon to hide this detail:
Click the icon to show a detailed description of each argument.
• Creates a service, alpha, with host1 as master and the other hosts as slaves.
• Creates a service, beta, with host2 as master and the other hosts as slaves.
• Creates a service, gamma, with host3 as master and the other hosts as slaves.
The different options set the values and configuration for the system as follows:
Different options set the configuration for the system for different deployment types; click the icon to hide this detail:
Click the icon to show a detailed description of the different options set the configuration for the system for different deploymenttypes:
• --topology=all-masters [212]
Configures the topology type, in this case, all-masters indicates that a multi-master topology is required.
• --install-directory=/opt/continuent [197]
Set the installation directory for Tungsten Replicator.
• --replication-user=tungsten [206]
Set the user to be used by Tungsten Replicator when applying data to a database.
• --replication-password=secret [206]
Set the password to be used by Tungsten Replicator when applying data to a database.
• --master=host1,host2,host3 [199]
Sets the list of master hosts. As we are configuring a multi-master topology, all three hosts in the cluster are listed as masters.
• --members=host1,host2,host3 [199]
Sets the list of member hosts of the dataservice. As we are configuring a multi-master topology, all three hosts in the cluster arelisted as members.
• --master-services=alpha,beta,gamma [199]
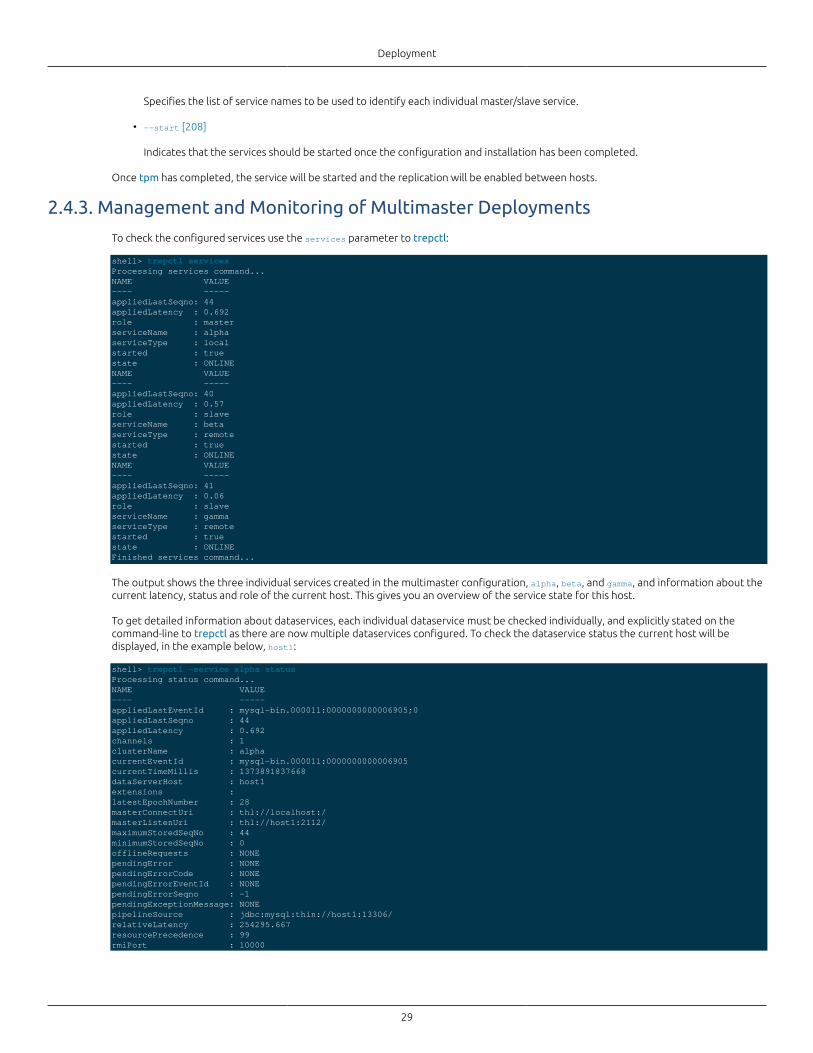
Deployment
29
Specifies the list of service names to be used to identify each individual master/slave service.
• --start [208]
Indicates that the services should be started once the configuration and installation has been completed.
Once tpm has completed, the service will be started and the replication will be enabled between hosts.
2.4.3. Management and Monitoring of Multimaster Deployments
To check the configured services use the services parameter to trepctl:
shell> trepctl servicesProcessing services command...NAME VALUE---- -----appliedLastSeqno: 44appliedLatency : 0.692role : masterserviceName : alphaserviceType : localstarted : truestate : ONLINENAME VALUE---- -----appliedLastSeqno: 40appliedLatency : 0.57role : slaveserviceName : betaserviceType : remotestarted : truestate : ONLINENAME VALUE---- -----appliedLastSeqno: 41appliedLatency : 0.06role : slaveserviceName : gammaserviceType : remotestarted : truestate : ONLINEFinished services command...
The output shows the three individual services created in the multimaster configuration, alpha, beta, and gamma, and information about thecurrent latency, status and role of the current host. This gives you an overview of the service state for this host.
To get detailed information about dataservices, each individual dataservice must be checked individually, and explicitly stated on thecommand-line to trepctl as there are now multiple dataservices configured. To check the dataservice status the current host will bedisplayed, in the example below, host1:
shell> trepctl -service alpha statusProcessing status command...NAME VALUE---- -----appliedLastEventId : mysql-bin.000011:0000000000006905;0appliedLastSeqno : 44appliedLatency : 0.692channels : 1clusterName : alphacurrentEventId : mysql-bin.000011:0000000000006905currentTimeMillis : 1373891837668dataServerHost : host1extensions : latestEpochNumber : 28masterConnectUri : thl://localhost:/masterListenUri : thl://host1:2112/maximumStoredSeqNo : 44minimumStoredSeqNo : 0offlineRequests : NONEpendingError : NONEpendingErrorCode : NONEpendingErrorEventId : NONEpendingErrorSeqno : -1pendingExceptionMessage: NONEpipelineSource : jdbc:mysql:thin://host1:13306/relativeLatency : 254295.667resourcePrecedence : 99rmiPort : 10000
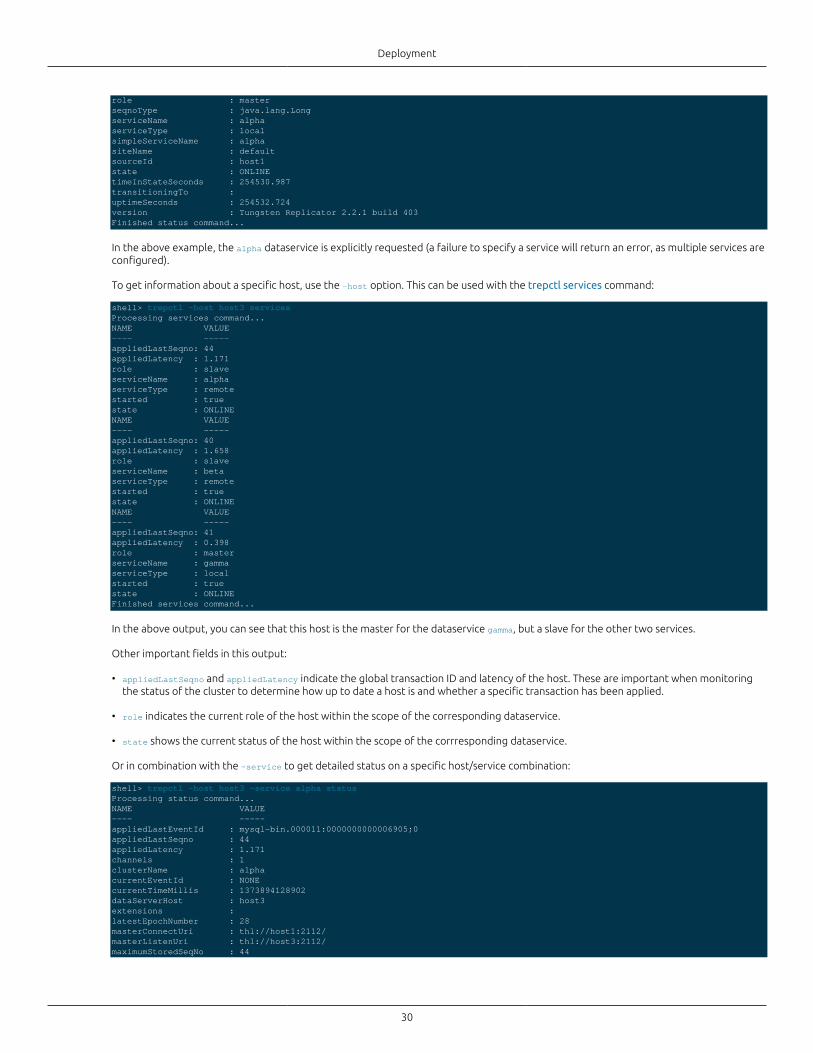
Deployment
30
role : masterseqnoType : java.lang.LongserviceName : alphaserviceType : localsimpleServiceName : alphasiteName : defaultsourceId : host1state : ONLINEtimeInStateSeconds : 254530.987transitioningTo : uptimeSeconds : 254532.724version : Tungsten Replicator 2.2.1 build 403Finished status command...
In the above example, the alpha dataservice is explicitly requested (a failure to specify a service will return an error, as multiple services areconfigured).
To get information about a specific host, use the -host option. This can be used with the trepctl services command:
shell> trepctl -host host3 services Processing services command...NAME VALUE---- -----appliedLastSeqno: 44appliedLatency : 1.171role : slaveserviceName : alphaserviceType : remotestarted : truestate : ONLINENAME VALUE---- -----appliedLastSeqno: 40appliedLatency : 1.658role : slaveserviceName : betaserviceType : remotestarted : truestate : ONLINENAME VALUE---- -----appliedLastSeqno: 41appliedLatency : 0.398role : masterserviceName : gammaserviceType : localstarted : truestate : ONLINEFinished services command...
In the above output, you can see that this host is the master for the dataservice gamma, but a slave for the other two services.
Other important fields in this output:
• appliedLastSeqno and appliedLatency indicate the global transaction ID and latency of the host. These are important when monitoringthe status of the cluster to determine how up to date a host is and whether a specific transaction has been applied.
• role indicates the current role of the host within the scope of the corresponding dataservice.
• state shows the current status of the host within the scope of the corrresponding dataservice.
Or in combination with the -service to get detailed status on a specific host/service combination:
shell> trepctl -host host3 -service alpha statusProcessing status command...NAME VALUE---- -----appliedLastEventId : mysql-bin.000011:0000000000006905;0appliedLastSeqno : 44appliedLatency : 1.171channels : 1clusterName : alphacurrentEventId : NONEcurrentTimeMillis : 1373894128902dataServerHost : host3extensions : latestEpochNumber : 28masterConnectUri : thl://host1:2112/masterListenUri : thl://host3:2112/maximumStoredSeqNo : 44
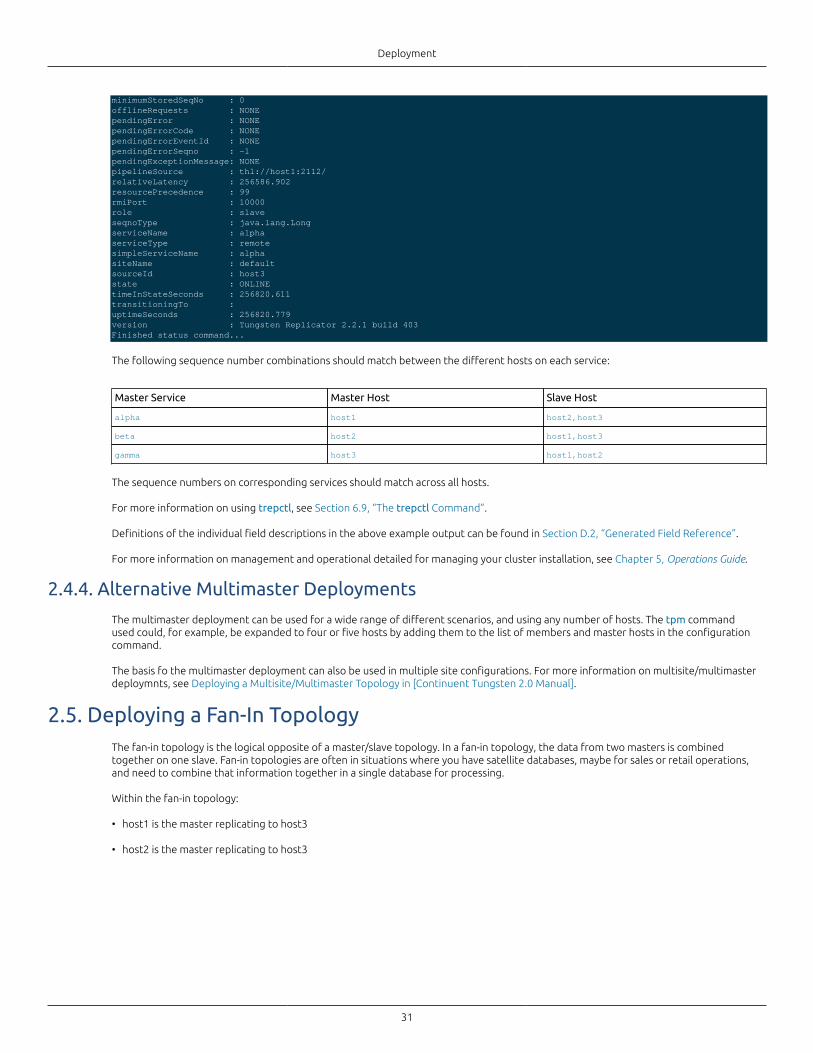
Deployment
31
minimumStoredSeqNo : 0offlineRequests : NONEpendingError : NONEpendingErrorCode : NONEpendingErrorEventId : NONEpendingErrorSeqno : -1pendingExceptionMessage: NONEpipelineSource : thl://host1:2112/relativeLatency : 256586.902resourcePrecedence : 99rmiPort : 10000role : slaveseqnoType : java.lang.LongserviceName : alphaserviceType : remotesimpleServiceName : alphasiteName : defaultsourceId : host3state : ONLINEtimeInStateSeconds : 256820.611transitioningTo : uptimeSeconds : 256820.779version : Tungsten Replicator 2.2.1 build 403Finished status command...
The following sequence number combinations should match between the different hosts on each service:
Master Service Master Host Slave Host
alpha host1 host2,host3
beta host2 host1,host3
gamma host3 host1,host2
The sequence numbers on corresponding services should match across all hosts.
For more information on using trepctl, see Section 6.9, “The trepctl Command”.
Definitions of the individual field descriptions in the above example output can be found in Section D.2, “Generated Field Reference”.
For more information on management and operational detailed for managing your cluster installation, see Chapter 5, Operations Guide.
2.4.4. Alternative Multimaster Deployments
The multimaster deployment can be used for a wide range of different scenarios, and using any number of hosts. The tpm commandused could, for example, be expanded to four or five hosts by adding them to the list of members and master hosts in the configurationcommand.
The basis fo the multimaster deployment can also be used in multiple site configurations. For more information on multisite/multimasterdeploymnts, see Deploying a Multisite/Multimaster Topology in [Continuent Tungsten 2.0 Manual].
2.5. Deploying a Fan-In TopologyThe fan-in topology is the logical opposite of a master/slave topology. In a fan-in topology, the data from two masters is combinedtogether on one slave. Fan-in topologies are often in situations where you have satellite databases, maybe for sales or retail operations,and need to combine that information together in a single database for processing.
Within the fan-in topology:
• host1 is the master replicating to host3
• host2 is the master replicating to host3
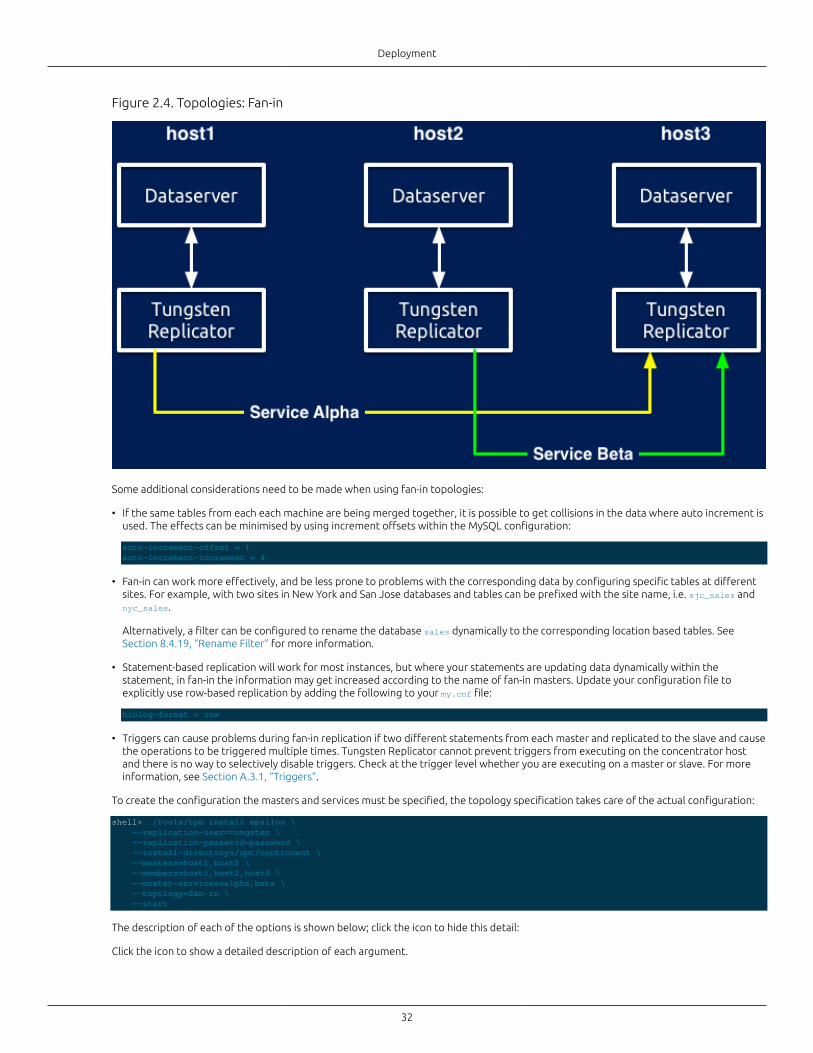
Deployment
32
Figure 2.4. Topologies: Fan-in
Some additional considerations need to be made when using fan-in topologies:
• If the same tables from each each machine are being merged together, it is possible to get collisions in the data where auto increment isused. The effects can be minimised by using increment offsets within the MySQL configuration:
auto-increment-offset = 1auto-increment-increment = 4
• Fan-in can work more effectively, and be less prone to problems with the corresponding data by configuring specific tables at differentsites. For example, with two sites in New York and San Jose databases and tables can be prefixed with the site name, i.e. sjc_sales andnyc_sales.
Alternatively, a filter can be configured to rename the database sales dynamically to the corresponding location based tables. SeeSection 8.4.19, “Rename Filter” for more information.
• Statement-based replication will work for most instances, but where your statements are updating data dynamically within thestatement, in fan-in the information may get increased according to the name of fan-in masters. Update your configuration file toexplicitly use row-based replication by adding the following to your my.cnf file:
binlog-format = row
• Triggers can cause problems during fan-in replication if two different statements from each master and replicated to the slave and causethe operations to be triggered multiple times. Tungsten Replicator cannot prevent triggers from executing on the concentrator hostand there is no way to selectively disable triggers. Check at the trigger level whether you are executing on a master or slave. For moreinformation, see Section A.3.1, “Triggers”.
To create the configuration the masters and services must be specified, the topology specification takes care of the actual configuration:
shell> ./tools/tpm install epsilon \ --replication-user=tungsten \ --replication-password=password \ --install-directory=/opt/continuent \ --masters=host1,host2 \ --members=host1,host2,host3 \ --master-services=alpha,beta \ --topology=fan-in \ --start
The description of each of the options is shown below; click the icon to hide this detail:
Click the icon to show a detailed description of each argument.
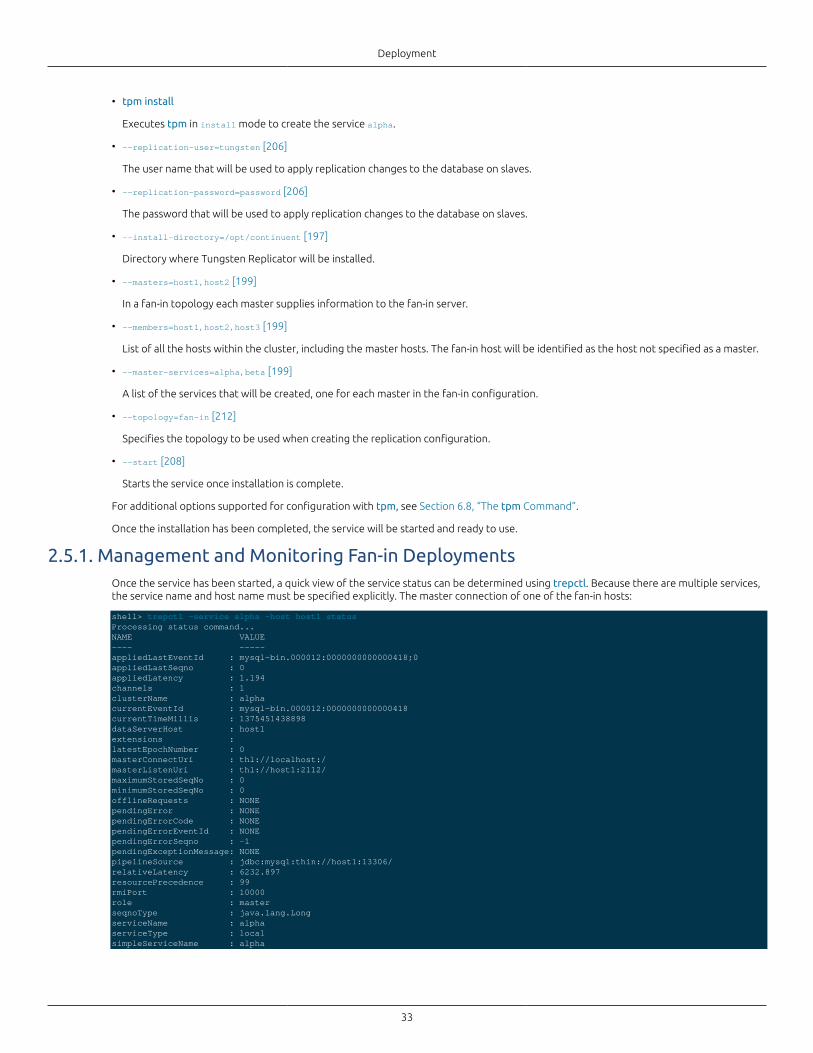
Deployment
33
• tpm install
Executes tpm in install mode to create the service alpha.
• --replication-user=tungsten [206]
The user name that will be used to apply replication changes to the database on slaves.
• --replication-password=password [206]
The password that will be used to apply replication changes to the database on slaves.
• --install-directory=/opt/continuent [197]
Directory where Tungsten Replicator will be installed.
• --masters=host1,host2 [199]
In a fan-in topology each master supplies information to the fan-in server.
• --members=host1,host2,host3 [199]
List of all the hosts within the cluster, including the master hosts. The fan-in host will be identified as the host not specified as a master.
• --master-services=alpha,beta [199]
A list of the services that will be created, one for each master in the fan-in configuration.
• --topology=fan-in [212]
Specifies the topology to be used when creating the replication configuration.
• --start [208]
Starts the service once installation is complete.
For additional options supported for configuration with tpm, see Section 6.8, “The tpm Command”.
Once the installation has been completed, the service will be started and ready to use.
2.5.1. Management and Monitoring Fan-in DeploymentsOnce the service has been started, a quick view of the service status can be determined using trepctl. Because there are multiple services,the service name and host name must be specified explicitly. The master connection of one of the fan-in hosts:
shell> trepctl -service alpha -host host1 statusProcessing status command...NAME VALUE---- -----appliedLastEventId : mysql-bin.000012:0000000000000418;0appliedLastSeqno : 0appliedLatency : 1.194channels : 1clusterName : alphacurrentEventId : mysql-bin.000012:0000000000000418currentTimeMillis : 1375451438898dataServerHost : host1extensions : latestEpochNumber : 0masterConnectUri : thl://localhost:/masterListenUri : thl://host1:2112/maximumStoredSeqNo : 0minimumStoredSeqNo : 0offlineRequests : NONEpendingError : NONEpendingErrorCode : NONEpendingErrorEventId : NONEpendingErrorSeqno : -1pendingExceptionMessage: NONEpipelineSource : jdbc:mysql:thin://host1:13306/relativeLatency : 6232.897resourcePrecedence : 99rmiPort : 10000role : masterseqnoType : java.lang.LongserviceName : alphaserviceType : localsimpleServiceName : alpha
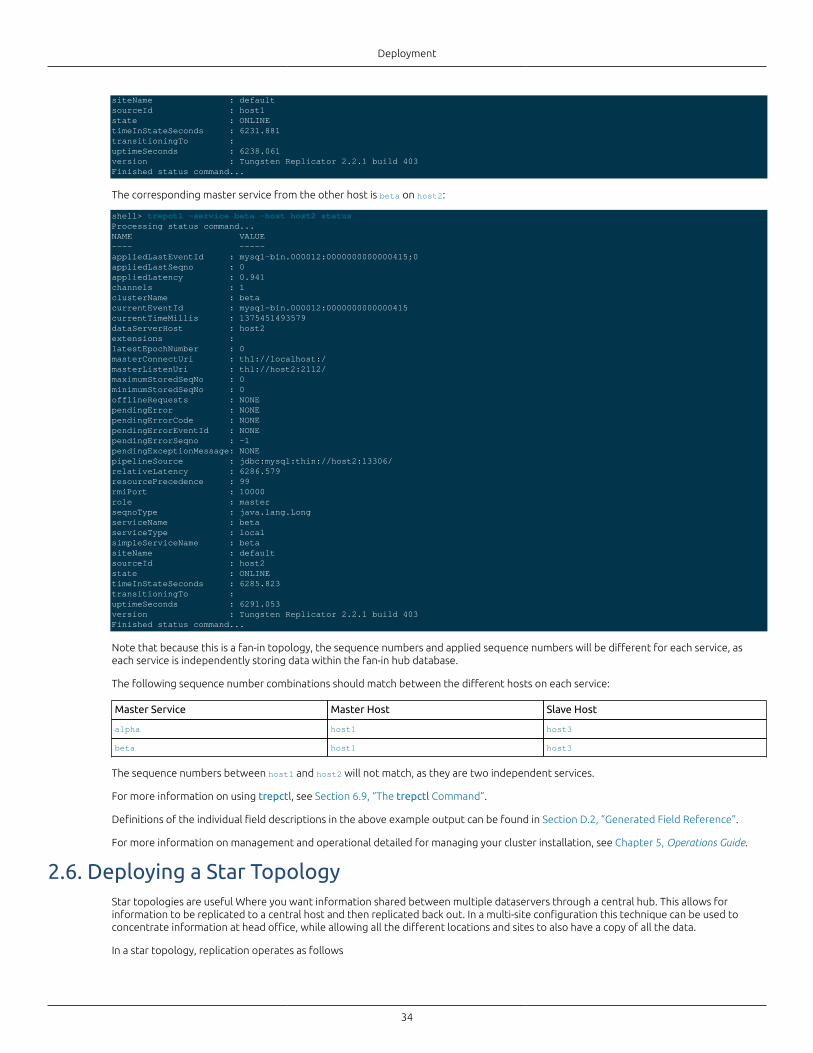
Deployment
34
siteName : defaultsourceId : host1state : ONLINEtimeInStateSeconds : 6231.881transitioningTo : uptimeSeconds : 6238.061version : Tungsten Replicator 2.2.1 build 403Finished status command...
The corresponding master service from the other host is beta on host2:
shell> trepctl -service beta -host host2 statusProcessing status command...NAME VALUE---- -----appliedLastEventId : mysql-bin.000012:0000000000000415;0appliedLastSeqno : 0appliedLatency : 0.941channels : 1clusterName : betacurrentEventId : mysql-bin.000012:0000000000000415currentTimeMillis : 1375451493579dataServerHost : host2extensions : latestEpochNumber : 0masterConnectUri : thl://localhost:/masterListenUri : thl://host2:2112/maximumStoredSeqNo : 0minimumStoredSeqNo : 0offlineRequests : NONEpendingError : NONEpendingErrorCode : NONEpendingErrorEventId : NONEpendingErrorSeqno : -1pendingExceptionMessage: NONEpipelineSource : jdbc:mysql:thin://host2:13306/relativeLatency : 6286.579resourcePrecedence : 99rmiPort : 10000role : masterseqnoType : java.lang.LongserviceName : betaserviceType : localsimpleServiceName : betasiteName : defaultsourceId : host2state : ONLINEtimeInStateSeconds : 6285.823transitioningTo : uptimeSeconds : 6291.053version : Tungsten Replicator 2.2.1 build 403Finished status command...
Note that because this is a fan-in topology, the sequence numbers and applied sequence numbers will be different for each service, aseach service is independently storing data within the fan-in hub database.
The following sequence number combinations should match between the different hosts on each service:
Master Service Master Host Slave Host
alpha host1 host3
beta host1 host3
The sequence numbers between host1 and host2 will not match, as they are two independent services.
For more information on using trepctl, see Section 6.9, “The trepctl Command”.
Definitions of the individual field descriptions in the above example output can be found in Section D.2, “Generated Field Reference”.
For more information on management and operational detailed for managing your cluster installation, see Chapter 5, Operations Guide.
2.6. Deploying a Star TopologyStar topologies are useful Where you want information shared between multiple dataservers through a central hub. This allows forinformation to be replicated to a central host and then replicated back out. In a multi-site configuration this technique can be used toconcentrate information at head office, while allowing all the different locations and sites to also have a copy of all the data.
In a star topology, replication operates as follows
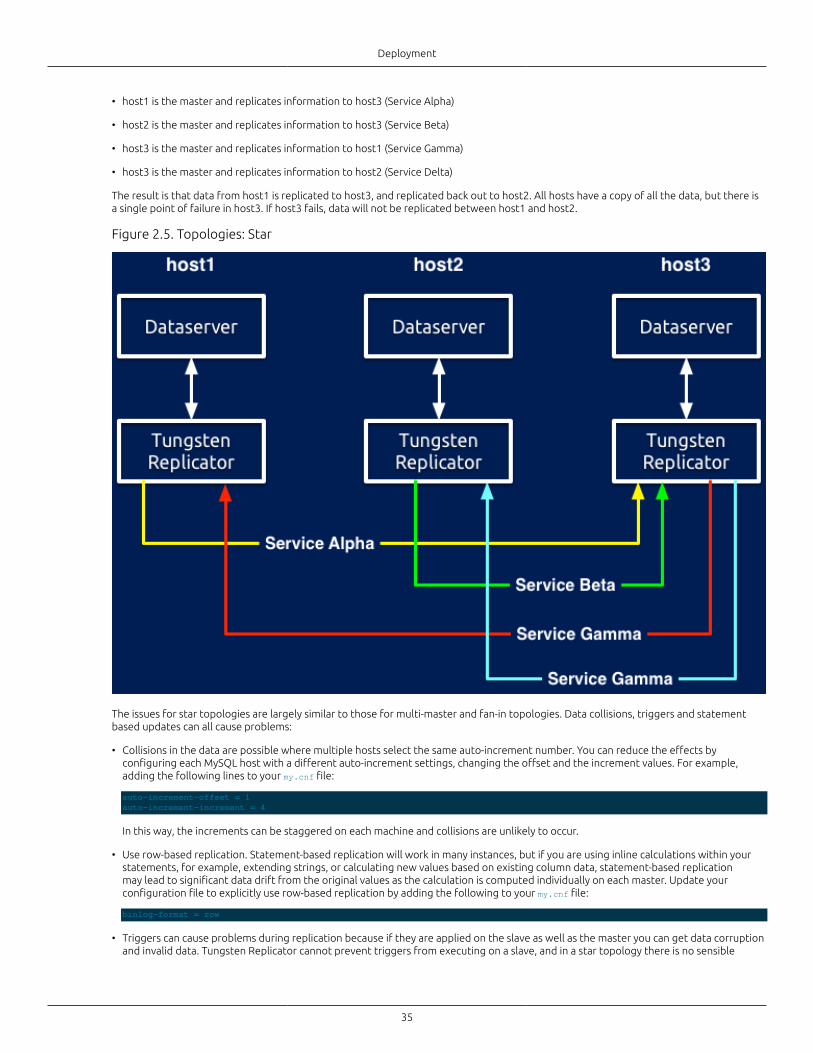
Deployment
35
• host1 is the master and replicates information to host3 (Service Alpha)
• host2 is the master and replicates information to host3 (Service Beta)
• host3 is the master and replicates information to host1 (Service Gamma)
• host3 is the master and replicates information to host2 (Service Delta)
The result is that data from host1 is replicated to host3, and replicated back out to host2. All hosts have a copy of all the data, but there isa single point of failure in host3. If host3 fails, data will not be replicated between host1 and host2.
Figure 2.5. Topologies: Star
The issues for star topologies are largely similar to those for multi-master and fan-in topologies. Data collisions, triggers and statementbased updates can all cause problems:
• Collisions in the data are possible where multiple hosts select the same auto-increment number. You can reduce the effects byconfiguring each MySQL host with a different auto-increment settings, changing the offset and the increment values. For example,adding the following lines to your my.cnf file:
auto-increment-offset = 1auto-increment-increment = 4
In this way, the increments can be staggered on each machine and collisions are unlikely to occur.
• Use row-based replication. Statement-based replication will work in many instances, but if you are using inline calculations within yourstatements, for example, extending strings, or calculating new values based on existing column data, statement-based replicationmay lead to significant data drift from the original values as the calculation is computed individually on each master. Update yourconfiguration file to explicitly use row-based replication by adding the following to your my.cnf file:
binlog-format = row
• Triggers can cause problems during replication because if they are applied on the slave as well as the master you can get data corruptionand invalid data. Tungsten Replicator cannot prevent triggers from executing on a slave, and in a star topology there is no sensible
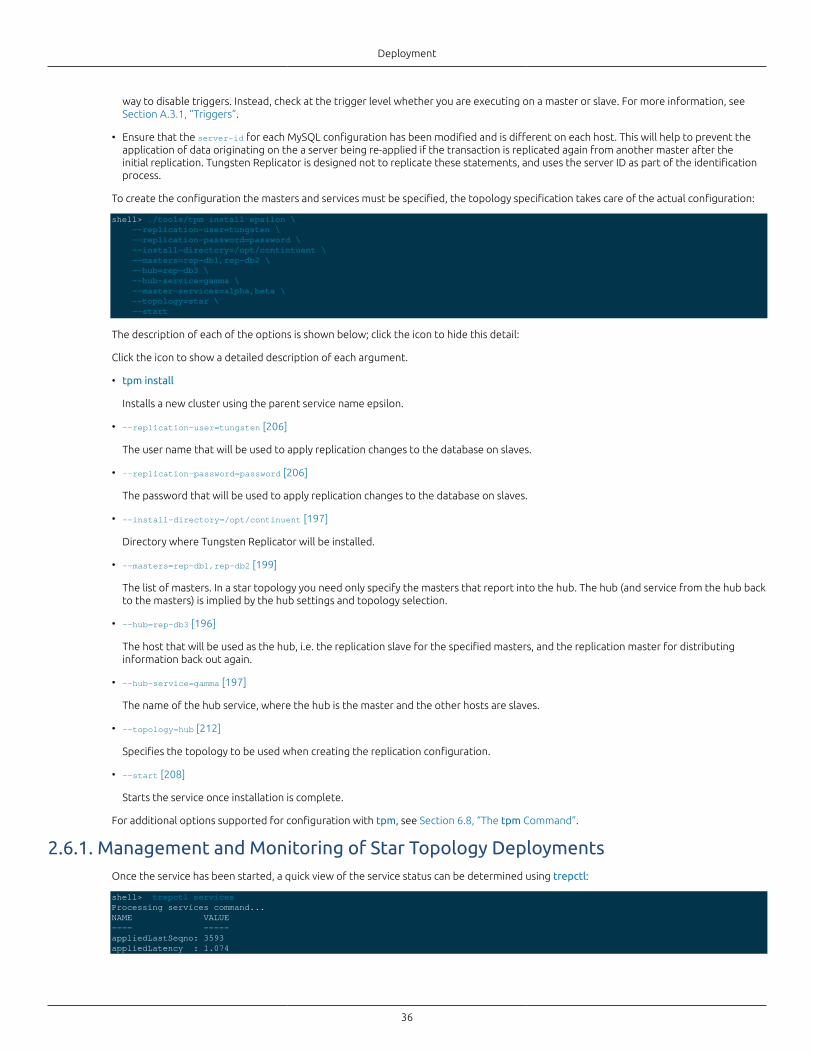
Deployment
36
way to disable triggers. Instead, check at the trigger level whether you are executing on a master or slave. For more information, seeSection A.3.1, “Triggers”.
• Ensure that the server-id for each MySQL configuration has been modified and is different on each host. This will help to prevent theapplication of data originating on the a server being re-applied if the transaction is replicated again from another master after theinitial replication. Tungsten Replicator is designed not to replicate these statements, and uses the server ID as part of the identificationprocess.
To create the configuration the masters and services must be specified, the topology specification takes care of the actual configuration:
shell> ./tools/tpm install epsilon \ --replication-user=tungsten \ --replication-password=password \ --install-directory=/opt/contintuent \ --masters=rep-db1,rep-db2 \ --hub=rep-db3 \ --hub-service=gamma \ --master-services=alpha,beta \ --topology=star \ --start
The description of each of the options is shown below; click the icon to hide this detail:
Click the icon to show a detailed description of each argument.
• tpm install
Installs a new cluster using the parent service name epsilon.
• --replication-user=tungsten [206]
The user name that will be used to apply replication changes to the database on slaves.
• --replication-password=password [206]
The password that will be used to apply replication changes to the database on slaves.
• --install-directory=/opt/continuent [197]
Directory where Tungsten Replicator will be installed.
• --masters=rep-db1,rep-db2 [199]
The list of masters. In a star topology you need only specify the masters that report into the hub. The hub (and service from the hub backto the masters) is implied by the hub settings and topology selection.
• --hub=rep-db3 [196]
The host that will be used as the hub, i.e. the replication slave for the specified masters, and the replication master for distributinginformation back out again.
• --hub-service=gamma [197]
The name of the hub service, where the hub is the master and the other hosts are slaves.
• --topology=hub [212]
Specifies the topology to be used when creating the replication configuration.
• --start [208]
Starts the service once installation is complete.
For additional options supported for configuration with tpm, see Section 6.8, “The tpm Command”.
2.6.1. Management and Monitoring of Star Topology DeploymentsOnce the service has been started, a quick view of the service status can be determined using trepctl:
shell> trepctl servicesProcessing services command...NAME VALUE---- -----appliedLastSeqno: 3593appliedLatency : 1.074
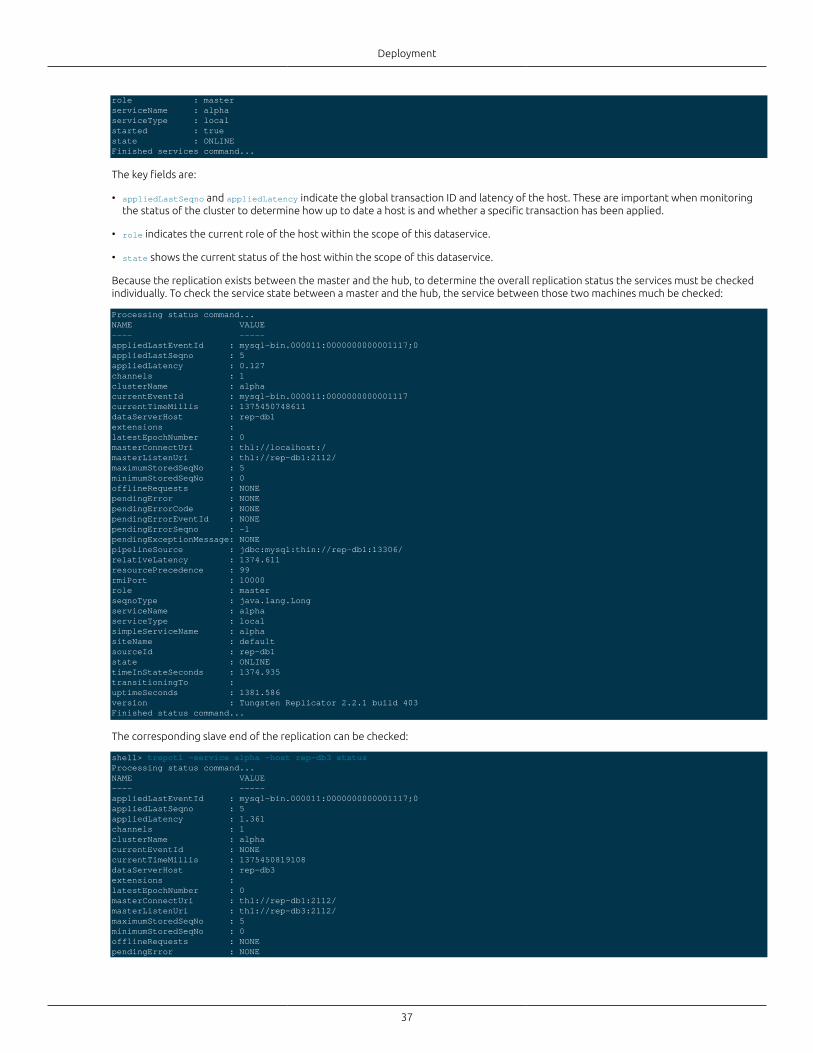
Deployment
37
role : masterserviceName : alphaserviceType : localstarted : truestate : ONLINEFinished services command...
The key fields are:
• appliedLastSeqno and appliedLatency indicate the global transaction ID and latency of the host. These are important when monitoringthe status of the cluster to determine how up to date a host is and whether a specific transaction has been applied.
• role indicates the current role of the host within the scope of this dataservice.
• state shows the current status of the host within the scope of this dataservice.
Because the replication exists between the master and the hub, to determine the overall replication status the services must be checkedindividually. To check the service state between a master and the hub, the service between those two machines much be checked:
Processing status command...NAME VALUE---- -----appliedLastEventId : mysql-bin.000011:0000000000001117;0appliedLastSeqno : 5appliedLatency : 0.127channels : 1clusterName : alphacurrentEventId : mysql-bin.000011:0000000000001117currentTimeMillis : 1375450748611dataServerHost : rep-db1extensions : latestEpochNumber : 0masterConnectUri : thl://localhost:/masterListenUri : thl://rep-db1:2112/maximumStoredSeqNo : 5minimumStoredSeqNo : 0offlineRequests : NONEpendingError : NONEpendingErrorCode : NONEpendingErrorEventId : NONEpendingErrorSeqno : -1pendingExceptionMessage: NONEpipelineSource : jdbc:mysql:thin://rep-db1:13306/relativeLatency : 1374.611resourcePrecedence : 99rmiPort : 10000role : masterseqnoType : java.lang.LongserviceName : alphaserviceType : localsimpleServiceName : alphasiteName : defaultsourceId : rep-db1state : ONLINEtimeInStateSeconds : 1374.935transitioningTo : uptimeSeconds : 1381.586version : Tungsten Replicator 2.2.1 build 403Finished status command...
The corresponding slave end of the replication can be checked:
shell> trepctl -service alpha -host rep-db3 statusProcessing status command...NAME VALUE---- -----appliedLastEventId : mysql-bin.000011:0000000000001117;0appliedLastSeqno : 5appliedLatency : 1.361channels : 1clusterName : alphacurrentEventId : NONEcurrentTimeMillis : 1375450819108dataServerHost : rep-db3extensions : latestEpochNumber : 0masterConnectUri : thl://rep-db1:2112/masterListenUri : thl://rep-db3:2112/maximumStoredSeqNo : 5minimumStoredSeqNo : 0offlineRequests : NONEpendingError : NONE
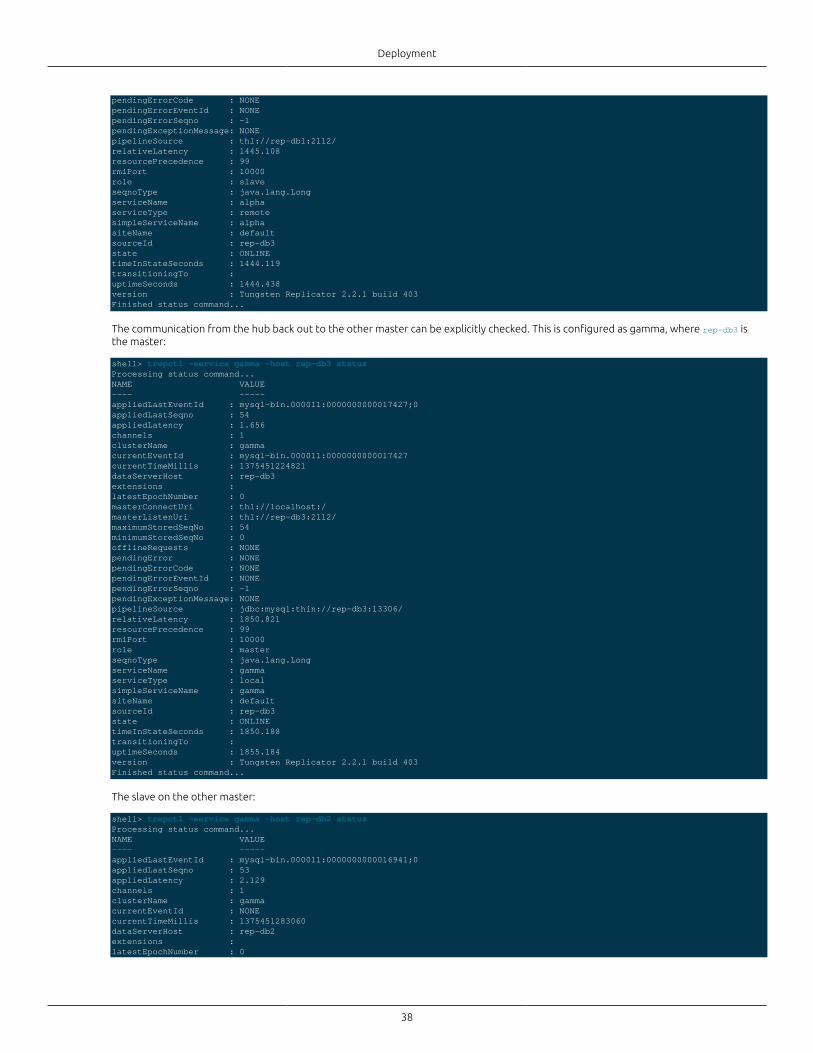
Deployment
38
pendingErrorCode : NONEpendingErrorEventId : NONEpendingErrorSeqno : -1pendingExceptionMessage: NONEpipelineSource : thl://rep-db1:2112/relativeLatency : 1445.108resourcePrecedence : 99rmiPort : 10000role : slaveseqnoType : java.lang.LongserviceName : alphaserviceType : remotesimpleServiceName : alphasiteName : defaultsourceId : rep-db3state : ONLINEtimeInStateSeconds : 1444.119transitioningTo : uptimeSeconds : 1444.438version : Tungsten Replicator 2.2.1 build 403Finished status command...
The communication from the hub back out to the other master can be explicitly checked. This is configured as gamma, where rep-db3 isthe master:
shell> trepctl -service gamma -host rep-db3 statusProcessing status command...NAME VALUE---- -----appliedLastEventId : mysql-bin.000011:0000000000017427;0appliedLastSeqno : 54appliedLatency : 1.656channels : 1clusterName : gammacurrentEventId : mysql-bin.000011:0000000000017427currentTimeMillis : 1375451224821dataServerHost : rep-db3extensions : latestEpochNumber : 0masterConnectUri : thl://localhost:/masterListenUri : thl://rep-db3:2112/maximumStoredSeqNo : 54minimumStoredSeqNo : 0offlineRequests : NONEpendingError : NONEpendingErrorCode : NONEpendingErrorEventId : NONEpendingErrorSeqno : -1pendingExceptionMessage: NONEpipelineSource : jdbc:mysql:thin://rep-db3:13306/relativeLatency : 1850.821resourcePrecedence : 99rmiPort : 10000role : masterseqnoType : java.lang.LongserviceName : gammaserviceType : localsimpleServiceName : gammasiteName : defaultsourceId : rep-db3state : ONLINEtimeInStateSeconds : 1850.188transitioningTo : uptimeSeconds : 1855.184version : Tungsten Replicator 2.2.1 build 403Finished status command...
The slave on the other master:
shell> trepctl -service gamma -host rep-db2 statusProcessing status command...NAME VALUE---- -----appliedLastEventId : mysql-bin.000011:0000000000016941;0appliedLastSeqno : 53appliedLatency : 2.129channels : 1clusterName : gammacurrentEventId : NONEcurrentTimeMillis : 1375451283060dataServerHost : rep-db2extensions : latestEpochNumber : 0
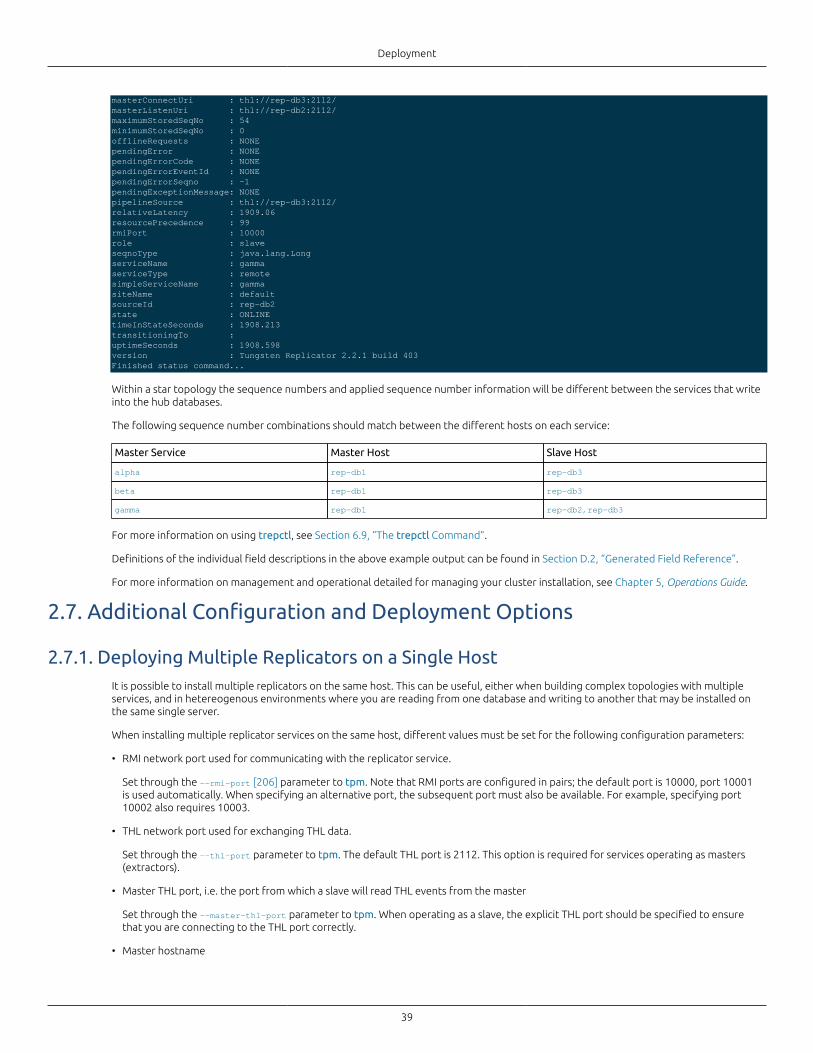
Deployment
39
masterConnectUri : thl://rep-db3:2112/masterListenUri : thl://rep-db2:2112/maximumStoredSeqNo : 54minimumStoredSeqNo : 0offlineRequests : NONEpendingError : NONEpendingErrorCode : NONEpendingErrorEventId : NONEpendingErrorSeqno : -1pendingExceptionMessage: NONEpipelineSource : thl://rep-db3:2112/relativeLatency : 1909.06resourcePrecedence : 99rmiPort : 10000role : slaveseqnoType : java.lang.LongserviceName : gammaserviceType : remotesimpleServiceName : gammasiteName : defaultsourceId : rep-db2state : ONLINEtimeInStateSeconds : 1908.213transitioningTo : uptimeSeconds : 1908.598version : Tungsten Replicator 2.2.1 build 403Finished status command...
Within a star topology the sequence numbers and applied sequence number information will be different between the services that writeinto the hub databases.
The following sequence number combinations should match between the different hosts on each service:
Master Service Master Host Slave Host
alpha rep-db1 rep-db3
beta rep-db1 rep-db3
gamma rep-db1 rep-db2,rep-db3
For more information on using trepctl, see Section 6.9, “The trepctl Command”.
Definitions of the individual field descriptions in the above example output can be found in Section D.2, “Generated Field Reference”.
For more information on management and operational detailed for managing your cluster installation, see Chapter 5, Operations Guide.
2.7. Additional Configuration and Deployment Options
2.7.1. Deploying Multiple Replicators on a Single HostIt is possible to install multiple replicators on the same host. This can be useful, either when building complex topologies with multipleservices, and in hetereogenous environments where you are reading from one database and writing to another that may be installed onthe same single server.
When installing multiple replicator services on the same host, different values must be set for the following configuration parameters:
• RMI network port used for communicating with the replicator service.
Set through the --rmi-port [206] parameter to tpm. Note that RMI ports are configured in pairs; the default port is 10000, port 10001is used automatically. When specifying an alternative port, the subsequent port must also be available. For example, specifying port10002 also requires 10003.
• THL network port used for exchanging THL data.
Set through the --thl-port parameter to tpm. The default THL port is 2112. This option is required for services operating as masters(extractors).
• Master THL port, i.e. the port from which a slave will read THL events from the master
Set through the --master-thl-port parameter to tpm. When operating as a slave, the explicit THL port should be specified to ensurethat you are connecting to the THL port correctly.
• Master hostname

Deployment
40
Set through the --master-thl-host parameter to tpm. This is optional if the master hostname has been configured correctly through the--master [199] parameter.
• Installation directory used when the replicator is installed.
Set through the --install-directory [197] or --install-directory [197] parameters to tpm. This directory must have been created,and be configured with suitable permissions before installation starts. For more information, see Section C.2.3, “Directory Locations andConfiguration”.
For example, to create two services, one that reads from MySQL and another that writes to MongoDB on the same host:
1. Extract the Tungsten Replicator software into a single directory.
2. Extractor reading from MySQL:
shell> ./tools/tpm configure extractor \--install-directory=/opt/extractor \--java-file-encoding=UTF8 \--master=host1 \--members=host1 \--mysql-enable-enumtostring=true \--mysql-enable-settostring=true \--mysql-use-bytes-for-string=false \--replication-password=password \--replication-user=tungsten \--start=true \--svc-extractor-filters=colnames,pkey
This is a standard configuration using the default ports, with the directory /opt/extractor.
3. Reset the configuration:
shell> tpm configure defaults --reset
4. Applier for writing to MongoDB:
shell> ./tools/tpm configure applier \--datasource-type=mongodb \--install-directory=/opt/applier \--java-file-encoding=UTF8 \--master=host1 \--members=host1 \--skip-validation-check=InstallerMasterSlaveCheck \--start=true \--svc-parallelization-type=none \--topology=master-slave \--rmi-port=10002 \--master-thl-port=2112 \--master-thl-host=host1 \--thl-port=2113
In this configuration, the master THL port is specified explicitly, along with the THL port used by this replicator, the RMI port used foradministration, and the installation directory /opt/applier.
When multiple replicators have been installed, checking the replicator status through trepctl depends on the replicator executablelocation used. If /opt/extractor/tungsten/tungsten-replicator/bin/trepctl, the extractor service status will be reported. If /opt/applier/tungsten/tungsten-replicator/bin/trepctl is used, then the applier service status will be reported.
Alternatively, a specific replicator can be checked by explicitly specifying the RMI port of the service. For example, to check the extractorservice:
shell> trepctl -port 10000 status
Or to check the applier service:
shell> trepctl -port 10002 status
When an explicit port has been specified in this way, the executable used is irrelevant. Any valid trepctl instance will work.
2.8. Replicating Data Into an Existing DataserviceIf you have an existing dataservice, data can be replicated from a standalone MySQL server into the service. The replication is configuredby creating a service that reads from the standalone MySQL server and writes into the master of the target dataservice. By writing thisway, changes are replicated to the master and slave in the new deployment.
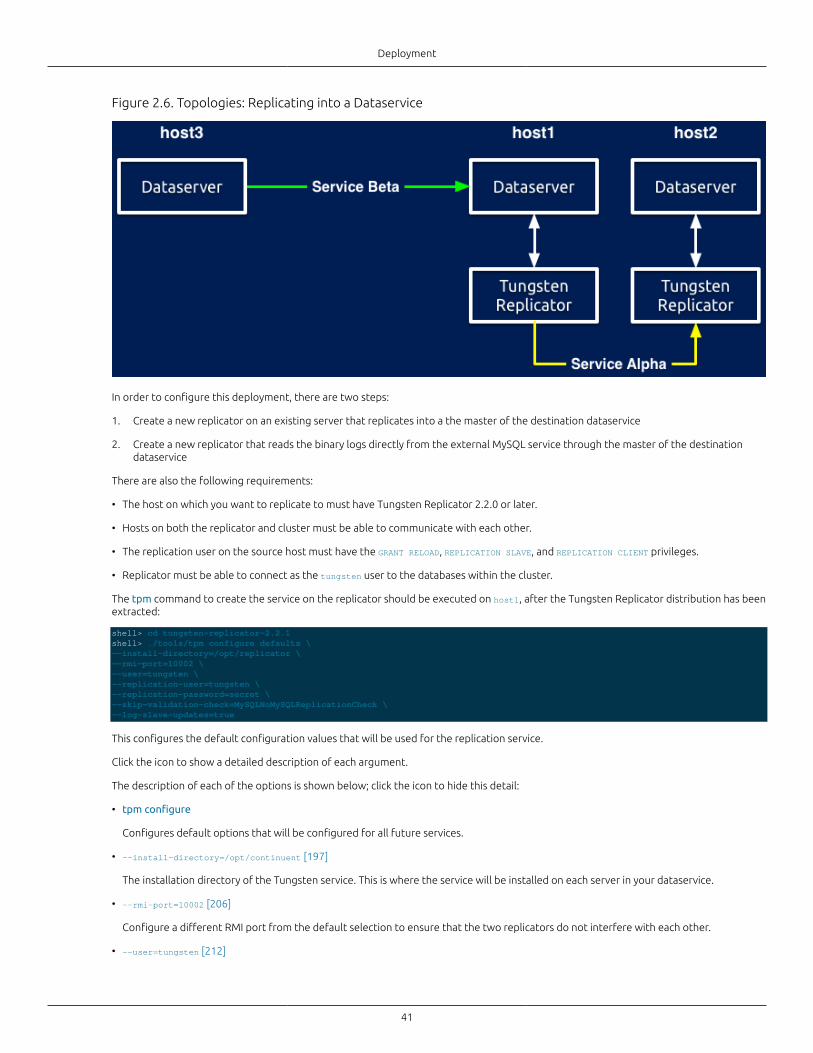
Deployment
41
Figure 2.6. Topologies: Replicating into a Dataservice
In order to configure this deployment, there are two steps:
1. Create a new replicator on an existing server that replicates into a the master of the destination dataservice
2. Create a new replicator that reads the binary logs directly from the external MySQL service through the master of the destinationdataservice
There are also the following requirements:
• The host on which you want to replicate to must have Tungsten Replicator 2.2.0 or later.
• Hosts on both the replicator and cluster must be able to communicate with each other.
• The replication user on the source host must have the GRANT RELOAD, REPLICATION SLAVE, and REPLICATION CLIENT privileges.
• Replicator must be able to connect as the tungsten user to the databases within the cluster.
The tpm command to create the service on the replicator should be executed on host1, after the Tungsten Replicator distribution has beenextracted:
shell> cd tungsten-replicator-2.2.1shell> ./tools/tpm configure defaults \--install-directory=/opt/replicator \--rmi-port=10002 \--user=tungsten \--replication-user=tungsten \--replication-password=secret \--skip-validation-check=MySQLNoMySQLReplicationCheck \--log-slave-updates=true
This configures the default configuration values that will be used for the replication service.
Click the icon to show a detailed description of each argument.
The description of each of the options is shown below; click the icon to hide this detail:
• tpm configure
Configures default options that will be configured for all future services.
• --install-directory=/opt/continuent [197]
The installation directory of the Tungsten service. This is where the service will be installed on each server in your dataservice.
• --rmi-port=10002 [206]
Configure a different RMI port from the default selection to ensure that the two replicators do not interfere with each other.
• --user=tungsten [212]

Deployment
42
The operating system user name that you have created for the Tungsten service, tungsten.
• --replication-user=tungsten [206]
The user name that will be used to apply replication changes to the database on slaves.
• --replication-password=password [206]
The password that will be used to apply replication changes to the database on slaves.
Now that the defaults are configured, first we configure a cluster alias that points to the masters and slaves within the current TungstenReplicator service that you are replicating from:
shell> ./tools/tpm configure beta \ --topology=direct \ --master=host1 \ --direct-datasource-host=host3 \ --thl-port=2113
This creates a configuration that specifies that the topology should read directly from the source host, host3, writing directly to host1. Analternative THL port is provided to ensure that the THL listener is not operating on the same network port as the original.
Now install the service, which will create the replicator reading direct from host3 into host1:
shell> ./tools/tpm install
Once the installation has been completed, you must update the position of the replicator so that it points to the correct position withinthe source database to prevent errors during replication. If the replication is being created as part of a migration process, determine theposition of the binary log from the external replicator service used when the backup was taken. For example:
mysql> show master status;*************************** 1. row *************************** File: mysql-bin.000026 Position: 1311 Binlog_Do_DB: Binlog_Ignore_DB: 1 row in set (0.00 sec)
Use tungsten_set_position to update the replicator position to point to the master log position:
shell> /opt/replicator/scripts/tungsten_set_position \ --seqno=0 --epoch=0 --service=beta \ --source-id=host3 --event-id=mysql-bin.000026:1311
Now start the replicator:
shell> /opt/replicator/tungsten/tungsten-replicator/bin/replicator start
Replication status should be checked by explicitly using the servicename and/or RMI port:
shell> /opt/replicator/tungsten/tungsten-replicator/bin/trepctl statusProcessing status command...NAME VALUE---- -----appliedLastEventId : mysql-bin.000026:0000000000001311;1252appliedLastSeqno : 5appliedLatency : 0.748channels : 1clusterName : betacurrentEventId : mysql-bin.000026:0000000000001311currentTimeMillis : 1390410611881dataServerHost : host1extensions : host : host3latestEpochNumber : 1masterConnectUri : thl://host3:2112/masterListenUri : thl://host1:2113/maximumStoredSeqNo : 5minimumStoredSeqNo : 0offlineRequests : NONEpendingError : NONEpendingErrorCode : NONEpendingErrorEventId : NONEpendingErrorSeqno : -1pendingExceptionMessage: NONEpipelineSource : jdbc:mysql:thin://host3:13306/relativeLatency : 8408.881resourcePrecedence : 99
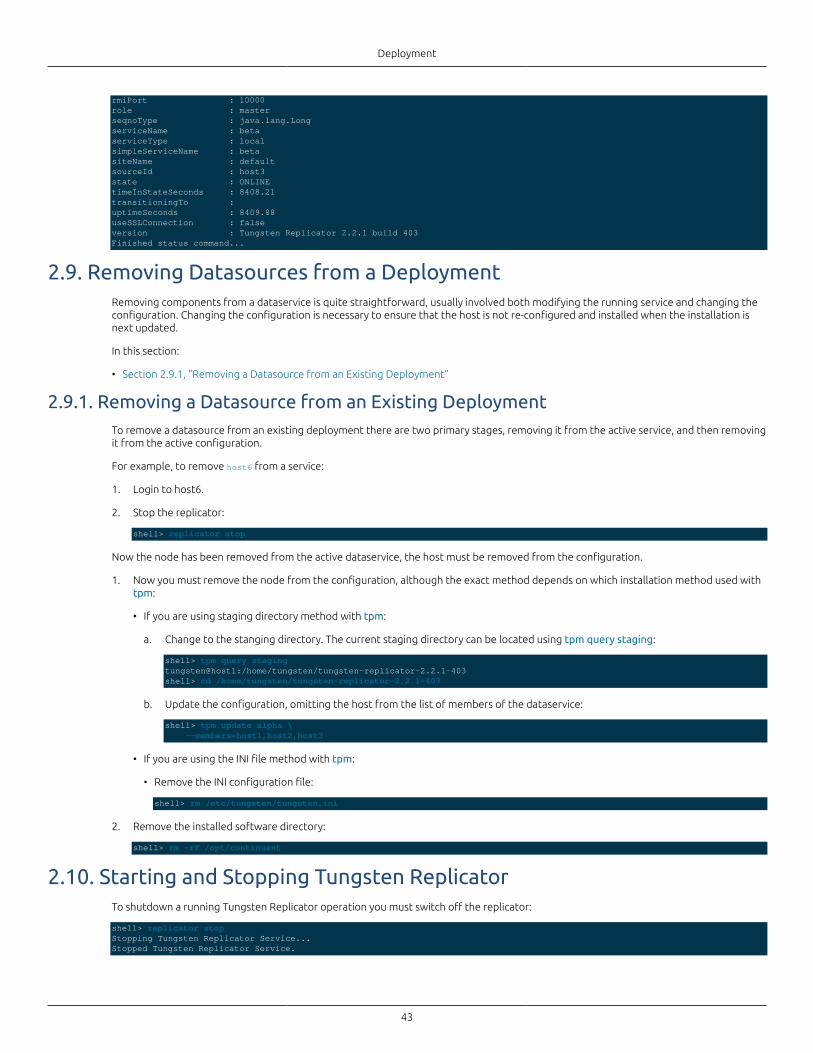
Deployment
43
rmiPort : 10000role : masterseqnoType : java.lang.LongserviceName : betaserviceType : localsimpleServiceName : betasiteName : defaultsourceId : host3state : ONLINEtimeInStateSeconds : 8408.21transitioningTo : uptimeSeconds : 8409.88useSSLConnection : falseversion : Tungsten Replicator 2.2.1 build 403Finished status command...
2.9. Removing Datasources from a DeploymentRemoving components from a dataservice is quite straightforward, usually involved both modifying the running service and changing theconfiguration. Changing the configuration is necessary to ensure that the host is not re-configured and installed when the installation isnext updated.
In this section:
• Section 2.9.1, “Removing a Datasource from an Existing Deployment”
2.9.1. Removing a Datasource from an Existing DeploymentTo remove a datasource from an existing deployment there are two primary stages, removing it from the active service, and then removingit from the active configuration.
For example, to remove host6 from a service:
1. Login to host6.
2. Stop the replicator:
shell> replicator stop
Now the node has been removed from the active dataservice, the host must be removed from the configuration.
1. Now you must remove the node from the configuration, although the exact method depends on which installation method used withtpm:
• If you are using staging directory method with tpm:
a. Change to the stanging directory. The current staging directory can be located using tpm query staging:
shell> tpm query stagingtungsten@host1:/home/tungsten/tungsten-replicator-2.2.1-403shell> cd /home/tungsten/tungsten-replicator-2.2.1-403
b. Update the configuration, omitting the host from the list of members of the dataservice:
shell> tpm update alpha \ --members=host1,host2,host3
• If you are using the INI file method with tpm:
• Remove the INI configuration file:
shell> rm /etc/tungsten/tungsten.ini
2. Remove the installed software directory:
shell> rm -rf /opt/continuent
2.10. Starting and Stopping Tungsten ReplicatorTo shutdown a running Tungsten Replicator operation you must switch off the replicator:
shell> replicator stopStopping Tungsten Replicator Service...Stopped Tungsten Replicator Service.
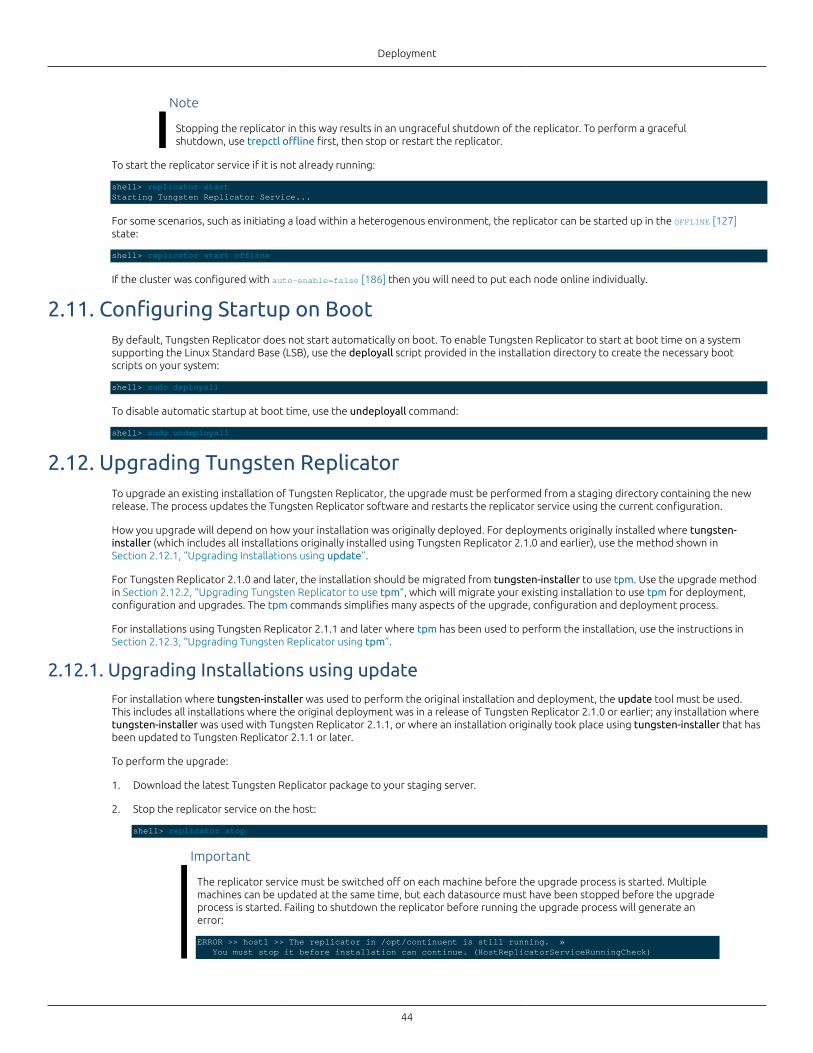
Deployment
44
Note
Stopping the replicator in this way results in an ungraceful shutdown of the replicator. To perform a gracefulshutdown, use trepctl offline first, then stop or restart the replicator.
To start the replicator service if it is not already running:
shell> replicator startStarting Tungsten Replicator Service...
For some scenarios, such as initiating a load within a heterogenous environment, the replicator can be started up in the OFFLINE [127]state:
shell> replicator start offline
If the cluster was configured with auto-enable=false [186] then you will need to put each node online individually.
2.11. Configuring Startup on BootBy default, Tungsten Replicator does not start automatically on boot. To enable Tungsten Replicator to start at boot time on a systemsupporting the Linux Standard Base (LSB), use the deployall script provided in the installation directory to create the necessary bootscripts on your system:
shell> sudo deployall
To disable automatic startup at boot time, use the undeployall command:
shell> sudo undeployall
2.12. Upgrading Tungsten ReplicatorTo upgrade an existing installation of Tungsten Replicator, the upgrade must be performed from a staging directory containing the newrelease. The process updates the Tungsten Replicator software and restarts the replicator service using the current configuration.
How you upgrade will depend on how your installation was originally deployed. For deployments originally installed where tungsten-installer (which includes all installations originally installed using Tungsten Replicator 2.1.0 and earlier), use the method shown inSection 2.12.1, “Upgrading Installations using update”.
For Tungsten Replicator 2.1.0 and later, the installation should be migrated from tungsten-installer to use tpm. Use the upgrade methodin Section 2.12.2, “Upgrading Tungsten Replicator to use tpm”, which will migrate your existing installation to use tpm for deployment,configuration and upgrades. The tpm commands simplifies many aspects of the upgrade, configuration and deployment process.
For installations using Tungsten Replicator 2.1.1 and later where tpm has been used to perform the installation, use the instructions inSection 2.12.3, “Upgrading Tungsten Replicator using tpm”.
2.12.1. Upgrading Installations using updateFor installation where tungsten-installer was used to perform the original installation and deployment, the update tool must be used.This includes all installations where the original deployment was in a release of Tungsten Replicator 2.1.0 or earlier; any installation wheretungsten-installer was used with Tungsten Replicator 2.1.1, or where an installation originally took place using tungsten-installer that hasbeen updated to Tungsten Replicator 2.1.1 or later.
To perform the upgrade:
1. Download the latest Tungsten Replicator package to your staging server.
2. Stop the replicator service on the host:
shell> replicator stop
Important
The replicator service must be switched off on each machine before the upgrade process is started. Multiplemachines can be updated at the same time, but each datasource must have been stopped before the upgradeprocess is started. Failing to shutdown the replicator before running the upgrade process will generate anerror:
ERROR >> host1 >> The replicator in /opt/continuent is still running. » You must stop it before installation can continue. (HostReplicatorServiceRunningCheck)
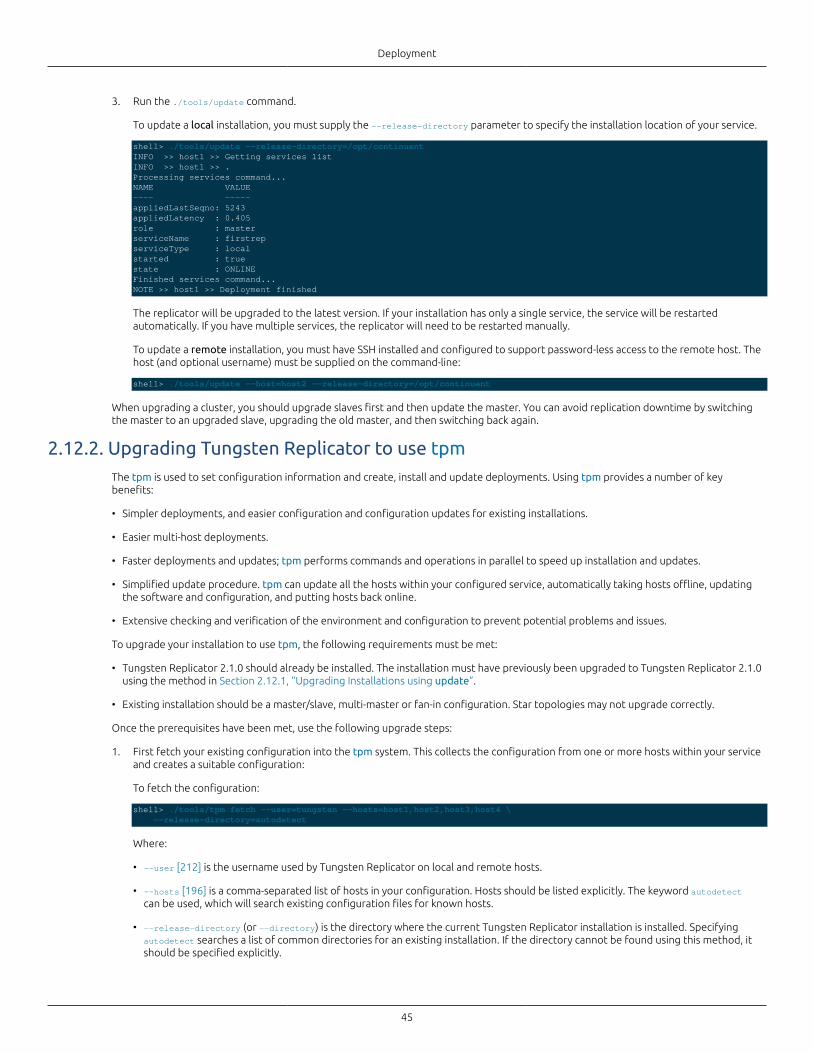
Deployment
45
3. Run the ./tools/update command.
To update a local installation, you must supply the --release-directory parameter to specify the installation location of your service.
shell> ./tools/update --release-directory=/opt/continuentINFO >> host1 >> Getting services listINFO >> host1 >> .Processing services command...NAME VALUE---- -----appliedLastSeqno: 5243appliedLatency : 0.405role : masterserviceName : firstrepserviceType : localstarted : truestate : ONLINEFinished services command...NOTE >> host1 >> Deployment finished
The replicator will be upgraded to the latest version. If your installation has only a single service, the service will be restartedautomatically. If you have multiple services, the replicator will need to be restarted manually.
To update a remote installation, you must have SSH installed and configured to support password-less access to the remote host. Thehost (and optional username) must be supplied on the command-line:
shell> ./tools/update --host=host2 --release-directory=/opt/continuent
When upgrading a cluster, you should upgrade slaves first and then update the master. You can avoid replication downtime by switchingthe master to an upgraded slave, upgrading the old master, and then switching back again.
2.12.2. Upgrading Tungsten Replicator to use tpmThe tpm is used to set configuration information and create, install and update deployments. Using tpm provides a number of keybenefits:
• Simpler deployments, and easier configuration and configuration updates for existing installations.
• Easier multi-host deployments.
• Faster deployments and updates; tpm performs commands and operations in parallel to speed up installation and updates.
• Simplified update procedure. tpm can update all the hosts within your configured service, automatically taking hosts offline, updatingthe software and configuration, and putting hosts back online.
• Extensive checking and verification of the environment and configuration to prevent potential problems and issues.
To upgrade your installation to use tpm, the following requirements must be met:
• Tungsten Replicator 2.1.0 should already be installed. The installation must have previously been upgraded to Tungsten Replicator 2.1.0using the method in Section 2.12.1, “Upgrading Installations using update”.
• Existing installation should be a master/slave, multi-master or fan-in configuration. Star topologies may not upgrade correctly.
Once the prerequisites have been met, use the following upgrade steps:
1. First fetch your existing configuration into the tpm system. This collects the configuration from one or more hosts within your serviceand creates a suitable configuration:
To fetch the configuration:
shell> ./tools/tpm fetch --user=tungsten --hosts=host1,host2,host3,host4 \ --release-directory=autodetect
Where:
• --user [212] is the username used by Tungsten Replicator on local and remote hosts.
• --hosts [196] is a comma-separated list of hosts in your configuration. Hosts should be listed explicitly. The keyword autodetectcan be used, which will search existing configuration files for known hosts.
• --release-directory (or --directory) is the directory where the current Tungsten Replicator installation is installed. Specifyingautodetect searches a list of common directories for an existing installation. If the directory cannot be found using this method, itshould be specified explicitly.
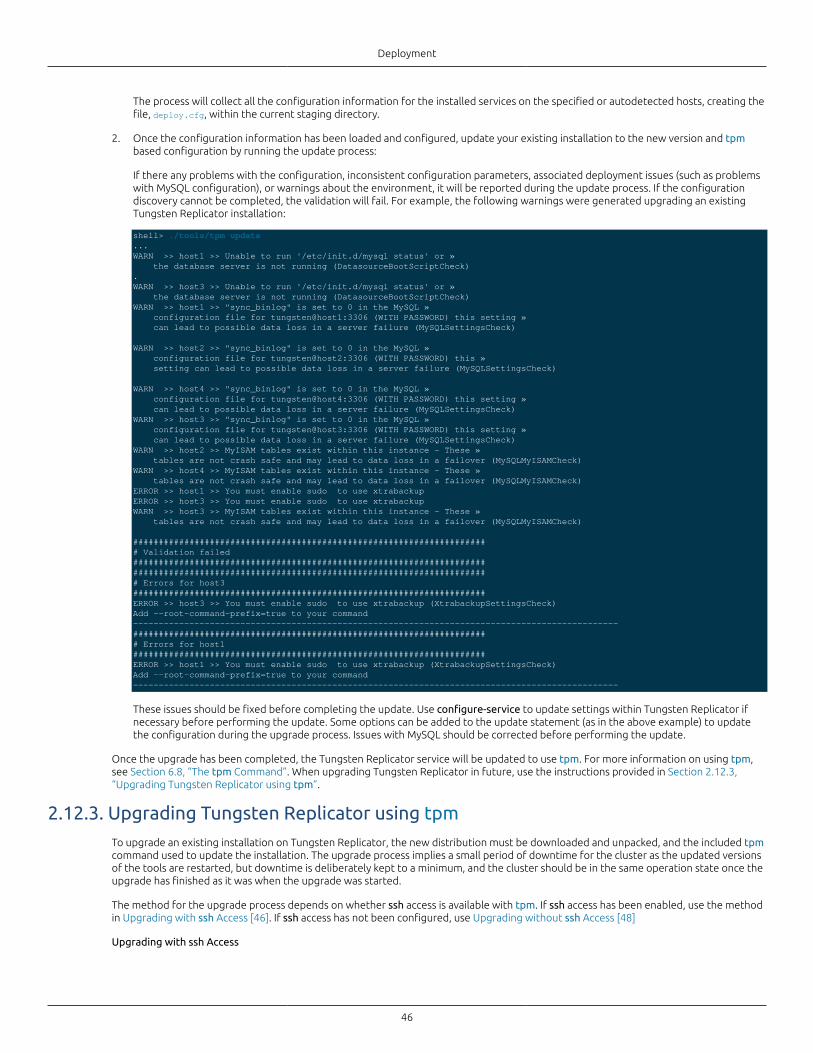
Deployment
46
The process will collect all the configuration information for the installed services on the specified or autodetected hosts, creating thefile, deploy.cfg, within the current staging directory.
2. Once the configuration information has been loaded and configured, update your existing installation to the new version and tpmbased configuration by running the update process:
If there any problems with the configuration, inconsistent configuration parameters, associated deployment issues (such as problemswith MySQL configuration), or warnings about the environment, it will be reported during the update process. If the configurationdiscovery cannot be completed, the validation will fail. For example, the following warnings were generated upgrading an existingTungsten Replicator installation:
shell> ./tools/tpm update...WARN >> host1 >> Unable to run '/etc/init.d/mysql status' or » the database server is not running (DatasourceBootScriptCheck).WARN >> host3 >> Unable to run '/etc/init.d/mysql status' or » the database server is not running (DatasourceBootScriptCheck)WARN >> host1 >> "sync_binlog" is set to 0 in the MySQL » configuration file for tungsten@host1:3306 (WITH PASSWORD) this setting » can lead to possible data loss in a server failure (MySQLSettingsCheck)
WARN >> host2 >> "sync_binlog" is set to 0 in the MySQL » configuration file for tungsten@host2:3306 (WITH PASSWORD) this » setting can lead to possible data loss in a server failure (MySQLSettingsCheck)
WARN >> host4 >> "sync_binlog" is set to 0 in the MySQL » configuration file for tungsten@host4:3306 (WITH PASSWORD) this setting » can lead to possible data loss in a server failure (MySQLSettingsCheck)WARN >> host3 >> "sync_binlog" is set to 0 in the MySQL » configuration file for tungsten@host3:3306 (WITH PASSWORD) this setting » can lead to possible data loss in a server failure (MySQLSettingsCheck)WARN >> host2 >> MyISAM tables exist within this instance - These » tables are not crash safe and may lead to data loss in a failover (MySQLMyISAMCheck)WARN >> host4 >> MyISAM tables exist within this instance - These » tables are not crash safe and may lead to data loss in a failover (MySQLMyISAMCheck)ERROR >> host1 >> You must enable sudo to use xtrabackupERROR >> host3 >> You must enable sudo to use xtrabackupWARN >> host3 >> MyISAM tables exist within this instance - These » tables are not crash safe and may lead to data loss in a failover (MySQLMyISAMCheck)
###################################################################### Validation failed########################################################################################################################################### Errors for host3#####################################################################ERROR >> host3 >> You must enable sudo to use xtrabackup (XtrabackupSettingsCheck)Add --root-command-prefix=true to your command-----------------------------------------------------------------------------------------------###################################################################### Errors for host1#####################################################################ERROR >> host1 >> You must enable sudo to use xtrabackup (XtrabackupSettingsCheck)Add --root-command-prefix=true to your command-----------------------------------------------------------------------------------------------
These issues should be fixed before completing the update. Use configure-service to update settings within Tungsten Replicator ifnecessary before performing the update. Some options can be added to the update statement (as in the above example) to updatethe configuration during the upgrade process. Issues with MySQL should be corrected before performing the update.
Once the upgrade has been completed, the Tungsten Replicator service will be updated to use tpm. For more information on using tpm,see Section 6.8, “The tpm Command”. When upgrading Tungsten Replicator in future, use the instructions provided in Section 2.12.3,“Upgrading Tungsten Replicator using tpm”.
2.12.3. Upgrading Tungsten Replicator using tpmTo upgrade an existing installation on Tungsten Replicator, the new distribution must be downloaded and unpacked, and the included tpmcommand used to update the installation. The upgrade process implies a small period of downtime for the cluster as the updated versionsof the tools are restarted, but downtime is deliberately kept to a minimum, and the cluster should be in the same operation state once theupgrade has finished as it was when the upgrade was started.
The method for the upgrade process depends on whether ssh access is available with tpm. If ssh access has been enabled, use the methodin Upgrading with ssh Access [46]. If ssh access has not been configured, use Upgrading without ssh Access [48]
Upgrading with ssh Access
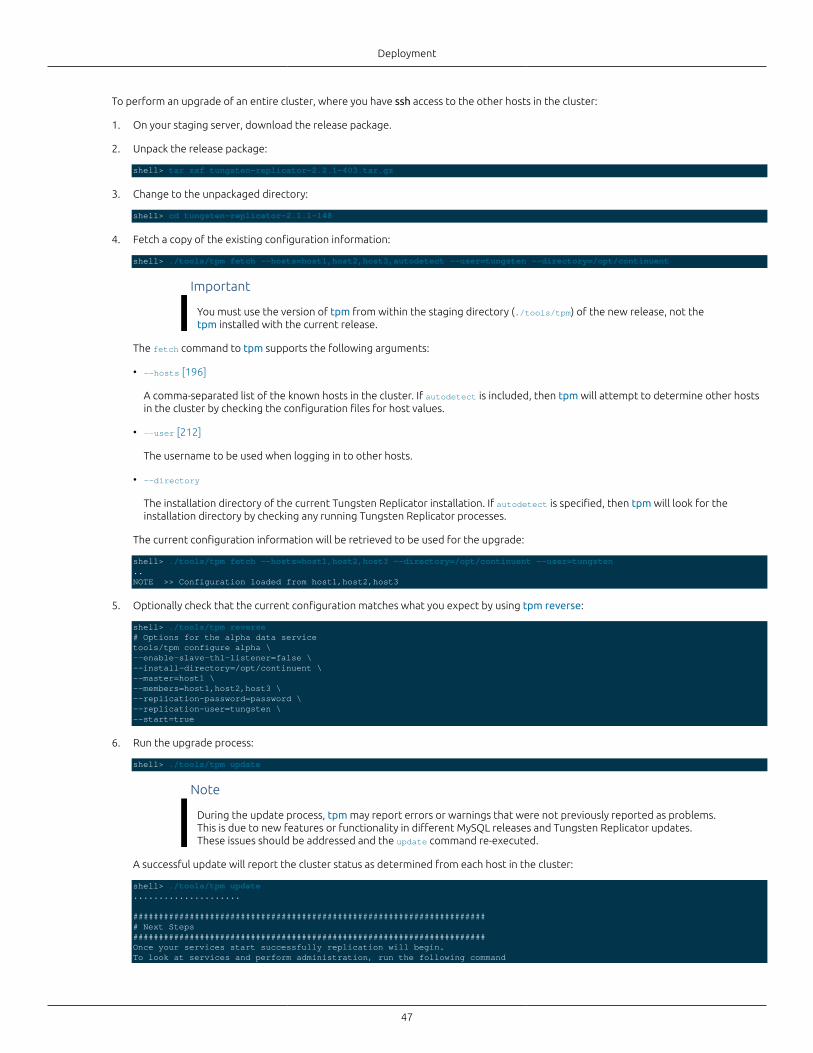
Deployment
47
To perform an upgrade of an entire cluster, where you have ssh access to the other hosts in the cluster:
1. On your staging server, download the release package.
2. Unpack the release package:
shell> tar zxf tungsten-replicator-2.2.1-403.tar.gz
3. Change to the unpackaged directory:
shell> cd tungsten-replicator-2.1.1-148
4. Fetch a copy of the existing configuration information:
shell> ./tools/tpm fetch --hosts=host1,host2,host3,autodetect --user=tungsten --directory=/opt/continuent
Important
You must use the version of tpm from within the staging directory (./tools/tpm) of the new release, not thetpm installed with the current release.
The fetch command to tpm supports the following arguments:
• --hosts [196]
A comma-separated list of the known hosts in the cluster. If autodetect is included, then tpm will attempt to determine other hostsin the cluster by checking the configuration files for host values.
• --user [212]
The username to be used when logging in to other hosts.
• --directory
The installation directory of the current Tungsten Replicator installation. If autodetect is specified, then tpm will look for theinstallation directory by checking any running Tungsten Replicator processes.
The current configuration information will be retrieved to be used for the upgrade:
shell> ./tools/tpm fetch --hosts=host1,host2,host3 --directory=/opt/continuent --user=tungsten..NOTE >> Configuration loaded from host1,host2,host3
5. Optionally check that the current configuration matches what you expect by using tpm reverse:
shell> ./tools/tpm reverse# Options for the alpha data servicetools/tpm configure alpha \--enable-slave-thl-listener=false \--install-directory=/opt/continuent \--master=host1 \--members=host1,host2,host3 \--replication-password=password \--replication-user=tungsten \--start=true
6. Run the upgrade process:
shell> ./tools/tpm update
Note
During the update process, tpm may report errors or warnings that were not previously reported as problems.This is due to new features or functionality in different MySQL releases and Tungsten Replicator updates.These issues should be addressed and the update command re-executed.
A successful update will report the cluster status as determined from each host in the cluster:
shell> ./tools/tpm update.....................
###################################################################### Next Steps#####################################################################Once your services start successfully replication will begin.To look at services and perform administration, run the following command
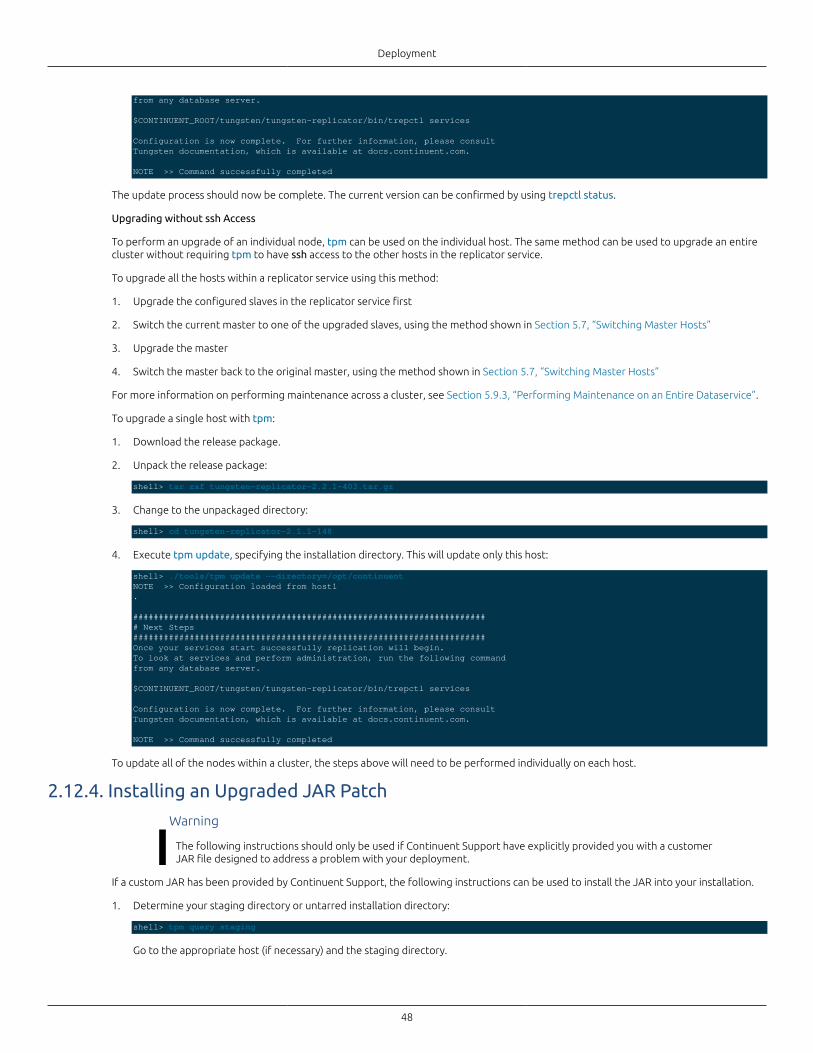
Deployment
48
from any database server.
$CONTINUENT_ROOT/tungsten/tungsten-replicator/bin/trepctl services
Configuration is now complete. For further information, please consultTungsten documentation, which is available at docs.continuent.com.
NOTE >> Command successfully completed
The update process should now be complete. The current version can be confirmed by using trepctl status.
Upgrading without ssh Access
To perform an upgrade of an individual node, tpm can be used on the individual host. The same method can be used to upgrade an entirecluster without requiring tpm to have ssh access to the other hosts in the replicator service.
To upgrade all the hosts within a replicator service using this method:
1. Upgrade the configured slaves in the replicator service first
2. Switch the current master to one of the upgraded slaves, using the method shown in Section 5.7, “Switching Master Hosts”
3. Upgrade the master
4. Switch the master back to the original master, using the method shown in Section 5.7, “Switching Master Hosts”
For more information on performing maintenance across a cluster, see Section 5.9.3, “Performing Maintenance on an Entire Dataservice”.
To upgrade a single host with tpm:
1. Download the release package.
2. Unpack the release package:
shell> tar zxf tungsten-replicator-2.2.1-403.tar.gz
3. Change to the unpackaged directory:
shell> cd tungsten-replicator-2.1.1-148
4. Execute tpm update, specifying the installation directory. This will update only this host:
shell> ./tools/tpm update --directory=/opt/continuentNOTE >> Configuration loaded from host1.
###################################################################### Next Steps#####################################################################Once your services start successfully replication will begin.To look at services and perform administration, run the following commandfrom any database server.
$CONTINUENT_ROOT/tungsten/tungsten-replicator/bin/trepctl services
Configuration is now complete. For further information, please consultTungsten documentation, which is available at docs.continuent.com.
NOTE >> Command successfully completed
To update all of the nodes within a cluster, the steps above will need to be performed individually on each host.
2.12.4. Installing an Upgraded JAR Patch
Warning
The following instructions should only be used if Continuent Support have explicitly provided you with a customerJAR file designed to address a problem with your deployment.
If a custom JAR has been provided by Continuent Support, the following instructions can be used to install the JAR into your installation.
1. Determine your staging directory or untarred installation directory:
shell> tpm query staging
Go to the appropriate host (if necessary) and the staging directory.
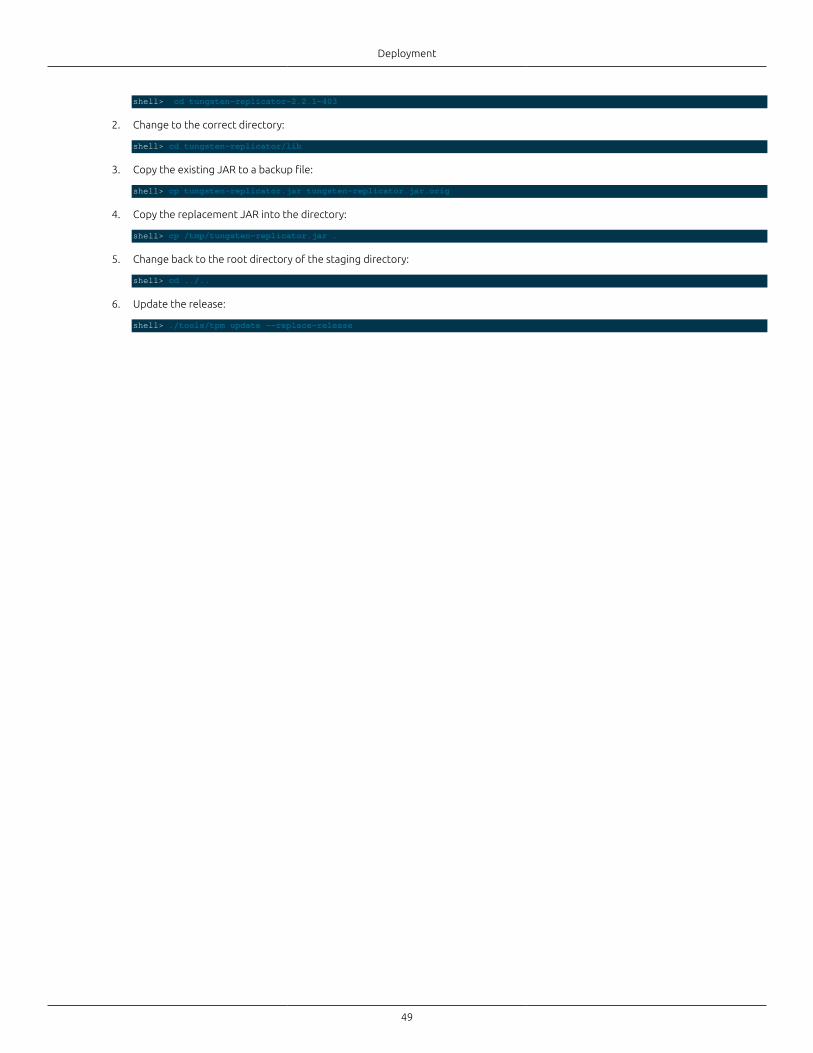
Deployment
49
shell> cd tungsten-replicator-2.2.1-403
2. Change to the correct directory:
shell> cd tungsten-replicator/lib
3. Copy the existing JAR to a backup file:
shell> cp tungsten-replicator.jar tungsten-replicator.jar.orig
4. Copy the replacement JAR into the directory:
shell> cp /tmp/tungsten-replicator.jar .
5. Change back to the root directory of the staging directory:
shell> cd ../..
6. Update the release:
shell> ./tools/tpm update --replace-release
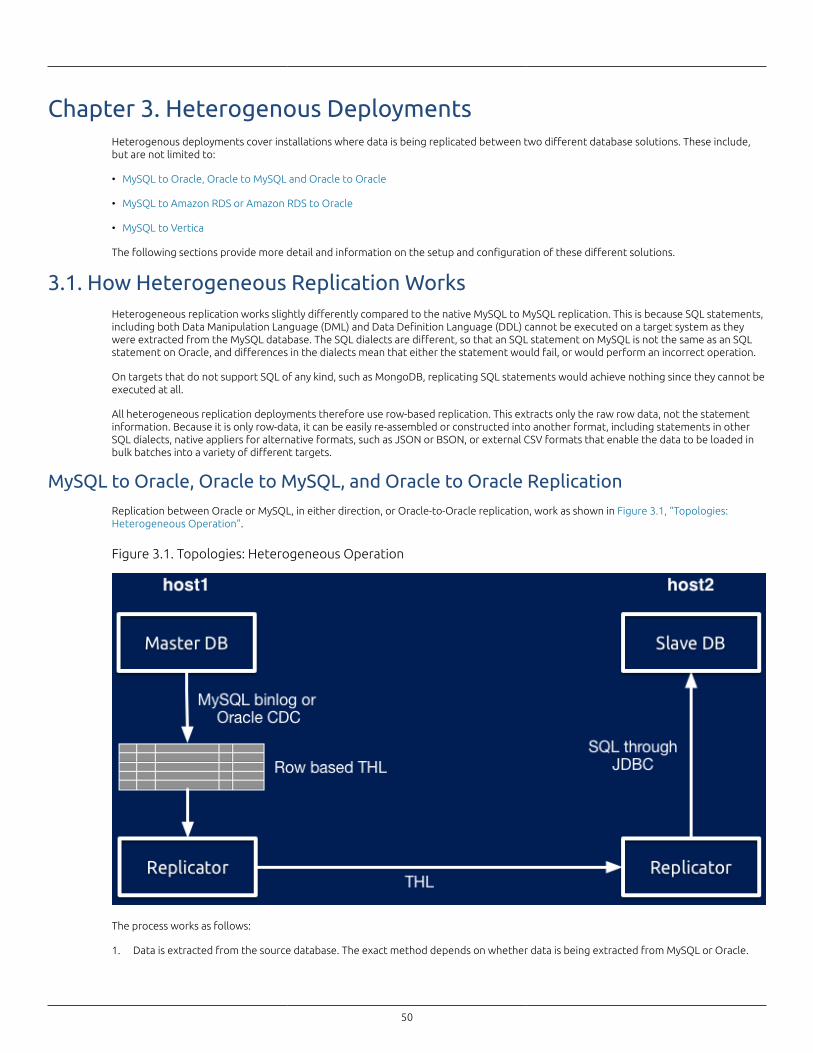
50
Chapter 3. Heterogenous DeploymentsHeterogenous deployments cover installations where data is being replicated between two different database solutions. These include,but are not limited to:
• MySQL to Oracle, Oracle to MySQL and Oracle to Oracle
• MySQL to Amazon RDS or Amazon RDS to Oracle
• MySQL to Vertica
The following sections provide more detail and information on the setup and configuration of these different solutions.
3.1. How Heterogeneous Replication WorksHeterogeneous replication works slightly differently compared to the native MySQL to MySQL replication. This is because SQL statements,including both Data Manipulation Language (DML) and Data Definition Language (DDL) cannot be executed on a target system as theywere extracted from the MySQL database. The SQL dialects are different, so that an SQL statement on MySQL is not the same as an SQLstatement on Oracle, and differences in the dialects mean that either the statement would fail, or would perform an incorrect operation.
On targets that do not support SQL of any kind, such as MongoDB, replicating SQL statements would achieve nothing since they cannot beexecuted at all.
All heterogeneous replication deployments therefore use row-based replication. This extracts only the raw row data, not the statementinformation. Because it is only row-data, it can be easily re-assembled or constructed into another format, including statements in otherSQL dialects, native appliers for alternative formats, such as JSON or BSON, or external CSV formats that enable the data to be loaded inbulk batches into a variety of different targets.
MySQL to Oracle, Oracle to MySQL, and Oracle to Oracle Replication
Replication between Oracle or MySQL, in either direction, or Oracle-to-Oracle replication, work as shown in Figure 3.1, “Topologies:Heterogeneous Operation”.
Figure 3.1. Topologies: Heterogeneous Operation
The process works as follows:
1. Data is extracted from the source database. The exact method depends on whether data is being extracted from MySQL or Oracle.
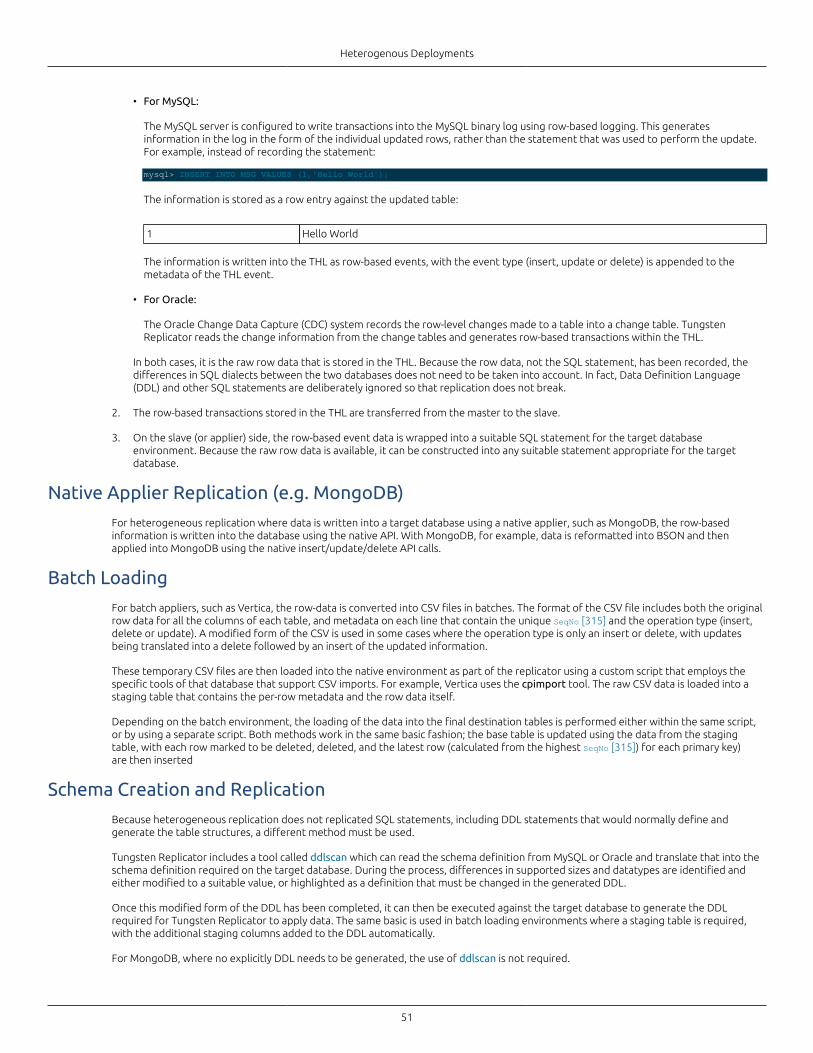
Heterogenous Deployments
51
• For MySQL:
The MySQL server is configured to write transactions into the MySQL binary log using row-based logging. This generatesinformation in the log in the form of the individual updated rows, rather than the statement that was used to perform the update.For example, instead of recording the statement:
mysql> INSERT INTO MSG VALUES (1,'Hello World');
The information is stored as a row entry against the updated table:
1 Hello World
The information is written into the THL as row-based events, with the event type (insert, update or delete) is appended to themetadata of the THL event.
• For Oracle:
The Oracle Change Data Capture (CDC) system records the row-level changes made to a table into a change table. TungstenReplicator reads the change information from the change tables and generates row-based transactions within the THL.
In both cases, it is the raw row data that is stored in the THL. Because the row data, not the SQL statement, has been recorded, thedifferences in SQL dialects between the two databases does not need to be taken into account. In fact, Data Definition Language(DDL) and other SQL statements are deliberately ignored so that replication does not break.
2. The row-based transactions stored in the THL are transferred from the master to the slave.
3. On the slave (or applier) side, the row-based event data is wrapped into a suitable SQL statement for the target databaseenvironment. Because the raw row data is available, it can be constructed into any suitable statement appropriate for the targetdatabase.
Native Applier Replication (e.g. MongoDB)
For heterogeneous replication where data is written into a target database using a native applier, such as MongoDB, the row-basedinformation is written into the database using the native API. With MongoDB, for example, data is reformatted into BSON and thenapplied into MongoDB using the native insert/update/delete API calls.
Batch Loading
For batch appliers, such as Vertica, the row-data is converted into CSV files in batches. The format of the CSV file includes both the originalrow data for all the columns of each table, and metadata on each line that contain the unique SeqNo [315] and the operation type (insert,delete or update). A modified form of the CSV is used in some cases where the operation type is only an insert or delete, with updatesbeing translated into a delete followed by an insert of the updated information.
These temporary CSV files are then loaded into the native environment as part of the replicator using a custom script that employs thespecific tools of that database that support CSV imports. For example, Vertica uses the cpimport tool. The raw CSV data is loaded into astaging table that contains the per-row metadata and the row data itself.
Depending on the batch environment, the loading of the data into the final destination tables is performed either within the same script,or by using a separate script. Both methods work in the same basic fashion; the base table is updated using the data from the stagingtable, with each row marked to be deleted, deleted, and the latest row (calculated from the highest SeqNo [315]) for each primary key)are then inserted
Schema Creation and Replication
Because heterogeneous replication does not replicated SQL statements, including DDL statements that would normally define andgenerate the table structures, a different method must be used.
Tungsten Replicator includes a tool called ddlscan which can read the schema definition from MySQL or Oracle and translate that into theschema definition required on the target database. During the process, differences in supported sizes and datatypes are identified andeither modified to a suitable value, or highlighted as a definition that must be changed in the generated DDL.
Once this modified form of the DDL has been completed, it can then be executed against the target database to generate the DDLrequired for Tungsten Replicator to apply data. The same basic is used in batch loading environments where a staging table is required,with the additional staging columns added to the DDL automatically.
For MongoDB, where no explicitly DDL needs to be generated, the use of ddlscan is not required.
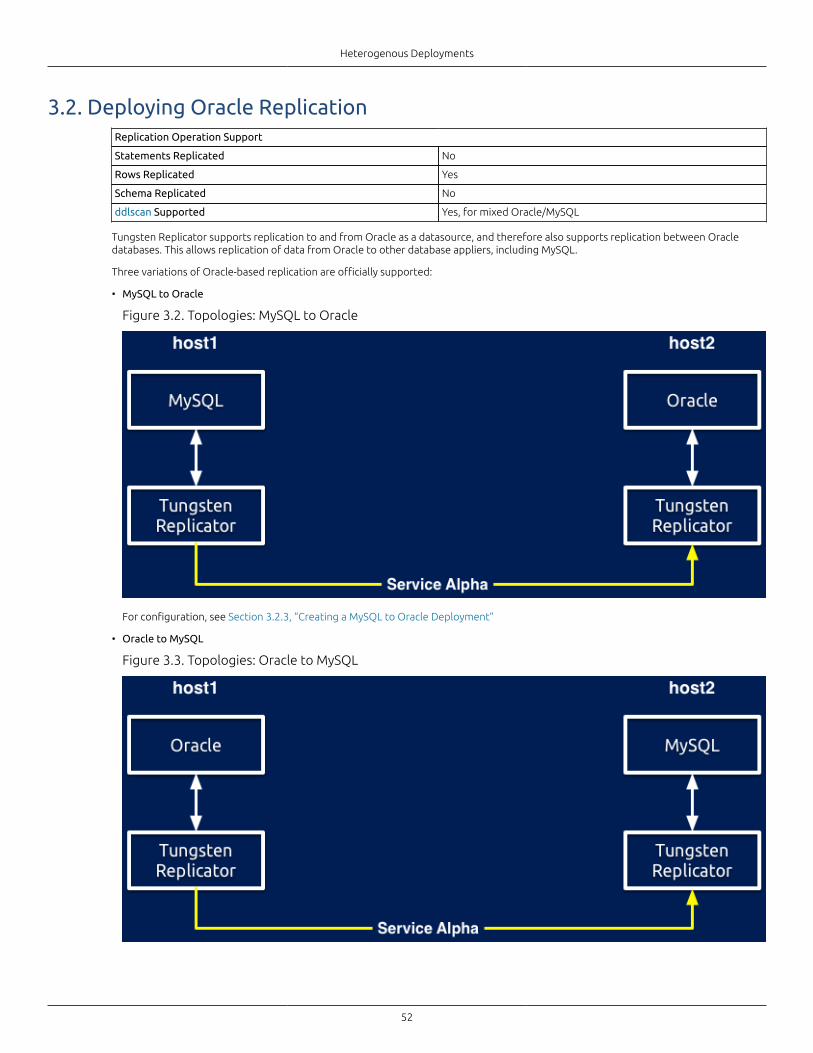
Heterogenous Deployments
52
3.2. Deploying Oracle ReplicationReplication Operation Support
Statements Replicated No
Rows Replicated Yes
Schema Replicated No
ddlscan Supported Yes, for mixed Oracle/MySQL
Tungsten Replicator supports replication to and from Oracle as a datasource, and therefore also supports replication between Oracledatabases. This allows replication of data from Oracle to other database appliers, including MySQL.
Three variations of Oracle-based replication are officially supported:
• MySQL to Oracle
Figure 3.2. Topologies: MySQL to Oracle
For configuration, see Section 3.2.3, “Creating a MySQL to Oracle Deployment”
• Oracle to MySQL
Figure 3.3. Topologies: Oracle to MySQL
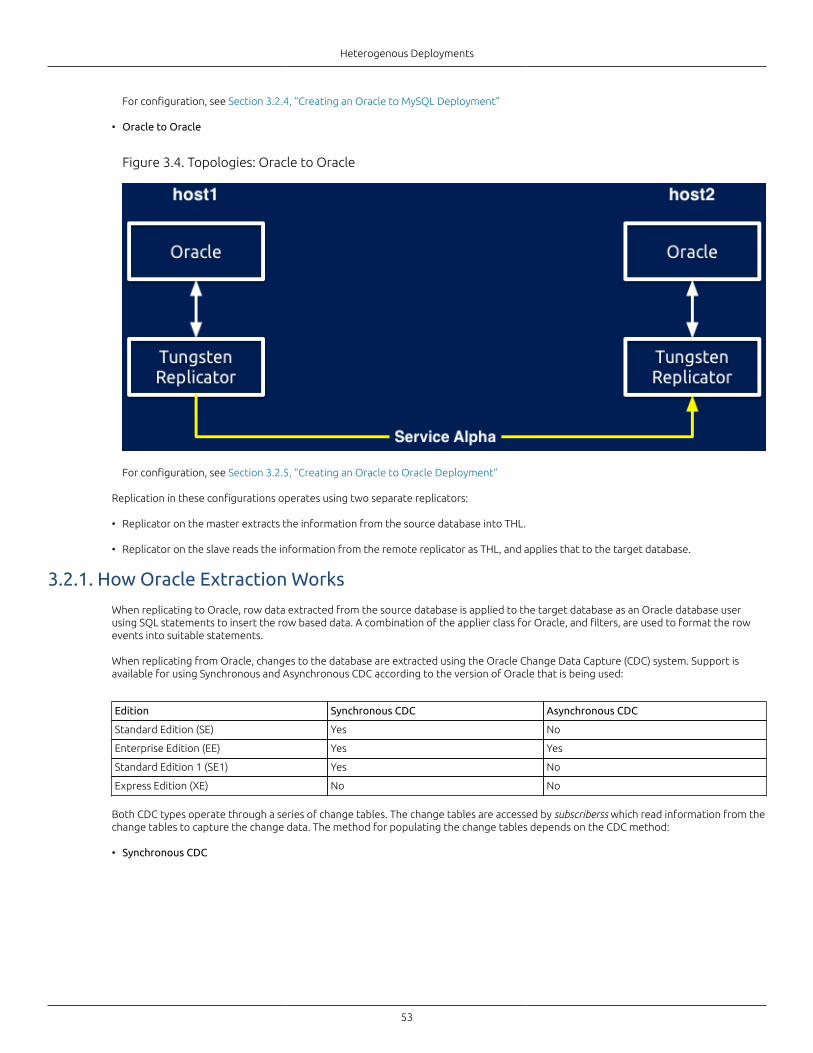
Heterogenous Deployments
53
For configuration, see Section 3.2.4, “Creating an Oracle to MySQL Deployment”
• Oracle to Oracle
Figure 3.4. Topologies: Oracle to Oracle
For configuration, see Section 3.2.5, “Creating an Oracle to Oracle Deployment”
Replication in these configurations operates using two separate replicators:
• Replicator on the master extracts the information from the source database into THL.
• Replicator on the slave reads the information from the remote replicator as THL, and applies that to the target database.
3.2.1. How Oracle Extraction Works
When replicating to Oracle, row data extracted from the source database is applied to the target database as an Oracle database userusing SQL statements to insert the row based data. A combination of the applier class for Oracle, and filters, are used to format the rowevents into suitable statements.
When replicating from Oracle, changes to the database are extracted using the Oracle Change Data Capture (CDC) system. Support isavailable for using Synchronous and Asynchronous CDC according to the version of Oracle that is being used:
Edition Synchronous CDC Asynchronous CDC
Standard Edition (SE) Yes No
Enterprise Edition (EE) Yes Yes
Standard Edition 1 (SE1) Yes No
Express Edition (XE) No No
Both CDC types operate through a series of change tables. The change tables are accessed by subscriberss which read information from thechange tables to capture the change data. The method for populating the change tables depends on the CDC method:
• Synchronous CDC
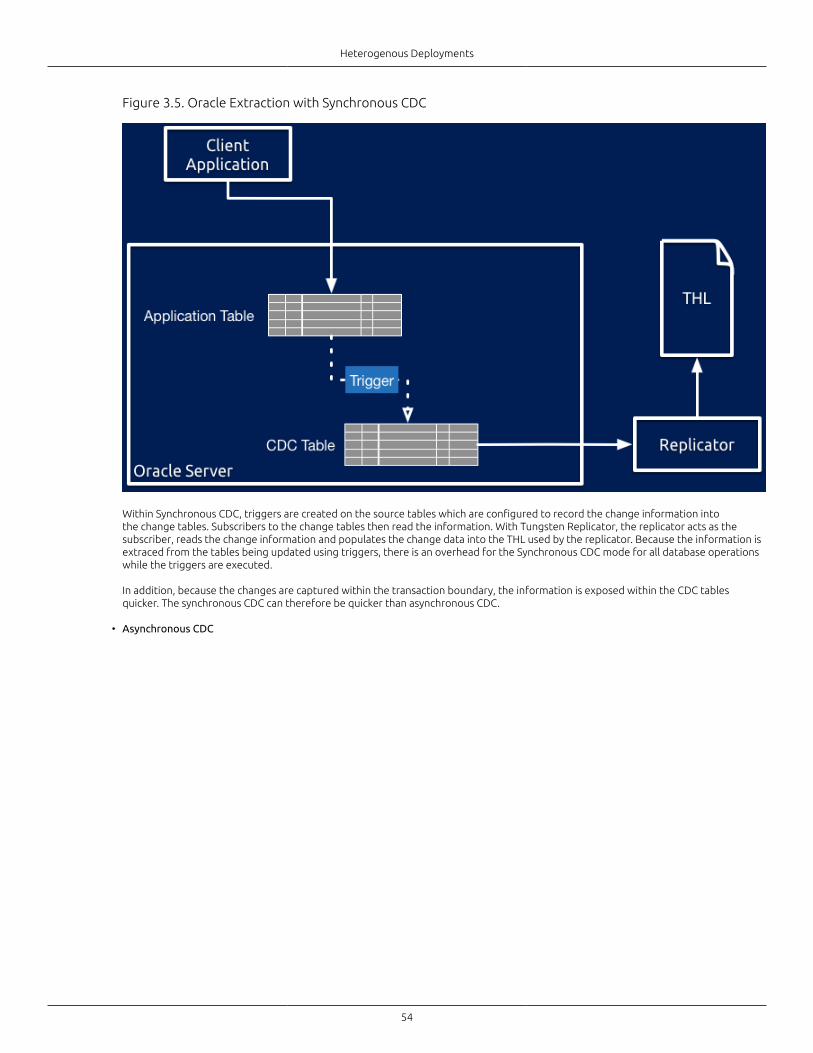
Heterogenous Deployments
54
Figure 3.5. Oracle Extraction with Synchronous CDC
Within Synchronous CDC, triggers are created on the source tables which are configured to record the change information intothe change tables. Subscribers to the change tables then read the information. With Tungsten Replicator, the replicator acts as thesubscriber, reads the change information and populates the change data into the THL used by the replicator. Because the information isextraced from the tables being updated using triggers, there is an overhead for the Synchronous CDC mode for all database operationswhile the triggers are executed.
In addition, because the changes are captured within the transaction boundary, the information is exposed within the CDC tablesquicker. The synchronous CDC can therefore be quicker than asynchronous CDC.
• Asynchronous CDC
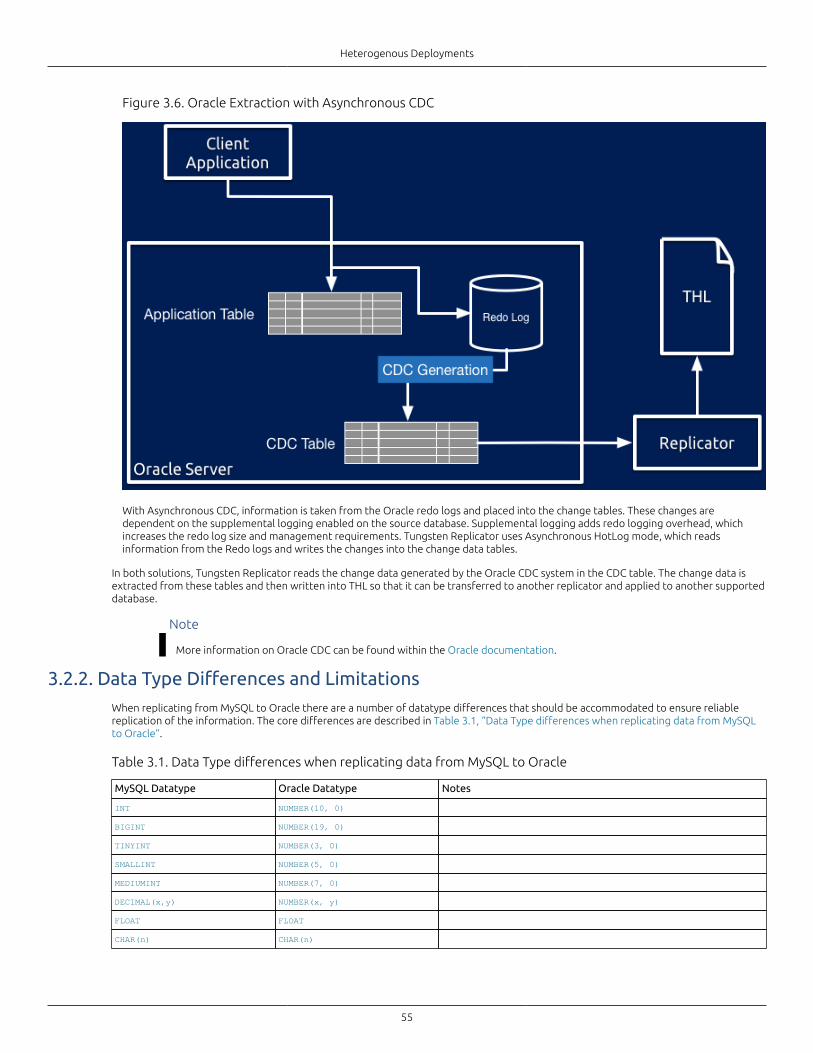
Heterogenous Deployments
55
Figure 3.6. Oracle Extraction with Asynchronous CDC
With Asynchronous CDC, information is taken from the Oracle redo logs and placed into the change tables. These changes aredependent on the supplemental logging enabled on the source database. Supplemental logging adds redo logging overhead, whichincreases the redo log size and management requirements. Tungsten Replicator uses Asynchronous HotLog mode, which readsinformation from the Redo logs and writes the changes into the change data tables.
In both solutions, Tungsten Replicator reads the change data generated by the Oracle CDC system in the CDC table. The change data isextracted from these tables and then written into THL so that it can be transferred to another replicator and applied to another supporteddatabase.
Note
More information on Oracle CDC can be found within the Oracle documentation.
3.2.2. Data Type Differences and LimitationsWhen replicating from MySQL to Oracle there are a number of datatype differences that should be accommodated to ensure reliablereplication of the information. The core differences are described in Table 3.1, “Data Type differences when replicating data from MySQLto Oracle”.
Table 3.1. Data Type differences when replicating data from MySQL to Oracle
MySQL Datatype Oracle Datatype Notes
INT NUMBER(10, 0)
BIGINT NUMBER(19, 0)
TINYINT NUMBER(3, 0)
SMALLINT NUMBER(5, 0)
MEDIUMINT NUMBER(7, 0)
DECIMAL(x,y) NUMBER(x, y)
FLOAT FLOAT
CHAR(n) CHAR(n)
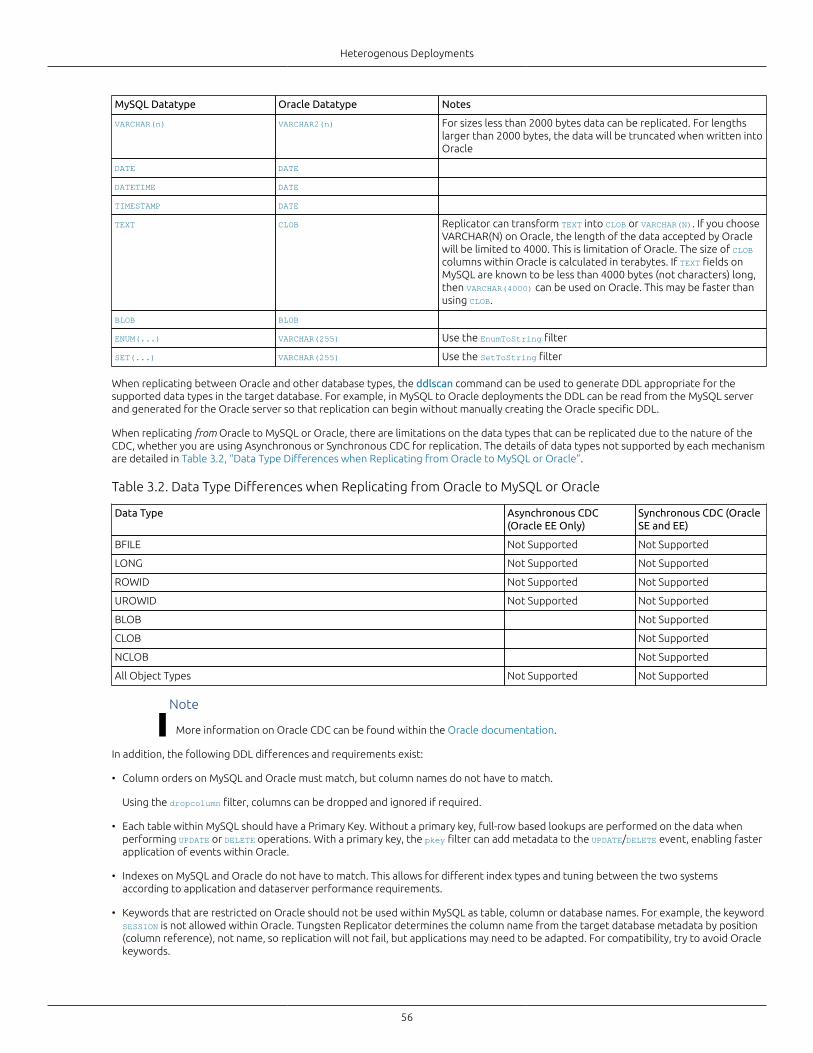
Heterogenous Deployments
56
MySQL Datatype Oracle Datatype Notes
VARCHAR(n) VARCHAR2(n) For sizes less than 2000 bytes data can be replicated. For lengthslarger than 2000 bytes, the data will be truncated when written intoOracle
DATE DATE
DATETIME DATE
TIMESTAMP DATE
TEXT CLOB Replicator can transform TEXT into CLOB or VARCHAR(N). If you chooseVARCHAR(N) on Oracle, the length of the data accepted by Oraclewill be limited to 4000. This is limitation of Oracle. The size of CLOBcolumns within Oracle is calculated in terabytes. If TEXT fields onMySQL are known to be less than 4000 bytes (not characters) long,then VARCHAR(4000) can be used on Oracle. This may be faster thanusing CLOB.
BLOB BLOB
ENUM(...) VARCHAR(255) Use the EnumToString filter
SET(...) VARCHAR(255) Use the SetToString filter
When replicating between Oracle and other database types, the ddlscan command can be used to generate DDL appropriate for thesupported data types in the target database. For example, in MySQL to Oracle deployments the DDL can be read from the MySQL serverand generated for the Oracle server so that replication can begin without manually creating the Oracle specific DDL.
When replicating from Oracle to MySQL or Oracle, there are limitations on the data types that can be replicated due to the nature of theCDC, whether you are using Asynchronous or Synchronous CDC for replication. The details of data types not supported by each mechanismare detailed in Table 3.2, “Data Type Differences when Replicating from Oracle to MySQL or Oracle”.
Table 3.2. Data Type Differences when Replicating from Oracle to MySQL or Oracle
Data Type Asynchronous CDC(Oracle EE Only)
Synchronous CDC (OracleSE and EE)
BFILE Not Supported Not Supported
LONG Not Supported Not Supported
ROWID Not Supported Not Supported
UROWID Not Supported Not Supported
BLOB Not Supported
CLOB Not Supported
NCLOB Not Supported
All Object Types Not Supported Not Supported
Note
More information on Oracle CDC can be found within the Oracle documentation.
In addition, the following DDL differences and requirements exist:
• Column orders on MySQL and Oracle must match, but column names do not have to match.
Using the dropcolumn filter, columns can be dropped and ignored if required.
• Each table within MySQL should have a Primary Key. Without a primary key, full-row based lookups are performed on the data whenperforming UPDATE or DELETE operations. With a primary key, the pkey filter can add metadata to the UPDATE/DELETE event, enabling fasterapplication of events within Oracle.
• Indexes on MySQL and Oracle do not have to match. This allows for different index types and tuning between the two systemsaccording to application and dataserver performance requirements.
• Keywords that are restricted on Oracle should not be used within MySQL as table, column or database names. For example, the keywordSESSION is not allowed within Oracle. Tungsten Replicator determines the column name from the target database metadata by position(column reference), not name, so replication will not fail, but applications may need to be adapted. For compatibility, try to avoid Oraclekeywords.
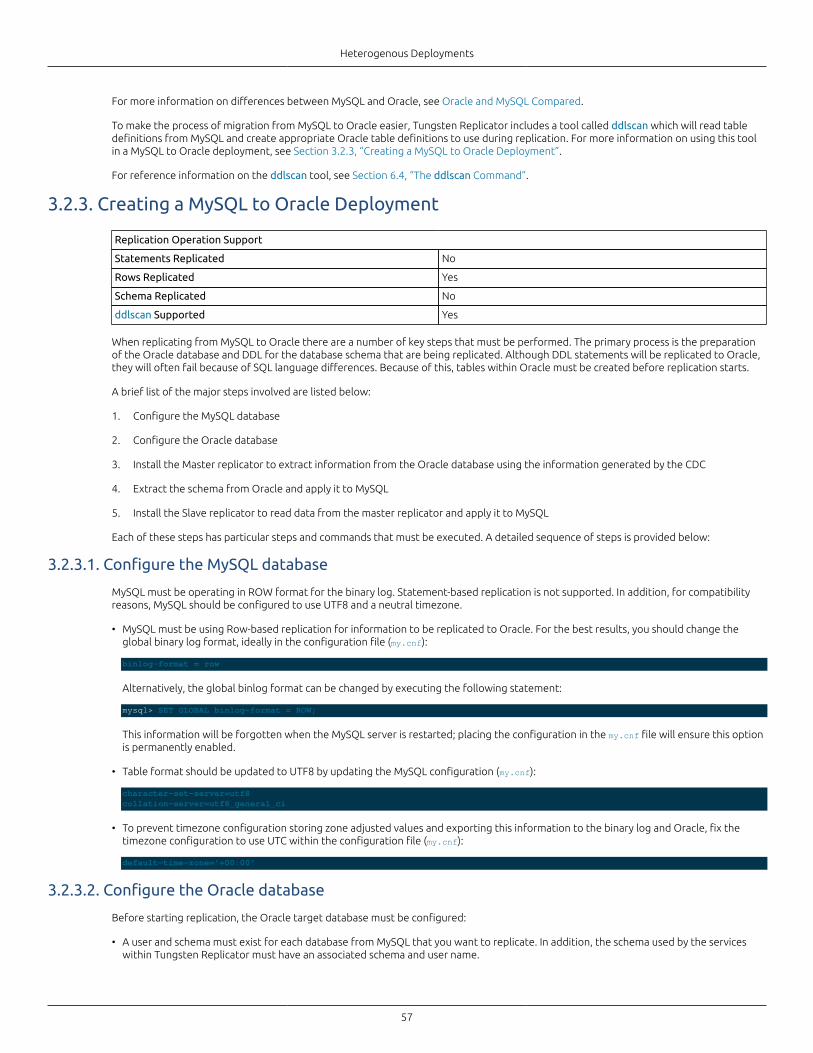
Heterogenous Deployments
57
For more information on differences between MySQL and Oracle, see Oracle and MySQL Compared.
To make the process of migration from MySQL to Oracle easier, Tungsten Replicator includes a tool called ddlscan which will read tabledefinitions from MySQL and create appropriate Oracle table definitions to use during replication. For more information on using this toolin a MySQL to Oracle deployment, see Section 3.2.3, “Creating a MySQL to Oracle Deployment”.
For reference information on the ddlscan tool, see Section 6.4, “The ddlscan Command”.
3.2.3. Creating a MySQL to Oracle Deployment
Replication Operation Support
Statements Replicated No
Rows Replicated Yes
Schema Replicated No
ddlscan Supported Yes
When replicating from MySQL to Oracle there are a number of key steps that must be performed. The primary process is the preparationof the Oracle database and DDL for the database schema that are being replicated. Although DDL statements will be replicated to Oracle,they will often fail because of SQL language differences. Because of this, tables within Oracle must be created before replication starts.
A brief list of the major steps involved are listed below:
1. Configure the MySQL database
2. Configure the Oracle database
3. Install the Master replicator to extract information from the Oracle database using the information generated by the CDC
4. Extract the schema from Oracle and apply it to MySQL
5. Install the Slave replicator to read data from the master replicator and apply it to MySQL
Each of these steps has particular steps and commands that must be executed. A detailed sequence of steps is provided below:
3.2.3.1. Configure the MySQL database
MySQL must be operating in ROW format for the binary log. Statement-based replication is not supported. In addition, for compatibilityreasons, MySQL should be configured to use UTF8 and a neutral timezone.
• MySQL must be using Row-based replication for information to be replicated to Oracle. For the best results, you should change theglobal binary log format, ideally in the configuration file (my.cnf):
binlog-format = row
Alternatively, the global binlog format can be changed by executing the following statement:
mysql> SET GLOBAL binlog-format = ROW;
This information will be forgotten when the MySQL server is restarted; placing the configuration in the my.cnf file will ensure this optionis permanently enabled.
• Table format should be updated to UTF8 by updating the MySQL configuration (my.cnf):
character-set-server=utf8collation-server=utf8_general_ci
• To prevent timezone configuration storing zone adjusted values and exporting this information to the binary log and Oracle, fix thetimezone configuration to use UTC within the configuration file (my.cnf):
default-time-zone='+00:00'
3.2.3.2. Configure the Oracle database
Before starting replication, the Oracle target database must be configured:
• A user and schema must exist for each database from MySQL that you want to replicate. In addition, the schema used by the serviceswithin Tungsten Replicator must have an associated schema and user name.

Heterogenous Deployments
58
For example, if you are replicating the database sales to Oracle, the following statements must be executed to create a suitable user.This can be performed through any connection, including sqlplus:
shell> sqlplus sys/oracle as sysdbaSQL> CREATE USER sales IDENTIFIED BY password DEFAULT TABLESPACE DEMO QUOTA UNLIMITED ON DEMO;
The above assumes a suitable tablespace has been created (DEMO in this case).
• A schema must also be created for each service replicating into Oracle. For example, if the service is called alpha, then thetungsten_alpha schema/user must be created. The same command can be used:
SQL> CREATE USER tungsten_alpha IDENTIFIED BY password DEFAULT TABLESPACE DEMO QUOTA UNLIMITED ON DEMO;
• One of the users used above must be configured so that it has the rights to connect to Oracle and has all rights so that it can executestatements on any schema:
SQL> GRANT CONNECT TO tungsten_alpha;SQL> GRANT ALL PRIVILEGES TO tungsten_alpha;
The user/password combination selected will be required when configuring the slave replication service.
3.2.3.3. Create the Destination Schema
On the host which has been already configured as the master, use ddlscan to extract the DDL for Oracle:
shell> cd tungsten-replicator-2.2.1-403shell> ./bin/ddlscan -user tungsten -url 'jdbc:mysql:thin://host1:13306/access_log' \ -pass password -template ddl-mysql-oracle.vm -db access_log
The output should be captured and checked before applying it to your Oracle instance:
shell> ./bin/ddlscan -user tungsten -url 'jdbc:mysql:thin://host1:13306/access_log' \ -pass password -template ddl-mysql-oracle.vm -db access_log > access_log.ddl
If you are happy with the output, it can be executed against your target Oracle database:
shell> cat access_log.ddl | sqlplus sys/oracle as sysdba
The generated DDL includes statements to drop existing tables if they exist. This will fail in a new installation, but the output can beignored.
Once the process has been completed for this database, it must be repeated for each database that you plan on replicating from Oracle toMySQL.
3.2.3.4. Install the Master Replicator Service
The master replicator is responsible for reading information from the MySQL binary log, converting that data into the THL format, andthen exposing that data to the slave that will apply the data into Oracle.
To configure the master replicator, use tpm to create a simple replicator installation, in this case enabling heterogeneous operations, andthe required user, password and installation directory.
shell> ./tools/tpm install alpha \ --master=host1 \ --install-directory=/opt/continuent \ --replication-user=tungsten \ --replication-password=password \ --enable-heterogeneous-master=true \ --start
The description of each of the options is shown below; click the icon to hide this detail:
Click the icon to show a detailed description of each argument.
• tpm install
Executes tpm in install mode to create the service alpha.
• --master=host1 [199]
Specifies which host will be the master.
• --replication-user=tungsten [206]
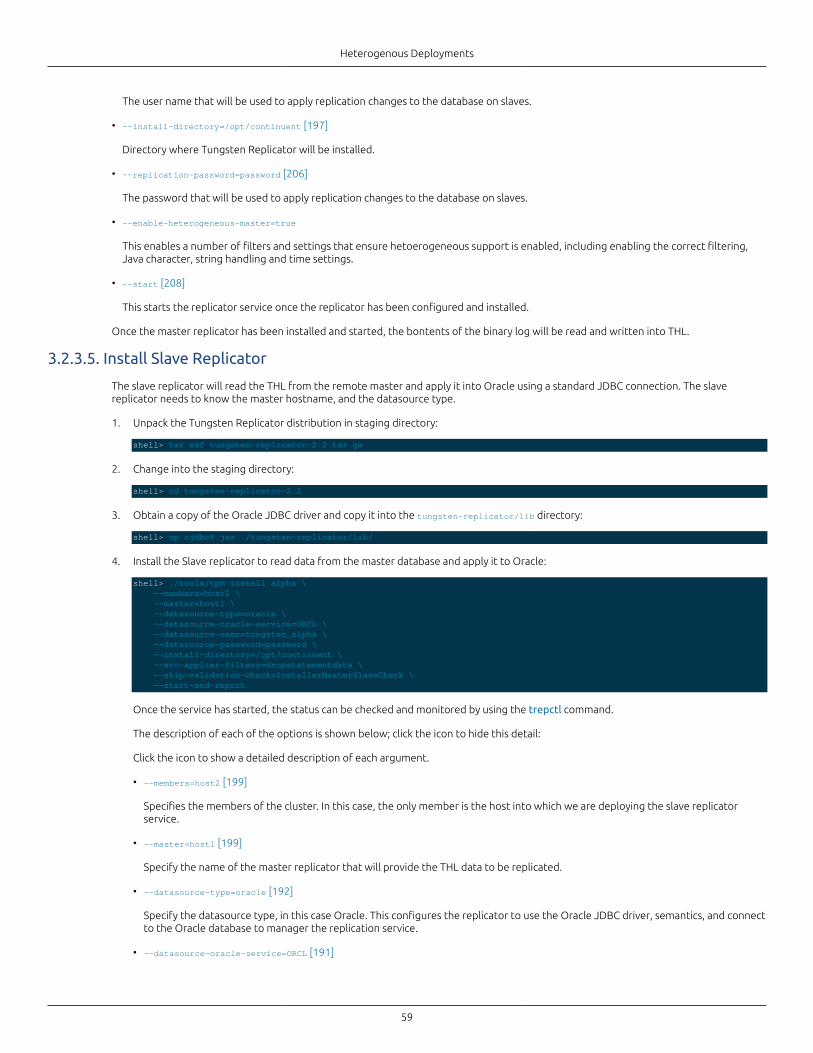
Heterogenous Deployments
59
The user name that will be used to apply replication changes to the database on slaves.
• --install-directory=/opt/continuent [197]
Directory where Tungsten Replicator will be installed.
• --replication-password=password [206]
The password that will be used to apply replication changes to the database on slaves.
• --enable-heterogeneous-master=true
This enables a number of filters and settings that ensure hetoerogeneous support is enabled, including enabling the correct filtering,Java character, string handling and time settings.
• --start [208]
This starts the replicator service once the replicator has been configured and installed.
Once the master replicator has been installed and started, the bontents of the binary log will be read and written into THL.
3.2.3.5. Install Slave Replicator
The slave replicator will read the THL from the remote master and apply it into Oracle using a standard JDBC connection. The slavereplicator needs to know the master hostname, and the datasource type.
1. Unpack the Tungsten Replicator distribution in staging directory:
shell> tar zxf tungsten-replicator-2.2.tar.gz
2. Change into the staging directory:
shell> cd tungsten-replicator-2.2
3. Obtain a copy of the Oracle JDBC driver and copy it into the tungsten-replicator/lib directory:
shell> cp ojdbc6.jar ./tungsten-replicator/lib/
4. Install the Slave replicator to read data from the master database and apply it to Oracle:
shell> ./tools/tpm install alpha \ --members=host2 \ --master=host1 \ --datasource-type=oracle \ --datasource-oracle-service=ORCL \ --datasource-user=tungsten_alpha \ --datasource-password=password \ --install-directory=/opt/continuent \ --svc-applier-filters=dropstatementdata \ --skip-validation-check=InstallerMasterSlaveCheck \ --start-and-report
Once the service has started, the status can be checked and monitored by using the trepctl command.
The description of each of the options is shown below; click the icon to hide this detail:
Click the icon to show a detailed description of each argument.
• --members=host2 [199]
Specifies the members of the cluster. In this case, the only member is the host into which we are deploying the slave replicatorservice.
• --master=host1 [199]
Specify the name of the master replicator that will provide the THL data to be replicated.
• --datasource-type=oracle [192]
Specify the datasource type, in this case Oracle. This configures the replicator to use the Oracle JDBC driver, semantics, and connectto the Oracle database to manager the replication service.
• --datasource-oracle-service=ORCL [191]
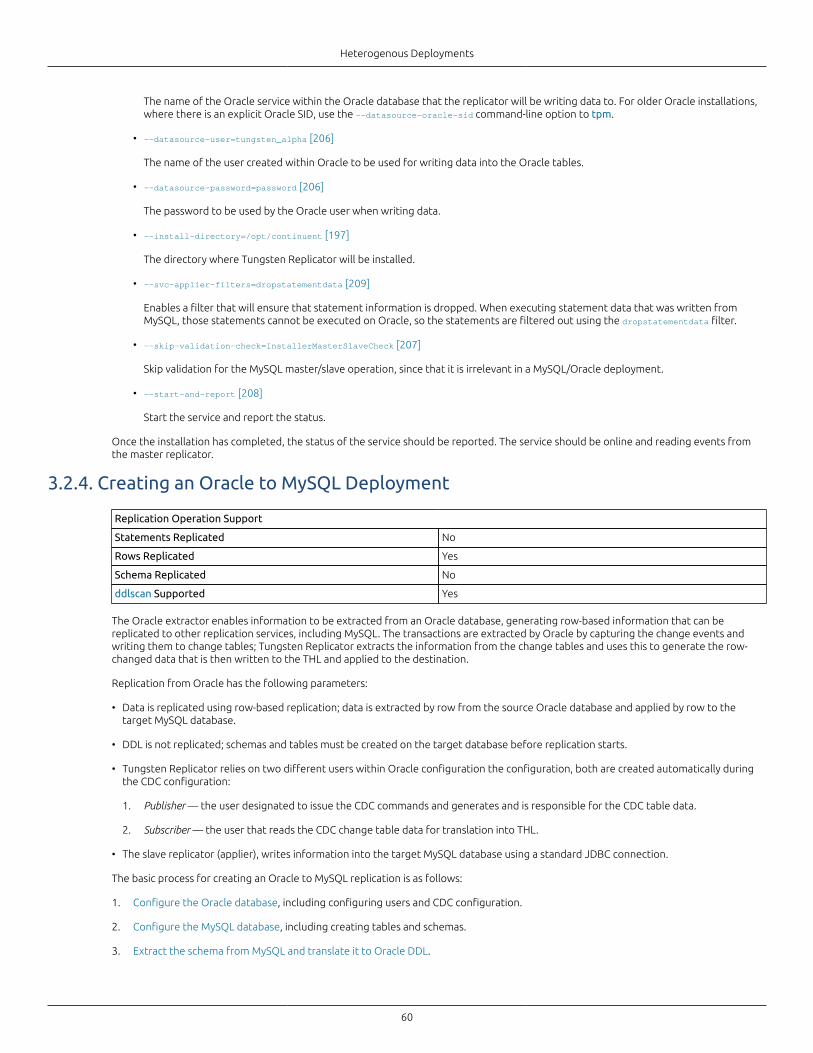
Heterogenous Deployments
60
The name of the Oracle service within the Oracle database that the replicator will be writing data to. For older Oracle installations,where there is an explicit Oracle SID, use the --datasource-oracle-sid command-line option to tpm.
• --datasource-user=tungsten_alpha [206]
The name of the user created within Oracle to be used for writing data into the Oracle tables.
• --datasource-password=password [206]
The password to be used by the Oracle user when writing data.
• --install-directory=/opt/continuent [197]
The directory where Tungsten Replicator will be installed.
• --svc-applier-filters=dropstatementdata [209]
Enables a filter that will ensure that statement information is dropped. When executing statement data that was written fromMySQL, those statements cannot be executed on Oracle, so the statements are filtered out using the dropstatementdata filter.
• --skip-validation-check=InstallerMasterSlaveCheck [207]
Skip validation for the MySQL master/slave operation, since that it is irrelevant in a MySQL/Oracle deployment.
• --start-and-report [208]
Start the service and report the status.
Once the installation has completed, the status of the service should be reported. The service should be online and reading events fromthe master replicator.
3.2.4. Creating an Oracle to MySQL Deployment
Replication Operation Support
Statements Replicated No
Rows Replicated Yes
Schema Replicated No
ddlscan Supported Yes
The Oracle extractor enables information to be extracted from an Oracle database, generating row-based information that can bereplicated to other replication services, including MySQL. The transactions are extracted by Oracle by capturing the change events andwriting them to change tables; Tungsten Replicator extracts the information from the change tables and uses this to generate the row-changed data that is then written to the THL and applied to the destination.
Replication from Oracle has the following parameters:
• Data is replicated using row-based replication; data is extracted by row from the source Oracle database and applied by row to thetarget MySQL database.
• DDL is not replicated; schemas and tables must be created on the target database before replication starts.
• Tungsten Replicator relies on two different users within Oracle configuration the configuration, both are created automatically duringthe CDC configuration:
1. Publisher — the user designated to issue the CDC commands and generates and is responsible for the CDC table data.
2. Subscriber — the user that reads the CDC change table data for translation into THL.
• The slave replicator (applier), writes information into the target MySQL database using a standard JDBC connection.
The basic process for creating an Oracle to MySQL replication is as follows:
1. Configure the Oracle database, including configuring users and CDC configuration.
2. Configure the MySQL database, including creating tables and schemas.
3. Extract the schema from MySQL and translate it to Oracle DDL.
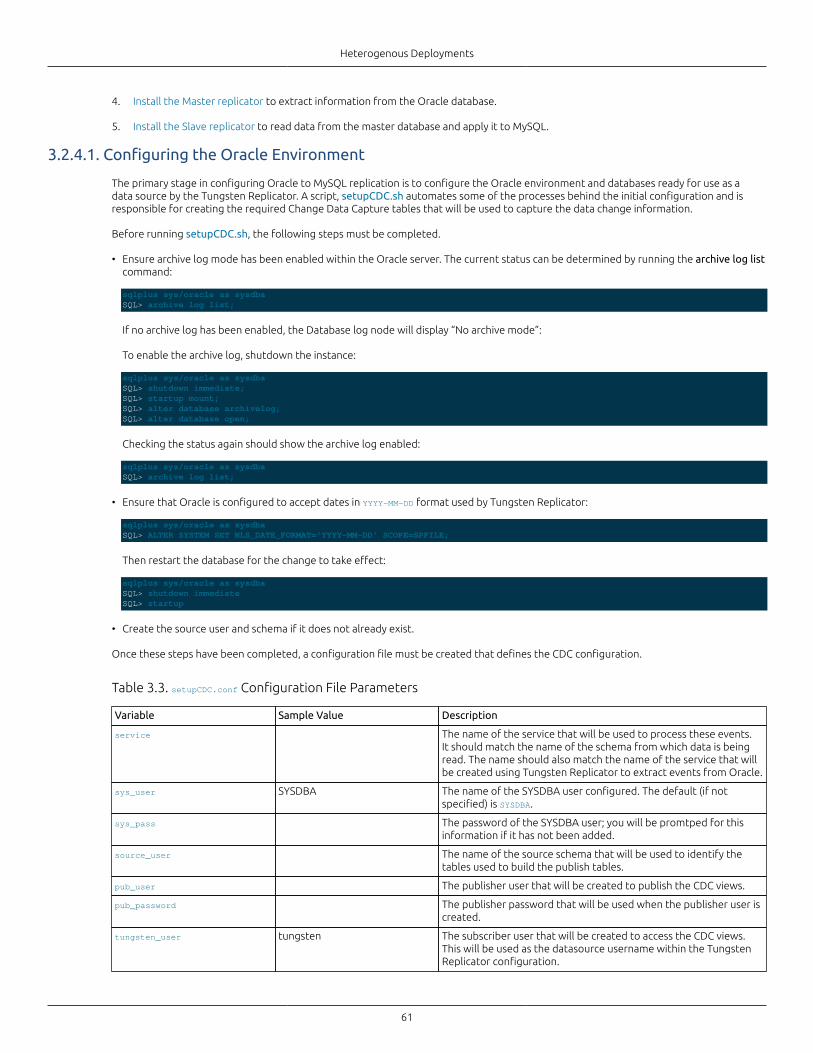
Heterogenous Deployments
61
4. Install the Master replicator to extract information from the Oracle database.
5. Install the Slave replicator to read data from the master database and apply it to MySQL.
3.2.4.1. Configuring the Oracle Environment
The primary stage in configuring Oracle to MySQL replication is to configure the Oracle environment and databases ready for use as adata source by the Tungsten Replicator. A script, setupCDC.sh automates some of the processes behind the initial configuration and isresponsible for creating the required Change Data Capture tables that will be used to capture the data change information.
Before running setupCDC.sh, the following steps must be completed.
• Ensure archive log mode has been enabled within the Oracle server. The current status can be determined by running the archive log listcommand:
sqlplus sys/oracle as sysdba SQL> archive log list;
If no archive log has been enabled, the Database log node will display “No archive mode”:
To enable the archive log, shutdown the instance:
sqlplus sys/oracle as sysdbaSQL> shutdown immediate;SQL> startup mount;SQL> alter database archivelog;SQL> alter database open;
Checking the status again should show the archive log enabled:
sqlplus sys/oracle as sysdba SQL> archive log list;
• Ensure that Oracle is configured to accept dates in YYYY-MM-DD format used by Tungsten Replicator:
sqlplus sys/oracle as sysdbaSQL> ALTER SYSTEM SET NLS_DATE_FORMAT='YYYY-MM-DD' SCOPE=SPFILE;
Then restart the database for the change to take effect:
sqlplus sys/oracle as sysdbaSQL> shutdown immediateSQL> startup
• Create the source user and schema if it does not already exist.
Once these steps have been completed, a configuration file must be created that defines the CDC configuration.
Table 3.3. setupCDC.conf Configuration File Parameters
Variable Sample Value Description
service The name of the service that will be used to process these events.It should match the name of the schema from which data is beingread. The name should also match the name of the service that willbe created using Tungsten Replicator to extract events from Oracle.
sys_user SYSDBA The name of the SYSDBA user configured. The default (if notspecified) is SYSDBA.
sys_pass The password of the SYSDBA user; you will be promtped for thisinformation if it has not been added.
source_user The name of the source schema that will be used to identify thetables used to build the publish tables.
pub_user The publisher user that will be created to publish the CDC views.
pub_password The publisher password that will be used when the publisher user iscreated.
tungsten_user tungsten The subscriber user that will be created to access the CDC views.This will be used as the datasource username within the TungstenReplicator configuration.
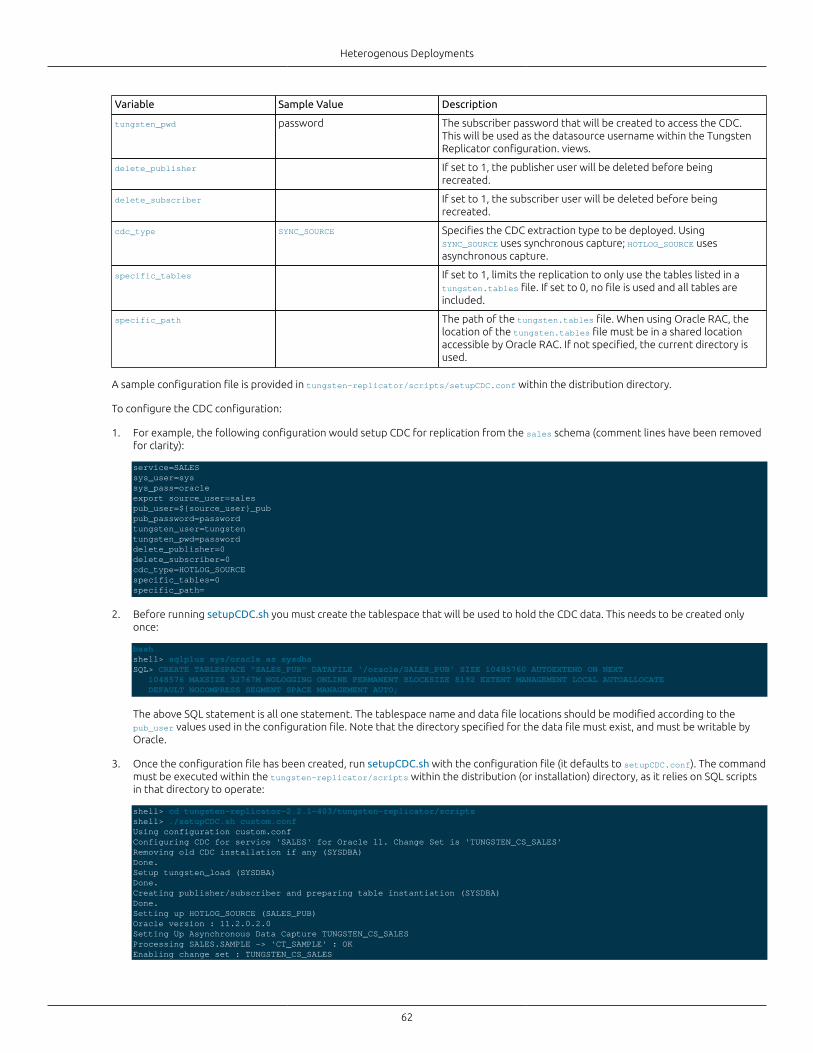
Heterogenous Deployments
62
Variable Sample Value Description
tungsten_pwd password The subscriber password that will be created to access the CDC.This will be used as the datasource username within the TungstenReplicator configuration. views.
delete_publisher If set to 1, the publisher user will be deleted before beingrecreated.
delete_subscriber If set to 1, the subscriber user will be deleted before beingrecreated.
cdc_type SYNC_SOURCE Specifies the CDC extraction type to be deployed. UsingSYNC_SOURCE uses synchronous capture; HOTLOG_SOURCE usesasynchronous capture.
specific_tables If set to 1, limits the replication to only use the tables listed in atungsten.tables file. If set to 0, no file is used and all tables areincluded.
specific_path The path of the tungsten.tables file. When using Oracle RAC, thelocation of the tungsten.tables file must be in a shared locationaccessible by Oracle RAC. If not specified, the current directory isused.
A sample configuration file is provided in tungsten-replicator/scripts/setupCDC.conf within the distribution directory.
To configure the CDC configuration:
1. For example, the following configuration would setup CDC for replication from the sales schema (comment lines have been removedfor clarity):
service=SALESsys_user=syssys_pass=oracleexport source_user=salespub_user=${source_user}_pubpub_password=passwordtungsten_user=tungstentungsten_pwd=passworddelete_publisher=0delete_subscriber=0cdc_type=HOTLOG_SOURCEspecific_tables=0specific_path=
2. Before running setupCDC.sh you must create the tablespace that will be used to hold the CDC data. This needs to be created onlyonce:
bashshell> sqlplus sys/oracle as sysdbaSQL> CREATE TABLESPACE "SALES_PUB" DATAFILE '/oracle/SALES_PUB' SIZE 10485760 AUTOEXTEND ON NEXT 1048576 MAXSIZE 32767M NOLOGGING ONLINE PERMANENT BLOCKSIZE 8192 EXTENT MANAGEMENT LOCAL AUTOALLOCATE DEFAULT NOCOMPRESS SEGMENT SPACE MANAGEMENT AUTO;
The above SQL statement is all one statement. The tablespace name and data file locations should be modified according to thepub_user values used in the configuration file. Note that the directory specified for the data file must exist, and must be writable byOracle.
3. Once the configuration file has been created, run setupCDC.sh with the configuration file (it defaults to setupCDC.conf). The commandmust be executed within the tungsten-replicator/scripts within the distribution (or installation) directory, as it relies on SQL scriptsin that directory to operate:
shell> cd tungsten-replicator-2.2.1-403/tungsten-replicator/scriptsshell> ./setupCDC.sh custom.confUsing configuration custom.confConfiguring CDC for service 'SALES' for Oracle 11. Change Set is 'TUNGSTEN_CS_SALES'Removing old CDC installation if any (SYSDBA)Done.Setup tungsten_load (SYSDBA)Done.Creating publisher/subscriber and preparing table instantiation (SYSDBA)Done.Setting up HOTLOG_SOURCE (SALES_PUB)Oracle version : 11.2.0.2.0Setting Up Asynchronous Data Capture TUNGSTEN_CS_SALESProcessing SALES.SAMPLE -> 'CT_SAMPLE' : OKEnabling change set : TUNGSTEN_CS_SALES
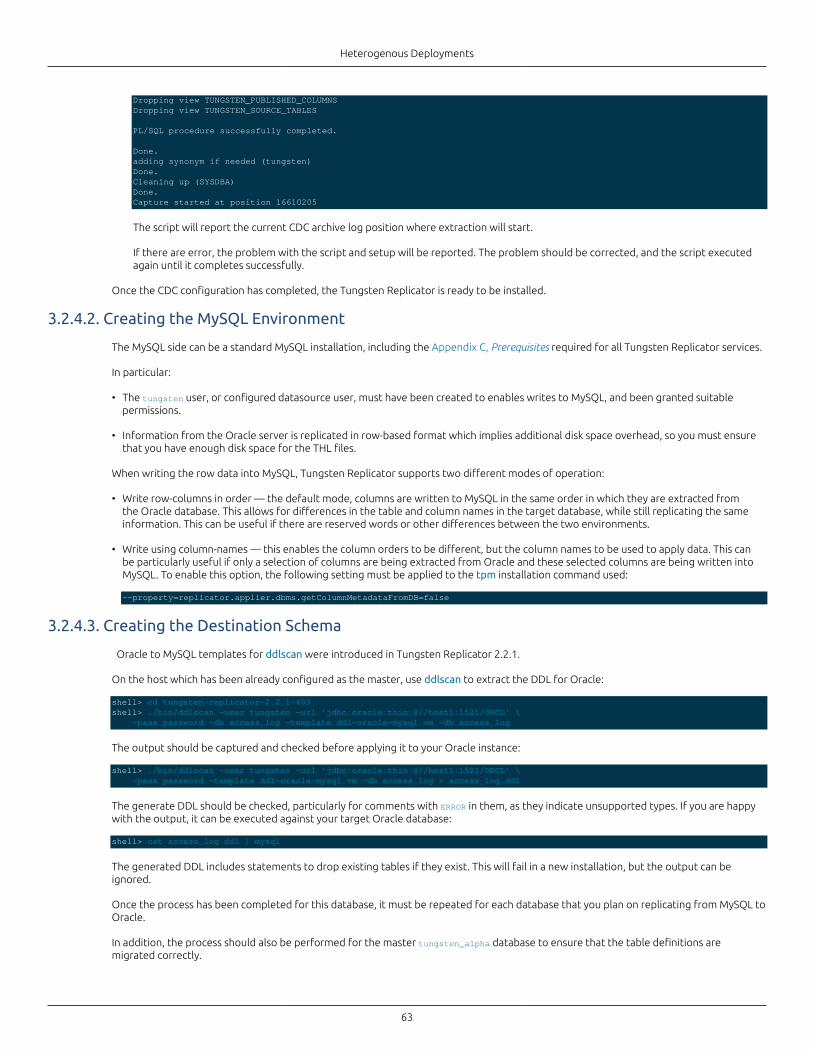
Heterogenous Deployments
63
Dropping view TUNGSTEN_PUBLISHED_COLUMNSDropping view TUNGSTEN_SOURCE_TABLES
PL/SQL procedure successfully completed.
Done.adding synonym if needed (tungsten)Done.Cleaning up (SYSDBA)Done.Capture started at position 16610205
The script will report the current CDC archive log position where extraction will start.
If there are error, the problem with the script and setup will be reported. The problem should be corrected, and the script executedagain until it completes successfully.
Once the CDC configuration has completed, the Tungsten Replicator is ready to be installed.
3.2.4.2. Creating the MySQL Environment
The MySQL side can be a standard MySQL installation, including the Appendix C, Prerequisites required for all Tungsten Replicator services.
In particular:
• The tungsten user, or configured datasource user, must have been created to enables writes to MySQL, and been granted suitablepermissions.
• Information from the Oracle server is replicated in row-based format which implies additional disk space overhead, so you must ensurethat you have enough disk space for the THL files.
When writing the row data into MySQL, Tungsten Replicator supports two different modes of operation:
• Write row-columns in order — the default mode, columns are written to MySQL in the same order in which they are extracted fromthe Oracle database. This allows for differences in the table and column names in the target database, while still replicating the sameinformation. This can be useful if there are reserved words or other differences between the two environments.
• Write using column-names — this enables the column orders to be different, but the column names to be used to apply data. This canbe particularly useful if only a selection of columns are being extracted from Oracle and these selected columns are being written intoMySQL. To enable this option, the following setting must be applied to the tpm installation command used:
--property=replicator.applier.dbms.getColumnMetadataFromDB=false
3.2.4.3. Creating the Destination Schema
Oracle to MySQL templates for ddlscan were introduced in Tungsten Replicator 2.2.1.
On the host which has been already configured as the master, use ddlscan to extract the DDL for Oracle:
shell> cd tungsten-replicator-2.2.1-403shell> ./bin/ddlscan -user tungsten -url 'jdbc:oracle:thin:@//host1:1521/ORCL' \ -pass password -db access_log -template ddl-oracle-mysql.vm -db access_log
The output should be captured and checked before applying it to your Oracle instance:
shell> ./bin/ddlscan -user tungsten -url 'jdbc:oracle:thin:@//host1:1521/ORCL' \ -pass password -template ddl-oracle-mysql.vm -db access_log > access_log.ddl
The generate DDL should be checked, particularly for comments with ERROR in them, as they indicate unsupported types. If you are happywith the output, it can be executed against your target Oracle database:
shell> cat access_log.ddl | mysql
The generated DDL includes statements to drop existing tables if they exist. This will fail in a new installation, but the output can beignored.
Once the process has been completed for this database, it must be repeated for each database that you plan on replicating from MySQL toOracle.
In addition, the process should also be performed for the master tungsten_alpha database to ensure that the table definitions aremigrated correctly.
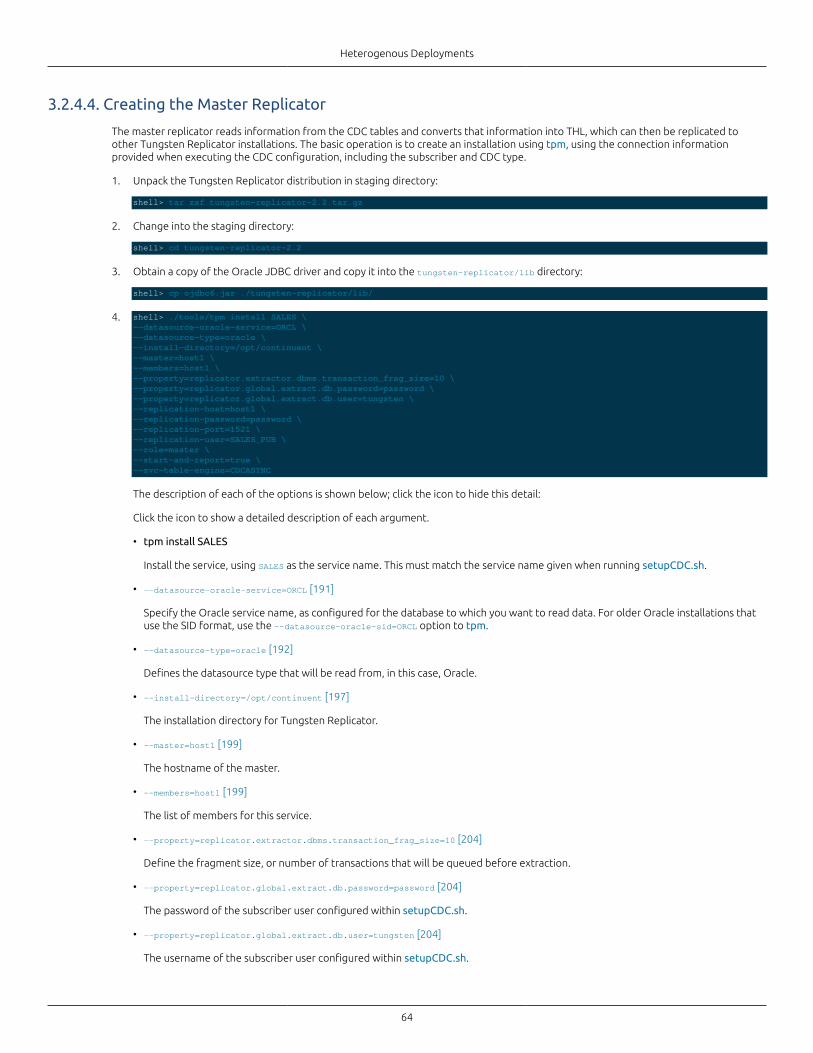
Heterogenous Deployments
64
3.2.4.4. Creating the Master Replicator
The master replicator reads information from the CDC tables and converts that information into THL, which can then be replicated toother Tungsten Replicator installations. The basic operation is to create an installation using tpm, using the connection informationprovided when executing the CDC configuration, including the subscriber and CDC type.
1. Unpack the Tungsten Replicator distribution in staging directory:
shell> tar zxf tungsten-replicator-2.2.tar.gz
2. Change into the staging directory:
shell> cd tungsten-replicator-2.2
3. Obtain a copy of the Oracle JDBC driver and copy it into the tungsten-replicator/lib directory:
shell> cp ojdbc6.jar ./tungsten-replicator/lib/
4. shell> ./tools/tpm install SALES \--datasource-oracle-service=ORCL \--datasource-type=oracle \--install-directory=/opt/continuent \--master=host1 \--members=host1 \--property=replicator.extractor.dbms.transaction_frag_size=10 \--property=replicator.global.extract.db.password=password \--property=replicator.global.extract.db.user=tungsten \--replication-host=host1 \--replication-password=password \--replication-port=1521 \--replication-user=SALES_PUB \--role=master \--start-and-report=true \--svc-table-engine=CDCASYNC
The description of each of the options is shown below; click the icon to hide this detail:
Click the icon to show a detailed description of each argument.
• tpm install SALES
Install the service, using SALES as the service name. This must match the service name given when running setupCDC.sh.
• --datasource-oracle-service=ORCL [191]
Specify the Oracle service name, as configured for the database to which you want to read data. For older Oracle installations thatuse the SID format, use the --datasource-oracle-sid=ORCL option to tpm.
• --datasource-type=oracle [192]
Defines the datasource type that will be read from, in this case, Oracle.
• --install-directory=/opt/continuent [197]
The installation directory for Tungsten Replicator.
• --master=host1 [199]
The hostname of the master.
• --members=host1 [199]
The list of members for this service.
• --property=replicator.extractor.dbms.transaction_frag_size=10 [204]
Define the fragment size, or number of transactions that will be queued before extraction.
• --property=replicator.global.extract.db.password=password [204]
The password of the subscriber user configured within setupCDC.sh.
• --property=replicator.global.extract.db.user=tungsten [204]
The username of the subscriber user configured within setupCDC.sh.
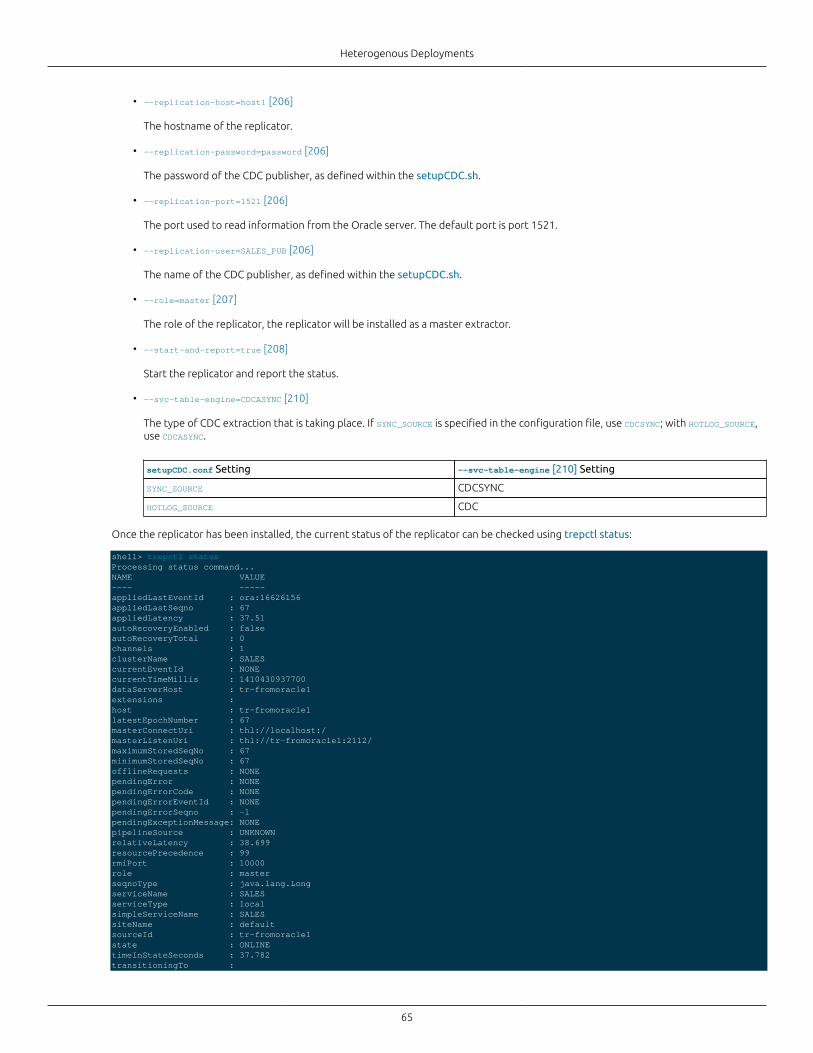
Heterogenous Deployments
65
• --replication-host=host1 [206]
The hostname of the replicator.
• --replication-password=password [206]
The password of the CDC publisher, as defined within the setupCDC.sh.
• --replication-port=1521 [206]
The port used to read information from the Oracle server. The default port is port 1521.
• --replication-user=SALES_PUB [206]
The name of the CDC publisher, as defined within the setupCDC.sh.
• --role=master [207]
The role of the replicator, the replicator will be installed as a master extractor.
• --start-and-report=true [208]
Start the replicator and report the status.
• --svc-table-engine=CDCASYNC [210]
The type of CDC extraction that is taking place. If SYNC_SOURCE is specified in the configuration file, use CDCSYNC; with HOTLOG_SOURCE,use CDCASYNC.
setupCDC.conf Setting --svc-table-engine [210] Setting
SYNC_SOURCE CDCSYNC
HOTLOG_SOURCE CDC
Once the replicator has been installed, the current status of the replicator can be checked using trepctl status:
shell> trepctl statusProcessing status command...NAME VALUE---- -----appliedLastEventId : ora:16626156appliedLastSeqno : 67appliedLatency : 37.51autoRecoveryEnabled : falseautoRecoveryTotal : 0channels : 1clusterName : SALEScurrentEventId : NONEcurrentTimeMillis : 1410430937700dataServerHost : tr-fromoracle1extensions : host : tr-fromoracle1latestEpochNumber : 67masterConnectUri : thl://localhost:/masterListenUri : thl://tr-fromoracle1:2112/maximumStoredSeqNo : 67minimumStoredSeqNo : 67offlineRequests : NONEpendingError : NONEpendingErrorCode : NONEpendingErrorEventId : NONEpendingErrorSeqno : -1pendingExceptionMessage: NONEpipelineSource : UNKNOWNrelativeLatency : 38.699resourcePrecedence : 99rmiPort : 10000role : masterseqnoType : java.lang.LongserviceName : SALESserviceType : localsimpleServiceName : SALESsiteName : defaultsourceId : tr-fromoracle1state : ONLINEtimeInStateSeconds : 37.782transitioningTo :
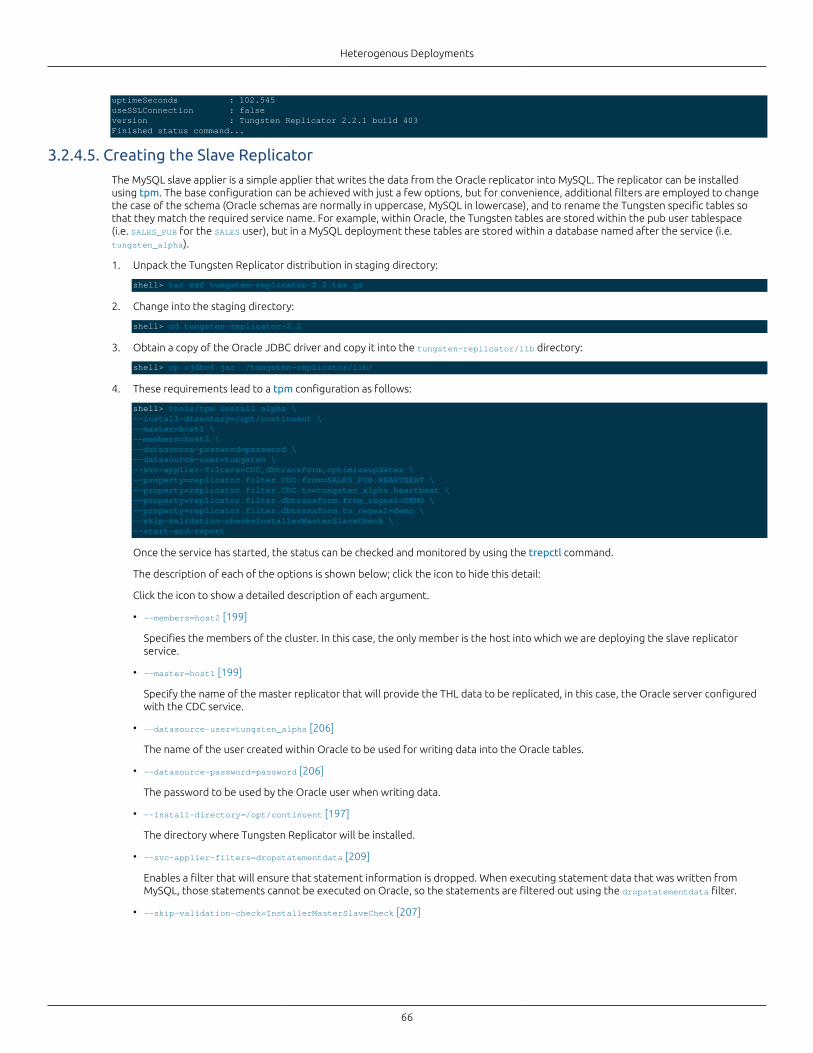
Heterogenous Deployments
66
uptimeSeconds : 102.545useSSLConnection : falseversion : Tungsten Replicator 2.2.1 build 403Finished status command...
3.2.4.5. Creating the Slave Replicator
The MySQL slave applier is a simple applier that writes the data from the Oracle replicator into MySQL. The replicator can be installedusing tpm. The base configuration can be achieved with just a few options, but for convenience, additional filters are employed to changethe case of the schema (Oracle schemas are normally in uppercase, MySQL in lowercase), and to rename the Tungsten specific tables sothat they match the required service name. For example, within Oracle, the Tungsten tables are stored within the pub user tablespace(i.e. SALES_PUB for the SALES user), but in a MySQL deployment these tables are stored within a database named after the service (i.e.tungsten_alpha).
1. Unpack the Tungsten Replicator distribution in staging directory:
shell> tar zxf tungsten-replicator-2.2.tar.gz
2. Change into the staging directory:
shell> cd tungsten-replicator-2.2
3. Obtain a copy of the Oracle JDBC driver and copy it into the tungsten-replicator/lib directory:
shell> cp ojdbc6.jar ./tungsten-replicator/lib/
4. These requirements lead to a tpm configuration as follows:
shell> tools/tpm install alpha \--install-directory=/opt/continuent \--master=host1 \--members=host2 \--datasource-password=password \ --datasource-user=tungsten \--svc-applier-filters=CDC,dbtransform,optimizeupdates \--property=replicator.filter.CDC.from=SALES_PUB.HEARTBEAT \--property=replicator.filter.CDC.to=tungsten_alpha.heartbeat \--property=replicator.filter.dbtransform.from_regex1=DEMO \--property=replicator.filter.dbtransform.to_regex1=demo \--skip-validation-check=InstallerMasterSlaveCheck \--start-and-report
Once the service has started, the status can be checked and monitored by using the trepctl command.
The description of each of the options is shown below; click the icon to hide this detail:
Click the icon to show a detailed description of each argument.
• --members=host2 [199]
Specifies the members of the cluster. In this case, the only member is the host into which we are deploying the slave replicatorservice.
• --master=host1 [199]
Specify the name of the master replicator that will provide the THL data to be replicated, in this case, the Oracle server configuredwith the CDC service.
• --datasource-user=tungsten_alpha [206]
The name of the user created within Oracle to be used for writing data into the Oracle tables.
• --datasource-password=password [206]
The password to be used by the Oracle user when writing data.
• --install-directory=/opt/continuent [197]
The directory where Tungsten Replicator will be installed.
• --svc-applier-filters=dropstatementdata [209]
Enables a filter that will ensure that statement information is dropped. When executing statement data that was written fromMySQL, those statements cannot be executed on Oracle, so the statements are filtered out using the dropstatementdata filter.
• --skip-validation-check=InstallerMasterSlaveCheck [207]
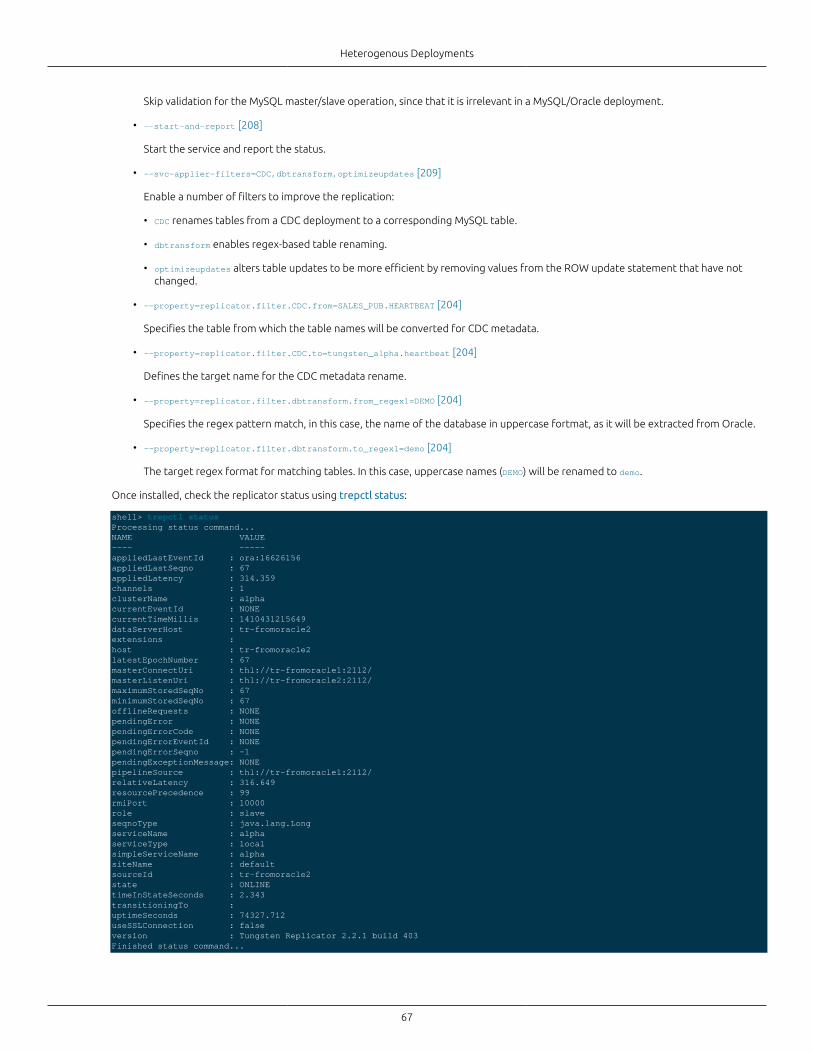
Heterogenous Deployments
67
Skip validation for the MySQL master/slave operation, since that it is irrelevant in a MySQL/Oracle deployment.
• --start-and-report [208]
Start the service and report the status.
• --svc-applier-filters=CDC,dbtransform,optimizeupdates [209]
Enable a number of filters to improve the replication:
• CDC renames tables from a CDC deployment to a corresponding MySQL table.
• dbtransform enables regex-based table renaming.
• optimizeupdates alters table updates to be more efficient by removing values from the ROW update statement that have notchanged.
• --property=replicator.filter.CDC.from=SALES_PUB.HEARTBEAT [204]
Specifies the table from which the table names will be converted for CDC metadata.
• --property=replicator.filter.CDC.to=tungsten_alpha.heartbeat [204]
Defines the target name for the CDC metadata rename.
• --property=replicator.filter.dbtransform.from_regex1=DEMO [204]
Specifies the regex pattern match, in this case, the name of the database in uppercase fortmat, as it will be extracted from Oracle.
• --property=replicator.filter.dbtransform.to_regex1=demo [204]
The target regex format for matching tables. In this case, uppercase names (DEMO) will be renamed to demo.
Once installed, check the replicator status using trepctl status:
shell> trepctl statusProcessing status command...NAME VALUE---- -----appliedLastEventId : ora:16626156appliedLastSeqno : 67appliedLatency : 314.359channels : 1clusterName : alphacurrentEventId : NONEcurrentTimeMillis : 1410431215649dataServerHost : tr-fromoracle2extensions : host : tr-fromoracle2latestEpochNumber : 67masterConnectUri : thl://tr-fromoracle1:2112/masterListenUri : thl://tr-fromoracle2:2112/maximumStoredSeqNo : 67minimumStoredSeqNo : 67offlineRequests : NONEpendingError : NONEpendingErrorCode : NONEpendingErrorEventId : NONEpendingErrorSeqno : -1pendingExceptionMessage: NONEpipelineSource : thl://tr-fromoracle1:2112/relativeLatency : 316.649resourcePrecedence : 99rmiPort : 10000role : slaveseqnoType : java.lang.LongserviceName : alphaserviceType : localsimpleServiceName : alphasiteName : defaultsourceId : tr-fromoracle2state : ONLINEtimeInStateSeconds : 2.343transitioningTo : uptimeSeconds : 74327.712useSSLConnection : falseversion : Tungsten Replicator 2.2.1 build 403Finished status command...
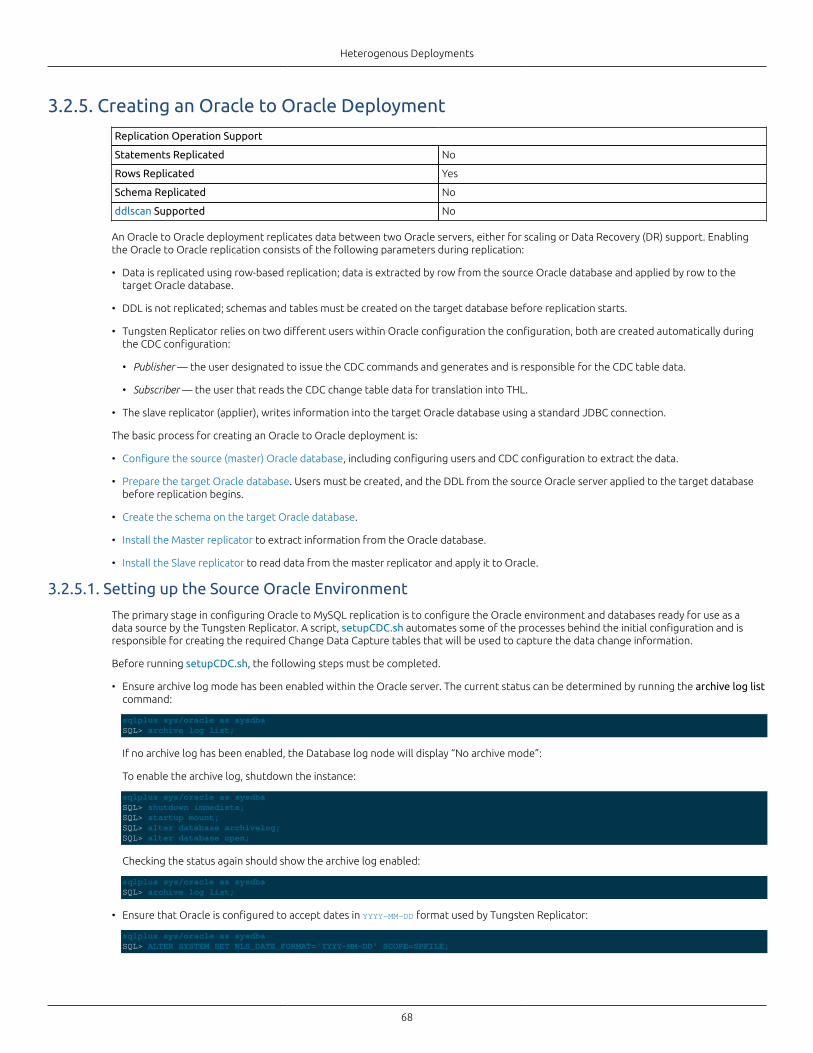
Heterogenous Deployments
68
3.2.5. Creating an Oracle to Oracle Deployment
Replication Operation Support
Statements Replicated No
Rows Replicated Yes
Schema Replicated No
ddlscan Supported No
An Oracle to Oracle deployment replicates data between two Oracle servers, either for scaling or Data Recovery (DR) support. Enablingthe Oracle to Oracle replication consists of the following parameters during replication:
• Data is replicated using row-based replication; data is extracted by row from the source Oracle database and applied by row to thetarget Oracle database.
• DDL is not replicated; schemas and tables must be created on the target database before replication starts.
• Tungsten Replicator relies on two different users within Oracle configuration the configuration, both are created automatically duringthe CDC configuration:
• Publisher — the user designated to issue the CDC commands and generates and is responsible for the CDC table data.
• Subscriber — the user that reads the CDC change table data for translation into THL.
• The slave replicator (applier), writes information into the target Oracle database using a standard JDBC connection.
The basic process for creating an Oracle to Oracle deployment is:
• Configure the source (master) Oracle database, including configuring users and CDC configuration to extract the data.
• Prepare the target Oracle database. Users must be created, and the DDL from the source Oracle server applied to the target databasebefore replication begins.
• Create the schema on the target Oracle database.
• Install the Master replicator to extract information from the Oracle database.
• Install the Slave replicator to read data from the master replicator and apply it to Oracle.
3.2.5.1. Setting up the Source Oracle Environment
The primary stage in configuring Oracle to MySQL replication is to configure the Oracle environment and databases ready for use as adata source by the Tungsten Replicator. A script, setupCDC.sh automates some of the processes behind the initial configuration and isresponsible for creating the required Change Data Capture tables that will be used to capture the data change information.
Before running setupCDC.sh, the following steps must be completed.
• Ensure archive log mode has been enabled within the Oracle server. The current status can be determined by running the archive log listcommand:
sqlplus sys/oracle as sysdba SQL> archive log list;
If no archive log has been enabled, the Database log node will display “No archive mode”:
To enable the archive log, shutdown the instance:
sqlplus sys/oracle as sysdbaSQL> shutdown immediate;SQL> startup mount;SQL> alter database archivelog;SQL> alter database open;
Checking the status again should show the archive log enabled:
sqlplus sys/oracle as sysdba SQL> archive log list;
• Ensure that Oracle is configured to accept dates in YYYY-MM-DD format used by Tungsten Replicator:
sqlplus sys/oracle as sysdbaSQL> ALTER SYSTEM SET NLS_DATE_FORMAT='YYYY-MM-DD' SCOPE=SPFILE;
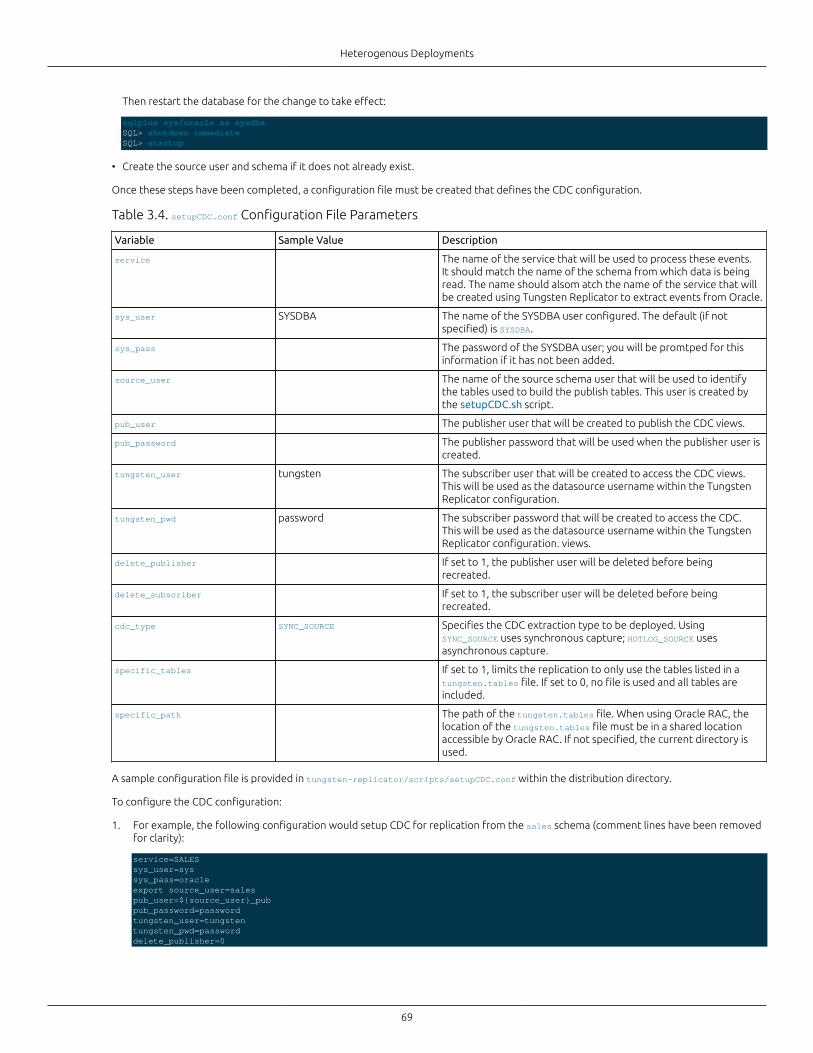
Heterogenous Deployments
69
Then restart the database for the change to take effect:
sqlplus sys/oracle as sysdbaSQL> shutdown immediateSQL> startup
• Create the source user and schema if it does not already exist.
Once these steps have been completed, a configuration file must be created that defines the CDC configuration.
Table 3.4. setupCDC.conf Configuration File Parameters
Variable Sample Value Description
service The name of the service that will be used to process these events.It should match the name of the schema from which data is beingread. The name should alsom atch the name of the service that willbe created using Tungsten Replicator to extract events from Oracle.
sys_user SYSDBA The name of the SYSDBA user configured. The default (if notspecified) is SYSDBA.
sys_pass The password of the SYSDBA user; you will be promtped for thisinformation if it has not been added.
source_user The name of the source schema user that will be used to identifythe tables used to build the publish tables. This user is created bythe setupCDC.sh script.
pub_user The publisher user that will be created to publish the CDC views.
pub_password The publisher password that will be used when the publisher user iscreated.
tungsten_user tungsten The subscriber user that will be created to access the CDC views.This will be used as the datasource username within the TungstenReplicator configuration.
tungsten_pwd password The subscriber password that will be created to access the CDC.This will be used as the datasource username within the TungstenReplicator configuration. views.
delete_publisher If set to 1, the publisher user will be deleted before beingrecreated.
delete_subscriber If set to 1, the subscriber user will be deleted before beingrecreated.
cdc_type SYNC_SOURCE Specifies the CDC extraction type to be deployed. UsingSYNC_SOURCE uses synchronous capture; HOTLOG_SOURCE usesasynchronous capture.
specific_tables If set to 1, limits the replication to only use the tables listed in atungsten.tables file. If set to 0, no file is used and all tables areincluded.
specific_path The path of the tungsten.tables file. When using Oracle RAC, thelocation of the tungsten.tables file must be in a shared locationaccessible by Oracle RAC. If not specified, the current directory isused.
A sample configuration file is provided in tungsten-replicator/scripts/setupCDC.conf within the distribution directory.
To configure the CDC configuration:
1. For example, the following configuration would setup CDC for replication from the sales schema (comment lines have been removedfor clarity):
service=SALESsys_user=syssys_pass=oracleexport source_user=salespub_user=${source_user}_pubpub_password=passwordtungsten_user=tungstentungsten_pwd=passworddelete_publisher=0
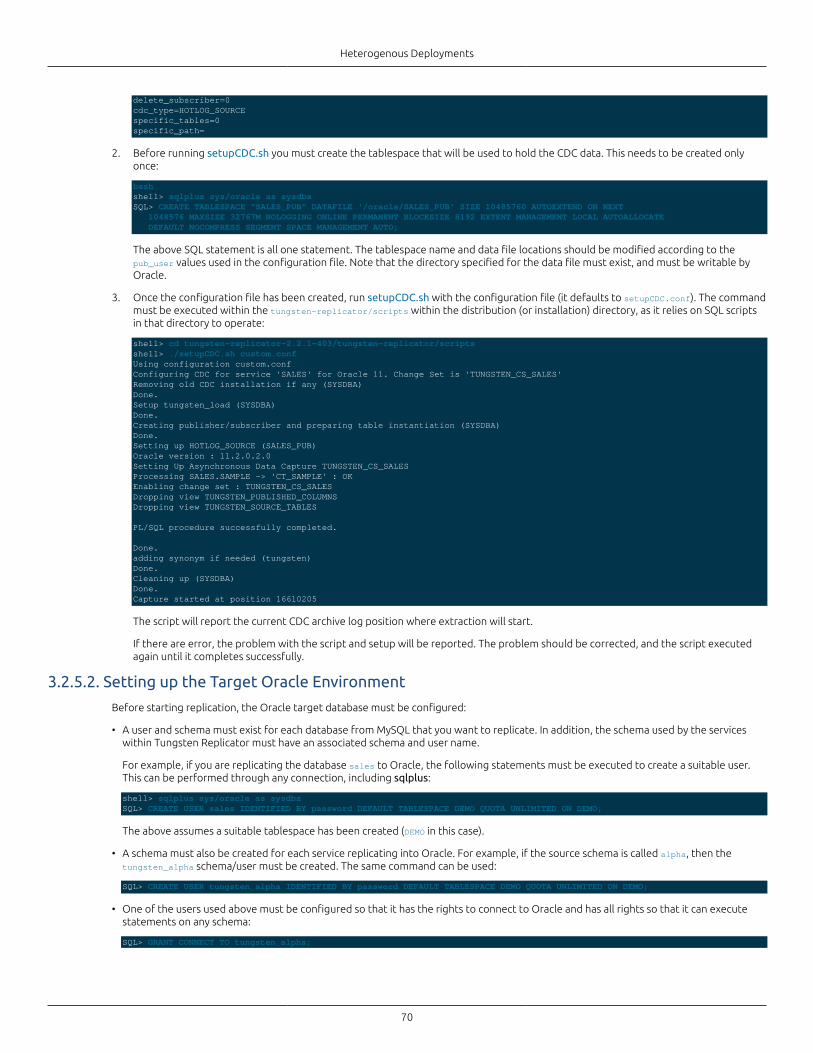
Heterogenous Deployments
70
delete_subscriber=0cdc_type=HOTLOG_SOURCEspecific_tables=0specific_path=
2. Before running setupCDC.sh you must create the tablespace that will be used to hold the CDC data. This needs to be created onlyonce:
bashshell> sqlplus sys/oracle as sysdbaSQL> CREATE TABLESPACE "SALES_PUB" DATAFILE '/oracle/SALES_PUB' SIZE 10485760 AUTOEXTEND ON NEXT 1048576 MAXSIZE 32767M NOLOGGING ONLINE PERMANENT BLOCKSIZE 8192 EXTENT MANAGEMENT LOCAL AUTOALLOCATE DEFAULT NOCOMPRESS SEGMENT SPACE MANAGEMENT AUTO;
The above SQL statement is all one statement. The tablespace name and data file locations should be modified according to thepub_user values used in the configuration file. Note that the directory specified for the data file must exist, and must be writable byOracle.
3. Once the configuration file has been created, run setupCDC.sh with the configuration file (it defaults to setupCDC.conf). The commandmust be executed within the tungsten-replicator/scripts within the distribution (or installation) directory, as it relies on SQL scriptsin that directory to operate:
shell> cd tungsten-replicator-2.2.1-403/tungsten-replicator/scriptsshell> ./setupCDC.sh custom.confUsing configuration custom.confConfiguring CDC for service 'SALES' for Oracle 11. Change Set is 'TUNGSTEN_CS_SALES'Removing old CDC installation if any (SYSDBA)Done.Setup tungsten_load (SYSDBA)Done.Creating publisher/subscriber and preparing table instantiation (SYSDBA)Done.Setting up HOTLOG_SOURCE (SALES_PUB)Oracle version : 11.2.0.2.0Setting Up Asynchronous Data Capture TUNGSTEN_CS_SALESProcessing SALES.SAMPLE -> 'CT_SAMPLE' : OKEnabling change set : TUNGSTEN_CS_SALESDropping view TUNGSTEN_PUBLISHED_COLUMNSDropping view TUNGSTEN_SOURCE_TABLES
PL/SQL procedure successfully completed.
Done.adding synonym if needed (tungsten)Done.Cleaning up (SYSDBA)Done.Capture started at position 16610205
The script will report the current CDC archive log position where extraction will start.
If there are error, the problem with the script and setup will be reported. The problem should be corrected, and the script executedagain until it completes successfully.
3.2.5.2. Setting up the Target Oracle Environment
Before starting replication, the Oracle target database must be configured:
• A user and schema must exist for each database from MySQL that you want to replicate. In addition, the schema used by the serviceswithin Tungsten Replicator must have an associated schema and user name.
For example, if you are replicating the database sales to Oracle, the following statements must be executed to create a suitable user.This can be performed through any connection, including sqlplus:
shell> sqlplus sys/oracle as sysdbaSQL> CREATE USER sales IDENTIFIED BY password DEFAULT TABLESPACE DEMO QUOTA UNLIMITED ON DEMO;
The above assumes a suitable tablespace has been created (DEMO in this case).
• A schema must also be created for each service replicating into Oracle. For example, if the source schema is called alpha, then thetungsten_alpha schema/user must be created. The same command can be used:
SQL> CREATE USER tungsten_alpha IDENTIFIED BY password DEFAULT TABLESPACE DEMO QUOTA UNLIMITED ON DEMO;
• One of the users used above must be configured so that it has the rights to connect to Oracle and has all rights so that it can executestatements on any schema:
SQL> GRANT CONNECT TO tungsten_alpha;
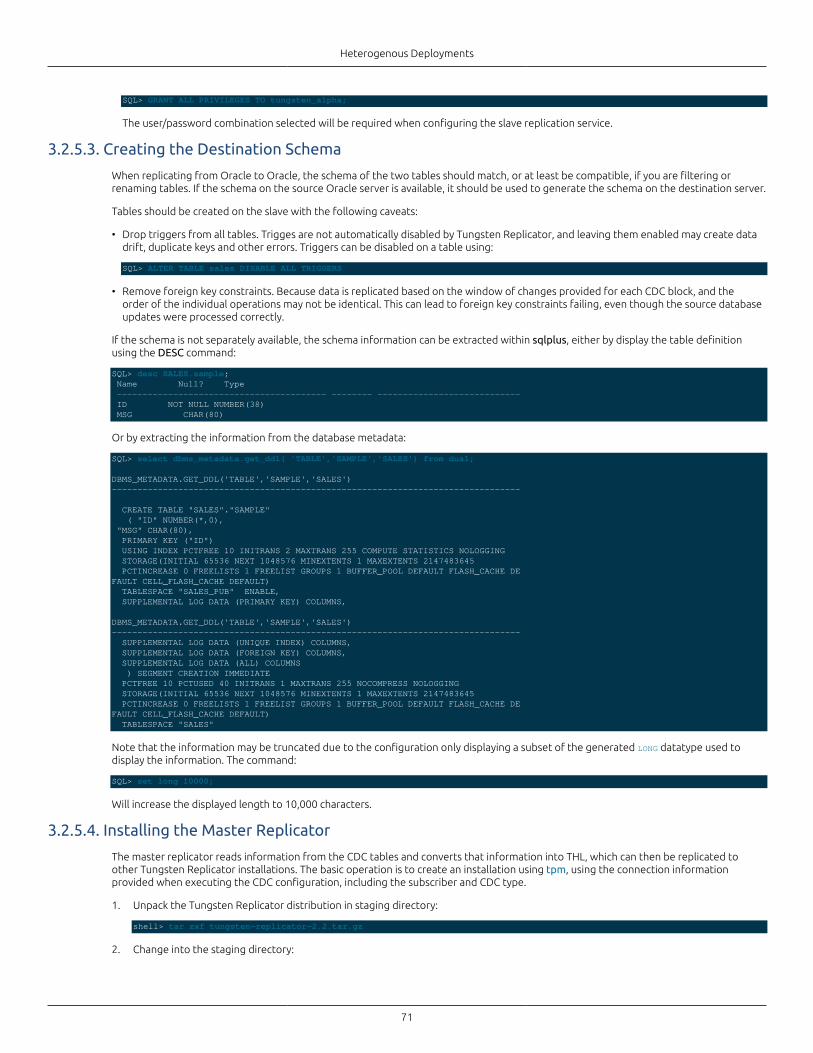
Heterogenous Deployments
71
SQL> GRANT ALL PRIVILEGES TO tungsten_alpha;
The user/password combination selected will be required when configuring the slave replication service.
3.2.5.3. Creating the Destination Schema
When replicating from Oracle to Oracle, the schema of the two tables should match, or at least be compatible, if you are filtering orrenaming tables. If the schema on the source Oracle server is available, it should be used to generate the schema on the destination server.
Tables should be created on the slave with the following caveats:
• Drop triggers from all tables. Trigges are not automatically disabled by Tungsten Replicator, and leaving them enabled may create datadrift, duplicate keys and other errors. Triggers can be disabled on a table using:
SQL> ALTER TABLE sales DISABLE ALL TRIGGERS
• Remove foreign key constraints. Because data is replicated based on the window of changes provided for each CDC block, and theorder of the individual operations may not be identical. This can lead to foreign key constraints failing, even though the source databaseupdates were processed correctly.
If the schema is not separately available, the schema information can be extracted within sqlplus, either by display the table definitionusing the DESC command:
SQL> desc SALES.sample; Name Null? Type ----------------------------------------- -------- ---------------------------- ID NOT NULL NUMBER(38) MSG CHAR(80)
Or by extracting the information from the database metadata:
SQL> select dbms_metadata.get_ddl( 'TABLE','SAMPLE','SALES') from dual;
DBMS_METADATA.GET_DDL('TABLE','SAMPLE','SALES')--------------------------------------------------------------------------------
CREATE TABLE "SALES"."SAMPLE" ( "ID" NUMBER(*,0), "MSG" CHAR(80), PRIMARY KEY ("ID") USING INDEX PCTFREE 10 INITRANS 2 MAXTRANS 255 COMPUTE STATISTICS NOLOGGING STORAGE(INITIAL 65536 NEXT 1048576 MINEXTENTS 1 MAXEXTENTS 2147483645 PCTINCREASE 0 FREELISTS 1 FREELIST GROUPS 1 BUFFER_POOL DEFAULT FLASH_CACHE DEFAULT CELL_FLASH_CACHE DEFAULT) TABLESPACE "SALES_PUB" ENABLE, SUPPLEMENTAL LOG DATA (PRIMARY KEY) COLUMNS,
DBMS_METADATA.GET_DDL('TABLE','SAMPLE','SALES')-------------------------------------------------------------------------------- SUPPLEMENTAL LOG DATA (UNIQUE INDEX) COLUMNS, SUPPLEMENTAL LOG DATA (FOREIGN KEY) COLUMNS, SUPPLEMENTAL LOG DATA (ALL) COLUMNS ) SEGMENT CREATION IMMEDIATE PCTFREE 10 PCTUSED 40 INITRANS 1 MAXTRANS 255 NOCOMPRESS NOLOGGING STORAGE(INITIAL 65536 NEXT 1048576 MINEXTENTS 1 MAXEXTENTS 2147483645 PCTINCREASE 0 FREELISTS 1 FREELIST GROUPS 1 BUFFER_POOL DEFAULT FLASH_CACHE DEFAULT CELL_FLASH_CACHE DEFAULT) TABLESPACE "SALES"
Note that the information may be truncated due to the configuration only displaying a subset of the generated LONG datatype used todisplay the information. The command:
SQL> set long 10000;
Will increase the displayed length to 10,000 characters.
3.2.5.4. Installing the Master Replicator
The master replicator reads information from the CDC tables and converts that information into THL, which can then be replicated toother Tungsten Replicator installations. The basic operation is to create an installation using tpm, using the connection informationprovided when executing the CDC configuration, including the subscriber and CDC type.
1. Unpack the Tungsten Replicator distribution in staging directory:
shell> tar zxf tungsten-replicator-2.2.tar.gz
2. Change into the staging directory:

Heterogenous Deployments
72
shell> cd tungsten-replicator-2.2
3. Obtain a copy of the Oracle JDBC driver and copy it into the tungsten-replicator/lib directory:
shell> cp ojdbc6.jar ./tungsten-replicator/lib/
4. shell> ./tools/tpm install SALES \--datasource-oracle-service=ORCL \--datasource-type=oracle \--install-directory=/opt/continuent \--master=host1 \--members=host1 \--property=replicator.extractor.dbms.transaction_frag_size=10 \--property=replicator.global.extract.db.password=password \--property=replicator.global.extract.db.user=tungsten \--replication-host=host1 \--replication-password=password \--replication-port=1521 \--replication-user=SALES_PUB \--role=master \--start-and-report=true \--svc-table-engine=CDCASYNC
The description of each of the options is shown below; click the icon to hide this detail:
Click the icon to show a detailed description of each argument.
• tpm install SALES
Install the service, using SALES as the service name. This must match the service name given when running setupCDC.sh.
• --datasource-oracle-service=ORCL [191]
Specify the Oracle service name, as configured for the database to which you want to read data. For older Oracle installations thatuse the SID format, use the --datasource-oracle-sid=ORCL option to tpm.
• --datasource-type=oracle [192]
Defines the datasource type that will be read from, in this case, Oracle.
• --install-directory=/opt/continuent [197]
The installation directory for Tungsten Replicator.
• --master=host1 [199]
The hostname of the master.
• --members=host1 [199]
The list of members for this service.
• --property=replicator.extractor.dbms.transaction_frag_size=10 [204]
Define the fragment size, or number of transactions that will be queued before extraction.
• --property=replicator.global.extract.db.password=password [204]
The password of the subscriber user configured within setupCDC.sh.
• --property=replicator.global.extract.db.user=tungsten [204]
The username of the subscriber user configured within setupCDC.sh.
• --replication-host=host1 [206]
The hostname of the replicator.
• --replication-password=password [206]
The password of the CDC publisher, as defined within the setupCDC.sh.
• --replication-port=1521 [206]
The port used to read information from the Oracle server. The default port is port 1521.
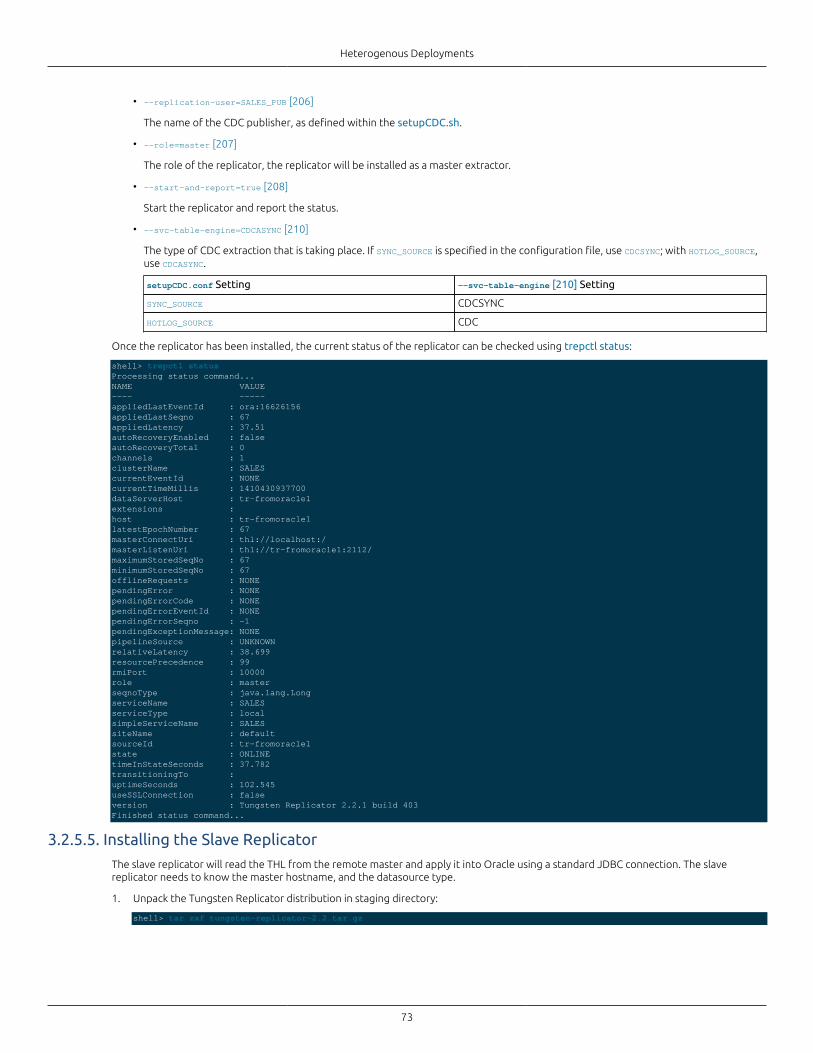
Heterogenous Deployments
73
• --replication-user=SALES_PUB [206]
The name of the CDC publisher, as defined within the setupCDC.sh.
• --role=master [207]
The role of the replicator, the replicator will be installed as a master extractor.
• --start-and-report=true [208]
Start the replicator and report the status.
• --svc-table-engine=CDCASYNC [210]
The type of CDC extraction that is taking place. If SYNC_SOURCE is specified in the configuration file, use CDCSYNC; with HOTLOG_SOURCE,use CDCASYNC.
setupCDC.conf Setting --svc-table-engine [210] Setting
SYNC_SOURCE CDCSYNC
HOTLOG_SOURCE CDC
Once the replicator has been installed, the current status of the replicator can be checked using trepctl status:
shell> trepctl statusProcessing status command...NAME VALUE---- -----appliedLastEventId : ora:16626156appliedLastSeqno : 67appliedLatency : 37.51autoRecoveryEnabled : falseautoRecoveryTotal : 0channels : 1clusterName : SALEScurrentEventId : NONEcurrentTimeMillis : 1410430937700dataServerHost : tr-fromoracle1extensions : host : tr-fromoracle1latestEpochNumber : 67masterConnectUri : thl://localhost:/masterListenUri : thl://tr-fromoracle1:2112/maximumStoredSeqNo : 67minimumStoredSeqNo : 67offlineRequests : NONEpendingError : NONEpendingErrorCode : NONEpendingErrorEventId : NONEpendingErrorSeqno : -1pendingExceptionMessage: NONEpipelineSource : UNKNOWNrelativeLatency : 38.699resourcePrecedence : 99rmiPort : 10000role : masterseqnoType : java.lang.LongserviceName : SALESserviceType : localsimpleServiceName : SALESsiteName : defaultsourceId : tr-fromoracle1state : ONLINEtimeInStateSeconds : 37.782transitioningTo : uptimeSeconds : 102.545useSSLConnection : falseversion : Tungsten Replicator 2.2.1 build 403Finished status command...
3.2.5.5. Installing the Slave ReplicatorThe slave replicator will read the THL from the remote master and apply it into Oracle using a standard JDBC connection. The slavereplicator needs to know the master hostname, and the datasource type.
1. Unpack the Tungsten Replicator distribution in staging directory:
shell> tar zxf tungsten-replicator-2.2.tar.gz
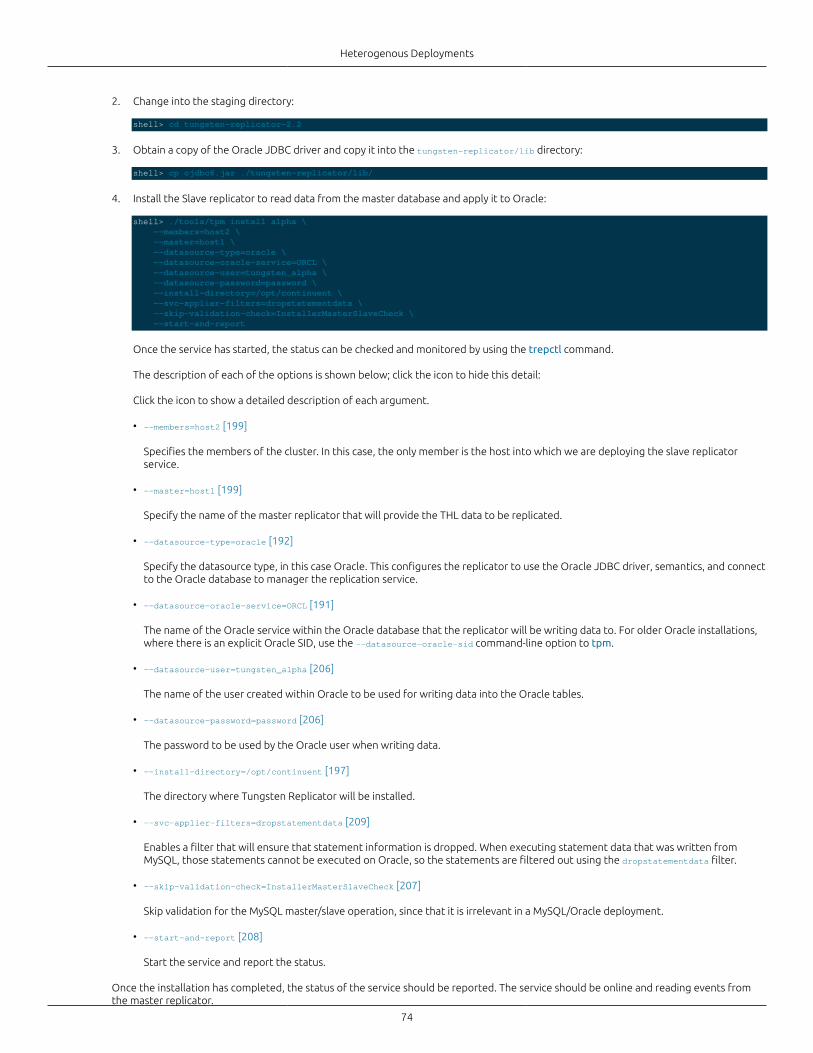
Heterogenous Deployments
74
2. Change into the staging directory:
shell> cd tungsten-replicator-2.2
3. Obtain a copy of the Oracle JDBC driver and copy it into the tungsten-replicator/lib directory:
shell> cp ojdbc6.jar ./tungsten-replicator/lib/
4. Install the Slave replicator to read data from the master database and apply it to Oracle:
shell> ./tools/tpm install alpha \ --members=host2 \ --master=host1 \ --datasource-type=oracle \ --datasource-oracle-service=ORCL \ --datasource-user=tungsten_alpha \ --datasource-password=password \ --install-directory=/opt/continuent \ --svc-applier-filters=dropstatementdata \ --skip-validation-check=InstallerMasterSlaveCheck \ --start-and-report
Once the service has started, the status can be checked and monitored by using the trepctl command.
The description of each of the options is shown below; click the icon to hide this detail:
Click the icon to show a detailed description of each argument.
• --members=host2 [199]
Specifies the members of the cluster. In this case, the only member is the host into which we are deploying the slave replicatorservice.
• --master=host1 [199]
Specify the name of the master replicator that will provide the THL data to be replicated.
• --datasource-type=oracle [192]
Specify the datasource type, in this case Oracle. This configures the replicator to use the Oracle JDBC driver, semantics, and connectto the Oracle database to manager the replication service.
• --datasource-oracle-service=ORCL [191]
The name of the Oracle service within the Oracle database that the replicator will be writing data to. For older Oracle installations,where there is an explicit Oracle SID, use the --datasource-oracle-sid command-line option to tpm.
• --datasource-user=tungsten_alpha [206]
The name of the user created within Oracle to be used for writing data into the Oracle tables.
• --datasource-password=password [206]
The password to be used by the Oracle user when writing data.
• --install-directory=/opt/continuent [197]
The directory where Tungsten Replicator will be installed.
• --svc-applier-filters=dropstatementdata [209]
Enables a filter that will ensure that statement information is dropped. When executing statement data that was written fromMySQL, those statements cannot be executed on Oracle, so the statements are filtered out using the dropstatementdata filter.
• --skip-validation-check=InstallerMasterSlaveCheck [207]
Skip validation for the MySQL master/slave operation, since that it is irrelevant in a MySQL/Oracle deployment.
• --start-and-report [208]
Start the service and report the status.
Once the installation has completed, the status of the service should be reported. The service should be online and reading events fromthe master replicator.
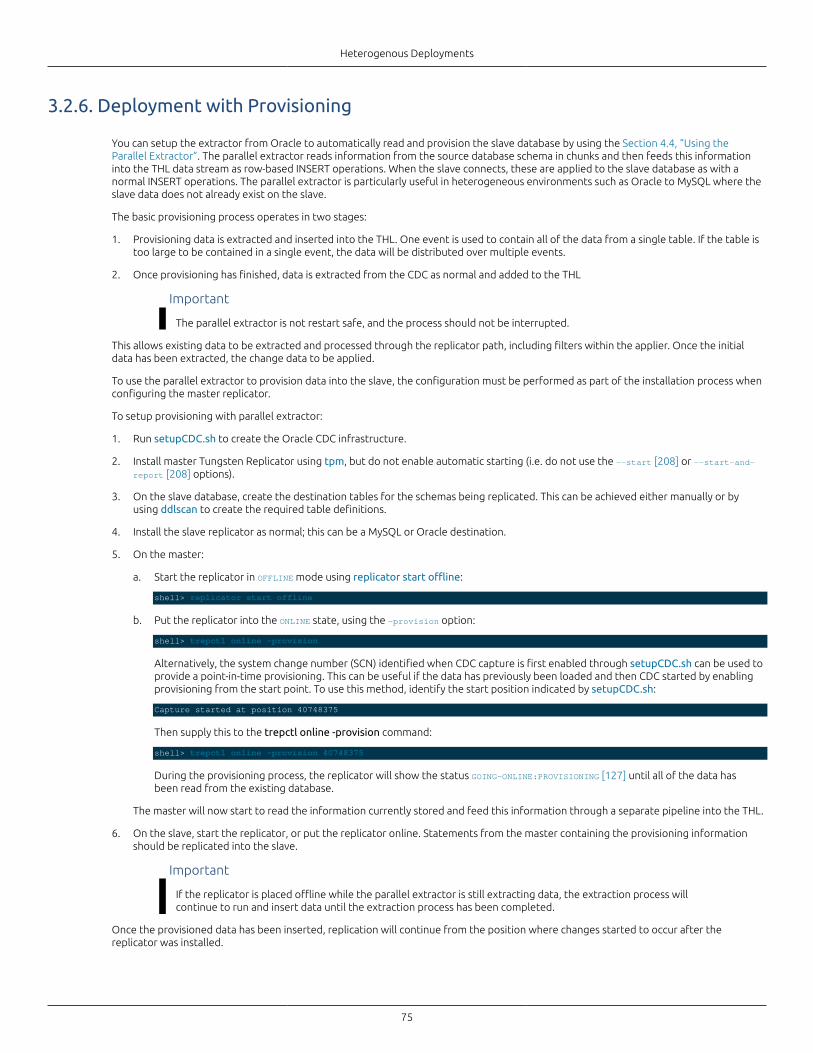
Heterogenous Deployments
75
3.2.6. Deployment with Provisioning
You can setup the extractor from Oracle to automatically read and provision the slave database by using the Section 4.4, “Using theParallel Extractor”. The parallel extractor reads information from the source database schema in chunks and then feeds this informationinto the THL data stream as row-based INSERT operations. When the slave connects, these are applied to the slave database as with anormal INSERT operations. The parallel extractor is particularly useful in heterogeneous environments such as Oracle to MySQL where theslave data does not already exist on the slave.
The basic provisioning process operates in two stages:
1. Provisioning data is extracted and inserted into the THL. One event is used to contain all of the data from a single table. If the table istoo large to be contained in a single event, the data will be distributed over multiple events.
2. Once provisioning has finished, data is extracted from the CDC as normal and added to the THL
Important
The parallel extractor is not restart safe, and the process should not be interrupted.
This allows existing data to be extracted and processed through the replicator path, including filters within the applier. Once the initialdata has been extracted, the change data to be applied.
To use the parallel extractor to provision data into the slave, the configuration must be performed as part of the installation process whenconfiguring the master replicator.
To setup provisioning with parallel extractor:
1. Run setupCDC.sh to create the Oracle CDC infrastructure.
2. Install master Tungsten Replicator using tpm, but do not enable automatic starting (i.e. do not use the --start [208] or --start-and-report [208] options).
3. On the slave database, create the destination tables for the schemas being replicated. This can be achieved either manually or byusing ddlscan to create the required table definitions.
4. Install the slave replicator as normal; this can be a MySQL or Oracle destination.
5. On the master:
a. Start the replicator in OFFLINE mode using replicator start offline:
shell> replicator start offline
b. Put the replicator into the ONLINE state, using the -provision option:
shell> trepctl online -provision
Alternatively, the system change number (SCN) identified when CDC capture is first enabled through setupCDC.sh can be used toprovide a point-in-time provisioning. This can be useful if the data has previously been loaded and then CDC started by enablingprovisioning from the start point. To use this method, identify the start position indicated by setupCDC.sh:
Capture started at position 40748375
Then supply this to the trepctl online -provision command:
shell> trepctl online -provision 40748375
During the provisioning process, the replicator will show the status GOING-ONLINE:PROVISIONING [127] until all of the data hasbeen read from the existing database.
The master will now start to read the information currently stored and feed this information through a separate pipeline into the THL.
6. On the slave, start the replicator, or put the replicator online. Statements from the master containing the provisioning informationshould be replicated into the slave.
Important
If the replicator is placed offline while the parallel extractor is still extracting data, the extraction process willcontinue to run and insert data until the extraction process has been completed.
Once the provisioned data has been inserted, replication will continue from the position where changes started to occur after thereplicator was installed.
Heterogenous Deployments
76
For more information on tuning the parallel extractor, see Section 4.4.1, “Advanced Configuration Parameters”.
3.2.7. Updating CDC after Schema ChangesIf the schema for an existing CDC installation has changed, the CDC configuration must be updated to match the new schemaconfiguration. If this step is not completed, then the correct information will not be extracted from the source tables into the CDC tables.
Schema changes should therefore be performed as follows:
1. Stop the replicator using trepctl offline:
shell> trepctl offline
2. Change the schema definition within Oracle.
3. If multiple tables have been changed, update the setupCDC.conf file so that the delete_publisher variable is set to one. This will ensurethat the publisher is dropped and recreated for the entire table set.
4. • To update multiple tables, the entire setup process must be started again; run the setupCDC.sh command, using the originalconfiguration file, but with the drop_publisher set to 1:
shell> setupCDC.sh setupCDC.conf
• If only one table has changed, or you are adding only a single table, this can be specified on the command-line:
shell> updateCDC.sh setupCDC.conf sampletable
5. Put the replicator back online with trepctl online:
shell> trepctl online
To add a new table to an existing configuration:
1. Stop the replicator using trepctl offline:
shell> trepctl offline
2. Update the configuration using updateCDC.sh, supplying the new table name.
shell> updateCDC.sh setupCDC.conf newtable
If you have used a specific tables file (i.e. with sepecific_tables=1 in the configuration file, make sure that you add the table to thetable file.
3. Put the replicator back online with trepctl online:
shell> trepctl online
3.2.8. CDC Cleanup and CorrectionIn the event that the CDC tables have become corrupted, no longer work correctly, or where you have changed the tables, users or otherdetails in your CDC configuration the CDC can be cleaned up. This deletes and unsubscribes the existing CDC configuration so that thesetupCDC.sh script can be executed again with the updated values.
If setupCDC.sh returns an error that subscriptions already exist, this SQL file will also cleanup this configuration in preparation for runningsetupCDC.sh again.
To cleanup your existing configuration, an SQL script has been provided within the tungsten-replicator/scripts directory ascleanup_cdc_tables.sql for Oracle 11g, and cleanup_cdc_tables-10.sql for Oracle 10.
To execute, login to Oracle with sqlplus with SYSDBA credentials:
shell> sqlplus / as sysdbaSQL> @cleanup_cdc_tables.sql SALES_PUB TUNGSTEN_CS_SALES
Note
The changeset name used by every Tungsten Replicator CDC installation is prefixed with TUNGSTEN_CS_, followed bythe service name configured in the CDC configuration file.
The name of the existing CDC publisher user and changeset should be specified to ensure that the right subscriptions are cleaned up.
Once completed, setupCDC.sh can be executed again. See Section 3.2.3.2, “Configure the Oracle database” for more information.
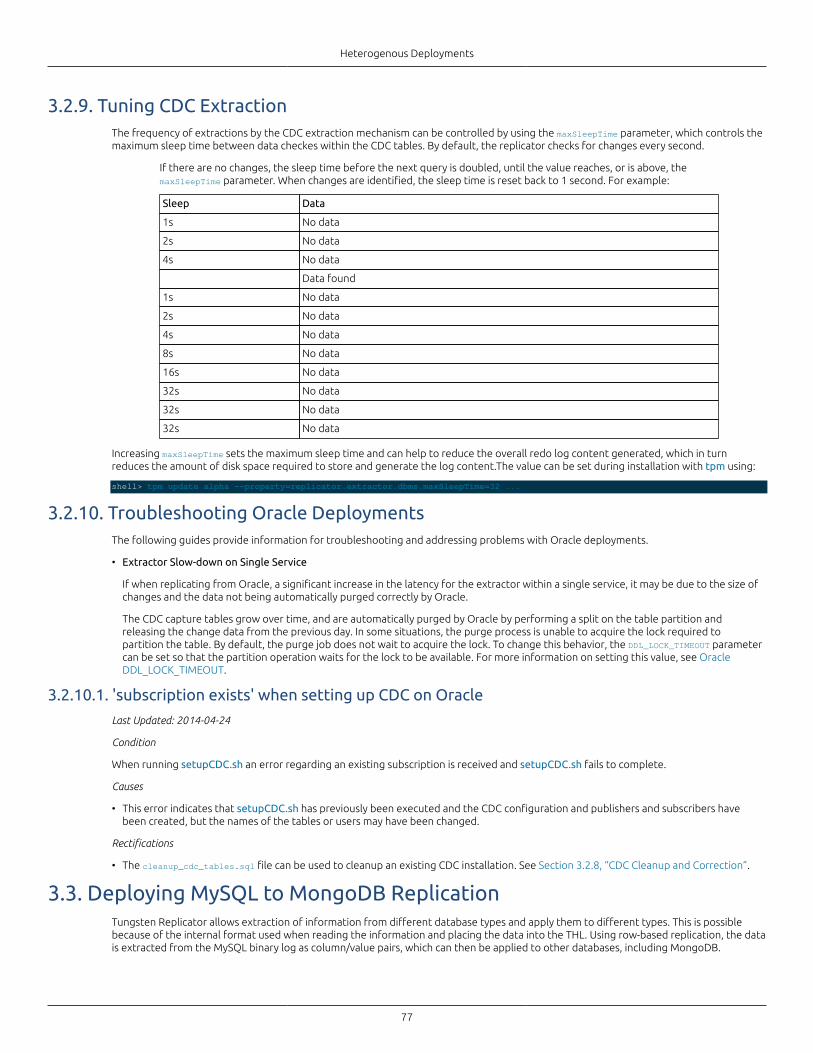
Heterogenous Deployments
77
3.2.9. Tuning CDC ExtractionThe frequency of extractions by the CDC extraction mechanism can be controlled by using the maxSleepTime parameter, which controls themaximum sleep time between data checkes within the CDC tables. By default, the replicator checks for changes every second.
If there are no changes, the sleep time before the next query is doubled, until the value reaches, or is above, themaxSleepTime parameter. When changes are identified, the sleep time is reset back to 1 second. For example:
Sleep Data
1s No data
2s No data
4s No data
Data found
1s No data
2s No data
4s No data
8s No data
16s No data
32s No data
32s No data
32s No data
Increasing maxSleepTime sets the maximum sleep time and can help to reduce the overall redo log content generated, which in turnreduces the amount of disk space required to store and generate the log content.The value can be set during installation with tpm using:
shell> tpm update alpha --property=replicator.extractor.dbms.maxSleepTime=32 ...
3.2.10. Troubleshooting Oracle DeploymentsThe following guides provide information for troubleshooting and addressing problems with Oracle deployments.
• Extractor Slow-down on Single Service
If when replicating from Oracle, a significant increase in the latency for the extractor within a single service, it may be due to the size ofchanges and the data not being automatically purged correctly by Oracle.
The CDC capture tables grow over time, and are automatically purged by Oracle by performing a split on the table partition andreleasing the change data from the previous day. In some situations, the purge process is unable to acquire the lock required topartition the table. By default, the purge job does not wait to acquire the lock. To change this behavior, the DDL_LOCK_TIMEOUT parametercan be set so that the partition operation waits for the lock to be available. For more information on setting this value, see OracleDDL_LOCK_TIMEOUT.
3.2.10.1. 'subscription exists' when setting up CDC on Oracle
Last Updated: 2014-04-24
Condition
When running setupCDC.sh an error regarding an existing subscription is received and setupCDC.sh fails to complete.
Causes
• This error indicates that setupCDC.sh has previously been executed and the CDC configuration and publishers and subscribers havebeen created, but the names of the tables or users may have been changed.
Rectifications
• The cleanup_cdc_tables.sql file can be used to cleanup an existing CDC installation. See Section 3.2.8, “CDC Cleanup and Correction”.
3.3. Deploying MySQL to MongoDB ReplicationTungsten Replicator allows extraction of information from different database types and apply them to different types. This is possiblebecause of the internal format used when reading the information and placing the data into the THL. Using row-based replication, the datais extracted from the MySQL binary log as column/value pairs, which can then be applied to other databases, including MongoDB.
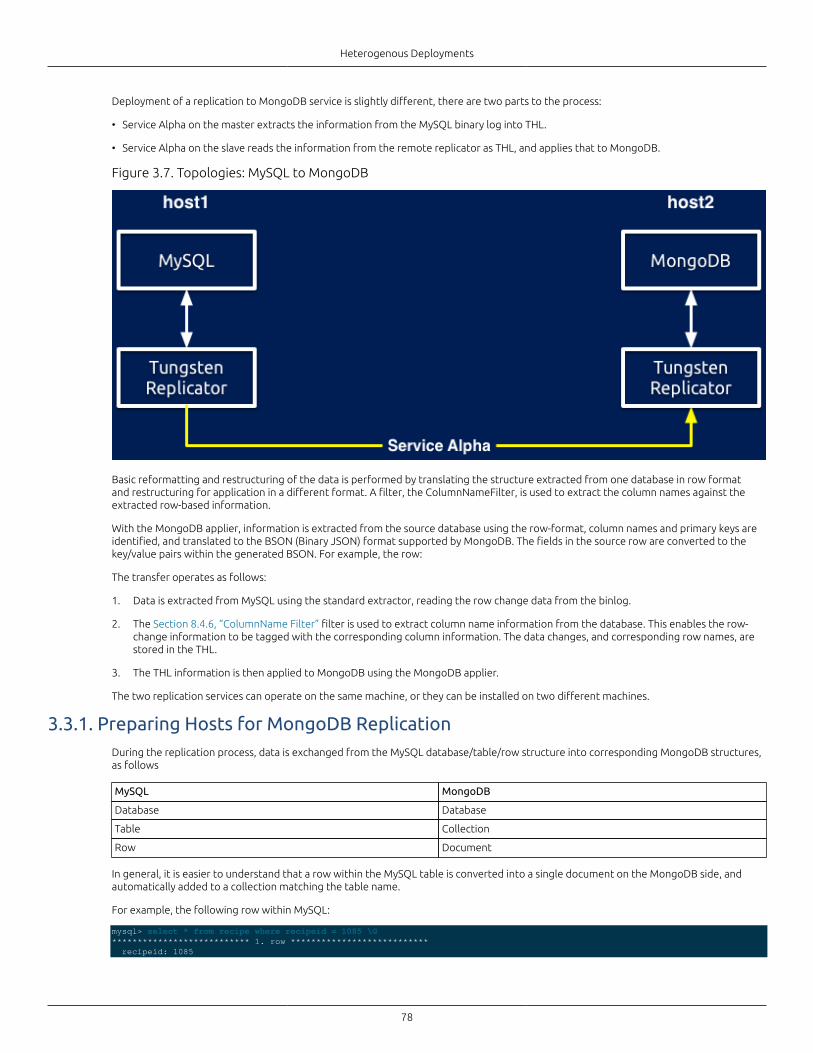
Heterogenous Deployments
78
Deployment of a replication to MongoDB service is slightly different, there are two parts to the process:
• Service Alpha on the master extracts the information from the MySQL binary log into THL.
• Service Alpha on the slave reads the information from the remote replicator as THL, and applies that to MongoDB.
Figure 3.7. Topologies: MySQL to MongoDB
Basic reformatting and restructuring of the data is performed by translating the structure extracted from one database in row formatand restructuring for application in a different format. A filter, the ColumnNameFilter, is used to extract the column names against theextracted row-based information.
With the MongoDB applier, information is extracted from the source database using the row-format, column names and primary keys areidentified, and translated to the BSON (Binary JSON) format supported by MongoDB. The fields in the source row are converted to thekey/value pairs within the generated BSON. For example, the row:
The transfer operates as follows:
1. Data is extracted from MySQL using the standard extractor, reading the row change data from the binlog.
2. The Section 8.4.6, “ColumnName Filter” filter is used to extract column name information from the database. This enables the row-change information to be tagged with the corresponding column information. The data changes, and corresponding row names, arestored in the THL.
3. The THL information is then applied to MongoDB using the MongoDB applier.
The two replication services can operate on the same machine, or they can be installed on two different machines.
3.3.1. Preparing Hosts for MongoDB ReplicationDuring the replication process, data is exchanged from the MySQL database/table/row structure into corresponding MongoDB structures,as follows
MySQL MongoDB
Database Database
Table Collection
Row Document
In general, it is easier to understand that a row within the MySQL table is converted into a single document on the MongoDB side, andautomatically added to a collection matching the table name.
For example, the following row within MySQL:
mysql> select * from recipe where recipeid = 1085 \G*************************** 1. row *************************** recipeid: 1085
Heterogenous Deployments
79
title: Creamy egg and leek special subtitle: servings: 4 active: 1 parid: 0 userid: 0 rating: 0.0 cumrating: 0.0createdate: 01 row in set (0.00 sec)
Is replicated into the MongoDB document:
{ "_id" : ObjectId("5212233584ae46ce07e427c3"), "recipeid" : "1085", "title" : "Creamy egg and leek special", "subtitle" : "", "servings" : "4", "active" : "1", "parid" : "0", "userid" : "0", "rating" : "0.0", "cumrating" : "0.0", "createdate" : "0"}
When preparing the hosts you must be aware of this translation of the different structures, as it will have an effect on the way theinformation is replicated from MySQL to MongoDB.
MySQL Host
The data replicated from MySQL can be any data, although there are some known limitations and assumptions made on the way theinformation is transferred.
The following are required for replication to MongoDB:
• MySQL must be using Row-based replication for information to be replicated to MongoDB. For the best results, you should change theglobal binary log format, ideally in the configuration file (my.cnf):
binlog-format = row
Alternatively, the global binlog format can be changed by executing the following statement:
mysql> SET GLOBAL binlog-format = ROW;
This information will be forgotten when the MySQL server is restarted; placing the configuration in the my.cnf file will ensure this optionis permanently enabled.
• Table format should be updated to UTF8 by updating the MySQL configuration (my.cnf):
character-set-server=utf8collation-server=utf8_general_ci
Tables must also be configured as UTF8 tables, and existig tables should be updated to UTF8 support before they are replicated toprevent character set corruption issues.
• To prevent timezone configuration storing zone adjusted values and exporting this information to the binary log and MongoDB, fix thetimezone configuration to use UTC within the configuration file (my.cnf):
default-time-zone='+00:00'
For the best results when replicating, be aware of the following issues and limitations:
• Use primary keys on all tables. The use of primary keys will improve the lookup of information within MongoDB when rows are updated.Without a primary key on a table a full table scan is performed, which can affect performance.
• MySQL TEXT columns are correctly replicated, but cannot be used as keys.
• MySQL BLOB columns are converted to text using the configured character type. Depending on the data that is being stored within theBLOB, the data may need to be custom converted. A filter can be written to convert and reformat the content as required.
MongoDB Host
• Enable networking; by default MongoDB is configured to listen only on the localhost (127.0.0.1) IP address. The address should bechanged to the IP address off your host, or 0.0.0.0, which indicates all interfaces on the current host.
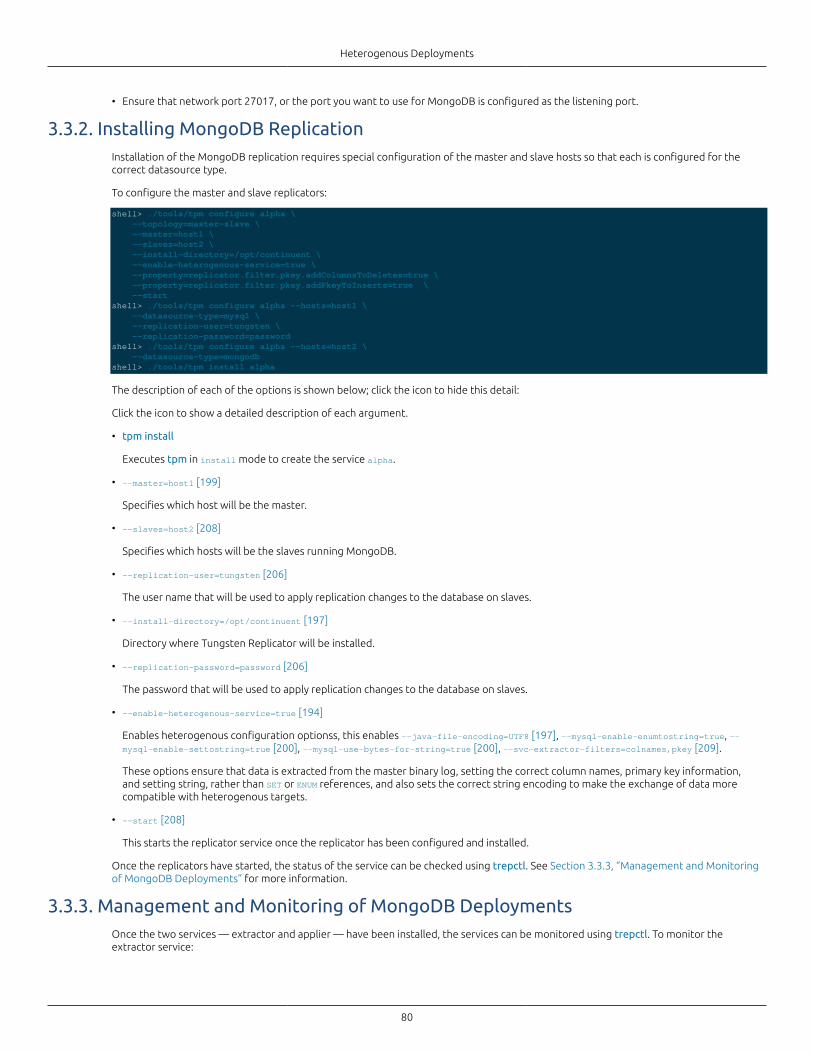
Heterogenous Deployments
80
• Ensure that network port 27017, or the port you want to use for MongoDB is configured as the listening port.
3.3.2. Installing MongoDB ReplicationInstallation of the MongoDB replication requires special configuration of the master and slave hosts so that each is configured for thecorrect datasource type.
To configure the master and slave replicators:
shell> ./tools/tpm configure alpha \ --topology=master-slave \ --master=host1 \ --slaves=host2 \ --install-directory=/opt/continuent \ --enable-heterogenous-service=true \ --property=replicator.filter.pkey.addColumnsToDeletes=true \ --property=replicator.filter.pkey.addPkeyToInserts=true \ --startshell> ./tools/tpm configure alpha --hosts=host1 \ --datasource-type=mysql \ --replication-user=tungsten \ --replication-password=passwordshell> ./tools/tpm configure alpha --hosts=host2 \ --datasource-type=mongodbshell> ./tools/tpm install alpha
The description of each of the options is shown below; click the icon to hide this detail:
Click the icon to show a detailed description of each argument.
• tpm install
Executes tpm in install mode to create the service alpha.
• --master=host1 [199]
Specifies which host will be the master.
• --slaves=host2 [208]
Specifies which hosts will be the slaves running MongoDB.
• --replication-user=tungsten [206]
The user name that will be used to apply replication changes to the database on slaves.
• --install-directory=/opt/continuent [197]
Directory where Tungsten Replicator will be installed.
• --replication-password=password [206]
The password that will be used to apply replication changes to the database on slaves.
• --enable-heterogenous-service=true [194]
Enables heterogenous configuration optionss, this enables --java-file-encoding=UTF8 [197], --mysql-enable-enumtostring=true, --mysql-enable-settostring=true [200], --mysql-use-bytes-for-string=true [200], --svc-extractor-filters=colnames,pkey [209].
These options ensure that data is extracted from the master binary log, setting the correct column names, primary key information,and setting string, rather than SET or ENUM references, and also sets the correct string encoding to make the exchange of data morecompatible with heterogenous targets.
• --start [208]
This starts the replicator service once the replicator has been configured and installed.
Once the replicators have started, the status of the service can be checked using trepctl. See Section 3.3.3, “Management and Monitoringof MongoDB Deployments” for more information.
3.3.3. Management and Monitoring of MongoDB DeploymentsOnce the two services — extractor and applier — have been installed, the services can be monitored using trepctl. To monitor theextractor service:
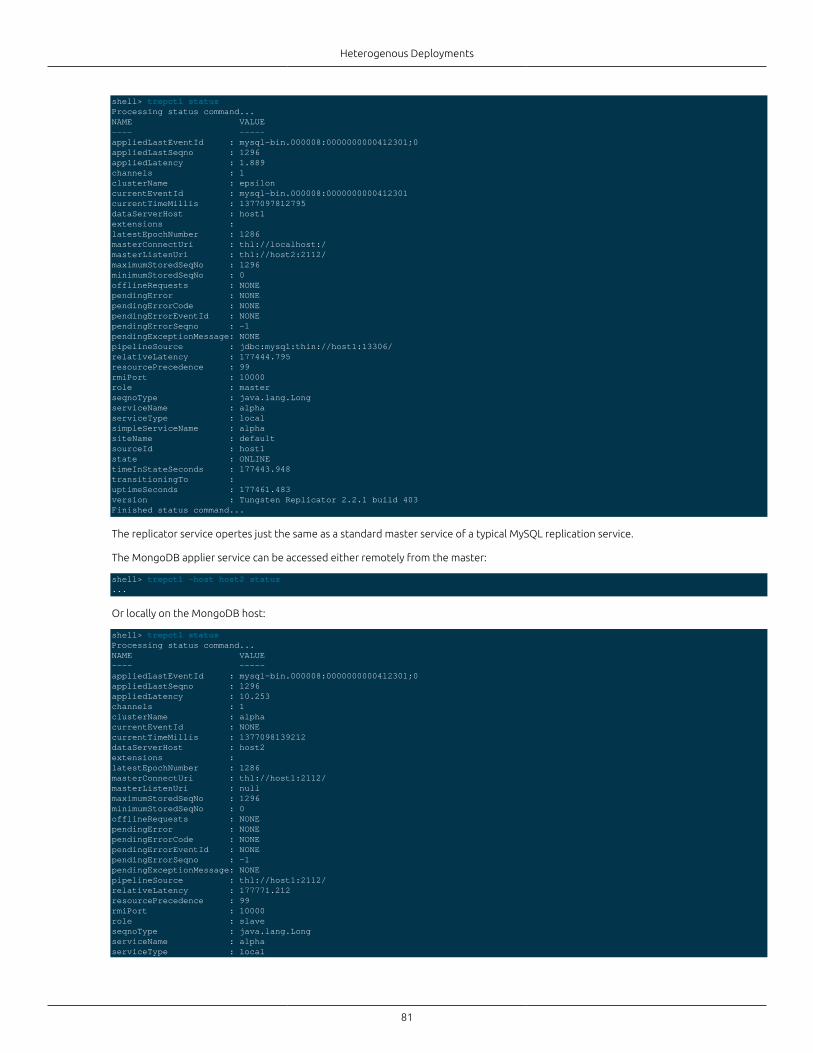
Heterogenous Deployments
81
shell> trepctl statusProcessing status command...NAME VALUE---- -----appliedLastEventId : mysql-bin.000008:0000000000412301;0appliedLastSeqno : 1296appliedLatency : 1.889channels : 1clusterName : epsiloncurrentEventId : mysql-bin.000008:0000000000412301currentTimeMillis : 1377097812795dataServerHost : host1extensions : latestEpochNumber : 1286masterConnectUri : thl://localhost:/masterListenUri : thl://host2:2112/maximumStoredSeqNo : 1296minimumStoredSeqNo : 0offlineRequests : NONEpendingError : NONEpendingErrorCode : NONEpendingErrorEventId : NONEpendingErrorSeqno : -1pendingExceptionMessage: NONEpipelineSource : jdbc:mysql:thin://host1:13306/relativeLatency : 177444.795resourcePrecedence : 99rmiPort : 10000role : masterseqnoType : java.lang.LongserviceName : alphaserviceType : localsimpleServiceName : alphasiteName : defaultsourceId : host1state : ONLINEtimeInStateSeconds : 177443.948transitioningTo : uptimeSeconds : 177461.483version : Tungsten Replicator 2.2.1 build 403Finished status command...
The replicator service opertes just the same as a standard master service of a typical MySQL replication service.
The MongoDB applier service can be accessed either remotely from the master:
shell> trepctl -host host2 status...
Or locally on the MongoDB host:
shell> trepctl statusProcessing status command...NAME VALUE---- -----appliedLastEventId : mysql-bin.000008:0000000000412301;0appliedLastSeqno : 1296appliedLatency : 10.253channels : 1clusterName : alphacurrentEventId : NONEcurrentTimeMillis : 1377098139212dataServerHost : host2extensions : latestEpochNumber : 1286masterConnectUri : thl://host1:2112/masterListenUri : nullmaximumStoredSeqNo : 1296minimumStoredSeqNo : 0offlineRequests : NONEpendingError : NONEpendingErrorCode : NONEpendingErrorEventId : NONEpendingErrorSeqno : -1pendingExceptionMessage: NONEpipelineSource : thl://host1:2112/relativeLatency : 177771.212resourcePrecedence : 99rmiPort : 10000role : slaveseqnoType : java.lang.LongserviceName : alphaserviceType : local
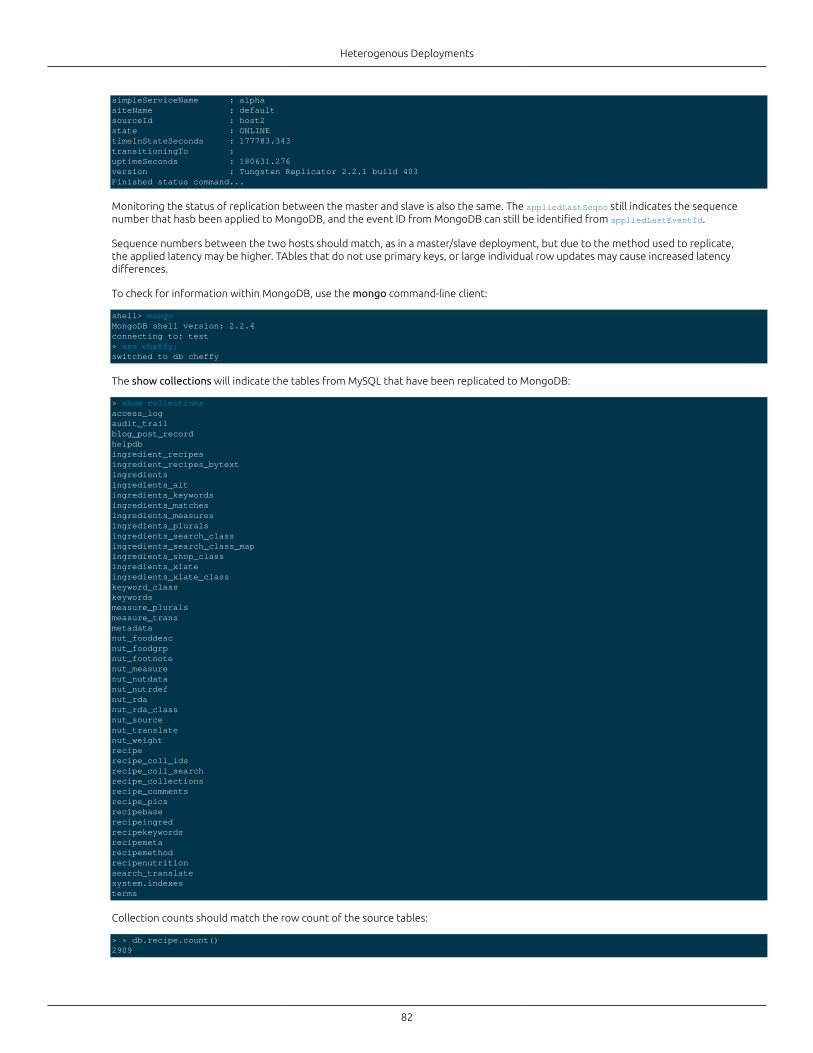
Heterogenous Deployments
82
simpleServiceName : alphasiteName : defaultsourceId : host2state : ONLINEtimeInStateSeconds : 177783.343transitioningTo : uptimeSeconds : 180631.276version : Tungsten Replicator 2.2.1 build 403Finished status command...
Monitoring the status of replication between the master and slave is also the same. The appliedLastSeqno still indicates the sequencenumber that hasb been applied to MongoDB, and the event ID from MongoDB can still be identified from appliedLastEventId.
Sequence numbers between the two hosts should match, as in a master/slave deployment, but due to the method used to replicate,the applied latency may be higher. TAbles that do not use primary keys, or large individual row updates may cause increased latencydifferences.
To check for information within MongoDB, use the mongo command-line client:
shell> mongoMongoDB shell version: 2.2.4connecting to: test> use cheffy;switched to db cheffy
The show collections will indicate the tables from MySQL that have been replicated to MongoDB:
> show collectionsaccess_logaudit_trailblog_post_recordhelpdbingredient_recipesingredient_recipes_bytextingredientsingredients_altingredients_keywordsingredients_matchesingredients_measuresingredients_pluralsingredients_search_classingredients_search_class_mapingredients_shop_classingredients_xlateingredients_xlate_classkeyword_classkeywordsmeasure_pluralsmeasure_transmetadatanut_fooddescnut_foodgrpnut_footnotenut_measurenut_nutdatanut_nutrdefnut_rdanut_rda_classnut_sourcenut_translatenut_weightreciperecipe_coll_idsrecipe_coll_searchrecipe_collectionsrecipe_commentsrecipe_picsrecipebaserecipeingredrecipekeywordsrecipemetarecipemethodrecipenutritionsearch_translatesystem.indexesterms
Collection counts should match the row count of the source tables:
> > db.recipe.count()2909
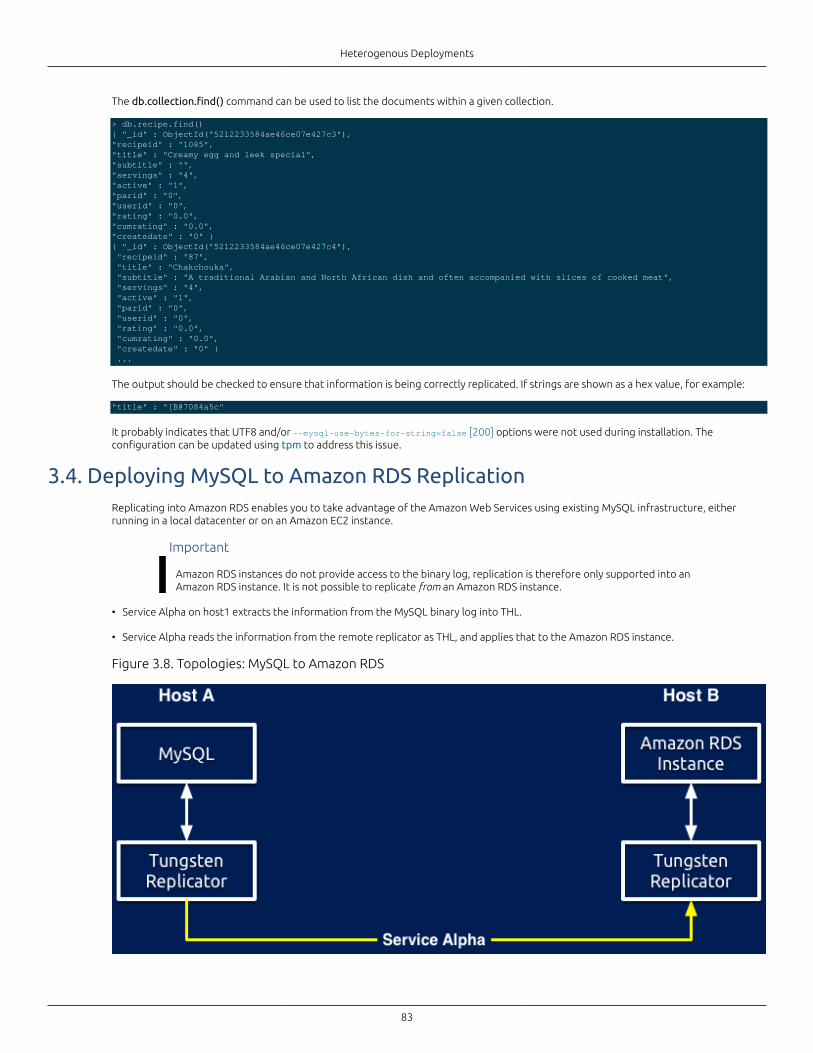
Heterogenous Deployments
83
The db.collection.find() command can be used to list the documents within a given collection.
> db.recipe.find(){ "_id" : ObjectId("5212233584ae46ce07e427c3"), "recipeid" : "1085", "title" : "Creamy egg and leek special", "subtitle" : "", "servings" : "4", "active" : "1", "parid" : "0", "userid" : "0", "rating" : "0.0", "cumrating" : "0.0", "createdate" : "0" }{ "_id" : ObjectId("5212233584ae46ce07e427c4"), "recipeid" : "87", "title" : "Chakchouka", "subtitle" : "A traditional Arabian and North African dish and often accompanied with slices of cooked meat", "servings" : "4", "active" : "1", "parid" : "0", "userid" : "0", "rating" : "0.0", "cumrating" : "0.0", "createdate" : "0" } ...
The output should be checked to ensure that information is being correctly replicated. If strings are shown as a hex value, for example:
"title" : "[B@7084a5c"
It probably indicates that UTF8 and/or --mysql-use-bytes-for-string=false [200] options were not used during installation. Theconfiguration can be updated using tpm to address this issue.
3.4. Deploying MySQL to Amazon RDS ReplicationReplicating into Amazon RDS enables you to take advantage of the Amazon Web Services using existing MySQL infrastructure, eitherrunning in a local datacenter or on an Amazon EC2 instance.
Important
Amazon RDS instances do not provide access to the binary log, replication is therefore only supported into anAmazon RDS instance. It is not possible to replicate from an Amazon RDS instance.
• Service Alpha on host1 extracts the information from the MySQL binary log into THL.
• Service Alpha reads the information from the remote replicator as THL, and applies that to the Amazon RDS instance.
Figure 3.8. Topologies: MySQL to Amazon RDS
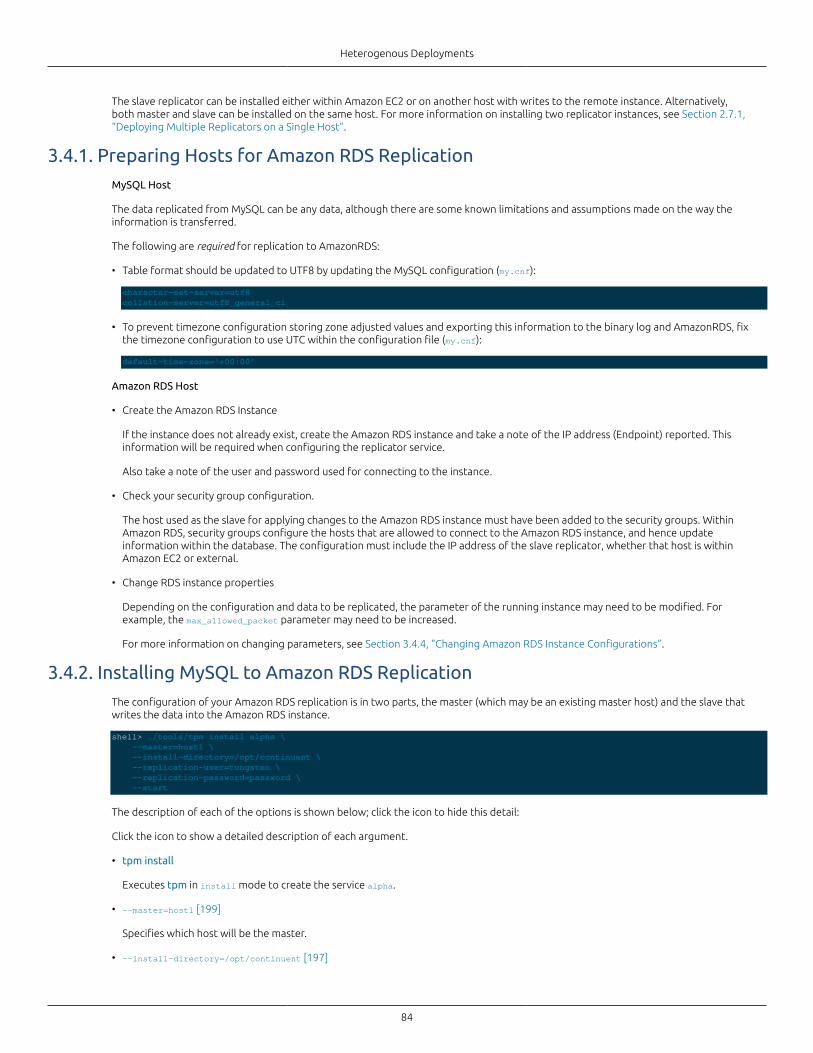
Heterogenous Deployments
84
The slave replicator can be installed either within Amazon EC2 or on another host with writes to the remote instance. Alternatively,both master and slave can be installed on the same host. For more information on installing two replicator instances, see Section 2.7.1,“Deploying Multiple Replicators on a Single Host”.
3.4.1. Preparing Hosts for Amazon RDS ReplicationMySQL Host
The data replicated from MySQL can be any data, although there are some known limitations and assumptions made on the way theinformation is transferred.
The following are required for replication to AmazonRDS:
• Table format should be updated to UTF8 by updating the MySQL configuration (my.cnf):
character-set-server=utf8collation-server=utf8_general_ci
• To prevent timezone configuration storing zone adjusted values and exporting this information to the binary log and AmazonRDS, fixthe timezone configuration to use UTC within the configuration file (my.cnf):
default-time-zone='+00:00'
Amazon RDS Host
• Create the Amazon RDS Instance
If the instance does not already exist, create the Amazon RDS instance and take a note of the IP address (Endpoint) reported. Thisinformation will be required when configuring the replicator service.
Also take a note of the user and password used for connecting to the instance.
• Check your security group configuration.
The host used as the slave for applying changes to the Amazon RDS instance must have been added to the security groups. WithinAmazon RDS, security groups configure the hosts that are allowed to connect to the Amazon RDS instance, and hence updateinformation within the database. The configuration must include the IP address of the slave replicator, whether that host is withinAmazon EC2 or external.
• Change RDS instance properties
Depending on the configuration and data to be replicated, the parameter of the running instance may need to be modified. Forexample, the max_allowed_packet parameter may need to be increased.
For more information on changing parameters, see Section 3.4.4, “Changing Amazon RDS Instance Configurations”.
3.4.2. Installing MySQL to Amazon RDS ReplicationThe configuration of your Amazon RDS replication is in two parts, the master (which may be an existing master host) and the slave thatwrites the data into the Amazon RDS instance.
shell> ./tools/tpm install alpha \ --master=host1 \ --install-directory=/opt/continuent \ --replication-user=tungsten \ --replication-password=password \ --start
The description of each of the options is shown below; click the icon to hide this detail:
Click the icon to show a detailed description of each argument.
• tpm install
Executes tpm in install mode to create the service alpha.
• --master=host1 [199]
Specifies which host will be the master.
• --install-directory=/opt/continuent [197]
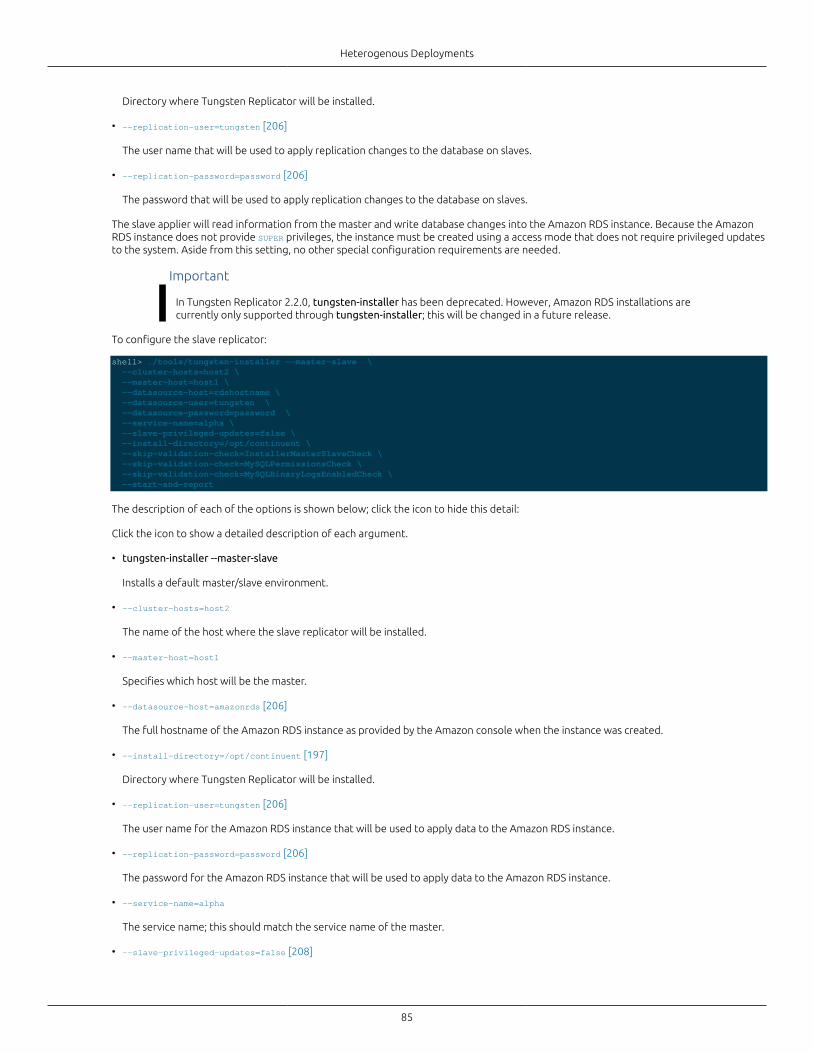
Heterogenous Deployments
85
Directory where Tungsten Replicator will be installed.
• --replication-user=tungsten [206]
The user name that will be used to apply replication changes to the database on slaves.
• --replication-password=password [206]
The password that will be used to apply replication changes to the database on slaves.
The slave applier will read information from the master and write database changes into the Amazon RDS instance. Because the AmazonRDS instance does not provide SUPER privileges, the instance must be created using a access mode that does not require privileged updatesto the system. Aside from this setting, no other special configuration requirements are needed.
Important
In Tungsten Replicator 2.2.0, tungsten-installer has been deprecated. However, Amazon RDS installations arecurrently only supported through tungsten-installer; this will be changed in a future release.
To configure the slave replicator:
shell> ./tools/tungsten-installer --master-slave \ --cluster-hosts=host2 \ --master-host=host1 \ --datasource-host=rdshostname \ --datasource-user=tungsten \ --datasource-password=password \ --service-name=alpha \ --slave-privileged-updates=false \ --install-directory=/opt/continuent \ --skip-validation-check=InstallerMasterSlaveCheck \ --skip-validation-check=MySQLPermissionsCheck \ --skip-validation-check=MySQLBinaryLogsEnabledCheck \ --start-and-report
The description of each of the options is shown below; click the icon to hide this detail:
Click the icon to show a detailed description of each argument.
• tungsten-installer --master-slave
Installs a default master/slave environment.
• --cluster-hosts=host2
The name of the host where the slave replicator will be installed.
• --master-host=host1
Specifies which host will be the master.
• --datasource-host=amazonrds [206]
The full hostname of the Amazon RDS instance as provided by the Amazon console when the instance was created.
• --install-directory=/opt/continuent [197]
Directory where Tungsten Replicator will be installed.
• --replication-user=tungsten [206]
The user name for the Amazon RDS instance that will be used to apply data to the Amazon RDS instance.
• --replication-password=password [206]
The password for the Amazon RDS instance that will be used to apply data to the Amazon RDS instance.
• --service-name=alpha
The service name; this should match the service name of the master.
• --slave-privileged-updates=false [208]
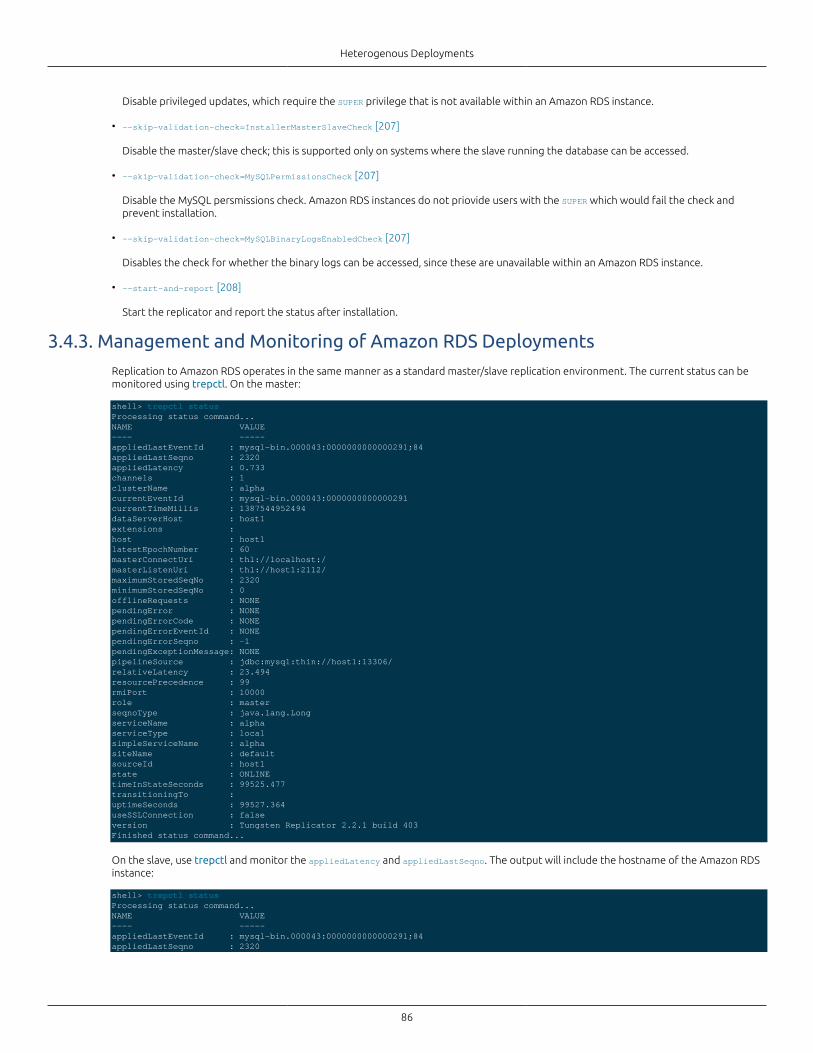
Heterogenous Deployments
86
Disable privileged updates, which require the SUPER privilege that is not available within an Amazon RDS instance.
• --skip-validation-check=InstallerMasterSlaveCheck [207]
Disable the master/slave check; this is supported only on systems where the slave running the database can be accessed.
• --skip-validation-check=MySQLPermissionsCheck [207]
Disable the MySQL persmissions check. Amazon RDS instances do not priovide users with the SUPER which would fail the check andprevent installation.
• --skip-validation-check=MySQLBinaryLogsEnabledCheck [207]
Disables the check for whether the binary logs can be accessed, since these are unavailable within an Amazon RDS instance.
• --start-and-report [208]
Start the replicator and report the status after installation.
3.4.3. Management and Monitoring of Amazon RDS Deployments
Replication to Amazon RDS operates in the same manner as a standard master/slave replication environment. The current status can bemonitored using trepctl. On the master:
shell> trepctl statusProcessing status command...NAME VALUE---- -----appliedLastEventId : mysql-bin.000043:0000000000000291;84appliedLastSeqno : 2320appliedLatency : 0.733channels : 1clusterName : alphacurrentEventId : mysql-bin.000043:0000000000000291currentTimeMillis : 1387544952494dataServerHost : host1extensions : host : host1latestEpochNumber : 60masterConnectUri : thl://localhost:/masterListenUri : thl://host1:2112/maximumStoredSeqNo : 2320minimumStoredSeqNo : 0offlineRequests : NONEpendingError : NONEpendingErrorCode : NONEpendingErrorEventId : NONEpendingErrorSeqno : -1pendingExceptionMessage: NONEpipelineSource : jdbc:mysql:thin://host1:13306/relativeLatency : 23.494resourcePrecedence : 99rmiPort : 10000role : masterseqnoType : java.lang.LongserviceName : alphaserviceType : localsimpleServiceName : alphasiteName : defaultsourceId : host1state : ONLINEtimeInStateSeconds : 99525.477transitioningTo : uptimeSeconds : 99527.364useSSLConnection : falseversion : Tungsten Replicator 2.2.1 build 403Finished status command...
On the slave, use trepctl and monitor the appliedLatency and appliedLastSeqno. The output will include the hostname of the Amazon RDSinstance:
shell> trepctl statusProcessing status command...NAME VALUE---- -----appliedLastEventId : mysql-bin.000043:0000000000000291;84appliedLastSeqno : 2320
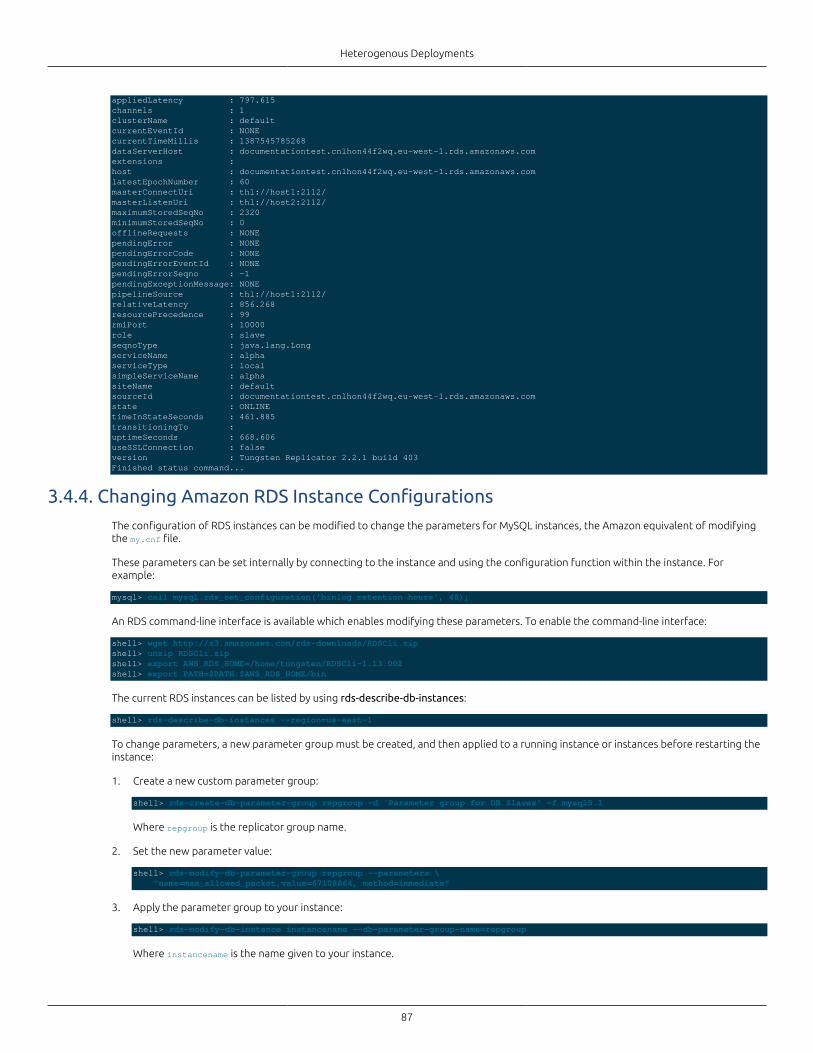
Heterogenous Deployments
87
appliedLatency : 797.615channels : 1clusterName : defaultcurrentEventId : NONEcurrentTimeMillis : 1387545785268dataServerHost : documentationtest.cnlhon44f2wq.eu-west-1.rds.amazonaws.comextensions : host : documentationtest.cnlhon44f2wq.eu-west-1.rds.amazonaws.comlatestEpochNumber : 60masterConnectUri : thl://host1:2112/masterListenUri : thl://host2:2112/maximumStoredSeqNo : 2320minimumStoredSeqNo : 0offlineRequests : NONEpendingError : NONEpendingErrorCode : NONEpendingErrorEventId : NONEpendingErrorSeqno : -1pendingExceptionMessage: NONEpipelineSource : thl://host1:2112/relativeLatency : 856.268resourcePrecedence : 99rmiPort : 10000role : slaveseqnoType : java.lang.LongserviceName : alphaserviceType : localsimpleServiceName : alphasiteName : defaultsourceId : documentationtest.cnlhon44f2wq.eu-west-1.rds.amazonaws.comstate : ONLINEtimeInStateSeconds : 461.885transitioningTo : uptimeSeconds : 668.606useSSLConnection : falseversion : Tungsten Replicator 2.2.1 build 403Finished status command...
3.4.4. Changing Amazon RDS Instance ConfigurationsThe configuration of RDS instances can be modified to change the parameters for MySQL instances, the Amazon equivalent of modifyingthe my.cnf file.
These parameters can be set internally by connecting to the instance and using the configuration function within the instance. Forexample:
mysql> call mysql.rds_set_configuration('binlog retention hours', 48);
An RDS command-line interface is available which enables modifying these parameters. To enable the command-line interface:
shell> wget http://s3.amazonaws.com/rds-downloads/RDSCli.zipshell> unzip RDSCli.zipshell> export AWS_RDS_HOME=/home/tungsten/RDSCli-1.13.002shell> export PATH=$PATH:$AWS_RDS_HOME/bin
The current RDS instances can be listed by using rds-describe-db-instances:
shell> rds-describe-db-instances --region=us-east-1
To change parameters, a new parameter group must be created, and then applied to a running instance or instances before restarting theinstance:
1. Create a new custom parameter group:
shell> rds-create-db-parameter-group repgroup -d 'Parameter group for DB Slaves' -f mysql5.1
Where repgroup is the replicator group name.
2. Set the new parameter value:
shell> rds-modify-db-parameter-group repgroup --parameters \ "name=max_allowed_packet,value=67108864, method=immediate"
3. Apply the parameter group to your instance:
shell> rds-modify-db-instance instancename --db-parameter-group-name=repgroup
Where instancename is the name given to your instance.

Heterogenous Deployments
88
4. Restart the instance:
shell> rds-reboot-db-instance instancename
3.5. Deploying MySQL to Vertica ReplicationHewlett-Packard's Vertica provides support for BigData, SQL-based analysis and processing. Integration with MySQL enables data to bereplicated live from the MySQL database directly into Vertica without the need to manually export and import the data.
Replication to Vertica operates as follows:
• Data is extracted from the source database into THL.
• When extracting the data from the THL, the Vertica replicator writes the data into CSV files according to the name of the source tables.The files contain all of the row-based data, including the global transaction ID generated by Tungsten Replicator during replication, andthe operation type (insert, delete, etc) as part of the CSV data.
• The CSV data is then loaded into Vertica into staging tables.
• SQL statements are then executed to perform updates on the live version of the tables, using the CSV, batch loaded, information,deleting old rows, and inserting the new data when performing updates to work effectively within the confines of Vertica operation.
Figure 3.9. Topologies: MySQL to Vertica
Setting up replication requires setting up both the master and slave components as two different configurations, one for MySQL and theother for Vertica. Replication also requires some additional steps to ensure that the Vertica host is ready to accept the replicated data thathas been extracted. Tungsten Replicator uses all the tools required to perform these operations during the installation and setup.
3.5.1. Preparing Hosts for Vertica Deployments
Preparing the hosts for the replication process requires setting some key configuration parameters within the MySQL server to ensure thatdata is stored and written correctly. On the Vertica side, the database and schema must be created using the existing schema definition sothat the databases and tables exist within Vertica.
MySQL Host
The data replicated from MySQL can be any data, although there are some known limitations and assumptions made on the way theinformation is transferred.
The following are required for replication to Vertica:
• MySQL must be using Row-based replication for information to be replicated to Vertica. For the best results, you should change theglobal binary log format, ideally in the configuration file (my.cnf):
binlog-format = row
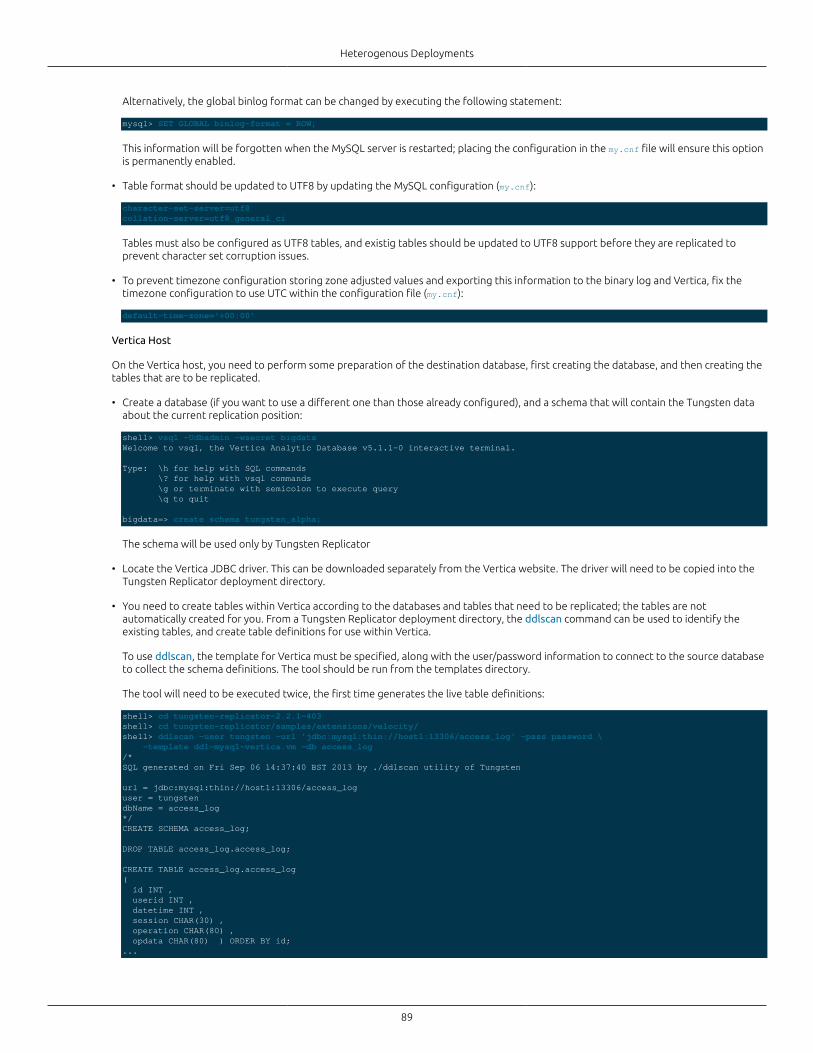
Heterogenous Deployments
89
Alternatively, the global binlog format can be changed by executing the following statement:
mysql> SET GLOBAL binlog-format = ROW;
This information will be forgotten when the MySQL server is restarted; placing the configuration in the my.cnf file will ensure this optionis permanently enabled.
• Table format should be updated to UTF8 by updating the MySQL configuration (my.cnf):
character-set-server=utf8collation-server=utf8_general_ci
Tables must also be configured as UTF8 tables, and existig tables should be updated to UTF8 support before they are replicated toprevent character set corruption issues.
• To prevent timezone configuration storing zone adjusted values and exporting this information to the binary log and Vertica, fix thetimezone configuration to use UTC within the configuration file (my.cnf):
default-time-zone='+00:00'
Vertica Host
On the Vertica host, you need to perform some preparation of the destination database, first creating the database, and then creating thetables that are to be replicated.
• Create a database (if you want to use a different one than those already configured), and a schema that will contain the Tungsten dataabout the current replication position:
shell> vsql -Udbadmin -wsecret bigdataWelcome to vsql, the Vertica Analytic Database v5.1.1-0 interactive terminal.
Type: \h for help with SQL commands \? for help with vsql commands \g or terminate with semicolon to execute query \q to quit
bigdata=> create schema tungsten_alpha;
The schema will be used only by Tungsten Replicator
• Locate the Vertica JDBC driver. This can be downloaded separately from the Vertica website. The driver will need to be copied into theTungsten Replicator deployment directory.
• You need to create tables within Vertica according to the databases and tables that need to be replicated; the tables are notautomatically created for you. From a Tungsten Replicator deployment directory, the ddlscan command can be used to identify theexisting tables, and create table definitions for use within Vertica.
To use ddlscan, the template for Vertica must be specified, along with the user/password information to connect to the source databaseto collect the schema definitions. The tool should be run from the templates directory.
The tool will need to be executed twice, the first time generates the live table definitions:
shell> cd tungsten-replicator-2.2.1-403shell> cd tungsten-replicator/samples/extensions/velocity/shell> ddlscan -user tungsten -url 'jdbc:mysql:thin://host1:13306/access_log' -pass password \ -template ddl-mysql-vertica.vm -db access_log/*SQL generated on Fri Sep 06 14:37:40 BST 2013 by ./ddlscan utility of Tungsten
url = jdbc:mysql:thin://host1:13306/access_loguser = tungstendbName = access_log*/CREATE SCHEMA access_log;
DROP TABLE access_log.access_log;
CREATE TABLE access_log.access_log( id INT , userid INT , datetime INT , session CHAR(30) , operation CHAR(80) , opdata CHAR(80) ) ORDER BY id;...
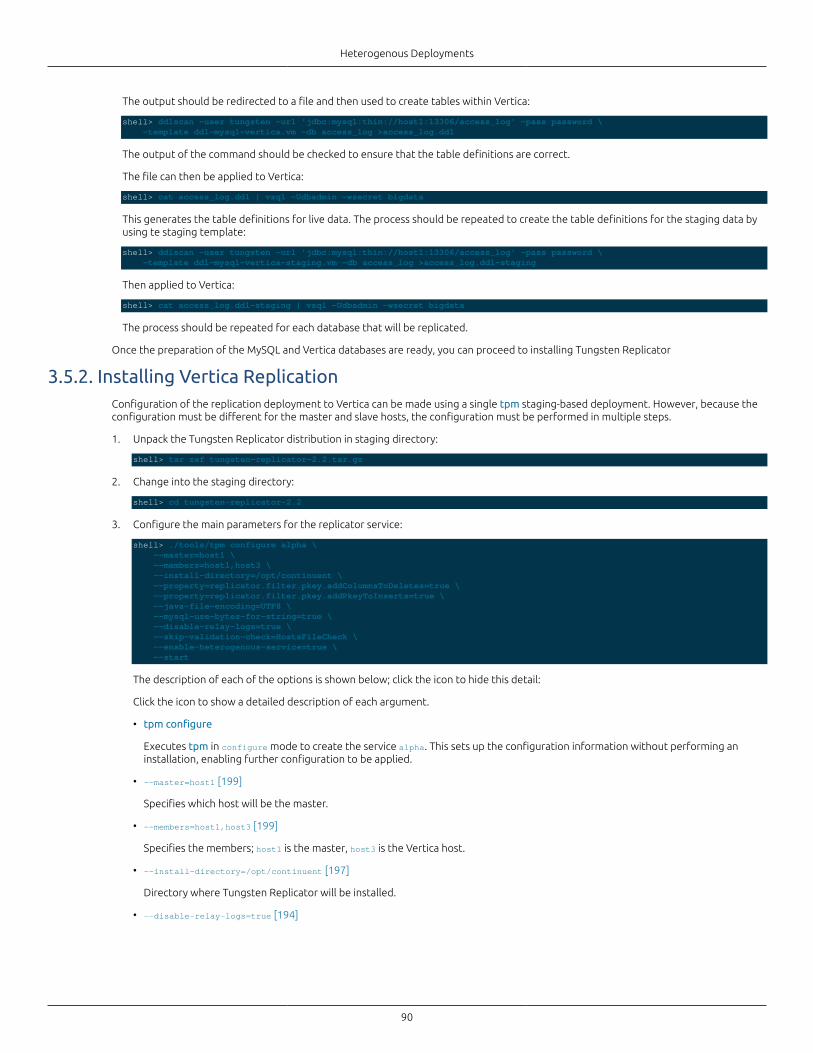
Heterogenous Deployments
90
The output should be redirected to a file and then used to create tables within Vertica:
shell> ddlscan -user tungsten -url 'jdbc:mysql:thin://host1:13306/access_log' -pass password \ -template ddl-mysql-vertica.vm -db access_log >access_log.ddl
The output of the command should be checked to ensure that the table definitions are correct.
The file can then be applied to Vertica:
shell> cat access_log.ddl | vsql -Udbadmin -wsecret bigdata
This generates the table definitions for live data. The process should be repeated to create the table definitions for the staging data byusing te staging template:
shell> ddlscan -user tungsten -url 'jdbc:mysql:thin://host1:13306/access_log' -pass password \ -template ddl-mysql-vertica-staging.vm -db access_log >access_log.ddl-staging
Then applied to Vertica:
shell> cat access_log.ddl-staging | vsql -Udbadmin -wsecret bigdata
The process should be repeated for each database that will be replicated.
Once the preparation of the MySQL and Vertica databases are ready, you can proceed to installing Tungsten Replicator
3.5.2. Installing Vertica ReplicationConfiguration of the replication deployment to Vertica can be made using a single tpm staging-based deployment. However, because theconfiguration must be different for the master and slave hosts, the configuration must be performed in multiple steps.
1. Unpack the Tungsten Replicator distribution in staging directory:
shell> tar zxf tungsten-replicator-2.2.tar.gz
2. Change into the staging directory:
shell> cd tungsten-replicator-2.2
3. Configure the main parameters for the replicator service:
shell> ./tools/tpm configure alpha \ --master=host1 \ --members=host1,host3 \ --install-directory=/opt/continuent \ --property=replicator.filter.pkey.addColumnsToDeletes=true \ --property=replicator.filter.pkey.addPkeyToInserts=true \ --java-file-encoding=UTF8 \ --mysql-use-bytes-for-string=true \ --disable-relay-logs=true \ --skip-validation-check=HostsFileCheck \ --enable-heterogenous-service=true \ --start
The description of each of the options is shown below; click the icon to hide this detail:
Click the icon to show a detailed description of each argument.
• tpm configure
Executes tpm in configure mode to create the service alpha. This sets up the configuration information without performing aninstallation, enabling further configuration to be applied.
• --master=host1 [199]
Specifies which host will be the master.
• --members=host1,host3 [199]
Specifies the members; host1 is the master, host3 is the Vertica host.
• --install-directory=/opt/continuent [197]
Directory where Tungsten Replicator will be installed.
• --disable-relay-logs=true [194]
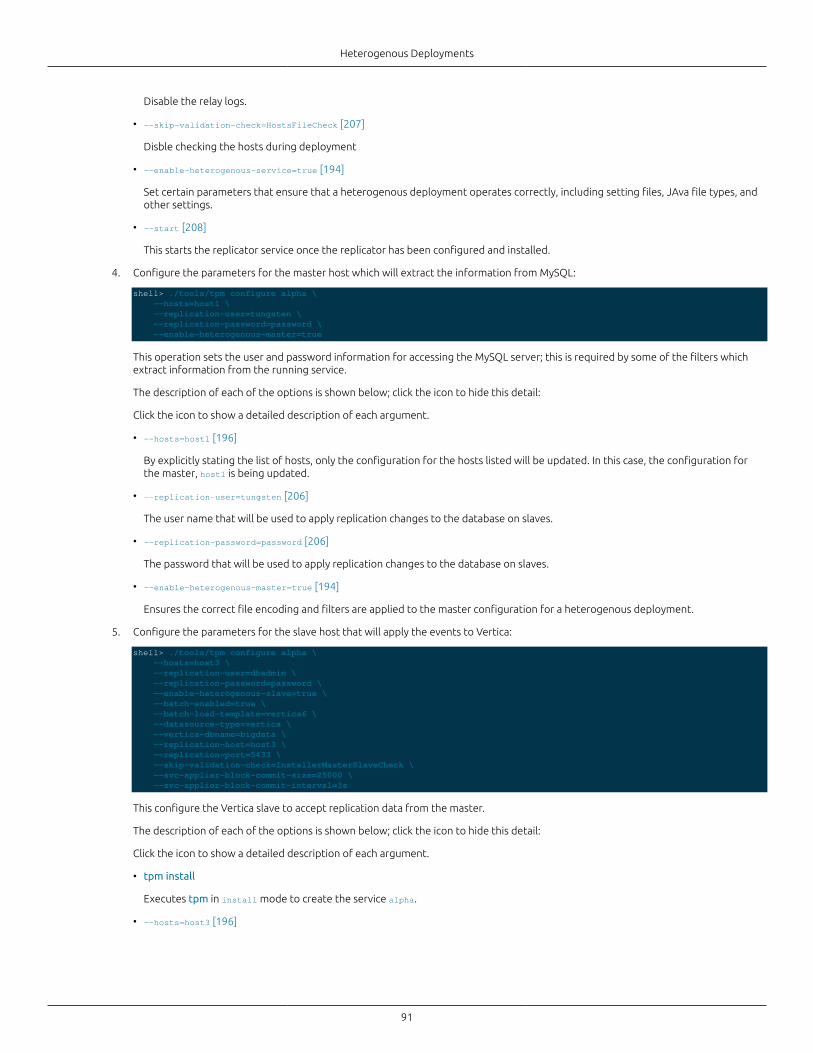
Heterogenous Deployments
91
Disable the relay logs.
• --skip-validation-check=HostsFileCheck [207]
Disble checking the hosts during deployment
• --enable-heterogenous-service=true [194]
Set certain parameters that ensure that a heterogenous deployment operates correctly, including setting files, JAva file types, andother settings.
• --start [208]
This starts the replicator service once the replicator has been configured and installed.
4. Configure the parameters for the master host which will extract the information from MySQL:
shell> ./tools/tpm configure alpha \ --hosts=host1 \ --replication-user=tungsten \ --replication-password=password \ --enable-heterogenous-master=true
This operation sets the user and password information for accessing the MySQL server; this is required by some of the filters whichextract information from the running service.
The description of each of the options is shown below; click the icon to hide this detail:
Click the icon to show a detailed description of each argument.
• --hosts=host1 [196]
By explicitly stating the list of hosts, only the configuration for the hosts listed will be updated. In this case, the configuration forthe master, host1 is being updated.
• --replication-user=tungsten [206]
The user name that will be used to apply replication changes to the database on slaves.
• --replication-password=password [206]
The password that will be used to apply replication changes to the database on slaves.
• --enable-heterogenous-master=true [194]
Ensures the correct file encoding and filters are applied to the master configuration for a heterogenous deployment.
5. Configure the parameters for the slave host that will apply the events to Vertica:
shell> ./tools/tpm configure alpha \ --hosts=host3 \ --replication-user=dbadmin \ --replication-password=password \ --enable-heterogenous-slave=true \ --batch-enabled=true \ --batch-load-template=vertica6 \ --datasource-type=vertica \ --vertica-dbname=bigdata \ --replication-host=host3 \ --replication-port=5433 \ --skip-validation-check=InstallerMasterSlaveCheck \ --svc-applier-block-commit-size=25000 \ --svc-applier-block-commit-interval=3s
This configure the Vertica slave to accept replication data from the master.
The description of each of the options is shown below; click the icon to hide this detail:
Click the icon to show a detailed description of each argument.
• tpm install
Executes tpm in install mode to create the service alpha.
• --hosts=host3 [196]
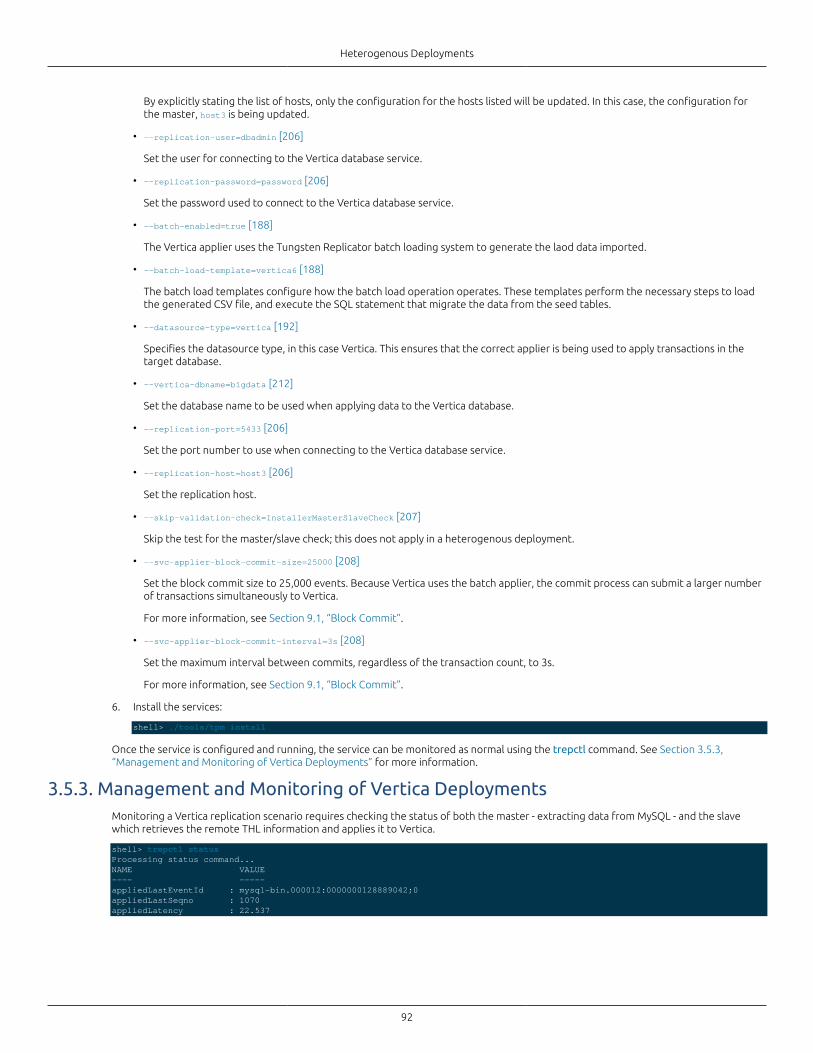
Heterogenous Deployments
92
By explicitly stating the list of hosts, only the configuration for the hosts listed will be updated. In this case, the configuration forthe master, host3 is being updated.
• --replication-user=dbadmin [206]
Set the user for connecting to the Vertica database service.
• --replication-password=password [206]
Set the password used to connect to the Vertica database service.
• --batch-enabled=true [188]
The Vertica applier uses the Tungsten Replicator batch loading system to generate the laod data imported.
• --batch-load-template=vertica6 [188]
The batch load templates configure how the batch load operation operates. These templates perform the necessary steps to loadthe generated CSV file, and execute the SQL statement that migrate the data from the seed tables.
• --datasource-type=vertica [192]
Specifies the datasource type, in this case Vertica. This ensures that the correct applier is being used to apply transactions in thetarget database.
• --vertica-dbname=bigdata [212]
Set the database name to be used when applying data to the Vertica database.
• --replication-port=5433 [206]
Set the port number to use when connecting to the Vertica database service.
• --replication-host=host3 [206]
Set the replication host.
• --skip-validation-check=InstallerMasterSlaveCheck [207]
Skip the test for the master/slave check; this does not apply in a heterogenous deployment.
• --svc-applier-block-commit-size=25000 [208]
Set the block commit size to 25,000 events. Because Vertica uses the batch applier, the commit process can submit a larger numberof transactions simultaneously to Vertica.
For more information, see Section 9.1, “Block Commit”.
• --svc-applier-block-commit-interval=3s [208]
Set the maximum interval between commits, regardless of the transaction count, to 3s.
For more information, see Section 9.1, “Block Commit”.
6. Install the services:
shell> ./tools/tpm install
Once the service is configured and running, the service can be monitored as normal using the trepctl command. See Section 3.5.3,“Management and Monitoring of Vertica Deployments” for more information.
3.5.3. Management and Monitoring of Vertica DeploymentsMonitoring a Vertica replication scenario requires checking the status of both the master - extracting data from MySQL - and the slavewhich retrieves the remote THL information and applies it to Vertica.
shell> trepctl statusProcessing status command...NAME VALUE---- -----appliedLastEventId : mysql-bin.000012:0000000128889042;0appliedLastSeqno : 1070appliedLatency : 22.537

Heterogenous Deployments
93
channels : 1clusterName : alphacurrentEventId : mysql-bin.000012:0000000128889042currentTimeMillis : 1378489888477dataServerHost : host1extensions :latestEpochNumber : 897masterConnectUri : thl://localhost:/masterListenUri : thl://host1:2112/maximumStoredSeqNo : 1070minimumStoredSeqNo : 0offlineRequests : NONEpendingError : NONEpendingErrorCode : NONEpendingErrorEventId : NONEpendingErrorSeqno : -1pendingExceptionMessage: NONEpipelineSource : jdbc:mysql:thin://host1:13306/relativeLatency : 691980.477resourcePrecedence : 99rmiPort : 10000role : masterseqnoType : java.lang.LongserviceName : alphaserviceType : localsimpleServiceName : alphasiteName : defaultsourceId : host1state : ONLINEtimeInStateSeconds : 694039.058transitioningTo :uptimeSeconds : 694041.81useSSLConnection : falseversion : Tungsten Replicator 2.2.1 build 403Finished status command...
On the slave, the output of trepctl shows the current sequence number and applier status:
shell> trepctl statusProcessing status command...NAME VALUE---- -----appliedLastEventId : mysql-bin.000012:0000000128889042;0appliedLastSeqno : 1070appliedLatency : 78.302channels : 1clusterName : defaultcurrentEventId : NONEcurrentTimeMillis : 1378479271609dataServerHost : host3extensions :latestEpochNumber : 897masterConnectUri : thl://host1:2112/masterListenUri : nullmaximumStoredSeqNo : 1070minimumStoredSeqNo : 0offlineRequests : NONEpendingError : NONEpendingErrorCode : NONEpendingErrorEventId : NONEpendingErrorSeqno : -1pendingExceptionMessage: NONEpipelineSource : thl://host1:2112/relativeLatency : 681363.609resourcePrecedence : 99rmiPort : 10000role : slaveseqnoType : java.lang.LongserviceName : alphaserviceType : localsimpleServiceName : alphasiteName : defaultsourceId : host3state : ONLINEtimeInStateSeconds : 681486.806transitioningTo :uptimeSeconds : 689922.693useSSLConnection : falseversion : Tungsten Replicator 2.2.1 build 403Finished status command...
The appliedLastSeqno should match as normal. Because of the batching of transactions the appliedLatency may be much higher than anormal MySQL to MySQL replication.
Heterogenous Deployments
94
3.5.4. Troubleshooting Vertica Installations• Remember that changes to the DDL within the source database are not automatically replicated to Vertica. Changes to the table
definitions, additional tables, or additional databases, must all be updated manually within Vertica.
• If you get errors similar to:
stage_xxx_access_log does not exist
When loading into Vertica, it means that the staging tables have not created correctly. Check the steps for creating the staging tablesusing ddlscan in Section 3.5.1, “Preparing Hosts for Vertica Deployments”.
• Replication may fail if date types contain zero values, which are legal in MySQL. For example, the timestamp 0000-00-00 00:00:00 is validin MySQL. An error reporting a mismatch in the values will be reportd when applying the data into Vertica, for example:
ERROR 2631: Column "time" is of type timestamp but expression is of type intHINT: You will need to rewrite or cast the expression
Or:
ERROR 2992: Date/time field value out of range: "0"HINT: Perhaps you need a different "datestyle" setting
To address this error, use the zerodate2null filter, which translates zero-value dates into a valid NULL value. This can be enabled byadding the zerodate2null filter to the applier stage when configuring the service using tpm:
shell> ./tools/tpm update alpha --repl-svc-applier-filters=zerodate2null
95
Chapter 4. Advanced Deployments
4.1. Migrating and Seeding Data
4.1.1. Migrating from MySQL Native Replication 'In-Place'If you are migrating an existing MySQL native replication deployment to use Tungsten Replicator the configuration of the TungstenReplicator replication must be updated to match the status of the slave.
1. Deploy Tungsten Replicator using the model or system appropriate according to Chapter 2, Deployment. Ensure that the TungstenReplicator is not started automatically by excluding the --start [208] or --start-and-report [208] options from the tpmcommands.
2. On each slave
Confirm that native replication is working on all slave nodes :
shell> echo 'SHOW SLAVE STATUS\G' | tpm mysql | \egrep ' Master_Host| Last_Error| Slave_SQL_Running' Master_Host: tr-ssl1 Slave_SQL_Running: Yes Last_Error:
3. On the master and each slave
Reset the Tungsten Replicator position on all servers :
shell> replicator start offlineshell> trepctl -service alpha reset -all -y
4. On the master
Login and start Tungsten Replicator services and put the Tungsten Replicator online:
shell> startallshell> trepctl online
5. On each slave
Record the current slave log position (as reported by the Master_Log_File and Exec_Master_Log_Pos output from SHOW SLAVE STATUS.Ideally, each slave should be stopped at the same position:
shell> echo 'SHOW SLAVE STATUS\G' | tpm mysql | \egrep ' Master_Host| Last_Error| Master_Log_File| Exec_Master_Log_Pos' Master_Host: tr-ssl1 Master_Log_File: mysql-bin.000025 Last_Error: Error executing row event: 'Table 'tungsten_alpha.heartbeat' doesn't exist' Exec_Master_Log_Pos: 181268
If you have multiple slaves configured to read from this master, record the slave position individually for each host. Once you have theinformation for all the hosts, determine the earliest log file and log position across all the slaves, as this information will be neededwhen starting Tungsten Replicator replication. If one of the servers does not show an error, it may be replicating from an intermediateserver. If so, you can proceed normally and assume this server stopped at the same position as the host is replicating from.
6. On the master
Take the replicator offline and clear the THL:
shell> trepctl offlineshell> trepctl -service alpha reset -all -y
7. On the master
Start replication, using the lowest binary log file and log position from the slave information determined in step 5.
shell> trepctl online -from-event 000025:181268
Tungsten Replicator will start reading the MySQL binary log from this position, creating the corresponding THL event data.
8. On each slave
a. Disable native replication to prevent native replication being accidentally started on the slave.
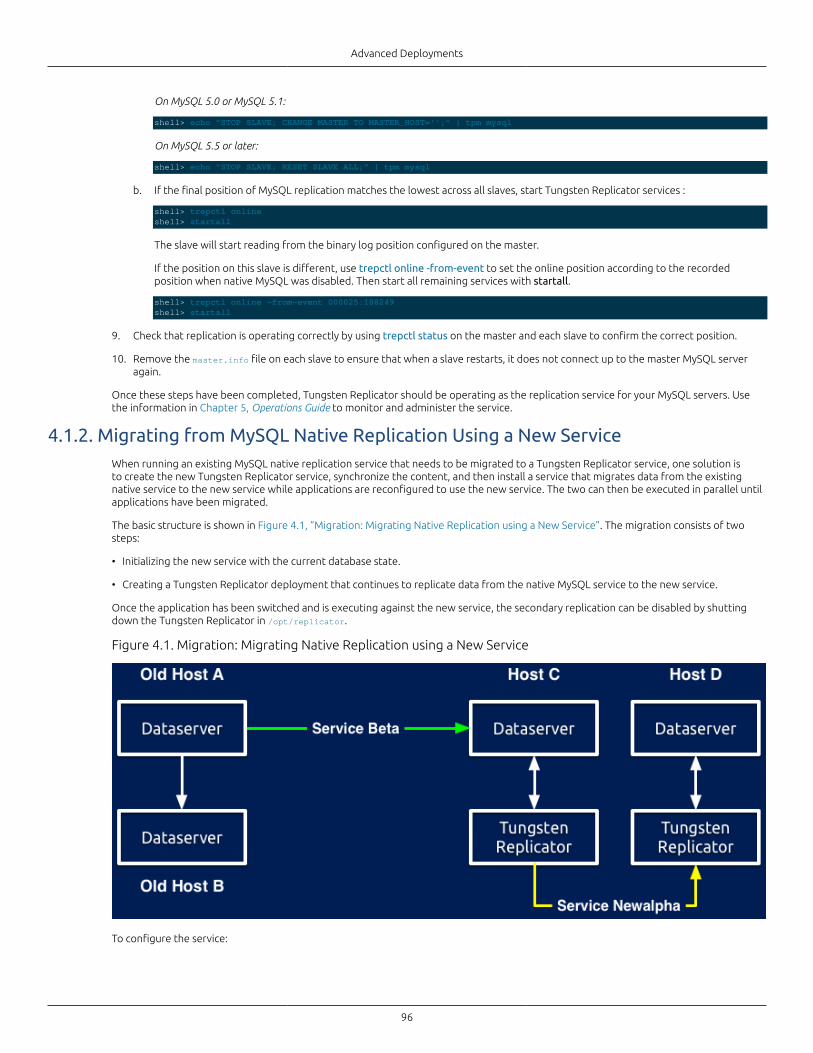
Advanced Deployments
96
On MySQL 5.0 or MySQL 5.1:
shell> echo "STOP SLAVE; CHANGE MASTER TO MASTER_HOST='';" | tpm mysql
On MySQL 5.5 or later:
shell> echo "STOP SLAVE; RESET SLAVE ALL;" | tpm mysql
b. If the final position of MySQL replication matches the lowest across all slaves, start Tungsten Replicator services :
shell> trepctl onlineshell> startall
The slave will start reading from the binary log position configured on the master.
If the position on this slave is different, use trepctl online -from-event to set the online position according to the recordedposition when native MySQL was disabled. Then start all remaining services with startall.
shell> trepctl online -from-event 000025:188249shell> startall
9. Check that replication is operating correctly by using trepctl status on the master and each slave to confirm the correct position.
10. Remove the master.info file on each slave to ensure that when a slave restarts, it does not connect up to the master MySQL serveragain.
Once these steps have been completed, Tungsten Replicator should be operating as the replication service for your MySQL servers. Usethe information in Chapter 5, Operations Guide to monitor and administer the service.
4.1.2. Migrating from MySQL Native Replication Using a New ServiceWhen running an existing MySQL native replication service that needs to be migrated to a Tungsten Replicator service, one solution isto create the new Tungsten Replicator service, synchronize the content, and then install a service that migrates data from the existingnative service to the new service while applications are reconfigured to use the new service. The two can then be executed in parallel untilapplications have been migrated.
The basic structure is shown in Figure 4.1, “Migration: Migrating Native Replication using a New Service”. The migration consists of twosteps:
• Initializing the new service with the current database state.
• Creating a Tungsten Replicator deployment that continues to replicate data from the native MySQL service to the new service.
Once the application has been switched and is executing against the new service, the secondary replication can be disabled by shuttingdown the Tungsten Replicator in /opt/replicator.
Figure 4.1. Migration: Migrating Native Replication using a New Service
To configure the service:
Advanced Deployments
97
1. Stop replication on a slave for the existing native replication installation :
mysql> STOP SLAVE;
Obtain the current slave position within the master binary log :
mysql> SHOW SLAVE STATUS\G... Master_Host: host3 Master_Log_File: mysql-bin.000002 Exec_Master_Log_Pos: 559...
2. Create a backup using any method that provides a consistent snapshot. The MySQL master may be used if you do not have a slave tobackup from. Be sure to get the binary log position as part of your back. This is included in the output to Xtrabackup or using the --master-data=2 option with mysqldump.
3. Restart the slave using native replication :
mysql> START SLAVE;
4. On the master and each slave within the new service, restore the backup data and start the database service
5. Setup the new Tungsten Replicator deployment using the MySQL servers on which the data has been restored. For clarity, this will becalled newalpha.
6. Configure a second replication service, beta to apply data using the existing MySQL native replication server as the master, and themaster of newalpha. The information provided in Section 2.8, “Replicating Data Into an Existing Dataservice” will help. Do not start thenew service.
7. Set the replication position for beta using tungsten_set_position to set the position to the point within the binary logs where thebackup was taken:
shell> /opt/replicator/tungsten/tungsten-replicator/bin/tungsten_set_position \ --seqno=0 --epoch=0 --service=beta \ --source-id=host3 --event-id=mysql-bin.000002:559
8. Start replicator service beta:
shell> /opt/replicator/tungsten/tungsten-replicator/bin/replicator start
Once replication has been started, use trepctl to check the status and ensure that replication is operating correctly.
The original native MySQL replication master can continue to be used for reading and writing from within your application, and changeswill be replicated into the new service on the new hardware. Once the applications have been updated to use the new service, the oldservers can be decommissioned and replicator service beta stopped and removed.
4.1.3. Seeding Data through MySQLOnce the Tungsten Replicator is installed, it can be used to provision all slaves with the master data. The slaves will need enoughinformation in order for the installation to succeed and for Tungsten Replicator to start. The provisioning process requires dumpingall data on the master and reloading it back into the master server. This will create a full set of THL entries for the slave replicators toapply. There may be no other applications accessing the master server while this process is running. Every table will be emptied out andrepopulated so other applications would get an inconsistent view of the database. If the master is a MySQL slave, then the slave processmay be stopped and started to prevent any changes without affecting other servers.
1. If you are using a MySQL slave as the master, stop the replication thread :
mysql> STOP SLAVE;
2. Check Tungsten Replicator status on all servers to make sure it is ONLINE and that the appliedLastSeqno values are matching :
shell> trepctl status
Starting the process before all servers are consistent could cause inconsistencies. If you are trying to completely reprovision the serverthen you may consider running trepctl reset before proceeding. That will reset the replication position and ignore any previous eventson the master.
3. Use mysqldump to output all of the schemas that need to be provisioned :
shell> mysqldump --opt --skip-extended-insert -hhost3 -utungsten -P13306 -p \ --databases db1,db2 > ~/dump.sql
Optionally, you can just dump a set of tables to be provisioned :
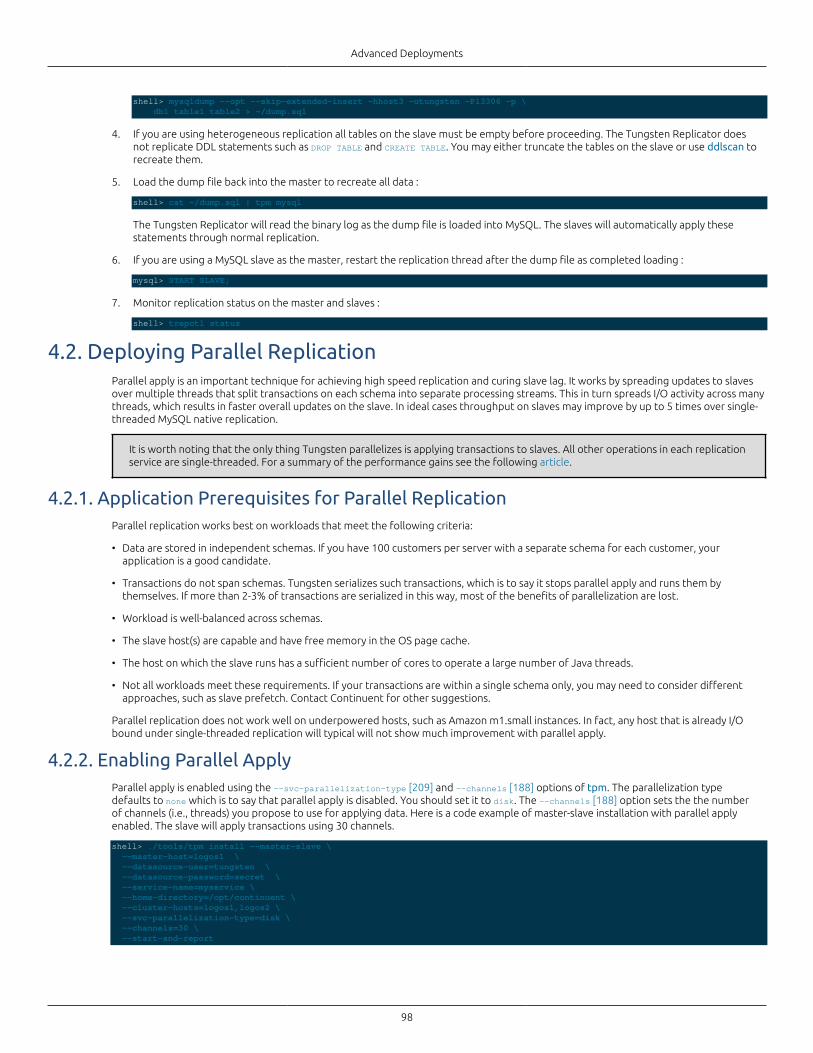
Advanced Deployments
98
shell> mysqldump --opt --skip-extended-insert -hhost3 -utungsten -P13306 -p \ db1 table1 table2 > ~/dump.sql
4. If you are using heterogeneous replication all tables on the slave must be empty before proceeding. The Tungsten Replicator doesnot replicate DDL statements such as DROP TABLE and CREATE TABLE. You may either truncate the tables on the slave or use ddlscan torecreate them.
5. Load the dump file back into the master to recreate all data :
shell> cat ~/dump.sql | tpm mysql
The Tungsten Replicator will read the binary log as the dump file is loaded into MySQL. The slaves will automatically apply thesestatements through normal replication.
6. If you are using a MySQL slave as the master, restart the replication thread after the dump file as completed loading :
mysql> START SLAVE;
7. Monitor replication status on the master and slaves :
shell> trepctl status
4.2. Deploying Parallel ReplicationParallel apply is an important technique for achieving high speed replication and curing slave lag. It works by spreading updates to slavesover multiple threads that split transactions on each schema into separate processing streams. This in turn spreads I/O activity across manythreads, which results in faster overall updates on the slave. In ideal cases throughput on slaves may improve by up to 5 times over single-threaded MySQL native replication.
It is worth noting that the only thing Tungsten parallelizes is applying transactions to slaves. All other operations in each replicationservice are single-threaded. For a summary of the performance gains see the following article.
4.2.1. Application Prerequisites for Parallel ReplicationParallel replication works best on workloads that meet the following criteria:
• Data are stored in independent schemas. If you have 100 customers per server with a separate schema for each customer, yourapplication is a good candidate.
• Transactions do not span schemas. Tungsten serializes such transactions, which is to say it stops parallel apply and runs them bythemselves. If more than 2-3% of transactions are serialized in this way, most of the benefits of parallelization are lost.
• Workload is well-balanced across schemas.
• The slave host(s) are capable and have free memory in the OS page cache.
• The host on which the slave runs has a sufficient number of cores to operate a large number of Java threads.
• Not all workloads meet these requirements. If your transactions are within a single schema only, you may need to consider differentapproaches, such as slave prefetch. Contact Continuent for other suggestions.
Parallel replication does not work well on underpowered hosts, such as Amazon m1.small instances. In fact, any host that is already I/Obound under single-threaded replication will typical will not show much improvement with parallel apply.
4.2.2. Enabling Parallel ApplyParallel apply is enabled using the --svc-parallelization-type [209] and --channels [188] options of tpm. The parallelization typedefaults to none which is to say that parallel apply is disabled. You should set it to disk. The --channels [188] option sets the the numberof channels (i.e., threads) you propose to use for applying data. Here is a code example of master-slave installation with parallel applyenabled. The slave will apply transactions using 30 channels.
shell> ./tools/tpm install --master-slave \ --master-host=logos1 \ --datasource-user=tungsten \ --datasource-password=secret \ --service-name=myservice \ --home-directory=/opt/continuent \ --cluster-hosts=logos1,logos2 \ --svc-parallelization-type=disk \ --channels=30 \ --start-and-report
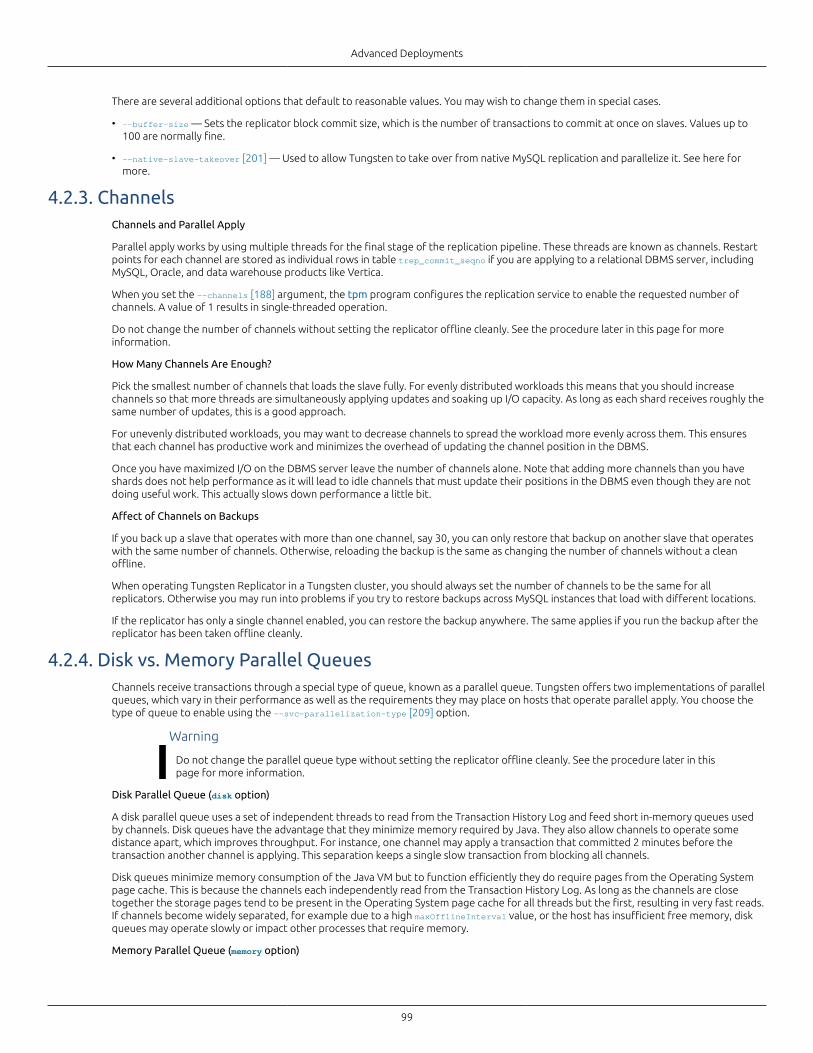
Advanced Deployments
99
There are several additional options that default to reasonable values. You may wish to change them in special cases.
• --buffer-size — Sets the replicator block commit size, which is the number of transactions to commit at once on slaves. Values up to100 are normally fine.
• --native-slave-takeover [201] — Used to allow Tungsten to take over from native MySQL replication and parallelize it. See here formore.
4.2.3. ChannelsChannels and Parallel Apply
Parallel apply works by using multiple threads for the final stage of the replication pipeline. These threads are known as channels. Restartpoints for each channel are stored as individual rows in table trep_commit_seqno if you are applying to a relational DBMS server, includingMySQL, Oracle, and data warehouse products like Vertica.
When you set the --channels [188] argument, the tpm program configures the replication service to enable the requested number ofchannels. A value of 1 results in single-threaded operation.
Do not change the number of channels without setting the replicator offline cleanly. See the procedure later in this page for moreinformation.
How Many Channels Are Enough?
Pick the smallest number of channels that loads the slave fully. For evenly distributed workloads this means that you should increasechannels so that more threads are simultaneously applying updates and soaking up I/O capacity. As long as each shard receives roughly thesame number of updates, this is a good approach.
For unevenly distributed workloads, you may want to decrease channels to spread the workload more evenly across them. This ensuresthat each channel has productive work and minimizes the overhead of updating the channel position in the DBMS.
Once you have maximized I/O on the DBMS server leave the number of channels alone. Note that adding more channels than you haveshards does not help performance as it will lead to idle channels that must update their positions in the DBMS even though they are notdoing useful work. This actually slows down performance a little bit.
Affect of Channels on Backups
If you back up a slave that operates with more than one channel, say 30, you can only restore that backup on another slave that operateswith the same number of channels. Otherwise, reloading the backup is the same as changing the number of channels without a cleanoffline.
When operating Tungsten Replicator in a Tungsten cluster, you should always set the number of channels to be the same for allreplicators. Otherwise you may run into problems if you try to restore backups across MySQL instances that load with different locations.
If the replicator has only a single channel enabled, you can restore the backup anywhere. The same applies if you run the backup after thereplicator has been taken offline cleanly.
4.2.4. Disk vs. Memory Parallel QueuesChannels receive transactions through a special type of queue, known as a parallel queue. Tungsten offers two implementations of parallelqueues, which vary in their performance as well as the requirements they may place on hosts that operate parallel apply. You choose thetype of queue to enable using the --svc-parallelization-type [209] option.
Warning
Do not change the parallel queue type without setting the replicator offline cleanly. See the procedure later in thispage for more information.
Disk Parallel Queue (disk option)
A disk parallel queue uses a set of independent threads to read from the Transaction History Log and feed short in-memory queues usedby channels. Disk queues have the advantage that they minimize memory required by Java. They also allow channels to operate somedistance apart, which improves throughput. For instance, one channel may apply a transaction that committed 2 minutes before thetransaction another channel is applying. This separation keeps a single slow transaction from blocking all channels.
Disk queues minimize memory consumption of the Java VM but to function efficiently they do require pages from the Operating Systempage cache. This is because the channels each independently read from the Transaction History Log. As long as the channels are closetogether the storage pages tend to be present in the Operating System page cache for all threads but the first, resulting in very fast reads.If channels become widely separated, for example due to a high maxOfflineInterval value, or the host has insufficient free memory, diskqueues may operate slowly or impact other processes that require memory.
Memory Parallel Queue (memory option)
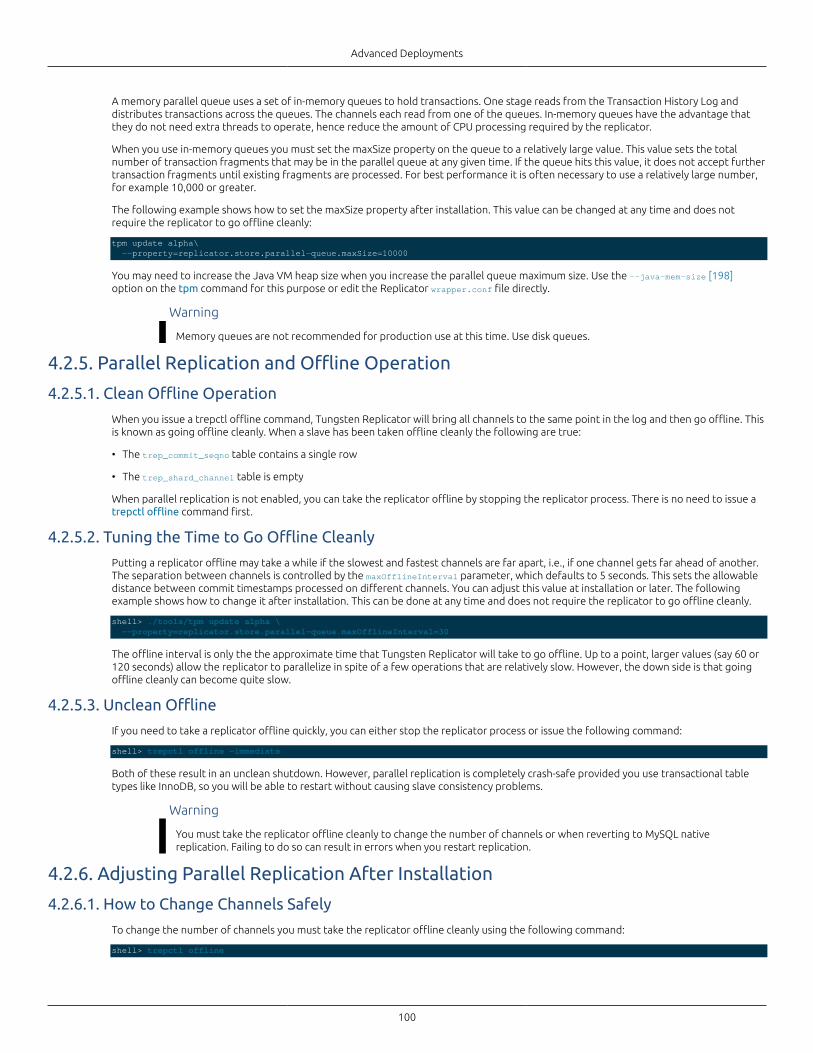
Advanced Deployments
100
A memory parallel queue uses a set of in-memory queues to hold transactions. One stage reads from the Transaction History Log anddistributes transactions across the queues. The channels each read from one of the queues. In-memory queues have the advantage thatthey do not need extra threads to operate, hence reduce the amount of CPU processing required by the replicator.
When you use in-memory queues you must set the maxSize property on the queue to a relatively large value. This value sets the totalnumber of transaction fragments that may be in the parallel queue at any given time. If the queue hits this value, it does not accept furthertransaction fragments until existing fragments are processed. For best performance it is often necessary to use a relatively large number,for example 10,000 or greater.
The following example shows how to set the maxSize property after installation. This value can be changed at any time and does notrequire the replicator to go offline cleanly:
tpm update alpha\ --property=replicator.store.parallel-queue.maxSize=10000
You may need to increase the Java VM heap size when you increase the parallel queue maximum size. Use the --java-mem-size [198]option on the tpm command for this purpose or edit the Replicator wrapper.conf file directly.
Warning
Memory queues are not recommended for production use at this time. Use disk queues.
4.2.5. Parallel Replication and Offline Operation
4.2.5.1. Clean Offline Operation
When you issue a trepctl offline command, Tungsten Replicator will bring all channels to the same point in the log and then go offline. Thisis known as going offline cleanly. When a slave has been taken offline cleanly the following are true:
• The trep_commit_seqno table contains a single row
• The trep_shard_channel table is empty
When parallel replication is not enabled, you can take the replicator offline by stopping the replicator process. There is no need to issue atrepctl offline command first.
4.2.5.2. Tuning the Time to Go Offline Cleanly
Putting a replicator offline may take a while if the slowest and fastest channels are far apart, i.e., if one channel gets far ahead of another.The separation between channels is controlled by the maxOfflineInterval parameter, which defaults to 5 seconds. This sets the allowabledistance between commit timestamps processed on different channels. You can adjust this value at installation or later. The followingexample shows how to change it after installation. This can be done at any time and does not require the replicator to go offline cleanly.
shell> ./tools/tpm update alpha \ --property=replicator.store.parallel-queue.maxOfflineInterval=30
The offline interval is only the the approximate time that Tungsten Replicator will take to go offline. Up to a point, larger values (say 60 or120 seconds) allow the replicator to parallelize in spite of a few operations that are relatively slow. However, the down side is that goingoffline cleanly can become quite slow.
4.2.5.3. Unclean Offline
If you need to take a replicator offline quickly, you can either stop the replicator process or issue the following command:
shell> trepctl offline -immediate
Both of these result in an unclean shutdown. However, parallel replication is completely crash-safe provided you use transactional tabletypes like InnoDB, so you will be able to restart without causing slave consistency problems.
Warning
You must take the replicator offline cleanly to change the number of channels or when reverting to MySQL nativereplication. Failing to do so can result in errors when you restart replication.
4.2.6. Adjusting Parallel Replication After Installation
4.2.6.1. How to Change Channels Safely
To change the number of channels you must take the replicator offline cleanly using the following command:
shell> trepctl offline
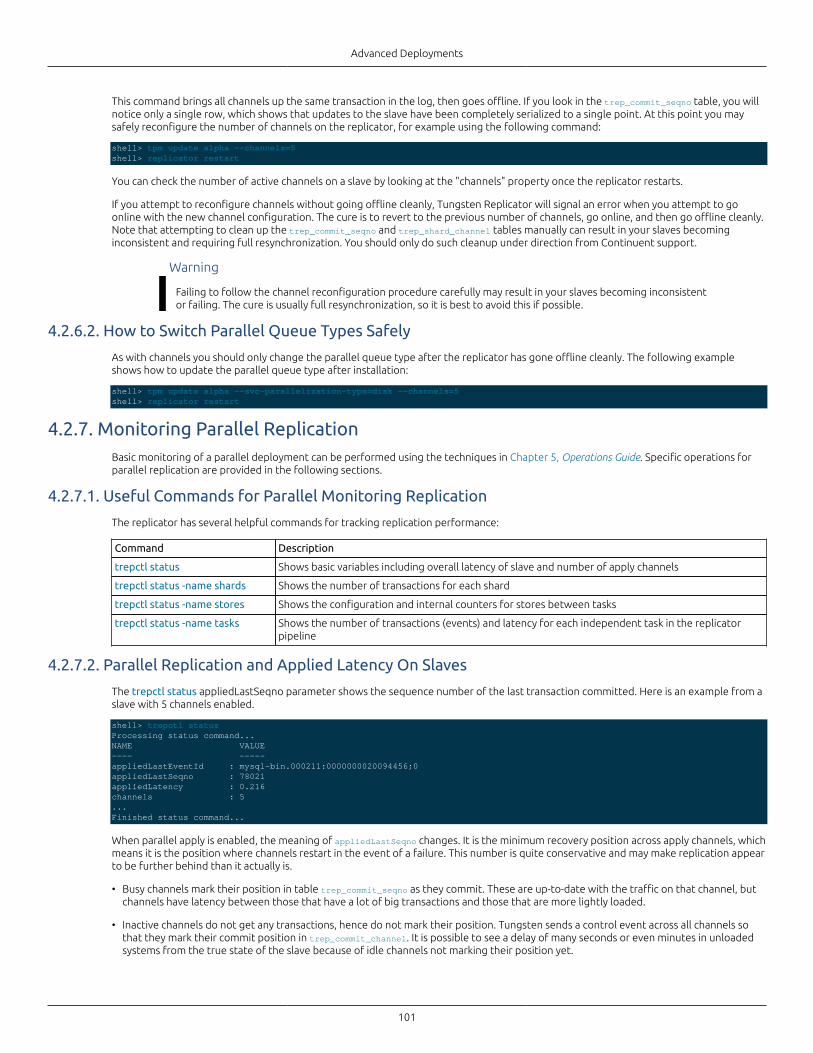
Advanced Deployments
101
This command brings all channels up the same transaction in the log, then goes offline. If you look in the trep_commit_seqno table, you willnotice only a single row, which shows that updates to the slave have been completely serialized to a single point. At this point you maysafely reconfigure the number of channels on the replicator, for example using the following command:
shell> tpm update alpha --channels=5 shell> replicator restart
You can check the number of active channels on a slave by looking at the "channels" property once the replicator restarts.
If you attempt to reconfigure channels without going offline cleanly, Tungsten Replicator will signal an error when you attempt to goonline with the new channel configuration. The cure is to revert to the previous number of channels, go online, and then go offline cleanly.Note that attempting to clean up the trep_commit_seqno and trep_shard_channel tables manually can result in your slaves becominginconsistent and requiring full resynchronization. You should only do such cleanup under direction from Continuent support.
Warning
Failing to follow the channel reconfiguration procedure carefully may result in your slaves becoming inconsistentor failing. The cure is usually full resynchronization, so it is best to avoid this if possible.
4.2.6.2. How to Switch Parallel Queue Types Safely
As with channels you should only change the parallel queue type after the replicator has gone offline cleanly. The following exampleshows how to update the parallel queue type after installation:
shell> tpm update alpha --svc-parallelization-type=disk --channels=5shell> replicator restart
4.2.7. Monitoring Parallel ReplicationBasic monitoring of a parallel deployment can be performed using the techniques in Chapter 5, Operations Guide. Specific operations forparallel replication are provided in the following sections.
4.2.7.1. Useful Commands for Parallel Monitoring Replication
The replicator has several helpful commands for tracking replication performance:
Command Description
trepctl status Shows basic variables including overall latency of slave and number of apply channels
trepctl status -name shards Shows the number of transactions for each shard
trepctl status -name stores Shows the configuration and internal counters for stores between tasks
trepctl status -name tasks Shows the number of transactions (events) and latency for each independent task in the replicatorpipeline
4.2.7.2. Parallel Replication and Applied Latency On Slaves
The trepctl status appliedLastSeqno parameter shows the sequence number of the last transaction committed. Here is an example from aslave with 5 channels enabled.
shell> trepctl statusProcessing status command...NAME VALUE---- -----appliedLastEventId : mysql-bin.000211:0000000020094456;0appliedLastSeqno : 78021appliedLatency : 0.216channels : 5...Finished status command...
When parallel apply is enabled, the meaning of appliedLastSeqno changes. It is the minimum recovery position across apply channels, whichmeans it is the position where channels restart in the event of a failure. This number is quite conservative and may make replication appearto be further behind than it actually is.
• Busy channels mark their position in table trep_commit_seqno as they commit. These are up-to-date with the traffic on that channel, butchannels have latency between those that have a lot of big transactions and those that are more lightly loaded.
• Inactive channels do not get any transactions, hence do not mark their position. Tungsten sends a control event across all channels sothat they mark their commit position in trep_commit_channel. It is possible to see a delay of many seconds or even minutes in unloadedsystems from the true state of the slave because of idle channels not marking their position yet.
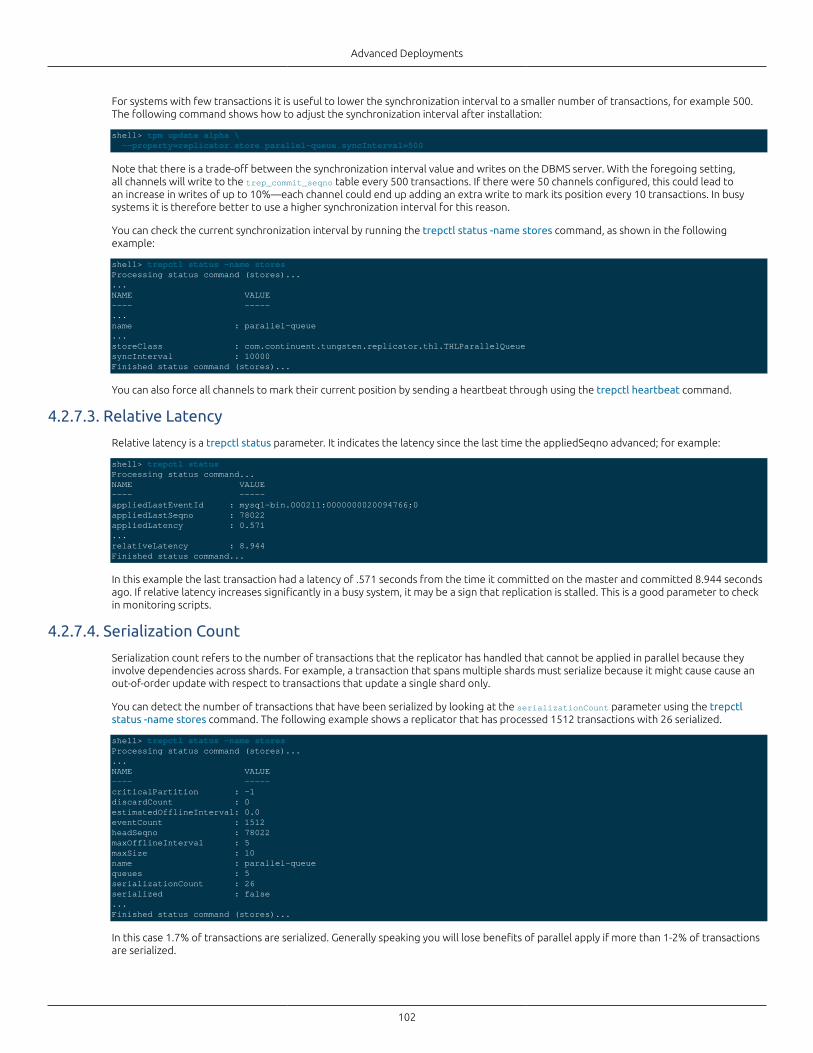
Advanced Deployments
102
For systems with few transactions it is useful to lower the synchronization interval to a smaller number of transactions, for example 500.The following command shows how to adjust the synchronization interval after installation:
shell> tpm update alpha \ --property=replicator.store.parallel-queue.syncInterval=500
Note that there is a trade-off between the synchronization interval value and writes on the DBMS server. With the foregoing setting,all channels will write to the trep_commit_seqno table every 500 transactions. If there were 50 channels configured, this could lead toan increase in writes of up to 10%—each channel could end up adding an extra write to mark its position every 10 transactions. In busysystems it is therefore better to use a higher synchronization interval for this reason.
You can check the current synchronization interval by running the trepctl status -name stores command, as shown in the followingexample:
shell> trepctl status -name storesProcessing status command (stores)......NAME VALUE---- -----...name : parallel-queue...storeClass : com.continuent.tungsten.replicator.thl.THLParallelQueuesyncInterval : 10000Finished status command (stores)...
You can also force all channels to mark their current position by sending a heartbeat through using the trepctl heartbeat command.
4.2.7.3. Relative Latency
Relative latency is a trepctl status parameter. It indicates the latency since the last time the appliedSeqno advanced; for example:
shell> trepctl statusProcessing status command...NAME VALUE---- -----appliedLastEventId : mysql-bin.000211:0000000020094766;0appliedLastSeqno : 78022appliedLatency : 0.571...relativeLatency : 8.944Finished status command...
In this example the last transaction had a latency of .571 seconds from the time it committed on the master and committed 8.944 secondsago. If relative latency increases significantly in a busy system, it may be a sign that replication is stalled. This is a good parameter to checkin monitoring scripts.
4.2.7.4. Serialization Count
Serialization count refers to the number of transactions that the replicator has handled that cannot be applied in parallel because theyinvolve dependencies across shards. For example, a transaction that spans multiple shards must serialize because it might cause cause anout-of-order update with respect to transactions that update a single shard only.
You can detect the number of transactions that have been serialized by looking at the serializationCount parameter using the trepctlstatus -name stores command. The following example shows a replicator that has processed 1512 transactions with 26 serialized.
shell> trepctl status -name storesProcessing status command (stores)......NAME VALUE---- -----criticalPartition : -1discardCount : 0estimatedOfflineInterval: 0.0eventCount : 1512headSeqno : 78022maxOfflineInterval : 5maxSize : 10name : parallel-queuequeues : 5serializationCount : 26serialized : false...Finished status command (stores)...
In this case 1.7% of transactions are serialized. Generally speaking you will lose benefits of parallel apply if more than 1-2% of transactionsare serialized.
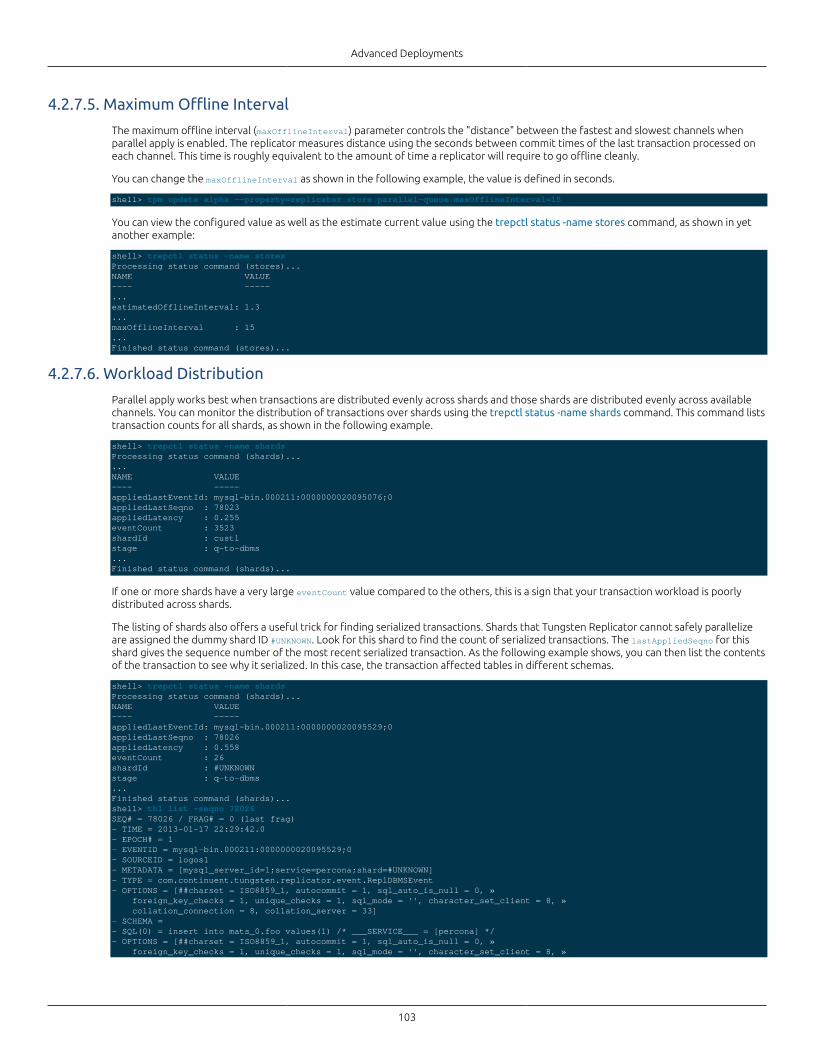
Advanced Deployments
103
4.2.7.5. Maximum Offline Interval
The maximum offline interval (maxOfflineInterval) parameter controls the "distance" between the fastest and slowest channels whenparallel apply is enabled. The replicator measures distance using the seconds between commit times of the last transaction processed oneach channel. This time is roughly equivalent to the amount of time a replicator will require to go offline cleanly.
You can change the maxOfflineInterval as shown in the following example, the value is defined in seconds.
shell> tpm update alpha --property=replicator.store.parallel-queue.maxOfflineInterval=15
You can view the configured value as well as the estimate current value using the trepctl status -name stores command, as shown in yetanother example:
shell> trepctl status -name storesProcessing status command (stores)...NAME VALUE---- -----...estimatedOfflineInterval: 1.3...maxOfflineInterval : 15...Finished status command (stores)...
4.2.7.6. Workload Distribution
Parallel apply works best when transactions are distributed evenly across shards and those shards are distributed evenly across availablechannels. You can monitor the distribution of transactions over shards using the trepctl status -name shards command. This command liststransaction counts for all shards, as shown in the following example.
shell> trepctl status -name shardsProcessing status command (shards)......NAME VALUE---- -----appliedLastEventId: mysql-bin.000211:0000000020095076;0appliedLastSeqno : 78023appliedLatency : 0.255eventCount : 3523shardId : cust1stage : q-to-dbms...Finished status command (shards)...
If one or more shards have a very large eventCount value compared to the others, this is a sign that your transaction workload is poorlydistributed across shards.
The listing of shards also offers a useful trick for finding serialized transactions. Shards that Tungsten Replicator cannot safely parallelizeare assigned the dummy shard ID #UNKNOWN. Look for this shard to find the count of serialized transactions. The lastAppliedSeqno for thisshard gives the sequence number of the most recent serialized transaction. As the following example shows, you can then list the contentsof the transaction to see why it serialized. In this case, the transaction affected tables in different schemas.
shell> trepctl status -name shardsProcessing status command (shards)...NAME VALUE---- -----appliedLastEventId: mysql-bin.000211:0000000020095529;0appliedLastSeqno : 78026appliedLatency : 0.558eventCount : 26shardId : #UNKNOWNstage : q-to-dbms...Finished status command (shards)...shell> thl list -seqno 78026SEQ# = 78026 / FRAG# = 0 (last frag)- TIME = 2013-01-17 22:29:42.0- EPOCH# = 1- EVENTID = mysql-bin.000211:0000000020095529;0- SOURCEID = logos1- METADATA = [mysql_server_id=1;service=percona;shard=#UNKNOWN]- TYPE = com.continuent.tungsten.replicator.event.ReplDBMSEvent- OPTIONS = [##charset = ISO8859_1, autocommit = 1, sql_auto_is_null = 0, » foreign_key_checks = 1, unique_checks = 1, sql_mode = '', character_set_client = 8, » collation_connection = 8, collation_server = 33]- SCHEMA =- SQL(0) = insert into mats_0.foo values(1) /* ___SERVICE___ = [percona] */- OPTIONS = [##charset = ISO8859_1, autocommit = 1, sql_auto_is_null = 0, » foreign_key_checks = 1, unique_checks = 1, sql_mode = '', character_set_client = 8, »
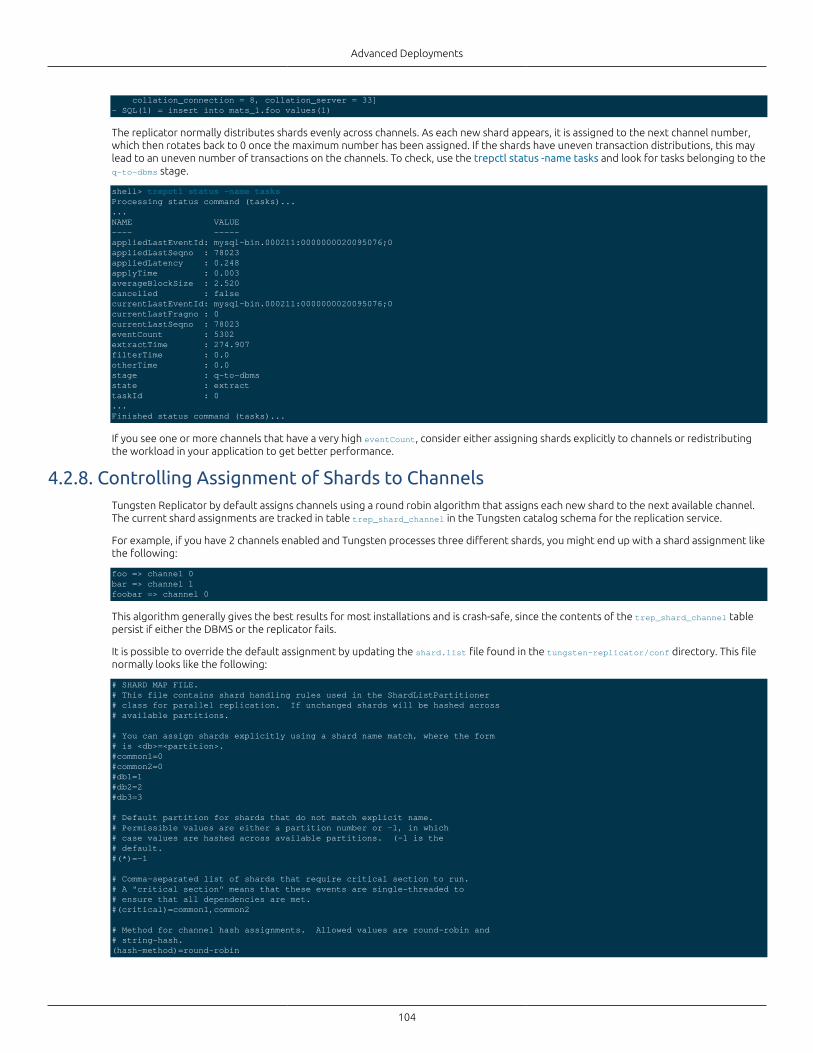
Advanced Deployments
104
collation_connection = 8, collation_server = 33]- SQL(1) = insert into mats_1.foo values(1)
The replicator normally distributes shards evenly across channels. As each new shard appears, it is assigned to the next channel number,which then rotates back to 0 once the maximum number has been assigned. If the shards have uneven transaction distributions, this maylead to an uneven number of transactions on the channels. To check, use the trepctl status -name tasks and look for tasks belonging to theq-to-dbms stage.
shell> trepctl status -name tasksProcessing status command (tasks)......NAME VALUE---- -----appliedLastEventId: mysql-bin.000211:0000000020095076;0appliedLastSeqno : 78023appliedLatency : 0.248applyTime : 0.003averageBlockSize : 2.520cancelled : falsecurrentLastEventId: mysql-bin.000211:0000000020095076;0currentLastFragno : 0currentLastSeqno : 78023eventCount : 5302extractTime : 274.907filterTime : 0.0otherTime : 0.0stage : q-to-dbmsstate : extracttaskId : 0...Finished status command (tasks)...
If you see one or more channels that have a very high eventCount, consider either assigning shards explicitly to channels or redistributingthe workload in your application to get better performance.
4.2.8. Controlling Assignment of Shards to ChannelsTungsten Replicator by default assigns channels using a round robin algorithm that assigns each new shard to the next available channel.The current shard assignments are tracked in table trep_shard_channel in the Tungsten catalog schema for the replication service.
For example, if you have 2 channels enabled and Tungsten processes three different shards, you might end up with a shard assignment likethe following:
foo => channel 0bar => channel 1foobar => channel 0
This algorithm generally gives the best results for most installations and is crash-safe, since the contents of the trep_shard_channel tablepersist if either the DBMS or the replicator fails.
It is possible to override the default assignment by updating the shard.list file found in the tungsten-replicator/conf directory. This filenormally looks like the following:
# SHARD MAP FILE.# This file contains shard handling rules used in the ShardListPartitioner# class for parallel replication. If unchanged shards will be hashed across# available partitions.
# You can assign shards explicitly using a shard name match, where the form# is <db>=<partition>.#common1=0#common2=0#db1=1#db2=2#db3=3
# Default partition for shards that do not match explicit name.# Permissible values are either a partition number or -1, in which# case values are hashed across available partitions. (-1 is the# default.#(*)=-1
# Comma-separated list of shards that require critical section to run.# A "critical section" means that these events are single-threaded to# ensure that all dependencies are met.#(critical)=common1,common2
# Method for channel hash assignments. Allowed values are round-robin and# string-hash.(hash-method)=round-robin
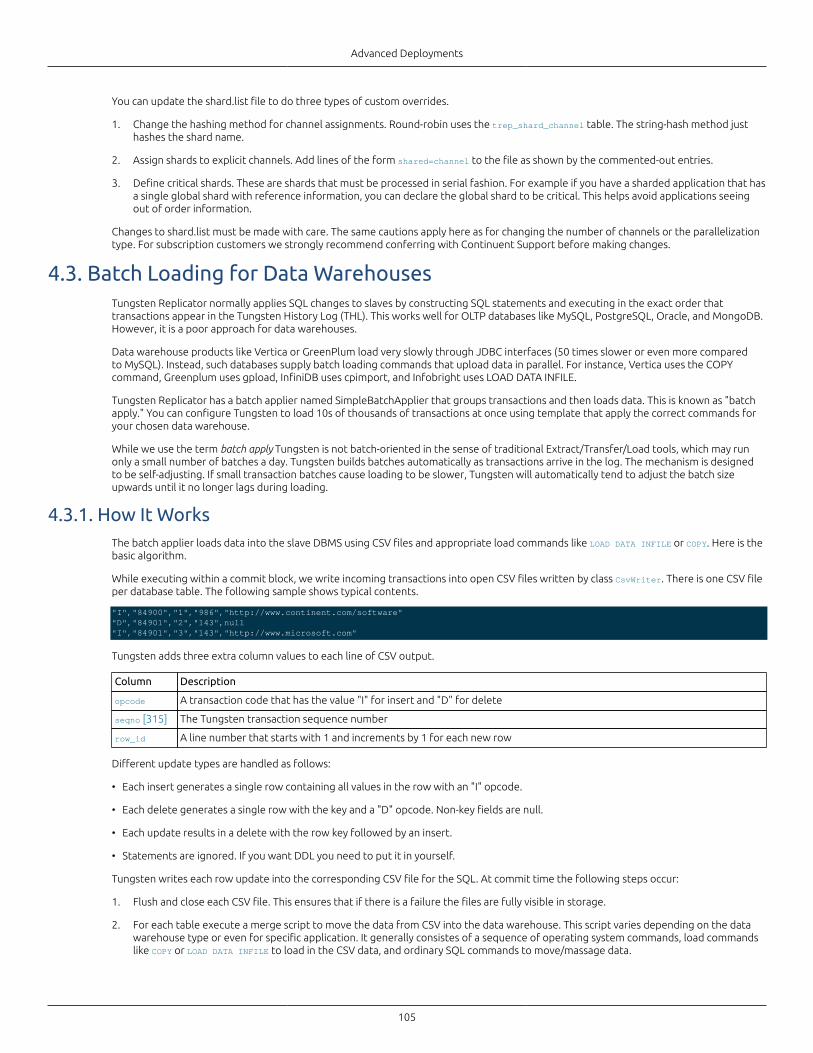
Advanced Deployments
105
You can update the shard.list file to do three types of custom overrides.
1. Change the hashing method for channel assignments. Round-robin uses the trep_shard_channel table. The string-hash method justhashes the shard name.
2. Assign shards to explicit channels. Add lines of the form shared=channel to the file as shown by the commented-out entries.
3. Define critical shards. These are shards that must be processed in serial fashion. For example if you have a sharded application that hasa single global shard with reference information, you can declare the global shard to be critical. This helps avoid applications seeingout of order information.
Changes to shard.list must be made with care. The same cautions apply here as for changing the number of channels or the parallelizationtype. For subscription customers we strongly recommend conferring with Continuent Support before making changes.
4.3. Batch Loading for Data WarehousesTungsten Replicator normally applies SQL changes to slaves by constructing SQL statements and executing in the exact order thattransactions appear in the Tungsten History Log (THL). This works well for OLTP databases like MySQL, PostgreSQL, Oracle, and MongoDB.However, it is a poor approach for data warehouses.
Data warehouse products like Vertica or GreenPlum load very slowly through JDBC interfaces (50 times slower or even more comparedto MySQL). Instead, such databases supply batch loading commands that upload data in parallel. For instance, Vertica uses the COPYcommand, Greenplum uses gpload, InfiniDB uses cpimport, and Infobright uses LOAD DATA INFILE.
Tungsten Replicator has a batch applier named SimpleBatchApplier that groups transactions and then loads data. This is known as "batchapply." You can configure Tungsten to load 10s of thousands of transactions at once using template that apply the correct commands foryour chosen data warehouse.
While we use the term batch apply Tungsten is not batch-oriented in the sense of traditional Extract/Transfer/Load tools, which may runonly a small number of batches a day. Tungsten builds batches automatically as transactions arrive in the log. The mechanism is designedto be self-adjusting. If small transaction batches cause loading to be slower, Tungsten will automatically tend to adjust the batch sizeupwards until it no longer lags during loading.
4.3.1. How It WorksThe batch applier loads data into the slave DBMS using CSV files and appropriate load commands like LOAD DATA INFILE or COPY. Here is thebasic algorithm.
While executing within a commit block, we write incoming transactions into open CSV files written by class CsvWriter. There is one CSV fileper database table. The following sample shows typical contents.
"I","84900","1","986","http://www.continent.com/software""D","84901","2","143",null"I","84901","3","143","http://www.microsoft.com"
Tungsten adds three extra column values to each line of CSV output.
Column Description
opcode A transaction code that has the value "I" for insert and "D" for delete
seqno [315] The Tungsten transaction sequence number
row_id A line number that starts with 1 and increments by 1 for each new row
Different update types are handled as follows:
• Each insert generates a single row containing all values in the row with an "I" opcode.
• Each delete generates a single row with the key and a "D" opcode. Non-key fields are null.
• Each update results in a delete with the row key followed by an insert.
• Statements are ignored. If you want DDL you need to put it in yourself.
Tungsten writes each row update into the corresponding CSV file for the SQL. At commit time the following steps occur:
1. Flush and close each CSV file. This ensures that if there is a failure the files are fully visible in storage.
2. For each table execute a merge script to move the data from CSV into the data warehouse. This script varies depending on the datawarehouse type or even for specific application. It generally consistes of a sequence of operating system commands, load commandslike COPY or LOAD DATA INFILE to load in the CSV data, and ordinary SQL commands to move/massage data.
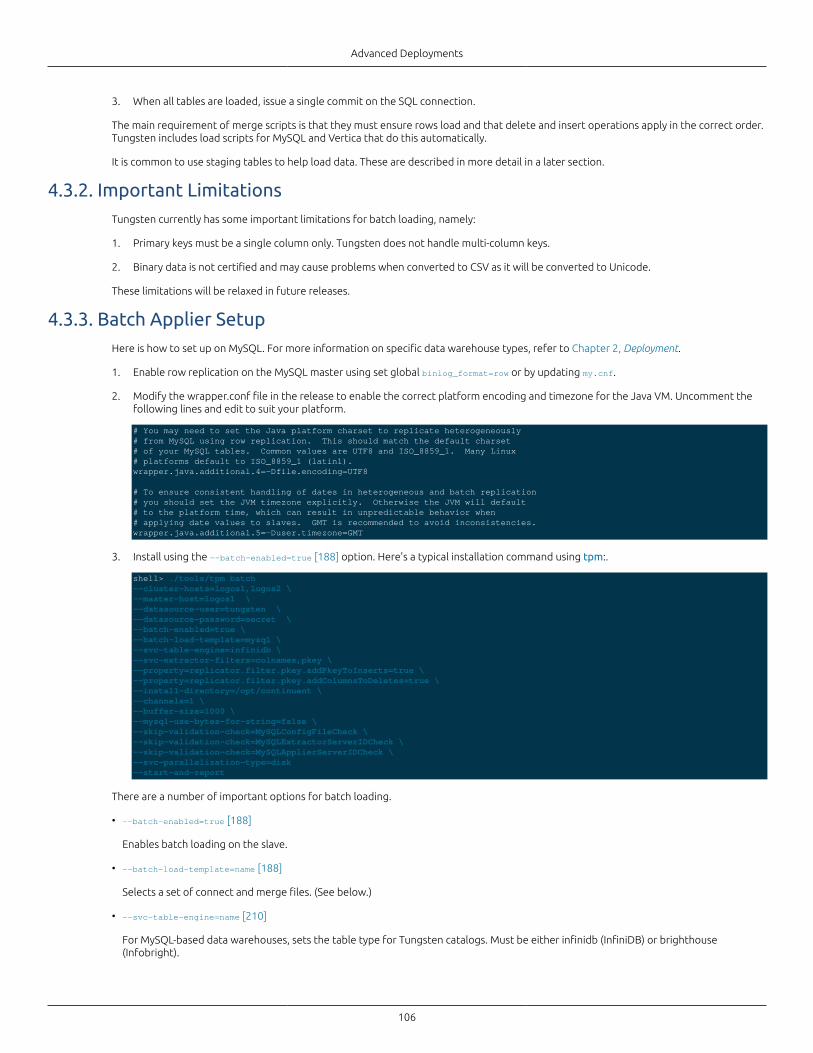
Advanced Deployments
106
3. When all tables are loaded, issue a single commit on the SQL connection.
The main requirement of merge scripts is that they must ensure rows load and that delete and insert operations apply in the correct order.Tungsten includes load scripts for MySQL and Vertica that do this automatically.
It is common to use staging tables to help load data. These are described in more detail in a later section.
4.3.2. Important LimitationsTungsten currently has some important limitations for batch loading, namely:
1. Primary keys must be a single column only. Tungsten does not handle multi-column keys.
2. Binary data is not certified and may cause problems when converted to CSV as it will be converted to Unicode.
These limitations will be relaxed in future releases.
4.3.3. Batch Applier SetupHere is how to set up on MySQL. For more information on specific data warehouse types, refer to Chapter 2, Deployment.
1. Enable row replication on the MySQL master using set global binlog_format=row or by updating my.cnf.
2. Modify the wrapper.conf file in the release to enable the correct platform encoding and timezone for the Java VM. Uncomment thefollowing lines and edit to suit your platform.
# You may need to set the Java platform charset to replicate heterogeneously# from MySQL using row replication. This should match the default charset# of your MySQL tables. Common values are UTF8 and ISO_8859_1. Many Linux # platforms default to ISO_8859_1 (latin1). wrapper.java.additional.4=-Dfile.encoding=UTF8
# To ensure consistent handling of dates in heterogeneous and batch replication# you should set the JVM timezone explicitly. Otherwise the JVM will default# to the platform time, which can result in unpredictable behavior when # applying date values to slaves. GMT is recommended to avoid inconsistencies.wrapper.java.additional.5=-Duser.timezone=GMT
3. Install using the --batch-enabled=true [188] option. Here's a typical installation command using tpm:.
shell> ./tools/tpm batch--cluster-hosts=logos1,logos2 \--master-host=logos1 \--datasource-user=tungsten \--datasource-password=secret \--batch-enabled=true \--batch-load-template=mysql \--svc-table-engine=infinidb \--svc-extractor-filters=colnames,pkey \--property=replicator.filter.pkey.addPkeyToInserts=true \--property=replicator.filter.pkey.addColumnsToDeletes=true \--install-directory=/opt/continuent \--channels=1 \--buffer-size=1000 \--mysql-use-bytes-for-string=false \--skip-validation-check=MySQLConfigFileCheck \--skip-validation-check=MySQLExtractorServerIDCheck \--skip-validation-check=MySQLApplierServerIDCheck \--svc-parallelization-type=disk --start-and-report
There are a number of important options for batch loading.
• --batch-enabled=true [188]
Enables batch loading on the slave.
• --batch-load-template=name [188]
Selects a set of connect and merge files. (See below.)
• --svc-table-engine=name [210]
For MySQL-based data warehouses, sets the table type for Tungsten catalogs. Must be either infinidb (InfiniDB) or brighthouse(Infobright).
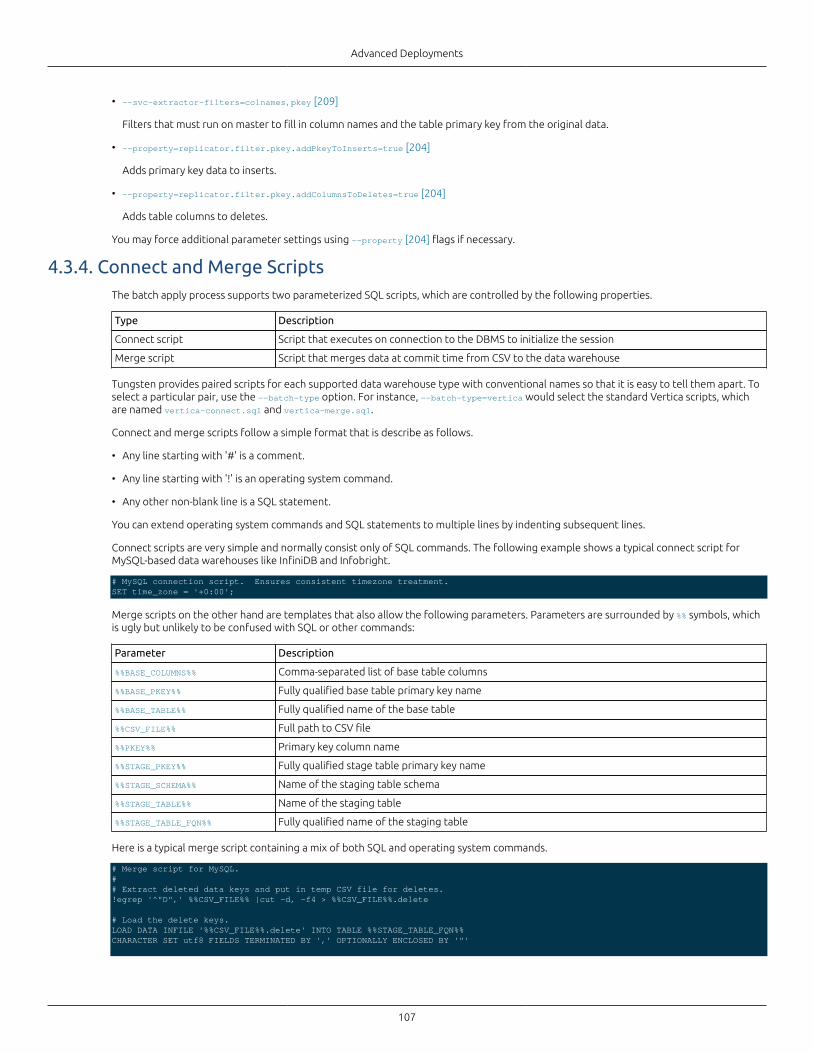
Advanced Deployments
107
• --svc-extractor-filters=colnames,pkey [209]
Filters that must run on master to fill in column names and the table primary key from the original data.
• --property=replicator.filter.pkey.addPkeyToInserts=true [204]
Adds primary key data to inserts.
• --property=replicator.filter.pkey.addColumnsToDeletes=true [204]
Adds table columns to deletes.
You may force additional parameter settings using --property [204] flags if necessary.
4.3.4. Connect and Merge ScriptsThe batch apply process supports two parameterized SQL scripts, which are controlled by the following properties.
Type Description
Connect script Script that executes on connection to the DBMS to initialize the session
Merge script Script that merges data at commit time from CSV to the data warehouse
Tungsten provides paired scripts for each supported data warehouse type with conventional names so that it is easy to tell them apart. Toselect a particular pair, use the --batch-type option. For instance, --batch-type=vertica would select the standard Vertica scripts, whichare named vertica-connect.sql and vertica-merge.sql.
Connect and merge scripts follow a simple format that is describe as follows.
• Any line starting with '#' is a comment.
• Any line starting with '!' is an operating system command.
• Any other non-blank line is a SQL statement.
You can extend operating system commands and SQL statements to multiple lines by indenting subsequent lines.
Connect scripts are very simple and normally consist only of SQL commands. The following example shows a typical connect script forMySQL-based data warehouses like InfiniDB and Infobright.
# MySQL connection script. Ensures consistent timezone treatment. SET time_zone = '+0:00';
Merge scripts on the other hand are templates that also allow the following parameters. Parameters are surrounded by %% symbols, whichis ugly but unlikely to be confused with SQL or other commands:
Parameter Description
%%BASE_COLUMNS%% Comma-separated list of base table columns
%%BASE_PKEY%% Fully qualified base table primary key name
%%BASE_TABLE%% Fully qualified name of the base table
%%CSV_FILE%% Full path to CSV file
%%PKEY%% Primary key column name
%%STAGE_PKEY%% Fully qualified stage table primary key name
%%STAGE_SCHEMA%% Name of the staging table schema
%%STAGE_TABLE%% Name of the staging table
%%STAGE_TABLE_FQN%% Fully qualified name of the staging table
Here is a typical merge script containing a mix of both SQL and operating system commands.
# Merge script for MySQL.## Extract deleted data keys and put in temp CSV file for deletes.!egrep '^"D",' %%CSV_FILE%% |cut -d, -f4 > %%CSV_FILE%%.delete
# Load the delete keys.LOAD DATA INFILE '%%CSV_FILE%%.delete' INTO TABLE %%STAGE_TABLE_FQN%%CHARACTER SET utf8 FIELDS TERMINATED BY ',' OPTIONALLY ENCLOSED BY '"'
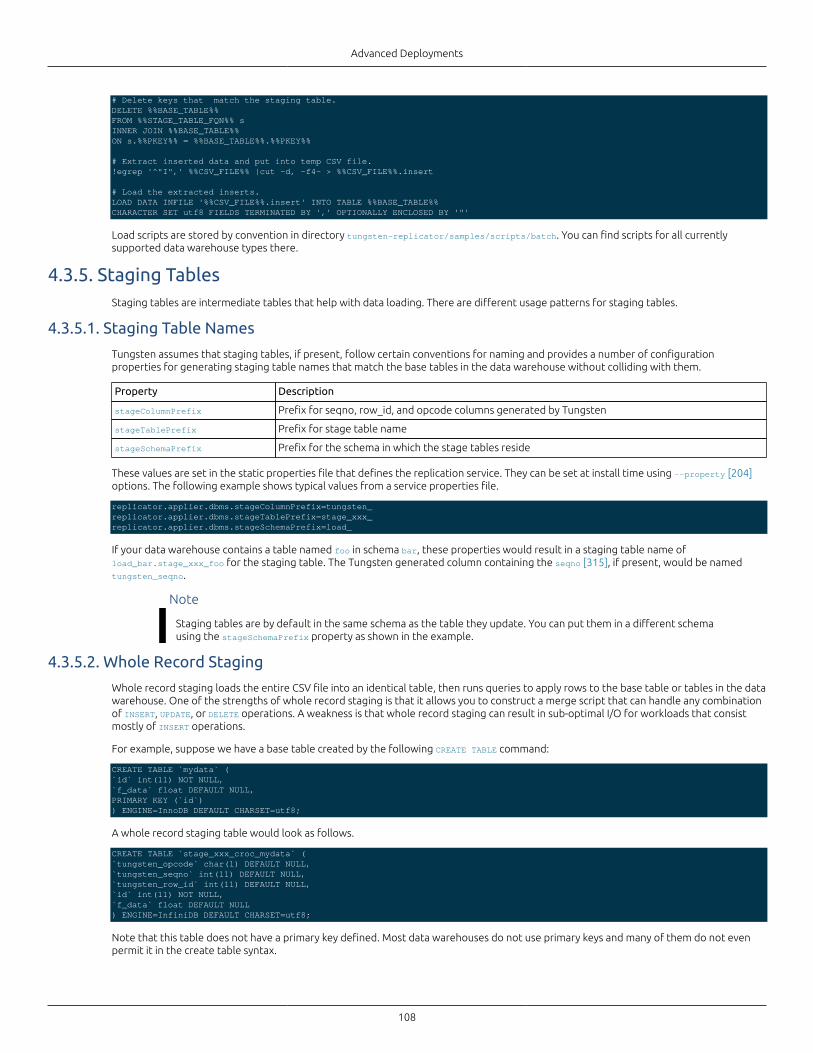
Advanced Deployments
108
# Delete keys that match the staging table.DELETE %%BASE_TABLE%%FROM %%STAGE_TABLE_FQN%% sINNER JOIN %%BASE_TABLE%%ON s.%%PKEY%% = %%BASE_TABLE%%.%%PKEY%%
# Extract inserted data and put into temp CSV file.!egrep '^"I",' %%CSV_FILE%% |cut -d, -f4- > %%CSV_FILE%%.insert
# Load the extracted inserts.LOAD DATA INFILE '%%CSV_FILE%%.insert' INTO TABLE %%BASE_TABLE%%CHARACTER SET utf8 FIELDS TERMINATED BY ',' OPTIONALLY ENCLOSED BY '"'
Load scripts are stored by convention in directory tungsten-replicator/samples/scripts/batch. You can find scripts for all currentlysupported data warehouse types there.
4.3.5. Staging TablesStaging tables are intermediate tables that help with data loading. There are different usage patterns for staging tables.
4.3.5.1. Staging Table Names
Tungsten assumes that staging tables, if present, follow certain conventions for naming and provides a number of configurationproperties for generating staging table names that match the base tables in the data warehouse without colliding with them.
Property Description
stageColumnPrefix Prefix for seqno, row_id, and opcode columns generated by Tungsten
stageTablePrefix Prefix for stage table name
stageSchemaPrefix Prefix for the schema in which the stage tables reside
These values are set in the static properties file that defines the replication service. They can be set at install time using --property [204]options. The following example shows typical values from a service properties file.
replicator.applier.dbms.stageColumnPrefix=tungsten_replicator.applier.dbms.stageTablePrefix=stage_xxx_replicator.applier.dbms.stageSchemaPrefix=load_
If your data warehouse contains a table named foo in schema bar, these properties would result in a staging table name ofload_bar.stage_xxx_foo for the staging table. The Tungsten generated column containing the seqno [315], if present, would be namedtungsten_seqno.
Note
Staging tables are by default in the same schema as the table they update. You can put them in a different schemausing the stageSchemaPrefix property as shown in the example.
4.3.5.2. Whole Record Staging
Whole record staging loads the entire CSV file into an identical table, then runs queries to apply rows to the base table or tables in the datawarehouse. One of the strengths of whole record staging is that it allows you to construct a merge script that can handle any combinationof INSERT, UPDATE, or DELETE operations. A weakness is that whole record staging can result in sub-optimal I/O for workloads that consistmostly of INSERT operations.
For example, suppose we have a base table created by the following CREATE TABLE command:
CREATE TABLE `mydata` (`id` int(11) NOT NULL,`f_data` float DEFAULT NULL,PRIMARY KEY (`id`)) ENGINE=InnoDB DEFAULT CHARSET=utf8;
A whole record staging table would look as follows.
CREATE TABLE `stage_xxx_croc_mydata` (`tungsten_opcode` char(1) DEFAULT NULL,`tungsten_seqno` int(11) DEFAULT NULL,`tungsten_row_id` int(11) DEFAULT NULL,`id` int(11) NOT NULL,`f_data` float DEFAULT NULL) ENGINE=InfiniDB DEFAULT CHARSET=utf8;
Note that this table does not have a primary key defined. Most data warehouses do not use primary keys and many of them do not evenpermit it in the create table syntax.
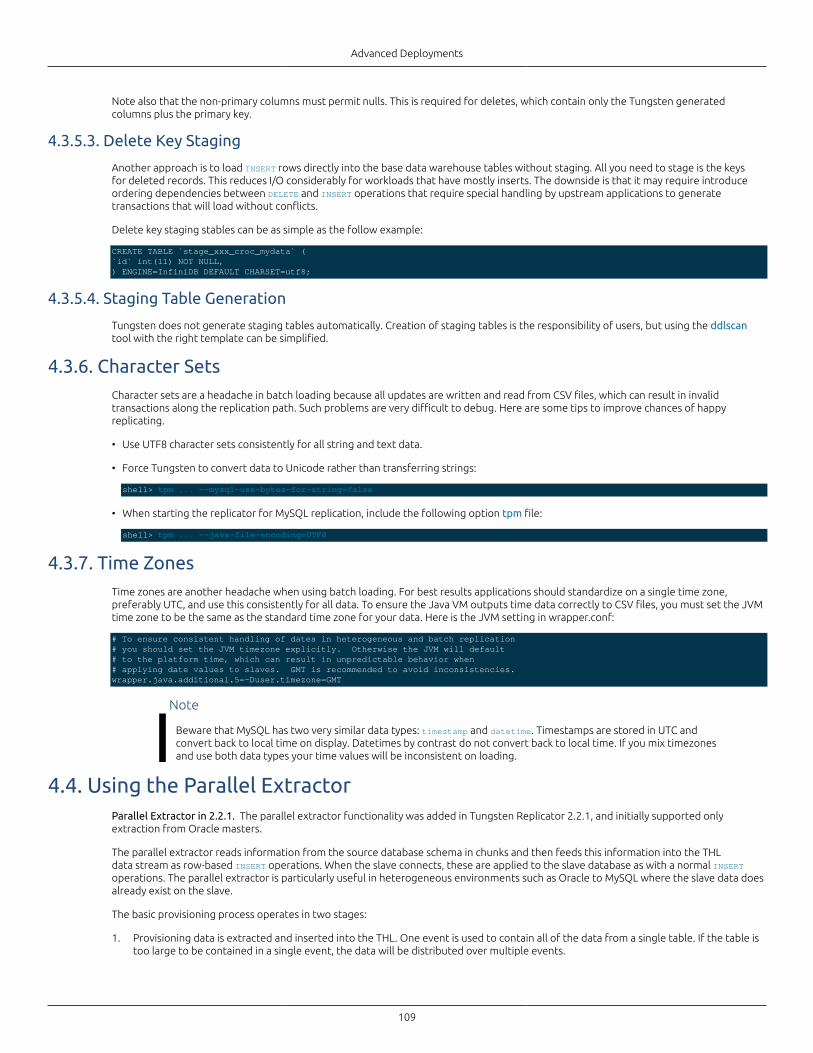
Advanced Deployments
109
Note also that the non-primary columns must permit nulls. This is required for deletes, which contain only the Tungsten generatedcolumns plus the primary key.
4.3.5.3. Delete Key Staging
Another approach is to load INSERT rows directly into the base data warehouse tables without staging. All you need to stage is the keysfor deleted records. This reduces I/O considerably for workloads that have mostly inserts. The downside is that it may require introduceordering dependencies between DELETE and INSERT operations that require special handling by upstream applications to generatetransactions that will load without conflicts.
Delete key staging stables can be as simple as the follow example:
CREATE TABLE `stage_xxx_croc_mydata` (`id` int(11) NOT NULL,) ENGINE=InfiniDB DEFAULT CHARSET=utf8;
4.3.5.4. Staging Table Generation
Tungsten does not generate staging tables automatically. Creation of staging tables is the responsibility of users, but using the ddlscantool with the right template can be simplified.
4.3.6. Character SetsCharacter sets are a headache in batch loading because all updates are written and read from CSV files, which can result in invalidtransactions along the replication path. Such problems are very difficult to debug. Here are some tips to improve chances of happyreplicating.
• Use UTF8 character sets consistently for all string and text data.
• Force Tungsten to convert data to Unicode rather than transferring strings:
shell> tpm ... --mysql-use-bytes-for-string=false
• When starting the replicator for MySQL replication, include the following option tpm file:
shell> tpm ... --java-file-encoding=UTF8
4.3.7. Time ZonesTime zones are another headache when using batch loading. For best results applications should standardize on a single time zone,preferably UTC, and use this consistently for all data. To ensure the Java VM outputs time data correctly to CSV files, you must set the JVMtime zone to be the same as the standard time zone for your data. Here is the JVM setting in wrapper.conf:
# To ensure consistent handling of dates in heterogeneous and batch replication# you should set the JVM timezone explicitly. Otherwise the JVM will default# to the platform time, which can result in unpredictable behavior when # applying date values to slaves. GMT is recommended to avoid inconsistencies.wrapper.java.additional.5=-Duser.timezone=GMT
Note
Beware that MySQL has two very similar data types: timestamp and datetime. Timestamps are stored in UTC andconvert back to local time on display. Datetimes by contrast do not convert back to local time. If you mix timezonesand use both data types your time values will be inconsistent on loading.
4.4. Using the Parallel ExtractorParallel Extractor in 2.2.1. The parallel extractor functionality was added in Tungsten Replicator 2.2.1, and initially supported onlyextraction from Oracle masters.
The parallel extractor reads information from the source database schema in chunks and then feeds this information into the THLdata stream as row-based INSERT operations. When the slave connects, these are applied to the slave database as with a normal INSERToperations. The parallel extractor is particularly useful in heterogeneous environments such as Oracle to MySQL where the slave data doesalready exist on the slave.
The basic provisioning process operates in two stages:
1. Provisioning data is extracted and inserted into the THL. One event is used to contain all of the data from a single table. If the table istoo large to be contained in a single event, the data will be distributed over multiple events.
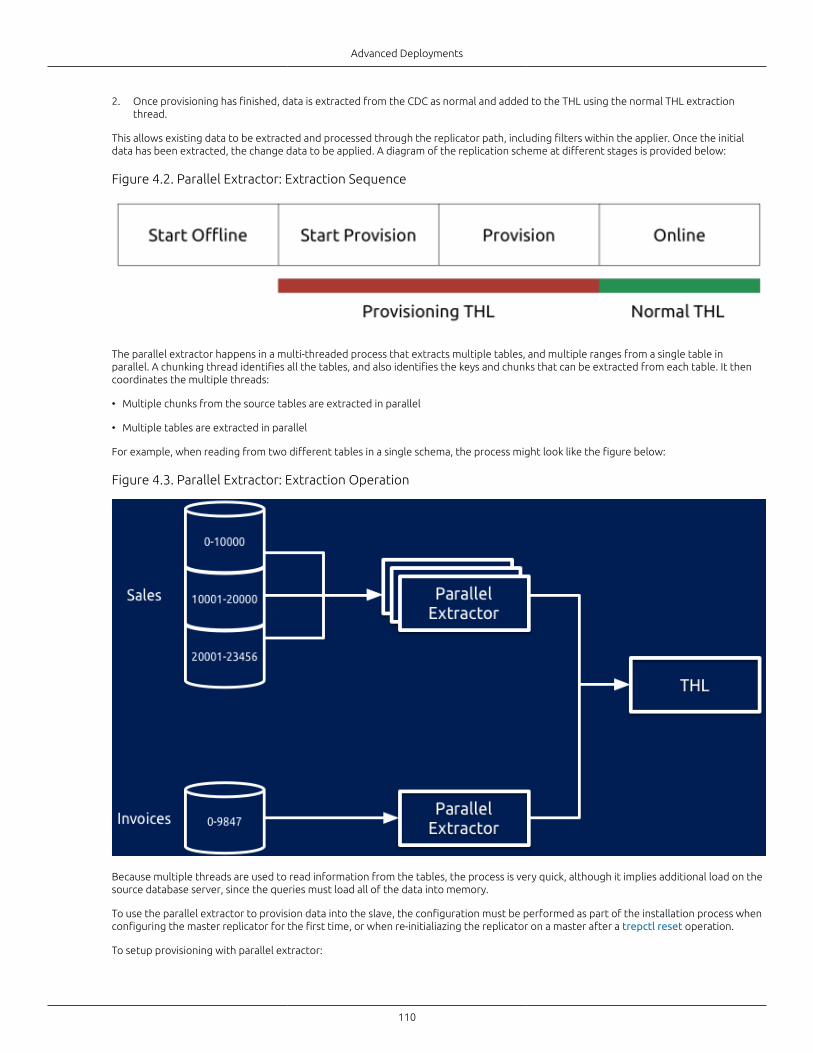
Advanced Deployments
110
2. Once provisioning has finished, data is extracted from the CDC as normal and added to the THL using the normal THL extractionthread.
This allows existing data to be extracted and processed through the replicator path, including filters within the applier. Once the initialdata has been extracted, the change data to be applied. A diagram of the replication scheme at different stages is provided below:
Figure 4.2. Parallel Extractor: Extraction Sequence
The parallel extractor happens in a multi-threaded process that extracts multiple tables, and multiple ranges from a single table inparallel. A chunking thread identifies all the tables, and also identifies the keys and chunks that can be extracted from each table. It thencoordinates the multiple threads:
• Multiple chunks from the source tables are extracted in parallel
• Multiple tables are extracted in parallel
For example, when reading from two different tables in a single schema, the process might look like the figure below:
Figure 4.3. Parallel Extractor: Extraction Operation
Because multiple threads are used to read information from the tables, the process is very quick, although it implies additional load on thesource database server, since the queries must load all of the data into memory.
To use the parallel extractor to provision data into the slave, the configuration must be performed as part of the installation process whenconfiguring the master replicator for the first time, or when re-initialiazing the replicator on a master after a trepctl reset operation.
To setup provisioning with parallel extractor:

Advanced Deployments
111
1. Install master Tungsten Replicator using tpm, but do not enable automatic starting (i.e. do not use the --start [208] or --start-and-report [208] options).
2. Install the slave replicator as normal.
3. On the master:
a. Start the replicator in OFFLINE mode using replicator start offline:
shell> replicator start offline
b. Put the replicator into the ONLINE state, using the -provision option:
shell> trepctl online -provision
If you have an identifiable reference number, such as a the system change number or MySQL event, then this can be specified onthe command-line to the trepctl online -provision command:
shell> trepctl online -provision 40748375
During the provisioning process, the replicator will show the status GOING-ONLINE:PROVISIONING [127] until all of the data hasbeen read from the existing database.
The master will now start to read the information currently stored and feed this information through a separate pipeline into the THL.
4. On the slave, start the replicator, or put the replicator online. Statements from the master containing the provisioning informationshould be replicated into the slave.
Important
If the replicator is placed offline while the parallel extractor is still extracting data, the extraction process willcontinue to run and insert data until the extraction process has been completed.
Once the provisioned data has been inserted, replication will continue from the position where changes started to occur after thereplicator was installed.
4.4.1. Advanced Configuration ParametersThe provisioning process can be controlled using a number of properties that can be configured when the replicator is installed by using --property [204] option. For example:
shell> tpm update alpha \ --property=replicator.extractor.parallel-extractor.ChunkDefinitionFile=/opt/continuent/share/chunks.csv
• replicator.extractor.parallel-extractor.ChunkDefinitionFile
The path to a file that contains a specification of the tables that should be included in the extraction. If no file is specified then all tablesand extracted for provisioning.
The format of the chunk definition file is a Comma Separated Values (CSV) file, with each line containing the schema name, optionaltable name, optional chunk size and optional column list to be extracted. For example:
SALES
Would extract all tables within the schema SALES:
SALES,INVOICES
Would extract only the INVOICES table from the SALES schema.
SALES,INVOICES,1000
Would extract only the INVOICES table from the SALES schema, only in chunks of 1000 rows.
To extract only specific columns, add the column list to the end of the schema, table and chunk size. For example:
SALES,INVOICES,1000,INVOICENO,CUSTOMERID,VALUE
Multiple lines can be used to define a range of schemas, tables, and chunk size combinations.
• replicator.extractor.parallel-extractor.chunk_size
The chunk size defines the number of rows that are extracted from the source tables and inserted into the THL. This number should beadjusted when extracting very large rows from the source tables.
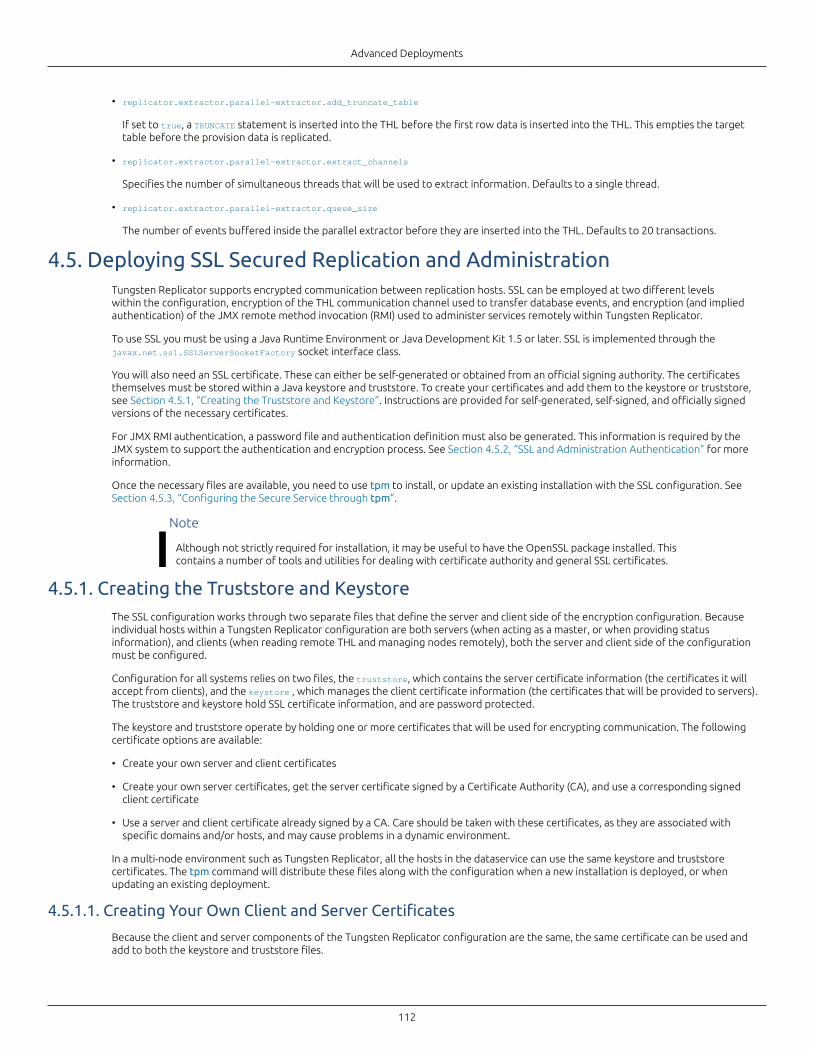
Advanced Deployments
112
• replicator.extractor.parallel-extractor.add_truncate_table
If set to true, a TRUNCATE statement is inserted into the THL before the first row data is inserted into the THL. This empties the targettable before the provision data is replicated.
• replicator.extractor.parallel-extractor.extract_channels
Specifies the number of simultaneous threads that will be used to extract information. Defaults to a single thread.
• replicator.extractor.parallel-extractor.queue_size
The number of events buffered inside the parallel extractor before they are inserted into the THL. Defaults to 20 transactions.
4.5. Deploying SSL Secured Replication and AdministrationTungsten Replicator supports encrypted communication between replication hosts. SSL can be employed at two different levelswithin the configuration, encryption of the THL communication channel used to transfer database events, and encryption (and impliedauthentication) of the JMX remote method invocation (RMI) used to administer services remotely within Tungsten Replicator.
To use SSL you must be using a Java Runtime Environment or Java Development Kit 1.5 or later. SSL is implemented through thejavax.net.ssl.SSLServerSocketFactory socket interface class.
You will also need an SSL certificate. These can either be self-generated or obtained from an official signing authority. The certificatesthemselves must be stored within a Java keystore and truststore. To create your certificates and add them to the keystore or truststore,see Section 4.5.1, “Creating the Truststore and Keystore”. Instructions are provided for self-generated, self-signed, and officially signedversions of the necessary certificates.
For JMX RMI authentication, a password file and authentication definition must also be generated. This information is required by theJMX system to support the authentication and encryption process. See Section 4.5.2, “SSL and Administration Authentication” for moreinformation.
Once the necessary files are available, you need to use tpm to install, or update an existing installation with the SSL configuration. SeeSection 4.5.3, “Configuring the Secure Service through tpm”.
Note
Although not strictly required for installation, it may be useful to have the OpenSSL package installed. Thiscontains a number of tools and utilities for dealing with certificate authority and general SSL certificates.
4.5.1. Creating the Truststore and KeystoreThe SSL configuration works through two separate files that define the server and client side of the encryption configuration. Becauseindividual hosts within a Tungsten Replicator configuration are both servers (when acting as a master, or when providing statusinformation), and clients (when reading remote THL and managing nodes remotely), both the server and client side of the configurationmust be configured.
Configuration for all systems relies on two files, the truststore, which contains the server certificate information (the certificates it willaccept from clients), and the keystore , which manages the client certificate information (the certificates that will be provided to servers).The truststore and keystore hold SSL certificate information, and are password protected.
The keystore and truststore operate by holding one or more certificates that will be used for encrypting communication. The followingcertificate options are available:
• Create your own server and client certificates
• Create your own server certificates, get the server certificate signed by a Certificate Authority (CA), and use a corresponding signedclient certificate
• Use a server and client certificate already signed by a CA. Care should be taken with these certificates, as they are associated withspecific domains and/or hosts, and may cause problems in a dynamic environment.
In a multi-node environment such as Tungsten Replicator, all the hosts in the dataservice can use the same keystore and truststorecertificates. The tpm command will distribute these files along with the configuration when a new installation is deployed, or whenupdating an existing deployment.
4.5.1.1. Creating Your Own Client and Server Certificates
Because the client and server components of the Tungsten Replicator configuration are the same, the same certificate can be used andadd to both the keystore and truststore files.
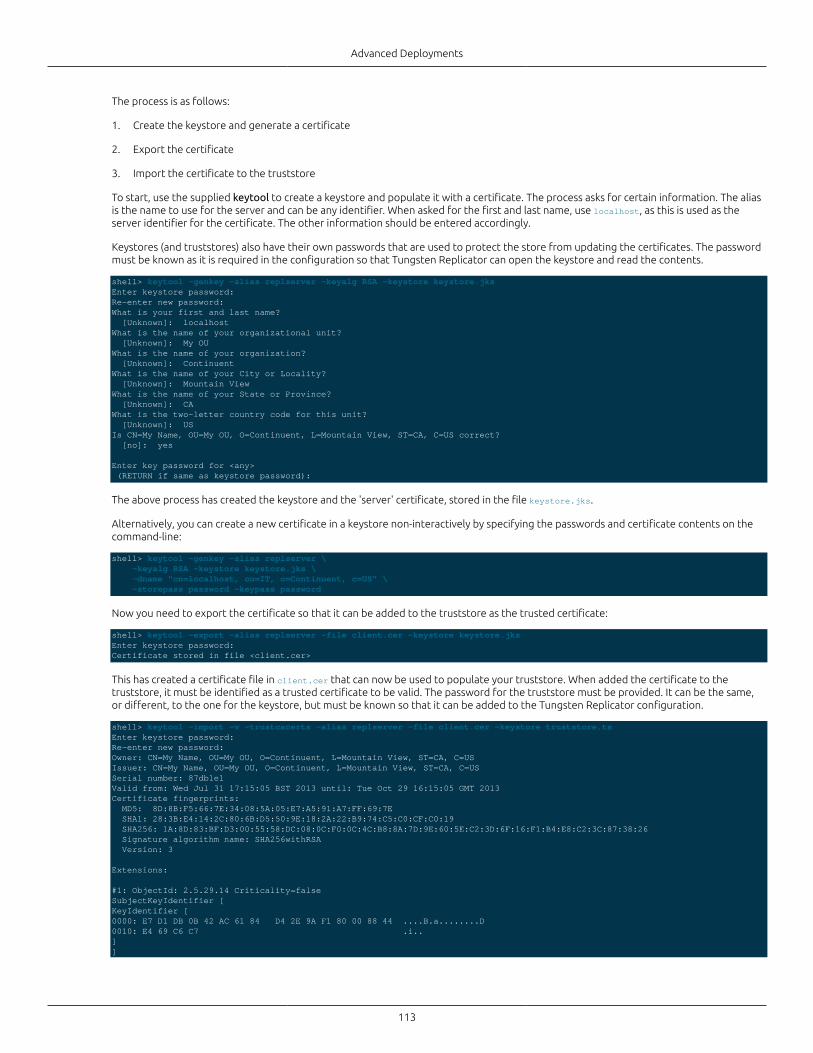
Advanced Deployments
113
The process is as follows:
1. Create the keystore and generate a certificate
2. Export the certificate
3. Import the certificate to the truststore
To start, use the supplied keytool to create a keystore and populate it with a certificate. The process asks for certain information. The aliasis the name to use for the server and can be any identifier. When asked for the first and last name, use localhost, as this is used as theserver identifier for the certificate. The other information should be entered accordingly.
Keystores (and truststores) also have their own passwords that are used to protect the store from updating the certificates. The passwordmust be known as it is required in the configuration so that Tungsten Replicator can open the keystore and read the contents.
shell> keytool -genkey -alias replserver -keyalg RSA -keystore keystore.jksEnter keystore password: Re-enter new password: What is your first and last name? [Unknown]: localhostWhat is the name of your organizational unit? [Unknown]: My OUWhat is the name of your organization? [Unknown]: ContinuentWhat is the name of your City or Locality? [Unknown]: Mountain View What is the name of your State or Province? [Unknown]: CAWhat is the two-letter country code for this unit? [Unknown]: USIs CN=My Name, OU=My OU, O=Continuent, L=Mountain View, ST=CA, C=US correct? [no]: yes
Enter key password for <any> (RETURN if same as keystore password):
The above process has created the keystore and the 'server' certificate, stored in the file keystore.jks.
Alternatively, you can create a new certificate in a keystore non-interactively by specifying the passwords and certificate contents on thecommand-line:
shell> keytool -genkey -alias replserver \ -keyalg RSA -keystore keystore.jks \ -dname "cn=localhost, ou=IT, o=Continuent, c=US" \ -storepass password -keypass password
Now you need to export the certificate so that it can be added to the truststore as the trusted certificate:
shell> keytool -export -alias replserver -file client.cer -keystore keystore.jksEnter keystore password: Certificate stored in file <client.cer>
This has created a certificate file in client.cer that can now be used to populate your truststore. When added the certificate to thetruststore, it must be identified as a trusted certificate to be valid. The password for the truststore must be provided. It can be the same,or different, to the one for the keystore, but must be known so that it can be added to the Tungsten Replicator configuration.
shell> keytool -import -v -trustcacerts -alias replserver -file client.cer -keystore truststore.ts Enter keystore password: Re-enter new password: Owner: CN=My Name, OU=My OU, O=Continuent, L=Mountain View, ST=CA, C=USIssuer: CN=My Name, OU=My OU, O=Continuent, L=Mountain View, ST=CA, C=USSerial number: 87db1e1Valid from: Wed Jul 31 17:15:05 BST 2013 until: Tue Oct 29 16:15:05 GMT 2013Certificate fingerprints: MD5: 8D:8B:F5:66:7E:34:08:5A:05:E7:A5:91:A7:FF:69:7E SHA1: 28:3B:E4:14:2C:80:6B:D5:50:9E:18:2A:22:B9:74:C5:C0:CF:C0:19 SHA256: 1A:8D:83:BF:D3:00:55:58:DC:08:0C:F0:0C:4C:B8:8A:7D:9E:60:5E:C2:3D:6F:16:F1:B4:E8:C2:3C:87:38:26 Signature algorithm name: SHA256withRSA Version: 3
Extensions:
#1: ObjectId: 2.5.29.14 Criticality=falseSubjectKeyIdentifier [KeyIdentifier [0000: E7 D1 DB 0B 42 AC 61 84 D4 2E 9A F1 80 00 88 44 ....B.a........D0010: E4 69 C6 C7 .i..]]
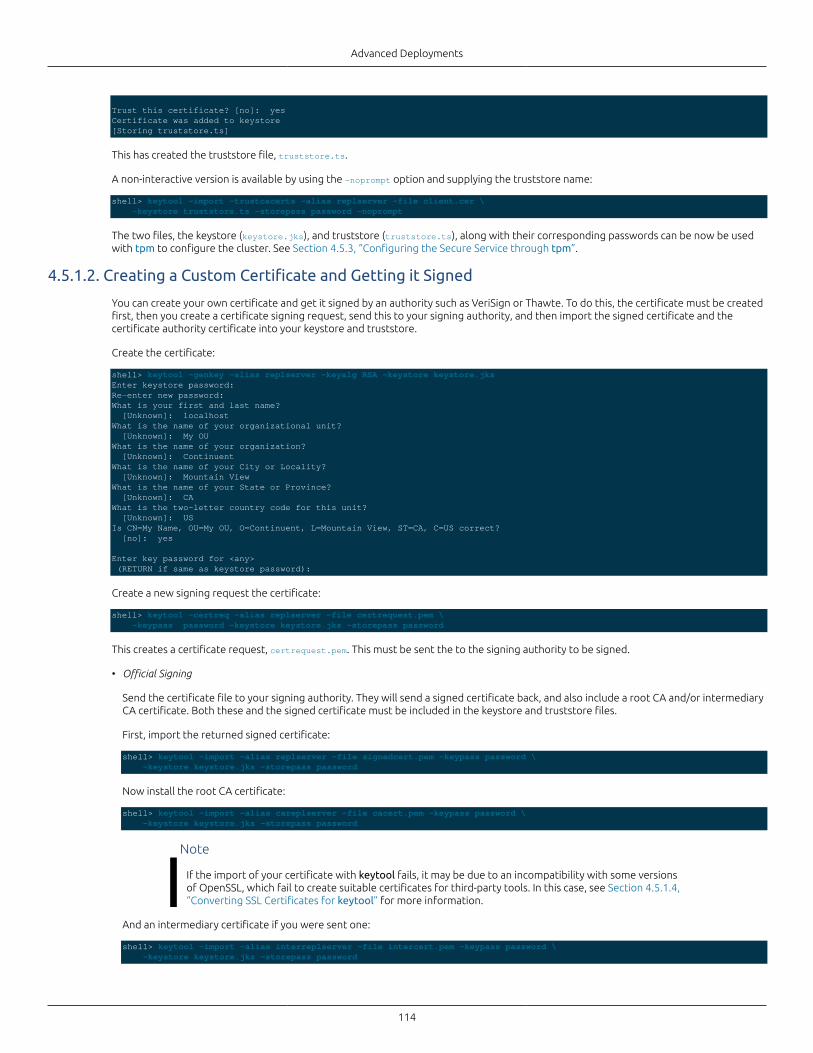
Advanced Deployments
114
Trust this certificate? [no]: yesCertificate was added to keystore[Storing truststore.ts]
This has created the truststore file, truststore.ts.
A non-interactive version is available by using the -noprompt option and supplying the truststore name:
shell> keytool -import -trustcacerts -alias replserver -file client.cer \ -keystore truststore.ts -storepass password -noprompt
The two files, the keystore (keystore.jks), and truststore (truststore.ts), along with their corresponding passwords can be now be usedwith tpm to configure the cluster. See Section 4.5.3, “Configuring the Secure Service through tpm”.
4.5.1.2. Creating a Custom Certificate and Getting it Signed
You can create your own certificate and get it signed by an authority such as VeriSign or Thawte. To do this, the certificate must be createdfirst, then you create a certificate signing request, send this to your signing authority, and then import the signed certificate and thecertificate authority certificate into your keystore and truststore.
Create the certificate:
shell> keytool -genkey -alias replserver -keyalg RSA -keystore keystore.jksEnter keystore password: Re-enter new password: What is your first and last name? [Unknown]: localhostWhat is the name of your organizational unit? [Unknown]: My OUWhat is the name of your organization? [Unknown]: ContinuentWhat is the name of your City or Locality? [Unknown]: Mountain View What is the name of your State or Province? [Unknown]: CAWhat is the two-letter country code for this unit? [Unknown]: USIs CN=My Name, OU=My OU, O=Continuent, L=Mountain View, ST=CA, C=US correct? [no]: yes
Enter key password for <any> (RETURN if same as keystore password):
Create a new signing request the certificate:
shell> keytool -certreq -alias replserver -file certrequest.pem \ -keypass password -keystore keystore.jks -storepass password
This creates a certificate request, certrequest.pem. This must be sent the to the signing authority to be signed.
• Official Signing
Send the certificate file to your signing authority. They will send a signed certificate back, and also include a root CA and/or intermediaryCA certificate. Both these and the signed certificate must be included in the keystore and truststore files.
First, import the returned signed certificate:
shell> keytool -import -alias replserver -file signedcert.pem -keypass password \ -keystore keystore.jks -storepass password
Now install the root CA certificate:
shell> keytool -import -alias careplserver -file cacert.pem -keypass password \ -keystore keystore.jks -storepass password
Note
If the import of your certificate with keytool fails, it may be due to an incompatibility with some versionsof OpenSSL, which fail to create suitable certificates for third-party tools. In this case, see Section 4.5.1.4,“Converting SSL Certificates for keytool” for more information.
And an intermediary certificate if you were sent one:
shell> keytool -import -alias interreplserver -file intercert.pem -keypass password \ -keystore keystore.jks -storepass password
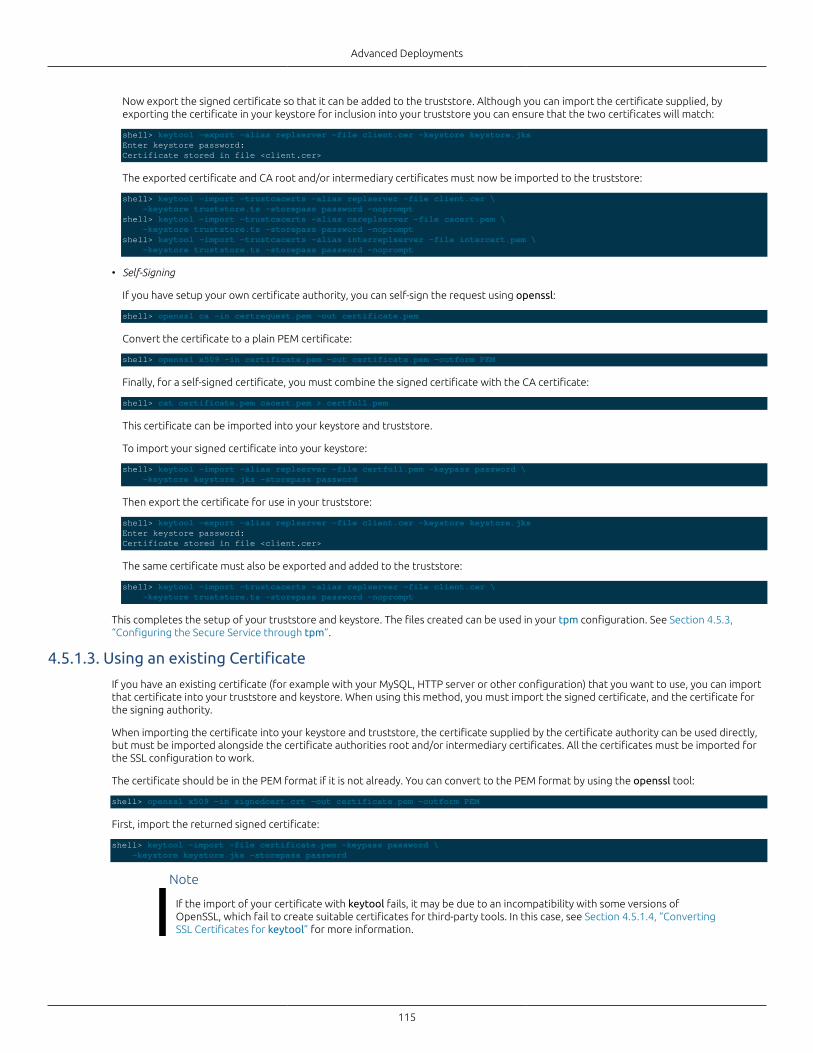
Advanced Deployments
115
Now export the signed certificate so that it can be added to the truststore. Although you can import the certificate supplied, byexporting the certificate in your keystore for inclusion into your truststore you can ensure that the two certificates will match:
shell> keytool -export -alias replserver -file client.cer -keystore keystore.jksEnter keystore password: Certificate stored in file <client.cer>
The exported certificate and CA root and/or intermediary certificates must now be imported to the truststore:
shell> keytool -import -trustcacerts -alias replserver -file client.cer \ -keystore truststore.ts -storepass password -nopromptshell> keytool -import -trustcacerts -alias careplserver -file cacert.pem \ -keystore truststore.ts -storepass password -nopromptshell> keytool -import -trustcacerts -alias interreplserver -file intercert.pem \ -keystore truststore.ts -storepass password -noprompt
• Self-Signing
If you have setup your own certificate authority, you can self-sign the request using openssl:
shell> openssl ca -in certrequest.pem -out certificate.pem
Convert the certificate to a plain PEM certificate:
shell> openssl x509 -in certificate.pem -out certificate.pem -outform PEM
Finally, for a self-signed certificate, you must combine the signed certificate with the CA certificate:
shell> cat certificate.pem cacert.pem > certfull.pem
This certificate can be imported into your keystore and truststore.
To import your signed certificate into your keystore:
shell> keytool -import -alias replserver -file certfull.pem -keypass password \ -keystore keystore.jks -storepass password
Then export the certificate for use in your truststore:
shell> keytool -export -alias replserver -file client.cer -keystore keystore.jksEnter keystore password: Certificate stored in file <client.cer>
The same certificate must also be exported and added to the truststore:
shell> keytool -import -trustcacerts -alias replserver -file client.cer \ -keystore truststore.ts -storepass password -noprompt
This completes the setup of your truststore and keystore. The files created can be used in your tpm configuration. See Section 4.5.3,“Configuring the Secure Service through tpm”.
4.5.1.3. Using an existing Certificate
If you have an existing certificate (for example with your MySQL, HTTP server or other configuration) that you want to use, you can importthat certificate into your truststore and keystore. When using this method, you must import the signed certificate, and the certificate forthe signing authority.
When importing the certificate into your keystore and truststore, the certificate supplied by the certificate authority can be used directly,but must be imported alongside the certificate authorities root and/or intermediary certificates. All the certificates must be imported forthe SSL configuration to work.
The certificate should be in the PEM format if it is not already. You can convert to the PEM format by using the openssl tool:
shell> openssl x509 -in signedcert.crt -out certificate.pem -outform PEM
First, import the returned signed certificate:
shell> keytool -import -file certificate.pem -keypass password \ -keystore keystore.jks -storepass password
Note
If the import of your certificate with keytool fails, it may be due to an incompatibility with some versions ofOpenSSL, which fail to create suitable certificates for third-party tools. In this case, see Section 4.5.1.4, “ConvertingSSL Certificates for keytool” for more information.
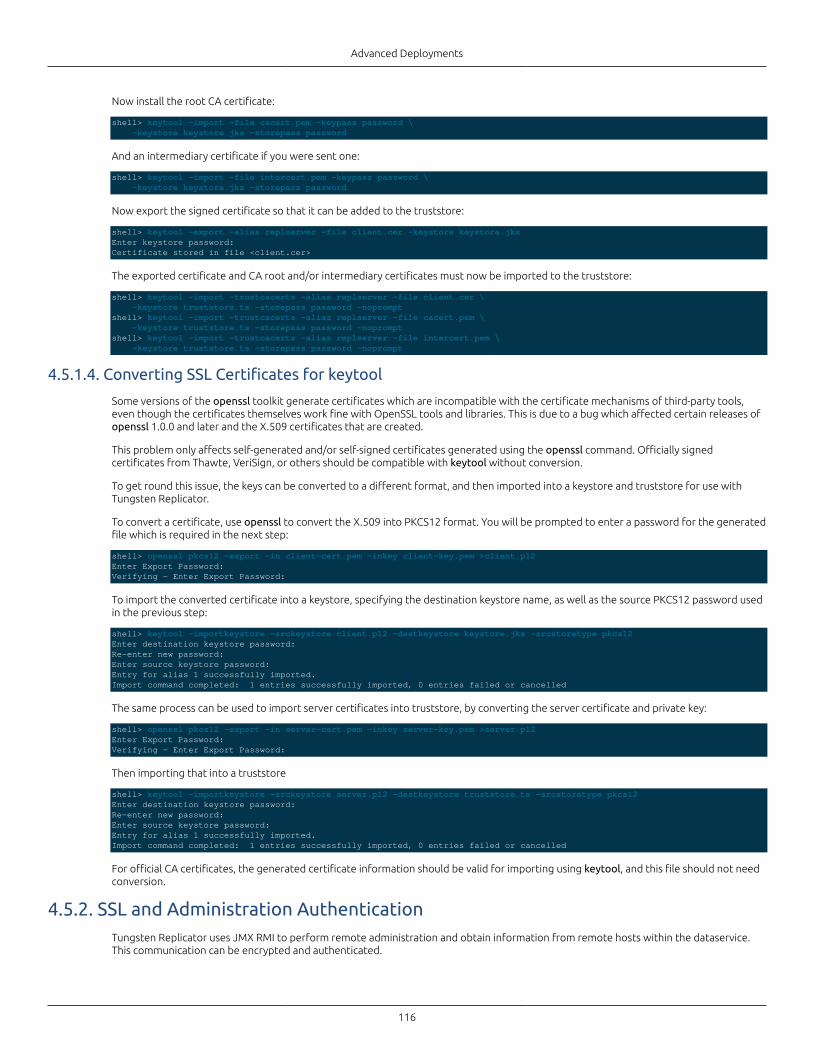
Advanced Deployments
116
Now install the root CA certificate:
shell> keytool -import -file cacert.pem -keypass password \ -keystore keystore.jks -storepass password
And an intermediary certificate if you were sent one:
shell> keytool -import -file intercert.pem -keypass password \ -keystore keystore.jks -storepass password
Now export the signed certificate so that it can be added to the truststore:
shell> keytool -export -alias replserver -file client.cer -keystore keystore.jksEnter keystore password: Certificate stored in file <client.cer>
The exported certificate and CA root and/or intermediary certificates must now be imported to the truststore:
shell> keytool -import -trustcacerts -alias replserver -file client.cer \ -keystore truststore.ts -storepass password -nopromptshell> keytool -import -trustcacerts -alias replserver -file cacert.pem \ -keystore truststore.ts -storepass password -nopromptshell> keytool -import -trustcacerts -alias replserver -file intercert.pem \ -keystore truststore.ts -storepass password -noprompt
4.5.1.4. Converting SSL Certificates for keytool
Some versions of the openssl toolkit generate certificates which are incompatible with the certificate mechanisms of third-party tools,even though the certificates themselves work fine with OpenSSL tools and libraries. This is due to a bug which affected certain releases ofopenssl 1.0.0 and later and the X.509 certificates that are created.
This problem only affects self-generated and/or self-signed certificates generated using the openssl command. Officially signedcertificates from Thawte, VeriSign, or others should be compatible with keytool without conversion.
To get round this issue, the keys can be converted to a different format, and then imported into a keystore and truststore for use withTungsten Replicator.
To convert a certificate, use openssl to convert the X.509 into PKCS12 format. You will be prompted to enter a password for the generatedfile which is required in the next step:
shell> openssl pkcs12 -export -in client-cert.pem -inkey client-key.pem >client.p12Enter Export Password:Verifying - Enter Export Password:
To import the converted certificate into a keystore, specifying the destination keystore name, as well as the source PKCS12 password usedin the previous step:
shell> keytool -importkeystore -srckeystore client.p12 -destkeystore keystore.jks -srcstoretype pkcs12Enter destination keystore password: Re-enter new password: Enter source keystore password: Entry for alias 1 successfully imported.Import command completed: 1 entries successfully imported, 0 entries failed or cancelled
The same process can be used to import server certificates into truststore, by converting the server certificate and private key:
shell> openssl pkcs12 -export -in server-cert.pem -inkey server-key.pem >server.p12Enter Export Password:Verifying - Enter Export Password:
Then importing that into a truststore
shell> keytool -importkeystore -srckeystore server.p12 -destkeystore truststore.ts -srcstoretype pkcs12Enter destination keystore password: Re-enter new password: Enter source keystore password: Entry for alias 1 successfully imported.Import command completed: 1 entries successfully imported, 0 entries failed or cancelled
For official CA certificates, the generated certificate information should be valid for importing using keytool, and this file should not needconversion.
4.5.2. SSL and Administration AuthenticationTungsten Replicator uses JMX RMI to perform remote administration and obtain information from remote hosts within the dataservice.This communication can be encrypted and authenticated.
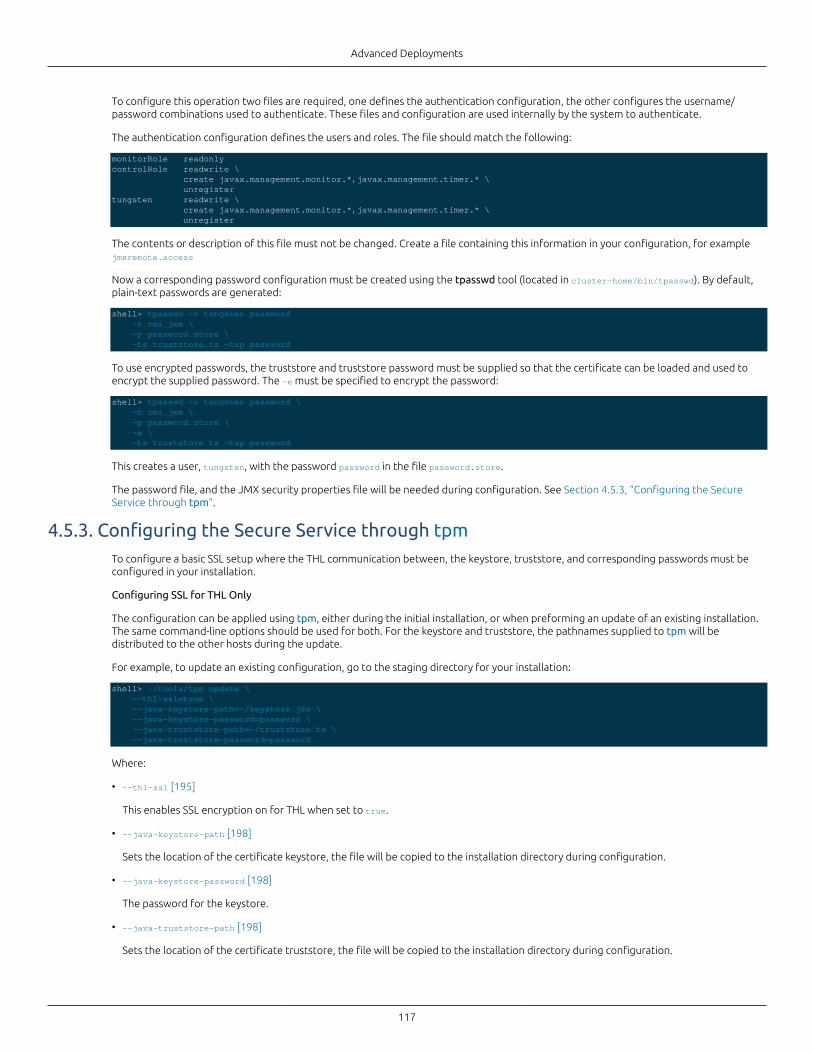
Advanced Deployments
117
To configure this operation two files are required, one defines the authentication configuration, the other configures the username/password combinations used to authenticate. These files and configuration are used internally by the system to authenticate.
The authentication configuration defines the users and roles. The file should match the following:
monitorRole readonlycontrolRole readwrite \ create javax.management.monitor.*,javax.management.timer.* \ unregistertungsten readwrite \ create javax.management.monitor.*,javax.management.timer.* \ unregister
The contents or description of this file must not be changed. Create a file containing this information in your configuration, for examplejmxremote.access
Now a corresponding password configuration must be created using the tpasswd tool (located in cluster-home/bin/tpasswd). By default,plain-text passwords are generated:
shell> tpasswd -c tungsten password -t rmi_jmx \ -p password.store \ -ts truststore.ts -tsp password
To use encrypted passwords, the truststore and truststore password must be supplied so that the certificate can be loaded and used toencrypt the supplied password. The -e must be specified to encrypt the password:
shell> tpasswd -c tungsten password \ -t rmi_jmx \ -p password.store \ -e \ -ts truststore.ts -tsp password
This creates a user, tungsten, with the password password in the file password.store.
The password file, and the JMX security properties file will be needed during configuration. See Section 4.5.3, “Configuring the SecureService through tpm”.
4.5.3. Configuring the Secure Service through tpmTo configure a basic SSL setup where the THL communication between, the keystore, truststore, and corresponding passwords must beconfigured in your installation.
Configuring SSL for THL Only
The configuration can be applied using tpm, either during the initial installation, or when preforming an update of an existing installation.The same command-line options should be used for both. For the keystore and truststore, the pathnames supplied to tpm will bedistributed to the other hosts during the update.
For example, to update an existing configuration, go to the staging directory for your installation:
shell> ./tools/tpm update \ --thl-ssl=true \ --java-keystore-path=~/keystore.jks \ --java-keystore-password=password \ --java-truststore-path=~/truststore.ts \ --java-truststore-password=password
Where:
• --thl-ssl [195]
This enables SSL encryption on for THL when set to true.
• --java-keystore-path [198]
Sets the location of the certificate keystore, the file will be copied to the installation directory during configuration.
• --java-keystore-password [198]
The password for the keystore.
• --java-truststore-path [198]
Sets the location of the certificate truststore, the file will be copied to the installation directory during configuration.
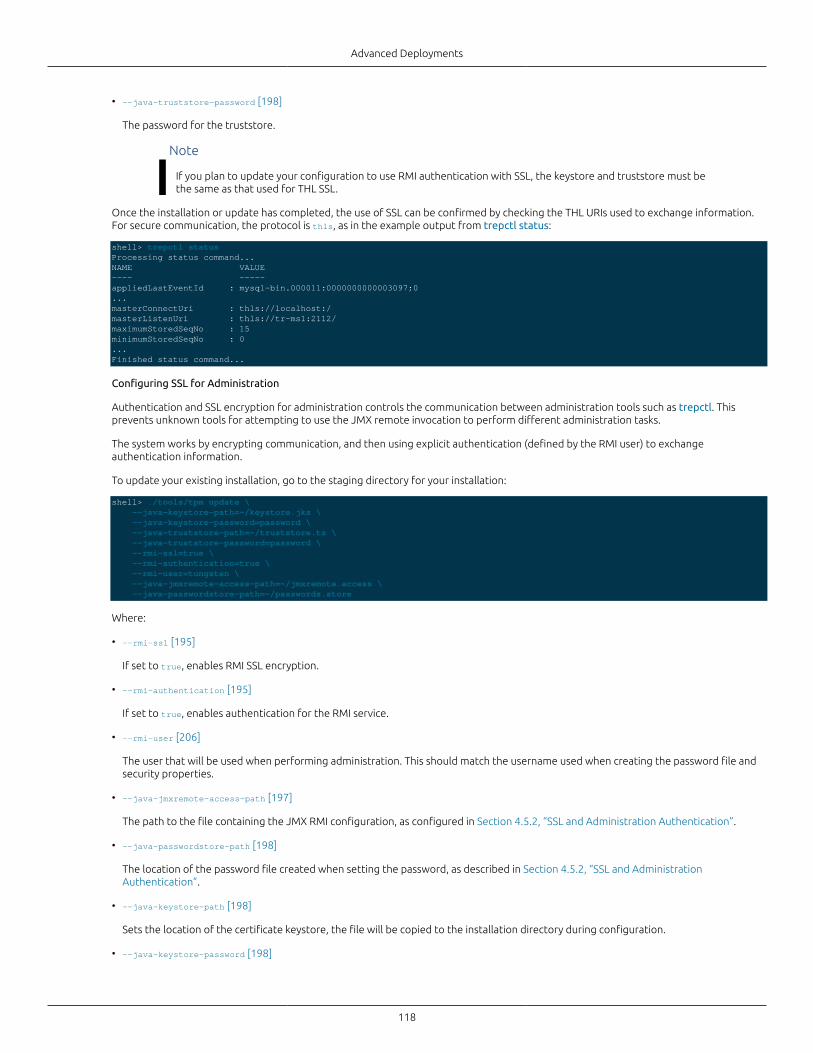
Advanced Deployments
118
• --java-truststore-password [198]
The password for the truststore.
Note
If you plan to update your configuration to use RMI authentication with SSL, the keystore and truststore must bethe same as that used for THL SSL.
Once the installation or update has completed, the use of SSL can be confirmed by checking the THL URIs used to exchange information.For secure communication, the protocol is thls, as in the example output from trepctl status:
shell> trepctl statusProcessing status command...NAME VALUE---- -----appliedLastEventId : mysql-bin.000011:0000000000003097;0...masterConnectUri : thls://localhost:/masterListenUri : thls://tr-ms1:2112/maximumStoredSeqNo : 15minimumStoredSeqNo : 0...Finished status command...
Configuring SSL for Administration
Authentication and SSL encryption for administration controls the communication between administration tools such as trepctl. Thisprevents unknown tools for attempting to use the JMX remote invocation to perform different administration tasks.
The system works by encrypting communication, and then using explicit authentication (defined by the RMI user) to exchangeauthentication information.
To update your existing installation, go to the staging directory for your installation:
shell> ./tools/tpm update \ --java-keystore-path=~/keystore.jks \ --java-keystore-password=password \ --java-truststore-path=~/truststore.ts \ --java-truststore-password=password \ --rmi-ssl=true \ --rmi-authentication=true \ --rmi-user=tungsten \ --java-jmxremote-access-path=~/jmxremote.access \ --java-passwordstore-path=~/passwords.store
Where:
• --rmi-ssl [195]
If set to true, enables RMI SSL encryption.
• --rmi-authentication [195]
If set to true, enables authentication for the RMI service.
• --rmi-user [206]
The user that will be used when performing administration. This should match the username used when creating the password file andsecurity properties.
• --java-jmxremote-access-path [197]
The path to the file containing the JMX RMI configuration, as configured in Section 4.5.2, “SSL and Administration Authentication”.
• --java-passwordstore-path [198]
The location of the password file created when setting the password, as described in Section 4.5.2, “SSL and AdministrationAuthentication”.
• --java-keystore-path [198]
Sets the location of the certificate keystore, the file will be copied to the installation directory during configuration.
• --java-keystore-password [198]
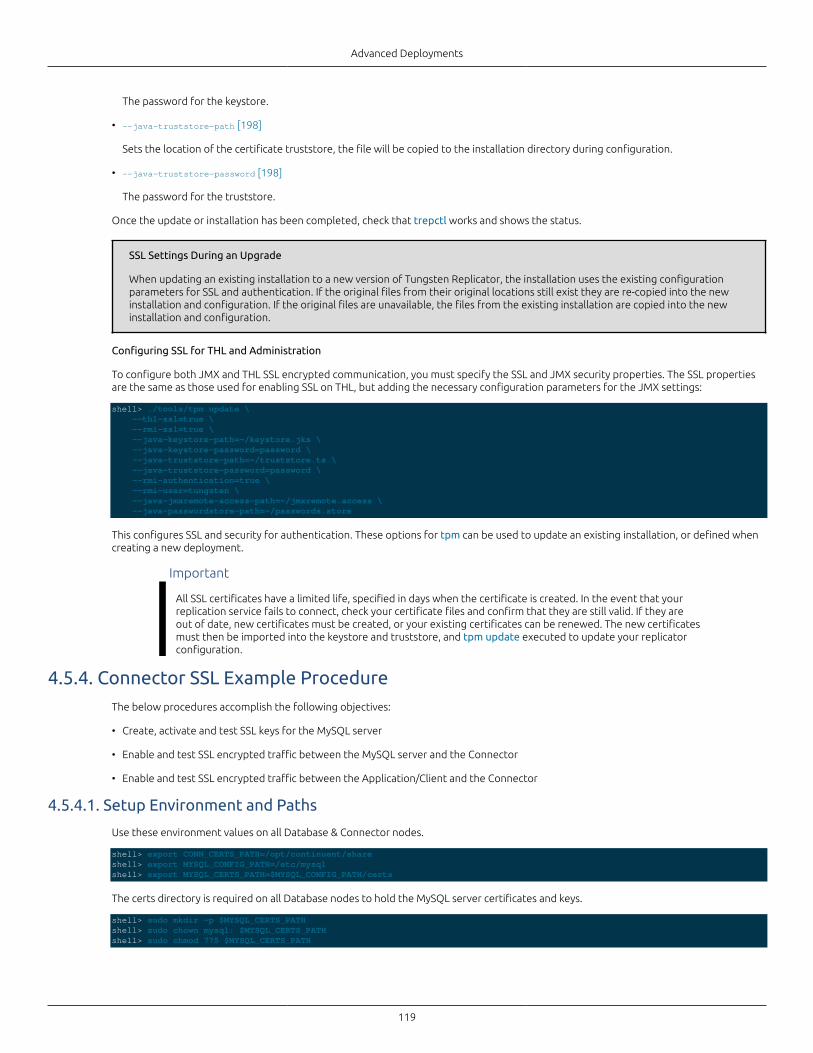
Advanced Deployments
119
The password for the keystore.
• --java-truststore-path [198]
Sets the location of the certificate truststore, the file will be copied to the installation directory during configuration.
• --java-truststore-password [198]
The password for the truststore.
Once the update or installation has been completed, check that trepctl works and shows the status.
SSL Settings During an Upgrade
When updating an existing installation to a new version of Tungsten Replicator, the installation uses the existing configurationparameters for SSL and authentication. If the original files from their original locations still exist they are re-copied into the newinstallation and configuration. If the original files are unavailable, the files from the existing installation are copied into the newinstallation and configuration.
Configuring SSL for THL and Administration
To configure both JMX and THL SSL encrypted communication, you must specify the SSL and JMX security properties. The SSL propertiesare the same as those used for enabling SSL on THL, but adding the necessary configuration parameters for the JMX settings:
shell> ./tools/tpm update \ --thl-ssl=true \ --rmi-ssl=true \ --java-keystore-path=~/keystore.jks \ --java-keystore-password=password \ --java-truststore-path=~/truststore.ts \ --java-truststore-password=password \ --rmi-authentication=true \ --rmi-user=tungsten \ --java-jmxremote-access-path=~/jmxremote.access \ --java-passwordstore-path=~/passwords.store
This configures SSL and security for authentication. These options for tpm can be used to update an existing installation, or defined whencreating a new deployment.
Important
All SSL certificates have a limited life, specified in days when the certificate is created. In the event that yourreplication service fails to connect, check your certificate files and confirm that they are still valid. If they areout of date, new certificates must be created, or your existing certificates can be renewed. The new certificatesmust then be imported into the keystore and truststore, and tpm update executed to update your replicatorconfiguration.
4.5.4. Connector SSL Example ProcedureThe below procedures accomplish the following objectives:
• Create, activate and test SSL keys for the MySQL server
• Enable and test SSL encrypted traffic between the MySQL server and the Connector
• Enable and test SSL encrypted traffic between the Application/Client and the Connector
4.5.4.1. Setup Environment and Paths
Use these environment values on all Database & Connector nodes.
shell> export CONN_CERTS_PATH=/opt/continuent/shareshell> export MYSQL_CONFIG_PATH=/etc/mysqlshell> export MYSQL_CERTS_PATH=$MYSQL_CONFIG_PATH/certs
The certs directory is required on all Database nodes to hold the MySQL server certificates and keys.
shell> sudo mkdir -p $MYSQL_CERTS_PATHshell> sudo chown mysql: $MYSQL_CERTS_PATHshell> sudo chmod 775 $MYSQL_CERTS_PATH
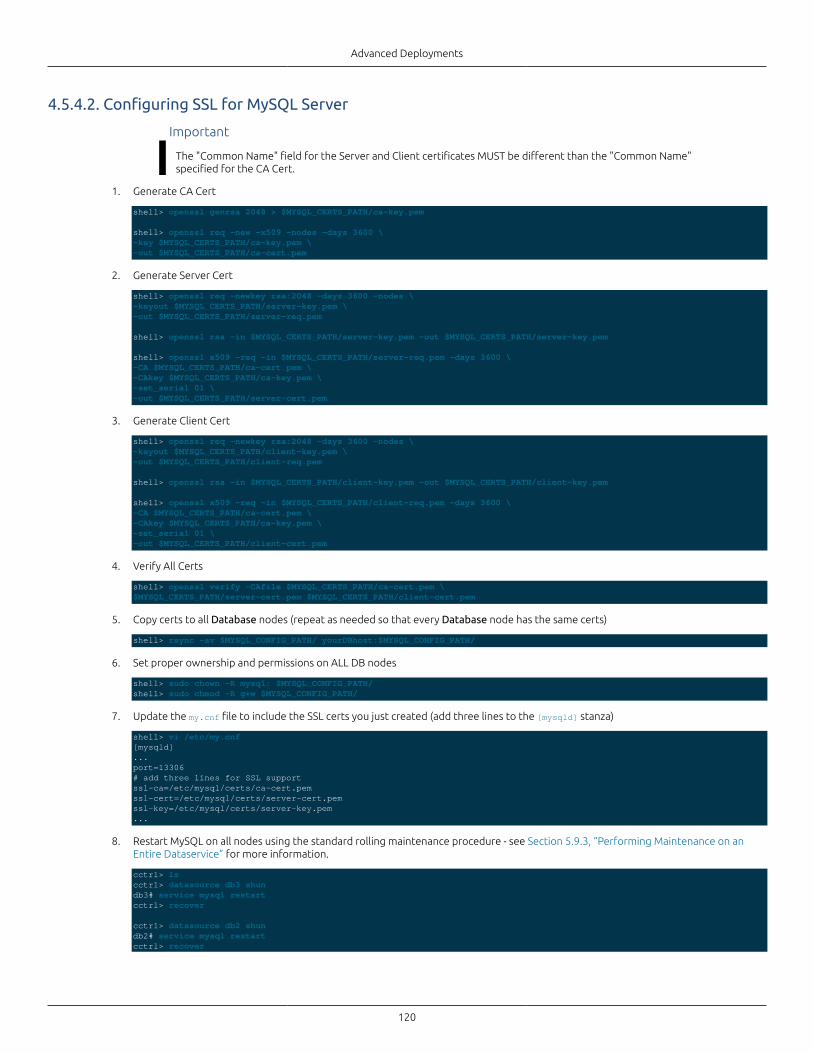
Advanced Deployments
120
4.5.4.2. Configuring SSL for MySQL Server
Important
The "Common Name" field for the Server and Client certificates MUST be different than the "Common Name"specified for the CA Cert.
1. Generate CA Cert
shell> openssl genrsa 2048 > $MYSQL_CERTS_PATH/ca-key.pem
shell> openssl req -new -x509 -nodes -days 3600 \-key $MYSQL_CERTS_PATH/ca-key.pem \-out $MYSQL_CERTS_PATH/ca-cert.pem
2. Generate Server Cert
shell> openssl req -newkey rsa:2048 -days 3600 -nodes \-keyout $MYSQL_CERTS_PATH/server-key.pem \-out $MYSQL_CERTS_PATH/server-req.pem
shell> openssl rsa -in $MYSQL_CERTS_PATH/server-key.pem -out $MYSQL_CERTS_PATH/server-key.pem
shell> openssl x509 -req -in $MYSQL_CERTS_PATH/server-req.pem -days 3600 \-CA $MYSQL_CERTS_PATH/ca-cert.pem \-CAkey $MYSQL_CERTS_PATH/ca-key.pem \-set_serial 01 \-out $MYSQL_CERTS_PATH/server-cert.pem
3. Generate Client Cert
shell> openssl req -newkey rsa:2048 -days 3600 -nodes \-keyout $MYSQL_CERTS_PATH/client-key.pem \-out $MYSQL_CERTS_PATH/client-req.pem
shell> openssl rsa -in $MYSQL_CERTS_PATH/client-key.pem -out $MYSQL_CERTS_PATH/client-key.pem
shell> openssl x509 -req -in $MYSQL_CERTS_PATH/client-req.pem -days 3600 \-CA $MYSQL_CERTS_PATH/ca-cert.pem \-CAkey $MYSQL_CERTS_PATH/ca-key.pem \-set_serial 01 \-out $MYSQL_CERTS_PATH/client-cert.pem
4. Verify All Certs
shell> openssl verify -CAfile $MYSQL_CERTS_PATH/ca-cert.pem \$MYSQL_CERTS_PATH/server-cert.pem $MYSQL_CERTS_PATH/client-cert.pem
5. Copy certs to all Database nodes (repeat as needed so that every Database node has the same certs)
shell> rsync -av $MYSQL_CONFIG_PATH/ yourDBhost:$MYSQL_CONFIG_PATH/
6. Set proper ownership and permissions on ALL DB nodes
shell> sudo chown -R mysql: $MYSQL_CONFIG_PATH/shell> sudo chmod -R g+w $MYSQL_CONFIG_PATH/
7. Update the my.cnf file to include the SSL certs you just created (add three lines to the [mysqld] stanza)
shell> vi /etc/my.cnf[mysqld]...port=13306# add three lines for SSL supportssl-ca=/etc/mysql/certs/ca-cert.pemssl-cert=/etc/mysql/certs/server-cert.pemssl-key=/etc/mysql/certs/server-key.pem...
8. Restart MySQL on all nodes using the standard rolling maintenance procedure - see Section 5.9.3, “Performing Maintenance on anEntire Dataservice” for more information.
cctrl> lscctrl> datasource db3 shundb3# service mysql restartcctrl> recover
cctrl> datasource db2 shundb2# service mysql restartcctrl> recover
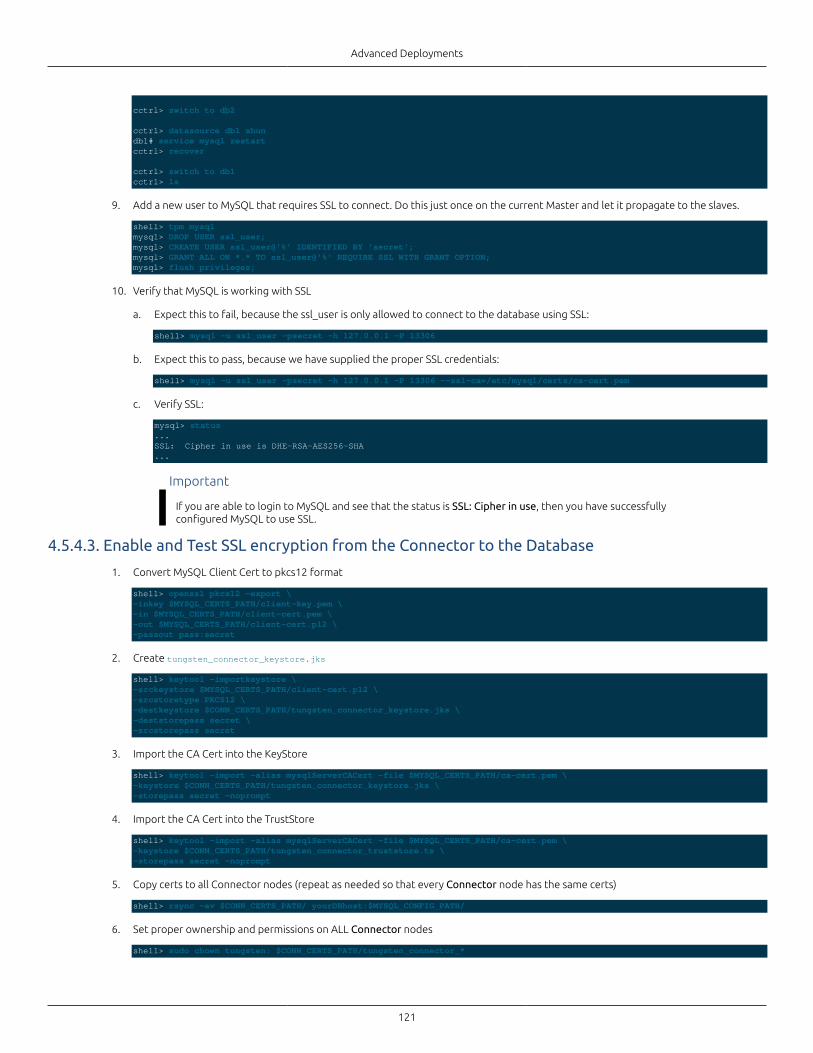
Advanced Deployments
121
cctrl> switch to db2
cctrl> datasource db1 shundb1# service mysql restartcctrl> recover
cctrl> switch to db1cctrl> ls
9. Add a new user to MySQL that requires SSL to connect. Do this just once on the current Master and let it propagate to the slaves.
shell> tpm mysqlmysql> DROP USER ssl_user;mysql> CREATE USER ssl_user@'%' IDENTIFIED BY 'secret';mysql> GRANT ALL ON *.* TO ssl_user@'%' REQUIRE SSL WITH GRANT OPTION;mysql> flush privileges;
10. Verify that MySQL is working with SSL
a. Expect this to fail, because the ssl_user is only allowed to connect to the database using SSL:
shell> mysql -u ssl_user -psecret -h 127.0.0.1 -P 13306
b. Expect this to pass, because we have supplied the proper SSL credentials:
shell> mysql -u ssl_user -psecret -h 127.0.0.1 -P 13306 --ssl-ca=/etc/mysql/certs/ca-cert.pem
c. Verify SSL:
mysql> status...SSL: Cipher in use is DHE-RSA-AES256-SHA...
Important
If you are able to login to MySQL and see that the status is SSL: Cipher in use, then you have successfullyconfigured MySQL to use SSL.
4.5.4.3. Enable and Test SSL encryption from the Connector to the Database
1. Convert MySQL Client Cert to pkcs12 format
shell> openssl pkcs12 -export \-inkey $MYSQL_CERTS_PATH/client-key.pem \-in $MYSQL_CERTS_PATH/client-cert.pem \-out $MYSQL_CERTS_PATH/client-cert.p12 \-passout pass:secret
2. Create tungsten_connector_keystore.jks
shell> keytool -importkeystore \-srckeystore $MYSQL_CERTS_PATH/client-cert.p12 \-srcstoretype PKCS12 \-destkeystore $CONN_CERTS_PATH/tungsten_connector_keystore.jks \-deststorepass secret \-srcstorepass secret
3. Import the CA Cert into the KeyStore
shell> keytool -import -alias mysqlServerCACert -file $MYSQL_CERTS_PATH/ca-cert.pem \-keystore $CONN_CERTS_PATH/tungsten_connector_keystore.jks \-storepass secret -noprompt
4. Import the CA Cert into the TrustStore
shell> keytool -import -alias mysqlServerCACert -file $MYSQL_CERTS_PATH/ca-cert.pem \-keystore $CONN_CERTS_PATH/tungsten_connector_truststore.ts \-storepass secret -noprompt
5. Copy certs to all Connector nodes (repeat as needed so that every Connector node has the same certs)
shell> rsync -av $CONN_CERTS_PATH/ yourDBhost:$MYSQL_CONFIG_PATH/
6. Set proper ownership and permissions on ALL Connector nodes
shell> sudo chown tungsten: $CONN_CERTS_PATH/tungsten_connector_*
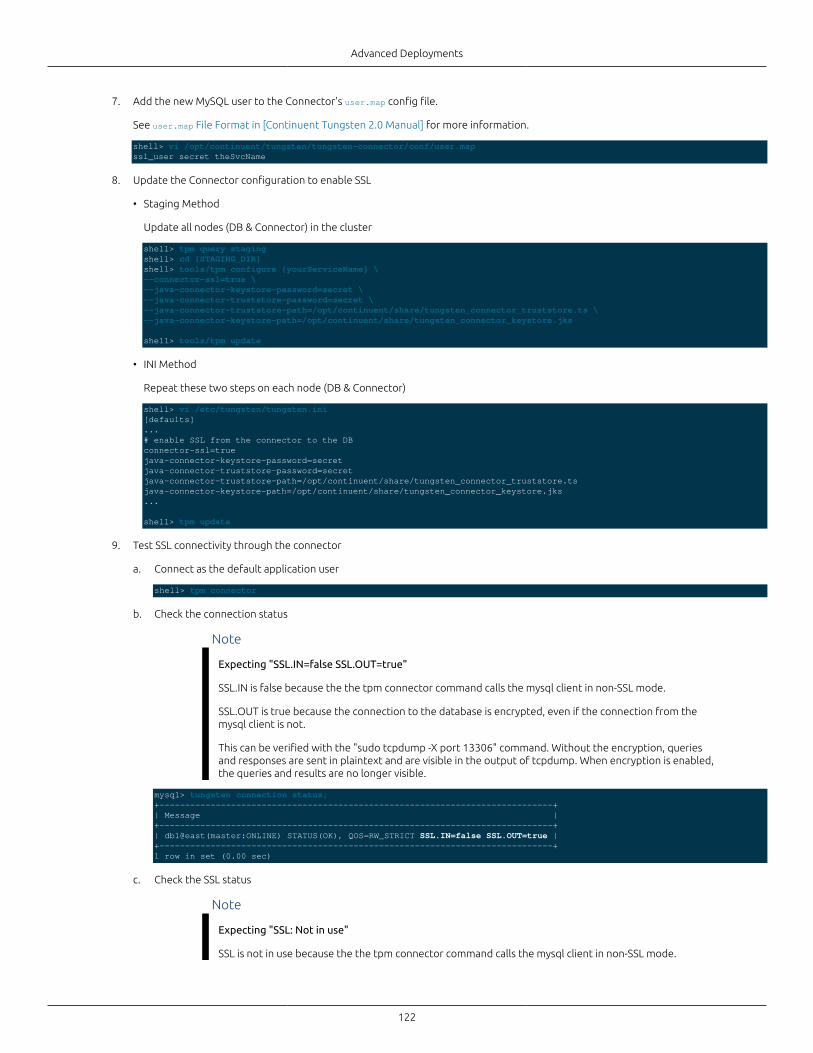
Advanced Deployments
122
7. Add the new MySQL user to the Connector's user.map config file.
See user.map File Format in [Continuent Tungsten 2.0 Manual] for more information.
shell> vi /opt/continuent/tungsten/tungsten-connector/conf/user.mapssl_user secret theSvcName
8. Update the Connector configuration to enable SSL
• Staging Method
Update all nodes (DB & Connector) in the cluster
shell> tpm query stagingshell> cd {STAGING_DIR}shell> tools/tpm configure {yourServiceName} \--connector-ssl=true \--java-connector-keystore-password=secret \--java-connector-truststore-password=secret \--java-connector-truststore-path=/opt/continuent/share/tungsten_connector_truststore.ts \--java-connector-keystore-path=/opt/continuent/share/tungsten_connector_keystore.jks
shell> tools/tpm update
• INI Method
Repeat these two steps on each node (DB & Connector)
shell> vi /etc/tungsten/tungsten.ini[defaults]...# enable SSL from the connector to the DBconnector-ssl=truejava-connector-keystore-password=secretjava-connector-truststore-password=secretjava-connector-truststore-path=/opt/continuent/share/tungsten_connector_truststore.tsjava-connector-keystore-path=/opt/continuent/share/tungsten_connector_keystore.jks...
shell> tpm update
9. Test SSL connectivity through the connector
a. Connect as the default application user
shell> tpm connector
b. Check the connection status
Note
Expecting "SSL.IN=false SSL.OUT=true"
SSL.IN is false because the the tpm connector command calls the mysql client in non-SSL mode.
SSL.OUT is true because the connection to the database is encrypted, even if the connection from themysql client is not.
This can be verified with the "sudo tcpdump -X port 13306" command. Without the encryption, queriesand responses are sent in plaintext and are visible in the output of tcpdump. When encryption is enabled,the queries and results are no longer visible.
mysql> tungsten connection status;+-----------------------------------------------------------------------------+| Message |+-----------------------------------------------------------------------------+| db1@east(master:ONLINE) STATUS(OK), QOS=RW_STRICT SSL.IN=false SSL.OUT=true |+-----------------------------------------------------------------------------+1 row in set (0.00 sec)
c. Check the SSL status
Note
Expecting "SSL: Not in use"
SSL is not in use because the the tpm connector command calls the mysql client in non-SSL mode.
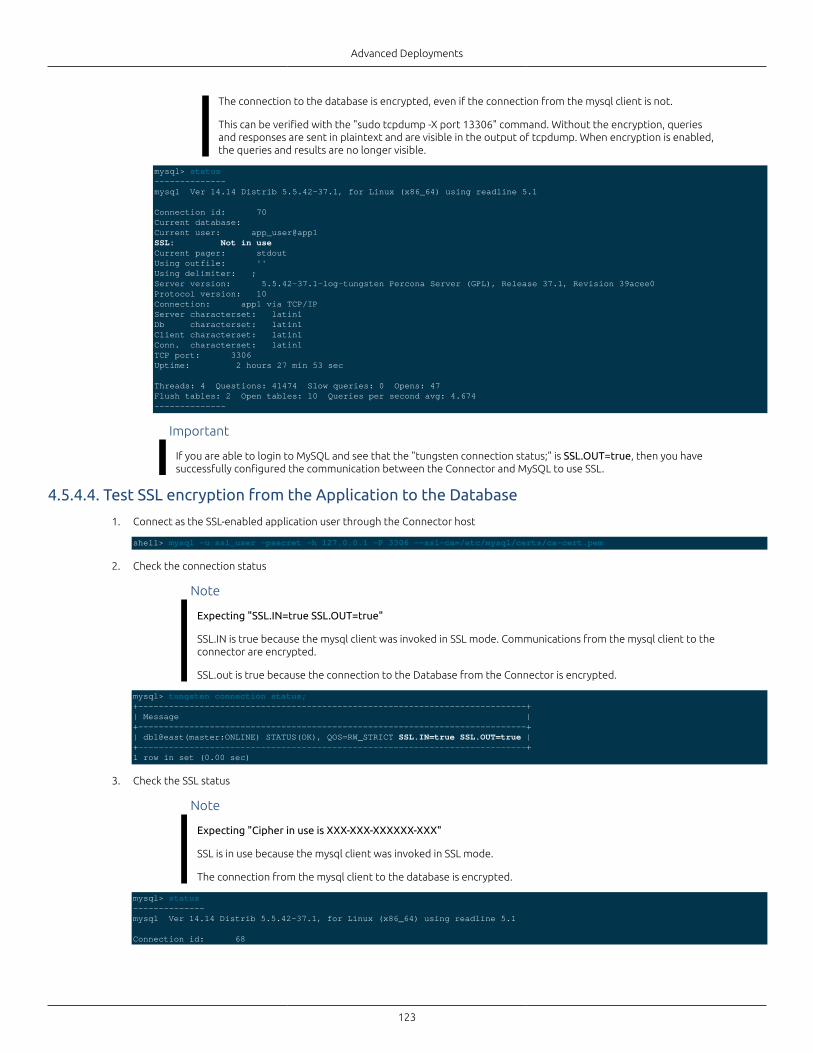
Advanced Deployments
123
The connection to the database is encrypted, even if the connection from the mysql client is not.
This can be verified with the "sudo tcpdump -X port 13306" command. Without the encryption, queriesand responses are sent in plaintext and are visible in the output of tcpdump. When encryption is enabled,the queries and results are no longer visible.
mysql> status--------------mysql Ver 14.14 Distrib 5.5.42-37.1, for Linux (x86_64) using readline 5.1
Connection id: 70Current database: Current user: app_user@app1SSL: Not in useCurrent pager: stdoutUsing outfile: ''Using delimiter: ;Server version: 5.5.42-37.1-log-tungsten Percona Server (GPL), Release 37.1, Revision 39acee0Protocol version: 10Connection: app1 via TCP/IPServer characterset: latin1Db characterset: latin1Client characterset: latin1Conn. characterset: latin1TCP port: 3306Uptime: 2 hours 27 min 53 sec
Threads: 4 Questions: 41474 Slow queries: 0 Opens: 47 Flush tables: 2 Open tables: 10 Queries per second avg: 4.674--------------
Important
If you are able to login to MySQL and see that the "tungsten connection status;" is SSL.OUT=true, then you havesuccessfully configured the communication between the Connector and MySQL to use SSL.
4.5.4.4. Test SSL encryption from the Application to the Database
1. Connect as the SSL-enabled application user through the Connector host
shell> mysql -u ssl_user -psecret -h 127.0.0.1 -P 3306 --ssl-ca=/etc/mysql/certs/ca-cert.pem
2. Check the connection status
Note
Expecting "SSL.IN=true SSL.OUT=true"
SSL.IN is true because the mysql client was invoked in SSL mode. Communications from the mysql client to theconnector are encrypted.
SSL.out is true because the connection to the Database from the Connector is encrypted.
mysql> tungsten connection status;+----------------------------------------------------------------------------+| Message |+----------------------------------------------------------------------------+| db1@east(master:ONLINE) STATUS(OK), QOS=RW_STRICT SSL.IN=true SSL.OUT=true |+----------------------------------------------------------------------------+1 row in set (0.00 sec)
3. Check the SSL status
Note
Expecting "Cipher in use is XXX-XXX-XXXXXX-XXX"
SSL is in use because the mysql client was invoked in SSL mode.
The connection from the mysql client to the database is encrypted.
mysql> status--------------mysql Ver 14.14 Distrib 5.5.42-37.1, for Linux (x86_64) using readline 5.1
Connection id: 68
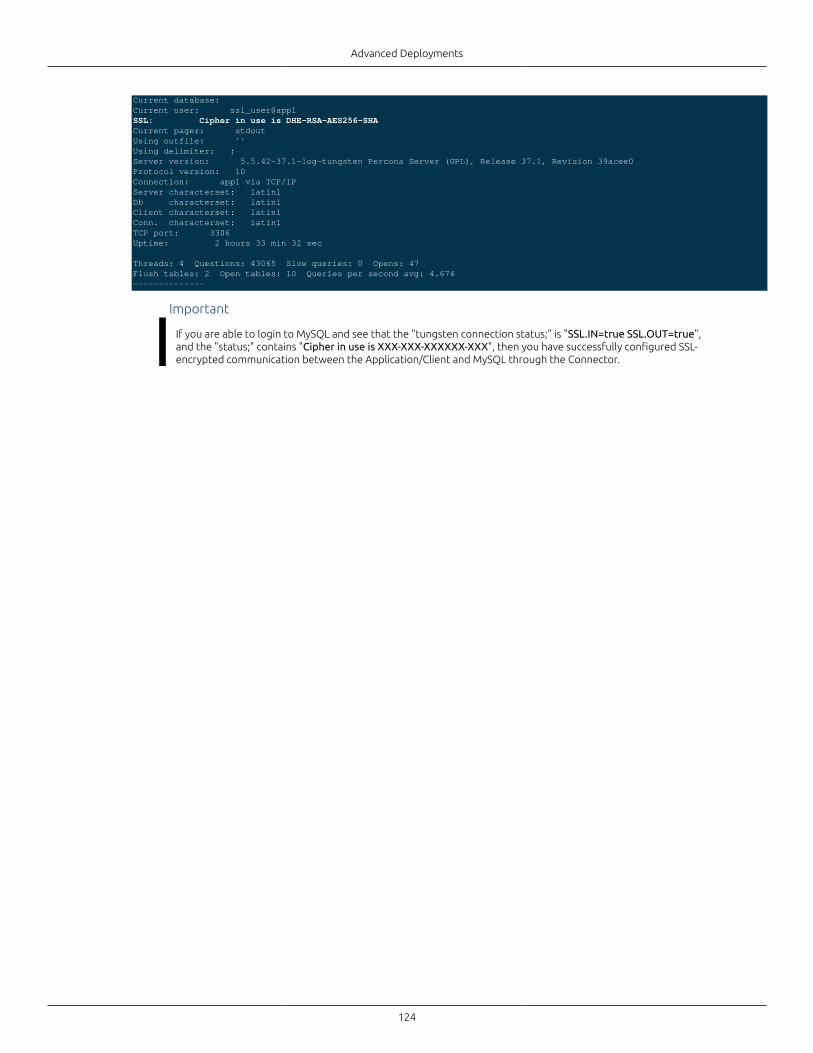
Advanced Deployments
124
Current database: Current user: ssl_user@app1SSL: Cipher in use is DHE-RSA-AES256-SHACurrent pager: stdoutUsing outfile: ''Using delimiter: ;Server version: 5.5.42-37.1-log-tungsten Percona Server (GPL), Release 37.1, Revision 39acee0Protocol version: 10Connection: app1 via TCP/IPServer characterset: latin1Db characterset: latin1Client characterset: latin1Conn. characterset: latin1TCP port: 3306Uptime: 2 hours 33 min 32 sec
Threads: 4 Questions: 43065 Slow queries: 0 Opens: 47 Flush tables: 2 Open tables: 10 Queries per second avg: 4.674--------------
Important
If you are able to login to MySQL and see that the "tungsten connection status;" is "SSL.IN=true SSL.OUT=true",and the "status;" contains "Cipher in use is XXX-XXX-XXXXXX-XXX", then you have successfully configured SSL-encrypted communication between the Application/Client and MySQL through the Connector.
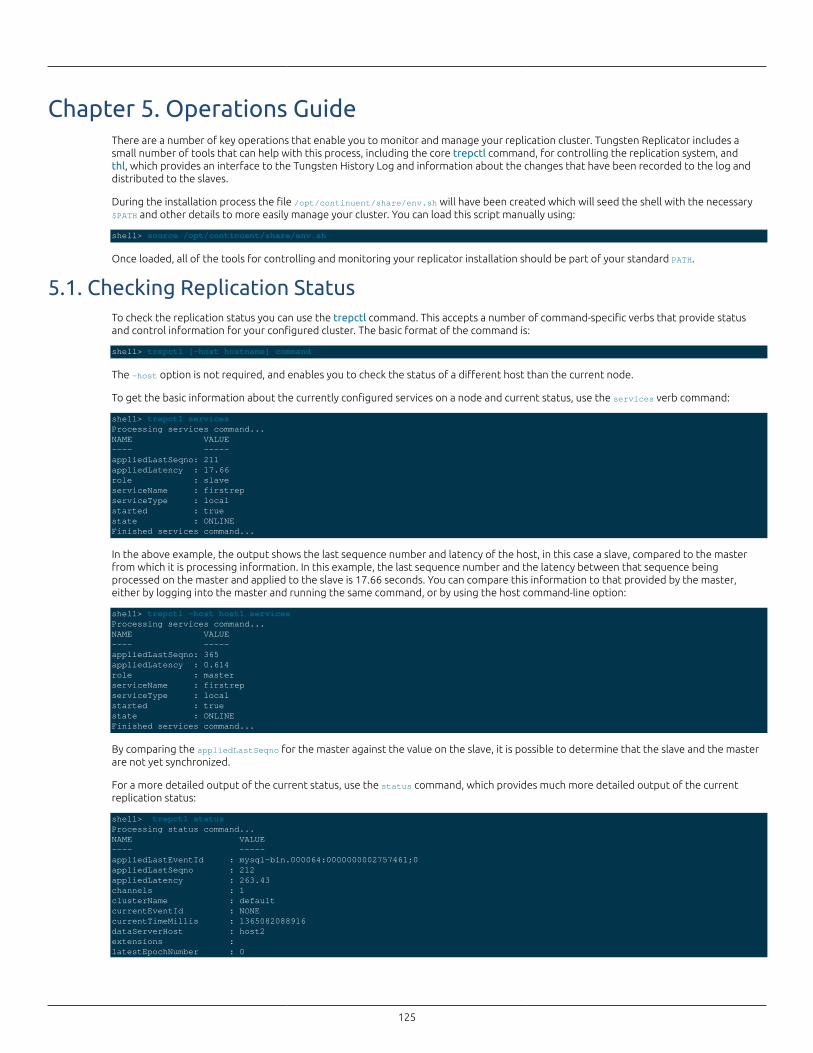
125
Chapter 5. Operations GuideThere are a number of key operations that enable you to monitor and manage your replication cluster. Tungsten Replicator includes asmall number of tools that can help with this process, including the core trepctl command, for controlling the replication system, andthl, which provides an interface to the Tungsten History Log and information about the changes that have been recorded to the log anddistributed to the slaves.
During the installation process the file /opt/continuent/share/env.sh will have been created which will seed the shell with the necessary$PATH and other details to more easily manage your cluster. You can load this script manually using:
shell> source /opt/continuent/share/env.sh
Once loaded, all of the tools for controlling and monitoring your replicator installation should be part of your standard PATH.
5.1. Checking Replication StatusTo check the replication status you can use the trepctl command. This accepts a number of command-specific verbs that provide statusand control information for your configured cluster. The basic format of the command is:
shell> trepctl [-host hostname] command
The -host option is not required, and enables you to check the status of a different host than the current node.
To get the basic information about the currently configured services on a node and current status, use the services verb command:
shell> trepctl servicesProcessing services command...NAME VALUE---- -----appliedLastSeqno: 211appliedLatency : 17.66role : slaveserviceName : firstrepserviceType : localstarted : truestate : ONLINEFinished services command...
In the above example, the output shows the last sequence number and latency of the host, in this case a slave, compared to the masterfrom which it is processing information. In this example, the last sequence number and the latency between that sequence beingprocessed on the master and applied to the slave is 17.66 seconds. You can compare this information to that provided by the master,either by logging into the master and running the same command, or by using the host command-line option:
shell> trepctl -host host1 servicesProcessing services command...NAME VALUE---- -----appliedLastSeqno: 365appliedLatency : 0.614role : masterserviceName : firstrepserviceType : localstarted : truestate : ONLINEFinished services command...
By comparing the appliedLastSeqno for the master against the value on the slave, it is possible to determine that the slave and the masterare not yet synchronized.
For a more detailed output of the current status, use the status command, which provides much more detailed output of the currentreplication status:
shell> trepctl statusProcessing status command...NAME VALUE---- -----appliedLastEventId : mysql-bin.000064:0000000002757461;0appliedLastSeqno : 212appliedLatency : 263.43channels : 1clusterName : defaultcurrentEventId : NONEcurrentTimeMillis : 1365082088916dataServerHost : host2extensions : latestEpochNumber : 0

Operations Guide
126
masterConnectUri : thl://host1:2112/masterListenUri : thl://host2:2112/maximumStoredSeqNo : 724minimumStoredSeqNo : 0offlineRequests : NONEpendingError : NONEpendingErrorCode : NONEpendingErrorEventId : NONEpendingErrorSeqno : -1pendingExceptionMessage: NONEpipelineSource : thl://host1:2112/relativeLatency : 655.915resourcePrecedence : 99rmiPort : 10000role : slaveseqnoType : java.lang.LongserviceName : firstrepserviceType : localsimpleServiceName : firstrepsiteName : defaultsourceId : host2state : ONLINEtimeInStateSeconds : 893.32uptimeSeconds : 9370.031version : Tungsten Replicator 2.2.1 build 403Finished status command...
Similar to the host specification, trepctl provides information for the default service. If you have installed multiple services, you mustspecify the service explicitly:
shell> trepctrl -service servicename status
If the service has been configured to operate on an alternative management port, this can be specified using the -port option. The defaultis to use port 10000.
The above command was executed on the slave host, host2. Some key parameter values from the generated output:
• appliedLastEventId
This shows the last event from the source event stream that was applied to the database. In this case, the output shows that source ofthe data was a MySQL binary log. The portion before the colon, mysql-bin.000064 is the filename of the binary log on the master. Theportion after the colon is the physical location, in bytes, within the binary log file.
• appliedLastSeqno
The last sequence number for the transaction from the Tungsten stage that has been applied to the database. This indicates the lastactual transaction information written into the slave database.
When using parallel replication, this parameter returns the minimum applied sequence number among all the channels applying data.
• appliedLatency
The appliedLatency is the latency between the commit time and the time the last committed transaction reached the end of thecorresponding pipeline within the replicator.
In replicators that are operating with parallel apply, appliedLatency indicates the latency of the trailing channel. Because the parallelapply mechanism does not update all channels simultaneously, the figure shown may trail significantly from the actual latency.
• masterConnectUri
On a master, the value will be empty.
On a slave, the URI of the master Tungsten Replicator from which the transaction data is being read from. The value supports multipleURIs (separated by comma) for topologies with multiple masters.
• maximumStoredSeqNo
The maximum transaction ID that has been stored locally on the machine in the THL. Because Tungsten Replicator operates in stages, itis sometimes important to compare the sequence and latency between information being ready from the source into the THL, and thenfrom the THL into the database. You can compare this value to the appliedLastSeqno, which indicates the last sequence committed tothe database. The information is provided at a resolution of milliseconds.
• pipelineSource
Indicates the source of the information that is written into the THL. For a master, pipelineSource is the MySQL binary log. For a slave,pipelineSource is the THL of the master.
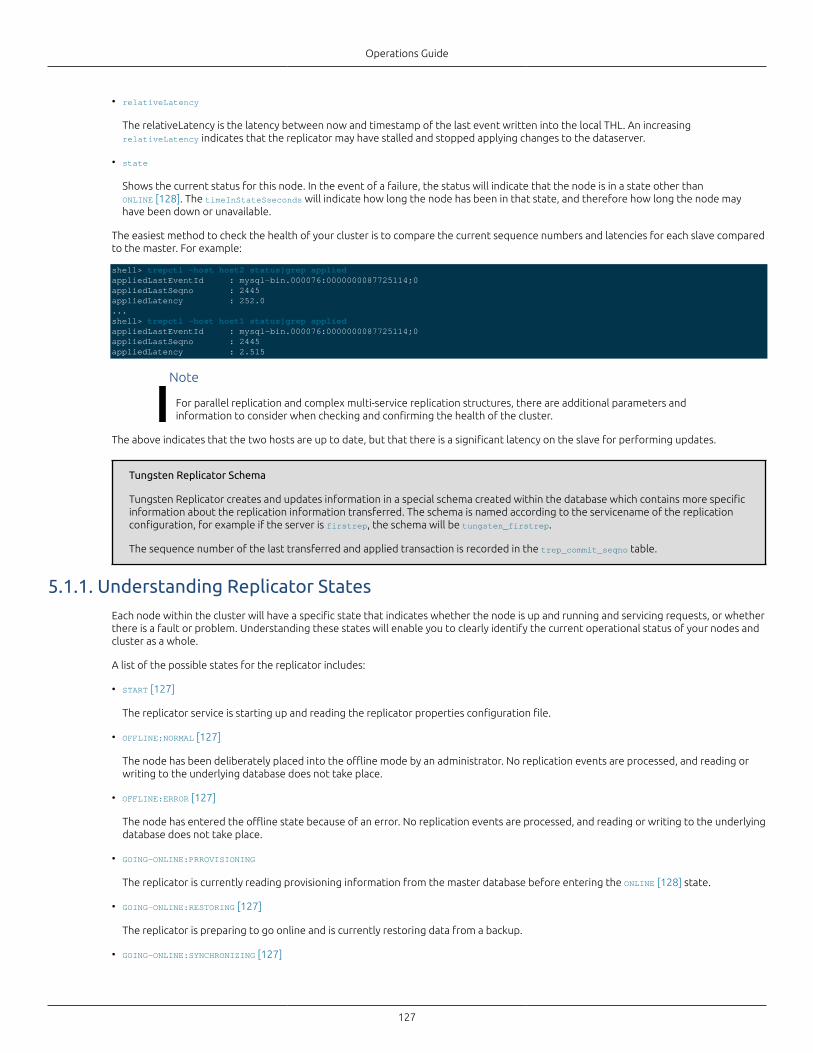
Operations Guide
127
• relativeLatency
The relativeLatency is the latency between now and timestamp of the last event written into the local THL. An increasingrelativeLatency indicates that the replicator may have stalled and stopped applying changes to the dataserver.
• state
Shows the current status for this node. In the event of a failure, the status will indicate that the node is in a state other thanONLINE [128]. The timeInStateSseconds will indicate how long the node has been in that state, and therefore how long the node mayhave been down or unavailable.
The easiest method to check the health of your cluster is to compare the current sequence numbers and latencies for each slave comparedto the master. For example:
shell> trepctl -host host2 status|grep appliedappliedLastEventId : mysql-bin.000076:0000000087725114;0appliedLastSeqno : 2445appliedLatency : 252.0...shell> trepctl -host host1 status|grep appliedappliedLastEventId : mysql-bin.000076:0000000087725114;0appliedLastSeqno : 2445appliedLatency : 2.515
Note
For parallel replication and complex multi-service replication structures, there are additional parameters andinformation to consider when checking and confirming the health of the cluster.
The above indicates that the two hosts are up to date, but that there is a significant latency on the slave for performing updates.
Tungsten Replicator Schema
Tungsten Replicator creates and updates information in a special schema created within the database which contains more specificinformation about the replication information transferred. The schema is named according to the servicename of the replicationconfiguration, for example if the server is firstrep, the schema will be tungsten_firstrep.
The sequence number of the last transferred and applied transaction is recorded in the trep_commit_seqno table.
5.1.1. Understanding Replicator StatesEach node within the cluster will have a specific state that indicates whether the node is up and running and servicing requests, or whetherthere is a fault or problem. Understanding these states will enable you to clearly identify the current operational status of your nodes andcluster as a whole.
A list of the possible states for the replicator includes:
• START [127]
The replicator service is starting up and reading the replicator properties configuration file.
• OFFLINE:NORMAL [127]
The node has been deliberately placed into the offline mode by an administrator. No replication events are processed, and reading orwriting to the underlying database does not take place.
• OFFLINE:ERROR [127]
The node has entered the offline state because of an error. No replication events are processed, and reading or writing to the underlyingdatabase does not take place.
• GOING-ONLINE:PRROVISIONING
The replicator is currently reading provisioning information from the master database before entering the ONLINE [128] state.
• GOING-ONLINE:RESTORING [127]
The replicator is preparing to go online and is currently restoring data from a backup.
• GOING-ONLINE:SYNCHRONIZING [127]
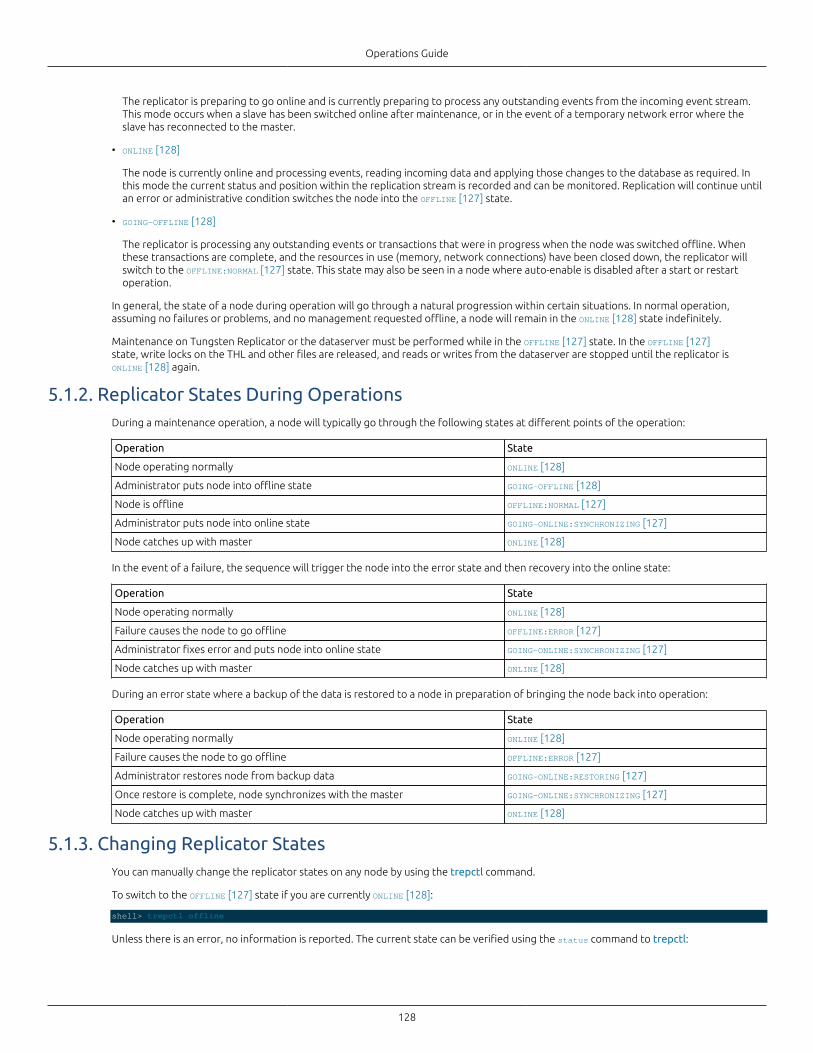
Operations Guide
128
The replicator is preparing to go online and is currently preparing to process any outstanding events from the incoming event stream.This mode occurs when a slave has been switched online after maintenance, or in the event of a temporary network error where theslave has reconnected to the master.
• ONLINE [128]
The node is currently online and processing events, reading incoming data and applying those changes to the database as required. Inthis mode the current status and position within the replication stream is recorded and can be monitored. Replication will continue untilan error or administrative condition switches the node into the OFFLINE [127] state.
• GOING-OFFLINE [128]
The replicator is processing any outstanding events or transactions that were in progress when the node was switched offline. Whenthese transactions are complete, and the resources in use (memory, network connections) have been closed down, the replicator willswitch to the OFFLINE:NORMAL [127] state. This state may also be seen in a node where auto-enable is disabled after a start or restartoperation.
In general, the state of a node during operation will go through a natural progression within certain situations. In normal operation,assuming no failures or problems, and no management requested offline, a node will remain in the ONLINE [128] state indefinitely.
Maintenance on Tungsten Replicator or the dataserver must be performed while in the OFFLINE [127] state. In the OFFLINE [127]state, write locks on the THL and other files are released, and reads or writes from the dataserver are stopped until the replicator isONLINE [128] again.
5.1.2. Replicator States During OperationsDuring a maintenance operation, a node will typically go through the following states at different points of the operation:
Operation State
Node operating normally ONLINE [128]
Administrator puts node into offline state GOING-OFFLINE [128]
Node is offline OFFLINE:NORMAL [127]
Administrator puts node into online state GOING-ONLINE:SYNCHRONIZING [127]
Node catches up with master ONLINE [128]
In the event of a failure, the sequence will trigger the node into the error state and then recovery into the online state:
Operation State
Node operating normally ONLINE [128]
Failure causes the node to go offline OFFLINE:ERROR [127]
Administrator fixes error and puts node into online state GOING-ONLINE:SYNCHRONIZING [127]
Node catches up with master ONLINE [128]
During an error state where a backup of the data is restored to a node in preparation of bringing the node back into operation:
Operation State
Node operating normally ONLINE [128]
Failure causes the node to go offline OFFLINE:ERROR [127]
Administrator restores node from backup data GOING-ONLINE:RESTORING [127]
Once restore is complete, node synchronizes with the master GOING-ONLINE:SYNCHRONIZING [127]
Node catches up with master ONLINE [128]
5.1.3. Changing Replicator StatesYou can manually change the replicator states on any node by using the trepctl command.
To switch to the OFFLINE [127] state if you are currently ONLINE [128]:
shell> trepctl offline
Unless there is an error, no information is reported. The current state can be verified using the status command to trepctl:

Operations Guide
129
shell> trepctl statusProcessing status command......state : OFFLINE:NORMALtimeInStateSeconds : 21.409uptimeSeconds : 935.072
To switch back to the ONLINE [128] state:
shell> trepctl online
When using replicator states in this manner, the replication between hosts is effectively paused. Any outstanding events from the masterwill be replicated to the slave with the replication continuing from the point where the node was switched to the OFFLINE [127] state.The sequence number and latency will be reported accordingly, as seen in the example below where the node is significantly behind themaster:
shell> trepctl statusProcessing status command...NAME VALUE---- -----appliedLastEventId : mysql-bin.000004:0000000005162941;0appliedLastSeqno : 21appliedLatency : 179.366
5.2. Managing Transaction FailuresInconsistencies between a master and slave dataserver can occur for a number of reasons, including:
• An update or insertion has occurred on the slave independently of the master. This situation can occur if updates are allowed on a slavethat is acting as a read-only slave for scale out, or in the event of running management or administration scripts on the slave
• A switch or failover operation has lead to inconsistencies. This can happen if client applications are still writing to the slave or master atthe point of the switch.
• A database failure causes a database or table to become corrupted.
When a failure to apply transactions occurs, the problem must be resolved, either by skipping or ignoring the transaction, or fixing andupdating the underlying database so that the transaction can be applied.
When a failure occurs, replication is stopped immediately at the first transaction that caused the problem, but it may not be the onlytransaction and this may require extensive examination of the pending transactions to determine what caused the original databasefailure and
5.2.1. Identifying a Transaction MismatchWhen a mismatch occurs, the replicator service will indicate that there was a problem applying a transaction on the slave. The replicationprocess stops applying changes to the slave when the first transaction fails to be applied to the slave. This prevents multiple-statementsfrom failing
When checking the replication status with trepctl, the pendingError and pendingExceptionMessage will show the error indicating the failureto insert the statement. For example:
shell> trepctl status...pendingError : Event application failed: seqno=120 fragno=0 message=java.sql.SQLException: » Statement failed on slave but succeeded on masterpendingErrorCode : NONEpendingErrorEventId : mysql-bin.000012:0000000000012967;0pendingErrorSeqno : 120pendingExceptionMessage: java.sql.SQLException: Statement failed on slave but succeeded on master insert into messages values (0,'Trial message','Jack','Jill',now())...
The trepsvc.log log file will also contain the error information about the failed statement. For example:
...INFO | jvm 1 | 2013/06/26 10:14:12 | 2013-06-26 10:14:12,423 [firstcluster - » q-to-dbms-0] INFO pipeline.SingleThreadStageTask Performing emergency » rollback of applied changesINFO | jvm 1 | 2013/06/26 10:14:12 | 2013-06-26 10:14:12,424 [firstcluster - » q-to-dbms-0] INFO pipeline.SingleThreadStageTask Dispatching error event: » Event application failed: seqno=120 fragno=0 message=java.sql.SQLException: » Statement failed on slave but succeeded on masterINFO | jvm 1 | 2013/06/26 10:14:12 | 2013-06-26 10:14:12,424 [firstcluster - » pool-2-thread-1] ERROR management.OpenReplicatorManager Received error notification, » shutting down services :INFO | jvm 1 | 2013/06/26 10:14:12 | Event application failed: seqno=120 fragno=0 »
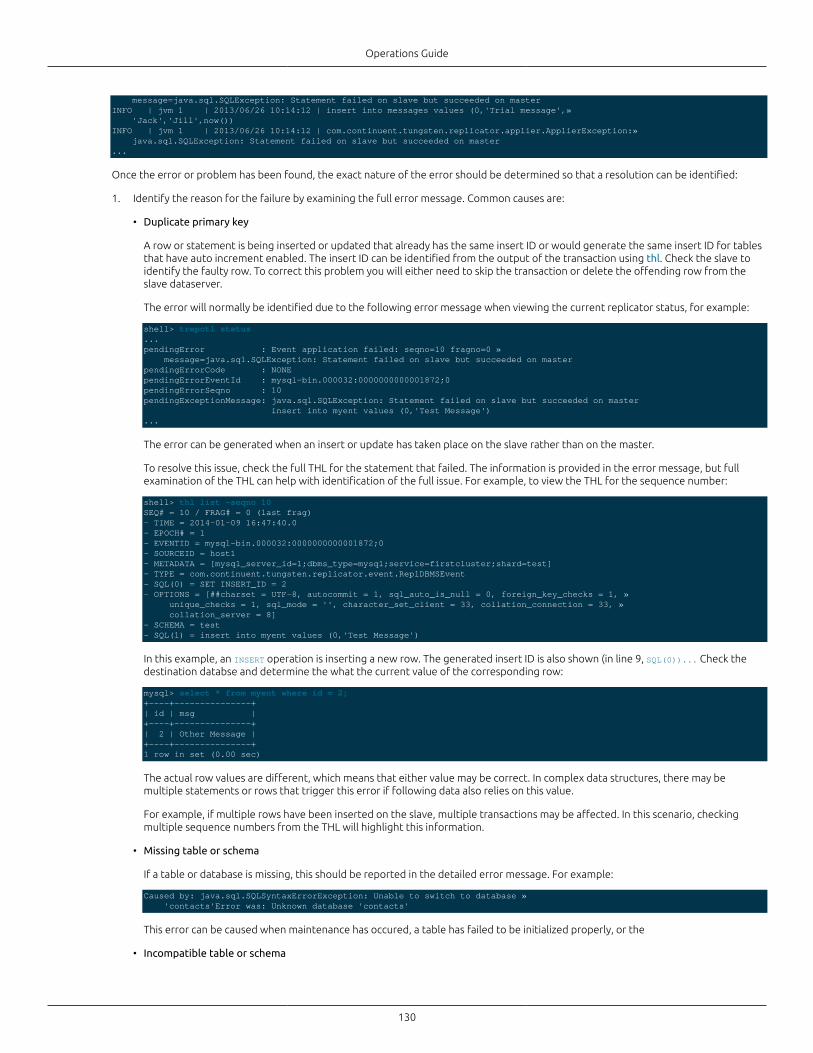
Operations Guide
130
message=java.sql.SQLException: Statement failed on slave but succeeded on masterINFO | jvm 1 | 2013/06/26 10:14:12 | insert into messages values (0,'Trial message',» 'Jack','Jill',now())INFO | jvm 1 | 2013/06/26 10:14:12 | com.continuent.tungsten.replicator.applier.ApplierException:» java.sql.SQLException: Statement failed on slave but succeeded on master...
Once the error or problem has been found, the exact nature of the error should be determined so that a resolution can be identified:
1. Identify the reason for the failure by examining the full error message. Common causes are:
• Duplicate primary key
A row or statement is being inserted or updated that already has the same insert ID or would generate the same insert ID for tablesthat have auto increment enabled. The insert ID can be identified from the output of the transaction using thl. Check the slave toidentify the faulty row. To correct this problem you will either need to skip the transaction or delete the offending row from theslave dataserver.
The error will normally be identified due to the following error message when viewing the current replicator status, for example:
shell> trepctl status...pendingError : Event application failed: seqno=10 fragno=0 » message=java.sql.SQLException: Statement failed on slave but succeeded on masterpendingErrorCode : NONEpendingErrorEventId : mysql-bin.000032:0000000000001872;0pendingErrorSeqno : 10pendingExceptionMessage: java.sql.SQLException: Statement failed on slave but succeeded on master insert into myent values (0,'Test Message')...
The error can be generated when an insert or update has taken place on the slave rather than on the master.
To resolve this issue, check the full THL for the statement that failed. The information is provided in the error message, but fullexamination of the THL can help with identification of the full issue. For example, to view the THL for the sequence number:
shell> thl list -seqno 10SEQ# = 10 / FRAG# = 0 (last frag)- TIME = 2014-01-09 16:47:40.0- EPOCH# = 1- EVENTID = mysql-bin.000032:0000000000001872;0- SOURCEID = host1- METADATA = [mysql_server_id=1;dbms_type=mysql;service=firstcluster;shard=test]- TYPE = com.continuent.tungsten.replicator.event.ReplDBMSEvent- SQL(0) = SET INSERT_ID = 2- OPTIONS = [##charset = UTF-8, autocommit = 1, sql_auto_is_null = 0, foreign_key_checks = 1, » unique_checks = 1, sql_mode = '', character_set_client = 33, collation_connection = 33, » collation_server = 8]- SCHEMA = test- SQL(1) = insert into myent values (0,'Test Message')
In this example, an INSERT operation is inserting a new row. The generated insert ID is also shown (in line 9, SQL(0))... Check thedestination databse and determine the what the current value of the corresponding row:
mysql> select * from myent where id = 2;+----+---------------+| id | msg |+----+---------------+| 2 | Other Message |+----+---------------+1 row in set (0.00 sec)
The actual row values are different, which means that either value may be correct. In complex data structures, there may bemultiple statements or rows that trigger this error if following data also relies on this value.
For example, if multiple rows have been inserted on the slave, multiple transactions may be affected. In this scenario, checkingmultiple sequence numbers from the THL will highlight this information.
• Missing table or schema
If a table or database is missing, this should be reported in the detailed error message. For example:
Caused by: java.sql.SQLSyntaxErrorException: Unable to switch to database » 'contacts'Error was: Unknown database 'contacts'
This error can be caused when maintenance has occured, a table has failed to be initialized properly, or the
• Incompatible table or schema
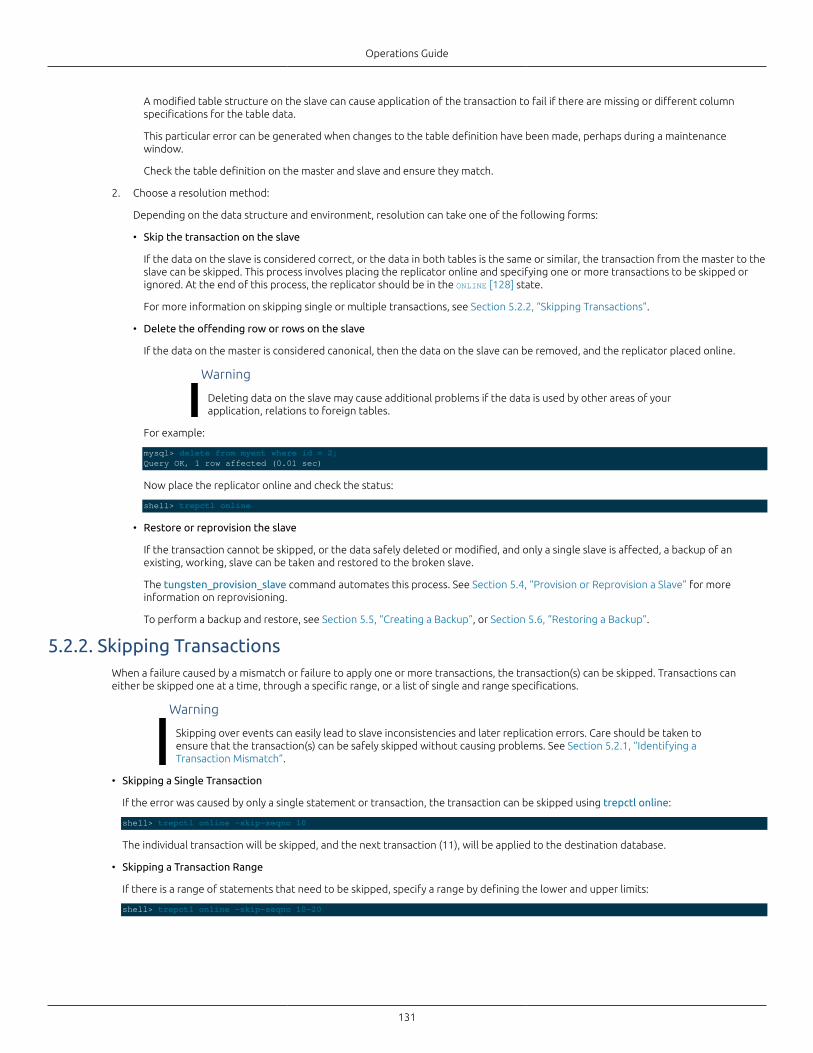
Operations Guide
131
A modified table structure on the slave can cause application of the transaction to fail if there are missing or different columnspecifications for the table data.
This particular error can be generated when changes to the table definition have been made, perhaps during a maintenancewindow.
Check the table definition on the master and slave and ensure they match.
2. Choose a resolution method:
Depending on the data structure and environment, resolution can take one of the following forms:
• Skip the transaction on the slave
If the data on the slave is considered correct, or the data in both tables is the same or similar, the transaction from the master to theslave can be skipped. This process involves placing the replicator online and specifying one or more transactions to be skipped orignored. At the end of this process, the replicator should be in the ONLINE [128] state.
For more information on skipping single or multiple transactions, see Section 5.2.2, “Skipping Transactions”.
• Delete the offending row or rows on the slave
If the data on the master is considered canonical, then the data on the slave can be removed, and the replicator placed online.
Warning
Deleting data on the slave may cause additional problems if the data is used by other areas of yourapplication, relations to foreign tables.
For example:
mysql> delete from myent where id = 2;Query OK, 1 row affected (0.01 sec)
Now place the replicator online and check the status:
shell> trepctl online
• Restore or reprovision the slave
If the transaction cannot be skipped, or the data safely deleted or modified, and only a single slave is affected, a backup of anexisting, working, slave can be taken and restored to the broken slave.
The tungsten_provision_slave command automates this process. See Section 5.4, “Provision or Reprovision a Slave” for moreinformation on reprovisioning.
To perform a backup and restore, see Section 5.5, “Creating a Backup”, or Section 5.6, “Restoring a Backup”.
5.2.2. Skipping TransactionsWhen a failure caused by a mismatch or failure to apply one or more transactions, the transaction(s) can be skipped. Transactions caneither be skipped one at a time, through a specific range, or a list of single and range specifications.
Warning
Skipping over events can easily lead to slave inconsistencies and later replication errors. Care should be taken toensure that the transaction(s) can be safely skipped without causing problems. See Section 5.2.1, “Identifying aTransaction Mismatch”.
• Skipping a Single Transaction
If the error was caused by only a single statement or transaction, the transaction can be skipped using trepctl online:
shell> trepctl online -skip-seqno 10
The individual transaction will be skipped, and the next transaction (11), will be applied to the destination database.
• Skipping a Transaction Range
If there is a range of statements that need to be skipped, specify a range by defining the lower and upper limits:
shell> trepctl online -skip-seqno 10-20
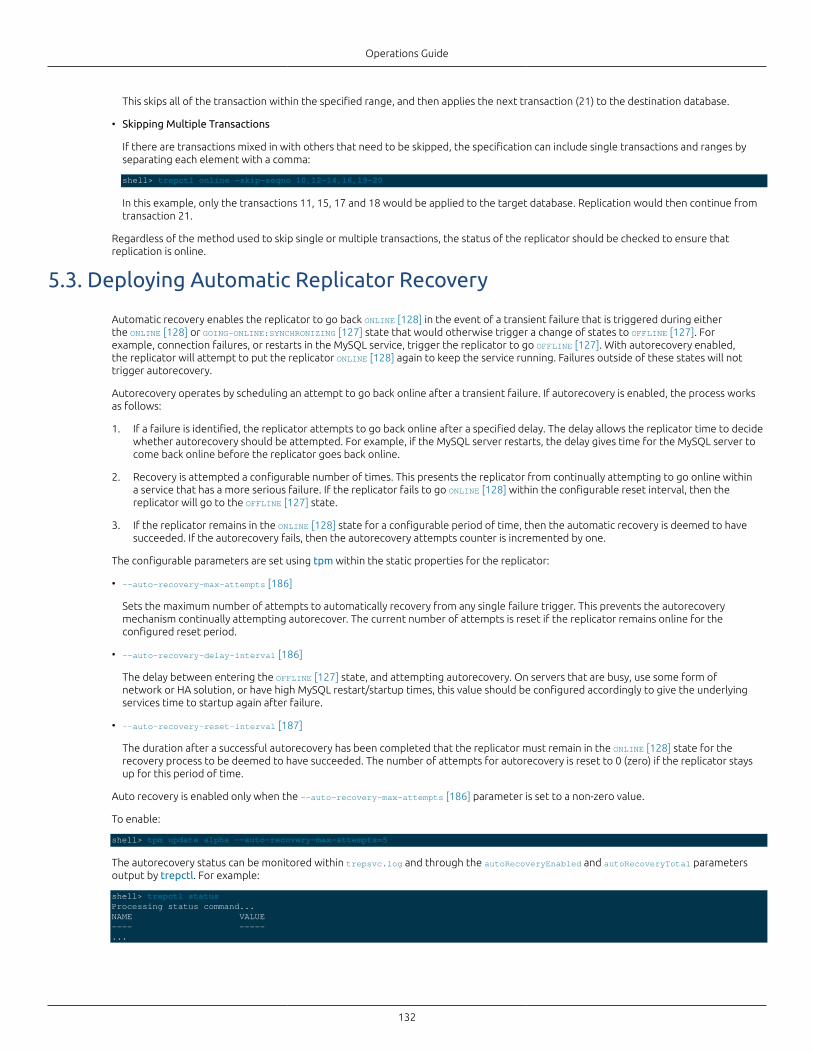
Operations Guide
132
This skips all of the transaction within the specified range, and then applies the next transaction (21) to the destination database.
• Skipping Multiple Transactions
If there are transactions mixed in with others that need to be skipped, the specification can include single transactions and ranges byseparating each element with a comma:
shell> trepctl online -skip-seqno 10,12-14,16,19-20
In this example, only the transactions 11, 15, 17 and 18 would be applied to the target database. Replication would then continue fromtransaction 21.
Regardless of the method used to skip single or multiple transactions, the status of the replicator should be checked to ensure thatreplication is online.
5.3. Deploying Automatic Replicator Recovery
Automatic recovery enables the replicator to go back ONLINE [128] in the event of a transient failure that is triggered during eitherthe ONLINE [128] or GOING-ONLINE:SYNCHRONIZING [127] state that would otherwise trigger a change of states to OFFLINE [127]. Forexample, connection failures, or restarts in the MySQL service, trigger the replicator to go OFFLINE [127]. With autorecovery enabled,the replicator will attempt to put the replicator ONLINE [128] again to keep the service running. Failures outside of these states will nottrigger autorecovery.
Autorecovery operates by scheduling an attempt to go back online after a transient failure. If autorecovery is enabled, the process worksas follows:
1. If a failure is identified, the replicator attempts to go back online after a specified delay. The delay allows the replicator time to decidewhether autorecovery should be attempted. For example, if the MySQL server restarts, the delay gives time for the MySQL server tocome back online before the replicator goes back online.
2. Recovery is attempted a configurable number of times. This presents the replicator from continually attempting to go online withina service that has a more serious failure. If the replicator fails to go ONLINE [128] within the configurable reset interval, then thereplicator will go to the OFFLINE [127] state.
3. If the replicator remains in the ONLINE [128] state for a configurable period of time, then the automatic recovery is deemed to havesucceeded. If the autorecovery fails, then the autorecovery attempts counter is incremented by one.
The configurable parameters are set using tpm within the static properties for the replicator:
• --auto-recovery-max-attempts [186]
Sets the maximum number of attempts to automatically recovery from any single failure trigger. This prevents the autorecoverymechanism continually attempting autorecover. The current number of attempts is reset if the replicator remains online for theconfigured reset period.
• --auto-recovery-delay-interval [186]
The delay between entering the OFFLINE [127] state, and attempting autorecovery. On servers that are busy, use some form ofnetwork or HA solution, or have high MySQL restart/startup times, this value should be configured accordingly to give the underlyingservices time to startup again after failure.
• --auto-recovery-reset-interval [187]
The duration after a successful autorecovery has been completed that the replicator must remain in the ONLINE [128] state for therecovery process to be deemed to have succeeded. The number of attempts for autorecovery is reset to 0 (zero) if the replicator staysup for this period of time.
Auto recovery is enabled only when the --auto-recovery-max-attempts [186] parameter is set to a non-zero value.
To enable:
shell> tpm update alpha --auto-recovery-max-attempts=5
The autorecovery status can be monitored within trepsvc.log and through the autoRecoveryEnabled and autoRecoveryTotal parametersoutput by trepctl. For example:
shell> trepctl statusProcessing status command...NAME VALUE---- -----...
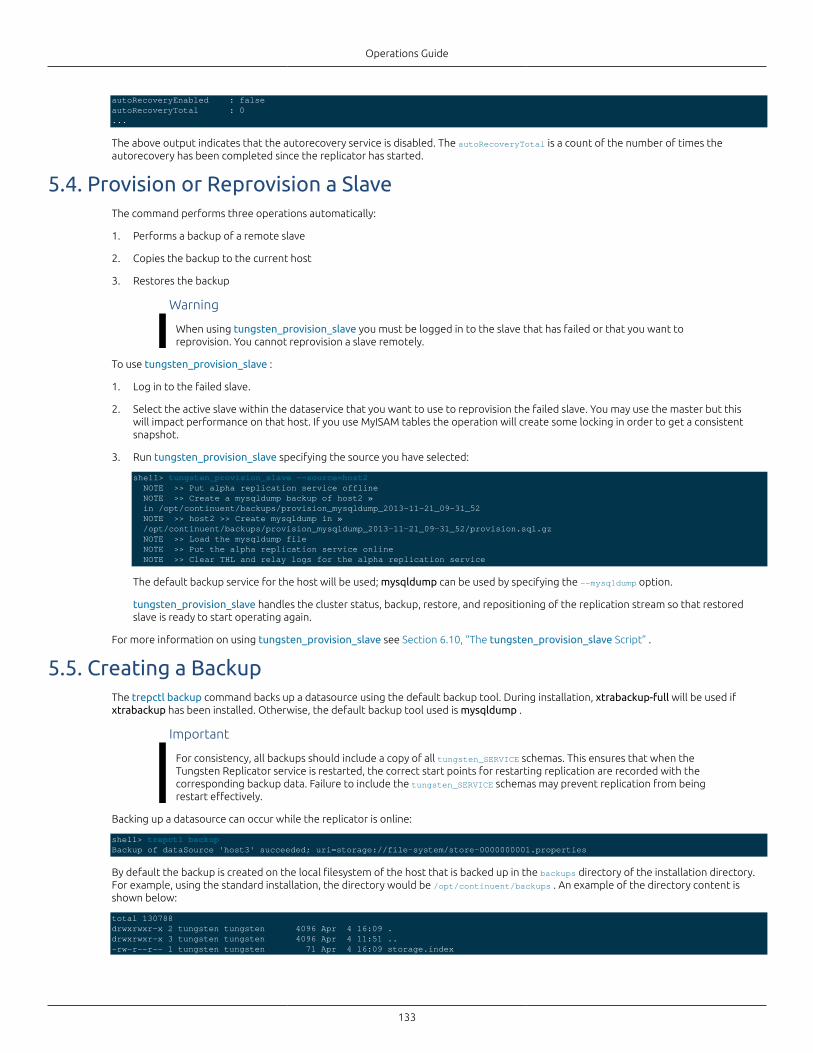
Operations Guide
133
autoRecoveryEnabled : falseautoRecoveryTotal : 0...
The above output indicates that the autorecovery service is disabled. The autoRecoveryTotal is a count of the number of times theautorecovery has been completed since the replicator has started.
5.4. Provision or Reprovision a SlaveThe command performs three operations automatically:
1. Performs a backup of a remote slave
2. Copies the backup to the current host
3. Restores the backup
Warning
When using tungsten_provision_slave you must be logged in to the slave that has failed or that you want toreprovision. You cannot reprovision a slave remotely.
To use tungsten_provision_slave :
1. Log in to the failed slave.
2. Select the active slave within the dataservice that you want to use to reprovision the failed slave. You may use the master but thiswill impact performance on that host. If you use MyISAM tables the operation will create some locking in order to get a consistentsnapshot.
3. Run tungsten_provision_slave specifying the source you have selected:
shell> tungsten_provision_slave --source=host2 NOTE >> Put alpha replication service offline NOTE >> Create a mysqldump backup of host2 » in /opt/continuent/backups/provision_mysqldump_2013-11-21_09-31_52 NOTE >> host2 >> Create mysqldump in » /opt/continuent/backups/provision_mysqldump_2013-11-21_09-31_52/provision.sql.gz NOTE >> Load the mysqldump file NOTE >> Put the alpha replication service online NOTE >> Clear THL and relay logs for the alpha replication service
The default backup service for the host will be used; mysqldump can be used by specifying the --mysqldump option.
tungsten_provision_slave handles the cluster status, backup, restore, and repositioning of the replication stream so that restoredslave is ready to start operating again.
For more information on using tungsten_provision_slave see Section 6.10, “The tungsten_provision_slave Script” .
5.5. Creating a BackupThe trepctl backup command backs up a datasource using the default backup tool. During installation, xtrabackup-full will be used ifxtrabackup has been installed. Otherwise, the default backup tool used is mysqldump .
Important
For consistency, all backups should include a copy of all tungsten_SERVICE schemas. This ensures that when theTungsten Replicator service is restarted, the correct start points for restarting replication are recorded with thecorresponding backup data. Failure to include the tungsten_SERVICE schemas may prevent replication from beingrestart effectively.
Backing up a datasource can occur while the replicator is online:
shell> trepctl backupBackup of dataSource 'host3' succeeded; uri=storage://file-system/store-0000000001.properties
By default the backup is created on the local filesystem of the host that is backed up in the backups directory of the installation directory.For example, using the standard installation, the directory would be /opt/continuent/backups . An example of the directory content isshown below:
total 130788drwxrwxr-x 2 tungsten tungsten 4096 Apr 4 16:09 .drwxrwxr-x 3 tungsten tungsten 4096 Apr 4 11:51 ..-rw-r--r-- 1 tungsten tungsten 71 Apr 4 16:09 storage.index
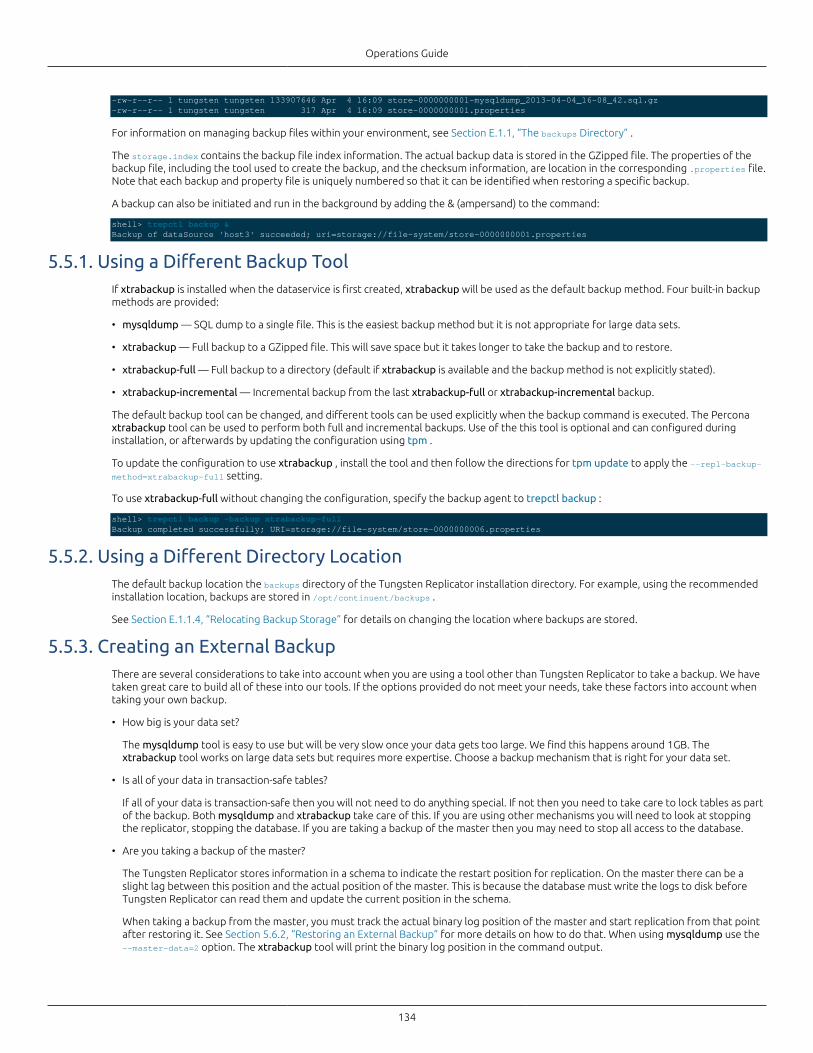
Operations Guide
134
-rw-r--r-- 1 tungsten tungsten 133907646 Apr 4 16:09 store-0000000001-mysqldump_2013-04-04_16-08_42.sql.gz-rw-r--r-- 1 tungsten tungsten 317 Apr 4 16:09 store-0000000001.properties
For information on managing backup files within your environment, see Section E.1.1, “The backups Directory” .
The storage.index contains the backup file index information. The actual backup data is stored in the GZipped file. The properties of thebackup file, including the tool used to create the backup, and the checksum information, are location in the corresponding .properties file.Note that each backup and property file is uniquely numbered so that it can be identified when restoring a specific backup.
A backup can also be initiated and run in the background by adding the & (ampersand) to the command:
shell> trepctl backup &Backup of dataSource 'host3' succeeded; uri=storage://file-system/store-0000000001.properties
5.5.1. Using a Different Backup ToolIf xtrabackup is installed when the dataservice is first created, xtrabackup will be used as the default backup method. Four built-in backupmethods are provided:
• mysqldump — SQL dump to a single file. This is the easiest backup method but it is not appropriate for large data sets.
• xtrabackup — Full backup to a GZipped file. This will save space but it takes longer to take the backup and to restore.
• xtrabackup-full — Full backup to a directory (default if xtrabackup is available and the backup method is not explicitly stated).
• xtrabackup-incremental — Incremental backup from the last xtrabackup-full or xtrabackup-incremental backup.
The default backup tool can be changed, and different tools can be used explicitly when the backup command is executed. The Perconaxtrabackup tool can be used to perform both full and incremental backups. Use of the this tool is optional and can configured duringinstallation, or afterwards by updating the configuration using tpm .
To update the configuration to use xtrabackup , install the tool and then follow the directions for tpm update to apply the --repl-backup-method=xtrabackup-full setting.
To use xtrabackup-full without changing the configuration, specify the backup agent to trepctl backup :
shell> trepctl backup -backup xtrabackup-fullBackup completed successfully; URI=storage://file-system/store-0000000006.properties
5.5.2. Using a Different Directory LocationThe default backup location the backups directory of the Tungsten Replicator installation directory. For example, using the recommendedinstallation location, backups are stored in /opt/continuent/backups .
See Section E.1.1.4, “Relocating Backup Storage” for details on changing the location where backups are stored.
5.5.3. Creating an External BackupThere are several considerations to take into account when you are using a tool other than Tungsten Replicator to take a backup. We havetaken great care to build all of these into our tools. If the options provided do not meet your needs, take these factors into account whentaking your own backup.
• How big is your data set?
The mysqldump tool is easy to use but will be very slow once your data gets too large. We find this happens around 1GB. Thextrabackup tool works on large data sets but requires more expertise. Choose a backup mechanism that is right for your data set.
• Is all of your data in transaction-safe tables?
If all of your data is transaction-safe then you will not need to do anything special. If not then you need to take care to lock tables as partof the backup. Both mysqldump and xtrabackup take care of this. If you are using other mechanisms you will need to look at stoppingthe replicator, stopping the database. If you are taking a backup of the master then you may need to stop all access to the database.
• Are you taking a backup of the master?
The Tungsten Replicator stores information in a schema to indicate the restart position for replication. On the master there can be aslight lag between this position and the actual position of the master. This is because the database must write the logs to disk beforeTungsten Replicator can read them and update the current position in the schema.
When taking a backup from the master, you must track the actual binary log position of the master and start replication from that pointafter restoring it. See Section 5.6.2, “Restoring an External Backup” for more details on how to do that. When using mysqldump use the--master-data=2 option. The xtrabackup tool will print the binary log position in the command output.

Operations Guide
135
Using mysqldump can be a very simple way to take consistent backup. Be aware that it can cause locking on MyISAM tables so running itagainst your master will cause application delays. The example below shows the bare minimum for arguments you should provide:
shell> mysqldump --opt --single-transaction --all-databases --add-drop-database --master-data=2
5.6. Restoring a BackupIf a restore is being performed as part of the recovery procedure, consider using the tungsten_provision_slave tool. This will work forrestoring from the master or a slave and is faster when you do not already have a backup ready to be restored. For more information, seeSection 5.4, “Provision or Reprovision a Slave”.
To restore a backup, use the trepctl restore command :
1. Put the replication service offline using trepctl:
shell> trepctl offline
2. Restore the backup using trepctl restore :
shell> trepctl restore
3. Put the replication service online using trepctl:
shell> trepctl online
By default, the restore process takes the latest backup available for the host being restored. Tungsten Replicator does not automaticallylocate the latest backup within the dataservice across all datasources.
5.6.1. Restoring a Specific BackupTo restore a specific backup, specify the location of the corresponding properties file using the format:
storage://storage-type/location
For example, to restore the backup from the filesystem using the information in the properties file store-0000000004.properties , login tothe failed host:
1. Put the replication service offline using trepctl:
shell> trepctl offline
2. Restore the backup using trepctl restore:
shell> trepctl restore \-uri storage://file-system/store-0000000004.properties
3. Put the replication service online using trepctl:
shell> trepctl online
5.6.2. Restoring an External BackupIf a backup has been performed outside of Tungsten Replicator, for example from filesystem snapshot or a backup performed outside ofthe dataservice, follow these steps:
1. Put the replication service offline using trepctl:
shell> trepctl offline
2. Reset the THL, either using thl or by deleting the files directly :
shell> thl -service alpha purge
3. Restore the data or files using the external tool. This may require the database server to be stopped. If so, you should restart thedatabase server before moving to the next step.
Note
The backup must be complete and the tungsten specific schemas must be part of the recovered data, as theyare required to restart replication at the correct point. SeeSection 5.5.3, “Creating an External Backup” formore information on creating backups.
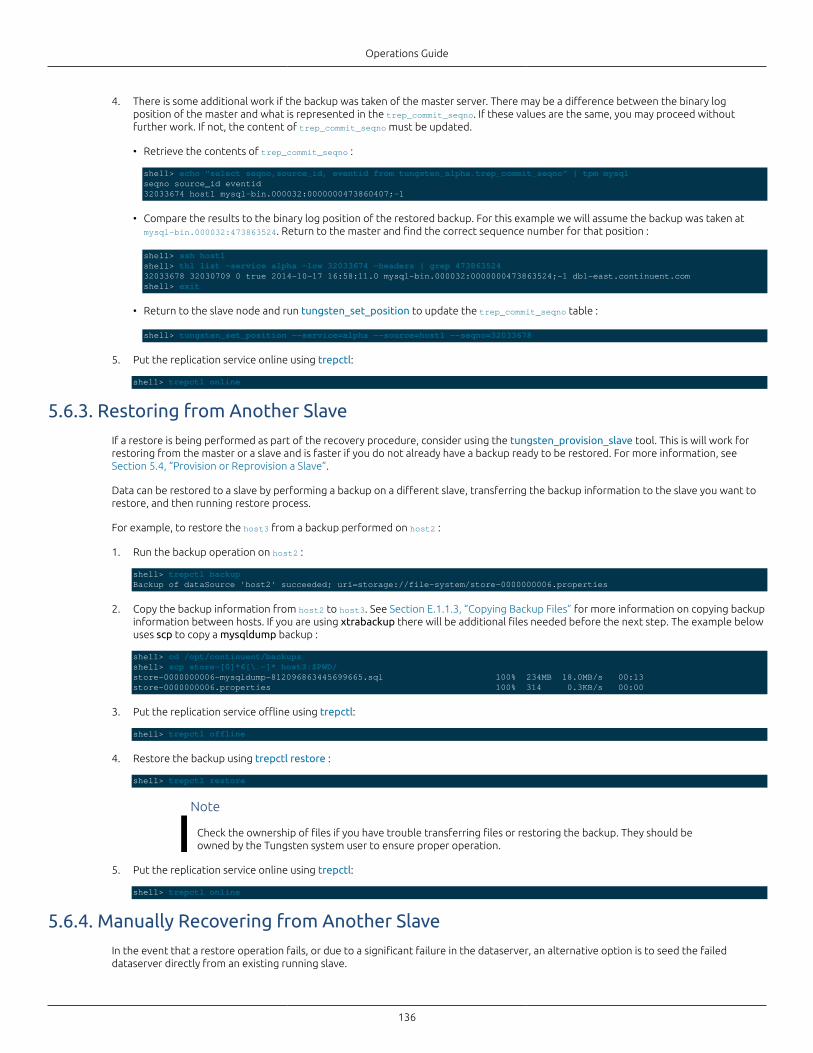
Operations Guide
136
4. There is some additional work if the backup was taken of the master server. There may be a difference between the binary logposition of the master and what is represented in the trep_commit_seqno. If these values are the same, you may proceed withoutfurther work. If not, the content of trep_commit_seqno must be updated.
• Retrieve the contents of trep_commit_seqno :
shell> echo "select seqno,source_id, eventid from tungsten_alpha.trep_commit_seqno" | tpm mysqlseqno source_id eventid32033674 host1 mysql-bin.000032:0000000473860407;-1
• Compare the results to the binary log position of the restored backup. For this example we will assume the backup was taken atmysql-bin.000032:473863524. Return to the master and find the correct sequence number for that position :
shell> ssh host1shell> thl list -service alpha -low 32033674 -headers | grep 47386352432033678 32030709 0 true 2014-10-17 16:58:11.0 mysql-bin.000032:0000000473863524;-1 db1-east.continuent.comshell> exit
• Return to the slave node and run tungsten_set_position to update the trep_commit_seqno table :
shell> tungsten_set_position --service=alpha --source=host1 --seqno=32033678
5. Put the replication service online using trepctl:
shell> trepctl online
5.6.3. Restoring from Another Slave
If a restore is being performed as part of the recovery procedure, consider using the tungsten_provision_slave tool. This is will work forrestoring from the master or a slave and is faster if you do not already have a backup ready to be restored. For more information, seeSection 5.4, “Provision or Reprovision a Slave”.
Data can be restored to a slave by performing a backup on a different slave, transferring the backup information to the slave you want torestore, and then running restore process.
For example, to restore the host3 from a backup performed on host2 :
1. Run the backup operation on host2 :
shell> trepctl backupBackup of dataSource 'host2' succeeded; uri=storage://file-system/store-0000000006.properties
2. Copy the backup information from host2 to host3. See Section E.1.1.3, “Copying Backup Files” for more information on copying backupinformation between hosts. If you are using xtrabackup there will be additional files needed before the next step. The example belowuses scp to copy a mysqldump backup :
shell> cd /opt/continuent/backupsshell> scp store-[0]*6[\.-]* host3:$PWD/store-0000000006-mysqldump-812096863445699665.sql 100% 234MB 18.0MB/s 00:13store-0000000006.properties 100% 314 0.3KB/s 00:00
3. Put the replication service offline using trepctl:
shell> trepctl offline
4. Restore the backup using trepctl restore :
shell> trepctl restore
Note
Check the ownership of files if you have trouble transferring files or restoring the backup. They should beowned by the Tungsten system user to ensure proper operation.
5. Put the replication service online using trepctl:
shell> trepctl online
5.6.4. Manually Recovering from Another Slave
In the event that a restore operation fails, or due to a significant failure in the dataserver, an alternative option is to seed the faileddataserver directly from an existing running slave.
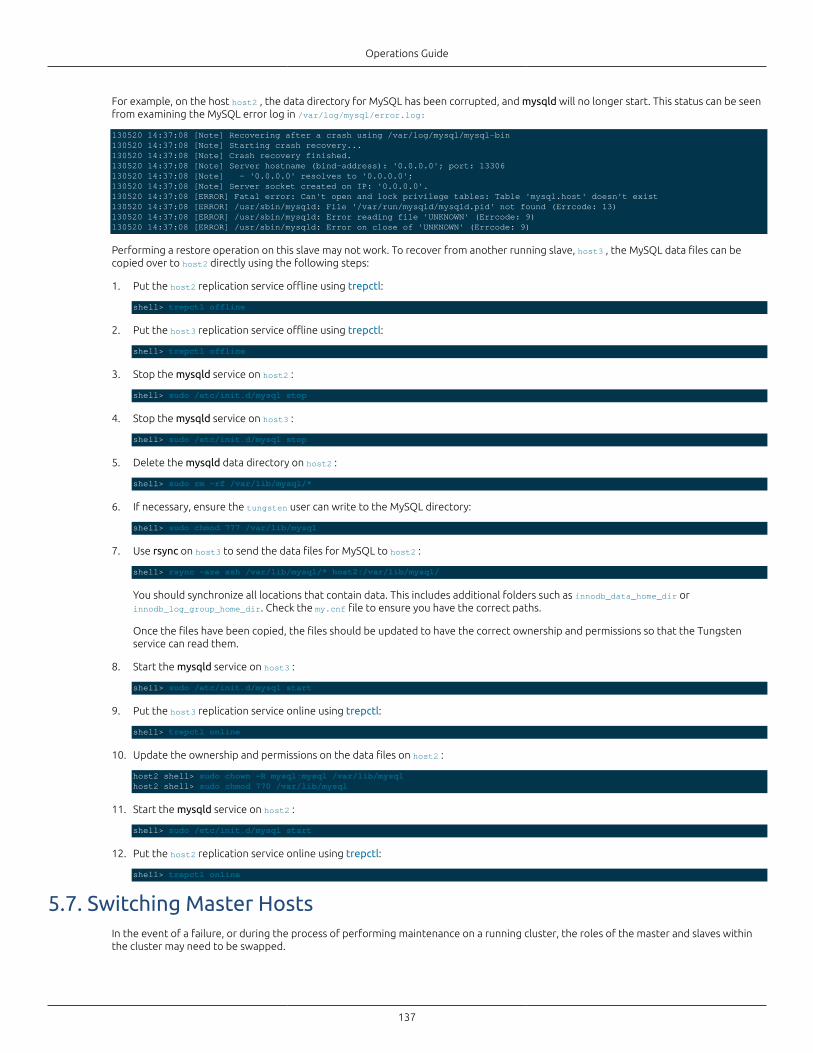
Operations Guide
137
For example, on the host host2 , the data directory for MySQL has been corrupted, and mysqld will no longer start. This status can be seenfrom examining the MySQL error log in /var/log/mysql/error.log:
130520 14:37:08 [Note] Recovering after a crash using /var/log/mysql/mysql-bin130520 14:37:08 [Note] Starting crash recovery...130520 14:37:08 [Note] Crash recovery finished.130520 14:37:08 [Note] Server hostname (bind-address): '0.0.0.0'; port: 13306130520 14:37:08 [Note] - '0.0.0.0' resolves to '0.0.0.0';130520 14:37:08 [Note] Server socket created on IP: '0.0.0.0'.130520 14:37:08 [ERROR] Fatal error: Can't open and lock privilege tables: Table 'mysql.host' doesn't exist130520 14:37:08 [ERROR] /usr/sbin/mysqld: File '/var/run/mysqld/mysqld.pid' not found (Errcode: 13)130520 14:37:08 [ERROR] /usr/sbin/mysqld: Error reading file 'UNKNOWN' (Errcode: 9)130520 14:37:08 [ERROR] /usr/sbin/mysqld: Error on close of 'UNKNOWN' (Errcode: 9)
Performing a restore operation on this slave may not work. To recover from another running slave, host3 , the MySQL data files can becopied over to host2 directly using the following steps:
1. Put the host2 replication service offline using trepctl:
shell> trepctl offline
2. Put the host3 replication service offline using trepctl:
shell> trepctl offline
3. Stop the mysqld service on host2 :
shell> sudo /etc/init.d/mysql stop
4. Stop the mysqld service on host3 :
shell> sudo /etc/init.d/mysql stop
5. Delete the mysqld data directory on host2 :
shell> sudo rm -rf /var/lib/mysql/*
6. If necessary, ensure the tungsten user can write to the MySQL directory:
shell> sudo chmod 777 /var/lib/mysql
7. Use rsync on host3 to send the data files for MySQL to host2 :
shell> rsync -aze ssh /var/lib/mysql/* host2:/var/lib/mysql/
You should synchronize all locations that contain data. This includes additional folders such as innodb_data_home_dir orinnodb_log_group_home_dir. Check the my.cnf file to ensure you have the correct paths.
Once the files have been copied, the files should be updated to have the correct ownership and permissions so that the Tungstenservice can read them.
8. Start the mysqld service on host3 :
shell> sudo /etc/init.d/mysql start
9. Put the host3 replication service online using trepctl:
shell> trepctl online
10. Update the ownership and permissions on the data files on host2 :
host2 shell> sudo chown -R mysql:mysql /var/lib/mysqlhost2 shell> sudo chmod 770 /var/lib/mysql
11. Start the mysqld service on host2 :
shell> sudo /etc/init.d/mysql start
12. Put the host2 replication service online using trepctl:
shell> trepctl online
5.7. Switching Master HostsIn the event of a failure, or during the process of performing maintenance on a running cluster, the roles of the master and slaves withinthe cluster may need to be swapped.
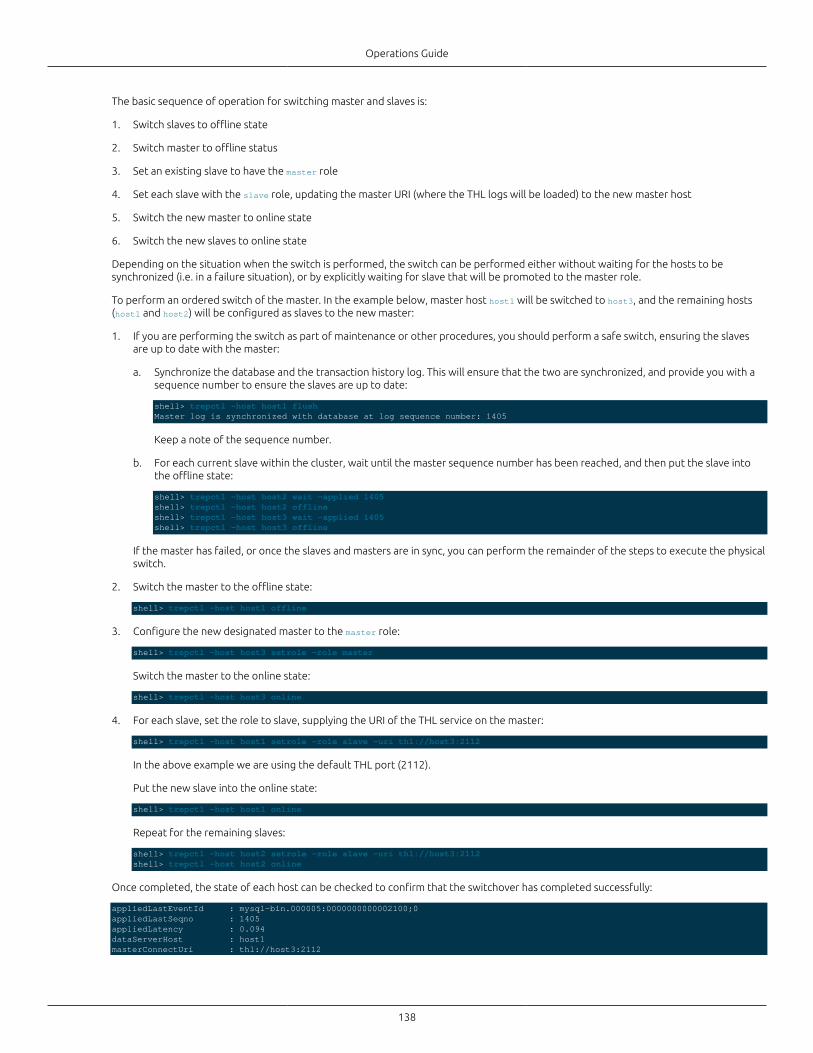
Operations Guide
138
The basic sequence of operation for switching master and slaves is:
1. Switch slaves to offline state
2. Switch master to offline status
3. Set an existing slave to have the master role
4. Set each slave with the slave role, updating the master URI (where the THL logs will be loaded) to the new master host
5. Switch the new master to online state
6. Switch the new slaves to online state
Depending on the situation when the switch is performed, the switch can be performed either without waiting for the hosts to besynchronized (i.e. in a failure situation), or by explicitly waiting for slave that will be promoted to the master role.
To perform an ordered switch of the master. In the example below, master host host1 will be switched to host3, and the remaining hosts(host1 and host2) will be configured as slaves to the new master:
1. If you are performing the switch as part of maintenance or other procedures, you should perform a safe switch, ensuring the slavesare up to date with the master:
a. Synchronize the database and the transaction history log. This will ensure that the two are synchronized, and provide you with asequence number to ensure the slaves are up to date:
shell> trepctl -host host1 flushMaster log is synchronized with database at log sequence number: 1405
Keep a note of the sequence number.
b. For each current slave within the cluster, wait until the master sequence number has been reached, and then put the slave intothe offline state:
shell> trepctl -host host2 wait -applied 1405shell> trepctl -host host2 offlineshell> trepctl -host host3 wait -applied 1405shell> trepctl -host host3 offline
If the master has failed, or once the slaves and masters are in sync, you can perform the remainder of the steps to execute the physicalswitch.
2. Switch the master to the offline state:
shell> trepctl -host host1 offline
3. Configure the new designated master to the master role:
shell> trepctl -host host3 setrole -role master
Switch the master to the online state:
shell> trepctl -host host3 online
4. For each slave, set the role to slave, supplying the URI of the THL service on the master:
shell> trepctl -host host1 setrole -role slave -uri thl://host3:2112
In the above example we are using the default THL port (2112).
Put the new slave into the online state:
shell> trepctl -host host1 online
Repeat for the remaining slaves:
shell> trepctl -host host2 setrole -role slave -uri thl://host3:2112shell> trepctl -host host2 online
Once completed, the state of each host can be checked to confirm that the switchover has completed successfully:
appliedLastEventId : mysql-bin.000005:0000000000002100;0appliedLastSeqno : 1405appliedLatency : 0.094dataServerHost : host1masterConnectUri : thl://host3:2112
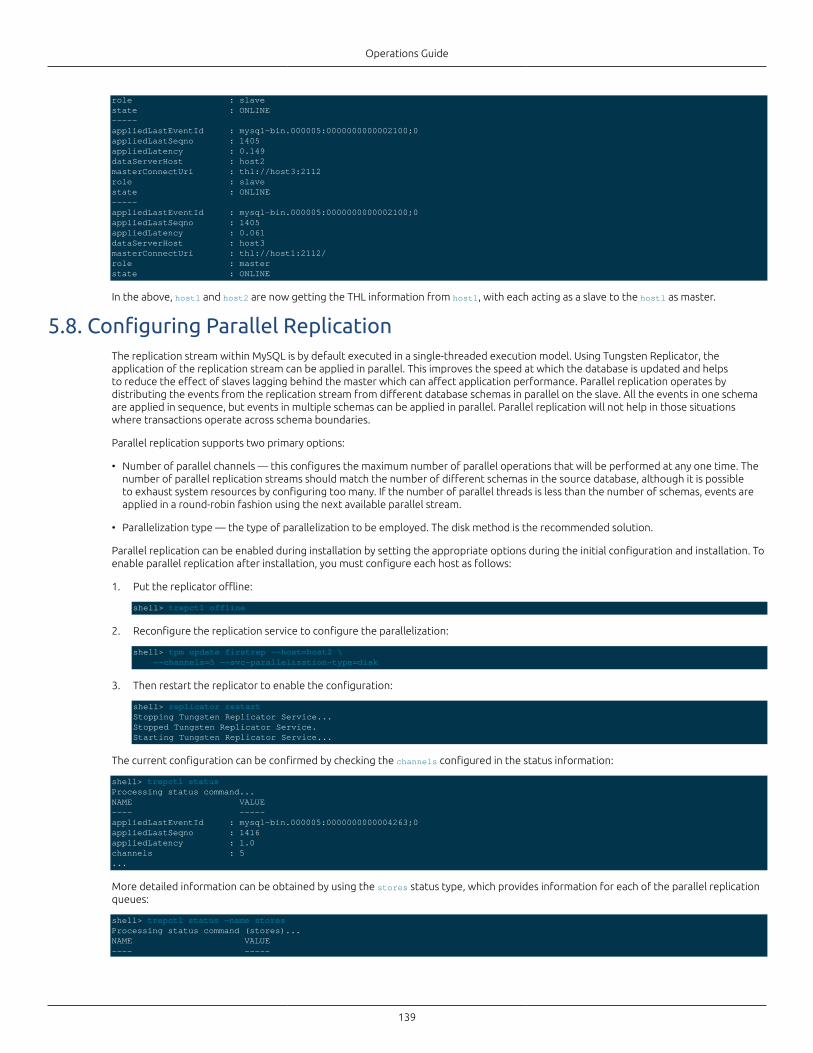
Operations Guide
139
role : slavestate : ONLINE-----appliedLastEventId : mysql-bin.000005:0000000000002100;0appliedLastSeqno : 1405appliedLatency : 0.149dataServerHost : host2masterConnectUri : thl://host3:2112role : slavestate : ONLINE-----appliedLastEventId : mysql-bin.000005:0000000000002100;0appliedLastSeqno : 1405appliedLatency : 0.061dataServerHost : host3masterConnectUri : thl://host1:2112/role : masterstate : ONLINE
In the above, host1 and host2 are now getting the THL information from host1, with each acting as a slave to the host1 as master.
5.8. Configuring Parallel ReplicationThe replication stream within MySQL is by default executed in a single-threaded execution model. Using Tungsten Replicator, theapplication of the replication stream can be applied in parallel. This improves the speed at which the database is updated and helpsto reduce the effect of slaves lagging behind the master which can affect application performance. Parallel replication operates bydistributing the events from the replication stream from different database schemas in parallel on the slave. All the events in one schemaare applied in sequence, but events in multiple schemas can be applied in parallel. Parallel replication will not help in those situationswhere transactions operate across schema boundaries.
Parallel replication supports two primary options:
• Number of parallel channels — this configures the maximum number of parallel operations that will be performed at any one time. Thenumber of parallel replication streams should match the number of different schemas in the source database, although it is possibleto exhaust system resources by configuring too many. If the number of parallel threads is less than the number of schemas, events areapplied in a round-robin fashion using the next available parallel stream.
• Parallelization type — the type of parallelization to be employed. The disk method is the recommended solution.
Parallel replication can be enabled during installation by setting the appropriate options during the initial configuration and installation. Toenable parallel replication after installation, you must configure each host as follows:
1. Put the replicator offline:
shell> trepctl offline
2. Reconfigure the replication service to configure the parallelization:
shell> tpm update firstrep --host=host2 \ --channels=5 --svc-parallelization-type=disk
3. Then restart the replicator to enable the configuration:
shell> replicator restartStopping Tungsten Replicator Service...Stopped Tungsten Replicator Service.Starting Tungsten Replicator Service...
The current configuration can be confirmed by checking the channels configured in the status information:
shell> trepctl statusProcessing status command...NAME VALUE---- -----appliedLastEventId : mysql-bin.000005:0000000000004263;0appliedLastSeqno : 1416appliedLatency : 1.0channels : 5...
More detailed information can be obtained by using the stores status type, which provides information for each of the parallel replicationqueues:
shell> trepctl status -name stores Processing status command (stores)...NAME VALUE---- -----
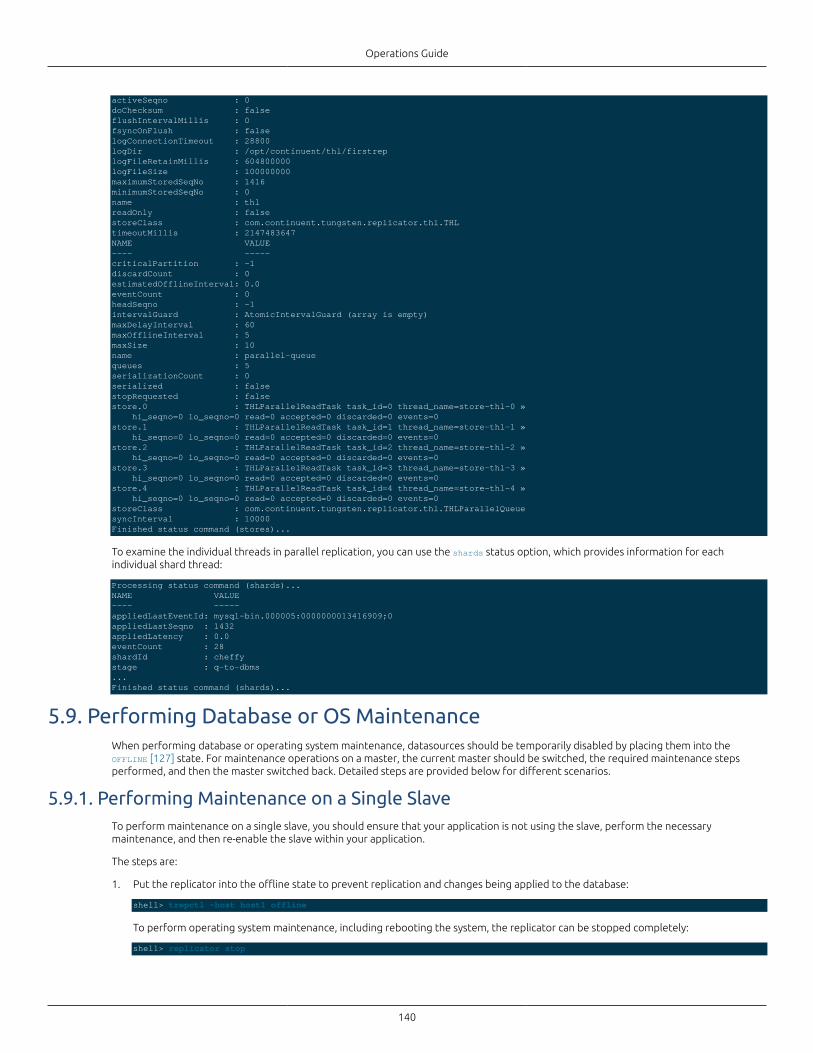
Operations Guide
140
activeSeqno : 0doChecksum : falseflushIntervalMillis : 0fsyncOnFlush : falselogConnectionTimeout : 28800logDir : /opt/continuent/thl/firstreplogFileRetainMillis : 604800000logFileSize : 100000000maximumStoredSeqNo : 1416minimumStoredSeqNo : 0name : thlreadOnly : falsestoreClass : com.continuent.tungsten.replicator.thl.THLtimeoutMillis : 2147483647NAME VALUE---- -----criticalPartition : -1discardCount : 0estimatedOfflineInterval: 0.0eventCount : 0headSeqno : -1intervalGuard : AtomicIntervalGuard (array is empty)maxDelayInterval : 60maxOfflineInterval : 5maxSize : 10name : parallel-queuequeues : 5serializationCount : 0serialized : falsestopRequested : falsestore.0 : THLParallelReadTask task_id=0 thread_name=store-thl-0 » hi_seqno=0 lo_seqno=0 read=0 accepted=0 discarded=0 events=0store.1 : THLParallelReadTask task_id=1 thread_name=store-thl-1 » hi_seqno=0 lo_seqno=0 read=0 accepted=0 discarded=0 events=0store.2 : THLParallelReadTask task_id=2 thread_name=store-thl-2 » hi_seqno=0 lo_seqno=0 read=0 accepted=0 discarded=0 events=0store.3 : THLParallelReadTask task_id=3 thread_name=store-thl-3 » hi_seqno=0 lo_seqno=0 read=0 accepted=0 discarded=0 events=0store.4 : THLParallelReadTask task_id=4 thread_name=store-thl-4 » hi_seqno=0 lo_seqno=0 read=0 accepted=0 discarded=0 events=0storeClass : com.continuent.tungsten.replicator.thl.THLParallelQueuesyncInterval : 10000Finished status command (stores)...
To examine the individual threads in parallel replication, you can use the shards status option, which provides information for eachindividual shard thread:
Processing status command (shards)...NAME VALUE---- -----appliedLastEventId: mysql-bin.000005:0000000013416909;0appliedLastSeqno : 1432appliedLatency : 0.0eventCount : 28shardId : cheffystage : q-to-dbms...Finished status command (shards)...
5.9. Performing Database or OS MaintenanceWhen performing database or operating system maintenance, datasources should be temporarily disabled by placing them into theOFFLINE [127] state. For maintenance operations on a master, the current master should be switched, the required maintenance stepsperformed, and then the master switched back. Detailed steps are provided below for different scenarios.
5.9.1. Performing Maintenance on a Single SlaveTo perform maintenance on a single slave, you should ensure that your application is not using the slave, perform the necessarymaintenance, and then re-enable the slave within your application.
The steps are:
1. Put the replicator into the offline state to prevent replication and changes being applied to the database:
shell> trepctl -host host1 offline
To perform operating system maintenance, including rebooting the system, the replicator can be stopped completely:
shell> replicator stop
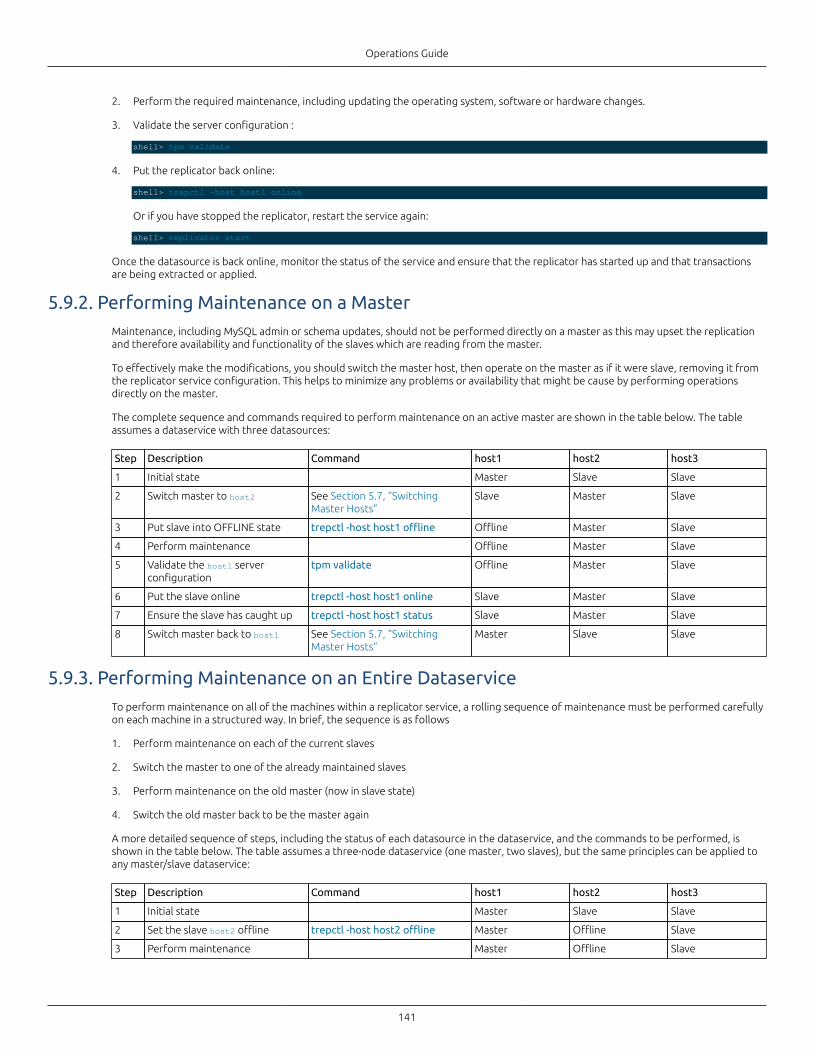
Operations Guide
141
2. Perform the required maintenance, including updating the operating system, software or hardware changes.
3. Validate the server configuration :
shell> tpm validate
4. Put the replicator back online:
shell> trepctl -host host1 online
Or if you have stopped the replicator, restart the service again:
shell> replicator start
Once the datasource is back online, monitor the status of the service and ensure that the replicator has started up and that transactionsare being extracted or applied.
5.9.2. Performing Maintenance on a MasterMaintenance, including MySQL admin or schema updates, should not be performed directly on a master as this may upset the replicationand therefore availability and functionality of the slaves which are reading from the master.
To effectively make the modifications, you should switch the master host, then operate on the master as if it were slave, removing it fromthe replicator service configuration. This helps to minimize any problems or availability that might be cause by performing operationsdirectly on the master.
The complete sequence and commands required to perform maintenance on an active master are shown in the table below. The tableassumes a dataservice with three datasources:
Step Description Command host1 host2 host3
1 Initial state Master Slave Slave
2 Switch master to host2 See Section 5.7, “SwitchingMaster Hosts”
Slave Master Slave
3 Put slave into OFFLINE state trepctl -host host1 offline Offline Master Slave
4 Perform maintenance Offline Master Slave
5 Validate the host1 serverconfiguration
tpm validate Offline Master Slave
6 Put the slave online trepctl -host host1 online Slave Master Slave
7 Ensure the slave has caught up trepctl -host host1 status Slave Master Slave
8 Switch master back to host1 See Section 5.7, “SwitchingMaster Hosts”
Master Slave Slave
5.9.3. Performing Maintenance on an Entire DataserviceTo perform maintenance on all of the machines within a replicator service, a rolling sequence of maintenance must be performed carefullyon each machine in a structured way. In brief, the sequence is as follows
1. Perform maintenance on each of the current slaves
2. Switch the master to one of the already maintained slaves
3. Perform maintenance on the old master (now in slave state)
4. Switch the old master back to be the master again
A more detailed sequence of steps, including the status of each datasource in the dataservice, and the commands to be performed, isshown in the table below. The table assumes a three-node dataservice (one master, two slaves), but the same principles can be applied toany master/slave dataservice:
Step Description Command host1 host2 host3
1 Initial state Master Slave Slave
2 Set the slave host2 offline trepctl -host host2 offline Master Offline Slave
3 Perform maintenance Master Offline Slave
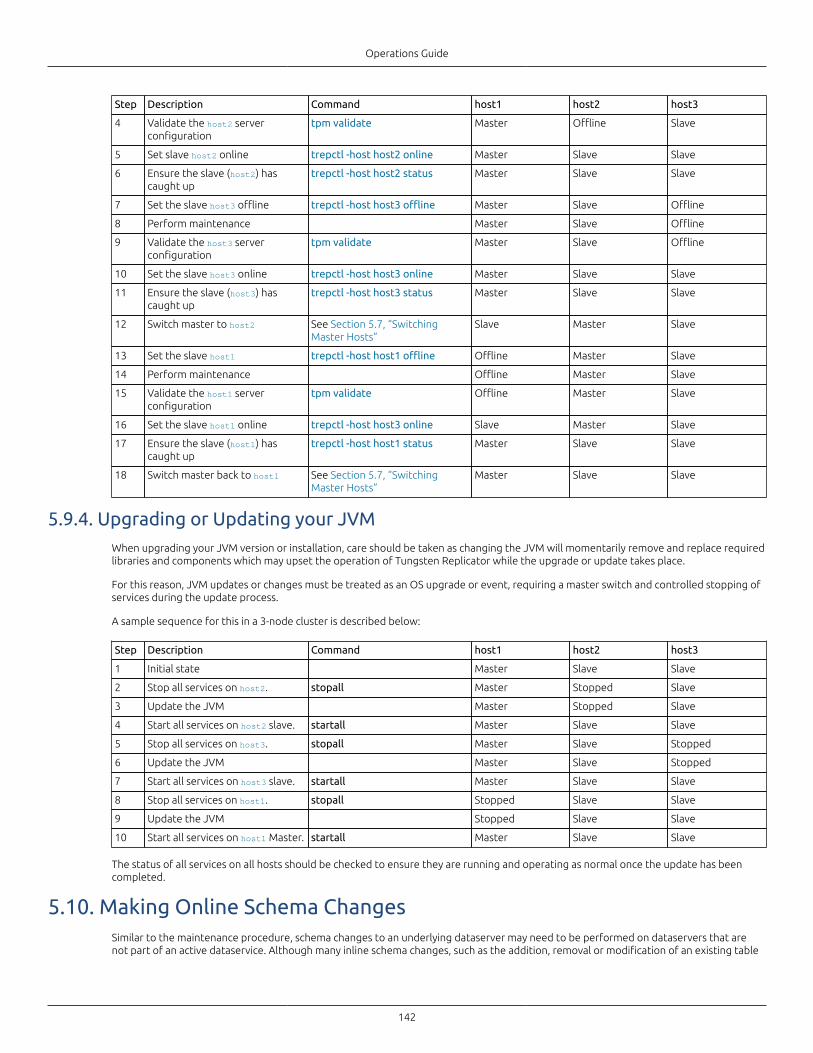
Operations Guide
142
Step Description Command host1 host2 host3
4 Validate the host2 serverconfiguration
tpm validate Master Offline Slave
5 Set slave host2 online trepctl -host host2 online Master Slave Slave
6 Ensure the slave (host2) hascaught up
trepctl -host host2 status Master Slave Slave
7 Set the slave host3 offline trepctl -host host3 offline Master Slave Offline
8 Perform maintenance Master Slave Offline
9 Validate the host3 serverconfiguration
tpm validate Master Slave Offline
10 Set the slave host3 online trepctl -host host3 online Master Slave Slave
11 Ensure the slave (host3) hascaught up
trepctl -host host3 status Master Slave Slave
12 Switch master to host2 See Section 5.7, “SwitchingMaster Hosts”
Slave Master Slave
13 Set the slave host1 trepctl -host host1 offline Offline Master Slave
14 Perform maintenance Offline Master Slave
15 Validate the host1 serverconfiguration
tpm validate Offline Master Slave
16 Set the slave host1 online trepctl -host host3 online Slave Master Slave
17 Ensure the slave (host1) hascaught up
trepctl -host host1 status Master Slave Slave
18 Switch master back to host1 See Section 5.7, “SwitchingMaster Hosts”
Master Slave Slave
5.9.4. Upgrading or Updating your JVMWhen upgrading your JVM version or installation, care should be taken as changing the JVM will momentarily remove and replace requiredlibraries and components which may upset the operation of Tungsten Replicator while the upgrade or update takes place.
For this reason, JVM updates or changes must be treated as an OS upgrade or event, requiring a master switch and controlled stopping ofservices during the update process.
A sample sequence for this in a 3-node cluster is described below:
Step Description Command host1 host2 host3
1 Initial state Master Slave Slave
2 Stop all services on host2. stopall Master Stopped Slave
3 Update the JVM Master Stopped Slave
4 Start all services on host2 slave. startall Master Slave Slave
5 Stop all services on host3. stopall Master Slave Stopped
6 Update the JVM Master Slave Stopped
7 Start all services on host3 slave. startall Master Slave Slave
8 Stop all services on host1. stopall Stopped Slave Slave
9 Update the JVM Stopped Slave Slave
10 Start all services on host1 Master. startall Master Slave Slave
The status of all services on all hosts should be checked to ensure they are running and operating as normal once the update has beencompleted.
5.10. Making Online Schema ChangesSimilar to the maintenance procedure, schema changes to an underlying dataserver may need to be performed on dataservers that arenot part of an active dataservice. Although many inline schema changes, such as the addition, removal or modification of an existing table
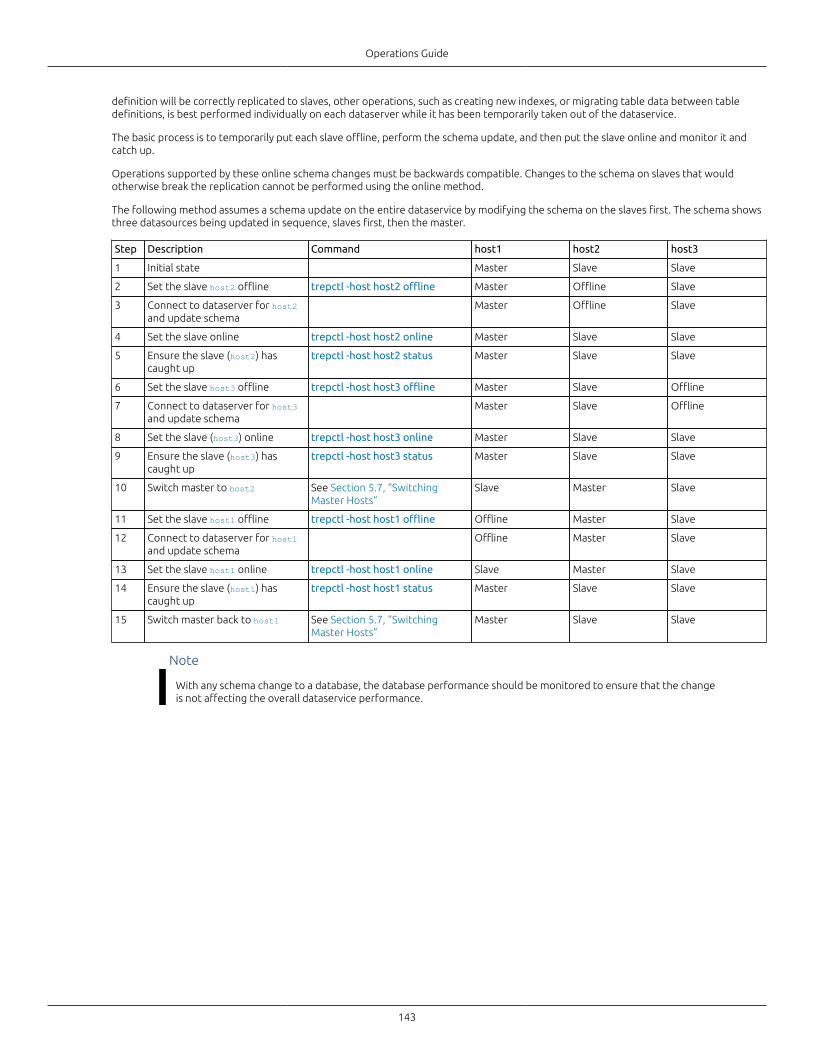
Operations Guide
143
definition will be correctly replicated to slaves, other operations, such as creating new indexes, or migrating table data between tabledefinitions, is best performed individually on each dataserver while it has been temporarily taken out of the dataservice.
The basic process is to temporarily put each slave offline, perform the schema update, and then put the slave online and monitor it andcatch up.
Operations supported by these online schema changes must be backwards compatible. Changes to the schema on slaves that wouldotherwise break the replication cannot be performed using the online method.
The following method assumes a schema update on the entire dataservice by modifying the schema on the slaves first. The schema showsthree datasources being updated in sequence, slaves first, then the master.
Step Description Command host1 host2 host3
1 Initial state Master Slave Slave
2 Set the slave host2 offline trepctl -host host2 offline Master Offline Slave
3 Connect to dataserver for host2and update schema
Master Offline Slave
4 Set the slave online trepctl -host host2 online Master Slave Slave
5 Ensure the slave (host2) hascaught up
trepctl -host host2 status Master Slave Slave
6 Set the slave host3 offline trepctl -host host3 offline Master Slave Offline
7 Connect to dataserver for host3and update schema
Master Slave Offline
8 Set the slave (host3) online trepctl -host host3 online Master Slave Slave
9 Ensure the slave (host3) hascaught up
trepctl -host host3 status Master Slave Slave
10 Switch master to host2 See Section 5.7, “SwitchingMaster Hosts”
Slave Master Slave
11 Set the slave host1 offline trepctl -host host1 offline Offline Master Slave
12 Connect to dataserver for host1and update schema
Offline Master Slave
13 Set the slave host1 online trepctl -host host1 online Slave Master Slave
14 Ensure the slave (host1) hascaught up
trepctl -host host1 status Master Slave Slave
15 Switch master back to host1 See Section 5.7, “SwitchingMaster Hosts”
Master Slave Slave
Note
With any schema change to a database, the database performance should be monitored to ensure that the changeis not affecting the overall dataservice performance.
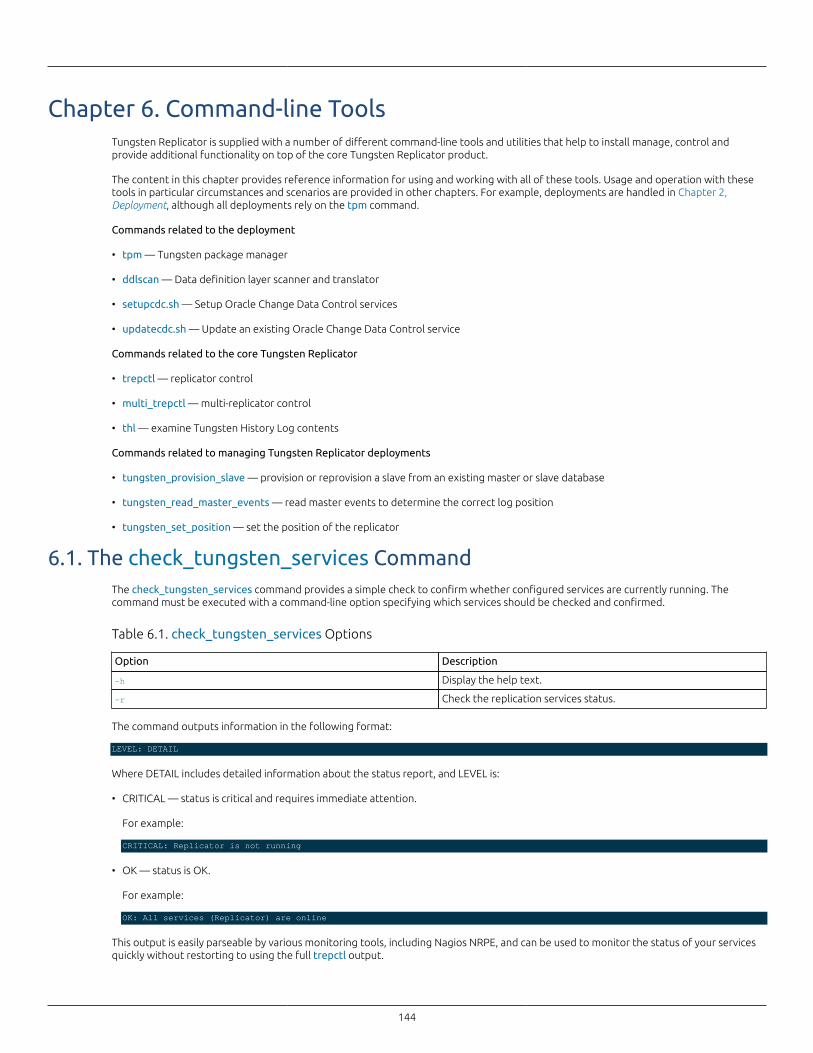
144
Chapter 6. Command-line ToolsTungsten Replicator is supplied with a number of different command-line tools and utilities that help to install manage, control andprovide additional functionality on top of the core Tungsten Replicator product.
The content in this chapter provides reference information for using and working with all of these tools. Usage and operation with thesetools in particular circumstances and scenarios are provided in other chapters. For example, deployments are handled in Chapter 2,Deployment, although all deployments rely on the tpm command.
Commands related to the deployment
• tpm — Tungsten package manager
• ddlscan — Data definition layer scanner and translator
• setupcdc.sh — Setup Oracle Change Data Control services
• updatecdc.sh — Update an existing Oracle Change Data Control service
Commands related to the core Tungsten Replicator
• trepctl — replicator control
• multi_trepctl — multi-replicator control
• thl — examine Tungsten History Log contents
Commands related to managing Tungsten Replicator deployments
• tungsten_provision_slave — provision or reprovision a slave from an existing master or slave database
• tungsten_read_master_events — read master events to determine the correct log position
• tungsten_set_position — set the position of the replicator
6.1. The check_tungsten_services CommandThe check_tungsten_services command provides a simple check to confirm whether configured services are currently running. Thecommand must be executed with a command-line option specifying which services should be checked and confirmed.
Table 6.1. check_tungsten_services Options
Option Description
-h Display the help text.
-r Check the replication services status.
The command outputs information in the following format:
LEVEL: DETAIL
Where DETAIL includes detailed information about the status report, and LEVEL is:
• CRITICAL — status is critical and requires immediate attention.
For example:
CRITICAL: Replicator is not running
• OK — status is OK.
For example:
OK: All services (Replicator) are online
This output is easily parseable by various monitoring tools, including Nagios NRPE, and can be used to monitor the status of your servicesquickly without restorting to using the full trepctl output.
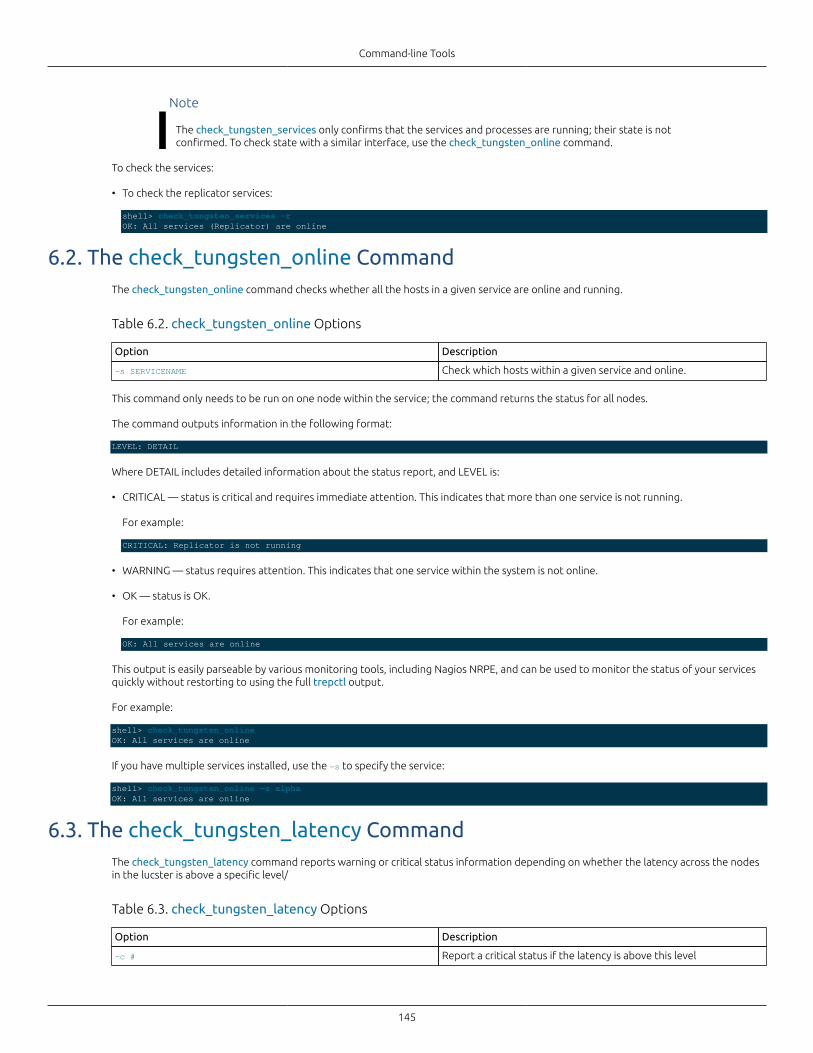
Command-line Tools
145
Note
The check_tungsten_services only confirms that the services and processes are running; their state is notconfirmed. To check state with a similar interface, use the check_tungsten_online command.
To check the services:
• To check the replicator services:
shell> check_tungsten_services -rOK: All services (Replicator) are online
6.2. The check_tungsten_online CommandThe check_tungsten_online command checks whether all the hosts in a given service are online and running.
Table 6.2. check_tungsten_online Options
Option Description
-s SERVICENAME Check which hosts within a given service and online.
This command only needs to be run on one node within the service; the command returns the status for all nodes.
The command outputs information in the following format:
LEVEL: DETAIL
Where DETAIL includes detailed information about the status report, and LEVEL is:
• CRITICAL — status is critical and requires immediate attention. This indicates that more than one service is not running.
For example:
CRITICAL: Replicator is not running
• WARNING — status requires attention. This indicates that one service within the system is not online.
• OK — status is OK.
For example:
OK: All services are online
This output is easily parseable by various monitoring tools, including Nagios NRPE, and can be used to monitor the status of your servicesquickly without restorting to using the full trepctl output.
For example:
shell> check_tungsten_onlineOK: All services are online
If you have multiple services installed, use the -s to specify the service:
shell> check_tungsten_online -s alphaOK: All services are online
6.3. The check_tungsten_latency CommandThe check_tungsten_latency command reports warning or critical status information depending on whether the latency across the nodesin the lucster is above a specific level/
Table 6.3. check_tungsten_latency Options
Option Description
-c # Report a critical status if the latency is above this level
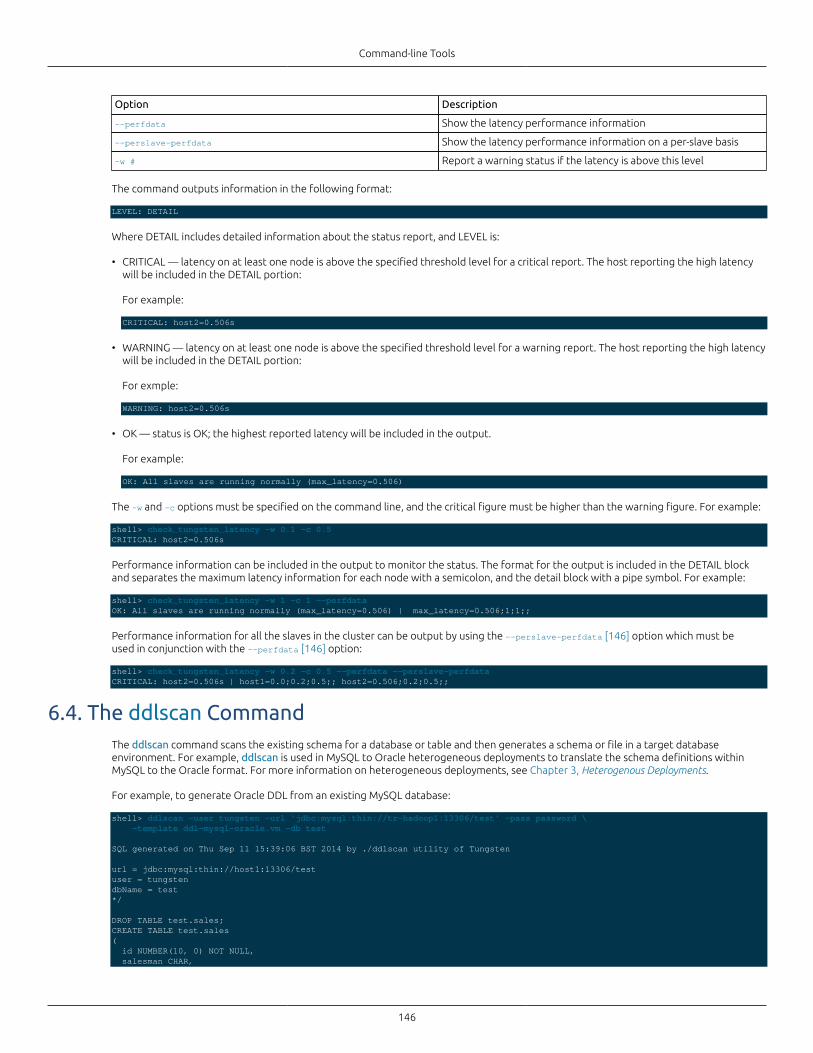
Command-line Tools
146
Option Description
--perfdata Show the latency performance information
--perslave-perfdata Show the latency performance information on a per-slave basis
-w # Report a warning status if the latency is above this level
The command outputs information in the following format:
LEVEL: DETAIL
Where DETAIL includes detailed information about the status report, and LEVEL is:
• CRITICAL — latency on at least one node is above the specified threshold level for a critical report. The host reporting the high latencywill be included in the DETAIL portion:
For example:
CRITICAL: host2=0.506s
• WARNING — latency on at least one node is above the specified threshold level for a warning report. The host reporting the high latencywill be included in the DETAIL portion:
For exmple:
WARNING: host2=0.506s
• OK — status is OK; the highest reported latency will be included in the output.
For example:
OK: All slaves are running normally (max_latency=0.506)
The -w and -c options must be specified on the command line, and the critical figure must be higher than the warning figure. For example:
shell> check_tungsten_latency -w 0.1 -c 0.5CRITICAL: host2=0.506s
Performance information can be included in the output to monitor the status. The format for the output is included in the DETAIL blockand separates the maximum latency information for each node with a semicolon, and the detail block with a pipe symbol. For example:
shell> check_tungsten_latency -w 1 -c 1 --perfdataOK: All slaves are running normally (max_latency=0.506) | max_latency=0.506;1;1;;
Performance information for all the slaves in the cluster can be output by using the --perslave-perfdata [146] option which must beused in conjunction with the --perfdata [146] option:
shell> check_tungsten_latency -w 0.2 -c 0.5 --perfdata --perslave-perfdataCRITICAL: host2=0.506s | host1=0.0;0.2;0.5;; host2=0.506;0.2;0.5;;
6.4. The ddlscan CommandThe ddlscan command scans the existing schema for a database or table and then generates a schema or file in a target databaseenvironment. For example, ddlscan is used in MySQL to Oracle heterogeneous deployments to translate the schema definitions withinMySQL to the Oracle format. For more information on heterogeneous deployments, see Chapter 3, Heterogenous Deployments.
For example, to generate Oracle DDL from an existing MySQL database:
shell> ddlscan -user tungsten -url 'jdbc:mysql:thin://tr-hadoop1:13306/test' -pass password \ -template ddl-mysql-oracle.vm -db test
SQL generated on Thu Sep 11 15:39:06 BST 2014 by ./ddlscan utility of Tungsten
url = jdbc:mysql:thin://host1:13306/testuser = tungstendbName = test*/
DROP TABLE test.sales;CREATE TABLE test.sales( id NUMBER(10, 0) NOT NULL, salesman CHAR,
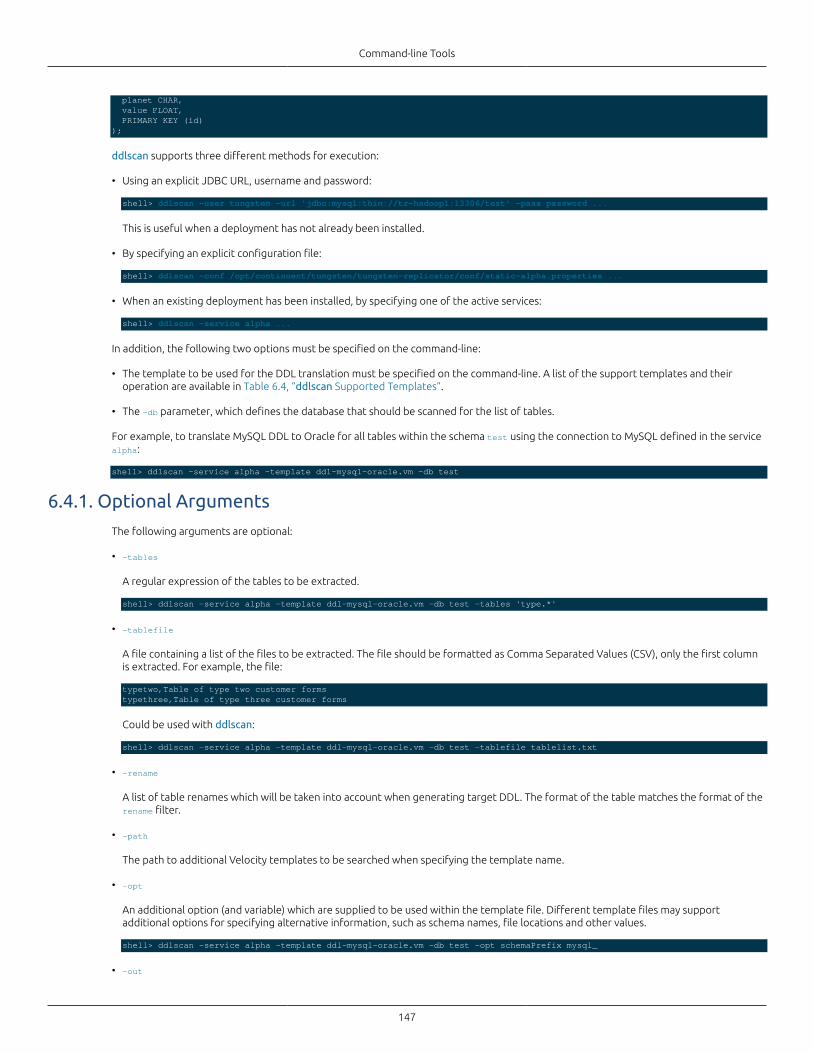
Command-line Tools
147
planet CHAR, value FLOAT, PRIMARY KEY (id));
ddlscan supports three different methods for execution:
• Using an explicit JDBC URL, username and password:
shell> ddlscan -user tungsten -url 'jdbc:mysql:thin://tr-hadoop1:13306/test' -pass password ...
This is useful when a deployment has not already been installed.
• By specifying an explicit configuration file:
shell> ddlscan -conf /opt/continuent/tungsten/tungsten-replicator/conf/static-alpha.properties ...
• When an existing deployment has been installed, by specifying one of the active services:
shell> ddlscan -service alpha ...
In addition, the following two options must be specified on the command-line:
• The template to be used for the DDL translation must be specified on the command-line. A list of the support templates and theiroperation are available in Table 6.4, “ddlscan Supported Templates”.
• The -db parameter, which defines the database that should be scanned for the list of tables.
For example, to translate MySQL DDL to Oracle for all tables within the schema test using the connection to MySQL defined in the servicealpha:
shell> ddlscan -service alpha -template ddl-mysql-oracle.vm -db test
6.4.1. Optional Arguments
The following arguments are optional:
• -tables
A regular expression of the tables to be extracted.
shell> ddlscan -service alpha -template ddl-mysql-oracle.vm -db test -tables 'type.*'
• -tablefile
A file containing a list of the files to be extracted. The file should be formatted as Comma Separated Values (CSV), only the first columnis extracted. For example, the file:
typetwo,Table of type two customer formstypethree,Table of type three customer forms
Could be used with ddlscan:
shell> ddlscan -service alpha -template ddl-mysql-oracle.vm -db test -tablefile tablelist.txt
• -rename
A list of table renames which will be taken into account when generating target DDL. The format of the table matches the format of therename filter.
• -path
The path to additional Velocity templates to be searched when specifying the template name.
• -opt
An additional option (and variable) which are supplied to be used within the template file. Different template files may supportadditional options for specifying alternative information, such as schema names, file locations and other values.
shell> ddlscan -service alpha -template ddl-mysql-oracle.vm -db test -opt schemaPrefix mysql_
• -out
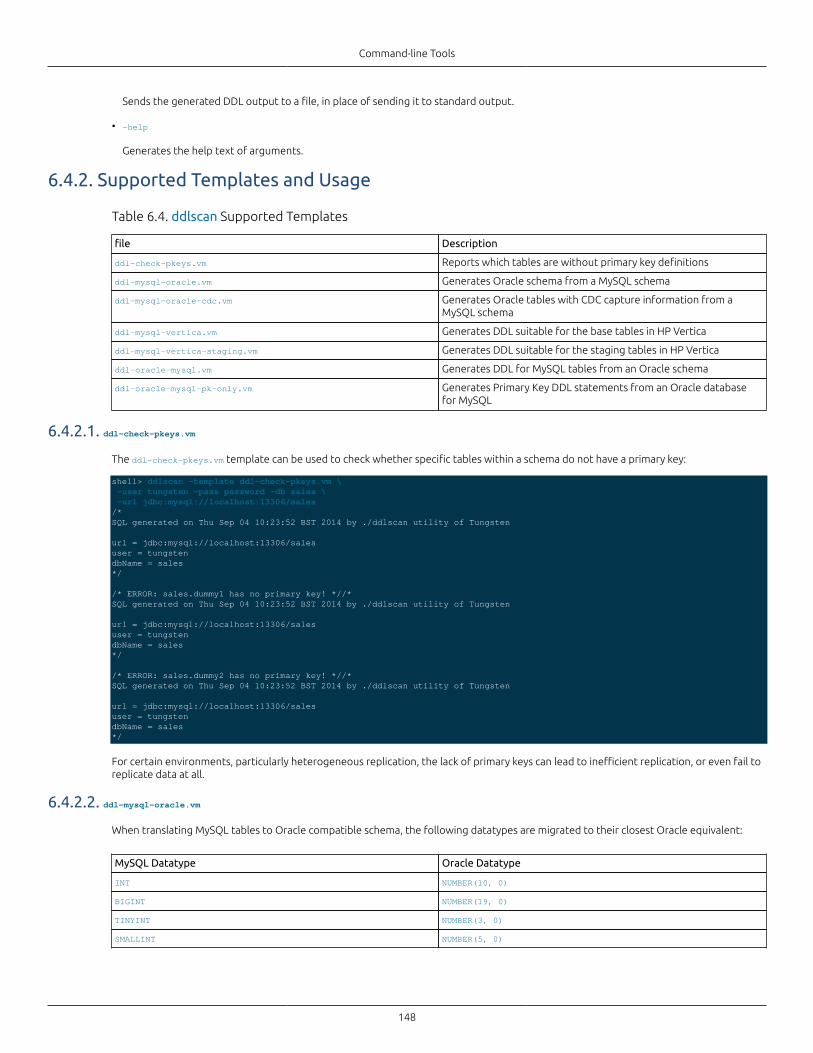
Command-line Tools
148
Sends the generated DDL output to a file, in place of sending it to standard output.
• -help
Generates the help text of arguments.
6.4.2. Supported Templates and Usage
Table 6.4. ddlscan Supported Templates
file Description
ddl-check-pkeys.vm Reports which tables are without primary key definitions
ddl-mysql-oracle.vm Generates Oracle schema from a MySQL schema
ddl-mysql-oracle-cdc.vm Generates Oracle tables with CDC capture information from aMySQL schema
ddl-mysql-vertica.vm Generates DDL suitable for the base tables in HP Vertica
ddl-mysql-vertica-staging.vm Generates DDL suitable for the staging tables in HP Vertica
ddl-oracle-mysql.vm Generates DDL for MySQL tables from an Oracle schema
ddl-oracle-mysql-pk-only.vm Generates Primary Key DDL statements from an Oracle databasefor MySQL
6.4.2.1. ddl-check-pkeys.vm
The ddl-check-pkeys.vm template can be used to check whether specific tables within a schema do not have a primary key:
shell> ddlscan -template ddl-check-pkeys.vm \ -user tungsten -pass password -db sales \ -url jdbc:mysql://localhost:13306/sales /*SQL generated on Thu Sep 04 10:23:52 BST 2014 by ./ddlscan utility of Tungsten
url = jdbc:mysql://localhost:13306/salesuser = tungstendbName = sales*/
/* ERROR: sales.dummy1 has no primary key! *//*SQL generated on Thu Sep 04 10:23:52 BST 2014 by ./ddlscan utility of Tungsten
url = jdbc:mysql://localhost:13306/salesuser = tungstendbName = sales*/
/* ERROR: sales.dummy2 has no primary key! *//*SQL generated on Thu Sep 04 10:23:52 BST 2014 by ./ddlscan utility of Tungsten
url = jdbc:mysql://localhost:13306/salesuser = tungstendbName = sales*/
For certain environments, particularly heterogeneous replication, the lack of primary keys can lead to inefficient replication, or even fail toreplicate data at all.
6.4.2.2. ddl-mysql-oracle.vm
When translating MySQL tables to Oracle compatible schema, the following datatypes are migrated to their closest Oracle equivalent:
MySQL Datatype Oracle Datatype
INT NUMBER(10, 0)
BIGINT NUMBER(19, 0)
TINYINT NUMBER(3, 0)
SMALLINT NUMBER(5, 0)
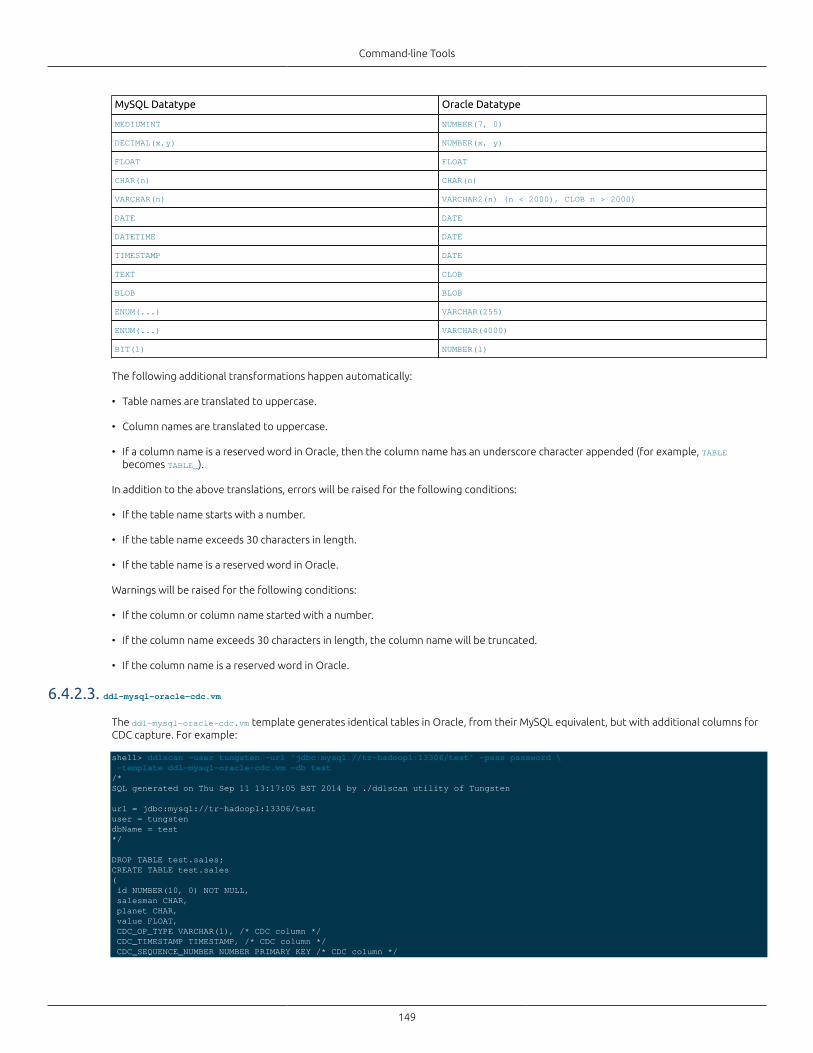
Command-line Tools
149
MySQL Datatype Oracle Datatype
MEDIUMINT NUMBER(7, 0)
DECIMAL(x,y) NUMBER(x, y)
FLOAT FLOAT
CHAR(n) CHAR(n)
VARCHAR(n) VARCHAR2(n) (n < 2000), CLOB n > 2000)
DATE DATE
DATETIME DATE
TIMESTAMP DATE
TEXT CLOB
BLOB BLOB
ENUM(...) VARCHAR(255)
ENUM(...) VARCHAR(4000)
BIT(1) NUMBER(1)
The following additional transformations happen automatically:
• Table names are translated to uppercase.
• Column names are translated to uppercase.
• If a column name is a reserved word in Oracle, then the column name has an underscore character appended (for example, TABLEbecomes TABLE_).
In addition to the above translations, errors will be raised for the following conditions:
• If the table name starts with a number.
• If the table name exceeds 30 characters in length.
• If the table name is a reserved word in Oracle.
Warnings will be raised for the following conditions:
• If the column or column name started with a number.
• If the column name exceeds 30 characters in length, the column name will be truncated.
• If the column name is a reserved word in Oracle.
6.4.2.3. ddl-mysql-oracle-cdc.vm
The ddl-mysql-oracle-cdc.vm template generates identical tables in Oracle, from their MySQL equivalent, but with additional columns forCDC capture. For example:
shell> ddlscan -user tungsten -url 'jdbc:mysql://tr-hadoop1:13306/test' -pass password \ -template ddl-mysql-oracle-cdc.vm -db test/*SQL generated on Thu Sep 11 13:17:05 BST 2014 by ./ddlscan utility of Tungsten
url = jdbc:mysql://tr-hadoop1:13306/testuser = tungstendbName = test*/
DROP TABLE test.sales;CREATE TABLE test.sales( id NUMBER(10, 0) NOT NULL, salesman CHAR, planet CHAR, value FLOAT, CDC_OP_TYPE VARCHAR(1), /* CDC column */ CDC_TIMESTAMP TIMESTAMP, /* CDC column */ CDC_SEQUENCE_NUMBER NUMBER PRIMARY KEY /* CDC column */
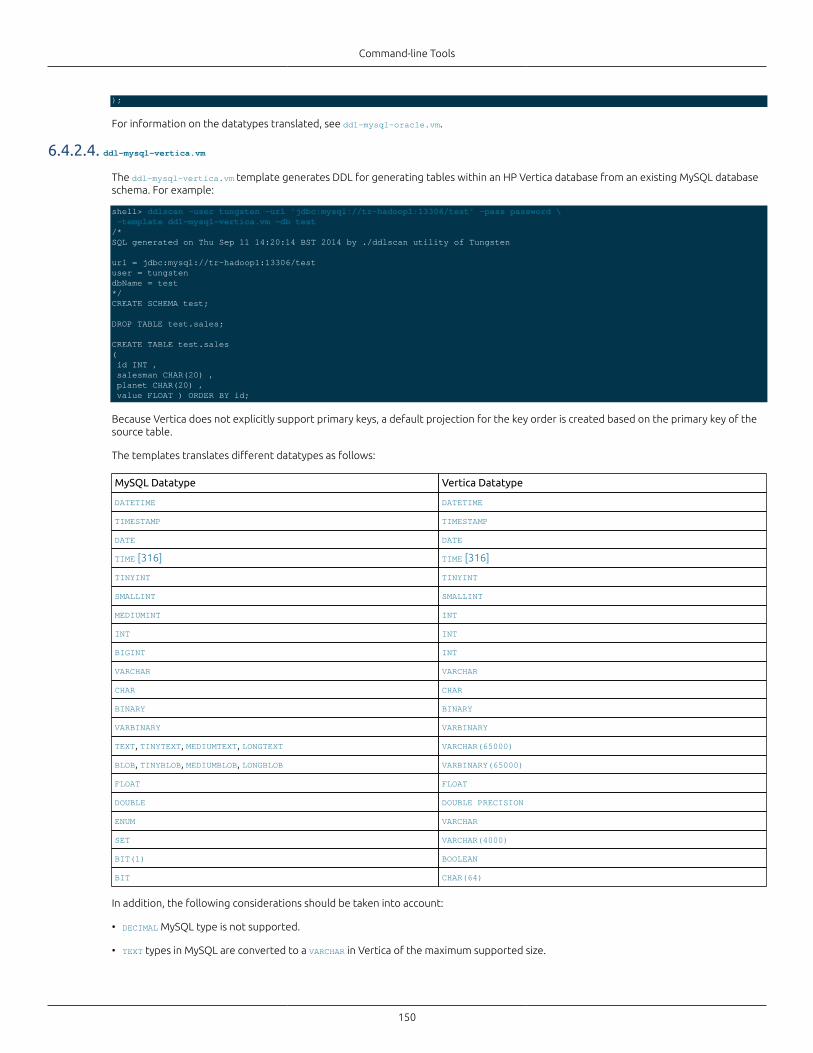
Command-line Tools
150
);
For information on the datatypes translated, see ddl-mysql-oracle.vm.
6.4.2.4. ddl-mysql-vertica.vm
The ddl-mysql-vertica.vm template generates DDL for generating tables within an HP Vertica database from an existing MySQL databaseschema. For example:
shell> ddlscan -user tungsten -url 'jdbc:mysql://tr-hadoop1:13306/test' -pass password \ -template ddl-mysql-vertica.vm -db test/*SQL generated on Thu Sep 11 14:20:14 BST 2014 by ./ddlscan utility of Tungsten
url = jdbc:mysql://tr-hadoop1:13306/testuser = tungstendbName = test*/CREATE SCHEMA test;
DROP TABLE test.sales;
CREATE TABLE test.sales( id INT , salesman CHAR(20) , planet CHAR(20) , value FLOAT ) ORDER BY id;
Because Vertica does not explicitly support primary keys, a default projection for the key order is created based on the primary key of thesource table.
The templates translates different datatypes as follows:
MySQL Datatype Vertica Datatype
DATETIME DATETIME
TIMESTAMP TIMESTAMP
DATE DATE
TIME [316] TIME [316]
TINYINT TINYINT
SMALLINT SMALLINT
MEDIUMINT INT
INT INT
BIGINT INT
VARCHAR VARCHAR
CHAR CHAR
BINARY BINARY
VARBINARY VARBINARY
TEXT, TINYTEXT, MEDIUMTEXT, LONGTEXT VARCHAR(65000)
BLOB, TINYBLOB, MEDIUMBLOB, LONGBLOB VARBINARY(65000)
FLOAT FLOAT
DOUBLE DOUBLE PRECISION
ENUM VARCHAR
SET VARCHAR(4000)
BIT(1) BOOLEAN
BIT CHAR(64)
In addition, the following considerations should be taken into account:
• DECIMAL MySQL type is not supported.
• TEXT types in MySQL are converted to a VARCHAR in Vertica of the maximum supported size.
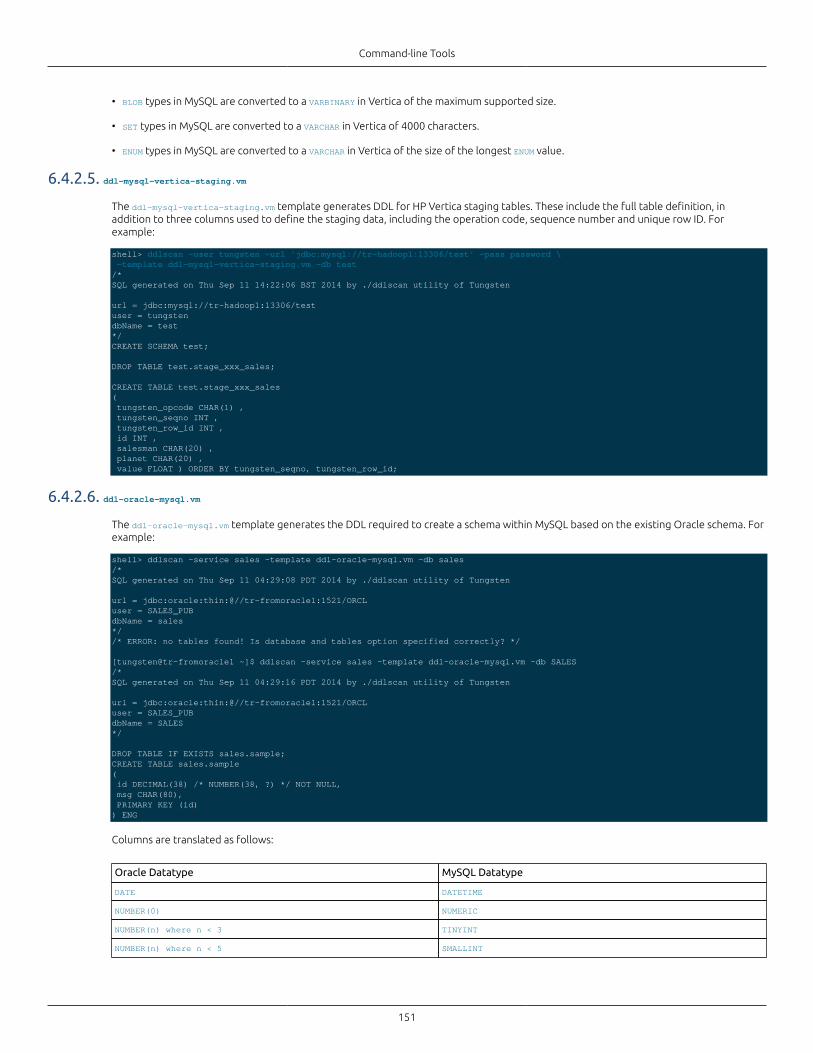
Command-line Tools
151
• BLOB types in MySQL are converted to a VARBINARY in Vertica of the maximum supported size.
• SET types in MySQL are converted to a VARCHAR in Vertica of 4000 characters.
• ENUM types in MySQL are converted to a VARCHAR in Vertica of the size of the longest ENUM value.
6.4.2.5. ddl-mysql-vertica-staging.vm
The ddl-mysql-vertica-staging.vm template generates DDL for HP Vertica staging tables. These include the full table definition, inaddition to three columns used to define the staging data, including the operation code, sequence number and unique row ID. Forexample:
shell> ddlscan -user tungsten -url 'jdbc:mysql://tr-hadoop1:13306/test' -pass password \ -template ddl-mysql-vertica-staging.vm -db test/*SQL generated on Thu Sep 11 14:22:06 BST 2014 by ./ddlscan utility of Tungsten
url = jdbc:mysql://tr-hadoop1:13306/testuser = tungstendbName = test*/CREATE SCHEMA test;
DROP TABLE test.stage_xxx_sales;
CREATE TABLE test.stage_xxx_sales( tungsten_opcode CHAR(1) , tungsten_seqno INT , tungsten_row_id INT , id INT , salesman CHAR(20) , planet CHAR(20) , value FLOAT ) ORDER BY tungsten_seqno, tungsten_row_id;
6.4.2.6. ddl-oracle-mysql.vm
The ddl-oracle-mysql.vm template generates the DDL required to create a schema within MySQL based on the existing Oracle schema. Forexample:
shell> ddlscan -service sales -template ddl-oracle-mysql.vm -db sales/*SQL generated on Thu Sep 11 04:29:08 PDT 2014 by ./ddlscan utility of Tungsten
url = jdbc:oracle:thin:@//tr-fromoracle1:1521/ORCLuser = SALES_PUBdbName = sales*//* ERROR: no tables found! Is database and tables option specified correctly? */
[tungsten@tr-fromoracle1 ~]$ ddlscan -service sales -template ddl-oracle-mysql.vm -db SALES/*SQL generated on Thu Sep 11 04:29:16 PDT 2014 by ./ddlscan utility of Tungsten
url = jdbc:oracle:thin:@//tr-fromoracle1:1521/ORCLuser = SALES_PUBdbName = SALES*/
DROP TABLE IF EXISTS sales.sample;CREATE TABLE sales.sample( id DECIMAL(38) /* NUMBER(38, ?) */ NOT NULL, msg CHAR(80), PRIMARY KEY (id)) ENG
Columns are translated as follows:
Oracle Datatype MySQL Datatype
DATE DATETIME
NUMBER(0) NUMERIC
NUMBER(n) where n < 3 TINYINT
NUMBER(n) where n < 5 SMALLINT
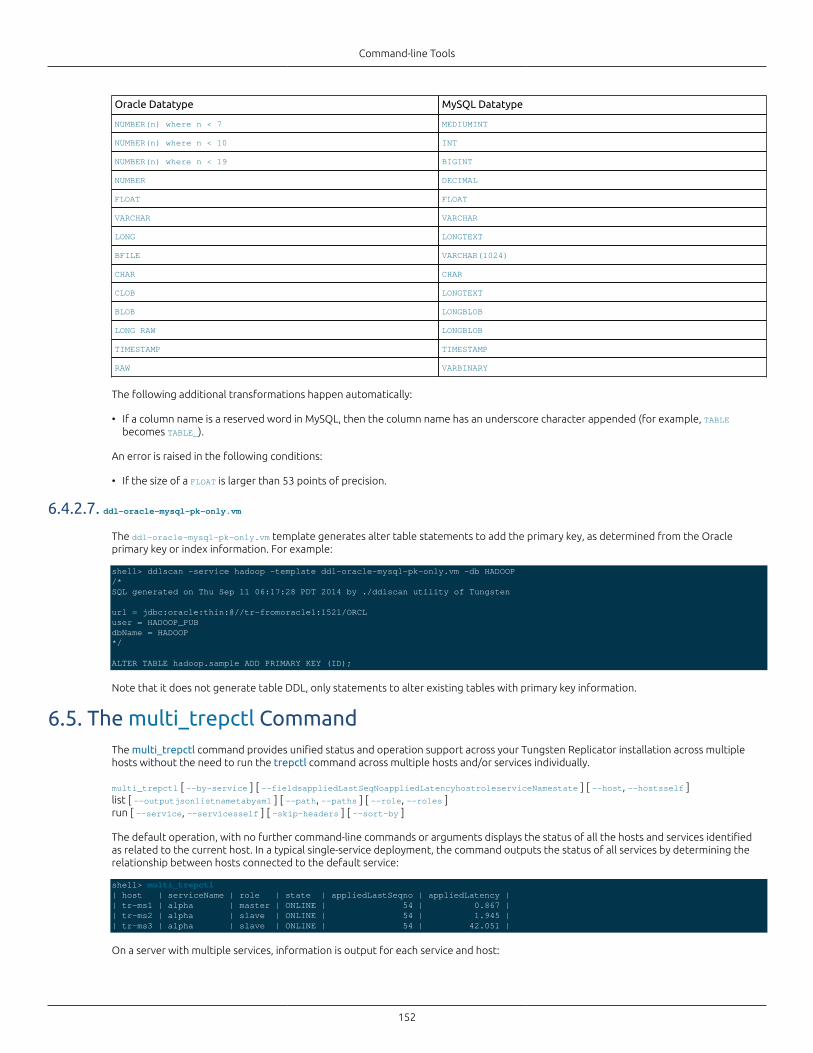
Command-line Tools
152
Oracle Datatype MySQL Datatype
NUMBER(n) where n < 7 MEDIUMINT
NUMBER(n) where n < 10 INT
NUMBER(n) where n < 19 BIGINT
NUMBER DECIMAL
FLOAT FLOAT
VARCHAR VARCHAR
LONG LONGTEXT
BFILE VARCHAR(1024)
CHAR CHAR
CLOB LONGTEXT
BLOB LONGBLOB
LONG RAW LONGBLOB
TIMESTAMP TIMESTAMP
RAW VARBINARY
The following additional transformations happen automatically:
• If a column name is a reserved word in MySQL, then the column name has an underscore character appended (for example, TABLEbecomes TABLE_).
An error is raised in the following conditions:
• If the size of a FLOAT is larger than 53 points of precision.
6.4.2.7. ddl-oracle-mysql-pk-only.vm
The ddl-oracle-mysql-pk-only.vm template generates alter table statements to add the primary key, as determined from the Oracleprimary key or index information. For example:
shell> ddlscan -service hadoop -template ddl-oracle-mysql-pk-only.vm -db HADOOP/*SQL generated on Thu Sep 11 06:17:28 PDT 2014 by ./ddlscan utility of Tungsten
url = jdbc:oracle:thin:@//tr-fromoracle1:1521/ORCLuser = HADOOP_PUBdbName = HADOOP*/
ALTER TABLE hadoop.sample ADD PRIMARY KEY (ID);
Note that it does not generate table DDL, only statements to alter existing tables with primary key information.
6.5. The multi_trepctl CommandThe multi_trepctl command provides unified status and operation support across your Tungsten Replicator installation across multiplehosts without the need to run the trepctl command across multiple hosts and/or services individually.
multi_trepctl [ --by-service ] [ --fieldsappliedLastSeqNoappliedLatencyhostroleserviceNamestate ] [ --host, --hostsself ]list [ --outputjsonlistnametabyaml ] [ --path, --paths ] [ --role, --roles ]run [ --service, --servicesself ] [ -skip-headers ] [ --sort-by ]
The default operation, with no further command-line commands or arguments displays the status of all the hosts and services identifiedas related to the current host. In a typical single-service deployment, the command outputs the status of all services by determining therelationship between hosts connected to the default service:
shell> multi_trepctl| host | serviceName | role | state | appliedLastSeqno | appliedLatency || tr-ms1 | alpha | master | ONLINE | 54 | 0.867 || tr-ms2 | alpha | slave | ONLINE | 54 | 1.945 || tr-ms3 | alpha | slave | ONLINE | 54 | 42.051 |
On a server with multiple services, information is output for each service and host:
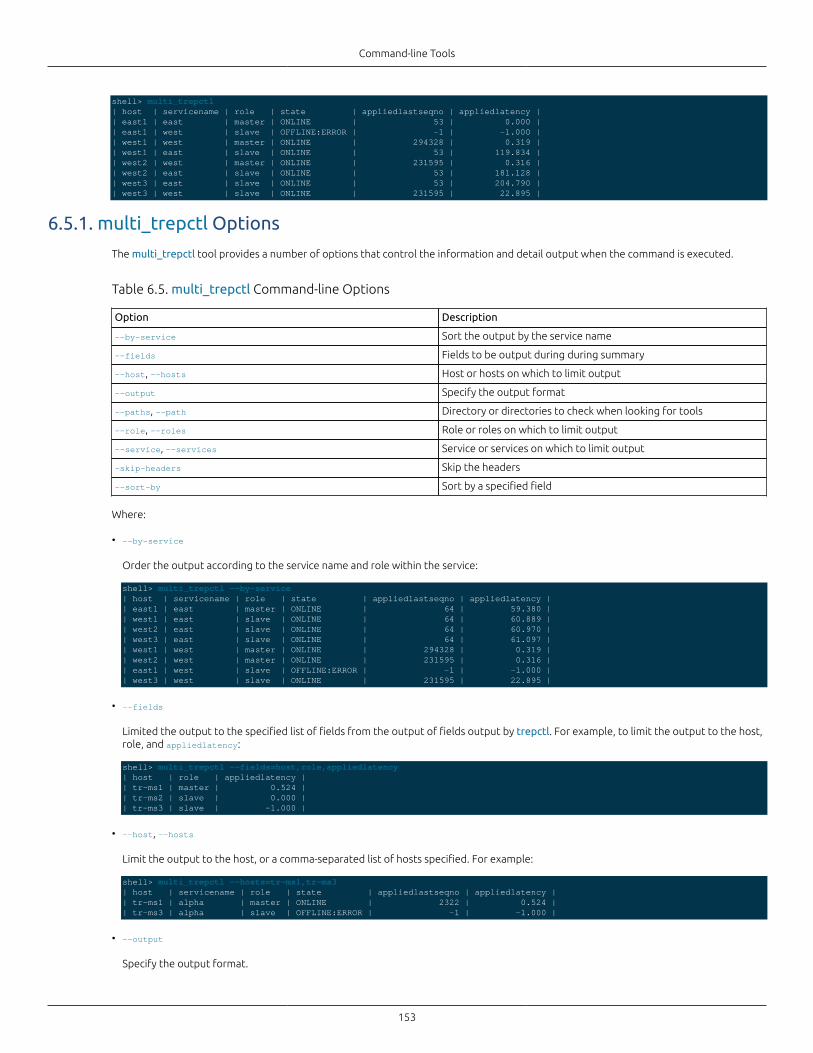
Command-line Tools
153
shell> multi_trepctl | host | servicename | role | state | appliedlastseqno | appliedlatency || east1 | east | master | ONLINE | 53 | 0.000 || east1 | west | slave | OFFLINE:ERROR | -1 | -1.000 || west1 | west | master | ONLINE | 294328 | 0.319 || west1 | east | slave | ONLINE | 53 | 119.834 || west2 | west | master | ONLINE | 231595 | 0.316 || west2 | east | slave | ONLINE | 53 | 181.128 || west3 | east | slave | ONLINE | 53 | 204.790 || west3 | west | slave | ONLINE | 231595 | 22.895 |
6.5.1. multi_trepctl Options
The multi_trepctl tool provides a number of options that control the information and detail output when the command is executed.
Table 6.5. multi_trepctl Command-line Options
Option Description
--by-service Sort the output by the service name
--fields Fields to be output during during summary
--host, --hosts Host or hosts on which to limit output
--output Specify the output format
--paths, --path Directory or directories to check when looking for tools
--role, --roles Role or roles on which to limit output
--service, --services Service or services on which to limit output
-skip-headers Skip the headers
--sort-by Sort by a specified field
Where:
• --by-service
Order the output according to the service name and role within the service:
shell> multi_trepctl --by-service| host | servicename | role | state | appliedlastseqno | appliedlatency || east1 | east | master | ONLINE | 64 | 59.380 || west1 | east | slave | ONLINE | 64 | 60.889 || west2 | east | slave | ONLINE | 64 | 60.970 || west3 | east | slave | ONLINE | 64 | 61.097 || west1 | west | master | ONLINE | 294328 | 0.319 || west2 | west | master | ONLINE | 231595 | 0.316 || east1 | west | slave | OFFLINE:ERROR | -1 | -1.000 || west3 | west | slave | ONLINE | 231595 | 22.895 |
• --fields
Limited the output to the specified list of fields from the output of fields output by trepctl. For example, to limit the output to the host,role, and appliedlatency:
shell> multi_trepctl --fields=host,role,appliedlatency| host | role | appliedlatency || tr-ms1 | master | 0.524 || tr-ms2 | slave | 0.000 || tr-ms3 | slave | -1.000 |
• --host, --hosts
Limit the output to the host, or a comma-separated list of hosts specified. For example:
shell> multi_trepctl --hosts=tr-ms1,tr-ms3| host | servicename | role | state | appliedlastseqno | appliedlatency || tr-ms1 | alpha | master | ONLINE | 2322 | 0.524 || tr-ms3 | alpha | slave | OFFLINE:ERROR | -1 | -1.000 |
• --output
Specify the output format.
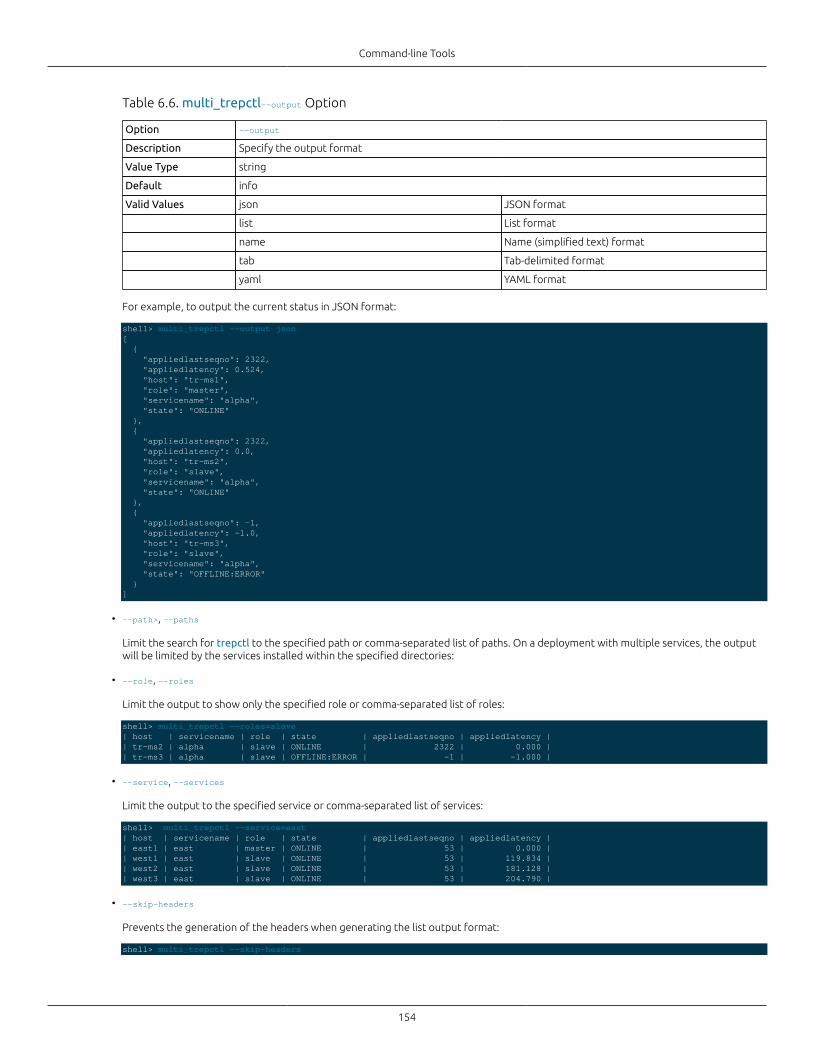
Command-line Tools
154
Table 6.6. multi_trepctl--output Option
Option --output
Description Specify the output format
Value Type string
Default info
Valid Values json JSON format
list List format
name Name (simplified text) format
tab Tab-delimited format
yaml YAML format
For example, to output the current status in JSON format:
shell> multi_trepctl --output json[ { "appliedlastseqno": 2322, "appliedlatency": 0.524, "host": "tr-ms1", "role": "master", "servicename": "alpha", "state": "ONLINE" }, { "appliedlastseqno": 2322, "appliedlatency": 0.0, "host": "tr-ms2", "role": "slave", "servicename": "alpha", "state": "ONLINE" }, { "appliedlastseqno": -1, "appliedlatency": -1.0, "host": "tr-ms3", "role": "slave", "servicename": "alpha", "state": "OFFLINE:ERROR" }]
• --path>, --paths
Limit the search for trepctl to the specified path or comma-separated list of paths. On a deployment with multiple services, the outputwill be limited by the services installed within the specified directories:
• --role, --roles
Limit the output to show only the specified role or comma-separated list of roles:
shell> multi_trepctl --roles=slave| host | servicename | role | state | appliedlastseqno | appliedlatency || tr-ms2 | alpha | slave | ONLINE | 2322 | 0.000 || tr-ms3 | alpha | slave | OFFLINE:ERROR | -1 | -1.000 |
• --service, --services
Limit the output to the specified service or comma-separated list of services:
shell> multi_trepctl --service=east | host | servicename | role | state | appliedlastseqno | appliedlatency || east1 | east | master | ONLINE | 53 | 0.000 || west1 | east | slave | ONLINE | 53 | 119.834 || west2 | east | slave | ONLINE | 53 | 181.128 || west3 | east | slave | ONLINE | 53 | 204.790 |
• --skip-headers
Prevents the generation of the headers when generating the list output format:
shell> multi_trepctl --skip-headers
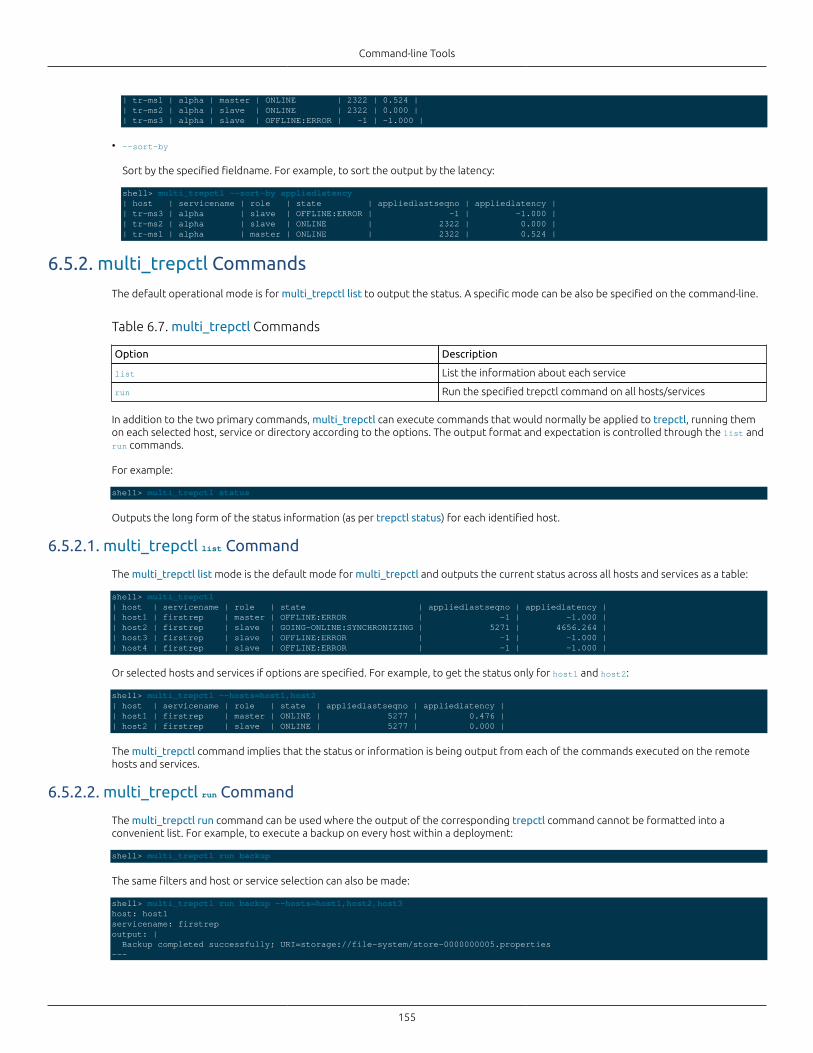
Command-line Tools
155
| tr-ms1 | alpha | master | ONLINE | 2322 | 0.524 || tr-ms2 | alpha | slave | ONLINE | 2322 | 0.000 || tr-ms3 | alpha | slave | OFFLINE:ERROR | -1 | -1.000 |
• --sort-by
Sort by the specified fieldname. For example, to sort the output by the latency:
shell> multi_trepctl --sort-by appliedlatency| host | servicename | role | state | appliedlastseqno | appliedlatency || tr-ms3 | alpha | slave | OFFLINE:ERROR | -1 | -1.000 || tr-ms2 | alpha | slave | ONLINE | 2322 | 0.000 || tr-ms1 | alpha | master | ONLINE | 2322 | 0.524 |
6.5.2. multi_trepctl Commands
The default operational mode is for multi_trepctl list to output the status. A specific mode can be also be specified on the command-line.
Table 6.7. multi_trepctl Commands
Option Description
list List the information about each service
run Run the specified trepctl command on all hosts/services
In addition to the two primary commands, multi_trepctl can execute commands that would normally be applied to trepctl, running themon each selected host, service or directory according to the options. The output format and expectation is controlled through the list andrun commands.
For example:
shell> multi_trepctl status
Outputs the long form of the status information (as per trepctl status) for each identified host.
6.5.2.1. multi_trepctl list Command
The multi_trepctl list mode is the default mode for multi_trepctl and outputs the current status across all hosts and services as a table:
shell> multi_trepctl | host | servicename | role | state | appliedlastseqno | appliedlatency || host1 | firstrep | master | OFFLINE:ERROR | -1 | -1.000 || host2 | firstrep | slave | GOING-ONLINE:SYNCHRONIZING | 5271 | 4656.264 || host3 | firstrep | slave | OFFLINE:ERROR | -1 | -1.000 || host4 | firstrep | slave | OFFLINE:ERROR | -1 | -1.000 |
Or selected hosts and services if options are specified. For example, to get the status only for host1 and host2:
shell> multi_trepctl --hosts=host1,host2| host | servicename | role | state | appliedlastseqno | appliedlatency || host1 | firstrep | master | ONLINE | 5277 | 0.476 || host2 | firstrep | slave | ONLINE | 5277 | 0.000 |
The multi_trepctl command implies that the status or information is being output from each of the commands executed on the remotehosts and services.
6.5.2.2. multi_trepctl run Command
The multi_trepctl run command can be used where the output of the corresponding trepctl command cannot be formatted into aconvenient list. For example, to execute a backup on every host within a deployment:
shell> multi_trepctl run backup
The same filters and host or service selection can also be made:
shell> multi_trepctl run backup --hosts=host1,host2,host3host: host1servicename: firstrepoutput: | Backup completed successfully; URI=storage://file-system/store-0000000005.properties---
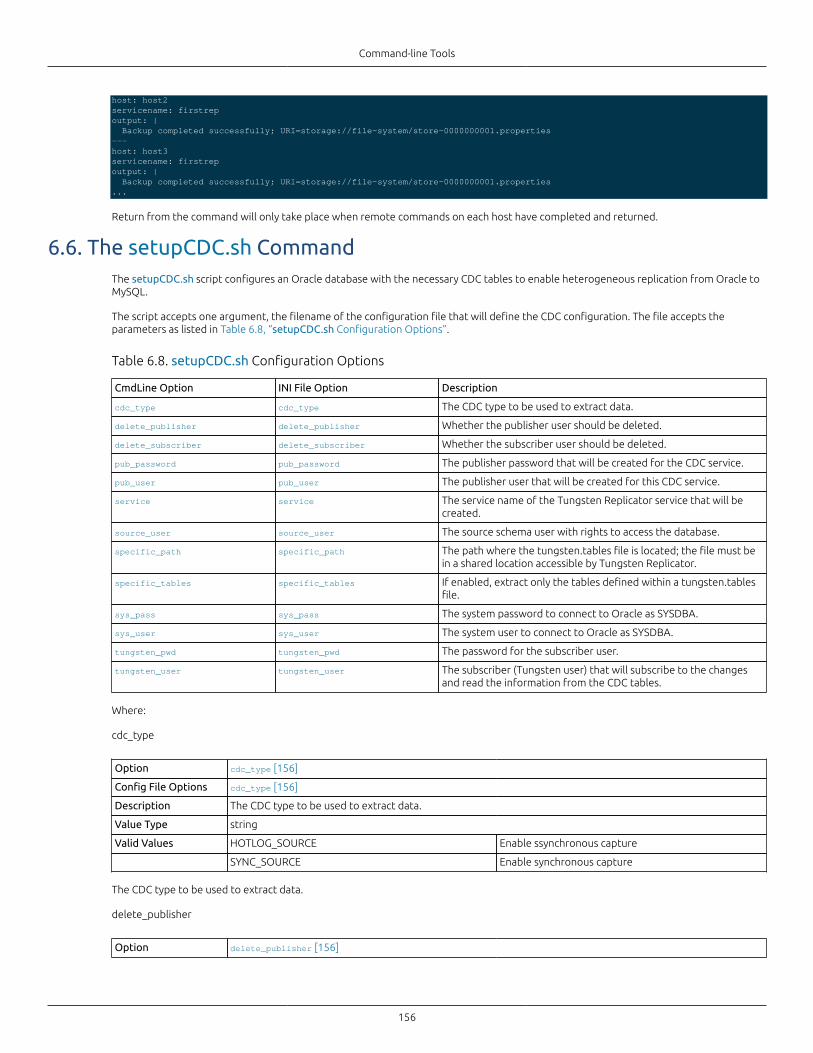
Command-line Tools
156
host: host2servicename: firstrepoutput: | Backup completed successfully; URI=storage://file-system/store-0000000001.properties---host: host3servicename: firstrepoutput: | Backup completed successfully; URI=storage://file-system/store-0000000001.properties...
Return from the command will only take place when remote commands on each host have completed and returned.
6.6. The setupCDC.sh CommandThe setupCDC.sh script configures an Oracle database with the necessary CDC tables to enable heterogeneous replication from Oracle toMySQL.
The script accepts one argument, the filename of the configuration file that will define the CDC configuration. The file accepts theparameters as listed in Table 6.8, “setupCDC.sh Configuration Options”.
Table 6.8. setupCDC.sh Configuration Options
CmdLine Option INI File Option Description
cdc_type cdc_type The CDC type to be used to extract data.
delete_publisher delete_publisher Whether the publisher user should be deleted.
delete_subscriber delete_subscriber Whether the subscriber user should be deleted.
pub_password pub_password The publisher password that will be created for the CDC service.
pub_user pub_user The publisher user that will be created for this CDC service.
service service The service name of the Tungsten Replicator service that will becreated.
source_user source_user The source schema user with rights to access the database.
specific_path specific_path The path where the tungsten.tables file is located; the file must bein a shared location accessible by Tungsten Replicator.
specific_tables specific_tables If enabled, extract only the tables defined within a tungsten.tablesfile.
sys_pass sys_pass The system password to connect to Oracle as SYSDBA.
sys_user sys_user The system user to connect to Oracle as SYSDBA.
tungsten_pwd tungsten_pwd The password for the subscriber user.
tungsten_user tungsten_user The subscriber (Tungsten user) that will subscribe to the changesand read the information from the CDC tables.
Where:
cdc_type
Option cdc_type [156]
Config File Options cdc_type [156]
Description The CDC type to be used to extract data.
Value Type string
Valid Values HOTLOG_SOURCE Enable ssynchronous capture
SYNC_SOURCE Enable synchronous capture
The CDC type to be used to extract data.
delete_publisher
Option delete_publisher [156]
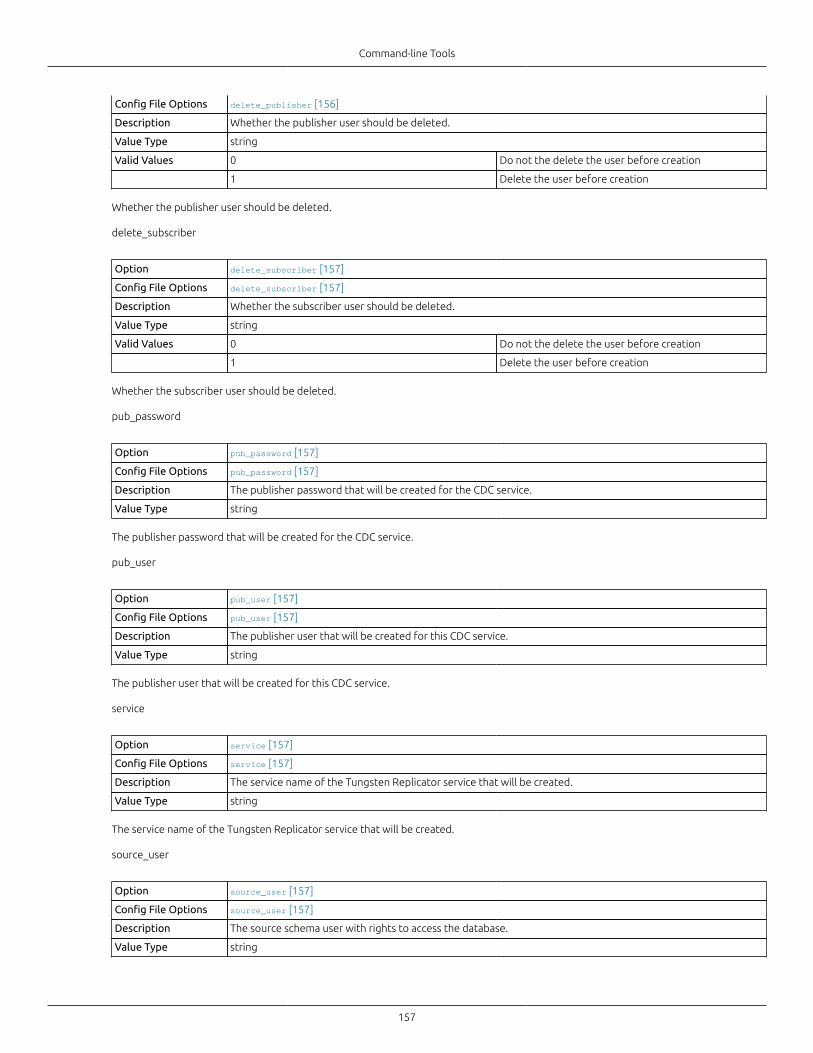
Command-line Tools
157
Config File Options delete_publisher [156]
Description Whether the publisher user should be deleted.
Value Type string
Valid Values 0 Do not the delete the user before creation
1 Delete the user before creation
Whether the publisher user should be deleted.
delete_subscriber
Option delete_subscriber [157]
Config File Options delete_subscriber [157]
Description Whether the subscriber user should be deleted.
Value Type string
Valid Values 0 Do not the delete the user before creation
1 Delete the user before creation
Whether the subscriber user should be deleted.
pub_password
Option pub_password [157]
Config File Options pub_password [157]
Description The publisher password that will be created for the CDC service.
Value Type string
The publisher password that will be created for the CDC service.
pub_user
Option pub_user [157]
Config File Options pub_user [157]
Description The publisher user that will be created for this CDC service.
Value Type string
The publisher user that will be created for this CDC service.
service
Option service [157]
Config File Options service [157]
Description The service name of the Tungsten Replicator service that will be created.
Value Type string
The service name of the Tungsten Replicator service that will be created.
source_user
Option source_user [157]
Config File Options source_user [157]
Description The source schema user with rights to access the database.
Value Type string
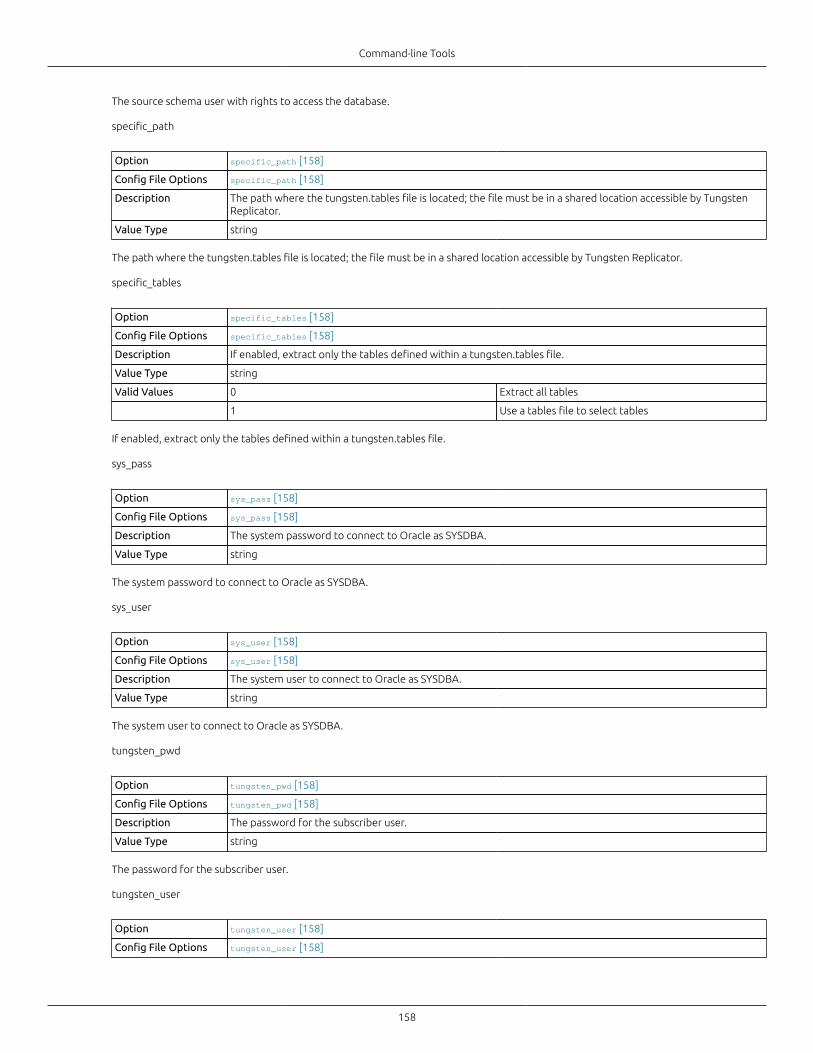
Command-line Tools
158
The source schema user with rights to access the database.
specific_path
Option specific_path [158]
Config File Options specific_path [158]
Description The path where the tungsten.tables file is located; the file must be in a shared location accessible by TungstenReplicator.
Value Type string
The path where the tungsten.tables file is located; the file must be in a shared location accessible by Tungsten Replicator.
specific_tables
Option specific_tables [158]
Config File Options specific_tables [158]
Description If enabled, extract only the tables defined within a tungsten.tables file.
Value Type string
Valid Values 0 Extract all tables
1 Use a tables file to select tables
If enabled, extract only the tables defined within a tungsten.tables file.
sys_pass
Option sys_pass [158]
Config File Options sys_pass [158]
Description The system password to connect to Oracle as SYSDBA.
Value Type string
The system password to connect to Oracle as SYSDBA.
sys_user
Option sys_user [158]
Config File Options sys_user [158]
Description The system user to connect to Oracle as SYSDBA.
Value Type string
The system user to connect to Oracle as SYSDBA.
tungsten_pwd
Option tungsten_pwd [158]
Config File Options tungsten_pwd [158]
Description The password for the subscriber user.
Value Type string
The password for the subscriber user.
tungsten_user
Option tungsten_user [158]
Config File Options tungsten_user [158]
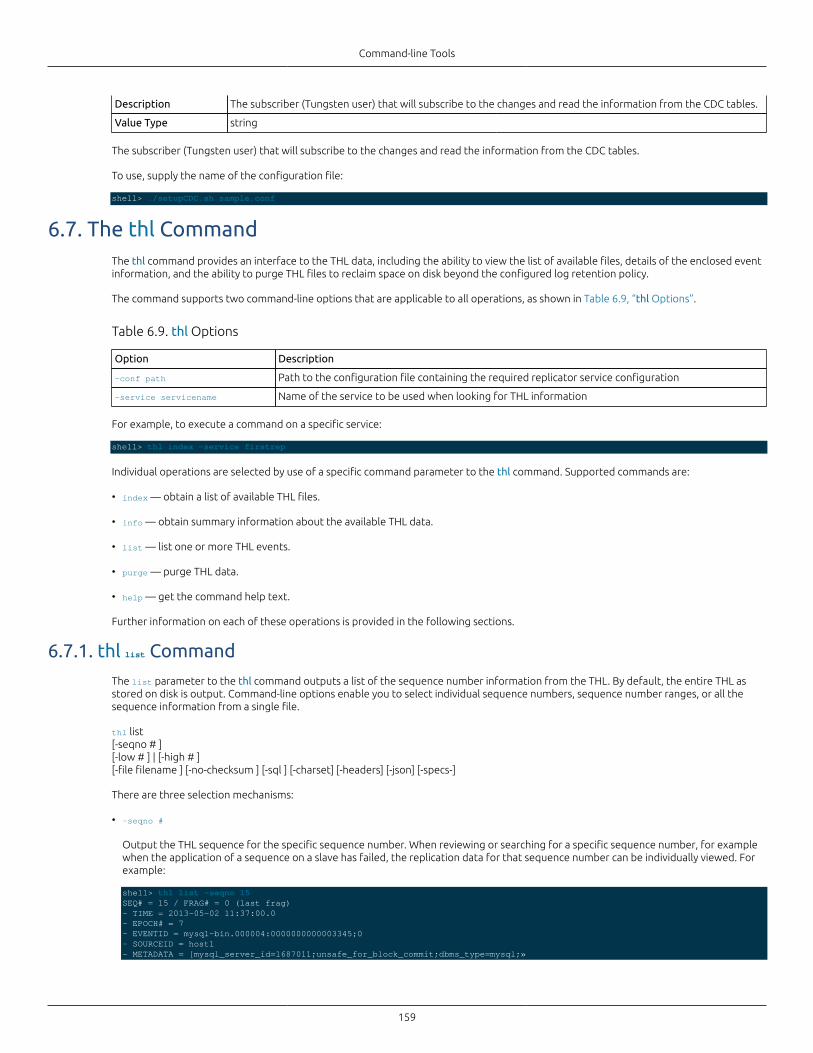
Command-line Tools
159
Description The subscriber (Tungsten user) that will subscribe to the changes and read the information from the CDC tables.
Value Type string
The subscriber (Tungsten user) that will subscribe to the changes and read the information from the CDC tables.
To use, supply the name of the configuration file:
shell> ./setupCDC.sh sample.conf
6.7. The thl CommandThe thl command provides an interface to the THL data, including the ability to view the list of available files, details of the enclosed eventinformation, and the ability to purge THL files to reclaim space on disk beyond the configured log retention policy.
The command supports two command-line options that are applicable to all operations, as shown in Table 6.9, “thl Options”.
Table 6.9. thl Options
Option Description
-conf path Path to the configuration file containing the required replicator service configuration
-service servicename Name of the service to be used when looking for THL information
For example, to execute a command on a specific service:
shell> thl index -service firstrep
Individual operations are selected by use of a specific command parameter to the thl command. Supported commands are:
• index — obtain a list of available THL files.
• info — obtain summary information about the available THL data.
• list — list one or more THL events.
• purge — purge THL data.
• help — get the command help text.
Further information on each of these operations is provided in the following sections.
6.7.1. thl list Command
The list parameter to the thl command outputs a list of the sequence number information from the THL. By default, the entire THL asstored on disk is output. Command-line options enable you to select individual sequence numbers, sequence number ranges, or all thesequence information from a single file.
thl list[-seqno # ][-low # ] | [-high # ][-file filename ] [-no-checksum ] [-sql ] [-charset] [-headers] [-json] [-specs-]
There are three selection mechanisms:
• -seqno #
Output the THL sequence for the specific sequence number. When reviewing or searching for a specific sequence number, for examplewhen the application of a sequence on a slave has failed, the replication data for that sequence number can be individually viewed. Forexample:
shell> thl list -seqno 15SEQ# = 15 / FRAG# = 0 (last frag)- TIME = 2013-05-02 11:37:00.0- EPOCH# = 7- EVENTID = mysql-bin.000004:0000000000003345;0- SOURCEID = host1- METADATA = [mysql_server_id=1687011;unsafe_for_block_commit;dbms_type=mysql;»
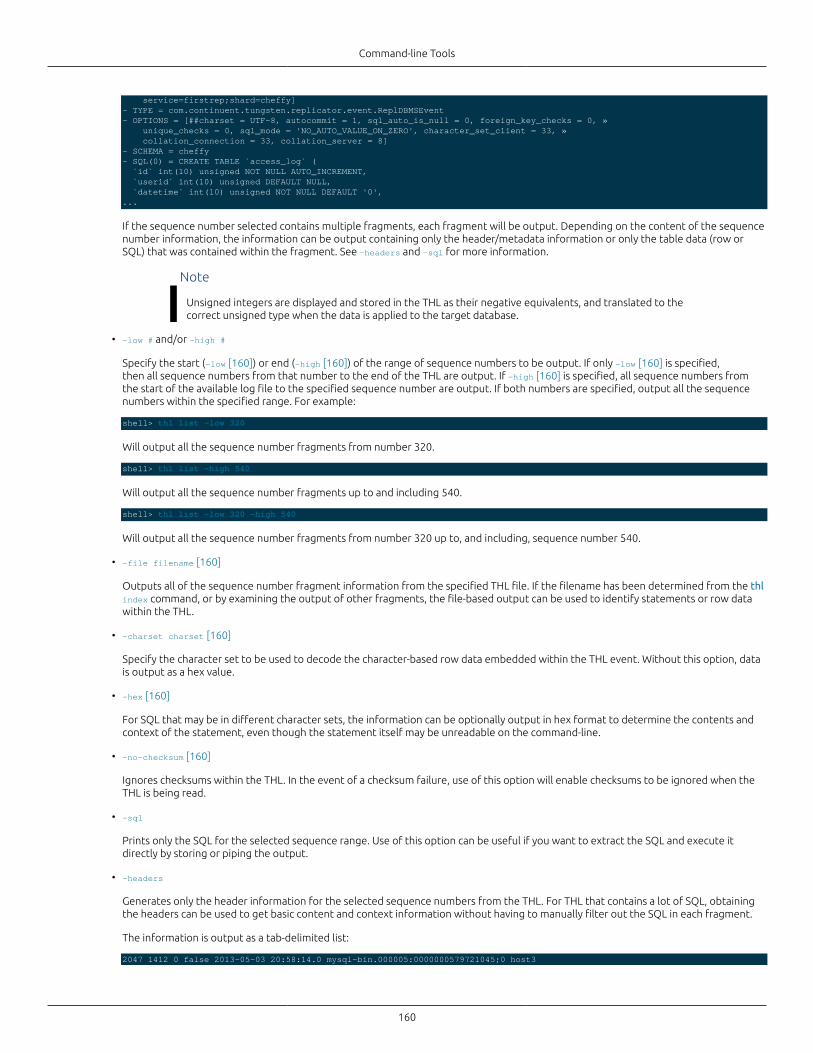
Command-line Tools
160
service=firstrep;shard=cheffy]- TYPE = com.continuent.tungsten.replicator.event.ReplDBMSEvent- OPTIONS = [##charset = UTF-8, autocommit = 1, sql_auto_is_null = 0, foreign_key_checks = 0, » unique_checks = 0, sql_mode = 'NO_AUTO_VALUE_ON_ZERO', character_set_client = 33, » collation_connection = 33, collation_server = 8]- SCHEMA = cheffy- SQL(0) = CREATE TABLE `access_log` ( `id` int(10) unsigned NOT NULL AUTO_INCREMENT, `userid` int(10) unsigned DEFAULT NULL, `datetime` int(10) unsigned NOT NULL DEFAULT '0',...
If the sequence number selected contains multiple fragments, each fragment will be output. Depending on the content of the sequencenumber information, the information can be output containing only the header/metadata information or only the table data (row orSQL) that was contained within the fragment. See -headers and -sql for more information.
Note
Unsigned integers are displayed and stored in the THL as their negative equivalents, and translated to thecorrect unsigned type when the data is applied to the target database.
• -low # and/or -high #
Specify the start (-low [160]) or end (-high [160]) of the range of sequence numbers to be output. If only -low [160] is specified,then all sequence numbers from that number to the end of the THL are output. If -high [160] is specified, all sequence numbers fromthe start of the available log file to the specified sequence number are output. If both numbers are specified, output all the sequencenumbers within the specified range. For example:
shell> thl list -low 320
Will output all the sequence number fragments from number 320.
shell> thl list -high 540
Will output all the sequence number fragments up to and including 540.
shell> thl list -low 320 -high 540
Will output all the sequence number fragments from number 320 up to, and including, sequence number 540.
• -file filename [160]
Outputs all of the sequence number fragment information from the specified THL file. If the filename has been determined from the thlindex command, or by examining the output of other fragments, the file-based output can be used to identify statements or row datawithin the THL.
• -charset charset [160]
Specify the character set to be used to decode the character-based row data embedded within the THL event. Without this option, datais output as a hex value.
• -hex [160]
For SQL that may be in different character sets, the information can be optionally output in hex format to determine the contents andcontext of the statement, even though the statement itself may be unreadable on the command-line.
• -no-checksum [160]
Ignores checksums within the THL. In the event of a checksum failure, use of this option will enable checksums to be ignored when theTHL is being read.
• -sql
Prints only the SQL for the selected sequence range. Use of this option can be useful if you want to extract the SQL and execute itdirectly by storing or piping the output.
• -headers
Generates only the header information for the selected sequence numbers from the THL. For THL that contains a lot of SQL, obtainingthe headers can be used to get basic content and context information without having to manually filter out the SQL in each fragment.
The information is output as a tab-delimited list:
2047 1412 0 false 2013-05-03 20:58:14.0 mysql-bin.000005:0000000579721045;0 host3
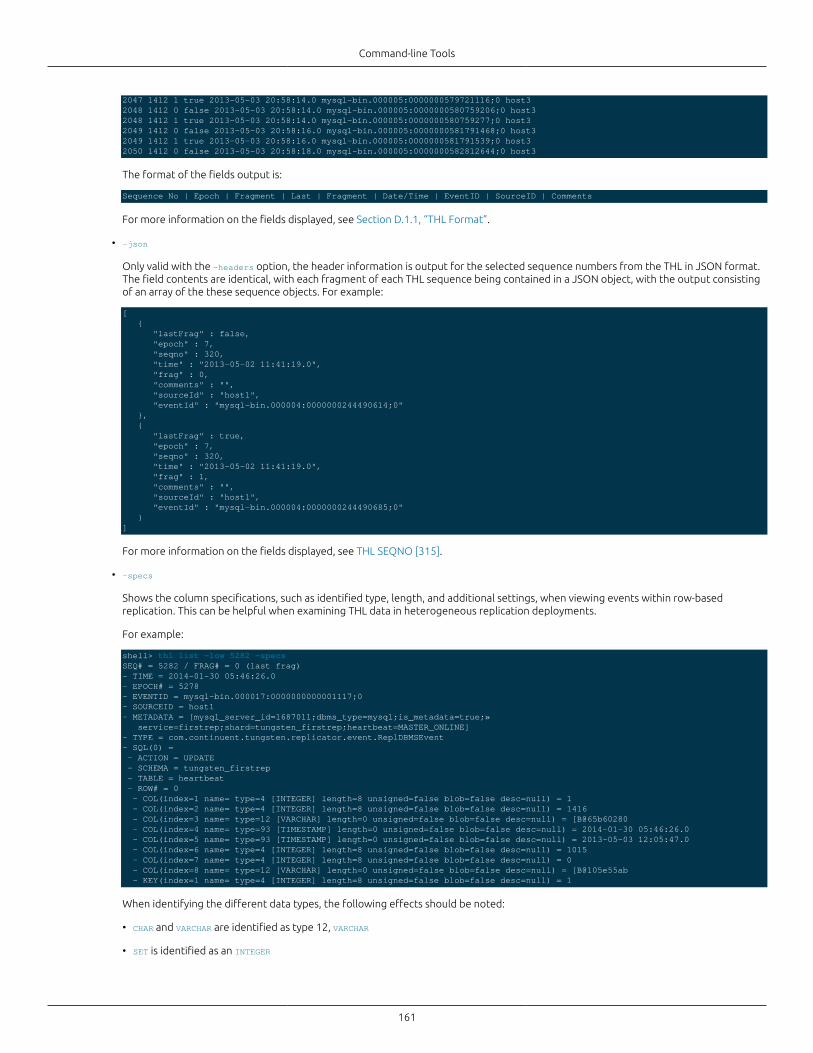
Command-line Tools
161
2047 1412 1 true 2013-05-03 20:58:14.0 mysql-bin.000005:0000000579721116;0 host3 2048 1412 0 false 2013-05-03 20:58:14.0 mysql-bin.000005:0000000580759206;0 host3 2048 1412 1 true 2013-05-03 20:58:14.0 mysql-bin.000005:0000000580759277;0 host3 2049 1412 0 false 2013-05-03 20:58:16.0 mysql-bin.000005:0000000581791468;0 host3 2049 1412 1 true 2013-05-03 20:58:16.0 mysql-bin.000005:0000000581791539;0 host3 2050 1412 0 false 2013-05-03 20:58:18.0 mysql-bin.000005:0000000582812644;0 host3
The format of the fields output is:
Sequence No | Epoch | Fragment | Last | Fragment | Date/Time | EventID | SourceID | Comments
For more information on the fields displayed, see Section D.1.1, “THL Format”.
• -json
Only valid with the -headers option, the header information is output for the selected sequence numbers from the THL in JSON format.The field contents are identical, with each fragment of each THL sequence being contained in a JSON object, with the output consistingof an array of the these sequence objects. For example:
[ { "lastFrag" : false, "epoch" : 7, "seqno" : 320, "time" : "2013-05-02 11:41:19.0", "frag" : 0, "comments" : "", "sourceId" : "host1", "eventId" : "mysql-bin.000004:0000000244490614;0" }, { "lastFrag" : true, "epoch" : 7, "seqno" : 320, "time" : "2013-05-02 11:41:19.0", "frag" : 1, "comments" : "", "sourceId" : "host1", "eventId" : "mysql-bin.000004:0000000244490685;0" }]
For more information on the fields displayed, see THL SEQNO [315].
• -specs
Shows the column specifications, such as identified type, length, and additional settings, when viewing events within row-basedreplication. This can be helpful when examining THL data in heterogeneous replication deployments.
For example:
shell> thl list -low 5282 -specsSEQ# = 5282 / FRAG# = 0 (last frag)- TIME = 2014-01-30 05:46:26.0- EPOCH# = 5278- EVENTID = mysql-bin.000017:0000000000001117;0- SOURCEID = host1- METADATA = [mysql_server_id=1687011;dbms_type=mysql;is_metadata=true;» service=firstrep;shard=tungsten_firstrep;heartbeat=MASTER_ONLINE]- TYPE = com.continuent.tungsten.replicator.event.ReplDBMSEvent- SQL(0) = - ACTION = UPDATE - SCHEMA = tungsten_firstrep - TABLE = heartbeat - ROW# = 0 - COL(index=1 name= type=4 [INTEGER] length=8 unsigned=false blob=false desc=null) = 1 - COL(index=2 name= type=4 [INTEGER] length=8 unsigned=false blob=false desc=null) = 1416 - COL(index=3 name= type=12 [VARCHAR] length=0 unsigned=false blob=false desc=null) = [B@65b60280 - COL(index=4 name= type=93 [TIMESTAMP] length=0 unsigned=false blob=false desc=null) = 2014-01-30 05:46:26.0 - COL(index=5 name= type=93 [TIMESTAMP] length=0 unsigned=false blob=false desc=null) = 2013-05-03 12:05:47.0 - COL(index=6 name= type=4 [INTEGER] length=8 unsigned=false blob=false desc=null) = 1015 - COL(index=7 name= type=4 [INTEGER] length=8 unsigned=false blob=false desc=null) = 0 - COL(index=8 name= type=12 [VARCHAR] length=0 unsigned=false blob=false desc=null) = [B@105e55ab - KEY(index=1 name= type=4 [INTEGER] length=8 unsigned=false blob=false desc=null) = 1
When identifying the different data types, the following effects should be noted:
• CHAR and VARCHAR are identified as type 12, VARCHAR
• SET is identified as an INTEGER
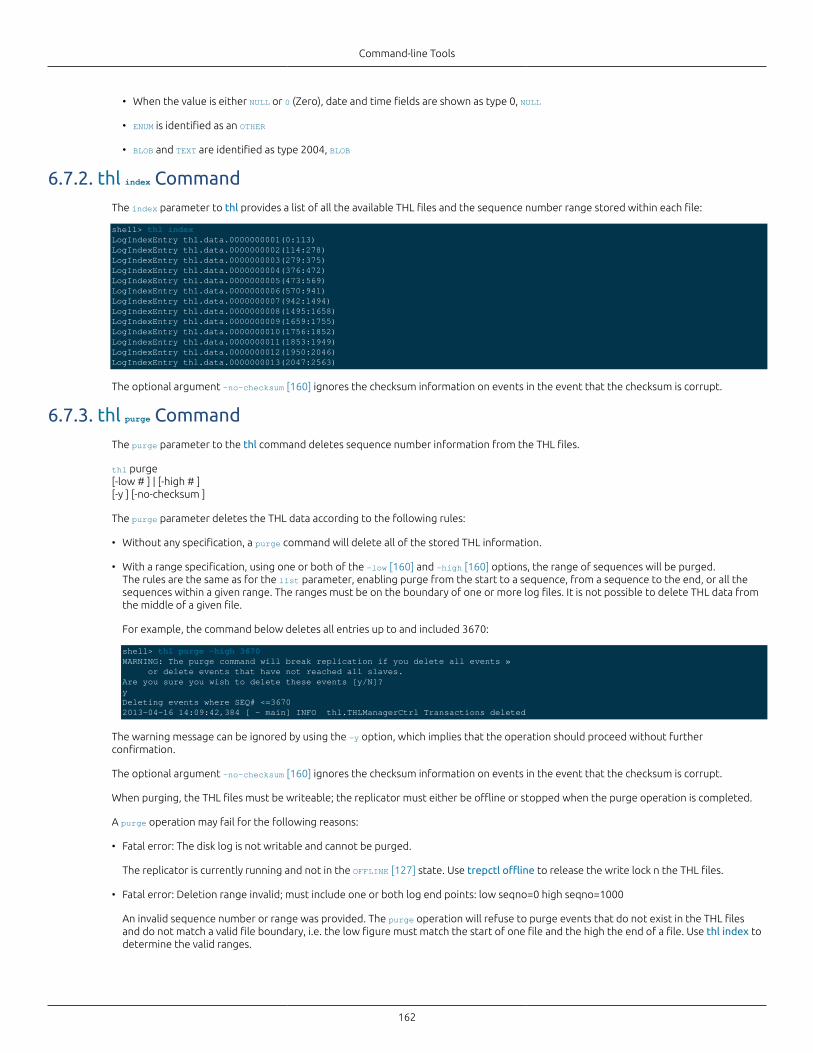
Command-line Tools
162
• When the value is either NULL or 0 (Zero), date and time fields are shown as type 0, NULL
• ENUM is identified as an OTHER
• BLOB and TEXT are identified as type 2004, BLOB
6.7.2. thl index CommandThe index parameter to thl provides a list of all the available THL files and the sequence number range stored within each file:
shell> thl indexLogIndexEntry thl.data.0000000001(0:113)LogIndexEntry thl.data.0000000002(114:278)LogIndexEntry thl.data.0000000003(279:375)LogIndexEntry thl.data.0000000004(376:472)LogIndexEntry thl.data.0000000005(473:569)LogIndexEntry thl.data.0000000006(570:941)LogIndexEntry thl.data.0000000007(942:1494)LogIndexEntry thl.data.0000000008(1495:1658)LogIndexEntry thl.data.0000000009(1659:1755)LogIndexEntry thl.data.0000000010(1756:1852)LogIndexEntry thl.data.0000000011(1853:1949)LogIndexEntry thl.data.0000000012(1950:2046)LogIndexEntry thl.data.0000000013(2047:2563)
The optional argument -no-checksum [160] ignores the checksum information on events in the event that the checksum is corrupt.
6.7.3. thl purge CommandThe purge parameter to the thl command deletes sequence number information from the THL files.
thl purge[-low # ] | [-high # ][-y ] [-no-checksum ]
The purge parameter deletes the THL data according to the following rules:
• Without any specification, a purge command will delete all of the stored THL information.
• With a range specification, using one or both of the -low [160] and -high [160] options, the range of sequences will be purged.The rules are the same as for the list parameter, enabling purge from the start to a sequence, from a sequence to the end, or all thesequences within a given range. The ranges must be on the boundary of one or more log files. It is not possible to delete THL data fromthe middle of a given file.
For example, the command below deletes all entries up to and included 3670:
shell> thl purge -high 3670WARNING: The purge command will break replication if you delete all events » or delete events that have not reached all slaves.Are you sure you wish to delete these events [y/N]?yDeleting events where SEQ# <=36702013-04-16 14:09:42,384 [ - main] INFO thl.THLManagerCtrl Transactions deleted
The warning message can be ignored by using the -y option, which implies that the operation should proceed without furtherconfirmation.
The optional argument -no-checksum [160] ignores the checksum information on events in the event that the checksum is corrupt.
When purging, the THL files must be writeable; the replicator must either be offline or stopped when the purge operation is completed.
A purge operation may fail for the following reasons:
• Fatal error: The disk log is not writable and cannot be purged.
The replicator is currently running and not in the OFFLINE [127] state. Use trepctl offline to release the write lock n the THL files.
• Fatal error: Deletion range invalid; must include one or both log end points: low seqno=0 high seqno=1000
An invalid sequence number or range was provided. The purge operation will refuse to purge events that do not exist in the THL filesand do not match a valid file boundary, i.e. the low figure must match the start of one file and the high the end of a file. Use thl index todetermine the valid ranges.
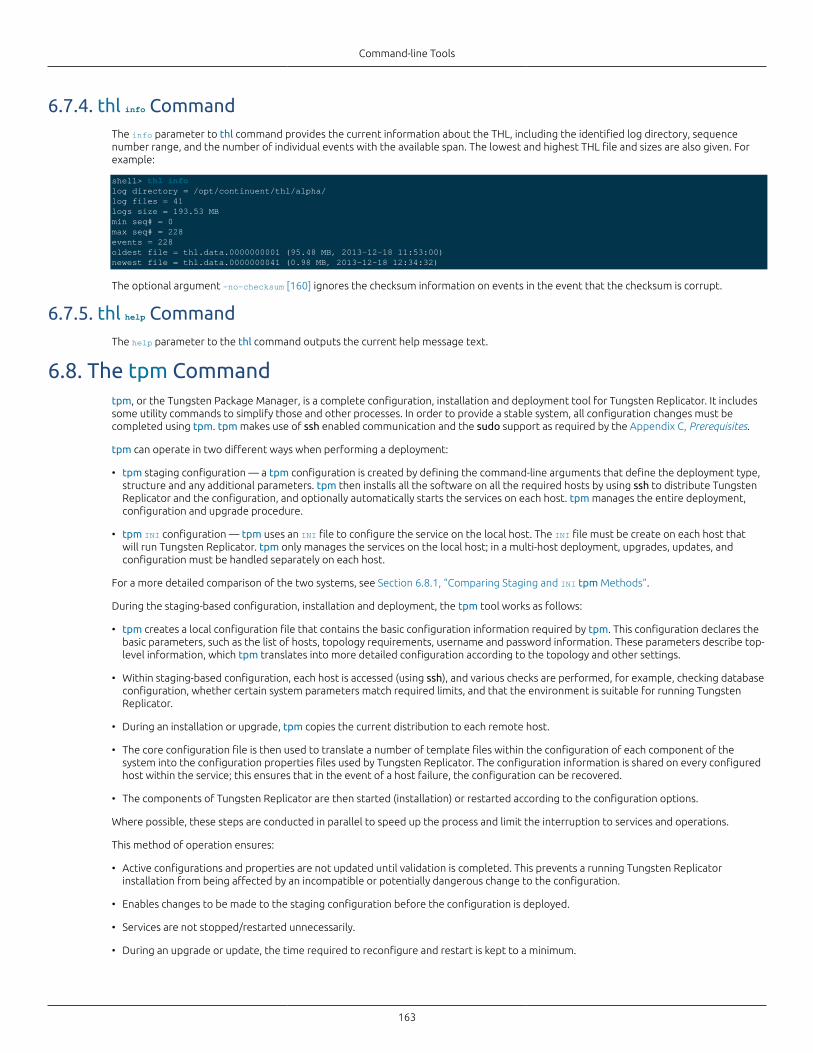
Command-line Tools
163
6.7.4. thl info CommandThe info parameter to thl command provides the current information about the THL, including the identified log directory, sequencenumber range, and the number of individual events with the available span. The lowest and highest THL file and sizes are also given. Forexample:
shell> thl infolog directory = /opt/continuent/thl/alpha/log files = 41logs size = 193.53 MBmin seq# = 0max seq# = 228events = 228oldest file = thl.data.0000000001 (95.48 MB, 2013-12-18 11:53:00)newest file = thl.data.0000000041 (0.98 MB, 2013-12-18 12:34:32)
The optional argument -no-checksum [160] ignores the checksum information on events in the event that the checksum is corrupt.
6.7.5. thl help CommandThe help parameter to the thl command outputs the current help message text.
6.8. The tpm Commandtpm, or the Tungsten Package Manager, is a complete configuration, installation and deployment tool for Tungsten Replicator. It includessome utility commands to simplify those and other processes. In order to provide a stable system, all configuration changes must becompleted using tpm. tpm makes use of ssh enabled communication and the sudo support as required by the Appendix C, Prerequisites.
tpm can operate in two different ways when performing a deployment:
• tpm staging configuration — a tpm configuration is created by defining the command-line arguments that define the deployment type,structure and any additional parameters. tpm then installs all the software on all the required hosts by using ssh to distribute TungstenReplicator and the configuration, and optionally automatically starts the services on each host. tpm manages the entire deployment,configuration and upgrade procedure.
• tpm INI configuration — tpm uses an INI file to configure the service on the local host. The INI file must be create on each host thatwill run Tungsten Replicator. tpm only manages the services on the local host; in a multi-host deployment, upgrades, updates, andconfiguration must be handled separately on each host.
For a more detailed comparison of the two systems, see Section 6.8.1, “Comparing Staging and INI tpm Methods”.
During the staging-based configuration, installation and deployment, the tpm tool works as follows:
• tpm creates a local configuration file that contains the basic configuration information required by tpm. This configuration declares thebasic parameters, such as the list of hosts, topology requirements, username and password information. These parameters describe top-level information, which tpm translates into more detailed configuration according to the topology and other settings.
• Within staging-based configuration, each host is accessed (using ssh), and various checks are performed, for example, checking databaseconfiguration, whether certain system parameters match required limits, and that the environment is suitable for running TungstenReplicator.
• During an installation or upgrade, tpm copies the current distribution to each remote host.
• The core configuration file is then used to translate a number of template files within the configuration of each component of thesystem into the configuration properties files used by Tungsten Replicator. The configuration information is shared on every configuredhost within the service; this ensures that in the event of a host failure, the configuration can be recovered.
• The components of Tungsten Replicator are then started (installation) or restarted according to the configuration options.
Where possible, these steps are conducted in parallel to speed up the process and limit the interruption to services and operations.
This method of operation ensures:
• Active configurations and properties are not updated until validation is completed. This prevents a running Tungsten Replicatorinstallation from being affected by an incompatible or potentially dangerous change to the configuration.
• Enables changes to be made to the staging configuration before the configuration is deployed.
• Services are not stopped/restarted unnecessarily.
• During an upgrade or update, the time required to reconfigure and restart is kept to a minimum.
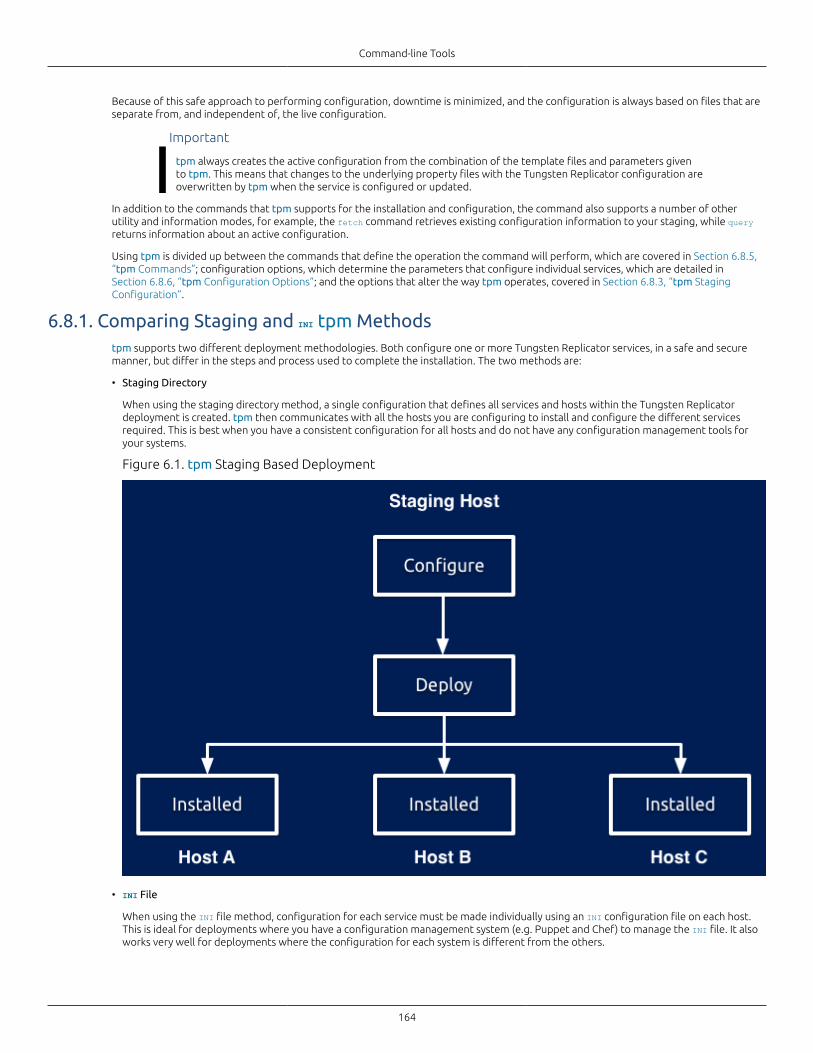
Command-line Tools
164
Because of this safe approach to performing configuration, downtime is minimized, and the configuration is always based on files that areseparate from, and independent of, the live configuration.
Important
tpm always creates the active configuration from the combination of the template files and parameters givento tpm. This means that changes to the underlying property files with the Tungsten Replicator configuration areoverwritten by tpm when the service is configured or updated.
In addition to the commands that tpm supports for the installation and configuration, the command also supports a number of otherutility and information modes, for example, the fetch command retrieves existing configuration information to your staging, while queryreturns information about an active configuration.
Using tpm is divided up between the commands that define the operation the command will perform, which are covered in Section 6.8.5,“tpm Commands”; configuration options, which determine the parameters that configure individual services, which are detailed inSection 6.8.6, “tpm Configuration Options”; and the options that alter the way tpm operates, covered in Section 6.8.3, “tpm StagingConfiguration”.
6.8.1. Comparing Staging and INI tpm Methodstpm supports two different deployment methodologies. Both configure one or more Tungsten Replicator services, in a safe and securemanner, but differ in the steps and process used to complete the installation. The two methods are:
• Staging Directory
When using the staging directory method, a single configuration that defines all services and hosts within the Tungsten Replicatordeployment is created. tpm then communicates with all the hosts you are configuring to install and configure the different servicesrequired. This is best when you have a consistent configuration for all hosts and do not have any configuration management tools foryour systems.
Figure 6.1. tpm Staging Based Deployment
• INI File
When using the INI file method, configuration for each service must be made individually using an INI configuration file on each host.This is ideal for deployments where you have a configuration management system (e.g. Puppet and Chef) to manage the INI file. It alsoworks very well for deployments where the configuration for each system is different from the others.
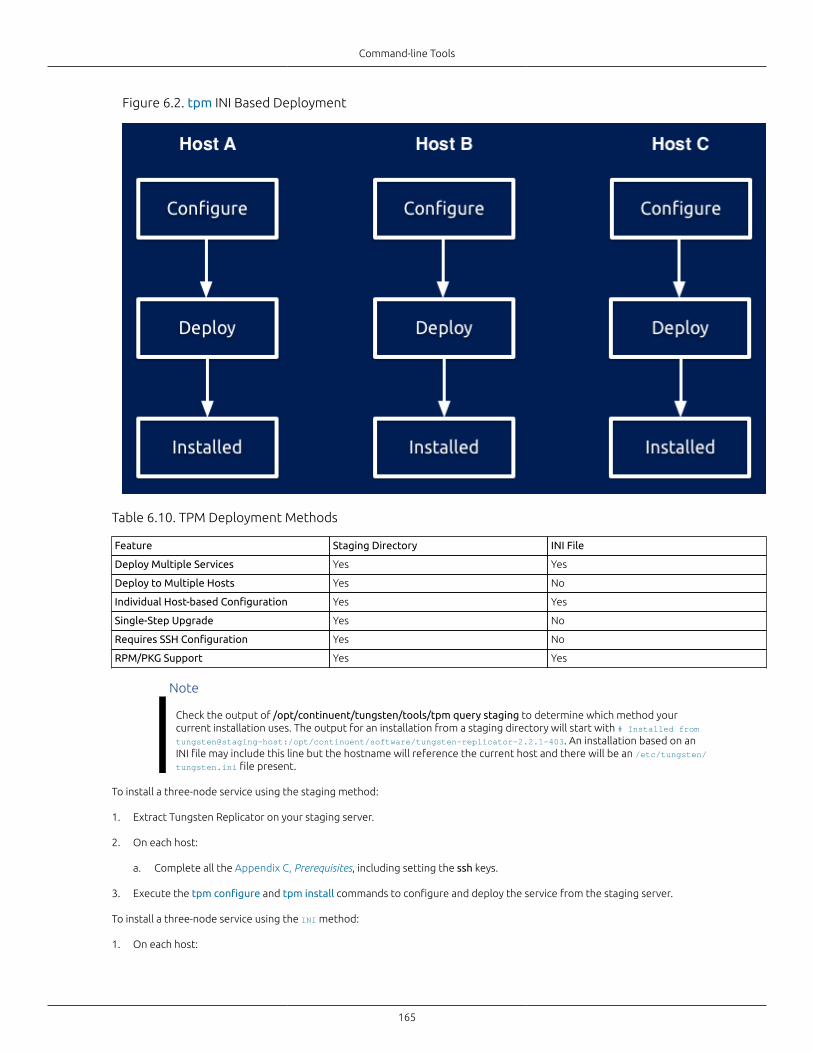
Command-line Tools
165
Figure 6.2. tpm INI Based Deployment
Table 6.10. TPM Deployment Methods
Feature Staging Directory INI File
Deploy Multiple Services Yes Yes
Deploy to Multiple Hosts Yes No
Individual Host-based Configuration Yes Yes
Single-Step Upgrade Yes No
Requires SSH Configuration Yes No
RPM/PKG Support Yes Yes
Note
Check the output of /opt/continuent/tungsten/tools/tpm query staging to determine which method yourcurrent installation uses. The output for an installation from a staging directory will start with # Installed fromtungsten@staging-host:/opt/continuent/software/tungsten-replicator-2.2.1-403. An installation based on anINI file may include this line but the hostname will reference the current host and there will be an /etc/tungsten/tungsten.ini file present.
To install a three-node service using the staging method:
1. Extract Tungsten Replicator on your staging server.
2. On each host:
a. Complete all the Appendix C, Prerequisites, including setting the ssh keys.
3. Execute the tpm configure and tpm install commands to configure and deploy the service from the staging server.
To install a three-node service using the INI method:
1. On each host:
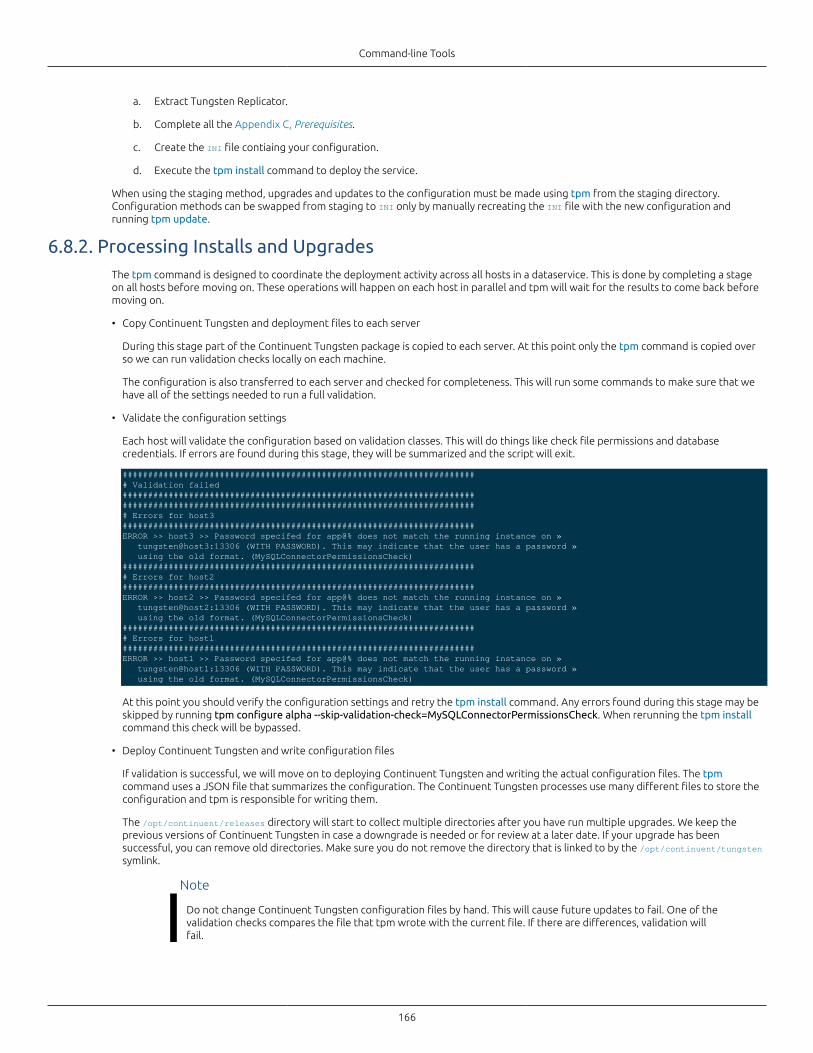
Command-line Tools
166
a. Extract Tungsten Replicator.
b. Complete all the Appendix C, Prerequisites.
c. Create the INI file contiaing your configuration.
d. Execute the tpm install command to deploy the service.
When using the staging method, upgrades and updates to the configuration must be made using tpm from the staging directory.Configuration methods can be swapped from staging to INI only by manually recreating the INI file with the new configuration andrunning tpm update.
6.8.2. Processing Installs and UpgradesThe tpm command is designed to coordinate the deployment activity across all hosts in a dataservice. This is done by completing a stageon all hosts before moving on. These operations will happen on each host in parallel and tpm will wait for the results to come back beforemoving on.
• Copy Continuent Tungsten and deployment files to each server
During this stage part of the Continuent Tungsten package is copied to each server. At this point only the tpm command is copied overso we can run validation checks locally on each machine.
The configuration is also transferred to each server and checked for completeness. This will run some commands to make sure that wehave all of the settings needed to run a full validation.
• Validate the configuration settings
Each host will validate the configuration based on validation classes. This will do things like check file permissions and databasecredentials. If errors are found during this stage, they will be summarized and the script will exit.
###################################################################### Validation failed########################################################################################################################################### Errors for host3#####################################################################ERROR >> host3 >> Password specifed for app@% does not match the running instance on » tungsten@host3:13306 (WITH PASSWORD). This may indicate that the user has a password » using the old format. (MySQLConnectorPermissionsCheck)###################################################################### Errors for host2#####################################################################ERROR >> host2 >> Password specifed for app@% does not match the running instance on » tungsten@host2:13306 (WITH PASSWORD). This may indicate that the user has a password » using the old format. (MySQLConnectorPermissionsCheck)###################################################################### Errors for host1#####################################################################ERROR >> host1 >> Password specifed for app@% does not match the running instance on » tungsten@host1:13306 (WITH PASSWORD). This may indicate that the user has a password » using the old format. (MySQLConnectorPermissionsCheck)
At this point you should verify the configuration settings and retry the tpm install command. Any errors found during this stage may beskipped by running tpm configure alpha --skip-validation-check=MySQLConnectorPermissionsCheck. When rerunning the tpm installcommand this check will be bypassed.
• Deploy Continuent Tungsten and write configuration files
If validation is successful, we will move on to deploying Continuent Tungsten and writing the actual configuration files. The tpmcommand uses a JSON file that summarizes the configuration. The Continuent Tungsten processes use many different files to store theconfiguration and tpm is responsible for writing them.
The /opt/continuent/releases directory will start to collect multiple directories after you have run multiple upgrades. We keep theprevious versions of Continuent Tungsten in case a downgrade is needed or for review at a later date. If your upgrade has beensuccessful, you can remove old directories. Make sure you do not remove the directory that is linked to by the /opt/continuent/tungstensymlink.
Note
Do not change Continuent Tungsten configuration files by hand. This will cause future updates to fail. One of thevalidation checks compares the file that tpm wrote with the current file. If there are differences, validation willfail.
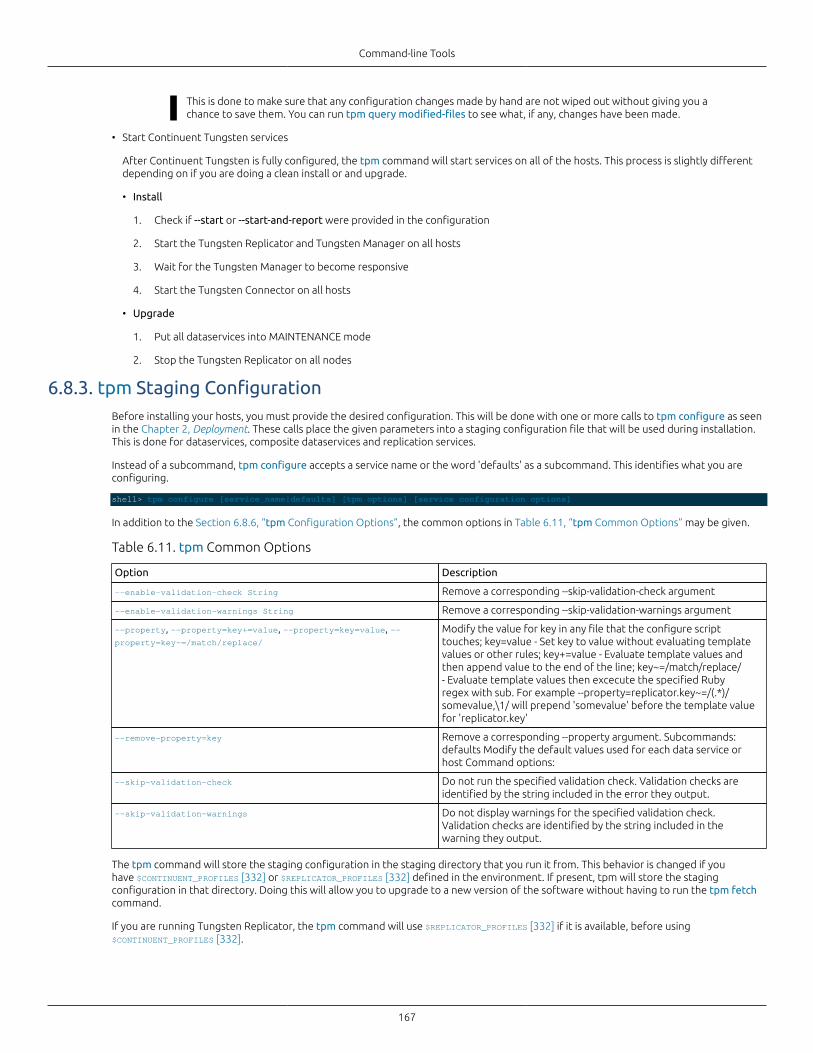
Command-line Tools
167
This is done to make sure that any configuration changes made by hand are not wiped out without giving you achance to save them. You can run tpm query modified-files to see what, if any, changes have been made.
• Start Continuent Tungsten services
After Continuent Tungsten is fully configured, the tpm command will start services on all of the hosts. This process is slightly differentdepending on if you are doing a clean install or and upgrade.
• Install
1. Check if --start or --start-and-report were provided in the configuration
2. Start the Tungsten Replicator and Tungsten Manager on all hosts
3. Wait for the Tungsten Manager to become responsive
4. Start the Tungsten Connector on all hosts
• Upgrade
1. Put all dataservices into MAINTENANCE mode
2. Stop the Tungsten Replicator on all nodes
6.8.3. tpm Staging ConfigurationBefore installing your hosts, you must provide the desired configuration. This will be done with one or more calls to tpm configure as seenin the Chapter 2, Deployment. These calls place the given parameters into a staging configuration file that will be used during installation.This is done for dataservices, composite dataservices and replication services.
Instead of a subcommand, tpm configure accepts a service name or the word 'defaults' as a subcommand. This identifies what you areconfiguring.
shell> tpm configure [service_name|defaults] [tpm options] [service configuration options]
In addition to the Section 6.8.6, “tpm Configuration Options”, the common options in Table 6.11, “tpm Common Options” may be given.
Table 6.11. tpm Common Options
Option Description
--enable-validation-check String Remove a corresponding --skip-validation-check argument
--enable-validation-warnings String Remove a corresponding --skip-validation-warnings argument
--property, --property=key+=value, --property=key=value, --property=key~=/match/replace/
Modify the value for key in any file that the configure scripttouches; key=value - Set key to value without evaluating templatevalues or other rules; key+=value - Evaluate template values andthen append value to the end of the line; key~=/match/replace/- Evaluate template values then excecute the specified Rubyregex with sub. For example --property=replicator.key~=/(.*)/somevalue,\1/ will prepend 'somevalue' before the template valuefor 'replicator.key'
--remove-property=key Remove a corresponding --property argument. Subcommands:defaults Modify the default values used for each data service orhost Command options:
--skip-validation-check Do not run the specified validation check. Validation checks areidentified by the string included in the error they output.
--skip-validation-warnings Do not display warnings for the specified validation check.Validation checks are identified by the string included in thewarning they output.
The tpm command will store the staging configuration in the staging directory that you run it from. This behavior is changed if youhave $CONTINUENT_PROFILES [332] or $REPLICATOR_PROFILES [332] defined in the environment. If present, tpm will store the stagingconfiguration in that directory. Doing this will allow you to upgrade to a new version of the software without having to run the tpm fetchcommand.
If you are running Tungsten Replicator, the tpm command will use $REPLICATOR_PROFILES [332] if it is available, before using$CONTINUENT_PROFILES [332].

Command-line Tools
168
6.8.3.1. Configuring default options for all servicesshell> ./tools/tpm configure defaults \ --replication-user=tungsten \ --replication-password=secret \ --replication-port=13306
These options will apply to all services in the configuration file. This is useful when working with a composite dataservice or multipleindependent services. These options may be overridden by calls to tpm configure service_name or tpm configure service_name --hosts.
6.8.3.2. Configuring a single serviceshell> ./tools/tpm configure alpha \ --master=host1 \ --members=host1,host2,host3 \ --home-directory=/opt/continuent \ --user=tungsten
The configuration options provided following the service name will be associated with the 'alpha' dataservice. These options will overrideany given with tpm configure defaults.
Relationship of --members [199], --slaves [208] and --master [199]
Each dataservice will use some combination of these options to define the hosts it is installed on. They define the relationship ofservers for each dataservice.
If you specify --master [199] and --slaves [208]; --members [199] will be calculated as the unique join of both values.
If you specify --master [199] and --members [199]; --slaves [208] will be calculated as the unique difference of both values.
6.8.3.3. Configuring a single hostshell> ./tools/tpm configure alpha --hosts=host3 \ --backup-method=xtrabackup-incremental
This will apply the --repl-backup-method option to just the host3 server. Multiple hosts may be given as a comma-separated list. The namesused in the --members [199], --slaves [208], --master [199], options should be used when calling --hosts [196]. These values willoverride any given in tpm configure defaults or tpm configure alpha.
6.8.3.4. Reviewing the current configuration
You may run the tpm reverse command to review the list of configuration options. This will run in the staging directory and in yourinstallation directory. It is a good idea to run this command prior to installation and upgrades to validate the current settings.
# Installed from tungsten@host1:/home/tungsten/tungsten-replicator-2.2.1-403# Options for the alpha data servicetools/tpm configure alpha \--enable-thl-ssl=true \--install-directory=/opt/continuent \--java-keystore-password=password \--java-truststore-password=password \--master=host1 \--members=host1,host2,host3 \--replication-password=password \--replication-user=tungsten \--start=true \--topology=master-slave
The output includes all of the tpm configure commands necessary to rebuild the configuration. It includes all default, dataservice and hostspecific configuration settings. Review this output and make changes as needed until you are satisfied.
6.8.3.5. Installation
After you have prepared the configuration file, it is time to install.
shell> ./tools/tpm install
This will install all services defined in configuration. The installation will be done as explained in Section 6.8.2, “Processing Installs andUpgrades”. This will include the full set of --members [199], --slaves [208], --master [199] and --connectors.
6.8.3.5.1. Installing a set of specific servicesshell> ./tools/tpm install alpha,bravo
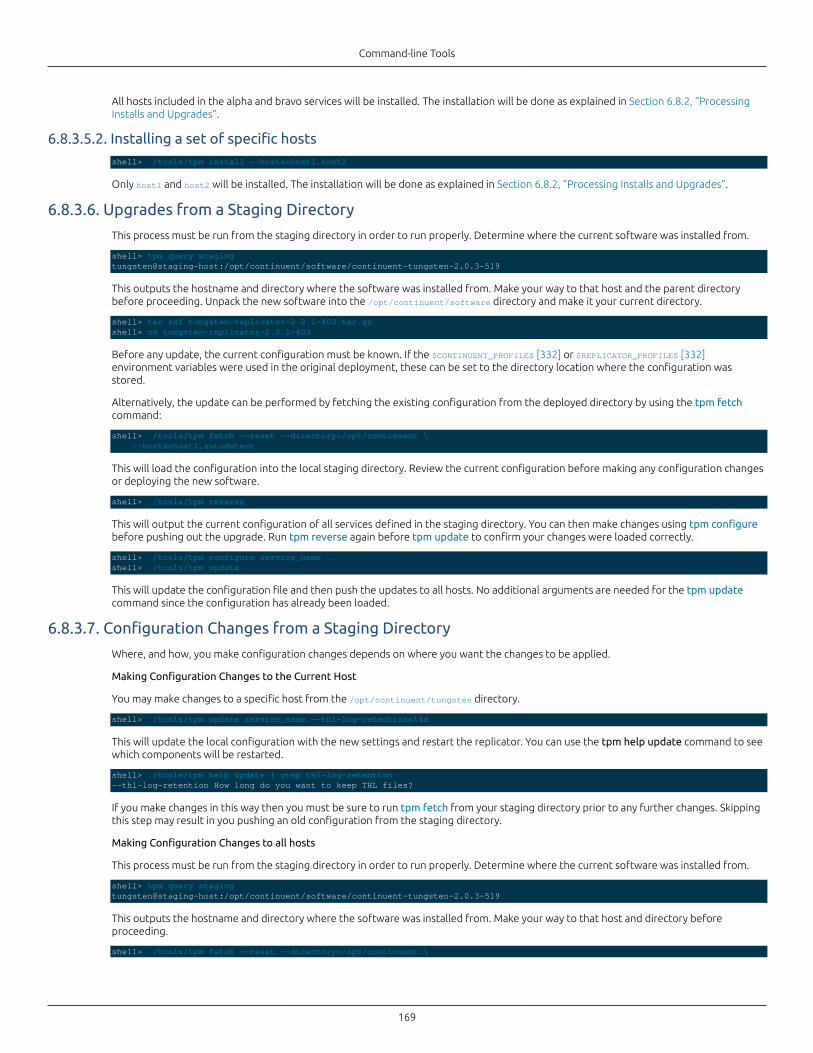
Command-line Tools
169
All hosts included in the alpha and bravo services will be installed. The installation will be done as explained in Section 6.8.2, “ProcessingInstalls and Upgrades”.
6.8.3.5.2. Installing a set of specific hostsshell> ./tools/tpm install --hosts=host1,host2
Only host1 and host2 will be installed. The installation will be done as explained in Section 6.8.2, “Processing Installs and Upgrades”.
6.8.3.6. Upgrades from a Staging Directory
This process must be run from the staging directory in order to run properly. Determine where the current software was installed from.
shell> tpm query stagingtungsten@staging-host:/opt/continuent/software/continuent-tungsten-2.0.3-519
This outputs the hostname and directory where the software was installed from. Make your way to that host and the parent directorybefore proceeding. Unpack the new software into the /opt/continuent/software directory and make it your current directory.
shell> tar zxf tungsten-replicator-2.2.1-403.tar.gzshell> cd tungsten-replicator-2.2.1-403
Before any update, the current configuration must be known. If the $CONTINUENT_PROFILES [332] or $REPLICATOR_PROFILES [332]environment variables were used in the original deployment, these can be set to the directory location where the configuration wasstored.
Alternatively, the update can be performed by fetching the existing configuration from the deployed directory by using the tpm fetchcommand:
shell> ./tools/tpm fetch --reset --directory=/opt/continuent \ --hosts=host1,autodetect
This will load the configuration into the local staging directory. Review the current configuration before making any configuration changesor deploying the new software.
shell> ./tools/tpm reverse
This will output the current configuration of all services defined in the staging directory. You can then make changes using tpm configurebefore pushing out the upgrade. Run tpm reverse again before tpm update to confirm your changes were loaded correctly.
shell> ./tools/tpm configure service_name ...shell> ./tools/tpm update
This will update the configuration file and then push the updates to all hosts. No additional arguments are needed for the tpm updatecommand since the configuration has already been loaded.
6.8.3.7. Configuration Changes from a Staging Directory
Where, and how, you make configuration changes depends on where you want the changes to be applied.
Making Configuration Changes to the Current Host
You may make changes to a specific host from the /opt/continuent/tungsten directory.
shell> ./tools/tpm update service_name --thl-log-retention=14d
This will update the local configuration with the new settings and restart the replicator. You can use the tpm help update command to seewhich components will be restarted.
shell> ./tools/tpm help update | grep thl-log-retention--thl-log-retention How long do you want to keep THL files?
If you make changes in this way then you must be sure to run tpm fetch from your staging directory prior to any further changes. Skippingthis step may result in you pushing an old configuration from the staging directory.
Making Configuration Changes to all hosts
This process must be run from the staging directory in order to run properly. Determine where the current software was installed from.
shell> tpm query stagingtungsten@staging-host:/opt/continuent/software/continuent-tungsten-2.0.3-519
This outputs the hostname and directory where the software was installed from. Make your way to that host and directory beforeproceeding.
shell> ./tools/tpm fetch --reset --directory=/opt/continuent \
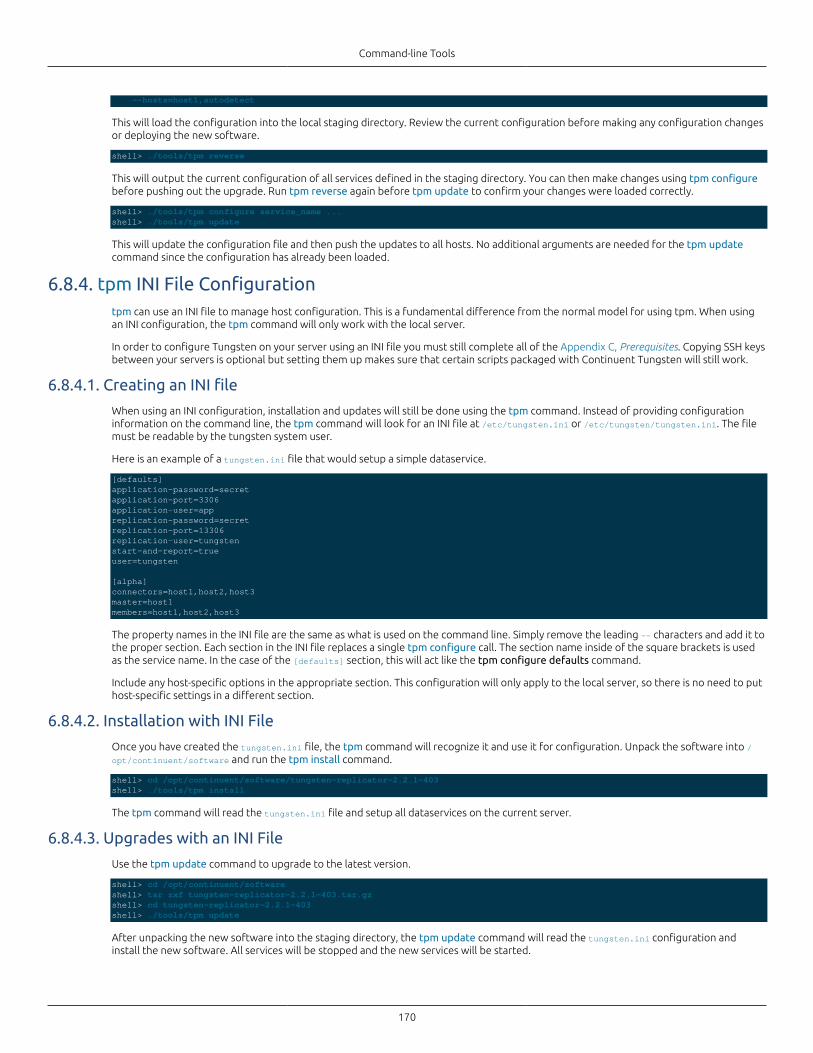
Command-line Tools
170
--hosts=host1,autodetect
This will load the configuration into the local staging directory. Review the current configuration before making any configuration changesor deploying the new software.
shell> ./tools/tpm reverse
This will output the current configuration of all services defined in the staging directory. You can then make changes using tpm configurebefore pushing out the upgrade. Run tpm reverse again before tpm update to confirm your changes were loaded correctly.
shell> ./tools/tpm configure service_name ...shell> ./tools/tpm update
This will update the configuration file and then push the updates to all hosts. No additional arguments are needed for the tpm updatecommand since the configuration has already been loaded.
6.8.4. tpm INI File Configurationtpm can use an INI file to manage host configuration. This is a fundamental difference from the normal model for using tpm. When usingan INI configuration, the tpm command will only work with the local server.
In order to configure Tungsten on your server using an INI file you must still complete all of the Appendix C, Prerequisites. Copying SSH keysbetween your servers is optional but setting them up makes sure that certain scripts packaged with Continuent Tungsten will still work.
6.8.4.1. Creating an INI file
When using an INI configuration, installation and updates will still be done using the tpm command. Instead of providing configurationinformation on the command line, the tpm command will look for an INI file at /etc/tungsten.ini or /etc/tungsten/tungsten.ini. The filemust be readable by the tungsten system user.
Here is an example of a tungsten.ini file that would setup a simple dataservice.
[defaults]application-password=secretapplication-port=3306application-user=appreplication-password=secretreplication-port=13306replication-user=tungstenstart-and-report=trueuser=tungsten
[alpha]connectors=host1,host2,host3master=host1members=host1,host2,host3
The property names in the INI file are the same as what is used on the command line. Simply remove the leading -- characters and add it tothe proper section. Each section in the INI file replaces a single tpm configure call. The section name inside of the square brackets is usedas the service name. In the case of the [defaults] section, this will act like the tpm configure defaults command.
Include any host-specific options in the appropriate section. This configuration will only apply to the local server, so there is no need to puthost-specific settings in a different section.
6.8.4.2. Installation with INI File
Once you have created the tungsten.ini file, the tpm command will recognize it and use it for configuration. Unpack the software into /opt/continuent/software and run the tpm install command.
shell> cd /opt/continuent/software/tungsten-replicator-2.2.1-403shell> ./tools/tpm install
The tpm command will read the tungsten.ini file and setup all dataservices on the current server.
6.8.4.3. Upgrades with an INI File
Use the tpm update command to upgrade to the latest version.
shell> cd /opt/continuent/softwareshell> tar zxf tungsten-replicator-2.2.1-403.tar.gzshell> cd tungsten-replicator-2.2.1-403shell> ./tools/tpm update
After unpacking the new software into the staging directory, the tpm update command will read the tungsten.ini configuration andinstall the new software. All services will be stopped and the new services will be started.
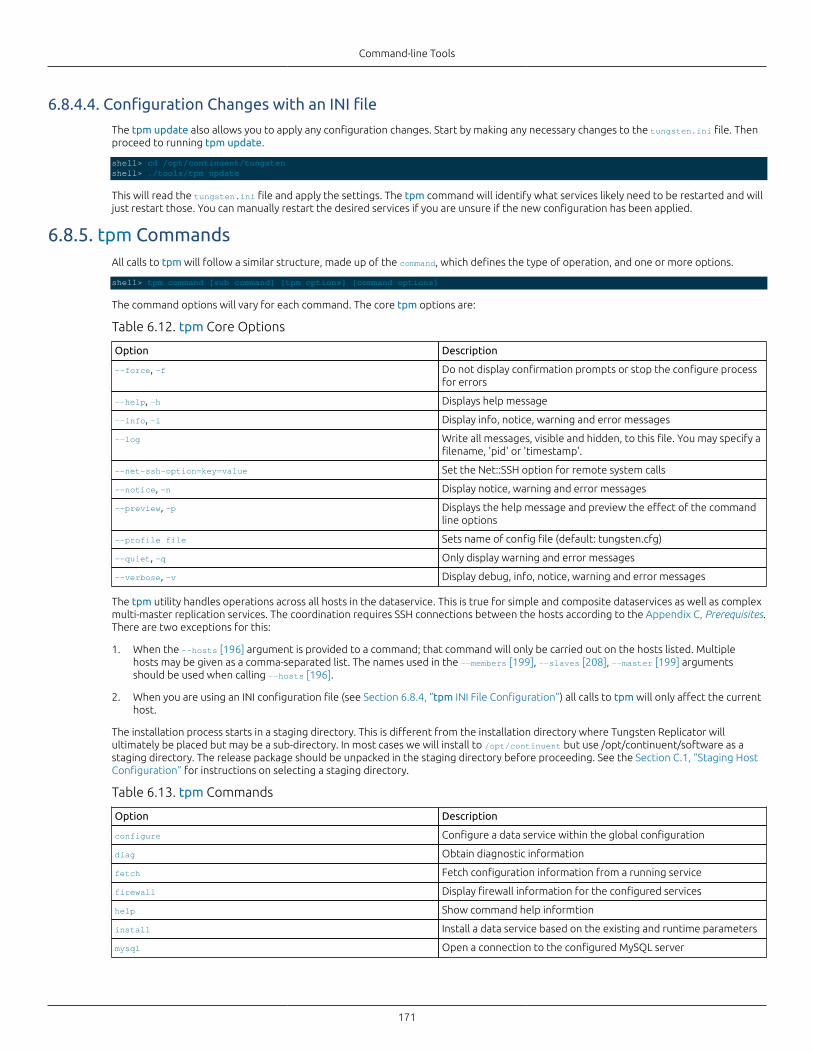
Command-line Tools
171
6.8.4.4. Configuration Changes with an INI file
The tpm update also allows you to apply any configuration changes. Start by making any necessary changes to the tungsten.ini file. Thenproceed to running tpm update.
shell> cd /opt/continuent/tungstenshell> ./tools/tpm update
This will read the tungsten.ini file and apply the settings. The tpm command will identify what services likely need to be restarted and willjust restart those. You can manually restart the desired services if you are unsure if the new configuration has been applied.
6.8.5. tpm CommandsAll calls to tpm will follow a similar structure, made up of the command, which defines the type of operation, and one or more options.
shell> tpm command [sub command] [tpm options] [command options]
The command options will vary for each command. The core tpm options are:
Table 6.12. tpm Core Options
Option Description
--force, -f Do not display confirmation prompts or stop the configure processfor errors
--help, -h Displays help message
--info, -i Display info, notice, warning and error messages
--log Write all messages, visible and hidden, to this file. You may specify afilename, 'pid' or 'timestamp'.
--net-ssh-option=key=value Set the Net::SSH option for remote system calls
--notice, -n Display notice, warning and error messages
--preview, -p Displays the help message and preview the effect of the commandline options
--profile file Sets name of config file (default: tungsten.cfg)
--quiet, -q Only display warning and error messages
--verbose, -v Display debug, info, notice, warning and error messages
The tpm utility handles operations across all hosts in the dataservice. This is true for simple and composite dataservices as well as complexmulti-master replication services. The coordination requires SSH connections between the hosts according to the Appendix C, Prerequisites.There are two exceptions for this:
1. When the --hosts [196] argument is provided to a command; that command will only be carried out on the hosts listed. Multiplehosts may be given as a comma-separated list. The names used in the --members [199], --slaves [208], --master [199] argumentsshould be used when calling --hosts [196].
2. When you are using an INI configuration file (see Section 6.8.4, “tpm INI File Configuration”) all calls to tpm will only affect the currenthost.
The installation process starts in a staging directory. This is different from the installation directory where Tungsten Replicator willultimately be placed but may be a sub-directory. In most cases we will install to /opt/continuent but use /opt/continuent/software as astaging directory. The release package should be unpacked in the staging directory before proceeding. See the Section C.1, “Staging HostConfiguration” for instructions on selecting a staging directory.
Table 6.13. tpm Commands
Option Description
configure Configure a data service within the global configuration
diag Obtain diagnostic information
fetch Fetch configuration information from a running service
firewall Display firewall information for the configured services
help Show command help informtion
install Install a data service based on the existing and runtime parameters
mysql Open a connection to the configured MySQL server
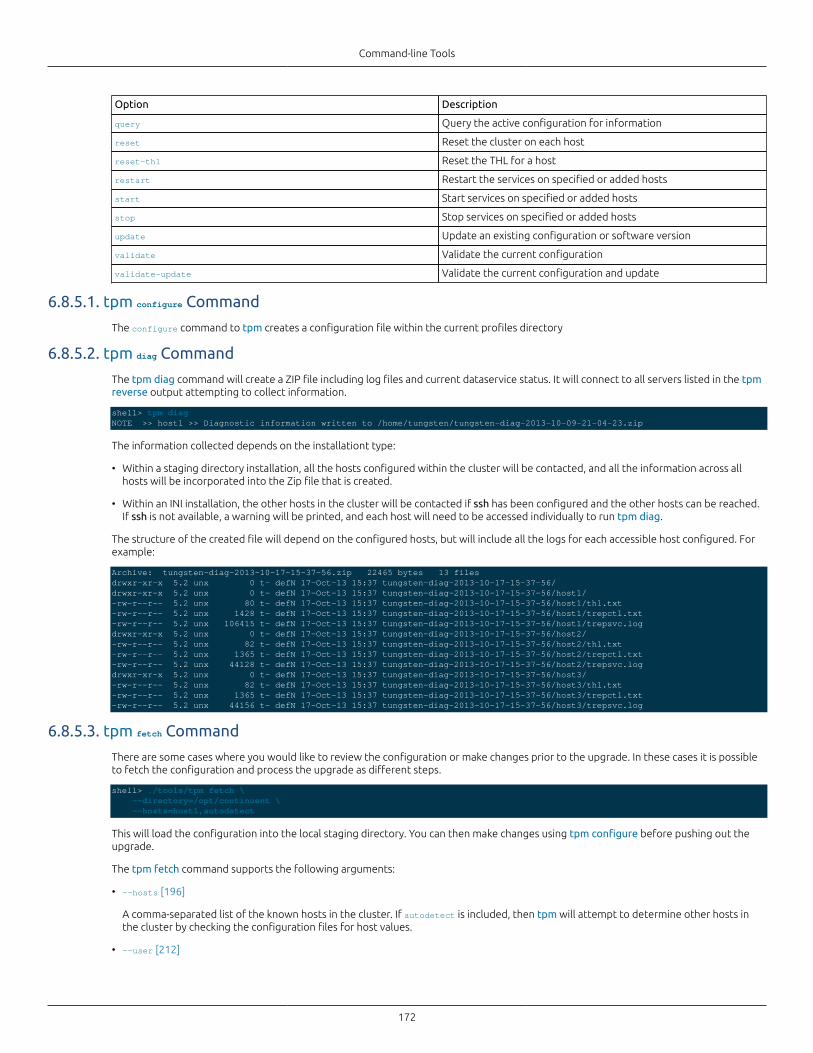
Command-line Tools
172
Option Description
query Query the active configuration for information
reset Reset the cluster on each host
reset-thl Reset the THL for a host
restart Restart the services on specified or added hosts
start Start services on specified or added hosts
stop Stop services on specified or added hosts
update Update an existing configuration or software version
validate Validate the current configuration
validate-update Validate the current configuration and update
6.8.5.1. tpm configure Command
The configure command to tpm creates a configuration file within the current profiles directory
6.8.5.2. tpm diag Command
The tpm diag command will create a ZIP file including log files and current dataservice status. It will connect to all servers listed in the tpmreverse output attempting to collect information.
shell> tpm diagNOTE >> host1 >> Diagnostic information written to /home/tungsten/tungsten-diag-2013-10-09-21-04-23.zip
The information collected depends on the installationt type:
• Within a staging directory installation, all the hosts configured within the cluster will be contacted, and all the information across allhosts will be incorporated into the Zip file that is created.
• Within an INI installation, the other hosts in the cluster will be contacted if ssh has been configured and the other hosts can be reached.If ssh is not available, a warning will be printed, and each host will need to be accessed individually to run tpm diag.
The structure of the created file will depend on the configured hosts, but will include all the logs for each accessible host configured. Forexample:
Archive: tungsten-diag-2013-10-17-15-37-56.zip 22465 bytes 13 filesdrwxr-xr-x 5.2 unx 0 t- defN 17-Oct-13 15:37 tungsten-diag-2013-10-17-15-37-56/drwxr-xr-x 5.2 unx 0 t- defN 17-Oct-13 15:37 tungsten-diag-2013-10-17-15-37-56/host1/-rw-r--r-- 5.2 unx 80 t- defN 17-Oct-13 15:37 tungsten-diag-2013-10-17-15-37-56/host1/thl.txt-rw-r--r-- 5.2 unx 1428 t- defN 17-Oct-13 15:37 tungsten-diag-2013-10-17-15-37-56/host1/trepctl.txt-rw-r--r-- 5.2 unx 106415 t- defN 17-Oct-13 15:37 tungsten-diag-2013-10-17-15-37-56/host1/trepsvc.logdrwxr-xr-x 5.2 unx 0 t- defN 17-Oct-13 15:37 tungsten-diag-2013-10-17-15-37-56/host2/-rw-r--r-- 5.2 unx 82 t- defN 17-Oct-13 15:37 tungsten-diag-2013-10-17-15-37-56/host2/thl.txt-rw-r--r-- 5.2 unx 1365 t- defN 17-Oct-13 15:37 tungsten-diag-2013-10-17-15-37-56/host2/trepctl.txt-rw-r--r-- 5.2 unx 44128 t- defN 17-Oct-13 15:37 tungsten-diag-2013-10-17-15-37-56/host2/trepsvc.logdrwxr-xr-x 5.2 unx 0 t- defN 17-Oct-13 15:37 tungsten-diag-2013-10-17-15-37-56/host3/-rw-r--r-- 5.2 unx 82 t- defN 17-Oct-13 15:37 tungsten-diag-2013-10-17-15-37-56/host3/thl.txt-rw-r--r-- 5.2 unx 1365 t- defN 17-Oct-13 15:37 tungsten-diag-2013-10-17-15-37-56/host3/trepctl.txt-rw-r--r-- 5.2 unx 44156 t- defN 17-Oct-13 15:37 tungsten-diag-2013-10-17-15-37-56/host3/trepsvc.log
6.8.5.3. tpm fetch Command
There are some cases where you would like to review the configuration or make changes prior to the upgrade. In these cases it is possibleto fetch the configuration and process the upgrade as different steps.
shell> ./tools/tpm fetch \ --directory=/opt/continuent \ --hosts=host1,autodetect
This will load the configuration into the local staging directory. You can then make changes using tpm configure before pushing out theupgrade.
The tpm fetch command supports the following arguments:
• --hosts [196]
A comma-separated list of the known hosts in the cluster. If autodetect is included, then tpm will attempt to determine other hosts inthe cluster by checking the configuration files for host values.
• --user [212]
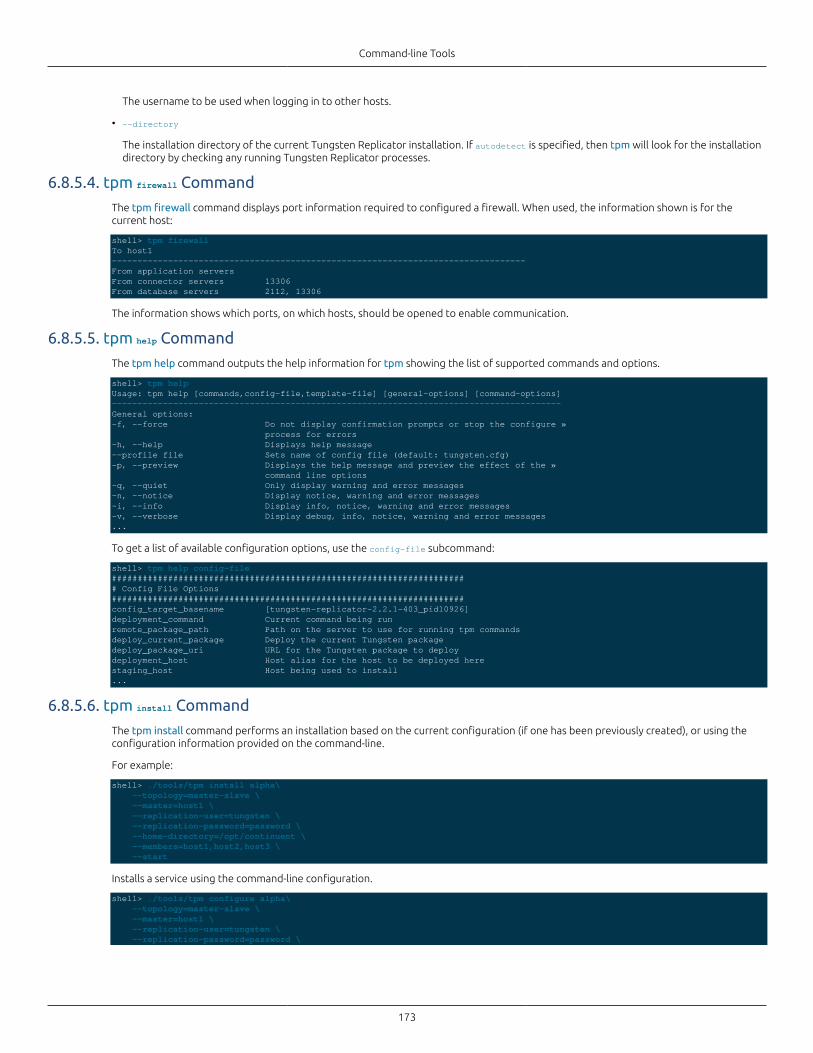
Command-line Tools
173
The username to be used when logging in to other hosts.
• --directory
The installation directory of the current Tungsten Replicator installation. If autodetect is specified, then tpm will look for the installationdirectory by checking any running Tungsten Replicator processes.
6.8.5.4. tpm firewall Command
The tpm firewall command displays port information required to configured a firewall. When used, the information shown is for thecurrent host:
shell> tpm firewallTo host1---------------------------------------------------------------------------------From application serversFrom connector servers 13306From database servers 2112, 13306
The information shows which ports, on which hosts, should be opened to enable communication.
6.8.5.5. tpm help Command
The tpm help command outputs the help information for tpm showing the list of supported commands and options.
shell> tpm helpUsage: tpm help [commands,config-file,template-file] [general-options] [command-options]----------------------------------------------------------------------------------------General options:-f, --force Do not display confirmation prompts or stop the configure » process for errors-h, --help Displays help message--profile file Sets name of config file (default: tungsten.cfg)-p, --preview Displays the help message and preview the effect of the » command line options-q, --quiet Only display warning and error messages-n, --notice Display notice, warning and error messages-i, --info Display info, notice, warning and error messages-v, --verbose Display debug, info, notice, warning and error messages...
To get a list of available configuration options, use the config-file subcommand:
shell> tpm help config-file###################################################################### Config File Options#####################################################################config_target_basename [tungsten-replicator-2.2.1-403_pid10926]deployment_command Current command being runremote_package_path Path on the server to use for running tpm commandsdeploy_current_package Deploy the current Tungsten packagedeploy_package_uri URL for the Tungsten package to deploydeployment_host Host alias for the host to be deployed herestaging_host Host being used to install...
6.8.5.6. tpm install Command
The tpm install command performs an installation based on the current configuration (if one has been previously created), or using theconfiguration information provided on the command-line.
For example:
shell> ./tools/tpm install alpha\ --topology=master-slave \ --master=host1 \ --replication-user=tungsten \ --replication-password=password \ --home-directory=/opt/continuent \ --members=host1,host2,host3 \ --start
Installs a service using the command-line configuration.
shell> ./tools/tpm configure alpha\ --topology=master-slave \ --master=host1 \ --replication-user=tungsten \ --replication-password=password \
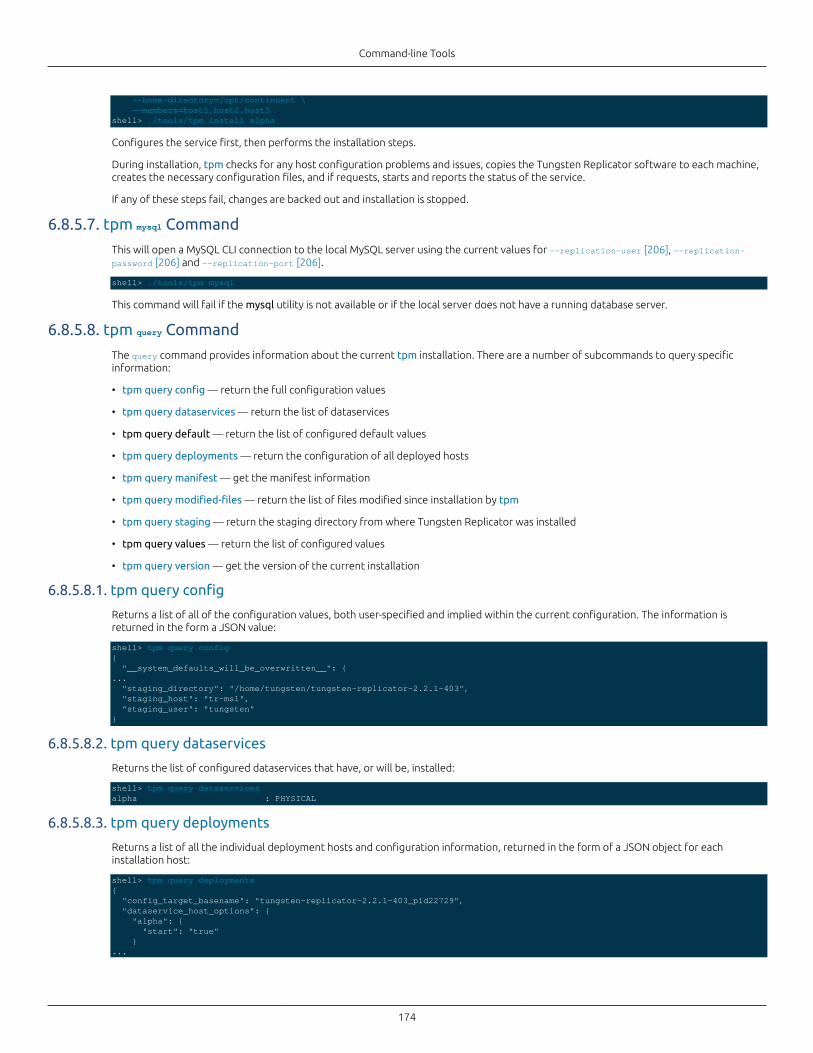
Command-line Tools
174
--home-directory=/opt/continuent \ --members=host1,host2,host3 shell> ./tools/tpm install alpha
Configures the service first, then performs the installation steps.
During installation, tpm checks for any host configuration problems and issues, copies the Tungsten Replicator software to each machine,creates the necessary configuration files, and if requests, starts and reports the status of the service.
If any of these steps fail, changes are backed out and installation is stopped.
6.8.5.7. tpm mysql Command
This will open a MySQL CLI connection to the local MySQL server using the current values for --replication-user [206], --replication-password [206] and --replication-port [206].
shell> ./tools/tpm mysql
This command will fail if the mysql utility is not available or if the local server does not have a running database server.
6.8.5.8. tpm query Command
The query command provides information about the current tpm installation. There are a number of subcommands to query specificinformation:
• tpm query config — return the full configuration values
• tpm query dataservices — return the list of dataservices
• tpm query default — return the list of configured default values
• tpm query deployments — return the configuration of all deployed hosts
• tpm query manifest — get the manifest information
• tpm query modified-files — return the list of files modified since installation by tpm
• tpm query staging — return the staging directory from where Tungsten Replicator was installed
• tpm query values — return the list of configured values
• tpm query version — get the version of the current installation
6.8.5.8.1. tpm query config
Returns a list of all of the configuration values, both user-specified and implied within the current configuration. The information isreturned in the form a JSON value:
shell> tpm query config{ "__system_defaults_will_be_overwritten__": {... "staging_directory": "/home/tungsten/tungsten-replicator-2.2.1-403", "staging_host": "tr-ms1", "staging_user": "tungsten"}
6.8.5.8.2. tpm query dataservices
Returns the list of configured dataservices that have, or will be, installed:
shell> tpm query dataservicesalpha : PHYSICAL
6.8.5.8.3. tpm query deployments
Returns a list of all the individual deployment hosts and configuration information, returned in the form of a JSON object for eachinstallation host:
shell> tpm query deployments{ "config_target_basename": "tungsten-replicator-2.2.1-403_pid22729", "dataservice_host_options": { "alpha": { "start": "true" }...
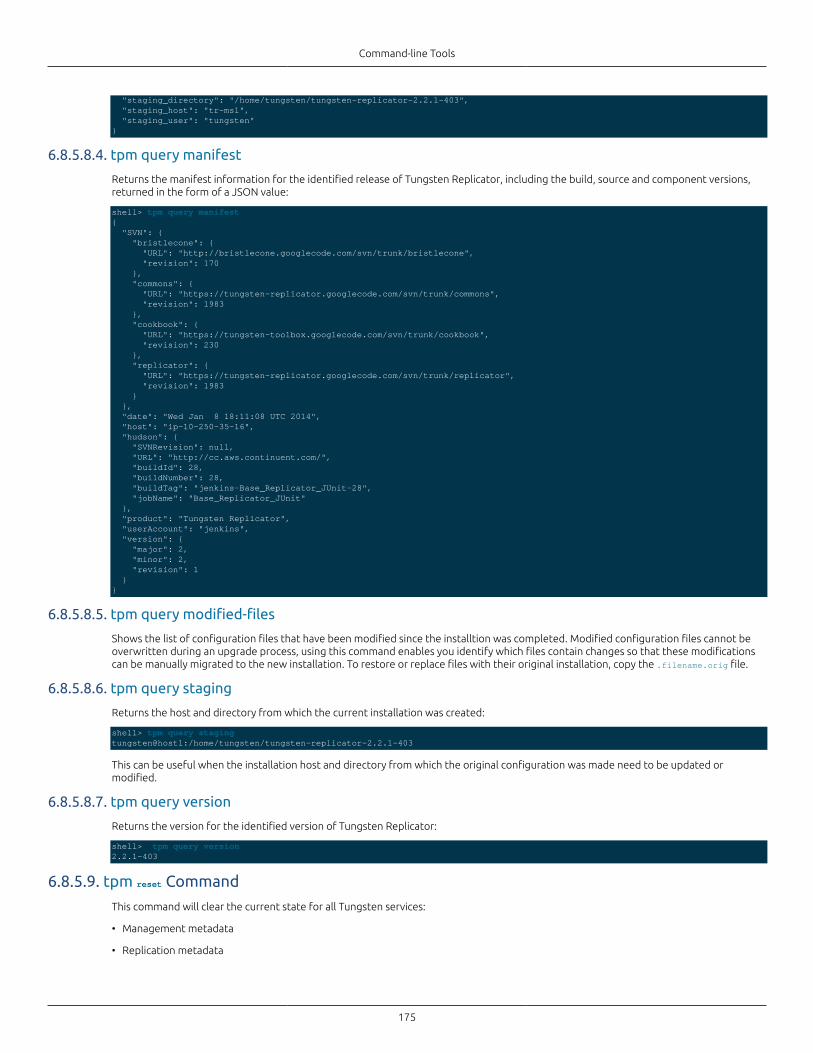
Command-line Tools
175
"staging_directory": "/home/tungsten/tungsten-replicator-2.2.1-403", "staging_host": "tr-ms1", "staging_user": "tungsten"}
6.8.5.8.4. tpm query manifest
Returns the manifest information for the identified release of Tungsten Replicator, including the build, source and component versions,returned in the form of a JSON value:
shell> tpm query manifest{ "SVN": { "bristlecone": { "URL": "http://bristlecone.googlecode.com/svn/trunk/bristlecone", "revision": 170 }, "commons": { "URL": "https://tungsten-replicator.googlecode.com/svn/trunk/commons", "revision": 1983 }, "cookbook": { "URL": "https://tungsten-toolbox.googlecode.com/svn/trunk/cookbook", "revision": 230 }, "replicator": { "URL": "https://tungsten-replicator.googlecode.com/svn/trunk/replicator", "revision": 1983 } }, "date": "Wed Jan 8 18:11:08 UTC 2014", "host": "ip-10-250-35-16", "hudson": { "SVNRevision": null, "URL": "http://cc.aws.continuent.com/", "buildId": 28, "buildNumber": 28, "buildTag": "jenkins-Base_Replicator_JUnit-28", "jobName": "Base_Replicator_JUnit" }, "product": "Tungsten Replicator", "userAccount": "jenkins", "version": { "major": 2, "minor": 2, "revision": 1 }}
6.8.5.8.5. tpm query modified-files
Shows the list of configuration files that have been modified since the installtion was completed. Modified configuration files cannot beoverwritten during an upgrade process, using this command enables you identify which files contain changes so that these modificationscan be manually migrated to the new installation. To restore or replace files with their original installation, copy the .filename.orig file.
6.8.5.8.6. tpm query staging
Returns the host and directory from which the current installation was created:
shell> tpm query stagingtungsten@host1:/home/tungsten/tungsten-replicator-2.2.1-403
This can be useful when the installation host and directory from which the original configuration was made need to be updated ormodified.
6.8.5.8.7. tpm query version
Returns the version for the identified version of Tungsten Replicator:
shell> tpm query version2.2.1-403
6.8.5.9. tpm reset Command
This command will clear the current state for all Tungsten services:
• Management metadata
• Replication metadata
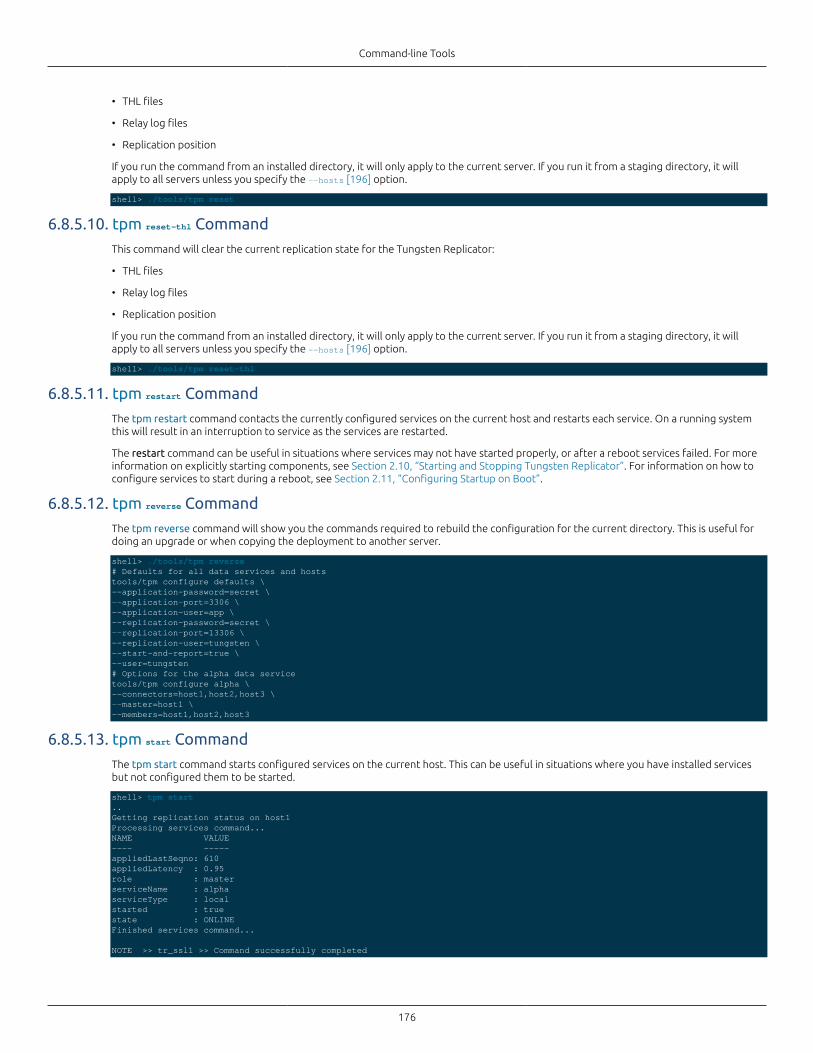
Command-line Tools
176
• THL files
• Relay log files
• Replication position
If you run the command from an installed directory, it will only apply to the current server. If you run it from a staging directory, it willapply to all servers unless you specify the --hosts [196] option.
shell> ./tools/tpm reset
6.8.5.10. tpm reset-thl Command
This command will clear the current replication state for the Tungsten Replicator:
• THL files
• Relay log files
• Replication position
If you run the command from an installed directory, it will only apply to the current server. If you run it from a staging directory, it willapply to all servers unless you specify the --hosts [196] option.
shell> ./tools/tpm reset-thl
6.8.5.11. tpm restart Command
The tpm restart command contacts the currently configured services on the current host and restarts each service. On a running systemthis will result in an interruption to service as the services are restarted.
The restart command can be useful in situations where services may not have started properly, or after a reboot services failed. For moreinformation on explicitly starting components, see Section 2.10, “Starting and Stopping Tungsten Replicator”. For information on how toconfigure services to start during a reboot, see Section 2.11, “Configuring Startup on Boot”.
6.8.5.12. tpm reverse Command
The tpm reverse command will show you the commands required to rebuild the configuration for the current directory. This is useful fordoing an upgrade or when copying the deployment to another server.
shell> ./tools/tpm reverse# Defaults for all data services and hoststools/tpm configure defaults \--application-password=secret \--application-port=3306 \--application-user=app \--replication-password=secret \--replication-port=13306 \--replication-user=tungsten \--start-and-report=true \--user=tungsten# Options for the alpha data servicetools/tpm configure alpha \--connectors=host1,host2,host3 \--master=host1 \--members=host1,host2,host3
6.8.5.13. tpm start Command
The tpm start command starts configured services on the current host. This can be useful in situations where you have installed servicesbut not configured them to be started.
shell> tpm start..Getting replication status on host1Processing services command...NAME VALUE---- -----appliedLastSeqno: 610appliedLatency : 0.95role : masterserviceName : alphaserviceType : localstarted : truestate : ONLINEFinished services command...
NOTE >> tr_ssl1 >> Command successfully completed
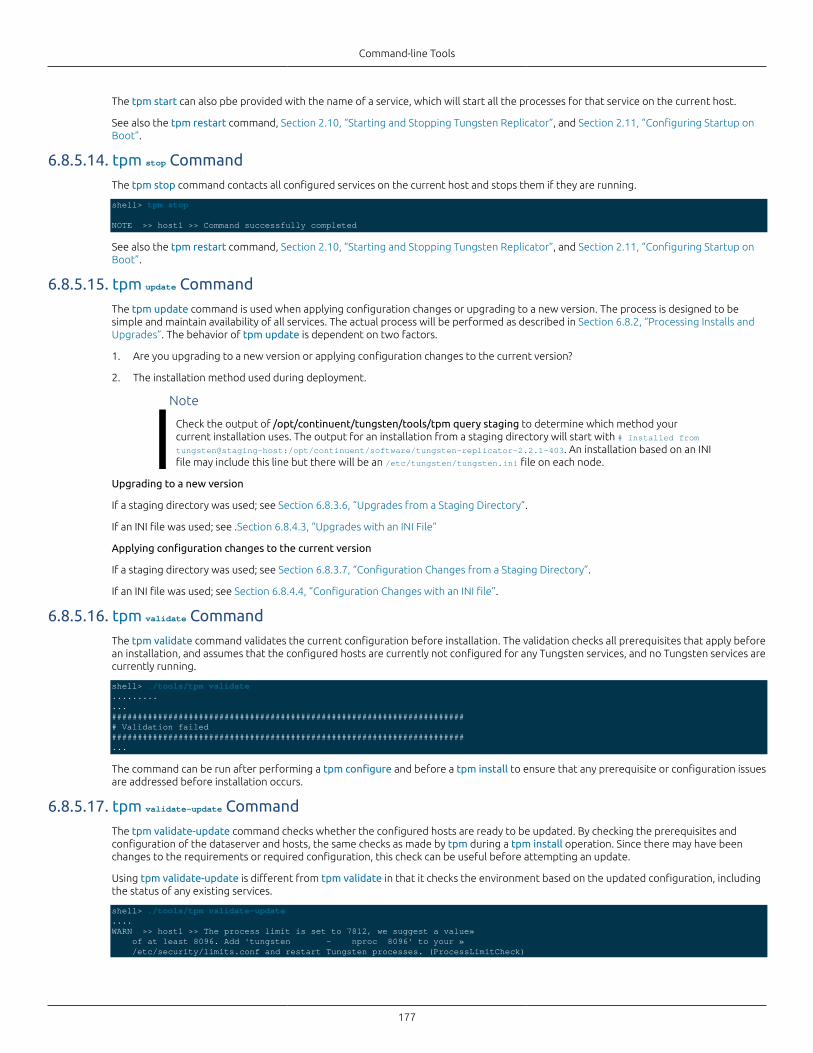
Command-line Tools
177
The tpm start can also pbe provided with the name of a service, which will start all the processes for that service on the current host.
See also the tpm restart command, Section 2.10, “Starting and Stopping Tungsten Replicator”, and Section 2.11, “Configuring Startup onBoot”.
6.8.5.14. tpm stop Command
The tpm stop command contacts all configured services on the current host and stops them if they are running.
shell> tpm stop
NOTE >> host1 >> Command successfully completed
See also the tpm restart command, Section 2.10, “Starting and Stopping Tungsten Replicator”, and Section 2.11, “Configuring Startup onBoot”.
6.8.5.15. tpm update Command
The tpm update command is used when applying configuration changes or upgrading to a new version. The process is designed to besimple and maintain availability of all services. The actual process will be performed as described in Section 6.8.2, “Processing Installs andUpgrades”. The behavior of tpm update is dependent on two factors.
1. Are you upgrading to a new version or applying configuration changes to the current version?
2. The installation method used during deployment.
Note
Check the output of /opt/continuent/tungsten/tools/tpm query staging to determine which method yourcurrent installation uses. The output for an installation from a staging directory will start with # Installed fromtungsten@staging-host:/opt/continuent/software/tungsten-replicator-2.2.1-403. An installation based on an INIfile may include this line but there will be an /etc/tungsten/tungsten.ini file on each node.
Upgrading to a new version
If a staging directory was used; see Section 6.8.3.6, “Upgrades from a Staging Directory”.
If an INI file was used; see .Section 6.8.4.3, “Upgrades with an INI File”
Applying configuration changes to the current version
If a staging directory was used; see Section 6.8.3.7, “Configuration Changes from a Staging Directory”.
If an INI file was used; see Section 6.8.4.4, “Configuration Changes with an INI file”.
6.8.5.16. tpm validate Command
The tpm validate command validates the current configuration before installation. The validation checks all prerequisites that apply beforean installation, and assumes that the configured hosts are currently not configured for any Tungsten services, and no Tungsten services arecurrently running.
shell> ./tools/tpm validate............###################################################################### Validation failed#####################################################################...
The command can be run after performing a tpm configure and before a tpm install to ensure that any prerequisite or configuration issuesare addressed before installation occurs.
6.8.5.17. tpm validate-update Command
The tpm validate-update command checks whether the configured hosts are ready to be updated. By checking the prerequisites andconfiguration of the dataserver and hosts, the same checks as made by tpm during a tpm install operation. Since there may have beenchanges to the requirements or required configuration, this check can be useful before attempting an update.
Using tpm validate-update is different from tpm validate in that it checks the environment based on the updated configuration, includingthe status of any existing services.
shell> ./tools/tpm validate-update....WARN >> host1 >> The process limit is set to 7812, we suggest a value» of at least 8096. Add 'tungsten - nproc 8096' to your » /etc/security/limits.conf and restart Tungsten processes. (ProcessLimitCheck)
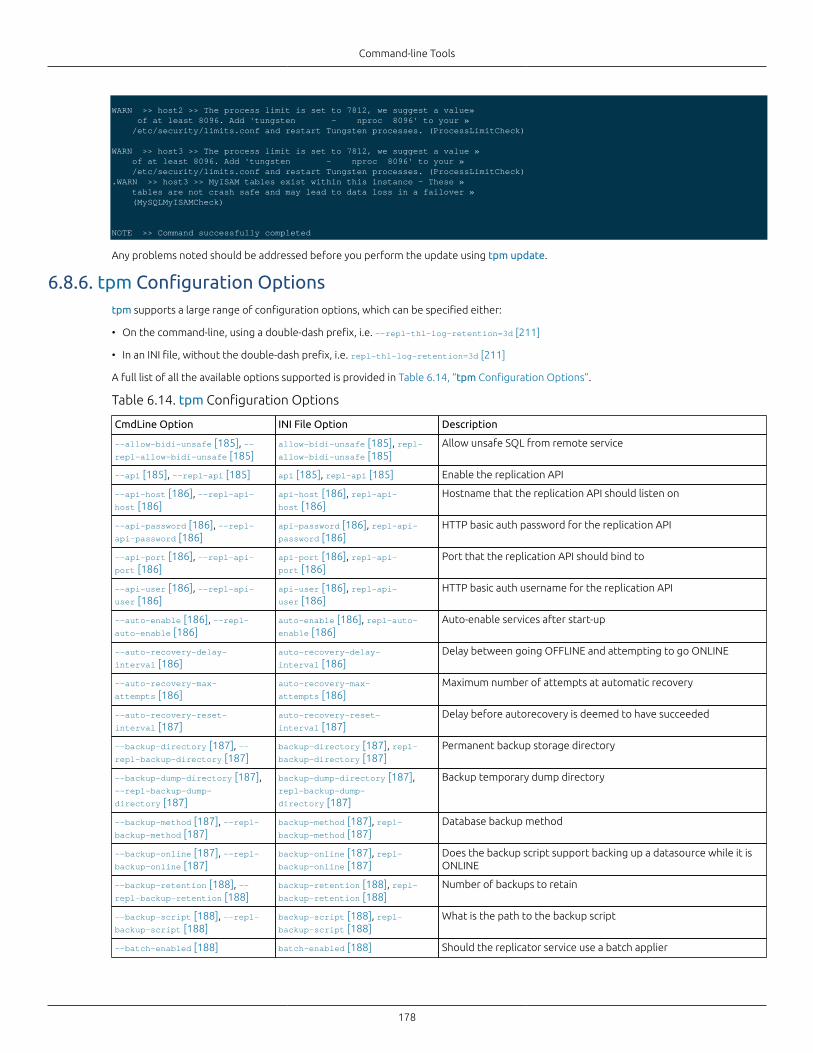
Command-line Tools
178
WARN >> host2 >> The process limit is set to 7812, we suggest a value» of at least 8096. Add 'tungsten - nproc 8096' to your » /etc/security/limits.conf and restart Tungsten processes. (ProcessLimitCheck)
WARN >> host3 >> The process limit is set to 7812, we suggest a value » of at least 8096. Add 'tungsten - nproc 8096' to your » /etc/security/limits.conf and restart Tungsten processes. (ProcessLimitCheck).WARN >> host3 >> MyISAM tables exist within this instance - These » tables are not crash safe and may lead to data loss in a failover » (MySQLMyISAMCheck)
NOTE >> Command successfully completed
Any problems noted should be addressed before you perform the update using tpm update.
6.8.6. tpm Configuration Optionstpm supports a large range of configuration options, which can be specified either:
• On the command-line, using a double-dash prefix, i.e. --repl-thl-log-retention=3d [211]
• In an INI file, without the double-dash prefix, i.e. repl-thl-log-retention=3d [211]
A full list of all the available options supported is provided in Table 6.14, “tpm Configuration Options”.
Table 6.14. tpm Configuration Options
CmdLine Option INI File Option Description
--allow-bidi-unsafe [185], --repl-allow-bidi-unsafe [185]
allow-bidi-unsafe [185], repl-allow-bidi-unsafe [185]
Allow unsafe SQL from remote service
--api [185], --repl-api [185] api [185], repl-api [185] Enable the replication API
--api-host [186], --repl-api-host [186]
api-host [186], repl-api-host [186]
Hostname that the replication API should listen on
--api-password [186], --repl-api-password [186]
api-password [186], repl-api-password [186]
HTTP basic auth password for the replication API
--api-port [186], --repl-api-port [186]
api-port [186], repl-api-port [186]
Port that the replication API should bind to
--api-user [186], --repl-api-user [186]
api-user [186], repl-api-user [186]
HTTP basic auth username for the replication API
--auto-enable [186], --repl-auto-enable [186]
auto-enable [186], repl-auto-enable [186]
Auto-enable services after start-up
--auto-recovery-delay-
interval [186]auto-recovery-delay-
interval [186]Delay between going OFFLINE and attempting to go ONLINE
--auto-recovery-max-
attempts [186]auto-recovery-max-
attempts [186]Maximum number of attempts at automatic recovery
--auto-recovery-reset-
interval [187]auto-recovery-reset-
interval [187]Delay before autorecovery is deemed to have succeeded
--backup-directory [187], --repl-backup-directory [187]
backup-directory [187], repl-backup-directory [187]
Permanent backup storage directory
--backup-dump-directory [187],--repl-backup-dump-
directory [187]
backup-dump-directory [187],repl-backup-dump-
directory [187]
Backup temporary dump directory
--backup-method [187], --repl-backup-method [187]
backup-method [187], repl-backup-method [187]
Database backup method
--backup-online [187], --repl-backup-online [187]
backup-online [187], repl-backup-online [187]
Does the backup script support backing up a datasource while it isONLINE
--backup-retention [188], --repl-backup-retention [188]
backup-retention [188], repl-backup-retention [188]
Number of backups to retain
--backup-script [188], --repl-backup-script [188]
backup-script [188], repl-backup-script [188]
What is the path to the backup script
--batch-enabled [188] batch-enabled [188] Should the replicator service use a batch applier
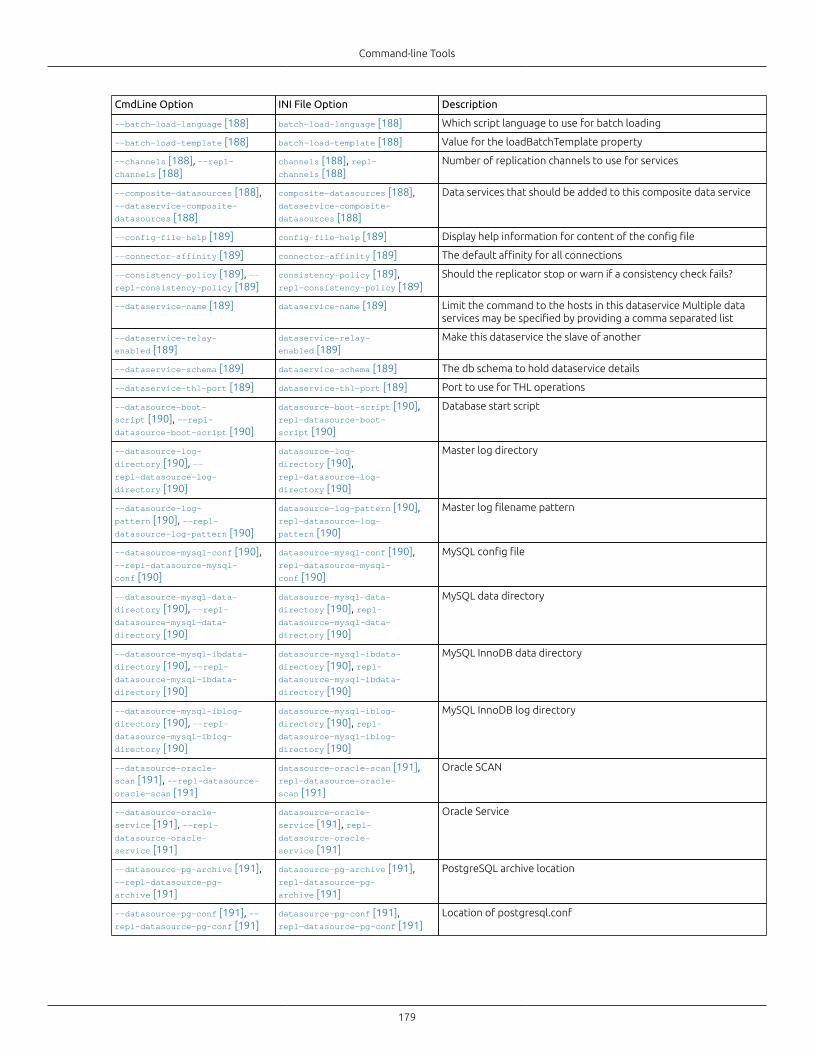
Command-line Tools
179
CmdLine Option INI File Option Description
--batch-load-language [188] batch-load-language [188] Which script language to use for batch loading
--batch-load-template [188] batch-load-template [188] Value for the loadBatchTemplate property
--channels [188], --repl-channels [188]
channels [188], repl-channels [188]
Number of replication channels to use for services
--composite-datasources [188],--dataservice-composite-
datasources [188]
composite-datasources [188],dataservice-composite-
datasources [188]
Data services that should be added to this composite data service
--config-file-help [189] config-file-help [189] Display help information for content of the config file
--connector-affinity [189] connector-affinity [189] The default affinity for all connections
--consistency-policy [189], --repl-consistency-policy [189]
consistency-policy [189],repl-consistency-policy [189]
Should the replicator stop or warn if a consistency check fails?
--dataservice-name [189] dataservice-name [189] Limit the command to the hosts in this dataservice Multiple dataservices may be specified by providing a comma separated list
--dataservice-relay-
enabled [189]dataservice-relay-
enabled [189]Make this dataservice the slave of another
--dataservice-schema [189] dataservice-schema [189] The db schema to hold dataservice details
--dataservice-thl-port [189] dataservice-thl-port [189] Port to use for THL operations
--datasource-boot-
script [190], --repl-datasource-boot-script [190]
datasource-boot-script [190],repl-datasource-boot-
script [190]
Database start script
--datasource-log-
directory [190], --repl-datasource-log-
directory [190]
datasource-log-
directory [190],repl-datasource-log-
directory [190]
Master log directory
--datasource-log-
pattern [190], --repl-datasource-log-pattern [190]
datasource-log-pattern [190],repl-datasource-log-
pattern [190]
Master log filename pattern
--datasource-mysql-conf [190],--repl-datasource-mysql-
conf [190]
datasource-mysql-conf [190],repl-datasource-mysql-
conf [190]
MySQL config file
--datasource-mysql-data-
directory [190], --repl-datasource-mysql-data-
directory [190]
datasource-mysql-data-
directory [190], repl-datasource-mysql-data-
directory [190]
MySQL data directory
--datasource-mysql-ibdata-
directory [190], --repl-datasource-mysql-ibdata-
directory [190]
datasource-mysql-ibdata-
directory [190], repl-datasource-mysql-ibdata-
directory [190]
MySQL InnoDB data directory
--datasource-mysql-iblog-
directory [190], --repl-datasource-mysql-iblog-
directory [190]
datasource-mysql-iblog-
directory [190], repl-datasource-mysql-iblog-
directory [190]
MySQL InnoDB log directory
--datasource-oracle-
scan [191], --repl-datasource-oracle-scan [191]
datasource-oracle-scan [191],repl-datasource-oracle-
scan [191]
Oracle SCAN
--datasource-oracle-
service [191], --repl-datasource-oracle-
service [191]
datasource-oracle-
service [191], repl-datasource-oracle-
service [191]
Oracle Service
--datasource-pg-archive [191],--repl-datasource-pg-
archive [191]
datasource-pg-archive [191],repl-datasource-pg-
archive [191]
PostgreSQL archive location
--datasource-pg-conf [191], --repl-datasource-pg-conf [191]
datasource-pg-conf [191],repl-datasource-pg-conf [191]
Location of postgresql.conf
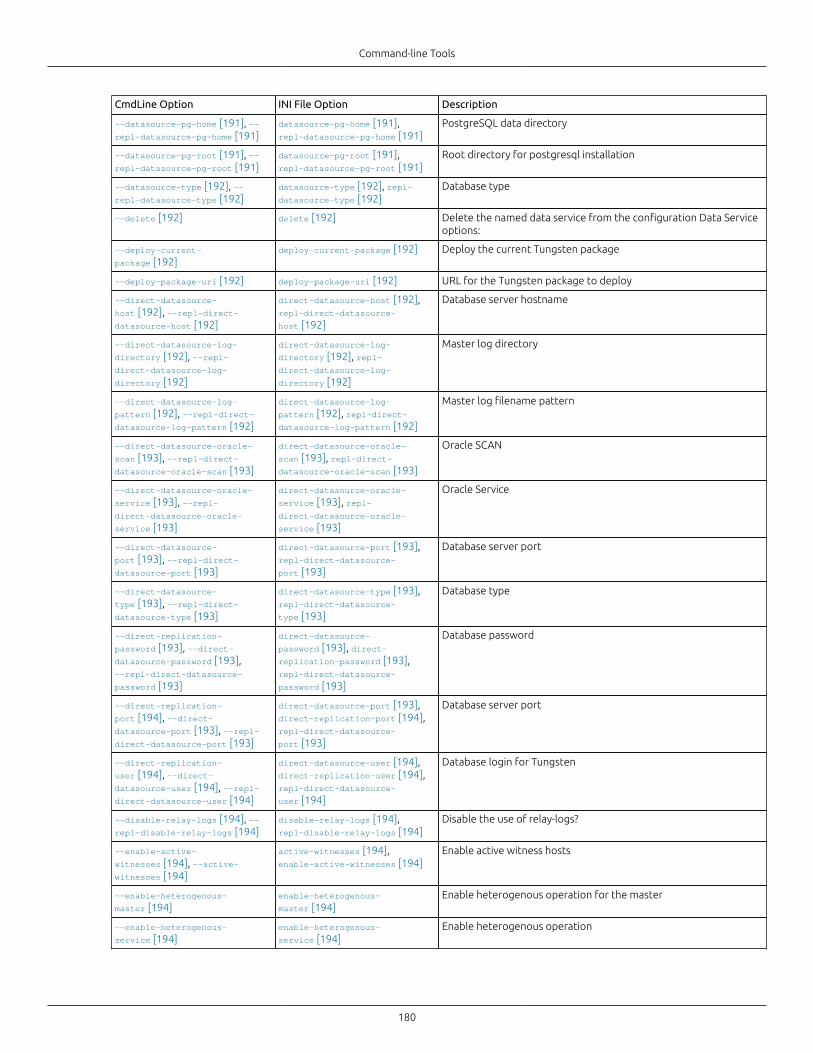
Command-line Tools
180
CmdLine Option INI File Option Description
--datasource-pg-home [191], --repl-datasource-pg-home [191]
datasource-pg-home [191],repl-datasource-pg-home [191]
PostgreSQL data directory
--datasource-pg-root [191], --repl-datasource-pg-root [191]
datasource-pg-root [191],repl-datasource-pg-root [191]
Root directory for postgresql installation
--datasource-type [192], --repl-datasource-type [192]
datasource-type [192], repl-datasource-type [192]
Database type
--delete [192] delete [192] Delete the named data service from the configuration Data Serviceoptions:
--deploy-current-
package [192]deploy-current-package [192] Deploy the current Tungsten package
--deploy-package-uri [192] deploy-package-uri [192] URL for the Tungsten package to deploy
--direct-datasource-
host [192], --repl-direct-datasource-host [192]
direct-datasource-host [192],repl-direct-datasource-
host [192]
Database server hostname
--direct-datasource-log-
directory [192], --repl-direct-datasource-log-
directory [192]
direct-datasource-log-
directory [192], repl-direct-datasource-log-
directory [192]
Master log directory
--direct-datasource-log-
pattern [192], --repl-direct-datasource-log-pattern [192]
direct-datasource-log-
pattern [192], repl-direct-datasource-log-pattern [192]
Master log filename pattern
--direct-datasource-oracle-
scan [193], --repl-direct-datasource-oracle-scan [193]
direct-datasource-oracle-
scan [193], repl-direct-datasource-oracle-scan [193]
Oracle SCAN
--direct-datasource-oracle-
service [193], --repl-direct-datasource-oracle-
service [193]
direct-datasource-oracle-
service [193], repl-direct-datasource-oracle-
service [193]
Oracle Service
--direct-datasource-
port [193], --repl-direct-datasource-port [193]
direct-datasource-port [193],repl-direct-datasource-
port [193]
Database server port
--direct-datasource-
type [193], --repl-direct-datasource-type [193]
direct-datasource-type [193],repl-direct-datasource-
type [193]
Database type
--direct-replication-
password [193], --direct-datasource-password [193],--repl-direct-datasource-
password [193]
direct-datasource-
password [193], direct-replication-password [193],repl-direct-datasource-
password [193]
Database password
--direct-replication-
port [194], --direct-datasource-port [193], --repl-direct-datasource-port [193]
direct-datasource-port [193],direct-replication-port [194],repl-direct-datasource-
port [193]
Database server port
--direct-replication-
user [194], --direct-datasource-user [194], --repl-direct-datasource-user [194]
direct-datasource-user [194],direct-replication-user [194],repl-direct-datasource-
user [194]
Database login for Tungsten
--disable-relay-logs [194], --repl-disable-relay-logs [194]
disable-relay-logs [194],repl-disable-relay-logs [194]
Disable the use of relay-logs?
--enable-active-
witnesses [194], --active-witnesses [194]
active-witnesses [194],enable-active-witnesses [194]
Enable active witness hosts
--enable-heterogenous-
master [194]enable-heterogenous-
master [194]Enable heterogenous operation for the master
--enable-heterogenous-
service [194]enable-heterogenous-
service [194]Enable heterogenous operation
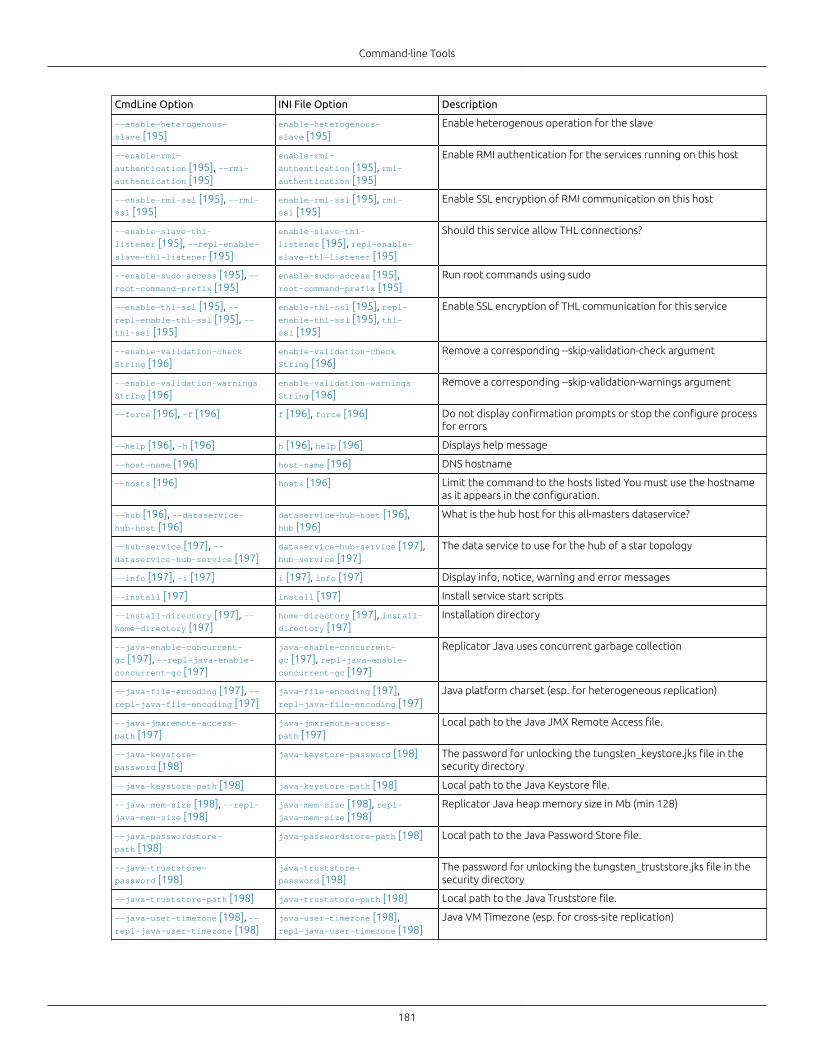
Command-line Tools
181
CmdLine Option INI File Option Description
--enable-heterogenous-
slave [195]enable-heterogenous-
slave [195]Enable heterogenous operation for the slave
--enable-rmi-
authentication [195], --rmi-authentication [195]
enable-rmi-
authentication [195], rmi-authentication [195]
Enable RMI authentication for the services running on this host
--enable-rmi-ssl [195], --rmi-ssl [195]
enable-rmi-ssl [195], rmi-ssl [195]
Enable SSL encryption of RMI communication on this host
--enable-slave-thl-
listener [195], --repl-enable-slave-thl-listener [195]
enable-slave-thl-
listener [195], repl-enable-slave-thl-listener [195]
Should this service allow THL connections?
--enable-sudo-access [195], --root-command-prefix [195]
enable-sudo-access [195],root-command-prefix [195]
Run root commands using sudo
--enable-thl-ssl [195], --repl-enable-thl-ssl [195], --thl-ssl [195]
enable-thl-ssl [195], repl-enable-thl-ssl [195], thl-ssl [195]
Enable SSL encryption of THL communication for this service
--enable-validation-check
String [196]enable-validation-check
String [196]Remove a corresponding --skip-validation-check argument
--enable-validation-warnings
String [196]enable-validation-warnings
String [196]Remove a corresponding --skip-validation-warnings argument
--force [196], -f [196] f [196], force [196] Do not display confirmation prompts or stop the configure processfor errors
--help [196], -h [196] h [196], help [196] Displays help message
--host-name [196] host-name [196] DNS hostname
--hosts [196] hosts [196] Limit the command to the hosts listed You must use the hostnameas it appears in the configuration.
--hub [196], --dataservice-hub-host [196]
dataservice-hub-host [196],hub [196]
What is the hub host for this all-masters dataservice?
--hub-service [197], --dataservice-hub-service [197]
dataservice-hub-service [197],hub-service [197]
The data service to use for the hub of a star topology
--info [197], -i [197] i [197], info [197] Display info, notice, warning and error messages
--install [197] install [197] Install service start scripts
--install-directory [197], --home-directory [197]
home-directory [197], install-directory [197]
Installation directory
--java-enable-concurrent-
gc [197], --repl-java-enable-concurrent-gc [197]
java-enable-concurrent-
gc [197], repl-java-enable-concurrent-gc [197]
Replicator Java uses concurrent garbage collection
--java-file-encoding [197], --repl-java-file-encoding [197]
java-file-encoding [197],repl-java-file-encoding [197]
Java platform charset (esp. for heterogeneous replication)
--java-jmxremote-access-
path [197]java-jmxremote-access-
path [197]Local path to the Java JMX Remote Access file.
--java-keystore-
password [198]java-keystore-password [198] The password for unlocking the tungsten_keystore.jks file in the
security directory
--java-keystore-path [198] java-keystore-path [198] Local path to the Java Keystore file.
--java-mem-size [198], --repl-java-mem-size [198]
java-mem-size [198], repl-java-mem-size [198]
Replicator Java heap memory size in Mb (min 128)
--java-passwordstore-
path [198]java-passwordstore-path [198] Local path to the Java Password Store file.
--java-truststore-
password [198]java-truststore-
password [198]The password for unlocking the tungsten_truststore.jks file in thesecurity directory
--java-truststore-path [198] java-truststore-path [198] Local path to the Java Truststore file.
--java-user-timezone [198], --repl-java-user-timezone [198]
java-user-timezone [198],repl-java-user-timezone [198]
Java VM Timezone (esp. for cross-site replication)
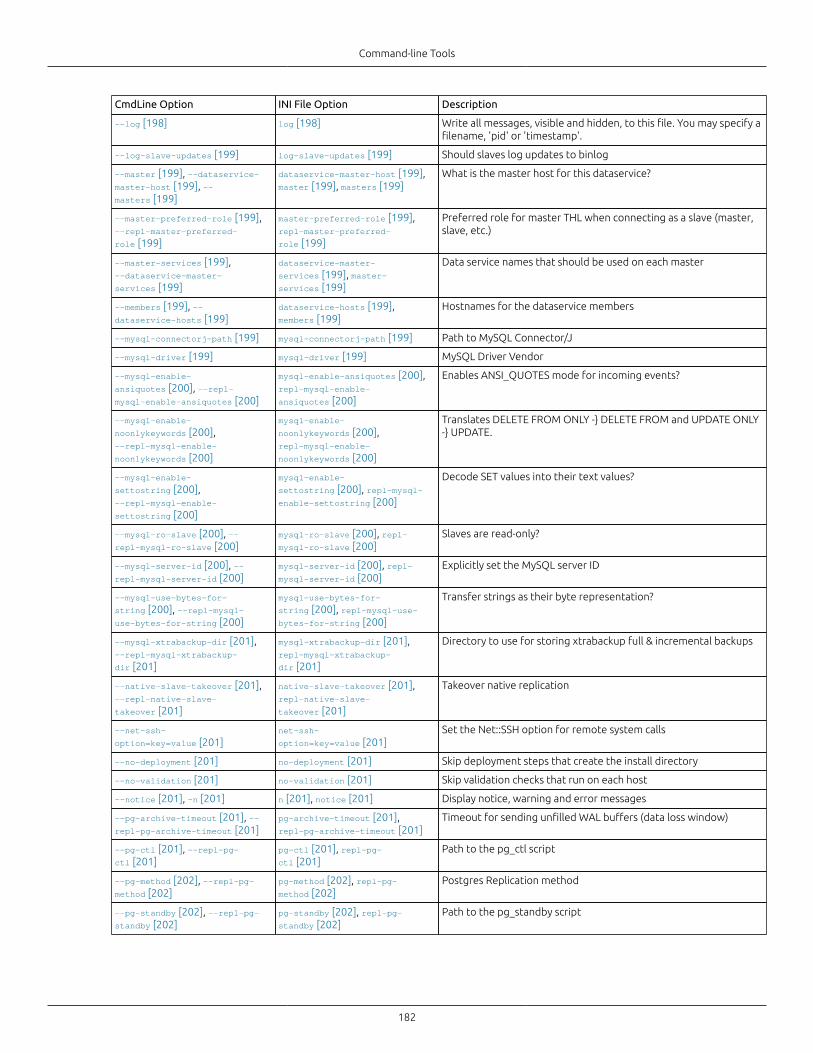
Command-line Tools
182
CmdLine Option INI File Option Description
--log [198] log [198] Write all messages, visible and hidden, to this file. You may specify afilename, 'pid' or 'timestamp'.
--log-slave-updates [199] log-slave-updates [199] Should slaves log updates to binlog
--master [199], --dataservice-master-host [199], --masters [199]
dataservice-master-host [199],master [199], masters [199]
What is the master host for this dataservice?
--master-preferred-role [199],--repl-master-preferred-
role [199]
master-preferred-role [199],repl-master-preferred-
role [199]
Preferred role for master THL when connecting as a slave (master,slave, etc.)
--master-services [199],--dataservice-master-
services [199]
dataservice-master-
services [199], master-services [199]
Data service names that should be used on each master
--members [199], --dataservice-hosts [199]
dataservice-hosts [199],members [199]
Hostnames for the dataservice members
--mysql-connectorj-path [199] mysql-connectorj-path [199] Path to MySQL Connector/J
--mysql-driver [199] mysql-driver [199] MySQL Driver Vendor
--mysql-enable-
ansiquotes [200], --repl-mysql-enable-ansiquotes [200]
mysql-enable-ansiquotes [200],repl-mysql-enable-
ansiquotes [200]
Enables ANSI_QUOTES mode for incoming events?
--mysql-enable-
noonlykeywords [200],--repl-mysql-enable-
noonlykeywords [200]
mysql-enable-
noonlykeywords [200],repl-mysql-enable-
noonlykeywords [200]
Translates DELETE FROM ONLY -} DELETE FROM and UPDATE ONLY-} UPDATE.
--mysql-enable-
settostring [200],--repl-mysql-enable-
settostring [200]
mysql-enable-
settostring [200], repl-mysql-enable-settostring [200]
Decode SET values into their text values?
--mysql-ro-slave [200], --repl-mysql-ro-slave [200]
mysql-ro-slave [200], repl-mysql-ro-slave [200]
Slaves are read-only?
--mysql-server-id [200], --repl-mysql-server-id [200]
mysql-server-id [200], repl-mysql-server-id [200]
Explicitly set the MySQL server ID
--mysql-use-bytes-for-
string [200], --repl-mysql-use-bytes-for-string [200]
mysql-use-bytes-for-
string [200], repl-mysql-use-bytes-for-string [200]
Transfer strings as their byte representation?
--mysql-xtrabackup-dir [201],--repl-mysql-xtrabackup-
dir [201]
mysql-xtrabackup-dir [201],repl-mysql-xtrabackup-
dir [201]
Directory to use for storing xtrabackup full & incremental backups
--native-slave-takeover [201],--repl-native-slave-
takeover [201]
native-slave-takeover [201],repl-native-slave-
takeover [201]
Takeover native replication
--net-ssh-
option=key=value [201]net-ssh-
option=key=value [201]Set the Net::SSH option for remote system calls
--no-deployment [201] no-deployment [201] Skip deployment steps that create the install directory
--no-validation [201] no-validation [201] Skip validation checks that run on each host
--notice [201], -n [201] n [201], notice [201] Display notice, warning and error messages
--pg-archive-timeout [201], --repl-pg-archive-timeout [201]
pg-archive-timeout [201],repl-pg-archive-timeout [201]
Timeout for sending unfilled WAL buffers (data loss window)
--pg-ctl [201], --repl-pg-ctl [201]
pg-ctl [201], repl-pg-ctl [201]
Path to the pg_ctl script
--pg-method [202], --repl-pg-method [202]
pg-method [202], repl-pg-method [202]
Postgres Replication method
--pg-standby [202], --repl-pg-standby [202]
pg-standby [202], repl-pg-standby [202]
Path to the pg_standby script
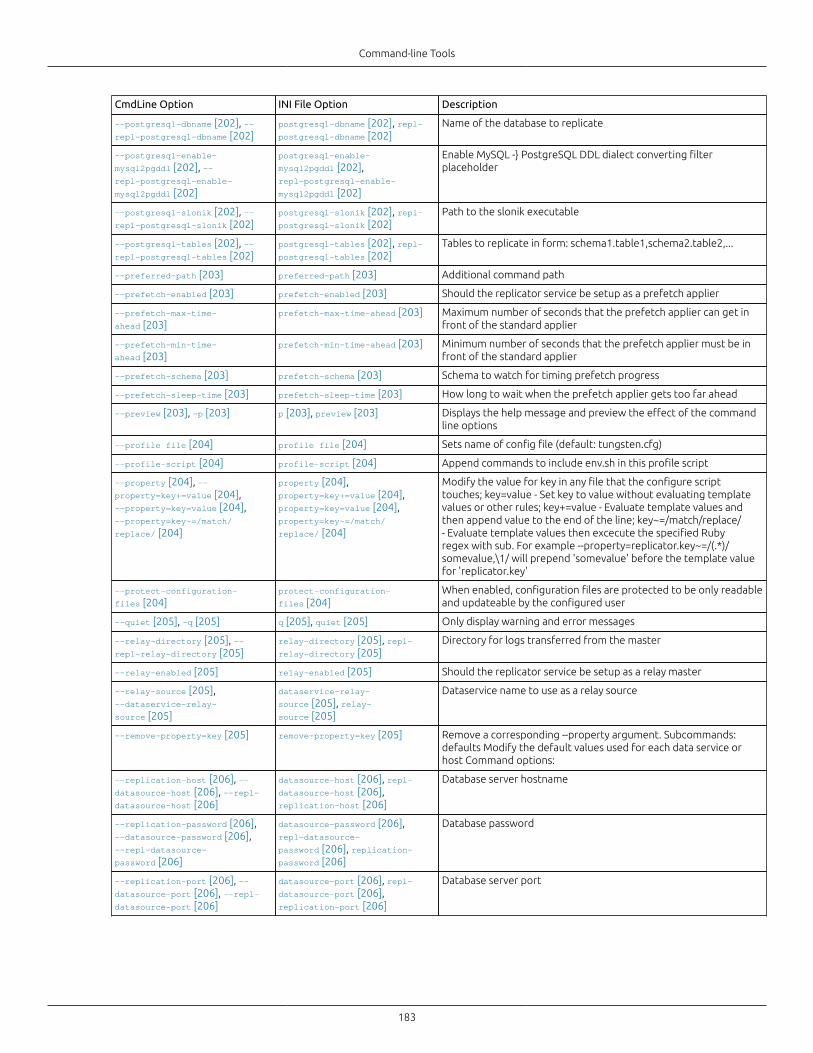
Command-line Tools
183
CmdLine Option INI File Option Description
--postgresql-dbname [202], --repl-postgresql-dbname [202]
postgresql-dbname [202], repl-postgresql-dbname [202]
Name of the database to replicate
--postgresql-enable-
mysql2pgddl [202], --repl-postgresql-enable-
mysql2pgddl [202]
postgresql-enable-
mysql2pgddl [202],repl-postgresql-enable-
mysql2pgddl [202]
Enable MySQL -} PostgreSQL DDL dialect converting filterplaceholder
--postgresql-slonik [202], --repl-postgresql-slonik [202]
postgresql-slonik [202], repl-postgresql-slonik [202]
Path to the slonik executable
--postgresql-tables [202], --repl-postgresql-tables [202]
postgresql-tables [202], repl-postgresql-tables [202]
Tables to replicate in form: schema1.table1,schema2.table2,...
--preferred-path [203] preferred-path [203] Additional command path
--prefetch-enabled [203] prefetch-enabled [203] Should the replicator service be setup as a prefetch applier
--prefetch-max-time-
ahead [203]prefetch-max-time-ahead [203] Maximum number of seconds that the prefetch applier can get in
front of the standard applier
--prefetch-min-time-
ahead [203]prefetch-min-time-ahead [203] Minimum number of seconds that the prefetch applier must be in
front of the standard applier
--prefetch-schema [203] prefetch-schema [203] Schema to watch for timing prefetch progress
--prefetch-sleep-time [203] prefetch-sleep-time [203] How long to wait when the prefetch applier gets too far ahead
--preview [203], -p [203] p [203], preview [203] Displays the help message and preview the effect of the commandline options
--profile file [204] profile file [204] Sets name of config file (default: tungsten.cfg)
--profile-script [204] profile-script [204] Append commands to include env.sh in this profile script
--property [204], --property=key+=value [204],--property=key=value [204],--property=key~=/match/
replace/ [204]
property [204],property=key+=value [204],property=key=value [204],property=key~=/match/
replace/ [204]
Modify the value for key in any file that the configure scripttouches; key=value - Set key to value without evaluating templatevalues or other rules; key+=value - Evaluate template values andthen append value to the end of the line; key~=/match/replace/- Evaluate template values then excecute the specified Rubyregex with sub. For example --property=replicator.key~=/(.*)/somevalue,\1/ will prepend 'somevalue' before the template valuefor 'replicator.key'
--protect-configuration-
files [204]protect-configuration-
files [204]When enabled, configuration files are protected to be only readableand updateable by the configured user
--quiet [205], -q [205] q [205], quiet [205] Only display warning and error messages
--relay-directory [205], --repl-relay-directory [205]
relay-directory [205], repl-relay-directory [205]
Directory for logs transferred from the master
--relay-enabled [205] relay-enabled [205] Should the replicator service be setup as a relay master
--relay-source [205],--dataservice-relay-
source [205]
dataservice-relay-
source [205], relay-source [205]
Dataservice name to use as a relay source
--remove-property=key [205] remove-property=key [205] Remove a corresponding --property argument. Subcommands:defaults Modify the default values used for each data service orhost Command options:
--replication-host [206], --datasource-host [206], --repl-datasource-host [206]
datasource-host [206], repl-datasource-host [206],replication-host [206]
Database server hostname
--replication-password [206],--datasource-password [206],--repl-datasource-
password [206]
datasource-password [206],repl-datasource-
password [206], replication-password [206]
Database password
--replication-port [206], --datasource-port [206], --repl-datasource-port [206]
datasource-port [206], repl-datasource-port [206],replication-port [206]
Database server port

Command-line Tools
184
CmdLine Option INI File Option Description
--replication-user [206], --datasource-user [206], --repl-datasource-user [206]
datasource-user [206], repl-datasource-user [206],replication-user [206]
Database login for Tungsten
--reset [206] reset [206] Clear the current configuration before processing any arguments
--rmi-port [206], --repl-rmi-port [206]
repl-rmi-port [206], rmi-port [206]
Replication RMI listen port
--rmi-user [206] rmi-user [206] The username for RMI authentication
--role [207], --repl-role [207]
repl-role [207], role [207] What is the replication role for this service?
--security-directory [207] security-directory [207] Storage directory for the Java security/encryption files
--service-alias [207],--dataservice-service-
alias [207]
dataservice-service-
alias [207], service-alias [207]
Replication alias of this dataservice
--service-type [207], --repl-service-type [207]
repl-service-type [207],service-type [207]
What is the replication service type?
--skip-validation-check [207] skip-validation-check [207] Do not run the specified validation check. Validation checks areidentified by the string included in the error they output.
--skip-validation-
warnings [207]skip-validation-
warnings [207]Do not display warnings for the specified validation check.Validation checks are identified by the string included in thewarning they output.
--slave-privileged-
updates [208]slave-privileged-
updates [208]Does login for slave update have superuser privileges
--slaves [208], --dataservice-slaves [208]
dataservice-slaves [208],slaves [208]
What are the slaves for this dataservice?
--start [208] start [208] Start the services after configuration
--start-and-report [208] start-and-report [208] Start the services and report out the status after configuration
--svc-allow-any-remote-
service [208], --repl-svc-allow-any-remote-
service [208]
repl-svc-allow-any-remote-
service [208], svc-allow-any-remote-service [208]
Replicate from any service
--svc-applier-block-commit-
interval [208], --repl-svc-applier-block-commit-
interval [208]
repl-svc-applier-block-commit-
interval [208], svc-applier-block-commit-interval [208]
Minimum interval between commits
--svc-applier-block-commit-
size [208], --repl-svc-applier-block-commit-
size [208]
repl-svc-applier-block-commit-
size [208], svc-applier-block-commit-size [208]
Applier block commit size (min 1)
--svc-applier-buffer-
size [209], --repl-buffer-size [209], --repl-svc-applier-buffer-size [209]
repl-buffer-size [209], repl-svc-applier-buffer-size [209],svc-applier-buffer-size [209]
Applier block commit size (min 1)
--svc-applier-filters [209],--repl-svc-applier-
filters [209]
repl-svc-applier-
filters [209], svc-applier-filters [209]
Replication service applier filters
--svc-extractor-filters [209],--repl-svc-extractor-
filters [209]
repl-svc-extractor-
filters [209], svc-extractor-filters [209]
Replication service extractor filters
--svc-parallelization-
type [209], --repl-svc-parallelization-type [209]
repl-svc-parallelization-
type [209], svc-parallelization-type [209]
Method for implementing parallel apply
--svc-reposition-on-source-
id-change [209], --repl-svc-reposition-on-source-id-
change [209]
repl-svc-reposition-on-
source-id-change [209], svc-reposition-on-source-id-
change [209]
The master will come ONLINE from the current position if thestored source_id does not match the value in the static properties
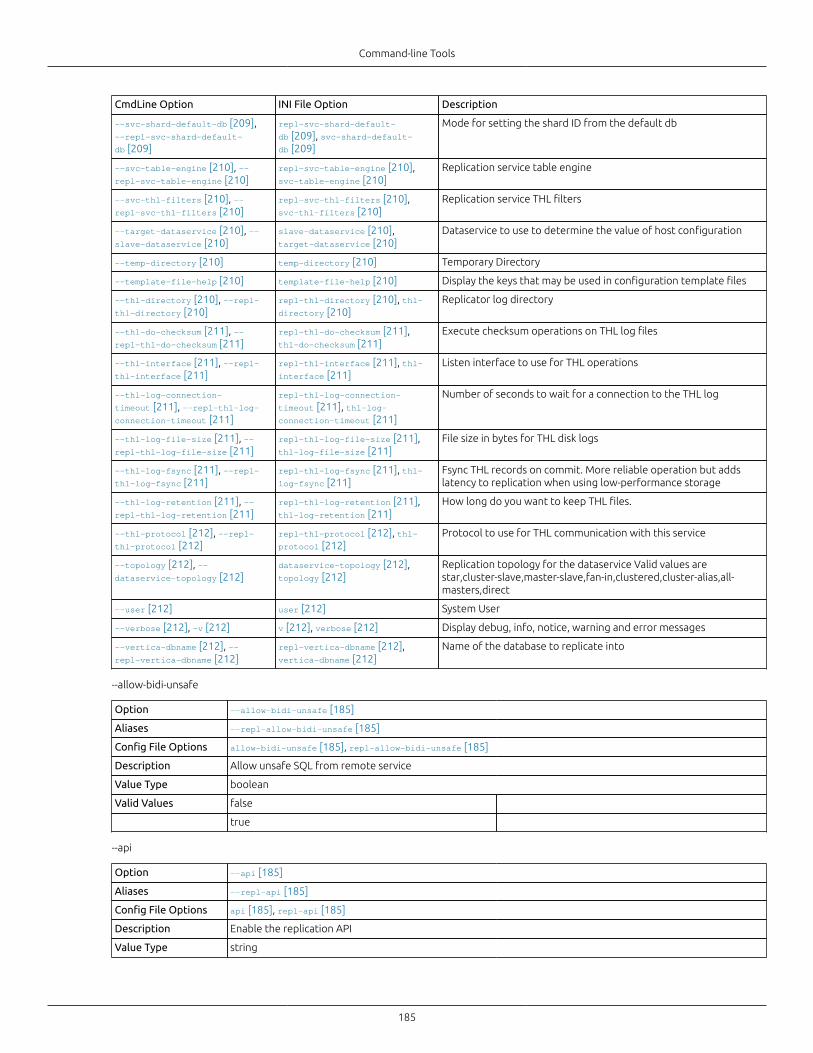
Command-line Tools
185
CmdLine Option INI File Option Description
--svc-shard-default-db [209],--repl-svc-shard-default-
db [209]
repl-svc-shard-default-
db [209], svc-shard-default-db [209]
Mode for setting the shard ID from the default db
--svc-table-engine [210], --repl-svc-table-engine [210]
repl-svc-table-engine [210],svc-table-engine [210]
Replication service table engine
--svc-thl-filters [210], --repl-svc-thl-filters [210]
repl-svc-thl-filters [210],svc-thl-filters [210]
Replication service THL filters
--target-dataservice [210], --slave-dataservice [210]
slave-dataservice [210],target-dataservice [210]
Dataservice to use to determine the value of host configuration
--temp-directory [210] temp-directory [210] Temporary Directory
--template-file-help [210] template-file-help [210] Display the keys that may be used in configuration template files
--thl-directory [210], --repl-thl-directory [210]
repl-thl-directory [210], thl-directory [210]
Replicator log directory
--thl-do-checksum [211], --repl-thl-do-checksum [211]
repl-thl-do-checksum [211],thl-do-checksum [211]
Execute checksum operations on THL log files
--thl-interface [211], --repl-thl-interface [211]
repl-thl-interface [211], thl-interface [211]
Listen interface to use for THL operations
--thl-log-connection-
timeout [211], --repl-thl-log-connection-timeout [211]
repl-thl-log-connection-
timeout [211], thl-log-connection-timeout [211]
Number of seconds to wait for a connection to the THL log
--thl-log-file-size [211], --repl-thl-log-file-size [211]
repl-thl-log-file-size [211],thl-log-file-size [211]
File size in bytes for THL disk logs
--thl-log-fsync [211], --repl-thl-log-fsync [211]
repl-thl-log-fsync [211], thl-log-fsync [211]
Fsync THL records on commit. More reliable operation but addslatency to replication when using low-performance storage
--thl-log-retention [211], --repl-thl-log-retention [211]
repl-thl-log-retention [211],thl-log-retention [211]
How long do you want to keep THL files.
--thl-protocol [212], --repl-thl-protocol [212]
repl-thl-protocol [212], thl-protocol [212]
Protocol to use for THL communication with this service
--topology [212], --dataservice-topology [212]
dataservice-topology [212],topology [212]
Replication topology for the dataservice Valid values arestar,cluster-slave,master-slave,fan-in,clustered,cluster-alias,all-masters,direct
--user [212] user [212] System User
--verbose [212], -v [212] v [212], verbose [212] Display debug, info, notice, warning and error messages
--vertica-dbname [212], --repl-vertica-dbname [212]
repl-vertica-dbname [212],vertica-dbname [212]
Name of the database to replicate into
--allow-bidi-unsafe
Option --allow-bidi-unsafe [185]
Aliases --repl-allow-bidi-unsafe [185]
Config File Options allow-bidi-unsafe [185], repl-allow-bidi-unsafe [185]
Description Allow unsafe SQL from remote service
Value Type boolean
Valid Values false
true
--api
Option --api [185]
Aliases --repl-api [185]
Config File Options api [185], repl-api [185]
Description Enable the replication API
Value Type string
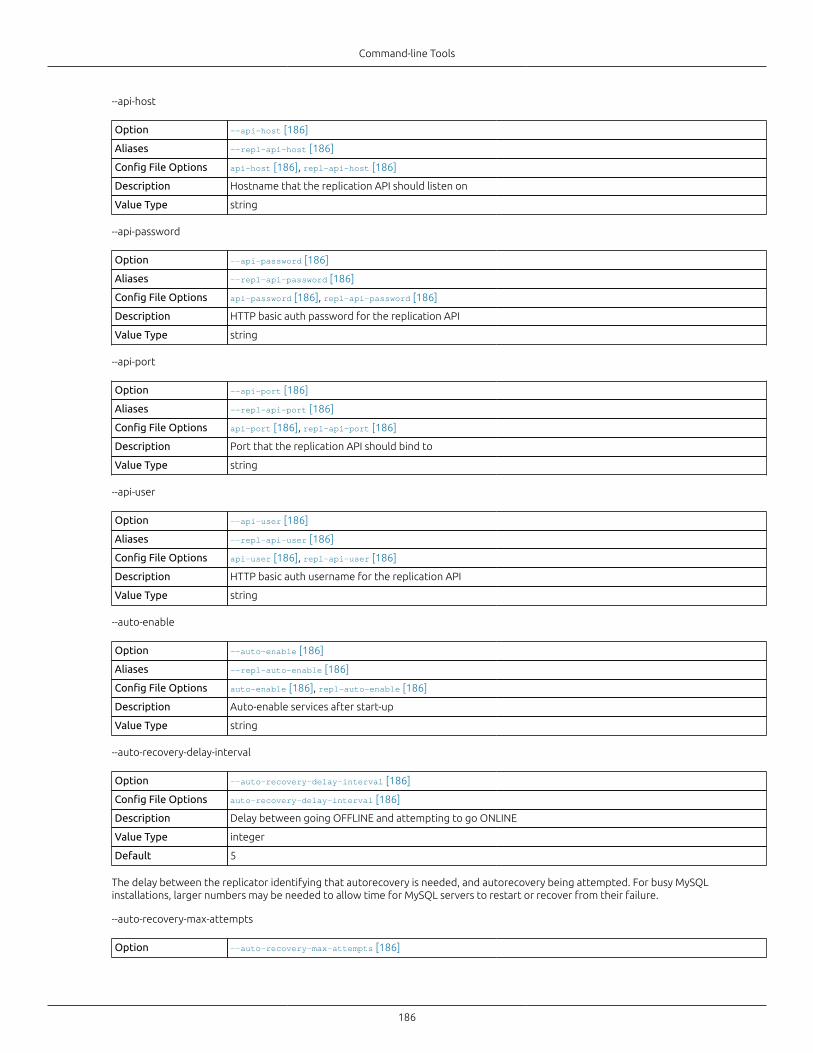
Command-line Tools
186
--api-host
Option --api-host [186]
Aliases --repl-api-host [186]
Config File Options api-host [186], repl-api-host [186]
Description Hostname that the replication API should listen on
Value Type string
--api-password
Option --api-password [186]
Aliases --repl-api-password [186]
Config File Options api-password [186], repl-api-password [186]
Description HTTP basic auth password for the replication API
Value Type string
--api-port
Option --api-port [186]
Aliases --repl-api-port [186]
Config File Options api-port [186], repl-api-port [186]
Description Port that the replication API should bind to
Value Type string
--api-user
Option --api-user [186]
Aliases --repl-api-user [186]
Config File Options api-user [186], repl-api-user [186]
Description HTTP basic auth username for the replication API
Value Type string
--auto-enable
Option --auto-enable [186]
Aliases --repl-auto-enable [186]
Config File Options auto-enable [186], repl-auto-enable [186]
Description Auto-enable services after start-up
Value Type string
--auto-recovery-delay-interval
Option --auto-recovery-delay-interval [186]
Config File Options auto-recovery-delay-interval [186]
Description Delay between going OFFLINE and attempting to go ONLINE
Value Type integer
Default 5
The delay between the replicator identifying that autorecovery is needed, and autorecovery being attempted. For busy MySQLinstallations, larger numbers may be needed to allow time for MySQL servers to restart or recover from their failure.
--auto-recovery-max-attempts
Option --auto-recovery-max-attempts [186]
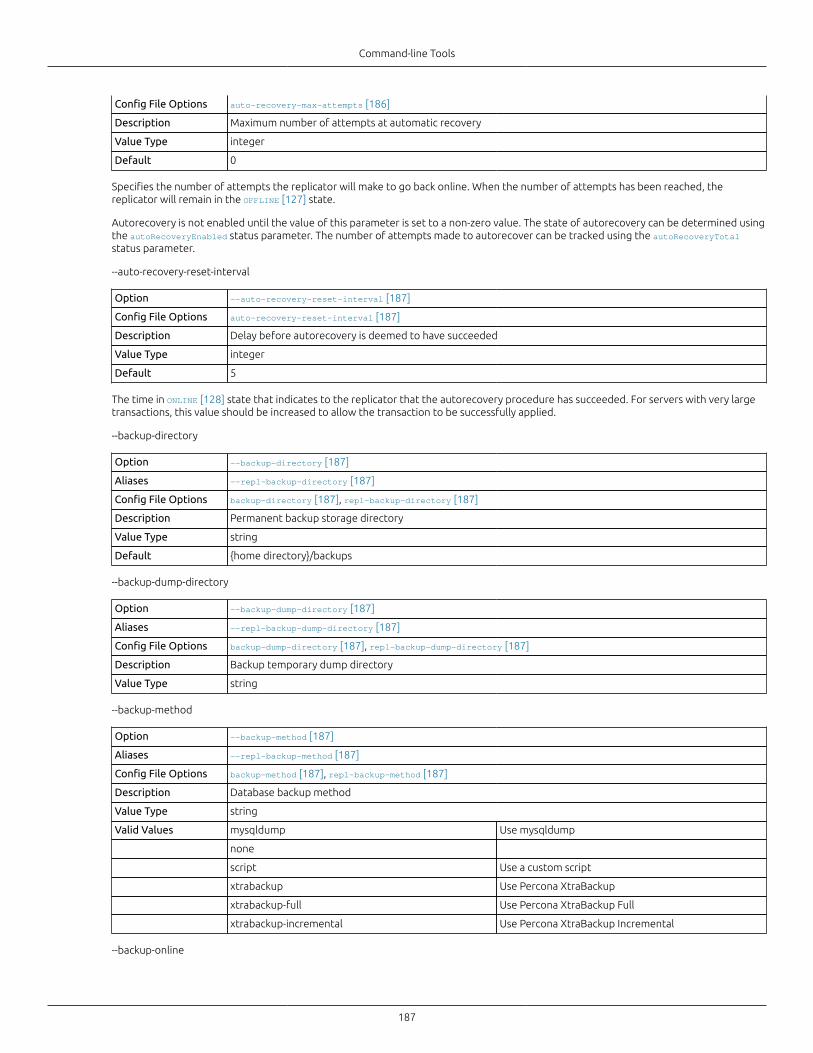
Command-line Tools
187
Config File Options auto-recovery-max-attempts [186]
Description Maximum number of attempts at automatic recovery
Value Type integer
Default 0
Specifies the number of attempts the replicator will make to go back online. When the number of attempts has been reached, thereplicator will remain in the OFFLINE [127] state.
Autorecovery is not enabled until the value of this parameter is set to a non-zero value. The state of autorecovery can be determined usingthe autoRecoveryEnabled status parameter. The number of attempts made to autorecover can be tracked using the autoRecoveryTotalstatus parameter.
--auto-recovery-reset-interval
Option --auto-recovery-reset-interval [187]
Config File Options auto-recovery-reset-interval [187]
Description Delay before autorecovery is deemed to have succeeded
Value Type integer
Default 5
The time in ONLINE [128] state that indicates to the replicator that the autorecovery procedure has succeeded. For servers with very largetransactions, this value should be increased to allow the transaction to be successfully applied.
--backup-directory
Option --backup-directory [187]
Aliases --repl-backup-directory [187]
Config File Options backup-directory [187], repl-backup-directory [187]
Description Permanent backup storage directory
Value Type string
Default {home directory}/backups
--backup-dump-directory
Option --backup-dump-directory [187]
Aliases --repl-backup-dump-directory [187]
Config File Options backup-dump-directory [187], repl-backup-dump-directory [187]
Description Backup temporary dump directory
Value Type string
--backup-method
Option --backup-method [187]
Aliases --repl-backup-method [187]
Config File Options backup-method [187], repl-backup-method [187]
Description Database backup method
Value Type string
Valid Values mysqldump Use mysqldump
none
script Use a custom script
xtrabackup Use Percona XtraBackup
xtrabackup-full Use Percona XtraBackup Full
xtrabackup-incremental Use Percona XtraBackup Incremental
--backup-online
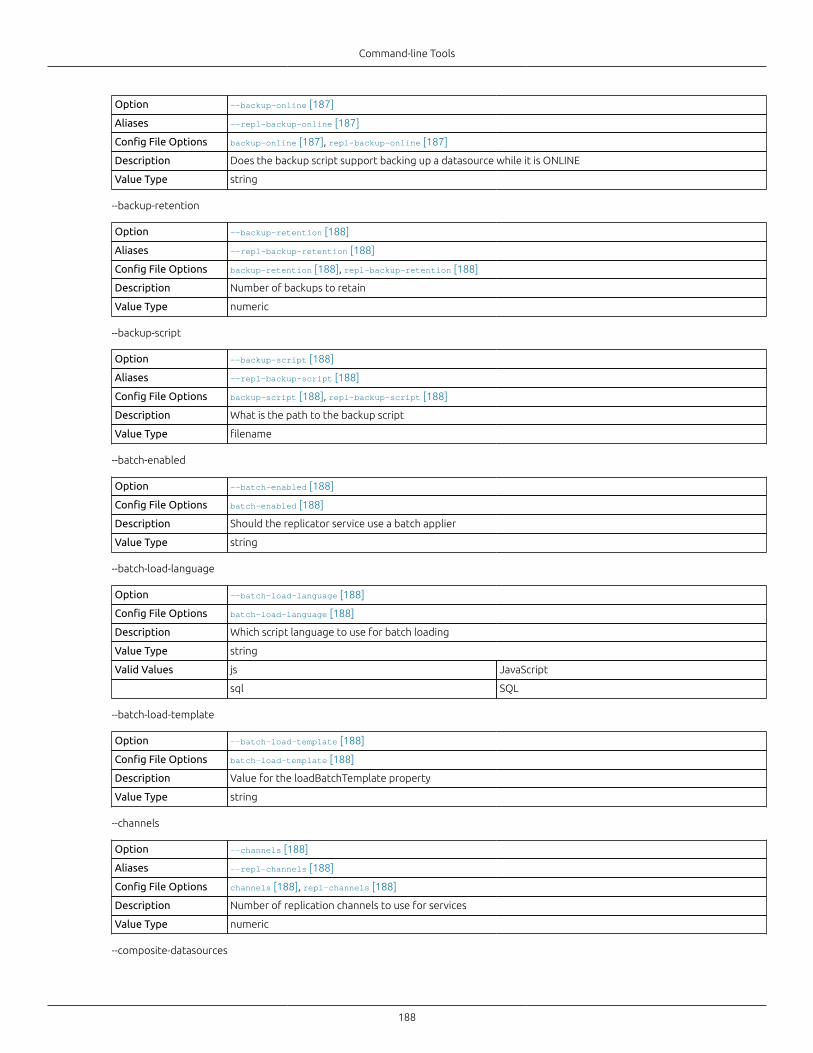
Command-line Tools
188
Option --backup-online [187]
Aliases --repl-backup-online [187]
Config File Options backup-online [187], repl-backup-online [187]
Description Does the backup script support backing up a datasource while it is ONLINE
Value Type string
--backup-retention
Option --backup-retention [188]
Aliases --repl-backup-retention [188]
Config File Options backup-retention [188], repl-backup-retention [188]
Description Number of backups to retain
Value Type numeric
--backup-script
Option --backup-script [188]
Aliases --repl-backup-script [188]
Config File Options backup-script [188], repl-backup-script [188]
Description What is the path to the backup script
Value Type filename
--batch-enabled
Option --batch-enabled [188]
Config File Options batch-enabled [188]
Description Should the replicator service use a batch applier
Value Type string
--batch-load-language
Option --batch-load-language [188]
Config File Options batch-load-language [188]
Description Which script language to use for batch loading
Value Type string
Valid Values js JavaScript
sql SQL
--batch-load-template
Option --batch-load-template [188]
Config File Options batch-load-template [188]
Description Value for the loadBatchTemplate property
Value Type string
--channels
Option --channels [188]
Aliases --repl-channels [188]
Config File Options channels [188], repl-channels [188]
Description Number of replication channels to use for services
Value Type numeric
--composite-datasources
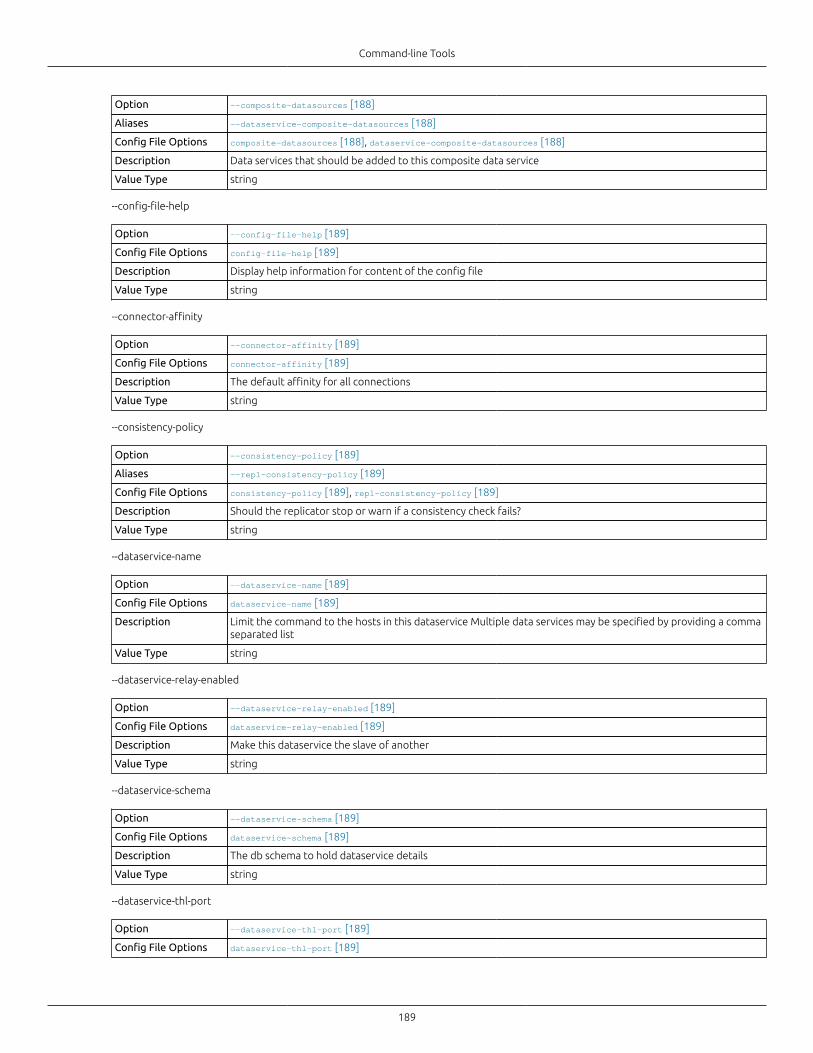
Command-line Tools
189
Option --composite-datasources [188]
Aliases --dataservice-composite-datasources [188]
Config File Options composite-datasources [188], dataservice-composite-datasources [188]
Description Data services that should be added to this composite data service
Value Type string
--config-file-help
Option --config-file-help [189]
Config File Options config-file-help [189]
Description Display help information for content of the config file
Value Type string
--connector-affinity
Option --connector-affinity [189]
Config File Options connector-affinity [189]
Description The default affinity for all connections
Value Type string
--consistency-policy
Option --consistency-policy [189]
Aliases --repl-consistency-policy [189]
Config File Options consistency-policy [189], repl-consistency-policy [189]
Description Should the replicator stop or warn if a consistency check fails?
Value Type string
--dataservice-name
Option --dataservice-name [189]
Config File Options dataservice-name [189]
Description Limit the command to the hosts in this dataservice Multiple data services may be specified by providing a commaseparated list
Value Type string
--dataservice-relay-enabled
Option --dataservice-relay-enabled [189]
Config File Options dataservice-relay-enabled [189]
Description Make this dataservice the slave of another
Value Type string
--dataservice-schema
Option --dataservice-schema [189]
Config File Options dataservice-schema [189]
Description The db schema to hold dataservice details
Value Type string
--dataservice-thl-port
Option --dataservice-thl-port [189]
Config File Options dataservice-thl-port [189]
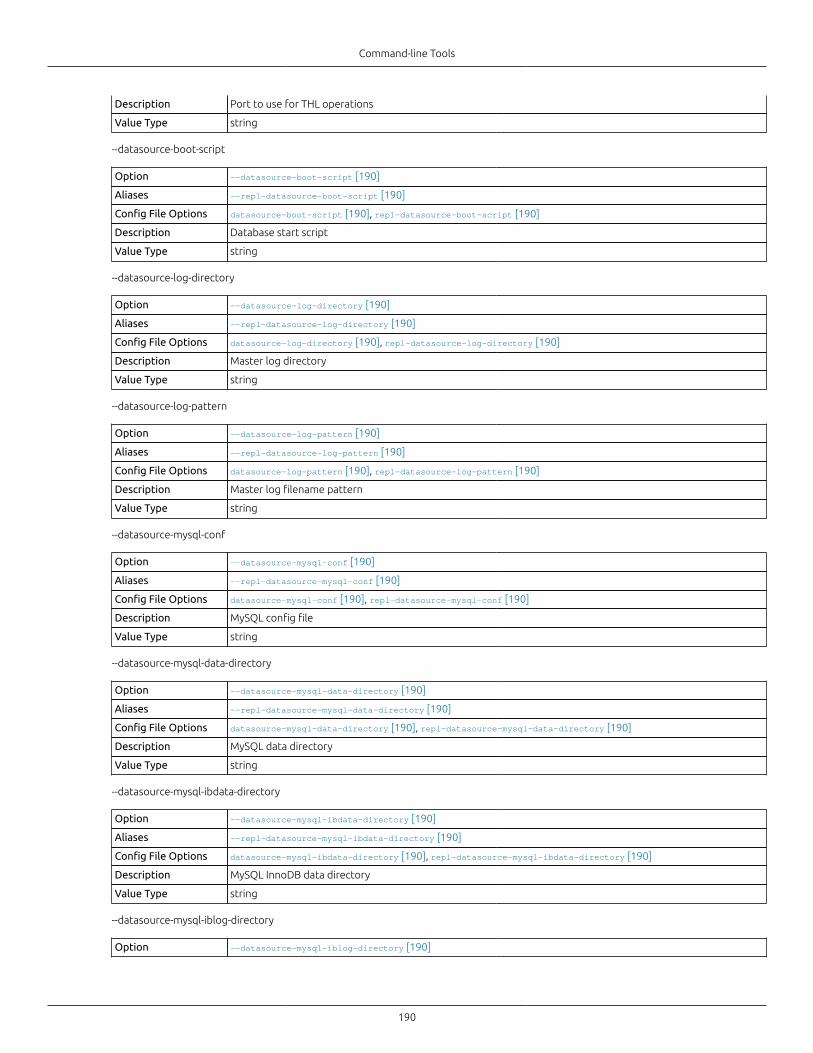
Command-line Tools
190
Description Port to use for THL operations
Value Type string
--datasource-boot-script
Option --datasource-boot-script [190]
Aliases --repl-datasource-boot-script [190]
Config File Options datasource-boot-script [190], repl-datasource-boot-script [190]
Description Database start script
Value Type string
--datasource-log-directory
Option --datasource-log-directory [190]
Aliases --repl-datasource-log-directory [190]
Config File Options datasource-log-directory [190], repl-datasource-log-directory [190]
Description Master log directory
Value Type string
--datasource-log-pattern
Option --datasource-log-pattern [190]
Aliases --repl-datasource-log-pattern [190]
Config File Options datasource-log-pattern [190], repl-datasource-log-pattern [190]
Description Master log filename pattern
Value Type string
--datasource-mysql-conf
Option --datasource-mysql-conf [190]
Aliases --repl-datasource-mysql-conf [190]
Config File Options datasource-mysql-conf [190], repl-datasource-mysql-conf [190]
Description MySQL config file
Value Type string
--datasource-mysql-data-directory
Option --datasource-mysql-data-directory [190]
Aliases --repl-datasource-mysql-data-directory [190]
Config File Options datasource-mysql-data-directory [190], repl-datasource-mysql-data-directory [190]
Description MySQL data directory
Value Type string
--datasource-mysql-ibdata-directory
Option --datasource-mysql-ibdata-directory [190]
Aliases --repl-datasource-mysql-ibdata-directory [190]
Config File Options datasource-mysql-ibdata-directory [190], repl-datasource-mysql-ibdata-directory [190]
Description MySQL InnoDB data directory
Value Type string
--datasource-mysql-iblog-directory
Option --datasource-mysql-iblog-directory [190]
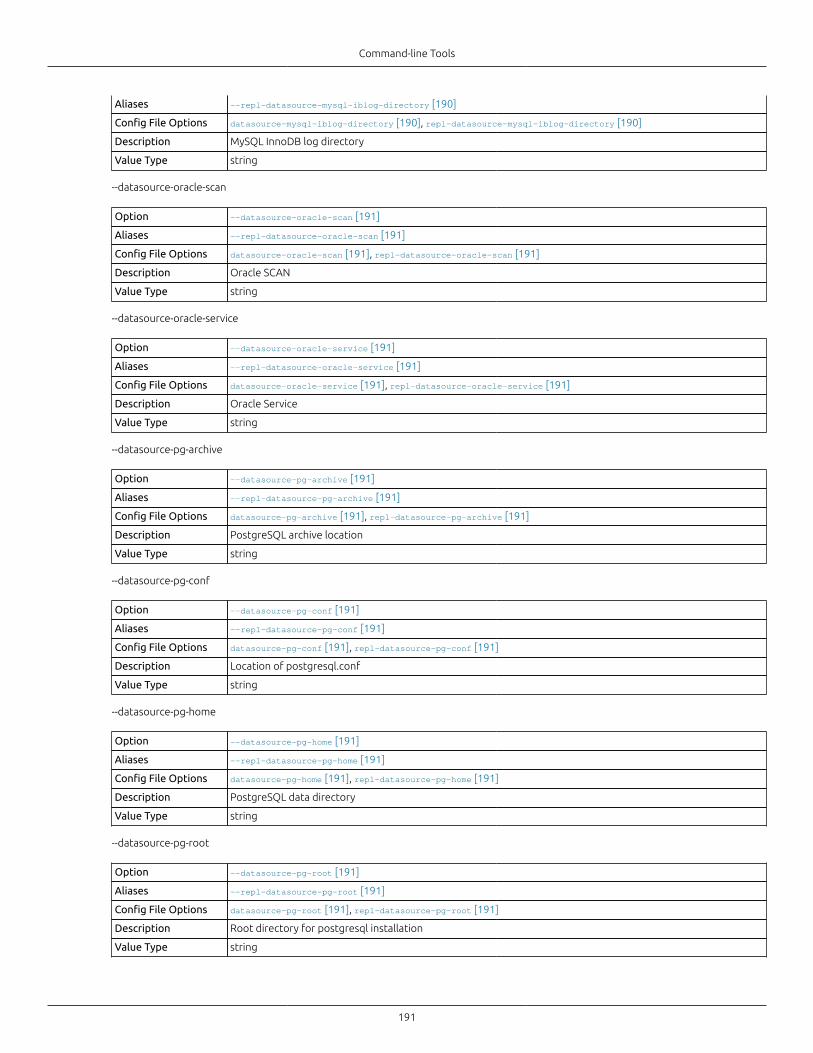
Command-line Tools
191
Aliases --repl-datasource-mysql-iblog-directory [190]
Config File Options datasource-mysql-iblog-directory [190], repl-datasource-mysql-iblog-directory [190]
Description MySQL InnoDB log directory
Value Type string
--datasource-oracle-scan
Option --datasource-oracle-scan [191]
Aliases --repl-datasource-oracle-scan [191]
Config File Options datasource-oracle-scan [191], repl-datasource-oracle-scan [191]
Description Oracle SCAN
Value Type string
--datasource-oracle-service
Option --datasource-oracle-service [191]
Aliases --repl-datasource-oracle-service [191]
Config File Options datasource-oracle-service [191], repl-datasource-oracle-service [191]
Description Oracle Service
Value Type string
--datasource-pg-archive
Option --datasource-pg-archive [191]
Aliases --repl-datasource-pg-archive [191]
Config File Options datasource-pg-archive [191], repl-datasource-pg-archive [191]
Description PostgreSQL archive location
Value Type string
--datasource-pg-conf
Option --datasource-pg-conf [191]
Aliases --repl-datasource-pg-conf [191]
Config File Options datasource-pg-conf [191], repl-datasource-pg-conf [191]
Description Location of postgresql.conf
Value Type string
--datasource-pg-home
Option --datasource-pg-home [191]
Aliases --repl-datasource-pg-home [191]
Config File Options datasource-pg-home [191], repl-datasource-pg-home [191]
Description PostgreSQL data directory
Value Type string
--datasource-pg-root
Option --datasource-pg-root [191]
Aliases --repl-datasource-pg-root [191]
Config File Options datasource-pg-root [191], repl-datasource-pg-root [191]
Description Root directory for postgresql installation
Value Type string
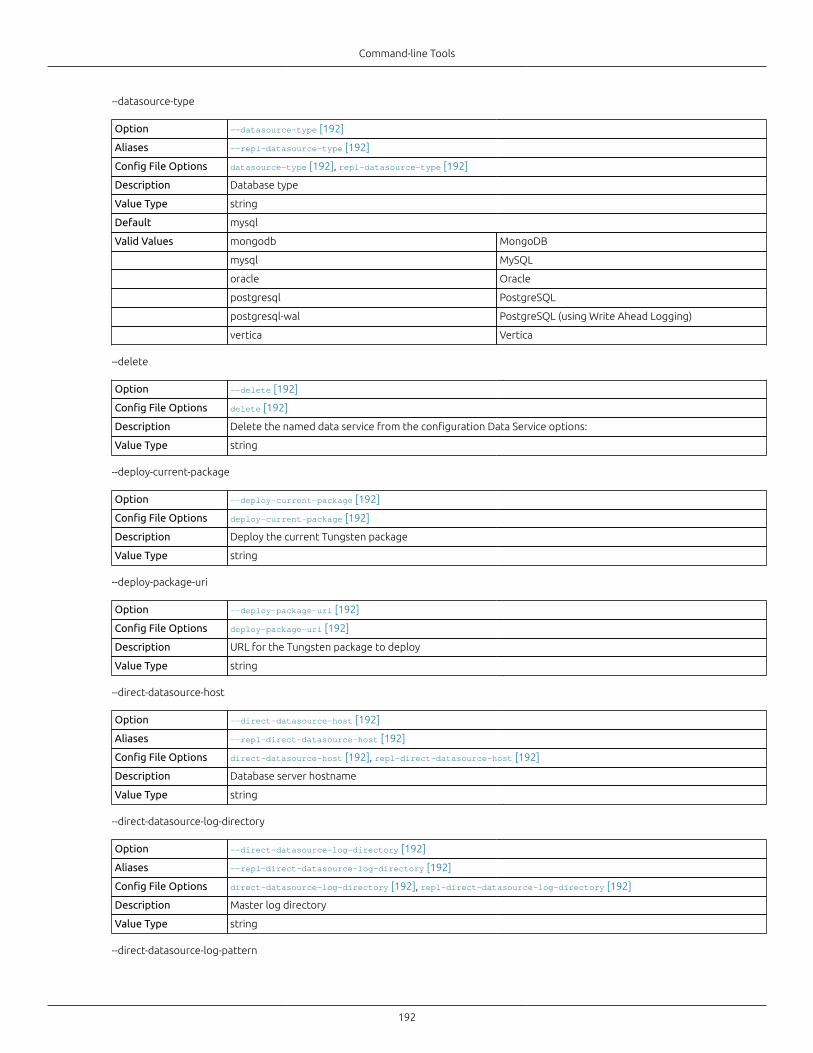
Command-line Tools
192
--datasource-type
Option --datasource-type [192]
Aliases --repl-datasource-type [192]
Config File Options datasource-type [192], repl-datasource-type [192]
Description Database type
Value Type string
Default mysql
Valid Values mongodb MongoDB
mysql MySQL
oracle Oracle
postgresql PostgreSQL
postgresql-wal PostgreSQL (using Write Ahead Logging)
vertica Vertica
--delete
Option --delete [192]
Config File Options delete [192]
Description Delete the named data service from the configuration Data Service options:
Value Type string
--deploy-current-package
Option --deploy-current-package [192]
Config File Options deploy-current-package [192]
Description Deploy the current Tungsten package
Value Type string
--deploy-package-uri
Option --deploy-package-uri [192]
Config File Options deploy-package-uri [192]
Description URL for the Tungsten package to deploy
Value Type string
--direct-datasource-host
Option --direct-datasource-host [192]
Aliases --repl-direct-datasource-host [192]
Config File Options direct-datasource-host [192], repl-direct-datasource-host [192]
Description Database server hostname
Value Type string
--direct-datasource-log-directory
Option --direct-datasource-log-directory [192]
Aliases --repl-direct-datasource-log-directory [192]
Config File Options direct-datasource-log-directory [192], repl-direct-datasource-log-directory [192]
Description Master log directory
Value Type string
--direct-datasource-log-pattern
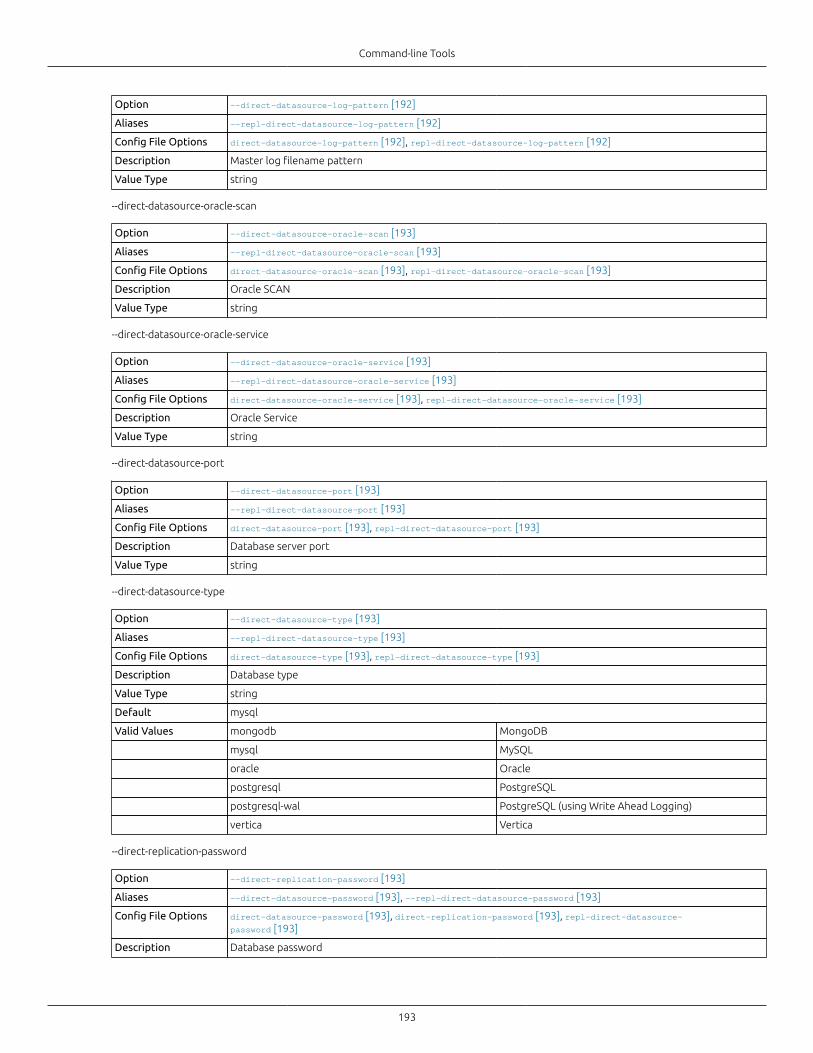
Command-line Tools
193
Option --direct-datasource-log-pattern [192]
Aliases --repl-direct-datasource-log-pattern [192]
Config File Options direct-datasource-log-pattern [192], repl-direct-datasource-log-pattern [192]
Description Master log filename pattern
Value Type string
--direct-datasource-oracle-scan
Option --direct-datasource-oracle-scan [193]
Aliases --repl-direct-datasource-oracle-scan [193]
Config File Options direct-datasource-oracle-scan [193], repl-direct-datasource-oracle-scan [193]
Description Oracle SCAN
Value Type string
--direct-datasource-oracle-service
Option --direct-datasource-oracle-service [193]
Aliases --repl-direct-datasource-oracle-service [193]
Config File Options direct-datasource-oracle-service [193], repl-direct-datasource-oracle-service [193]
Description Oracle Service
Value Type string
--direct-datasource-port
Option --direct-datasource-port [193]
Aliases --repl-direct-datasource-port [193]
Config File Options direct-datasource-port [193], repl-direct-datasource-port [193]
Description Database server port
Value Type string
--direct-datasource-type
Option --direct-datasource-type [193]
Aliases --repl-direct-datasource-type [193]
Config File Options direct-datasource-type [193], repl-direct-datasource-type [193]
Description Database type
Value Type string
Default mysql
Valid Values mongodb MongoDB
mysql MySQL
oracle Oracle
postgresql PostgreSQL
postgresql-wal PostgreSQL (using Write Ahead Logging)
vertica Vertica
--direct-replication-password
Option --direct-replication-password [193]
Aliases --direct-datasource-password [193], --repl-direct-datasource-password [193]
Config File Options direct-datasource-password [193], direct-replication-password [193], repl-direct-datasource-password [193]
Description Database password
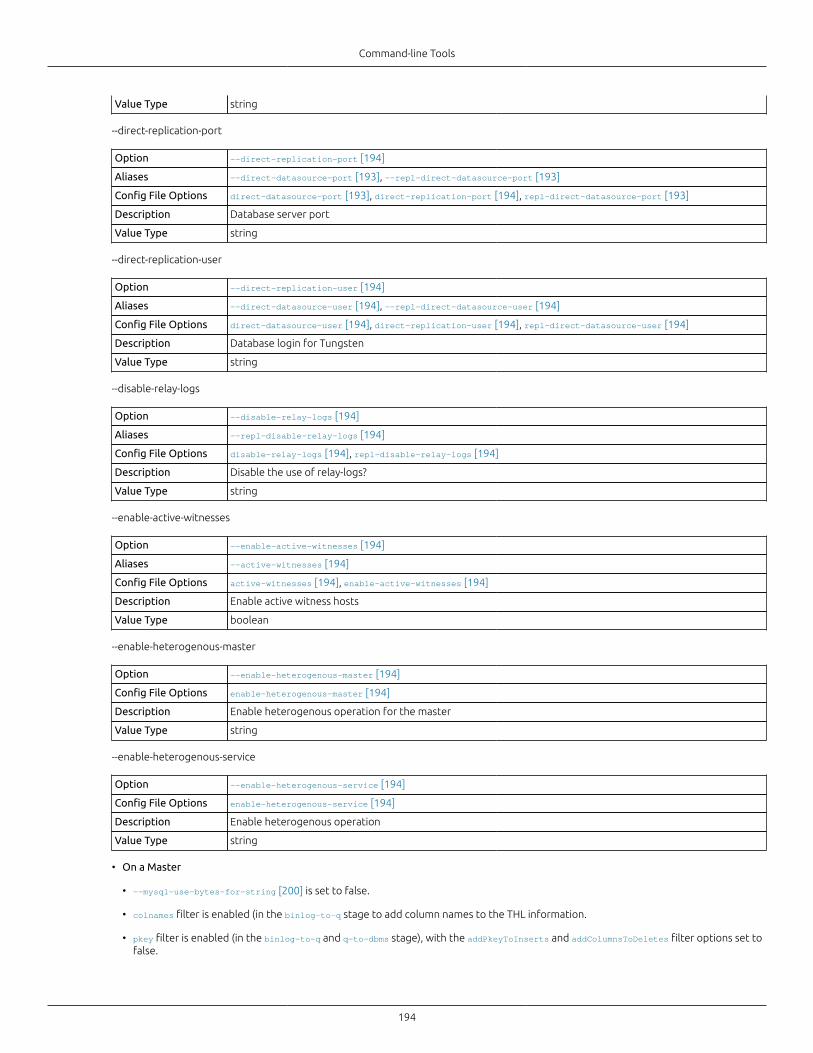
Command-line Tools
194
Value Type string
--direct-replication-port
Option --direct-replication-port [194]
Aliases --direct-datasource-port [193], --repl-direct-datasource-port [193]
Config File Options direct-datasource-port [193], direct-replication-port [194], repl-direct-datasource-port [193]
Description Database server port
Value Type string
--direct-replication-user
Option --direct-replication-user [194]
Aliases --direct-datasource-user [194], --repl-direct-datasource-user [194]
Config File Options direct-datasource-user [194], direct-replication-user [194], repl-direct-datasource-user [194]
Description Database login for Tungsten
Value Type string
--disable-relay-logs
Option --disable-relay-logs [194]
Aliases --repl-disable-relay-logs [194]
Config File Options disable-relay-logs [194], repl-disable-relay-logs [194]
Description Disable the use of relay-logs?
Value Type string
--enable-active-witnesses
Option --enable-active-witnesses [194]
Aliases --active-witnesses [194]
Config File Options active-witnesses [194], enable-active-witnesses [194]
Description Enable active witness hosts
Value Type boolean
--enable-heterogenous-master
Option --enable-heterogenous-master [194]
Config File Options enable-heterogenous-master [194]
Description Enable heterogenous operation for the master
Value Type string
--enable-heterogenous-service
Option --enable-heterogenous-service [194]
Config File Options enable-heterogenous-service [194]
Description Enable heterogenous operation
Value Type string
• On a Master
• --mysql-use-bytes-for-string [200] is set to false.
• colnames filter is enabled (in the binlog-to-q stage to add column names to the THL information.
• pkey filter is enabled (in the binlog-to-q and q-to-dbms stage), with the addPkeyToInserts and addColumnsToDeletes filter options set tofalse.
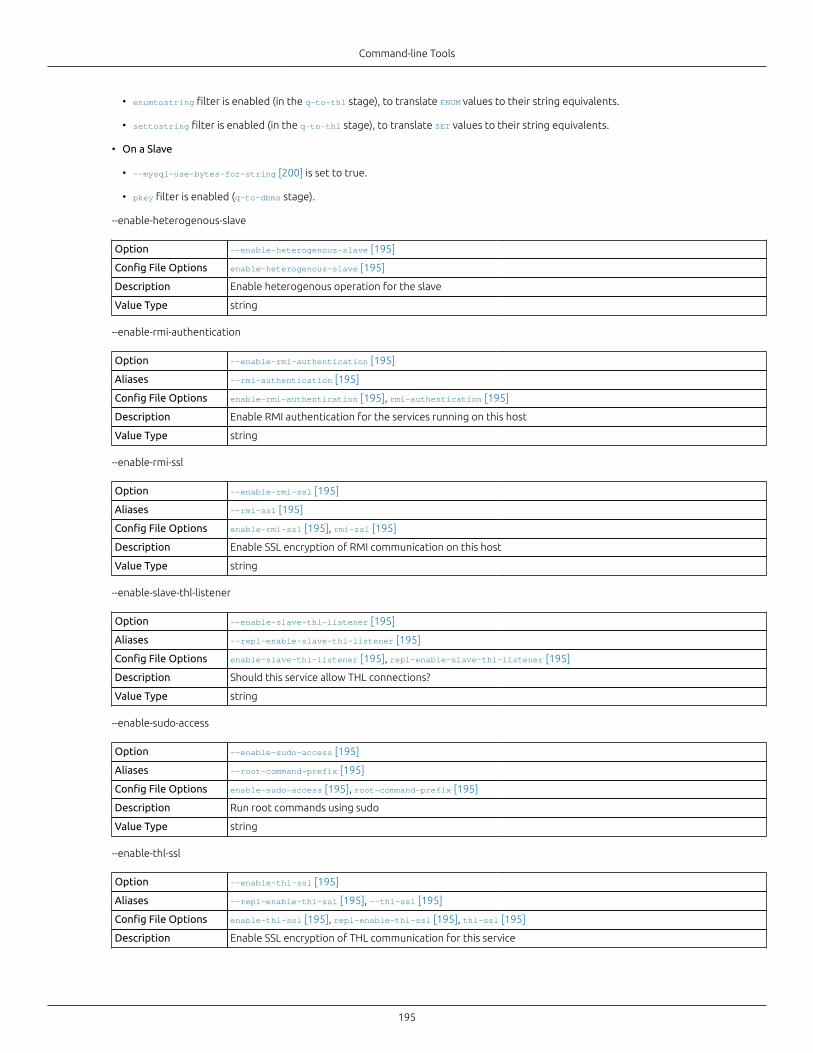
Command-line Tools
195
• enumtostring filter is enabled (in the q-to-thl stage), to translate ENUM values to their string equivalents.
• settostring filter is enabled (in the q-to-thl stage), to translate SET values to their string equivalents.
• On a Slave
• --mysql-use-bytes-for-string [200] is set to true.
• pkey filter is enabled (q-to-dbms stage).
--enable-heterogenous-slave
Option --enable-heterogenous-slave [195]
Config File Options enable-heterogenous-slave [195]
Description Enable heterogenous operation for the slave
Value Type string
--enable-rmi-authentication
Option --enable-rmi-authentication [195]
Aliases --rmi-authentication [195]
Config File Options enable-rmi-authentication [195], rmi-authentication [195]
Description Enable RMI authentication for the services running on this host
Value Type string
--enable-rmi-ssl
Option --enable-rmi-ssl [195]
Aliases --rmi-ssl [195]
Config File Options enable-rmi-ssl [195], rmi-ssl [195]
Description Enable SSL encryption of RMI communication on this host
Value Type string
--enable-slave-thl-listener
Option --enable-slave-thl-listener [195]
Aliases --repl-enable-slave-thl-listener [195]
Config File Options enable-slave-thl-listener [195], repl-enable-slave-thl-listener [195]
Description Should this service allow THL connections?
Value Type string
--enable-sudo-access
Option --enable-sudo-access [195]
Aliases --root-command-prefix [195]
Config File Options enable-sudo-access [195], root-command-prefix [195]
Description Run root commands using sudo
Value Type string
--enable-thl-ssl
Option --enable-thl-ssl [195]
Aliases --repl-enable-thl-ssl [195], --thl-ssl [195]
Config File Options enable-thl-ssl [195], repl-enable-thl-ssl [195], thl-ssl [195]
Description Enable SSL encryption of THL communication for this service
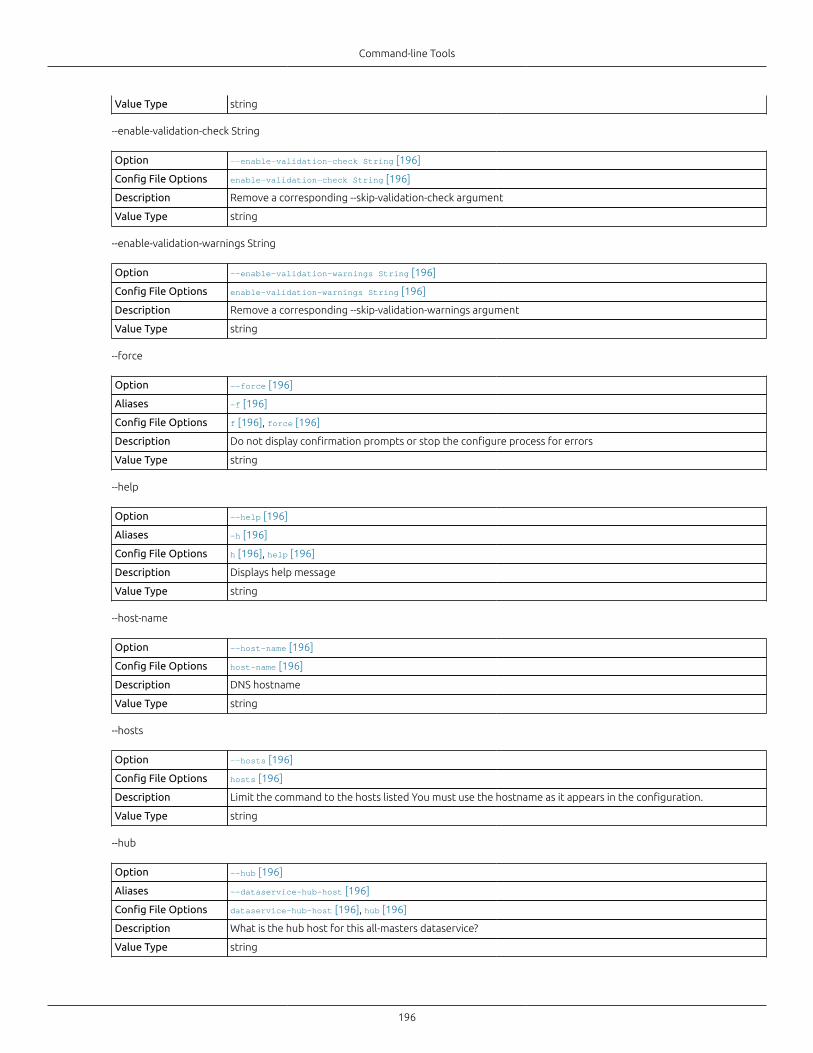
Command-line Tools
196
Value Type string
--enable-validation-check String
Option --enable-validation-check String [196]
Config File Options enable-validation-check String [196]
Description Remove a corresponding --skip-validation-check argument
Value Type string
--enable-validation-warnings String
Option --enable-validation-warnings String [196]
Config File Options enable-validation-warnings String [196]
Description Remove a corresponding --skip-validation-warnings argument
Value Type string
--force
Option --force [196]
Aliases -f [196]
Config File Options f [196], force [196]
Description Do not display confirmation prompts or stop the configure process for errors
Value Type string
--help
Option --help [196]
Aliases -h [196]
Config File Options h [196], help [196]
Description Displays help message
Value Type string
--host-name
Option --host-name [196]
Config File Options host-name [196]
Description DNS hostname
Value Type string
--hosts
Option --hosts [196]
Config File Options hosts [196]
Description Limit the command to the hosts listed You must use the hostname as it appears in the configuration.
Value Type string
--hub
Option --hub [196]
Aliases --dataservice-hub-host [196]
Config File Options dataservice-hub-host [196], hub [196]
Description What is the hub host for this all-masters dataservice?
Value Type string
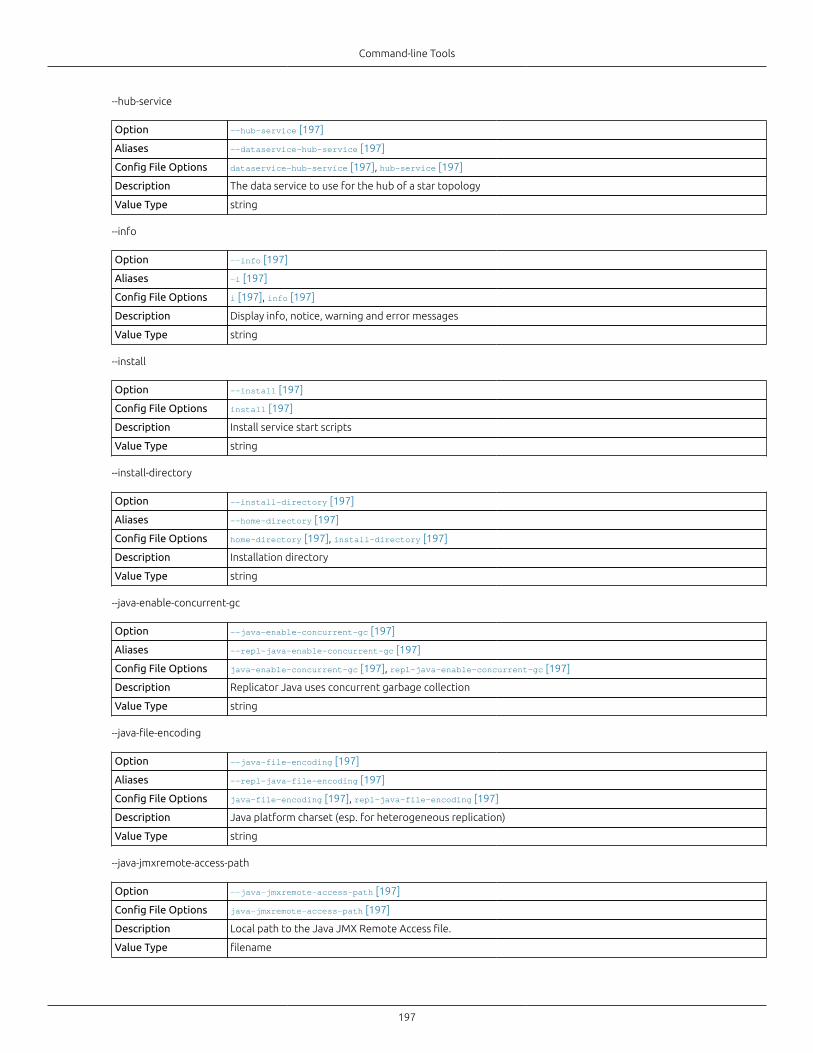
Command-line Tools
197
--hub-service
Option --hub-service [197]
Aliases --dataservice-hub-service [197]
Config File Options dataservice-hub-service [197], hub-service [197]
Description The data service to use for the hub of a star topology
Value Type string
--info
Option --info [197]
Aliases -i [197]
Config File Options i [197], info [197]
Description Display info, notice, warning and error messages
Value Type string
--install
Option --install [197]
Config File Options install [197]
Description Install service start scripts
Value Type string
--install-directory
Option --install-directory [197]
Aliases --home-directory [197]
Config File Options home-directory [197], install-directory [197]
Description Installation directory
Value Type string
--java-enable-concurrent-gc
Option --java-enable-concurrent-gc [197]
Aliases --repl-java-enable-concurrent-gc [197]
Config File Options java-enable-concurrent-gc [197], repl-java-enable-concurrent-gc [197]
Description Replicator Java uses concurrent garbage collection
Value Type string
--java-file-encoding
Option --java-file-encoding [197]
Aliases --repl-java-file-encoding [197]
Config File Options java-file-encoding [197], repl-java-file-encoding [197]
Description Java platform charset (esp. for heterogeneous replication)
Value Type string
--java-jmxremote-access-path
Option --java-jmxremote-access-path [197]
Config File Options java-jmxremote-access-path [197]
Description Local path to the Java JMX Remote Access file.
Value Type filename
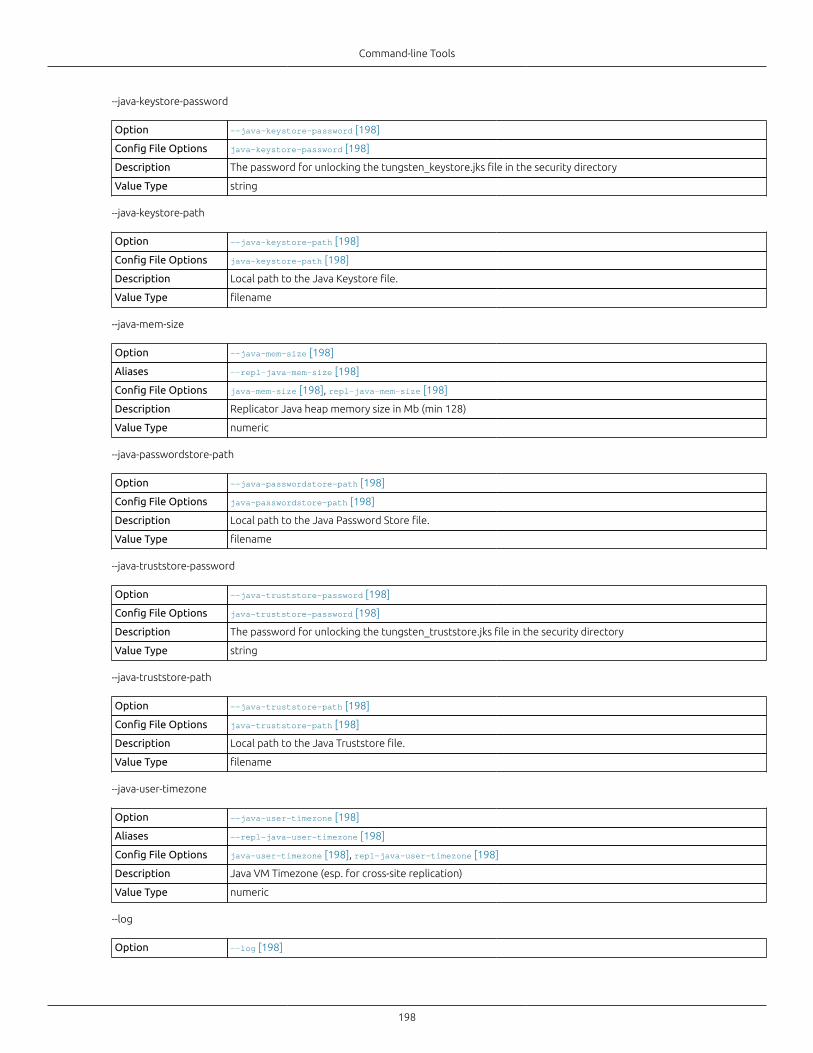
Command-line Tools
198
--java-keystore-password
Option --java-keystore-password [198]
Config File Options java-keystore-password [198]
Description The password for unlocking the tungsten_keystore.jks file in the security directory
Value Type string
--java-keystore-path
Option --java-keystore-path [198]
Config File Options java-keystore-path [198]
Description Local path to the Java Keystore file.
Value Type filename
--java-mem-size
Option --java-mem-size [198]
Aliases --repl-java-mem-size [198]
Config File Options java-mem-size [198], repl-java-mem-size [198]
Description Replicator Java heap memory size in Mb (min 128)
Value Type numeric
--java-passwordstore-path
Option --java-passwordstore-path [198]
Config File Options java-passwordstore-path [198]
Description Local path to the Java Password Store file.
Value Type filename
--java-truststore-password
Option --java-truststore-password [198]
Config File Options java-truststore-password [198]
Description The password for unlocking the tungsten_truststore.jks file in the security directory
Value Type string
--java-truststore-path
Option --java-truststore-path [198]
Config File Options java-truststore-path [198]
Description Local path to the Java Truststore file.
Value Type filename
--java-user-timezone
Option --java-user-timezone [198]
Aliases --repl-java-user-timezone [198]
Config File Options java-user-timezone [198], repl-java-user-timezone [198]
Description Java VM Timezone (esp. for cross-site replication)
Value Type numeric
--log
Option --log [198]
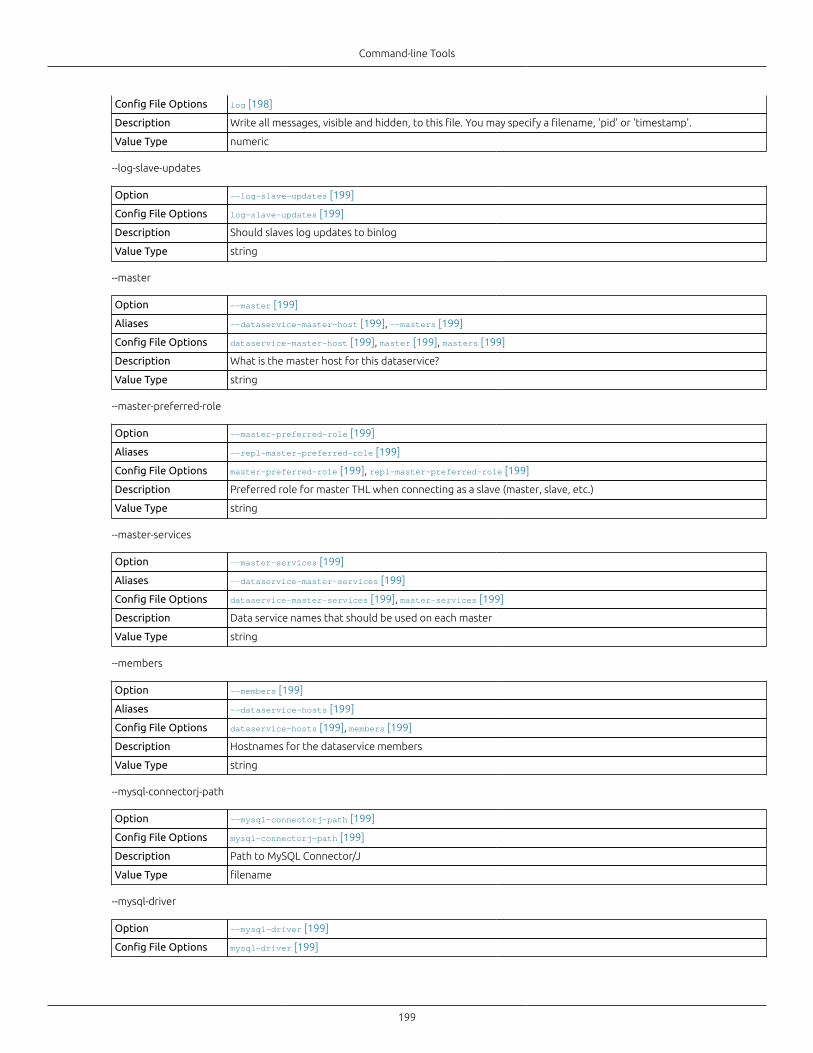
Command-line Tools
199
Config File Options log [198]
Description Write all messages, visible and hidden, to this file. You may specify a filename, 'pid' or 'timestamp'.
Value Type numeric
--log-slave-updates
Option --log-slave-updates [199]
Config File Options log-slave-updates [199]
Description Should slaves log updates to binlog
Value Type string
--master
Option --master [199]
Aliases --dataservice-master-host [199], --masters [199]
Config File Options dataservice-master-host [199], master [199], masters [199]
Description What is the master host for this dataservice?
Value Type string
--master-preferred-role
Option --master-preferred-role [199]
Aliases --repl-master-preferred-role [199]
Config File Options master-preferred-role [199], repl-master-preferred-role [199]
Description Preferred role for master THL when connecting as a slave (master, slave, etc.)
Value Type string
--master-services
Option --master-services [199]
Aliases --dataservice-master-services [199]
Config File Options dataservice-master-services [199], master-services [199]
Description Data service names that should be used on each master
Value Type string
--members
Option --members [199]
Aliases --dataservice-hosts [199]
Config File Options dataservice-hosts [199], members [199]
Description Hostnames for the dataservice members
Value Type string
--mysql-connectorj-path
Option --mysql-connectorj-path [199]
Config File Options mysql-connectorj-path [199]
Description Path to MySQL Connector/J
Value Type filename
--mysql-driver
Option --mysql-driver [199]
Config File Options mysql-driver [199]

Command-line Tools
200
Description MySQL Driver Vendor
Value Type string
--mysql-enable-ansiquotes
Option --mysql-enable-ansiquotes [200]
Aliases --repl-mysql-enable-ansiquotes [200]
Config File Options mysql-enable-ansiquotes [200], repl-mysql-enable-ansiquotes [200]
Description Enables ANSI_QUOTES mode for incoming events?
Value Type string
--mysql-enable-noonlykeywords
Option --mysql-enable-noonlykeywords [200]
Aliases --repl-mysql-enable-noonlykeywords [200]
Config File Options mysql-enable-noonlykeywords [200], repl-mysql-enable-noonlykeywords [200]
Description Translates DELETE FROM ONLY -} DELETE FROM and UPDATE ONLY -} UPDATE.
Value Type string
--mysql-enable-settostring
Option --mysql-enable-settostring [200]
Aliases --repl-mysql-enable-settostring [200]
Config File Options mysql-enable-settostring [200], repl-mysql-enable-settostring [200]
Description Decode SET values into their text values?
Value Type string
--mysql-ro-slave
Option --mysql-ro-slave [200]
Aliases --repl-mysql-ro-slave [200]
Config File Options mysql-ro-slave [200], repl-mysql-ro-slave [200]
Description Slaves are read-only?
Value Type string
--mysql-server-id
Option --mysql-server-id [200]
Aliases --repl-mysql-server-id [200]
Config File Options mysql-server-id [200], repl-mysql-server-id [200]
Description Explicitly set the MySQL server ID
Value Type string
Setting this option explicitly sets the server-id information normally located in the MySQL configuration (my.cnf). This is useful in situationswhere there may be multiple MySQL installations and the server ID needs to be identified to prevent collisions when reading from thesame master.
--mysql-use-bytes-for-string
Option --mysql-use-bytes-for-string [200]
Aliases --repl-mysql-use-bytes-for-string [200]
Config File Options mysql-use-bytes-for-string [200], repl-mysql-use-bytes-for-string [200]
Description Transfer strings as their byte representation?
Value Type string
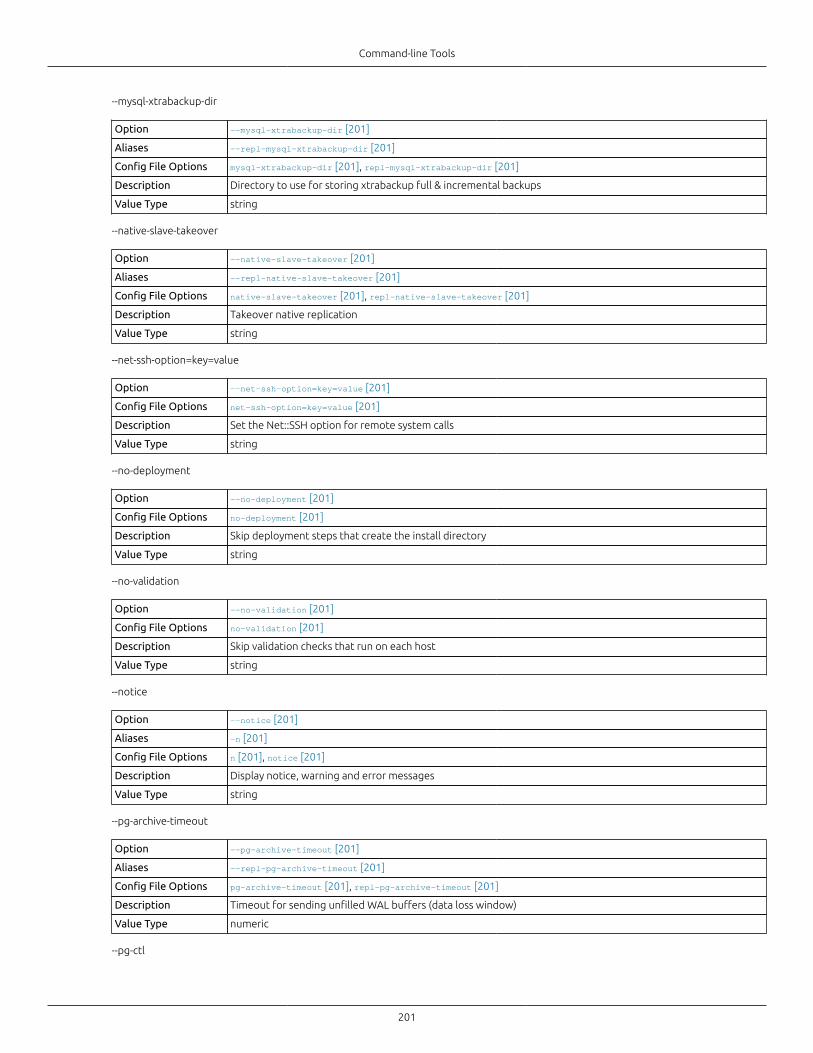
Command-line Tools
201
--mysql-xtrabackup-dir
Option --mysql-xtrabackup-dir [201]
Aliases --repl-mysql-xtrabackup-dir [201]
Config File Options mysql-xtrabackup-dir [201], repl-mysql-xtrabackup-dir [201]
Description Directory to use for storing xtrabackup full & incremental backups
Value Type string
--native-slave-takeover
Option --native-slave-takeover [201]
Aliases --repl-native-slave-takeover [201]
Config File Options native-slave-takeover [201], repl-native-slave-takeover [201]
Description Takeover native replication
Value Type string
--net-ssh-option=key=value
Option --net-ssh-option=key=value [201]
Config File Options net-ssh-option=key=value [201]
Description Set the Net::SSH option for remote system calls
Value Type string
--no-deployment
Option --no-deployment [201]
Config File Options no-deployment [201]
Description Skip deployment steps that create the install directory
Value Type string
--no-validation
Option --no-validation [201]
Config File Options no-validation [201]
Description Skip validation checks that run on each host
Value Type string
--notice
Option --notice [201]
Aliases -n [201]
Config File Options n [201], notice [201]
Description Display notice, warning and error messages
Value Type string
--pg-archive-timeout
Option --pg-archive-timeout [201]
Aliases --repl-pg-archive-timeout [201]
Config File Options pg-archive-timeout [201], repl-pg-archive-timeout [201]
Description Timeout for sending unfilled WAL buffers (data loss window)
Value Type numeric
--pg-ctl
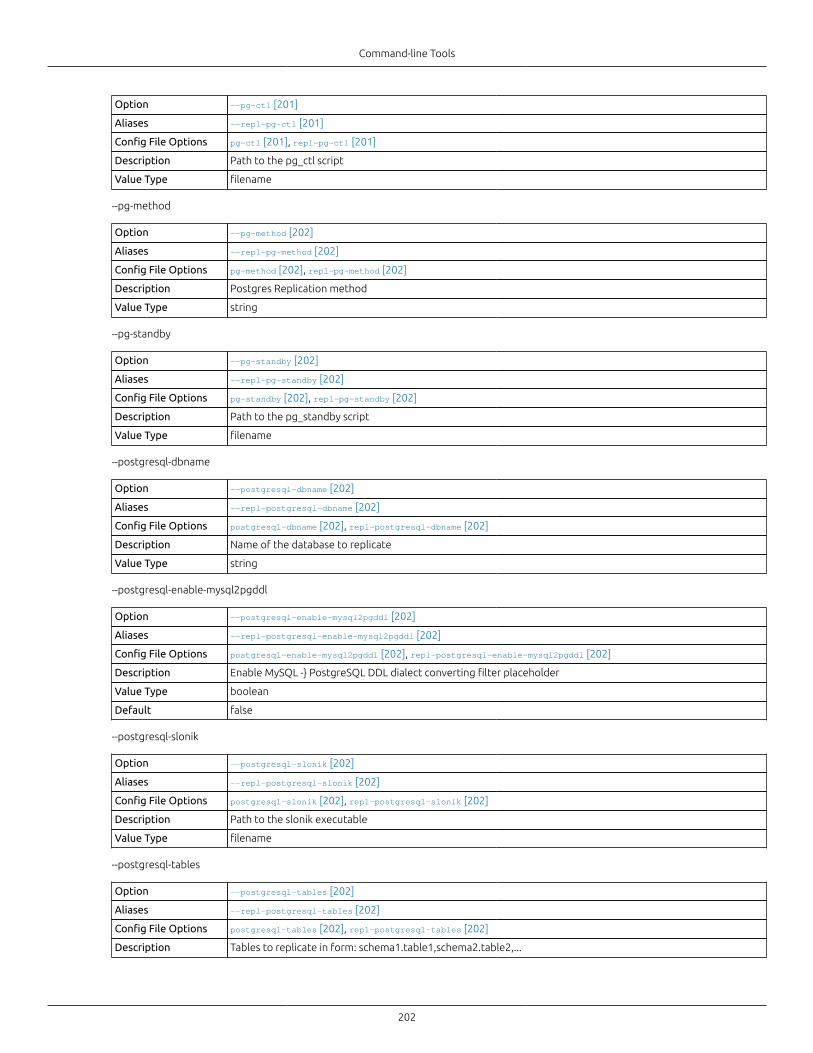
Command-line Tools
202
Option --pg-ctl [201]
Aliases --repl-pg-ctl [201]
Config File Options pg-ctl [201], repl-pg-ctl [201]
Description Path to the pg_ctl script
Value Type filename
--pg-method
Option --pg-method [202]
Aliases --repl-pg-method [202]
Config File Options pg-method [202], repl-pg-method [202]
Description Postgres Replication method
Value Type string
--pg-standby
Option --pg-standby [202]
Aliases --repl-pg-standby [202]
Config File Options pg-standby [202], repl-pg-standby [202]
Description Path to the pg_standby script
Value Type filename
--postgresql-dbname
Option --postgresql-dbname [202]
Aliases --repl-postgresql-dbname [202]
Config File Options postgresql-dbname [202], repl-postgresql-dbname [202]
Description Name of the database to replicate
Value Type string
--postgresql-enable-mysql2pgddl
Option --postgresql-enable-mysql2pgddl [202]
Aliases --repl-postgresql-enable-mysql2pgddl [202]
Config File Options postgresql-enable-mysql2pgddl [202], repl-postgresql-enable-mysql2pgddl [202]
Description Enable MySQL -} PostgreSQL DDL dialect converting filter placeholder
Value Type boolean
Default false
--postgresql-slonik
Option --postgresql-slonik [202]
Aliases --repl-postgresql-slonik [202]
Config File Options postgresql-slonik [202], repl-postgresql-slonik [202]
Description Path to the slonik executable
Value Type filename
--postgresql-tables
Option --postgresql-tables [202]
Aliases --repl-postgresql-tables [202]
Config File Options postgresql-tables [202], repl-postgresql-tables [202]
Description Tables to replicate in form: schema1.table1,schema2.table2,...
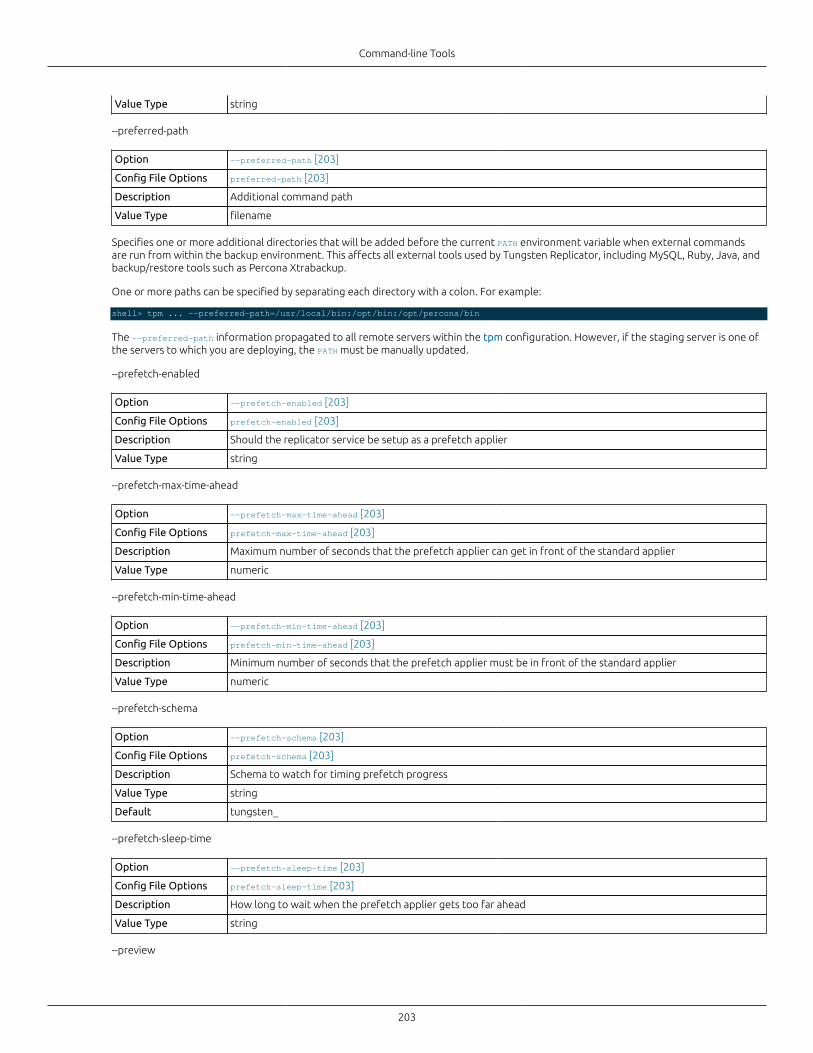
Command-line Tools
203
Value Type string
--preferred-path
Option --preferred-path [203]
Config File Options preferred-path [203]
Description Additional command path
Value Type filename
Specifies one or more additional directories that will be added before the current PATH environment variable when external commandsare run from within the backup environment. This affects all external tools used by Tungsten Replicator, including MySQL, Ruby, Java, andbackup/restore tools such as Percona Xtrabackup.
One or more paths can be specified by separating each directory with a colon. For example:
shell> tpm ... --preferred-path=/usr/local/bin:/opt/bin:/opt/percona/bin
The --preferred-path information propagated to all remote servers within the tpm configuration. However, if the staging server is one ofthe servers to which you are deploying, the PATH must be manually updated.
--prefetch-enabled
Option --prefetch-enabled [203]
Config File Options prefetch-enabled [203]
Description Should the replicator service be setup as a prefetch applier
Value Type string
--prefetch-max-time-ahead
Option --prefetch-max-time-ahead [203]
Config File Options prefetch-max-time-ahead [203]
Description Maximum number of seconds that the prefetch applier can get in front of the standard applier
Value Type numeric
--prefetch-min-time-ahead
Option --prefetch-min-time-ahead [203]
Config File Options prefetch-min-time-ahead [203]
Description Minimum number of seconds that the prefetch applier must be in front of the standard applier
Value Type numeric
--prefetch-schema
Option --prefetch-schema [203]
Config File Options prefetch-schema [203]
Description Schema to watch for timing prefetch progress
Value Type string
Default tungsten_
--prefetch-sleep-time
Option --prefetch-sleep-time [203]
Config File Options prefetch-sleep-time [203]
Description How long to wait when the prefetch applier gets too far ahead
Value Type string
--preview
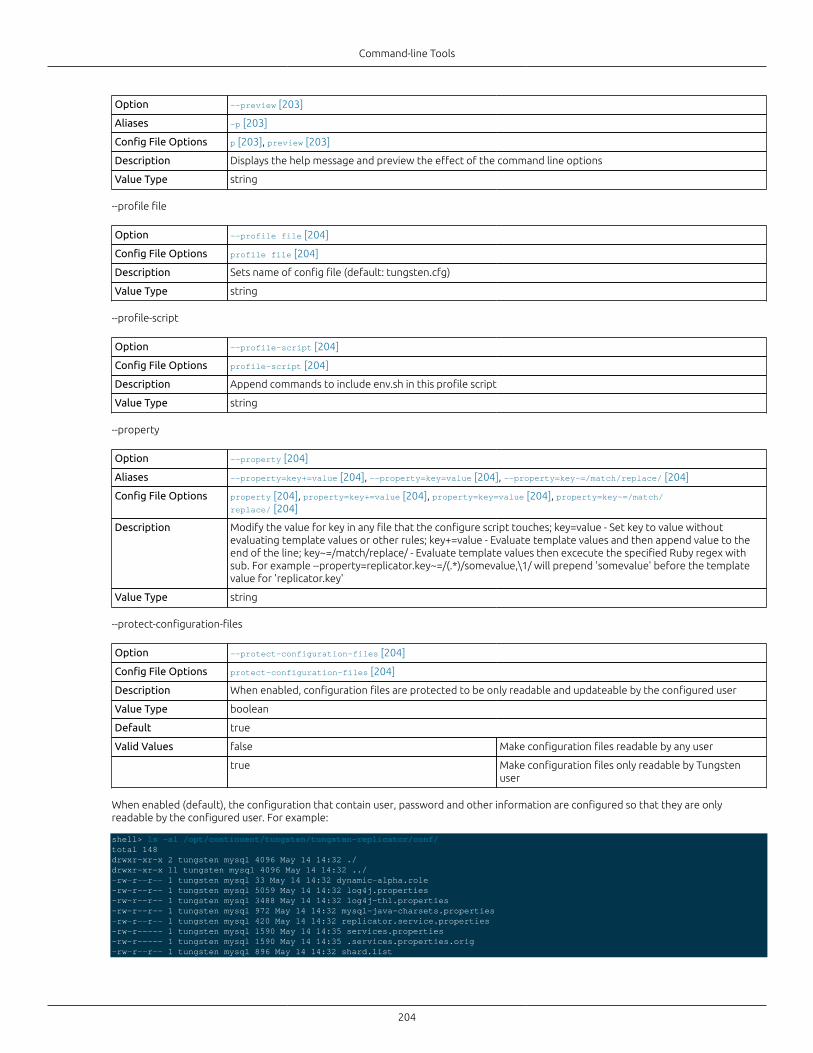
Command-line Tools
204
Option --preview [203]
Aliases -p [203]
Config File Options p [203], preview [203]
Description Displays the help message and preview the effect of the command line options
Value Type string
--profile file
Option --profile file [204]
Config File Options profile file [204]
Description Sets name of config file (default: tungsten.cfg)
Value Type string
--profile-script
Option --profile-script [204]
Config File Options profile-script [204]
Description Append commands to include env.sh in this profile script
Value Type string
--property
Option --property [204]
Aliases --property=key+=value [204], --property=key=value [204], --property=key~=/match/replace/ [204]
Config File Options property [204], property=key+=value [204], property=key=value [204], property=key~=/match/replace/ [204]
Description Modify the value for key in any file that the configure script touches; key=value - Set key to value withoutevaluating template values or other rules; key+=value - Evaluate template values and then append value to theend of the line; key~=/match/replace/ - Evaluate template values then excecute the specified Ruby regex withsub. For example --property=replicator.key~=/(.*)/somevalue,\1/ will prepend 'somevalue' before the templatevalue for 'replicator.key'
Value Type string
--protect-configuration-files
Option --protect-configuration-files [204]
Config File Options protect-configuration-files [204]
Description When enabled, configuration files are protected to be only readable and updateable by the configured user
Value Type boolean
Default true
Valid Values false Make configuration files readable by any user
true Make configuration files only readable by Tungstenuser
When enabled (default), the configuration that contain user, password and other information are configured so that they are onlyreadable by the configured user. For example:
shell> ls -al /opt/continuent/tungsten/tungsten-replicator/conf/total 148drwxr-xr-x 2 tungsten mysql 4096 May 14 14:32 ./drwxr-xr-x 11 tungsten mysql 4096 May 14 14:32 ../-rw-r--r-- 1 tungsten mysql 33 May 14 14:32 dynamic-alpha.role-rw-r--r-- 1 tungsten mysql 5059 May 14 14:32 log4j.properties-rw-r--r-- 1 tungsten mysql 3488 May 14 14:32 log4j-thl.properties-rw-r--r-- 1 tungsten mysql 972 May 14 14:32 mysql-java-charsets.properties-rw-r--r-- 1 tungsten mysql 420 May 14 14:32 replicator.service.properties-rw-r----- 1 tungsten mysql 1590 May 14 14:35 services.properties-rw-r----- 1 tungsten mysql 1590 May 14 14:35 .services.properties.orig-rw-r--r-- 1 tungsten mysql 896 May 14 14:32 shard.list
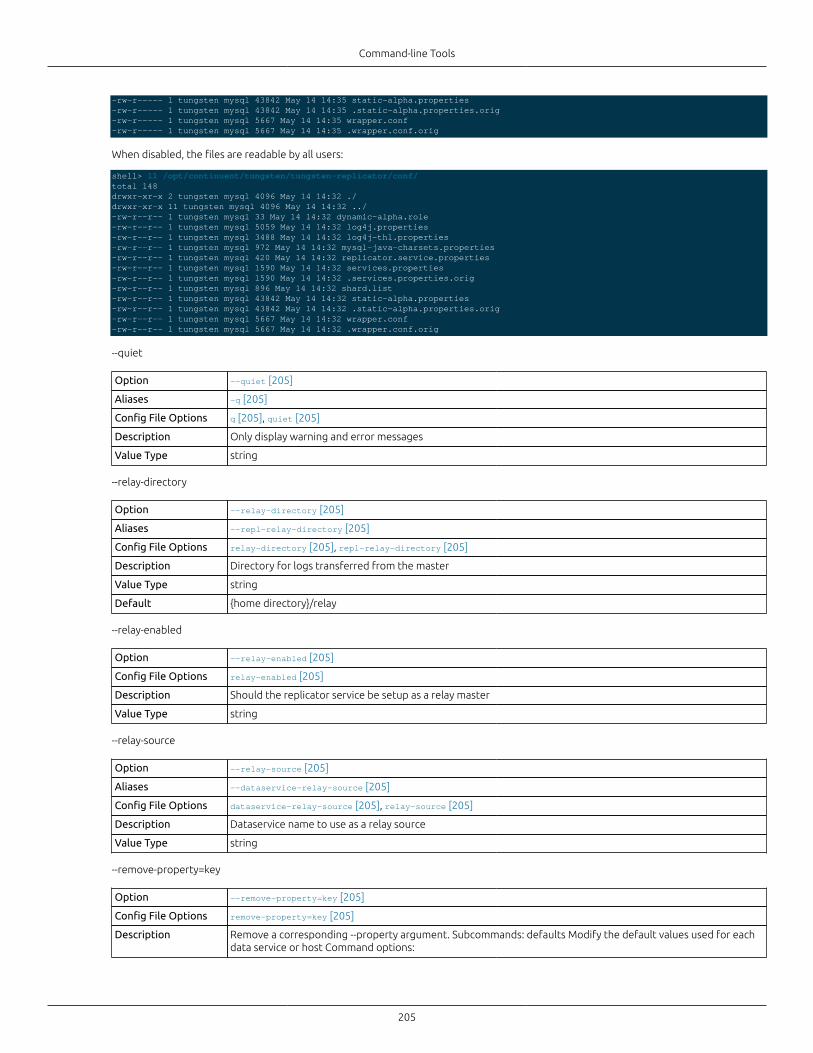
Command-line Tools
205
-rw-r----- 1 tungsten mysql 43842 May 14 14:35 static-alpha.properties-rw-r----- 1 tungsten mysql 43842 May 14 14:35 .static-alpha.properties.orig-rw-r----- 1 tungsten mysql 5667 May 14 14:35 wrapper.conf-rw-r----- 1 tungsten mysql 5667 May 14 14:35 .wrapper.conf.orig
When disabled, the files are readable by all users:
shell> ll /opt/continuent/tungsten/tungsten-replicator/conf/total 148drwxr-xr-x 2 tungsten mysql 4096 May 14 14:32 ./drwxr-xr-x 11 tungsten mysql 4096 May 14 14:32 ../-rw-r--r-- 1 tungsten mysql 33 May 14 14:32 dynamic-alpha.role-rw-r--r-- 1 tungsten mysql 5059 May 14 14:32 log4j.properties-rw-r--r-- 1 tungsten mysql 3488 May 14 14:32 log4j-thl.properties-rw-r--r-- 1 tungsten mysql 972 May 14 14:32 mysql-java-charsets.properties-rw-r--r-- 1 tungsten mysql 420 May 14 14:32 replicator.service.properties-rw-r--r-- 1 tungsten mysql 1590 May 14 14:32 services.properties-rw-r--r-- 1 tungsten mysql 1590 May 14 14:32 .services.properties.orig-rw-r--r-- 1 tungsten mysql 896 May 14 14:32 shard.list-rw-r--r-- 1 tungsten mysql 43842 May 14 14:32 static-alpha.properties-rw-r--r-- 1 tungsten mysql 43842 May 14 14:32 .static-alpha.properties.orig-rw-r--r-- 1 tungsten mysql 5667 May 14 14:32 wrapper.conf-rw-r--r-- 1 tungsten mysql 5667 May 14 14:32 .wrapper.conf.orig
--quiet
Option --quiet [205]
Aliases -q [205]
Config File Options q [205], quiet [205]
Description Only display warning and error messages
Value Type string
--relay-directory
Option --relay-directory [205]
Aliases --repl-relay-directory [205]
Config File Options relay-directory [205], repl-relay-directory [205]
Description Directory for logs transferred from the master
Value Type string
Default {home directory}/relay
--relay-enabled
Option --relay-enabled [205]
Config File Options relay-enabled [205]
Description Should the replicator service be setup as a relay master
Value Type string
--relay-source
Option --relay-source [205]
Aliases --dataservice-relay-source [205]
Config File Options dataservice-relay-source [205], relay-source [205]
Description Dataservice name to use as a relay source
Value Type string
--remove-property=key
Option --remove-property=key [205]
Config File Options remove-property=key [205]
Description Remove a corresponding --property argument. Subcommands: defaults Modify the default values used for eachdata service or host Command options:
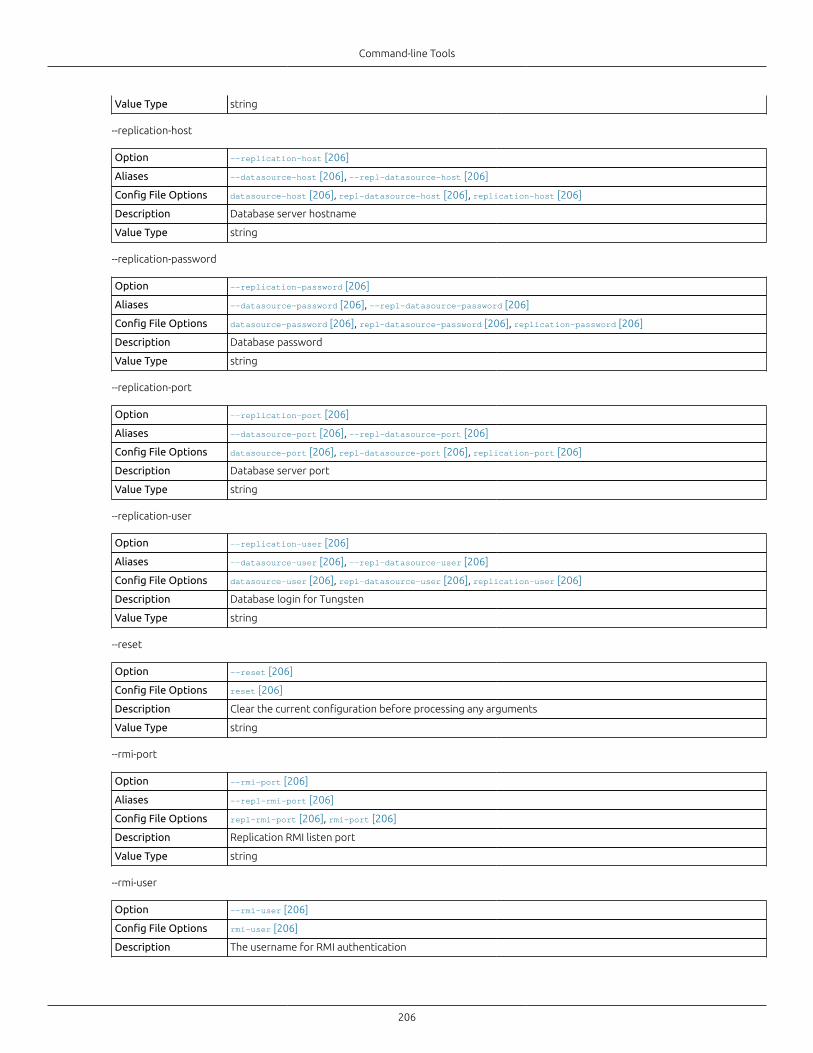
Command-line Tools
206
Value Type string
--replication-host
Option --replication-host [206]
Aliases --datasource-host [206], --repl-datasource-host [206]
Config File Options datasource-host [206], repl-datasource-host [206], replication-host [206]
Description Database server hostname
Value Type string
--replication-password
Option --replication-password [206]
Aliases --datasource-password [206], --repl-datasource-password [206]
Config File Options datasource-password [206], repl-datasource-password [206], replication-password [206]
Description Database password
Value Type string
--replication-port
Option --replication-port [206]
Aliases --datasource-port [206], --repl-datasource-port [206]
Config File Options datasource-port [206], repl-datasource-port [206], replication-port [206]
Description Database server port
Value Type string
--replication-user
Option --replication-user [206]
Aliases --datasource-user [206], --repl-datasource-user [206]
Config File Options datasource-user [206], repl-datasource-user [206], replication-user [206]
Description Database login for Tungsten
Value Type string
--reset
Option --reset [206]
Config File Options reset [206]
Description Clear the current configuration before processing any arguments
Value Type string
--rmi-port
Option --rmi-port [206]
Aliases --repl-rmi-port [206]
Config File Options repl-rmi-port [206], rmi-port [206]
Description Replication RMI listen port
Value Type string
--rmi-user
Option --rmi-user [206]
Config File Options rmi-user [206]
Description The username for RMI authentication
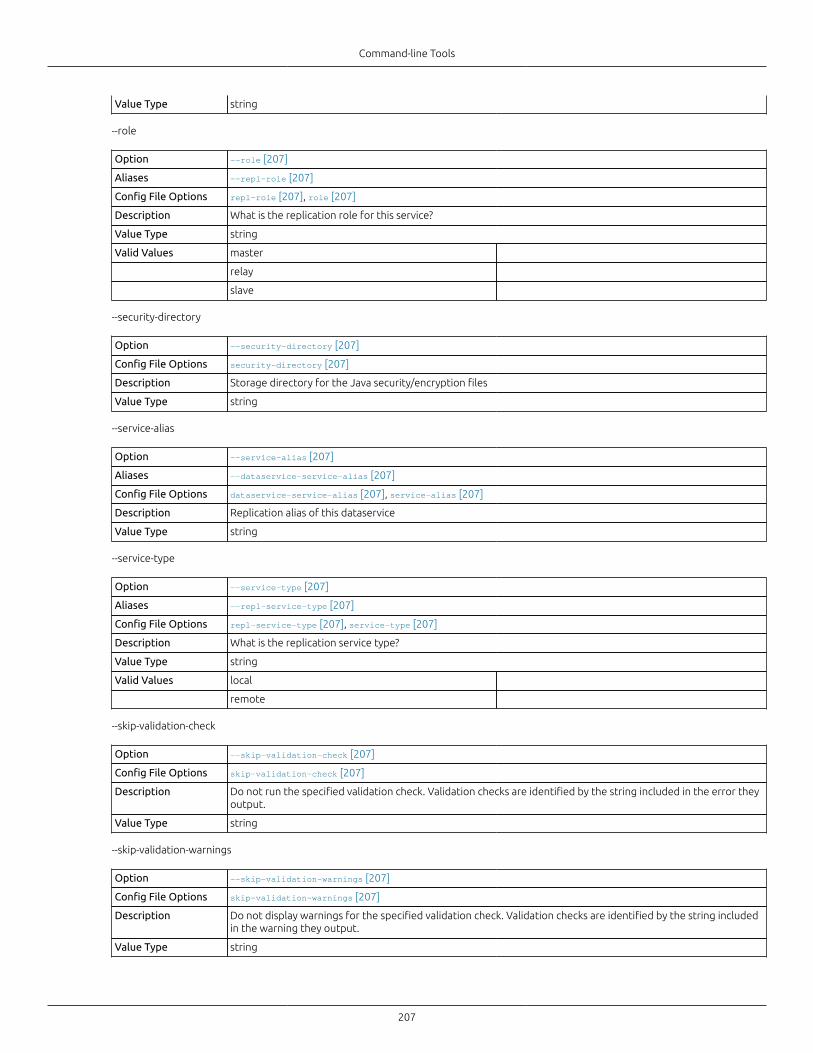
Command-line Tools
207
Value Type string
--role
Option --role [207]
Aliases --repl-role [207]
Config File Options repl-role [207], role [207]
Description What is the replication role for this service?
Value Type string
Valid Values master
relay
slave
--security-directory
Option --security-directory [207]
Config File Options security-directory [207]
Description Storage directory for the Java security/encryption files
Value Type string
--service-alias
Option --service-alias [207]
Aliases --dataservice-service-alias [207]
Config File Options dataservice-service-alias [207], service-alias [207]
Description Replication alias of this dataservice
Value Type string
--service-type
Option --service-type [207]
Aliases --repl-service-type [207]
Config File Options repl-service-type [207], service-type [207]
Description What is the replication service type?
Value Type string
Valid Values local
remote
--skip-validation-check
Option --skip-validation-check [207]
Config File Options skip-validation-check [207]
Description Do not run the specified validation check. Validation checks are identified by the string included in the error theyoutput.
Value Type string
--skip-validation-warnings
Option --skip-validation-warnings [207]
Config File Options skip-validation-warnings [207]
Description Do not display warnings for the specified validation check. Validation checks are identified by the string includedin the warning they output.
Value Type string
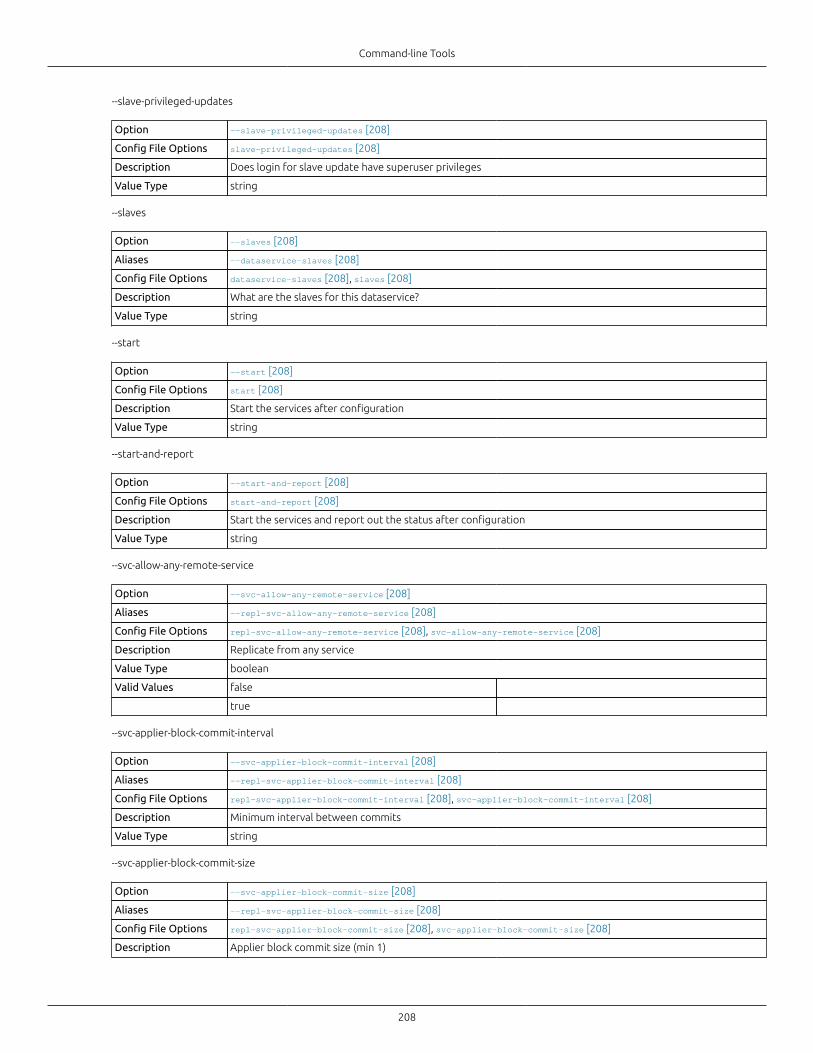
Command-line Tools
208
--slave-privileged-updates
Option --slave-privileged-updates [208]
Config File Options slave-privileged-updates [208]
Description Does login for slave update have superuser privileges
Value Type string
--slaves
Option --slaves [208]
Aliases --dataservice-slaves [208]
Config File Options dataservice-slaves [208], slaves [208]
Description What are the slaves for this dataservice?
Value Type string
--start
Option --start [208]
Config File Options start [208]
Description Start the services after configuration
Value Type string
--start-and-report
Option --start-and-report [208]
Config File Options start-and-report [208]
Description Start the services and report out the status after configuration
Value Type string
--svc-allow-any-remote-service
Option --svc-allow-any-remote-service [208]
Aliases --repl-svc-allow-any-remote-service [208]
Config File Options repl-svc-allow-any-remote-service [208], svc-allow-any-remote-service [208]
Description Replicate from any service
Value Type boolean
Valid Values false
true
--svc-applier-block-commit-interval
Option --svc-applier-block-commit-interval [208]
Aliases --repl-svc-applier-block-commit-interval [208]
Config File Options repl-svc-applier-block-commit-interval [208], svc-applier-block-commit-interval [208]
Description Minimum interval between commits
Value Type string
--svc-applier-block-commit-size
Option --svc-applier-block-commit-size [208]
Aliases --repl-svc-applier-block-commit-size [208]
Config File Options repl-svc-applier-block-commit-size [208], svc-applier-block-commit-size [208]
Description Applier block commit size (min 1)
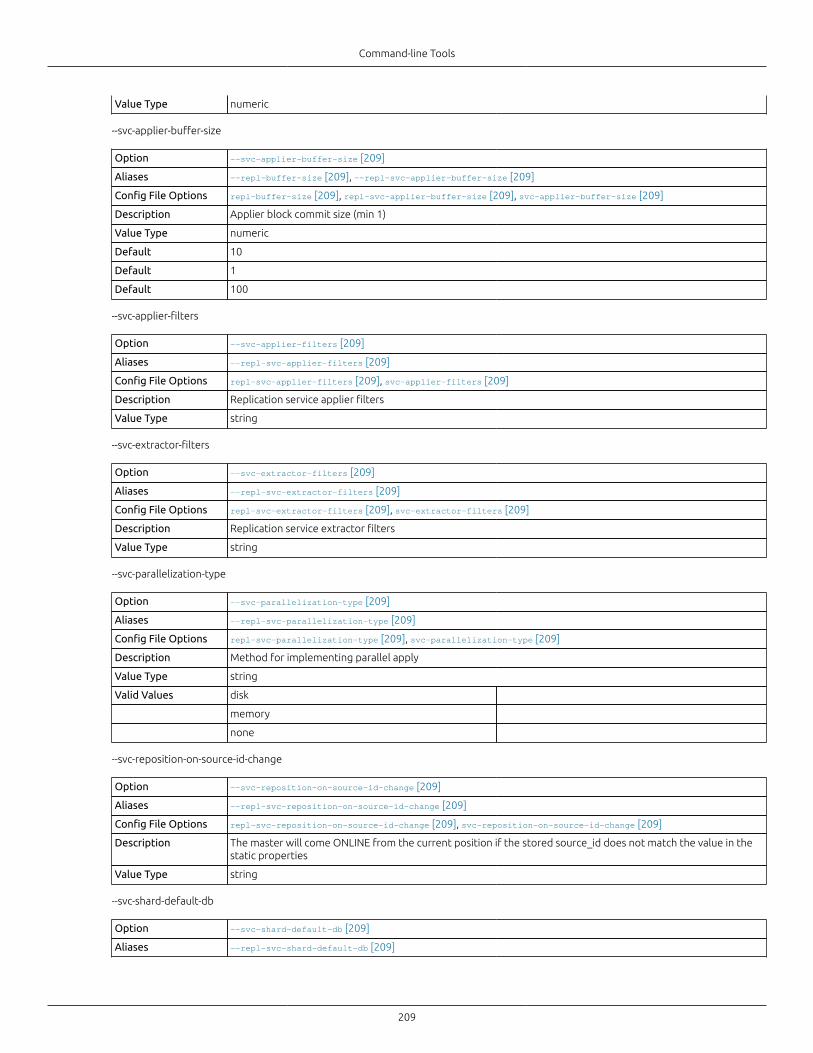
Command-line Tools
209
Value Type numeric
--svc-applier-buffer-size
Option --svc-applier-buffer-size [209]
Aliases --repl-buffer-size [209], --repl-svc-applier-buffer-size [209]
Config File Options repl-buffer-size [209], repl-svc-applier-buffer-size [209], svc-applier-buffer-size [209]
Description Applier block commit size (min 1)
Value Type numeric
Default 10
Default 1
Default 100
--svc-applier-filters
Option --svc-applier-filters [209]
Aliases --repl-svc-applier-filters [209]
Config File Options repl-svc-applier-filters [209], svc-applier-filters [209]
Description Replication service applier filters
Value Type string
--svc-extractor-filters
Option --svc-extractor-filters [209]
Aliases --repl-svc-extractor-filters [209]
Config File Options repl-svc-extractor-filters [209], svc-extractor-filters [209]
Description Replication service extractor filters
Value Type string
--svc-parallelization-type
Option --svc-parallelization-type [209]
Aliases --repl-svc-parallelization-type [209]
Config File Options repl-svc-parallelization-type [209], svc-parallelization-type [209]
Description Method for implementing parallel apply
Value Type string
Valid Values disk
memory
none
--svc-reposition-on-source-id-change
Option --svc-reposition-on-source-id-change [209]
Aliases --repl-svc-reposition-on-source-id-change [209]
Config File Options repl-svc-reposition-on-source-id-change [209], svc-reposition-on-source-id-change [209]
Description The master will come ONLINE from the current position if the stored source_id does not match the value in thestatic properties
Value Type string
--svc-shard-default-db
Option --svc-shard-default-db [209]
Aliases --repl-svc-shard-default-db [209]
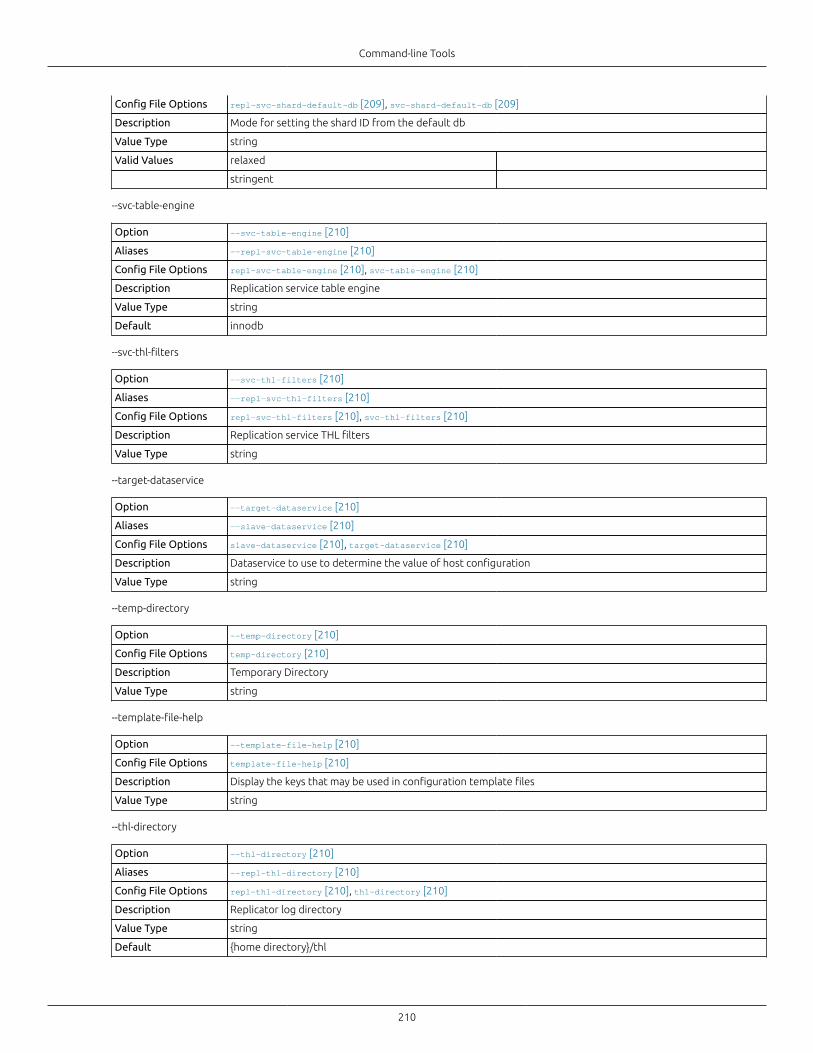
Command-line Tools
210
Config File Options repl-svc-shard-default-db [209], svc-shard-default-db [209]
Description Mode for setting the shard ID from the default db
Value Type string
Valid Values relaxed
stringent
--svc-table-engine
Option --svc-table-engine [210]
Aliases --repl-svc-table-engine [210]
Config File Options repl-svc-table-engine [210], svc-table-engine [210]
Description Replication service table engine
Value Type string
Default innodb
--svc-thl-filters
Option --svc-thl-filters [210]
Aliases --repl-svc-thl-filters [210]
Config File Options repl-svc-thl-filters [210], svc-thl-filters [210]
Description Replication service THL filters
Value Type string
--target-dataservice
Option --target-dataservice [210]
Aliases --slave-dataservice [210]
Config File Options slave-dataservice [210], target-dataservice [210]
Description Dataservice to use to determine the value of host configuration
Value Type string
--temp-directory
Option --temp-directory [210]
Config File Options temp-directory [210]
Description Temporary Directory
Value Type string
--template-file-help
Option --template-file-help [210]
Config File Options template-file-help [210]
Description Display the keys that may be used in configuration template files
Value Type string
--thl-directory
Option --thl-directory [210]
Aliases --repl-thl-directory [210]
Config File Options repl-thl-directory [210], thl-directory [210]
Description Replicator log directory
Value Type string
Default {home directory}/thl
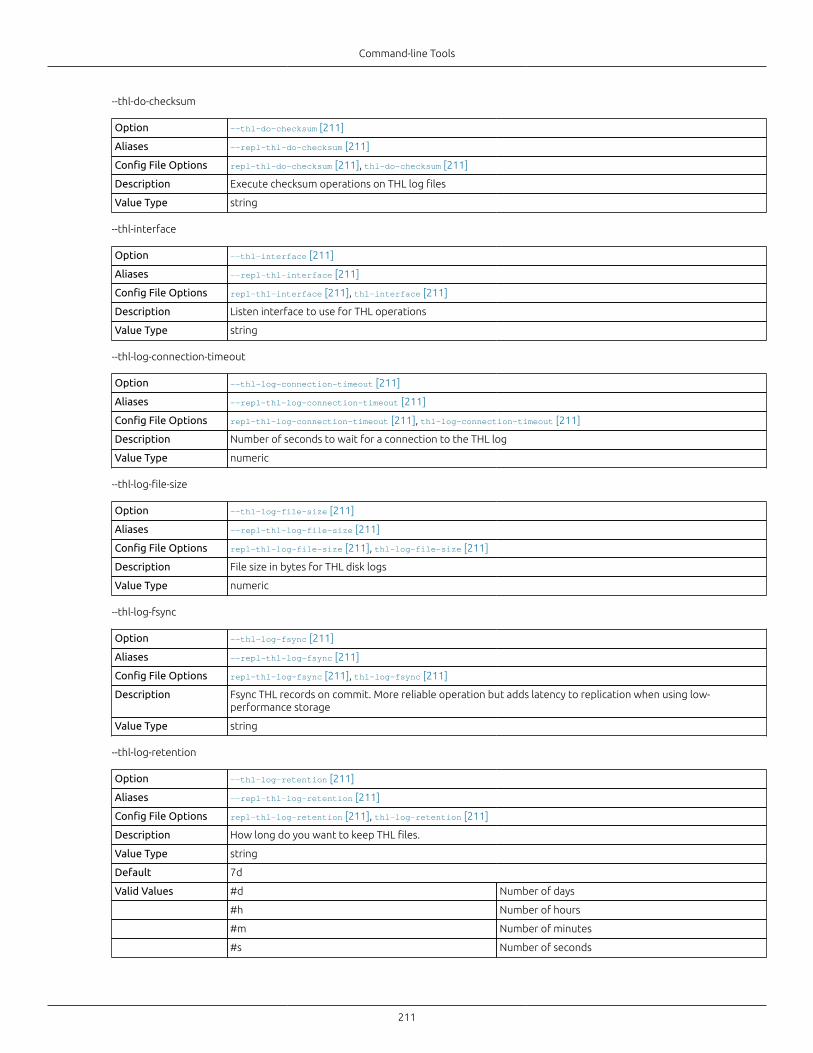
Command-line Tools
211
--thl-do-checksum
Option --thl-do-checksum [211]
Aliases --repl-thl-do-checksum [211]
Config File Options repl-thl-do-checksum [211], thl-do-checksum [211]
Description Execute checksum operations on THL log files
Value Type string
--thl-interface
Option --thl-interface [211]
Aliases --repl-thl-interface [211]
Config File Options repl-thl-interface [211], thl-interface [211]
Description Listen interface to use for THL operations
Value Type string
--thl-log-connection-timeout
Option --thl-log-connection-timeout [211]
Aliases --repl-thl-log-connection-timeout [211]
Config File Options repl-thl-log-connection-timeout [211], thl-log-connection-timeout [211]
Description Number of seconds to wait for a connection to the THL log
Value Type numeric
--thl-log-file-size
Option --thl-log-file-size [211]
Aliases --repl-thl-log-file-size [211]
Config File Options repl-thl-log-file-size [211], thl-log-file-size [211]
Description File size in bytes for THL disk logs
Value Type numeric
--thl-log-fsync
Option --thl-log-fsync [211]
Aliases --repl-thl-log-fsync [211]
Config File Options repl-thl-log-fsync [211], thl-log-fsync [211]
Description Fsync THL records on commit. More reliable operation but adds latency to replication when using low-performance storage
Value Type string
--thl-log-retention
Option --thl-log-retention [211]
Aliases --repl-thl-log-retention [211]
Config File Options repl-thl-log-retention [211], thl-log-retention [211]
Description How long do you want to keep THL files.
Value Type string
Default 7d
Valid Values #d Number of days
#h Number of hours
#m Number of minutes
#s Number of seconds
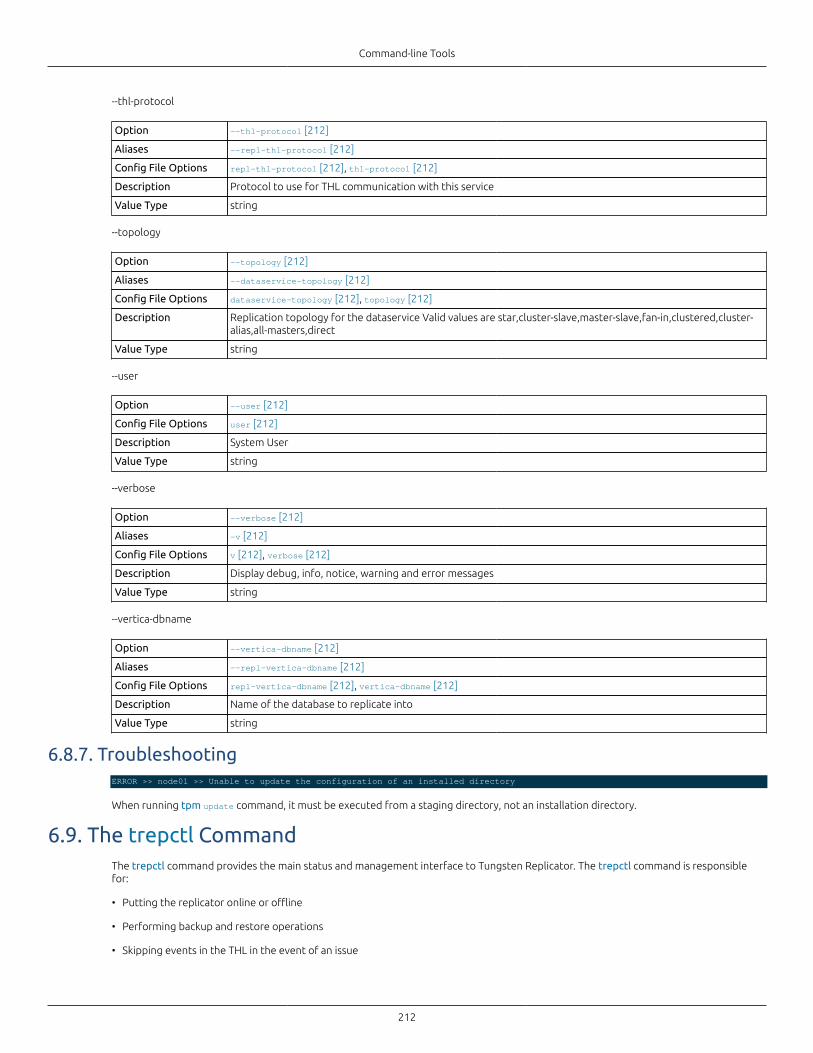
Command-line Tools
212
--thl-protocol
Option --thl-protocol [212]
Aliases --repl-thl-protocol [212]
Config File Options repl-thl-protocol [212], thl-protocol [212]
Description Protocol to use for THL communication with this service
Value Type string
--topology
Option --topology [212]
Aliases --dataservice-topology [212]
Config File Options dataservice-topology [212], topology [212]
Description Replication topology for the dataservice Valid values are star,cluster-slave,master-slave,fan-in,clustered,cluster-alias,all-masters,direct
Value Type string
--user
Option --user [212]
Config File Options user [212]
Description System User
Value Type string
--verbose
Option --verbose [212]
Aliases -v [212]
Config File Options v [212], verbose [212]
Description Display debug, info, notice, warning and error messages
Value Type string
--vertica-dbname
Option --vertica-dbname [212]
Aliases --repl-vertica-dbname [212]
Config File Options repl-vertica-dbname [212], vertica-dbname [212]
Description Name of the database to replicate into
Value Type string
6.8.7. TroubleshootingERROR >> node01 >> Unable to update the configuration of an installed directory
When running tpm update command, it must be executed from a staging directory, not an installation directory.
6.9. The trepctl CommandThe trepctl command provides the main status and management interface to Tungsten Replicator. The trepctl command is responsiblefor:
• Putting the replicator online or offline
• Performing backup and restore operations
• Skipping events in the THL in the event of an issue
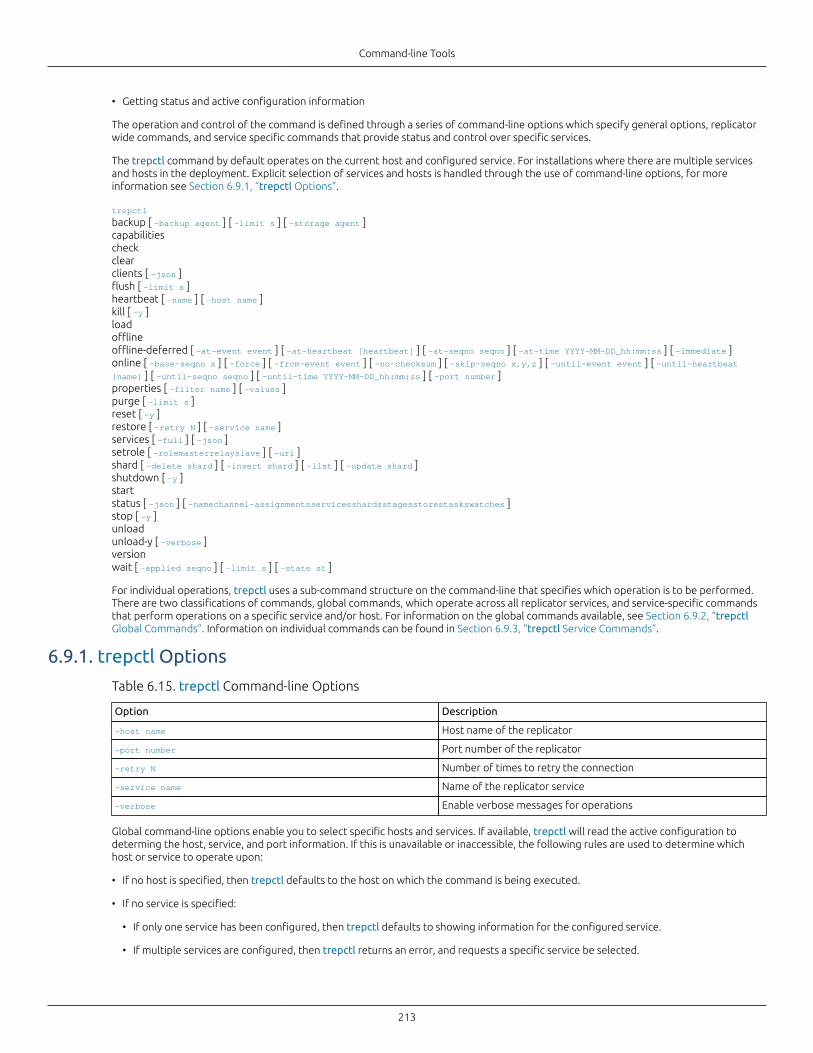
Command-line Tools
213
• Getting status and active configuration information
The operation and control of the command is defined through a series of command-line options which specify general options, replicatorwide commands, and service specific commands that provide status and control over specific services.
The trepctl command by default operates on the current host and configured service. For installations where there are multiple servicesand hosts in the deployment. Explicit selection of services and hosts is handled through the use of command-line options, for moreinformation see Section 6.9.1, “trepctl Options”.
trepctl
backup [ -backup agent ] [ -limit s ] [ -storage agent ]capabilitiescheckclearclients [ -json ]flush [ -limit s ]heartbeat [ -name ] [ -host name ]kill [ -y ]loadofflineoffline-deferred [ -at-event event ] [ -at-heartbeat [heartbeat] ] [ -at-seqno seqno ] [ -at-time YYYY-MM-DD_hh:mm:ss ] [ -immediate ]online [ -base-seqno x ] [ -force ] [ -from-event event ] [ -no-checksum ] [ -skip-seqno x,y,z ] [ -until-event event ] [ -until-heartbeat[name] ] [ -until-seqno seqno ] [ -until-time YYYY-MM-DD_hh:mm:ss ] [ -port number ]properties [ -filter name ] [ -values ]purge [ -limit s ]reset [ -y ]restore [ -retry N ] [ -service name ]services [ -full ] [ -json ]setrole [ -rolemasterrelayslave ] [ -uri ]shard [ -delete shard ] [ -insert shard ] [ -list ] [ -update shard ]shutdown [ -y ]startstatus [ -json ] [ -namechannel-assignmentsservicesshardsstagesstorestaskswatches ]stop [ -y ]unloadunload-y [ -verbose ]versionwait [ -applied seqno ] [ -limit s ] [ -state st ]
For individual operations, trepctl uses a sub-command structure on the command-line that specifies which operation is to be performed.There are two classifications of commands, global commands, which operate across all replicator services, and service-specific commandsthat perform operations on a specific service and/or host. For information on the global commands available, see Section 6.9.2, “trepctlGlobal Commands”. Information on individual commands can be found in Section 6.9.3, “trepctl Service Commands”.
6.9.1. trepctl Options
Table 6.15. trepctl Command-line Options
Option Description
-host name Host name of the replicator
-port number Port number of the replicator
-retry N Number of times to retry the connection
-service name Name of the replicator service
-verbose Enable verbose messages for operations
Global command-line options enable you to select specific hosts and services. If available, trepctl will read the active configuration todeterming the host, service, and port information. If this is unavailable or inaccessible, the following rules are used to determine whichhost or service to operate upon:
• If no host is specified, then trepctl defaults to the host on which the command is being executed.
• If no service is specified:
• If only one service has been configured, then trepctl defaults to showing information for the configured service.
• If multiple services are configured, then trepctl returns an error, and requests a specific service be selected.
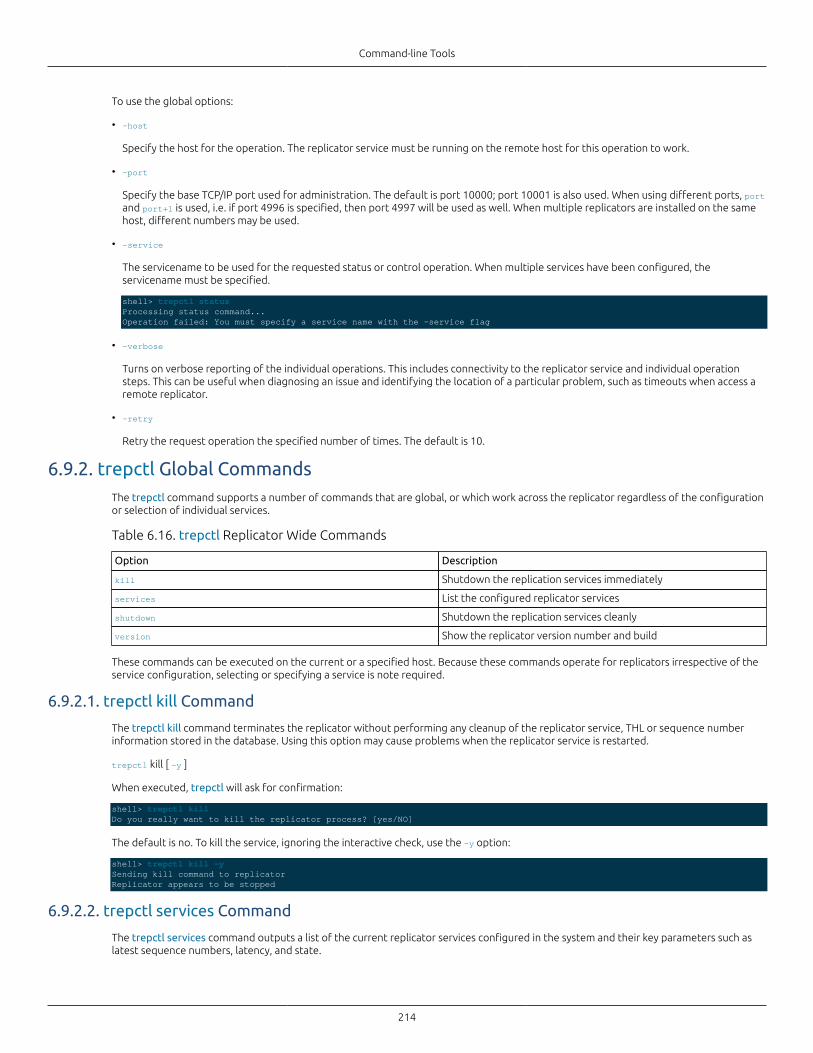
Command-line Tools
214
To use the global options:
• -host
Specify the host for the operation. The replicator service must be running on the remote host for this operation to work.
• -port
Specify the base TCP/IP port used for administration. The default is port 10000; port 10001 is also used. When using different ports, portand port+1 is used, i.e. if port 4996 is specified, then port 4997 will be used as well. When multiple replicators are installed on the samehost, different numbers may be used.
• -service
The servicename to be used for the requested status or control operation. When multiple services have been configured, theservicename must be specified.
shell> trepctl statusProcessing status command...Operation failed: You must specify a service name with the -service flag
• -verbose
Turns on verbose reporting of the individual operations. This includes connectivity to the replicator service and individual operationsteps. This can be useful when diagnosing an issue and identifying the location of a particular problem, such as timeouts when access aremote replicator.
• -retry
Retry the request operation the specified number of times. The default is 10.
6.9.2. trepctl Global CommandsThe trepctl command supports a number of commands that are global, or which work across the replicator regardless of the configurationor selection of individual services.
Table 6.16. trepctl Replicator Wide Commands
Option Description
kill Shutdown the replication services immediately
services List the configured replicator services
shutdown Shutdown the replication services cleanly
version Show the replicator version number and build
These commands can be executed on the current or a specified host. Because these commands operate for replicators irrespective of theservice configuration, selecting or specifying a service is note required.
6.9.2.1. trepctl kill Command
The trepctl kill command terminates the replicator without performing any cleanup of the replicator service, THL or sequence numberinformation stored in the database. Using this option may cause problems when the replicator service is restarted.
trepctl kill [ -y ]
When executed, trepctl will ask for confirmation:
shell> trepctl killDo you really want to kill the replicator process? [yes/NO]
The default is no. To kill the service, ignoring the interactive check, use the -y option:
shell> trepctl kill -ySending kill command to replicatorReplicator appears to be stopped
6.9.2.2. trepctl services Command
The trepctl services command outputs a list of the current replicator services configured in the system and their key parameters such aslatest sequence numbers, latency, and state.
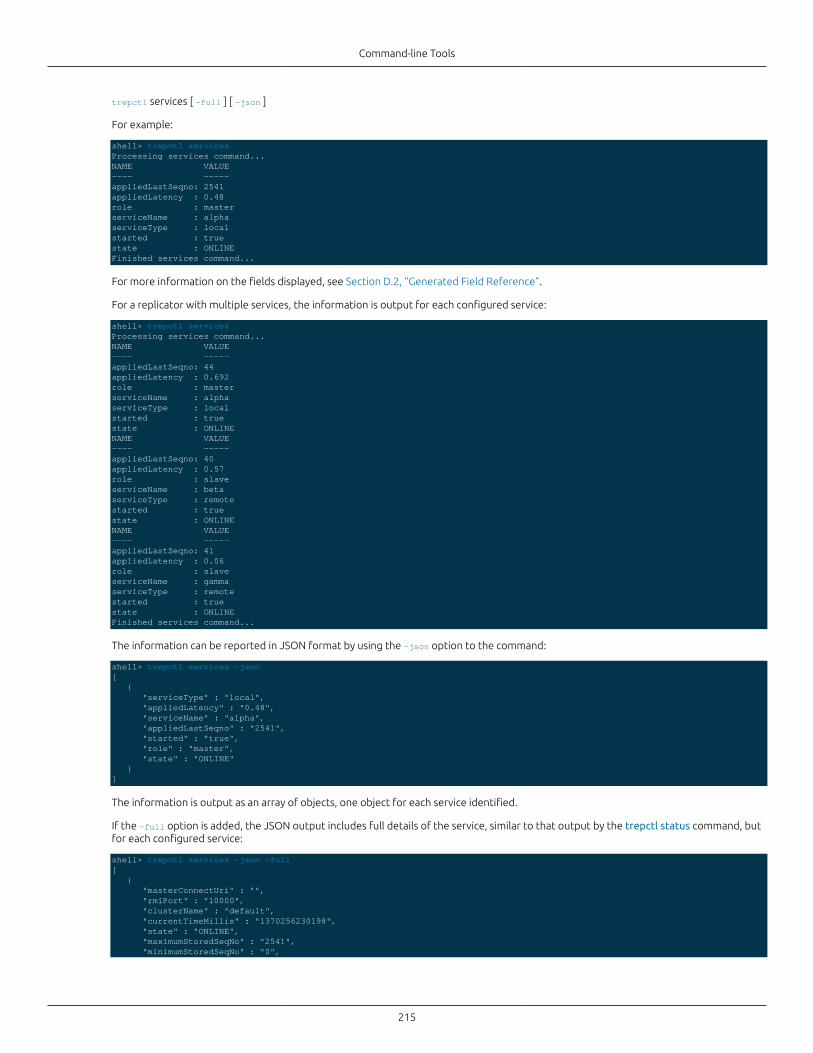
Command-line Tools
215
trepctl services [ -full ] [ -json ]
For example:
shell> trepctl servicesProcessing services command...NAME VALUE---- -----appliedLastSeqno: 2541appliedLatency : 0.48role : masterserviceName : alphaserviceType : localstarted : truestate : ONLINEFinished services command...
For more information on the fields displayed, see Section D.2, “Generated Field Reference”.
For a replicator with multiple services, the information is output for each configured service:
shell> trepctl servicesProcessing services command...NAME VALUE---- -----appliedLastSeqno: 44appliedLatency : 0.692role : masterserviceName : alphaserviceType : localstarted : truestate : ONLINENAME VALUE---- -----appliedLastSeqno: 40appliedLatency : 0.57role : slaveserviceName : betaserviceType : remotestarted : truestate : ONLINENAME VALUE---- -----appliedLastSeqno: 41appliedLatency : 0.06role : slaveserviceName : gammaserviceType : remotestarted : truestate : ONLINEFinished services command...
The information can be reported in JSON format by using the -json option to the command:
shell> trepctl services -json[ { "serviceType" : "local", "appliedLatency" : "0.48", "serviceName" : "alpha", "appliedLastSeqno" : "2541", "started" : "true", "role" : "master", "state" : "ONLINE" }]
The information is output as an array of objects, one object for each service identified.
If the -full option is added, the JSON output includes full details of the service, similar to that output by the trepctl status command, butfor each configured service:
shell> trepctl services -json -full[ { "masterConnectUri" : "", "rmiPort" : "10000", "clusterName" : "default", "currentTimeMillis" : "1370256230198", "state" : "ONLINE", "maximumStoredSeqNo" : "2541", "minimumStoredSeqNo" : "0",
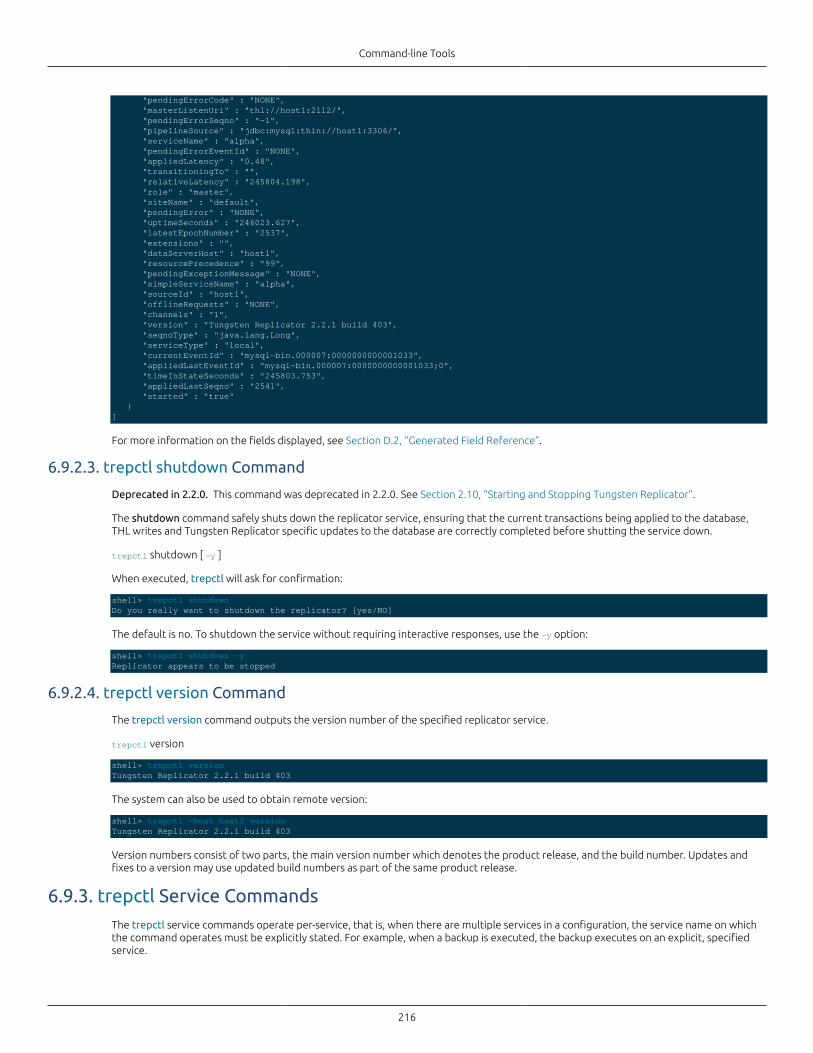
Command-line Tools
216
"pendingErrorCode" : "NONE", "masterListenUri" : "thl://host1:2112/", "pendingErrorSeqno" : "-1", "pipelineSource" : "jdbc:mysql:thin://host1:3306/", "serviceName" : "alpha", "pendingErrorEventId" : "NONE", "appliedLatency" : "0.48", "transitioningTo" : "", "relativeLatency" : "245804.198", "role" : "master", "siteName" : "default", "pendingError" : "NONE", "uptimeSeconds" : "246023.627", "latestEpochNumber" : "2537", "extensions" : "", "dataServerHost" : "host1", "resourcePrecedence" : "99", "pendingExceptionMessage" : "NONE", "simpleServiceName" : "alpha", "sourceId" : "host1", "offlineRequests" : "NONE", "channels" : "1", "version" : "Tungsten Replicator 2.2.1 build 403", "seqnoType" : "java.lang.Long", "serviceType" : "local", "currentEventId" : "mysql-bin.000007:0000000000001033", "appliedLastEventId" : "mysql-bin.000007:0000000000001033;0", "timeInStateSeconds" : "245803.753", "appliedLastSeqno" : "2541", "started" : "true" }]
For more information on the fields displayed, see Section D.2, “Generated Field Reference”.
6.9.2.3. trepctl shutdown Command
Deprecated in 2.2.0. This command was deprecated in 2.2.0. See Section 2.10, “Starting and Stopping Tungsten Replicator”.
The shutdown command safely shuts down the replicator service, ensuring that the current transactions being applied to the database,THL writes and Tungsten Replicator specific updates to the database are correctly completed before shutting the service down.
trepctl shutdown [ -y ]
When executed, trepctl will ask for confirmation:
shell> trepctl shutdownDo you really want to shutdown the replicator? [yes/NO]
The default is no. To shutdown the service without requiring interactive responses, use the -y option:
shell> trepctl shutdown -yReplicator appears to be stopped
6.9.2.4. trepctl version Command
The trepctl version command outputs the version number of the specified replicator service.
trepctl version
shell> trepctl versionTungsten Replicator 2.2.1 build 403
The system can also be used to obtain remote version:
shell> trepctl -host host2 versionTungsten Replicator 2.2.1 build 403
Version numbers consist of two parts, the main version number which denotes the product release, and the build number. Updates andfixes to a version may use updated build numbers as part of the same product release.
6.9.3. trepctl Service CommandsThe trepctl service commands operate per-service, that is, when there are multiple services in a configuration, the service name on whichthe command operates must be explicitly stated. For example, when a backup is executed, the backup executes on an explicit, specifiedservice.
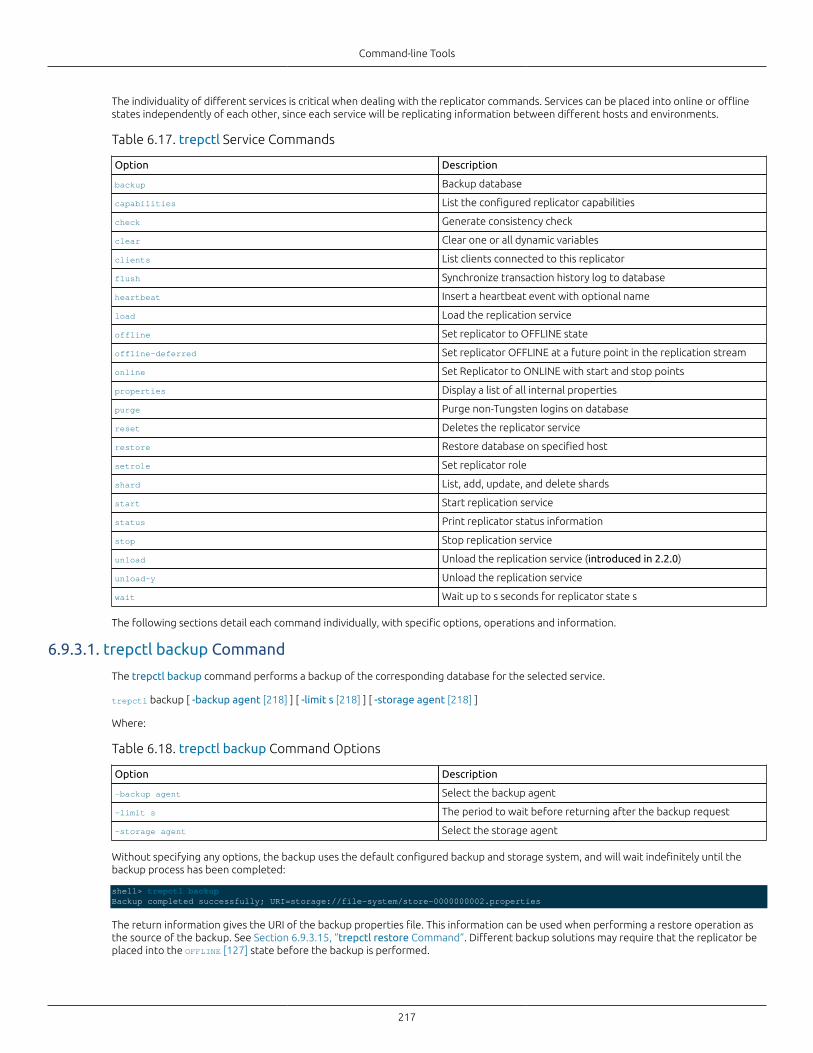
Command-line Tools
217
The individuality of different services is critical when dealing with the replicator commands. Services can be placed into online or offlinestates independently of each other, since each service will be replicating information between different hosts and environments.
Table 6.17. trepctl Service Commands
Option Description
backup Backup database
capabilities List the configured replicator capabilities
check Generate consistency check
clear Clear one or all dynamic variables
clients List clients connected to this replicator
flush Synchronize transaction history log to database
heartbeat Insert a heartbeat event with optional name
load Load the replication service
offline Set replicator to OFFLINE state
offline-deferred Set replicator OFFLINE at a future point in the replication stream
online Set Replicator to ONLINE with start and stop points
properties Display a list of all internal properties
purge Purge non-Tungsten logins on database
reset Deletes the replicator service
restore Restore database on specified host
setrole Set replicator role
shard List, add, update, and delete shards
start Start replication service
status Print replicator status information
stop Stop replication service
unload Unload the replication service (introduced in 2.2.0)
unload-y Unload the replication service
wait Wait up to s seconds for replicator state s
The following sections detail each command individually, with specific options, operations and information.
6.9.3.1. trepctl backup Command
The trepctl backup command performs a backup of the corresponding database for the selected service.
trepctl backup [ -backup agent [218] ] [ -limit s [218] ] [ -storage agent [218] ]
Where:
Table 6.18. trepctl backup Command Options
Option Description
-backup agent Select the backup agent
-limit s The period to wait before returning after the backup request
-storage agent Select the storage agent
Without specifying any options, the backup uses the default configured backup and storage system, and will wait indefinitely until thebackup process has been completed:
shell> trepctl backupBackup completed successfully; URI=storage://file-system/store-0000000002.properties
The return information gives the URI of the backup properties file. This information can be used when performing a restore operation asthe source of the backup. See Section 6.9.3.15, “trepctl restore Command”. Different backup solutions may require that the replicator beplaced into the OFFLINE [127] state before the backup is performed.
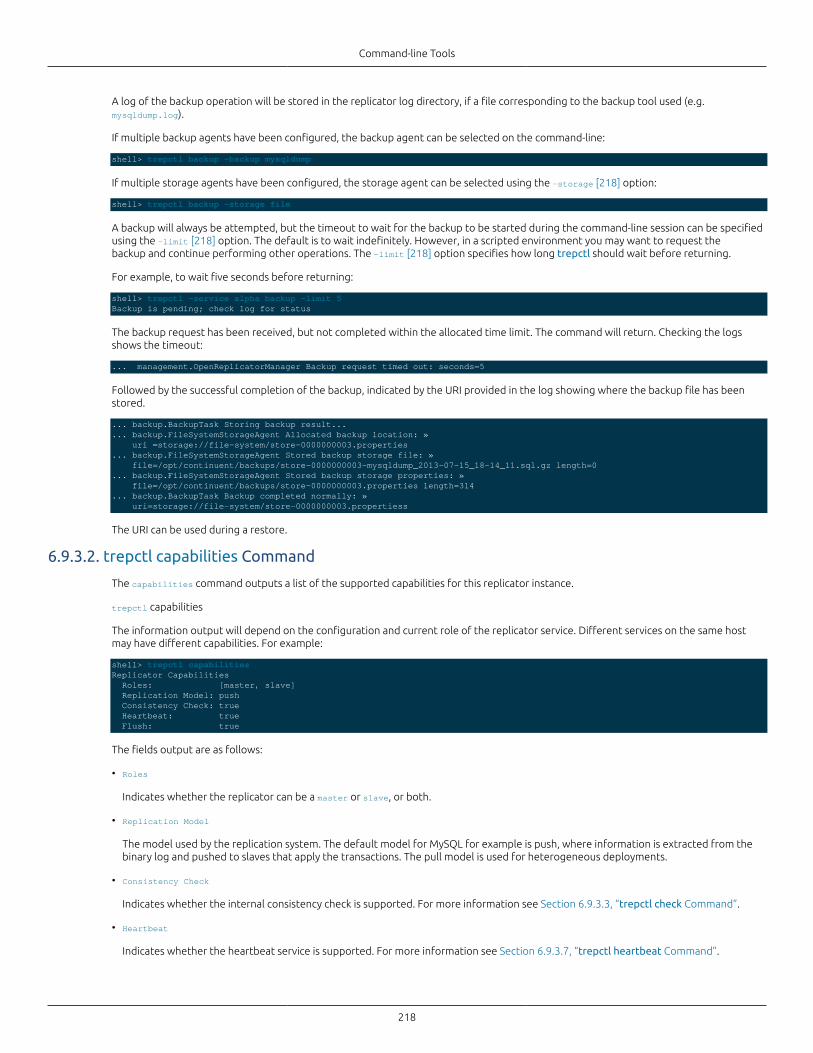
Command-line Tools
218
A log of the backup operation will be stored in the replicator log directory, if a file corresponding to the backup tool used (e.g.mysqldump.log).
If multiple backup agents have been configured, the backup agent can be selected on the command-line:
shell> trepctl backup -backup mysqldump
If multiple storage agents have been configured, the storage agent can be selected using the -storage [218] option:
shell> trepctl backup -storage file
A backup will always be attempted, but the timeout to wait for the backup to be started during the command-line session can be specifiedusing the -limit [218] option. The default is to wait indefinitely. However, in a scripted environment you may want to request thebackup and continue performing other operations. The -limit [218] option specifies how long trepctl should wait before returning.
For example, to wait five seconds before returning:
shell> trepctl -service alpha backup -limit 5Backup is pending; check log for status
The backup request has been received, but not completed within the allocated time limit. The command will return. Checking the logsshows the timeout:
... management.OpenReplicatorManager Backup request timed out: seconds=5
Followed by the successful completion of the backup, indicated by the URI provided in the log showing where the backup file has beenstored.
... backup.BackupTask Storing backup result...
... backup.FileSystemStorageAgent Allocated backup location: » uri =storage://file-system/store-0000000003.properties... backup.FileSystemStorageAgent Stored backup storage file: » file=/opt/continuent/backups/store-0000000003-mysqldump_2013-07-15_18-14_11.sql.gz length=0... backup.FileSystemStorageAgent Stored backup storage properties: » file=/opt/continuent/backups/store-0000000003.properties length=314... backup.BackupTask Backup completed normally: » uri=storage://file-system/store-0000000003.propertiess
The URI can be used during a restore.
6.9.3.2. trepctl capabilities Command
The capabilities command outputs a list of the supported capabilities for this replicator instance.
trepctl capabilities
The information output will depend on the configuration and current role of the replicator service. Different services on the same hostmay have different capabilities. For example:
shell> trepctl capabilitiesReplicator Capabilities Roles: [master, slave] Replication Model: push Consistency Check: true Heartbeat: true Flush: true
The fields output are as follows:
• Roles
Indicates whether the replicator can be a master or slave, or both.
• Replication Model
The model used by the replication system. The default model for MySQL for example is push, where information is extracted from thebinary log and pushed to slaves that apply the transactions. The pull model is used for heterogeneous deployments.
• Consistency Check
Indicates whether the internal consistency check is supported. For more information see Section 6.9.3.3, “trepctl check Command”.
• Heartbeat
Indicates whether the heartbeat service is supported. For more information see Section 6.9.3.7, “trepctl heartbeat Command”.
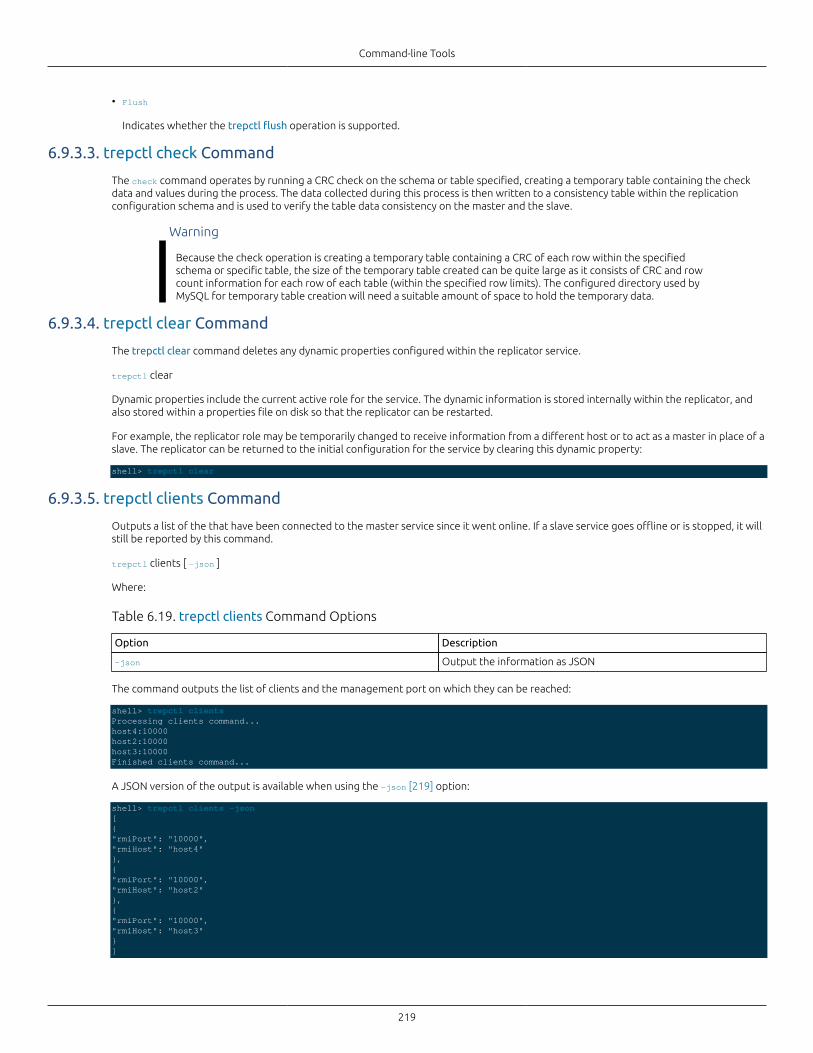
Command-line Tools
219
• Flush
Indicates whether the trepctl flush operation is supported.
6.9.3.3. trepctl check Command
The check command operates by running a CRC check on the schema or table specified, creating a temporary table containing the checkdata and values during the process. The data collected during this process is then written to a consistency table within the replicationconfiguration schema and is used to verify the table data consistency on the master and the slave.
Warning
Because the check operation is creating a temporary table containing a CRC of each row within the specifiedschema or specific table, the size of the temporary table created can be quite large as it consists of CRC and rowcount information for each row of each table (within the specified row limits). The configured directory used byMySQL for temporary table creation will need a suitable amount of space to hold the temporary data.
6.9.3.4. trepctl clear Command
The trepctl clear command deletes any dynamic properties configured within the replicator service.
trepctl clear
Dynamic properties include the current active role for the service. The dynamic information is stored internally within the replicator, andalso stored within a properties file on disk so that the replicator can be restarted.
For example, the replicator role may be temporarily changed to receive information from a different host or to act as a master in place of aslave. The replicator can be returned to the initial configuration for the service by clearing this dynamic property:
shell> trepctl clear
6.9.3.5. trepctl clients Command
Outputs a list of the that have been connected to the master service since it went online. If a slave service goes offline or is stopped, it willstill be reported by this command.
trepctl clients [ -json ]
Where:
Table 6.19. trepctl clients Command Options
Option Description
-json Output the information as JSON
The command outputs the list of clients and the management port on which they can be reached:
shell> trepctl clients Processing clients command...host4:10000host2:10000host3:10000Finished clients command...
A JSON version of the output is available when using the -json [219] option:
shell> trepctl clients -json[{"rmiPort": "10000","rmiHost": "host4"},{"rmiPort": "10000","rmiHost": "host2"},{"rmiPort": "10000","rmiHost": "host3"}]
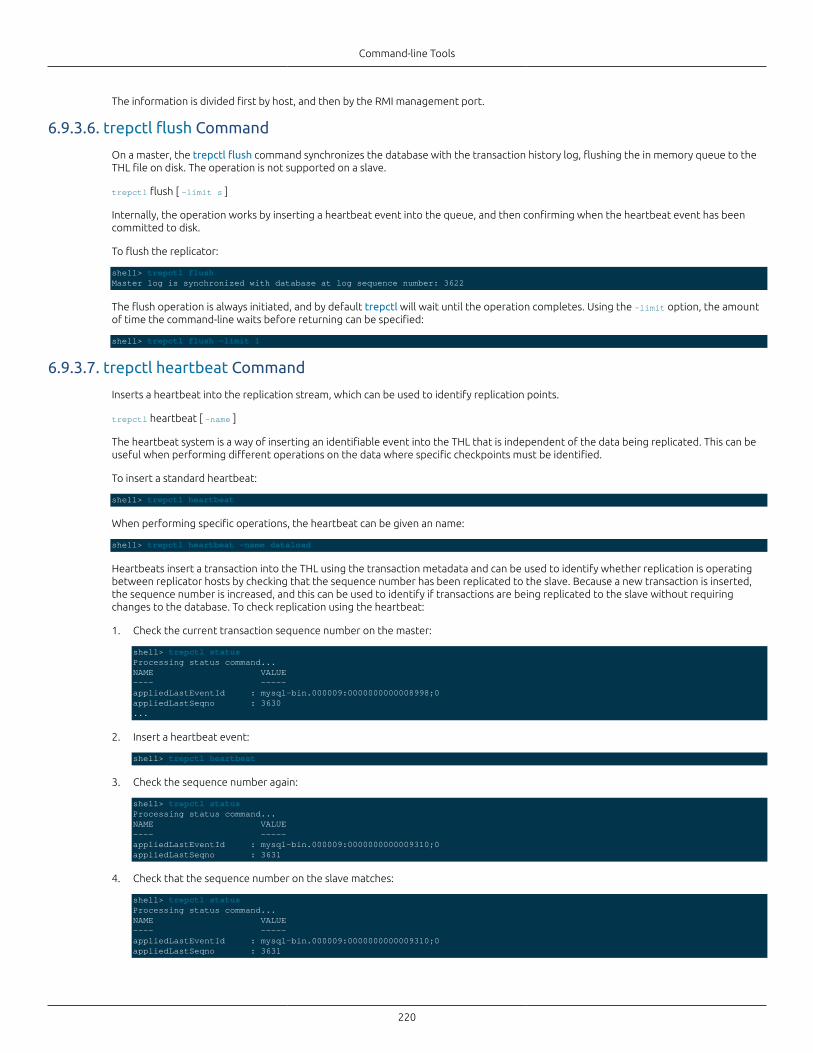
Command-line Tools
220
The information is divided first by host, and then by the RMI management port.
6.9.3.6. trepctl flush Command
On a master, the trepctl flush command synchronizes the database with the transaction history log, flushing the in memory queue to theTHL file on disk. The operation is not supported on a slave.
trepctl flush [ -limit s ]
Internally, the operation works by inserting a heartbeat event into the queue, and then confirming when the heartbeat event has beencommitted to disk.
To flush the replicator:
shell> trepctl flush Master log is synchronized with database at log sequence number: 3622
The flush operation is always initiated, and by default trepctl will wait until the operation completes. Using the -limit option, the amountof time the command-line waits before returning can be specified:
shell> trepctl flush -limit 1
6.9.3.7. trepctl heartbeat Command
Inserts a heartbeat into the replication stream, which can be used to identify replication points.
trepctl heartbeat [ -name ]
The heartbeat system is a way of inserting an identifiable event into the THL that is independent of the data being replicated. This can beuseful when performing different operations on the data where specific checkpoints must be identified.
To insert a standard heartbeat:
shell> trepctl heartbeat
When performing specific operations, the heartbeat can be given an name:
shell> trepctl heartbeat -name dataload
Heartbeats insert a transaction into the THL using the transaction metadata and can be used to identify whether replication is operatingbetween replicator hosts by checking that the sequence number has been replicated to the slave. Because a new transaction is inserted,the sequence number is increased, and this can be used to identify if transactions are being replicated to the slave without requiringchanges to the database. To check replication using the heartbeat:
1. Check the current transaction sequence number on the master:
shell> trepctl statusProcessing status command...NAME VALUE---- -----appliedLastEventId : mysql-bin.000009:0000000000008998;0appliedLastSeqno : 3630...
2. Insert a heartbeat event:
shell> trepctl heartbeat
3. Check the sequence number again:
shell> trepctl statusProcessing status command...NAME VALUE---- -----appliedLastEventId : mysql-bin.000009:0000000000009310;0appliedLastSeqno : 3631
4. Check that the sequence number on the slave matches:
shell> trepctl statusProcessing status command...NAME VALUE---- -----appliedLastEventId : mysql-bin.000009:0000000000009310;0appliedLastSeqno : 3631
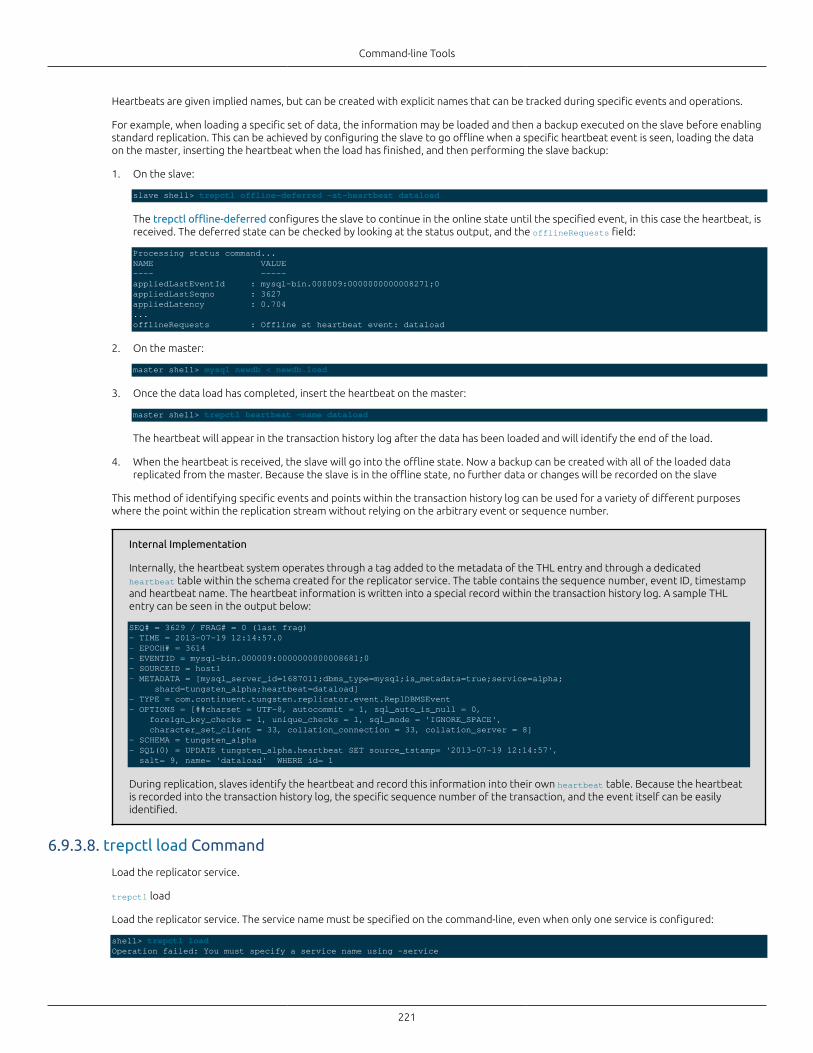
Command-line Tools
221
Heartbeats are given implied names, but can be created with explicit names that can be tracked during specific events and operations.
For example, when loading a specific set of data, the information may be loaded and then a backup executed on the slave before enablingstandard replication. This can be achieved by configuring the slave to go offline when a specific heartbeat event is seen, loading the dataon the master, inserting the heartbeat when the load has finished, and then performing the slave backup:
1. On the slave:
slave shell> trepctl offline-deferred -at-heartbeat dataload
The trepctl offline-deferred configures the slave to continue in the online state until the specified event, in this case the heartbeat, isreceived. The deferred state can be checked by looking at the status output, and the offlineRequests field:
Processing status command...NAME VALUE---- -----appliedLastEventId : mysql-bin.000009:0000000000008271;0appliedLastSeqno : 3627appliedLatency : 0.704...offlineRequests : Offline at heartbeat event: dataload
2. On the master:
master shell> mysql newdb < newdb.load
3. Once the data load has completed, insert the heartbeat on the master:
master shell> trepctl heartbeat -name dataload
The heartbeat will appear in the transaction history log after the data has been loaded and will identify the end of the load.
4. When the heartbeat is received, the slave will go into the offline state. Now a backup can be created with all of the loaded datareplicated from the master. Because the slave is in the offline state, no further data or changes will be recorded on the slave
This method of identifying specific events and points within the transaction history log can be used for a variety of different purposeswhere the point within the replication stream without relying on the arbitrary event or sequence number.
Internal Implementation
Internally, the heartbeat system operates through a tag added to the metadata of the THL entry and through a dedicatedheartbeat table within the schema created for the replicator service. The table contains the sequence number, event ID, timestampand heartbeat name. The heartbeat information is written into a special record within the transaction history log. A sample THLentry can be seen in the output below:
SEQ# = 3629 / FRAG# = 0 (last frag)- TIME = 2013-07-19 12:14:57.0- EPOCH# = 3614- EVENTID = mysql-bin.000009:0000000000008681;0- SOURCEID = host1- METADATA = [mysql_server_id=1687011;dbms_type=mysql;is_metadata=true;service=alpha; shard=tungsten_alpha;heartbeat=dataload]- TYPE = com.continuent.tungsten.replicator.event.ReplDBMSEvent- OPTIONS = [##charset = UTF-8, autocommit = 1, sql_auto_is_null = 0, foreign_key_checks = 1, unique_checks = 1, sql_mode = 'IGNORE_SPACE', character_set_client = 33, collation_connection = 33, collation_server = 8]- SCHEMA = tungsten_alpha- SQL(0) = UPDATE tungsten_alpha.heartbeat SET source_tstamp= '2013-07-19 12:14:57', salt= 9, name= 'dataload' WHERE id= 1
During replication, slaves identify the heartbeat and record this information into their own heartbeat table. Because the heartbeatis recorded into the transaction history log, the specific sequence number of the transaction, and the event itself can be easilyidentified.
6.9.3.8. trepctl load Command
Load the replicator service.
trepctl load
Load the replicator service. The service name must be specified on the command-line, even when only one service is configured:
shell> trepctl loadOperation failed: You must specify a service name using -service
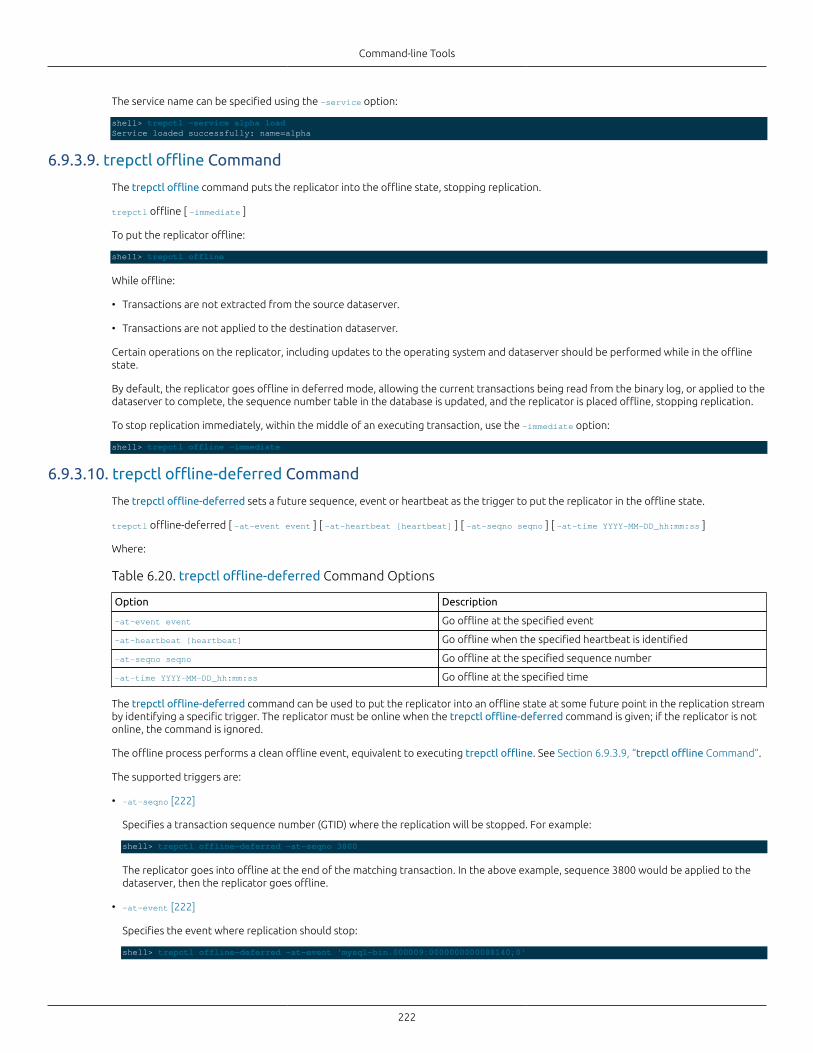
Command-line Tools
222
The service name can be specified using the -service option:
shell> trepctl -service alpha loadService loaded successfully: name=alpha
6.9.3.9. trepctl offline Command
The trepctl offline command puts the replicator into the offline state, stopping replication.
trepctl offline [ -immediate ]
To put the replicator offline:
shell> trepctl offline
While offline:
• Transactions are not extracted from the source dataserver.
• Transactions are not applied to the destination dataserver.
Certain operations on the replicator, including updates to the operating system and dataserver should be performed while in the offlinestate.
By default, the replicator goes offline in deferred mode, allowing the current transactions being read from the binary log, or applied to thedataserver to complete, the sequence number table in the database is updated, and the replicator is placed offline, stopping replication.
To stop replication immediately, within the middle of an executing transaction, use the -immediate option:
shell> trepctl offline -immediate
6.9.3.10. trepctl offline-deferred Command
The trepctl offline-deferred sets a future sequence, event or heartbeat as the trigger to put the replicator in the offline state.
trepctl offline-deferred [ -at-event event ] [ -at-heartbeat [heartbeat] ] [ -at-seqno seqno ] [ -at-time YYYY-MM-DD_hh:mm:ss ]
Where:
Table 6.20. trepctl offline-deferred Command Options
Option Description
-at-event event Go offline at the specified event
-at-heartbeat [heartbeat] Go offline when the specified heartbeat is identified
-at-seqno seqno Go offline at the specified sequence number
-at-time YYYY-MM-DD_hh:mm:ss Go offline at the specified time
The trepctl offline-deferred command can be used to put the replicator into an offline state at some future point in the replication streamby identifying a specific trigger. The replicator must be online when the trepctl offline-deferred command is given; if the replicator is notonline, the command is ignored.
The offline process performs a clean offline event, equivalent to executing trepctl offline. See Section 6.9.3.9, “trepctl offline Command”.
The supported triggers are:
• -at-seqno [222]
Specifies a transaction sequence number (GTID) where the replication will be stopped. For example:
shell> trepctl offline-deferred -at-seqno 3800
The replicator goes into offline at the end of the matching transaction. In the above example, sequence 3800 would be applied to thedataserver, then the replicator goes offline.
• -at-event [222]
Specifies the event where replication should stop:
shell> trepctl offline-deferred -at-event 'mysql-bin.000009:0000000000088140;0'
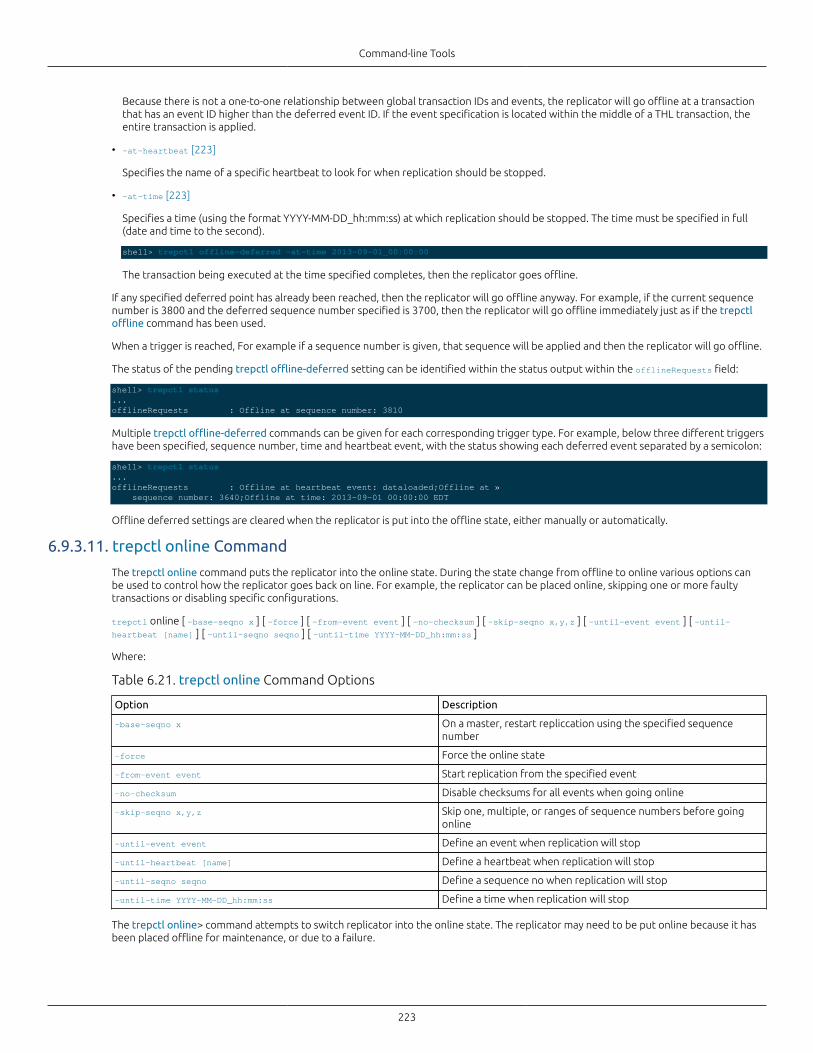
Command-line Tools
223
Because there is not a one-to-one relationship between global transaction IDs and events, the replicator will go offline at a transactionthat has an event ID higher than the deferred event ID. If the event specification is located within the middle of a THL transaction, theentire transaction is applied.
• -at-heartbeat [223]
Specifies the name of a specific heartbeat to look for when replication should be stopped.
• -at-time [223]
Specifies a time (using the format YYYY-MM-DD_hh:mm:ss) at which replication should be stopped. The time must be specified in full(date and time to the second).
shell> trepctl offline-deferred -at-time 2013-09-01_00:00:00
The transaction being executed at the time specified completes, then the replicator goes offline.
If any specified deferred point has already been reached, then the replicator will go offline anyway. For example, if the current sequencenumber is 3800 and the deferred sequence number specified is 3700, then the replicator will go offline immediately just as if the trepctloffline command has been used.
When a trigger is reached, For example if a sequence number is given, that sequence will be applied and then the replicator will go offline.
The status of the pending trepctl offline-deferred setting can be identified within the status output within the offlineRequests field:
shell> trepctl status...offlineRequests : Offline at sequence number: 3810
Multiple trepctl offline-deferred commands can be given for each corresponding trigger type. For example, below three different triggershave been specified, sequence number, time and heartbeat event, with the status showing each deferred event separated by a semicolon:
shell> trepctl status...offlineRequests : Offline at heartbeat event: dataloaded;Offline at » sequence number: 3640;Offline at time: 2013-09-01 00:00:00 EDT
Offline deferred settings are cleared when the replicator is put into the offline state, either manually or automatically.
6.9.3.11. trepctl online Command
The trepctl online command puts the replicator into the online state. During the state change from offline to online various options canbe used to control how the replicator goes back on line. For example, the replicator can be placed online, skipping one or more faultytransactions or disabling specific configurations.
trepctl online [ -base-seqno x ] [ -force ] [ -from-event event ] [ -no-checksum ] [ -skip-seqno x,y,z ] [ -until-event event ] [ -until-heartbeat [name] ] [ -until-seqno seqno ] [ -until-time YYYY-MM-DD_hh:mm:ss ]
Where:
Table 6.21. trepctl online Command Options
Option Description
-base-seqno x On a master, restart repliccation using the specified sequencenumber
-force Force the online state
-from-event event Start replication from the specified event
-no-checksum Disable checksums for all events when going online
-skip-seqno x,y,z Skip one, multiple, or ranges of sequence numbers before goingonline
-until-event event Define an event when replication will stop
-until-heartbeat [name] Define a heartbeat when replication will stop
-until-seqno seqno Define a sequence no when replication will stop
-until-time YYYY-MM-DD_hh:mm:ss Define a time when replication will stop
The trepctl online> command attempts to switch replicator into the online state. The replicator may need to be put online because it hasbeen placed offline for maintenance, or due to a failure.
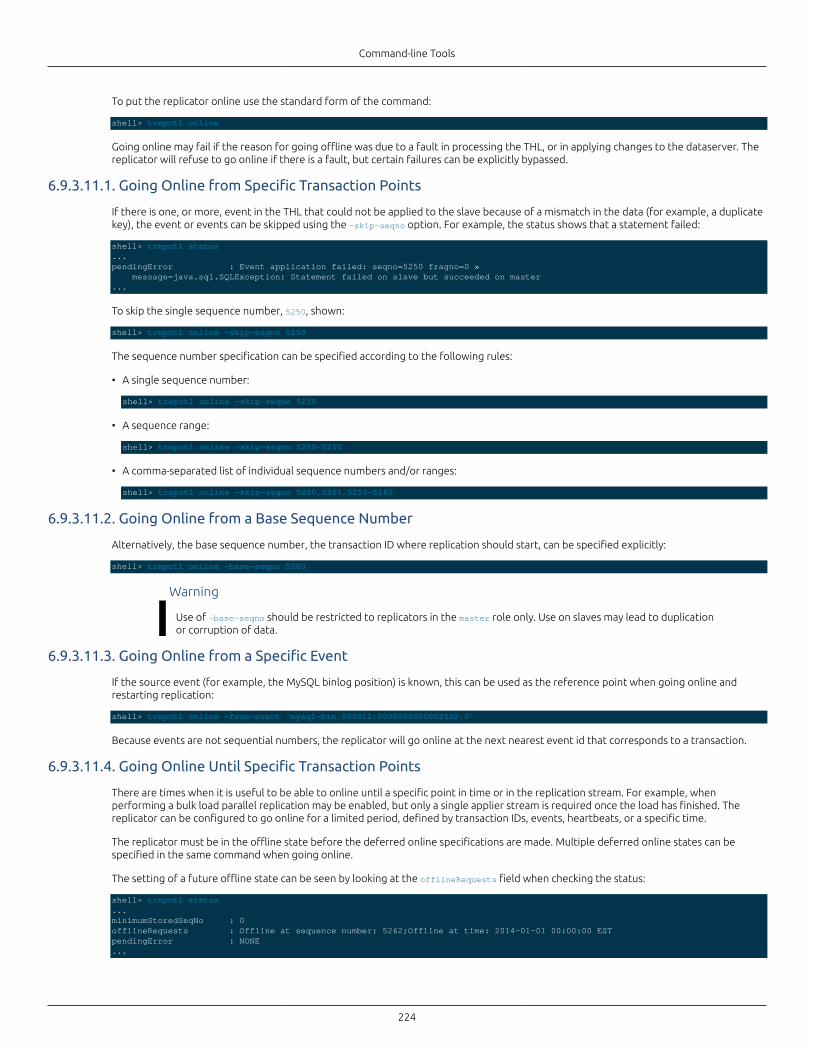
Command-line Tools
224
To put the replicator online use the standard form of the command:
shell> trepctl online
Going online may fail if the reason for going offline was due to a fault in processing the THL, or in applying changes to the dataserver. Thereplicator will refuse to go online if there is a fault, but certain failures can be explicitly bypassed.
6.9.3.11.1. Going Online from Specific Transaction Points
If there is one, or more, event in the THL that could not be applied to the slave because of a mismatch in the data (for example, a duplicatekey), the event or events can be skipped using the -skip-seqno option. For example, the status shows that a statement failed:
shell> trepctl status...pendingError : Event application failed: seqno=5250 fragno=0 » message=java.sql.SQLException: Statement failed on slave but succeeded on master...
To skip the single sequence number, 5250, shown:
shell> trepctl online -skip-seqno 5250
The sequence number specification can be specified according to the following rules:
• A single sequence number:
shell> trepctl online -skip-seqno 5250
• A sequence range:
shell> trepctl online -skip-seqno 5250-5260
• A comma-separated list of individual sequence numbers and/or ranges:
shell> trepctl online -skip-seqno 5250,5251,5253-5260
6.9.3.11.2. Going Online from a Base Sequence Number
Alternatively, the base sequence number, the transaction ID where replication should start, can be specified explicitly:
shell> trepctl online -base-seqno 5260
Warning
Use of -base-seqno should be restricted to replicators in the master role only. Use on slaves may lead to duplicationor corruption of data.
6.9.3.11.3. Going Online from a Specific Event
If the source event (for example, the MySQL binlog position) is known, this can be used as the reference point when going online andrestarting replication:
shell> trepctl online -from-event 'mysql-bin.000011:0000000000002552;0'
Because events are not sequential numbers, the replicator will go online at the next nearest event id that corresponds to a transaction.
6.9.3.11.4. Going Online Until Specific Transaction Points
There are times when it is useful to be able to online until a specific point in time or in the replication stream. For example, whenperforming a bulk load parallel replication may be enabled, but only a single applier stream is required once the load has finished. Thereplicator can be configured to go online for a limited period, defined by transaction IDs, events, heartbeats, or a specific time.
The replicator must be in the offline state before the deferred online specifications are made. Multiple deferred online states can bespecified in the same command when going online.
The setting of a future offline state can be seen by looking at the offlineRequests field when checking the status:
shell> trepctl status...minimumStoredSeqNo : 0offlineRequests : Offline at sequence number: 5262;Offline at time: 2014-01-01 00:00:00 ESTpendingError : NONE...
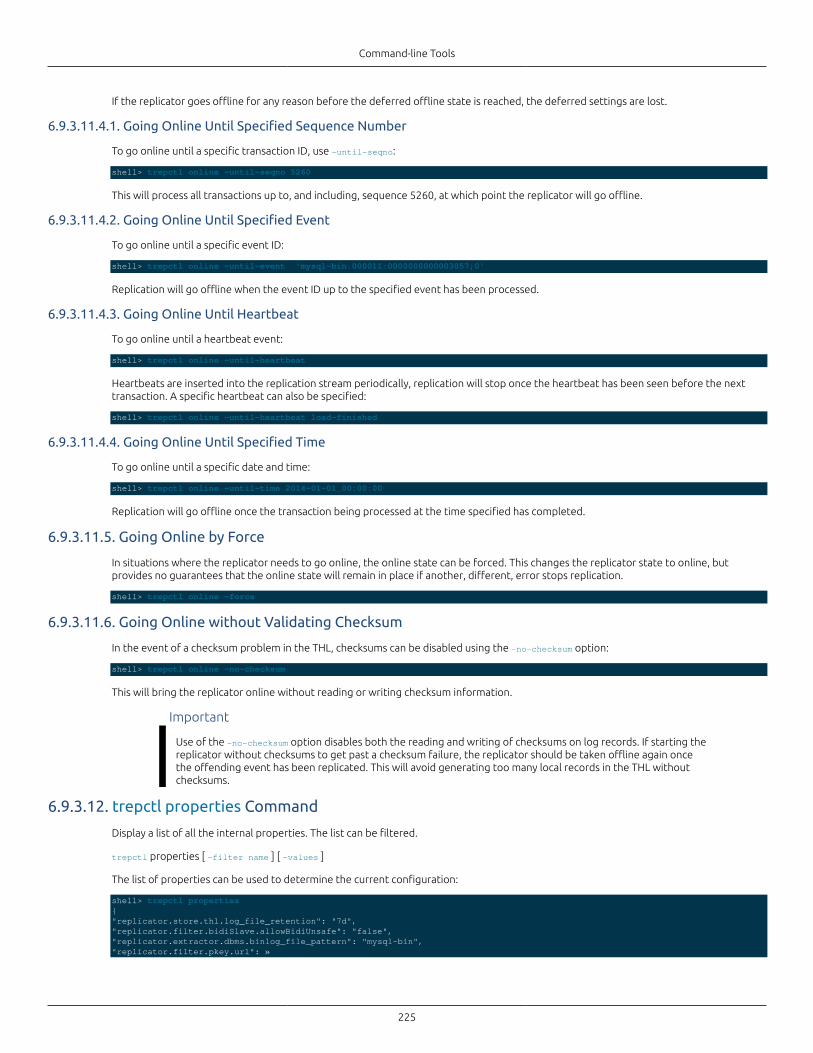
Command-line Tools
225
If the replicator goes offline for any reason before the deferred offline state is reached, the deferred settings are lost.
6.9.3.11.4.1. Going Online Until Specified Sequence Number
To go online until a specific transaction ID, use -until-seqno:
shell> trepctl online -until-seqno 5260
This will process all transactions up to, and including, sequence 5260, at which point the replicator will go offline.
6.9.3.11.4.2. Going Online Until Specified Event
To go online until a specific event ID:
shell> trepctl online -until-event 'mysql-bin.000011:0000000000003057;0'
Replication will go offline when the event ID up to the specified event has been processed.
6.9.3.11.4.3. Going Online Until Heartbeat
To go online until a heartbeat event:
shell> trepctl online -until-heartbeat
Heartbeats are inserted into the replication stream periodically, replication will stop once the heartbeat has been seen before the nexttransaction. A specific heartbeat can also be specified:
shell> trepctl online -until-heartbeat load-finished
6.9.3.11.4.4. Going Online Until Specified Time
To go online until a specific date and time:
shell> trepctl online -until-time 2014-01-01_00:00:00
Replication will go offline once the transaction being processed at the time specified has completed.
6.9.3.11.5. Going Online by Force
In situations where the replicator needs to go online, the online state can be forced. This changes the replicator state to online, butprovides no guarantees that the online state will remain in place if another, different, error stops replication.
shell> trepctl online -force
6.9.3.11.6. Going Online without Validating Checksum
In the event of a checksum problem in the THL, checksums can be disabled using the -no-checksum option:
shell> trepctl online -no-checksum
This will bring the replicator online without reading or writing checksum information.
Important
Use of the -no-checksum option disables both the reading and writing of checksums on log records. If starting thereplicator without checksums to get past a checksum failure, the replicator should be taken offline again oncethe offending event has been replicated. This will avoid generating too many local records in the THL withoutchecksums.
6.9.3.12. trepctl properties Command
Display a list of all the internal properties. The list can be filtered.
trepctl properties [ -filter name ] [ -values ]
The list of properties can be used to determine the current configuration:
shell> trepctl properties {"replicator.store.thl.log_file_retention": "7d","replicator.filter.bidiSlave.allowBidiUnsafe": "false","replicator.extractor.dbms.binlog_file_pattern": "mysql-bin","replicator.filter.pkey.url": »
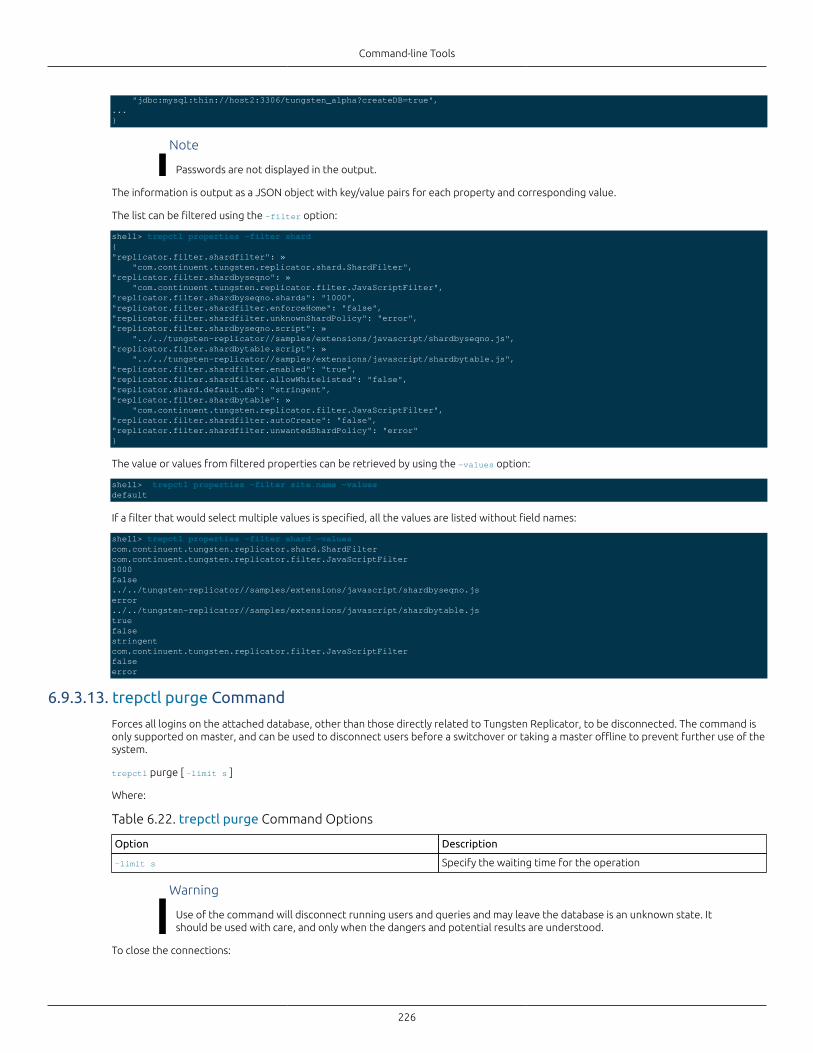
Command-line Tools
226
"jdbc:mysql:thin://host2:3306/tungsten_alpha?createDB=true",...}
Note
Passwords are not displayed in the output.
The information is output as a JSON object with key/value pairs for each property and corresponding value.
The list can be filtered using the -filter option:
shell> trepctl properties -filter shard{"replicator.filter.shardfilter": » "com.continuent.tungsten.replicator.shard.ShardFilter","replicator.filter.shardbyseqno": » "com.continuent.tungsten.replicator.filter.JavaScriptFilter","replicator.filter.shardbyseqno.shards": "1000","replicator.filter.shardfilter.enforceHome": "false","replicator.filter.shardfilter.unknownShardPolicy": "error","replicator.filter.shardbyseqno.script": » "../../tungsten-replicator//samples/extensions/javascript/shardbyseqno.js","replicator.filter.shardbytable.script": » "../../tungsten-replicator//samples/extensions/javascript/shardbytable.js","replicator.filter.shardfilter.enabled": "true","replicator.filter.shardfilter.allowWhitelisted": "false","replicator.shard.default.db": "stringent","replicator.filter.shardbytable": » "com.continuent.tungsten.replicator.filter.JavaScriptFilter","replicator.filter.shardfilter.autoCreate": "false","replicator.filter.shardfilter.unwantedShardPolicy": "error"}
The value or values from filtered properties can be retrieved by using the -values option:
shell> trepctl properties -filter site.name -valuesdefault
If a filter that would select multiple values is specified, all the values are listed without field names:
shell> trepctl properties -filter shard -valuescom.continuent.tungsten.replicator.shard.ShardFiltercom.continuent.tungsten.replicator.filter.JavaScriptFilter1000false../../tungsten-replicator//samples/extensions/javascript/shardbyseqno.jserror../../tungsten-replicator//samples/extensions/javascript/shardbytable.jstruefalsestringentcom.continuent.tungsten.replicator.filter.JavaScriptFilterfalseerror
6.9.3.13. trepctl purge Command
Forces all logins on the attached database, other than those directly related to Tungsten Replicator, to be disconnected. The command isonly supported on master, and can be used to disconnect users before a switchover or taking a master offline to prevent further use of thesystem.
trepctl purge [ -limit s ]
Where:
Table 6.22. trepctl purge Command Options
Option Description
-limit s Specify the waiting time for the operation
Warning
Use of the command will disconnect running users and queries and may leave the database is an unknown state. Itshould be used with care, and only when the dangers and potential results are understood.
To close the connections:
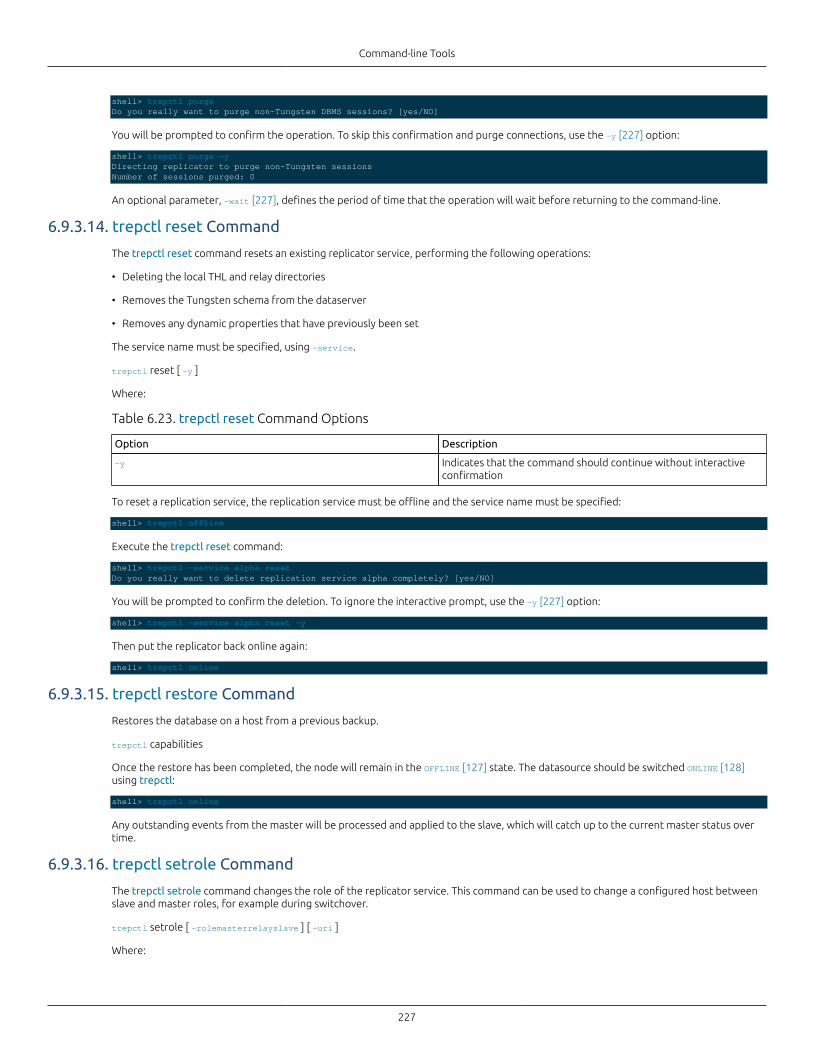
Command-line Tools
227
shell> trepctl purgeDo you really want to purge non-Tungsten DBMS sessions? [yes/NO]
You will be prompted to confirm the operation. To skip this confirmation and purge connections, use the -y [227] option:
shell> trepctl purge -yDirecting replicator to purge non-Tungsten sessionsNumber of sessions purged: 0
An optional parameter, -wait [227], defines the period of time that the operation will wait before returning to the command-line.
6.9.3.14. trepctl reset Command
The trepctl reset command resets an existing replicator service, performing the following operations:
• Deleting the local THL and relay directories
• Removes the Tungsten schema from the dataserver
• Removes any dynamic properties that have previously been set
The service name must be specified, using -service.
trepctl reset [ -y ]
Where:
Table 6.23. trepctl reset Command Options
Option Description
-y Indicates that the command should continue without interactiveconfirmation
To reset a replication service, the replication service must be offline and the service name must be specified:
shell> trepctl offline
Execute the trepctl reset command:
shell> trepctl -service alpha resetDo you really want to delete replication service alpha completely? [yes/NO]
You will be prompted to confirm the deletion. To ignore the interactive prompt, use the -y [227] option:
shell> trepctl -service alpha reset -y
Then put the replicator back online again:
shell> trepctl online
6.9.3.15. trepctl restore Command
Restores the database on a host from a previous backup.
trepctl capabilities
Once the restore has been completed, the node will remain in the OFFLINE [127] state. The datasource should be switched ONLINE [128]using trepctl:
shell> trepctl online
Any outstanding events from the master will be processed and applied to the slave, which will catch up to the current master status overtime.
6.9.3.16. trepctl setrole Command
The trepctl setrole command changes the role of the replicator service. This command can be used to change a configured host betweenslave and master roles, for example during switchover.
trepctl setrole [ -rolemasterrelayslave ] [ -uri ]
Where:
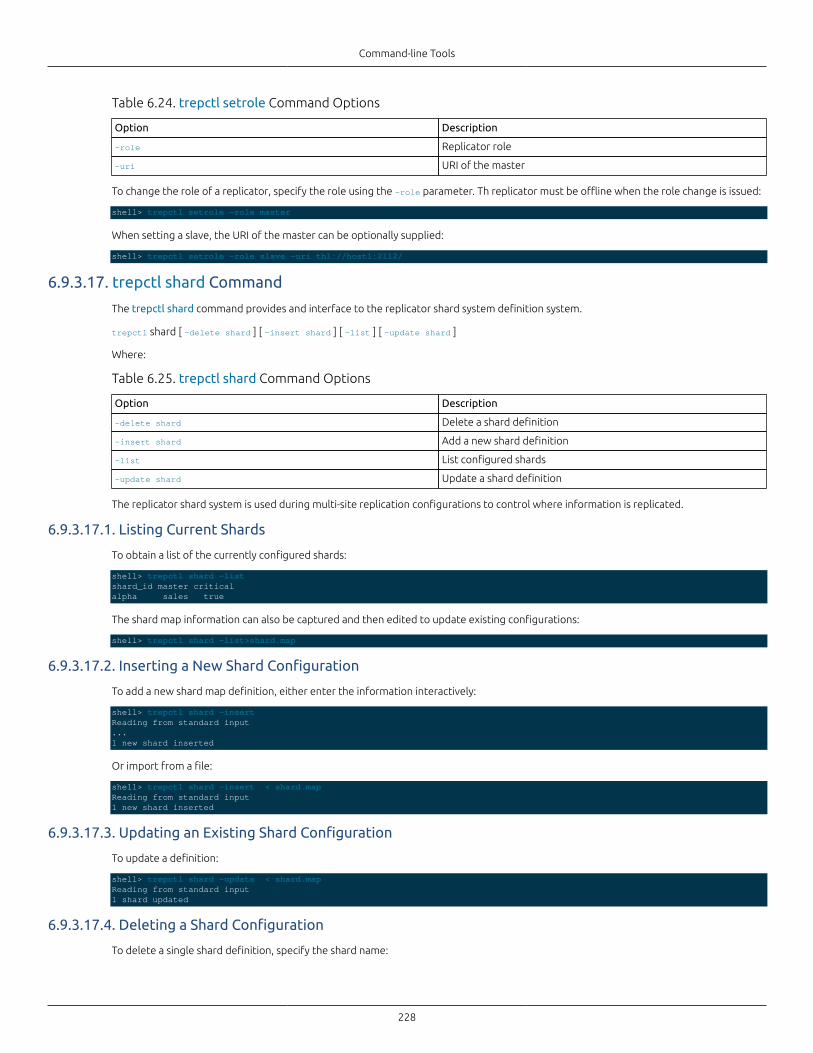
Command-line Tools
228
Table 6.24. trepctl setrole Command Options
Option Description
-role Replicator role
-uri URI of the master
To change the role of a replicator, specify the role using the -role parameter. Th replicator must be offline when the role change is issued:
shell> trepctl setrole -role master
When setting a slave, the URI of the master can be optionally supplied:
shell> trepctl setrole -role slave -uri thl://host1:2112/
6.9.3.17. trepctl shard Command
The trepctl shard command provides and interface to the replicator shard system definition system.
trepctl shard [ -delete shard ] [ -insert shard ] [ -list ] [ -update shard ]
Where:
Table 6.25. trepctl shard Command Options
Option Description
-delete shard Delete a shard definition
-insert shard Add a new shard definition
-list List configured shards
-update shard Update a shard definition
The replicator shard system is used during multi-site replication configurations to control where information is replicated.
6.9.3.17.1. Listing Current Shards
To obtain a list of the currently configured shards:
shell> trepctl shard -listshard_id master criticalalpha sales true
The shard map information can also be captured and then edited to update existing configurations:
shell> trepctl shard -list>shard.map
6.9.3.17.2. Inserting a New Shard Configuration
To add a new shard map definition, either enter the information interactively:
shell> trepctl shard -insert Reading from standard input...1 new shard inserted
Or import from a file:
shell> trepctl shard -insert < shard.mapReading from standard input1 new shard inserted
6.9.3.17.3. Updating an Existing Shard Configuration
To update a definition:
shell> trepctl shard -update < shard.mapReading from standard input1 shard updated
6.9.3.17.4. Deleting a Shard Configuration
To delete a single shard definition, specify the shard name:
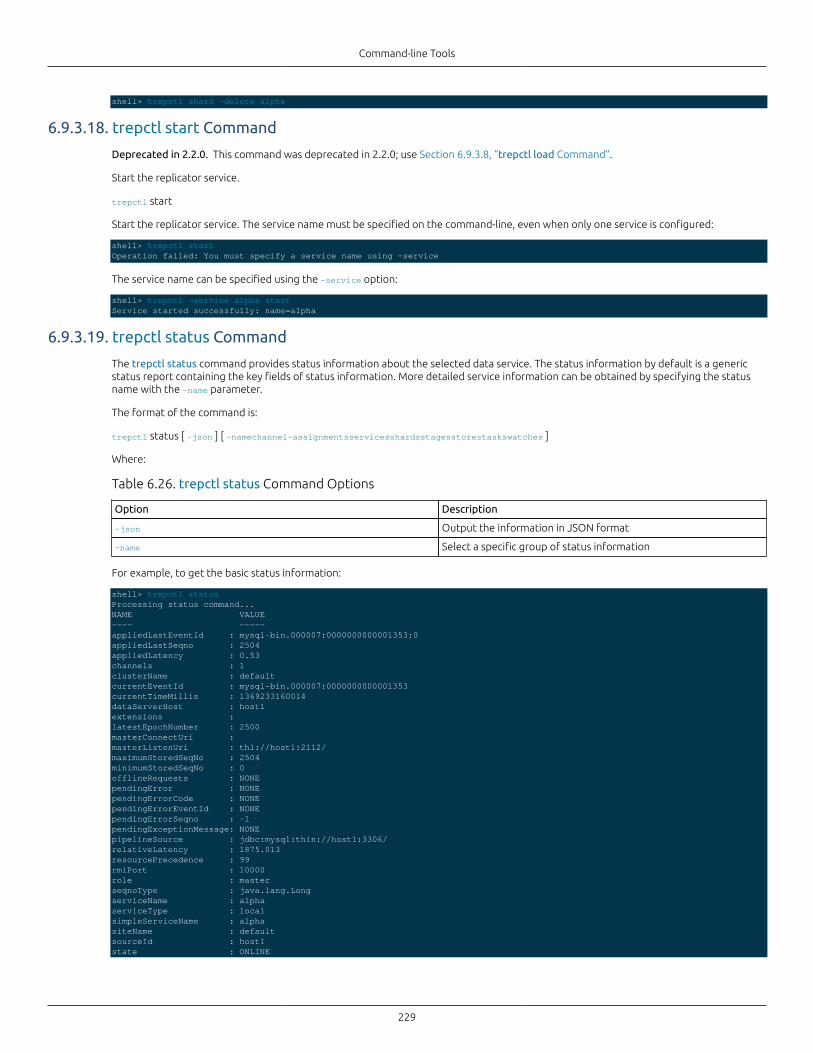
Command-line Tools
229
shell> trepctl shard -delete alpha
6.9.3.18. trepctl start Command
Deprecated in 2.2.0. This command was deprecated in 2.2.0; use Section 6.9.3.8, “trepctl load Command”.
Start the replicator service.
trepctl start
Start the replicator service. The service name must be specified on the command-line, even when only one service is configured:
shell> trepctl startOperation failed: You must specify a service name using -service
The service name can be specified using the -service option:
shell> trepctl -service alpha startService started successfully: name=alpha
6.9.3.19. trepctl status Command
The trepctl status command provides status information about the selected data service. The status information by default is a genericstatus report containing the key fields of status information. More detailed service information can be obtained by specifying the statusname with the -name parameter.
The format of the command is:
trepctl status [ -json ] [ -namechannel-assignmentsservicesshardsstagesstorestaskswatches ]
Where:
Table 6.26. trepctl status Command Options
Option Description
-json Output the information in JSON format
-name Select a specific group of status information
For example, to get the basic status information:
shell> trepctl statusProcessing status command...NAME VALUE---- -----appliedLastEventId : mysql-bin.000007:0000000000001353;0appliedLastSeqno : 2504appliedLatency : 0.53channels : 1clusterName : defaultcurrentEventId : mysql-bin.000007:0000000000001353currentTimeMillis : 1369233160014dataServerHost : host1extensions : latestEpochNumber : 2500masterConnectUri : masterListenUri : thl://host1:2112/maximumStoredSeqNo : 2504minimumStoredSeqNo : 0offlineRequests : NONEpendingError : NONEpendingErrorCode : NONEpendingErrorEventId : NONEpendingErrorSeqno : -1pendingExceptionMessage: NONEpipelineSource : jdbc:mysql:thin://host1:3306/relativeLatency : 1875.013resourcePrecedence : 99rmiPort : 10000role : masterseqnoType : java.lang.LongserviceName : alphaserviceType : localsimpleServiceName : alphasiteName : defaultsourceId : host1state : ONLINE
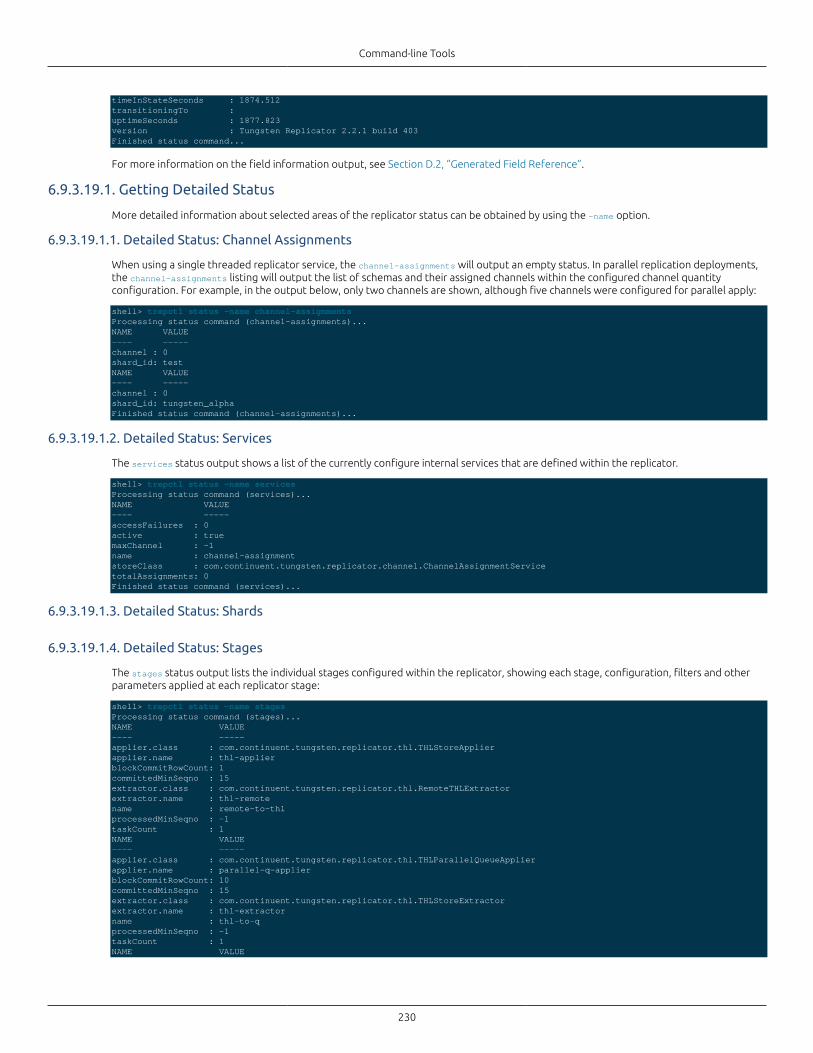
Command-line Tools
230
timeInStateSeconds : 1874.512transitioningTo : uptimeSeconds : 1877.823version : Tungsten Replicator 2.2.1 build 403Finished status command...
For more information on the field information output, see Section D.2, “Generated Field Reference”.
6.9.3.19.1. Getting Detailed Status
More detailed information about selected areas of the replicator status can be obtained by using the -name option.
6.9.3.19.1.1. Detailed Status: Channel Assignments
When using a single threaded replicator service, the channel-assignments will output an empty status. In parallel replication deployments,the channel-assignments listing will output the list of schemas and their assigned channels within the configured channel quantityconfiguration. For example, in the output below, only two channels are shown, although five channels were configured for parallel apply:
shell> trepctl status -name channel-assignmentsProcessing status command (channel-assignments)...NAME VALUE---- -----channel : 0shard_id: testNAME VALUE---- -----channel : 0shard_id: tungsten_alphaFinished status command (channel-assignments)...
6.9.3.19.1.2. Detailed Status: Services
The services status output shows a list of the currently configure internal services that are defined within the replicator.
shell> trepctl status -name servicesProcessing status command (services)...NAME VALUE---- -----accessFailures : 0active : truemaxChannel : -1name : channel-assignmentstoreClass : com.continuent.tungsten.replicator.channel.ChannelAssignmentServicetotalAssignments: 0Finished status command (services)...
6.9.3.19.1.3. Detailed Status: Shards
6.9.3.19.1.4. Detailed Status: Stages
The stages status output lists the individual stages configured within the replicator, showing each stage, configuration, filters and otherparameters applied at each replicator stage:
shell> trepctl status -name stagesProcessing status command (stages)...NAME VALUE---- -----applier.class : com.continuent.tungsten.replicator.thl.THLStoreApplierapplier.name : thl-applierblockCommitRowCount: 1committedMinSeqno : 15extractor.class : com.continuent.tungsten.replicator.thl.RemoteTHLExtractorextractor.name : thl-remotename : remote-to-thlprocessedMinSeqno : -1taskCount : 1NAME VALUE---- -----applier.class : com.continuent.tungsten.replicator.thl.THLParallelQueueApplierapplier.name : parallel-q-applierblockCommitRowCount: 10committedMinSeqno : 15extractor.class : com.continuent.tungsten.replicator.thl.THLStoreExtractorextractor.name : thl-extractorname : thl-to-qprocessedMinSeqno : -1taskCount : 1NAME VALUE
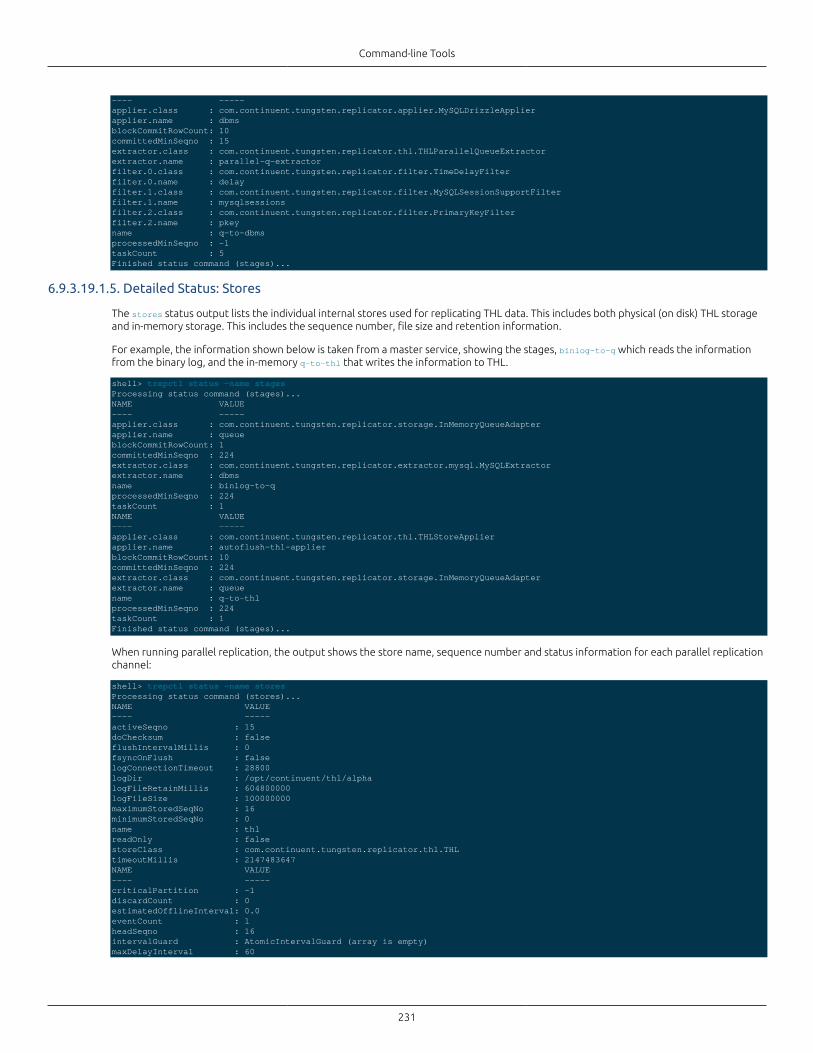
Command-line Tools
231
---- -----applier.class : com.continuent.tungsten.replicator.applier.MySQLDrizzleApplierapplier.name : dbmsblockCommitRowCount: 10committedMinSeqno : 15extractor.class : com.continuent.tungsten.replicator.thl.THLParallelQueueExtractorextractor.name : parallel-q-extractorfilter.0.class : com.continuent.tungsten.replicator.filter.TimeDelayFilterfilter.0.name : delayfilter.1.class : com.continuent.tungsten.replicator.filter.MySQLSessionSupportFilterfilter.1.name : mysqlsessionsfilter.2.class : com.continuent.tungsten.replicator.filter.PrimaryKeyFilterfilter.2.name : pkeyname : q-to-dbmsprocessedMinSeqno : -1taskCount : 5Finished status command (stages)...
6.9.3.19.1.5. Detailed Status: Stores
The stores status output lists the individual internal stores used for replicating THL data. This includes both physical (on disk) THL storageand in-memory storage. This includes the sequence number, file size and retention information.
For example, the information shown below is taken from a master service, showing the stages, binlog-to-q which reads the informationfrom the binary log, and the in-memory q-to-thl that writes the information to THL.
shell> trepctl status -name stagesProcessing status command (stages)...NAME VALUE---- -----applier.class : com.continuent.tungsten.replicator.storage.InMemoryQueueAdapterapplier.name : queueblockCommitRowCount: 1committedMinSeqno : 224extractor.class : com.continuent.tungsten.replicator.extractor.mysql.MySQLExtractorextractor.name : dbmsname : binlog-to-qprocessedMinSeqno : 224taskCount : 1NAME VALUE---- -----applier.class : com.continuent.tungsten.replicator.thl.THLStoreApplierapplier.name : autoflush-thl-applierblockCommitRowCount: 10committedMinSeqno : 224extractor.class : com.continuent.tungsten.replicator.storage.InMemoryQueueAdapterextractor.name : queuename : q-to-thlprocessedMinSeqno : 224taskCount : 1Finished status command (stages)...
When running parallel replication, the output shows the store name, sequence number and status information for each parallel replicationchannel:
shell> trepctl status -name storesProcessing status command (stores)...NAME VALUE---- -----activeSeqno : 15doChecksum : falseflushIntervalMillis : 0fsyncOnFlush : falselogConnectionTimeout : 28800logDir : /opt/continuent/thl/alphalogFileRetainMillis : 604800000logFileSize : 100000000maximumStoredSeqNo : 16minimumStoredSeqNo : 0name : thlreadOnly : falsestoreClass : com.continuent.tungsten.replicator.thl.THLtimeoutMillis : 2147483647NAME VALUE---- -----criticalPartition : -1discardCount : 0estimatedOfflineInterval: 0.0eventCount : 1headSeqno : 16intervalGuard : AtomicIntervalGuard (array is empty)maxDelayInterval : 60
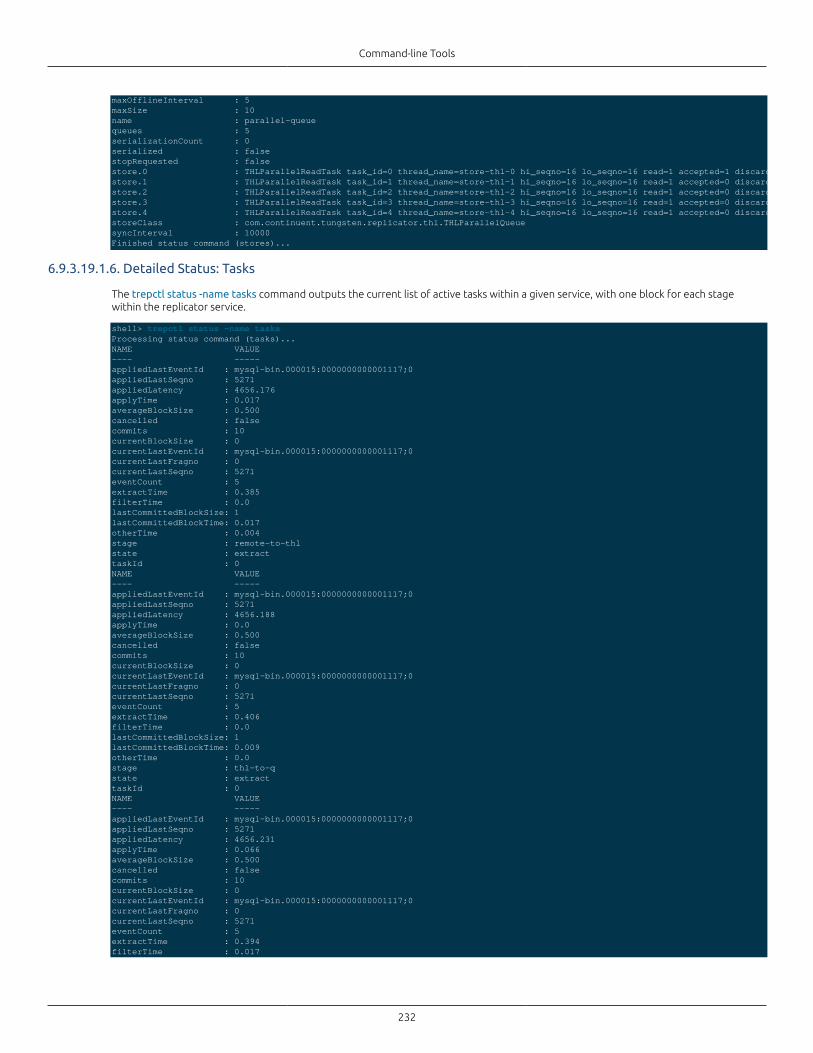
Command-line Tools
232
maxOfflineInterval : 5maxSize : 10name : parallel-queuequeues : 5serializationCount : 0serialized : falsestopRequested : falsestore.0 : THLParallelReadTask task_id=0 thread_name=store-thl-0 hi_seqno=16 lo_seqno=16 read=1 accepted=1 discarded=0 events=0store.1 : THLParallelReadTask task_id=1 thread_name=store-thl-1 hi_seqno=16 lo_seqno=16 read=1 accepted=0 discarded=1 events=0store.2 : THLParallelReadTask task_id=2 thread_name=store-thl-2 hi_seqno=16 lo_seqno=16 read=1 accepted=0 discarded=1 events=0store.3 : THLParallelReadTask task_id=3 thread_name=store-thl-3 hi_seqno=16 lo_seqno=16 read=1 accepted=0 discarded=1 events=0store.4 : THLParallelReadTask task_id=4 thread_name=store-thl-4 hi_seqno=16 lo_seqno=16 read=1 accepted=0 discarded=1 events=0storeClass : com.continuent.tungsten.replicator.thl.THLParallelQueuesyncInterval : 10000Finished status command (stores)...
6.9.3.19.1.6. Detailed Status: Tasks
The trepctl status -name tasks command outputs the current list of active tasks within a given service, with one block for each stagewithin the replicator service.
shell> trepctl status -name tasksProcessing status command (tasks)...NAME VALUE---- -----appliedLastEventId : mysql-bin.000015:0000000000001117;0appliedLastSeqno : 5271appliedLatency : 4656.176applyTime : 0.017averageBlockSize : 0.500 cancelled : falsecommits : 10currentBlockSize : 0currentLastEventId : mysql-bin.000015:0000000000001117;0currentLastFragno : 0currentLastSeqno : 5271eventCount : 5extractTime : 0.385filterTime : 0.0lastCommittedBlockSize: 1lastCommittedBlockTime: 0.017otherTime : 0.004stage : remote-to-thlstate : extracttaskId : 0NAME VALUE---- -----appliedLastEventId : mysql-bin.000015:0000000000001117;0appliedLastSeqno : 5271appliedLatency : 4656.188applyTime : 0.0averageBlockSize : 0.500 cancelled : falsecommits : 10currentBlockSize : 0currentLastEventId : mysql-bin.000015:0000000000001117;0currentLastFragno : 0currentLastSeqno : 5271eventCount : 5extractTime : 0.406filterTime : 0.0lastCommittedBlockSize: 1lastCommittedBlockTime: 0.009otherTime : 0.0stage : thl-to-qstate : extracttaskId : 0NAME VALUE---- -----appliedLastEventId : mysql-bin.000015:0000000000001117;0appliedLastSeqno : 5271appliedLatency : 4656.231applyTime : 0.066averageBlockSize : 0.500 cancelled : falsecommits : 10currentBlockSize : 0currentLastEventId : mysql-bin.000015:0000000000001117;0currentLastFragno : 0currentLastSeqno : 5271eventCount : 5extractTime : 0.394filterTime : 0.017
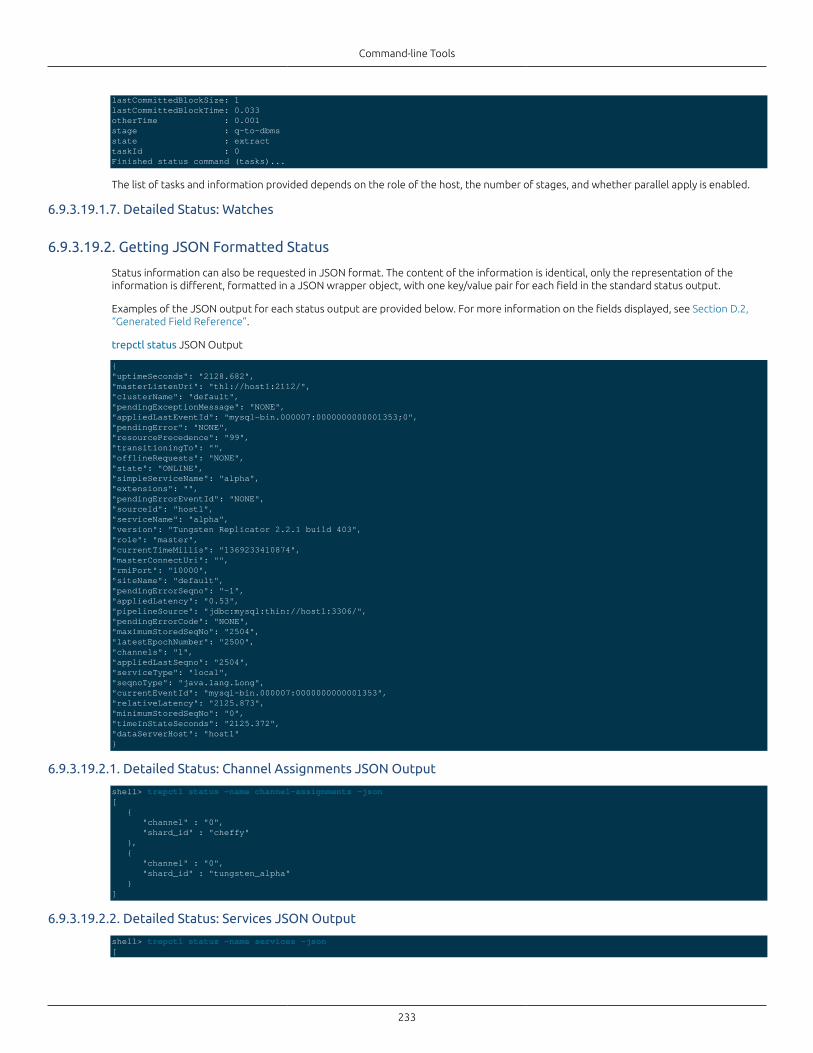
Command-line Tools
233
lastCommittedBlockSize: 1lastCommittedBlockTime: 0.033otherTime : 0.001stage : q-to-dbmsstate : extracttaskId : 0Finished status command (tasks)...
The list of tasks and information provided depends on the role of the host, the number of stages, and whether parallel apply is enabled.
6.9.3.19.1.7. Detailed Status: Watches
6.9.3.19.2. Getting JSON Formatted Status
Status information can also be requested in JSON format. The content of the information is identical, only the representation of theinformation is different, formatted in a JSON wrapper object, with one key/value pair for each field in the standard status output.
Examples of the JSON output for each status output are provided below. For more information on the fields displayed, see Section D.2,“Generated Field Reference”.
trepctl status JSON Output
{"uptimeSeconds": "2128.682","masterListenUri": "thl://host1:2112/","clusterName": "default","pendingExceptionMessage": "NONE","appliedLastEventId": "mysql-bin.000007:0000000000001353;0","pendingError": "NONE","resourcePrecedence": "99","transitioningTo": "","offlineRequests": "NONE","state": "ONLINE","simpleServiceName": "alpha","extensions": "","pendingErrorEventId": "NONE","sourceId": "host1","serviceName": "alpha","version": "Tungsten Replicator 2.2.1 build 403","role": "master","currentTimeMillis": "1369233410874","masterConnectUri": "","rmiPort": "10000","siteName": "default","pendingErrorSeqno": "-1","appliedLatency": "0.53","pipelineSource": "jdbc:mysql:thin://host1:3306/","pendingErrorCode": "NONE","maximumStoredSeqNo": "2504","latestEpochNumber": "2500","channels": "1","appliedLastSeqno": "2504","serviceType": "local","seqnoType": "java.lang.Long","currentEventId": "mysql-bin.000007:0000000000001353","relativeLatency": "2125.873","minimumStoredSeqNo": "0","timeInStateSeconds": "2125.372","dataServerHost": "host1"}
6.9.3.19.2.1. Detailed Status: Channel Assignments JSON Output
shell> trepctl status -name channel-assignments -json[ { "channel" : "0", "shard_id" : "cheffy" }, { "channel" : "0", "shard_id" : "tungsten_alpha" }]
6.9.3.19.2.2. Detailed Status: Services JSON Output
shell> trepctl status -name services -json[
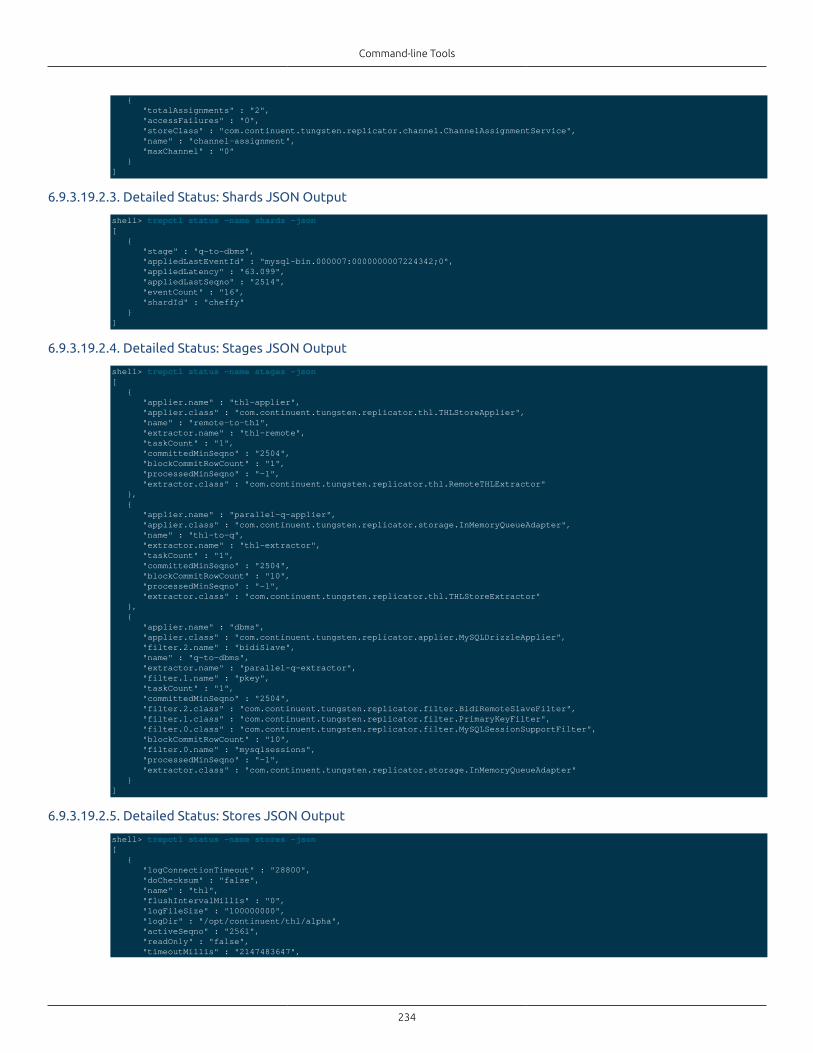
Command-line Tools
234
{ "totalAssignments" : "2", "accessFailures" : "0", "storeClass" : "com.continuent.tungsten.replicator.channel.ChannelAssignmentService", "name" : "channel-assignment", "maxChannel" : "0" }]
6.9.3.19.2.3. Detailed Status: Shards JSON Output
shell> trepctl status -name shards -json[ { "stage" : "q-to-dbms", "appliedLastEventId" : "mysql-bin.000007:0000000007224342;0", "appliedLatency" : "63.099", "appliedLastSeqno" : "2514", "eventCount" : "16", "shardId" : "cheffy" }]
6.9.3.19.2.4. Detailed Status: Stages JSON Output
shell> trepctl status -name stages -json[ { "applier.name" : "thl-applier", "applier.class" : "com.continuent.tungsten.replicator.thl.THLStoreApplier", "name" : "remote-to-thl", "extractor.name" : "thl-remote", "taskCount" : "1", "committedMinSeqno" : "2504", "blockCommitRowCount" : "1", "processedMinSeqno" : "-1", "extractor.class" : "com.continuent.tungsten.replicator.thl.RemoteTHLExtractor" }, { "applier.name" : "parallel-q-applier", "applier.class" : "com.continuent.tungsten.replicator.storage.InMemoryQueueAdapter", "name" : "thl-to-q", "extractor.name" : "thl-extractor", "taskCount" : "1", "committedMinSeqno" : "2504", "blockCommitRowCount" : "10", "processedMinSeqno" : "-1", "extractor.class" : "com.continuent.tungsten.replicator.thl.THLStoreExtractor" }, { "applier.name" : "dbms", "applier.class" : "com.continuent.tungsten.replicator.applier.MySQLDrizzleApplier", "filter.2.name" : "bidiSlave", "name" : "q-to-dbms", "extractor.name" : "parallel-q-extractor", "filter.1.name" : "pkey", "taskCount" : "1", "committedMinSeqno" : "2504", "filter.2.class" : "com.continuent.tungsten.replicator.filter.BidiRemoteSlaveFilter", "filter.1.class" : "com.continuent.tungsten.replicator.filter.PrimaryKeyFilter", "filter.0.class" : "com.continuent.tungsten.replicator.filter.MySQLSessionSupportFilter", "blockCommitRowCount" : "10", "filter.0.name" : "mysqlsessions", "processedMinSeqno" : "-1", "extractor.class" : "com.continuent.tungsten.replicator.storage.InMemoryQueueAdapter" }]
6.9.3.19.2.5. Detailed Status: Stores JSON Output
shell> trepctl status -name stores -json[ { "logConnectionTimeout" : "28800", "doChecksum" : "false", "name" : "thl", "flushIntervalMillis" : "0", "logFileSize" : "100000000", "logDir" : "/opt/continuent/thl/alpha", "activeSeqno" : "2561", "readOnly" : "false", "timeoutMillis" : "2147483647",
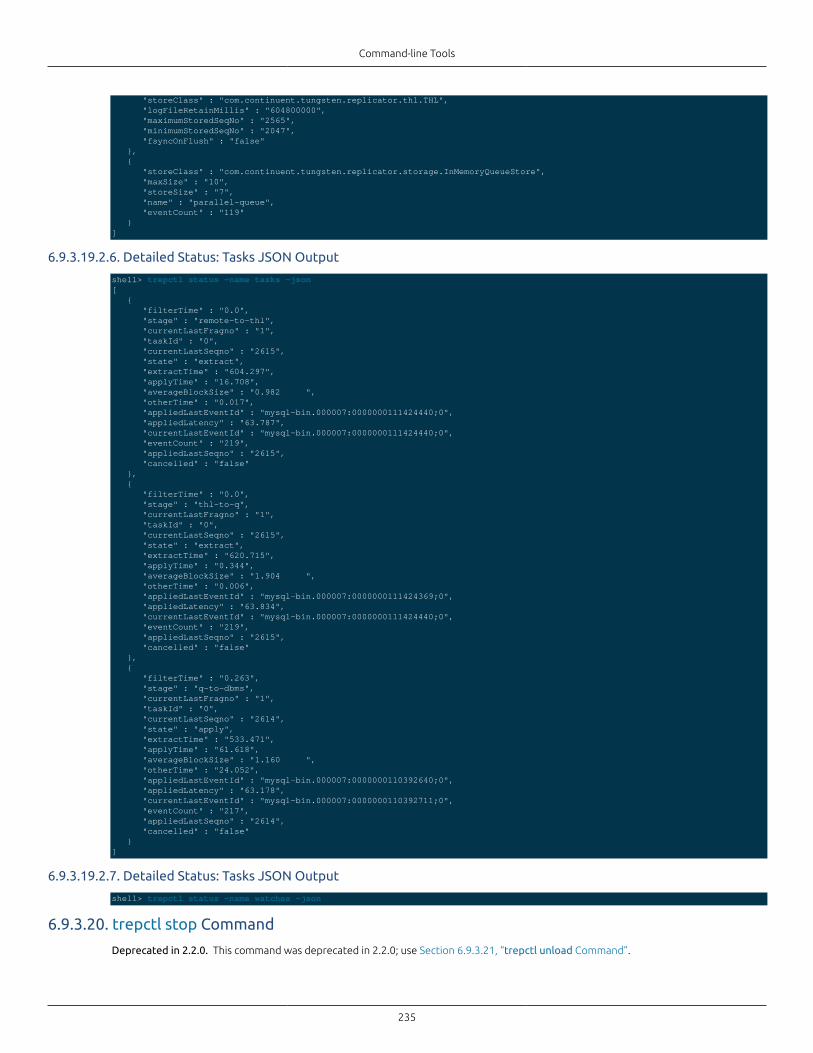
Command-line Tools
235
"storeClass" : "com.continuent.tungsten.replicator.thl.THL", "logFileRetainMillis" : "604800000", "maximumStoredSeqNo" : "2565", "minimumStoredSeqNo" : "2047", "fsyncOnFlush" : "false" }, { "storeClass" : "com.continuent.tungsten.replicator.storage.InMemoryQueueStore", "maxSize" : "10", "storeSize" : "7", "name" : "parallel-queue", "eventCount" : "119" }]
6.9.3.19.2.6. Detailed Status: Tasks JSON Output
shell> trepctl status -name tasks -json[ { "filterTime" : "0.0", "stage" : "remote-to-thl", "currentLastFragno" : "1", "taskId" : "0", "currentLastSeqno" : "2615", "state" : "extract", "extractTime" : "604.297", "applyTime" : "16.708", "averageBlockSize" : "0.982 ", "otherTime" : "0.017", "appliedLastEventId" : "mysql-bin.000007:0000000111424440;0", "appliedLatency" : "63.787", "currentLastEventId" : "mysql-bin.000007:0000000111424440;0", "eventCount" : "219", "appliedLastSeqno" : "2615", "cancelled" : "false" }, { "filterTime" : "0.0", "stage" : "thl-to-q", "currentLastFragno" : "1", "taskId" : "0", "currentLastSeqno" : "2615", "state" : "extract", "extractTime" : "620.715", "applyTime" : "0.344", "averageBlockSize" : "1.904 ", "otherTime" : "0.006", "appliedLastEventId" : "mysql-bin.000007:0000000111424369;0", "appliedLatency" : "63.834", "currentLastEventId" : "mysql-bin.000007:0000000111424440;0", "eventCount" : "219", "appliedLastSeqno" : "2615", "cancelled" : "false" }, { "filterTime" : "0.263", "stage" : "q-to-dbms", "currentLastFragno" : "1", "taskId" : "0", "currentLastSeqno" : "2614", "state" : "apply", "extractTime" : "533.471", "applyTime" : "61.618", "averageBlockSize" : "1.160 ", "otherTime" : "24.052", "appliedLastEventId" : "mysql-bin.000007:0000000110392640;0", "appliedLatency" : "63.178", "currentLastEventId" : "mysql-bin.000007:0000000110392711;0", "eventCount" : "217", "appliedLastSeqno" : "2614", "cancelled" : "false" }]
6.9.3.19.2.7. Detailed Status: Tasks JSON Output
shell> trepctl status -name watches -json
6.9.3.20. trepctl stop Command
Deprecated in 2.2.0. This command was deprecated in 2.2.0; use Section 6.9.3.21, “trepctl unload Command”.
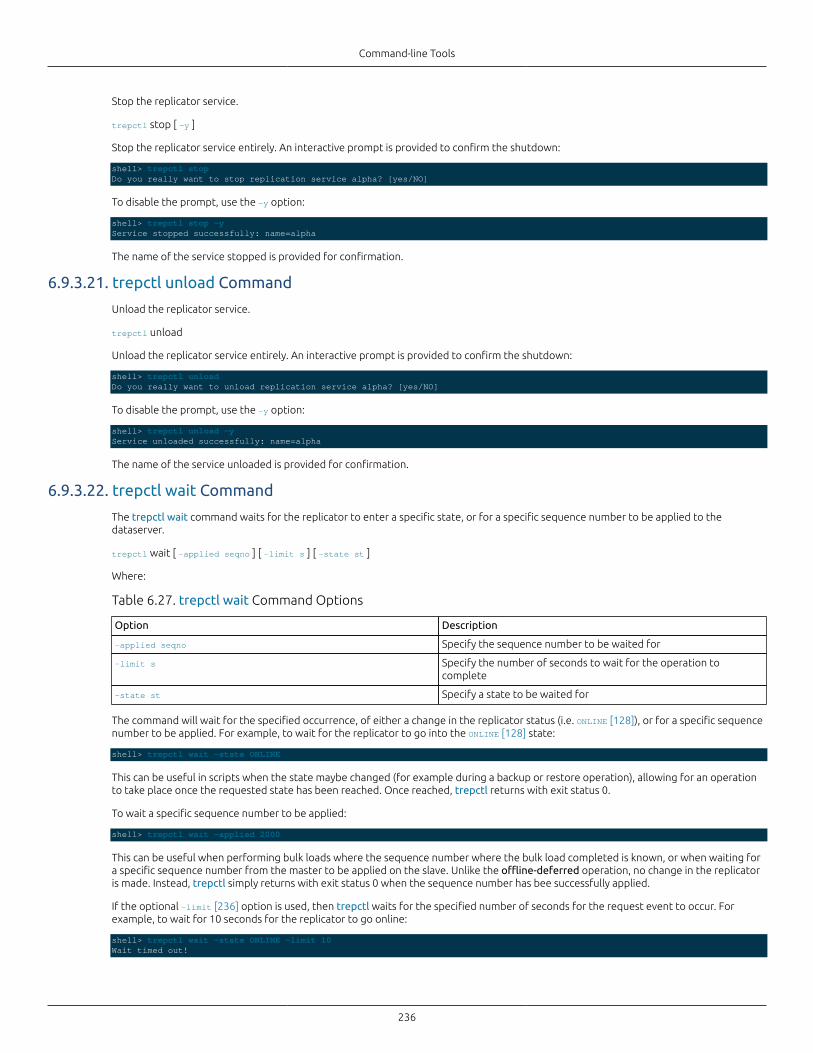
Command-line Tools
236
Stop the replicator service.
trepctl stop [ -y ]
Stop the replicator service entirely. An interactive prompt is provided to confirm the shutdown:
shell> trepctl stopDo you really want to stop replication service alpha? [yes/NO]
To disable the prompt, use the -y option:
shell> trepctl stop -yService stopped successfully: name=alpha
The name of the service stopped is provided for confirmation.
6.9.3.21. trepctl unload Command
Unload the replicator service.
trepctl unload
Unload the replicator service entirely. An interactive prompt is provided to confirm the shutdown:
shell> trepctl unloadDo you really want to unload replication service alpha? [yes/NO]
To disable the prompt, use the -y option:
shell> trepctl unload -yService unloaded successfully: name=alpha
The name of the service unloaded is provided for confirmation.
6.9.3.22. trepctl wait Command
The trepctl wait command waits for the replicator to enter a specific state, or for a specific sequence number to be applied to thedataserver.
trepctl wait [ -applied seqno ] [ -limit s ] [ -state st ]
Where:
Table 6.27. trepctl wait Command Options
Option Description
-applied seqno Specify the sequence number to be waited for
-limit s Specify the number of seconds to wait for the operation tocomplete
-state st Specify a state to be waited for
The command will wait for the specified occurrence, of either a change in the replicator status (i.e. ONLINE [128]), or for a specific sequencenumber to be applied. For example, to wait for the replicator to go into the ONLINE [128] state:
shell> trepctl wait -state ONLINE
This can be useful in scripts when the state maybe changed (for example during a backup or restore operation), allowing for an operationto take place once the requested state has been reached. Once reached, trepctl returns with exit status 0.
To wait a specific sequence number to be applied:
shell> trepctl wait -applied 2000
This can be useful when performing bulk loads where the sequence number where the bulk load completed is known, or when waiting fora specific sequence number from the master to be applied on the slave. Unlike the offline-deferred operation, no change in the replicatoris made. Instead, trepctl simply returns with exit status 0 when the sequence number has bee successfully applied.
If the optional -limit [236] option is used, then trepctl waits for the specified number of seconds for the request event to occur. Forexample, to wait for 10 seconds for the replicator to go online:
shell> trepctl wait -state ONLINE -limit 10Wait timed out!
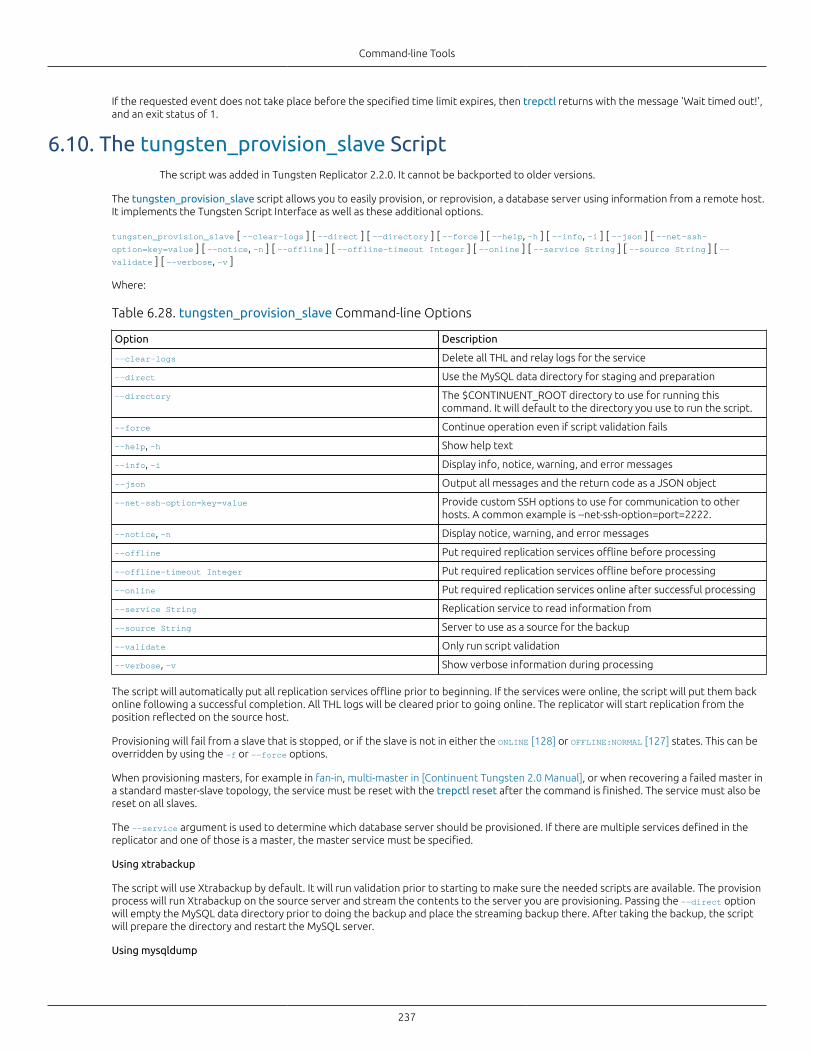
Command-line Tools
237
If the requested event does not take place before the specified time limit expires, then trepctl returns with the message 'Wait timed out!',and an exit status of 1.
6.10. The tungsten_provision_slave ScriptThe script was added in Tungsten Replicator 2.2.0. It cannot be backported to older versions.
The tungsten_provision_slave script allows you to easily provision, or reprovision, a database server using information from a remote host.It implements the Tungsten Script Interface as well as these additional options.
tungsten_provision_slave [ --clear-logs ] [ --direct ] [ --directory ] [ --force ] [ --help, -h ] [ --info, -i ] [ --json ] [ --net-ssh-option=key=value ] [ --notice, -n ] [ --offline ] [ --offline-timeout Integer ] [ --online ] [ --service String ] [ --source String ] [ --validate ] [ --verbose, -v ]
Where:
Table 6.28. tungsten_provision_slave Command-line Options
Option Description
--clear-logs Delete all THL and relay logs for the service
--direct Use the MySQL data directory for staging and preparation
--directory The $CONTINUENT_ROOT directory to use for running thiscommand. It will default to the directory you use to run the script.
--force Continue operation even if script validation fails
--help, -h Show help text
--info, -i Display info, notice, warning, and error messages
--json Output all messages and the return code as a JSON object
--net-ssh-option=key=value Provide custom SSH options to use for communication to otherhosts. A common example is --net-ssh-option=port=2222.
--notice, -n Display notice, warning, and error messages
--offline Put required replication services offline before processing
--offline-timeout Integer Put required replication services offline before processing
--online Put required replication services online after successful processing
--service String Replication service to read information from
--source String Server to use as a source for the backup
--validate Only run script validation
--verbose, -v Show verbose information during processing
The script will automatically put all replication services offline prior to beginning. If the services were online, the script will put them backonline following a successful completion. All THL logs will be cleared prior to going online. The replicator will start replication from theposition reflected on the source host.
Provisioning will fail from a slave that is stopped, or if the slave is not in either the ONLINE [128] or OFFLINE:NORMAL [127] states. This can beoverridden by using the -f or --force options.
When provisioning masters, for example in fan-in, multi-master in [Continuent Tungsten 2.0 Manual], or when recovering a failed master ina standard master-slave topology, the service must be reset with the trepctl reset after the command is finished. The service must also bereset on all slaves.
The --service argument is used to determine which database server should be provisioned. If there are multiple services defined in thereplicator and one of those is a master, the master service must be specified.
Using xtrabackup
The script will use Xtrabackup by default. It will run validation prior to starting to make sure the needed scripts are available. The provisionprocess will run Xtrabackup on the source server and stream the contents to the server you are provisioning. Passing the --direct optionwill empty the MySQL data directory prior to doing the backup and place the streaming backup there. After taking the backup, the scriptwill prepare the directory and restart the MySQL server.
Using mysqldump
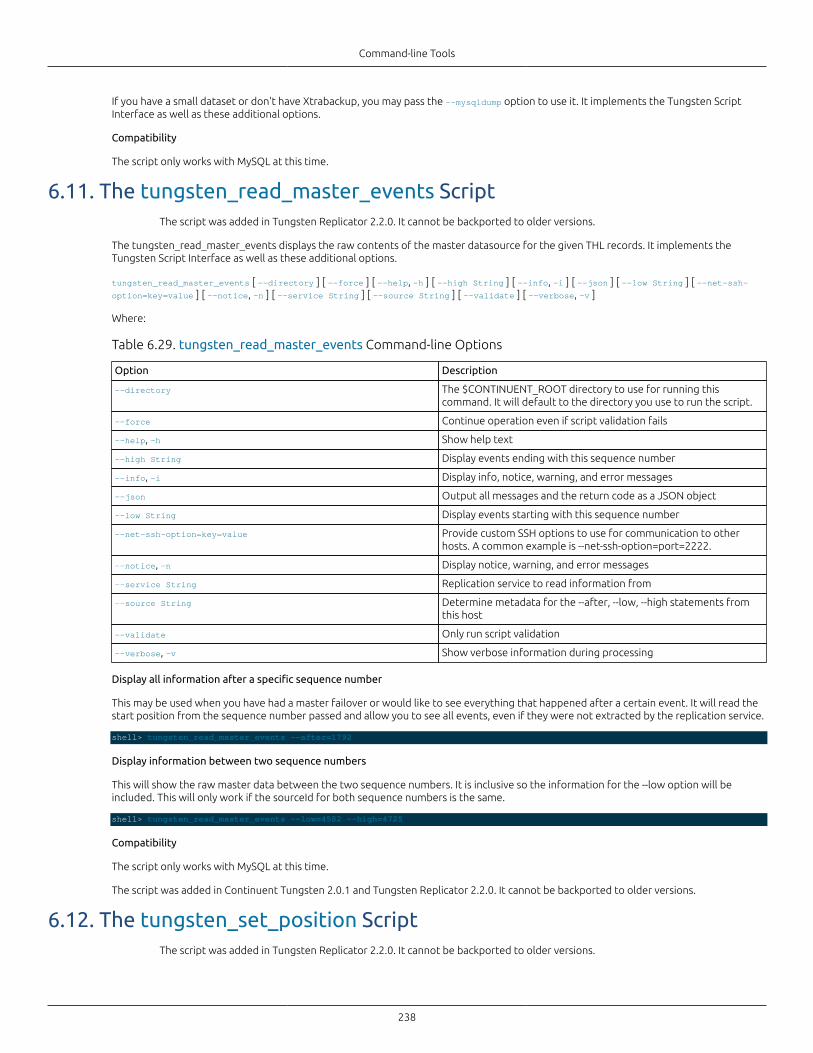
Command-line Tools
238
If you have a small dataset or don't have Xtrabackup, you may pass the --mysqldump option to use it. It implements the Tungsten ScriptInterface as well as these additional options.
Compatibility
The script only works with MySQL at this time.
6.11. The tungsten_read_master_events ScriptThe script was added in Tungsten Replicator 2.2.0. It cannot be backported to older versions.
The tungsten_read_master_events displays the raw contents of the master datasource for the given THL records. It implements theTungsten Script Interface as well as these additional options.
tungsten_read_master_events [ --directory ] [ --force ] [ --help, -h ] [ --high String ] [ --info, -i ] [ --json ] [ --low String ] [ --net-ssh-option=key=value ] [ --notice, -n ] [ --service String ] [ --source String ] [ --validate ] [ --verbose, -v ]
Where:
Table 6.29. tungsten_read_master_events Command-line Options
Option Description
--directory The $CONTINUENT_ROOT directory to use for running thiscommand. It will default to the directory you use to run the script.
--force Continue operation even if script validation fails
--help, -h Show help text
--high String Display events ending with this sequence number
--info, -i Display info, notice, warning, and error messages
--json Output all messages and the return code as a JSON object
--low String Display events starting with this sequence number
--net-ssh-option=key=value Provide custom SSH options to use for communication to otherhosts. A common example is --net-ssh-option=port=2222.
--notice, -n Display notice, warning, and error messages
--service String Replication service to read information from
--source String Determine metadata for the --after, --low, --high statements fromthis host
--validate Only run script validation
--verbose, -v Show verbose information during processing
Display all information after a specific sequence number
This may be used when you have had a master failover or would like to see everything that happened after a certain event. It will read thestart position from the sequence number passed and allow you to see all events, even if they were not extracted by the replication service.
shell> tungsten_read_master_events --after=1792
Display information between two sequence numbers
This will show the raw master data between the two sequence numbers. It is inclusive so the information for the --low option will beincluded. This will only work if the sourceId for both sequence numbers is the same.
shell> tungsten_read_master_events --low=4582 --high=4725
Compatibility
The script only works with MySQL at this time.
The script was added in Continuent Tungsten 2.0.1 and Tungsten Replicator 2.2.0. It cannot be backported to older versions.
6.12. The tungsten_set_position ScriptThe script was added in Tungsten Replicator 2.2.0. It cannot be backported to older versions.
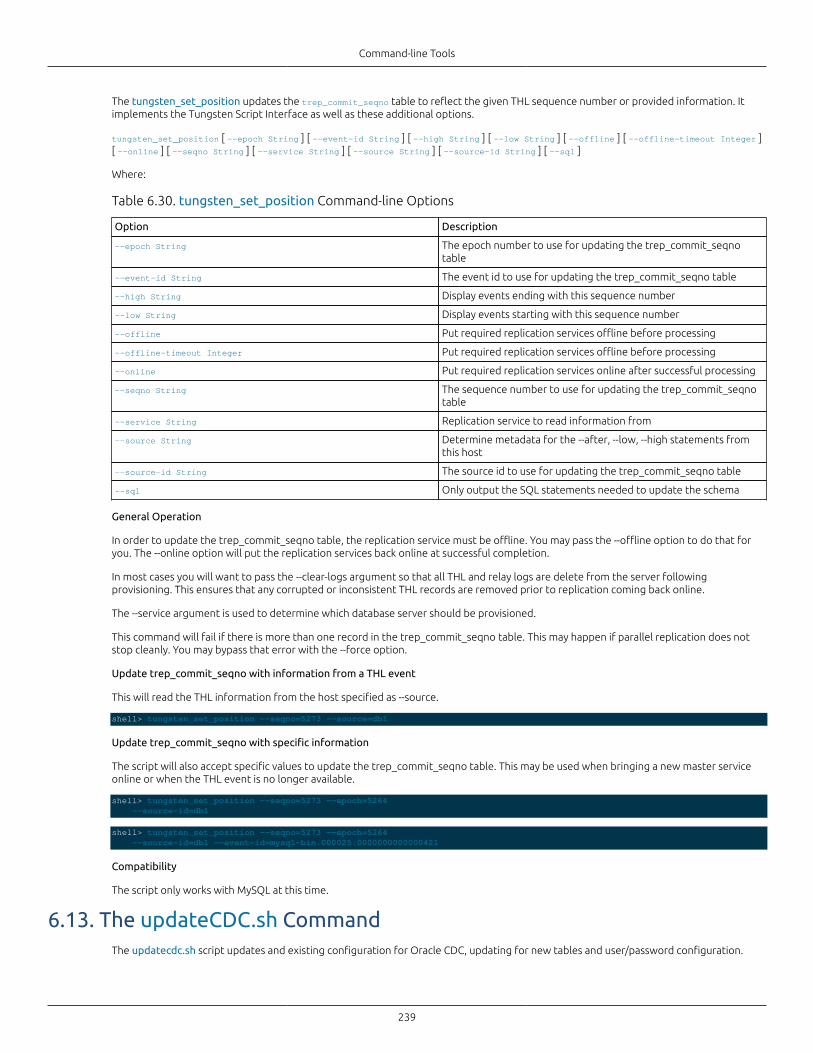
Command-line Tools
239
The tungsten_set_position updates the trep_commit_seqno table to reflect the given THL sequence number or provided information. Itimplements the Tungsten Script Interface as well as these additional options.
tungsten_set_position [ --epoch String ] [ --event-id String ] [ --high String ] [ --low String ] [ --offline ] [ --offline-timeout Integer ][ --online ] [ --seqno String ] [ --service String ] [ --source String ] [ --source-id String ] [ --sql ]
Where:
Table 6.30. tungsten_set_position Command-line Options
Option Description
--epoch String The epoch number to use for updating the trep_commit_seqnotable
--event-id String The event id to use for updating the trep_commit_seqno table
--high String Display events ending with this sequence number
--low String Display events starting with this sequence number
--offline Put required replication services offline before processing
--offline-timeout Integer Put required replication services offline before processing
--online Put required replication services online after successful processing
--seqno String The sequence number to use for updating the trep_commit_seqnotable
--service String Replication service to read information from
--source String Determine metadata for the --after, --low, --high statements fromthis host
--source-id String The source id to use for updating the trep_commit_seqno table
--sql Only output the SQL statements needed to update the schema
General Operation
In order to update the trep_commit_seqno table, the replication service must be offline. You may pass the --offline option to do that foryou. The --online option will put the replication services back online at successful completion.
In most cases you will want to pass the --clear-logs argument so that all THL and relay logs are delete from the server followingprovisioning. This ensures that any corrupted or inconsistent THL records are removed prior to replication coming back online.
The --service argument is used to determine which database server should be provisioned.
This command will fail if there is more than one record in the trep_commit_seqno table. This may happen if parallel replication does notstop cleanly. You may bypass that error with the --force option.
Update trep_commit_seqno with information from a THL event
This will read the THL information from the host specified as --source.
shell> tungsten_set_position --seqno=5273 --source=db1
Update trep_commit_seqno with specific information
The script will also accept specific values to update the trep_commit_seqno table. This may be used when bringing a new master serviceonline or when the THL event is no longer available.
shell> tungsten_set_position --seqno=5273 --epoch=5264 --source-id=db1
shell> tungsten_set_position --seqno=5273 --epoch=5264 --source-id=db1 --event-id=mysql-bin.000025:0000000000000421
Compatibility
The script only works with MySQL at this time.
6.13. The updateCDC.sh CommandThe updatecdc.sh script updates and existing configuration for Oracle CDC, updating for new tables and user/password configuration.

Command-line Tools
240
The script accepts one argument, the filename of the configuration file that will define the CDC configuration. The file accepts theparameters as listed in Table 6.8, “setupCDC.sh Configuration Options”.
To use, supply the name of the configuration file:
shell> ./updateCDC.sh sample.conf

241
Chapter 7. Using the Cookbook
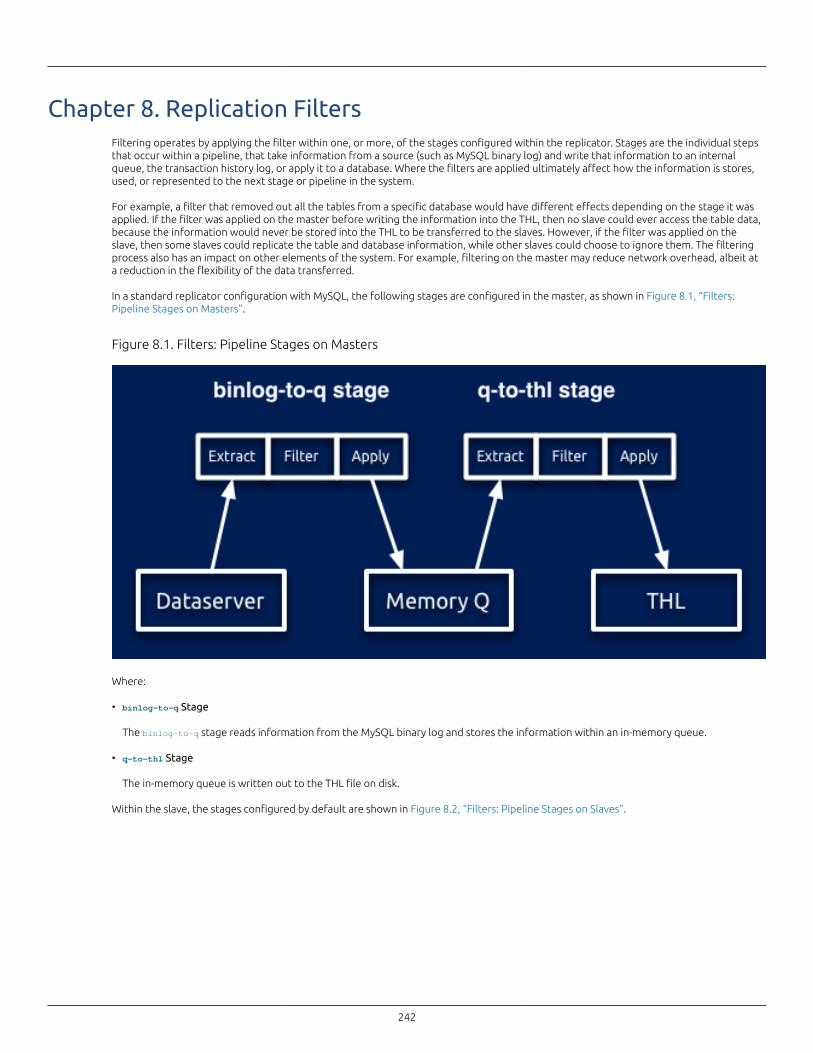
242
Chapter 8. Replication FiltersFiltering operates by applying the filter within one, or more, of the stages configured within the replicator. Stages are the individual stepsthat occur within a pipeline, that take information from a source (such as MySQL binary log) and write that information to an internalqueue, the transaction history log, or apply it to a database. Where the filters are applied ultimately affect how the information is stores,used, or represented to the next stage or pipeline in the system.
For example, a filter that removed out all the tables from a specific database would have different effects depending on the stage it wasapplied. If the filter was applied on the master before writing the information into the THL, then no slave could ever access the table data,because the information would never be stored into the THL to be transferred to the slaves. However, if the filter was applied on theslave, then some slaves could replicate the table and database information, while other slaves could choose to ignore them. The filteringprocess also has an impact on other elements of the system. For example, filtering on the master may reduce network overhead, albeit ata reduction in the flexibility of the data transferred.
In a standard replicator configuration with MySQL, the following stages are configured in the master, as shown in Figure 8.1, “Filters:Pipeline Stages on Masters”.
Figure 8.1. Filters: Pipeline Stages on Masters
Where:
• binlog-to-q Stage
The binlog-to-q stage reads information from the MySQL binary log and stores the information within an in-memory queue.
• q-to-thl Stage
The in-memory queue is written out to the THL file on disk.
Within the slave, the stages configured by default are shown in Figure 8.2, “Filters: Pipeline Stages on Slaves”.
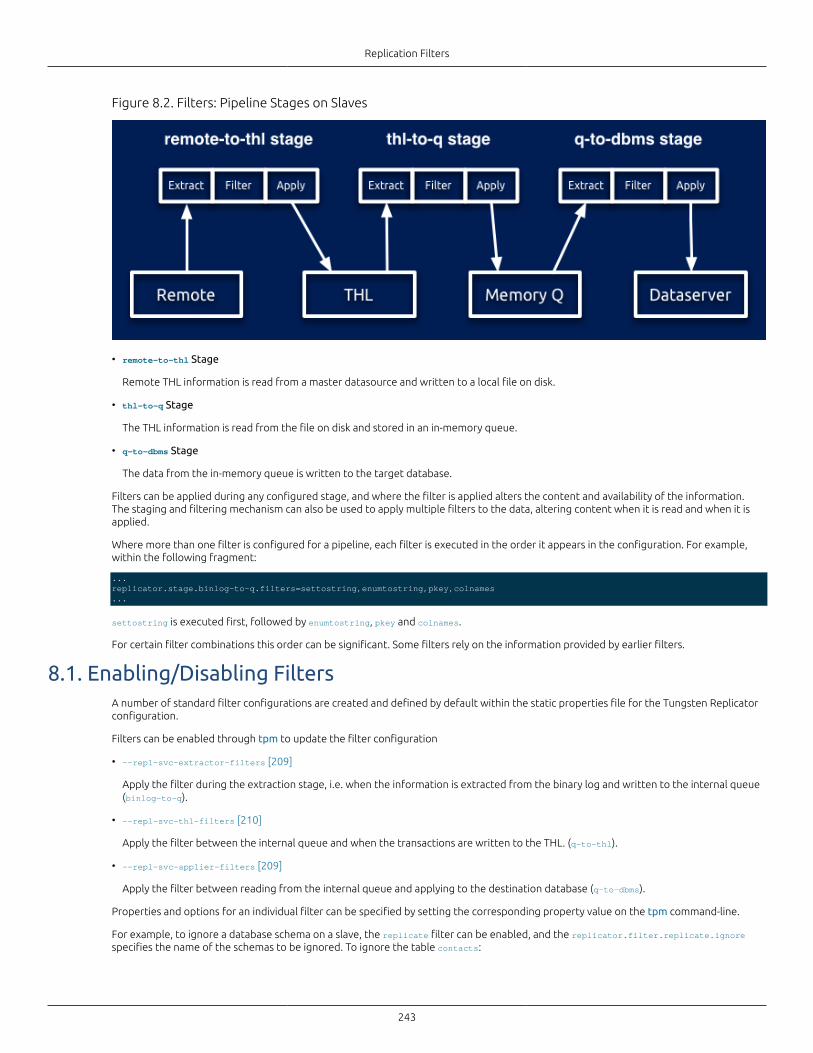
Replication Filters
243
Figure 8.2. Filters: Pipeline Stages on Slaves
• remote-to-thl Stage
Remote THL information is read from a master datasource and written to a local file on disk.
• thl-to-q Stage
The THL information is read from the file on disk and stored in an in-memory queue.
• q-to-dbms Stage
The data from the in-memory queue is written to the target database.
Filters can be applied during any configured stage, and where the filter is applied alters the content and availability of the information.The staging and filtering mechanism can also be used to apply multiple filters to the data, altering content when it is read and when it isapplied.
Where more than one filter is configured for a pipeline, each filter is executed in the order it appears in the configuration. For example,within the following fragment:
...replicator.stage.binlog-to-q.filters=settostring,enumtostring,pkey,colnames...
settostring is executed first, followed by enumtostring, pkey and colnames.
For certain filter combinations this order can be significant. Some filters rely on the information provided by earlier filters.
8.1. Enabling/Disabling FiltersA number of standard filter configurations are created and defined by default within the static properties file for the Tungsten Replicatorconfiguration.
Filters can be enabled through tpm to update the filter configuration
• --repl-svc-extractor-filters [209]
Apply the filter during the extraction stage, i.e. when the information is extracted from the binary log and written to the internal queue(binlog-to-q).
• --repl-svc-thl-filters [210]
Apply the filter between the internal queue and when the transactions are written to the THL. (q-to-thl).
• --repl-svc-applier-filters [209]
Apply the filter between reading from the internal queue and applying to the destination database (q-to-dbms).
Properties and options for an individual filter can be specified by setting the corresponding property value on the tpm command-line.
For example, to ignore a database schema on a slave, the replicate filter can be enabled, and the replicator.filter.replicate.ignorespecifies the name of the schemas to be ignored. To ignore the table contacts:
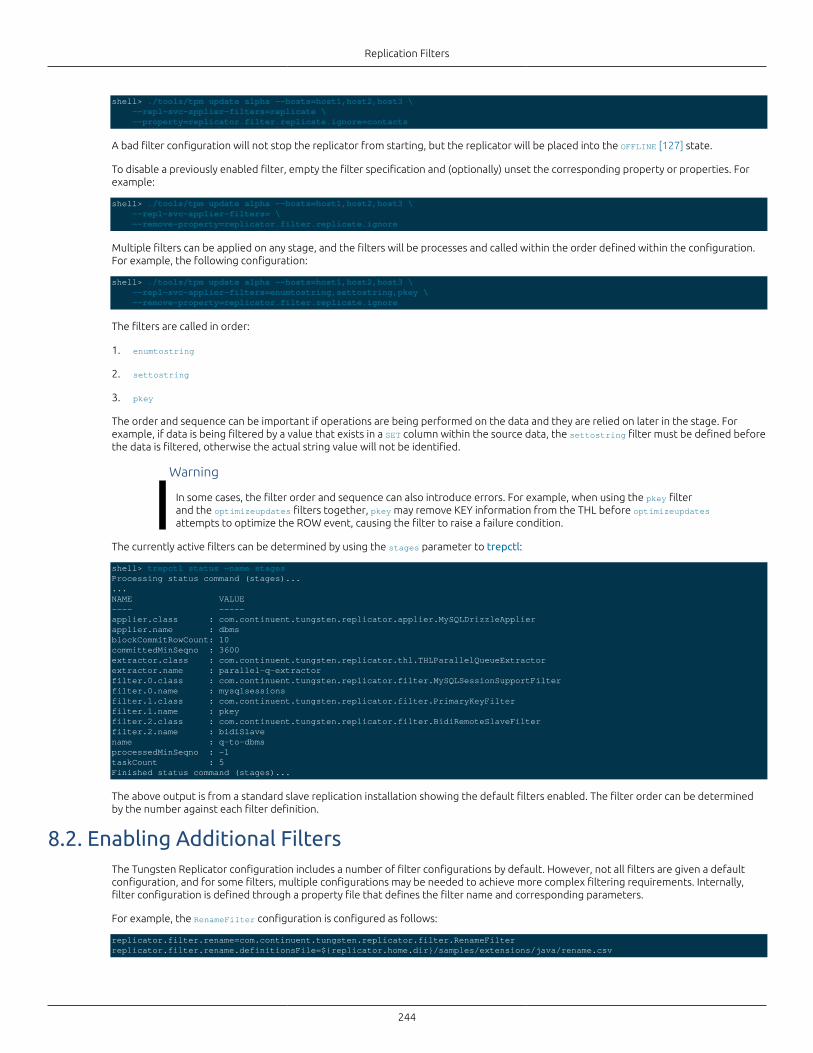
Replication Filters
244
shell> ./tools/tpm update alpha --hosts=host1,host2,host3 \ --repl-svc-applier-filters=replicate \ --property=replicator.filter.replicate.ignore=contacts
A bad filter configuration will not stop the replicator from starting, but the replicator will be placed into the OFFLINE [127] state.
To disable a previously enabled filter, empty the filter specification and (optionally) unset the corresponding property or properties. Forexample:
shell> ./tools/tpm update alpha --hosts=host1,host2,host3 \ --repl-svc-applier-filters= \ --remove-property=replicator.filter.replicate.ignore
Multiple filters can be applied on any stage, and the filters will be processes and called within the order defined within the configuration.For example, the following configuration:
shell> ./tools/tpm update alpha --hosts=host1,host2,host3 \ --repl-svc-applier-filters=enumtostring,settostring,pkey \ --remove-property=replicator.filter.replicate.ignore
The filters are called in order:
1. enumtostring
2. settostring
3. pkey
The order and sequence can be important if operations are being performed on the data and they are relied on later in the stage. Forexample, if data is being filtered by a value that exists in a SET column within the source data, the settostring filter must be defined beforethe data is filtered, otherwise the actual string value will not be identified.
Warning
In some cases, the filter order and sequence can also introduce errors. For example, when using the pkey filterand the optimizeupdates filters together, pkey may remove KEY information from the THL before optimizeupdatesattempts to optimize the ROW event, causing the filter to raise a failure condition.
The currently active filters can be determined by using the stages parameter to trepctl:
shell> trepctl status -name stagesProcessing status command (stages)......NAME VALUE---- -----applier.class : com.continuent.tungsten.replicator.applier.MySQLDrizzleApplierapplier.name : dbmsblockCommitRowCount: 10committedMinSeqno : 3600extractor.class : com.continuent.tungsten.replicator.thl.THLParallelQueueExtractorextractor.name : parallel-q-extractorfilter.0.class : com.continuent.tungsten.replicator.filter.MySQLSessionSupportFilterfilter.0.name : mysqlsessionsfilter.1.class : com.continuent.tungsten.replicator.filter.PrimaryKeyFilterfilter.1.name : pkeyfilter.2.class : com.continuent.tungsten.replicator.filter.BidiRemoteSlaveFilterfilter.2.name : bidiSlavename : q-to-dbmsprocessedMinSeqno : -1taskCount : 5Finished status command (stages)...
The above output is from a standard slave replication installation showing the default filters enabled. The filter order can be determinedby the number against each filter definition.
8.2. Enabling Additional FiltersThe Tungsten Replicator configuration includes a number of filter configurations by default. However, not all filters are given a defaultconfiguration, and for some filters, multiple configurations may be needed to achieve more complex filtering requirements. Internally,filter configuration is defined through a property file that defines the filter name and corresponding parameters.
For example, the RenameFilter configuration is configured as follows:
replicator.filter.rename=com.continuent.tungsten.replicator.filter.RenameFilterreplicator.filter.rename.definitionsFile=${replicator.home.dir}/samples/extensions/java/rename.csv
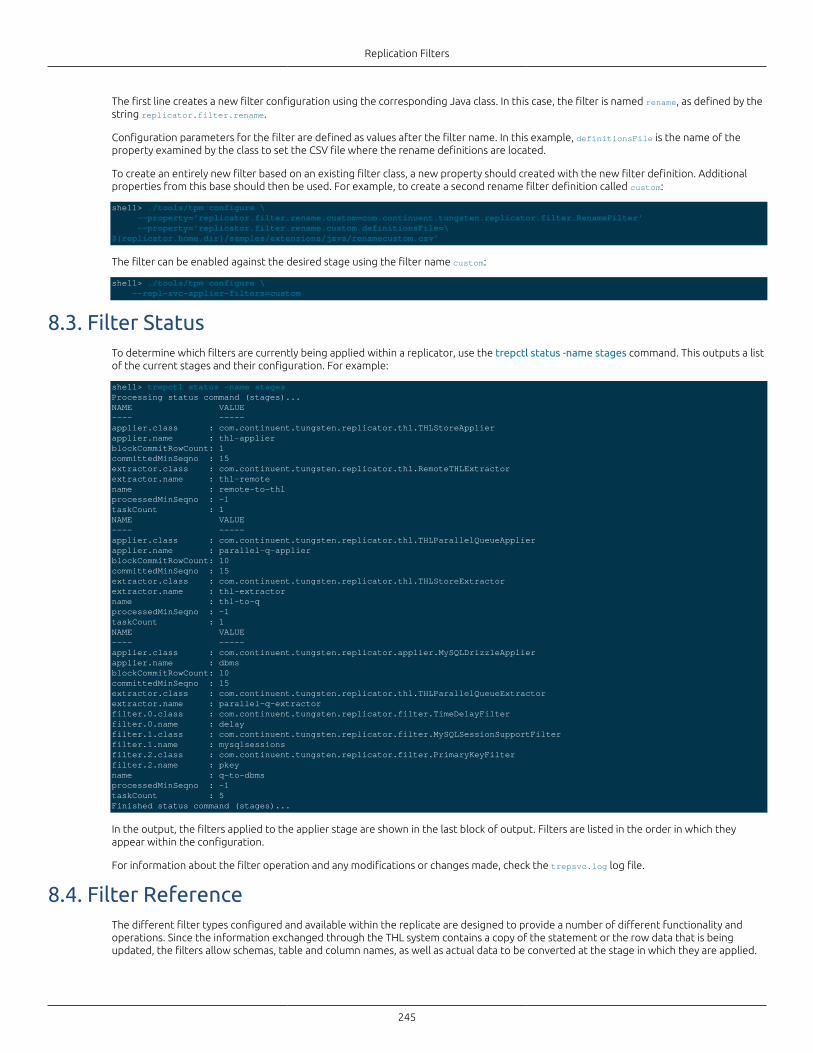
Replication Filters
245
The first line creates a new filter configuration using the corresponding Java class. In this case, the filter is named rename, as defined by thestring replicator.filter.rename.
Configuration parameters for the filter are defined as values after the filter name. In this example, definitionsFile is the name of theproperty examined by the class to set the CSV file where the rename definitions are located.
To create an entirely new filter based on an existing filter class, a new property should created with the new filter definition. Additionalproperties from this base should then be used. For example, to create a second rename filter definition called custom:
shell> ./tools/tpm configure \ --property='replicator.filter.rename.custom=com.continuent.tungsten.replicator.filter.RenameFilter' --property='replicator.filter.rename.custom.definitionsFile=\${replicator.home.dir}/samples/extensions/java/renamecustom.csv'
The filter can be enabled against the desired stage using the filter name custom:
shell> ./tools/tpm configure \ --repl-svc-applier-filters=custom
8.3. Filter StatusTo determine which filters are currently being applied within a replicator, use the trepctl status -name stages command. This outputs a listof the current stages and their configuration. For example:
shell> trepctl status -name stagesProcessing status command (stages)...NAME VALUE---- -----applier.class : com.continuent.tungsten.replicator.thl.THLStoreApplierapplier.name : thl-applierblockCommitRowCount: 1committedMinSeqno : 15extractor.class : com.continuent.tungsten.replicator.thl.RemoteTHLExtractorextractor.name : thl-remotename : remote-to-thlprocessedMinSeqno : -1taskCount : 1NAME VALUE---- -----applier.class : com.continuent.tungsten.replicator.thl.THLParallelQueueApplierapplier.name : parallel-q-applierblockCommitRowCount: 10committedMinSeqno : 15extractor.class : com.continuent.tungsten.replicator.thl.THLStoreExtractorextractor.name : thl-extractorname : thl-to-qprocessedMinSeqno : -1taskCount : 1NAME VALUE---- -----applier.class : com.continuent.tungsten.replicator.applier.MySQLDrizzleApplierapplier.name : dbmsblockCommitRowCount: 10committedMinSeqno : 15extractor.class : com.continuent.tungsten.replicator.thl.THLParallelQueueExtractorextractor.name : parallel-q-extractorfilter.0.class : com.continuent.tungsten.replicator.filter.TimeDelayFilterfilter.0.name : delayfilter.1.class : com.continuent.tungsten.replicator.filter.MySQLSessionSupportFilterfilter.1.name : mysqlsessionsfilter.2.class : com.continuent.tungsten.replicator.filter.PrimaryKeyFilterfilter.2.name : pkeyname : q-to-dbmsprocessedMinSeqno : -1taskCount : 5Finished status command (stages)...
In the output, the filters applied to the applier stage are shown in the last block of output. Filters are listed in the order in which theyappear within the configuration.
For information about the filter operation and any modifications or changes made, check the trepsvc.log log file.
8.4. Filter ReferenceThe different filter types configured and available within the replicate are designed to provide a number of different functionality andoperations. Since the information exchanged through the THL system contains a copy of the statement or the row data that is beingupdated, the filters allow schemas, table and column names, as well as actual data to be converted at the stage in which they are applied.
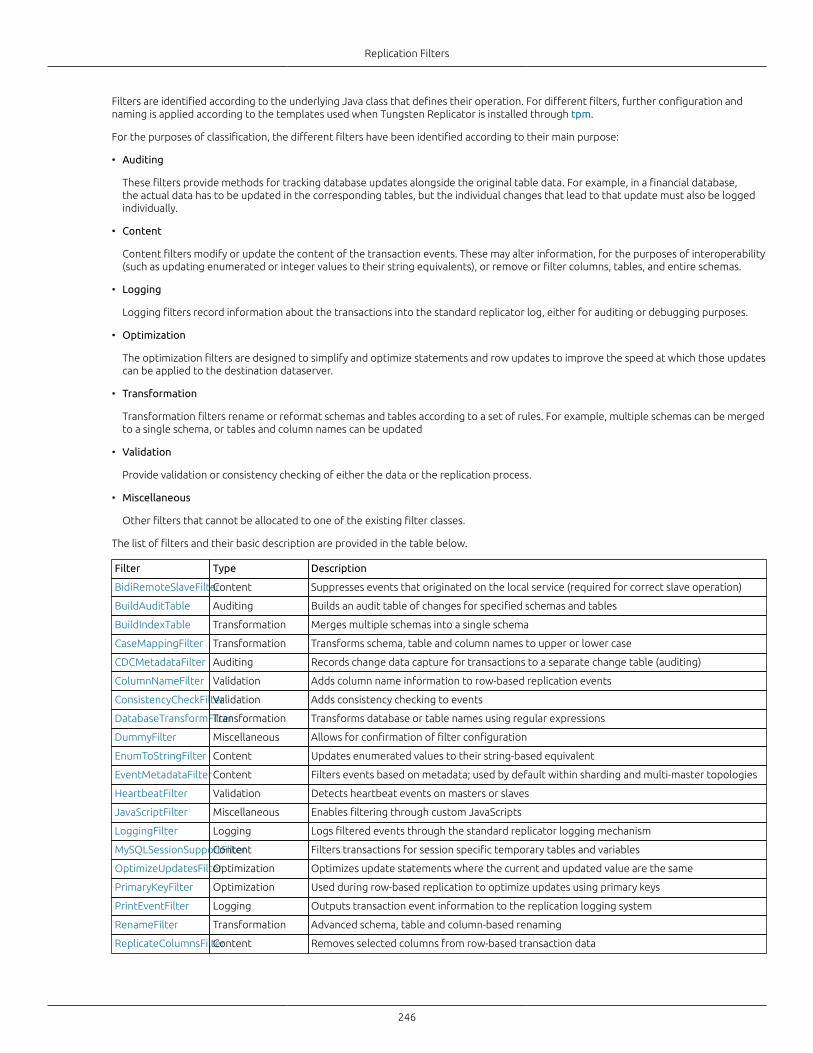
Replication Filters
246
Filters are identified according to the underlying Java class that defines their operation. For different filters, further configuration andnaming is applied according to the templates used when Tungsten Replicator is installed through tpm.
For the purposes of classification, the different filters have been identified according to their main purpose:
• Auditing
These filters provide methods for tracking database updates alongside the original table data. For example, in a financial database,the actual data has to be updated in the corresponding tables, but the individual changes that lead to that update must also be loggedindividually.
• Content
Content filters modify or update the content of the transaction events. These may alter information, for the purposes of interoperability(such as updating enumerated or integer values to their string equivalents), or remove or filter columns, tables, and entire schemas.
• Logging
Logging filters record information about the transactions into the standard replicator log, either for auditing or debugging purposes.
• Optimization
The optimization filters are designed to simplify and optimize statements and row updates to improve the speed at which those updatescan be applied to the destination dataserver.
• Transformation
Transformation filters rename or reformat schemas and tables according to a set of rules. For example, multiple schemas can be mergedto a single schema, or tables and column names can be updated
• Validation
Provide validation or consistency checking of either the data or the replication process.
• Miscellaneous
Other filters that cannot be allocated to one of the existing filter classes.
The list of filters and their basic description are provided in the table below.
Filter Type Description
BidiRemoteSlaveFilterContent Suppresses events that originated on the local service (required for correct slave operation)
BuildAuditTable Auditing Builds an audit table of changes for specified schemas and tables
BuildIndexTable Transformation Merges multiple schemas into a single schema
CaseMappingFilter Transformation Transforms schema, table and column names to upper or lower case
CDCMetadataFilter Auditing Records change data capture for transactions to a separate change table (auditing)
ColumnNameFilter Validation Adds column name information to row-based replication events
ConsistencyCheckFilterValidation Adds consistency checking to events
DatabaseTransformFilterTransformation Transforms database or table names using regular expressions
DummyFilter Miscellaneous Allows for confirmation of filter configuration
EnumToStringFilter Content Updates enumerated values to their string-based equivalent
EventMetadataFilterContent Filters events based on metadata; used by default within sharding and multi-master topologies
HeartbeatFilter Validation Detects heartbeat events on masters or slaves
JavaScriptFilter Miscellaneous Enables filtering through custom JavaScripts
LoggingFilter Logging Logs filtered events through the standard replicator logging mechanism
MySQLSessionSupportFilterContent Filters transactions for session specific temporary tables and variables
OptimizeUpdatesFilterOptimization Optimizes update statements where the current and updated value are the same
PrimaryKeyFilter Optimization Used during row-based replication to optimize updates using primary keys
PrintEventFilter Logging Outputs transaction event information to the replication logging system
RenameFilter Transformation Advanced schema, table and column-based renaming
ReplicateColumnsFilterContent Removes selected columns from row-based transaction data
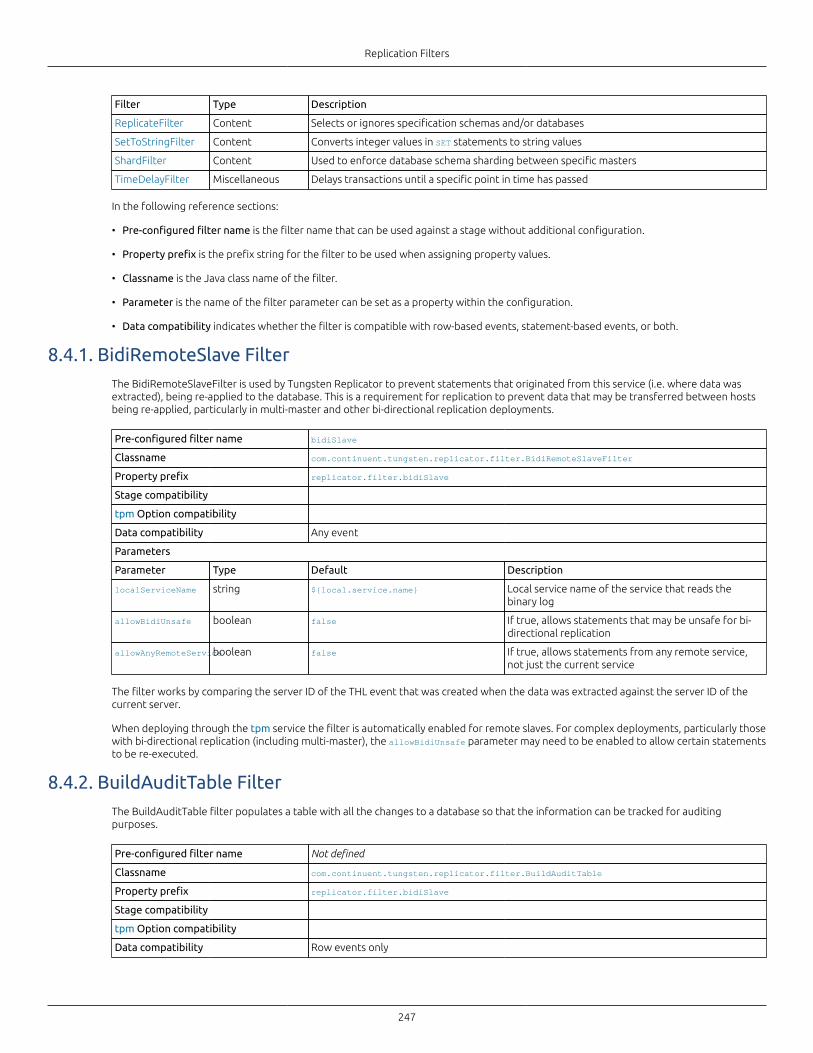
Replication Filters
247
Filter Type Description
ReplicateFilter Content Selects or ignores specification schemas and/or databases
SetToStringFilter Content Converts integer values in SET statements to string values
ShardFilter Content Used to enforce database schema sharding between specific masters
TimeDelayFilter Miscellaneous Delays transactions until a specific point in time has passed
In the following reference sections:
• Pre-configured filter name is the filter name that can be used against a stage without additional configuration.
• Property prefix is the prefix string for the filter to be used when assigning property values.
• Classname is the Java class name of the filter.
• Parameter is the name of the filter parameter can be set as a property within the configuration.
• Data compatibility indicates whether the filter is compatible with row-based events, statement-based events, or both.
8.4.1. BidiRemoteSlave FilterThe BidiRemoteSlaveFilter is used by Tungsten Replicator to prevent statements that originated from this service (i.e. where data wasextracted), being re-applied to the database. This is a requirement for replication to prevent data that may be transferred between hostsbeing re-applied, particularly in multi-master and other bi-directional replication deployments.
Pre-configured filter name bidiSlave
Classname com.continuent.tungsten.replicator.filter.BidiRemoteSlaveFilter
Property prefix replicator.filter.bidiSlave
Stage compatibility
tpm Option compatibility
Data compatibility Any event
Parameters
Parameter Type Default Description
localServiceName string ${local.service.name} Local service name of the service that reads thebinary log
allowBidiUnsafe boolean false If true, allows statements that may be unsafe for bi-directional replication
allowAnyRemoteServiceboolean false If true, allows statements from any remote service,not just the current service
The filter works by comparing the server ID of the THL event that was created when the data was extracted against the server ID of thecurrent server.
When deploying through the tpm service the filter is automatically enabled for remote slaves. For complex deployments, particularly thosewith bi-directional replication (including multi-master), the allowBidiUnsafe parameter may need to be enabled to allow certain statementsto be re-executed.
8.4.2. BuildAuditTable FilterThe BuildAuditTable filter populates a table with all the changes to a database so that the information can be tracked for auditingpurposes.
Pre-configured filter name Not defined
Classname com.continuent.tungsten.replicator.filter.BuildAuditTable
Property prefix replicator.filter.bidiSlave
Stage compatibility
tpm Option compatibility
Data compatibility Row events only

Replication Filters
248
Parameters
Parameter Type Default Description
targetTableName string Name of the table where audit information will bestored
8.4.3. BuildIndexTable Filter
Pre-configured filter name buildindextable
Classname com.continuent.tungsten.replicator.filter.BuildIndexTable
Property prefix replicator.filter.buildindextable
Stage compatibility
tpm Option compatibility
Data compatibility Row events only
Parameters
Parameter Type Default Description
target_schema_name string test Name of the schema where the new indexinformation will be created
8.4.4. CaseMapping Filter
Pre-configured filter name casetransform
Classname com.continuent.tungsten.replicator.filter.CaseMappingFilter
Property prefix replicator.filter.casetransform
Stage compatibility
tpm Option compatibility
Data compatibility Any Event
Parameters
Parameter Type Default Description
to_upper_case boolean true If true, converts object names to upper case; if falseconverts them to lower case
8.4.5. CDCMetadata Filter
Pre-configured filter name customcdc
Classname com.continuent.tungsten.replicator.filter.CDCMetadataFilter
Property prefix replicator.filter.customcdc
Stage compatibility
tpm Option compatibility
Data compatibility Row events only
Parameters
Parameter Type Default Description
cdcColumnsAtFront boolean false If true, the additional CDC columns are added at thestart of the table row. If false, they are added to theend of the table row
schemaNameSuffix string Specifies the schema name suffix. If defined, thetables are created in a schema matching schemaname of the source transaction with the schemasuffix appended
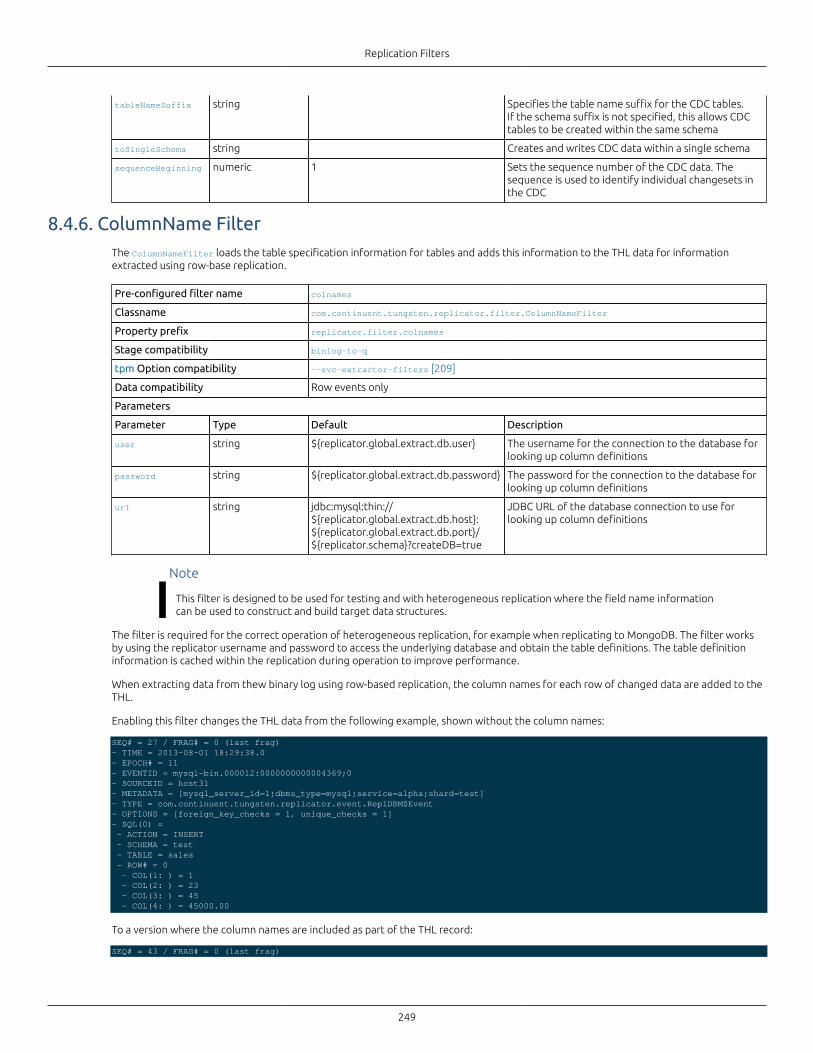
Replication Filters
249
tableNameSuffix string Specifies the table name suffix for the CDC tables.If the schema suffix is not specified, this allows CDCtables to be created within the same schema
toSingleSchema string Creates and writes CDC data within a single schema
sequenceBeginning numeric 1 Sets the sequence number of the CDC data. Thesequence is used to identify individual changesets inthe CDC
8.4.6. ColumnName FilterThe ColumnNameFilter loads the table specification information for tables and adds this information to the THL data for informationextracted using row-base replication.
Pre-configured filter name colnames
Classname com.continuent.tungsten.replicator.filter.ColumnNameFilter
Property prefix replicator.filter.colnames
Stage compatibility binlog-to-q
tpm Option compatibility --svc-extractor-filters [209]
Data compatibility Row events only
Parameters
Parameter Type Default Description
user string ${replicator.global.extract.db.user} The username for the connection to the database forlooking up column definitions
password string ${replicator.global.extract.db.password} The password for the connection to the database forlooking up column definitions
url string jdbc:mysql:thin://${replicator.global.extract.db.host}:${replicator.global.extract.db.port}/${replicator.schema}?createDB=true
JDBC URL of the database connection to use forlooking up column definitions
Note
This filter is designed to be used for testing and with heterogeneous replication where the field name informationcan be used to construct and build target data structures.
The filter is required for the correct operation of heterogeneous replication, for example when replicating to MongoDB. The filter worksby using the replicator username and password to access the underlying database and obtain the table definitions. The table definitioninformation is cached within the replication during operation to improve performance.
When extracting data from thew binary log using row-based replication, the column names for each row of changed data are added to theTHL.
Enabling this filter changes the THL data from the following example, shown without the column names:
SEQ# = 27 / FRAG# = 0 (last frag)- TIME = 2013-08-01 18:29:38.0- EPOCH# = 11- EVENTID = mysql-bin.000012:0000000000004369;0- SOURCEID = host31- METADATA = [mysql_server_id=1;dbms_type=mysql;service=alpha;shard=test]- TYPE = com.continuent.tungsten.replicator.event.ReplDBMSEvent- OPTIONS = [foreign_key_checks = 1, unique_checks = 1]- SQL(0) = - ACTION = INSERT - SCHEMA = test - TABLE = sales - ROW# = 0 - COL(1: ) = 1 - COL(2: ) = 23 - COL(3: ) = 45 - COL(4: ) = 45000.00
To a version where the column names are included as part of the THL record:
SEQ# = 43 / FRAG# = 0 (last frag)
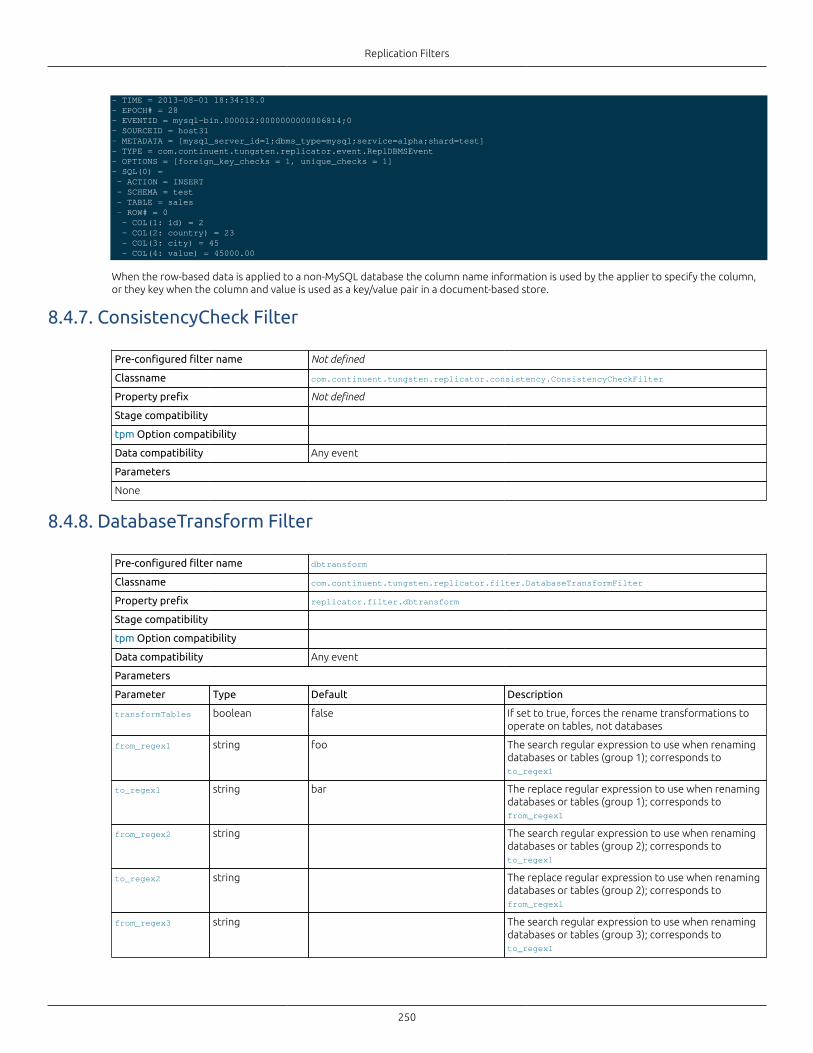
Replication Filters
250
- TIME = 2013-08-01 18:34:18.0- EPOCH# = 28- EVENTID = mysql-bin.000012:0000000000006814;0- SOURCEID = host31- METADATA = [mysql_server_id=1;dbms_type=mysql;service=alpha;shard=test]- TYPE = com.continuent.tungsten.replicator.event.ReplDBMSEvent- OPTIONS = [foreign_key_checks = 1, unique_checks = 1]- SQL(0) = - ACTION = INSERT - SCHEMA = test - TABLE = sales - ROW# = 0 - COL(1: id) = 2 - COL(2: country) = 23 - COL(3: city) = 45 - COL(4: value) = 45000.00
When the row-based data is applied to a non-MySQL database the column name information is used by the applier to specify the column,or they key when the column and value is used as a key/value pair in a document-based store.
8.4.7. ConsistencyCheck Filter
Pre-configured filter name Not defined
Classname com.continuent.tungsten.replicator.consistency.ConsistencyCheckFilter
Property prefix Not defined
Stage compatibility
tpm Option compatibility
Data compatibility Any event
Parameters
None
8.4.8. DatabaseTransform Filter
Pre-configured filter name dbtransform
Classname com.continuent.tungsten.replicator.filter.DatabaseTransformFilter
Property prefix replicator.filter.dbtransform
Stage compatibility
tpm Option compatibility
Data compatibility Any event
Parameters
Parameter Type Default Description
transformTables boolean false If set to true, forces the rename transformations tooperate on tables, not databases
from_regex1 string foo The search regular expression to use when renamingdatabases or tables (group 1); corresponds toto_regex1
to_regex1 string bar The replace regular expression to use when renamingdatabases or tables (group 1); corresponds tofrom_regex1
from_regex2 string The search regular expression to use when renamingdatabases or tables (group 2); corresponds toto_regex1
to_regex2 string The replace regular expression to use when renamingdatabases or tables (group 2); corresponds tofrom_regex1
from_regex3 string The search regular expression to use when renamingdatabases or tables (group 3); corresponds toto_regex1
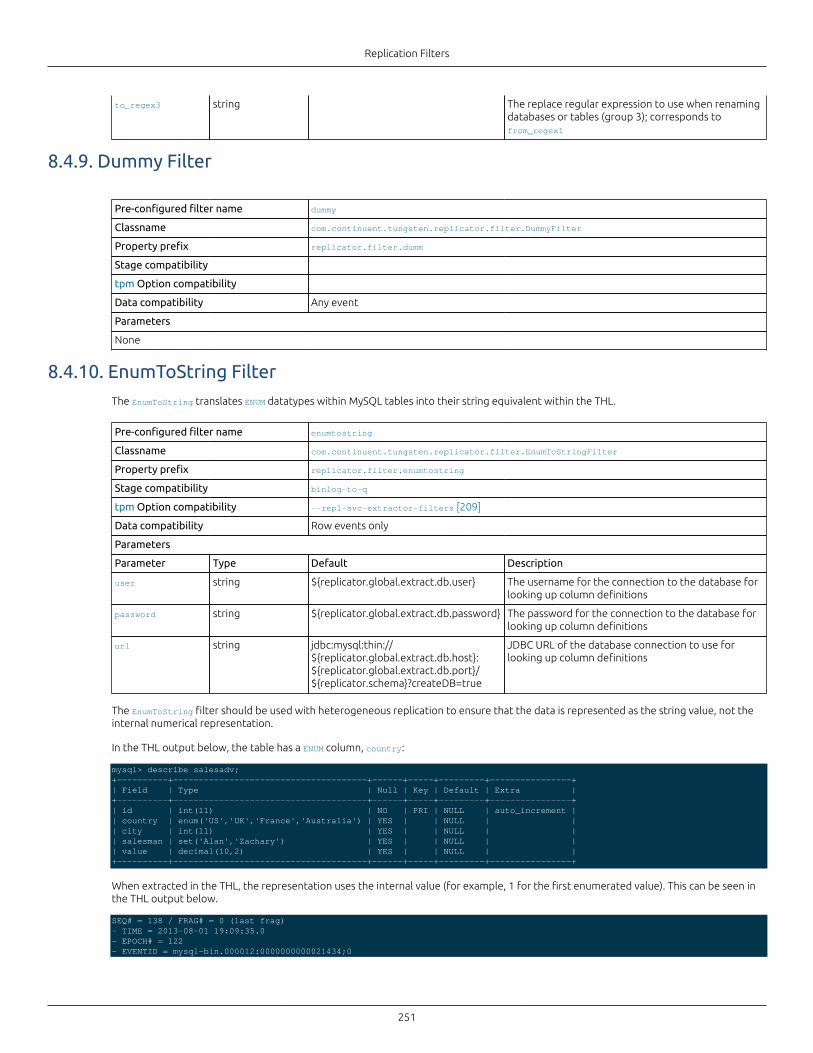
Replication Filters
251
to_regex3 string The replace regular expression to use when renamingdatabases or tables (group 3); corresponds tofrom_regex1
8.4.9. Dummy Filter
Pre-configured filter name dummy
Classname com.continuent.tungsten.replicator.filter.DummyFilter
Property prefix replicator.filter.dumm
Stage compatibility
tpm Option compatibility
Data compatibility Any event
Parameters
None
8.4.10. EnumToString FilterThe EnumToString translates ENUM datatypes within MySQL tables into their string equivalent within the THL.
Pre-configured filter name enumtostring
Classname com.continuent.tungsten.replicator.filter.EnumToStringFilter
Property prefix replicator.filter.enumtostring
Stage compatibility binlog-to-q
tpm Option compatibility --repl-svc-extractor-filters [209]
Data compatibility Row events only
Parameters
Parameter Type Default Description
user string ${replicator.global.extract.db.user} The username for the connection to the database forlooking up column definitions
password string ${replicator.global.extract.db.password} The password for the connection to the database forlooking up column definitions
url string jdbc:mysql:thin://${replicator.global.extract.db.host}:${replicator.global.extract.db.port}/${replicator.schema}?createDB=true
JDBC URL of the database connection to use forlooking up column definitions
The EnumToString filter should be used with heterogeneous replication to ensure that the data is represented as the string value, not theinternal numerical representation.
In the THL output below, the table has a ENUM column, country:
mysql> describe salesadv;+----------+--------------------------------------+------+-----+---------+----------------+| Field | Type | Null | Key | Default | Extra |+----------+--------------------------------------+------+-----+---------+----------------+| id | int(11) | NO | PRI | NULL | auto_increment || country | enum('US','UK','France','Australia') | YES | | NULL | || city | int(11) | YES | | NULL | || salesman | set('Alan','Zachary') | YES | | NULL | || value | decimal(10,2) | YES | | NULL | |+----------+--------------------------------------+------+-----+---------+----------------+
When extracted in the THL, the representation uses the internal value (for example, 1 for the first enumerated value). This can be seen inthe THL output below.
SEQ# = 138 / FRAG# = 0 (last frag)- TIME = 2013-08-01 19:09:35.0- EPOCH# = 122- EVENTID = mysql-bin.000012:0000000000021434;0
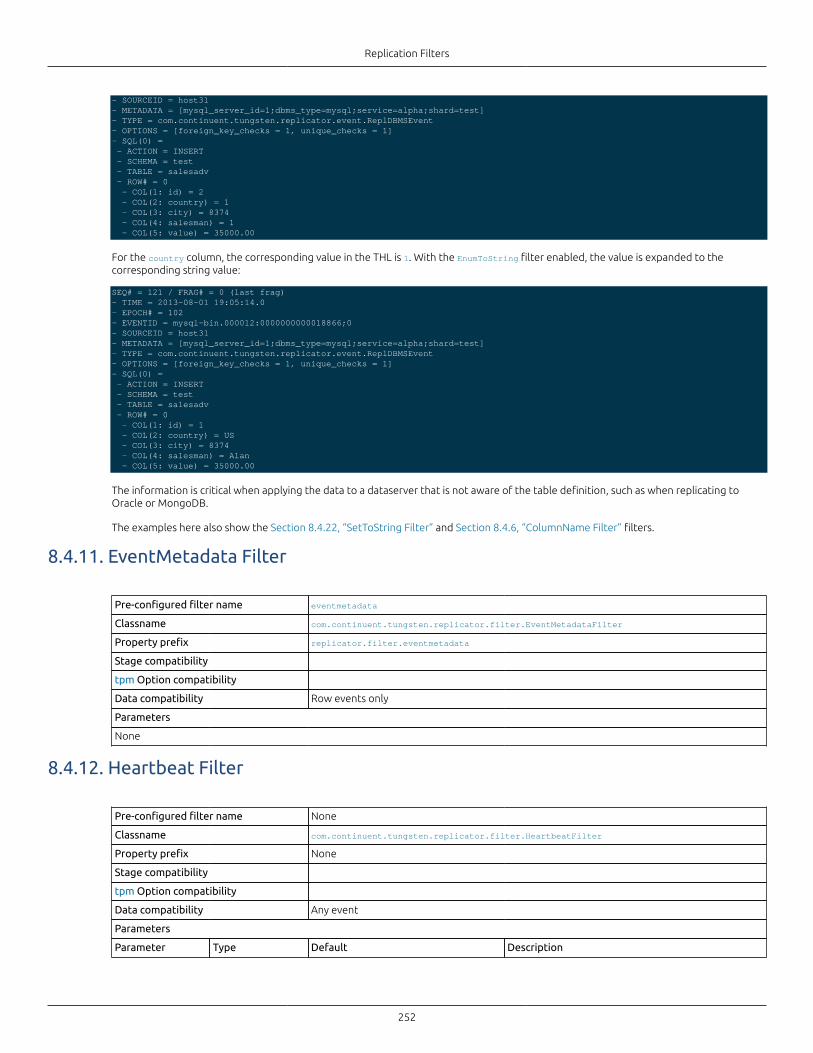
Replication Filters
252
- SOURCEID = host31- METADATA = [mysql_server_id=1;dbms_type=mysql;service=alpha;shard=test]- TYPE = com.continuent.tungsten.replicator.event.ReplDBMSEvent- OPTIONS = [foreign_key_checks = 1, unique_checks = 1]- SQL(0) = - ACTION = INSERT - SCHEMA = test - TABLE = salesadv - ROW# = 0 - COL(1: id) = 2 - COL(2: country) = 1 - COL(3: city) = 8374 - COL(4: salesman) = 1 - COL(5: value) = 35000.00
For the country column, the corresponding value in the THL is 1. With the EnumToString filter enabled, the value is expanded to thecorresponding string value:
SEQ# = 121 / FRAG# = 0 (last frag)- TIME = 2013-08-01 19:05:14.0- EPOCH# = 102- EVENTID = mysql-bin.000012:0000000000018866;0- SOURCEID = host31- METADATA = [mysql_server_id=1;dbms_type=mysql;service=alpha;shard=test]- TYPE = com.continuent.tungsten.replicator.event.ReplDBMSEvent- OPTIONS = [foreign_key_checks = 1, unique_checks = 1]- SQL(0) = - ACTION = INSERT - SCHEMA = test - TABLE = salesadv - ROW# = 0 - COL(1: id) = 1 - COL(2: country) = US - COL(3: city) = 8374 - COL(4: salesman) = Alan - COL(5: value) = 35000.00
The information is critical when applying the data to a dataserver that is not aware of the table definition, such as when replicating toOracle or MongoDB.
The examples here also show the Section 8.4.22, “SetToString Filter” and Section 8.4.6, “ColumnName Filter” filters.
8.4.11. EventMetadata Filter
Pre-configured filter name eventmetadata
Classname com.continuent.tungsten.replicator.filter.EventMetadataFilter
Property prefix replicator.filter.eventmetadata
Stage compatibility
tpm Option compatibility
Data compatibility Row events only
Parameters
None
8.4.12. Heartbeat Filter
Pre-configured filter name None
Classname com.continuent.tungsten.replicator.filter.HeartbeatFilter
Property prefix None
Stage compatibility
tpm Option compatibility
Data compatibility Any event
Parameters
Parameter Type Default Description

Replication Filters
253
heartbeatInterval Numeric 3000 Interval in milliseconds when a heartbeat event isinserted into the THL
8.4.13. Logging Filter
Pre-configured filter name logger
Classname com.continuent.tungsten.replicator.filter.LoggingFilter
Property prefix replicator.filter.logger
Stage compatibility
tpm Option compatibility
Data compatibility Any event
Parameters
None
8.4.14. MySQLSessionSupport Filter
Pre-configured filter name mysqlsessions
Classname com.continuent.tungsten.replicator.filter.MySQLSessionSupportFilter
Property prefix replicator.filter.mysqlsession
Stage compatibility
tpm Option compatibility
Data compatibility Any event
Parameters
None
8.4.15. NetworkClient Filter
The NetworkClientFilter processes data in selected columns
Pre-configured filter name networkclient
Classname com.continuent.tungsten.replicator.filter.NetwrokClientFilter
Property prefix replicator.filter.networkclient
Stage compatibility Any
tpm Option compatibility --svc-extractor-filters [209], --svc-thl-filters [210], --svc-applier-filters [209]
Data compatibility Row events only
Parameters
Parameter Type Default Description
definitionsFile pathname ${replicator.home.dir}/samples/extensions/java/networkclient.json
The name of a file containing thedefinitions for how columns should beprocessed by filters
serverPort number 3112 The network port to use whencommunicating with the networkclient
timeout number 10 Timeout in seconds before treatingthe network client as failed whenwaiting to send or receive content.
The network filter operates by sending field data, as defined in the corresponding filter configuration file, out to a network server thatprocesses the informaiton and sends it back to be re-introduced in place of the original field data. This can be used to translate andreformat information during the replication scheme.

Replication Filters
254
The filter operation works as follows:
• All filtered data will be sent to a single network server, at the configured port.
• A single network server can be used to provide multiple transformations.
• The JSON configuration file for the filter supports multiple types and multiple column definitions.
• The protocol used by the network filter must be followed to effectively process the information. A failure in the network server orcommunication will cause the replicator to raise an error and replication to go OFFLINE [127].
• The network server must be running before the replicator is started. If the network server cannot be found, replication will goOFFLINE [127].
Correct operation requires building a suitable network filter, and creating the JSON configuration file.
8.4.15.1. Network Client Configuration
The format of the configuration file defines the translation operation to be requested from the network client, in addition to the schema,table and columne name. The format for the file is JSON, with the top-level hash defining the operation, and an array of field selections foreach field that should be processed accordingly. For example:
{ "String_to_HEX_v1" : [ { "table" : "hextable", "schema" : "hexdb", "columns" : [ "hexcol" ] } ]}
The operation in this case is String_to_HEX_v1; this will be sent to the network server as part of the request. The column definition follows.
To send multiple columns from different tables to the same translation:
{ "String_to_HEX_v1" : [ { "table" : "hextable", "schema" : "hexdb", "columns" : [ "hexcol" ] }, { "table" : "hexagon", "schema" : "sourcetext", "columns" : [ "itemtext" ] } ]}
Alternatively, to configure different operations for the same two tables:
{ "String_to_HEX_v1" : [ { "table" : "hextable", "schema" : "hexdb", "columns" : [ "hexcol" ] } ], "HEX_to_String_v1" : [ { "table" : "hexagon", "schema" : "sourcetext", "columns" : [ "itemtext" ] } ]
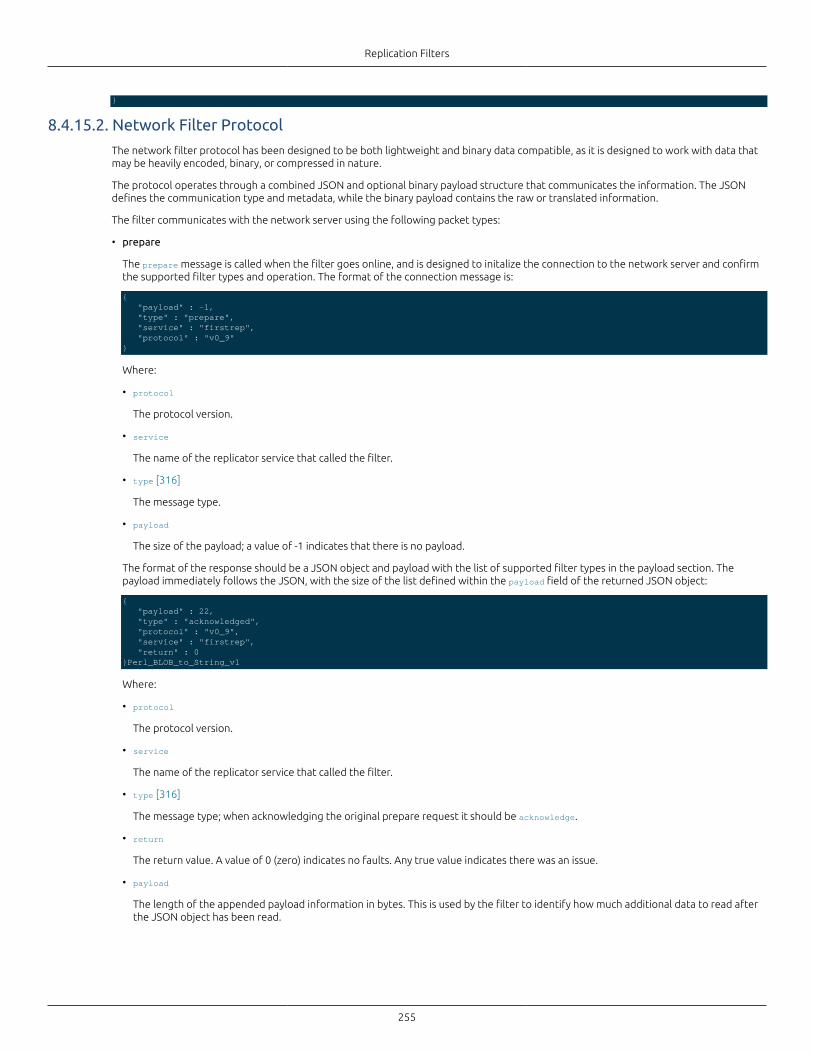
Replication Filters
255
}
8.4.15.2. Network Filter Protocol
The network filter protocol has been designed to be both lightweight and binary data compatible, as it is designed to work with data thatmay be heavily encoded, binary, or compressed in nature.
The protocol operates through a combined JSON and optional binary payload structure that communicates the information. The JSONdefines the communication type and metadata, while the binary payload contains the raw or translated information.
The filter communicates with the network server using the following packet types:
• prepare
The prepare message is called when the filter goes online, and is designed to initalize the connection to the network server and confirmthe supported filter types and operation. The format of the connection message is:
{ "payload" : -1, "type" : "prepare", "service" : "firstrep", "protocol" : "v0_9"}
Where:
• protocol
The protocol version.
• service
The name of the replicator service that called the filter.
• type [316]
The message type.
• payload
The size of the payload; a value of -1 indicates that there is no payload.
The format of the response should be a JSON object and payload with the list of supported filter types in the payload section. Thepayload immediately follows the JSON, with the size of the list defined within the payload field of the returned JSON object:
{ "payload" : 22, "type" : "acknowledged", "protocol" : "v0_9", "service" : "firstrep", "return" : 0}Perl_BLOB_to_String_v1
Where:
• protocol
The protocol version.
• service
The name of the replicator service that called the filter.
• type [316]
The message type; when acknowledging the original prepare request it should be acknowledge.
• return
The return value. A value of 0 (zero) indicates no faults. Any true value indicates there was an issue.
• payload
The length of the appended payload information in bytes. This is used by the filter to identify how much additional data to read afterthe JSON object has been read.
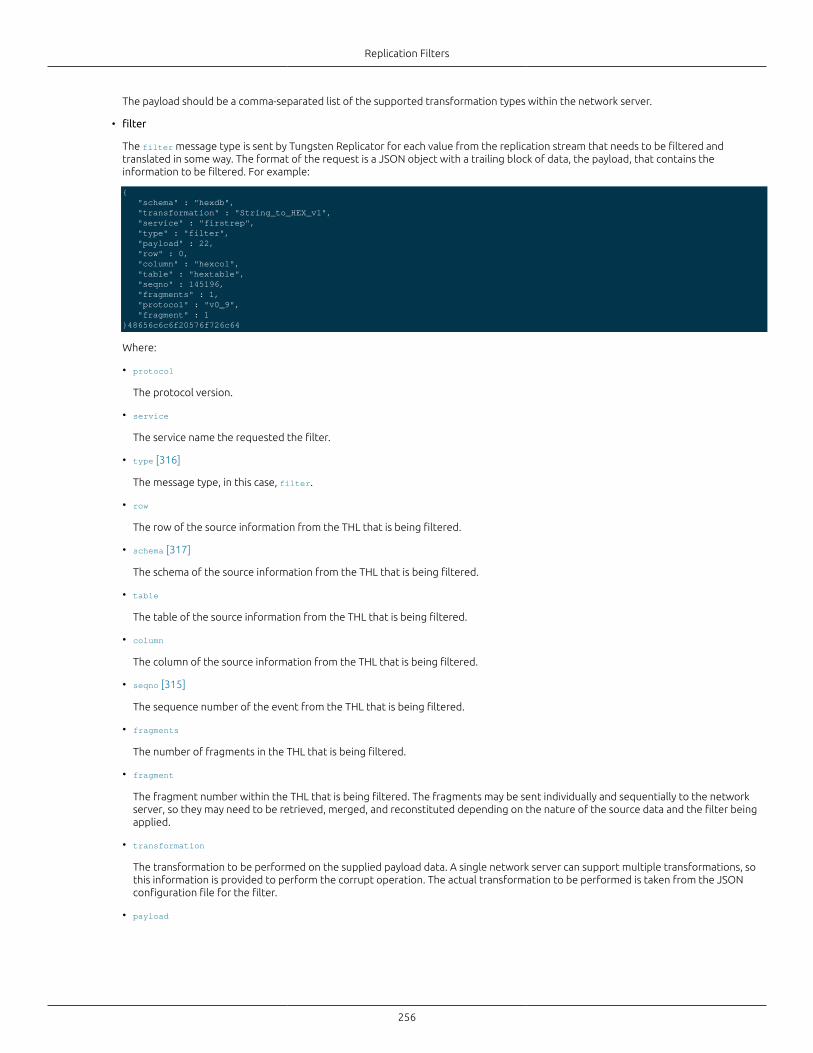
Replication Filters
256
The payload should be a comma-separated list of the supported transformation types within the network server.
• filter
The filter message type is sent by Tungsten Replicator for each value from the replication stream that needs to be filtered andtranslated in some way. The format of the request is a JSON object with a trailing block of data, the payload, that contains theinformation to be filtered. For example:
{ "schema" : "hexdb", "transformation" : "String_to_HEX_v1", "service" : "firstrep", "type" : "filter", "payload" : 22, "row" : 0, "column" : "hexcol", "table" : "hextable", "seqno" : 145196, "fragments" : 1, "protocol" : "v0_9", "fragment" : 1}48656c6c6f20576f726c64
Where:
• protocol
The protocol version.
• service
The service name the requested the filter.
• type [316]
The message type, in this case, filter.
• row
The row of the source information from the THL that is being filtered.
• schema [317]
The schema of the source information from the THL that is being filtered.
• table
The table of the source information from the THL that is being filtered.
• column
The column of the source information from the THL that is being filtered.
• seqno [315]
The sequence number of the event from the THL that is being filtered.
• fragments
The number of fragments in the THL that is being filtered.
• fragment
The fragment number within the THL that is being filtered. The fragments may be sent individually and sequentially to the networkserver, so they may need to be retrieved, merged, and reconstituted depending on the nature of the source data and the filter beingapplied.
• transformation
The transformation to be performed on the supplied payload data. A single network server can support multiple transformations, sothis information is provided to perform the corrupt operation. The actual transformation to be performed is taken from the JSONconfiguration file for the filter.
• payload
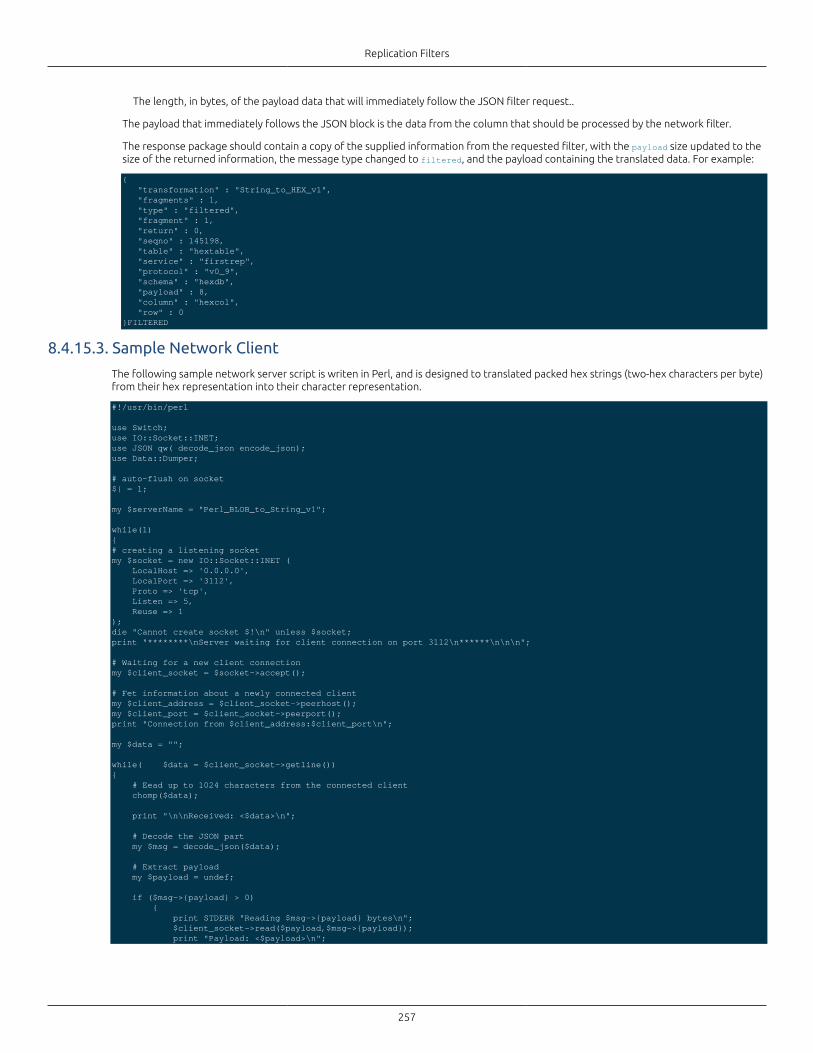
Replication Filters
257
The length, in bytes, of the payload data that will immediately follow the JSON filter request..
The payload that immediately follows the JSON block is the data from the column that should be processed by the network filter.
The response package should contain a copy of the supplied information from the requested filter, with the payload size updated to thesize of the returned information, the message type changed to filtered, and the payload containing the translated data. For example:
{ "transformation" : "String_to_HEX_v1", "fragments" : 1, "type" : "filtered", "fragment" : 1, "return" : 0, "seqno" : 145198, "table" : "hextable", "service" : "firstrep", "protocol" : "v0_9", "schema" : "hexdb", "payload" : 8, "column" : "hexcol", "row" : 0}FILTERED
8.4.15.3. Sample Network Client
The following sample network server script is writen in Perl, and is designed to translated packed hex strings (two-hex characters per byte)from their hex representation into their character representation.
#!/usr/bin/perl
use Switch;use IO::Socket::INET;use JSON qw( decode_json encode_json); use Data::Dumper;
# auto-flush on socket$| = 1;
my $serverName = "Perl_BLOB_to_String_v1";
while(1){# creating a listening socketmy $socket = new IO::Socket::INET ( LocalHost => '0.0.0.0', LocalPort => '3112', Proto => 'tcp', Listen => 5, Reuse => 1);die "Cannot create socket $!\n" unless $socket;print "********\nServer waiting for client connection on port 3112\n******\n\n\n";
# Waiting for a new client connectionmy $client_socket = $socket->accept();
# Fet information about a newly connected clientmy $client_address = $client_socket->peerhost();my $client_port = $client_socket->peerport();print "Connection from $client_address:$client_port\n";
my $data = "";
while( $data = $client_socket->getline()){ # Eead up to 1024 characters from the connected client chomp($data);
print "\n\nReceived: <$data>\n";
# Decode the JSON part my $msg = decode_json($data);
# Extract payload my $payload = undef;
if ($msg->{payload} > 0) { print STDERR "Reading $msg->{payload} bytes\n"; $client_socket->read($payload,$msg->{payload}); print "Payload: <$payload>\n";
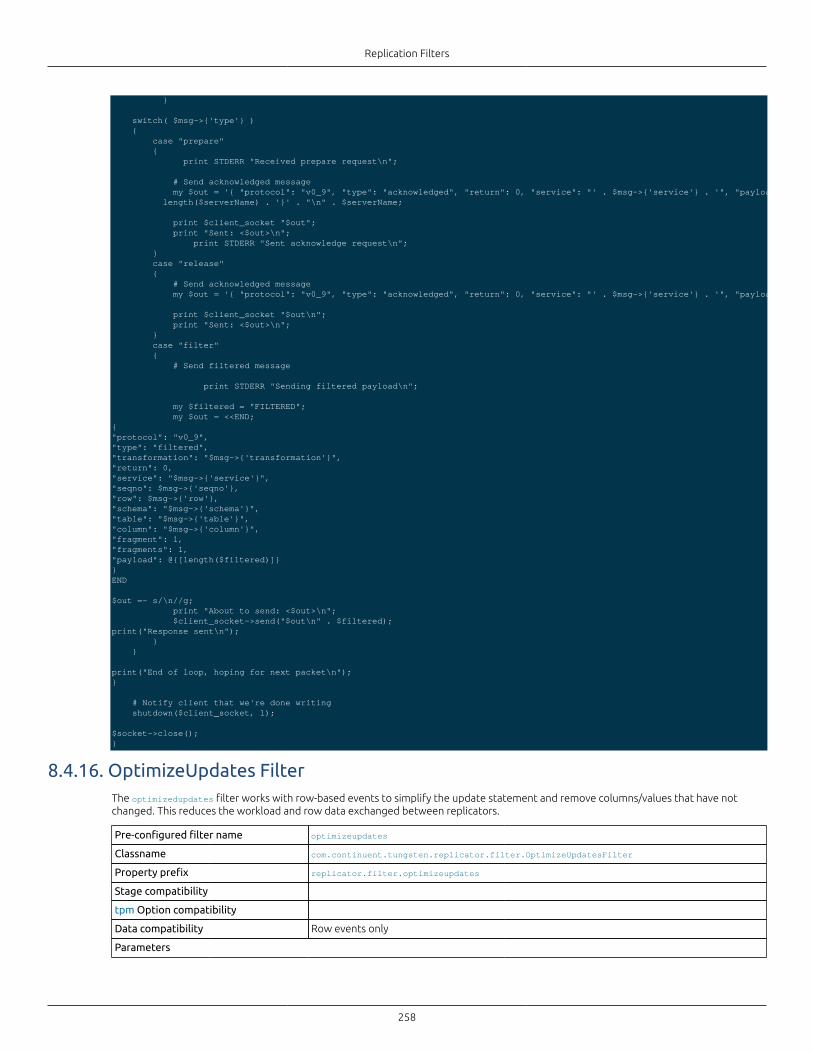
Replication Filters
258
}
switch( $msg->{'type'} ) { case "prepare" { print STDERR "Received prepare request\n";
# Send acknowledged message my $out = '{ "protocol": "v0_9", "type": "acknowledged", "return": 0, "service": "' . $msg->{'service'} . '", "payload": ' . length($serverName) . '}' . "\n" . $serverName;
print $client_socket "$out"; print "Sent: <$out>\n"; print STDERR "Sent acknowledge request\n"; } case "release" { # Send acknowledged message my $out = '{ "protocol": "v0_9", "type": "acknowledged", "return": 0, "service": "' . $msg->{'service'} . '", "payload": 0}';
print $client_socket "$out\n"; print "Sent: <$out>\n"; } case "filter" { # Send filtered message
print STDERR "Sending filtered payload\n";
my $filtered = "FILTERED"; my $out = <<END;{"protocol": "v0_9","type": "filtered","transformation": "$msg->{'transformation'}","return": 0,"service": "$msg->{'service'}","seqno": $msg->{'seqno'},"row": $msg->{'row'},"schema": "$msg->{'schema'}","table": "$msg->{'table'}","column": "$msg->{'column'}","fragment": 1,"fragments": 1,"payload": @{[length($filtered)]}}END
$out =~ s/\n//g; print "About to send: <$out>\n"; $client_socket->send("$out\n" . $filtered);print("Response sent\n"); } }
print("End of loop, hoping for next packet\n");}
# Notify client that we're done writing shutdown($client_socket, 1);
$socket->close();}
8.4.16. OptimizeUpdates FilterThe optimizedupdates filter works with row-based events to simplify the update statement and remove columns/values that have notchanged. This reduces the workload and row data exchanged between replicators.
Pre-configured filter name optimizeupdates
Classname com.continuent.tungsten.replicator.filter.OptimizeUpdatesFilter
Property prefix replicator.filter.optimizeupdates
Stage compatibility
tpm Option compatibility
Data compatibility Row events only
Parameters
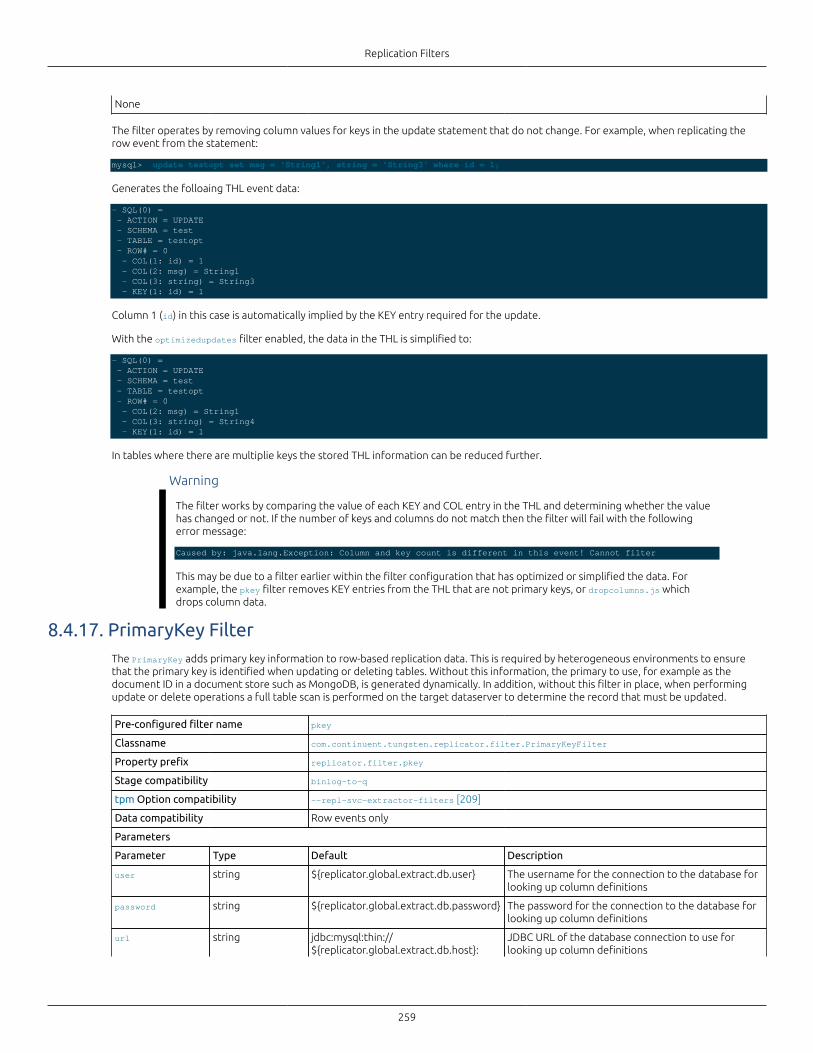
Replication Filters
259
None
The filter operates by removing column values for keys in the update statement that do not change. For example, when replicating therow event from the statement:
mysql> update testopt set msg = 'String1', string = 'String3' where id = 1;
Generates the folloaing THL event data:
- SQL(0) = - ACTION = UPDATE - SCHEMA = test - TABLE = testopt - ROW# = 0 - COL(1: id) = 1 - COL(2: msg) = String1 - COL(3: string) = String3 - KEY(1: id) = 1
Column 1 (id) in this case is automatically implied by the KEY entry required for the update.
With the optimizedupdates filter enabled, the data in the THL is simplified to:
- SQL(0) = - ACTION = UPDATE - SCHEMA = test - TABLE = testopt - ROW# = 0 - COL(2: msg) = String1 - COL(3: string) = String4 - KEY(1: id) = 1
In tables where there are multiplie keys the stored THL information can be reduced further.
Warning
The filter works by comparing the value of each KEY and COL entry in the THL and determining whether the valuehas changed or not. If the number of keys and columns do not match then the filter will fail with the followingerror message:
Caused by: java.lang.Exception: Column and key count is different in this event! Cannot filter
This may be due to a filter earlier within the filter configuration that has optimized or simplified the data. Forexample, the pkey filter removes KEY entries from the THL that are not primary keys, or dropcolumns.js whichdrops column data.
8.4.17. PrimaryKey FilterThe PrimaryKey adds primary key information to row-based replication data. This is required by heterogeneous environments to ensurethat the primary key is identified when updating or deleting tables. Without this information, the primary to use, for example as thedocument ID in a document store such as MongoDB, is generated dynamically. In addition, without this filter in place, when performingupdate or delete operations a full table scan is performed on the target dataserver to determine the record that must be updated.
Pre-configured filter name pkey
Classname com.continuent.tungsten.replicator.filter.PrimaryKeyFilter
Property prefix replicator.filter.pkey
Stage compatibility binlog-to-q
tpm Option compatibility --repl-svc-extractor-filters [209]
Data compatibility Row events only
Parameters
Parameter Type Default Description
user string ${replicator.global.extract.db.user} The username for the connection to the database forlooking up column definitions
password string ${replicator.global.extract.db.password} The password for the connection to the database forlooking up column definitions
url string jdbc:mysql:thin://${replicator.global.extract.db.host}:
JDBC URL of the database connection to use forlooking up column definitions
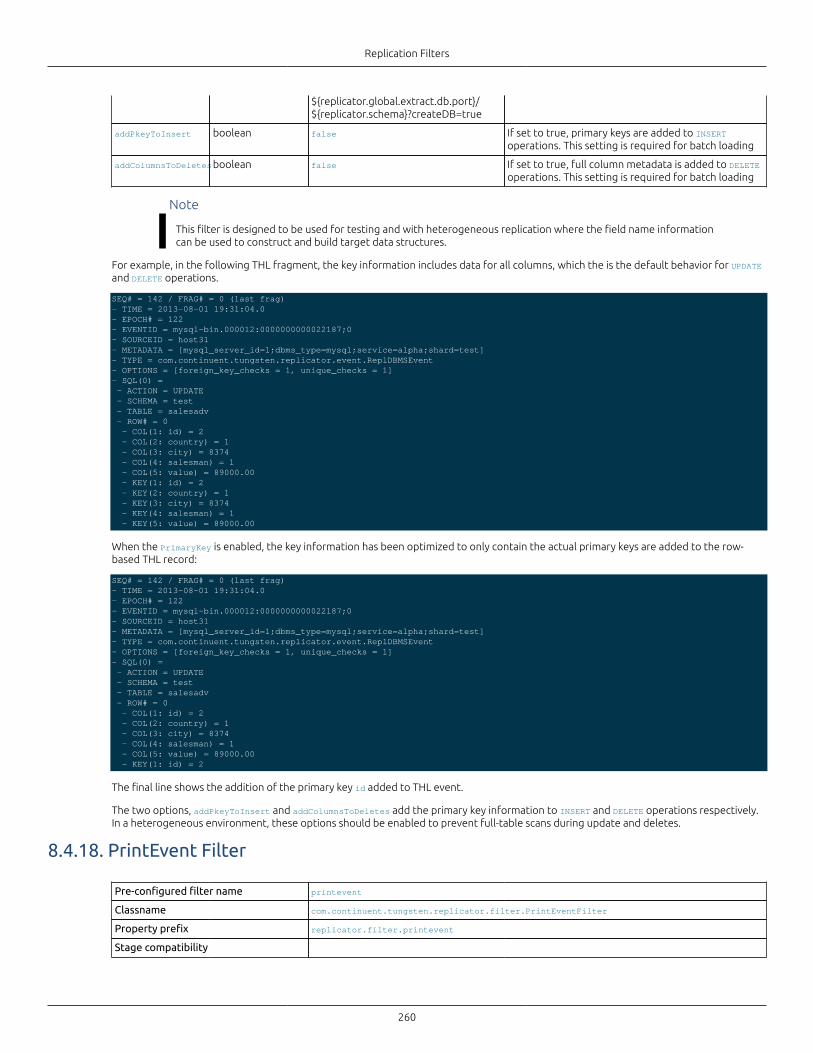
Replication Filters
260
${replicator.global.extract.db.port}/${replicator.schema}?createDB=true
addPkeyToInsert boolean false If set to true, primary keys are added to INSERToperations. This setting is required for batch loading
addColumnsToDeletesboolean false If set to true, full column metadata is added to DELETEoperations. This setting is required for batch loading
Note
This filter is designed to be used for testing and with heterogeneous replication where the field name informationcan be used to construct and build target data structures.
For example, in the following THL fragment, the key information includes data for all columns, which the is the default behavior for UPDATEand DELETE operations.
SEQ# = 142 / FRAG# = 0 (last frag)- TIME = 2013-08-01 19:31:04.0- EPOCH# = 122- EVENTID = mysql-bin.000012:0000000000022187;0- SOURCEID = host31- METADATA = [mysql_server_id=1;dbms_type=mysql;service=alpha;shard=test]- TYPE = com.continuent.tungsten.replicator.event.ReplDBMSEvent- OPTIONS = [foreign_key_checks = 1, unique_checks = 1]- SQL(0) = - ACTION = UPDATE - SCHEMA = test - TABLE = salesadv - ROW# = 0 - COL(1: id) = 2 - COL(2: country) = 1 - COL(3: city) = 8374 - COL(4: salesman) = 1 - COL(5: value) = 89000.00 - KEY(1: id) = 2 - KEY(2: country) = 1 - KEY(3: city) = 8374 - KEY(4: salesman) = 1 - KEY(5: value) = 89000.00
When the PrimaryKey is enabled, the key information has been optimized to only contain the actual primary keys are added to the row-based THL record:
SEQ# = 142 / FRAG# = 0 (last frag)- TIME = 2013-08-01 19:31:04.0- EPOCH# = 122- EVENTID = mysql-bin.000012:0000000000022187;0- SOURCEID = host31- METADATA = [mysql_server_id=1;dbms_type=mysql;service=alpha;shard=test]- TYPE = com.continuent.tungsten.replicator.event.ReplDBMSEvent- OPTIONS = [foreign_key_checks = 1, unique_checks = 1]- SQL(0) = - ACTION = UPDATE - SCHEMA = test - TABLE = salesadv - ROW# = 0 - COL(1: id) = 2 - COL(2: country) = 1 - COL(3: city) = 8374 - COL(4: salesman) = 1 - COL(5: value) = 89000.00 - KEY(1: id) = 2
The final line shows the addition of the primary key id added to THL event.
The two options, addPkeyToInsert and addColumnsToDeletes add the primary key information to INSERT and DELETE operations respectively.In a heterogeneous environment, these options should be enabled to prevent full-table scans during update and deletes.
8.4.18. PrintEvent Filter
Pre-configured filter name printevent
Classname com.continuent.tungsten.replicator.filter.PrintEventFilter
Property prefix replicator.filter.printevent
Stage compatibility
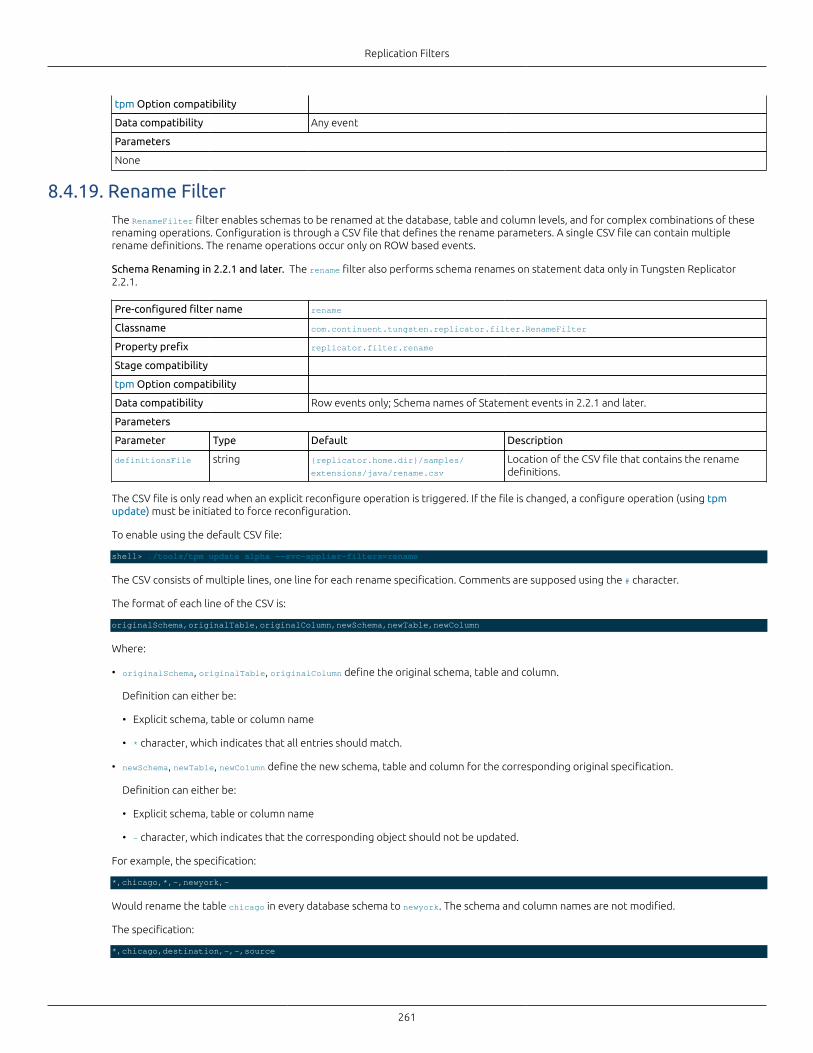
Replication Filters
261
tpm Option compatibility
Data compatibility Any event
Parameters
None
8.4.19. Rename FilterThe RenameFilter filter enables schemas to be renamed at the database, table and column levels, and for complex combinations of theserenaming operations. Configuration is through a CSV file that defines the rename parameters. A single CSV file can contain multiplerename definitions. The rename operations occur only on ROW based events.
Schema Renaming in 2.2.1 and later. The rename filter also performs schema renames on statement data only in Tungsten Replicator2.2.1.
Pre-configured filter name rename
Classname com.continuent.tungsten.replicator.filter.RenameFilter
Property prefix replicator.filter.rename
Stage compatibility
tpm Option compatibility
Data compatibility Row events only; Schema names of Statement events in 2.2.1 and later.
Parameters
Parameter Type Default Description
definitionsFile string {replicator.home.dir}/samples/
extensions/java/rename.csv
Location of the CSV file that contains the renamedefinitions.
The CSV file is only read when an explicit reconfigure operation is triggered. If the file is changed, a configure operation (using tpmupdate) must be initiated to force reconfiguration.
To enable using the default CSV file:
shell> ./tools/tpm update alpha --svc-applier-filters=rename
The CSV consists of multiple lines, one line for each rename specification. Comments are supposed using the # character.
The format of each line of the CSV is:
originalSchema,originalTable,originalColumn,newSchema,newTable,newColumn
Where:
• originalSchema, originalTable, originalColumn define the original schema, table and column.
Definition can either be:
• Explicit schema, table or column name
• * character, which indicates that all entries should match.
• newSchema, newTable, newColumn define the new schema, table and column for the corresponding original specification.
Definition can either be:
• Explicit schema, table or column name
• - character, which indicates that the corresponding object should not be updated.
For example, the specification:
*,chicago,*,-,newyork,-
Would rename the table chicago in every database schema to newyork. The schema and column names are not modified.
The specification:
*,chicago,destination,-,-,source
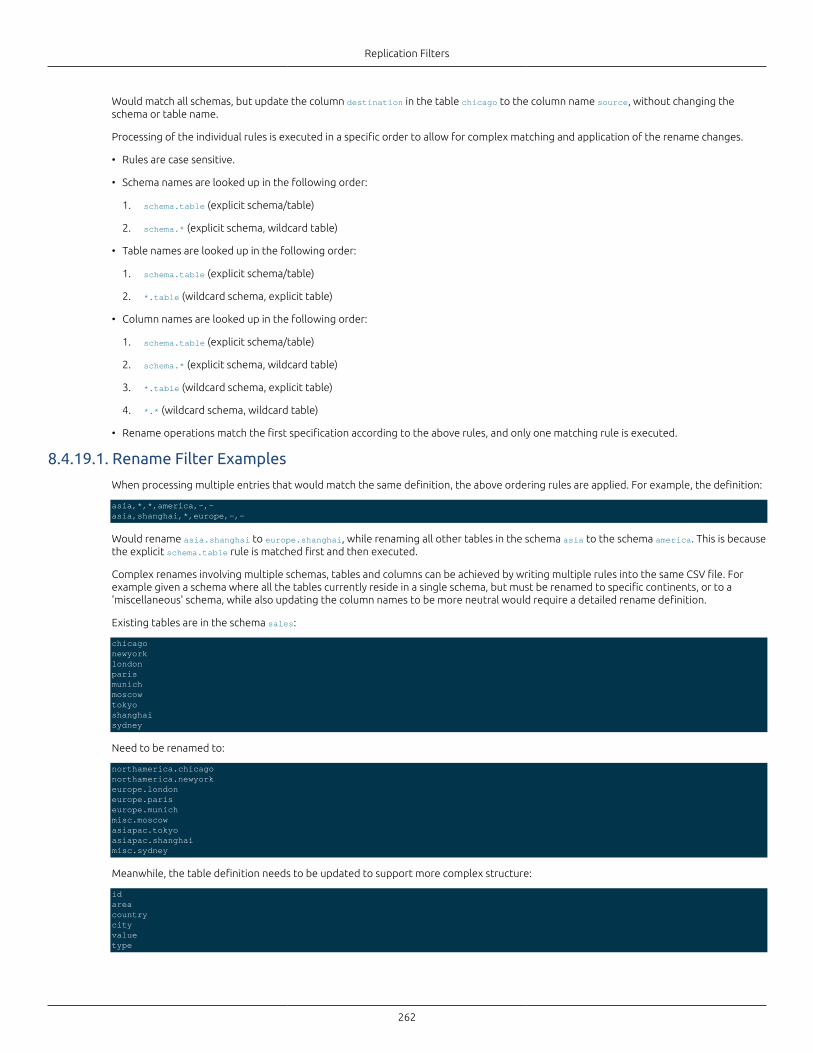
Replication Filters
262
Would match all schemas, but update the column destination in the table chicago to the column name source, without changing theschema or table name.
Processing of the individual rules is executed in a specific order to allow for complex matching and application of the rename changes.
• Rules are case sensitive.
• Schema names are looked up in the following order:
1. schema.table (explicit schema/table)
2. schema.* (explicit schema, wildcard table)
• Table names are looked up in the following order:
1. schema.table (explicit schema/table)
2. *.table (wildcard schema, explicit table)
• Column names are looked up in the following order:
1. schema.table (explicit schema/table)
2. schema.* (explicit schema, wildcard table)
3. *.table (wildcard schema, explicit table)
4. *.* (wildcard schema, wildcard table)
• Rename operations match the first specification according to the above rules, and only one matching rule is executed.
8.4.19.1. Rename Filter Examples
When processing multiple entries that would match the same definition, the above ordering rules are applied. For example, the definition:
asia,*,*,america,-,-asia,shanghai,*,europe,-,-
Would rename asia.shanghai to europe.shanghai, while renaming all other tables in the schema asia to the schema america. This is becausethe explicit schema.table rule is matched first and then executed.
Complex renames involving multiple schemas, tables and columns can be achieved by writing multiple rules into the same CSV file. Forexample given a schema where all the tables currently reside in a single schema, but must be renamed to specific continents, or to a'miscellaneous' schema, while also updating the column names to be more neutral would require a detailed rename definition.
Existing tables are in the schema sales:
chicagonewyorklondonparismunichmoscowtokyoshanghaisydney
Need to be renamed to:
northamerica.chicagonorthamerica.newyorkeurope.londoneurope.pariseurope.munichmisc.moscowasiapac.tokyoasiapac.shanghaimisc.sydney
Meanwhile, the table definition needs to be updated to support more complex structure:
idareacountrycityvaluetype
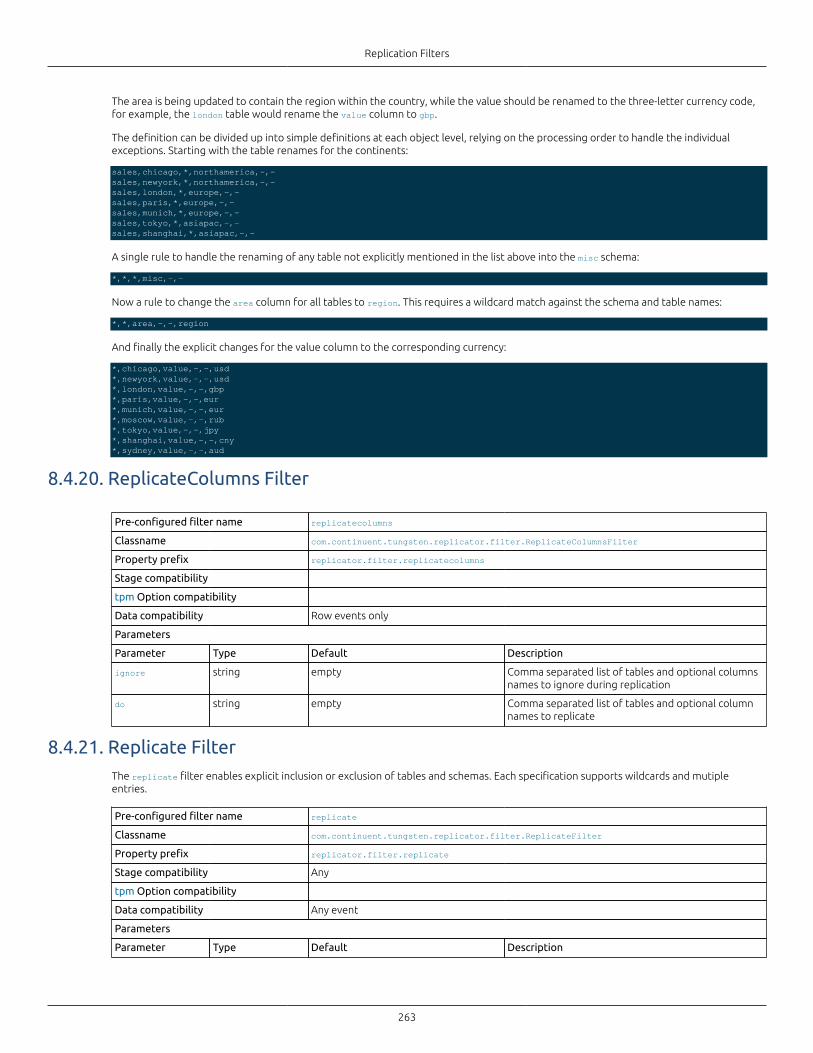
Replication Filters
263
The area is being updated to contain the region within the country, while the value should be renamed to the three-letter currency code,for example, the london table would rename the value column to gbp.
The definition can be divided up into simple definitions at each object level, relying on the processing order to handle the individualexceptions. Starting with the table renames for the continents:
sales,chicago,*,northamerica,-,-sales,newyork,*,northamerica,-,-sales,london,*,europe,-,-sales,paris,*,europe,-,-sales,munich,*,europe,-,-sales,tokyo,*,asiapac,-,-sales,shanghai,*,asiapac,-,-
A single rule to handle the renaming of any table not explicitly mentioned in the list above into the misc schema:
*,*,*,misc,-,-
Now a rule to change the area column for all tables to region. This requires a wildcard match against the schema and table names:
*,*,area,-,-,region
And finally the explicit changes for the value column to the corresponding currency:
*,chicago,value,-,-,usd*,newyork,value,-,-,usd*,london,value,-,-,gbp*,paris,value,-,-,eur*,munich,value,-,-,eur*,moscow,value,-,-,rub*,tokyo,value,-,-,jpy*,shanghai,value,-,-,cny*,sydney,value,-,-,aud
8.4.20. ReplicateColumns Filter
Pre-configured filter name replicatecolumns
Classname com.continuent.tungsten.replicator.filter.ReplicateColumnsFilter
Property prefix replicator.filter.replicatecolumns
Stage compatibility
tpm Option compatibility
Data compatibility Row events only
Parameters
Parameter Type Default Description
ignore string empty Comma separated list of tables and optional columnsnames to ignore during replication
do string empty Comma separated list of tables and optional columnnames to replicate
8.4.21. Replicate FilterThe replicate filter enables explicit inclusion or exclusion of tables and schemas. Each specification supports wildcards and mutipleentries.
Pre-configured filter name replicate
Classname com.continuent.tungsten.replicator.filter.ReplicateFilter
Property prefix replicator.filter.replicate
Stage compatibility Any
tpm Option compatibility
Data compatibility Any event
Parameters
Parameter Type Default Description
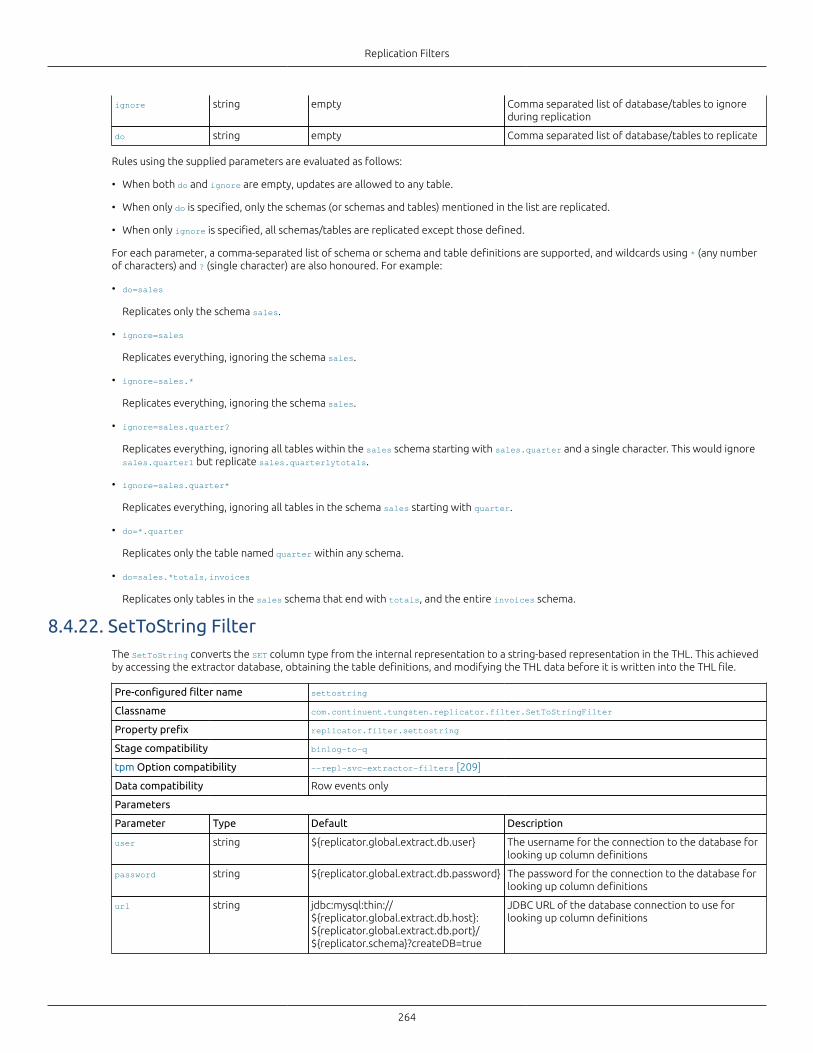
Replication Filters
264
ignore string empty Comma separated list of database/tables to ignoreduring replication
do string empty Comma separated list of database/tables to replicate
Rules using the supplied parameters are evaluated as follows:
• When both do and ignore are empty, updates are allowed to any table.
• When only do is specified, only the schemas (or schemas and tables) mentioned in the list are replicated.
• When only ignore is specified, all schemas/tables are replicated except those defined.
For each parameter, a comma-separated list of schema or schema and table definitions are supported, and wildcards using * (any numberof characters) and ? (single character) are also honoured. For example:
• do=sales
Replicates only the schema sales.
• ignore=sales
Replicates everything, ignoring the schema sales.
• ignore=sales.*
Replicates everything, ignoring the schema sales.
• ignore=sales.quarter?
Replicates everything, ignoring all tables within the sales schema starting with sales.quarter and a single character. This would ignoresales.quarter1 but replicate sales.quarterlytotals.
• ignore=sales.quarter*
Replicates everything, ignoring all tables in the schema sales starting with quarter.
• do=*.quarter
Replicates only the table named quarter within any schema.
• do=sales.*totals,invoices
Replicates only tables in the sales schema that end with totals, and the entire invoices schema.
8.4.22. SetToString FilterThe SetToString converts the SET column type from the internal representation to a string-based representation in the THL. This achievedby accessing the extractor database, obtaining the table definitions, and modifying the THL data before it is written into the THL file.
Pre-configured filter name settostring
Classname com.continuent.tungsten.replicator.filter.SetToStringFilter
Property prefix replicator.filter.settostring
Stage compatibility binlog-to-q
tpm Option compatibility --repl-svc-extractor-filters [209]
Data compatibility Row events only
Parameters
Parameter Type Default Description
user string ${replicator.global.extract.db.user} The username for the connection to the database forlooking up column definitions
password string ${replicator.global.extract.db.password} The password for the connection to the database forlooking up column definitions
url string jdbc:mysql:thin://${replicator.global.extract.db.host}:${replicator.global.extract.db.port}/${replicator.schema}?createDB=true
JDBC URL of the database connection to use forlooking up column definitions

Replication Filters
265
The SetToString filter should be used with heterogeneous replication to ensure that the data is represented as the string value, not theinternal numerical representation.
In the THL output below, the table has a SET column, salesman:
mysql> describe salesadv;+----------+--------------------------------------+------+-----+---------+----------------+| Field | Type | Null | Key | Default | Extra |+----------+--------------------------------------+------+-----+---------+----------------+| id | int(11) | NO | PRI | NULL | auto_increment || country | enum('US','UK','France','Australia') | YES | | NULL | || city | int(11) | YES | | NULL | || salesman | set('Alan','Zachary') | YES | | NULL | || value | decimal(10,2) | YES | | NULL | |+----------+--------------------------------------+------+-----+---------+----------------+
When extracted in the THL, the representation uses the internal value (for example, 1 for the first element of the set description). This canbe seen in the THL output below.
SEQ# = 138 / FRAG# = 0 (last frag)- TIME = 2013-08-01 19:09:35.0- EPOCH# = 122- EVENTID = mysql-bin.000012:0000000000021434;0- SOURCEID = host31- METADATA = [mysql_server_id=1;dbms_type=mysql;service=alpha;shard=test]- TYPE = com.continuent.tungsten.replicator.event.ReplDBMSEvent- OPTIONS = [foreign_key_checks = 1, unique_checks = 1]- SQL(0) = - ACTION = INSERT - SCHEMA = test - TABLE = salesadv - ROW# = 0 - COL(1: id) = 2 - COL(2: country) = 1 - COL(3: city) = 8374 - COL(4: salesman) = 1 - COL(5: value) = 35000.00
For the salesman column, the corresponding value in the THL is 1. With the SetToString filter enabled, the value is expanded to thecorresponding string value:
SEQ# = 121 / FRAG# = 0 (last frag)- TIME = 2013-08-01 19:05:14.0- EPOCH# = 102- EVENTID = mysql-bin.000012:0000000000018866;0- SOURCEID = host31- METADATA = [mysql_server_id=1;dbms_type=mysql;service=alpha;shard=test]- TYPE = com.continuent.tungsten.replicator.event.ReplDBMSEvent- OPTIONS = [foreign_key_checks = 1, unique_checks = 1]- SQL(0) = - ACTION = INSERT - SCHEMA = test - TABLE = salesadv - ROW# = 0 - COL(1: id) = 1 - COL(2: country) = US - COL(3: city) = 8374 - COL(4: salesman) = Alan - COL(5: value) = 35000.00
The examples here also show the Section 8.4.10, “EnumToString Filter” and Section 8.4.6, “ColumnName Filter” filters.
8.4.23. Shard Filter
Pre-configured filter name shardfilter
Classname com.continuent.tungsten.replicator.filter.ShardFilter
Property prefix replicator.filter.shardfilter
Stage compatibility
tpm Option compatibility
Data compatibility Any event
Parameters
Parameter Type Default Description

Replication Filters
266
enabled boolean false If set to true, enables the shard filter
unknownShardPolicy string error Select the filter policy when the shard unknown; validvalues are accept, drop, warn, and error
unwantedShardPolicystring error Select the filter policy when the shard is unwanted;valid values are accept, drop, warn, and error
enforcedHome boolean false If true, enforce the home for the shard
allowWhitelisted boolean false If true, allow explicitly whitelisted shards
autoCreate boolean false If true, allow shard rules to be created automatically
8.4.24. TimeDelay FilterThe TimeDelayFilter delays writing events to the THL and should be used only on slaves in the remote-to-thl stage. This delays writing thetransactions into the THL files, but allows the application of the slave data to the database to continue without further intervention.
Pre-configured filter name delay
Classname com.continuent.tungsten.replicator.filter.TimeDelayFilter
Property prefix replicator.filter.delay
Stage compatibility remote-to-thl
tpm Option compatibility --repl-svc-thl-filters [210]
Data compatibility Any event
Parameters
Parameter Type Default Description
delay numeric 300 Number of seconds to delay transaction processingrow
The TimeDelay delays the application of transactions recorded in the THL. The delay can be used to allow point-in-time recovery of DMLoperations before the transaction has been applied to the slave, or where data may need to be audited or checked before transactions arecommitted.
Note
For effective operation, master and slaves should be synchronized using NTP or a similar protocol.
To enable the TimeDelayFilter, use tpm command to enable the filter operation and the required delay. For example, to enable the delayfor 900 seconds:
shell> ./tools/tpm update alpha --hosts=host1,host2,host3 \ --repl-svc-applier-filters=delay \ --property=replicator.filter.delay.delay=900
Time delay of transaction events should be performed with care, since the delay will prevent a slave from being up to date compared tothe master. In the event of a node failure, an up to date slave is required to ensure that data is safe.
8.5. JavaScript FiltersIn addition to the supplied Java filters, Tungsten Replicator also includes support for custom script-based filters written in JavaScript andsupported through the JavaScript filter. This filter provides a JavaScript environment that exposes the transaction information as it isprocessed internally through an object-based JavaScript API.
The JavaScript implementation is provided through the Rhino open-source implementation. Rhino provides a direct interface between theunderlying Java classes used to implement the replicator code and a full JavaScript environment. This enables scripts to be developed thathave access to the replicator constructs and data structures, and allows information to be updated, reformatted, combined, extracted andreconstructed.
At the simplest level, this allows for operations such as database renames and filtering. More complex solutions allow for modification ofthe individual data, such as removing nulls, bad dates, and duplication of information.
Warning
Updating the static properties file for the replicator will break automated upgrades through tpm. When upgrading,tpm relies on existing template files to create the new configuration based on the tpm parameters used.
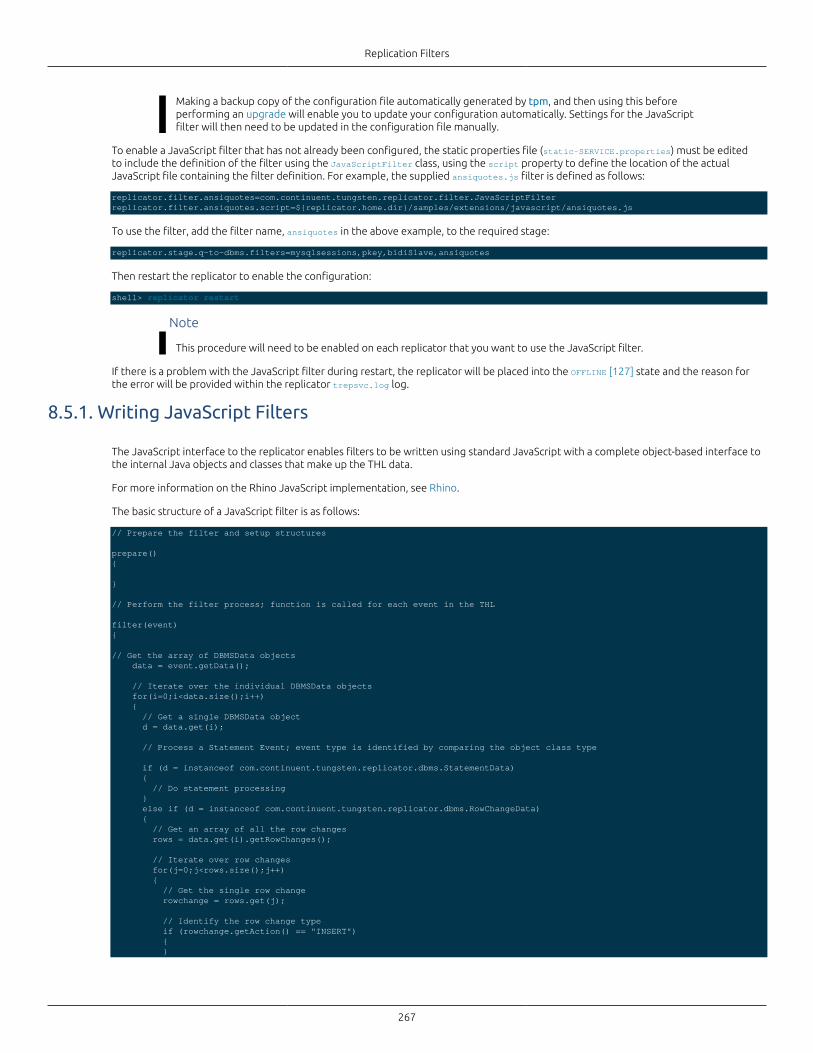
Replication Filters
267
Making a backup copy of the configuration file automatically generated by tpm, and then using this beforeperforming an upgrade will enable you to update your configuration automatically. Settings for the JavaScriptfilter will then need to be updated in the configuration file manually.
To enable a JavaScript filter that has not already been configured, the static properties file (static-SERVICE.properties) must be editedto include the definition of the filter using the JavaScriptFilter class, using the script property to define the location of the actualJavaScript file containing the filter definition. For example, the supplied ansiquotes.js filter is defined as follows:
replicator.filter.ansiquotes=com.continuent.tungsten.replicator.filter.JavaScriptFilterreplicator.filter.ansiquotes.script=${replicator.home.dir}/samples/extensions/javascript/ansiquotes.js
To use the filter, add the filter name, ansiquotes in the above example, to the required stage:
replicator.stage.q-to-dbms.filters=mysqlsessions,pkey,bidiSlave,ansiquotes
Then restart the replicator to enable the configuration:
shell> replicator restart
Note
This procedure will need to be enabled on each replicator that you want to use the JavaScript filter.
If there is a problem with the JavaScript filter during restart, the replicator will be placed into the OFFLINE [127] state and the reason forthe error will be provided within the replicator trepsvc.log log.
8.5.1. Writing JavaScript Filters
The JavaScript interface to the replicator enables filters to be written using standard JavaScript with a complete object-based interface tothe internal Java objects and classes that make up the THL data.
For more information on the Rhino JavaScript implementation, see Rhino.
The basic structure of a JavaScript filter is as follows:
// Prepare the filter and setup structures
prepare(){
}
// Perform the filter process; function is called for each event in the THL
filter(event){
// Get the array of DBMSData objects data = event.getData();
// Iterate over the individual DBMSData objects for(i=0;i<data.size();i++) { // Get a single DBMSData object d = data.get(i);
// Process a Statement Event; event type is identified by comparing the object class type
if (d = instanceof com.continuent.tungsten.replicator.dbms.StatementData) { // Do statement processing } else if (d = instanceof com.continuent.tungsten.replicator.dbms.RowChangeData) { // Get an array of all the row changes rows = data.get(i).getRowChanges();
// Iterate over row changes for(j=0;j<rows.size();j++) { // Get the single row change rowchange = rows.get(j);
// Identify the row change type if (rowchange.getAction() == "INSERT") { }
Replication Filters
268
....
} } }}
The following sections will examine the different data structures, functions, and information available when processing these individualevents.
8.5.1.1. Implementable Functions
Each JavaScript filter must defined one or more functions that are used to operate the filter process. The filter() function must bedefined, as it contains the primary operation sequence for the defined filter. The function is supplied the event from the THL as the eventsare processed by the replicator.
In addition, two other JavaScript functions can optionally be defined that are executed before and after the filter process. Additional, user-specific, functions can be defined within the filter context to support the filter operations.
• prepare()
The prepare() function is called when the replicator is first started, and initializes the configured filter with any values that may berequired during the filter process. These can include loading and identifying configuration values, creating lookup, exception or otherreference tables and other internal JavaScript tables based on the configuration information, and reporting the generated configurationor operation for debugging.
• filter(event)
The filter() function is the main function that is called each time an event is loaded from the THL. The event is parsed as the onlyparameter to the function and is an object containing all the statement or row data for a given event.
• release()
The release() function is called when the filter is deallocated and removed, typically during shutdown of the replicator, although it mayalso occur when a processing thread is restarted.
8.5.1.2. Getting Configuration Parameters
The JavaScript interface enables you to get two different sets of configuration properties, the filter specific properties, and the generalreplicator properties. The filter specific properties should be used configure and specify configuration information unique to that instanceof the filter configuration. Since multiple filter configurations using the same filter definition can be created, using the filter-specificcontent is the simplest method for obtaining this information.
• Getting Filter Properties
To obtain the properties configured for the filter within the static configuration file according to the filter's own context, use thefilterProperties class with the getString() method. For example, the dbrename.js filter uses two properties, dbsource and dbtarget toidentify the database to be renamed and the new name. The definition for the filter within the configuration file might be:
replicator.filter.jsdbrename=com.continuent.tungsten.replicator.filter.JavaScriptFilterreplicator.filter.jsdbrename.script=${replicator.home.dir}/samples/extensions/javascript/dbrename.jsreplicator.filter.jsdbrename.dbsource=contactsreplicator.filter.jsdbrename.dbtarget=nyc_contacts
Within the JavaScript filter, they are retrieved using:
sourceName = filterProperties.getString("dbsource");targetName = filterProperties.getString("dbtarget");
• Generic Replicator Properties
General properties can be retrieved using the properties class and the getString() method:
master = properties.getString("replicator.thl.remote_uri");
8.5.1.3. Logging Information and Exceptions
Information about the filtering process can be reported into the standard trepsvc.log file by using the logger object. This supportsdifferent methods according to the configured logging level:
• logger.info() — information level entry, used to indicate configuration, loading or progress.
• logger.debug() — information will be logged when debugging is enabled, used when showing progress during development.
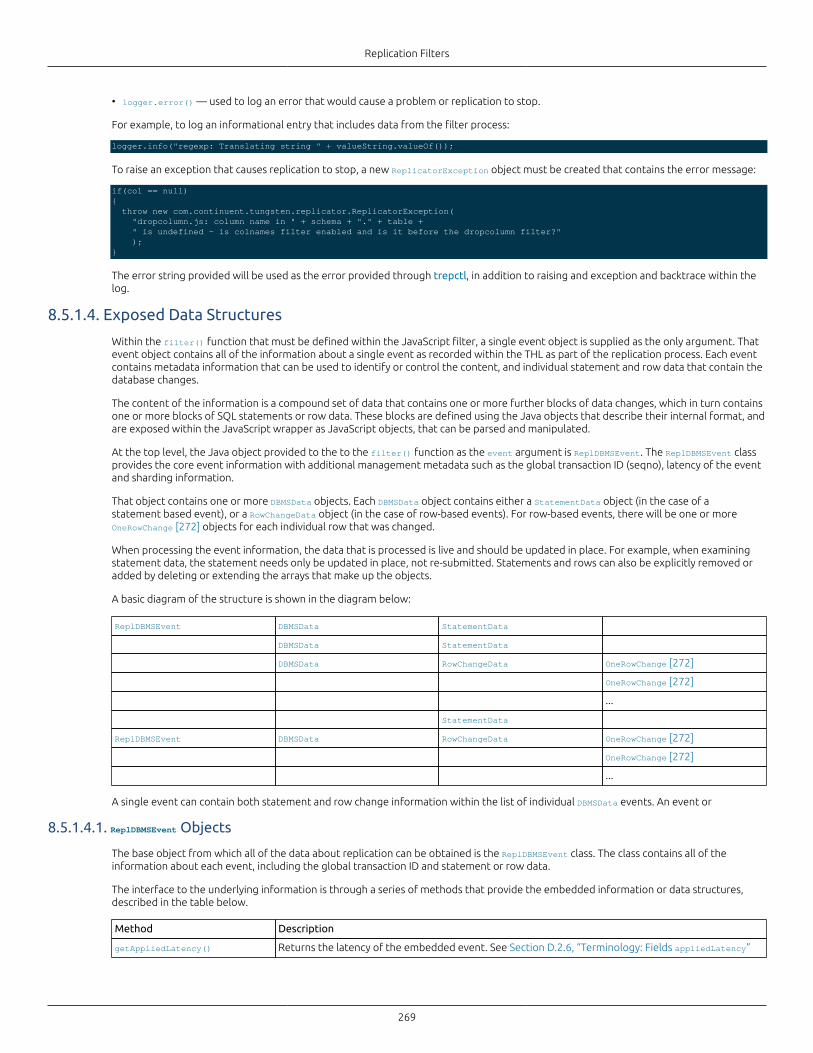
Replication Filters
269
• logger.error() — used to log an error that would cause a problem or replication to stop.
For example, to log an informational entry that includes data from the filter process:
logger.info("regexp: Translating string " + valueString.valueOf());
To raise an exception that causes replication to stop, a new ReplicatorException object must be created that contains the error message:
if(col == null){ throw new com.continuent.tungsten.replicator.ReplicatorException( "dropcolumn.js: column name in " + schema + "." + table + " is undefined - is colnames filter enabled and is it before the dropcolumn filter?" );}
The error string provided will be used as the error provided through trepctl, in addition to raising and exception and backtrace within thelog.
8.5.1.4. Exposed Data Structures
Within the filter() function that must be defined within the JavaScript filter, a single event object is supplied as the only argument. Thatevent object contains all of the information about a single event as recorded within the THL as part of the replication process. Each eventcontains metadata information that can be used to identify or control the content, and individual statement and row data that contain thedatabase changes.
The content of the information is a compound set of data that contains one or more further blocks of data changes, which in turn containsone or more blocks of SQL statements or row data. These blocks are defined using the Java objects that describe their internal format, andare exposed within the JavaScript wrapper as JavaScript objects, that can be parsed and manipulated.
At the top level, the Java object provided to the to the filter() function as the event argument is ReplDBMSEvent. The ReplDBMSEvent classprovides the core event information with additional management metadata such as the global transaction ID (seqno), latency of the eventand sharding information.
That object contains one or more DBMSData objects. Each DBMSData object contains either a StatementData object (in the case of astatement based event), or a RowChangeData object (in the case of row-based events). For row-based events, there will be one or moreOneRowChange [272] objects for each individual row that was changed.
When processing the event information, the data that is processed is live and should be updated in place. For example, when examiningstatement data, the statement needs only be updated in place, not re-submitted. Statements and rows can also be explicitly removed oradded by deleting or extending the arrays that make up the objects.
A basic diagram of the structure is shown in the diagram below:
ReplDBMSEvent DBMSData StatementData
DBMSData StatementData
DBMSData RowChangeData OneRowChange [272]
OneRowChange [272]
...
StatementData
ReplDBMSEvent DBMSData RowChangeData OneRowChange [272]
OneRowChange [272]
...
A single event can contain both statement and row change information within the list of individual DBMSData events. An event or
8.5.1.4.1. ReplDBMSEvent Objects
The base object from which all of the data about replication can be obtained is the ReplDBMSEvent class. The class contains all of theinformation about each event, including the global transaction ID and statement or row data.
The interface to the underlying information is through a series of methods that provide the embedded information or data structures,described in the table below.
Method Description
getAppliedLatency() Returns the latency of the embedded event. See Section D.2.6, “Terminology: Fields appliedLatency”
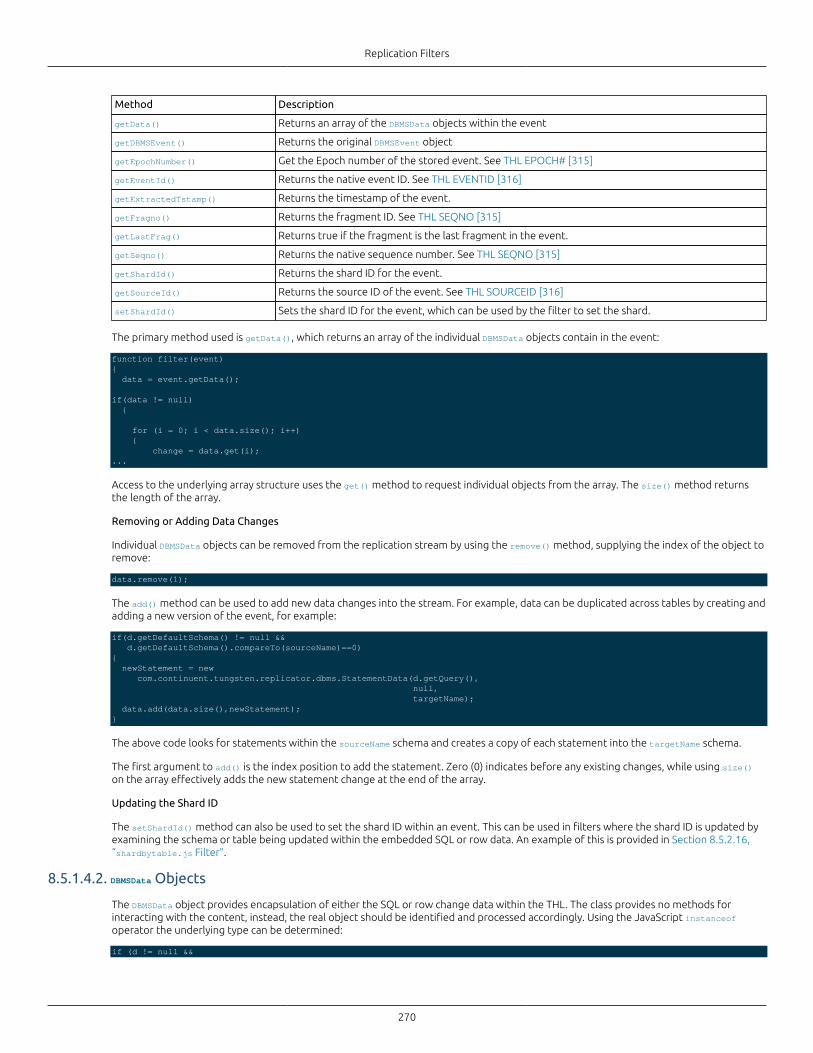
Replication Filters
270
Method Description
getData() Returns an array of the DBMSData objects within the event
getDBMSEvent() Returns the original DBMSEvent object
getEpochNumber() Get the Epoch number of the stored event. See THL EPOCH# [315]
getEventId() Returns the native event ID. See THL EVENTID [316]
getExtractedTstamp() Returns the timestamp of the event.
getFragno() Returns the fragment ID. See THL SEQNO [315]
getLastFrag() Returns true if the fragment is the last fragment in the event.
getSeqno() Returns the native sequence number. See THL SEQNO [315]
getShardId() Returns the shard ID for the event.
getSourceId() Returns the source ID of the event. See THL SOURCEID [316]
setShardId() Sets the shard ID for the event, which can be used by the filter to set the shard.
The primary method used is getData(), which returns an array of the individual DBMSData objects contain in the event:
function filter(event){ data = event.getData();
if(data != null) {
for (i = 0; i < data.size(); i++) { change = data.get(i);...
Access to the underlying array structure uses the get() method to request individual objects from the array. The size() method returnsthe length of the array.
Removing or Adding Data Changes
Individual DBMSData objects can be removed from the replication stream by using the remove() method, supplying the index of the object toremove:
data.remove(1);
The add() method can be used to add new data changes into the stream. For example, data can be duplicated across tables by creating andadding a new version of the event, for example:
if(d.getDefaultSchema() != null && d.getDefaultSchema().compareTo(sourceName)==0){ newStatement = new com.continuent.tungsten.replicator.dbms.StatementData(d.getQuery(), null, targetName); data.add(data.size(),newStatement);}
The above code looks for statements within the sourceName schema and creates a copy of each statement into the targetName schema.
The first argument to add() is the index position to add the statement. Zero (0) indicates before any existing changes, while using size()on the array effectively adds the new statement change at the end of the array.
Updating the Shard ID
The setShardId() method can also be used to set the shard ID within an event. This can be used in filters where the shard ID is updated byexamining the schema or table being updated within the embedded SQL or row data. An example of this is provided in Section 8.5.2.16,“shardbytable.js Filter”.
8.5.1.4.2. DBMSData Objects
The DBMSData object provides encapsulation of either the SQL or row change data within the THL. The class provides no methods forinteracting with the content, instead, the real object should be identified and processed accordingly. Using the JavaScript instanceofoperator the underlying type can be determined:
if (d != null &&
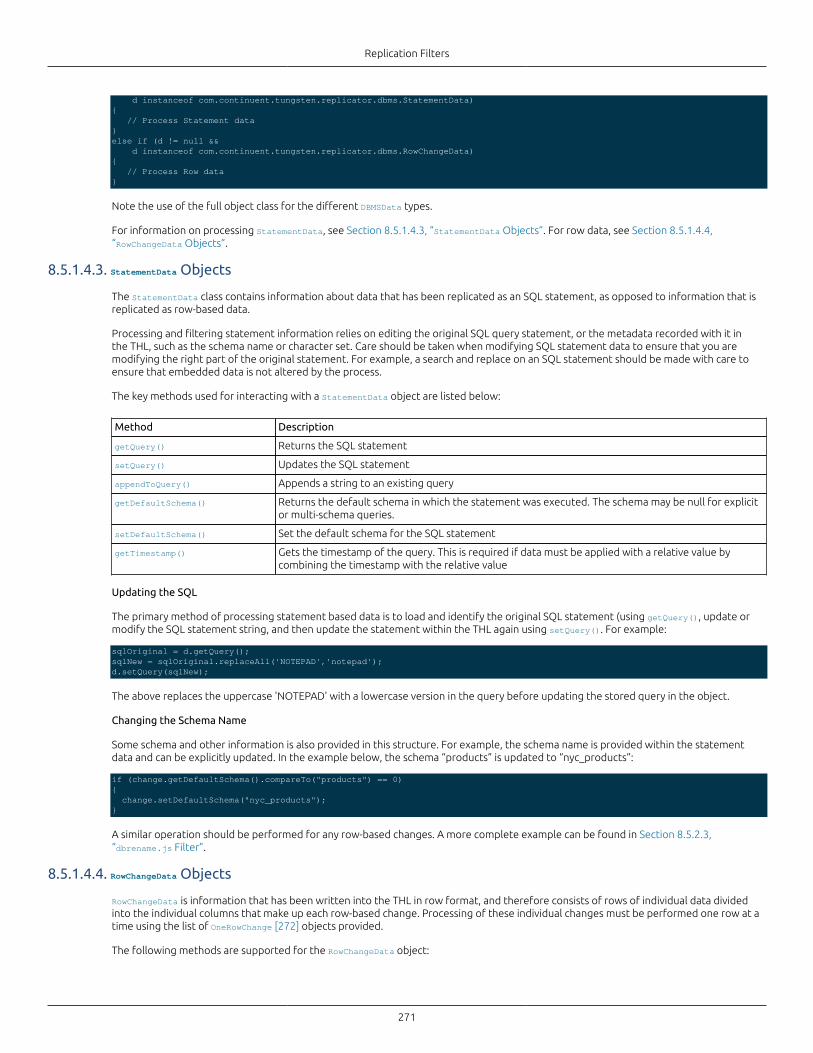
Replication Filters
271
d instanceof com.continuent.tungsten.replicator.dbms.StatementData){ // Process Statement data}else if (d != null && d instanceof com.continuent.tungsten.replicator.dbms.RowChangeData){ // Process Row data}
Note the use of the full object class for the different DBMSData types.
For information on processing StatementData, see Section 8.5.1.4.3, “StatementData Objects”. For row data, see Section 8.5.1.4.4,“RowChangeData Objects”.
8.5.1.4.3. StatementData Objects
The StatementData class contains information about data that has been replicated as an SQL statement, as opposed to information that isreplicated as row-based data.
Processing and filtering statement information relies on editing the original SQL query statement, or the metadata recorded with it inthe THL, such as the schema name or character set. Care should be taken when modifying SQL statement data to ensure that you aremodifying the right part of the original statement. For example, a search and replace on an SQL statement should be made with care toensure that embedded data is not altered by the process.
The key methods used for interacting with a StatementData object are listed below:
Method Description
getQuery() Returns the SQL statement
setQuery() Updates the SQL statement
appendToQuery() Appends a string to an existing query
getDefaultSchema() Returns the default schema in which the statement was executed. The schema may be null for explicitor multi-schema queries.
setDefaultSchema() Set the default schema for the SQL statement
getTimestamp() Gets the timestamp of the query. This is required if data must be applied with a relative value bycombining the timestamp with the relative value
Updating the SQL
The primary method of processing statement based data is to load and identify the original SQL statement (using getQuery(), update ormodify the SQL statement string, and then update the statement within the THL again using setQuery(). For example:
sqlOriginal = d.getQuery();sqlNew = sqlOriginal.replaceAll('NOTEPAD','notepad');d.setQuery(sqlNew);
The above replaces the uppercase 'NOTEPAD' with a lowercase version in the query before updating the stored query in the object.
Changing the Schema Name
Some schema and other information is also provided in this structure. For example, the schema name is provided within the statementdata and can be explicitly updated. In the example below, the schema “products” is updated to “nyc_products”:
if (change.getDefaultSchema().compareTo("products") == 0){ change.setDefaultSchema("nyc_products");}
A similar operation should be performed for any row-based changes. A more complete example can be found in Section 8.5.2.3,“dbrename.js Filter”.
8.5.1.4.4. RowChangeData Objects
RowChangeData is information that has been written into the THL in row format, and therefore consists of rows of individual data dividedinto the individual columns that make up each row-based change. Processing of these individual changes must be performed one row at atime using the list of OneRowChange [272] objects provided.
The following methods are supported for the RowChangeData object:

Replication Filters
272
Method Description
appendOneRowChange(rowChange) Appends a single row change to the event, using the supplied OneRowChange [272] object.
getRowChanges() Returns an array list of all the changes as OneRowChange [272] objects.
setRowChanges(rowChanges) Sets the row changes within the event using the supplied list of OneRowChange objects.
For example, a typical row-based process will operate as follows:
if (d != null && d instanceof com.continuent.tungsten.replicator.dbms.RowChangeData) { rowChanges = d.getRowChanges();
for(j = 0; j < rowChanges.size(); j++) { oneRowChange = rowChanges.get(j); // Do row filter
The OneRowChange [272] object contains the changes for just one row within the event. The class contains the information about thetables, field names and field values. The following methods are supported:
Method Description
getAction() Returns the row action type, i.e. whether the row change is an INSERT, UPDATE or DELETE
getColumnSpec() Returns the specification of each column within the row change
getColumnValues() Returns the value of each column within the row change
getSchemaName() Gets the schema name of the row change
getTableName() Gets the table name of the row change
setColumnSpec() Sets the column specification using an array of column specifications
setColumnValues() Sets the column values
setSchemaName() Sets the schema name
setTableName() Sets the table name
Changing Schema or Table Names
The schema, table and column names are exposed at different levels within the OneRowChange [272] object. Updating the schema namecan be achieved by getting and setting the name through the getSchemaName() and setSchemaName() methods. For example, to add a prefixto a schema name:
rowchange.setSchemaName('prefix_' + rowchange.getSchemaName());
To update a table name, the getTableName() and setTableName() can be used in the same manner:
oneRowChange.setTableName('prefix_' + oneRowChange.getTableName());
Getting Action Types
Row operations are categorised according to the action of the row change, i.e. whether the change was an insert, update or deleteoperation. This information can be extracted from each row change by using the getAction() method:
action = oneRowChange.getAction();
The action information is returned as a string, i.e. INSERT, UPDATE, or DELETE. This enables information to be filtered according to thechanges; for example by selectively modifying or altering events.
For example, DELETE events could be removed from the list of row changes:
for(j=0;j<rowChanges.size();j++){ oneRowChange = rowChanges.get(j); if (oneRowChange.actionType == 'DELETE') { rowChanges.remove(j); j--; }}
The j-- is required because as each row change is removed, the size of the array changes and our current index within the array needs tobe explicitly modified.
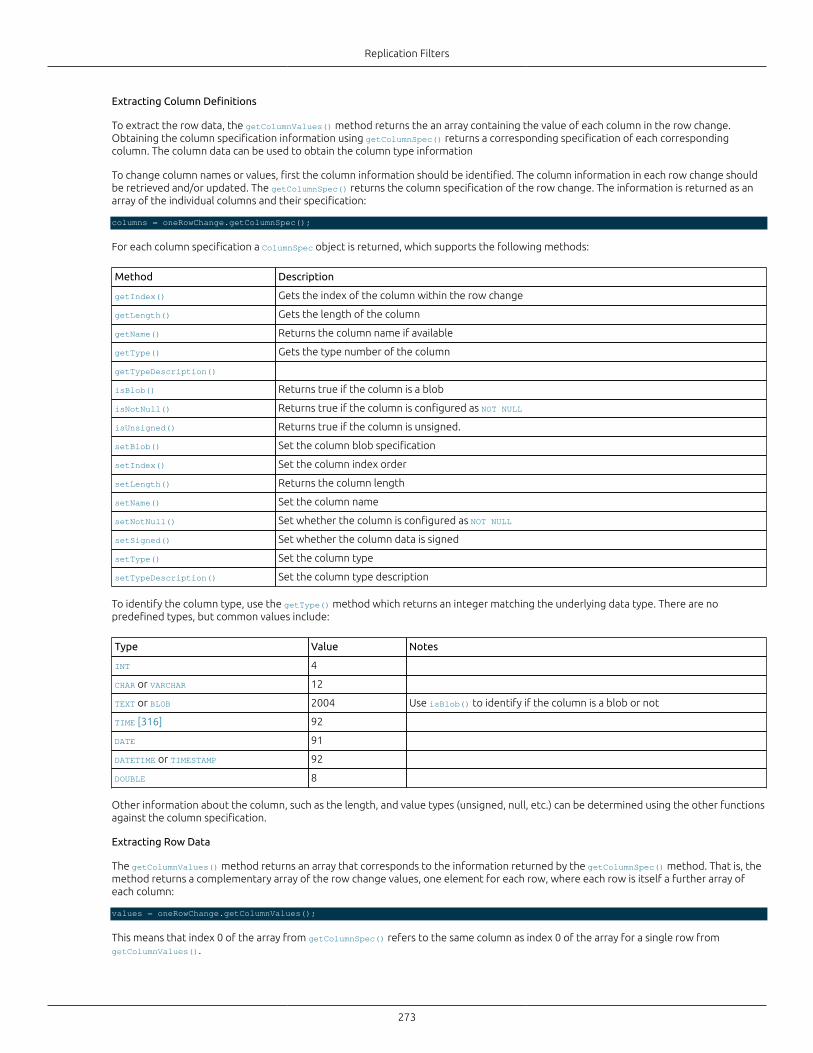
Replication Filters
273
Extracting Column Definitions
To extract the row data, the getColumnValues() method returns the an array containing the value of each column in the row change.Obtaining the column specification information using getColumnSpec() returns a corresponding specification of each correspondingcolumn. The column data can be used to obtain the column type information
To change column names or values, first the column information should be identified. The column information in each row change shouldbe retrieved and/or updated. The getColumnSpec() returns the column specification of the row change. The information is returned as anarray of the individual columns and their specification:
columns = oneRowChange.getColumnSpec();
For each column specification a ColumnSpec object is returned, which supports the following methods:
Method Description
getIndex() Gets the index of the column within the row change
getLength() Gets the length of the column
getName() Returns the column name if available
getType() Gets the type number of the column
getTypeDescription()
isBlob() Returns true if the column is a blob
isNotNull() Returns true if the column is configured as NOT NULL
isUnsigned() Returns true if the column is unsigned.
setBlob() Set the column blob specification
setIndex() Set the column index order
setLength() Returns the column length
setName() Set the column name
setNotNull() Set whether the column is configured as NOT NULL
setSigned() Set whether the column data is signed
setType() Set the column type
setTypeDescription() Set the column type description
To identify the column type, use the getType() method which returns an integer matching the underlying data type. There are nopredefined types, but common values include:
Type Value Notes
INT 4
CHAR or VARCHAR 12
TEXT or BLOB 2004 Use isBlob() to identify if the column is a blob or not
TIME [316] 92
DATE 91
DATETIME or TIMESTAMP 92
DOUBLE 8
Other information about the column, such as the length, and value types (unsigned, null, etc.) can be determined using the other functionsagainst the column specification.
Extracting Row Data
The getColumnValues() method returns an array that corresponds to the information returned by the getColumnSpec() method. That is, themethod returns a complementary array of the row change values, one element for each row, where each row is itself a further array ofeach column:
values = oneRowChange.getColumnValues();
This means that index 0 of the array from getColumnSpec() refers to the same column as index 0 of the array for a single row fromgetColumnValues().
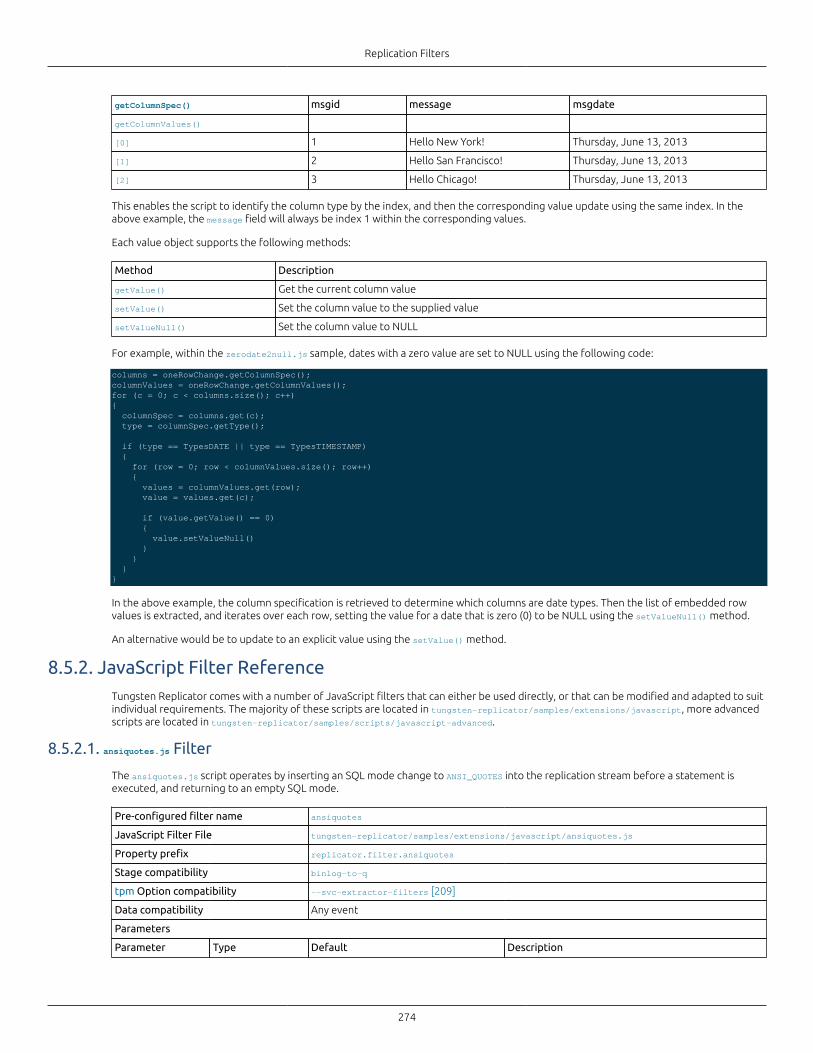
Replication Filters
274
getColumnSpec() msgid message msgdate
getColumnValues()
[0] 1 Hello New York! Thursday, June 13, 2013
[1] 2 Hello San Francisco! Thursday, June 13, 2013
[2] 3 Hello Chicago! Thursday, June 13, 2013
This enables the script to identify the column type by the index, and then the corresponding value update using the same index. In theabove example, the message field will always be index 1 within the corresponding values.
Each value object supports the following methods:
Method Description
getValue() Get the current column value
setValue() Set the column value to the supplied value
setValueNull() Set the column value to NULL
For example, within the zerodate2null.js sample, dates with a zero value are set to NULL using the following code:
columns = oneRowChange.getColumnSpec();columnValues = oneRowChange.getColumnValues();for (c = 0; c < columns.size(); c++){ columnSpec = columns.get(c); type = columnSpec.getType();
if (type == TypesDATE || type == TypesTIMESTAMP) { for (row = 0; row < columnValues.size(); row++) { values = columnValues.get(row); value = values.get(c);
if (value.getValue() == 0) { value.setValueNull() } } }}
In the above example, the column specification is retrieved to determine which columns are date types. Then the list of embedded rowvalues is extracted, and iterates over each row, setting the value for a date that is zero (0) to be NULL using the setValueNull() method.
An alternative would be to update to an explicit value using the setValue() method.
8.5.2. JavaScript Filter ReferenceTungsten Replicator comes with a number of JavaScript filters that can either be used directly, or that can be modified and adapted to suitindividual requirements. The majority of these scripts are located in tungsten-replicator/samples/extensions/javascript, more advancedscripts are located in tungsten-replicator/samples/scripts/javascript-advanced.
8.5.2.1. ansiquotes.js Filter
The ansiquotes.js script operates by inserting an SQL mode change to ANSI_QUOTES into the replication stream before a statement isexecuted, and returning to an empty SQL mode.
Pre-configured filter name ansiquotes
JavaScript Filter File tungsten-replicator/samples/extensions/javascript/ansiquotes.js
Property prefix replicator.filter.ansiquotes
Stage compatibility binlog-to-q
tpm Option compatibility --svc-extractor-filters [209]
Data compatibility Any event
Parameters
Parameter Type Default Description
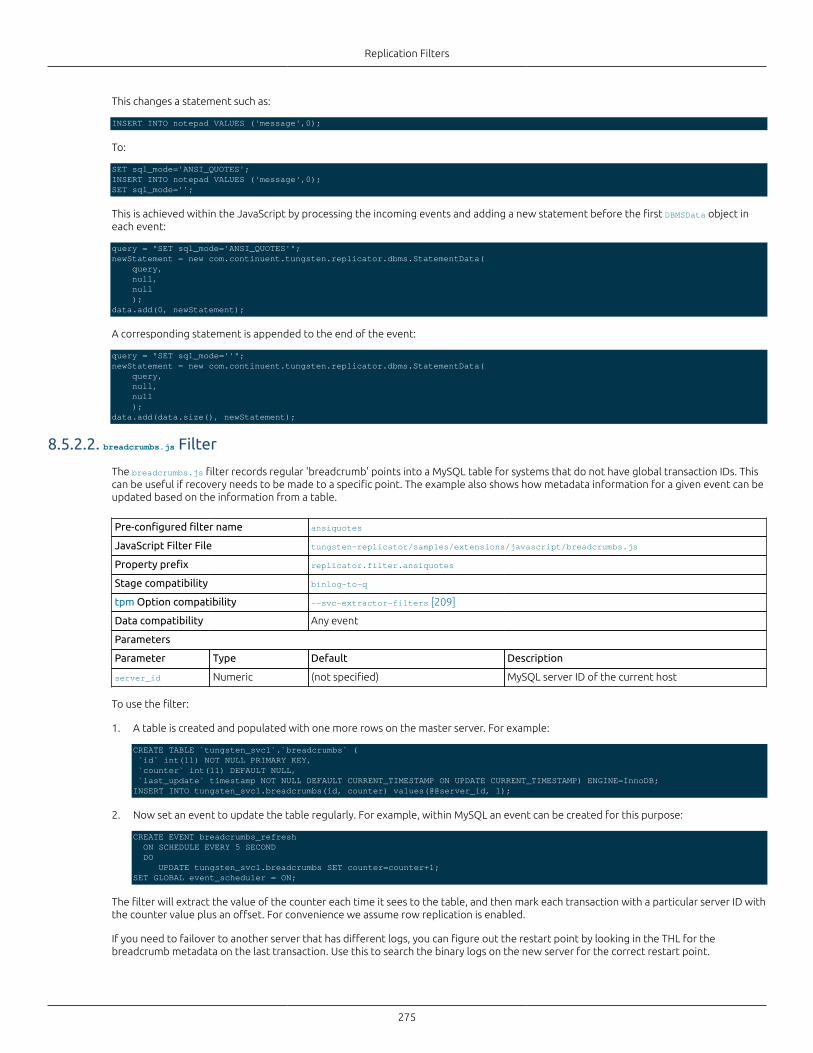
Replication Filters
275
This changes a statement such as:
INSERT INTO notepad VALUES ('message',0);
To:
SET sql_mode='ANSI_QUOTES';INSERT INTO notepad VALUES ('message',0);SET sql_mode='';
This is achieved within the JavaScript by processing the incoming events and adding a new statement before the first DBMSData object ineach event:
query = "SET sql_mode='ANSI_QUOTES'";newStatement = new com.continuent.tungsten.replicator.dbms.StatementData( query, null, null );data.add(0, newStatement);
A corresponding statement is appended to the end of the event:
query = "SET sql_mode=''";newStatement = new com.continuent.tungsten.replicator.dbms.StatementData( query, null, null );data.add(data.size(), newStatement);
8.5.2.2. breadcrumbs.js Filter
The breadcrumbs.js filter records regular 'breadcrumb' points into a MySQL table for systems that do not have global transaction IDs. Thiscan be useful if recovery needs to be made to a specific point. The example also shows how metadata information for a given event can beupdated based on the information from a table.
Pre-configured filter name ansiquotes
JavaScript Filter File tungsten-replicator/samples/extensions/javascript/breadcrumbs.js
Property prefix replicator.filter.ansiquotes
Stage compatibility binlog-to-q
tpm Option compatibility --svc-extractor-filters [209]
Data compatibility Any event
Parameters
Parameter Type Default Description
server_id Numeric (not specified) MySQL server ID of the current host
To use the filter:
1. A table is created and populated with one more rows on the master server. For example:
CREATE TABLE `tungsten_svc1`.`breadcrumbs` ( `id` int(11) NOT NULL PRIMARY KEY, `counter` int(11) DEFAULT NULL, `last_update` timestamp NOT NULL DEFAULT CURRENT_TIMESTAMP ON UPDATE CURRENT_TIMESTAMP) ENGINE=InnoDB;INSERT INTO tungsten_svc1.breadcrumbs(id, counter) values(@@server_id, 1);
2. Now set an event to update the table regularly. For example, within MySQL an event can be created for this purpose:
CREATE EVENT breadcrumbs_refresh ON SCHEDULE EVERY 5 SECOND DO UPDATE tungsten_svc1.breadcrumbs SET counter=counter+1;SET GLOBAL event_scheduler = ON;
The filter will extract the value of the counter each time it sees to the table, and then mark each transaction with a particular server ID withthe counter value plus an offset. For convenience we assume row replication is enabled.
If you need to failover to another server that has different logs, you can figure out the restart point by looking in the THL for thebreadcrumb metadata on the last transaction. Use this to search the binary logs on the new server for the correct restart point.
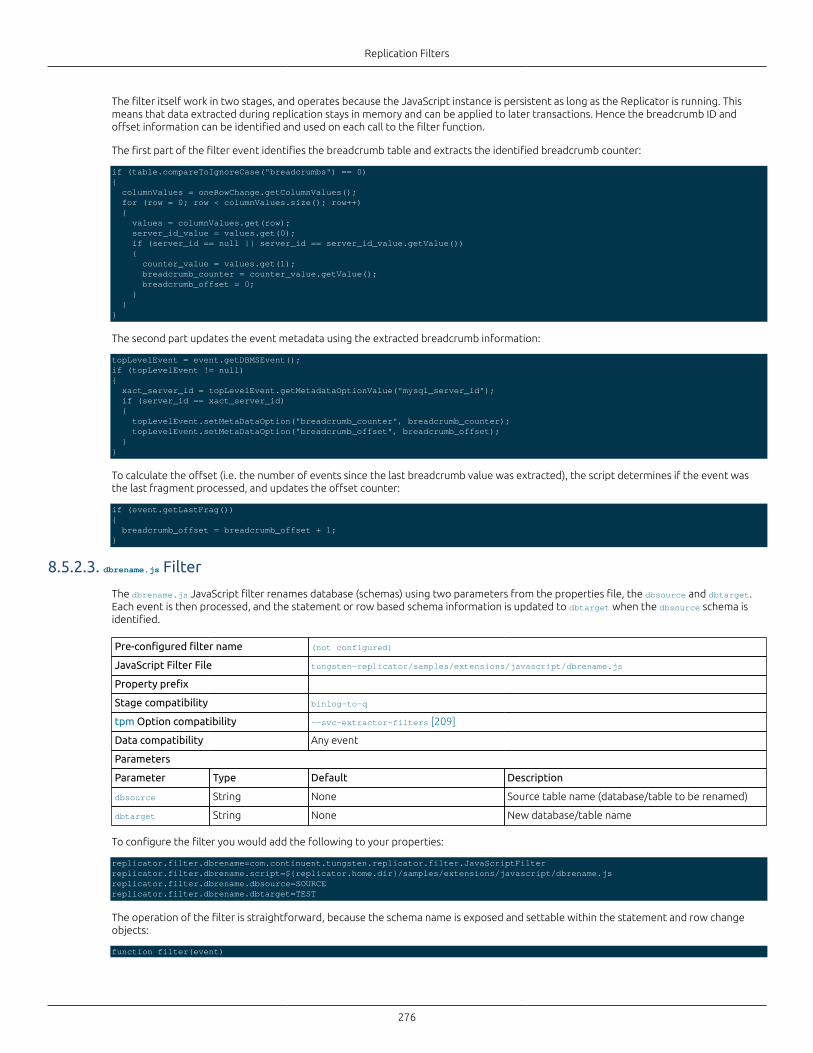
Replication Filters
276
The filter itself work in two stages, and operates because the JavaScript instance is persistent as long as the Replicator is running. Thismeans that data extracted during replication stays in memory and can be applied to later transactions. Hence the breadcrumb ID andoffset information can be identified and used on each call to the filter function.
The first part of the filter event identifies the breadcrumb table and extracts the identified breadcrumb counter:
if (table.compareToIgnoreCase("breadcrumbs") == 0){ columnValues = oneRowChange.getColumnValues(); for (row = 0; row < columnValues.size(); row++) { values = columnValues.get(row); server_id_value = values.get(0); if (server_id == null || server_id == server_id_value.getValue()) { counter_value = values.get(1); breadcrumb_counter = counter_value.getValue(); breadcrumb_offset = 0; } }}
The second part updates the event metadata using the extracted breadcrumb information:
topLevelEvent = event.getDBMSEvent();if (topLevelEvent != null){ xact_server_id = topLevelEvent.getMetadataOptionValue("mysql_server_id"); if (server_id == xact_server_id) { topLevelEvent.setMetaDataOption("breadcrumb_counter", breadcrumb_counter); topLevelEvent.setMetaDataOption("breadcrumb_offset", breadcrumb_offset); }}
To calculate the offset (i.e. the number of events since the last breadcrumb value was extracted), the script determines if the event wasthe last fragment processed, and updates the offset counter:
if (event.getLastFrag()){ breadcrumb_offset = breadcrumb_offset + 1;}
8.5.2.3. dbrename.js Filter
The dbrename.js JavaScript filter renames database (schemas) using two parameters from the properties file, the dbsource and dbtarget.Each event is then processed, and the statement or row based schema information is updated to dbtarget when the dbsource schema isidentified.
Pre-configured filter name (not configured)
JavaScript Filter File tungsten-replicator/samples/extensions/javascript/dbrename.js
Property prefix
Stage compatibility binlog-to-q
tpm Option compatibility --svc-extractor-filters [209]
Data compatibility Any event
Parameters
Parameter Type Default Description
dbsource String None Source table name (database/table to be renamed)
dbtarget String None New database/table name
To configure the filter you would add the following to your properties:
replicator.filter.dbrename=com.continuent.tungsten.replicator.filter.JavaScriptFilterreplicator.filter.dbrename.script=${replicator.home.dir}/samples/extensions/javascript/dbrename.jsreplicator.filter.dbrename.dbsource=SOURCEreplicator.filter.dbrename.dbtarget=TEST
The operation of the filter is straightforward, because the schema name is exposed and settable within the statement and row changeobjects:
function filter(event)

Replication Filters
277
{ sourceName = filterProperties.getString("dbsource"); targetName = filterProperties.getString("dbtarget");
data = event.getData();
for(i=0;i<data.size();i++) { d = data.get(i);
if(d instanceof com.continuent.tungsten.replicator.dbms.StatementData) { if(d.getDefaultSchema() != null && d.getDefaultSchema().compareTo(sourceName)==0) { d.setDefaultSchema(targetName); } } else if(d instanceof com.continuent.tungsten.replicator.dbms.RowChangeData) { rowChanges = data.get(i).getRowChanges();
for(j=0;j<rowChanges.size();j++) { oneRowChange = rowChanges.get(j);
if(oneRowChange.getSchemaName().compareTo(sourceName)==0) { oneRowChange.setSchemaName(targetName); } } } }}
8.5.2.4. dbselector.js Filter
Filtering only a single database schema can be useful when you want to extract a single schema for external processing, or for shardinginformation across multiple replication targets. The dbselector.js filter deletes all statement and row changes, except those for theselected table. To configure, the db parameter to the filter configuration specifies the schema to be replicated.
Pre-configured filter name (not configured)
JavaScript Filter File tungsten-replicator/samples/extensions/javascript/dbselector.js
Property prefix
Stage compatibility binlog-to-q, q-to-thl, q-to-dbms
tpm Option compatibility --svc-extractor-filters [209], --svc-applier-filters [209]
Data compatibility Any event
Parameters
Parameter Type Default Description
db String (none) Database to be selected
Within the filter, statement changes look for the schema in the StatementData object and remove it from the array:
if (d instanceof com.continuent.tungsten.replicator.dbms.StatementData){ if(d.getDefaultSchema().compareTo(db)!=0) { data.remove(i); i--; }}
Because entries are being removed from the list of statements, the iterator used to process each item must be explicitly decremented by 1to reset the counter back to the new position.
Similarly, when looking at row changes in the RowChangeData:
else if(d instanceof com.continuent.tungsten.replicator.dbms.RowChangeData){ rowChanges = data.get(i).getRowChanges();
for(j=0;j<rowChanges.size();j++)
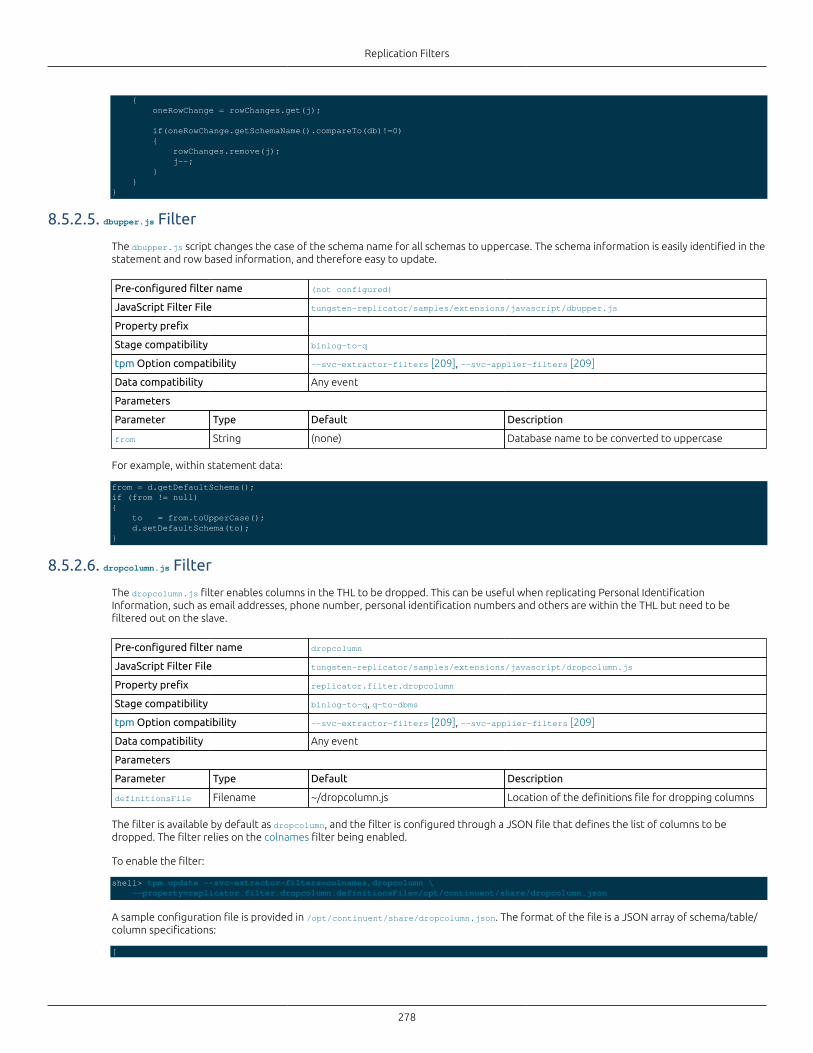
Replication Filters
278
{ oneRowChange = rowChanges.get(j);
if(oneRowChange.getSchemaName().compareTo(db)!=0) { rowChanges.remove(j); j--; } }}
8.5.2.5. dbupper.js Filter
The dbupper.js script changes the case of the schema name for all schemas to uppercase. The schema information is easily identified in thestatement and row based information, and therefore easy to update.
Pre-configured filter name (not configured)
JavaScript Filter File tungsten-replicator/samples/extensions/javascript/dbupper.js
Property prefix
Stage compatibility binlog-to-q
tpm Option compatibility --svc-extractor-filters [209], --svc-applier-filters [209]
Data compatibility Any event
Parameters
Parameter Type Default Description
from String (none) Database name to be converted to uppercase
For example, within statement data:
from = d.getDefaultSchema();if (from != null){ to = from.toUpperCase(); d.setDefaultSchema(to);}
8.5.2.6. dropcolumn.js Filter
The dropcolumn.js filter enables columns in the THL to be dropped. This can be useful when replicating Personal IdentificationInformation, such as email addresses, phone number, personal identification numbers and others are within the THL but need to befiltered out on the slave.
Pre-configured filter name dropcolumn
JavaScript Filter File tungsten-replicator/samples/extensions/javascript/dropcolumn.js
Property prefix replicator.filter.dropcolumn
Stage compatibility binlog-to-q, q-to-dbms
tpm Option compatibility --svc-extractor-filters [209], --svc-applier-filters [209]
Data compatibility Any event
Parameters
Parameter Type Default Description
definitionsFile Filename ~/dropcolumn.js Location of the definitions file for dropping columns
The filter is available by default as dropcolumn, and the filter is configured through a JSON file that defines the list of columns to bedropped. The filter relies on the colnames filter being enabled.
To enable the filter:
shell> tpm update --svc-extractor-filters=colnames,dropcolumn \ --property=replicator.filter.dropcolumn.definitionsFile=/opt/continuent/share/dropcolumn.json
A sample configuration file is provided in /opt/continuent/share/dropcolumn.json. The format of the file is a JSON array of schema/table/column specifications:
[
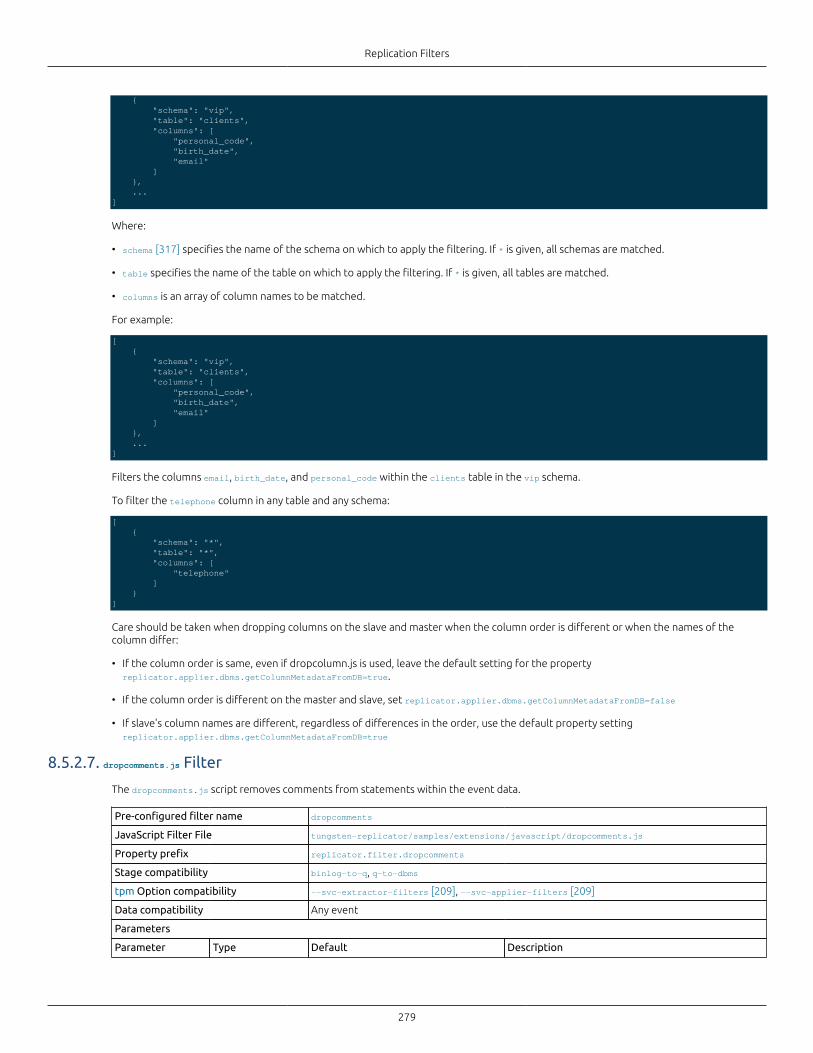
Replication Filters
279
{ "schema": "vip", "table": "clients", "columns": [ "personal_code", "birth_date", "email" ] }, ...]
Where:
• schema [317] specifies the name of the schema on which to apply the filtering. If * is given, all schemas are matched.
• table specifies the name of the table on which to apply the filtering. If * is given, all tables are matched.
• columns is an array of column names to be matched.
For example:
[ { "schema": "vip", "table": "clients", "columns": [ "personal_code", "birth_date", "email" ] }, ...]
Filters the columns email, birth_date, and personal_code within the clients table in the vip schema.
To filter the telephone column in any table and any schema:
[ { "schema": "*", "table": "*", "columns": [ "telephone" ] }]
Care should be taken when dropping columns on the slave and master when the column order is different or when the names of thecolumn differ:
• If the column order is same, even if dropcolumn.js is used, leave the default setting for the propertyreplicator.applier.dbms.getColumnMetadataFromDB=true.
• If the column order is different on the master and slave, set replicator.applier.dbms.getColumnMetadataFromDB=false
• If slave's column names are different, regardless of differences in the order, use the default property settingreplicator.applier.dbms.getColumnMetadataFromDB=true
8.5.2.7. dropcomments.js Filter
The dropcomments.js script removes comments from statements within the event data.
Pre-configured filter name dropcomments
JavaScript Filter File tungsten-replicator/samples/extensions/javascript/dropcomments.js
Property prefix replicator.filter.dropcomments
Stage compatibility binlog-to-q, q-to-dbms
tpm Option compatibility --svc-extractor-filters [209], --svc-applier-filters [209]
Data compatibility Any event
Parameters
Parameter Type Default Description
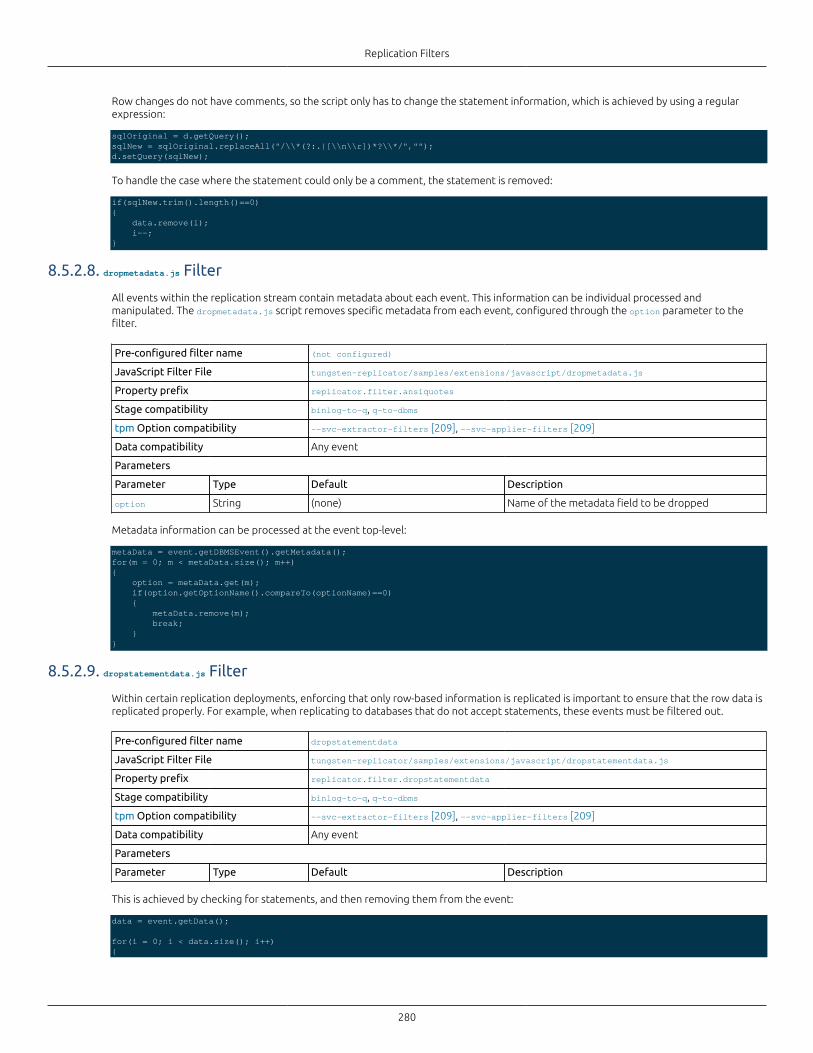
Replication Filters
280
Row changes do not have comments, so the script only has to change the statement information, which is achieved by using a regularexpression:
sqlOriginal = d.getQuery();sqlNew = sqlOriginal.replaceAll("/\\*(?:.|[\\n\\r])*?\\*/","");d.setQuery(sqlNew);
To handle the case where the statement could only be a comment, the statement is removed:
if(sqlNew.trim().length()==0){ data.remove(i); i--;}
8.5.2.8. dropmetadata.js Filter
All events within the replication stream contain metadata about each event. This information can be individual processed andmanipulated. The dropmetadata.js script removes specific metadata from each event, configured through the option parameter to thefilter.
Pre-configured filter name (not configured)
JavaScript Filter File tungsten-replicator/samples/extensions/javascript/dropmetadata.js
Property prefix replicator.filter.ansiquotes
Stage compatibility binlog-to-q, q-to-dbms
tpm Option compatibility --svc-extractor-filters [209], --svc-applier-filters [209]
Data compatibility Any event
Parameters
Parameter Type Default Description
option String (none) Name of the metadata field to be dropped
Metadata information can be processed at the event top-level:
metaData = event.getDBMSEvent().getMetadata();for(m = 0; m < metaData.size(); m++){ option = metaData.get(m); if(option.getOptionName().compareTo(optionName)==0) { metaData.remove(m); break; }}
8.5.2.9. dropstatementdata.js Filter
Within certain replication deployments, enforcing that only row-based information is replicated is important to ensure that the row data isreplicated properly. For example, when replicating to databases that do not accept statements, these events must be filtered out.
Pre-configured filter name dropstatementdata
JavaScript Filter File tungsten-replicator/samples/extensions/javascript/dropstatementdata.js
Property prefix replicator.filter.dropstatementdata
Stage compatibility binlog-to-q, q-to-dbms
tpm Option compatibility --svc-extractor-filters [209], --svc-applier-filters [209]
Data compatibility Any event
Parameters
Parameter Type Default Description
This is achieved by checking for statements, and then removing them from the event:
data = event.getData();
for(i = 0; i < data.size(); i++){
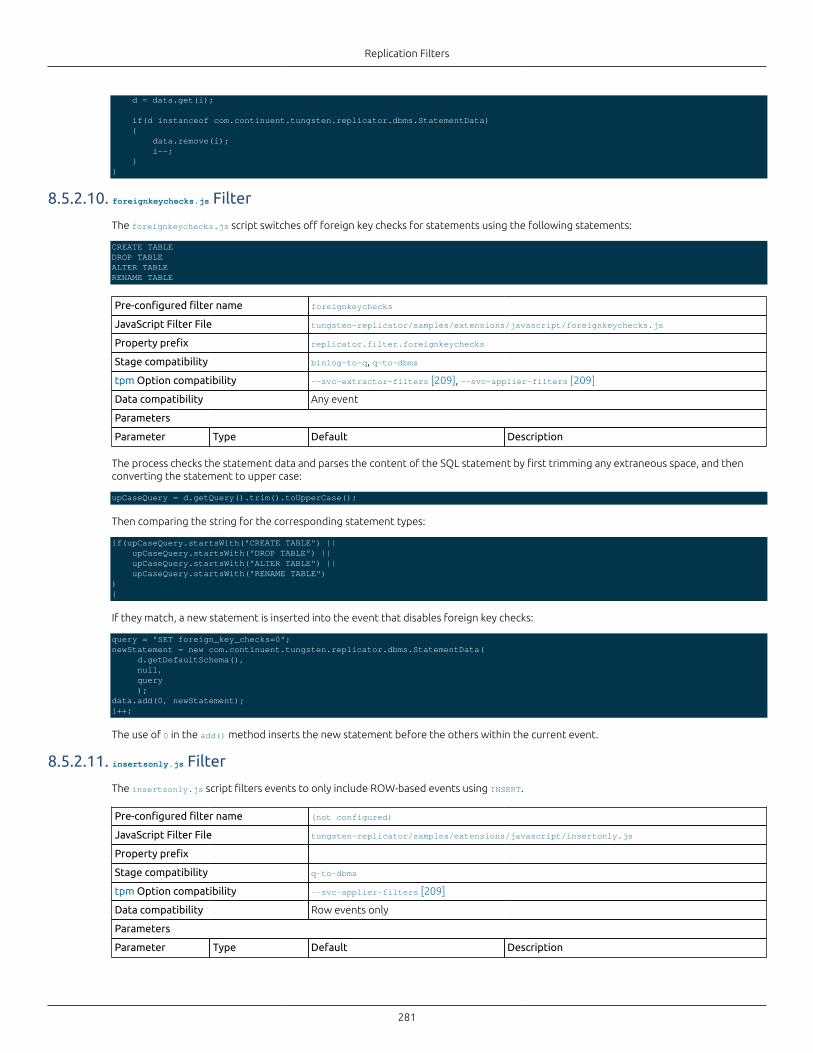
Replication Filters
281
d = data.get(i);
if(d instanceof com.continuent.tungsten.replicator.dbms.StatementData) { data.remove(i); i--; }}
8.5.2.10. foreignkeychecks.js Filter
The foreignkeychecks.js script switches off foreign key checks for statements using the following statements:
CREATE TABLEDROP TABLEALTER TABLERENAME TABLE
Pre-configured filter name foreignkeychecks
JavaScript Filter File tungsten-replicator/samples/extensions/javascript/foreignkeychecks.js
Property prefix replicator.filter.foreignkeychecks
Stage compatibility binlog-to-q, q-to-dbms
tpm Option compatibility --svc-extractor-filters [209], --svc-applier-filters [209]
Data compatibility Any event
Parameters
Parameter Type Default Description
The process checks the statement data and parses the content of the SQL statement by first trimming any extraneous space, and thenconverting the statement to upper case:
upCaseQuery = d.getQuery().trim().toUpperCase();
Then comparing the string for the corresponding statement types:
if(upCaseQuery.startsWith("CREATE TABLE") || upCaseQuery.startsWith("DROP TABLE") || upCaseQuery.startsWith("ALTER TABLE") || upCaseQuery.startsWith("RENAME TABLE")){
If they match, a new statement is inserted into the event that disables foreign key checks:
query = "SET foreign_key_checks=0";newStatement = new com.continuent.tungsten.replicator.dbms.StatementData( d.getDefaultSchema(), null, query );data.add(0, newStatement);i++;
The use of 0 in the add() method inserts the new statement before the others within the current event.
8.5.2.11. insertsonly.js Filter
The insertsonly.js script filters events to only include ROW-based events using INSERT.
Pre-configured filter name (not configured)
JavaScript Filter File tungsten-replicator/samples/extensions/javascript/insertonly.js
Property prefix
Stage compatibility q-to-dbms
tpm Option compatibility --svc-applier-filters [209]
Data compatibility Row events only
Parameters
Parameter Type Default Description
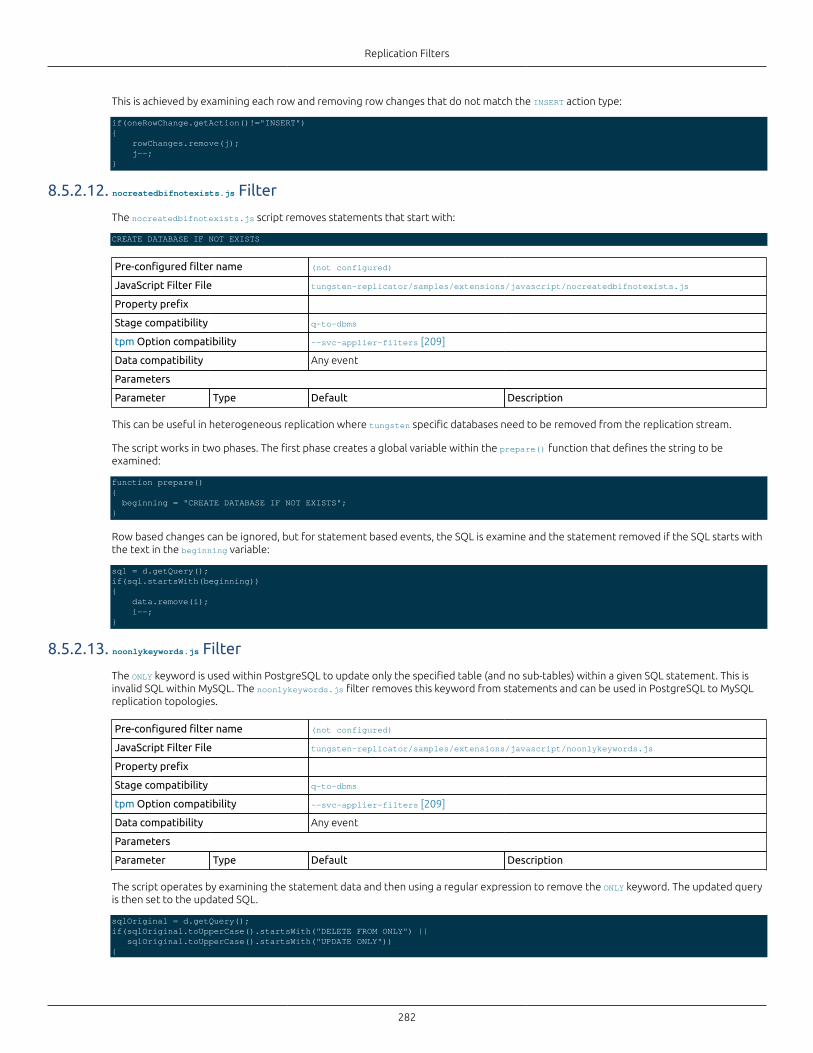
Replication Filters
282
This is achieved by examining each row and removing row changes that do not match the INSERT action type:
if(oneRowChange.getAction()!="INSERT"){ rowChanges.remove(j); j--;}
8.5.2.12. nocreatedbifnotexists.js Filter
The nocreatedbifnotexists.js script removes statements that start with:
CREATE DATABASE IF NOT EXISTS
Pre-configured filter name (not configured)
JavaScript Filter File tungsten-replicator/samples/extensions/javascript/nocreatedbifnotexists.js
Property prefix
Stage compatibility q-to-dbms
tpm Option compatibility --svc-applier-filters [209]
Data compatibility Any event
Parameters
Parameter Type Default Description
This can be useful in heterogeneous replication where tungsten specific databases need to be removed from the replication stream.
The script works in two phases. The first phase creates a global variable within the prepare() function that defines the string to beexamined:
function prepare(){ beginning = "CREATE DATABASE IF NOT EXISTS";}
Row based changes can be ignored, but for statement based events, the SQL is examine and the statement removed if the SQL starts withthe text in the beginning variable:
sql = d.getQuery();if(sql.startsWith(beginning)){ data.remove(i); i--;}
8.5.2.13. noonlykeywords.js Filter
The ONLY keyword is used within PostgreSQL to update only the specified table (and no sub-tables) within a given SQL statement. This isinvalid SQL within MySQL. The noonlykeywords.js filter removes this keyword from statements and can be used in PostgreSQL to MySQLreplication topologies.
Pre-configured filter name (not configured)
JavaScript Filter File tungsten-replicator/samples/extensions/javascript/noonlykeywords.js
Property prefix
Stage compatibility q-to-dbms
tpm Option compatibility --svc-applier-filters [209]
Data compatibility Any event
Parameters
Parameter Type Default Description
The script operates by examining the statement data and then using a regular expression to remove the ONLY keyword. The updated queryis then set to the updated SQL.
sqlOriginal = d.getQuery();if(sqlOriginal.toUpperCase().startsWith("DELETE FROM ONLY") || sqlOriginal.toUpperCase().startsWith("UPDATE ONLY")){
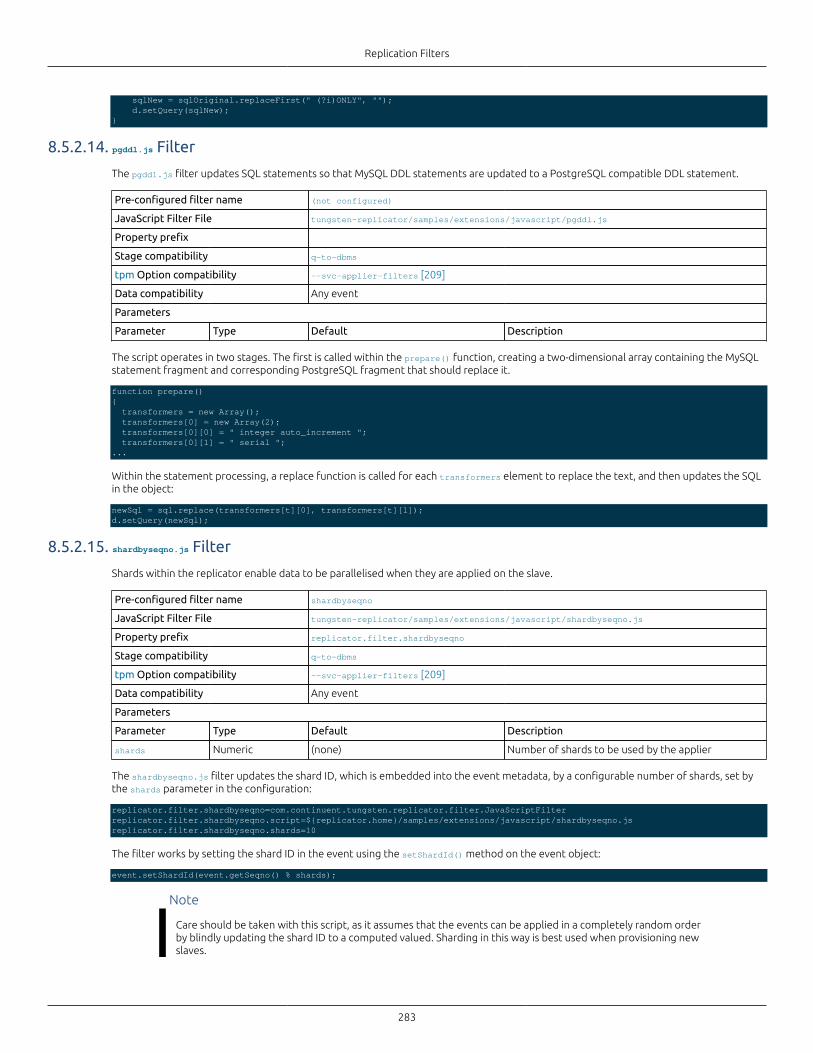
Replication Filters
283
sqlNew = sqlOriginal.replaceFirst(" (?i)ONLY", ""); d.setQuery(sqlNew);}
8.5.2.14. pgddl.js Filter
The pgddl.js filter updates SQL statements so that MySQL DDL statements are updated to a PostgreSQL compatible DDL statement.
Pre-configured filter name (not configured)
JavaScript Filter File tungsten-replicator/samples/extensions/javascript/pgddl.js
Property prefix
Stage compatibility q-to-dbms
tpm Option compatibility --svc-applier-filters [209]
Data compatibility Any event
Parameters
Parameter Type Default Description
The script operates in two stages. The first is called within the prepare() function, creating a two-dimensional array containing the MySQLstatement fragment and corresponding PostgreSQL fragment that should replace it.
function prepare(){ transformers = new Array(); transformers[0] = new Array(2); transformers[0][0] = " integer auto_increment "; transformers[0][1] = " serial ";...
Within the statement processing, a replace function is called for each transformers element to replace the text, and then updates the SQLin the object:
newSql = sql.replace(transformers[t][0], transformers[t][1]);d.setQuery(newSql);
8.5.2.15. shardbyseqno.js Filter
Shards within the replicator enable data to be parallelised when they are applied on the slave.
Pre-configured filter name shardbyseqno
JavaScript Filter File tungsten-replicator/samples/extensions/javascript/shardbyseqno.js
Property prefix replicator.filter.shardbyseqno
Stage compatibility q-to-dbms
tpm Option compatibility --svc-applier-filters [209]
Data compatibility Any event
Parameters
Parameter Type Default Description
shards Numeric (none) Number of shards to be used by the applier
The shardbyseqno.js filter updates the shard ID, which is embedded into the event metadata, by a configurable number of shards, set bythe shards parameter in the configuration:
replicator.filter.shardbyseqno=com.continuent.tungsten.replicator.filter.JavaScriptFilterreplicator.filter.shardbyseqno.script=${replicator.home}/samples/extensions/javascript/shardbyseqno.jsreplicator.filter.shardbyseqno.shards=10
The filter works by setting the shard ID in the event using the setShardId() method on the event object:
event.setShardId(event.getSeqno() % shards);
Note
Care should be taken with this script, as it assumes that the events can be applied in a completely random orderby blindly updating the shard ID to a computed valued. Sharding in this way is best used when provisioning newslaves.
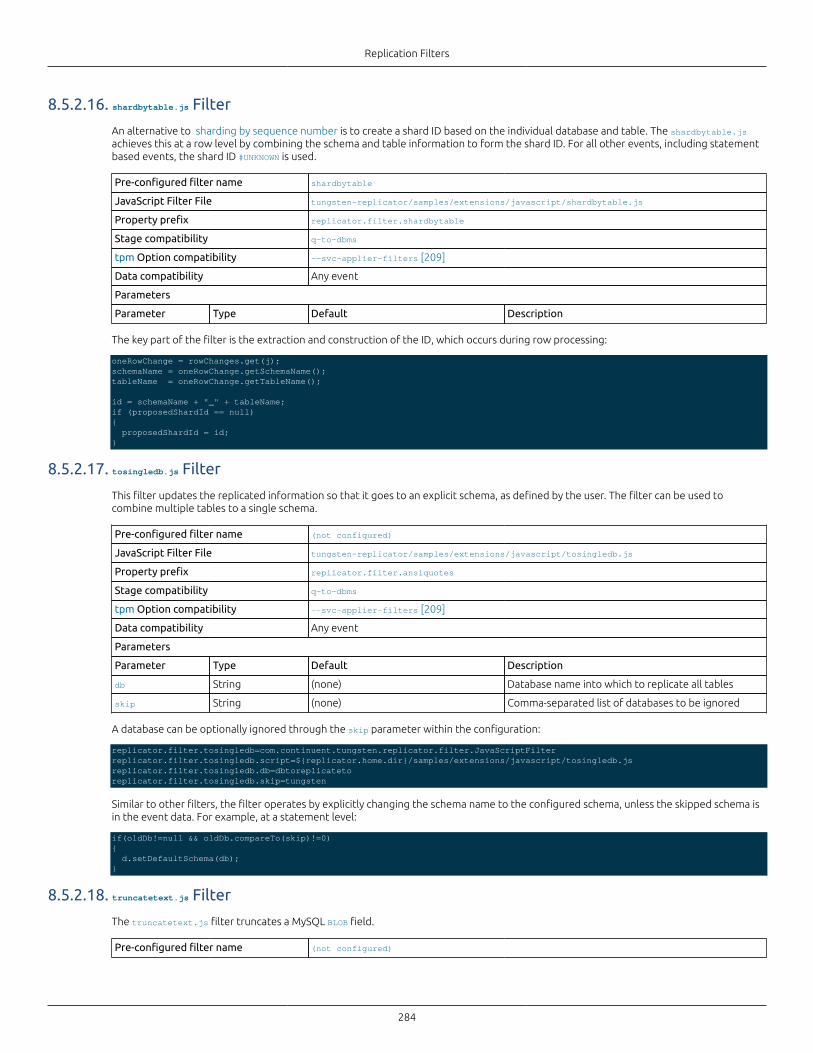
Replication Filters
284
8.5.2.16. shardbytable.js Filter
An alternative to sharding by sequence number is to create a shard ID based on the individual database and table. The shardbytable.jsachieves this at a row level by combining the schema and table information to form the shard ID. For all other events, including statementbased events, the shard ID #UNKNOWN is used.
Pre-configured filter name shardbytable
JavaScript Filter File tungsten-replicator/samples/extensions/javascript/shardbytable.js
Property prefix replicator.filter.shardbytable
Stage compatibility q-to-dbms
tpm Option compatibility --svc-applier-filters [209]
Data compatibility Any event
Parameters
Parameter Type Default Description
The key part of the filter is the extraction and construction of the ID, which occurs during row processing:
oneRowChange = rowChanges.get(j);schemaName = oneRowChange.getSchemaName();tableName = oneRowChange.getTableName();
id = schemaName + "_" + tableName;if (proposedShardId == null){ proposedShardId = id;}
8.5.2.17. tosingledb.js Filter
This filter updates the replicated information so that it goes to an explicit schema, as defined by the user. The filter can be used tocombine multiple tables to a single schema.
Pre-configured filter name (not configured)
JavaScript Filter File tungsten-replicator/samples/extensions/javascript/tosingledb.js
Property prefix replicator.filter.ansiquotes
Stage compatibility q-to-dbms
tpm Option compatibility --svc-applier-filters [209]
Data compatibility Any event
Parameters
Parameter Type Default Description
db String (none) Database name into which to replicate all tables
skip String (none) Comma-separated list of databases to be ignored
A database can be optionally ignored through the skip parameter within the configuration:
replicator.filter.tosingledb=com.continuent.tungsten.replicator.filter.JavaScriptFilterreplicator.filter.tosingledb.script=${replicator.home.dir}/samples/extensions/javascript/tosingledb.jsreplicator.filter.tosingledb.db=dbtoreplicatetoreplicator.filter.tosingledb.skip=tungsten
Similar to other filters, the filter operates by explicitly changing the schema name to the configured schema, unless the skipped schema isin the event data. For example, at a statement level:
if(oldDb!=null && oldDb.compareTo(skip)!=0){ d.setDefaultSchema(db);}
8.5.2.18. truncatetext.js Filter
The truncatetext.js filter truncates a MySQL BLOB field.
Pre-configured filter name (not configured)
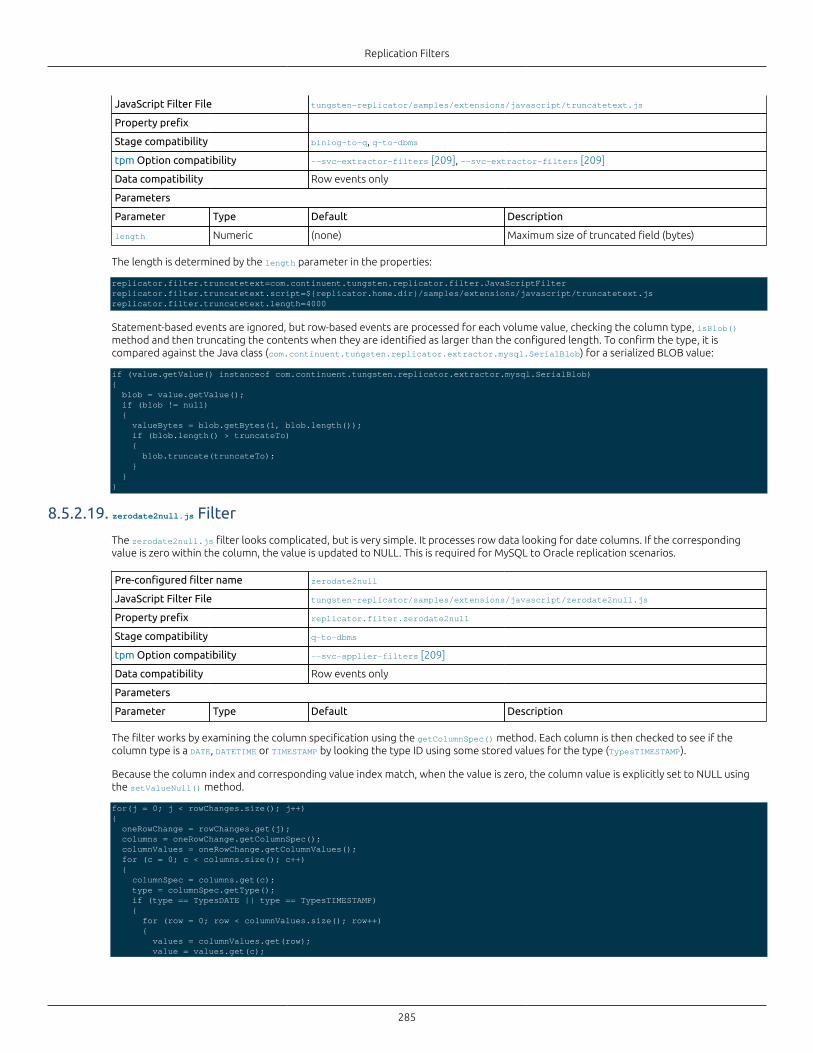
Replication Filters
285
JavaScript Filter File tungsten-replicator/samples/extensions/javascript/truncatetext.js
Property prefix
Stage compatibility binlog-to-q, q-to-dbms
tpm Option compatibility --svc-extractor-filters [209], --svc-extractor-filters [209]
Data compatibility Row events only
Parameters
Parameter Type Default Description
length Numeric (none) Maximum size of truncated field (bytes)
The length is determined by the length parameter in the properties:
replicator.filter.truncatetext=com.continuent.tungsten.replicator.filter.JavaScriptFilterreplicator.filter.truncatetext.script=${replicator.home.dir}/samples/extensions/javascript/truncatetext.jsreplicator.filter.truncatetext.length=4000
Statement-based events are ignored, but row-based events are processed for each volume value, checking the column type, isBlob()method and then truncating the contents when they are identified as larger than the configured length. To confirm the type, it iscompared against the Java class (com.continuent.tungsten.replicator.extractor.mysql.SerialBlob) for a serialized BLOB value:
if (value.getValue() instanceof com.continuent.tungsten.replicator.extractor.mysql.SerialBlob){ blob = value.getValue(); if (blob != null) { valueBytes = blob.getBytes(1, blob.length()); if (blob.length() > truncateTo) { blob.truncate(truncateTo); } }}
8.5.2.19. zerodate2null.js Filter
The zerodate2null.js filter looks complicated, but is very simple. It processes row data looking for date columns. If the correspondingvalue is zero within the column, the value is updated to NULL. This is required for MySQL to Oracle replication scenarios.
Pre-configured filter name zerodate2null
JavaScript Filter File tungsten-replicator/samples/extensions/javascript/zerodate2null.js
Property prefix replicator.filter.zerodate2null
Stage compatibility q-to-dbms
tpm Option compatibility --svc-applier-filters [209]
Data compatibility Row events only
Parameters
Parameter Type Default Description
The filter works by examining the column specification using the getColumnSpec() method. Each column is then checked to see if thecolumn type is a DATE, DATETIME or TIMESTAMP by looking the type ID using some stored values for the type (TypesTIMESTAMP).
Because the column index and corresponding value index match, when the value is zero, the column value is explicitly set to NULL usingthe setValueNull() method.
for(j = 0; j < rowChanges.size(); j++){ oneRowChange = rowChanges.get(j); columns = oneRowChange.getColumnSpec(); columnValues = oneRowChange.getColumnValues(); for (c = 0; c < columns.size(); c++) { columnSpec = columns.get(c); type = columnSpec.getType(); if (type == TypesDATE || type == TypesTIMESTAMP) { for (row = 0; row < columnValues.size(); row++) { values = columnValues.get(row); value = values.get(c);

Replication Filters
286
if (value.getValue() == 0) { value.setValueNull() } } } }}
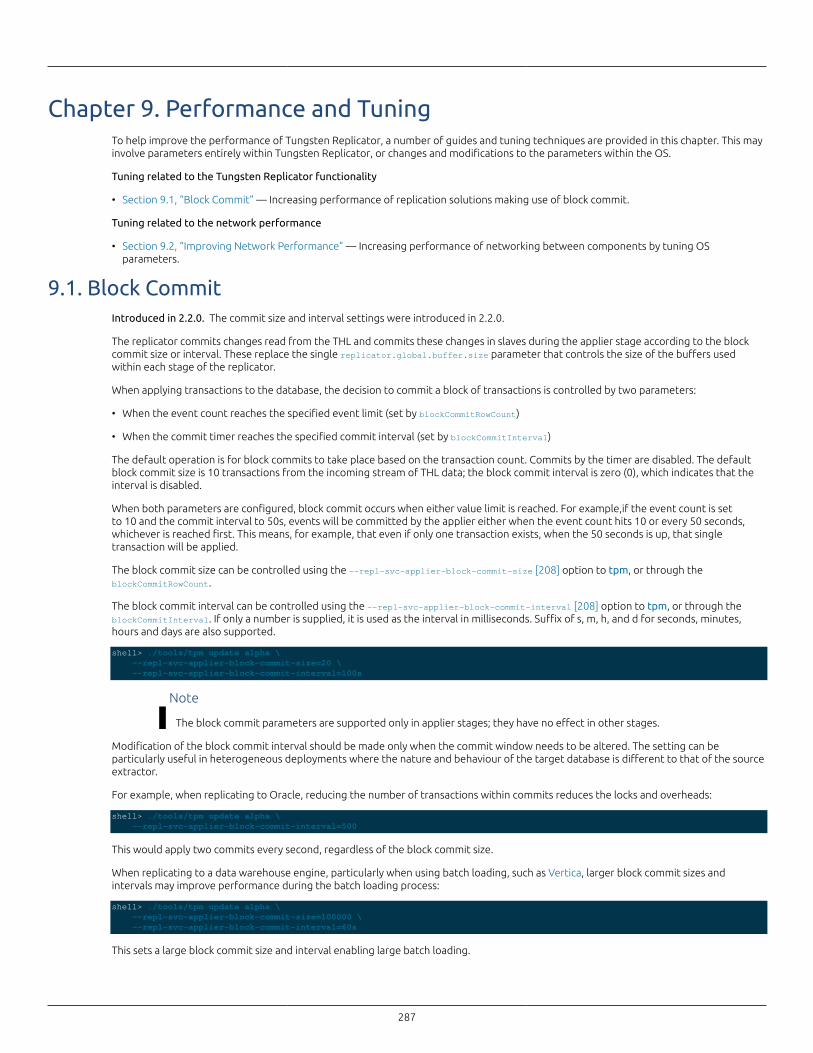
287
Chapter 9. Performance and TuningTo help improve the performance of Tungsten Replicator, a number of guides and tuning techniques are provided in this chapter. This mayinvolve parameters entirely within Tungsten Replicator, or changes and modifications to the parameters within the OS.
Tuning related to the Tungsten Replicator functionality
• Section 9.1, “Block Commit” — Increasing performance of replication solutions making use of block commit.
Tuning related to the network performance
• Section 9.2, “Improving Network Performance” — Increasing performance of networking between components by tuning OSparameters.
9.1. Block CommitIntroduced in 2.2.0. The commit size and interval settings were introduced in 2.2.0.
The replicator commits changes read from the THL and commits these changes in slaves during the applier stage according to the blockcommit size or interval. These replace the single replicator.global.buffer.size parameter that controls the size of the buffers usedwithin each stage of the replicator.
When applying transactions to the database, the decision to commit a block of transactions is controlled by two parameters:
• When the event count reaches the specified event limit (set by blockCommitRowCount)
• When the commit timer reaches the specified commit interval (set by blockCommitInterval)
The default operation is for block commits to take place based on the transaction count. Commits by the timer are disabled. The defaultblock commit size is 10 transactions from the incoming stream of THL data; the block commit interval is zero (0), which indicates that theinterval is disabled.
When both parameters are configured, block commit occurs when either value limit is reached. For example,if the event count is setto 10 and the commit interval to 50s, events will be committed by the applier either when the event count hits 10 or every 50 seconds,whichever is reached first. This means, for example, that even if only one transaction exists, when the 50 seconds is up, that singletransaction will be applied.
The block commit size can be controlled using the --repl-svc-applier-block-commit-size [208] option to tpm, or through theblockCommitRowCount.
The block commit interval can be controlled using the --repl-svc-applier-block-commit-interval [208] option to tpm, or through theblockCommitInterval. If only a number is supplied, it is used as the interval in milliseconds. Suffix of s, m, h, and d for seconds, minutes,hours and days are also supported.
shell> ./tools/tpm update alpha \ --repl-svc-applier-block-commit-size=20 \ --repl-svc-applier-block-commit-interval=100s
Note
The block commit parameters are supported only in applier stages; they have no effect in other stages.
Modification of the block commit interval should be made only when the commit window needs to be altered. The setting can beparticularly useful in heterogeneous deployments where the nature and behaviour of the target database is different to that of the sourceextractor.
For example, when replicating to Oracle, reducing the number of transactions within commits reduces the locks and overheads:
shell> ./tools/tpm update alpha \ --repl-svc-applier-block-commit-interval=500
This would apply two commits every second, regardless of the block commit size.
When replicating to a data warehouse engine, particularly when using batch loading, such as Vertica, larger block commit sizes andintervals may improve performance during the batch loading process:
shell> ./tools/tpm update alpha \ --repl-svc-applier-block-commit-size=100000 \ --repl-svc-applier-block-commit-interval=60s
This sets a large block commit size and interval enabling large batch loading.
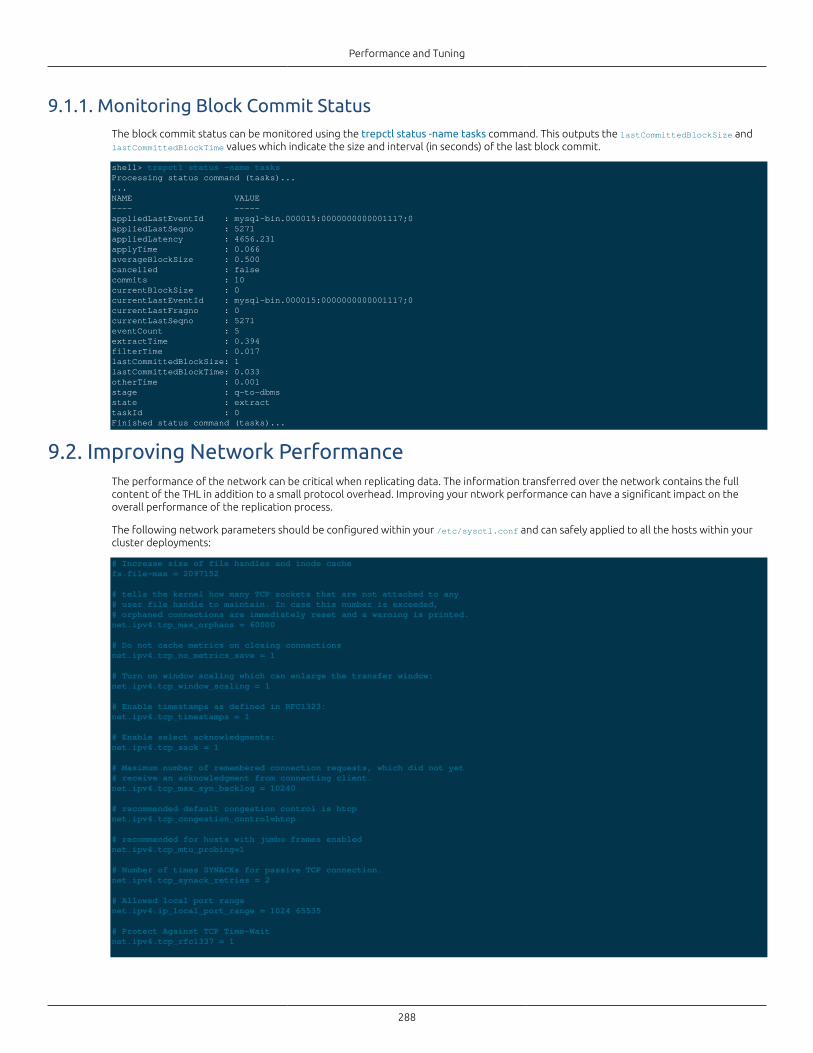
Performance and Tuning
288
9.1.1. Monitoring Block Commit StatusThe block commit status can be monitored using the trepctl status -name tasks command. This outputs the lastCommittedBlockSize andlastCommittedBlockTime values which indicate the size and interval (in seconds) of the last block commit.
shell> trepctl status -name tasksProcessing status command (tasks)......NAME VALUE---- -----appliedLastEventId : mysql-bin.000015:0000000000001117;0appliedLastSeqno : 5271appliedLatency : 4656.231applyTime : 0.066averageBlockSize : 0.500 cancelled : falsecommits : 10currentBlockSize : 0currentLastEventId : mysql-bin.000015:0000000000001117;0currentLastFragno : 0currentLastSeqno : 5271eventCount : 5extractTime : 0.394filterTime : 0.017lastCommittedBlockSize: 1lastCommittedBlockTime: 0.033otherTime : 0.001stage : q-to-dbmsstate : extracttaskId : 0Finished status command (tasks)...
9.2. Improving Network PerformanceThe performance of the network can be critical when replicating data. The information transferred over the network contains the fullcontent of the THL in addition to a small protocol overhead. Improving your ntwork performance can have a significant impact on theoverall performance of the replication process.
The following network parameters should be configured within your /etc/sysctl.conf and can safely applied to all the hosts within yourcluster deployments:
# Increase size of file handles and inode cache fs.file-max = 2097152
# tells the kernel how many TCP sockets that are not attached to any# user file handle to maintain. In case this number is exceeded,# orphaned connections are immediately reset and a warning is printed.net.ipv4.tcp_max_orphans = 60000
# Do not cache metrics on closing connections net.ipv4.tcp_no_metrics_save = 1
# Turn on window scaling which can enlarge the transfer window: net.ipv4.tcp_window_scaling = 1
# Enable timestamps as defined in RFC1323: net.ipv4.tcp_timestamps = 1
# Enable select acknowledgments: net.ipv4.tcp_sack = 1
# Maximum number of remembered connection requests, which did not yet# receive an acknowledgment from connecting client.net.ipv4.tcp_max_syn_backlog = 10240
# recommended default congestion control is htcp net.ipv4.tcp_congestion_control=htcp
# recommended for hosts with jumbo frames enabled net.ipv4.tcp_mtu_probing=1
# Number of times SYNACKs for passive TCP connection. net.ipv4.tcp_synack_retries = 2
# Allowed local port range net.ipv4.ip_local_port_range = 1024 65535
# Protect Against TCP Time-Wait net.ipv4.tcp_rfc1337 = 1
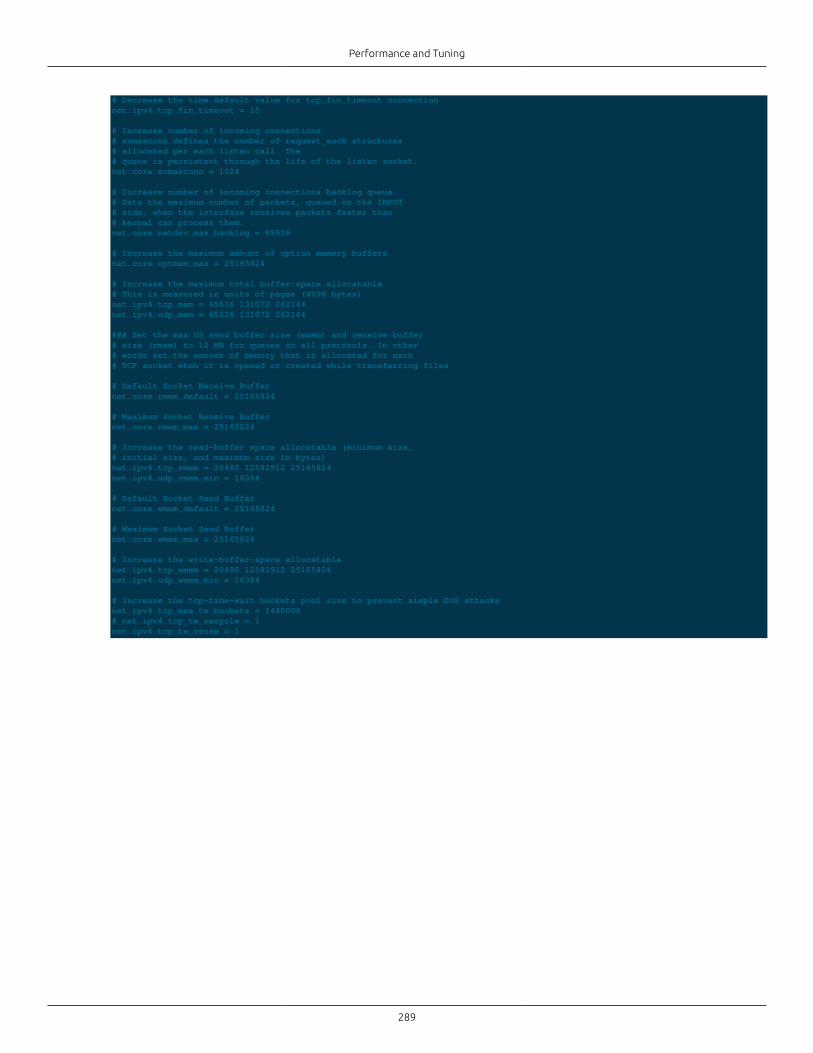
Performance and Tuning
289
# Decrease the time default value for tcp_fin_timeout connection net.ipv4.tcp_fin_timeout = 15
# Increase number of incoming connections # somaxconn defines the number of request_sock structures # allocated per each listen call. The# queue is persistent through the life of the listen socket.net.core.somaxconn = 1024
# Increase number of incoming connections backlog queue # Sets the maximum number of packets, queued on the INPUT # side, when the interface receives packets faster than# kernel can process them. net.core.netdev_max_backlog = 65536
# Increase the maximum amount of option memory buffers net.core.optmem_max = 25165824
# Increase the maximum total buffer-space allocatable # This is measured in units of pages (4096 bytes) net.ipv4.tcp_mem = 65536 131072 262144 net.ipv4.udp_mem = 65536 131072 262144
### Set the max OS send buffer size (wmem) and receive buffer# size (rmem) to 12 MB for queues on all protocols. In other # words set the amount of memory that is allocated for each# TCP socket when it is opened or created while transferring files
# Default Socket Receive Buffer net.core.rmem_default = 25165824
# Maximum Socket Receive Buffer net.core.rmem_max = 25165824
# Increase the read-buffer space allocatable (minimum size, # initial size, and maximum size in bytes) net.ipv4.tcp_rmem = 20480 12582912 25165824 net.ipv4.udp_rmem_min = 16384
# Default Socket Send Buffer net.core.wmem_default = 25165824
# Maximum Socket Send Buffer net.core.wmem_max = 25165824
# Increase the write-buffer-space allocatable net.ipv4.tcp_wmem = 20480 12582912 25165824 net.ipv4.udp_wmem_min = 16384
# Increase the tcp-time-wait buckets pool size to prevent simple DOS attacks net.ipv4.tcp_max_tw_buckets = 1440000 # net.ipv4.tcp_tw_recycle = 1 net.ipv4.tcp_tw_reuse = 1
290
Chapter 10. Configuration Files and Format
10.1. Replicator Configuration Properties
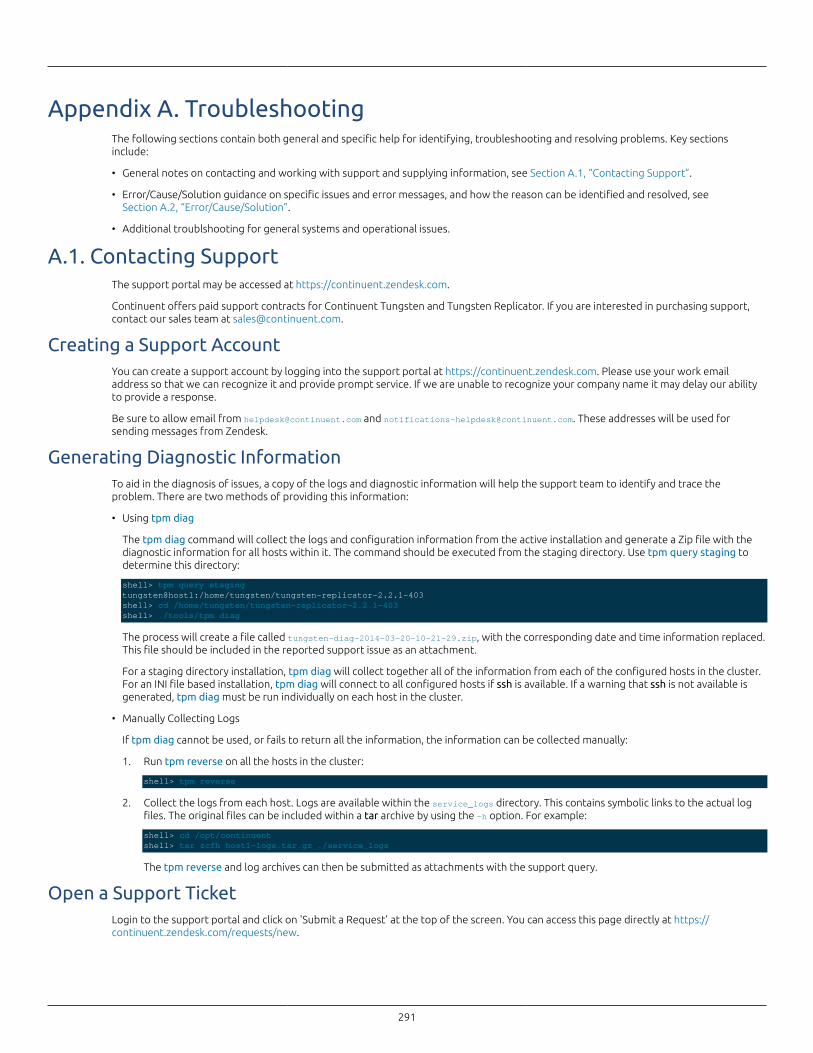
291
Appendix A. TroubleshootingThe following sections contain both general and specific help for identifying, troubleshooting and resolving problems. Key sectionsinclude:
• General notes on contacting and working with support and supplying information, see Section A.1, “Contacting Support”.
• Error/Cause/Solution guidance on specific issues and error messages, and how the reason can be identified and resolved, seeSection A.2, “Error/Cause/Solution”.
• Additional troublshooting for general systems and operational issues.
A.1. Contacting SupportThe support portal may be accessed at https://continuent.zendesk.com.
Continuent offers paid support contracts for Continuent Tungsten and Tungsten Replicator. If you are interested in purchasing support,contact our sales team at [email protected].
Creating a Support AccountYou can create a support account by logging into the support portal at https://continuent.zendesk.com. Please use your work emailaddress so that we can recognize it and provide prompt service. If we are unable to recognize your company name it may delay our abilityto provide a response.
Be sure to allow email from [email protected] and [email protected]. These addresses will be used forsending messages from Zendesk.
Generating Diagnostic InformationTo aid in the diagnosis of issues, a copy of the logs and diagnostic information will help the support team to identify and trace theproblem. There are two methods of providing this information:
• Using tpm diag
The tpm diag command will collect the logs and configuration information from the active installation and generate a Zip file with thediagnostic information for all hosts within it. The command should be executed from the staging directory. Use tpm query staging todetermine this directory:
shell> tpm query stagingtungsten@host1:/home/tungsten/tungsten-replicator-2.2.1-403shell> cd /home/tungsten/tungsten-replicator-2.2.1-403shell> ./tools/tpm diag
The process will create a file called tungsten-diag-2014-03-20-10-21-29.zip, with the corresponding date and time information replaced.This file should be included in the reported support issue as an attachment.
For a staging directory installation, tpm diag will collect together all of the information from each of the configured hosts in the cluster.For an INI file based installation, tpm diag will connect to all configured hosts if ssh is available. If a warning that ssh is not available isgenerated, tpm diag must be run individually on each host in the cluster.
• Manually Collecting Logs
If tpm diag cannot be used, or fails to return all the information, the information can be collected manually:
1. Run tpm reverse on all the hosts in the cluster:
shell> tpm reverse
2. Collect the logs from each host. Logs are available within the service_logs directory. This contains symbolic links to the actual logfiles. The original files can be included within a tar archive by using the -h option. For example:
shell> cd /opt/continuentshell> tar zcfh host1-logs.tar.gz ./service_logs
The tpm reverse and log archives can then be submitted as attachments with the support query.
Open a Support TicketLogin to the support portal and click on 'Submit a Request' at the top of the screen. You can access this page directly at https://continuent.zendesk.com/requests/new.

Troubleshooting
292
Open a Support Ticket via EmailSend an email to [email protected] from the email address that you used to create your support account. You can include adescription and attachments to help us diagnose the problem.
Getting Updates for all Company Support TicketsIf multiple people in your organization have created support tickets, it is possible to get updates on any support tickets they open. Youshould see your organization name along the top of the support portal. It will be listed after the Check Your Existing Requests tab.
To see all updates for your organization, click on the organization name and then click the Subscribe link.
If you do not see your organization name listed in the headers, open a support ticket asking us to create the organization and list thepeople that should be included.
A.2. Error/Cause/Solution
A.2.1. Too many open processes or filesLast Updated: 2013-10-09
Condition
The operating system or enviroment reports that the tungsten or designated Tungsten Replicator user has too many open files, processes,or both.
Causes
• User limits for processes or files have either been exhausted, or recommended limits for user configuration have not been set.
Rectifications
• Check the output of ulimit and check the configure file and process limits:
shell> ulimit -acore file size (blocks, -c) 0data seg size (kbytes, -d) unlimitedfile size (blocks, -f) unlimitedmax locked memory (kbytes, -l) unlimitedmax memory size (kbytes, -m) unlimitedopen files (-n) 256pipe size (512 bytes, -p) 1stack size (kbytes, -s) 8192cpu time (seconds, -t) unlimitedmax user processes (-u) 709virtual memory (kbytes, -v) unlimited
If the figures reported are less than the recommended settings, see Section C.2.1, “Creating the User Environment” for guidance on howthese values should be changed.
More Information
Section C.2.1, “Creating the User Environment”
A.2.2. OptimizeUpdatesFilter cannot filter, because column and key count isdifferent. Make sure that it is defined before filters which remove keys (eg.PrimaryKeyFilter).
Last Updated: 2014-07-28
Condition
When using the optimizeupdates filter, replication stops with the error message in the output from trepctl status or when examining thelog file.
Causes
• The optimizeupdates filter works by removing indexed columns from updates that are unnecesary when a primary key exists to locatethe record. If the key information has already been removed (for example, by the pkey filter, then the columns cannot be effectivelycompared and optimized.

Troubleshooting
293
Rectifications
• If the pkey filter is required, change the order of the filters within the specified stage within the replicator so that the optimizeupdatesfilter is called before the pkey filter.
A.2.3. Unable to update the configuration of an installed directoryLast Updated: 2013-08-07
Condition
Running an update or configuration with tpm returns the error 'Unable to update the configuration of an installed directory'
Causes
• Updates to the configuration of a running cluster must be performed from the staging directory where Tungsten Replicator wasoriginally installed.
Rectifications
• Change to the staging directory and perform the necessary commands with tpm. To determine the staging directory, use:
shell> tpm query staging
Then change to the staging directory and perform the updates:
shell> ./tools/tpm configure ....
More Information
Chapter 2, Deployment
A.2.4. 'subscription exists' when setting up CDC on OracleLast Updated: 2014-04-24
Condition
When running setupCDC.sh an error regarding an existing subscription is received and setupCDC.sh fails to complete.
Causes
• This error indicates that setupCDC.sh has previously been executed and the CDC configuration and publishers and subscribers havebeen created, but the names of the tables or users may have been changed.
Rectifications
• The cleanup_cdc_tables.sql file can be used to cleanup an existing CDC installation. See Section 3.2.8, “CDC Cleanup and Correction”.
A.2.5. MySQLExtractException: unknown data type 0Last Updated: 2014-04-15
Condition
Replication fails to extract the data from the MySQL binary log, and the replicator will not go online again.
Causes
• The format of DECIMAL types between MySQL 4.x and MySQL 5.0 changed, however, the datatype was not automatically modified duringan upgrade process. This means that tables that were created in MySQL 4.x and now exist within MySQL 5.0 using the DECIMAL generatean incompatible entry within the MySQL binary log. The upgrade and mysql_upgrade commands do not update the tables correctly.More detailed information on the cahgne and issue can be located in Bug #57166.
Rectifications
• The table definition must be manually upgraded to force the change of the columns using the older DECIMAL type. The recommendedcorrection is to explicitly upgrade the DECIMAL columns. For example:
mysql> ALTER TABLE faulty MODIFY COLUMN faulty_column DECIMAL;
This should be performed on the master within your topology. To correct the error, you must use tpm reset -thl to regenerate the THL.
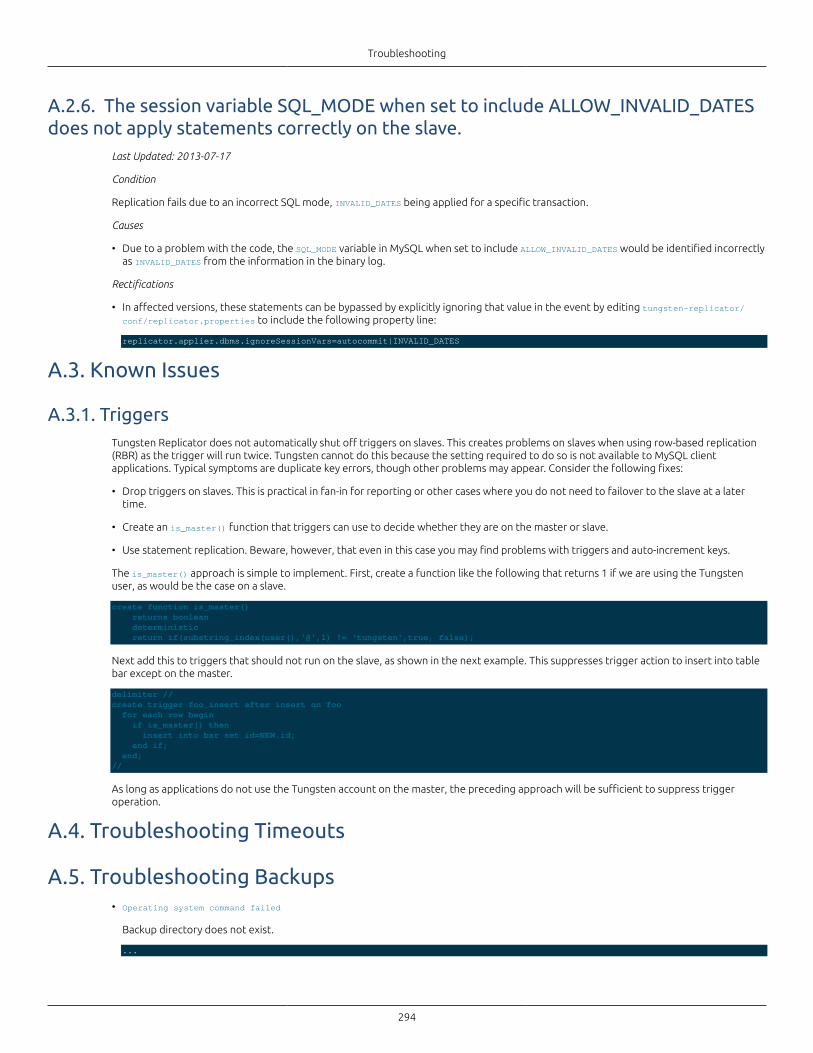
Troubleshooting
294
A.2.6. The session variable SQL_MODE when set to include ALLOW_INVALID_DATESdoes not apply statements correctly on the slave.
Last Updated: 2013-07-17
Condition
Replication fails due to an incorrect SQL mode, INVALID_DATES being applied for a specific transaction.
Causes
• Due to a problem with the code, the SQL_MODE variable in MySQL when set to include ALLOW_INVALID_DATES would be identified incorrectlyas INVALID_DATES from the information in the binary log.
Rectifications
• In affected versions, these statements can be bypassed by explicitly ignoring that value in the event by editing tungsten-replicator/conf/replicator.properties to include the following property line:
replicator.applier.dbms.ignoreSessionVars=autocommit|INVALID_DATES
A.3. Known Issues
A.3.1. TriggersTungsten Replicator does not automatically shut off triggers on slaves. This creates problems on slaves when using row-based replication(RBR) as the trigger will run twice. Tungsten cannot do this because the setting required to do so is not available to MySQL clientapplications. Typical symptoms are duplicate key errors, though other problems may appear. Consider the following fixes:
• Drop triggers on slaves. This is practical in fan-in for reporting or other cases where you do not need to failover to the slave at a latertime.
• Create an is_master() function that triggers can use to decide whether they are on the master or slave.
• Use statement replication. Beware, however, that even in this case you may find problems with triggers and auto-increment keys.
The is_master() approach is simple to implement. First, create a function like the following that returns 1 if we are using the Tungstenuser, as would be the case on a slave.
create function is_master() returns boolean deterministic return if(substring_index(user(),'@',1) != 'tungsten',true, false);
Next add this to triggers that should not run on the slave, as shown in the next example. This suppresses trigger action to insert into tablebar except on the master.
delimiter //create trigger foo_insert after insert on foo for each row begin if is_master() then insert into bar set id=NEW.id; end if; end;//
As long as applications do not use the Tungsten account on the master, the preceding approach will be sufficient to suppress triggeroperation.
A.4. Troubleshooting Timeouts
A.5. Troubleshooting Backups• Operating system command failed
Backup directory does not exist.
...
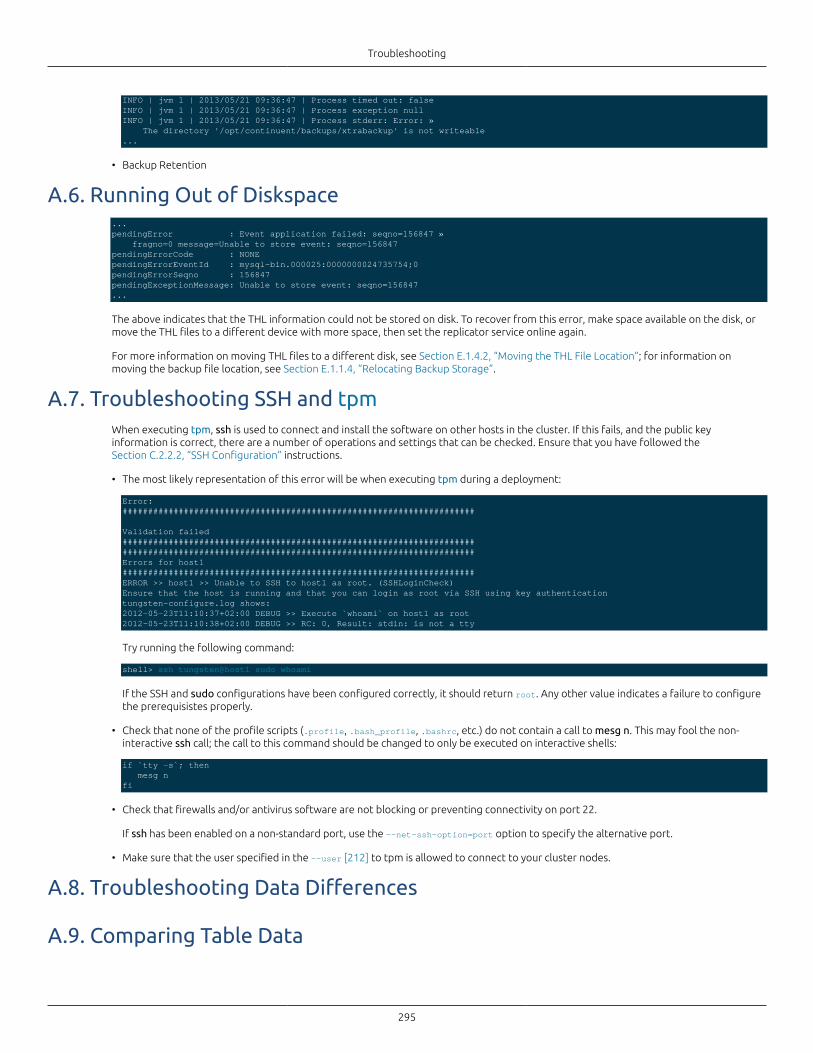
Troubleshooting
295
INFO | jvm 1 | 2013/05/21 09:36:47 | Process timed out: falseINFO | jvm 1 | 2013/05/21 09:36:47 | Process exception nullINFO | jvm 1 | 2013/05/21 09:36:47 | Process stderr: Error: » The directory '/opt/continuent/backups/xtrabackup' is not writeable...
• Backup Retention
A.6. Running Out of Diskspace...pendingError : Event application failed: seqno=156847 » fragno=0 message=Unable to store event: seqno=156847pendingErrorCode : NONEpendingErrorEventId : mysql-bin.000025:0000000024735754;0pendingErrorSeqno : 156847pendingExceptionMessage: Unable to store event: seqno=156847...
The above indicates that the THL information could not be stored on disk. To recover from this error, make space available on the disk, ormove the THL files to a different device with more space, then set the replicator service online again.
For more information on moving THL files to a different disk, see Section E.1.4.2, “Moving the THL File Location”; for information onmoving the backup file location, see Section E.1.1.4, “Relocating Backup Storage”.
A.7. Troubleshooting SSH and tpmWhen executing tpm, ssh is used to connect and install the software on other hosts in the cluster. If this fails, and the public keyinformation is correct, there are a number of operations and settings that can be checked. Ensure that you have followed theSection C.2.2.2, “SSH Configuration” instructions.
• The most likely representation of this error will be when executing tpm during a deployment:
Error:#####################################################################
Validation failed##########################################################################################################################################Errors for host1#####################################################################ERROR >> host1 >> Unable to SSH to host1 as root. (SSHLoginCheck)Ensure that the host is running and that you can login as root via SSH using key authenticationtungsten-configure.log shows:2012-05-23T11:10:37+02:00 DEBUG >> Execute `whoami` on host1 as root2012-05-23T11:10:38+02:00 DEBUG >> RC: 0, Result: stdin: is not a tty
Try running the following command:
shell> ssh tungsten@host1 sudo whoami
If the SSH and sudo configurations have been configured correctly, it should return root. Any other value indicates a failure to configurethe prerequisistes properly.
• Check that none of the profile scripts (.profile, .bash_profile, .bashrc, etc.) do not contain a call to mesg n. This may fool the non-interactive ssh call; the call to this command should be changed to only be executed on interactive shells:
if `tty -s`; then mesg nfi
• Check that firewalls and/or antivirus software are not blocking or preventing connectivity on port 22.
If ssh has been enabled on a non-standard port, use the --net-ssh-option=port option to specify the alternative port.
• Make sure that the user specified in the --user [212] to tpm is allowed to connect to your cluster nodes.
A.8. Troubleshooting Data Differences
A.9. Comparing Table Data
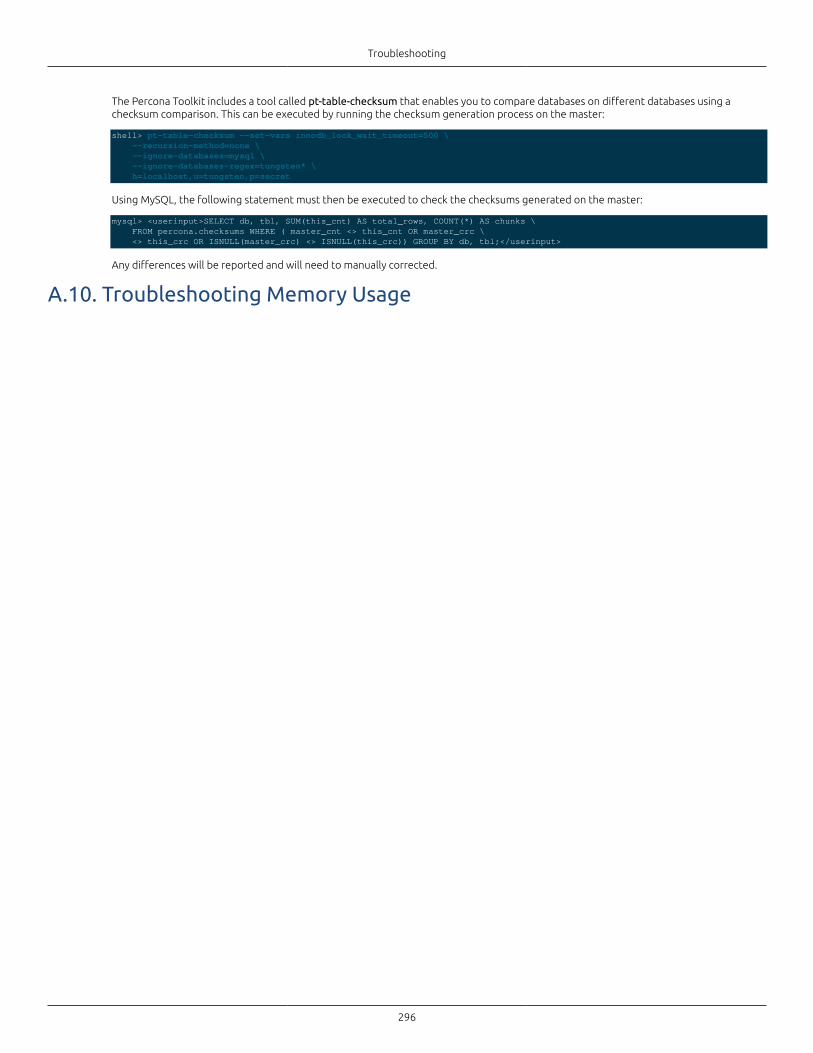
Troubleshooting
296
The Percona Toolkit includes a tool called pt-table-checksum that enables you to compare databases on different databases using achecksum comparison. This can be executed by running the checksum generation process on the master:
shell> pt-table-checksum --set-vars innodb_lock_wait_timeout=500 \ --recursion-method=none \ --ignore-databases=mysql \ --ignore-databases-regex=tungsten* \ h=localhost,u=tungsten,p=secret
Using MySQL, the following statement must then be executed to check the checksums generated on the master:
mysql> <userinput>SELECT db, tbl, SUM(this_cnt) AS total_rows, COUNT(*) AS chunks \ FROM percona.checksums WHERE ( master_cnt <> this_cnt OR master_crc \ <> this_crc OR ISNULL(master_crc) <> ISNULL(this_crc)) GROUP BY db, tbl;</userinput>
Any differences will be reported and will need to manually corrected.
A.10. Troubleshooting Memory Usage
297
Appendix B. Release Notes
B.1. Tungsten Replicator 2.2.1 GA (13 May 2014)Behavior Changes
The following changes have been made to Tungsten Replicator and may affect existing scripts and integration tools.Any scripts or environment which make use of these tools should check and update for the new configuration:
• The tpm tool and configuration have been updated to support both older Oracle SIDs and the new JDBC URLformat for Oracle service IDs. When configuring an Oracle service, use --datasource-oracle-sid for older servicespecifications, and --datasource-oracle-service [191] for newer JDBC URL installations.
Issues: 817
Improvements, new features and functionality
• Installation and Deployment
• When using the --enable-heterogeneous-master option to tpm, the MySQL service is now checked to ensure that ROW-basedreplication has been enabled.
Issues: 834
• Command-line Tools
• The thl command has been expanded to support an additional output format, -specs, which adds the field specifications for row-based THL output.
Issues: 801
For more information, see thl list -specs Command.
• Oracle Replication
• Templates have been added to the suite of DDL translation templates supported by ddlscan to support Oracle to MySQL replication.Two templates are included:
• ddl-oracle-mysql provides standard translation of DDL when replicating from Oracle to MySQL
• ddl-oracle-mysql-pk-only provides standard translation of DDL including automatic selection of a primary key from the availableunique indexes if no explicit primary key is defined within Oracle DDL when replicating to MySQL
Issues: 787
• ddlscan has been updated to support parsing of a file containing a list of tables to be parsed for DDL information. The file should beformatted as a CSV file, but only the first argument, table name, will be extracted. Lines starting with a # (hash) character are ignored.
The file is in the same format as used by setupCDC.sh.
To use the file, supply the -tableFile parameter to the command.
Issues: 832
• Core Replicator
• The replicator has been updated to support autorecovery from transient failures that would normally cause the replicator to goOFFLINE [127] while in either the ONLINE [128] or GOING-ONLINE:SYNCHRONIZING [127] state. This enables the replicator to recover fromerrors such as MySQL restarts, or transient connection errors.
The period, number of attempted recovery operations, and the delay before a recovery is considered successful are configurablethrough individual properties.
Issues: 784
For more information, see Section 5.3, “Deploying Automatic Replicator Recovery”.
• The way VARCHAR values were stored and represented within the replicator has been updated which improves performancesignificantly.
Issues: 804
Release Notes
298
• If the binary logs for MySQL were flushed and purged (using FLUSH LOGS and PURGE BINARY LOGS), and then the replicator is restarted,the replicator would fail to identify and locate the newly created logs with an MySQLExtractException.
Issues: 851
• Documentation
• The deployment and recovery procedures for Multi-site/Multi-master deployments have been documented.
Issues: 797
For more information, see Deploying a Multisite/Multimaster Topology in [Continuent Tungsten 2.0 Manual].
Bug Fixes
• Installation and Deployment
• tpm would mis-identify options that accepted true/false values, which could cause incorrect interpretations, or subsequent options onthe command-line to be used as true/false indications.
Issues: 310
• Removing an existing parallel replication configuration using tpm would cause the replicator to fail due to a mismatch in the statustable and current configuration.
Issues: 867
• Command-line Tools
• The tungsten_provision_slave tool would fail to correctly re-provision a master within a fan-in or multi-master configuration. When re-provisioning, the service should be reset with trepctl reset.
Issues: 709
• Errors when executing tungsten_provision_slave that have been generated by the underlying mysqldump or xtrabackup are nowredirected to STDOUT.
Issues: 802
• The tungsten_provision_slave tool would re-provision using a slave in a OFFLINE:ERROR [127] state, even through this could create asecond, invalid, slave deployment. Reprovisioning from a slave in the ERROR state is now blocked, unless the -f or --force option isused.
Issues: 860
For more information, see Section 6.10, “The tungsten_provision_slave Script”.
• Oracle Replication
• Tuning for the CDC extraction from Oracle has been updated to support both a minimum sleep time parameter, minSleepTime, and theincrement value used when increasing the sleep time between updates, sleepAddition.
Issues: 239
For more information, see Section 3.2.9, “Tuning CDC Extraction”.
• The URLs used for connecting to Oracle RAC SCAN addresses were not correct and were incompatible with non-RAC installations. TheURL format has been updated to use a URL format that is compatible with both Oracle RAC and non-RAC installations.
Issues: 479
• Core Replicator
• When a timeout occurred on the connection to MySQL for the channel assignment service (part of parallel applier), the replicatorwould go offline, rather than retrying the connection. The service has now been updated to retry the connection if a timeout occurs.The default reconnect timeout is 120 seconds.
Issues: 783
• A slave replicator would incorrectly set the restart sequence number when reading from a master if the slave THL directory wascleared. This would cause slave replicators to fail to restart correctly.
Release Notes
299
Issues: 794
• Unsigned integers are extracted from the source database in a non-platform independent method. This would cause the Oracleapplier to incorrectly attempt to apply negative values in place of their unsigned equivalents. The Oracle applier has been updated tocorrectly translate these values for types identified as unsigned to the correct value. When viewing these values are viewed within theTHL, they will still be identified as a negative value.
Issues: 798
For more information, see Section 6.7.1, “thl list Command”.
• Replication would fail when processing binlog entries containing the statement INSERT INTO ... WHERE... when operating in mixedmode.
Issues: 807
• Filters
• The mysqlsessionsupport filter would cause replication to fail when the default thread_id was set to -1, for example whenSTRICT_ALL_TABLES SQL mode had been enabled. The replicator has been updated to interpret -1 as 0 to prevent this error.
Issues: 821
• The rename filter has been updated so that renaming of only the schema name for STATEMENT events. Previously, only ROW eventswould be renamed by the filter.
Issues: 842
B.2. Tungsten Replicator 2.2.0 GA (23 December 2013)Tungsten Replicator 2.2.0 is a bug fix and feature release that contains a number of key improvements to the installation and managementof the replicator:
• tpm is now the default installation and deployment tool; use of tungsten-installer, configure, configure-service, and update aredeprecated.
• tpm incorporates support for both INI file and staging directory deployments. See Section 6.8.4, “tpm INI File Configuration”.
• Deployments are possible using standard Linux RPM and PKG deployments. See Section 2.2.2, “Using the RPM and DEB package files”.
• tpm has been improved to handle heterogeneous deployments more easily.
• New command-line tools have been added to make recovery easier during a failure. See Section 6.10, “The tungsten_provision_slaveScript”, Section 6.11, “The tungsten_read_master_events Script”, Section 6.12, “The tungsten_set_position Script”.
• Improvements to the core replicator, including identification and recovery from failure.
• New multi_trepctl tool for monitoring multiple hosts/services.
Behavior Changes
The following changes have been made to Tungsten Replicator and may affect existing scripts and integration tools.Any scripts or environment which make use of these tools should check and update for the new configuration:
• The thl info command has been updated so that the output also displays the lowest and highest THL file, sizes anddates.
Issues: 471
For more information, see Section 6.7.4, “thl info Command”.
• The following commands to trepctl have been deprecated and will be removed in a future release:
• trepctl start has been replaced with trepctl load
• trepctl stop has been replaced with trepctl unload
• trepctl shutdown has been deprecated; use Section 2.10, “Starting and Stopping Tungsten Replicator” to stop thereplicator.
Issues: 672
Release Notes
300
For more information, see Section 6.9.3.8, “trepctl load Command”, Section 6.9.3.21, “trepctl unload Command”,Section 2.10, “Starting and Stopping Tungsten Replicator”.
• The tpm command has been updated to be the default method for installing deployments using the cookbook. Touse the old tungsten-installer command, set the USE_OLD_INSTALLER environment variable.
Issues: 691
Improvements, new features and functionality
• Installation and Deployment
• For heterogeneous deployments, three new options have been added to tpm:
• --enable-heterogenous-master [194]
This options applies a range of settings, including --mysql-use-bytes-for=string=false, --java-file-encoding=UTF8 [197], --mysql-enable-enumtostring=true, and --mysql-enable-settostring=true [200]. This option also enables the colnames and pkey filters.
• --enable-heterogenous-slave [195]
This option disables parallel replication for hosts that do not support it, and sets the --java-file-encoding=UTF8 [197] option.
• --enable-heterogenous-service [194]
Enables the --enable-heterogenous-master [194] and --enable-heterogenous-slave [195] for masters and slaves respectively.
Issues: 692
For more information, see Section 3.3.2, “Installing MongoDB Replication”, Section 3.5.2, “Installing Vertica Replication”.
• Command-line Tools
• A new command-line tool, tungsten_set_position, has been created. This enables the position of either a master or slave to be setwith respect to reading local or remote events. This provides easier control over during the recovery of a slave or master in the eventof a failure.
Issues: 684
For more information, see Section 6.12, “The tungsten_set_position Script”, Section 5.2, “Managing Transaction Failures”.
• A new command-line tool, tungsten_provision_slave, has been created. This allows for an automated backup of an existing host andrestore of that data to a new host. The script can be used to provision new slaves based on existing slave configurations, or to recovera slave that has failed.
Issues: 689
For more information, see Section 6.10, “The tungsten_provision_slave Script”, Section 5.2, “Managing Transaction Failures”.
• A new command-line tool, tungsten_read_master_events, has been created. This enables events from the MySQL binary log to beviewed based on the THL event ID.
Issues: 694
For more information, see Section 6.11, “The tungsten_read_master_events Script”, Section 5.2, “Managing Transaction Failures”.
• The trepctl properties command has been updated to support a -values option that outputs only the values for filtered properties.
Issues: 719
For more information, see Section 6.9.3.12, “trepctl properties Command”.
• The multi_trepctl command has been added. The tool enables status and other output from multiple hosts and/or services, providinga simpler way of monitoring a typical Tungsten Replicator installation.
Issues: 756
For more information, see Section 6.5, “The multi_trepctl Command”.
• Oracle Replication
Release Notes
301
• The ddlscan tool and the ddl-mysql-oracle.vm template have been modified to support custom included templates on a per tablebasis.
The tool has also been updated to support additional paths for searching for velocity templates using the -path option.
Issues: 723
• Core Replicator
• The block commit process has been updated to support different configurations. Two new parameters have been added, which affectthe block commit size, and enable transactions to be committed to a slave in blocks either based on the number of events, or the timeinterval since the last commit occurred.
• --repl-svc-applier-block-commit-size [208] sets the number of events that will trigger a block commit. The default is 10.
• --repl-svc-applier-block-commit-interval [208] sets the time interval between block commits. The default is 0 (disabled).
Issues: 677, 699
For more information, see Section 9.1, “Block Commit”.
• Filters
• The dropcolumn JavaScript filter has been added. The filter enables individual columns to be removed from the THL so that personalidentification information (PII) can be removed on a slave.
Issues: 716
For more information, see Section 8.5.2.6, “dropcolumn.js Filter”.
Bug Fixes
• Installation and Deployment
• When performing a Vertica deployment, tpm would fail to create the correct configuration parameters. In addition, error messagesand warnings would be generated that did not apply to Vertica installations. tpm has been updated to simplify the Vertica installationprocess.
Issues: 688, 781
For more information, see Section 3.5.2, “Installing Vertica Replication”.
• tpm would allow parallel replication to be configured in heterogeneous environments where parallel replication was not supported.During deployment, tpm now reports an error if parallel configuration parameters are supplied for datasource types other thanMySQL or Oracle.
Issues: 733
• When configuring a single host to support a parallel, multi-channel deployment, tpm would report that this operation was notsupported. tpm has now been updated to support single host parallel apply configurations.
Issues: 737
• Configuring an installation with a preferred path for MySQL deployments using the --preferred-path [203] option would not setthe PATH variable correctly, this would lead to the tools from an incorrect directory being used when performing backup or restoreoperations. tpm has been updated to correctly set the environment during execution.
Issues: 752
• Command-line Tools
• When using the -sql option to the thl, additional metadata and options would be displayed. The tool has now been updated to onlyoutput the corresponding SQL.
Issues: 264
• DATETIME values could be displayed incorrectly in the THL when using the thl tool to show log contents.
Issues: 676

Release Notes
302
• An incorrect RMI port could be used within a deployment if a non-standard RMI port was specified during installation, affecting theoperation of trepctl. The precedence for selecting the RMI port to use has been updated to use the -port, the system property, andthen service properties for the selected service and/or trepctl executable.
Issues: 695
• Backup and Restore
• During installation, tpm would fail to check the version for Percona XtraBackup when working with built-in InnoDB support in MySQL.The check has now been updated and validation will fail if XtraBackup 2.1 or later is used with a MySQL 5.1 and built-in InnoDBsupport.
Issues: 671
• When using xtrabackup during a restore operation, the restore would fail. The problem was due to a difference in the interface forXtraBackup 2.1.6.
Issues: 778
• Oracle Replication
• When performing an Oracle deployment, tpm would apply incorrect parameters and filters and check MySQL specific environmentinformation. The following changes have been made:
• The colnames filter is no longer added to Oracle master (extractor) deployments.
• Incorrect schema value would be defined for the replicator schema.
The check for mysqldump is still performed on an Oracle master host; use --preferred-path [203] to set a valid location, or disable theMySQLDumpCheck validation check.
Issues: 685
• Core Replicator
• DECIMAL values could be extracted from the MySQL binary log incorrectly when using statement based logging.
Issues: 650
• A null pointer exception could be raised by the master, which would lead to the slave failing to connect to the master correctly. Theslave will now retry the connection.
Issues: 698
• A slave replicator could fail when synchronizing the THL if the master goes offline. This was due to network interrupts during a failurenot being recognised properly.
Issues: 714
• In certain circumstances, a replicator could apply transactions that had been generated by itself. This could happen during a failover,leading to events written to the THL, but without the trep_commit_seqno table having been updated. To fix this problem, consistencychecks on the THL contents are now performed during startup. In addition, all replicators now write their currently assigned role to afile within the configuration directory of the running replication service, called static-servicename.role.
When the replicator goes online, a static-servicename.role file is examined. If the current role identified in that file was a master, andthe current role of the replicator is a slave, then the THL consistency checks are enabled. These check the following situations:
• If the trep_commit_seqno is out of sync with the contents of the THL provided that the last THL record exists and matches the source-id of the transaction.
• If the current log position is different to the THL position, and assuming that THL position exists, then an error will be raised and thereplicator will go offline. This behavior can be overridden by using the trepctl online -force command.
Once the checks have been completed, the new role for the replicator is updated in the static-servicename.role file.
Important
The static-servicename.role file must be deleted, or the THL files must be deleted, when restoring a backup.This is to ensure that the correct current log position is identified.
Issues: 735
Release Notes
303
• An UnsupportedEncodingException error could occur when extracting statement based replication events if the MySQL character setdid not match a valid Java character set used by the replicator.
Issues: 743
• When using Row-based replication, replicating into a table on the slave that did not exist, a Null-Pointer Exception would be raised.The replicator now correctly raises an SQL error indicating that the table does not exist.
Issues: 747
• During a master failure under load, the number of transactions making it to the slave before the master replicator fails.
Issues: 753
• Upgrading a replicator and changing the hostname could cause the replicator to skip events in the THL. This was due to the way inwhich the source-id of events in the slave replicator checks the information compared to the remote THL read from the master. Thisparticularly affect standalone replicators. The fix adds a new property, replicator.repositionOnSourceIdChange. This is a booleanvalue, and specifies whether the replicator should try to reposition to the correct location in the THL when the source ID has beenmodified.
Issues: 754
• Running trepctl reset on a service deployed in an multi-master (all master) configuration would not correctly remove the schema fromthe database.
Issues: 758
• Replication of temporary tables with the same name, but within different sessions would cause a conflict in the slave.
Issues: 772
• Filters
• The PrimaryKeyFilter would not renew connections to the master to determine the primary key information. When replication hadbeen running for a long time, the active connection would be dropped, but never renewed. The filter has been updated to re-connecton failure.
Issues: 670
For more information, see Section 8.4.17, “PrimaryKey Filter”.
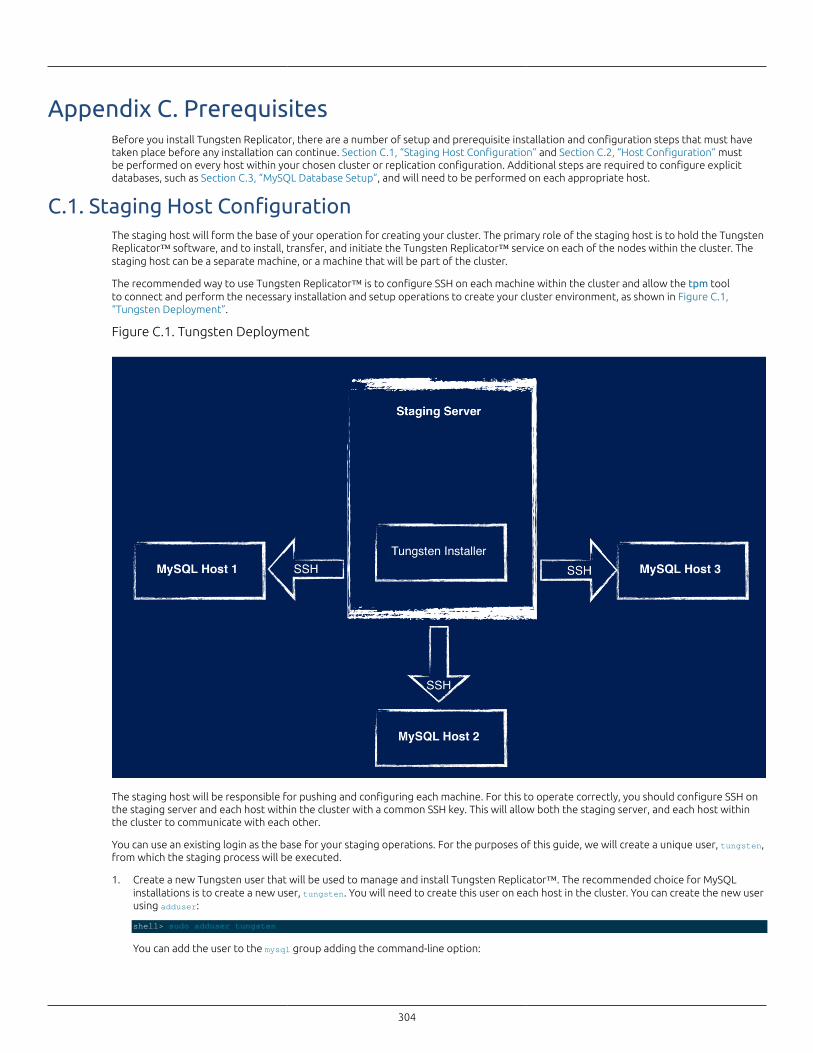
304
Appendix C. PrerequisitesBefore you install Tungsten Replicator, there are a number of setup and prerequisite installation and configuration steps that must havetaken place before any installation can continue. Section C.1, “Staging Host Configuration” and Section C.2, “Host Configuration” mustbe performed on every host within your chosen cluster or replication configuration. Additional steps are required to configure explicitdatabases, such as Section C.3, “MySQL Database Setup”, and will need to be performed on each appropriate host.
C.1. Staging Host ConfigurationThe staging host will form the base of your operation for creating your cluster. The primary role of the staging host is to hold the TungstenReplicator™ software, and to install, transfer, and initiate the Tungsten Replicator™ service on each of the nodes within the cluster. Thestaging host can be a separate machine, or a machine that will be part of the cluster.
The recommended way to use Tungsten Replicator™ is to configure SSH on each machine within the cluster and allow the tpm toolto connect and perform the necessary installation and setup operations to create your cluster environment, as shown in Figure C.1,“Tungsten Deployment”.
Figure C.1. Tungsten Deployment
The staging host will be responsible for pushing and configuring each machine. For this to operate correctly, you should configure SSH onthe staging server and each host within the cluster with a common SSH key. This will allow both the staging server, and each host withinthe cluster to communicate with each other.
You can use an existing login as the base for your staging operations. For the purposes of this guide, we will create a unique user, tungsten,from which the staging process will be executed.
1. Create a new Tungsten user that will be used to manage and install Tungsten Replicator™. The recommended choice for MySQLinstallations is to create a new user, tungsten. You will need to create this user on each host in the cluster. You can create the new userusing adduser:
shell> sudo adduser tungsten
You can add the user to the mysql group adding the command-line option:
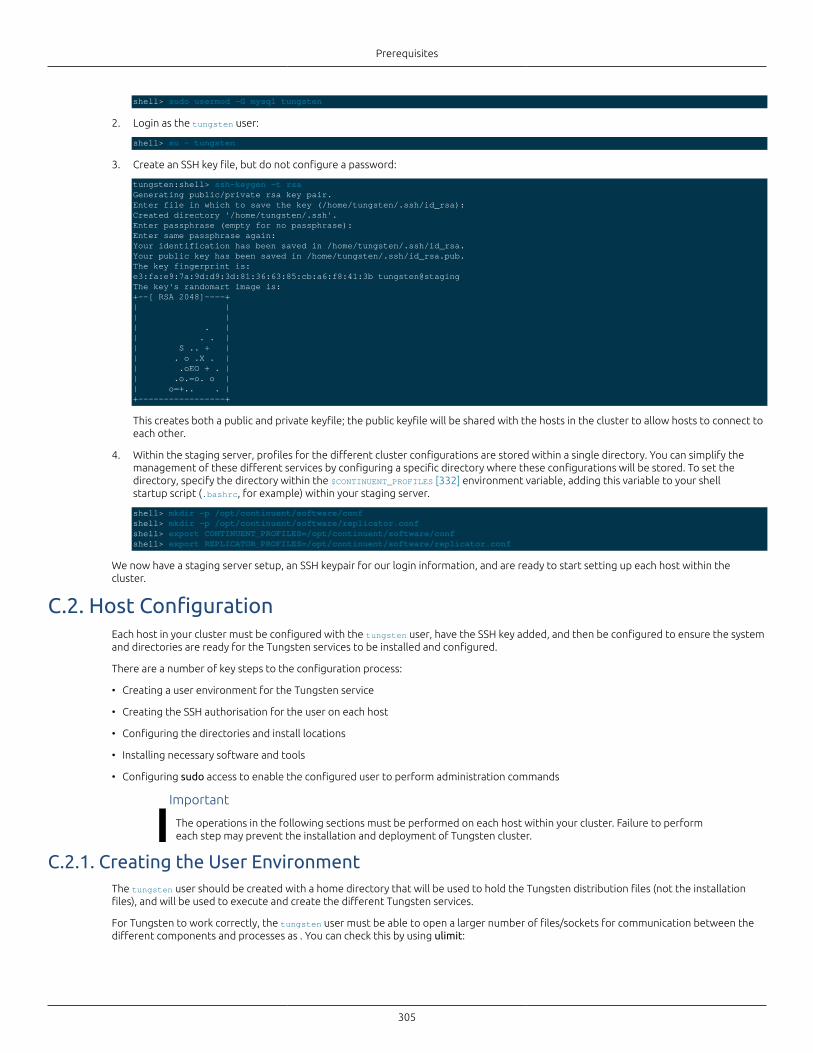
Prerequisites
305
shell> sudo usermod -G mysql tungsten
2. Login as the tungsten user:
shell> su - tungsten
3. Create an SSH key file, but do not configure a password:
tungsten:shell> ssh-keygen -t rsaGenerating public/private rsa key pair.Enter file in which to save the key (/home/tungsten/.ssh/id_rsa): Created directory '/home/tungsten/.ssh'.Enter passphrase (empty for no passphrase): Enter same passphrase again: Your identification has been saved in /home/tungsten/.ssh/id_rsa.Your public key has been saved in /home/tungsten/.ssh/id_rsa.pub.The key fingerprint is:e3:fa:e9:7a:9d:d9:3d:81:36:63:85:cb:a6:f8:41:3b tungsten@stagingThe key's randomart image is:+--[ RSA 2048]----+| || || . || . . || S .. + || . o .X . || .oEO + . || .o.=o. o || o=+.. . |+-----------------+
This creates both a public and private keyfile; the public keyfile will be shared with the hosts in the cluster to allow hosts to connect toeach other.
4. Within the staging server, profiles for the different cluster configurations are stored within a single directory. You can simplify themanagement of these different services by configuring a specific directory where these configurations will be stored. To set thedirectory, specify the directory within the $CONTINUENT_PROFILES [332] environment variable, adding this variable to your shellstartup script (.bashrc, for example) within your staging server.
shell> mkdir -p /opt/continuent/software/confshell> mkdir -p /opt/continuent/software/replicator.confshell> export CONTINUENT_PROFILES=/opt/continuent/software/confshell> export REPLICATOR_PROFILES=/opt/continuent/software/replicator.conf
We now have a staging server setup, an SSH keypair for our login information, and are ready to start setting up each host within thecluster.
C.2. Host ConfigurationEach host in your cluster must be configured with the tungsten user, have the SSH key added, and then be configured to ensure the systemand directories are ready for the Tungsten services to be installed and configured.
There are a number of key steps to the configuration process:
• Creating a user environment for the Tungsten service
• Creating the SSH authorisation for the user on each host
• Configuring the directories and install locations
• Installing necessary software and tools
• Configuring sudo access to enable the configured user to perform administration commands
Important
The operations in the following sections must be performed on each host within your cluster. Failure to performeach step may prevent the installation and deployment of Tungsten cluster.
C.2.1. Creating the User EnvironmentThe tungsten user should be created with a home directory that will be used to hold the Tungsten distribution files (not the installationfiles), and will be used to execute and create the different Tungsten services.
For Tungsten to work correctly, the tungsten user must be able to open a larger number of files/sockets for communication between thedifferent components and processes as . You can check this by using ulimit:
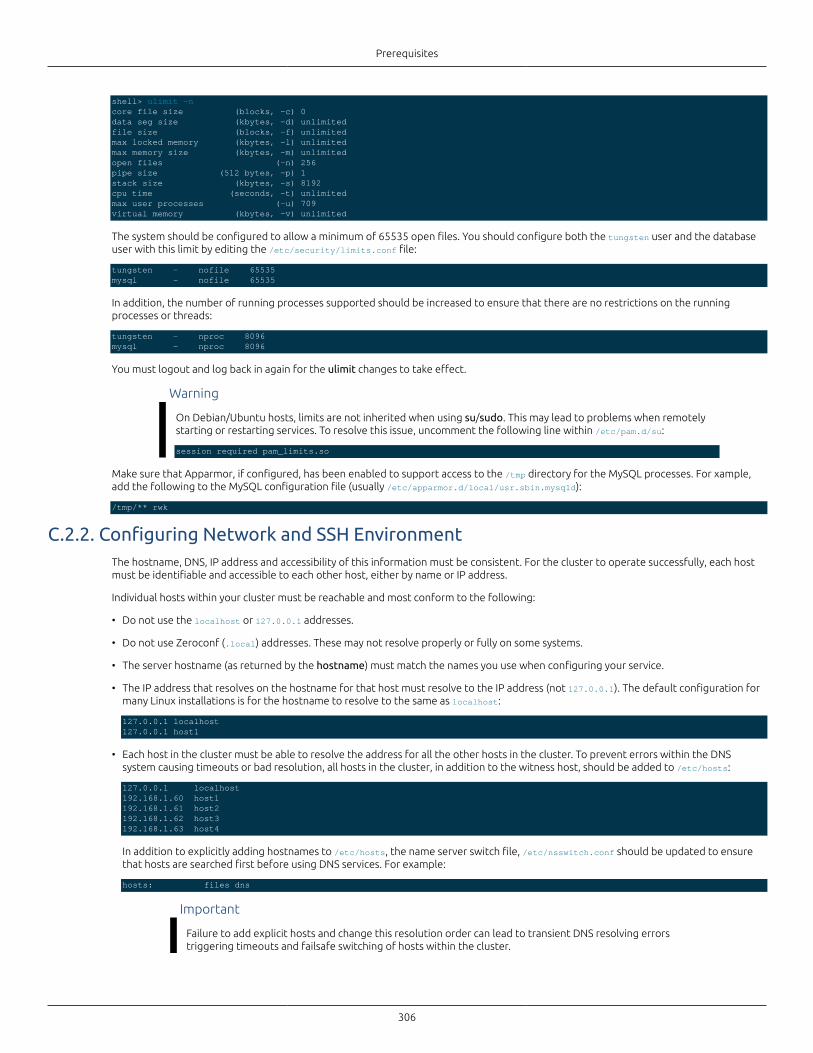
Prerequisites
306
shell> ulimit -ncore file size (blocks, -c) 0data seg size (kbytes, -d) unlimitedfile size (blocks, -f) unlimitedmax locked memory (kbytes, -l) unlimitedmax memory size (kbytes, -m) unlimitedopen files (-n) 256pipe size (512 bytes, -p) 1stack size (kbytes, -s) 8192cpu time (seconds, -t) unlimitedmax user processes (-u) 709virtual memory (kbytes, -v) unlimited
The system should be configured to allow a minimum of 65535 open files. You should configure both the tungsten user and the databaseuser with this limit by editing the /etc/security/limits.conf file:
tungsten - nofile 65535mysql - nofile 65535
In addition, the number of running processes supported should be increased to ensure that there are no restrictions on the runningprocesses or threads:
tungsten - nproc 8096mysql - nproc 8096
You must logout and log back in again for the ulimit changes to take effect.
Warning
On Debian/Ubuntu hosts, limits are not inherited when using su/sudo. This may lead to problems when remotelystarting or restarting services. To resolve this issue, uncomment the following line within /etc/pam.d/su:
session required pam_limits.so
Make sure that Apparmor, if configured, has been enabled to support access to the /tmp directory for the MySQL processes. For xample,add the following to the MySQL configuration file (usually /etc/apparmor.d/local/usr.sbin.mysqld):
/tmp/** rwk
C.2.2. Configuring Network and SSH EnvironmentThe hostname, DNS, IP address and accessibility of this information must be consistent. For the cluster to operate successfully, each hostmust be identifiable and accessible to each other host, either by name or IP address.
Individual hosts within your cluster must be reachable and most conform to the following:
• Do not use the localhost or 127.0.0.1 addresses.
• Do not use Zeroconf (.local) addresses. These may not resolve properly or fully on some systems.
• The server hostname (as returned by the hostname) must match the names you use when configuring your service.
• The IP address that resolves on the hostname for that host must resolve to the IP address (not 127.0.0.1). The default configuration formany Linux installations is for the hostname to resolve to the same as localhost:
127.0.0.1 localhost127.0.0.1 host1
• Each host in the cluster must be able to resolve the address for all the other hosts in the cluster. To prevent errors within the DNSsystem causing timeouts or bad resolution, all hosts in the cluster, in addition to the witness host, should be added to /etc/hosts:
127.0.0.1 localhost192.168.1.60 host1192.168.1.61 host2192.168.1.62 host3192.168.1.63 host4
In addition to explicitly adding hostnames to /etc/hosts, the name server switch file, /etc/nsswitch.conf should be updated to ensurethat hosts are searched first before using DNS services. For example:
hosts: files dns
Important
Failure to add explicit hosts and change this resolution order can lead to transient DNS resolving errorstriggering timeouts and failsafe switching of hosts within the cluster.
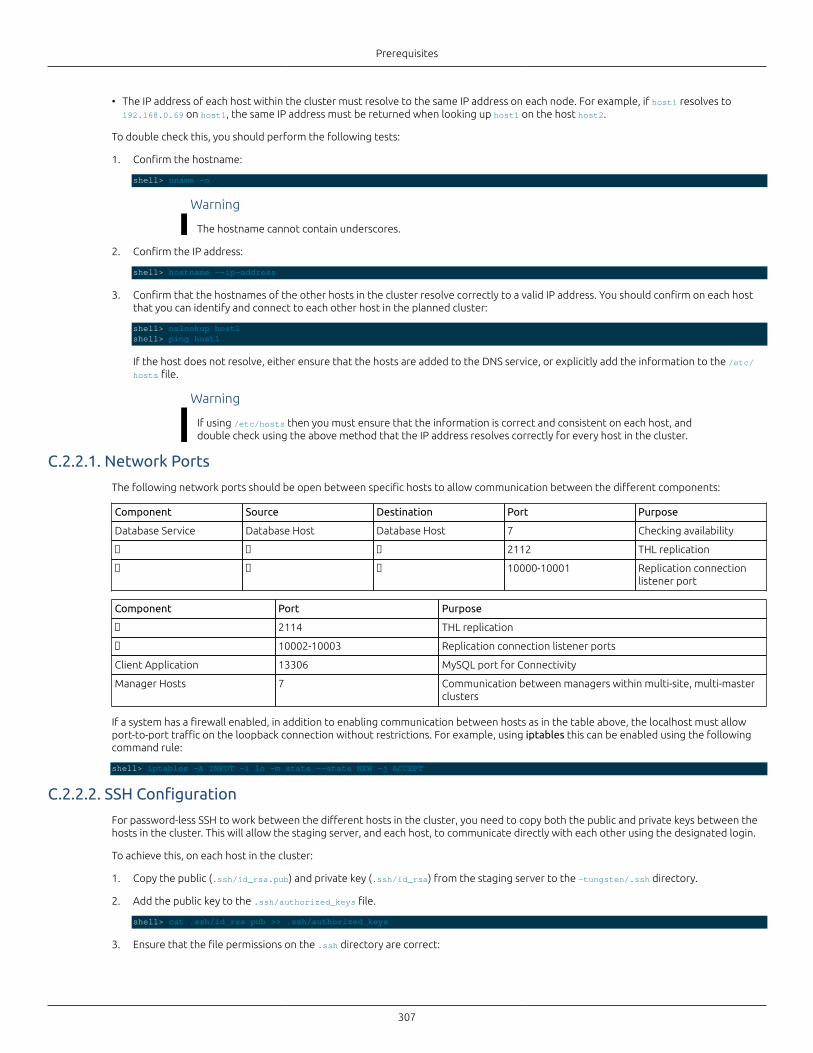
Prerequisites
307
• The IP address of each host within the cluster must resolve to the same IP address on each node. For example, if host1 resolves to192.168.0.69 on host1, the same IP address must be returned when looking up host1 on the host host2.
To double check this, you should perform the following tests:
1. Confirm the hostname:
shell> uname -n
Warning
The hostname cannot contain underscores.
2. Confirm the IP address:
shell> hostname --ip-address
3. Confirm that the hostnames of the other hosts in the cluster resolve correctly to a valid IP address. You should confirm on each hostthat you can identify and connect to each other host in the planned cluster:
shell> nslookup host1shell> ping host1
If the host does not resolve, either ensure that the hosts are added to the DNS service, or explicitly add the information to the /etc/hosts file.
Warning
If using /etc/hosts then you must ensure that the information is correct and consistent on each host, anddouble check using the above method that the IP address resolves correctly for every host in the cluster.
C.2.2.1. Network Ports
The following network ports should be open between specific hosts to allow communication between the different components:
Component Source Destination Port Purpose
Database Service Database Host Database Host 7 Checking availability
� � � 2112 THL replication
� � � 10000-10001 Replication connectionlistener port
Component Port Purpose
� 2114 THL replication
� 10002-10003 Replication connection listener ports
Client Application 13306 MySQL port for Connectivity
Manager Hosts 7 Communication between managers within multi-site, multi-masterclusters
If a system has a firewall enabled, in addition to enabling communication between hosts as in the table above, the localhost must allowport-to-port traffic on the loopback connection without restrictions. For example, using iptables this can be enabled using the followingcommand rule:
shell> iptables -A INPUT -i lo -m state --state NEW -j ACCEPT
C.2.2.2. SSH Configuration
For password-less SSH to work between the different hosts in the cluster, you need to copy both the public and private keys between thehosts in the cluster. This will allow the staging server, and each host, to communicate directly with each other using the designated login.
To achieve this, on each host in the cluster:
1. Copy the public (.ssh/id_rsa.pub) and private key (.ssh/id_rsa) from the staging server to the ~tungsten/.ssh directory.
2. Add the public key to the .ssh/authorized_keys file.
shell> cat .ssh/id_rsa.pub >> .ssh/authorized_keys
3. Ensure that the file permissions on the .ssh directory are correct:
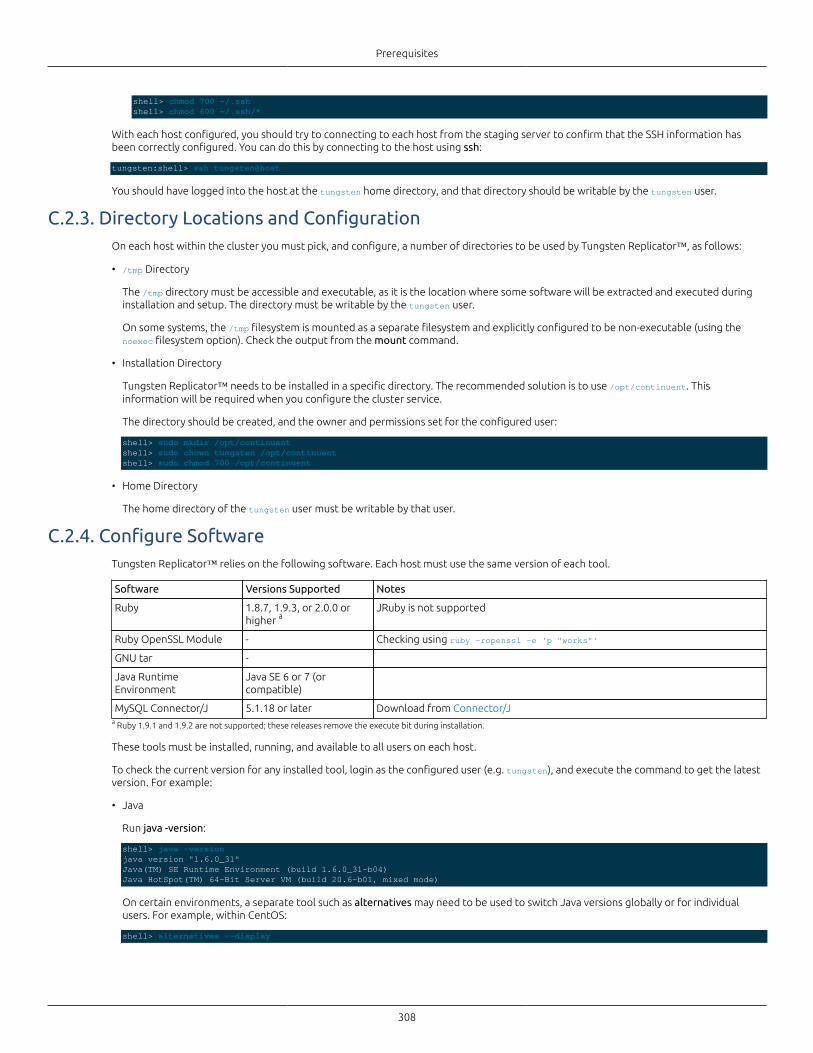
Prerequisites
308
shell> chmod 700 ~/.sshshell> chmod 600 ~/.ssh/*
With each host configured, you should try to connecting to each host from the staging server to confirm that the SSH information hasbeen correctly configured. You can do this by connecting to the host using ssh:
tungsten:shell> ssh tungsten@host
You should have logged into the host at the tungsten home directory, and that directory should be writable by the tungsten user.
C.2.3. Directory Locations and ConfigurationOn each host within the cluster you must pick, and configure, a number of directories to be used by Tungsten Replicator™, as follows:
• /tmp Directory
The /tmp directory must be accessible and executable, as it is the location where some software will be extracted and executed duringinstallation and setup. The directory must be writable by the tungsten user.
On some systems, the /tmp filesystem is mounted as a separate filesystem and explicitly configured to be non-executable (using thenoexec filesystem option). Check the output from the mount command.
• Installation Directory
Tungsten Replicator™ needs to be installed in a specific directory. The recommended solution is to use /opt/continuent. Thisinformation will be required when you configure the cluster service.
The directory should be created, and the owner and permissions set for the configured user:
shell> sudo mkdir /opt/continuentshell> sudo chown tungsten /opt/continuentshell> sudo chmod 700 /opt/continuent
• Home Directory
The home directory of the tungsten user must be writable by that user.
C.2.4. Configure SoftwareTungsten Replicator™ relies on the following software. Each host must use the same version of each tool.
Software Versions Supported Notes
Ruby 1.8.7, 1.9.3, or 2.0.0 orhigher a
JRuby is not supported
Ruby OpenSSL Module - Checking using ruby -ropenssl -e 'p "works"'
GNU tar -
Java RuntimeEnvironment
Java SE 6 or 7 (orcompatible)
MySQL Connector/J 5.1.18 or later Download from Connector/Ja Ruby 1.9.1 and 1.9.2 are not supported; these releases remove the execute bit during installation.
These tools must be installed, running, and available to all users on each host.
To check the current version for any installed tool, login as the configured user (e.g. tungsten), and execute the command to get the latestversion. For example:
• Java
Run java -version:
shell> java -versionjava version "1.6.0_31"Java(TM) SE Runtime Environment (build 1.6.0_31-b04)Java HotSpot(TM) 64-Bit Server VM (build 20.6-b01, mixed mode)
On certain environments, a separate tool such as alternatives may need to be used to switch Java versions globally or for individualusers. For example, within CentOS:
shell> alternatives --display
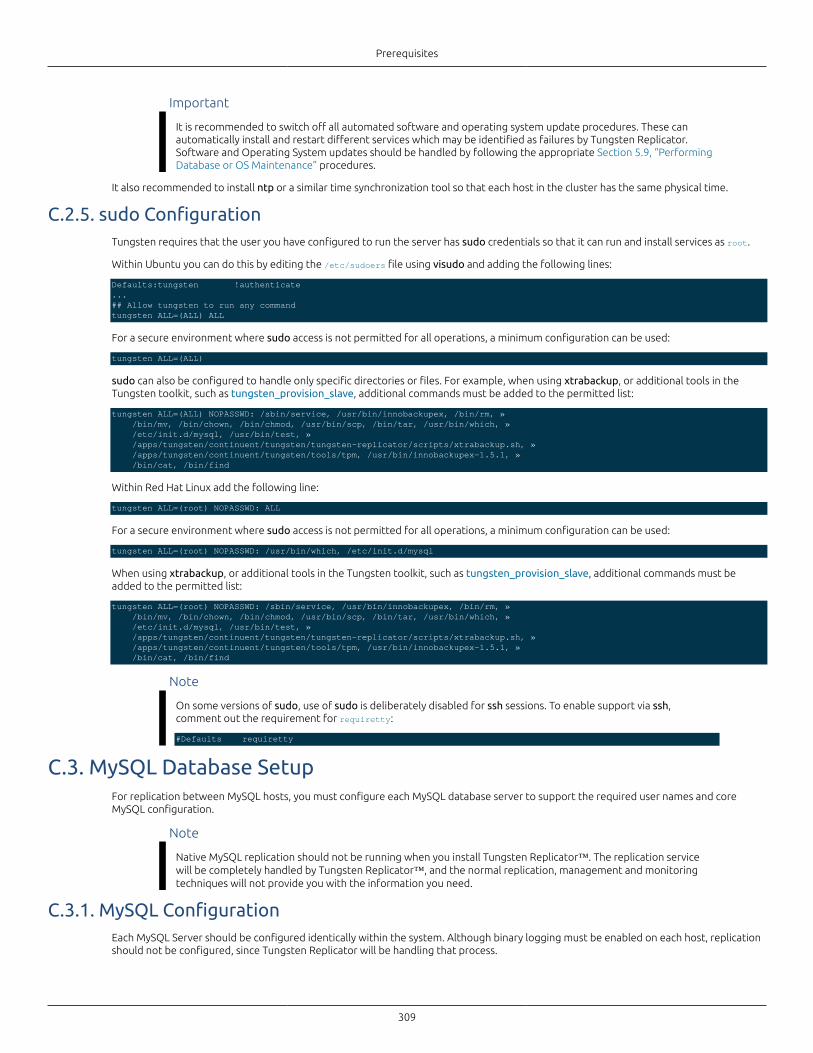
Prerequisites
309
Important
It is recommended to switch off all automated software and operating system update procedures. These canautomatically install and restart different services which may be identified as failures by Tungsten Replicator.Software and Operating System updates should be handled by following the appropriate Section 5.9, “PerformingDatabase or OS Maintenance” procedures.
It also recommended to install ntp or a similar time synchronization tool so that each host in the cluster has the same physical time.
C.2.5. sudo ConfigurationTungsten requires that the user you have configured to run the server has sudo credentials so that it can run and install services as root.
Within Ubuntu you can do this by editing the /etc/sudoers file using visudo and adding the following lines:
Defaults:tungsten !authenticate...## Allow tungsten to run any commandtungsten ALL=(ALL) ALL
For a secure environment where sudo access is not permitted for all operations, a minimum configuration can be used:
tungsten ALL=(ALL)
sudo can also be configured to handle only specific directories or files. For example, when using xtrabackup, or additional tools in theTungsten toolkit, such as tungsten_provision_slave, additional commands must be added to the permitted list:
tungsten ALL=(ALL) NOPASSWD: /sbin/service, /usr/bin/innobackupex, /bin/rm, » /bin/mv, /bin/chown, /bin/chmod, /usr/bin/scp, /bin/tar, /usr/bin/which, » /etc/init.d/mysql, /usr/bin/test, » /apps/tungsten/continuent/tungsten/tungsten-replicator/scripts/xtrabackup.sh, » /apps/tungsten/continuent/tungsten/tools/tpm, /usr/bin/innobackupex-1.5.1, » /bin/cat, /bin/find
Within Red Hat Linux add the following line:
tungsten ALL=(root) NOPASSWD: ALL
For a secure environment where sudo access is not permitted for all operations, a minimum configuration can be used:
tungsten ALL=(root) NOPASSWD: /usr/bin/which, /etc/init.d/mysql
When using xtrabackup, or additional tools in the Tungsten toolkit, such as tungsten_provision_slave, additional commands must beadded to the permitted list:
tungsten ALL=(root) NOPASSWD: /sbin/service, /usr/bin/innobackupex, /bin/rm, » /bin/mv, /bin/chown, /bin/chmod, /usr/bin/scp, /bin/tar, /usr/bin/which, » /etc/init.d/mysql, /usr/bin/test, » /apps/tungsten/continuent/tungsten/tungsten-replicator/scripts/xtrabackup.sh, » /apps/tungsten/continuent/tungsten/tools/tpm, /usr/bin/innobackupex-1.5.1, » /bin/cat, /bin/find
Note
On some versions of sudo, use of sudo is deliberately disabled for ssh sessions. To enable support via ssh,comment out the requirement for requiretty:
#Defaults requiretty
C.3. MySQL Database SetupFor replication between MySQL hosts, you must configure each MySQL database server to support the required user names and coreMySQL configuration.
Note
Native MySQL replication should not be running when you install Tungsten Replicator™. The replication servicewill be completely handled by Tungsten Replicator™, and the normal replication, management and monitoringtechniques will not provide you with the information you need.
C.3.1. MySQL ConfigurationEach MySQL Server should be configured identically within the system. Although binary logging must be enabled on each host, replicationshould not be configured, since Tungsten Replicator will be handling that process.
Prerequisites
310
The configured tungsten must be able to read the MySQL configuration file (for installation) and the binary logs. Either the tungsten usershould be a member of the appropriate group (i.e. mysql), or the permissions altered accordingly.
Important
Parsing of mysqld_multi configuration files is not currently supported. To use a mysqld_multi installation, copy therelevant portion of the configuration file to a separate file to be used during installation.
To setup your MySQL servers, you need to do the following:
• Configure your my.cnf settings. The following changes should be made to the [mysqld] section of your my.cnf file:
• By default, MySQL is configured only to listen on the localhost address (127.0.0.1). The bind-address parameter should be checked toensure that it is either set to a valid value, or commented to allow listening on all available network interfaces:
#bind-address = 127.0.0.1
• Specify the server id
Each server must have a unique server id:
server-id = 1
• Ensure that the maximum number of open files matches the configuration of the database user. This was configured earlier at 65535files.
open_files_limit = 65535
• Enable binary logs
Tungsten Replicator operates by reading the binary logs on each machine, so logging must be enabled:
log-bin = mysql-bin
• Set the sync_binlog parameter to 1 (one).
The MySQL sync_binlog parameter sets the frequency at which the binary log is flushed to disk. A value of zero indicates that thebinary log should not be synchronized to disk, which implies that only standard operating system flushing of writes will occur. A valuegreater than one configures the binary log to be flushed only after sync_binlog events have been written. This can introduce a delayinto writing information to the binary log, and therefore replication, but also opens the system to potential data loss if the binary loghas not been flushed when a fatal system error occurs.
Setting a value of value 1 (one) will synchronize the binary log on disk after each event has been written.
sync_binlog = 1
• Increase MySQL protocol packet sizes
The replicator can apply statements up to the maximum size of a single transaction, so the maximum allowed protocol packet sizemust be increase to support this:
max_allowed_packet = 52m
• Configure InnoDB as the default storage engine
Tungsten Replicator needs to use a transaction safe storage engine to ensure the validity of the database. The InnoDB storage enginealso provides automatic recovery in the event of a failure. Using MyISAM can lead to table corruption, and in the event of a switchoveror failure, and inconsistent state of the database, making it difficult to recover or restart replication effectively.
InnoDB should therefore be the default storage engine for all tables, and any existing tables should be converted to InnoDB beforedeploying Tungsten Replicator.
default-storage-engine = InnoDB
• Configure InnoDB Settings
Tungsten Replicator creates tables and must use InnoDB tables to store the status information for replication configuration andapplication:
The MySQL option innodb_flush_log_at_trx_commit configures how InnoDB writes and confirms writes to disk during a transaction.The available values are:
Prerequisites
311
• A value of 0 (zero) provides the best performance, but it does so at the potential risk of losing information in the event of a systemor hardware failure. For use with Tungsten Replicator™ the value should never be set to 0, otherwise the cluster health may beaffected during a failure or failover scenario.
• A value of 1 (one) provides the best transaction stability by ensuring that all writes to disk are flushed and committed before thetransaction is returned as complete. Using this setting implies an increased disk load and so may impact the overall performance.
When using Tungsten Replicator™ in a multi-master, multi-site, fan-in or data critical cluster, the value ofinnodb_flush_log_at_trx_commit should be set to 1. This not only ensures that the transactional data being stored in the clusterare safely written to disk, this setting also ensures that the metadata written by Tungsten Replicator™ describing the cluster andreplication status is also written to disk and therefore available in the event of a failover or recovery situation.
• A value of 2 (two) ensures that transactions are committed to disk, but data loss may occur if the disk data is not flushed from anyOS or hardware-based buffering before a hardware failure, but the disk overhead is much lower and provides higher performance.
This setting must be used as a minimum for all Tungsten Replicator™ installations, and should be the setting for all configurationsthat do not require innodb_flush_log_at_trx_commit set to 1.
At a minimum innodb_flush_log_at_trx_commit should be set to 2; a warning will be generated if this value is set to zero:
innodb_flush_log_at_trx_commit = 2
MySQL configuration settings can be modified on a running cluster, providing you switch your host to maintenance mode beforereconfiguring and restarting MySQL Server. See Section 5.9, “Performing Database or OS Maintenance”.
Optional configuration changes that can be made to your MySQL configuration:
• InnoDB Flush Method
innodb_flush_method=O_DIRECT
The InnoDB flush method can effect the performance of writes within MySQL and the system as a whole.
O_DIRECT is generally recommended as it eliminates double-buffering of InnoDB writes through the OS page cache. Otherwise,MySQL will be contending with Tungsten and other processes for pages there — MySQL is quite active and has a lot of hot pages forindexes and the like this can result lower i/o throughput for other processes.
Tungsten particularly depends on the page cache being stable when using parallel apply. There is one thread that scans forward overthe THL pages to coordinate the channels and keep them from getting too far ahead. We then depend on those pages staying incache for a while so that all the channels can read them — as you are aware parallel apply works like a bunch of parallel table scansthat are traveling like a school of sardines over the same part of the THL. If pages get kicked out again before all the channels seethem, parallel replication will start to serialize as it has to wait for the OS to read them back in again. If they stay in memory on theother hand, the reads on the THL are in-memory, and fast. For more information on parallel replication, see Section 4.2, “DeployingParallel Replication”.
• Increase InnoDB log file size
The default InnoDB log file size is 5MB. This should be increased to a larger file size, due to a known issue with xtrabackup duringbackup and restore operations.
To change the file size, read the corresponding information in the MySQL manual for configuring the file size information. See MySQL5.1, MySQL 5.5, MySQL 5.6, MySQL 5.7.
• Binary Logging Format
Tungsten Replicator works with both statement and row-based logging, and therefore also mixed-based logging. The chosen format isentirely up to the systems and preferences, and there are no differences or changes required for Tungsten Replicator to operate. Fornative MySQL to MySQL master/slave replication, either format will sork fine.
Depending on the exact use case and deployment, different binary log formats imply different requirements and settings. Certaindeployment types and environments require different settings:
• For multi-master deployment, use row-based logging. This will help to avoid data drift where statements make fractional changes tothe data in place of explicit updates.
• Use row-based logging for heterogeneous deployments. All deployments to Oracle, MongoDB, Vertica and others rely on row-based logging.
• Use mixed replication if warnings are raised within the MySQL log indicating that statement only is transferring possibly dangerousstatements.
Prerequisites
312
• Use statement or mixed replication for transactions that update many rows; this reduces the size of the binary log and improves theperformance when the transaction are applied on the slave.
• Use row replication for transactions that have temporary tables. Temporary tables are replicated if statement or mixed basedlogging is in effect, and use of temporary tables can stop replication as the table is unavailable between transactions. Using row-based logging also prevents these tables entering the binary log, which means they do not clog and delay replication.
The configuration of the MySQL server can be permanently changed to use an explicit replication by modifying the configuration inthe configuration file:
binlog-format = row
For temporary changes during execution of explicit statements, the binlog format can be changed by executing the followingstatement:
mysql> SET binlog-format = ROW;
You must restart MySQL after any changes have been made.
• Ensure the tungsten user can access the MySQL binary logs by either opening up the directory permissions, or adding the tungsten userto the group owner for the directory.
C.3.2. MySQL User Configuration• Tungsten User Login
The tungsten user connects to the MySQL database and applies the data from the replication stream from other datasources in thedataservice. The user must therefore be able execute any SQL statement on the server, including grants for other users. The user musthave the following privileges in addition to privileges for creating, updating and deleting DDL and data within the database:
• SUPER privilege is required so that the user can perform all administrative operations including setting global variables.
• GRANT OPTION privilege is required so that users and grants can be updated.
To create a user with suitable privileges:
mysql> CREATE USER tungsten@'%' IDENTIFIED BY 'password';mysql> GRANT ALL ON *.* TO tungsten@'%' WITH GRANT OPTION;
The connection will be made from the host to the local MySQL server. You may also need to create an explicit entry for this connection.For example, on the host host1, create the user with an explicit host reference:
mysql> CREATE USER tungsten@'host1' IDENTIFIED BY 'password';mysql> GRANT ALL ON *.* TO tungsten@'host1' WITH GRANT OPTION;
The above commands enable logins from any host using the user name/password combination. If you want to limit the configuration toonly include the hosts within your cluster you must create and grant individual user/host combinations:
mysql> CREATE USER tungsten@'client1' IDENTIFIED BY 'password';mysql> GRANT ALL ON *.* TO tungsten@'client1' WITH GRANT OPTION;
Note
If you later change the cluster configuration and add more hosts, you will need to update this configuration witheach new host in the cluster.
C.4. Oracle Database Setup
C.4.1. Oracle Environment VariablesEnsure the tungsten user being used for the master Tungsten Replicator service has the same environment setup as an Oracle databaseuser. The user must have the following environment variables set:
Environment Variable Sample Directory Notes
ORACLE_HOME /home/oracle/app/oracle/product/11.2.0/dbhome_2 The home directory of the Oracle installation.
LD_LIBRARY_PATH $ORACLE_HOME/lib The library directory of the Oracle installation.
ORACLE_SID orcl Oracle System ID for this installation.
Prerequisites
313
Environment Variable Sample Directory Notes
JAVA_HOME The home of the Java installation.
PATH $ORACLE_HOME/bin:$JAVA_HOME/bin Must include the Oracle and Java binary directories.
CLASSPATH $ORACLE_HOME/ucp/lib/ucp.jar:$ORACLE_HOME/jdbc/
lib/ojdbc6.jar:$CLASSPATH
Must include the key Oracle libararies the OracleJDBC driver.
These should be set within the .bashrc or .profile to ensure these values are set correctly for all logins.
C.5. PostgreSQL Database Setup
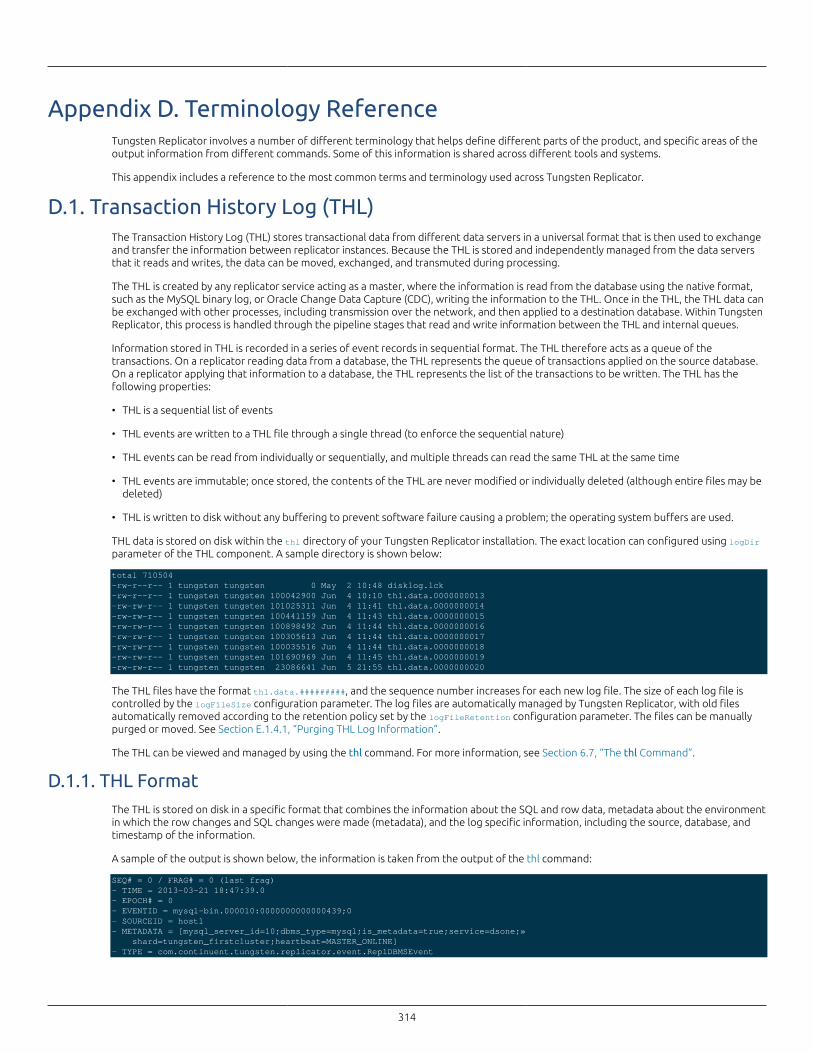
314
Appendix D. Terminology ReferenceTungsten Replicator involves a number of different terminology that helps define different parts of the product, and specific areas of theoutput information from different commands. Some of this information is shared across different tools and systems.
This appendix includes a reference to the most common terms and terminology used across Tungsten Replicator.
D.1. Transaction History Log (THL)The Transaction History Log (THL) stores transactional data from different data servers in a universal format that is then used to exchangeand transfer the information between replicator instances. Because the THL is stored and independently managed from the data serversthat it reads and writes, the data can be moved, exchanged, and transmuted during processing.
The THL is created by any replicator service acting as a master, where the information is read from the database using the native format,such as the MySQL binary log, or Oracle Change Data Capture (CDC), writing the information to the THL. Once in the THL, the THL data canbe exchanged with other processes, including transmission over the network, and then applied to a destination database. Within TungstenReplicator, this process is handled through the pipeline stages that read and write information between the THL and internal queues.
Information stored in THL is recorded in a series of event records in sequential format. The THL therefore acts as a queue of thetransactions. On a replicator reading data from a database, the THL represents the queue of transactions applied on the source database.On a replicator applying that information to a database, the THL represents the list of the transactions to be written. The THL has thefollowing properties:
• THL is a sequential list of events
• THL events are written to a THL file through a single thread (to enforce the sequential nature)
• THL events can be read from individually or sequentially, and multiple threads can read the same THL at the same time
• THL events are immutable; once stored, the contents of the THL are never modified or individually deleted (although entire files may bedeleted)
• THL is written to disk without any buffering to prevent software failure causing a problem; the operating system buffers are used.
THL data is stored on disk within the thl directory of your Tungsten Replicator installation. The exact location can configured using logDirparameter of the THL component. A sample directory is shown below:
total 710504-rw-r--r-- 1 tungsten tungsten 0 May 2 10:48 disklog.lck-rw-r--r-- 1 tungsten tungsten 100042900 Jun 4 10:10 thl.data.0000000013-rw-rw-r-- 1 tungsten tungsten 101025311 Jun 4 11:41 thl.data.0000000014-rw-rw-r-- 1 tungsten tungsten 100441159 Jun 4 11:43 thl.data.0000000015-rw-rw-r-- 1 tungsten tungsten 100898492 Jun 4 11:44 thl.data.0000000016-rw-rw-r-- 1 tungsten tungsten 100305613 Jun 4 11:44 thl.data.0000000017-rw-rw-r-- 1 tungsten tungsten 100035516 Jun 4 11:44 thl.data.0000000018-rw-rw-r-- 1 tungsten tungsten 101690969 Jun 4 11:45 thl.data.0000000019-rw-rw-r-- 1 tungsten tungsten 23086641 Jun 5 21:55 thl.data.0000000020
The THL files have the format thl.data.#########, and the sequence number increases for each new log file. The size of each log file iscontrolled by the logFileSize configuration parameter. The log files are automatically managed by Tungsten Replicator, with old filesautomatically removed according to the retention policy set by the logFileRetention configuration parameter. The files can be manuallypurged or moved. See Section E.1.4.1, “Purging THL Log Information”.
The THL can be viewed and managed by using the thl command. For more information, see Section 6.7, “The thl Command”.
D.1.1. THL FormatThe THL is stored on disk in a specific format that combines the information about the SQL and row data, metadata about the environmentin which the row changes and SQL changes were made (metadata), and the log specific information, including the source, database, andtimestamp of the information.
A sample of the output is shown below, the information is taken from the output of the thl command:
SEQ# = 0 / FRAG# = 0 (last frag)- TIME = 2013-03-21 18:47:39.0- EPOCH# = 0- EVENTID = mysql-bin.000010:0000000000000439;0- SOURCEID = host1- METADATA = [mysql_server_id=10;dbms_type=mysql;is_metadata=true;service=dsone;» shard=tungsten_firstcluster;heartbeat=MASTER_ONLINE]- TYPE = com.continuent.tungsten.replicator.event.ReplDBMSEvent
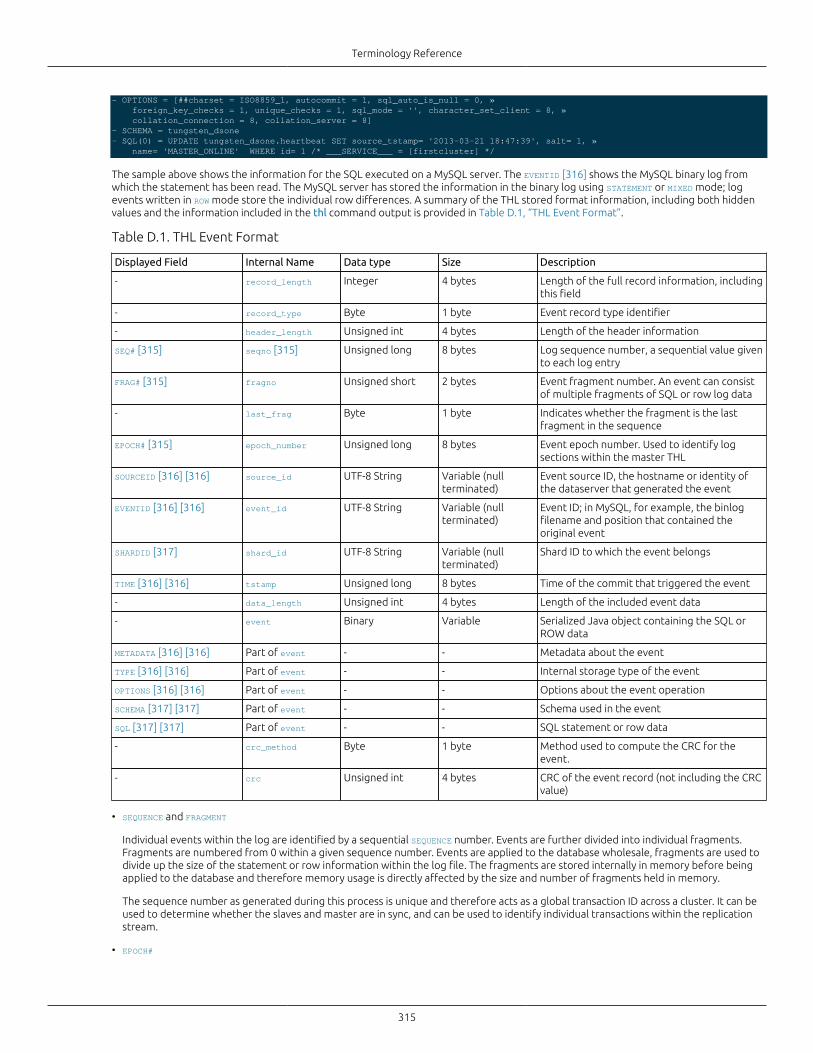
Terminology Reference
315
- OPTIONS = [##charset = ISO8859_1, autocommit = 1, sql_auto_is_null = 0, » foreign_key_checks = 1, unique_checks = 1, sql_mode = '', character_set_client = 8, » collation_connection = 8, collation_server = 8]- SCHEMA = tungsten_dsone- SQL(0) = UPDATE tungsten_dsone.heartbeat SET source_tstamp= '2013-03-21 18:47:39', salt= 1, » name= 'MASTER_ONLINE' WHERE id= 1 /* ___SERVICE___ = [firstcluster] */
The sample above shows the information for the SQL executed on a MySQL server. The EVENTID [316] shows the MySQL binary log fromwhich the statement has been read. The MySQL server has stored the information in the binary log using STATEMENT or MIXED mode; logevents written in ROW mode store the individual row differences. A summary of the THL stored format information, including both hiddenvalues and the information included in the thl command output is provided in Table D.1, “THL Event Format”.
Table D.1. THL Event Format
Displayed Field Internal Name Data type Size Description
- record_length Integer 4 bytes Length of the full record information, includingthis field
- record_type Byte 1 byte Event record type identifier
- header_length Unsigned int 4 bytes Length of the header information
SEQ# [315] seqno [315] Unsigned long 8 bytes Log sequence number, a sequential value givento each log entry
FRAG# [315] fragno Unsigned short 2 bytes Event fragment number. An event can consistof multiple fragments of SQL or row log data
- last_frag Byte 1 byte Indicates whether the fragment is the lastfragment in the sequence
EPOCH# [315] epoch_number Unsigned long 8 bytes Event epoch number. Used to identify logsections within the master THL
SOURCEID [316] [316] source_id UTF-8 String Variable (nullterminated)
Event source ID, the hostname or identity ofthe dataserver that generated the event
EVENTID [316] [316] event_id UTF-8 String Variable (nullterminated)
Event ID; in MySQL, for example, the binlogfilename and position that contained theoriginal event
SHARDID [317] shard_id UTF-8 String Variable (nullterminated)
Shard ID to which the event belongs
TIME [316] [316] tstamp Unsigned long 8 bytes Time of the commit that triggered the event
- data_length Unsigned int 4 bytes Length of the included event data
- event Binary Variable Serialized Java object containing the SQL orROW data
METADATA [316] [316] Part of event - - Metadata about the event
TYPE [316] [316] Part of event - - Internal storage type of the event
OPTIONS [316] [316] Part of event - - Options about the event operation
SCHEMA [317] [317] Part of event - - Schema used in the event
SQL [317] [317] Part of event - - SQL statement or row data
- crc_method Byte 1 byte Method used to compute the CRC for theevent.
- crc Unsigned int 4 bytes CRC of the event record (not including the CRCvalue)
• SEQUENCE and FRAGMENT
Individual events within the log are identified by a sequential SEQUENCE number. Events are further divided into individual fragments.Fragments are numbered from 0 within a given sequence number. Events are applied to the database wholesale, fragments are used todivide up the size of the statement or row information within the log file. The fragments are stored internally in memory before beingapplied to the database and therefore memory usage is directly affected by the size and number of fragments held in memory.
The sequence number as generated during this process is unique and therefore acts as a global transaction ID across a cluster. It can beused to determine whether the slaves and master are in sync, and can be used to identify individual transactions within the replicationstream.
• EPOCH#
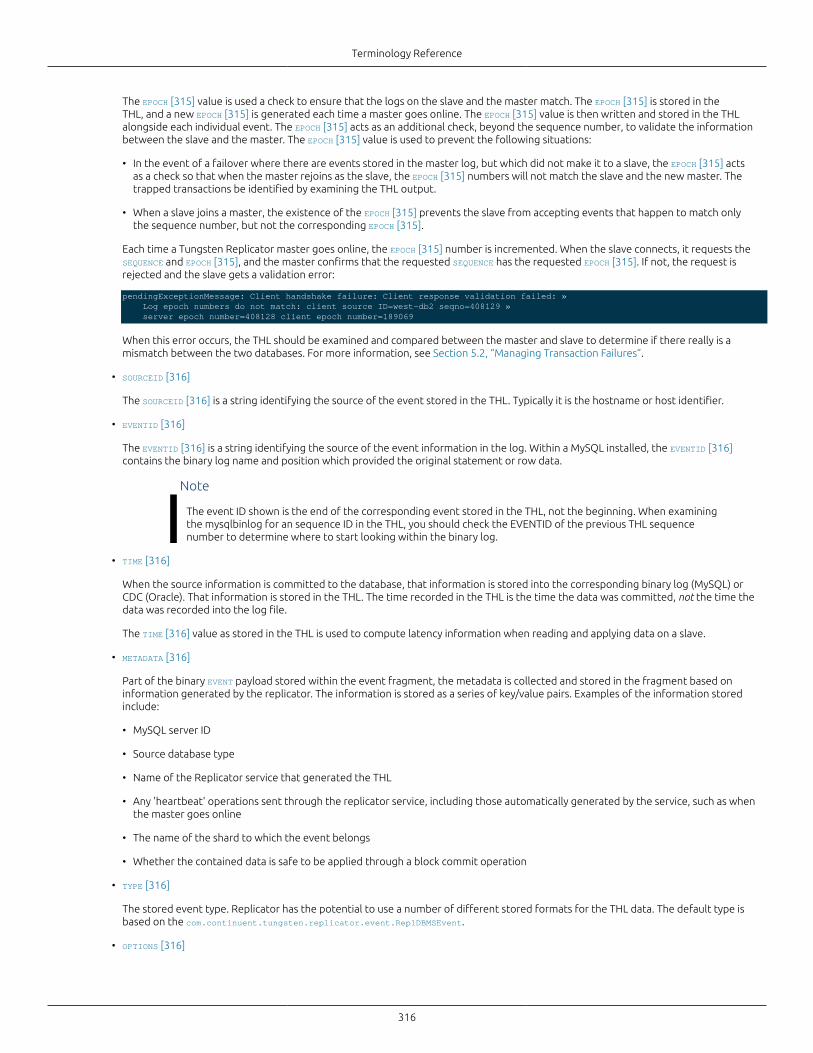
Terminology Reference
316
The EPOCH [315] value is used a check to ensure that the logs on the slave and the master match. The EPOCH [315] is stored in theTHL, and a new EPOCH [315] is generated each time a master goes online. The EPOCH [315] value is then written and stored in the THLalongside each individual event. The EPOCH [315] acts as an additional check, beyond the sequence number, to validate the informationbetween the slave and the master. The EPOCH [315] value is used to prevent the following situations:
• In the event of a failover where there are events stored in the master log, but which did not make it to a slave, the EPOCH [315] actsas a check so that when the master rejoins as the slave, the EPOCH [315] numbers will not match the slave and the new master. Thetrapped transactions be identified by examining the THL output.
• When a slave joins a master, the existence of the EPOCH [315] prevents the slave from accepting events that happen to match onlythe sequence number, but not the corresponding EPOCH [315].
Each time a Tungsten Replicator master goes online, the EPOCH [315] number is incremented. When the slave connects, it requests theSEQUENCE and EPOCH [315], and the master confirms that the requested SEQUENCE has the requested EPOCH [315]. If not, the request isrejected and the slave gets a validation error:
pendingExceptionMessage: Client handshake failure: Client response validation failed: » Log epoch numbers do not match: client source ID=west-db2 seqno=408129 » server epoch number=408128 client epoch number=189069
When this error occurs, the THL should be examined and compared between the master and slave to determine if there really is amismatch between the two databases. For more information, see Section 5.2, “Managing Transaction Failures”.
• SOURCEID [316]
The SOURCEID [316] is a string identifying the source of the event stored in the THL. Typically it is the hostname or host identifier.
• EVENTID [316]
The EVENTID [316] is a string identifying the source of the event information in the log. Within a MySQL installed, the EVENTID [316]contains the binary log name and position which provided the original statement or row data.
Note
The event ID shown is the end of the corresponding event stored in the THL, not the beginning. When examiningthe mysqlbinlog for an sequence ID in the THL, you should check the EVENTID of the previous THL sequencenumber to determine where to start looking within the binary log.
• TIME [316]
When the source information is committed to the database, that information is stored into the corresponding binary log (MySQL) orCDC (Oracle). That information is stored in the THL. The time recorded in the THL is the time the data was committed, not the time thedata was recorded into the log file.
The TIME [316] value as stored in the THL is used to compute latency information when reading and applying data on a slave.
• METADATA [316]
Part of the binary EVENT payload stored within the event fragment, the metadata is collected and stored in the fragment based oninformation generated by the replicator. The information is stored as a series of key/value pairs. Examples of the information storedinclude:
• MySQL server ID
• Source database type
• Name of the Replicator service that generated the THL
• Any 'heartbeat' operations sent through the replicator service, including those automatically generated by the service, such as whenthe master goes online
• The name of the shard to which the event belongs
• Whether the contained data is safe to be applied through a block commit operation
• TYPE [316]
The stored event type. Replicator has the potential to use a number of different stored formats for the THL data. The default type isbased on the com.continuent.tungsten.replicator.event.ReplDBMSEvent.
• OPTIONS [316]
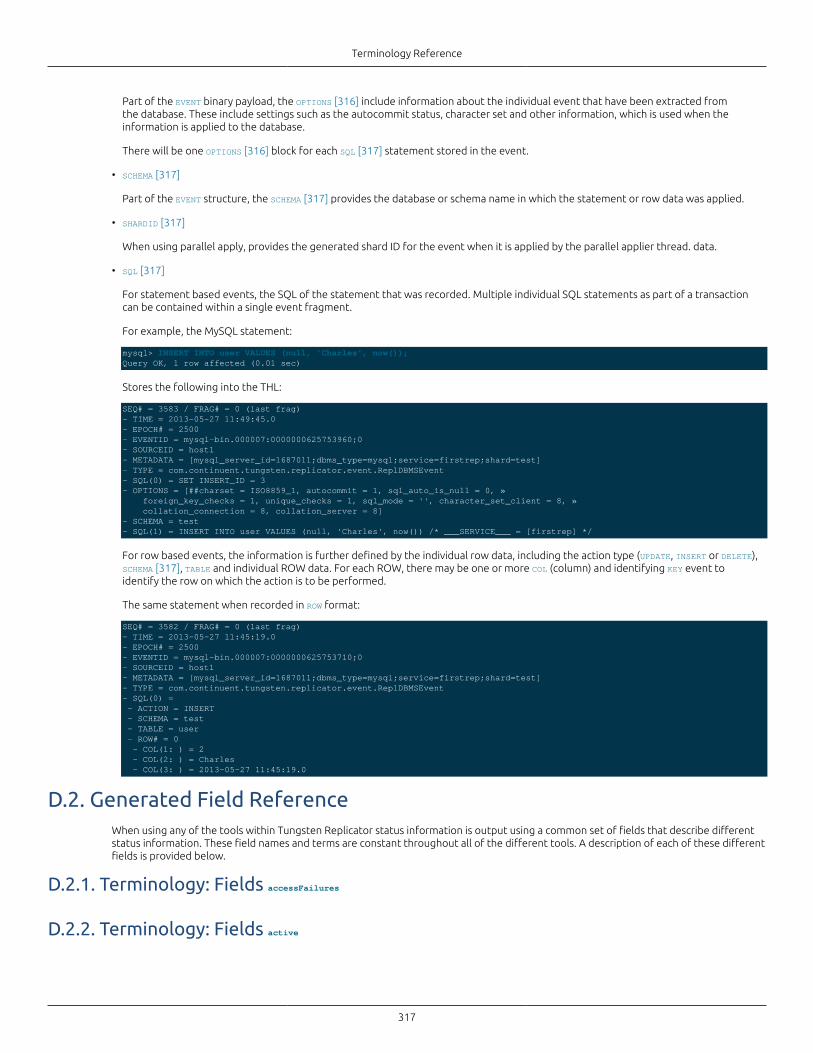
Terminology Reference
317
Part of the EVENT binary payload, the OPTIONS [316] include information about the individual event that have been extracted fromthe database. These include settings such as the autocommit status, character set and other information, which is used when theinformation is applied to the database.
There will be one OPTIONS [316] block for each SQL [317] statement stored in the event.
• SCHEMA [317]
Part of the EVENT structure, the SCHEMA [317] provides the database or schema name in which the statement or row data was applied.
• SHARDID [317]
When using parallel apply, provides the generated shard ID for the event when it is applied by the parallel applier thread. data.
• SQL [317]
For statement based events, the SQL of the statement that was recorded. Multiple individual SQL statements as part of a transactioncan be contained within a single event fragment.
For example, the MySQL statement:
mysql> INSERT INTO user VALUES (null, 'Charles', now());Query OK, 1 row affected (0.01 sec)
Stores the following into the THL:
SEQ# = 3583 / FRAG# = 0 (last frag)- TIME = 2013-05-27 11:49:45.0- EPOCH# = 2500- EVENTID = mysql-bin.000007:0000000625753960;0- SOURCEID = host1- METADATA = [mysql_server_id=1687011;dbms_type=mysql;service=firstrep;shard=test]- TYPE = com.continuent.tungsten.replicator.event.ReplDBMSEvent- SQL(0) = SET INSERT_ID = 3- OPTIONS = [##charset = ISO8859_1, autocommit = 1, sql_auto_is_null = 0, » foreign_key_checks = 1, unique_checks = 1, sql_mode = '', character_set_client = 8, » collation_connection = 8, collation_server = 8]- SCHEMA = test- SQL(1) = INSERT INTO user VALUES (null, 'Charles', now()) /* ___SERVICE___ = [firstrep] */
For row based events, the information is further defined by the individual row data, including the action type (UPDATE, INSERT or DELETE),SCHEMA [317], TABLE and individual ROW data. For each ROW, there may be one or more COL (column) and identifying KEY event toidentify the row on which the action is to be performed.
The same statement when recorded in ROW format:
SEQ# = 3582 / FRAG# = 0 (last frag)- TIME = 2013-05-27 11:45:19.0- EPOCH# = 2500- EVENTID = mysql-bin.000007:0000000625753710;0- SOURCEID = host1- METADATA = [mysql_server_id=1687011;dbms_type=mysql;service=firstrep;shard=test]- TYPE = com.continuent.tungsten.replicator.event.ReplDBMSEvent- SQL(0) = - ACTION = INSERT - SCHEMA = test - TABLE = user - ROW# = 0 - COL(1: ) = 2 - COL(2: ) = Charles - COL(3: ) = 2013-05-27 11:45:19.0
D.2. Generated Field ReferenceWhen using any of the tools within Tungsten Replicator status information is output using a common set of fields that describe differentstatus information. These field names and terms are constant throughout all of the different tools. A description of each of these differentfields is provided below.
D.2.1. Terminology: Fields accessFailures
D.2.2. Terminology: Fields active
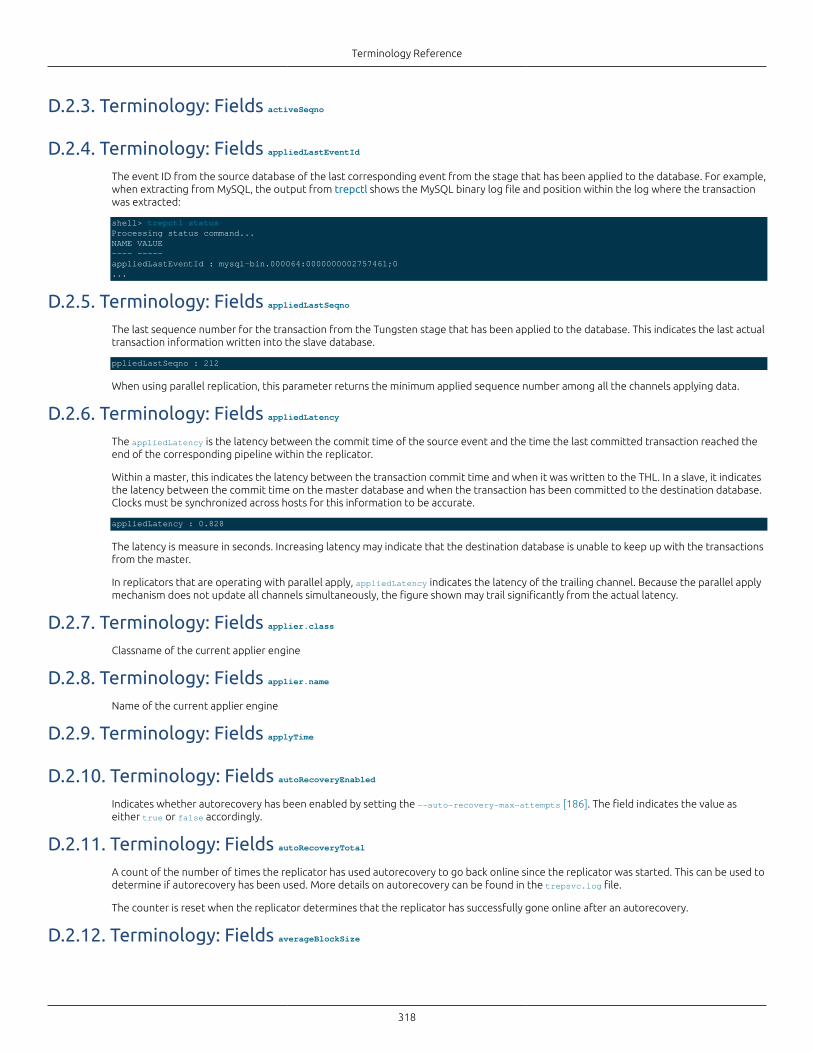
Terminology Reference
318
D.2.3. Terminology: Fields activeSeqno
D.2.4. Terminology: Fields appliedLastEventIdThe event ID from the source database of the last corresponding event from the stage that has been applied to the database. For example,when extracting from MySQL, the output from trepctl shows the MySQL binary log file and position within the log where the transactionwas extracted:
shell> trepctl statusProcessing status command...NAME VALUE---- -----appliedLastEventId : mysql-bin.000064:0000000002757461;0...
D.2.5. Terminology: Fields appliedLastSeqnoThe last sequence number for the transaction from the Tungsten stage that has been applied to the database. This indicates the last actualtransaction information written into the slave database.
ppliedLastSeqno : 212
When using parallel replication, this parameter returns the minimum applied sequence number among all the channels applying data.
D.2.6. Terminology: Fields appliedLatencyThe appliedLatency is the latency between the commit time of the source event and the time the last committed transaction reached theend of the corresponding pipeline within the replicator.
Within a master, this indicates the latency between the transaction commit time and when it was written to the THL. In a slave, it indicatesthe latency between the commit time on the master database and when the transaction has been committed to the destination database.Clocks must be synchronized across hosts for this information to be accurate.
appliedLatency : 0.828
The latency is measure in seconds. Increasing latency may indicate that the destination database is unable to keep up with the transactionsfrom the master.
In replicators that are operating with parallel apply, appliedLatency indicates the latency of the trailing channel. Because the parallel applymechanism does not update all channels simultaneously, the figure shown may trail significantly from the actual latency.
D.2.7. Terminology: Fields applier.classClassname of the current applier engine
D.2.8. Terminology: Fields applier.nameName of the current applier engine
D.2.9. Terminology: Fields applyTime
D.2.10. Terminology: Fields autoRecoveryEnabledIndicates whether autorecovery has been enabled by setting the --auto-recovery-max-attempts [186]. The field indicates the value aseither true or false accordingly.
D.2.11. Terminology: Fields autoRecoveryTotalA count of the number of times the replicator has used autorecovery to go back online since the replicator was started. This can be used todetermine if autorecovery has been used. More details on autorecovery can be found in the trepsvc.log file.
The counter is reset when the replicator determines that the replicator has successfully gone online after an autorecovery.
D.2.12. Terminology: Fields averageBlockSize

Terminology Reference
319
D.2.13. Terminology: Fields blockCommitRowCount
D.2.14. Terminology: Fields cancelled
D.2.15. Terminology: Fields channel
D.2.16. Terminology: Fields channelsThe number of channels being used to apply transactions to the target dataserver. In a standard replication setup there is typically onlyone channel. When parallel replication is in effect, there will be more than one channel used to apply transactions.
channels : 1
D.2.17. Terminology: Fields clusterNameThe name of the cluster. This information is different to the service name and is used to identify the cluster, rather than the individualservice information being output.
D.2.18. Terminology: Fields commits
D.2.19. Terminology: Fields committedMinSeqno
D.2.20. Terminology: Fields criticalPartition
D.2.21. Terminology: Fields currentBlockSize
D.2.22. Terminology: Fields currentEventIdEvent ID of the transaction currently being processed
D.2.23. Terminology: Fields currentLastEventId
D.2.24. Terminology: Fields currentLastFragno
D.2.25. Terminology: Fields currentLastSeqno
D.2.26. Terminology: Fields currentTimeMillisThe current time on the host, in milliseconds since the epoch. This information can used to confirm that the time on different hostsis within a suitable limit. Internally, the information is used to record the time when transactions are applied, and may therefore theappliedLatency figure.
D.2.27. Terminology: Fields dataServerHost
D.2.28. Terminology: Fields discardCount
D.2.29. Terminology: Fields doChecksum
Terminology Reference
320
D.2.30. Terminology: Fields estimatedOfflineInterval
D.2.31. Terminology: Fields eventCount
D.2.32. Terminology: Fields extensions
D.2.33. Terminology: Fields extractTime
D.2.34. Terminology: Fields extractor.class
D.2.35. Terminology: Fields extractor.name
D.2.36. Terminology: Fields filter.#.class
D.2.37. Terminology: Fields filter.#.name
D.2.38. Terminology: Fields filterTime
D.2.39. Terminology: Fields flushIntervalMillis
D.2.40. Terminology: Fields fsyncOnFlush
D.2.41. Terminology: Fields headSeqno
D.2.42. Terminology: Fields intervalGuard
D.2.43. Terminology: Fields lastCommittedBlockSizeThe lastCommittedBlockSize contains the size of the last block that was committed as part of the block commit procedure. The value is onlydisplayed on appliers and defines the number of events in the last block. By comparing this value to the configured block commit size, thecommit type can be determined.
For more information, see Section 9.1, “Block Commit”.
D.2.44. Terminology: Fields lastCommittedBlockTimeThe lastCommittedBlockSize contains the duration since the last committed block. The value is only displayed on appliers and defines thenumber of seconds since the last block was committed. By comparing this value to the configured block interval, the commit type can bedetermined.
For more information, see Section 9.1, “Block Commit”.
D.2.45. Terminology: Fields latestEpochNumber
D.2.46. Terminology: Fields logConnectionTimeout

Terminology Reference
321
D.2.47. Terminology: Fields logDir
D.2.48. Terminology: Fields logFileRetainMillis
D.2.49. Terminology: Fields logFileSize
D.2.50. Terminology: Fields masterConnectUriThe URI being used to extract THL information. On a master, the information may be empty, or may contain the reference to theunderlying extractor source where information is being read.
On a slave, the URI indicates the host from which THL data is being read:
masterConnectUri : thl://host1:2112/
In a secure installation where SSL is being used to exchange data, the URI protocol will be thls:
masterConnectUri : thls://host1:2112/
D.2.51. Terminology: Fields masterListenUriThe URI on which the replicator is listening for incoming slave requests. On a master, this is the URI used to distribute THL information.
masterListenUri : thls://host1:2112/
D.2.52. Terminology: Fields maxChannel
D.2.53. Terminology: Fields maxDelayInterval
D.2.54. Terminology: Fields maxOfflineInterval
D.2.55. Terminology: Fields maxSize
D.2.56. Terminology: Fields maximumStoredSeqNoThe maximum transaction ID that has been stored locally on the machine in the THL. Because Tungsten Replicator operates in stages, itis sometimes important to compare the sequence and latency between information being ready from the source into the THL, and thenfrom the THL into the database. You can compare this value to the appliedLastSeqno, which indicates the last sequence committed to thedatabase. The information is provided at a resolution of milliseconds.
maximumStoredSeqNo : 25
D.2.57. Terminology: Fields minimumStoredSeqNoThe minimum transaction ID stored locally in the THL on the host:
minimumStoredSeqNo : 0
The figure should match the lowest transaction ID as output by the thl index command. On a busy host, or one where the THL informationhas been purged, the figure will show the corresponding transaction ID as stored in the THL.
D.2.58. Terminology: Fields name
D.2.59. Terminology: Fields offlineRequestsContains the specifications of one or more future offline events that have been configured for the replicator. Multiple events areseparated by a semicolon:
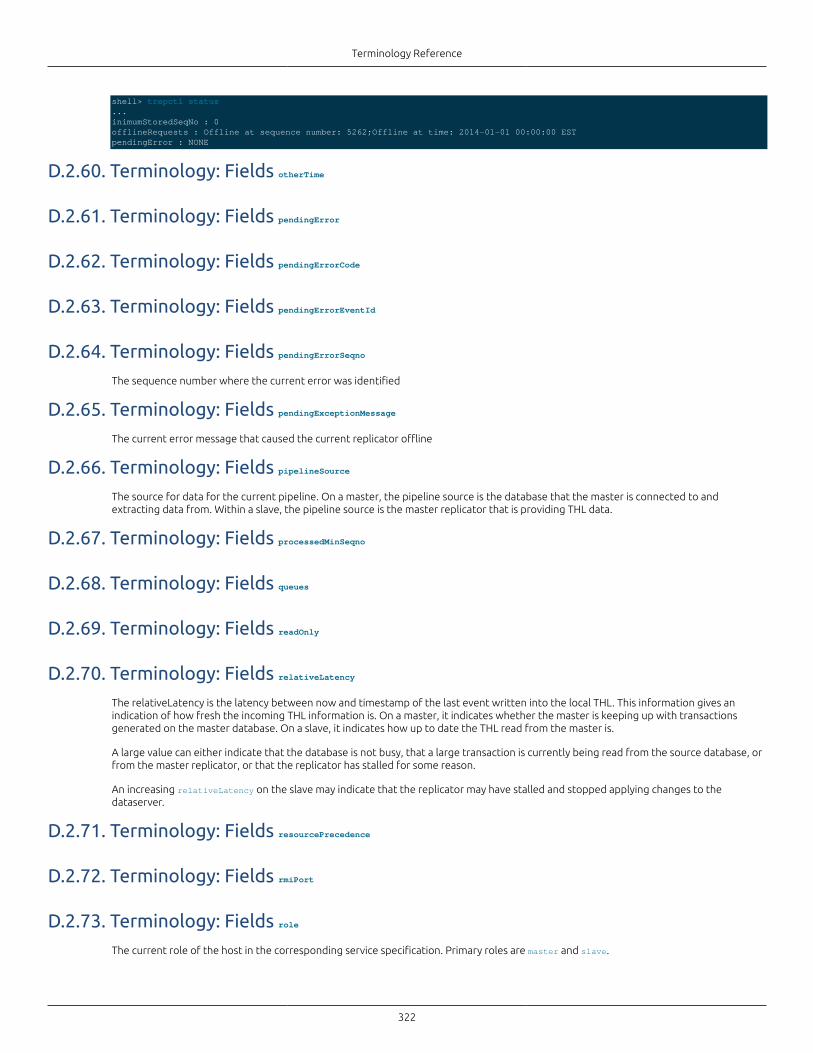
Terminology Reference
322
shell> trepctl status...inimumStoredSeqNo : 0offlineRequests : Offline at sequence number: 5262;Offline at time: 2014-01-01 00:00:00 ESTpendingError : NONE
D.2.60. Terminology: Fields otherTime
D.2.61. Terminology: Fields pendingError
D.2.62. Terminology: Fields pendingErrorCode
D.2.63. Terminology: Fields pendingErrorEventId
D.2.64. Terminology: Fields pendingErrorSeqnoThe sequence number where the current error was identified
D.2.65. Terminology: Fields pendingExceptionMessageThe current error message that caused the current replicator offline
D.2.66. Terminology: Fields pipelineSourceThe source for data for the current pipeline. On a master, the pipeline source is the database that the master is connected to andextracting data from. Within a slave, the pipeline source is the master replicator that is providing THL data.
D.2.67. Terminology: Fields processedMinSeqno
D.2.68. Terminology: Fields queues
D.2.69. Terminology: Fields readOnly
D.2.70. Terminology: Fields relativeLatencyThe relativeLatency is the latency between now and timestamp of the last event written into the local THL. This information gives anindication of how fresh the incoming THL information is. On a master, it indicates whether the master is keeping up with transactionsgenerated on the master database. On a slave, it indicates how up to date the THL read from the master is.
A large value can either indicate that the database is not busy, that a large transaction is currently being read from the source database, orfrom the master replicator, or that the replicator has stalled for some reason.
An increasing relativeLatency on the slave may indicate that the replicator may have stalled and stopped applying changes to thedataserver.
D.2.71. Terminology: Fields resourcePrecedence
D.2.72. Terminology: Fields rmiPort
D.2.73. Terminology: Fields roleThe current role of the host in the corresponding service specification. Primary roles are master and slave.
Terminology Reference
323
D.2.74. Terminology: Fields seqnoTypeThe internal class used to store the transaction ID. In MySQL replication, the sequence number is typically stored internally as a Java Long(java.lang.Long). In heterogeneous replication environments, the type used may be different to match the required information from thesource database.
D.2.75. Terminology: Fields serializationCount
D.2.76. Terminology: Fields serialized
D.2.77. Terminology: Fields serviceNameThe name of the configured service, as defined when the deployment was first created through tpm.
serviceName : alpha
A replicator may support multiple services. The information is output to confirm the service information being displayed.
D.2.78. Terminology: Fields serviceTypeThe configured service type. Where the replicator is on the same host as the database, the service is considered to be local. When readingor write to a remote dataserver, the service is remote.
D.2.79. Terminology: Fields shard_id
D.2.80. Terminology: Fields simpleServiceNameA simplified version of the serviceName.
D.2.81. Terminology: Fields siteName
D.2.82. Terminology: Fields sourceId
D.2.83. Terminology: Fields stage
D.2.84. Terminology: Fields started
D.2.85. Terminology: Fields state
D.2.86. Terminology: Fields stopRequested
D.2.87. Terminology: Fields store.#
D.2.88. Terminology: Fields storeClass
D.2.89. Terminology: Fields syncInterval
D.2.90. Terminology: Fields taskCount

Terminology Reference
324
D.2.91. Terminology: Fields taskId
D.2.92. Terminology: Fields timeInStateSeconds
D.2.93. Terminology: Fields timeoutMillis
D.2.94. Terminology: Fields totalAssignments
D.2.95. Terminology: Fields transitioningTo
D.2.96. Terminology: Fields uptimeSeconds
D.2.97. Terminology: Fields version
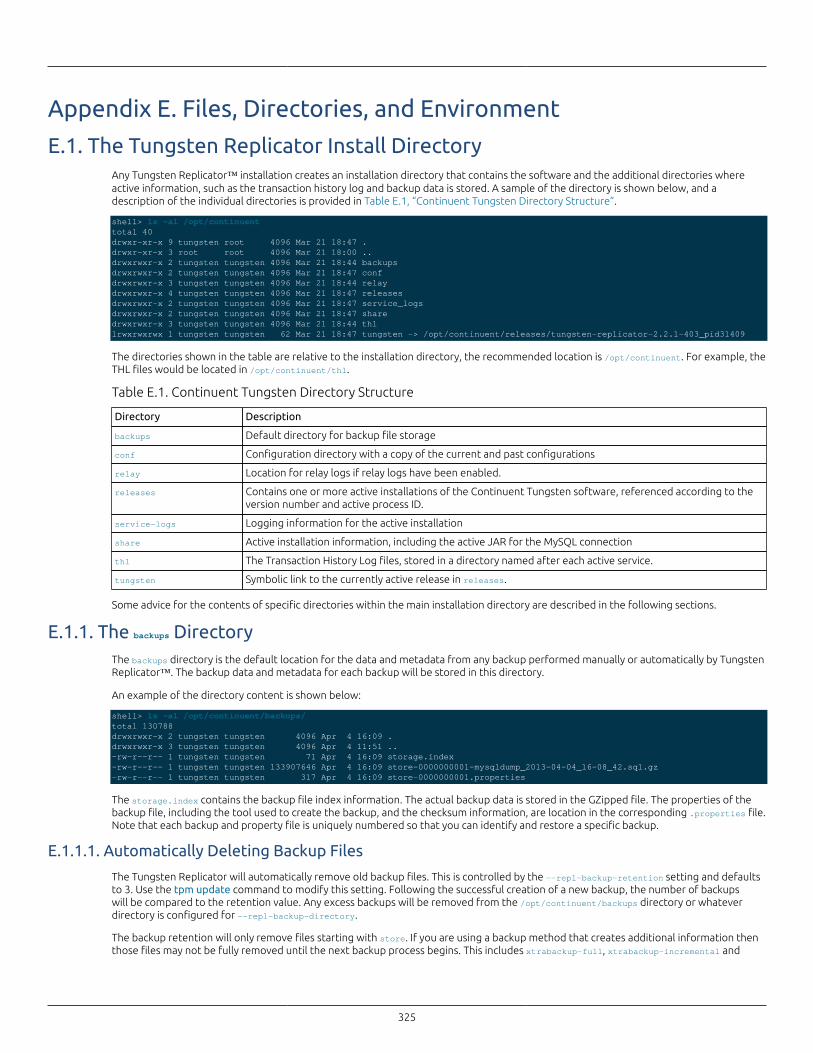
325
Appendix E. Files, Directories, and Environment
E.1. The Tungsten Replicator Install DirectoryAny Tungsten Replicator™ installation creates an installation directory that contains the software and the additional directories whereactive information, such as the transaction history log and backup data is stored. A sample of the directory is shown below, and adescription of the individual directories is provided in Table E.1, “Continuent Tungsten Directory Structure”.
shell> ls -al /opt/continuenttotal 40drwxr-xr-x 9 tungsten root 4096 Mar 21 18:47 .drwxr-xr-x 3 root root 4096 Mar 21 18:00 ..drwxrwxr-x 2 tungsten tungsten 4096 Mar 21 18:44 backupsdrwxrwxr-x 2 tungsten tungsten 4096 Mar 21 18:47 confdrwxrwxr-x 3 tungsten tungsten 4096 Mar 21 18:44 relaydrwxrwxr-x 4 tungsten tungsten 4096 Mar 21 18:47 releasesdrwxrwxr-x 2 tungsten tungsten 4096 Mar 21 18:47 service_logsdrwxrwxr-x 2 tungsten tungsten 4096 Mar 21 18:47 sharedrwxrwxr-x 3 tungsten tungsten 4096 Mar 21 18:44 thllrwxrwxrwx 1 tungsten tungsten 62 Mar 21 18:47 tungsten -> /opt/continuent/releases/tungsten-replicator-2.2.1-403_pid31409
The directories shown in the table are relative to the installation directory, the recommended location is /opt/continuent. For example, theTHL files would be located in /opt/continuent/thl.
Table E.1. Continuent Tungsten Directory Structure
Directory Description
backups Default directory for backup file storage
conf Configuration directory with a copy of the current and past configurations
relay Location for relay logs if relay logs have been enabled.
releases Contains one or more active installations of the Continuent Tungsten software, referenced according to theversion number and active process ID.
service-logs Logging information for the active installation
share Active installation information, including the active JAR for the MySQL connection
thl The Transaction History Log files, stored in a directory named after each active service.
tungsten Symbolic link to the currently active release in releases.
Some advice for the contents of specific directories within the main installation directory are described in the following sections.
E.1.1. The backups DirectoryThe backups directory is the default location for the data and metadata from any backup performed manually or automatically by TungstenReplicator™. The backup data and metadata for each backup will be stored in this directory.
An example of the directory content is shown below:
shell> ls -al /opt/continuent/backups/total 130788drwxrwxr-x 2 tungsten tungsten 4096 Apr 4 16:09 .drwxrwxr-x 3 tungsten tungsten 4096 Apr 4 11:51 ..-rw-r--r-- 1 tungsten tungsten 71 Apr 4 16:09 storage.index-rw-r--r-- 1 tungsten tungsten 133907646 Apr 4 16:09 store-0000000001-mysqldump_2013-04-04_16-08_42.sql.gz-rw-r--r-- 1 tungsten tungsten 317 Apr 4 16:09 store-0000000001.properties
The storage.index contains the backup file index information. The actual backup data is stored in the GZipped file. The properties of thebackup file, including the tool used to create the backup, and the checksum information, are location in the corresponding .properties file.Note that each backup and property file is uniquely numbered so that you can identify and restore a specific backup.
E.1.1.1. Automatically Deleting Backup Files
The Tungsten Replicator will automatically remove old backup files. This is controlled by the --repl-backup-retention setting and defaultsto 3. Use the tpm update command to modify this setting. Following the successful creation of a new backup, the number of backupswill be compared to the retention value. Any excess backups will be removed from the /opt/continuent/backups directory or whateverdirectory is configured for --repl-backup-directory.
The backup retention will only remove files starting with store. If you are using a backup method that creates additional information thenthose files may not be fully removed until the next backup process begins. This includes xtrabackup-full, xtrabackup-incremental and
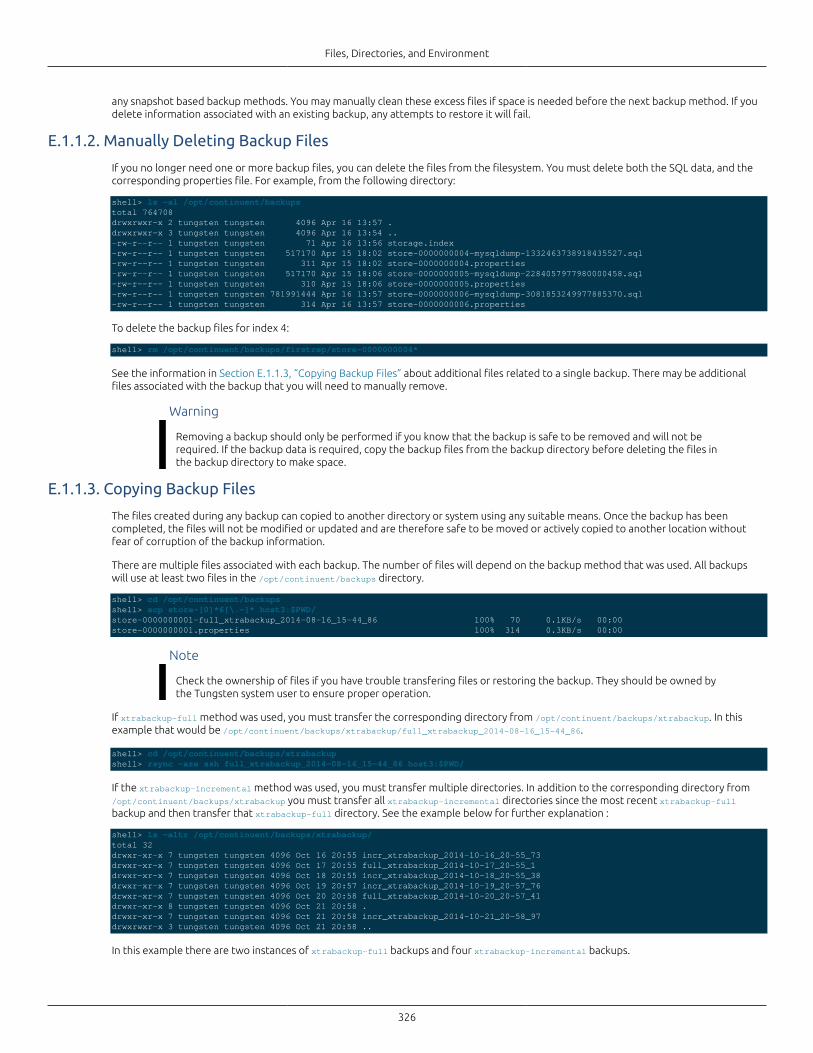
Files, Directories, and Environment
326
any snapshot based backup methods. You may manually clean these excess files if space is needed before the next backup method. If youdelete information associated with an existing backup, any attempts to restore it will fail.
E.1.1.2. Manually Deleting Backup Files
If you no longer need one or more backup files, you can delete the files from the filesystem. You must delete both the SQL data, and thecorresponding properties file. For example, from the following directory:
shell> ls -al /opt/continuent/backupstotal 764708drwxrwxr-x 2 tungsten tungsten 4096 Apr 16 13:57 .drwxrwxr-x 3 tungsten tungsten 4096 Apr 16 13:54 ..-rw-r--r-- 1 tungsten tungsten 71 Apr 16 13:56 storage.index-rw-r--r-- 1 tungsten tungsten 517170 Apr 15 18:02 store-0000000004-mysqldump-1332463738918435527.sql-rw-r--r-- 1 tungsten tungsten 311 Apr 15 18:02 store-0000000004.properties-rw-r--r-- 1 tungsten tungsten 517170 Apr 15 18:06 store-0000000005-mysqldump-2284057977980000458.sql-rw-r--r-- 1 tungsten tungsten 310 Apr 15 18:06 store-0000000005.properties-rw-r--r-- 1 tungsten tungsten 781991444 Apr 16 13:57 store-0000000006-mysqldump-3081853249977885370.sql-rw-r--r-- 1 tungsten tungsten 314 Apr 16 13:57 store-0000000006.properties
To delete the backup files for index 4:
shell> rm /opt/continuent/backups/firstrep/store-0000000004*
See the information in Section E.1.1.3, “Copying Backup Files” about additional files related to a single backup. There may be additionalfiles associated with the backup that you will need to manually remove.
Warning
Removing a backup should only be performed if you know that the backup is safe to be removed and will not berequired. If the backup data is required, copy the backup files from the backup directory before deleting the files inthe backup directory to make space.
E.1.1.3. Copying Backup Files
The files created during any backup can copied to another directory or system using any suitable means. Once the backup has beencompleted, the files will not be modified or updated and are therefore safe to be moved or actively copied to another location withoutfear of corruption of the backup information.
There are multiple files associated with each backup. The number of files will depend on the backup method that was used. All backupswill use at least two files in the /opt/continuent/backups directory.
shell> cd /opt/continuent/backupsshell> scp store-[0]*6[\.-]* host3:$PWD/store-0000000001-full_xtrabackup_2014-08-16_15-44_86 100% 70 0.1KB/s 00:00store-0000000001.properties 100% 314 0.3KB/s 00:00
Note
Check the ownership of files if you have trouble transfering files or restoring the backup. They should be owned bythe Tungsten system user to ensure proper operation.
If xtrabackup-full method was used, you must transfer the corresponding directory from /opt/continuent/backups/xtrabackup. In thisexample that would be /opt/continuent/backups/xtrabackup/full_xtrabackup_2014-08-16_15-44_86.
shell> cd /opt/continuent/backups/xtrabackupshell> rsync -aze ssh full_xtrabackup_2014-08-16_15-44_86 host3:$PWD/
If the xtrabackup-incremental method was used, you must transfer multiple directories. In addition to the corresponding directory from/opt/continuent/backups/xtrabackup you must transfer all xtrabackup-incremental directories since the most recent xtrabackup-fullbackup and then transfer that xtrabackup-full directory. See the example below for further explanation :
shell> ls -altr /opt/continuent/backups/xtrabackup/total 32drwxr-xr-x 7 tungsten tungsten 4096 Oct 16 20:55 incr_xtrabackup_2014-10-16_20-55_73drwxr-xr-x 7 tungsten tungsten 4096 Oct 17 20:55 full_xtrabackup_2014-10-17_20-55_1drwxr-xr-x 7 tungsten tungsten 4096 Oct 18 20:55 incr_xtrabackup_2014-10-18_20-55_38drwxr-xr-x 7 tungsten tungsten 4096 Oct 19 20:57 incr_xtrabackup_2014-10-19_20-57_76drwxr-xr-x 7 tungsten tungsten 4096 Oct 20 20:58 full_xtrabackup_2014-10-20_20-57_41drwxr-xr-x 8 tungsten tungsten 4096 Oct 21 20:58 .drwxr-xr-x 7 tungsten tungsten 4096 Oct 21 20:58 incr_xtrabackup_2014-10-21_20-58_97drwxrwxr-x 3 tungsten tungsten 4096 Oct 21 20:58 ..
In this example there are two instances of xtrabackup-full backups and four xtrabackup-incremental backups.
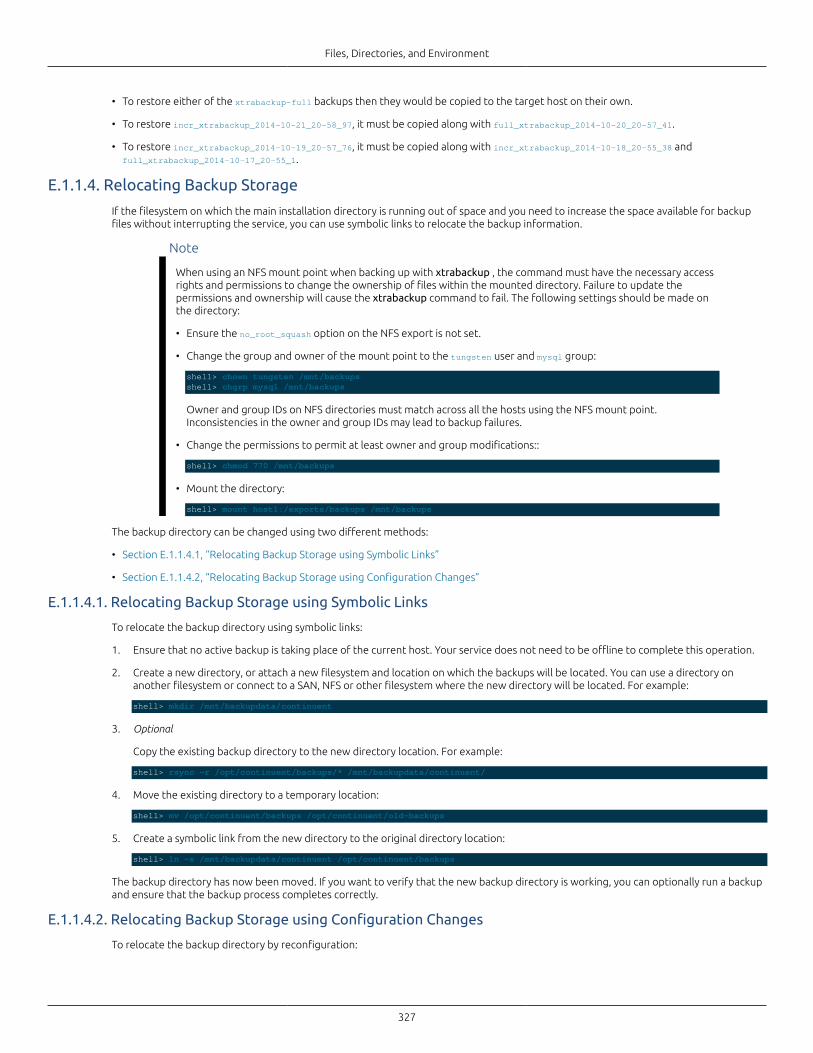
Files, Directories, and Environment
327
• To restore either of the xtrabackup-full backups then they would be copied to the target host on their own.
• To restore incr_xtrabackup_2014-10-21_20-58_97, it must be copied along with full_xtrabackup_2014-10-20_20-57_41.
• To restore incr_xtrabackup_2014-10-19_20-57_76, it must be copied along with incr_xtrabackup_2014-10-18_20-55_38 andfull_xtrabackup_2014-10-17_20-55_1.
E.1.1.4. Relocating Backup Storage
If the filesystem on which the main installation directory is running out of space and you need to increase the space available for backupfiles without interrupting the service, you can use symbolic links to relocate the backup information.
Note
When using an NFS mount point when backing up with xtrabackup , the command must have the necessary accessrights and permissions to change the ownership of files within the mounted directory. Failure to update thepermissions and ownership will cause the xtrabackup command to fail. The following settings should be made onthe directory:
• Ensure the no_root_squash option on the NFS export is not set.
• Change the group and owner of the mount point to the tungsten user and mysql group:
shell> chown tungsten /mnt/backupsshell> chgrp mysql /mnt/backups
Owner and group IDs on NFS directories must match across all the hosts using the NFS mount point.Inconsistencies in the owner and group IDs may lead to backup failures.
• Change the permissions to permit at least owner and group modifications::
shell> chmod 770 /mnt/backups
• Mount the directory:
shell> mount host1:/exports/backups /mnt/backups
The backup directory can be changed using two different methods:
• Section E.1.1.4.1, “Relocating Backup Storage using Symbolic Links”
• Section E.1.1.4.2, “Relocating Backup Storage using Configuration Changes”
E.1.1.4.1. Relocating Backup Storage using Symbolic Links
To relocate the backup directory using symbolic links:
1. Ensure that no active backup is taking place of the current host. Your service does not need to be offline to complete this operation.
2. Create a new directory, or attach a new filesystem and location on which the backups will be located. You can use a directory onanother filesystem or connect to a SAN, NFS or other filesystem where the new directory will be located. For example:
shell> mkdir /mnt/backupdata/continuent
3. Optional
Copy the existing backup directory to the new directory location. For example:
shell> rsync -r /opt/continuent/backups/* /mnt/backupdata/continuent/
4. Move the existing directory to a temporary location:
shell> mv /opt/continuent/backups /opt/continuent/old-backups
5. Create a symbolic link from the new directory to the original directory location:
shell> ln -s /mnt/backupdata/continuent /opt/continuent/backups
The backup directory has now been moved. If you want to verify that the new backup directory is working, you can optionally run a backupand ensure that the backup process completes correctly.
E.1.1.4.2. Relocating Backup Storage using Configuration Changes
To relocate the backup directory by reconfiguration:
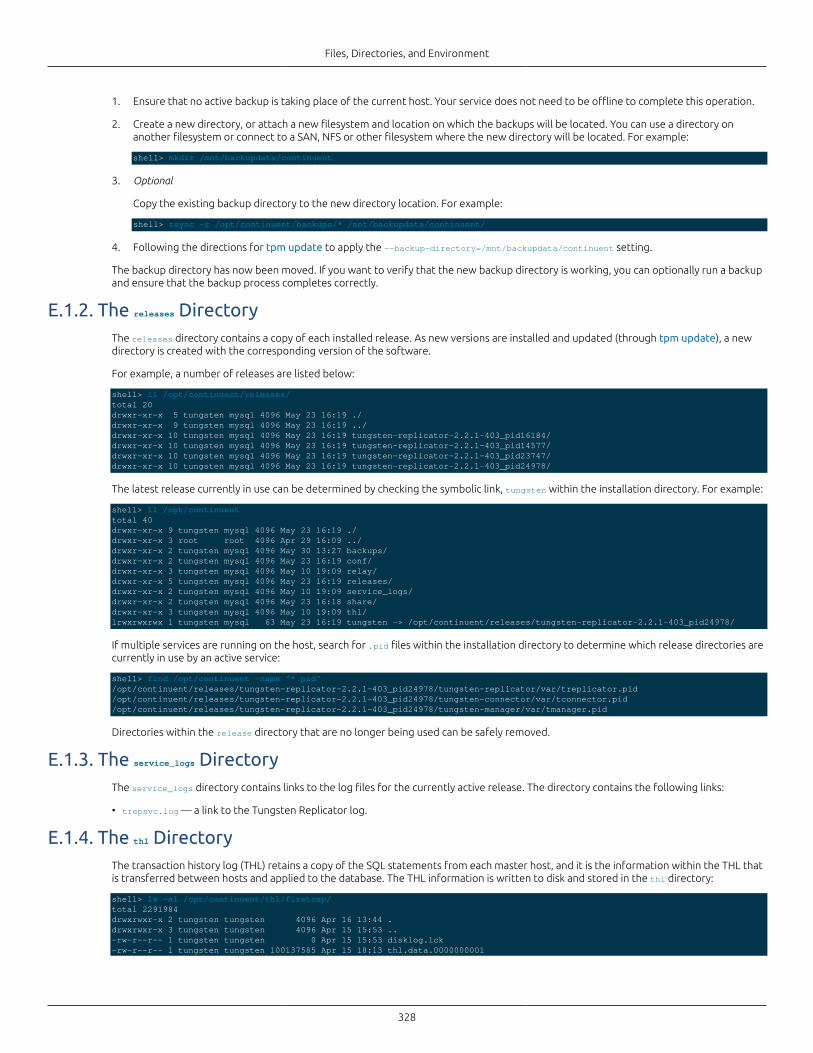
Files, Directories, and Environment
328
1. Ensure that no active backup is taking place of the current host. Your service does not need to be offline to complete this operation.
2. Create a new directory, or attach a new filesystem and location on which the backups will be located. You can use a directory onanother filesystem or connect to a SAN, NFS or other filesystem where the new directory will be located. For example:
shell> mkdir /mnt/backupdata/continuent
3. Optional
Copy the existing backup directory to the new directory location. For example:
shell> rsync -r /opt/continuent/backups/* /mnt/backupdata/continuent/
4. Following the directions for tpm update to apply the --backup-directory=/mnt/backupdata/continuent setting.
The backup directory has now been moved. If you want to verify that the new backup directory is working, you can optionally run a backupand ensure that the backup process completes correctly.
E.1.2. The releases DirectoryThe releases directory contains a copy of each installed release. As new versions are installed and updated (through tpm update), a newdirectory is created with the corresponding version of the software.
For example, a number of releases are listed below:
shell> ll /opt/continuent/releases/total 20drwxr-xr-x 5 tungsten mysql 4096 May 23 16:19 ./drwxr-xr-x 9 tungsten mysql 4096 May 23 16:19 ../drwxr-xr-x 10 tungsten mysql 4096 May 23 16:19 tungsten-replicator-2.2.1-403_pid16184/drwxr-xr-x 10 tungsten mysql 4096 May 23 16:19 tungsten-replicator-2.2.1-403_pid14577/drwxr-xr-x 10 tungsten mysql 4096 May 23 16:19 tungsten-replicator-2.2.1-403_pid23747/drwxr-xr-x 10 tungsten mysql 4096 May 23 16:19 tungsten-replicator-2.2.1-403_pid24978/
The latest release currently in use can be determined by checking the symbolic link, tungsten within the installation directory. For example:
shell> ll /opt/continuenttotal 40drwxr-xr-x 9 tungsten mysql 4096 May 23 16:19 ./drwxr-xr-x 3 root root 4096 Apr 29 16:09 ../drwxr-xr-x 2 tungsten mysql 4096 May 30 13:27 backups/drwxr-xr-x 2 tungsten mysql 4096 May 23 16:19 conf/drwxr-xr-x 3 tungsten mysql 4096 May 10 19:09 relay/drwxr-xr-x 5 tungsten mysql 4096 May 23 16:19 releases/drwxr-xr-x 2 tungsten mysql 4096 May 10 19:09 service_logs/drwxr-xr-x 2 tungsten mysql 4096 May 23 16:18 share/drwxr-xr-x 3 tungsten mysql 4096 May 10 19:09 thl/lrwxrwxrwx 1 tungsten mysql 63 May 23 16:19 tungsten -> /opt/continuent/releases/tungsten-replicator-2.2.1-403_pid24978/
If multiple services are running on the host, search for .pid files within the installation directory to determine which release directories arecurrently in use by an active service:
shell> find /opt/continuent -name "*.pid"/opt/continuent/releases/tungsten-replicator-2.2.1-403_pid24978/tungsten-replicator/var/treplicator.pid/opt/continuent/releases/tungsten-replicator-2.2.1-403_pid24978/tungsten-connector/var/tconnector.pid/opt/continuent/releases/tungsten-replicator-2.2.1-403_pid24978/tungsten-manager/var/tmanager.pid
Directories within the release directory that are no longer being used can be safely removed.
E.1.3. The service_logs DirectoryThe service_logs directory contains links to the log files for the currently active release. The directory contains the following links:
• trepsvc.log — a link to the Tungsten Replicator log.
E.1.4. The thl DirectoryThe transaction history log (THL) retains a copy of the SQL statements from each master host, and it is the information within the THL thatis transferred between hosts and applied to the database. The THL information is written to disk and stored in the thl directory:
shell> ls -al /opt/continuent/thl/firstrep/total 2291984drwxrwxr-x 2 tungsten tungsten 4096 Apr 16 13:44 .drwxrwxr-x 3 tungsten tungsten 4096 Apr 15 15:53 ..-rw-r--r-- 1 tungsten tungsten 0 Apr 15 15:53 disklog.lck-rw-r--r-- 1 tungsten tungsten 100137585 Apr 15 18:13 thl.data.0000000001
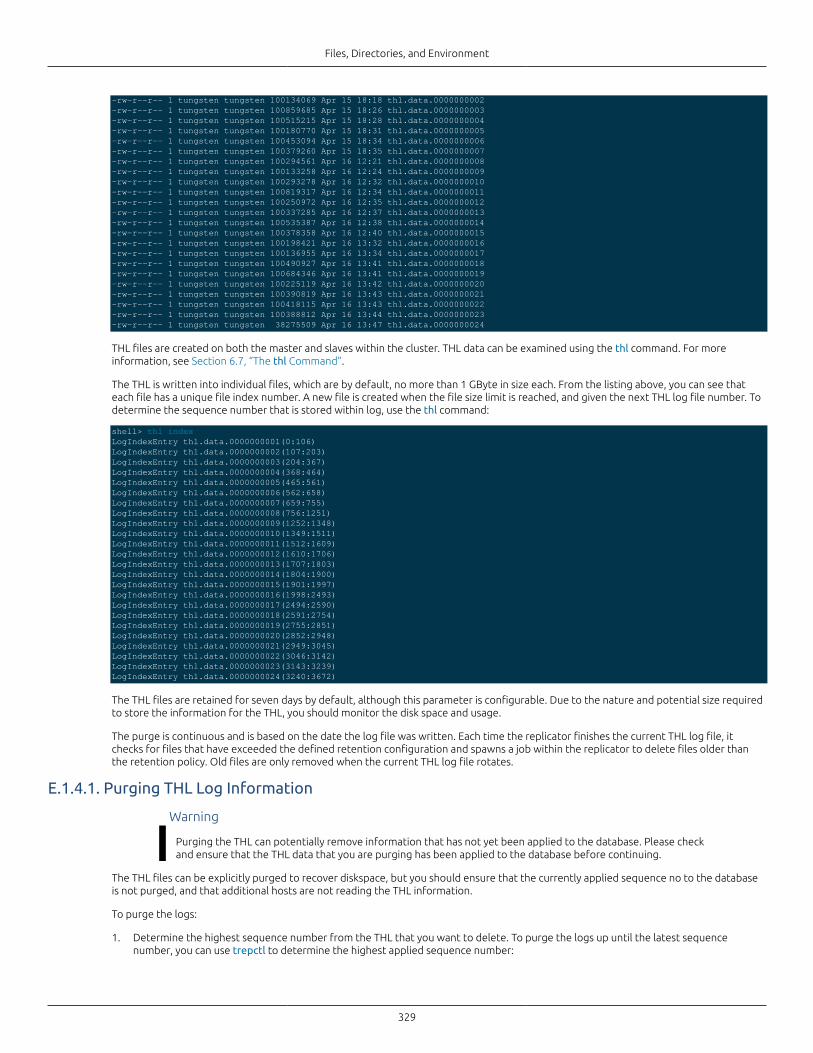
Files, Directories, and Environment
329
-rw-r--r-- 1 tungsten tungsten 100134069 Apr 15 18:18 thl.data.0000000002-rw-r--r-- 1 tungsten tungsten 100859685 Apr 15 18:26 thl.data.0000000003-rw-r--r-- 1 tungsten tungsten 100515215 Apr 15 18:28 thl.data.0000000004-rw-r--r-- 1 tungsten tungsten 100180770 Apr 15 18:31 thl.data.0000000005-rw-r--r-- 1 tungsten tungsten 100453094 Apr 15 18:34 thl.data.0000000006-rw-r--r-- 1 tungsten tungsten 100379260 Apr 15 18:35 thl.data.0000000007-rw-r--r-- 1 tungsten tungsten 100294561 Apr 16 12:21 thl.data.0000000008-rw-r--r-- 1 tungsten tungsten 100133258 Apr 16 12:24 thl.data.0000000009-rw-r--r-- 1 tungsten tungsten 100293278 Apr 16 12:32 thl.data.0000000010-rw-r--r-- 1 tungsten tungsten 100819317 Apr 16 12:34 thl.data.0000000011-rw-r--r-- 1 tungsten tungsten 100250972 Apr 16 12:35 thl.data.0000000012-rw-r--r-- 1 tungsten tungsten 100337285 Apr 16 12:37 thl.data.0000000013-rw-r--r-- 1 tungsten tungsten 100535387 Apr 16 12:38 thl.data.0000000014-rw-r--r-- 1 tungsten tungsten 100378358 Apr 16 12:40 thl.data.0000000015-rw-r--r-- 1 tungsten tungsten 100198421 Apr 16 13:32 thl.data.0000000016-rw-r--r-- 1 tungsten tungsten 100136955 Apr 16 13:34 thl.data.0000000017-rw-r--r-- 1 tungsten tungsten 100490927 Apr 16 13:41 thl.data.0000000018-rw-r--r-- 1 tungsten tungsten 100684346 Apr 16 13:41 thl.data.0000000019-rw-r--r-- 1 tungsten tungsten 100225119 Apr 16 13:42 thl.data.0000000020-rw-r--r-- 1 tungsten tungsten 100390819 Apr 16 13:43 thl.data.0000000021-rw-r--r-- 1 tungsten tungsten 100418115 Apr 16 13:43 thl.data.0000000022-rw-r--r-- 1 tungsten tungsten 100388812 Apr 16 13:44 thl.data.0000000023-rw-r--r-- 1 tungsten tungsten 38275509 Apr 16 13:47 thl.data.0000000024
THL files are created on both the master and slaves within the cluster. THL data can be examined using the thl command. For moreinformation, see Section 6.7, “The thl Command”.
The THL is written into individual files, which are by default, no more than 1 GByte in size each. From the listing above, you can see thateach file has a unique file index number. A new file is created when the file size limit is reached, and given the next THL log file number. Todetermine the sequence number that is stored within log, use the thl command:
shell> thl indexLogIndexEntry thl.data.0000000001(0:106)LogIndexEntry thl.data.0000000002(107:203)LogIndexEntry thl.data.0000000003(204:367)LogIndexEntry thl.data.0000000004(368:464)LogIndexEntry thl.data.0000000005(465:561)LogIndexEntry thl.data.0000000006(562:658)LogIndexEntry thl.data.0000000007(659:755)LogIndexEntry thl.data.0000000008(756:1251)LogIndexEntry thl.data.0000000009(1252:1348)LogIndexEntry thl.data.0000000010(1349:1511)LogIndexEntry thl.data.0000000011(1512:1609)LogIndexEntry thl.data.0000000012(1610:1706)LogIndexEntry thl.data.0000000013(1707:1803)LogIndexEntry thl.data.0000000014(1804:1900)LogIndexEntry thl.data.0000000015(1901:1997)LogIndexEntry thl.data.0000000016(1998:2493)LogIndexEntry thl.data.0000000017(2494:2590)LogIndexEntry thl.data.0000000018(2591:2754)LogIndexEntry thl.data.0000000019(2755:2851)LogIndexEntry thl.data.0000000020(2852:2948)LogIndexEntry thl.data.0000000021(2949:3045)LogIndexEntry thl.data.0000000022(3046:3142)LogIndexEntry thl.data.0000000023(3143:3239)LogIndexEntry thl.data.0000000024(3240:3672)
The THL files are retained for seven days by default, although this parameter is configurable. Due to the nature and potential size requiredto store the information for the THL, you should monitor the disk space and usage.
The purge is continuous and is based on the date the log file was written. Each time the replicator finishes the current THL log file, itchecks for files that have exceeded the defined retention configuration and spawns a job within the replicator to delete files older thanthe retention policy. Old files are only removed when the current THL log file rotates.
E.1.4.1. Purging THL Log Information
Warning
Purging the THL can potentially remove information that has not yet been applied to the database. Please checkand ensure that the THL data that you are purging has been applied to the database before continuing.
The THL files can be explicitly purged to recover diskspace, but you should ensure that the currently applied sequence no to the databaseis not purged, and that additional hosts are not reading the THL information.
To purge the logs:
1. Determine the highest sequence number from the THL that you want to delete. To purge the logs up until the latest sequencenumber, you can use trepctl to determine the highest applied sequence number:
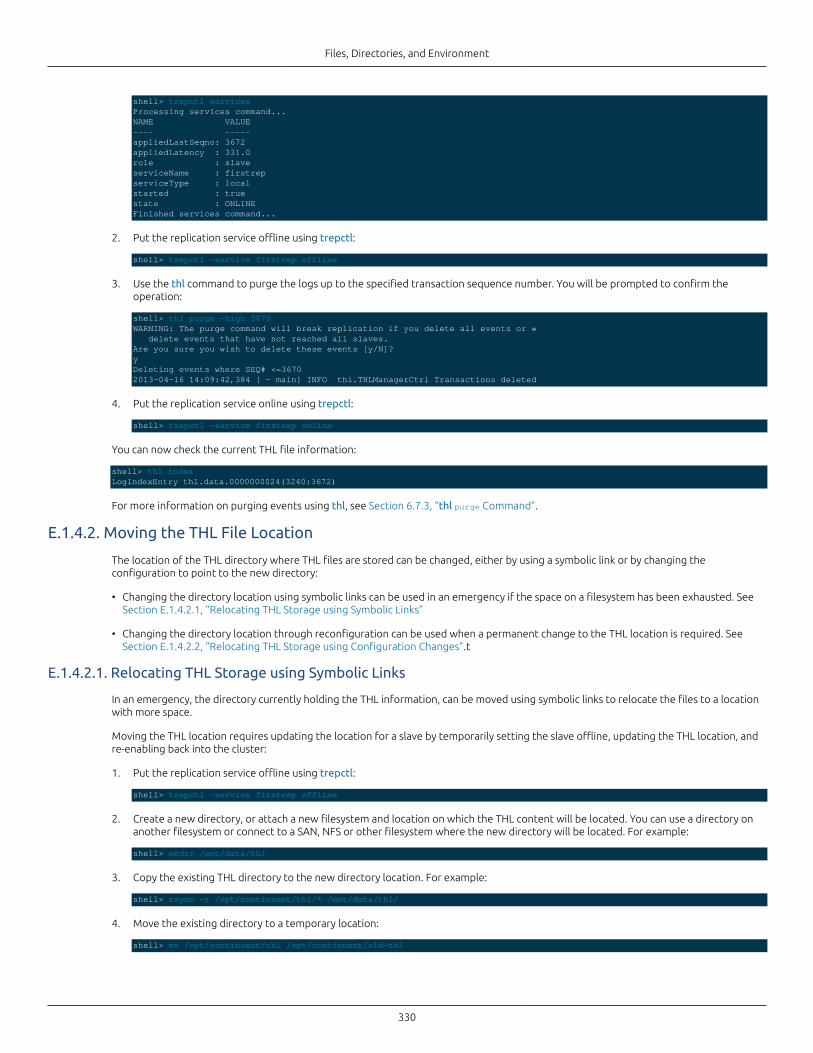
Files, Directories, and Environment
330
shell> trepctl servicesProcessing services command...NAME VALUE---- -----appliedLastSeqno: 3672appliedLatency : 331.0role : slaveserviceName : firstrepserviceType : localstarted : truestate : ONLINEFinished services command...
2. Put the replication service offline using trepctl:
shell> trepctl -service firstrep offline
3. Use the thl command to purge the logs up to the specified transaction sequence number. You will be prompted to confirm theoperation:
shell> thl purge -high 3670WARNING: The purge command will break replication if you delete all events or » delete events that have not reached all slaves.Are you sure you wish to delete these events [y/N]?yDeleting events where SEQ# <=36702013-04-16 14:09:42,384 [ - main] INFO thl.THLManagerCtrl Transactions deleted
4. Put the replication service online using trepctl:
shell> trepctl -service firstrep online
You can now check the current THL file information:
shell> thl indexLogIndexEntry thl.data.0000000024(3240:3672)
For more information on purging events using thl, see Section 6.7.3, “thl purge Command”.
E.1.4.2. Moving the THL File Location
The location of the THL directory where THL files are stored can be changed, either by using a symbolic link or by changing theconfiguration to point to the new directory:
• Changing the directory location using symbolic links can be used in an emergency if the space on a filesystem has been exhausted. SeeSection E.1.4.2.1, “Relocating THL Storage using Symbolic Links”
• Changing the directory location through reconfiguration can be used when a permanent change to the THL location is required. SeeSection E.1.4.2.2, “Relocating THL Storage using Configuration Changes”.t
E.1.4.2.1. Relocating THL Storage using Symbolic Links
In an emergency, the directory currently holding the THL information, can be moved using symbolic links to relocate the files to a locationwith more space.
Moving the THL location requires updating the location for a slave by temporarily setting the slave offline, updating the THL location, andre-enabling back into the cluster:
1. Put the replication service offline using trepctl:
shell> trepctl -service firstrep offline
2. Create a new directory, or attach a new filesystem and location on which the THL content will be located. You can use a directory onanother filesystem or connect to a SAN, NFS or other filesystem where the new directory will be located. For example:
shell> mkdir /mnt/data/thl
3. Copy the existing THL directory to the new directory location. For example:
shell> rsync -r /opt/continuent/thl/* /mnt/data/thl/
4. Move the existing directory to a temporary location:
shell> mv /opt/continuent/thl /opt/continuent/old-thl
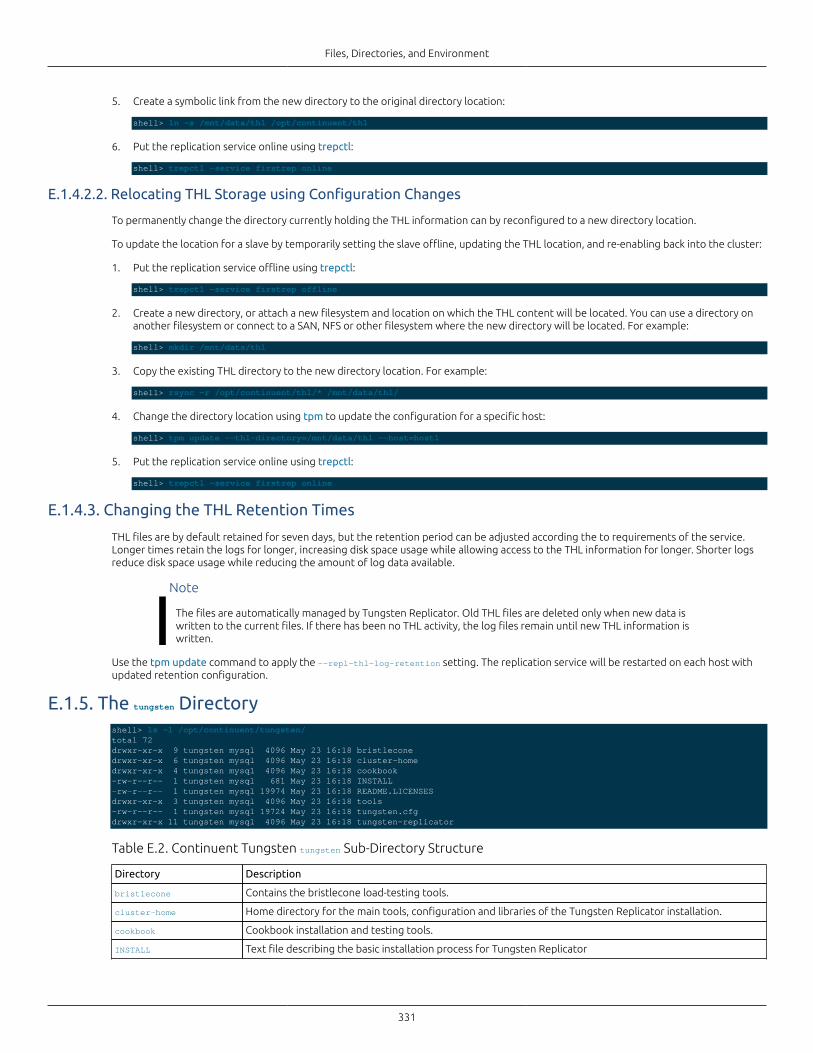
Files, Directories, and Environment
331
5. Create a symbolic link from the new directory to the original directory location:
shell> ln -s /mnt/data/thl /opt/continuent/thl
6. Put the replication service online using trepctl:
shell> trepctl -service firstrep online
E.1.4.2.2. Relocating THL Storage using Configuration Changes
To permanently change the directory currently holding the THL information can by reconfigured to a new directory location.
To update the location for a slave by temporarily setting the slave offline, updating the THL location, and re-enabling back into the cluster:
1. Put the replication service offline using trepctl:
shell> trepctl -service firstrep offline
2. Create a new directory, or attach a new filesystem and location on which the THL content will be located. You can use a directory onanother filesystem or connect to a SAN, NFS or other filesystem where the new directory will be located. For example:
shell> mkdir /mnt/data/thl
3. Copy the existing THL directory to the new directory location. For example:
shell> rsync -r /opt/continuent/thl/* /mnt/data/thl/
4. Change the directory location using tpm to update the configuration for a specific host:
shell> tpm update --thl-directory=/mnt/data/thl --host=host1
5. Put the replication service online using trepctl:
shell> trepctl -service firstrep online
E.1.4.3. Changing the THL Retention Times
THL files are by default retained for seven days, but the retention period can be adjusted according the to requirements of the service.Longer times retain the logs for longer, increasing disk space usage while allowing access to the THL information for longer. Shorter logsreduce disk space usage while reducing the amount of log data available.
Note
The files are automatically managed by Tungsten Replicator. Old THL files are deleted only when new data iswritten to the current files. If there has been no THL activity, the log files remain until new THL information iswritten.
Use the tpm update command to apply the --repl-thl-log-retention setting. The replication service will be restarted on each host withupdated retention configuration.
E.1.5. The tungsten Directoryshell> ls -l /opt/continuent/tungsten/total 72drwxr-xr-x 9 tungsten mysql 4096 May 23 16:18 bristleconedrwxr-xr-x 6 tungsten mysql 4096 May 23 16:18 cluster-homedrwxr-xr-x 4 tungsten mysql 4096 May 23 16:18 cookbook-rw-r--r-- 1 tungsten mysql 681 May 23 16:18 INSTALL-rw-r--r-- 1 tungsten mysql 19974 May 23 16:18 README.LICENSESdrwxr-xr-x 3 tungsten mysql 4096 May 23 16:18 tools-rw-r--r-- 1 tungsten mysql 19724 May 23 16:18 tungsten.cfgdrwxr-xr-x 11 tungsten mysql 4096 May 23 16:18 tungsten-replicator
Table E.2. Continuent Tungsten tungsten Sub-Directory Structure
Directory Description
bristlecone Contains the bristlecone load-testing tools.
cluster-home Home directory for the main tools, configuration and libraries of the Tungsten Replicator installation.
cookbook Cookbook installation and testing tools.
INSTALL Text file describing the basic installation process for Tungsten Replicator
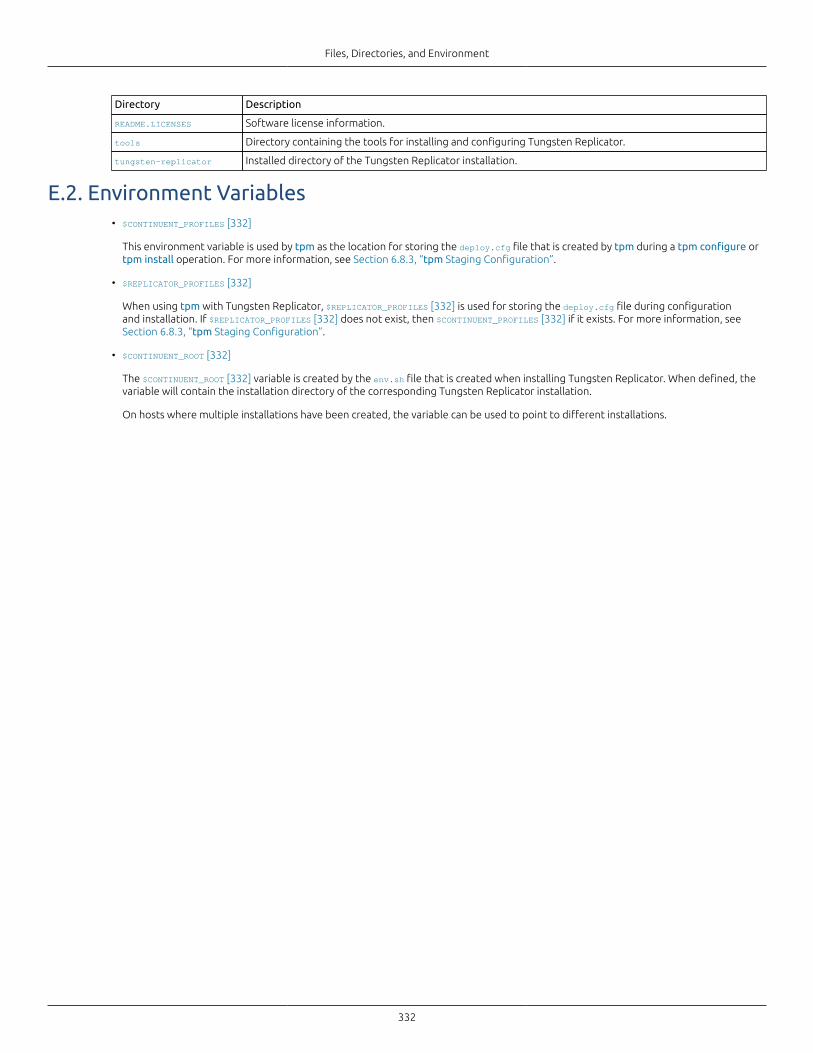
Files, Directories, and Environment
332
Directory Description
README.LICENSES Software license information.
tools Directory containing the tools for installing and configuring Tungsten Replicator.
tungsten-replicator Installed directory of the Tungsten Replicator installation.
E.2. Environment Variables• $CONTINUENT_PROFILES [332]
This environment variable is used by tpm as the location for storing the deploy.cfg file that is created by tpm during a tpm configure ortpm install operation. For more information, see Section 6.8.3, “tpm Staging Configuration”.
• $REPLICATOR_PROFILES [332]
When using tpm with Tungsten Replicator, $REPLICATOR_PROFILES [332] is used for storing the deploy.cfg file during configurationand installation. If $REPLICATOR_PROFILES [332] does not exist, then $CONTINUENT_PROFILES [332] if it exists. For more information, seeSection 6.8.3, “tpm Staging Configuration”.
• $CONTINUENT_ROOT [332]
The $CONTINUENT_ROOT [332] variable is created by the env.sh file that is created when installing Tungsten Replicator. When defined, thevariable will contain the installation directory of the corresponding Tungsten Replicator installation.
On hosts where multiple installations have been created, the variable can be used to point to different installations.
333
Appendix F. InternalsTungsten Replicator includes a number of different systems and elements to provide the core services and functionality. Some of these aredesigned only to be customer-configured. Others should be changed only on the advice of Continuent or Continuent support. This chaptercovers a range of different systems hat are designated as internal features and functionality.
This chapter contains information on the following sections of Tungsten Replicator:
• Section F.1, “Extending Backup and Restore Behavior” — details on how the backup scripts operate and how to write custom backupscripts.
• Section F.2, “Character Sets in Database and Tungsten Replicator” — covers how character sets affect replication and command-line tooloutput.
• Section F.3, “Memory Tuning and Performance” — information on how the memory is used and allocated within Tungsten Replicator.
F.1. Extending Backup and Restore BehaviorThe backup and restore system within Tungsten Replicator is handled entirely by the replicator. When a backup is initiated, the replicatoron the specified datasource is asked to start the backup process.
The backup and restore system both use a modular mechanism that is used to perform the actual backup or restore operation. This can beconfigured to use specific backup tools or a custom script.
F.1.1. Backup BehaviorWhen a backup is requested, the Tungsten Replicator performs a number of separate, discrete, operations designed to perform thebackup operation.
The backup operation performs the following steps:
1. Tungsten Replicator identifies the filename where properties about the backup will be stored. The file is used as the primary interfacebetween the underlying backup script and Tungsten Replicator.
2. Tungsten Replicator executes the configured backup/restore script, supplying any configured arguments, and the location of aproperties file, which the script updates with the location of the backup file created during the process.
3. If the backup completes successfully, the file generated by the backup process is copied into the configured Tungsten Replicatordirectory (for example /opt/continuent/backups.
4. Tungsten Replicator updates the property information with a CRC value for the backup file and the standard metadata for backups,including the tool used to create the backup.
A log is created of the backup process into a file according to the configured backup configuration. For example, when backing up usingmysqldump the log is written to the log directory as mysqldump.log. When using a custom script, the log is written to script.log.
As standard, Tungsten Replicator supports two primary backup types, mysqldump and xtrabackup. A third option is based on theincremental version of the xtrabackup tool. The use of external backup script enables additional backup tools and methods to besupported.
To create a custom backup script, see Section F.1.3, “Writing a Custom Backup/Restore Script” for a list of requirements and samples.
F.1.2. Restore BehaviorThe restore operation operates in a similar manner to the backup operation. The same script is called (but supplied with the -restorecommand-line option).
The restore operation performs the following steps:
1. Tungsten Replicator creates a temporary properties file, which contains the location of the backup file to be restored.
2. Tungsten Replicator executes the configured backup/restore script in restore mode, supplying any configured arguments, and thelocation of the properties file.
3. The script used during the restore process should read the supplied properties file to determine the location of the backup file.
4. The script performs all the necessary steps to achieve the restore process, including stopping the dataserver, restoring the data, andrestarting the dataserver.

Internals
334
5. The replicator will remain in the OFFLINE [127] state once the restore process has finished.
F.1.3. Writing a Custom Backup/Restore ScriptThe synopsis of the custom script is as follows:
SCRIPT {-backup-restore } -properties FILE -options OPTIONS
Where:
• -backup — indicates that the script should work in the backup mode and create a backup.
• -restore — indicates that the scrip should work in the restore mode and restore a previous backup.
• -properties — defines the name of the properties file. When called in backup mode, the properties file should be updated by the scriptwith the location of the generated backup file. When called in restore mode, the file should be examined by the script to determine thebackup file that will be used to perform the restore operation.
• -options — specifies any unique options to the script.
The custom script must support the following:
• The script must be capable of performing both the backup and the restore operation. Tungsten Replicator selects the operation byproviding the -backup or -restore option to the script on the command-line.
• The script must parse command-line arguments to extract the operation type, properties file and other settings.
• Accept the name of the properties file to be used during the backup process. This is supplied on the command-line using the format:
-properties FILENAME
The properties file is used by Tungsten Replicator to exchange information about the backup or restore.
• Must parse any additional options supplied on the command-line using the format:
-options ARG1=VAL1&ARG2=VAL2
• Must be responsible for executing whatever steps are required to create a consistent snapshot of the dataserver
• Must place the contents of the database backup into a single file. If the backup process generates multiple files, then the contentsshould be packaged using tar or zip.
The script has to determine the files that were generated during the backup process and collect them into a single file as appropriate.
• Must update the supplied properties with the name of the backup file generated, as follows:
file=BACKUPFILE
If the file has not been updated with the information, or the file cannot be found, then the backup is considered to have failed.
Once the backup process has completed, the backup file specified in the properties file will be moved to the configured backup location(for example /opt/continuent/backups).
• Tungsten Replicator will forward all STDOUT and STDERR from the script to the log file script.log within the log directory. This file isrecreated each time a backup is executed.
• Script should have an exit (return) value of 0 for success, and 1 for failure. The script is responsible for handling any errors in theunderlying backup tool or script used to perform the backup, but it must then pass the corresponding success or failure condition usingthe exit code.
A sample Ruby script that creates a simple text file as the backup content, but demonstrates the core operations for the script is shownbelow:
#!/usr/bin/env rubyrequire "/opt/continuent/tungsten/cluster-home/lib/ruby/tungsten"require "/opt/continuent/tungsten/tungsten-replicator/lib/ruby/backup"class MyCustomBackupScript < TungstenBackupScript def backup TU.info("Take a backup with arg1 = #{@options[:arg1]} and myarg = #{@options[:myarg]}") storage_file = "/opt/continuent/backups/backup_" +Time.now.strftime("%Y-%m-%d_%H-%M") + "_" + rand(100).to_s() # Take a backup of the server and store the information tostorage_file TU.cmd_result("echo 'my backup' > #{storage_file}")
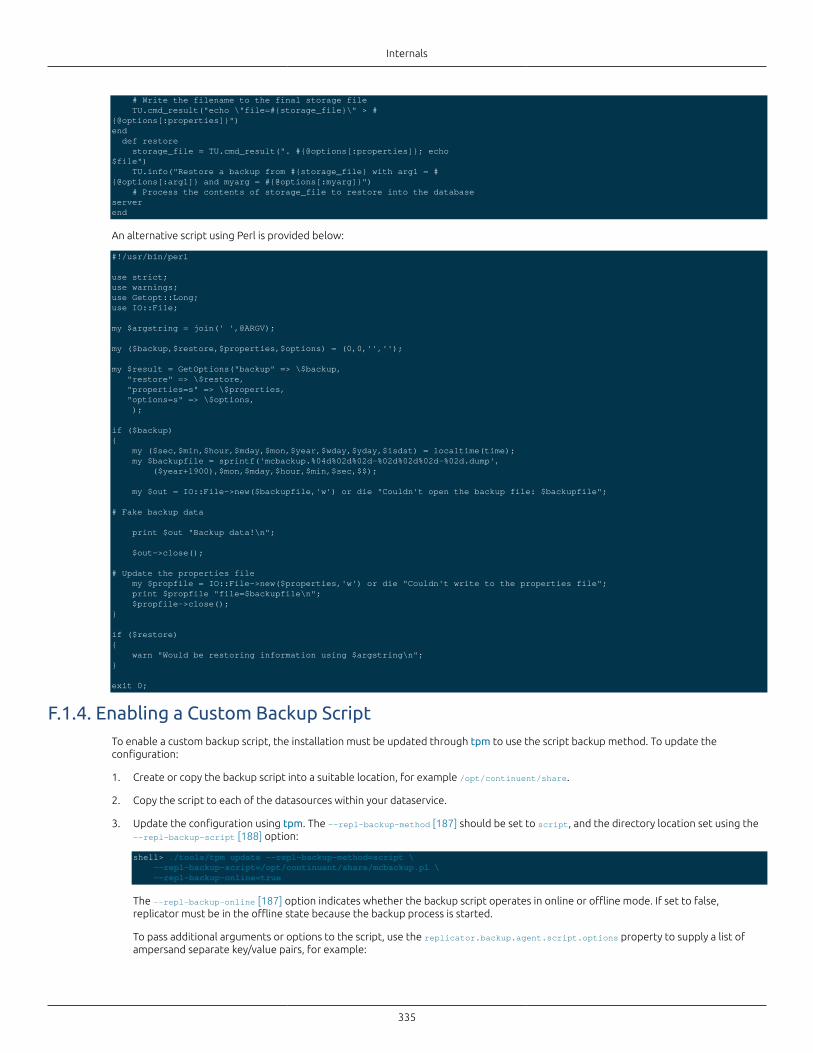
Internals
335
# Write the filename to the final storage file TU.cmd_result("echo \"file=#{storage_file}\" > #{@options[:properties]}")end def restore storage_file = TU.cmd_result(". #{@options[:properties]}; echo$file") TU.info("Restore a backup from #{storage_file} with arg1 = #{@options[:arg1]} and myarg = #{@options[:myarg]}") # Process the contents of storage_file to restore into the databaseserverend
An alternative script using Perl is provided below:
#!/usr/bin/perl
use strict;use warnings;use Getopt::Long;use IO::File;
my $argstring = join(' ',@ARGV);
my ($backup,$restore,$properties,$options) = (0,0,'','');
my $result = GetOptions("backup" => \$backup, "restore" => \$restore, "properties=s" => \$properties, "options=s" => \$options, );
if ($backup){ my ($sec,$min,$hour,$mday,$mon,$year,$wday,$yday,$isdst) = localtime(time); my $backupfile = sprintf('mcbackup.%04d%02d%02d-%02d%02d%02d-%02d.dump', ($year+1900),$mon,$mday,$hour,$min,$sec,$$); my $out = IO::File->new($backupfile,'w') or die "Couldn't open the backup file: $backupfile"; # Fake backup data
print $out "Backup data!\n";
$out->close(); # Update the properties file my $propfile = IO::File->new($properties,'w') or die "Couldn't write to the properties file"; print $propfile "file=$backupfile\n"; $propfile->close();}
if ($restore){ warn "Would be restoring information using $argstring\n";}
exit 0;
F.1.4. Enabling a Custom Backup ScriptTo enable a custom backup script, the installation must be updated through tpm to use the script backup method. To update theconfiguration:
1. Create or copy the backup script into a suitable location, for example /opt/continuent/share.
2. Copy the script to each of the datasources within your dataservice.
3. Update the configuration using tpm. The --repl-backup-method [187] should be set to script, and the directory location set using the--repl-backup-script [188] option:
shell> ./tools/tpm update --repl-backup-method=script \ --repl-backup-script=/opt/continuent/share/mcbackup.pl \ --repl-backup-online=true
The --repl-backup-online [187] option indicates whether the backup script operates in online or offline mode. If set to false,replicator must be in the offline state because the backup process is started.
To pass additional arguments or options to the script, use the replicator.backup.agent.script.options property to supply a list ofampersand separate key/value pairs, for example:
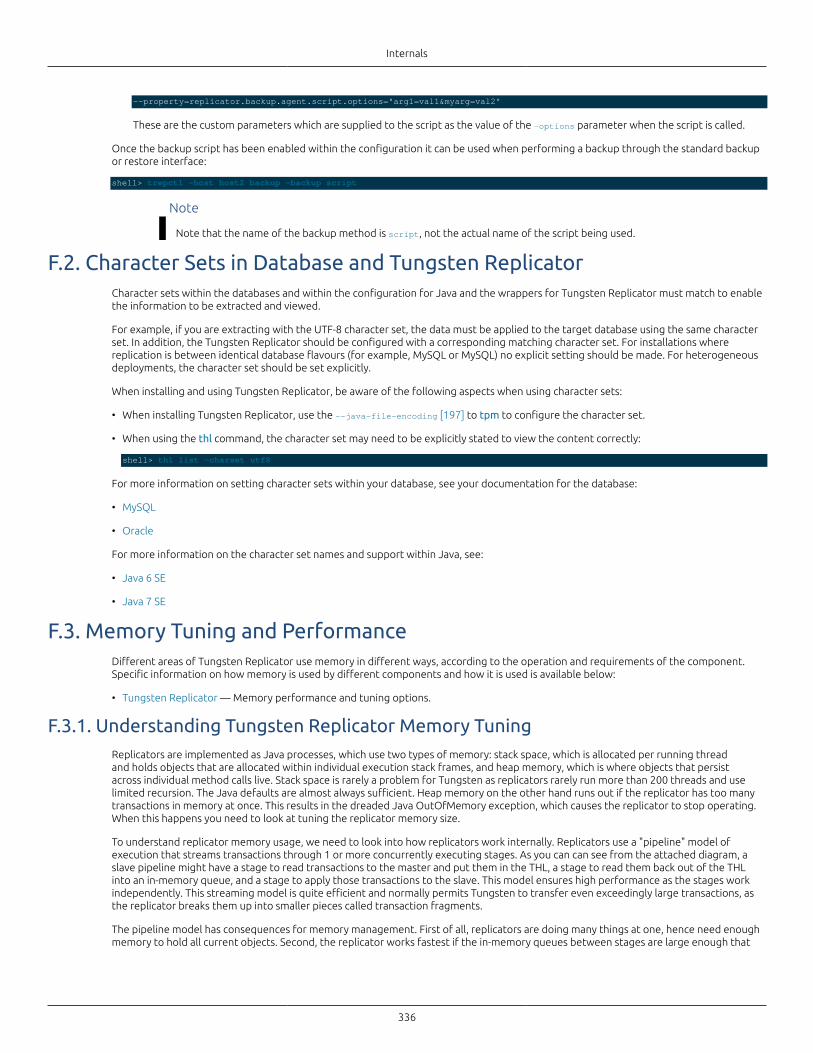
Internals
336
--property=replicator.backup.agent.script.options="arg1=val1&myarg=val2"
These are the custom parameters which are supplied to the script as the value of the -options parameter when the script is called.
Once the backup script has been enabled within the configuration it can be used when performing a backup through the standard backupor restore interface:
shell> trepctl -host host2 backup -backup script
Note
Note that the name of the backup method is script, not the actual name of the script being used.
F.2. Character Sets in Database and Tungsten ReplicatorCharacter sets within the databases and within the configuration for Java and the wrappers for Tungsten Replicator must match to enablethe information to be extracted and viewed.
For example, if you are extracting with the UTF-8 character set, the data must be applied to the target database using the same characterset. In addition, the Tungsten Replicator should be configured with a corresponding matching character set. For installations wherereplication is between identical database flavours (for example, MySQL or MySQL) no explicit setting should be made. For heterogeneousdeployments, the character set should be set explicitly.
When installing and using Tungsten Replicator, be aware of the following aspects when using character sets:
• When installing Tungsten Replicator, use the --java-file-encoding [197] to tpm to configure the character set.
• When using the thl command, the character set may need to be explicitly stated to view the content correctly:
shell> thl list -charset utf8
For more information on setting character sets within your database, see your documentation for the database:
• MySQL
• Oracle
For more information on the character set names and support within Java, see:
• Java 6 SE
• Java 7 SE
F.3. Memory Tuning and PerformanceDifferent areas of Tungsten Replicator use memory in different ways, according to the operation and requirements of the component.Specific information on how memory is used by different components and how it is used is available below:
• Tungsten Replicator — Memory performance and tuning options.
F.3.1. Understanding Tungsten Replicator Memory TuningReplicators are implemented as Java processes, which use two types of memory: stack space, which is allocated per running threadand holds objects that are allocated within individual execution stack frames, and heap memory, which is where objects that persistacross individual method calls live. Stack space is rarely a problem for Tungsten as replicators rarely run more than 200 threads and uselimited recursion. The Java defaults are almost always sufficient. Heap memory on the other hand runs out if the replicator has too manytransactions in memory at once. This results in the dreaded Java OutOfMemory exception, which causes the replicator to stop operating.When this happens you need to look at tuning the replicator memory size.
To understand replicator memory usage, we need to look into how replicators work internally. Replicators use a "pipeline" model ofexecution that streams transactions through 1 or more concurrently executing stages. As you can can see from the attached diagram, aslave pipeline might have a stage to read transactions to the master and put them in the THL, a stage to read them back out of the THLinto an in-memory queue, and a stage to apply those transactions to the slave. This model ensures high performance as the stages workindependently. This streaming model is quite efficient and normally permits Tungsten to transfer even exceedingly large transactions, asthe replicator breaks them up into smaller pieces called transaction fragments.
The pipeline model has consequences for memory management. First of all, replicators are doing many things at one, hence need enoughmemory to hold all current objects. Second, the replicator works fastest if the in-memory queues between stages are large enough that
Internals
337
they do not ever become empty. This keeps delays in upstream processing from delaying things at the end of the pipeline. Also, it allowsreplicators to make use of block commit. Block commit is an important performance optimization in which stages try to commit manytransactions at once on slaves to amortize the cost of commit. In block commit the end stage continues to commit transactions until iteither runs out of work (i.e., the upstream queue becomes empty) or it hits the block commit limit. Larger upstream queues help keep theend stage from running out of work, hence increase efficiency.
Bearing this in mind, we can alter replicator behavior in a number of ways to make it use less memory or to handle larger amounts of trafficwithout getting a Java OutOfMemory error. You should look at each of these when tuning memory:
• Property wrapper.java.memory in file wrapper.conf. This controls the amount of heap memory available to replicators. 1024 MB is theminimum setting for most replicators. Busy replicators, those that have multiple services, or replicators that use parallel apply shouldconsider using 2048 MB instead. If you get a Java OutOfMemory exception, you should first try raising the current setting to a highervalue. This is usually enough to get past most memory-related problems. You can set this at installation time as the --repl-java-mem-size [198] parameter.
If you set the heap memory to a very large value (e.g. over 3 GB), you should also consider enabling concurrent garbage collection. Javaby default uses mark-and-sweep garbage collection, which may result in long pauses during which network calls to the replicator mayfail. Concurrent garbage collection uses more CPU cycles and reduces on-going performance a bit but avoids periods of time duringwhich the replicator is non-responsive. You can set this using the --repl-java-enable-concurrent-gc [197] parameter at installationtime.)
• Property replicator.global.buffer.size in the replicator properties file. This controls two things, the size of in-memory queues in thereplicator as well as the block commit size. If you still have problems after increasing the heap size, try reducing this value. It reduces thenumber of objects simultaneously stored on the Java heap. A value of 2 is a good setting to try to get around temporary problems. Thiscan be set at installation time as the --repl-buffer-size [209] parameter.
• Property replicator.stage.q-to-dbms.blockCommitRowCount in the replicator properties file. This parameter sets the block commitcount in the final stage in a slave pipeline. If you reduce the global buffer size, it is a good idea to set this to a fixed size, such as 10, toavoid reducing the block commit effect too much. Very low block commit values in this stage can cut update rates on slaves by 50% ormore in some cases. This is available at installation time as the --repl-svc-applier-buffer-size [209] parameter.
• Property replicator.extractor.dbms.transaction_frag_size in the replicator.properties file. This parameter controls the size offragments for long transactions. Tungsten automatically breaks up long transactions into fragments. This parameter controls thenumber of bytes of binlog per transaction fragment. You can try making this value smaller to reduce overall memory usage if manytransactions are simultaneously present. Normally however this value has minimal impact.
Finally, it is worth mentioning that the main cause of out-of-memory conditions in replicators is large transactions. In particular, Tungstencannot fragment individual statements or row changes, so changes to very large column values can also result in OutOfMemoryconditions. For now the best approach is to raise memory, as described above, and change your application to avoid such transactions.
338
Appendix G. Frequently Asked Questions (FAQ)G.1. Do we support a 3-node cluster spread across three AWS Availability Zones?
This is a normal deployment pattern for working in AWS reduce risk. A single cluster works quite well in this topology.
G.2. What are the best settings for the Tungsten connector intelligent proxy?
Standard settings work out of the box. Fine tuning can be done by working with the specific customer application during a Proof-Of-Concept or Production roll-out.
G.3. How do we use Tungsten to scale DB nodes up/down?
Currently a manual process. New puppet modules to aid this process are being developed, and will be included in thedocumentation when completed. Here is a link to the relevant procedure Adding Datasources to an Existing Deployment in[Continuent Tungsten 2.0 Manual].
G.4. Do you handle bandwidth/traffic management to the DB servers?
This is not something we have looked at.
G.5. One of my hosts is regularly a number of seconds behind my other slaves?
The most likely culprit for this issue is that the time is different on the machine in question. If you have ntp or a similar network timetool installed on your machine, use it to update the current time across all the hosts within your deployment:
shell> ntpdate pool.ntp.org
Once the command has been executed across all the hosts, trying sending a heartbeat on the master to slaves and checking thelatency:
shell> trepctl heartbeat
G.6. How do you change the replicator heap size after installation?
You can change the configuration by running the following command from the staging directory:
shell> ./tools/tpm --host=host1 --java-mem-size=2048
G.7. What effect do triggers have on replication, either row or statement-based?
Tungsten Replicator does not automatically shut off triggers on slaves. This creates problems on slaves when using row-basedreplication (RBR) as the trigger will run twice. Tungsten cannot do this because the setting required to do so is not available toMySQL client applications. Typical symptoms are duplicate key errors, though other problems may appear. Consider the followingfixes:
• Drop triggers on slaves. This is practical in fan-in for reporting or other cases where you do not need to failover to the slave at alater time.
• Create an "is_master()" function that triggers can use to decide whether they are on the master or slave.
• Use statement replication; not an option for heterogenous replication.
The is_master() approach is simple to implement. First, create a function like the following that returns 1 if we are using theTungsten user, as would be the case on a slave.
create function is_master() returns boolean deterministic return if(substring_index(user(),'@',1) != 'tungsten',true, false);
Next add a check to triggers that should not run on the slave. This suppresses trigger action to insert into table bar except on themaster.
delimiter //create trigger foo_insert after insert on foo for each row begin if is_master() then insert into bar set id=NEW.id; end if; end;//

Frequently Asked Questions (FAQ)
339
As long as applications do not use the Tungsten account on the master, the preceding approach will be sufficient to suppresstrigger operation.
340
Appendix H. Ecosystem SupportIn addition to the core utilities provided by Tungsten Replicator, additional tools and scripts are available that augment the core code withadditional functionality, such as integrating with third-party monitoring systems, or providing additional functionality that is designed tobe used and adapted for specific needs and requirements.
Different documentation and information exists for the following tools:
• Github — a selection of tools and utilities are provided in Github to further support and expand the functionality of Tungsten Replicatorduring deployment, monitoring, and management.
• logrotate — provides configuration information for users making use of the logrotate to manage Tungsten Replicator logs.
• Cacti — templates and scripts to enable monitoring through the Cacti environment.
• Nagios — templates and scripts to enable monitoring through the Nagios environment.
H.1. Managing Log Files with logrotateYou can manage the logs generated by Tungsten Replicator using logrotate.
• trepsvc.log
/opt/continuent/tungsten/tungsten-replicator/log/trepsvc.log { notifempty daily rotate 3 missingok compress copytruncate}
H.2. Monitoring Status Using cactiGraphing Tungsten Replicator data is supported through Cacti extensions. These provide information gathering for the following datapoints:
• Applied Latency
• Sequence Number (Events applied)
• Status (Online, Offline, Error, or Other)
To configure the Cacti services:
1. Download both files from https://github.com/continuent/monitoring/tree/master/cacti
2. Place the PHP script into /usr/share/cacti/scripts.
3. Modify the installed PHP file with the appropriate $ssh_user and $tungsten_home location from your installation:
• $ssh_user should match the user used during installation.
• $tungsten_home is the installation directory and the tungsten subdirectory. For example, if you have installed into /opt/continuent,use /opt/continuent/tungsten.
Add SSH arguments to specify the correct id_rsa file if needed.
4. Ensure that the configured $ssh_user has the correct SSH authorized keys to login to the server or servers being monitored. The usermust also have the correct permissions and rights to write to the cache directory.
5. Test the script by running it by hand:
shell> php -q /usr/share/cacti/scripts/get_replicator_stats.php --hostname replserver
If you are using multiple replication services, add --service servicename to the command.
6. Import the XML file as a Cacti template.
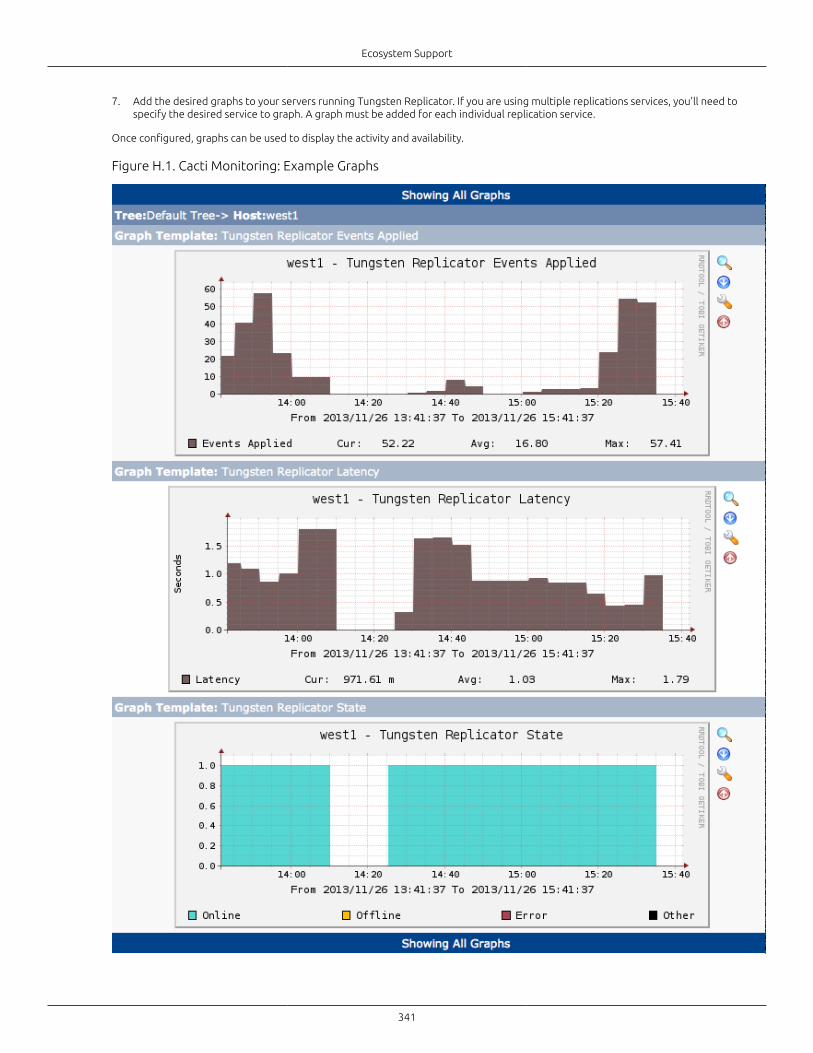
Ecosystem Support
341
7. Add the desired graphs to your servers running Tungsten Replicator. If you are using multiple replications services, you'll need tospecify the desired service to graph. A graph must be added for each individual replication service.
Once configured, graphs can be used to display the activity and availability.
Figure H.1. Cacti Monitoring: Example Graphs
Ecosystem Support
342
H.3. Monitoring Status Using nagiosIn addition to the scripts bundled with the software, there is a Ruby gem available with expanded checks and amechanism to add custom checks. See https://github.com/continuent/continuent-monitors-nagios for more details.
Integration with Nagios is supported through a number of scripts that output information in a format comaptible with the NagiosNRPE plugin. Using the plugin the check commands, such as check_tungsten_latency can be executed and the output parsed for statusinformation.
The available commands are:
• check_tungsten_latency
• check_tungsten_online
• check_tungsten_services
To configure the scripts to be executed through NRPE:
1. Install the Nagios NRPE server.
2. Start the NRPE dameon:
shell> sudo /etc/init.d/nagios-nrpe-server start
3. Add the IP of your Nagios server to the /etc/nagios/nrpe.cfg configuration file. For example:
allowed_hosts=127.0.0.1,192.168.2.20
4. Add the Tungsten check commands that you want to execute to the /etc/nagios/nrpe.cfg configuration file. For example:
command[check_tungsten_online]=/opt/continuent/tungsten/cluster-home/bin/check_tungsten_online
5. Restart the NRPE service:
shell> sudo /etc/init.d/nagios-nrpe-server start
6. If the commands need to be executed with superuser privileges, the /etc/sudo or /etc/sudoers file must be updated to enable thecommands to be executed as root through sudo as the nagios user. This can be achieved by updating the configuration file, usuallyperformed by using the visudo command:
nagios ALL=(tungsten) NOPASSWD: /opt/continuent/tungsten/cluster-home/bin/check*
In addition, the sudo command should be added to the Tungsten check commands within the Nagios nrpe.cfg, for example:
command[check_tungsten_online]=/usr/bin/sudo -u tungsten /opt/continuent/tungsten/cluster-home/bin/check_tungsten_online
Restart the NRPE service for these changes to take effect.
7. Add an entry to your Nagois services.cfg file for each service you want to monitor:
define service { host_name database service_description check_tungsten_online check_command check_nrpe! -H $HOSTADDRESS$ -t 30 -c check_tungsten_online retry_check_interval 1 check_period 24x7 max_check_attempts 3 flap_detection_enabled 1 notifications_enabled 1 notification_period 24x7 notification_interval 60 notification_options c,f,r,u,w normal_check_interval 5}
The same process can be repeated for all the hosts within your environment where there is a Tungsten service installed.