Embed Size (px)
Citation preview
TT-25“Speaker”
These instructions will tell you how to properly mount your new TT-25 transducer, and get the most out of it. If your unit came with Max2-SPL speaker in the red enclosure, these instructions may be ignored.
First an introduction to the TT-25. The TT-25 is known as a Tactile Transducer or an Exciter. The principle is basically the same as a speaker, but there is no cone. Instead it vibrates the material that it is adhered to, to vibrate it and make it act like the speaker cone. In our case, that would be the airframe of a model RC aircraft, or body of a surface vehicle.
The volume output and base tone of the TT-25 depends on a number of factors. Unlike a speaker where firm decibel levels can be given, the TT-25 is more subjective, and user results may vary based on these factors.
Material, thickness, and shape all have an effect on the output, and they may even vary from model to model depending on these factors. Recommendations for mounting on foam is to locate an area of foam approximately 1/8” to 1/4” thick for mounting the TT-25. Most of foam aircraft currently out there, have areas where the foam is approximately that thick. Thickness over 1/2” will begin to yield a deepening bass tone, in exchange for some volume output. Similarly a denser ply wood, or plastic may yield a lower tone, but slightly less volume over balsa, or less dense plastic.
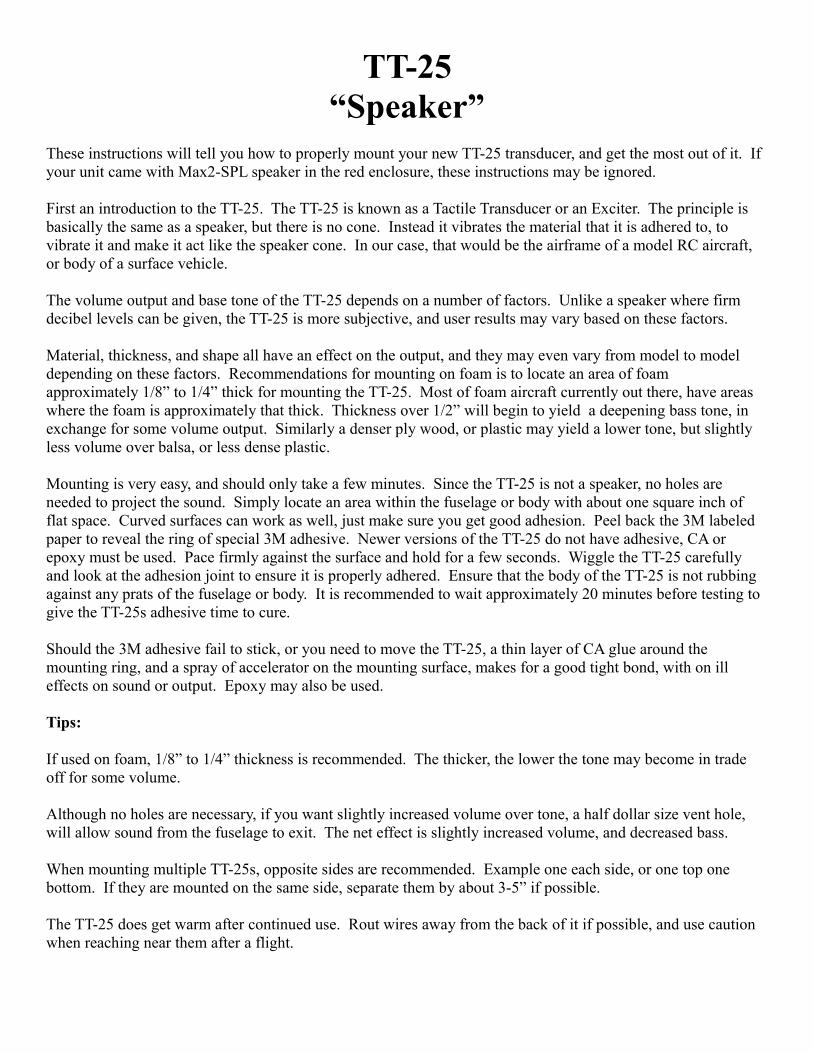
Mounting is very easy, and should only take a few minutes. Since the TT-25 is not a speaker, no holes are needed to project the sound. Simply locate an area within the fuselage or body with about one square inch of flat space. Curved surfaces can work as well, just make sure you get good adhesion. Peel back the 3M labeled paper to reveal the ring of special 3M adhesive. Newer versions of the TT-25 do not have adhesive, CA or epoxy must be used. Pace firmly against the surface and hold for a few seconds. Wiggle the TT-25 carefully and look at the adhesion joint to ensure it is properly adhered. Ensure that the body of the TT-25 is not rubbing against any prats of the fuselage or body. It is recommended to wait approximately 20 minutes before testing to give the TT-25s adhesive time to cure.
Should the 3M adhesive fail to stick, or you need to move the TT-25, a thin layer of CA glue around the mounting ring, and a spray of accelerator on the mounting surface, makes for a good tight bond, with on ill effects on sound or output. Epoxy may also be used.
Tips:
If used on foam, 1/8” to 1/4” thickness is recommended. The thicker, the lower the tone may become in trade off for some volume.
Although no holes are necessary, if you want slightly increased volume over tone, a half dollar size vent hole, will allow sound from the fuselage to exit. The net effect is slightly increased volume, and decreased bass.
When mounting multiple TT-25s, opposite sides are recommended. Example one each side, or one top one bottom. If they are mounted on the same side, separate them by about 3-5” if possible.
The TT-25 does get warm after continued use. Rout wires away from the back of it if possible, and use caution when reaching near them after a flight.
Rove the 3M paper. Hold in mounting spot desired, press firmly and hold for a few seconds.
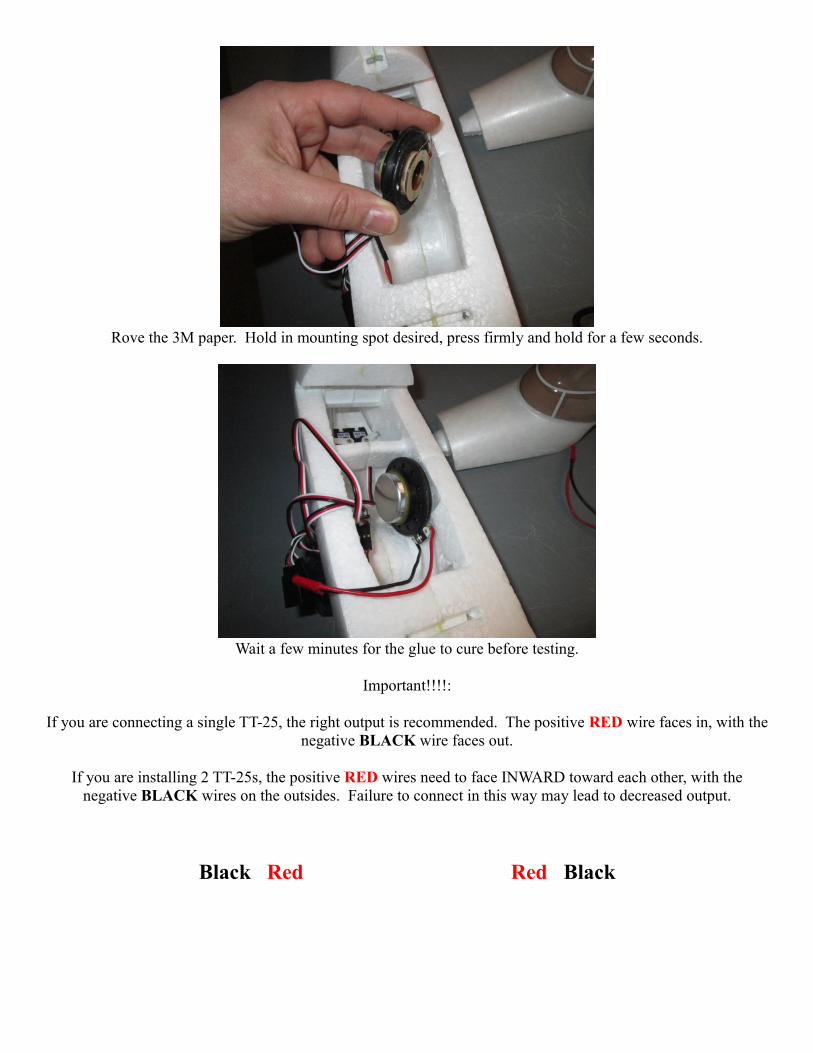
Wait a few minutes for the glue to cure before testing.
Important!!!!:
If you are connecting a single TT-25, the right output is recommended. The positive RED wire faces in, with the negative BLACK wire faces out.
If you are installing 2 TT-25s, the positive RED wires need to face INWARD toward each other, with the negative BLACK wires on the outsides. Failure to connect in this way may lead to decreased output.
Black Red Red Black