Embed Size (px)
Citation preview
Rev.2.3
Software Manual
Software Manual
Contents
1. Windows™ 2000/XP Driver Installation / Uninstallation............................................................ 1 1.1. Installation ........................................................................................................................... 1 1.2. Uninstallation ...................................................................................................................... 3
2. Windows™ 2000/XP Driver Generic Information....................................................................... 4 2.1. Windows Printer Driver ...................................................................................................... 4 2.2. OPOS Driver ....................................................................................................................... 5 2.3. JavaPOS Driver ................................................................................................................... 5 2.4. Star Port Emulator ............................................................................................................... 5 2.5. ESC/POS Mode................................................................................................................... 5
3. Windows 2000/XP Printer Driver Usage...................................................................................... 6 3.1. Printer Driver Configuration ............................................................................................... 6
3.1.1. Paper Type.................................................................................................................... 6 3.1.2. Page Cut Type (TSP143 only)...................................................................................... 7 3.1.3. Document Cut Type ..................................................................................................... 8 3.1.4. Cash Drawer 1 Pulse Width ......................................................................................... 9 3.1.5. Cash Drawer 1 ............................................................................................................ 10 3.1.6. Cash Drawer 2 ............................................................................................................ 11
3.2. Paper Sizes ........................................................................................................................ 12 3.3. Device Font Usage ............................................................................................................ 13 3.4. Control Font Usage ........................................................................................................... 15
3.4.1. Control Font list.......................................................................................................... 15 3.4.2. Control Font Usage .................................................................................................... 17
3.5. Barcode Font ..................................................................................................................... 18 3.5.1. Barcode Font List ....................................................................................................... 18 3.5.2. Enter the Barcode font................................................................................................ 18 3.5.3. Barcode Font Usage ................................................................................................... 20
3.6. 2D Code Printing Function................................................................................................ 21 3.6.1. 2D Code Command Setting Font ............................................................................... 22 3.6.2. 2D Code Data Setting Font (DATA1,DATA2,DATA3,ESC_FONT)....................... 23 3.6.3. 2D Code Font Usage .................................................................................................. 25
3.7. Configuring Paper Types and Print Colors ....................................................................... 27 3.8. Document Formatting Guidelines (Windows 2000/XP) ................................................... 29
3.8.1. Attention in use of MS Word ..................................................................................... 29 3.8.2. Restriction and Caution .............................................................................................. 30
4. Configuring on Windows 2000/XP (Star Line Mode)................................................................ 31 4.1. Overview ........................................................................................................................... 31 4.2. Launching the Configuration Application......................................................................... 31 4.3. Information........................................................................................................................ 33 4.4. General Settings ................................................................................................................ 34
4.4.1. Default Text Settings.................................................................................................. 35 4.4.2. Default Print Settings ................................................................................................. 36
4.5. Printer Tests....................................................................................................................... 38 4.5.1. Default Character Set ................................................................................................. 38 4.5.2. Barcode Print .............................................................................................................. 38
Software Manual
4.5.3. Print Head Test ........................................................................................................... 38 4.5.4. Open Cash Drawer 1 .................................................................................................. 39 4.5.5. Open Cash Drawer 2 .................................................................................................. 39
4.6. OPOS Installation.............................................................................................................. 40 4.6.1. Add a New Printer Device.......................................................................................... 41 4.6.2. Add a New Cash Drawer Device ............................................................................... 41 4.6.3. Delete.......................................................................................................................... 41 4.6.4. Configure.................................................................................................................... 42 4.6.5. Check Health .............................................................................................................. 42 4.6.6. Sample Application .................................................................................................... 43
4.7. JavaPOS™ Installation...................................................................................................... 44 4.7.1. Add a New Printer Device.......................................................................................... 45 4.7.2. Configure a Printer Device......................................................................................... 45 4.7.3. Add a New Cash Drawer Device ............................................................................... 45 4.7.4. Configure a Cash Drawer Device............................................................................... 46
4.8. Serial Port Emulator .......................................................................................................... 47 4.8.1. Creating a Virtual Serial Port ..................................................................................... 48 4.8.2. Configuring the Port Emulator Service ...................................................................... 49 4.8.3. Check Health .............................................................................................................. 49 4.8.4. Removing a Virtual Serial Port .................................................................................. 49
4.9. Image List.......................................................................................................................... 50 4.9.1. Adding an Image ........................................................................................................ 50
4.10. Logos & Cropping............................................................................................................. 52 4.10.1. Logo Tool ................................................................................................................... 52 4.10.2. Crop Tool ................................................................................................................... 53
4.11. Text Processing ................................................................................................................. 54 4.11.1. Text Triggers .............................................................................................................. 54 4.11.2. End Page Detect ......................................................................................................... 56
4.12. Barcodes ............................................................................................................................ 57 4.12.1. ITF Bearer Bars .......................................................................................................... 58 4.12.2. UPC-A Guard Bar Length.......................................................................................... 58 4.12.3. JAN/EAN-13 Guard Bar Length................................................................................ 59 4.12.4. CODE39 Guard Bar Length ....................................................................................... 59
4.13. Print Preview ..................................................................................................................... 60 4.14. Journaling, and Printing of Multiple Customized Copies ................................................. 62
4.14.1. Multi-Copy Printing ................................................................................................... 62 4.14.2. Journal ........................................................................................................................ 64
4.15. Vertical Mounting ............................................................................................................. 67 4.16. Printer Font........................................................................................................................ 68
5. Configuring on Windows 2000/XP (ESC/POS Mode)............................................................... 70 5.1. Overview ........................................................................................................................... 70 5.2. Launching the Configuration Application......................................................................... 70 5.3. General Settings ................................................................................................................ 71
5.3.1. Default Text Settings.................................................................................................. 71 5.3.2. Default Print Settings ................................................................................................. 72
5.4. Print job Routing ............................................................................................................... 73
Software Manual
6. Windows 98/Me Driver Installation ........................................................................................... 74 6.1. USB Printing Support Installation..................................................................................... 74 6.2. TSP100 futurePRNT Printer Driver Installation ............................................................... 77
7. Windows 98/Me Printer Driver Usage ....................................................................................... 82 7.1. Printer Driver Configuration ............................................................................................. 82
7.1.1. Paper Type.................................................................................................................. 83 7.1.2. Cut Action -Page- (TSP143 only) .............................................................................. 84 7.1.3. Cut Action -Document- .............................................................................................. 85 7.1.4. Print Quality ............................................................................................................... 86 7.1.5. Cash Drawer 1 Pulse width ........................................................................................ 87 7.1.6. Cash Drawer 1 ............................................................................................................ 88 7.1.7. Cash Drawer 2 ............................................................................................................ 89 7.1.8. Two-tone printing....................................................................................................... 90
7.2. Paper Sizes ........................................................................................................................ 91 7.3. Document Formatting Guidelines (Windows 98/98SE/Me) ............................................. 93
7.3.1. Restriction and Caution .............................................................................................. 93 8. Release History ........................................................................................................................... 94
Software Manual
1
1. Windows™ 2000/XP Driver Installation / Uninstallation
1.1. Installation
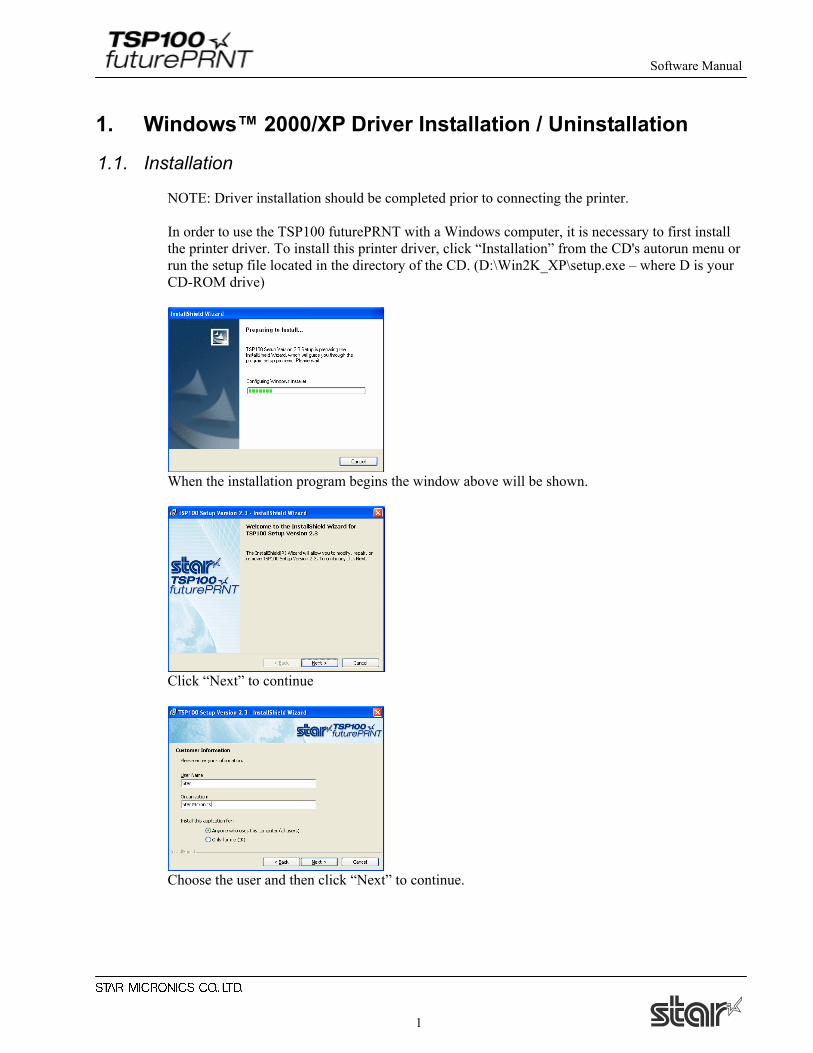
NOTE: Driver installation should be completed prior to connecting the printer. In order to use the TSP100 futurePRNT with a Windows computer, it is necessary to first install the printer driver. To install this printer driver, click “Installation” from the CD's autorun menu or run the setup file located in the directory of the CD. (D:\Win2K_XP\setup.exe – where D is your CD-ROM drive)
When the installation program begins the window above will be shown.
Click “Next” to continue
Choose the user and then click “Next” to continue.
Software Manual
2
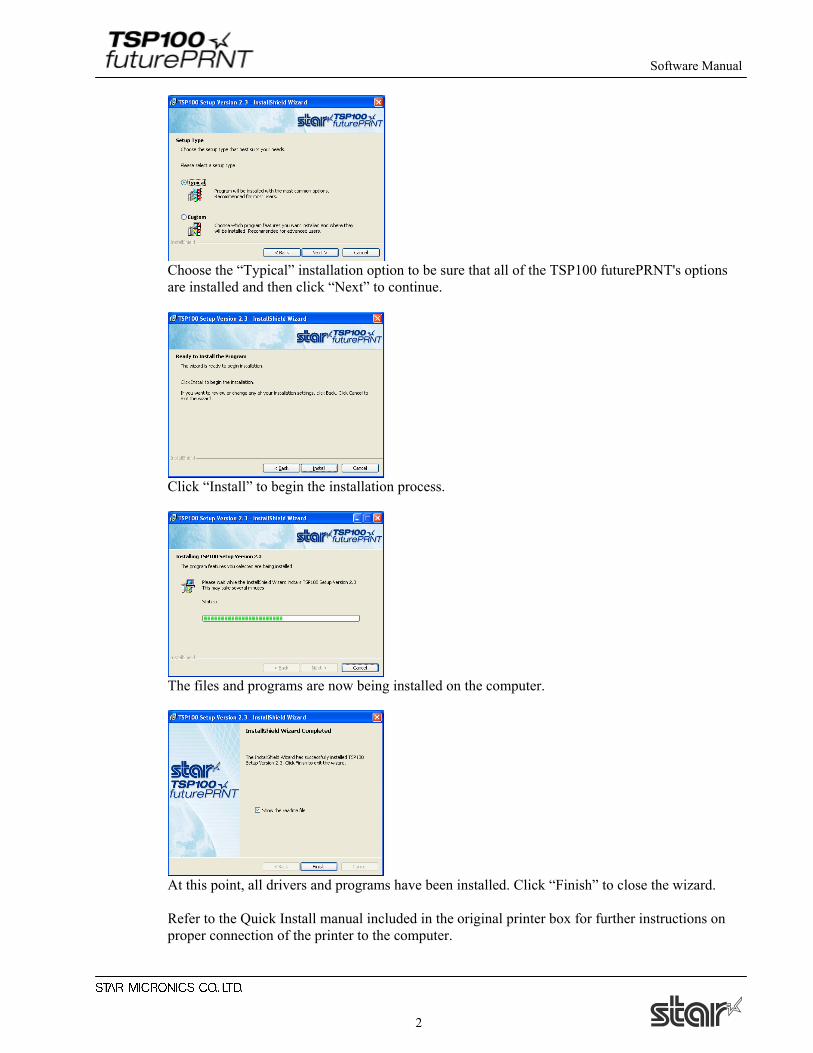
Choose the “Typical” installation option to be sure that all of the TSP100 futurePRNT's options are installed and then click “Next” to continue.
Click “Install” to begin the installation process.
The files and programs are now being installed on the computer.
At this point, all drivers and programs have been installed. Click “Finish” to close the wizard. Refer to the Quick Install manual included in the original printer box for further instructions on proper connection of the printer to the computer.
Software Manual
3
1.2. Uninstallation
1. Turn the printer off. 2. Click “Start Menu” 3. Select “All Programs” → “StarMicronics” → “Star TSP100” → “Uninstall”. 4. The Uninstaller will appear and delete all software of TSP100.
Software Manual
4
2. Windows™ 2000/XP Driver Generic Information
2.1. Windows Printer Driver
The Windows Printer Driver offers compatibility with any software package that supports printing to a Windows printer. This driver is also well-suited for applications printing mainly graphical content such as web pages or documents containing large amounts of TrueType fonts and bitmaps. It is important to note the added functionality of this driver afforded by the advanced features of the TSP100 futurePRNT printer and its software. Using the Windows Printer Driver also allows for the use of device fonts for the ultimate consistency and efficiency in printing ASCII test. Additionally, the Windows Printer Driver offers support for barcode printing using natively generated barcodes rather than graphically generated barcodes or barcode fonts. Supported Device Fonts 7 CPI* 8.5 CPI 16 CPI ESC_Font
7 CPI (RED)** 8.5 CPI (RED) 16 CPI (RED) ControlFont
7 CPI Tall*** 8.5 CPI Tall 16 CPI Tall
7 CPI Tall (RED) 8.5 CPI Tall (RED) 16 CPI Tall (RED)
8 CPI 14 CPI 17 CPI
8 CPI (RED) 14 CPI (RED) 17 CPI (RED)
8 CPI Tall 14 CPI Tall 17 CPI Tall
8 CPI Tall (RED) 14 CPI Tall (Red) 17 CPI * CPI = Characters Per (Horizontal) Inch ** Characters will be printed in red when using red/black two-color thermal paper and two-color printing mode. *** Characters will be printed in double-high mode (double the normal height). Supported Barcode Symbologies CODE39 JAN/EAN 8
CODE93 JAN/EAN 13
CODE128 UPC-A
Interleaved Two of Five (ITF) NW-7
Software Manual
5
2.2. OPOS Driver
OLE for Retail Point of Sale (OPOS) was created by industry leaders as a device standard for POS hardware. OPOS is a Win32-based architecture for POS device access. The benefits of this standard are realized in the ease of access to hardware in not only outputting data to devices, but also reading back the status of the device. This OPOS driver can be used with any existing OPOS compliant application. Star also recommends use of the OPOS standard to any developer creating a Win32-based retail software application. Star’s OPOS driver offers full compliance with the OPOS standard version 1.8.
2.3. JavaPOS Driver
JavaPOS takes the existing advantages of the OPOS standard and adds to them the ability for applications to be platform independent. Also, being based on the Java Virtual Machine, the minimum system requirements are lowered, thus reducing overall system costs as well. Star’s JavaPOS driver offers full compliance with the JavaPOS standard version 1.4. The JavaPOS driver can be used with any existing JavaPOS application and is additionally highly recommended for developers creating new applications where platform independence and/or simple hardware are valued features.
2.4. Star Port Emulator
The Star Port Emulator allows the TSP100 futurePRNT printer to act as a serial port printer. This is especially helpful in legacy applications with no support for USB printing. USB support is still required on the host device, but the application itself need only support serial (COM port) printing.
2.5. ESC/POS Mode
The TSP100 futurePRNT provides ESC/POS mode emulation, which can be configured in “TSP100 Configuration Utility”. Thus, even if your current software is designed for the ESC/POS mode, you will be able to use it as is, without making changes. The functions (logo printing, journal, etc.) of the TSP100 futurePRNT remain usable even when you print in the ESC/POS mode.
Software Manual
6
3. Windows 2000/XP Printer Driver Usage
3.1. Printer Driver Configuration
3.1.1. Paper Type
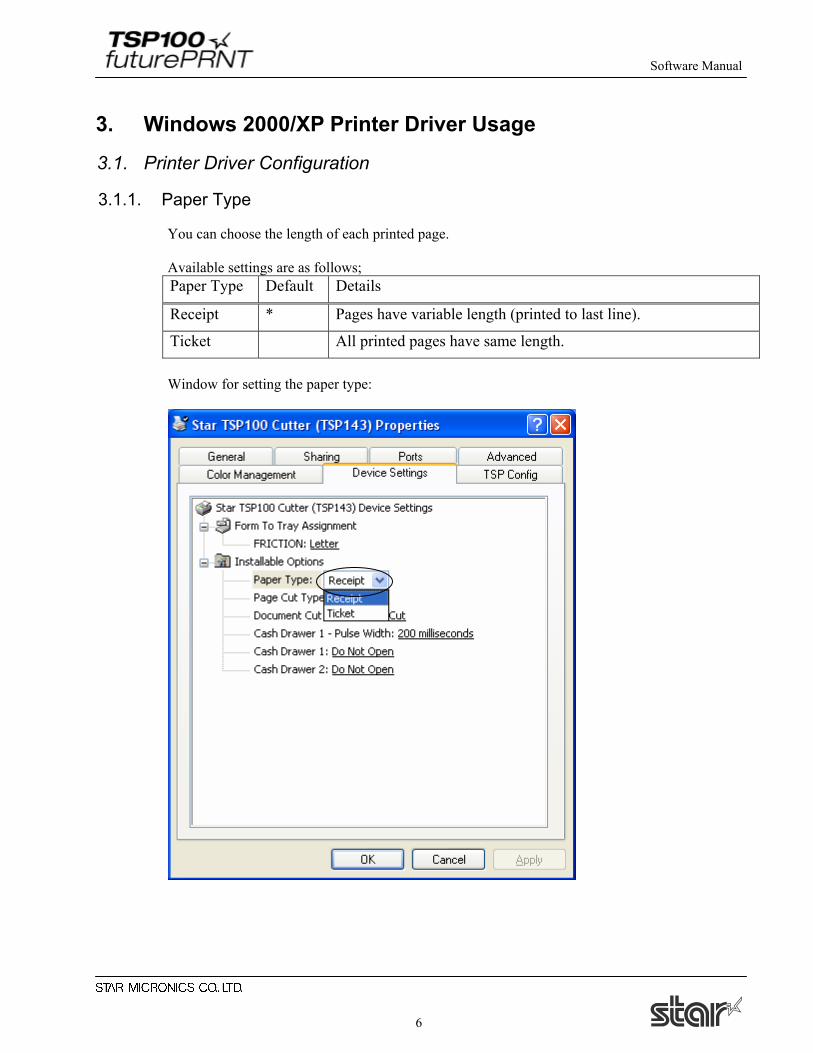
You can choose the length of each printed page. Available settings are as follows; Paper Type Default Details
Receipt * Pages have variable length (printed to last line).
Ticket All printed pages have same length. Window for setting the paper type:
Software Manual
7
3.1.2. Page Cut Type (TSP143 only)
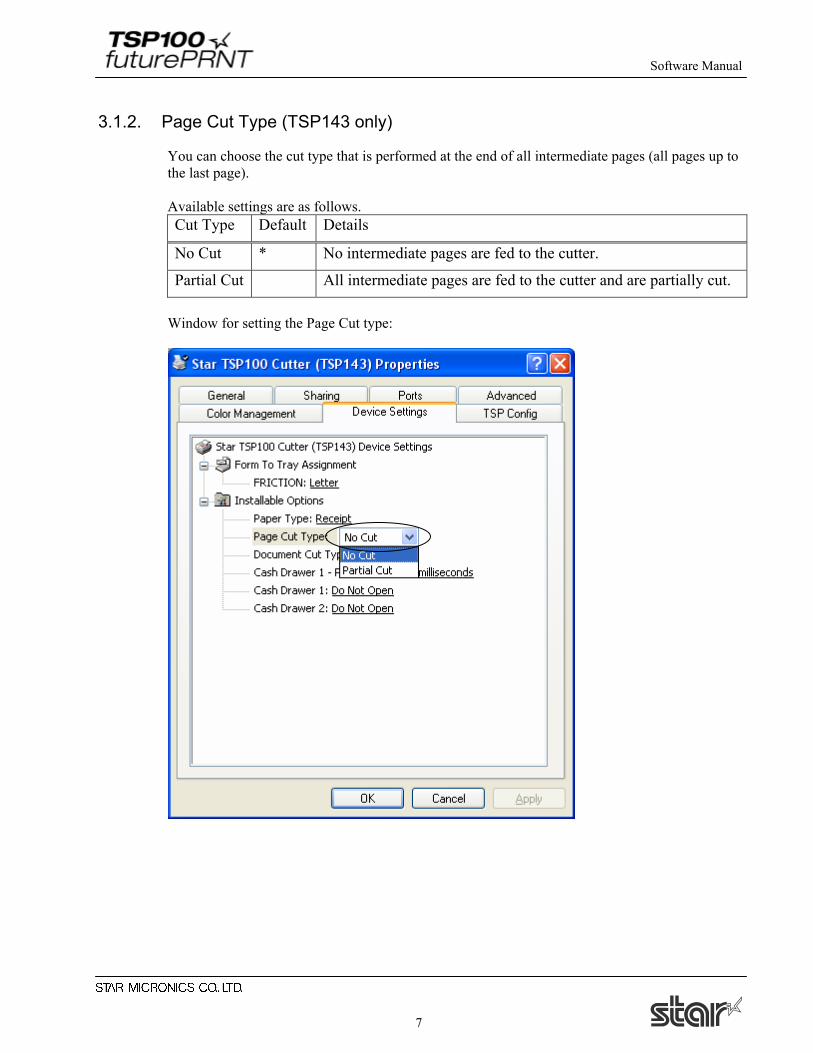
You can choose the cut type that is performed at the end of all intermediate pages (all pages up to the last page). Available settings are as follows. Cut Type Default Details
No Cut * No intermediate pages are fed to the cutter.
Partial Cut All intermediate pages are fed to the cutter and are partially cut. Window for setting the Page Cut type:
Software Manual
8
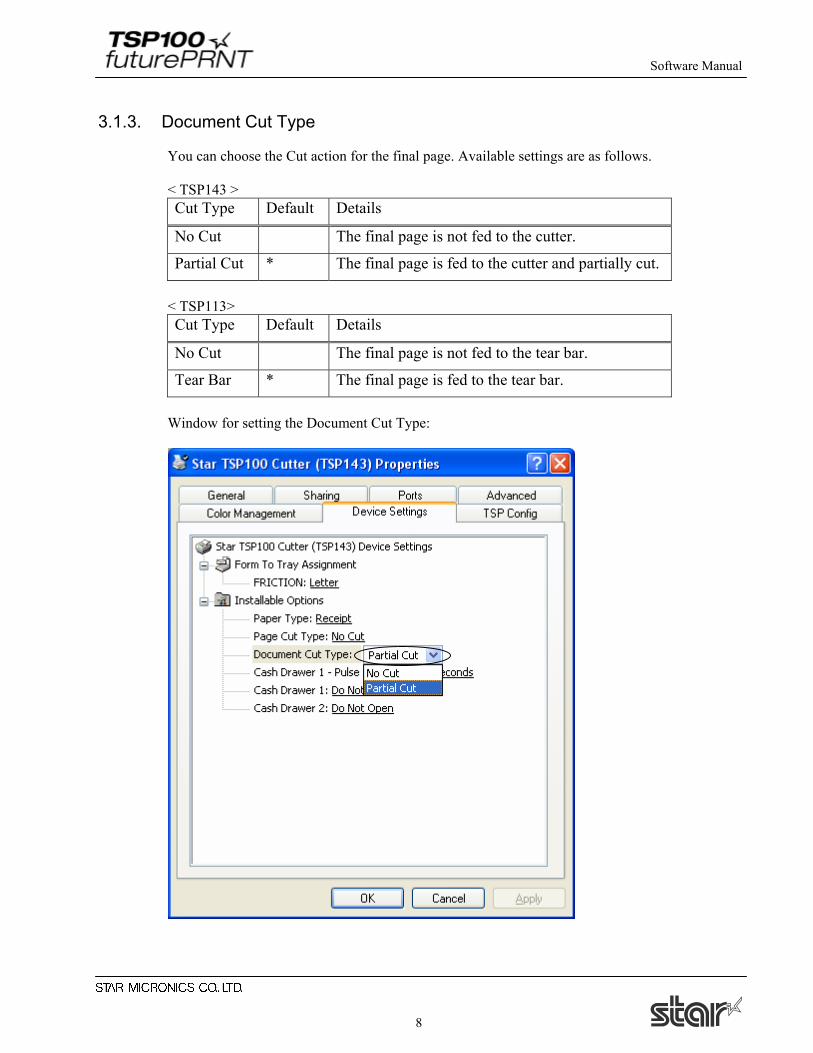
3.1.3. Document Cut Type
You can choose the Cut action for the final page. Available settings are as follows. < TSP143 > Cut Type Default Details
No Cut The final page is not fed to the cutter.
Partial Cut * The final page is fed to the cutter and partially cut. < TSP113> Cut Type Default Details
No Cut The final page is not fed to the tear bar.
Tear Bar * The final page is fed to the tear bar. Window for setting the Document Cut Type:
Software Manual
9
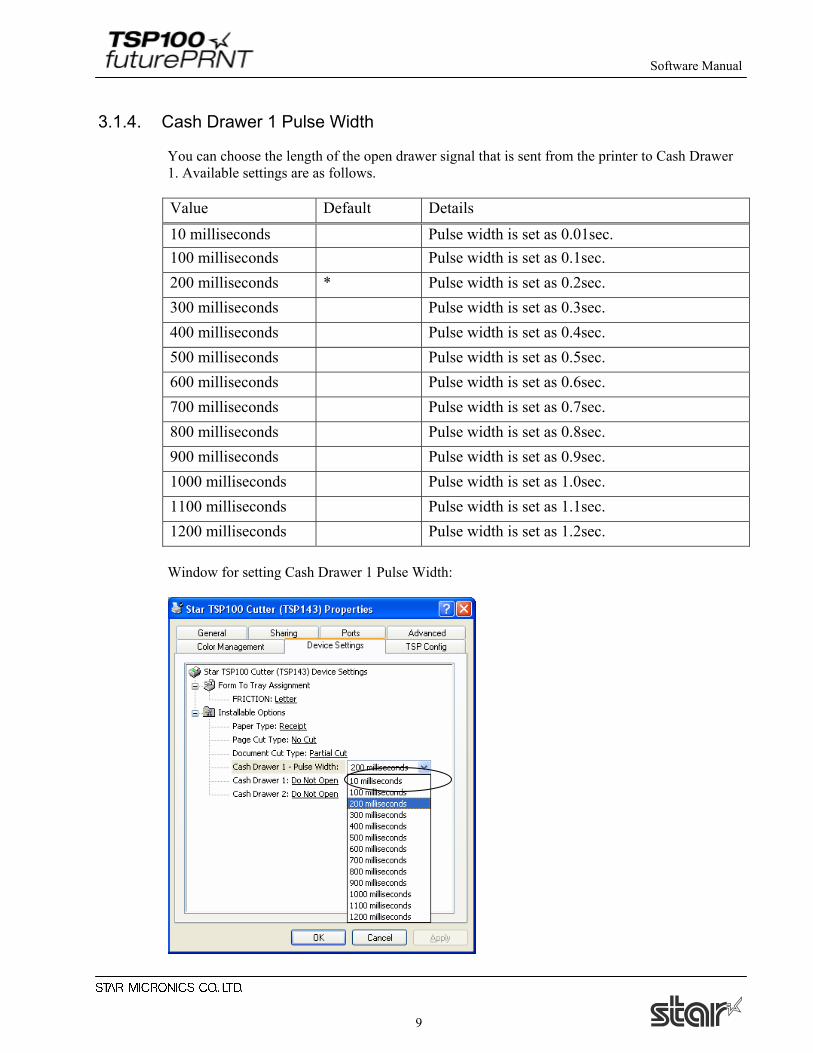
3.1.4. Cash Drawer 1 Pulse Width
You can choose the length of the open drawer signal that is sent from the printer to Cash Drawer 1. Available settings are as follows. Value Default Details
10 milliseconds Pulse width is set as 0.01sec. 100 milliseconds Pulse width is set as 0.1sec. 200 milliseconds * Pulse width is set as 0.2sec. 300 milliseconds Pulse width is set as 0.3sec. 400 milliseconds Pulse width is set as 0.4sec. 500 milliseconds Pulse width is set as 0.5sec. 600 milliseconds Pulse width is set as 0.6sec. 700 milliseconds Pulse width is set as 0.7sec. 800 milliseconds Pulse width is set as 0.8sec. 900 milliseconds Pulse width is set as 0.9sec. 1000 milliseconds Pulse width is set as 1.0sec. 1100 milliseconds Pulse width is set as 1.1sec. 1200 milliseconds Pulse width is set as 1.2sec. Window for setting Cash Drawer 1 Pulse Width:
Software Manual
10
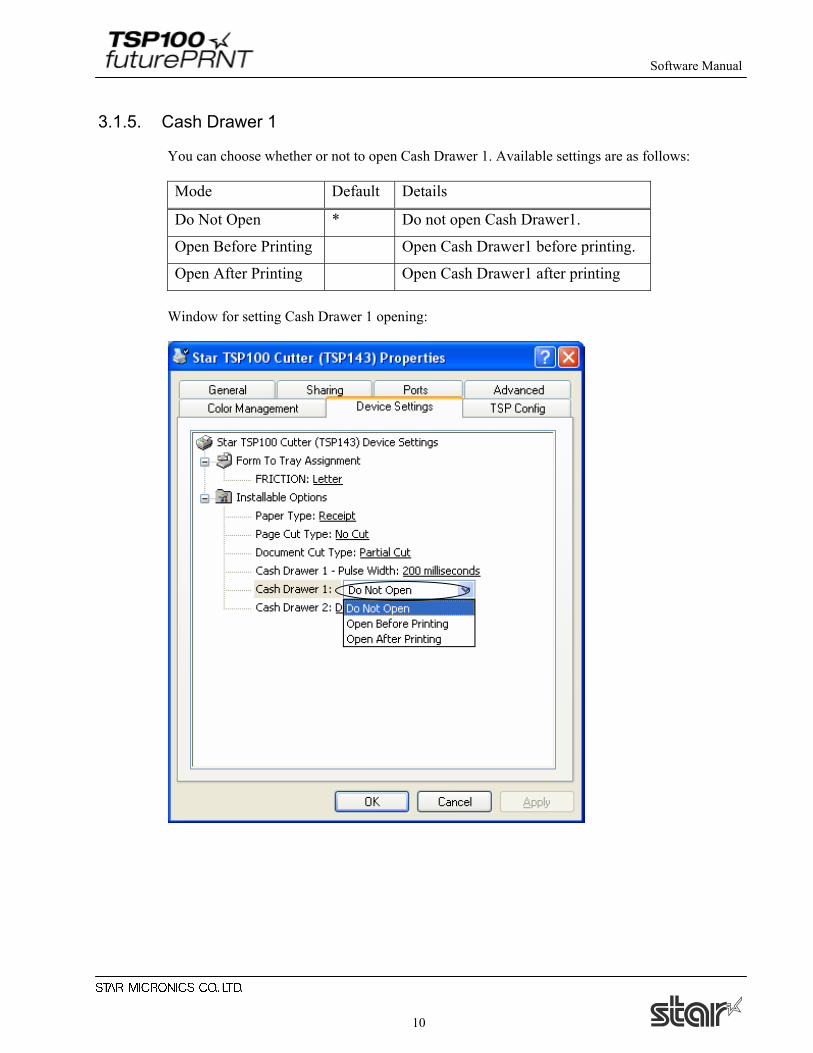
3.1.5. Cash Drawer 1
You can choose whether or not to open Cash Drawer 1. Available settings are as follows: Mode Default Details
Do Not Open * Do not open Cash Drawer1.
Open Before Printing Open Cash Drawer1 before printing.
Open After Printing Open Cash Drawer1 after printing Window for setting Cash Drawer 1 opening:
Software Manual
11
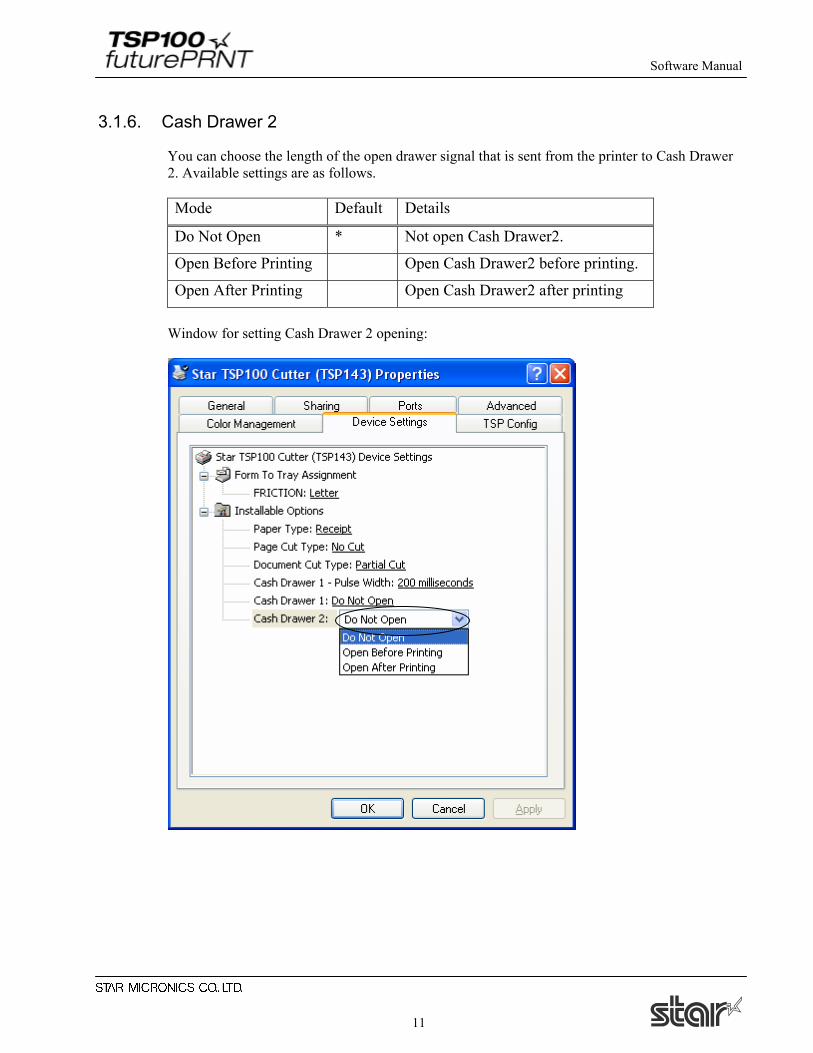
3.1.6. Cash Drawer 2
You can choose the length of the open drawer signal that is sent from the printer to Cash Drawer 2. Available settings are as follows. Mode Default Details
Do Not Open * Not open Cash Drawer2.
Open Before Printing Open Cash Drawer2 before printing.
Open After Printing Open Cash Drawer2 after printing Window for setting Cash Drawer 2 opening:

Software Manual
12
3.2. Paper Sizes
This driver set defines two standard paper sizes (Built-in paper size) - A4, Letter, four custom paper sizes, and also supports user defined paper sizes. The following table is the list of the custom paper sizes supported by this printer driver. Built-in paper sizes Width Length
72mm x 200mm 72mm 200mm
72mm x Receipt 72mm 3,000mm
51mm x 200mm 51mm 200mm
51mm x Receipt 51mm 3,000mm
A4 210mm(Printable area is 72mm) 297mm
Letter 8.5inch(Printable area is 72mm) 11inch The paper width is set as printable area. For example, if you use 80mm width roll paper, set paper size to 72mm. For journal printing (without form feed), set the paper size to ‘72mm x Receipt’ or ‘51mm x Receipt’, and set Paper Type to Receipt. User defined paper sizes are created through the Server Properties form accessible from the Windows Printer Folder. The procedure for creating a user defined paper size is as follows: 1. Open the Windows Printer Folder. 2. Enter the File menu and choose Server Properties. 3. Enter the Forms property sheet page 4. Check the ‘Create a new form’ checkbox. 5. Type the name of your new form in the ‘Form Name’ field. 6. Choose the units of measurement for specified values (either Metric or English). 7. Enter the width into the Paper Size Width field. 8. Enter the height into the Paper Size Height field. 9. Enter 0 into all of the Printer area margin fields. 10. Click the ‘Save Form’ button to save your new form The following table is the list of the maximum paper size which user defines. Width Length
72mm 3,276mm

Software Manual
13
3.3. Device Font Usage
The printer driver in this set does contain device fonts which are designed according to the characteristics of the printer. These will give a clearer print than printing with TrueType fonts. Moreover, because device fonts are compatible with the TSP600/TSP700/TSP800/TSP1000 Series of Star printers, the same print result as these printers can be obtained. When you use these device fonts, be sure to select the correct font height. The following is the list of supported device fonts.
Font name Width (Pixels)
Height (Pixels)
Digit number 72mm (576dots)
Details
Printer 17cpi 12 24 48 Thermal Printer Font
Printer 8.5cpi 24 24 24
Printer 17cpi Tall 12 48 48
Printer 8.5cpi Tall 24 48 24
Printer 16cpi 13 24 44
Printer 8cpi 26 24 22
Printer 16cpi Tall 13 48 44
Printer 8cpi Tall 26 48 22
Printer 14cpi 15 24 38
Printer 7cpi 30 24 19
Printer 14cpi Tall 15 48 38
Printer 7cpi Tall 30 48 19
Printer 17cpi (RED) 12 24 48
Printer 8.5cpi (RED) 24 24 24
Printer 17cpi Tall (RED) 12 48 48
Printer 8.5cpi Tall (RED) 24 48 24
Printer 16cpi (RED) 13 24 44
Printer 8cpi (RED) 26 24 22
Printer 16cpi Tall (RED) 13 48 44
Printer 8cpi Tall (RED) 26 48 22
Printer 14cpi (RED) 15 24 38
Printer 7cpi (RED) 30 24 19
Printer 14cpi Tall (RED) 15 48 38
Printer 7cpi Tall (RED) 30 48 19
Software Manual
14
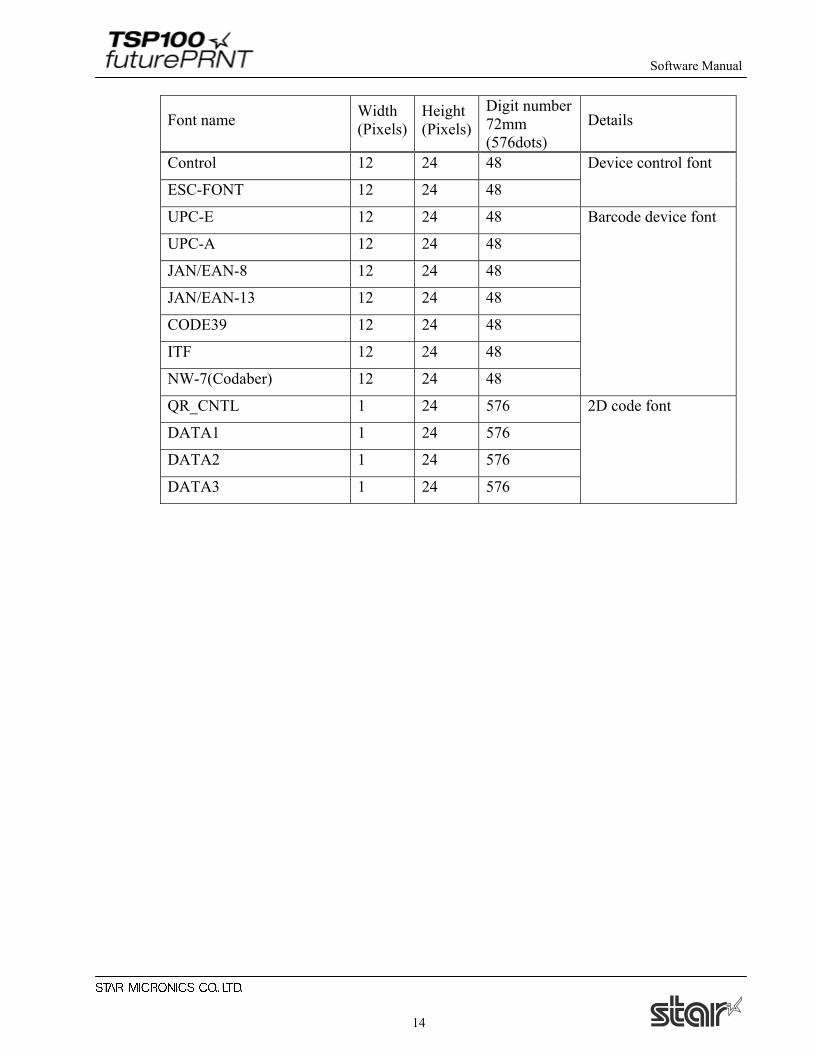
Font name Width (Pixels)
Height (Pixels)
Digit number 72mm (576dots)
Details
Control 12 24 48 Device control font
ESC-FONT 12 24 48
UPC-E 12 24 48 Barcode device font
UPC-A 12 24 48
JAN/EAN-8 12 24 48
JAN/EAN-13 12 24 48
CODE39 12 24 48
ITF 12 24 48
NW-7(Codaber) 12 24 48
QR_CNTL 1 24 576 2D code font
DATA1 1 24 576
DATA2 1 24 576
DATA3 1 24 576
Software Manual
15
3.4. Control Font Usage
The Control device font is used to provide for control within the span of a single document. This font is not used for character printing.
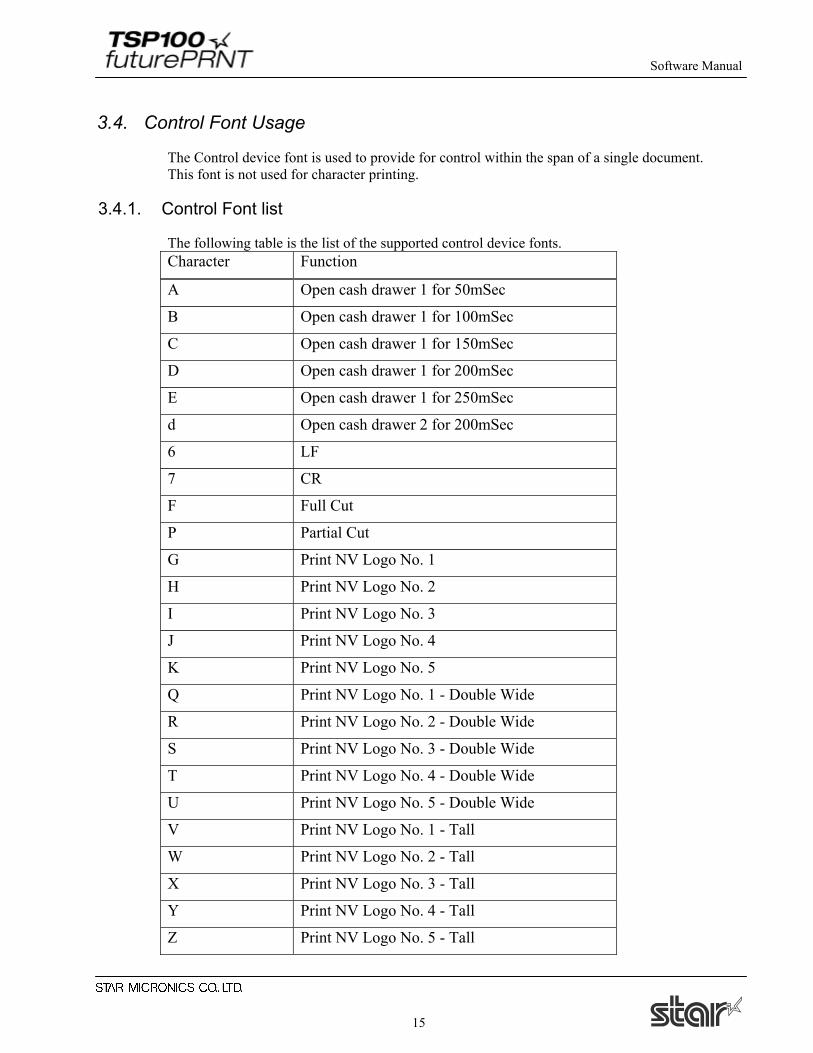
3.4.1. Control Font list
The following table is the list of the supported control device fonts. Character Function
A Open cash drawer 1 for 50mSec
B Open cash drawer 1 for 100mSec
C Open cash drawer 1 for 150mSec
D Open cash drawer 1 for 200mSec
E Open cash drawer 1 for 250mSec
d Open cash drawer 2 for 200mSec
6 LF
7 CR
F Full Cut
P Partial Cut
G Print NV Logo No. 1
H Print NV Logo No. 2
I Print NV Logo No. 3
J Print NV Logo No. 4
K Print NV Logo No. 5
Q Print NV Logo No. 1 - Double Wide
R Print NV Logo No. 2 - Double Wide
S Print NV Logo No. 3 - Double Wide
T Print NV Logo No. 4 - Double Wide
U Print NV Logo No. 5 - Double Wide
V Print NV Logo No. 1 - Tall
W Print NV Logo No. 2 - Tall
X Print NV Logo No. 3 - Tall
Y Print NV Logo No. 4 - Tall
Z Print NV Logo No. 5 - Tall
Software Manual
16
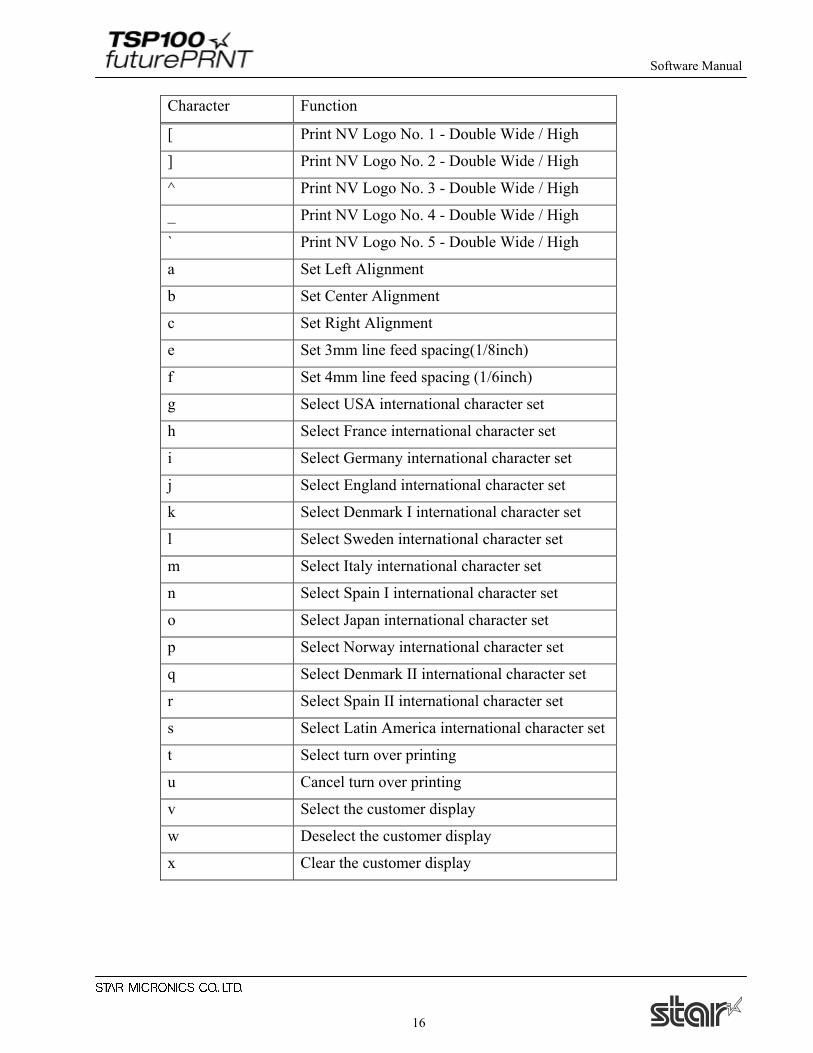
Character Function
[ Print NV Logo No. 1 - Double Wide / High
] Print NV Logo No. 2 - Double Wide / High
^ Print NV Logo No. 3 - Double Wide / High
_ Print NV Logo No. 4 - Double Wide / High
` Print NV Logo No. 5 - Double Wide / High
a Set Left Alignment
b Set Center Alignment
c Set Right Alignment
e Set 3mm line feed spacing(1/8inch)
f Set 4mm line feed spacing (1/6inch)
g Select USA international character set
h Select France international character set
i Select Germany international character set
j Select England international character set
k Select Denmark I international character set
l Select Sweden international character set
m Select Italy international character set
n Select Spain I international character set
o Select Japan international character set
p Select Norway international character set
q Select Denmark II international character set
r Select Spain II international character set
s Select Latin America international character set
t Select turn over printing
u Cancel turn over printing
v Select the customer display
w Deselect the customer display
x Clear the customer display
Software Manual
17
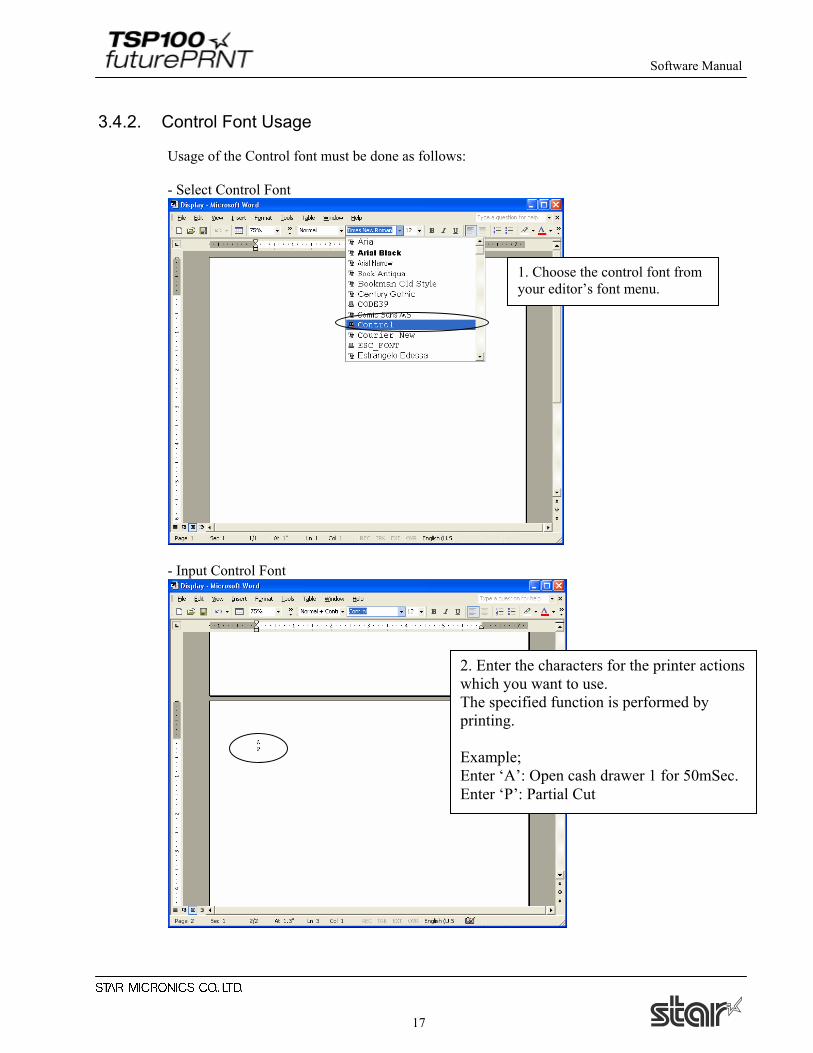
3.4.2. Control Font Usage
Usage of the Control font must be done as follows: - Select Control Font
- Input Control Font
1. Choose the control font from your editor’s font menu.
2. Enter the characters for the printer actions which you want to use. The specified function is performed by printing. Example; Enter ‘A’: Open cash drawer 1 for 50mSec. Enter ‘P’: Partial Cut
Software Manual
18
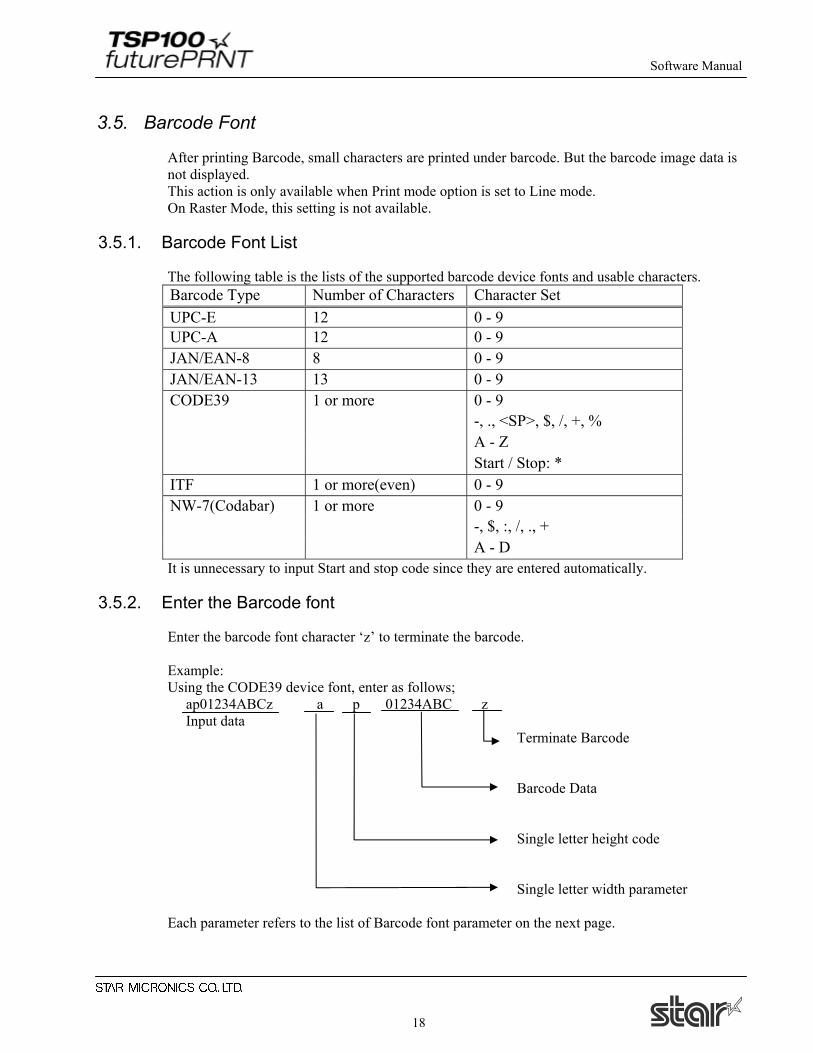
3.5. Barcode Font
After printing Barcode, small characters are printed under barcode. But the barcode image data is not displayed. This action is only available when Print mode option is set to Line mode. On Raster Mode, this setting is not available.
3.5.1. Barcode Font List
The following table is the lists of the supported barcode device fonts and usable characters. Barcode Type Number of Characters Character Set UPC-E 12 0 - 9 UPC-A 12 0 - 9 JAN/EAN-8 8 0 - 9 JAN/EAN-13 13 0 - 9 CODE39 1 or more 0 - 9 -, ., <SP>, $, /, +, % A - Z Start / Stop: * ITF 1 or more(even) 0 - 9 NW-7(Codabar) 1 or more 0 - 9 -, $, :, /, ., + A - D It is unnecessary to input Start and stop code since they are entered automatically.
3.5.2. Enter the Barcode font
Enter the barcode font character ‘z’ to terminate the barcode. Example: Using the CODE39 device font, enter as follows; ap01234ABCz a p 01234ABC z Input data Terminate Barcode Barcode Data Single letter height code Single letter width parameter Each parameter refers to the list of Barcode font parameter on the next page.
Software Manual
19
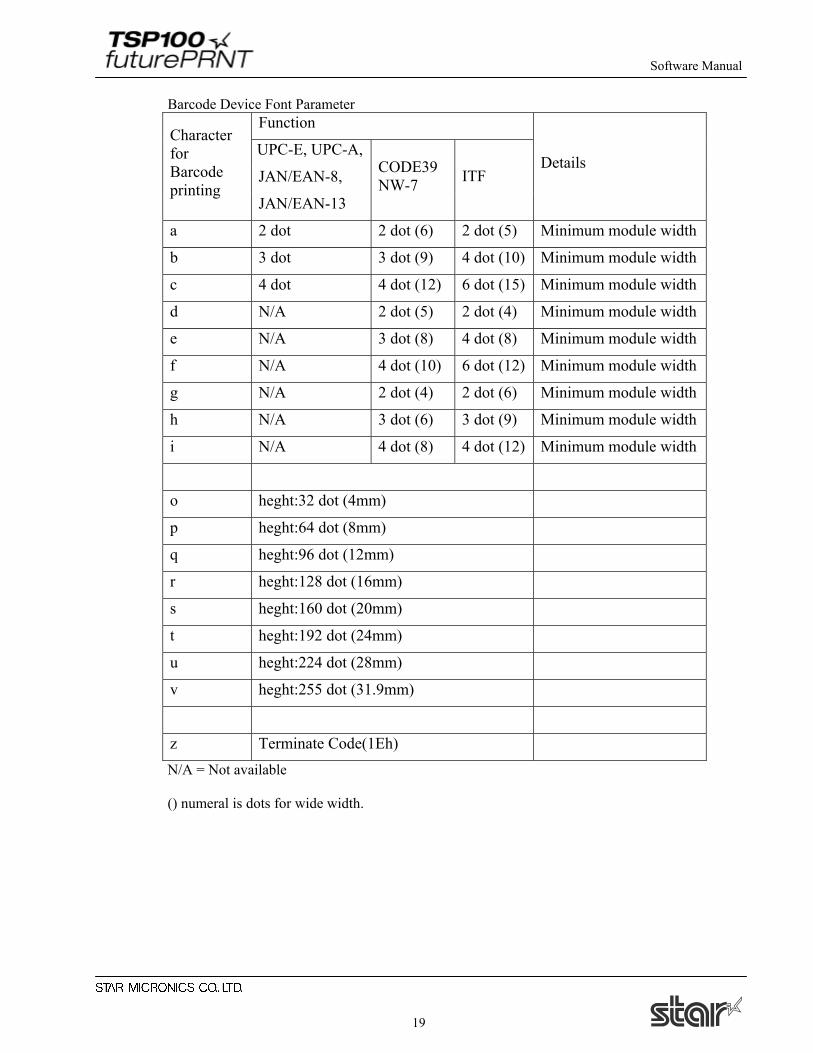
Barcode Device Font Parameter Function
UPC-E, UPC-A,
JAN/EAN-8,
Character for Barcode printing
JAN/EAN-13
CODE39 NW-7 ITF
Details
a 2 dot 2 dot (6) 2 dot (5) Minimum module width
b 3 dot 3 dot (9) 4 dot (10) Minimum module width
c 4 dot 4 dot (12) 6 dot (15) Minimum module width
d N/A 2 dot (5) 2 dot (4) Minimum module width
e N/A 3 dot (8) 4 dot (8) Minimum module width
f N/A 4 dot (10) 6 dot (12) Minimum module width
g N/A 2 dot (4) 2 dot (6) Minimum module width
h N/A 3 dot (6) 3 dot (9) Minimum module width
i N/A 4 dot (8) 4 dot (12) Minimum module width
o heght:32 dot (4mm)
p heght:64 dot (8mm)
q heght:96 dot (12mm)
r heght:128 dot (16mm)
s heght:160 dot (20mm)
t heght:192 dot (24mm)
u heght:224 dot (28mm)
v heght:255 dot (31.9mm)
z Terminate Code(1Eh) N/A = Not available () numeral is dots for wide width.
Software Manual
20
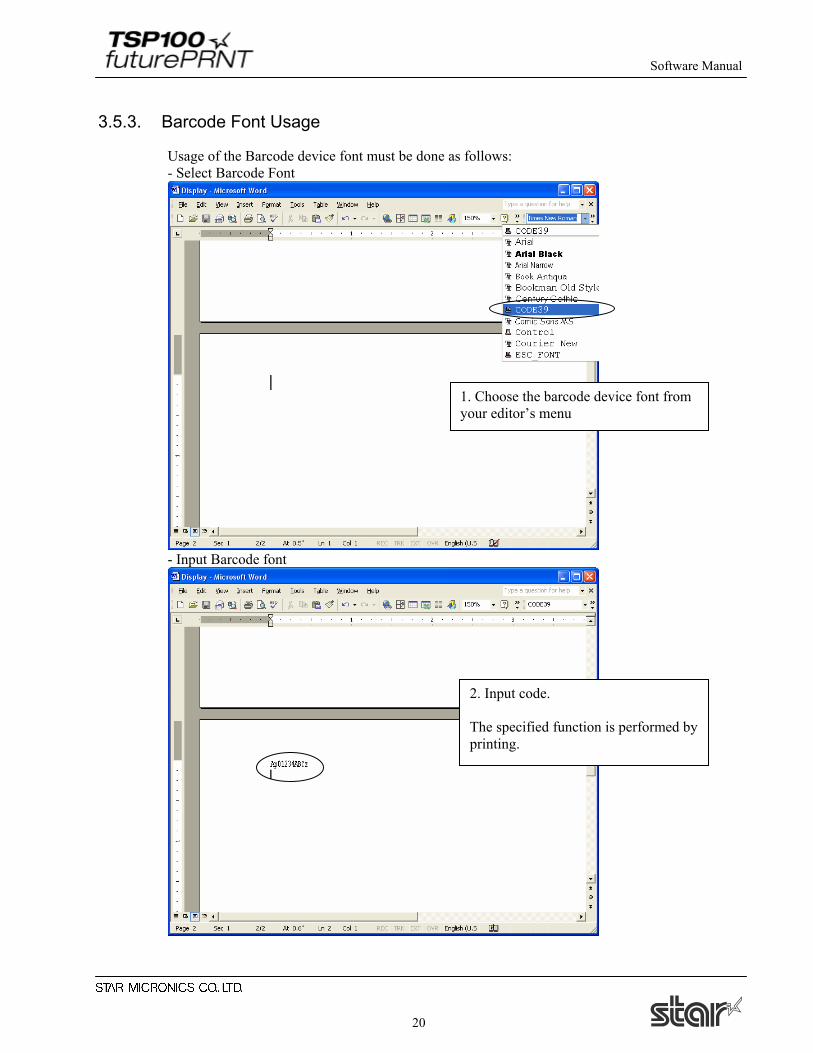
3.5.3. Barcode Font Usage
Usage of the Barcode device font must be done as follows: - Select Barcode Font
- Input Barcode font
1. Choose the barcode device font from your editor’s menu
2. Input code. The specified function is performed by printing.
Software Manual
21
3.6. 2D Code Printing Function
2D code printing is used combining 2D code (QR_CNTL, DATA1, DATA2, and DATA3) and Control Font (ESC_FONT). Note: This action is only available when Print mode is set to Star Line mode. On ESC/POS Mode, this setting is not available. Each Font Function as follows; Device Font Name
Function Details Memo
QR_CNTL Setting QR commands
Output commands for QR printing.
DATA1 \x20 - \x7F replace \x00 - \x5F
DATA2 \x20 - \x7F replace \x60 - \xBF
DATA3 \x20 - \x5F replace \xC0 - \xFF
Output \x00 -\xFF is possible.
ESC_FONT
Setting 2D code data
Output \x20 - \x7F Output \x20 -\x7F is possible.
Software Manual
22
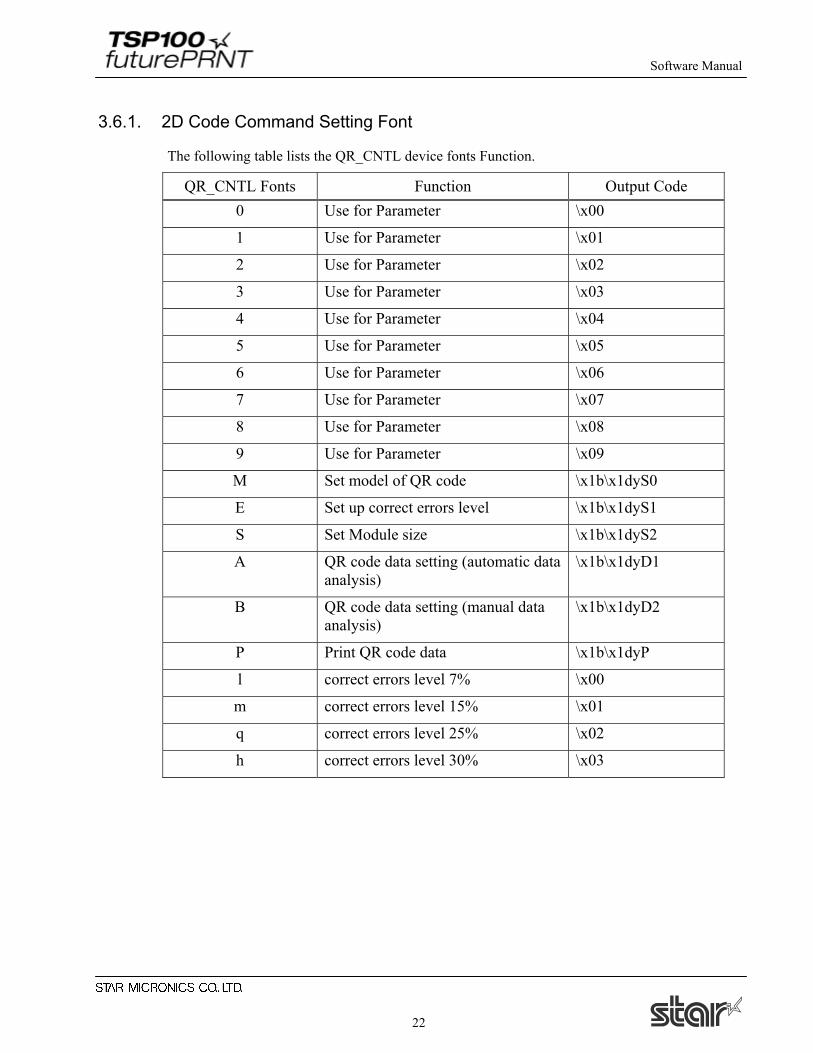
3.6.1. 2D Code Command Setting Font
The following table lists the QR_CNTL device fonts Function.
QR_CNTL Fonts Function Output Code 0 Use for Parameter \x00
1 Use for Parameter \x01
2 Use for Parameter \x02
3 Use for Parameter \x03
4 Use for Parameter \x04
5 Use for Parameter \x05
6 Use for Parameter \x06
7 Use for Parameter \x07
8 Use for Parameter \x08
9 Use for Parameter \x09
M Set model of QR code \x1b\x1dyS0
E Set up correct errors level \x1b\x1dyS1
S Set Module size \x1b\x1dyS2
A QR code data setting (automatic data analysis)
\x1b\x1dyD1
B QR code data setting (manual data analysis)
\x1b\x1dyD2
P Print QR code data \x1b\x1dyP
l correct errors level 7% \x00
m correct errors level 15% \x01
q correct errors level 25% \x02
h correct errors level 30% \x03
Software Manual
23
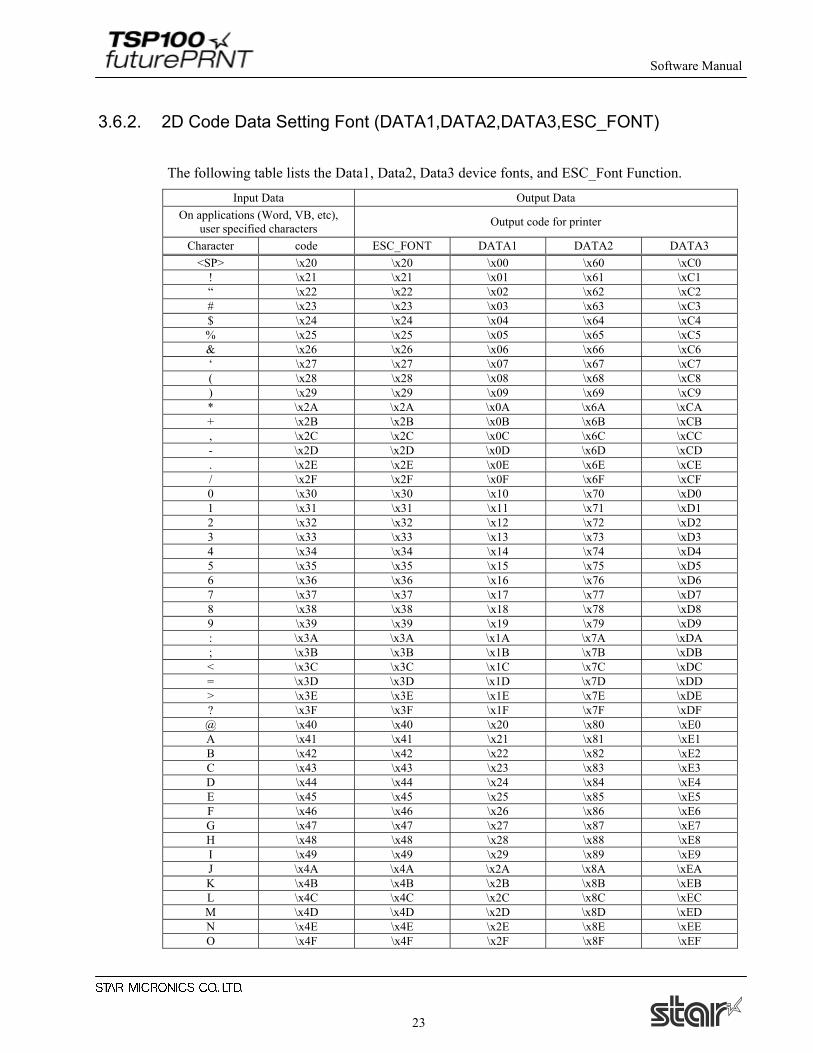
3.6.2. 2D Code Data Setting Font (DATA1,DATA2,DATA3,ESC_FONT)
The following table lists the Data1, Data2, Data3 device fonts, and ESC_Font Function.
Input Data Output Data On applications (Word, VB, etc),
user specified characters Output code for printer
Character code ESC_FONT DATA1 DATA2 DATA3 <SP> \x20 \x20 \x00 \x60 \xC0
! \x21 \x21 \x01 \x61 \xC1 “ \x22 \x22 \x02 \x62 \xC2 # \x23 \x23 \x03 \x63 \xC3 $ \x24 \x24 \x04 \x64 \xC4 % \x25 \x25 \x05 \x65 \xC5 & \x26 \x26 \x06 \x66 \xC6 ‘ \x27 \x27 \x07 \x67 \xC7 ( \x28 \x28 \x08 \x68 \xC8 ) \x29 \x29 \x09 \x69 \xC9 * \x2A \x2A \x0A \x6A \xCA + \x2B \x2B \x0B \x6B \xCB , \x2C \x2C \x0C \x6C \xCC - \x2D \x2D \x0D \x6D \xCD . \x2E \x2E \x0E \x6E \xCE / \x2F \x2F \x0F \x6F \xCF 0 \x30 \x30 \x10 \x70 \xD0 1 \x31 \x31 \x11 \x71 \xD1 2 \x32 \x32 \x12 \x72 \xD2 3 \x33 \x33 \x13 \x73 \xD3 4 \x34 \x34 \x14 \x74 \xD4 5 \x35 \x35 \x15 \x75 \xD5 6 \x36 \x36 \x16 \x76 \xD6 7 \x37 \x37 \x17 \x77 \xD7 8 \x38 \x38 \x18 \x78 \xD8 9 \x39 \x39 \x19 \x79 \xD9 : \x3A \x3A \x1A \x7A \xDA ; \x3B \x3B \x1B \x7B \xDB < \x3C \x3C \x1C \x7C \xDC = \x3D \x3D \x1D \x7D \xDD > \x3E \x3E \x1E \x7E \xDE ? \x3F \x3F \x1F \x7F \xDF @ \x40 \x40 \x20 \x80 \xE0 A \x41 \x41 \x21 \x81 \xE1 B \x42 \x42 \x22 \x82 \xE2 C \x43 \x43 \x23 \x83 \xE3 D \x44 \x44 \x24 \x84 \xE4 E \x45 \x45 \x25 \x85 \xE5 F \x46 \x46 \x26 \x86 \xE6 G \x47 \x47 \x27 \x87 \xE7 H \x48 \x48 \x28 \x88 \xE8 I \x49 \x49 \x29 \x89 \xE9 J \x4A \x4A \x2A \x8A \xEA K \x4B \x4B \x2B \x8B \xEB L \x4C \x4C \x2C \x8C \xEC M \x4D \x4D \x2D \x8D \xED N \x4E \x4E \x2E \x8E \xEE O \x4F \x4F \x2F \x8F \xEF
Software Manual
24
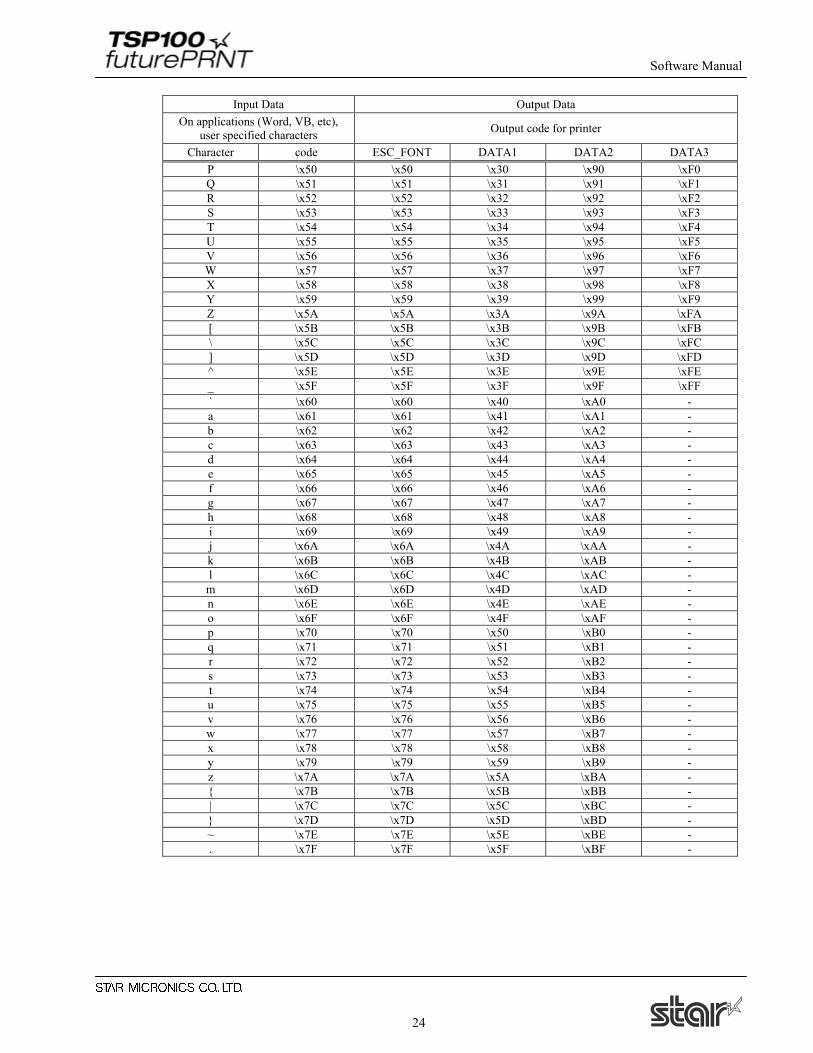
Input Data Output Data On applications (Word, VB, etc),
user specified characters Output code for printer
Character code ESC_FONT DATA1 DATA2 DATA3 P \x50 \x50 \x30 \x90 \xF0 Q \x51 \x51 \x31 \x91 \xF1 R \x52 \x52 \x32 \x92 \xF2 S \x53 \x53 \x33 \x93 \xF3 T \x54 \x54 \x34 \x94 \xF4 U \x55 \x55 \x35 \x95 \xF5 V \x56 \x56 \x36 \x96 \xF6 W \x57 \x57 \x37 \x97 \xF7 X \x58 \x58 \x38 \x98 \xF8 Y \x59 \x59 \x39 \x99 \xF9 Z \x5A \x5A \x3A \x9A \xFA [ \x5B \x5B \x3B \x9B \xFB \ \x5C \x5C \x3C \x9C \xFC ] \x5D \x5D \x3D \x9D \xFD ^ \x5E \x5E \x3E \x9E \xFE _ \x5F \x5F \x3F \x9F \xFF ` \x60 \x60 \x40 \xA0 - a \x61 \x61 \x41 \xA1 - b \x62 \x62 \x42 \xA2 - c \x63 \x63 \x43 \xA3 - d \x64 \x64 \x44 \xA4 - e \x65 \x65 \x45 \xA5 - f \x66 \x66 \x46 \xA6 - g \x67 \x67 \x47 \xA7 - h \x68 \x68 \x48 \xA8 - i \x69 \x69 \x49 \xA9 - j \x6A \x6A \x4A \xAA - k \x6B \x6B \x4B \xAB - l \x6C \x6C \x4C \xAC - m \x6D \x6D \x4D \xAD - n \x6E \x6E \x4E \xAE - o \x6F \x6F \x4F \xAF - p \x70 \x70 \x50 \xB0 - q \x71 \x71 \x51 \xB1 - r \x72 \x72 \x52 \xB2 - s \x73 \x73 \x53 \xB3 - t \x74 \x74 \x54 \xB4 - u \x75 \x75 \x55 \xB5 - v \x76 \x76 \x56 \xB6 - w \x77 \x77 \x57 \xB7 - x \x78 \x78 \x58 \xB8 - y \x79 \x79 \x59 \xB9 - z \x7A \x7A \x5A \xBA - { \x7B \x7B \x5B \xBB - | \x7C \x7C \x5C \xBC - } \x7D \x7D \x5D \xBD - ~ \x7E \x7E \x5E \xBE - . \x7F \x7F \x5F \xBF -
Software Manual
25
3.6.3. 2D Code Font Usage
QR code can be specified up to 500 bytes. (It includes input data and punctuated marks in 500bytes.) Sample programs of Visual Basic using 2D code is as follows; QR Code Print Sample1: Private Sub Command1_Click()
Printer.Font.Name = "Printer 17cpi Tall Printer.Print "QR Code Test Print for VB 6.0" Printer.Font.Name = "Printer 17cpi" Printer.Print Printer.Print "DATA:" Printer.Print "1234567890" Printer.Print Printer.Print "QR code:"; Printer.Font.Name = "QR_CNTL" Printer.Print "M2"; 'Bar code model setting Printer.Print "Em"; 'Error correction level setting Printer.Print "S3" 'Module size setting Printer.Print "B1"; 'Bar code data setting (automatic data analysis) + number of blocks Printer.Print "2"; 'Number (data type) Printer.Font.Name = "DATA1" 'DATA = 0x0000 – 0x005F Printer.Print Chr(&H2A); 'Number of bytes for bar code data Printer.Print Chr(&H20); Printer.Font.Name = "ESC_FONT" 'ESC_FONT = 0x0020 – 0x007F Printer.Print "1234567890"; Printer.Font.Name = "QR_CNTL" Printer.Print "P" 'Printed characters for bar code data Printer.EndDoc
End Sub
Software Manual
26
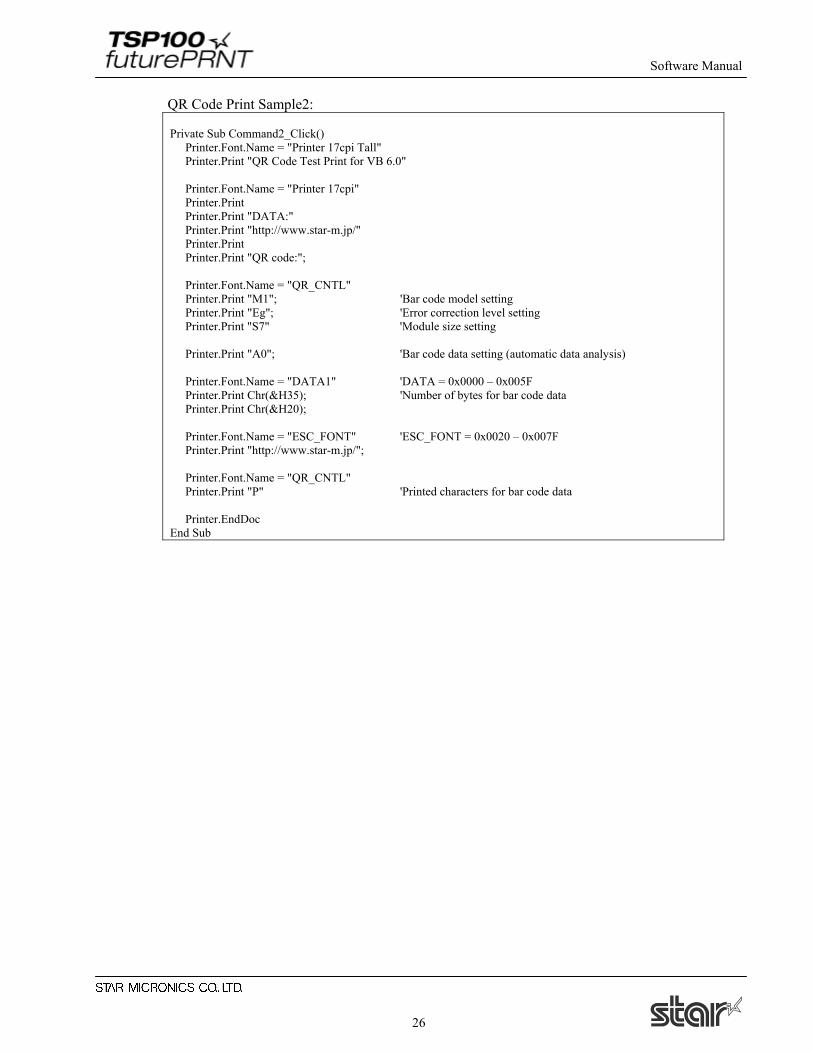
QR Code Print Sample2: Private Sub Command2_Click()
Printer.Font.Name = "Printer 17cpi Tall" Printer.Print "QR Code Test Print for VB 6.0" Printer.Font.Name = "Printer 17cpi" Printer.Print Printer.Print "DATA:" Printer.Print "http://www.star-m.jp/" Printer.Print Printer.Print "QR code:"; Printer.Font.Name = "QR_CNTL" Printer.Print "M1"; 'Bar code model setting Printer.Print "Eg"; 'Error correction level setting Printer.Print "S7" 'Module size setting Printer.Print "A0"; 'Bar code data setting (automatic data analysis) Printer.Font.Name = "DATA1" 'DATA = 0x0000 – 0x005F Printer.Print Chr(&H35); 'Number of bytes for bar code data Printer.Print Chr(&H20); Printer.Font.Name = "ESC_FONT" 'ESC_FONT = 0x0020 – 0x007F Printer.Print "http://www.star-m.jp/"; Printer.Font.Name = "QR_CNTL" Printer.Print "P" 'Printed characters for bar code data Printer.EndDoc
End Sub
Software Manual
27
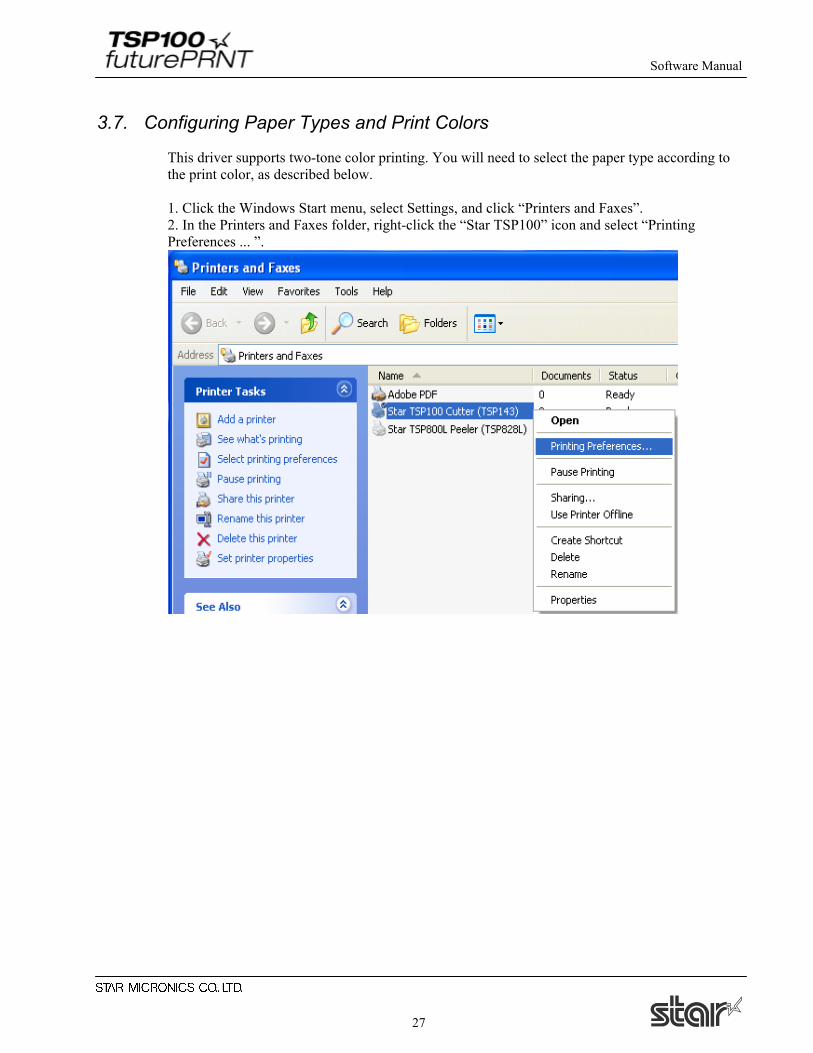
3.7. Configuring Paper Types and Print Colors
This driver supports two-tone color printing. You will need to select the paper type according to the print color, as described below. 1. Click the Windows Start menu, select Settings, and click “Printers and Faxes”. 2. In the Printers and Faxes folder, right-click the “Star TSP100” icon and select “Printing Preferences ... ”.
Software Manual
28
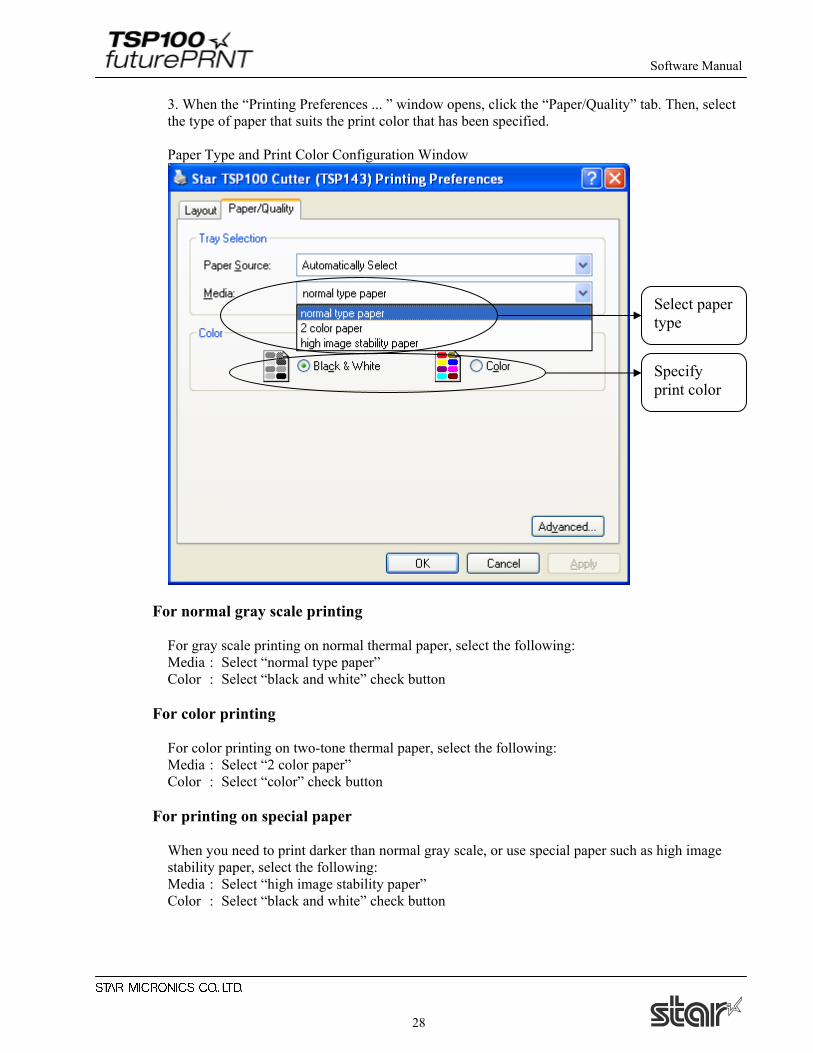
3. When the “Printing Preferences ... ” window opens, click the “Paper/Quality” tab. Then, select the type of paper that suits the print color that has been specified. Paper Type and Print Color Configuration Window
For normal gray scale printing For gray scale printing on normal thermal paper, select the following: Media : Select “normal type paper” Color : Select “black and white” check button
For color printing For color printing on two-tone thermal paper, select the following: Media : Select “2 color paper” Color : Select “color” check button
For printing on special paper When you need to print darker than normal gray scale, or use special paper such as high image stability paper, select the following: Media : Select “high image stability paper” Color : Select “black and white” check button
Select paper type
Specify print color
Software Manual
29
3.8. Document Formatting Guidelines (Windows 2000/XP)
1. This driver does not require any margins. Set all document margins to 0. 2. This driver supports 4 kinds of custom papers and user defined paper sizes. You can create a user defined paper size via the Server Properties form available off the File menu of the Windows Printer Folder. Refer to the Windows help system for information on how to do this. Remember that no margins are required.
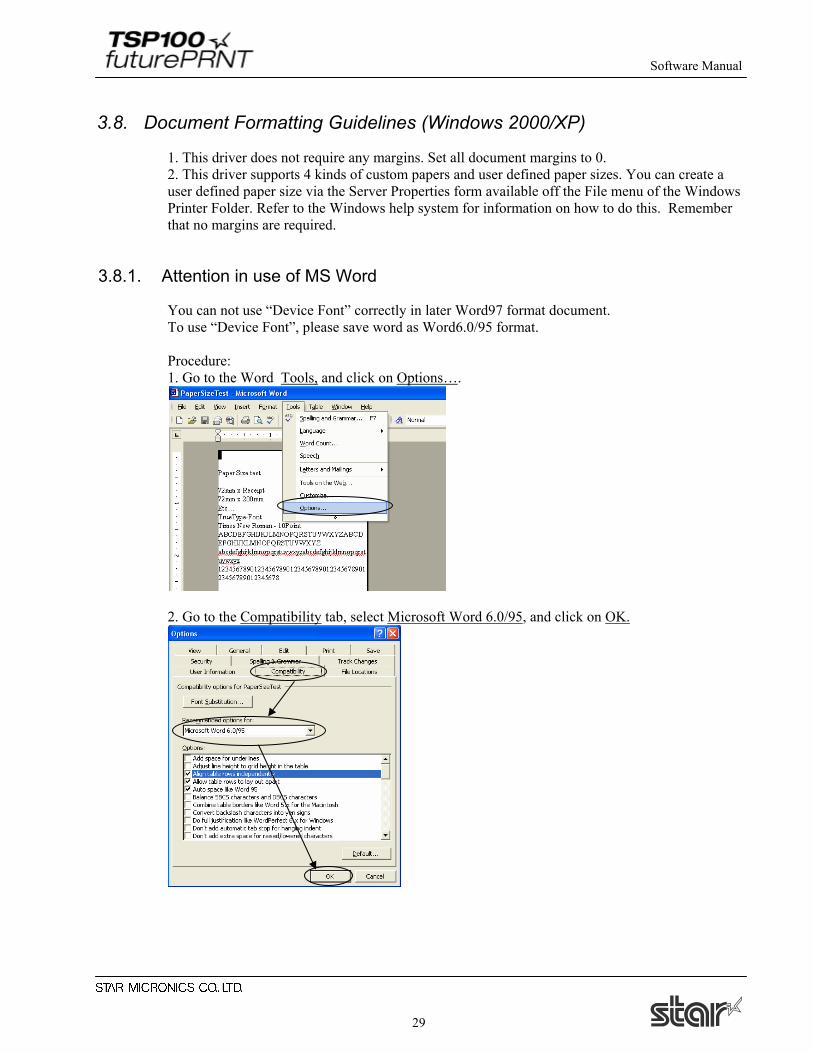
3.8.1. Attention in use of MS Word
You can not use “Device Font” correctly in later Word97 format document. To use “Device Font”, please save word as Word6.0/95 format. Procedure: 1. Go to the Word Tools, and click on Options….
2. Go to the Compatibility tab, select Microsoft Word 6.0/95, and click on OK.
Software Manual
30
3.8.2. Restriction and Caution
1. Use only one type of device font per line. 2. Do not print device fonts and graphics on the same horizontal line. This will cause the difference between the displayed document and the printed document. 3. When you use the barcode device fonts, characters will appear only on the computer’s display. You can see the printed result will be a barcode. By this difference, the length of the displayed document and the printed document can be different slightly. 4. Control device font is not used for character printing.
Software Manual
31
4. Configuring on Windows 2000/XP (Star Line Mode)
4.1. Overview
The TSP100 configuration application lets you control the look and content of printed receipts. You can set up separate configurations for Star Line mode and for ESC/POS mode. This chapter explains the settings available for Star Line mode. For details about settings that are specific to ESC/POS mode, please turn to Chapter 5.
4.2. Launching the Configuration Application
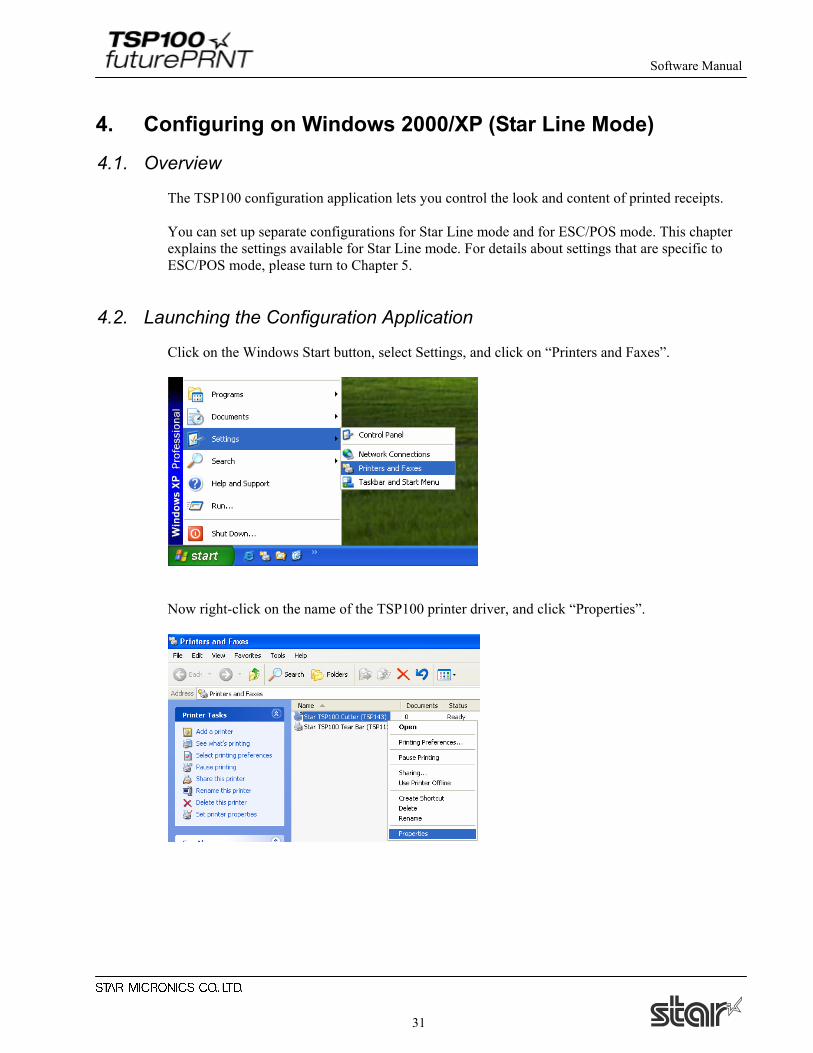
Click on the Windows Start button, select Settings, and click on “Printers and Faxes”.
Now right-click on the name of the TSP100 printer driver, and click “Properties”.
Software Manual
32
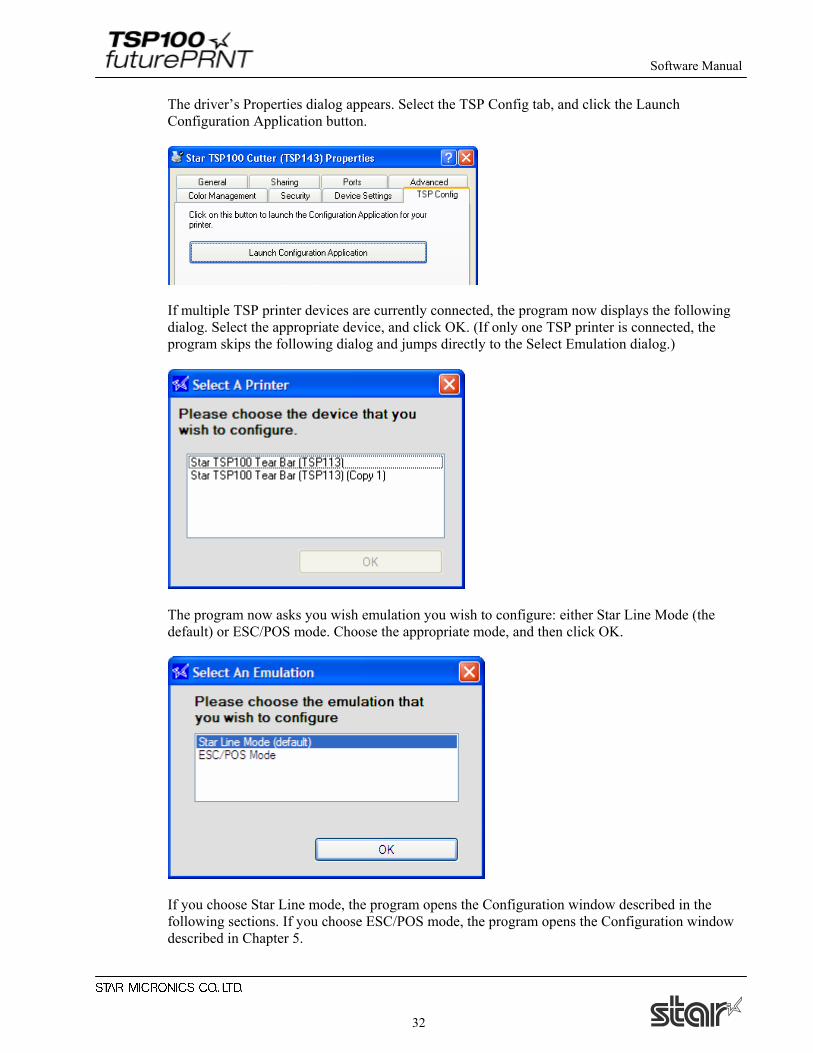
The driver’s Properties dialog appears. Select the TSP Config tab, and click the Launch Configuration Application button.
If multiple TSP printer devices are currently connected, the program now displays the following dialog. Select the appropriate device, and click OK. (If only one TSP printer is connected, the program skips the following dialog and jumps directly to the Select Emulation dialog.)
The program now asks you wish emulation you wish to configure: either Star Line Mode (the default) or ESC/POS mode. Choose the appropriate mode, and then click OK.
If you choose Star Line mode, the program opens the Configuration window described in the following sections. If you choose ESC/POS mode, the program opens the Configuration window described in Chapter 5.
Software Manual
33
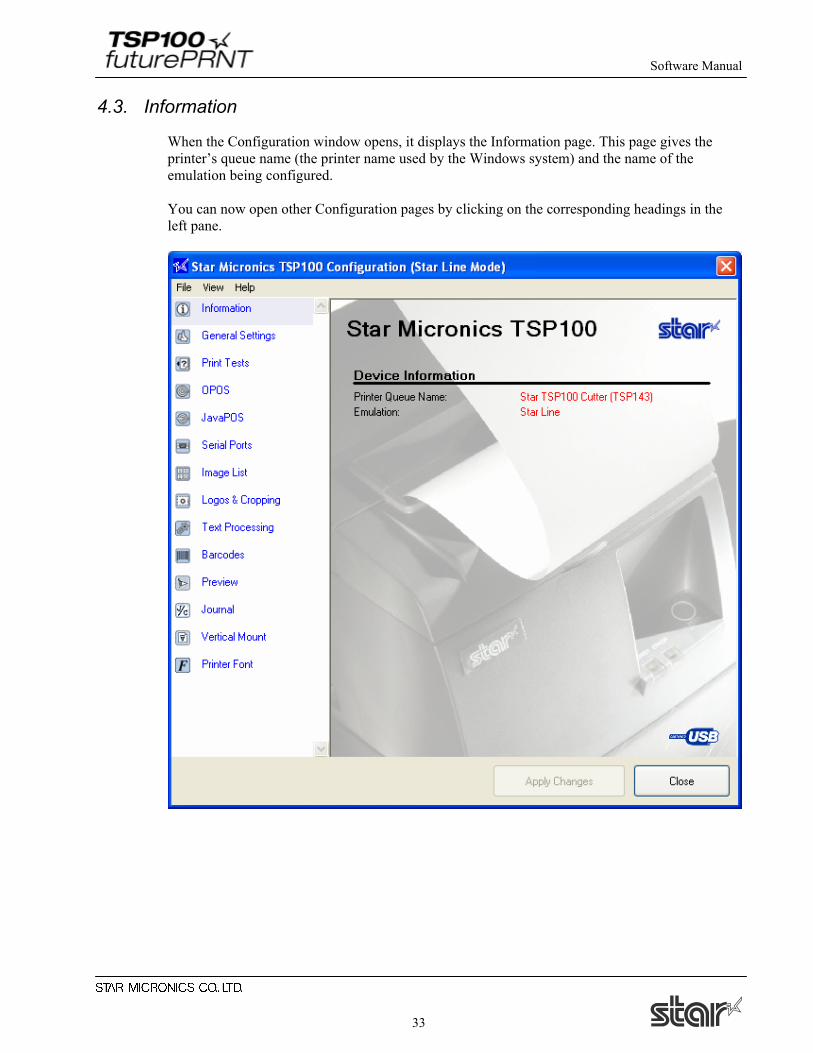
4.3. Information
When the Configuration window opens, it displays the Information page. This page gives the printer’s queue name (the printer name used by the Windows system) and the name of the emulation being configured. You can now open other Configuration pages by clicking on the corresponding headings in the left pane.
Software Manual
34
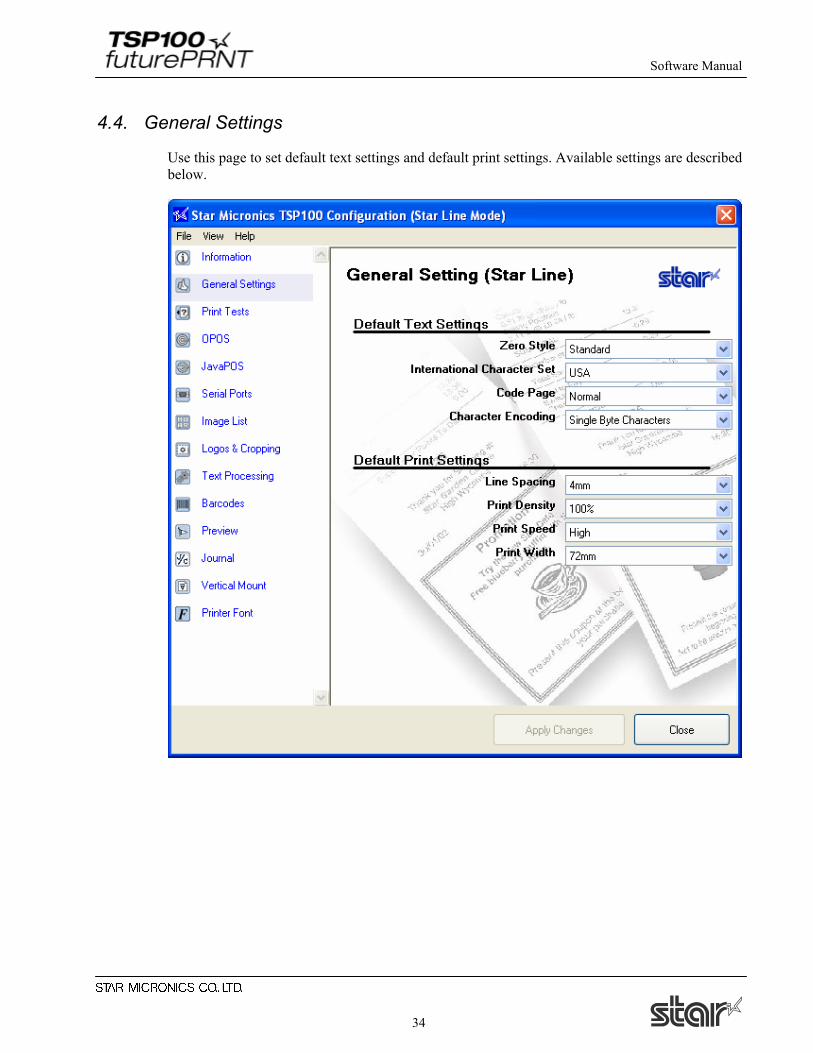
4.4. General Settings
Use this page to set default text settings and default print settings. Available settings are described below.
Software Manual
35
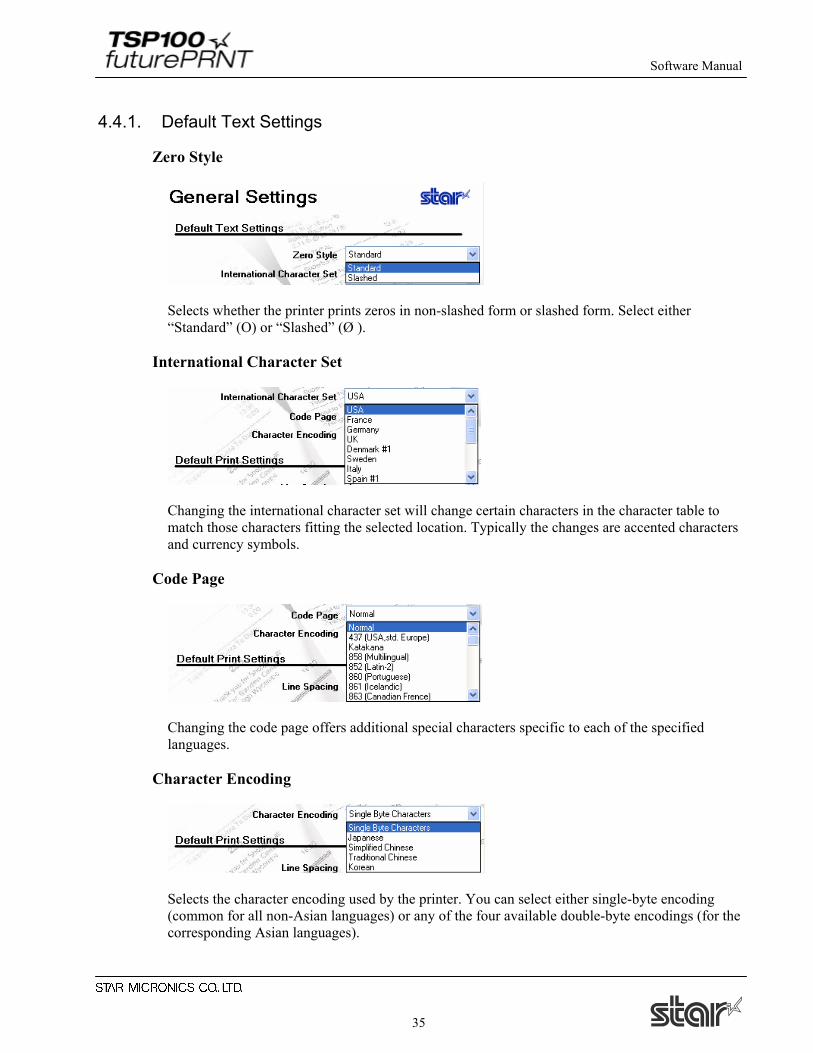
4.4.1. Default Text Settings
Zero Style
Selects whether the printer prints zeros in non-slashed form or slashed form. Select either “Standard” (O) or “Slashed” (Ø ).
International Character Set
Changing the international character set will change certain characters in the character table to match those characters fitting the selected location. Typically the changes are accented characters and currency symbols.
Code Page
Changing the code page offers additional special characters specific to each of the specified languages.
Character Encoding
Selects the character encoding used by the printer. You can select either single-byte encoding (common for all non-Asian languages) or any of the four available double-byte encodings (for the corresponding Asian languages).
Software Manual
36
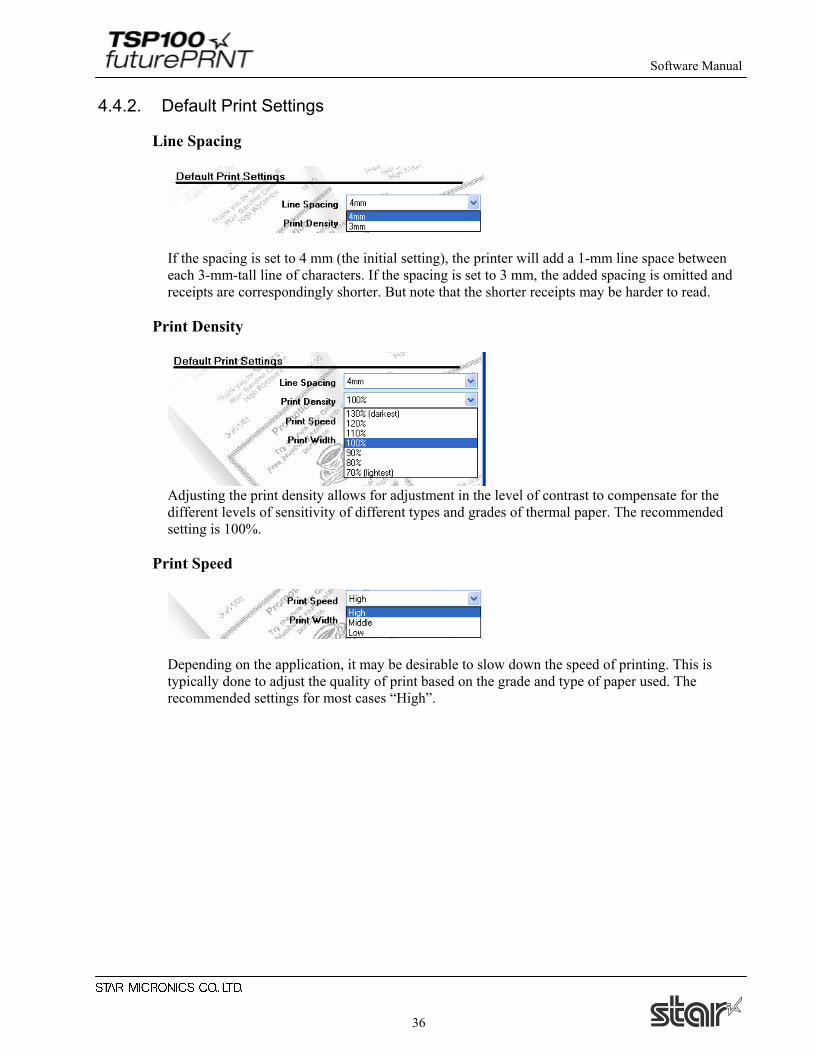
4.4.2. Default Print Settings
Line Spacing
If the spacing is set to 4 mm (the initial setting), the printer will add a 1-mm line space between each 3-mm-tall line of characters. If the spacing is set to 3 mm, the added spacing is omitted and receipts are correspondingly shorter. But note that the shorter receipts may be harder to read.
Print Density
Adjusting the print density allows for adjustment in the level of contrast to compensate for the different levels of sensitivity of different types and grades of thermal paper. The recommended setting is 100%.
Print Speed
Depending on the application, it may be desirable to slow down the speed of printing. This is typically done to adjust the quality of print based on the grade and type of paper used. The recommended settings for most cases “High”.

Software Manual
37
Print Width
The print width should be set according to the size of paper used. The standard default print width is 72 mm, which provides 4-mm margins on both sides of 80-mm paper. The 51-mm print width setting is appropriate if you are using the optional 58-mm paper supported by the TSP100 futurePRNT.

Software Manual
38
4.5. Printer Tests
The page lets you generate various sample receipt printouts. Use this feature to test or demonstrate the TSP100 futurePRNT’s printing capabilities.
4.5.1. Default Character Set
Prints a table exhibiting the entire TSP100 futurePRNT default single byte character table.
4.5.2. Barcode Print
Prints samples of all of the TSP100 futurePRNT’s available barcodes.
4.5.3. Print Head Test
Tests the print head by printing solid black for several lines. If this sample has vertical white lines in the black area this can indicate that the print head requires cleaning or repair. Refer to the printer’s owner’s manual for further instructions regarding routine maintenance.

Software Manual
39
4.5.4. Open Cash Drawer 1
Tests cash drawer 1.
4.5.5. Open Cash Drawer 2
Tests cash drawer 2.
Software Manual
40
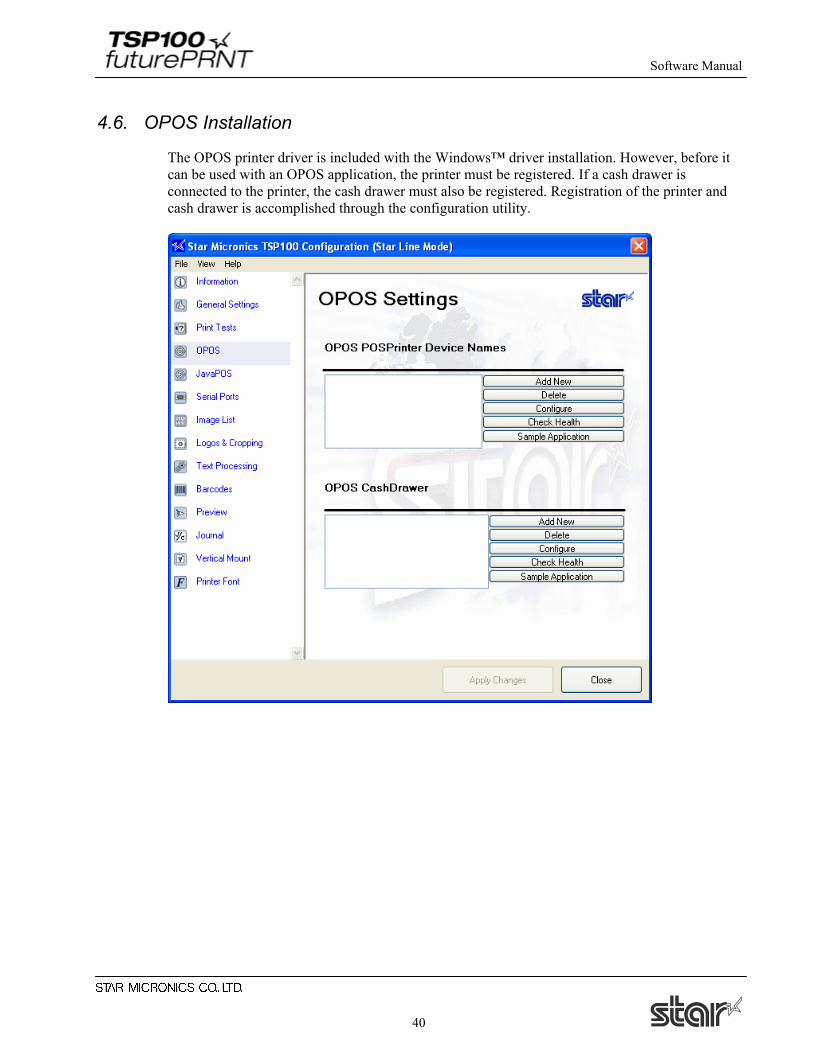
4.6. OPOS Installation
The OPOS printer driver is included with the Windows™ driver installation. However, before it can be used with an OPOS application, the printer must be registered. If a cash drawer is connected to the printer, the cash drawer must also be registered. Registration of the printer and cash drawer is accomplished through the configuration utility.
Software Manual
41
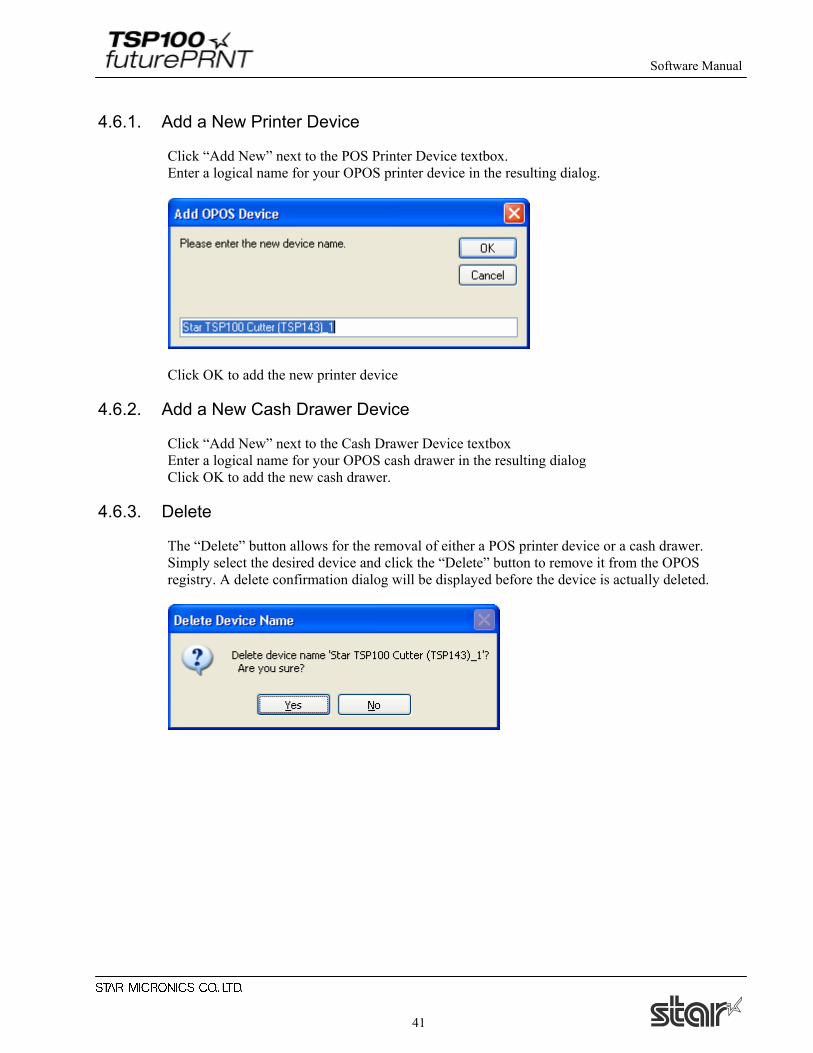
4.6.1. Add a New Printer Device
Click “Add New” next to the POS Printer Device textbox. Enter a logical name for your OPOS printer device in the resulting dialog.
Click OK to add the new printer device
4.6.2. Add a New Cash Drawer Device
Click “Add New” next to the Cash Drawer Device textbox Enter a logical name for your OPOS cash drawer in the resulting dialog Click OK to add the new cash drawer.
4.6.3. Delete
The “Delete” button allows for the removal of either a POS printer device or a cash drawer. Simply select the desired device and click the “Delete” button to remove it from the OPOS registry. A delete confirmation dialog will be displayed before the device is actually deleted.

Software Manual
42
4.6.4. Configure
The “Configure” button allows for the creation of a logical name or alias for each device. In the sample the printer’s logical device name is “FrontCounter TSP100” and this name would be used to call the printer from the OPOS application.
4.6.5. Check Health
The “Check Health” button performs a system check to ensure that the printer is connected and working properly under OPOS. After the initial check, a sample receipt will be printed to show the printer is printing with its full capability.
Software Manual
43
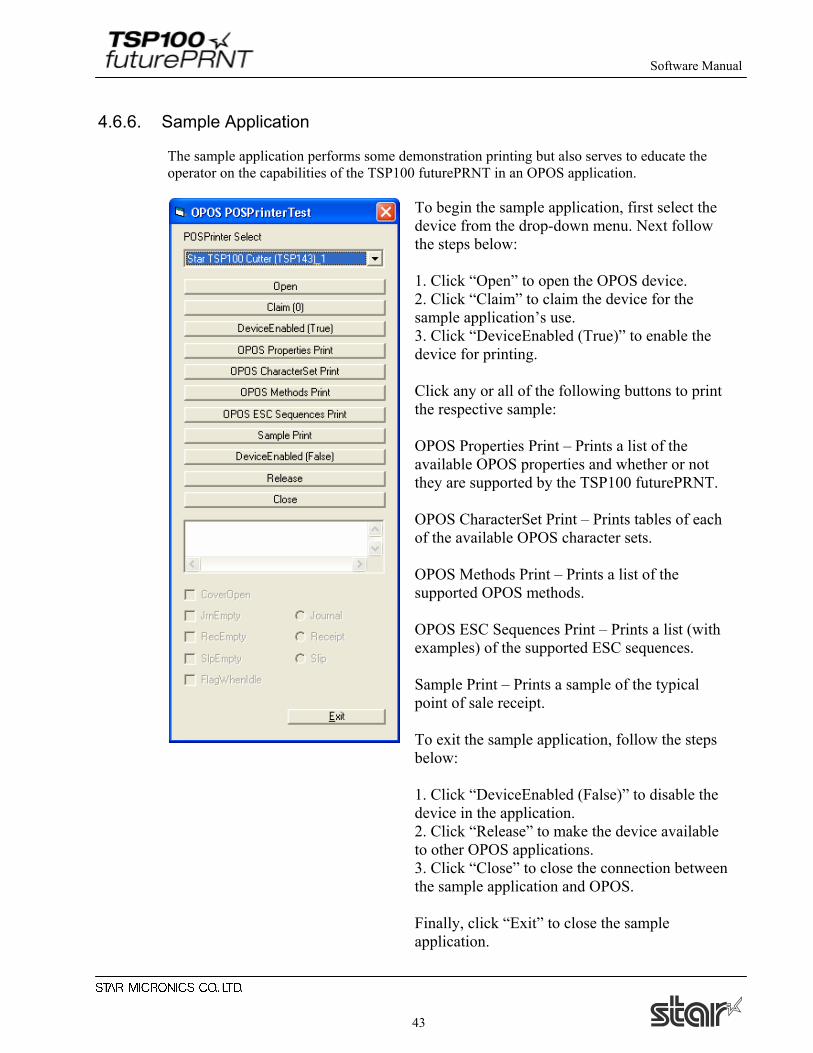
4.6.6. Sample Application
The sample application performs some demonstration printing but also serves to educate the operator on the capabilities of the TSP100 futurePRNT in an OPOS application.
To begin the sample application, first select the device from the drop-down menu. Next follow the steps below: 1. Click “Open” to open the OPOS device. 2. Click “Claim” to claim the device for the sample application’s use. 3. Click “DeviceEnabled (True)” to enable the device for printing. Click any or all of the following buttons to print the respective sample: OPOS Properties Print – Prints a list of the available OPOS properties and whether or not they are supported by the TSP100 futurePRNT. OPOS CharacterSet Print – Prints tables of each of the available OPOS character sets. OPOS Methods Print – Prints a list of the supported OPOS methods. OPOS ESC Sequences Print – Prints a list (with examples) of the supported ESC sequences. Sample Print – Prints a sample of the typical point of sale receipt. To exit the sample application, follow the steps below: 1. Click “DeviceEnabled (False)” to disable the device in the application. 2. Click “Release” to make the device available to other OPOS applications. 3. Click “Close” to close the connection between the sample application and OPOS. Finally, click “Exit” to close the sample application.
Software Manual
44
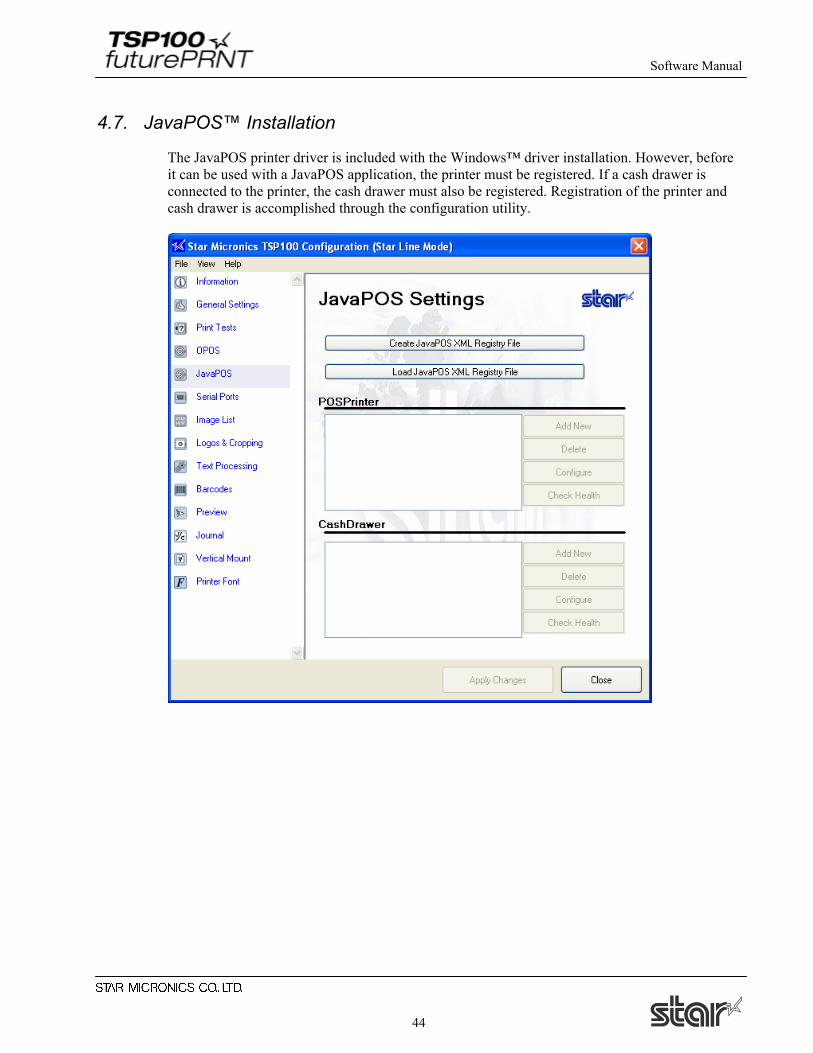
4.7. JavaPOS™ Installation
The JavaPOS printer driver is included with the Windows™ driver installation. However, before it can be used with a JavaPOS application, the printer must be registered. If a cash drawer is connected to the printer, the cash drawer must also be registered. Registration of the printer and cash drawer is accomplished through the configuration utility.
Software Manual
45
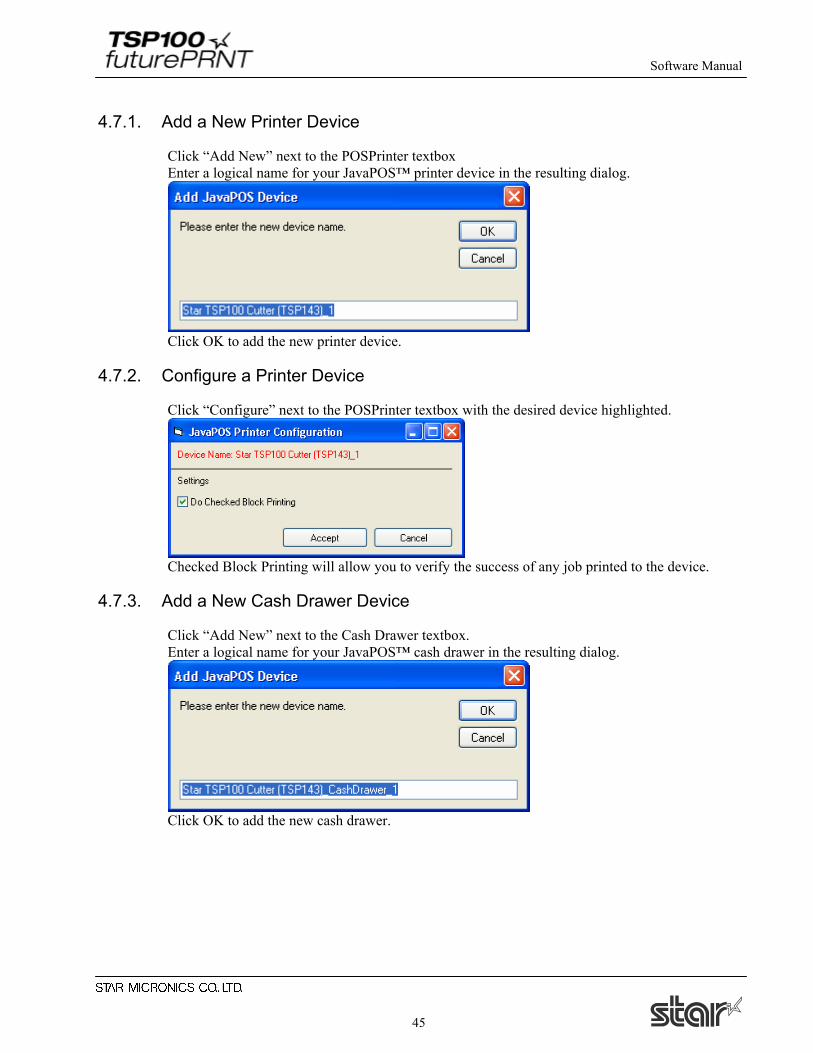
4.7.1. Add a New Printer Device
Click “Add New” next to the POSPrinter textbox Enter a logical name for your JavaPOS™ printer device in the resulting dialog.
Click OK to add the new printer device.
4.7.2. Configure a Printer Device
Click “Configure” next to the POSPrinter textbox with the desired device highlighted.
Checked Block Printing will allow you to verify the success of any job printed to the device.
4.7.3. Add a New Cash Drawer Device
Click “Add New” next to the Cash Drawer textbox. Enter a logical name for your JavaPOS™ cash drawer in the resulting dialog.
Click OK to add the new cash drawer.
Software Manual
46
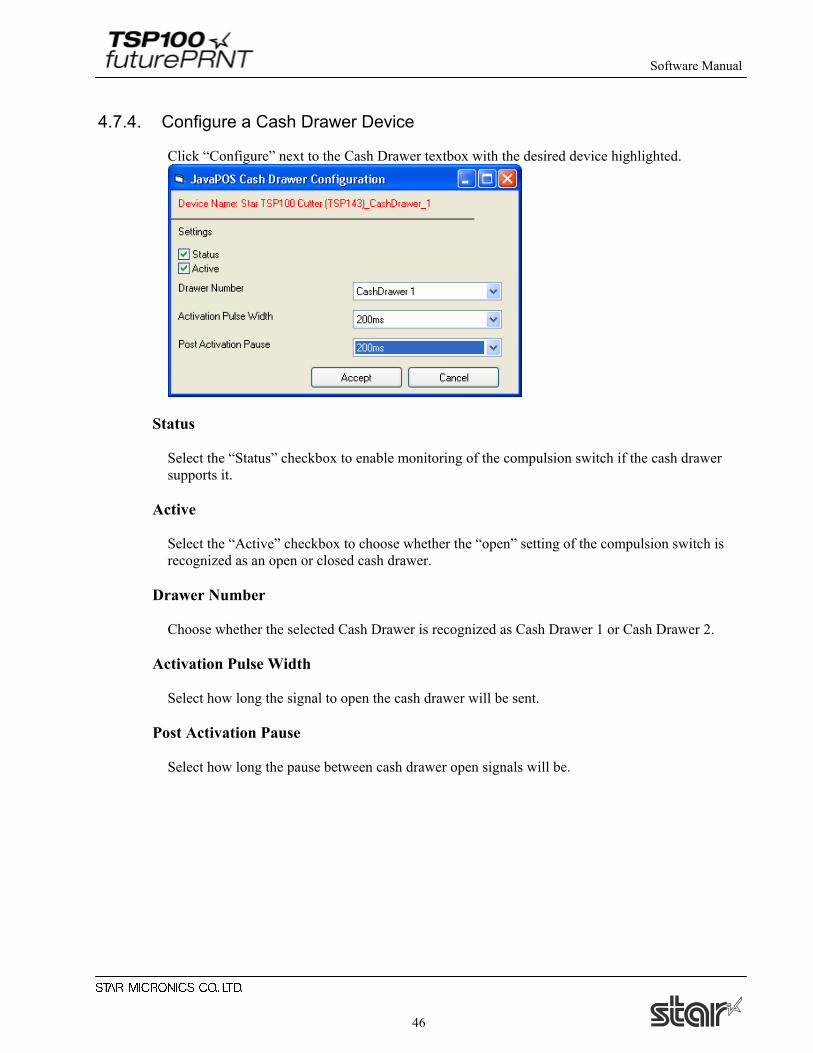
4.7.4. Configure a Cash Drawer Device
Click “Configure” next to the Cash Drawer textbox with the desired device highlighted.
Status Select the “Status” checkbox to enable monitoring of the compulsion switch if the cash drawer supports it.
Active Select the “Active” checkbox to choose whether the “open” setting of the compulsion switch is recognized as an open or closed cash drawer.
Drawer Number Choose whether the selected Cash Drawer is recognized as Cash Drawer 1 or Cash Drawer 2.
Activation Pulse Width Select how long the signal to open the cash drawer will be sent.
Post Activation Pause Select how long the pause between cash drawer open signals will be.
Software Manual
47
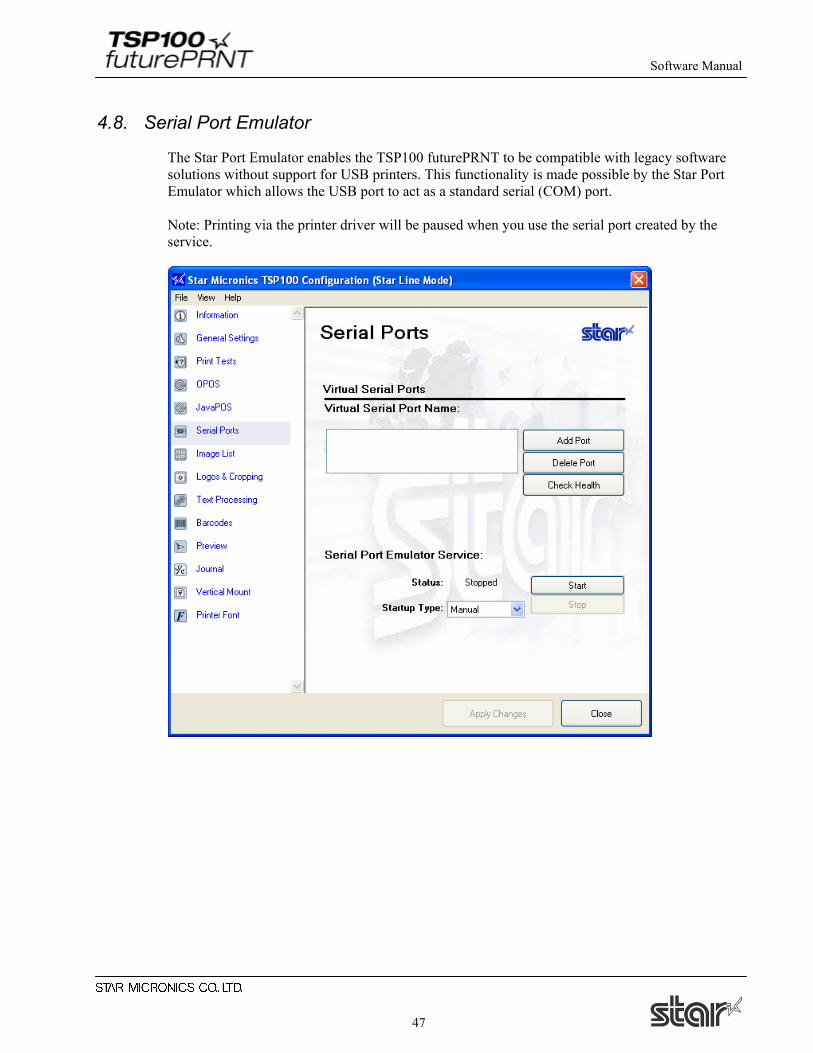
4.8. Serial Port Emulator
The Star Port Emulator enables the TSP100 futurePRNT to be compatible with legacy software solutions without support for USB printers. This functionality is made possible by the Star Port Emulator which allows the USB port to act as a standard serial (COM) port. Note: Printing via the printer driver will be paused when you use the serial port created by the service.
Software Manual
48
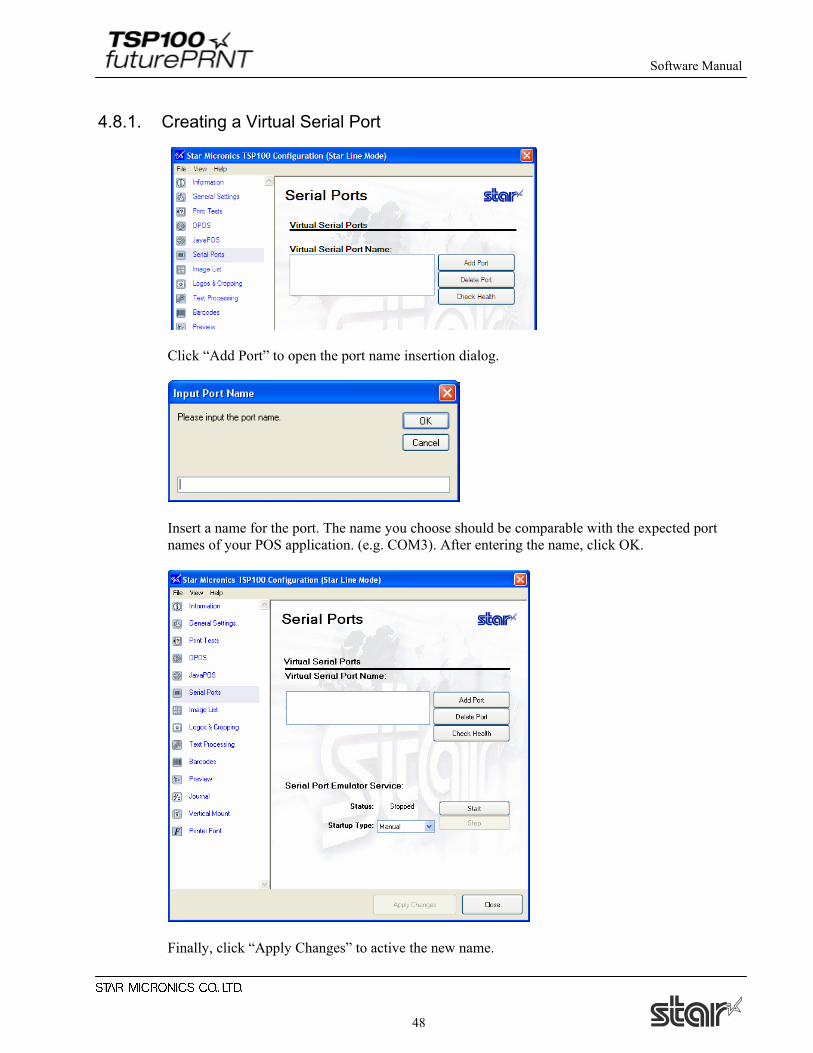
4.8.1. Creating a Virtual Serial Port
Click “Add Port” to open the port name insertion dialog.
Insert a name for the port. The name you choose should be comparable with the expected port names of your POS application. (e.g. COM3). After entering the name, click OK.
Finally, click “Apply Changes” to active the new name.
Software Manual
49
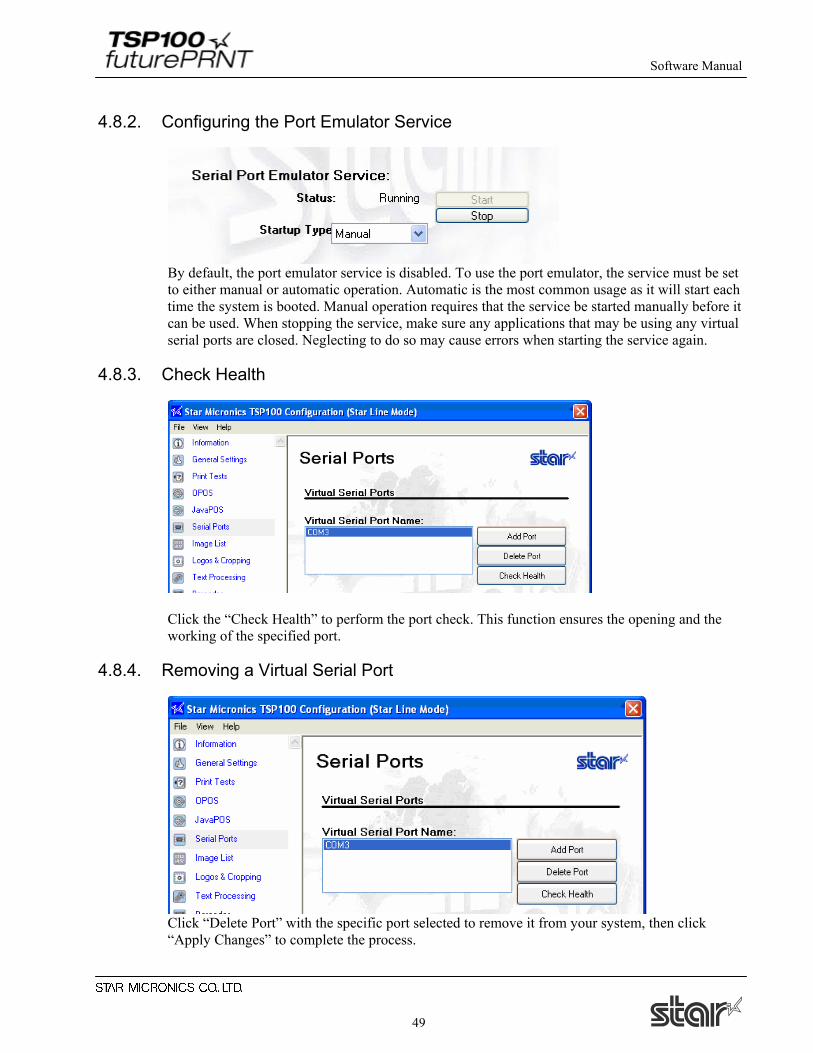
4.8.2. Configuring the Port Emulator Service
By default, the port emulator service is disabled. To use the port emulator, the service must be set to either manual or automatic operation. Automatic is the most common usage as it will start each time the system is booted. Manual operation requires that the service be started manually before it can be used. When stopping the service, make sure any applications that may be using any virtual serial ports are closed. Neglecting to do so may cause errors when starting the service again.
4.8.3. Check Health
Click the “Check Health” to perform the port check. This function ensures the opening and the working of the specified port.
4.8.4. Removing a Virtual Serial Port
Click “Delete Port” with the specific port selected to remove it from your system, then click “Apply Changes” to complete the process.
Software Manual
50
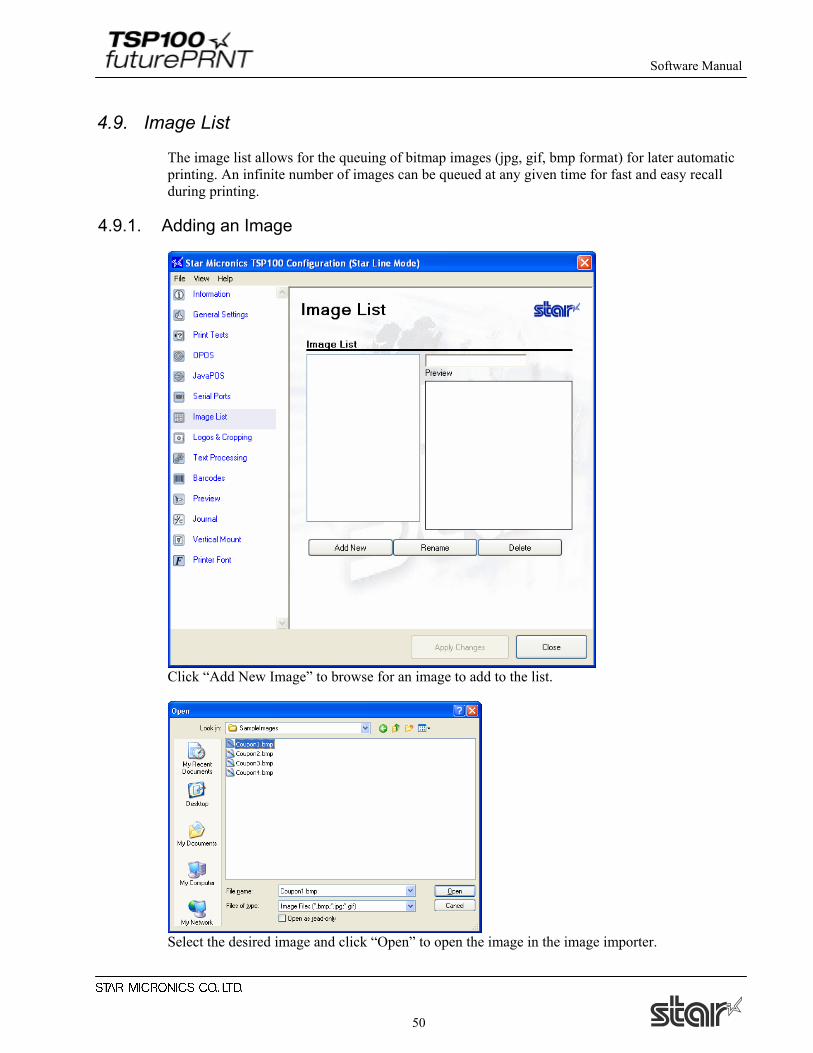
4.9. Image List
The image list allows for the queuing of bitmap images (jpg, gif, bmp format) for later automatic printing. An infinite number of images can be queued at any given time for fast and easy recall during printing.
4.9.1. Adding an Image
Click “Add New Image” to browse for an image to add to the list.
Select the desired image and click “Open” to open the image in the image importer.

Software Manual
51
Use the image importer to: • Give your image a unique name using the Image ID Name field • Adjust image width in 1/8 mm increments using the image width slider • Select the preferred dithering method • Adjust dither settings to desired image quality Note: Each dither method offers different adjustment options. For best results it is recommended to experiment with the settings to find which setting works best for any particular image. After adjusting the image to your satisfaction, click “Use Image” to add the image to the image list and make it available for use with the TSP100 futurePRNT’s Logos and Cropping utility.
Software Manual
52
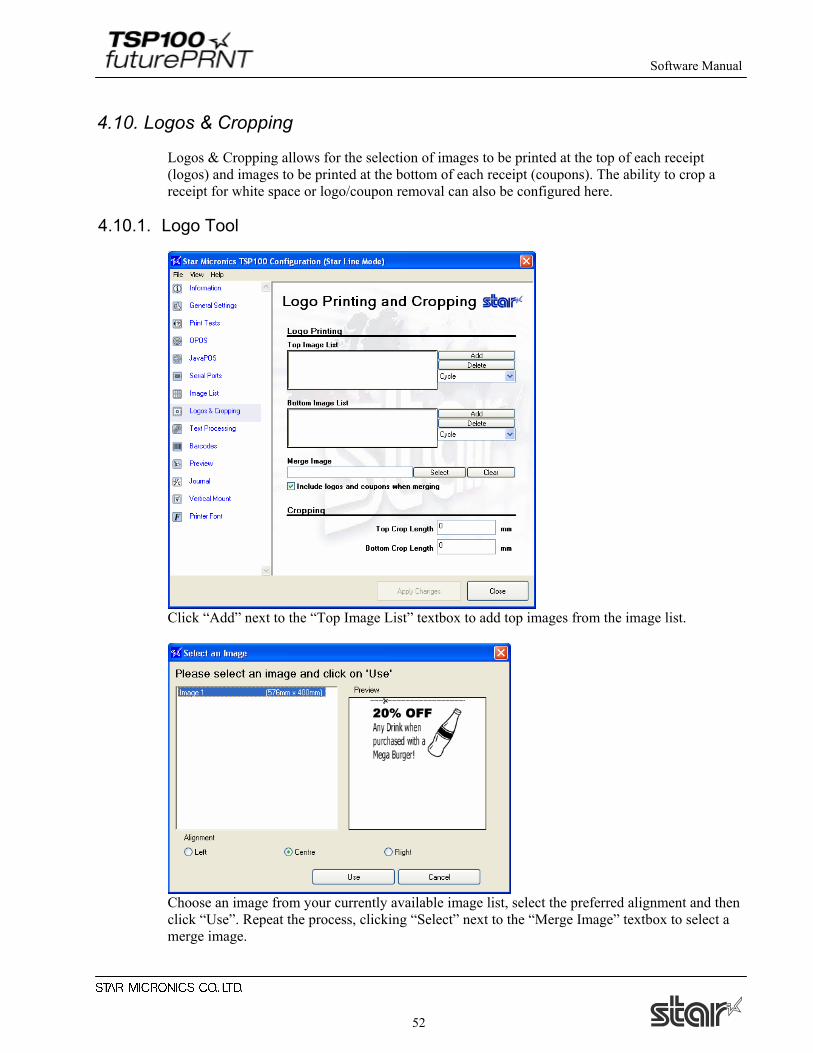
4.10. Logos & Cropping
Logos & Cropping allows for the selection of images to be printed at the top of each receipt (logos) and images to be printed at the bottom of each receipt (coupons). The ability to crop a receipt for white space or logo/coupon removal can also be configured here.
4.10.1. Logo Tool
Click “Add” next to the “Top Image List” textbox to add top images from the image list.
Choose an image from your currently available image list, select the preferred alignment and then click “Use”. Repeat the process, clicking “Select” next to the “Merge Image” textbox to select a merge image.
Software Manual
53
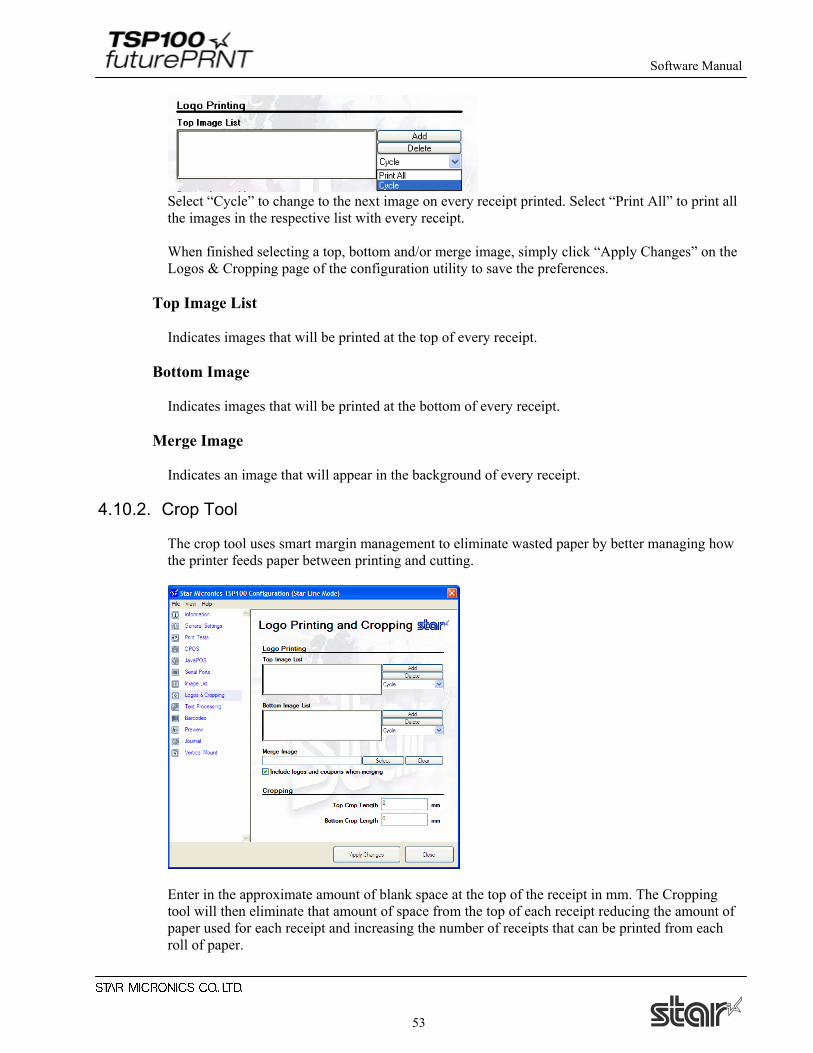
Select “Cycle” to change to the next image on every receipt printed. Select “Print All” to print all the images in the respective list with every receipt. When finished selecting a top, bottom and/or merge image, simply click “Apply Changes” on the Logos & Cropping page of the configuration utility to save the preferences.
Top Image List Indicates images that will be printed at the top of every receipt.
Bottom Image Indicates images that will be printed at the bottom of every receipt.
Merge Image Indicates an image that will appear in the background of every receipt.
4.10.2. Crop Tool
The crop tool uses smart margin management to eliminate wasted paper by better managing how the printer feeds paper between printing and cutting.
Enter in the approximate amount of blank space at the top of the receipt in mm. The Cropping tool will then eliminate that amount of space from the top of each receipt reducing the amount of paper used for each receipt and increasing the number of receipts that can be printed from each roll of paper.
Software Manual
54
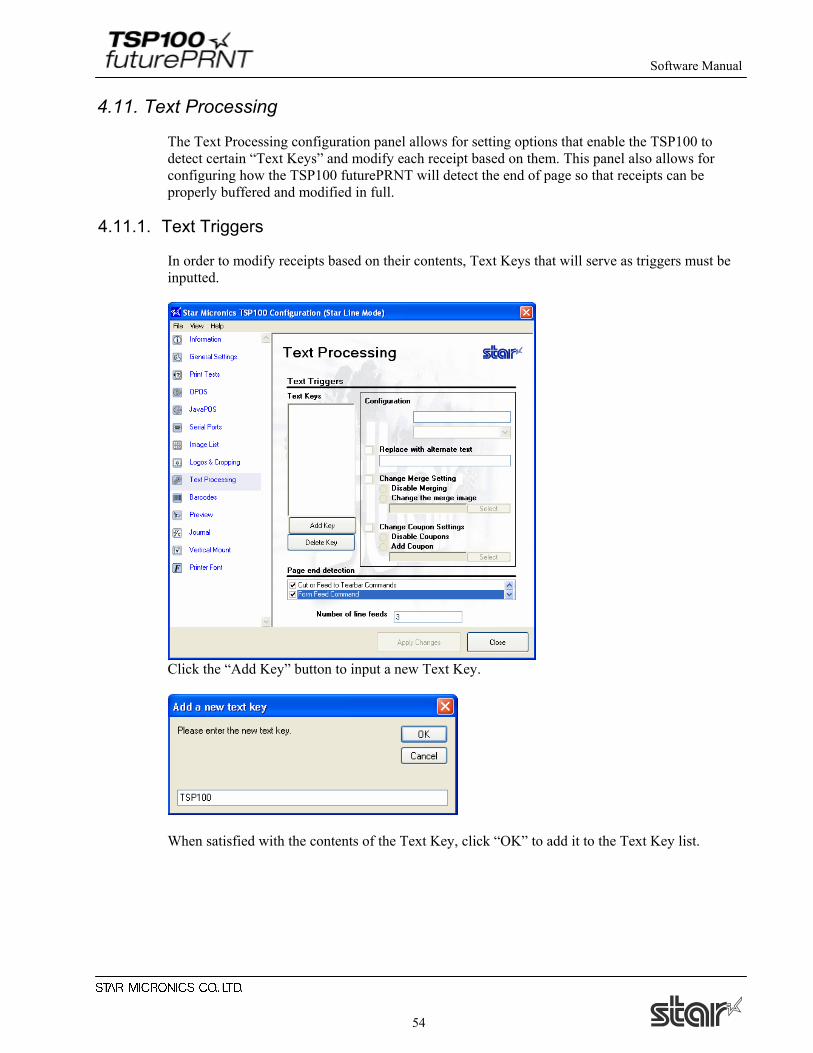
4.11. Text Processing
The Text Processing configuration panel allows for setting options that enable the TSP100 to detect certain “Text Keys” and modify each receipt based on them. This panel also allows for configuring how the TSP100 futurePRNT will detect the end of page so that receipts can be properly buffered and modified in full.
4.11.1. Text Triggers
In order to modify receipts based on their contents, Text Keys that will serve as triggers must be inputted.
Click the “Add Key” button to input a new Text Key.
When satisfied with the contents of the Text Key, click “OK” to add it to the Text Key list.

Software Manual
55
The default character code is 1252 (Windows Latin 1). If you cannot do a search or the replaced character string has become corrupted, change the character code as necessary. * See Windows 1252 Code Table on page 69.
With the proper Text Key selected, Configuration options are enabled. The functionality of these options are explained below.
Replace with alternate text With this option enabled, it is possible to replace the selected Text Key with a new string. This is useful if there is an old phone number or address that needs to be changed on a legacy application that cannot be changed programmatically.
Change Merge Setting With this setting enabled, it is possible to change the merge image selected in the Logos & Cropping section or completely disable merging all together for that receipt.
Change Coupon Settings With this setting enabled, it is possible to add a coupon to the bottom of the receipt or disable printing of coupons all together for that receipt.
Software Manual
56
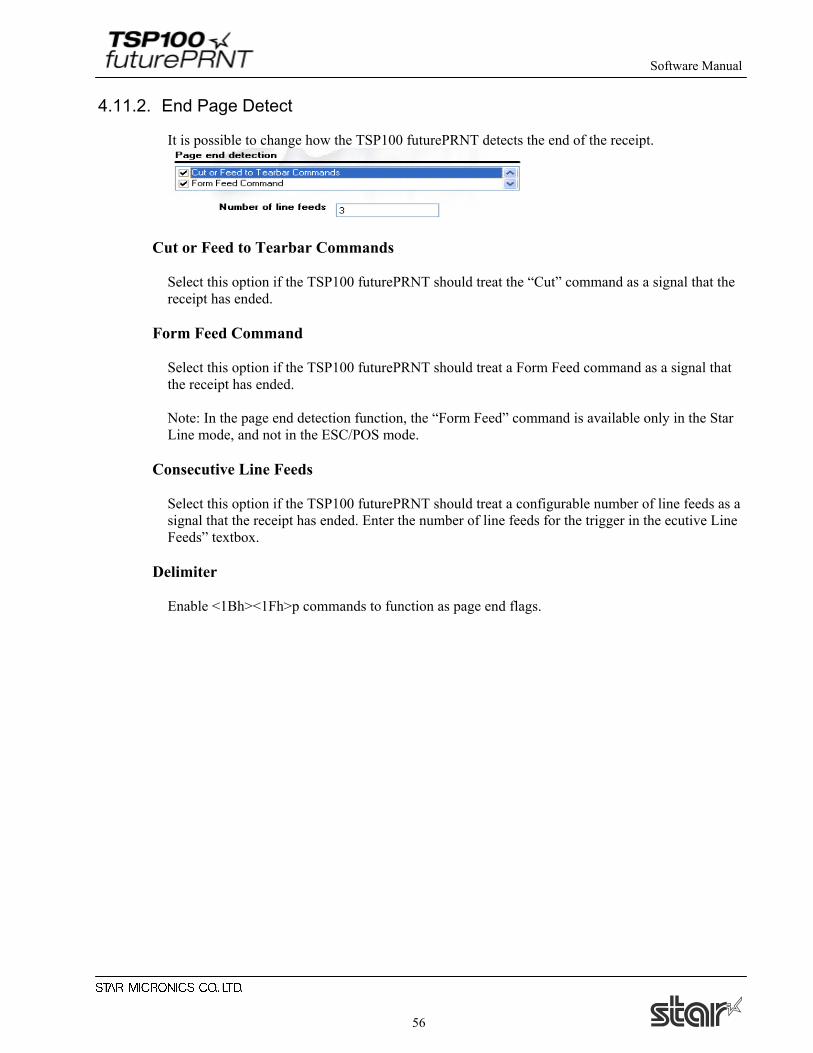
4.11.2. End Page Detect
It is possible to change how the TSP100 futurePRNT detects the end of the receipt.
Cut or Feed to Tearbar Commands Select this option if the TSP100 futurePRNT should treat the “Cut” command as a signal that the receipt has ended.
Form Feed Command Select this option if the TSP100 futurePRNT should treat a Form Feed command as a signal that the receipt has ended. Note: In the page end detection function, the “Form Feed” command is available only in the Star Line mode, and not in the ESC/POS mode.
Consecutive Line Feeds Select this option if the TSP100 futurePRNT should treat a configurable number of line feeds as a signal that the receipt has ended. Enter the number of line feeds for the trigger in the ecutive Line Feeds” textbox.
Delimiter Enable <1Bh><1Fh>p commands to function as page end flags.
Software Manual
57
4.12. Barcodes
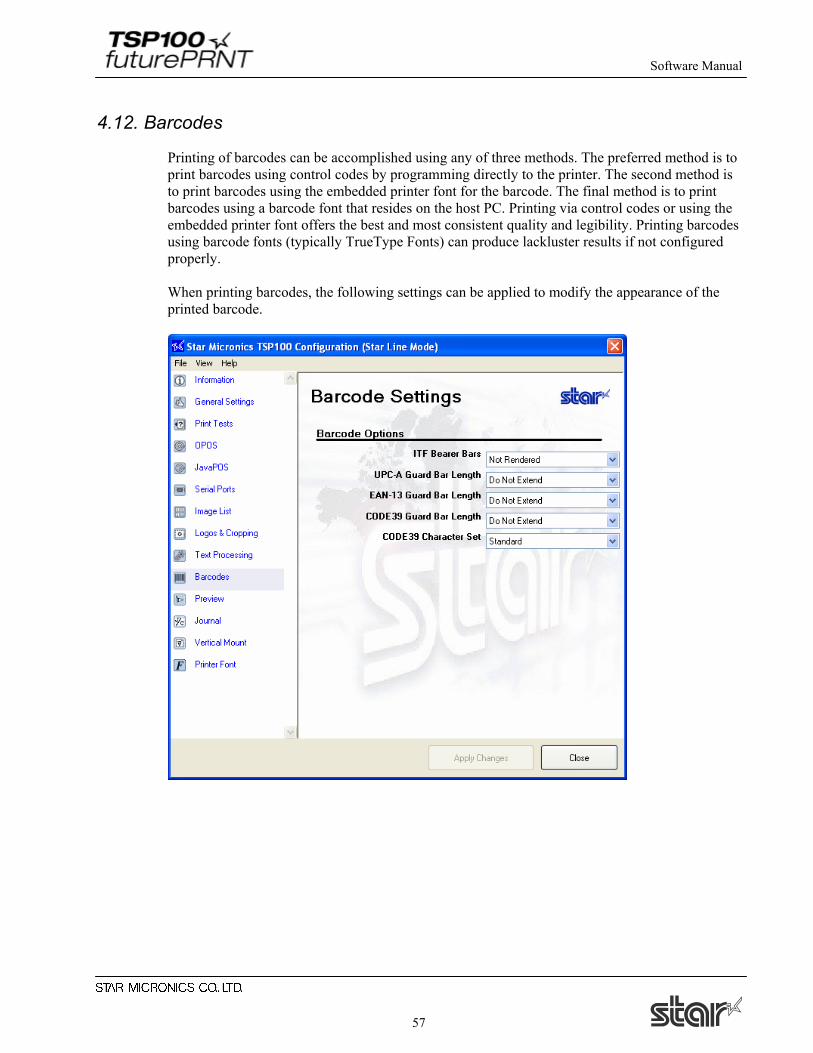
Printing of barcodes can be accomplished using any of three methods. The preferred method is to print barcodes using control codes by programming directly to the printer. The second method is to print barcodes using the embedded printer font for the barcode. The final method is to print barcodes using a barcode font that resides on the host PC. Printing via control codes or using the embedded printer font offers the best and most consistent quality and legibility. Printing barcodes using barcode fonts (typically TrueType Fonts) can produce lackluster results if not configured properly. When printing barcodes, the following settings can be applied to modify the appearance of the printed barcode.
Software Manual
58
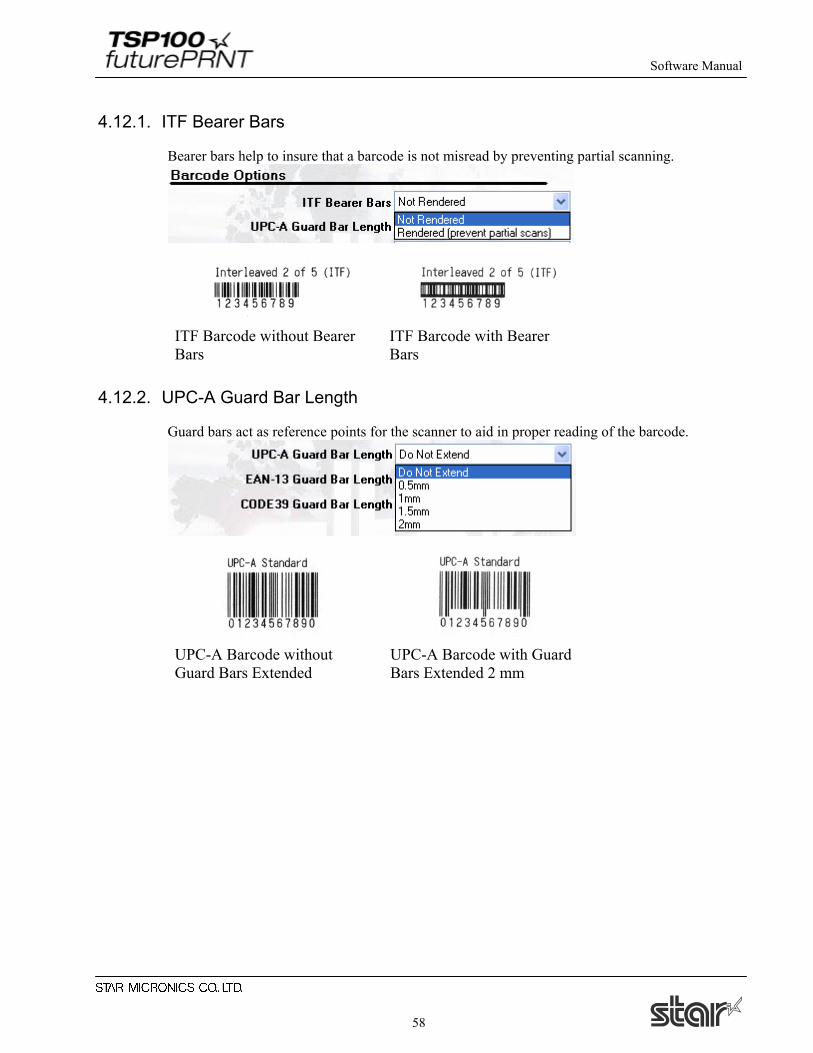
4.12.1. ITF Bearer Bars
Bearer bars help to insure that a barcode is not misread by preventing partial scanning.
ITF Barcode without Bearer Bars
ITF Barcode with Bearer Bars
4.12.2. UPC-A Guard Bar Length
Guard bars act as reference points for the scanner to aid in proper reading of the barcode.
UPC-A Barcode without Guard Bars Extended
UPC-A Barcode with Guard Bars Extended 2 mm

Software Manual
59
4.12.3. JAN/EAN-13 Guard Bar Length
Guard bars act as reference points for the scanner to aid in proper reading of the barcode.
JAN/EAN-13 Barcode without Guard Bars Extended
JAN/EAN-13 Barcode with Guard Bars Extended 2 mm
4.12.4. CODE39 Guard Bar Length
Guard bars act as reference points for the scanner to aid in proper reading of the barcode.
CODE39 Barcode without Guard Bars Extended
CODE39 Barcode with Guard Bars Extended 2 mm
Software Manual
60
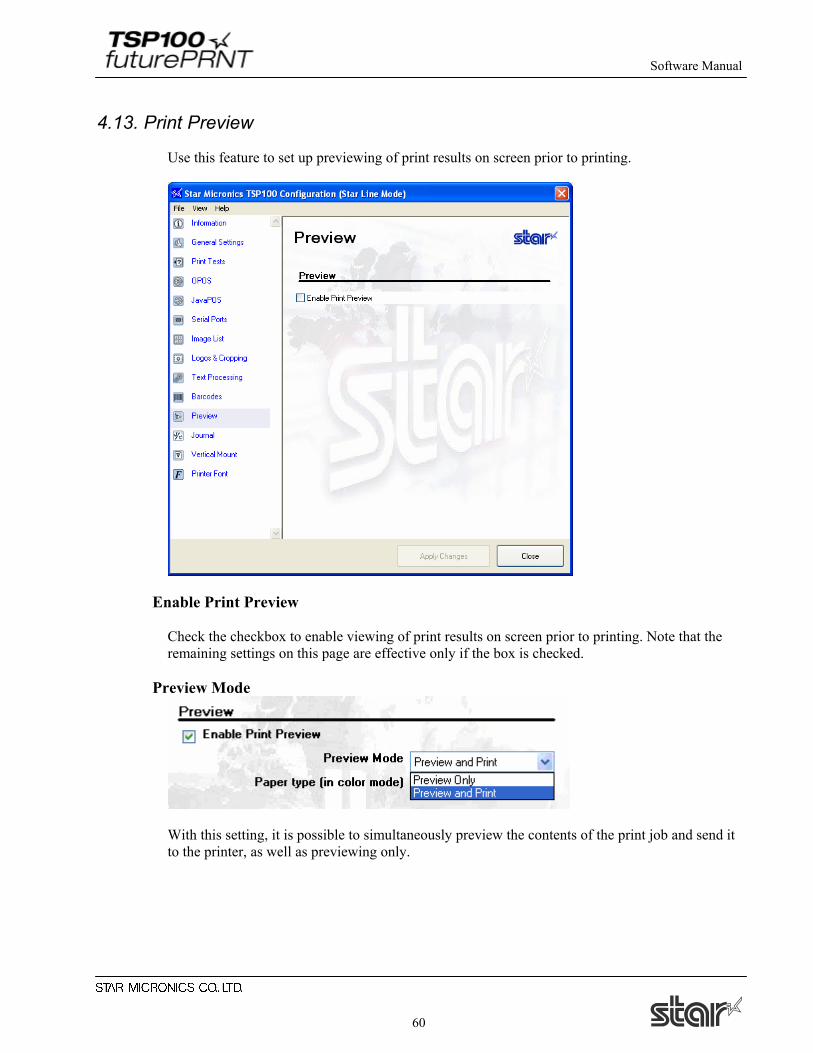
4.13. Print Preview
Use this feature to set up previewing of print results on screen prior to printing.
Enable Print Preview Check the checkbox to enable viewing of print results on screen prior to printing. Note that the remaining settings on this page are effective only if the box is checked.
Preview Mode
With this setting, it is possible to simultaneously preview the contents of the print job and send it to the printer, as well as previewing only.
Software Manual
61
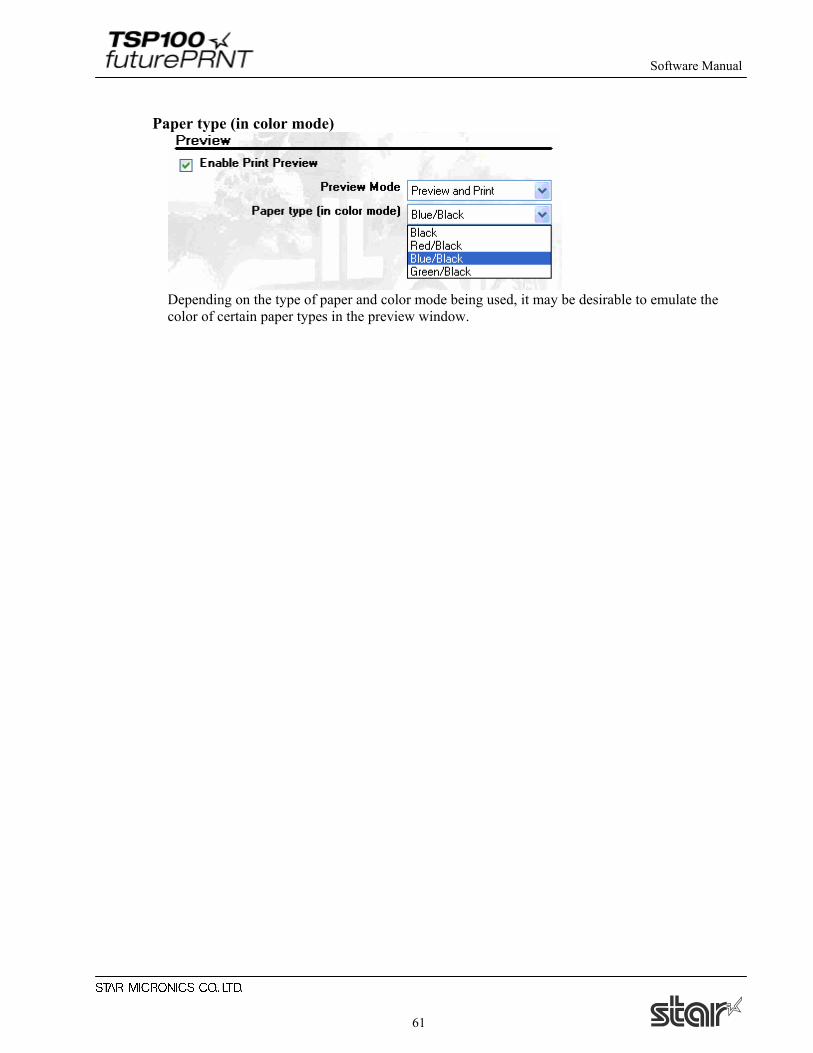
Paper type (in color mode)
Depending on the type of paper and color mode being used, it may be desirable to emulate the color of certain paper types in the preview window.

Software Manual
62
4.14. Journaling, and Printing of Multiple Customized Copies
Use this page to set up journaling and multi-copy printing.
4.14.1. Multi-Copy Printing
This feature lets you print up to four customized copies together with the original receipt. You can set separate header, footer, and merge images for each of these copies, and you can independently enable or disable printing of each of these copies.
Automatic Multiple Copies If unchecked: The printer prints the original receipt only, with no copies. All settings in the
tabbed setup area are ignored. If checked: The printer prints the original, followed by as many as four customized copies (up
to five prints in total). Printing of customized copies is determined by the settings in the tabbed setup area.
Software Manual
63
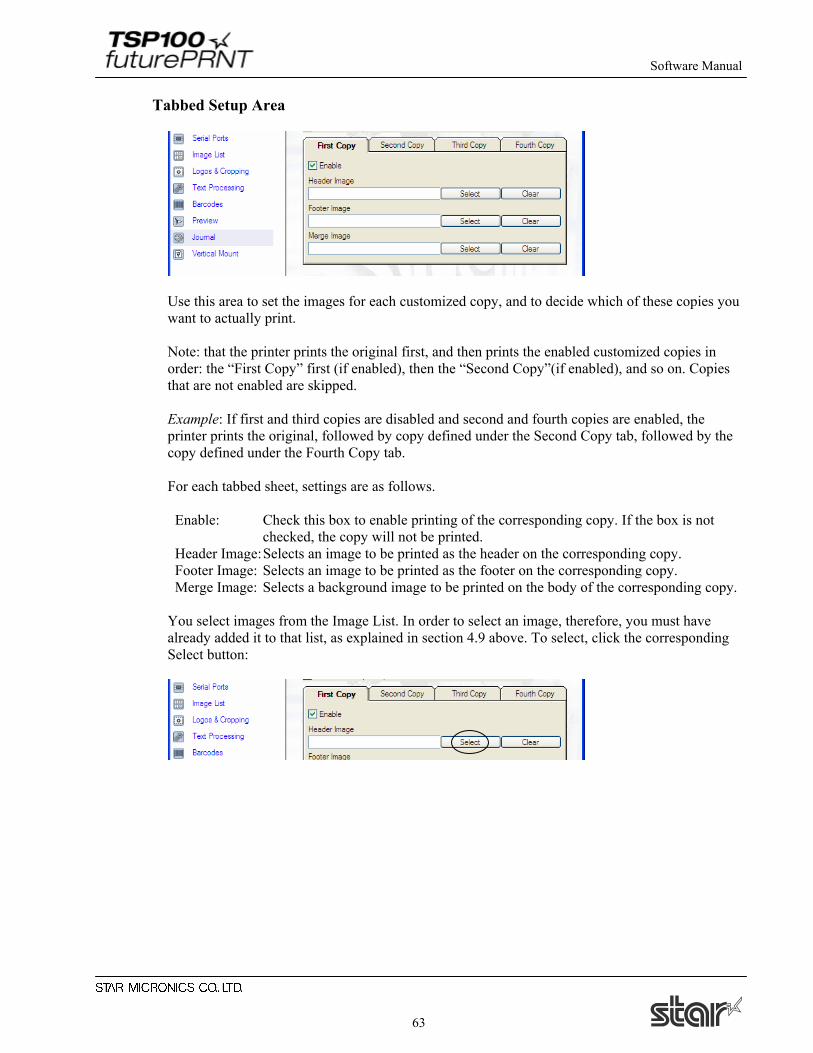
Tabbed Setup Area
Use this area to set the images for each customized copy, and to decide which of these copies you want to actually print. Note: that the printer prints the original first, and then prints the enabled customized copies in order: the “First Copy” first (if enabled), then the “Second Copy”(if enabled), and so on. Copies that are not enabled are skipped. Example: If first and third copies are disabled and second and fourth copies are enabled, the printer prints the original, followed by copy defined under the Second Copy tab, followed by the copy defined under the Fourth Copy tab. For each tabbed sheet, settings are as follows.
Enable: Check this box to enable printing of the corresponding copy. If the box is not checked, the copy will not be printed.
Header Image: Selects an image to be printed as the header on the corresponding copy. Footer Image: Selects an image to be printed as the footer on the corresponding copy. Merge Image: Selects a background image to be printed on the body of the corresponding copy.
You select images from the Image List. In order to select an image, therefore, you must have already added it to that list, as explained in section 4.9 above. To select, click the corresponding Select button:
Software Manual
64
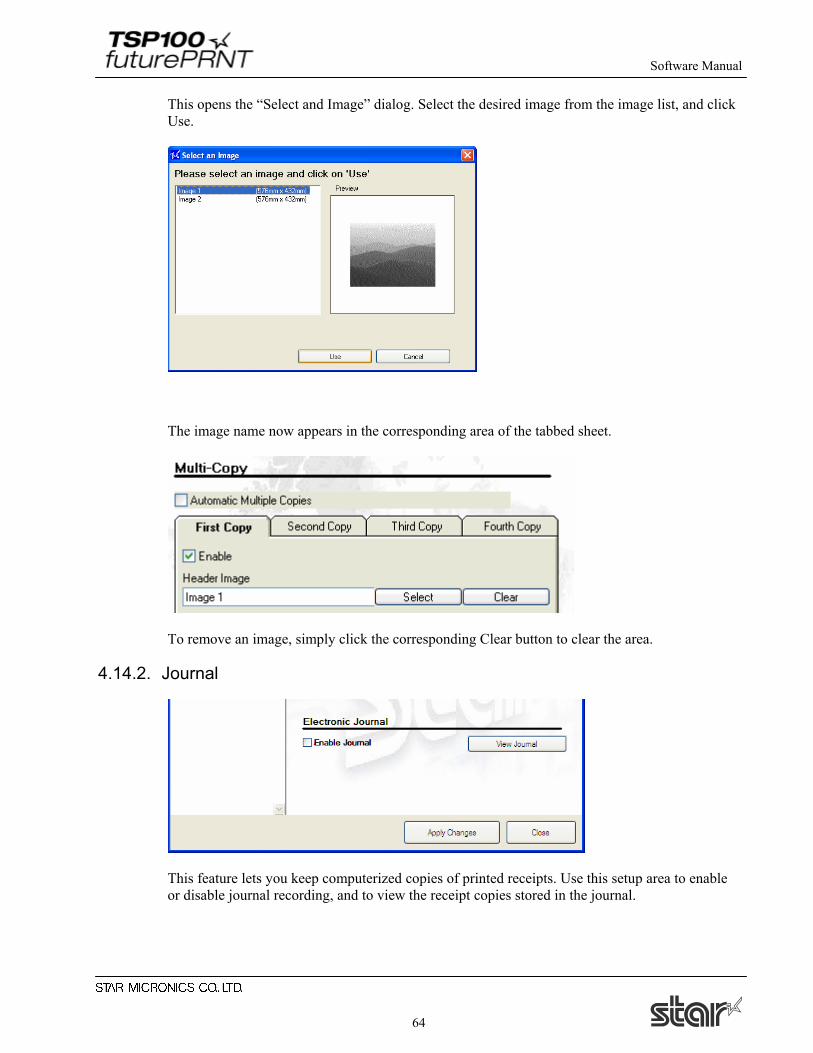
This opens the “Select and Image” dialog. Select the desired image from the image list, and click Use.
The image name now appears in the corresponding area of the tabbed sheet.
To remove an image, simply click the corresponding Clear button to clear the area.
4.14.2. Journal
This feature lets you keep computerized copies of printed receipts. Use this setup area to enable or disable journal recording, and to view the receipt copies stored in the journal.
Software Manual
65
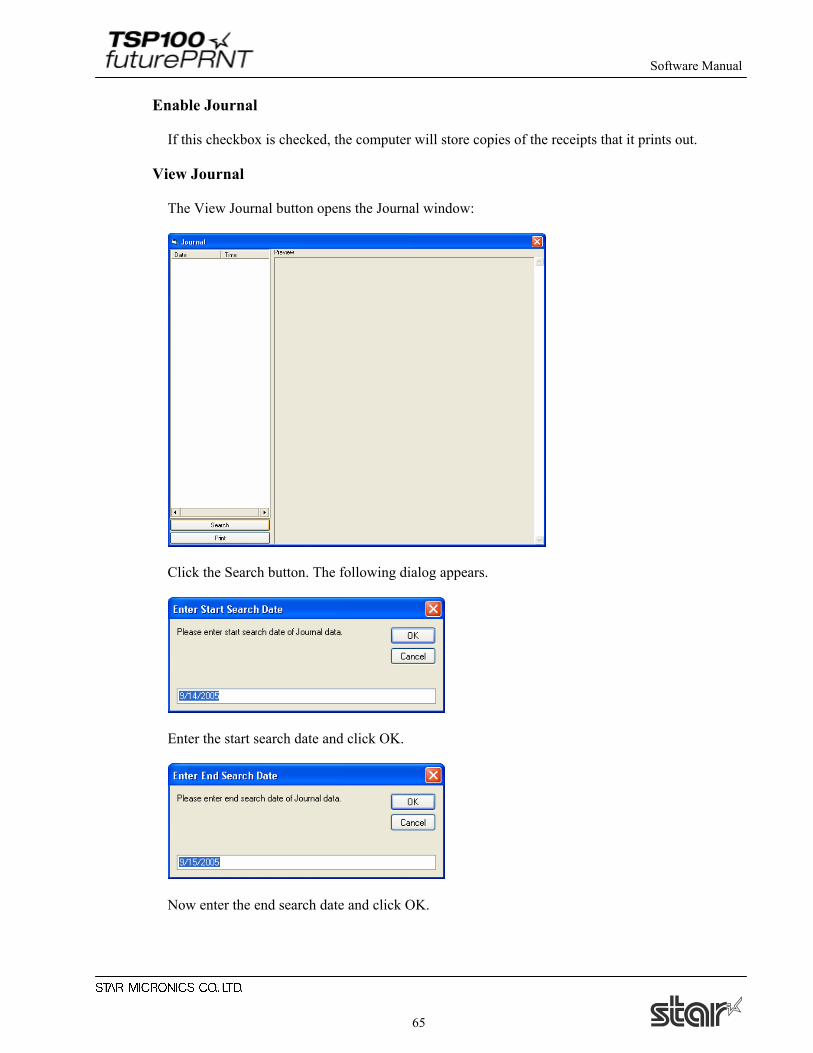
Enable Journal If this checkbox is checked, the computer will store copies of the receipts that it prints out.
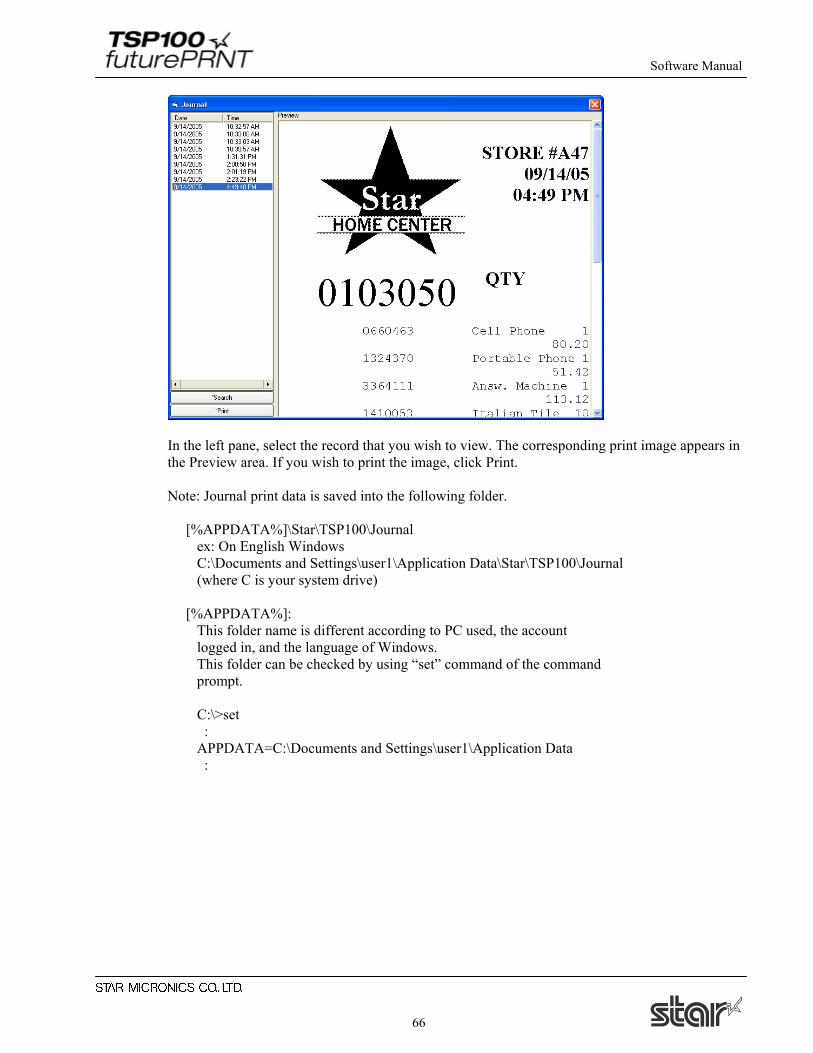
View Journal The View Journal button opens the Journal window:
Click the Search button. The following dialog appears.
Enter the start search date and click OK.
Now enter the end search date and click OK.
Software Manual
66
In the left pane, select the record that you wish to view. The corresponding print image appears in the Preview area. If you wish to print the image, click Print. Note: Journal print data is saved into the following folder. [%APPDATA%]\Star\TSP100\Journal ex: On English Windows C:\Documents and Settings\user1\Application Data\Star\TSP100\Journal (where C is your system drive) [%APPDATA%]: This folder name is different according to PC used, the account logged in, and the language of Windows. This folder can be checked by using “set” command of the command prompt. C:\>set : APPDATA=C:\Documents and Settings\user1\Application Data :

Software Manual
67
4.15. Vertical Mounting
If you are setting the printer upright or mounting it on the wall, check this checkbox to invert the printing. If the button is checked, receipts are printed bottom-to-top so that they are easier to present correctly to the customer.
Software Manual
68
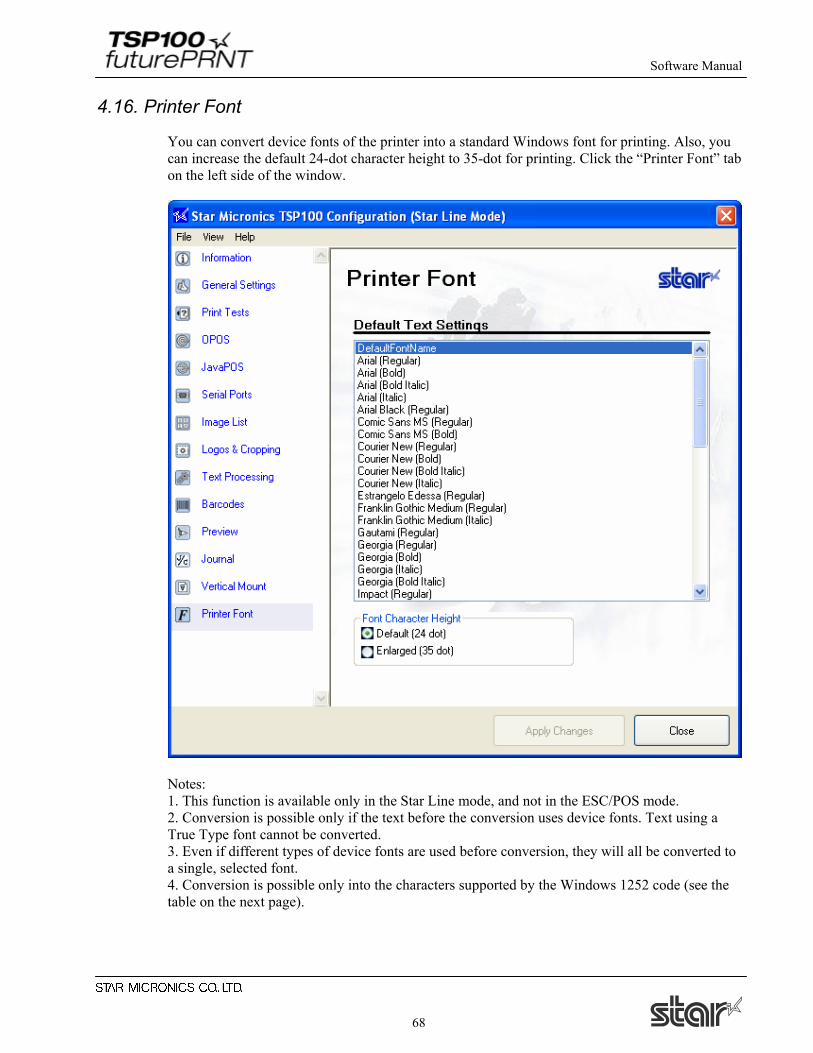
4.16. Printer Font
You can convert device fonts of the printer into a standard Windows font for printing. Also, you can increase the default 24-dot character height to 35-dot for printing. Click the “Printer Font” tab on the left side of the window.
Notes: 1. This function is available only in the Star Line mode, and not in the ESC/POS mode. 2. Conversion is possible only if the text before the conversion uses device fonts. Text using a True Type font cannot be converted. 3. Even if different types of device fonts are used before conversion, they will all be converted to a single, selected font. 4. Conversion is possible only into the characters supported by the Windows 1252 code (see the table on the next page).
Software Manual
69
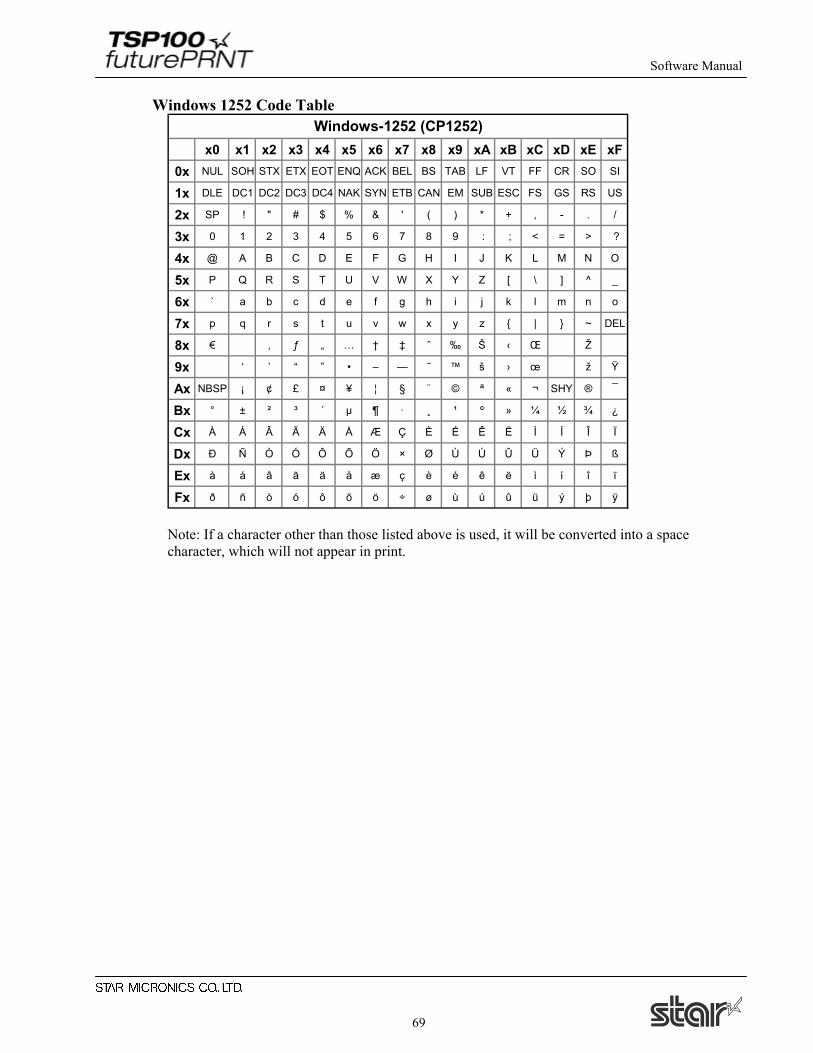
Windows 1252 Code Table
x0 x1 x2 x3 x4 x5 x6 x7 x8 x9 xA xB xC xD xE xF0x NUL SOH STX ETX EOT ENQ ACK BEL BS TAB LF VT FF CR SO SI
1x DLE DC1 DC2 DC3 DC4 NAK SYN ETB CAN EM SUB ESC FS GS RS US
2x SP ! " # $ % & ' ( ) * + , - . /
3x 0 1 2 3 4 5 6 7 8 9 : ; < = > ?
4x @ A B C D E F G H I J K L M N O
5x P Q R S T U V W X Y Z [ \ ] ^ _
6x ` a b c d e f g h i j k l m n o
7x p q r s t u v w x y z { | } ~ DEL
8x € ‚ ƒ „ … † ‡ ˆ ‰ Š ‹ Œ Ž
9x ‘ ’ “ ” • – — ˜ ™ š › œ ž Ÿ
Ax NBSP ¡ ¢ £ ¤ ¥ ¦ § ¨ © ª « ¬ SHY ® ¯
Bx ° ± ² ³ ´ µ ¶ · ¸ ¹ º » ¼ ½ ¾ ¿
Cx À Á Â Ã Ä Å Æ Ç È É Ê Ë Ì Í Î Ï
Dx Ð Ñ Ò Ó Ô Õ Ö × Ø Ù Ú Û Ü Ý Þ ß
Ex à á â ã ä å æ ç è é ê ë ì í î ï
Fx ð ñ ò ó ô õ ö ÷ ø ù ú û ü ý þ ÿ
Windows-1252 (CP1252)
Note: If a character other than those listed above is used, it will be converted into a space character, which will not appear in print.
Software Manual
70
5. Configuring on Windows 2000/XP (ESC/POS Mode)
5.1. Overview
Configuration for ESC/POS mode is in most respects identical to configuration in Star Line Mode, explained in the preceding chapter. This chapter explains only the displays, procedures, and settings that are specific to ESC/POS mode. For information about all other items, please refer back to Chapter 4, “Configuring on Windows 2000/XP (Star Line Mode).”
5.2. Launching the Configuration Application
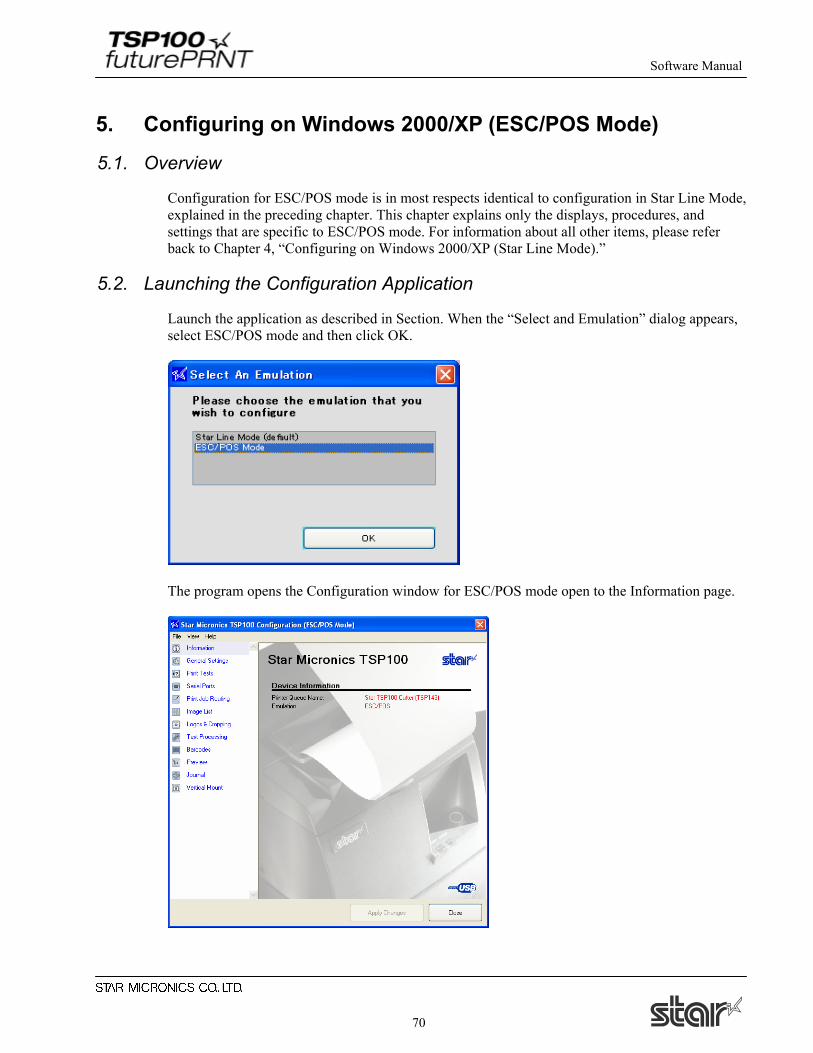
Launch the application as described in Section. When the “Select and Emulation” dialog appears, select ESC/POS mode and then click OK.
The program opens the Configuration window for ESC/POS mode open to the Information page.
Software Manual
71
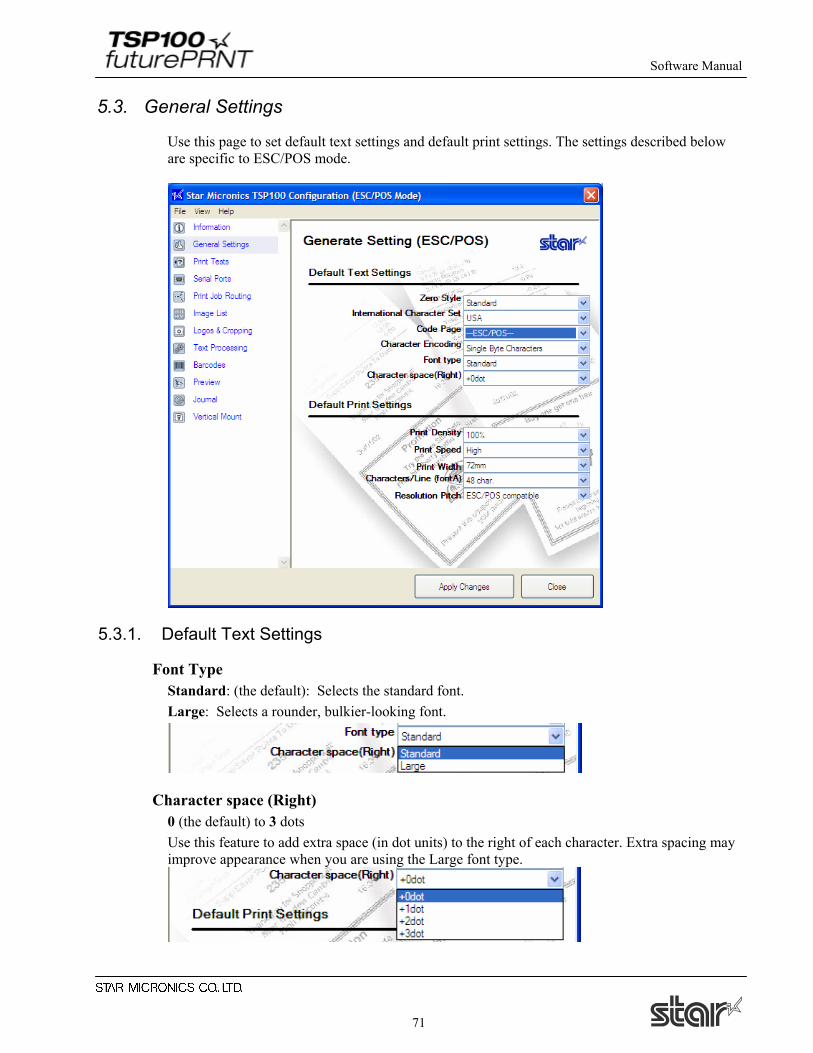
5.3. General Settings
Use this page to set default text settings and default print settings. The settings described below are specific to ESC/POS mode.
5.3.1. Default Text Settings
Font Type Standard: (the default): Selects the standard font. Large: Selects a rounder, bulkier-looking font.
Character space (Right) 0 (the default) to 3 dots Use this feature to add extra space (in dot units) to the right of each character. Extra spacing may improve appearance when you are using the Large font type.
Software Manual
72
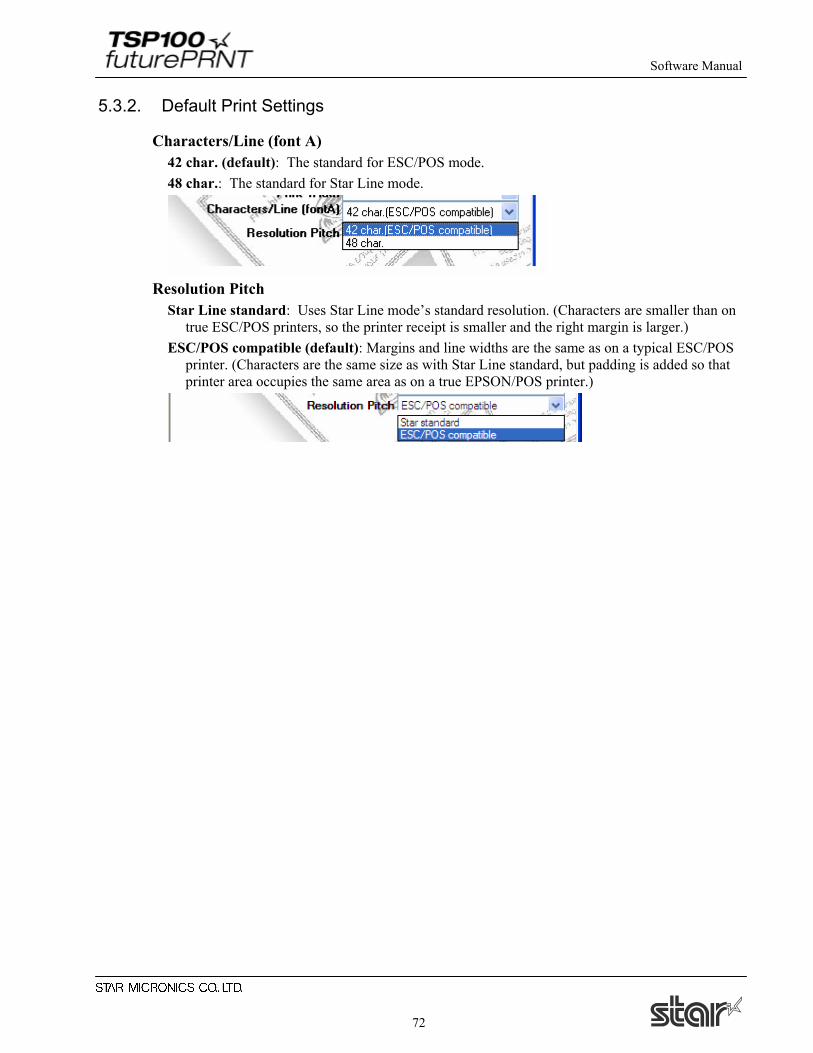
5.3.2. Default Print Settings
Characters/Line (font A) 42 char. (default): The standard for ESC/POS mode. 48 char.: The standard for Star Line mode.
Resolution Pitch
Star Line standard: Uses Star Line mode’s standard resolution. (Characters are smaller than on true ESC/POS printers, so the printer receipt is smaller and the right margin is larger.)
ESC/POS compatible (default): Margins and line widths are the same as on a typical ESC/POS printer. (Characters are the same size as with Star Line standard, but padding is added so that printer area occupies the same area as on a true EPSON/POS printer.)
Software Manual
73
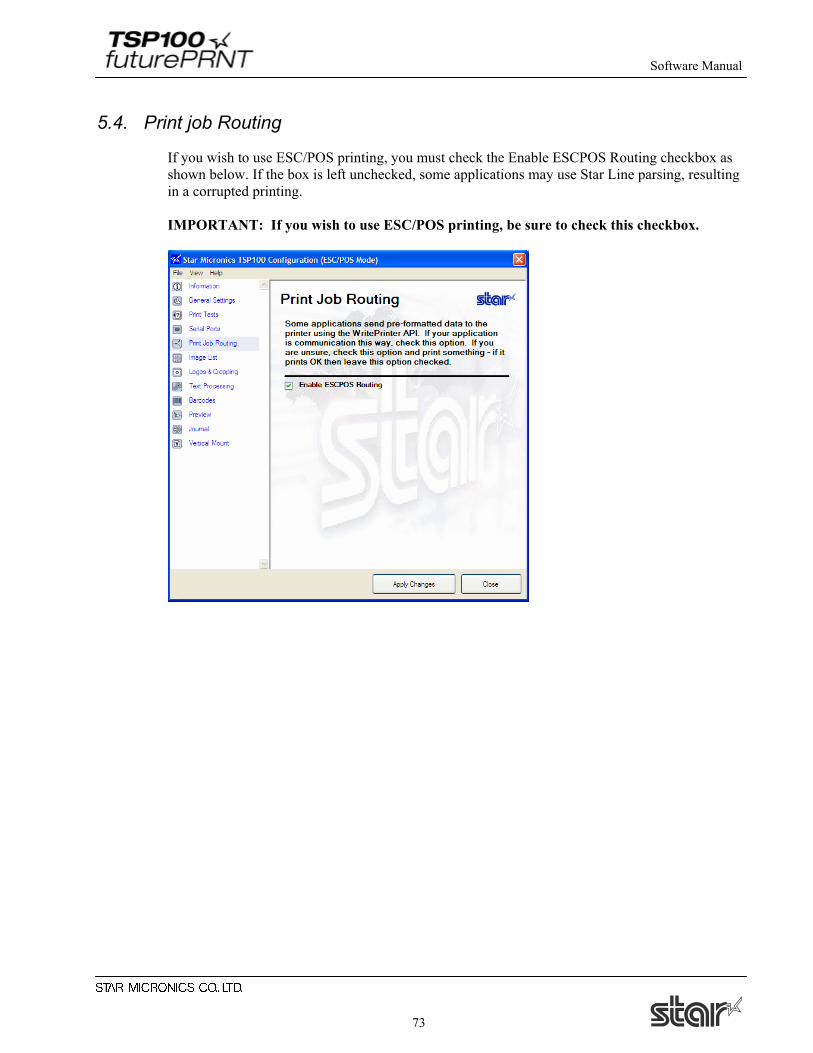
5.4. Print job Routing
If you wish to use ESC/POS printing, you must check the Enable ESCPOS Routing checkbox as shown below. If the box is left unchecked, some applications may use Star Line parsing, resulting in a corrupted printing. IMPORTANT: If you wish to use ESC/POS printing, be sure to check this checkbox.
Software Manual
74
6. Windows 98/Me Driver Installation
6.1. USB Printing Support Installation
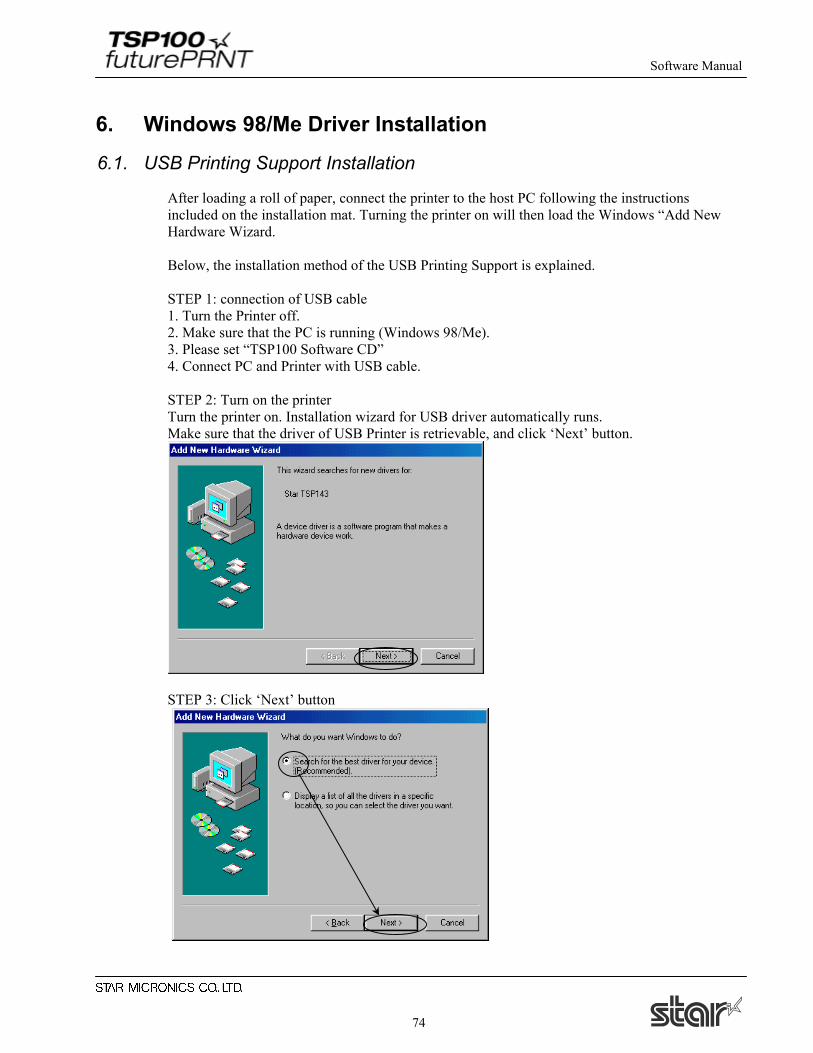
After loading a roll of paper, connect the printer to the host PC following the instructions included on the installation mat. Turning the printer on will then load the Windows “Add New Hardware Wizard. Below, the installation method of the USB Printing Support is explained. STEP 1: connection of USB cable 1. Turn the Printer off. 2. Make sure that the PC is running (Windows 98/Me). 3. Please set “TSP100 Software CD” 4. Connect PC and Printer with USB cable. STEP 2: Turn on the printer Turn the printer on. Installation wizard for USB driver automatically runs. Make sure that the driver of USB Printer is retrievable, and click ‘Next’ button.
STEP 3: Click ‘Next’ button
Software Manual
75
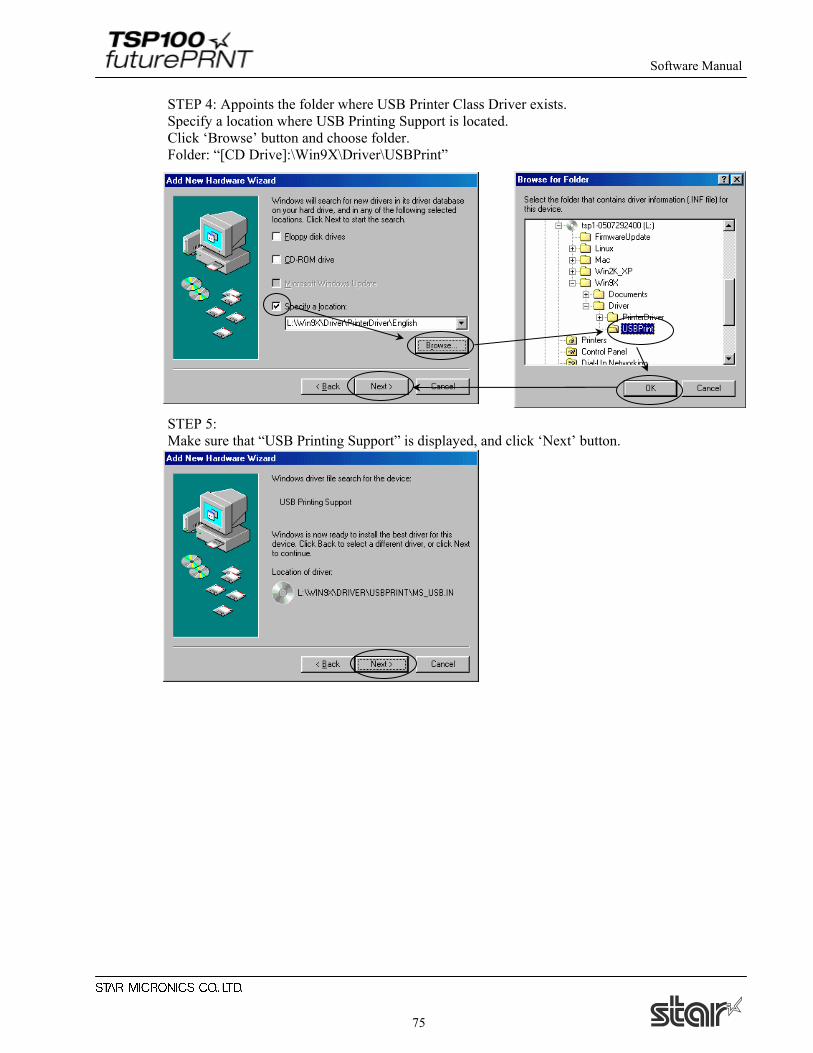
STEP 4: Appoints the folder where USB Printer Class Driver exists. Specify a location where USB Printing Support is located. Click ‘Browse’ button and choose folder. Folder: “[CD Drive]:\Win9X\Driver\USBPrint” STEP 5: Make sure that “USB Printing Support” is displayed, and click ‘Next’ button.
Software Manual
76
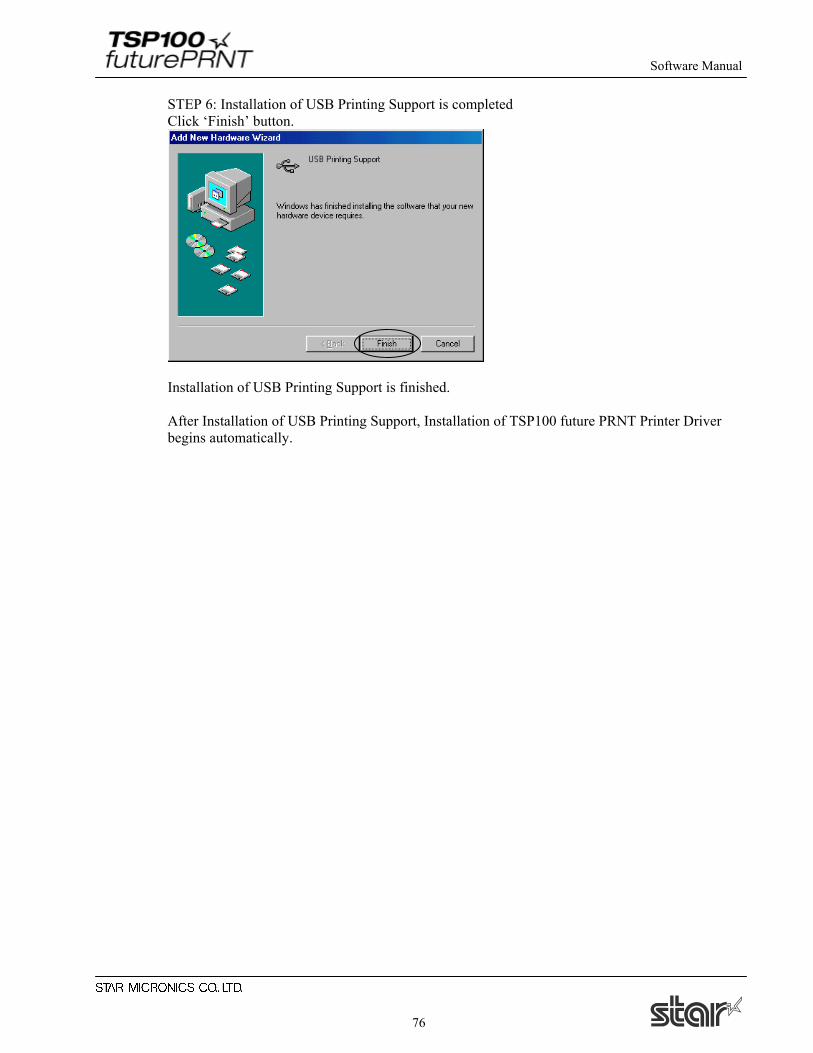
STEP 6: Installation of USB Printing Support is completed Click ‘Finish’ button.
Installation of USB Printing Support is finished. After Installation of USB Printing Support, Installation of TSP100 future PRNT Printer Driver begins automatically.
Software Manual
77
6.2. TSP100 futurePRNT Printer Driver Installation
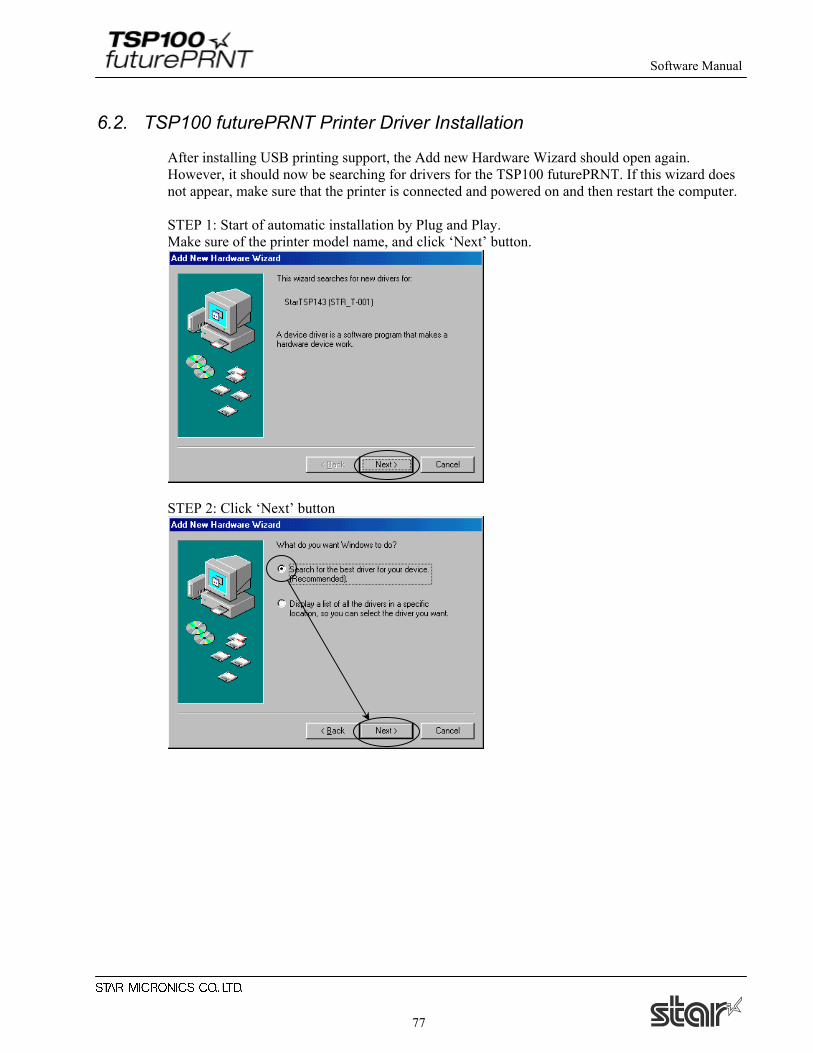
After installing USB printing support, the Add new Hardware Wizard should open again. However, it should now be searching for drivers for the TSP100 futurePRNT. If this wizard does not appear, make sure that the printer is connected and powered on and then restart the computer. STEP 1: Start of automatic installation by Plug and Play. Make sure of the printer model name, and click ‘Next’ button.
STEP 2: Click ‘Next’ button
Software Manual
78
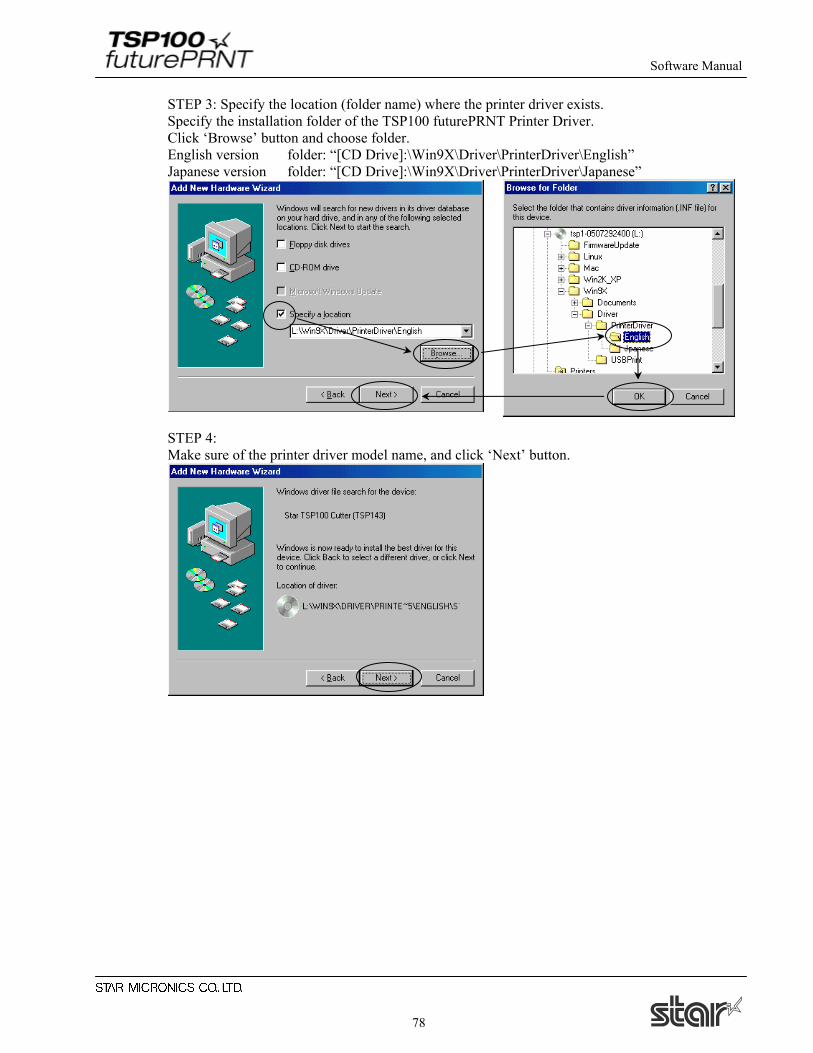
STEP 3: Specify the location (folder name) where the printer driver exists. Specify the installation folder of the TSP100 futurePRNT Printer Driver. Click ‘Browse’ button and choose folder. English version folder: “[CD Drive]:\Win9X\Driver\PrinterDriver\English” Japanese version folder: “[CD Drive]:\Win9X\Driver\PrinterDriver\Japanese”
STEP 4: Make sure of the printer driver model name, and click ‘Next’ button.
Software Manual
79
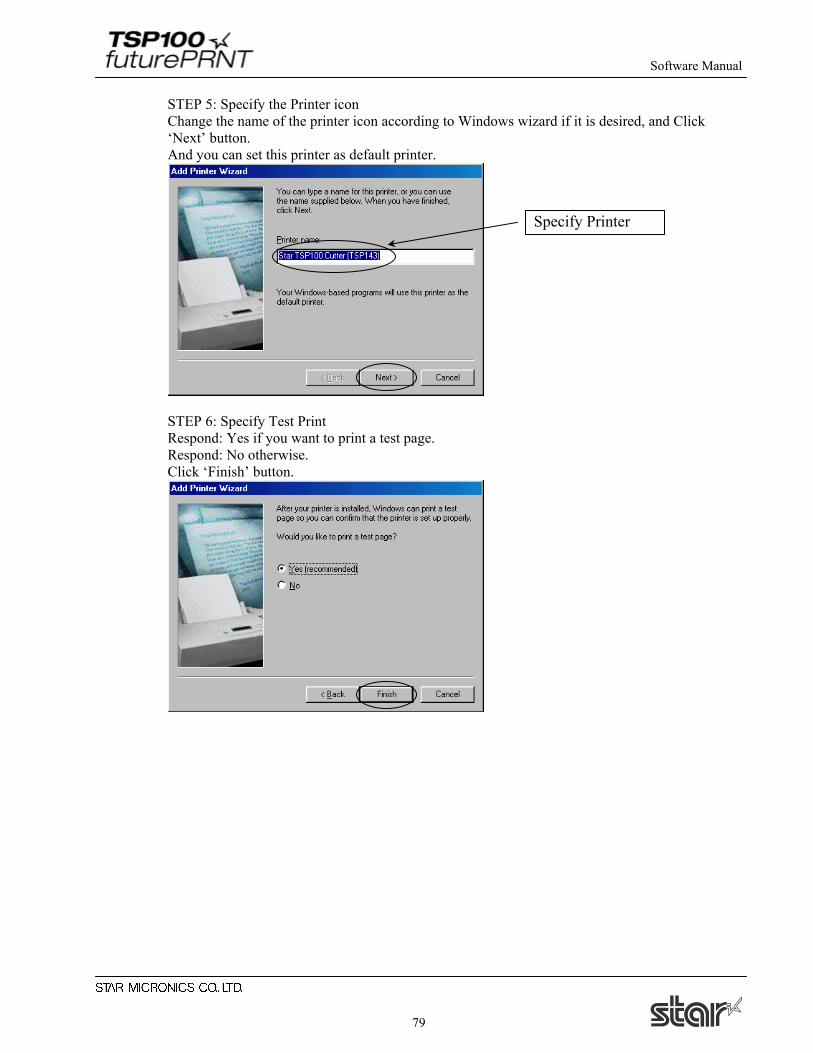
STEP 5: Specify the Printer icon Change the name of the printer icon according to Windows wizard if it is desired, and Click ‘Next’ button. And you can set this printer as default printer.
STEP 6: Specify Test Print Respond: Yes if you want to print a test page. Respond: No otherwise. Click ‘Finish’ button.
Specify Printer
Software Manual
80
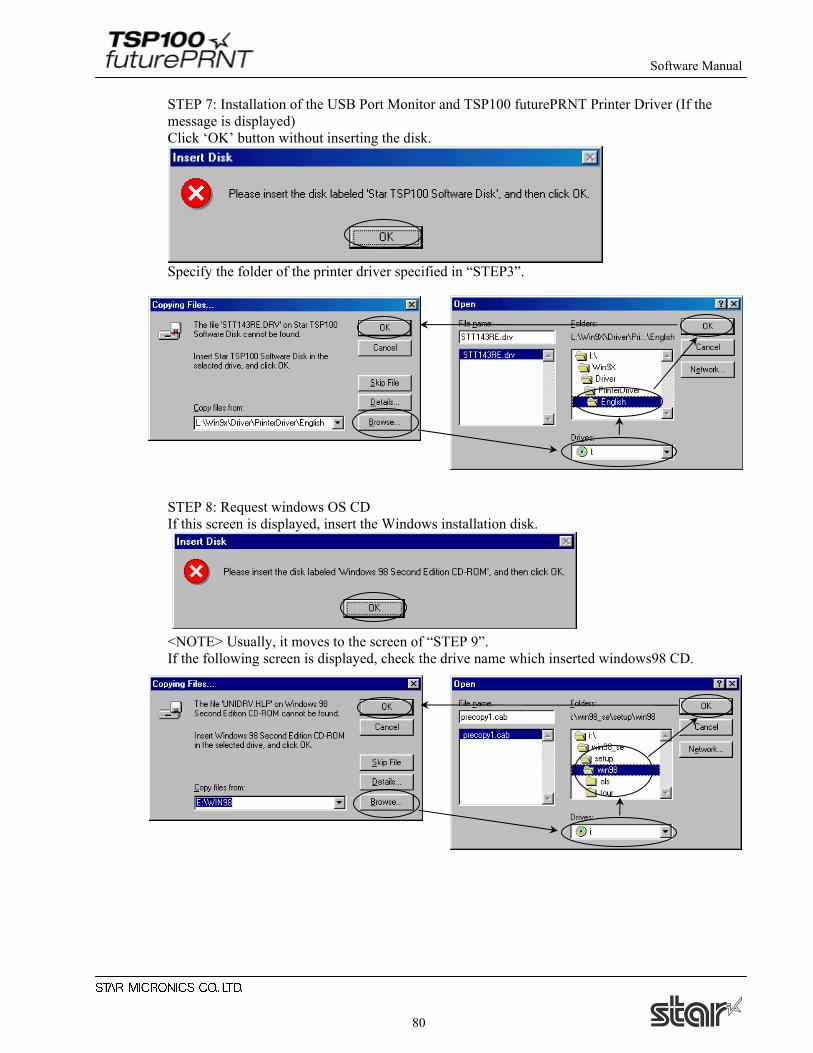
STEP 7: Installation of the USB Port Monitor and TSP100 futurePRNT Printer Driver (If the message is displayed) Click ‘OK’ button without inserting the disk.
Specify the folder of the printer driver specified in “STEP3”. STEP 8: Request windows OS CD If this screen is displayed, insert the Windows installation disk. <NOTE> Usually, it moves to the screen of “STEP 9”. If the following screen is displayed, check the drive name which inserted windows98 CD.
Software Manual
81
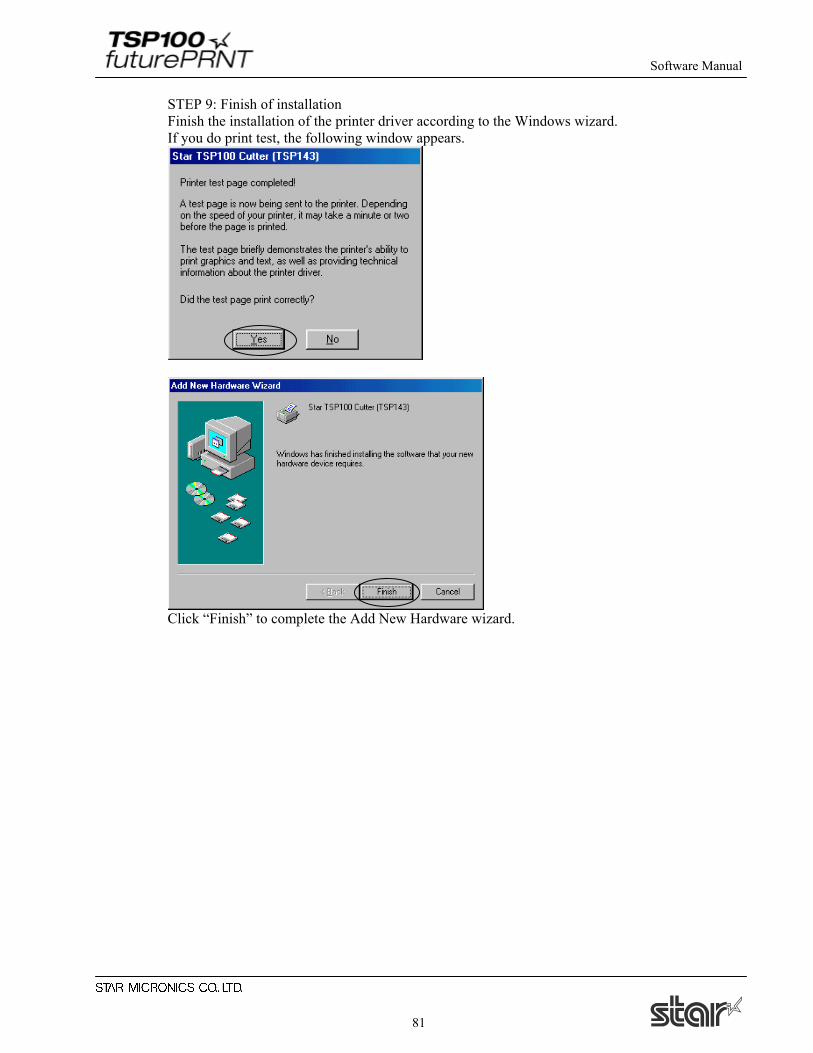
STEP 9: Finish of installation Finish the installation of the printer driver according to the Windows wizard. If you do print test, the following window appears.
Click “Finish” to complete the Add New Hardware wizard.
Software Manual
82
7. Windows 98/Me Printer Driver Usage
7.1. Printer Driver Configuration
This driver provides various functions. You can set up all of these by using the property sheet of the driver. Please follow below to enter the configuration window of Raster mode printer driver: 1. Go to the Start menu, and hit the Printers and Faxes option. 2. The Printers and Faxes folder contains icons for all printers installed. Choose the icon for TSP100 printer, then right click it to find the ‘Properties’ option. 3. When the printer properties window opens, go to the ‘Device Settings’ tab. The following is a description of Raster mode feature.
Software Manual
83
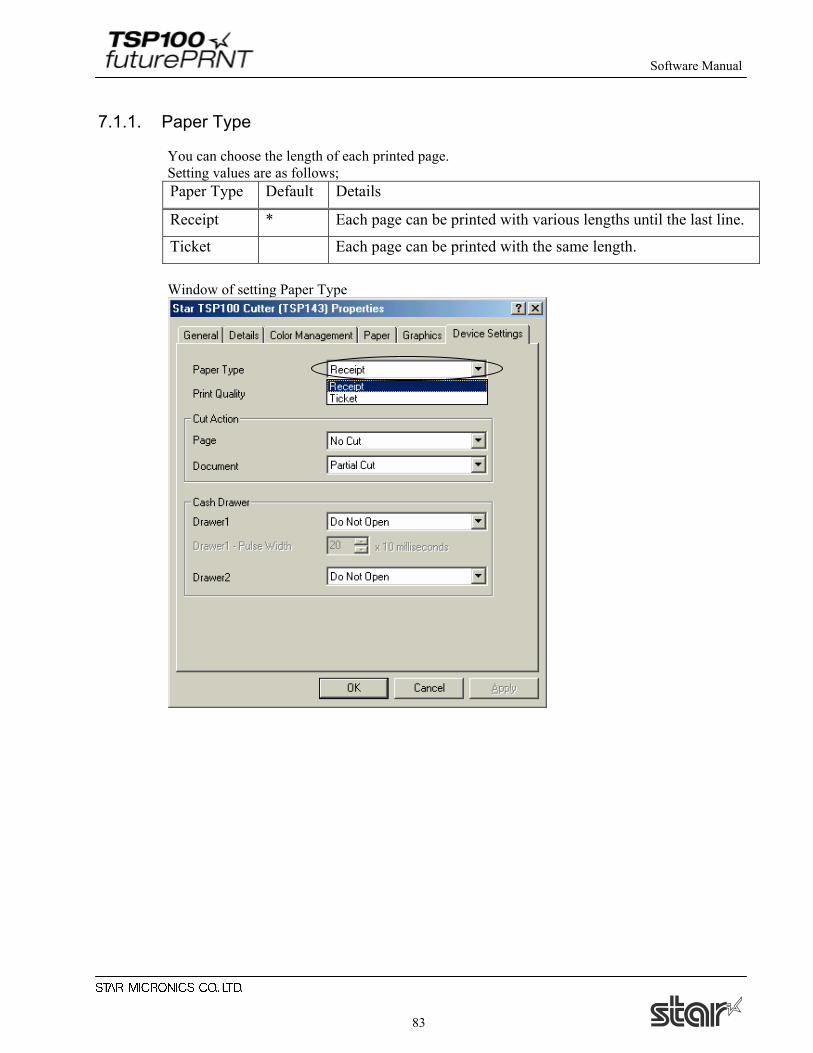
7.1.1. Paper Type
You can choose the length of each printed page. Setting values are as follows; Paper Type Default Details
Receipt * Each page can be printed with various lengths until the last line.
Ticket Each page can be printed with the same length. Window of setting Paper Type
Software Manual
84
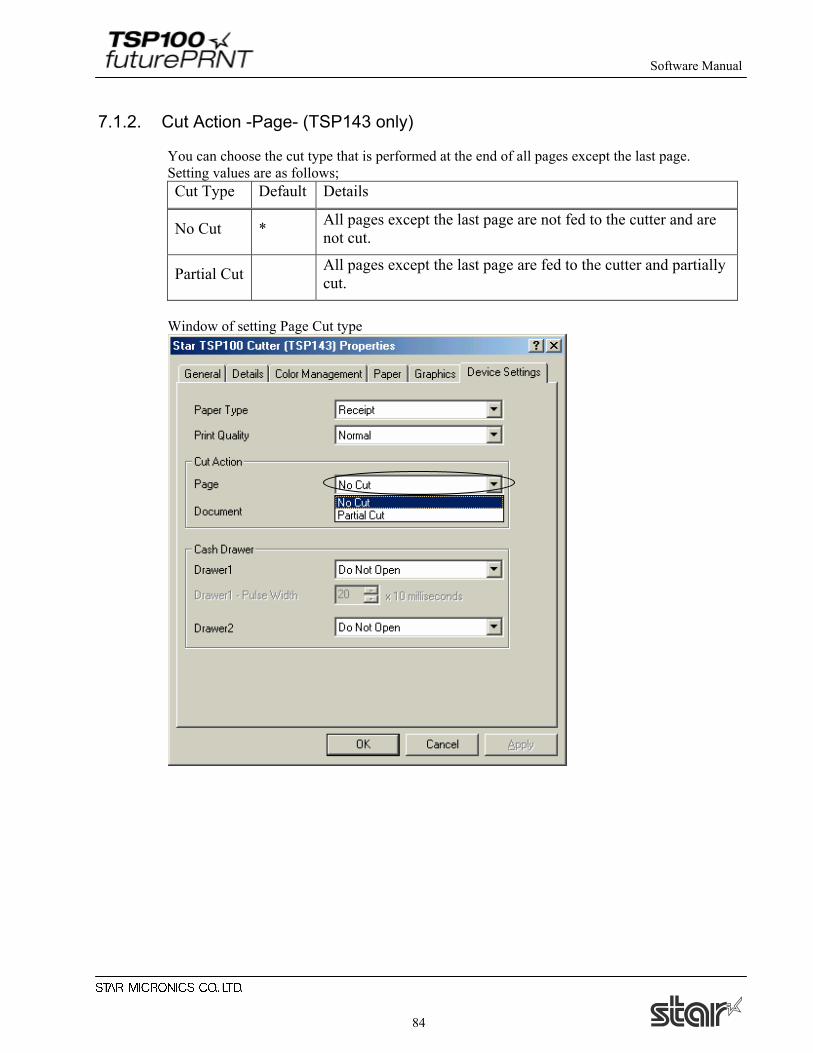
7.1.2. Cut Action -Page- (TSP143 only)
You can choose the cut type that is performed at the end of all pages except the last page. Setting values are as follows; Cut Type Default Details
No Cut * All pages except the last page are not fed to the cutter and are not cut.
Partial Cut All pages except the last page are fed to the cutter and partially cut.
Window of setting Page Cut type
Software Manual
85
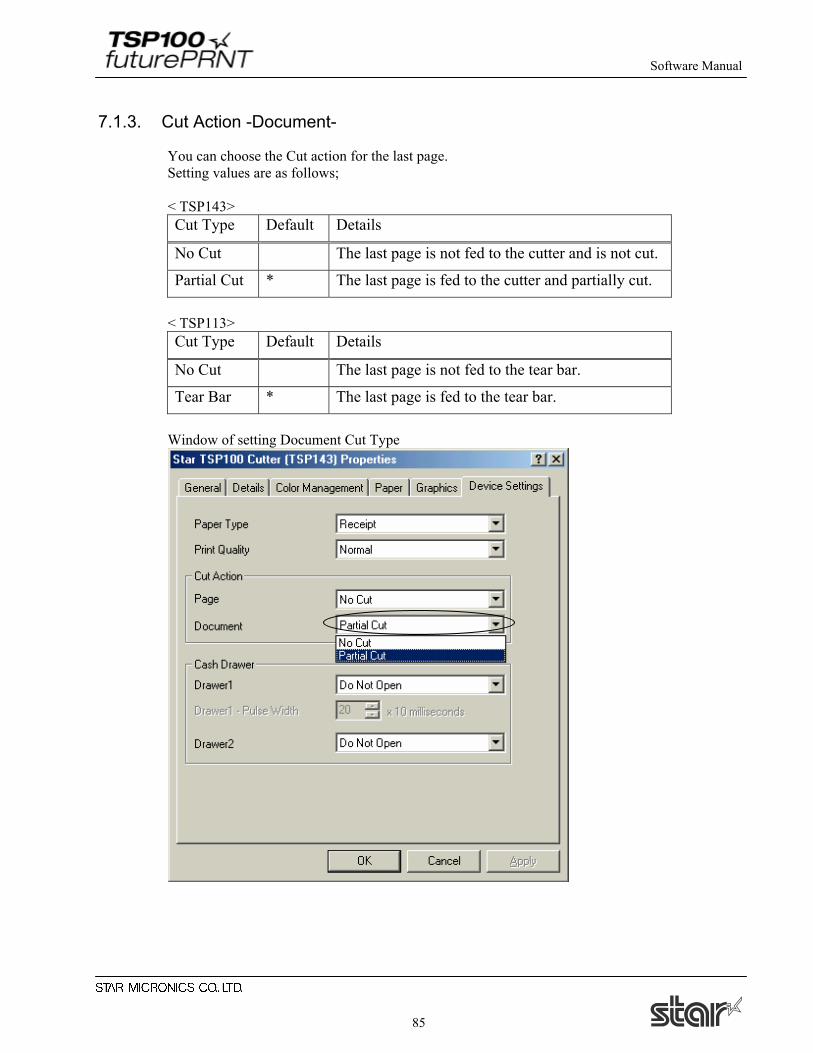
7.1.3. Cut Action -Document-
You can choose the Cut action for the last page. Setting values are as follows; < TSP143> Cut Type Default Details
No Cut The last page is not fed to the cutter and is not cut.
Partial Cut * The last page is fed to the cutter and partially cut. < TSP113> Cut Type Default Details
No Cut The last page is not fed to the tear bar.
Tear Bar * The last page is fed to the tear bar. Window of setting Document Cut Type
Software Manual
86
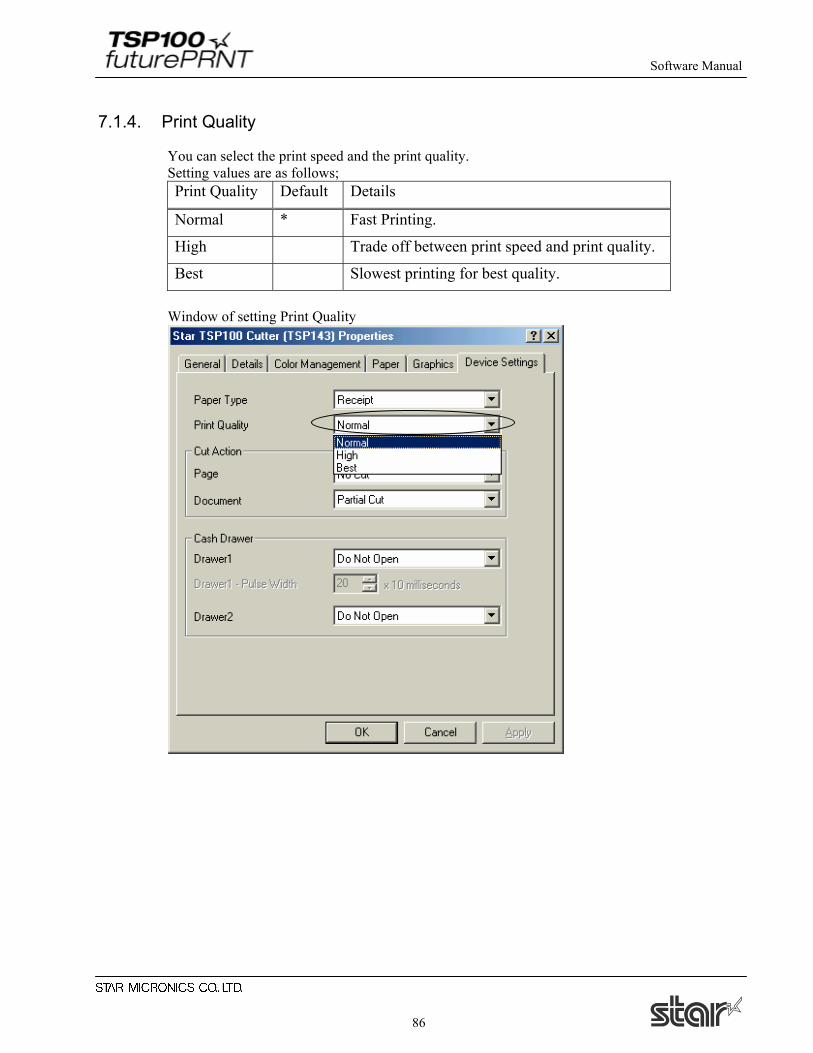
7.1.4. Print Quality
You can select the print speed and the print quality. Setting values are as follows; Print Quality Default Details
Normal * Fast Printing.
High Trade off between print speed and print quality.
Best Slowest printing for best quality. Window of setting Print Quality
Software Manual
87
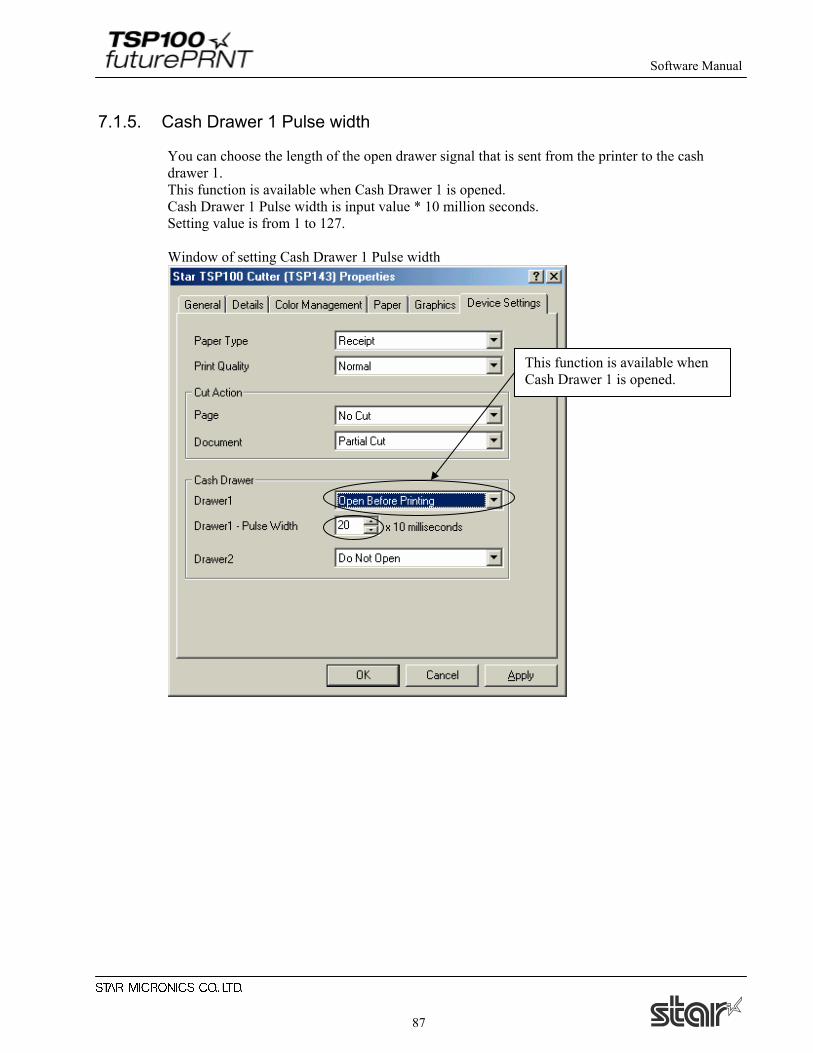
7.1.5. Cash Drawer 1 Pulse width
You can choose the length of the open drawer signal that is sent from the printer to the cash drawer 1. This function is available when Cash Drawer 1 is opened. Cash Drawer 1 Pulse width is input value * 10 million seconds. Setting value is from 1 to 127. Window of setting Cash Drawer 1 Pulse width
This function is available when Cash Drawer 1 is opened.
Software Manual
88
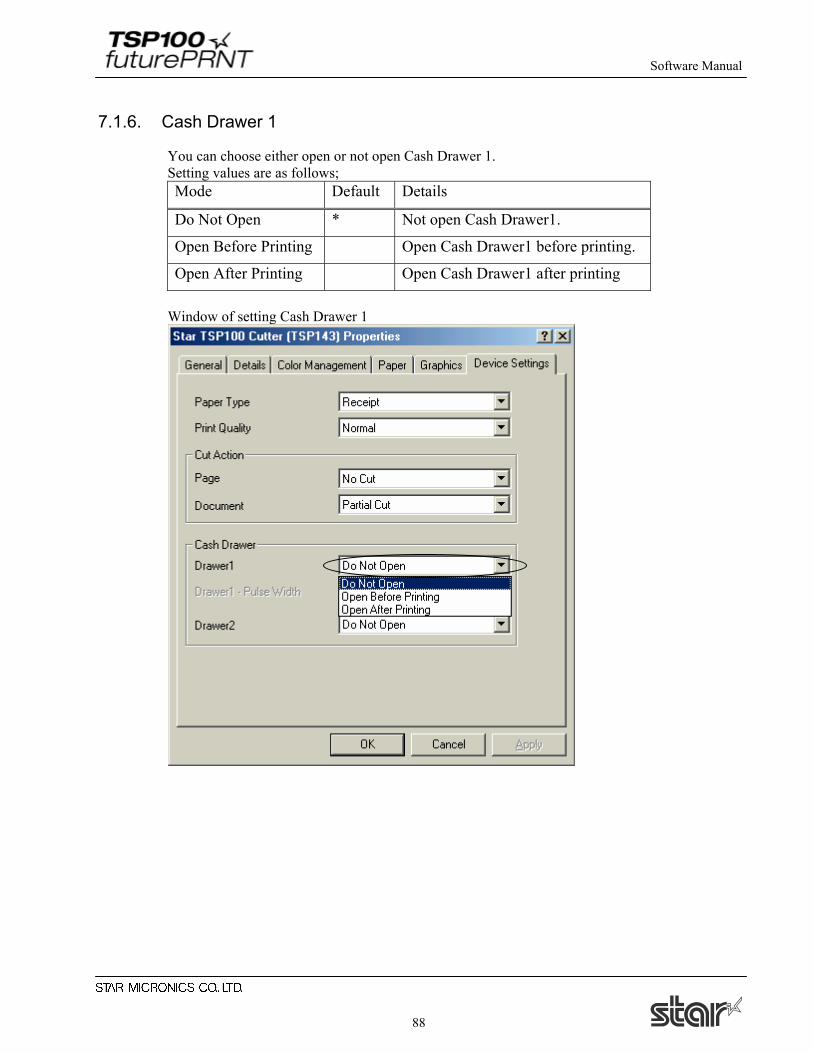
7.1.6. Cash Drawer 1
You can choose either open or not open Cash Drawer 1. Setting values are as follows; Mode Default Details
Do Not Open * Not open Cash Drawer1.
Open Before Printing Open Cash Drawer1 before printing.
Open After Printing Open Cash Drawer1 after printing Window of setting Cash Drawer 1
Software Manual
89
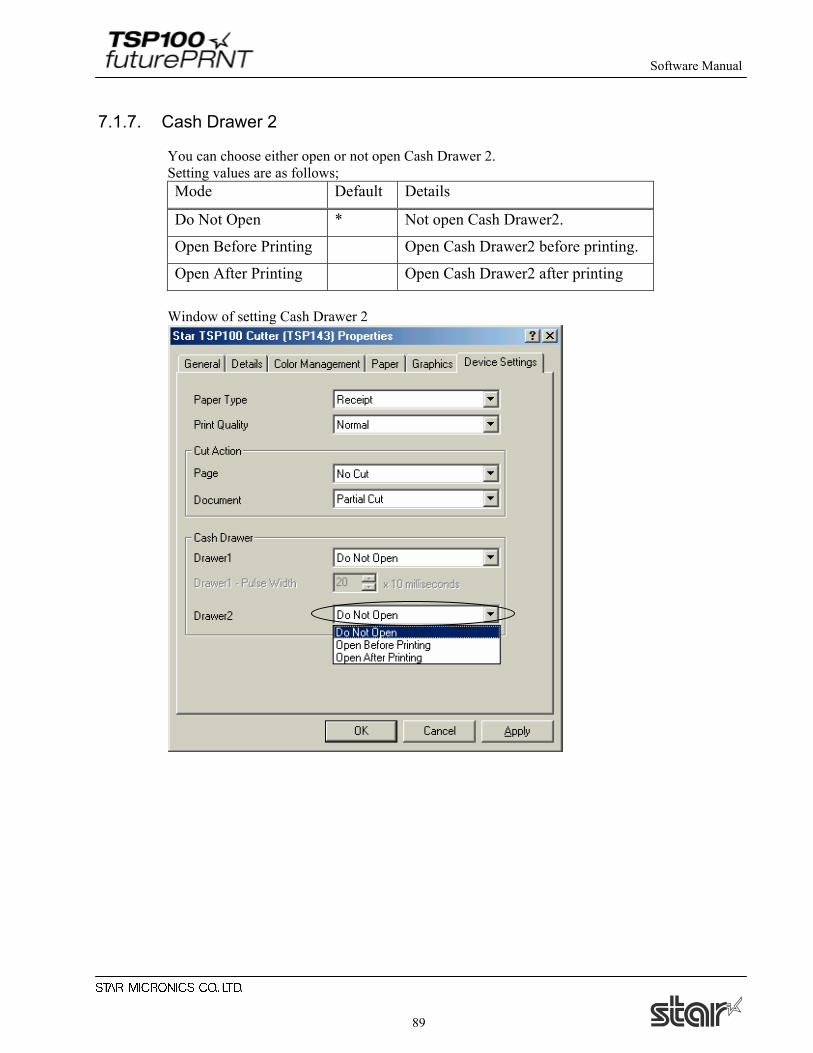
7.1.7. Cash Drawer 2
You can choose either open or not open Cash Drawer 2. Setting values are as follows; Mode Default Details
Do Not Open * Not open Cash Drawer2.
Open Before Printing Open Cash Drawer2 before printing.
Open After Printing Open Cash Drawer2 after printing Window of setting Cash Drawer 2
Software Manual
90
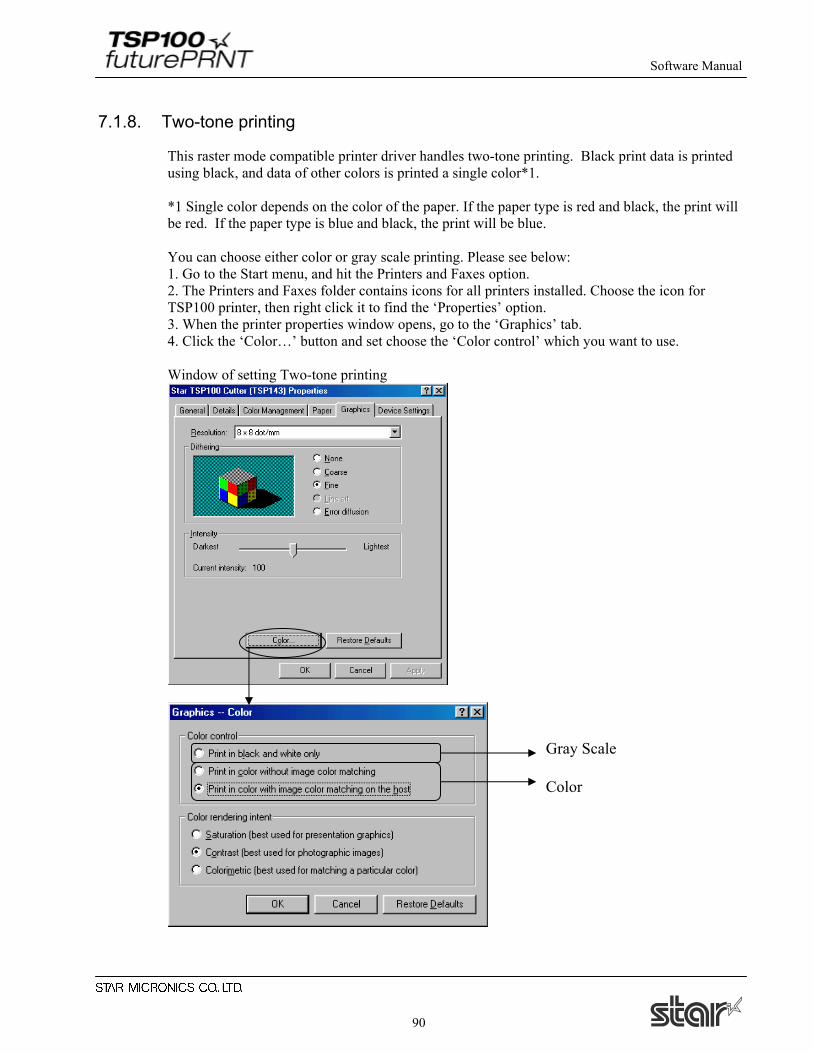
7.1.8. Two-tone printing
This raster mode compatible printer driver handles two-tone printing. Black print data is printed using black, and data of other colors is printed a single color*1. *1 Single color depends on the color of the paper. If the paper type is red and black, the print will be red. If the paper type is blue and black, the print will be blue. You can choose either color or gray scale printing. Please see below: 1. Go to the Start menu, and hit the Printers and Faxes option. 2. The Printers and Faxes folder contains icons for all printers installed. Choose the icon for TSP100 printer, then right click it to find the ‘Properties’ option. 3. When the printer properties window opens, go to the ‘Graphics’ tab. 4. Click the ‘Color…’ button and set choose the ‘Color control’ which you want to use. Window of setting Two-tone printing
Gray Scale
Color
Software Manual
91
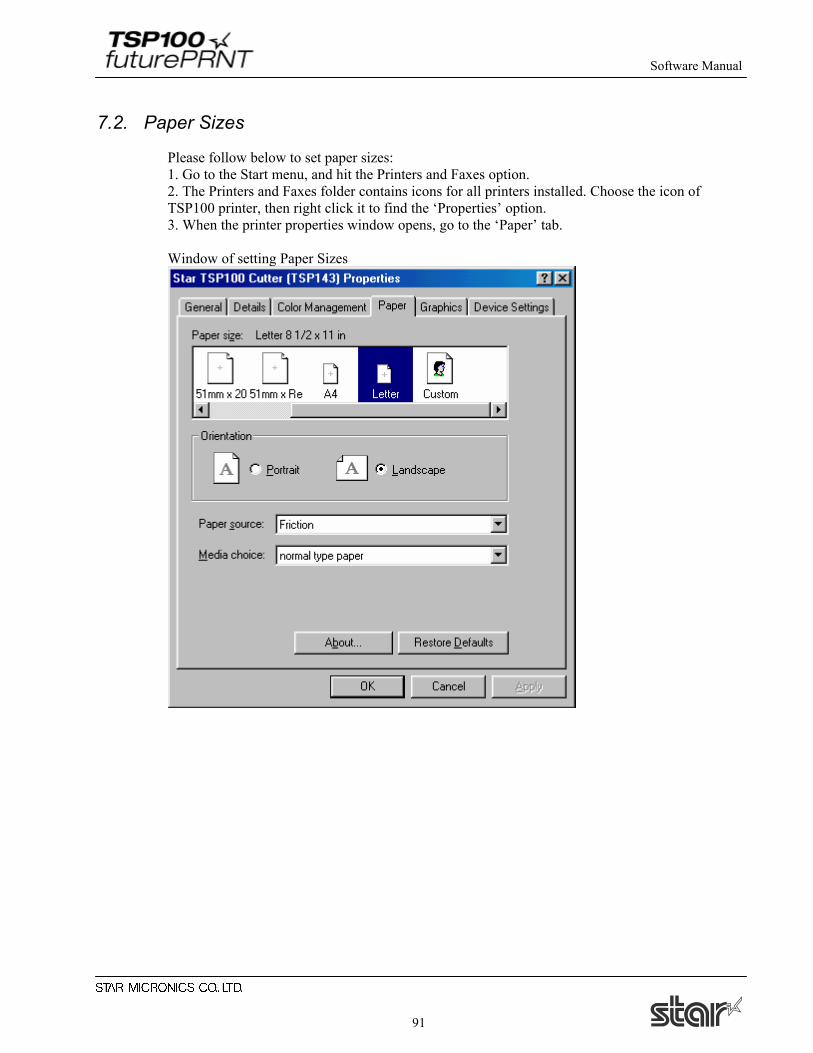
7.2. Paper Sizes
Please follow below to set paper sizes: 1. Go to the Start menu, and hit the Printers and Faxes option. 2. The Printers and Faxes folder contains icons for all printers installed. Choose the icon of TSP100 printer, then right click it to find the ‘Properties’ option. 3. When the printer properties window opens, go to the ‘Paper’ tab. Window of setting Paper Sizes
Software Manual
92
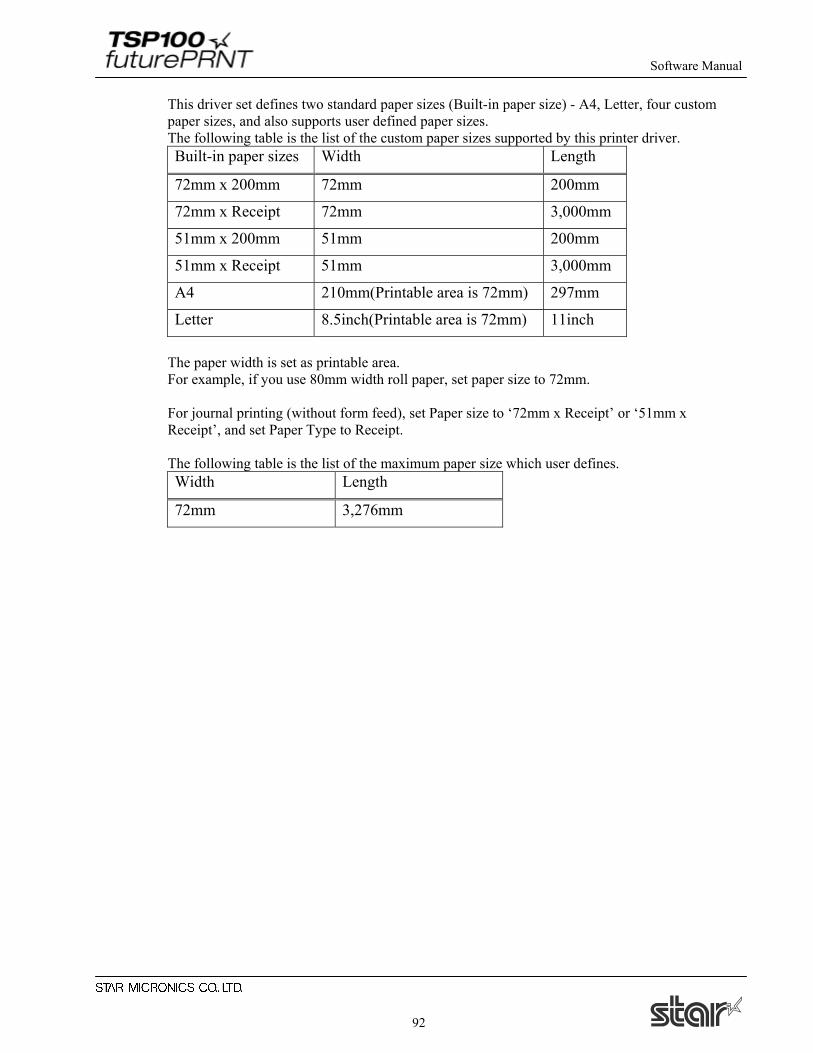
This driver set defines two standard paper sizes (Built-in paper size) - A4, Letter, four custom paper sizes, and also supports user defined paper sizes. The following table is the list of the custom paper sizes supported by this printer driver. Built-in paper sizes Width Length
72mm x 200mm 72mm 200mm
72mm x Receipt 72mm 3,000mm
51mm x 200mm 51mm 200mm
51mm x Receipt 51mm 3,000mm
A4 210mm(Printable area is 72mm) 297mm
Letter 8.5inch(Printable area is 72mm) 11inch The paper width is set as printable area. For example, if you use 80mm width roll paper, set paper size to 72mm. For journal printing (without form feed), set Paper size to ‘72mm x Receipt’ or ‘51mm x Receipt’, and set Paper Type to Receipt. The following table is the list of the maximum paper size which user defines. Width Length
72mm 3,276mm
Software Manual
93
7.3. Document Formatting Guidelines (Windows 98/98SE/Me)
1. This driver does not require any margins. Set all document margins to 0.
7.3.1. Restriction and Caution
1. This driver may not operate normally according to the setting of the memory switch of a printer. Except for the case of this manual instruction, please return to default settings. 2. When you use the barcode device fonts, characters will appear only on the computer’s display. You can see the printed result will be a barcode. By this difference, the length of the displayed document and the printed document can be different slightly.
Software Manual
94
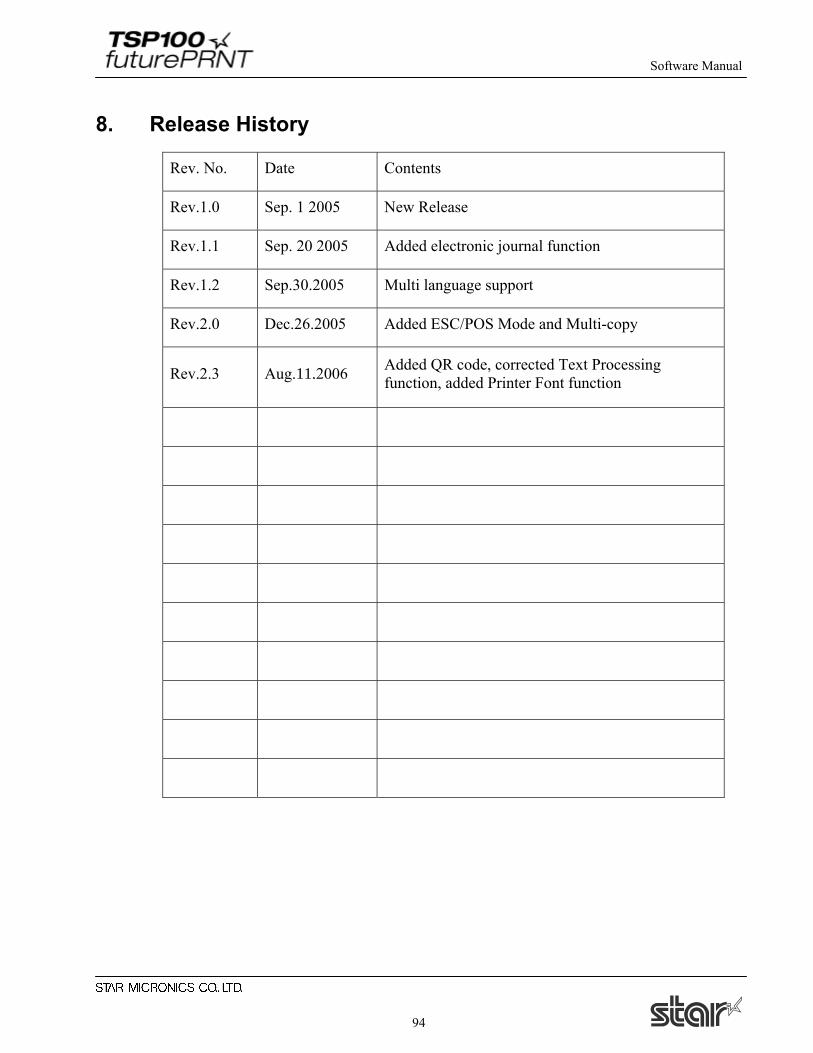
8. Release History
Rev. No. Date Contents
Rev.1.0 Sep. 1 2005 New Release
Rev.1.1 Sep. 20 2005 Added electronic journal function
Rev.1.2 Sep.30.2005 Multi language support
Rev.2.0 Dec.26.2005 Added ESC/POS Mode and Multi-copy
Rev.2.3 Aug.11.2006 Added QR code, corrected Text Processing function, added Printer Font function


![Tube-U4Gv2 LTE USB Driver Installation Guide - alfa.com.tw8] 4G_LTE/Tube-U4G V2/ALFA_Tube-U... · Driver Installation Guide 7 / 16. 2.2. Installation Procedures . Before driver installation,](https://img.pdfslide.us/doc/110x75/5c36b34209d3f27e1e8be307/tube-u4gv2-lte-usb-driver-installation-guide-alfacomtw-8-4gltetube-u4g-v2alfatube-u.jpg)