Embed Size (px)
Citation preview
http://tshirtecommerce.com
TShirt eCommerce Opencart User Manual
Support Center: http://tshirtecommerce.com/support
Table of Contents
Page i
Table of Contents
1. Getting Started ........................................................................................................................... 1
1.1. Module Requirements ...................................................................................................... 2
1.2. Install module ................................................................................................................... 2
1.3. Setup Module ................................................................................................................... 4
1.4. Update Module ................................................................................................................. 5
2. Dashboard .................................................................................................................................. 7
3. Settings ....................................................................................................................................... 9
3.1. Configuration ................................................................................................................. 10
3.1.1. Your Shop ............................................................................................................... 10
3.1.2. Your Price ............................................................................................................... 11
3.1.3. Config ..................................................................................................................... 11
3.2. Colors ............................................................................................................................. 13
3.3. Fonts ............................................................................................................................... 14
3.4. Languages....................................................................................................................... 16
4. Product ..................................................................................................................................... 19
4.1. Add Product in T-Shirt eCommerce............................................................................... 20
4.1.1. Product Info ............................................................................................................ 20
4.1.1.1. Product Description ......................................................................................... 20
4.1.1.2. Product Data .................................................................................................... 21
4.1.1.3. Product Categories ........................................................................................... 25
4.1.1.4. Product Image .................................................................................................. 26
4.1.2. Product Design ........................................................................................................ 27
4.2. T-Shirt eCommerce Product List ................................................................................... 29
4.3. Add Product in Opencart ................................................................................................ 31
4.4. Add Admin Design Templates ....................................................................................... 32
5. Clipart ...................................................................................................................................... 40
5.1. Clipart Directory ............................................................................................................ 41
Table of Contents
Page ii
5.1.1. Add New Category ................................................................................................. 41
5.1.2. Edit A Category ...................................................................................................... 42
5.1.3. Delete A Category................................................................................................... 42
5.2. Clipart File...................................................................................................................... 43
5.2.1. Add New Clipart ..................................................................................................... 43
5.2.2. Edit A Clipart .......................................................................................................... 44
5.2.3. Delete A Clipart ...................................................................................................... 45
5.3. Export SVG File ............................................................................................................. 45
6. Media ....................................................................................................................................... 47
7. Manage Order .......................................................................................................................... 50

1. Getting Started
Page 1
1. Getting Started
1. Getting Started
Page 2
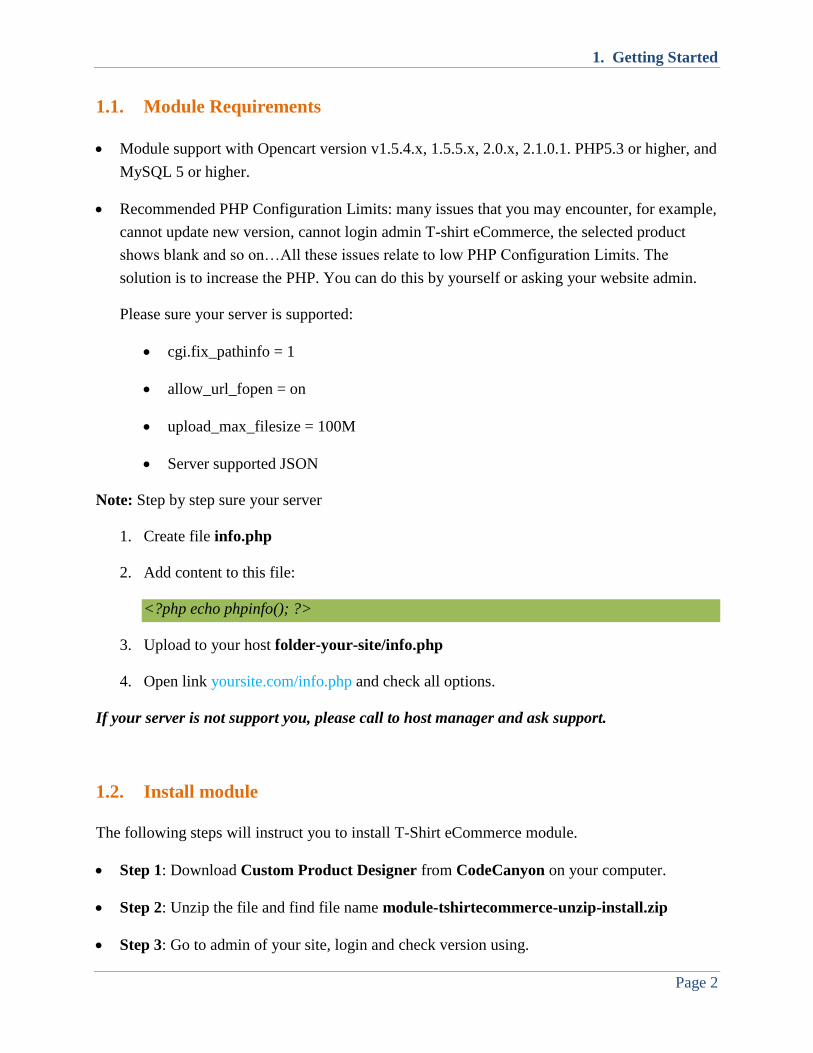
1.1. Module Requirements
Module support with Opencart version v1.5.4.x, 1.5.5.x, 2.0.x, 2.1.0.1. PHP5.3 or higher, and
MySQL 5 or higher.
Recommended PHP Configuration Limits: many issues that you may encounter, for example,
cannot update new version, cannot login admin T-shirt eCommerce, the selected product
shows blank and so on…All these issues relate to low PHP Configuration Limits. The
solution is to increase the PHP. You can do this by yourself or asking your website admin.
Please sure your server is supported:
cgi.fix_pathinfo = 1
allow_url_fopen = on
upload_max_filesize = 100M
Server supported JSON
Note: Step by step sure your server
1. Create file info.php
2. Add content to this file:
<?php echo phpinfo(); ?>
3. Upload to your host folder-your-site/info.php
4. Open link yoursite.com/info.php and check all options.
If your server is not support you, please call to host manager and ask support.
1.2. Install module
The following steps will instruct you to install T-Shirt eCommerce module.
Step 1: Download Custom Product Designer from CodeCanyon on your computer.
Step 2: Unzip the file and find file name module-tshirtecommerce-unzip-install.zip
Step 3: Go to admin of your site, login and check version using.

1. Getting Started
Page 3
Step4: Unzip file module-tshirtecommerce-unzip-install.zip and find in folder your
version using.
Step 5: Open folder and use FileZilla and upload all to your server (folder of your site)
1. Getting Started
Page 4
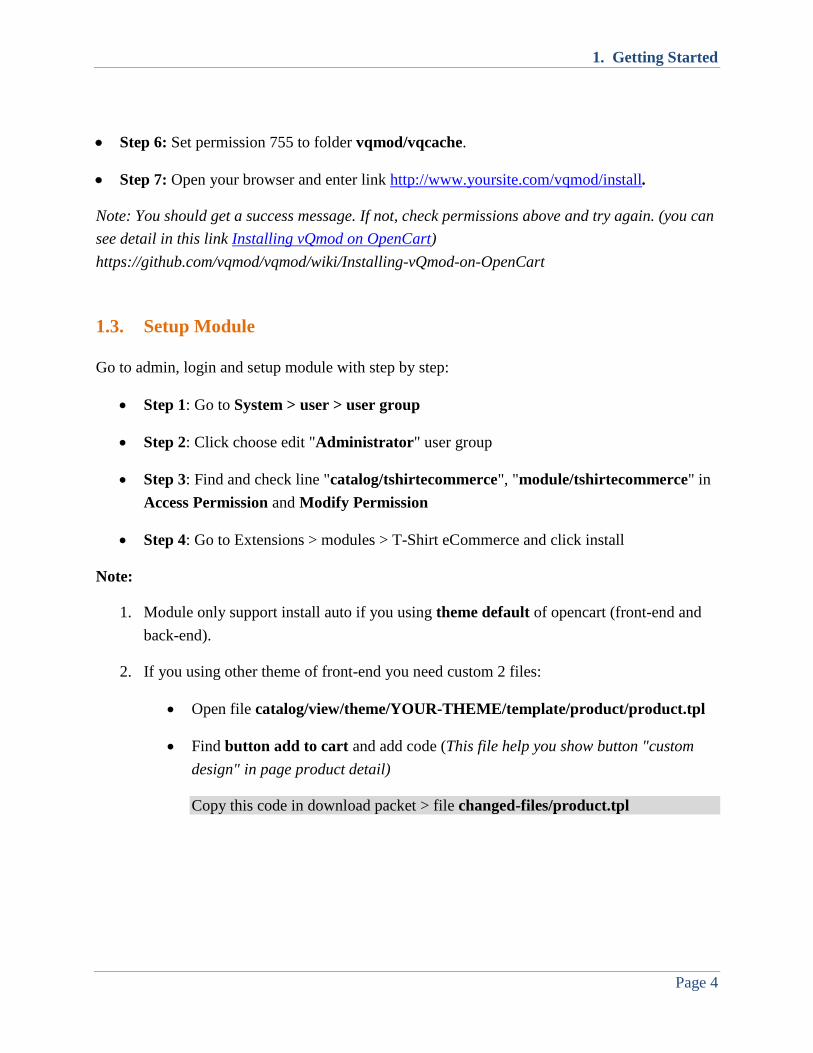
Step 6: Set permission 755 to folder vqmod/vqcache.
Step 7: Open your browser and enter link http://www.yoursite.com/vqmod/install.
Note: You should get a success message. If not, check permissions above and try again. (you can
see detail in this link Installing vQmod on OpenCart)
https://github.com/vqmod/vqmod/wiki/Installing-vQmod-on-OpenCart
1.3. Setup Module
Go to admin, login and setup module with step by step:
Step 1: Go to System > user > user group
Step 2: Click choose edit "Administrator" user group
Step 3: Find and check line "catalog/tshirtecommerce", "module/tshirtecommerce" in
Access Permission and Modify Permission
Step 4: Go to Extensions > modules > T-Shirt eCommerce and click install
Note:
1. Module only support install auto if you using theme default of opencart (front-end and
back-end).
2. If you using other theme of front-end you need custom 2 files:
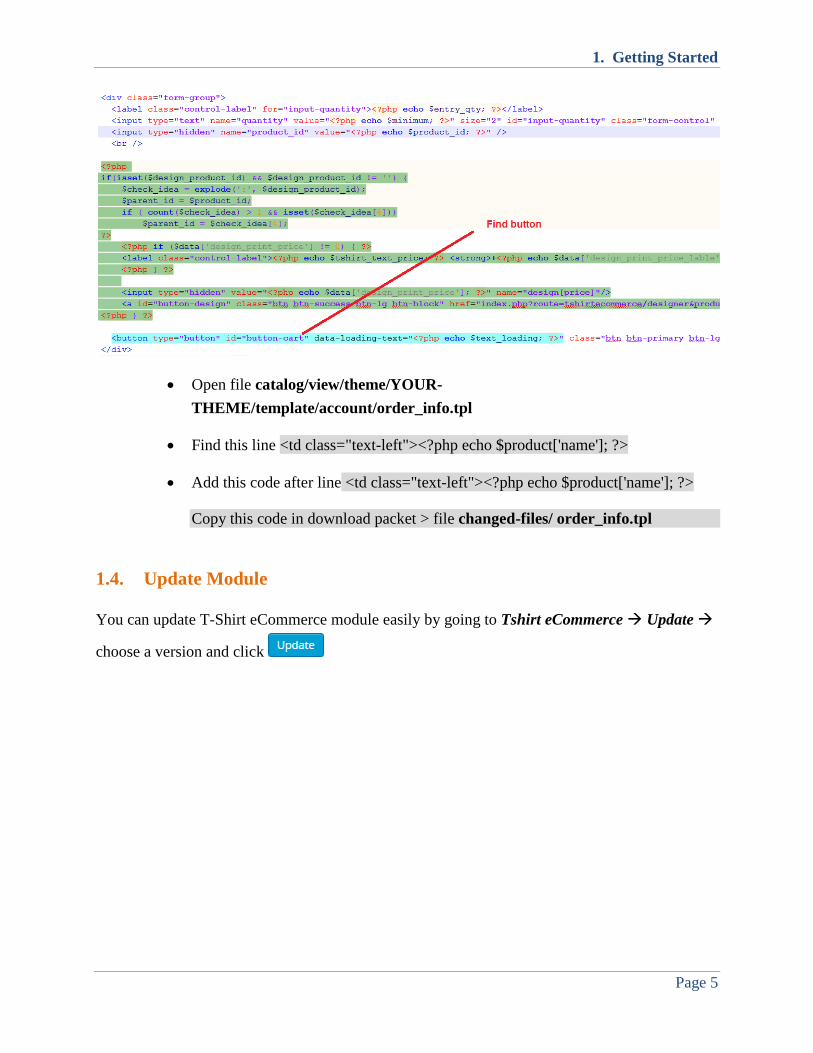
Open file catalog/view/theme/YOUR-THEME/template/product/product.tpl
Find button add to cart and add code (This file help you show button "custom
design" in page product detail)
Copy this code in download packet > file changed-files/product.tpl
1. Getting Started
Page 5
Open file catalog/view/theme/YOUR-
THEME/template/account/order_info.tpl
Find this line <td class="text-left"><?php echo $product['name']; ?>
Add this code after line <td class="text-left"><?php echo $product['name']; ?>
Copy this code in download packet > file changed-files/ order_info.tpl
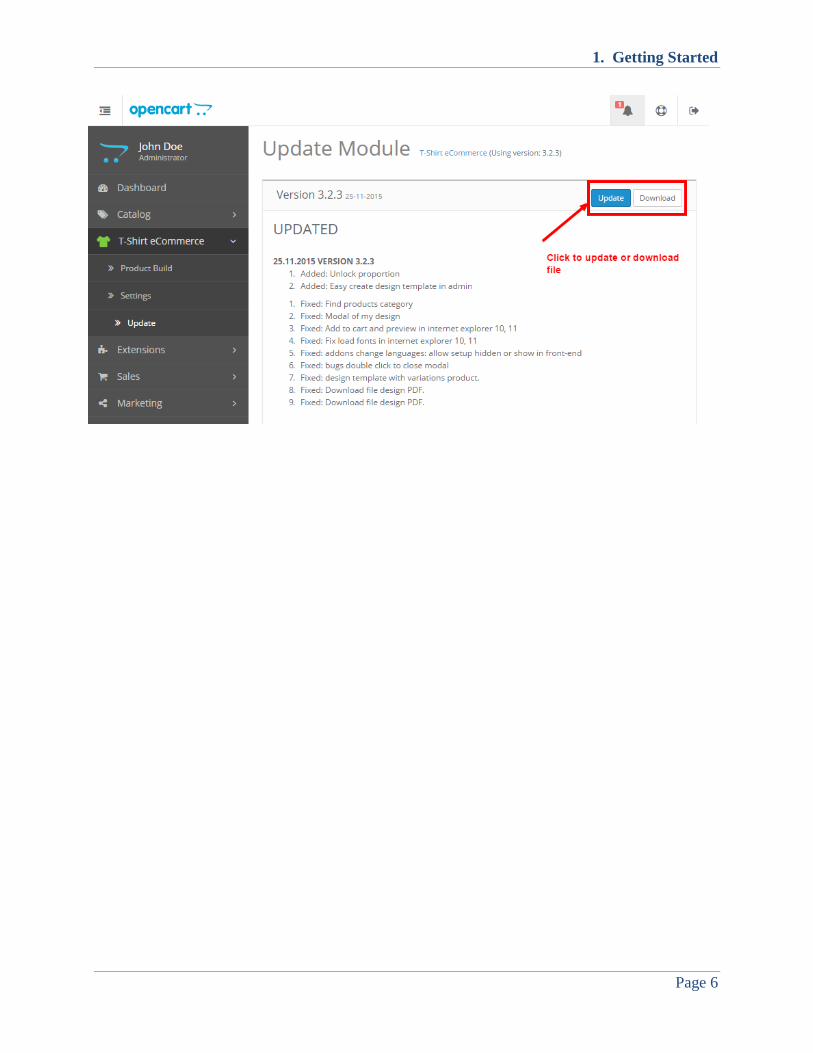
1.4. Update Module
You can update T-Shirt eCommerce module easily by going to Tshirt eCommerce Update
choose a version and click
1. Getting Started
Page 6
2. Dashboard
Page 7
2. Dashboard
2. Dashboard
Page 8
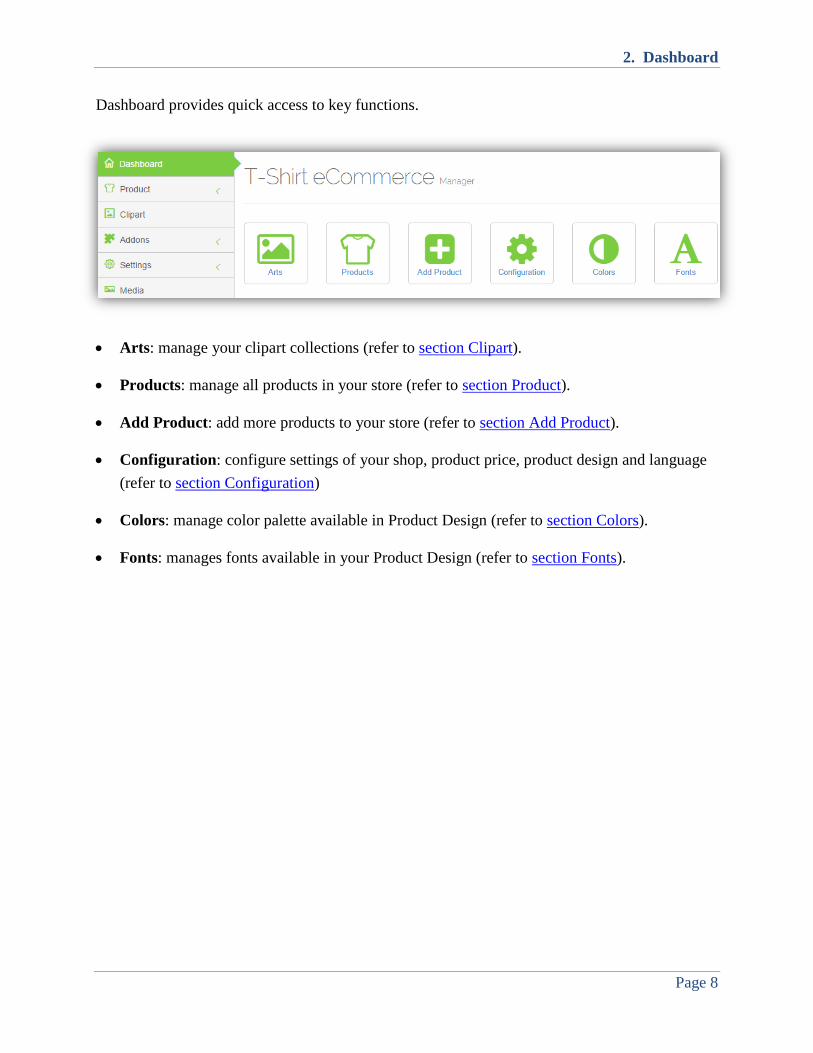
Dashboard provides quick access to key functions.
Arts: manage your clipart collections (refer to section Clipart).
Products: manage all products in your store (refer to section Product).
Add Product: add more products to your store (refer to section Add Product).
Configuration: configure settings of your shop, product price, product design and language
(refer to section Configuration)
Colors: manage color palette available in Product Design (refer to section Colors).
Fonts: manages fonts available in your Product Design (refer to section Fonts).
3. Settings
Page 9
3. Settings
3. Settings
Page 10
3.1. Configuration
3.1.1. Your Shop
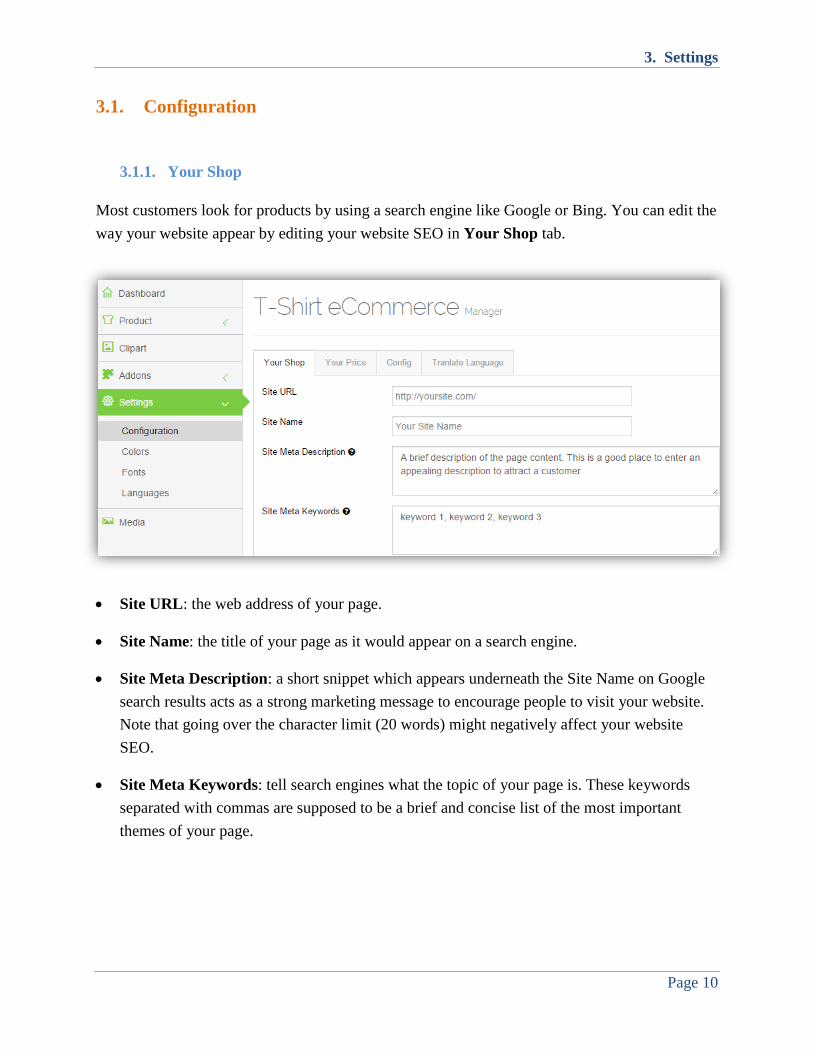
Most customers look for products by using a search engine like Google or Bing. You can edit the
way your website appear by editing your website SEO in Your Shop tab.
Site URL: the web address of your page.
Site Name: the title of your page as it would appear on a search engine.
Site Meta Description: a short snippet which appears underneath the Site Name on Google
search results acts as a strong marketing message to encourage people to visit your website.
Note that going over the character limit (20 words) might negatively affect your website
SEO.
Site Meta Keywords: tell search engines what the topic of your page is. These keywords
separated with commas are supposed to be a brief and concise list of the most important
themes of your page.
3. Settings
Page 11
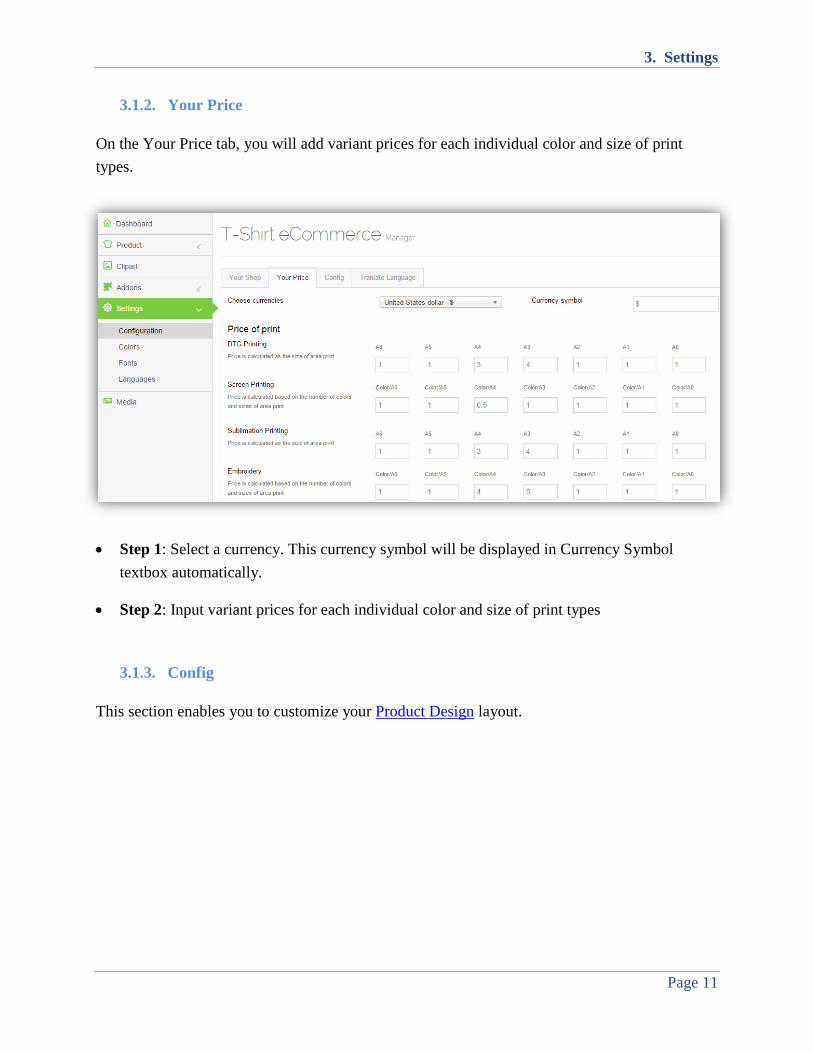
3.1.2. Your Price
On the Your Price tab, you will add variant prices for each individual color and size of print
types.
Step 1: Select a currency. This currency symbol will be displayed in Currency Symbol
textbox automatically.
Step 2: Input variant prices for each individual color and size of print types
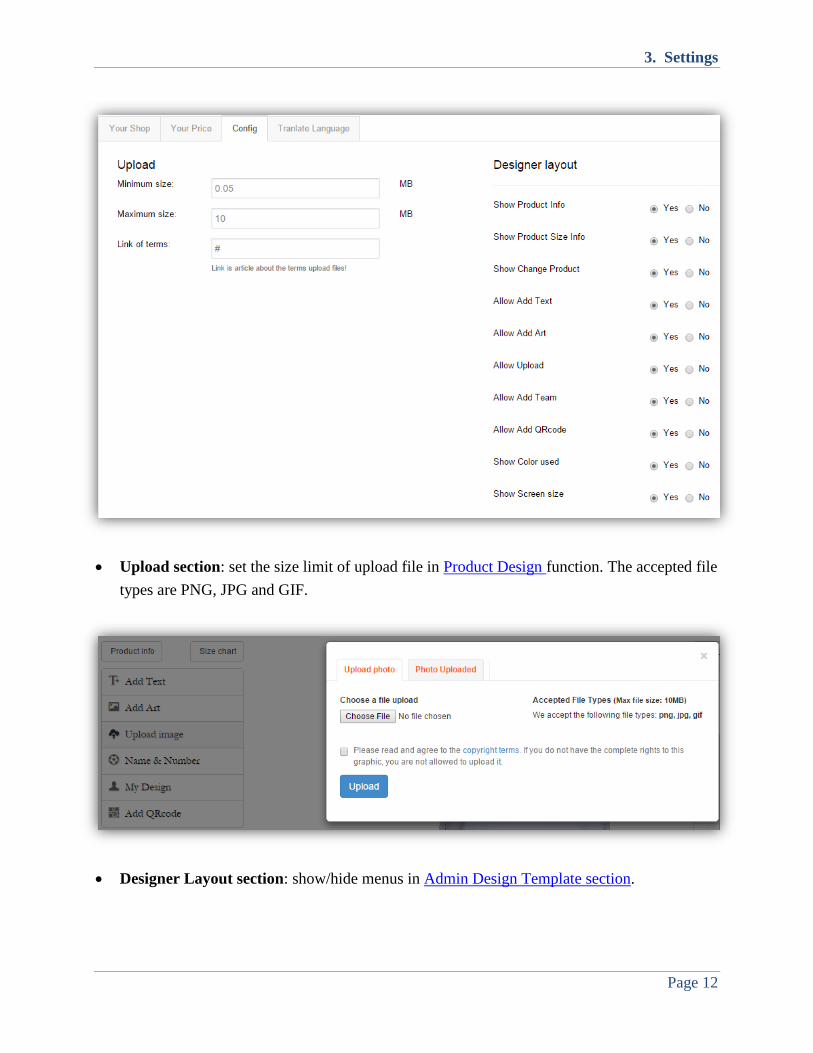
3.1.3. Config
This section enables you to customize your Product Design layout.
3. Settings
Page 12
Upload section: set the size limit of upload file in Product Design function. The accepted file
types are PNG, JPG and GIF.
Designer Layout section: show/hide menus in Admin Design Template section.

3. Settings
Page 13
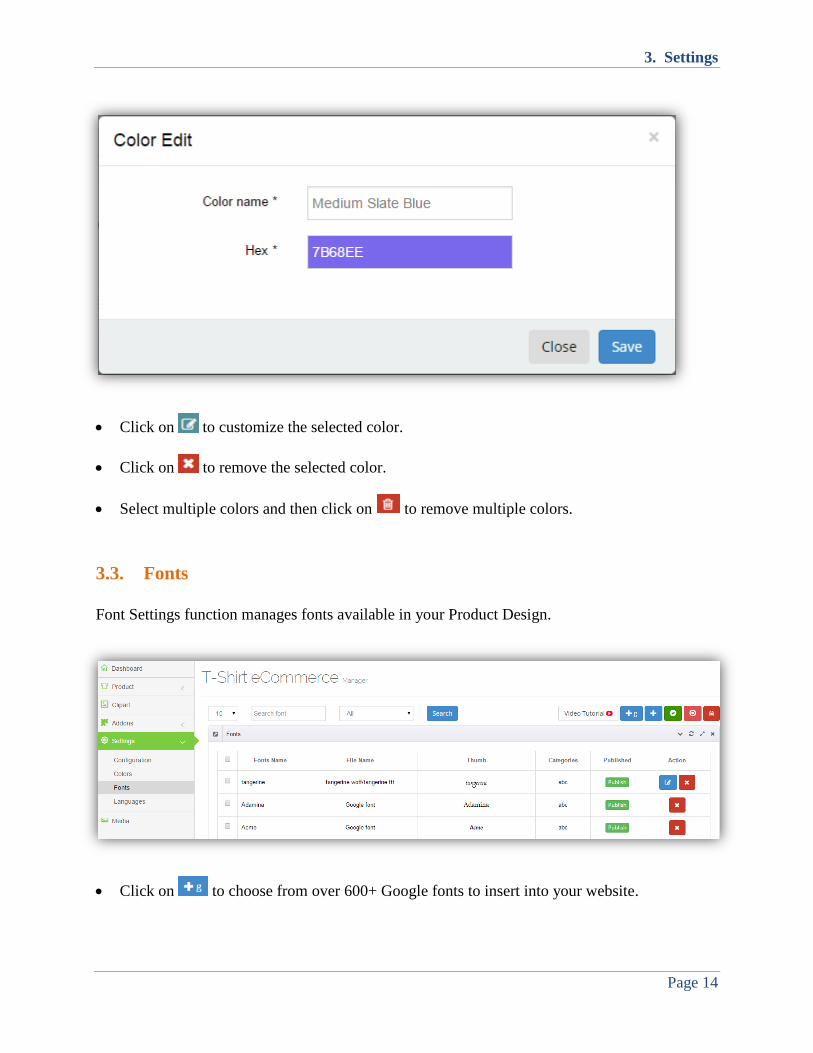
3.2. Colors
This function allows you to add/customize Color palette available in Product Design.
Click on , input Color name, select Hex color and then click Save to add a new color.
3. Settings
Page 14
Click on to customize the selected color.
Click on to remove the selected color.
Select multiple colors and then click on to remove multiple colors.
3.3. Fonts
Font Settings function manages fonts available in your Product Design.
Click on to choose from over 600+ Google fonts to insert into your website.

3. Settings
Page 15
Click on to add a font from your own drive.
Select fonts and then click on / to activate/deactivate these fonts.
Click on to delete a single font.
Select fonts and then click on to delete multiple fonts.
Click on to edit the selected font (except Google font).
4. Select a category to add selected fonts
1. Select a script
3a. Click to add this font to the list 3b
3b. Click to remove this font
2. Search a font from selected script
3. Settings
Page 16
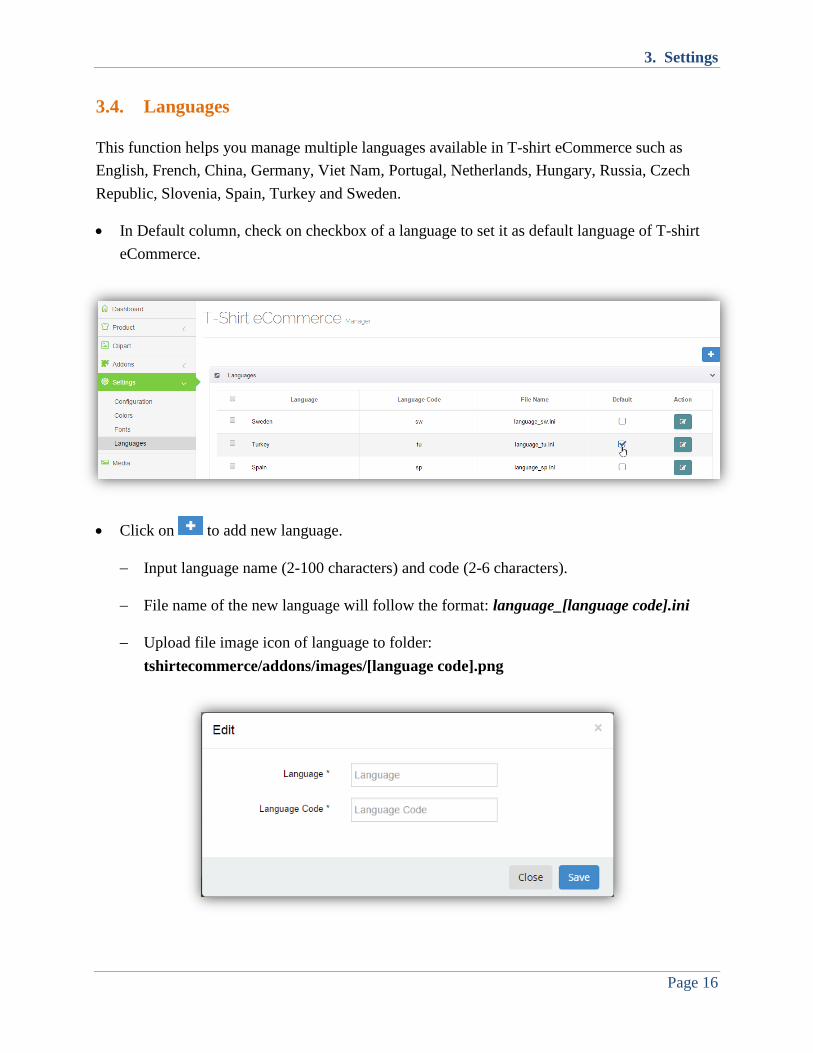
3.4. Languages
This function helps you manage multiple languages available in T-shirt eCommerce such as
English, French, China, Germany, Viet Nam, Portugal, Netherlands, Hungary, Russia, Czech
Republic, Slovenia, Spain, Turkey and Sweden.
In Default column, check on checkbox of a language to set it as default language of T-shirt
eCommerce.
Click on to add new language.
Input language name (2-100 characters) and code (2-6 characters).
File name of the new language will follow the format: language_[language code].ini
Upload file image icon of language to folder:
tshirtecommerce/addons/images/[language code].png
3. Settings
Page 17
Click on to edit the selected language. Editing a language is similar to creating a new
language above.
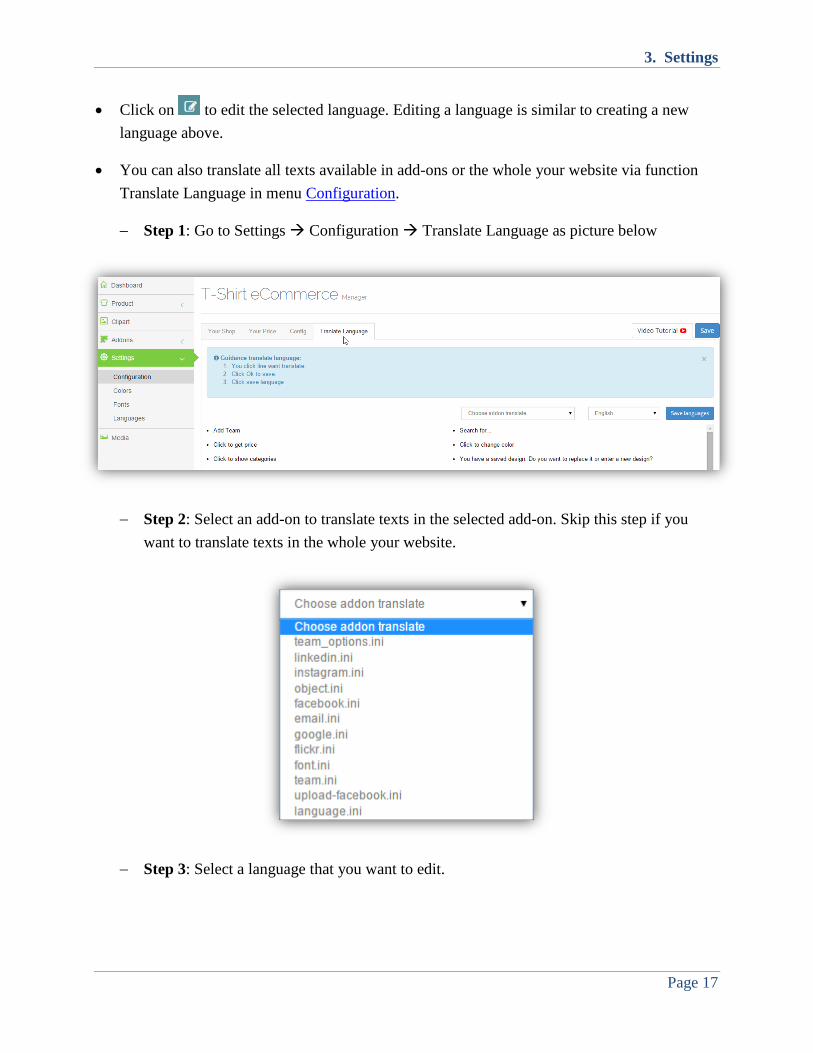
You can also translate all texts available in add-ons or the whole your website via function
Translate Language in menu Configuration.
Step 1: Go to Settings Configuration Translate Language as picture below
Step 2: Select an add-on to translate texts in the selected add-on. Skip this step if you
want to translate texts in the whole your website.
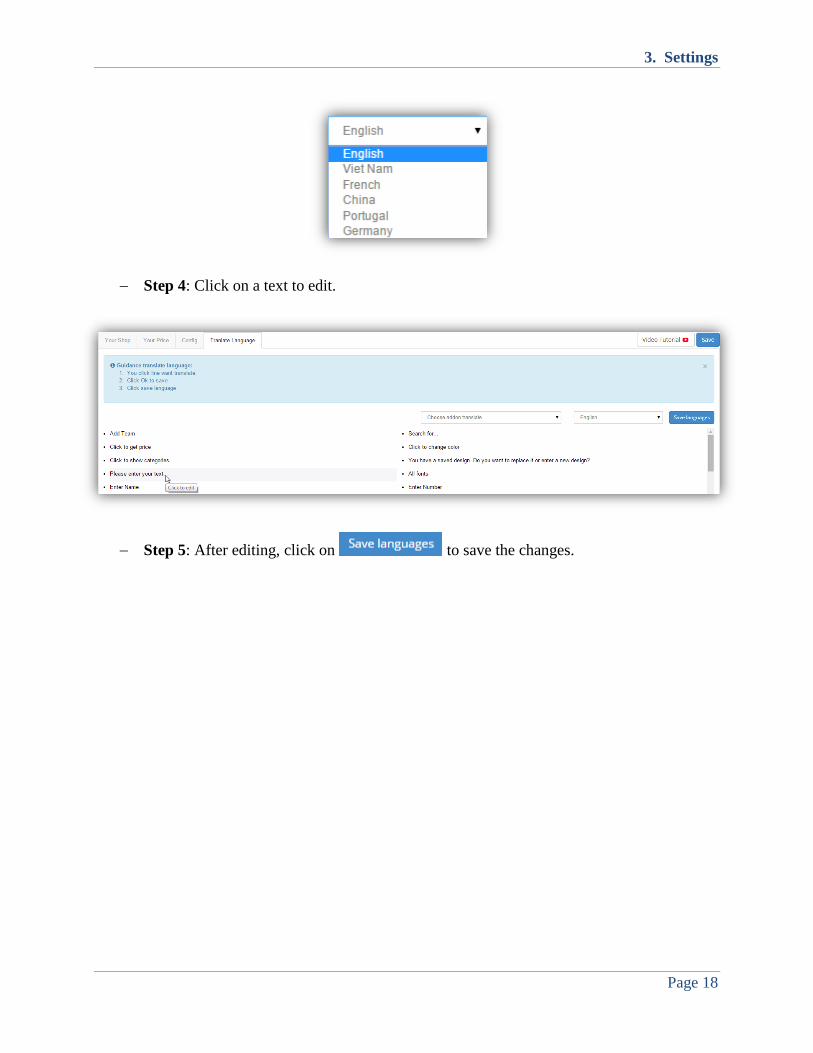
Step 3: Select a language that you want to edit.
3. Settings
Page 18
Step 4: Click on a text to edit.
Step 5: After editing, click on to save the changes.
4. Product
Page 19
4. Product
4. Product
Page 20
4.1. Add Product in T-Shirt eCommerce
Now for the fun stuff, adding your products! Products are what are for sale in your store (e.g. T-
shirt). Adding products to your store is the first step in selling online.
4.1.1. Product Info
4.1.1.1. Product Description
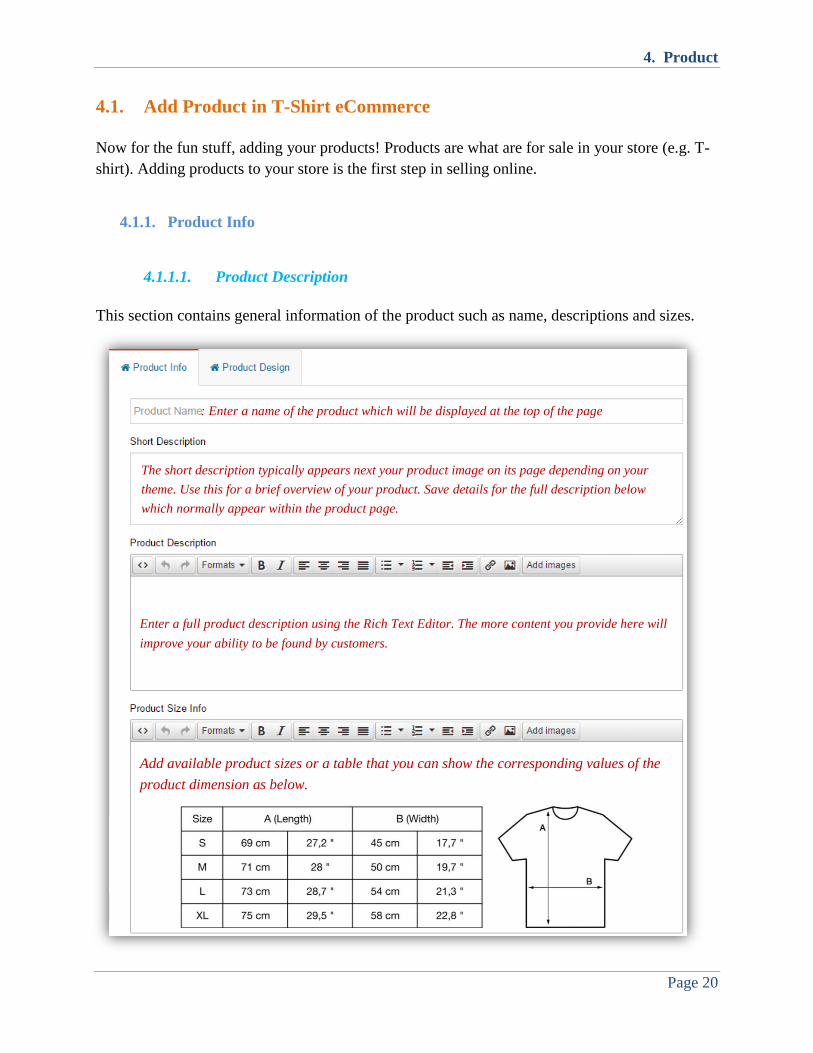
This section contains general information of the product such as name, descriptions and sizes.
: Enter a name of the product which will be displayed at the top of the page
The short description typically appears next your product image on its page depending on your
theme. Use this for a brief overview of your product. Save details for the full description below
which normally appear within the product page.
Enter a full product description using the Rich Text Editor. The more content you provide here will
improve your ability to be found by customers.
Add available product sizes or a table that you can show the corresponding values of the
product dimension as below.
4. Product
Page 21
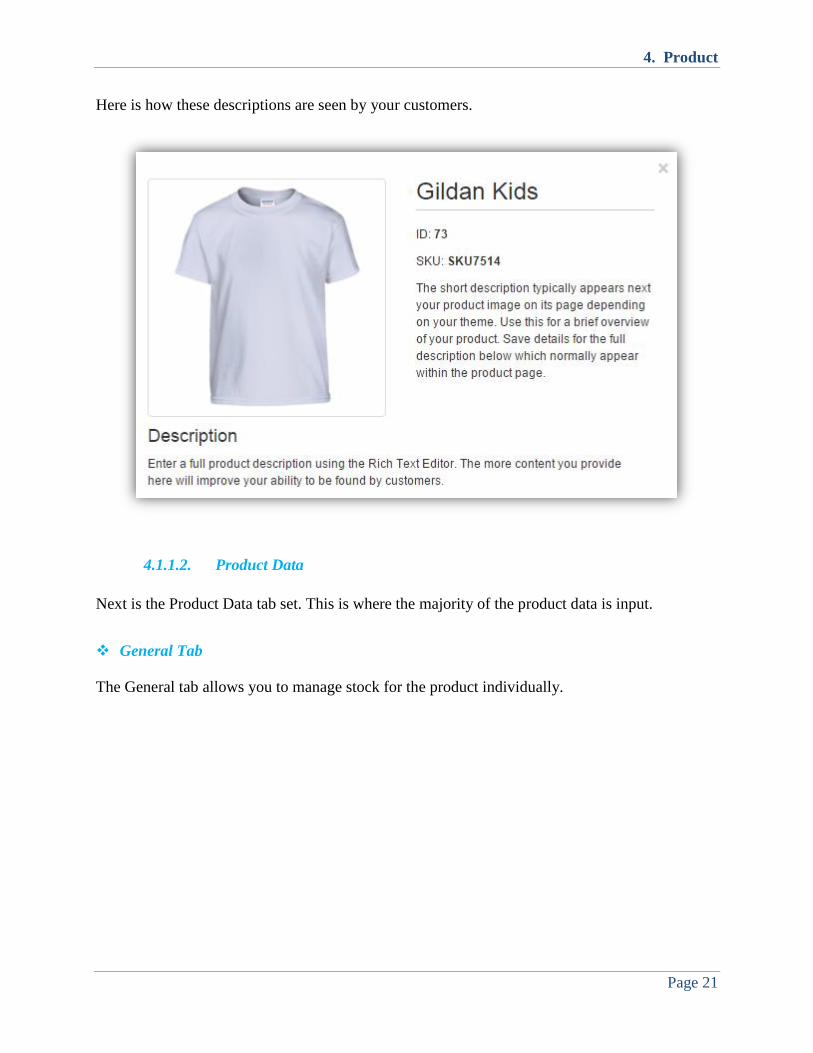
Here is how these descriptions are seen by your customers.
4.1.1.2. Product Data
Next is the Product Data tab set. This is where the majority of the product data is input.
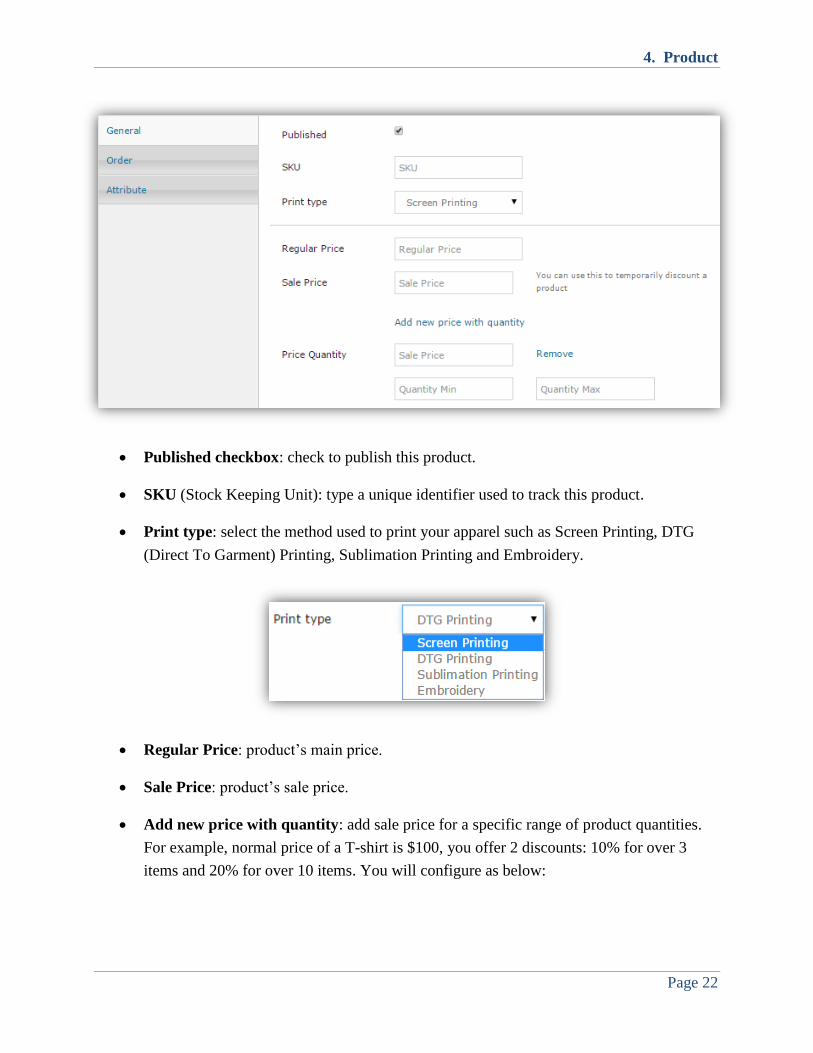
General Tab
The General tab allows you to manage stock for the product individually.
4. Product
Page 22
Published checkbox: check to publish this product.
SKU (Stock Keeping Unit): type a unique identifier used to track this product.
Print type: select the method used to print your apparel such as Screen Printing, DTG
(Direct To Garment) Printing, Sublimation Printing and Embroidery.
Regular Price: product’s main price.
Sale Price: product’s sale price.
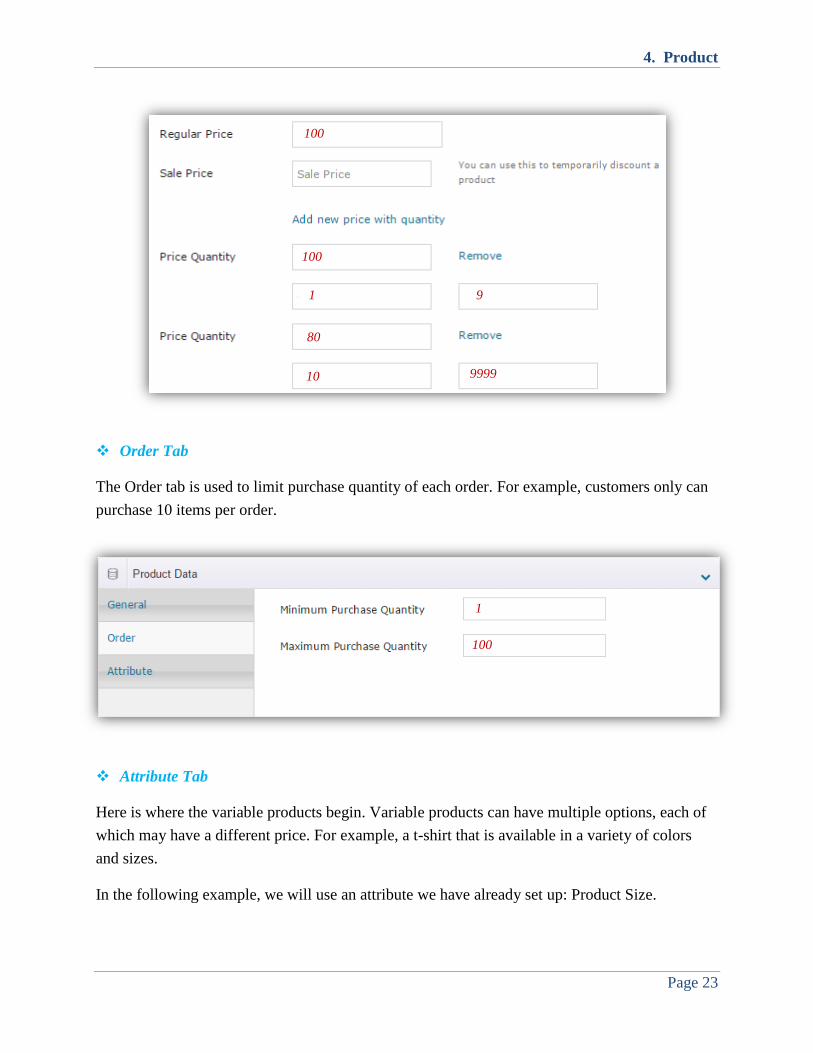
Add new price with quantity: add sale price for a specific range of product quantities.
For example, normal price of a T-shirt is $100, you offer 2 discounts: 10% for over 3
items and 20% for over 10 items. You will configure as below:
4. Product
Page 23
Order Tab
The Order tab is used to limit purchase quantity of each order. For example, customers only can
purchase 10 items per order.
Attribute Tab
Here is where the variable products begin. Variable products can have multiple options, each of
which may have a different price. For example, a t-shirt that is available in a variety of colors
and sizes.
In the following example, we will use an attribute we have already set up: Product Size.
100
80
1 9
10
100
1
100
9999
4. Product
Page 24
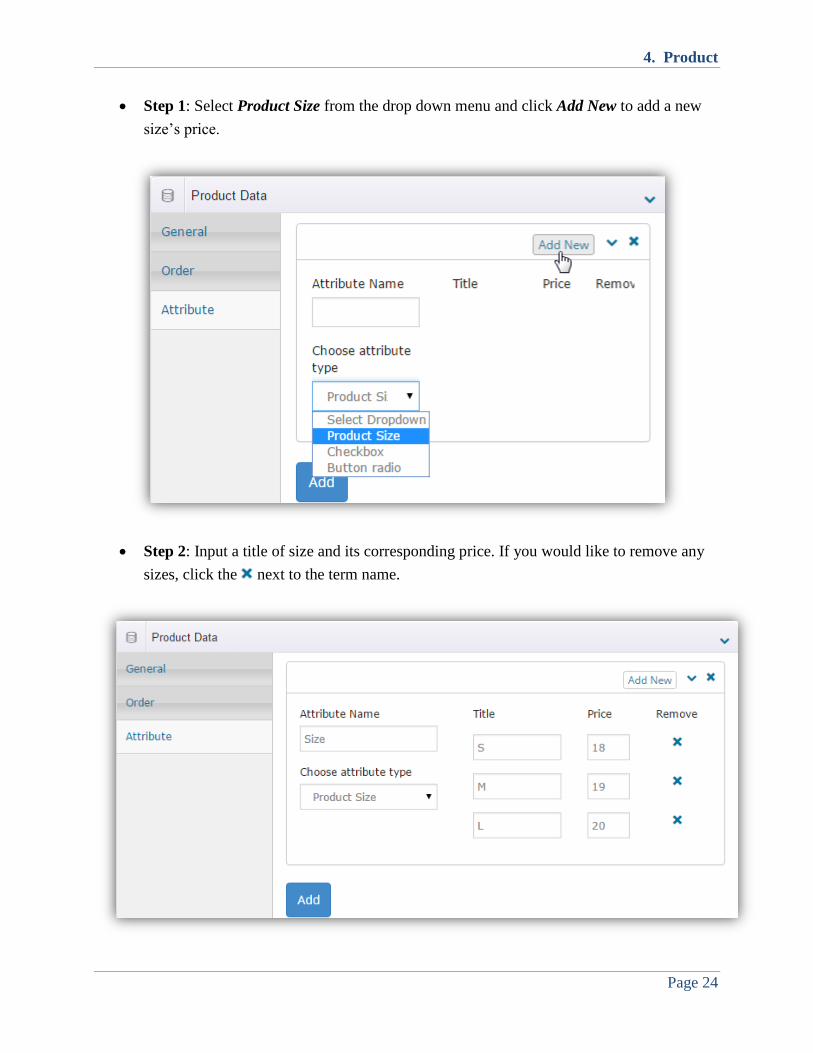
Step 1: Select Product Size from the drop down menu and click Add New to add a new
size’s price.
Step 2: Input a title of size and its corresponding price. If you would like to remove any
sizes, click the next to the term name.
4. Product
Page 25
Step 3: Make sure to click Add button, as these will not be visible on the attribute tab
until you do so.
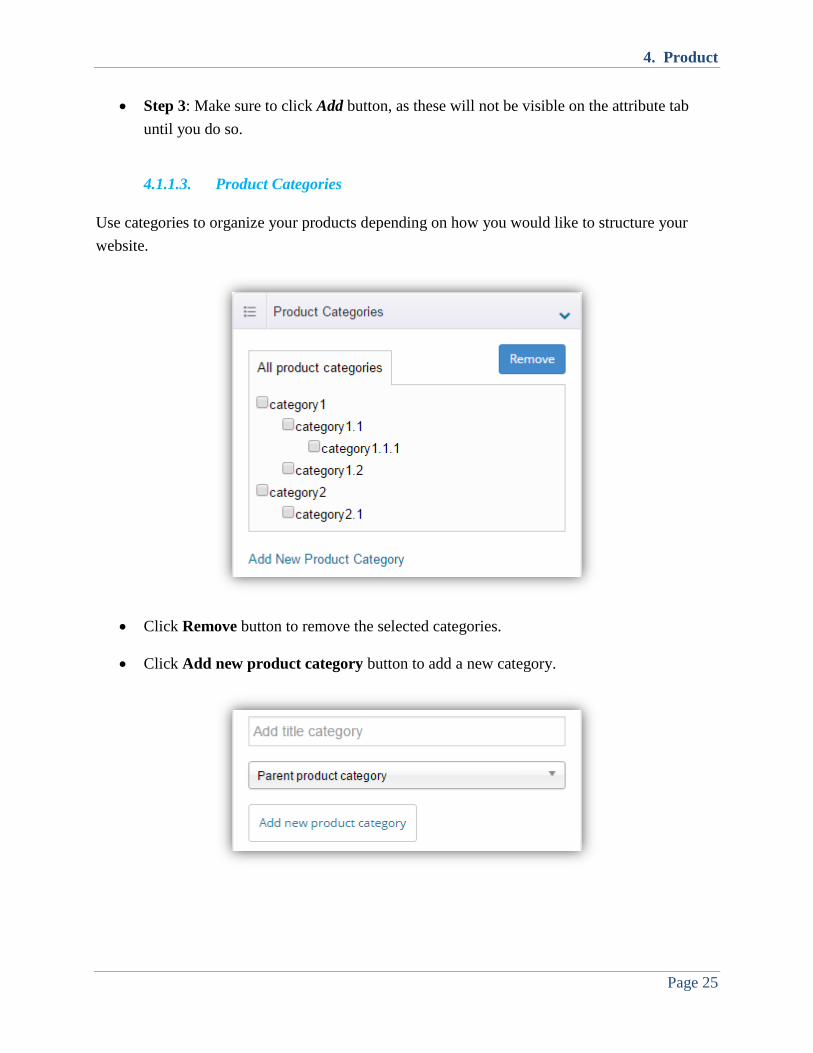
4.1.1.3. Product Categories
Use categories to organize your products depending on how you would like to structure your
website.
Click Remove button to remove the selected categories.
Click Add new product category button to add a new category.
4. Product
Page 26
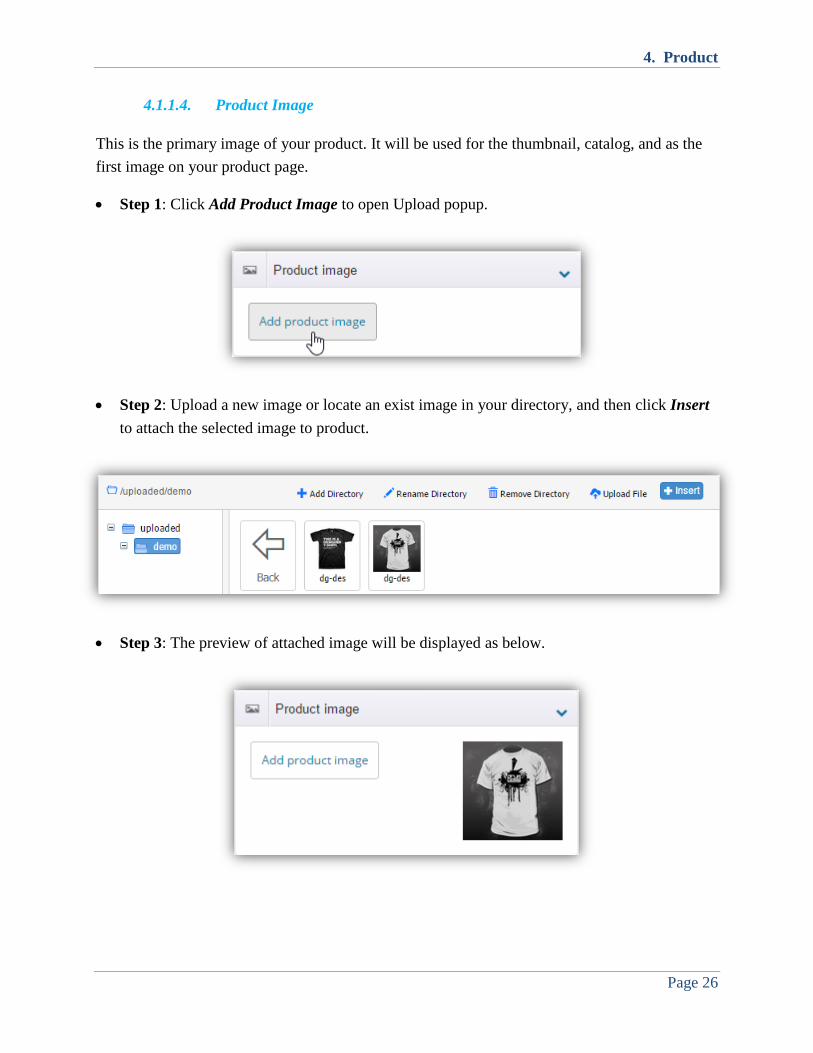
4.1.1.4. Product Image
This is the primary image of your product. It will be used for the thumbnail, catalog, and as the
first image on your product page.
Step 1: Click Add Product Image to open Upload popup.
Step 2: Upload a new image or locate an exist image in your directory, and then click Insert
to attach the selected image to product.
Step 3: The preview of attached image will be displayed as below.
4. Product
Page 27
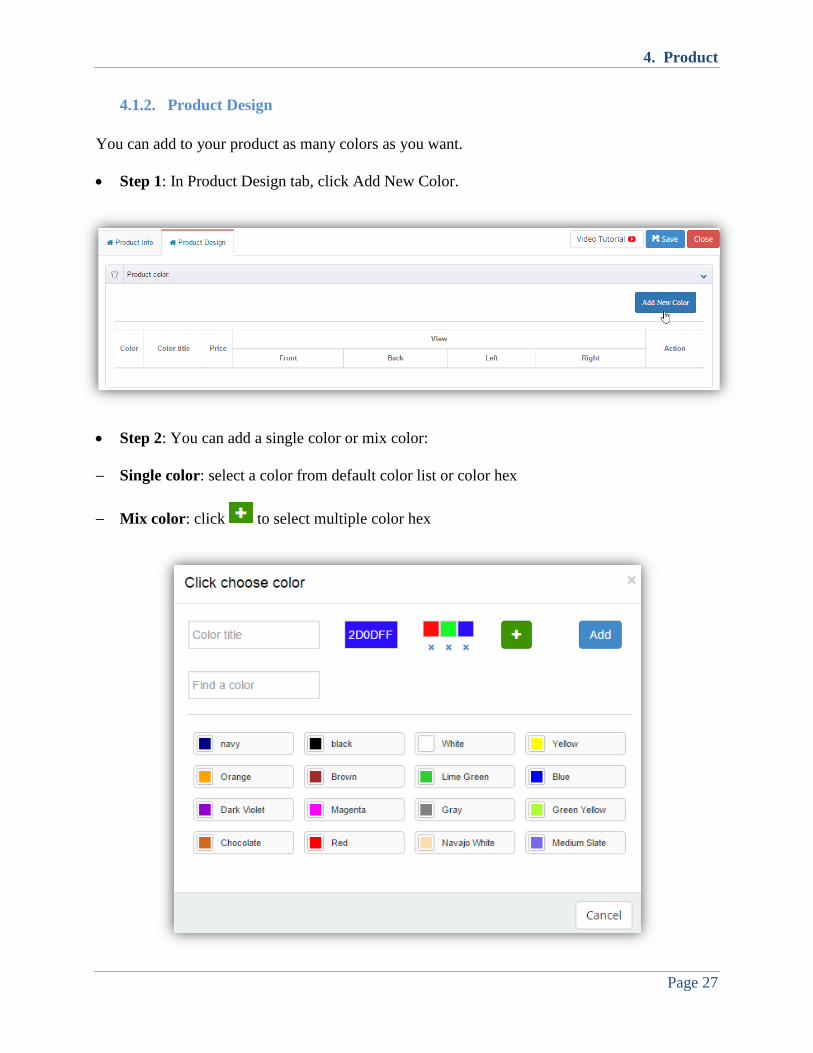
4.1.2. Product Design
You can add to your product as many colors as you want.
Step 1: In Product Design tab, click Add New Color.
Step 2: You can add a single color or mix color:
Single color: select a color from default color list or color hex
Mix color: click to select multiple color hex
4. Product
Page 28
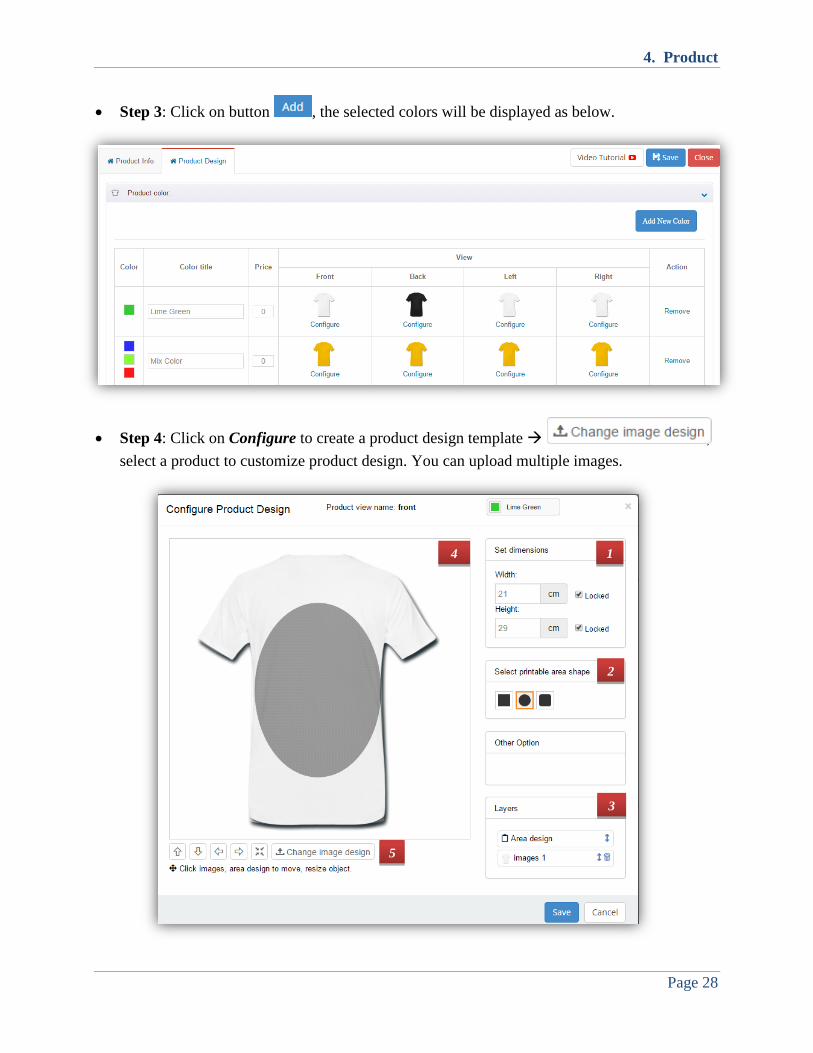
Step 3: Click on button , the selected colors will be displayed as below.
Step 4: Click on Configure to create a product design template ,
select a product to customize product design. You can upload multiple images.
1
2
3
4
5
4. Product
Page 29
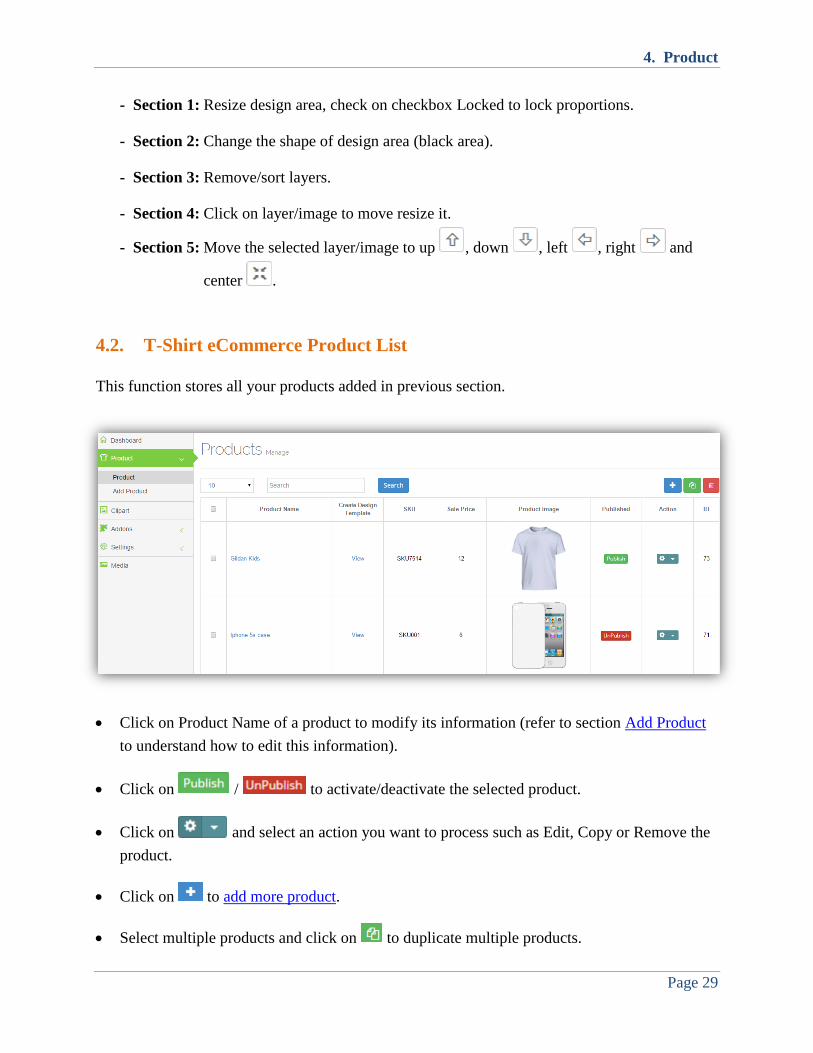
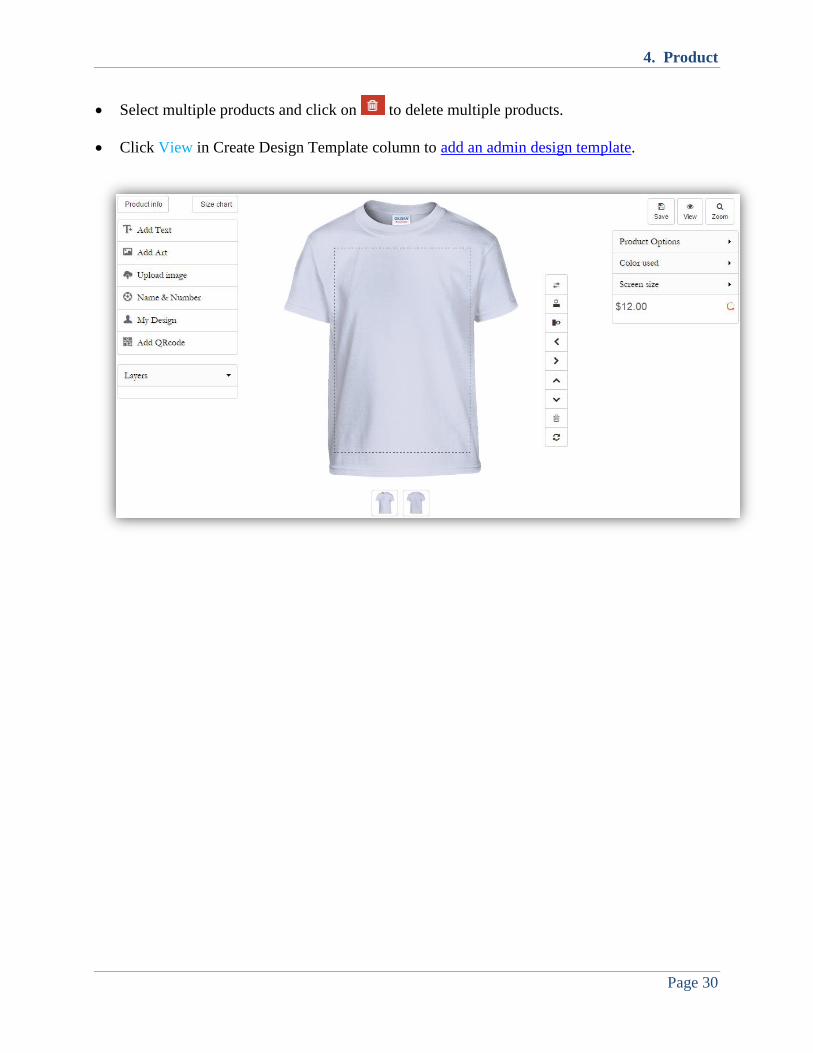
- Section 1: Resize design area, check on checkbox Locked to lock proportions.
- Section 2: Change the shape of design area (black area).
- Section 3: Remove/sort layers.
- Section 4: Click on layer/image to move resize it.
- Section 5: Move the selected layer/image to up , down , left , right and
center .
4.2. T-Shirt eCommerce Product List
This function stores all your products added in previous section.
Click on Product Name of a product to modify its information (refer to section Add Product
to understand how to edit this information).
Click on / to activate/deactivate the selected product.
Click on and select an action you want to process such as Edit, Copy or Remove the
product.
Click on to add more product.
Select multiple products and click on to duplicate multiple products.
4. Product
Page 30
Select multiple products and click on to delete multiple products.
Click View in Create Design Template column to add an admin design template.
4. Product
Page 31
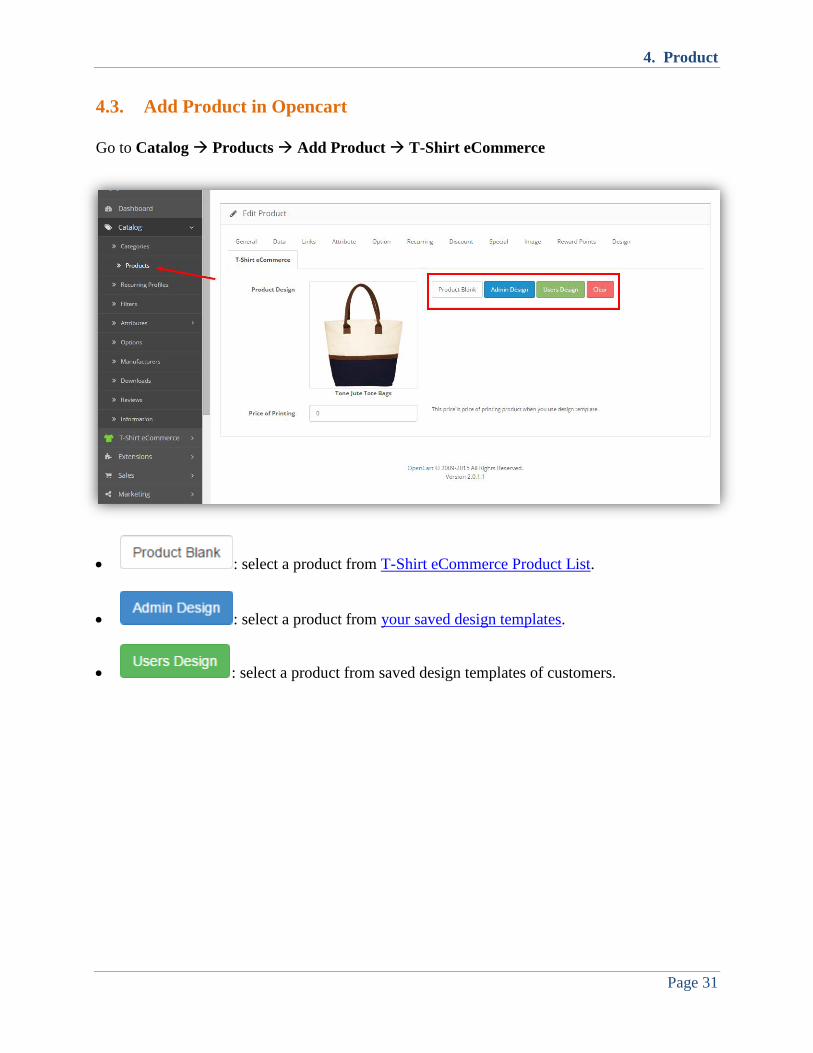
4.3. Add Product in Opencart
Go to Catalog Products Add Product T-Shirt eCommerce
: select a product from T-Shirt eCommerce Product List.
: select a product from your saved design templates.
: select a product from saved design templates of customers.
4. Product
Page 32
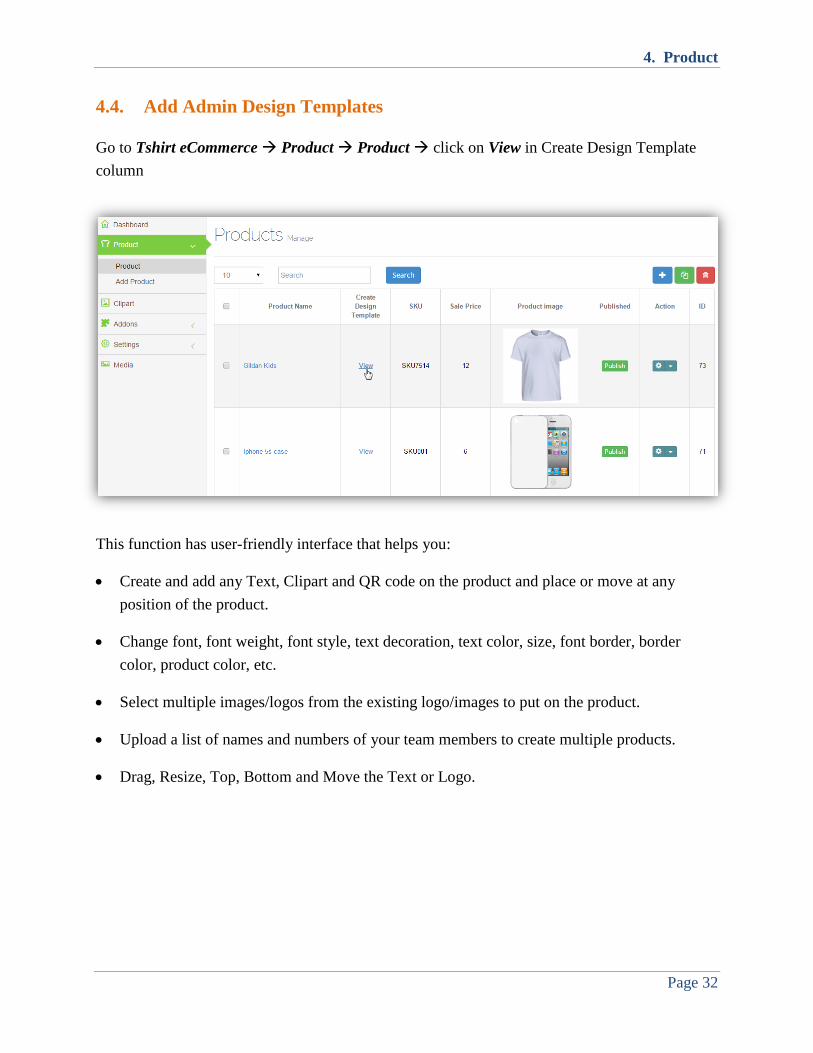
4.4. Add Admin Design Templates
Go to Tshirt eCommerce Product Product click on View in Create Design Template
column
This function has user-friendly interface that helps you:
Create and add any Text, Clipart and QR code on the product and place or move at any
position of the product.
Change font, font weight, font style, text decoration, text color, size, font border, border
color, product color, etc.
Select multiple images/logos from the existing logo/images to put on the product.
Upload a list of names and numbers of your team members to create multiple products.
Drag, Resize, Top, Bottom and Move the Text or Logo.
4. Product
Page 33
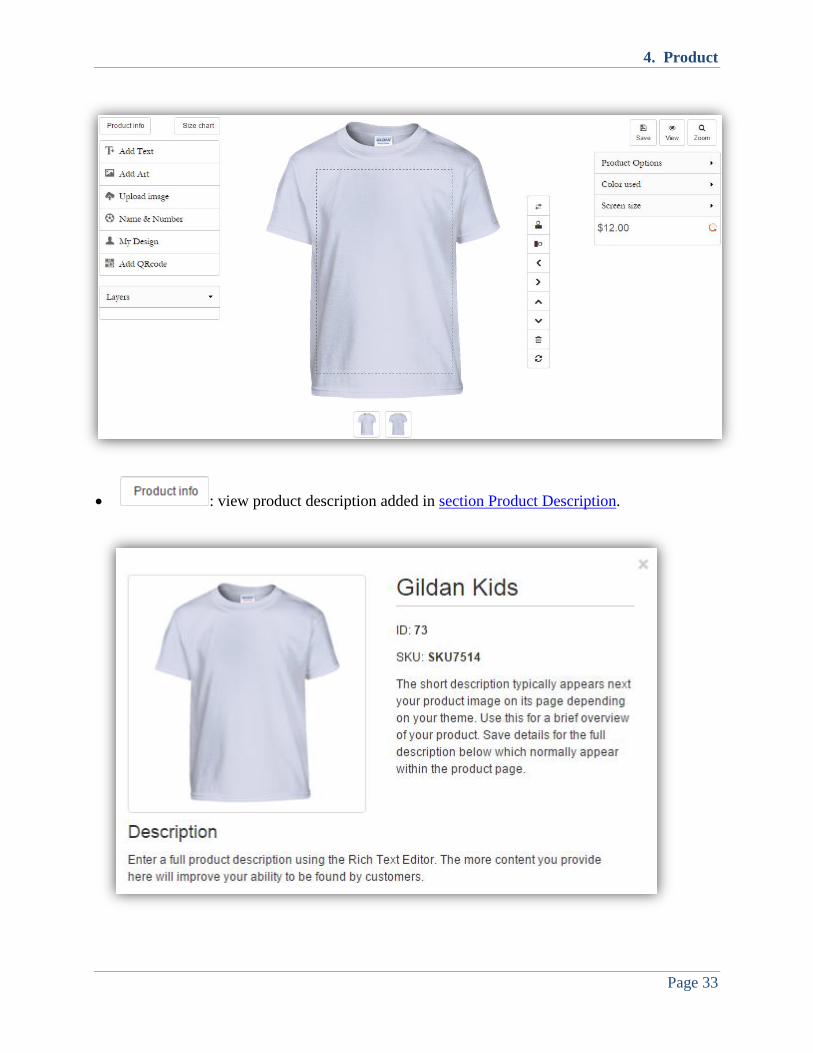
: view product description added in section Product Description.
4. Product
Page 34
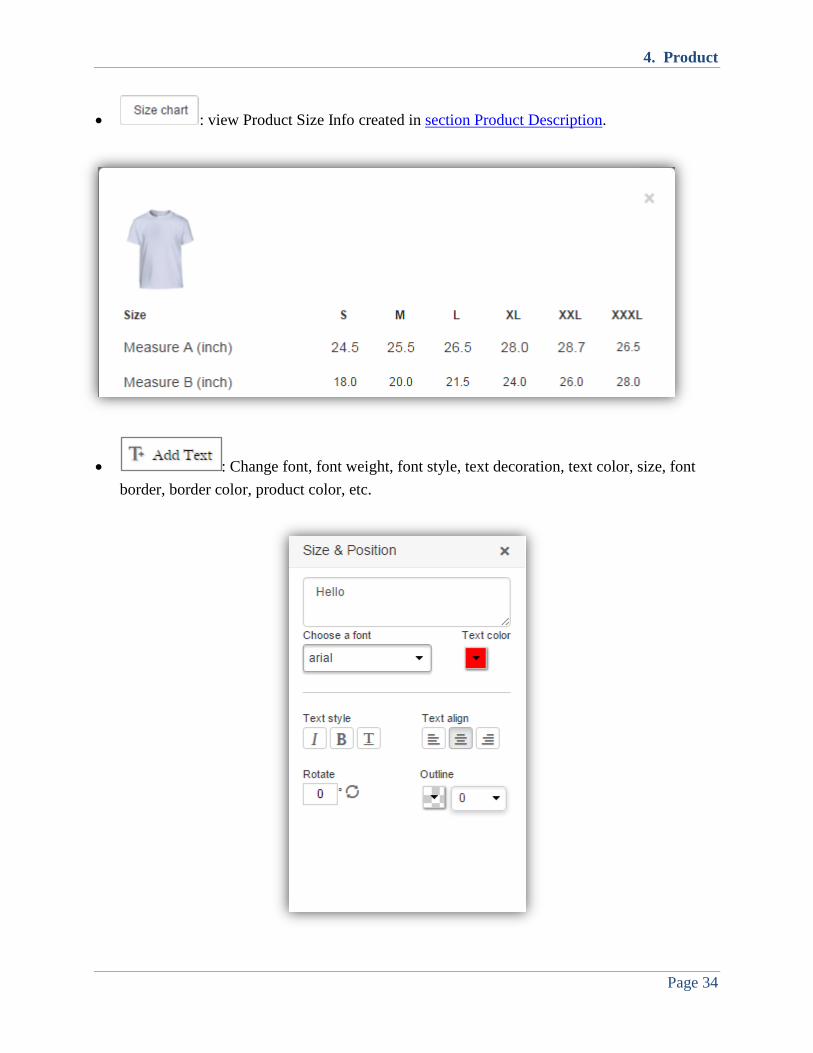
: view Product Size Info created in section Product Description.
: Change font, font weight, font style, text decoration, text color, size, font
border, border color, product color, etc.
4. Product
Page 35
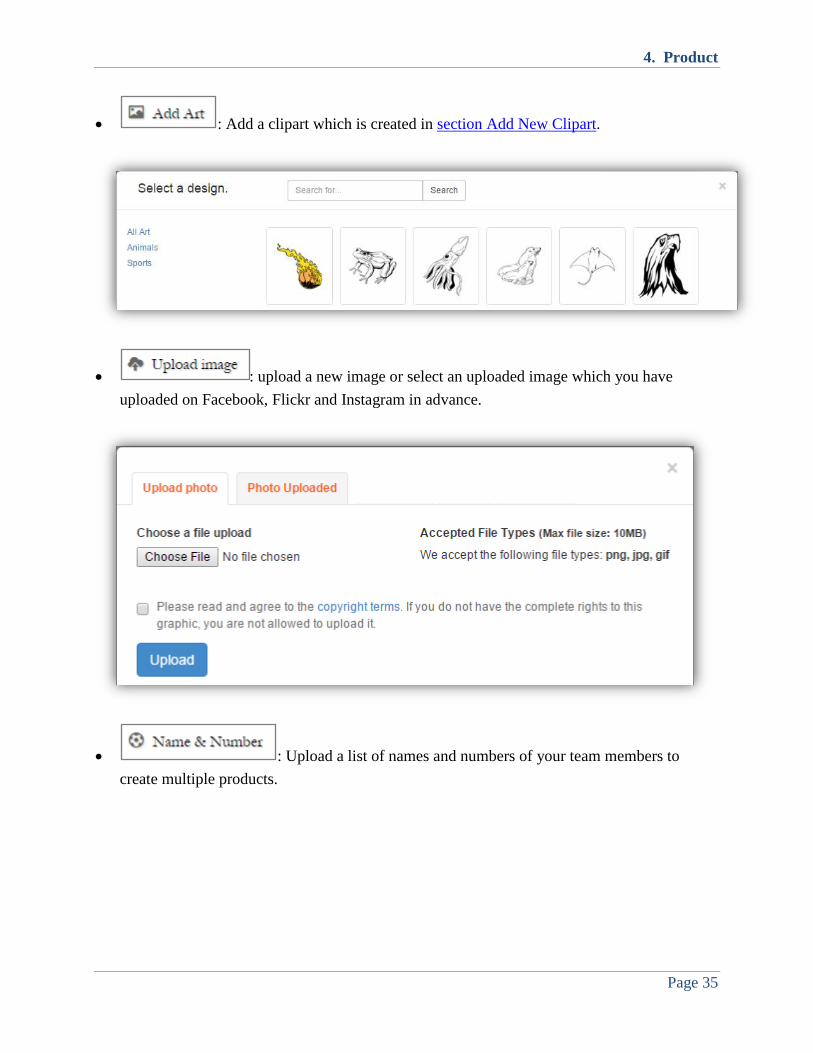
: Add a clipart which is created in section Add New Clipart.
: upload a new image or select an uploaded image which you have
uploaded on Facebook, Flickr and Instagram in advance.
: Upload a list of names and numbers of your team members to
create multiple products.

4. Product
Page 36
: select your saved design template.
4. Product
Page 37
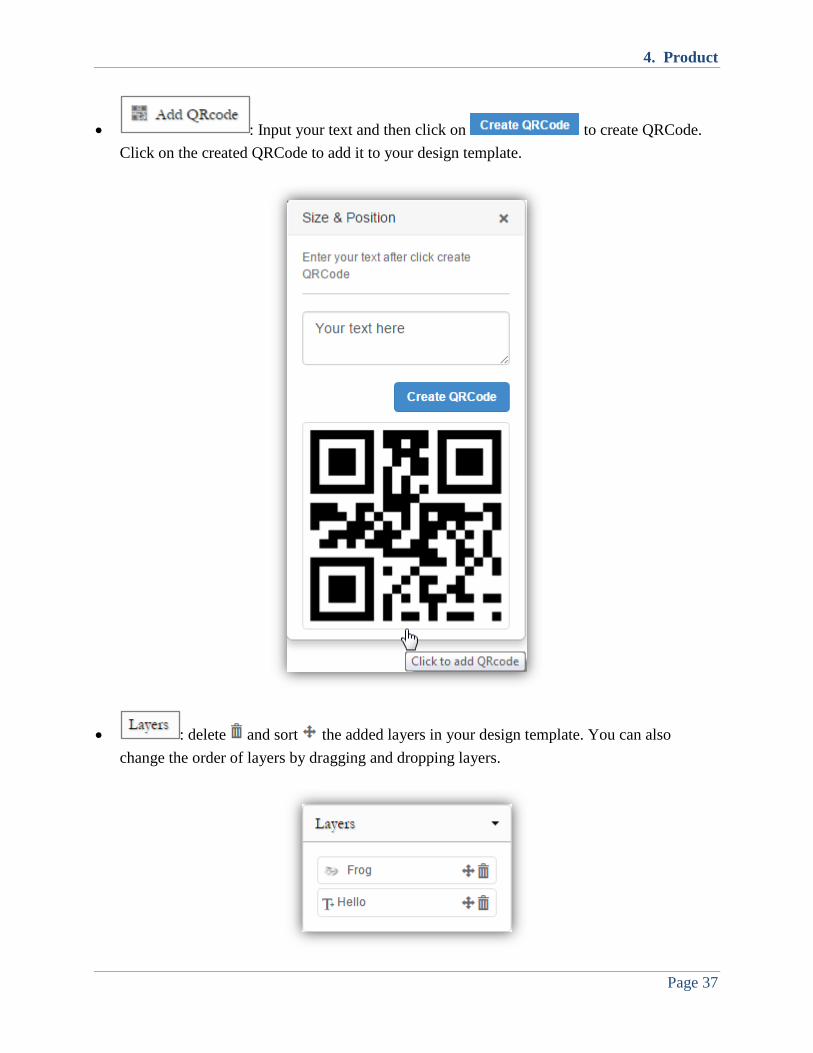
: Input your text and then click on to create QRCode.
Click on the created QRCode to add it to your design template.
: delete and sort the added layers in your design template. You can also
change the order of layers by dragging and dropping layers.
4. Product
Page 38
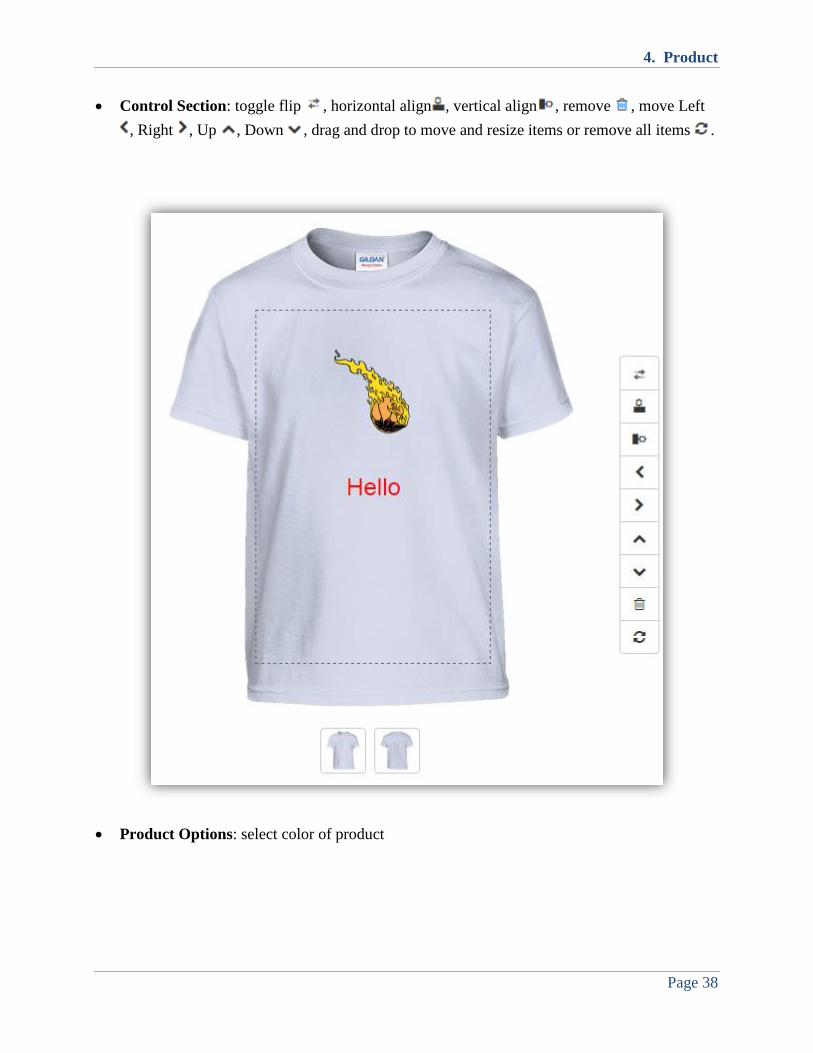
Control Section: toggle flip , horizontal align , vertical align , remove , move Left
, Right , Up , Down , drag and drop to move and resize items or remove all items .
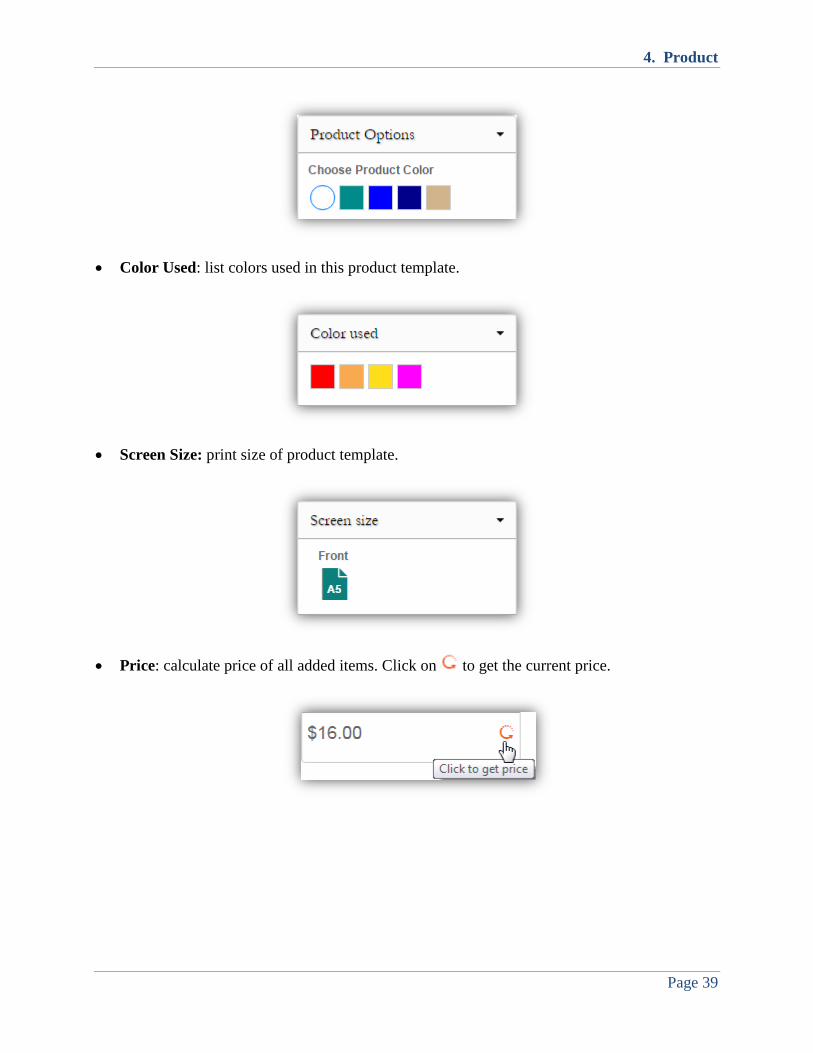
Product Options: select color of product
4. Product
Page 39
Color Used: list colors used in this product template.
Screen Size: print size of product template.
Price: calculate price of all added items. Click on to get the current price.
5. Clipart
Page 40
5. Clipart
5. Clipart
Page 41
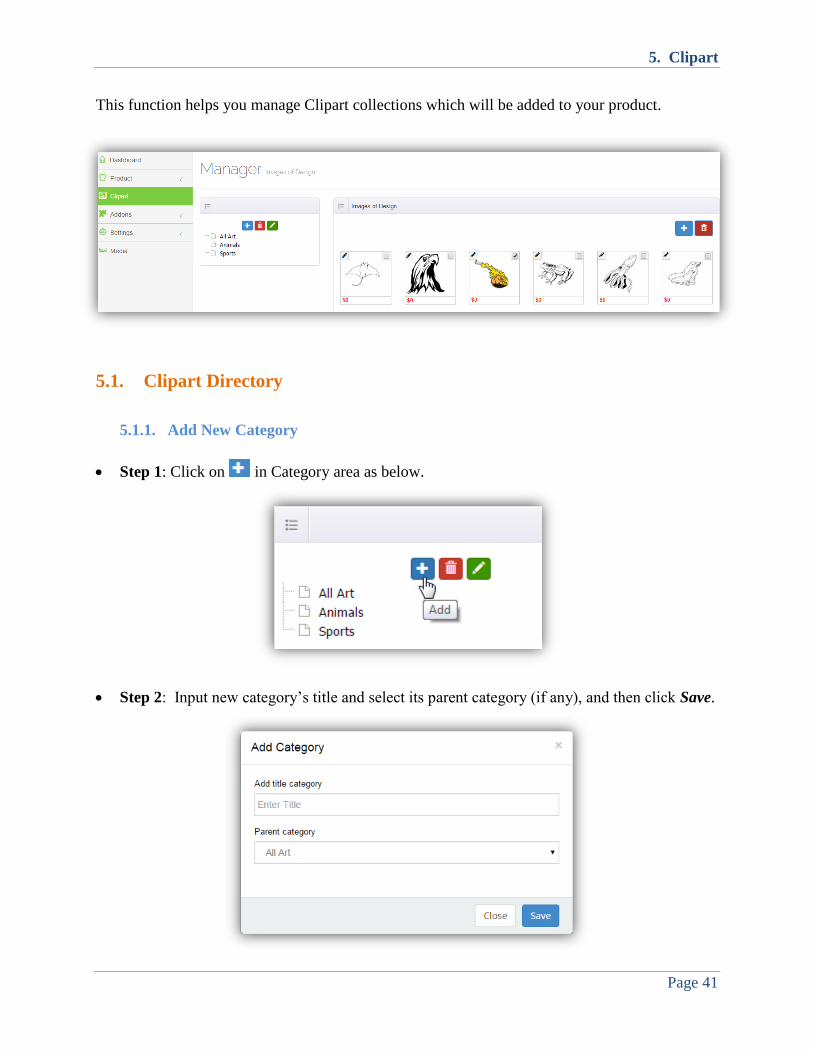
This function helps you manage Clipart collections which will be added to your product.
5.1. Clipart Directory
5.1.1. Add New Category
Step 1: Click on in Category area as below.
Step 2: Input new category’s title and select its parent category (if any), and then click Save.
5. Clipart
Page 42
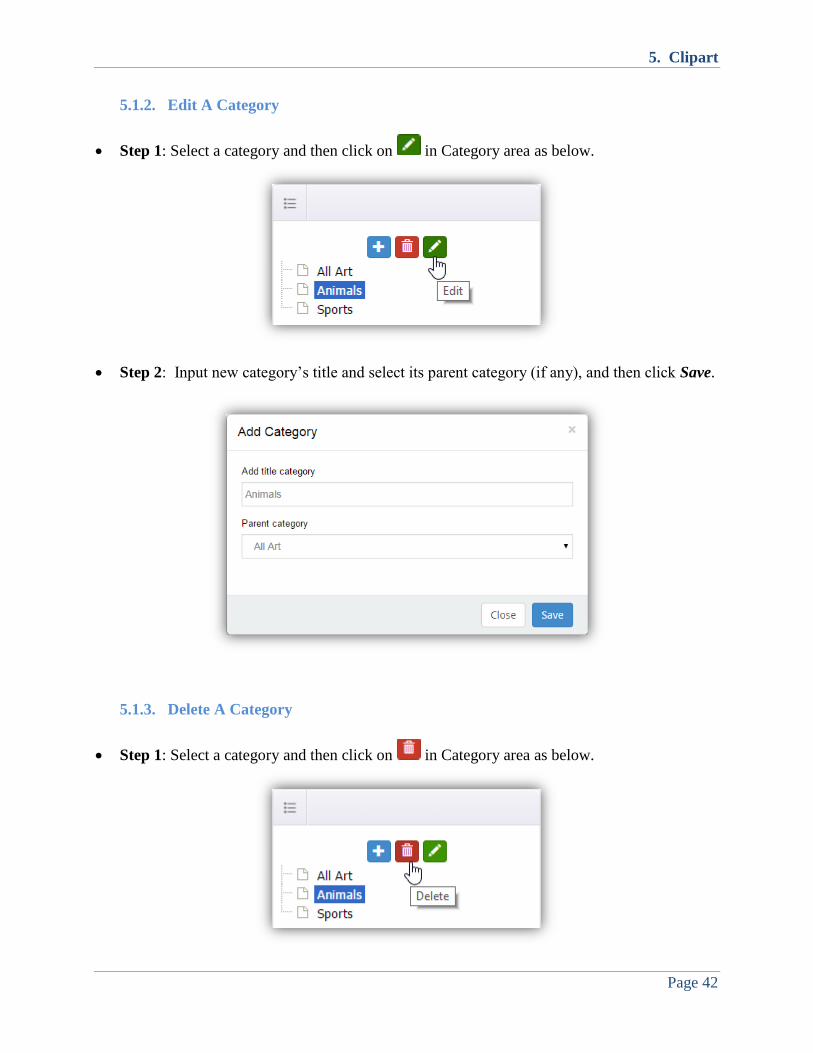
5.1.2. Edit A Category
Step 1: Select a category and then click on in Category area as below.
Step 2: Input new category’s title and select its parent category (if any), and then click Save.
5.1.3. Delete A Category
Step 1: Select a category and then click on in Category area as below.
5. Clipart
Page 43
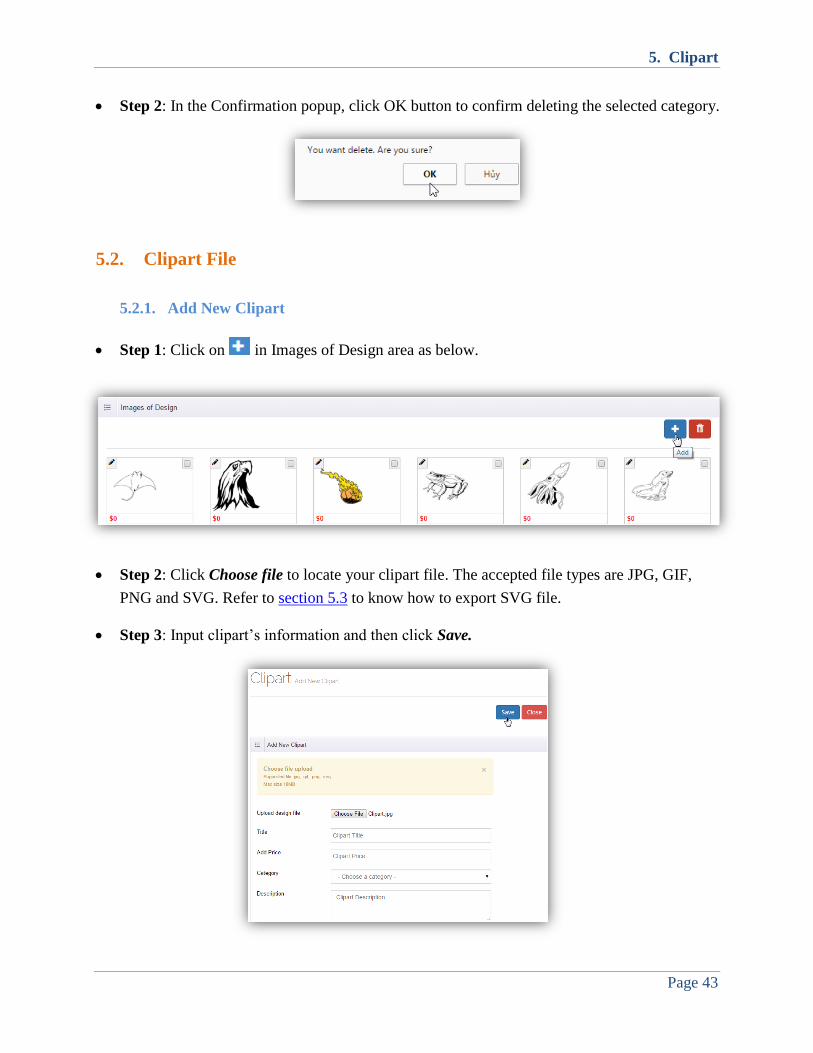
Step 2: In the Confirmation popup, click OK button to confirm deleting the selected category.
5.2. Clipart File
5.2.1. Add New Clipart
Step 1: Click on in Images of Design area as below.
Step 2: Click Choose file to locate your clipart file. The accepted file types are JPG, GIF,
PNG and SVG. Refer to section 5.3 to know how to export SVG file.
Step 3: Input clipart’s information and then click Save.
5. Clipart
Page 44
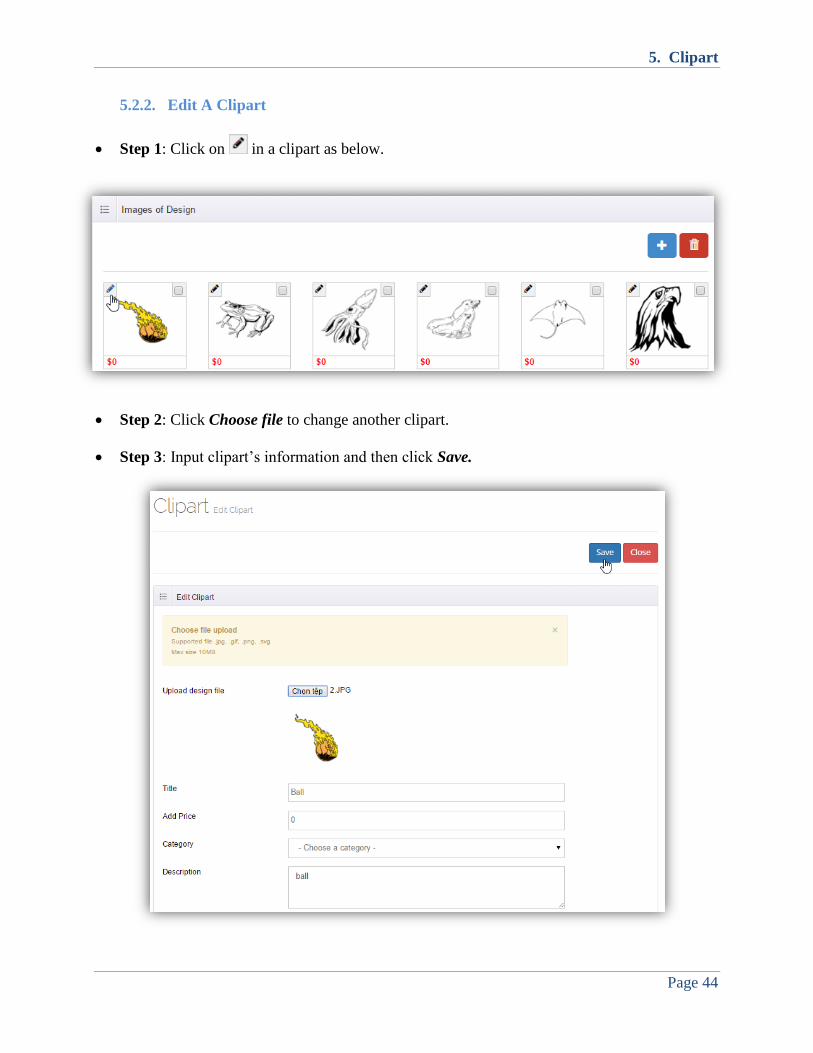
5.2.2. Edit A Clipart
Step 1: Click on in a clipart as below.
Step 2: Click Choose file to change another clipart.
Step 3: Input clipart’s information and then click Save.
5. Clipart
Page 45
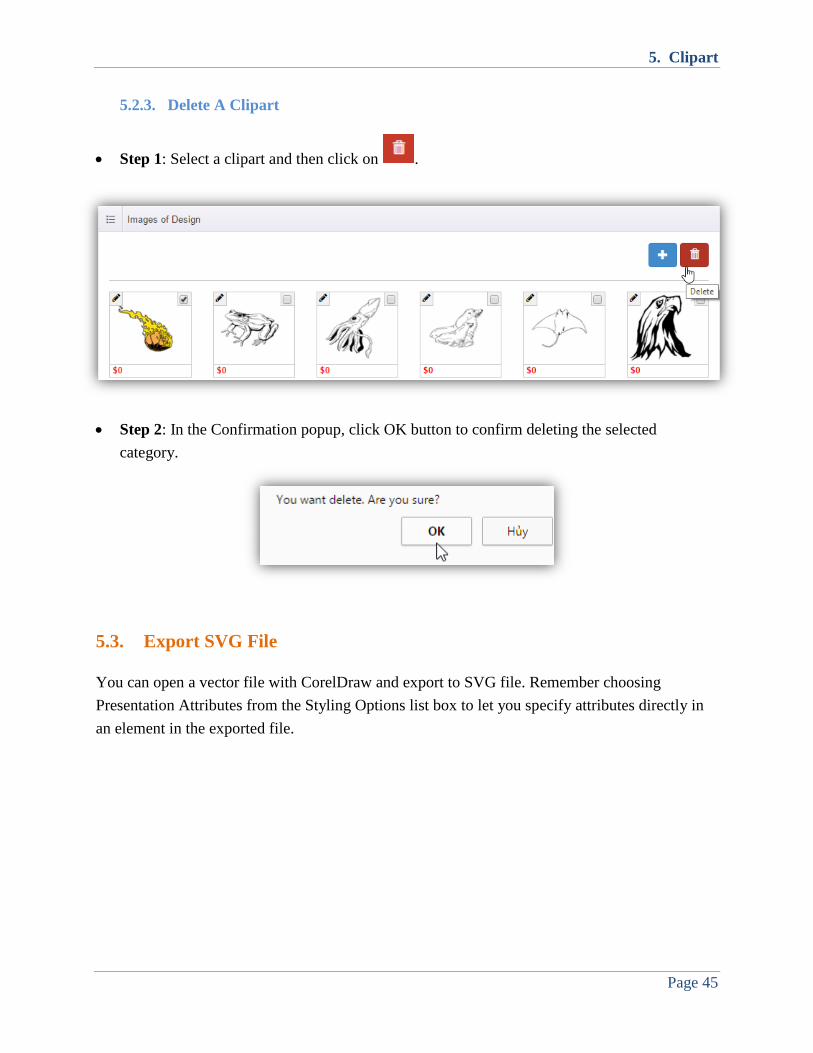
5.2.3. Delete A Clipart
Step 1: Select a clipart and then click on .
Step 2: In the Confirmation popup, click OK button to confirm deleting the selected
category.
5.3. Export SVG File
You can open a vector file with CorelDraw and export to SVG file. Remember choosing
Presentation Attributes from the Styling Options list box to let you specify attributes directly in
an element in the exported file.

5. Clipart
Page 46

6. Media
Page 47
6. Media
6. Media
Page 48
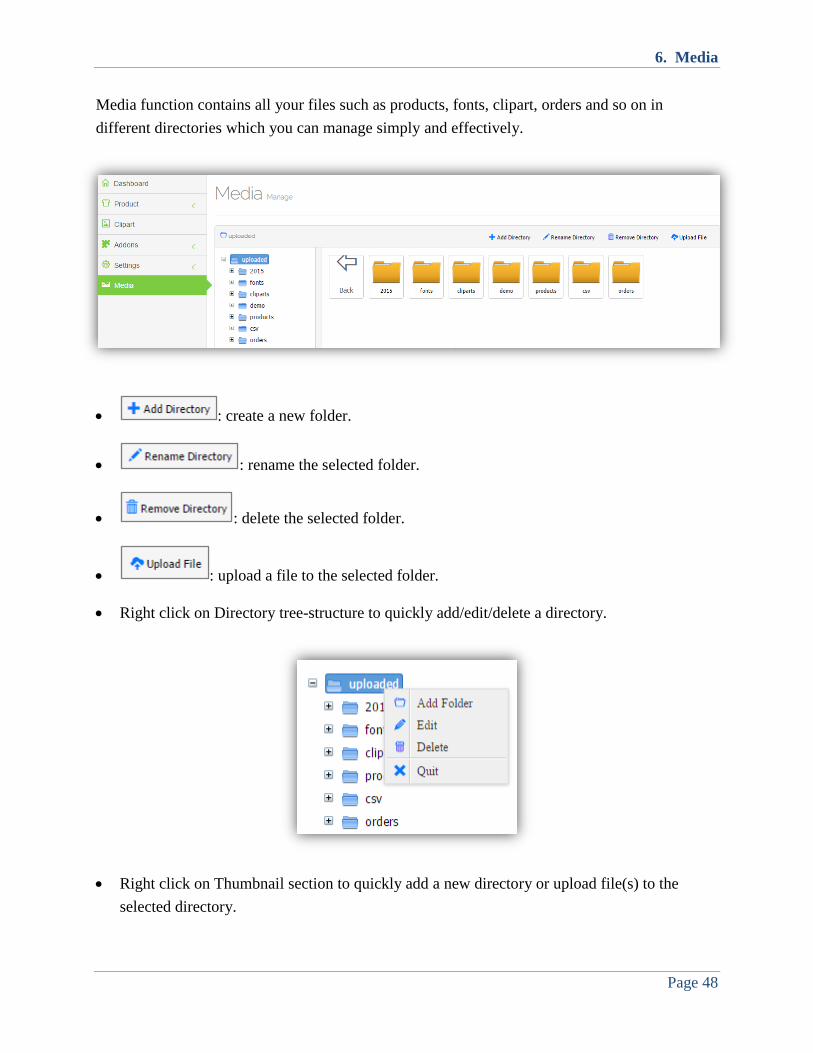
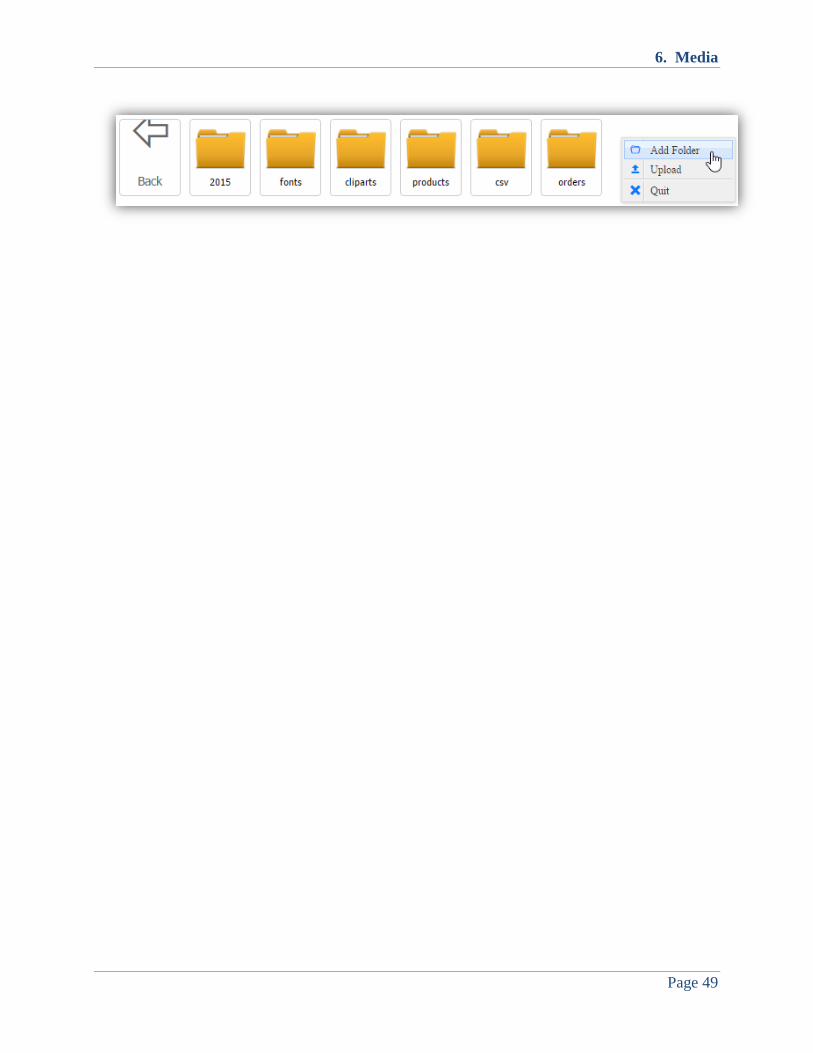
Media function contains all your files such as products, fonts, clipart, orders and so on in
different directories which you can manage simply and effectively.
: create a new folder.
: rename the selected folder.
: delete the selected folder.
: upload a file to the selected folder.
Right click on Directory tree-structure to quickly add/edit/delete a directory.
Right click on Thumbnail section to quickly add a new directory or upload file(s) to the
selected directory.
6. Media
Page 49
7. Manage Order
Page 50
7. Manage Order
7. Manage Order
Page 51
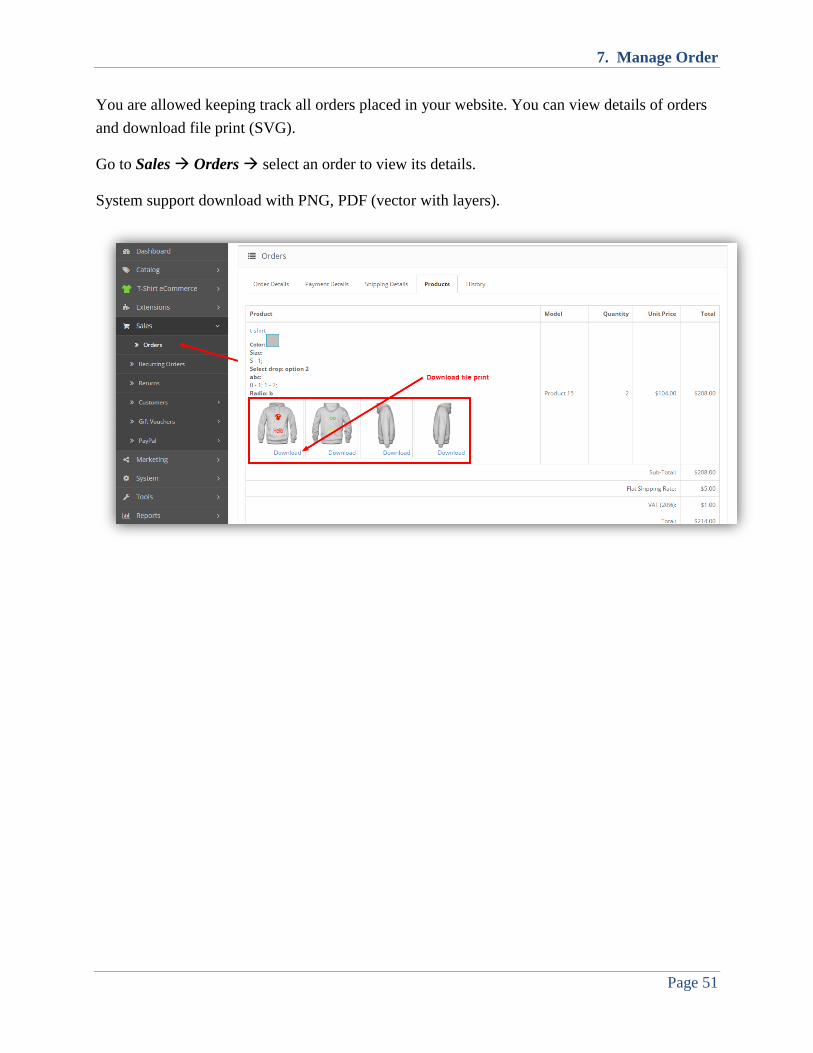
You are allowed keeping track all orders placed in your website. You can view details of orders
and download file print (SVG).
Go to Sales Orders select an order to view its details.
System support download with PNG, PDF (vector with layers).